Yamaha PLG100 de handleiding
- Categorie
- Digitale piano's
- Type
- de handleiding
Deze handleiding is ook geschikt voor

Important Notices
The VH Effect Editor provides an easy, intuitive way to edit the Harmony effect settings of the
PLG100-VH Vocal Harmony Plug-in Board.
• Do not use any of the panel controls on an external tone generator while editing the Harmony
effect with the VH Effect Editor, since this may inadvertently change the settings of the
PLG100-VH.
Copyright Notices
• The software and this owner’s manual are the exclusive copyrights of Yamaha Corporation.
• Copying of the software or reproduction of this manual in whole or in part by any means is
expressly forbidden without the written consent of the manufacturer.
• Copying of the commercially available music sequence data and/or digital audio files is
strictly prohibited except for your personal use.
Trade Marks and Registered Trade Marks
• The company names and product names in this Owner’s Manual are the trademarks or regis-
tered trademarks of their respective companies.
Notices
• Yamaha makes no representations or warranties with regard to the use of the software and
documentation and cannot be held responsible for the results of the use of this manual and
the software.
• The windows and illustrations in this manual are for instructional purposes only, and may
slightly different from the ones shown on your software.
About this manual
• The screens shown in this manual are almost all on Windows systems. Although some
screens may differ for Macintosh systems, the basic operations are the same.
• Keyboard shortcuts referred in this manual are effective for only Windows system.
For Windows users
When you use the VH Effect Editor, set “Font Size” to “Small Fonts” at the “Control Panel | Display | (Settings |)
Advanced” page. If “Large Fonts” is selected, messages in some dialog boxes may not be displayed properly.
VH Effect Editor
Manual
Copyright (c) 2001 Yamaha Corporation. All rights reserved.
Version 1.0, 2001
YAMAHA CORPORATION

2
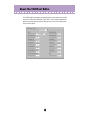
About the VH Effect Editor
The VH Effect Editor is providing an exceptionally simple and convenient way to edit and
control the PLG100-VH Vocal Harmony Plug-in Board. It also features comprehensive,
detailed control of the Harmony effect by giving you access to all of the “hidden” param-
eters of the PLG100-VH.

3
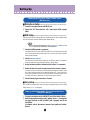
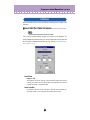
Setting Up
■
Microphone Setup........................................................
z
Connect a microphone to the A/D INPUT jack.
x
Select Part “A1,” then select the “Mic” preset (bank #000, program
#002).
■
MIDI Setup.....................................................................
If you wish to control the Harmony effect from a MIDI keyboard or with song data played
on a MIDI sequencer, make the following MIDI-related settings.
• MIDI is used only when the Harmony Type is set to Vocoder or Chordal. For the Detune and
Chromatic types, Harmony is unaffected by a connected MIDI device.
z
Set up the MIDI keyboard or sequencer.
Connect the MIDI OUT of the MIDI device to MIDI IN of the tone generator/sound
card. Set the device’s MIDI transmit channel to 1 (or to the same channel you’ll be
setting in step #2 below).
x
Set the Harmony Channel.
This determines the MIDI receive channel for the Harmony effect, and should be
set to the same value as set for the MIDI device in step #1 above.
c
Assign the Harmony effect to the desired Part (with the Part parameter).
v
Disable all other Parts set to the same channel as the Harmony Channel.
You'll want to make sure that the connected keyboard or sequencer doesn’t sound
any of the instrument Parts of the tone generator/sound card. If one or more Parts
are set to the same MIDI channel (as set in step #2 above), change the MIDI chan-
nel setting of the Part(s), mute them, or set the volume of each Part to 0.
b
Set the Harmony Type to Vocoder or Chordal.
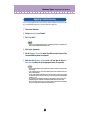
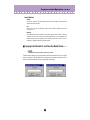
■
Easy Setup....................................................................
You can quickly and easily make many of the above settings directly from the VH Effect
Editor, with the Easy Setup dialog box.
z
Connect a microphone to the A/D INPUT jack of the “mother” device.
x
Make the appropriate settings on the “mother” device — ensuring that
the signal received via the A/D INPUT jack is properly sent to the
PLG100-VH.
(For details, refer to the owner’s manual of your particular “mother”
device.)
Setting up with XG Plug-in System “mother” device
(MU series, etc.)
Setting up with Modular Synthesis Plug-in System “mother” device
(S80, MOTIF series, etc.)

4
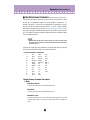
Harmony Types
The Harmony effect features four separate types: Vocoder, Chordal, Detune, and Chro-
matic.
The Vocoder type produces up to three harmony notes, corresponding to the notes you
play on a connected MIDI keyboard. In other words, you can sing the melody and
“play” the harmony or harmonies from the keyboard (or from a sequencer).
The Chordal type produces up to three harmony notes that correspond to the chords
you play on a connected MIDI keyboard (or chords recorded to a sequencer). Thirty-
four different chord types are recognized in this mode.
The Detune type produces a slightly “detuned” pitch and mixes it with the input signal for
a rich chorusing effect.
The Chromatic type produces a harmony at a predetermined, fixed pitch interval from
the original sound (such as an octave, or a third).
When the Type is set to Thru, no Harmony effect is applied, and the only other available
parameter is Insert Part.
About the Harmony Types

5
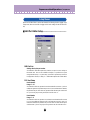
Harmony Types /
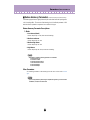
Applying Vocoder Harmony
The Vocoder type allows you to “play” up to three harmony notes from a connected MIDI
keyboard or sequencer.
z
Click on the Effect tab.
x
Set the Harmony Type to Vocoder.
c
Set Part to “Ad1.”
• If you are using a Modular Synthesis Plug-in-compatible tone generator or synthesizer, you’ll
need to set the Part Number from the device itself.
v
Click on the System tab.
b
Set the Harmony Channel to match the MIDI transmit channel of the
connected MIDI keyboard or sequencer.
n
Make sure that Harmony Mute is set to “off” and that all three Har-
mony Volume settings are set to appropriate levels (90 or greater).
• When you play the keyboard and sing into the microphone, the harmony or harmonies match
the pitch of the notes you play.
• You can create automatic harmonies for an entire song (on sequencer) by recording the
appropriate notes to one track of the song.
• The Mode parameter gives you access to a wide variety of harmonies by letting you set how
the harmonies are transposed.
Applying Vocoder Harmony

6
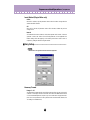
Harmony Types /
Applying Chordal Harmony
The Chordal type produces up to three harmony notes according to the chords you play
on a connected MIDI keyboard (or chords recorded to a sequencer).
z
Click on the Effect tab.
x
Set the Harmony Type to Chordal.
c
Set Part to “Ad1.”
• If you are using a Modular Synthesis Plug-in-compatible tone generator or synthesizer, you’ll
need to set the Part Number from the device itself.
v
Click on the System tab.
b
Set the Harmony Channel to match the MIDI transmit channel of the
connected MIDI keyboard or sequencer.
n
Make sure that Harmony Mute is set to “off” and that all three Har-
mony Volume settings are set to appropriate levels (90 or greater).
• When you play the keyboard and sing into the microphone, the harmonies correspond to the
chord you play.
• If you continue to hold your vocal note, the harmony notes will also continue to sound, even
after you release the keys.
• You can create automatic chordal harmonies for an entire song (on sequencer) by recording
the appropriate chords to one track of the song. The chords can also be specified and input
from the Chord tab.
• The chord data for controlling the harmonies can be recorded as system exclusive data —
eliminating the need for a keyboard or for dedicating a MIDI channel for harmony data.
• The Mode parameter gives you access to a variety of harmony styles (Duet, Trio, and Quartet)
and various voicings (above and below the original vocal note).
Applying Chordal Harmony

7
Harmony Types /
Applying Detune Harmony
/
Applying Chromatic Harmony
The Detune produces a slightly “detuned” pitch and mixes it with the input signal for a
chorus-like effect.
z
Click on the Effect tab.
x
Set the Harmony Type to Detune.
c
Set Part to “Ad1.”
• If you are using a Modular Synthesis Plug-in-compatible tone generator or synthesizer, you'll
need to set the Part Number from the device itself.
v
Click on the System tab.
b
Make sure that Harmony Mute is set to “off” and that all three Har-
mony Volume settings are set to appropriate levels (90 or greater).
• When you sing into the microphone, a rich, natural chorus effect is produced.
• The Mode parameter lets you change the amount of detuning, letting you set how subtle or
dramatic the effect is.
• The gender of the harmony note cannot be changed in Detune.
The Chromatic type produces a harmony at a specific pitch interval from the original
sound.
z
Click on the Effect tab.
x
Set the Harmony Type to Chromatic.
c
Set Part to “Ad1.”
• If you are using a Modular Synthesis Plug-in-compatible tone generator or synthesizer, you'll
need to set the Part Number from the device itself.
v
Click on the System tab.
b
Make sure that Harmony Mute is set to “off” and that all three Har-
mony Volume settings are set to appropriate levels (90 or greater).
• When you sing into the microphone, the Harmony effect produces a single harmony note — at
a specified interval from the original vocal note.
• The Mode parameter lets you change the amount of pitch shift, or the interval from the origi-
nal note.
Applying Detune Harmony
Applying Chromatic Harmony

8
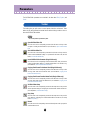
Parameters
The VH Effect Editor parameters are contained in the three tabs: Effect, System, and
Chord.
The toolbar gives you quick access to some important functions and controls. These
buttons let you easily execute the desired function without having to select a menu or
leave the VH Effect Editor window.
• This function pertains only to Windows system.
Open VH Effect Editor File
This is the same as the corresponding command in the File menu. It lets you select
and open an existing VH Effect Editor File. (See File Menus, Open VH Effect Editor
File.)
Save VH Effect Editor File
This is the same as the corresponding command in the File menu. It lets you save the
current VH Effect EditorEditor settings as a parameter file for future recall. (See File
Menus, Save VH Effect Editor File.)
Insert VH Effect Editor Parameter (Plug-in Editor only)
This is the same as the corresponding command in the Edit menu. It lets you insert the
current VH Effect Editor settings to a specified track/position in the XGworks song.
(See Edit Menus, Insert VH Effect Editor Parameter.)
Copying Chord Events To the Master Track (Plug-in Editor only)
This is the same as the corresponding command in the Edit menu. It lets you select
and copy chord events to the the Master Track. (See Edit Menus, Copying Chord
Events To the Master Track.)
Copying Chord Events From the Master Track (Plug-in Editor only)
This is the same as the corresponding command in the Edit menu. It lets you select
and copy chord events from the the Master Track. (See Edit Menus, Copying Chord
Events From the Master Track.)
VH Effect Editor Setup
This is the same as the corresponding command in the Setup menu. It lets you make
various important settings for configuring the VH Effect Editor with the PLG100-VH.
(See Setup Menus, VH Effect Editor Setup.)
Easy Setup
This is the same as the corresponding command in the Setup menu. It lets you make
easy settings for configuring the VH Effect Editor with the PLG100-VH. (See Setup
Menus, Easy Setup.)
Manual
This is the same as the corresponding command in the Help menu. It lets you open the
VH Effect Editor manual.
Toolbar

9
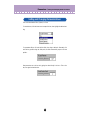
Parameters /
Setting and Changing Parameter Values
Click on the desired tab: Effect, System, or Chord.
For combo boxes, click the down arrow to expand the box, then highlight the desired set-
ting.
For parameter sliders, click and hold the slider, then drag as desired. Alternately, click
and hold any position along the slider path; the slider automatically snaps to the new
position.
Most parameters can also be set by typing the value directly in the box. Click on the
box, then type the desired value.
Setting and Changing Parameter Values

10
Parameters /
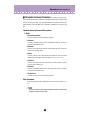
Effect Parameters
■
Thru...............................................................................
When the Type is set to Thru, no Harmony effect is applied, and the only other available
parameter is Insert Part.
■
Vocoder Harmony Parameters....................................
The Vocoder type produces up to three harmony notes whose pitches correspond to the
notes you play on a connected MIDI keyboard. This lets you sing the melody and “play”
the harmony or harmonies from the keyboard (or from a sequencer). The Harmony
sound can also be transposed (see the Mode parameter).
• When more than four MIDI notes are received, priority is given first to the most recently
played notes, then the highest notes. (In other words, the harmonies of lower notes and ear-
lier notes are cut off.)
Vocoder Type is best suited when:
• You want to determine the precise harmony notes yourself, including their octave register and
whether they are above or below the original melody note.
• You want to use harmony notes and voicings that fall outside the standard chords available in
the Chordal type.
• You can play the harmony part on the keyboard, or have it played on a sequencer.
• You want to precisely control how the harmony note or notes change pitch around a fixed
melody pitch.
Vocoder Harmony Parameter Descriptions
1. Mode
1: No Transpose (default)
No transposition. The harmony notes correspond exactly to the pitch of the incoming
MIDI notes.
2: Auto Transpose
Automatic transposition. This keeps the harmony notes close (±600 cents) in interval
to the input signal, no matter which octave the MIDI notes are played.
3: -3 Octave Transpose ... 8: +3 Octave Transpose
Octave transposition. This fixes the octave transposition of the harmony notes, select-
able in octaves from 3 octaves below (-) to 3 octaves above (+).
Effect Parameters

11
Parameters /
Effect Parameters
2. Harmony Gender Type
Settings: Off, Auto
Default: Off
This automatically determines the gender of the harmony notes (relative to the actual
gender of the singer).
Off
This turns off the gender change effect for the harmony notes.
Auto
For this setting, the PLG100-VH “listens” to the pitch of your voice to determine your gen-
der, and automatically selects the opposite gender for the harmony notes. Keep in mind
that the gender change effect may vary according to the quality, character and pitch of
the actual voice.
When “Auto” is set, the operation of the gender change effect is affected by these param-
eters: Auto Upper Gender Threshold, Auto Lower Gender Threshold, Upper Gender
Depth, and Lower Gender Depth.
3. Lead Gender Type
Settings: Off, Unison, Male, Female
Default: Off
These settings determine whether the gender of the lead voice can be changed or not. It
also lets you set the gender. When this is set to “Off,” the gender of the lead voice cannot
be changed. When this is set to “Unison,” the lead voice is reproduced at the same pitch
as the voice; however, the gender can be changed by using the Lead Gender Depth
parameter. The “Male” and “Female” settings reproduce the voice with the respective
male or female vocal qualities. (To finely adjust the quality of the lead voice, use the
Lead Gender Depth parameter.)
• When Lead Gender Type is set to “Unison,” “Male,” or “Female,” the amount of harmony notes
is reduced from three to two.
About the Lead and Harmony Voices
The PLG100-VH also produces a “lead” voice sound that can be mixed with the automat-
ically produced harmony voices.
The PLG100-VH in effect “copies” your actual voice to create the lead voice. The lead
voice then can be altered both in pitch and gender, just as with the harmony voices.

12
Parameters /
Effect Parameters
Using the Lead Voice
To properly use the lead voice, make sure to set the following parameters:
Lead Gender Type............“Unison,” “Male,” or “Female”
Lead Gender Depth..........Set to desired/appropriate value.
Lead/Harmony Balance....Set to appropriate value. (For values at or near the maxi-
mum of “L<H63,” lead may not sound.)
You can control the pitch of the lead voice separately from the harmonies. One useful
application would be to have melody and harmony data on different tracks/MIDI channels
of sequencer song data — the melody track would control the pitch of the lead voice,
while the harmony track would control the harmonies. This would ensure that all vocal
parts stay in tune with each other and with the song — even if your actual singing is
slightly off pitch!
To control the pitch of the lead voice from a connected MIDI keyboard or sequencer (sep-
arate from the harmonies), make the following settings:
Pitch Correction................“On”
Melody Channel ...............Set to same channel as the MIDI device.(Match this to the
melody track of the song data.)
Harmony Channel ............Set to different value from Melody Channel. (Match this to
the harmony track of the song data.)
4. Lead Gender Depth
Range: -64 ... +63
Default: 0
This determines the quality or character of the lead voice, and depends on the setting
made in Lead Gender Type. (This parameter has no effect when Lead Gender Type is
set to “Off.”) Extreme negative or positive values result in pronounced distortion of the
voice quality.
5. Lead Pitch Correction
Settings: Off, On
Default: Off
This determines whether the pitch of the lead voice is controlled by MIDI note data or not.
When this parameter and Lead Gender Type are set to “On,” the pitch of the lead voice is
“corrected” to the pitch of the received MIDI note. (This has no effect when Lead Gender
Type is set to “Off.”)
• The Pitch Correction parameter is not available when Harmony Type is set to Detune. Also,
this parameter has no effect when Lead Gender Type is set to “off.”

13
Parameters /
Effect Parameters
6. Auto Upper Gender Threshold
Range: 0 ... 12 (semitones)
Default: 0
This determines which harmony notes above the melody will be gender-transformed
when Harmony Gender Type is set to “Auto.” More specifically, it sets the range or inter-
val of unchanged harmonies. When set to “0,” the gender of all harmony notes above the
melody will be changed. When set to another value, any harmonies within the interval
specified will not be changed.
For example, when this is set to 7 semitones, any harmonies a perfect fifth or lower will
remain at the same gender as the original vocal.
Used with Auto Lower Gender Threshold, this gives you flexible control over the gender
of the harmony notes, both above and below the melody.
• This parameter has no effect when Harmony Gender Type is set to “off.”
7. Auto Lower Gender Threshold
Range: 0 ... 12 (semitones)
Default: 0
This determines which harmony notes below the melody will be gender-transformed
when Harmony Gender Type is set to “Auto.” More specifically, it sets the range or inter-
val of unchanged harmonies. When set to “0,” the gender of all harmony notes below the
melody will be changed. When set to another value, any harmonies within the interval
specified will not be changed. For example, when this is set to 5 semitones, any harmo-
nies higher than a fourth below remain at the same gender as the original vocal.
Used with Auto Upper Gender Threshold, this gives you flexible control over the gender
of the harmony notes, both above and below the melody.
• This parameter has no effect when Harmony Gender Type is set to “off.”

14
Parameters /
Effect Parameters
8. Upper Gender Depth
Range: -64 ... +63
Default: 20
This determines the quality or character of the harmony notes above the melody that are
set to automatically change gender — according to the Harmony Gender Type and Auto
Upper Gender Threshold settings.
Extreme negative or positive values result in pronounced distortion of the voice quality.
Also, the effect may vary according to the quality, character and pitch of the actual voice.
Experiment with this to find values that sound most natural (or unnatural, if you prefer).
• This parameter has no effect when Harmony Gender Type is set to “off.”
9. Lower Gender Depth
Range: -64 ... +63
Default: -20
This determines the quality or character of the harmony notes below the melody that are
set to automatically change gender — according to the Harmony Gender Type and Auto
Lower Gender Threshold settings.
Extreme negative or positive values result in pronounced distortion of the voice quality.
Also, the effect may vary according to the quality, character and pitch of the actual voice.
Experiment with this to find values that sound most natural (or unnatural, if you prefer).
• This parameter has no effect when Harmony Gender Type is set to “off.”
10. Lead/Harmony Balance (Lead/Harm)
Range: L63>H (maximum lead level) ... L=H (equal level) ...
L<H63 (maximum harmony level)
Default: L=H
This determines the relative balance of the lead and harmony voices. For most conven-
tional applications, this should be set to “L=H” or a slightly higher lead level (such as
“L10>H” or more).
11. Vibrato Depth
Range: 0 ... 127
Default: 39
This determines the depth of the Vibrato effect on the harmony notes and the lead note.
(The lead note is not affected when Lead Gender Type is set to “Off.”) Higher values
result in a stronger, more pronounced vibrato sound.

15
Parameters /
Effect Parameters
12. Vibrato Rate
Range: 0 ... 127
Default: 47
This determines the speed of the Vibrato effect on the harmony notes and the lead note.
(The lead note is not affected when Lead Gender Type is set to “Off.”) Higher values
result in a faster vibrato sound.
13. Vibrato Delay
Range: 0 ... 127
Default: 0
This determines the amount of delay in the onset of the Vibrato effect on the harmony
notes and the lead note. (The lead note is not affected when Lead Gender Type is set to
“Off.”) Singers often employ a delayed vibrato as they hold notes; this parameter is
designed to reproduce that effect, and helps to create a more natural, lifelike sound.
Higher values result in a longer delay time.
14. Part
Settings: Off, Part1 ... 64, Ad1 ... Ad63
Default: Off
This determines the Part to which the Harmony effect is applied. For example, to apply
Harmony to a microphone input connected to the A/D INPUT, set this to “Ad01.” When
set to “Off,” the Harmony effect is cancelled.
• If you are using a Modular Synthesis Plug-in-compatible tone generator, you'll need to set the
Part Number from the device itself.
• The number of selectable Parts in this parameter exceeds the actual amount available on the
tone generator/sound card. The parameter has these values to accommodate the expanded
capacity of future tone generators and boards.

16
Parameters /
Effect Parameters
■ Chordal Harmony Parameters.....................................
The Chordal type produces up to three harmony notes that correspond to the chords
you play on a connected MIDI keyboard (or chords recorded to a sequencer). For
example, if you play a C major triad on the keyboard (with Chordal Mode set to “trio”)
and sing a C note, the resulting harmonies will be C, E, and G. Thirty-four different
chord types are recognized in this mode (see Chords Recognized in Chordal Type), giv-
ing you an amazingly full and flexible palette of harmonies, suitable for nearly any music
style. The number of harmonies produced and their position above or below the melody
is set in the Mode parameter.
• When more than four MIDI notes are received, priority is given first to the most recently
played notes, then the highest notes. (In other words, the harmonies of lower notes and ear-
lier notes are cut off.)
In general, the Chordal Type is best suited when you want to simply play the chords and
have the Harmony effect automatically sort out the suitable notes.
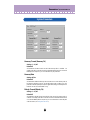
• Chords Recognized in Chordal Type
C Maj min(9) 7(13)
C# Maj6 min7(9) 7(b9)
D Maj7 min7(11) 7(b13)
D# Maj7(#11) minMaj7 7(#9)
E Maj(9) minMaj7(9) Maj7aug
F Maj7(9) dim 7aug
F# Maj6(9) dim7 1+8
G aug 7th 1+5
G# min 7sus4 sus4
A min6 7b5 1+2+5
A# min7 7(9)
B min7b57(#11)
Chordal Harmony Parameter Descriptions
1. Mode
1: Duet Above (default)
Produces one harmony note, in a pitch above the lead note.
2: Duet Below
Produces one harmony note, in a pitch below the lead note.
3: Duet Above + Bass
Produces two harmony notes — one in a pitch above the lead note, and one an octave
below the other harmony. (The “+ Bass” in the type name stands for “added bass
note.”)

17
Parameters / Effect Parameters
4: Trio Above
Produces two harmony notes, in pitches above the lead note.
5: Trio Above&Below
Produces two harmony notes — one in a pitch above the lead note, and one below.
6: Trio Below
Produces two harmony notes, in pitches below the lead note.
7: Trio Above&Below + Bass
Produces three harmony notes — one in a pitch above the lead note, and two below —
one of them an octave below the higher harmony. (The “+ Bass” in the type name
stands for “added bass note.”)
8: Quartet Above
Produces three harmony notes, in pitches above the lead note.
9: Quartet Above&Below
Produces three harmony notes — two in pitches above the lead note, and one below.
10: Quartet Below
Produces three harmony notes, in pitches below the lead note.
Other Parameters
The remaining parameters for the Chordal Type are the same as those for the Vocoder
Type.
• If you are using a Modular Synthesis Plug-in-compatible tone generator, you'll need to set the
Part Number (14. Part) from the device itself.

18
Parameters /
Effect Parameters
■ Detune Harmony Parameters......................................
The Detune type produces a slightly “detuned” pitch and mixes it with the input signal for
a rich chorusing effect. The amount of the detuning is set in the Mode parameter. MIDI
note data from a keyboard or sequencer has no effect in this type.
Detune Harmony Parameter Descriptions
1. Mode
1: Low Detune (default)
Detunes the pitch by ±7 cents (least amount of detuning).
2: Medium-Low Detune
Detunes the pitch by ±11 cents.
3: Medium-High Detune
Detunes the pitch by ±15 cents.
4: High Detune
Detunes the pitch by ±20 cents (most amount of detuning).
• When Detune is selected, the following parameters are not available:
2. Harmony Gender Type
5. Lead Pitch Correction
6. Auto Upper Gender Threshold
7. Auto Lower Gender Threshold
8. Upper Gender Depth
9. Lower Gender Depth
Other Parameters
The remaining parameters for the Detune Type are the same as those for the Vocoder
Type.
• If you are using a Modular Synthesis Plug-in-compatible tone generator, you'll need to set the
Part Number (14. Part) from the device itself.

19
Parameters / Effect Parameters
■ Chromatic Harmony Parameters ................................
The Chromatic type produces a harmony at a fixed pitch interval from the original sound
(such as an octave, or a third). The amount and direction of the pitch shift is set in the
Mode parameter. MIDI note data from a keyboard or sequencer has no effect in this
type.
Chromatic Harmony Parameter Descriptions
1. Mode
1: Octave Below (default)
Produces a harmony note an octave below the input note.
2: 3rd Below
Produces a major third harmony note in the octave below the input note. (Harmony is
transposed eight semitones down.)
3: 5th Below
Produces a perfect fifth harmony note in the octave below the input note. (Harmony is
transposed five semitones down.)
4: Unison
Produces a “harmony” note at the same pitch as the input note. (This can be clearly
distinguished from the original signal by changing the Harmony Gender Type.)
5: 3rd Above
Produces a major third harmony note in the same octave as the input note. (Harmony
is transposed four semitones up.)
6: 5th Above
Produces a perfect fifth harmony note in the same octave as the input note. (Harmony
is transposed seven semitones up.)
7: Octave Above
Produces a harmony note an octave above the input note.
Other Parameters
The remaining parameters for the Chromatic Type are the same as those for the Vocoder
Type.
• If you are using a Modular Synthesis Plug-in-compatible tone generator, you'll need to set the
Part Number (14. Part) from the device itself.

20
Parameters /
System Parameters
Harmony Channel (Harmony Ch)
Settings: 1 ... 16, Off
Default: Off
This determines the MIDI channel over which the Harmony effect is controlled. For
example, when this is set to the same value as the MIDI transmit channel of a connected
MIDI keyboard or sequencer, you can use that device to “play” harmonies.
Harmony Mute
Settings: Off, On
Default: Off
This determines whether the harmony notes are muted or not. For the harmony notes to
be heard, this should be set to “Off.” To mute the harmony notes, set this to “On.” This
parameter is intended primarily for sequencer applications, letting you effectively turn the
harmonies on and off as needed within a song.
Melody Channel (Melody Ch)
Settings: 1 ... 16, Off
Default: Off
This determines the MIDI channel over which the lead sound of the Harmony effect is
controlled. For example, when this is set to the same value as the MIDI transmit channel
of a connected MIDI keyboard or sequencer, you can use that device to control the pitch
of the lead sound. (See “Using the Lead Voice.”)
System Parameters

21
Parameters / Chord Parameters
Harmony 1 - 3 Volume
Range: 0 ... 127
Default: 127
This determines the volume of the selected harmony note (1, 2, or 3).
Harmony 1 - 3 Pan
Settings: Random, -63 (full left) ... 0 (center) ... +63 (full right)
Default: 0
This determines the stereo position of the selected harmony note (1, 2, or 3). The “Ran-
dom” setting randomly assigns the selected harmony note to a pan position.
Harmony 1 - 3 Detune
Range: -64 ... +63
Default: 0
This determines the amount of detuning for the selected harmony note (1, 2, or 3). A set-
ting of “0” results in no detuning; positive and negative settings adjust the pitch of the har-
mony note up or down, respectively.
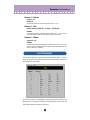
This tab section allows you to specify the chord for the Harmony effect. To select a
chord, click one of the twelve root notes and one of the thirty-four types. (Both the root
note and type must be specified.)
To insert the chord to an host application's track, drag and drop the Chord tab to the
desired track (the chord event is inserted to the nearest measure), or use the Insert VH
Effect Editor Parameter command in the Edit menu.
Chord Parameters

22
Sequencer-related Operations
The following menus and functions are available only when the VH Effect Editor is active
and selected (the Editor screen appears in the foreground).
• The following information pertains only to the Plug-in Editor.
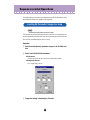
This operation lets you insert parameter changes to a song track in host application. By
inserting appropriate parameter values, you can fully automate the Harmony effect and
have it change as needed during the course of a song.
Operation
z Make the desired Harmony parameter changes in the VH Editor win-
dow.
x Select “Insert VH Effect Editor Parameter.”
With the mouse:
Click “Edit” on the menu bar, then select “Insert VH Effect Editor Parameter.”
With keyboard shortcuts:
Press: [Alt], [E] (Edit), [I] (Insert)
c Change the settings in the dialog box, if desired.
Inserting VH Parameter Changes to a Song

23
Sequencer-related Operations / File Menus
When the VH Effect Editor is active and selected, the following functions appear in the
File menu:
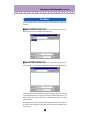
■ Open VH Effect Editor File...........................................
Use this function to open an existing Harmony Editor File.
■ Save VH Effect Editor File............................................
Use this function to save the current VH Effect Editor settings to a Harmony Editor File.
These are used for saving and opening your original Harmony Editor Files. Using the
Save command here saves a “Snapshot” of the current VH Effect Editor settings. (The
default setting is as a Harmony Editor File; the .HRM extension allows you to easily
organize the files.)
By keeping a library of often used Harmony effect settings as Harmony Editor Files, you
can easily call up the settings you need (with the Open command) and quickly insert
them to a song.
File Menus

24
Sequencer-related Operations /
Edit Menu
When the VH Effect Editor is active and selected, the following functions appear in the
Edit menu:
■ Insert VH Effect Editor Parameter...............................
• The following information pertains only to the Plug-in Editor.
This is used for inserting parameter changes to a song track in host application. By
inserting appropriate parameter values, you can fully automate the Harmony effect and
have it change as needed during the course of a song. (Also see Inserting VH Parame-
ter Changes to a Song.)
Insert Track
Range: 1 ... 100
This determines the track to which the Harmony parameter settings will be inserted.
Generally, you should use the same track number for all parameter inserts, and make
sure that no other data is contained in the track.
Insert Location
This determines the precise location in the track to which the Harmony parameter set-
tings will be inserted. You can specify the Measure (Meas), Beat, and Clock.
Edit Menu

25
Sequencer-related Operations / Edit Menu
Insert Method
Offset
When this is selected, only the parameters whose values have been changed from the
default value will be inserted.
All
When this is selected, all parameter values will be inserted, whether they’ve been
changed or not.
Interval
This determines the amount of time (in clocks) that separates each insertion. If the tone
generator or sound card “chokes” on the incoming MIDI data, or host application has
trouble sending all the data properly, or the Harmony effect doesn’t seem to work as
expected, try setting the Interval to a higher number.
■
Copying Chord Events To and From the Master Track........
• The following information pertains only to the Plug-in Editor.
These functions allow you copy chord events to and from the Master Track in host appli-
cation, converting XF format chord data (on software for the Yamaha Clavinova and Por-
taTone/PortaSound instruments) to host application format data.

26
Sequencer-related Operations /
Setup Menus
When the VH Effect Editor is active and selected, the following functions appear in the
Setup menu (these are used for changing various basic settings for the VH Effect Edi-
tor):
■ VH Effect Editor Setup.................................................
MIDI Out Port
Settings: Device, Out port number
This determines which MIDI output device (interface) and port is used for sending VH
Effect Editor data. There are four available devices/ports, as specified in the System
Setup parameters (Setup —> System Setup). (For details on System Setup, refer to the
host application's manual.) A setting of “---” disables MIDI output for the VH Effect Editor.
PLG Host Setup
Device Number
Range: 1 ... 16
This determines which tone generator the VH Effect Editor will send data to. If you have
multiple tone generators in your MIDI setup and each is set to a different Device Number,
this parameter lets you select which tone generator will be affected by the VH Effect Edi-
tor. If you are using only one tone generator, this should be set to “1.”
Board Number
Range: 1 ... 8
This determines which tone generator card (or board) the VH Effect Editor will send data
to. If you have multiple tone generator cards in your MIDI setup and each is set to a dif-
ferent Device Number, this parameter lets you select which card will be affected by the
VH Effect Editor. If you are using only one tone generator card, this should be set to “1.”
Setup Menus

27
Sequencer-related Operations / Setup Menus
Insert Method (Plug-in Editor only)
Offset
When this is selected, only the parameters whose values have been changed from the
default value will be inserted.
All
When this is selected, all parameter values will be inserted, whether they’ve been
changed or not.
Interval
This determines the amount of time (in clocks) that separates each insertion. If the tone
generator or sound card “chokes” on the incoming MIDI data, or host application has
trouble sending all the data properly, or the Harmony effect doesn’t seem to work as
expected, try setting the Interval to a higher number.
■ Easy Setup....................................................................
• This function is not supported in Macintosh stand-alone application.
Harmony Channel
Range: 1 ... 16
This determines the MIDI channel over which the Harmony effect (Vocoder or Chordal) is
controlled . For example, when this is set to the same value as the MIDI transmit channel
of a connected MIDI keyboard or sequencer, you can use that device to “play” harmonies.
(This is the same parameter as in the System tab of the VH Effect Editor; however, the
“off” setting is not available here.)

28
Sequencer-related Operations /
Setup Menus
Insert Track (Plug-in Editor only)
Range: 1 ... 100
This determines the track to which the setup data and settings will be inserted. Gener-
ally, you should use the same track number for all parameter inserts, and make sure that
no other data is contained in the track.
Insert Location (Plug-in Editor only)
This determines the precise location in the track to which the setup data and settings will
be inserted. You can specify the Measure, Beat, and Clock.
Insert Method (Plug-in Editor only)
Interval
This determines the amount of time (in clocks) that separates each insertion. If the tone
generator or sound card “chokes” on the incoming MIDI data, or host application has
trouble sending all the data properly, or the Harmony effect doesn’t seem to work as
expected, try setting the Interval to a higher number.
MIDI-Out
Click this to directly enter the basic setup settings for the PLG100-VH to the tone genera-
tor/sound card. In addition to the Harmony Channel set in this box, these include all the
necessary settings for using the Harmony effect, such as calling up the “Mic” setting for
the A/D input, muting any other Parts set to the same MIDI channel as Harmony, and so
on.
Insert (Plug-in Editor only)
Click this to insert the basic setup settings for the PLG100-VH to the selected host appli-
cation's track. (The settings will actually change on the tone generator/sound card only
when the song is played back.) In addition to the Harmony Channel set in this box, these
include all the necessary settings for using the Harmony effect, such as calling up the
“Mic” setting for the A/D input, muting any other Parts set to the same MIDI channel as
Harmony, and so on.
Clicking the [MIDI-Out] button automatically makes the following settings on the connected tone
generator (by transmitting the appropriate MIDI data):
(1) The A/D Part of the tone generator/sound card is set to “Mic.”
(2) Harmony Channel is set to the specified channel.
(3) Harmony Type is set to “Vocoder.”
(4) The Insert Part of the PLG100-VH is set to “AD1.”
(5) Note On messages are automatically filtered out for all other Parts that are set to the same
channel as the Harmony Channel. This effectively mutes all Parts that would otherwise
interfere with the Harmony sound.
Settings (1), (4) and (5) above are ignored by Modular Synthesis Plug-in-compatible tone gener-
ators.

29
Troubleshooting
If the Harmony effect does not seem to work as expected, check the following points:
• Is Part set to “Ad1” or “Ad2”?
• Is the Lead/Harmony Balance set to an appropriate value (such as “L=H”)?
• For Vocoder and Chordal types:
Is the Harmony Channel set to the same channel as the transmit channel on
the MIDI keyboard or sequencer?
Are other keyboard/sequencer settings appropriate? (For example, check
that Note On messages are being properly sent, that all transpose and other
pitch related settings are at “0” or normal, etc.)
• Is Harmony Mute set to “off”?
• Are the Harmony Volume (1 - 3) settings appropriate?
If the parameter settings do not seem to change on the connected tone generator/sound
card when using the VH Effect Editor, check the following points:
• In host application, make sure that System Exclusive is NOT checked (System
Setup, MIDI Out Filter tab).
• Make sure that the tone generator is properly set to receive system exclusive
messages. (On the MU100, the Receive System Exclusive parameter in the
Utility mode should be set to “on.”)
When using inserted VH Effect Editor data in a sequenced song, if the Harmony effect
doesn’t work as expected or behave erratically, the tone generator/sound card (or host
application itself) could be “choking” on too much MIDI data. To remedy this, set Interval
to a higher number and re-insert the data.
-
 1
1
-
 2
2
-
 3
3
-
 4
4
-
 5
5
-
 6
6
-
 7
7
-
 8
8
-
 9
9
-
 10
10
-
 11
11
-
 12
12
-
 13
13
-
 14
14
-
 15
15
-
 16
16
-
 17
17
-
 18
18
-
 19
19
-
 20
20
-
 21
21
-
 22
22
-
 23
23
-
 24
24
-
 25
25
-
 26
26
-
 27
27
-
 28
28
-
 29
29


Yamaha PLG100 de handleiding
- Categorie
- Digitale piano's
- Type
- de handleiding
- Deze handleiding is ook geschikt voor
in andere talen
- English: Yamaha PLG100 Owner's manual
- italiano: Yamaha PLG100 Manuale del proprietario
- русский: Yamaha PLG100 Инструкция по применению
- français: Yamaha PLG100 Le manuel du propriétaire
- español: Yamaha PLG100 El manual del propietario
- Deutsch: Yamaha PLG100 Bedienungsanleitung
- português: Yamaha PLG100 Manual do proprietário
- dansk: Yamaha PLG100 Brugervejledning
- suomi: Yamaha PLG100 Omistajan opas
- čeština: Yamaha PLG100 Návod k obsluze
- svenska: Yamaha PLG100 Bruksanvisning
- Türkçe: Yamaha PLG100 El kitabı
- polski: Yamaha PLG100 Instrukcja obsługi
- română: Yamaha PLG100 Manualul proprietarului