De Dietrich DRH920JE de handleiding
- Categorie
- Diepvriezers
- Type
- de handleiding

Réfrigérateur
Refrigerator
Ijkast
Kühlschrank
FR GUIDE D’INSTALLATION & D’UTILISATION
EN INSTRUCTIONS FOR USE
NL GEBRUIKSAANWIJZING
DE BEDIENUNGSANLEITUNG
2223 510-41
DRH 920 JE
LES NOUVEAUX OBJETS DE VALEUR

2
Chère Cliente, Cher Client,
Vous venez d'acquérir un congélateur DE DIETRICH et nous vous en remercions.
Nos équipes de recherche ont conçu pour vous cette nouvelle génération d'appareils, qui par leur
qualité, leur esthétique, leurs fonctions et leurs évolutions technologiques en font des produits
d'exception, révélateurs de notre savoir-faire.
Votre nouveau congélateur DE DIETRICH s'intègrera harmonieusement dans votre cuisine et alliera
parfaitement les performances conservation de vos aliments, et la facilité d’utilisation. Nous avons
voulu vous offrir un produit d’excellence.
Vous trouverez également dans la gamme des produits DE DIETRICH, un vaste choix de fours, de
fours à micro-ondes, de tables de cuisson, de hottes aspirantes, de lave-vaisselle, et de réfrigérateurs
intégrables, que vous pourrez coordonner à votre nouveau congélateur DE DIETRICH.
Bien entendu, dans un souci permanent de satisfaire le mieux possible vos exigences vis à vis de nos
produits, notre service consommateurs est à votre disposition et à votre écoute pour répondre à
toutes vos questions ou suggestions (coordonnées à la fin de ce livret).
Et retrouvez-nous aussi sur notre site www
.dedietrich-electromenager.com
sur lequel vous
trouverez nos dernières innovations ainsi que des informations utiles et complémentaires.
DE DIETRICH
Les nouveaux objets de valeur
Dans le souci d’une amélioration constante de nos produits, nous nous réservons le droit d’apporter à leurs
caractéristiques techniques, fonctionnelles ou esthétiques toutes modifications liées à leur évolution.
Important: Avant de mettre votre appareil en route, veuillez lire attentivement
ce guide d’installation et d’utilisation afin de vous familiariser plus rapidement avec
son fonctionnement.

Avertissements importants
3
Protection de l’environnement
Cet appareil ne contient pas, dans son circuit
réfrigérant et ses matières isolantes, de gaz
réfrigérants nocifs à la couche d'ozone. Il ne doit pas
être mis au rebut avec les ordures urbaines et la
ferraille afin d'éviter d'endommager le circuit
réfrigérant, plus particulièrement à l'arrière de
l'appareil. Contactez votre mairie afin de vous
renseigner sur la collecte de ce type d'appareils.
Les matériaux utilisés dans cet appareil et
identifiés par ce symbole sont recyclables.
Elimination des vieux appareils
Le symbole sur le produit ou son emballage
indique que ce produit ne peut être traité comme
déchet ménager. Il doit plutôt être remis au point de
ramassage concerné, se chargeant du recyclage du
matériel électrique et électronique. En vous assurant
que ce produit est éliminé correctement, vous
favorisez la prévention des conséquences négatives
pour l’environnement et la santé humaine qui, sinon,
seraient le résultat d’un traitement inapproprié des
déchets de ce produit. Pour obtenir plus de détails
sur le recyclage de ce produit, veuillez prendre
contact avec le bureau municipal de votre région,
votre service d’élimination des déchets ménagers ou
le magasin où vous avez acheté le produit.
Usage domestique
• Les réfrigérateurs/congélateurs domestiques sont
destinés uniquement à la conservation et/ou à la
congélation des aliments.
• Contrôler, avant d’installer l’appareil, s’il n’est pas
endommagé. Dans le cas contraire, s’adresser au
revendeur.
• Cet appareil est lourd. Faites attention lors de son
déplacement.
• Une éventuelle modification à l’installation
électrique de votre maison qui devrait être
nécessaire pour l’installation de l’appareil ne devra
être effectuée que par du personnel qualifié.
• Assurez-vous, après avoir installé l’appareil, que
celui-ci ne repose pas sur le câble d’alimentation.
• A cause du système de transport, I’huile contenue
dans le compresseur pourrait s’écouler dans le
circuit réfrigérant. Attendez 2 heures au moins
avant de brancher l’appareil pour permettre à
l’huile de refluer dans le compresseur.
• Ne pas mettre d’instruments électriques à l’intérieur
de l’appareil (sorbetière, par exemple).
• Ne placez ni bouteilles ni boîtes de boissons
gazeuses dans le congélateur/compartiment à
basse température, elles pourraient éclater.
• Ne touchez pas les aliments surgelés avec des
mains humides. Les mains pourraient y rester
collées.
• Ne jamais essayer de réparer l’appareil vous-
même. Les réparations effectuées par des
incompétents peuvent endommager l’appareil.
S’adresser au centre de service après-vente le
plus proche et n’exiger que des pièces de
rechange d’origine.
Sécurité enfants
• Les éléments de l’emballage (par ex. sacs,
pellicules, polystyrène) peuvent être dangereux
pour les enfants. Ils peuvent s’étouffer!
• En cas d’élimination de l’appareil, couper le câble
d’alimentation et neutraliser le dispositif de
fermeture de la porte de manière à ce que les
enfants ne puissent pas rester enfermés à
l’intérieur de l’appareil.
Ce sont des avertissements de sécurité. Nous
vous prions donc de les lire attentivement avant
d’installer et d’utiliser votre appareil.
Nous recommandons de conserver cette notice afin
de pouvoir la consulter au besoin et de la remettre, le
cas échéant, au nouveau propriétaire de l’appareil.
• Cet appareil n'est pas destiné à être utilisé par des
enfants ou des personnes dont les capacités
physiques, sensorielles ou mentales, ou le
manque d'expérience et de connaissance les
empêchent d'utiliser l'appareil sans risque
lorsqu'ils sont sans surveillance ou en l'absence
d'instruction d'une personne responsable qui
puisse leur assurer une utilisation de l'appareil
sans danger.

Elimination
• L'appareil est ainsi en état de fonctionnement. Pour
arrêter le fonctionnement, placez l'indicateur du
bouton en correspondance du symbole «O».
Réglage de la température
• Le bouton rotatif pour la sélection de la
température se trouve dans le compartiment
réfrigérateur, à droite.
• L'exacte position du thermostat doit être repérée
en considérant que la température interne dépend
des facteurs suivants:
• température ambiante;
• fréquence d'ouverture des portes;
• quantité d'aliments conservés;
• emplacement de l'appareil.
• La température est réglée automatiquement.
• Position „1“ = température la plus élevée
• Position „6“ = température la plus basse
• Position „0“ = arrêt
Une position moyenne est la plus indiquée.
Utilisation
Avant la mise en service
A cause du système de transport, I’huile
contenue dans le compresseur pourrait
s’écouler dans le circuit réfrigérant. Attendez 2
heures au moins avant de brancher l’appareil
pour permettre à l’huile de refluer dans le
compresseur.
• L'appareil étant convenablement installé, nous
vous conseillons de le nettoyer soigneusement
avec de l'eau tiède savonneuse, pour enlever
l'odeur caractéristique de «neuf».
N'utilisez pas de produits abrasifs, poudre
à récurer, éponge métallique.
L’appareil et certaines parties de l’équipement
intérieur sont protégés pour le transport.
Enlevez les bandes autocollantes à gauche et à
droite à l’extérieur de la porte et toutes les bandes
autocollantes et rembourrages à l’intérieur de
l’appareil (sauf la plaque signalétique).
Matériaux de l’emballage
• Les matériaux marqués du symbole sont
recyclables.
>PE<=polyéthylène
>PS<=polystyrène
>PP<=polypropylène
Tous les matériaux de l’emballage sont recyclables.
Mise au rebut des anciens appareils
S’adresser aux services de la commune pour avoir
les renseignements nécessaires sur les
déchetteries.
4
Sommaire
Avertissements importants . . . . . . . . . . . . . . . . . . . . . . . . . . . . . . . . . . . . . . . . . . . . . . . . . . . . . . . . . . . . . . . .3
Elimination / Utilisation Avant la mise en service . . . . . . . . . . . . . . . . . . . . . . . . . . . . . . . . . . . . . . . . . . . . . .4
Compartiment réfrigérateur - Mise en service / Réglage de la température . . . . . . . . . . . . . . . . . . . . . . . . . . .4
Equipement intérieur . . . . . . . . . . . . . . . . . . . . . . . . . . . . . . . . . . . . . . . . . . . . . . . . . . . . . . . . . . . . . . . . . . . . .5
Explication signalétique de la zone froide/Conseils/Compartiment congélateur-Réglage de la température . .6
Compartiment congélateur - Equipement intérieur / Conseils . . . . . . . . . . . . . . . . . . . . . . . . . . . . . . . . . . . . .7
Entretien Dégivrage . . . . . . . . . . . . . . . . . . . . . . . . . . . . . . . . . . . . . . . . . . . . . . . . . . . . . . . . . . . . . . . . . . . . . .7
Nettoyage / Changement de l’ampoule . . . . . . . . . . . . . . . . . . . . . . . . . . . . . . . . . . . . . . . . . . . . . . . . . . . . . . .8
Si quelque chose ne va pas ... . . . . . . . . . . . . . . . . . . . . . . . . . . . . . . . . . . . . . . . . . . . . . . . . . . . . . . . . . . . . .9
Service après-vente et pièces de rechange / Caractéristiques Techniques . . . . . . . . . . . . . . . . . . . . . . . .9
Installation Emplacement / Branchement électrique . . . . . . . . . . . . . . . . . . . . . . . . . . . . . . . . . . . . . . . . . . . .10
Réversibilité de la porte . . . . . . . . . . . . . . . . . . . . . . . . . . . . . . . . . . . . . . . . . . . . . . . . . . . . . . . . . . . . . . . . . .11
Réversibilité de la porte du compartiment congélateur / Instructions pour l’encastrement . . . . . . . . . . . . . .12
Compartiment réfrigérateur
Mise en service
• Branchez la prise de courant et ouvrez la porte.
Tournez le bouton du thermostat dans le sens des
aiguilles d'une montre au-delà de la position «O»
(arrêt).

5
Equipement intérieur
Tablettes amovibles
• Les glissières se trouvant sur les parois de la cuve
permettent de positionner les tablettes à différentes
hauteurs, selon vos besoins.
• Tirer la surface de rangement vers l’avant jusqu’à
ce qu’on puisse la faire basculer vers le haut ou
vers le bas et l’extraire.
• Pour le placement à une autre hauteur, procéder
dans l’ordre inverse.
• Pour une meilleure utilisation de l’espace vous
pouvez superposer les demi-tablettes antérieures
sur les demi-tablettes postérieures.
Pour permettre une bonne circulation de l’air
n’enlevez pas la clayette inférieure en verre
au-dessus du/des bac/s à légumes et le
balconnet porte-bouteille.
D338
Balconnets
• Il est possible de changer de place le balconnet
central.
• Dégagez le balconnet en agissant dans le sens
indiqué par les flèches.
• Remontez le balconnet à la hauteur désirée.
Pour un nettoyage plus soigné, les balconnets
supérieur et inférieur peuvent être aisément retirés et
replacés dans la même position.
Clayette porte bouteille
• Placez les bouteilles (ouverture vers l’avant) dans
les emplacements prévus de la clayette.
Si la clayette est placée à l’horizontal, ne placez
que des bouteilles non entamées.
• Cette clayette porte bouteilles a la possibilité de
s’incliner afin de favoriser le rangement de
bouteilles déjà entamées.
Pour cela, tirez la clayette vers l’avant jusqu’à ce
qu’elle puisse pivoter vers le haut afin de glisser la
clayette dans le support clayette supérieur.
PRXXX

Conseils
Économie d’énergie
• N’installez pas l’appareil à proximité de cuisinières,
radiateurs ou autres sources de chaleur. Si la
température ambiante est élevée, le compresseur
fonctionne plus fréquemment et plus longtemps
(voir chapitre “Installation”).
• N’ouvrez pas la porte plus longtemps que
nécessaire.
• Si le thermostat est réglé sur la position de froid
maximum, lorsque la température ambiante est
élevée et que l'appareil est plein, il est possible que
le compresseur fonctionne en régime continu.
Dans ce cas, il y a un risque de formation
excessive de givre sur la paroi postérieure à
l'intérieur de l'appareil. Pour éviter cet
inconvénient, placez le thermostat sur une position
moins élevée, de façon à permettre un dégivrage
automatique et, par conséquent, des économies de
courant.
• Ne placez pas d’aliments chauds dans l’appareil.
Attendez que les aliments refroidissent.
• Ne réglez pas la température plus bas que
nécessaire.
• Placez les aliments surgelés dans le réfrigérateur
pour les dégeler. Le froid des aliments surgelés est
ainsi utilisé pour le refroidissement du
réfrigérateur.
• De temps en temps, dépoussiérez le condenseur
situé à l’arrière de l’appareil, à l’aide d’un
aspirateur ou d’une brosse souple.
Réfrigération
• N'introduisez pas d'aliments encore chauds ou de
liquides en évaporation dans la cuve.
• Couvrez les aliments, surtout s'ils sont
aromatiques.
• Placez les denrées de façon à ce que l'air puisse
circuler tout autour.
Où placer les denrées?
Viandes (de toutes sortes): enveloppez-la dans des
sachets en plastique et placez-la sur la tablette en
verre au-dessus du bac à légumes.
La période de conservation est de 1 à 2 jours au
maximum.
Aliments cuits, plats froids, etc.: placez-les, bien
couverts, sur une clayette.
Fruits et légumes: bac(s) à légumes (une fois
nettoyés).
Beurre et fromage: enveloppez-les soigneusement
dans des feuilles d'aluminium ou de polyéthylène et
mettez-les dans les casiers appropriés.
Lait en bouteille: à placer dans l'un des balconnets
de la contreporte.
Bananes, pommes de terre, oignons et ail ne se
conservent pas au réfrigérateur. Les fromages
fermentés ne seront mis au réfrigérateur que si
l’on désire arrêter leur maturation. Ils devront
alors être soigneusement enveloppés.
Compartiment congélateur
Réglage de la température
• Pour congeler les aliments frais il n'est pas
nécessaire de régler le thermostat sur une position
différente de celle employée en fonctionnement
normal.
• Si vous désirez congeler plus rapidement vous
pouvez régler le thermostat sur une position plus
froide tout en veillant à ce que la température ne
descende pas en dessous de 0°C dans le
6
Explication signalétique de la zone froide
Le symbole ci-contre indique l’emplacement
de la zone la plus froide de votre
réfrigérateur.
Zone la plus froide
: inférieure ou égale à +4° C
Viandes, volailles, poissons, charcuteries, plats
préparés, salades composées, préparations et
pâtisseries à base d'œufs ou de crème, pâtes
fraîches, pâte à tarte, pizza/quiches, produits frais et
fromages au lait cru, légumes prêts à l'emploi vendus
sous sachet plastique et plus généralement, tout
produit frais dont la date limite de consommation
(DLC) est associée à une température de
conservation inférieure ou égale à +4°C.
Indicateur de température
Thermostat à régler Température correcte
L'indicateur de température permet de contrôler le
bon fonctionnement de votre réfrigérateur.
L'indicateur présente la mention "OK" lorsque la
zone la plus froide atteint une température inférieure
ou égale à 4°C.
Si la température est supérieure à 4°C, l'indicateur
reste noir. L'utilisateur doit alors faire baisser la
température de son réfrigérateur en réglant son
thermostat.
ATTENTION: Une ouverture prolongée de la porte du
réfrigérateur entraîne une hausse de la température
interne. Afin de bien mesurer la température, la
lecture de l'indicateur doit être effectuée dans les 30
secondes.
OK

compartiment réfrigérateur. Dans ce cas il faudra
ramener le thermostat sur une position moins
froide.
• A la première mise en fonctionnement ou après un
arrêt prolongé faites fonctionner l'appareil pendant
deux heures au moins sur la position de froid
maximum.
Ramenez ensuite le thermostat sur la position
désirée.
7
Equipement intérieur
Fabrication de glaçons
La fabrication des glaçons s'effectue dans le
compartiment congélateur.
Remplissez d'eau le bac jusqu'aux trois-quarts de sa
hauteur afin de permettre l'expansion de la glace.
Le démoulage des bacs en matières plastique
s'obtient par simple torsion.
N'employez pas d'objet métallique pour
décoller les bacs à glaçons.
Conseils
Congélation et surgélation
• Des paquets de petites dimensions permettent
d'obtenir une congélation rapide et uniforme.
• Envoleppez les denrées dans du papier
d’aluminium ou de polythène, en éliminant les
bulles d’air et en fermant bien les paquets.
• Évitez de placer des produits à congeler en contact
avec des denrées déjà entreposées, pour éviter
d’en élever la température.
• Ne consommez pas certains produits tels que les
bâtonnets glacés des leur sortie du congélateur. La
température très basse à laquelle ils se trouvent
peut provoquer des gelures.
• Indiquez sur chaque paquet la date de congélation,
afin de pouvoir contrôler le temps d'entreposage.
• Au moment de l'achat, il est vivement recommandé
d'écourter au minimum le temps qui s'écoule entre
le moment ou le produit est acheté et le moment
ou il est placé dans le compartiment congélateur.
• Ne placez ni bouteilles ni boîtes de boissons
gazeuses dans le congélateur, elles pourraient
éclater.
• Les aliments dégelés, même partiellement, ne
peuvent être recongelés.
Entretien
Débranchez l’appareil avant toute
opération.
Attention
Cet appareil contient des hydrocarbures
dans son circuit réfrigérant; l’entretien et la
recharge ne doivent donc être effectués
que par du personnel qualifié.
Dégivrage
Compartiment réfrigérateur
• Le dégivrage s'effectue automatiquement, à
chaque arrêt du compresseur. L'eau de dégivrage
est évacuée dans un bac situé à l'arrière de
l'appareil où elle s'évapore sans intervention.
• Nous recommandons de nettoyer
périodiquement l'orifice d'écoulement de l'eau
de dégivrage se trouvant dans la partie centrale
de la gouttière du compartiment réfrigérateur
afin d'éviter que l'eau, en débordant, ne coule
sur les denrées stockées dans la cuve. Utilisez
à cet effet le bâtonnet se trouvant dans l'orifice.
D037

Nettoyage
N’utilisez jamais de produits abrasifs ou
caustiques ni d’éponges avec grattoir pour
procéder au nettoyage de votre appareil.
N'utilisez jamais d'objets métalliques pour
nettoyer l'appareil; vous risquez de
l'endommager.
Pour faciliter le nettoyage les balconnets peuvent
être aisément enlevés.
Nettoyez périodiquement l'intérieur de votre appareil
avec de l'eau tiède et du bicarbonate de soude.
Rincez et séchez soigneusement.
De temps en temps démontez la grille d’aération
située à la base de l'appareil et dépoussiérez les
conduites pour le passage de l’air à l'aide d'un
aspirateur ou d'une brosse. Une accumulation de
poussière risquerait de diminuer le rendement de
l'appareil.
Arrêt prolongé
•
Débranchez la prise de courant. videz
l'appareil, dégivrez-le et nettoyez-le à fond.
•
Laissez les portes entrouvertes pour faire
circuler de l'air, de façon à éviter les
mauvaises odeurs.
Changement de l'ampoule
• Avant de remplacer l’ampoule, mettez à l’arrêt
l’appareil et débranchez-le.
L'ampoule d'éclairage dans le compartiment
réfrigérateur est accessible en effectuant les
opérations ci-dessous:
1. Dévissez la vis de fixation du plafonnier.
2. Décrochez la partie mobile en exerçant une
pression sur celle-ci comme indiqué dans la figure.
3. Mettez une autre ampoule qui ait la même
puissance.
D411
Compartiment congélateur
• Dans le congélateur il faut éliminer le givre à
chaque fois qu'il y a une couche épaisse qui s'est
formée (de 5 mm environ), en se servant de la
spatule en plastique qui est livrée avec l'appareil.
Pour effectuer un dégivrage complet procédez de
la manière suivante:
• Enveloppez les denrées dans plusieurs feuilles de
papier journal et conservez-les dans un endroit
frais.
• Tournez le bouton du thermostat sur la position
«O» ou débranchez l’appareil.
• Maintenez la porte ouverte.
• Une fois que le dégivrage est terminé, épongez
bien le congélateur.
• Ramenez le bouton du thermostat sur la position
désirée ou rebranchez l’appareil.
Pour cette opération n’utilisez jamais
d’objet métallique qui risquerait de
détériorer l’appareil.
N’utilisez jamais de dispositifs mécaniques
ou autres moyens artificiels pour accélérer
le dégivrage, à part ceux préconisés.
8

9
Si quelque chose ne va pas ...
Si l'appareil marche mal, il faut contrôler:
Dérangement Remède
La température à l’intérieur de l’appareil est
trop chaude.
L’appareil refroidit trop.
Le compresseur fonctionne sans interruption
Il y a de l’eau au fond du compartiment
réfrigérateur ou sur les clayettes.
Bruits
La température est mal réglée. Veuillez consulter la partie "Réglage de la température".
Placez les denrées de façon à ce que l'air puisse circuler tout autour.
Vérifiez que la porte soit bien fermée.
La température ambiante du local est trop elevée.
La température est mal réglée. Veuillez consulter la partie "Réglage de la température".
Tourner le bouton du thermostat en choisissant une température plus basse.
La température ambiante du local est trop chaude.
Vérifier si l’aération de l’appareil est suffisante et si aucun obstacle n’empêche son
acheminement.
De trop grandes quantités d’aliments ont été entreposées au cours des dernières 24
heures.
N’ouvrez pas la porte plus longtemps que nécessaire.
Le trou d’écoulement de l’eau de dégivrage est bouché. Nettoyez l'orifice d'écoulement
avec le bâtonnet se trouvant dans l’orifice.
Les bruits sont typiques des appareils frigorifiques.
Il n’est pas anormal d’entendre le bruit de circulation du fluide frigorigène selon son état
liquide, gazeux ou vaporeux.
Dès que le compresseur se met en marche, vous l’entendrez bourdonner ou claquer.
Certaines sources de bruit sont dus à la mise en place de la structure du meuble.
Service après-vente et pièces de rechange
Une fois que tous ces contrôles ont été effectués, si
l'anomalie de fonctionnement persiste, adressez-
vous au Service Après-Vente le plus proche.
Pour que l'intervention soit plus rapide, au moment
de l'appel, il vaut mieux indiquer:
• le modèle
• le numéro de produit (PNC)
• le numéro de série (S-No)
Ces indications figurent sur le certificat de garantie
ou sur la plaque signalétique située à l'intérieur de
l'appareil, à gauche et en bas.
Nous vous conseillons de noter ces indications ici
afin de les avoir rapidement à portée de la main.
Caractéristiques Techniques
Les données techniques figurent sur la plaque signalétique située sur le côte gauche à l’intérieur de l’appareil.
En cas de coupure de courant abstenez-vous d’ouvrir la porte. Si l’interruption est de courte
durée (jusqu’à 12 heures) et si le congélateur est rempli, il n’y a aucun risque d’altération pour les
aliments. En cas contraire vous devrez consommer les aliments le plus rapidement possible (une
augmentation de la température peut réduire remarquablement la durée de conservation des
aliments).

Le tableau ci-dessous vous permet de repérer les
différentes classes climatiques existantes et les
températures ambiantes correspondantes:
ATTENTION: En dehors des températures
ambiantes indiquées par la classe climatique
d’appartenance de ce produit, il est obligatoire de
respecter les indications suivantes: lorsque la
température ambiante descend sous la valeur
minimum, la température de conservation du
compartiment congélateur peut ne pas être garantie;
il est donc conseillé de consommer les produits que
ce dernier contient au plus vite.
Classe
climatique
SN +10 à +32°C
+16 à +32°C
+16 à +38°C
+16 à +43°C
N
ST
T
pour une température
ambiante de
Branchement électrique
Contrôlez, avant de brancher l'appareil, si le voltage
et la fréquence indiqués sur la plaque signalétique
correspondent à ceux de votre réseau. Tolérance
admise: 6% en plus ou en moins. Pour l'adaptation
de l'appareil à des voltages différents, l'adjonction
d'un autotransformateur d'une puissance adéquate
est indispensable.
Important
Vérifiez si la prise de courant murale est en
bon état et apte à recevoir la fiche du cordon
d'alimentation du congélateur. Cette dernière
est conforme aux normes en vigueur et
comporte un logement pour mise à la terre.
Cette fiche peut être branchée sur n'importe
quel socle de prise de courant standard, qui
toutefois doit être muni d'une broche
raccordée à la terre.
Notre responsabilité ne saurait être
engagée pour tout incident ou accident
provoqué par une mise à la terre
inexistante ou défectueuse.
Cet appareil est conforme aux Directives
Communautaires suivantes:
- 73/23 CEE 19/02/73 (Basse Tension) et
modifications successives;
- 87/308 du 2.6.87 concernant la suppression
des interférences radio-électriques.
- 89/336 CEE 03/05/89 (Compatibilité
Electromagnétique) et modifications
successives.
Important
L’appareil doit pouvoir être débranché du
secteur; il est donc nécessaire que la fiche
reste accessible une fois que l’installation est
terminée.
Installation
Lors du transport et de l’installation de
l’appareil, veiller à n’endommager aucune
partie du circuit frigorifique.
• Pendant le fonctionnement normal, le condenseur
et le compresseur à l’arrière de l’appareil
s’échauffent sensiblement. Pour des raisons de
sécurité, la ventilation doit être prévue comme
indiqué dans le paragraphe correspondant.
Veuillez consulter la partie “Emplacement”.
• Important: en cas de dommage du câble
d’alimentation, il faudra le remplacer avec un câble
spécial ou un ensemble disponible chez le
fabricant ou le service après-vente.
Pour le bon fonctionnement de votre appareil, la
température ambiante du local doit être comprise
entre la classe climatique (indiquée sur la plaque
signalétique) pour lequel il est prévu. Au delà de ces
températures, ses performances peuvent s’en
trouver diminuées.
10

11
Réversibilité de la porte
TAW1MERA
TAW2MERA
Attention
La réversibilité de la porte une fois effectuée,
contrôlez ensuite que le joint magnétique adhère à la
carrosserie. Si la température à l'intérieur de la pièce
est trop basse (en hiver, p.ex.), il se peut que le joint
n'adhère pas parfaitement. Dans ce cas, si on ne
veut pas attendre que le joint reprenne ses
dimensions naturelles après un certain temps, on
pourra accélérer ce processus en chauffant la partie
intéressée à l'aide d'un sèche-cheveux.
TAW3MERA

12
Installation
Emplacement
Placez de préférence votre appareil loin d'une source
de chaleur (chauffage, cuisson ou rayons solaires
trop intenses).
Veillez à ce que l'air circule librement tout autour de
l'appareil (voir instructions pour I'encastrement).
Pour le bon fonctionnement de votre appareil, la
température ambiante du local doit être comprise
entre +10°C et +38°C. La classe d’appartenance
est indiquée sur la plaque signalétique.
Audelà de ces températures, ses performances
peuvent s'en trouver diminuées.
Instructions pour I'encastrement
Dimensions de la niche
Il est également nécessaire que la niche soit équipée
d’un conduit d’areation ayant les mesures suivantes:
Profondeur 50 mm
Largeur 540 mm
50
1219
1233
530
Réversibilité du portillon du
compartiment congélateur
180°
50 mm
min.
200 cm
2
200 cm
2
min.
D526

13
Kit
100
90°
90°
MAU2ME
Alignement de l’élément du meuble
1BL80R
Démontage de la porte de l’appareil
Les étapes suivantes du montage ne sont
représentées que pour une porte qui s’ouvre à droite
(appareil livré ainsi). Si la porte s’ouvre à gauche,
veuillez exécuter les étapes suivantes du montage
sur le côté opposé.

14
FAL1MERA
FAL2MERA
2. Coupez les baguettes couvre-joint (E).
3. Collez les baguettes couvre-joint (E).
FAL3MERA
4. Mettez en place l’appareil.
1. Procédez aux ajustages.
PL09

15
5. Vissez l’appareil.
GF1MERA
6. Mettez en place les caches (L) des vis.
SAB1ME
7. Montez le kit de décoration.
PL12
8. Posez la poignée.
TE1MERA
9. Mettez en place la porte de l’appareil.
10. Alignez la porte de l’appareil (si nécessaire).
DEC3MERA
M

Contents
Safety Instructions
These warnings are provided in the interests of
your safety. Please read these operating
instructions carefully before installing the
appliance. Ensure you fully understand them
before installing or using the appliance. If you are
unsure about the meaning of these warnings
contact the Customer Care Department.
Domestic Use
• The domestic refrigerators and freezers are
designed to be used specifically for the storage of
edible foodstuffs only.
• Check the appliance for transport damage. Under
no circumstances should a damaged appliance be
installed. In the event of damage please contact
your retailer.
• This appliance is heavy. The edges and projecting
parts of the cabinet may be sharp. Be careful when
moving the cabinet and always use gloves.
• Any electrical work required to install this appliance
should be carried out by a qualified electrician or
competent person.
• Ensure that the appliance does not stand on the
electrical supply cable.
• Do not use electrical appliances inside the
appliance
• Do not keep carbonated drinks or bottles in the freezer
compartment. The glass bottles may break.
• Ice lollies can cause ‘frost/freezer burns’ if
consumed straight from the freezer.
• It is dangerous to try and alter the specifications or
modify this product in any way.
• Under no circumstances should you attempt to
repair the appliance yourself. Refer to your local
Service Centre, and always insist on genuine spare
parts.
Child Safety
• This appliance is designed to be operated by
adults only. There is a risk of suffocation! Keep
packaging material away from children!
• In case of disposal of the appliance, cut off the
supply cable as close as possible and make
thelock unusable, to prevent children from closing
themselves inside the appliances.
• This appliance is not intended for use by persons
(including children) with reduced physical, sensory
or mental capabilities, or lack of experience and
knowledge, unless they have been given
supervision or instruction concerning use of the
appliance by a person responsible for their safety.
Children should be supervised to ensure that they
do not play with the appliance.
Environment Protection
• This appliance does not contain any refrigerant gases
harmful to the ozone layer in its refrigeration circuit
and its insulating materials. It must not be scrapped
with the urban rubbish and scrap iron in order to avoid
damaging the refrigeration circuit and in particular the
back of the appliance. Contact your town council for
information on the collection of these types of
appliances.
The materials used in this appliance, which are
identified by this symbol, can be recycled.
Disposal of old appliances
The symbol on the product or on its packaging
indicates that this product may not be treated as
household waste. Instead it shall be handed over to
the applicable collection point for the recycling of
electrical and electronic equipment. By ensuring this
product is disposed of correctly, you will help prevent
potential negative consequences for the environment
and human health, which could otherwise be caused
by inappropriate waste handling of this product. For
more detailed information about recycling of this
product, please contact your local city office, your
household waste disposal service or the shop where
you purchased the product.
15
Safety Instructions . . . . . . . . . . . . . . . . . . . . . . . . . . . . . . . . . . . . . . . . . . . . . . . . . . . . . . . . . . . . . . . . . . . . . .16
Disposal . . . . . . . . . . . . . . . . . . . . . . . . . . . . . . . . . . . . . . . . . . . . . . . . . . . . . . . . . . . . . . . . . . . . . . . . . . . . . . .17
Use and Control Before Use / Refrigerator compartment - Starting the appliance / Temperature control . . . .17
Internal parts / Explanation of the cold zone signs . . . . . . . . . . . . . . . . . . . . . . . . . . . . . . . . . . . . . . . . . . . . .18
Refrigerator compartment - Hints / Freezer compartment - Temperature control / Interior accessories . . . . .19
Freezer compartment - Hints . . . . . . . . . . . . . . . . . . . . . . . . . . . . . . . . . . . . . . . . . . . . . . . . . . . . . . . . . . . . .20
Maintenance Defrosting . . . . . . . . . . . . . . . . . . . . . . . . . . . . . . . . . . . . . . . . . . . . . . . . . . . . . . . . . . . . . . . . . .20
Cleaning / Changing the light bulb . . . . . . . . . . . . . . . . . . . . . . . . . . . . . . . . . . . . . . . . . . . . . . . . . . . . . . . . .21
Something not Working . . . . . . . . . . . . . . . . . . . . . . . . . . . . . . . . . . . . . . . . . . . . . . . . . . . . . . . . . . . . . . . . . .21
Customer Service and Spare Parts . . . . . . . . . . . . . . . . . . . . . . . . . . . . . . . . . . . . . . . . . . . . . . . . . . . . . . . . .22
Technical Specifications . . . . . . . . . . . . . . . . . . . . . . . . . . . . . . . . . . . . . . . . . . . . . . . . . . . . . . . . . . . . . . . . .22
Installation Positioning . . . . . . . . . . . . . . . . . . . . . . . . . . . . . . . . . . . . . . . . . . . . . . . . . . . . . . . . . . . . . . . . . .22
Electrical connection . . . . . . . . . . . . . . . . . . . . . . . . . . . . . . . . . . . . . . . . . . . . . . . . . . . . . . . . . . . . . . . . . . . .23
Door reversal . . . . . . . . . . . . . . . . . . . . . . . . . . . . . . . . . . . . . . . . . . . . . . . . . . . . . . . . . . . . . . . . . . . . . . . . . .24
Inner door reversal . . . . . . . . . . . . . . . . . . . . . . . . . . . . . . . . . . . . . . . . . . . . . . . . . . . . . . . . . . . . . . . . . . . . .24
Building-in . . . . . . . . . . . . . . . . . . . . . . . . . . . . . . . . . . . . . . . . . . . . . . . . . . . . . . . . . . . . . . . . . . . . . . . . . . . . .24

17
Instructions for the use of the instructions booklet
Notes which are important for your safety or for the proper functioning of the appliance
Supplementary information regarding operation and practical applications of the appliance.
Tips and notes concerning economical and environmentally sound use of the appliance
Use and Control
Before Use
Wait two hours before connecting the
appliance to allow the oil to flow back in the
compressor.
• Before using the appliance for the first time, wash
the interior and all internal accessories with
lukewarm water and some neutral soap so as to
remove the typical smell of a brand-new product,
then dry thoroughly.
Do not use detergents or abrasive
powders, as these will damage the finish.
• Remove safety elements used for transportation.
Disposal
Appliance Packaging Information
• The materials used on this appliance marked with the symbol are recyclable.
>PE<=polyethylene
>PS<=polystyrene
>PP<=polypropylene
All materials are environmentally sound!
Disposal of old Appliances
Information concerning collection schedules or locations can be obtained from your local Council or
Environmental Health Office.
Refrigerator compartment
Starting the appliance
• Insert the plug into the wall socket and turn the
thermostat knob clockwise beyond position «O»
(OFF).
• Turn the thermostat control to the required setting.
Temperature Control
• The thermostat control situated inside the fridge
compartment regulates the temperature of the
appliance.
• It allows you to adjust the temperature inside the
refrigerator according to use and external
conditions.
• Setting „1“ = hightest temperature, warmest
setting
• Setting „6“ = lowest temperature, coldest
setting.
• Setting „0“ = Off
A medium setting is generally the most suitable.
Internal Parts
Storage shelves
• The shelves can be removed for cleaning.
• To permit storage of food packages of various
sizes, the shelves can be placed at different
heights.
• To remove the internal shelf pull forward until it can
be tipped up or down and removed.
• Please do the same in reverse to insert the shelf at
a different height.
• For better use of space, the front half-shelves can
lie over the rear ones.

18
Variable door interior
• To permit storage of food packages of various
sizes, the central door shelf can be adjusted in
height.
• Gradually pull the shelf in the direction of the
arrows until it comes free, then reposition as
required.
• For more thorough cleaning, the top and bottom
door sheves can be removed by pulling them in the
direction of the arrows, then refitting them in
position.
Bottle holder
• Place the bottles (with the opening facing front) in
the pre-positioned shelf.
If the shelf is positioned horizontally, place only
closed bottles.
• This bottle holder shelf can be tilted in order to
store previously opened bottles.
To obtain this result, pull the shelf up so it can
rotate upwards and be placed on the next higher
level.
The glass shelf above the vegetable drawers
and the bottle shelf should always remain in
position, to ensure correct air circulation.
Explanation of the cold zone signs
The symbol shown here on the left indicates
the coldest point inside your refrigerator.
Coldest area
: below or equal to +4°C
Meat, poultry, fish, cold cuts, ready-to-eat meals,
mixed salads, egg or cream based mixes and cakes,
fresh pasta, cake mixes, pizzas/quiches, fresh foods
and fresh-milk cheeses, vegetables ready to be used
and packed in plastic bags and all other fresh foods
whose expiry date is associated with a preservation
temperature below or equal to +4°C.
D338
PRXXX

19
Temperatur indicator
Thermostat must be adjusted Right Temperature
With the temperature indicator you can keep a check
that your refrigerator is working properly.
The indicator shows the "OK" symbol when the
coldest area reaches a temperature that is below or
equal to 4°C.
If the temperature is higher than 4°C the indicator is
black so you must adjust the thermostat to make the
temperature drop.
ATTENTION: Keeping the refrigerator door open for
a long time will cause the internal temperature to
rise. To measure the temperature correctly, it should
be read on the indicator within 30 seconds.
Hints for refrigeration
• Do not store warm food or evaporating liquids in
the refrigerator and do cover or wrap up the food,
particularly if it has a strong smell.
To help you use your refrigerator correctly, here are
some useful hints:
• Raw meat (beef, pork, lamb & poultry): wrap in
polythene bags and place on top of the salad
compartment, this being the coldest spot in the
refrigerator.
Meat can only be stored safely in this way for
one or two days at the most.
• Cooked food, cold cuts, jelly, etc.: these should
be well covered and can be stored on any of the
glass shelves.
• Fruit & vegetables: these should be thoroughly
cleaned and placed in the bottom drawer.
• Butter & cheese: these should be placed in
special airtight containers or wrapped in aluminium
foil or polythene bags to keep out as much air as
possible.
• Milk bottles: these should have a top and should
be stored in the bottle rack on the door.
Bananas, potatoes, onions and garlic, if not
packed, must not be kept in the refrigerator.
Freezer compartment
Temperature Control
• To freeze fresh foods it is not necessary to change
the setting of the thermostat knob.
• For a quicker freezing operation, turn the
thermostat knob to the coldest setting; but
remember that, in this condition, the refrigerator
compartment temperature might drop below 0°C. If
this occurs reset thermostat knob to a warmer
setting.
• At the first starting-up or after a period out of use,
before putting the products in the compartment, let
the appliance run for at least two hours on the
coldest setting, then turn the thermostat knob to
the normal operating position.
Interior Accessories
Ice-cube production
This appliance is equipped with one or more trays for
the production of ice-cubes.
Fill these trays with water, then put them in the
freezer compartment.
Do not use metallic instruments to remove
the trays from the freezer.
Hints
Saving Energy
• Pay careful attention to where the cabinet is
placed. See the section “Installation”. When
installed correctly the cabinet will consume less
energy.
• Try to avoid keeping the doors open for long
periods or opening the doors too frequently as
warm air will enter the cabinet and cause the
compressor to switch on unnecessarily often.
• If the ambient temperature is high, the thermostat
knob is on the coldest setting (higher numbers) and
the appliance is fully loaded, the compressor may
run continuously, causing frost or ice to form on the
evaporator. If this happens, turn the knob to a
warmer setting (lower numbers) to allow automatic
defrosting and so a saving in electricity
consumption.
• Do not place warm foods inside the appliance.
Allow warm foods to cool first.
• Put frozen food in the fridge to defrost. The cold in
the frozen food will then be used to cool the fridge.
• Keep the heat emitting condenser, the metall grille
on the rear wall of your appliance, always clean.
OK

20
Maintenance
Unplug the appliance before carrying out
any maintenance operation.
Warning
This appliance contains hydrocarbons in its
cooling unit maintenance and recharging must
therefore only be carried out by authorised
technicians.
Defrosting
Refrigerator compartment
• Defrosting the refrigerator compartment is
automatic. The defrost water drains out through a
trough into a container at the back of the appliance,
above the motor compressor, where it evaporates.
• It is important to periodically clean the defrost
water drain hole.
D037
Prooceed as follows:
• Remove any stored food, wrap it in several layers
of newspaper and put it in a cool place.
• Pull out the plug from the wall socket or turn the
thermostat knob to the «O» setting.
• Leave the door open.
• When defrosting is completed, dry the interior
thoroughly.
• Turn the thermostat knob back to the required
setting or replace the plug in the power socket.
• Reload the previously removed food into the
compartment.
Never use sharp metal tools to scrape off
frost from the evaporator as you could
damage it.
Do not use a mechanical device or any
artificial means to speed up the thawing
process other than those recommended by
the manufacturer.
Hints
Freezing of fresh food and storage of frozen food
• Prepare food in small portions to enable it to be
rapidly and completely frozen and to make it
possible subsequently to thaw only the quantity
required.
• Wrap up the food in aluminium foil or polythene
and make sure that the packages are airtight.
• Do not allow fresh, unfrozen food to touch food
which is already frozen, thus avoiding a rise in
temperature of the latter.
• Do not touch frozen food with wet hands. Your
hands could stick to the food and cause skin
abrasions.
• It is advisable to show the freezing-in date on each
individual pack to enable you to keep tab of the
storage time.
• Be sure that frozen foodstuffs are transferred from
the foodstore to the freezer in the shortest possible
time.
• Do not put carbonated liquids (fizzy drinks,
etc.) in the freezing compartment as they may
burst.
• Once defrosted, food deteriorates rapidly and
cannot be refrozen.
Freezer compartment
• Remove the frost with a plastic scraper.
• Whenever the thickness of the frost exceeds 5 mm
complete defrosting should be carried out.

21
Cleaning
Never use metal objects for cleaning your
appliance as it may get damaged.
NEVER use detergents, abrasive powders,
highly perfumed cleaning products or wax
polishes to clean the interior as these will
damage the surface and leave a strong
odour.
Clean the inside with warm water and bicarbonate of
soda. Rinse and dry thoroughly.
To guarantee a safe operation of the fridge, once a
year remove the ventilation grille at the base and
clean the air channels with a vacuum cleaner.
When the appliance is not in use
Disconnect the appliance from the electricity supply.
Empty all foods and clean the appliance, leaving the
doors ajar to prevent unpleasant smells.
Changing the light bulb
• Should the interior light fail to work, first switch off
the appliance and disconnect from the electricity
supply, then replace the bulb as follows:
1. unscrew the light cover securing screws.
2. unhook the moving part by pressing it as shown
in the figure.
3. Replace the bulb by other with another with the
same charcteristics.
D411
Something not Working
Problems may be due to causes which can easily be solved before calling the Technical Service. Please
follow these instructions:
Weight surpasses the storage limit of the door shelf so spread weight more evenly or
take some products out.
The appliance is not properly installed. Please look in the “Building-in” section.
Set a lower temperature.
Distribute the food products to allow cold air to circulate around them.
Make sure that the door is completely closed and that the insulating strip is complete
and clean.
The temperature where the cabinet is placed is above normal room temperature.
Set a warmer temperature.
Turn the thermostat knob to a lower number.
The temperature where the cabinet is placed is above normal room temperature.
Check that the ventilation is sufficient and that the ventilation openings are
unobstructed.
The cause could be the introduction of large quantities of food and/or frequent
opening/closing of the door.
Sometimes is normal. During automatic defrosting frost thaws on the cooling plate.
Place the drain hose at the back of the cabinet above the drain bowl.
Sometimes this is normal. Temperature control may cause clicking sounds when the
system is connected or disconnected.
The injected cooling gas may produce a gurgling sound while passing through the
tubes.
The motor may cause a humming noise and/or slight bumping.
The insulation material used has a tendency to slighly increase noise levels, how ever it
allows for much better insulation and a lower energy consumption.
Door does not close
It is too warm inside the refrigerator
It is too cold inside the refrigerator.
The compressor works continuously.
There is water inside/outside the refrigerator.
Water comes out on the floor.
Noises
SYMPTOM SOLUTION

22
Installation
Take utmost care when handling your
appliance so as not to cause any damages to
the cooling unit with consequent possible fluid
leakages.
• During normal operation, the condenser and
compressor at the back of the appliance heat up
considerably. Always ensure that there is adequate
ventilation as a failure to do this will result in
component failure and possible food loss. See
installation instructions.
• Important: if the supply cord is damaged, it must
be replaced by a special cord or assembly availa-
ble from the manufacturer or its service agent.
Positioning
• Unpack the cabinet and check that it is in good
condition and free of any transport damage.
• Place the refrigerator away from direct sunlight and
heat sources.
• Avoid prolonged exposure of the appliance to
direct sunlight.
• For safety reasons, minimum ventilation must be
as shown in Fig.
Attention: keep ventilation openings clear of
obstruction.
50 mm
min.
200 cm
2
200 cm
2
min.
D526
Technical specifications
The technical data is indicated in the rating plate on the left side inside the appliance.
If there is a power failure when food is in the freezer, do not open the door of the freezer
compartment. The frozen food will not be affected if the power cut is of short duration (up to 12
hours) and the freezer compartment is full, otherwise, it is recommended that the food should be
used within a short time (a temperature increase of the frozen food shortens its safe storage
period).
This information can be found on the rating plate
inside the cabenit on the left hand wall. We
recommend that you enter this information here, so
that it is handy if needed.
If you cannot find the remedy for a malfunction in
these operating instructions, please contact your
dealer or our customer service department and
consult the Guarantee card.
Selective ordering of replacement parts can save
unnecessary travel and costs.
For this reason always provide the following
appliance information:
• Model Name
• Model Number (PNC)
• Serial Number (S-No.)
Customer service and spare parts
• It is necessary that the niche is provided with a
conduct of venti-lation having the following
dimensions:
Depth 50 mm
Width 540 mm
The climate classification can be found on the rating
plate, which is located inside the cabinet on the left
hand wall.

23
The following table shows which ambient
temperature is correct for each climate classification:
Climate
classification
SN +10 to +32°C
+16 to +32°C
+16 to +38°C
+16 to +43°C
N
ST
T
for an ambient temperature of
When the ambient temperature is not included
within the range indicated for the class of this
appliance, the storage temperature in the
appliance cannot be guaranteed; therefore it is
advisable to use the food stored as soon as
possible.
Electrical connection
Before plugging in, ensure that the voltage and
frequency shown on the serial number plate
correspond to your domestic power supply.
Voltage can vary by ±6% of the rated voltage.
For operation with different voltages, a suitably sized
auto-transformer must be used.
Important
The appliance must be earthed.
The power supply cable plug is provided with a
contact for this purpose.
If the domestic power supply socket is not
earthed. connect the appliance to a separate
earth in compliance with current regulations,
consulting a specialist technician.
The Manufacturer declines all
responsibility if the above safety
precautions are not observed.
This appliance complies with the following E.E.C.
Directives:
- 87/308 EEC of 2/6/87 relative to radio
interference suppression.
- 73/23 EEC of 19.2.73 (Low Voltage
Directive)
and subsequent modifications.
- 89/336 EEC of 3.5.89 (Electromagnetic
Compatibility Directive) and subsequent
modifications.
Attention!
It must
be possible to disconnect the appliance
from the mains power supply; the plug must
therefore be easily accessible after installation.
Inner door reversal
180°

24
Dimensions of the recess
Building-in
50
1219
1233
530
Door reversal
After reversing the door, make sure the
magnetic seal adheres to the cabinet. If the
room temperature is cold (e.g. in winter ), the
seal may not adhere perfectly to the cabinet.
In this case, wait until the seal has softened on
its own or speed up the process by warming
the relevant part with a normal hair-dryer.
TAW1MERA
TAW2MERA
TAW3MERA
It is necessary that the niche is provided with a
conduct of ventilation having the following
dimensions:
Depth 50 mm
Width 540 mm

25
Compartment levelling
100
90°
90°
MAU2ME
1BL80R
Door removal
The following assembly steps only apply for doors
with rabbet on the right side (supply status). If the
door rabbet is provided for on the left side, please
carry out the relevant assembly steps on the
opposite side.
FAL1MERA
1. Make the adjustments.
Kit

26
FAL2MERA
2. Cut the side trim (E).
3. Apply the side trim (E).
FAL3MERA
4. Insert the appliance.
5. Fix the appliance.
GF1MERA
6. Apply the hole covers.
SAB1ME
7. Fit the decorative panel.
PL12
PL09

27
8. Fitting the handle.
9. Refit the door.
TE1MERA
10. Door alignment (if necessary).
DEC3MERA
M

Het is uiterst belangrijk dat de bij het apparaat
behorende gebruiksaanwijzing bewaard blijft.
Zou het apparaat door u aan iemand anders
gegeven of verkocht worden, of zou het apparaat
in het huis van waaruit u verhuist achterblijven,
dan dient de nieuwe gebruik(st)er over de
gebruiksaanwijzing en de daarin opgenomen
waarschuwingen te kunnen beschikken.
Indien dit apparaat in de plaats van een oud
model met haak- of veersluiting opgesteld wordt,
dan is het raadzaam de sluiting van het oude
apparaat, dat terzijde gezet wordt, onbruikbaar te
maken.
Deze waarschuwingen zijn bedoeld voor uw en
andermans veiligheid. U wordt geacht ze gelezen
te hebben, alvorens u het apparaat installeert
en/of in gebruik neemt.
uitsluitend door een daartoe bevoegd persoon
uitgevoerd worden. Het betreffende stopcontact
dient, ook na eventuele onder- of inbouw,
gemakkelijk bereikbaar te zijn. Werkzaamheden
die door personen zonder de noodzakelijke kennis
uitgevoerd worden, kunnen schade of letsel tot
gevolg hebben.
•
Laat inspectie- en/of herstelwerkzaamheden
uitvoeren door een erkend servicecentrum en laat
geen andere dan originele onderdelen plaatsen.
•
Dit apparaat bevat koolwaterstoffen in de
koudekringloop; het onderhoud en het bijvullen
dient daarom uitsluitend door door het bedrijf
aangewezen deskundig personeel uitgevoerd te
worden.
• Tracht, in geval van storing of een defect, dit
apparaat niet zelf te repareren. Reparaties welke
door niet-deskundige personen uitgevoerd worden,
kunnen tot schade of letsel leiden. Raadpleeg het
plaatselijke servicecentrum en vraag altijd om
originele reserveonderdelen.
Gebruik
• Huishoudelijke koel- en/of vriesapparaten zijn
uitsluitend bedoeld voor het bewaren en/of
invriezen van eet- of drinkbare producten.
• Volg de raadgevingen van de fabrikant op met
betrekking tot waar en hoe u spijzen en dranken
bewaart of invriest. Ontdooide diepvriesproducten
mogen, om gezondheidsredenen, niet wederom
ingevroren worden.
• De vriezende binnenwanden of -vlakken in het
apparaat bevatten koelmiddel. Plaats geen
scherpe voorwerpen tegen zo’n wand of vlak en
schraap evenmin met metalen voorwerpen rijp of
ijs af. Lekkage kan het gevolg zijn, hetgeen een
onherstelbare schade aan het apparaat en bederf
van de levensmiddelen veroorzaakt.
• Geen voorwerpen of methodes gebruiken om het
ontdooiproces te versnellen die niet door de
fabrikant zijn aangegeven.
• Nooit metalen voorwerpen gebruiken om het
apparaat schoon te maken; dit zou het apparaat
kunnen beschadigen.
• Plaats geen koolzuurhoudende of mousserende
dranken in het vriesvak, het vriesgedeelte of de
vriezer; de blikjes of flesjes kunnen door bevriezing
van de inhoud exploderen.
Installatie
• Overtuig u er van dat het apparaat niet op het
aansluitsnoer staat.
• Plaats het apparaat met z’n achterkant zo dicht
mogelijk bij een muur. Hiermee voorkomt u
verbrandingsletsel door aanraking van hete tot
zeer hete delen.
28
Veiligheid
Algemene veiligheid
•
Dit apparaat is niet bedoeld voor gebruik door
kinderen, personen met verminderde lichamelijke,
zintuigelijke of geestelijke capaciteiten of een
gebrek aan kennis en ervaring, tenzij er toezicht is
ingesteld door de persoon die verantwoordelijk is
voor hun veiligheid of tenzij zij van deze persoon
instructies hebben gekregen over het gebruik.
Laat kinderen niet zonder toezicht in de buurt van
het apparaat.
•Het is gevaarlijk om, in welke vorm
dan ook, dit apparaat of de eigenschappen
daarvan te veranderen.
• Neem vóór u aan ontdooien, schoonmaak-
werkzaamheden of het verwisselen van het,
eventueel aanwezige, verlichtingslampje begint
altijd de stekker uit het stopcontact.
• Dit apparaat is zwaar. Delen van randen aan
achter- en onderkant kunnen scherp zijn. Wees
voorzichtig bij het tillen.
• Plaats NOOIT explosieve stoffen in het apparaat,
zoals gasvullingen, benzine, ether, aceton
enzovoorts.
• Het direct vanuit een vriesvak, vriesgedeelte of
vriezer consumeren van ijslollies en dergelijke, kan
verbranding van de mondhuid tot gevolg hebben;
wacht even.
AFDANKEN. Verwijder de deur(en) of het deksel en
knip het aansluitsnoer af, zodat, in afwachting van
wegbrengen of weghalen, spelende kinderen er zich
niet in op kunnen sluiten of aan een elektrische
schok bloot kunnen staan.
• Plaats nooit elektrische apparaten (bijv.
ijsmachines) in de kast.
Onderhoud / Reparatie
•
Een eventueel noodzakelijke wijziging aan de
elektrische huisinstallatie of het aansluitsnoer, ten
behoeve van de installatie van dit apparaat, mag

29
Weggooien
Informatie over de verpakking van het apparaat
• De materialen in dit apparaat die voorzien zijn van het symbool zijn geschikt voor recycling.
>PE<=polyethyleen
>PS<=schuimpolystyrol
>PP<=polypropyleen
Alle gebruikte materialen zijn niet schadelijk voor het milieu!
Weggooien van oude apparaten
Informatie over afhaaltijden of inzamelplaatsen zijn te verkrijgen bij de plaatselijke reinigingsdienst of het
gemeentehuis.
Inhoud
Veiligheid . . . . . . . . . . . . . . . . . . . . . . . . . . . . . . . . . . . . . . . . . . . . . . . . . . . . . . . . . . . . . . . . . . . . . . . . . . . . .28
Veggooien . . . . . . . . . . . . . . . . . . . . . . . . . . . . . . . . . . . . . . . . . . . . . . . . . . . . . . . . . . . . . . . . . . . . . . . . . . . . .29
Gebruik Voor ingebruikname / Koelruimte - Ingebruikname / Instellen van de temperatuur / Interieur . . . . . .30
Uitleg van de symbolische tekens van het koude gebied . . . . . . . . . . . . . . . . . . . . . . . . . . . . . . . . . . . . . . . .31
Koelruimte - Tips / Vrieslruimte - Instellen van de temperatuur / Interieur / Tips . . . . . . . . . . . . . . . . . . . . . . .32
Onderhoud Ontdooien / Schoonmaken . . . . . . . . . . . . . . . . . . . . . . . . . . . . . . . . . . . . . . . . . . . . . . . . . . . . . .33
Vervangen van de lamp . . . . . . . . . . . . . . . . . . . . . . . . . . . . . . . . . . . . . . . . . . . . . . . . . . . . . . . . . . . . . . . . .34
Storingen . . . . . . . . . . . . . . . . . . . . . . . . . . . . . . . . . . . . . . . . . . . . . . . . . . . . . . . . . . . . . . . . . . . . . . . . . . . . . . . . . . . . .34
Klantenservice . . . . . . . . . . . . . . . . . . . . . . . . . . . . . . . . . . . . . . . . . . . . . . . . . . . . . . . . . . . . . . . . . . . . . . . . .34
Technische gegevens . . . . . . . . . . . . . . . . . . . . . . . . . . . . . . . . . . . . . . . . . . . . . . . . . . . . . . . . . . . . . . . . . . .34
Installatie Plaats van opstelling / Elektrische aansluiting . . . . . . . . . . . . . . . . . . . . . . . . . . . . . . . . . . . . . . . . .35
Wijzigen van de deurdraairichting Wijzigen van de draairichting van het vriesvakdeurtje . . . . . . . . . . . . . .36
Inbouw . . . . . . . . . . . . . . . . . . . . . . . . . . . . . . . . . . . . . . . . . . . . . . . . . . . . . . . . . . . . . . . . . . . . . . . . . . . . . . .37
Milieubescherming
• Het koelsysteem en het isolatiemateriaal van dit
apparaat bevatten geen koelgassen die schadelijk
zijn voor de ozonlaag. Het apparaat mag niet
worden afgevoerd met het huisvuil of op de
schroothoop om beschadiging van het koelsysteem
te voorkomen met name aan de achterzijde van
het apparaat. Neem contact op met uw
gemeentehuis om te weten te komen op welke
manier u dit soort apparaten kunt afvoeren.
De materialen gebruikt voor dit apparaat en
geïdentificeerd met dit symbool zijn recycleerbaar.
Weggooien van oude apparaten
Het symbool op het product of op de
verpakking wijst erop dat dit product niet als
huishoudafval mag worden behandeld. Het moet
echter naar een plaats worden gebracht waar
elektrische en elektronische apparatuur wordt
gerecycled. Als u ervoor zorgt dat dit product op de
correcte manier wordt verwijderd, voorkomt u
mogelijk voor mens en milieu negatieve gevolgen die
zich zouden
kunnen voordoen in geval van verkeerde
afvalbehandeling. Voor meer details in verband met
het recyclen van dit product, neemt u het best
contact op met de gemeentelijke instanties, het
bedrijf of de dienst belast met de verwijdering van
huishoudafval of de winkel waar u het product hebt
gekocht.

30
Gebruik
Interieur
Legvlakken
• De legvlakken zijn in hoogte verstelbaar.
• Daartoe het legvlak zover naar voren trekken tot
het naar boven of onderen bewogen kan worden
en eruit gehaald kan worden.
• Om de legvlakken op een andere hoogte te zetten
in omgekeerde volgorde te werk gaan.
• Om de ruimte beter te benutten, bij sommige
modellen, kunt u de voorste platen over de
achterste plaatsen.
Het legvlak boven de groentelade en het
flessenrek moeten altijd op hun plek blijven om
een goede luchtcirculatie te waarborgen.
Flessenrek
• Flessen met de flessenhals naar voren in het vak
leggen.
Attentie! Alleen ongeopende flessen horizontaal
neerleggen.
• Om aangebroken flessen op te bergen kan het
flessenrek schuin opgesteld worden.
Voor ingebruikname
Wacht, na het plaatsen van het apparaat, ten
minste twee uuren alvorens de stekker in het
stopcontact te steken. Daarmee geeft u de olie
de gelegenheid in de compressor terug te
vloeien.
• Voor u de kast in gebruik neemt, dient u de
binnenkant met lauw water en een neutraal
schoonmaakmiddel te reinigen om de typische
geur van een nieuw apparaat weg te nemen.
Droog vervolgens de wanden goed af.
Gebruik geen schurende
schoonmaakmiddelen, waarmee u de
afwerkingen van het apparaat zou kunnen
beschadigen.
Het apparaat en onderdelen van het interieur zijn
voor het transport beschermd.
Plakband links en rechts aan de buitenkant van de
deur verwijderen. Alle plakband en bekledingsdelen
uit het interieur verwijderen.
Koelruimte
Ingebruikname
• Steek de stekker in het stopcontact.
Open de deur en draai de thermostaatknop,
rechtsom uit de stand «O» (STOP-stand).
• De koelkast is nu in werking. De werking van de
kast kan geheel gestopt worden door de knop in de
stand «O» te draaien.
Instellen van de temperatuur
• De temperatuurregelaar bevindt zich in de
koelruimte rechts boven.
• Bij het instellen van de juiste stand dient u er
rekening mee te houden dat de temperatuur in het
apparaat afhankelijk is van:
• de kamertemperatuur;
• de frequentie waarmee de deuren geopend
worden;
• de hoeveelheid levensmiddelen in de kast;
• de plaats van het apparaat.
• De temperatuur wordt automatisch geregeld.
• Stand „1“ = warmste binnentenperatuur
• Stand „6“ = koudste binnentenperatuur
• Stand „0“ = koeling uit
Wij adviseren u de knop aanvankelijk op de
middenstand te draaien.
D338

31
• Trek daartoe het flessenrek zover naar voren tot het
naar boven gedraaid kan worden en schuif dan het
voorste vak in het volgend hogere niveau.
Uitleg van de symbolische tekens
van het koude gebied
Het symbool hiernaast duidt de plaats aan
van het koudste gedeelte van ijskast.
Koudste gebied
: lager of gelijk aan +4°C
Vlees, pluimvee, vis, vleeswaren, kant en klare
gerechten, gemengde salades, gerechten en gebak
gemaakt van eieren of slagroom, verse pasta,
taartdeeg, pizza/quiche, verse producten en kaas
gemaakt van verse melk, groenten klaar voor gebruik
verpakt in plastic zakjes en meer in het algemeen
alle verse producten, waarvan de vervaldatum in
verband staat met een conserveringtemperatuur die
lager is dan of gelijk aan +4°C.
T
emperatuuraanduiding
Thermostaat die afgesteld moet worden
Goede temperatuur
De temperatuuraanduiding maakt het mogelijk de
goede werking van uw ijskast te controleren.
Op de aanduiding verschijnt het opschrift "OK",
wanneer het koudste gebied een temperatuur bereikt
die lager is dan, of gelijk aan 4°C.
Indien de temperatuur hoger is dan 4°C blijft de
aanduiding zwart. De gebruiker dient de temperatuur
van de ijskast in dit geval dus te verlagen door de
thermostaat af te stellen.
LET OP: Als de deur van de ijskast lang open blijft
staan, wordt de interne temperatuur verhoogd. Om
de temperatuur op de juiste manier te meten, dient
de aanduiding binnen 30 seconden afgelezen te
worden.
OK
Deurvakken
• De ruimte tussen de centraal deurvakken kan naar
behoefte aangepast worden.
• Trek het vak geleidelijk naar de door de pijlen
aangegeven richting totdat het loskomt.
• Verplaats daarna het vak naar de gewenste
hoogte.
Voor een goede schoonmaakbeurt kan het bovenste
deurvakje verwijderd worden door het te schuiven,
waarna het weer op zijn plaats gezet wordt.
PRXXX

32
Vriesruimte
Instellen van de temperatuur
• Voor het invriezen kunt u de thermostaatknop op
de gebruikelijke stand laten staan.
• Wilt u sneller invriezen, dan dient u de
thermostaatknop op de koudste stand te draaien.
In deze stand kan de temperatuur in het koelvak
echter beneden 0°C dalen. In dat geval dient u de
knop op een minder koude stand te draaien.
• Indien u de koelkast voor het eerst in gebruik
neemt of weer gebruikt na een periode van
stilstand, dient u de thermostaatknop op de
koudste stand te draaien. Plaats vervolgens de
diepvriesproducten na twee uur in de kast en draai
de thermostaat terug naar de gebruikelijke stand.
Koelen
• Plaats geen warme of dampende spijzen of
dranken in de koelruimte.
• Dek vooral sterk geurend voedsel af of verpak het.
• Plaats de levensmiddelen zo, dat de lucht vrij
eromheen kan circuleren.
Enkele praktische tips:
• Vlees (alle soorten): wordt in plastic zakjes op de
glazen plaat boven de groentelade geplaatst.
Bewaar vlees niet langer dan één of twee
dagen.
• Gekookt voedsel, koude schotels enz.: kunnen,
goed afgedekt, op elk legvlak geplaatst worden.
• Fruit en groente: worden schoongemaakt in de
groentelade(n) gelegd.
• Boter en kaas: worden, om blootstelling aan de
lucht te voorkomen, in speciale koeldozen bewaard
of in plastic- of aluminiumfolie verpakt.
• Flessen melk: worden, goed gesloten, in het
flessenrek geplaatst.
Bewaar niet-luchtdicht verpakte bananen,
aardappelen, uien of knoflook niet in de
koelkast.
Interieur
IJslaatjes
Bij het apparaat worden 1 of meerdere ijslaatjes voor
het maken van ijsblokjes geleverd. Vul ze met
drinkwater en plaats ze in het vriesvak.
Gebruik geen metalen voorwerpen om de
laatjes los te wrikken.
Tips
Invriezen en bewaren
• Verdeel de levensmiddelen in handzame porties .
Deze vriezen sneller in en bij later gebruik hoeft u
slechts de benodigde hoeveelheid te ontdooien.
• Verpak de levensmiddelen in aluminium- of
kunststoffolie. Sluit de pakjes goed en luchtdicht af.
• Zorg ervoor dat in te vriezen pakjes niet in
aanraking komen met reeds ingevroren producten;
de temperatuur van deze laatste zou daardoor
kunnen stijgen.
• Vermijd rechtstreekse consumptie van ijslollies uit
het vriesvak; u zou uw mondhuid kunnen
verbranden.
• Schrijf de invriesdatum op de pakjes zodat u de
houdbaarheidsduur kunt controleren.
• Breng de diepvriesproducten na aankoop zo snel
mogelijk over naar het vriesvak; open de deur altijd
zo weinig en zo kort mogelijk.
• Plaats geen koolzuurhoudende of mousserende
dranken in het vriesvak; de blikjes of flessen
zouden kunnen ontploffen.
• Onthoud dat reeds ontdooide levensmiddelen niet
wederom ingevroren mogen worden.
Tips
Energie besparen
• Het apparaat niet in de buurt van kachels,
verwarmingselementen of andere warmtebronnen
plaatsen. Bij een hoge omgevingstemperatuur
werkt de compressor vaker en langer. Zie
hoofdstuk “Plaats van opstelling”.
• Deur slechts zo lang open laten als nodig is.
• Het kan voorkomen dat, indien de thermostaatknop
in de koudste stand gedraaid is, bijvoorbeeld ten
gevolge van zeer warme omgevingstemperatuur of
het snel willen koelen van grote hoeveelheden
dranken, de compressor continu loopt, waardoor
automatische ontdooiing van de koelverdamper
niet plaatsvindt en zich daarop ijs afzet. Draai, in
dat geval, de thermostaatknop naar een wat
minder koude stand, zodat automatische
ontdooiing kan plaatsvinden; hierdoor spaart u
tevens energie.
• Geen warme spijzen in het apparaat zetten.
Warme spijzen eerst laten afkoelen.
• De temperatuur niet lager dan nodig instellen.
• Diepvriesartikelen voor het ontdooien in de
koelruimte leggen. De koude in de
diepvriesartikelen wordt zo voor koeling van de
koelruimte gebruikt.
• Houd de warmte afgevende verdamper, het
metalen rooster aan de achterzijde van het
apparaat, schoon.

33
Onderhoud
Neem voor iedere handeling altijd eerst de
stekker uit het stopcontact.
Belangrijk
Dit apparaat bevat koolwaterstoffen in het
koelcircuit; onderhoud en bijvulling dient
daarom uitsluitend door door de fabrikant
bevoegd personeel uitgevoerd te worden.
Ontdooien
Koelruimte
• Het ontdooien van de koelkast heeft automatisch
plaats elke keer dat de compressor stopt. Het
dooiwater wordt via een afvoerkanaaltje
opgevangen in een bakje dat zich aan de
achterkant van het apparaat boven de compressor
bevindt. Hier verdampt het water.
• Wij raden u aan het gaatje in het afvoerkanaal
regelmatig schoon te maken, om te voorkomen dat
het dooiwater de levensmiddelen nat maakt.
Gebruik voor het doorprikken het staafje dat zich in
het gaatje bevindt.
D037
Vriesruimte
• In het vriesvak dient u de rijp te verwijderen,
wanneer deze een laag van circa 5 mm vormt.
Gebruik hiervoor de meegeleverde plastic spatel.
Ga als volgt te werk:
• Omwikkel de levensmiddelen met meerdere
kranten en bewaar ze op een koele plaats.
• Draai de thermostaatknop op «O» of trek de
stekker uit het stopcontact.
• Laat de deur openstaan.
• Droog na het ontdooien het vriesvak zorgvuldig.
• Draai de thermostaatknop in de gewenste stand of
steek de stekker weer in het stopcontact.
Gebruik voor het verwijderen van de rijp
nooit metalen voorwerpen; u zou uw
koelkast kunnen beschadigen.
Geen voorwerpen of methodes gebruiken
om het ontdooiproces te versnellen die niet
door de fabrikant zijn aangegeven.
Schoonmaken
Geen schurende schoonmaakmiddelen
gebruiken.
Nooit metalen voorwerpen gebruiken om
het apparaat schoon te maken; dit zou het
apparaat kunnen beschadigen.
Naar behoefte kunt u de buitenkant van de kast
lappen met lauwwarm water en een neutraal
huishoudschoonmaakmiddel, daarna afnemen met
schoon water.
Het verdient aanbeveling de buitenkant af en toe in
de witte (auto-) was te zetten.
Opdat de koelkast zo goed mogelijk werkt, één keer
per jaar het rooster van het voetstuk verwijderen en
de ventilatiekanalen schoonmaken met een borstel
of stofzuiger met borstel.
Stof belemmert de warmte-afgifte en verhoogt
zodoende het energieverbruik.
Tijdelijk buiten gebruik stellen
• Trek de stekker uit het stopcontact, verwijder dan
alle resterende levensmiddelen en maak de
binnenkant goed schoon (zie “Voor
ingebruikname”).
• Laat de deur op een kier staan.

34
Vervangen van de lamp
Voor het vervangen van de lamp het apparaat
uitzetten en de stekker uit het stopcontact trekken.
Het lampje van de koelkast is op de volgende wijze
bereikbaar:
1. Schroef het afschermkapje los.
2. Verwijder het losse deel door er lichte druk op uit
te oefenen (zie afbeelding).
3. Vervang het lampje dan door een lampje met
hetzelfde vermogen. Het vermogen is op het
afschermkapje aangegeven.
D411
Storingen
Indien de koelkast niet functioneert, controleer dan onderstaande punten, voordat u contact opneemt met onze
service-afdeling:
Storing Oplossing
Temperatuur in het apparaat is te hoog
Apparaat koelt te sterk.
Het koelaggregaat werkt continu
Water op de bodem van de koelruimte of op de
legvlakken.
Geluiden
Temperatuur is niet juist ingesteld. Zie hoofdstuk “Instellen van de temperatuur”.
Plaats de levensmiddelen zo, dat de lucht vrij eromheen kan circuleren.
Omgevingstemperatuur te hoog.
Temperatuur is niet juist ingesteld. Zie hoofdstuk “Instellen van de temperatuur”.
Draai de thermostaatknop naar een lager cijfer.
Omgevingstemperatuur te hoog.
In de laatste 24 uur zijn grotere hoeveelheden warme levensmiddelen opgeslagen.
Deur slechts zo lang open laten als nodig is.
Dooiwaterafvoer is verstopt. Gebruik voor het doorprikken het staafje dat zich in het
gaatje bevindt.
Geluiden zijn karakteristiek voor koelapparaten.
Wanneer het koelmiddel door smalle leidingen stroomt, hoort u een gebubbel of
gegorgel.
Zodra de compressor functioneert, hoort u gezoem. Elke keer als de compressor in- of
uitgeschakeld wordt, hoort u een klik.
Klantenservice
Kunt u de storing niet zelf lokaliseren en verhelpen,
raadpleeg dan onze service-afdeling.
Vermeld de volgende gegevens van het apparaat:
• Modelnaam
• Productnummer (PNC)
• Productienummer (S-No.)
Deze gegevens vindt u op het garantiebewijs of op
het typeplaatje dat zich linksonder aan de
binnenzijde van het apparaat bevindt.
Aanbevolen wordt deze gegevens hier in te vullen
om ze snel bij de hand te hebben.
Technische gegevens
Het typeplaatje met de technische gegevens vindt u aan de linker binnenzijde van het apparaat.
Belangrijk
Open de vriesvakdeur niet tijdens stroomuitval. Wij adviseren u om na een stroomuitval de
diepvriesproducten in korte tijd te consumeren (een temperatuurstijging verkort de
houdbaarheidsduur van de producten). De normale houdbaarheid wordt niet aangetast indien de
stroomuitval kort was (minder dan 12 uur) en het vriesvak vol is.

35
Attentie
Het apparaat moet
van de stroomvoorziening
afgesloten kunnen worden; de stekker moet
dus ook na de installatie bereikbaar blijven.
Installatie
Bij het transport en het opstellen van het
apparaat erop letten dat geen onderdelen van
het koelvloeistofcircuit beschadigd worden.
• Tijdens normaal gebruik worden de condensor en
de compressor die zich op de achterkant van het
apparaat bevinden, warm. Om veiligheidsredenen
moet de ventilatie zodanig zijn als aangegeven in
de speciale afbeelding. Zie hoofdstuk “Plaats van
opstelling”.
• Belangrijk: Als het aansluitsnoer beschadigd
raakt, moet het snoer, eventueel met stekkers,
vervangen worden; deze onderdelen zijn
verkrijgbaar bij onze service-afdeling.
Plaats van opstelling
• Controleer het koelapparaat op transportschade.
• Plaats het apparaat uit de buurt van
warmtebronnen: centrale verwarming, kachels,
felle zonnestralen enz.
• Plaats het apparaat niet in de nabijheid van een
centrale verwarming of een gasfornuis.
• Ten behoeve van een optimale ventilatie moeten
de minimale oppervlakten voor de ventilatie-
openingen volgens figuur in acht genomen worden.
• Attentie: zorg ervoor dat de ventilatie
openingen tijdens gebruik niet worden
afgedekt.
De nis moet tevens voorzien zijn van een luchtkanaal
met de volgende afmetningen:
diepte 50 mm
breedte 540 mm
50 mm
min.
200 cm
2
200 cm
2
min.
D526
De klimaatklasse staat op het typeplaatje dat zich
links aan de binnenkant van het apparaat bevindt.
De volgende tabel geeft aan welke
omgevingstemperatuur bij welke klimaatklasse
behoort:
Klimaatklasse
SN +10 tot +32°C
+16 tot +32°C
+16 tot +38°C
+16 tot +43°C
N
ST
T
voor een
omgevingstemperatuur van
Attentie: u dient niet alleen rekening te houden met
de omgevingstemperatuur voor dit type product maar
tevens met de volgende aanwijzingen: wanneer de
omgevingstemperatuur onder de aangeduide
minimum waarde daalt, wordt de
conserveringstemperatuur in het vriesvak niet meer
gegarandeerd; u kunt de bewaarde levensmiddelen
dan het beste zo snel mogelijk nuttigen.
Elektrische aansluiting
Overtuig u ervan dat de netspanning en de
netfrequentie, die op het typeplaatje in de kast staan
aangegeven, overeenkomen met de netspanning en
de netfrequentie in uw woning.
Een afwijking op de netspanning tot plus of minus
6% is toegestaan.
Bij aansluiting op een andere spanning dient u een
geschikte transformator te gebruiken.
De stekker mag alleen geplaatst worden in
een geaard stopcontact.
De kast is daarom voorzien van een speciaal
drieaderig snoer, geschikt voor een geaard
stopcontact. Mocht het stopcontact in uw
woning niet geaard zijn, dan dient een erkend
installateur het apparaat volgens de geldende
normen te aarden.
Wij wijzen u er op dat schade of letsel,
veroorzaakt door het niet voldoen aan dit
veiligheidsvoorschrift, niet onder de
verantwoordelijkheid van de fabrikant valt.
Dit apparaat voldoet aan de volgende EU-richtlijnen:
- 73/23 EG-richtlijn van 19/02/73
(Laagspanning) en opeenvolgende
wijzigingen;
- 87/308 EG-richtlijn van 2.6.87 met betrekking
tot de radio-ontstoring;
- 89/336 EG-richtlijn van 03/05/89
(Elektromagnetische compatibiliteit) en
opeenvolgende wijzigingen.

36
180°
Wijzigen van de draairichting van het vriesvakdeurtje
Wijzigen van de deurdraairichting
Nadat de draairichting van de deur is
omgedraaid, moet u controleren of de
magnetische pakking goed aansluit op het
meubel. Als de omgevingstemperatuur laag is
(bijv. in de winter), kan het gebeuren dat de
pakking niet perfect aansluit op het meubel.
Wacht in dat geval tot de pakking zich op
natuurlijk wijze herstelt of versnel dit
verwarmingsproces door het betreffende deel
te verwarmen met een normale haardroger.
TAW1MERA
TAW2MERA
TAW3MERA

37
Nismaten
De nis moet tevens voorzien zijn van een luchtkanaal
met de volgende afmetningen:
diepte 50 mm breedte 540 mm
Inbouw
50
1219
1233
530
Kit

38
Waterpas maken van de ruimte waar het apparaat
geplaatst wordt
100
90°
90°
MAU2ME
1BL80R
Demontage van de deur
De volgende montagesequenties zijn alleen
weergegeven voor deuren met de aanslag aan de
rechterkant (staat van aflevering). Indien de aanslag
van de deur zich aan de linkerkant bevindt, dan
verzoeken wij u de montagesequenties op dezelfde
wijze aan de andere kant uit te voeren.
FAL1MERA
1. Maak de aanpassingen.

39
FAL2MERA
FAL3MERA
GF1MERA
SAB1ME
PL12
2. Verwijder de tochtstrip aan de zijkant (E).
3. Bevestig de tochtstrip aan de zijkant (E).
4. Schuif het apparaat op zijn plaats.
5. Bevestig het apparaat.
6. Plaats de gatafdichtingen.
7. Monteer het decoratiepaneel.
PL09

40
9. Bevestiging van de deur .
TE1MERA
10. Uitlijnen van de deur (indien nodig).
8. Bevestiging van de handgreep.
DEC3MERA
M

Sicherheitshinweise . . . . . . . . . . . . . . . . . . . . . . . . . . . . . . . . . . . . . . . . . . . . . . . . . . . . . . . . . . . . . . . . . . . . .41
Entsorgung . . . . . . . . . . . . . . . . . . . . . . . . . . . . . . . . . . . . . . . . . . . . . . . . . . . . . . . . . . . . . . . . . . . . . . . . . . . .42
Gebrauch Vor Inbetriebnahme / Kühlabteil - Inbetriebnhame / Temperaturregelung . . . . . . . . . . . . . . . . . . . .42
Kühlabteilausstattung / Erklärung der Symbole des Kühlraums . . . . . . . . . . . . . . . . . . . . . . . . . . . . . . . . . . .43
Kühlabteil - Tipps / Gefrierabteil - Temperaturregelung / Gefrierabteilausstattung / Tipps . . . . . . . . . . . . . . .44
Gefrierabteil - Tipps . . . . . . . . . . . . . . . . . . . . . . . . . . . . . . . . . . . . . . . . . . . . . . . . . . . . . . . . . . . . . . . . . . . . .44
Wartung Abtauen . . . . . . . . . . . . . . . . . . . . . . . . . . . . . . . . . . . . . . . . . . . . . . . . . . . . . . . . . . . . . . . . . . . . . .45
Reinigung / Innenbeleuchtung . . . . . . . . . . . . . . . . . . . . . . . . . . . . . . . . . . . . . . . . . . . . . . . . . . . . . . . . . . . .46
Wenn etwas nicht funktioniert . . . . . . . . . . . . . . . . . . . . . . . . . . . . . . . . . . . . . . . . . . . . . . . . . . . . . . . . . . . .46
Kundendienst und Ersatzteile / Technische Angabe . . . . . . . . . . . . . . . . . . . . . . . . . . . . . . . . . . . . . . . . . .47
Installation Aufstellung . . . . . . . . . . . . . . . . . . . . . . . . . . . . . . . . . . . . . . . . . . . . . . . . . . . . . . . . . . . . . . . . . .48
Elektrischer Anschluss . . . . . . . . . . . . . . . . . . . . . . . . . . . . . . . . . . . . . . . . . . . . . . . . . . . . . . . . . . . . . . . . . .48
Türanschlag wechseln Anschlagwechsel Verdampferfachtür . . . . . . . . . . . . . . . . . . . . . . . . . . . . . . . . . . . .49
Einbau . . . . . . . . . . . . . . . . . . . . . . . . . . . . . . . . . . . . . . . . . . . . . . . . . . . . . . . . . . . . . . . . . . . . . . . . . . . . . . . .50
Sicherheitshinweise
41
Bevor Sie Ihr neues Kältegerät in Betrieb
nehmen, lesen Sie bitte diese
Gebrauchsanweisung aufmerksam durch.
Diese sind Sicherheitshinweise. Wir ersuchen Sie
daher, die folgenden Punkte vor der Installation
des Gerätes und seiner Inbetriebnahme
aufmerksam durchzulesen.
Es wird empfohlen, diese Gebrauchsanweisung gut
aufzubewahren und bei einem eventuellen Verkauf
des Gerätes dem neuen Besitzer auszuhändigen.
Benutzung im Haushalt
• Die Kühl- und/oder Gefrierschränke sind zur
Einlagerung und/oder zum Einfrieren von
Lebensmitteln bestimmt.
• Vor der Installation sicherstellen, dass das Gerät
nicht beschädigt ist. Mögliche Transportschäden
sind dem Händler unverzüglich mitzuteilen.
•
Das Gerät ist schwer. Scharfe Metallkanten am
Gerät hinten und unten stellen ein Verletzungsrisiko
dar. Beim Aufstellen oder Verschieben sind
Schutzhandschuhe zu tragen.
• Sollte die Installation des Gerätes eine Änderung
der elektrischen Hausinstallation verlangen, so darf
diese nur von Elektro-Fachkräften durchgeführt
werden.
• Nach Installation des Gerätes kontrollieren, dass
dieses nicht auf dem Anschlusskabel aufliegt.
• Keine Elektrogeräte (z.B. Eismaschinen) in das
Gerät stellen.
• Es sollten keine kohlensäurehaltigen Getränke in
das Gefrier- bzw. Frosterfach eingestellt werden,
sie könnten platzen.
• Speiseeis und Eiswürfel nicht unmittelbar aus dem
Gefrierfach in den Mund nehmen. Sehr kaltes Eis
kann an Lippen oder Zunge festfrieren und
Verletzungen verursachen.
• Tiefkühlgut nicht mit nassen Händen berühren. Die
Hände könnten daran festfrieren.
• Tritt eine Störung oder ein Defekt ein, versuchen
Sie nicht, das Gerät selbst zu reparieren.
Elektrogeräte dürfen nur von Elektro-Fachkräften
repariert werden, da durch unsachgemässe
Reparaturen erhebliche Folgeschäden entstehen
können. Sich an die nächstgelegene
Kundendienststelle wenden und nur Original-
Ersatzteile anfordern.
Sicherheit für Kinder
• Die Teile des Verpackungsmaterials (z.B.
Kunststoffhüllen, Polystyrol) können für Kinder
gefährlich werden. Erstickungsgefahr!
• Im Falle der Entsorgung des Gerätes ist das
Anschlusskabel durchzutrennen und der
Türverschluss unbrauchbar zu machen, damit sich
spielende Kinder nicht im Gerät einschließen
können.
• Das Gerät darf von Kindern und Personen, deren
physische, sensorische oder geistige Fähigkeiten
sowie Mangel an Erfahrung und Kenntnissen einen
sicheren Gebrauch des Gerätes ausschließen, nur
unter Aufsicht oder nach entsprechender
Einweisung durch eine Person benutzt werden, die
sicherstellt, dass sie sich den Gefahren des
Gebrauchs bewusst sind.
Kinder sind zu beaufsichtigen, sodass sie nicht am
Gerät spielen können.
Umweltnormen
• Das Gerät darf nicht mit dem Hausmüll oder
Sperrmüll entsorgt werden. Auskunft über
Abholtermine oder Sammelplätze gibt die örtliche
Gemeindeverwaltung an.
Inhalt

42
Gebrauch
Vor Inbetriebnahme
Man sollte mindestens 2 Std. warten, bevor
das Gerät in Betrieb genommen wird, damit
das Kältemittel zurückströmen kann.
• Bevor Sie das Gerät in Betrieb nehmen, beseitigen
Sie den typischen «Neugeruch» am besten durch
Auswaschen der Innenteile mit lauwarmem Wasser
und einem neutralen Reinigungsmittel. Sorgfältig
nachtrocknen.
Bitte keine Reinigungs- bzw. Scheuermittel
verwenden, die das Gerät beschädigen
könnten.
Das Gerät sowie Teile der Innenausstattung sind für
den Transport geschützt.
Alle Klebebänder sowie Polsterteile aus dem
Geräteinnenraum entfernen.
Kühlabteil
Inbetriebnahme
• Den Stecker in die Steckdose einsetzen. Kühl-
schranktür öffnen und Thermostatknopf von der
Stellung «O» (STOP) aus im Uhrzeigersinn drehen.
• Das Gerät ist eingeschaltet. Den Stillstand des
Gerätes erhält man durch Drehen des
Thermostatknopfes auf das Symbol «O».
Temperaturregelung
• Der Drehknopf für die Temperaturwahl ist im
Kühlraum rechts.
• Die richtige Einstellung erhält man, unter
Berücksichtigung folgender, die Innentemperatur
beeinflussender Faktoren:
• Raumtemperatur
• Häufigkeit des Türöffnens
• Menge der eingelagerten Lebensmittel,
• Aufstellung des Gerätes.
• Die Temperatur wird automatisch geregelt.
• Stellung „1“ = wärmste Innentemperatur
• Stellung „6“ = kälteste Innentemperatur
• Stellung „0“ = Kühlung aus
Die mittlere Einstellung ist meistens die
geeigneteste.
Entsorgung
Verpackungsmaterialien
• Die mit dem Symbol gekennzeichneten
Materialien sind recyclingfähig.
>PE<=Polyäthylen
>PS<=Polystyrol
>PP<=Polypropylen
Sämtliche Verpackungsmaterialien sind
recyclingfähig.
In Deutschland können Sie die Verpackung an den
Händler zurückgeben, bei dem Sie das Gerät gekauft
haben.
Entsorgung von Altgeräten
Das Symbol auf dem Produkt oder seiner
Verpackung weist darauf hin, dass dieses Produkt
nicht als normaler Haushaltsabfall zu behandeln ist,
sondern an einem Sammelpunkt für das Recycling
von elektrischen und elektronischen Geräten
abgegeben werden muss.
Durch Ihren Beitrag zum korrekten Entsorgen dieses
Produkts schützen Sie die Umwelt und die
Gesundheit Ihrer Mitmenschen. Umwelt und
Gesundheit werden durch falsches Entsorgen
gefährdet. Weitere Informationen über das Recycling
dieses Produkts erhalten Sie von Ihrem Rathaus,
Ihrer Müllabfuhr oder dem Geschäft, in dem Sie das
Produkt gekauft haben.

43
Flaschenablage
• Flaschen mit dem Flaschenhals nach vorne in die
Ablage legen.
Achtung: Nur ungeöffnete Flaschen waagrecht
lagern.
•
Zur Lagerung angebrochener Flaschen kann die
Flaschenablage schräggestellt werden.
•
Dazu die Flaschenablage soweit nach vorne
ziehen, bis sie sich nach oben abschwenken läßt,
und dann die vordere Auflage in die nächsthöhere
Ebene einschieben.
Kühlabteilausstattung
Abstellregale
• Zur Einlagerung von Lebensmittel-Packungen
verschiedener Größe, sind die Abstellregale
höhenverstellbar.
• Dazu die Abstellfläche soweit nach vorne ziehen,
bis sie sich nach oben oder unten abschwenken
und herausnehmen läßt.
• Das Einsetzen in eine andere Höhe bitte in
umgekehrter Reihenfolge vornehmen.
• Zur besseren Raumnutzung können die vorderen
Halbteile der Ablagen auf die rückwärtigen
hinaufgelegt werden.
Die Glasablage über der Gemüseschale und
die Flascheablage müssen immer in der
Stellung verbleiben, um eine korrekte
Luftzirkulation zu gewährleisten.
D338
Variable Innentür
• Die mittlere Abstellregale der Innentür sind
höhenverstellbar.
• Das Abstellregal stufenweise in Pfeilrichtung
drücken bis es frei wird; dann in der gewünschten
Höhe wieder anbringen.
• Zur besseren Reinigung können die obere und die
untere Ablagen ebenfalls herausgenommen
werden.
Erklärung der Symbole des
Kühlraums
Das nebenstehende Symbol gibt an, das in
diesem Bereich des Kühlraums die niedrigste
Temperatur herrscht.
PRXXX

44
Kältester Bereich: weniger oder gleich +4°C
Fleisch, Geflügel, Fisch, Wurstwaren, Fertiggerichte,
gemischte Salate, Gerichte und Süßspeisen auf der
Grundlage von Eiern oder Sahne, frische Teigwaren,
Kuchenteig, Pizzen/Quiches, frische Lebensmittel
und Frischkäse, in Plastikbeuteln verpacktes
Gemüse und im Allgemeineren sämtliche frische
Lebensmittel, die bis zu deren Haltbarkeitsdatum bei
+4°C oder weniger aufzubewahren sind.
T
emperaturanzeiger
Einzustellender Thermostat Korrekte Temperatur
Über den Temperaturanzeiger kann die
Funktionsweise Ihres Kühlschranks überprüft
werden.
Sobald im kältesten Bereich des Kühlraums eine
Temperatur von +4°C oder weniger herrscht,
erscheint am Temperaturanzeiger das Symbol "OK".
Liegt die Temperatur über +4°C, bleibt der
Temperaturanzeiger schwarz. Demzufolge ist die
Temperatur durch Einstellen des Thermostats auf
einen niedrigeren Wert zu bringen.
ACHTUNG: Die Türen des Kühlschranks sollten nie
über längere Zeit offen gelassen werden, da dies zu
einer Erhöhung der Innentemperatur führt. Für eine
korrekte Temperaturmessung ist der
Temperaturanzeiger innerhalb von 30 Sekunden
abzulesen.
OK
Tipps
Energie-Einsparung
• Das Gerät nicht in der Nähe von Herden,
Heizkörpern oder anderen Wärmequellen
aufstellen. Bei hoher Umgebungstemperatur läuft
der Kompressor häufiger und länger. Bitte im
Abschnitt “Aufstellung” nachsehen.
• Tür nur so lange wie nötig geöffnet lassen.
• Höchste Kälteeinstellung bei hoher
Raumtemperatur und erheblicher
Lebensmittelmenge kann fortdauernden
Kühlschrank-Betrieb verursachen, dabei kann sich
eine Reif- oder Eisschicht an der hinteren
Innenwand bilden.
In diesem Falle den Thermostatknopf auf wärmere
Temperaturen stellen, damit das automatische
Abtauen, mit folglich geringerem Stromverbrauch,
gewährleistet werden kann.
• Keine warmen Speisen in das Gerät stellen.
Warme Speisen erst abkühlen lassen.
• Tiefkühlgut zum Auftauen in den Kühlraum legen.
Die Kälte im Tiefkühlgut wird so zur Kühlung im
Kühlraum genutzt.
• Den Verflüssiger, das Metallgitter an der
Geräterückseite, mit einem Staubsauger oder einer
Bürste immer sauber halten.
Richtiges Kühlen
• keine warmen Speisen oder dampfenden
Flüssigkeiten in den Kühlschrank einstellen.
• Geruchverbreitende Lebensmittel müssen
abgedeckt oder eingewickelt werden.
• Die Lebensmittel müssen so eingelagert werden,
dass die Kälte um sie frei zirkulieren kann.
Nachstehend einige praktische Ratschläge:
• Fleisch (alle Sorten) in Plastikfolie einpacken und
auf die Glasplatte, die sich über der Gemüseschale
befindet, legen. In dieser Lage kann das Fleisch
längstens 1-2 Tage aufbewahrt werden.
• Gekochte Nahrungsmittel, kalte Platten, usw.
zugedeckt aufbewahren. Sie können auf jede
beliebige Glasablage gelegt werden.
• Obst und Gemüse: nach vorherigem Säubern und
Waschen in den Gemüseschalen) aufbewahren.
• Butter und Käse: in speziellen Behältern
aufbewahren oder in Alu- bzw. Plastikfolie
einpacken, um den Kontakt mit der Luft zu
vermeiden.
• Milch in Flaschen: gut verschlossen in den
Flaschenhalter der Innentür stellen.
Wenn Bananen, Kartoffeln, Zwiebeln und
Knoblauch nicht verpackt sind, sollten sie nicht
in den Kühlschrank gegeben werden.
Gefrierabteil
Temperaturregelung
• Der Thermostatknopf regelt das Kühl- und
Gefrierabteil.
• Für das Einfrieren von Lebensmitteln ist es nicht
nötig die Einstellung des Thermostatknopfes von
der üblichen Normalstellung zu ändern.
• Nach einem längeren Stillstand oder bei der ersten
Inbetriebnahme des Gerätes muß vor der
Einlagerung der Tiefkühlkost die höchste Stellung
des Thermostatknopfes gewählt werden. Nach ca.
2 Std. kann dieser auf eine mittlere Stellung
zurückgedreht werden.
Gefrierabteilausstattung
Eiswürfelbereitung
Das Gerät hat eine oder mehrere Eiswürfelschalen,
welche mit Wasser aufgefüllt in das Gefrierfach
gestellt werden.
Bitte zur Entnahme der Eiswürfelschalen
keine Metallgegenstände benutzen!

45
• Es ist empfehlenswert, auf der Verpackung das
Einfrierdatum zu notieren, damit die
Aufbewahrungszeit eingehalten werden kann.
• Der Transport vom Verkäufer zum Verbraucher
muss in kurzer Zeit erfolgen.
• Es sollten keine kohlensäurehaltigen Getränke
in das Gefrierfach eingestellt werden, da sie
explodieren können.
• Einmal aufgetaute Lebensmittel verderben schnell
und können kein ein zweites Mal eingefroren
werden.
Wartung
Vor jeder Reinigungsarbeit immer den
Netzstecker aus der Steckdose ziehen.
Dieses Gerät erhält im Kaltekreislauf
Kohlenwasserstoff. Aus diesem Grund darf
die Wartung und das Nachfüllen
ausschließlich von autorisierten
Fachpersonal durchgeführt werden.
Abtauen
Kühlraum
• An der Rückwand des Gerätes bildet sich im
Betrieb eine Reifsicht, die in den Stillstandszeiten
des Kompressors von selbst abtaut. Das
Tauwasser läuft durch eine Rinne in eine
Plastikschale auf der Rückseite des Gerätes (über
dem Kompressor) und verdunstet dort.
• Reinigen Sie regelmäßig das Ablaufloch des
Abtauwassers. Verwenden Sie hierzu den Reiniger,
der sich schon im Ablaufloch befindet.
D037
Gefrierraum
• Die Reifschicht mit dem Plastikschaber abkratzen.
• Wenn im Gefrierabteil die Eisschicht stärker als ca.
5 mm ist, tauen Sie Ihr Gerät ab.
Um ein vollständiges Abtauen durchzuführen, geht
man wie folgt vor:
• Tiefkühlgut herausnehmen, in mehrere Lagen
Zeitungspapier einpacken und abgedeckt an einem
kühlen Ort lagern.
• Thermostatknopf auf «O» einstellen oder Stecker
aus der Steckdose herausziehen;
• Tür offen lassen.
• Nach beendetem Abtauprozess das Gefrierteil gut
nachtrocknen.
• Nach dem Abtauen, Gerät einschließlich
Innenausstattung gründlich reinigen.
• Lebensmittel einlagern und Gerät wieder in Betrieb
nehmen.
Benutzen Sie niemals Metallgegenstände,
um die Reifschicht abzukratzen, damit eine
Beschädigung des Gerätes vermieden
werden kann.
Benutzen Sie kein mechanisches oder
anderes Mittel für einen schnelleren
Abtauprozeß mit Ausnahme der vom
Hersteller empfohlenen.
Tipps
Einfrieren und Tiefkühllagern
• Die Lebensmittel in kleine Portionen einteilen,
damit der Gefriervorgang beschleunigt wird; dies
ermöglicht das spätere Auftauen von kleineren
Portionen.
• Die Lebensmittel in Alu- oder Polyäthylenfolien
luftdicht verpacken.
• Die einzufrierenden Lebensmittel sollen mit den
Tiefkühlkosten nicht in Berührung kommen, um ein
Temperaturanstieg an diese zu verhindern.
• Speiseeis, das direkt aus dem Gefrierfach
genommen wird, kann Kälte-Brandwunden
verursachen.

46
Reinigung
Bitte keine Reinigungs- bzw. Scheuermittel
verwenden, die das Gerät beschädigen
könnten.
Benutzen Sie nie Metallgegenstände um
das Gerät zu reinigen, da es beschädigt
werden könnte.
Den Innenraum mit lauwarmem Wasser und einem
neutralen Reinigungsmittel reinigen.
Gut nachwaschen und sorgfältig trocknen.
Um einen sicheren Betrieb des Gerätes zu
gerwährleisten, einmal im Jahr den Sockel-Grill
abbauen und die Luftkanäle mit einem Staubsauger
reinigen. Dies begünstigt den guten Betrieb mit
folglicher Stromersparnis.
Stillstandszeiten
• Den Stecker aus der Steckdose ziehen. Alle
Lebensmittel herausnehmen und Gerät reinigen.
• Die Tür offen lassen, um im Inneren eine gute
Luftzirkulation zu gewährleisten und somit
Geruchsbildung zu vermeiden.
Innenbeleuchtung
• Vor dem Lampenwechsel Gerät abschalten und
den Netzstecker ziehen.
1. Lösen Sie die Befestigungsschraube der
Lampenabdeckung.
2. Heben Sie den beweglichen Teil ab, indem Sie
wie in der Abbildung gezeigt darauf drücken.
3. Defekte Lampe durch eine neue Lampe
gleicher Leistung auswechseln.
D411
Wenn etwas nicht funktioniert
Falls das Gerät Störungen aufweisen sollte, bevor Sie den Kundendienst verständigen, überprüfen Sie
zuerst folgendes:
Störung Abhilfe
Im Gerät wird es nicht kalt genug
Gerät kühlt zu stark.
Der Kompressor läuft ständig
Wasser im Kühlschrank.
Der Drehknopf auf kältere Temperatur drehen.
Die Lebensmittel müssen so eingelagert werden, dass die Kälte um sie frei zirkulieren
kann.
Tür richtig schließen.
Die Umgebungstemperatur ist zu warm.
Der Drehknopf auf wärmere Temperatur drehen.
Der Drehknopf auf niedrigere Zahlen drehen.
Die Umgebungstemperatur ist zu warm.
Achten Sie darauf, dass diese Öffnungen nicht durch Sockelblenden oder Geschirr
abgedeckt werden.
Innerhalb der letzen 24 Std. wurden größere Mengen warmer Lebensmittel eingelagert.
Tür nur so lange wie nötig geöffnet lassen.
Die Ablauföffnung an der Rückwand im Geräteinnenraum ist verstopft. Mit einem nicht
scharfkantigen Gegenstand reinigen.

47
Technische Angabe
Die technischen Angaben sind auf dem Typschild genannt, das auf der linken inneren Seite der Anlage liegt.
Im Falle einer Stromunterbrechung während der Lagerung von Tiefkühlkost bzw. von
eingefrorenen Lebensmitteln soll die Tür des Gefrierfaches nicht geöffnet werden. Die
Tiefkühlkost verdirbt nicht, wenn es sich um eine kurze Unterbrechung handelt (12 Std.) und das
Gerät voll ist. Wenn das nicht der Fall ist, ist es nötig, die tiefgefrorenen Lebensmittel innerhalb
kurzer Zeit zu verbrauchen (eine Temperaturerhöhung der Tiefkühlkost verkürzt die
Aufbewahrungsdauer).
Störung Abhilfe
Geräusche Manchmal sind sie charakterstisch für Kältegeräte.
Wenn Kältemittel in dünne Rohre einströmt, können Sie ein blubberndes oder
plätscherndes Geräusch hören.
Immer wenn der Kompressor ein- oder ausschaltet, ist ein Klicken zu hören.
Geräusche können durch das Instand setzen der Möbelstruktur entstehen.
Kundendienst und Ersatzteile
Sollten Sie nach o.e. Prüfungen zu keinem Resultat
kommen, so wenden Sie sich bitte an unseren
nächsten Kundendienst.
Um ein rasches Beheben des Schadens zu
ermöglichen, ist es beim Anruf an den Kundendienst
notwendig anzugeben:
• Modellbezeichnung
• Erzeugnis-Nummer (PNC)
• Fertigungs-Nummer (S-No.)
Diese Angaben finden Sie auf dem Typschild links an
der Innenseite des Gerätes. Damit Sie die Daten
schnell bei der Hand haben, empfehlen wir, sie hier
einzutragen.

48
Installation
• Vor der Installation sicherstellen, dass das Gerät
nicht beschädigt ist. Mögliche Transportschäden
sind dem Händler unverzüglich mitzuteilen.
• Das Gerät darf nicht in unmittelbarer Nähe von
Heizkörpern oder sonstigen Wärmequelle
aufgestellt werden.
• Ein Standort mit direkter Sonneneinstrahlung sollte
vermieden werden.
• Eine ausreichende Luftzirkulation an der
Geräterückseite muß gewährleistet sein.
• Für eine optimale Belüftung des Gerätes müssen
die minimalen Lüftungsquerschnitet (Abb.)
eingehalten werden.
Achtung: Die Ventilations - Öffnungen müssen
immer saubergehalten werden.
Ferner ist auch am hinteren Einbauschrankteil ein
Lüftungskamin mit folgenden Massen notwendig:
Tiefe 50 mm
Breite 540 mm
Die Klimaklasse finden Sie auf dem Typschild, das
sich links im Innenraum des Gerätes befindet.
Nachstehende Tabelle zeigt, welche
Umgebungstemperatur welcher Klimaklasse
zugeordnet ist:
Klimaklasse
SN +10 bis +32°C
+16 bis +32°C
+16 bis +38°C
+16 bis +43°C
N
ST
T
für Umgebungstemperatur von
Elektrischer Anschluß
Bevor Sie den Stecker in die Steckdose einstecken,
überprüfen Sie bitte, daß die auf dem Typschild des
Gerätes angegebene Spannung sowie Frequenz mit
dem Anschlußwert des Hauses übereinstimmen.
Eine Abweichung von ±6% von der
Nominalspannung ist zulässig.
Für die Anpassung des Gerätes an andere
Spannungen muß ein Spartransformator
angemessener Leistung vorgeschaltet werden.
Wichtig
Das Gerät muß unbedingt vorschriftsmäßig
geerdet werden.
Zu diesem Zweck ist der Stecker des
Anschlußkabels mit dem dafür vorgesehenen
Kontakt versehen. Sollte die Netzleitung im
Haus nicht mit einer Erdleitung versehen sein,
so muß das Gerät an eine getrennte Erdleitung
vorschriftsmäßig und unter Hinzuziehung eines
Fachmanns angeschlossen werden.
Die Erzeugerfirma lehnt jede Verantwortung
ab, falls diese Unfallverhütungsvorschrift
nicht beachtet wird.
Dieses Gerät entspricht der folgende EWG Richtlinie:
- 73/23 EWG vom 19.2.73 (Niederspannung)
und folgende Änderungen;
- 87/308 EWG vom 2.6.87 (Funkentstörung);
- 89/336 EWG vom 03/05/89 (Elektromagne-
tische Verträglichkeit) und folgende
Änderungen.
Wichtig
Es muß möglich sein, das Gerät vom Netz zu
trennen; nach der Installation muß die
Steckdose daher zugänglich bleiben.
50 mm
min.
200 cm
2
200 cm
2
min.
D526

49
Anschlagwechsel Verdampferfachtür
Türanschlag wechseln
Gehen Sie wie folgt vor:
TAW1MERA
TAW2MERA
TAW3MERA
1 2
3
Überprüfen Sie nach dem Türanschlagwechsel
unbedingt, daß die Türmagnetdichtungen
einwandfrei am Gehäuse anliegen und alle
Schrauben kraftschlüssig angezogen sind.
180°

Einbau
Maßzeichnungen
50
1219
1233
530
50
Kit

51
2. Fugenabdeckleisten (E) abschneiden.
FAL2MERA
3. Fugenabdeckleisten (E) ankleben.
100
90°
90°
MAU2ME
1BL80R
Gerätetür abnehmen
Möbelschrank ausrichten
Die nachfolgenden Montageschritte sind nur für
Türanschlag rechts (Lieferzustand) dargestellt. Bei
Türanschlag links, bitte die nachfolgenden
Montageschritte entsprechend auf der
gegenüberliegenden Geräteseite ausführen.
1. Anpassungen vornehmen.
FAL1MERA
FAL3MERA

52
7. Dekorsatz anbringen.
GF1MERA
4. Gerät einschieben.
6. Schraubenabdeckungen (L) anbringen.
SAB1ME
5. Gerät festschrauben.
8. Montage Türgriff
9. Gerätetür einsetzen.
TE1MERA
PL12
10. Gerätetür ausrichten (falls erforderlich).
PL09
DEC3MERA
M

Allgemeine Garantiebestimmungen
- Wir beheben unentgeltlich nach Maßgabe folgender Bedingungen Mängel am Gerät, die
nachweislich auf einem Material- oder Herstellungsfehler beruhen, sofern diese Mängel uns
unverzüglich nach Feststellung und innerhalb 24 Monate (bei gewerblicher Nutzung oder
gleichzusetzender Beanspruchung innerhalb von 12 Monaten) nach Lieferung an den
Erstendabnehmer gemeldet wurden. Bei Mängel, die sich innerhalb von 6 Monaten ab Lieferung
zeigen, wird ein Material- bzw. Herstellfehler vermutet.
- Teile, die einer betriebsbedingten Abnutzung unterliegen, sind ebenso von der Garantie
ausgeschlossen wie leicht zerbrechliche Teile. Geringfügige Sollabweichungen in der Beschaffenheit
des Gerätes, die für die Wert- und Gebrauchstauglichkeit unerheblich sind oder Schäden aus
chemischen, elektrochemischen Einwirkungen von Wasser , anormale Umwelt- und sachfremde
Betriebsbedingungen oder sonstige Einwirkungen/Berührungen von ungeeigneten Stoffen lösen
keine Garantiepflicht aus. Nicht unter die Garantiepflicht fallen Schäden und Mängel, die durch
eine nicht fachgerechte Installation und Montage, Fehlgebrauch, mangelnde Pflege oder
Nichtbeachtung von Bedienungs- und Montagehinweisen zurückzuführen sind. Das Fehlen, die
Veränderung oder Beschädigung des Typenschildes, Reparaturversuche oder Eingriffe seitens
eines nicht autorisierten Kundendienstes oder nicht autorisierten Personen, sowie der Einbau
von nicht Originalen Ersatz-, Zubehör- und Ergänzungsteilen, durch die, ein Defekt verursacht
wurde, führen ebenfalls zu einem Verlust der Garantie.
- Mangelhafte Teile werden nach unserer Wahl unentgeltlich ersetzt oder Instand gesetzt.
Ersetzte Teile gehen in unser Eigentum über. Instandsetzungen vor Ort können nur für stationär
betriebene Geräte verlangt werden. Geräte, die zumutbar transportiert werden können und für
die Garantieleistungen unter Bezugnahme dieser Garantie beansprucht wird, sind der
nächstgelegenen Kundendienststelle zu übergeben oder einzusenden. Der Kaufbeleg mit Kauf oder
Lieferdatum ist für die Inanspruchnahme dieser Garantie vorzulegen.
- Sofern die Nachbesserung von uns abgelehnt wird oder fehlschlägt, wird innerhalb der oben
genannten Garantiezeit auf Wunsch des Endabnehmers kostenfrei gleichwertiger Ersatz geliefert.
Im Falle einer Ersatzlieferung behalten wir uns die Geltendmachung einer angemessenen
Nutzungsrechnung für die bisherige Nutzungszeit vor.
- Garantieleistungen setzen keine neue Garantiefrist in Lauf, noch bewirken sie eine Verlängerung
der Garantie. Die Garantiefrist für eingebaute Ersatzteile endet mit der Garantiefrist für das komplette Gerät.
- Weitergehende Ansprüche, insbesondere auf Ersatz außerhalb des Gerätes entstandener
Schäden sind ausgeschlossen, sofern eine Haftung nicht zwingend gesetzlich angeordnet ist.
Die Gewährleistungspflicht des Verkäufers aus dem Kaufvertrag mit dem Endabnehmer bleibt
von diesen Garantiebedingungen unberührt.
Anschriften
De Dietrich
Frankfurter Str. 168
D-63263 Neu-Isenburg
Fax. 06102-372674
mailto: [email protected]
Servicepartner in Deutschland
Servicetelefon:
0800/3246726
Ersatzteilbestellungen:
01805/324673
Servicepartner in Österreich:
SEISER-SERVICE GmbH,
Am Heumarkt 9
A-1030 Wien,
Servicetel.: 01/7131250


Brandt UK Ltd
Intec Four, Wade Road, Basingstoke, Hampshire RG24 8NE
Brochures and Stockist information : 08707 505 503
All other departments : 01256 308 000
Service fax : 01256 346 877
Sales Order Processing fax : 01256 843 024
Marketing and Home Economist fax : 01256 325 888
Distributor in Ireland :
Quality Electrical Distributors Ltd
143b Slaney Close, Dublin Industrial Estate , Glasnevin, Dublin 11
Sales telephone : 01 878 1996 ; Sales fax : 01 878 1473
Email : sales@qedltd.ie
ElcoBrandt Suisse SA
Service Après Vente
Route de Soleure 12
2072 St Blaise (NE)
Tél : 032-756-49-89
Fax : 032-756-49-99
Numéro vert : 0800 81 12 34
E-mail : serviceCH@elcobrandt.com

Service Consommateurs De Dietrich
BP 9526
95069 CERGY PONTOISE CEDEX
Tel : +33 (0) 892 02 88 04*
*0,34 Eur TTC / min à partir d’un poste fixe
Tarif en vigueur au 1 avril 2004
Service fourni par
Brandt Customer Services société par actions simplifiée au capital de 2.500.000 euros
5/7 avenue des Béthunes, 95310 Saint Ouen l'Aumône
RCS Pontoise 440 303 303
Brandt Appliances - S. A. S. au capital de 10 000 000 Euros - RCS Nanterre B 440 302 347
-
 1
1
-
 2
2
-
 3
3
-
 4
4
-
 5
5
-
 6
6
-
 7
7
-
 8
8
-
 9
9
-
 10
10
-
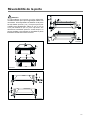 11
11
-
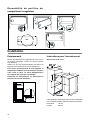 12
12
-
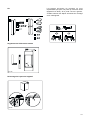 13
13
-
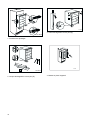 14
14
-
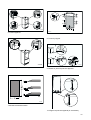 15
15
-
 16
16
-
 17
17
-
 18
18
-
 19
19
-
 20
20
-
 21
21
-
 22
22
-
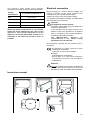 23
23
-
 24
24
-
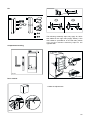 25
25
-
 26
26
-
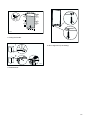 27
27
-
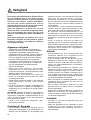 28
28
-
 29
29
-
 30
30
-
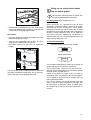 31
31
-
 32
32
-
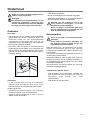 33
33
-
 34
34
-
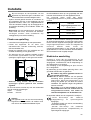 35
35
-
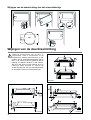 36
36
-
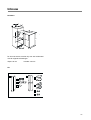 37
37
-
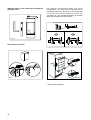 38
38
-
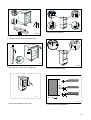 39
39
-
 40
40
-
 41
41
-
 42
42
-
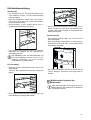 43
43
-
 44
44
-
 45
45
-
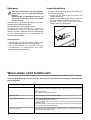 46
46
-
 47
47
-
 48
48
-
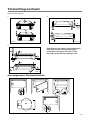 49
49
-
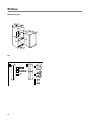 50
50
-
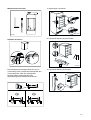 51
51
-
 52
52
-
 53
53
-
 54
54
-
 55
55
-
 56
56


De Dietrich DRH920JE de handleiding
- Categorie
- Diepvriezers
- Type
- de handleiding