Kenwood KCL95.424SI de handleiding
- Categorie
- Mixers
- Type
- de handleiding

2
TYPE: KCL95
Instructions
Istruzioni
Instrucciones
Bedienungsanleitungen
Gebruiksaanwijzing
Instrukcja obsługi

3
English 2 - 18
Nederlands 19 - 35
Français 36 - 52
Deutsch 53 - 69
Italiano 70 - 86
Español 87 - 104
Česky 105 - 120
Polski 121 - 138

4
6
32
30
34
33
7
8
16
15
5
3
1
12
2
33
17
19
13
22 23 24 25
31
26 27 28 29
14
18 20 21
4
3 4 9
35
10 11

All in One Dishes
Fruit Compote
Slow Cook
Chunky Soup
Steam
Manual Mode
To pause, push dial
Min02:0 3 Off
A B C D
E F G H
I J K L
M N O
KENWOOD WORLD APP
P Q R
Using Preset Programmes
To Use Your Cooking Chef Connect – Manual Operation

500ml
+
goz
0 g goz
200 g
Zero
Manual Mode
To pause, push dial
Min02:0 3 Off
STo Use The Weighing Function
TTo Use Your Steamer Attachment
UV
Tool Height Adjustment
To Fit and Use Your Splashguard Assembly
WTo Fit and Remove Your Stir Assist Clip
XAssembling The High Temperature Creaming Beater

Safety
ORead these instructions carefully and retain for future reference.
ORemove all packaging and any labels.
OIf the plug or cord is damaged it must, for safety reasons, be replaced by
Kenwood or an authorised Kenwood repairer in order to avoid a hazard.
important note - electronic medical implants
OLike all induction heating products, this appliance generates short-range
magnetic fields. If any user or person in close proximity has a pacemaker or
other active implants, please consult a doctor before use, concerning any
possible incompatibility to prevent any risk to health.
OSwitch off and unplug the appliance before fitting or removing tools/
attachments, after use and before cleaning.
OKeep body parts, hair, jewellery and loose clothing away from moving parts
and fitted attachments.
ONever put your fingers etc., into the hinge mechanism.
ONever leave the appliance on unattended when in a non cooking mode.
O When leaving the appliance unattended in the cooking mode, pay close
attention to the following:
{ ensure the instructions are followed with regards to temperatures and
maximum quantities to process;
{ make sure the unit and cord are positioned out of reach of children and away
from the edge of the work surface;
{ check the progress on a regular basis to ensure enough liquid is added and
food is not overcooking.
ONever use a damaged appliance. Get it checked or repaired: see ‘Service and
Customer Care’.
ONever use an unauthorised attachment or more than one attachment at once.
ONever exceed the maximum capacities and when using the induction heater
never exceed the 3 litre maximum fill level marked on the inside of the bowl.
OWhen using an attachment, read the safety and usage instructions that come
with it.
OTake care when lifting this appliance as it is heavy. Ensure the head is locked
and that the bowl, tools, outlet covers and cord are secure before lifting.
OWhen moving the appliance always pick up by the pedestal base and mixer
head. Do not lift or carry the appliance by the bowl handle.
ONever let the cord hang down where a child could grab it.
ONever let the power unit, cord or plug get wet.
OBe careful when handling or touching any part of the appliance when being
used in the cook mode or after cooking, IN PARTICULAR THE BOWL,
SPLASHGUARD AND TOOLS as they will remain HOT long after the appliance
has been switched off. Use the handles to remove and carry the bowl.
Use oven gloves when handling the hot bowl and hot mixing tools.
OThe symbol marked on the product indicates a surface that can become hot
during use.
OTake care when removing bowl tools after extended use as they may get hot.
OThe underside of the bowl will remain hot long after the heating has stopped.
Use caution when handling and use the work surface protection mat when
placing the bowl on heat sensitive surfaces.
OBe careful of steam escaping from the mixer bowl particularly when opening
the lid in the splashguard or when raising the mixer head.
OIf transferring hot food from the mixer to the blender, always allow the
ingredients to cool to room temperature before placing in the blender.
OOnly use the bowl and tools supplied with this appliance. Never use the bowl
with any other heat source.
ONever operate the appliance in the cook mode with the bowl empty.
ONever insert anything through the air vents.
OWhen using this appliance ensure it is positioned on a level surface away from
the edge. Make sure it is at least 10 cm from walls and ensure that the vents
are not blocked. Do not position below overhanging cupboards.
OFor the correct and safe operation of the induction cooker ensure that the
bowl base and temperature sensors are clean and dry before cooking.
2

3
OMetallic objects such as knives, forks, spoons and lids should not be placed on
the bowl pedestal/induction area as they can get hot.
OAs with all induction cooking appliances do not place credit cards, magnetic
media or sensitive electronic equipment near to the appliance when in use.
ODo not use the appliance for deep frying foods.
OAlways ensure food is thoroughly cooked before eating.
ODo not exceed 250ml when cooking with oil.
OFood should be eaten shortly after cooking or allowed to cool quickly and
then refrigerated as soon as possible.
O Misuse of your appliance can result in injury.
O Do not use excessive force when pressing the touch screen and never use a
sharp object to operate it.
ODo not use the whisk for heavy mixtures (e.g. creaming fat and sugar) as you
could damage it.
OThe power-supply cord is used to reduce risk resulting from becoming
entangled in or tripping. Extension cords may be used if care is exercised
in their use. If an extension cord is used: 1) The marked electrical rating of
the extension cord should be at least as great as the electrical rating of the
appliance; and 2) The cord should be arranged so that it will not drape over
the countertop or tabletop where it can be pulled on by children or tripped
over unintentionally. If the appliance is of the earthed type, the extension cord
should be a earthing-type 3-wire cord. The electrical rating of the appliance is
listed on the bottom of the unit.
OAppliances can be used by persons with reduced physical, sensory or mental
capabilities or lack of experience and knowledge if they have been given
supervision or instruction concerning use of the appliance in a safe way and if
they understand the hazards involved.
OChildren should be supervised to ensure that they do not play with the
appliance.
OThis appliance shall not be used by children. Keep the appliance and its cord
out of reach of children.
OOnly use the appliance for its intended domestic use. Kenwood will not accept
any liability if the appliance is subject to improper use, or failure to comply
with these instructions.
OThe maximum rating is based on the mini chopper/mill attachment that draws
the greatest load. Other attachments may draw less power.
OThis appliance is not intended to be operated by means of an external timer or
separate remote-control system.
ODo not move or raise the mixer head with an attachment fitted as the Stand
Mixer could become unstable.
ODo not operate your appliance near the edge or overhanging the work surface
or apply force to an attachment when fitted, as this may cause the unit to
become unstable and tip over, which may result in injury.
Steamer attachment
O This attachment produces steam which can burn you.
O Do not get burnt by steam coming out of your steamer basket, especially when
removing the splashguard or lifting the feed chute lid.
O Take care when handling parts; any liquid, condensation, steamer part or Stand
mixer part will be very hot. Use oven gloves.
O Unplug the appliance before fitting or removing parts or cleaning.
Food safety
O Cook meat, poultry, fish and seafood thoroughly. And never cook them from
frozen.
O Do not reheat cooked food in your steamer.

4
Know Your Kenwood Cooking Chef
Key
Attachment outlets
1 High speed outlet (HSO)
2 Slow speed outlet (SSO)
3 Bowl tool socket
4 Stir tool socket
Mixer
5 High speed outlet cover
6 Mixer head
7 Slow speed outlet cover
8 Cooking chef bowl
9 Head - lift lever
10 Control dial
11 On/Off switch
12 Display screen
13 Work surface protection mat
14 Drain hole
15 Bowl pedestal/induction area
16 Air vents
17 Temperature sensors
18 Heat shield
19 Rubber seal (removable)
20 Splashguard
21 Feed chute lid
22 K-beater
23 High temperature creaming beater
24 Whisk
25 Dough tool
26 Stir tool
27 Stir assist clip
28 High temperature spatula
29 Dough scraper
30 Spanner
Steamer Attachment
31 Handle supports
32 Supporting ring
33 Folding handles
34 Removeable tray
35 Egg holders
Note: Slow Speed outlet attachments
The slow speed outlet on your Stand mixer model features
the Twist Connection System. It is designed to accept Twist
Connection System attachments.
When purchasing new attachments for the slow speed outlet
you should check compatibility with your Stand mixer. All
Twist Connection System attachments can be identified by the
product code which starts with KAX and also by the Twist logo
which is visible on packaging.
If you own attachments featuring the Bar Connection System
you will need to use the KAT002ME adaptor to connect
these to the Twist Connection System on your Stand
mixer.
For more information visit
www.kenwoodworld.com/twist.
Connecting to Kenwood World App
Refer to Illustrations A – D
The Kenwood World App will allow you to control your
appliance through your smart phone or tablet.
1 Plug in and press the On/O switch on the side of the
power unit.
2 Select Settings > WiFi > Connect and follow the
instructions on the touch screen.
PIN number
O This will be required when prompted by the Kenwood
World App.
O The appliance can only be connected when the PIN
Number is shown on the display screen. If the PIN is
entered incorrectly, follow the instructions on the app and
retry.
O To display the unit’s PIN number, select Settings
> WiFi > Connect and follow the instructions on the display
screen (only when connected to WiFi).
Note:
WiFi
Operates with IEEE802.11 b, g and n at 2.4 GHz only. xxj
Compatibility
Kenwood World App compatible with latest versions of iOS
and Android.
Factory reset
Important
O When disposing of the appliance, it is important to factory
reset it to protect your personal data.
O Selecting this option will erase all WiFi data stored on the
appliance and restore it to factory settings.
O To factory reset your appliance, select Settings
>Factory Reset.
To Set Up Your Cooking Chef Connect
Refer to Illustrations E – I
IMPORTANT
O Make sure the induction area, temperature sensors and
external surface of the bowl base are clean. Failure to do
this will affect the heat sensor, resulting in poor cooking
performance.
O Check that all the outlet covers including the heat shield
are fitted. If they are not correctly fitted the heating
function will not operate.
1 Plug in and press the On/Off switch.
2 Turn the head-lift lever clockwise and raise the mixer head
until it locks.
3 Push the heat shield upwards onto the underside of the
mixer head until fully located. The heat shield must never
be used without the rubber seal fitted correctly.
O If using the Cooking Chef Connect without heat, it is
not necessary to fit the heat shield unless using the
splashguard. Refer to ‘To Fit and Use Your Splashguard
Assembly’ section.
4 Fit the bowl to the base.
5 Place the required tool in the bowl tool socket or stir tool
socket if using the stir tool, locating the pin in the groove
and then turn to lock into position.
Before plugging in
O Make sure your electricity supply is the same as the one shown on the underside of your appliance.
O WARNING: THIS APPLIANCE MUST BE EARTHED.
O This appliance conforms to EC Regulation 1935/2004 on materials and articles intended to come into contact with food.
O This appliance is in compliance with the essential requirements and other relevant provisions of Directive 2014/53/EU.
Before using for the first time
O Wash the parts: see ‘Care and Cleaning’.

5
O To remove a tool, reverse step 5 above. (Always use oven
gloves to remove tools after cooking).
6 To lower the mixer head, raise it slightly, then turn the head
lift lever clockwise.
Lower into the locked position.
Stir Tool – when using the stir tool the stir assist clip can also
be used to assist the mixing action, see ‘to fit and remove
your stir assist clip'. The stir tool can also be used with the
whisk. Do not use the stir tool with the dough tool.
To Use Your Cooking Chef Connect - Manual
Operation
1 Add the relevant ingredients to be cooked/mixed.
2 Set the required time, speed and temperature.
Note: To use the machine as a mixer without heat, select
'Off' when setting the temperature.
Turn the control dial anti-clockwise to use stir intervals and
pulse.
Turn the control dial clockwise to use continuous speeds.
3 Press the control dial to start.
4 To stop the unit at any time, press the control dial. If in
cooking mode, take care as the unit will be hot.
High speed, high temperature mode (HSHT)
To mix at high speed at temperatures of 60°C and above
O Select time (if applicable), speed and temperature of
60°C or above.
O A warning will pop up on the display screen advising that
you are entering HSHT mode
O Once the warning has been read and undestood, press
yes to confirm that you are happy to enter HSHT mode.
O Press the control dial to start.
This function MUST ONLY be used with the whisk and/
or stir tool. You should not exceed the maximum cooking
capacity of 3 litres and you must ensure the splashguard is
fitted. The machine must not be left unattended.
5 Once a programme has finished, the unit will beep 3 times.
O Note: If no time has been set, the heating and stirring
processes will automatically end once the timer has
reached 8 hours.
6 To stop the heating process, change the temperature to
‘OFF’. To stop the unit at any time press the control dial.
Important – If at any time the mixer head is raised during
an operation, the heating process will pause and the bowl
tool will stop and will not restart when the mixer head is
lowered. To restart the mixer, lower the mixer head and
press the control dial.
Using Preset Programmes
Refer to Illustrations P – R
1 Select the Preset Menu.
2 Choose the preset you wish to use.
3 Follow the instructions on the display screen.
4 To stop the unit at any time, press the control dial. Take
care as the bowl and tools will be hot.
After Cooking
O Be careful when handling or touching any part of the
appliance when being used in the cooking mode or after
cooking, IN PARTICULAR THE BOWL AND TOOLS as
they will remain HOT long after the appliance has been
switched off.
O Use the two side handles to remove and carry the bowl.
Use oven gloves when handling the hot bowl and hot
tools.
O The underside of the bowl will remain hot long after the
heating has stopped. Use caution when handling and use
the work surface protection mat provided to protect heat
sensitive surfaces.
Hints and Tips
O Some recipes, in particular those with a high water
content, will not be able to reach a cooking temperature
above 100°C (as this is the boiling point of water).
O When adding ingredients to the bowl during cooking,
turn the speed down and add the ingredients slowly and
evenly.
O To heat sauces quickly use a continuous stir setting.
O If using the splashguard during cooking, always
remove it before lifting the mixer head. Be aware of
condensation formed on the splashguard and heat
shield.
O When lifting the mixer head lift it slowly to allow any
liquid on the underside of the heat shield to flow back
into the bowl.
O Four stir delay functions are available which enable
you to select the appropriate amount of stirring for
individual recipes. Some recipes will require constant
stirring to stop ingredients from sticking to the
bottom of the bowl, whereas others will benefit from
intermittent stirring to maintain the texture of the food.
Manual Operation (Attachments)
1 Remove High speed outlet/Slow Speed outlet cover (if
applicable).
2 Fit attachment according to specific instructions
supplied.
3 Set the required time and speed (refer to illustrations
L - M). Press the control dial to start.
To stop the unit at any time, press the control dial again.
To Remove And Fit Outlet Covers
High-Speed Outlet Cover
1 To remove the cover, use the grip and lift upwards.
2 To fit, place the cover over the outlet and push
downwards.
Slow-Speed Outlet Cover
1 To remove the cover, use the grip on the underside and
pull outwards.
2 To fit, locate the catch at the top of the cover into the
outlet recess and push to clip into position.
To Use The Weighing Function
Refer to Illustrations S
1 Select the weighing function on the touch screen.
2 Fit the bowl.
3 Zero the scale.
4 Weigh the ingredients.
5 To change between units tap the unit button on the
weighing screen.
Note: Always place the appliance on a dry flat, stable surface
prior to weighing. Do not apply pressure to the mixer or bowl
whilst weighing as this will affect the accuracy of the scales.
The weighing function can be used with the mixer head in
either the down or up position.
The weighing function is accurate up to 6kg.

6
Preset Usage Chart
The default settings can be adjusted to suit your recipe, where available.
Non-adjustable settings are indicated by the icon.
When “Heating” is shown on the display screen, the timer will not start counting down until the correct temperature has been
reached.
Preset Recommended Tool Default Settings
(adjustable)
Keep Warm Stage Recipe Ideas / Uses
Egg White Whisking 1 min 15 secs
(15 secs – 5 mins)
Max
OFF
Egg whites for chocolate mousse
Sponge Cake 1 min
(30 secs – 5 mins)
1 – Max
(– Max)
OFF
Victoria Sponge, Cupcakes
Dough Kneading 10 mins
(1 mins – 30 mins)
Min to 1
(min – 2)
OFF
Bread Rolls, Pizza
Dough Proving 1 hrs
(5 mins – 2 hrs)
OFF
w
30˚C
(25˚C – 35˚C)
Proving yeasted doughs
Chocolate Melting 10 mins
(5 mins – 2 hrs)
60˚C
Chocolate Mousse
Swiss Meringue 10 mins
(1 mins – 20 mins)
Max
40˚C
Base for Buttercream frosting
Italian Meringue 4 mins
(1 mins – 20 mins)
HSHT 6
(– Max)
60˚C – 85˚C
Lemon Meringue Pie
Baked Alaska
Fruit Compote 20 mins
(5 secs – 2 hrs)
()
104˚C
30 mins
62˚C
Cake Fillings, Dessert toppings
Popcorn 10 mins
(5 mins – 10 mins)
OFF
180˚C
For fresh homemade popcorn
* For best results always use the
preset.

7
Recipe
Prune Marinade
200g Clear Runny Honey
40g Soft Prunes
40ml Water
1 Place all ingredients into the mini chopper/mill. Refrigerate
overnight.
2 Fit the attachment to the Stand mixer.
3 Switch to pulse for 4 seconds.
4 Use as required.
Steamer Attachment
Refer to Illustration T
O When using your steamer basket, always keep your
Cooking Chef away from walls and overhanging cupboards:
the steam could damage them.
O Season food after cooking, this will help to prevent spots
or pitting occurring on the stainless bowl.
1 Place the removable tray on a flat surface ensuring that the
handles are folded inwards.
2 Fit the supporting ring onto the tray ensuring that the
handle supports on the ring fit next to the V shaped cut
outs in the tray.
3 Fold out the handles and clip onto the handle supports.
4 Place the food to be cooked onto the tray. Vegetables
should be thoroughly cleaned and peeled as required.
5 Add the required amount of water to the bowl (see
cooking chart). Filtered water is best as it reduces
limescale and spotting.
6 Place the assembled steamer into the bowl – it will find its
own height.
7 Fit the heatshield to the mixer head.
8 Fit the bowl and steamer basket to the Kitchen Machine.
9 Lower the mixer head and then fit the splashguard.
10 Select the steam pre-set and adjust the cooking time (as
per the Recommended Cooking Chart). Press the control
dial to start
11 Allow to cook for the required time.
12 Remove the splashguard.
13 Lift the mixer head.
Preset Usage Chart – Continued
Preset Recommended Tool Default Settings
(adjustable)
Keep Warm Stage Recipe Ideas / Uses
Steam 20 mins
(5 mins – 45 mins)
OFF
100˚C
Salmon en Papillote
All in One Dishes 40 mins
(5 secs – 8 hrs)
()
103˚C – 140˚C
30 mins
62˚C
Bolognese
Chunky Soup 20 mins
(5 secs – 8 hrs)
()
103˚C – 140˚C
30 mins
62˚C
Minestrone, Broths
Slow Cook 2 hrs
(5 secs – 8 hrs)
()
98˚C – 140˚C
30 mins
62˚C
Beef bourguignon

8
14 Lift out the steamer basket by the handles – take care to
prevent them folding inwards.
15 Place the steamer basket on a large plate or other suitable
container.
16 Unclip the handles and fold in towards the centre. Lift off
the supporting ring and fold out the handles.
17 Remove the food.
important
Be careful when handling anything: any liquid,
condensation, steamer part or Stand Mixer part will be
very hot. Use oven gloves.
O Do not attempt to fit a mixing tool when using the steamer
basket.
O Do not cook food in the mixer bowl whilst using the
steamer basket.
Hints and Tips
O Liquid left in the bowl is good for making soup or stock.
Be careful it will be very hot.
O Leave gaps between pieces of food.
O Stir large amounts half way through cooking.
O Similar sized pieces of food cook more evenly.
O If steaming more than 1 type of food, if something needs
less time, add it later.
O If you lift the feed chute lid or remove the splashguard,
steam will escape and cooking may take longer.
O Food will continue cooking when your Stand Mixer
switches off, so remove food immediately.
O If your food’s not cooked enough, reset the time. You
may need to top up with water.
O The cooking times are a guide only. Always check that
food is thoroughly cooked before eating.
O Do not allow the unit to boil dry, top up with water as
necessary.
Display Screen Explained
Tap this icon to open the settings menu.
Tap this icon to open the pre-set programmes menu.
Tap this icon to weigh ingredients into the bowl.
Shows the time selected in hours (h), minutes (m) and seconds (s).
Shows the stir interval selected.
If an intermittent speed (2 Æ 4) is selected, the outer ring will progressively increase and
the appliance will stir when it is full.
Shows the temperature selected.
A pulsing red background indicates the machine is in heating mode.
A solid red background indicates the machine has reached the set temperature.
An intermittent arrow pointing downwards indicates the appliance is cooling down.
Indicates that a setting (time, speed or temperature) cannot be adjusted.
Status Information Text here shows status information.
Indicates that the bowl, its contents and any parts being used are hot. Please handle with
care.
Indicates that the appliance is connected to a WiFi network.
Indicates that the appliance is in the high speed high temperature mode (HSHT)
Turn the control dial anti-clockwise to use stir intervals and pulse.
Turn the control dial clockwise to use continuous speeds min - max.

9
Recipes
Recipe Tool Used Preset / Manual Settings Ingredients
Minestrone Chunky Soup
20 mins
98˚C
Add the following all at once:
100g pancetta, diced
2 garlic cloves, chopped
50g Arborio rice
2½ tbsp tomato puree
70g savoy cabbage
1 tsp dried rosemary
2 tsp dried sage
1 celery stick, sliced
60g leek, sliced
75g onion, sliced
75g carrot, sliced
1L hot vegetable stock
Salt and pepper
Beef Strogano All in One Dishes
30 mins
103˚C
Add the following all at once:
600g beef, diced
1 tbsp paprika
1 tbsp butter
1 garlic clove, chopped
400g beef stock
200g mushroom, sliced
150g onion, sliced
300g carrot, sliced
200ml single cream
1 tbsp cornstarch
1 tbsp water }mix together
Salt and pepper
Crème Anglaise Manual Settings
15 mins
85˚C
Add the following all at once:
250g full fat milk
250g double cream
1 tsp vanilla extract
2 tbsp cornflour
96g egg yolk, }mix together
80g caster sugar
Popcorn Popcorn
10 mins
OFF
180˚C
Add the following all at once:
50g Popcorn Kernels
20g Sunflower Oil
* For best results always use the preset.
Rice Pudding Manual Settings
1 hr
15 mins
95˚C
Add the following all at once:
150g short grain rice
1L full fat milk
75g caster sugar
2 tsp vanilla extract

10
Temperature and Speed Settings
Temperature
Guidelines
60°C Melting Chocolate
72°C – 82°C Poaching
98°C – 99°C Simmering
100°C Boiling, steaming
130°C – 140°C Sautéing vegetables
180°C Browning meat
(P) Pulse - For short bursts of maximum power.
Stir interval 1 – The mixer will operate at a constant slow speed. Used for folding
light ingredients into heavier mixtures.
Stir interval 2 – Intermittent stir with short pauses. When set to this speed,
intermittently operates on a slow speed every 10 seconds for 1.5 revolutions.
Stir interval 3 – Intermittent stir with medium pauses. When set to this speed,
intermittently operates on a slow speed every 30 seconds for 1.5 revolutions.
Stir interval 4 – Intermittent stir with long pauses. When set to this speed,
intermittently operates on a slow speed every 5 minutes for 1.5 revolutions.
Speed min - max Continuous speeds gradually increasing to max
HSHT To mix at temperatures above 60˚C using speeds Min-Max.
Recommended Usage Chart
This is for guidance only and will vary depending on the exact recipe and ingredients being processed.
K-beater
For making cakes, biscuits, pastry, icing, fillings, eclairs and mashed potato.
Hints and Tips
• To avoid splashing of ingredients gradually increase the speed.
• To fully incorporate the ingredients, stop mixing and scrape down the bowl with the
spatula frequently.
• Use cold ingredients for pastry unless your recipe says otherwise.
Recipe/ Process
(Max) (Minutes)
Pastry & Biscuits – rubbing fat into flour Flour weight 910g Min 12
All In one cake mixes Total weight 4kg Min Max 45–60 secs
Creaming Beater
For creaming and mixing soft ingredients
Hints and Tips
• To avoid splashing of ingredients gradually increase the speed.
• When creaming fat and sugar for cake mixes, always use the fat at room temperature or
soften it first.
• Two wiper blades are supplied with your high temperature creaming beater. Use one
wiper blade for sweet recipes and the other for savoury recipes.
Recipe/ Process
(Max) (Minutes)
Creaming butter/margarine and sugar 4.55kg
(15 Egg Mix)
Min Max 4
Beating eggs into cake mixes Min Max 1–4
Folding in flour, fruit etc Min 1 30–60 secs
Eggs sizes used = medium sized (Weight 53 – 63g).
Whipping cream used = Fresh Whipping cream with minimum 38% Fat content

11
Recommended Usage Chart
This is for guidance only and will vary depending on the exact recipe and ingredients being processed.
Whisk
For eggs, cream and soufflés.
Important
• To avoid splashing of ingredients gradually increase the speed.
•
Do not use the whisk for heavy mixtures (all in one cakes and creaming fat and sugar)
as you could damage it.
• Best results achieved when eggs are at room temperature.
Before whisking egg whites, make sure there is no grease or egg yolk on the whisk or the
bowl.
Recipe/ Process
(Max) (Minutes)
Egg whites 16 (605g)
Min Max
1½-2
Fatless sponges 930g 4 -6
Cream 2L 1½-3
Pancake Batter
• Add flour to the bowl first, followed by the wet
ingredients.
• Mix on minimum speed to incorporate ingredients.
250g Flour
500g Milk
200g Eggs
Min 10 secs
Max 45–60 secs
Mayonnaise
• For best results scrape down the bowl after the
addition of the oil and run for a further 10 secs at
max speed.
2 Egg Yolks
10g Mustard
200mls Vegetable Oil
Max 1-1½
Dough Tool
For yeasted dough mixes
Hints and Tips
Important
• Never exceed the maximum capacities and speeds stated – you may overload the
machine.
• If you hear the machine labouring, switch o, remove half the dough and do each half
separately.
• The ingredients mix best if you put the liquid in first.
Yeast
• Dried Yeast (the type that needs reconstituting): pour the warm water into the bowl.
Then add the yeast and sugar and leave to stand for 10 minutes until frothy.
• Fresh yeast: crumble into the flour
• Other types of yeast: follow the manufacturer’s instructions.
Recipe/ Process
(Max) (Minutes)
Bread Dough (stiff yeasted) Flour weight 350g–1.6kg Min 60 secs
1 3–4
Total weight 564g–2.58kg Re-knead
Speed 1
60 secs
Soft yeasted dough (enriched with
butter and eggs)
Flour weight 250g–1.6kg Min 60 secs
Total weight 478g–3.1kg 1 3–4
Re-knead
Speed 1
60 secs
Eggs sizes used = medium sized (Weight 53 – 63g).
Whipping cream used = Fresh Whipping cream with minimum 38% Fat content

12
Steamer Attachment Cooking Guide
O
These cooking times are for guidance only. 500ml of water can be used for food requiring up to 20 minutes cooking time. For
food requiring a longer cooking time use 650ml of water.
O
Do not allow the unit to boil dry, top up with water as necessary.
O
Do not overcrowd the basket when steaming poultry and fish.
O
Read ‘food safety’ in the safety section.
Vegetables
Ingredient
(Max) (minutes)
Qty of Water Preparation
Asparagus 450g 15 500ml Trim
Beans, green 450g 15-20 500ml Trim
Beans, runner 450g 15-20 500ml Trim & thinly slice
Broccoli 450g 20 500ml Cut into florets
Brussel sprouts 450g 25 500ml Trim and cut bases
Cabbage 1 small 25 500ml Shred
Carrots 450g 20 500ml Thinly slice
Cauliflower 1 medium 25 - 30 650ml Cut into florets
Courgettes 450g 15 500ml Thinly slice
Celery 1 head 15 500ml Thinly slice
Leeks 3 15 500ml Thinly slice
Mange tout 250g 15 500ml Trim
Button Mushrooms 450g 10 500ml Wipe
Parsnips 450g 15 500ml Dice or thinly slice
Peas 450g 15 500ml Shell
Potatoes, new 450g 30-40 650ml Wipe
Poultry and Fish
Recipe/Process
(Max) (minutes)
Qty of Water Comments
Chicken, boneless breasts 4 30-40 650ml Steam until thoroughly cooked
and tender
Clams 450g 10 500ml Steam until open
Prawns, medium 450g 10 500ml Steam until pink
Fish, fillets 230g 10-20 500ml Steam until it flakes
Fish, steak 2.5cm thick 15-20 500ml Steam until it flakes
Fish, whole 340g 15-20 500ml Steam until it flakes
Lobster tails 2-4 20 500ml Steam until red
Mussels 450g 15 500ml Steam until open
Oysters 6 15 500ml Steam until open
Scallops 230g 15 500ml Steam until hot and tender

13
Tool Height Adjustment
Refer to Illustration U
Whisk, Stainless Steel K-beater
For best performance the whisk and K-beater should be
almost touching the bottom of the bowl. If necessary adjust
the height using the spanner provided.
High Temperature Creaming Beater - this tool should just
touch the bottom of the bowl.
1 Unplug the appliance.
2 Raise the mixer head and insert the whisk, K-beater or high
temperature creaming beater.
3 Lower the mixer head. If the clearance needs to be
adjusted, raise the mixer head and remove the tool.
4 Using the spanner provided loosen the nut sufficiently to
allow adjustment of the shaft. To lower the tool closer to
the bottom of the bowl, turn the shaft anti-clockwise. To
raise the tool away from the bottom of the bowl turn the
shaft clockwise.
5 Re-tighten the nut.
6 Fit the tool to the mixer and lower the mixer head. (Check
its position see points above).
7 Repeat the above steps as necessary until the tool is set
correctly. Once this is achieved tighten the nut securely.
Dough Tool - this tool is set at factory and is not adjustable.
Stir Tool - this tool should just touch the bottom of the bowl.
1 Unplug the appliance.
2 Raise the mixer head and insert the stir tool.
3 Lower the mixer head. If the tool needs adjustment, raise
the mixer head and use the spanner to loosen the nut, then
lower the mixer head.
4 To lower the tool closer to the bottom of the bowl, turn the
adjustment wheel clockwise. To raise the tool away from
the bottom of the bowl, turn the adjustment wheel anti-
clockwise.
5 Re-tighten the nut.
To Fit And Use Your Splashguard Assembly
Refer to Illustration V
The splashguard assembly consists of 2 pieces: the heat shield
and the splashguard.
The heat shield is to protect the mixer head from steam
produced during the cooking process.
The splashguard should not be fitted to the bowl unless used
in conjunction with the heat shield.
1 Raise the mixer head until it locks.
2 Push the heat shield upwards onto the underside of the
mixer head until fully located. The heat shield must never
be used without the rubber seal correctly fitted.
3 Fit the bowl onto the base.
4 Lower the mixer head.
5 Rest the splashguard on the bowl rim and then slide
forward until fully located.
• During mixing, ingredients can be added directly to the
bowl via the feed chute.
6 To remove the splashguard simply slide it away from the
appliance.
Note: The splashguard will remain attached to the heat shield
when the mixer head is raised unless removed before lifting
the mixer head.
7 To remove the heat shield, raise the mixer head until
it locks. Remove the tool, then pull the heat shield
downwards from the underside of the mixer head.
Note: Only fit or remove the splashguard when the mixer
head is in the locked position.
To Fit And Remove Your Stir Assist Clip
Refer to Illustration W
The stir assist clip can be used to assist the mixing action.
1 Slot the stir assist clip over the side of the bowl with the
vertical ridge on the inside and the clips on the outside.
2 Turn the clip anti-clockwise onto the bowl handles.
3 To remove, reverse the procedure.
IMPORTANT - The stir assist clip should not be fitted when
using the K-beater, whisk, dough tool or creaming beater.
Assembling The High Temperature
Creaming Beater
Refer to Illustration X
Fitting The Wiper Blade
The wiper blade is supplied already fitted and should always
be removed before cleaning.
1 Carefully fit the flexible wiper blade onto the tool by
locating the base of the wiper blade into the slot then fit
one side into the groove before gently hooking the end in
place. Repeat with the other side.
Care And Cleaning
O Always switch off and unplug before cleaning.
O A little grease may appear at outlet when you first use
it. This is normal - just wipe it off.
O The metal surfaces of the temperature sensors may show
signs of wear during normal use. This does not affect the
performance of the product.
O Do not leave the high temperature flexible beater fitted to
the mixer when not in use.
Appliance, outlet covers
O Wipe with a damp cloth, then dry.
O Never use abrasives or immerse in water.
High temperature creaming beater
O Always remove the flexible wiper blade from the tool
before cleaning.
O Wash the flexible wiper blade and tool in hot soapy water,
then dry thoroughly. Alternatively the parts can be washed
in a dishwasher.
Note: Please inspect the condition of the tool body before and
after use and also regularly inspect the condition of the wiper
blade and replace it if there are any signs of wear.
Bowl, Tools, Splashguard, Stir Assist Clip
O Wash by hand, then dry thoroughly or wash in the
dishwasher (refer to chart at front of manual).
O Never use a wire brush, steel wool or bleach to clean your
stainless steel bowl. Use vinegar or a suitable descaler to
remove limescale.
O If food sticks or burns on the inside of the bowl, remove as
much as possible using the spatula provided. Fill the bowl
with warm soapy water and allow to soak. Remove any
stubborn deposits using a nylon brush.
O Any discolouration of the bowl will not affect its
performance.
Drain Hole
O Ensure this area is free from food. If necessary use a pipe
cleaner or cotton bud to clean.
Temperature sensors
O Wipe with a damp cloth then dry thoroughly. Never use
abrasives or sharp instruments to clean the sensors.

14
Steamer Attachment
O Always switch off and unplug before removing the
attachment from the Stand Mixer.
O For easier cleaning always wash the parts immediately
after use.
All parts can be washed in hot soapy water, then dried
thoroughly. Alternatively they can be washed in the
dishwasher.
O Ordinary water and food contains salts and acids which
can sometimes effect metal surfaces such as the inside of
the mixer bowl. Should this occur clean with a nylon brush,
a non abrasive scourer or a proprietary stainless steel
cleaner.
Service and Customer Care
O If you experience any problems with the operation of
your appliance, before requesting assistance refer to the
‘Troubleshooting Guide’ section in the manual or visit
www.kenwoodworld.com.
O Please note that your product is covered by a warranty,
which complies with all legal provisions concerning any
existing warranty and consumer rights in the country
where the product was purchased.
O If your Kenwood product malfunctions or you find
any defects, please send it or bring it to an authorised
KENWOOD Service Centre. To find up to date details of
your nearest authorised KENWOOD Service centre visit
www.kenwoodworld.com or the website specific to your
Country.
O Designed and engineered by Kenwood in the UK.
O Made in China.
IMPORTANT INFORMATION FOR CORRECT DISPOSAL OF
THE PRODUCT IN ACCORDANCE WITH THE EUROPEAN
DIRECTIVE ON WASTE ELECTRICAL AND ELECTRONIC
EQUIPMENT (WEEE)
At the end of its working life, the product must not be disposed
of as urban waste. It must be taken to a special local authority
differentiated waste collection centre or to a dealer providing
this service.

15
Troubleshooting Guide
Problem Cause Solution
The machine will not operate in the
heat mode and displays an error
message and gives a warning beep.
One of the safety sensors has been
activated.
Check display screen for notification of cause.
• Ensure the head is lowered and locked.
• Ensure all outlet covers are correctly fitted.
• Ensure the heat shield is correctly fitted.
• Ensure the cooking chef bowl is corrected
fitted.
The machine changes speed or
speed is limited during cooking.
The speed is automatically limited when
the bowl contents reach 60°C and the hot
temperature warning indicator will be on.
This is a safety feature.
Food burning on the base of the
bowl.
1 The temperature setting selected may be
too high.
2 Incorrect tool being used.
3 The stir delay is too long.
4 The tool may not be low enough in the
bowl.
5 The timer has been set for too long.
6 The sensor and/or the underside of bowl
may not be clean.
1 Reduce the temperature.
2 Check the most suitable tool is being used
and adjusted correctly.
3 Increase the frequency of the stir delay or
increase to a continuous operation.
4 Adjust the tool.
5 Cook for a shorter length of time (ensure
food is thoroughly cooked).
6 Ensure that these areas are kept clean and
dry.
Consistency of food not maintained. 1 Temperature selected too high.
2 Stir delay too frequent.
3 Ingredients cooked for too long.
4 Incorrect tool being used.
1 Reduce temperature.
2 Reduce stir delay.
3 Reduce the cooking time (ensure food is
thoroughly cooked).
4 Check the most suitable tool is being used.
Inconsistent mixing speed. 1 Ingredients too large, hard or too firm. 1 Cut food into smaller pieces, remove stones
from fruit, slowly melt ingredients without a
tool in position (but ensure a speed has been
selected).
2 Add ingredients after the head is lowered.
3 Check the most suitable tool is being used.
Difficult to shut mixer head. 1 Firm ingredients such as chocolate in the
bottom of the bowl prevent the mixer
head from locking down.
2 Stir tool has been incorrectly fitted.
1 Add ingredients after the mixer head is
lowered.
2 Ensure the stir tool is fitted into the stir tool
outlet.
Motor speed is limited when using
attachments
Hot bowl fitted. Remove the bowl, or cool the bowl to below
60°C.
The whisk or K-beater knocks
against the bottom of the bowl or
not reaching the ingredients in the
bottom of the bowl.
The high temperature creaming
beater not picking up ingredients
from the bottom of the bowl.
Tool at the wrong height and needs
adjusting.
Adjust the height using a suitable spanner –
see “Tool Height Adjustment” section.
The whisk, K-beater or creaming
beater knock against the stir assist
clip.
Stir assist clip is fitted. Remove stir assist clip – this should be used
when using the stir tool only.
Slow speed attachment cannot be
fitted.
Check your attachment is compatible for
use with your model.
Twist connection system required (Model
KAX)
Attachment must have the KAX twist
connection system to fit the outlet.
If you own attachments featuring the Bar
Connection System you will need to use
the KAT002ME adaptor to connect these to
the Twist Connection System on your Stand
Mixer.
For more information visit
www.kenwoodworld.com/twist.

16
Troubleshooting Guide - Continued
Problem Cause Solution
Standby light flashing when Stand
Mixer first plugged in.
Mixer head in the raised position or not
locked down correctly.
Check Stand Mixer head is locked down
correctly.
The Stand Mixer stops during
operation.
Standby light flashing rapidly for a
few seconds.
Overload protection or overheat system
activated.
Maximum capacity exceeded.
Unplug and check for obstruction or
overloading.
If the machine will not operate, remove some
of the ingredients to reduce the load and
restart.
If this still does not resolve the problem,
unplug and allow to stand for 15 minutes. Plug
in and reselect the speed.
If the machine does not restart following the
above procedure contact “customer care” for
further advice.
The Stand Mixer stops during
operation. Standby light is flashing
slowly.
Mixer head lifted. Lower the mixer head and restart.
Standby light off whilst machine
plugged in.
Stand Mixer has been left plugged in
for more than 20 minutes without being
operated and has gone into Standby mode.
Press the touch screen or turn the control dial
to reset.
The Stand Mixer stops during
operation.
Heat shield removed or an outlet cover
removed.
Fit the heat shield or outlet cover and then
restart.
Display screen shows an alpha/
numerical error code.
Appliance not functioning properly. Contact an authorised Kenwood Service
Centre. To find up to date details of your
nearest Kenwood Service Centre visit
www.kenwoodworld.com or the website
specific to your country.
No power to appliance /display
screen not coming on.
Appliance not plugged in.
On/O switch not operated.
Appliance has gone into standby mode.
Check appliance plugged in.
Press the On/O switch to the On position.
Touch the display screen or rotate the control
dial.
Appliance not operating. Control dial not pressed. Press the control dial to start cooking.
Timer not counting down on display
screen.
During the heating stage the timer will not
count down until the correct temperature is
reached.
Temperature set above 100˚C but water
content of food preventing temperature
going above 100˚C.
Normal operation.
Reduce or select correct temperature.
Temperature of bowl contents does
not go above 100˚C.
Water content of ingredients may prevent
the temperature from going above 100˚C.
Normal operation.
Heavy movement or vibrations
during operation.
Uneven load in bowl causing excessive
vibrations.
Maximum capacity exceeded.
Wrong tool or speed used.
Reduce quantity or rearrange food in bowl and
restart unit.
Refer to the relevant programme and
recommended speed charts for correct tool
and speed to use.
Display shows error message E:34 WiFi connection issue. Check WiFi Password.
Forget WiFi network, go to Settings > WiFi
> Forget Network.
Restart Appliance Setup from the Kenwood
World App.
slow flashing Unable to find known WiFi network Appliance may have moved, router may be
turned o or may require a restart.
fast flashing WiFi available, but unable to connect to
cloud servers.
Router may require a restart, or contact your
Internet Service Provider.
Check for working Internet connection on local
network.
Display shows error message E42 Boil Dry Error (Steam preset error) Add water to the bowl
Explanation of appliance beeping sounds
1) Fast single beep. 1) Pressing the control dial to start or stop
the machine or the head is lifted during
operation
Normal Operation

17
Troubleshooting Guide - Continued
Problem Cause Solution
2) Quick double beep
3) Triple Beep
2) Appliance waiting – appliance will give
a quick double beep 10 minutes and
5 minutes before the end of the keep
warm cycle.
3) Signifies the following;
- End of preset programme
- End of manual operation
- End of keep warm cycle
- When appliance is about to stir.
Normal Operation
Normal Operation
When contacting customer care, you may be required to supply details of the software version. This can be found by pressing the
settings menu icon, then selecting " About Appliance".
Display screen shows “- -“. The scale is zeroing. Normal operation.
Display screen shows a minus
reading.
Display not zeroed and either ingredients
or the bowl/lid/attachment has been
removed.
Ingredients or items are pressed against or
underneath the appliance.
Appliance is pressed against a wall.
Either zero the screen, replace the missing
ingredients or refit the bowl.
Ensure there are no ingredients or items
pressed against or underneath the appliance.
Ensure there is space between the appliance
and any walls.
Zero the display before weighing next
ingredients.
Display screen not registering small
quantities.
Quantity weighed too small. Use teaspoon or tablespoon measures for very
small quantities.
Weight changed on display screen. Appliance moved during operation.
Edge of bowl touched during weighing of
ingredients.
Always place the appliance on a dry flat stable
surface prior to weighing.
Do not move the appliance or touch the bowl
during operation of the weighing function.
Zero the display before weighing next
ingredients.
Unable to switch quickly between
metric and imperial units.
Appliance is reconfiguring to display
previously selected unit and measurement.
Wait 5 seconds and try again.
Weighing in app (weight displayed
on mobile device) is slow to
respond.
Poor WiFi signal strength.
Mobile device not connected to the same
local WiFi home network.
Ensure appliance has good signal strength
(contact your internet service provider for
guidance on how to improve).
Make sure mobile device is connected to the
same local WiFi home network as appliance
(go to mobile device settings and select your
local WiFi network).
If the problem persists contact your nearest authorised Kenwood Service Centre. To find up to date details of your nearest
Kenwood Service Centre visit www.kenwoodworld.com or the website specific to your country.

18
Ecodesign Information
Network Port: Single WiFi network port, activated by default.
Model No.: TYPE: KCL95
RF Frequency Range: 2412 - 2472 MHz
Maximum Transmit Power: < 20 dBm
Communications Protocol: IEEE802.11 b, g, n
The KCL95 has a single WiFi network port and is intended for use as remotely operated, network equipment.
O The Network Port can be deactivated in the WiFi settings menu and selecting “Off”.
O The Network Port can be re-activated in the WiFi settings menu and selecting “On”.
Reactivation: The appliance can be reactivated from standby mode by;
O From networked standby: Touch the display screen, rotate the control dial or remotely via the App.
O From non-networked standby: Touch the display screen, rotate the control dial.
O The bowl and lid should always be kept fitted to the main unit so that it can be operated remotely.
Factory Reset - Important
When disposing of the appliance, it is important to factory reset it to protect your personal data. Selecting this option will erase all
WiFi data stored on the appliance and restore it to factory settings. To factory reset your appliance, select Settings> Factory Reset.
WEBSITE
Modes Power consumption
Non-Networked Standby - After 20 mins of inactivity display screen turns off. WiFi
network port de-activated.
0.2 W
Networked Standby - After 20 mins of inactivity display screen turns off and all WiFi
network ports remain activated.
0.7 W
Off -Activated by switch on rear of unit. 0.0 W

19
Veiligheid
OLees deze instructies zorgvuldig door en bewaar ze voor toekomstig
gebruik.
OVerwijder de verpakking en alle labels.
OAls de stekker of het snoer beschadigd is, moet het om veiligheidsredenen
door Kenwood of een door Kenwood geautoriseerd reparatiebedrijf vervangen
worden, om gevaar te voorkomen.
Belangrijke mededeling – elektronisch-medische implantaten
ONet als andere inductieverwarmingsproducten genereert dit apparaat
magnetische velden met beperkt bereik. Gebruikers of andere personen met
een pacemaker of ander actief implantaat dienen voor gebruik een arts te
raadplegen over eventuele incompatibiliteit, zodat eventueel gevaar voor de
gezondheid kan worden voorkomen.
OSchakel het apparaat uit en haal de stekker uit het stopcontact voordat u
hulpstukken installeert of verwijdert, na het gebruik en voordat u het apparaat
reinigt.
OHoud lichaamsdelen, haar, sieraden en loszittende kleding uit de buurt van
bewegende delen en geïnstalleerde hulpstukken.
OSteek uw vingers, enz. nooit in het scharniermechanisme.
OLaat het apparaat nooit onbeheerd achter wanneer het in een niet-kookmodus
staat.
OAls u de machine in de kookstand zonder toezicht laat werken, moet u goed
op het volgende letten:
{ zorg ervoor dat alle instructies over temperaturen en maximale
verwerkingshoeveelheden opgevolgd zijn;
{ zorg ervoor dat kinderen niet bij de machine of het snoer kunnen. De
machine en het snoer mogen niet over de rand van het werkoppervlak
uitsteken;
{ controleer het proces regelmatig om te zien of er voldoende vloeistof is
toegevoegd en het eten niet te gaar wordt.
OGebruik nooit een beschadigd apparaat. Laat het nakijken of repareren: zie
‘Onderhoud en klantenservice’.
OGebruik nooit een ongeautoriseerd hulpstuk of meer dan één hulpstuk
tegelijkertijd.
OOverschrijd nooit de maximumcapaciteit en wanneer u het inductieve
verwarmingsapparaat gebruikt, mag u nooit het maximale afvulniveau van 3
liter overschrijden, gemarkeerd aan de binnenkant van de kom.
OLees bij het gebruik van een hulpstuk de veiligheids- en gebruiksinformatie die
erbij wordt geleverd.
OWees voorzichtig wanneer u dit apparaat optilt, omdat het zwaar is. Zorg
dat de kop vergrendeld is en dat de kom, hulpstukken, afdekking van de
aansluitpunten en het snoer vastzitten voordat u het apparaat optilt.
OBij het verplaatsen van het apparaat altijd oppakken bij de voet en de
mengkop. Het apparaat NIET optillen of dragen aan de komgreep.
OLaat het snoer nooit naar beneden hangen waar een kind erbij kan.
OLaat de motor, het snoer of de stekker nooit nat worden.
OWees voorzichtig als u enig deel van het apparaat vastpakt of aanraakt
terwijl het in de kookstand wordt gebruikt en na het koken. DIT GELDT
MET NAME VOOR DE KOM, HET SPATDEKSEL EN DE HULPSTUKKEN
omdat deze nog lange tijd nadat het apparaat is uitgeschakeld HEET blijven.
Gebruik de handgrepen om de kom te verwijderen en te dragen. Gebruik
ovenhandschoenen om de hete kom en menghulpstukken aan te pakken.
OHet symbool op een product geeft aan dat een oppervlak heet kan worden
tijdens gebruik.
OWees voorzichtig bij het verwijderen van de komhulpstukken na langdurig
gebruik, omdat ze heet kunnen zijn.
ODe onderkant van de kom blijft nog lange tijd nadat de verwarming is
uitgeschakeld heet. Wees voorzichtig als u de kom vastpakt en gebruik de
beschermmat voor het werkoppervlak als u de kom op een warmtegevoelige
ondergrond plaatst.
OPas op voor stoom die uit de mengkom kan komen, met name als u het deksel
Nederlands
Vouw de voorpagina a.u.b. uit voordat u begint te lezen.
Op deze manier zijn de afbeeldingen zichtbaar

20
van het spatdeksel verwijdert of de mixerkop omhoog zet.
OAls heet voedsel van de mixer wordt overgebracht naar de blender, laat u de
ingrediënten altijd tot kamertemperatuur afkoelen, voordat u ze in de blender
doet.
OGebruik alleen de kom en hulpstukken die bij dit apparaat worden geleverd.
Gebruik de kom met geen enkele andere hittebron.
OLaat het apparaat nooit werken in de kookstand als de kom leeg is.
OSteek nooit iets in de ventilatiegaten.
OZorg dat dit apparaat tijdens het gebruik niet te dicht bij de rand en op een
vlakke ondergrond staat. Zorg dat het ten minste 10 cm verwijderd is van de
muur en dat de ventilatiegaten niet worden geblokkeerd. Plaats het apparaat
niet onder overhangende keukenkastjes.
OVoor een juiste en veilige werking van de inductiekoker dient u ervoor te
zorgen dat de kombasis en temperatuursensors schoon en droog zijn voordat
u gaat koken.
OMetalen voorwerpen zoals messen, vorken, lepels en deksels mogen niet op het
voetstuk of inductiegebied worden geplaatst het voetstuk omdat deze heet
kunnen worden.
ONet als voor andere inductieverwarmende apparaten geldt dat u geen
creditcards, magnetische media of gevoelige elektronische apparatuur in de
buurt van het apparaat mag plaatsen wanneer dit in gebruik is.
OGebruik het apparaat niet om te frituren.
OZorg dat het voedsel voldoende gekookt is voordat u gaat eten.
OVul de kom niet meer dan 250 ml wanneer u met olie kookt.
OVoedsel dient kort na bereiding te worden gegeten of moet snel worden
afgekoeld en zo snel mogelijk in de koelkast worden bewaard.
OMisbruik van dit apparaat kan persoonlijk letsel veroorzaken.
OGebruik geen overmatige kracht bij het indrukken van het touchscreen en
gebruik nooit een scherp voorwerp om deze te bedienen.
OGebruik de garde niet voor zware mengsels (bijv. Crèmevet en suiker), omdat u
deze kunt beschadigen.
OHet stroomsnoer wordt gebruikt om het risico van verstrengeling of struikelen
te voorkomen. Er mag een verlengsnoer worden gebruikt, zolang men
voorzichtig is. Als een verlengsnoer wordt gebruikt: 1) het op het verlengsnoer
aangegeven vermogen moet minstens zo groot zijn als het elektrische
vermogen van het apparaat; en 2) zorg ervoor dat het snoer niet over het werk-
of tafelblad hangt, zodat kinderen eraan kunnen trekken of mensen erover
kunnen struikelen. Als het apparaat geaard is, moet het verlengsnoer 3 geaarde
draden hebben. Het elektrische vermogen van het apparaat vindt u aan de
onderkant.
ODit apparaat kan worden gebruikt door personen met verminderde
lichamelijke, sensorische of geestelijke capaciteiten of gebrek aan ervaring en
kennis mits ze onder toezicht staan of instructie hebben gekregen over het
veilige gebruik van het apparaat, en de betrokken risico’s begrijpen.
OOp kinderen moet toezicht gehouden worden om er zeker van te zijn dat ze
niet met het apparaat spelen.
ODit apparaat mag niet door kinderen worden gebruikt. Houd het apparaat en
het snoer buiten het bereik van kinderen.
OGebruik het apparaat alleen voor het huishoudelijke gebruik waarvoor het is
bedoeld. Kenwood kan niet aansprakelijk worden gesteld in als het apparaat is
misbruikt of als deze instructies niet zijn opgevolgd.
ODe maximale beoordeling is gebaseerd op de mini-hakmolen / molen hulpstuk
dat de grootste belasting trekt. Andere hulpstukken kunnen minder stroom
verbruiken.
ODeze machine kan niet worden bediend met een externe timer of een
afzonderlijke afstandsbediening.
O Verplaats de machine niet en haal de kop niet omhoog als een hulpstuk
aangebracht is, omdat de keukenmachine dan instabiel kan worden.
O Gebruik uw apparaat niet in de buurt van de rand of overhangend
werkoppervlak en oefen geen kracht uit op een vastgemaakte bevestiging,
omdat dit ertoe kan leiden dat het apparaat instabiel wordt en kantelt, wat kan
resulteren in verwondingen.

21
Stoomhulpstuk
ODit hulpstuk produceert stoom waaraan u zich kunt verbranden.
OVoorkom brandwonden door stoom uit het mandje, vooral wanneer u het
spatdeksel verwijdert of het deksel van de vultrechter optilt.
OWees voorzichtig met alle onderdelen; alle vloeistoen, condensatie, stomer- of
keukenmachineonderdelen zijn erg heet. Gebruik ovenwanten.
OHaal de stekker van het apparaat uit het stopcontact voordat u onderdelen
verwijdert of reinigt.
Voedselveiligheid
OKook vlees, gevogelte en vis door en door. Prepareer geen bevroren vlees,
gevogelte of vis.
OWarm gekookt voedsel niet op in uw stoomapparaat.
Voordat u de stekker in het stopcontact steekt
O Controleer of de elektriciteitsvoorziening dezelfde spanning heeft als op de onderkant van het apparaat wordt aangegeven.
O WAARSCHUWING: DIT APPARAAT MOET GEAARD ZIJN.
O Dit apparaat voldoet aan EG Verordening 1935/2004 inzake materialen en voorwerpen die bestemd zijn om met levensmiddelen in
contact te komen.
O Dit apparaat voldoet aan de essentiële eisen en andere relevante voorzieningen van Richtlijn 2014/53/EU.
Voordat u de machine voor het eerst gebruikt
O Lees het deel ‘Onderhoud en reiniging’, voordat u de
onderdelen gaat schoonmaken.
Ken uw Kenwood Cooking Chef
Legenda
Contacten voor hulpstukken
1 Contact hoge snelheid (HSO)
2 Contact lage snelheid (SSO)
3 Contact voor komhulpstuk
4 Contact voor roerder
Mixer
5 Afdekking aansluitpunt hoge snelheid
6 Mixerkop
7 Deksel voor lagesnelheidscontact
8 Kom van cooking chef
9 Kop - hefhendel
10 Bedieningsknop
11 Aan / uit-schakelaar
12 Displayscherm
13 Beschermmat werkoppervlak
14 Drainopening
15 Kombasis/inductiegebied
16 Ventilatiegaten
17 Temperatuursensors
18 Hittescherm
19 Rubber afdichting (verwijderbaar)
20 Spatscherm
21 Deksel vulopening
22 K-klopper
23 Slagroomklopper voor hoge temperatuur
24 Aangedreven garde
25 Deeghaak
26 Roerder
27 Roerhulpklem
28 Spatel voor hoge temperatuur
29 Deegschraper
30 Moersleutel
Stoomhulpstuk
31 Handgreepsteunen
32 Steunring
33 Opvouwbare handgrepen
34 Verwijderbare plaat
35 Eihouder
Opmerking: Hulpstukken voor het lagesnelheidscontact
Het lagesnelheidscontact van uw keukenmachinemodel
heeft een draaiverbinding. Het is speciaal ontworpen
voor hulpstukken die uitgerust zijn met het
draaiverbindingssysteem.
Als u nieuwe hulpstukken voor het lagesnelheidscontact
koopt, dient u de compatibiliteit met uw keukenmachine te
controleren. Alle hulpstukken met het draaiverbindingssysteem
zijn te herkennen aan de productcode die begint met KAX en
aan het Twist-logo dat op de verpakking staat.
Als u hulpstukken hebt met het stangverbindingssysteem ,
dan hebt u de KAT002ME-adapter nodig om deze
hulpstukken aan het draaiverbindingssysteem
van uw
keukenmachine te bevestigen.
Ga voor meer informatie naar
www.kenwoodworld.com/twist.
Verbinding maken met de
Kenwood World-app
Zie afbeeldingen A – D
Met de Kenwood World app kunt u het apparaat via uw
smartphone of tablet aansturen.
1 Steek de stekker in het stopcontact en druk op de aan /
uit-schakelaar aan de zijkant van de power unit.
2 Selecteer Instellingen > WiFi> Verbinden en volg de
instructies op het touchscreen.
PIN-nummer
O Zorg ervoor dat u het PIN-nummer bij de hand hebt. De
Kenwood World app zal erom vragen.
O Het apparaat kan alleen worden aangesloten wanneer het
PIN-nummer op het scherm wordt weergegeven. Als de
PIN onjuist wordt ingevoerd, volgt u de aanwijzingen van
de app en probeert u het opnieuw.
O Om het PIN-nummer van de machine te zien, selecteer
Instellingen > WiFi > Verbinden en volg de aanwijzingen
op het displayscherm (alleen als er wifiverbinding is).
Opmerking:
Wifi
Functioneert alleen met IEEE802.11 b, g en n op 2,4 GHz.
Compatibiliteit
De Kenwood World app is compatibel met de
nieuwste versies van iOS en Android.
Resetten
Belangrijk
O Wanneer u het apparaat van de hand doet, is het belangrijk
om het apparaat te resetten, om uw persoonlijke data te
beschermen.
O Met deze opdracht worden alle opgeslagen wifigegevens
van het apparaat gewist en wordt de wifi gereset.
O Om uw machine te resetten, kiest u Instellingen
>Resetten naar de fabrieksinstellingen.

22
Uw Cooking Chef Connect instellen
Zie afbeeldingen E – I
De Cooking Chef gebruiken
BELANGRIJK
OZorg dat het inductiegebied, de temperatuursensors en
het externe oppervlak van de kombodem schoon zijn. Als
dit niet gebeurt, wordt de temperatuursensor beïnvloed en
krijgt u een minder kookresultaat.
OControleer of alle afdekkingen van de aansluitpunten, met
inbegrip van het hittescherm, zijn aangebracht. Als ze niet
juist zijn aangebracht, werkt de verwarmingsfunctie niet.
1 Steek de stekker in het stopcontact en druk op de aan /
uit-schakelaar.
2 Draai de hendel voor het omhoog halen van de kop naar
rechts en haal de mixerkop omhoog, totdat hij vergrendelt.
3 Duw het hittescherm omhoog tegen de onderkant van de
mixerkop, totdat hij goed is bevestigd. Het hittescherm
mag alleen worden gebruikt met een goed aangebrachte
rubberen afdichting.
O Als u de Cooking Chef Connect zonder warmte gebruikt,
is het niet nodig om het hitteschild te gebruiken tenzij u
het spatscherm gebruikt. Raadpleeg ‘De spatbescherming
aanbrengen en gebruiken in de Assemblage sectie.
4 Plaats de kom op de basis.
5 Steek het benodigde hulpstuk in het contact voor het
komhulpstuk of het contact voor de roerder als u de
roerder gebruikt. Steek de pen in de groef en draai het
hulpstuk totdat het vergrendelt.
O Als u een hulpstuk wilt verwijderen, voert u bovenstaande
stap 5 in omgekeerde volgorde uit. (Gebruik altijd
ovenwanten om de hulpstukken na het koken te
verwijderen).
6 Wanneer u de mixerkop wilt neerhalen, haalt u hem eerst
iets omhoog en draait u de hendel naar rechts.
Laat de kop dan zakken tot hij vergrendelt.
Roerder - wanneer u de roerder gebruikt, kan de
roerhulpklem ook worden gebruikt om het mengen te
ondersteunen, zie 'Uw roerhulpklem plaatsen en verwijderen'.
De roerder kan ook met de garde worden gebruikt. Gebruik
de roerder niet met de deeghaak.
Uw Cooking Chef Connect gebruiken -
Handmatige bediening
1 Voeg de ingrediënten toe die gekookt/gemengd moeten
worden.
2 Stel de gewenste tijd, snelheid en temperatuur in.
Opmerking: als u de machine zonder warmte wilt
gebruiken, schakel de temperatuur uit als u de temperatuur
in wilt stellen.
Draai de bedieningsknop tegen de klok in om
roerintervallen en pulseren te gebruiken.
Draai de bedieningsknop naar rechts om continue
snelheden te gebruiken
3 Druk op de bedieningsknop om te starten.
4 Druk op elk gewenst moment op de bedieningsknop
om het apparaat te stoppen. Als in kookmodus, wees
voorzichtig, want het apparaat is heet.
Hoge snelheid, hoge temperatuur modus (HSHT)
Op hoge snelheid mengen bij temperaturen van heger dan
60 ° C
O Selecteer tijd (indien van toepassing), snelheid en
temperatuur van 60 ° C of hoger.
O Er verschijnt een waarschuwing op het display die
aangeeft dat u naar de HSHT-modus gaat.
O
Nadat de waarschuwing is gelezen en is begrepen, drukt u
op ja om te bevestigen dat u de HSHT-modus wilt openen.
O Druk op de bedieningsknop om te starten.
Deze functie MOET ALLEEN worden gebruikt met de garde
en /of roerder. U mag de maximale inhoud van 3 liter niet
overschrijden en u moet ervoor zorgen dat het spatscherm
is Voorzien van het spatscherm. De machine mag niet
onbeheerd worden achtergelaten.
5
Zodra een programma is afgerond, piept de machine 3 maal.
OOpmerking: Als er geen tijd is ingesteld, stoppen de
verwarmings- en roerprocessen automatisch zodra de
timer 8 uur heeft bereikt.
6 Om het verwarmingsproces te stoppen of de temperatuur
te veranderen veranderd u dit op de unit via de UIT knop.
Druk op de bedieningsknop om het apparaat op elk
gewenst moment te stoppen.
Belangrijk - Als de mengkop op enig moment
omhoog wordt gebracht tijden gebruik, dan wordt het
verwarmingsproces gepauzeerd en het hulpstuk stopt en
start niet opnieuw wanneer de mixerkop omlaag staat. Om
de mixer opnieuw te starten, laat de mixerkop zakken en
druk op de bedieningsknop.
De ingestelde programma’s gebruiken
Zie afbeeldingen P – R
1 Selecteer het vooraf ingesteld menu.
2 Kies het programma dat u wilt gebruiken.
3 Volg de instructies op het scherm.
4 Druk op de bedieningsknop om het apparaat op elk
gewenst moment te stoppen. Let op: de kom en het
gereedschap kunnen heet zijn.
After Cooking
O Wees voorzichtig wanneer u onderdelen van de machine
verplaatst of aanraakt in de kookstand of na het koken.
Dit geldt vooral voor de KOM en de HULPSTUKKEN,
omdat ze nog lang nadat de machine is uitgeschakeld
HEET zullen zijn.
O Gebruik beide handvatten aan de zijkant om de kom te
verwijderen en te verplaatsen. Gebruik ovenhandschoenen
voor het verplaatsen van de hete kom en hete hulpstukken.
O De onderkant van de kom blijft heet lang nadat het
verwarmen is gestopt. Wees voorzichtig bij het hanteren en
gebruik de meegeleverde werkoppervlakbeschermingsmat
om hittegevoelige oppervlakken te beschermen.
Tips
O In sommige recepten, met name recepten met een hoog
watergehalte, kan de kooktemperatuur niet boven 100
°C uitstijgen (dit is het kookpunt van water).
O Als u tijdens het koken ingrediënten wilt toevoegen,
draait u de snelheid omlaag en voegt de ingrediënten
langzaam en gelijkmatig toe.
O Om sauzen snel te verwarmen, gebruikt een u continue
roerinstelling.
O Als u het spatdeksel gebruikt tijdens het koken, dient
u dit altijd te verwijderen voordat u de mixerkop
optilt. Vergeet niet dat het spatdeksel en hittescherm
condensatie bevatten.
O Til de mixerkop langzaam op zodat eventuele vloeistof
aan de onderkant van het hittescherm terug in de kom
kan vallen.
O Vier roervertragingsfuncties zijn beschikbaar. Deze
helpen u de juiste snelheid te vinden bij elk recept. Voor
sommige recepten moet constant worden geroerd om
te voorkomen dat ingrediënten aan de bodem van de
kom blijven plakken, terwijl anderen zullen profiteren van
intermitterend roeren om de textuur van de ingrediënten
te behouden.

23
Handmatig gebruik (hulpstukken)
1 Verwijder de afdekking van het contact voor hoge
snelheid/lage snelheid (indien van toepassing).
2 Bevestig het hulpstuk volgens de specifieke,
meegeleverde instructies.
3 Stel de gewenste tijd en snelheid in (zie afbeelding
L - M). Druk op de bedieningsknop om te starten.
Druk nogmaals op de bedieningsknop om het apparaat te
stoppen.
De afdekkingen verwijderen en bevestigen
Afdekking aansluitpunt hoge snelheid
1 Als u de afdekking wilt verwijderen, gebruikt u de greep
en haalt u hem omhoog.
2 Als u de afdekking wilt bevestigen, plaatst u hem over
het aansluitpunt en drukt u hem naar beneden.
Afdekking aansluitpunt lage snelheid
1 Als u de afdekking wilt verwijderen, gebruikt u de greep
aan de onderkant en trekt u hem weg.
2 Als u de afdekking wilt bevestigen, steekt u het lipje aan
de bovenkant van de afdekking in de inkeping van het
aansluitpunt. Klem de afdekking vast.
De weegfunctie gebruiken
Zie afbeeldingen S
1 Selecteer de weegfunctie op het touchscreen.
2 Plaats de kom.
3 Zet de schaal op nul.
4 Weeg de ingrediënten.
5 Om tussen eenheden te schakelen, tikt u op de
eenheidstoets op het weegscherm.
Opmerking: plaats het apparaat altijd op een droge, vlakke
en stabiele ondergrond voordat u gaat wegen. Oefen tijdens
het wegen geen druk uit op de mixer of kom, omdat dit de
nauwkeurigheid van de weegschaal beïnvloedt.
De weegfunctie is nauwkeurig tot maximaal 6 kg.
Vooraf ingesteld overzicht
De standaardinstellingen kunnen worden aangepast aan uw recept, indien beschikbaar.
Niet-aanpasbare instellingen worden aangegeven door het pictogram.
Wanneer "Verwarming" op het displayscherm wordt weergegeven, begint de timer niet met aftellen totdat de juiste temperatuur is
bereikt.
Voor-instelling Aangeraden
hulpstuk
Standaard Instellingen
(aanpasbaar)
Warmhouden Recepten/ideen/gebruik
Eiwit opkloppen 1 min 15 secs
(15 secs – 5 min)
Max
OFF
Eiwit voor chocolade mousse
Cake 1 min
(30 secs – 5 min)
1 – Max
( – Max)
OFF
Cake, Cupcakes
Deeg kneden 10 min
(1 min – 30 min)
Min to 1
(min – 2)
OFF
Broodjes, pizza
Deeg rijzen 1 uur
(5 min – 2 uur)
OFF
30˚C
(25˚C – 35˚C)
Deeg rijzen
Chocolade smelten 10 min
(5 min – 2 uur)
60˚C
Chocolade mousse
Schuimgebak 10 min
(1 min – 20 min)
Max
40˚C
Basis voor Buttercream frosting

24
Vooraf ingesteld overzicht
Voor-instelling Aangeraden
hulpstuk
Standaard Instellingen
(aanpasbaar)
Warmhouden Recepten/ideen/gebruik
Italiaans schuimgebak 4 min
(1 min – 20 min)
HSHT 6
(– Max)
60˚C – 85˚C
Limoen schuimgebak
Fruit Compote 20 min
(5 secs – 2 uur)
()
104˚C
30 min
62˚C
Cake vullingen en toppings voor
desserts
Popcorn 10 min
(5 min – 10 min)
OFF
180˚C
Voor versgemaakte popcorn
* Voor de beste resultaten altijd
het vooringestelde programma
gebruiken.
Steam 20 min
(5 min – 45 min)
OFF
100˚C
Zalm en Papillote
Alles in een gerechten 40 min
(5 sec – 8 uur)
()
103˚C – 140˚C
30 min
62˚C
Bolognese
Dikke soep 20 mins
(5 secs – 8 uur)
()
103˚C – 140˚C
30 min
62˚C
Minestrone, Bouiilon
Slow Cook 2 uur
(5 secs – 8 uur)
()
98˚C – 140˚C
30 min
62˚C
Beef bourguignon

25
Recept
Pruimen Marinade
200 g heldere honing
40g zachte pruimen
40 ml water
1 Doe alle ingrediënten in de mini hakmolen / molen. Koel 's
nachts.
2 Bevestig het hulpstuk aan de standaard mixer.
3 Schakel gedurende 4 seconden naar puls.
4 Gebruik zoals vereist
Montage en gebruik
Zie afbeeldingen T
O Houd uw Cooking Chef bij het gebruik van uw
stoommandjes, altijd uit de buurt van muren en
overhangende keukenkastjes: deze kunnen door de stoom
worden beschadigd.
O Voeg peper en zout toe na het stomen; hierdoor wordt
voorkomen dat de roestvrij stalen kom vlekken of pitten
krijgt.
1 Plaats de verwijderbare plaat op een vlakke ondergrond en
zorg dat de handgrepen naar binnen zijn opgevouwen.
2 Zet de steunring op de plaat; zorg dat de handvatsteunen
op de ring naast de V-vormige uitsparingen in de plaat
zitten.
3 Vouw de handgrepen uit en klem ze aan de
handvatsteunen.
4 Plaats het voedsel dat u wilt koken op de plaat. Groenten
dienen goed gereinigd en zo nodig geschild te zijn.
5 Voeg de vereiste hoeveelheid water toe aan de kom (zie
kooktabel: Gefilterd water is het best, omdat hierdoor
minder kalkaanslag en vlekken ontstaan.
6 Zet de geassembleerde stomer in de kom – De stomer
vindt zelf de benodigde diepte.
7 Zet het hittescherm op de mixerkop.
8 Zet de kom en het stoommandje op de keukenmachine.
9 Laat de mixerkop zakken en leg het spatdeksel erop.
10 Selecteer de vooraf ingestelde stoom en pas de kooktijd
aan (zoals in de aanbevolen kooktabel). Druk op de knop
om te starten.
11 Laat koken voor de benodigde tijd.
12 Verwijder het spatdeksel.
13 Til de mixerkop op.
14 Til het stoommandje bij de handgrepen op – voorkom dat
de handgrepen naar binnen opvouwen.
15 Zet het stoommandje op een grote plaat of andere
geschikte container.
16 Maak de handgrepen los en vouw ze naar het midden.
Verwijder de steunring en vouw de handgrepen uit.
17 Verwijder het voedsel.
Belangrijk
Wees voorzichtig: alle vloeistoffen, de condensatie, het
stomer- en het keukenmachine-element zijn erg heet.
Gebruik ovenwanten.
O Probeer geen mixerhulpstukken op te zetten als u het
stoommandje gebruikt.
O Kook geen voedsel in de mengkom terwijl u het
stoommandje gebruikt.
Tips
O Vloeistof die in de kom achterblijft, is goed voor het
maken van soep of bouillon. Wees voorzichtig, het wordt
erg heet.
O Zorg dat de stukken voedsel niet te dicht op elkaar
zitten.
O Roer een grote hoeveelheid halverwege de kooktijd door.
O Stukken voedsel van dezelfde afmeting worden
gelijkmatiger gekookt.
O Als u meer dan één soort voedsel stoomt, voegt u
ingrediënten die korter gestoomd moeten worden, later
toe.
O Als u het deksel van de vulopening optilt of het
spatdeksel verwijdert, ontsnapt er stoom en duurt het
kookproces langer.
O Het kookproces gaat door als de keukenmachine
uitschakelt; verwijder het voedsel dus onmiddellijk.
O Als het voedsel niet voldoende is gekookt, stelt u de
timer opnieuw in. U moet het water misschien bijvullen.
O De kooktijden dienen alleen als richtlijn. Controleer altijd
of het voedsel voldoende is gekookt voordat u gaat eten.
O Laat het apparaat niet droog koken; vul het zo nodig met
water bij.

26
Uitleg displayscherm
Tik op dit pictogram om het instellingenmenu te openen.
Tik op dit pictogram om het menu met de vooraf ingestelde programma's te openen.
Tik op dit pictogram om ingrediënten in de kom te wegen.
Geeft de gekozen tijd in uren (h), minuten (m) en seconden (s) weer.
Toont het geselecteerde roerinterval.
Als een snelheid met tussenpozen (2 Æ 4) is gekozen, verschijnt geleidelijk de buitenste
cirkel. De machine gaat roeren als de cirkel rond is.
Geeft de gekozen temperatuur weer.
Een pulserende rode achtergrond geeft aan dat de machine in de verwarmingsmodus
staat.
Een rode achtergrond geeft aan dat de machine de ingestelde temperatuur heeft bereikt.
Een knipperende, naar beneden wijzende pijl geeft aan dat het apparaat afkoelt.
Geeft aan dat de instelling (tijd, snelheid of temperatuur) niet veranderd kan worden.
Statusinformatie De tekst hier is de statusinformatie.
Geeft aan dat de kom, de inhoud ervan en alle onderdelen die gebruikt worden heet zijn.
Wees dus voorzichtig.
Geeft aan dat de machine aan een WiFi netwerk verbonden is.
Geeft aan dat het apparaat in de hogesnelheidsmodus op hoge temperatuur (HSHT) staat.
Draai de bedieningsknop tegen de klok in om roerintervallen en puls te gebruiken.
Draai de bedieningsknop met de klok mee om continue snelheden min - max te gebruiken.
Recepten
Recept Gebruikt hulpstuk Vooraf ingesteld /
Handmatige
instellingen
Ingrediënten
Minestrone Dikke soep
20 min
98˚C
Voeg onderstaande ingrediënten tegelijk toe:
100 g pancetta, in blokjes
2 teentjes knoflook, kleingesneden
50 g arboriorijst
2½ eetlepels tomatenpuree
70 g savooiekool
1 tl gedroogde rozemarijn
2 tl gedroogde salie
1 stengel bleekselderij, gesneden
60 g prei, gesneden
75 g ui, gesneden
75g wortel, gesneden
1 liter hete groentebouillon
Zout en peper

27
Recept Gebruikt hulpstuk Vooraf ingesteld /
Handmatige
instellingen
Ingrediënten
Beef Strogano Alles in een gerechten
30 min
103˚C
Voeg onderstaande ingrediënten tegelijk toe:
600 g rundsvlees, in blokjes
1 eetlepel paprikapoeder
1 eetlepel boter
1 teentje knoflook, kleingesneden
400 g rundvleesbouillon
200 g champignon, gesneden
150 g ui, gesneden
300 g wortel, gesneden
200 ml kookroom
1 eetlepel maïzena
1 eetlepel water }mengen
Zout en peper
Crème Anglaise
Handmatige instellingen
15 min
85˚C
Voeg onderstaande ingrediënten tegelijk toe:
250 g volle melk
250 g room (double cream)
1 tl vanille-extract
2 eetlepels maizena
96 g eigeel, geklopt}mengen
80 gr (gries) suiker
Popcorn Popcorn
10 min
OFF
180˚C
Voeg het volgende allemaal tegelijk toe:
50 g maïskorrels
20 g zonnebloemolie
* Voor de beste resultaten altijd het vooringestelde
programma gebruiken.
Rijstepap
Handmatige instellingen
1 uur
15 min
95˚C
Voeg onderstaande ingrediënten tegelijk toe:
150 g korte korrelrijst
1 liter volle melk
75 gr (gries)suiker
2 tl vanille-extract
Temperatuur and Snelheidsinstellingen
Temperatuur richtlijnen 60°C Chocolade smelten
72°C – 82°C Poaching
98°C – 99°C Sudderen
100°C Koken, stomen
130°C – 140°C Groente braden
180°C Vlees bruinen
(P) Pulseren – voor krachtige snelheidsbursts
Roerinterval 1 - De mixer werkt met een constante lage snelheid. Gebruikt voor
folden van lichte ingrediënten in zwaardere mengsels.
Roerinterval 2 - Onderbroken roeren met korte pauzes. Wanneer ingesteld op
deze snelheid, Werkt deze op lage snelheid met tussenpozen van 10 seconden
gedurende 1,5 omwentelingen.
Roerinterval 3 - Onderbroken roeren met gemiddelde pauzes. Wanneer ingesteld
op deze snelheid, Werkt deze op lage snelheid met tussenpozen van 30
seconden gedurende 1,5 omwentelingen.
Roerinterval 4 - Onderbroken roeren met lange pauzes. Wanneer ingesteld
op deze snelheid, Werkt deze elke 5 minuten met tussenpozen gedurende 1,5
omwentelingen.
Speed min - max Continu snelheden geleidelijk oplopend tot max
HSHT Het mixen op een hogere temperatuur als 60c graden tijdens het gebruik van
minimale en maximale snelheden.

28
Tabel met aanbevolen snelheden
Dit dient alleen als richtlijn en kan variëren afhankelijk van het recept en de ingrediënten die worden gebruikt
K-klopper
Voor het maken van cakes, koekjes, gebak, ijsvorming, vullingen, eclairs en aardappelpuree.
Tips
• Als u wilt voorkomen dat de ingrediënten opspatten, verhoogt u de snelheid geleidelijk.
• Stop de machine regelmatig om de kom met de spatel af te schrapen, zodat alle
ingrediënten goed worden gemengd.
• Gebruik koude ingrediënten als u deeg gaat maken, tenzij het recept iets anders
voorschrijft.
Recept / Verwerken
(Max) (Minuten)
Deegwaren en koekjes – boter en
bloem vermengen
Bloemgewicht 910 g Min 12
All-in-one cakemix Totaalgewicht 4 kg Min Max 45–60 sec.
Slagroomklopper
Voor het afromen en mengen van zachte ingrediënten
Tips
• Als u wilt voorkomen dat de ingrediënten opspatten, verhoogt u de snelheid geleidelijk.
• Wanneer u boter en suiker voor taartbeslag vermengt, moet u de boter altijd eerst op
kamertemperatuur brengen of verzachten.
• Met de slagroomklopper voor hoge temperatuur worden twee wissers geleverd. Gebruik
één van deze wissers voor zoete recepten en de andere voor hartige recepten.
Recept / Verwerken
(Max) (Minuten)
Boter/margarine en suiker romig maken 4,55 kg
(15 eieren)
Min Max 4
Eieren in cakemix kloppen Min Max 1–4
Bloem, vruchten, etc. in het mengsel vouwen Min 1 30–60 sec.
Garde
Voor eieren, room en souffles.
Belangrijk
• Als u wilt voorkomen dat de ingrediënten opspatten, verhoogt u de snelheid geleidelijk.
• Gebruik de garde niet voor zware mengsels (alles in één cake en vet en suiker kloppen),
omdat u deze kunt beschadigen.
• Het beste resultaat wordt bereikt wanneer de eieren op kamertemperatuur zijn.
Zorg ervoor dat er geen boter of eigeel op de garde of in de kom aanwezig is, voordat u
eiwit gaat opkloppen.
Recept / Verwerken
(Max) (Minuten)
Eiwit 16 (605 g)
Min Max
1½-2
Vetloze sponge cake 930 g 4 -6
Room 2L 1½-3
Pannenkoekbeslag
• Doe eerst de bloem in de kom en daarna de natte
ingrediënten.
• Meng de ingrediënten op minimale snelheid.
250 g bloem
500 g melk
200 g eieren
Min 10 sec.
Max 45–60 sec.
Mayonaise
• Voor het beste resultaat schraapt u de kom af
nadat u de olie hebt toegevoegd. Meng nog eens 10
seconden op maximale snelheid.
2 eierdooiers
10 g mosterd
200 ml plantaardige olie
Max 1-1½
Gebruikte eieren = medium (gewicht 53-63 g).
Slagroom gebruikt = Verse Slagroom met minimaal 38% vetgehalte.

29
Tabel met aanbevolen snelheden
Dit dient alleen als richtlijn en kan variëren afhankelijk van het recept en de ingrediënten die worden gebruikt
Deeghaak
Verrijkt met boter en eieren
Tips
Belangrijk
• Nooit de aangegeven maximale capaciteit overschrijden, anders raakt de machine
overbelast.
• Als u hoort dat de machine het deeg niet goed aan kan, zet u de machine uit, verwijdert u
de helft van het deeg en mengt u elke helft afzonderlijk.
• De ingrediënten zullen het beste mengen als u eerst de vloeistof in de kom giet.
Gist
• Gedroogde gist (het soort dat gereconstitueerd moet worden): giet het warme water in de
kom. Voeg er de gist en de suiker aan toe en laat het mengsel ca. 10 minuten rusten, totdat
het opschuimt.
• Verse gist: brokkel de gist in de bloem.
• Andere soorten gist: volg de aanwijzingen van de producent.
Recept / Verwerken
(Max) (Minuten)
Brooddeeg (stijf gegist) Bloemgewicht 350 g–1,6 kg Min 60 sec.
1 3–4
Totaalgewicht 564 g–2,58 kg Opnieuw kneden
Snelheid 1
60 sec.
Zacht gegist deeg (verrijkt met boter
en eieren)
Bloemgewicht 250 g–1,6 kg Min 60 sec.
Totaalgewicht 478 g–3,1 kg 1 3–4
Opnieuw kneden
Snelheid 1
60 sec.
Gebruikte eieren = medium (gewicht 53-63 g).
Stoom-hulpstuk Kookgids
O
Deze kooktijden zijn alleen richtlijnen. 500 ml water kan worden gebruikt voor voedsel dat tot 20 minuten kooktijd vereist. Voor
voedsel dat een langere kooktijd vereist gebruikt u 650 ml water.
O
Laat het apparaat niet droog koken, vul zo nodig bij met water.
O
Maak de mand niet te vol bij het stomen van gevogelte en vis.
O
Lees ‘voedselveiligheid’ in het veiligheidsgedeelte.
Groenten
Ingredient
(Max) (minuten)
Hoeveelheid water Voorbereiding
Asperges 450 g 15 500 ml Schillen
Bonen, groen 450 g 15-20 500 ml Schillen
Pronkbonen 450 g 15-20 500 ml Schillen en in plakjes snijden
Broccoli 450 g 20 500 ml In roosjes verdelen
Spruiten 450 g 25 500 ml Schillen en onderkant afsnijden
Kool 1 kleine 25 500 ml Schaven
Wortels 450 g 20 500 ml In plakjes snijden
Bloemkool 1 middelmaat 25 - 30 650 ml In roosjes verdelen
Courgettes 450 g 15 500 ml In plakjes snijden
Selderij 1 stronk 15 500 ml In plakjes snijden
Prei 3 15 500 ml In plakjes snijden
Peultjes 250 g 15 500 ml Schillen
Kleine champignons 450 g 10 500 ml Schoonvegen
Pastinaak 450 g 15 500 ml In blokjes of plakjes snijden
Erwten 450 g 15 500 ml Doppen
Aardappels, nieuwe 450 g 30-40 650 ml Schoonvegen

30
Vis en gevogelte
Recept / Verwerken
(Max) (minuten)
Hoeveelheid water Opmerkingen
Kip, borststukken zonder
bot
4 30-40 650 ml Stomen tot goed gaar en mals
Schelpdieren 450 g 10 500 ml Stomen tot schelpen openen
Garnalen, medium 450 g 10 500 ml Stomen tot ze roze zijn
Vis, filet 230 g 10-20 500 ml Stomen tot vis uiteenvalt
Vis, moot 2,5 cm dik 15-20 500 ml Stomen tot vis uiteenvalt
Vis, hele 340 g 15-20 500 ml Stomen tot vis uiteenvalt
Kreeftenstaartjes 2-4 20 500 ml Stomen tot ze rood zijn
Mosselen 450 g 15 500 ml Stomen tot schelpen openen
Oesters 6 15 500 ml Stomen tot schelpen openen
Sint-Jakobsschelpen 230 g 15 500 ml Stomen tot ze heet en mals zijn
Hulpstuk hoogte aanpassing
Zie afbeeldingen U
Garde, roestvrijstalen K-klopper
Voor het beste resultaat moeten de garde en de K-klopper de
onderkant van de kom bijna aanraken. Zo nodig verstelt u de
hoogte met de meegeleverde sleutel.
Slagroomklopper voor hoge temperatuur – dit hulpstuk moet
de bodem van de kom net raken.
1 Haal de stekker uit het stopcontact.
2 Breng de mixerkop omhoog en plaats de garde, K-klopper
of de hoge temperatuur slagroomklopper.
3 Laat de mixerkop weer zakken. Als de tussenruimte moet
worden aangepast, haalt u de mixerkop en verwijdert u het
hulpstuk.
4 Gebruik de meegeleverde sleutel om de moer voldoende
los te draaien en de as af te stellen. Om het hulpstuk
dichter bij de bodem van de kom te krijgen, draait u de as
naar links. Om het hulpstuk verder van de bodem van de
kom te verwijderen, draait u de as naar rechts.
5 Draai de moer weer vast.
6 Zet het hulpstuk in de mixer en laat de mixerkop zakken.
(Controleer de positie, zie bovenstaande punten).
7 Herhaal zo nodig de bovengenoemde stappen tot het
hulpstuk zich in de juiste positie bevindt. Vervolgens draait
u de moer goed vast.
Deeghaak - dit hulpstuk is in de fabriek ingesteld en kan niet
gewijzigd worden.
Roerder - dit hulpstuk moet de onderkant van de kom net
raken.
1 Haal de stekker uit het stopcontact.
2 Haal de mixerkop omhoog en bevestig de roerder.
3 Laat de mixerkop zakken. Als het hulpstuk aangepast moet
worden, haalt u de mixerkop omhoog en draait u de moer
met de sleutel los. Laat de mixerkop weer zakken.
4 Als u het hulpstuk wilt uittrekken, zodat het dichter bij de
bodem van de kom functioneert, draait u het wieltje naar
rechts. Als u het hulpstuk wilt intrekken, zodat het verder
van de bodem van de kom af functioneert, draait u het
wieltje naar links.
5 Draai de moer weer vast.
Het spatdeksel/hittescherm bevestigen en
gebruiken
Zie afbeeldingen V
Het spatdeksel bestaat uit 2 delen: het hittescherm en het
spatdeksel.
Het hitteschild beschermt de mixerkop tegen stoom
geproduceerd tijdens het kookproces.
Het spatdeksel mag niet bevestigd zijn, tenzij het samen met
het hittescherm wordt gebruikt.
1 Til de mixerkop op tot hij is vergrendeld.
2 Duw het hittescherm op de onderkant van de mixerkop
tot hij goed vastzit. Het hittescherm mag nooit worden
gebruikt zonder dat de rubber afdichting goed is
bevestigd.
3 Zet de kom op het onderstel.
4 Laat de mixerkop weer zakken.
5 Zet het spatdeksel op de komrand en schuif hem
vervolgens naar voren tot hij goed is bevestigd.
O Tijdens het mixen kunnen ingrediënten via de vulopening
rechtstreeks aan de kom worden toegevoegd.
6 Om het spatdeksel te verwijderen, schuift u hem van het
apparaat af.
Opmerking: het spatscherm blijft bevestigd aan het hitteschild
wanneer de mixerkop omhoog staat, tenzij deze verwijderd
wordt voordat hij wordt opgetild door de mengkop.
7 Om het hittescherm te verwijderen, tilt u de mixerkop op
tot hij is vergrendeld. Verwijder het hulpstuk en trek het
hittescherm vervolgens van de onderkant van de mixerkop
naar onderen.
NB: Bevestig en verwijder het spatdeksel alleen als de
mixerkop vergrendeld is.

31
De roerhulpklem bevestigen en verwijderen
Zie afbeeldingen W
De roerhulpklem kan worden gebruikt als hulp bij het mengen.
1 Plaats de roerhulpklem over de rand van de kom met de
verticale richel aan de binnenkant en de klemmen aan de
buitenkant.
2 Draai de klem naar links op de handvatten van de kom.
3 Als u de klem wilt verwijderen, voert u deze procedure in
omgekeerde volgorde uit.
BELANGRIJK - De roerhulpclip mag niet worden
gemonteerd als de de K-klopper, garde, deeggereedschap of
slagroomklopper wordt gebruikt.
Assemblage van de slagroomklopper
voor hoge temperatuur
Zie afbeeldingen X
De wisser installeren
De machine wordt geleverd met een geïnstalleerde wisser. De
wisser altijd eerst verwijderen en dan pas reinigen.
1 Plaats de flexibele wisser voorzichtig op het hulpstuk door
de onderkant van de wisser in de gleuf te steken en dan
één zijde in de groef te schuiven, voordat u het uiteinde
voorzichtig op zijn plaats haakt. Herhaal dit aan de andere
kant.
Onderhoud en reiniging
O Schakel het apparaat altijd uit en haal de stekker uit het
stopcontact voor u het gaat reinigen.
O Bij het eerste gebruik kan een beetje vet bij het
aansluitpunt zitten. Dit is normaal. U kunt het gewoon
wegvegen.
O De metalen oppervlakken van de temperatuursensors
kunnen tijdens normaal gebruik tekenen van slijtage
vertonen. Dit heeft geen invloed op de prestaties van het
product.
O Laat de flexibele klopper voor hoge temperatuur niet op
de mixer zitten als het apparaat niet in gebruik is.
Apparaat, afdekkingen aansluitpunten
O Met een vochtige doek afvegen en vervolgens afdrogen.
O Nooit in water onderdompelen of schuurmiddelen
gebruiken.
Slagroomklopper voor hoge temperatuur
O Verwijder het flexibele vegerblad altijd van het hulpmiddel
voordat u het reinigt.
O Was het flexibele vegerblad en hulpstuk in heet zeepsop
en droog ze vervolgens goed af. De onderdelen kunnen
ook in de afwasmachine worden gewassen.
NB: Inspecteer de conditie van het hoofddeel van het hulpstuk
vóór en na gebruik en controleer verder regelmatig de conditie
van het vegerblad; vervang het als er tekenen van slijtage zijn.
Kom, hulpstukken, spatscherm, roerhulpklem
O Met de hand afwassen en goed afdrogen, of in de
afwasmachine wassen (raadpleeg de grafiek aan de
voorkant van de handleiding).
O Gebruik nooit een staalborstel, staalwol of bleekmiddel om
uw roestvrij stalen kom te reinigen. Gebruik azijn of een
geschikt ontkalkingsmiddel om kalkaanslag te verwijderen.
O Als voedsel aan de binnenkant van de kom aankoekt
of aanbrandt, verwijdert u zo veel mogelijk met de
meegeleverde spatel. Vul de kom met warm zeepsop en
laat hem weken. Verwijder hardnekkige resten met een
nylon borstel.
O Verkleuring van de kom heeft geen invloed op de
prestaties ervan.
Drainopening
O Zorg dat zich geen voedsel in de buurt van deze opening
bevindt. gebruik zo nodig een pijpenrager of wattenstaafje
om de opening te reinigen.
Temperatuursensors
O Met een vochtige doek afvegen en vervolgens goed
afdrogen. Gebruik nooit schuurmiddelen of scherpe
instrumenten om de sensors te reinigen.
Stoomhulpstuk
O Schakel het apparaat altijd uit en haal de stekker uit het
stopcontact voor u het hulpstuk van de keukenmachine
haalt.
O Voor gemakkelijker reinigen, wast u de onderdelen
onmiddellijk na gebruik af.
Alle onderdelen kunnen in heet zeepsop worden gewassen;
droog ze daarna zorgvuldig af. U kunt ze ook in de
afwasmachine wassen.
O Gewoon water en voedsel bevat zouten en zuren; deze
kunnen het metalen oppervlak zoals de binnenkant van
de mengkom soms aantasten. Als dit gebeurt, reinigt u de
kom met een nylon borstel, een niet-schurend sponsje of
een roestvrij stalen reinigingssponsje.
Onderhoud en klantenservice
O Als u problemen ondervindt met de werking van de machine,
raadpleegt u de informatie onder ‘Problemen oplossen’ in deze
handleiding of gaat u naar www.kenwoodworld.com.
O Dit product is gedekt door een garantie die voldoet
aan alle wettelijke regels voor bestaande garanties en
consumentenrechten die gelden in het land waar het product
is gekocht.
O Als uw Kenwood product niet goed functioneert of als
u defecten opmerkt, kunt u het naar een erkend Service
Center van KENWOOD sturen of brengen. Voor informatie
over het KENWOOD Service Center in uw buurt gaat u naar
www.kenwoodworld.com of naar de specifieke website in
uw land.
O Ontworpen en ontwikkeld door Kenwood in het VK.
O Vervaardigd in China.
BELANGRIJKE INFORMATIE VOOR DE JUISTE VERWIJDERING
VAN HET PRODUCT VOLGENS DE EUROPESE RICHTLIJN
BETREFFENDE AFGEDANKTE ELEKTRISCHE EN
ELEKTRONISCHE APPARATUUR (AEEA)
Aan het einde van de levensduur van het product mag het
niet samen met het gewone huishoudelijke afval worden
verwijderd. Het moet naar een speciaal centrum voor gescheiden
afvalinzameling van de gemeente worden gebracht, of naar een
verkooppunt dat deze service verschaft.

32
Problemen oplossen
Probleem Oorzaak Oplossing
De mixer werkt niet in de
verwarmingstand en geeft een
foutmelding en een waarschuwingstoon
weer.
Een van de veiligheidssensors is
geactiveerd.
Kijk of er een oorzaak op het displayscherm
wordt weergegeven.
•
Controleer of de kop omlaag is gebracht
en is vergrendeld.
•
Zorg dat alle afdekkingen van de
aansluitpunten juist zijn aangebracht.
•
Zorg dat het hittescherm op de juiste
manier is geplaatst.
•
Zorg dat de kom van de cooking chef juist
is geplaatst.
De machine verandert van snelheid
of de snelheid is tijdens het koken
beperkt.
De snelheid wordt automatisch beperkt
wanneer de inhoud van de kom een
temperatuur van 60°C heeft bereikt. De
waarschuwing over hoge temperatuur licht
op.
Dit is een veiligheidskenmerk.
Voedsel brandt aan op de bodem van
de kom.
1 De geselecteerde temperatuurinstelling
kan te hoog zijn.
2 Onjuist hulpstuk gebruikt.
3 Het roerinterval is te lang.
4 Het hulpstuk is misschien niet laag
genoeg in de kom bevestigd.
5 De timer is voor een te lange tijdsduur
ingesteld.
6 De sensor en/of de onderkant van de kom
zijn misschien niet schoon.
1 Verlaag de temperatuur.
2 Controleer of het beste hulpstuk wordt
gebruikt en verstel het zo nodig.
3 Verhoog de frequentie van het
roerinterval of stel een continue werking
in.
4 Stel de hoogte van het hulpstuk bij.
5 Kook het voedsel korter (maar zorg wel
dat het gaar is).
6 Zorg dat deze gebieden schoon en droog
blijven.
Textuur van het voedsel niet bewaard
gebleven.
1 De temperatuur is te hoog ingesteld.
2 Het roerinterval is te frequent.
3 De ingrediënten zijn te lang gekookt.
4 Onjuist hulpstuk gebruikt.
1 Verlaag de temperatuur.
2 Reduceer het roerinterval.
3 Verkort de kooktijd (maar zorg wel dat
het voedsel gaar is).
4 Controleer of het meest geschikte
hulpstuk wordt gebruikt.
Onregelmatige mengsnelheid. 1 Ingredienten te groot, te hard of te stevig. 1 Snij het voedsel in kleinere stukken,
verwijder de pitten uit het fruit, smelt
ingrediënten langzaam zonder gebruik te
maken van een hulpstuk (maar zorg wel
dat een snelheid is geselecteerd).
2 Voeg de ingrediënten toe nadat de kop
omlaag is gebracht.
3 Controleer of het meest geschikte
hulpstuk wordt gebruikt.
Het is moeilijk om de mixerkop te
sluiten.
1 Als er stevige ingrediënten zoals chocola
op de bodem van de kom liggen, kan de
mixerkop niet worden vergrendeld.
2 De roerder is onjuist bevestigd.
1 Voeg de ingrediënten toe nadat de kop
omlaag is gebracht.
2 Zorg ervoor dat de roerder in het juiste
aansluitpunt is gestoken.
De motorsnelheid wordt beperkt als
hulpstukken worden gebruikt.
De kom is heet. Verwijder de kom of koel de kom af tot
onder 60 °C.
De garde of K-klopper stoot tegen de
onderkant van de kom aan of bereikt
de ingrediënten aan de bodem van de
kom niet.
De slagroomklopper pakt op hoge
temperatuur geen ingrediënten op van
de bodem van de kom.
De hoogte van het hulpstuk is verkeerd en
moet afgesteld worden.
Pas de hoogte aan met een geschikte
sleutel - zie het gedeelte "Aanpassing
hoogte hulpstukken".
De garde, K-klopper of
slagroomklopper botsen tegen de
roerhulpklem.
De roerhulpklem is bevestigd. Verwijder de roerhulpklem – de klem wordt
alleen samen met de roerder gebruikt.

33
Problemen oplossen (vervolg)
Probleem Oorzaak Oplossing
Het hulpstuk voor lage snelheid kan
niet worden gemonteerd.
Controleer of het hulpstuk geschikt is voor
uw machinemodel. Het hulpstuk moet een
draaiverbinding hebben (model KAX)
Het hulpstuk moet een KAX
draaiverbinding hebben , zodat hij op
het contact past.
Als u hulpstukken hebt met het
stangverbindingssysteem
, dan hebt u de KAT002ME-adapter
nodig om deze hulpstukken aan de
draaiverbindingssysteem van uw
keukenmachine te bevestigen.
Ga voor meer informatie naar
www.kenwoodworld.com/twist.
Knipperend stand-bylichtje wanneer de
keukenmachine wordt ingeschakeld.
De mixerkop staat omhoog of is niet goed
vergrendeld.
Controleer of de kop van de
keukenmachine goed omlaag vergrendeld
is.
De keukenmachine schakelt ineens uit.
Het stand-bylichtje knippert snel
gedurende een paar seconden.
Overbelastingsbeveiliging of
oververhittingssysteem geactiveerd.
De maximumcapaciteit is overschreden.
Haal de stekker uit het stopcontact en
controleer de machine op blokkeringen of
overbelasting.
Als de machine niet functioneert, verwijdert
u enkele ingrediënten om de belasting te
reduceren. Start de machine opnieuw.
Als het probleem nog steeds niet is
verholpen, haalt u de stekker uit het
stopcontact en laat u de machine 15
minuten rusten. Steek de stekker in het
stopcontact en laat de machine op de
gewenste snelheid draaien.
Als de machine na bovenstaande
procedure niet start, neemt u contact op
met de klantenservice.
De keukenmachine stopt tijdens de
werking. Het stand-by lichtje knippert
langzaam.
De mixerkop is omhooggehaald. Laat de mixerkop zakken en start opnieuw.
Stand-bylichtje uit terwijl de machine
ingeschakeld is.
De keukenmachine is langer dan 20
minuten niet gebruikt en staat nu op
stand-by.
Raak het touchscreen aan of verdraai de
bedieningsknop om de machine te resetten.
De keukenmachine schakelt ineens uit. Het hittescherm is verwijderd of er is een
afdekking is verwijderd.
Zet het hittescherm of de afdekking weer
op zijn plaats en start de machine opnieuw.
Op het displayscherm wordt een
alfanumerieke foutcode weergegeven.
De machine functioneert niet goed. Neem contact op met de klantenservice
van Kenwood. Voor informatie over
de dichtstbijzijnde Klantenservice
van Kenwood gaat u naar
www.kenwoodworld.com of naar de
website voor uw land.
Geen stroom naar de machine /
het scherm gaat niet aan.
De stekker zit niet in het stopcontact.
Aan/uit-schakelaar niet gebruikt.
Machine staat nu op standby.
Controleer of de stekker in het
stopcontact zit.
Zet de aan/uit-schakelaar op aan.
Raak het displayscherm aan of draai aan de
draaiknop.
De machine functioneert niet. Draaiknop niet ingedrukt. Druk de draaiknop in om het kookproces te
starten.
De timer op het display telt niet af. Tijdens de opwarmfase telt de timer pas af
wanneer de juiste temperatuur is bereikt.
De temperatuur is ingesteld op meer
dan 100˚C maar het watergehalte van
de voedingsmiddelen voorkomt dat de
temperatuur hoger wordt dan 100˚C.
Normale werking.
Verlaag of kies de juiste temperatuur.
De temperatuur van de kominhoud
wordt niet hoger dan 100˚C.
Het watergehalte van de ingrediënten kan
voorkomen dat de temperatuur hoger
wordt dan 100˚C.
Normale werking.
Grote bewegingen of trillingen tijdens
de werking.
Ongelijkmatige lading in de kom
veroorzaakt te veel trillingen.
Maximale capaciteit overschreden.
Verkeerd hulpstuk of verkeerde snelheid.
Reduceer de hoeveelheid of verspreid de
ingrediënten regelmatig in de kom en start
de machine opnieuw.
Raadpleeg het relevante programma en de
tabel met aanbevolen snelheden voor het
juiste hulpstuk en de juiste snelheid.

34
Problemen oplossen (vervolg)
Probleem Oorzaak Oplossing
Foutbericht E:34 wordt weergegeven Probleem met wifi-verbinding. Controleer het Wifi-wachtwoord.
Wifinetwerk vergeten: ga naar Instellingen
> WiFi > Netwerk vergeten.
Begin opnieuw met ‘Apparaat instellen’ via
de Kenwood World app.
langzaam knipperend Kan geen bekend Wifi-netwerk vinden. Mogelijk is de machine verplaatst, is de router
uitgeschakeld of dient de router opnieuw
gestart te worden.
snel knipperend WiFi is beschikbaar, maar kan geen
verbinding maken met de cloud servers.
Router moet opnieuw worden gestart, of
neem contact op met uw Internet Service
Provider.
Controleer of uw een werkende
internetverbinding heeft op het lokale
netwerk.
Op het scherm wordt foutmelding
E42 weergegeven.
Foutmelding ‘droog koken’ (fout vooraf
ingestelde stoom).
Voeg water aan de kom toe.
Uitleg van piepgeluiden van het apparaat
1) Eén snel piepje.
2) Snel dubbel piepje.
3) Drie piepjes.
1) De bedieningsknop is ingedrukt om de
machine te starten of te stoppen, of de
kop is tijdens de werking opgetild.
2) Het apparaat wacht. Het geeft 10
minuten en 5 minuten voor het einde
van de warmhoudcyclus een snel dubbel
piepje.
3) Betekent het volgende:
- Einde van vooringesteld programma
- Einde van handmatige werking
- Einde van warmhoudcyclus
- Vlak voor het apparaat begint te roeren
Normale werking
Normale werking
Normale werking
Wanneer u contact opneemt met de klantenservice, moet u mogelijk informatie over de softwareversie opgeven. U kunt dit vinden door
op pictogram van het instellingenmenu te drukken en “ over dit apparaat” te selecteren.
Op het scherm staat “- -“. De weegschaal is aan het nulstellen. Normaal gebruik.
Op het scherm staat een negatief
getal.
Scherm is niet op nul gezet en ingrediënten
of kom/deksel/hulpstuk zijn verwijderd.
Ingrediënten of andere dingen staan tegen
of onder de machine aan gedrukt.
Machine staat tegen een muur gedrukt.
Zet het scherm op nul, vervang de
ontbrekende ingrediënten of plaats de kom
terug.
Zorg dat er geen ingrediënten of andere
dingen tegen of onder de machine aan
gedrukt staan.
Zorg dat er ruimte is tussen de machine en
de muren.
Zet het scherm op nul voordat u de volgende
ingrediënten gaat wegen
Scherm geeft kleine hoeveelheden
niet aan.
Hoeveelheid is te klein. Gebruik theelepel of eetlepel voor hele kleine
hoeveelheden.
Gewicht is veranderd op het scherm. Machine is verplaatst tijdens gebruik.
Rand van de kom aangeraakt tijdens het
wegen van ingrediënten.
Plaats het apparaat voor het wegen altijd op
een droog, stabiel en horizontaal oppervlak.
Verplaats het apparaat niet en raak de kom
niet aan tijdens werking van de weegfunctie.
Zet het scherm op nul voordat u de volgende
ingrediënten gaat wegen.
Kan niet snel tussen grammen en
Engelse eenheden wisselen.
Apparaat is ingesteld om de eerder
geselecteerde meeteenheid weer te geven.
Wacht 5 seconden en probeer het dan
opnieuw.
Wegen in app (gewicht weergegeven
op mobiele apparaat) reageert traag.
Slecht wifisignaal.
Mobiele apparaat niet aan hetzelfde lokale
wifinetwerk verbonden.
Zorg ervoor dat het apparaat een goed
signaal ontvangt (neem contact op met uw
internetaanbieder als u het wilt verbeteren).
Zorg ervoor dat mobiele apparaat verbonden
is aan hetzelfde lokale wifinetwerk als de
machine (ga naar de instellingen van het
mobiele apparaat en selecteer uw lokale
wifinetwerk).
Als het probleem aanhoudt, neemt u contact op met de dichtstbijzijnde erkende klantenservice van Kenwood. Voor informatie
over de dichtstbijzijnde klantenservice van Kenwood gaat u naar www.kenwoodworld.com of naar de website voor uw land.

35
Ecodesign-informatie
Netwerkpoort: enkele wifi-netwerkpoort, standaard geactiveerd.
Model nr.: TYPE: KCL95
RF-frequentiebereik: 2412 - 2472 MHz
Maximale transmitvoeding: < 20 dBm
Communicatieprotocol: IEEE802.11 b, g, n
De KCL95 heeft een enkele wifinetwerkpoort en is geschikt voor gebruik als op afstand bedienbaar netwerkapparatuur.
O De netwerkpoort kan uitgezet worden door in het wifi-instellingenmenu “uit” te selecteren.
O De netwerkpoort kan weer aangezet worden door in het wifi-instellingenmenu “aan” te selecteren.
Reactivering: De machine kan vanuit standby gereactiveerd worden door:
O Vanuit genetwerkte standby: Raak het scherm aan, draai aan de draaiknop of op afstand met de app.
O Vanuit niet-genetwerkte standby: Raak het displayscherm aan of draai aan de draaiknop.
O Bewaar de kom en het deksel altijd op de hoofdeenheid zodat deze op afstand bediend kan worden.
Fabrieksreset - Belangrijk
Wanneer u het apparaat weggooit, is het belangrijk om het in de fabriek te resetten om uw persoonlijke gegevens te beschermen.
Als u deze optie selecteert, worden alle gegevens gewist WiFi-gegevens opgeslagen op het apparaat en terugzetten naar de
fabrieksinstellingen.
WEBSITE
Modi Stroomverbruik
Niet-netwerkstand-by - Na 20 minuten inactiviteit wordt het scherm uitgeschakeld.
WiFi-netwerkpoort gedeactiveerd.
0,2 W
Networked Standby - Na 20 minuten inactiviteit wordt het scherm uitgeschakeld en
blijven alle wifi-netwerkpoorten geactiveerd.
0,7 W
Uit - Geactiveerd door schakelaar aan de achterkant van het apparaat. 0,0 W

36
Français
Sécurité
OLisez et conservez soigneusement ces instructions pour pouvoir vous y
référer ultérieurement.
ORetirez tous les éléments d’emballage et les étiquettes.
OSi le cordon ou la prise sont endommagés, il faut les faire remplacer, pour des
raisons de sécurité, par Kenwood ou un réparateur agréé par Kenwood pour
éviter tout accident.
Remarque importante – implants médicaux électroniques
OComme tous les produits de cuisson par induction, cet appareil génère des
champs magnétiques à ondes courtes. Si l’utilisateur ou une personne se tenant
à proximité de l’appareil porte un pacemaker ou tout autre implant actif, il est
recommandé de consulter un médecin avant utilisation au sujet d’une possible
incompatibilité afin de prévenir tout risque pour la santé.
OÉteignez et débranchez l’appareil avant d'installer ou de retirer les accessoires,
après utilisation et avant de le nettoyer.
ON’approchez pas des parties de votre corps, cheveux, bijoux ou vêtements
amples des parties en mouvement et des accessoires installés.
ONe mettez pas les doigts dans le mécanisme de charnière.
ONe laissez jamais l'appareil allumé sans surveillance lorsqu'il n'est pas en mode
cuisson.
O Lorsque vous laissez l’appareil sans surveillance en mode cuisson, faites très
attention à ce qui suit :
{ assurez-vous de suivre les instructions relatives aux températures et aux
quantités maximales ;
{ veillez à maintenir le cordon et le robot hors de la portée des enfants et
éloignés du bord du plan de travail ;
{ vérifiez régulièrement la progression de la cuisson pour ajouter suffisamment
de liquide et éviter tout risque de sur-cuisson des aliments.
ON’utilisez jamais un appareil endommagé. Faites-le vérifier et réparer : voir la
rubrique “Service après-vente”.
ON’utilisez jamais d’accessoire non prévu pour cet appareil ou plus d’un
accessoire à la fois.
ONe dépassez jamais les capacités maximales ; quand vous utilisez la cuisson par
induction, ne dépassez jamais le niveau de remplissage maximum de 3 litres
indiqué à l’intérieur du bol.
OQuand vous utilisez un accessoire supplémentaire, lisez les instructions
d’utilisation qui l’accompagnent.
OFaites attention en soulevant cet appareil car il est assez lourd. Assurez-vous
que la tête est verrouillée et que le bol, les accessoires, les couvercles et le
cordon sont bien attachés avant de soulever l’appareil.
OSaisissez toujours l'appareil par la base et la tête du mélangeur lorsque vous
souhaitez le déplacer. NE PAS soulever ni transporter l'appareil par la poignée
du bol.
ONe laissez jamais le cordon pendre de sorte qu’un enfant puisse l’attraper.
ONe laissez jamais le bloc moteur, le cordon d’alimentation ou la prise se mouiller.
OFaites attention en manipulant ou en touchant toute partie de l’appareil quand
il est utilisé en mode cuisson ou après la cuisson, EN PARTICULIER, LE BOL,
LE COUVERCLE ANTI-ÉCLABOUSSURE ET LES ACCESSOIRES car ils restent
CHAUDS longtemps après l'arrêt de l’appareil. Utilisez les poignées pour
retirer et porter le bol. Utilisez un gant anti-chaleur pour manipuler le bol et les
accessoires de mélange chauds.
OLe symbole figurant sur le produit indique une surface dont la température
est susceptible d’augmenter en cours d’utilisation.
O Faites attention lorsque vous retirez les ustensiles du bol car ils peuvent être
chauds.
OLe dessous du bol restera chaud longtemps après la fin de la cuisson. Faites
attention en manipulant le bol et protégez votre plan de travail ou les surfaces
sensibles à la chaleur.
OPrenez garde à la vapeur s’échappant du bol, particulièrement quand vous
enlevez le couvercle ou quand vous soulevez la tête du robot.
Avant de lire, veuillez déplier la première page contenant les illustrations

37
OSi vous transférez des ingrédients chauds dans le robot, laissez-les refroidir à
température ambiante avant de les placer dans le robot.
ON’utilisez que le bol et les accessoires fournis avec cet appareil. N’utilisez jamais
le bol avec une autre source de chaleur.
ONe jamais faire fonctionner l’appareil en mode cuisson si le bol est vide.
ON'insérez rien dans les grilles de ventilation.
OQuand vous utilisez cet appareil, posez-le sur une surface plane loin du bord.
Placez-le à au moins 10 cm des murs et assurez-vous que la ventilation n’est pas
bloquée. Ne placez pas l’appareil sous un placard saillant.
OPour une utilisation correcte et sûre du cuiseur par induction, assurez-vous que
la base du bol et les capteurs de température sont propres et secs avant de
lancer la cuisson.
OLes objets métalliques tels que les couteaux, les fourchettes, les cuillères et les
couvercles peuvent devenir chauds sous l'effet de l'induction, en conséquence
ils ne doivent pas être placés au niveau de la zone d'induction.
OComme pour tous les appareils de cuisson par induction, ne placez pas de
cartes de crédit, appareils magnétiques ou électroniques sensibles à proximité
de l’appareil pendant son utilisation.
ON’utilisez pas l’appareil pour frire des aliments.
OAssurez-vous toujours que les ingrédients sont complètement cuits avant de les
consommer.
OLorsque vous utilisez de l’huile, ne dépassez jamais 250 ml.
O
Il est recommandé de consommer les aliments peu de temps après leur
préparation ou de les refroidir rapidement et de les réfrigérer le plus vite possible.
OToute mauvaise utilisation de votre appareil peut être source de blessures.
ON'exercez pas une force excessive lorsque vous appuyez sur l'écran tactile et
n'utilisez jamais d'objet pointu.
ON'utilisez pas le fouet pour les mélanges compacts (ex, mélanges d'ingrédients
gras et de sucre) au risque de l'endommager.
OLe cordon d'alimentation est utilisé pour réduire les risques d'enchevêtrement
ou de chute. Il est possible d'utiliser des rallonges avec la plus grande
précaution. Si vous utilisez une rallonge : 1) La puissance électrique indiquée
sur la rallonge doit être au moins égale à la puissance électrique de
l'appareil ; et 2) le cordon doit être placé de telle sorte qu'il ne reposera pas
sur le comptoir ou la table et ne pourra pas être attrapé par un enfant ou tiré
de manière accidentelle. Si l'appareil est équipé d'une mise à la terre, le cordon
d'alimentation doit être un câble à trois fils avec terre. La puissance électrique
de l'appareil figure sous l'unité.
OLes appareils peuvent être utilisés par des personnes dont les capacités
physiques, sensorielles ou mentales sont diminuées, ou qui ne disposent pas
des connaissances ou de l’expérience nécessaires, si elles ont été formées et
encadrées pour l’utilisation des appareils, et si elles ont conscience des risques
encourus.
OLes enfants doivent être surveillés afin qu’ils ne puissent pas jouer avec cet
appareil.
OCet appareil ne doit pas être utilisé par des enfants. Veuillez garder l’appareil et
le cordon hors de portée des enfants.
ON’employez l’appareil qu’à la fin domestique prévue. Kenwood décline toute
responsabilité dans les cas où l’appareil est utilisé incorrectement ou que les
présentes instructions ne sont pas respectées.
OLa consommation d'énergie maximale est basée sur celle du mini-hachoir/
moulin, les autres accessoires peuvent demander moins d'énergie.
OCet appareil n'est pas conçu pour fonctionner avec un minuteur externe ou un
système de commande à distance séparé.
O Ne bougez pas la tête du robot, et ne la soulevez pas lorsqu’un accessoire est
installé car cela pourrait rendre le robot pâtissier multifonction instable.
O
N'utilisez pas votre appareil près du bord ou en surplomb par rapport à la
surface de travail. Ne forcez pas sur un accessoire installé sur l'appareil, cette
action est susceptible de le rendre instable et de le faire basculer, entraînant un
risque de blessures.

38
Avant d’utiliser votre appareil pour la première fois
O Lavez les pièces : voir «Entretien et nettoyage ».
Découvrez votre Cooking Chef
Légende
Points de branchement
1 Sortie rapide (HSO)
2 Sortie lente (SSO)
3 Prise des accessoires du bol
4 Prise de l'accessoir mélangeur
Robot
5 Cache de la sortie rapide
6 Tête du robot
7 Cache sortie lente
8 Bol
9 Tête – levier pour soulever
10 Bouton de commande
11 Interrupteur marche/arrêt
12 Écran d'affichage
13 Tapis de protection du plan de travail
14 Orifice d’écoulement
15 Socle du bol/ zone de cuisson par induction
16 Ventilation
17 Capteurs de température
18 Protège-chaleur
19 Joint en caoutchouc (amovible)
20 Couvercle anti-éclaboussure
21 Couvercle de la cheminée d’alimentation
22 Batteur- K
23 Batteur souple à haute température
24 Fouet
25 Pétrin
26 Outil mélangeur
27 Pince d'aide au mélange
28 Spatule haute température
29 Raclette à pâte
30 Clé de serrage
Panier-vapeur
31 Supports de poignée
32 Anneau de support
33 Poignées pliantes
34 Plateau amovible
35 Supports pour œufs
Remarque : accessoires pour la sortie lente
La sortie lente sur votre modèle de robot comporte le Système
de connexion Twist. Il est conçu pour accepter les accessoires
du Système de connexion Twist.
Lorsque vous achetez de nouveaux accessoires pour la sortie
lente, vous devez vérifier leur compatibilité avec votre robot.
Tous les accessoires du Système de connexion Twist sont
identifiables par le code produit commençant par KAX, de
même que par le symbole Twist dessiné sur l’emballage.
Si vos accessoires comportent le Système de connexion
Bar , vous devez utiliser l’adaptateur KAT002ME pour
raccorder ces derniers au Système de connexion Twist sur
votre robot.
Pour plus d’informations, veuillez consulter le site
www.kenwoodworld.com/twist.
Connexion à l’application Kenwood World
Voir les illustrations A - D
L’application Kenwood World vous permet de contrôler votre
appareil par le biais de votre smartphone ou tablette.
1 Branchez l'appareil et appuyez sur l'interrupteur marche/
arrêt situé sur le côté.
2 Sélectionnez Paramètres > WiFi > Connexion et suivez
les instructions affichées.
Code PIN
O L’application Kenwood World vous demandera votre code
PIN.
O L’appareil ne pourra se connecter que lorsque le code PIN
s’affiche à l’écran. En cas de saisie d’un code PIN incorrect,
suivez les consignes de l’application et réessayez.
O Pour afficher le code PIN de l’appareil, sélectionnez les
Paramètres > WiFi > Connect (Connexion), et suivez les
consignes affichées à l’écran (une fois la connexion à la WiFi
établie).
Remarque :
WiFi
Fonctionne sur un réseau IEEE802.11 b, g et n à 2,4 GHz
seulement.
Compatibilité
L’application Kenwood World est compatible avec les
dernières versions d’iOS et d’Android.
Avant de brancher l’appareil
O Assurez-vous que votre alimentation électrique corresponde à celle qui est indiquée sur la partie inférieure de votre appareil.
O AVERTISSEMENT : CET APPAREIL DOIT ÊTRE RELIÉ À LA TERRE
O Cet appareil est conforme au règlement 1935/2004 de la CE sur les matériaux et les articles destinés au contact alimentaire.
O Cet appareil respecte les exigences principales et autres dispositions pertinentes de la Directive 2014/53 de la CE.
Panier-vapeur
OCet accessoire produit de la vapeur avec laquelle vous pourriez vous brûler.
OFaites attention à ne pas vous brûler avec la vapeur qui s’échappe du panier
vapeur, particulièrement en retirant le couvercle anti-projections ou en
soulevant le couvercle de la cheminée d’alimentation.
OPrenez garde en manipulant les éléments : les liquides, la condensation et les
éléments du panier vapeur ou du robot pâtissier multifonction seront très
chauds. Utilisez des gants à four.
ODébranchez l’appareil avant de le démonter ou de le nettoyer.
Sécurité des aliments
OFaites cuire la volaille, le poisson et les fruits de mer entièrement. Ne faites pas
cuire ces aliments lorsqu’ils sont encore congelés.
ONe réchauffez pas des aliments déjà cuits dans votre appareil de cuisson à la
vapeur.

39
Remise aux paramètres d'usine
Important
O Lors de la mise au rebut de l’appareil, il est important
d'eectuer une remise aux paramètres d'usine pour
protéger vos données personnelles.
O Sélectionnez cette option pour supprimer toutes les
données WiFi stockées sur l’appareil et restaurer ses
paramètres d’usine.
O Pour réinitialiser l’appareil, sélectionnez Paramètres
> Factory Reset (Réinitialisation).
Configuration de votre Cooking Chef Connect
Voir les illustrations E - I
IMPORTANT
O Vérifiez que la zone d’induction, les capteurs de
température et la surface de la base du bol sont propres.
Faute de quoi, le capteur de température fonctionnera mal
ce qui entraînera une mauvaise cuisson.
O Vérifiez que tous les couvercles de l’appareil, y compris
le protège-chaleur sont installés. S’ils ne sont pas
correctement placés, la fonction cuisson ne marchera pas.
1 Branchez l'appareil et appuyez sur l'interrupteur marche/
arrêt.
2 Tournez la molette d'ouverture dans le sens des aiguilles
d'une montre et levez la tête.
3 Poussez le protège-chaleur contre la partie inférieure de
la tête du robot jusqu'à ce qu'il soit entièrement inséré. Le
protège-chaleur ne doit jamais être utilisé sans que le joint
en caoutchouc soit correctement ajusté.
O Si vous utilisez votre Cooking Chef Connect sans la
fonction de chauffage/cuisson, il n'est pas nécessaire
d'installer la protection thermique sauf utilisation du
couvercle anti-éclaboussures. Reportez-vous à la section «
Installation et utilisation du couvercle anti-éclaboussures ».
4 Placez le bol sur la base.
5 Placez l'accessoire requis dans la prise l'accessoire ou
la prise du mélangeur si vous utilisez le mélangeur, en
insérant l'embout dans l'orifice prévu à cet effet avant de le
tourner pour le verrouiller.
O Pour retirer un outil, procédez selon les 5 étapes ci-dessus,
dans l'ordre inverse. (Toujours utiliser des gants pour retirer
les outils après l'utilisation).
6 Pour baisser la tête du mixeur, soulevez-la légèrement,
puis basculez le levier de levage de la tête dans le sens des
aiguilles d'une montre.
Baissez en position verrouillée.
Mélangeur - lors de l'utilisation du mélangeur, la pince
d'aide au mélange peut également être utilisée pour faciliter
l'action de brassage, voir « Installation et retrait de la pince
d'aide au mélange ». Le mélangeur peut également être
utilisé avec le fouet. N'utilisez pas le mélangeur avec
l'accessoire de pétrissage.
Utilisation de votre Cooking Chef Connect -
Mode manuel
1 Ajoutez les ingrédients nécessaires pour les cuire/mélanger.
2 Réglez la durée, la vitesse et la température requises.
Remarque : En cas d'utilisation du robot sans fonction de
chauffage/cuisson, sélectionnez « Off » lors du réglage de
la température.
Tournez le bouton de commande dans le sens antihoraire
pour utiliser la fonction de mélange intermittent et la
fonction pulse.
Tournez le bouton de commande dans le sens horaire pour
utiliser les vitesses en continu.
3 Appuyez sur le bouton de commande pour démarrer.
4 Appuyez sur le bouton de commande pour arrêter
l'appareil à tout moment. En mode cuisson, la température
du robot augmente, il convient donc de faire attention.
Sortie rapide, mode haute température
(HSHT)
Mélanger à vitesse élevée à des températures de 60 °C et
plus
O Sélectionnez la durée (le cas échéant), la vitesse et la
température (60 °C ou plus).
O Un avertissement vous informant que vous sélectionnez
le mode HSHT apparaît sur l'écran.
O Une fois l'avertissement lu et compris, appuyez sur « Oui
» pour confirmer la sélection du mode HSHT.
O Appuyez sur le bouton de commande pour démarrer.
Cette fonction DOIT UNIQUEMENT être utilisée avec le
fouet et/ou le mélangeur. Vous ne devez pas dépasser la
capacité maximale de cuisson de 3 litres et vous devez
veiller à ce que le couvercle anti-éclaboussures soit
installé. Le robot ne doit pas être laissé sans surveillance.
5 Une fois le programme terminé, l'unité sonne 3 fois.
O Remarque : si aucun temps n'a été défini, les processus
de chauffe et de mélange se terminent automatiquement
quand la minuterie atteint 8 heures.
6 Pour arrêter la fonction de cuisson/chauffage, réglez
la température sur « OFF ». Appuyez sur le bouton de
commande pour arrêter l'appareil à tout moment.
Important - Si la tête du robot est relevée en cours
d'utilisation, la fonction de chauffage se coupe, l'accessoire
s'arrête et ne redémarre pas lorsque la tête du mélangeur
est rebaissée. Pour redémarrer le robot, baissez la tête et
appuyez sur le bouton de commande.
Utilisation des programmes prédéfinis
Voir les illustrations P – R
1 Sélectionnez le menu Preset (Présélection).
2 Choisissez le programme prédéfini souhaité.
3 Suivez les consignes apparaissant à l’écran.
4 Appuyez sur le bouton de commande pour arrêter
l'appareil à tout moment. La température du bol et des
accessoires augmente, il convient donc de faire attention.
Après la cuisson
O Faites attention lorsque vous touchez ou manipulez
toute pièce de l’appareil utilisé en mode cuisson ou
suite à cette cuisson, EN PARTICULIER LE BOL ET LES
ACCESSOIRES car ils restent CHAUDS longtemps après
que l’appareil a été éteint.
O Utilisez les deux poignées latérales pour retirer le bol et le
transporter. Lorsque le bol ou les accessoires sont chauds,
utilisez des gants de cuisine.
O Le dessous du bol reste chaud longtemps après l'arrêt de
la fonction de chauffage. Il convient d'être prudent lors de
la manipulation du robot et des accessoires et d'utiliser
le tapis de protection fourni afin de protéger les surfaces
sensibles à la chaleur.
Conseils et astuces
O Certaines recettes, en particulier à forte teneur en eau,
ne pourront pas atteindre une température de cuisson
supérieure à 100°C (la température d’ébullition de l’eau).
O Pour ajouter des ingrédients dans le bol pendant la
cuisson, diminuez la vitesse et ajoutez les ingrédients
lentement et régulièrement.
O Pour chauffer rapidement une sauce, utilisez le réglage
de mélange continuel.
O Si vous utilisez le couvercle anti-éclaboussure pendant la
cuisson, enlevez-le toujours avant de soulever la tête du
robot. Faites attention à la condensation qui se forme sur
le couvercle et le protège-chaleur.

40
O Soulevez la tête du robot lentement pour permettre au
liquide se trouvant sous le protège-chaleur de couler
dans le bol.
O Quatre réglages de la fonction de mélange sont
disponibles, ils vous permettent d'adapter le type de
mélange à chaque recette. Certaines recettes requièrent
un mélange constant pour empêcher que les ingrédients
ne viennent coller au fond du bol, tandis que d'autres
ont besoin d'un mélange intermittent qui permet de
préserver la texture des aliments.
Fonctionnement manuel (accessoires)
1 Enlever le couvercle de la sortie hagrande ute vitesse/la
sortie basse vitesse (le cas échéant).
2 Fixer l’accessoire en suivant les instructions fournies.
3 Régler le temps et la vitesse nécessaires (voir illustrations
L - M). Appuyez sur le bouton de commande pour
démarrer.
Pour arrêter l'appareil à tout moment, appuyez à nouveau
sur le bouton de commande.
Installation et retrait des caches sorties
Cache sortie rapide
1 Pour retirer le couvercle, utilisez la prise et soulevez.
2 Pour mettre en place, installez le cache sur la sortie et
enfoncez vers le bas.
Cache de sortie lente
1
Pour retirer le
cache
, utilisez la prise présente dessous et
tirez vers l'extérieur.
2 Pour installer, repérez la prise en haut du cache dans la
cavité de la sortie et poussez pour le clipser en position.
Utilisation de la fonction de pesage
Voir les illustrations S
1 Sélectionnez la fonction de pesage sur l'écran tactile.
2 Installez le bol.
3 Mettez la balance à zéro.
4 Pesez les ingrédients.
5 Pour changer d'unité, appuyez sur le bouton correspondant
sur l'écran.
Remarque : Placez toujours l'appareil sur une surface sèche,
plane et stable avant de peser. N'appuyez pas sur le robot ou
le bol lui-même pendant le pesage, cela affecterait la précision
de la balance.
La fonction de pesage peut être utilisée avec la tête du robot
en position basse ou haute.
La fonction de pesage est précise jusqu'à 6 kg.
Tableau d'utilisation des préréglages
Les réglages par défaut peuvent être ajustés en fonction de votre recette, le cas échéant.
Les réglages non modifiables sont indiqués par l'icône .
Lorsque « Chauffage » s'affiche sur l'écran, le minuteur ne démarre pas le compte à rebours tant que la température correcte n'a
pas été atteinte.
Préréglage Accessoire
recommandé
Paramètres par défaut
(plage)
Phase de maintien
au chaud
Utilisations / Idées de recettes
Monter des blancs en
neige
1 min 15 s
(15 s à 5 min)
Max
OFF
Blanc d'oeufs montés en neige
pour mousse au chocolat
Génoise 1 min
(30 s à 5 min)
1 – Max
( à Max)
OFF
Génoise victorienne, Cupcakes
Pétrissage 10 min
(1 à 30 min)
Min to 1
(min à 2)
OFF
Petits pains, Pizza
Pousse de pâtes 1 h
(5 min à 2 h)
OFF
30 ˚C
(25 à 35 ˚C)
Apprêt/levée des pâtes avec
levure
Faire fondre du
chocolat
10 min
(5 min à 2 h)
60 ˚C
Mousse au chocolat

41
Tableau d'utilisation des préréglages
Préréglage Accessoire
recommandé
Paramètres par défaut
(plage)
Phase de maintien
au chaud
Utilisations / Idées de recettes
Meringue suisse 10 min
(1 à 20 min)
Max
40 ˚C
Base pour glaçage à la crème au
beurre
* Pour obtenir les meilleurs
résultats, utilisez toujours le
préréglage.
Meringue italienne 4 min
(1 à 20 min)
HSHT 6
(– Max)
60 à 85 ˚C
Tarte au citron meringuée
Omelette norvégienne
Compote de fruits 20 min
(5 s à 2 h)
()
104˚C
30 min
62 ˚C
Garnitures pour gâteaux,
nappages pour desserts
Popcorn 10 min
(5 s à 10 min)
OFF
180 ˚C
Pour popcorn frais fait maison
* Pour obtenir les meilleurs
résultats, utilisez toujours le
préréglage.
Cuisson vapeur 20 min
(5 à 45 min)
OFF
100 ˚C
Saumon en papillote
One Pot 40 min
(5 s à 8 h)
()
103˚C – 140˚C
30 min
62˚C
Bolognaise
Soupes à l’ancienne 20 min
(5 s à 8 h)
()
103˚C – 140˚C
30 min
62˚C
Minestrone, bouillons
Cuisson lente 2 h
(5 s à 8 h)
()
98˚C – 140˚C
30 min
62˚C
Boeuf bourguignon

42
Recette
Marinade aux pruneaux
200 g de miel liquide clair
40 g de pruneaux doux
40 ml d'eau
1 Placez tous les ingrédients dans le mini-hachoir/moulin.
Placez au réfrigérateur jusqu'au lendemain.
2 Installez l'accessoire sur le robot.
3 Appuyez sur le bouton de commande pour une impulsion
pendant 4 secondes.
4 Utilisez selon les besoins.
Panier-vapeur
Voir les illustrations T
O Quand vous utilisez le panier de cuisson à la vapeur,
éloignez votre robot des murs ou des placards en hauteur :
la vapeur pourrait les endommager.
O Assaisonnez les aliments après la cuisson : cela aidera à
prévenir l’apparition de tâches ou de traces sur le bol en
acier inoxydable.
1 Placez le plateau amovible sur une surface plane en vous
assurant que les poignées sont repliées vers l’intérieur.
2 Installez l’anneau de support sur le plateau en vous
assurant que les supports de poignée situés sur l’anneau
s’insèrent dans les découpes en V sur le plateau.
3 Repliez les poignées et attachez-les aux supports de
poignée au moyen du clip.
4 Disposez les aliments à cuire sur le plateau. Les légumes
doivent être lavés et pelés si nécessaire.
5 Ajoutez la quantité d’eau requise dans le bol (voir tableau
de cuisson). Utilisez de préférence de l’eau filtrée pour
réduire la teneur en calcaire et les taches.
6 Placez le panier vapeur sur le bol – il s’ajustera à la hauteur
voulue.
7 Installez le protège-chaleur sur la tête du batteur.
8 Installez le bol et le panier vapeur sur le robot pâtissier
multifonction.
9 Abaissez la tête du batteur et installez le couvercle anti-
projections.
10 Sélectionnez le préréglage Vapeur et ajustez le temps
de cuisson (conformément au Tableau de cuisson
recommandé). Appuyez sur le bouton de commande pour
démarrer.
11 Laissez cuire pendant la durée requise.
12 Retirez le couvercle anti-projections.
13 Soulevez la tête du batteur.
14 Soulevez le panier vapeur par les poignées – attention à
ce qu’elles ne se replient pas.
15 Placez le panier vapeur sur une grande assiette ou un
récipient adéquat.
16 Détachez les poignées et repliez-les vers le centre.
Soulevez l’anneau de support et repliez les poignées.
17 Retirez les aliments.
Important
Faites attention dans vos manipulations : les liquides,
la condensation et les éléments du panier vapeur ou du
robot pâtissier multifonction seront très chauds. Utilisez
une manique.
O N’essayez pas d’installer un accessoire de mélange pendant
que vous utilisez le panier vapeur.
O Ne cuisez pas d’ingrédients dans le bol du batteur pendant
que vous utilisez le panier vapeur.
Conseils et astuces
O Le liquide restant dans le bol est parfait pour faire de la
soupe ou du bouillon. Attention, il reste très chaud.
O Laissez un espace entre les aliments.
O Mélangez les grandes quantités à mi-cuisson.
O Mettez des morceaux de taille similaire pour une cuisson
plus homogène.
O
Si vous cuisez à la vapeur plusieurs types d’ingrédients et
qu’un de ceux-ci a besoin de moins de temps de cuisson,
ajoutez-le plus tard.
O Si vous relevez le couvercle de la cheminée
d’alimentation ou retirez le couvercle anti-projections,
de la vapeur s’échappera et la cuisson pourrait être plus
longue.
O Les aliments continueront à cuire après l’arrêt
automatique du robot pâtissier multifonction, retirez-les
donc immédiatement.
O Si les aliments ne sont pas suffisamment cuits, réglez à
nouveau le minuteur. Vous devrez peut-être ajouter de
l’eau.
O Les temps de cuisson ne sont indiqués qu’à titre indicatif.
Vérifiez toujours que les aliments sont parfaitement cuits
avant de les consommer.
O Ne laissez pas l’appareil fonctionner à sec, ajoutez de
l’eau si nécessaire.

43
Écran : explications
Tapotez cette icône pour ouvrir le menu des paramètres.
Tapotez cette icône pour ouvrir le menu des programmes prédéfinis.
Appuyez sur cette icône pour peser les ingrédients dans le bol.
Ache la durée choisie en heures (h), minutes (m) et secondes (s).
Affiche l'intervalle de mélange sélectionné.
Si on sélectionne une vitesse intermittente, (2 Æ 4), le cercle extérieur augmentera
progressivement et l’appareil se mettra à mélanger une fois plein.
Ache la température sélectionnée.
Un fond rouge clignotant indique que le robot est en mode chauffage.
Un fond rouge fixe indique que le robot a atteint la température définie.
Une flèche clignotante pointant vers le bas indique que l'appareil est en train de refroidir.
Indique l’impossibilité de régler un paramètre (durée, vitesse ou température).
Status Information Le texte apparaissant ici montre le statut.
Indique si le bol, son contenu et toute autre pièce sont chauds et doivent être manipulés
avec précaution.
Indique si l’appareil est connecté à la WiFi.
Indique que l'appareil est en mode haute vitesse haute température (HSHT)
Tournez le bouton de commande dans le sens antihoraire pour utiliser la fonction de
mélange intermittent et la fonction impulsion.
Tournez le bouton de commande dans le sens horaire pour utiliser les vitesses en continu
min à max.
Recettes
Recette Accessoire utilisé
Paramètres prédéfinis /
manuels
Ingrédients
Minestrone Soupes à l’ancienne
20 min
98 ˚C
Ajouter tous les ingrédients suivants au même moment :
100 g pancetta, coupée en dés
2 gousses d’ail, hachées
50 g de riz Arborio
2,5 c. à soupe
de purée de tomates
70 g de chou
1 c. à café de romarin séché
2 c. à café de sauge séchée
1
branche de céleri, émincée
60 g de poireau, émincé
75 g d’oignon, émincé
75 g de carottes, coupées en rondelles
1 l
de bouillon de légumes chaud
Sel et poivre

44
Recettes
Recette Accessoire utilisé
Paramètres prédéfinis /
manuels
Ingrédients
Bœuf Strogano
One Pot
30 min
103 ˚C
Ajouter tous les ingrédients suivants au même moment :
600g de viande de bœuf, coupée en dés
1 c. à soupe
de paprika
1 c. à soupe
de beurre
1 gousses d’ail, hachées
400 g bouillon de boeuf
200 g
de champignons, émincés
150 g onion, émincé
300 g de carottes, coupées en rondelles
200 ml de crème liquide
1 c. à soupe
fécule de maïs
1 c. à soupe
eau }mélanger
Sel et poivre
Crème Anglaise Paramètres manuels
15 min
85 ˚C
Ajouter tous les ingrédients suivants au même moment :
250 g de lait entier
250 g de crème
1 c. à café d’extrait de vanille
2 c. à soupe
de maïzena
96 g de jaune d’œuf, battu,}mélanger
80 g de sucre en poudre
Popcorn Popcorn
10 mins
OFF
180˚C
Ajoutez les ingrédients suivants tous en même temps :
50g de grains de maïs
20g d'huile de tournesol
* Pour obtenir les meilleurs résultats, utilisez toujours le
préréglage.
Riz au lait Paramètres manuels
1 h
15 min
95 ˚C
Ajouter tous les ingrédients suivants au même moment :
150 g de riz rond
1 l de lait entier
75 g de sucre en poudre
2 c. à café d’extrait de vanille
Réglages de température et de vitesse
Conseils de
température
60 °C Faire fondre du chocolat
72 °C – 82 °C Pochage
98 °C – 99 °C Mijoter
100°C Faire bouillir, cuire à la vapeur
130 °C – 140 °C Légumes sautés
180 °C Faire dorer de la viande
(P) Impulsion - Pour de courts instants à puissance maximale.
Mélange intermittent 1 - le robot tourne à une vitesse lente constante. Utilisé pour
incorporer des ingrédients légers/aérés dans des mélanges plus compacts.
Intervalle de mélange 2 - Mélange intermittent avec de courtes pauses. Ce
réglage permet un mélange à une vitesse lente toutes les 10 secondes sur un tour
et demi.
Intervalle de mélange 3 - Mélange intermittent avec pauses de durée moyenne.
Ce réglage permet un mélange à une vitesse lente toutes les 30 secondes sur un
tour et demi.
Intervalle de mélange 4 - Mélange intermittent avec de longues pauses. Ce
réglage permet un mélange à une vitesse lente toutes les 5 minutes sur un tour
et demi.
Vitesse min - max Vitesses continues augmentant progressivement jusqu'à la vitesse maximum
HSHT Mélanger à des températures supérieures à 60 °C en utilisant les vitesses Min à
Max.

45
Conseils d’utilisation
Informations données à titre indicatif qui varieront en fonction de la recette et des ingrédients utilisés
Batteur-K
Pour préparer des gâteaux, des biscuits, des pâtisseries, du glaçage, des garnitures, des
éclairs et de la purée de pommes de terre.
Conseils et astuces
• Pour éviter les éclaboussures, augmentez progressivement la vitesse.
• Pour bien incorporer les ingrédients, arrêtez le robot et raclez fréquemment le bol avec
la spatule.
• Sauf indication contraire sur votre recette, utilisez toujours des ingrédients froids pour
les pâtisseries.
Recette / Action
(Max) (Minutes)
Pâtisseries et biscuits : intègre les
matières grasses à la farine
Quantité de
farine
910 g Min 12
Préparations pour gâteaux tout-en-un Poids total 4 kg Min Max 45–60 s
Batteur souple
Pour le crémage et le mélange d'ingrédients mous.
Conseils et astuces
• Pour éviter les éclaboussures, augmentez progressivement la vitesse.
• Pour monter en crème les matières grasses et le sucre pour les préparations pour
gâteaux, utilisez toujours la matière grasse à température ambiante ou faites-la ramollir
au préalable.
• Deux raclettes sont fournies avec votre batteur souple haute temperature. Utilisez une
raclette pour les recettes sucrées et l'autre pour les recettes salées.
Recette / Action
(Max) (Minutes)
Monter en crème du beurre/de la margarine/du sucre 4,55 kg
(préparation à 15 oeufs)
Min Max 4
Battre des oeufs dans les préparations pour gâteaux Min Max 1–4
Incorporer de la farine, des fruits, etc. Min 1 30–60 s
Fouet
Pour les œufs, la crème et les soufflés.
Important
• Pour éviter les éclaboussures, augmentez progressivement la vitesse.
• N'utilisez pas le fouet pour les mélanges compacts (gâteaux tout-en-un et pour le
crémage des mélanges d'ingrédients gras et sucrés) au risque de l'endommager.
• Utilisez des oeufs à température ambiante pour un résultat optimal.
Avant de battre les blancs d’oeufs, vérifiez que le fouet et le bol sont exempts d’huile/ de
beurre ou de jaune d’oeuf.
Recette / Action
(Max) (Minutes)
Blancs en neige 16 (605 g)
Min Max
1½-2
Génoises sans matières grasses 930 g 4 -6
Crème 2 L 1½-3
Pâte à crêpe épaisse
• Commencez par placer la farine dans le bol, avant
d’ajouter les ingrédients liquides.
• Utilisez la vitesse la plus basse pour incorporer les
ingrédients.
250 g Farine
500 g Lait
200 g OEufs
Min 10 s
Max 45–60 s
Mayonnaise
• Pour un résultat optimal, raclez le bol après avoir
ajouté l’huile et remettez en route pendant 10
secondes supplémentaires à plein régime.
2 Jaune d’oeuf
10 g Moutarde
200 ml Huile végétale
Max 1-1½
Taille des oeufs utilisés = taille moyenne (poids variant de 53 à 63 g).
Crème utilisée = crème fraîche à au moins 38 % de matières grasses

46
Conseils d’utilisation
Informations données à titre indicatif qui varieront en fonction de la recette et des ingrédients utilisés
Accessoire de pétrissage
Pour les préparations levurées souples
Conseils et astuces
Important
• Ne dépassez jamais les capacités maximales données (risque de surcharge).
• Si votre robot peine à tourner, éteignez-le, retirez la moitié de la pâte et travaillez-la en
deux fois.
• Versez les ingrédients liquides en premier pour que les ingrédients se mélangent bien.
Levure
• Levure sèche (type de levure devant être reconstituée) : versez l’eau chaude dans le
bol. Ajoutez la levure et le sucre et laissez reposer 10 minutes environ jusqu’à ce que la
préparation soit mousseuse.
• Levure fraîche : à émietter dans la farine.
• Autres types de levure : suivez les consignes du fabricant.
Recette / Action
(Max) (Minutes)
Pâte à pain (levurée ferme) Quantité de
farine
350 g–1,6 kg Min 60 s
1 3–4
Poids total 564 g–2,58 kg Re-pétrissez sur la
vitesse 1
60 s
Pâte levurée souple (enrichie au beurre
et aux oeufs
Quantité de
farine
250 g–1,6 kg Min 60 s
Poids total 478 g–3,1 kg 1 3–4
Re-pétrissez sur la
vitesse 1
60 s
Taille des oeufs utilisés = taille moyenne (poids variant de 53 à 63 g).
Guide d'utilisation de l'accessoire de cuisson vapeur
O
Ces temps de cuisson sont fournis à titre indicatif uniquement. Une quantité de 500 ml d'eau peut être utilisée pour les aliments
nécessitant jusqu'à 20 minutes de cuisson. Pour les aliments nécessitant un temps de cuisson plus long, utilisez 650 ml d'eau.
O
Ne laissez pas l'appareil chauffer sans eau, ajoutez de l'eau si nécessaire.
O
Ne surchargez pas le panier lorsque vous faites cuire de la volaille ou du poisson.
O
Lire « Sécurité alimentaire » dans la section Sécurité.
Légumes
Ingrédient
(Max) (minutes)
Quantité d’eau Préparation
Asperges 450 g 15 500 ml Épluchez
Haricots verts 450 g 15-20 500 ml Épluchez
Haricots plats 450 g 15-20 500 ml Épluchez/coupez
Brocoli 450 g 20 500 ml En bouquets
Choux de bruxelles 450 g 25 500 ml Épluchez
Chou petit 25 500 ml Épluchez
Carottes 450 g 20 500 ml Tranches fines
Chou-fleur moyen 25 - 30 650 ml En bouquets
Courgettes 450 g 15 500 ml Tranches fines
Céleri 1 tête 15 500 ml Tranches fines
Poireaux 3 15 500 ml Tranches fines
Pois en cosse 250 g 15 500 ml Épluchez
Champignons de Paris 450 g 10 500 ml Essuyez
Navets 450 g 15 500 ml En dés ou tranches
Pois 450 g 15 500 ml Écossez
Pommes de terre
nouvelles
450 g 30-40 650 ml Essuyez

47
Poisson et volaille
Recette / Action
(Max) (minutes)
Quantité d’eau Remarques
Blancs de poulet 4 30-40 650 ml Cuire jusqu’à ce qu’ils soient
tendres
Palourdes 450 g 10 500 ml Cuire jusqu’à leur ouverture
Crevettes 450 g 10 500 ml Cuire jusqu’à leur ouverture
Poisson (filets) 230 g 10-20 500 ml Cuire jusqu’à ce qu’ils soient
roses
Poisson (tranches) 2,5 cm d'épaisseur 15-20 500 ml Cuire jusqu’à ce qu’elles soient
transparentes
Poisson (entier) 340 g 15-20 500 ml Cuire jusqu’à ce qu’elles soient
transparentes
Langoustes (queues) 2-4 20 500 ml Cuire jusqu’à ce qu’elles soient
rouges
Moules 450 g 15 500 ml Cuire jusqu’à leur ouverture
Huîtres 6 15 500 ml Cuire jusqu’à leur ouverture
Coquilles saint-Jacques 230 g 15 500 ml Cuire jusqu’à ce qu’elles soient
tendres
Réglage de la hauteur du panier
Voir les illustrations U
Fouet, batteur K en acier inoxydable
Pour obtenir un résultat optimal, le fouet et le batteur K
doivent presque toucher le fond du bol. Au besoin, ajustez la
hauteur à l'aide de la clé fournie.
Batteur à crème haute température – cet accessoire doit
toucher le fond du bol.
1 Débranchez l’appareil.
2 Levez la tête du robot et insérez le fouet, le batteur K ou le
batteur souple haute température.
3 Abaisser la tête du robot. Si la hauteur doit être ajustée,
soulevez la tête du robot et retirez l’accessoire.
4 Utilisez la clé pour desserrer l’écrou afin de pouvoir ajuster
l’axe. Pour baisser l’accessoire, tournez l’axe dans le sens
inverse des aiguilles d’une montre. Pour le lever par rapport
au fond du bol, tournez l’axe dans le sens des aiguilles
d’une montre.
5 Resserrez l’écrou.
6 Insérez l’accessoire dans la tête du robot. (Vérifiez sa
position, voir ci-dessus).
7 Répétez les étapes précédentes jusqu’à ce que l’accessoire
soit correctement placé. Resserrez alors l’écrou fermement.
Crochet de pétrissage – cet outil est réglé en usine et ne peut
pas être ajusté.
Mélangeur - cet accessoire doit juste toucher le fond du bol.
1 Débranchez l'appareil.
2 Levez la tête du mixeur et insérez l'accessoire.
3 Baissez la tête du robot. Si l'accessoire nécessite un
ajustement, levez la tête du robot et desserrez l'écrou à
l'aide de la clé, puis baissez la tête du robot.
4 Pour baisser l'accessoire plus près du fond du bol, tournez
la molette d'ajustement dans le sens des aiguilles d'une
montre. Pour lever l'accessoire et l'éloigner du fond du bol,
tournez la molette d'ajustement dans le sens inverse des
aiguilles d'une montre.
5 Resserez l'écrou.a
Installation et utilisation du couvercle anti-
éclaboussures
Voir les illustrations V
Le couvercle anti-éclaboussures se compose de deux
éléments : la protection thermique et le convercle anti-
éclaboussures lui même.
La protection thermique protège la tête du robot de la vapeur
produite pendant la cuisson.
Le couvercle anti-éclaboussures ne doit pas être installé sur
le bol s'il n'est pas utilisé conjointement avec la protection
thermique.
1 Levez la tête du robot jusqu’en position verrouillée.
2 Poussez le protège-chaleur vers le haut sur la partie
inférieure de la tête du robot jusqu’à sa mise en place.
Le protège-chaleur ne doit s’utiliser que si le joint en
caoutchouc est correctement installé.
3 Installez le bol sur le socle.
4 Abaissez la tête du robot.
5 Placez le couvercle anti-éclaboussure sur le bord du bol
et faites-le glisser vers l’avant jusqu’à sa mise en place
complète.
• Pendant la préparation du mélange, on peut ajouter des
ingrédients directement dans le bol par la cheminée
d’alimentation.
6 Pour retirer le couvercle, faites-le simplement glisser vers
vous.
Remarque : Le couvercle anti-éclaboussures reste solidaire
de la protection thermique lorsque la tête du robot est levée,
excepté si celui-ci est retiré avant de lever la tête.
7 Pour retirer le protège-chaleur, levez la tête du robot
jusqu’en position verrouillée. Retirez l’accessoire, puis tirez
le protège-chaleur vers le bas de la partie inférieure de la
tête du robot.
Remarque : pour installer ou retirer le protège-chaleur, la
tête du robot doit être en position verrouillée.

48
Installation et retrait de la pince d'aide au
mélange
Voir les illustrations W
La pince d'aide au mélange peut être utilisé pour faciliter
l'action de mélange.
1 Insérez la pince d'aide au mélange sur le côté du bol avec
l'arête verticale vers l'intérieur et les pinces vers l'extérieur.
2 Tournez la pince dans le sens inverse des aiguilles d'une
montre sur les poignées du bol.
3 Pour la retirer, inversez la procédure.
IMPORTANT - La pince d'aide au mélange ne doit pas
être installée lors de l'utilisation du batteur K, du fouet, de
l'accessoire de pétrissage ou du batteur souple.
Montage du batteur souple haute
température
Voir les illustrations X
installation de la spatule haute température
La spatule est fournie déjà installée et doit toujours être retirée
avant le nettoyage.
1
Installez avec précaution la spatule flexible sur l'accessoire
en insérant la base de la spatule dans la fente puis placez
un côté dans l'encoche avant de crocheter délicatement
l'extrémité en place. Recommencez avec l'autre côté.
Entretien et nettoyage
O Éteignez et débranchez toujours votre appareil avant de le
nettoyer.
O Un peu de graisse peut apparaître à l’orifice lors de la
première utilisation. C’est normal, il vous suffit de l’essuyer.
O Les surfaces en métal des capteurs de température
peuvent montrer des signes d’usure lors d’une utilisation
normale. Cela n’affecte pas les performances de l’appareil.
O Ne laissez pas le batteur souple haute température installé
dans le robot quand celui-ci n’est pas utilisé.
Robot, couvercles des sorties
O Essuyez avec un chiffon humide, puis séchez.
O N’utilisez jamais d’abrasifs et ne les plongez jamais
dans l’eau.
Batteur souple haute température
O Retirez toujours la lame du batteur souple de
l’accessoire avant le nettoyage.
O Lavez la lame du batteur souple et l’accessoire
dans de l’eau chaude savonneuse, puis séchez
minutieusement. Autrement, les pièces peuvent être
passées au lave-vaisselle.
Remarque : veuillez inspecter l’état du corps de l’accessoire
avant et après utilisation ; vérifiez aussi régulièrement l’état de
la lame du fouet et remplacez-la en cas de signe d’usure.
Bol, accessoires, couvercle anti-éclaboussures, pince d'aide
au mélange
O Lavez à la main puis essuyez, ou lavez en lave-vaisselle
(voir le tableau au début de ce manuel).
O N’utilisez jamais de brosse métallique, de paille de fer ou de
chlore pour nettoyer votre bol en inox. Utilisez du vinaigre
pour enlever le calcaire.
O Si des ingrédients sont restés collés ou brûlés au fond,
enlevez le plus gros à l’aide de la spatule fournie.
Remplissez le bol d’eau chaude savonneuse et laissez
tremper. Retirez les dépôts récalcitrants à l’aide d’une
brosse en nylon.
O Toute décoloration du bol n’affecte pas sa performance.
Orifice d’écoulement
O Vérifiez que cet endroit n’est pas obstrué par des déchets.
Si nécessaire, nettoyez-le avec un goupillon ou un coton-
tige.
Capteurs de température
O Essuyez avec un chiffon humide, puis séchez
minutieusement. N’utilisez jamais d’abrasifs ou
d’instruments pointus pour nettoyer les capteurs.
Panier-vapeur
O Eteignez et débranchez toujours l’appareil avant de retirer
l’accessoire du robot.
O Pour un nettoyage plus facile, lavez les éléments
immédiatement après emploi. Tous les éléments peuvent
être lavés à l’eau chaude savonneuse, puis entièrement
séchés. Ils peuvent aussi être lavés au lave-vaisselle.
O L’eau ordinaire et les aliments contiennent des sels et des
acides qui peuvent parfois abîmer les surfaces en métal,
comme l’intérieur du bol du batteur. Dans ce cas, nettoyer
avec une brosse en nylon, une éponge non abrasive ou un
produit spécial pour l’acier inoxydable.
Service après-vente
OSi vous rencontrez des problèmes lors de l’utilisation de votre
appareil, reportez-vous à la section « Guide de dépannage »
de ce manuel ou consultez la page www.kenwoodworld.com
avant de contacter le service après-vente.
ON’oubliez pas que votre appareil est couvert par une garantie,
qui respecte toutes les dispositions légales concernant les
garanties existantes et les droits du consommateur dans le
pays où vous avez acheté le produit.
OSi votre appareil Kenwood fonctionne mal ou si vous trouvez
un quelconque défaut, veuillez l’envoyer ou l’apporter à un
centre de réparation KENWOOD autorisé. Pour trouver des
détails actualisés sur votre centre de réparation KENWOOD le
plus proche, veuillez consulter www.kenwoodworld.com ou le
site internet spécifique à votre pays.
OConçu et développé par Kenwood au Royaume-Uni.
OFabriqué en Chine.
AVERTISSEMENTS POUR L’ÉLIMINATION CORRECTE DU
PRODUIT CONFORMÉMENT AUX TERMES DE LA DIRECTIVE
EUROPÉENNE RELATIVE AUX DÉCHETS D’ÉQUIPEMENTS
ÉLECTRIQUES ET ÉLECTRONIQUES (DEEE).
Au terme de son utilisation, le produit ne doit pas être éliminé
avec les déchets urbains.
Le produit doit être remis à l’un des centres de collecte
sélective prévus par l’administration communale ou auprès des
revendeurs assurant ce service.

49
Guide de dépannage
Problème Cause Solution
Le mode cuisson du robot ne
fonctionne pas, l'appareil affiche
un message d'erreur et émet un
bip d'avertissement.
L'un des capteurs de sécurité a été
activé.
Vérifiez si l'écran affiche une notification qui indiquerait la
cause.
• Vérifiez que la tête du batteur est abaissée et verrouillée.
• Vérifiez que tous les couvercles sont correctement
installés
• Vérifiez que le protège-chaleur est correctement installé.
• Vérifiez que le bol du robot est correctement installé.
L’appareil change de vitesse ou
la vitesse est limitée pendant la
cuisson.
La vitesse est automatiquement
limitée lorsque le contenu du
bol atteint 60°C et l'indicateur
d'avertissement de température
élevée s'allume.
C’est une mesure de sécurité.
Des ingrédients brûlent au fond
du bol.
1 La température sélectionnée est
peut-être trop élevée.
2 Un accessoire incorrect est utilisé.
3 Le délai d'attente du mélange est
trop long.
4 L’accessoire n’est peut-être pas
positionné assez bas dans le bol.
5 Le minuteur a été réglé sur une
durée trop longue.
6 Le capteur et/ou le dessous du
bol ne sont peut-être pas propres.
1 Réduisez la température.
2 Vérifiez que l'accessoire le plus adapté est utilisé et
ajusté correctement.
3 Augmentez la fréquence des délais d'attente de
mélange ou augmentez-la pour un fonctionnement en
continu.
4 Ajustez l’accessoire.
5 Cuire pendant moins longtemps (assurez-vous que les
aliments sont bien cuits)
6 Vérifiez que ces zones sont propres et sèches.
Les aliments ne gardent pas leur
consistance.
1 Température sélectionnée trop
élevée.
2 Le réglage du mélange est trop
fréquent.
3 Les ingrédients ont cuit trop
longtemps.
4 Accessoire incorrect utilisé.
1 Réduisez la température.
2 Réduisez le délai d'attente de mélange.
3 Réduisez le temps de cuisson (assurez-vous que les
aliments sont bien cuits).
4 Vérifiez que l’accessoire le plus approprié est utilisé.
Vitesse de mélange irrégulière. 1 Ingrédients trop gros ou trop durs. 1 Coupez les ingrédients en plus petits morceaux,
dénoyautez les fruits, mélangez doucement les
ingrédients sans accessoire (mais sélectionnez une
vitesse).
2 Ajoutez les ingrédients une fois la tête du robot
rabaissée.
3 Vérifiez que l’accessoire le plus approprié est utilisé.
Difficile de fermer la tête du
robot.
1 Des ingrédients durs, comme
du chocolat au fond du bol
empêchent la tête du robot de se
verrouiller.
2 Le mélangeur n'est pas
correctement installé.
1 Ajoutez les ingrédients une fois la tête du robot
rabaissée.
2 Vérifiez que le mélangeur est installé dans la sortie du
mélangeur.
La vitesse du moteur est limitée
quand on ajoute des accessoires.
Bol chaud installé. Retirez le bol ou laissez le bol refroidir en dessous de
60°C.
Le fouet ou le batteur K racle le
fond du bol ou n’atteint pas les
ingrédients dans le fond du bol.
Le batteur souple haute
température n'entraine pas les
ingrédients au fond du bol.
La pièce n’est pas à la bonne
hauteur et nécessite d’être réglée.
Réglez la hauteur à l'aide d'une clé appropriée - voir la
section « Réglage de la hauteur du panier ».
Le fouet, le batteur K ou le
batteur à crème cogne contre la
pince d'aide au mélange.
La pince d'aide au mélange est
installée.
Retirez la pince d'aide au mélange – elle doit être utilisée
uniquement avec le mélangeur.
L’accessoire sur la sortie lente ne
peut pas être installé.
Vérifiez la compatibilité de votre
accessoire avec votre modèle.
Système de connexion Twist requis
(Modèle KAX)
L’accessoire doit être équipé du système de connexion
Twist KAX pour être installé sur la sortie. Si vos
accessoires comportent le Système de connexion
Bar , vous devez utiliser l’adaptateur KAT002ME pour
raccorder ces derniers au Système de connexion Twist sur
votre robot.
Pour plus d’information, veuillez consulter le site
www.kenwoodworld.com/twist

50
Guide de dépannage - suite
Problème Cause Solution
Le témoin lumineux Marche /
Arrêt clignote lorsque le robot
est branché pour la première
fois.
La tête du robot est relevée ou
n’est pas correctement verrouillée
en position basse.
Vérifiez si la tête du robot est correctement verrouillée.
Le robot s’arrête en cours de
fonctionnement.
Voyant clignotant rapidement
pendant quelques secondes.
La protection anti-surcharge ou
surchauffe du système est activée.
La capacité maximale est dépassée.
Débranchez et vérifiez qu’il n’y a pas d'obstruction ou de
surcharge.
Si l’appareil ne fonctionne pas, retirez une partie des
ingrédients pour réduire la charge et redémarrez.
Si le problème n’est pas résolu, débranchez l’appareil
et laissez-le au repos pendant 15 minutes. Branchez et
sélectionnez de nouveau la vitesse.
Si le robot ne redémarre pas après la procédure
susmentionnée, contactez le service “après-vente” pour
plus de conseils.
Le robot de cuisine s'arrête
pendant l'opération. Le voyant
de mise en attente clignote
lentement.
Tête de robot soulevée. Baissez la tête du robot et redémarrez.
Le témoin lumineux Marche /
Arrêt s’éteint lorsque l’appareil
est branché.
Le robot est resté branché plus de
20 minutes sans fonctionner. Il est
donc passé en mode Pause.
Appuyez sur l'écran tactile ou tournez la molette de
commande pour réinitialiser.
Le robot s’arrête en cours de
fonctionnement.
La protection thermique est retirée
ou un couvercle de sortie est
enlevé.
Installez la protection thermique ou le couvercle de sortie,
puis redémarrez.
L'écran affiche un code d'erreur
alphanumérique.
L'appareil ne fonctionne pas
correctement.
Contactez un service après-vente autorisé par
Kenwood. Pour connaître les coordonnées du service
après-vente Kenwood le plus proche, consultez le site
www.kenwoodworld.com ou le site Web spécifique à
votre pays.
Absence d’alimentation / L’écran
de contrôle ne s’allume pas.
L’appareil n’est pas branché.
Bouton Marche/Arrêt sur Arrêt
(O).
L’appareil est en mode veille.
Vérifiez si l’appareil est branché.
Mettez le bouton marche/arrêt sur ON.
Touchez l’écran ou tournez le bouton de commande.
L’appareil ne fonctionne pas. Le bouton de commande n’est pas
appuyé.
Appuyez sur le bouton de commande pour lancer la
cuisson.
Le minuteur ne lance pas le
compte à rebours sur l’écran
d’achage.
Au cours de la phase de chaue,
le minuteur ne lancera le compte à
rebours que lorsque la température
voulue sera atteinte.
La température est réglée à plus de
100 °C, mais l’eau contenue dans les
aliments empêche la température
de dépasser les 100 °C.
Fonctionnement normal.
Réduisez ou choisissez une température appropriée.
La température du contenu du
bol ne dépasse pas 100 ˚C.
La contenance en eau des
ingrédients peut empêcher la
température de monter au-dessus
de 100 ˚C.
Fonctionnement normal.
Mouvements ou vibrations
excessives pendant le
fonctionnement.
Une charge inégale des aliments
dans le bol provoque des vibrations
excessives.
Capacité maximale dépassée.
L’outil ou la vitesse appliquée ne
sont pas corrects.
Réduisez la quantité ou répartissez uniformément les
aliments dans le bol et redémarrez l’appareil.
Reportez-vous au programme correspondant et au tableau
des vitesses recommandées pour savoir quel outil et quelle
vitesse appliquer.
L’écran ache le message
d’erreur E:34
Problème de connexion WiFi. Vérifiez le mot de passe WiFi.
Pour oublier le réseau WiFi, allez sur les Paramètres >
WiFi > Forget Network (Oublier le réseau).
Redémarrez la Configuration appareil à partir de l’appli
Kenwood World.
clignotement lent Impossible de trouver un réseau
WiFi connu.
L’appareil a peut-être été déplacé, le routeur est peut-être
éteint ou pourrait nécessiter un redémarrage.

51
Guide de dépannage - suite
Problème Cause Solution
clignotement rapide WiFi disponible mais impossible de se
connecter aux serveurs dans le cloud.
Il est peut-être nécessaire de redémarrer le
routeur. Sinon, contactez votre fournisseur de
services Internet.
Vérifiez que la connexion Internet de votre
réseau local fonctionne.
Le message d'erreur E42 s'affiche Erreur de chauffe à sec (Erreur de
préréglage de la vapeur)
Ajoutez de l’eau dans le bol
Explication des signaux sonores de l’appareil
1) Signal sonore unique rapide.
2) Double signal sonore rapide
3) Triple signal sonore
1) Appuyer sur le bouton de commande
pour démarrer ou arrêter la machine
ou la tête est soulevée pendant le
fonctionnement
2) Appareil en attente - l'appareil émet
un double signal sonore rapide de 10
minutes et 5 minutes avant la fin du cycle
de maintien au chaud.
3) Significations ;
- Fin du programme prédéfini
- Fin de l'opération manuelle
- Fin du cycle de maintien au chaud
- L'appareil est sur le point de se mettre
en marche.
Fonctionnement normal
Fonctionnement normal
Fonctionnement normal
Lorsque vous contactez le service client, vous pouvez être amené à devoir fournir des détails sur la version du logiciel. Vous pouvez
le trouver en appuyant sur l'icône du menu des paramètres, puis en sélectionnant « À propos de l'appareil ».
L’écran ache “- -“. La balance revient à zéro. Fonctionnement normal.
L’écran ache une valeur négative. L’écran n’a pas été remis à zéro, et soit
les ingrédients soit le bol/le couvercle/
l’accessoire ont été retiré.
Des ingrédients ou d’autres choses sont
appuyés contre l’appareil ou se trouvent
sous l’appareil.
L’appareil est appuyé contre une paroi.
Mettez l'affichage à zéro, déplacez les
ingrédients ou réinstallez le bol.
Vérifiez qu’il n’y a pas d’ingrédients ou d’autres
choses appuyés contre l’appareil ou se
trouvant sous l’appareil.
Vérifiez qu’il y a un espace entre l’appareil et
les parois de la pièce.
Remettez l’écran à zéro avant de peser les
prochains ingrédients.
L’écran n’ache pas les petites
quantités.
La quantité pesée est trop faible. Utilisez des mesures de cuillères à café ou à
soupe pour les très petites quantités.
Le poids aché change. L’appareil a bougé pendant l’opération.
Le bord du bol a été touché pendant le
pesage des ingrédients.
Placez toujours l’appareil sur une surface plane,
stable et sèche avant de peser les ingrédients.
Ne déplacez pas l'appareil et ne touchez pas le
bol pendant le pesage.
Mettez l’écran sur zéro avant de peser les
ingrédients suivants.
Impossible de passer rapidement
entre les deux types d’unités de
mesure (métriques et impériales).
L’appareil est en cours de reconfiguration
pour acher la mesure et l’unité
précédemment sélectionnées.
Patientez pendant
5 secondes et réessayez.
Long délai de réponse de
l’application de pesage (pour
acher le poids sur le dispositif
mobile).
Le signal WiFi est trop faible.
Le dispositif mobile n’est pas connecté au
même réseau WiFi local que l’appareil.
Vérifiez que l’appareil bénéficie d’une bonne
réception (contactez votre fournisseur internet
pour en savoir plus sur la manière d’améliorer
votre réception).
Vérifiez que votre dispositif mobile est bien
connecté au même réseau WiFi local que
l’appareil (allez sur les paramètres du dispositif
mobile et sélectionnez votre réseau WiFi local).
Si le problème persiste, veuillez contacter le centre d’assistance Kenwood agréé le plus proche. Pour obtenir les coordonnées
de votre centre Kenwood le plus proche, veuillez consulter le site www.kenwoodworld.com ou le site Web propre à votre pays.

52
Informations sur Ecodesign
Port réseau : Port réseau WiFi unique, activé par défaut.
Numéro de modèle : TYPE: KCL95
Plage de fréquences RF : 2412-2472 MHz
Puissance d’émission maximale : < 20 dBm
Protocole de communication : IEEE802.11 b, g, n
Le KCL95 est doté d’un seul port réseau WiFi et il est conçu pour être utilisé à distance et en réseau.
O Le port réseau peut être désactivé dans les paramètres WiFi en sélectionnant « Off » (Arrêt).
O Le port réseau peut être réactivé dans les paramètres WiFi en sélectionnant « On » (Marche).
Reactivation: l’appareil peut être réactivé depuis le mode veille ainsi :
O À partir du mode veille en réseau : touchez l’écran, tournez le bouton de commande ou réactivez à distance depuis l’application.
O À partir du mode veille hors réseau : touchez l’écran ou tournez le bouton de commande.
O Le bol et le couvercle doivent toujours être installés sur l’unité principale pour pouvoir les activer à distance.
Réinitialisation usine - Important
Lors de la mise au rebut de l'appareil, il est important d'effectuer une réinitialisation usine afin de protéger vos données personnelles.
La sélection de cette option efface tous les paramètres WiFi stockés sur l'appareil et les restaure aux paramètres d'usine. Pour
effectuer cette réinitialisation, sélectionnez Paramètres> Réinitialisation usine.
SITE INTERNET
Modes Consommation électrique
Veille sans connexion au réseau - Après 20 minutes d'inactivité, l'écran s'éteint. Port
réseau WiFi désactivé.
0,2 W
Veille avec connexion au réseau - Après 20 minutes d'inactivité, l'écran s'éteint et tous
les ports réseau WiFi restent activés.
0,7 W
Off - Activé par l'interrupteur situé à l'arrière de l'appareil. 0,0 W

53
Sicherheit
OLesen Sie diese Anleitungen sorgfältig durch und bewahren Sie sie zur
späteren Bezugnahme auf.
OEntfernen Sie sämtliche Verpackungen und Aufkleber.
OFalls Stecker oder Netzkabel beschädigt sind, müssen sie aus
Sicherheitsgründen von Kenwood oder einer autorisierten Kenwood-
Kundendienststelle ausgetauscht werden, um Gefahren zu vermeiden.
Wichtiger Hinweis zu elektronischen medizinischen Implantaten
OWie alle Induktionsheizprodukte erzeugt dieses Gerät Magnetfelder in seiner
unmittelbaren Umgebung. Benutzer oder Personen mit Herzschrittmachern
oder anderen aktiven Implantaten sollten ärztlichen Rat einholen, bevor sie in
Berührung mit dem Gerät kommen, um etwaige Gesundheitsrisiken aufgrund
von Unverträglichkeit zu verhindern.
ODas Gerät vor dem Anbringen von Rührelementen/Zubehör, nach Gebrauch
und vor dem Reinigen ausschalten und den Netzstecker ziehen.
OKörperteile, Haar, Schmuck und lockere Kleidung von beweglichen Teilen und
angebrachten Aufsätzen fernhalten.
ONiemals Ihre Finger o.ä. in den Klappmechanismus stecken.
ODas Gerät niemals unbeaufsichtigt lassen, wenn es im Nicht-Kochmodus
eingeschaltet ist.
O Wenn Sie das Gerät im Kochmodus unbeaufsichtigt lassen, bitte sorgfältig auf
Folgendes achten:
{ Sicherstellen, dass Temperaturen und zu verarbeitende Höchstmengen den
Anleitungen entsprechen.
{ Sicherstellen, dass Gerät und Netzkabel für Kinder unzugänglich sind und
sich nicht nahe der Kante einer Arbeitsoberfläche befinden.
{ Den Fortschritt regelmäßig überprüfen, um sicherzustellen, dass genügend
Flüssigkeit hinzugefügt wurde und die Zutaten nicht verkochen.
ONiemals ein beschädigtes Gerät benutzen, überprüfen oder reparieren lassen.
Siehe „Kundendienst und Service“.
ONiemals unzulässiges Zubehör oder mehr als ein Zubehörteil gleichzeitig
benutzen.
ONiemals die angegebenen Höchstmengen überschreiten und bei Verwendung
des Induktionsheizers die Schüssel immer nur bis zur inneren 3-Liter-Markierung
füllen.
OBeim Verwenden eines Zubehörteils die entsprechenden Sicherheits- und
Gebrauchsanweisungen lesen.
OVorsicht beim Anheben dieses Geräts, es ist schwer. Vor dem Anheben
sicherstellen, dass der Maschinenkopf verriegelt ist und Schüssel, Rührelemente,
Anschlussdeckel und Kabel fest sitzen bzw. gut verstaut sind.
ODas Gerät beim Umstellen immer am Sockel und Maschinenkopf anfassen. Das
Gerät NICHT am Schüsselgriff hochheben oder tragen
ONiemals das Kabel so herabhängen lassen, dass ein Kind danach greifen könnte.
OAntriebseinheit, Netzkabel und Netzstecker niemals nass werden lassen.
OVorsicht bei der Berührung irgendwelcher Teile der Maschine im Kochmodus
oder nach dem Kochen. Dies gilt INSBESONDERE FÜR DIE SCHÜSSEL,
DEN SPRITZSCHUTZ UND DIE RÜHRELEMENTE, da diese noch lange nach
Ausschalten des Geräts HEISS bleiben. Schüssel zum Abnehmen und Tragen an
ihren Griffen anfassen. Zum Handhaben der heißen Schüssel und Rührelemente
Topflappen verwenden.
ODas auf dem Produkt markierteSymbol zeigt an, dass eine Oberfläche
während des Gebrauchs heiß werden kann.
O Vorsicht beim Entfernen von Rührelementen aus der Schüssel – sie können
nach längerem Gebrauch heiß sein.
ODie Unterseite der Schüssel bleibt noch lange nach dem Erhitzen heiß. Seien Sie
daher vorsichtig im Umgang damit und verwenden Sie die Schutzmatte, wenn
Sie die Schüssel auf hitzeempfindlichen Oberflächen absetzen.
OVorsicht mit heißem Dampf, der aus der Schüssel austreten kann, insbesondere
beim Öffnen des Spritzschutzes oder Aufklappen des Maschinenkopfes.
Deutsch
Vor dem Lesen bitte die Titelseite mit den Illustrationen auseinanderfalten

54
OHeiße Zutaten vor dem Umfüllen von der Rührschüssel in den Mixer immer erst
auf Raumtemperatur abkühlen lassen.
ONur Originalteile bzw. die Schüssel und das Zubehör benutzen, die zum
Lieferumfang dieses Geräts gehören. Die Schüssel niemals mit einer anderen
Hitzequelle verwenden.
ODas Gerät niemals im Kochmodus bei leerer Schüssel betreiben.
ONiemals irgendwelche Gegenstände in die Entlüftungsschlitze einführen.
OBei Gebrauch dieses Geräts sicherstellen, dass es auf einer ebenen Oberfläche
und nicht zu nah an der Kante steht. Darauf achten, dass ein Abstand von
mindestens 10 cm zu den Wänden besteht und die Entlüftungsschlitze nicht
blockiert sind. Nicht unter Hängeschränken aufstellen.
OZum ordnungsgemäßen und sicheren Betrieb des Induktionskochers vor dem
Kochen sicherstellen, dass Schüsselboden und Temperaturfühler sauber und
trocken sind.
OKeine metallischen Gegenstände wie Messer, Gabeln, Löffel und Deckel auf dem
Schüsselsockel/Induktionsfeld ablegen, denn sie könnten heiß werden.
OWie bei allen Induktionskochern während des Gebrauchs keine Kreditkarten,
magnetischen Medien oder empfindlichen elektronischen Geräte in der Nähe
platzieren.
ODas Gerät nicht zum Frittieren von Speisen verwenden.
OVor dem Verzehr immer sicherstellen, dass die Speisen gar sind.
OBeim Kochen mit Öl nur maximal 250 ml verwenden.
OSpeisen sollten kurz nach dem Kochen verzehrt oder schnell abgekühlt und so
bald wie möglich in den Kühlschrank gestellt werden.
OUnsachgemäßer Gebrauch Ihres Geräts kann zu Verletzungen führen.
O Nicht zu hart auf das Display drücken und niemals scharfe Objekte zu seiner
Betätigung verwenden.
O Den Schneebesen nicht für schwere Mischungen (z. B. zum Schaumigrühren
von Fett und Zucker) verwenden – er könnte dadurch beschädigt werden.
ODieses Netzkabel bietet ein geringeres Risiko, sich darin zu verfangen oder
darüber zu stolpern. Im Bedarfsfall kann – mit angemessener Vorsicht
– ein Verlängerungskabel verwendet werden. Bei Verwendung eines
Verlängerungskabels: 1) Die angegebene Spannung und Stromstärke des
Verlängerungskabels müssen zumindest den Werten des Geräts entsprechen.
2) Das Kabel darf nicht von der Arbeitsplatte bzw. dem Tisch hängen, so
dass Kinder daran ziehen oder Personen darüber stolpern können. Wenn das
Gerät geerdet ist, sollte das Verlängerungskabel einen geerdeten Stecker mit
dreiadriger Leitung aufweisen. Spannung und Stromstärke des Geräts sind auf
der Unterseite angegeben.
OGeräte können von Personen mit körperlichen, sensorischen oder geistigen
Behinderungen oder von Personen mit mangelnder Erfahrung oder Kenntnis
verwendet werden, sofern diese beaufsichtigt oder in die sichere Verwendung
des Geräts eingewiesen wurden und sofern sie die damit verbundenen Gefahren
verstehen.
OKinder müssen überwacht werden, damit sie nicht mit dem Gerät spielen.
ODieses Gerät darf nicht von Kindern verwendet werden. Gerät und Netzkabel
müssen für Kinder unzugänglich sein.
OVerwenden Sie das Gerät nur für seinen vorgesehenen Zweck im Haushalt.
Bei unsachgemäßer Benutzung oder Nichteinhaltung dieser Anweisungen
übernimmt Kenwood keinerlei Haftung.
ODer maximale Leistungswert wird anhand des Kompakt-Zerkleinerers/
Mahlaufsatzes mit der größten Leistungsaufnahme berechnet. Bei anderen
Aufsätzen ist die Leistungsaufnahme u. U. geringer.
ODieses Gerät ist nicht für den Betrieb mit einer externen Zeitschaltuhr oder
einer separaten Fernbedienung vorgesehen.
O Den Maschinenkopf nicht mit angebrachtem Aufsatz bewegen oder
hochklappen, da die Küchenmaschine dadurch ihren sicheren Stand verlieren
könnte.
O Das Gerät nicht nahe der Kante einer Arbeitsfläche aufstellen bzw. über die
Kante hinausragen lassen und nicht zu kräftig gegen einen angebrachten

55
Komponenten Ihres Kenwood Cooking Chef
Übersicht
Zubehör-Anschlüsse
1 Hochgeschwindigkeits-Anschluss (HSO)
2 Niedriggeschwindigkeits-Anschluss (SSO)
3 Rührelement-Steckplatz
4 Koch-Rührelement-Steckplatz
Küchenmaschine
5 Deckel für Hochgeschwindigkeits-Anschluss
6 Maschinenkopf
7 Deckel für Niedriggeschwindigkeits-Anschluss
8 Cooking Chef Schüssel
9 Maschinenkopf - Lifthebel
10 Drehregler
11 Ein/Aus-Schalter
12 Display
13 Arbeitsflächen-Schutzmatte
14 Abflussöffnung
15 Schüsselsockel/Induktionsbereich
16 Entlüftungsschlitze
17 Temperaturfühler
18 Hitzeschild
19 Gummidichtung (abnehmbar)
20 Spritzschutz
21 Füllschachtdeckel
22 K-Haken
23 Flexi-Rührelement
24 Schneebesen
25 Knethaken
26 Koch-Rührelement
27 Rührhilfeclip
28 Hochtemperatur-Spatel
29 Teigschaber
30 Schraubenschlüssel
Dampfgar-Aufsatz
31 Griffstützen
32 Haltering
33 Klappgriffe
34 Herausnehmbare Platte
35 Eierhalter
Hinweis: Aufsätze für den Niedriggeschwindigkeits-
Anschluss
Der Niedriggeschwindigkeits-Anschluss Ihrer Küchenmaschine
ist zum Anbringen von Aufsätzen mit TWIST-System
ausgelegt.
Wenn Sie neue Aufsätze für den Niedriggeschwindigkeits-
Anschluss kaufen, sollten Sie deren Kompatibilität mit Ihrer
Küchenmaschine überprüfen. Alle Aufsätze mit TWIST-System
sind durch Produktcodes beginnend mit KAX gekennzeichnet
sowie durch das auf der Packung abgebildete TWIST-Logo
.
Wenn Sie Aufsätze für das BAR-System besitzen, müssen
Sie den Adapter KAT002ME verwenden, um diese an das
TWIST-System Ihrer Maschine anschließen zu können.
Für weitere Informationen besuchen Sie
http://www.kenwoodworld.com/de-de/kenwood-adapter
www.kenwoodworld.com/twist.
Verbindung mit der Kenwood World App
Siehe Abbildungen A – D
Mit der Kenwood World App können Sie Ihr Gerät über Ihr
Smartphone oder Tablet steuern.
1 Das Gerät ans Netz anschließen und den Ein/Aus-Schalter
an der Seite der Antriebseinheit betätigen.
2 Einstellungen > WiFi > Verbinden auswählen und die
Anweisungen auf dem Touchscreen befolgen.
PIN-Nummer
O Diese muss bei entsprechender Aufforderung von der
Kenwood World App eingeben werden.
O Das Gerät kann nur dann Verbindung aufnehmen, wenn die
PIN-Nummer im Display erscheint. Wurde die PIN falsch
eingegeben, den Anleitungen der App folgen und erneut
versuchen.
Vor dem Anschluss
O Sicherstellen, dass die Netzspannung mit den Angaben auf der Unterseite des Geräts übereinstimmt.
O WARNUNG: DIESES GERÄT MUSS GEERDET SEIN.
O Das Gerät entspricht der EG-Verordnung Nr. 1935/2004 über Materialien und Gegenstände, die dazu bestimmt sind, mit Lebensmitteln in
Berührung zu kommen.
O Dieses Gerät erfüllt die wesentlichen Anforderungen und andere relevante Bestimmungen der Richtlinie 2014/53/EU.
Vor erstmaligem Gebrauch
• Die Teile spülen: Siehe „Pflege und Reinigung“.
Aufsatz drücken – das Gerät könnte dadurch seinen sicheren Stand verlieren
und umkippen, was zu Verletzungen führen kann.
Dampfgar-Aufsatz
O Dieser Aufsatz erzeugt Dampf, an dem Sie sich verbrennen können.
OVorsicht: Verbrennen Sie sich nicht an dem austretenden Dampf, vor allem beim
Entfernen des Spritzschutzes oder Anheben des Füllschachtdeckels.
OSeien Sie vorsichtig beim Umgang mit Flüssigkeiten, Wasserdampf,
Dämpfeinsatz- und Maschinenteilen – sie können sehr heiß sein. Tragen Sie
Ofenhandschuhe.
ODas Gerät vor dem Anbringen oder Entfernen von Teilen oder Reinigen vom
Netzstrom abtrennen.
Lebensmittelsicherheit
OAchten Sie darauf, dass Fleisch, Geflügel, Fisch und Meeresfrüchte wirklich gar
sind. Lassen Sie Speisen vor dem Garen vollständig auftauen.
OWärmen Sie gekochte Speisen nicht in Ihrem Dämpfeinsatz auf.

56
O Um die PIN-Nummer des Geräts anzuzeigen, Einstellungen
> WiFi > Verbinden wählen und die Anweisungen auf
dem Display befolgen (nur wenn mit WiFi verbunden).
Hinweis:
Wi-Fi
Betrieb von IEEE802.11 b, g und n nur bei 2,4 GHz.
Kompatibilität
Die Kenwood World App ist kompatibel mit den neuesten
Versionen von iOS und Android.
Factory-Reset
Wichtig
O Vor dem Entsorgen des Geräts ist es wichtig, es auf die
Werkseinstellungen zurückzusetzen, um Ihre persönlichen
Daten zu schützen.
O Bei Wahl dieser Option werden alle im Gerät
gespeicherten WiFi-Daten gelöscht und das Gerät auf die
Werkseinstellungen zurückgesetzt.
O Um Ihr Gerät auf die Werkseinstellungen zurückzusetzen,
Einstellungen > Factory-Reset wählen.
Einrichtung Ihrer Cooking Chef Connect
Siehe Abbildungen E – I
WICHTIG
O Sicherstellen, dass Induktionsbereich, Temperaturfühler und
Oberfläche des Schüsselsockels sauber sind. Ansonsten
könnte der Temperaturfühler beeinträchtigt werden, was zu
mangelhaften Kochergebnissen führt.
O Überprüfen, dass alle Anschlussdeckel und das Hitzeschild
angebracht sind. Wenn dies nicht der Fall ist, funktioniert
der Kochmodus nicht.
1 Das Gerät ans Netz anschließen und den Ein/Aus-Schalter
betätigen.
2 Drehen Sie den Maschinenkopf-Lifthebel im Uhrzeigersinn
und klappen Sie den Maschinenkopf hoch, bis er einrastet.
3 Schieben Sie das Hitzeschild nach oben auf die Unterseite
des Maschinenkopfes, bis es fest sitzt. Das Hitzeschild
darf niemals ohne ordnungsgemäß angebrachte
Gummidichtung verwendet werden.
O Wenn Sie die Cooking Chef Connect ohne Hitze
verwenden, ist das Anbringen des Hitzeschilds nur nötig,
wenn Sie den Spritzschutz verwenden. Siehe Abschnitt
„Anbringen und Verwendung des Spritzschutzes“.
4 Die Schüssel auf den Sockel aufsetzen.
5 Führen Sie das gewünschte Rührelement in den
Rührelemente-Steckplatz oder Koch-Rührelement-
Steckplatz (bei Verwendung des Koch-Rührelements) ein.
Richten Sie dazu den Schaftstift an der Kerbe aus und
drehen Sie das Element, bis es einrastet.
O Zum Entfernen eines Rührelements führen Sie Schritt
5 in umgekehrter Reihenfolge aus. (Zum Entfernen
von Rührelementen nach dem Kochen grundsätzlich
TopfIappen verwenden.)
6 Klappen Sie den Maschinenkopf herunter, indem Sie
ihn zunächst leicht anheben und dann den Lifthebel im
Uhrzeigersinn drehen.
Klappen Sie den Kopf herunter, so dass er einrastet.
Koch-Rührelement – Bei Verwendung des Rührelements
kann auch der Rührhilfeclip eingesetzt werden, um das
Vermischen zu unterstützen. Siehe Abschnitt „Anbringen
und Entfernen des Rührhilfeclips“. Das Koch-Rührelement
lässt sich auch zusammen mit dem Schneebesen verwenden.
Verwenden Sie das Koch-Rührelement nicht zusammen mit
dem Knethaken.
Verwendung Ihrer Cooking Chef Connect –
Manueller Betrieb
1 Geben Sie die Zutaten hinein, die Sie kochen/verarbeiten
möchten.
2 Die gewünschte Zeit, Geschwindigkeit und Temperatur
einstellen.
Hinweis: Um die Maschine als Mixer ohne Hitze zu
verwenden, bei Einstellung der Temperatur „Aus“ wählen.
Zum Einstellen der Rührintervalle und Pulsfunktion den
Drehregler gegen den Uhrzeigersinn drehen.
Für Dauergeschwindigkeiten den Drehregler im
Uhrzeigersinn drehen.
3 Um anzufangen, auf den Drehregler drücken.
4 Um das Gerät jederzeit zu stoppen, auf den Drehregler
drücken. Vorsicht im Kochmodus, denn das Gerät wird heiß
sein.
HSHT-Modus (hohe Geschwindigkeit, hohe
Temperatur)
Zum Rühren bei hoher Geschwindigkeit und bei
Temperaturen ab 60 °C:
OZeit (falls gewünscht), Geschwindigkeit und Temperatur
von 60 °C oder mehr einstellen.
OAuf dem Display erscheint eine Warnung, dass Sie jetzt in
den HSHT-Modus eintreten.
OWenn Sie die Warnanzeige zur Kenntnis genommen
und verstanden haben, drücken Sie bitte auf JA, um zu
bestätigen, dass Sie einverstanden sind, in den HSHT-
Modus zu gehen.
OUm anzufangen, auf den Drehregler drücken.
Diese Funktion darf NUR mit dem Schneebesen und/oder
Koch-Rührelement verwendet werden. Sie sollten auf
keinen Fall die Höchstmenge von 3 Litern überschreiten,
und der Spritzschutz muss angebracht sein. Das Gerät darf
im Betrieb nicht unbeaufsichtigt bleiben.
5 Nach Ablauf eines Programms gibt das Gerät drei
Signaltöne ab.
O Hinweis: Wenn keine Zeit eingestellt wurde, endet der Heiz-
und Rührvorgang automatisch nach Ablauf von 8 Stunden.
6 Zum Stoppen des Heizvorgangs stellen Sie die Temperatur
auf „AUS“. Um das Gerät jederzeit zu stoppen, auf den
Drehregler drücken.
Wichtig – Wenn der Maschinenkopf während des Betriebs
angehoben wird, unterbricht dies den Heizvorgang. Das
Rührelement stoppt und nimmt beim Herunterklappen des
Maschinenkopfes nicht automatisch wieder den Betrieb
auf. Um das Rühren fortzusetzen, müssen Sie nach dem
Herunterklappen des Maschinenkopfes auf den Drehregler
drücken.
Verwendung der voreingestellten Programme
Siehe Abbildungen P – R
1 Das Voreinstellungsmenü wählen.
2 Die gewünschte Voreinstellung wählen.
3 Die Anweisungen auf dem Display befolgen.
4 Um das Gerät jederzeit zu stoppen, auf den Drehregler
drücken. Vorsicht, denn die Schüssel und Rührelemente
werden heiß sein.
Nach dem Kochen
O Vorsicht beim Berühren irgendwelcher Teile des
Geräts im Kochmodus oder nach dem Kochen. Dies
gilt INSBESONDERE FÜR DIE SCHÜSSEL UND DIE
VERARBEITUNGSELEMENTE, da diese noch lange nach
Ausschalten des Geräts HEISS bleiben.
O Schüssel beim Abnehmen und Tragen an ihren beidseitigen
Griffen anfassen. Ofenhandschuhe zum Handhaben der
heißen Schüssel und Verarbeitungselemente verwenden.

57
O Die Unterseite der Schüssel bleibt noch lange nach dem
Erhitzen heiß. Seien Sie daher vorsichtig im Umgang mit ihr
und verwenden Sie die mitgelieferte Schutzmatte, wenn Sie
die Schüssel auf hitzeempfindlichen Oberflächen absetzen.
Hinweise und Tipps
O Einige Rezepte, insbesondere solche mit hohem
Flüssigkeitsgehalt, können keine Kochtemperaturen
von über 100°C erreichen, da dies der Siedepunkt für
Wasser ist.
O Um Zutaten während des Kochens in die Schüssel zu
geben, reduzieren Sie die Geschwindigkeit und fügen
Sie die Zutaten langsam und gleichmäßig hinzu.
O Wählen Sie zum schnellen Erhitzen von Saucen eine
kontinuierliche Rühreinstellung.
O Wenn Sie den Spritzschutz beim Kochen verwenden,
entfernen Sie diesen immer, bevor Sie den
Maschinenkopf anheben. Denken Sie daran, dass sich
auf Spritzschutz und Hitzeschild Kondensation bilden
kann.
O Klappen Sie den Maschinenkopf grundsätzlich langsam
nach oben, damit etwaige Flüssigkeit an der Unterseite
des Hitzeschilds in die Schüssel ablaufen kann.
O Es stehen vier Rührintervall-Einstellungen zur
Verfügung, mit denen Sie die richtige Rührstärke für
das jeweilige Rezept wählen können. Einige Rezepte
erfordern ständiges Rühren, damit Zutaten nicht am
Schüsselboden festhaften, während bei anderen nur
gelegentliches Rühren angebracht ist, um die Konsistenz
der Speise zu erhalten.
Manueller Betrieb (Zubehörteile)
1 Deckel für den Hoch-/Niedriggeschwindigkeits-
Anschluss (falls gegeben) abnehmen.
2 Zubehör gemäß der mitgelieferten Anleitung anbringen.
3 Die erforderliche Zeit und Geschwindigkeit einstellen
(siehe Abbildungen L - M). Um anzufangen, auf den
Drehregler drücken.
Um das Gerät jederzeit anzuhalten, erneut auf den
Drehregler drücken.
Entfernen und Anbringen der
Anschlussdeckel
Deckel für Hochgeschwindigkeits-Anschluss
1 Entfernen Sie den Deckel, indem Sie den Griff nach oben
ziehen.
2 Bringen Sie den Deckel an, indem Sie ihn auf den
Anschluss setzen und nach unten drücken.
Deckel für Niedriggeschwindigkeits-Anschluss
1 Entfernen Sie den Deckel, indem Sie den Griff an der
Unterseite nach außen ziehen.
2 Bringen Sie den Deckel an, indem Sie den Vorsprung
oben am Deckel in die Aussparung am Anschluss stecken
und den Deckel herunterdrücken, bis er einrastet.
Verwendung der Wiegefunktion
Siehe Abbildungen S
1 Auf dem Touchscreen die Wiegefunktion auswählen.
2 Die Schüssel aufsetzen.
3 Die Waage auf Null stellen.
4 Die Zutaten wiegen.
5 Zum Wechseln zwischen Einheiten, auf dem Bildschirm die
Einheiten-Taste antippen.
Hinweis: Das Gerät zum Wiegen immer auf eine trockene,
ebene, stabile Fläche stellen. Während des Wiegens keinen
Druck auf den Mixer oder die Schüssel ausüben, da dies die
Genauigkeit der Waage beeinträchtigen würde.
Die Wiegefunktion kann bei hoch- oder runtergeklapptem
Maschinenkopf benutzt werden.
Die Wiegefunktion zeigt genaue Ergebnisse bis 6 kg an.

58
Tabelle zur Nutzung der Voreinstellungen
Die Standardeinstellungen lassen sich ggf. durch Verstellen an Ihr Rezept anpassen.
Nicht verstellbare Einstellungen werden vom Symbol gekennzeichnet.
Wenn „Aufheizen“ im Display erscheint, beginnt der Timer erst dann abwärts zu zählen, wenn die richtige Temperatur erreicht ist.
Voreinstellung Empfohlenes
Element
Standardeinstellungen
(einstellbar)
Warmhaltephase Rezeptvorschläge /
Verwendungsmöglichkeiten
Eischnee schlagen 1 Min. 15 Sek.
(15 Sek. – 5 Min.)
Max
AUS
Eischnee für Schokomousse
Biskuitteig 1 Min.
(30 Sek. – 5 Min.)
1 – Max
( – Max)
AUS
Victoria-Biskuitkuchen, Cupcakes
Teig kneten 10 Min.
(1 Min. – 30 Min.)
Min. bis 1
(Min. – 2)
AUS
Brötchen, Pizza
Teig gehen lassen 1 Std.
(5 Min. – 2 Std.)
AUS
30˚C
(25˚C – 35˚C)
Aufgehen von Hefeteig
Schokolade schmelzen 10 Min.
(5 Min. – 2 Std.)
60˚C
Schokomousse
Schweizer Baiser 10 Min.
(1 Min. – 20 Min.)
Max
40˚C
Unterlage für Buttercreme
Italienisches Baiser 4 Min.
(1 Min. – 20 Min.)
HSHT 6
( – Max)
60˚C – 85˚C
Zitronenbaiser-Torte
Omelette surprise
Obstkompott 20 Min.
(5 Sek. – 2 Std.)
()
104˚C
30 Min.
62˚C
Kuchenfüllung, Dessert-Topping
Popcorn 10 Min.
(5 Min. – 10 Min.)
AUS
180˚C
Für frisches, selbstgemachtes
Popcorn
* Für beste Resultate immer die
Voreinstellung benutzen.

59
Tabelle zur Nutzung der Voreinstellungen
Die Standardeinstellungen lassen sich ggf. durch Verstellen an Ihr Rezept anpassen.
Nicht verstellbare Einstellungen werden vom Symbol gekennzeichnet.
Wenn „Aufheizen“ im Display erscheint, beginnt der Timer erst dann abwärts zu zählen, wenn die richtige Temperatur erreicht ist.
Voreinstellung Empfohlenes
Element
Standardeinstellungen
(einstellbar)
Warmhaltephase Rezeptvorschläge /
Verwendungsmöglichkeiten
Dampfgaren 20 Min.
(5 Min. – 45 Min.)
AUS
100˚C
Lachs in Folie
One Pot Gerichte 40 Min.
(5 Sek. – 8 Std.)
()
103˚C – 140˚C
30 Min.
62˚C
Sauce Bolognese
Eintopf 20 mins
(5 Sek. – 8 Std,)
()
103˚C – 140˚C
30 Min.
62˚C
Minestrone, Gemüsesuppe
Slow Cooking 2 Std.
(5 Sek. – 8 Std.)
()
98˚C – 140˚C
30 Min.
62˚C
Beef Bourguignon
Rezept
Backpflaumen-Marinade
200 g klarer, flüssiger Honig
40 g weiche Backpflaumen
40 ml Wasser
1 Alle Zutaten in die Kräuter- und Gewürzmühle geben. Über
Nacht in den Kühlschrank stellen.
2 Den Aufsatz an der Küchenmaschine anbringen.
3 Die Puls-Funktion 4 Sekunden lang einschalten.
4 Nach Bedarf verwenden.
Dampfgar-Aufsatz
Siehe Abbildungen T
O Stellen Sie Ihren Cooking Chef bei Verwendung des
Dämpfeinsatzes stets mit genügend Abstand zu
Wänden und Hängeschränken auf: Der Dampf könnte sie
beschädigen.
O Würzen Sie Speisen erst nach dem Garen, um Flecken oder
Lochfraß an der Edelstahlschüssel vermeiden.
1 Legen Sie die herausnehmbare Platte auf eine ebene
Fläche, wobei die Griffe nach innen geklappt sein müssen.
2 Setzen Sie den Haltering auf die Platte, so dass die
Griffstützen des Rings auf die keilförmigen Aussparungen
der Platte stoßen.
3 Klappen Sie die Griffe hoch und klemmen Sie sie an den
Griffstützen fest.
4 Geben Sie die Speisen in den Einsatz. Gemüse sollte
gründlich gewaschen und ggf. geschält sein.
5 Geben Sie die erforderliche Menge Wasser in die Schüssel
(siehe Garübersicht). Gefiltertes Wasser ist ideal, da es
Kalkablagerungen und Fleckenbildung reduziert.
6 Stellen Sie den zusammengebauten Einsatz in die Schüssel
– er wird in der richtigen Höhe aufsetzen.
7 Bringen Sie das Hitzeschild am Maschinenkopf an.
8 Setzen Sie Schüssel und Dämpfeinsatz auf die
Küchenmaschine.
9 Klappen Sie den Maschinenkopf nach unten und bringen
Sie dann den Spritzschutz an.
10 Wählen Sie die Voreinstellung Dampfgaren aus und stellen
Sie die Garzeit ein (siehe Garübersicht).
11 Für die eingestellte Zeit garen.
12 Nehmen Sie den Spritzschutz ab.
13 Klappen Sie den Maschinenkopf nach oben.
14 Heben Sie den Dämpfeinsatz an den Griffen heraus –
klappen Sie die Griffe dabei auf keinen Fall nach innen.
15 Stellen Sie den Dämpfeinsatz auf einem großen Teller oder
einer anderen geeigneten Ablage ab.
16 Lösen Sie die Griffe von den Griffstützen und klappen Sie
sie nach innen. Heben Sie den Haltering ab und klappen Sie
die Griffe nach außen.
17 Entnehmen Sie die Speisen.
Wichtig
Seien Sie vorsichtig beim Umgang mit Flüssigkeiten,
Wasserdampf, Dämpfeinsatz- und Maschinenteilen – sie
können sehr heiß sein. Tragen Sie Ofenhandschuhe.
O Versuchen Sie nicht, bei Verwendung des Dämpfeinsatzes
ein Rührelement anzubringen.
O Kochen Sie bei Verwendung des Dämpfeinsatzes niemals
gleichzeitig Speisen in der Schüssel.
Hinweise und Tipps
O In der Schüssel zurückgebliebene Flüssigkeiten eignen
sich gut als Grundlage für Suppen und Brühen. Vorsicht,
denn sie werden sehr heiß sein.
O Lassen Sie einen gewissen Abstands zwischen den zu
garenden Stücken.
O Rühren Sie große Mengen nach Ablauf der halben
Garzeit durch.
O Stücke ähnlicher Größe werden gleichmäßiger gar.

60
O Wenn Sie mehrere verschiedene Arten von Speisen garen, sollten Sie die schneller garenden Zutaten später hinzugeben.
O Beim Anheben des Füllschachtdeckels oder Entfernen des Spritzschutzes tritt Dampf aus, wodurch sich die Garzeit eventuell
verlängert.
O Speisen garen nach Abschalten der Küchenmaschine weiter. Sie sollten sie deshalb sofort herausnehmen.
O Falls die Speisen nicht ganz gar sind, stellen Sie eine längere Zeit ein. Sie müssen eventuell Wasser nachfüllen.
O Die Garzeiten dienen lediglich zur allgemeinen Orientierung. Stellen Sie vor dem Essen immer sicher, dass die Speisen gar sind.
O Lassen Sie das Gerät niemals trockenkochen; füllen Sie bei Bedarf Wasser nach.
Erläuterung des Displays
Auf dieses Symbol tippen, um das Einstellungsmenü zu önen.
Auf dieses Symbol tippen, um das Menu der voreingestellten Programme zu önen.
Dieses Symbol antippen, um Zutaten in die Schüssel zu wiegen.
Zeigt die gewählte Zeit in Stunden (h), Minuten (m) und Sekunden an (s).
Zeigt das gewählte Rührintervall an.
Bei Wahl einer Geschwindigkeit mit Unterbrechungen (2 Æ 4) wird sich der äußere Kreis
zunehmend vergrößern und wird das Gerät rühren, wenn es gefüllt ist.
Zeigt die gewählte Temperatur an.
Ein pulsierender roter Hintergrund zeigt an, dass sich die Maschine im Aufheiz-Modus
befindet.
Ein stetiger roter Hintergrund zeigt an, dass die Maschine die eingestellte Temperatur
erreicht hat.
Ein blinkender Abwärtspfeil zeigt an, dass sich das Gerät abkühlt.
Kein Dreieck bedeutet, dass das Gerät die gewünschte Temperatur erreicht hat.
Statusinformation Der hier gezeigte Text zeigt die Statusinformation an.
Zeigt an, das die Schüssel, ihr Inhalt und alle verwendeten Teile heiß sind. Bitte vorsichtig
handhaben.
Zeigt an, dass das Gerät mit einem WiFi-Netzwerk verbunden ist.
Zeigt an, dass sich das Gerät im Hochtemperatur-Modus (HSHT) befindet.
Zum Einstellen der Rührintervalle und Pulsfunktion den Drehregler gegen den
Uhrzeigersinn drehen.
Für Dauergeschwindigkeiten den Drehregler im Uhrzeigersinn drehen.

61
Rezepte
Rezept Benutztes Element Voreinstellungen /
Manuelle Einstellungen
Zutaten
Minestrone Eintopf
20 Min.
98˚C
Folgendes gleichzeitig hinzugeben:
100 g Pancetta, gewürfelt
2 Knoblauchzehen, gehackt
50 g Arborio Reis
2½ EL Tomatenmark
70 g Wirsing
1 TL getrockneter Rosmarin
2 TL getrockneter Salbei
1 Stange Sellerie, aufgeschnitten
60 g Lauch, aufgeschnitten
75 g Zwiebeln, aufgeschnitten
75 g Möhren, aufgeschnitten
1 l heiße Gemüsebrühe
Salz und Pfeffer
Beef Strogano One Pot Gerichte
30 Min.
103˚C
Folgendes gleichzeitig hinzugeben:
600 g Rindfleisch, gewürfelt
1 EL Paprika
1 EL Butter
1 Knoblauchzehe, gehackt
400 g Rinderbrühe
200 g Champignons, aufgeschnitten
150 g Zwiebel, aufgeschnitten
300 g Möhren, aufgeschnitten
200 ml Sahne
1 EL Maisstärke
1 EL Wasser }vermischen
Salz und Pfeffer
Englische Creme Manuelle Einstellungen
15 Min.
85˚C
Folgendes gleichzeitig hinzugeben:
250 g Vollmilch
250 g Doppelrahm
1 TL Vanilleextrakt
2 EL Speisestärke
96 g Eigelb, }vermischen
80 g Zucker
Popcorn Popcorn
10 Min.
AUS
180˚C
Die folgenden Zutaten gleichzeitig einfüllen:
50 g Popcornmais
20 g Sonnenblumenöl
* Für beste Resultate immer die Voreinstellung
benutzen.
Reispudding Manuelle Einstellungen
1 Std.
15 Min.
95˚C
Folgendes gleichzeitig hinzugeben:
150 g Rundkornreis
1 l Vollmilch
75 g Zucker
2 TL Vanilleextrakt

62
Temperatur- und Geschwindigkeitseinstellungen
Temperatur-Richtwerte 60°C Schmelzen von Schokolade
72°C – 82°C Pochieren
98°C – 99°C Sieden
100°C Kochen, Dampfgaren
130°C – 140°C Sautieren von Gemüse
180°C Anbraten von Fleisch
(P) Puls - Für kurze Stöße von maximaler Geschwindigkeit.
Rührintervall 1 – Der Mixer arbeitet mit einer stetigen langsamen Geschwindigkeit.
Geeignet zum Unterheben von leichten Zutaten in schwerere Mischungen.
Rührintervall 2 – Rühren mit kurzen Pausen. Bei dieser Einstellung schaltet sich
alle 10 Sekunden ein langsamer Rührvorgang von 1,5 Umdrehungen ein.
Rührintervall 3 – Rühren mit mittleren Pausen. Bei dieser Einstellung schaltet sich
alle 30 Sekunden ein langsamer Rührvorgang von 1,5 Umdrehungen ein.
Rührintervall 4 – Rühren mit langen Pausen. Bei dieser Einstellung schaltet sich
alle 5 Minuten ein langsamer Rührvorgang von 1,5 Umdrehungen ein.
Geschwindigkeit
min - max
Dauergeschwindigkeit, die allmählich zur Höchstgeschwindigkeit ansteigt
HSHT Zum Mischen bei Temperaturen über 60 ˚C bei Geschwindigkeiten Min-Max.
Empfehlungstabelle
Diese Angaben dienen lediglich zur Orientierung. Tatsächliche Zeiten sind abhängig vom jeweiligen Rezept und den
verarbeiteten Zutaten.
K-Haken
Zum Zubereiten von Kuchen, Keksen, Gebäck, Zuckerglasur, Füllungen, Eclairs und
Kartoffelbrei.
Hinweise und Tipps
• Zum Verhindern von Spritzern die Geschwindigkeit langsam steigern.
• Um alle Zutaten komplett zu verarbeiten, die Maschine regelmäßig stoppen und das
Mischgut mit dem Spatel von den Seiten der Schüssel nach unten schaben.
• Beim Zubereiten von Teig kalte Zutaten verwenden (wenn nicht im Rezept anders
angegeben).
Rezept/Verfahren
(Max) (Minuten)
Knet- und Plätzchenteig –
Einarbeiten von Fett in Mehl
Mehlgewicht 910 g Min 12
Schneller Kuchenteig (alles in
einem)
Gesamtgewicht 4 kg Min Max 45–60 Sek.
Flexi-Rührelement
Zum Schaumigrühren und Mixen weicher Zutaten
Hinweise und Tipps
• Zum Verhindern von Spritzern die Geschwindigkeit langsam steigern.
• Beim Schaumigschlagen von Fett und Zucker für Rührteig das Fett immer bei
Raumtemperatur verwenden oder vorher weich werden lassen.
• Mit Ihrem Hochtemperatur-Flexi-Rührelement werden zwei Schaberblätter mitgeliefert.
Verwenden Sie ein Schaberblatt für süße und das andere für herzhafte Speisen.
Rezept/Verfahren
(Max) (Minuten)
Schaumigschlagen von Butter/Margarine und Zucker 4.55 kg
(mit 15 Eiern)
Min Max 4
Einrühren von Eiern in Kuchenteig Min Max 1–4
Unterheben von Mehl, Rosinen usw. Min 1 30–60 Sek.
Eiergröße in der Tabelle = mittelgroß (53 – 63 g).
Verwendete Schlagsahne = Frische Schlagsahne mit einem Mindestfettgehalt von 38 %

63
Empfehlungstabelle
Diese Angaben dienen lediglich zur Orientierung. Tatsächliche Zeiten sind abhängig vom jeweiligen Rezept und den
verarbeiteten Zutaten.
Schneebesen
Für Eier, Sahne und Soufflés.
Wichtig
• Zum Verhindern von Spritzern die Geschwindigkeit langsam steigern.
• Den Schneebesen nicht für schwere Mischungen (z. B. All-in-1-Kuchen und zum
Schaumigrühren von Fett und Zucker) verwenden, denn er könnte dadurch beschädigt
werden.
• Eier sollten am besten Raumtemperatur haben.
Vor dem Schlagen von Eischnee sicherstellen, dass sich keine Spuren von Fett oder Eigelb
an Schneebesen oder Schüssel befinden.
Rezept/Verfahren
(Max) (Minuten)
Eiweiß 16 (605 g)
Min Max
1½-2
Biskuit ohne Fett 930 g 4 -6
Sahne 2 l 1½-3
Pfannkuchenteig
• Mehl in die Schüssel geben, dann feuchte Zutaten
hinzufügen.
• Zutaten bei Mindestgeschwindigkeit verrühren.
250 g Mehl
500 g Milch
200 g Eier
Min 10 Sek.
Max 45–60 Sek.
Mayonnaise
• Für beste Ergebnisse das Mischgut nach Zugabe
des Öls von den Seiten der Schüssel nach unten
schaben und weitere 10 Sekunden bei Höchst-
geschwindigkeit verarbeiten.
2 Eigelb
10 g Senf
200 ml Pflanzenöl
Max 1-1½
Knethaken
Für Hefeteig
Hinweise und Tipps
Wichtig
• Niemals die angegebenen Höchstmengen überschreiten – Sie könnten die Maschine
überlasten.
• Wenn Sie hören, dass die Maschine überlastet ist: Gerät ausschalten, die Hälfte des Teiges
entnehmen und die halben Mengen separat verarbeiten.
• Die Zutaten vermengen sich am besten, wenn Sie zuerst die Flüssigkeit eingeben.
Hefe
• Trockenhefe (muss aufbereitet werden): Warmes Wasser in die Schüssel geben. Hefe und
Zucker hinzufügen und 10 Minuten stehen lassen, bis die Mischung schaumig wird.
• Frische Hefe: Zerbröckeln und zum Mehl geben.
• Andere Hefearten: Den Anleitungen des Herstellers folgen.
Rezept/Verfahren
(Max) (Minuten)
Brotteig (fester Hefeteig) Mehlgewicht 350 g–1,6 kg Min 60 Sek.
1 3–4
Gesamtgewicht 564 g–2,58 kg Erneut durchkneten
Stufe 1
60 Sek.
Weicher Hefeteig (mit Butter und
Eiern)
Mehlgewicht 250 g–1,6 kg Min 60 Sek.
Gesamtgewicht 478 g–3,1 kg 1 3–4
Erneut durchkneten
Stufe 1
60 Sek.
Eiergröße in der Tabelle = mittelgroß (53 – 63 g).
Verwendete Schlagsahne = Frische Schlagsahne mit einem Mindestfettgehalt von 38 %

64
Kochanleitung für Dampfgar-Aufsatz
ODiese Garzeiten dienen lediglich zur allgemeinen Orientierung. Für Speisen mit einer Garzeit bis zu 20 Minuten sollten Sie 500 ml
Wasser zugeben. Für Speisen mit einer längeren Garzeit verwenden Sie 650 ml Wasser.
OLassen Sie das Gerät niemals trockenkochen; füllen Sie bei Bedarf Wasser nach.
ODen Dämpfeinsatz beim Dampfgaren von Geflügel und Fisch nicht überfüllen..
OLesen Sie den Abschnitt „Lebensmittelsicherheit“ im Teil über Sicherheit.
Gemüse
Zutat
(Max) (Minuten)
Wassermenge Zubereitung
Spargel 450 g 15 500 ml Schälen
Grüne Bohnen 450 g 15-20 500 ml Schälen
Stangenbohnen 450 g 15-20 500 ml Putzen, in dünne Scheiben
schneiden
Broccoli 450 g 20 500 ml In Röschen teilen
Rosenkohl 450 g 25 500 ml Putzen, Stängelansatz entfernen
Kohl 1 kleiner Kopf 25 500 ml Hobeln
Karotten 450 g 20 500 ml In dünne Scheiben schneiden
Blumenkohl 1 mittlerer Kopf 25 - 30 650 ml In Röschen teilen
Zucchini 450 g 15 500 ml In dünne Scheiben schneiden
Sellerie 1 Knolle 15 500 ml In dünne Scheiben schneiden
Porree 3 Stangen 15 500 ml In dünne Scheiben schneiden
Erbsen 250 g 15 500 ml Schälen
Champignons 450 g 10 500 ml Putzen
Rüben 450 g 15 500 ml In dünne Scheiben schneiden
oder würfeln
Zuckererbsen 450 g 15 500 ml Schälen
Kartoffeln, neue 450 g 30-40 650 ml Waschen
Geflügel / Fisch
Rezept/Verfahren
(Max) (Minuten)
Wassermenge Anmerkungen
Hähnchenbrust (ohne
Knochen)
4 30-40 650 ml Dämpfen bis Hähnchenbrust
weich und gar ist
Venusmuscheln 450 g 10 500 ml Dämpfen bis Muscheln geöffnet
sind
Krabben (mittelgroß) 450 g 15-20 500 ml Dämpfen bis Krabben rosa sind
Fischfilet 230 g 15-20 500 ml Dämpfen bis sich Fleisch von den
Gräten trennen lässt
Fischsteaks ca. 2,5 cm dick 15 500 ml Dämpfen bis sich Fleisch von den
Gräten trennen lässt
Fisch, ganz 340 g 20 500 ml Dämpfen bis sich Fleisch von den
Gräten trennen lässt
Krebsschwänze 6 15 500 ml Dämpfen bis Krebsschwänze rot
Miesmuscheln 450 g 10 500 ml Dämpfen bis Muscheln geöffnet
sind
Austern 230 g 15 500 ml Dämpfen bis Austern geöffnet
sind
Jakobsmuscheln 230 g 10-20 500 ml Dämpfen bis Muscheln geöffnet
sind

65
Einstellen der Rührelemente
Siehe Abbildungen U
Profi-Ballonschneebesen, K-Haken aus Edelstahl
Die beste Leistung erzielen Sie, wenn der Profi-
Ballonschneebesen oder K-Haken fast den Boden der
Schüssel berührt. Verändern Sie bei Bedarf die Höhe mit dem
Schraubenschlüssel (im Lieferumfang).
Flexi-Rührelement - Dieses Rührelement sollte den
Schüsselboden gerade berühren.
1 Ziehen Sie den Netzstecker.
2 Klappen Sie den Maschinenkopf hoch und führen Sie den
Schneebesen, den K-Haken oder das Flexi-Rührelement ein.
3 Klappen Sie den Kopf nach unten. Wenn Sie den Abstand
ändern müssen, klappen Sie den Maschinenkopf wieder
hoch und nehmen Sie das Rührelement ab.
4 Lösen Sie die Mutter mit dem beiliegenden
Schraubenschlüssel genügend, um die Höhe des Schafts
zu verstellen. Zum Senken des Rührelements drehen Sie
den Schaft gegen den Uhrzeigersinn. Zum Anheben des
Rührelements drehen Sie den Schaft im Uhrzeigersinn.
5 Ziehen Sie die Mutter wieder fest.
6 Bringen Sie das Rührelement erneut am Maschinenkopf an
und klappen Sie ihn nach unten. (Prüfen Sie seine Position
– siehe obige Punkte.)
7 Wiederholen Sie die oben genannten Schritte nach Bedarf,
bis das Rührelement richtig sitzt. Ziehen Sie daraufhin die
Mutter wieder fest an.
Knethaken - dieses Rührelement wird im Werk eingestellt und
lässt sich nicht anpassen.
Koch-Rührelement - dieses Rührelement sollte den Boden der
Schüssel gerade eben berühren.
1 Ziehen Sie den Netzstecker des Geräts.
2 Klappen Sie den Maschinenkopf hoch und führen Sie den
Rührer ein.
3 Klappen Sie den Maschinenkopf nach unten. Wenn
Sie den Abstand ändern müssen, klappen Sie den
Maschinenkopf nach oben, lockern Sie die Mutter mit dem
Schraubenschlüssel und senken Sie den Maschinenkopf
wieder ab.
4 Zum Senken des Rührers drehen Sie das Stellrad im
Uhrzeigersinn. Zum Anheben des Rührers drehen Sie das
Stellrad gegen den Uhrzeigersinn.
5 Ziehen Sie die Mutter wieder fest.
Anbringen und Verwendung des
Spritzschutzes
Siehe Abbildungen V
Die Spritzschutzeinheit besteht aus zwei Teilen: dem
Hitzeschild und dem Spritzschutz.
Das Hitzeschild schützt den Maschinenkopf vor dem Dampf,
der sich beim Kochvorgang entwickelt.
Der Spritzschutz sollte nur in Kombination mit dem Hitzeschild
angebracht werden.
1 Klappen Sie den Maschinenkopf nach oben, bis er einrastet.
2 Schieben Sie das Hitzeschild nach oben auf die
Unterseite des Maschinenkopfes, bis es fest einrastet. Das
Hitzeschild niemals ohne ordnungsgemäß angebrachte
Gummidichtung verwenden.
3 Setzen Sie die Schüssel auf den Sockel.
4 Klappen Sie den Kopf nach unten.
5 Setzen Sie den Spritzschutz auf den Schüsselrand und
schieben Sie ihn nach vorne, bis er komplett einrastet.
O Während des Rührvorgangs können Zutaten direkt über
den Füllschacht hinzugegeben werden.
6 Zum Entfernen des Spritzschutzes schieben Sie diesen
einfach vom Gerät weg.
Hinweis: Beim Anheben des Maschinenkopfes wird der
Spritzschutz am Hitzeschild befestigt bleiben, wenn er nicht
vorher abgenommen wurde.
7 Zum Abnehmen des Hitzeschilds klappen Sie den
Maschinenkopf hoch, bis er einrastet. Entfernen Sie das
Rührelement und ziehen Sie dann das Hitzeschild von der
Unterseite des Maschinenkopfes nach unten.
Hinweis: Den Spritzschutz nur anbringen oder abnehmen,
wenn der der Maschinenkopf eingerastet ist.
Anbringen und Entfernen des Rührhilfe-Clips
Siehe Abbildungen W
Der Rührhilfe-Clip kann verwendet werden, um den
Rührvorgang zu unterstützen.
1 Stecken Sie den Rührhilfe-Clip auf den Rand der Schüssel;
der senkrechte Vorsprung sollte dabei nach innen weisen,
die Clips nach außen.
2 Schieben Sie den Clip gegen den Uhrzeigersinn auf die
Schüsselgriffe.
3 Führen Sie die obigen Schritte in umgekehrter Reihenfolge
aus, um den Rührclip abzunehmen.
WICHTIG - Der Rührhilfeclip sollte nicht angebracht werden,
wenn Sie den K-Haken, Schneebesen, Knethaken oder das
Flexi-Rührelement verwenden.
Zusammenbau des Flexi-Rührelements
Siehe Abbildungen X
Anbringen der Gummilippe
Das Flexischaberblatt ist bei Lieferung bereits angebracht und
sollte zur Reinigung stets entfernt werden.
1 Bringen Sie die Gummilippe am Rührelement an, indem Sie
den unteren Teil des Schaberblatts in den Schlitz stecken,
dann eine Seite in die Rille einsetzen und vorsichtig das
Ende festhaken. Wiederholen Sie den Vorgang auf der
anderen Seite.
Pflege und Reinigung
O Das Gerät vor dem Reinigen immer ausschalten und den
Netzstecker ziehen.
O Beim ersten Gebrauch erscheint u.U. ein wenig Schmierfett
an Anschluss . Dies ist normal – einfach abwischen.
O Die Metalloberflächen der Temperaturfühler können im
Verlauf des normalen Gebrauchs Verschleißerscheinungen
aufweisen. Dies beeinträchtigt die Leistung des Produkts in
keiner Weise.
O Den Flexi-Rührelement abnehmen, wenn die Maschine
nicht benutzt wird.
Gerät, Anschlussdeckel
O Mit einem feuchten Tuch abwischen und trocknen lassen.
O
Niemals Scheuermittel benutzen oder in Wasser eintauchen.
Flexi-Rührelement
O Nehmen Sie der Gummilippe zum Reinigen grundsätzlich
vom Rührelement ab.
O Waschen Sie Gummilippe und Rührelement in heißem
Wasser und Spülmittel und trocken Sie beides gründlich
ab. Die Teile lassen sich auch in der Geschirrspülmaschine
waschen.
Hinweis: Bitte überprüfen Sie den Zustand des Gerätekörpers
vor und nach Gebrauch. Überprüfen Sie außerdem
regelmäßig die Gummilippe und ersetzen Sie es, wenn es
Verschleißerscheinungen aufweist.

66
Schüssel, Rührelemente, Spritzschutz, Rührhilfe-Clip
O Von Hand spülen und gründlich abtrocknen oder in
die Spülmaschine geben (siehe Tabelle am Anfang der
Bedienungsanleitung).
O Die Schüssel aus Edelstahl niemals mit einer Drahtbürste,
Stahlwolle oder Bleichmittel reinigen. Zum Entfernen von
Kalk Essig oder einen geeigneten Entkalker verwenden.
O Wenn Zutaten am Innern der Schüssel kleben oder
einbrennen, diese so bald wie möglich mit dem Spatel
(im Lieferumfang) abschaben. Die Schüssel mit warmem
Seifenwasser füllen und einweichen. Alle hartnäckigen
Reste mit einer Nylonbürste entfernen.
O Eine Verfärbung der Schüssel führt nicht zu einer
Beeinträchtigung ihrer Leistung.
Abflussöffnung
O Sicherstellen, dass der Bereich frei von Mischgutresten
ist. Wenn erforderlich, mit einem Pfeifenreiniger oder
Wattestäbchen reinigen.
Temperaturfühler
O Mit einem feuchten Tuch abwischen und gründlich trocknen
lassen. Niemals Scheuermittel oder scharfe Gegenstände zum
Reinigen der Fühler verwenden.
Dampfgar-Aufsatz
O Vor dem Anbringen oder Abnehmen von Aufsätzen die
Küchenmaschine grundsätzlich ausschalten und vom
Netzstrom trennen.
O Zur einfacheren Reinigung die Teile direkt nach Gebrauch
abwaschen. Alle Teile mit heißem Seifenwasser abwaschen
und gründlich abtrocknen. Andernfalls lassen sich die Teile
auch in der Spülmaschine reinigen.
O Wasser und Speisen enthalten Salze und Säuren, die
manchmal auf Metall einwirken können, wie z.B. die
Innenflächen der Rührschüssel. Reinigen Sie die Schüssel in
diesem Fall mit einer Nylonbürste, einem nichtscheuernden
Topfschwamm oder einem handelsüblichen
Edelstahlreiniger.
Kundendienst und Service
O Sollten Sie irgendwelche Probleme mit dem Betrieb Ihres Geräts haben, ziehen Sie bitte den Abschnitt „Fehlerbehebung“ zu Rate oder
besuchen Sie www.kenwoodworld.com, bevor Sie Hilfe anfordern.
O Bitte beachten Sie, dass Ihr Produkt durch eine Garantie abgedeckt ist – diese erfüllt alle gesetzlichen Anforderungen hinsichtlich
geltender Garantie- und Verbraucherrechte in dem Land, in dem das Produkt gekauft wurde.
O Falls Ihr Kenwood-Produkt nicht ordnungsgemäß funktioniert oder Defekte aufweist, bringen Sie es bitte zu einem autorisierten
KENWOOD Servicecenter oder senden Sie es ein. Aktuelle Informationen zu autorisierten KENWOOD Servicecentern in Ihrer Nähe finden
Sie bei www.kenwoodworld.com bzw. auf der Website für Ihr Land.
O Gestaltet und entwickelt von Kenwood GB.
O Hergestellt in China.
Aktualisierte Informationen zur Entsorgung von Altgeräten
Das Elektro- und Elektronikgerätegesetz (ElektroG) enthält eine Vielzahl von Anforderungen an den Umgang mit Elektro und
Elektronikgeräten. Die wichtigsten sind hier zusammengestellt.
1. Getrennte Erfassung von Altgeräten
Elektro- und Elektronikgeräte, die zu Abfall geworden sind, werden als Altgeräte bezeichnet. Besitzer von Altgeräten haben diese einer vom
unsortierten Siedlungsabfall getrennten Erfassung zuzuführen. Altgeräte gehören insbesondere nicht in den Hausmüll, sondern in spezielle
Sammel- und Rückgabesysteme.
2. Batterien und Akkus sowie Lampen
Besitzer von Altgeräten haben Altbatterien und Altakkumulatoren, die nicht vom Altgerät umschlossen sind, sowie Lampen, die
zerstörungsfrei aus dem Altgerät entnommen werden können, im Regelfall vor der Abgabe an einer Erfassungsstelle vom Altgerät
zu trennen. Dies gilt nicht, soweit Altgeräte einer Vorbereitung zur Wiederverwendung unter Beteiligung eines öentlich-rechtlichen
Entsorgungsträgers zugeführt werden.
3. Möglichkeiten der Rückgabe von Altgeräten
Besitzer von Altgeräten aus privaten Haushalten können diese bei den Sammelstellen der öentlich-rechtlichen Entsorgungsträger oder bei
den von Herstellern oder Vertreibern im Sinne des ElektroG eingerichteten Rücknahmestellen unentgeltlich abgeben.
Rücknahmepflichtig sind Geschäfte mit einer Verkaufsfläche von mindestens 400 m2 für Elektro- und Elektronikgeräte sowie diejenigen
Lebensmittelgeschäfte mit einer Gesamtverkaufsfläche von mindestens 800 m2, die mehrmals pro Jahr oder dauerhaft Elektro- und
Elektronikgeräte anbieten und auf dem Markt bereitstellen. Dies gilt auch bei Vertrieb unter Verwendung von Fernkommunikationsmitteln,
wenn die Lager- und Versandflächen für Elektro- und Elektronikgeräte mindestens 400 m2 betragen oder die gesamten Lager- und
Versandflächen mindestens 800 m2 betragen. Vertreiber haben die Rücknahme grundsätzlich durch geeignete Rückgabemöglichkeiten in
zumutbarer Entfernung zum jeweiligen Endnutzer zu gewährleisten.
Die Möglichkeit der unentgeltlichen Rückgabe eines Altgerätes besteht bei rücknahmepflichtigen Vertreibern unter anderem dann, wenn
ein neues gleichartiges Gerät, das im Wesentlichen die gleichen Funktionen erfüllt, an einen Endnutzer abgegeben wird. Wenn ein neues
Gerät an einen privaten Haushalt ausgeliefert wird, kann das gleichartige Altgerät auch dort zur unentgeltlichen Abholung übergeben
werden; dies gilt bei einem Vertrieb unter Verwendung von Fernkommunikationsmitteln für Geräte der Kategorien 1, 2 oder 4 gemäß § 2
Abs. 1 ElektroG, nämlich „Wärmeüberträger“, „Bildschirmgeräte“ oder „Großgeräte“ (letztere mit mindestens einer äußeren Abmessung über
50 Zentimeter). Zu einer entsprechenden Rückgabe-Absicht werden Endnutzer beim Abschluss eines Kaufvertrages befragt. Außerdem
besteht die Möglichkeit der unentgeltlichen Rückgabe bei Sammelstellen der Vertreiber unabhängig vom Kauf eines neuen Gerätes für
solche Altgeräte, die in keiner äußeren Abmessung größer als 25 Zentimeter sind, und zwar beschränkt auf drei Altgeräte pro Geräteart.
4. Datenschutz-Hinweis
Altgeräte enthalten häufig sensible personenbezogene Daten. Dies gilt insbesondere für Geräte der Informations- und
Telekommunikationstechnik wie Computer und Smartphones. Bitte beachten Sie in Ihrem eigenen Interesse, dass für die Löschung der
Daten auf den zu entsorgenden Altgeräten jeder Endnutzer selbst verantwortlich ist.
5. Bedeutung des Symbols „durchgestrichene Mülltonne“
Das auf Elektro- und Elektronikgeräten regelmäßig abgebildete Symbol einer durchgestrichenen Mülltonne weist darauf hin, dass
das jeweilige Gerät am Ende seiner Lebensdauer getrennt vom unsortierten Siedlungsabfall zu erfassen ist.

67
Fehlerbehebung
Problem Ursache Lösung
Die Küchenmaschine arbeitet nicht
im Kochmodus. Sie zeigt eine
Fehlermeldung an und gibt einen
Warnton aus.
Einer der Sicherheitsfühler wurde aktiviert. Display auf Fehlermeldungen überprüfen.
• Sicherstellen, dass Maschinenkopf
heruntergeklappt und eingerastet ist.
• Sicherstellen, dass alle Anschlussdeckel
korrekt aufgesetzt sind.
• Sicherstellen, dass das Hitzeschild korrekt
angebracht ist.
• Sicherstellen, dass die Cooking Chef
Schüssel korrekt aufgesetzt ist.
Geschwindigkeit ändert sich oder ist
beim Kochen begrenzt.
Die Geschwindigkeit wird automatisch
begrenzt, wenn der Schüsselinhalt 60 °C
erreicht, und die Temperatur-Warnanzeige
leuchtet auf.
Dies ist eine Sicherheitsfunktion.
Das Mischgut brennt auf dem
Schüsselboden an.
1 Die ausgewählte Temperatur könnte zu
hoch sein.
2 Es wird ein falsches Rührelement
verwendet.
3 Rührfrequenz ist zu langsam.
4 Das Rührelement sitzt vielleicht nicht tief
genug in der Schüssel.
5 Der Timer wurde auf eine zu lange Zeit
eingestellt.
6 Der Fühler und/oder die Unterseite der
Schüssel sind eventuell nicht sauber.
1 Die Temperatur reduzieren.
2 Überprüfen, dass das richtige
Rührelement eingesetzt und korrekt
eingestellt ist.
3 Rührfrequenz einstellen oder
Dauerbetrieb wählen.
4 Position des Rührelements korrigieren.
5 Kochdauer verkürzen (sicherstellen, dass
Speisen gar werden).
6 Diese Bereiche sauber und trocken halten.
Die Konsistenz des Mischguts bleibt
nicht erhalten.
1 Die ausgewählte Temperatur ist zu hoch.
2 Rührfrequenz ist zu schnell.
3 Zutaten werden zu lange gekocht.
4 Es wird ein falsches Rührelement
verwendet.
1 Temperatur reduzieren.
2 Rührfrequenz reduzieren.
3 Kochdauer reduzieren (sicherstellen, dass
Speisen gar werden).
4 Überprüfen, dass das richtige
Rührelement verwendet wird.
Ungleichmäßige Rührgeschwindigkeit. 1 Zutaten sind zu groß, zu hart oder zu fest. 1 Zutaten in kleinere Stücke schneiden,
Obststeine entfernen, Zutaten langsam
ohne Rührelement (aber mit eingestellter
Geschwindigkeit) schmelzen.
2 Zutaten nach dem Herunterklappen des
Maschinenkopfes in die Schüssel geben.
3 Überprüfen, dass das richtige
Rührelement verwendet wird.
Maschinenkopf lässt sich nur schwer
einrasten.
1 Feste Zutaten wie Schokolade auf dem
Schüsselboden hindern den Maschinenkopf
daran, in heruntergeklappter Position
einzurasten.
2 Rührer wurde falsch eingesetzt.
1 Zutaten nach dem Herunterklappen des
Maschinenkopfes in die Schüssel geben.
2 Sicherstellen, dass Rührer in den Rührer-
Steckplatz eingeführt ist.
Motorgeschwindigkeit ist bei
Verwendung von Aufsätzen begrenzt.
Es ist eine heiße Schüssel aufgesetzt. Schüssel entfernen oder auf unter 60°C
abkühlen.
Der Schneebesen oder K-Haken schlägt
gegen den Boden der Schüssel oder
reicht nicht bis zu den Zutaten unten in
der Schüssel.
Das Flexi-Rührelement verarbeitet die
am Schüsselboden befindliche Zutaten
nicht ausreichend.
Rührelement hat nicht die richtige Höhe und
muss angepasst werden.
Mit einem geeigneten Schraubenschlüssel
die Höhe verstellen – siehe Abschnitt
„Einstellen der Rührelemente“.
Schneebesen, K-Haken oder Flexirührer
schlagen gegen den Rührclip.
Rührclip ist angebracht. Rührclip entfernen – er sollte ausschließlich
mit dem Rührer verwendet werden.
Niedriggeschwindigkeits-Aufsatz lässt
sich nicht anbringen.
Überprüfen, dass Ihr Aufsatz für das Modell
geeignet ist.
Drehanschluss-System erforderlich (Modell
KAX) .
Aufsatz muss das Drehanschluss-System
KAX besitzen, um auf den Anschluss zu
passen.
Wenn Sie Aufsätze für das Steckschlitz-
System besitzen, müssen Sie den
Adapter KAT002ME verwenden, um
diese an das Drehanschluss-System Ihrer
Maschine anschließen zu können.
Für weitere Informationen besuchen Sie
www.kenwoodworld.com/twist
Standby-Anzeige blinkt beim ersten
Einschalten der Küchenmaschine.
Maschinenkopf hochgeklappt oder nicht
richtig eingerastet.
Überprüfen, dass der Maschinenkopf
heruntergeklappt und eingerastet ist.

68
Problem Ursache Lösung
Die Küchenmaschine stoppt während
des Betriebs.
Standby-Licht blinkt ein paar Sekunden
lang schnell.
Überlastungs- oder Überhitzungssystem
aktiviert.
Höchstmengen wurden überschritten.
Ausschalten und auf Blockierung oder
Überlastung überprüfen.
Wenn die Maschine nach wie vor nicht
funktioniert, einige Zutaten entfernen, um
die Last zu reduzieren, und erneut starten.
Wenn auch dies das Problem nicht löst, den
Netzstecker ziehen und die Maschine 15
Minuten ruhen lassen. Wieder einschalten
und die Geschwindigkeit neu auswählen.
Sollte die Maschine danach immer noch
nicht starten, den Kundendienst zu Rate
ziehen.
Die Küchenmaschine stoppt während
des Betriebs. Standby-Anzeige blinkt
langsam.
Maschinenkopf ist angehoben. Den Maschinenkopf absenken und neu
starten.
Standby-Anzeige leuchtet nicht, obwohl
die Maschine eingeschaltet ist.
Die eingeschaltete Küchenmaschine wurde
20 Minuten lang nicht betrieben und ist in
den Standby-Modus übergegangen.
Zum Zurücksetzen auf den Touchscreen
drücken oder den Drehregler drehen.
Die Küchenmaschine stoppt während
des Betriebs.
Hitzeschild oder Anschlussdeckel wurde
abgenommen.
Hitzeschild oder Anschlussdeckel anbringen
und dann neu starten.
Display zeigt alphanumerischen
Fehlercode an.
Gerät funktioniert nicht korrekt. Kontaktieren Sie ein autorisiertes Kenwood
Servicecenter. Aktuelle Informationen zu
einem Kenwood Servicecenter in Ihrer Nähe
finden Sie bei www.kenwoodworld.com
bzw. auf der Website für Ihr Land.
Gerät/Display schaltet sich nicht
ein.
Gerät nicht angeschlossen.
Ein/Aus-Schalter nicht betätigt.
Gerät ist in den Standby-Modus gegangen.
Prüfen, ob Gerät angeschlossen
ist.
Den Ein/Aus-Schalter einschalten.
Das Display berühren oder den Drehregler
drehen.
Gerät funktioniert nicht. Drehregler nicht gedrückt. Auf den Drehregler drücken, um den
Kochvorgang zu starten.
Timer zählt auf dem Display nicht
herunter.
Während der Aufheizphase zählt der Timer
erst dann herunter, wenn die korrekte
Temperatur erreicht wurde.
Temperatur ist auf über 100˚C eingestellt,
doch Wassergehalt der Zutaten verhindert,
dass die Temperatur über 100˚C ansteigt.
Normaler Betrieb.
Temperatur reduzieren oder korrekte
Temperatur wählen.
Temperatur des Schüsselinhalts steigt
nicht über 100˚C an.
Wassergehalt der Zutaten kann verhindern,
dass die Temperatur über 100˚C ansteigt.
Normaler Betrieb
Schwere Bewegung oder Vibration
im Betrieb.
Ungleichmäßig verteilte Zutaten in der
Schüssel können zu starken Vibrationen
führen.
Höchstmenge überschritten.
Falsches Zubehörteil / falsche
Geschwindigkeit gewählt.
Menge reduzieren oder Zutaten in der
Schüssel besser verteilen und Gerät erneut
starten.
Siehe relevantes Programm und
Empfehlungstabellen für korrektes
Zubehörteil / korrekte Geschwindigkeit.
Display zeigt Fehlermeldung E:34
an.
WiFi-Verbindungsproblem. Wi-Fi-Passwort prüfen.
Das WiFi-Netzwerk außer Acht lassen,
gehen Sie zu Einstellungen > WiFi >
Ohne Netzwerk.
Setup des Geräts erneut über die
Kenwood World APP starten.
Blinkt langsam Bekanntes Wi-Fi-Netzwerk nicht
gefunden.
Gerät wurde u. U. bewegt, Router wurde u.
U. ausgeschaltet bzw. erfordert Neustart.
Blinkt schnell Wi-Fi verfügbar, aber Verbindung zu Cloud-
Servern nicht möglich.
Router erfordert u. U. Neustart, oder
kontaktieren Sie Ihren Internet-Anbieter.
Prüfen, dass eine funktionierende
Internetverbindung zum lokalen Netzwerk
besteht.
Display zeigt Fehlermeldung E42 Leerkochfehler (Dampfeinstellungsfehler) Wasser in die Schüssel geben
Erklärung der Pieptöne des Geräts
1) Schneller Einzel-Piepser.
2) Schneller Doppel-Piepser
1) Drehregler wird zum Starten oder
Stoppen des Geräts gedrückt, oder Kopf
wird während des Betriebs angehoben
2) Gerät wartet – Gerät wird 10 und
5 Minuten vor dem Ende des
Warmhaltezyklus einen schnellen Doppel-
Piepser abgeben.
Normaler Betrieb
Normaler Betrieb

69
3) Dreifach-Piepser 3) Bedeutet Folgendes:
- Ende des voreingestellten Programms
- Ende des manuellen Betriebs
- Ende des Warmhaltezyklus
- Gerät wird sich gleich in Bewegung
setzen.
Normaler Betrieb
Wenn Sie den Kundenservice kontaktieren, werden Sie u. U. um Informationen zur Softwareversion gebeten. Sie finden diese
Angaben, indem Sie auf das Menüsymbol drücken und dann „Über das Gerät“ wählen.
Display zeigt „—" an. Skala wird auf 0 gestellt. Normaler Betrieb.
Display zeigt einen Minuswert an. Display wurde nicht auf Null gesetzt und es
wurden entweder Zutaten oder Schüssel/
Deckel/Aufsatz entfernt.
Zutaten oder andere Dinge kleben an oder
unter dem Gerät fest.
Gerät stößt an die Wand an.
Entweder die Anzeige auf Null setzen, die
fehlenden Zutaten zurückgeben oder die
Schüssel neu aufsetzen.
Sicherstellen, dass keine Zutaten oder
andere Dinge an oder unter dem Gerät
festkleben.
Sicherstellen, dass genug Abstand zwischen
dem Gerät und etwaigen Wände besteht.
Display vor dem Wiegen der nächsten
Zutaten wieder auf Null stellen.
Display registriert keine kleinen Mengen. Gewogene Menge zu klein. Zum Wiegen sehr kleiner Mengen einen
Tee- oder Esslöel verwenden.
Display zeigt ein sich veränderndes
Gewicht an.
Gerät wurde beim Wiegen bewegt.
Beim Wiegen von Zutaten wurde der Rand
der Schüssel berührt.
Gerät zum Wiegen immer auf eine trockene,
ebene Fläche stellen.
Während der Nutzung der Wiegefunktion
das Gerät nicht bewegen und die Schüssel
nicht berühren.
Display vor dem Wiegen der nächsten
Zutaten wieder auf Null stellen.
Kein Umschalten zwischen metrischen
und englischen Maßeinheiten möglich.
Gerät konfiguriert sich momentan zur zuvor
gewählten Maßeinheit.
5 Sekunden warten, dann noch einmal
versuchen.
Wiegen in der App (Gewichtsanzeige
auf Mobilgerät) dauert sehr lange.
Schwaches WiFi-Signal.
Mobilgerät nicht mit demselben lokalen
WiFi-Heimnetz verbunden.
Gute Signalstärke für das Gerät sicherstellen
(Ihren Internetanbieter um Ratschläge zur
Verbesserung bitten).
Sicherstellen, dass das Mobilgerät mit
demselben lokalen WiFi-Heimnetz
verbunden ist (gehen Sie zu Mobilgerät-
Einstellungen und wählen Sie dort Ihr
lokales WiFi-Netzwerk aus).
Falls das Problem weiterhin besteht, ein autorisiertes Kenwood Servicecenter in Ihrer Nähe kontaktieren. Aktuelle
Informationen zu einem Kenwood Servicecenter in Ihrer Nähe finden Sie bei www.kenwoodworld.com bzw. auf der Website für
Ihr Land.
Ecodesign-Information
Netzwerkport: Einzelner WiFi-Port, standardmäßig aktiviert.
Modell-Nr.: TYPE: KCL95
HF-Frequenzbereich: 2412 - 2472 MHz
Maximale Übertagungsleistung: < 20 dBm
Kommunikationsprotokoll: IEEE802.11 b, g, n
Das KCL95 hat einen einzelnen WiFi-Netzwerkport und ist zur Verwendung als fernbetriebene Netzwerkausrüstung gedacht.
O Der Netzwerk-Port kann im WiFi-Einstellungsmenü durch Auswahl von „Aus“ deaktiviert werden.
O Der Netzwerk-Port kann im WiFi-Einstellungsmenü durch Auswahl von „Ein“ reaktiviert werden.
Reaktivierung: Das Gerät kann wie folgt aus dem Standby-Modus reaktiviert werden:
O Vom vernetzten Standby aus: Das Display berühren, die Drehtaste drehen oder fernbedient über die App.
O Vom nicht-vernetzten Standby: Das Display berühren oder den Drehregler drehen.
O Um die Fernbedienung zu ermöglichen, müssen die Schüssel und der Deckel immer am Hauptgerät angebracht bleiben.
Factory-Reset - Wichtig
Vor dem Entsorgen des Geräts ist es wichtig, es auf die Werkseinstellungen zurückzusetzen, um Ihre persönlichen Daten zu
schützen. Bei Wahl dieser Option werden alle im Gerät gespeicherten WiFi-Daten gelöscht und das Gerät auf die Werkseinstellungen
zurückgesetzt. Um Ihr Gerät auf die Werkseinstellungen zurückzusetzen, Einstellungen > Factory-Reset wählen.
WEBSITE
Modi Stromverbrauch
Nicht-vernetztes Standby - Nach 20 Minuten Inaktivität geht das Display aus. WiFi-
Netzwerkport deaktiviert.
0.2W
Vernetztes Standby – Nach 20 Minuten Inaktivität geht das Display aus; alle WiFi-
Netzwerkports bleiben aktiviert.
0.7W
Aus - Betätigt durch Schalter auf der Rückseite des Geräts. 0.0W

70
Sicurezza
OLeggere attentamente le presenti istruzioni e conservarle come futuro
riferimento.
ORimuovere la confezione e le etichette.
OSe la spina o il cavo sono danneggiati, per motivi di sicurezza, devono essere
sostituiti da Kenwood o da un riparatore autorizzato da Kenwood per evitare
pericoli.
Importante – impianti medici elettronici
OCome tutti i prodotti generanti riscaldamento a induzione, questo apparecchio
genera campi magnetici a corto raggio. Se l’utilizzatore o una persona nelle
immediate vicinanze dell’apparecchio ha un pacemaker o altro impianto medico
attivo, prima dell’uso si prega di consultare il medico per escludere eventuali
incompatibilità e rischi per la salute.
OSpegnere l’apparecchio e disinserire la spina dalla presa elettrica prima di
montare o staccare utensili/accessori, dopo l’uso e prima della pulizia.
OTenere lontano il corpo, i capelli, gli articoli di gioielleria/bigiotteria e gli
indumenti larghi dalle parti in movimento e dagli accessori installati.
ONon inserire mai le dita ecc. nel meccanismo della cerniera.
ONon lasciare mai l'apparecchio incustodito quando non è in modalità di cottura.
OQuando l’apparecchio viene lasciato incustodito nella modalità di cottura,
prestare molta attenzione a quanto segue:
{ verificare che siano seguite le istruzioni riguardanti le temperature e le
quantità massime degli ingredienti da cucinare;
{ assicurarsi che l’apparecchio e il cavo elettrico siano tenuti fuori dalla portata
dei bambini e che l’apparecchio sia posizionato lontano dal bordo della
superficie di lavoro;
{ controllare regolarmente la cottura per accertarsi che sia aggiunta agli
ingredienti una quantità sufficiente di liquido e che i cibi non stiano
cuocendo troppo.
ONon usare mai un accessorio danneggiato. Farlo controllare o riparare: vedere
alla sezione ‘Manutenzione e assistenza tecnica’.
ONon usare mai un accessorio non approvato, oppure più di un accessorio alla
volta.
ONon superare mai le capacità massime e, quando si utilizza la cottura ad
induzione, non superare mai il livello massimo di 3 litri indicato all’interno del
recipiente.
OSe viene usato un accessorio, leggere le istruzioni di sicurezza e di impiego che
lo corredano.
OFare attenzione nel sollevare questo apparecchio, per via del peso. Verificare
che la testa sia bloccata in posizione e che recipiente, utensili, coperchi degli
attacchi e cavo elettrico siano ben saldi prima di sollevare l’apparecchio.
OQuando si sposta l'apparecchio, sollevare sempre dalla base del piedistallo e
dalla testa del mixer. NON sollevare o trasportare l'apparecchio con la maniglia
della ciotola
ONon lasciare mai che il cavo penzoli da dove un bambino potrebbe afferrarlo.
ONon lasciare mai che corpo motore, il filo o la spina elettrica si bagnino.
OAttenzione nel maneggiare o toccare qualsiasi parte dell’apparecchio durante
o dopo la cottura, IN PARTICOLARE IL RECIPIENTE, IL PARASCHIZZI E GLI
UTENSILI, che continueranno a SCOTTARE anche diverso tempo dopo che
l’apparecchio è stato spento. Per estrarre e spostare il recipiente, servirsi dei
manici. Usare guanti da forno al momento di maneggiare il recipiente caldo e
gli utensili caldi per miscelare.
OIlsimbolo contrassegnato sul prodotto indica una superficie che può
diventare molto calda durante l’utilizzo.
O Fare attenzione a rimuovere gli accessori della ciotola dopo un uso prolungato,
perché potrebbero essere caldi.
OLa base del recipiente continua a scottare anche molto tempo dopo il termine
della cottura. Fare attenzione nel maneggiare il recipiente e usare il tappetino
di protezione prima di appoggiarlo a superfici sensibili al calore.
Italiano
Si prega di aprire la prima pagina, al cui interno troverete le illustrazioni

71
OFare attenzione al vapore che fuoriesce dal recipiente del mixer, in particolare
nell’aprire il coperchio del paraschizzi, oppure al momento di sollevare la testa
dell’impastatrice.
OSe si desidera versare alimenti caldi dal mixer al frullatore, lasciarli sempre
raffreddare a temperatura ambiente prima di versarli nel frullatore.
OUsare solo il recipiente e gli utensili in dotazione con questo apparecchio. Non
utilizzare mai il recipiente con altre sorgenti di calore.
ONon azionare mai l’apparecchio nella modalità di cottura se il recipiente è
vuoto.
ONon cercare di inserire nulla attraverso le bocchette per l’aria.
OPrima di usare questo apparecchio, collocarlo su una superficie piana, lontano
dal bordo del piano di lavoro. Assicurarsi che vi sia una distanza di almeno 10
cm dalle pareti, e che le bocchette dell’aria non siano ostruite. Non collocare
l’apparecchio sotto a una credenza.
OA garanzia dell’uso corretto e sicuro della piastra ad induzione, controllare che
la base del recipiente e i sensori della temperatura siano puliti ed asciutti prima
di avviare la cottura.
OOggetti metallici come coltelli, forchette, cucchiai e coperchi non devono
essere posti sul piedistallo della ciotola/sulla zona di induzione poiché possono
surriscaldarsi.
OCome per qualunque apparecchio per cottura a induzione, evitare di collocare
carte di credito, supporti magnetici o altri apparecchi elettronici sensibili vicino
all’apparecchio dopo averlo acceso.
ONon usare questo apparecchio per friggere i cibi.
OControllare sempre che i cibi siano ben cotti prima di mangiarli.
ONon superare i 250 ml quando si cucina con l’olio.
OConsumare i cibi entro breve tempo dopo averli cotti; in alternativa, farli
raffreddare velocemente e poi refrigerarli non appena possibile.
OUn utilizzo scorretto dell’apparecchio può provocare serie lesioni fisiche.
ONon esercitare una forza eccessiva quando si preme il touchscreen e non
utilizzare mai un oggetto appuntito per azionarlo.
ONon utilizzare la frusta per miscele pesanti (ad es. scrematura di grassi e
zucchero) in quanto si potrebbe danneggiare.
OIl cavo di alimentazione deve essere utilizzato riducendo al minimo il rischio
che l’utilizzatore s’ingarbugli o s’inciampi. È permesso l’uso delle prolunghe
se si presta la dovuta attenzione durante l’uso. Se è utilizzata una prolunga:
1) il valore nominale della tensione contrassegnato sulla prolunga deve essere
almeno equivalente a quello dell’apparecchio; 2) il cavo deve essere sistemato
in modo che non penzoli dai piani di lavoro o dai tavoli per evitare che possa
essere afferrato dai bambini o che causi cadute accidentali. Se l’apparecchio è
di modello provvisto di messa a terra, la prolunga deve essere costituita da un
cavo elettrico triplo inclusivo di messa a terra. Il valore nominale della tensione
dell’apparecchio è indicato sotto l’unità.
OGli apparecchi possono essere utilizzati da persone con ridotte capacità
psicofisico-sensoriali, o con esperienza e conoscenze insufficienti solo nel caso
in cui siano state attentamente sorvegliate e istruite da un responsabile su
come utilizzare un apparecchio in modo sicuro e siano consapevoli dei pericoli.
OSorvegliare i bambini, assicurandosi che non giochino con l’apparecchio.
OQuesto apparecchio non dev’essere utilizzato dai bambini. Tenere apparecchio
e cavo lontani dalla portata dei bambini.
OUtilizzare l’apparecchio solo per l’uso domestico per cui è stato realizzato.
Kenwood non si assumerà alcuna responsabilità se l’apparecchio viene
utilizzato in modo improprio o senza seguire le presenti istruzioni.
OLa potenza nominale massima si basa sull’accessorio mini tritatutto/macinio che
assorbe il massimo carico. Altri accessori possono assorbire meno energia.
OQuesto apparecchio non può essere utilizzato insieme a un timer esterno o con
un sistema di controllo remoto.
O Non spostare né sollevare la testa dell’impastatrice quando l’attrezzatura è
montata perché la Kitchen Machine potrebbe diventare instabile.

72
O Non utilizzare il dispositivo vicino al bordo o se sporge dal piano di lavoro o
applicare forza ad un accessorio quando installato, poiché ciò potrebbe rendere
l’unità instabile e farla ribaltare, il che potrebbe causare un infortunio.
Accessorio per cottura a vapore
O Questo accessorio genera vapore che potrebbe causare scottature.
OFare attenzione a non scottarsi con il vapore che fuoriesce dal cestello per
cottura a vapore, specialmente quando si toglie il paraspruzzi o si solleva il
coperchio del tubo introduttore per alimenti.
OAttenzione nel maneggiare i componenti: eventuali liquidi, condensa e la
sezione del cestello o della Kitchen Machine scotteranno. Usare guanti da forno.
ODisinserire la spina dell’apparecchio dalla presa elettrica prima di estrarre i
componenti o di pulirlo.
Sicurezza degli alimenti
OCuocere bene carni, pollame, pesce e frutti di mare. Inoltre, non cuocerli mai
direttamente dal freezer.
ONon riscaldare nel cestello per cottura a vapore cibi già cotti.
Prima di collegare l’apparecchio alla rete elettrica
O Assicurarsi che la tensione della vostra rete elettrica sia la stessa di quella indicata sulla targhetta sotto l’apparecchio.
O AVVERTENZA: L’APPARECCHIO DEVE ESSERE MESSO A TERRA.
O Questo apparecchio è conforme al regolamento (CE) No. 1935/2004 sui materiali e articoli in contatto con alimenti.
O Questo apparecchio è conforme ai requisiti essenziali e alle altre disposizioni pertinenti della Direttiva 2014/53/UE.
Prima dell’uso
O Lavare i componenti: vedere la sezione ‘Cura e pulizia’.
Conoscere Kenwood Cooking Chef
Legenda
Attacchi per gli accessori
1 Attacco ad alta velocità (HSO)
2 Attacco a bassa velocità (SSO)
3 Attacco recipiente
4 Attacco braccio miscelatore
Impastatrice
5 Coperchio attacco ad alta velocità
6 Testa dell’impastatrice
7 Coperchio attacco per lavorazioni a bassa velocità
8 Recipiente di Kenwood Cooking Chef
9 Levetta alza-testa
10 Ghiera di controllo
11 Interruttore On/Off
12 Schermo di visualizzazione
13 Tappetino di protezione
14 Foro di scarico
15 Piedistallo del recipiente/area ad induzione
16 Bocchette per l’aria
17 Sensori della temperatura
18 Protezione termica
19 Ttenuta di gomma (rimuovibile)
20 Paraschizzi
21 Coperchio dell’introduttore per alimenti
22 Frusta K
23 Frusta gommata ad alta temperatura
24 Frusta a filo
25 Gancio impastatore
26 Mescolatore
27 Accessorio di co-miscelazione
28 Spatola per alta temperatura
29 Raschietto per impasto
30 Chiave
Accessorio per cottura a vapore
31 Sostegni per i manici
32 Anello di supporto
33 Manici ripiegabili
34 Vassoio estraibile
35 Portauova
Nota: Attrezzature da inserire nell’attacco per
lavorazioni a bassa velocità
L’attacco degli accessori per lavorazioni a bassa velocità
presente nella Kitchen Machine utilizza il sistema di innesto a
rotazione (Twist Connection System). È stato progettato per
degli accessori da collegare mediante innesto a rotazione.
Quando si intendono acquistare nuovi accessori da inserire
nell’attacco per lavorazioni a bassa velocità, occorre verificarne
la compatibilità con la propria Kitchen Machine. Tutti gli
accessori del sistema di innesto a rotazione sono identificabili
con il codice prodotto che inizia con KAX e dalla presenza del
logo Twist visibile sull’imballaggio.
Se gli accessori di cui si dispone si avvalgono di sistema
di attacco a barra (Bar Connection System) si dovrà
utilizzare l’adattatore KAT002ME per inserirli mediante
l’innesto a rotazione (Twist Connection System) sulla
Kitchen Machine.
Per maggiori informazioni, visitare il sito
www.kenwoodworld.com/twist.
Collegamento alla
Kenwood World App
Fare riferimento alle illustrazioni A – D
L’app di Kenwood World permette di impartire comandi al
proprio apparecchio tramite smartphone o tablet.
1 Collegare e premere l'interruttore acceso/spento sul lato
del corpo motore.
2 Selezionare Impostazioni > Wi-Fi> Connetti e seguire le
istruzioni sul touchscreen.
Numero PIN
O Il numero PIN sarà necessario quando richiesto dall’app di
Kenwood World.

73
O L’apparecchio può solo essere connesso quando il numero
PIN viene visualizzato sul display. Se il PIN non è inserito
correttamente, seguire le istruzioni sull’app e riprovare.
O Per visualizzare il numero PIN dell’unità, selezionare
Impostazioni > Wi-Fi> Connetti e seguire le istruzioni
sullo schermo del display (solo quando connesso a Wi-Fi).
N.B.
La connessione Wi-Fi
Funziona con IEEE802.11 b, g ed n solo a 2,4 GHz.
Compatibilità
L’app Kenwood World è compatibile con le versioni più recenti
di iOS e Android.
Ripristino delle impostazioni di fabbrica
Importante
O Quando si smaltisce l’apparecchio, è importante ripristinare
le impostazioni di fabbrica per proteggere i dati personali.
O Selezionando questa opzione verranno cancellati tutti i
dati Wi-Fi memorizzati sull’apparecchio e ripristinati alle
impostazioni di fabbrica.
O Per ripristinare le impostazioni di fabbrica dell’apparecchio,
selezionare Impostazioni > Ripristino impostazioni di
fabbrica.
Come configurare il Cooking Chef Connect
Fare riferimento alle illustrazioni E – I
IMPORTANTE
O Controllare che l’area ad induzione, i sensori della
temperatura e l’esterno della base del recipiente
siano puliti. In caso contrario, il sensore termico viene
compromesso e si avrà una cottura scadente.
O Verificare che tutti i coperchi degli attacchi, compresa
la protezione termica, siano installati. Se non sono stati
montati correttamente, la funzione di riscaldamento non si
attiva.
1 Collegare e premere l'interruttore On/Off.
2 Ruotare la leva alza-testa in senso orario e sollevare la testa
dell’impastatrice fino a quando non si blocca in posizione.
3 Spingere la protezione termica verso l'alto sul lato
inferiore della testa dell’impastatrice fino a quando non
sarà completamente bloccata. La protezione termica non
deve mai essere utilizzata senza la guarnizione in gomma
montata correttamente.
O Se si utilizza Cooking Chef Connect senza calore, non è
necessario montare la protezione termico a meno che non
si utilizzi il paraspruzzi. Fare riferimento alla sezione "Come
montare e utilizzare il gruppo paraspruzzi".
4 Montare la ciotola sulla base.
5 Posizionare l’utensile richiesto nell’attacco del recipiente
o nell’attacco del braccio miscelatore, se si utilizza il
braccio miscelatore, posizionando il perno nell’incavo e poi
ruotando fino a bloccarlo in posizione.
O Per rimuovere un utensile, eseguire la procedura descritta
al punto 4 in senso contrario (Utilizzare sempre guanti da
forno per rimuovere utensili dopo la cottura).
6 Per abbassare la testa dell’impastatrice, sollevarla
leggermente e ruotare la leva alza-testa in senso orario.
Abbassarla fino a quando non si bloccherà in posizione.
Braccio miscelatore: quando si utilizza il braccio miscelatore,
è possibile utilizzare anche l’accessorio di co-miscelazione
per migliorare l'azione di miscelazione, vedere "Come
montare e rimuovere l’accessorio di co-miscelazione”. Il
braccio miscelatore può essere utilizzato anche con la
frusta. Non utilizzare il braccio miscelatore con il gancio
impastatore.
Come utilizzare il tuo Cooking Chef Connect -
Funzionamento manuale
1 Aggiungere gli ingredienti in questione da cucinare/
miscelare.
2 Impostare il tempo, la velocità e la temperatura richiesti.
Nota: per utilizzare la macchina come mixer senza
riscaldamento, selezionare 'Off' quando si imposta la
temperatura.
Ruotare la ghiera di controllo in senso antiorario per
utilizzare gli intervalli di agitazione e impulso.
Ruotare la ghiera di controllo in senso orario per utilizzare
le velocità continue.
3 Premere la ghiera di controllo per iniziare.
4 Per arrestare l'unità in qualsiasi momento, premere la
ghiera di controllo. In modalità di cottura, fare attenzione
poiché l'unità sarà molto calda.
Modalità alta velocità, alta temperatura
(HSHT)
Per miscelare ad alta velocità a temperature di almeno 60°C
O Selezionare il tempo (se applicabile), la velocità e la
temperatura di 60°C o superiore.
O Verrà visualizzato un avviso sullo schermo per informare
che si sta entrando in modalità HSHT
O Quando l'avviso sarà stato letto e compreso, premere
YES (Sì) per confermare che accetta di entrare in
modalità HSHT.
O Premere la ghiera di controllo per avviare.
Questa funzione DEVE essere utilizzata SOLO con la frusta
e/o con il braccio miscelatore. Non si deve superare la
capacità massima di cottura di 3 litri e ci si deve assicurarsi
che il paraspruzzi sia montato. La macchina non deve
essere lasciata incustodita.
5 Una volta che un programma sarà terminato, l’apparecchio
emetterà 3 segnali acustici.
O N.B.: se non è stato impostato alcun valore di tempo,
i processi di cottura e miscelazione termineranno
automaticamente quando il timer avrà raggiunto 8 ore.
6 Per interrompere il processo di riscaldamento, portare
la temperatura su "OFF". Per arrestare l'unità in qualsiasi
momento, premere la ghiera di controllo.
Importante - Se in qualsiasi momento si solleva la testa
dell’impastatrice durante un'operazione, il processo
di riscaldamento si interromperà e l’accessorio della
ciotola si fermerà e non si riavvierà fino quando la testa
dell’impastatrice verrà abbassata. Per riavviare il mixer,
abbassare la testa dell’impastatrice e premere la ghiera di
controllo.
Utilizzo di programmi preimpostati
Fare riferimento alle illustrazioni P – R
1 Selezionare il menu predefinito.
2 Scegliere l’impostazione che si desidera utilizzare.
3 Seguire le istruzioni visualizzate sullo schermo.
4 Per fermare l'unità in qualsiasi momento, premere la ghiera
di controllo. Fare attenzione poiché la ciotola e gli utensili
saranno molto caldi.

74
Dopo la cottura
O Fare attenzione nel toccare o utilizzare qualsiasi parte
dell’apparecchio quando si è in modalità cottura o dopo
la cottura, IN PARTICOLARE CIOTOLA E UTENSILI,
poiché rimangono CALDI a lungo anche dopo che
l’apparecchio è stato spento.
O Utilizzare i due manici laterali per rimuovere e trasportare
la ciotola. Usare guanti da forno quando si maneggiano la
ciotola calda e gli accessori caldi.
O La parte sottostante della ciotola rimarrà calda per molto
tempo anche dopo avere interrotto il riscaldamento.
Fare attenzione durante la manipolazione e utilizzare
il tappetino di protezione della superficie di lavoro in
dotazione per proteggere le superfici sensibili al calore.
Suggerimenti e consigli
O Per alcune ricette, in particolare quelle ad alto contenuto
di acqua, non sarà possibile raggiungere temperature
di cottura oltre 100ºC (ossia il punto di ebollizione
dell’acqua).
O Quando si desidera aggiungere ingredienti nel recipiente
in fase di cottura, ridurre la velocità e versarli in modo
lento e continuo.
O Per riscaldare velocemente le salse, mescolarle in modo
continuo.
O Se durante la cottura viene utilizzato il paraschizzi,
toglierlo sempre prima di sollevare la testa
dell’impastatrice.. Attenzione alla condensa che si forma
sul paraschizzi e sulla protezione termica.
O Sollevare la testa dell’impastatrice lentamente, per
consentire all’eventuale liquido presente sulla parte
sottostante della protezione termica di rifluire nel
recipiente.
O Sono disponibili quattro funzioni di ritardo di
miscelazione che consentono di selezionare la quantità
appropriata di miscelazione per le singole ricette. Alcune
ricette richiedono una miscelazione continua per evitare
che gli ingredienti si attacchino al fondo della ciotola,
mentre altre trarranno beneficio da una miscelazione
intermittente per mantenere la consistenza del cibo.
Funzionamento manuale (accessori)
1 Rimuovere il coperchio dell'attacco ad alta velocità/
attacco a bassa velocità (se del caso).
2 Montare l'accessorio secondo le istruzioni specifiche
indicate.
3 Impostare il tempo e la velocità richiesti (fare riferimento
alle illustrazioni L - M). Premere la ghiera di controllo per
iniziare.
Per fermare l'unità in qualsiasi momento, premere
nuovamente la ghiera di controllo.
Rimuovere o inserire i coperchi degli attacchi
Coperchio attacco alta-velocità
1 Per rimuovere il coperchio, afferrare l’impugnatura e
sollevare verso l’alto.
2 Per inserire il coperchio, posizionarlo sull’attacco e
spingere verso il basso.
Coperchio per attacco a bassa-velocità
1 Per rimuovere il coperchio, afferrare l’impugnatura sulla
parte inferiore e tirare verso l’esterno.
2 Per inserire, posizionare il fermo in cima al coperchio
nella rientranza dell’attacco e spingere per incastrare in
posizione.
Utilizzo della funzione di pesatura
Fare riferimento alle illustrazioni S
1 Selezionare la funzione di pesatura sul touchscreen.
2 Montare la ciotola.
3 Azzerare la bilancia.
4 Pesare gli ingredienti.
5 Per passare da un'unità all'altra, toccare il pulsante
dell'unità sullo schermo di pesatura.
Nota: posizionare sempre l'apparecchio su una superficie
asciutta, piana e stabile prima della pesatura. Non esercitare
pressione sul dispositivo o sulla ciotola durante la pesatura
poiché influirà sulla precisione della bilancia.
La funzione di pesatura può essere utilizzata con la testa
dell’impastatrice in posizione verso il basso o verso l'alto.
La funzione di pesatura è precisa fino a 6 kg.
Tabella di utilizzo preimpostato
Le impostazioni predefinite possono essere regolate in base alla ricetta, ove disponibile.
Le impostazioni non regolabili sono indicate dall'icona .
Quando viene visualizzato “Riscaldamento” viene sul display, il timer non inizierà il conto alla rovescia fino al raggiungimento della
temperatura corretta.
Preimpostazione Utensile consigliato Impostazioni predefinite
(regolabili)
Fase mantenimento
al caldo
Idee/usi ricette
Sbattere bianchi
d'uovo
1 min 15 sec
(15 sec – 5 mins)
Max
OFF
Albumi per la mousse al
cioccolato
Pan di Spagna 1 min
(30 sec – 5 min)
1 – Max
( – Max)
OFF
Pan di Spagna, cupcake
Impastare l'impasto 10 min
(1 min – 30 min)
Min to 1
(min – 2)
OFF
Panini, pizza

75
Tabella di utilizzo preimpostato – Continua
Preimpostazione Utensile consigliato Impostazioni predefinite
(regolabili)
Fase mantenimento
al caldo
Idee/usi ricette
Far lievitare l'impasto 1 ora
(5 min – 2 ora)
OFF
30˚C
(25˚C – 35˚C)
Far lievitare l'impasto
Fondere il cioccolato 10 min
(5 min – 2 ora)
60˚C
Mousse al cioccolato
Meringa svizzera 10 min
(1 min – 20 min)
Max
40˚C
Base per glassa di crema al burro
Meringa italiana 4 min
(1 min – 20 min)
HSHT 6
( – Max)
60˚C – 85˚C
Torta meringata al limone
Baked Alaska (Torta di pan di
Spagna e gelato ricoperta di
meringa)
Composta di frutta 20 min
(5 sec – 2 ora)
()
104˚C
30 min
62˚C
Ripieni per dolci, condimenti per
dessert
Popcorn 10 min
(5 min – 10 min)
OFF
180˚C
Per popcorn fresco fatto in casa
*Per ottenere i migliori risultati,
utilizzare sempre la pre-
impostazione.
Cuocere a vapore 20 min
(5 min – 45 min)
OFF
100˚C
Salmone al cartoccio
Piatti unici 40 min
(5 sec – 8 ora)
()
103˚C – 140˚C
30 min
62˚C
Bolognese
Minestrone Con
Verdure E Cerali
20 mins
(5 sec – 8 ora)
()
103˚C – 140˚C
30 min
62˚C
MinestroneBrodin
Cottura lenta 2 hrs
(5 sec – 8 ora)
()
98˚C – 140˚C
30 min
62˚C
Beef bourguignon

76
Ricetta
Marinata di prugne
200 g di miele liquido
40 g di prugne molli
40 ml di acqua
1 Mettere tutti gli ingredienti nel mini tritatutto/macinino.
Refrigerare durante la notte.
2 Montare l'accessorio sull’apparecchio.
3 Attivare impulso per 4 secondi.
4 Utilizzare come richiesto.
Accessorio per cottura a vapore
Fare riferimento alle illustrazioni T
O Durante l’uso del cestello per cottura a vapore, tenere
sempre l’apparecchio Cooking Chef lontano dalle pareti e
non collocarlo sotto a credenze: il vapore potrebbe causare
danni.
O Se il cibo viene condito a cottura ultimata, questo può
prevenire la comparsa di macchie o di forellini sul recipiente
di acciaio inox.
1 Appoggiare il vassoio estraibile su una superficie in piano,
controllando che i manici siano ripiegati verso l’interno.
2 Inserire l’anello di supporto sul vassoio, verificando che i
sostegni per i manici sul vassoio si inseriscano vicino alle
fessure a V sul vassoio.
3 Ora aprire i manici verso l’esterno e agganciarli ai loro
sostegni.
4 Appoggiare i cibi da cuocere sul vassoio. Le verdure vanno
pulite e fondo e pelate, se del caso.
5 Aggiungere la necessaria quantità di acqua nel recipiente
(vedere la tabella per la cottura). È consigliabile usare
acqua filtrata, che riduce sia il calcare che la comparsa di
macchie.
6 Inserire il cestello nel recipiente: non occorre regolare
l’altezza.
7 Ora montare il paraspruzzi sulla testa dell’impastatrice..
8 Montare il recipiente e il cestello per cottura a vapore sulla
Kitchen Machine.
9 Abbassare la testa dell’impastatrice e poi montare il
paraspruzzi.
10 Selezionare la pre-impostazione del vapore e regolare il
tempo di cottura (secondo la tabella di cottura consigliata).
Premere la ghiera di controllo per iniziare
11 Lasciar cuocere per il tempo richiesto.
12 Estrarre il paraspruzzi.
13 Sollevare la testa dell’impastatrice.
14 Sollevare ed estrarre il cestello per cottura a vapore
tenendolo dai manici, avendo cura che essi non si
ripieghino verso l’interno.
15 Appoggiare il cestello su un piatto grande, o su un altro
recipiente idoneo.
16 Sganciare i manici e ripiegarli verso il centro. Sollevare ed
estrarre l’anello di supporto, quindi aprire i manici verso
l’esterno.
17 Infine, estrarre gli alimenti dal cestello.
Importante
Attenzione nel maneggiare qualsiasi cosa: eventuali liquidi,
condensa e la sezione del cestello o della Kitchen Machine
scotteranno. Usare guanti da forno.
O Non cercare di inserire un utensile per miscelare mentre si
usa il cestello per cottura a vapore.
O Non cuocere alimenti nel recipiente del mixer mentre si usa
il cestello per cottura a vapore.
Suggerimenti e consigli
O Il liquido rimasto nella ciotola è ottimo per preparare
zuppe o brodini. Prestare attenzione perché sarà molto
caldo.
O Lasciare spazio fra un pezzo di cibo e l’altro.
O Se si cuociono molti cibi insieme, mescolarli a metà
cottura.
O Cibi tagliati a pezzetti di dimensioni simili cuoceranno in
modo più uniforme.
O Per cuocere insieme a vapore cibi di tipo diverso: se un
particolare alimento richiede meno tempo di cottura,
aggiungerlo in seguito.
O Se si solleva il coperchio del tubo per introdurre gli
alimenti o si toglie il paraspruzzi, dall’apparecchio esce
vapore e la cottura potrà richiedere più tempo.
O I cibi continuano a cuocere anche quando la
Kitchen Machine si spegne, quindi toglierli subito
dall’apparecchio.
O Se i cibi non sono cotti a sufficienza, impostare
nuovamente il tempo di cottura. Potrebbe essere
necessario aggiungere altra acqua.
O I tempi di cottura sono a semplice titolo di guida.
Controllare sempre che i cibi siano ben cotti prima di
mangiarli.
O Non lasciare che l’apparecchio giunga ad ebollizione
senza acqua: aggiungere altra acqua se necessario.
Illustrazione dello schermo del display
Toccare questa icona per aprire il menu delle impostazioni.
Toccare questa icona per aprire il menu dei programmi preimpostati.
Toccare questa icona per pesare gli ingredienti nella ciotola.
Indica il tempo selezionato in ore (h), minuti (m) e secondi (s).

77
Illustrazione dello schermo del display
Indica l'intervallo di miscelazione selezionato.
Se viene selezionata una velocità intermittente (2 Æ 4), l’anello esterno aumenterà
progressivamente e l’apparecchio si agiterà quando sarà è pieno.
Indica la temperatura selezionata.
Uno sfondo rosso pulsante indica che la macchina è in modalità riscaldamento.
Uno sfondo rosso fisso indica che la macchina ha raggiunto la temperatura impostata.
Una freccia intermittente rivolta verso il basso indica che l'apparecchio si sta raffreddando.
Indica che un’impostazione (tempo, velocità o temperatura) non può essere regolata.
Informazioni di stato Questo testo indica le informazioni sullo stato.
Indica che la ciotola, il suo contenuto e tutte le parti utilizzate sono caldi. Si prega di
maneggiare con cautela.
Indica che l’apparecchio è collegato a una rete Wi-Fi.
Indica che l'apparecchio è in modalità alta temperatura ad alta velocità (HSHT)
Ruotare la ghiera di controllo in senso antiorario per utilizzare gli intervalli di miscelazione
e impulso.
Ruotare la ghiera di controllo in senso orario per utilizzare le velocità continue min. - max.
Ricette
Ricetta Accessorio
usato
Impostazione predefinita/
Impostazione manuale
Ingredienti
Minestrone Minestrone Con
Verdure E Cerali
20 minuti
98˚C
Aggiungere i seguenti ingredienti tutti insieme:
100 g di pancetta a dadini
2 spicchi d’aglio tritati
50 g di riso Arborio
2½ cucchiai di passata di pomodoro
70 g di verza
1 cucchiaino di rosmarino essiccato
2 cucchiaini di salvia secca
1 gambo di sedano affettato
60 g di porri affettati
75 g di cipolle affettati
75 g di carote affettati
1 litro di brodo vegetale caldo
Sale e pepe
Manzo alla Strogano Piatto unico
30 minuti
103˚C
Aggiungere i seguenti ingredienti tutti insieme:
600 g di manzo a dadini
1 cucchiaio di paprika
1 cucchiaio di burro
1 spicchio d’aglio tritato
400 g brodo di carne
200 g funghi, aettati
150 g di cipolle, aettate
300 g di carote, aettate
200 ml di panna semigrassa
1 cucchiaio amido di mais
1 cucchiaio d'acqua }miscelare
insieme
Sale e pepe
Crème Anglaise Impostazioni manuali
15 minuti
85˚C
Aggiungere i seguenti ingredienti tutti insieme:
250 g di latte intero
250 g di panna intera
1 cucchiaino di estratto di vaniglia
2 cucchiaio di farina di mais
96 g di tuorlo d’uovo, sbattuto }
miscelare
insieme
80 g di zucchero semolato

78
Ricette
Ricetta Accessorio
usato
Impostazione predefinita/
Impostazione manuale
Ingredienti
Popcorn Popcorn
10 min
OFF
180˚C
Aggiungere i seguenti ingredienti tutti in una volta:
50 g di chicchi di popcorn
20 g di olio di girasole
*Per ottenere i migliori risultati, utilizzare sempre la
pre-impostazione.
Budino di riso Impostazioni manuali
1 ora
15 minuti
95˚C
Aggiungere i seguenti ingredienti tutti insieme:
150 g di riso a grani corti
1 litro di latte intero
75 g di zucchero semolato
2 cucchiaini di estratto di vaniglia
Impostazioni di temperatura e velocità
Linee guida
temperatura
60°C Fondere il cioccolato
72°C – 82°C Cottura in bianco
98°C – 99°C Cottura a fuoco lento
100°C Bollitura, cottura a vapore
130°C – 140°C Saltare le verdure
180°C Doratura carne
(P) Impulso – Per brevi scatti di massima potenza.
Intervallo miscelazione 1 – Il mixer funzionerà ad una velocità lenta costante.
Usato per miscelare ingredienti leggeri in miscele più spesse.
Intervallo miscelazione 2 – Miscelazione intermittente con brevi pause. Quando
impostato a questa velocità, il dispositivo funziona in modo intermittente a
velocità lenta ogni 10 secondi per 1,5 giri.
Intervallo miscelazione 3 – Miscelazione intermittente con pause medie. Quando
impostato a questa velocità, il dispositivo funziona in modo intermittente a
velocità lenta ogni 30 secondi per 1,5 giri.
Intervallo miscelazione 4 – Miscelazione intermittente con pause lunghe. Quando
impostato a questa velocità, il dispositivo funziona in modo intermittente a bassa
ogni 5 minuti per 1,5 giri.
Velocità min - max Velocità continue che aumentano gradatamente fino al max.
HSHT Per miscelare a temperature superiori a 60˚C con velocità min. - max.

79
Grafico di utilizzo consigliato
Questo serve solo da guida e varierà a seconda della ricetta esatta e degli ingredienti lavorati
Frusta K
Per la preparazione di torte, biscotti, pasticceria, glassa, ripieni, bignè e purè di patate.
Suggerimenti e consigli
• Per evitare schizzi di ingredienti, aumentare gradualmente la velocità.
• Per incorporare completamente gli ingredienti smettere di mescolare e raschiare la
scodella con la spatola frequentemente.
• Utilizzare ingredienti freddi per dolci, a meno che la ricetta indichi il contrario.
Ricetta/Processo
(Max) (Minuti)
Dolci e biscotti – miscelare burro e
farina
Peso farina 910 g Min 12
Miscele pronte per dolci Peso totale 4 kg Min Max 45–60 secondi
Frusta gommata
Per creare e mescolare ingredienti morbidi.
Suggerimenti e consigli
• Per evitare schizzi di ingredienti, aumentare gradualmente la velocità.
• Quando si amalgamano burro/margarina e zucchero per preparare dolci, usare sempre
burro a temperatura ambiente o ammorbidirlo prima.
• Due lame ad aletta sono in dotazione con la frusta gommata ad alta temperatura. Usare
una lama per preparare le ricette dolci e l'altra per le ricette salate.
Ricetta/Processo
(Max) (Minuti)
Amalgamare burro/margarina e zucchero 4,55 kg
(Miscela 15 uova)
Min Max 4
Amalgamare le uova per impasti per torte Min Max 1–4
Amalgamare farina, frutta, ecc. Min 1 30–60 secondi
Frusta a filo
Per uova, panna e soufflé.
Importante
• Per evitare schizzi di ingredienti, aumentare gradualmente la velocità.
• Non utilizzare la frusta per miscele pesanti (miscele pronte per dolci e per sbattere
burro e zucchero) in quanto si potrebbe danneggiare.
• Si ottengono i migliori risultati quando le uova sono a temperatura ambiente.
Prima di montare gli albumi, accertarsi che non vi sia unto o tuorlo d’uovo sulla frusta o
sulla ciotola.
Ricetta/Processo
(Max) (Minuti)
Albumi 16 (605 g)
Min Max
1½-2
Pan di spagna 930 g 4 -6
Panna 2 L 1½-3
Pastella per frittelle
• Aggiungere prima la farina alla ciotola, seguita dagli
ingredienti liquidi.
• Mescolare alla velocità minima per amalgamare gli
ingredienti.
250 g di farina
500 g di latte
200 g di uova
Min 10 secondi
Max 45–60 secondi
Maionese
• Per ottenere i migliori risultati, raschiare la ciotola
dopo l’aggiunta dell’olio e azionarla per altri 10 sec-
ondi alla massima velocità.
2 tuorli d'uovo
10 g di senape
200 ml di olio vegetale
Max 1-1½
Dimensioni uova = medie (peso 53 – 63 g).
Panna da montare usata = Panna da montare fresca con contenuto di grassi minimo del 38%

80
Grafico di utilizzo consigliato
Questo serve solo da guida e varierà a seconda della ricetta esatta e degli ingredienti lavorati
Gancio impastatore
Per miscele di impasti con lievito
Suggerimenti e consigli
Importante
• Non superare mai le capacità massime indicate, per non rischiare di sovraccaricare la
macchina.
• Se si nota che la macchina sforza troppo durante il suo funzionamento, spegnerla,
rimuovere metà dell’impasto e lavorare separatamente le due metà.
• Gli ingredienti si amalgamano meglio se si versano prima gli ingredienti liquidi.
Lievito
• Lievito disidratato (il tipo che deve essere ricostituito): versare l’acqua calda nella
ciotola. Quindi aggiungere il lievito e lo zucchero e lasciare riposare per circa 10 minuti
sino alla formazione della schiuma.
• Lievito fresco: sbriciolare nella farina.
• Altri tipi di lievito: seguire le istruzioni sulla confezione.
Ricetta/Processo
(Max) (Minuti)
Impasto per pane (con lievito duro) Peso farina 350 g–1.,6 kg Min 60 secondi
1 3–4
Peso totale 564 g–2,58 kg Impastare nuovamente
alla Velocità 1
60 secondi
Impasto con lievito morbido (arricchito
con burro e uova)
Peso farina 250 g–1,6 kg Min 60 secondi
Peso totale 478 g–3,1 kg 1 3–4
Impastare nuovamente
alla Velocità 1
60 secondi
Dimensioni uova = medie (peso 53 – 63 g).
Guida alla cottura accessorio per cottura a vapore
O
Questi tempi di cottura sono puramente indicativi. Si possono utilizzare 500 ml di acqua per alimenti che richiedono fino a 20
minuti di cottura. Per alimenti che richiedono tempi di cottura più lunghi, utilizzare 650 ml di acqua.
O
Non lasciare asciugare l'unità a secco, rabboccare con acqua se necessario.
O
Non sovraccaricare il cestello quando si cuociono al vapore pollame e pesce.
O
Leggere "sicurezza alimentare" nella sezione sulla sicurezza.
Vegetables
Ingrediente
(Max) (minuti)
Quantità d’acqua Preparazione
Asparagi 450 g 15 500 ml Spuntare
Fagiolini verdi 450 g 15-20 500 ml Spuntare
Fagioli di Spagna 450 g 15-20 500 ml Spuntare e affettare finemente
Broccoli 450 g 20 500 ml Tagliare in piccoli fioretti
Cavolini di Bruxelles 450 g 25 500 ml Spuntare e tagliare la base
Cavoli 1 piccolo 25 500 ml Sminuzzare
Carote 450 g 20 500 ml Affettare finemente
Cavolfiore 1 medio 25 - 30 650 ml Tagliare in piccoli fioretti
Zucchine 450 g 15 500 ml Affettare finemente
Sedano 1 testa 15 500 ml Affettare finemente
Porri 3 15 500 ml Affettare finemente
Piselli mangiatutto 250 g 15 500 ml Spuntare
Funghi champignon 450 g 10 500 ml Pulire con un panno
Pastinaca 450 g 15 500 ml Tagliare a dadini o affettare
finemente
Piselli 450 g 15 500 ml Sgusciare
Patate novelle 450 g 30-40 650 ml Pulire con un panno

81
Pollame e pesce
Ricetta/Processo
(Max) (minuti)
Quantità d’acqua Commenti
Petti di pollo disossati 4 30-40 650 ml Cuocere fino a quando sono
teneri e ben cotti
Frutti di mare 450 g 10 500 ml Cuocere fino a quando si aprono
Gamberetti medi 450 g 10 500 ml Cuocere fino a quando diventano
rosati
Pesce, filetti 230 g 10-20 500 ml Cuocere fino a quando si sfaldano
Pesce, tranci Spessore 2,5 cm 15-20 500 ml Cuocere fino a quando si sfaldano
Pesce, intero 340 g 15-20 500 ml Cuocere fino a quando si sfaldano
Code di aragosta 2-4 20 500 ml Cuocere fino a quando diventano
rosse
Cozze 450 g 15 500 ml Cuocere fino a quando si aprono
Ostriche 6 15 500 ml Cuocere fino a quando si aprono
Pettini 230 g 15 500 ml Cuocere fino a quando sono
teneri e caldi
Regolazione dell'altezza dell'utensile
Fare riferimento alle illustrazioni U
Frusta a filo, frusta K in acciaio inossidabile
Per ottenere i migliori risultati, la frusta a fili grossi e la frusta K
devono quasi essere in contatto con il fondo del recipiente. Se
necessario, regolare la loro altezza con la chiave in dotazione.
Frusta gommata ad alta temperatura - questo utensile deve
toccare appena il fondo del recipiente.
1 Disinserire la spina dell’apparecchio dalla presa elettrica.
2 Sollevare la testa dell’impastatrice e inserire la frustra, la
frusta K o la frusta gommata ad alta temperatura.
3 Abbassare la testa dell’impastatrice. Se occorre regolare il
gioco, sollevare la testa e staccare l’utensile.
4 Usando la chiave fornita, allentare a sufficienza il dado
per consentire la regolazione dell’alberino. Per abbassare
l’utensile verso il fondo del recipiente, ruotare in senso
antiorario l’alberino. Per sollevare l’utensile allontanandolo
dal fondo del recipiente, ruotare l’alberino in senso orario.
5 Stringere nuovamente il dado.
6 Montare l’utensile sul mixer e abbassare la testa
dell’impastatrice. (Controllare la sua posizione – vedi i punti
suddetti).
7 Se necessario, ripetere questa procedura fino a quando
l’utensile è regolato in modo corretto. A questo punto,
stringere bene il dado.
Gancio impastatore: questo utensile è impostato presso il
luogo di fabbricazione e non è regolabile.
Braccio miscelatore: - questo utensile deve toccare appena il
fondo del recipiente.
1 Staccare l’apparecchio dalla presa di corrente.
2 Sollevare la testa dell'impastatrice e inserire il braccio
miscelatore.
3 Abbassare la testa dell'impastatrice. Se l’utensile deve
essere regolato, sollevare la testa dell'impastatrice e
utilizzare la chiave inglese per allentare il dado e poi
abbassare la testa dell'impastatrice.
4 Per abbassare l’utensile più vicino al fondo del recipiente,
ruotare la ghiera di regolazione in senso orario. Per alzare
l’utensile più lontano dal fondo del recipiente, ruotare la
ghiera di regolazione in senso antiorario.
5 Stringere nuovamente il dado.
Montare e utilizzare il gruppo paraschizzi
Fare riferimento alle illustrazioni V
Il gruppo del paraschizzi comprende 2 componenti: la
protezione termica e il paraschizzi.
La protezione termica serve a proteggere la testa
dell'impastatrice dal vapore prodotto durante il processo di
cottura.
Il paraschizzi non deve essere montato sul recipiente a meno
che non sia utilizzato insieme alla protezione termica.
1 Sollevare la testa dell'impastatrice fino a quando non si
blocca.
2 Spingere verso l’alto la protezione termica, sulla parte
sottostante della testa dell'impastatrice, fino a inserirla a
fondo. Non usare mai la protezione termica senza inserire
correttamente la tenuta di gomma.
3 Ora inserire il recipiente sulla base.
4 Abbassare la testa dell'impastatrice..
5 Appoggiare il paraschizzi sul bordo del recipiente e poi
spostarlo in avanti fino a inserirlo bene.
O Durante la miscelazione è possibile aggiungere gli
ingredienti direttamente nel recipiente, utilizzando l'imbuto.
6 Per estrarre il paraschizzi basta semplicemente allontanarlo
dall’apparecchio.
Nota: il paraspruzzi rimarrà attaccato allo schermo protettivo
quando la testa del mixer viene sollevata a meno che non
venga rimossa prima di sollevare la testa dell'impastatrice.
7 Per togliere la protezione termica, sollevare la testa
dell'impastatrice finché non si blocca. Estrarre l’utensile,
quindi spingere la protezione termica verso il basso per
staccarla dalla base della testa dell'impastatrice..
NB: Installare od estrarre il paraschizzi solo quando la testa
dell'impastatrice si trova in posizione bloccata.

82
Montare e smontare l’accessorio di co-
miscelazione
Fare riferimento alle illustrazioni W
L’accessorio di co-miscelazione può essere utilizzato per
favorire l’azione di miscelazione.
1 Incastrare l’accessorio di co-miscelazione sul lato del
recipiente con il rilievo verticale sull’interno e la clip di
fermo sull’esterno.
2 Ruotare l'accessorio in senso antiorario posizionandola in
asse con i manici del recipiente.
3 Per smontare, svolgere la procedura in senso contrario.
IMPORTANTE: non utilizzare l’accessorio di co-miscelazione
per miscelare quando si usa la frusta K, la frusta, il gancio
impastatore o la frusta gommata.
Montaggio della frusta gommata per alte
temperature
Fare riferimento alle illustrazioni X
installazione lama dell’aletta
La lama dell’aletta è fornita già installata in dotazione e deve
sempre essere rimossa prima delle operazioni di pulizia.
1 Installare l’aletta della lama flessibile con cautela
sull’utensile posizionando la base dell’aletta della lama
nella scanalatura e poi fissando un lato nell’incavo prima di
agganciare delicatamente l’estremità in posizione. Ripetere
dall’altro lato.
Cura e pulizia
O Spegnere sempre l’apparecchio e togliere la spina dalla
presa elettrica prima di pulirlo.
O Con il primo uso, dall’attacco potrebbe essere visibile
un po' di grasso.
Questo è normale – asportare i residui.
O Le superfici metalliche dei sensori della temperatura
possono mostrare segni
di usura durante l’uso normale. Tuttavia, questo non
compromette il rendimento del prodotto.
O Non lasciare la frusta flessibile per alte temperature
montata sull’apparecchio quando non viene utilizzata.
Apparecchio e copriprese
O Passarli con un panno umido e poi asciugare.
O Non usare mai prodotti abrasivi né immergere in acqua
questi componenti.
Frusta gommata per alte temperature
O Rimuovere sempre la lama dell’aletta flessibile prima di
pulire.
O Lavare la lama dell’aletta flessibile e l’accessorio con acqua
calda e detergente, poi asciugare bene, oppure le parti
possono essere lavate in lavastoviglie.
NB: Si prega di verificare le condizioni del corpo
dell’accessorio prima e dopo l’uso e di verificare regolarmente
le condizioni della lama dell’aletta flessibile e di sostituirla nel
caso siano evidenti segni di usura.
Recipiente, utensili, paraschizzi, accessorio di co-
miscelazione
O Lavarli a mano e asciugarli a fondo, oppure lavarli in
lavastoviglie (fare riferimento alla tabella nella parte
anteriore del manuale).
O Non usare spazzole metalliche, pagliette o candeggina per
pulire il recipiente in
acciaio inox. Per asportare il calcare, utilizzare aceto o un
prodotto idoneo.
O Se i cibi aderiscono o si bruciano nel recipiente, asportarli
per quanto possibile usando la spatola in dotazione.
Riempire il recipiente di acqua calda saponata e lasciare a
bagno. Asportare i residui più ostinati con una spazzola in
nylon.
O L’eventuale scolorimento del recipiente non ne
compromette il rendimento.
Foro di scarico
O Controllare che non vi siano residui di alimenti. Se
necessario, pulire con uno spazzolino per tubature o con un
bastoncino di cotone idrofilo.
Sensori della temperatura
O Passarli con un panno umido e poi asciugare. Non usare
mai prodotti abrasivi o utensili appuntiti per pulire i sensori.
Accessorio per cottura a vapore
O Spegnere sempre l’apparecchio e disinserire la spina
dalla presa elettrica prima di staccare l’accessorio
dall’apparecchio da cucina.
O Per una pulizia più facile, lavare sempre i componenti
subito dopo l’uso. Tutti i componenti possono essere
lavati con acqua saponata calda e poi asciugati a fondo. In
alternativa, è possibile lavarli in lavastoviglie.
O L’acqua di rubinetto e i cibi contengono sali e acidi che
talvolta possono corrodere le superfici in metallo, come
l’interno del recipiente del mixer. Se questo si verifica, pulire
con una spazzola di nylon, una paglietta non abrasiva o un
detersivo brevettato per la pulizia dell’acciaio inox.
Manutenzione e assistenza tecnica
O In caso di qualsiasi problema relativo al funzionamento
dell’apparecchio, prima di contattare il servizio assistenza
si consiglia di consultare la sezione “Guida alla risoluzione
problemi”, o di visitare il sito www.kenwoodworld.com.
O NB L’apparecchio è coperto da garanzia, nel rispetto di tutte
le disposizioni di legge relative a garanzie preesistenti e ai
diritti dei consumatori vigenti nel Paese ove l’apparecchio è
stato acquistato.
O In caso di guasto o cattivo funzionamento di un apparecchio
Kenwood, si prega di inviare o consegnare di persona
l’apparecchio a uno dei centri assistenza KENWOOD. Per
individuare il centro assistenza KENWOOD più vicino, visitare
il sito www.kenwoodworld.com o il sito specifico del Paese di
residenza.
O Disegnato e progettato da Kenwood nel Regno Unito.
O Prodotto in Cina.
IMPORTANTI AVVERTENZE PER IL CORRETTO SMALTIMENTO
DEL PRODOTTO AI SENSI DELLA DIRETTIVA EUROPEA
SUI RIFIUTI DI APPARECCHIATURE ELETTRICHE ED
ELETTRONICHE (RAEE)
Alla fine della sua vita utile il prodotto non deve essere smaltito
insieme ai rifiuti urbani.
Deve essere consegnato presso gli appositi centri di raccolta
differenziata predisposti dalle amministrazioni comunali, oppure
presso i rivenditori che offrono questo servizio.

83
Guida alla risoluzione problemi
Problema Causa Soluzione
L'apparecchio non funziona nella
modalità di cottura, viene visualizzato
un messaggio di errore ed emesso un
segnale acustico.
Uno dei sensori di sicurezza si è attivato. Verificare se sullo schermo di visualizzazione
è stata notificata la causa.
• Controllare che la testa sia abbassata e
bloccata.
• Verificare che tutti i coperchi degli
attacchi siano correttamente inseriti.
• Verificare che la protezione termica sia
montata in modo corretto.
• Controllare che il recipiente di Kenwood
Cooking Chef sia ben inserito.
L’apparecchio cambia velocità o la
velocità viene limitata durante la
cottura.
La velocità viene limitata in modo
automatico quando i contenuti del
recipiente raggiungono 60 °C e l’indicatore
di avviso di alta temperatura si accende.
Questo è un accorgimento di sicurezza.
I cibi si bruciano sul fondo del
recipiente.
1 La temperatura impostata potrebbe
essere eccessiva.
2 Viene usato l’utensile sbagliato.
3 L’intervallo tra le azioni di miscelazione è
troppo lungo.
4 L’utensile potrebbe non raggiungere la
parte bassa del recipiente.
5 Il tempo impostato per il timer è troppo
lungo.
6 Il sensore e/o la base del recipiente
possono non essere puliti.
1 Ridurre la temperatura.
2 Verificare se è utilizzato l’utensile
più adatto e se è stato regolato
correttamente.
3 Aumentare la frequenza delle azioni di
miscelazione o selezionare miscelazione
continua.
4 Regolare l’utensile.
5 Cuocere per meno tempo (ma verificare
che i cibi non siano crudi).
6 Controllare che queste aree vengano
tenute pulire e asciutte.
La consistenza dei cibi non viene
mantenuta.
1 La temperatura selezionata è eccessiva.
2 L’intervallo tra le azioni di miscelazione è
troppo breve.
3 Gli ingredienti sono stati cotti per troppo
tempo.
4 Viene usato l’utensile sbagliato.
1 Ridurre la temperatura.
2 Ridurre la frequenza delle azioni di
miscelazione.
3 Ridurre il tempo di cottura (controllando
che i cibi non siano crudi).
4 Verificare che l’utensile usato sia quello
più adatto.
La velocità di miscelazione non è
uniforme.
1 Ingredienti troppo grossi, troppo duri o
troppo solidi.
1 Tagliare gli ingredienti a pezzetti più
piccoli, asportare i noccioli dalla frutta,
fondere lentamente gli ingredienti senza
usare alcun utensile (ma verificare di aver
selezionato una velocità).
2 Aggiungere gli ingredienti dopo aver
abbassato la testa.
3 Verificare che l’utensile usato sia quello
più adatto.
È difficile chiudere la testa
dell'impastatrice.
1 Ingredienti duri, come il cioccolato, sul
fondo del recipiente possono impedire
alla testa dell'impastatrice di bloccarsi in
posizione abbassata.
2 Il braccio miscelatore è stato montato in
modo scorretto.
1 Aggiungere gli ingredienti dopo aver
abbassato la testa.
2 Assicurarsi che il braccio miscelatore
sia montato sull’attacco del braccio
miscelatore.
L’uso degli accessori limita la velocità
del motore.
È stato inserito un recipiente caldo. Estrarre il recipiente, oppure lasciarlo
raffreddare fino a 60°C.
La frusta a filo o la frusta K sbatte
contro il fondo della ciotola o non
raggiunge gli ingredienti sul fondo della
ciotola.
Il frullino per crema ad alta temperatura
non raccoglie gli ingredienti dal fondo
della ciotola.
L’accessorio è posizionato ad un’altezza
sbagliata che deve essere regolata.
Regolare l'altezza usando una chiave
adatta - vedere la sezione "Regolazione
dell'altezza dell'utensile".
La frusta a fili grossi, la frusta K o la
frusta gommata sbattono contro
l’accessorio di co-miscelazione.
L’accessorio di co-miscelazione è montato. Rimuovere l’accessorio di co-miscelazione:
deve essere utilizzato solo quando si usa il
braccio miscelatore.

84
Guida alla risoluzione problemi – Continua
Problema Causa Soluzione
Impossibile montare un accessorio per
lavorazione a bassa velocità.
Verificare che l’accessorio sia compatibile
con il modello di macchina. È necessario un
accessorio dotato di sistema di innesto a
rotazione (Modello KAX)
L’accessorio deve essere dotato di
per poter essere montato sull’attacco.
Se le attrezzature di cui si dispone si
avvalgono di sistema di attacco a barra
(Bar Connection System) si dovrà
utilizzare l’adattatore KAT002ME per
inserirle mediante l’innesto a rotazione
(Twist Connection System) sulla Kitchen
Machine.
Per maggiori informazioni, visitare il sito
www.kenwoodworld.com/twist.
La spia di stand-by lampeggia quando
il cavo elettrico della Kitchen Machine
viene inserito per la prima volta nella
presa di corrente.
La testa dell'impastatrice è nella posizione
alzata o non è bloccata correttamente
verso il basso.
Controllare che la testa della Kitchen
Machine sia correttamente bloccata verso
il basso.
La Kitchen Machine si arresta durante il
funzionamento.
Spia di standby che lampeggia
rapidamente per alcuni secondi.
Attivazione della protezione da sovraccarico
o surriscaldamento del sistema.
Quantità massima superata.
Scollegare il cavo elettrico e verificare che
non vi siano ostruzioni o surriscaldamento.
Se la macchina non funziona, rimuovere
parte degli ingredienti per ridurre il carico e
riaccenderla.
Se il problema persiste, scollegare il cavo
elettrico e lasciare riposare la macchina
per 15 minuti. Inserire la spina nella presa
di corrente e selezionare nuovamente la
velocità.
Se la macchina non si riavvia dopo
aver seguito la procedura indicata in
precedenza, contattare il “Servizio
Assistenza Clienti” per richiedere ulteriore
assistenza.
La Kitchen Machine si arresta durante
il funzionamento. La luce di standbay
lampeggia lentamente.
Protezione termica rimossa o coperchio di
attacco rimosso.
Montare lo schermo termico o il coperchio
della presa, quindi riavviare.
La spia di stand-by si spegne quando la
macchina è collegata alla corrente.
La Kitchen Machine è stata collegata per
oltre 20 minuti senza funzionare per cui è
entrata in modalità Stand-by.
Premere lo schermo al tocco o ruotare la
ghiera di controllo per effettuare il reset.
La Kitchen Machine si arresta durante il
funzionamento.
Protezione termica rimossa o coperchio
dell’attacco rimosso.
Rimontare la protezione termica o il
coperchio dell’attacco e quindi riavviare.
Lo schermo di visualizzazione mostra
un codice di errore alfanumerico.
L’apparecchio non funziona correttamente. Contattare uno dei centri assistenza
autorizzati KENWOOD. Per individuare il
centro assistenza KENWOOD più vicino,
visitare il sito www.kenwoodworld.com o il
sito specifico del Paese di residenza.
Non c’è corrente/il display non si
illumina.
L’apparecchio non è collegato alla corrente.
Interruttore On/Off non attivato.
L’apparecchio è entrato in modalità di
standby.
Controllare che la spina sia inserita nella
presa di corrente.
Premere l’interruttore On/Off nella
posizione On.
Toccare lo schermo o ruotare la ghiera di
controllo.
L’apparecchio non funziona. Non è stata premuta la ghiera di controllo. Premere la ghiera di controllo per iniziare la
cottura.
Il contatore non procede a contare alla
rovescia sul display.
Durante la fase di riscaldamento il contatore
non procederà a contare alla rovescia fino a
quando non sarà raggiunta la temperatura
corretta.
La temperatura è impostata sopra 100˚C
ma il contenuto d’acqua del cibo impedisce
alla temperatura di salire sopra i 100˚C.
Funzionamento normale.
Ridurre o selezionare la temperatura
corretta.
La temperatura dei cibi contenuti della
ciotola non sale al di sopra di 100˚C.
Il contenuto di acqua degli ingredienti può
impedire che la temperatura salga al di
sopra di 100˚C.
Funzionamento normale.

85
Guida alla risoluzione problemi – Continua
Problema Causa Soluzione
Movimento pesante o vibrazioni
durante l’azionamento.
Carico non distribuito uniformemente nella
ciotola che causa vibrazioni eccessive.
Superata capacità massima. Utilizzato
strumento o velocità errati.
Ridurre la quantità o risistemare il cibo nella
ciotola e riavviare l’apparecchio.
Fare riferimento al programma pertinente
e alle tabelle di velocità consigliate per
lo strumento e la velocità corretti da
utilizzare.
Il display mostra il messaggio di errore
E:34
Problema di connessione Wi-Fi. Controllare la password del Wi-Fi.
Dimenticare la rete Wi-Fi, andare su
Impostazioni > Wi-Fi > Dimentica rete.
Riavviare la configurazione delle
impostazioni dell’apparecchio dall’APP di
Kenwood World.
lampeggiamento lento Impossibile trovare rete Wi-Fi conosciuta. L’apparecchio potrebbe essersi spostato,
il router potrebbe essere spento o dover
essere riavviato.
lampeggiamento rapido Wi-Fi disponibile, ma impossibile collegarsi
ai server del cloud.
Il router potrebbe dover essere riavviato.
In alternativa contattare il proprio Internet
Service Provider.
Verificare che la connessione Internet
funzioni sulla rete locale.
Il display mostra il messaggio di errore
E42
Boil Dry Error (errore p-impostazione
vapore) [Errore bollitura a secco]
Aggiungere acqua alla ciotola
Spiegazione dei segnali acustici dell'apparecchio
1) Un unico segnale acustico veloce.
2) Segnale acustico rapido doppio
3) Segnale acustico triplo
1) Se si preme la ghiera di controllo per
avviare o arrestare la macchina o
se la testa viene sollevata durante il
funzionamento
2) Apparecchio in attesa: l'apparecchio
emetterà un segnale acustico doppio
10 minuti e 5 minuti prima della fine del
ciclo di mantenimento in caldo.
3) Significa quanto segue:
- Fine del programma preimpostato
- Fine del funzionamento manuale
- Fine del ciclo di mantenimento in caldo
- Quando l'apparecchio sta per
mescolare.
Funzionamento normale
Funzionamento normale
Funzionamento normale
Quando si contatta l'assistenza clienti, potrebbe essere necessario fornire i dettagli della versione del software. Questo si trova
premendo l'icona del menù delle impostazioni, quindi selezionando "Informazioni sull'apparecchio".
Il display mostra “- -“. La bilancia si sta azzerando. Funzionamento normale.
Il display mostra una lettura negativa. Display non azzerato e gli ingredienti o la
ciotola/il coperchio/l’accessorio sono stati
rimossi.
Degli ingredienti o degli oggetti vengono
premuti contro o sotto l’apparecchio.
L’apparecchio viene premuto contro un
muro.
Azzerare lo schermo, sostituire gli
ingredienti mancanti o rimontare la ciotola.
Assicurarsi che non vi siano ingredienti
o elementi premuti contro o sotto
l’apparecchio.
Accertarsi che vi sia spazio tra
l’apparecchio e le pareti.
Azzerare il display prima di pesare gli
ingredienti successivi.
Il display non registra piccole quantità. Le quantità pesate sono troppo piccole. Misurare con un cucchiaino o cucchiaio
quantità molto piccole.
Peso cambiato sul display. L’apparecchio si è mosso durante il
funzionamento.
È stato toccato il bordo della ciotola
durante la pesatura degli ingredienti.
Porre sempre l’apparecchio su una
superficie piana, asciutta e stabile prima
della pesatura.
Non spostare l'apparecchio né toccare
la ciotola durante il funzionamento della
funzione di pesatura.
Azzerare il display prima di pesare gli
ingredienti successivi.

86
Informazioni ecocompatibilità
Porta di rete: singola porta di rete Wi-Fi, attivata tramite impostazione predefinita.
N. di modello: TYPE: KCL95
RF Gamma frequenze: 2412 - 2472 MHz
Potenza trasmissione massima: < 20 dBm
Protocollo di comunicazione: IEEE802.11 b, g, n
Il KCL95 è provvisto di una Porta di rete Wi-Fi singola ed è progettato per essere utilizzato come apparecchiatura di rete azionata a
distanza.
O La porta di rete può essere disattivata nel menu delle impostazioni Wi-Fi e selezionando “Off”.
O La porta di rete può essere riattivata nel menu delle impostazioni Wi-Fi e selezionando “On”.
Riattivazione: L’apparecchio può essere riattivato dalla modalità stand-by:
O Da standby in rete: toccare lo schermo del display, ruotare la ghiera di controllo o in remoto tramite l’app.
O Da standby non in rete: toccare lo schermo del display o ruotare la ghiera di controllo.
O La ciotola e il coperchio devono essere sempre tenuti montati sull’unità principale affinché questa possa essere azionata a
distanza.
Ripristino delle impostazioni di fabbrica - Importante
Quando si smaltisce l'apparecchio, è importante riportarlo alle impostazioni di fabbrica per proteggere i dati personali. Selezionando
questa opzione verranno cancellati tutti i dati Wi-Fi memorizzati sull'apparecchio e ripristinati alle impostazioni di fabbrica. Per
ripristinare le impostazioni di fabbrica dell'apparecchio, selezionare Impostazioni> Ripristino impostazioni di fabbrica.
SITO WEB
Modalità Consumo energetico
Standby non in rete: dopo 20 minuti di inattività, lo schermo si spegne. Porta di rete
Wi-Fi disattivata.
0,2W
Standby in rete: dopo 20 minuti di inattività, lo schermo si spegne e tutte le porte di
rete Wi-Fi rimangono attivate.
0,7W
Off (spento): attivato dall'interruttore sul retro dell'unità. 0,0W
Impossibile passare rapidamente da
unità metriche a unità di misura del
sistema imperiale.
L’apparecchio si sta riconfigurando
per visualizzare l’unità e la misurazione
precedentemente selezionata.
Attendere 5 secondi e poi riprovare.
L’app di pesatura (peso visualizzato sul
dispositivo mobile) è lenta a rispondere.
Scarsa potenza del segnale Wi-Fi.
Dispositivo mobile non connesso alla stessa
rete domestica Wi-Fi locale.
Assicurarsi che l’apparecchio riceva un
segnale potente (contattare il fornitore di
servizi Internet per indicazioni su come
migliorarlo).
Assicurarsi che il dispositivo mobile sia
collegato alla stessa rete domestica
Wi-Fi locale dell’apparecchio (andare
alle impostazioni del dispositivo mobile e
selezionare la propria rete Wi-Fi locale).
Se il problema persiste, contattare il centro assistenza Kenwood più vicino. Per individuare il centro assistenza Kenwood più
vicino, visitare il sito www.kenwoodworld.com o il sito specifico del Paese di residenza.

87
Seguridad
OLea estas instrucciones atentamente y guárdelas para poder utilizarlas en el
futuro.
OQuite todo el embalaje y las etiquetas.
OSi el enchufe o el cable están dañados, por razones de seguridad, deben ser
sustituidos por Kenwood o por un técnico autorizado por Kenwood para evitar
posibles riesgos.
Nota importante - implantes médicos electrónicos
OAl igual que todos los productos de calentamiento por inducción, este aparato
genera campos magnéticos de corto alcance. Si cualquier usuario o persona
cerca del aparato lleva un marcapasos u otros implantes activos, debe consultar
con un médico antes de su uso, por si existe alguna incompatibilidad, a fin de
evitar cualquier riesgo para la salud.
ODesconecte y desenchufe el aparato antes de acoplar o quitar utensilios/
accesorios, después de su uso y antes de limpiarlo.
OMantenga las joyas, cabello, partes del cuerpo y ropa amplia lejos de las partes
móviles y de los accesorios acoplados.
ONo ponga nunca los dedos, etc, en el mecanismo de bisagra.
ONunca deje el aparato desatendido cuando esté en marcha en un modo de no
cocción.
O Cuando deje el aparato desatendido en el modo cocción, preste mucha
atención a lo siguiente:
{ asegúrese de que se sigan las instrucciones en relación con las temperaturas
y las cantidades máximas que se pueden procesar.
{ asegúrese de que la unidad y el cable estén colocados fuera del alcance de
los niños y alejados del borde de la superficie de trabajo.
{ compruebe el progreso regularmente para asegurarse de que se añada
suficiente líquido y de que la comida no se cueza demasiado.
ONunca utilice un aparato dañado. Para solicitar que la revisen o la reparen:
consulte “Servicio técnico y atención al cliente”.
ONunca utilice un accesorio no autorizado o más de un accesorio a la vez.
ONunca sobrepase las capacidades máximas y, al utilizar el calentador de
inducción, no sobrepase nunca el nivel de llenado máximo de 3 litros marcado
en el interior del bol.
OAl usar un accesorio, lea las instrucciones de uso y de seguridad que se
adjuntan.
OTenga cuidado al levantar este aparato ya que pesa mucho. Asegúrese de
que el cabezal esté bloqueado y de que el bol, los utensilios, las tapas de los
accesos de salida y el cable estén fijos antes de levantarlo.
OAl mover el aparato, cójalo siempre por la base del pedestal y el cabezal de la
mezcladora. NO levante ni transporte el aparato por el asa del bol
ONunca deje que el cable de alimentación eléctrica cuelgue de un lugar donde
un niño pueda cogerlo.
ONo permita que se mojen la unidad de potencia, el cable o el enchufe.
OTenga cuidado al manejar o tocar cualquier parte del aparato cuando se esté
utilizando en el modo de cocción o después de cocinar, EN ESPECIAL EL BOL,
EL ANTISALPICADURAS Y LOS UTENSILIOS ya que permanecen CALIENTES
durante mucho tiempo después de que el aparato se haya desconectado. Use
las asas para quitar y llevar el bol. Use guantes para horno al manejar el bol
caliente y los utensilios de mezclado calientes.
OElsímbolo marcado en el producto indica una superficie que puede
calentarse durante el uso.
O Tenga cuidado al quitar utensilios del bol después de un uso prolongado ya que
pueden calentarse.
OLa parte inferior del bol permanecerá caliente durante mucho tiempo después
de que el proceso de calentamiento se haya detenido. Sea prudente y utilice
el posafuentes protector de la superficie de trabajo cuando coloque el bol en
superficies sensibles al calor.
OTenga cuidado con el vapor que sale del bol para mezclas, especialmente al
abrir la tapa en el antisalpicaduras o al levantar el cabezal de la mezcladora.
Español
Antes de leer, por favor despliegue la portada que muestra las ilustraciones

88
OAl transferir comida caliente de la mezcladora a la licuadora, deje siempre que
los ingredientes se enfríen hasta que alcancen la temperatura ambiente antes
de ponerlos en la licuadora.
OUtilice sólo el bol y los utensilios que se facilitan con este aparato. Nunca utilice
el bol con ninguna otra fuente de calor.
ONunca ponga el aparato en marcha en el modo de cocción con el bol vacío.
ONunca inserte nada a través de las salidas de aire.
OAl utilizar este aparato, asegúrese de que esté colocado sobre una superficie
plana alejado de cualquier borde. Asegúrese de que esté al menos a 10 cm de
las paredes y compruebe que las aberturas no estés obstruidas. No lo ponga
debajo de armarios colgantes.
OPara el funcionamiento correcto y seguro de la cocina de inducción, compruebe
que la base del bol y los sensores de temperatura estén limpios y secos antes
de cocinar.
OLos objetos metálicos como cuchillos, tenedores, cucharas y tapas no deben
ponerse sobre el pedestal del bol/zona de inducción ya que pueden calentarse.
OAl igual que con todos los aparatos de cocción por inducción, no coloque
tarjetas de crédito, soportes magnéticos ni equipo electrónico sensible cerca
del aparato cuando esté en marcha.
ONo utilice el aparato para alimentos que se deban freír en abundante aceite.
OCompruebe siempre que los alimentos estén bien cocidos antes de comer.
ONo sobrepase los 250 ml al cocinar con aceite.
OLos alimentos se deben comer poco después de haberlos cocinado o dejar que
se enfríen rápidamente y luego refrigerarlos lo antes posible.
OEl uso incorrecto de su aparato puede producir lesiones.
ONo haga una fuerza excesiva al pulsar la pantalla táctil, y no utilice nunca un
objeto afilado para manejarla.
ONo utilice el batidor de varillas para mezclas pesadas (p. ej., batir manteca y
azúcar) ya que puede dañarlo.
OEl cable de alimentación se utiliza para reducir el riesgo de enredarse o
tropezar. Pueden utilizarse cables de extensión si se hace con precaución. Si se
utiliza un cable de extensión: 1) la capacidad eléctrica del cable de extensión
debe ser al menos igual a la del aparato; y (2) el cable se debe colocar de
forma que no cuelgue de la encimera o de la mesa, donde los niños puedan
manipularlo o pueda provocar tropiezos accidentalmente. Si el aparato requiere
toma a tierra, el cable de extensión debe ser del tipo de toma a tierra de tres
cables. La capacidad eléctrica del aparato está indicada en la base del mismo.
OEste aparato puede ser utilizado por personas con capacidades físicas,
sensoriales o mentales disminuidas o con falta de experiencia o conocimientos
si han recibido instrucciones o supervisión en relación con el uso del aparato de
forma segura y si entienden los peligros que ello implica.
OLos niños deben ser vigilados para asegurarse de que no juegan con el aparato.
OEste aparato no debe ser utilizado por niños. Mantenga el aparato y su cable
fuera del alcance de los niños.
OUtilice este aparato únicamente para el uso doméstico al que está destinado.
Kenwood no se hará cargo de responsabilidad alguna si el aparato se somete a
un uso inadecuado o si no se siguen estas instrucciones.
OLa potencia máxima se establece según el accesorio minipicadora/molinillo
que requiera la mayor fuerza. Es posible que otros accesorios requieran menos
potencia.
OEste aparato no está pensado para ser manejado mediante un temporizador
externo o un sistema de control remoto separado.
O No mueva ni levante el cabezal de la mezcladora con un accesorio acoplado ya
que ello podría afectar a la estabilidad del robot de cocina.
O No ponga el aparto en funcionamiento cerca del borde de la encimera ni
sobresaliendo de ella, y no aplique demasiada fuerza al colocar un accesorio ya
que esto puede afectar a la estabilidad de la unidad y hacer que vuelque, lo que
podría producir lesiones.

89
Conozca su Cooking Chef Kenwood
Descripción del aparato
Salidas de los accesorios
1 Salida de alta velocidad (HSO)
2 Salida de baja velocidad (SSO)
3 Toma de los utensilios del bol
4 Toma del utensilio para remover
Mezcladora
5 Tapa de la salida de alta velocidad
6 Cabezal de la mezcladora
7 Tapa de la salida de baja velocidad
8 Bol del Cooking Chef
9 Palanca para levantar el cabezal
10 Dial de control
11 Interruptor de encendido/apagado
12 Pantalla
13 Posafuentes protector de la superficie de trabajo
14 Agujero de drenaje
15 Pedestal del bol/zona de inducción
16 Salidas de aire
17 Sensores de temperatura
18 Pantalla térmica
19 Obturador de caucho (desmontable)
20 Antisalpicaduras
21 Tapa del tubo de alimentación
22 Batidor K
23 Paleta batidora para temperaturas elevadas
24 Batidor de varillas
25 Gancho de amasar
26 Utensilio para remover
27 Clip auxiliar para remover
28 Espátula para temperatura elevada
29 Rasqueta para la masa
30 Llave inglesa
Accesorio de cocción al vapor
31 Soportes para las asas
32 Anillo de soporte
33 Asas plegables
34 Bandeja desmontable
35 Soportes para huevos
Nota: accesorios de la salida de baja velocidad
La salida de baja velocidad de su modelo de robot de cocina
ofrece el sistema de conexión Twist (Twist Connection System)
Está diseñada para aceptar accesorios con el sistema de
conexión Twist.
Cuando compre accesorios nuevos para la salida de baja
velocidad, debe comprobar la compatibilidad con su robot de
cocina. Todos los accesorios con el sistema de conexión Twist
se pueden identificar por el código de producto que empieza
por KAX y también por el logotipo Twist que aparece en
el embalaje.
Si tiene accesorios con el sistema de conexión de barra
(Bar Connection System) deberá utilizar el adaptador
KAT002ME para conectarlos al sistema de conexión Twist
de su robot de cocina.
Para obtener más información visite la página
www.kenwoodworld.com/twist.
Conexión con la aplicación
Kenwood World
Consulte las ilustraciones A – D
La aplicación de Kenwood World le permitirá controlar el
aparato a través de su teléfono inteligente o su tableta.
1 Enchufe y pulse el interruptor de encendido/apagado en el
lado de la unidad de potencia.
2 Seleccione Ajustes > WiFi > Conectar y siga las
instrucciones de la pantalla táctil.
Número PIN
O Esto será necesario cuando la aplicación de Kenwood
World lo solicite.
O El aparato solo se puede conectar cuando el número PIN
se muestra en la pantalla. Si el PIN se introduce de forma
incorrecta, siga las instrucciones de la aplicación y vuelva a
intentarlo.
Antes de enchufar el aparato
O Asegúrese de que el suministro de energía eléctrica sea el mismo que el que se muestra en la parte inferior del aparato.
O ADVERTENCIA: ESTE APARATO DEBE CONECTARSE A TIERRA.
O Este dispositivo cumple con el reglamento (CE) n.º 1935/2004 sobre los materiales y objetos destinados a entrar en contacto con
alimentos.
O Este dispositivo cumple con los requisitos esenciales y otras disposiciones relevantes de la Directiva 2014/53/UE.
Antes de utilizar el aparato por primera vez
O Para lavar las piezas: consulte “Cuidado y limpieza”.
Accesorio de cocción al vapor
OEste accesorio produce vapor que podría quemarle.
ONo se queme con el vapor que sale de la cesta para cocer al vapor,
especialmente al quitar el antisalpicaduras o al levantar la tapa del tubo de
alimentación.
OTenga cuidado al manipular las piezas: cualquier líquido, condensación, pieza de
la olla de cocción al vapor o pieza del robot de cocina estarán muy calientes.
Utilice guantes para horno.
ODesenchufe el aparato antes de colocar o quitar piezas o antes de limpiarlo.
Seguridad alimentaria
OCocine bien la carne, el pescado y los mariscos. Nunca cocine estos alimentos
sacados directamente del congelador.
ONo recaliente alimentos cocinados en su olla de cocción al vapor.

90
O Para mostrar el número PIN de la unidad, seleccione Ajustes
> WiFi > Conectar y siga las instrucciones de la
pantalla (solo cuando esté conectado a WiFi).
Nota:
Wi-Fi
Funciona con IEEE802.11 b, g y n a 2,4 GHz solamente.
Compatibilidad
La aplicación de Kenwood World es compatible
con las últimas versiones de iOS y Android.
Restaurar los valores de fábrica
Importante
O Cuando se deshaga del aparato, es importante reiniciarlo
para restablecer los valores de fábrica a fin de proteger sus
datos personales.
O Al seleccionar esta opción, se eliminarán todos los datos
WiFi almacenados en el aparato y se restablecerán los
valores de fábrica.
O TPara restablecer los valores de fábrica de su aparato,
seleccione Ajustes >Restaurar los valores de fábrica.
Configurar el Cooking Chef Connect
Consulte las ilustraciones E – I
IMPORTANTE
OCompruebe que la zona de inducción, los sensores de
temperatura y la superficie externa de la base del bol
estén limpios. Si no se sigue esta indicación, el sensor de
calor se verá afectado, lo que tendrá como resultado un
rendimiento de cocción pobre.
OCompruebe que todas las tapas de las salidas, incluyendo
la pantalla térmica, estén colocadas. Si no están
correctamente colocadas, la función de calentamiento no
funcionará.
1 Enchufe y pulse el interruptor de encendido/apagado.
2 Gire la palanca para levantar el cabezal en el sentido de las
agujas del reloj y levante el cabezal de la mezcladora hasta
que quede bloqueado.
3 Empuje la pantalla térmica hacia arriba en la parte inferior
del cabezal de la mezcladora hasta que esté totalmente
colocada. La pantalla térmica nunca se debe utilizar sin que
el obturador de caucho esté correctamente ajustado.
O Si utiliza el Cooking Chef Connect sin calor, no es
necesario colocar la pantalla térmica a menos que utilice el
antisalpicaduras. Consulte la sección “Acoplar y utilizar el
montaje del antisalpicaduras”.
4 Acople el bol a la base.
5 Ponga el utensilio deseado en la toma de los utensilios
del bol o la toma del utensilio para remover si va a utilizar
dicho utensilio, colocando el vástago en la ranura y, luego,
gire para que quede ajustado en su posición.
O Para quitar un utensilio, invierta el paso 5 de arriba. (Utilice
siempre guantes para horno para quitar utensilios después
de cocinar).
6 Para bajar el cabezal de la mezcladora, levántelo
ligeramente y, luego, gire la palanca para levantar el
cabezal en el sentido de las agujas del reloj.
Bajar hasta que esté en posición de bloqueo.
Utensilio para remover – Al utilizar el utensilio para remover,
también puede utilizarse el clip auxiliar para remover con el
fin de ayudar en el proceso de mezclado; consulte “Poner y
quitar el clip auxiliar para remover”. El utensilio para remover
también puede utilizarse con el batidor de varillas. No use el
utensilio para remover con el gancho de amasar.
Usar el Cooking Chef Connect –
Funcionamiento manual
1 Añada los ingredientes importantes que vaya a cocinar/
mezclar.
2 Ajuste el tiempo, la velocidad y la temperatura deseados.
Nota: para usar el aparato como una mezcladora sin calor,
seleccione "Off" al ajustar la temperatura.
Gire el dial de control en sentido contrario a las agujas
del reloj para usar intervalos de remoción y la función de
acción intermitente.
Gire el dial de control en el sentido de las agujas del reloj
para usar velocidades constantes.
3 Pulse el dial de control para empezar.
4 Para parar la unidad en cualquier momento, pulse el dial
de control. Si la unidad está en modo de cocción, tenga
cuidado ya que estará caliente.
Modo velocidad alta, temperatura elevada
(HSHT)
Para mezclar a velocidad alta a temperaturas de 60 °C y
superiores:
O Seleccione el tiempo (si corresponde), la velocidad y la
temperatura de 60 °C o superior.
O Aparecerá una advertencia en la pantalla indicando que
está accediendo al modo HSHT
O Una vez que haya leído y entendido la advertencia, pulse
"Sí" para confirmar que desea acceder al modo HSHT.
O Pulse el dial de control para empezar.
Esta función SOLAMENTE se debe utilizar con el batidor
de varillas y/o el utensilio para remover. No debe
sobrepasar la capacidad de cocción máxima de 3 litros, y
debe comprobar que el antisalpicaduras esté colocado. El
aparato no se debe dejar desatendido.
5 Cuando un programa haya finalizado, la unidad pitará
3 veces.
O Nota: si no se ha fijado ningún tiempo, los procesos de
calentamiento y remoción finalizarán automáticamente
cuando el temporizador haya alcanzado las 8 horas.
6 Para detener el proceso de calentamiento, cambie la
temperatura a “OFF”. Para parar la unidad en cualquier
momento, pulse el dial de control.
Importante – Si en cualquier momento el cabezal de la
mezcladora se levanta mientras está en funcionamiento,
el proceso de calentamiento se detendrá y el utensilio del
bol se parará y no se volverá a poner en marcha cuando
se baje el cabezal. Para volver a poner la mezcladora en
marcha, baje le cabezal de la mezcladora y pulse el dial de
control.
Uso de los programas preestablecidos
Consulte las ilustraciones P – R
1 Seleccione el menú preestablecido.
2 Elija la opción preestablecida que desee utilizar.
3 Siga las instrucciones de la pantalla.
4 Para parar la unidad en cualquier momento, pulse el dial de
control. Tenga cuidado ya que el bol y los utensilios estarán
calientes.
Después de cocinar
O Tenga cuidado al manipular o tocar cualquier pieza del
aparato cuando se esté utilizando en el modo cocción
o después de cocinar, EN ESPECIAL, EL BOL Y LOS
UTENSILIOS ya que permanecen CALIENTES durante
mucho tiempo después de que el aparato se haya
desconectado.

91
O Use las dos asas laterales para quitar y transportar el bol.
Use guantes para horno al manipular el bol caliente y los
utensilios calientes.
O La parte inferior del bol permanecerá caliente
durante mucho tiempo después de que el proceso de
calentamiento se haya detenido. Sea prudente y utilice el
posafuentes protector de la superficie de trabajo facilitado
para proteger las superficies sensibles al calor.
Consejos y sugerencias
O Algunas recetas, en particular, las que tienen un alto
contenido de agua, no podrán alcanzar una temperatura
de cocción por encima de los 100 °C (ya que éste es el
punto de ebullición del agua).
O Al añadir ingredientes al bol durante la cocción, baje
la velocidad y añada los ingredientes de forma lenta y
uniforme.
O Para calentar salsas de forma rápida, use un ajuste
continuo de la función remover.
O Si utiliza el antisalpicaduras durante la cocción, quítelo
siempre antes de levantar el cabezal de la mezcladora.
Tenga cuidado con el vaho que se forma en el
antisalpicaduras y la pantalla térmica.
O Cuando levante el cabezal de la mezcladora, levántelo
lentamente para dejar que cualquier líquido en la parte
inferior de la pantalla térmica vuelva a caer en el bol.
O Hay disponibles cuatro funciones de intervalos de
remoción que le permiten elegir si desea remover más
o menos los alimentos según cada receta. Algunas
recetas necesitarán que los alimentos se remuevan
constantemente para evitar que algunos ingredientes
se peguen en el fondo del bol, mientras que para otras
recetas será mejor que los alimentos se remuevan
de forma intermitente para mantener la textura de la
comida.
Funcionamiento manual (accesorios)
1 Quite la tapa de salida de velocidad alta/tapa de la salida
de baja velocidad (si procede).
2 Acople el accesorio de acuerdo con las instrucciones
específicas suministradas.
3 Ajuste el tiempo y la velocidad deseados (consulte las
ilustraciones L - M). Pulse el dial de control para poner el
aparato en marcha.
Para parar la unidad en cualquier momento, vuelva a pulsar
el dial de control.
Quitar y poner las tapas de las salidas
Tapa de la salida de alta velocidad
1 Para quitar la tapa, use el asa y levántela.
2 Para ponerla, coloque la tapa sobre la salida y empuje
hacia abajo.
Tapa de la salida de baja velocidad
1 Para quitar la tapa, use el asa de la parte inferior y tire
hacia fuera.
2 Para ponerla, coloque el tirador de la parte superior de
la tapa dentro de la ranura de la salida y empuje para
engancharla en su posición.
Usar la función de pesaje
Consulte las ilustraciones S
1 Seleccione la función de pesaje en la pantalla táctil.
2 Coloque el bol.
3 Ponga la báscula a cero.
4 Pese los ingredientes.
5 Para cambiar la unidad, toque el botón de unidades en la
pantalla de pesaje.
Nota: coloque siempre el aparato sobre una superficie estable,
plana y seca antes de pesar los ingredientes. No aplique
presión a la mezcladora ni al bol durante el pesaje ya que ello
afectará a la precisión de la báscula.
La función de pesaje se puede usar con el cabezal de la
mezcladora tanto bajado como levantado.
La función de pesaje es precisa hasta 6 kg.

92
Tabla de usos preestablecidos
Los ajustes predeterminados se pueden regular para adaptarse a su receta, si están disponibles.
Los ajustes no regulables están indicados por el icono .
Cuando "Calentando" se muestre en la pantalla, el temporizador no empezará la cuenta atrás hasta que se haya alcanzado la
temperatura correcta.
Preestablecido Utensilio
recomendado
Ajustes predeterminados
(regulables)
Fase "Mantener
caliente"
Usos/ideas para recetas
Batir claras de huevo 1 min 15 segundos
(15 segundos –
5 min)
Máx
OFF
Claras de huevo para mousse de
chocolate
Bizcocho 1 min
(30 segundos –
5 min)
1 – Máx
( – Máx)
OFF
Tarta Victoria Sponge, cupcakes
Amasar la masa 10 min
(1 min – 30 min)
Mín a 1
(mín – 2)
OFF
Panecillos, pizza
Leudar la masa 1 hora
(5 min – 2 hora)
OFF
30 ˚C
(25 ˚C – 35 ˚C)
Fermentar masas con levadura
Derretir chocolate 10 min
(5 min – 2 hr)
60 ˚C
Mousse de chocolate
Merengue suizo 10 min
(1 min – 20 min)
Máx
40 ˚C
Base para frosting de mantequilla
Merengue italiano 4 min
(1 min – 20 min)
HSHT 6
( – Máx)
60 ˚C – 85 ˚C
Tarta de merengue de limón
Baked Alaska
Compota de fruta 20 min
(5 segundos –
2 hora)
()
104 ˚C
30 min
62 ˚C
Rellenos para tartas, coberturas
para postres
Palomitas 10 min
(5 min – 10 min)
OFF
180 ˚C
Para palomitas caseras frescas
* Para obtener mejores
resultados, utilice siempre el
programa preestablecido.

93
Tabla de usos preestablecidos
Preestablecido Utensilio
recomendado
Ajustes predeterminados
(regulables)
Fase "Mantener
caliente"
Usos/ideas para recetas
Cocción al vapor 20 min
(5 min – 45 min)
OFF
100 ˚C
Salmón en papillote
Platos de fácil
preparación
40 min
(5 segundos –
8 hora)
()
103˚C – 140˚C
30 min
62˚C
Boloñesa
Sopa con tropezones 20 min
(5 segundos –
8 hora)
()
103˚C – 140˚C
30 mins
62˚C
Minestrone, caldos
Cocción lenta 2 hrs
(5 segundos –
8 hora)
()
98˚C – 140˚C
30 mins
62˚C
Ternera a la borgoñona
Receta
Adobo de ciruela pasa
200 g de miel líquida
40 g de ciruelas pasas blandas
40 ml de agua
1 Ponga todos los ingredientes en la minipicadora/molinillo.
Refrigere durante la noche.
2 Acople el accesorio al robot de cocina.
3 Pulse el botón de acción intermitente durante 4 segundos.
4 Úselo como sea necesario.
Accesorio de cocción al vapor
Consulte las ilustraciones T
O Al utilizar la cesta para cocer al vapor, mantenga siempre el
Cooking Chef alejado de paredes o armarios colgantes: el
vapor podría dañarlos.
O Sazone los alimentos después de cocinarlos, esto ayudará
a evitar que aparezcan manchas o picaduras en el bol de
acero inoxidable.
1 Coloque la bandeja desmontable sobre una superficie
plana asegurándose de que las asas estén plegadas hacia
adentro.
2 Acople el anillo de soporte en la bandeja asegurándose de
que los soportes para las asas del anillo se acoplen junto a
los cortes en forma de V de la bandeja.
3 Despliegue las asas y engánchelas en los soportes para las
asas.
4 Coloque la comida en la bandeja. Las verduras y hortalizas
se deben limpiar bien y pelar según sea necesario.
5 Añada la cantidad de agua necesaria al bol (consulte la
tabla de cocción). Es mejor utilizar agua filtrada ya que
reduce las incrustaciones de cal y las manchas.
6 Ponga la olla de cocción al vapor montada dentro del bol –
encontrará su propia altura.
7 Acople la pantalla térmica al cabezal de la mezcladora.
8 Acople el bol y la cesta para cocer al vapor al robot de
cocina.
9 Baje el cabezal de la mezcladora y luego acople el
antisalpicaduras.
10 Seleccione el programa de cocción al vapor preestablecido
y ajuste el tiempo de cocción (de acuerdo con la Tabla
de cocción recomendada). Pulse el dial de control para
empezar.
11 Deje cocer durante el tiempo requerido.
12 Retire el antisalpicaduras.
13 Levante el cabezal de la mezcladora.
14 Saque la cesta para cocer al vapor por las asas – tenga
cuidado de que no se doblen hacia adentro.
15 Ponga la cesta para cocer al vapor en un plato grande u
otro recipiente adecuado.
16 Desenganche las asas y dóblelas hacia el centro. Quite el
anillo de soporte y despliegue las asas.
17 Retire la comida.
importante
Tenga cuidado al manipular cualquier elemento:
cualquier líquido, condensación, pieza de la olla de
cocción al vapor o pieza del robot de cocina estarán muy
calientes. Utilice guantes para horno.
O No intente acoplar un utensilio de mezclado cuando esté
utilizando la cesta para cocer al vapor.
O No cocine alimentos en el bol para mezclas mientras esté
utilizando la cesta para cocer al vapor.

94
Hints and Tips
OEl líquido que queda en el bol es bueno para hacer sopa o caldo. Tenga cuidado ya que estará muy caliente.
O Deje espacio entre las piezas de comida.
O Remueva las cantidades grandes a mitad de la cocción.
O Las piezas de comida de tamaño similar se cuecen de manera más uniforme.
O Si está cociendo la vapor más de un tipo de comida a la vez y hay algún alimento que necesite menos tiempo, añádalo más
tarde.
O Si levanta la tapa del tubo de alimentación o quita el antisalpicaduras, el vapor se escapará y la cocción puede llevar más
tiempo.
O La comida seguirá cociéndose cuando su robot de cocina se apague, por eso, retire la comida inmediatamente.
O Si la comida no está suficientemente cocida, reinicie el tiempo. Quizá sea necesario añadir agua.
O Los tiempos de cocción son sólo una guía. Compruebe siempre que los alimentos estén bien cocidos antes de comer.
O No deje que la unidad se quede sin agua, añada agua si es necesario.
Explicación de la pantalla
Toque este icono para abrir el menú Ajustes.
Toque este icono para abrir el menú de programas preestablecidos.
Toque este icono para pesar ingredientes dentro del bol.
Muestra el tiempo seleccionado en horas (h), minutos (m) y segundos (s).
Muestra el intervalo de remoción seleccionado.
Si se selecciona una velocidad intermitente (2 Æ 4) el anillo exterior aumentará
progresivamente y el aparato removerá el contenido cuando
Muestra la temperatura seleccionada.
Un fondo rojo parpadeante indica que el aparato está en modo calentamiento.
Un fondo rojo permanente indica que el aparato ha alcanzado la temperatura fijada.
Una flecha intermitente que señala hacia abajo indica que el aparato se está enfriando.
Indica que un ajuste (tiempo, velocidad o temperatura
Información de estado El texto aquí muestra la información de estado.
Indica que el bol, su contenido y cualquier pieza que se esté utilizando están calientes.
Manéjelos con cuidado.
Indica que el aparato está conectado a una red WiFi.
Indica que el aparato está en modo velocidad alta, temperatura elevada (HSHT).
Gire el dial de control en sentido contrario a las agujas del reloj para usar intervalos de
remoción y la función de acción intermitente.
Gire el dial de control en el sentido de las agujas del reloj para usar velocidades constantes
mín - máx.

95
Recetas
Receta Utensilio utilizado Ajustes
preestablecidos/
manuales
Ingredientes
Minestrone Sopa con tropezones
20 min
98 ˚C
Añada los siguientes ingredientes todos a la vez:
100 g de panceta, en dados
2 dientes de ajo, picados
50 g de arroz Arborio
2½ cucharadas de concentrado de tomate
70 g de col de Milán
1 cucharadita de romero seco
2 cucharaditas de salvia seca
1 tallo de apio, cortado en rodajas
60 g de puerro, cortado en rodajas
75 g de cebolla, cortada en rodajas
75 g de zanahoria, cortada en rodajas
1 l de caldo vegetal caliente
Sal y pimienta
Ternera Strógono Platos de fácil
preparación
30 min
98 ˚C
Añada los siguientes ingredientes todos a la vez:
600 g de ternera, en dados
1 cucharada de pimentón
1 cucharada de mantequilla
1 diente de ajo, picado
400 g de caldo de ternera
200 g de champiñones,cortados en rodajas
150 g de cebolla, cortada en rodajas
300 g de zanahoria, cortada en rodajas
200 ml de nata líquida
1 cucharada de maicena
1 cucharada de agua }Mezclar todo junto
Sal y pimienta
Crema inglesa Ajustes manuales
15 min
85 ˚C
Añada los siguientes ingredientes todos a la vez:
250 g de leche entera
250 g de nata para montar
1 cucharadita de extracto de vainilla
2 cucharada de maizena
96 g de yema de huevo}
Mezclar todo
junto
80 g de azúcar lustre
Palomitas Palomitas
10 min
OFF
180 ˚C
Añada los siguientes ingredientes todos a la vez:
50 g de granos de palomitas
20 g de aceite de girasol
* Para obtener mejores resultados, utilice siempre el
programa preestablecido.
Pudin de arroz Ajustes manuales
1 hora
15 min
95 ˚C
Añada los siguientes ingredientes todos a la vez:
150 g de arroz de grano corto
1 l de leche entera
75 g de azúcar lustre
2 cucharaditas de extracto de vainilla

96
Ajustes de temperatura y velocidad
Pautas de temperatura 60 °C Derretir chocolate
72 °C – 82 °C Escalfar
98 °C – 99 °C Cocer a fuego lento
100 °C Hervir, cocer al vapor
130 °C – 140 °C Saltear verduras
180 °C Dorar carne
(P) Función de acción intermitente - Para generar impulsos breves de máxima
potencia.
Intervalo de remoción 1 – La mezcladora funcionará a una velocidad baja
constante. Se usa para incorporar ingredientes ligeros a mezclas más pesadas.
Intervalo de remoción 2 – Remoción intermitente con pausas cortas. Cuando se
ajusta a esta velocidad, funciona de forma intermitente a una velocidad lenta
cada 10 segundos durante 1,5 revoluciones.
Intervalo de remoción 3 – Remoción intermitente con pausas medias. Cuando
se ajusta a esta velocidad, funciona de forma intermitente a una velocidad lenta
cada 30 segundos durante 1,5 revoluciones.
Intervalo de remoción 4 – Remoción intermitente con pausas largas. Cuando se
ajusta a esta velocidad, funciona de forma intermitente a una velocidad lenta
cada 5 minutos durante 1,5 revoluciones.
Velocidad mín - máx Velocidades constantes que aumentan gradualmente a máx
HSHT
Para mezclar a temperaturas por encima de 60 ˚C usando velocidades Mín - Máx.
Tabla de usos recomendados
Esto es solo una orientación y variará dependiendo de la receta exacta y de los ingredientes que se procesen.
Batidor K
Para hacer tartas, galletas, pastelitos, glaseado, rellenos, pastelitos rellenos de crema y
puré de patata.
Consejos y sugerencias
• Para evitar que los ingredientes salpiquen, aumente la velocidad poco a poco.
• Para incorporar completamente los ingredientes, pare la mezcladora y raspe el bol con la
espátula frecuentemente.
• Utilice ingredientes fríos para los pastelitos a menos que su receta indique lo contrario.
Receta/ proceso
(Máx) (Minutos)
Pastelitos y galletas – mezclar manteca
y harina
Peso de la
harina
910 g Mín 12
Preparados para tartas en un solo paso Peso total 4 kg Mín Máx 45–60 segundos
Paleta batidora
Para batir y mezclar ingredientes blandos.
Consejos y sugerencias
• Para evitar que los ingredientes salpiquen, aumente la velocidad poco a poco.
• Al batir manteca y azúcar para preparados para tartas, utilice siempre la manteca a
temperatura ambiente o ablándela primero.
• Junto con su paleta batidora para temperaturas elevadas, se facilitan dos escobillas de
los limpiadores. Use una escobilla del limpiador para las recetas dulces y la otra para las
recetas saladas.
Receta/ proceso
(Máx) (Minutos)
Batir mantequilla/margarina y azúcar 4,55 kg
(mezcla de 15 huevos)
Mín Máx 4
Batir huevos para incorporarlos en preparados para
tarta
Mín Máx 1–4
Añadir harina, fruta, etc. Mín 1 30–60 segundos
Tamaño de los huevos utilizados = tamaño mediano (peso 53 – 63 g).
Nata para montar utilizada = nata para montar fresca con un contenido mínimo de materia grasa del 38 %

97
Tabla de usos recomendados
Esto es solo una orientación y variará dependiendo de la receta exacta y de los ingredientes que se procesen.
Batidor de varillas
Para huevos, nata y suflés.
Importante
• Para evitar que los ingredientes salpiquen, aumente la velocidad poco a poco.
• No utilice el batidor de varillas para mezclas pesadas (preparados para tartas en un
solo paso y batir manteca y azúcar) ya que podría dañarlo.
• Se obtienen mejores resultados si los huevos están a temperatura ambiente.
Antes de batir claras de huevo, compruebe que no haya grasa ni yema de huevo en el
batidor de varillas o en el bol.
Receta/ proceso
(Máx (Minutos)
Claras de huevo 16 (605 g)
Mín Máx
1½-2
Bizcochos ligeros 930 g 4 -6
Nata 2 l 1½-3
Masa para crepes
• Primero añada harina al bol, seguida de los
ingredientes húmedos.
• Mezcle a velocidad mínima para incorporar
ingredientes.
250 g de harina
500 g de leche
200 g de huevos
Mín 10 segundos
Máx 45–60 segundos
Mayonesa
• Para obtener mejores resultados, raspe el bol con
una espátula después de añadir el aceite y haga
funcionar el batidor de varillas durante 10 segundos
más a máxima velocidad.
2 yemas de huevo
10 g de mostaza
200 ml de aceite vegeta
Máx 1-1½
Gancho de amasar
Para masas con levadura)
Consejos y sugerencias
Importante
• Nunca sobrepase las capacidades máximas establecidas, de lo contrario, sobrecargará
el aparato.
• Si oye que el aparato se ahoga, apáguelo, retire la mitad de la masa y trabaje cada mitad
por separado.
• Los ingredientes se mezclan mejor si se pone primero el líquido.
Levadura
• Levadura seca (de la clase que necesita reconstitución): vierta el agua caliente en el bol.
A continuación, añada la levadura y el azúcar y déjelo reposar durante unos 10 minutos
hasta que adquiera una consistencia espumosa.
• Levadura fresca: desmenúcela en la harina.
• Otros tipos de levadura: siga las instrucciones del fabricante.
Receta/ proceso
(Máx) (Minutos)
Masa de pan (con levadura dura) Peso de la
harina
350 g–1,6 kg
Mín
60 segundos
1 3–4
Peso total 564 g–2,58 kg Reamasar
Velocidad 1
60 segundos
Masa con levadura blanda (enriquecida
con mantequilla y huevos)
Peso de la
harina
250 g–1,6 kg Mín 60 segundos
Peso total 478 g–3,1 kg 1 3–4
Reamasar
Velocidad 1
60 segundos
Tamaño de los huevos utilizados = tamaño mediano (peso 53 – 63 g).
Nata para montar utilizada = nata para montar fresca con un contenido mínimo de materia grasa del 38 %

98
Guía de cocción del accesorio de cocción al vapor
O
Estos tiempos de cocción son solo una guía. Se pueden utilizar 500 ml de agua para los alimentos que necesiten hasta 20
minutos de cocción. Para los alimentos de necesiten un tiempo de cocción más prolongado, utilice 650 ml de agua.
O
No deje que la unidad se quede sin agua, añada agua cuando sea necesario.
O
No sobrecargue la cesta cuando cueza al vapor carne de ave y pescado.
O
Lea "Seguridad alimentaria" en la sección de seguridad.
Verduras
Ingrediente
(Max) (minutos)
Cantidad de agua Preparación
Espárragos 450 g 15 500 ml Recortar
Judías verdes redondas 450 g 15-20 500 ml Recortar
Judías verdes 450 g 15-20 500 ml Recortar y hacer trozos finos
Brócoli 450 g 20 500 ml Cortar en racimos
Coles de Bruselas 450 g 25 500 ml Recortar y cortar las bases
Berza 1 pequeña 25 500 ml Trocear
Zanahorias 450 g 20 500 ml Hacer rodajas finas
Coliflor 1 mediana 25 - 30 650 ml Cortar en racimos
Calabacines 450 g 15 500 ml Hacer rodajas finas
Apio 1 cogollo 15 500 ml Hacer rodajas finas
Puerros 3 15 500 ml Hacer rodajas finas
Judías verdes pequeñas 250 g 15 500 ml Recortar
Champiñones 450 g 10 500 ml Limpiar
Chirivías 450 g 15 500 ml Cortar en taquitos o rodajas finas
Guisantes 450 g 15 500 ml Pelar
Patatas nuevas 450 g 30-40 650 ml Limpiar
Aves de corral y pescado
Recipe/Process
(Max) (minutes)
Cantidad de agua Comentarios
Pollo, pechugas sin hueso 4 30-40 650 ml Cocinar al vapor hasta que esté
bien hecho y tierno
Almejas 450 g 10 500 ml Cocinar al vapor hasta que se
abran
Gambas, tamaño mediano 450 g 10 500 ml Cocinar al vapor hasta que se
pongan de color rosa
Pescado, en filetes 230 g 10-20 500 ml Cocinar al vapor hasta que se
desprenda
Pescado, en tajadas 2,5 cm de grosor 15-20 500 ml Cocinar al vapor hasta que se
desprenda
Pescado, entero 340 g 15-20 500 ml Cocinar al vapor hasta que se
desprenda
Colas de langosta 2-4 20 500 ml Cocinar al vapor hasta
langosta que se pongan de
color rojo
Mejillones 450 g 15 500 ml Cocinar al vapor hasta que se
abran
Ostras 6 15 500 ml Cocinar al vapor hasta que se
abran
Vieiras 230 g 15 500 ml Cocinar al vapor hasta que se
calienten y estén tiernas

99
Ajuste de la altura de los utensilios
Consulte las ilustraciones U
Batidor de varillas, batidor K de acero inoxidable
Para obtener el mejor resultado, el batidor de varillas y el
batidor K casi deben tocar el fondo del bol. Si es necesario,
ajuste la altura con la llave que se facilita.
Paleta batidora para temperaturas elevadas – este utensilio
debería casi tocar el fondo del bol.
1 Desenchufe el aparato.
2 Levante el cabezal de la mezcladora e inserte el batidor de
varillas, el batidor K o la paleta batidora para temperaturas
elevadas.
3 Baje el cabezal de la mezcladora. Si hay que ajustar el
espacio libre, levante el cabezal de la mezcladora y quite el
utensilio.
4 Con la llave inglesa facilitada, afloje la tuerca lo bastante
para permitir el ajuste del eje. Para bajar el utensilio más
cerca del fondo del bol, gire el eje en sentido contrario a las
agujas del reloj. Para subir el utensilio hacia arriba y alejarlo
del fondo del bol, gire el eje en el sentido de las agujas del
reloj.
5 Vuelva a apretar la tuerca.
6 Acople el utensilio a la mezcladora y baje el cabezal.
(Compruebe su posición, consulte los puntos que se
indican arriba)
7 Repita los pasos anteriores, en caso necesario, hasta
que el utensilio esté colocado correctamente. Una vez
conseguido, apriete bien la tuerca.
Gancho de amasar - este utensilio se regula en la fábrica y no
es ajustable.
Utensilio para remover - este utensilio debería casi tocar el
fondo del bol.
1 Desenchufe el aparato.
2 Levante el cabezal de la mezcladora e inserte el utensilio
para remover.
3 Baje el cabezal de la mezcladora. Si el utensilio necesita
ajustarse, levante el cabezal de la mezcladora y use la llave
para aflojar la tuerca, y luego baje el cabezal.
4 Para bajar el utensilio más cerca del fondo del bol, gire la
rueda de ajuste en el sentido de las agujas del reloj. Para
subir el utensilio hacia arriba y alejarlo del fondo del bol,
gire la rueda de ajuste en sentido contrario a las agujas del
reloj.
5 Vuelva a apretar la tuerca.
Para acoplar y utilizar el montaje del
antisalpicaduras
Consulte las ilustraciones V
El montaje del antisalpicaduras consta de 2 piezas: la pantalla
térmica y el antisalpicaduras.
La pantalla térmica es para proteger el cabezal de la
mezcladora del vapor producido durante el proceso de
cocción.
El antisalpicaduras no se debe acoplar al bol a menos que se
utilice junto con la pantalla térmica.
1 Levante el cabezal de la mezcladora hasta que quede
bloqueado.
2 Empuje la pantalla térmica hacia arriba en la parte inferior
del cabezal de la mezcladora hasta que esté totalmente
colocada. La pantalla térmica nunca se debe utilizar sin que
el obturador de caucho esté correctamente ajustado.
3 Ajuste el bol sobre la base.
4 Baje el cabezal de la mezcladora.
5 Apoye el antisalpicaduras en el borde del bol y, a
continuación, deslícelo hacia adelante hasta que esté
completamente colocado.
O Durante el proceso de mezclado, los ingredientes se
pueden añadir directamente al bol a través del tubo de
alimentación.
6 Para quitar el antisalpicaduras, simplemente, deslícelo hacia
atrás para apartarlo del aparato.
Nota: el antisalpicaduras permanecerá acoplado a la pantalla
térmica cuando el cabezal de la mezcladora se levante, a
menos que se quite antes de levantar el cabezal.
7 Para quitar la pantalla térmica, levante el cabezal de la
mezcladora hasta que quede bloqueado. Retire el utensilio,
a continuación, tire de la pantalla térmica hacia abajo
desde la parte inferior del cabezal de la mezcladora.
Nota: únicamente, coloque o retire el antisalpicaduras
cuando el cabezal de la mezcladora esté en posición de
bloqueo.
Poner y quitar el clip auxiliar para remover
Consulte las ilustraciones W
El clip auxiliar para remover puede utilizarse para ayudar en el
proceso de mezclado.
1 Encaje el clip auxiliar para remover sobre el lado del bol
con la cresta vertical en la parte interior y los clips en la
parte exterior.
2 Gire el clip en sentido contrario a las agujas del reloj sobre
las asas del bol.
3 Para quitarlo, invierta el proceso.
IMPORTANTE - El clip auxiliar para remover no se debe
colocar cuando se utilice el batidor K, el batidor de varillas, el
gancho de amasar o la paleta batidora.
Montar la paleta batidora para temperaturas
elevadas
Consulte las ilustraciones X
Colocar la escobilla del limpiador
La escobilla del limpiador se suministra ya colocada y debe
quitarse siempre antes de limpiarla.
1 Acople con cuidado la escobilla del limpiador flexible en
el utensilio colocando la base de la escobilla del limpiador
dentro de la ranura, a continuación, coloque un lado en la
abertura antes de enganchar el extremo cuidadosamente
en su lugar. Repita la operación con el otro lado.
Cuidado y limpieza
O Apague y desenchufe siempre el aparato antes de
proceder a su limpieza.
O Quizá aparezca un poco de grasa en la salida la primera
vez que use el aparato. Esto es algo normal – límpiela sin
más.
O Las superficies de metal de los sensores de temperatura
pueden mostrar signos de desgaste durante el uso normal.
Esto es normal y no afecta al rendimiento del producto.
O No deje el batidor flexible para temperaturas elevadas
acoplado a la mezcladora cuando no la utilice.
Aparato, tapas de las salidas
O Límpielos con un paño húmedo y, a continuación, séquelos.
O Nunca los sumerja en agua ni utilice productos abrasivos.
Paleta batidora para temperaturas elevadas
O Quite siempre la escobilla del limpiador flexible del utensilio
antes de proceder a la limpieza.
O Lave la escobilla del limpiador flexible y el utensilio en agua
caliente con jabón, y luego seque bien. También se pueden
lavar las piezas en el lavavajillas.
Nota: revise el estado del cuerpo del utensilio antes y después
de su uso; revise también regularmente el estado de la
escobilla del limpiador y sustitúyala si hay signos de desgaste.

100
Bol, utensilios, antisalpicaduras, clip auxiliar para remover
O Lave a mano y luego seque bien o lave en el lavavajillas
(consulte la tabla en la parte delantera del manual).
O No utilice nunca un cepillo metálico, un estropajo de
aluminio ni lejía para limpiar su bol de acero inoxidable. Use
vinagre o un producto antical adecuado para eliminar las
incrustaciones de cal.
O Si se pega o se quema comida dentro del bol, quite todo lo
que pueda con la espátula que se facilita. Llene el bol con
agua templada con jabón y déjelo en remojo. Elimine los
depósitos rebeldes con un cepillo de nylon.
O Cualquier cambio de color del bol no afectará a su
rendimiento.
Agujero de drenaje
O Asegúrese de que esta zona esté libre de comida. En caso
necesario, use un limpiador de tubos o un bastoncillo de
algodón para limpiarlo.
Sensores de temperatura
O Límpielos con un paño húmedo y, a continuación, séquelos
bien. Nunca utilice productos abrasivos ni instrumentos
afilados para limpiar los sensores.
Accesorio de cocción al vapor
O Desconecte y desenchufe siempre antes de quitar el
accesorio del robot de cocina.
O Para una limpieza más fácil, lave siempre las diferentes
piezas inmediatamente después de su uso.
Todas las piezas pueden lavarse en agua jabonosa
templada, luego se deben secar muy bien. También se
pueden lavar en el lavavajillas.
O El agua normal y los alimentos contienes sales y ácidos
que, a veces, pueden afectar a las superficies de metal
como, por ejemplo, el interior del bol para mezclas. Si esto
sucediera, limpie con un cepillo de nylon, un estropajo
no abrasivo o un limpiador de acero inoxidable de marca
registrada.
Servicio técnico y atención al cliente
O Si tiene problemas con el funcionamiento del aparato, antes
de solicitar ayuda, consulte la sección “Guía de solución de
problemas” en el manual o visite www.kenwoodworld.com.
O Tenga en cuenta que su producto está cubierto por una
garantía que cumple con todas las disposiciones legales
relativas a cualquier garantía existente y a los derechos de
los consumidores vigentes en el país donde se adquirió el
producto.
O Si su producto Kenwood funciona mal o si encuentra
algún defecto, envíelo o llévelo a un centro de servicios
KENWOOD autorizado. Para encontrar información
actualizada sobre su centro de servicios KENWOOD
autorizado más cercano, visite www.kenwoodworld.com o la
página web específica de su país.
O Diseñado y creado por Kenwood en el Reino Unido.
O Fabricado en China.
ADVERTENCIAS PARA LA CORRECTA ELIMINACIÓN
DEL PRODUCTO SEGÚN ESTABLECE LA DIRECTIVA
EUROPEA SOBRE RESIDUOS DE APARATOS ELÉCTRICOS Y
ELECTRÓNICOS (RAEE)
Al final de su vida útil, el producto no debe eliminarse junto a los
desechos urbanos.
Puede entregarse a centros específicos de recogida diferenciada
dispuestos por las administraciones municipales, o a
distribuidores que faciliten este servicio.
Guía de solución de problemas
Problema Causa Solución
El aparato no funciona en el modo
calor y muestra un mensaje de error y
emite un pitido de aviso.
Uno de los sensores de seguridad ha sido
activado.
Mire la pantalla para ver si está la notificación
de la causa.
• Compruebe que el cabezal esté bajado y
bloqueado.
• Compruebe que todas las tapas de las
salidas estén correctamente acopladas.
• Compruebe que la pantalla térmica esté
correctamente acoplada.
• Compruebe que el bol del Cooking Chef
esté correctamente acoplado.
El aparato cambia de velocidad o la
velocidad se limita durante la cocción.
La velocidad se limita automáticamente
cuando el contenido del bol alcanza los
60 °C y el indicador de advertencia de
temperatura caliente se encenderá.
Esto es una función de seguridad.
La comida se quema en la base del bol. 1 Puede que el ajuste de temperatura
seleccionado sea demasiado alto.
2 Se está utilizando un utensilio incorrecto.
3 El intervalo de remoción es demasiado
largo.
4 Puede que el utensilio no esté lo
suficientemente cerca del fondo del bol.
5 El temporizador se ha configurado para
un tiempo demasiado prolongado.
6 Puede que el sensor y/o la parte inferior
del bol no estén limpios.
1 Reduzca la temperatura.
2 Compruebe que se esté utilizando el
utensilio más adecuado y que esté
correctamente ajustado.
3 Aumente la frecuencia del intervalo de
remoción o aumente a un funcionamiento
continuo.
4 Ajuste el utensilio.
5 Cocine durante un período de tiempo
más corto (compruebe que la comida
esté bien cocida).
6 Compruebe que estas zonas estén
limpias y secas.

101
Guía de solución de problemas (continuación)
Problema Causa Solución
No se mantiene la consistencia de los
alimentos.
1 La temperatura seleccionada es
demasiado alta.
2 El intervalo de remoción es demasiado
frecuente.
3 Ingredientes cocidos durante
demasiado tiempo.
4 Se está utilizando un utensilio
incorrecto.
1 Reduzca la temperatura.
2 Reduzca el intervalo de remoción.
3 Reduzca el tiempo de cocción
(compruebe que la comida esté bien
cocida).
4 Compruebe que se esté utilizando el
utensilio más adecuado.
Velocidad de mezclado inconstante. 1 Los ingredientes son demasiado grandes,
duros o demasiado firmes.
1 Corte los alimentos en trozos más
pequeños,quite los huesos de la fruta,
funda lentamente los ingredientes sin
que haya un utensilio colocado (pero
compruebe que se haya seleccionado una
velocidad).
2 Añada los ingredientes después de haber
bajado el cabezal.
3 Compruebe que se esté utilizando el
utensilio más adecuado.
Dificultad para cerrar el cabezal de la
mezcladora.
1 Los ingredientes firmes como el chocolate
en el fondo del bol impiden que el
cabezal de la mezcladora se cierre bien.
2 El utensilio para remover no se ha
colocado correctamente.
1 Añada los ingredientes después de haber
bajado el cabezal de la mezcladora.
2 Compruebe que el utensilio para remover
esté colocado en la toma de dicho
utensilio.
La velocidad del motor está limitada
cuandose usan accesorios.
El bol acoplado está caliente. Quite el bol o enfríe el bol a menos de
60 °C.
El batidor de varillas o el batidor K
golpea el fondodel bol o no llega hasta
los ingredientes del fondo del bol.
La paleta batidora para temperaturas
elevadas no recoge ingredientes del
fondo del bol.
El utensilio está a una altura equivocada y
necesita ser ajustado.
Ajuste la altura con una llave fija adecuada
– consulte la sección “Ajuste de la altura de
los utensilios”.
El batidor de varillas, el batidor K o la
paleta batidora chocan contra el clip
auxiliar para remover.
El clip auxiliar para remover está colocado. Quite el clip auxiliar para remover; este
debe utilizarse solamente cuando se utilice
el utensilio para remover.
El accesorio de baja velocidad no se
puede acoplar.
Compruebe que su accesorio sea
compatible para utilizarlo con su modelo.
Se requiere el sistema de conexión Twist
(modelo KAX)
El accesorio debe tener el sistema de
conexión Twist KAX para encajar en la
salida.
Si tiene accesorios con el sistema de
conexión de barra deberá utilizar el
adaptador KAT002ME para conectarlos al
sistema de conexión Twist de su robot de
cocina.
Para obtener más información visite la
página www.kenwoodworld.com/twist
La luz de “en espera” parpadea cuando
el robot de cocina se enchufa por
primera vez.
El cabezal de la mezcladora está levantado o
no está correctamente bloqueado.
Compruebe que el cabezal del robot de
cocina esté correctamente bloqueado.
El robot de cocina se para durante el
funcionamiento.
La luz de “en espera” parpadea
rápidamente durante unos segundos.
La protección de sobrecarga o el sistema
de sobrecalentamiento está activado.
Capacidad máxima sobrepasada.
Desenchufe y compruebe si hay alguna
obstrucción o sobrecarga.
Si no funciona, quite algunos ingredientes
para reducir la carga y vuelva a ponerlo en
marcha.
Si esto tampoco soluciona el problema,
desenchufe el aparato y déjelo parado
durante 15 minutos. Enchúfelo y vuelva a
seleccionar la velocidad.
Si el aparato no se vuelve a poner en
marcha al seguir el procedimiento arriba
indicado, póngase en contacto con
“Atención al cliente” para obtener más
asesoramiento.

102
Guía de solución de problemas (continuación)
Problema Causa Solución
El robot de cocina se para durante el
funcionamiento. La luz de “en espera”
parpadea lentamente.
El cabezal de la mezcladora está
levantado.
Baje el cabezal de la mezcladora y vuelva
a poner el aparato en marcha.
La luz de “en espera” se apaga
mientras el aparato está enchufado.
El robot de cocina se ha dejado enchufado
durante más de 20 minutos sin ser utilizado
y ha entrado en modo espera.
Pulse la pantalla táctil o gire el dial de
control para reiniciar.
El robot de cocina se para durante el
funcionamiento.
Se ha quitado la pantalla térmica o se ha
quitado una tapa de la salida.
Coloque la pantalla térmica o la tapa de la
salida y luego vuelva a poner el aparato en
marcha.
La pantalla muestra un código de error
alfanumérico.
El aparato no funciona correctamente. Póngase en contacto con un centro
de servicios Kenwood autorizado. Para
encontrar información actualizada sobre su
centro de servicios Kenwood más cercano,
visite www.kenwoodworld.com o la página
web específica de su país.
No llega corriente eléctrica al aparato /
la pantalla no se enciende.
El aparato no está enchufado.
No se ha accionado el interruptor
de encendido/apagado.
El aparato ha entrado en modo espera.
Compruebe que el aparato esté
enchufado.
Pulse el interruptor de encendido/
apagado hacia la posición de
encendido.
Toque la pantalla o gire el dial de control.
El aparato no funciona. No se ha pulsado el dial de control. Pulse el dial de control para iniciar la
cocción.
El temporizador no realiza la cuenta
atrás en la pantalla.
Durante la fase de calentamiento, el
temporizador no empezará la cuenta hasta
que se alcance la temperatura correcta.
La temperatura está fijada por encima de
100 ˚C pero el contenido de agua de
los alimentos impide que la temperatura
suba por encima de 100 ˚C.
Funcionamiento normal.
Reduzca o seleccione la temperatura
correcta.
La temperatura del contenido del bol
no sube por encima de 100 ˚C.
El contenido de agua de los ingredientes
puede impedir que la temperatura suba por
encima de 100 ˚C.
Funcionamiento normal.
Movimiento fuerte o vibraciones
durante el funcionamiento.
Carga desigual en el bol que causa una
vibración excesiva.
Capacidad máxima sobrepasada.
Se está usando un utensilio o una velocidad
incorrectos.
Reduzca la cantidad o redistribuya los
alimentos en el bol y vuelva a poner la
unidad en marcha.
Consulte el programa correspondiente y las
tablas de velocidades recomendadas para
usar el utensilio y la velocidad correctos.
La pantalla muestra el mensaje de error
E:34.
Problema de conexión WiFi. Compruebe la contraseña del Wi-Fi.
Olvídese de la red WiFi, vaya a Ajustes
> WiFi > Olvídese de la red.
Reinicie la configuración del aparato desde
la aplicación de Kenwood World.
parpadeo lento No se puede encontrar una red Wi-Fi
conocida.
Puede que el aparato se haya movido de
lugar, puede que el router esté apagado o
que haya que reiniciarlo.
parpadeo rápido WiFi disponible, pero no puede conectarse
a los servidores en la nube.
Puede que haya que reiniciar el router, o
póngase en contacto con su proveedor de
servicios de Internet.
Busque una conexión a Internet que
funcione en la red local.
La pantalla muestra el mensaje de error
E42.
Error de calentamiento en seco (error en la
Cocción al vapor preestablecida).
Añada agua al bol.

103
Guía de solución de problemas (continuación)
Problema Causa Solución
Explicación de los pitidos del aparato
1) Un único pitido rápido
2) Pitido doble rápido
3) Pitido triple pitido
1) Al pulsar el dial de control para poner en
marcha o parar el aparato, o al levantar el
cabezal durante el funcionamiento.
2) Aparato en espera; el aparato emitirá
un pitido doble rápido 10 minutos
y 5 minutos antes del final del ciclo
“mantener caliente”.
3) Significa lo siguiente:
- Fin del programa preestablecido
- Fin del funcionamiento manual
- Fin del ciclo “mantener caliente”
- Cuando el aparato está a punto de
remover.
Funcionamiento normal
Funcionamiento normal
Funcionamiento normal
Al ponerse en contacto con el servicio de atención al cliente, es posible que le pidan que proporcione detalles de la versión del
software. Esto se puede encontrar pulsando el icono del menú Ajustes y seleccionando "Detalles del aparato".
La pantalla muestra “- -“. La báscula se está poniendo a cero. Funcionamiento normal.
La pantalla muestra una lectura
negativa.
La pantalla no se ha puesto a cero y o bien
los ingredientes, o el bol/tapa/accesorio se
han quitado.
Los ingredientes o alimentos están
presionados contra o debajo del aparato.
El aparato está presionado contra una
pared.
Ponga la pantalla a cero, vuelva a poner los
ingredientes que faltan o vuelva a colocar
el bol.
Asegúrese de que no haya ingredientes o
alimentos presionados contra o debajo del
aparato.
Asegúrese de que haya espacio entre el
aparato y cualquier pared.
Ponga la pantalla a cero antes de pesar los
próximos ingredientes.
La pantalla no registra las cantidades
pequeñas.
La cantidad pesada es demasiado
pequeña..
Realice las mediciones en cucharaditas o
cucharadas soperas para cantidades muy
pequeñas.
Peso cambiado en la pantalla. El aparato se ha movido durante el
funcionamiento.
Se ha tocado el borde del bol durante el
pesaje de los ingredientes.
Coloque siempre el aparato sobre una
superficie estable, plana y seca antes de
pesar los ingredientes.
No mueva el aparato ni toque el bol
durante el uso de la función de pesaje.
Ponga la pantalla a cero antes de pesar los
próximos ingredientes.
No puede cambiar rápidamente de las
unidades métricas a las imperiales.
El aparato se está reconfigurando
para mostrar la unidad y la medida
seleccionadas previamente.
Espere 5 segundos y vuelva a intentarlo
La función de pesaje de la aplicación
(visualización del peso en un
dispositivo móvil) tarda en responder.
La intensidad de la señal WiFi es débil.
El dispositivo móvil no está conectado a la
misma red doméstica WiFi local.
Asegúrese de que el aparato tenga una
buena intensidad de la señal (póngase en
contacto con su proveedor de servicios de
Internet para obtener asesoramiento sobre
cómo mejorarla).
Asegúrese de que el dispositivo móvil esté
conectado a la misma red doméstica WiFi
local que el aparato (vaya a los ajustes del
dispositivo móvil y seleccione su red WiFi
local).
Si el problema persiste, póngase en contacto con su centro de servicios KENWOOD autorizado más cercano. Para encontrar
información actualizada sobre su centro de servicios KENWOOD más cercano, visite www.kenwoodworld.com o la página web
específica de su país.

104
Información del ecodiseño
Puerto de red: puerto de red WiFi único, activado por defecto.
Modelo n.º TYPE: KCL95
Rango de frecuencia RF: 2412 - 2472 MHz
Potencia de transmisión máxima: < 20 dBm
Protocolo de comunicaciones: IEEE802.11 b, g, n
El KCL95 tiene un puerto de red WiFi único y está diseñado para ser usado como un equipo de red controlado a distancia.
O El puerto de red se puede desactivar en el menú de ajustes de WiFi y seleccionando "Off".
O El puerto de red se puede reactivar en el menú de ajustes de WiFi y seleccionando "On".
Reactivación: el aparato se puede reactivar desde “en espera” de la siguiente forma:
O Desde modo de espera conectado en red: toque la pantalla, gire el dial de control o a distancia a través de la aplicación.
O Desde modo de espera no conectado en red: toque la pantalla o gire el dial de control.
O El bol y la tapa se deben mantener siempre acoplados a la unidad principal para poder manejarla a distancia.
Restaurar los valores de fábrica - Importante
Cuando se deshaga del aparato, es importante reiniciarlo para restablecer los valores de fábrica a fin de proteger sus datos
personales. Al seleccionar esta opción, se eliminarán todos los datos WiFi almacenados en el aparato y se restablecerán los valores
de fábrica. Para restablecer los valores de fábrica de su aparato, seleccione Ajustes> Restaurar los valores de fábrica.
PÁGINA WEB
Modos Consumo de energía
Modo en espera no conectado en red – Después de 20 minutos de inactividad, la
pantalla se apaga. Puerto de red WiFi desactivado.
0,2 W
Modo de espera conectado en red - Después de 20 minutos de inactividad, la pantalla
se apaga y todos los puertos de red WiFi permanecen activados.
0,7 W
Apagado - Activado mediante el interruptor en la parte posterior de la unidad. 0,0 W

105
Bezpečnost
O Přečtěte si pečlivě pokyny v této příručce a uschovejte ji pro budoucí
použití.
O Odstraňte veškerý obalový materiál a nálepky.
OPokud by došlo k poškození napájecího kabelu, je z bezpečnostních důvodů
nutné nechat ho vyměnit od firmy Kenwood nebo od autorizovaného servisního
technika firmy Kenwood, aby se předešlo nebezpečí.
Důležité upozornění – elektronické implantáty
O Jako všechna zařízení na bázi indukčního ohřevu i tento přístroj produkuje
krátkovlnné magnetické pole. Pokud má uživatel nebo osoba nacházející se
v blízkosti zařízení voperovaný kardiostimulátor nebo jiný aktivní elektronický
implantát, je nutné používání zařízení konzultovat s lékařem pro případ možné
nekompatibility a zabránění možným zdravotním rizikům.
O Před montáží a demontáží příslušenství/nástrojů a před a po čištění spotřebič
vypněte a zástrčku vytáhněte ze zásuvky.
O K pohyblivým částem a nasazeným nástrojům/příslušenství nepřibližujte části
těla, vlasy, šperky a volné oblečení.
O Nevkládejte prsty do uzavíracího mechanismu spotřebiče.
ONikdy nenechávejte přístroj bez dozoru, když není v režimu vaření.
OKdyž spotřebič ponecháte bez dozoru v režimu vaření, věnujte pozornost těmto
bodům:
{ dodržujte pokyny ohledně teploty a maximálního množství v nádobě,
{ dbejte na to, aby byla jednotka i s kabelem umístěná mimo dosah dětí a dále
od hrany pracovní plochy,
{ pravidelně kontrolujte vývoj, aby bylo v nádobě dost tekutiny a jídlo se
nepřevařilo.
O Nepoužívejte spotřebič, pokud je poškozený. V takovém případě jej nechte
opravit: viz oddíl „Servis a údržba“.
O Nepoužívejte příslušenství nedoporučené výrobcem; nikdy nepoužívejte více
než jedno příslušenství najednou.
O Nikdy nepřekračujte maximální objem a při používání indukčního ohřívače
nepřekračujte maximální úroveň 3 litrů vyznačenou na vnitřní stěně nádoby.
O Před použitím příslušenství si přečtěte bezpečnostní pokyny uvedené
v návodu.
O Spotřebič zvedejte opatrně, neboť je těžký. Před zvednutím spotřebiče se
ujistěte, že pracovní mísa, příslušenství, krytky výstupů a přívodní kabel jsou
zajištěny.
O Při přenášení přístroj vždy zvedejte za základnu podstavce a rameno mixéru.
NEZVEDEJTE a nepřenášejte přístroj pomocí rukojeti mísy.
O Nenechávejte přívodní kabel volně viset v dosahu dětí.
O Pohonná jednotka, přívodní kabel a zástrčka nesmějí přijít do styku s vodou.
O Při manipulaci se spotřebičem v režimu vaření nebo po ukončení vaření je
třeba opatrnosti – ZVLÁŠTĚ PRACOVNÍ MÍSA, OCHRANNÝ KRUHOVÝ KRYT
A PŘÍSLUŠENSTVÍ zůstávají HORKÉ dlouho po vypnutí spotřebiče. Pro vyjmutí
a manipulaci s pracovní mísou použijte držadla. Při manipulaci s horkou
pracovní mísou a příslušenstvím používejte kuchyňské rukavice.
O Symbol umístěný na produktu označuje povrch, který může být při použití
přístroje horký.
O Při odpojování nástrojů k míse po delším používání buďte opatrní, protože
mohou být horké.
O Spodní strana pracovní mísy zůstává horká dlouho po ukončení vaření. Při
manipulaci s horkou pracovní mísou buďte opatrní a použijte ochrannou
podložku, abyste zabránili poškození povrchu pracovní plochy přílišným
teplem.
O Při otevření ochranného krytu nebo zvednutí ramena robotu dávejte pozor na
páru unikající z nádoby.
O Pokud chcete přemístit horký obsah z robotu do mixéru, vždy nechte
ingredience nejdříve vychladnout na pokojovou teplotu.
O Používejte výhradně pracovní nádoby a ostatní příslušenství dodávané se
spotřebičem. Pracovní nádobu používejte na ohřívání/vaření pouze s robotem.
Česky
P¡ed ïtením rozlo¥te p¡ední stránku s ilustrací

106
O Nepoužívejte spotřebič v režimu vaření, pokud je pracovní nádoba prázdná.
O Větrací otvory nejsou určeny ke vkládání potravin.
O Při používání spotřebiče zajistěte, aby přístroj spočíval na rovném povrchu
a v bezpečné vzdálenosti od okraje pracovní plochy. Zajistěte, aby spotřebič
byl alespoň 10 cm od stěny a aby větrací otvory nebyly blokovány.
Neumisťujte spotřebič pod poličky zavěšené bezprostředně nad spotřebičem.
O Pro správné a bezpečné fungování indukčního vařiče zajistěte, aby spodní část
spotřebiče a tepelné senzory byly čisté a suché.
ONa základnu pro mísu/do indukční oblasti nepokládejte kovové předměty, např.
nože, vidličky, lžíce a poklice, protože mohou být horké.
O Stejně jako u ostatních spotřebičů na bázi indukčního ohřevu nepokládejte
platební karty, magnetická média nebo citlivá elektronická zařízení do blízkosti
spotřebiče, pokud je v provozu.
O Nepoužívejte pro fritování potravin.
O Než začnete jíst, vždy se ujistěte, že jídlo je důkladně uvařené.
O Pokud vaříte s olejem, nepřekračujte 250 ml.
O Jídlo je nejlépe spotřebovat krátce po uvaření nebo ponechat vychladnout
a ihned zmrazit.
ONesprávné používání spotřebiče může způsobit zranění.
ONetlačte na displej příliš velkou silou a neovládejte ho ostrými předměty.
ONepoužívejte šlehací metlu na hutné směsi (např. šlehání tuku s cukrem),
protože by se mohla poškodit.
O Napájecí kabel snižuje riziko možného zamotání se nebo zakopnutí.
Prodlužovací kabely se mohou používat, pokud dbáte na opatrnost. Při použití
prodlužovacího kabelu: 1) Vyznačená zatížitelnost elektrickým proudem musí
být minimálně stejně vysoká jako výkon spotřebiče a 2) Kabel by měl být veden
tak, aby nevisel z pracovní plochy nebo stolu tak, že by za něj mohlo zatáhnout
dítě nebo někdo nechtěně zakopnout. Pokud spotřebič vyžaduje uzemnění,
musí být prodlužovací kabel třížilový se zemnicím vodičem. Elektrický výkon
spotřebiče je uveden na jeho spodní straně.
OOsoby se sníženými fyzickými, smyslovými nebo mentálními schopnostmi nebo
s nedostatkem zkušeností a znalostí mohou spotřebič používat v případě, že
jsou pod dozorem nebo byly poučeny o bezpečném používání spotřebiče
a chápou rizika, která jsou s používáním spojená.
O Dohlédněte, aby si děti s přístrojem nehrály.
OTento spotřebič nesmějí používat děti. Spotřebič a jeho kabel musí být mimo
dosah dětí.
O Toto zařízení je určeno pouze pro domácí použití. Společnost Kenwood
vylučuje veškerou odpovědnost v případě, že zařízení bylo nesprávně
používáno nebo pokud nebyly dodrženy tyto pokyny.
OMaximální výkon vychází z hodnot pro univerzální mlýnek/sekáček, který má
nejvyšší příkon. Ostatní příslušenství mohou odebírat energie méně.
OTento spotřebič není určen k ovládání prostřednictvím externího časovače nebo
samostatného systému dálkového ovládání.
O S ramenem mixéru, ke kterému je připojen nástavec, nehýbejte a nezvedejte ho,
protože byste ohrozili stabilitu kuchyňského robotu.
O Nespouštějte přístroj blízko hrany pracovní plochy nebo v poloze, kdy přes
hranu přečnívá, a netlačte silou na připojený nástavec. Jinak by mohl být přístroj
nestabilní a mohl by se převrátit a způsobit úraz.
Nástavec pro vaření v páře
OTento nástavec vytváří páru, která by vás mohla popálit.
ODávejte pozor, abyste se neopařili parou, která vychází z pařáku, zvláště při
snímání ochranného krytu nebo zvedání víka plnícího otvoru.
OPři manipulaci s částmi buďte velmi opatrní: veškeré tekutiny, kondenzáty
a také části pařáku nebo kuchyňského robotu budou velmi horké. Používejte
kuchyňské chňapky.
OZařízení odpojte ze sítě před osazováním či snímáním dílů či před čištěním.
Bezpečná příprava jídel
OMaso, drůbež a ryby vařte důkladně. Nikdy nevařte tyto potraviny zmražené.
ONepoužívejte pařák k opětovnému ohřevu již uvařených jídel.

107
Před prvním použitím
O Omyjte jednotlivé části: viz část ‚Péče a čištění‘.
Popis robotu Kenwood Cooking Chef
Popis
Výstupy pro nástavce
1 Výstup pro vysokou rychlost (HSO)
2 Výstup pro pomalou rychlost (SSO)
3 Otvor pro nástroje k nádobě
4 Otvor pro míchadlo
Robot
5 Krytka výstupu pro vysokou rychlost
6 Rameno robotu
7 Krytka výstupu pro nízkou rychlost
8 Pracovní nádoba
9 Páčka zvedání ramena robotu
10 Ovládací knoflík
11 Vypínač
12 Displej
13 Ochranná podložka povrchu pracovní plochy
14 Výpusť
15 Základna pro mísu/indukční oblast
16 Větrací otvory
17 Teplotní senzory
18 Tepelný štít
19 Gumové těsnění (odnímatelné)
20 Kryt mísy
21 Víko plnícího hrdla
22 K-metla
23 Stírací metla pro vysokou teplotu
24 Šlehací metla
25 Hnětací hák
26 Míchadlo
27 Pomocný nástavec k míchání
28 Špachtle/stěrka pro vysoké teploty
29 Stěrka na těsto
30 Klíč
Nástavec pro vaření v páře
31 Podpěry rukojetí
32 Podpůrný věnec
33 Skládací rukojeti
34 Vyjímatelný podnos
35 Otvor na vejce
Poznámka: Nástavce pro výstup pro nízkou rychlost
Výstup pro nízkou rychlost na vašem modelu kuchyňského
robotu je vybaven systémem připojení Twist. Je určen pro
připojení nástavců se systémem připojení Twist.
Při nákupu nových nástavců pro výstup pro nízkou rychlost
zkontrolujte, zda jsou s vaším kuchyňským robotem
kompatibilní. Všechny nástavce se systémem připojení Twist
lze poznat podle kódu výrobku, který začíná na KAX, a také
podle loga Twist , které je na obalu.
Pokud vlastníte nástavce se systémem připojení Bar , pak
pro jejich připojení k systému Twist na vašem kuchyňském
robotu musíte použít adaptér KAT002ME.
Další informace najdete na stránce
www.kenwoodworld.com/twist.
Připojení k aplikaci Kenwood World
Viz ilustrace A – D
Aplikace Kenwood World umožňuje ovládat spotřebič pomocí
chytrého telefonu nebo tabletu.
1 Připojte přístroj k napájení a stiskněte vypínač na boku
pohonné jednotky.
2 Zvolte Nastavení > Wi-Fi > Připojit a postupujte podle
pokynů na displeji.
Číslo PIN
O Toto číslo je nutné zadat, když k tomu aplikace Kenwood
World vyzve.
O Spotřebič lze připojit pouze, když se na displeji zobrazuje
číslo PIN. Pokud PIN zadáte nesprávně, postupujte podle
pokynů v aplikaci a zkuste to znovu.
O Chcete-li zobrazit číslo PIN spotřebiče, zvolte Nastavení
> Wi-Fi > Připojit a postupujte podle pokynů na displeji
(pouze při připojení k Wi-Fi).
Poznámka:
Wi-Fi
Funguje pouze se standardy IEEE802.11 b, g a n v pásmu
2,4 GHz.
Kompatibilita
Aplikace Kenwood World je kompatibilní s nejnovějšími
verzemi systémů iOS a Android.
Obnovení nastavení z výroby
Důležité upozornění
O Při likvidaci přístroje je důležité obnovit nastavení z výroby
na ochranu osobních údajů.
O Zvolením této možnosti vymažete všechna data Wi-Fi
uložená ve spotřebiči a obnovíte jeho tovární nastavení.
O TK obnovení továrního nastavení přístroje vyberte
Nastavení >Tovární nastavení.
Nastavení přístroje Cooking Chef Connect
Viz ilustrace E – I
DŮLEŽITÉ UPOZORNĚNÍ
O Ujistěte se, že oblast indukčního ohřevu, teplotní senzory
a vnější povrch pracovní mísy jsou čisté. V opačném
případě teplotní senzory nebudou pracovat přesně, a to se
projeví na výsledku vaření.
O Ujistěte se, že všechny krytky výstupů jsou řádně nasazeny
a stejně tak i tepelný štít. Pokud tomu tak není, funkce
ohřívání nebude fungovat.
1 Připojte přístroj k napájení a stiskněte vypínač.
2 Otočte páčkou pro zvednutí ramene ve směru hodinových
ručiček a zvedněte rameno robotu, dokud nahoře
nezaklapne.
3 Nasuňte tepelný štít směrem nahoru na spodní stranu
ramene robotu tak, aby plně dosedl. Tepelný štít se nesmí
používat bez správně nasazeného gumového těsnění.
O Při používání robotu Cooking Chef bez ohřevu není nutné
tepelný štít nasadit, pokud nepoužíváte ochranný kryt
proti šplíchání. Přečtěte si část „nasazení a používání
ochranného krytu proti šplíchání“.
4 Nasaďte nádobu na základnu.
5 Zasuňte požadovaný nástroj do otvoru pro nástroje k
nádobě nebo otvoru pro míchadlo, pokud používáte
míchadlo. Výčnělek umístěte do drážky a otočením
zajistěte.
O Pokud chcete nástroj odpojit, postupujte jako v kroku 6, ale
opačně. (Při odpojování nástrojů po vaření vždy používejte
kuchyňské chňapky.)
Před zapojením
O Přesvědčte se, že vaše elektrická zásuvka odpovídá zásuvce uvedené na spodní straně přístroje.
O VAROVÁNÍ: TENTO SPOTŘEBIČ MUSÍ BÝT UZEMNĚNÝ.
O Tento spotřebič splňuje nařízení ES č. 1935/2004 o materiálech a výrobcích určených pro styk s potravinami.
O Tento spotřebič splňuje základní požadavky a další relevantní ustanovení nařízení 2014/53/EU.

108
6 Abyste spustili rameno robotu, mírně je nadzvedněte a pak
otočte páčkou pro zvednutí ramene ve směru hodinových
ručiček.
Spusťte do zajištěné polohy.
Míchadlo – při použití míchadla lze použít také pomocný
nástavec k míchání, který napomáhá promíchávání (viz
část „nasazení a sundání pomocného nástavce k míchání“).
Míchadlo lze také používat se šlehací metlou. Nepoužívejte
míchadlo s hnětacím hákem.
Používání přístroje Cooking Chef Connect –
ruční režim
1 Přidejte ingredience, které chcete vařit/míchat.
2 Nastavte požadovaný čas, rychlost a teplotu.
Poznámka: Chcete-li přístroj použít jako mixér bez ohřevu,
zvolte při výběru teploty nastavení „Vypnuto“.
Otáčejte ovládacím knoflíkem proti směru hodinových
ručiček, pokud chcete použít intervaly míchání a pulzní
režim.
Při použití stálé rychlosti otáčejte ovládacím knoflíkem po
směru hodinových ručiček.
3 Spusťte přístroj zmáčknutím ovládacího knoflíku.
4 Chcete-li chod přístroje kdykoliv zastavit, zmáčkněte
ovládací knoflík. V režimu vaření dávejte pozor, protože
přístroj bude horký.
Režim vysoké rychlosti s vysokou teplotou
(VRVT)
Pokud chcete míchat vysokou rychlostí s teplotou vyšší než
60 °C:
O Zvolte čas (v případě potřeby), rychlost a teplotu 60 °C
nebo vyšší.
O Na displeji se objeví upozornění, že jste vstoupili do
režimu VRVT.
O Jakmile si upozornění přečtete a porozumíte mu,
potvrďte stisknutím tlačítka Ano, že souhlasíte se
vstupem do režimu VRVT.
O Spusťte přístroj zmáčknutím ovládacího knoflíku.
Tato funkce se smí používat POUZE se šlehací metlou
a/nebo míchadlem. Nesmíte překročit maximální objem
3 litrů a musíte nasadit ochranný kryt proti šplíchání.
Přístroj nesmí zůstat bez dozoru.
5 Po dokončení programu přístroj třikrát pípne.
O Poznámka: Pokud není nastaven čas, ohřívání a míchání
automaticky skončí, když časovač dosáhne 8 hodin.
6 Pokud chcete zastavit ohřev, přepněte teplotu do polohy
„Vypnuto“. Přístroj můžete kdykoliv zastavit zmáčknutím
ovládacího knoflíku.
Důležité upozornění – Pokud bude kdykoli za provozu
zvednuto rameno mixéru, ohřev se pozastaví. Nástroj
k míse se zastaví a po spuštění ramene se znovu nespustí.
K opětovnému spuštění přístroje spusťte rameno mixéru
a zmáčkněte ovládací knoflík.
Použití předvoleb
Viz ilustrace P – R
1 Zvolte nabídku Předvolby.
2 Vyberte předvolbu, kterou chcete použít.
3 Postupujte podle pokynů na displeji.
4 Chcete-li chod přístroje kdykoliv zastavit, zmáčkněte
ovládací knoflík. Dávejte pozor, protože nádoba a nástroje
budou horké.
Po vařenì
O Při manipulaci se spotřebičem nebo dotýkání se
spotřebiče v režimu vaření nebo po vaření buďte opatrní.
To platí ZEJMÉNA PRO NÁDOBU A NÁSTROJE, protože
dlouho po vypnutí spotřebiče zůstávají HORKÉ.
O K vyjmutí a přenášení nádoby používejte postranní držadla.
Při manipulaci s horkou nádobou a horkými nástroji
používejte kuchyňské chňapky.
O Spodní strana pracovní mísy zůstává horká dlouho po
ukončení ohřevu. Buďte opatrní při manipulaci a použijte
dodávanou ochrannou podložku, abyste ochránili povrchy
citlivé na teplo.
Rady a tipy
O Některé pokrmy, zvláště takové, které obsahují vysoký
podíl vody, nebude možné vařit při teplotě vyšší než 100
°C (protože tato teplota je varný bod vody).
O Když přidáváte potraviny do pracovní mísy během
vaření, vždy snižte rychlost a potraviny vkládejte pomalu
a rovnoměrně.
O Pro rychlé ohřátí omáček použijte nastavení pro
nepřetržité míchání.
O Pokud používáte kruhový kryt během vaření, před
zvednutím ramene robotu jej vždy sejměte. Dávejte
si pozor na kondenzovanou tekutinu, která vzniká na
kruhovém krytu a tepelném štítu.
O Při zvedání ramene robotu postupujte pomalu, aby
kapalina na spodní straně tepelného štítu mohla stéci
zpět do mísy.
O K dispozici jsou čtyři funkce intervalů míchání, které
umožňují zvolit vhodný způsob míchání pro jednotlivé
recepty. Některé recepty vyžadují neustálé míchání, aby
se obsah nepřichytil ke dnu nádoby, zatímco u jiných
receptů je vhodné přerušované míchání, aby se udržela
struktura obsahu.
Ruční vaření (nástavce)
1 Sundejte krytku výstupu pro vysokou/nízkou rychlost
(pokud je nasazená).
2 Připojte nástavec podle příslušných pokynů dodaných s
nástavcem.
3 Nastavte požadovaný čas a rychlost (viz ilustrace L–M).
Spusťte přístroj stisknutím ovládacího knoflíku.
Budete-li chtít přístroj kdykoliv vypnout, stiskněte znovu
ovládací knoflík.
Sundání a nasazení krytek výstupů
Krytka výstupu pro vysokou rychlost
1 Krytku sundáte tak, že použijete úchyt a krytku zvednete
nahoru.
2 Krytku nasadíte tak, že ji položíte na vývod a zatlačíte
dolů.
Krytka výstupu pro nízkou rychlost
1 Krytku sundáte tak, že použijete úchyt na spodní straně
a krytku vytáhnete směrem ven.
2 Krytku nasadíte tak, že západku na horní straně krytky
zasunete do drážky ve vývodu a krytku zacvaknete na
místo.
Použití funkce vážení
Viz ilustrace S
1 Zvolte funkci vážení na dotykové obrazovce.
2 Nasaďte nádobu.
3 Vynulujte váhu.
4 Zvažte ingredience.
5 Klepnutím na tlačítko jednotek na obrazovce vážení můžete
přepínat mezi jednotkami.

109
Tabulka použití předvoleb
Výchozí nastavení lze upravit podle receptu, pokud je to možné.
Nastavení, která upravit nelze, jsou označena ikonou .
Když je na displeji zobrazeno „Zahřívání“, časovač začne běžet až poté, co je dosaženo správné teploty.
Předvolba Doporučený nástroj Výchozí nastavení
(upravitelné)
Fáze udržování
v teple
Recepty k inspiraci / použití
Šlehání bílků 1 min 15 s
(15 s—5 min)
Max
VYPNUTO
Bílky do čokoládové pěny
Piškotový dort 1 min
(30 s—5 min)
1—Max
( —Max)
VYPNUTO
Bublanina, dortíky v košíčku
Hnětení těsta 10 min
(1 min—30 min)
Min to 1
(min—2)
VYPNUTO
Chlebové housky, pizza
Kynutí těsta 1 hod
(25 min—2 hod)
VYPNUTO
30 ˚C
(25 ˚C—35 ˚C)
Kynutí kvasnicového těsta
Rozpouštění čokolády 10 min
(5 min—2 hod)
60 ˚C
Čokoládová pěna
Švýcarská sněhová
pusinka
10 min
(1 min—20 min)
Max
40˚C
Základ pro máslovo-smetanovou
polevu
Italská sněhová
pusinka
4 min
(1 min—20 min)
HSHT 6
( —Max)
60 ˚C – 85 ˚C
Citronový dort se sněhem
Pečená Aljaška
Ovocný kompot 20 min
(5 s—2 hod)
()
104 ˚C
30 min
62 ˚C
Náplně do dortů, polevy na
moučníky
Pražená kukuřice 10 min
(5 min—10 min)
VYPNUTO
180 ˚C
Čerstvá domácí pražená kukuřice
* K dosažení nejlepších výsledků
vždy použijte předvolbu.
Poznámka: Před vážením vždy položte přístroj na suchý, rovný
a stabilní povrch. Při vážení netlačte na mixér nebo na nádobu,
protože to ovlivní přesnost váhy. Funkci vážení lze použít
s ramenem mixéru v dolní i horní poloze.
Funkce vážení je přesná až do 6 kg.

110
Tabulka použití předvoleb (pokračování)
Předvolba Doporučený nástroj Výchozí nastavení
(upravitelné)
Fáze udržování v
teple
Recepty k inspiraci / použití
Pára 20 min
(5 min – 45 min)
VYPNUTO
100 ˚C
Losos v papilotu
Jídla z jednoho hrnce 40 mins
(5 s – 8 hod)
()
103˚C – 140˚C
30 mins
62˚C
Boloňská omáčka
Polévka s kousky 20 mins
(5 s – 8 hod)
()
103˚C – 140˚C
30 mins
62˚C
Zeleninová polévka, vývary
Pomalé vaření 2 hrs
(5 s – 8 hod)
()
98˚C – 140˚C
30 mins
62˚C
Dušené hovězí
Recept
Marináda ze sušených švestek
200 g čirého tekutého medu
40 g měkkých sušených švestek
40 ml vody
1 Vložte všechny ingredience do minisekáčku/mlýnku.
Nechejte je přes noc v lednici.
2 Nasaďte nástavec na stojací mixér.
3 Zapněte na 4 sekund pulzní režim.
4 Použijte podle potřeby.
Nástavec pro vaření v páře
Viz ilustrace T
O Při používání pařáku vždy udržujte bezpečnou vzdálenost
mezi přístrojem a stěnou či poličkou umístěnou nad
přístrojem, aby nedošlo k jejich poškození unikající parou.
O Jídlo dochuťte až po uvaření – tím zabráníte tvorbě skvrn
nebo důlků v nerezové nádobě.
1 Umístěte vyjímatelný podnos na rovnou plochu a ujistěte
se, že skládací rukojeti směřují směrem dovnitř.
2 Umístěte věnec na podnos tak, aby podpory rukojetí na
věnci zapadaly do výřezů ve tvaru písmene V na podnose.
3 Rozložte rukojeti a uchyťte je do podpor.
4 Jídlo připravené k vaření umístěte na podnos. Zeleninu je
nutné pečlivě předem omýt a případně oloupat.
5 Do nádoby nalijte požadovaný objem vody (viz tabulka
vaření). Nejlepší je použít filtrovanou vodu, protože
redukuje tvorbu vodního kamene a tvorbu skvrn.
6 Vložte smontovaný pařák do nádoby – sám se výškově
přizpůsobí.
7 Nasaďte tepelný ochranný štít na rameno robota.
8 Nasaďte nádobu s pařákem na kuchyňský robot.
9 Spusťte rameno robota dolů a potom nasaďte ochranný
kruhový kryt.
10 Zvolte předvolbu pro vaření v páře a upravte dobu vaření
(podle tabulky doporučeného nastavení). Spusťte přístroj
zmáčknutím ovládacího knoflíku.
11 Nechte vařit po požadovanou dobu.
12 Sejměte ochranný kruhový kryt.
13 Zdvihněte rameno robota.
14 Vyjměte pařák pomocí rukojetí – dávejte pozor, aby se
nesložily dovnitř.
15 Položte pařák na veliký talíř nebo do jiné vhodné nádoby.
16 Odepněte rukojeti a složte je směrem do středu. Zdvihněte
podpůrný věnec a rozložte rukojeti.
17 Vyjměte jídlo.
Důležité
Při manipulaci buďte velmi opatrní: veškeré tekutiny,
kondenzáty a také části pařáku nebo kuchyňského robotu
budou velmi horké na dotek. Používejte kuchyňské
chňapky.
O Nepokoušejte se nasadit příslušenství pro mixování, když
používáte pařák.
O Nevařte jídlo v mixovací nádobě, když používáte pařák.
Rady a tipy
OTekutina, která zbude v nádobě, je vhodná pro přípravu
polévek nebo vývaru. Buďte opatrní, protože bude velmi
horká.
O Ponechejte mezery mezi jednotlivými kusy jídla.
O Velké množství jídla v průběhu vaření promíchejte.
O Kusy jídla o podobné velikosti se vaří rovnoměrněji.
O Pokud vaříte v páře různé druhy potravin, potravinu,
která vyžaduje kratší čas vaření, přidejte později.
O Pokud sejmete víko plnícího otvoru nebo ochranný kryt,
pára unikne a vaření potrvá déle.
O Po vypnutí kuchyňského robotu se jídlo bude nadále
vařit, je tedy nutné jídlo ihned po skončení vaření
vyjmout.
O Pokud není jídlo dostatečně uvařené, přidejte na
časomíře dobu vaření. Možná také budete muset přidat
více vody.
O Uvedené doby vaření jsou pouze orientační. Vždy se
ujistěte, že jídlo je důkladně uvařené.
O Nenechte nikdy vyvařit vodu z nádoby a doplňujte
podle potřeby.

111
Vysvětlivky k displeji
Klepněte na tuto ikonu, pokud chcete otevřít nabídku nastavení.
Klepněte na tuto ikonu, pokud chcete otevřít nabídku předvoleb.
Klepněte na tuto ikonu, pokud chcete zvážit ingredience v nádobě.
Zobrazuje zvolený čas v hodinách (h), minutách (m) a sekundách (s).
Zobrazuje zvolený interval míchání.
Je-li zvolena přerušovaná rychlost (2 Æ 4)), vnější kroužek se bude postupně zvětšovat a
přístroj bude míchat, až bude plný.
Zobrazuje zvolenou teplotu.
Blikající červené pozadí udává, že přístroj je v režimu ohřevu.
Nepřerušovaně svítící červené pozadí udává, že přístroj dosáhl nastavené teploty.
Přerušovaná šipka směřující dolů udává, že přístroj se chladí.
Udává, že nastavení (čas, rychlost nebo teplotu) nelze upravit.
Informace o stavu Text na tomto místě udává informace u stavu.
Udává, že nádoba, její obsah a použité díly jsou horké. Zacházejte s nimi opatrně.
Udává, že přístroj je připojený k síti Wi-Fi.
Udává, že přístroj je v režimu vysoké rychlosti s vysokou teplotou (VRVT).
Otáčením ovládacího knoflíku proti směru hodinových ručiček zapnete intervaly míchání
a pulzní režim.
Otáčením ovládacího knoflíku po směru hodinových ručiček nastavíte nepřerušovanou
rychlost (min—max).
Recepty
Recept Použitý nástroj Předvolba /
ruční nastavení
Ingredience
Zeleninová polévka Polévka s kousky
20 min
98 ˚C
Přidejte vše najednou:
100 g pancetty, nakrájené na kostičky
2 stroužky česneku, nasekané
50 g rýže Arborio
2½ lžíce rajčatového protlaku
70 g kapusty
1 lžičk sušené rozmarýny
2 lžičk sušené šalvěje
1 stonek řapíkatého celeru, nakrájeného na
kolečka
60 g pórku, nakrájené na kolečka
75 g cibule, nakrájené na kolečka
75 g mrkve, nakrájené na kolečka
1 l horkého zeleninového vývaru
Sůl a pepř

112
Recepty
Recept Použitý nástroj Předvolba /
ruční nastavení
Ingredience
Hovězí
Stroganov
Jídla z jednoho hrnce
30 min
103 ˚C
Přidejte vše najednou:
600 g hovězího masa, nakrájeného na kostičky
1 lžíce papriky
1 lžíce másla
1 stroužek česneku, nasekaný
400 g hovězího vývaru
200 g hub, nakrájených
150 g cibule, nakrájené na kolečka
300 g mrkve, nakrájené na kolečka
1 lžíce kukuřičného škrobu
1 lžíce vody }smíchejte
200 ml smetany
Sůl a pepř
Vanilkový krém Ruční nastavení
15 min
85 ˚C
Přidejte vše najednou:
250 g plnotučného mléka
250 g smetany ke šlehání
1 lžička vanilkového extraktu
2 lžíce kukuřičné mouky
96 g vaječných žloutků }smíchejte
80 g cukru krupice
Pražená kukuřice Pražená kukuřice
10 min
VYPNUTO
180 ˚C
Přidejte vše najednou:
50 g zrn kukuřice na pražení
20 g slunečnicového oleje
* K dosažení nejlepších výsledků vždy použijte
předvolbu.
Rýžová kaše Ruční nastavení
1 h
15 mins
95 ˚C
Přidejte vše najednou:
150 g krátkozrnné rýže
1 l plnotučného mléka
75 g cukru krupice
2 tsp vanilkového extraktu
Nastavení teploty a rychlosti
Doporučené teploty 60 °C Rozpouštění čokolády
72 °C—82 °C Velmi mírné vaření
98 °C —99 °C Mírné vaření
100 °C Vaření, vaření v páře
130 °C—140 °C Restování zeleniny
180 °C Osmahnutí masa
(P) Pulz – pro krátké impulzy maximálního výkonu.
Interval míchání 1—mixér se bude otáčet nepřerušovaně při nízké rychlosti.
Vhodný pro vmíchání lehkých ingrediencí do hutnějších směsí.
Interval míchání 2—přerušované míchání s krátkými pauzami. Při tomto nastavení
probíhá přerušované míchání pomalou rychlostí na 1,5 otáčky každých 10 sekund.
Interval míchání 3—přerušované míchání se středně dlouhými pauzami. Při tomto
nastavení probíhá přerušované míchání pomalou rychlostí na 1,5 otáčky každých
30 sekund.
Interval míchání 4—přerušované míchání s dlouhými pauzami. Při tomto nastavení
probíhá přerušované míchání pomalou rychlostí na 1,5 otáčky každých 5 minut.
Rychlost min—max Stálé rychlosti postupně narůstající až na maximální rychlost.
VRVT Míchání při teplotách nad 60 ˚C při nastavení rychlosti min.—max.

113
Tabulka doporučeného používání
Tyto hodnoty jsou pouze přibližné a mohou se lišit v závislosti na konkrétním receptu a ingrediencích.
K-metla
Pro přípravu koláčů, cukroví, těsta, polev, náplní, trubiček z odpalovaného těsta a bramborové
kaše.
Rady a tipy
• Rychlost zvyšujte postupně, abyste zabránili vystříkávání ingrediencí.
• Aby se ingredience zcela promíchaly, často míchání přerušujte a stírejte stěny mísy pomocí
stěrky.
• Pokud není v receptu uvedeno jinak, na těsto používejte studené ingredience.
Recept/ postup
(Max.) (Minuty)
Sladká těsta a sušenky – tření tuku
s moukou
Hmotnost
mouky
910 g Min. 12
Základní těsta na moučníky Celková
hmotnost
4 kg Min. Max. 45—60 s
Stírací metla
K rozšlehání a míchání měkkých ingrediencí.
Rady a tipy
• Rychlost zvyšujte postupně, abyste zabránili vystříkávání ingrediencí.
• Při šlehání tuku s cukrem na moučníkové těsto používejte tuk s pokojovou teplotou nebo jej
předem nechte změknout.
• Se stírací metlou pro vysoké teploty jsou dodávány dvě stěrky. Jednu stěrku použijte pro
přípravu sladkých a druhou pro přípravu slaných pokrmů.
Recept/ postup
(Max.) (Minuty)
Rozšlehání másla/margarinu a cukru 4.,55 kg
(směs z 15 vajec)
Min. Max. 4
Šlehání vajec do těst na moučníky Min. Max. 1—4
Vmíchání mouky, ovoce apod. Min. 1 30—60 s
Šlehací metla
Na vejce, smetanu a bublaninu.
Důležité
• Rychlost zvyšujte postupně, abyste zabránili vystříkávání ingrediencí.
• Nepoužívejte šlehací metlu na hutné směsi (např. k přípravě základního těsta na moučníky
nebo šlehání tuku s cukrem), protože by se mohla poškodit.
• Nejlepších výsledků dosáhnete, když budou mít bílky pokojovou teplotu.
Před šleháním bílků se ujistěte, že na šlehací metle ani v míse není.
Recept/ postup
(Max.) (Minuty)
Bílky 16 (605 g)
Min. Max.
1½—2
Piškoty bez tuku 930 g 4—6
Smetana 2 l 1½—3
Lívancové těsto
• Nejdříve do mísy přidejte mouku a pak mokré
ingredience.
• Míchejte na Minimální rychlost, aby se ingredience
dobře promíchaly.
250 g mouky
500 g mléka
200 g vajec
Min. 10 s
Max. 45—60 s
Majonéza
• Nejlepších výsledků dosáhnete, když po přidání
oleje setřete stěny mísy a spustíte na dalších 10 s
maximální rychlostí.
2 žloutky
10 g hořčice
200 ml rostlinného oleje
Max. 1—1½
Velikost použitých vajec = střední (hmotnost 53—63 g).
Použitá smetana ke šlehání = čerstvá smetana ke šlehání s obsahem tuku nejméně 38 %

114
Tabulka doporučeného používání
Tyto hodnoty jsou pouze přibližné a mohou se lišit v závislosti na konkrétním receptu a ingrediencích.
Hnětací hák
Na kynutá těsta
Rady a tipy
Důležité
• Nikdy nepřekračujte maximální objemy – přístroj by se mohl přetížit.
• Pokud slyšíte, že přístroj pracuje s velkou námahou, vypněte jej, odeberte polovinu těsta
a každou polovinu zpracujte samostatně.
• Ingredience se nejlépe promíchají, když nejdříve nalijete tekutinu.
Droždí
• Sušené droždí (typ, který potřebuje rozmíchat ve vodě): Teplou vodu nalijte do mísy. Pak
přidejte droždí a cukr a nechte odstát asi 10 minut do zpěnění.
• Čerstvé droždí: Nadrobte do mouky.
• Ostatní typy droždí: Řiďte se pokyny výrobce.
Recept/ postup
(Max.) (Minuty)
Těsto na chleba (tuhé kynuté) Hmotnost
mouky
350 g—1,6 kg Min. 60 s
1 3—4
Celková
hmotnost
564 g—2,58 kg Opakované prohnětení
Rychlost 1
60 s
Jemné kynuté těsto (s máslem a vejci) Hmotnost
mouky
250 g—1,6 kg Min. 60 s
Celková
hmotnost
478 g—3,1 kg 1 3—4
Opakované prohnětení
Rychlost 1
60 s
Velikost použitých vajec = střední (hmotnost 53—63 g).
Pokyny pro vaření s parním nástavcem
O Uvedené doby vaření jsou pouze orientační. Pro potraviny, které vyžadují 20 minut vaření, je třeba 500 ml vody. Déle se vařící
potraviny vyžadují 650 ml vody.
O Nenechte nikdy vyvařit vodu z nádoby a doplňujte ji podle potřeby.
O Při vaření drůbeže a ryb nenaplňujte příliš pařák.
O Přečtěte si oddíl „bezpečná příprava jídla“.
Vegetables
Ingredience
(Max.) (minuty)
Množství vody Příprava
Chřest 450 g 15 500 ml Očistit
Zelené fazolky 450 g 15—20 500 ml Očistit
Zelené fazolky 450 g 15—20 500 ml Očistit a najemno nakrájet
Brokolice 450 g 20 500 ml Rozkrájet na růžičky
Růžičková kapusta 450 g 25 500 ml Očistit a zespodu ořezat
Zelí malá hlávka 25 500 ml Nakrouhat
Mrkev 450 g 20 500 ml Najemno nakrájet
Květák 1 střední 25—30 650 ml Rozkrájet na růžičky
Cukíny 450 g 15 500 ml Najemno nakrájet
Celer 1 15 500 ml Najemno nakrájet
Pórek 3 15 500 ml Najemno nakrájet
Jarní hrášek (lusky) 250 g 15 500 ml Očistit
Žampiony 450 g 10 500 ml Ot¡ít
Pastiñák 450 g 15 500 ml Nakrájet na kostky/najemno
Hrách 450 g 15 500 ml Vyloupat
Brambory, nové 450 g 30—40 650 ml Ot¡ít

115
Drůbež a ryby
Recept/ postup
(Max.) (minuty)
Množství vody Poznámky
Kuře, prsa bez kostí 4 30-40 650ml Vařte v páře, až je maso zcela
provařené a měkké.
Škeble 450 g 10 500 ml Vařte v páře, dokud se neotevřou
Krevety (střední) 450 g 10 500 ml Vařte v páře do růžova
Ryba, filé 230 g 10—20 500 ml Vařte, až se maso dá loupat
Ryba, řízky 2,5 cm 15—20 500 ml Vařte, až se maso dá loupat
Ryba, vcelku 340 g 15—20 500 ml Vařte, až se maso dá loupat
Humr, ocas 2-4 20 500 ml Vařte v páře do červena
Slávky 450 g 15 500 ml Vařte v páře, dokud se neotevřou
Ústřice 6 15 500 ml Vařte v páře, dokud se neotevřou
Hřebenatky 230 g 15 500 ml Vařte, až jsou horké a měkké
Výškové nastavení příslušenství
Viz ilustrace U
Šlehací metla, nerezová K-metla, míchadlo
Nejlepších výsledků dosáhnete, když se bude šlehací metla a
K-metla téměř dotýkat dna nádoby. V případě potřeby upravte
výšku pomocí dodaného klíče.
Stírací metla pro vysokou teplotu – tento nástroj by se měl
lehce dotýkat dna nádoby
1 Spotřebič odpojte ze sítě.
2 Zvedněte rameno mixéru a nasaďte šlehací metlu, K-metlu
nebo stírací metlu.
3 Zatlačte rameno dolů. Pokud je třeba upravit světlou výšku
mezi příslušenstvím a dnem nádoby, zvedněte rameno
robotu a vyjměte nasazené příslušenství.
4 Pomocí dodávaného klíče uvolněte matku tak, abyste mohli
nastavit hřídel. Pro přiblížení nástroje blíže ke dnu nádoby
otáčejte hřídelí proti směru hodinových ručiček. Pro zvýšení
vzdálenosti ode dna otáčejte hřídelí po směru hodinových
ručiček.
5 Utáhněte matku.
6 Nasaďte vybraný nástroj a zatlačte rameno robotu dolů.
(Zkontrolujte, zda je nástroj v požadované poloze, viz
předcházející body).
7 Opakujte předcházející kroky, pokud bude potřeba, dokud
příslušenství není nastaveno k vaší spokojenosti. Poté
pevně utáhněte závit.
Hnětací hák – tento nástroj se nastavuje ve výrobě a jeho
výšku nelze upravit.
Hnětací hák – tento nástroj by se měl lehce dotýkat dna
nádoby.
1 Odpojte spotřebič od napájení.
2 Zvedněte rameno robotu a nasaďte míchadlo.
3 Spusťte rameno robotu. Pokud nástroj potřebuje výškově
upravit, zvedněte rameno robotu a pomocí klíče uvolněte
matici. Pak rameno robotu spusťte dolů.
4 Chcete-li nástroj snížit ke dnu nádoby, otočte nastavovacím
kolečkem ve směru hodinových ručiček. Chcete-li nástroj
ode dna nádoby zvýšit, otočte nastavovacím kolečkem
proti směru hodinových ručiček.
5 Znovu matici utáhněte.
Nasazení a používání ochranného krytu proti
šplíchání
Viz ilustrace V
Ochranný systém se skládá ze dvou částí: tepelného štítu a
kruhového ochranného krytu proti šplíchání.
Tepelný ochranný štít slouží k ochraně ramena mixéru před
parou, která vzniká během vaření.
Ochranný kryt proti šplíchání by se na nádobu měl nasazovat
pouze v kombinaci s tepelným štítem.
1 Zvedněte rameno robotu, až se zajistí v horní poloze.
2 Nasaďte tepelný štít na spodní stanu ramene robotu
a tlačte, dokud štít není zcela zajištěn. Tepelný štít se
nesmí použít bez správně nasazeného gumového těsnícího
kroužku.
3 Nasaďte nádobu do základny.
4 Rameno zatlačte dolů.
5 Nasaďte kruhový kryt na okraj pracovní nádoby a zasuňte,
dokud není zcela zajištěn.
O Během mixování je možné přidávat potraviny do nádoby
pomocí plnícího otvoru.
6 Kruhový kryt jednoduše sejmete vysunutím z ramene
robotu.
Poznámka: Ochranný kryt proti šplíchání zůstane nasazený
na tepelný štít, když se zvedne rameno mixéru, pokud nebyl
předtím sejmut.
7 Chcete-li sejmout tepelný štít, zvedněte rameno přístroje
do horní polohy, dokud se nezajistí. Vyjměte nasazené
příslušenství a potom tahem dolů sejměte štít z ramene
robotu.
Upozornění: Kruhový kryt nasazujte či sundávejte, pouze
pokud je rameno robotu zajištěno v horní poloze.

116
Nasazení a sundání pomocného nástavce
k míchání
Viz ilustrace W
Pomocný nástavec k míchání lze použít jako pomůcku k
míchání.
1 Nasuňte pomocný nástavec k míchání na stěnu nádoby tak,
aby bylo svislé žebro zevnitř a svěrky zvenčí.
2 Nasuňte svěrky proti směru hodinových ručiček na držadlo
nádoby.
3 Sundání provedete stejným postupem v opačném pořadí.
DŮLEŽITÉ UPOZORNĚNÍ - Pomocný nástavec k míchání byste
neměli nasazovat, pokud používáte K-metlu, šlehací metlu,
hnětací hák nebo stírací metlu.
Sestavení stírací metly pro vysoké teploty
Viz ilustrace X
Nasazení stěrky
Stěrka se dodává už nasazená a před čištěním ji vždy sundejte.
1 Opatrně flexibilní stěrku nasaďte na metlu tak, že základnu
stěrky zasunete do otvoru a pak jednu stranu nasadíte do
drážky a konec jemně zaháknete do správné polohy. To
samé opakujte s druhou stranou.
Péče a čištění
O Před čištěním vždy vypněte a odpojte od zdroje energie.
O Při prvním použití se u výstupu může objevit menší
množství maziva. To je v pořádku – mazivo jednoduše
utřete.
O U kovových povrchů teplotních senzorů se během běžného
užívání může projevit opotřebování. To nemá vliv na výkon
zařízení.
O Nenechávejte ohebný šlehač osazen na robotu, pokud jej
neužíváte.
Zařízení, krytky výstupů
O Otřete vlhkým hadříkem a pak osušte.
O Nikdy neužívejte brusný materiál, ani neponořujte do vody.
Stírací metla pro vysokou teplotu
O Před čištěním vždy sejměte pružnou stěrku z nástroje.
O Pružnou stěrku a nástroj omyjte v horké vodě se
saponátem, poté řádně osušte. Tyto díly lze také mýt
v myčce nádobí.
Pozn.: Před a po použití zkontrolujte stav těla nástroje a rovněž
pravidelně kontrolujte stav stěrky. V případě jakýchkoli známek
opotřebení ji vyměňte.
Nádoba, nástroje, ochranný kryt, pomocný nástavec k
míchání
O Umyjte ručně a pak důkladně osušte nebo užijte myčku (viz
tabulka na začátku návodu).
O Nikdy neužívejte drátěný kartáč, drátěnku ani bělidlo na
čištění nerez nádoby. Na vodní kámen užívejte ocet nebo
vhodný odstraňovač vodního kamene.
O Pokud se potravina připaluje nebo ulpívá uvnitř nádoby,
odstraňte špachtlí tolik, kolik půjde. Pak naplňte nádobu
teplou mýdlovou vodou a nechte odstát. Na odstranění
zachycených zbytků usazeniny použijte nylonový kartáč.
O Změny zbarvení nádoby nemají vliv na výkon robotu.
Výpusť
O Ujistěte se, že se v těchto místech nezachytily zbytky
potravin. V případě nutnosti užijte na vyčištění čistič na
trubky či tyčinku s vatou.
Teplotní senzory
• Otřete vlhkým hadříkem a pak důkladně osušte. Nikdy
neužívejte brusný materiál nebo ostré předměty k čištění
senzorů.
Nástavec pro vaření v páře
O Před vyjmutím příslušenství z přístroje spotřebič vždy
vypněte a odpojte ze sítě.
O Čištění bude snadnější, pokud je provedete vždy po
každém použití spotřebiče a příslušenství.Veškeré součásti
spotřebiče lze omýt v horké mýdlové vodě a poté osušit.
Lze také použít myčku.
O Obyčejná voda a jídlo obsahuje soli a kyseliny, které někdy
mohou mít dopad na kovové povrchy, např. povrch nádoby
mixeru. Pokud se tak stane, vyčistěte pomocí nylonového
kartáče, nebrusné houbičky či pomocí kvalitního prostředku
na čištění nerezového nádobí.
Servis a péče o zákazníky
O Pokud při používání spotřebiče narazíte na jakékoli
problémy, před vyžádáním pomoci si přečtěte část
„Průvodce odstraňováním problémů“ v návodu nebo
navštivte stránky www.kenwoodworld.com.
O Upozorňujeme, že na váš výrobek se vztahuje záruka, která
je v souladu se všemi zákonnými ustanoveními ohledně
všech existujících záručních práv a práv spotřebitelů v zemi,
kde byl výrobek zakoupen.
O Pokud se váš výrobek Kenwood porouchá nebo u něj zjistíte
závady, zašlete nebo odneste jej prosím do autorizovaného
servisního centra KENWOOD. Aktuální informace o
nejbližším autorizovaném servisním centru KENWOOD
najdete na webu www.kenwoodworld.com nebo na webu
společnosti Kenwood pro vaši zemi.
O Zkonstruováno a vyvinuto společností Kenwood ve Velké
Británii.
O Vyrobeno v Číně.
DŮLEŽITÉ INFORMACE PRO SPRÁVNOU LIKVIDACI VÝROBKU
V SOULADU S EVROPSKOU SMĚRNICÍ O ODPADNÍCH
ELEKTRICKÝCH A ELEKTRONICKÝCH ZAŘÍZENÍCH (OEEZ)
Po ukončení doby provozní životnosti se tento výrobek nesmí
likvidovat společně s domácím odpadem.
Výrobek se musí odevzdat na specializovaném místě pro
sběr tříděného odpadu, zřizovaném městskou správou anebo
prodejcem, kde se tato služba poskytuje.

117
Průvodce odstraňováním problémů
Popis problému Příčina Řešení
Robot nefunguje v režimu ohřívání
a na displeji se zobrazuje chybové
hlášení a ozývá se varovné pípání.
Byl aktivován jeden z bezpečnostních
senzorů.
Zkontrolujte oznámení o závadě na displeji.
• Ujistěte se, že rameno je ve spodní poloze
a zajištěné.
• Ujistěte se, že všechny krytky výstupů jsou správně
osazeny.
• Ujistěte se, že tepelný štít je správně osazen.
• Ujistěte se, že pracovní nádoba je správně
nasazena.
Robot mění rychlost nebo je
rychlost během vaření omezená.
Když obsah nádoby dosáhne 60
°C, rychlost se automaticky omezí
a rozsvítí se ukazatel upozornění na
vysokou teplotu.
Toto je bezpečnostní funkce.
Potravina na dně nádoby se
připaluje.
1 Zvolené nastavení teploty může být
příliš vysoké.
2 Je užíván nesprávný nástroj.
3 Interval míchání je příliš dlouhý.
4 Nástroj není umístěn v nádobě
dostatečně nízko.
5 Časovač byl nastaven na příliš
dlouhou dobu.
6 Senzor a/nebo spodní strana
nádoby jsou znečištěny.
1 Nastavte nižší teplotu.
2 Zkontrolujte, zda se používá nejvhodnější nástroj
a je správně výškově nastavený.
3 Zkraťte délku intervalu míchání nebo změňte na
neustálé míchání.
4 Upravte výšku nástroje.
5 Vařte po kratší dobu (ujistěte se však, že jídlo je
důkladně uvařené).
6 Ujistěte se, že tyto plochy jsou čisté a suché.
Není dodržena konzistence jídla. 1 Zvolena příliš vysoká teplota.
2 Interval míchání je příliš krátký.
3 Obsah v nádobě se vaří příliš dlouho.
4 Je užíván nesprávný nástroj.
1 Snižte teplotu.
2 Zvyšte interval míchání.
3 Vařte po kratší dobu (ujistěte se však, že jídlo je
důkladně uvařené).
4 Zkontrolujte, zda užíváte nejvhodnější nástroj.
Nestálá rychlost mixování. 1 Přísady jsou příliš velké, tvrdé nebo
příliš tuhé.
1 Nakrájejte potravinu na menší kousky, vyjměte
pecky z ovoce, pomalu rozpusťte přísady bez
nasazeného nástroje (ale se zvolenou rychlostí).
2 Přidejte přísady až po zajištění ramene ve spodní
poloze.
3 Zkontrolujte, zda užíváte nejvhodnější nástroj.
Rameno robotu nejde snadno
sklopit.
1 Tuhé přísady, např. čokoláda, na dně
nádoby zabraňují zaklapnutí ramena
robotu.
2 Míchadlo není správně nasazené.
1 Přidejte přísady až po zajištění ramene ve spodní
poloze.
2 Zkontrolujte, jestli je míchadlo nasazené do otvoru
pro míchadlo.
Při použití příslušenství je omezena
rychlost motoru.
Byla nasazena horká nádoba. Sejměte nádobu, nebo ji zchlaďte na teplotu pod
60°C.
Šlehací metla nebo K-metla naráží
do dna mísy nebo nedosáhne na
ingredience na dně mísy.
Stírací metla pro vysoké teploty
nenabírá ingredience na dně mísy.
Nástroj má nesprávnou výšku a je
potřeba jej nastavit.
Upravte výšku pomocí vhodného klíče – viz část
„Výškové nastavení příslušenství“.
Šlehací metla, K-metla nebo stírací
metla naráží do pomocného
nástavce k míchání.
Je nasazen pomocný nástavec k
míchání.
Sundejte pomocný nástavec k míchání – měl by se
používat jen s míchadlem.
Nástavce do pomaloběžného
výstupu nelze nasadit.
Zkontrolujte, zda je nástavec
kompatibilní s vaším modelem.
Je vyžadován systém připojení Twist
(model KAX)
Aby šel nástavec nasadit do výstupu, musí mít
systém připojení KAX Twist .
Pokud vlastníte nástavce se systémem připojení
Bar , pak pro jejich připojení k systému Twist na
vašem kuchyňském robotu musíte použít adaptér
KAT002ME.
Další informace najdete na stránce
www.kenwoodworld.com/twist

118
Průvodce odstraňováním problémů (pokračování)
Popis problému Příčina Řešení
Při prvním zapojení kuchyňského
robotu bliká tlačítko pohotovostního
režimu.
Rameno robotu je ve zvednuté poloze
nebo není v dolní poloze správně
zajištěno.
Zkontrolujte, zda je rameno kuchyňského robotu
správně zajištěno v dolní poloze.
Kuchyňský robot se během provozu
zastaví.
Tlačítko pohotovostního režimu
několik sekund rychle bliká.
Aktivovala se ochrana proti přetížení
nebo přehřátí.
Bylo překročeno maximální množství.
Odpojte ze zásuvky a zkontrolujte případné
překážky nebo příčinu přetížení.
Pokud robot nefunguje, vyjměte část ingrediencí,
abyste snížili zátěž, a znovu spusťte.
Pokud ani tohle problém nevyřeší, odpojte ze
zásuvky a nechte 15 minut stát. Zapojte do zásuvky
a znovu zvolte rychlost.
Pokud se přístroj podle výše popsaného postupu
znovu nespustí, kontaktujte oddělení pro péči o
zákazníky.
Kuchyňský robot se během provozu
zastaví. Pomalu bliká kontrolka
pohotovostního režimu.
Bylo zvednuto rameno robotu. Spusťte rameno mixéru a znovu přístroj zapněte.
Když je robot zapojený, tlačítko
pohotovostního režimu nesvítí.
Kuchyňský robot byl ponechán
zapojený déle než 20 minut bez
provozu a přešel do pohotovostního
režimu.
Spusťte ho znovu - dotkněte se obrazovky nebo
otočte ovládací knoflík.
Kuchyňský robot se během provozu
zastaví.
Byl odebrán tepelný štít nebo krytka
výstupu.
Nasaďte tepelný štít nebo krytku a znovu přístroj
spusťte.
Na displeji se zobrazuje
alfanumerický chybový kód.
Spotřebič správně nefunguje. Kontaktujte autorizované servisní centrum Kenwood.
Aktuální informace o nejbližším autorizovaném
servisním centru Kenwood najdete na webu
www.kenwoodworld.com nebo na webu společnosti
Kenwood pro vaši zemi.
Spotřebič není napájený / displej se
nerozsvítí.
Spotřebič není zapojený do elektrické
zásuvky.
Nezmáčkli jste vypínač.
Přístroj se přepnul do pohotovostního
režimu.
Zkontrolujte zapojení spotřebiče.
Zmáčkněte vypínač do polohy On (Zapnuto).
Dotkněte se displeje nebo otočte ovládací knoflík.
Spotřebič nefunguje. Nádoba není Nezmáčkli jste ovládací knoflík. Začněte vařit zmáčknutím ovládacího knoflíku.
Časovač na displeji neodpočítává. Během fáze ohřívání nebude časovač
odpočítávat, dokud nebude dosažena
správná teplota.
Teplota je nastavena na 100 ˚C, ale
obsah vody v potravinách brání
dosažení teploty nad 100 ˚C.
Nejde o závadu.
Snižte nebo vyberte správnou teplotu.
Teplota obsahu nádoby
nepřekračuje 100 ˚C.
Obsah vody v ingrediencích může
bránit dosažení teploty nad 100 ˚C.
Nejde o závadu.
Silný pohyb nebo vibrace během
provozu.
Nerovnoměrně rozložený obsah v
nádobě způsobuje nadměrné vibrace.
Překročena maximální kapacita.
Používá se nesprávný nástroj nebo
rychlost.
Snižte množství nebo potraviny v nádobě lépe
rozložte a spotřebič znovu spusťte.
Správný nástroj a rychlost, které se mají použít,
najdete v příslušném programu a tabulce
doporučených rychlostí.
Na displeji se zobrazuje chybová
zpráva E:34.
Problém s připojením k síti Wi-Fi. Zkontrolujte heslo k Wi-Fi.
Odeberte síť WiFi, přejděte na Nastavení > Wi-Fi
> Odebrat síť.
Restartujte nastavení spotřebiče z aplikace
Kenwood World.
pomalé blikání Nelze najít známou síť Wi-Fi. Spotřebič byl možná přemístěn, směrovač byl
možná vypnut nebo může vyžadovat restartování.
rychlé blikání Síť Wi-Fi dostupná, ale nelze se
připojit ke cloudovým serverům.
Směrovač může vyžadovat restartování nebo
kontaktujte svého poskytovatele připojení
k internetu.
Prověřte, zda je v místní síti funkční připojení
k Internetu.

119
Průvodce odstraňováním problémů (pokračování)
Popis problému Příčina Řešení
Na displeji se zobrazuje chybové
hlášení E42
Chyba vaření za sucha (chyba
předvolby pro vaření v páře)
Doplňte do nádoby vodu.
Vysvětlení pípání přístroje
1) Jedno rychlé pípnutí
2) Dvojité rychlé pípnutí
3) Trojité pípnutí
1) Stisknutí ovládacího knoflíku ke
spuštění nebo zastavení přístroje
nebo zvednutí ramena za provozu
2) Přístroj čeká - přístroj dvakrát
rychle pípne 10 minut a 5 minut
před koncem cyklu udržování
v teplém stavu.
3) Význam:
- konec programu předvolby
- konec ručního provozu
- konec cyklu udržování v teplém
stavu
- přístroj se chystá promíchat obsah
Nejde o závadu.
Nejde o závadu.
Nejde o závadu.
Pokud se obrátíte na zákaznickou podporu, mohou vás její pracovníci požádat o informace o verzi softwaru. Najdete je tak, že stisknete
ikonu nabídky Nastavení a zvolíte položku „O spotřebiči“.
Na displeji se zobrazuje „- -„. Váhy se nulují. Běžný provoz.
Na displeji se zobrazuje záporná
hodnota.
Displej nebyl vynulovaný a byly
odebrány ingredience nebo nádoba/
víko/nástavec nebo se přístroje z
boku nebo zespodu dotýkají nějaké
předměty.
Přístroj se dotýká zdi.
Vynulujte obrazovku, vraťte chybějící ingredience
nebo znovu nasaďte misku.
Zkontrolujte, zda se přístroje z boku nebo zespodu
nedotýkají ingredience nebo jiné předměty.
Zkontrolujte, zda je mezi přístrojem a zdí volný
prostor.
Před vážením dalších ingrediencí vynulujte displej.
Na displeji se nezobrazují malá
množství.
Vážené množství je příliš malé. Velmi malá množství odměřujte lžičkou nebo lžící.
Hmotnost na displeji se změnila. Přístroj se za provozu posunul.
Při vážení ingrediencí se někdo dotkl
okraje misky.
Před vážením přístroj vždy postavte na suchý, rovný
a stabilní povrch.
Při vážení přístroj nepřesunujte a nedotýkejte se
misky.
Před vážením dalších ingrediencí vynulujte displej.
Nelze rychle přepínat mezi
metrickými a britskými jednotkami.
Přístroj mění konfiguraci k zobrazení
předchozí zvolené jednotky a hodnoty.
Počkejte 5 sekund a úkon opakujte.
Vážení v aplikaci (hmotnost
zobrazená na mobilním zařízení)
pomalu reaguje.
Špatný signál Wi-Fi.
Mobilní zařízení není připojené ke
stejné místní domácí síti Wi-Fi.
Zkontrolujte, zda má přístroj dobrý signál (poraďte
se s poskytovatelem internetového připojení, jak
signál vylepšit).
Zkontrolujte, zda je mobilní zařízení připojeno ke
stejné místní domácí síti Wi-Fi jako přístroj (přejděte
do nastavení mobilního zařízení a zvolte místní síť
Wi-Fi).
Pokud problém trvá, kontaktujte nejbližší autorizované servisní centrum Kenwood. Aktuální informace o nejbližším
autorizovaném servisním centru Kenwood najdete na webu www.kenwoodworld.com nebo na webu společosti Kenwood pro
vaši zemi.

120
Informace o ekologickém designu
Síťový port: Jeden bezdrátový síťový port aktivovaný implicitně..
Model č.: TYPE: KCL95
Frekvenční rozsah: 2412—2472 MHz
Maximální vysílací výkon: < 20 dBm
Komunikační protokol: IEEE802.11 b, g, n
Přístroj KCL95 je vybaven jedním bezdrátovým síťovým portem a je určen k použití jako dálkově ovládané, síťové zařízení.
O Síťový port lze deaktivovat v nabídce nastavení Wi-Fi výběrem položky Vypnuto.
O Síťový port lze znovu aktivovat v nabídce nastavení Wi-Fi výběrem položky Zapnuto.
Reaktivace: Přístroj lze reaktivovat z úsporného režimu:
O Z úsporného režimu v síti: Dotkněte se displeje, otočte ovládacím knoflíkem nebo přístroj znovu aktivujte na dálku z aplikace.
O Z úsporného režimu mimo síť: Dotkněte se displeje nebo otočte ovládacím knoflíkem.
O Nádoba a víko musí být vždy nasazené na hlavní jednotku, aby bylo možné ovládat přístroj na dálku.
Obnovení nastavení z výroby – důležité upozornění
Při likvidaci přístroje je důležité obnovit nastavení z výroby na ochranu osobních údajů. Zvolením této možnosti vymažete všechna
data Wi-Fi uložená ve spotřebiči a obnovíte jeho tovární nastavení. K obnovení továrního nastavení přístroje vyberte Nastavení >
Tovární nastavení.
WEBOVÉ STRÁNKY
Režimy Spotřeba energie
Pohotovostní režim mimo síť—Po 20 minutách nečinnosti se displej vypne. Síťový port
Wi-Fi je deaktivován.
0,2 W
Pohotovostní režim v síti—Po 20 minutách nečinnosti se displej vypne a všechny síťové
porty Wi-Fi zůstanou aktivní.
0,7 W
Vypnuto—Aktivace vypínačem vzadu na přístroji. 0,0 W

121
Bezpieczeństwo obsługi
OPrzeczytać uważnie poniższą instrukcję i zachować na wypadek potrzeby
skorzystania z niej w przyszłości.
OUsunąć wszelkie materiały pakunkowe i etykiety.
OZe względów bezpieczeństwa uszkodzony przewód musi zostać wymieniony
przez pracownika firmy Kenwood lub upoważnionego przez firmę Kenwood
zakładu naprawczego w celu uniknięcia zagrożenia.
Ważne informacje dla osób posiadających wszczepione implanty
elektroniczne
OJak wszystkie inne urządzenia podgrzewające na zasadzie indukcji, mikser
wytwarza pola magnetyczne o krótkim zasięgu. Jeżeli użytkownik urządzenia
lub osoby znajdujące się w pobliżu posiadają rozrusznik serca lub innego
rodzaju czynny implant, przed użyciem powinny skonsultować się z lekarzem,
by wyeliminować potencjalne zakłócenia pracy implantu i zagrożenia zdrowia.
OPrzed zakładaniem i zdejmowaniem nasadek i przyborów, po zakończeniu
pracy oraz przed czyszczeniem należy zawsze wyłączyć urządzenie i wyjąć
wtyczkę z gniazda sieciowego.
ODo obracających się elementów i zamontowanych na urządzenie nasadek nie
zbliżać części ciała, włosów, biżuterii i luźnych części garderoby.
ODo mechanizmu zawiasowego nie wkładać palców i innych części ciała.
OWłączonego urządzenia pracującego w trybie innym niż tryb gotowania nigdy
nie należy pozostawiać bez nadzoru.
O Pozostawiając pracujące w trybie gotowania urządzenie bez nadzoru, należy
zwrócić szczególną uwagę na następujące kwestie:
{ przestrzegać instrukcji dotyczących temperatury i maksymalnej ilości
składników do przygotowania;
{ urządzenie i przewód zasilający należy umieścić w miejscu niedostępnym dla
dzieci i z dala od krawędzi blatu;
{ regularnie sprawdzać postępy, aby mieć pewność, że w misce znajduje się
wystarczająca ilość wody, a potrawa nie rozgotowała się.
ONie używać uszkodzonego urządzenia. W razie uszkodzenia oddać do
sprawdzenia lub naprawy (zob. ustęp pt. „Serwis i punkty obsługi klienta”).
ONigdy nie stosować niekompatybilnych nasadek lub kilku nasadek
jednocześnie.
ONie przekraczać maksymalnej pojemności dla danego typu składników, a
używając grzałki indukcyjnej, nie przekraczać maksymalnego poziomu 3 l,
oznaczonego wewnątrz miski.
OKorzystając z nasadek, należy przeczytać załączoną do danej nasadki
instrukcję obsługi i bezpieczeństwa.
OPodczas podnoszenia urządzenia należy zachować ostrożność, ponieważ
jest ciężkie. Przed podniesieniem sprawdzić, czy głowica jest zablokowana, a
miska, przybory, osłony wyjść i przewód sieciowy nie są luźne.
OPodczas przemieszczania urządzenia zawsze podnosić je, trzymając za
podstawę i głowicę miksera. NIE podnosić ani nie przenosić urządzenia,
trzymając za uchwyt miski.
ONie dopuścić, by przewód sieciowy luźno zwisał w miejscach dostępnych dla
dzieci.
ONie wolno dopuszczać do zamoczenia korpusu z silnikiem, przewodu
sieciowego ani wtyczki.
OPodczas obsługi bądź dotykania pracujących w trybie gotowania części
urządzenia – W SZCZEGÓLNOŚCI MISKI, OSŁONY PRZECIWROZPRYSKOWEJ
ORAZ KOŃCÓWEK DO MIESZANIA – oraz po zakończeniu gotowania należy
zachować ostrożność, ponieważ pozostaną GORĄCE długo po wyłączeniu
urządzenia. Wyjmując i przenosząc miskę należy trzymać ją za uchwyty.
Gorącą miskę i przybory mieszające można dotykać wyłącznie po
założeniu rękawic kuchennych.
OSymbol na produkcie oznacza powierzchnię, która może nagrzewać się
podczas użytkowania.
O Podczas wymontowywania przyborów do użytku w misce po dłuższej pracy
należy zachować ostrożność, ponieważ mogą one być gorące.
Polski
Przed czytaniem prosimy roz¢o¯yç pierwszå stronë, zawierajåcå ilustracje

122
OSpód miski pozostaje gorący długo po wyłączeniu funkcji gotowania.
Dotykając miski należy zachować ostrożność i używać podkładki ochronnej,
by chronić nieodporne na ciepło powierzchnie i blaty.
ONależy uważać na wydostającą się z miski parę, szczególnie podczas
podnoszenia pokrywy w osłonie przeciwrozpryskowej lub unoszenia głowicy
miksera.
OPrzekładając gorące składniki z miksera do blendera, przed umieszczeniem ich
w blenderze należy zaczekać, aż ostygną do temperatury pokojowej.
OUżywać wyłącznie miski i przyborów załączonych w zestawie. Nie wolno
używać miski z innym źródłem ciepła.
ONie ustawiać urządzenia na tryb gotowania, jeżeli miska jest pusta.
ONie wkładać niczego do otworów wentylacyjnych.
OUżywając urządzenia należy ustawić je na płaskiej powierzchni, z daleka od
jej krawędzi. Urządzenie powinno znajdować się w odległości co najmniej 10
cm od ściany, a otwory wentylacyjne nie mogą być zasłonięte. Nie stawiać
miksera pod wiszącymi szafkami.
OAby zapewnić właściwe i bezpieczne działanie grzałki indukcyjnej, przed
rozpoczęciem gotowania należy sprawdzić, czy spód miski i czujniki
temperatury są czyste i suche.
ONa podstawie miski/płytki indukcyjnej nie należy kłaść metalowych
przedmiotów takich jak noże, widelce, łyżki bądź pokrywki, ponieważ mogą się
bardzo nagrzać.
OJak w przypadku innych indukcyjnych urządzeń do podgrzewania, w
pobliżu pracującego miksera nie wolno kłaść kart kredytowych, nośników
magnetycznych ani reagujących na pole magnetyczne urządzeń
elektronicznych.
ONie używać do smażenia na głębokim tłuszczu.
OPrzed spożyciem potrawy sprawdzić, czy jest dobrze ugotowana.
OGotując z użyciem oleju, nie przekraczać pojemności 250 ml.
OPotrawy należy spożyć bezpośrednio po przygotowaniu bądź szybko ostudzić
i natychmiast włożyć do lodówki.
OStosowanie urządzenia w sposób niezgodny z przeznaczeniem może grozić
wypadkiem.
OPodczas naciskania ekranu dotykowego nie używać zbyt dużej siły i nigdy nie
używać do tego celu ostrych przedmiotów.
ONie używać trzepaczki do gęstych mieszanin (np. ucierania cukru z tłuszczem),
ponieważ może to spowodować jej uszkodzenie.
OPrzewód zasilający ma zmniejszać zagrożenia związane z możliwością
zaplątania się w przewód lub potknięcia się o niego. Używanie przedłużaczy
jest dozwolone pod warunkiem zachowania ostrożności podczas ich
użytkowania. Podczas używania przedłużacza: 1) wartości zasilania podane
na tabliczce znamionowej przedłużacza muszą być co najmniej tak wysokie,
jak wartości podane na tabliczce znamionowej urządzenia; 2) przewód
należy ułożyć tak, by nie zwisał z blatów w miejscach, w których mogłoby
go pociągnąć dziecko, lub w których można by się o niego przez przypadek
potknąć. Jeżeli urządzenie jest wyposażone w uziemienie, należy stosować
przedłużacz z uziemieniem z przewodem trójżyłowym. Parametry elektryczne
urządzenia podane są na spodzie obudowy.
OUrządzenia mogą być użytkowane przez osoby o obniżonej sprawności
fizycznej, zmysłowej lub umysłowej lub osoby niemające doświadczenia
ani wiedzy na temat zastosowania tych urządzeń, o ile korzystają z nich
pod nadzorem odpowiedniej osoby lub otrzymały instrukcje dotyczące ich
bezpiecznej obsługi i rozumieją zagrożenia związane z ich użytkowaniem.
ONależy sprawować kontrolę nad dziećmi, żeby nie bawiły się urządzeniem.
OUrządzenia nie wolno obsługiwać dzieciom. Urządzenie i przewód sieciowy
należy przechowywać w miejscu niedostępnym dla dzieci.
OUrządzenie jest przeznaczone wyłącznie do użytku domowego. Firma
Kenwood nie ponosi żadnej odpowiedzialności w przypadku niewłaściwego
korzystania z urządzenia lub nieprzestrzegania niniejszych instrukcji.
OWartość maksymalna mocy urządzenia odnosi się do nasadki mini-
rozdrabniacza/młynka pracującej pod największym obciążeniem i pobierającej
największą ilość prądu. Pobór mocy innych przystawek może być mniejszy.

123
OUrządzenie nie jest przeznaczone do pracy z użyciem zewnętrznych
włączników czasowych ani oddzielnego systemu zdalnego sterowania.
O Nie ruszać ani nie unosić głowicy miksera, gdy na robocie zamocowana jest
jedna z nasadek, ponieważ może on utracić stabilność.
O Nie należy obsługiwać urządzenia stojącego w pobliżu krawędzi blatu ani
wystającego poza jego krawędź, ani nie stosować siły podczas obsługi nasadki
zamocowanej na urządzeniu, ponieważ może to spowodować utratę stabilności
i przewrócenie się urządzenia, co może skutkować urazem ciała użytkownika.
Parowar
O Urządzenie wytwarza parę, która może parzyć.
ONależy zachować ostrożność, by nie poparzyć się parą wydobywającą się
z kosza do gotowania na parze, szczególnie podczas zdejmowania osłony
przeciwrozpryskowej i unoszenia pokrywy gardzieli zasypowej.
OPodczas dotykania wszelkich elementów urządzenia należy zachować
ostrożność: wszystkie części koszyka i robota, a także znajdujące się w nich
płyny i skroplona para będą bardzo gorące. Założyć rękawice kuchenne.
OPrzed zdejmowaniem lub zakładaniem oraz czyszczeniem części wyłączyć
urządzenie i wyjąć wtyczkę z gniazda sieciowego.
Bezpieczeństwo żywności
OMięso, drób, ryby i owoce morza muszą być dobrze ugotowane. Nie wolno ich
gotować na parze z mrożonek.
OUgotowanej żywności nie podgrzewać ponownie w koszu do gotowania na
parze.
Przed podłączeniem do sieci
O Sprawdzić, czy napięcie sieciowe odpowiada danym znamionowym podanym na spodzie obudowy urządzenia.
O OSTRZEŻENIE: NINIEJSZE URZĄDZENIE MUSI BYĆ UZIEMIONE.
O Urządzenie spełnia wymogi rozporządzenia Wspólnoty Europejskiej nr 1935/2004 dotyczącego materiałów i wyrobów przeznaczonych
do kontaktu z żywnością.
O Niniejsze urządzenie spełnia zasadnicze wymogi i inne odpowiednie przepisy dyrektywy 2014/53/UE.
Przed pierwszym użyciem
O Umyć części (zob. część pt. „Konserwacja i czyszczenie”).
Robot kuchenny Kenwood Cooking Chef –
podstawowe informacje
Oznaczenia
Gniazda nasadek
1 Gniazdo obrotów wysokich (HSO)
2 Gniazdo obrotów niskich (SSO)
3 Gniazdo przyborów do użytku w misce
4 Gniazdo mieszadła
Mikser
5 Osłona gniazda obrotów wysokich
6 Głowica miksera
7 Osłona gniazda obrotów niskich
8 Miska
9 Dźwignia podnoszenia głowicy
10 Regulator
11 Włącznik
12 Wyświetlacz
13 Podkładka ochronna
14 Otwór odprowadzający
15 Podstawa miski/płytka indukcyjna
16 Otwory wentylacyjne
17 Czujniki temperatury
18 Osłona termiczna
19 Gumowa uszczelka (zdejmowana)
20 Osłona przeciwrozpryskowa
21 Pokrywa gardzieli zasypowej
22 Ubijak „K”
23 Końcówka do ucierania w wysokiej temperaturze
24 Trzepaczka
25 Końcówka do zagniatania ciasta
26 Mieszadło
27 Klips wspomagający mieszanie
28 Łopatka do pracy przy wysokiej temperaturze
29 Końcówka do zgarniania ciasta
30 Klucz
Parowar
31 Wsporniki uchwytów
32 Pierścień wspierający
33 Składane uchwyty
34 Wyjmowana taca
35 Wgłębienia przytrzymujące do jaj
Uwaga: nasadki pracujące na gnieździe obrotów niskich
Gniazdo obrotów niskich w tym modelu robota kuchennego to
gniazdo typu obrotowego (Twist), przeznaczone do nasadek
ze złączem obrotowym (Twist).
Nabywając nowe nasadki do napędu niskoobrotowego, należy
sprawdzić, czy są one kompatybilne z posiadanym robotem.
Kod produktu wszystkich nasadek ze złączem obrotowym
rozpoczyna się literami „KAX”; oznaczone są one także logo
systemu obrotowego: , umieszczonym na opakowaniu.
Aby móc używać posiadanych już nasadek ze złączem
belkowym (Bar) , konieczne jest zastosowanie nakładki
przejściowej KAT002ME, by można było podłączyć nasadkę
do gniazda obrotowego (Twist) robota .
Więcej informacji znajduje się na stronie
www.kenwoodworld.com/twist.

124
Łączenie się z aplikacją Kenwood World
Zob. ilustracje A – D
Aplikacja Kenwood World umożliwia obsługę urządzenia za
pomocą smartfona lub tabletu.
1 Podłączyć urządzenie do prądu i nacisnąć włącznik,
znajdujący się z boku korpusu z silnikiem.
2 Wybrać opcję Ustawienia > Wi-Fi > Połącz i
postępować zgodnie z instrukcjami na ekranie dotykowym.
Numer PIN
O Numer PIN należy podać na żądanie aplikacji Kenwood
World.
O Urządzenie można podłączyć wyłącznie wówczas, gdy na
ekranie wyświetlacza widnieje numer PIN. W razie wpisania
niewłaściwego numeru PIN należy postępować zgodnie
ze wskazówkami podawanymi przez aplikację i spróbować
ponownie.
O Aby wyświetlić numer PIN urządzenia, wybrać opcję
Ustawienia > WiFi > Połącz i postępować zgodnie
z instrukcjami na ekranie wyświetlacza (wyłącznie kiedy
urządzenie będzie połączone z siecią Wi-Fi).
Uwaga:
Wi-Fi
Działa wyłącznie z protokołem IEEE802.11 b, g oraz n w
częstotliwości 2,4 GHz.
Kompatybilność
Aplikacja Kenwood World jest kompatybilna z
najnowszymi wersjami systemu iOS oraz Android.
Resetowanie do ustawień fabrycznych
Uwaga!
O Usuwając urządzenie, należy pamiętać o zresetowaniu
go do ustawień fabrycznych, aby chronić swoje dane
osobowe.
O Wybranie tej opcji spowoduje usunięcie wszystkich danych
Wi-Fi przechowywanych w urządzeniu i przywrócenie go
do ustawień fabrycznych.
O Aby przywrócić urządzenie do ustawień fabrycznych,
wybrać Ustawienia >Resetowanie do ustawień
fabrycznych.
Konfigurowanie robota Cooking Chef
Connect
Zob. ilustracje E – I
UWAGA:
O Płytkę indukcyjną, czujniki temperatury i zewnętrzną
powierzchnię podstawy miski należy utrzymywać w
czystości. Zabrudzenia tych powierzchni wpływają na
pracę czujnika ciepła, w wyniku czego urządzenie nie
funkcjonuje poprawnie.
O Sprawdzić, czy wszystkie osłony, łącznie z osłoną
termiczną, są założone. Jeżeli osłony nie są poprawnie
założone, funkcja podgrzewania nie włączy się.
1 Podłączyć urządzenie do prądu i nacisnąć włącznik.
2 Dźwignię podnoszenia głowicy obrócić w kierunku
zgodnym z ruchem wskazówek zegara i unieść głowicę
miksera, aż zaskoczy.
3 Wepchnąć osłonę termiczną w spodnią część głowicy
miksera, tak, aby znalazła się we właściwym położeniu.
Osłony termicznej nie wolno używać bez poprawnie
założonej gumowej uszczelki.
O Jeżeli robot Cooking Chef Connect pracuje bez
podgrzewania, montowanie osłony termicznej
nie jest konieczne, chyba że używana jest osłona
przeciwrozpryskowa. Zob. część pt. „Montaż i korzystanie z
osłony przeciwrozpryskowej”.
4 Zamocować miskę w podstawie.
5 Wybraną końcówkę włożyć do gniazda przyborów do
użytku w misce lub gniazda mieszadła (jeżeli mieszadło ma
być używane), wypustkę na trzonku umieszczając w rowku,
a następnie przekręcić, by zaskoczyła we właściwe miejsce.
O Aby wyjąć końcówkę, opisany powyżej krok 5 wykonać w
odwrotnej kolejności. (Wyjmując przybory po zakończeniu
gotowania, należy zawsze zakładać rękawice kuchenne.)
6 Aby opuścić głowicę miksera, należy ją lekko unieść, a
następnie dźwignię do podnoszenia głowicy przekręcić w
kierunku zgodnym z ruchem wskazówek zegara.
Opuścić głowicę.
Mieszadło – używając mieszadła, można także skorzystać z
klipsa wspomagającego mieszanie – zob. część pt.: „Montaż
i demontaż klipsa wspomagającego mieszanie”. Mieszadła
można używać również w połączeniu z trzepaczką. Nie
należy go używać razem z końcówką do zagniatania ciasta.
Użytkowanie robota Cooking Chef Connect —
obsługa ręczna
1 Dodać składniki, które mają zostać ugotowane/
zmiksowane.
2 Ustawić wymagany czas, prędkość i temperaturę.
Uwaga: Aby korzystać z urządzenia jako miksera bez
funkcji podgrzewania, podczas ustawiania temperatury
należy wybrać opcję „Wył.”.
Aby skorzystać z mieszania przerywanego lub trybu pracy
przerywanej, przekręcić regulator w kierunku przeciwnym
do ruchu wskazówek zegara.
Aby skorzystać z prędkości stałych, przekręcić regulator w
kierunku zgodnym z ruchem wskazówek zegara.
3 Przycisnąć regulator, aby zacząć.
4 Aby w dowolnej chwili zatrzymać urządzenie, nacisnąć
regulator. W trybie gotowania należy zachować ostrożność,
ponieważ urządzenie będzie gorące.
Przycisk trybu wysokich obrotów i wysokiej
temperatury (HSHT)
Do mieszania na dużych prędkościach w temperaturze 60°C
i wyższej.
O Wybrać czas (jeśli dotyczy), prędkość i temperaturę
60°C lub wyższą.
O Na ekranie wyświetlacza pojawi się ostrzeżenie
informujące o wejściu w tryb HSHT.
O Po zapoznaniu się z ostrzeżeniem nacisnąć opcję „Tak”,
aby potwierdzić swoją chęć przejścia do trybu HSHT.
O Przycisnąć regulator, aby zacząć.
Powyższej funkcji można używać WYŁĄCZNIE przy
stosowaniu trzepaczki i/lub mieszadła. Należy założyć
osłonę przeciwrozpryskową i nie przekraczać maksymalnej
pojemności (3 l). Pracującego urządzenia nie wolno
pozostawiać bez nadzoru.
5 Po zakończeniu programu urządzenie wyda trzy sygnały
dźwiękowe.
O Uwaga: jeżeIi nie zostanie wybrany czas, procesy
podgrzewania i mieszania zakończą się automatycznie po
odliczeniu przez minutnik 8 godzin.
6 Aby zakończyć podgrzewanie, należy zmienić ustawienie
temperatury na „OFF” (wyłączona). Aby w dowolnej chwili
zatrzymać urządzenie, nacisnąć regulator.

125
Uwaga – Jeżeli w którymś momencie pracy głowica
miksera zostanie uniesiona, proces podgrzewania zostanie
przerwany, a końcówka do użytku w misce zatrzyma się
i po opuszczeniu głowicy miksera nie zacznie ponownie
pracy. Aby ponownie uruchomić mikser, opuścić głowicę i
nacisnąć regulator.
Korzystanie z zaprogramowanych funkcji
Zob. ilustracje P – R
1 Wybrać menu ustawień zaprogramowanych.
2 Wybrać ustawienie zaprogramowane, które ma zostać
użyte.
3 Postępować zgodnie z instrukcjami na ekranie
wyświetlacza.
4 Aby w dowolnej chwili zatrzymać urządzenie, nacisnąć
regulator. Zachować ostrożność, ponieważ miska i
przybory będą gorące.
Po zakończeniu gotowania
O Podczas obsługi bądź dotykania pracujących w trybie
gotowania części urządzenia – W SZCZEGÓLNOŚCI
MISKI ORAZ PRZYBORÓW – oraz po zakończeniu
gotowania należy zachować ostrożność, ponieważ
pozostaną one GORĄCE jeszcze długo po wyłączeniu
urządzenia.
O Wyjmując i przenosząc misę, należy trzymać ją za dwa
boczne uchwyty. Rozgrzanej miski i przyborów należy
dotykać przez rękawice kuchenne.
O Spód miski pozostaje gorący długo po wyłączeniu funkcji
gotowania. Przemieszczając miskę, należy zachować
ostrożność i używać załączonej w zestawie podkładki, aby
nie zniszczyć nieodpornych na ciepło powierzchni i blatów.
Porady i wskazówki
O Niektóre potrawy, szczególnie te o wysokiej zawartości
wody, nie osiągną temperatury gotowania powyżej
100°C (jest to temperatura wrzenia wody).
O Dodając składniki do miski podczas gotowania,
zmniejszyć prędkość i dodawać je powoli i
równomiernie.
O Aby szybko podgrzać sos, użyć trybu mieszania
ciągłego.
O Używając osłony przeciwrozpryskowej podczas
gotowania, przed podniesieniem głowicy miksera należy
zawsze najpierw zdjąć osłonę. Zachować ostrożność,
ponieważ na osłonie przeciwrozpryskowej i osłonie
termicznej skrapla się gorąca para.
O Podnosząc głowicę miksera należy robić to wolno, by
woda spłynęła ze spodu osłony termicznej z powrotem
do miski.
O Urządzenie wyposażone jest w cztery funkcje
opóźniania mieszania, co umożliwia wybranie
odpowiedniej dla danej potrawy ilości mieszania.
Niektóre potrawy wymagają ciągłego mieszania, by
składniki nie przywierały do dna miski, natomiast inne
lepiej mieszać sporadycznie, aby utrzymać żądaną
konsystencję składników.
Obsługa ręczna (nasadki)
1 Zdjąć osłonę gniazda szybkich obrotów/gniazda wolnych
obrotów (jeżeli ma zastosowanie).
2 Zamocować nasadkę, zgodnie z właściwą załączoną
instrukcją.
3 Ustawić wymagany czas i prędkość (zob. ilustracje L-M).
Przycisnąć regulator, aby zacząć.
Aby w dowolnej chwili zatrzymać urządzenie, ponownie
przycisnąć regulator.
Montaż i demontaż osłon gniazd
Osłona gniazda obrotów wysokich
1 Aby zdjąć osłonę, użyć uchwytu i unieść ją.
2 Aby zamocować osłonę, umieścić ją na gnieździe i
nacisnąć.
Osłona gniazda obrotów niskich
1 Aby zdjąć osłonę, użyć uchwytu znajdującego w jej
spodniej części i wyjąć ją.
2 Aby zamocować osłonę, wpasować znajdujący się w jej
górnej części zaczep w zagłębienie gniazda i nacisnąć
osłonę, aby wpiąć ją na swoje miejsce.
Użytkowanie wagi
Zob. ilustracje S
1 Wybrać funkcję ważenia na ekranie dotykowym.
2 Zamocować miskę.
3 Wyzerować szalę.
4 Zważyć składniki.
5 Aby zmienić jednostkę, dotknąć przycisku jednostki na
ekranie ważenia.
Uwaga: Przed ważeniem urządzenie należy umieścić na suchej,
płaskiej i stabilnej powierzchni. Podczas ważenia nie należy
wywierać nacisku na mikser ani na miskę, gdyż wpłynie to na
dokładność wyniku. Funkcji ważenia można używać zarówno
przy uniesionej, jak i opuszczonej głowicy miksera.
Waga waży dokładnie do 6 kg.

126
Tabela zaleceń dotyczących używania funkcji zaprogramowanych
Ustawienia domyślne można regulować, aby dostosować je do danego przepisu (tam, gdzie możliwość ta jest dostępna).
Niemożliwe do regulowania ustawienia wskazuje ikonka .
Kiedy na wyświetlaczu wyświetlony jest napis „Podgrzewanie”, minutnik rozpocznie odliczanie dopiero po osiągnięciu przez
urządzenie właściwej temperatury.
Zaprogramowana
funkcja
Zalecana końcówka/
mieszadło
Ustawienia domyślne
(regulowane)
Etap utrzymywania
w ciepłej
temperaturze
Przykładowe przepisy/zastoso-
wanie
Ubijanie białek 1 min. 15 sek.
(15 sek. – 5 min.)
Maks.
WYŁ.
Białka na piankę czekoladową
Ciasto biszkoptowe 1 min.
(30 sek. – 5 min.)
1 – Maks.
( – Maks.)
WYŁ.
Biszkopt Wiktorii, babeczki typu
cupcakes
Zagniatanie ciasta 10 minut
(1 min. – 30 min.)
Min. to 1
(min. – 2)
WYŁ.
Bułki, pizza
Wyrastanie ciasta 1 godz.
(5 min, – 2 godz.)
WYŁ.
30˚C
(25˚C – 35˚C)
Wyrastanie ciasta drożdżowego
Topienie czekolady 10 minut
(5 min. – 2 godz.)
60˚C
Pianka czekoladowa
Beza szwajcarska 10 minut
(1 min. – 20 min.)
Maks.
40˚C
Baza do masy lukrowej na bazie
masła
Beza włoska 4 minuty
(1 min. – 20 min.)
HSHT 6
( – Maks.)
60˚C – 85˚C
Cytrynowa tarta z bezą
Omlet norweski
Kompot owocowy 20 minut
(5 sek. – 2 godz.)
()
104˚C
30 minut
62˚C
Masy do ciast, polewy do
deserów
Popcorn 10 minut
(5 min. – 10 min.)
WYŁ
180˚C
Popcorn domowej roboty
* Aby za każdym razem uzyskać
optymalne wyniki, korzystać z
programu.

127
Tabela zaleceń dotyczących używania funkcji zaprogramowanych – cd.
Zaprogramowana
funkcja
Zalecana końcówka/
mieszadło
Ustawienia domyślne
(regulowane)
Etap utrzymywania
w ciepłej
temperaturze
Przykładowe przepisy/zastoso-
wanie
Gotuj na parze 20 minut
(5 min. – 45 min.)
WYŁ.
100˚C
Łosoś en papillote
Potrawy
jednogarnkowe
40 minut
(5 sek. – 8 godz.)
()
103˚C – 140˚C
30 minut
62˚C
Bolognese
Zupa z kawałkami
warzyw, mięsa
20 minut
(5 sek. – 8 godz.)
()
103˚C – 140˚C
30 minut
62˚C
Minestrone, buliony, krupnik
Wolnowar 2 hrs
(5 sek. – 8 godz.)
()
98˚C – 140˚C
30 minut
62˚C
Wołowina po burgundzku
Przepis
Marynata śliwkowa
200 g płynnego miodu
40 g miękkich śliwek
40 ml wody
1 Wszystkie składniki umieścić w mini-rozdrabniaczu/
młynku. Wstawić na noc do lodówki.
2 Zamocować nasadkę na mikserze stojącym.
3 Na 4 sekundy włączyć tryb pracy przerywanej.
4 Stosować w preferowany sposób.
Parowar
Zob. ilustracje T
O Używając kosza do gotowania na parze nie stawiać miksera
Cooking Chef pod wiszącymi szafkami ani zbyt blisko
ścian: wydobywająca się z urządzenia para mogłaby je
uszkodzić.
O Przyprawy należy dodawać po zakończeniu gotowania, co
pomaga zapobiec powstawaniu plam i śladów na misce ze
stali nierdzewnej.
1 Wyjmowaną tacę ze złożonymi do wewnątrz uchwytami
postawić na płaskiej powierzchni.
2 Na tacę nałożyć pierścień wspierający w taki sposób,
by wsporniki uchwytów na pierścieniu znalazły się obok
nacięć w kształcie litery V w tacy.
3 Rozłożyć uchwyty i zamocować je na wspornikach.
4 Składniki do ugotowania na parze umieścić na tacy.
Warzywa powinny być dobrze umyte, a w razie
konieczności także obrane.
5 Do miski wlać potrzebną ilość wody (zob. tabela ze
wskazówkami dotyczącymi gotowania). Najlepiej użyć
wody przefiltrowanej, ponieważ pomaga to zmniejszyć
ilość powstającego kamiennego osadu i plam.
6 Złożony kosz umieścić w misce – kosz sam zatrzyma się na
odpowiedniej wysokości.
7 Do głowicy miksera przymocować osłonę termiczną.
8 Miskę z koszem do gotowania na parze umieścić w robocie.
9 Opuścić głowicę i zamocować osłonę przeciwrozpryskową.
10 Wybrać zaprogramowane ustawienie funkcji gotowania
na parze i ustawić czas gotowania (zgodnie z tabelą
zalecanego czasu gotowania). Przycisnąć regulator, aby
zacząć.
11 Pozwolić urządzeniu gotować przez wymagany czas.
12 Zdjąć osłonę przeciwrozpryskową.
13 Podnieść głowicę.
14 Trzymając za uchwyty wyjąć kosz do gotowania na parze.
Uważać, by uchwyty nie złożyły się do środka.
15 Postawić kosz na dużym talerzu lub w innym odpowiednim
pojemniku.
16 Odpiąć uchwyty i złożyć je do wewnątrz. Zdjąć pierścień
wspierający i rozłożyć uchwyty.
17 Wyjąć ugotowane składniki.
Uwaga
Podczas dotykania wszelkich elementów urządzenia
należy zachować ostrożność: wszystkie części koszyka i
robota, a także znajdujące się w nich płyny i skroplona
para będą bardzo gorące. Założyć rękawice kuchenne.
O Podczas używania kosza do gotowania na parze nie
próbować zakładać przyborów miksujących.
O Podczas gotowania na parze w koszu nie wolno gotować
nic w misce.
Porady i wskazówki
O Pozostały w misce płyn doskonale nadaje się na zupę lub
wywar. Należy zachować ostrożność, ponieważ będzie
bardzo gorący.
O Układając składniki na tacy należy zostawić między nimi
odstępy.
O Przy dużej ilości składników należy je zamieszać po
upłynięciu połowy czasu gotowania.
O Składniki pokrojone na kawałki o podobnej wielkości
gotują się bardziej równomiernie.
O Gotując składniki więcej niż jednego typu, te
wymagające krótszego czasu gotowania należy dodać
później.

128
O Przy uniesionej pokrywie gardzieli zasypowej lub zdjętej osłonie przeciwrozpryskowej para wydostaje się na zewnątrz, czas
gotowania może się więc wydłużyć.
O Po wyłączeniu się robota składniki będą nadal się gotować, dlatego należy natychmiast wyjąć je z kosza.
O Jeżeli składniki nie zostały dobrze ugotowane, należy ponownie ustawić czas. Konieczne może być dolanie wody.
O Podany w tabeli czas gotowania służy wyłącznie za wskazówkę. Przed spożyciem potrawy sprawdzić, czy wszystkie składniki
są dobrze ugotowane.
O Nie dopuścić do wygotowania się wody – w razie konieczności dolać więcej.
Objaśnienie informacji pokazywanych na wyświetlaczu
Tej ikonki należy dotknąć, aby otworzyć menu ustawień.
Tej ikonki należy dotknąć, aby otworzyć menu funkcji zaprogramowanych.
Dotknięcie tej ikonki pozwala zważyć składniki w misce.
Wybrany czas, podany w godzinach (h), minutach (m) i sekundach (s).
Pokazuje wybraną długość przerwy w mieszaniu.
Jeżeli wybrana została prędkość przerywana (2 Æ 4), zewnętrzny pierścień będzie się
stopniowo powiększać, a kiedy się wypełni, urządzenie zacznie mieszać.
Wskazuje wybraną temperaturę.
Pulsujące czerwone tło wskazuje, że urządzenie znajduje się w trybie podgrzewania.
Stale czerwone tło wskazuje, że urządzenie osiągnęło ustawioną temperaturę.
Przerywana strzałka skierowana w dół wskazuje, że urządzenie stygnie.
Wskazuje, że ustawienia (czasu, prędkości lub temperatury) nie można regulować.
Informacje o stanie Tekst w tym miejscu podaje informacje o stanie.
Wskazuje, że miska, jej zawartość oraz wszelkie używane przybory i części urządzenia są
gorące. Zachować ostrożność.
Wskazuje, że urządzenie jest połączone z siecią Wi-Fi.
Wskazuje, że urządzenie znajduje się w trybie wysokich obrotów i wysokiej temperatury
(HSHT).
Aby skorzystać z mieszania przerywanego lub trybu pracy przerywanej, przekręcić
regulator w kierunku przeciwnym do ruchu wskazówek zegara.
Aby skorzystać z prędkości stałych min. – maks., przekręć regulator w kierunku zgodnym z
ruchem wskazówek zegara.

129
Przepisy
Przepis Używana końcówka/
mieszadło
Ustawienia
zaprogramowane /
ręczne
Składniki
Minestrone Zupa z kawałkami
warzyw, mięsa
20 minut
98˚C
Poniższe składniki dodać wszystkie jednocześnie:
100 g boczku typu pancetta,
pokrojonego w kostkę
2 ząbki czosnku, posiekane
50 g ryżu arborio
2½ łyżki stołowej przecieru pomidorowego
70 g kapusty włoskiej
1 łyżeczka suszonego rozmarynu
2 łyżeczki suszonej szałwii
1 seler naciowy, pokrojony na plastry
60 g pora, pokrojonego w krążki
75 g cebuli, pokrojonej w krążki
75 g marchewki, pokrojonej na plastry
1 l gorącego wywaru z warzyw
Sól, pieprz
Boeuf Stroganow Potrawy jednogarnkowe
30 minut
103˚C
Poniższe składniki dodać wszystkie jednocześnie:
600 g wołowiny, pokrojonej w kostkę
1 łyżka stołowa papryki słodkiej mielonej
1 łyżka stołowa masła
1 ząbek czosnku, posiekanego
400 g bulionu wołowego
200 g pieczarek, pokrojonych na plastry
150 g cebuli, pokrojonej w krążki
300 g marchewki, pokrojonej na plastry
200 ml śmietany
1 łyżka stołowa mąki kukurydzianej
1 łyżka stołowa wody }
wymieszać
razem
Sól, pieprz
Krem angielski Ustawienia ręczne
15 minut
85˚C
Poniższe składniki dodać wszystkie jednocześnie:
250 g pełnego mleka
250 g śmietany kremówki
1 łyżeczka ekstraktu wanilii
2 łyżka stołowa mąki kukurydzianej
96 g żółtek
}
wymieszać
razem
80 g bardzo miałkiego
cukru
Popcorn Popcorn
10 minut
WYŁ.
180˚C
Poniższe składniki dodać wszystkie jednocześnie:
50 g ziaren kukurydzy do prażenia
20 g oleju słonecznikowego
* Aby za każdym razem uzyskać optymalne wyniki,
korzystać z programu.
Pudding ryżowy Ustawienia ręczne
1 godz.
15 minut
95˚C
Poniższe składniki dodać wszystkie jednocześnie:
150 g ryżu krótkoziarnistego
1 l pełnego mleka
75 g bardzo miałkiego cukru
2 łyżeczka ekstraktu wanilii

130
Ustawienia temperatury i prędkości
Wskazówki dotyczące
temperatury
60°C Topienie czekolady
72°C – 82°C Gotowanie w niewielkiej ilości wody
98°C – 99°C Gotowanie na wolnym ogniu
100°C Zagotowywanie, gotowanie na parze
130°C – 140°C Podsmażanie warzyw w niewielkiej ilości tłuszczu
180°C Zrumienianie mięsa
(P) Tryb pracy przerywanej — wybrać, jeżeli urządzenie ma pracować w krótkich
seriach na najwyższej mocy.
Mieszanie przerywane 1 — mikser będzie pracować na stałej, wolnej prędkości
obrotów. Służy do łączenia lżejszych bądź rzadszych składników z gęstszymi
masami.
Mieszanie przerywane 2 — mieszanie przerywane z krótkimi przerwami. Przy
ustawieniu tej prędkości urządzenie sporadycznie (co 10 sekund) wykonuje 1,5
wolnego obrotu.
Mieszanie przerywane 3 — mieszanie przerywane ze średnimi przerwami. Przy
ustawieniu tej prędkości urządzenie sporadycznie (co 30 sekund) wykonuje 1,5
wolnego obrotu.
Mieszanie przerywane 4 — mieszanie przerywane z długimi przerwami. Przy
ustawieniu tej prędkości urządzenie sporadycznie (co 5 minut) wykonuje 1,5
wolnego obrotu.
Prędkość min – maks. Mieszanie nieprzerwane przy stopniowo zwiększającej się prędkości do prędkości
maksymalnej
HSHT Do mieszania w temperaturach powyżej 60˚C przy prędkościach min. – maks..
Tabela zaleceń
Wartości te służą jedynie za wskazówkę i będą różne w zależności od konkretnego przepisu i rodzaju rozdrabnianych składników.
Ubijak „K”
Do przygotowywania różnego rodzaju ciast, ciastek, lukru, polew, mas, nadzienia, eklerów i
purée z ziemniaków.
Porady i wskazówki
• Aby uniknąć rozchlapywania składników, prędkość zwiększać stopniowo.
• Aby całkowicie połączyć składniki ze sobą, mieszanie należy często przerywać i zgarniać
składniki osadzające się na bokach miski.
• Do ciast używać zimnych składników, chyba że w przepisie podano inaczej.
Przepis/sposób użycia
(Maks.) (Minuty)
Ciasta i ciastka – wcieranie tłuszczu do
mąki
Waga mąki 910 g Min. 12
Jednoetapowe ciasta w proszku Waga
całkowita
4 kg Min. Maks. 45–60 sekund
Końcówka do ucierania
Do ucierania i mieszania miękkich składników
Porady i wskazówki
• Aby uniknąć rozchlapywania składników, prędkość zwiększać stopniowo.
• Ucierając tłuszcz z cukrem na ciasta słodkie, używać tłuszczu w temperaturze pokojowej
lub zmiękczyć go przed użyciem.
• W zestawie z końcówką do ucierania w wysokiej temperaturze dostarczane są dwa pióra
wycieraka. Jednego pióra należy używać do potraw na słodko, a drugiego do potraw na
słono.
Przepis/sposób użycia
(Maks.) (Minuty)
Ucieranie masła/margaryny z cukrem 4,55 kg
(mieszanina z 15 jajami)
Min. Maks. 4
Wbijanie jaj do mieszanek na ciasta Min. Maks. 1–4
Łączenie składników lżejszych, rzadszych itp. (np.
mąki, owoców) z pozostałymi składnikam
Min. 1 30–60 sekund
Wielkość jaj użytych w przepisie = średnie (waga: 53-63 g).
Użyta śmietana do ubijania = świeża śmietana do ubijania o minimalnej zawartości 38% tłuszczu

131
Tabela zaleceń
Wartości te służą jedynie za wskazówkę i będą różne w zależności od konkretnego przepisu i rodzaju rozdrabnianych składników.
Trzepaczka
Do jaj, śmietany i sufletów.
Uwaga
• Aby uniknąć rozchlapywania składników, prędkość zwiększać stopniowo.
• Nie używać trzepaczki do gęstych mieszanin (jednoetapowe ciasta w proszku i
ucieranie cukru z tłuszczem), ponieważ można w ten sposób ją uszkodzić.
• Najlepsze wyniki daje używanie jaj o temperaturze pokojowej.
Przed ubijaniem białek sprawdzić, czy w misce i na trzepaczce nie ma pozostałości
tłuszczu bądź żółtek.
Przepis/sposób użycia
(Maks.) (Minuty)
Białka 16 (605 g)
Min. Maks.
1½-2
Beztłuszczowe ciasta biszkoptowe 930 g 4 -6
Śmietana 2 l 1½-3
Ciasto naleśnikowe
• Do miski najpierw dodać mąkę, a następnie składniki
mokre.
• Mieszać na prędkości minimalnej, aby połączyć
składniki.
350 g mąki
500 g mleka
200 g jaj
Min. 10 sekund
Maks. 45–60 sekund
Majonez
• Aby uzyskać możliwie najlepsze wyniki, po doda-
niu oleju zgarnąć składniki z boków miski i mieszać
przez kolejne 10 sekund na maksymalnej prędkości.
2 żółtka
10 g musztardy
200 ml oleju roślinnego
Maks. 1-1½
Końcówka do zagniatania ciasta
Do mieszanek na ciasto drożdżowe
Porady i wskazówki
Uwaga
• Nie przekraczać podanej maksymalnej ilości składników – może to spowodować
przeciążenie urządzenia.
• Jeżeli słychać, że silnik się przesila, wyłączyć urządzenie, wyjąć połowę ciasta i każdą
połowę przygotować osobno.
• Składniki mieszają się najlepiej, gdy najpierw wlane zostaną składniki płynne.
Drożdże
• Drożdże w proszku (typ wymagający rozpuszczenia w wodzie): ciepłą wodę wlać do
miski, dodać drożdże i cukier i pozostawić na ok. 10 minut (do spienienia).
• Świeże drożdże: wkruszyć do mąki.
• Inne rodzaje drożdży: przygotować zgodnie z zaleceniami producenta.
Przepis/sposób użycia
(Maks.) (Minuty)
Ciasto na chleb (twarde ciasto
drożdżowe)
Waga mąki 350 g–1,6 kg Min. 60 sekund
1 3–4
Waga
całkowita
564 g–2,58 kg Zagnieść ponownie na
prędkości 1
60 sekund
Miękkie ciasto drożdżowe (z dodatkiem
masła i jaj)
Waga mąki 250 g–1,6 kg Min 60 sekund
Waga
całkowita
478 g–3,1 kg 1 3–4
Zagnieść ponownie na
prędkości 1
60 sekund
Wielkość jaj użytych w przepisie = średnie (waga: 53-63 g).
Użyta śmietana do ubijania = świeża śmietana do ubijania o minimalnej zawartości 38% tłuszczu

132
Przewodnik dotyczący gotowania w nasadce do gotowania na parze
O Podany czas gotowania służy wyłącznie za wskazówkę. Używając składników wymagających czasu gotowania wynoszącego do
20 minut, można dodać 500 ml wody. Używając składników wymagających dłuższego czasu gotowania, dodać 650 ml wody.
O Nie dopuścić do tego, by woda się wygotowała — w razie konieczności dolać więcej.
O
Nie należy przepełniać kosza podczas gotowania na parze drobiu i ryb.
O
Zapoznać się z sekcją pt. „Bezpieczeństwo żywności” w części dotyczącej bezpieczeństwa.
Warzywa
Składnik
(Maks.) (minuty)
Ilość wody Sposób przygotowania
Szparagi 450 g 15 500 ml Obciąć
Fasolka zielona 450 g 15-20 500 ml Obciąć
Fasolka szparagowa 450 g 15-20 500 ml Obiąć i cienko pokrajać
Brokuły 450 g 20 500 ml Pokrajać na florety
Brukselka 450 g 25 500 ml Obciąć i naciąć głąby
Kapusta 1 mała 25 500 ml Poszatkować
Marchew 450 g 20 500 ml Cienko pokrajać
Kalafior 1 średni 25 - 30 650 ml Pokrajać na florety
Cukinie 450 g 15 500 ml Cienko pokrajać
Seler łodygowy 1 główka 15 500 ml Cienko pokrajać
Pory 3 15 500 ml Cienko pokrajać
Groszek w stråkach 250 g 15 500 ml Obciąć
Pieczarki 450 g 10 500 ml Wytrzeć
Pasternak 450 g 15 500 ml Pokrajać w plasterki lub cienko
posiekać
Groszek 450 g 15 500 ml Obłuskać
Młode ziemniaki 450 g 30-40 650 ml Oskrobać
Drób i ryby
Przepis/sposób użycia
(Maks.) (minuty)
ilość wody Uwagi
Filety z kurczëcia bez
kości
4 30-40 650 ml Parować, aż ugotowane na
wskroś i miękkie
Mięczaki 450 g 10 500 ml Parować, aż się
Krewetki, średnie 450 g 10 500 ml Parować, aż będą
Ryba, filety 230 g 10-20 500 ml Parować, aż będzie dzielić się na
płatki
Ryba, dzwonka grub. 2,5 cm 15-20 500 ml Parować, aż będzie dzielić się na
płatki
Ryba w ca¢oÿci 340 g 15-20 500 ml Parować, aż będzie dzielić się na
płatki
Szyjki homarów 2-4 20 500 ml Parować, aż będą czerwone
Muszle 450 g 15 500 ml Parować, aż się otworzą
Ostrygi 6 15 500 ml Parować, aż się otworzą
Przegrzebki 230 g 15 500 ml Parować, aż będą gorące i
miękkie

133
Regulacja wysokości końcówki
Zob. ilustracje U
Trzepaczka, ubijak „K”
Najlepsze wyniki uzyskuje się, gdy trzepaczka i ubijak „K”
prawie dotykają dna miski. W razie konieczności należy
wyregulować wysokość przyborów, używając załączonego w
zestawie klucza.
Końcówka do ucierania w wysokiej temperaturze – ta
końcówka powinna lekko dotykać dna miski.
1 Odłączyć urządzenie od źródła zasilania.
2 Unieść głowicę miksera i zamocować trzepaczkę, ubijak „K”
lub końcówkę do ucierania w wysokiej temperaturze.
3 Opuścić głowicę. Jeżeli konieczne jest wyregulowanie
wysokości, ponownie unieść głowicę i wyjąć końcówkę.
4 Za pomocą klucza załączonego w zestawie poluzować
nakrętkę na tyle, by możliwa była zmiana długości trzonka.
Aby opuścić końcówkę niżej (by znalazła się bliżej dna
miski), należy przekręcać trzonek w kierunku przeciwnym
do ruchu wskazówek zegara. Aby podnieść końcówkę
wyżej (dalej od dna miski), przekręcać w kierunku
zgodnym z ruchem wskazówek zegara.
5 Zakręcić nakrętkę.
6 Zamocować końcówkę w mikserze, a następnie opuścić
głowicę miksera. Sprawdzić pozycję końcówki (zob. punkty
powyżej).
7 W razie konieczności czynność powtarzać do momentu,
aż końcówka znajdzie się na odpowiedniej wysokości.
Po wyregulowaniu wysokości końcówki mocno zakręcić
nakrętkę.
Końcówka do zagniatania ciasta – wysokość tej końcówki
ustawiona jest fabrycznie i nie można jej regulować.
Mieszadło – ta końcówka powinna lekko dotykać dna miski.
1 Wyjąć wtyczkę urządzenia z gniazda zasilającego.
2 Unieść głowicę miksera i wsunąć mieszadło.
3 Opuścić głowicę miksera. Jeżeli wysokość zawieszenia
końcówki trzeba wyregulować, unieść głowicę miksera i
za pomocą klucza poluzować nakrętkę. Następnie opuścić
głowicę miksera.
4 Aby opuścić końcówkę niżej (by znalazła się bliżej dna
miski), należy przekręcać pokrętło do regulacji w kierunku
zgodnym z ruchem wskazówek zegara. Aby podnieść
końcówkę wyżej (dalej od dna miski), przekręcać pokrętło
do regulacji w kierunku przeciwnym do ruchu wskazówek
zegara.
5 Ponownie dokręcić nakrętkę.
Montaż i korzystanie z osłony
przeciwrozpryskowej
Zob. ilustracje V
Zespół przeciwrozpryskowy składa się z dwóch elementów:
osłony termicznej i osłony przeciwrozpryskowej.
Osłona termiczna chroni głowicę miksera przed tworzącą się
podczas gotowania parą.
Osłonę przeciwrozpryskową można montować do miski
wyłącznie w połączeniu z osłoną termiczną.
1 Unieść głowicę miksera aż zaskoczy.
2 Wepchnąć osłonę termiczną w spodnią część głowicy
miksera, aż znajdzie się we właściwym położeniu. Osłony
termicznej nie wolno używać bez poprawnie założonej
gumowej uszczelki.
3 Umieścić miskę w podstawie.
4 Opuścić głowicę.
5 Ułożyć osłonę przeciwrozpryskową na wierzchu miski,
a następnie wsunąć do przodu, aż znajdzie się we
właściwym położeniu.
O Podczas mieszania składniki można wrzucać bezpośrednio
do miski przez otwór w osłonie (gardziel zasypową).
6 Aby zdjąć osłonę przeciwrozpryskową, wystarczy ją
wysunąć.
Uwaga: Podczas podnoszenia głowicy miksera osłona
przeciwrozpryskowa pozostanie przymocowana do osłony
termicznej, chyba że przed podniesieniem głowicy zostanie
ona zdjęta.
7 Aby zdjąć osłonę termiczną, unieść głowicę miksera, aż
zaskoczy. Wyjąć końcówkę, a następnie pociągnąć osłonę
termiczną w dół i wyjąć ją spod głowicy.
Uwaga: Osłonę przeciwrozpryskową należy zakładać i
wyjmować wyłącznie, gdy głowica miksera znajduje się w
pozycji zablokowanej.
Montaż i demontaż klipsa wspomagającego
mieszanie
Klipsa wspomagającego mieszanie można używać do pomocy
podczas mieszania.
1 Klips zamocować na brzegu miski, pionowy grzbiet
umieszczając wewnątrz, a klamry na zewnątrz miski.
2 Przekręcić klips w kierunku przeciwnym do ruchu
wskazówek zegara nad uchwyt miski.
3 Aby zdjąć osłonę, wykonać powyższą procedurę w
odwrotnej kolejności.
WAŻNE — klips wspomagający mieszanie nie powinien być
zamocowany w czasie korzystania z ubijaka „K”, trzepaczki,
końcówki do zagniatania ciasta i końcówki do ucierania.
Składanie końcówki do ucierania w wysokiej
temperaturze
Zob. ilustracje X
Montaż pióra wycieraka
Pióro wycieraka zostało zamocowane fabrycznie, a przed
każdym czyszczeniem należy je zdjąć.
1 Ostrożnie założyć elastyczne pióro na końcówkę,
wpasowując podstawę pióra w otwór, następnie wsunąć
jedną połowę pióra w rowek, a potem koniec zahaczyć
o haczyk w górnej części końcówki. W taki sam sposób
nałożyć drugą połowę pióra.
Konserwacja i czyszczenie
O Przed przystąpieniem do czyszczenia wyłączyć mikser i
wyjąć wtyczkę z gniazda sieciowego.
O Podczas pierwszego użycia wyjścia wokół wyjścia
może pojawić się niewielka ilość smaru. Jest to całkowicie
normalne – smar wystarczy wytrzeć.
O W miarę użytkowania, na metalowych powierzchniach
czujników temperatury mogą pojawić się ślady zużycia. Nie
ma to wpływu na poprawną pracę urządzenia.
O Nie należy zostawiać elastycznego ubijaka do wysokiej
temperatury zamontowanego w mikserze, gdy urządzenie
nie pracuje.
Urządzenie, osłony wyjść
O Wytrzeć wilgotną szmatką, a następnie wysuszyć.
O Do czyszczenia nie używać środków ściernych ani nie
zanurzać urządzenia w wodzie.
Końcówka do ucierania w wysokiej temperaturze
O Przed czyszczeniem zdjąć elastyczne pióro z wycieraka.
O Końcówkę i elastyczne pióro umyć w ciepłej wodzie z
dodatkiem płynu do naczyń, a następnie dobrze wysuszyć.
Elementy te można także myć w zmywarce do naczyń.
Uwaga: przed i po użyciu należy sprawdzić stan końcówki,
a także regularnie sprawdzać stan elastycznego pióra i po
zauważeniu wszelkich śladów zużycia wymienić je na nowe.

134
Miska, przybory, osłona przeciwrozpryskowa, klips
O Umyć w zmywarce do naczyń bądź ręcznie, a następnie
dobrze wysuszyć (Zob. tabela na początku niniejszej
instrukcji.).
O Do czyszczenia miski ze stali nierdzewnej nie używać
szczoteczek drucianych, druciaków ani środków
wybielająco-dezynfekujących. Aby usunąć kamienny osad,
stosować ocet lub odpowiedni preparat do usuwania
kamienia.
O Jeżeli do wnętrza miski przywarły bądź przypaliły się
resztki jedzenia, należy je w możliwie największym
stopniu usunąć za pomocą załączonej w zestawie łopatki.
Następnie napełnić miskę ciepłą wodą z dodatkiem płynu
na mycia naczyń i pozostawić do odmoczenia. Uporczywy
osad usunąć szczotką z nylonowego włosia.
O Wszelkiego rodzaju plamy i przebarwienia miski nie
wpływają na jej poprawne funkcjonowanie.
Otwór odprowadzający
O Dbać, by w pobliżu otworu nie znajdowały się resztki
jedzenia. W razie konieczności wyczyścić używając środka
do czyszczenia rur bądź patyczka kosmetycznego.
Czujniki temperatury
O Wytrzeć wilgotną szmatką, a następnie dobrze wysuszyć.
Do czyszczenia czujników nie wolno używać środków
ściernych ani ostrych przedmiotów.
Parowar
O Przed zdjęciem nasadki z miksera należy zawsze wyłączyć
urządzenie i wyjąć wtyczkę z gniazda sieciowego.
O Mycie przyborów bezpośrednio po użyciu ułatwia
utrzymywanie ich w czystości. Wszystkie elementy można
myć w gorącej wodzie z dodatkiem płynu do naczyń.
Należy je następnie dokładnie wysuszyć. Elementy można
także myć w zmywarce do naczyń.
O Zwykła woda oraz żywność zawierają sole i kwasy,
które mogą czasem pozostawiać ślady na metalowych
powierzchniach, takich jak wnętrze miski. W takim
przypadku należy je wyczyścić nylonową szczotką,
niezawierającym środków ściernych proszkiem do
czyszczenia lub markowym środkiem do czyszczenia
przedmiotów ze stali nierdzewnej.
Serwis i punkty obsługi klienta
O W razie wszelkich problemów z obsługą urządzenia
przed zwróceniem się o pomoc należy zapoznać się ze
wskazówkami w części pt.: „Rozwiązywanie problemów”
w instrukcji obsługi urządzenia lub odwiedzić stronę
internetową www.kenwoodworld.com.
O Prosimy pamiętać, że niniejszy produkt objęty jest
gwarancją, która spełnia wszystkie wymogi prawne
dotyczące wszelkich istniejących praw konsumenta oraz
gwarancyjnych w kraju, w którym produkt został zakupiony.
O W razie wadliwego działania produktu marki Kenwood
lub wykrycia wszelkich usterek prosimy przesłać lub
dostarczyć urządzenie do autoryzowanego punktu
serwisowego firmy KENWOOD. Aktualne informacje na
temat najbliższych punktów serwisowych firmy KENWOOD
znajdują się na stronie internetowej firmy, pod adresem
www.kenwoodworld.com lub adresem właściwym dla
danego kraju.
O Zaprojektowała i opracowała firma Kenwood w Wielkiej
Brytanii.
O Wyprodukowano w Chinach.
Uwagi dotyczące prawidłowego usuwania produktu.
Na koniec okresu użyteczności produktu nie należy wyrzucać
do odpadów miejskich. Można go dostarczyć do odpowiednich
ośrodków segregujących odpady przygotowanych przez
władze miejskie lub do jednostek zapewniających takie usługi.
Osobne usuwanie sprzętu AGD pozwala uniknąć negatywnych
skutków dla środowiska naturalnego i zdrowia z powodu jego
nieodpowiedniego usuwania i umożliwia odzyskiwanie
materiałów, z których jest złożony, w celu uzyskania znaczącej
oszczędności energii i zasobów. Zużyty sprzęt może mieć
szkodliwy wpływ na środowisko i zdrowie ludzi, z uwagi na
potencjalną zawartość niebezpiecznych substancji, mieszanin
oraz części składowych. Na obowiązek osobnego usuwania
sprzętu AGD wskazuje umieszczony na produkcie symbol
przekreślonego pojemnika na śmieci.
Rozwiązywanie problemów
Problem Przyczyna Rozwiązanie
Mikser nie pracuje w trybie
podgrzewania, wyświetla komunikat o
błędzie i wydaje sygnał ostrzegawczy.
Włączył się jeden z czujników
bezpieczeństwa.
Sprawdzić komunikat na ekranie wyświetlacza,
wskazujący przyczynę problemu.
• Opuścić i zablokować głowicę.
• Sprawdzić, czy wszystkie osłony wyjść są
poprawnie założone.
• Sprawdzić, czy osłona termiczna jest
poprawnie założona.
• Sprawdzić, czy miska została poprawnie
założona.
Urządzenie zmienia prędkość obrotów
lub nie osiąga podczas gotowania
wszystkich prędkości.
Prędkość obrotów automatycznie
zmniejsza się, gdy zawartość miski
osiągnie temperaturę 60°C – zapala
się wtedy wskaźnik ostrzegający przed
wysoką temperaturą.
Ustawić prędkość obrotów.

135
Rozwiązywanie problemów (c.d.)
Problem Przyczyna Rozwiązanie
Składniki przypalają się do dna miski. 1 Wybrana temperatura może być za
wysoka.
2 Używana jest niewłaściwa końcówka.
3 Wybrano zbyt duże opóźnienie
mieszania.
4 Końcówka może nie być
wystarczająco nisko opuszczona w
misce.
5 Minutnik ustawiono na zbyt długi
okres czasu.
6 Czujnik temperatury i/lub spód miski
może być zabrudzony.
1 Obniżyć temperaturę.
2 Sprawdzić, czy używana jest
najodpowiedniejsza końcówka i czy
wysokość jej zawieszenia jest prawidłowo
wyregulowana.
3 Zwiększyć częstotliwość włączania się funkcji
opóźniania mieszania lub zmienić tryb na
ciągły.
4 Wyregulować wysokość końcówki w misce.
5 Gotować przez krótszy okres czasu
(pamiętając jednak, by składniki zostały
całkowicie ugotowane).
6 Czujniki temperatury i spód miski muszą być
suche i czyste.
Właściwa konsystencja składników nie
jest utrzymywana.
1 Wybrana temperatura jest zbyt
wysoka.
2 Funkcja opóźniania mieszania włącza
się zbyt często.
3 Składniki gotowane są zbyt długo.
4 Używana jest niewłaściwa końcówka.
1 Zmniejszyć temperaturę.
2 Zmniejszyć ustawienie opóźnienia mieszania.
3 Zmniejszyć czas gotowania (pamiętając
jednak, by składniki zostały całkowicie
ugotowane).
4 Sprawdzić, czy używana jest
najodpowiedniejsza końcówka.
Prędkość mieszania jest nierówna. 1 Składniki są zbyt duże bądź zbyt
twarde.
1 Pokroić składniki na mniejsze kawałki, z
owoców usunąć pestki, powoli roztopić
składniki bez założonej końcówki (ustawiając
jedną z prędkości).
2 Składniki dodać po opuszczeniu głowicy.
3 Sprawdzić, czy używana jest
najodpowiedniejsza końcówka.
Podczas zamykania głowicy miksera
występują problemy.
1 Jeżeli składniki nie zostaną dobrze
wymieszane, temperatura w różnych
miejscach miski będzie inna.
2 Mieszadło jest nieprawidłowo
zamocowane.
1 Odczekać wystarczającą ilość czasu, by
składniki zostały dobrze wymieszane.
2 Sprawdzić, czy mieszadło zostało
zamocowane w gnieździe mieszadła.
Używanie nasadek ogranicza prędkość
silnika.
Założono gorącą miskę. Wyjąć miskę lub schłodzić ją do temperatury
poniżej 60°C.
Trzepaczka lub ubijak „K” uderza o
dno miski lub nie sięga składników
znajdujących się na jej dnie.
Końcówka do ucierania w wysokiej
temperaturze nie sięga składników
znajdujących się na dnie miski.
Niewłaściwa wysokość zawieszenia
końcówki – należy ją wyregulować.
Wyregulować wysokość za pomocą
odpowiedniego klucza — zob. część pt.
„Regulacja wysokości końcówki”.
Trzepaczka, ubijak „K” lub końcówka do
ucierania uderza o klips wspomagający
mieszanie.
Założony jest klips wspomagający
mieszanie.
Zdjąć klips wspomagający mieszanie –
powinien on być używany wyłącznie z
mieszadłem.
Nasadki do pracy na gnieździe obrotów
niskich nie da się zamocować.
Sprawdzić, czy nasadka jest
kompatybilna z posiadanym modelem
robota. Wymagana jest nasadka ze
złączem obrotowym (model KAX)
Aby pasować do gniazda, nasadka musi być
wyposażona w złącze obrotowe KAX .
Aby móc używać posiadanych już nasadek
ze złączem belkowym , konieczne
jest zastosowanie nakładki przejściowej
KAT002ME, by można było podłączyć nasadkę
do gniazda obrotowego (Twist) robota. Więcej
informacji znajduje się na stronie
www.kenwoodworld.com/twist.
Wskaźnik trybu czuwania miga po
podłączeniu robota do źródła zasilania.
Głowica miksera znajduje się w pozycji
uniesionej lub nie została prawidłowo
zablokowana.
Sprawdzić, czy głowica miksera stojącego
została prawidłowo zablokowana.

136
Rozwiązywanie problemów (c.d.)
Problem Przyczyna Rozwiązanie
Mikser stojący zatrzymuje się podczas
pracy.
Wskaźnik trybu czuwania miga bardzo
szybko przez kilka sekund.
Włączyła się ochrona przeciążeniowa
lub system zabezpieczający przed
przegrzaniem.
Przekroczono maksymalną ilość
składników.
Wyjąć wtyczkę z gniazda sieciowego i
sprawdzić, czy nic nie przeszkadza w pracy
urządzenia lub nie powoduje jego przeciążenia.
Jeżeli robot wciąż nie działa, wyjąć część
składników z miski, aby odciążyć silnik, i
ponownie uruchomić urządzenie.
Jeżeli powyższe czynności nie rozwiązują
problemu, wyjąć wtyczkę z gniazda
sieciowego i odczekać 15 minut. Podłączyć
urządzenie do zasilania i ponownie wybrać
poprzednio ustawioną prędkość.
Jeżeli po wykonaniu powyższej procedury
robot nadal się nie uruchamia, należy
skontaktować się z działem obsługi klienta.
Mikser stojący zatrzymuje się podczas
pracy. Wskaźnik trybu czuwania miga
wolno.
Głowica miksera została uniesiona. Opuścić głowicę miksera i ponownie
uruchomic urządzenie.
Wskaźnik trybu czuwania nie świeci się,
choć urządzenie jest podłączone do
zasilania.
Mikser stojący był podłączony do
zasilania przez ponad 20 minut, ale
nie został użyty i przeszedł do trybu
czuwania.
Nacisnąć ekran dotykowy lub przekręcić
regulator, aby wyzerować urządzenie.
Mikser stojący zatrzymuje się podczas
pracy.
Zdjęto osłonę termiczną lub osłonę
gniazda.
Zamocować osłonę termiczną lub osłonę
gniazda, a następnie ponownie uruchomić
urządzenie.
Na ekranie wyświetlacza wyświetlany
jest alfanumeryczny kod błędu.
Urządzenie nie działa prawidłowo. Skontaktować się z autoryzowanym punktem
serwisowym firmy Kenwood. Aktualne
informacje na temat najbliższych punktów
serwisowych firmy Kenwood znajdują się
na stronie internetowej firmy, pod adresem
www.kenwoodworld.com lub adresem
właściwym dla danego kraju.
Brak dopływu zasilania do urządzenia/
wyświetlacz nie włącza się.
Urządzenie nie jest podłączone do
prądu.
Nie naciśnięto włącznika.
Urządzenie przeszło w tryb czuwania.
Sprawdzić, czy wtyczka jest podłączona do
prądu
Nacisnąć włącznik tak aby
znalazł się w pozycji „włączony”.
Dotknąć wyświetlacza lub przekręcić regulator.
Urządzenie nie działa. Regulator nie został naciśnięty. Przycisnąć regulator, aby zacząć gotowanie.
Minutnik na wyświetlaczu nie odlicza
czasu.
Podczas etapu podgrzewania
minutnik nie odlicza czasu – odliczanie
rozpoczyna się dopiero po osiągnięciu
odpowiedniej temperatury.
Ustawiona temperatura wynosi powyżej
100˚C, ale zawarta w składnikach woda
uniemożliwia osiągnięcie temperatury
powyżej 100˚C.
Działanie normalne.
Zmniejszyć wartość lub ustawić prawidłową
temperaturę.
Temperatura składników w misce nie
wzrasta powyżej 100˚C.
Zawarta w składnikach woda może
uniemożliwiać osiągnięcie temperatury
powyżej 100˚C.
Działanie normalne.
Podczas pracy urządzenie porusza
końcówką z trudnością lub nadmiernie
wibruje.
Nierównomierne rozłożenie składników
w misce powoduje nadmierne wibracje.
Przekroczono maksymalną pojemność.
Źle dobrana końcówka lub prędkość.
Zmniejszyć ilość składników lub rozłożyć
je bardziej równomiernie i zrestartować
urządzenie.
Informacje na temat dobierania właściwych
końcówek i prędkości podano w tabeli
programów i tabeli zalecanych prędkości.
Wyświetlacz pokazuje komunikat o
błędzie E:34
Problem z łącznością z siecią Wi-Fi. Sprawdzić hasło sieci Wi-Fi.
Zapomnieć sieć Wi-Fi: przejść do ustawień
> Wi-Fi > Zapomnij sieć.
Zrestartować ustawienia
urządzenia z aplikacji Kenwood
World.
wolne miganie Nie można znaleźć znanej sieci
Wi-Fi.
Urządzenie mogło zostać przesunięte bądź
też router może być wyłączony lub wymagać
ponownego uruchomienia.

137
Rozwiązywanie problemów (c.d.)
Problem Przyczyna Rozwiązanie
szybkie miganie Sieć Wi-Fi jest dostępna, ale nie
można nawiązać połączenia z
serwerami chmurowymi.
Router może wymagać ponownego
uruchomienia bądź też konieczne może być
skontaktowanie się z dostawcą usług
internetowych.
Sprawdzić, czy działa połączenie z Internetem
w sieci lokalnej.
Wyświetlacz pokazuje komunikat o
błędzie E42.
Błąd wygotowania się wody (błąd
funkcji gotowania na parze).
Do miski dolać wody.
Wyjaśnienie sygnałów dźwiękowych urządzenia
1) Szybki, pojedynczy sygnał
dźwiękowy
2) Dwa szybkie sygnały dźwiękowe
3) Trzy sygnały dźwiękowe
1) Przyciśnięcie regulatora w celu
włączenia lub wyłączenia urządzenia
lub uniesienie głowicy w czasie pracy.
2) Urządzenie czeka – urządzenie wyda
dwa szybkie sygnały dźwiękowe
na 10 i 5 minut przed końcem
cyklu utrzymywania w ciepłej
temperaturze.
3) Sygnał ma następujące znaczenie:
- koniec zaprogramowanej funkcji
- koniec pracy w trybie ręcznym
- koniec cyklu utrzymywania w
ciepłej temperaturze
- urządzenie za chwilę zacznie
mieszanie.
Działanie normalne.
Działanie normalne.
Działanie normalne.
Punkt obsługi klienta może poprosić o podanie wersji oprogramowania urządzenia. Dane te można znaleźć, naciskając ikonkę menu
ustawień, następnie wybierając opcję „Wersja”.
Na ekranie wyświetlacza widnieje
symbol „- -”.
Szala jest zerowana. Działanie normalne.
Na ekranie wyświetlacza widnieje
odczyt ujemny.
Wyświetlacz nie został wyzerowany i
składniki albo misa/pokrywa/nasadka
zostały zdjęte.
Składniki lub przedmioty naciskają na
urządzenie lub znajdują się pod nim.
Urządzenie jest przyciśnięte do ściany.
Należy albo wyzerować wyświetlacz i
ponownie położyć na szali brakujące składniki,
albo ponownie zamocować miskę.
Upewnić się, że żadne składniki ani przedmioty
nie naciskają na urządzenie ani nie znajdują się
pod nim.
Upewnić się, że między urządzeniem a
wszelkimi ścianami jest przerwa.
Przed zważeniem następnych składników
wyzerować wyświetlacz.
Wyświetlacz nie rejestruje małych ilości. Ważona ilość jest zbyt mała. Do odmierzania bardzo małych ilości użyć
łyżeczki lub łyżki stołowej.
Pokazywana na wyświetlaczu waga
zmieniła się.
Urządzenie zostało poruszone podczas
pracy.
Krawędź miski została dotknięta
podczas ważenia składników.
Przed ważeniem urządzenie należy umieścić
na suchej, płaskiej i stabilnej powierzchni.
Podczas pracy wagi nie należy przesuwać
urządzenia ani nie dotykać miski.
Przed zważeniem następnych składników
wyzerować wyświetlacz.
Nie jest możliwa szybka zmiana z
systemu metrycznego na system
angielski.
Urządzenie jest w trakcie ponownej
konfiguracji, aby wyświetlać wybraną
wcześniej jednostkę i miarę.
Odczekać 5 sekund i spróbować ponownie.
Ważenie za pomocą aplikacji (waga
wyświetlana na urządzeniu mobilnym)
reaguje powoli.
Słaba siła sygnału Wi-Fi.
Urządzenie mobilne nie jest podłączone
do tej samej lokalnej domowej sieci
Wi-Fi.
Upewnić się, że urządzenie odbiera sygnał o
dobrej sile (skontaktować ze swoim dostawcą
usług internetowych, aby uzyskać wskazówki
dotyczące sposobów poprawy siły sygnału).
Upewnić się, że urządzenie mobilne jest
podłączone do tej samej lokalnej domowej
sieci Wi-Fi, co urządzenie (przejść do ustawień
urządzenia mobilnego i wybrać lokalną sieć
Wi-Fi).
Jeżeli problem nie przestanie się pojawiać, prosimy skontaktować się z najbliższym autoryzowanym punktem serwisowym
firmy Kenwood. Aktualne informacje na temat najbliższych punktów serwisowych firm Kenwood znajdują sie na stronie
internetowej firmy, pod adresem www.kenwoodworld.com lub adresem właściwym dla danego kraju.

138
Informacje dotyczące ekoprojektu
Port sieciowy: Pojedynczy port sieciowy Wi-Fi, aktywny domyślnie.
Nr modelu: TYPE: KCL95
Zakres częstotliwości radiowej: 2412 - 2472 MHz
Maksymalna moc nadawania: < 20 dBm
Protokół komunikacyjny: IEEE802.11 b, g, n
Model KCL95 wyposażony jest w pojedynczy port sieci Wi-Fi i jest przeznaczony do stosowania jako zdalnie sterowany sprzęt
sieciowy.
O Port sieciowy można wyłączyć w menu ustawień Wi-Fi poprzez wybranie opcji „Wyłączony”.
O Port sieciowy można ponownie włączyć w menu ustawień Wi-Fi poprzez wybranie opcji „Włączony”.
Ponowne uruchomienie: Urządzenie można uruchomić ponownie z trybu czuwania w następujący sposób:
O Z trybu czuwania z połączeniem z siecią: dotknąć ekranu wyświetlacza, obrócić regulator lub zdalnie za pomocą aplikacji.
O Z trybu czuwania bez połączenia z siecią: dotknąć wyświetlacza lub przekręcić regulator.
O Aby urządzenie główne można było obsługiwać zdalnie, przez cały czas powinny być na nim zamocowane misa i pokrywa.
Resetowanie do ustawień fabrycznych — ważne informacje
Usuwając urządzenie, należy pamiętać o zresetowaniu go do ustawień fabrycznych, aby chronić swoje dane osobowe. Wybranie tej
opcji spowoduje usunięcie wszystkich danych Wi-Fi przechowywanych w urządzeniu i przywrócenie go do ustawień fabrycznych.
Aby przywrócić urządzenie do ustawień fabrycznych, wybrać Ustawienia > Resetowanie do ustawień fabrycznych.
WITRYNA INTERNETOWA
Modes Power consumption
Tryb czuwania bez połączenia z siecią — po 20 minutach braku aktywności ekran
wyświetlacza wyłącza się. Port sieciowy Wi-Fi wyłączony.
0,2 W
Tryb czuwania z połączeniem z siecią — po 20 minutach braku aktywności ekran
wyświetlacza wyłącza się, ale wszystkie porty sieciowe Wi-Fi pozostają włączone.
0,7 W
Wyłączony — włączany za pomocą włącznika z tyłu urządzenia. 0,0 W


Kenwood Ltd
New Lane
Havant
Hampshire
PO9 2NH
kenwoodworld.com
© Copyright 2022 Kenwood Limited. All rights reserved 5720001843/5
-
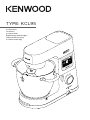 1
1
-
 2
2
-
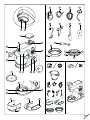 3
3
-
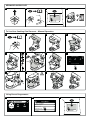 4
4
-
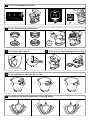 5
5
-
 6
6
-
 7
7
-
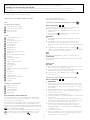 8
8
-
 9
9
-
 10
10
-
 11
11
-
 12
12
-
 13
13
-
 14
14
-
 15
15
-
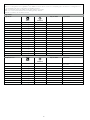 16
16
-
 17
17
-
 18
18
-
 19
19
-
 20
20
-
 21
21
-
 22
22
-
 23
23
-
 24
24
-
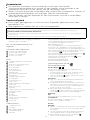 25
25
-
 26
26
-
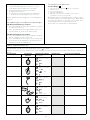 27
27
-
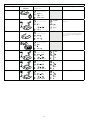 28
28
-
 29
29
-
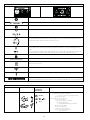 30
30
-
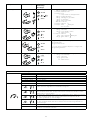 31
31
-
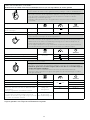 32
32
-
 33
33
-
 34
34
-
 35
35
-
 36
36
-
 37
37
-
 38
38
-
 39
39
-
 40
40
-
 41
41
-
 42
42
-
 43
43
-
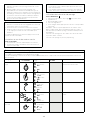 44
44
-
 45
45
-
 46
46
-
 47
47
-
 48
48
-
 49
49
-
 50
50
-
 51
51
-
 52
52
-
 53
53
-
 54
54
-
 55
55
-
 56
56
-
 57
57
-
 58
58
-
 59
59
-
 60
60
-
 61
61
-
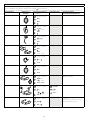 62
62
-
 63
63
-
 64
64
-
 65
65
-
 66
66
-
 67
67
-
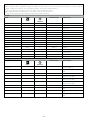 68
68
-
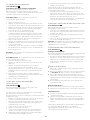 69
69
-
 70
70
-
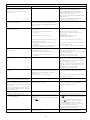 71
71
-
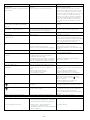 72
72
-
 73
73
-
 74
74
-
 75
75
-
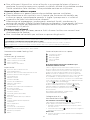 76
76
-
 77
77
-
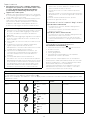 78
78
-
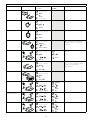 79
79
-
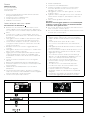 80
80
-
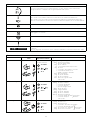 81
81
-
 82
82
-
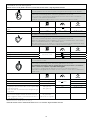 83
83
-
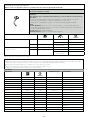 84
84
-
 85
85
-
 86
86
-
 87
87
-
 88
88
-
 89
89
-
 90
90
-
 91
91
-
 92
92
-
 93
93
-
 94
94
-
 95
95
-
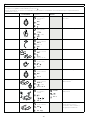 96
96
-
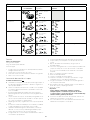 97
97
-
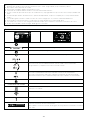 98
98
-
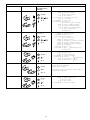 99
99
-
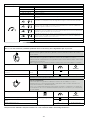 100
100
-
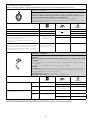 101
101
-
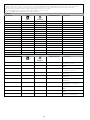 102
102
-
 103
103
-
 104
104
-
 105
105
-
 106
106
-
 107
107
-
 108
108
-
 109
109
-
 110
110
-
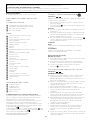 111
111
-
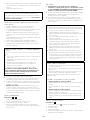 112
112
-
 113
113
-
 114
114
-
 115
115
-
 116
116
-
 117
117
-
 118
118
-
 119
119
-
 120
120
-
 121
121
-
 122
122
-
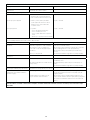 123
123
-
 124
124
-
 125
125
-
 126
126
-
 127
127
-
 128
128
-
 129
129
-
 130
130
-
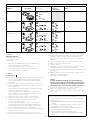 131
131
-
 132
132
-
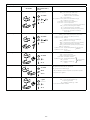 133
133
-
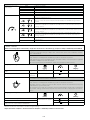 134
134
-
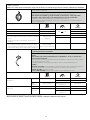 135
135
-
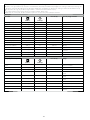 136
136
-
 137
137
-
 138
138
-
 139
139
-
 140
140
-
 141
141
-
 142
142
-
 143
143
-
 144
144


Kenwood KCL95.424SI de handleiding
- Categorie
- Mixers
- Type
- de handleiding
in andere talen
- italiano: Kenwood KCL95.424SI Manuale del proprietario
- français: Kenwood KCL95.424SI Le manuel du propriétaire
- español: Kenwood KCL95.424SI El manual del propietario
- Deutsch: Kenwood KCL95.424SI Bedienungsanleitung
- slovenčina: Kenwood KCL95.424SI Návod na obsluhu
- polski: Kenwood KCL95.424SI Instrukcja obsługi