Iomega ULTRAMAX PRO Snelstartgids
- Categorie
- Externe harde schijven
- Type
- Snelstartgids

Quick Start Guide
Guide de démarrage rapide
Schnellstart-Handbuch
Guida di installazione rapida
Guía de instrucciones rápidas
Guia de uso rápido
Snel aan de slag
Snabbstartguide
Introduktion
Hurtigreferanse
Pikaopas
Gyors útmutató
Stručná příručka
Wprowadzenie
Οδηγός γρήγορης εκκίνησης
快速入門指南
*
Iomega
®
UltraMax Pro
Desktop Hard Drive

Contents • Matières • Inhalt • Sommario • Contenido
Conteúdo • Inhoudsopgave • Innehåll • Indhold • Innhold
Sisällys • Tartalom • Obsah • Spis treści • Περιεχόµενα • 內容
Quick Install – eSATA Connection . . . . . . . . . . . . . . . . . . . . . . . . . . . . . . . . . . . . . . . . 4
Installation rapide – Connexion eSATA
. . . . . . . . . . . . . . . . . . . . . . . . . . . . . . . . . . . . . 4
Schnellstart – eSATA-Anschluss . . . . . . . . . . . . . . . . . . . . . . . . . . . . . . . . . . . . . . . . .
5
Installazione rapida – Connessione eSATA . . . . . . . . . . . . . . . . . . . . . . . . . . . . . . . . . . .
5
Instalación rápida: conexión eSATA . . . . . . . . . . . . . . . . . . . . . . . . . . . . . . . . . . . . . . .
6
Instalação rápida – conexão eSATA . . . . . . . . . . . . . . . . . . . . . . . . . . . . . . . . . . . . . . .
6
Snelle installatie – eSATA-aansluiting
. . . . . . . . . . . . . . . . . . . . . . . . . . . . . . . . . . . . . 7
Snabbinstallation – eSATA-anslutning
. . . . . . . . . . . . . . . . . . . . . . . . . . . . . . . . . . . . . 7
Hurtig installation – eSATA-stik
. . . . . . . . . . . . . . . . . . . . . . . . . . . . . . . . . . . . . . . . . 8
Rask installering – eSATA-forbindelse
. . . . . . . . . . . . . . . . . . . . . . . . . . . . . . . . . . . . . 8
Pika-asennus – eSATA-liitäntä . . . . . . . . . . . . . . . . . . . . . . . . . . . . . . . . . . . . . . . . . .
9
Gyorstelepítés – eSATA csatlakozás
. . . . . . . . . . . . . . . . . . . . . . . . . . . . . . . . . . . . . . 9
Rychlá instalace – připojení eSATA
. . . . . . . . . . . . . . . . . . . . . . . . . . . . . . . . . . . . . . . 10
Szybka instalacja — złącze eSATA . . . . . . . . . . . . . . . . . . . . . . . . . . . . . . . . . . . . . . . . 10
Γρήγορη εγκατάσταση – Σύνδεση eSATA . . . . . . . . . . . . . . . . . . . . . . . . . . . . . . . . . . . . 11
快速安裝 - eSATA 連線 . . . . . . . . . . . . . . . . . . . . . . . . . . . . . . . . . . . . . . . . . . . . . . 11
Quick Install – FireWire or USB Connection . . . . . . . . . . . . . . . . . . . . . . . . . . . . . . . . . . 12
Installation rapide – Connexion FireWire ou USB
. . . . . . . . . . . . . . . . . . . . . . . . . . . . . . . 12
Schnellstart – FireWire- oder USB-Anschluss
. . . . . . . . . . . . . . . . . . . . . . . . . . . . . . . . . 12
Installazione rapida – Connessione FireWire o USB . . . . . . . . . . . . . . . . . . . . . . . . . . . . . . 12
Instalación rápida: conexión FireWire o USB . . . . . . . . . . . . . . . . . . . . . . . . . . . . . . . . . . 13
Instalação rápida – conexão FireWire ou USB
. . . . . . . . . . . . . . . . . . . . . . . . . . . . . . . . . 13
Snelle installatie – FireWire- of USB-aansluiting
. . . . . . . . . . . . . . . . . . . . . . . . . . . . . . . 13
Snabbinstallation – FireWire eller USB-anslutning
. . . . . . . . . . . . . . . . . . . . . . . . . . . . . . 13
Hurtig installation – FireWire- eller USB-stik . . . . . . . . . . . . . . . . . . . . . . . . . . . . . . . . . . 14
Rask installering – FireWire- eller USB-forbindelse . . . . . . . . . . . . . . . . . . . . . . . . . . . . . . 14
Pika-asennus – FireWire- tai USB-liitäntä
. . . . . . . . . . . . . . . . . . . . . . . . . . . . . . . . . . . 14
Gyorstelepítés – FireWire vagy USB csatlakozás
. . . . . . . . . . . . . . . . . . . . . . . . . . . . . . . 14
Rychlá instalace – připojení FireWire nebo USB . . . . . . . . . . . . . . . . . . . . . . . . . . . . . . . . 15
Szybka instalacja — złącze FireWire lub USB
. . . . . . . . . . . . . . . . . . . . . . . . . . . . . . . . . 15
Γρήγορη εγκατάσταση – Σύνδεση FireWire ή USB . . . . . . . . . . . . . . . . . . . . . . . . . . . . . . . 15
快速安裝 - FireWire 或 USB 連線 . . . . . . . . . . . . . . . . . . . . . . . . . . . . . . . . . . . . . . . . 15
Using Your Drive
. . . . . . . . . . . . . . . . . . . . . . . . . . . . . . . . . . . . . . . . . . . . . . . . . . 16
Utilisation du lecteur
. . . . . . . . . . . . . . . . . . . . . . . . . . . . . . . . . . . . . . . . . . . . . . . 17
Verwenden des Laufwerks
. . . . . . . . . . . . . . . . . . . . . . . . . . . . . . . . . . . . . . . . . . . . 18
Uso dell’unità
. . . . . . . . . . . . . . . . . . . . . . . . . . . . . . . . . . . . . . . . . . . . . . . . . . . 19
Uso de la unidad . . . . . . . . . . . . . . . . . . . . . . . . . . . . . . . . . . . . . . . . . . . . . . . . . . 21
Utilização da unidade . . . . . . . . . . . . . . . . . . . . . . . . . . . . . . . . . . . . . . . . . . . . . . . 22
De drive gebruiken
. . . . . . . . . . . . . . . . . . . . . . . . . . . . . . . . . . . . . . . . . . . . . . . . 23
使用磁碟機 . . . . . . . . . . . . . . . . . . . . . . . . . . . . . . . . . . . . . . . . . . . . . . . . . . . . . 24

Troubleshooting . . . . . . . . . . . . . . . . . . . . . . . . . . . . . . . . . . . . . . . . . . . . . . . . . . 16
Dépannage . . . . . . . . . . . . . . . . . . . . . . . . . . . . . . . . . . . . . . . . . . . . . . . . . . . . . 17
Fehlerbehebung
. . . . . . . . . . . . . . . . . . . . . . . . . . . . . . . . . . . . . . . . . . . . . . . . . . 18
Risoluzione dei problemi . . . . . . . . . . . . . . . . . . . . . . . . . . . . . . . . . . . . . . . . . . . . . 20
Solución de problemas
. . . . . . . . . . . . . . . . . . . . . . . . . . . . . . . . . . . . . . . . . . . . . . 21
Solução de problemas
. . . . . . . . . . . . . . . . . . . . . . . . . . . . . . . . . . . . . . . . . . . . . . 22
Problemen oplossen
. . . . . . . . . . . . . . . . . . . . . . . . . . . . . . . . . . . . . . . . . . . . . . . 23
疑難排解 . . . . . . . . . . . . . . . . . . . . . . . . . . . . . . . . . . . . . . . . . . . . . . . . . . . . . . 25
User’s Manual
. . . . . . . . . . . . . . . . . . . . . . . . . . . . . . . . . . . . . . . . . . . . . . . . . . . 17
Guide de l’utilisateur
. . . . . . . . . . . . . . . . . . . . . . . . . . . . . . . . . . . . . . . . . . . . . . . 18
Benutzerhandbuch
. . . . . . . . . . . . . . . . . . . . . . . . . . . . . . . . . . . . . . . . . . . . . . . . 19
Manuale dell’utente . . . . . . . . . . . . . . . . . . . . . . . . . . . . . . . . . . . . . . . . . . . . . . . . 20
Manual del usuario
. . . . . . . . . . . . . . . . . . . . . . . . . . . . . . . . . . . . . . . . . . . . . . . . 22
Manual do usuário
. . . . . . . . . . . . . . . . . . . . . . . . . . . . . . . . . . . . . . . . . . . . . . . . 23
Gebruikershandleiding
. . . . . . . . . . . . . . . . . . . . . . . . . . . . . . . . . . . . . . . . . . . . . . 24
完整使用者手冊 . . . . . . . . . . . . . . . . . . . . . . . . . . . . . . . . . . . . . . . . . . . . . . . . . . 25
Limited Warranty
. . . . . . . . . . . . . . . . . . . . . . . . . . . . . . . . . . . . . . . . . . . . . . . . . 26
Garantie Limitée . . . . . . . . . . . . . . . . . . . . . . . . . . . . . . . . . . . . . . . . . . . . . . . . . . 26
Eingeschränkte Garantie
. . . . . . . . . . . . . . . . . . . . . . . . . . . . . . . . . . . . . . . . . . . . . 27
Garanzia limitata
. . . . . . . . . . . . . . . . . . . . . . . . . . . . . . . . . . . . . . . . . . . . . . . . . 28
Garantía limitada
. . . . . . . . . . . . . . . . . . . . . . . . . . . . . . . . . . . . . . . . . . . . . . . . . 28
Garantia limitada
. . . . . . . . . . . . . . . . . . . . . . . . . . . . . . . . . . . . . . . . . . . . . . . . . 29
Beperkte garantie . . . . . . . . . . . . . . . . . . . . . . . . . . . . . . . . . . . . . . . . . . . . . . . . . 30
限期保固 . . . . . . . . . . . . . . . . . . . . . . . . . . . . . . . . . . . . . . . . . . . . . . . . . . . . . . 30
Customer Support . . . . . . . . . . . . . . . . . . . . . . . . . . . . . . . . . . . . . . . . . . . . . . . . . 31
Assistance clientèle . . . . . . . . . . . . . . . . . . . . . . . . . . . . . . . . . . . . . . . . . . . . . . . . 31
Kundenunterstützung . . . . . . . . . . . . . . . . . . . . . . . . . . . . . . . . . . . . . . . . . . . . . . . 31
Assistenza clienti
. . . . . . . . . . . . . . . . . . . . . . . . . . . . . . . . . . . . . . . . . . . . . . . . . 31
Asistencia al cliente . . . . . . . . . . . . . . . . . . . . . . . . . . . . . . . . . . . . . . . . . . . . . . . . 31
Suporte ao cliente . . . . . . . . . . . . . . . . . . . . . . . . . . . . . . . . . . . . . . . . . . . . . . . . . 31
客戶支援 . . . . . . . . . . . . . . . . . . . . . . . . . . . . . . . . . . . . . . . . . . . . . . . . . . . . . . 31

4
Some models only. For best performance, connect the
drive to an eSATA PCI card or a built-in external eSATA
connection. Connect the drive to USB if a supported
eSATA connection is not available (see page 10).
1. If you are connecting to an eSATA PCI card, make
sure the drivers for the card have been installed
and the card is properly recognized by your
operating system.
NOTE: You do not need to install special drivers
for the Iomega UltraMax Pro Hard drive. It is
supported by the drivers included with the
eSATA PCI card. If you are using a built-in eSATA
connection, the drive is supported by native
drivers in the operating system.
2. Shut down the computer.
NOTE: The eSATA interface is NOT plug-and-
play. Always shut down the computer before
connecting or disconnecting the drive.
3. Connect the included power supply to the back of
the drive. Place the drive on a stable surface and
connect the power supply to a power outlet.
CAUTION! To avoid damage to the power supply
connector, make sure it is aligned correctly before
plugging it into the drive. Do not move the drive
while it is powered up to avoid drive damage or
data loss.
4. Identify the eSATA cable and connect it to the
back of the drive. Never connect the drive to the
computer with more than one cable.
5. Connect the other end of the cable to your eSATA
PCI card or built-in eSATA connection.
6. Turn on the power switch on the back of the drive
and restart your computer.
7. The drive icon should appear in My Computer,
Windows Explorer or on the Mac Desktop. If the
drive does not appear on your computer, refer to
Troubleshooting (page 16).
Certains modèles uniquement. Pour de meilleures
performances, connectez le disque à une carte PCI
eSATA ou à une connexion eSATA externe intégrée.
Connectez le lecteur au port USB si aucune connexion
eSATA n’est disponible (see page 10).
1. En cas de connexion à une carte PCI eSATA,
assurez-vous que les pilotes pour la carte ont
été installés et que la carte est correctement
reconnue par votre système d’exploitation.
REMARQUE : il n’est pas nécessaire d’installer
des pilotes particuliers pour le disque dur Iomega
Iomega UltraMax Pro. Il est pris en charge par
les pilotes inclus avec la carte eSATA PCI. Si
votre ordinateur dispose d’une connexion eSATA
intégrée, le lecteur est pris en charge par les
pilotes natifs du système d’exploitation.
2. Eteignez l’ordinateur.
REMARQUE : l’interface eSATA ne dispose
PAS de la fonction plug-and-play. Eteignez
toujours l’ordinateur avant de connecter ou de
déconnecter le disque.
3. Connectez le câble d’alimentation inclus à
l’arrière du disque. Placez le disque sur une
surface stable et connectez l’alimentation à une
prise secteur.
ATTENTION ! Pour éviter d’endommager le
connecteur d’alimentation, assurez-vous de son
alignement avant de le raccorder au disque. Ne
déplacez pas le disque lorsqu’il est sous tension
pour éviter tout dommage ou perte de données.
4. Identifiez le câble eSATA et connectez-le à l’arrière
du disque. Ne connectez
JAMAIS le disque à
l’ordinateur à l’aide de plusieurs câbles.
5. Connectez l’autre extrémité du câble à votre carte
PCI eSATA ou à la connexion eSATA intégrée.
6. Redémarrez votre ordinateur à l’aide de
l’interrupteur d’alimentation situé à l’arrière du
disque.
7. L’icône du disque doit apparaître dans le Poste
de travail, l’Explorateur Windows ou sur le bureau
du Mac. Si l’icône du disque n’apparaît pas sur
votre ordinateur, consultez la rubrique Dépannage
(page 17).
eSATA
SA
T
A
S
AT
A
S
A
T
A

5
Nur bestimmte Modelle. Um die besten Ergebnisse zu
erzielen, verbinden Sie das Laufwerk mit einer eSATA-PCI-
Karte oder einem integrierten externen eSATA-Anschluss.
Verbinden Sie das Laufwerk mit dem USB-Port, wenn kein
unterstützter eSATA-Anschluss verfügbar ist.
1. Wenn Sie eine eSATA-PCI-Karte anschließen, stellen
Sie sicher, dass die Treiber für die Karte installiert
sind und die Karte von Ihrem Betriebssystem
ordnungsgemäß erkannt wurde.
HINWEIS: Für die Iomega Iomega UltraMax Pro
-
Festplatte müssen Sie spezielle Treiber installieren.
Sie wird von den Treibern unterstützt, die bei der
eSATA-PCI-Karte enthalten sind. Wenn Ihr Computer
über einen integrierten eSATA-Anschluss verfügt,
wird das Laufwerk von den nativen Treibern des
Betriebssystems ünterstützt.
2. Fahren Sie den Computer herunter.
HINWEIS: Die eSATA-Schnittstelle verfügt NICHT
über Plug-and-Play. Fahren Sie den Computer immer
herunter, bevor Sie das Laufwerk verbinden oder die
Verbindung trennen.
3. Schließen Sie das mitgelieferte Netzkabel an der
Rückseite des Laufwerks an. Stellen Sie das Laufwerk
auf eine stabile Oberfläche, und verbinden Sie das
Netzkabel mit einer Steckdose.
ACHTUNG! Um Beschädigungen des Netzkabelsteckers
zu vermeiden, stellen Sie sicher, dass er korrekt
ausgerichtet ist, bevor Sie ihn in das Laufwerk
einstecken. Bewegen Sie das Laufwerk während des
Einschaltvorgangs nicht, um Laufwerkbeschädigungen
oder Datenverluste zu vermeiden.
4. Wählen Sie das eSATA Kabel aus, und schließen
Sie es an der Laufwerksrückseite an. Schließen Sie
das Laufwerk niemals mit mehr als einem Kabel am
Computer an.
5. Verbinden Sie das andere Ende des Kabels mit
der eSATA-PCI-Karte oder dem integrierten eSATA-
Anschluss.
6. Schalten die den Hauptschalter auf der
Laufwerksrückseite an, und starten Sie Ihren Computer
neu.
7. Das Laufwerksymbol wird im Arbeitsplatz, dem
Windows Explorer oder auf dem Mac-Desktop
angezeigt. Falls das Laufwerk auf Ihrem System
nicht angezeigt wird, lesen Sie den Abschnitt
„Fehlerbehebung“ (Seite 18).
Solo alcuni modelli. Per prestazioni ottimali, collegare
l’unità ad una scheda PCI eSATA oppure a una
connessione eSATA esterna integrata. Collegare l’unità
a una porta USB se non è disponibile una connessione
eSATA.
1. Se si effettua la connessione a una scheda PCI
eSATA, assicurarsi che i driver relativi siano stati
installati e che la scheda venga riconosciuta
correttamente dal sistema operativo.
NOTA: non è necessario installare dei driver
speciali per l’unità disco rigido Iomega Iomega
UltraMax Pro supportata dai driver forniti con
la scheda PCI eSATA. Se il computer è dotato di
connessione integrata eSATA, l’unità è supportata
dai driver nativi del sistema operativo.
2. Spegnere il computer.
NOTA: l’interfaccia eSATA NON è plug-and-play.
Spegnere sempre il computer prima di connettere
o disconnettere l’unità.
3. Collegare l’alimentatore fornito in dotazione alla
parte posteriore dell’unità. Posizionare l’unità su
una superficie stabile e collegare l’alimentatore a
una presa di corrente.
ATTENZIONE! Per evitare che il connettore
dell’alimentatore si danneggi, assicurarsi che
sia correttamente allineato prima di inserirlo
nell’unità. Non spostare l’unità mentre è accesa
per evitare danni o perdite di dati.
4. Individuare il cavo eSATA e collegarlo al retro
dell’unità. Evitare di collegare l’unità al computer
utilizzando più di un cavo.
5. Collegare l’altra estremità del cavo alla scheda
PCI eSATA o alla connessione integrata eSATA.
6. Accendere l’interruttore di alimentazione situato
sulla parte posteriore dell’unità e riavviare il
computer.
7. L’icona dell’unità verrà visualizzata in Risorse
del computer, Esplora risorse di Windows o sulla
Scrivania Mac. Se l’unità non risulta presente
nel computer, fare riferimento a Risoluzione dei
problemi (pagina 19).
eSATA
SA
T
A
S
AT
A
S
A
T
A

6
Sólo algunos modelos. Para obtener el máximo
rendimiento, conecte la unidad a una tarjeta PCI
eSATA o a una conexión externa eSATA incorporada.
Conecte la unidad mediante USB si no dispone de una
conexión eSATA compatible.
1. Si la conecta a una tarjeta PCI eSATA, asegúrese
de que se han instalado los controladores de la
tarjeta y de que el sistema operativo reconoce
correctamente la tarjeta.
NOTA: No necesita instalar controladores
especiales para la unidad de disco duro Iomega
UltraMax Pro. Se incluyen en los controladores de
la tarjeta PCI eSATA. Si su equipo dispone de una
conexión eSATA incorporada, los controladores
nativos del sistema operativo detectan la unidad.
2. Apague el equipo.
NOTA: La interfaz eSATA NO es un sistema Plug-
and-Play. Apague siempre el equipo antes de
conectar o desconectar la unidad.
3. Conecte el cable de alimentación incluido a la
parte posterior de la unidad. Coloque la unidad
sobre una superficie estable y conecte el cable de
alimentación a una toma eléctrica.
PRECAUCIÓN: Para evitar daños en el conector
de alimentación, asegúrese de que esté
correctamente alineado antes de enchufarlo a
la unidad. No mueva la unidad mientras esté
encendida para evitar posibles daños en la
unidad o la pérdida de datos.
4. Busque el cable eSATA y conéctelo a la parte
posterior de la unidad. Nunca conecte la unidad al
equipo con más de un cable.
5. Conecte el otro extremo del cable a su tarjeta PCI
eSATA o conexión eSATA incorporada.
6. Pulse el interruptor de encendido de la parte
posterior de la unidad y reinicie el equipo.
7. El icono de la unidad aparecerá en Mi PC, el
Explorador de Windows o en el escritorio de Mac.
Si la unidad no aparece en el equipo, consulte
Solución de problemas (página 20).
Alguns modelos somente. Para melhor desempenho
conecte a unidade a uma placa eSATA PCI ou a uma
conexão externa eSATA embutida. Conecte a unidade
a USB se não houver conexão eSATA suportada
disponível.
1. Caso esteja conectando a uma placa eSATA
PCI, certifique-se de que os drivers para a
placa tenham sido instalados e de que a placa
seja reconhecida corretamente pelo sistema
operacional.
OBS: não é preciso instalar drivers especiais para
a unidade Iomega UltraMax Pro. Ela é suportada
pelos drivers incluídos na placa eSATA PCI. Se
o seu computador possuir uma conexão eSATA
embutida, a unidade é suportada por drivers
nativos do sistema operacional.
2. Desligue o computador.
OBS: a interface eSATA NÃO é plug-and-play.
Sempre desligue o computador antes de conectar
ou desconectar a unidade.
3. Conecte a fonte de alimentação que acompanha
o produto à parte traseira da unidade. Coloque
a unidade em uma superfície estável e conecte a
fonte de alimentação a uma tomada elétrica.
CUIDADO! Para evitar danos ao conector da
fonte de alimentação, certifique-se de que ele
esteja alinhado corretamente antes de encaixá-
lo na unidade. Não mova a unidade enquanto
ela estiver ligada para evitar danos à mesma ou
perda de dados.
4. Identifique o cabo exata apropriado e conecte-o
à parte traseira da unidade. Nunca conecte a
unidade ao computador através de mais de um
cabo.
5. Conecte a outra extremidade do cabo à placa
eSATA PCI ou à conexão eSATA embutida.
6. Ligue o botão de alimentação na parte traseira da
unidade e reinicie o computador.
7. O ícone da unidade aparecerá em Meu
computador, no Windows Explorer ou na mesa
do Mac. Se a unidade não aparecer no seu
computador, consulte a seção Solução de
problemas (página 22).
SA
T
A
S
AT
A
S
A
T
A
eSATA

7
Alleen op bepaalde modellen. Voor de beste
resultaten sluit u de drive aan op een eSATA PCI-kaart
of een geïntegreerde externe eSATA-aansluiting. Als er
geen ondersteunde eSATA-aansluiting beschikbaar is,
sluit u de drive aan op een USB-poort.
1. Als u op een eSATA PCI-kaart aansluit, moeten
de stuurprogramma’s voor de kaart geïnstalleerd
zijn en moet de kaart correct door uw
besturingssysteem worden herkend.
OPMERKING: u hoeft geen speciale
stuurprogramma’s te installeren voor de Iomega
UltraMax Pro. Deze wordt ondersteund door de
stuurprogramma’s die bij de eSATA PCI-kaart
worden meegeleverd. Als uw computer over een
geïntegreerde eSATA-aansluiting beschikt, wordt
de drive ondersteund door de standaardstuurprog
ramma’s van het besturingssysteem.
2. Schakel de computer uit.
OPMERKING: de eSATA-interface is NIET van het
type plug-and-play. Schakel de computer daarom
altijd uit voordat u de drive aansluit of loskoppelt.
3. Sluit de meegeleverde voeding aan op de
achterkant van de drive. Plaats de drive op een
stabiel oppervlak en sluit het andere uiteinde van
de voeding aan op een stopcontact.
WAARSCHUWING! Let erop dat u de connector
van het stroomsnoer loodrecht in de connector
van de drive plaatst. Anders kan deze worden
beschadigd. Verplaats de drive niet wanneer deze
van stroom is voorzien, om beschadigingen of
gegevensverlies te voorkomen.
4. Neem de eSATA-kabel en sluit die aan op de
achterkant van de drive. Sluit de drive
nooit met
meer dan één kabel aan op de computer.
5. Sluit het andere uiteinde van de kabel aan op
uw eSATA PCI-kaart of geïntegreerde eSATA-
aansluiting.
6. Schakel de drive in met de aan/uit-knop op de
achterzijde van de drive en start uw computer
opnieuw op.
7. Het pictogram van de drive verschijnt normaal
in Deze computer, Windows Verkenner of op het
Mac-bureaublad.
Endast vissa modeller. För bästa prestanda ansluter
du enheten till ett eSATA PCI-kort eller en inbyggd
extern eSATA-anslutning. Anslut enheten till USB om
det inte finns någon eSATA-anslutning som stöds.
1. Om du ansluter till ett eSATA PCI-kort bör du
kontrollera att drivrutinerna för kortet har
installerats och att operativsystemet känner av
kortet.
OBS! Du behöver inte installera några
särskilda drivrutiner för hårddisken Iomega
UltraMax Pro. Den stöds av drivrutinerna som
medföljer eSATA PCI-kortet. Om din dator har
en inbyggd eSATA-anslutning stöds enheten av
standarddrivrutinerna i operativsystemet.
2. Stäng av datorn.
OBS! eSATA-gränssnittet är INTE plug-and-play.
Stäng alltid av datorn innan du ansluter eller
kopplar bort enheten.
3. Anslut den medföljande nätkabeln på baksidan av
enheten. Ställ enheten på en stabil yta och anslut
nätkabeln till ett eluttag.
VARNING! Kontrollera att du ansluter kontakten
på nätkabeln till enheten på rätt sätt. Annars
kan den skadas. Flytta inte enheten medan den
startar. Den kan skadas och du kan förlora data.
4. Leta reda på eSATA-kabeln och anslut den på
enhetens baksida. Anslut aldrig enheten till
datorn med fler än en kabel.
5. Anslut den andra änden av kabeln till eSATA PCI-
kortet eller den inbyggda eSATA-anslutningen.
6. Slå på strömbrytaren på enhetens baksida och
starta om datorn.
7. Enhetsikonen bör visas i Den här datorn,
Utforskaren eller på skrivbordet på Mac.
SA
T
A
S
AT
A
S
A
T
A
eSATA

8
Kun for nogle modeller. Du opnår den bedste ydelse
ved at slutte drevet til et eSATA PCI-kort eller et
indbygget eksternt eSATA-stik. Slut drevet til USB, hvis
et understøttet eSATA-stik ikke er tilgængeligt.
1. Hvis du opretter tilslutning til et eSATA PCI-
kort, skal du sørge for at driverne til kortet
er installeret, og at kortet genkendes af
operativsystemet.
Bemærk! Du behøver ikke installere specielle
drivere til harddisken Iomega UltraMax Pro. Den
understøttes af de drivere, der leveres med eSATA
PCI-kortet. Hvis computeren har et indbygget
eSATA-stik, understøttes drevet af de drivere, der
findes i operativsystemet.
2. Luk computeren ned.
Bemærk! eSATA-grænsefladen er IKKE plug-and-
play. Luk altid computeren ned, før du tilslutter
eller frakobler drevet.
3. Slut det medfølgende strømkabel til bagsiden af
drevet. Placer drevet på en stabil overflade, og
slut strømkablet til en stikkontakt.
Forsigtig! Hvis du vil undgå at beskadige
strømstikket, skal du sørge for at vende det
rigtigt, før du sætter det i drevet. Hvis du vil
undgå at beskadige drevet eller miste data, må du
ikke flytte drevet, mens det startes.
4. Find sSATA-kablet, og sæt det i på bagsiden af
drevet. Slut aldrig drevet til computeren med
mere end ét kabel.
5. Slut den anden ende af kablet til eSATA-kortet
eller det indbyggede eSATA-stik.
6. Tænd for afbryderen bag på drevet, og genstart
computeren.
7. Drevikonet skulle blive vist i Denne computer i
Windows Stifinder eller på Mac-skrivebordet.
Kun enkelte modeller. Koble stasjonen til et eSATA
PCI-kort eller en innebygd ekstern eSATA-tilkobling for
å få best mulig ytelse. Koble stasjonen til USB hvis du
ikke har en støttet eSATA-tilkobling.
1. Hvis du kobler til et eSATA PCI-kort, må du
kontrollere at driverne for kortet er installert, og
at kortet gjenkjennes riktig av operativsystemet.
MERK: Det er ikke nødvendig å installere egne
drivere for Iomega UltraMax Pro. Den støttes av
driverne som følger med eSATA PCI-kortet. Hvis
datamaskinen har en innebygd eSATA-tilkobling,
støttes stasjonen av driverne som er innebygd i
operativsystemet.
2. Avslutt datamaskinen.
MERK: eSATA-grensesnittet er IKKE plug-and-
play. Avslutt alltid datamaskinen før du kobler
stasjonen til eller fra.
3. Koble den medfølgende strømforsyningen til på
baksiden av stasjonen. Plasser stasjonen på et
stabilt underlag og koble strømforsyningen til en
stikkontakt.
FORSIKTIG! Pass på å holde
strømforsyningskontakten riktig før du setter den
i stasjonen, slik at du unngår å skade den. For å
unngå skade på stasjonen eller tap av data må
ikke stasjonen flyttes mens den er slått på.
4. Finn frem eSATA-kabelen og koble den til på
baksiden av stasjonen. Koble aldri stasjonen til
datamaskinen med mer enn én kabel.
5. Koble den andre enden av kabelen til eSATA PCI-
kortet eller den innebygde eSATA-tilkoblingen.
6. Slå på strømbryteren på baksiden av stasjonen,
og start datamaskinen.
7. Stasjonsikonet skal vises i Min datamaskin,
Windows Utforsker eller på Mac-skrivebordet.
SA
T
A
S
AT
A
S
A
T
A
eSATA

9
Vain tietyissä malleissa. Laite toimii parhaiten,
kun kytket aseman eSATA PCI -korttiin tai
sisäänrakennettuun eSATA-liitäntään. Kytke laite USB-
porttiin, jos käytettävissä ei ole eSATA-liitäntää.
1. Jos kytket laitteen eSATA PCI -korttiin, varmista,
että kortin ohjaimet on asennettu ja että
käyttöjärjestelmä on tunnistanut kortin oikein.
HUOMAUTUS:
Iomega UltraMax Pro -kiintolevyä
varten ei tarvitse asentaa erityisiä ohjaimia.
eSATA PCI -kortin mukana toimitettavat
ohjaimet tukevat kiintolevyä. Jos tietokoneessa
on sisäänrakennettu eSATA-liitäntä,
käyttöjärjestelmän asema ohjaimet tukevat
kiintolevyä.
2. Katkaise tietokoneesta virta.
HUOMAUTUS: eSata-liitäntä ei ole plug-and-play-
yhteensopiva. Katkaise tietokoneen virta aina,
kun kytket tai irrotat kiintolevyn.
3. Kytke virtajohto aseman takana olevaan
liitäntään. Aseta kiintolevy vakaan alustan päälle
ja kytke virtajohto pistorasiaan.
VAROITUS: Kohdista virtakaapeli laitteeseen
kytkettäessä oikein, jotta virtalähteen liitin ei
vaurioidu kytkettäessä. Älä siirrä kiintolevyä, kun
siihen on virta kytkettynä. Levy voi vahingoittua,
tai tietoja voi hävitä.
4. Ota eSATA-kaapeli ja kytke se kiintolevyn
takaosassa olevaan liitäntään. Kytke kiintolevy
tietokoneeseen vain yhdellä kaapelilla.
5. Kytke kaapelin toinen pää eSATA PCI -korttiin tai
sisäänrakennettuun eSATA-liitäntään.
6. Kytke laitteeseen virta kiintolevyn takana olevasta
virtakytkimestä ja käynnistä tietokone uudelleen.
7. Levyaseman kuvake tulee näkyviin Oma tietokone
-ikkunaan, Windowsin Resurssienhallintaan tai
Macintosh-tietokoneen työpöydälle.
Csak néhány modell esetében érvényes. A legjobb
teljesítmény elérése érdekében csatlakoztassa
a meghajtót egy eSATA PCI-kártyához vagy egy
beépített külső eSATA-csatlakozóhoz. Amennyiben
nem áll rendelkezésére támogatott eSATA-csatlakozó,
csatlakoztassa a meghajtót az USB-porthoz.
1. eSATA PCI-kártyához való csatlakoztatáskor
győződjön meg arról, hogy a kártyához tartozó
meghajtó telepítve lett, és a kártyát az operációs
rendszer felismeri.
MEGJEGYZÉS: Az
Iomega UltraMax Pro
merevlemez-meghajtóhoz nem szükséges speciális
meghajtóprogramokat telepíteni. A meghajtót
támogatják az eSATA PCI-kártyához mellékelt
meghajtóprogramok. Amennyiben számítógépéhez
beépített eSATA-csatlakozó tartozik, a meghajtót az
operációs rendszer saját meghajtói is támogatják.
2. Zárja le a számítógépet.
MEGJEGYZÉS: Az eSATA felület NEM „plug-and-play“
jellegű, vagyis nem használható azonnal. A meghajtó
csatlakoztatásakor, illetve leválasztásakor mindig
kapcsolja ki a számítógépet.
3. Csatlakoztassa a tápellátó egységet a meghajtó hátsó
részéhez. Helyezze a meghajtót stabil felületre, és
csatlakoztassa a tápellátó egységet a fali aljzatba.
VIGYÁZAT! A tápkonnektor sérülésének elkerülése
érdekében győződjön meg arról, hogy a konnektor
a meghajtóba való csatlakoztatás előtt megfelelően
van kiegyenlítve. Bekapcsolás közben ne mozgassa a
meghajtót, így elkerülheti az esetleges sérüléseket és
adatvesztéseket.
4. Válassza ki az eSATA-kábelt, és csatlakoztassa
a meghajtó hátsó részéhez. A meghajtó és a
számítógép csatlakoztatásához soha ne használjon
egynél több kábelt.
5. Csatlakoztassa a kábel másik végét az eSATA PCI-
kártyához vagy a beépített eSATA-csatlakozóhoz.
6. Kapcsolja be a meghajtó hátoldalán található
főkapcsolót, és indítja újra a számítógépet.
7. A meghajtó ikonja ezután megjelenik a My Computer
(Sajátgép) vagy a Windows Explorer (Windows Intéző)
részben vagy a Mac asztalon.
SA
T
A
S
AT
A
S
A
T
A
eSATA

10
Jen některé modely. Nejlepšího výkonu dosáhnete,
připojíte-li jednotku ke kartě PCI eSATA PCI nebo
k vestavěnému externímu připojení eSATA. Není-li
k dispozici podporované připojení eSATA, připojte
jednotku prostřednictvím rozhraní USB.
1. Připojujete-li jednotku ke kartě PCI eSATA,
ujistěte se, že jsou pro kartu nainstalovány
všechny ovladače a karta je správně rozpoznána
operačním systémem.
POZNÁMKA: Pro pevný disk Iomega UltraMax Pro
není nutné instalovat zvláštní ovladače. Disk je
podporován ovladači ke kartě PCI eSATA. Je-li v
počítači k dispozici vestavěné připojení eSATA,
je jednotka podporována nativními ovladači v
operačním systému.
2. Vypněte počítač.
POZNÁMKA: eSATA NENÍ rozhraní typu plug-and-
play. Před připojováním či odpojováním jednotky
počítač vždy vypněte.
3. Zapojte přiložený napájecí kabel do zadní
strany jednotky. Diskovou jednotku umístěte na
stabilní povrch a zapojte napájecí kabel do síťové
zásuvky.
UPOZORNĚNÍ! Chcete-li předejít poškození
síťového konektoru, přesvědčte se před jeho
připojením k diskové jednotce, že je správně
zapojen. Nepřemísťujte diskovou jednotku, když
je napájena. Hrozí poškození disků a ztráta dat.
4. Najděte příslušný kabel eSATA a připojte jej do
zadní části jednotky. Nikdy nepřipojujte jednotku
k počítači pomocí více než jednoho kabelu.
5. Připojte opačný konec kabelu ke kartě PCI eSATA
nebo vestavěnému připojení eSATA.
6. Zapněte síťový vypínač na zadní straně jednotky a
restartujte počítač.
7. Ikona jednotky by se měla zobrazit v okně Tento
počítač, Průzkumník Windows nebo na pracovní
ploše systému Mac.
Dotyczy tylko niektórych modeli. Aby dysk działał
niezawodnie, należy go podłączyć do karty PCI eSATA
lub wbudowanego złącza zewnętrznego eSATA. Jeśli
nie można użyć obsługiwanego połączenia eSATA,
dysk należy podłączyć do portu USB.
1. W przypadku podłączania dysku do karty PCI
eSATA pamiętaj o zainstalowaniu sterowników
karty oraz sprawdź, czy karta jest poprawnie
rozpoznawana przez system operacyjny.
UWAGA: Dysk twardy Iomega UltraMax Pro nie
wymaga instalowania specjalnych sterowników.
Jest on obsługiwany przez sterowniki karty PCI
eSATA. Jeśli w komputerze jest wbudowane złącze
eSATA, dysk jest obsługiwany przez sterowniki
systemu operacyjnego.
2. Wyłącz komputer.
UWAGA: Interfejs eSATA NIE jest interfejsem
plug-and-play. Przed podłączeniem i odłączeniem
dysku należy zawsze wyłączyć komputer.
3. Podłącz dostarczony zasilacz z tyłu dysku. Ustaw
dysk na stabilnej powierzchni i podłącz zasilacz
do gniazda zasilania.
UWAGA! Aby uniknąć uszkodzenia złącza
zasilania, przed podłączeniem dysku należy
sprawdzić polaryzację. Aby uniknąć uszkodzenia
dysku lub utraty danych, nie wolno przenosić
włączonego dysku.
4. Znajdź odpowiedni przewód eSATA i podłącz
go z tyłu dysku. Nie wolno podłączać dysku
do komputera za pomocą więcej niż jednego
przewodu.
5. Podłącz drugi koniec przewodu do karty PCI
eSATA lub wbudowanego złącza eSATA.
6. Włącz dysk za pomocą przełącznika z tyłu
obudowy i uruchom ponownie komputer.
7. Ikona dysku powinna zostać wyświetlona w oknie
Mój komputer, w programie Eksplorator Windows
lub na biurku w systemie Mac.
SA
T
A
S
AT
A
S
A
T
A
eSATA

11
Μόνο σε ορισµένα µοντέλα. Για την καλύτερη δυνατή
απόδοση, συνδέστε το δίσκο σε µια κάρτα eSATA PCI ή σε
µια ενσωµατωµένη στον υπολογιστή εξωτερική υποδοχή
USB 2.0. Συνδέστε το δίσκο µε σύνδεση USB αν δεν υπάρχει
διαθέσιµη υποστηριζόµενη σύνδεση eSATA.
1. Εάν κάνετε σύνδεση σε µια κάρτα eSATA PCI,
βεβαιωθείτε ότι έχουν εγκατασταθεί τα προγράµµατα
οδήγησης της κάρτας και ότι η κάρτα αναγνωρίζεται
κανονικά από το λειτουργικό σας σύστηµα.
Σ
ΗΜΕΙΩΣΗ: ∆εν χρειάζεται να εγκαταστήσετε ειδικά
προγράµµατα οδήγησης για το σκληρό δίσκο Iomega
UltraMax Pro. Υποστηρίζεται από τα προγράµµατα
οδήγησης που περιλαµβάνονται στην κάρτα eSATA
PCI. Εάν ο υπολογιστής σας διαθέτει ενσωµατωµένη
σύνδεση eSATA, ο δίσκος υποστηρίζεται από τα
προγράµµατα οδήγησης που περιλαµβάνονται ήδη στο
λειτουργικό σύστηµα.
2. Σβήστε τον υπολογιστή.
ΣΗΜΕΙΩΣΗ: Η διασύνδεση eSATA ∆ΕΝ είναι plug-and-
play. Πρέπει πάντα να τερµατίζετε τη λειτουργία του
υπολογιστή πριν συνδέσετε ή αποσυνδέσετε το δίσκο.
3. Συνδέστε το καλώδιο τροφοδοσίας που συνοδεύει το
δίσκο στο πίσω µέρος της. Τοποθετήστε το δίσκο σε µια
σταθερή επιφάνεια και συνδέστε το τροφοδοτικό σε
µια πρίζα ηλεκτρικού.
ΠΡΟΣΟΧΗ! Για να αποφύγετε την πρόκληση ζηµιάς
στο βύσµα του τροφοδοτικού, βεβαιωθείτε ότι έχει
ευθυγραµµιστεί σωστά προτού το συνδέσετε στο δίσκο.
Μην µετακινείτε το δίσκο όταν ξεκινά η τροφοδοσία
του, για να µην προκληθεί ζηµιά ή απώλεια δεδοµένων.
4. Εντοπίστε το καλώδιο eSATA και συνδέστε το στο πίσω
µέρος του δίσκου. Ποτέ µην συνδέετε το δίσκο µε τον
υπολογιστή µε περισσότερα του ενός καλώδια.
5. Συνδέστε το άλλο άκρο του καλωδίου στην κάρτα
eSATA PCI ή στην ενσωµατωµένη υποδοχή eSATA.
6. Ανάψτε το διακόπτη τροφοδοσίας στο πίσω µέρος του
δίσκου και κάντε επανεκκίνηση του υπολογιστή.
7. Το εικονίδιο του δίσκου πρέπει να εµφανίζεται στο
φάκελο Ο Υπολογιστής µου (My Computer), στην
Εξερεύνηση των Windows (Windows Explorer) ή στο
γραφείο του Mac.
僅限某些模式。為確保發揮最佳效能,請將磁碟機接
上 eSATA PCI 卡或內建外接式 eSATA 連線。如果沒有
支援的 eSATA 連線,請將磁碟機連接到 USB。
1.
如果您連接 eSATA PCI 卡,請確定介面卡的驅動程
式已經安裝,且您的作業系統可以正確識別該介面
卡。
注意:您不需要為「Iomega UltraMax Pro」安裝
特別的驅動程式。包含在 eSATA PCI 卡內的驅動
程式會支援該硬碟。如果您的電腦擁有內建的
eSATA 連線,則作業系統內原本的驅動程式就會支
援該磁碟機。
2.
關閉電腦的電源。
注意:eSATA 介面「不支援」隨插即用。在連接或
移除磁碟機之前,請務必關閉電腦的電源。
3. 將隨附的電源供應器連接至磁碟機的背面。將磁
碟機放置在穩定表面上並將電源供應器連接到電
源插座。
注意!為了避免電源供應器接頭損壞,在將其插到
磁碟機中之前,請確保已將其正確對齊。為避免
磁碟機資料遺失,當磁碟機電源開啟時,請勿移動
它。
4.
確定 eSATA 的纜線後,將該纜線連接到磁碟機背
面。將磁碟機連接到電腦時,絕對不可使用一條以
上的纜線。
5.
將資料纜線的另一端連接至 eSATA PCI 卡或內建
的 eSATA 連線。
6. 打開磁碟機背面的電源開關然後重新啟動您的電
腦。
7.
磁碟機圖示應顯示在「我的電腦」、Windows 「
檔案總管」或 Mac 桌面上。
SA
T
A
S
AT
A
S
A
T
A
eSATA

12
1. Schließen Sie das mitgelieferte Netzteil an der
Rückseite des Laufwerks und an eine Steckdose an.
ACHTUNG! Bewegen Sie das Laufwerk
während des Einschaltvorgangs nicht, um
Laufwerkbeschädigungen oder Datenverluste zu
vermeiden.
2. Wählen Sie das richtige Kabel aus, und schließen
Sie es an der Laufwerksrückseite an.
3. Verbinden Sie das andere Ende des Kabels mit
dem Anschluss des Computers. Schließen Sie das
Laufwerk niemals mit mehr als einem Kabel am
Computer an.
4. Falls das Laufwerk auf Ihrem System nicht
angezeigt wird, lesen Sie den Abschnitt
„Fehlerbehebung“ (Seite 19).
HINWEIS: Das FireWire-/USB-Laufwerk ist bei der
Auslieferung mit HFS+ (Mac OS) vorformatiert
und muss für den Gebrauch unter Windows
erneut formatiert werden (siehe Anweisungen auf
Seite 18). Das eSATA-/USB-Laufwerk ist bei der
Auslieferung mit FAT32 vorformatiert und muss
nicht erneut formatiert werden.
1. Collegare l’alimentatore in dotazione al retro
dell’unità e inserirlo in una presa di corrente.
ATTENZIONE! Non spostare l’unità mentre è
accesa per evitare danni o perdite di dati.
2. Individuare il cavo appropriato e collegarlo al
retro dell’unità.
3. Collegare l’altra estremità del cavo alla porta del
computer. Evitare di collegare l’unità al computer
utilizzando più di un cavo.
4. Se l’unità non risulta presente nel computer, fare
riferimento a Risoluzione dei problemi (pagina 19).
NOTA: l’unità viene fornita preformattata HFS+
(Mac OS); riformattare l’unità per l’utilizzo con
Windows (vedere le istruzioni a pag. 20). l’unità
SATA/USB viene fornita preformattata FAT32 e non
richiede formattazione.
1. Connect the included power supply to the back of
the drive and to a power outlet.
CAUTION! Do not move the drive while it is
powered up to avoid drive damage or data loss.
2. Identify the appropriate cable and connect it to
the back of the drive.
3. Connect the other end of the cable to the port on
your computer.
Never connect the drive to the
computer with more than one cable.
4. If the drive does not appear on your computer,
refer to Troubleshooting (page 16).
NOTE
: The FireWire/USB drive ships preformatted
HFS+ (Mac OS) and must be reformatted for use
with Windows (see instructions on page 16). The
eSATA/USB drive ships preformatted FAT32 and
does not require reformatting.
1. Connectez l’alimentation fournie à l’arrière du
disque, puis connectez-la à une prise secteur.
ATTENTION ! Ne déplacez pas le disque lorsqu’il
est sous tension pour éviter tout dommage ou
perte de données.
2. Identifiez le câble approprié et connectez-le à
l’arrière du disque.
3. Connectez l’autre extrémité du câble au port de
votre ordinateur. Ne connectez
JAMAIS le disque à
l’ordinateur à l’aide de plusieurs câbles.
4. Si l’icône du disque n’apparaît pas sur votre
ordinateur, consultez la rubrique Dépannage
(page 17).
REMARQUE : le disque FireWire/USB est livré
préformaté HFS+ (MAC OS) et doit être reformaté
pour une utilisation sous Windows (voir les
instructions à la page 17). Le disque eSATA/USB
est livré préformaté FAT32 et ne nécessite aucun
reformatage.
USB / FireWire

13
USB / FireWire
1. Conecte la fuente de alimentación suministrada
a la parte posterior de la unidad y a la toma de
alimentación.
PRECAUCIÓN: No mueva la unidad mientras
esté encendida para evitar posibles daños en la
unidad o la pérdida de datos.
2. Identifique el cable adecuado y conéctelo a la
parte posterior de la unidad.
3. Conecte el otro extremo del cable al puerto del
equipo. Nunca conecte la unidad al equipo con
más de un cable.
4. Si la unidad no aparece en el equipo, consulte
Solución de problemas (página 20).
NOTA: La unidad FireWire/USB se entrega con
el formato HFS+ (Mac OS) y se debe volver a
formatear para utilizarla con Windows (consulte
las instrucciones de la página 20). La unidad
eSATA/USB se entrega con el formato FAT32 y no
requiere volver a formatearla.
1. Conecte a fonte de alimentação fornecida à parte
traseira da unidade e depois a uma tomada elétrica.
CUIDADO!
Não mova a unidade enquanto ela
estiver ligada para evitar danos à mesma ou perda
de dados.
2. Identifique o cabo apropriado e conecte-o à parte
traseira da unidade.
3. Conecte a outra extremidade do cabo à porta do
seu computador.
Nunca
conecte a unidade ao
computador através de mais de um cabo.
4. Se a unidade não aparecer no seu computador,
consulte a seção Solução de problemas (página 22).
OBS:
A unidade FireWire/USB é enviada pré-
formatada com HFS+ (Mac OS) e precisa ser
reformatada para uso com Windows (consulte as
instruções na página 22). A unidade eSATA/USB é
enviada pré-formatada com FAT32 e não precisa ser
reformatada.
1. Sluit het ene uiteinde van de meegeleverde
voeding aan op de achterkant van de drive en het
andere op een stopcontact.
WAARSCHUWING! Verplaats de drive niet wanneer
deze van stroom is voorzien, om beschadigingen
of gegevensverlies te voorkomen.
2. Neem de geschikte kabel en sluit die aan op de
achterkant van de drive.
3. Sluit het andere uiteinde van de kabel aan op de
poort van de computer. Sluit de drive
nooit met
meer dan één kabel aan op de computer.
4. Als het pictogram van de drive niet wordt
weergegeven, raadpleegt u Problemen oplossen
(pagina 23).
OPMERKING: De FireWire/USB-drive wordt vooraf
geformatteerd als HFS+ (Mac OS) en zodanig
geleverd en moet opnieuw worden geformatteerd
voor gebruik met Windows (zie instructies op
pagina 24). De eSATA/USB-drive wordt vooraf
geformatteerd als FAT32 en zodanig geleverd en
hoeft niet opnieuw te worden geformatteerd.
1. Anslut den medföljande strömkabeln till
enhetens baksida och koppla den därefter till ett
strömuttag.
VARNING! Flytta inte enheten när den har startats
för att undvika att den skadas eller att data går
förlorade.
2. Lokalisera rätt kabel och anslut den till uttaget på
baksidan av enheten.
3. Anslut den andra änden av kabeln till porten på
datorn. Anslut aldrig enheten till datorn med mer
än en kabel.
4. Om drivrutinen inte visas på datorn, se
felsökningsavsnittet.
OBS: FireWire-/USB-drivrutinen levereras
förformaterad för HFS+ (Mac OS) och måste
omformateras för användning med Windows.
eSATA-/USB-drivrutinen levereras förformaterad
för FAT32 och kräver ingen omformatering.

14
USB / FireWire
1. Sæt stikket fra den medfølgende strømforsyning i
på bagsiden af drevet, og sæt derefter den anden
ende i en stikkontakt.
Forsigtig! Hvis du vil undgå at beskadige drevet
eller miste data, må du ikke flytte drevet, mens
det startes.
2. Find det korrekte kabel, og sæt det i på bagsiden
af drevet.
3. Slut den anden ende af kablet til porten på
computeren. Slut aldrig drevet til computeren
med mere end ét kabel.
4. Hvis drevet ikke vises på computeren, henvises
du til Fejlfinding.
B
emærk! FireWire/USB-drevet leveres
præformateret med HFS+ (Mac OS) og skal
omformateres til brug med Windows. eSATA/
USB-drevet leveres præformateret med FAT32 og
kræver ikke omformatering.
1. Koble til den medfølgende strømforsyningen
på baksiden av stasjonen, og deretter til en
stikkontakt.
FORSIKTIG! For å unngå skade på stasjonen eller
tap av data må ikke stasjonen flyttes mens den er
slått på.
2. Finn frem den riktige kabelen og koble den til på
baksiden av stasjonen.
3. Koble den andre enden av kabelen til porten
på datamaskinen. Koble aldri stasjonen til
datamaskinen med mer enn én kabel.
4. Hvis stasjonen ikke vises på datamaskinen, se
Problemløsing.
MERK: FireWire/USB-stasjonen leveres
ferdig formatert med HFS+ (Mac OS) og må
omformateres for bruk sammen med Windows.
eSATA/USB-stasjonen leveres ferdig formatert
med FAT32 og krever ikke omformatering.
1. Kytke laitteen mukana toimitettu virtalähde
aseman takaosaan ja pistorasiaan.
VAROITUS: Älä irrota asemaa, kun sen virta on
kytkettynä. Näin vältät aseman vaurioitumisen ja
tietojen katoamisen.
2. Etsi oikea kaapeli ja kytke se aseman takaosaan.
3. Kytke kaapelin toinen pää tietokoneen porttiin.
Kytke kiintolevy tietokoneeseen vain yhdellä
kaapelilla.
4. Jos asemaa ei löydy tietokoneelta, katso
Vianmääritys.
HUOM: FireWire-/USB- asema on esialustettu
HFS+ (Mac OS) -muotoon ja se on alustettava
uudelleen Windows-käyttöjärjestelmää varten.
FAT32-muotoon esialustettuja eSATA-/USB-asemia
ei tarvitse alustaa uudelleen.
1. Csatlakoztassa a mellékelt tápegységet a
meghajtó hátuljához és a konnektorhoz.
VIGYÁZAT! Bekapcsolás közben ne mozgassa
a meghajtót, így elkerülheti az esetleges
sérüléseket és adatvesztéseket.
2. Keresse meg a megfelelő kábelt, majd
csatlakoztassa a meghajtó hátuljához.
3. A kábel másik végét csatlakoztassa a számítógép
egyik portjához. A meghajtó és a számítógép
csatlakoztatásához soha ne használjon egynél
több kábelt.
4. Ha a meghajtó nem jelenik meg a számítógépen,
olvassa el a Hibaelhárítás című részt.
Megjegyzés: A FireWire/USB meghajtó HFS+ (Mac
OS) rendszerhez előformázva kerül szállításra,
és Windows operációs rendszeren történő
használathoz újra kell formázni. Az eSATA/USB
meghajtó FAT32 rendszerhez előformázva kerül
szállításra, és nem igényel újraformázást.

15
USB / FireWire
1. Pomocí přiloženého adaptéru připojte diskové
pole k elektrické síti.
UPOZORNĚNÍ! Nepřemísťujte zapnuté diskové
pole. Hrozí poškození disků a ztráta dat.
2. Najděte příslušný kabel a připojte jej do zadní
části jednotky.
3. Připojte druhý konec kabelu k portu v počítači.
Nikdy nepřipojujte jednotku k počítači pomocí
více než jednoho kabelu.
4. Neobjeví-li se diskové pole v počítači, postupujte
podle pokynů uvedených v části Vyhledání a
odstranění závad.
POZNÁMKA: Diskové pole FireWire/USB se
dodává naformátované jako HFS+ (Mac OS) a pro
použití se systémem Windows se musí znovu
naformátovat. Diskové pole eSATA/USB se dodává
naformátované jako FAT32 a nevyžaduje další
formátování.
1. Podłącz dostarczony zasilacz do gniazda z tyłu
dysku oraz do gniazda zasilania.
UWAGA! Aby uniknąć uszkodzenia dysku lub
utraty danych, nie wolno przenosić włączonego
napędu.
2. Znajdź odpowiedni przewód i podłącz go z tyłu
napędu.
3. Podłącz drugi koniec przewodu do portu w
komputerze. Nie wolno podłączać napędu
do komputera za pomocą więcej niż jednego
przewodu.
4. Jeżeli napęd nie jest widoczny w komputerze,
zapoznaj się z częścią Rozwiązywanie problemów.
UWAGA: Napęd FireWire/USB jest wysyłany w
stanie wstępnie sformatowanym HFS+ (system
operacyjny Mac OS) i musi zostać ponownie
sformatowany w przypadku wykorzystywania
w systemie Windows. Napęd eSATA/USB jest
dostarczany wstępnie sformatowany w systemie
FAT32 i nie wymaga ponownego formatowania.
1. 將隨附的電源供應器接到磁碟機背面,再接到電源
插座。
注意!為避免磁碟機資料遺失,當磁碟機電源開啟
時,請勿移動它。
2. 確定正確的纜線後,將該纜線連接到磁碟機背面。
3. 將纜線的另一端連接到您電腦上的連接埠。將磁
碟機連接到電腦時,絕對不可使用一條以上的纜
線。
4. 若電腦上未出現磁碟機圖示,請參閱疑難排解。
注意:FireWire/USB 磁碟機出廠時預先格式化成
HFS+ (Mac OS) 格式,使用於 Windows 時,必須重
新格式化。eSATA/USB 磁碟機出廠時預先格式化
成 FAT32 格式,不需要重新格式化。
1. Συνδέστε το τροφοδοτικό που συνοδεύει το δίσκο
στο πίσω µέρος του και σε µια πρίζα ηλεκτρικού.
ΠΡΟΣΟΧΗ!
Μην µετακινείτε το δίσκο όταν ξεκινά
η τροφοδοσία του, για να µην προκληθεί ζηµιά ή
απώλεια δεδοµένων.
2. Εντοπίστε το κατάλληλο καλώδιο και συνδέστε το
στο πίσω µέρος του δίσκου.
3. Συνδέστε το άλλο άκρο του καλωδίου σε
µια υποδοχή στον υπολογιστή σας. Ποτέ µην
συνδέετε το δίσκο µε τον υπολογιστή µε
περισσότερα του ενός καλώδια.
4. Αν δεν εµφανιστεί ο δίσκος στον υπολογιστή
σας, ανατρέξτε στην ενότητα Troubleshooting
(Αντιµετώπιση προβληµάτων).
ΣΗΜΕΙΩΣΗ:
Ο δίσκος FireWire/USB παραδίδεται
µε εκ των προτέρων διαµόρφωση HFS+ (Mac OS)
και, για να χρησιµοποιηθεί στα Windows, πρέπει
να διαµορφωθεί εκ νέου. Ο δίσκος eSATA/USB
παραδίδεται µε εκ των προτέρων διαµόρφωση
FAT32 και δεν απαιτεί εκ νέου διαµόρφωση.

16
Using Your Drive
NOTE: If you need additional instructions or troubleshooting help, see the user’s manual on the Solutions CD.
Volume Configuration
The Iomega UltraMax Pro drive ships configured as a striped (RAID 0) volume, which appears as a single disk on
the computer system. You can configure your Iomega UltraMax Pro Hard Drive to support several different volume
types. See the HTML User’s Manual on the Solutions CD for detailed descriptions of these configuration options
and for instructions on setting the configuration switches.
CAUTION! Changing the volume configuration will erase all existing data! If you have files on the drive you
want to save, move them to another drive before changing the configuration. Do NOT change the configuration
switches while the drive is powered up.
Disconnecting the Drive
CAUTION! To prevent data loss, do not disconnect the drive during data transfer (activity light flashing).
eSATA Users: Always turn off power to the drive and computer before disconnecting.
Backing Up with Your Drive
Iomega recommends periodic system backups and more frequent data backups to ensure that your critical data
is always protected. The frequency of your backup should depend on the importance of your data. To protect
your data, you can simply drag and drop copies of your critical files onto the drive, or you can use backup
software to schedule regular backups.
Troubleshooting
Drive does not appear in My Computer or Windows Explorer or on the Mac Desktop
• Try rebooting your computer.
• Check all connections.
• Make sure the drive is receiving power (check if the status light is on). Make sure the power switch is on.
• Make sure you are using the cable that came with your drive.
• Make sure the drive is connected to only one interface.
PC Users: Formatting the Iomega UltraMax Pro FireWire/USB Hard Drive for Windows
®
FireWire/USB models ship preformatted HFS+ (Mac OS). If you are using the drive on a Windows PC and the drive
is not recognized, reformat the drive to either NTFS or FAT32.
CAUTION! Reformatting the Iomega UltraMax Pro drive will erase all existing data on the drive.
1. Connect the Iomega UltraMax Pro FireWire/USB drive to your computer.
2. Open Windows Disk Management (right click on My Computer, select Manage, and click on Disk
Management
).
3. If the Disk Wizard opens, click Next. Select the disk, click Next, then Finish.
If the Wizard does not open, locate the drive in the lower list. Look for a disk that does not show a drive
letter or file system. Right click on the drive name and select Initialize Disk (Windows XP) or Write Signature
(Windows 2000), then OK.
4. The drive will now appear as Unallocated and the bar will be black. Right click on the black bar and select
New Partition (Windows XP) or Create Partition (Windows 2000).
5. When the Partition Wizard opens, click Next
.
6. Verify that the partition type is Primary partition and click Next
.
7. Leave the maximum disk space selected and click Next
.
8. Assign the next drive letter available and click Next.
9. To format the drive with an NTFS file system, click Next, then click Finish. The drive will be ready to use when
the format completes.
NOTE: If you want to use the drive with other operating systems, use the Iomega FAT32 Formatter located on the
CD to change the format to FAT32 (needed for cross-platform compatibility). If you need detailed instructions,
check the Support and Downloads area on www.iomega.com
.

17
PC will not start up
If your PC will not start up when the drive is connected, there is probably a conflict with the computer. To work
around this problem, power off the drive when starting the computer. Power on the drive after the computer
finishes starting up.
Complete User's Manual
A complete user’s manual in HTML format is available on the Support & Downloads area on www.iomega.com.
Utilisation du lecteur
REMARQUE: Si vous avez besoin d’instructions complémentaires ou d’une aide au dépannage, reportez-vous au
guide de l’utilisateur sur le CD Solutions.
Configuration du volume
Le disque Iomega UltraMax Pro est configuré en tant que volume réparti (RAID 0) qui s’affiche comme disque
unique sur le système. Votre disque dur Iomega UltraMax Pro peut être configuré pour prendre en charge
différents types de volumes. Consultez le guide de l’utilisateur au format HTML sur le CD Solutions pour obtenir
des descriptions détaillées de ces options de configuration et pour obtenir des instructions sur les paramètres
de l’alternance de configuration.
ATTENTION ! La modification de la configuration du volume efface toutes les données existantes ! Si le disque
contient des fichiers que vous voulez sauvegarder, déplacez-les sur un autre disque avant de modifier la
configuration. Ne modifiez PAS la configuration lorsque le disque est alimenté.
Déconnexion du lecteur
ATTENTION ! Pour éviter toute perte de données, ne déconnectez pas le lecteur pendant un transfert de données
(voyant d’activité clignotant).
Utilisateurs de eSATA : mettez toujours le lecteur et l’ordinateur hors tension avant la déconnexion.
Sauvegarder avec votre disque dur
Iomega recommande d’effectuer des sauvegardes régulières du système et des sauvegardes fréquentes de
données pour assurer la protection permanente de vos données les plus importantes. La périodicité des
sauvegardes dépend directement de l’importance des données à sauvegarder. Pour protéger vos données,
copiez vos fichiers les plus importants sur le disque par simple glisser-déplacer ou utilisez le logiciel de
sauvegarde pour programmer des sauvegardes régulières.
Dépannage
Le lecteur n’apparaît pas dans le Poste de travail, l’Explorateur Windows ou sur le bureau du Mac.
• Redémarrez votre ordinateur.
• Vérifiez toutes les connexions.
• Assurez-vous que le disque est alimenté (vérifiez que le voyant d’état est allumé). Assurez-vous que
l’interrupteur d’alimentation est sous tension.
• Assurez-vous que vous utilisez le câble fourni avec le disque
.
• Assurez-vous que le disque est connecté à une seule interface.
Utilisateurs de PC : Formatage du lecteur de disque dur FireWire/USB Iomega UltraMax Pro pour Windows
Les modèles de FireWire/USB sont livrés préformatés au format HFS+ (Mac OS). Si vous utilisez le disque dur sur
un PC Windows et qu’il n’est pas reconnu, vous devez reformater le disque dur au format NTFS ou FAT32.
ATTENTION ! Le reformatage du lecteur efface toutes les données existantes !
1. Connectez le lecteur Iomega UltraMax Pro FireWire/USB à votre ordinateur.
2. Ouvrez l’utilitaire de gestion des disques de Windows (cliquez avec le bouton droit de la souris sur Poste de
travail, Gérer, puis Gestion des disques
).
3. Si l’Assistant lecteur s’ouvre, cliquez sur Suivant. Sélectionnez le lecteur, cliquez sur Suivant puis sur
Terminer
.
Si l’Assistant ne s’ouvre pas, recherchez le lecteur dans la liste inférieure. Recherchez un disque ne
présentant ni lettre de lecteur ni système de fichiers. Cliquez avec le bouton droit de la souris sur le nom du
lecteur et sélectionnez Initialiser le lecteur (Windows XP) ou Ecrire une signature (Windows 2000) puis OK.

18
4. Le disque apparaît comme Non attribué et la barre doit être noire. Cliquez avec le bouton droit sur la barre
noire et sélectionnez Nouvelle partition (Windows 2000) ou Créer une partition (Windows XP).
5. Lorsque l’Assistant Création de partition s’ouvre, cliquez sur Suivant
.
6. Vérifiez que le type de partition sélectionné est bien Partition primaire, puis cliquez sur Suivant.
7. Sélectionnez l’espace disque maximum disponible et cliquez sur Suivant
.
8. Attribuez la prochaine lettre de lecteur disponible au disque et cliquez sur Suivant
.
9. Pour formater le disque avec système de fichiers NTFS, cliquez sur Suivant, puis sur Terminer. Le disque
peut être utilisé dès que le formatage est terminé.
REMARQUE : Si vous souhaitez utiliser le disque avec d’autres systèmes d’exploitation, utilisez le Iomega Fat32
Formatter situé sur le CD pour formater le disque au format FAT32 (requis pour la compatibilité multiplate-forme).
Pour obtenir des instructions détaillées, consultez la section Assistance et téléchargements du site
www.iomega.com.
L’ordinateur ne démarre pas
Si votre ordinateur ne démarre pas lorsque le disque est connecté, il existe très certainement un conflit avec
l’ordinateur. Afin de résoudre ce problème, éteignez le disque lorsque vous démarrez l’ordinateur. Allumez le
disque après avoir démarré l’ordinateur.
Guide complet de l’utilisateur
Un guide de l’utilisateur complet est disponible au format HTML dans la section Support et Téléchargement du
site www.iomega.com.
Verwenden des Laufwerks
HINWEIS: Zusätzliche Anweisungen und Informationen zur Fehlerbehebung finden Sie im Benutzerhandbuch auf
der Solutions-CD.
Volumekonfiguration
Das Iomega UltraMax Pro-Laufwerk ist werksseitig als Striping-Volume (RAID 0) konfiguriert und wird daher auf
dem Computer als einzelner Datenträger angezeigt. Sie können das Iomega UltraMax Pro-Festplattenlaufwerk so
konfigurieren, dass es die unterschiedlichsten Volumetypen unterstützt. Ausführliche Beschreibungen zu diesen
Konfigurationsoptionen sowie Anweisungen zum Festlegen der Konfigurationsswitches finden Sie im HTML-
Benutzerhandbuch auf der Lösungs-CD.
ACHTUNG: Bei einer Änderung der Volumekonfiguration werden sämtliche vorhandenen Daten gelöscht! Sollten
Sie Dateien auf dem Laufwerk haben, die Sie speichern möchten, verschieben Sie diese auf ein anderes Laufwerk,
bevor Sie die Schaltereinstellungen ändern. Ändern Sie NICHT die Konfigurationsswitches, während das Laufwerk
hochgefahren ist.
Trennen des Laufwerks vom System
ACHTUNG! Um Datenverluste zu vermeiden, trennen Sie das Laufwerk während der Datenübertragung (wenn
Aktivitätsanzeige blinkt) nicht vom Computer.
eSATA-Benutzer: Müssen Sie das Laufwerk und den Computer immer vor dem Trennen der Verbindung
abschalten.
Mit dem Iomega Laufwerk auf Nummer Sicher
Es empfiehlt sich, das System regelmäßig und die Daten noch häufiger zu sichern, um den ständigen Schutz
Ihrer wichtigen Daten zu gewährleisten. Wie oft Sie eine Sicherung vornehmen, hängt jeweils von der Wichtigkeit
Ihrer Daten ab. Sie können die Daten auf einfache Weise sichern, indem Sie Kopien derselben durch Ziehen
und Ablegen auf das Laufwerk kopieren. Alternativ dazu bietet die Sicherungssoftware die Möglichkeit, eine
regelmäßige Sicherung zu planen.
Fehlerbehebung
Laufwerk wird nicht im Arbeitsplatz, dem Windows Explorer oder auf dem Mac-Desktop angezeigt
• Führen Sie probeweise einen Neustart des Computers durch.
• Überprüfen Sie alle Verbindungen.
• Kontrollieren Sie anhand des Statuslämpchens, ob das Laufwerk mit Strom versorgt wird. Stellen Sie sicher,
dass der Hauptschalter eingeschaltet ist
.

19
• Achten Sie darauf, dass Sie das mit dem Laufwerk gelieferte Kabel verwenden.
• Vergewissern Sie sich, dass das Laufwerk nur an eine Schnittstelle angeschlossen ist.
PC-Benutzer mit FireWire/USB-Laufwerk: Formatieren unter Windows
Die FireWire/USB Modelle sind ab Werk auf HFS+ (Mac OS) vorformatiert. Wenn Sie das Laufwerk unter Windows
betreiben und dieses nicht erkannt wird, müssen Sie es entweder auf NTFS oder auf FAT32 umformatieren.
ACHTUNG! Bei einer Neuformatierung des Laufwerks werden sämtliche vorhandenen Daten gelöscht!
1. Schließen Sie das Iomega UltraMax Pro FireWire/USB-Laufwerk am Computer an.
2. Öffnen Sie die Windows Datenträgerverwaltung (mit rechter Maustaste auf Arbeitsplatz klicken, Verwalten
wählen und dann auf Datenträgerverwaltung klicken).
3. Falls der Assistent für die Datenträgerinitialisierung gestartet wird, klicken Sie auf Weiter. Wählen Sie den
Datenträger aus. Klicken Sie auf Weiter und dann auf Fertig stellen
.
Falls der Assistent für die Datenträgerinitialisierung nicht gestartet wird, suchen Sie das Laufwerk in der unteren
Liste. Suchen Sie nach einem Datenträger, bei dem kein Laufwerksbuchstabe oder Dateisystem angezeigt wird.
Klicken Sie mit der rechten Maustaste auf den Laufwerksnamen und wählen Sie dann Datenträger initialisieren
(Windows XP) oder Signatur schreiben (Windows 2000). Klicken Sie anschließend auf OK
.
4. Das Laufwerk wird dann als Nicht zugeordnet angezeigt und der Balken schwarz dargestellt. Klicken Sie mit
der rechten Maustaste Right auf den schwarzen Balken und wählen Sie Neue Partition (Windows XP) oder
Partition erstellen (Windows 2000).
5. Sobald der Assistent zum Erstellen neuer Partitionen geöffnet wird, klicken Sie auf Weiter
.
6. Überprüfen Sie, ob es sich beim Partitionstyp um Primäre Partition handelt, und klicken Sie auf Weiter.
7. Lassen Sie die Auswahl (maximaler Speicherplatz ) stehen und klicken Sie auf Weiter
.
8. Ordnen Sie der Festplatte den nächsten Laufwerksbuchstaben zu und klicken Sie auf Weiter
.
9. Um das Laufwerk mit einem NTFS-Dateisystem zu formatieren, klicken Sie auf Weiter und dann auf Fertig
stellen. Sobald die Formatierung abgeschlossen ist, können Sie das Laufwerk verwenden.
HINWEIS: Falls Sie das Laufwerk mit anderen Betriebssystemen verwenden möchten, können Sie das Format mit
dem Iomega FAT32-Formatter auf der CD in FAT32 ändern (für Kompatibilität zwischen verschiedenen Plattformen
erforderlich). Wenn Sie ausführliche Anweisungen wünschen, rufen Sie den Bereich Support und Downloads
unter www.iomega.com auf.
Der PC lässt sich nicht starten
FWenn sich Ihr PC mit dem angeschlossenen Laufwerk nicht starten lässt, besteht wahrscheinlich ein Konflikt
mit dem Computer. Sie können dieses Problem umgehen, indem Sie das Laufwerk beim Starten des Computers
ausschalten. Nach dem Starten des Computers schalten Sie das Laufwerk ein.
Benutzerhandbuch (vollständig)
Im Bereich “Support & Downloads” unter www.iomega.com steht Ihnen ein vollständiges Benutzerhandbuch im
HTML-Format zur Verfügung.
Uso dell’unità
NOTA: per ulteriori istruzioni relative all’installazione o per informazioni sulla risoluzione dei problemi,
consultare il manuale dell’utente disponibile nel CD Soluzioni.
Configurazione del volume
L’unità Iomega UltraMax Pro viene fornita come volume striped (RAID 0), visualizzato sul computer come disco
singolo. È possibile configurare l’unità Iomega UltraMax Pro Hard Drive per supportare diversi tipi di volumi. Per
una descrizione dettagliata delle opzioni di configurazione disponibili e istruzioni sull’impostazione dei selettori
di configurazione, consultare il Manuale dell’utente in formato HTML contenuto nel CD Soluzioni.
ATTENZIONE! La modifica della configurazione del volume provoca l’eliminazione dei dati esistenti! Se i file che
si intende salvare risiedono sull’unità, spostarli su un’altra unità prima di modificare la configurazione.
NON
modificare i selettori di configurazione quando l’unità è accesa.
Scollegamento dell’unità
ATTENZIONE! Per evitare che si verifichino perdite di dati, non scollegare l’unità durante il trasferimento di
informazioni (la spia verde di attività lampeggia).
Utenti PC: Prima di scollegarla, ricordarsi sempre di spegnere sia l’unità che il computer.

20
Backup con le unità Iomega
Iomega consiglia di eseguire backup di sistema periodici e backup di dati più frequenti per garantire che i dati
essenziali siano sempre protetti. La frequenza dei backup varia in base all’importanza dei dati da memorizzare.
Per proteggere i dati, è sufficiente selezionare e trascinare copie dei dati più importanti sull’unità, oppure
utilizzare il software incluso per pianificare l’esecuzione di backup a intervalli regolari.
Risoluzione dei problemi
L’icona dell’unità non viene visualizzata in Risorse del computer, Esplora risorse di Windows o sulla
Scrivania Mac.
• Provare a riavviare il computer.
• Controllare i collegamenti.
• Assicurarsi che l’unità sia alimentata verificando che la spia sia accesa. Assicurarsi che l’interruttore di
alimentazione sia acceso
.
• Assicurarsi di utilizzare il cavo fornito in dotazione con l’unità.
• Accertarsi che l’unità sia collegata a una sola interfaccia.
Utenti PC: formattazione dell’unità a disco rigido Iomega UltraMax Pro FireWire/USB per Windows
I modelli di FireWire/USB vengono forniti preformattati HFS+ (Mac OS). Se si usa l’unità su un PC Windows e non
viene riconosciuta, riformattare l’unità in NTFS o FAT32.
ATTENZIONE! La riformattazione dell’unità provoca l’eliminazione dei dati esistenti!
1. Collegare l’unità Iomega UltraMax Pro FireWire/USB al computer.
2. Aprire Gestione disco di Windows (fare clic con il pulsante destro del mouse su Risorse del computer,
selezionare Gestisci, quindi fare clic su Gestione disco).
3. Quando si avvia l’Installazione guidata disco, scegliere Avanti. Selezionare il disco, fare clic su Avanti
,
quindi su Fine.
Se la procedura guidata non si avvia, cercare l’unità nella parte inferiore dell’elenco. Cercare un disco senza
lettera di unità o file system. Fare clic con il pulsante destro del mouse sul nome dell’unità e selezionare
Inizializza disco (Windows XP) o Riporta la firma (Windows 2000), quindi scegliere
OK.
4. A questo punto l’unità apparirà come Non allocata e la barra diventerà nera. Fare clic con il pulsante destro
del mouse sulla barra nera, quindi selezionare Nuova partizione (Windows XP) o Crea partizione (Windows
2000).
5. Quando si apre la Procedura guidata di partizione, fare clic su Avanti.
6. Accertarsi che la tipologia di partizione sia impostata su Partizione primaria, quindi fare clic su Avanti
.
7. Lasciare selezionato lo spazio massimo su disco e fare clic su Avanti
.
8. Assegnare la successiva lettera di unità disponibile e fare clic su Avanti
.
9. Per formattare l’unità con un file system NTFS, fare clic su Avanti, quindi su Fine. L’unità potrà essere
utilizzata al termine della formattazione.
NOTA: se si desidera utilizzare l’unità con altri sistemi operativi, utilizzare il programma Iomega FAT32 Formatter
contenuto nel CD per modificare la formattazione in FAT32 (richiesta per compatibilità tra diverse piattaforme).
Per ulteriori informazioni, visitare la sezione Supporto tecnico e download sul sito www.iomega.com.
Il computer non si avvia
Se il PC non si avvia quando l’unità è collegata, è possibile che esista un conflitto tra l’unità e il computer.
Per risolvere il problema, spegnere l’unità quando si accende il computer. Accendere l’unità dopo l’avvio del
computer.
Manuale completo dell’utente
Nell’area assistenza e download del sito Web www.iomega.com è disponibile il manuale completo dell’utente in
formato HTML.

21
Uso de la unidad
NOTA: Si desea obtener instrucciones adicionales o la ayuda de solución de problemas, consulte el manual del
usuario incluido en el CD de Soluciones.
Configuración de volumen
La unidad Iomega UltraMax Pro viene configurada como volumen agrupado (RAID 0), que aparece como
un solo disco en el sistema del ordenador. Puede configurar su disco duro Iomega UltraMax Pro para que
admita diferentes tipos de volúmenes. Consulte el Manual del usuario HTML en el CD de soluciones para ver
descripciones detalladas de estas opciones de configuración, así como instrucciones sobre como definir los
interruptores de configuración.
PRECAUCIÓN: Si cambia la configuración de volumen se borrarán todos los datos existentes. Si tiene archivos
en la unidad que desee conservar, muévalos a otra unidad antes de cambiar la configuración.
NO cambie los
interruptores de configuración con la unidad encendida.
Desconexión de la unidad
PRECAUCIÓN: Para impedir la pérdida de datos, no desconecte la unidad durante el proceso de transferencia de
datos (la luz de actividad parpadea).
Usuarios de PC: Apague siempre la unidad y el ordenador antes de desconectarla.
Realización de copias de seguridad con la unidad
Iomega recomienda realizar con periodicidad copias de seguridad del sistema y copias de seguridad más
frecuentes de los datos para garantizar que los datos importantes estén siempre protegidos. La frecuencia de
las copias de seguridad dependerá de la importancia de los datos. Para proteger los datos, no tiene más que
arrastrar y soltar copias de los archivos importantes en la unidad o utilizar el software de copia de seguridad
para programar copias de seguridad regulares.
Solución de problemas
La unidad no aparece en Mi PC, el Explorador de Windows o en el escritorio de Mac.
• Inténtelo reiniciando el equipo.
• Compruebe todas las conexiones.
• Asegúrese de que la unidad recibe alimentación (compruebe si la luz de estado está encendida). Asegúrese
de que el interruptor de encendido está en posición de encendido.
• Asegúrese de que está utilizando el cable que se incluye con la unidad
.
• Asegúrese de que la unidad está conectada a una sola interfaz.
Usuarios de PC: Formateo de la unidad de disco duro Iomega UltraMax Pro FireWire/USB para Windows
Los modelos de FireWire/USB vienen preformateados con formato HFS+ (Mac OS). Si utiliza la unidad en un PC
con Windows y el sistema no reconoce la unidad, vuelva a formatearla con formato NTFS o FAT32.
PRECAUCION: Al volver a formatear la unidad, se borrarán todos los datos existentes.
1. Conecte la unidad Iomega UltraMax Pro FireWire/USB al ordenador.
2. Abra Administración de discos de Windows (haga clic con el botón derecho del ratón en Mi PC, seleccione
Administrar y, a continuación, haga clic en Administración de discos
).
3. Si se abre el asistente para discos, haga clic en Siguiente. Seleccione el disco, haga clic en Siguiente y, a
continuación, en Finalizar.
Si el asistente no se abre, localice la unidad en la lista de abajo. Busque un disco que no tenga letra de
unidad asignada o sistema de archivos. Haga clic con el botón derecho del ratón en el nombre de la unidad
y seleccione Inicializar disco (Windows XP) o Escribir firma (Windows 2000). A continuación, haga clic en
Aceptar
.
4. A continuación, la unidad aparecerá como No asignado y la barra se mostrará negra. Haga clic con el botón
derecho del ratón en la barra negra y seleccione Nueva partición (Windows XP) o Crear partición (Windows
2000).
5. Cuando se abra la ventana del asistente para particiones, haga clic en Siguiente
.
6. Compruebe que el tipo de partición sea Partición primaria y haga clic en Siguiente.
7. Deje el máximo espacio en el disco seleccionado y haga clic en Siguiente
.
8. Asigne la siguiente letra de unidad disponible y haga clic en Siguiente
.

22
9. Para formatear la unidad con un sistema de archivos NTFS, haga clic en Siguiente y, a continuación, en
Finalizar. Cuando el formateo finalice, la unidad estará lista para ser utilizada.
NOTA
: Si desea utilizar la unidad con otros sistemas operativos, utilice el software Iomega FAT32 Formatter que
se incluye en el CD para cambiar el formato a FAT32 (necesario para plataformas cruzadas). Si desea obtener
instrucciones detalladas, visite el área de asistencia y descargas en www.iomega.com.
El PC no arranca
Si su PC no arranca cuando la unidad está conectada, probablemente exista un conflicto con el ordenador. Para
solucionar este problema, apague la unidad cuando arranque el ordenador. Encienda la unidad después de que
el ordenador haya terminado de arrancar.
Completo manual del usuario
El manual de usuario completo en formato HTML está disponible en el área de asistencia y descargas del sitio
www.iomega.com.
Utilização da unidade
NOTA: Caso precise de mais instruções ou ajuda na solução de problemas, consulte o manual do usuário no CD
Soluções.
Configuração de volume
A unidade Iomega UltraMax Pro vem configurada como um volume dividido (RAID 0), que aparece como um único
disco no sistema do computador. Você pode configurar o disco rígido UltraMax Pro da Iomega para que ele seja
compatível com vários tipos de volumes. Consulte o Manual do usuário em HTML no CD Soluções para obter
descrições detalhadas dessas opções de configuração e instruções para definir as chaves de configuração.
CUIDADO! Mudar a configuração de volume aparagá todos os dados existentes! Caso você possua arquivos na
unidade que deseje salvar, mova-os para outra unidade antes de mudar a configuração.
NÃO mude as chaves de
configuração enquanto a unidade estiver ligada.
Desconexão da unidade
CUIDADO! A fim de evitar a perda de dados, não desconecte a unidade durante a transferência de dados (luz de
atividade da unidade piscando).
Usuários de eSATA: Sempre desligue a unidade e o computador antes de desconectá-la.
Execução de backup com a sua unidade
A Iomega recomenda que sejam feitos backups periódicos do sistema e backups mais freqüentes de dados para
garantir que seus dados mais importantes estejam sempre protegidos. A freqüência da execução de backups
deve basear-se na importância de seus dados. Para proteger seus dados, você pode simplesmente arrastar e
soltar cópias de seus arquivos importantes na unidade ou pode usar um software de backup para programar
backups regulares.
Solução de problemas
A unidade não aparece em Meu computador, no Windows Explorer ou na mesa do Mac.
• Tente reiniciar seu computador.
• Verifique todas as conexões.
• Certifique-se de que a unidade esteja recebendo energia (verifique se a luz de status está ligada). Certifique-
se de que a unidade esteja ligada.
• Certifique-se de que esteja utilizando o cabo enviado com a unidade
.
• Certifique-se de que a unidade esteja conectada a apenas uma interface.
Usuários de PC: Formatação do disco rígido Iomega UltraMax FireWire/USB para Windows
Os modelos FireWire/USB são enviados pré-formatados para HFS+ (Mac OS). Caso você esteja usando a unidade
em um PC com Windows e ela não seja reconhecida, reformate a unidade para NTFS ou FAT32.
CUIDADO! A reformatação da unidade apagará todos os dados existentes!
1. Conecte a unidade Iomega UltraMax Pro FireWire/USB ao computador.
2. Abra o Gerenciamento de Disco do Windows (clique com o botão direito do mouse em Meu Computador,
selecione Gerenciar e, em seguida, clique em Gerenciamento de Disco).
3. Se o Assistente de Disco abrir, clique em Avançar. Selecione o disco, clique em Avançar e Concluir
.

23
Se o assistente não abrir, localize a unidade na lista inferior. Procure um disco que não tenha uma letra de
unidade ou um sistema de arquivos. Clique com o botão direito do mouse no nome da unidade, selecione
Inicializar Disco (Windows XP) ou Gravação de Assinaturas (Windows 2000) e OK.
4. A unidade aparecerá como Não Alocada e a barra estará preta. Clique com o botão direito do mouse na
barra preta e selecione Nova Partição (Windows XP) ou Criar Partição (Windows 2000).
5. Quando o Assistente de Partição do Windows abrir, clique em Avançar
.
6. Verifique se o tipo de partição é Partição primária e clique em Avançar
.
7. Marque o espaço máximo de disco e clique em Avançar
.
8. Atribua a próxima letra de unidade disponível e clique em Avançar
.
9. Para formatar a unidade com um sistema de arquivos NTFS, clique em Avançar e, em seguida, em Concluir.
A unidade estará pronta para uso quando a formatação estiver concluída.
NOTA: Para usar a unidade com outros sistemas operacionais, use o Iomega FAT32 Formatter, incluído no CD,
para alterar o formato para FAT32 (necessário para manter compatibilidade entre plataformas). Se precisar de
instruções detalhadas, visite a área de Suporte e Downloads do site www.iomega.com
.
O computador não inicia
Se o PC não ligar quando a unidade está conectada, provavelmente há um conflito com o computador. Para
resolver esse problema, desligue a unidade ao iniciar o computador. Ligue a unidade quando o computador
terminar de iniciar.
Manual completo do usuário
Está disponível na área de Suporte e Downloads no site www.iomega.com a versão completa do manual do
usuário em formato HTML.
De drive gebruiken
OPMERKING: voor aanvullende instructies of help over het oplossen van problemen raadpleegt u de
gebruikershandleiding op de cd.
Volumeconfiguratie
De Iomega UltraMax Pro-drive wordt geleverd als een vooraf geconfigureerd striped volume (RAID 0), dat in het
computersysteem als één schijf wordt weergegeven. U kunt uw Iomega UltraMax Pro Hard Drive zo configureren
dat deze verschillende volumetypen ondersteunt. Raadpleeg de html-versie van de Gebruikershandleiding op de
cd Solutions voor gedetailleerde beschrijvingen van deze configuratieopties en voor instructies over het instellen
van de configuratieswitches.
WAARSCHUWING! Wanneer u de volumeconfiguratie wijzigt , worden alle gegevens op de drive gewist! Als uw
drive bestanden bevat die u wilt bewaren, verplaatst u ze naar een andere drive voordat u de configuratie wijzigt.
Wijzig de configuratieswitches
NIET wanneer de drive in gebruik is.
De drive loskoppelen
WAARSCHUWING! Koppel de drive nooit los tijdens een gegevensoverdracht (wanneer het statuslampje van de drive-
activiteit knippert).
eSATA-gebruikers:
U moet de drive en computer dus altijd uitschakelen voordat u de drive loskoppelt.
Back-ups maken met uw drive
Iomega raadt u aan regelmatig een back-up te maken van uw systeem en nog regelmatiger een back-up van
uw gegevens, zodat u er altijd op kunt vertrouwen dat uw kritieke gegevens zijn veiliggesteld. De regelmaat
waarmee u back-ups maakt, stemt u het beste af op het belang van uw gegevens. U kunt uw gegevens eenvoudig
beschermen door kopieën van uw bestanden naar de drive te verslepen of door gebruik te maken van back-
upsoftware om regelmatig back-ups te plannen.
Problemen oplossen
De drive verschijnt niet in Deze computer, Windows Verkenner of op het Mac-bureaublad.
• Start de computer opnieuw op.
• Controleer alle aansluitingen.
• Controleer of de drive van stroom is voorzien (controleer of het statuslampje brandt). Controleer of de aan/
uit-knop van de drive is ingeschakeld
.

24
• Controleer of u wel de kabel gebruikt die bij de drive is meegeleverd.
• Controleer of de drive slechts op één interface is aangesloten.
PC-gebruikers: de Iomega UltraMax Pro FireWire/USB-drive formatteren voor Windows
De modellen FireWire/USB worden vooraf geformatteerd als HFS+ (Mac OS) en zo geleverd. Als u de drive op een
pc met Windows gebruikt en de drive wordt niet herkend, formatteert u de drive opnieuw als een NTFS- of FAT32-
drive.
WAARSCHUWING! Door de drive opnieuw te formatteren, zullen alle gegevens op de drive worden gewist!
1. Sluit de Iomega UltraMax Pro FireWire/USB-drive aan op uw computer.
2. Open Windows Schijfbeheer (klik met de rechtermuisknop op Deze computer, selecteer Beheren en klik
daarna op Schijfbeheer
).
3. Als de wizard Schijf wordt geopend, klikt u op Volgende. Selecteer de schijf en klik achtereenvolgens op
Volgende en Voltooien.
Als de wizard niet verschijnt, zoekt u de drive in de lijst onderaan. Zoek naar een schijf zonder een
stationsaanduiding of bestandssysteem. Klik met de rechtermuisknop op de naam van de drive, selecteer
Schijf initialiseren (Windows XP) of Handtekening schrijven (Windows 2000) en klik op
OK.
4. De drive zal nu verschijnen als Niet-toegewezen en de balk zal zwart zijn. Klik met de rechtermuisknop op de
zwarte balk en selecteer Nieuwe partitie (Windows XP) of Partitie maken (Windows 2000).
5. Wanneer de wizard Partitie maken verschijnt, klikt u op Volgende
.
6. Controleer of het partitietype is ingesteld op Primaire partitie en klik op Volgende.
7. Laat de maximale schijfruimte geselecteerd en klik op Volgende
.
8. Wijs de volgende beschikbare stationsaanduiding toe en klik op Volgende
.
9. Klik achtereenvolgens op Volgende en Voltooien. De drive is gebruiksklaar nadat de formattering is voltooid.
OPMERKING: als u de drive in andere besturingssystemen wilt gebruiken, gebruikt u de Iomega FAT32 Formatter,
die zich op de cd bevindt, om het formaat in te stellen op FAT32 (wat vereist is voor compatibiliteit tussen
platforms). Voor gedetailleerde instructies raadpleegt u de sectie voor ondersteuning en downloads op www.
iomega.com.
PC wilt niet opstarten
Als uw pc niet wilt opstarten wanneer de drive is aangesloten, is er wellicht een conflict met de computer. U kunt
dit probleem oplossen door de stroomvoorziening van de drive uit te schakelen wanneer u de computer opstart.
Schakel de stroomvoorziening van de drive weer in nadat de computer volledig is opgestart..
Volledige gebruikershandleiding
Een volledige gebruikershandleiding in HTML-indeling is verkrijgbaar in de sectie Support & Downloads op
www.iomega.com.
使用磁碟機
注意:若您需要其他的指示說明或疑難排解說明,請參閱「解決方案 CD」內的使用者手冊。
磁碟組態
Iomega UltraMax Pro 出廠時設定為等量 (RAID 0) 磁碟,在電腦系統中以單一磁碟呈現。您可以設定 Iomega
UltraMax Pro 硬碟以支援數種不同的磁碟類型。請參閱 Solutions 光碟中的 HTML 使用者手冊以取得組態選項
的詳細說明,以及設定組態開關的說明。
注意! 變更磁碟組態將清除所有現存資料! 如果磁碟機內有您想要儲存的檔案,則在變更設定前將檔案移至另一
台磁碟機中。磁碟機電源為開啟時,請勿變更組態開關。
中斷磁碟機的連接
注意!為避免資料遺失,在資料傳輸過程中 (磁碟機指示燈閃爍) 請勿拔除磁碟機。
eSATA 使用者: 請務必關閉磁碟機和電腦之電源。
備份您的磁碟
Iomega 建議您定期進行系統備份,並經常進行資料備份,以確保您的重要資料受到妥善保護。備份的頻率可由
資料的重要性來決定。若要保護您的資料,您可簡單地將重要檔案的複本拖放到磁碟上,或使用備份軟體排程定
期備份。

25
疑難排解
磁碟機未出現在「我的電腦」、「Windows 檔案總管」或 Mac 桌面上
• 嘗試將電腦重新開機。
• 檢查所有的連接情形。
• 請確定磁碟機接通電源 (檢查狀態指示燈是否已亮起)。確定電源已開啟。
• 請確定使用磁碟機隨附的
纜線。
• 請確認磁碟機只有連接至一個介面
。
PC
使用者:格式化 Iomega 硬碟
某些機型出廠時已預先格式化為 HFS+ (Mac OS)。如果您在 Windows PC 上使用磁碟機卻無法辨識該磁碟機,請
重新格式化磁碟為 NTFS 或 FAT32。
注意! 重新格式化 Iomega 硬碟會將磁碟機所有現存資料都清除。
1. 依循第 5 頁的指示,將 Iomega 硬碟連接至電腦。
2. 開啟「Windows 磁碟管理」(在我的電腦上按右鍵,選擇管理,再按一下磁碟管理)。
3.
在清單下方找到 Iomega 硬碟。找出沒有顯示代號或檔案系統的磁碟,該磁碟應列出狀況良好,方塊頂端為
藍色。
4. 在該磁碟的藍色列上按右鍵,選擇刪除磁碟分割。按一下是確認您希望刪除主要磁碟分割。磁碟現在會呈
現未配置,上方列呈黑色。
5.
在黑色列上按右鍵,選擇建立磁碟分割 (Windows XP) 或新磁碟分割 (Windows 2000)。
6. 開啟「Windows 磁碟分割精靈」時,按一下下一步。
7. 認磁碟分割類型為主要磁碟分割,並按一下下一步。
8. 保持選取最大的磁碟空間,並按一下下一步。
9. 指派下個可用的磁碟代號,按一下下一步。
若要將磁碟格式化為 NTFS 檔案系統,請按下一步,再按結束。格
式化完成之後即可使用磁碟。
注意: 若您希望在其他作業系統上使用磁碟,請使用 Solutions CD 上的 Iomega FAT32 Formatter 將格式變更為
FAT32 (跨平台相容所需)。若您需要詳細指示,請參閱 www.iomega.com 上的支援部分。
PC 無法啟動
如果連接磁碟機時 PC 無法啟動,則應該是與電腦發生衝突。若要解決此問題,請在啟動電腦時關閉磁碟機的電
源。並在電腦完成啟動後開啟電源。
完整使用者手冊
在 www.iomega.com 網站上的「支援與下載」區,可取得 HTML 格式的使用者手冊。

26
Limited Warranty • Garantie Limitée
Eingeschränkte Garantie • Garanzia limitata
Garantía limitada • Garantia limitada • Beperkte garantie
限期保固
Iomega warrants this hardware product to be free from defects in materials and workmanship for the warranty period. This non-transferable,
limited warranty is only to you, the first end-user purchaser. The warranty begins on the date of purchase and lasts for a period of one (1)
year for product purchased in the Americas, the Asia-Pacific region, or non-European Union nations in Europe, the Middle East, or Africa;
ninety (90) days for Iomega reconditioned products purchased in these regions; or, two (2) years for product purchased by an end-user in
member nations of the European Union.
This warranty does not apply to: (a) Iomega software products; (b) expendable components such as fuses or bulbs; or (c) third party
products, hardware or software, supplied with the warranted product. Iomega makes no warranty of any kind on such products which, if
included, are provided “AS IS.” This warranty also excludes damage caused by accident, misuse, abuse, use of non-Iomega approved media,
exposure of media to excessive magnetic fields, or external environmental causes.
Your sole and exclusive remedy for a covered defect is repair or replacement of the defective product, at Iomega’s sole option and expense
(shipping may be charged), and Iomega may use new or refurbished parts or products to do so. The replaced part/product will be warranted
for the remainder of the original warranty or three (3) months from the date of shipment of such parts/products, whichever is longer. If
Iomega is unable to repair or replace a defective product, your alternate exclusive remedy shall be a refund of the original purchase price.
The above is Iomega’s entire obligation to you under this warranty. IN NO EVENT SHALL IOMEGA BE LIABLE FOR INDIRECT, INCIDENTAL,
CONSEQUENTIAL OR SPECIAL DAMAGES OR LOSSES, INCLUDING LOSS OF DATA, USE, OR PROFITS EVEN IF IOMEGA HAS BEEN ADVISED OF THE
POSSIBILITY OF SUCH DAMAGES. In no event shall Iomega’s liability exceed the original purchase price of the drive or the media disk. Some
jurisdictions do not allow the exclusion or limitation of incidental or consequential damages, so the above limitation or exclusion may not
apply to you.
Obtaining Warranty Service
You must notify Iomega within the warranty period to receive warranty service. Just as technology and market conditions vary, Iomega’s
specific customer support policies (including fees for services) and procedures change over time. To obtain information about Iomega’s
current policies or warranty service, please visit our website at www.iomega.com/supportpolicy.html or write to: Iomega Customer Service,
4059 South 1900 West, Roy, UT 84067. Contact Information for Iomega Customer Service in Europe can be obtained on our Support website
at www.iomega.com/europe/support. If your product is eligible for warranty service, you will be required to return it to Iomega, along with
proper identification, a return authorization number obtained from the Iomega website or provided by the Iomega representative, and proof
of purchase. Iomega will not protect, recover, or return data during warranty service so you should duplicate your data before shipment.
Limitations
THE ABOVE WARRANTY IS EXCLUSIVE AND IN LIEU OF ALL OTHER WARRANTIES, EXPRESS OR IMPLIED. To the extent permitted by applicable
law, IOMEGA SPECIFICALLY DISCLAIMS ANY IMPLIED WARRANTIES, INCLUDING ANY IMPLIED WARRANTY OF MERCHANTABILITY OR FITNESS FOR
A PARTICULAR PURPOSE. Any implied warranty required by applicable law shall be limited in duration to the express warranty term. Some
jurisdictions do not allow disclaimers of implied warranties or limitations on how long an implied warranty lasts, so the above limitation may
not apply to you. This warranty gives you specific legal rights and you may also have other rights that vary from jurisdiction to jurisdiction.
Any suit for breach of any warranty on your Product must be filed within one (1) year of the first date the suit could have been brought.
Iomega garantit que ce produit est exempt de tout vice de fabrication ou de malfaçon pendant toute la période de garantie. Cette garantie
limitée n’est pas transférable et ne s’applique qu’à l’utilisateur final. La garantie est effective à partir de la date d’achat et reste ensuite
valable pendant une période de un (1) an à compter de cette même date sur le continent américain, dans la région Asie-Pacifique, dans les
pays d’Europe non membres de l’Union Européenne, au Moyen-Orient ou en Afrique, quatre-vingt dix (90) jours pour les produits remis en
état achetés dans les pays ou régions précédemment cités ou deux (2) ans dans le cadre d’un achat effectué par un utilisateur final au sein
de l’Union Européenne.
Cette garantie ne s’applique pas : (a) aux produits logiciels Iomega, (b) aux composants consommables comme les fusibles ou les ampoules
ou (c) aux produits tiers, matériel ou logiciel, fournis avec le produit sous garantie. Iomega ne garantit en aucun cas ces produits qui, si
inclus, sont fournis “EN L’ETAT”. Sont exclus les dommages causés par un accident, une mauvaise utilisation, un usage abusif, l’utilisation
de supports non fournis ou non approuvés par Iomega, une exposition excessive des supports à un champ magnétique ou tout autre cause
externe d’origine naturelle.
Votre seul et unique recours en cas de défaut reconnu est la réparation ou le remplacement du produit défectueux, aux frais et à la discrétion
de Iomega (l’expédition pourra vous être facturée). Iomega se réserve le droit d’utiliser des pièces ou produits neufs ou remis en état pour
procéder à la réparation. L’élément/produit remplacé sera garanti pendant le reste de la garantie d’origine ou, au maximum, trois (3) mois
à dater de l’expédition desdits éléments/produits. S’il s’avère que Iomega est dans l’impossibilité de réparer ou remplacer un produit
défectueux, votre seul recours sera le remboursement du prix d’achat initial. L’obligation de garantie de Iomega envers vous se limite aux
éléments cités précédemment. EN AUCUN CAS IOMEGA NE POURRA ETRE TENUE POUR RESPONSABLE DES DOMMAGES OU PERTES INDIRECTS,
ACCESSOIRES OU SPECIAUX, Y COMPRIS LA PERTE DE DONNEES, DE L’IMPOSSIBILITE D’UTILISATION OU DE PROFIT ET CE MEME SI IOMEGA A
ETE AVERTIE DE L’EVENTUALITE DE TELS DOMMAGES. En aucun cas la responsabilité de Iomega ne pourra s’étendre au-delà du prix d’achat
initial de l’appareil ou du support. Certaines juridictions ne reconnaissent pas l’exclusion ou la limitation des dommages accessoires ou
indirects. De ce fait, les limitations ou les exclusions énoncées ci-dessus peuvent ne pas être applicables dans votre cas.

27
Obtention d’un service de garantie
Pour bénéficier des services sous garantie, vous devez en avertir Iomega pendant la période de garantie. A l’image des technologies et des
conditions du marché, les procédures et les politiques d’Iomega en matière d’assistance clientèle (notamment la tarification des services)
sont susceptibles de varier dans le temps. Afin d’obtenir des informations pertinentes sur les politiques actuelles ou sur le service de
garantie d’Iomega, veuillez visiter notre site Web www.iomega.com/supportpolicy.html ou nous écrire à l’adresse suivante :
Iomega Customer Service, 4059 South 1900 West, Roy, UT 84067. Les coordonnées des services d’assistance clientèle d’Iomega en Europe
se trouvent sur notre site Web d’assistance, www.iomega.com/europe/support. Si votre produit peut bénéficier du service sous
garantie, vous devrez le retourner à Iomega, avec son identification détaillée, un numéro d’autorisation de retour obtenu à partir de notre
site Web ou fourni par votre représentant Iomega et une preuve d’achat. Iomega ne protège, ne récupère ni ne retourne des données pendant
le service de garantie ; assurez-vous donc de copier vos données avant d’expédier le matériel.
Limites
LA PRESENTE GARANTIE EST EXCLUSIVE ET TIENT LIEU DE TOUTE AUTRE GARANTIE, EXPRESSE OU IMPLICITE. Dans les limites de la législation
en vigueur, IOMEGA DECLINE TOUTE GARANTIE IMPLICITE, Y COMPRIS TOUTE GARANTIE IMPLICITE DE COMMERCIALISATION OU D’ADAPTATION
A UN USAGE PARTICULIER. Toute garantie implicite requise par la législation en vigueur sera limitée dans le temps à la durée de la garantie
expresse. Certaines juridictions ne reconnaissent pas la déclaration de non-responsabilité des dommages accessoires ou indirects. De ce
fait, les limitations ou les exclusions énoncées ci-dessus peuvent ne pas être applicables dans votre cas. Cette garantie vous donne certains
droits spécifiques, mais vous pouvez également bénéficier de droits supplémentaires en fonction de la législation de votre état. Toute
poursuite pour défaut de garantie sur votre produit devra être déposée dans un délai d’un an à compter du premier jour à partir duquel la
poursuite peut être engagée.
Iomega garantiert, dass dieses Hardwareprodukt während des Garantiezeitraums keine Material- oder Herstellungsfehler aufweist.
Diese nicht übertragbare, eingeschränkte Garantie gilt ausschließlich für Sie als ersten Käufer sowie Endnutzer dieses Produkts. Der
Garantiezeitraum beginnt mit dem Erwerbsdatum und hat für folgenden Zeitraum Gültigkeit: ein (1) Jahr für Produkte, die in Nord-/Süd-
/Mittelamerika, im asiatisch-pazifischen Raum oder nicht-EU-Ländern innerhalb Europas, dem Nahen Osten oder Afrika erworben wurden;
neunzig (90) Tage für alle bei Iomega überholten Produkte, die in diesen Regionen erworben wurden; zwei (2) Jahre für Produkte, die von
Endverbrauchern in EU-Mitgliedsstaaten erworben wurden.
Von dieser Garantie sind ausgenommen: (a) Iomega-Softwareprodukte; (b) Verschleißteile wie Sicherungen oder Glühbirnen; bzw.
(c) Drittanbieterprodukte, -Hardware oder -Software, die im Lieferumfang des Produkts enthalten waren, auf das sich die Garantie
bezieht. Iomega übernimmt hinsichtlich dieser Art von Produkten keinerlei Garantie. Falls diese im Lieferumfang enthalten sind, werden
sie mit Abbedingen der Haftung für einen bestimmten Zweck zur Verfügung gestellt. Ausgenommen sind Schäden, die durch Unfall,
Zweckentfremdung, unsachgemäße Verwendung, Verwendung von Medien, die nicht von Iomega zur Verfügung gestellt oder anerkannt
wurden, Kontakt der Medien mit übermäßig starken Magnetfeldern oder Umwelteinflüssen verursacht wurden.
Ihr einziges und ausschließliches Rechtsmittel im Falle eines abgedeckten Defekts ist die Reparatur bzw. der Ersatz des defekten Produkts;
die diesbezügliche Entscheidung sowie die anfallenden Kosten liegen ausschließlich bei Iomega (abgesehen von evtl. anfallenden
Frachtkosten). Iomega kann hierzu neue oder gebrauchte Teile oder Produkte verwenden. Für das ersetzte Teil/Produkt wird für den Rest
der ursprünglichen Garantiefrist oder für drei (3) Monate ab Versanddatum solcher Teile/Produkte Garantie geleistet, je nachdem, welcher
Zeitraum länger ist. Falls die Reparatur bzw. der Ersatz eines defekten Produkts durch Iomega nicht möglich ist, ist Ihr einziges alternatives
Rechtsmittel die Erstattung des ursprünglichen Kaufpreises. Die obigen Angaben stellen sämtliche Verpflichtungen dar, die Iomega Ihnen
gegenüber im Rahmen dieser Garantie hat. IOMEGA IST UNTER KEINEN UMSTÄNDEN HAFTBAR FÜR MITTELBARE SCHÄDEN, SCHADENSERSATZ
FÜR AUFWENDUNGEN BEI VERTRAGSERFÜLLUNG, FOLGESCHÄDEN ODER SPEZIELLE SCHÄDEN BZW. VERLUSTE, EINSCHLIESSLICH
DATENVERLUST, NUTZUNGSAUSFALL SOWIE BETRIEBSUNTERBRECHUNG, SELBST WENN IOMEGA AUF DIE MÖGLICHKEIT SOLCHER SCHÄDEN
HINGEWIESEN WURDE. Die Haftung von Iomega übersteigt keinesfalls den ursprünglichen Kaufpreis des jeweiligen Laufwerks oder
Datenträgers. Gemäß einiger Rechtsprechungen ist der Ausschluss bzw. die Einschränkung von Schadensersatz für Aufwendungen
bei Vertragserfüllung bzw. Folgeschäden nicht zulässig, sodass die oben genannten Ausschluss- bzw. Einschränkungsklauseln für Sie
möglicherweise nicht relevant sind.
Inanspruchnahme des Garantieservice
Um den Garantieservice in Anspruch nehmen zu können, müssen Sie Iomega innerhalb der Garantiefrist benachrichtigen. Die spezifischen
Kundendienstrichtlinien von Iomega (einschließlich der Servicegebühren) sowie die entsprechenden Vorgehensweisen können sich aufgrund
der veränderlichen Technologie und Marktbedingungen ändern. Wenn Sie gerne mehr über die aktuellen Kundendienstangebote oder
Garantieleistungen von Iomega erfahren möchten, besuchen Sie unsere Website unter www.iomega.com/supportpolicy.html. Sie
können sich auch unter folgender Adresse schriftlich mit Iomega in Verbindung setzen: Iomega Customer Service, 4059 South 1900 West,
Roy, UT 84067. Informationen zur Kontaktaufnahme mit dem Kundendienst von Iomega finden Sie auf unserer Kundendienst-Website unter
www.iomega.com/europe/support. Wenn für Ihr Produkt Garantieanspruch besteht, müssen Sie es mit ordnungsgemäßer
Identifikation, der über die Iomega Website oder vom Vertreter zur Verfügung gestellten Nummer der Rückgabeberechtigung sowie dem
Kaufnachweis an Iomega zurück senden. Im Rahmen des Garantieservice werden Daten von Iomega weder geschützt noch wiederhergestellt
oder zurückgegeben, weshalb es sich empfiehlt, Ihre Daten vor dem Versand zu duplizieren.
Einschränkungen
BEI DER OBIGEN GARANTIE HANDELT ES SICH UM EINE AUSSCHLIESSLICHE GARANTIE, DIE ANSTELLE ALLER WEITEREN GARANTIEN,
AUSDRÜCKLICHER ODER STILLSCHWEIGENDER NATUR, GÜLTIGKEIT HAT. Innerhalb des gesetzlich zulässigen Rahmens SCHLIESST IOMEGA
AUSDRÜCKLICH JEGLICHE STILLSCHWEIGENDEN GARANTIEN AUS, EINSCHLIESSLICH JEGLICHER STILLSCHWEIGENDER GARANTIE HINSICHTLICH
DER MARKTGÄNGIGKEIT BZW. DER EIGNUNG FÜR EINEN BESTIMMTEN ZWECK. Sämtliche stillschweigenden Garantien, die laut geltendem
Recht gewährt werden müssen, sind auf die Laufzeit der ausdrücklichen Garantie beschränkt. Gemäß einiger Rechtsprechungen ist der
Haftungsausschluss stillschweigender Garantien oder die Einschränkung bezüglich der Laufzeit stillschweigender Garantien nicht zulässig,
sodass die obigen Einschränkungsklauseln für Sie möglicherweise nicht relevant sind. Durch diese Garantie werden Ihnen gewisse
subjektive Rechte verliehen, und Sie verfügen u. U. über weitere Rechte, die je nach Rechtsprechung variieren. Sämtliche Klagen hinsichtlich
Garantieverletzungen in Bezug auf Ihr Produkt müssen innerhalb 1 Jahres erhoben werden. Ausschlaggebend hierfür ist das Datum, zu dem
die Klageerhebung erstmalig möglich war.

28
Iomega garantisce che questo prodotto hardware è privo di difetti di fabbricazione e dei materiali durante l’intero periodo di validità della
garanzia. La presente garanzia limitata, non trasferibile, è da considerarsi valida per il solo utente finale e non può quindi essere ceduta
a terze parti. La garanzia decorre a partire dalla data di acquisto del prodotto e ha validità di un (1) anno per i prodotti acquistati nelle
Americhe, nella regione Estremo Oriente e Oceania o nei paesi non membri dell’Unione Europea, in Medio Oriente o in Africa; la garanzia
ha una validità di novanta (90) giorni per i prodotti Iomega ricondizionati acquistati in tali regioni; oppure di due (2) anni per i prodotti
acquistati dall’utente finale in uno dei paesi membri dell’Unione Europea.
La presente garanzia non è da ritenersi valida per: (a) i prodotti software Iomega; (b) i materiali di consumo, come ad esempio i fusibili
o le lampadine; o (c) i prodotti di terze parti, hardware o software, forniti in dotazione con il prodotto coperto da garanzia. Iomega non
fornisce alcun tipo di garanzia su tali prodotti che, se inclusi, vengono forniti “COSÌ COME SONO”. Si considera escluso da garanzia il danno
causato da incidente, l’uso improprio, l’abuso, l’utilizzo di supporti non approvati da Iomega, l’esposizione dei supporti a campi magnetici
particolarmente intensi o a cause ambientali esterne.
L’unico ed esclusivo diritto risarcitorio esercitabile in caso di difetto di un prodotto coperto da garanzia è la riparazione o la sostituzione
del prodotto difettoso, a sola discrezione e interamente a carico di Iomega; Iomega ha inoltre la facoltà di utilizzare componenti o prodotti
nuovi o rimessi a nuovo. È prevista la copertura del componente/prodotto sostituito per tutto il periodo di validità della garanzia stipulata
originariamente o per i tre (3) mesi successivi alla data di spedizione di tale componente/prodotto, quale che sia la situazione temporale
che risulti più conveniente per garantire l’estendibilità della garanzia. Nell’eventualità in cui Iomega non sia in grado di riparare o sostituire
il prodotto difettoso, l’unico diritto risarcitorio alternativo esercitabile dall’acquirente consiste nella restituzione del prezzo di acquisto
del prodotto originale. Quanto sopra enunciato costituisce l’obbligo contrattuale cui attenersi ai sensi della presente garanzia. IN NESSUN
CASO IOMEGA DOVRÀ ESSERE RITENUTA RESPONSABILE DI EVENTUALI DANNI INDIRETTI, INCIDENTALI, CONSEGUENZIALI O SPECIALI O
DI ALTRI DANNI TRA CUI LE PERDITE DI DATI, UTILIZZO O DI PROFITTO, INDIPENDENTEMENTE DAL FATTO CHE IOMEGA FOSSE AL CORRENTE
DELLA POSSIBILITÀ CHE SI POTESSERO VERIFICARE TALI DANNI. In nessun caso la responsabilità di Iomega potrà superare il prezzo di
acquisto originale dell’unità o del supporto. Poiché alcune giurisdizioni non prevedono l’esclusione o la limitazione di danni incidentali o
conseguenziali, la limitazione o l’esclusione di cui sopra potrebbe non avere alcuna validità giuridica.
Come ottenere servizi di assistenza durante il periodo di validità della garanzia
Per ricevere assistenza durante il periodo di validità della garanzia, è necessario inviare opportuna notifica a Iomega entro detto periodo.
Le politiche di assistenza clienti Iomega (compresi i servizi a pagamento) e le relative procedure variano in base alle esigenze di mercato
e alle tecnologie emergenti. Per ottenere informazioni sulle procedure Iomega in vigore, visitare il sito Web all’indirizzo www.iomega.
com/supportpolicy.html o scrivere a Iomega Customer Service, 4059 South 1900 West, Roy, UT 84067. Le informazioni sui contatti
dell’Assistenza clienti di Iomega in Europe sono disponibili sul sito Web del Supporto tecnico all’indirizzo www.iomega.com/europe/
support. Nel caso in cui il prodotto sia idoneo a ricevere gli interventi manutentivi previsti dalla garanzia, sarà necessario restituire
il prodotto a Iomega unitamente al relativo codice, al numero di autorizzazione per la restituzione disponibile sul sito Web di Iomega o
fornito dal rivenditore Iomega e la prova di acquisto. Poiché Iomega non prevede la protezione, il ripristino o la restituzione dei dati durante
l’esecuzione degli interventi di manutenzione, si consiglia sempre di duplicarli prima di procedere alla spedizione del prodotto.
Limitazioni
LA PRESENTE GARANZIA HA NATURA ESCLUSIVA, PERTANTO SOSTITUISCE QUALUNQUE ALTRA GARANZIA ESPLICITA O IMPLICITA. Nella misura
in cui sia consentito dalle leggi in vigore, IOMEGA DISCONOSCE ESPRESSAMENTE EVENTUALI GARANZIE IMPLICITE, COMPRESE QUELLE
IMPLICITE DI COMMERCIABILITÀ O DI IDONEITÀ A FINI SPECIFICI. Eventuali garanzie implicite previste dalla legislazione vigente devono
essere limitate nel tempo in base a quanto sancito dai termini della garanzia esplicita. Poiché alcune giurisdizioni non prevedono il ricorso
a formule di diniego di garanzie implicite o limitazioni sulla durata di validità di tale garanzia, è possibile che la limitazione di cui sopra
non abbia alcuna validità nel caso specifico. La presente garanzia concede particolari diritti legali, nonché eventuali altri diritti suscettibili
di variazione in base alla giurisdizione specifica. Eventuali risarcimenti per violazione dei termini contenuti nella garanzia devono essere
richiesti entro 1 anno dalla data in cui è possibile intraprendere un’azione legale.
Iomega garantiza que este producto de hardware está libre de defectos de materiales y mano de obra durante el período de garantía. Esta
garantía limitada e intransferible es sólo para usted, el primer comprador usuario final. El período de garantía comienza en la fecha de
compra y tiene una duración de un (1) año para productos adquiridos en el continente americano, la región Asia-Pacífico, países europeos no
pertenecientes a la UE, Oriente Medio o África; noventa (90) días para productos reacondicionados de Iomega adquiridos en estas regiones;
o dos (2) años para productos adquiridos por un usuario final en a algún país miembro de la Unión Europea.
Esta garantía no se aplica a: (a) productos de software de Iomega, (b) consumibles como fusibles o lámparas, o (c) productos, hardware o
software, de terceros incluidos con el producto en garantía. Iomega no ofrece ningún tipo de garantía para dichos productos que, si están
incluidos, se proporcionan “TAL CUAL”. Se excluyen de esta garantía los daños provocados por accidente, uso incorrecto, abuso, uso de
discos no suministrados o no autorizados por Iomega, exposición excesiva de los discos a campos magnéticos o por causas ambientales
externas al producto.
Su única y exclusiva compensación por un defecto cubierto es la reparación o sustitución del producto defectuoso, a elección y cargo de Iomega (el
porte puede ser cobrado); Iomega puede utilizar piezas o productos nuevos o reparados para tal fin. La garantía de la pieza o producto repuesto
tendrá la validez del resto de la garantía original o tres (3) meses desde la fecha de envío de dichas piezas o productos, sea cual sea su duración. Si
Iomega no puede reparar o sustituir un producto defectuoso, su única compensación alternativa será un reembolso del precio de compra original. Lo
expuesto anteriormente es la única obligación de Iomega con respecto a usted según esta garantía. EN NINGÚN CASO IOMEGA SERÁ RESPONSABLE
DE CUALQUIER DAÑO INDIRECTO, INCIDENTAL O RESULTANTE NI DE PÉRDIDAS, INCLUIDA LA PÉRDIDA DE DATOS, USO O BENEFICIOS INCLUSO SI SE HA
ADVERTIDO A IOMEGA DE LA POSIBILIDAD DE TALES DAÑOS. En ningún caso la responsabilidad de Iomega superará el precio de compra original de
la unidad o el disco. Algunas jurisdicciones no permiten la exclusión o limitación de los daños incidentales o resultantes, por lo que es posible que
la limitación o exclusión anterior no se aplique a
usted.

29
Obtención de servicio de garantía
Para recibir el servicio de garantía deberá notificar su caso al Iomega durante el período de garantía. La política y procedimientos de
asistencia al cliente de Iomega (incluidas las tarifas de los servicios) cambian al ritmo que lo hacen la tecnología y las condiciones del
mercado. Para obtener información acerca de las políticas actuales de Iomega o del servicio de garantía, visite nuestra página Web en www.
iomega.com/supportpolicy.html o escriba a: Iomega Customer Service, 4059 South 1900 West, Roy, UT 84067, EE.UU. Para obtener
información sobre el servicio de atención al cliente de Iomega en Europa, visite nuestra página Web de asistencia: www.iomega.com/
europe/support. Si tiene derecho a que su producto reciba servicio de garantía, se le pedirá que lo devuelva a Iomega, junto con la
identificación adecuada, un número de autorización de devolución obtenido del sitio Web de Iomega o proporcionado por el representante, y
una prueba de compra. Iomega no protegerá, recuperará o devolverá datos durante el servicio de garantía, por lo que debe duplicarlos antes
del envío.
Limitaciones
LA GARANTÍA ANTERIOR ES EXCLUSIVA Y SUSTITUYE LAS DEMÁS GARANTÍAS, EXPRESAS O IMPLÍCITAS. En la medida permitida por la ley
aplicable, IOMEGA RENUNCIA ESPECÍFICAMENTE A CUALQUIER TIPO DE GARANTÍA, INCLUIDAS LA GARANTÍA IMPLÍCITA DE COMERCIABILIDAD
O IDONEIDAD PARA UN FIN DETERMINADO. Cualquier garantía implícita requerida por la ley aplicable estará limitada a la duración del plazo
de la garantía expresa. Algunas jurisdicciones no permiten la renuncia de las garantías implícitas ni limitación en la duración de una garantía
limitada, con lo que es posible que la limitación anterior no se aplique a usted. Esta garantía le otorga derechos legales específicos y es
posible que también tenga otros derechos que varían de una jurisdicción a otra. Cualquier demanda por violación de la garantía del producto
será presentada en un plazo de 1 año desde la primera fecha en la que la demanda pudiera haber sido interpuesta.
A Iomega garante que este produto de hardware encontra-se isento de defeitos de material e de mão-de-obra durante todo o período de
garantia. Esta garantia limitada e intransferível destina-se unicamente ao consumidor, o primeiro comprador usuário final. A garantia
começa na data da compra e dura por um período de um (1) ano por produto adquirido nas Américas, na região da Ásia-Pacífico, ou em
países da Europa não pertencentes à União Européia, no Oriente Médio ou na África; noventa (90) dias por produtos recondicionados Iomega
adquiridos nestas regiões; ou, dois (2) anos por produto adquirido por um usuário final em países membros da União Européia.
Esta garantia não se aplica a: (a) produtos de software da Iomega; (b) componentes perecíveis, como fusíveis ou lâmpadas, ou (c) produtos
de terceiros, hardware ou software, fornecidos com o produto garantido. A Iomega não oferece garantias de qualquer espécie sobre tais
produtos que, quando incluídos, são fornecidos “NO ESTADO”. Estão excluídos os dados causados por acidente, uso impróprio, abuso, uso
de mídia não fornecida ou aprovada pela Iomega, exposição da mídia a campos magnéticos excessivos ou causas ambientais externas.
O único e exclusivo recurso do usuário com referência a defeitos cobertos pela garantia é o reparo ou substituição do produto defeituoso,
segundo escolha e determinação da Iomega (a remessa pode ser cobrada). Para tanto, a Iomega poderá utilizar peças ou produtos novos
ou recondicionados. A peça ou o produto substituído será coberto pelo tempo restante da garantia original ou por 3 (três) meses a serem
contados a partir da data de envio do mesmo, prevalecendo o tempo mais longo. Se a Iomega não puder reparar ou substituir um produto
defeituoso, o único recurso alternativo exclusivo será a restituição da importância paga originalmente pela aquisição do produto. O exposto
acima representa todas as obrigações da Iomega para com o usuário sob esta garantia. EM NENHUMA EVENTUALIDADE A IOMEGA PODERÁ
SER RESPONSABILIZADA POR PERDAS OU DANOS INDIRETOS, INCIDENTAIS, EMERGENTES OU ESPECIAIS, INCLUINDO PERDA DE DADOS,
USO OU LUCROS, MESMO QUE A IOMEGA TENHA SIDO ADVERTIDA QUANTO À POSSIBILIDADE DE TAIS DANOS. Em nenhuma eventualidade
a responsabilidade da Iomega excederá o preço original de aquisição da unidade ou disco de mídia. Algumas jurisdições não permitem a
exclusão ou limitação de danos incidentais ou emergentes, portanto a limitação ou exclusão acima poderá não se aplicar ao usuário.
Obtenção de serviço de garantia
É preciso notificar a Iomega dentro do período de garantia para receber o serviço de garantia. Os procedimentos da Iomega, assim
como suas políticas específicas de suporte ao cliente (incluindo taxas de serviços), mudam conforme as condições tecnológicas e de
mercado. Para obter informações sobre as políticas atuais da Iomega ou sobre o serviço de garantia, visite nosso website em www.
iomega.com/supportpolicy.html ou escreva para: Iomega Customer Service, 4059 South 1900 West, Roy, UT 84067. Informações
de contato para o atendimento ao cliente da Iomega na Europa podem ser obtidas em nosso website de Suporte em www.iomega.
com/europe/support. Caso o produto tenha direito ao serviço de garantia, será necessário devolvê-lo à Iomega, acompanhado da
identificação apropriada: o número da autorização de retorno obtido no website da Iomega ou fornecido pelo representante da Iomega e
uma comprovação de aquisição. A Iomega não protege, recupera ou retorna dados durante o serviço de garantia, portanto o usuário deve
fazer cópia dos documentos antes da remessa.
Limitações
A GARANTIA ACIMA É EXCLUSIVA E SUBSTITUI TODAS AS OUTRAS GARANTIAS, EXPRESSAS OU IMPLÍCITAS. Na extensão permitida pelas leis
aplicáveis, A IOMEGA DESOBRIGA-SE ESPECIFICAMENTE DE QUAISQUER GARANTIAS IMPLÍCITAS, INCLUINDO QUALQUER GARANTIA IMPLÍCITA
DE COMERCIALIZAÇÃO OU ADEQUAÇÃO A UM DETERMINADO PROPÓSITO. Quaisquer garantias implícitas exigidas pelas leis aplicáveis
deverão ser limitadas, em duração, ao prazo da garantia expressa. Algumas jurisdições não permitem a desobrigação de garantias implícitas
ou limitações sobre a duração de uma garantia implícita, portanto a limitação acima pode não se aplicar ao usuário. Esta garantia outorga
direitos legais específicos ao usuário, mas o usuário também poderá ter direitos que variam conforme sua jurisdição. Qualquer processo
judicial por violação de qualquer garantia sobre o Produto deverá ser aberto no prazo de 1 ano, a contar da primeira data na qual a ação
poderia ter sido movida.

30
Iomega garandeert voor de garantieperiode dat dit hardwareproduct vrij is van materiaal- en productiefouten. Deze niet-overdraagbare
beperkte garantie geldt alleen voor u, de eerste eindgebruiker die het product heeft aangeschaft. De garantie gaat in op de dag van aankoop
en loopt af na één (1) jaar voor producten die gekocht zijn op het Amerikaanse continent, in Azië en het Stille-Oceaangebied of in Europese
landen die geen lid zijn van de Europese Unie, in het Midden-Oosten of in Afrika; negentig (90) dagen voor vervangende Iomega-producten
die in deze regio’s zijn gekocht; of, twee (2) jaar voor producten die door een eindgebruiker in een lidstaat van de Europese Unie zijn
gekocht.
Deze garantie geldt niet voor: (a) softwareproducten van Iomega; (b) verbruiksartikelen zoals zekeringen of lampjes; of (c) producten, hard-
of software, van derden die zijn meegeleverd met het product waarvoor de garantie geldt. Iomega biedt geen enkele garantie voor dergelijke
producten: indien meegeleverd, worden deze als zodanig meegeleverd. Uitgesloten wordt schade veroorzaakt door een ongeluk, verkeerd
gebruik, misbruik, gebruik van niet door Iomega geleverde of goedgekeurde media, blootstelling van media aan extreme magnetische velden
of externe oorzaken die met de omgeving samenhangen.
Uw enige en exclusieve verhaalsrecht voor een gedekt defect is reparatie of vervanging van het defecte product, uitsluitend door Iomega
te bepalen en te betalen, en Iomega kan daarvoor nieuwe of gereviseerde onderdelen of producten gebruiken. Het vervangen onderdeel/
product wordt gegarandeerd voor de rest van de oorspronkelijke garantie of drie (3) maanden vanaf de datum van verzending van deze
onderdelen/producten, als dit langer is. Als Iomega een defect product niet kan repareren of vervangen, is uw alternatieve exclusieve
verhaalsrecht beperkt tot restitutie van de oorspronkelijke aanschafprijs. Het hierboven beschrevene is de volledige verplichting van
Iomega aan u op grond van deze garantie. IOMEGA IS IN GEEN GEVAL AANSPRAKELIJK VOOR INDIRECTE SCHADE, INCIDENTELE SCHADE,
GEVOLGSCHADE OF SPECIALE SCHADE OF VERLIEZEN, INCLUSIEF VERLIES VAN GEGEVENS, GEBRUIK OF WINST, OOK ALS IOMEGA OP DE
HOOGTE IS GESTELD VAN DE MOGELIJKHEID VAN DERGELIJKE SCHADE. In ieder geval is de financiële aansprakelijkheid van Iomega beperkt
tot de oorspronkelijke aanschafprijs van de drive of de mediadisk. In sommige rechtsgebieden is de uitsluiting of beperking van incidentele
schade of gevolgschade niet toegestaan, waardoor het bovenstaande mogelijk niet voor u van toepassing is.
Service onder de garantie krijgen
U moet Iomega binnen de garantieperiode laten weten dat u een beroep wilt doen op de garantieservice. Iomega’s specifieke beleid voor
klantenondersteuning (evenals vergoedingen voor services) en procedures worden regelmatig aangepast aan de veranderende technologie
en marktsituatie. Bezoek Iomega op www.iomega.com/supportpolicy.html voor meer informatie over het huidige beleid van Iomega
of schrijf naar: Iomega Customer Service, 4059 South 1900 West, Roy, UT 84067, VS. U vindt de contactinformatie voor de klantenservice
van Iomega in Europa via onze website voor ondersteuning: www.iomega.com/europe/support. Als uw product in aanmerking komt
voor de garantieservice, moet u het artikel retourneren aan Iomega met de juiste identificatie, een retourbonnummer dat u via de Iomega-
website of een Iomega-vertegenwoordiger hebt gekregen en een bewijs van aankoop. Iomega kan tijdens de garantieservice geen gegevens
beveiligen, herstellen of terugsturen. U moet bijgevolg zelf uw gegevens kopiëren voordat u het product verzendt.
Beperkingen
BOVENSTAANDE GARANTIE IS EXCLUSIEF EN VERVANGT ALLE ANDERE GARANTIES, EXPLICIET OF IMPLICIET. Voorzover toegestaan door
de toepasselijke wetgeving, WIJST IOMEGA SPECIFIEK ALLE IMPLICIETE GARANTIES AF, INCLUSIEF ALLE IMPLICIETE GARANTIES VAN
VERKOOPBAARHEID OF GESCHIKTHEID VOOR EEN BEPAALD DOEL. Elke impliciete garantie die de geldende wetgeving vereist, wordt in duur
beperkt tot de expliciete garantietermijn. In sommige rechtsgebieden is afwijzing van impliciete garanties of beperkingen ten aanzien van
de duur van impliciete garanties niet toegestaan. Mogelijk geldt de bovenstaande beperking dan ook niet voor u. Deze garantie geeft u
specifieke wettelijke rechten en mogelijk hebt u ook andere rechten, die per rechtsgebied kunnen verschillen. Elk verzoek wegens schending
van enige garantie op uw product moet binnen één jaar na de eerste datum waarop het verzoek kon zijn ingebracht, worden ingediend.
Iomega 保證在保固期間之內,此硬體產品之材料與製作均不會出現缺陷。 此項限期保固不可轉移給他人,僅供您 (即第一位購買的終端使
用者) 使用。保固自購買日起生效,在美洲、亞太地區或歐洲非歐盟國、中東或非洲地區購買,其有效期間為一 (1)
年。在這些地區購買的 Iomega 產品有九十 (90) 天的產品調適期;歐盟成員國的使用者購買之產品有兩 (2) 年期
效。
本保固並不適用於下列項目:(a) Iomega 的軟體產品;(b) 耗材,例如保險絲或燈泡;(c) 隨附於受保固之產品的他廠產品、硬體或軟體。Iomega
不保固上述的任何產品,即使附有這些產品,也是依其「現況」提供。因為意外、不當使用、濫用、使用非 Iomega 認可之媒體、媒體曝露
於過量磁場或外在因素而造成之損壞均不在保固範圍內。
對於產品瑕疵之唯一補償措施是修復或替換不良品,由 Iomega 自行選擇與負擔費用 (可能必須收取運費) ,Iomega 得以使用全新或整修過之
零件或產品進行維修或替換。若 Iomega 無法修復或替換瑕疵品,唯一的補償方法是退回原購買金額。
上述是本保固規範下,Iomega 應負之所有責任。在任何情況下,即使 IOMEGA 已被告知有下述損壞發生的可能性,IOMEGA 對間接、附帶、衍
生性或特殊之損壞或損失 (包括資料、使用或收益上之損失) 均不負責。在任何情況下,Iomega 的責任皆不超過此磁碟機或媒體磁片的原購
價格。有些地區不允許將附帶或間接損壞列為除外責任或責任限制範圍,因此上述之責任限制範圍或除外責任有可能不適用於您。
取得保固服務
您必須在保固期間內通知 Iomega,以取得保固服務。Iomega 特定的顧客支援政策 (包括收費或服務) 和程
序,將隨科技進步及市場狀況而異。如需 Iomega 目前政策的相關資訊,請造訪我們的網站 www.iomega.com/
supportpolicy.html,或寫信至:Iomega Customer Service, 4059 South 1900 West, Roy, UT 84067。顧客服務部門的聯絡資料
可在我們的支援 Web 網站上取得:www.iomega.com/europe/support。若您的產品符合保固服務的條件,請將此
產品和適當的證明文件以及從 Iomega 網站取得或由 Iomega 的代表提供您的寄回授權碼和購買證明,一併送回
Iomega。在進行保固服務時,Iomega 不會保護、還原或退回資料,因此您在寄出前必須自行複製資料。
限制
上述保固將取代其他任何明示或隱含性的保固,為唯一之責任保證。在適用法律允許的範圍內,IOMEGA 特別聲明對任何隱含性保證 (包括對
特殊目的之可銷售性或適用性的隱含性保證) 均不負責。適用法律所規定之任何隱含性保證,僅適用於明示的保固期間。在隱含性保證或限
制的除外責任方面,有些地區不允許對任何隱含性保證的期間設限,因此上述限制可能不適用於您。
此項保固賦予您特定的法律權利。視地區的不同,您將可能有其他的權利。任何違反產品保固的訴訟,必須自可提出訴訟之第一日起的一年
內提出。

31
If you have a problem, we can help. Please do NOT return this product to the store!
Your answer is on the web. Visit our award-winning web support site
www.iomega.com. Select your region, then
select Support & Downloads
.
Si vous avez un problème, nous pouvons vous aider. NE RENVOYEZ PAS ce produit au magasin !
Votre réponse est sur le Web. Site Web d’assistance primé www.iomega.com
. Sélectionnez votre région puis
Support et téléchargements
.
Wenn Sie ein Problem haben, können wir Ihnen helfen. Bringen Sie dieses Produkt NICHT zu Ihrem Händler zurück!
Ihre Antwort steht im Netz.
Preisgekrönte Support-Website www.iomega.com. Wählen Sie Ihr Gebiet aus und klicken Sie
auf Support und Downloads
.
In caso di problemi, noi possiamo fornire assistenza. NON restituire questo prodotto al rivenditore!
La risposta
è sul Web. Sito di supporto sul Web premiato www.iomega.com. Selezionare la propria regione, quindi
scegliere Assistenza e Download
.
Si tiene algún problema, podemos ayudar. ¡Por favor, NO devuelva este producto a la tienda!
Su respuesta está en la web. Destacado sitio Web de atención al cliente
www.iomega.com. Elija su región y
luego seleccione Suporte y Descargas
.
Se você tiver um problema, nós podemos ajudar. NÃO devolva esse produto à loja!
A resposta para você está na web. Site da web vencedor de prêmios www.iomega.com
. Selecione a sua região e
Suporte e Downloads.w.iomega.com.
如需 Iomega 產品的服務與支援,請造訪我們的網站 www.iomega.com。
Customer Support • Assistance clientèle • Kundenunterstützung
Assistenza clienti • Asistencia al cliente • Suporte ao cliente
客戶支援

31701900 5/29/07 b
Copyright © 2007 Iomega Corporation. All rights reserved. Iomega, the stylized “i” logo, and all Iomega brand blocks are either registered
trademarks or trademarks of Iomega Corporation in the United States and/or other countries. Microsoft and Windows are either registered
trademarks or trademarks of Microsoft Corporation in the United States and/or other countries. Apple, Macintosh, Mac, and FireWire are
either registered trademarks or trademarks of Apple, Inc. in the United States and/or other countries. Certain other product names, brand
names, and company names may be trademarks or designations of their respective owners.
*
Models may vary.
Les modèles peuvent varier.
Abweichungen je nach Modell möglich.
I modelli possono variare.
Los modelos pueden variar.
Os modelos podem variar.
Modellen kunnen verschillen.
Documenttranscriptie
Iomega UltraMax Pro Desktop Hard Drive ® Quick Start Guide Guide de démarrage rapide Schnellstart-Handbuch Guida di installazione rapida Guía de instrucciones rápidas Guia de uso rápido Snel aan de slag Snabbstartguide Introduktion Hurtigreferanse Pikaopas Gyors útmutató Stručná příručka Wprowadzenie Οδηγός γρήγορης εκκίνησης 快速入門指南 * Contents • Matières • Inhalt • Sommario • Contenido Conteúdo • Inhoudsopgave • Innehåll • Indhold • Innhold Sisällys • Tartalom • Obsah • Spis treści • Περιεχόµενα • 內容 Quick Install – eSATA Connection . . . . . . Installation rapide – Connexion eSATA . . . Schnellstart – eSATA-Anschluss. . . . . . . Installazione rapida – Connessione eSATA . Instalación rápida: conexión eSATA . . . . . Instalação rápida – conexão eSATA . . . . . Snelle installatie – eSATA-aansluiting . . . Snabbinstallation – eSATA-anslutning . . . Hurtig installation – eSATA-stik . . . . . . . Rask installering – eSATA-forbindelse . . . Pika-asennus – eSATA-liitäntä . . . . . . . . Gyorstelepítés – eSATA csatlakozás . . . . Rychlá instalace – připojení eSATA . . . . . Szybka instalacja — złącze eSATA . . . . . . Γρήγορη εγκατάσταση – Σύνδεση eSATA . . 快速安裝 - eSATA 連線 . . . . . . . . . . . . . . . . . . . . . . . . . . . . . . . . . . . . . . . . . . . . . . . . . . . . . . . . . . . . . . . . . . . . . . . . . . . . . . . . . . . . . . . . . . . . . . . . . . . . . . . . . . . . . . . . . . . . . . . . . . . . . . . . . . . . . . . . . . . . . . . . . . . . . . . . . . . . . . . . . . . . . . . . . . . . . . . . . . . . . . . . . . . . . . . . . . . . . . . . . . . . . . . . . . . . . . . . . . . . . . . . . . . . . . . . . . . . . . . . . . . . . . . . . . . . . . . . . . . . . . . . . . . . . . . . . . . . . . . . . . . . . . . . . . . . . . . . . . . . . . . . . . . . . . . . . . . . . . . . . . . . . . . . . . . . . . . . . . . . . . . . . . . . . . . . . . . . . . . . . . . . . . . . . . . . . . . . . . . . . . . . . . . . . . . . . . . . . . . . . . . . . . . . . . . . . . . . . . . . . . . . . . . . . . . . . . . . . . . . . . . . . . . . . . . . . . . . . . . . . . . . . . . . . . . . . . . . . 4 . 4 . 5 . 5 . 6 . 6 . 7 . 7 . 8 . 8 . 9 . 9 . 10 . 10 . 11 . 11 Quick Install – FireWire or USB Connection . . . . . Installation rapide – Connexion FireWire ou USB . . Schnellstart – FireWire- oder USB-Anschluss . . . . Installazione rapida – Connessione FireWire o USB . Instalación rápida: conexión FireWire o USB . . . . . Instalação rápida – conexão FireWire ou USB . . . . Snelle installatie – FireWire- of USB-aansluiting . . Snabbinstallation – FireWire eller USB-anslutning . Hurtig installation – FireWire- eller USB-stik. . . . . Rask installering – FireWire- eller USB-forbindelse . Pika-asennus – FireWire- tai USB-liitäntä . . . . . . Gyorstelepítés – FireWire vagy USB csatlakozás . . Rychlá instalace – připojení FireWire nebo USB . . . Szybka instalacja — złącze FireWire lub USB . . . . Γρήγορη εγκατάσταση – Σύνδεση FireWire ή USB . . 快速安裝 - FireWire 或 USB 連線 . . . . . . . . . . . . . . . . . . . . . . . . . . . . . . . . . . . . . . . . . . . . . . . . . . . . . . . . . . . . . . . . . . . . . . . . . . . . . . . . . . . . . . . . . . . . . . . . . . . . . . . . . . . . . . . . . . . . . . . . . . . . . . . . . . . . . . . . . . . . . . . . . . . . . . . . . . . . . . . . . . . . . . . . . . . . . . . . . . . . . . . . . . . . . . . . . . . . . . . . . . . . . . . . . . . . . . . . . . . . . . . . . . . . . . . . . . . . . . . . . . . . . . . . . . . . . . . . . . . . . . . . . . . . . . . . . . . . . . . . . . . . . . . . . . . . . . . . . . . . . . . . . . . . . . . . . . . . . . . . . . . . . . . . . . . . . . . . . . . . . . . . . . . . . . . . . . . . . . . . . . . . . . . . . . . . . . . . . . . . . . . . . . . . . . . . . . . . . . . . . . . . . . . . . . . . . . . . . . . . . . . . . . . . . . . . . . . . . . . . . . . . . . . . . . . . . . . . . . . . 12 . 12 . 12 . 12 . 13 . 13 . 13 . 13 . 14 . 14 . 14 . 14 . 15 . 15 . 15 . 15 Using Your Drive . . . . . . . Utilisation du lecteur . . . . Verwenden des Laufwerks . Uso dell’unità . . . . . . . . Uso de la unidad . . . . . . . Utilização da unidade . . . . De drive gebruiken . . . . . 使用磁碟機 . . . . . . . . . . . . . . . . . . . . . . . . . . . . . . . . . . . . . . . . . . . . . . . . . . . . . . . . . . . . . . . . . . . . . . . . . . . . . . . . . . . . . . . . . . . . . . . . . . . . . . . . . . . . . . . . . . . . . . . . . . . . . . . . . . . . . . . . . . . . . . . . . . . . . . . . . . . . . . . . . . . . . . . . . . . . . . . . . . . . . . . . . . . . . . . . . . . . . . . . . . . . . . . . . . . . . . . . . . . . . . . . . . . . . . . . . . . 16 . 17 . 18 . 19 . 21 . 22 . 23 . 24 . . . . . . . . . . . . . . . . . . . . . . . . . . . . . . . . . . . . . . . . . . . . . . . . . . . . . . . . . . . . . . . . . . . . . . . . . . . . . . . . . . . . . . . . . . . . . . . . . . . . . . . . . . . . . . . . . . . . . . . . . . . . . . . . . . . . . . . . . . . . . . . . . . . . . . . . . . . . . . . . . . . . . . . . . . . . . . . . Troubleshooting . . . . . . Dépannage . . . . . . . . . Fehlerbehebung . . . . . . Risoluzione dei problemi . Solución de problemas . . Solução de problemas . . Problemen oplossen . . . 疑難排解 . . . . . . . . . . . . . . . . . . . . . . . . . . . . . . . . . . . . . . . . . . . . . . . . . . . . . . . . . . . . . . . . . . . . . . . . . . . . . . . . . . . . . . . . . . . . . . . . . . . . . . . . . . . . . . . . . . . . . . . . . . . . . . . . . . . . . . . . . . . . . . . . . . . . . . . . . . . . . . . . . . . . . . . . . . . . . . . . . . . . . . . . . . . . . . . . . . . . . . . . . . . . . . . . . . . . . . . . . . . . . . . . . . . . . . . . . . . . . . . . . . . . . . . . . . . . . . . . . . . . . . . . . . . . . . . . . . . . . . . . . . . . . . . . . . . . . . . . . . . . . . . . . . . . . . . . . . . . . . . . . . . . . . . . . . . . . . . . . . . . . . . . . . . . . . . . . . . 16 . 17 . 18 . 20 . 21 . 22 . 23 . 25 User’s Manual . . . . . . Guide de l’utilisateur . . Benutzerhandbuch . . . Manuale dell’utente . . . Manual del usuario . . . Manual do usuário . . . Gebruikershandleiding . 完整使用者手冊 . . . . . . . . . . . . . . . . . . . . . . . . . . . . . . . . . . . . . . . . . . . . . . . . . . . . . . . . . . . . . . . . . . . . . . . . . . . . . . . . . . . . . . . . . . . . . . . . . . . . . . . . . . . . . . . . . . . . . . . . . . . . . . . . . . . . . . . . . . . . . . . . . . . . . . . . . . . . . . . . . . . . . . . . . . . . . . . . . . . . . . . . . . . . . . . . . . . . . . . . . . . . . . . . . . . . . . . . . . . . . . . . . . . . . . . . . . . . . . . . . . . . . . . . . . . . . . . . . . . . . . . . . . . . . . . . . . . . . . . . . . . . . . . . . . . . . . . . . . . . . . . . . . . . . . . . . . . . . . . . . . . . . . . . . . . . . . . . . . . . . . . . . . . . . . . . . . . . . . 17 . 18 . 19 . 20 . 22 . 23 . 24 . 25 Limited Warranty . . . . . Garantie Limitée . . . . . . Eingeschränkte Garantie . Garanzia limitata . . . . . Garantía limitada . . . . . Garantia limitada . . . . . Beperkte garantie . . . . . 限期保固 . . . . . . . . . . . . . . . . . . . . . . . . . . . . . . . . . . . . . . . . . . . . . . . . . . . . . . . . . . . . . . . . . . . . . . . . . . . . . . . . . . . . . . . . . . . . . . . . . . . . . . . . . . . . . . . . . . . . . . . . . . . . . . . . . . . . . . . . . . . . . . . . . . . . . . . . . . . . . . . . . . . . . . . . . . . . . . . . . . . . . . . . . . . . . . . . . . . . . . . . . . . . . . . . . . . . . . . . . . . . . . . . . . . . . . . . . . . . . . . . . . . . . . . . . . . . . . . . . . . . . . . . . . . . . . . . . . . . . . . . . . . . . . . . . . . . . . . . . . . . . . . . . . . . . . . . . . . . . . . . . . . . . . . . . . . . . . . . . . . . . . . . . . . . . . . . . . . 26 . 26 . 27 . 28 . 28 . 29 . 30 . 30 Customer Support . . . Assistance clientèle . . Kundenunterstützung . Assistenza clienti . . . Asistencia al cliente . . Suporte ao cliente . . . 客戶支援 . . . . . . . . . . . . . . . . . . . . . . . . . . . . . . . . . . . . . . . . . . . . . . . . . . . . . . . . . . . . . . . . . . . . . . . . . . . . . . . . . . . . . . . . . . . . . . . . . . . . . . . . . . . . . . . . . . . . . . . . . . . . . . . . . . . . . . . . . . . . . . . . . . . . . . . . . . . . . . . . . . . . . . . . . . . . . . . . . . . . . . . . . . . . . . . . . . . . . . . . . . . . . . . . . . . . . . . . . . . . . . . . . . . . . . . . . . . . . . . . . . . . . . . . . . . . . . . . . . . . . . . . . . . . . . . . . . . . . . . . . . . . . . . . . . . . . . . . . . . . . . . . . . . . . . 31 . 31 . 31 . 31 . 31 . 31 . 31 . . . . . . . . . . . . . . eSATA SATA Some models only. For best performance, connect the drive to an eSATA PCI card or a built-in external eSATA connection. Connect the drive to USB if a supported eSATA connection is not available (see page 10). 1. If you are connecting to an eSATA PCI card, make sure the drivers for the card have been installed and the card is properly recognized by your operating system. NOTE: You do not need to install special drivers for the Iomega UltraMax Pro Hard drive. It is supported by the drivers included with the eSATA PCI card. If you are using a built-in eSATA connection, the drive is supported by native drivers in the operating system. 2. Shut down the computer. NOTE: The eSATA interface is NOT plug-andplay. Always shut down the computer before connecting or disconnecting the drive. 3. Connect the included power supply to the back of the drive. Place the drive on a stable surface and connect the power supply to a power outlet. CAUTION! To avoid damage to the power supply connector, make sure it is aligned correctly before plugging it into the drive. Do not move the drive while it is powered up to avoid drive damage or data loss. 4. Identify the eSATA cable and connect it to the back of the drive. Never connect the drive to the computer with more than one cable. 5. Connect the other end of the cable to your eSATA PCI card or built-in eSATA connection. 6. Turn on the power switch on the back of the drive and restart your computer. 7. The drive icon should appear in My Computer, Windows Explorer or on the Mac Desktop. If the drive does not appear on your computer, refer to Troubleshooting (page 16). SATA SATA Certains modèles uniquement. Pour de meilleures performances, connectez le disque à une carte PCI eSATA ou à une connexion eSATA externe intégrée. Connectez le lecteur au port USB si aucune connexion eSATA n’est disponible (see page 10). 1. En cas de connexion à une carte PCI eSATA, assurez-vous que les pilotes pour la carte ont été installés et que la carte est correctement reconnue par votre système d’exploitation. REMARQUE : il n’est pas nécessaire d’installer des pilotes particuliers pour le disque dur Iomega Iomega UltraMax Pro. Il est pris en charge par les pilotes inclus avec la carte eSATA PCI. Si votre ordinateur dispose d’une connexion eSATA intégrée, le lecteur est pris en charge par les pilotes natifs du système d’exploitation. 2. Eteignez l’ordinateur. REMARQUE : l’interface eSATA ne dispose PAS de la fonction plug-and-play. Eteignez toujours l’ordinateur avant de connecter ou de déconnecter le disque. 3. Connectez le câble d’alimentation inclus à l’arrière du disque. Placez le disque sur une surface stable et connectez l’alimentation à une prise secteur. ATTENTION ! Pour éviter d’endommager le connecteur d’alimentation, assurez-vous de son alignement avant de le raccorder au disque. Ne déplacez pas le disque lorsqu’il est sous tension pour éviter tout dommage ou perte de données. 4. Identifiez le câble eSATA et connectez-le à l’arrière du disque. Ne connectez JAMAIS le disque à l’ordinateur à l’aide de plusieurs câbles. 5. Connectez l’autre extrémité du câble à votre carte PCI eSATA ou à la connexion eSATA intégrée. 6. Redémarrez votre ordinateur à l’aide de l’interrupteur d’alimentation situé à l’arrière du disque. 7. L’icône du disque doit apparaître dans le Poste de travail, l’Explorateur Windows ou sur le bureau du Mac. Si l’icône du disque n’apparaît pas sur votre ordinateur, consultez la rubrique Dépannage (page 17). 4 eSATA SATA SATA SATA Nur bestimmte Modelle. Um die besten Ergebnisse zu erzielen, verbinden Sie das Laufwerk mit einer eSATA-PCIKarte oder einem integrierten externen eSATA-Anschluss. Verbinden Sie das Laufwerk mit dem USB-Port, wenn kein unterstützter eSATA-Anschluss verfügbar ist. Solo alcuni modelli. Per prestazioni ottimali, collegare l’unità ad una scheda PCI eSATA oppure a una connessione eSATA esterna integrata. Collegare l’unità a una porta USB se non è disponibile una connessione eSATA. 1. Wenn Sie eine eSATA-PCI-Karte anschließen, stellen Sie sicher, dass die Treiber für die Karte installiert sind und die Karte von Ihrem Betriebssystem ordnungsgemäß erkannt wurde. 1. Se si effettua la connessione a una scheda PCI eSATA, assicurarsi che i driver relativi siano stati installati e che la scheda venga riconosciuta correttamente dal sistema operativo. HINWEIS: Für die Iomega Iomega UltraMax ProFestplatte müssen Sie spezielle Treiber installieren. Sie wird von den Treibern unterstützt, die bei der eSATA-PCI-Karte enthalten sind. Wenn Ihr Computer über einen integrierten eSATA-Anschluss verfügt, wird das Laufwerk von den nativen Treibern des Betriebssystems ünterstützt. 2. Fahren Sie den Computer herunter. HINWEIS: Die eSATA-Schnittstelle verfügt NICHT über Plug-and-Play. Fahren Sie den Computer immer herunter, bevor Sie das Laufwerk verbinden oder die Verbindung trennen. 3. Schließen Sie das mitgelieferte Netzkabel an der Rückseite des Laufwerks an. Stellen Sie das Laufwerk auf eine stabile Oberfläche, und verbinden Sie das Netzkabel mit einer Steckdose. ACHTUNG! Um Beschädigungen des Netzkabelsteckers zu vermeiden, stellen Sie sicher, dass er korrekt ausgerichtet ist, bevor Sie ihn in das Laufwerk einstecken. Bewegen Sie das Laufwerk während des Einschaltvorgangs nicht, um Laufwerkbeschädigungen oder Datenverluste zu vermeiden. 4. Wählen Sie das eSATA Kabel aus, und schließen Sie es an der Laufwerksrückseite an. Schließen Sie das Laufwerk niemals mit mehr als einem Kabel am Computer an. 5. Verbinden Sie das andere Ende des Kabels mit der eSATA-PCI-Karte oder dem integrierten eSATAAnschluss. 6. Schalten die den Hauptschalter auf der Laufwerksrückseite an, und starten Sie Ihren Computer neu. 7. Das Laufwerksymbol wird im Arbeitsplatz, dem Windows Explorer oder auf dem Mac-Desktop angezeigt. Falls das Laufwerk auf Ihrem System nicht angezeigt wird, lesen Sie den Abschnitt „Fehlerbehebung“ (Seite 18). NOTA: non è necessario installare dei driver speciali per l’unità disco rigido Iomega Iomega UltraMax Pro supportata dai driver forniti con la scheda PCI eSATA. Se il computer è dotato di connessione integrata eSATA, l’unità è supportata dai driver nativi del sistema operativo. 2. Spegnere il computer. NOTA: l’interfaccia eSATA NON è plug-and-play. Spegnere sempre il computer prima di connettere o disconnettere l’unità. 3. Collegare l’alimentatore fornito in dotazione alla parte posteriore dell’unità. Posizionare l’unità su una superficie stabile e collegare l’alimentatore a una presa di corrente. ATTENZIONE! Per evitare che il connettore dell’alimentatore si danneggi, assicurarsi che sia correttamente allineato prima di inserirlo nell’unità. Non spostare l’unità mentre è accesa per evitare danni o perdite di dati. 4. Individuare il cavo eSATA e collegarlo al retro dell’unità. Evitare di collegare l’unità al computer utilizzando più di un cavo. 5. Collegare l’altra estremità del cavo alla scheda PCI eSATA o alla connessione integrata eSATA. 6. Accendere l’interruttore di alimentazione situato sulla parte posteriore dell’unità e riavviare il computer. 7. L’icona dell’unità verrà visualizzata in Risorse del computer, Esplora risorse di Windows o sulla Scrivania Mac. Se l’unità non risulta presente nel computer, fare riferimento a Risoluzione dei problemi (pagina 19). 5 eSATA SATA SATA SATA Sólo algunos modelos. Para obtener el máximo rendimiento, conecte la unidad a una tarjeta PCI eSATA o a una conexión externa eSATA incorporada. Conecte la unidad mediante USB si no dispone de una conexión eSATA compatible. Alguns modelos somente. Para melhor desempenho conecte a unidade a uma placa eSATA PCI ou a uma conexão externa eSATA embutida. Conecte a unidade a USB se não houver conexão eSATA suportada disponível. 1. Si la conecta a una tarjeta PCI eSATA, asegúrese de que se han instalado los controladores de la tarjeta y de que el sistema operativo reconoce correctamente la tarjeta. 1. Caso esteja conectando a uma placa eSATA PCI, certifique-se de que os drivers para a placa tenham sido instalados e de que a placa seja reconhecida corretamente pelo sistema operacional. NOTA: No necesita instalar controladores especiales para la unidad de disco duro Iomega UltraMax Pro. Se incluyen en los controladores de la tarjeta PCI eSATA. Si su equipo dispone de una conexión eSATA incorporada, los controladores nativos del sistema operativo detectan la unidad. 2. Apague el equipo. NOTA: La interfaz eSATA NO es un sistema Plugand-Play. Apague siempre el equipo antes de conectar o desconectar la unidad. 3. Conecte el cable de alimentación incluido a la parte posterior de la unidad. Coloque la unidad sobre una superficie estable y conecte el cable de alimentación a una toma eléctrica. PRECAUCIÓN: Para evitar daños en el conector de alimentación, asegúrese de que esté correctamente alineado antes de enchufarlo a la unidad. No mueva la unidad mientras esté encendida para evitar posibles daños en la unidad o la pérdida de datos. 4. Busque el cable eSATA y conéctelo a la parte posterior de la unidad. Nunca conecte la unidad al equipo con más de un cable. OBS: não é preciso instalar drivers especiais para a unidade Iomega UltraMax Pro. Ela é suportada pelos drivers incluídos na placa eSATA PCI. Se o seu computador possuir uma conexão eSATA embutida, a unidade é suportada por drivers nativos do sistema operacional. 2. Desligue o computador. OBS: a interface eSATA NÃO é plug-and-play. Sempre desligue o computador antes de conectar ou desconectar a unidade. 3. Conecte a fonte de alimentação que acompanha o produto à parte traseira da unidade. Coloque a unidade em uma superfície estável e conecte a fonte de alimentação a uma tomada elétrica. CUIDADO! Para evitar danos ao conector da fonte de alimentação, certifique-se de que ele esteja alinhado corretamente antes de encaixálo na unidade. Não mova a unidade enquanto ela estiver ligada para evitar danos à mesma ou perda de dados. 5. Conecte el otro extremo del cable a su tarjeta PCI eSATA o conexión eSATA incorporada. 4. Identifique o cabo exata apropriado e conecte-o à parte traseira da unidade. Nunca conecte a unidade ao computador através de mais de um cabo. 6. Pulse el interruptor de encendido de la parte posterior de la unidad y reinicie el equipo. 5. Conecte a outra extremidade do cabo à placa eSATA PCI ou à conexão eSATA embutida. 7. El icono de la unidad aparecerá en Mi PC, el Explorador de Windows o en el escritorio de Mac. Si la unidad no aparece en el equipo, consulte Solución de problemas (página 20). 6. Ligue o botão de alimentação na parte traseira da unidade e reinicie o computador. 6 7. O ícone da unidade aparecerá em Meu computador, no Windows Explorer ou na mesa do Mac. Se a unidade não aparecer no seu computador, consulte a seção Solução de problemas (página 22). eSATA SATA Alleen op bepaalde modellen. Voor de beste resultaten sluit u de drive aan op een eSATA PCI-kaart of een geïntegreerde externe eSATA-aansluiting. Als er geen ondersteunde eSATA-aansluiting beschikbaar is, sluit u de drive aan op een USB-poort. 1. Als u op een eSATA PCI-kaart aansluit, moeten de stuurprogramma’s voor de kaart geïnstalleerd zijn en moet de kaart correct door uw besturingssysteem worden herkend. OPMERKING: u hoeft geen speciale stuurprogramma’s te installeren voor de Iomega UltraMax Pro. Deze wordt ondersteund door de stuurprogramma’s die bij de eSATA PCI-kaart worden meegeleverd. Als uw computer over een geïntegreerde eSATA-aansluiting beschikt, wordt de drive ondersteund door de standaardstuurprog ramma’s van het besturingssysteem. 2. Schakel de computer uit. OPMERKING: de eSATA-interface is NIET van het type plug-and-play. Schakel de computer daarom altijd uit voordat u de drive aansluit of loskoppelt. 3. Sluit de meegeleverde voeding aan op de achterkant van de drive. Plaats de drive op een stabiel oppervlak en sluit het andere uiteinde van de voeding aan op een stopcontact. WAARSCHUWING! Let erop dat u de connector van het stroomsnoer loodrecht in de connector van de drive plaatst. Anders kan deze worden beschadigd. Verplaats de drive niet wanneer deze van stroom is voorzien, om beschadigingen of gegevensverlies te voorkomen. 4. Neem de eSATA-kabel en sluit die aan op de achterkant van de drive. Sluit de drive nooit met meer dan één kabel aan op de computer. 5. Sluit het andere uiteinde van de kabel aan op uw eSATA PCI-kaart of geïntegreerde eSATAaansluiting. SATA SATA Endast vissa modeller. För bästa prestanda ansluter du enheten till ett eSATA PCI-kort eller en inbyggd extern eSATA-anslutning. Anslut enheten till USB om det inte finns någon eSATA-anslutning som stöds. 1. Om du ansluter till ett eSATA PCI-kort bör du kontrollera att drivrutinerna för kortet har installerats och att operativsystemet känner av kortet. OBS! Du behöver inte installera några särskilda drivrutiner för hårddisken Iomega UltraMax Pro. Den stöds av drivrutinerna som medföljer eSATA PCI-kortet. Om din dator har en inbyggd eSATA-anslutning stöds enheten av standarddrivrutinerna i operativsystemet. 2. Stäng av datorn. OBS! eSATA-gränssnittet är INTE plug-and-play. Stäng alltid av datorn innan du ansluter eller kopplar bort enheten. 3. Anslut den medföljande nätkabeln på baksidan av enheten. Ställ enheten på en stabil yta och anslut nätkabeln till ett eluttag. VARNING! Kontrollera att du ansluter kontakten på nätkabeln till enheten på rätt sätt. Annars kan den skadas. Flytta inte enheten medan den startar. Den kan skadas och du kan förlora data. 4. Leta reda på eSATA-kabeln och anslut den på enhetens baksida. Anslut aldrig enheten till datorn med fler än en kabel. 5. Anslut den andra änden av kabeln till eSATA PCIkortet eller den inbyggda eSATA-anslutningen. 6. Slå på strömbrytaren på enhetens baksida och starta om datorn. 7. Enhetsikonen bör visas i Den här datorn, Utforskaren eller på skrivbordet på Mac. 6. Schakel de drive in met de aan/uit-knop op de achterzijde van de drive en start uw computer opnieuw op. 7. Het pictogram van de drive verschijnt normaal in Deze computer, Windows Verkenner of op het Mac-bureaublad. 7 eSATA SATA Kun for nogle modeller. Du opnår den bedste ydelse ved at slutte drevet til et eSATA PCI-kort eller et indbygget eksternt eSATA-stik. Slut drevet til USB, hvis et understøttet eSATA-stik ikke er tilgængeligt. 1. Hvis du opretter tilslutning til et eSATA PCIkort, skal du sørge for at driverne til kortet er installeret, og at kortet genkendes af operativsystemet. Bemærk! Du behøver ikke installere specielle drivere til harddisken Iomega UltraMax Pro. Den understøttes af de drivere, der leveres med eSATA PCI-kortet. Hvis computeren har et indbygget eSATA-stik, understøttes drevet af de drivere, der findes i operativsystemet. 2. Luk computeren ned. Bemærk! eSATA-grænsefladen er IKKE plug-andplay. Luk altid computeren ned, før du tilslutter eller frakobler drevet. 3. Slut det medfølgende strømkabel til bagsiden af drevet. Placer drevet på en stabil overflade, og slut strømkablet til en stikkontakt. Forsigtig! Hvis du vil undgå at beskadige strømstikket, skal du sørge for at vende det rigtigt, før du sætter det i drevet. Hvis du vil undgå at beskadige drevet eller miste data, må du ikke flytte drevet, mens det startes. SATA SATA Kun enkelte modeller. Koble stasjonen til et eSATA PCI-kort eller en innebygd ekstern eSATA-tilkobling for å få best mulig ytelse. Koble stasjonen til USB hvis du ikke har en støttet eSATA-tilkobling. 1. Hvis du kobler til et eSATA PCI-kort, må du kontrollere at driverne for kortet er installert, og at kortet gjenkjennes riktig av operativsystemet. MERK: Det er ikke nødvendig å installere egne drivere for Iomega UltraMax Pro. Den støttes av driverne som følger med eSATA PCI-kortet. Hvis datamaskinen har en innebygd eSATA-tilkobling, støttes stasjonen av driverne som er innebygd i operativsystemet. 2. Avslutt datamaskinen. MERK: eSATA-grensesnittet er IKKE plug-andplay. Avslutt alltid datamaskinen før du kobler stasjonen til eller fra. 3. Koble den medfølgende strømforsyningen til på baksiden av stasjonen. Plasser stasjonen på et stabilt underlag og koble strømforsyningen til en stikkontakt. FORSIKTIG! Pass på å holde strømforsyningskontakten riktig før du setter den i stasjonen, slik at du unngår å skade den. For å unngå skade på stasjonen eller tap av data må ikke stasjonen flyttes mens den er slått på. 4. Find sSATA-kablet, og sæt det i på bagsiden af drevet. Slut aldrig drevet til computeren med mere end ét kabel. 4. Finn frem eSATA-kabelen og koble den til på baksiden av stasjonen. Koble aldri stasjonen til datamaskinen med mer enn én kabel. 5. Slut den anden ende af kablet til eSATA-kortet eller det indbyggede eSATA-stik. 5. Koble den andre enden av kabelen til eSATA PCIkortet eller den innebygde eSATA-tilkoblingen. 6. Tænd for afbryderen bag på drevet, og genstart computeren. 6. Slå på strømbryteren på baksiden av stasjonen, og start datamaskinen. 7. Drevikonet skulle blive vist i Denne computer i Windows Stifinder eller på Mac-skrivebordet. 7. Stasjonsikonet skal vises i Min datamaskin, Windows Utforsker eller på Mac-skrivebordet. 8 eSATA SATA Vain tietyissä malleissa. Laite toimii parhaiten, kun kytket aseman eSATA PCI -korttiin tai sisäänrakennettuun eSATA-liitäntään. Kytke laite USBporttiin, jos käytettävissä ei ole eSATA-liitäntää. 1. Jos kytket laitteen eSATA PCI -korttiin, varmista, että kortin ohjaimet on asennettu ja että käyttöjärjestelmä on tunnistanut kortin oikein. HUOMAUTUS: Iomega UltraMax Pro -kiintolevyä varten ei tarvitse asentaa erityisiä ohjaimia. eSATA PCI -kortin mukana toimitettavat ohjaimet tukevat kiintolevyä. Jos tietokoneessa on sisäänrakennettu eSATA-liitäntä, käyttöjärjestelmän asema ohjaimet tukevat kiintolevyä. 2. Katkaise tietokoneesta virta. HUOMAUTUS: eSata-liitäntä ei ole plug-and-playyhteensopiva. Katkaise tietokoneen virta aina, kun kytket tai irrotat kiintolevyn. 3. Kytke virtajohto aseman takana olevaan liitäntään. Aseta kiintolevy vakaan alustan päälle ja kytke virtajohto pistorasiaan. VAROITUS: Kohdista virtakaapeli laitteeseen kytkettäessä oikein, jotta virtalähteen liitin ei vaurioidu kytkettäessä. Älä siirrä kiintolevyä, kun siihen on virta kytkettynä. Levy voi vahingoittua, tai tietoja voi hävitä. 4. Ota eSATA-kaapeli ja kytke se kiintolevyn takaosassa olevaan liitäntään. Kytke kiintolevy tietokoneeseen vain yhdellä kaapelilla. 5. Kytke kaapelin toinen pää eSATA PCI -korttiin tai sisäänrakennettuun eSATA-liitäntään. 6. Kytke laitteeseen virta kiintolevyn takana olevasta virtakytkimestä ja käynnistä tietokone uudelleen. 7. Levyaseman kuvake tulee näkyviin Oma tietokone -ikkunaan, Windowsin Resurssienhallintaan tai Macintosh-tietokoneen työpöydälle. SATA SATA Csak néhány modell esetében érvényes. A legjobb teljesítmény elérése érdekében csatlakoztassa a meghajtót egy eSATA PCI-kártyához vagy egy beépített külső eSATA-csatlakozóhoz. Amennyiben nem áll rendelkezésére támogatott eSATA-csatlakozó, csatlakoztassa a meghajtót az USB-porthoz. 1. eSATA PCI-kártyához való csatlakoztatáskor győződjön meg arról, hogy a kártyához tartozó meghajtó telepítve lett, és a kártyát az operációs rendszer felismeri. MEGJEGYZÉS: Az Iomega UltraMax Pro merevlemez-meghajtóhoz nem szükséges speciális meghajtóprogramokat telepíteni. A meghajtót támogatják az eSATA PCI-kártyához mellékelt meghajtóprogramok. Amennyiben számítógépéhez beépített eSATA-csatlakozó tartozik, a meghajtót az operációs rendszer saját meghajtói is támogatják. 2. Zárja le a számítógépet. MEGJEGYZÉS: Az eSATA felület NEM „plug-and-play“ jellegű, vagyis nem használható azonnal. A meghajtó csatlakoztatásakor, illetve leválasztásakor mindig kapcsolja ki a számítógépet. 3. Csatlakoztassa a tápellátó egységet a meghajtó hátsó részéhez. Helyezze a meghajtót stabil felületre, és csatlakoztassa a tápellátó egységet a fali aljzatba. VIGYÁZAT! A tápkonnektor sérülésének elkerülése érdekében győződjön meg arról, hogy a konnektor a meghajtóba való csatlakoztatás előtt megfelelően van kiegyenlítve. Bekapcsolás közben ne mozgassa a meghajtót, így elkerülheti az esetleges sérüléseket és adatvesztéseket. 4. Válassza ki az eSATA-kábelt, és csatlakoztassa a meghajtó hátsó részéhez. A meghajtó és a számítógép csatlakoztatásához soha ne használjon egynél több kábelt. 5. Csatlakoztassa a kábel másik végét az eSATA PCIkártyához vagy a beépített eSATA-csatlakozóhoz. 6. Kapcsolja be a meghajtó hátoldalán található főkapcsolót, és indítja újra a számítógépet. 7. A meghajtó ikonja ezután megjelenik a My Computer (Sajátgép) vagy a Windows Explorer (Windows Intéző) részben vagy a Mac asztalon. 9 eSATA SATA Jen některé modely. Nejlepšího výkonu dosáhnete, připojíte-li jednotku ke kartě PCI eSATA PCI nebo k vestavěnému externímu připojení eSATA. Není-li k dispozici podporované připojení eSATA, připojte jednotku prostřednictvím rozhraní USB. 1. Připojujete-li jednotku ke kartě PCI eSATA, ujistěte se, že jsou pro kartu nainstalovány všechny ovladače a karta je správně rozpoznána operačním systémem. POZNÁMKA: Pro pevný disk Iomega UltraMax Pro není nutné instalovat zvláštní ovladače. Disk je podporován ovladači ke kartě PCI eSATA. Je-li v počítači k dispozici vestavěné připojení eSATA, je jednotka podporována nativními ovladači v operačním systému. 2. Vypněte počítač. POZNÁMKA: eSATA NENÍ rozhraní typu plug-andplay. Před připojováním či odpojováním jednotky počítač vždy vypněte. 3. Zapojte přiložený napájecí kabel do zadní strany jednotky. Diskovou jednotku umístěte na stabilní povrch a zapojte napájecí kabel do síťové zásuvky. UPOZORNĚNÍ! Chcete-li předejít poškození síťového konektoru, přesvědčte se před jeho připojením k diskové jednotce, že je správně zapojen. Nepřemísťujte diskovou jednotku, když je napájena. Hrozí poškození disků a ztráta dat. SATA SATA Dotyczy tylko niektórych modeli. Aby dysk działał niezawodnie, należy go podłączyć do karty PCI eSATA lub wbudowanego złącza zewnętrznego eSATA. Jeśli nie można użyć obsługiwanego połączenia eSATA, dysk należy podłączyć do portu USB. 1. W przypadku podłączania dysku do karty PCI eSATA pamiętaj o zainstalowaniu sterowników karty oraz sprawdź, czy karta jest poprawnie rozpoznawana przez system operacyjny. UWAGA: Dysk twardy Iomega UltraMax Pro nie wymaga instalowania specjalnych sterowników. Jest on obsługiwany przez sterowniki karty PCI eSATA. Jeśli w komputerze jest wbudowane złącze eSATA, dysk jest obsługiwany przez sterowniki systemu operacyjnego. 2. Wyłącz komputer. UWAGA: Interfejs eSATA NIE jest interfejsem plug-and-play. Przed podłączeniem i odłączeniem dysku należy zawsze wyłączyć komputer. 3. Podłącz dostarczony zasilacz z tyłu dysku. Ustaw dysk na stabilnej powierzchni i podłącz zasilacz do gniazda zasilania. UWAGA! Aby uniknąć uszkodzenia złącza zasilania, przed podłączeniem dysku należy sprawdzić polaryzację. Aby uniknąć uszkodzenia dysku lub utraty danych, nie wolno przenosić włączonego dysku. 4. Najděte příslušný kabel eSATA a připojte jej do zadní části jednotky. Nikdy nepřipojujte jednotku k počítači pomocí více než jednoho kabelu. 4. Znajdź odpowiedni przewód eSATA i podłącz go z tyłu dysku. Nie wolno podłączać dysku do komputera za pomocą więcej niż jednego przewodu. 5. Připojte opačný konec kabelu ke kartě PCI eSATA nebo vestavěnému připojení eSATA. 5. Podłącz drugi koniec przewodu do karty PCI eSATA lub wbudowanego złącza eSATA. 6. Zapněte síťový vypínač na zadní straně jednotky a restartujte počítač. 6. Włącz dysk za pomocą przełącznika z tyłu obudowy i uruchom ponownie komputer. 7. Ikona jednotky by se měla zobrazit v okně Tento počítač, Průzkumník Windows nebo na pracovní ploše systému Mac. 7. Ikona dysku powinna zostać wyświetlona w oknie Mój komputer, w programie Eksplorator Windows lub na biurku w systemie Mac. 10 eSATA SATA Μόνο σε ορισµένα µοντέλα. Για την καλύτερη δυνατή απόδοση, συνδέστε το δίσκο σε µια κάρτα eSATA PCI ή σε µια ενσωµατωµένη στον υπολογιστή εξωτερική υποδοχή USB 2.0. Συνδέστε το δίσκο µε σύνδεση USB αν δεν υπάρχει διαθέσιµη υποστηριζόµενη σύνδεση eSATA. 1. Εάν κάνετε σύνδεση σε µια κάρτα eSATA PCI, βεβαιωθείτε ότι έχουν εγκατασταθεί τα προγράµµατα οδήγησης της κάρτας και ότι η κάρτα αναγνωρίζεται κανονικά από το λειτουργικό σας σύστηµα. ΣΗΜΕΙΩΣΗ: ∆εν χρειάζεται να εγκαταστήσετε ειδικά προγράµµατα οδήγησης για το σκληρό δίσκο Iomega UltraMax Pro. Υποστηρίζεται από τα προγράµµατα οδήγησης που περιλαµβάνονται στην κάρτα eSATA PCI. Εάν ο υπολογιστής σας διαθέτει ενσωµατωµένη σύνδεση eSATA, ο δίσκος υποστηρίζεται από τα προγράµµατα οδήγησης που περιλαµβάνονται ήδη στο λειτουργικό σύστηµα. 2. Σβήστε τον υπολογιστή. ΣΗΜΕΙΩΣΗ: Η διασύνδεση eSATA ∆ΕΝ είναι plug-andplay. Πρέπει πάντα να τερµατίζετε τη λειτουργία του υπολογιστή πριν συνδέσετε ή αποσυνδέσετε το δίσκο. 3. Συνδέστε το καλώδιο τροφοδοσίας που συνοδεύει το δίσκο στο πίσω µέρος της. Τοποθετήστε το δίσκο σε µια σταθερή επιφάνεια και συνδέστε το τροφοδοτικό σε µια πρίζα ηλεκτρικού. ΠΡΟΣΟΧΗ! Για να αποφύγετε την πρόκληση ζηµιάς στο βύσµα του τροφοδοτικού, βεβαιωθείτε ότι έχει ευθυγραµµιστεί σωστά προτού το συνδέσετε στο δίσκο. Μην µετακινείτε το δίσκο όταν ξεκινά η τροφοδοσία του, για να µην προκληθεί ζηµιά ή απώλεια δεδοµένων. 4. Εντοπίστε το καλώδιο eSATA και συνδέστε το στο πίσω µέρος του δίσκου. Ποτέ µην συνδέετε το δίσκο µε τον υπολογιστή µε περισσότερα του ενός καλώδια. SATA SATA 僅限某些模式。為確保發揮最佳效能,請將磁碟機接 上 eSATA PCI 卡或內建外接式 eSATA 連線。如果沒有 支援的 eSATA 連線,請將磁碟機連接到 USB。 1. 如果您連接 eSATA PCI 卡,請確定介面卡的驅動程 式已經安裝,且您的作業系統可以正確識別該介面 卡。 注意:您不需要為「Iomega UltraMax Pro」安裝 特別的驅動程式。包含在 eSATA PCI 卡內的驅動 程式會支援該硬碟。如果您的電腦擁有內建的 eSATA 連線,則作業系統內原本的驅動程式就會支 援該磁碟機。 2. 關閉電腦的電源。 注意:eSATA 介面「不支援」隨插即用。在連接或 移除磁碟機之前,請務必關閉電腦的電源。 3. 將隨附的電源供應器連接至磁碟機的背面。將磁 碟機放置在穩定表面上並將電源供應器連接到電 源插座。 注意!為了避免電源供應器接頭損壞,在將其插到 磁碟機中之前,請確保已將其正確對齊。為避免 磁碟機資料遺失,當磁碟機電源開啟時,請勿移動 它。 4. 確定 eSATA 的纜線後,將該纜線連接到磁碟機背 面。將磁碟機連接到電腦時,絕對不可使用一條以 上的纜線。 5. 將資料纜線的另一端連接至 eSATA PCI 卡或內建 的 eSATA 連線。 6. 打開磁碟機背面的電源開關然後重新啟動您的電 腦。 7. 磁碟機圖示應顯示在「我的電腦」、Windows 「 檔案總管」或 Mac 桌面上。 5. Συνδέστε το άλλο άκρο του καλωδίου στην κάρτα eSATA PCI ή στην ενσωµατωµένη υποδοχή eSATA. 6. Ανάψτε το διακόπτη τροφοδοσίας στο πίσω µέρος του δίσκου και κάντε επανεκκίνηση του υπολογιστή. 7. Το εικονίδιο του δίσκου πρέπει να εµφανίζεται στο φάκελο Ο Υπολογιστής µου (My Computer), στην Εξερεύνηση των Windows (Windows Explorer) ή στο γραφείο του Mac. 11 USB / FireWire 1. Connect the included power supply to the back of the drive and to a power outlet. CAUTION! Do not move the drive while it is powered up to avoid drive damage or data loss. 2. Identify the appropriate cable and connect it to the back of the drive. 3. Connect the other end of the cable to the port on your computer. Never connect the drive to the computer with more than one cable. 4. If the drive does not appear on your computer, refer to Troubleshooting (page 16). NOTE: The FireWire/USB drive ships preformatted HFS+ (Mac OS) and must be reformatted for use with Windows (see instructions on page 16). The eSATA/USB drive ships preformatted FAT32 and does not require reformatting. 1. Connectez l’alimentation fournie à l’arrière du disque, puis connectez-la à une prise secteur. ATTENTION ! Ne déplacez pas le disque lorsqu’il est sous tension pour éviter tout dommage ou perte de données. 2. Identifiez le câble approprié et connectez-le à l’arrière du disque. 3. Connectez l’autre extrémité du câble au port de votre ordinateur. Ne connectez JAMAIS le disque à l’ordinateur à l’aide de plusieurs câbles. 4. Si l’icône du disque n’apparaît pas sur votre ordinateur, consultez la rubrique Dépannage (page 17). REMARQUE : le disque FireWire/USB est livré préformaté HFS+ (MAC OS) et doit être reformaté pour une utilisation sous Windows (voir les instructions à la page 17). Le disque eSATA/USB est livré préformaté FAT32 et ne nécessite aucun reformatage. 1. Schließen Sie das mitgelieferte Netzteil an der Rückseite des Laufwerks und an eine Steckdose an. 1. Collegare l’alimentatore in dotazione al retro dell’unità e inserirlo in una presa di corrente. ACHTUNG! Bewegen Sie das Laufwerk während des Einschaltvorgangs nicht, um Laufwerkbeschädigungen oder Datenverluste zu vermeiden. ATTENZIONE! Non spostare l’unità mentre è accesa per evitare danni o perdite di dati. 2. Wählen Sie das richtige Kabel aus, und schließen Sie es an der Laufwerksrückseite an. 3. Verbinden Sie das andere Ende des Kabels mit dem Anschluss des Computers. Schließen Sie das Laufwerk niemals mit mehr als einem Kabel am Computer an. 4. Falls das Laufwerk auf Ihrem System nicht angezeigt wird, lesen Sie den Abschnitt „Fehlerbehebung“ (Seite 19). HINWEIS: Das FireWire-/USB-Laufwerk ist bei der Auslieferung mit HFS+ (Mac OS) vorformatiert und muss für den Gebrauch unter Windows erneut formatiert werden (siehe Anweisungen auf Seite 18). Das eSATA-/USB-Laufwerk ist bei der Auslieferung mit FAT32 vorformatiert und muss nicht erneut formatiert werden. 12 2. Individuare il cavo appropriato e collegarlo al retro dell’unità. 3. Collegare l’altra estremità del cavo alla porta del computer. Evitare di collegare l’unità al computer utilizzando più di un cavo. 4. Se l’unità non risulta presente nel computer, fare riferimento a Risoluzione dei problemi (pagina 19). NOTA: l’unità viene fornita preformattata HFS+ (Mac OS); riformattare l’unità per l’utilizzo con Windows (vedere le istruzioni a pag. 20). l’unità SATA/USB viene fornita preformattata FAT32 e non richiede formattazione. USB / FireWire 1. Conecte la fuente de alimentación suministrada a la parte posterior de la unidad y a la toma de alimentación. PRECAUCIÓN: No mueva la unidad mientras esté encendida para evitar posibles daños en la unidad o la pérdida de datos. 2. Identifique el cable adecuado y conéctelo a la parte posterior de la unidad. 3. Conecte el otro extremo del cable al puerto del equipo. Nunca conecte la unidad al equipo con más de un cable. 4. Si la unidad no aparece en el equipo, consulte Solución de problemas (página 20). NOTA: La unidad FireWire/USB se entrega con el formato HFS+ (Mac OS) y se debe volver a formatear para utilizarla con Windows (consulte las instrucciones de la página 20). La unidad eSATA/USB se entrega con el formato FAT32 y no requiere volver a formatearla. 1. Sluit het ene uiteinde van de meegeleverde voeding aan op de achterkant van de drive en het andere op een stopcontact. WAARSCHUWING! Verplaats de drive niet wanneer deze van stroom is voorzien, om beschadigingen of gegevensverlies te voorkomen. 1. Conecte a fonte de alimentação fornecida à parte traseira da unidade e depois a uma tomada elétrica. CUIDADO! Não mova a unidade enquanto ela estiver ligada para evitar danos à mesma ou perda de dados. 2. Identifique o cabo apropriado e conecte-o à parte traseira da unidade. 3. Conecte a outra extremidade do cabo à porta do seu computador. Nunca conecte a unidade ao computador através de mais de um cabo. 4. Se a unidade não aparecer no seu computador, consulte a seção Solução de problemas (página 22). OBS: A unidade FireWire/USB é enviada préformatada com HFS+ (Mac OS) e precisa ser reformatada para uso com Windows (consulte as instruções na página 22). A unidade eSATA/USB é enviada pré-formatada com FAT32 e não precisa ser reformatada. 1. Anslut den medföljande strömkabeln till enhetens baksida och koppla den därefter till ett strömuttag. VARNING! Flytta inte enheten när den har startats för att undvika att den skadas eller att data går förlorade. 2. Neem de geschikte kabel en sluit die aan op de achterkant van de drive. 2. Lokalisera rätt kabel och anslut den till uttaget på baksidan av enheten. 3. Sluit het andere uiteinde van de kabel aan op de poort van de computer. Sluit de drive nooit met meer dan één kabel aan op de computer. 3. Anslut den andra änden av kabeln till porten på datorn. Anslut aldrig enheten till datorn med mer än en kabel. 4. Als het pictogram van de drive niet wordt weergegeven, raadpleegt u Problemen oplossen (pagina 23). 4. Om drivrutinen inte visas på datorn, se felsökningsavsnittet. OPMERKING: De FireWire/USB-drive wordt vooraf geformatteerd als HFS+ (Mac OS) en zodanig geleverd en moet opnieuw worden geformatteerd voor gebruik met Windows (zie instructies op pagina 24). De eSATA/USB-drive wordt vooraf geformatteerd als FAT32 en zodanig geleverd en hoeft niet opnieuw te worden geformatteerd. OBS: FireWire-/USB-drivrutinen levereras förformaterad för HFS+ (Mac OS) och måste omformateras för användning med Windows. eSATA-/USB-drivrutinen levereras förformaterad för FAT32 och kräver ingen omformatering. 13 USB / FireWire 1. Sæt stikket fra den medfølgende strømforsyning i på bagsiden af drevet, og sæt derefter den anden ende i en stikkontakt. Forsigtig! Hvis du vil undgå at beskadige drevet eller miste data, må du ikke flytte drevet, mens det startes. 1. Koble til den medfølgende strømforsyningen på baksiden av stasjonen, og deretter til en stikkontakt. FORSIKTIG! For å unngå skade på stasjonen eller tap av data må ikke stasjonen flyttes mens den er slått på. 2. Find det korrekte kabel, og sæt det i på bagsiden af drevet. 2. Finn frem den riktige kabelen og koble den til på baksiden av stasjonen. 3. Slut den anden ende af kablet til porten på computeren. Slut aldrig drevet til computeren med mere end ét kabel. 3. Koble den andre enden av kabelen til porten på datamaskinen. Koble aldri stasjonen til datamaskinen med mer enn én kabel. 4. Hvis drevet ikke vises på computeren, henvises du til Fejlfinding. 4. Hvis stasjonen ikke vises på datamaskinen, se Problemløsing. Bemærk! FireWire/USB-drevet leveres præformateret med HFS+ (Mac OS) og skal omformateres til brug med Windows. eSATA/ USB-drevet leveres præformateret med FAT32 og kræver ikke omformatering. 1. Kytke laitteen mukana toimitettu virtalähde aseman takaosaan ja pistorasiaan. VAROITUS: Älä irrota asemaa, kun sen virta on kytkettynä. Näin vältät aseman vaurioitumisen ja tietojen katoamisen. 2. Etsi oikea kaapeli ja kytke se aseman takaosaan. 3. Kytke kaapelin toinen pää tietokoneen porttiin. Kytke kiintolevy tietokoneeseen vain yhdellä kaapelilla. 4. Jos asemaa ei löydy tietokoneelta, katso Vianmääritys. HUOM: FireWire-/USB- asema on esialustettu HFS+ (Mac OS) -muotoon ja se on alustettava uudelleen Windows-käyttöjärjestelmää varten. FAT32-muotoon esialustettuja eSATA-/USB-asemia ei tarvitse alustaa uudelleen. 14 MERK: FireWire/USB-stasjonen leveres ferdig formatert med HFS+ (Mac OS) og må omformateres for bruk sammen med Windows. eSATA/USB-stasjonen leveres ferdig formatert med FAT32 og krever ikke omformatering. 1. Csatlakoztassa a mellékelt tápegységet a meghajtó hátuljához és a konnektorhoz. VIGYÁZAT! Bekapcsolás közben ne mozgassa a meghajtót, így elkerülheti az esetleges sérüléseket és adatvesztéseket. 2. Keresse meg a megfelelő kábelt, majd csatlakoztassa a meghajtó hátuljához. 3. A kábel másik végét csatlakoztassa a számítógép egyik portjához. A meghajtó és a számítógép csatlakoztatásához soha ne használjon egynél több kábelt. 4. Ha a meghajtó nem jelenik meg a számítógépen, olvassa el a Hibaelhárítás című részt. Megjegyzés: A FireWire/USB meghajtó HFS+ (Mac OS) rendszerhez előformázva kerül szállításra, és Windows operációs rendszeren történő használathoz újra kell formázni. Az eSATA/USB meghajtó FAT32 rendszerhez előformázva kerül szállításra, és nem igényel újraformázást. USB / FireWire 1. Pomocí přiloženého adaptéru připojte diskové pole k elektrické síti. UPOZORNĚNÍ! Nepřemísťujte zapnuté diskové pole. Hrozí poškození disků a ztráta dat. 2. Najděte příslušný kabel a připojte jej do zadní části jednotky. 3. Připojte druhý konec kabelu k portu v počítači. Nikdy nepřipojujte jednotku k počítači pomocí více než jednoho kabelu. 4. Neobjeví-li se diskové pole v počítači, postupujte podle pokynů uvedených v části Vyhledání a odstranění závad. POZNÁMKA: Diskové pole FireWire/USB se dodává naformátované jako HFS+ (Mac OS) a pro použití se systémem Windows se musí znovu naformátovat. Diskové pole eSATA/USB se dodává naformátované jako FAT32 a nevyžaduje další formátování. 1. Συνδέστε το τροφοδοτικό που συνοδεύει το δίσκο στο πίσω µέρος του και σε µια πρίζα ηλεκτρικού. ΠΡΟΣΟΧΗ! Μην µετακινείτε το δίσκο όταν ξεκινά η τροφοδοσία του, για να µην προκληθεί ζηµιά ή απώλεια δεδοµένων. 2. Εντοπίστε το κατάλληλο καλώδιο και συνδέστε το στο πίσω µέρος του δίσκου. 3. Συνδέστε το άλλο άκρο του καλωδίου σε µια υποδοχή στον υπολογιστή σας. Ποτέ µην συνδέετε το δίσκο µε τον υπολογιστή µε περισσότερα του ενός καλώδια. 4. Αν δεν εµφανιστεί ο δίσκος στον υπολογιστή σας, ανατρέξτε στην ενότητα Troubleshooting (Αντιµετώπιση προβληµάτων). 1. Podłącz dostarczony zasilacz do gniazda z tyłu dysku oraz do gniazda zasilania. UWAGA! Aby uniknąć uszkodzenia dysku lub utraty danych, nie wolno przenosić włączonego napędu. 2. Znajdź odpowiedni przewód i podłącz go z tyłu napędu. 3. Podłącz drugi koniec przewodu do portu w komputerze. Nie wolno podłączać napędu do komputera za pomocą więcej niż jednego przewodu. 4. Jeżeli napęd nie jest widoczny w komputerze, zapoznaj się z częścią Rozwiązywanie problemów. UWAGA: Napęd FireWire/USB jest wysyłany w stanie wstępnie sformatowanym HFS+ (system operacyjny Mac OS) i musi zostać ponownie sformatowany w przypadku wykorzystywania w systemie Windows. Napęd eSATA/USB jest dostarczany wstępnie sformatowany w systemie FAT32 i nie wymaga ponownego formatowania. 1. 將隨附的電源供應器接到磁碟機背面,再接到電源 插座。 注意!為避免磁碟機資料遺失,當磁碟機電源開啟 時,請勿移動它。 2. 確定正確的纜線後,將該纜線連接到磁碟機背面。 3. 將纜線的另一端連接到您電腦上的連接埠。將磁 碟機連接到電腦時,絕對不可使用一條以上的纜 線。 4. 若電腦上未出現磁碟機圖示,請參閱疑難排解。 注意:FireWire/USB 磁碟機出廠時預先格式化成 HFS+ (Mac OS) 格式,使用於 Windows 時,必須重 新格式化。eSATA/USB 磁碟機出廠時預先格式化 成 FAT32 格式,不需要重新格式化。 ΣΗΜΕΙΩΣΗ: Ο δίσκος FireWire/USB παραδίδεται µε εκ των προτέρων διαµόρφωση HFS+ (Mac OS) και, για να χρησιµοποιηθεί στα Windows, πρέπει να διαµορφωθεί εκ νέου. Ο δίσκος eSATA/USB παραδίδεται µε εκ των προτέρων διαµόρφωση FAT32 και δεν απαιτεί εκ νέου διαµόρφωση. 15 Using Your Drive NOTE: If you need additional instructions or troubleshooting help, see the user’s manual on the Solutions CD. Volume Configuration The Iomega UltraMax Pro drive ships configured as a striped (RAID 0) volume, which appears as a single disk on the computer system. You can configure your Iomega UltraMax Pro Hard Drive to support several different volume types. See the HTML User’s Manual on the Solutions CD for detailed descriptions of these configuration options and for instructions on setting the configuration switches. CAUTION! Changing the volume configuration will erase all existing data! If you have files on the drive you want to save, move them to another drive before changing the configuration. Do NOT change the configuration switches while the drive is powered up. Disconnecting the Drive CAUTION! To prevent data loss, do not disconnect the drive during data transfer (activity light flashing). eSATA Users: Always turn off power to the drive and computer before disconnecting. Backing Up with Your Drive Iomega recommends periodic system backups and more frequent data backups to ensure that your critical data is always protected. The frequency of your backup should depend on the importance of your data. To protect your data, you can simply drag and drop copies of your critical files onto the drive, or you can use backup software to schedule regular backups. Troubleshooting Drive does not appear in My Computer or Windows Explorer or on the Mac Desktop • • • • • Try rebooting your computer. Check all connections. Make sure the drive is receiving power (check if the status light is on). Make sure the power switch is on. Make sure you are using the cable that came with your drive. Make sure the drive is connected to only one interface. PC Users: Formatting the Iomega UltraMax Pro FireWire/USB Hard Drive for Windows ® FireWire/USB models ship preformatted HFS+ (Mac OS). If you are using the drive on a Windows PC and the drive is not recognized, reformat the drive to either NTFS or FAT32. CAUTION! Reformatting the Iomega UltraMax Pro drive will erase all existing data on the drive. 1. Connect the Iomega UltraMax Pro FireWire/USB drive to your computer. 2. Open Windows Disk Management (right click on My Computer, select Manage, and click on Disk Management). 3. If the Disk Wizard opens, click Next. Select the disk, click Next, then Finish. If the Wizard does not open, locate the drive in the lower list. Look for a disk that does not show a drive letter or file system. Right click on the drive name and select Initialize Disk (Windows XP) or Write Signature (Windows 2000), then OK. 4. The drive will now appear as Unallocated and the bar will be black. Right click on the black bar and select New Partition (Windows XP) or Create Partition (Windows 2000). 5. When the Partition Wizard opens, click Next. 6. Verify that the partition type is Primary partition and click Next. 7. Leave the maximum disk space selected and click Next. 8. Assign the next drive letter available and click Next. 9. To format the drive with an NTFS file system, click Next, then click Finish. The drive will be ready to use when the format completes. NOTE: If you want to use the drive with other operating systems, use the Iomega FAT32 Formatter located on the CD to change the format to FAT32 (needed for cross-platform compatibility). If you need detailed instructions, check the Support and Downloads area on www.iomega.com. 16 PC will not start up If your PC will not start up when the drive is connected, there is probably a conflict with the computer. To work around this problem, power off the drive when starting the computer. Power on the drive after the computer finishes starting up. Complete User's Manual A complete user’s manual in HTML format is available on the Support & Downloads area on www.iomega.com. Utilisation du lecteur REMARQUE: Si vous avez besoin d’instructions complémentaires ou d’une aide au dépannage, reportez-vous au guide de l’utilisateur sur le CD Solutions. Configuration du volume Le disque Iomega UltraMax Pro est configuré en tant que volume réparti (RAID 0) qui s’affiche comme disque unique sur le système. Votre disque dur Iomega UltraMax Pro peut être configuré pour prendre en charge différents types de volumes. Consultez le guide de l’utilisateur au format HTML sur le CD Solutions pour obtenir des descriptions détaillées de ces options de configuration et pour obtenir des instructions sur les paramètres de l’alternance de configuration. ATTENTION ! La modification de la configuration du volume efface toutes les données existantes ! Si le disque contient des fichiers que vous voulez sauvegarder, déplacez-les sur un autre disque avant de modifier la configuration. Ne modifiez PAS la configuration lorsque le disque est alimenté. Déconnexion du lecteur ATTENTION ! Pour éviter toute perte de données, ne déconnectez pas le lecteur pendant un transfert de données (voyant d’activité clignotant). Utilisateurs de eSATA : mettez toujours le lecteur et l’ordinateur hors tension avant la déconnexion. Sauvegarder avec votre disque dur Iomega recommande d’effectuer des sauvegardes régulières du système et des sauvegardes fréquentes de données pour assurer la protection permanente de vos données les plus importantes. La périodicité des sauvegardes dépend directement de l’importance des données à sauvegarder. Pour protéger vos données, copiez vos fichiers les plus importants sur le disque par simple glisser-déplacer ou utilisez le logiciel de sauvegarde pour programmer des sauvegardes régulières. Dépannage Le lecteur n’apparaît pas dans le Poste de travail, l’Explorateur Windows ou sur le bureau du Mac. • Redémarrez votre ordinateur. • Vérifiez toutes les connexions. • Assurez-vous que le disque est alimenté (vérifiez que le voyant d’état est allumé). Assurez-vous que l’interrupteur d’alimentation est sous tension. • Assurez-vous que vous utilisez le câble fourni avec le disque. • Assurez-vous que le disque est connecté à une seule interface. Utilisateurs de PC : Formatage du lecteur de disque dur FireWire/USB Iomega UltraMax Pro pour Windows Les modèles de FireWire/USB sont livrés préformatés au format HFS+ (Mac OS). Si vous utilisez le disque dur sur un PC Windows et qu’il n’est pas reconnu, vous devez reformater le disque dur au format NTFS ou FAT32. ATTENTION ! Le reformatage du lecteur efface toutes les données existantes ! 1. Connectez le lecteur Iomega UltraMax Pro FireWire/USB à votre ordinateur. 2. Ouvrez l’utilitaire de gestion des disques de Windows (cliquez avec le bouton droit de la souris sur Poste de travail, Gérer, puis Gestion des disques). 3. Si l’Assistant lecteur s’ouvre, cliquez sur Suivant. Sélectionnez le lecteur, cliquez sur Suivant puis sur Terminer. Si l’Assistant ne s’ouvre pas, recherchez le lecteur dans la liste inférieure. Recherchez un disque ne présentant ni lettre de lecteur ni système de fichiers. Cliquez avec le bouton droit de la souris sur le nom du lecteur et sélectionnez Initialiser le lecteur (Windows XP) ou Ecrire une signature (Windows 2000) puis OK. 17 4. Le disque apparaît comme Non attribué et la barre doit être noire. Cliquez avec le bouton droit sur la barre noire et sélectionnez Nouvelle partition (Windows 2000) ou Créer une partition (Windows XP). 5. Lorsque l’Assistant Création de partition s’ouvre, cliquez sur Suivant. 6. Vérifiez que le type de partition sélectionné est bien Partition primaire, puis cliquez sur Suivant. 7. Sélectionnez l’espace disque maximum disponible et cliquez sur Suivant. 8. Attribuez la prochaine lettre de lecteur disponible au disque et cliquez sur Suivant. 9. Pour formater le disque avec système de fichiers NTFS, cliquez sur Suivant, puis sur Terminer. Le disque peut être utilisé dès que le formatage est terminé. REMARQUE : Si vous souhaitez utiliser le disque avec d’autres systèmes d’exploitation, utilisez le Iomega Fat32 Formatter situé sur le CD pour formater le disque au format FAT32 (requis pour la compatibilité multiplate-forme). Pour obtenir des instructions détaillées, consultez la section Assistance et téléchargements du site www.iomega.com. L’ordinateur ne démarre pas Si votre ordinateur ne démarre pas lorsque le disque est connecté, il existe très certainement un conflit avec l’ordinateur. Afin de résoudre ce problème, éteignez le disque lorsque vous démarrez l’ordinateur. Allumez le disque après avoir démarré l’ordinateur. Guide complet de l’utilisateur Un guide de l’utilisateur complet est disponible au format HTML dans la section Support et Téléchargement du site www.iomega.com. Verwenden des Laufwerks HINWEIS: Zusätzliche Anweisungen und Informationen zur Fehlerbehebung finden Sie im Benutzerhandbuch auf der Solutions-CD. Volumekonfiguration Das Iomega UltraMax Pro-Laufwerk ist werksseitig als Striping-Volume (RAID 0) konfiguriert und wird daher auf dem Computer als einzelner Datenträger angezeigt. Sie können das Iomega UltraMax Pro-Festplattenlaufwerk so konfigurieren, dass es die unterschiedlichsten Volumetypen unterstützt. Ausführliche Beschreibungen zu diesen Konfigurationsoptionen sowie Anweisungen zum Festlegen der Konfigurationsswitches finden Sie im HTMLBenutzerhandbuch auf der Lösungs-CD. ACHTUNG: Bei einer Änderung der Volumekonfiguration werden sämtliche vorhandenen Daten gelöscht! Sollten Sie Dateien auf dem Laufwerk haben, die Sie speichern möchten, verschieben Sie diese auf ein anderes Laufwerk, bevor Sie die Schaltereinstellungen ändern. Ändern Sie NICHT die Konfigurationsswitches, während das Laufwerk hochgefahren ist. Trennen des Laufwerks vom System ACHTUNG! Um Datenverluste zu vermeiden, trennen Sie das Laufwerk während der Datenübertragung (wenn Aktivitätsanzeige blinkt) nicht vom Computer. eSATA-Benutzer: Müssen Sie das Laufwerk und den Computer immer vor dem Trennen der Verbindung abschalten. Mit dem Iomega Laufwerk auf Nummer Sicher Es empfiehlt sich, das System regelmäßig und die Daten noch häufiger zu sichern, um den ständigen Schutz Ihrer wichtigen Daten zu gewährleisten. Wie oft Sie eine Sicherung vornehmen, hängt jeweils von der Wichtigkeit Ihrer Daten ab. Sie können die Daten auf einfache Weise sichern, indem Sie Kopien derselben durch Ziehen und Ablegen auf das Laufwerk kopieren. Alternativ dazu bietet die Sicherungssoftware die Möglichkeit, eine regelmäßige Sicherung zu planen. Fehlerbehebung Laufwerk wird nicht im Arbeitsplatz, dem Windows Explorer oder auf dem Mac-Desktop angezeigt • Führen Sie probeweise einen Neustart des Computers durch. • Überprüfen Sie alle Verbindungen. • Kontrollieren Sie anhand des Statuslämpchens, ob das Laufwerk mit Strom versorgt wird. Stellen Sie sicher, dass der Hauptschalter eingeschaltet ist. 18 • Achten Sie darauf, dass Sie das mit dem Laufwerk gelieferte Kabel verwenden. • Vergewissern Sie sich, dass das Laufwerk nur an eine Schnittstelle angeschlossen ist. PC-Benutzer mit FireWire/USB-Laufwerk: Formatieren unter Windows Die FireWire/USB Modelle sind ab Werk auf HFS+ (Mac OS) vorformatiert. Wenn Sie das Laufwerk unter Windows betreiben und dieses nicht erkannt wird, müssen Sie es entweder auf NTFS oder auf FAT32 umformatieren. ACHTUNG! Bei einer Neuformatierung des Laufwerks werden sämtliche vorhandenen Daten gelöscht! 1. Schließen Sie das Iomega UltraMax Pro FireWire/USB-Laufwerk am Computer an. 2. Öffnen Sie die Windows Datenträgerverwaltung (mit rechter Maustaste auf Arbeitsplatz klicken, Verwalten wählen und dann auf Datenträgerverwaltung klicken). 3. Falls der Assistent für die Datenträgerinitialisierung gestartet wird, klicken Sie auf Weiter. Wählen Sie den Datenträger aus. Klicken Sie auf Weiter und dann auf Fertig stellen. Falls der Assistent für die Datenträgerinitialisierung nicht gestartet wird, suchen Sie das Laufwerk in der unteren Liste. Suchen Sie nach einem Datenträger, bei dem kein Laufwerksbuchstabe oder Dateisystem angezeigt wird. Klicken Sie mit der rechten Maustaste auf den Laufwerksnamen und wählen Sie dann Datenträger initialisieren (Windows XP) oder Signatur schreiben (Windows 2000). Klicken Sie anschließend auf OK. 4. Das Laufwerk wird dann als Nicht zugeordnet angezeigt und der Balken schwarz dargestellt. Klicken Sie mit der rechten Maustaste Right auf den schwarzen Balken und wählen Sie Neue Partition (Windows XP) oder Partition erstellen (Windows 2000). 5. Sobald der Assistent zum Erstellen neuer Partitionen geöffnet wird, klicken Sie auf Weiter. 6. Überprüfen Sie, ob es sich beim Partitionstyp um Primäre Partition handelt, und klicken Sie auf Weiter. 7. Lassen Sie die Auswahl (maximaler Speicherplatz ) stehen und klicken Sie auf Weiter. 8. Ordnen Sie der Festplatte den nächsten Laufwerksbuchstaben zu und klicken Sie auf Weiter. 9. Um das Laufwerk mit einem NTFS-Dateisystem zu formatieren, klicken Sie auf Weiter und dann auf Fertig stellen. Sobald die Formatierung abgeschlossen ist, können Sie das Laufwerk verwenden. HINWEIS: Falls Sie das Laufwerk mit anderen Betriebssystemen verwenden möchten, können Sie das Format mit dem Iomega FAT32-Formatter auf der CD in FAT32 ändern (für Kompatibilität zwischen verschiedenen Plattformen erforderlich). Wenn Sie ausführliche Anweisungen wünschen, rufen Sie den Bereich Support und Downloads unter www.iomega.com auf. Der PC lässt sich nicht starten FWenn sich Ihr PC mit dem angeschlossenen Laufwerk nicht starten lässt, besteht wahrscheinlich ein Konflikt mit dem Computer. Sie können dieses Problem umgehen, indem Sie das Laufwerk beim Starten des Computers ausschalten. Nach dem Starten des Computers schalten Sie das Laufwerk ein. Benutzerhandbuch (vollständig) Im Bereich “Support & Downloads” unter www.iomega.com steht Ihnen ein vollständiges Benutzerhandbuch im HTML-Format zur Verfügung. Uso dell’unità NOTA: per ulteriori istruzioni relative all’installazione o per informazioni sulla risoluzione dei problemi, consultare il manuale dell’utente disponibile nel CD Soluzioni. Configurazione del volume L’unità Iomega UltraMax Pro viene fornita come volume striped (RAID 0), visualizzato sul computer come disco singolo. È possibile configurare l’unità Iomega UltraMax Pro Hard Drive per supportare diversi tipi di volumi. Per una descrizione dettagliata delle opzioni di configurazione disponibili e istruzioni sull’impostazione dei selettori di configurazione, consultare il Manuale dell’utente in formato HTML contenuto nel CD Soluzioni. ATTENZIONE! La modifica della configurazione del volume provoca l’eliminazione dei dati esistenti! Se i file che si intende salvare risiedono sull’unità, spostarli su un’altra unità prima di modificare la configurazione. NON modificare i selettori di configurazione quando l’unità è accesa. Scollegamento dell’unità ATTENZIONE! Per evitare che si verifichino perdite di dati, non scollegare l’unità durante il trasferimento di informazioni (la spia verde di attività lampeggia). Utenti PC: Prima di scollegarla, ricordarsi sempre di spegnere sia l’unità che il computer. 19 Backup con le unità Iomega Iomega consiglia di eseguire backup di sistema periodici e backup di dati più frequenti per garantire che i dati essenziali siano sempre protetti. La frequenza dei backup varia in base all’importanza dei dati da memorizzare. Per proteggere i dati, è sufficiente selezionare e trascinare copie dei dati più importanti sull’unità, oppure utilizzare il software incluso per pianificare l’esecuzione di backup a intervalli regolari. Risoluzione dei problemi L’icona dell’unità non viene visualizzata in Risorse del computer, Esplora risorse di Windows o sulla Scrivania Mac. • Provare a riavviare il computer. • Controllare i collegamenti. • Assicurarsi che l’unità sia alimentata verificando che la spia sia accesa. Assicurarsi che l’interruttore di alimentazione sia acceso. • Assicurarsi di utilizzare il cavo fornito in dotazione con l’unità. • Accertarsi che l’unità sia collegata a una sola interfaccia. Utenti PC: formattazione dell’unità a disco rigido Iomega UltraMax Pro FireWire/USB per Windows I modelli di FireWire/USB vengono forniti preformattati HFS+ (Mac OS). Se si usa l’unità su un PC Windows e non viene riconosciuta, riformattare l’unità in NTFS o FAT32. ATTENZIONE! La riformattazione dell’unità provoca l’eliminazione dei dati esistenti! 1. Collegare l’unità Iomega UltraMax Pro FireWire/USB al computer. 2. Aprire Gestione disco di Windows (fare clic con il pulsante destro del mouse su Risorse del computer, selezionare Gestisci, quindi fare clic su Gestione disco). 3. Quando si avvia l’Installazione guidata disco, scegliere Avanti. Selezionare il disco, fare clic su Avanti, quindi su Fine. Se la procedura guidata non si avvia, cercare l’unità nella parte inferiore dell’elenco. Cercare un disco senza lettera di unità o file system. Fare clic con il pulsante destro del mouse sul nome dell’unità e selezionare Inizializza disco (Windows XP) o Riporta la firma (Windows 2000), quindi scegliere OK. 4. A questo punto l’unità apparirà come Non allocata e la barra diventerà nera. Fare clic con il pulsante destro del mouse sulla barra nera, quindi selezionare Nuova partizione (Windows XP) o Crea partizione (Windows 2000). 5. Quando si apre la Procedura guidata di partizione, fare clic su Avanti. 6. Accertarsi che la tipologia di partizione sia impostata su Partizione primaria, quindi fare clic su Avanti. 7. Lasciare selezionato lo spazio massimo su disco e fare clic su Avanti. 8. Assegnare la successiva lettera di unità disponibile e fare clic su Avanti. 9. Per formattare l’unità con un file system NTFS, fare clic su Avanti, quindi su Fine. L’unità potrà essere utilizzata al termine della formattazione. NOTA: se si desidera utilizzare l’unità con altri sistemi operativi, utilizzare il programma Iomega FAT32 Formatter contenuto nel CD per modificare la formattazione in FAT32 (richiesta per compatibilità tra diverse piattaforme). Per ulteriori informazioni, visitare la sezione Supporto tecnico e download sul sito www.iomega.com. Il computer non si avvia Se il PC non si avvia quando l’unità è collegata, è possibile che esista un conflitto tra l’unità e il computer. Per risolvere il problema, spegnere l’unità quando si accende il computer. Accendere l’unità dopo l’avvio del computer. Manuale completo dell’utente Nell’area assistenza e download del sito Web www.iomega.com è disponibile il manuale completo dell’utente in formato HTML. 20 Uso de la unidad NOTA: Si desea obtener instrucciones adicionales o la ayuda de solución de problemas, consulte el manual del usuario incluido en el CD de Soluciones. Configuración de volumen La unidad Iomega UltraMax Pro viene configurada como volumen agrupado (RAID 0), que aparece como un solo disco en el sistema del ordenador. Puede configurar su disco duro Iomega UltraMax Pro para que admita diferentes tipos de volúmenes. Consulte el Manual del usuario HTML en el CD de soluciones para ver descripciones detalladas de estas opciones de configuración, así como instrucciones sobre como definir los interruptores de configuración. PRECAUCIÓN: Si cambia la configuración de volumen se borrarán todos los datos existentes. Si tiene archivos en la unidad que desee conservar, muévalos a otra unidad antes de cambiar la configuración. NO cambie los interruptores de configuración con la unidad encendida. Desconexión de la unidad PRECAUCIÓN: Para impedir la pérdida de datos, no desconecte la unidad durante el proceso de transferencia de datos (la luz de actividad parpadea). Usuarios de PC: Apague siempre la unidad y el ordenador antes de desconectarla. Realización de copias de seguridad con la unidad Iomega recomienda realizar con periodicidad copias de seguridad del sistema y copias de seguridad más frecuentes de los datos para garantizar que los datos importantes estén siempre protegidos. La frecuencia de las copias de seguridad dependerá de la importancia de los datos. Para proteger los datos, no tiene más que arrastrar y soltar copias de los archivos importantes en la unidad o utilizar el software de copia de seguridad para programar copias de seguridad regulares. Solución de problemas La unidad no aparece en Mi PC, el Explorador de Windows o en el escritorio de Mac. • Inténtelo reiniciando el equipo. • Compruebe todas las conexiones. • Asegúrese de que la unidad recibe alimentación (compruebe si la luz de estado está encendida). Asegúrese de que el interruptor de encendido está en posición de encendido. • Asegúrese de que está utilizando el cable que se incluye con la unidad. • Asegúrese de que la unidad está conectada a una sola interfaz. Usuarios de PC: Formateo de la unidad de disco duro Iomega UltraMax Pro FireWire/USB para Windows Los modelos de FireWire/USB vienen preformateados con formato HFS+ (Mac OS). Si utiliza la unidad en un PC con Windows y el sistema no reconoce la unidad, vuelva a formatearla con formato NTFS o FAT32. PRECAUCION: Al volver a formatear la unidad, se borrarán todos los datos existentes. 1. Conecte la unidad Iomega UltraMax Pro FireWire/USB al ordenador. 2. Abra Administración de discos de Windows (haga clic con el botón derecho del ratón en Mi PC, seleccione Administrar y, a continuación, haga clic en Administración de discos). 3. Si se abre el asistente para discos, haga clic en Siguiente. Seleccione el disco, haga clic en Siguiente y, a continuación, en Finalizar. Si el asistente no se abre, localice la unidad en la lista de abajo. Busque un disco que no tenga letra de unidad asignada o sistema de archivos. Haga clic con el botón derecho del ratón en el nombre de la unidad y seleccione Inicializar disco (Windows XP) o Escribir firma (Windows 2000). A continuación, haga clic en Aceptar. 4. A continuación, la unidad aparecerá como No asignado y la barra se mostrará negra. Haga clic con el botón derecho del ratón en la barra negra y seleccione Nueva partición (Windows XP) o Crear partición (Windows 2000). 5. Cuando se abra la ventana del asistente para particiones, haga clic en Siguiente. 6. Compruebe que el tipo de partición sea Partición primaria y haga clic en Siguiente. 7. Deje el máximo espacio en el disco seleccionado y haga clic en Siguiente. 8. Asigne la siguiente letra de unidad disponible y haga clic en Siguiente. 21 9. Para formatear la unidad con un sistema de archivos NTFS, haga clic en Siguiente y, a continuación, en Finalizar. Cuando el formateo finalice, la unidad estará lista para ser utilizada. NOTA: Si desea utilizar la unidad con otros sistemas operativos, utilice el software Iomega FAT32 Formatter que se incluye en el CD para cambiar el formato a FAT32 (necesario para plataformas cruzadas). Si desea obtener instrucciones detalladas, visite el área de asistencia y descargas en www.iomega.com. El PC no arranca Si su PC no arranca cuando la unidad está conectada, probablemente exista un conflicto con el ordenador. Para solucionar este problema, apague la unidad cuando arranque el ordenador. Encienda la unidad después de que el ordenador haya terminado de arrancar. Completo manual del usuario El manual de usuario completo en formato HTML está disponible en el área de asistencia y descargas del sitio www.iomega.com. Utilização da unidade NOTA: Caso precise de mais instruções ou ajuda na solução de problemas, consulte o manual do usuário no CD Soluções. Configuração de volume A unidade Iomega UltraMax Pro vem configurada como um volume dividido (RAID 0), que aparece como um único disco no sistema do computador. Você pode configurar o disco rígido UltraMax Pro da Iomega para que ele seja compatível com vários tipos de volumes. Consulte o Manual do usuário em HTML no CD Soluções para obter descrições detalhadas dessas opções de configuração e instruções para definir as chaves de configuração. CUIDADO! Mudar a configuração de volume aparagá todos os dados existentes! Caso você possua arquivos na unidade que deseje salvar, mova-os para outra unidade antes de mudar a configuração. NÃO mude as chaves de configuração enquanto a unidade estiver ligada. Desconexão da unidade CUIDADO! A fim de evitar a perda de dados, não desconecte a unidade durante a transferência de dados (luz de atividade da unidade piscando). Usuários de eSATA: Sempre desligue a unidade e o computador antes de desconectá-la. Execução de backup com a sua unidade A Iomega recomenda que sejam feitos backups periódicos do sistema e backups mais freqüentes de dados para garantir que seus dados mais importantes estejam sempre protegidos. A freqüência da execução de backups deve basear-se na importância de seus dados. Para proteger seus dados, você pode simplesmente arrastar e soltar cópias de seus arquivos importantes na unidade ou pode usar um software de backup para programar backups regulares. Solução de problemas A unidade não aparece em Meu computador, no Windows Explorer ou na mesa do Mac. • Tente reiniciar seu computador. • Verifique todas as conexões. • Certifique-se de que a unidade esteja recebendo energia (verifique se a luz de status está ligada). Certifiquese de que a unidade esteja ligada. • Certifique-se de que esteja utilizando o cabo enviado com a unidade. • Certifique-se de que a unidade esteja conectada a apenas uma interface. Usuários de PC: Formatação do disco rígido Iomega UltraMax FireWire/USB para Windows Os modelos FireWire/USB são enviados pré-formatados para HFS+ (Mac OS). Caso você esteja usando a unidade em um PC com Windows e ela não seja reconhecida, reformate a unidade para NTFS ou FAT32. CUIDADO! A reformatação da unidade apagará todos os dados existentes! 1. Conecte a unidade Iomega UltraMax Pro FireWire/USB ao computador. 2. Abra o Gerenciamento de Disco do Windows (clique com o botão direito do mouse em Meu Computador, selecione Gerenciar e, em seguida, clique em Gerenciamento de Disco). 3. Se o Assistente de Disco abrir, clique em Avançar. Selecione o disco, clique em Avançar e Concluir. 22 Se o assistente não abrir, localize a unidade na lista inferior. Procure um disco que não tenha uma letra de unidade ou um sistema de arquivos. Clique com o botão direito do mouse no nome da unidade, selecione Inicializar Disco (Windows XP) ou Gravação de Assinaturas (Windows 2000) e OK. 4. A unidade aparecerá como Não Alocada e a barra estará preta. Clique com o botão direito do mouse na barra preta e selecione Nova Partição (Windows XP) ou Criar Partição (Windows 2000). 5. Quando o Assistente de Partição do Windows abrir, clique em Avançar. 6. Verifique se o tipo de partição é Partição primária e clique em Avançar. 7. Marque o espaço máximo de disco e clique em Avançar. 8. Atribua a próxima letra de unidade disponível e clique em Avançar. 9. Para formatar a unidade com um sistema de arquivos NTFS, clique em Avançar e, em seguida, em Concluir. A unidade estará pronta para uso quando a formatação estiver concluída. NOTA: Para usar a unidade com outros sistemas operacionais, use o Iomega FAT32 Formatter, incluído no CD, para alterar o formato para FAT32 (necessário para manter compatibilidade entre plataformas). Se precisar de instruções detalhadas, visite a área de Suporte e Downloads do site www.iomega.com. O computador não inicia Se o PC não ligar quando a unidade está conectada, provavelmente há um conflito com o computador. Para resolver esse problema, desligue a unidade ao iniciar o computador. Ligue a unidade quando o computador terminar de iniciar. Manual completo do usuário Está disponível na área de Suporte e Downloads no site www.iomega.com a versão completa do manual do usuário em formato HTML. De drive gebruiken OPMERKING: voor aanvullende instructies of help over het oplossen van problemen raadpleegt u de gebruikershandleiding op de cd. Volumeconfiguratie De Iomega UltraMax Pro-drive wordt geleverd als een vooraf geconfigureerd striped volume (RAID 0), dat in het computersysteem als één schijf wordt weergegeven. U kunt uw Iomega UltraMax Pro Hard Drive zo configureren dat deze verschillende volumetypen ondersteunt. Raadpleeg de html-versie van de Gebruikershandleiding op de cd Solutions voor gedetailleerde beschrijvingen van deze configuratieopties en voor instructies over het instellen van de configuratieswitches. WAARSCHUWING! Wanneer u de volumeconfiguratie wijzigt , worden alle gegevens op de drive gewist! Als uw drive bestanden bevat die u wilt bewaren, verplaatst u ze naar een andere drive voordat u de configuratie wijzigt. Wijzig de configuratieswitches NIET wanneer de drive in gebruik is. De drive loskoppelen WAARSCHUWING! Koppel de drive nooit los tijdens een gegevensoverdracht (wanneer het statuslampje van de driveactiviteit knippert). eSATA-gebruikers: U moet de drive en computer dus altijd uitschakelen voordat u de drive loskoppelt. Back-ups maken met uw drive Iomega raadt u aan regelmatig een back-up te maken van uw systeem en nog regelmatiger een back-up van uw gegevens, zodat u er altijd op kunt vertrouwen dat uw kritieke gegevens zijn veiliggesteld. De regelmaat waarmee u back-ups maakt, stemt u het beste af op het belang van uw gegevens. U kunt uw gegevens eenvoudig beschermen door kopieën van uw bestanden naar de drive te verslepen of door gebruik te maken van backupsoftware om regelmatig back-ups te plannen. Problemen oplossen De drive verschijnt niet in Deze computer, Windows Verkenner of op het Mac-bureaublad. • Start de computer opnieuw op. • Controleer alle aansluitingen. • Controleer of de drive van stroom is voorzien (controleer of het statuslampje brandt). Controleer of de aan/ uit-knop van de drive is ingeschakeld. 23 • Controleer of u wel de kabel gebruikt die bij de drive is meegeleverd. • Controleer of de drive slechts op één interface is aangesloten. PC-gebruikers: de Iomega UltraMax Pro FireWire/USB-drive formatteren voor Windows De modellen FireWire/USB worden vooraf geformatteerd als HFS+ (Mac OS) en zo geleverd. Als u de drive op een pc met Windows gebruikt en de drive wordt niet herkend, formatteert u de drive opnieuw als een NTFS- of FAT32drive. WAARSCHUWING! Door de drive opnieuw te formatteren, zullen alle gegevens op de drive worden gewist! 1. Sluit de Iomega UltraMax Pro FireWire/USB-drive aan op uw computer. 2. Open Windows Schijfbeheer (klik met de rechtermuisknop op Deze computer, selecteer Beheren en klik daarna op Schijfbeheer). 3. Als de wizard Schijf wordt geopend, klikt u op Volgende. Selecteer de schijf en klik achtereenvolgens op Volgende en Voltooien. Als de wizard niet verschijnt, zoekt u de drive in de lijst onderaan. Zoek naar een schijf zonder een stationsaanduiding of bestandssysteem. Klik met de rechtermuisknop op de naam van de drive, selecteer Schijf initialiseren (Windows XP) of Handtekening schrijven (Windows 2000) en klik op OK. 4. De drive zal nu verschijnen als Niet-toegewezen en de balk zal zwart zijn. Klik met de rechtermuisknop op de zwarte balk en selecteer Nieuwe partitie (Windows XP) of Partitie maken (Windows 2000). 5. Wanneer de wizard Partitie maken verschijnt, klikt u op Volgende. 6. Controleer of het partitietype is ingesteld op Primaire partitie en klik op Volgende. 7. Laat de maximale schijfruimte geselecteerd en klik op Volgende. 8. Wijs de volgende beschikbare stationsaanduiding toe en klik op Volgende. 9. Klik achtereenvolgens op Volgende en Voltooien. De drive is gebruiksklaar nadat de formattering is voltooid. OPMERKING: als u de drive in andere besturingssystemen wilt gebruiken, gebruikt u de Iomega FAT32 Formatter, die zich op de cd bevindt, om het formaat in te stellen op FAT32 (wat vereist is voor compatibiliteit tussen platforms). Voor gedetailleerde instructies raadpleegt u de sectie voor ondersteuning en downloads op www. iomega.com. PC wilt niet opstarten Als uw pc niet wilt opstarten wanneer de drive is aangesloten, is er wellicht een conflict met de computer. U kunt dit probleem oplossen door de stroomvoorziening van de drive uit te schakelen wanneer u de computer opstart. Schakel de stroomvoorziening van de drive weer in nadat de computer volledig is opgestart.. Volledige gebruikershandleiding Een volledige gebruikershandleiding in HTML-indeling is verkrijgbaar in de sectie Support & Downloads op www.iomega.com. 使用磁碟機 注意:若您需要其他的指示說明或疑難排解說明,請參閱「解決方案 CD」內的使用者手冊。 磁碟組態 Iomega UltraMax Pro 出廠時設定為等量 (RAID 0) 磁碟,在電腦系統中以單一磁碟呈現。您可以設定 Iomega UltraMax Pro 硬碟以支援數種不同的磁碟類型。請參閱 Solutions 光碟中的 HTML 使用者手冊以取得組態選項 的詳細說明,以及設定組態開關的說明。 注意! 變更磁碟組態將清除所有現存資料! 如果磁碟機內有您想要儲存的檔案,則在變更設定前將檔案移至另一 台磁碟機中。磁碟機電源為開啟時,請勿變更組態開關。 中斷磁碟機的連接 注意!為避免資料遺失,在資料傳輸過程中 (磁碟機指示燈閃爍) 請勿拔除磁碟機。 eSATA 使用者: 請務必關閉磁碟機和電腦之電源。 備份您的磁碟 Iomega 建議您定期進行系統備份,並經常進行資料備份,以確保您的重要資料受到妥善保護。備份的頻率可由 資料的重要性來決定。若要保護您的資料,您可簡單地將重要檔案的複本拖放到磁碟上,或使用備份軟體排程定 期備份。 24 疑難排解 磁碟機未出現在「我的電腦」、「Windows 檔案總管」或 Mac 桌面上 • 嘗試將電腦重新開機。 • 檢查所有的連接情形。 • 請確定磁碟機接通電源 (檢查狀態指示燈是否已亮起)。確定電源已開啟。 • 請確定使用磁碟機隨附的纜線。 • 請確認磁碟機只有連接至一個介面。 PC 使用者:格式化 Iomega 硬碟 某些機型出廠時已預先格式化為 HFS+ (Mac OS)。如果您在 Windows PC 上使用磁碟機卻無法辨識該磁碟機,請 重新格式化磁碟為 NTFS 或 FAT32。 注意! 重新格式化 Iomega 硬碟會將磁碟機所有現存資料都清除。 1. 依循第 5 頁的指示,將 Iomega 硬碟連接至電腦。 2. 開啟「Windows 磁碟管理」(在我的電腦上按右鍵,選擇管理,再按一下磁碟管理)。 3. 在清單下方找到 Iomega 硬碟。找出沒有顯示代號或檔案系統的磁碟,該磁碟應列出狀況良好,方塊頂端為 藍色。 4. 在該磁碟的藍色列上按右鍵,選擇刪除磁碟分割。按一下是確認您希望刪除主要磁碟分割。磁碟現在會呈 現未配置,上方列呈黑色。 5. 在黑色列上按右鍵,選擇建立磁碟分割 (Windows XP) 或新磁碟分割 (Windows 2000)。 6. 開啟「Windows 磁碟分割精靈」時,按一下下一步。 7. 認磁碟分割類型為主要磁碟分割,並按一下下一步。 8. 保持選取最大的磁碟空間,並按一下下一步。 9. 指派下個可用的磁碟代號,按一下下一步。若要將磁碟格式化為 NTFS 檔案系統,請按下一步,再按結束。格 式化完成之後即可使用磁碟。 注意: 若您希望在其他作業系統上使用磁碟,請使用 Solutions CD 上的 Iomega FAT32 Formatter 將格式變更為 FAT32 (跨平台相容所需)。若您需要詳細指示,請參閱 www.iomega.com 上的支援部分。 PC 無法啟動 如果連接磁碟機時 PC 無法啟動,則應該是與電腦發生衝突。若要解決此問題,請在啟動電腦時關閉磁碟機的電 源。並在電腦完成啟動後開啟電源。 完整使用者手冊 在 www.iomega.com 網站上的「支援與下載」區,可取得 HTML 格式的使用者手冊。 25 Limited Warranty • Garantie Limitée Eingeschränkte Garantie • Garanzia limitata Garantía limitada • Garantia limitada • Beperkte garantie 限期保固 Iomega warrants this hardware product to be free from defects in materials and workmanship for the warranty period. This non-transferable, limited warranty is only to you, the first end-user purchaser. The warranty begins on the date of purchase and lasts for a period of one (1) year for product purchased in the Americas, the Asia-Pacific region, or non-European Union nations in Europe, the Middle East, or Africa; ninety (90) days for Iomega reconditioned products purchased in these regions; or, two (2) years for product purchased by an end-user in member nations of the European Union. This warranty does not apply to: (a) Iomega software products; (b) expendable components such as fuses or bulbs; or (c) third party products, hardware or software, supplied with the warranted product. Iomega makes no warranty of any kind on such products which, if included, are provided “AS IS.” This warranty also excludes damage caused by accident, misuse, abuse, use of non-Iomega approved media, exposure of media to excessive magnetic fields, or external environmental causes. Your sole and exclusive remedy for a covered defect is repair or replacement of the defective product, at Iomega’s sole option and expense (shipping may be charged), and Iomega may use new or refurbished parts or products to do so. The replaced part/product will be warranted for the remainder of the original warranty or three (3) months from the date of shipment of such parts/products, whichever is longer. If Iomega is unable to repair or replace a defective product, your alternate exclusive remedy shall be a refund of the original purchase price. The above is Iomega’s entire obligation to you under this warranty. IN NO EVENT SHALL IOMEGA BE LIABLE FOR INDIRECT, INCIDENTAL, CONSEQUENTIAL OR SPECIAL DAMAGES OR LOSSES, INCLUDING LOSS OF DATA, USE, OR PROFITS EVEN IF IOMEGA HAS BEEN ADVISED OF THE POSSIBILITY OF SUCH DAMAGES. In no event shall Iomega’s liability exceed the original purchase price of the drive or the media disk. Some jurisdictions do not allow the exclusion or limitation of incidental or consequential damages, so the above limitation or exclusion may not apply to you. Obtaining Warranty Service You must notify Iomega within the warranty period to receive warranty service. Just as technology and market conditions vary, Iomega’s specific customer support policies (including fees for services) and procedures change over time. To obtain information about Iomega’s current policies or warranty service, please visit our website at www.iomega.com/supportpolicy.html or write to: Iomega Customer Service, 4059 South 1900 West, Roy, UT 84067. Contact Information for Iomega Customer Service in Europe can be obtained on our Support website at www.iomega.com/europe/support. If your product is eligible for warranty service, you will be required to return it to Iomega, along with proper identification, a return authorization number obtained from the Iomega website or provided by the Iomega representative, and proof of purchase. Iomega will not protect, recover, or return data during warranty service so you should duplicate your data before shipment. Limitations THE ABOVE WARRANTY IS EXCLUSIVE AND IN LIEU OF ALL OTHER WARRANTIES, EXPRESS OR IMPLIED. To the extent permitted by applicable law, IOMEGA SPECIFICALLY DISCLAIMS ANY IMPLIED WARRANTIES, INCLUDING ANY IMPLIED WARRANTY OF MERCHANTABILITY OR FITNESS FOR A PARTICULAR PURPOSE. Any implied warranty required by applicable law shall be limited in duration to the express warranty term. Some jurisdictions do not allow disclaimers of implied warranties or limitations on how long an implied warranty lasts, so the above limitation may not apply to you. This warranty gives you specific legal rights and you may also have other rights that vary from jurisdiction to jurisdiction. Any suit for breach of any warranty on your Product must be filed within one (1) year of the first date the suit could have been brought. Iomega garantit que ce produit est exempt de tout vice de fabrication ou de malfaçon pendant toute la période de garantie. Cette garantie limitée n’est pas transférable et ne s’applique qu’à l’utilisateur final. La garantie est effective à partir de la date d’achat et reste ensuite valable pendant une période de un (1) an à compter de cette même date sur le continent américain, dans la région Asie-Pacifique, dans les pays d’Europe non membres de l’Union Européenne, au Moyen-Orient ou en Afrique, quatre-vingt dix (90) jours pour les produits remis en état achetés dans les pays ou régions précédemment cités ou deux (2) ans dans le cadre d’un achat effectué par un utilisateur final au sein de l’Union Européenne. Cette garantie ne s’applique pas : (a) aux produits logiciels Iomega, (b) aux composants consommables comme les fusibles ou les ampoules ou (c) aux produits tiers, matériel ou logiciel, fournis avec le produit sous garantie. Iomega ne garantit en aucun cas ces produits qui, si inclus, sont fournis “EN L’ETAT”. Sont exclus les dommages causés par un accident, une mauvaise utilisation, un usage abusif, l’utilisation de supports non fournis ou non approuvés par Iomega, une exposition excessive des supports à un champ magnétique ou tout autre cause externe d’origine naturelle. Votre seul et unique recours en cas de défaut reconnu est la réparation ou le remplacement du produit défectueux, aux frais et à la discrétion de Iomega (l’expédition pourra vous être facturée). Iomega se réserve le droit d’utiliser des pièces ou produits neufs ou remis en état pour procéder à la réparation. L’élément/produit remplacé sera garanti pendant le reste de la garantie d’origine ou, au maximum, trois (3) mois à dater de l’expédition desdits éléments/produits. S’il s’avère que Iomega est dans l’impossibilité de réparer ou remplacer un produit défectueux, votre seul recours sera le remboursement du prix d’achat initial. L’obligation de garantie de Iomega envers vous se limite aux éléments cités précédemment. EN AUCUN CAS IOMEGA NE POURRA ETRE TENUE POUR RESPONSABLE DES DOMMAGES OU PERTES INDIRECTS, ACCESSOIRES OU SPECIAUX, Y COMPRIS LA PERTE DE DONNEES, DE L’IMPOSSIBILITE D’UTILISATION OU DE PROFIT ET CE MEME SI IOMEGA A ETE AVERTIE DE L’EVENTUALITE DE TELS DOMMAGES. En aucun cas la responsabilité de Iomega ne pourra s’étendre au-delà du prix d’achat initial de l’appareil ou du support. Certaines juridictions ne reconnaissent pas l’exclusion ou la limitation des dommages accessoires ou indirects. De ce fait, les limitations ou les exclusions énoncées ci-dessus peuvent ne pas être applicables dans votre cas. 26 Obtention d’un service de garantie Pour bénéficier des services sous garantie, vous devez en avertir Iomega pendant la période de garantie. A l’image des technologies et des conditions du marché, les procédures et les politiques d’Iomega en matière d’assistance clientèle (notamment la tarification des services) sont susceptibles de varier dans le temps. Afin d’obtenir des informations pertinentes sur les politiques actuelles ou sur le service de garantie d’Iomega, veuillez visiter notre site Web www.iomega.com/supportpolicy.html ou nous écrire à l’adresse suivante : Iomega Customer Service, 4059 South 1900 West, Roy, UT 84067. Les coordonnées des services d’assistance clientèle d’Iomega en Europe se trouvent sur notre site Web d’assistance, www.iomega.com/europe/support. Si votre produit peut bénéficier du service sous garantie, vous devrez le retourner à Iomega, avec son identification détaillée, un numéro d’autorisation de retour obtenu à partir de notre site Web ou fourni par votre représentant Iomega et une preuve d’achat. Iomega ne protège, ne récupère ni ne retourne des données pendant le service de garantie ; assurez-vous donc de copier vos données avant d’expédier le matériel. Limites LA PRESENTE GARANTIE EST EXCLUSIVE ET TIENT LIEU DE TOUTE AUTRE GARANTIE, EXPRESSE OU IMPLICITE. Dans les limites de la législation en vigueur, IOMEGA DECLINE TOUTE GARANTIE IMPLICITE, Y COMPRIS TOUTE GARANTIE IMPLICITE DE COMMERCIALISATION OU D’ADAPTATION A UN USAGE PARTICULIER. Toute garantie implicite requise par la législation en vigueur sera limitée dans le temps à la durée de la garantie expresse. Certaines juridictions ne reconnaissent pas la déclaration de non-responsabilité des dommages accessoires ou indirects. De ce fait, les limitations ou les exclusions énoncées ci-dessus peuvent ne pas être applicables dans votre cas. Cette garantie vous donne certains droits spécifiques, mais vous pouvez également bénéficier de droits supplémentaires en fonction de la législation de votre état. Toute poursuite pour défaut de garantie sur votre produit devra être déposée dans un délai d’un an à compter du premier jour à partir duquel la poursuite peut être engagée. Iomega garantiert, dass dieses Hardwareprodukt während des Garantiezeitraums keine Material- oder Herstellungsfehler aufweist. Diese nicht übertragbare, eingeschränkte Garantie gilt ausschließlich für Sie als ersten Käufer sowie Endnutzer dieses Produkts. Der Garantiezeitraum beginnt mit dem Erwerbsdatum und hat für folgenden Zeitraum Gültigkeit: ein (1) Jahr für Produkte, die in Nord-/Süd/Mittelamerika, im asiatisch-pazifischen Raum oder nicht-EU-Ländern innerhalb Europas, dem Nahen Osten oder Afrika erworben wurden; neunzig (90) Tage für alle bei Iomega überholten Produkte, die in diesen Regionen erworben wurden; zwei (2) Jahre für Produkte, die von Endverbrauchern in EU-Mitgliedsstaaten erworben wurden. Von dieser Garantie sind ausgenommen: (a) Iomega-Softwareprodukte; (b) Verschleißteile wie Sicherungen oder Glühbirnen; bzw. (c) Drittanbieterprodukte, -Hardware oder -Software, die im Lieferumfang des Produkts enthalten waren, auf das sich die Garantie bezieht. Iomega übernimmt hinsichtlich dieser Art von Produkten keinerlei Garantie. Falls diese im Lieferumfang enthalten sind, werden sie mit Abbedingen der Haftung für einen bestimmten Zweck zur Verfügung gestellt. Ausgenommen sind Schäden, die durch Unfall, Zweckentfremdung, unsachgemäße Verwendung, Verwendung von Medien, die nicht von Iomega zur Verfügung gestellt oder anerkannt wurden, Kontakt der Medien mit übermäßig starken Magnetfeldern oder Umwelteinflüssen verursacht wurden. Ihr einziges und ausschließliches Rechtsmittel im Falle eines abgedeckten Defekts ist die Reparatur bzw. der Ersatz des defekten Produkts; die diesbezügliche Entscheidung sowie die anfallenden Kosten liegen ausschließlich bei Iomega (abgesehen von evtl. anfallenden Frachtkosten). Iomega kann hierzu neue oder gebrauchte Teile oder Produkte verwenden. Für das ersetzte Teil/Produkt wird für den Rest der ursprünglichen Garantiefrist oder für drei (3) Monate ab Versanddatum solcher Teile/Produkte Garantie geleistet, je nachdem, welcher Zeitraum länger ist. Falls die Reparatur bzw. der Ersatz eines defekten Produkts durch Iomega nicht möglich ist, ist Ihr einziges alternatives Rechtsmittel die Erstattung des ursprünglichen Kaufpreises. Die obigen Angaben stellen sämtliche Verpflichtungen dar, die Iomega Ihnen gegenüber im Rahmen dieser Garantie hat. IOMEGA IST UNTER KEINEN UMSTÄNDEN HAFTBAR FÜR MITTELBARE SCHÄDEN, SCHADENSERSATZ FÜR AUFWENDUNGEN BEI VERTRAGSERFÜLLUNG, FOLGESCHÄDEN ODER SPEZIELLE SCHÄDEN BZW. VERLUSTE, EINSCHLIESSLICH DATENVERLUST, NUTZUNGSAUSFALL SOWIE BETRIEBSUNTERBRECHUNG, SELBST WENN IOMEGA AUF DIE MÖGLICHKEIT SOLCHER SCHÄDEN HINGEWIESEN WURDE. Die Haftung von Iomega übersteigt keinesfalls den ursprünglichen Kaufpreis des jeweiligen Laufwerks oder Datenträgers. Gemäß einiger Rechtsprechungen ist der Ausschluss bzw. die Einschränkung von Schadensersatz für Aufwendungen bei Vertragserfüllung bzw. Folgeschäden nicht zulässig, sodass die oben genannten Ausschluss- bzw. Einschränkungsklauseln für Sie möglicherweise nicht relevant sind. Inanspruchnahme des Garantieservice Um den Garantieservice in Anspruch nehmen zu können, müssen Sie Iomega innerhalb der Garantiefrist benachrichtigen. Die spezifischen Kundendienstrichtlinien von Iomega (einschließlich der Servicegebühren) sowie die entsprechenden Vorgehensweisen können sich aufgrund der veränderlichen Technologie und Marktbedingungen ändern. Wenn Sie gerne mehr über die aktuellen Kundendienstangebote oder Garantieleistungen von Iomega erfahren möchten, besuchen Sie unsere Website unter www.iomega.com/supportpolicy.html. Sie können sich auch unter folgender Adresse schriftlich mit Iomega in Verbindung setzen: Iomega Customer Service, 4059 South 1900 West, Roy, UT 84067. Informationen zur Kontaktaufnahme mit dem Kundendienst von Iomega finden Sie auf unserer Kundendienst-Website unter www.iomega.com/europe/support. Wenn für Ihr Produkt Garantieanspruch besteht, müssen Sie es mit ordnungsgemäßer Identifikation, der über die Iomega Website oder vom Vertreter zur Verfügung gestellten Nummer der Rückgabeberechtigung sowie dem Kaufnachweis an Iomega zurück senden. Im Rahmen des Garantieservice werden Daten von Iomega weder geschützt noch wiederhergestellt oder zurückgegeben, weshalb es sich empfiehlt, Ihre Daten vor dem Versand zu duplizieren. Einschränkungen BEI DER OBIGEN GARANTIE HANDELT ES SICH UM EINE AUSSCHLIESSLICHE GARANTIE, DIE ANSTELLE ALLER WEITEREN GARANTIEN, AUSDRÜCKLICHER ODER STILLSCHWEIGENDER NATUR, GÜLTIGKEIT HAT. Innerhalb des gesetzlich zulässigen Rahmens SCHLIESST IOMEGA AUSDRÜCKLICH JEGLICHE STILLSCHWEIGENDEN GARANTIEN AUS, EINSCHLIESSLICH JEGLICHER STILLSCHWEIGENDER GARANTIE HINSICHTLICH DER MARKTGÄNGIGKEIT BZW. DER EIGNUNG FÜR EINEN BESTIMMTEN ZWECK. Sämtliche stillschweigenden Garantien, die laut geltendem Recht gewährt werden müssen, sind auf die Laufzeit der ausdrücklichen Garantie beschränkt. Gemäß einiger Rechtsprechungen ist der Haftungsausschluss stillschweigender Garantien oder die Einschränkung bezüglich der Laufzeit stillschweigender Garantien nicht zulässig, sodass die obigen Einschränkungsklauseln für Sie möglicherweise nicht relevant sind. Durch diese Garantie werden Ihnen gewisse subjektive Rechte verliehen, und Sie verfügen u. U. über weitere Rechte, die je nach Rechtsprechung variieren. Sämtliche Klagen hinsichtlich Garantieverletzungen in Bezug auf Ihr Produkt müssen innerhalb 1 Jahres erhoben werden. Ausschlaggebend hierfür ist das Datum, zu dem die Klageerhebung erstmalig möglich war. 27 Iomega garantisce che questo prodotto hardware è privo di difetti di fabbricazione e dei materiali durante l’intero periodo di validità della garanzia. La presente garanzia limitata, non trasferibile, è da considerarsi valida per il solo utente finale e non può quindi essere ceduta a terze parti. La garanzia decorre a partire dalla data di acquisto del prodotto e ha validità di un (1) anno per i prodotti acquistati nelle Americhe, nella regione Estremo Oriente e Oceania o nei paesi non membri dell’Unione Europea, in Medio Oriente o in Africa; la garanzia ha una validità di novanta (90) giorni per i prodotti Iomega ricondizionati acquistati in tali regioni; oppure di due (2) anni per i prodotti acquistati dall’utente finale in uno dei paesi membri dell’Unione Europea. La presente garanzia non è da ritenersi valida per: (a) i prodotti software Iomega; (b) i materiali di consumo, come ad esempio i fusibili o le lampadine; o (c) i prodotti di terze parti, hardware o software, forniti in dotazione con il prodotto coperto da garanzia. Iomega non fornisce alcun tipo di garanzia su tali prodotti che, se inclusi, vengono forniti “COSÌ COME SONO”. Si considera escluso da garanzia il danno causato da incidente, l’uso improprio, l’abuso, l’utilizzo di supporti non approvati da Iomega, l’esposizione dei supporti a campi magnetici particolarmente intensi o a cause ambientali esterne. L’unico ed esclusivo diritto risarcitorio esercitabile in caso di difetto di un prodotto coperto da garanzia è la riparazione o la sostituzione del prodotto difettoso, a sola discrezione e interamente a carico di Iomega; Iomega ha inoltre la facoltà di utilizzare componenti o prodotti nuovi o rimessi a nuovo. È prevista la copertura del componente/prodotto sostituito per tutto il periodo di validità della garanzia stipulata originariamente o per i tre (3) mesi successivi alla data di spedizione di tale componente/prodotto, quale che sia la situazione temporale che risulti più conveniente per garantire l’estendibilità della garanzia. Nell’eventualità in cui Iomega non sia in grado di riparare o sostituire il prodotto difettoso, l’unico diritto risarcitorio alternativo esercitabile dall’acquirente consiste nella restituzione del prezzo di acquisto del prodotto originale. Quanto sopra enunciato costituisce l’obbligo contrattuale cui attenersi ai sensi della presente garanzia. IN NESSUN CASO IOMEGA DOVRÀ ESSERE RITENUTA RESPONSABILE DI EVENTUALI DANNI INDIRETTI, INCIDENTALI, CONSEGUENZIALI O SPECIALI O DI ALTRI DANNI TRA CUI LE PERDITE DI DATI, UTILIZZO O DI PROFITTO, INDIPENDENTEMENTE DAL FATTO CHE IOMEGA FOSSE AL CORRENTE DELLA POSSIBILITÀ CHE SI POTESSERO VERIFICARE TALI DANNI. In nessun caso la responsabilità di Iomega potrà superare il prezzo di acquisto originale dell’unità o del supporto. Poiché alcune giurisdizioni non prevedono l’esclusione o la limitazione di danni incidentali o conseguenziali, la limitazione o l’esclusione di cui sopra potrebbe non avere alcuna validità giuridica. Come ottenere servizi di assistenza durante il periodo di validità della garanzia Per ricevere assistenza durante il periodo di validità della garanzia, è necessario inviare opportuna notifica a Iomega entro detto periodo. Le politiche di assistenza clienti Iomega (compresi i servizi a pagamento) e le relative procedure variano in base alle esigenze di mercato e alle tecnologie emergenti. Per ottenere informazioni sulle procedure Iomega in vigore, visitare il sito Web all’indirizzo www.iomega. com/supportpolicy.html o scrivere a Iomega Customer Service, 4059 South 1900 West, Roy, UT 84067. Le informazioni sui contatti dell’Assistenza clienti di Iomega in Europe sono disponibili sul sito Web del Supporto tecnico all’indirizzo www.iomega.com/europe/ support. Nel caso in cui il prodotto sia idoneo a ricevere gli interventi manutentivi previsti dalla garanzia, sarà necessario restituire il prodotto a Iomega unitamente al relativo codice, al numero di autorizzazione per la restituzione disponibile sul sito Web di Iomega o fornito dal rivenditore Iomega e la prova di acquisto. Poiché Iomega non prevede la protezione, il ripristino o la restituzione dei dati durante l’esecuzione degli interventi di manutenzione, si consiglia sempre di duplicarli prima di procedere alla spedizione del prodotto. Limitazioni LA PRESENTE GARANZIA HA NATURA ESCLUSIVA, PERTANTO SOSTITUISCE QUALUNQUE ALTRA GARANZIA ESPLICITA O IMPLICITA. Nella misura in cui sia consentito dalle leggi in vigore, IOMEGA DISCONOSCE ESPRESSAMENTE EVENTUALI GARANZIE IMPLICITE, COMPRESE QUELLE IMPLICITE DI COMMERCIABILITÀ O DI IDONEITÀ A FINI SPECIFICI. Eventuali garanzie implicite previste dalla legislazione vigente devono essere limitate nel tempo in base a quanto sancito dai termini della garanzia esplicita. Poiché alcune giurisdizioni non prevedono il ricorso a formule di diniego di garanzie implicite o limitazioni sulla durata di validità di tale garanzia, è possibile che la limitazione di cui sopra non abbia alcuna validità nel caso specifico. La presente garanzia concede particolari diritti legali, nonché eventuali altri diritti suscettibili di variazione in base alla giurisdizione specifica. Eventuali risarcimenti per violazione dei termini contenuti nella garanzia devono essere richiesti entro 1 anno dalla data in cui è possibile intraprendere un’azione legale. Iomega garantiza que este producto de hardware está libre de defectos de materiales y mano de obra durante el período de garantía. Esta garantía limitada e intransferible es sólo para usted, el primer comprador usuario final. El período de garantía comienza en la fecha de compra y tiene una duración de un (1) año para productos adquiridos en el continente americano, la región Asia-Pacífico, países europeos no pertenecientes a la UE, Oriente Medio o África; noventa (90) días para productos reacondicionados de Iomega adquiridos en estas regiones; o dos (2) años para productos adquiridos por un usuario final en a algún país miembro de la Unión Europea. Esta garantía no se aplica a: (a) productos de software de Iomega, (b) consumibles como fusibles o lámparas, o (c) productos, hardware o software, de terceros incluidos con el producto en garantía. Iomega no ofrece ningún tipo de garantía para dichos productos que, si están incluidos, se proporcionan “TAL CUAL”. Se excluyen de esta garantía los daños provocados por accidente, uso incorrecto, abuso, uso de discos no suministrados o no autorizados por Iomega, exposición excesiva de los discos a campos magnéticos o por causas ambientales externas al producto. Su única y exclusiva compensación por un defecto cubierto es la reparación o sustitución del producto defectuoso, a elección y cargo de Iomega (el porte puede ser cobrado); Iomega puede utilizar piezas o productos nuevos o reparados para tal fin. La garantía de la pieza o producto repuesto tendrá la validez del resto de la garantía original o tres (3) meses desde la fecha de envío de dichas piezas o productos, sea cual sea su duración. Si Iomega no puede reparar o sustituir un producto defectuoso, su única compensación alternativa será un reembolso del precio de compra original. Lo expuesto anteriormente es la única obligación de Iomega con respecto a usted según esta garantía. EN NINGÚN CASO IOMEGA SERÁ RESPONSABLE DE CUALQUIER DAÑO INDIRECTO, INCIDENTAL O RESULTANTE NI DE PÉRDIDAS, INCLUIDA LA PÉRDIDA DE DATOS, USO O BENEFICIOS INCLUSO SI SE HA ADVERTIDO A IOMEGA DE LA POSIBILIDAD DE TALES DAÑOS. En ningún caso la responsabilidad de Iomega superará el precio de compra original de la unidad o el disco. Algunas jurisdicciones no permiten la exclusión o limitación de los daños incidentales o resultantes, por lo que es posible que la limitación o exclusión anterior no se aplique a usted. 28 Obtención de servicio de garantía Para recibir el servicio de garantía deberá notificar su caso al Iomega durante el período de garantía. La política y procedimientos de asistencia al cliente de Iomega (incluidas las tarifas de los servicios) cambian al ritmo que lo hacen la tecnología y las condiciones del mercado. Para obtener información acerca de las políticas actuales de Iomega o del servicio de garantía, visite nuestra página Web en www. iomega.com/supportpolicy.html o escriba a: Iomega Customer Service, 4059 South 1900 West, Roy, UT 84067, EE.UU. Para obtener información sobre el servicio de atención al cliente de Iomega en Europa, visite nuestra página Web de asistencia: www.iomega.com/ europe/support. Si tiene derecho a que su producto reciba servicio de garantía, se le pedirá que lo devuelva a Iomega, junto con la identificación adecuada, un número de autorización de devolución obtenido del sitio Web de Iomega o proporcionado por el representante, y una prueba de compra. Iomega no protegerá, recuperará o devolverá datos durante el servicio de garantía, por lo que debe duplicarlos antes del envío. Limitaciones LA GARANTÍA ANTERIOR ES EXCLUSIVA Y SUSTITUYE LAS DEMÁS GARANTÍAS, EXPRESAS O IMPLÍCITAS. En la medida permitida por la ley aplicable, IOMEGA RENUNCIA ESPECÍFICAMENTE A CUALQUIER TIPO DE GARANTÍA, INCLUIDAS LA GARANTÍA IMPLÍCITA DE COMERCIABILIDAD O IDONEIDAD PARA UN FIN DETERMINADO. Cualquier garantía implícita requerida por la ley aplicable estará limitada a la duración del plazo de la garantía expresa. Algunas jurisdicciones no permiten la renuncia de las garantías implícitas ni limitación en la duración de una garantía limitada, con lo que es posible que la limitación anterior no se aplique a usted. Esta garantía le otorga derechos legales específicos y es posible que también tenga otros derechos que varían de una jurisdicción a otra. Cualquier demanda por violación de la garantía del producto será presentada en un plazo de 1 año desde la primera fecha en la que la demanda pudiera haber sido interpuesta. A Iomega garante que este produto de hardware encontra-se isento de defeitos de material e de mão-de-obra durante todo o período de garantia. Esta garantia limitada e intransferível destina-se unicamente ao consumidor, o primeiro comprador usuário final. A garantia começa na data da compra e dura por um período de um (1) ano por produto adquirido nas Américas, na região da Ásia-Pacífico, ou em países da Europa não pertencentes à União Européia, no Oriente Médio ou na África; noventa (90) dias por produtos recondicionados Iomega adquiridos nestas regiões; ou, dois (2) anos por produto adquirido por um usuário final em países membros da União Européia. Esta garantia não se aplica a: (a) produtos de software da Iomega; (b) componentes perecíveis, como fusíveis ou lâmpadas, ou (c) produtos de terceiros, hardware ou software, fornecidos com o produto garantido. A Iomega não oferece garantias de qualquer espécie sobre tais produtos que, quando incluídos, são fornecidos “NO ESTADO”. Estão excluídos os dados causados por acidente, uso impróprio, abuso, uso de mídia não fornecida ou aprovada pela Iomega, exposição da mídia a campos magnéticos excessivos ou causas ambientais externas. O único e exclusivo recurso do usuário com referência a defeitos cobertos pela garantia é o reparo ou substituição do produto defeituoso, segundo escolha e determinação da Iomega (a remessa pode ser cobrada). Para tanto, a Iomega poderá utilizar peças ou produtos novos ou recondicionados. A peça ou o produto substituído será coberto pelo tempo restante da garantia original ou por 3 (três) meses a serem contados a partir da data de envio do mesmo, prevalecendo o tempo mais longo. Se a Iomega não puder reparar ou substituir um produto defeituoso, o único recurso alternativo exclusivo será a restituição da importância paga originalmente pela aquisição do produto. O exposto acima representa todas as obrigações da Iomega para com o usuário sob esta garantia. EM NENHUMA EVENTUALIDADE A IOMEGA PODERÁ SER RESPONSABILIZADA POR PERDAS OU DANOS INDIRETOS, INCIDENTAIS, EMERGENTES OU ESPECIAIS, INCLUINDO PERDA DE DADOS, USO OU LUCROS, MESMO QUE A IOMEGA TENHA SIDO ADVERTIDA QUANTO À POSSIBILIDADE DE TAIS DANOS. Em nenhuma eventualidade a responsabilidade da Iomega excederá o preço original de aquisição da unidade ou disco de mídia. Algumas jurisdições não permitem a exclusão ou limitação de danos incidentais ou emergentes, portanto a limitação ou exclusão acima poderá não se aplicar ao usuário. Obtenção de serviço de garantia É preciso notificar a Iomega dentro do período de garantia para receber o serviço de garantia. Os procedimentos da Iomega, assim como suas políticas específicas de suporte ao cliente (incluindo taxas de serviços), mudam conforme as condições tecnológicas e de mercado. Para obter informações sobre as políticas atuais da Iomega ou sobre o serviço de garantia, visite nosso website em www. iomega.com/supportpolicy.html ou escreva para: Iomega Customer Service, 4059 South 1900 West, Roy, UT 84067. Informações de contato para o atendimento ao cliente da Iomega na Europa podem ser obtidas em nosso website de Suporte em www.iomega. com/europe/support. Caso o produto tenha direito ao serviço de garantia, será necessário devolvê-lo à Iomega, acompanhado da identificação apropriada: o número da autorização de retorno obtido no website da Iomega ou fornecido pelo representante da Iomega e uma comprovação de aquisição. A Iomega não protege, recupera ou retorna dados durante o serviço de garantia, portanto o usuário deve fazer cópia dos documentos antes da remessa. Limitações A GARANTIA ACIMA É EXCLUSIVA E SUBSTITUI TODAS AS OUTRAS GARANTIAS, EXPRESSAS OU IMPLÍCITAS. Na extensão permitida pelas leis aplicáveis, A IOMEGA DESOBRIGA-SE ESPECIFICAMENTE DE QUAISQUER GARANTIAS IMPLÍCITAS, INCLUINDO QUALQUER GARANTIA IMPLÍCITA DE COMERCIALIZAÇÃO OU ADEQUAÇÃO A UM DETERMINADO PROPÓSITO. Quaisquer garantias implícitas exigidas pelas leis aplicáveis deverão ser limitadas, em duração, ao prazo da garantia expressa. Algumas jurisdições não permitem a desobrigação de garantias implícitas ou limitações sobre a duração de uma garantia implícita, portanto a limitação acima pode não se aplicar ao usuário. Esta garantia outorga direitos legais específicos ao usuário, mas o usuário também poderá ter direitos que variam conforme sua jurisdição. Qualquer processo judicial por violação de qualquer garantia sobre o Produto deverá ser aberto no prazo de 1 ano, a contar da primeira data na qual a ação poderia ter sido movida. 29 Iomega garandeert voor de garantieperiode dat dit hardwareproduct vrij is van materiaal- en productiefouten. Deze niet-overdraagbare beperkte garantie geldt alleen voor u, de eerste eindgebruiker die het product heeft aangeschaft. De garantie gaat in op de dag van aankoop en loopt af na één (1) jaar voor producten die gekocht zijn op het Amerikaanse continent, in Azië en het Stille-Oceaangebied of in Europese landen die geen lid zijn van de Europese Unie, in het Midden-Oosten of in Afrika; negentig (90) dagen voor vervangende Iomega-producten die in deze regio’s zijn gekocht; of, twee (2) jaar voor producten die door een eindgebruiker in een lidstaat van de Europese Unie zijn gekocht. Deze garantie geldt niet voor: (a) softwareproducten van Iomega; (b) verbruiksartikelen zoals zekeringen of lampjes; of (c) producten, hardof software, van derden die zijn meegeleverd met het product waarvoor de garantie geldt. Iomega biedt geen enkele garantie voor dergelijke producten: indien meegeleverd, worden deze als zodanig meegeleverd. Uitgesloten wordt schade veroorzaakt door een ongeluk, verkeerd gebruik, misbruik, gebruik van niet door Iomega geleverde of goedgekeurde media, blootstelling van media aan extreme magnetische velden of externe oorzaken die met de omgeving samenhangen. Uw enige en exclusieve verhaalsrecht voor een gedekt defect is reparatie of vervanging van het defecte product, uitsluitend door Iomega te bepalen en te betalen, en Iomega kan daarvoor nieuwe of gereviseerde onderdelen of producten gebruiken. Het vervangen onderdeel/ product wordt gegarandeerd voor de rest van de oorspronkelijke garantie of drie (3) maanden vanaf de datum van verzending van deze onderdelen/producten, als dit langer is. Als Iomega een defect product niet kan repareren of vervangen, is uw alternatieve exclusieve verhaalsrecht beperkt tot restitutie van de oorspronkelijke aanschafprijs. Het hierboven beschrevene is de volledige verplichting van Iomega aan u op grond van deze garantie. IOMEGA IS IN GEEN GEVAL AANSPRAKELIJK VOOR INDIRECTE SCHADE, INCIDENTELE SCHADE, GEVOLGSCHADE OF SPECIALE SCHADE OF VERLIEZEN, INCLUSIEF VERLIES VAN GEGEVENS, GEBRUIK OF WINST, OOK ALS IOMEGA OP DE HOOGTE IS GESTELD VAN DE MOGELIJKHEID VAN DERGELIJKE SCHADE. In ieder geval is de financiële aansprakelijkheid van Iomega beperkt tot de oorspronkelijke aanschafprijs van de drive of de mediadisk. In sommige rechtsgebieden is de uitsluiting of beperking van incidentele schade of gevolgschade niet toegestaan, waardoor het bovenstaande mogelijk niet voor u van toepassing is. Service onder de garantie krijgen U moet Iomega binnen de garantieperiode laten weten dat u een beroep wilt doen op de garantieservice. Iomega’s specifieke beleid voor klantenondersteuning (evenals vergoedingen voor services) en procedures worden regelmatig aangepast aan de veranderende technologie en marktsituatie. Bezoek Iomega op www.iomega.com/supportpolicy.html voor meer informatie over het huidige beleid van Iomega of schrijf naar: Iomega Customer Service, 4059 South 1900 West, Roy, UT 84067, VS. U vindt de contactinformatie voor de klantenservice van Iomega in Europa via onze website voor ondersteuning: www.iomega.com/europe/support. Als uw product in aanmerking komt voor de garantieservice, moet u het artikel retourneren aan Iomega met de juiste identificatie, een retourbonnummer dat u via de Iomegawebsite of een Iomega-vertegenwoordiger hebt gekregen en een bewijs van aankoop. Iomega kan tijdens de garantieservice geen gegevens beveiligen, herstellen of terugsturen. U moet bijgevolg zelf uw gegevens kopiëren voordat u het product verzendt. Beperkingen BOVENSTAANDE GARANTIE IS EXCLUSIEF EN VERVANGT ALLE ANDERE GARANTIES, EXPLICIET OF IMPLICIET. Voorzover toegestaan door de toepasselijke wetgeving, WIJST IOMEGA SPECIFIEK ALLE IMPLICIETE GARANTIES AF, INCLUSIEF ALLE IMPLICIETE GARANTIES VAN VERKOOPBAARHEID OF GESCHIKTHEID VOOR EEN BEPAALD DOEL. Elke impliciete garantie die de geldende wetgeving vereist, wordt in duur beperkt tot de expliciete garantietermijn. In sommige rechtsgebieden is afwijzing van impliciete garanties of beperkingen ten aanzien van de duur van impliciete garanties niet toegestaan. Mogelijk geldt de bovenstaande beperking dan ook niet voor u. Deze garantie geeft u specifieke wettelijke rechten en mogelijk hebt u ook andere rechten, die per rechtsgebied kunnen verschillen. Elk verzoek wegens schending van enige garantie op uw product moet binnen één jaar na de eerste datum waarop het verzoek kon zijn ingebracht, worden ingediend. Iomega 保證在保固期間之內,此硬體產品之材料與製作均不會出現缺陷。 此項限期保固不可轉移給他人,僅供您 (即第一位購買的終端使 用者) 使用。保固自購買日起生效,在美洲、亞太地區或歐洲非歐盟國、中東或非洲地區購買,其有效期間為一 (1) 年。在這些地區購買的 Iomega 產品有九十 (90) 天的產品調適期;歐盟成員國的使用者購買之產品有兩 (2) 年期 效。 本保固並不適用於下列項目:(a) Iomega 的軟體產品;(b) 耗材,例如保險絲或燈泡;(c) 隨附於受保固之產品的他廠產品、硬體或軟體。Iomega 不保固上述的任何產品,即使附有這些產品,也是依其「現況」提供。因為意外、不當使用、濫用、使用非 Iomega 認可之媒體、媒體曝露 於過量磁場或外在因素而造成之損壞均不在保固範圍內。 對於產品瑕疵之唯一補償措施是修復或替換不良品,由 Iomega 自行選擇與負擔費用 (可能必須收取運費) ,Iomega 得以使用全新或整修過之 零件或產品進行維修或替換。若 Iomega 無法修復或替換瑕疵品,唯一的補償方法是退回原購買金額。 上述是本保固規範下,Iomega 應負之所有責任。在任何情況下,即使 IOMEGA 已被告知有下述損壞發生的可能性,IOMEGA 對間接、附帶、衍 生性或特殊之損壞或損失 (包括資料、使用或收益上之損失) 均不負責。在任何情況下,Iomega 的責任皆不超過此磁碟機或媒體磁片的原購 價格。有些地區不允許將附帶或間接損壞列為除外責任或責任限制範圍,因此上述之責任限制範圍或除外責任有可能不適用於您。 取得保固服務 您必須在保固期間內通知 Iomega,以取得保固服務。Iomega 特定的顧客支援政策 (包括收費或服務) 和程 序,將隨科技進步及市場狀況而異。如需 Iomega 目前政策的相關資訊,請造訪我們的網站 www.iomega.com/ supportpolicy.html,或寫信至:Iomega Customer Service, 4059 South 1900 West, Roy, UT 84067。顧客服務部門的聯絡資料 可在我們的支援 Web 網站上取得:www.iomega.com/europe/support。若您的產品符合保固服務的條件,請將此 產品和適當的證明文件以及從 Iomega 網站取得或由 Iomega 的代表提供您的寄回授權碼和購買證明,一併送回 Iomega。在進行保固服務時,Iomega 不會保護、還原或退回資料,因此您在寄出前必須自行複製資料。 限制 上述保固將取代其他任何明示或隱含性的保固,為唯一之責任保證。在適用法律允許的範圍內,IOMEGA 特別聲明對任何隱含性保證 (包括對 特殊目的之可銷售性或適用性的隱含性保證) 均不負責。適用法律所規定之任何隱含性保證,僅適用於明示的保固期間。在隱含性保證或限 制的除外責任方面,有些地區不允許對任何隱含性保證的期間設限,因此上述限制可能不適用於您。 此項保固賦予您特定的法律權利。視地區的不同,您將可能有其他的權利。任何違反產品保固的訴訟,必須自可提出訴訟之第一日起的一年 內提出。 30 Customer Support • Assistance clientèle • Kundenunterstützung Assistenza clienti • Asistencia al cliente • Suporte ao cliente 客戶支援 If you have a problem, we can help. Please do NOT return this product to the store! Your answer is on the web. Visit our award-winning web support site www.iomega.com. Select your region, then select Support & Downloads. Si vous avez un problème, nous pouvons vous aider. NE RENVOYEZ PAS ce produit au magasin ! Votre réponse est sur le Web. Site Web d’assistance primé www.iomega.com. Sélectionnez votre région puis Support et téléchargements. Wenn Sie ein Problem haben, können wir Ihnen helfen. Bringen Sie dieses Produkt NICHT zu Ihrem Händler zurück! Ihre Antwort steht im Netz. Preisgekrönte Support-Website www.iomega.com. Wählen Sie Ihr Gebiet aus und klicken Sie auf Support und Downloads. In caso di problemi, noi possiamo fornire assistenza. NON restituire questo prodotto al rivenditore! La risposta è sul Web. Sito di supporto sul Web premiato www.iomega.com. Selezionare la propria regione, quindi scegliere Assistenza e Download. Si tiene algún problema, podemos ayudar. ¡Por favor, NO devuelva este producto a la tienda! Su respuesta está en la web. Destacado sitio Web de atención al cliente www.iomega.com. Elija su región y luego seleccione Suporte y Descargas. Se você tiver um problema, nós podemos ajudar. NÃO devolva esse produto à loja! A resposta para você está na web. Site da web vencedor de prêmios www.iomega.com. Selecione a sua região e Suporte e Downloads.w.iomega.com. 如需 Iomega 產品的服務與支援,請造訪我們的網站 www.iomega.com。 31 * Models may vary. Les modèles peuvent varier. Abweichungen je nach Modell möglich. I modelli possono variare. Los modelos pueden variar. Os modelos podem variar. Modellen kunnen verschillen. Copyright © 2007 Iomega Corporation. All rights reserved. Iomega, the stylized “i” logo, and all Iomega brand blocks are either registered trademarks or trademarks of Iomega Corporation in the United States and/or other countries. Microsoft and Windows are either registered trademarks or trademarks of Microsoft Corporation in the United States and/or other countries. Apple, Macintosh, Mac, and FireWire are either registered trademarks or trademarks of Apple, Inc. in the United States and/or other countries. Certain other product names, brand names, and company names may be trademarks or designations of their respective owners. 31701900 5/29/07 b-
 1
1
-
 2
2
-
 3
3
-
 4
4
-
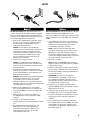 5
5
-
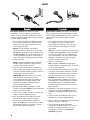 6
6
-
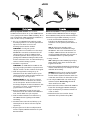 7
7
-
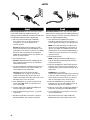 8
8
-
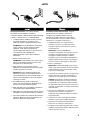 9
9
-
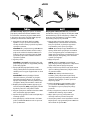 10
10
-
 11
11
-
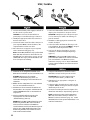 12
12
-
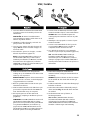 13
13
-
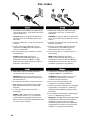 14
14
-
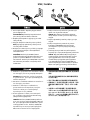 15
15
-
 16
16
-
 17
17
-
 18
18
-
 19
19
-
 20
20
-
 21
21
-
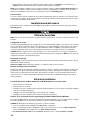 22
22
-
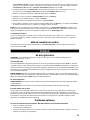 23
23
-
 24
24
-
 25
25
-
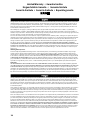 26
26
-
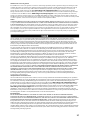 27
27
-
 28
28
-
 29
29
-
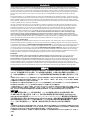 30
30
-
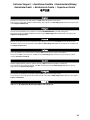 31
31
-
 32
32


Iomega ULTRAMAX PRO Snelstartgids
- Categorie
- Externe harde schijven
- Type
- Snelstartgids
in andere talen
- English: Iomega ULTRAMAX PRO Quick start guide
- italiano: Iomega ULTRAMAX PRO Guida Rapida
- français: Iomega ULTRAMAX PRO Guide de démarrage rapide
- español: Iomega ULTRAMAX PRO Guía de inicio rápido
- Deutsch: Iomega ULTRAMAX PRO Schnellstartanleitung
- português: Iomega ULTRAMAX PRO Guia rápido
Gerelateerde papieren
-
Iomega ULTRAMAX PLUS ESATA de handleiding
-
Iomega 33991 de handleiding
-
Iomega UltraMax Plus Snelstartgids
-
-
-
-
-
-
-