
LCD TV
user manual
imagine the possibilities
Thank you for purchasing this Samsung product.
To receive more complete service, please register
your product at
www.samsung.com/register
Model Serial No.
Contact SAMSUNG WORLDWIDE
If you have any questions or comments relating to Samsung products, please contact the SAMSUNG customer care centre.
Country Customer Care Centre Web Site
AUSTRIA 0810 - SAMSUNG (7267864, € 0.07/min) www.samsung.com/at
BELGIUM
02 201 2418 www.samsung.com/be
www.samsung.com/be_fr
CZECH REPUBLIC
800 - SAMSUNG (800-726786) www.samsung.com/cz
Distributor pro Českou republiku:
Samsung Zrt., česká organizační složka, Oasis Florenc, Sokolovská394/17, 180 00, Praha 8
DENMARK 8 - SAMSUNG (7267864) www.samsung.com/dk
EIRE 0818 717 100 www.samsung.com/ie
FINLAND 30 - 6227 515 www.samsung.com/
FRANCE 01 4863 0000 www.samsung.com/fr
GERMANY 01805 - SAMSUNG (7267864, € 0.14/Min) www.samsung.de
HUNGARY 06 - 80 - SAMSUNG (7267864) www.samsung.com/hu
ITALIA 800 - SAMSUNG (7267864) www.samsung.com/it
LUXEMBURG 02 261 03 710 www.samsung.com/lu
NETHERLANDS 0900-SAMSUNG (0900-7267864) (€ 0,10/Min) www.samsung.com/nl
NORWAY 3 - SAMSUNG (7267864) www.samsung.com/no
POLAND
0 801 1SAMSUNG(172678)
022 - 607 - 93 - 33
www.samsung.com/pl
PORTUGAL 808 20 - SAMSUNG (7267864) www.samsung.com/pt
SLOVAKIA 0800 - SAMSUNG (7267864) www.samsung.com/sk
SPAIN 902 - 1 - SAMSUNG (902 172 678) www.samsung.com/es
SWEDEN 0771 726 7864 (SAMSUNG) www.samsung.com/se
SWITZERLAND 0848 - SAMSUNG (7267864, CHF 0.08/min) www.samsung.com/ch
U.K 0845 SAMSUNG (7267864) www.samsung.com/uk
BELARUS 810-800-500-55-500 -
TURKEY 444 77 11 www.samsung.com/tr
ESTONIA 800-7267 www.samsung.com/ee
LATVIA 8000-7267 www.samsung.com/lv
LITHUANIA 8-800-77777 www.samsung.com/lt
MOLDOVA 00-800-500-55-500 -
KAZAHSTAN 8-10-800-500-55-500 www.samsung.com/kz_ru
KYRGYZSTAN 00-800-500-55-500 -
RUSSIA 8-800-555-55-55 www.samsung.ru
TADJIKISTAN 8-10-800-500-55-500 -
UKRAINE 8-800-502-0000
www.samsung.com/ua
www.samsung.com/ua_ru
UZBEKISTAN 8-10-800-500-55-500 www.samsung.com/kz_ru
BN68-02326A-03
[620-Weuro]BN68-02326A-03L09.ind1 1 2009-10-08 ¿ÀÀü 9:27:29

Digital TV Notice
1. Functionalities related to Digital TV(DVB) are only available in countries/areas where DVB-T (MPEG2 and MPEG4 AVC) digital
terrestrial signals are broadcasted or where you are able to access to a compatible DVB-C(MPEG2 and MPEG4
AAC) cable-
TV service. Please check with your local dealer the possibility to receive DVB-T or DVB-C signal.
2. DVB-T is the DVB European consortium standard for the broadcast transmission of digital terrestrial television and DVB-
C is that for the broadcast transmission of digital TV over cable. However, some differentiated features like EPG (Electric
Programme Guide), VOD (Video on Demand) and so on, are not included in this specification. So, they cannot be workable at
this moment.
3.
Although this TV set meets the latest DVB-T and DVB-C standards, as of [August, 2008], the compatibility with future DVB-T
digital terrestrial and DVB-C digital cable broadcasts cannot be guaranteed.
4.
Depending on the countries/areas where this TV set is used some cable-TV providers may charge an additional fee for such a
service and you may be required to agree to terms and conditions of their business.
5.
Some Digital TV functions might be unavailable in some countries or regions and DVB-C might not work correctly with some
cable service providers.
6.
For more information, please contact your local Samsung customer care centre.
Precautions When Displaying a Still Image
A still image may cause permanent damage to the TV screen
Do not display still image and partially still on the LCD panel for more than 2 hours as it can cause screen image retention.
This image retention is also known as screen burn. To avoid such image retention, reduce the degree of brightness and
contrast of the screen when displaying a still image.
Watching the LCD TV in 4:3 format for a long period of time may leave traces of borders displayed on the
left, right and centre of the screen caused by the difference of light emission on the screen. Playing a DVD or
a game console may cause a similar effect to the screen. Damages caused by the above effect are not
covered by the Warranty.
Displaying still images from Video games and PC for longer than a certain period of time may produce partial after-images. To
prevent this effect, reduce the ‘brightness’ and ‘contrast’ when displaying still images.
© 2009 Samsung Electronics Co., Ltd. All rights reserved.
❑
❑
●
●
●
Figures and illustrations in this User Manual are provided for reference only and may differ from actual product appearance.
Product design and specications may be changed without notice.
[620-Weuro]BN68-02326A-03L09.ind1 1 2009-10-08 ¿ÀÀü 9:27:29

English - 1
License
TruSurround HD, SRS and symbol are trademarks of SRS Labs, Inc. TruSurround HD technology is
incorporated under license from SRS Labs, Inc.
Manufactured under license from Dolby Laboratories. Dolby and the double-D symbol are trademarks of
Dolby Laboratories.
Symbol
N O T
Note One-Touch Button TOOLS Button Press
❑
❑
SETTING UP YOUR TV
Viewing the Control Panel ................................................................. 2
Accessories ....................................................................................... 3
Viewing the Connection Panel ........................................................... 4
Viewing the Remote Control .............................................................. 6
Installing Batteries in the Remote Control ......................................... 7
Viewing the menus ............................................................................ 7
Placing Your Television in Standby Mode .......................................... 8
Plug & Play Feature (depending on the model) ................................. 8
Viewing the Display ........................................................................... 9
CHANNEL
Channel Menu ................................................................................... 9
Managing Channels ........................................................................ 12
PICTURE
Conguring the Picture Menu .......................................................... 14
Using Your TV as a Computer (PC) Display .................................... 18
Setting up the TV with your PC........................................................ 19
SOUND
Conguring the Sound Menu ........................................................... 20
Selecting the Sound Mode .............................................................. 21
SETUP
Conguring the Setup Menu ............................................................ 22
Setting the Time ............................................................................... 24
INPUT / SUPPORT
Input Menu ....................................................................................... 26
Support Menu .................................................................................. 26
MEDIA PLAY (USB)
Connecting a USB Device ............................................................... 28
Media Play Function ........................................................................ 29
Photo List Option Menu ................................................................... 30
Viewing a Photo or Slide Show........................................................ 31
Slide Show Option Menu ................................................................. 32
Music List Option Menu ................................................................... 33
Playing Music .................................................................................. 34
Music Play Option Menu .................................................................. 35
Using the Setup Menu ..................................................................... 35
■
■
■
■
■
■
■
■
■
■
■
■
■
■
■
■
■
■
■
■
■
■
■
■
■
■
■
■
■
ANYNET
+
Connecting Anynet
+
Devices ........................................................... 36
Setting Up Anynet
+
.......................................................................... 37
Switching between Anynet
+
Devices ............................................... 37
Recording ........................................................................................ 38
Listening through a Receiver (Home theatre) .................................. 38
Troubleshooting for Anynet
+
............................................................ 39
RECOMMENDATIONS
Teletext Feature ............................................................................... 40
Installing the Stand .......................................................................... 41
Disconnecting the Stand .................................................................. 42
Installing the Wall Mount Kit ............................................................ 42
Assembling the Cables .................................................................... 42
Anti-Theft Kensington Lock ............................................................. 42
Securing the Installation Space ....................................................... 43
Securing the TV to the Wall ............................................................. 43
Troubleshooting ............................................................................... 44
Specications .................................................................................. 47
GNU GENERAL PUBLIC LICENSE
END OF TERMS AND CONDITIONS
GNU Lesser General Public License (LGPL)
END OF TERMS AND CONDITIONS
LICENSE ISSUES
■
■
■
■
■
■
■
■
■
■
■
■
■
■
■
■
■
■
■
■
■
CONTENTS
English
[620-Weuro]BN68-02326A-03L09.ind1 1 2009-10-08 ¿ÀÀü 9:27:29

English - 2
SETTING UP YOUR TV
Viewing the Control Panel
The product colour and shape may vary depending on the model.
The front panel buttons can be activated by touching it with your finger.
1
P
(POWER): Press to turn the TV on and off.
2
POWER INDICATOR: Blinks and turns off when the power is on and lights up in stand-by mode.
3
z
: Press to change channels. In the on-screen menu, use the
z
buttons as you would use the ▼ and ▲
buttons on the remote control.
4
Y
: Press to increase or decrease the volume.
In the on-screen menu, use the
Y
buttons as you would use the ◄ and ► buttons on the remote control.
5
MENU: Press to see an on-screen menu of your TV’s features.
6
SOURCE
E
: Toggles between all the available input sources. In the on-screen menu, use this button as you would use the
ENTER
E
button on the remote control.
7
REMOTE CONTROL SENSOR: Aim the remote control towards this spot on the TV.
8
SPEAKERS
¦
N
N
6
5
4
3
2
1
87
8
[620-Weuro]BN68-02326A-03L09.ind2 2 2009-10-08 ¿ÀÀü 9:27:30

English - 3
Accessories
Remote Control & Batteries (AAA x 2) Power Cord Cover-Bottom
Warranty Card / Safety Guide
(Not available in all locations)
Cleaning Cloth
Holder-Wire Cable
(Depending on the model)
● Owner’s Instructions
Please make sure the following items are included with your LCD TV
. If any items are missing, contact your dealer.
The items colour and shape may vary depending on the model.
¦
N
N
[620-Weuro]BN68-02326A-03L09.ind3 3 2009-10-08 ¿ÀÀü 9:27:31

English - 4
Viewing the Connection Panel
The product colour and shape may vary depending on the model.
1 COMPONENT IN
Connects Component video / audio.
2 HDMI IN 1, 2, 3(DVI), 4 / DVI
AUDIO IN
Connects to the HDMI jack of a device with an HDMI output.
No sound connection is needed for an HDMI to HDMI connection.
What is HDMI?
HDMI(High-Definition Multimedia Interface), is an interface that enables the transmission of digital audio and video signals
using a single cable.
The difference between HDMI and DVI is that the HDMI device is smaller than DVI’s one.
The TV may not output sound and pictures may be displayed with abnormal colour when DVD / Blu-ray player / Cable
Box / Satellite receiver (Set-Top Box) supporting HDMI versions older than 1.3 are connected. When connecting an older
HDMI cable and there is no sound, connect the HDMI cable to the HDMI IN 3(DVI) jack and the audio cables to the DVI
AUDIO IN jacks on the back of the TV. If this happens, contact the company that provided the DVD / Blu-ray player /
Cable Box / Satellite receiver (Set-Top Box) to confirm the HDMI version, then request an upgrade.
Use the HDMI IN 3(DVI) jack for DVI connection to an external device. Use a DVI to HDMI cable or DVI-HDMI adapter
(DVI to HDMI) for video connection and the DVI AUDIO IN jacks for audio. When using an HDMI / DVI cable connection,
you must use the HDMI IN 3(DVI) jack.
HDMI cables that are not 1.3 may cause annoying flicker or no screen display.
3 PC IN [PC] / [AUDIO]
Connects to the video and audio output jacks on your PC.
If your PC supports an HDMI connection, you can connect this to the HDMI IN 1, 2, 3(DVI) or 4 terminal.
If your PC supports a DVI connection, you can connect this to the HDMI IN 3(DVI) / DVI AUDIO IN terminal.
4 ANT IN
Connects to an antenna or cable TV system.
5 KENSINGT
ON LOCK (depending on the model)
The Kensington Lock (optional) is a device used to physically fix the system when used in a public place. If you want to use a
locking device, contact the dealer where you purchased the TV.
The location of the Kensington Lock may be different depending on its model.
¦
N
N
N
N
N
N
N
N
N
7890 6 5
@
2
#
!
21 34
[TV Side Panel]
[TV Rear Panel]
Power Input
[620-Weuro]BN68-02326A-03L09.ind4 4 2009-10-08 ¿ÀÀü 9:27:31

English - 5
6
H
(HEADPHONE)
Headphone may be connected to the headphone output on your set. While the head phone is connected, the sound from the
built-in speakers will be disabled.
Using the sound function is restricted when connecting headphones to the TV
.
Prolonged use of headphones at a high volume may damage your hearing.
You will not hear sound from the speakers when you connect headphones to the TV.
The headphone volume and TV volume are adjusted separately.
7 DIGIT
AL AUDIO OUT (OPTICAL)
Connects to a Digital Audio component such as a Home theatre receiver.
When a Digital Audio System is connected to the DIGITAL AUDIO OUT (OPTICAL) jack: Decrease the volume of the TV
and adjust the volume level with the system’s volume control.
5.1CH audio is possible when the TV is connected to an external device supporting 5.1CH.
When the receiver (home theatre) is set to On, you can hear sound output from the TV’s Optical jack. When the TV is
displaying a DTV(air) signal, the TV will send out 5.1 channel sound to the Home theatre receiver. When the source is a
digital component such as a DVD / Blu-ray player / Cable Box / Satellite receiver (Set-T
op Box) and is connected to the
TV via HDMI, only 2 channel sound will be heard from the Home Theatre receiver. If you want to hear 5.1 channel audio,
connect the digital audio out jack on DVD / Blu-ray player / Cable Box / Satellite receiver (Set-Top Box) directly to an
Amplifier or Home Theatre, not the TV.
8 SER
VICE
Connector for service only.
9 AUDIO OUT [R-AUDIO-L]
Connects to the audio input jacks on your Amplifier/Home theatre.
When an audio amplifier is connected to the AUDIO OUT [R-AUDIO-L] jacks: Decrease the volume of the TV and adjust the
volume level with the Amplifier’s volume control.
0 EXT 1, 2
Inputs or outputs for external devices, such as VCR, DVD, video game device or video disc players.
In EXT Mode, DTV Out supports MPEG SD Video and Audio only.
Input/Output Specification
Connector
Input Output
Video Audio (L / R) RGB Video + Audio (L / R)
EXT 1 O O O Only TV or DTV output is available.
EXT 2 O O X Output you can choose.
! A
V IN [VIDEO] / [R-AUDIO-L]
Video and audio inputs for external devices, such as a camcorder or VCR.
@ USB
Connector for software upgrades and Media Play, etc.
# COMMON INTERF
ACE Slot
When not inserting ‘CI(CI+) CARD’ in some channels, ‘Scrambled Signal’ is displayed on the screen.
The pairing information containing a telephone number, ‘CI(CI+) CARD’ ID, Host ID and other information will be displayed
in about 2~3 minutes. If an error message is displayed, please contact your service provider
.
When the channel information configuration has finished, the message ‘Updating Completed’
is displayed, indicating that
the channel list is now updated.
Depending on the model, a message requesting your Parental Lock password may appear when the CI card is
reinserted.
Depending on the model, even if the Parental Lock is set to Allow All a message requesting your password may appear
for adult (18 years and above) programmes.
You must obtain a ‘CI(CI+) CARD’ from a local cable service provider. Remove the ‘CI(CI+) CARD’ by carefully pulling it
out with your hands since dropping the ‘CI(CI+) CARD’ may cause damage to it.
Insert the ‘CI(CI+) CARD’ in the direction marked on it.
The place of the COMMON INTERFACE Slot may be different depending on its model.
‘CI(CI+) CARD’ is not supported in some countries, regions, broadcasting stations check with your authorized dealer.
The CI+ function is only applicable to LE********P model.
If you have some problems, please contact to service provider.
N
N
N
N
N
N
N
N
–
–
N
N
N
N
N
[620-Weuro]BN68-02326A-03L09.ind5 5 2009-10-08 ¿ÀÀü 9:27:31

English - 6
Viewing the Remote Control
You can use the remote control up to a distance of about 23 feet from the TV.
The performance of the remote control may be affected by bright light.
The product colour and shape may vary depending on the model.
1
POWER : Turns the TV on and
off.
2
NUMERIC BUTTONS : Press to
change the channel.
3
FAV.CH : Used to display
Favourites Channel Lists on the
screen.
4
Y
: Press to increase or
decrease the volume.
5
SOURCE : Press to display
and select the available video
sources.
6
INFO : Press to display
information on the TV screen.
7
TOOLS : Use to quickly select
frequently used functions.
8
CH LIST : Used to display
Channel Lists on the screen.
9
COLOURS BUTTONS : Use
these buttons in the Channel
list, Media Play menu, etc.
!
DUAL : Sound effect selection
@
Use these buttons in the Media
Play and Anynet
+
modes. (
∏
:
This remote can be used to
control recording on Samsung
recorders with the Anynet
+
feature)
#
TV : Selects the TV mode
directly.
$
PRE-CH : Enables you to return
to the previous channel you were
watching.
%
MUTE
M
: Press to temporarily
cut off the sound.
^
>
P
<
: Press to change
channels.
&
MENU : Displays the main on-
screen menu.
*
GUIDE : Electronic Programme
Guide (EPG) display.
(
RETURN : Returns to the
previous menu
)
E
:
Use to
select on-screen menu items and
change menu values.
a
EXIT : Press to exit the menu.
b
P.SIZE : Picture size selection.
c
MEDIA.P : Allows you to play
music files and pictures.
d
SUBT. : Digital subtitle display
e
AD : Audio Description selection.
Teletext Functions
5
0
: Teletext mode selection
(LIST / FLOF)
6
5
: Teletext reveal
7
4
: Teletext size selection
8
8
: Teletext store
9
Fastext topic selection
0
/
: Alternately select
Teletext, Double, or Mix.
#
:
: Exit from the Teletext
display
$
1
: Teletext sub page
^
2
: Teletext next page
3
: Teletext previous page
&
6
: Teletext index
(
9
: Teletext hold
a
7
: Teletext cancel
¦
N
N
N
INFO
C
H
L
I
S
T
AD
1 #
$
^
*
(
)
a
b
c
e
d
%
&
2
3
4
5
6
7
8
9
0
!
@
[620-Weuro]BN68-02326A-03L09.ind6 6 2009-10-08 ¿ÀÀü 9:27:32

English - 7
Installing Batteries in the Remote Control
1. Lift the cover at the back of the remote control upward as shown in the figure.
2. Install two AAA size batteries.
Make sure to match the ‘+’ and ‘–’ ends of the batteries with the diagram inside the
compartment.
3.
Replace the cover.
Remove the batteries and store them in a cool, dry place if you won’t be using the
remote control for a long time. (Assuming typical TV usage, the batteries should last for about one year.)
If the remote control doesn’t work, check the following:
Is the TV power on?
Are the plus and minus ends of the batteries reversed?
Are the batteries drained?
Is there a power outage or is the power cord unplugged?
Is there a special fluorescent light or neon sign nearby?
Viewing the menus
Before using the TV, follow the steps below to learn how to navigate the menu in order to select and adjust different functions.
Operation the OSD (On Screen Display)
The access step may differ depending on the selected menu.
1. Press the MENU button.
2.
The main menu appears on the screen. The menu’s left side has icons : Picture, Sound,
Channel, Setup, Input, Application, Support.
3. Press the ▲ or ▼ button to select one of the icons.
4.
Then press the ENTER
E
button to access the icon’s sub-menu.
5. Press the ▲ or ▼ button to select the icon’s submenu.
6.
Press the ◄ or ► button to decrease or increase the value of a particular item. The
adjustment OSD may differ depending on the selected menu.
7
. Press the ENTER
E
button to complete the configuration. Press the EXIT button to exit.
¦
N
N
N
¦
❑
INFO
AD
MENU Button
Display the main on-screen menu.
ENTER
E
/ Direction Buttons
Move the cursor and select an
item. Select the currently selected
item. Confirm the setting.
RETURN Button
Return to the previous menu.
EXIT
Exit the on-screen menu.
INFO
AD
INFO
AD
Mode :Standard ▶
Backlight :7
Contrast :95
Brightness :45
Sharpness :50
Colour :50
Tint(G/R) :G50/R50
AdvancedSettings
Picture
Mode :Standard
Backlight :7 ▶
Contrast :95
Brightness :45
Sharpness :50
Colour :50
Tint(G/R) :G50/R50
AdvancedSettings
PictureOptions
Picture
7
U
Move
L
Adjust
E
Enter
R
Return
▲
Backlight
▼
Help icon
[620-Weuro]BN68-02326A-03L09.ind7 7 2009-10-08 ¿ÀÀü 9:27:32

English - 8
Placing Your Television in Standby Mode
Your set can be placed in standby mode in order to reduce the power consumption. The standby mode can be useful when you
wish to interrupt viewing temporarily (during a meal, for example).
1. Press the POWER
P
button on the remote control.
The screen is turned off and a standby indicator appears on your set.
2.
To switch your set back on, simply press the POWER
P
button again.
Do not leave your set in standby mode for long periods of time (when you are away on holiday
, for example). It is best to
unplug the set from the mains and aerial.
Plug & Play Feature (depending on the model)
When the TV is initially powered on, basic settings proceed automatically and subsequently.
1. Press the POWER button on the remote control.
You can also use the POWER
P
button on the TV.
The message Select the OSD Language. is displayed.
2.
Press the ENTER
E
button. Select the appropriate language by pressing the ▲ or ▼
button. Press the ENTER
E
button to confirm your choice.
3. Press the ◄ or ► button to select Store Demo or Home Use, then the ENTER
E
button.
We recommend setting the TV to Home Use mode for the best picture in your home
environment.
Store Demo mode is only intended for use in retail environments.
If the unit is accidentally set to Store Demo mode and you want to return to Home Use (Standard): Press the volume
button on the TV. When the volume OSD is displayed, press and hold the MENU button on the TV for 5 seconds.
4.
Press the ENTER
E
button. Select the appropriate country by pressing the ▲ or ▼ button. Press the ENTER
E
button to
confirm your choice.
After selecting the country in the Country menu, some models may proceed with an additional option to setup the pin
number.
When you input the PIN number, 0-0-0-0 is not available.
5.
Press the ▲ or ▼ button to select Air or Cable, then press the ENTER
E
button.
Air: Air antenna signal.
Cable: Cable antenna signal.
6.
Press the ▲ or ▼ button to select the channel source to memorize. Press the ENTER
E
button to select Start.
When setting the antenna source to Cable, a step appears allowing you to set a value for the digital channel search. For
more information, refer to
.
Digital & Analogue: Digital and Analogue channels.
Digital: Digital channels.
Analogue: Analogue channels.
The channel search will start and end automatically.
Press the ENTER
E
button at any time to interrupt the memorization process.
After all the available channels are stored, the message Set the Clock Mode. is displayed.
7
. Press the ENTER
E
button. Press the ▲ or ▼ button to select Auto, then Press the ENTER
E
button.
If you select Manual, Set current date and time is displayed.
If you have received a digital signal, the time will be set automatically. If not, select
Manual to set the clock.
8. The description for the connection method providing the best HD screen quality is displayed. Check the description and press
the ENTER
E
button.
9. The message Enjoy your TV. is displayed. When you have finished, press the ENTER
E
button.
If you want to reset this feature...
1. Press the MENU button to display the menu. Press the ▲ or ▼ button to select Setup,
then press the ENTER
E
button.
2. Press the ENTER
E
button again to select Plug & Play.
3. Enter your 4 digit PIN number. The default PIN number of a new TV set is ‘0-0-0-0’.
If you want to change PIN number, use the Change PIN function.
The Plug & Play feature is only available in the TV mode.
¦
N
N
¦
N
N
N
N
N
N
N
N
N
N
N
N
N
N
N
N
N
N
INFO
AD
SelecttheOSDLanguage.
MenuLanguage :English ▶
E
Enter
Plug&Play
Plug&Play ▶
MenuLanguage :English
Time
Broadcast
Security
General
Setup
[620-Weuro]BN68-02326A-03L09.ind8 8 2009-10-08 ¿ÀÀü 9:27:33

English - 9
Viewing the Display
The display identifies the current channel and the status of certain audio-video settings.
Press the INFO button to viewing the information.
Press the INFO button on the remote control. The TV will display the channel, the type
of sound, and the status of certain picture and sound settings.
▲, ▼: You can view other channel’s information. If you want to move to the
currently selected channel, press ENTER
E
button.
◄, ►: You can view the desired programme’s information at the current channel.
Press the INFO button once more or wait approximately 10 seconds and the display
disappears automatically.
CHANNEL
Channel Menu
Country
Analogue Channel
You can change the country for analogue channels.
Digital Channel
You can change the country for digital channels.
The PIN number input screen appears. Enter your 4 digit PIN number.
Auto Store
You can scan for the frequency ranges available to you (and availability depends on your
country). Automatically allocated Programme numbers may not correspond to actual or desired Programme numbers.
If a channel is locked using the Child Lock function, the PIN input window appears.
Air / Cable
Antenna source to memorize
Digital & Analogue: Digital and Analogue channels.
Digital: Digital channels.
Analogue: Analogue channels.
When selecting ‘ or ‘
Provide a value to scan for cable channels.
Network ID: Displays the network identification code.
Frequency: Displays the frequency for the channel. (Differs in each country)
Modulation: Displays available modulation values.
Symbol Rate: Displays available symbol rates.
Scans for all channels with active broadcast stations and stores them in the TV’
s memory.
If you want to stop Auto Store, press the ENTER
E
button.
The Stop Auto Store? message will be displayed.
Select Yes by pressing the ◄ or ► button, then press the ENTER
E
button.
¦
O
●
●
N
¦
❑
■
■
N
❑
N
■
●
●
●
●
N
N
N
Country ▶
AutoStore
ManualStore
CableSearchOption
FullGuide
MiniGuide
DefaultGuide :FullGuide
ChannelList
Channel
INFO
AD
DTV Air
15
abc1
18:00 ~ 6:00
18:11 Thu 6 Jan
Life On Venus Avenue
Unclassified
No Detaild Information
' Information
[620-Weuro]BN68-02326A-03L09.ind9 9 2009-10-08 ¿ÀÀü 9:27:33

English - 10
Manual Store
Scans for a channel manually and stores it in the TV’s memory.
If a channel is locked using the Child Lock function, the PIN input window appears.
Digital Channel
Manual store for digital channels.
Digital Channel is only available in DTV mode.
Channel: Set the Channel number using the ▲, ▼ or number (0~9) buttons.
Frequency: Set the frequency using the number buttons.
Bandwidth: Set the bandwidth using the ▲, ▼ or number (0~9) buttons.
When it has finished, channels are updated in the channel list.
Analogue Channel
Manual store for analogue channel.
Programme (Programme number to be assigned to a channel): Sets the Programme number using the ▲, ▼ or number (0~9)
buttons.
: Sets the colour system value using the ▲ or ▼ button.
: Sets the sound system value using the ▲ or ▼ button.
Channel (When you know the number of the channel to be stored): Press the ▲ or ▼ button to select C (Air channel) or
S (Cable channel). Press the ► button, then press the ▲, ▼ or number (0~9) buttons to select the required number.
You can also select the channel number directly by pressing the number (0~9) buttons.
If there is abnormal sound or no sound, reselect the sound standard required.
Search (When you do not know the channel numbers): Press the ▲ or ▼ button to start the search. The tuner scans the
frequency range until the first channel or the channel that you selected is received on the screen.
Store (When you store the channel and associated Programme number): Set to OK by pressing the ENTER
E
button.
Channel mode
P (Programme mode): When completing tuning, the broadcasting stations in your area have been assigned to position
numbers from P00 to P99. You can select a channel by entering the position number in this mode.
C (Air channel mode): You can select a channel by entering the assigned number to each air broadcasting station in this
mode.
S (Cable channel mode): You can select a channel by entering the assigned number for each cable channel in this mode.
Cable Search Option (depending on the country)
Sets additional search options such as the frequency and symbol rate for cable network searches.
Freq.Start (Frequency Start): Set the start frequency (Differs in each country)
Freq.Stop (Frequency Stop): Set the stop frequency (Differs in each country)
Modulation: Displays available modulation values.
Symbol Rate: Displays available symbol rates.
Full Guide / Mini Guide
The EPG (Electronic Programme Guide) information is provided by the broadcasters. Programme entries may appear blank or out
of date as a result of the information broadcast on a given channel. The display will dynamically update as soon as new information
becomes available.
You can also display the guide menu simply by pressing the GUIDE button. (To configure the Default Guide, refer to the
descriptions.)
Full Guide
Displays the Programme information as time ordered One hour segments. T
wo hours of Programme information is displayed which
may be scrolled forwards or backwards in time.
Mini Guide
The information of each Programme is displayed by each line on the current channel Mini Guide screen from the current
Programme onwards according to the Programme starting time order.
❑
N
N
■
N
●
●
●
N
■
●
●
●
●
N
N
●
●
N
❑
●
●
●
●
❑
O
■
■
[620-Weuro]BN68-02326A-03L09.ind10 10 2009-10-08 ¿ÀÀü 9:27:33

English - 11
You can decide whether to display either the Full Guide or the Mini Guide when the GUIDE button on the remote control is
pressed.
Channel List
For detailed procedures on using the Channel List, refer to the ‘Managing Channels instructions.
You can select these options by simply pressing the CH LIST button on the remote control.
Channel Mode
When press the P
>
/
<
button, Channels will be switched within the selected channel list.
Added Ch.
Channels will be switched within the memorized channel list.
Favourite Ch.
Channels will be switched within the favourite channel list.
Fine Tune
If the reception is clear, you do not have to fine tune the channel, as this is done automatically during the search and store
operation. If the signal is weak or distorted, you may have to fine tune the channel manually
.
Fine tuned channels that have been saved are marked with an asterisk ‘*’ on the right-hand side of the channel number in the
channel banner.
To reset the fine-tuning, select Reset by pressing the ▲ or ▼ button and then press the ENTER
E
button.
Only Analogue TV channels can be fine tuned.
Using the Full / Mini Guide
To... Then...
Watch a Programme in the EPG list Select a Programme by pressing the ▲, ▼, ◄, ► button.
Exit the guide Press the blue button
If the next Programme is selected, it is scheduled with the clock icon displayed. If the ENTER
E
button is pressed again, press
the ◄, ► button to select Cancel Schedules, the scheduling is cancelled with the clock icon gone.
View Programme information Select a Programme of your choice by pressing the ▲, ▼, ◄, ► button.
Then press the INFO button when the Programme of your choice is
highlighted.
The Programme title is on the upper part of the screen centre.
Please click on INFO button for the detailed information. Channel Number, Running Time, Status Bar, Parental Level, Video
Quality Information (HD / SD), Sound Modes, Subtitle or Teletext, languages of Subtitle or Teletext and brief summary of the
highlighted Programme are included on the detailed information. ‘...’ will be appeare
d if the summary is long.
Toggle between the Full Guide and Mini Guide Press the Red button repeatedly.
In Full Guide
Scrolls backwards quickly (24 hours).
Scrolls forwards quickly (24 hours).
Press the Green button repeatedly.
Press the Yellow button repeatedly.
❑
❑
O
❑
■
■
❑
N
N
N
FullGuide
E
Watch Information Page MiniGuide +24Hours Exit
DTVCable900ftn2:10Tue1Jun
FreshmenOnCampus
2:00
-2:30
NoDetailedInformation
Today
2:00-3:00 3:00-4:00
MintExtra
Loaded
40withDynamiteMC
TheDistillery
SmashHits!Sunday
900ftn
901ITVPlay
902Kerrang!
903Kiss
904oneword
905Hits
▼
StreetHypn..
Kisstory
No
Information
NoInformation
NoInformation
FreshmenO..
900
E
Watch Information Page FullGuide Exit
MiniGuide DTVCable900ftn
StreetHypnosis
BoozeBritain
2:00
2:30
5:00
Freshmen
OnCampus
▼
[620-Weuro]BN68-02326A-03L09.ind11 11 2009-10-08 ¿ÀÀü 9:27:34

English - 12
Managing Channels
Using this menu, you can add / delete or set favourites channels and use the Programme guide for digital broadcasts.
All Channels
Shows all currently available channels.
Added Channels
Shows all added channels.
Favourites
Shows all favourite channels.
To select the favourites channels you have set up, press the FAV.CH button on the remote
control.
Programmed
Shows all current reserved Programmes.
Select a channel in the All Channels, Added Channels or Favourites screen by pressing the ▲ / ▼ buttons, and pressing
the ENTER
E
button. Then you can watch the selected channel.
Using the Colour buttons with the Channel List
Red (Channel Type): Toggle between your TV, Radio, Data / Other and All.
Green (Zoom): Enlarges or shrinks a channel number.
Yellow (Select): Selects multiple channel lists. You can perform the add/delete or add to favourites/delete from favourites
function for multiple channels at the same time. Select the required channels and press the
Yellow button to set all the
selected channels at the same time. The
c
mark appears to the left of the selected channels.
TOOLS (Tools): Displays the Delete (or Add), Add to Favourite (or Delete from Favourite), Lock (or Unlock), Timer
Viewing, Edit Channel Name, Edit Channel Number, Sort, Select All (or Deselect All), Auto Store menu. (The
Options menus may differ depending on the situation.)
Channel Status Display Icons
A
: An Analogue channel.
c
: A channel selected by pressing the Yellow button.
*
: A channel set as a Favourite.
(
: A Programme currently being broadcast.
\
: A locked channel.
)
: A reserved Programme
Channel List Option Menu (in All Channels / Added Channels / Favourites)
Press the TOOLS button to use the option menu.
Option menu items may differ depending on the channel status.
Add / Delete
You can delete or add a channel to display the channels you want.
All deleted channels will be shown on All Channels menu.
A gray-coloured channel indicates the channel has been deleted.
The Add menu only appears for deleted channels.
You can also delete a channel to the Added Channels or Favourites menu in the same
manner.
Add to Favourite / Delete from Favourite
You can set channels you watch frequently as favourites.
Press the TOOLS button to display the Tools menu. You can also set the add to (or delete from) Favourite by selecting Tools
(or Delete from Favourite).
The ‘
*
’ symbol will be displayed and the channel will be set as a favourite.
All favourite channels will be shown on Favourites menu.
Lock / Unlock
You can lock a channel so that the channel cannot be selected and viewed.
This function is available only when the Child Lock is set to On.
The PIN number input screen appears. Enter your 4 digit PIN number.
The default PIN number of a new TV set is ‘0-0-0-0’. You can change the PIN, by selecting Change PIN from the menu.
The ‘
\
’ symbol will be displayed and the channel will be locked.
¦
■
■
■
O
■
N
N
N
N
N
■
N
N
N
N
■
T
N
N
■
N
N
N
N
AllChannels
824UKTVGold
825UKTVstyle
A
1C--
A
2C--
A
3C--
A
4C--
A
5C--
A
6C--
A
7C--
A
8C--
All ChannelType Zoom Select
T
Tools
Delete
AddtoFavourite
Lock
Timer
Viewing
EditChannelName
Sort
AddedChannels
824UKTVGold
825UKTVstyle
A
1C--
A
2C--
A
3C--
A
4C--
A
5C--
A
6C--
A
7C--
A
8C--
All ChannelType Zoom Select
T
Tools
[620-Weuro]BN68-02326A-03L09.ind12 12 2009-10-08 ¿ÀÀü 9:27:34

English - 13
Timer Viewing
If you reserve a Programme you want to watch, the channel is automatically switched to the reserved channel in the Channel List;
even when you are watching another channel. To reserve a Programme, set the current time first.
Only memorized channels can be reserved.
You can set the channel, day, month, year, hour and minute directly by pressing the number buttons on the remote control.
Reserving a Programme will be shown in the Programmed menu.
Digital Programme Guide and Viewing Reservation
When a digital channel is selected, and you press the ► button, the Programme Guide for the channel appears.
You can
reserve a Programme according to the procedures described above.
Edit Channel Name (analogue channels only)
Channels can labelled so that their call letters appear whenever the channel is selected.
The names of digital broadcasting channels are automatically assigned and cannot be renamed.
Edit Channel Number (digital channels only)
You can also edit the channel number by pressing the number buttons on the remote control.
Sort (analogue channels only)
This operation allows you to change the Programme numbers of the stored channels.
This operation may be necessary after using
the auto store.
Select All / Deselect All
Select All: You can select all the channels in the channel list.
Deselect All: You can deselect all the selected channels.
You can only select Deselect All when there is a selected channel.
Auto Store
For detailed procedures on setting up options, refer to the ‘Channel Menu’ instructions.
If a channel is locked using the Child Lock function, the PIN input window appears.
Channel List Option Menu (in Programmed)
You can view, modify or delete a reservation.
Press the TOOLS button to use the option menu.
Change Info
Select to change a viewing reservation.
Cancel Schedules
Select to cancel a viewin`g reservation.
Information
Select to view a viewing reservation.
(You can also change the reservation information.)
Select All
Select all reserved Programmes.
■
N
N
N
N
■
N
■
■
■
●
●
N
■
N
N
N
■
■
■
■
Programmed
1/1/2009
13:595TV1
)
18:592TV3
)
TheEqualizer
20:592TV3
)
McMillan&Wife
21:592TV3
)
M.Spillane’smike
All Zoom Select
T
Tools
E
Information
ChangeInfo
CancelSchedules
Information
Select
All
[620-Weuro]BN68-02326A-03L09.ind13 13 2009-10-08 ¿ÀÀü 9:27:34

English - 14
PICTURE
Configuring the Picture Menu
Mode
You can select the type of picture which best corresponds to your viewing requirements.
Press the TOOLS button to display the Tools menu. You can also set the picture mode by
selecting .
Dynamic
Selects the picture for increased definition in a bright room.
Standard
Selects the picture for the optimum display in a normal environment.
Natural
Selects the picture for an optimum and eye-comfortable display.
This function is not available in PC mode.
Movie
Selects the picture for viewing movies in a dark room.
Backlight / Contrast / Brightness / Sharpness / Colour / Tint (G/R)
Your television has several setting options that allow you to control the picture quality.
Backlight: Adjusts the brightness of LCD back light.
Contrast: Adjusts the contrast level of the picture.
Brightness: Adjusts the brightness level of the picture
Sharpness: Adjusts the edge definition of the picture.
Colour: Adjusts colour saturation of the picture.
Tint (G/R): Adjusts the colour tint of the picture.
In analogue TV, Ext., AV modes of the PAL system, you cannot use the Tint (G/R) Function.
When you make changes to Backlight, Contrast, Brightness, Sharpness, Colour or Tint (G/R) the OSD will be adjusted
accordingly.
In PC mode, you can only make changes to Backlight, Contrast and Brightness.
Settings can be adjusted and stored for each external device you have connected to an input of the
TV.
The energy consumed during use can be signicantly reduced if the brightness level of the picture is lowered, which will
reduce the overall running cost.
Advanced Settings
Samsung’s new TVs allow you to make even more precise picture settings than previous
models.
Advanced Settings is available in Standard or Movie mode.
In PC mode, you can only make changes to Dynamic Contrast, Gamma and White
Balance from among the Advanced Settings items.
You can select the black level on the screen to adjust the screen depth.
You can adjust the screen contrast so that the optimal contrast is provided.
Gamma
You can adjust the primary colour (red, green, blue) intensity.
¦
❑
T
■
■
■
N
■
❑
●
●
●
●
●
●
N
N
N
N
N
❑
N
N
■
■
■
Mode :Standard ▶
Backlight :7
Contrast :95
Brightness :45
Sharpness :50
Colour :50
Tint(G/R) :G50/R50
AdvancedSettings
Picture
7
U
Move
L
Adjust
E
Enter
R
Return
▲
Backlight
▼
BlackTone :Off ▶
DynamicContrast :Medium
Gamma :0
ColourSpace :Native
WhiteBalance
FleshTone :0
EdgeEnhancement :On
U
Move
E
Enter
R
Return
AdvancedSettings
[620-Weuro]BN68-02326A-03L09.ind14 14 2009-10-08 ¿ÀÀü 9:27:35

English - 15
Colour Space
Colour space is a colour matrix composed of red, green and blue colours. Select your favourites colour space to experience the
most natural colour.
Auto: Auto Colour Space automatically adjusts to the most natural colour tone based on programme sources.
Native: Native Colour Space offers deep and rich colour tone.
Custom: Adjusts the colour range to suit your preference.
Changing the adjustment value will refresh the adjusted screen.
Settings can be adjusted and stored for each external device you have connected to an input of the
TV. For example, if
you have a DVD player connected to HDMI 1 and it is currently selected, settings and adjustments will be saved for the
DVD player.
Colour: Red, Green, Blue, Yellow, Cyan or Magenta
Colour is available when Colour Space is set to Custom.
In Colour, you can adjust the RGB values for the selected colour.
To reset the adjusted RGB value, select Reset.
Red: Adjusts the red saturation level of the selected colour.
Green: Adjusts the green saturation level of the selected colour.
Blue: Adjusts the blue saturation level of the selected colour.
Reset: Resets the colour space to the default values.
White Balance
You can adjust the colour temperature for more natural picture colours.
R-Offset: Adjusts the red colour darkness.
G-Offset: Adjusts the green colour darkness.
B-Offset: Adjusts the blue colour darkness.
R-Gain: Adjusts the red colour brightness.
G-Gain: Adjusts the green colour brightness.
B-Gain: Adjusts the blue colour brightness.
Reset: The previously adjusted white balance will be reset to the factory defaults.
Flesh Tone
You can emphasize the pink ‘flesh tone’ in the picture.
Changing the adjustment value will refresh the adjusted screen.
You can emphasize object boundaries in the picture.
Setting the xvYCC mode to on increases detail and colour space when watching movies from an external device (ie. DVD player)
connected to the HDMI or Component IN jacks.
xvYCC is available when the picture mode is set to Movie, and the external input is set to HDMI or Component mode.
This function may not be supported depending on your external device.
■
●
●
●
N
N
N
N
N
■
●
●
●
●
●
●
●
■
N
■
■
N
N
[620-Weuro]BN68-02326A-03L09.ind15 15 2009-10-08 ¿ÀÀü 9:27:35

English - 16
Picture Options
In PC mode, you can only make changes to the Colour Tone and Size from among the
items in Picture Options.
Warm1, Warm2 or Warm3 is only activated when the picture mode is Movie.
Settings can be adjusted and stored for each external device you have connected to an
input of the TV.
Size
Occasionally, you may want to change the size of the image on your screen. Your TV comes
with several screen size options, each designed to work best with specific types of video input.
Your cable box/satellite receiver
may have its own set of screen sizes as well. In general, though, you should view the TV in 16:9 mode as much as possible.
You can select these options by simply pressing the P.SIZE button on the remote control.
Auto Wide: Automatically adjusts the picture size to the 16:9 aspect ratio.
16:9: Adjusts the picture size to 16:9 appropriate for DVDs or wide broadcasting.
Wide Zoom: Magnify the size of the picture more than 4:3.
Zoom: Magnifies the 16:9 wide picture (in the vertical direction) to fit the screen size.
4:3: This is the default setting for a video movie or normal broadcasting.
Screen Fit: Use the function to see the full image without any cut-off when HDMI (720p / 1080i / 1080p) or Component (1080i
/ 1080p) signals are input.
Depending on the input source, the picture size options may vary.
The items available may differ depending on the selected mode.
In PC Mode, only 16:9 and 4:3 mode can be adjusted.
Settings can be adjusted and stored for each external device you have connected to an input of the
TV.
Temporary image retention may occur when viewing a static image on the set for more than two hours.
Wide Zoom: Press the ► button to Select Position, then press the ENTER
E
button. Press the ▲ or ▼ button to move the
picture up / down. Then press the ENTER
E
button.
Zoom: Press the ► button to Select Position, then press the ENTER
E
button. Press the ▲ or ▼ button to move the picture
up and down. Then press the ENTER
E
button. Press the ► button to Select Size, then press the ENTER
E
button. Press
the ▲ or ▼ button to magnify or reduce the picture size in the vertical direction. Then press the ENTER
E
button.
After selecting Screen Fit in HDMI (1080i / 1080p) or Component (1080i / 1080p) mode: Select Position by pressing the
◄ or ► button. Use the ▲, ▼, ◄ or ► button to move the picture.
Reset: Press the ◄ or ► button to select Reset, then press the ENTER
E
button. You can initialize the setting.
If you use the Screen Fit function with HDMI 720p input, 1 line will be cut at the top, bottom, left and right as in the Overscan
function.
When setting the picture size to Auto Wide in a 16:9 wide TV, you can determine the picture size you want to see the 4:3 WSS
(Wide Screen Service) image or nothing. Each individual European country requires dif
ferent picture size so this function is
intended for users to select it.
16:9: Sets the picture to 16:9 wide mode.
Wide Zoom: Magnify the size of the picture more than 4:3.
Zoom: Magnify the size of the picture vertically on screen.
4:3: Sets the picture to 4:3 normal mode.
This function is available in Auto Wide mode.
This function is not available in PC, Component or HDMI mode.
If the broadcast signal received by your TV is weak, you can activate the Digital Noise Reduction feature to help reduce any static
and ghosting that may appear on the screen.
When the signal is weak, select one of the other options until the best picture is displayed.
You can select the black level on the screen to adjust the screen depth.
This function is active only when an external device is connected to the TV via HDMI (RGB signals).
❑
N
■
N
N
■
O
●
●
●
●
●
●
N
N
N
N
N
N
N
N
N
■
●
●
●
●
N
N
■
N
■
N
ColourTone :Normal ▶
Size :AutoWide
ScreenMode :16:9
DigitalNR :Auto
HDMIBlackLevel :Normal
FilmMode :Off
BlueOnlyMode :Off
U
Move
E
Enter
R
Return
PictureOptions
[620-Weuro]BN68-02326A-03L09.ind16 16 2009-10-08 ¿ÀÀü 9:27:35

English - 17
The TV can be set to automatically sense and process film signals from all sources and adjust the picture for optimum quality.
Film Mode is supported in TV, AV, COMPONENT(480i / 1080i) and HDMI(480i / 1080i).
Off: Turn the Film Mode function off.
Auto1: Automatically adjusts the picture for the best quality when watching a film.
Auto2: Automatically optimizes the video text on the screen (not including closed captions) when watching a film.
Removes drag from fast scenes with a lot of movement to provide a clearer picture.
If you enable 100Hz Motion Plus, noise may appear on the screen. If this occurs, set 100Hz Motion Plus to off.
Off: Switches 100Hz Motion Plus off.
Clear: Sets 100Hz Motion Plus to minimum.
Standard: Sets 100Hz Motion Plus to medium.
Smooth: Sets 100Hz Motion Plus to maximum.
Custom: Adjusts the blur and judder reduction level to suit your preference.
Blur Reduction: Adjusts the blur reduction level from video sources.
Judder Reduction: Adjusts the judder reduction level from video sources when playing lms.
Reset: Reset the custom settings.
Demo: Displays the difference between 100Hz Motion Plus on and off modes.
This function is for AV device measurement experts. This function displays the blue signal only by removing the red and green
signals from the video signal so as to provide a Blue Filter effect that is used to adjust the Colour and Tint of video equipment such
as DVD players, Home Theatres, etc. Using this function, you can adjust the Colour and Tint to preferred values appropriate to
the signal level of each video device using the Red / Green / Blue / Cyan / Magenta /
Yellow Colour Bar Patterns, without using an
additional Blue Filter.
Blue Only Mode is available when the picture mode is set to Movie or Standard.
Resets all picture settings to the default values.
Reset Picture Mode: Current picture values return to default settings.
■
N
●
●
●
N
●
●
●
●
●
–
–
–
●
■
N
❑
N
[620-Weuro]BN68-02326A-03L09.ind17 17 2009-10-08 ¿ÀÀü 9:27:35

English - 18
Using Your TV as a Computer (PC) Display
Setting Up Your PC Software (Based on Windows XP)
The Windows display-settings for a typical computer are shown below. The actual screens on
your PC will probably be different, depending upon your particular version of Windows and
your particular video card. However, even if your actual screens look different, the same basic
set-up information will apply in almost all cases. (If not, contact your computer manufacturer or
Samsung Dealer.)
1.
First, click on ‘Control Panel’ on the Windows start menu.
2.
When the control panel window appears, click on ‘Appearance and Themes’
and a display
dialog-box will appear.
3.
When the control panel window appears, click on ‘Display’ and a display dialogbox will
appear.
4.
Navigate to the ‘Settings’ tab on the display dialog-box.
The correct size setting (resolution) - Optimum: 1920 X 1080 pixels
If a vertical-frequency option exists on your display settings dialog box, the correct
value is ‘60’ or ‘60 Hz’. Otherwise, just click ‘OK’ and exit the dialog box.
Display Modes
If the signal from the system equals the standard signal mode, the screen is adjusted automatically. If the signal from the system
doesn’t equal the standard signal mode, adjust the mode by referring to your videocard user guide; otherwise there may be no
video. For the display modes listed on the next page, the screen image has been optimized during manufacturing.
D-Sub and HDMI/DVI Input
Mode Resolution Horizontal Frequency
(KHz)
Vertical Frequency
(Hz)
Pixel Clock Frequency
(MHz)
Sync Polarity
(H / V)
IBM
640 x 350 31.469 70.086 25.175 +/-
720 x 400 31.469 70.087 28.322 -/+
MAC
640 x 480 35.000 66.667 30.240 -/-
832 x 624 49.726 74.551 57.284 -/-
1152 x 870 68.681 75.062 100.000 -/-
VESA CVT
720 x 576 35.910 59.950 32.750 -/+
1152 x 864 53.783 59.959 81.750 -/+
1280 x 720 44.772 59.855 74.500 -/+
1280 x 720 56.456 74.777 95.750 -/+
1280 x 960 75.231 74.857 130.000 -/+
VESA DMT
640 x 480 31.469 59.940 25.175 -/-
640 x 480 37.861 72.809 31.500 -/-
640 x 480 37.500 75.000 31.500 -/-
800 x 600 37.879 60.317 40.000 +/+
800 x 600 48.077 72.188 50.000 +/+
800 x 600 46.875 75.000 49.500 +/+
1024 x 768 48.363 60.004 65.000 -/-
1024 x 768 56.476 70.069 75.000 -/-
1024 x 768 60.023 75.029 78.750 +/+
1152 x 864 67.500 75.000 108.000 +/+
1280 x 1024 63.981 60.020 108.000 +/+
1280 x 1024 79.976 75.025 135.000 +/+
1280 x 800 49.702 59.810 83.500 -/+
1280 x 800 62.795 74.934 106.500 -/+
1280 x 960 60.000 60.000 108.000 +/+
1360 x 768 47.712 60.015 85.500 +/+
1440 x 900 55.935 59.887 106.500 -/+
1440 x 900 70.635 74.984 136.750 -/+
1680 x 1050 65.290 59.954 146.250 -/+
VESA GTF
1280 x 720 52.500 70.000 89.040 -/+
1280 x 1024 74.620 70.000 128.943 -/-
VESA DMT /
DTV CEA
1920 x 1080p 67.500 60.000 148.500 +/+
When using an HDMI / DVI cable connection, you must use the HDMI IN 3(DVI) jack.
The interlace mode is not supported.
The set might operate abnormally if a non-standard video format is selected.
Separate and Composite modes are supported. SOG is not supported.
Too long or low quality VGA cable can cause picture noise at high resolution modes (1920x1080).
¦
■
N
N
N
N
N
[620-Weuro]BN68-02326A-03L09.ind18 18 2009-10-08 ¿ÀÀü 9:27:35

English - 19
Setting up the TV with your PC
Preset: Press the SOURCE button to select PC mode.
Auto Adjustment
Use the Auto Adjust function to have the TV automatically adjust the video signals it receives.
The function also automatically fine-tunes the settings and adjusts the frequency values and
positions.
Press the TOOLS button to display the Tools menu. You can also set the Auto Adjustment
by selecting
.
This function does not work in DVI-HDMI mode.
Screen
Coarse / Fine
The purpose of picture quality adjustment is to remove or reduce picture noise. If the noise is
not removed by Fine-tuning alone, then adjust the frequency as best as possible (Coarse) and
Fine-tune again. After the noise has been reduced, readjust the picture so that it is aligned on
the centre of screen.
PC Position
Adjust the PC’s screen positioning if it does not fit the TV screen.
Press the ▲ or ▼ button to adjusting the Vertical-Position. Press the ◄ or ► button to adjust
the Horizontal-Position.
Image Reset
You can replace all image settings with the factory default values.
¦
N
❑
T
N
❑
■
■
■
Brightness :45
Sharpness :50
AutoAdjustment ▶
Screen
AdvancedSettings
PictureOptions
PictureReset
Picture
Coarse 50
Fine 0
PCPosition
ImageReset
U
Move
E
Enter
R
Return
Screen
[620-Weuro]BN68-02326A-03L09.ind19 19 2009-10-08 ¿ÀÀü 9:27:36

English - 20
SOUND
Configuring the Sound Menu
Press the TOOLS button to display the Tools menu. You can also set the sound mode by
selecting .
Standard: Selects the normal sound mode.
Music: Emphasizes music over voices.
Movie: Provides the best sound for movies.
Clear Voice: Emphasizes voice over other sounds.
Custom: Recalls your customized sound settings.
Equalizer
The sound settings can be adjusted to suit your personal preferences.
Mode: Selects the sound mode among the predefined settings.
Balance L/R: Adjusts the balance between the right and left speaker.
100Hz / 300Hz / 1KHz / 3KHz / 10KHz (Bandwidth Adjustment): To adjust the level of different bandwidth frequencies.
Reset: Resets the equalizer settings to the default values.
SRS TruSurround HD is a patented SRS technology that solves the problem of playing 5.1 multichannel content over two
speakers. TruSurround delivers a compelling, virtual surround sound experience through any two-speaker playback system,
including internal television speakers. It is fully compatible with all multichannel formats.
Press the TOOLS button to display the Tools menu. You can also set the SRS TruSurround HD by selecting
HD.
Audio Language
You can change the default value for audio languages. Displays the language information for the incoming stream.
While viewing a digital channel, this function can be selected.
You can only select the language among the actual languages being broadcast.
When sound is emitted from both the main speaker and the audio receiver, a sound echo may occur due to the decoding speed
difference between the main speaker and the audio receiver. In this case, use the TV Speaker function.
While viewing a digital channel, this function can be selected.
The Audio Format appears according to the broadcasting signal.
Audio Description
This is an auxiliary audio function that provides an additional audio track for visually challenged persons. This function handles the
Audio Stream for the AD (Audio Description), when it is sent along with the Main audio from the broadcaster. Users can turn the
Audio Description On or Off and control the volume.
Press the AD button on the remote control to select Off or On.
Turn the audio description function on or off.
Volume
You can adjust the audio description volume.
Volume is active when Audio Description is set to On.
While viewing a Digital channel, this function can be selected.
Each broadcasting station has its own signal conditions, and so it is not easy to adjust the volume every time the channel is
changed. This feature lets you automatically adjust the volume of the desired channel by lowering the sound output when the
modulation signal is high or by raising the sound output when the modulation signal is low
.
¦
❑
T
●
●
●
●
●
❑
●
●
●
●
❑
T
❑
N
N
❑
N
N
❑
O
■
■
N
N
❑
Mode :Custom ▶
Equalizer
SRSTruSurroundHD :Off
AudioLanguage :----
AudioFormat :----
AudioDescription
AutoVolume :Off
SpeakerSelect :TVSpeaker
Sound
[620-Weuro]BN68-02326A-03L09.ind20 20 2009-10-08 ¿ÀÀü 9:27:36

English - 21
Speaker Select
When you watch TV with it connecting to a Home theatre, turn the TV speakers off so you can listen to sound from the Home
theatre’s (external) speakers.
External Speaker: Used to listen to the sound of the External (Home Theatre) Speakers.
TV Speaker: Used to listen to the sound of the TV Speakers.
The volume and MUTE buttons do not operate when the Speaker Select is set to External Speaker.
If you select External Speaker in the Speaker Select menu, the sound settings will be limited
TV’s Internal Speakers Audio Out (Optical, L/R Out) to Sound System
RF / AV / Component / PC / HDMI RF / AV / Component / PC / HDMI
TV Speaker Sound Output Sound Output
External Speaker Mute Sound Output
Video No Signal Mute Mute
You can restore the Sound settings to the factory defaults.
Reset Sound Mode: Current sound values return to default settings.
Selecting the Sound Mode
You can set the sound mode by pressing the DUAL button. When you press it, the current sound mode is displayed on the screen.
Audio Type Dual 1 / 2 Default
A2 Stereo
Mono MONO
Automatic change
Stereo STEREO ↔ MONO
Dual DUAL 1 ↔ DUAL 2 DUAL 1
NICAM
Stereo
Mono MONO
Automatic change
Stereo MONO ↔ STEREO
Dual
MONO ↔ DUAL 1
DUAL 2
DUAL 1
If the stereo signal is weak and an automatic switching occurs, then switch to the mono.
This function is only activated in stereo sound signal. It is deactivated in mono sound signal.
This function is only available in TV mode.
❑
●
●
N
N
❑
N
¦
N
N
N
SoundReset
L
Move
E
Enter
R
Return
Cancelsoundreset.
ResetAll ResetSoundMode Cancel
[620-Weuro]BN68-02326A-03L09.ind21 21 2009-10-08 ¿ÀÀü 9:27:36

English - 22
SETUP
Configuring the Setup Menu
Menu Language
You can set the menu language.
Time
For detailed procedures on setting up options, refer to the ‘Setting the Time’ instructions.
Broadcast
Subtitle
You can activate and deactivate the subtitles. Use this menu to set the Subtitle Mode. Normal under the menu is the basic subtitle
and Hard of hearing is the subtitle for a hearing-impaired person.
Switches subtitles on or off.
Sets the subtitle mode.
Subtitle Language
Set the subtitle language.
If the Programme you are watching does not support the Hard of hearing function, Normal automatically activates even
though Hard of hearing mode is selected.
English is the default in cases where the selected language is unavailable in the broadcast.
You can select these options simply by pressing the SUBT. button on the remote control.
(UK only)
If the Programme is broadcast with digital text, this feature is enabled.
MHEG (Multimedia and Hypermedia Information Coding Experts Group)
An International standard for data encoding systems used in multimedia and hypermedia. This is at a higher level than the
MPEG system which includes data-linking hypermedia such as still images, character service, animation, graphic and video
files as well as multimedia data. MHEG is user runtime interaction technology and is being applied to various fields including
VOD (Video-On-Demand), ITV (Interactive TV), EC (Electronic Commerce), tele-education, tele-conferencing, digital libraries
and network games.
Teletext Language
You can set the Teletext language by selecting the language type.
English is the default in cases where the selected language is unavailable in the broadcast.
Preference
Primary Audio Language / Secondary Audio Language / Primary Subtitle Language / Secondary Subtitle Language /
Primary Teletext Language / Secondary Teletext Language
Using this feature, users can select one of the languages. The language selected here is the default when the user selects a
channel.
If you change the language setting, the Subtitle Language, Audio Language, and the Teletext Language of the Language
menu are automatically changed to the selected language.
The Subtitle Language, Audio Language, and the Teletext Language of the Language menu show a list of languages
supported by the current channel and the selection is highlighted. If you change this language setting, the new selection is
only valid for the current channel. The changed setting does not change the setting of the Primary Subtitle Language, Primary
Audio Language, or the Primary Teletext Language of the Preference menu.
¦
❑
❑
❑
■
●
●
●
N
N
O
■
N
■
N
■
●
Plug&Play
MenuLanguage :English ▶
Time
Broadcast
Security
General
Setup
[620-Weuro]BN68-02326A-03L09.ind22 22 2009-10-08 ¿ÀÀü 9:27:36

English - 23
Common Interface
CI Menu
This enables the user to select from the CAM-provided menu.
Select the CI Menu based on the menu PC Card.
Application Info.
This contains information on CAM inserted in the CI slot and displays it. The
Application Info inserting is about the ‘CI(CI+)
CARD’. You can install the CAM anytime whether the TV is ON or OFF.
1.
Purchase the CI CAM module by visiting your nearest dealer or by phone.
2.
Insert the ‘CI(CI+) CARD’ into the CAM in the direction of the arrow until it fits.
3.
Insert the CAM with the ‘CI(CI+) CARD’ installed into the common interface slot. (Insert the CAM in the direction of the
arrow, right up to the end so that it is parallel with the slot.)
4.
Check if you can see a picture on a scrambled signal channel.
Security (depending on the model)
Before the setup screen appears, the PIN number input screen appears. Enter your 4 digit PIN number.
The default PIN number of a new TV set is ‘0-0-0-0’. You can change the PIN by selecting Change PIN from the menu.
Some models require selecting the set PIN number when operating Plug & Play.
This feature allows you to prevent unauthorized users, such as children, from watching unsuitable Programme by muting out video
and audio.
You can lock some channels in Channel List.
Child Lock is available only in TV mode.
Parental Lock
This feature allows you to prevent unauthorized users, such as children, from watching unsuitable Programme by a 4-digit PIN
(Personal Identification Number) code that is defined by the user.
The Parental Lock item differs depending on the country.
When the Parental Lock is set, the ‘\’ symbol is displayed.
Allow All: Press to unlock all TV ratings.
Block All: Press to lock all TV ratings.
Change PIN
You can change your personal ID number that is required to set up the TV.
If you forget the PIN code, press the remote control buttons in the following sequence, which resets the PIN to ‘0-0-0-0’:
POWER (Off)
(On).
General
When connecting to a game console such as PlayStation™ or Xbox™, you can enjoy a more realistic gaming experience by
selecting game menu.
Restrictions on game mode (Caution)
To disconnect the game console and connect another external device, set Game Mode to Off in the setup menu.
If you display the TV menu in Game Mode, the screen shakes slightly.
Game Mode is not available in regular TV, PC and Ext. mode.
If the picture is poor when external device is connected to TV, check if Game Mode is On. Set Game Mode to Off and
connect external devices.
If Game Mode is On:
Picture mode is automatically changed to Standard and cannot be changed.
Sound mode is automatically changed to Custom and cannot be changed. Adjust the sound using the equalizer.
The Reset Sound function is activated. Selecting the Reset function after setting the equalizer resets the equalizer settings to
the factory defaults.
■
●
●
❑
N
N
N
■
N
N
■
N
N
N
■
N
❑
■
N
N
N
N
N
[620-Weuro]BN68-02326A-03L09.ind23 23 2009-10-08 ¿ÀÀü 9:27:36

English - 24
This feature adjusts the brightness of the TV in order to reduce power consumption. When watching TV at night, set the Energy
Saving mode option to High to reduce eye fatigue as well as power consumption.
If you select Picture Off, the screen is turned off and you can only hear the sound. Press any button to get out of Picture Off.
In the Tools menu, Picture Off function is not supported.
Press the TOOLS button to display the Tools menu. You can also set the Energy Saving option by selecting
Saving.
You can set the Transparency of the menu.
A melody sound can be set to come on when the TV is powered On or Off.
The Melody does not play
When no sound is output from the TV because the MUTE button has been pressed.
When no sound is output from the TV because the volume has been reduced to minimum with the volum (-) button.
When the TV is turned off by Sleep Timer function.
■
O
T
■
■
N
Setting the Time
Clock
Setting the clock is necessary in order to use the various timer features of the TV.
The current time will appear every time you press the INFO button.
If you disconnect the power cord, you have to set the clock again.
Clock Mode
You can set up the current time manually or automatically.
Auto: Set the current time automatically using the time from the digital broadcast.
Manual: Set the current time to a manually specified time.
Depending on the broadcast station and signal, the auto time may not be set correctly
. If
this occurs, set the time manually.
The Antenna or cable must be connected in order to set the time automatically.
Clock Set
You can set the current time manually.
This function is only available when Clock Mode is set to Manual.
You can set the day, month, year, hour and minute directly by pressing the number buttons
on the remote control.
Sleep Timer
The sleep timer automatically shuts off the TV after a preset time (30, 60, 90, 120, 150 and 180 minutes).
Press the TOOLS button to display the Tools menu. You can also set the sleep timer by selecting .
To cancel the Sleep Timer function, select Off.
Timer 1 / Timer 2 / Timer 3
Three different on / off timer settings can be made.
You must set the clock first.
On Time
Set the hour, minute, and activate / inactivate.
(To activate timer with the setting you’ve chosen, set to Activate.)
Off Time
Set the hour, minute, and activate / inactivate.
(To activate timer with the setting you’ve chosen, set to Activate.)
¦
❑
N
N
■
●
●
N
N
■
N
N
❑
T
N
❑
■
■
Clock :--:-- ▶
SleepTimer :Off
Timer1 :Inactivated
Timer2 :Inactivated
Timer3 :Inactivated
U
Move
E
Enter
R
Return
Time
Plug&Play
MenuLanguage :English
Time ▶
Broadcast
Security
General
Setup
OnTime
L
Move
U
Adjust
E
Enter
R
Return
Timer1
OffTime
Volume
00 00 Inactivate
00 00 Inactivate
10
Source Antenna Channel
TV ATV 0
Repeat
Once
Sun Mon Tue Wed Thu Fri Sat
[620-Weuro]BN68-02326A-03L09.ind24 24 2009-10-08 ¿ÀÀü 9:27:37

English - 25
Volume
Set the desired volume level.
You can select the TV or USB device content to be played when the TV turns on automatically. Select TV or USB. (Make sure that
an USB device is connected to your TV.)
Antenna (when Source is set to TV)
Select ATV or DTV.
Channel (when Source is set to TV)
Select the desired channel.
Contents (when Source is set to USB)
You can select a folder on the USB Device with music or photo files to be played when the TV turns on automatically.
If there is no music file on the USB or the folder containing a music file is not selected, Timer function does not operate
correctly.
When there is only one photo file in the USB, Slide Show will not be executed.
If the folder name is too long, the folder can not be selected.
If the folder name to be configured by the Contents function is too long, it cannot be selected.
Repeat
Select Once, Everyday, Mon~Fri, Mon~Sat, Sat~Sun or Manual.
When Manual is selected, press the ► button to select the desired day of the week. Press the ENTER
E
button over the
desired day and the
c
mark will appear.
You can set the hour, minute and channel by pressing the number buttons on the remote control.
Auto Power Off
When you set the timer on, the television will eventually turn off, if no controls are operated for 3 hours after the
TV was turned
on by the timer. This function is only available in timer on mode and prevents overheating, which may occur if a TV is on for
too long time.
■
■
■
■
■
N
N
N
N
■
N
N
N
[620-Weuro]BN68-02326A-03L09.ind25 25 2009-10-08 ¿ÀÀü 9:27:37

English - 26
INPUT / SUPPORT
Input Menu
Source List
Use to select TV or other external input sources such as DVD / Blu-ray players / Cable Box /
Satellite receivers (Set-Top Box) connected to the TV. Use to select the input source of your
choice.
Press the SOURCE button on the remote control to view an external signal source. TV
mode can be selected by pressing the TV button.
TV / Ext.1 / Ext.2 / AV / Component / PC / HDMI1 / HDMI2 / HDMI3/DVI / HDMI4
You can choose only those external devices that are connected to the TV. In the Source
List, connected inputs will be highlighted and sorted to the top. Inputs that are not connected
will be sorted to the bottom.
Ext. and PC Always stay activated.
Using the Colour buttons on the remote with the Source list
Red (Refresh): Refreshes the connected external devices. Press this if your Source is
on and connected, but does not appear in the list.
TOOLS (Tools): Displays the Edit Name and Information menus.
Edit Name
VCR / DVD / Cable STB / Satellite STB / PVR STB / AV Receiver / Game / Camcorder / PC / DVI / DVI PC / TV / IPTV / Blu-ray
/ HD DVD / DMA
Name the device connected to the input jacks to make your input source selection easier
.
When a PC with a resolution of 1920 x 1080@60Hz is connected to the HDMI IN 3(DVI) port, you should set the HDMI3/DVI
mode to DVI PC in the Edit Name of the Input mode.
When connecting an HDMI/DVI cable to the HDMI IN 3(DVI) port, you should set the HDMI3/DVI mode to DVI or DVI PC in
the Edit Name of the Input mode. In this case, a separate sound connection is required.
Support Menu
Self Diagnosis
Picture Test
If you think you have a picture problem, perform the picture test. Check the colour pattern on
the screen to see if the problem still exists.
Yes: If the test pattern does not appear or there is noise in the test pattern, select Yes.
There may be a problem with the TV. Therefore, contact Samsung’s call centre for
assistance.
No: If the test pattern is properly displayed, select No. There may be a problem with your
external equipment. Please check your connections. If the problem still persists, refer to the
external device’s user manual.
Sound Test
If you think you have a sound problem, please perform the sound test. Y
ou can check the sound
by playing a built-in melody sound through the TV.
If you hear no sound from the TV’s speakers, before performing the sound test, make sure
Speaker Select is set to TV speaker in the Sound menu.
The melody will be heard during the test even if Speaker Select is set to External Speaker or the sound is muted by pressing
the MUTE button.
Yes: If during the sound test you can hear sound only from one speaker or not at all, select Yes. There may be a problem with
the TV. Therefore, contact Samsung’s call centre for assistance.
No: If you can hear sound from the speakers, select No. There may be a problem with your external equipment. Please check
your connections. If the problem still persists, refer to the external device’s user manual.
¦
❑
O
■
N
N
N
❑
■
N
N
¦
❑
■
●
●
■
N
N
●
●
SelfDiagnosis ▶
SoftwareUpgrade
HDConnectionGuide
ContactSamsung
Support
SourceList
EditName
Input
Refresh
T
Tools
SourceList
TV
Ext.1 :----
Ext.2 :----
PC :----
AV :----
Component :----
SelfDiagnosis
U
Move
E
Enter
R
Return
PictureTest ▶
SoundTest
SignalInformation
[620-Weuro]BN68-02326A-03L09.ind26 26 2009-10-08 ¿ÀÀü 9:27:37

English - 27
Signal Information (digital channels only)
Unlike analogue channels, which can vary in reception quality from ‘snowy’ to clear
, digital (HDTV) channels have either perfect
reception quality or you will not receive them at all. So, unlike analogue channels, you cannot fine tune a digital channel. You can,
however, adjust your antenna to improve the reception of available digital channels.
If the signal strength meter indicates that the signal is weak, physically adjust your antenna to increase the signal strength.
Continue to adjust the antenna until you find the best position with the strongest signal.
Software Upgrade
Samsung may offer upgrades for the TV’s firmware in the future. These upgrades can be
performed via the TV when it is connected to the Internet, or by downloading the new firmware
from samsung.com to a USB memory device.
Current Version is the software already installed in the TV.
Alternative Software (Backup) shows the previous version that will be replaced.
Software is represented as ‘Year/Month/Day_Version’. The more recent the date, the newer
the software version. Installing the latest version is recommended.
By USB
Insert a USB drive containing the firmware upgrade downloaded from samsung.com into the
TV. Please be careful to not disconnect the power or remove the USB drive while upgrades
are being applied. The TV will turn off and turn on automatically after completing the firmware
upgrade. Please check the firmware version after the upgrades are complete (the new version
will have a higher number than the older version).
When software is upgraded, video and audio settings you have made will return to their default
(factory) settings. We recommend you write down your settings so that you can easily reset
them after the upgrade.
By Channel
Upgrades the software using the broadcasting signal.
If the function is selected during the software transmission period, this function searches for available software and downloads
the software.
The time required to download the software is determined by the signal status.
Standby Mode Upgrade
To continue software upgrade with master power on, Select On by pressing the ▲ or ▼ button. 45 minutes after entering standby
mode, a manual upgrade is automatically conducted. Since the power of the unit is turned on internally
, the screen may be on
slightly for the LCD product. This phenomenon may continue for more than 1 hour until the software upgrade is completed.
Alternative Software (Backup)
If there is an issue with the new firmware and it is affecting operation, you can change the software to the previous version.
If software was changed, existing software is displayed.
You can change current software to alternative software by ‘Alternative Software’.
HD Connection Guide
This menu presents the connection method that provides the optimal quality for the HD TV. Refer to this information when
connecting external devices to the TV.
Contact Samsung
View this information when your TV does not work properly or when you want to upgrade the software. You can view the
information regarding the call centre, product and software file download method.
■
N
❑
N
N
N
■
■
N
N
■
■
N
N
❑
❑
TV Side Panel
USB Drive
CurrentVersion 2009/01/18_000001
ByUSB ▶
ByChannel
StandbyModeUpgrade :45Min
AlternativeSoftware 2009/01/15_00000
U
Move
E
Enter
R
Return
SoftwareUpgrade
[620-Weuro]BN68-02326A-03L09.ind27 27 2009-10-08 ¿ÀÀü 9:27:37

English - 28
MEDIA PLAY (USB)
Connecting a USB Device
1. Press the POWER button to turn the TV on.
2. Connect a USB device containing photo and/or music files to the USB jack on the side of the
TV.
3.
When the Application selection screen is displayed, press the ENTER
E
button to select
Media Play (USB).
MTP (Media Transfer Protocol) is not supported.
The file system supports FAT16, FAT32 and NTFS.
Certain types of USB Digital camera and audio devices may not be compatible with this
TV.
Media Play only supports USB Mass Storage Class devices (MSC). MSC
is a Mass Storage Class Bulk-Only Transport device. Examples of MSC are
Thumb drives and Flash Card Readers (Both USB HDD and HUB are not
supported.)
Please connect directly to the USB port of your TV. If you are using a separate
cable connection, there may be a USB compatibility problem.
Before connecting your device to the TV, please back up your files to prevent
them from damage or loss of data. SAMSUNG is not responsible for any data
file damage or data loss.
Do not disconnect the USB device while it is loading.
The higher the resolution of the image, the longer it takes to display on the screen.
The maximum supported JPEG resolution is 15360X8640 pixels.
For unsupported or corrupted files, the ‘Not Supported File Format’ message is di
splayed.
MP3 files with DRM that have been downloaded from a non-free site cannot be played. Digital Rights Management (DRM)
is a technology that supports the creation of content, the distribution and management of the content in an integrated
and comprehensive way, including the protection of the rights and interests of the content providers, the prevention of the
illegal copying of contents, as well as managing billings and settlements.
When moving to a photo, loading may take a few seconds. At this point, the loading icon will appear at the screen.
If more than one MSC device is connected, some of them may not be recognized. If a device requires high power (more
than 500mA or 5V), the USB device may not be supported.
If an over-power warning message is displayed while you are connecting or using a USB device, the device may not be
recognized or may malfunction.
Using the Remote Control Button in Media Play Menu
Button Operations
▲/▼/◄/► Move the cursor and select an item.
ENTER
E
Select the currently selected item. While playing a slide show or music file:
- Pressing the ENTER
E
button during play pauses the play.
- Pressing the ENTER
E
button during pause resumes the play.
∂
/
∑
Play or pause the Slide Show, music.
RETURN Return to the previous menu.
TOOLS Run various functions from the Photo and Music menus.
∫
Stop the current slide show or Music file.
π
/
μ
Jump to previous group/Jump to next group.
INFO Show file information.
MEDIA.P Exit Media Play mode.
<
P
>
,
EXIT, TV
Stop Media Play mode and Returns to TV mode.
¦
N
N
N
N
N
N
N
N
N
N
N
N
N
N
TV Side Panel
USB Drive
851.86MB/993.02MBFree
Photo
SUM
SUM
Device
PHOTO
R
Return
Music Setup
[620-Weuro]BN68-02326A-03L09.ind28 28 2009-10-08 ¿ÀÀü 9:27:38

English - 29
Media Play Function
This function enables you to view and listen to photo and/or music files saved on a USB Mass Storage Class (MSC) device.
It might not work properly with unlicensed multimedia files.
Entering the Media Play (USB) Menu
1. Press the MENU button. Press the ▲ or ▼ button to select Application, then
press the ENTER
E
button.
2. Press the ▲ or ▼ button to select Media Play (USB), then press the ENTER
E
button.
The Media Play (USB) menu is displayed.
Press the MEDIA.P button on the remote control to display the Media Play
menu.
Press the SOURCE button on the remote control to view the source list.
Then Press the ▲ or ▼ button to select USB.
3.
Press the Red button, then press the ▲ or ▼ button to select the USB Memory.
Press the ENTER
E
button.
This function differs depending on the USB Memory.
The selected USB device name appears at the bottom left of the screen.
4.
Press the ◄ or ► button to select an icon (Photo, Music, Setup), then press the ENTER
E
button.
To exit Media Play mode, press the MEDIA.P button on the remote control.
Removing a USB Memory Device Safely
You can remove the device safely from the TV.
1. Press the TOOLS button in the Media Play file list screen, or while a Slide Show
or music is being played.
2.
Press the ▲ or ▼ button to select Remove Safely, then press the ENTER
E
button.
3. Remove the USB device from the TV.
Screen Display
Move to either ‘Group List Section’ or ‘File List Section’ using the Up and Down buttons. After selecting a section, press the ◄ or ►
buttons to select an item.
¦
N
N
O
O
N
N
N
INFO
AD
INFO
AD
851.86MB/993.02MBFree
Photo
SUM
SUM
Device
PHOTO
R
Return
Music Setup
SUM Device
Select
T
Tools
R
UpperFolder
1234.jpg
1235.jpg
1236.jpg
1237.jpg
1233.jpg
1232.jpg
1231.jpg
SlideShow
PlayCurrentGroup
Information
Remove
Safely
5/15
1 2
../Photo/
Group List Section
File List Section
SUM Device
Select
T
Tools
R
UpperFolder
1234.jpg
1235.jpg
1236.jpg
1237.jpg
1233.jpg
1232.jpg
1231.jpg
1File(s)Selected
2
3 5
4
1 2
1
5/15
c
../Photo/
[620-Weuro]BN68-02326A-03L09.ind29 29 2009-10-08 ¿ÀÀü 9:27:42

English - 30
1 View Groups: The sort group where the currently selected file is contained is highlighted.
2 Currently selected file: The selected file is the file you can now control. Photo file are displayed as thumbnail images.
3 Current Device: Shows the currently selected device name. Press the Red button to select a device.
Red (Device) button: Selects a connected device.
4 Item Selection Information: Shows the number of files that are selected by pressing the
Yellow button.
5 Help Items
Yellow (Select) button: Selects file from the file list. Selected files are marked with a symbol
c
. Press the Yellow button
again to cancel a file selection.
TOOLS (Tools) button: Displays the option menus. (The option menu changes according to the current status.)
Photo List Option Menu
1. Press the MEDIA.P button.
2. Press the ◄ or ► button to select Photo, then press the ENTER
E
button.
3. Press the ◄ or ► button to select the desired photo file.
Selecting Multiple Photos
Press the ◄ or ► button to select the desired photo file. Then press the
Yellow button.
Repeat the above operation to select multiple photo files.
The mark
c
appears to the selected photo file.
4. Press the TOOLS button.
The option menu changes according to the current status.
Slide Show
Using this menu, you can play a SlideShow using the photo files on the USB memory device.
Play Current Group
Using this menu, you can play a SlideShow using only the photo files in the currently selected sorting group.
Deselect All (When at least one file is selected)
You can deselect all files.
The
c
mark indicating the corresponding file is selected is hidden.
Information
The photo file information including the name, the size, the resolution, the date modified and the path is displayed.
You can view the information of photo files during a SlideShow using the same procedures.
Press the INFO button to viewing the information.
Remove Safely
You can remove the device safely from the TV.
¦
N
N
❑
❑
❑
N
❑
N
O
❑
INFO
AD
SUM Device
Select
T
Tools
R
UpperFolder
1234.jpg
1235.jpg
1236.jpg
1237.jpg
1233.jpg
1232.jpg
1231.jpg
SlideShow
PlayCurrentGroup
Information
Remove
Safely
5/15
1 2
../Photo/
[620-Weuro]BN68-02326A-03L09.ind30 30 2009-10-08 ¿ÀÀü 9:27:43

English - 31
Viewing a Photo or Slide Show
Viewing a Slide Show
1. Press the ▼ button to select the File List Section.
2. Press the TOOLS button.
3.
Press the ▲ or ▼ button to select Slide Show, then press the ENTER
E
button.
All files in the File List Section will be used for the Slide Show.
During the slide show, files are displayed in order from the currently shown file.
The Slide Show progresses in the order sorted in the File List Section.
Music files can be automatically played during the Slide Show if the Background
Music is set to On.
While a photo list is displayed, press the
∂
(Play)/ENTER
E
button on the
remote control to start slide show.
SlideShow Control Buttons
Button Operations
ENTER
E
Play/Pause the Slide Show.
∂
Play the Slide Show.
∑
Pause the Slide Show.
∫
Exit Slide Show and return to the photo list.
π
/
μ
Change the SlideShow playing speed.
TOOLS Run various functions from the Photo menus.
Playing current group
1. Press the ▲ button to move to the Group List Section.
2. Select a group using the ◄ and ► buttons.
3.
Press the
∂
(Play) button. A slideshow begins with the files of the selected
group.
Alternatively
1.
Select the files In the File List Section, contained the desired group.
To move to the previous/next group, press the
π
(REW) or
μ
(FF)
button.
2. Press the TOOLS button.
3.
Press the ▲ or ▼ button to select Play Current Group, then press the ENTER
E
button.
Only the photos in the sorting group including the selected files will be used for the Slide Show
.
1. Press the ▼ button to select the File List Section.
2. Press the ◄ or ► button to select the desired photo in the File List Section.
3.
Press the Yellow button.
4.
Repeat the above operation to select multiple photos.
The
c
mark appears to the left of the selected photo.
If you select one file, the Slide Show will not be performed.
To deselect all selected files, press the TOOLS button and select Deselect All.
5.
Press the
∂
(Play)/ENTER
E
button.
The selected files will be used for the Slide Show.
¦
N
N
N
N
O
N
●
N
N
N
N
N
N
INFO
AD
E
Pause◀▶Previous/Next
T
Tools
R
Return
SUM
1234.jpg
580x7652009/03/025/15
▶Normal
SUM Device
Select
T
Tools
R
UpperFolder
1234.jpg
1235.jpg
1236.jpg
1237.jpg
1233.jpg
1232.jpg
1231.jpg
SlideShow
PlayCurrentGroup
Information
Remove
Safely
5/15
1 2
../Photo/
SUM Device
Select
T
Tools
R
UpperFolder
1234.jpg
1235.jpg
1236.jpg
1237.jpg
1233.jpg
1232.jpg
1231.jpg
5/15
1 2
../Photo/
[620-Weuro]BN68-02326A-03L09.ind31 31 2009-10-08 ¿ÀÀü 9:27:47

English - 32
Alternatively
1. In the File List Section, press the Yellow buttons to select the desired photos.
2.
Press the TOOLS button.
3.
Press the ▲ or ▼ button to select Slide Show, then press the ENTER
E
button.
The selected files will be used for the Slide Show.
Slide Show Option Menu
1. During a slide show (or when viewing a photo), press the TOOLS button to set the
option.
2.
Press the ▲ or ▼ button to select the desired option, then press the ENTER
E
button.
Stop Slide Show / Start Slide Show
You can start or stop a SlideShow.
You can select the slide show speed.
This function is available only during a slide show.
You can also change the speed of the Slide Show by pressing the
π
(REW) or
μ
(FF) button during the Slide Show.
Rotate
You can rotate photos saved on a USB memory device.
Whenever you press the ◄ button, it rotates by 270˚, 180˚, 90˚ and 0˚.
Whenever you press the ► button, it rotates by 90˚, 180˚, 270˚ and 0˚.
The rotated file is not saved.
Zoom
You can magnify photos saved on a USB memory device. (x1 → x2 → x4)
To move the enlarged photo image, press the ENTER
E
button, then press the ▲/▼/◄/► buttons. Note that when the
enlarged picture is smaller than the original screen size, the location change function doesn’t work.
The enlarged file is not saved.
Background Music
You can select background music when watching a Slide Show.
To use this feature, there must be music and photo files stored on the USB device.
Off: Background music is not played.
On: When the background music is available, if you select On, the music is played back.
Select Music File (0 File(s) Selected)
Only the selected music file is set as the background music.
Picture Setting / Sound Setting
You can select the picture and sound settings.
Information
The photo file information is displayed.
Remove Safely
You can remove the device safely from the TV.
●
N
¦
❑
❑
N
N
❑
N
N
N
❑
N
N
❑
N
■
●
●
■
❑
❑
❑
StopSlideShow
SlideShowSpeed : Normal
Rotate
Zoom
Background
Music
PictureSetting
SoundSetting
Information
Remove
Safely
U
Move
E
Enter
e
Exit
Tools
[620-Weuro]BN68-02326A-03L09.ind32 32 2009-10-08 ¿ÀÀü 9:27:47

English - 33
Music List Option Menu
1. Press the MEDIA.P button.
2. Press the ◄ or ► button to select Music, then press the ENTER
E
button.
3. Press the ◄ or ► button to select the desired Music file.
Selecting Multiple Music Files
Press the ◄ or ► button to select the desired music file. Then press the
Yellow button.
Repeat the above operation to select multiple music files.
The mark
c
appears to the selected music file.
4. Press the TOOLS button.
The option menu changes according to the current status.
Play Current Group
Using this menu, you can only play music files in the currently selected sorting group.
Deselect All (When at least one file is selected)
You can deselect all files.
The
c
mark indicating the corresponding file is selected is hidden.
Information
The music file information including the name, the size, the date modified and the path is displayed.
You can view the music file information during Play Current Group using the same procedures.
Press the INFO button to viewing the information.
Remove Safely
You can remove the device safely from the TV.
¦
N
N
❑
❑
N
❑
N
O
❑
INFO
AD
SUM Device
Select
T
Tools
R
UpperFolder
HaHaHa
Gold
Shine
Way
Want
Me
Lies
ILoveYou
GlenHans
OnceOst
2007
Soundtrack
3/37
Energetic
PlayCurrentGroup
Information
Remove
Safely
5 1 2 34
../Music/
[620-Weuro]BN68-02326A-03L09.ind33 33 2009-10-08 ¿ÀÀü 9:27:47

English - 34
Playing Music
1. Press the ▼ button to select the File List Section.
2. Press the ◄ or ► button to select a music file to be played.
3.
Press the
∂
(Play)/ENTER
E
button.
This menu only shows files with the MP3 file extension. Files with other
file extensions are not displayed, even if they are saved on the same USB
device.
The selected file is displayed at the top with its playing time.
To adjust the music volume, press the volume button on the remote control.
To mute the sound, press the MUTE button on the remote control.
If the sound is odd when playing MP3 files, adjust the Equalizer and SRS TruSurround HD in the Sound menu. (An
over-modulated MP3 file may cause a sound problem.)
The playing duration of a music file may be displayed as ‘00:00:00’ if its playing time information is not found at the start of
the file.
π
(REW) or
μ
(FF) buttons do not function during play.
Music Play Control Buttons
Button Operations
ENTER
E
Play/Pause the music file.
∂
Play the music file
∑
Pause the music file
∫
Exit play mode and return to the music list.
TOOLS Run various functions from the Music menus.
Music function information icon
p
When all music files in the folder (or the selected file) are repeated. Repeat Mode is On.
q
When all music files in the folder (or the selected file) are played once. Repeat Mode is Off.
Playing the music group
1. Press the ▲ button to move to the Group List Section.
2. Select a group using the ◄ and ► buttons.
3.
Press the
∂
(Play) button. The files of the selected group will start playing.
Alternatively
1.
Select the files In the File List Section, contained the desired group.
To move to the previous/next group, press the
π
(REW) or
μ
(FF) button.
2. Press the TOOLS button.
3.
Press the ▲ or ▼ button to select Play Current Group, then press the ENTER
E
button.
The music files in the sorting group including the selected file are played.
1. Press the ▼ button to select the File List Section.
2. Press the ◄ or ► button to select the desired music file.
3.
Press the Yellow button.
4.
Repeat the above operation to select multiple music files.
The
c
appears to the left of the selected music file.
To deselect all selected files, press the TOOLS button and select Deselect All.
5.
Press the
∂
(Play)/ENTER
E
button.
The selected files will be played.
¦
N
N
N
N
N
N
N
N
●
N
N
N
N
N
E
Pause◀▶Previous/Next
T
Tools
R
Return
SUM
ILoveYou
HaHaHaWay
▶00:00:04/00:04:043/37
[620-Weuro]BN68-02326A-03L09.ind34 34 2009-10-08 ¿ÀÀü 9:27:48

English - 35
Music Play Option Menu
Music Play Option Menu
You can play music files repeatedly.
Picture Setting / Sound Setting
You can configure the picture and sound settings.
Information
The music file information is displayed.
Remove Safely
You can remove the device safely from the TV.
¦
❑
❑
❑
❑
Using the Setup Menu
Setup displays the user settings of the Media Play menu.
1. Press the MEDIA.P button.
2.
Press the ◄ or ► button to select Setup, then press the ENTER
E
button.
3. Press the ▲ or ▼ button to select the desired option.
4.
Press the ◄ or ► button to select the option.
To exit Media Play mode, press the MEDIA.P button on the remote control.
Select to repeatedly play music files.
Select to set the waiting time before the screen saver appears.
Information
Select to viewing the information of the connected device.
Remove Safely
You can remove the device safely from the TV.
¦
N
■
■
■
■
RepeatMode ◀On▶
PictureSetting
SoundSetting
Information
Remove
Safely
U
Move
L
Adjust
e
Exit
Tools
851.86MB/993.02MBFree
Photo
SUM
SUM
Device
SETUP
e
Exit
Music Setup
MusicRepeatMode ◀On▶
ScreenSaverRunTime :2hours
Information
Remove
Safely
U
Move
L
Adjust
R
Return
SUM Device
[620-Weuro]BN68-02326A-03L09.ind35 35 2009-10-08 ¿ÀÀü 9:27:48

English - 36
ANYNET
+
Connecting Anynet
+
Devices
What is Anynet
+
?
Anynet
+
is a function that enables you to control all connected Samsung devices that support Anynet
+
with your Samsung TV’s
remote. The Anynet
+
system can be used only with Samsung devices that have the Anynet
+
feature. To be sure your Samsung
device has this feature, check if there is an Anynet
+
logo on it.
To connect to a TV
1. Connect the HDMI IN (1, 2, 3(DVI) or 4) jack on the TV and the HDMI OUT jack of the corresponding Anynet
+
device using an
HDMI cable.
To connect to Home Theatre
1. Connect the HDMI IN (1, 2, 3(DVI) or 4) jack on the TV and the HDMI OUT jack of the corresponding Anynet
+
device using an
HDMI cable.
2. Connect the HDMI IN jack of the home theatre and the HDMI OUT jack of the corresponding Anynet
+
device using an HDMI
cable.
Connect the Optical cable between the DIGITAL AUDIO OUT (OPTICAL) jack on your TV and the Digital Audio Input on
the Home Theatre.
When following the connection above, the Optical jack only outputs 2 channel audio.
You will only hear sound from the
Home Theatre’s Front Left and Right speakers and the subwoofer. If you want to hear 5.1 channel audio, connect the
DIGITAL AUDIO OUT (OPTICAL) jack on the DVD / Satellite Box (ie Anynet Device 1 or 2) directly to the Amplifier or
Home Theatre, not the TV.
Connect only one Home Theatre.
You can connect an Anynet
+
device using the HDMI 1.3 cable. Some HDMI cables may not support Anynet
+
functions.
Anynet
+
works when the AV device supporting Anynet
+
is in the Standby or On status.
Anynet
+
supports up to 12 AV devices in total. Note that you can connect up to 3 devices of the same type.
¦
N
N
N
N
N
N
Anynet
+
Device 1
HDMI 1.3 Cable
HDMI 1.3 CableHDMI 1.3 Cable
HDMI 1.3 Cable
Anynet
+
Device 2 Anynet
+
Device 3 Anynet
+
Device 4
TV
Anynet
+
Device 1
HDMI 1.3 Cable
HDMI 1.3 Cable
HDMI 1.3 CableHDMI 1.3 Cable
TV
HDMI 1.3 Cable
Optical Cable
Anynet
+
Device 2 Anynet
+
Device 3 Anynet
+
Device 4
Home Theatre
[620-Weuro]BN68-02326A-03L09.ind36 36 2009-10-08 ¿ÀÀü 9:27:49

English - 37
Setting Up Anynet
+
Press the TOOLS button to display the Tools menu. You can also display Anynet
+
menu by
selecting
+
(HDMI-CEC).
Setup
Anynet
+
To use the Anynet
+
Function, Anynet
+
(HDMI-CEC) must be set to On.
When the Anynet
+
(HDMI-CEC) function is disabled, all the Anynet+ related operations are
deactivated.
Setting an Anynet
+
Device to turn Off automatically when the TV is turned Off.
The active source on the TV remote must be set to TV to use the Anynet
+
function.
If you set Auto Turn Off to Yes, connected external devices are also turned off when the
TV is turned off. If an external device is still recording, it may or may not turn off.
Switching between Anynet
+
Devices
1. Press the TOOLS button. Press the ENTER
E
button to select Anynet
+
(HDMI-CEC).
2. Press the ▲ or ▼ button to select Device List, then press the ENTER
E
button.
Anynet
+
devices connected to the TV are listed.
If you cannot find a device you want, press the red button to scan for devices.
3.
Press the ▲ or ▼ button to select a particular device and press the ENTER
E
button. It
is switched to the selected device.
Only when you set Anynet
+
(HDMI-CEC) to On in the Application menu, the Device
List menu appears.
Switching to the selected devices may take up to 2 minutes. You cannot cancel the
operation during the switching operation.
The time required to scan for devices is determined by the number of connected devices.
When the device scan is complete, the number of devices found are not displayed.
Although the TV automatically searches the device list when the TV is turned on via the power button, devices connected to
the TV may not always be automatically displayed in the device list. Press the red button to search for the connected device.
If you have selected external input mode by pressing the SOURCE button, you cannot use the Anynet
+
function. Make sure to
switch to an Anynet
+
device by using the Device List.
Anynet
+
Menu
The Anynet
+
menu changes depending on the type and status of the Anynet
+
devices connected to the TV.
Anynet
+
Menu Description
View TV Anynet
+
mode changes to TV broadcast mode.
Device List Shows the Anynet
+
device list.
(device_name) MENU
Shows the connected device menus. E.g. If a DVD recorder is connected, the disc
menu of the DVD recorder will appear.
(device_name) INFO
Shows the play menu of the connected device. E.g. If a DVD recorder is connected,
the play menu of the DVD recorder will appear.
Recording: (*recorder)
Starts recording immediately using the recorder. (This is only available for devices that
support the recording function.)
Stop Recording: (*recorder) Stops recording.
Receiver Sound is played through the receiver.
If more than one recording device is connected, they are displayed as (*recorder) and if only one recording device is
connected, it will be represented as (*device_name).
¦
T
❑
■
N
■
N
N
¦
N
N
N
N
N
N
N
N
N
U
Move
E
Enter
R
Return
Anynet
+
(HDMI-CEC) :On▶
Setup
AutoTurnOff :Yes
MediaPlay(USB)
Anynet
+
(HDMI-CEC)
Application
U
Move
E
Enter
R
Return
Anynet
+
(HDMI-CEC) :On
Setup
AutoTurnOff :Yes▶
U
Move
E
Enter
R
Return
ViewTV
DeviceList
Recording:DVDR
DVDRMENU
DVDRINFO
Receiver:Off
Setup
[620-Weuro]BN68-02326A-03L09.ind37 37 2009-10-08 ¿ÀÀü 9:27:50

English - 38
TV Remote Control Buttons Available in Anynet
+
Mode
Device Type Operating Status Available Buttons
Anynet
+
Device
After switching to the device, when the
menu of the corresponding device is
displayed on the screen.
Numeric buttons
▲/▼/◄/►/ ENTER
E
buttons
Colour buttons / EXIT button
After switching to the device, while playing
a file.
π
(Backward search) /
μ
(Forward search) /
∫
(Stop) /
∂
(Play) /
∑
(Pause)
Device with built-in
Tuner
After switching to the device, when you
are watching a TV programme.
P
>
/ P
<
button
Audio Device When Receiver is activated.
Y
/ MUTE button
The Anynet
+
function only works when the active source on the TV remote control is set to TV.
The
∏
button works only while in the recordable state.
You cannot control Anynet
+
devices using the buttons on the TV. You can control Anynet
+
devices only using the TV remote
control.
The TV remote control may not work under certain conditions. If this occurs, reselect the Anynet
+
device.
The Anynet
+
functions do not operate with other manufacturers’ products.
The
π
,
μ
operations may differ depending on the device.
Recording
You can make a recording of a TV programme using a Samsung recorder.
1. Press the TOOLS button. Press the ENTER
E
button to select Anynet
+
(HDMI-CEC).
2. Press the ▲ or ▼ button to select Recording Immediately and press the ENTER
E
button. Recording begins.
When there is more than one recording device
When multiple recording devices are connected, the recording devices are listed.
Press the ▲ or ▼ button to select a recording device and press the ENTER
E
button. Recording begins.
When the recording device is not displayed select Device List and press the Red
button to search devices
3.
Press the EXIT button to exit.
You can record the source streams by selecting Recording: (device_name).
Pressing the
∏
button will record whatever you are currently watching. If you are watching video from another device,
the video from the device is recorded.
Before recording, check whether the antenna jack is properly connected to the recording device.
To properly connect an
antenna to a recording device, refer to the recording device’s users manual.
Listening through a Receiver (Home theatre)
You can listen to sound through a receiver instead of the TV speaker.
1. Press the TOOLS button. Press the ENTER
E
button to select Anynet
+
(HDMI-CEC).
2. Press the ▲ or ▼ button to select Receiver. Press the ◄ or ► button to select On or Off.
3.
Press the EXIT button to exit.
If your receiver supports audio only, it may not appear in the device list.
The receiver will work when you have properly connected the optical in jack of the
receiver to the DIGITAL AUDIO OUT (OPTICAL) jack of the TV.
When the receiver (home theatre) is set to On, you can hear sound output from
the TV’s Optical jack. When the TV is displaying a DTV(air) signal, the TV will send
out 5.1 channel sound to the Home Theatre receiver. When the source is a digital component such as a DVD and is
connected to the TV via HDMI, only 2 channel sound will be heard from the Home Theatre receiver.
If there is a power interruption to the TV when the Receiver is set to On (by disconnecting the power cord or a power
failure), the Speaker Select may be set to External Speaker when you turn the TV on again.
N
N
N
N
N
N
¦
N
N
N
N
N
¦
N
N
N
N
U
Move
E
Enter
R
Return
ViewTV
DeviceList
Recording:DVDR
DVDRMENU
DVDRINFO
Receiver:Off
Setup
U
Move
E
Enter
R
Return
ViewTV
DeviceList
Recording:DVDR
DVDRMENU
DVDRINFO
Receiver:Off
Setup
[620-Weuro]BN68-02326A-03L09.ind38 38 2009-10-08 ¿ÀÀü 9:27:50

English - 39
Troubleshooting for Anynet
+
Problem Possible Solution
Anynet
+
does not work. Check if the device is an Anynet
+
device. The Anynet
+
system supports Anynet
+
devices
only.
Connect only one receiver (home theatre).
Check if the Anynet
+
device power cord is properly connected.
Check the Anynet
+
device’s Video/Audio/HDMI 1.3 cable connections.
Check whether Anynet
+
(HDMI-CEC) is set to On in the Anynet
+
setup menu.
Check whether the TV remote control is in TV mode.
Check whether it is Anynet
+
exclusive remote control.
Anynet
+
doesn’t work in certain situations. (Searching channels, Operating Media Play,
Plug & Play, etc.)
When connecting or removing the HDMI 1.3 cable, please make sure to search devices
again or turn your TV off and on again.
Check if the Anynet
+
Function of Anynet
+
device is set on.
●
●
●
●
●
●
●
●
●
●
I want to start Anynet
+
. Check if the Anynet+ device is properly connected to the TV and check if the
Anynet
+
(HDMI-CEC) is set to On in the Anynet
+
Setup menu.
Press the TV button on the TV remote control to switch to TV. Then press the TOOLS button
to show the Anynet
+
menu and select a menu you want.
●
●
I want to exit Anynet
+
. Select View TV in the Anynet
+
menu.
Press the SOURCE button on the TV remote control and select a device other than Anynet
+
devices.
Press P
>
/
<
, PRE-CH and FAV.CH to change the TV mode. (Note that the channel
button operates only when a tuner-embedded Anynet
+
device is not connected.)
●
●
●
The message
‘Connecting to Anynet+
device...’ appears on the
screen.
You cannot use the remote control when you are configuring Anynet
+
or switching to a view
mode.
Use the remote control when the Anynet
+
setting or switching to view mode is complete.
●
●
The Anynet
+
device does
not play.
You cannot use the play function when Plug & Play is in progress.
●
The connected device is
not displayed.
Check whether or not the device supports Anynet
+
functions.
Check whether or not the HDMI 1.3 cable is properly connected.
Check whether Anynet
+
(HDMI-CEC) is set to On in the Anynet
+
setup menu.
Search Anynet
+
devices again.
You can connect an Anynet
+
device using the HDMI 1.3 cable only. Some HDMI cables may
not support Anynet
+
functions.
If it is terminated by an abnormal situation such as disconnecting the HDMI cable or power
cord or a power failure, please repeat the device scan.
●
●
●
●
●
●
The TV programme
cannot be recorded.
Check whether the antenna jack on the recording device is properly connected.
●
The TV sound is not
output through the
receiver.
Connect the optical cable between TV and the receiver.
●
¦
[620-Weuro]BN68-02326A-03L09.ind39 39 2009-10-08 ¿ÀÀü 9:27:51

English - 40
RECOMMENDATIONS
Teletext Feature
Most television stations provide written information services via Teletext. The index page of the Teletext service gives you
information on how to use the service. In addition, you can select various options to suit your requirements by using the remote
control buttons.
For Teletext information to be displayed correctly, channel reception must be stable. Otherwise, information may be missing or
some pages may not be displayed.
You can change Teletext pages by pressing the numeric buttons on the remote control.
1
0
(mode)
Press to select the Teletext mode
(LIST/ FLOF). If you press it in
the LIST mode, it switches into
the List save mode. In the List
save mode, you can save Teletext
page into list using the
8
(store)
button.
2
5
(reveal)
Used to display the hidden text
(answers to quiz games, for
example). To display normal
screen, press it again.
3
4
(size)
Press to display the double-size
letters in the upper half of the
screen. For lower half of the
screen, press it again. To display
normal screen, press it once
again.
4
8
(store)
Used to store the Teletext pages.
5 Colour buttons (red/green/yellow/
blue)
If the FASTEXT system is used
by a broadcasting company, the
different topics covered on a
Teletext page are colour-coded
and can be selected by pressing
the coloured buttons. Press
one of them corresponding
to the required. The page is
displayed with other coloured
information that can be selected
in the same way. To display the
previous or next page, press the
corresponding coloured button.
6
/
(Teletext on/mix)
Press to activate Teletext mode after
selecting the channel providing the
Teletext service. Press it twice to
overlap the Teletext with the current
broadcasting screen.
7
:
(exit)
Exit from the Teletext display.
8
1
(sub-page)
Used to display the available sub-page.
9
2
(page up)
Used to display the next Teletext page.
0
3
(page down)
Used to display the previous Teletext
page.
!
9
(hold)
Used to hold the display on a given
page if the selected page is linked with
several secondary pages which follow
on automatically. To resume, press it
again.
@
6
(index)
Used to display the index (contents)
page at any time while you are viewing
Teletext.
#
7
(cancel)
Used to display the broadcast when
searching for a page.
¦
N
N
INFO
AD
1
2
3
4
5
6
8
7
9
0
!
#
@
[620-Weuro]BN68-02326A-03L09.ind40 40 2009-10-08 ¿ÀÀü 9:27:51

English - 41
The Teletext pages are organized according to six categories:
Part Contents
A Selected page number.
B Broadcasting channel identity.
C Current page number or search indications.
D Date and time.
E Text.
F Status information.
FASTEXT information.
Teletext information is often divided between several pages displayed in sequence, which can be accessed by:
Entering the page number
Selecting a title in a list
Selecting a coloured heading (FASTEXT system)
Teletext level supported by the TV is version 2.5 which is capable of displaying additional graphics or text.
Depending upon the transmission, blank side panels can occur when displaying T
eletext.
In these cases, additional graphics or text is not transmitted.
Older TV’s which do not support version 2.5 are not capable of displaying any additional graphics or text, regardless of the
Teletext transmission.
Press the TV button to exit from the Teletext display.
Installing the Stand
Preset: Place the Guide Stand and Cover Neck onto the stand and fasten it using the
screws.
1. Attach your LCD TV to the stand.
Two or more people should carry the TV.
Make sure to distinguish between the front and back of the stand when assembling
them.
To make sure the TV is installed on the stand at a proper level, do not apply excess
downward pressure to the upper left of right sides of the TV.
2.
Fasten screws at position
1
and then fasten screws at position
2
.
Stand the product up and fasten the screws. If you fasten the screws with the LCD
TV placed down, it may lean to one side.
N
N
N
N
N
O
¦
N
N
N
N
N
INFO
AD
Front
Back
1
2
[620-Weuro]BN68-02326A-03L09.ind41 41 2009-10-08 ¿ÀÀü 9:27:52

English - 42
Disconnecting the Stand
1. Remove screws from the back of the TV.
2. Separate the stand from the TV.
Two or more people should carry the TV.
3.
Cover the bottom hole with the cover.
Installing the Wall Mount Kit
Wall mount items (sold separately) allow you to mount the TV on the wall.
For detailed information on installing the wall mount, see the instructions provided with the
Wall Mount items. Contact a technician for assistance when installing the wall mounted
bracket.
Samsung Electronics is not responsible for any damage to the product or injury to yourself or
others if you elect to install the TV on your own.
Do not install your Wall Mount Kit while your TV is turned on. It may result in personal
injury due to electric shock.
Assembling the Cables
Enclose the cables in the Holder-Wire Cable so that the cables are not visible through the
transparent stand.
Anti-Theft Kensington Lock
The Kensington Lock is a device used to physically fix the system when using it in a public
place. The appearance and locking method may differ from the illustration depending on the
manufacturer.
Refer to the manual provided with the Kensington Lock for proper use.
The locking device has to be purchased separately.
The location of the Kensington Lock may be different depending on its model.
1.
Insert the locking device into the Kensington slot on the LCD TV (1) and turn it in the
locking direction (2).
2.
Connect the Kensington Lock cable (3).
3.
Fix the Kensington Lock to a desk or a heavy stationary object.
N
N
3
1
2
¦
N
¦
¦
¦
<Optional>
[620-Weuro]BN68-02326A-03L09.ind42 42 2009-10-08 ¿ÀÀü 9:27:55

English - 43
Securing the Installation Space
Keep the required distances between the product and other objects (e.g. walls) to ensure proper ventilation.
Failing to do so may result in fire or a problem with the product due to an increase in the internal temperature of the product.
Install the product so the required distances shown in the figure are kept.
When using a stand or wall-mount, use parts provided by Samsung Electronics only
.
If you use parts provided by another manufacturer, it may result in a problem with the product or an injury due to the
product falling.
If you use parts provided by another manufacturer, it may result in a problem with the product or fire due to an increase in
the internal temperature of the product due to poor ventilation.
The appearance may differ depending on the product.
When installing the product with a stand When installing the product with a wall-mount
10 cm
10 cm
10 cm
10 cm
10 cm
10 cm
10 cm
Securing the TV to the Wall
Caution: Pulling, pushing, or climbing on the TV may cause the TV to fall. In particular, ensure your children do
not hang over or destabilize the TV; doing so may cause the TV to tip over, causing serious injuries or death.
Follow all safety precautions provided on the included Safety Flyer. For added stability
, install the anti-fall device
for safety purposes, as follows.
To avoid the TV from falling:
1.
Put the screws into the clamps and firmly fasten them onto the wall. Confirm that the
screws have been firmly installed onto the wall.
You may need additional material such as an anchor depending on the type of wall.
Since the necessary clamps, screws, and string are not supplied, please purchase
these additionally.
2.
Remove the screws from the centre back of the TV, put the screws into the clamps, and
then fasten the screws onto the TV again.
Screws may not be supplied with the product. In this case, please purchase the
screws of the following specifications.
Screw Specifications
For a 17 ~ 29 Inch LCD TV: M4 X L15
For a 32 ~ 40 Inch LCD TV: M6 X L15
3.
Connect the clamps fixed onto the TV and the clamps fixed onto the wall with a strong
string and then tie the string tightly.
Install the TV near to the wall so that it does not fall backwards.
It is safe to connect the string so that the clamps fixed on the wall are equal to or
lower than the clamps fixed on the TV.
Untie the string before moving the TV.
4.
Verify all connections are properly secured. Periodically check connections for any sign
of fatigue for failure. If you have any doubt about the security of your connections,
contact a professional installer.
¦
N
N
¦
■
N
N
N
N
N
N
N
Wall
Wall
[620-Weuro]BN68-02326A-03L09.ind43 43 2009-10-08 ¿ÀÀü 9:27:57

English - 44
Troubleshooting
If you have any questions of TV, rst refer to this list. If none of these troubleshooting tips apply, please visit ‘www.samsung.com’
site, then click on Support or contact Call Centre on list of last page.
Issue Solution
Picture Quality
First of all, please perform the Picture Test to conrm that your TV is properly displaying
test image.
Go to MENU - Support - Self Diagnosis - Picture Test
If the test image is properly displayed, the poor picture may caused by the source or signal.
●
TV image does not look as good
as it did in the store.
If you have an analogue Cable/Set top box, upgrade to an Box. Use HDMI or
Component cables to deliver HD picture quality.
Cable/Satellite subscriber : Try HD(High Definition) stations from channel line up.
Antenna connection: Try HD stations after performing Auto programme.
Many HD channels are upscaled from SD(Standard Definition) contents.
Adjust Cable/Set top box video output resolution to 1080i or 720p.
Confirm that you are watching the TV at the minimum distance recomended based on
the size and definition of the signal you are displaying.
●
●
●
N
●
●
Picture is distorted : macroblock,
small block, dots, pixelization
Compression of video contents may cause picture distortion especially on fast moving
pictures such as sports and action movies.
Low signal level or bad quality can cause picture distortion. This is not a TV issue.
●
●
Wrong or missing colour with
Component connection.
Make sure the Component cables are connected to the correct jacks. Incorrect or loose
connections may cause colour problems or the screen will be blank.
●
Poor colour or brightness. Adjust Picture options in the TV menu. (Picture mode, Colour, Brightness,
Sharpness)
Adjust Energy Saving option in Setup menu.
Try picture reset to view the default picture setting. (Go to MENU - Picture - Picture
Reset)
●
●
●
Dotted line on the edge of screen. If picture size is set to Screen Fit, change to 16:9.
Change cable/set top box resolution.
●
●
Picture is black and white with AV
(Composite) input only.
Connect video cable(Yellow) to Green jack of component input 1 of the TV.
●
Picture freezes or is distorted
when changing channels or
picture is delayed.
If connected with cable box, please try to reset cable box. (reconnect AC cord and wait
until cable box reboots. It may take up to 20 minutes.)
Set output resolution of cable box to 1080i or 720p.
●
●
Sound Quality
First of all, please perform the Sound Test to conrm that your TV audio is properly
operating.
Go to MENU - Support - Self Diagnosis - Sound Test
If the audio is OK, the sound problem may caused by the source or signal.
●
No sound or sound is too low at
maximum volume.
Please check the volume of external device connected to your TV then, adjust the TV
volume accordingly.
●
Picture is good but no sound. Set the Speaker Select option to TV speaker in the sound menu.
Make sure audio cables from an external device are connected to correct audio input
jacks on the TV.
Check connected device’s audio output option. (ex: You may need to change your
cable box’ audio option to HDMI when you have HDMI connected to your TV.)
If you are using a DVI to HDMI cable, a separate audio cable is required.
Deactivate SRS function if you are setting the volume over 30 value.
Remove plug from headphone jack. (if available on your TV)
●
●
●
●
●
●
Noise from speaker. Check cable connections. Make sure a video cable is not connected to an audio input.
For Antenna/Cable connection, check signal strength. Low signal level may cause
sound distortion.
●
●
¦
[620-Weuro]BN68-02326A-03L09.ind44 44 2009-10-08 ¿ÀÀü 9:27:58

English - 45
Issue Solution
No Picture, No Video
TV won’t turn on. Make sure the AC power cord is plugged in securely to the wall outlet and the TV.
Make sure the wall outlet is working.
Try pressing the POWER button on the TV to make sure the remote is working
properly. If the TV turns on, it may be caused by Remote Control. To fix the Remote
problem, refer to ‘Remote control does not work’ below.
●
●
●
TV turns off automatically. Check if the Sleep Timer is set to On in the Setup menu.
If connected the TV to your PC, check your PC power settings.
Make sure the AC power cord is plugged in securely to the wall outlet and the TV.
If there is no signal for about 10 ~ 15 minutes with Antenna/Cable connection, the TV
will turn off.
●
●
●
●
No picture/Video. Check cable connections.(remove and reconnect all cables of TV and external devices)
Set your external device’s (Cable/Set top Box, DVD, Blu-ray etc) video output to match
the connections to the TV input. For example, external device’s output: HDMI, TV’s
input: HDMI.
Make sure your connected device is powered on.
Make sure to select the TV’s correct source by pressing the SOURCE button on the TV
remote.
●
●
●
●
RF(Cable/Antenna) Connection
Cannot receive all channels. Make sure Antenna cable is connected securely.
Please try Plug & Play to add available channels to the channel list. Go to MENU -
Setup - Plug & Play and wait for all avaiable channels are stored.
Verify Antenna is positioned correctly.
●
●
●
Picture is distorted: macroblock,
small block, dots, pixelization
Compression of video contents may cause picture distortion especially on fast moving
pictures such as sports and action movies.
Low signal level can cause picture distortion. This is not a TV issue.
●
●
PC Connection
‘Not Supported Mode’ message. Set your PC’s output resolution and frequency so it matches the resolutions supported
by the TV.
●
PC is always shown on source list
even if not connected.
This is normal; PC is always shown on the source list even though a PC is not
connected.
●
Video is OK but there is no audio
with HDMI connection.
Check the audio output setting on your PC.
●
[620-Weuro]BN68-02326A-03L09.ind45 45 2009-10-08 ¿ÀÀü 9:27:58

English - 46
Issue Solution
Others
Picture is not shown in full screen. Black bars on each side will be shown on HD channels when displaying upscaled SD
(4:3) contents.
Black bars on Top & Bottom will be shown on movies that have aspect ratios different
from your TV.
Adjust picture size option on your external device or TV to full screen.
●
●
●
Remote control does not work. Replace the remote control batteries with correct polarity (+ -).
Clean the transmission window located on the top of the remote.
Try pointing the remote directly at the TV from 5~6 feet away.
●
●
●
Can not control TV power or
volume with Cable/Set top box
remote control.
Programme the Cable/Set top box remote control to operate the TV. Refer to Cable/Sat
user manual for SAMSUNG TV code.
●
‘Not Supported Mode’ message. Check the supported resolution of the TV and adjust the external device’s output
resolution accordingly. Refer to resolution settings in this manual.
●
Plastic smell from TV. This smell is normal and will dissipate over time.
●
TV Signal Information is
unavailable in the Self Diagnostic
Test menu.
This function is only available with digital channels with an Antenna (RF/Coax)
connection.
●
TV is tilted to right or left side. Remove the stand base from TV and reassemble.
●
Can not assemble stand base. Make sure TV is placed on flat surface. If can not remove screws from TV, please use
magnetized screw driver.
●
Channel menu is grey out.
(unavailable)
Channel menu is only available when TV source is selected.
●
Your settings are lost after 30
minutes or every time TV is
turned off.
If TV is in the Store Demo mode, it will reset audio and picture settings every 30
minutes. Please change from Store Demo mode to Home Use mode in the
Plug & Play procedure. Press the SOURCE button to select TV mode, go to MENU →
Setup → Plug & Play → ENTER
E
.
●
Intermittent loss of audio or video. Check cable connections and reconnect.
Can be caused by using overly rigid or thick cables. Make sure the cables are flexible
enough for long term use. If wall mounting, we recommend using cables with 90
degree connectors.
●
●
You may see small particles if you
look closely at the edge of the
bezel surrounding the TV screen.
This is part of the product’s design and is not a defect.
●
‘Scramble signal’ or ‘Weak
Signal/No Signal’ with CAM
CARD(CI/CI+).
Check that CAM has CI(CI+) Card installed into the common interface slot.
Pull out CAM from the TV and insert into the slot again.
●
●
When turned off and 45 minutes
later, TV is turned on itself.
It is normal, the TV operate OTA (Over The Air) function itself to upgrade firmware
downloaded during watching.
●
Recurrent picture/sound issue. Check and change signal/source.
●
This TFT LCD panel uses a panel consisting of sub pixels which require sophisticated technology to produce. However, there
may be few bright or dark pixels on the screen. These pixels will have no impact on the performance of the product.
N
[620-Weuro]BN68-02326A-03L09.ind46 46 2009-10-08 ¿ÀÀü 9:27:58

English - 47
Specifications
Model Name LE40B620 LE46B620
Screen Size
(Diagonal)
40 inches 46 inches
PC Resolution
(Optimum)
1920 x 1080 @ 60 Hz 1920 x 1080 @ 60 Hz
Sound
(Output)
10W X 2 10W X 2
Dimensions (WxDxH)
Body
With stand
1040 x 79 x 638 mm
1040 x 255 x 699 mm
1172 x 79 x 712 mm
1172 x 275 x 774 mm
Weight
With Stand
19 kg 25 kg
Environmental Considerations
Operating Temperature
Operating Humidity
Storage Temperature
Storage Humidity
10°C to 40°C (50°F to 104°F)
10% to 80%, non-condensing
-20°C to 45°C (-4°F to 113°F)
5% to 95%, non-condensing
Stand Swivel
(Left / Right)
-20˚ ~ 20˚
Model Name LE52B620
Screen Size
(Diagonal)
52 inches
PC Resolution
(Optimum)
1920 x 1080 @ 60 Hz
Sound
(Output)
10W X 2
Dimensions (WxDxH)
Body
With stand
1321 x 81 x 805 mm
1321 x 305 x 866 mm
Weight
With Stand
32 kg
Environmental Considerations
Operating Temperature
Operating Humidity
Storage Temperature
Storage Humidity
10°C to 40°C (50°F to 104°F)
10% to 80%, non-condensing
-20°C to 45°C (-4°F to 113°F)
5% to 95%, non-condensing
Stand Swivel
(Left / Right)
-20˚ ~ 20˚
Design and specifications are subject to change without prior notice.
This device is a Class B digital apparatus.
For the power supply and Power Consumption, refer to the label attached to the product.
¦
N
N
N
[620-Weuro]BN68-02326A-03L09.ind47 47 2009-10-08 ¿ÀÀü 9:27:58

This product uses parts of the software from the Independent JPEG Group.
This product uses parts of the software owned by the Freetype Project (www.freetype.org).
This product uses some software programmes which are distributed under the GPL/LGPL
license. Accordingly, the following
GPL and LGPL software source codes that have been used in this product can be provided after asking to vdswmanager@
samsung.com.
GPL software: Linux Kernel, Busybox, Binutils
LGPL software: Glibc, ffmpeg, smpeg, libgphoto, libusb, SDL
GNU GENERAL PUBLIC LICENSE
Version 3, 29 June 2007
Copyright (C) 2007 Free Software Foundation, Inc. <http://fsf.org/>
Everyone is permitted to copy and distribute verbatim copies of this license document, but changing it is not allowed.
Preamble
The GNU General Public License is a free, copyright license for software and other kinds of works.
The licenses for most software and other practical works are designed to take away your freedom to share and change the
works. By contrast, the GNU General Public License is intended to guarantee your freedom to share and change all versions of
a programme--to make sure it remains free software for all its users. We, the Free Software Foundation, use the GNU General
Public License for most of our software; it applies also to any other work released this way by its authors.
You can apply it to your
programmes, too.
When we speak of free software, we are referring to freedom, not price. Our General Public Licenses are designed to make sure
that you have the freedom to distribute copies of free software (and charge for them if you wish), that you receive source code or
can get it if you want it, that you can change the software or use pieces of it in new free programmes, and that you know you can
do these things.
To protect your rights, we need to prevent others from denying you these rights or asking you to surrender the rights. Therefore,
you have certain responsibilities if you distribute copies of the software, or if you modify it: responsibilities to respect the freedom of
others.
For example, if you distribute copies of such a programme, whether gratis or for a fee, you must pass on to the recipients the same
freedoms that you received. You must make sure that they, too, receive or can get the source code. And you must show them
these terms so they know their rights.
Developers that use the GNU GPL protect your rights with two steps: (1) assert copyright on the software, and (2) offer you this
License giving you legal permission to copy, distribute and/or modify it.
For the developers’ and authors’ protection, the GPL clearly explains that there is no warranty for this free software. For both users’
and authors’ sake, the GPL requires that modified versions be marked as changed, so that their problems will not be attributed
erroneously to authors of previous versions.
Some devices are designed to deny users access to install or run modified versions of the software inside them, although the
manufacturer can do so. This is fundamentally incompatible with the aim of protecting users’ freedom to change the software.
The systematic pattern of such abuse occurs in the area of products for individuals to use, which is precisely where it is most
unacceptable. Therefore, we have designed this version of the GPL to prohibit the practice for those products. If such problems
arise substantially in other domains, we stand ready to extend this provision to those domains in future versions of the GPL, as
needed to protect the freedom of users.
Finally, every programme is threatened constantly by software patents. States should not allow patents to restrict development and
use of software on general-purpose computers, but in those that do, we wish to avoid the special danger that patents applied to a
free programme could make it effectively proprietary. To prevent this, the GPL assures that patents cannot be used to render the
programme non-free.
The precise terms and conditions for copying, distribution and modification follow.
TERMS AND CONDITIONS
0.
Definitions.
“This License” refers to version 3 of the GNU General Public License.
“Copyright” also means copyright-like laws that apply to other kinds of works, such as semiconductor masks.
“The Programme” refers to any copyrightable work licensed under this License. Each licensee is addressed as “you”.
“Licensees” and “recipients” may be individuals or organizations.
To “modify” a work means to copy from or adapt all or part of the work in a fashion requiring copyright permission, other than
the making of an exact copy. The resulting work is called a “modified version” of the earlier work or a work “based on” the
earlier work.
●
●
●
¦
[620-Weuro]BN68-02326A-03L09.ind48 48 2009-10-08 ¿ÀÀü 9:27:58

A “covered work” means either the unmodified Programme or a work based on the Programme.
To “propagate” a work means to do anything with it that, without permission, would make you directly or secondarily liable
for infringement under applicable copyright law, except executing it on a computer or modifying a private copy. Propagation
includes copying, distribution (with or without modification), making available to the public, and in some countries other
activities as well.
To “convey” a work means any kind of propagation that enables other parties to make or receive copies. Mere interaction with
a user through a computer network, with no transfer of a copy, is not conveying.
An interactive user interface displays “Appropriate Legal Notices” to the extent that it includes a convenient and prominently
visible feature that (1) displays an appropriate copyright notice, and (2) tells the user that there is no warranty for the work
(except to the extent that warranties are provided), that licensees may convey the work under this License, and how to view a
copy of this License. If the interface presents a list of user commands or options, such as a menu, a prominent item in the list
meets this criterion.
1.
Source Code.
The “source code” for a work means the preferred form of the work for making modifications to it. “Object code” means any
non-source
form of a work.
A “Standard Interface” means an interface that either is an official standard defined by a recognized standards body, or, in the
case of interfaces specified for a particular programmeming language, one that is widely used among developers working in
that language.
The “System Libraries” of an executable work include anything, other than the work as a whole, that (a) is included in the
normal form of packaging a Major Component, but which is not part of that Major Component, and (b) serves only to enable
use of the work with that Major Component, or to implement a Standard Interface for which an implementation is available to
the public in source code form. A “Major Component”, in this context, means a major essential component (kernel, window
system, and so on) of the specific operating system (if any) on which the executable work runs, or a compiler used to produce
the work, or an object code interpreter used to run it.
The “Corresponding Source” for a work in object code form means all the source code needed to generate, install, and (for
an executable work) run the object code and to modify the work, including scripts to control those activities. However
, it does
not include the work’s System Libraries, or general-purpose tools or generally available free programmes which are used
unmodified in performing those activities but which are not part of the work. For example, Corresponding Source includes
interface definition files associated with source files for the work, and the source code for shared libraries and dynamically
linked subprogrammes that the work is specifically designed to require, such as by intimate data communication or control flow
between those subprogrammes and other parts of the work.
The Corresponding Source need not include anything that users can regenerate automatically from other parts of the
Corresponding Source.
The Corresponding Source for a work in source code form is that same work.
2.
Basic Permissions.
All rights granted under this License are granted for the term of copyright on the Programme, and are irrevocable provided
the stated conditions are met. This License explicitly affirms your unlimited permission to run the unmodified Programme. The
output from running a covered work is covered by this License only if the output, given its content, constitutes a covered work.
This License acknowledges your rights of fair use or other equivalent, as provided by copyright law
. You may make, run and
propagate covered works that you do not convey, without conditions so long as your license otherwise remains in force. You
may convey covered works to others for the sole purpose of having them make modifications exclusively for you, or provide
you with facilities for running those works, provided that you comply with the terms of this License in conveying all material
for which you do not control copyright. Those thus making or running the covered works for you must do so exclusively on
your behalf, under your direction and control, on terms that prohibit them from making any copies of your copyrighted material
outside their relationship with you.
Conveying under any other circumstances is permitted solely under the conditions stated below
. Sublicensing is not allowed;
section 10 makes it unnecessary.
3. Protecting Users’ Legal Rights From Anti-Circumvention Law.
No covered work shall be deemed part of an effective technological measure under any applicable law fulfilling obligations
under article 11 of the WIPO copyright treaty adopted on 20 December 1996, or similar laws prohibiting or restricting
circumvention of such measures.
When you convey a covered work, you waive any legal power to forbid circumvention of technological measures to the extent
such circumvention is effected by exercising rights under this License with respect to the covered work, and you disclaim any
intention to limit operation or modification of the work as a means of enforcing, against the work’
s users, your or third parties’
legal rights to forbid circumvention of technological measures.
4. Conveying Verbatim Copies.
You may convey verbatim copies of the Programme’s source code as you receive it, in any medium, provided that you
conspicuously and appropriately publish on each copy an appropriate copyright notice; keep intact all notices stating that this
License and any non-permissive terms added in accord with section 7 apply to the code; keep intact all notices of the absence
of any warranty; and give all recipients a copy of this License along with the Programme.
You may charge any price or no price for each copy that you convey, and you may offer support or warranty protection for a
fee.
[620-Weuro]BN68-02326A-03L09.ind49 49 2009-10-08 ¿ÀÀü 9:27:58

5. Conveying Modified Source Versions.
You may convey a work based on the Programme, or the modifications to produce it from the Programme, in the form of
source code under the terms of section 4, provided that you also meet all of these conditions:
a) The work must carry prominent notices stating that you modified it, and giving a relevant date.
b) The work must carry prominent notices stating that it is released under this License and any conditions added under
section 7. This requirement modifies the requirement in section 4 to “keep intact all notices”.
c) You must license the entire work, as a whole, under this License to anyone who comes into possession of a copy. This
License will therefore apply, along with any applicable section 7 additional terms, to the whole of the work, and all its
parts, regardless of how they are packaged. This License gives no permission to license the work in any other way, but it
does not invalidate such permission if you have separately received it.
d) If the work has interactive user interfaces, each must display Appropriate Lega
l Notices; however, if the Programme
has interactive interfaces that do not display Appropriate Legal Notices, your work need not make them do so.
A compilation of a covered work with other separate and independent works, which are not by their nature extensions of the
covered work, and which are not combined with it such as to form a larger programme, in or on a volume of a storage or
distribution medium, is called an “aggregate” if the compilation and its resulting copyright are not used to limit the access or
legal rights of the compilation’s users beyond what the individual works permit. Inclusion of a covered work in an aggregate
does not cause this License to apply to the other parts of the aggregate.
6.
Conveying Non-Source Forms.
You may convey a covered work in object code form under the terms of sections 4 and 5, provided that you also convey the
machine-readable Corresponding Source under the terms of this License, in one of these ways:
a) Convey the object code in, or embodied in, a physical product (including a physical distribution medium), accompanied
by the Corresponding Source fixed on a durable physical medium customarily used for software interchange.
b) Convey the object code in, or embodied in, a physical product (including a physical distribution medium), accompanied
by a written offer, valid for at least three years and valid for as long as you offer spare parts or customer support for that
product model, to give anyone who possesses the object code either (1) a copy of the Corresponding Source for all the
software in the product that is covered by this License, on a durable physical medium customarily used for software
interchange, for a price no more than your reasonable cost of physically performing this conveying of source, or (2)
access to copy the Corresponding Source from a network server at no charge.
c) Convey individual copies of the object code with a copy of the written offer to provide the Corresponding Source.
This
alternative is allowed only occasionally and noncommercially, and only if you received the object code with such an offer,
in accord with subsection 6b.
d) Convey the object code by offering access from a designated place (gratis or for a charge), and offer equivalent
access to the Corresponding Source in the same way through the same place at no further charge. You need not require
recipients to copy the Corresponding Source along with the object code. If the place to copy the object code is a network
server, the Corresponding Source may be on a different server (operated by you or a third party) that supports equivalent
copying facilities, provided you maintain clear directions next to the object code saying where to find the Corresponding
Source. Regardless of what server hosts the Corresponding Source, you remain obligated to ensure that it is available for
as long as needed to satisfy these requirements.
e) Convey the object code using peer-to-peer transmission, provided you inform other peers where the object code and
Corresponding Source of the work are being offered to the general public at no charge under subsection 6d. A separable
portion of the object code, whose source code is excluded from the Corresponding Source as a System Library
, need not
be included in conveying the object code work.
A “User Product” is either (1) a “consumer product”, which means any tangible personal property which is normally used for
personal, family, or household purposes, or (2) anything designed or sold for incorporation into a dwelling. In determining
whether a product is a consumer product, doubtful cases shall be resolved in favor of coverage. For a particular product
received by a particular user, “normally used” refers to a typical or common use of that class of product, regardless of the
status of the particular user or of the way in which the particular user actually uses, or expects or is expected to use, the
product. A product is a consumer product regardless of whether the product has substantial commercial, industrial or non-
consumer uses, unless such uses represent the only significant mode of use of the product.
“Installation Information” for a User Product means any methods, procedures, authorization keys, or other information required
to install and execute modified versions of a covered work in that User Product from a modified version of its Corresponding
Source. The information must suffice to ensure that the continued functioning of the modified object code is in no case
prevented or interfered with solely because modification has been made.
If you convey an object code work under this section in, or with, or specifically for use in, a User Product, and the conveying
occurs as part of a transaction in which the right of possession and use of the User Product is transferred to the recipient in
perpetuity or for a fixed term (regardless of how the transaction is characterized), the Corresponding Source conveyed under
this section must be accompanied by the Installation Information. But this requirement does not apply if neither you nor any
third party retains the ability to install modified object code on the User Product (for example, the work has been installed in
ROM).
[620-Weuro]BN68-02326A-03L09.ind50 50 2009-10-08 ¿ÀÀü 9:27:58

The requirement to provide Installation Information does not include a requirement to continue to provide support service,
warranty, or updates for a work that has been modified or installed by the recipient, or for the User Product in which it has
been modified or installed. Access to a network may be denied when the modification itself materially and adversely affects the
operation of the network or violates the rules and protocols for communication across the network.
Corresponding Source conveyed, and Installation Information provided, in accord with this section must be in a format that is
publicly documented (and with an implementation available to the public in source code form), and must require no special
password or key for unpacking, reading or copying.
7
. Additional Terms.
“Additional permissions” are terms that supplement the terms of this License by making exceptions from one or more of its
conditions. Additional permissions that are applicable to the entire Programme shall be treated as though they were included
in this License, to the extent that they are valid under applicable law. If additional permissions apply only to part of the
Programme, that part may be used separately under those permissions, but the entire Programme remains governed by this
License without regard to the additional permissions.
When you convey a copy of a covered work, you may at your option remove any additional permissions from that copy
, or
from any part of it. (Additional permissions may be written to require their own removal in certain cases when you modify the
work.) You may place additional permissions on material, added by you to a covered work, for which you have or can give
appropriate copyright permission.
Notwithstanding any other provision of this License, for material you add to a covered work, you may (if authorized by the
copyright holders of that material) supplement the terms of this License with terms:
a) Disclaiming warranty or limiting liability differently from the terms of sections 15 and 16 of this License; or
b) Requiring preservation of specified reasonable legal notices or author attributions in that material or in the
Appropriate
Legal Notices displayed by works containing it; or
c) Prohibiting misrepresentation of the origin of that material, or requiring that modified versions of such material be
marked in reasonable ways as different from the original version; or
d) Limiting the use for publicity purposes of names of licensors or authors of the material; or
e) Declining to grant rights under trademark law for use of some trade names, trademarks, or service marks; or
f) Requiring indemnification of licensors and authors of that material by anyone who conveys the material (or modified
versions of it) with contractual assumptions of liability to the recipient, for any liability that these contractual assumptions
directly impose on those licensors and authors.
All other non-permissive additional terms are considered “further restrictions” within the meaning of section 10. If the
Programme as you received it, or any part of it, contains a notice stating that it is governed by this License along with a
term that is a further restriction, you may remove that term. If a license document contains a further restriction but permits
relicensing or conveying under this License, you may add to a covered work material governed by the terms of that license
document, provided that the further restriction does not survive such relicensing or conveying.
If you add terms to a covered work in accord with this section, you must place, in the relevant source files, a statement of the
additional terms that apply to those files, or a notice indicating where to find the applicable terms.
Additional terms, permissive or non-permissive, may be stated in the form of a separately written license, or stated as
exceptions; the above requirements apply either way.
8
. Termination.
You may not propagate or modify a covered work except as expressly provided under this License. Any attempt otherwise to
propagate or modify it is void, and will automatically terminate your rights under this License (including any patent licenses
granted under the third paragraph of section 11).
However, if you cease all violation of this License, then your license from a particular copyright holder is reinstated (a)
provisionally, unless and until the copyright holder explicitly and finally terminates your license, and (b) permanently, if the
copyright holder fails to notify you of the violation by some reasonable means prior to 60 days after the cessation.
Moreover, your license from a particular copyright holder is reinstated permanently if the copyright holder notifies you of the
violation by some reasonable means, this is the first time you have received notice of violation of this License (for any work)
from that copyright holder, and you cure the violation prior to 30 days after your receipt of the notice.
Termination of your rights under this section does not terminate the licenses of parties who have received copies or rights from
you under this License. If your rights have been terminated and not permanently reinstated, you do not qualify to receive new
licenses for the same material under section 10.
9.
Acceptance Not Required for Having Copies.
You are not required to accept this License in order to receive or run a copy of the Programme. Ancillary propagation of a
covered work occurring solely as a consequence of using peer-to-peer transmission to receive a copy likewise does not
require acceptance. However, nothing other than this License grants you permission to propagate or modify any covered work.
These actions infringe copyright if you do not accept this License. Therefore, by modifying or propagating a covered work, you
indicate your acceptance of this License to do so.
[620-Weuro]BN68-02326A-03L09.ind51 51 2009-10-08 ¿ÀÀü 9:27:59

10. Automatic Licensing of Downstream Recipients.
Each time you convey a covered work, the recipient automatically receives a license from the original licensors, to run, modify
and propagate that work, subject to this License. You are not responsible for enforcing compliance by third parties with this
License.
An “entity transaction” is a transaction transferring control of an organization, or substantially all assets of one, or subdividing
an organization, or merging organizations. If propagation of a covered work results from an entity transaction, each party
to that transaction who receives a copy of the work also receives whatever licenses to the work the party’
s predecessor in
interest had or could give under the previous paragraph, plus a right to possession of the Corresponding Source of the work
from the predecessor in interest, if the predecessor has it or can get it with reasonable efforts.
You may not impose any further restrictions on the exercise of the rights granted or affirmed under this License. For example,
you may not impose a license fee, royalty, or other charge for exercise of rights granted under this License, and you may not
initiate litigation (including a cross-claim or counterclaim in a lawsuit) alleging that any patent claim is infringed by making,
using, selling, offering for sale, or importing the Programme or any portion of it.
1
1. Patents.
A “contributor” is a copyright holder who authorizes use under this License of the Programme or a work on which the
Programme is based. The work thus licensed is called the contributor’s “contributor version”.
A contributor’s “essential patent claims” are all patent claims owned or controlled by the contributor, whether already acquired
or hereafter acquired, that would be infringed by some manner, permitted by this License, of making, using, or selling its
contributor version, but do not include claims that would be infringed only as a consequence of further modification of the
contributor version. For purposes of this definition, “control” includes the right to grant patent sublicenses in a manner
consistent with the requirements of this License.
Each contributor grants you a non-exclusive, worldwide, royalty-free patent license under the contributor
’s essential patent
claims, to make, use, sell, offer for sale, import and otherwise run, modify and propagate the contents of its contributor version.
In the following three paragraphs, a “patent license” is any express agreement or commitment, however denominated, not
to enforce a patent (such as an express permission to practice a patent or covenant not to sue for patent infringement).
To
“grant” such a patent license to a party means to make such an agreement or commitment not to enforce a patent against the
party.
If you convey a covered work, knowingly relying on a patent license, and the Corresponding Source of the work is not
available for anyone to copy, free of charge and under the terms of this License, through a publicly available network server or
other readily accessible means, then you must either (1) cause the Corresponding Source to be so available, or (2) arrange
to deprive yourself of the benefit of the patent license for this particular work, or (3) arrange, in a manner consistent with the
requirements of this License, to extend the patent license to downstream recipients. “Knowingly relying” means you have
actual knowledge that, but for the patent license, your conveying the covered work in a country
, or your recipient’s use of the
covered work in a country, would infringe one or more identifiable patents in that country that you have reason to believe are
valid.
If, pursuant to or in connection with a single transaction or arrangement, you convey
, or propagate by procuring conveyance
of, a covered work, and grant a patent license to some of the parties receiving the covered work authorizing them to use,
propagate, modify or convey a specific copy of the covered work, then the patent license you grant is automatically extended
to all recipients of the covered work and works based on it.
A patent license is “discriminatory” if it does not include within the scope of its coverage, prohibits the exercise of, or is
conditioned on the non-exercise of one or more of the rights that are specifically granted under this License. You may not
convey a covered work if you are a party to an arrangement with a third party that is in the business of distributing software,
under which you make payment to the third party based on the extent of your activity of conveying the work, and under which
the third party grants, to any of the parties who would receive the covered work from you, a discriminatory patent license (a)
in connection with copies of the covered work conveyed by you (or copies made from those copies), or (b) primarily for and in
connection with specific products or compilations that contain the covered work, unless you entered into that arrangement, or
that patent license was granted, prior to 28 March 2007.
Nothing in this License shall be construed as excluding or limiting any implied license or other defenses to infringement that
may otherwise be available to you under applicable patent law.
12.
No Surrender of Others’ Freedom.
If conditions are imposed on you (whether by court order, agreement or otherwise) that contradict the conditions of this
License, they do not excuse you from the conditions of this License. If you cannot convey a covered work so as to satisfy
simultaneously your obligations under this License and any other pertinent obligations, then as a consequence you may
not convey it at all. For example, if you agree to terms that obligate you to collect a royalty for further conveying from those
to whom you convey the Programme, the only way you could satisfy both those terms and this License would be to refrain
entirely from conveying the Programme.
13.
Use with the GNU Affero General Public License.
Notwithstanding any other provision of this License, you have permission to link or combine any covered work with a work
licensed under version 3 of the GNU Affero General Public License into a single combined work, and to convey the resulting
work. The terms of this License will continue to apply to the part which is the covered work, but the special requirements of
the GNU Affero General Public License, section 13, concerning interaction through a network will apply to the combination as
such.
[620-Weuro]BN68-02326A-03L09.ind52 52 2009-10-08 ¿ÀÀü 9:27:59

14. Revised Versions of this License.
The Free Software Foundation may publish revised and/or new versions of the GNU General Public License from time to time.
Such new versions will be similar in spirit to the present version, but may differ in detail to address new problems or concerns.
Each version is given a distinguishing version number. If the Programme specifies that a certain numbered version of the GNU
General Public License “or any later version” applies to it, you have the option of following the terms and conditions either of
that numbered version or of any later version published by the Free Software Foundation. If the Programme does not specify
a version number of the GNU General Public License, you may choose any version ever published by the Free Software
Foundation.
If the Programme specifies that a proxy can decide which future versions of the GNU General Public License can be
used, that proxy’s public statement of acceptance of a version permanently authorizes you to choose that version for the
Programme.
Later license versions may give you additional or different permissions. However, no additional obligations are imposed on any
author or copyright holder as a result of your choosing to follow a later version.
15.
Disclaimer of Warranty.
THERE IS NO WARRANTY FOR THE Programme, TO THE EXTENT PERMITTED BY APPLICABLE LAW. EXCEPT WHEN
OTHERWISE STATED IN WRITING THE COPYRIGHT HOLDERS AND/OR OTHER PARTIES PROVIDE THE Programme
“AS IS” WITHOUT WARRANTY OF ANY KIND, EITHER EXPRESSED OR IMPLIED, INCLUDING, BUT NOT LIMITED TO,
THE IMPLIED WARRANTIES OF MERCHANTABILITY AND FITNESS FOR A PARTICULAR PURPOSE. THE ENTIRE
RISK AS TO THE QUALITY AND PERFORMANCE OF THE Programme IS WITH YOU. SHOULD THE Programme PROVE
DEFECTIVE, YOU ASSUME THE COST OF ALL NECESSARY SERVICING, REPAIR OR CORRECTION.
16.
Limitation of Liability.
IN NO EVENT UNLESS REQUIRED BY APPLICABLE LAW OR AGREED TO IN WRITING WILL ANY COPYRIGHT
HOLDER, OR ANY OTHER PARTY WHO MODIFIES AND/OR CONVEYS THE Programme AS PERMITTED ABOVE, BE
LIABLE TO YOU FOR DAMAGES, INCLUDING ANY GENERAL, SPECIAL, INCIDENTAL OR CONSEQUENTIAL DAMAGES
ARISING OUT OF THE USE OR INABILITY TO USE THE Programme (INCLUDING BUT NOT LIMITED TO LOSS OF DATA
OR DATA BEING RENDERED INACCURATE OR LOSSES SUSTAINED BY YOU OR THIRD PARTIES OR A FAILURE OF
THE Programme TO OPERATE WITH ANY OTHER ProgrammeS), EVEN IF SUCH HOLDER OR OTHER PARTY HAS BEEN
ADVISED OF THE POSSIBILITY OF SUCH DAMAGES.
1
7. Interpretation of Sections 15 and 16.
If the disclaimer of warranty and limitation of liability provided above cannot be given local legal ef
fect according to their terms,
reviewing courts shall apply local law that most closely approximates an absolute waiver of all civil liability in connection with
the Programme, unless a warranty or assumption of liability accompanies a copy of the Programme in return for a fee.
END OF TERMS AND CONDITIONS
How to Apply These Terms to Your New Programmes
If you develop a new programme, and you want it to be of the greatest possible use to the public, the best way to achieve this is to
make it free software which everyone can redistribute and change under these terms.
To do so, attach the following notices to the programme. It is safest to attach them to the start of each source file to most effectively
state the exclusion of warranty; and each file should have at least the “copyright” line and a pointer to where the full notice is found.
<one line to give the programme’s name and a brief idea of what it does.> Copyright (C) <year> <name of author>
This programme is free software: you can redistribute it and/or modify it under the terms of the GNU General Public License
as published by the Free Software Foundation, either version 3 of the License, or (at your option) any later version.
This programme is distributed in the hope that it will be useful, but WITHOUT
ANY WARRANTY; without even the implied
warranty of MERCHANTABILITY or FITNESS FOR A PARTICULAR PURPOSE. See the GNU General Public License for
more details.
You should have received a copy of the GNU General Public License along with this programme. If not, see <http://www.gnu.
org/licenses/>.
Also add information on how to contact you by electronic and paper mail.
If the programme does terminal interaction, make it output a short notice like this when it starts in an interactive mode:
<programme> Copyright (C) <year> <name of author> This programme comes with ABSOLUTELY NO WARRANTY; for
details type `show w’. This is free software, and you are welcome to redistribute it under certain conditions; type `show c’ for
details.
The hypothetical commands `show w’ and `show c’ should show the appropriate parts of the General Public License. Of course,
your programme’s commands might be different; for a GUI interface, you would use an “about box”.
You should also get your employer (if you work as a programmer) or school, if any, to sign a “copyright disclaimer” for the
programme, if necessary.
For more information on this, and how to apply and follow the GNU GPL, see <http://www
.gnu.org/licenses/>.
The GNU General Public License does not permit incorporating your programme into proprietary programmes. If your programme
is a subroutine library, you may consider it more useful to permit linking proprietary applications with the library. If this is what
you want to do, use the GNU Lesser General Public License instead of this License. But first, please read <http://www
.gnu.org/
philosophy/why-not-lgpl.html>.
¦
[620-Weuro]BN68-02326A-03L09.ind53 53 2009-10-08 ¿ÀÀü 9:27:59

GNU Lesser General Public License (LGPL)
Version 3, 29 June 2007
Copyright (C) 2007 Free Software Foundation, Inc. <http://fsf.org/>
Everyone is permitted to copy and distribute verbatim copies of this license document, but changing it is not allowed.
Preamble
The GNU General Public License is a free, copyright license for software and other kinds of works.
The licenses for most software and other practical works are designed to take away your freedom to share and change the
works. By contrast, the GNU General Public License is intended to guarantee your freedom to share and change all versions of
a programme--to make sure it remains free software for all its users. We, the Free Software Foundation, use the GNU General
Public License for most of our software; it applies also to any other work released this way by its authors.
You can apply it to your
programmes, too.
When we speak of free software, we are referring to freedom, not price. Our General Public Licenses are designed to make sure
that you have the freedom to distribute copies of free software (and charge for them if you wish), that you receive source code or
can get it if you want it, that you can change the software or use pieces of it in new free programmes, and that you know you can
do these things.
To protect your rights, we need to prevent others from denying you these rights or asking you to surrender the rights. Therefore,
you have certain responsibilities if you distribute copies of the software, or if you modify it: responsibilities to respect the freedom of
others.
For example, if you distribute copies of such a programme, whether gratis or for a fee, you must pass on to the recipients the same
freedoms that you received. You must make sure that they, too, receive or can get the source code. And you must show them
these terms so they know their rights.
Developers that use the GNU GPL protect your rights with two steps: (1) assert copyright on the software, and (2) offer you this
License giving you legal permission to copy, distribute and/or modify it.
For the developers’ and authors’ protection, the GPL clearly explains that there is no warranty for this free software. For both users’
and authors’ sake, the GPL requires that modified versions be marked as changed, so that their problems will not be attributed
erroneously to authors of previous versions.
Some devices are designed to deny users access to install or run modified versions of the software inside them, although the
manufacturer can do so. This is fundamentally incompatible with the aim of protecting users’ freedom to change the software.
The systematic pattern of such abuse occurs in the area of products for individuals to use, which is precisely where it is most
unacceptable. Therefore, we have designed this version of the GPL to prohibit the practice for those products. If such problems
arise substantially in other domains, we stand ready to extend this provision to those domains in future versions of the GPL, as
needed to protect the freedom of users.
Finally, every programme is threatened constantly by software patents. States should not allow patents to restrict development and
use of software on general-purpose computers, but in those that do, we wish to avoid the special danger that patents applied to a
free programme could make it effectively proprietary. To prevent this, the GPL assures that patents cannot be used to render the
programme non-free.
The precise terms and conditions for copying, distribution and modification follow.
TERMS AND CONDITIONS
0.
Definitions.
“This License” refers to version 3 of the GNU General Public License.
“Copyright” also means copyright-like laws that apply to other kinds of works, such as semiconductor masks.
“The Programme” refers to any copyrightable work licensed under this License. Each licensee is addressed as “you”.
“Licensees” and “recipients” may be individuals or organizations.
To “modify” a work means to copy from or adapt all or part of the work in a fashion requiring copyright permission, other than
the making of an exact copy. The resulting work is called a “modified version” of the earlier work or a work “based on” the
earlier work.
A “covered work” means either the unmodified Programme or a work based on the Programme.
To “propagate” a work means to do anything with it that, without permission, would make you directly or secondarily liable
for infringement under applicable copyright law, except executing it on a computer or modifying a private copy. Propagation
includes copying, distribution (with or without modification), making available to the public, and in some countries other
activities as well.
To “convey” a work means any kind of propagation that enables other parties to make or receive copies. Mere interaction with
a user through a computer network, with no transfer of a copy, is not conveying.
An interactive user interface displays “Appropriate Legal Notices” to the extent that it includes a convenient and prominently
visible feature that (1) displays an appropriate copyright notice, and (2) tells the user that there is no warranty for the work
(except to the extent that warranties are provided), that licensees may convey the work under this License, and how to view a
copy of this License. If the interface presents a list of user commands or options, such as a menu, a prominent item in the list
meets this criterion.
¦
[620-Weuro]BN68-02326A-03L09.ind54 54 2009-10-08 ¿ÀÀü 9:27:59

1. Source Code.
The “source code” for a work means the preferred form of the work for making modifications to it. “Object code” means any
non-source
form of a work.
A “Standard Interface” means an interface that either is an official standard defined by a recognized standards body, or, in the
case of interfaces specified for a particular programmeming language, one that is widely used among developers working in
that language.
The “System Libraries” of an executable work include anything, other than the work as a whole, that (a) is included in the
normal form of packaging a Major Component, but which is not part of that Major Component, and (b) serves only to enable
use of the work with that Major Component, or to implement a Standard Interface for which an implementation is available to
the public in source code form. A “Major Component”, in this context, means a major essential component (kernel, window
system, and so on) of the specific operating system (if any) on which the executable work runs, or a compiler used to produce
the work, or an object code interpreter used to run it.
The “Corresponding Source” for a work in object code form means all the source code needed to generate, install, and (for
an executable work) run the object code and to modify the work, including scripts to control those activities. However
, it does
not include the work’s System Libraries, or general-purpose tools or generally available free programmes which are used
unmodified in performing those activities but which are not part of the work. For example, Corresponding Source includes
interface definition files associated with source files for the work, and the source code for shared libraries and dynamically
linked subprogrammes that the work is specifically designed to require, such as by intimate data communication or control flow
between those subprogrammes and other parts of the work.
The Corresponding Source need not include anything that users can regenerate automatically from other parts of the
Corresponding Source.
The Corresponding Source for a work in source code form is that same work.
2.
Basic Permissions.
All rights granted under this License are granted for the term of copyright on the Programme, and are irrevocable provided
the stated conditions are met. This License explicitly affirms your unlimited permission to run the unmodified Programme. The
output from running a covered work is covered by this License only if the output, given its content, constitutes a covered work.
This License acknowledges your rights of fair use or other equivalent, as provided by copyright law
. You may make, run and
propagate covered works that you do not convey, without conditions so long as your license otherwise remains in force. You
may convey covered works to others for the sole purpose of having them make modifications exclusively for you, or provide
you with facilities for running those works, provided that you comply with the terms of this License in conveying all material
for which you do not control copyright. Those thus making or running the covered works for you must do so exclusively on
your behalf, under your direction and control, on terms that prohibit them from making any copies of your copyrighted material
outside their relationship with you.
Conveying under any other circumstances is permitted solely under the conditions stated below
. Sublicensing is not allowed;
section 10 makes it unnecessary.
3. Protecting Users’ Legal Rights From Anti-Circumvention Law.
No covered work shall be deemed part of an effective technological measure under any applicable law fulfilling obligations
under article 11 of the WIPO copyright treaty adopted on 20 December 1996, or similar laws prohibiting or restricting
circumvention of such measures.
When you convey a covered work, you waive any legal power to forbid circumvention of technological measures to the extent
such circumvention is effected by exercising rights under this License with respect to the covered work, and you disclaim any
intention to limit operation or modification of the work as a means of enforcing, against the work’
s users, your or third parties’
legal rights to forbid circumvention of technological measures.
4. Conveying Verbatim Copies.
You may convey verbatim copies of the Programme’s source code as you receive it, in any medium, provided that you
conspicuously and appropriately publish on each copy an appropriate copyright notice; keep intact all notices stating that this
License and any non-permissive terms added in accord with section 7 apply to the code; keep intact all notices of the absence
of any warranty; and give all recipients a copy of this License along with the Programme.
You may charge any price or no price for each copy that you convey, and you may offer support or warranty protection for a
fee.
5.
Conveying Modified Source Versions.
You may convey a work based on the Programme, or the modifications to produce it from the Programme, in the form of
source code under the terms of section 4, provided that you also meet all of these conditions:
a) The work must carry prominent notices stating that you modified it, and giving a relevant date.
b) The work must carry prominent notices stating that it is released under this License and any conditions added under
section 7. This requirement modifies the requirement in section 4 to “keep intact all notices”.
c) You must license the entire work, as a whole, under this License to anyone who comes into possession of a copy. This
License will therefore apply, along with any applicable section 7 additional terms, to the whole of the work, and all its
parts, regardless of how they are packaged. This License gives no permission to license the work in any other way, but it
does not invalidate such permission if you have separately received it.
d) If the work has interactive user interfaces, each must display Appropriate Lega
l Notices; however, if the Programme
has interactive interfaces that do not display Appropriate Legal Notices, your work need not make them do so.
[620-Weuro]BN68-02326A-03L09.ind55 55 2009-10-08 ¿ÀÀü 9:27:59

A compilation of a covered work with other separate and independent works, which are not by their nature extensions of the
covered work, and which are not combined with it such as to form a larger programme, in or on a volume of a storage or
distribution medium, is called an “aggregate” if the compilation and its resulting copyright are not used to limit the access or
legal rights of the compilation’s users beyond what the individual works permit. Inclusion of a covered work in an aggregate
does not cause this License to apply to the other parts of the aggregate.
6.
Conveying Non-Source Forms.
You may convey a covered work in object code form under the terms of sections 4 and 5, provided that you also convey the
machine-readable Corresponding Source under the terms of this License, in one of these ways:
a) Convey the object code in, or embodied in, a physical product (including a physical distribution medium), accompanied
by the Corresponding Source fixed on a durable physical medium customarily used for software interchange.
b) Convey the object code in, or embodied in, a physical product (including a physical distribution medium), accompanied
by a written offer, valid for at least three years and valid for as long as you offer spare parts or customer support for that
product model, to give anyone who possesses the object code either (1) a copy of the Corresponding Source for all the
software in the product that is covered by this License, on a durable physical medium customarily used for software
interchange, for a price no more than your reasonable cost of physically performing this conveying of source, or (2)
access to copy the Corresponding Source from a network server at no charge.
c) Convey individual copies of the object code with a copy of the written offer to provide the Corresponding Source.
This
alternative is allowed only occasionally and noncommercially, and only if you received the object code with such an offer,
in accord with subsection 6b.
d) Convey the object code by offering access from a designated place (gratis or for a charge), and offer equivalent
access to the Corresponding Source in the same way through the same place at no further charge. You need not require
recipients to copy the Corresponding Source along with the object code. If the place to copy the object code is a network
server, the Corresponding Source may be on a different server (operated by you or a third party) that supports equivalent
copying facilities, provided you maintain clear directions next to the object code saying where to find the Corresponding
Source. Regardless of what server hosts the Corresponding Source, you remain obligated to ensure that it is available for
as long as needed to satisfy these requirements.
e) Convey the object code using peer-to-peer transmission, provided you inform other peers where the object code and
Corresponding Source of the work are being offered to the general public at no charge under subsection 6d. A separable
portion of the object code, whose source code is excluded from the Corresponding Source as a System Library
, need not
be included in conveying the object code work.
A “User Product” is either (1) a “consumer product”, which means any tangible personal property which is normally used for
personal, family, or household purposes, or (2) anything designed or sold for incorporation into a dwelling. In determining
whether a product is a consumer product, doubtful cases shall be resolved in favor of coverage. For a particular product
received by a particular user, “normally used” refers to a typical or common use of that class of product, regardless of the
status of the particular user or of the way in which the particular user actually uses, or expects or is expected to use, the
product. A product is a consumer product regardless of whether the product has substantial commercial, industrial or non-
consumer uses, unless such uses represent the only significant mode of use of the product.
“Installation Information” for a User Product means any methods, procedures, authorization keys, or other information required
to install and execute modified versions of a covered work in that User Product from a modified version of its Corresponding
Source. The information must suffice to ensure that the continued functioning of the modified object code is in no case
prevented or interfered with solely because modification has been made.
If you convey an object code work under this section in, or with, or specifically for use in, a User Product, and the conveying
occurs as part of a transaction in which the right of possession and use of the User Product is transferred to the recipient in
perpetuity or for a fixed term (regardless of how the transaction is characterized), the Corresponding Source conveyed under
this section must be accompanied by the Installation Information. But this requirement does not apply if neither you nor any
third party retains the ability to install modified object code on the User Product (for example, the work has been installed in
ROM).
The requirement to provide Installation Information does not include a requirement to continue to provide support service,
warranty, or updates for a work that has been modified or installed by the recipient, or for the User Product in which it has
been modified or installed. Access to a network may be denied when the modification itself materially and adversely affects the
operation of the network or violates the rules and protocols for communication across the network.
Corresponding Source conveyed, and Installation Information provided, in accord with this section must be in a format that is
publicly documented (and with an implementation available to the public in source code form), and must require no special
password or key for unpacking, reading or copying.
7
. Additional Terms.
“Additional permissions” are terms that supplement the terms of this License by making exceptions from one or more of its
conditions. Additional permissions that are applicable to the entire Programme shall be treated as though they were included
in this License, to the extent that they are valid under applicable law. If additional permissions apply only to part of the
Programme, that part may be used separately under those permissions, but the entire Programme remains governed by this
License without regard to the additional permissions.
[620-Weuro]BN68-02326A-03L09.ind56 56 2009-10-08 ¿ÀÀü 9:27:59

When you convey a copy of a covered work, you may at your option remove any additional permissions from that copy, or
from any part of it. (Additional permissions may be written to require their own removal in certain cases when you modify the
work.) You may place additional permissions on material, added by you to a covered work, for which you have or can give
appropriate copyright permission.
Notwithstanding any other provision of this License, for material you add to a covered work, you may (if authorized by the
copyright holders of that material) supplement the terms of this License with terms:
a) Disclaiming warranty or limiting liability differently from the terms of sections 15 and 16 of this License; or
b) Requiring preservation of specified reasonable legal notices or author attributions in that material or in the
Appropriate
Legal Notices displayed by works containing it; or
c) Prohibiting misrepresentation of the origin of that material, or requiring that modified versions of such material be
marked in reasonable ways as different from the original version; or
d) Limiting the use for publicity purposes of names of licensors or authors of the material; or
e) Declining to grant rights under trademark law for use of some trade names, trademarks, or service marks; or
f) Requiring indemnification of licensors and authors of that material by anyone who conveys the material (or modified
versions of it) with contractual assumptions of liability to the recipient, for any liability that these contractual assumptions
directly impose on those licensors and authors.
All other non-permissive additional terms are considered “further restrictions” within the meaning of section 10. If the
Programme as you received it, or any part of it, contains a notice stating that it is governed by this License along with a
term that is a further restriction, you may remove that term. If a license document contains a further restriction but permits
relicensing or conveying under this License, you may add to a covered work material governed by the terms of that license
document, provided that the further restriction does not survive such relicensing or conveying.
If you add terms to a covered work in accord with this section, you must place, in the relevant source files, a statement of the
additional terms that apply to those files, or a notice indicating where to find the applicable terms.
Additional terms, permissive or non-permissive, may be stated in the form of a separately written license, or stated as
exceptions; the above requirements apply either way.
8
. Termination.
You may not propagate or modify a covered work except as expressly provided under this License. Any attempt otherwise to
propagate or modify it is void, and will automatically terminate your rights under this License (including any patent licenses
granted under the third paragraph of section 11).
However, if you cease all violation of this License, then your license from a particular copyright holder is reinstated (a)
provisionally, unless and until the copyright holder explicitly and finally terminates your license, and (b) permanently, if the
copyright holder fails to notify you of the violation by some reasonable means prior to 60 days after the cessation.
Moreover, your license from a particular copyright holder is reinstated permanently if the copyright holder notifies you of the
violation by some reasonable means, this is the first time you have received notice of violation of this License (for any work)
from that copyright holder, and you cure the violation prior to 30 days after your receipt of the notice.
Termination of your rights under this section does not terminate the licenses of parties who have received copies or rights from
you under this License. If your rights have been terminated and not permanently reinstated, you do not qualify to receive new
licenses for the same material under section 10.
9.
Acceptance Not Required for Having Copies.
You are not required to accept this License in order to receive or run a copy of the Programme. Ancillary propagation of a
covered work occurring solely as a consequence of using peer-to-peer transmission to receive a copy likewise does not
require acceptance. However, nothing other than this License grants you permission to propagate or modify any covered work.
These actions infringe copyright if you do not accept this License. Therefore, by modifying or propagating a covered work, you
indicate your acceptance of this License to do so.
10.
Automatic Licensing of Downstream Recipients.
Each time you convey a covered work, the recipient automatically receives a license from the original licensors, to run, modify
and propagate that work, subject to this License. You are not responsible for enforcing compliance by third parties with this
License.
An “entity transaction” is a transaction transferring control of an organization, or substantially all assets of one, or subdividing
an organization, or merging organizations. If propagation of a covered work results from an entity transaction, each party
to that transaction who receives a copy of the work also receives whatever licenses to the work the party’
s predecessor in
interest had or could give under the previous paragraph, plus a right to possession of the Corresponding Source of the work
from the predecessor in interest, if the predecessor has it or can get it with reasonable efforts.
You may not impose any further restrictions on the exercise of the rights granted or affirmed under this License. For example,
you may not impose a license fee, royalty, or other charge for exercise of rights granted under this License, and you may not
initiate litigation (including a cross-claim or counterclaim in a lawsuit) alleging that any patent claim is infringed by making,
using, selling, offering for sale, or importing the Programme or any portion of it.
[620-Weuro]BN68-02326A-03L09.ind57 57 2009-10-08 ¿ÀÀü 9:27:59

11. Patents.
A “contributor” is a copyright holder who authorizes use under this License of the Programme or a work on which the
Programme is based. The work thus licensed is called the contributor’s “contributor version”.
A contributor’s “essential patent claims” are all patent claims owned or controlled by the contributor, whether already acquired
or hereafter acquired, that would be infringed by some manner, permitted by this License, of making, using, or selling its
contributor version, but do not include claims that would be infringed only as a consequence of further modification of the
contributor version. For purposes of this definition, “control” includes the right to grant patent sublicenses in a manner
consistent with the requirements of this License.
Each contributor grants you a non-exclusive, worldwide, royalty-free patent license under the contributor
’s essential patent
claims, to make, use, sell, offer for sale, import and otherwise run, modify and propagate the contents of its contributor version.
In the following three paragraphs, a “patent license” is any express agreement or commitment, however denominated, not
to enforce a patent (such as an express permission to practice a patent or covenant not to sue for patent infringement).
To
“grant” such a patent license to a party means to make such an agreement or commitment not to enforce a patent against the
party.
If you convey a covered work, knowingly relying on a patent license, and the Corresponding Source of the work is not
available for anyone to copy, free of charge and under the terms of this License, through a publicly available network server or
other readily accessible means, then you must either (1) cause the Corresponding Source to be so available, or (2) arrange
to deprive yourself of the benefit of the patent license for this particular work, or (3) arrange, in a manner consistent with the
requirements of this License, to extend the patent license to downstream recipients. “Knowingly relying” means you have
actual knowledge that, but for the patent license, your conveying the covered work in a country
, or your recipient’s use of the
covered work in a country, would infringe one or more identifiable patents in that country that you have reason to believe are
valid.
If, pursuant to or in connection with a single transaction or arrangement, you convey
, or propagate by procuring conveyance
of, a covered work, and grant a patent license to some of the parties receiving the covered work authorizing them to use,
propagate, modify or convey a specific copy of the covered work, then the patent license you grant is automatically extended
to all recipients of the covered work and works based on it.
A patent license is “discriminatory” if it does not include within the scope of its coverage, prohibits the exercise of, or is
conditioned on the non-exercise of one or more of the rights that are specifically granted under this License. You may not
convey a covered work if you are a party to an arrangement with a third party that is in the business of distributing software,
under which you make payment to the third party based on the extent of your activity of conveying the work, and under which
the third party grants, to any of the parties who would receive the covered work from you, a discriminatory patent license (a)
in connection with copies of the covered work conveyed by you (or copies made from those copies), or (b) primarily for and in
connection with specific products or compilations that contain the covered work, unless you entered into that arrangement, or
that patent license was granted, prior to 28 March 2007.
Nothing in this License shall be construed as excluding or limiting any implied license or other defenses to infringement that
may otherwise be available to you under applicable patent law.
12.
No Surrender of Others’ Freedom.
If conditions are imposed on you (whether by court order, agreement or otherwise) that contradict the conditions of this
License, they do not excuse you from the conditions of this License. If you cannot convey a covered work so as to satisfy
simultaneously your obligations under this License and any other pertinent obligations, then as a consequence you may
not convey it at all. For example, if you agree to terms that obligate you to collect a royalty for further conveying from those
to whom you convey the Programme, the only way you could satisfy both those terms and this License would be to refrain
entirely from conveying the Programme.
13.
Use with the GNU Affero General Public License.
Notwithstanding any other provision of this License, you have permission to link or combine any covered work with a work
licensed under version 3 of the GNU Affero General Public License into a single combined work, and to convey the resulting
work. The terms of this License will continue to apply to the part which is the covered work, but the special requirements of
the GNU Affero General Public License, section 13, concerning interaction through a network will apply to the combination as
such.
14.
Revised Versions of this License.
The Free Software Foundation may publish revised and/or new versions of the GNU General Public License from time to time.
Such new versions will be similar in spirit to the present version, but may differ in detail to address new problems or concerns.
Each version is given a distinguishing version number. If the Programme specifies that a certain numbered version of the GNU
General Public License “or any later version” applies to it, you have the option of following the terms and conditions either of
that numbered version or of any later version published by the Free Software Foundation. If the Programme does not specify
a version number of the GNU General Public License, you may choose any version ever published by the Free Software
Foundation.
If the Programme specifies that a proxy can decide which future versions of the GNU General Public License can be
used, that proxy’s public statement of acceptance of a version permanently authorizes you to choose that version for the
Programme.
Later license versions may give you additional or different permissions. However, no additional obligations are imposed on any
author or copyright holder as a result of your choosing to follow a later version.
[620-Weuro]BN68-02326A-03L09.ind58 58 2009-10-08 ¿ÀÀü 9:27:59

15. Disclaimer of Warranty.
THERE IS NO WARRANTY FOR THE Programme, TO THE EXTENT PERMITTED BY APPLICABLE LAW. EXCEPT WHEN
OTHERWISE STATED IN WRITING THE COPYRIGHT HOLDERS AND/OR OTHER PARTIES PROVIDE THE Programme
“AS IS” WITHOUT WARRANTY OF ANY KIND, EITHER EXPRESSED OR IMPLIED, INCLUDING, BUT NOT LIMITED TO,
THE IMPLIED WARRANTIES OF MERCHANTABILITY AND FITNESS FOR A PARTICULAR PURPOSE. THE ENTIRE
RISK AS TO THE QUALITY AND PERFORMANCE OF THE Programme IS WITH YOU. SHOULD THE Programme PROVE
DEFECTIVE, YOU ASSUME THE COST OF ALL NECESSARY SERVICING, REPAIR OR CORRECTION.
16.
Limitation of Liability.
IN NO EVENT UNLESS REQUIRED BY APPLICABLE LAW OR AGREED TO IN WRITING WILL ANY COPYRIGHT
HOLDER, OR ANY OTHER PARTY WHO MODIFIES AND/OR CONVEYS THE Programme AS PERMITTED ABOVE, BE
LIABLE TO YOU FOR DAMAGES, INCLUDING ANY GENERAL, SPECIAL, INCIDENTAL OR CONSEQUENTIAL DAMAGES
ARISING OUT OF THE USE OR INABILITY TO USE THE Programme (INCLUDING BUT NOT LIMITED TO LOSS OF DATA
OR DATA BEING RENDERED INACCURATE OR LOSSES SUSTAINED BY YOU OR THIRD PARTIES OR A FAILURE OF
THE Programme TO OPERATE WITH ANY OTHER ProgrammeS), EVEN IF SUCH HOLDER OR OTHER PARTY HAS BEEN
ADVISED OF THE POSSIBILITY OF SUCH DAMAGES.
1
7. Interpretation of Sections 15 and 16.
If the disclaimer of warranty and limitation of liability provided above cannot be given local legal ef
fect according to their terms,
reviewing courts shall apply local law that most closely approximates an absolute waiver of all civil liability in connection with
the Programme, unless a warranty or assumption of liability accompanies a copy of the Programme in return for a fee.
END OF TERMS AND CONDITIONS
How to Apply These Terms to Your New Programmes
If you develop a new programme, and you want it to be of the greatest possible use to the public, the best way to achieve this is to
make it free software which everyone can redistribute and change under these terms.
To do so, attach the following notices to the programme. It is safest to attach them to the start of each source file to most effectively
state the exclusion of warranty; and each file should have at least the “copyright” line and a pointer to where the full notice is found.
<one line to give the programme’s name and a brief idea of what it does.> Copyright (C) <year> <name of author>
This programme is free software: you can redistribute it and/or modify it under the terms of the GNU General Public License
as published by the Free Software Foundation, either version 3 of the License, or (at your option) any later version.
This programme is distributed in the hope that it will be useful, but WITHOUT
ANY WARRANTY; without even the implied
warranty of MERCHANTABILITY or FITNESS FOR A PARTICULAR PURPOSE. See the GNU General Public License for
more details.
You should have received a copy of the GNU General Public License along with this programme. If not, see <http://www.gnu.
org/licenses/>.
Also add information on how to contact you by electronic and paper mail.
If the programme does terminal interaction, make it output a short notice like this when it starts in an interactive mode:
<programme> Copyright (C) <year> <name of author> This programme comes with ABSOLUTELY NO WARRANTY; for
details type `show w’. This is free software, and you are welcome to redistribute it under certain conditions; type `show c’ for
details.
The hypothetical commands `show w’ and `show c’ should show the appropriate parts of the General Public License. Of course,
your programme’s commands might be different; for a GUI interface, you would use an “about box”.
You should also get your employer (if you work as a programmer) or school, if any, to sign a “copyright disclaimer” for the
programme, if necessary.
For more information on this, and how to apply and follow the GNU GPL, see <http://www
.gnu.org/licenses/>.
The GNU General Public License does not permit incorporating your programme into proprietary programmes. If your programme
is a subroutine library, you may consider it more useful to permit linking proprietary applications with the library. If this is what
you want to do, use the GNU Lesser General Public License instead of this License. But first, please read <http://www
.gnu.org/
philosophy/why-not-lgpl.html>.
¦
[620-Weuro]BN68-02326A-03L09.ind59 59 2009-10-08 ¿ÀÀü 9:27:59

LICENSE ISSUES
The OpenSSL toolkit stays under a dual license, i.e. both the conditions of the OpenSSL License and the original SSLeay license
apply to the toolkit. See below for the actual license texts. Actually both licenses are BSD-style Open Source licenses. In case of
any license issues related to OpenSSL please contact [email protected].
OpenSSL License
Copyright (c) 1998-2007 The OpenSSL Project. All rights reserved.
Redistribution and use in source and binary forms, with or without modification, are permitted provided that the following conditions
are met:
1.
Redistributions of source code must retain the above copyright notice, this list of conditions and the following disclaimer
.
2. Redistributions in binary form must reproduce the above copyright notice, this list of conditions and the following disclaimer in
the documentation and/or other materials provided with the distribution.
3.
All advertising materials mentioning features or use of this software must display the following acknowledgment: “This product
includes software developed by the OpenSSL Project for use in the OpenSSL Toolkit. (http://www.openssl.org/)”
4.
The names “OpenSSL Toolkit” and “OpenSSL Project” must not be used to endorse or promote products derived from this
software without prior written permission. For written permission, please contact [email protected].
5.
Products derived from this software may not be called “OpenSSL nor may “OpenSSL” appear in their names without prior
written permission of the OpenSSL Project.
6.
Redistributions of any form whatsoever must retain the following acknowledgment: “This product includes software developed
by the OpenSSL Project for use in the OpenSSL Toolkit (http://www.openssl.org/)”
THIS SOFTWARE IS PROVIDED BY THE OpenSSL PROJECT ``AS IS’’ AND ANY EXPRESSED OR IMPLIED WARRANTIES,
INCLUDING, BUT NOT LIMITED TO, THE IMPLIED WARRANTIES OF MERCHANTABILITY AND FITNESS FOR A PARTICULAR
PURPOSE ARE DISCLAIMED. IN NO EVENT SHALL THE OpenSSL PROJECT OR ITS CONTRIBUTORS BE LIABLE FOR
ANY DIRECT, INDIRECT, INCIDENTAL, SPECIAL, EXEMPLARY, OR CONSEQUENTIAL DAMAGES (INCLUDING, BUT NOT
LIMITED TO, PROCUREMENT OF SUBSTITUTE GOODS OR SERVICES; LOSS OF USE, DATA, OR PROFITS; OR BUSINESS
INTERRUPTION) HOWEVER CAUSED AND ON ANY THEORY OF LIABILITY, WHETHER IN CONTRACT, STRICT LIABILITY,
OR TORT (INCLUDING NEGLIGENCE OR OTHERWISE) ARISING IN ANY WAY OUT OF THE USE OF THIS SOFTWARE,
EVEN IF ADVISED OF THE POSSIBILITY OF SUCH DAMAGE.
This product includes cryptographic software written by Eric Young ([email protected]). This product includes software written by
Tim Hudson ([email protected]).
Original SSLeay License
Copyright (C) 1995-1998 Eric Young ([email protected]) All rights reserved.
This package is an SSL implementation written by Eric Young ([email protected]). The implementation was written so as to
conform with Netscapes SSL.
This library is free for commercial and non-commercial use as long as the following conditions are aheared to.
The following
conditions apply to all code found in this distribution, be it the RC4, RSA, lhash, DES, etc., code; not just the SSL code. The SSL
documentation included with this distribution is covered by the same copyright terms except that the holder is Tim Hudson (tjh@
cryptsoft.com).
Copyright remains Eric Young’s, and as such any Copyright notices in the code are not to be removed. If this package is used in
a product, Eric Young should be given attribution as the author of the parts of the library used. This can be in the form of a textual
message at programme startup or in documentation (online or textual) provided with the package.
Redistribution and use in source and binary forms, with or without modification, are permitted provided that the following conditions
are met:
1.
Redistributions of source code must retain the copyright notice, this list of conditions and the following disclaimer
.
2. Redistributions in binary form must reproduce the above copyright notice, this list of conditions and the following disclaimer in
the documentation and/or other materials provided with the distribution.
3.
All advertising materials mentioning features or use of this software must display the following acknowledgement: “This
product includes cryptographic software written by Eric Young ([email protected])” The word ‘cryptographic’ can be left out if
the rouines from the library being used are not cryptographic related :-).
4.
If you include any Windows specific code (or a derivative thereof) from the apps directory (application code) you must include
an acknowledgement: “This product includes software written by Tim Hudson ([email protected])”
THIS SOFTWARE IS PROVIDED BY ERIC YOUNG ``AS IS’’ AND ANY EXPRESS OR IMPLIED WARRANTIES, INCLUDING,
BUT NOT LIMITED TO, THE IMPLIED WARRANTIES OF MERCHANTABILITY AND FITNESS FOR A PARTICULAR
PURPOSE ARE DISCLAIMED. IN NO EVENT SHALL THE AUTHOR OR CONTRIBUTORS BE LIABLE FOR ANY DIRECT,
INDIRECT, INCIDENTAL, SPECIAL, EXEMPLARY, OR CONSEQUENTIAL DAMAGES (INCLUDING, BUT NOT LIMITED
TO, PROCUREMENT OF SUBSTITUTE GOODS OR SERVICES; LOSS OF USE, DATA, OR PROFITS; OR BUSINESS
INTERRUPTION) HOWEVER CAUSED AND ON ANY THEORY OF LIABILITY, WHETHER IN CONTRACT, STRICT LIABILITY,
OR TORT (INCLUDING NEGLIGENCE OR OTHERWISE) ARISING IN ANY WAY OUT OF THE USE OF THIS SOFTWARE,
EVEN IF ADVISED OF THE POSSIBILITY OF SUCH DAMAGE.
The licence and distribution terms for any publically available version or derivative of this code cannot be changed. i.e. this code
cannot simply be copied and put under another distribution licence [including the GNU Public Licence.]
¦
[620-Weuro]BN68-02326A-03L09.ind60 60 2009-10-08 ¿ÀÀü 9:27:59

This page is intentionally
left blank.
[620-Weuro]BN68-02326A-03L09.ind61 61 2009-10-08 ¿ÀÀü 9:27:59

Notifications pour le téléviseur numérique
1. Les fonctions relatives au téléviseur numérique (DVB) ne sont disponibles que dans les pays ou régions où des signaux
terrestres numériques de type DVB-T (MPEG2 et MPEG4 AVC) sont diffusés ou dans lesquels vous avez accès à un service
de télévision par câble compatible DVB-C (MPEG2 et MPEG4 AAC). Consultez votre distributeur local pour connaître les
possibilités de réception des signaux DVB-T ou DVB-C.
2. DVB-T est la norme du consortium européen pour la diffusion de signaux terrestres de télévision numérique. La norme DVB-
C est quant à elle prévue pour la diffusion des signaux de télévision numérique par câble. Certaines fonctions particulières,
telles que le guide électronique des programmes (Electric Program Guide - EPG), la vidéo à la demande (V
ideo on Demand
- VOD), etc., ne sont toutefois pas incluses dans cette spécification. Elles ne seront par conséquent pas traitées pour l'instant.
3. Bien que ce téléviseur soit conforme aux dernières normes DVB-T et DVB-C (août 2008), il n'est pas garanti qu'il soit
compatible avec les futures diffusions de signaux numériques terrestres DVB-T et par câble DVB-C.
4.
En fonction du pays ou de la région où vous vous trouvez, certains opérateurs de télévision par câble peuvent facturer des
frais supplémentaires pour un tel service. Vous devrez aussi peut-être accepter les termes et conditions de ces sociétés.
5.
Il se peut que certaines fonctions de TV numérique ne soient pas disponibles dans certains pays ou certaines régions et que
la réception des signaux DVB-C ne soit pas correcte avec tous les opérateurs.
6.
Pour plus d'informations, contactez votre service client Samsung.
Précautions à prendre lors de l'affichage d'une image fixe
Une image fixe peut occasionner des dommages irrémédiables à l'écran du téléviseur.
N'affichez pas d'image fixe sur l'écran LCD pendant plus de 2 heures car cela pourrait provoquer une rémanence de l'image
à l'écran. Cette rémanence de l'image est également appelée ‘brûlure de l'écran’. Pour l'éviter
, réduisez la luminosité et le
contraste de l'écran lorsque vous affichez une image fixe.
L'affichage sur l'écran LCD du téléviseur d'images au format 4:3 pendant une période prolongée peut laisser
des traces de bordures à gauche, à droite et au centre de l'écran, dues à la différence d'émission de lumière
sur celui-ci. La lecture d'un DVD ou l'utilisation d'une console de jeu peut avoir un effet similaire sur l'écran.
Les dommages occasionnés par l'effet précité ne sont pas couverts par la garantie.
L'affichage d'images fixes de jeux vidéo et d'ordinateurs pendant une période excessive peut produire des rémanences. Pour
éviter cela, réduisez la ‘luminosité’ et le ‘contraste’ lors de l'affichage d'images fixes.
© 2009 Samsung Electronics Co., Ltd. Tous droits réservés.
❑
❑
●
●
●
Les gures et illustrations contenues dans ce mode d’emploi sont fournies pour référence uniquement. Elles peuvent différer de
l’aspect réel du produit.
La conception et les spécications du produit sont susceptibles d’être modiées sans préavis.
[620-Weuro]BN68-02326A-03L09.ind1 1 2009-10-08 ¿ÀÀü 9:28:00

Français - 1
Licence
TruSurround HD, SRS et le symbole sont des marques déposées de SRS Labs, Inc. La technologie
TruSurround HD est intégrée à cet appareil sous licence consentie par SRS Labs, Inc.
Fabriqué sous licence de Dolby Laboratories. Dolby et le symbole du double D sont des marques déposées
de Dolby Laboratories.
Symboles
N O T
Remarque Bouton tactile Bouton TOOLS Appuyez sur
❑
❑
INSTALLATION DU TÉLÉVISEUR
Présentation du panneau de commande ........................................... 2
Accessoires ....................................................................................... 3
Présentation du panneau de branchement ....................................... 4
Présentation de la télécommande ..................................................... 6
Insertion des piles dans la télécommande ........................................ 7
Afchage des menus ......................................................................... 7
Mise en mode veille de votre téléviseur ............................................ 8
Fonction Plug & Play (En fonction du modèle) .................................. 8
Visualisation de l’afchage ................................................................ 9
CANAL
Menu Canal ....................................................................................... 9
Gestion des chaînes ....................................................................... 12
IMAGE
Conguration du menu Image ......................................................... 14
Utilisation de votre téléviseur comme écran d'ordinateur (PC) ........ 18
Conguration du téléviseur avec le PC ........................................... 19
SON
Conguration du menu Son ............................................................. 20
Sélection du mode son .................................................................... 21
CONFIGURATION
Conguration du menu Setup .......................................................... 22
Réglage de l'heure ........................................................................... 24
ENTRÉE / ASSISTANCE
Menu Entrée .................................................................................... 26
Menu Assistance ............................................................................. 26
MEDIA PLAY (USB)
Connexion d'un périphérique USB .................................................. 28
Fonction Media Play ........................................................................ 29
Menu d'options de la liste des photos .............................................. 30
Visualisation d'une photo ou d'un diaporama .................................. 31
Menu d'options du diaporama ......................................................... 32
Menu d'options de la liste musicale ................................................. 33
Lecture de musique ......................................................................... 34
Menu d'options de lecture de musique ............................................ 35
Utilisation du menu Setup ................................................................ 35
■
■
■
■
■
■
■
■
■
■
■
■
■
■
■
■
■
■
■
■
■
■
■
■
■
■
■
■
■
ANYNET
+
Connexion de périphériques Anynet
+
.............................................. 36
Conguration d'Anynet
+
.................................................................. 37
Commutation entre périphériques Anynet
+
..................................... 37
Enregistrement ................................................................................ 38
Écoute via un récepteur (home cinéma) .......................................... 38
Dépannage d'Anynet
+
..................................................................... 39
RECOMMENDATIONS
Fonction Télétexte ........................................................................... 40
Montage du socle ............................................................................ 41
Branchement du socle ..................................................................... 42
Installation du kit de montage mural ................................................ 42
Assemblage des câbles ................................................................... 42
Verrou antivol Kensington ................................................................ 42
Sécurisation de l'emplacement d'installation ................................... 43
Fixation du téléviseur au mur .......................................................... 43
Dépannage ...................................................................................... 44
Caractéristiques ............................................................................... 47
■
■
■
■
■
■
■
■
■
■
■
■
■
■
■
■
SOMMAIRE
Français
[620-Weuro]BN68-02326A-03L09.ind1 1 2009-10-08 ¿ÀÀü 9:28:00

Français - 2
INSTALLATION DU TÉLÉVISEUR
Présentation du panneau de commande
La couleur et la forme du produit peuvent varier en fonction du modèle.
Pour activer les boutons situés en face avant, effleurez-les avec votre doigt.
1
P
(PUISSANCE): Permet d'allumer et d'éteindre le téléviseur.
2
TEMOIN D'ALIMENTATION : Clignote et s'éteint lorsqu'il est sous tension et s'allume en mode veille.
3
z
: Permet de changer de chaîne. Dans le menu à l'écran, utilisez les boutons
z
de la même façon que les
boutons ▼ et ▲ de la télécommande.
4
Y
: Permet d'augmenter ou de baisser le volume.
Dans le menu à l'écran, utilisez les boutons
Y
de la même façon que les boutons ◄ et ► de la télécommande.
5
MENU: Permet d'afficher un menu à l'écran des fonctions du téléviseur.
6
SOURCE
E
: Bascule entre toutes les sources d'entrée disponibles. Dans le menu à l'écran, utilisez ce bouton de la même
façon que le bouton ENTER
E
de la télécommande.
7
CAPTEUR DE LA TÉLÉCOMMANDE: Dirigez la télécommande vers ce point du téléviseur.
8
HAUT-PARLEURS
¦
N
N
6
5
4
3
2
1
87
8
[620-Weuro]BN68-02326A-03L09.ind2 2 2009-10-08 ¿ÀÀü 9:28:00

Français - 3
Accessoires
Télécommande et piles (2 x AAA) Cordon d'alimentation Couvercle-Fond
Carte de garantie /
Manuel de sécurité
(non disponible dans certains pays)
Chiffon de nettoyage
Serre-câbles
(En fonction du modèle)
● Mode d'emploi
Vérifiez que les éléments suivants sont fournis avec votre téléviseur LCD. S'il manque des éléments, contactez votre
revendeur.
La couleur et la forme des éléments peuvent varier en fonction du modèle.
¦
N
N
[620-Weuro]BN68-02326A-03L09.ind3 3 2009-10-08 ¿ÀÀü 9:28:01

Français - 4
Présentation du panneau de branchement
La couleur et la forme du produit peuvent varier en fonction du modèle.
1 COMPONENT IN
Pour raccorder une prise vidéo / audio à composantes.
2 HDMI IN 1, 2, 3(DVI), 4 / DVI
AUDIO IN
Pour raccorder la fiche HDMI d'un périphérique équipé d'une sortie HDMI.
Aucune connexion audio n'est nécessaire pour une connexion HDMI-HDMI.
Qu'est-ce que HDMI ?
HDMI (High-Definition Multimedia Interface) est une interface qui permet la transmission des signaux audio et vidéo
numériques à l'aide d'un seul câble.
Entre le périphérique HDMI et le périphérique DVI la différence réside dans la taille, le HDMI étant plus petit.
Il se peut que le téléviseur n'émette aucun son et que les images s'affichent dans des couleurs anormales en cas de
connexion d'un lecteur DVD, d'un lecteur Blu-ray, d'un décodeur câble ou d'un récepteur satellite compatible avec des
versions de l'interface HDMI antérieures à HDMI 1.3. Si, lorsque vous branchez un câble HDMI de génération antérieure,
aucun son n'est émis, connectez le câble HDMI à la prise HDMI IN 3 (DVI) et les câbles audio aux prises DVI AUDIO
IN situées à l'arrière du téléviseur. Dans ce cas, contactez la société ayant fourni le lecteur DVD, le lecteur Blu-ray, le
décodeur câble ou le récepteur satellite afin de vérifier la version de l'interface HDMI, puis demandez une mise à jour de
celui-ci.
Utilisez la prise HDMI IN 3 (DVI) pour une connexion DVI à un périphérique externe. Utilisez un câble ou un adaptateur
DVI-HDMI pour la connexion vidéo et les prises DVI AUDIO IN pour le son. Lorsque vous utilisez une connexion avec
câble HDMI/DVI, vous devez utiliser la prise HDMI IN 3 (DVI).
Les câbles HDMI qui ne sont pas de version 1.3 peuvent provoquer des nuisances à l’écran ou une absence d’image.
3 PC IN [PC] / [AUDIO]
Pour raccorder les fiches de sortie audio et vidéo de votre PC.
Si votre PC dispose d'une prise HDMI, vous pouvez la relier à la borne HDMI IN 1, 2, 3 (DVI) ou 4.
Si votre PC dispose d'une prise DVI, vous pouvez la relier à la borne HDMI IN 3 (DVI) / DVI AUDIO IN.
4 ANT IN
Pour raccorder une antenne ou un système de câblodiffusion.
5 V
errou KENSINGTON (en fonction du modèle)
Le verrou Kensington (en option) est un dispositif permettant de fixer physiquement le système en cas d'utilisation dans un
lieu public. Si vous désirez utiliser un dispositif de verrouillage, contactez le revendeur auquel vous avez acheté le téléviseur
.
L'emplacement du verrou Kensington peut varier en fonction du modèle.
¦
N
N
N
N
N
N
N
N
N
7890 6 5
@
2
#
!
21 34
[Panneau latéral
du téléviseur]
[Panneau arrière du téléviseur]
Entrée de
l'alimentation
[620-Weuro]BN68-02326A-03L09.ind4 4 2009-10-08 ¿ÀÀü 9:28:01

Français - 5
6
H
(CASQUE)
Un casque peut être connecté à la sortie casque du poste. Lorsque le casque est branché, les haut-parleurs intégrés
n'émettent plus de son.
L’utilisation de la fonction Son est limitée lorsqu’un casque est connecté au téléviseur.
L'utilisation prolongée d'un casque à un niveau sonore élevé peut endommager l'ouïe.
Aucun son n'est émis depuis les enceintes lorsque vous connectez le casque au téléviseur
.
Le volume du casque et celui du téléviseur sont réglés séparément.
7 DIGIT
AL AUDIO OUT (OPTICAL)
Pour raccorder un composant audio numérique tel qu'un récepteur home cinéma.
Lorsqu'un système audio numérique est relié à la prise DIGITAL AUDIO OUT (OPTICAL): réduisez le volume du
téléviseur et réglez le volume à l'aide du système audio numérique.
L'audio 5.1 est disponible si le téléviseur est relié à un appareil externe le prenant en charge.
Lorsque le récepteur (home cinéma) est activé, vous pouvez écouter le son sortant de la prise optique du téléviseur
.
Lorsque le téléviseur affiche un signal DTV (Hertzien), il envoie un son canal 5.1 au récepteur du home cinéma. Lorsque
la source est un composant numérique (par exemple, un DVD, un lecteur Blu-ray, un décodeur câble ou un récepteur
satellite) connecté au téléviseur en HDMI, le récepteur home cinéma n'émet le son que sur 2 canaux. Pour obtenir du son
en 5.1, reliez la prise de sortie audio numérique du lecteur DVD, du lecteur Blu-ray, du décodeur câble ou du récepteur
satellite directement à un amplificateur ou un système home cinéma, et non au téléviseur.
8 SER
VICE
Prise pour tests uniquement.
9 AUDIO OUT [R-AUDIO-L]
Pour raccorder la fiche d'entrée audio de votre amplificateur ou système home cinéma.
Lorsqu'un amplificateur audio est relié aux prises AUDIO OUT [R-AUDIO-L] : réduisez le volume du téléviseur et réglez le
volume à l'aide de l'amplificateur.
0 EXT1, 2
Entrées ou sorties pour périphériques externes tels que des magnétoscopes, des lecteurs DVD, des consoles de jeux vidéo
ou des lecteurs de vidéodisques.
En mode EXT, la sortie DTV prend uniquement en charge les signaux audio et vidéo MPEG SD.
Spécifications entrée/sortie
Connecteur
Entrée Sortie
Vidéo Audio (G / D) RVB Vidéo + Audio (G / D)
EXT 1 O O O Seule la sortie TV ou DTV est disponible.
EXT 2 O O X Sortie que vous pouvez sélectionner.
! A
V IN [VIDEO] / [R-AUDIO-L]
Entrées audio et vidéo pour périphériques externes, tels qu'un caméscope ou un magnétoscope.
@ USB
Prise utilisée pour les mises à jour logicielles, la fonction Media Play, etc.
# Emplacement COMMON INTERF
ACE
Si vous n’insérez pas la carte d’interface commune (CI(CI+) CARD) dans certains canaux, le message ‘Signal brouillé’
s’affiche.
Les informations de pairage contenant un numéro de téléphone, l’ID de la carte d’interface commune (CI(CI+) CARD),
l’ID de l’hôte et d’autres informations s’afficheront dans 2 ou 3 minutes. Si un message d'erreur s'affiche, contactez votre
fournisseur de service.
Lorsque la configuration des informations sur les chaînes est terminée, le message ‘Updating Completed’
s'affiche,
indiquant que la liste des chaînes est à jour.
Selon le modèle, un message demandant le mot de passe du Verrouillage parental peut s’afcher à l’insertion de la
carte CI.
Selon le modèle, même si la fonction Verrouillage parental est dénie sur Autor.tout, un message demandant le mot de
passe peut s’afcher pour les programmes réservés aux adultes (18 ans et plus).
Vous devez vous procurer une carte d’interface commune (CI(CI+) CARD) auprès d’un fournisseur local de câblodiffusion.
Extrayez la carte d’interface commune (CI(CI+) CARD) en la tirant délicatement. Une chute pourrait l’endommager
.
Insérez la carte d’interface commune (CI(CI+) CARD) dans le sens indiqué sur celle-ci.
L'emplacement de la fente COMMON INTERFACE peut varier en fonction du modèle.
La carte d’interface commune (CI(CI+) CARD) n’est pas prise en charge dans certains pays, dans dans certaines régions
ni par certaines stations de dif
fusion ; vérifiez auprès de votre revendeur agréé.
La fonction CI+ n’est applicable qu’au modèle LE********P.
Si vous rencontrez des problèmes, contactez le prestataire de service.
N
N
N
N
N
N
N
N
–
–
N
N
N
N
N
[620-Weuro]BN68-02326A-03L09.ind5 5 2009-10-08 ¿ÀÀü 9:28:02

Français - 6
Présentation de la télécommande
Vous pouvez utiliser la télécommande jusqu'à une distance maximale d'environ 7 m du téléviseur.
Une lumière intense peut affecter le bon fonctionnement de la télécommande.
La couleur et la forme du produit peuvent varier en fonction du modèle.
1
POWER : Pour allumer et
éteindre la télévision.
2
:
Permettent de changer de
chaîne.
3
FAV.CH : Affiche la liste des
chaînes favorites à l'écran.
4
Y
: Permet d'augmenter
ou de baisser le volume.
5
SOURCE : Permet d'afficher et
de sélectionner les sources vidéo
disponibles.
6
INFO : Permet d'afficher des
informations sur l'écran du
téléviseur.
7
TOOLS: Permet de sélectionner
rapidement les fonctions
fréquemment utilisées.
8
CH LIST : Permet d'afficher la
liste des chaînes sur l'écran du
téléviseur.
9
BOUTONS DE COULEUR :
utilisez ces boutons dans les
menus Channel list, Media
Play, etc.
!
DUAL : sélection d'effets
sonores.
@
Utilisez ces boutons avec les
modes Media Play et Anynet
+
.
(
∏
: cette télécommande peut
être utilisée pour contrôler les
enregistreurs Samsung avec la
fonction Anynet
+
.)
#
TV : Sélectionne directement le
mode TV.
$
PRE-CH : Vous permet de
revenir à la chaîne que vous
regardiez précédemment.
%
MUTE
M
: Vous permet de
couper le son temporairement.
^
>
P
<
: Permet de changer de
chaîne.
&
MENU : Affiche le menu principal
à l'écran.
*
GUIDE : Affichage du guide
électronique des programmes
(EPG).
(
RETURN : Revient au menu
précédent
)
E
:
Permettent de sélectionner des
options de menu à l'écran et de
modifier des valeurs de menu.
a
EXIT : Permet de quitter le menu.
b
P.SIZE : sélection de la taille de
l'image.
c
MEDIA.P : Permet de lire les
fichiers de musique et les
images.
d
SUBT. : Affichage numérique des
sous-titres.
e
AD : Sélection de la description
audio.
Fonctions Télétexte
5
0
: Sélection du mode
Télétexte (LIST/FLOF).
6
5
: Activation du télétexte.
7
4
: Sélection de la taille du
télétexte.
8
8
: Mémorisation du télétexte.
9
Sélection des rubriques Fastext
0
/
: Sélection alternative de
Teletext, Double ou Mix.
#
:
: fermer l'affichage du
télétexte.
$
1
: Page secondaire du
télétexte.
^
2
: Page de télétexte suivante
3
: Page de télétexte
précédente.
&
6
: Index du télétexte
(
9
: Pause du télétexte.
a
7
: Annulation du télétexte.
¦
N
N
N
INFO
C
H
L
I
S
T
AD
1 #
$
^
*
(
)
a
b
c
e
d
%
&
2
3
4
5
6
7
8
9
0
!
@
[620-Weuro]BN68-02326A-03L09.ind6 6 2009-10-08 ¿ÀÀü 9:28:02

Français - 7
Insertion des piles dans la télécommande
1. Soulevez le couvercle au dos de la télécommande comme illustré dans la figure.
2. Placez-y deux piles AAA.
Assurez-vous que les pôles ‘+’ et ‘–’ des piles correspondent au schéma situé à
l'intérieur du compartiment.
3.
Replacez le couvercle.
Retirez les piles et stockez-les dans un endroit frais et sec si vous n'utilisez pas la
télécommande pendant longtemps. (Les piles devraient durer environ un an en cas d'usage normal).
Si la télécommande ne fonctionne pas, vérifiez les points suivants:
Le téléviseur est-il sous tension?
Les bornes + et - des piles ne sont-elles pas inversées?
Les piles sont-elles déchargées?
Le cordon d'alimentation est-il débranché ou y a-t-il une panne de courant?
Une lampe fluorescente ou néon est-elle allumée à proximité?
Affichage des menus
Avant d'utiliser le téléviseur, procédez comme suit pour apprendre à naviguer dans le menu afin de sélectionner et de régler les
différentes fonctions.
Maniement de l'affichage à l'écran
L'étape d'accès peut varier en fonctoin du menu sélectionné.
1. Appuyez sur le bouton MENU.
2.
Le menu principal apparaît à l'écran. Plusieurs icônes s’affichent sur le côté gauche du
menu: Image, Son, Canal, Configuration, Entrée, Application, Assistance.
3. Appuyez sur le bouton ▲ ou ▼ pour sélectionner l'une des icônes.
4.
Appuyez ensuite sur le bouton ENTER
E
pour accéder au sous-menu de l'icône.
5. Appuyez sur le bouton ▲ ou ▼ pour sélectionner l'un des sous-menus de l'icône.
6.
Appuyez sur le bouton ◄ ou ► pour diminuer ou augmenter la valeur d'un élément
spécifique. Les informations affichées à l'écran peuvent varier en fonction du menu
sélectionné.
7
. Appuyez sur le bouton ENTER
E
pour finir la configuration. Appuyez sur le bouton EXIT
pour quitter.
¦
N
N
N
¦
❑
INFO
AD
Bouton MENU
Afficher le menu principal à l'écran.
ENTER
E
/ Boutons DIRECTIONNELS
Déplace le curseur pour sélectionner un
élément. Valide l'élément actuellement
sélectionné. Confirmer un paramétrage.
Bouton RETURN
Revient au menu précédent.
EXIT
Fermer le menu affiché à l'écran.
INFO
AD
INFO
AD
Mode :Moyen ▶
Contre-jour :7
Contraste :95
Luminosité :45
Netteté :50
Couleur :50
Teinte(V/R) :V50/R50
Réglagesavancés
Image
Mode :Moyen
Contre-jour :7 ▶
Contraste :95
Luminosité :45
Netteté :50
Couleur :50
Teinte(V/R) :V50/R50
Réglagesavancés
Optionsd'image
Image
7
U
Déplacer
L
Régler
E
Entrer
R
Retour
▲
Contre-jour
▼
Icône de l’Aide
[620-Weuro]BN68-02326A-03L09.ind7 7 2009-10-08 ¿ÀÀü 9:28:03

Français - 8
Mise en mode veille de votre téléviseur
Vous pouvez mettre votre téléviseur en mode Veille afin de réduire la consommation électrique. Le mode veille peut être utile si
vous souhaitez éteindre votre téléviseur temporairement (pendant un repas par exemple).
1. Appuyez sur le bouton POWER
P
de la télécommande.
L'écran s'éteint et un voyant de veille apparaît sur votre téléviseur.
2.
Pour rallumer le téléviseur, appuyez de nouveau sur le bouton POWER
P
.
Ne laissez pas le téléviseur en mode Veille pendant de longues périodes (lorsque vous êtes en vacances par exemple). Il
est conseillé de débrancher le téléviseur du secteur et de l'antenne.
Fonction Plug & Play (En fonction du modèle)
Lorsque vous allumez le téléviseur pour la première fois, des réglages de base s'effectuent
l'un après l'autre de manière automatique.
1. Appuyez sur le bouton POWER de la télécommande.
Vous pouvez également utiliser le bouton POWER
P
du téléviseur.
Le message Select the OSD Language. s'affiche à l'écran.
2.
Appuyez sur le bouton ENTER
E
. Sélectionnez la langue de votre choix en appuyant sur
le bouton ▲ ou ▼. Appuyez sur le bouton ENTER
E
pour confirmer votre choix.
3. Appuyez sur le bouton ◄ ou ► pour sélectionner Démo magasin ou Util. à domicile,
puis appuyez sur le bouton ENTER
E
.
Nous recommandons de régler le téléviseur sur le mode Util. domicile pour une
meilleure qualité d'image dans votre environnement personnel.
Démo magasin n'est prévu que pour un usage en magasin.
Si l'unité est accidentellement réglée sur le mode Démo magasin et que vous souhaitez revenir au mode Util. domicile
(Standard): Appuyez sur le bouton Volume du téléviseur. Lorsque l'affichage écran du volume apparaît, appuyez pendant
5 secondes sur le bouton MENU du téléviseur.
4.
Appuyez sur le bouton ENTER
E
. Sélectionnez le pays approprié en appuyant sur le bouton ▲ ou ▼. Appuyez sur le bouton
ENTER
E
pour confirmer votre choix.
Après la sélection du pays dans le menu Pays, certains modèles peuvent demander, en plus, le code PIN.
Lors de l’entrée du code PIN, 0-0-0-0 n’est pas disponible.
5.
Appuyez sur le bouton ▲ ou ▼ pour sélectionner Hertzien ou Câble, puis appuyez sur le bouton ENTER
E
.
Hertzien: signal d'antenne aérienne.
Câble: signal d'antenne câble.
6.
Appuyez sur le bouton ▲ ou ▼ pour sélectionner la source de chaîne à mémoriser
. Appuyez sur le bouton ENTER
E
pour
sélectionner Démarrer.
Lors du réglage de la source d'antenne sur Câble, une fenêtre s'affiche, qui vous permet de définir une valeur pour la
recherche de chaîne numérique. Pour plus d'informations, reportez-vous à .
Numérique et Analogique: Chaînes numériques et analogiques.
Numérique: Chaînes numériques.
Analogique: Canal analogique.
La recherche de chaînes démarre et se termine automatiquement.
Appuyez sur le bouton ENTER
E
à tout moment pour interrompre la mémorisation.
Une fois toutes les chaînes disponibles mémorisées, le message Définit le mode Horloge s'affiche.
7
. Appuyez sur le bouton ENTER
E
. Appuyez sur le bouton ▲ ou ▼ pour sélectionner Auto., puis appuyez sur le bouton ENTER
E
.
Si vous sélectionnez Manuel, le message s'affiche.
Si vous recevez un signal numérique, l'heure se règle automatiquement. Sinon, sélectionnez Manuel pour régler l'horloge.
8
. La description relative à la méthode de connexion fournissant la meilleure qualité d'image en HD s'af
fiche à l'écran. Lisez-la
puis appuyez sur le bouton ENTER
E
.
9. Le message Profitez de votre téléviseur. s'affiche. Lorsque vous avez terminé, appuyez sur le bouton ENTER
E
.
Si vous souhaitez réinitialiser cette fonction...
1. Appuyez sur le bouton MENU pour afficher le menu. Appuyez sur le bouton ▲ ou ▼ pour
sélectionner Configuration, puis sur le bouton ENTER
E
.
2. Appuyez de nouveau sur le bouton ENTER
E
pour sélectionner Plug & Play.
3. Entrez votre code PIN à quatre chiffres. Le code PIN par défaut d'un nouveau téléviseur
est ‘0-0-0-0’.
Si vous voulez modifier le code PIN, utilisez la fonction Modifier PIN.
La fonction Plug & Play est uniquement disponible en mode TV.
¦
N
N
¦
N
N
N
N
N
N
N
N
N
N
N
N
N
N
N
N
N
N
INFO
AD
SelecttheOSDLanguage.
MenuLanguage :English ▶
E
Enter
Plug&Play
Plug&Play ▶
Languedesmenus :Français
Horloge
Diffuser
Sécurité
Général
Configuration
[620-Weuro]BN68-02326A-03L09.ind8 8 2009-10-08 ¿ÀÀü 9:28:03

Français - 9
L’affichage identifie la chaîne en cours et l’état de certains paramètres audio et vidéo.
Appuyez sur le bouton INFO pour afficher les informations.
Appuyez sur le bouton INFO de la télécommande. La télévision affiche la chaîne, le type
de son et l’état de certains paramètres de son et d’image.
▲, ▼: Vous pouvez afficher des informations relatives à une autre chaîne. Pour
accéder à la chaîne actuellement sélectionnée, appuyez sur le bouton ENTER
E
.
◄, ►: Vous pouvez afficher les informations relatives au programme souhaité de la
chaîne actuelle.
Appuyez de nouveau sur le bouton INFO ou attendez environ 10 secondes pour que
l’affichage disparaisse automatiquement.
CANAL
Menu Canal
Pays
Canal analogique
Permet de changer de pays pour les chaînes analogiques.
Canal numérique
Permet de changer de pays pour les chaînes numériques.
L'écran de saisie du code PIN s'affiche. Entrez votre code PIN à quatre chiffres.
Mémorisation Auto
Vous pouvez chercher les plages de fréquence disponibles par balayage (leur disponibilité dépend de votre pays). Il est possible
que les numéros de programme attribués automatiquement ne correspondent pas aux numéros de programme souhaités ou réels.
Si une chaîne est verrouillée par la fonction Verrouillage Canal, la fenêtre de saisie du code PIN s'affiche.
Hertzien / Câble
Source d'antenne à mémoriser
Numérique et Analogique: Chaînes numériques et analogiques.
Numérique: Chaînes numériques.
Analogique: Canal analogique.
Lors de la sélection ‘de ou ‘de
Fournissez une valeur à rechercher pour les chaînes câblées.
Rapide
Network ID : affiche le code d'identification du réseau.
Fréquence : affiche la fréquence correspondant au canal (varie d'un pays à l'autre).
Modulation: affiche les valeurs de modulation disponibles.
Taux de symbole: affiche les débits de symboles disponibles.
Cherche toutes les chaînes avec des stations de diffusion actives et les enregistre dans la mémoire du téléviseur.
Pour arrêter la mémorisation automatique, appuyez sur le bouton ENTER
E
.
Le message Arrêter le programme automatique? s'affiche.
Sélectionnez Oui en appuyant sur le bouton◄ ou ►puis appuyez sur le bouton ENTER
E
.
¦
O
●
●
N
¦
❑
■
■
N
❑
N
■
●
●
●
●
N
N
N
INFO
AD
DTV Air
15
abc1
18:00 ~ 6:00
18:11 Thu 6 Jan
Life On Venus Avenue
Unclassified
No Detaild Information
' Information
Pays ▶
MémorisationAuto
MémorisationManuelle
Optionderecherchedecâble
GuideComplet
MiniGuide
Pardéfaut :GuideComplet
Listedeschaînes
Canal
[620-Weuro]BN68-02326A-03L09.ind9 9 2009-10-08 ¿ÀÀü 9:28:03

Français - 10
Mémorisation Manuelle
Permet de chercher manuellement une chaîne et de l'enregistrer dans la mémoire du téléviseur.
Si une chaîne est verrouillée par la fonction Verrouillage Canal, la fenêtre de saisie du code PIN s'affiche.
Canal numérique
Enregistrement manuel de chaînes numériques.
Canal numérique est uniquement disponible en mode DTV.
Canal: Sélectionnez le numéro de chaîne à l'aide des boutons ▲, ▼ ou des chiffres (0-9).
Fréquence : Sélectionnez la fréquence à l'aide des chiffres.
Bande passante : Sélectionnez la bande passante à l'aide des boutons ▲, ▼ ou des chiffres (0-9).
Au terme de la recherche, les chaînes de la liste sont mises à jour.
Canal analogique
Enregistrement manuel de chaînes analogiques.
Programme (numéro de programme à attribuer à une chaîne): Sélectionnez le numéro de chaîne à l'aide des boutons ▲, ▼
ou des chiffres (0-9).
: Sélectionnez le système de couleurs à l'aide du bouton ▲ ou ▼.
: Sélectionnez le système audio à l'aide du bouton ▲ ou ▼.
Canal (si vous connaissez le numéro de la chaîne à mémoriser): Appuyez sur le bouton ▲ ou ▼ pour sélectionner C (chaîne
hertzienne) ou S (chaîne câblée). Appuyez sur le bouton ►, puis sur le bouton ▲ ou ▼ ou un chiffre (0~9) pour sélectionner
le numéro de votre choix.
Vous pouvez également sélectionner le numéro de chaîne directement en appuyant sur les touches numériques (0~9).
Si aucun son ne sort ou si le son produit est anormal, sélectionnez de nouveau la norme son requise.
Recherche (lorsque vous ne connaissez pas les numéros de chaîne) : Appuyez sur le bouton ▲ ou ▼ pour lancer la
recherche. Le syntoniseur balaie la plage de fréquences jusqu'à ce que vous receviez la première chaîne ou la chaîne que
vous avez sélectionnée à l'écran.
Mémoriser (permet de mémoriser la chaîne et le numéro de programme correspondant): Sélectionnez OK en appuyant sur le
bouton ENTER
E
.
Mode Canal
P (Mode Programme) : à la fin du réglage, des numéros de position compris entre P00 et P99 sont attribués aux stations
de radiodiffusion de votre région. Dans ce mode, vous pouvez sélectionner un chaîne en saisissant son numéro de
position.
C (Mode chaîne hertzienne) : dans ce mode, vous pouvez sélectionner une chaîne en saisissant le numéro attribué à
chacune des stations de télédiffusion.
S (Mode chaîne câblée) : dans ce mode, vous pouvez sélectionner une chaîne en saisissant le numéro attribué à
chacune des chaînes câblées.
Option de recherche de câble (en fonction du pays)
Définit des options supplémentaires telles que la fréquence et le débit de symboles pour les recherches sur réseau câblé.
Fréq. début (Frequency Start): définit la fréquence de démarrage (différente dans chaque pays).
Fréq. fin (Frequency Stop): définit la fréquence d'arrêt (différente dans chaque pays).
Modulation: affiche les valeurs de modulation disponibles.
Taux de symbole: affiche les débits de symboles disponibles.
Guide Complet / Mini Guide
Les informations relatives au guide électronique des programmes (EPG) sont fournies par les diffuseurs. Des entrées de
programmes peuvent être vides ou ne pas être à jour en raison des informations diffusées sur un canal donné. L'affichage est
automatiquement actualisé dès que de nouvelles informations sont disponibles.
Vous pouvez aussi afficher le guide en appuyant simplement sur le bouton GUIDE (pour configurer Par défaut, reportez-vous
aux descriptions).
Guide Complet
Affiche le programme heure par heure. Deux heures de programme sont affichées et vous pouvez faire défiler le programme en
avançant ou en remontant dans le temps.
Mini Guide
Les informations de chaque programme sont affichées ligne par ligne sur l'écran du mini-guide de la chaîne actuelle, en
commençant par le programme en cours, dans l'ordre des heures de début des programmes.
❑
N
N
■
N
●
●
●
N
■
●
●
●
●
N
N
●
●
N
❑
●
●
●
●
❑
O
■
■
[620-Weuro]BN68-02326A-03L09.ind10 10 2009-10-08 ¿ÀÀü 9:28:04

Français - 11
Vous pouvez choisir d'afficher le Guide Complet ou le Mini Guide lorsque vous appuyez sur le bouton GUIDE de la
télécommande.
Liste des chaînes
Pour obtenir plus de détails sur les procédures d'utilisation de la Liste des chaînes, reportez-vous aux instructions de ‘Gestion
des chaînes’.
Vous pouvez sélectionner ces options en appuyant sur le bouton CH LIST de la télécommande.
Mode des chaînes
Lorsque vous appuyez sur le bouton P
>
/
<
, les chaînes seront sélectionnées dans la liste des chaînes sélectionnée.
Chaînes ajoutées
Les chaînes sont sélectionnées dans la liste des chaînes mémorisée.
Favoris
Les chaînes sont sélectionnées dans la liste des chaînes mémorisée.
Réglage fin
Si la réception est claire, vous n'avez pas besoin d'effectuer une syntonisation fine du canal, car cette opération s'effectue
automatiquement pendant la recherche et la mémorisation. Si le signal est faible ou distordu, vous pouvez être amené à effectuer
manuellement une syntonisation fine du canal.
Les canaux finement syntonisés qui ont été mémorisés sont repérés par un astérisque "*" placé à droite de leur numéro dans
la bannière des canaux.
Pour rétablir la syntonisation fine, sélectionnez Réinit. à l'aide du bouton ▲ ou ▼, puis appuyez sur le bouton ENTER
E
.
La syntonisation fine n'est possible que pour des chaînes analogiques.
Utilisation du guide complet / mini-guide
Pour… Alors…
Regarder un programme de la liste du guide
électronique des programmes
Sélectionnez un programme à l'aide des boutons ▲, ▼, ◄, ►.
Quitter le guide Appuyez sur le bouton bleu.
Si le programme suivant est sélectionné, il est planifié avec l'icône de l'horloge affichée. Si vous appuyez de nouveau sur
le bouton ENTER
E
puis sur ◄, ► pour sélectionner Annuler progr., la programmation est annulée et l'icône de l'horloge
disparaît.
Voir les informations relatives aux programmes Sélectionnez un programme à l'aide des boutons ▲, ▼, ◄, ►.
Appuyez ensuite sur le bouton INFO lorsque le programme de votre
choix apparaît en surbrillance.
Le titre du programme se trouve dans la partie supérieure du centre de
l'écran.
Cliquez sur le bouton INFO pour obtenir des informations détaillées. Numéro de canal, temps de fonctionnement du
programme, barre d'état, niveau de contrôle parental, informations sur la qualité vidéo (HD/SD), modes son, sous-titres ou
télétexte, langue des sous-titres ou du télétexte et bref résumé du programme en surbrillance font partie des informations
détaillées. ‘...’ s'affiche si le résumé est long.
Basculer entre Guide Complet et Mini Guide Appuyez à plusieurs reprises sur le bouton rouge.
Dans le guide complet
Reculer rapidement (24 heures).
Avancer rapidement (24 heures).
Appuyez à plusieurs reprises sur le bouton vert.
Appuyez à plusieurs reprises sur le bouton jaune.
❑
❑
O
❑
■
■
❑
N
N
N
GuideComplet
E
Regarder Information Page MiniGuide +24heures Quitter
DTVCable900ftn2:10Tue1Jun
FreshmenOnCampus
2:00-2:30
NoDetailedInformation
Aujourd'hui
2:00-3:00 3:00-4:00
MintExtra
Loaded
40withDynamiteMC
TheDistillery
SmashHits!Sunday
900ftn
901ITVPlay
902Kerrang!
903Kiss
904oneword
905Hits
▼
StreetHypn..
Kisstory
No
Information
NoInformation
NoInformation
FreshmenO..
900
E
Regarder Information Page GuideComplet Quitter
MiniGuide DTVCable900ftn
StreetHypnosis
BoozeBritain
2:00
2:30
5:00
Freshmen
OnCampus
▼
[620-Weuro]BN68-02326A-03L09.ind11 11 2009-10-08 ¿ÀÀü 9:28:04

Français - 12
Gestion des chaînes
Ce menu permet d'ajouter/supprimer ou définir des chaînes favorites et d'utiliser le guide des programmes pour les émissions
numériques.
Tous les canaux
Affiche toutes les chaînes actuellement disponibles.
Chaînes ajoutées
Affiche toutes les chaînes ajoutées.
Favoris
Affiche toutes les chaînes favorites.
Pour sélectionner les chaînes favorites que vous avez configurées, appuyez sur le bouton
FAV.CH de la télécommande.
Programmé
Affiche tous les programmes actuellement réservés.
Sélectionnez une chaîne sur l'écran Tous les canaux, Chaînes ajoutées ou Favoris en appuyant sur le boutons ▲ / ▼, puis
sur le bouton ENTER
E
. Vous pouvez alors regarder la chaîne sélectionnée.
Utilisation des boutons de couleur dans la liste des chaînes
Rouge (Type de canal) : Permet de basculer entre TV, Radio, Donn/autre et Tous.
Vert (Zoom) : Agrandit ou réduit un numéro de chaîne.
Jaune (Sélection): Sélectionne plusieurs listes de chaînes. Vous pouvez appliquer les fonctions d'ajout/suppression ou
ajout/suppression de favoris à plusieurs chaînes à la fois. Sélectionnez les chaînes voulues, puis appuyez sur le bouton
jaune pour traiter toutes les chaînes sélectionnées à la fois. La marque c s'affiche à gauche des chaînes sélectionnées.
TOOLS (Outils) : Affiche le menu Supprimer (ou Ajouter), Ajouter aux favoris (ou Supprimer des favoris), Verrouil.
(ou Déverr.), Rappel de prog., Modifi. nom de chaîne, Modif. numéro chaîne, Tri des canaux, Sélectionner tout (ou
Désélectionner tout) ou Mémorisation Auto. (Les menus Options peuvent varier en fonction de la situation.)
Icônes d'état des chaînes
A
: chaîne analogique.
c
: chaîne sélectionnée en appuyant sur le bouton jaune.
*
: Chaîne définie comme favorite.
(
: Programme en cours de diffusion.
\
: Chaîne verrouillée.
)
: Programme réservé.
Menu d'options de la liste des chaînes (dans Tous les canaux / Chaînes ajoutées / Favoris)
Appuyez sur le bouton TOOLS pour utiliser le menu d'options.
Les éléments du menu Options peuvent varier selon l'état de la chaîne.
Ajouter / Supprimer
Vous pouvez supprimer ou ajouter une chaîne afin d'afficher les chaînes de votre choix.
Toutes les chaînes supprimées apparaîtront dans le menu Tous les canaux.
Une chaîne grisée est une chaîne qui a été supprimée.
Le menu Ajouter s'affiche uniquement pour les chaînes supprimées.
Vous pouvez également supprimer une chaîne du menu Chaînes ajoutées ou Favoris de
la même manière.
Ajouter aux favoris / Supprimer des favoris
Vous pouvez définir comme favorites les chaînes que vous regardez souvent.
Appuyez sur le bouton TOOLS pour afficher le menu Outils. Vous pouvez également définir l'ajout aux (ou suppression des)
favoris en sélectionnant
(ou Supprimer des favoris).
Le symbole ‘
*
’ s’affiche et la chaîne est définie comme favorite.
Toutes les chaînes favorites apparaîtront dans le menu Favoris.
Verrouil. / Déverr.
Vous pouvez verrouiller une chaîne afin qu'elle ne puisse pas être sélectionnée ni visualisée.
Cette fonction n'est disponible que si l'option Verrouillage Canal est définie sur Mar..
L'écran de saisie du code PIN s'affiche. Entrez votre code PIN à quatre chiffres.
Le code PIN par défaut d'un nouveau téléviseur est ‘0-0-0-0’. Vous pouvez modifier le code PIN en sélectionnant Modifier PIN
dans le menu.
Le symbole ‘
\
’ s'affiche et la chaîne est verrouillée.
¦
■
■
■
O
■
N
N
N
N
N
■
N
N
N
N
■
T
N
N
■
N
N
N
N
Touslescanaux
824UKTVGold
825UKTVstyle
A
1C--
A
2C--
A
3C--
A
4C--
A
5C--
A
6C--
A
7C--
A
8C--
Tous Typedecanal Zoom Sélection
T
Outils
Supprimer
Ajouterauxfavoris
Verrouil.
Rappel
deprog.
Modifi.nomdechaîne
Tridescanaux
Chaînesajoutées
824UKTVGold
825UKTVstyle
A
1C--
A
2C--
A
3C--
A
4C--
A
5C--
A
6C--
A
7C--
A
8C--
Tous
Typedecanal Zoom Sélection
T
Outils
[620-Weuro]BN68-02326A-03L09.ind12 12 2009-10-08 ¿ÀÀü 9:28:05

Français - 13
Rappel de prog.
Si vous réservez un programme que vous souhaitez regarder, la chaîne bascule automatiquement vers la chaîne réservée dans
la liste de chaînes, même si vous êtes en train de regarder une autre chaîne. Pour réserver un programme, réglez d'abord l'heure
actuelle
Il n'est possible de réserver que des chaînes mémorisées.
Vous pouvez régler directement la chaîne, le jour, le mois, l'heure et les minutes à l'aide des touches numériques de la
télécommande.
Les programmes réservés apparaissent dans le menu Programmé.
Guide des programmes numérique et affichage des réservations
Quand une chaîne numérique est sélectionnée et que vous appuyez sur le bouton ►, le Guide des programmes de la chaîne
s'affiche. Vous pouvez réserver un programme en suivant les procédures décrites ci-dessus.
Modifi. nom de chaîne (chaînes analogiques uniquement)
Vous pouvez attribuer aux chaînes un libellé qui s'affiche chaque fois que vous les sélectionnez.
Les noms des chaînes numériques leur sont automatiquement attribués ; vous ne pouvez pas les modifier
.
Modif. numéro chaîne (chaînes numériques uniquement)
Vous pouvez également modifier le numéro de chaîne à l'aide du pavé numérique de la télécommande.
Tri des canaux (chaînes analogiques uniquement)
Cette opération permet de changer les numéros de programme des chaînes mémorisées. Cette opération peut s'avérer
nécessaire après l'utilisation de la mémorisation automatique.
Sélectionner tout / Désélectionner tout
Sélectionner tout: Vous pouvez sélectionner toutes les chaînes de la liste des chaînes.
Désélectionner tout : Vous pouvez désélectionner toutes les chaînes sélectionnées.
La fonction Désélectionner tout n'est disponible que si au moins une chaîne est sélectionnée.
Mémorisation Auto
Pour la procédure détaillée du réglage des options, reportez-vous à la rubrique "Menu Canal".
Si une chaîne est verrouillée par la fonction Verrouillage Canal, la fenêtre de saisie du code PIN s'affiche.
Menu d'options de la liste des chaînes (dans Programmé)
Vous pouvez voir, modifier ou supprimer une réservation.
Appuyez sur le bouton TOOLS pour utiliser le menu d'options.
Infos modif.
Permet de modifier une réservation.
Annuler progr.
Permet d'annuler une réservation.
Information
Permet de visualiser une réservation
(et d'en changer les données).
Sélectionner tout
Permet de sélectionner tous les programmes réservés.
■
N
N
N
N
■
N
■
■
■
●
●
N
■
N
N
N
■
■
■
■
Programmé
1/1/2009
13:595TV1
)
18:592TV3
)
TheEqualizer
20:592TV3
)
McMillan&Wife
21:592TV3
)
M.Spillane’smike
Tous Zoom Sélection
T
Outils
E
Information
Infosmodif.
Annulerprogr.
Information
Sélectionner
tout
[620-Weuro]BN68-02326A-03L09.ind13 13 2009-10-08 ¿ÀÀü 9:28:05

Français - 14
Image
Configuration du menu Image
Mode
Vous pouvez sélectionner le type d'image correspondant le mieux à vos besoins d'affichage.
Appuyez sur le bouton TOOLS pour afficher le menu Outils. Vous pouvez également
définir le mode d'image en sélectionnant .
Dynamique
Sélectionne l'image pour un affichage à plus haute définition dans une pièce lumineuse.
Standard
Sélectionne l'image pour un affichage optimal dans un environnement normal.
Naturel
Sélectionne l'image pour un affichage optimal et confortable pour les yeux.
Cette fonction n'est pas disponible en mode PC.
Film
Sélectionne l'image pour un affichage agréable de films dans une pièce sombre.
Rétroéclairage / Contraste / Luminosité / Netteté / Couleur / Teinte (V/R)
Votre téléviseur offre de plusieurs options de paramétrage qui permettent de contrôler la qualité
d'image.
Rétroéclairage : Règle la luminosité du rétroéclairage de l'écran LCD.
Contraste : Règle le niveau de contraste de l'image.
Luminosité : Règle le niveau de luminosité de l'image.
Netteté : Règle la définition des bords de l'image.
Couleur : Règle la saturation de couleur de l'image.
Teinte (V/R) : Règle la teinte de l'image.
Dans les modes analogiques TV, Ext., AV du système PAL, vous ne pouvez pas utiliser la fonction Teinte (V/R).
Lorsque vous modifiez les paramètres Rétroéclairage, Contraste, Luminosité, Netteté, Couleur ou Teinte (V/R) l'affichage
écran change en conséquence.
En mode PC, vous ne pouvez modifier que les options Rétroéclairage, Contraste et Luminosité.
Vous pouvez régler et enregistrer des paramètres pour chaque périphérique externe connecté à une entrée du téléviseur.
Vous pouvez réduire sensiblement l'énergie consommée en cours d'utilisation en baissant le niveau de luminosité de l'image,
de façon à diminuer le coût de fonctionnement général.
Paramètres avancés
Les nouveaux téléviseurs Samsung permettent d'effectuer des réglages d'image encore plus
précis que les modèles précédents.
Paramètres avancés est disponible dans les modes Standard et Film.
En mode PC, vous ne pouvez modifier que les paramètres Contraste Dynam., Gamma et
Balance blancs parmi les options du menu Paramètres avancés.
Vous pouvez choisir le niveau de noir pour régler la profondeur de l'écran.
Vous pouvez régler le contraste de l'écran pour obtenir un résultat optimal.
Gamma
Vous pouvez régler l'intensité des couleurs primaires (rouge, vert, bleu).
¦
❑
T
■
■
■
N
■
❑
●
●
●
●
●
●
N
N
N
N
N
❑
N
N
■
■
■
Mode :Standard ▶
Rétroéclairage :7
Contraste :95
Luminosité :45
Netteté :50
Couleur :50
Teinte(V/R) :V50/R50
Paramètresavancés
Image
7
U
Déplacer
L
Régler
E
Entrer
R
Retour
▲
Rétroéclairage
▼
Nuancedenoir :Arr. ▶
ContrasteDynam. :Moyen
Gamma :0
Espacecouleur :Natif
Balanceblancs
Carnation :0
Nettetédescontours :Mar.
U
Déplacer
E
Entrer
R
Retour
Paramètresavancés
[620-Weuro]BN68-02326A-03L09.ind14 14 2009-10-08 ¿ÀÀü 9:28:05

Français - 15
Espace couleur
Un espace colorimétrique est une matrice de couleurs composée de rouge, de vert et de bleu. Sélectionnez votre espace
colorimétrique préféré et appréciez la couleur la plus naturelle.
Auto.: règle automatiquement la nuance de couleur la plus naturelle sur la base des sources de programme.
Natif: offre une nuance de couleur profonde et riche.
Personnel: permet de régler l'espace colorimétrique en fonction de vos préférences.
La modification des valeurs de réglage actualise l'affichage à l'écran.
Vous pouvez régler et enregistrer des paramètres pour chaque périphérique externe connecté à une entrée du téléviseur.
Par exemple, si vous avez un lecteur de DVD connecté à la prise HDMI 1 et s'il est sélectionné, les paramètres et
réglages seront enregistrés pour le lecteur de DVD.
Couleur: Rouge, Vert, Bleu, Jaune, Cyan ou Magenta
Couleur est disponible lorsque Espace couleur est réglé sur Personnel.
Dans Couleur, vous pouvez régler les valeurs RVB de la couleur sélectionnée.
Pour réinitialiser les valeurs RVB, sélectionnez Réinit..
Rouge: Règle le niveau de saturation en rouge de la couleur sélectionnée.
Vert: Règle le niveau de saturation en vert de la couleur sélectionnée.
Bleu : Règle le niveau de saturation en bleu de la couleur sélectionnée.
Réinit.: rétablit les valeurs par défaut de l'espace de couleur.
Balance blancs
Vous pouvez régler la température des couleurs pour que celles-ci soient plus naturelles.
Aj. Rouge: Règle la profondeur du rouge.
Aj. Vert : Règle la profondeur du vert.
Aj. Bleu : Règle la profondeur du bleu.
Regl. Rouge: Règle la luminosité du rouge.
Regl. vert: Règle la luminosité du vert.
Regl. bleu: Règle la luminosité du bleu.
Réinit.: les valeurs par défaut de l'équilibrage du blanc réglé précédemment sont rétablies.
Carnation
Vous pouvez accentuer le ‘ton chair’ de l'image.
La modification des valeurs de réglage actualise l'affichage à l'écran.
Vous pouvez faire ressortir les contours des objets dans l'image.
L'activation du mode xvYCC augmente les détails et agrandit l'espace colorimétrique lors de l'af
fichage des films provenant d'un
appareil externe (lecteur de DVD, etc.) relié à la prise HDMI ou Component IN.
xvYCC est disponible lorsque le mode d'image est réglé sur Film et lorsque l'entrée externe est en mode HDMI ou
Component.
Il se peut que cette fonction ne soit pas prise en charge sur votre périphérique.
■
●
●
●
N
N
N
N
N
■
●
●
●
●
●
●
●
■
N
■
■
N
N
[620-Weuro]BN68-02326A-03L09.ind15 15 2009-10-08 ¿ÀÀü 9:28:05

Français - 16
Options d'image
En mode PC, vous ne pouvez modifier que les paramètres Nuance Coul. et Format parmi
les options du menu Options d'image.
Chaude1, Chaude2 ou Chaude3 ne sont activées que si le mode d'image est Film.
Vous pouvez régler et enregistrer des paramètres pour chaque périphérique externe
connecté à une entrée du téléviseur.
Taille
Vous pouvez parfois modifier la taille de l’image sur votre écran. Votre télévsieur dispose de
plusieurs options relatives à la taille de l'écran, chacune d'entre elles étant conçue pour fonctionner au mieux avec un certain type
d'entrée vidéo. Votre découdeur câble / récepteur satellite peut également avoir son propre jeu de tailles d'écran. Toutefois, il est
conseillé d’utiliser le mode 16:9, autant que possible.
Vous pouvez sélectionner ces options en appuyant sur le bouton P.SIZE de la télécommande.
16/9 auto : règle automatiquement la taille de l'image sur le format 16:9.
16:9 : règle la taille de l'image sur 16:9 de façon appropriée pour les DVD ou la diffusion au format cinémascope.
Zoom large : agrandit l'image à une taille supérieure à 4:3.
Zoom : agrandit l'image en 16:9 (dans le sens vertical) pour l'adapter à la taille de l'écran.
4:3 : paramètre par défaut pour un film vidéo ou une diffusion normale.
Adapter à l'écran : Permet de voir l'intégralité de l'image sans coupure lors de l'entrée de signaux HDMI (720p / 1080i /
1080p) ou Composant(1080i / 1080p).
Les options de taille de l'image peuvent varier en fonction de la source d'entrée.
Les options disponibles peuvent varier en fonction du mode sélectionné.
En mode PC, seuls les modes 16:9 et 4:3 peuvent être réglés.
Vous pouvez régler et enregistrer des paramètres pour chaque périphérique externe connecté à une entrée du téléviseur.
Une rémanence temporaire peut se produire si vous affichez une image statique pendant plus de deux heures sur l'écran du
téléviseur.
Zoom large : Appuyez sur le bouton ► pour sélectionner Position, puis appuyez sur le bouton ENTER
E
. Appuyez sur le
bouton ▲ ou ▼ pour déplacer l'image vers le haut ou vers le bas. Appuyez ensuite sur le bouton ENTER
E
.
Zoom : Appuyez sur le bouton ► pour sélectionner Position, puis appuyez sur le bouton ENTER
E
. Appuyez sur le bouton
▲ ou ▼ pour déplacer l'image vers le haut et vers le bas. Appuyez ensuite sur le bouton ENTER
E
. Appuyez sur le bouton
► pour sélectionner Taille, puis appuyez sur le bouton ENTER
E
. Appuyez sur le bouton ▲ ou ▼ pour augmenter ou
réduire la hauteur de l'image. Appuyez ensuite sur le bouton ENTER
E
.
Après avoir sélectionné l’option Adapter à l'écran en mode HDMI (1080i / 1080p) ou Composant (1080i / 1080p):
sélectionnez Position à l'aide du bouton ◄ ou ►. Utilisez le bouton ▲, ▼, ◄ ou ► pour déplacer l'image.
Réinit.: Appuyez sur le bouton◄ ou ►pour sélectionner Réinit., puis sur le bouton ENTER
E
. Vous pouvez initialiser le
réglage.
Si vous utilisez la fonction Adapter à l'écran avec l'entrée HDMI 720p, une ligne sera coupée en haut, en bas, à gauche et à
droite, comme avec la fonction Overscan.
Lorsque vous réglez la taille de l' image sur 16/9 auto sur un téléviseur 16:9, vous pouvez déterminer la taille d'affichage d'une
image 4:3 WSS (Wide Screen Service/service d'écran large) ou choisir de ne rien af
ficher pour ce format. Chaque pays européen
impose une taille d'image différente ; cette fonction permet aux utilisateurs de sélectionner la leur.
16:9 : règle l'image en mode large, c'est-à-dire en 16:9.
Zoom large: agrandit l'image à une taille supérieure à 4:3.
Zoom: agrandit la taille de l'image sur l'écran dans le sens vertical.
4:3: règle l'image en mode normal, c'est-à-dire en 4:3.
Cette fonction n'est disponible qu'en mode 16/9 auto.
Cette fonction n'est pas disponible en mode PC, Composant ni HDMI.
Si le signal de radiodiffusion reçu est faible, vous pouvez activer la fonction Digital Noise Reduction pour faciliter la réduction
d'images fantômes ou statiques qui peuvent apparaître à l'écran.
Lorsque le signal est faible, sélectionnez une autre option jusqu'à obtention de la meilleure image possible.
Vous pouvez choisir le niveau de noir pour régler la profondeur de l'écran.
Cette fonction n'est active que si un appareil externe est reliée au téléviseur via la prise HDMI (signaux R
VB).
❑
N
■
N
N
■
O
●
●
●
●
●
●
N
N
N
N
N
N
N
N
N
■
●
●
●
●
N
N
■
N
■
N
NuanceCoul. :Normal ▶
Taille :16/9auto
Modeécran :16:9
NRnumérique :Auto.
Niv.noirHDMI :Normal
ModeFilm :Arr.
Modebleuuniquement :Arr.
U
Déplacer
E
Entrer
R
Retour
Optionsd'image
[620-Weuro]BN68-02326A-03L09.ind16 16 2009-10-08 ¿ÀÀü 9:28:06

Français - 17
Vous pouvez régler le téléviseur de sorte qu'il détecte et traite automatiquement les signaux de cinéma de toutes les sources et
adapte l'image pour obtenir une qualité optimale.
Mode Film n'est prise en charge que dans TV, AV, COMPONENT(480i / 1080i) et HDMI(480i / 1080i).
Arr. : désactive la fonction Film Mode.
Auto.1 : règle automatiquement l'image afin d'obtenir une qualité optimale lors du visionnage d'un film.
Auto.2 : Optimise automatiquement le texte vidéo affiché l'écran (à l'exception des sous-titres) lors du visionnage d'un film.
Supprime les traînées des scènes rapides avec beaucoup de mouvements, ce qui rend l’image plus claire.
Des parasites peuvent apparaître à l’écran lorsque la fonction 100 Hz Motion Plus est activée. Si cela ce produit, réglez la
fonction 100Hz Motion Plus sur Arrêt.
Arrêt : désactive la fonction 100Hz Motion Plus.
Clair : règle la fonction 100Hz Motion Plus au minimum.
Standard : règle la fonction 100Hz Motion Plus sur son paramètre moyen.
Fluide : règle la fonction 100Hz Motion Plus au maximum.
Personnel : Règle les niveaux de réduction de ou et de vibrations selon vos préférences.
règle le niveau de réduction du ou à partir des sources vidéo.
Réduc. vibrations : règle le niveau de réduction des saccades à partir des sources vidéo lors de la lecture des lms.
Réinit. : Réinitialise les paramètres de l’horloge.
Démo : Affiche la différence entre les modes activé et désactivé de 100Hz Motion Plus.
Cette fonction est destinée aux spécialistes de mesure des appareils A
V. Elle affiche uniquement le signal bleu en éliminant
les signaux rouge et vert du signal vidéo de manière à créer un effet de filtre bleu utilisé pour régler ca Couleur et la teinte des
appareils vidéo (lecteurs de DVD, home cinéma, etc.). Cette fonction vous permet de régler la couleur et la teinte sur les valeurs
les plus adaptées au signal de chaque appareil vidéo à l'aide des mires de couleur rouge / verte / bleue / cyan / magenta / jaune,
et ce, sans devoir utiliser de filtre bleu externe.
Mode bleu uniquement est disponible lorsque le mode d'image est réglé sur Film ou Standard.
Rétablit tous les paramètres des images aux valeurs par défaut.
Réinitial. mode image : rétablit les paramètres par défaut pour les valeurs de l'image actuelle.
■
N
●
●
●
N
●
●
●
●
●
–
–
–
●
■
N
❑
N
[620-Weuro]BN68-02326A-03L09.ind17 17 2009-10-08 ¿ÀÀü 9:28:06

Français - 18
Utilisation de votre téléviseur comme écran d'ordinateur (PC)
Les paramètres d'affichage Windows indiqués ci-dessous sont valables pour ordinateur
standard. Les affichages écran sur votre PC seront probablement différents, en fonction de
votre version de Windows et votre carte vidéo. Cependant, même si les affichages réels
diffèrent, les mêmes informations de configuration de base s'appliquent dans la plupart des
cas. (Dans le cas contraire, contactez le fabricant de votre ordinateur ou votre revendeur
Samsung.)
1. Dans le menu Démarrer de Windows, cliquez sur ‘Panneau de configuration’.
2.
Dans le Panneau de configuration, cliquez sur ‘Apparence et thèmes’. Une boîte de
dialogue s'affiche.
3.
Cliquez sur ‘Affichage’. Une nouvelle boîte de dialogue s'affiche.
4.
Cliquez sur l'onglet ‘Paramètres’.
Réglage correct de la taille (résolution) - Optimal : 1920 x 1080 pixels.
S’il existe une option de fréquence verticale sur votre boîte de dialogue des
paramètres d’affichage, la valeur correcte est ‘60’ ou ‘60 Hz’. Sinon, cliquez
simplement sur ‘OK’ pour quitter la boîte de dialogue.
Si le signal du système équivaut au mode de signal standard, l'écran se règle automatiquement. Si le signal du système ne
correspond pas au mode de signal standard, réglez le mode en vous reportant le cas échéant au manuel d'utilisation de la carte
vidéo. Pour les modes d'affichage répertoriés en page suivante, l'image de l'écran a été optimisée lors de la fabrication.
Entrée D-Sub et HDMI/DVI
Mode Résolution Fréquence horizontale
(KHz)
Fréquence verticale
(kHz)
Fréquence d'horloge
pixels (MHz)
Polarité
synchronisée
(H/V)
IBM
640 x 350 31,469 70,086 25,175 +/-
720 x 400 31,469 70,087 28,322 -/+
MAC
640 x 480 35,000 66,667 30,240 -/-
832 x 624 49,726 74,551 57,284 -/-
1152 x 870 68,681 75,062 100,000 -/-
VESA CVT
720 x 576 35,910 59,950 32,750 -/+
1152 x 864 53,783 59,959 81,750 -/+
1280 x 720 44,772 59,855 74,500 -/+
1280 x 720 56,456 74,777 95,750 -/+
1280 x 960 75,231 74,857 130,000 -/+
VESA DMT
640 x 480 31,469 59,940 25,175 -/-
640 x 480 37,861 72,809 31,500 -/-
640 x 480 37,500 75,000 31,500 -/-
800 x 600 37,879 60,317 40,000 +/+
800 x 600 48,077 72,188 50,000 +/+
800 x 600 46,875 75,000 49,500 +/+
1024 x 768 48,363 60,004 65,000 -/-
1024 x 768 56,476 70,069 75,000 -/-
1024 x 768 60,023 75,029 78,750 +/+
1152 x 864 67,500 75,000 108,000 +/+
1280 x 1024 63,981 60,020 108,000 +/+
1280 x 1024 79,976 75,025 135,000 +/+
1280 x 800 49,702 59,810 83,500 -/+
1280 x 800 62,795 74,934 106,500 -/+
1280 x 960 60,000 60,000 108,000 +/+
1360 x 768 47,712 60,015 85,500 +/+
1440 x 900 55,935 59,887 106,500 -/+
1440 x 900 70,635 74,984 136,750 -/+
1680 x 1050 65,290 59,954 146,250 -/+
VESA GTF
1280 x 720 52,500 70,000 89,040 -/+
1280 x 1024 74,620 70,000 128,943 -/-
VESA DMT /
DTV CEA
1920 x 1080p 67,500 60,000 148,500 +/+
Lorsque vous utilisez une connexion avec câble HDMI/DVI, vous devez utiliser la prise HDMI IN 3 (DVI).
Le mode entrelacé n'est pas pris en charge.
Le téléviseur peut fonctionner de façon anormale si le format vidéo sélectionné n'est pas standard.
Les modes Séparé et Composite sont pris en charge. Le format SOG (SVSV) n'est pas pris en charge.
Un câble VGA trop long ou de qualité médiocre peut être source de parasites visuels dans les modes haute résolution (1920 x
1080).
¦
■
N
N
N
N
N
[620-Weuro]BN68-02326A-03L09.ind18 18 2009-10-08 ¿ÀÀü 9:28:06

Français - 19
Configuration du téléviseur avec le PC
Préréglage : Appuyez sur le bouton SOURCE pour sélectionner le mode PC.
Réglage Automatique
Utilisez la fonction Auto Adjust pour que le téléviseur règle automatiquement les signaux vidéo
qu'il reçoit.
La fonction règle aussi automatiquement les paramètres ainsi que les valeurs et positions de
fréquences.
Appuyez sur le bouton TOOLS pour afcher le menu Outils. Vous pouvez également
dénir le réglage automatique en sélectionnant .
Cette fonction ne s'applique pas en mode DVI-HDMI.
Ecran
Regl. Base / Regl. Prec
Lorsque vous réglez la qualité de l'image, l'objectif est d'éliminer ou de réduire les parasites
visuels. Si vous ne pouvez pas éliminer ces parasites par une syntonisation fine, réglez la
fréquence (Regl. Base) au mieux, puis effectuez de nouveau une syntonisation fine. Une
fois les parasites réduits, effectuez un nouveau réglage de l'image pour l'aligner au centre de
l'écran.
Position du PC
Réglez la position d'affichage du PC si elle ne convient pas pour l'écran du téléviseur.
Appuyez sur le bouton ▲ ou ▼ pour régler la position verticale. Appuyez sur le bo
uton ◄ ou ►
pour régler la position horizontale.
Réinitialiser Image
Vous pouvez rétablir les valeurs par défaut de tous les paramètres d'image.
¦
N
❑
T
N
❑
■
■
■
Luminosité :45
Netteté :50
RéglageAutomatique ▶
Ecran
Paramètresavancés
Optionsd'image
Réinitialisationdel'image
Image
Regl.Base 50
Regl.Prec 0
PositionduPC
RéinitialiserImage
U
Déplacer
E
Entrer
R
Retour
Ecran
[620-Weuro]BN68-02326A-03L09.ind19 19 2009-10-08 ¿ÀÀü 9:28:06

Français - 20
SON
Configuration du menu Son
Appuyez sur le bouton TOOLS pour afcher le menu Outils. Vous pouvez également
dénir le mode sonore en sélectionnant .
Standard : Sélectionne le mode son normal.
Musique : Accentue la musique par rapport aux voix.
Film : Offre le meilleur son pour les films.
Voix claire : Accentue les voix par rapport aux autres sons.
Personnel: Rétablit vos paramètres de son personnalisés.
Egaliseur
Vous pouvez régler les paramètres du son en fonction de vos préférences.
Mode: permet de sélectionner le mode sonore parmi plusieurs paramètres prédéfinis.
Balance L/R: règle la balance entre les haut-parleurs droit et gauche.
100Hz / 300Hz / 1KHz / 3KHz / 10KHz (réglage de la bande passante) : permet de régler le niveau de fréquences de la bande
passante.
Réinit.: Rétablit les valeurs par défaut de l'égaliseur.
Le SRS TruSurround HD est une technologie SRS brevetée qui remédie au problème de la lecture de contenu multicanal 5.1 sur
deux haut-parleurs. Le TruSurround produit un son surround virtuel excellent au moyen de n'importe quel système de lecture à
deux haut-parleurs, dont les haut-parleurs internes du téléviseur. Il est totalement compatible avec tous les formats multicanal.
Appuyez sur le bouton TOOLS pour afficher le menu Outils. Vous pouvez également définir l'option SRS TruSurround HD en
sélectionnant .
Langue audio
Vous pouvez modifier la langue par défaut des sous-titres et de l'audio. Affiche les informations relatives à la langue pour le flux
entrant.
Cette fonction peut être sélectionnée pendant que vous regardez une chaîne numérique.
Vous pouvez sélectionner la langue uniquement parmi les langues en cours de diffusion.
Lorsque le son est émis à la fois par le haut-parleur principal et le récepteur audio, un effet d'écho peut se produire en raison
de la différence de vitesse de décodage entre le haut-parleur principal et le récepteur audio. Dans ce cas, utilisez la fonction TV
Speaker (haut-parleur du téléviseur).
Cette fonction peut être sélectionnée pendant que vous regardez une chaîne numérique.
Le format audio s'affiche en fonction du signal diffusé.
Description audio
Il s'agit d'une fonction audio auxiliaire qui fournit une piste audio supplémentaire à l'intention des personnes malvoyantes. Cette
fonction traite le flux audio relatif à la description audio (AD) lorsqu'il est envoyé avec le son principal par le radiodiffuseur. Les
utilisateurs peuvent activer ou désactiver la description audio et régler le volume.
Appuyez sur le bouton AD de la télécommande pour sélectionner Arr. ou Mar..
Active ou désactive la fonction de description verbale.
Volume
Il est possible de régler le volume de la description verbale.
Volume est actif lorsque Description audio est défini sur Mar..
Cette fonction peut être sélectionnée pendant que vous regardez une chaîne numérique.
Chaque station de télédiffusion possède ses propres conditions de signal. Il n'est donc pas facile de régler le volume chaque fois
que vous changez de chaîne. Cette fonction permet de régler automatiquement le volume du canal désiré en réduisant la sortie
son lorsque le signal de modulation est puissant ou en l'augmentant lorsque le signal est faible.
¦
❑
T
●
●
●
●
●
❑
●
●
●
●
❑
T
❑
N
N
❑
N
N
❑
O
■
■
N
N
❑
Mode :Personnel ▶
Egaliseur
SRSTruSurroundHD :Arr.
Langueaudio :----
FormatAudio :----
Descriptionaudio
Volumeauto :Arr.
SélectionHaut-parleur :Haut-parleurTV
Son
[620-Weuro]BN68-02326A-03L09.ind20 20 2009-10-08 ¿ÀÀü 9:28:06

Français - 21
Sélection Haut-parleur
Lorsque vous regardez la télévision alors que vous téléviseur est relié à un système home cinéma, éteignez les haut-parleurs du
téléviseur afin d'écouter le son sur les haut-parleurs (externes) du système home cinéma.
Ht-parl ext : permet d'écouter le son des haut-parleurs externes (ceux du système home cinéma).
Haut-parleur TV : permet d'écouter le son des haut-parleurs du téléviseur.
Les boutons de volume et MUTE ne fonctionnent pas lorsque la fonction Sélection Haut-parleur est réglée sur Ht-parl ext.
Si vous sélectionnez Ht-parl ext dans le menu Sélection Haut-parleur, les paramètres de son sont limités.
Haut-parleurs internes du téléviseur Sortie audio (Optique, Sortie G/D) vers système audio
RF / AV / Composant / PC / HDMI RF / AV / Composant / PC / HDMI
Haut-parleur TV Sortie son Sortie son
Ht-parl ext Muet Sortie son
Absence de signal vidéo Muet Muet
Vous pouvez rétablir les valeurs par défaut des paramètres audio.
Réinitial. mode son : rétablit les paramètres par défaut pour le son.
Sélection du mode son
Vous pouvez configurer le mode sonore en appuyant sur le bouton DUAL. Lorsque vous appuyez sur ce bouton, le mode sonore
courant s'affiche à l'écran.
Type d'audio Dual 1 / 2 Par défaut
Stéréo A2
Mono MONO
Changement automatique
Stéréo STEREO ↔ MONO
Dual DUAL 1 ↔ DUAL 2 DUAL 1
NICAM stéréo
Mono MONO
Changement automatique
Stéréo MONO ↔ STEREO
Dual
MONO ↔ DUAL 1
DUAL 2
DUAL 1
Si le signal stéréo est faible et qu'une commutation automatique se produit, passez alors en Mono.
Cette fonction n'est activée qu'en son stéréo. Elle est désactivée en mode mono.
Cette fonction n'est disponible qu'en mode TV.
❑
●
●
N
N
❑
N
¦
N
N
N
Réinitialisationduson
L
Déplacer
E
Entrer
R
Retour
Choisirlesoptionsderétablissementduson.
Réinitial.tout Réinitial.modeson Annuler
[620-Weuro]BN68-02326A-03L09.ind21 21 2009-10-08 ¿ÀÀü 9:28:06

Français - 22
CONFIGURATION
Configuration du menu Setup
Langue des menus
Permet de définir la langue des menus.
Horloge
Pour la procédure détaillée du réglage des options, reportez-vous à la rubrique ‘Réglage de
l'heure’.
Diffuser
Sous-titres
Vous pouvez activer ou désactiver les sous-titres. Utilisez ce menu pour définir le mode des sous-titres. Normal sélectionne les
sous-titres de base ; Malentendants sélectionne les sous-titres pour personnes malentendantes.
Active/désactive les sous-titres.
Sélectionne le mode de la fonction Sous-titres.
Langue des sous-titres
Définit la langue des sous-titres.
Si le programme visionné n'offre pas de fonction Malentendants, le mode Normal est automatiquement activé, même si
le mode Malentendants est sélectionné.
L'anglais est la langue par défaut si la langue sélectionnée n'est pas diffusée.
Vous pouvez sélectionner ces options en appuyant sur le bouton SUBT. de la télécommande.
(Royaume-Uni uniquement)
Si le programme est diffusé avec du texte numérique, cette fonction est activée.
MHEG (Multimedia and Hypermedia Information Coding Experts Group)
Norme internationale pour les systèmes de codage des données utilisés avec le multimédia et l'hypermédia. Niveau supérieur
à celui du système MPEG, qui inclut de l'hypermédia à liaison de données tel que des images fixes, le service de caractères,
l'animation, les fichiers graphiques et vidéo et les données multimédia. MHEG est une technologie d'interaction de l'utilisateur
en cours d'utilisation appliquée à divers domaines, dont la vidéo à la demande (VOD), la télévision interactive (ITV), le
commerce électronique, la téléformation, la téléconférence, les bibliothèques numériques et les jeux en réseau.
Langue du télétexte
Vous pouvez définir la langue du télétexte en sélectionnant le type de langue.
L'anglais est la langue par défaut si la langue sélectionnée n'est pas diffusée.
Préférence
Première Langue Audio / Deuxième Langue Audio / Langue princ. sous-titres / Langue sec. sous-titres / Première
Langue Télétexte / Deuxième Langue Télétexte
Cette fonction permet de sélectionner une des langues disponibles. La langue sélectionnée ici est la langue par défaut de la
chaîne sélectionnée.
Si vous changez la langue, les options Langue des sous-titres, Langue audio et Langue du télétexte du menu Langue sont
automatiquement modifiées en conséquence.
Les options Langue des sous-titres, Langue audio et Langue du télétexte du menu Langue présentent une liste des langues
prises en charge par la chaîne actuelle et la langue sélectionnée est affichée en surbrillance. Si vous modifiez le paramètre de
la langue, la nouvelle sélection n'est valable que pour la chaîne actuelle. Le nouveau paramétrage n'af
fecte pas le réglage des
options Langue princ. sous-titres, Première Langue Audio ou Première Langue Télétexte du menu Préférence.
¦
❑
❑
❑
■
●
●
●
N
N
N
■
N
■
N
■
●
Plug&Play
Languedesmenus :Français ▶
Horloge
Diffuser
Sécurité
Général
Configuration
[620-Weuro]BN68-02326A-03L09.ind22 22 2009-10-08 ¿ÀÀü 9:28:07

Français - 23
Interface commune
CI Menu
Cela aide l'utilisateur à sélectionner un élément du menu pris en charge par CAM.
Sélectionnez le menu CI dans le menu PC Card.
Infos sur l'application
Contient des informations sur le module CAM inséré dans la fente CI et les affiche. Les données Application Info concernent la
carte d’interface commune (CI(CI+) CARD). Vous pouvez installer le module CAM que le téléviseur soit allumé ou éteint.
1.
Achetez le module CI CAM en vous rendant chez le revendeur le plus proche ou par téléphone.
2.
Insérez la carte d’interface commune (CI(CI+) CARD) dans le CAM dans le sens indiqué par la flèche jusqu’à ce qu’elle
se loge en place.
3.
Insérez le CAM avec la carte d’interface commune (CI(CI+) CARD) installée dans la fente de l’interface commune.
(Insérez le module CAM dans le sens indiqué par la flèche, à fond, de façon à ce qu'il soit parallèle à la fente.)
4.
Vérifiez si une image est visible sur un canal à signal brouillé.
Sécurité
L'écran de saisie du code PIN s'affiche avant l'écran de configuration. Entrez votre code PIN à quatre chiffres.
Le code PIN par défaut d'un nouveau téléviseur est ‘0-0-0-0’. Vous pouvez modifier le code PIN en sélectionnant Modifier PIN
dans le menu.
Certains modèles exigent la sélection du code PIN défini pour autoriser l’utilisation de Plug & Play.
Cette fonction permet d'empêcher que des utilisateurs non autorisés, tels que des enfants, regardent des programmes
inappropriés, en désactivant la vidéo et l'audio.
Vous pouvez verrouiller certaines chaînes dans la liste des chaînes.
Verrouillage Canal est uniquement disponible en mode TV.
Verrouillage parental
Cette fonction permet d'empêcher certains utilisateurs, par exemple des enfants, de regarder des émissions inappropriées, en les
protégeant à l'aide d’un code de 4 chiffres défini par l'utilisateur.
L'option Verrouillage parental diffère en fonction du les pays.
Lorsque le Verrouillage parental est activé, le symbole ‘\’ s’afche.
Autor.tout: appuyez sur ce bouton pour déverrouiller toutes les évaluations TV
.
Bloq. tout: appuyez sur ce bouton pour verrouiller tous les classements TV.
Modifier PIN
Vous pouvez modifier le code personnel demandé pour pouvoir configurer le téléviseur.
Si vous avez oublié le code, appuyez sur les boutons de la télécommande dans l'ordre suivant, ce qui remet le code à ‘0-0-0-0’
: POWER (Arr.) (Mar.).
Général
En reliant le téléviseur à une console de jeu telle que PlayStation™ ou Xbox™, vous pouvez profiter d'une expérience de jeu plus
réaliste en sélectionnant le menu de jeu.
Limitations du mode jeu (attention)
Pour déconnecter la console de jeu et connecter un autre périphérique externe, réglez le mode Mode Jeu sur Arr. dans
le menu Configuration.
Si vous affichez le menu du téléviseur en mode Mode Jeu, l'écran vacille légèrement.
Mode Jeu n'est pas disponible avec les modes TV, PC et Ext classiques.
Si l'image est de mauvaise qualité lorsqu'un périphérique est connecté au téléviseur
, vérifiez si le mode Mode Jeu réglé sur
Mar.. Réglez le mode Mode Jeu sur Arr. et connectez les périphériques externes.
Si le Mode Jeu est activé:
Le mode Image bascule automatiquement sur Standard et il est impossible d'en changer.
Le mode Sound bascule automatiquement sur Personnel et il est impossible d'en changer. Réglez le son à l'aide de
l'égaliseur.
La fonction Régler du menu Son est activée. Sélectionner la fonction Reset après avoir réglé l'égaliseur rétablit ses
paramètres par défaut.
■
●
●
❑
N
N
N
■
N
N
■
N
N
N
■
N
❑
■
N
N
N
N
N
[620-Weuro]BN68-02326A-03L09.ind23 23 2009-10-08 ¿ÀÀü 9:28:07

Français - 24
Image désactivée / Auto.
Cette fonction règle la luminosité du téléviseur afin de réduire la consommation d'énergie. Lorsque vous regardez la télévision le
soir, réglez l'option du mode Mode éco. sur Elevé pour reposer vos yeux et réduire la consommation d'énergie.
Si vous sélectionnez Image désactivée, l’écran s’éteint. Seul le son est émis. Appuyez à nouveau sur ce bouton pour désactiver
la fonction Image désactivée.
La function Image désactivée n’est pas prise en charge dans le menu Outils.
Appuyez sur le bouton TOOLS pour afficher le menu Outils. Vous pouvez également régler l'option d'économie d'énergie en
sélectionnant
Vous pouvez régler la transparence du menu.
Il est possible de programmer la lecture d'une mélodie lors de la mise sous tension ou hors tension du téléviseur
.
Aucune mélodie n'est lue dans les cas suivants
Aucun son n'est émis par le téléviseur parce que le bouton MUTE a été actionné.
Aucun son n'est émis par le téléviseur car le volume est réglé au minimum à l'aide du bouton (–).
Lorsque le téléviseur est mis hors tension par la fonction de veille..
■
N
T
■
■
N
Réglage de l'heure
Horloge
Le réglage de l'horloge est nécessaire pour utiliser les différentes fonctions de minuterie de la
télévision.
L'heure actuelle s'affiche chaque fois que vous appuyez sur le bouton INFO.
Si vous débranchez le cordon d'alimentation, vous devez régler de nouveau l'horloge.
Mode Horloge
Vous pouvez définir l'heure actuelle manuellement ou automatiquement.
Auto.: Définit l'heure en cours automatiquement en utilisant l'heure de la transmission
numérique.
Manuel : Définit l'heure en cours d'après l'heure entrée manuellement.
En fonction de la station de diffusion et du signal diffusé, il se peut que l'heure ne soit pas
réglée correctement. Si cela se produit, réglez l'heure manuellement.
Pour que l'heure soit réglée automatiquement, l'antenne ou le câble doit être connecté.
Réglage Horloge
Vous pouvez définir l'heure en cours manuellement.
Cette option est uniquement disponible lorsque Mode Horloge est réglé sur Manuel.
Vous pouvez régler directement le jour, le mois, l'année, l'heure et la minute en appuyant sur les touches numériques de la
télécommande.
Veille
La minuterie de mise en veille éteint automatiquement la télévision après une durée préréglée (30, 60, 90, 120, 150 ou 180
minutes).
Appuyez sur le bouton TOOLS pour afficher le menu Outils. Vous pouvez également régler la minuterie de mise en veille en
sélectionnant .
Pour annuler la fonction Veille, sélectionnez Arr..
Minuteur 1 / Minuteur 2 / Minuteur 3
Trois réglages différents de mise en marche/arrêt peuvent être définis.
Vous devez préalablement régler l'horloge.
Période d'activation
Sélectionnez l'heure, la minute et l'action activer/désactiver
(Pour activer le minuteur selon les réglages définis, choisissez Activer".)
Période de désactivation
Sélectionnez l'heure, la minute et l'action activer/désactiver
(Pour activer le minuteur selon les réglages définis, choisissez Activer".)
¦
❑
N
N
■
●
●
N
N
■
N
N
❑
T
N
❑
■
■
Horloge :--:-- ▶
Veille :Arr.
Minuteur1 :Arrêt
Minuteur2 :Arrêt
Minuteur3 :Arrêt
U
Déplacer
E
Entrer
R
Retour
Heure
Périoded'activation
L
Déplacer
U
Régler
E
Entrer
R
Retour
Minuteur1
Périodededésactivation
Volume
00 00 Désactiver
00 00 Désactiver
10
Source Antenne Canal
TV ATV 0
Répétition
Unefois
Dim Lun Mar Mer Jeu Ven Sam
Plug&Play
Languedesmenus :Français
Horloge ▶
Diffuser
Sécurité
Général
Configuration
[620-Weuro]BN68-02326A-03L09.ind24 24 2009-10-08 ¿ÀÀü 9:28:07

Français - 25
Volume
Sélectionne le volume désiré.
Permet d'indiquer le contenu du périphérique TV ou USB qui doit être lu lorsque le téléviseur s'allume automatiquement.
Sélectionnez TV ou USB. (Assurez-vous que le périphérique USB est branché sur le téléviseur.)
Antenne (lorsque Source est réglé sur TV)
Sélectionnez ATV ou DTV.
Canal (lorsque Source est réglé sur TV)
Sélectionnez la chaîne désirée.
Contents (lorsque Source est réglé sur USB)
Permet de sélectionner le dossier du périphérique USB contenant les fichiers de musique ou les images devant être lus lorsque le
téléviseur s'allume automatiquement.
Si le périphérique USB ne contient aucun fichier musical ou si le dossier contenant un fichier musical n’est pas sélectionné, la
fonction de veille ne fonctionne pas correctement.
S'il n'y a qu'un seul fichier image sur le périphérique USB, la fonction Slide Show ne démarre pas.
Les dossiers dont le nom est trop long ne peuvent pas être sélectionnés.
Les dossiers dont le nom est trop long pour être configuré par la fonction Contents ne peuvent pas être sélectionnés.
Répétition
Sélectionnez Une fois, Ts jours, Lun~Ven, Lun~Sam, Sam~Dim ou Manuel.
Lorsque Manual est sélectionné, appuyez sur le bouton ► pour sélectionner le jour de la semaine.
Appuyez sur le bouton
ENTER
E
sur le jour de votre choix. Le symbole
c
s'affiche alors.
Vous pouvez régler l'heure, la minute et la chaîne directement à l'aide des touches numériques de la télécommande.
Mise hors tension automatique
Lorsque vous réglez la minuterie sur ON, le téléviseur s’éteint si aucune commande n’est utilisée dans les 3 heures qui
suivent la mise sous tension par le minuteur. Cette fonction est disponible uniquement lorsque la minuterie est réglée sur ON ;
elle permet d'éviter toute surchauffe occasionnée par une utilisation prolongée du téléviseur.
■
■
■
■
■
N
N
N
N
■
N
N
N
[620-Weuro]BN68-02326A-03L09.ind25 25 2009-10-08 ¿ÀÀü 9:28:07

Français - 26
ENTRÉE / ASSISTANCE
Menu Entrée
Liste Source
Permet de sélectionner le téléviseur ou d'autres sources externes (lecteur DVD, lecteur Blu-ray,
décodeur câble,
Récepteurs satellite (boîtiers décodeurs) connectés au téléviseur. Permet de sélectionner la
source d'entrée de votre choix.
Appuyez sur le bouton SOURCE de la télécommande pour afficher une source de signal
externe. Une pression sur le bouton TV sélectionne le mode TV.
TV / Ext.1 / Ext.2 / AV / Component / PC / HDMI1 / HDMI2 / HDMI3/DVI / HDMI4
Vous ne pouvez sélectionner que des périphériques externes connectés au téléviseur. Dans
Liste Source, les entrées connectées s'affichent en surbrillance en début de liste. Les
entrées non connectées s'affichent en bas de liste.
Les options Ext. et PC sont toujours activées.
Utilisation des boutons de couleur de la télécommande dans la liste des sources
Rouge (Rafraîchir) : actualise la liste des appareils externes connectés. Appuyez sur ce
bouton si votre source est allumée et correctement branchée mais n'apparaît pas dans
la liste.
TOOLS (Outils) : Affiche les menus Modif. Nom et Information.
Modif. Nom
Magnétoscope / DVD / Décodeur Câble / Décodeur satellite / Décodeur PVR / Récepteur AV / Jeu / Caméscope / PC / DVI /
DVI PC / TV / IPTV / Blu-ray / HD DVD / DMA
Nommez le périphérique connecté aux prises d'entrée pour faciliter la sélection de source d'entrée.
Si un PC d'une résolution de 1920 x 1080 à 60 Hz est connecté au port HDMI IN 3(DVI), vous devez régler le mode HDMI3/
DVI sur DVI PC dans le champ Modif. Nom du mode Entrée.
Lorsque vous connectez un câble HDMI/DVI au port HDMI IN 3(DVI), vous devez régler le mode HDMI3/DVI sur DVI ou DVI
PC dans le menu Modif. Nom du mode Entrée. Dans ce cas, une connexion audio séparée est indispensable.
Menu Assistance
Diagnostic automatique
Test de l'image
Si vous pensez que l'image n'est pas optimale, exécutez le test d'image. Vérifiez la mire de
couleur à l'écran pour voir si le problème persiste.
Oui : si la mire de couleur n'apparaît pas où si elle est parasitée, sélectionnez Oui. Il se
peut que le téléviseur soit défaillant. Dans ce cas, demandez de l'aide au centre d'appel de
Samsung.
Non: si la mire de couleur s'affiche correctement, sélectionnez Non. Il se peut que
l'équipement externe soit défaillant. Vérifiez les connexions. Si le problème persiste,
reportez-vous au mode d'emploi du périphérique externe.
Test du son
Si vous pensez que le son n'est pas optimal, exécutez le test du son. Vous pouvez
contrôler le
son en diffusant une mélodie préenregistrée sur le téléviseur.
Si les haut-parleurs du téléviseur restent muets, avant d'effectuer le test du son, vérifiez
que l'option Sélection Haut-parleur est réglée sur Haut-parleur TV dans le menu Sound.
La mélodie est diffusée pendant le test, même si l'option Sélection Haut-parleur est réglée sur Ht-parl ext ou si le son a été
désactivé en appuyant sur le bouton MUTE.
Oui : si, pendant le test du son, vous n'entendez du son que d'un haut-parleur ou pas de son du tout, sélectionnez Oui. Il se
peut que le téléviseur soit défaillant. Dans ce cas, demandez de l'aide au centre d'appel de Samsung.
Non: Si vous entendez du son des haut-parleurs, sélectionnez Non. Il se peut que l'équipement externe soit défaillant.
Vérifiez les connexions. Si le problème persiste, reportez-vous au mode d'emploi du périphérique externe.
¦
❑
O
■
N
N
N
❑
■
N
N
¦
❑
■
●
●
■
N
N
●
●
Diagnosticautomatique ▶
Miseàniveaudulogiciel
GuidedeconnexionHD
ContacterSamsung
Assistance
ListeSource
Modif.Nom
Entrée
Rafraîchir
T
Outils
ListeSource
TV
Ext.1 :----
Ext.2 :----
PC :----
AV :----
Composant :----
Diagnosticautomatique
U
Déplacer
E
Entrer
R
Retour
Testdel'image ▶
Testduson
Informationsdesignal
[620-Weuro]BN68-02326A-03L09.ind26 26 2009-10-08 ¿ÀÀü 9:28:08

Français - 27
Informations de signal (chaînes numériques uniquement)
À l'inverse des chaînes analogiques, dont la qualité de réception peut varier de ‘neigeuse’ à claire, les chaînes numériques (HDTV)
présentent une qualité de réception parfaite ou bien vous ne les recevez pas. Contrairement aux chaînes analogiques, vous ne
pouvez donc pas syntoniser une chaîne numérique. Vous avez toutefois la possibilité de régler votre antenne pour améliorer la
réception des chaînes numériques disponibles.
Si l'indicateur d'intensité du signal indique que celui-ci est faible, réglez physiquement votre antenne afin d'en augmenter
l'intensité. Continuez à régler l'antenne jusqu'à ce que trouver la position offrant le signal le plus puissant.
Mise à niveau du logiciel
A l'avenir, Samsung peut proposer des mises à niveau pour le micrologiciel de votre téléviseur.
Ces mises à jour peuvent être installées sur le téléviseur lorsque celui-ci se connecte à Internet
ou peuvent être téléchargées manuellement sur le site samsung.com et installées via une clé
USB.
Version actuelle indique la version du logiciel installé sur votre téléviseur.
Autre logiciel (sauvegarde) indique la version précédente, qui sera remplacée.
Le numéro de version est affiché au format suivant : ‘année/mois/jour_version’. Plus la date
est récente, plus la version du logiciel est élevée. Il est toujours recommandé d'installer la
dernière version.
USB
Branchez sur le téléviseur un lecteur USB contenant la mise à niveau du microprogramme
téléchargée sur samsung.com. Veillez à ne pas couper l'alimentation ni retirer le lecteur
USB pendant l'application des mises à niveau. Une fois la mise à niveau du micrologiciel
terminée, le téléviseur se met automatiquement hors puis sous tension. Vérifiez la version du
microprogramme une fois la mise à jour terminée (la nouvelle version doit avoir un numéro plus
élevé que l'ancienne).
Lorsque le logiciel est mis à niveau, les paramètres vidéo et audio définis reprennent leur valeur
par défaut (usine). Il est recommandé de noter les paramétrages afin de pouvoir les rétablir
facilement après la mise à niveau.
Canal
Mise à niveau du logiciel à l'aide du signal de diffusion.
Si elle est sélectionnée pendant la période de transmission du logiciel, cette fonction recherche le logiciel disponible et le
télécharge.
Le temps nécessaire au téléchargement du logiciel dépend de l'état du signal.
Mise à niveau en mode veille
Pour poursuivre la mise à jour du logiciel en gardant le téléviseur sous tension, sélectionnez Marche en appuyant sur le bouton
▲ ou ▼. Une mise à jour manuelle a lieu automatiquement 45 minutes après que l'entrée en mode veille. Étant donné que la mise
sous tension s'effectue de façon interne, il se peut que l'écran LCD s'allume légèrement. Ce phénomène peut se produire pendant
plus d'une heure, jusqu'à ce que la mise à jour logiciel soit terminée.
Autre logiciel (sauvegarde)
En cas problème avec le nouveau microprogramme (si, par exemple, le téléviseur ne fonctionne plus correctement), vous pouvez
revenir à la version précédente.
Si le logiciel a été modifié, la version existante s'affiche.
Vous pouvez passer à la version de sauvegarde du logiciel en sélectionnant ‘Autre logiciel’.
Guide de connexion HD
Ce menu indique la méthode de connexion offrant la qualité optimale pour le téléviseur haute définition. Consultez ces
informations lors de la connexion de périphériques externes au téléviseur.
Contacter Samsung
Consultez ces informations si le téléviseur ne fonctionne pas correctement ou si vous voulez mettre à niveau le logiciel. Vous
pouvez consulter les informations concernant le centre d'appel, le produit et la méthode de téléchargement du logiciel.
■
N
❑
N
N
N
■
■
N
N
■
■
N
N
❑
❑
Panneau latéral du téléviseur
Lecteur USB
Versionactuelle 2009/01/18_000001
USB ▶
Canal
Mise
àniveauenmodeveille :45Min.
Autrelogiciel 2009/01/15_00000
U
Déplacer
E
Entrer
R
Retour
Miseàniveaudulogiciel
[620-Weuro]BN68-02326A-03L09.ind27 27 2009-10-08 ¿ÀÀü 9:28:08

Français - 28
MEDIA PLAY (USB)
Connexion d'un périphérique USB
1. Appuyez sur le bouton POWER pour allumer le téléviseur.
2. Connectez un périphérique USB contenant des photos et/ou des fichiers de musique au port
USB sur le côté du téléviseur.
3.
Lorsque l'écran de sélection Application s'affiche, appuyez sur le bouton ENTER
E
pour
sélectionner Media Play (USB).
Le protocole MTP (Media Transfer Protocol) n'est pas pris en charge.
Le système de fichiers prend en charge les formats FAT16, FAT32 et NTFS.
Il est possible que certains types d'appareils photo numériques et de périphériques audio
USB ne soient pas compatibles avec ce téléviseur.
Media Play ne prend en charge que les périphériques de stockage de masse
USB de la classe MSC. Cette dernière est dédiée aux périphériques de
transport de masse uniquement. Il s’agit notamment des clés USB et des
lecteurs de cartes Flash (les concentrateurs et les disques durs USB ne sont
pas pris en charge).
Connectez-vous directement au port USB de votre téléviseur. Si vous utilisez
une connexion par câble distincte, un problème de compatibilité USB risque
de se poser.
Avant de connecter l'appareil au téléviseur, sauvegardez vos fichiers afin
d'éviter qu'ils ne soient endommagés ou que des données ne soient perdues. SAMSUNG ne saurait, en aucun cas, être
tenu responsable de la perte de données ou de l'endommagement d'un fichier de données.
Ne déconnectez pas le périphérique USB en cours de chargement.
Plus la résolution de l'image est élevée, plus le temps d'affichage à l'écran sera long.
La résolution JPEG maximale prise en charge est 15 360 x 8 640 pixels.
Pour les fichiers non pris en charge ou endommagés, le message ‘Format de fichier inconnu’
s'affiche.
Les fichiers MP3 avec gestion des droits numériques (DRM) téléchargés à partir d'un site payant ne peuvent pas être lus.
La technologie DRM (Gestion des droits numériques) prend en charge la création de contenu, la distribution et la gestion
intégrales du contenu (par exemple, la protection des droits et des intérêts des fournisseurs de contenu, la prévention de
la copie illégale du contenu), ainsi que la gestion de la facturation et des règlements.
Si vous passez à une photo, son chargement peut prendre quelques secondes. A
ce stade, l'icône de chargement
apparaît.
Si plusieurs périphériques MSC sont connectés, certains d'entre eux peuvent ne pas être reconnus. Si un périphérique
nécessite beaucoup de puissance (plus de 500 mA ou 5 V), le périphérique USB peut ne pas être pris en charge.
Si un message d'avertissement de surcharge s'affiche lorsque vous connectez ou utilisez un périphérique USB, le
périphérique peut ne pas être reconnu ou mal fonctionner.
Utilisation du bouton Remote Control dans le menu Media Play
Bouton Opération
▲/▼/◄/► Déplace le curseur pour sélectionner un élément.
ENTER
E
Valide l'élément actuellement sélectionné. Lors de la lecture d'un diaporama ou d'un fichier de
musique :
- Appuyer sur le bouton ENTER
E
pendant la lecture suspend celle-ci.
- Appuyer sur le bouton ENTER
E
en mode Pause relance la lecture.
∂
/
∑
Lance la lecture ou bascule en pause.
RETURN Revient au menu précédent.
TOOLS Exécute diverses fonctions dans les menus Photo et Music (Musique).
∫
Arrête la lecture du diaporama ou du fichier de musique en cours.
π
/
μ
Passe au groupe précédent/suivant.
INFO Affiche des informations sur le fichier.
MEDIA.P Quitte le modeMedia Play
<
P
>
,
EXIT, TV
Arrête le mode Media Play et retourne au mode TV.
¦
N
N
N
N
N
N
N
N
N
N
N
N
N
N
Panneau latéral du téléviseur
Lecteur USB
851.86MB/993.02MBLibre
Photo
SUM
SUM
Périph.
PHOTO
R
Retour
Music Setup
[620-Weuro]BN68-02326A-03L09.ind28 28 2009-10-08 ¿ÀÀü 9:28:08

Français - 29
Fonction Media Play
Cette fonction vous permet de lire les photos et/ou les fichiers de musique enregistrés sur un périphérique de stockage de masse
USB (MSC).
Il est se peut que le fonctionnement ne soit pas correct avec des fichiers multimédias sans licence.
Accès au menuMedia Play (USB)
1. Appuyez sur le bouton MENU. Appuyez sur le bouton ▲ ou ▼ pour sélectionner
Application, puis sur le bouton ENTER
E
.
2. Appuyez sur le bouton ▲ ou ▼ pour sélectionner Media Play (USB), puis sur le
bouton ENTER
E
.
Le menu Media Play (USB) s'affiche.
Appuyez sur le bouton MEDIA.P de la télécommande pour afficher le menu
Media Play.
Appuyez sur le bouton SOURCE de la télécommande pour afficher la liste
des sources. Appuyez ensuite sur le bouton ▲ ou ▼ pour sélectionner USB.
3.
Appuyez sur le bouton rouge, puis sur le bouton ▲ ou ▼ pour sélectionner la mémoire USB.
Appuyez sur le bouton
ENTER
E
.
Cette fonction diffère selon l'unité de stockage USB.
Le nom du périphérique USB sélectionné s'affiche dans le coin inférieur gauche de l'écran.
4.
Appuyez sur le bouton◄ ou ►pour sélectionner une icône (Photo, Music, Setup), puis appuyez sur le bouton ENTER
E
.
Pour quitter le mode Media Play, appuyez sur le bouton MEDIA.P de la télécommande.
Retrait d'une unité de stockage USB en toute sécurité
Vous pouvez retirer le périphérique du téléviseur en toute sécurité.
1. Appuyez sur le bouton TOOLS dans l'écran de la liste des fichiers Media Play ou
pendant la lecture d'un fichier de musique ou d'un diaporama.
2.
Appuyez sur le bouton ▲ ou ▼ pour sélectionner Retrait sécurisé puis sur le
bouton ENTER
E
.
3. Retirez le périphérique USB du téléviseur.
Accédez à Group List Section ou File List Section à l'aide des boutons Haut et Bas. Après avoir sélectionné une section, appuyez
sur le bouton◄ ou ►pour sélectionner un élément.
¦
N
N
O
O
N
N
N
INFO
AD
INFO
AD
851.86MB/993.02MBLibre
Photo
SUM
SUM
Périph.
PHOTO
R
Retour
Music Setup
SUM Périph.
Sélection
T
Outils
R
Dossiersupérieur
1234.jpg
1235.jpg
1236.jpg
1237.jpg
1233.jpg
1232.jpg
1231.jpg
Diaporama
Liregpact.
Information
Retrait
sécurisé
5/15
1 2
../Photo/
Section Liste de groupes
Section Liste de fichiers
SUM Périph.
Sélection
T
Outils
R
Dossiersupérieur
1234.jpg
1235.jpg
1236.jpg
1237.jpg
1233.jpg
1232.jpg
1231.jpg
1Fich.sél.
2
3 5
4
1 2
1
5/15
c
../Photo/
[620-Weuro]BN68-02326A-03L09.ind29 29 2009-10-08 ¿ÀÀü 9:28:11

Français - 30
1 View Groups : Le groupe de tri contenant le fichier actuellement sélectionné est mis en surbrillance.
2 Fichier actuellement sélectionné: vous pouvez contrôler le fichier sélectionné. Les fichiers de photo sont af
fichés sous la forme
de miniatures.
3 Périphérique actuel: indique le nom du périphérique actuellement sélectionné. Appuyez sur le bouton rouge pour sélectionner
un périphérique.
rouge (Périph.): Sélectionne un appareil connecté.
4 Informations de sélection: indique le nombre de fichiers sélectionnés en appuyant sur le bouton jaune.
5 Options d'aide
jaune (Sélection): sélectionne le fichier dans la liste. Les fichiers sélectionnés sont marqués du symbole
c
. Appuyez
une nouvelle fois sur le bouton jaune pour annuler la sélection d'un fichier.
TOOLS (Outils): affiche les menus d'options (le menu varie en fonction de l'état actuel).
Menu d'options de la liste des photos
1. Appuyez sur le bouton MEDIA.P.
2. Appuyez sur le bouton◄ ou ►pour sélectionner Photo, puis appuyez sur le
bouton ENTER
E
.
3. Appuyez sur le bouton◄ ou ►pour sélectionner le fichier photo de votre choix.
Sélection de plusieurs photos
Appuyez sur le bouton◄ ou ►pour sélectionner le fichier photo de votre
choix. Appuyez ensuite sur le bouton jaune.
Répétez l'opération ci-dessus pour sélectionner plusieurs fichiers photo.
La marque
c
s'affiche à côté du fichier photo sélectionné.
4. Appuyez sur le bouton TOOLS.
Le menu varie en fonction de l'état actuel.
Diaporama
Ce menu vous permet de lire un diaporama à l'aide des fichiers photo situés sur l'unité de stockage USB.
Lire gp act.
Ce menu vous permet de lire un diaporama portant uniquement sur les fichiers photo du groupe de tri sélectionné.
Désélectionner tout (lorsqu'au moins un fichier est sélectionné)
Vous pouvez désélectionner tous les fichiers.
La marque
c
indiquant que le fichier correspondant est sélectionné est masquée.
Information
Affiche des informations sur les fichiers photo, notamment le nom, la taille, la résolution, la date de modification et le chemin
d'accès.
Vous pouvez appliquer les mêmes procédures pour afficher les informations des fichiers photo pendant un diaporama.
Appuyez sur le bouton INFO pour afficher les informations.
Retrait sécurisé
Vous pouvez retirer le périphérique du téléviseur en toute sécurité.
¦
N
N
❑
❑
❑
N
❑
N
O
❑
INFO
AD
SUM Périph.
Sélection
T
Outils
R
Dossiersupérieur
1234.jpg
1235.jpg
1236.jpg
1237.jpg
1233.jpg
1232.jpg
1231.jpg
Diaporama
Liregpact.
Information
Retrait
sécurisé
5/15
1 2
../Photo/
[620-Weuro]BN68-02326A-03L09.ind30 30 2009-10-08 ¿ÀÀü 9:28:13

Français - 31
Visualisation d'une photo ou d'un diaporama
Visualisation d'un diaporama
1. Appuyez sur le bouton ▼ pour sélectionner Section Liste de fichiers.
2.
Appuyez sur le bouton TOOLS.
3.
Appuyez sur le bouton ▲ ou ▼ pour sélectionner Diaporama, puis appuyez sur
le bouton ENTER
E
.
Tous les fichiers de la section Liste de fichiers seront utilisés pour le
diaporama.
Durant le diaporama, les fichiers s'affichent dans l'ordre à partir du fichier à
l'écran.
Le diaporama progresse dans l'ordre de tri choisi dans la section Liste de fichiers.
Des fichiers musicaux peuvent être lus automatiquement pendant le diaporama,
si l'option Fond musical est définie sur Mar..
Lorsqu'une liste de photos est affichée, appuyez sur le bouton
∂
(Lire)/
ENTER
E
de la télécommande pour lancer le diaporama.
Boutons de commande du diaporama
Bouton Opération
ENTER
E
Lance/interrompt la lecture du diaporama.
∂
Lance la lecture du diaporama.
∑
Interrompt la lecture du diaporama.
∫
Permet de quitter le mode diaporama et de revenir à la
liste des photos.
π
/
μ
Modifie la vitesse de lecture du diaporama.
TOOLS Exécute diverses fonctions dans les menus Photo.
Lecture du groupe courant
1. Appuyez sur le bouton ▲ pour accéder à Section Liste de groupes.
2. Sélectionnez un groupe à l'aide des boutons ◄ et ►.
3.
Appuyez sur le bouton
∂
(Lire). Un diaporama débute par les fichiers du
groupe sélectionné.
Ou
1.
Dans File List Section, sélectionnez les fichiers contenus dans le groupe désiré.
Pour passer au groupe précédent/suivant, appuyez sur le bouton
π
(Retour arrière) ou
μ
(Avance rapide).
2. Appuyez sur le bouton TOOLS.
3.
Appuyez sur le bouton ▲ ou ▼ pour sélectionner Lire gp act., puis sur le bouton ENTER
E
.
Seules les photos du groupe contenant les fichiers sélectionnés seront utilisées pour le diaporama.
1. Appuyez sur le bouton ▼ pour sélectionner Section Liste de fichiers.
2. Appuyez sur le bouton◄ ou ►pour sélectionner la photo voulue dans File List Section.
3.
Appuyez sur le bouton jaune.
4.
Répétez l'opération ci-dessus pour sélectionner plusieurs photos.
La marque
c
s'affiche à gauche des photos sélectionnées.
Si vous sélectionnez un seul fichier, le diaporama ne s'exécute pas.
Pour désélectionner tous les fichiers, appuyez sur le bouton TOOLS, puis sélectionnez Désélectionner tout.
5.
Appuyez sur le bouton
∂
(Lire)/ENTER
E
.
Les fichiers sélectionnés seront utilisés pour le diaporama.
¦
N
N
N
N
O
N
●
N
N
N
N
N
N
INFO
AD
E
Pause◀▶Préc/Suiv
T
Outils
R
Retour
SUM
1234.jpg
580x7652009/03/025/15
▶Normal
SUM Périph.
Sélection
T
Outils
R
Dossiersupérieur
1234.jpg
1235.jpg
1236.jpg
1237.jpg
1233.jpg
1232.jpg
1231.jpg
Diaporama
Liregpact.
Information
Retrait
sécurisé
5/15
1 2
../Photo/
SUM Périph.
Sélection
T
Outils
R
Dossiersupérieur
1234.jpg
1235.jpg
1236.jpg
1237.jpg
1233.jpg
1232.jpg
1231.jpg
5/15
1 2
../Photo/
[620-Weuro]BN68-02326A-03L09.ind31 31 2009-10-08 ¿ÀÀü 9:28:16

Français - 32
Ou
1. Dans File List Section, appuyez sur les boutons jaunes pour sélectionner les photos de votre choix.
2.
Appuyez sur le bouton TOOLS.
3.
Appuyez sur le bouton ▲ ou ▼ pour sélectionner Diaporama, puis appuyez sur le bouton ENTER
E
.
Les fichiers sélectionnés seront utilisés pour le diaporama.
Menu d'options du diaporama
1. Pendant un diaporama (ou l'affichage d'une photo), appuyez sur le bouton TOOLS
pour définir l'option.
2. Appuyez sur le bouton ◄ ou ► pour sélectionner l'option, puis appuyez sur le
bouton ENTER
E
.
Arrêter le diaporama / Lancer le diaporama
Vous pouvez lancer ou arrêter un diaporama.
Sélectionnez cette option pour modifier la vitesse de défilement du diaporama.
Cette fonction est uniquement disponible au cours d'un diaporama.
Vous pouvez également modifier la vitesse du diaporama en appuyant sur la touche
π
(Retour arrière) ou
μ
(Avance
rapide) pendant la lecture.
Rotat.
Vous pouvez faire pivoter les photos enregistrées sur une unité de stockage USB.
Chaque fois que vous appuyez sur le bouton ◄, la photo pivote successivement à 270˚, 180˚, 90˚ et 0˚.
Chaque fois que vous appuyez sur le bouton ►, la photo pivote successivement de 90˚, 180˚, 270˚ et 0˚.
Le fichier pivoté n'est pas enregistré.
Zoom
Vous pouvez faire agrandir les photos enregistrées sur une unité de stockage USB. (x1 → x2 → x4)
Pour déplacer l'image agrandie, appuyez sur le bouton ENTER
E
, puis sur les boutons ▲/▼/◄/►. Notez que lorsque la
taille de l'image agrandie est inférieure à celle de l'écran, la fonction de déplacement est inopérante.
Le fichier agrandi n'est pas enregistré.
Fond musical
Vous pouvez sélectionner le fond musical d'un diaporama.
Pour utiliser cette fonction, de la musique et des photos doivent être stockées sur l'unité USB.
Arr. : le fond musical n'est pas lu.
Mar.: lorsque le fond musical est disponible, si vous sélectionnez Mar., la musique est lue.
Sél. fich. music. (0 Fich. sél.)
Seul le fichier musical sélectionné est défini comme fond musical.
Réglage de l'image / Réglage du son
Vous pouvez sélectionner les réglages de l'image et du son.
Information
Les informations relatives au fichier photo sont affichées.
Retrait sécurisé
Vous pouvez retirer le périphérique du téléviseur en toute sécurité.
●
N
¦
❑
❑
N
N
❑
N
N
N
❑
N
N
❑
N
■
●
●
■
❑
❑
❑
Arrêterlediaporama
Vitessedudiaporama : Normal
Rotat.
Zoom
Fond
musical
Réglagedel'image
Réglageduson
Information
Retrait
sécurisé
U
Déplacer
E
Entrer
e
Quitter
Outils
[620-Weuro]BN68-02326A-03L09.ind32 32 2009-10-08 ¿ÀÀü 9:28:17

Français - 33
Menu d'options de la liste musicale
1. Appuyez sur le bouton MEDIA.P.
2. Appuyez sur le bouton ◄ ou ►pour sélectionner Music, puis appuyez sur le
bouton ENTER
E
.
3. Appuyez sur le bouton ◄ ou ► pour sélectionner le fichier musical de votre
choix.
Sélection de plusieurs fichiers musicaux
Appuyez sur le bouton◄ ou ►pour sélectionner le fichier musical de
votre choix. Appuyez ensuite sur le bouton jaune.
Répétez l'opération ci-dessus pour sélectionner plusieurs fichiers
musicaux.
La marque
c
s'affiche à côté du fichier musical sélectionné.
4. Appuyez sur le bouton TOOLS.
Le menu varie en fonction de l'état actuel.
Lire gp act.
Ce menu vous permet de lire uniquement les fichiers musicaux du groupe de tri sélectionné.
Désélectionner tout (lorsqu'au moins un fichier est sélectionné)
Vous pouvez désélectionner tous les fichiers.
La marque
c
indiquant que le fichier correspondant est sélectionné est masquée.
Information
Affiche des informations sur les fichiers musicaux, notamment le nom, la taille, la date de modification et le chemin d'accès.
Vous pouvez afficher les informations du fichier musical durant Lire gp act. à l'aide des mêmes procédures.
Appuyez sur le bouton INFO pour afficher les informations.
Retrait sécurisé
Vous pouvez retirer le périphérique du téléviseur en toute sécurité.
¦
N
N
❑
❑
N
❑
N
O
❑
INFO
AD
SUM Périph.
Sélection
T
Outils
R
Dossiersupérieur
HaHaHa
Gold
Shine
Way
Want
Me
Lies
ILoveYou
GlenHans
OnceOst
2007
Soundtrack
3/37
Energique
Liregpact.
Information
Retrait
sécurisé
5 1 2 34
../Music/
[620-Weuro]BN68-02326A-03L09.ind33 33 2009-10-08 ¿ÀÀü 9:28:17

Français - 34
Lecture de musique
1. Appuyez sur le bouton ▼ pour sélectionner Section Liste de fichiers.
2. Appuyez sur le bouton◄ ou ►pour sélectionner le fichier musical à lire.
3.
Appuyez sur le bouton
∂
(Lire)/ENTER
E
.
Ce menu affiche uniquement les fichiers portant l'extension MP3. Les fichiers
portant d'autres extensions ne s'affichent pas, même s'ils sont enregistrés
sur le même périphérique USB.
Le fichier sélectionné s'affiche en haut de l'écran, avec la durée de lecture.
Pour régler le volume sonore, appuyez sur le bouton de volume de la
télécommande. Pour couper le son, appuyez sur le bouton MUTE de la
télécommande.
Si le son est déformé lors de la lecture de fichiers MP3, réglez les options Egaliseur et SRS TruSurround HD dans le
menu Sound. (un fichier MP3 surmodulé peut être à l'origine d'un problème sonore).
La durée de lecture d'un fichier musical peut s'afficher sous la forme ‘00:00:00’ si les informations relatives au temps de
lecture ne figurent pas au début du fichier.
π
(Retour arrière) et
μ
(Avance rapide) ne fonctionnent pas durant la lecture.
Boutons de commande de lecture
Bouton Opération
ENTER
E
Lance/interrompt la lecture du fichier musical.
∂
Lance la lecture du fichier musical.
∑
Interrompt la lecture du fichier musical.
∫
Quitte le mode de lecture et revient à la liste musicale.
TOOLS Exécute diverses fonctions dans les menus Musique.
Icône d'informations sur la fonction Musique (Music)
p
Tous les fichiers musicaux du dossier (ou le fichier sélectionné) sont répétés. Mode rep. est
défini sur Mar..
q
Tous les fichiers musicaux du dossier (ou le fichier sélectionné) sont lus une seule fois. Mode
rep. est défini sur Arr..
Lecture du groupe de musiques
1. Appuyez sur le bouton ▲ pour accéder à Section Liste de groupes.
2. Sélectionnez un groupe à l'aide des boutons ◄ et ►.
3.
Appuyez sur le bouton
∂
(Lire). La lecture des fichiers du groupe sélectionné commence.
Ou
1.
Dans File List Section, sélectionnez les fichiers contenus dans le groupe désiré.
Pour passer au groupe précédent/suivant, appuyez sur le bouton
π
(Retour arrière) ou
μ
(Avance rapide).
2. Appuyez sur le bouton TOOLS.
3.
Appuyez sur le bouton ▲ ou ▼ pour sélectionner Lire gp act., puis sur le bouton ENTER
E
.
Tous les fichiers musicaux du groupe de tri, y compris le fichier sélectionné, sont lus.
1. Appuyez sur le bouton ▼ pour sélectionner Section Liste de fichiers.
2. Appuyez sur le bouton◄ ou ►pour sélectionner le fichier musical de votre choix.
3.
Appuyez sur le bouton jaune.
4.
Répétez l'opération ci-dessus pour sélectionner plusieurs fichiers musicaux.
La marque
c
s'affiche à gauche du fichier musical sélectionné.
Pour désélectionner tous les fichiers, appuyez sur le bouton TOOLS, puis sélectionnez Désélectionner tout.
5.
Appuyez sur le bouton
∂
(Lire)/ENTER
E
.
Les fichiers sélectionnés sont lus.
¦
N
N
N
N
N
N
N
N
●
N
N
N
N
N
E
Pause◀▶Préc/Suiv
T
Outils
R
Retour
SUM
ILoveYou
HaHaHaWay
▶00:00:04/00:04:043/37
[620-Weuro]BN68-02326A-03L09.ind34 34 2009-10-08 ¿ÀÀü 9:28:18

Français - 35
Menu d'options de lecture de musique
Menu d'options de lecture de musique
Vous pouvez lire des fichiers musicaux en boucle.
Réglage de l'image / Réglage du son
Vous pouvez configurer les réglages de l'image et du son.
Information
Les informations relatives au fichier musical sont affichées.
Retrait sécurisé
Vous pouvez retirer le périphérique du téléviseur en toute sécurité.
¦
❑
❑
❑
❑
Utilisation du menu Setup
Le menu Setup affiche les paramètres utilisateur du menu Media Play.
1. Appuyez sur le bouton MEDIA.P.
2.
Appuyez sur le bouton◄ ou ►pour sélectionner Setup, puis sur le bouton
ENTER
E
.
3. Appuyez sur le bouton ▲ ou ▼ pour sélectionner l'option de votre choix.
4.
Appuyez sur le bouton◄ ou ►pour sélectionner l'option.
Pour quitter le mode Media Play, appuyez sur le bouton MEDIA.P de la
télécommande.
. / Arr.
Permet de répéter la lecture de fichiers musicaux.
Sélectionnez cette option pour définir le délai avant l'activation de l'écran de veille.
Information
Affiche les informations de l'appareil connecté.
Retrait sécurisé
Vous pouvez retirer le périphérique du téléviseur en toute sécurité.
¦
N
■
■
■
■
Modorep. ◀Mar.▶
Réglagedel'image
Réglageduson
Information
Retrait
sécurisé
U
Déplacer
L
Régler
e
Quitter
Outils
851.86MB/993.02MBLibre
Photo
SUM
SUM
Périph.
SETUP
e
Quitter
Music Setup
Moderépét. ◀Mar.▶
Tempsd'ex.éco.écran :2heures
Information
Retraitsécurisé
U
Déplacer
L
Régler
R
Retour
SUM Périph.
[620-Weuro]BN68-02326A-03L09.ind35 35 2009-10-08 ¿ÀÀü 9:28:18

Français - 36
ANYNET
+
Connexion de périphériques Anynet
+
+
?
Anynet
+
est une fonction qui vous permet de contrôler tous les appareils Samsung connectés compatibles Anynet
+
avec votre
télécommande Samsung. Le système Anynet
+
peut être utilisé uniquement avec les appareils Samsung disposant de la fonction
Anynet
+
. Pour vérifier que votre périphérique Samsung dispose de cette fonction, assurez-vous qu'il porte le logo Anynet
+
.
Connexion à un téléviseur
1. A l'aide d'un câble HDMI, reliez la prise HDMI IN (1, 2, 3(DVI) ou 4) du téléviseur à la prise HDMI OUT du périphérique
Anynet
+
correspondant.
Connexion à un système home cinéma
1. A l'aide d'un câble HDMI, reliez la prise HDMI IN (1, 2, 3(DVI) ou 4) du téléviseur à la prise HDMI OUT du périphérique
Anynet
+
correspondant.
2. A l'aide du câble HDMI, reliez la prise HDMI IN du système home cinéma à la prise HDMI OUT de l'appareil Anynet
+
correspondant.
Connectez le câble optique entre la prise DIGITAL AUDIO OUT (OPTICAL) de votre téléviseur et l'entrée Digital Audio
(audio numérique) de votre système home cinéma.
Si vous suivez les instructions de connexion ci-avant, la prise optique produit uniquement un signal audio 2 voies. Vous
n'entendrez du son qu'au niveau des haut-parleurs avant gauche et droit et du caisson de basses de votre système home cinéma.
Pour écouter des chaînes audio 5.1, branchez la prise DIGITAL AUDIO OUT (OPTICAL) du lecteur DVD ou du récepteur satellite
(c.-à-d. appareil Anynet 1 ou 2) directement sur l’amplificateur ou sur un système home cinéma, et non sur le téléviseur.
Ne connectez qu'un seul système home cinéma.
Vous pouvez connecter un périphérique Anynet
+
à l'aide du câble HDMI 1.3. Certains câbles HDMI peuvent ne pas
prendre en charge les fonctions Anynet
+
.
Anynet
+
fonctionne si le périphérique compatible est en mode veille (Veille) ou en marche (Marche).
Anynet
+
prend en charge jusqu'à 12 périphériques AV. Vous pouvez connecter jusqu'à 3 périphériques du même type.
¦
N
N
N
N
N
N
Périphérique Anynet
+
1
Câble HDMI 1.3
Câble HDMI 1.3Câble HDMI 1.3
Câble HDMI 1.3
Périphérique Anynet
+
2 Périphérique Anynet
+
3 Périphérique Anynet
+
4
TV
Périphérique Anynet
+
1
Câble HDMI 1.3
Câble HDMI 1.3
Câble HDMI 1.3Câble HDMI 1.3
TV
Câble HDMI 1.3
Câble optique
Périphérique Anynet
+
2 Périphérique Anynet
+
3 Périphérique Anynet
+
4
Home cinéma
[620-Weuro]BN68-02326A-03L09.ind36 36 2009-10-08 ¿ÀÀü 9:28:19

Français - 37
Configuration d'Anynet
+
Appuyez sur le bouton TOOLS pour afficher le menu Outils. Vous pouvez également
afficher le menu Anynet
+
en sélectionnant
+
(HDMI-CEC).
Configuration
Anynet
+
Pour utiliser la fonction Anynet
+
, l'option Anynet
+
(HDMI-CEC) doit être activée (Mar.).
Lorsque la fonction Anynet
+
(HDMI-CEC) est désactivée, toutes les activités associées à
Anynet+ sont également désactivées.
Extinction automatique d'un périphérique Anynet
+
lorsque le téléviseur est mis hors tension
La source active sur la télécommande du téléviseur doit être définie sur TV pour pouvoir
utiliser la fonction Anynet
+
.
Si vous réglez Arrêt automatique sur Oui, les périphériques connectés s'éteignent lors de
la mise hors tension du téléviseur. Toutefois, si un périphérique est en train d'enregistrer, il
se peut qu'il ne s'éteigne pas.
Commutation entre périphériques Anynet
+
1. Appuyez sur le bouton TOOLS. Appuyez sur le bouton ENTER
E
pour sélectionner
Anynet
+
(HDMI-CEC).
2. Appuyez sur le bouton ▲ ou ▼ pour sélectionner Liste d'appareils, puis appuyez sur le
bouton ENTER
E
.
La liste des périphériques Anynet
+
connectés au téléviseur s'affiche.
Si le périphérique souhaité est introuvable, appuyez sur le bouton rouge pour
chercher des périphériques.
3.
Appuyez sur le bouton ▲ ou ▼ pour sélectionner un périphérique particulier, puis
appuyez sur le bouton ENTER
E
. Vous passez ainsi au périphérique sélectionné.
Le menu Liste d'appareils ne s'affiche que si Anynet
+
(HDMI-CEC) est activé dans le menu Application.
Le basculement vers le périphérique sélectionné peut prendre jusqu'à 2 minutes. Il est impossible d'annuler l'opération de
basculement en cours.
Le temps de recherche nécessaire dépend du nombre de périphériques connectés.
Au terme de la recherche, le nombre de périphériques trouvés ne s'affiche pas.
Bien que le téléviseur examine automatiquement la liste des périphériques lorsqu'il est mis sous tension à l'aide du bouton
marche/arrêt, les périphériques connectés au téléviseur alors que celui-ci est déjà allumé ne s'af
fichent pas toujours
automatiquement dans la liste. Appuyez sur le bouton rouge pour rechercher le périphérique connecté.
Si vous avez choisi un mode d'entrée externe en appuyant sur le bouton SOURCE, vous ne pouvez pas utiliser la fonction
Anynet
+
. Veillez à basculer vers un périphérique Anynet
+
à l'aide de la Liste d'appareils.
Menu Anynet
+
Le menu Anynet
+
varie selon le type et l'état des périphériques Anynet
+
connectés au téléviseur.
Menu Anynet
+
Description
Voir télévision Le mode Anynet
+
change en mode de diffusion TV.
Liste d'appareils Affiche la liste des périphériques Anynet
+
.
MENU (nom_appareil)
Affiche les menus du périphérique connecté. Par exemple, si un graveur DVD est
connecté, son menu de disque s'affiche.
INFO (nom_appareil)
Affiche le menu de lecture du périphérique connecté. Par exemple, si un graveur DVD
est connecté, son menu de lecture s'affiche.
Enregistrement :
(*enregistreur)
Lance immédiatement l'enregistrement avec le graveur (cette fonction n'est disponible
que pour les périphériques prenant en charge la fonction d'enregistrement).
Arrêter Enr. : (*enregistreur) Arrête l'enregistrement.
Récepteur Le son est émis par l'intermédiaire du récepteur.
Si plusieurs enregistreurs sont connectés, ils s'affichent sous la forme (*enregistreur); si un seul enregistreur est connecté, il
s'affiche sous la forme (*nom_périphérique).
¦
T
❑
■
N
■
N
N
¦
N
N
N
N
N
N
N
N
N
U
Déplacer
E
Entrer
R
Retour
Voirtélévision
Listed'appareils
Enregistrement:DVDR
DVDRMENU
DVDRINFO
Récepteur:Arr.
Configuration
U
Déplacer
E
Entrer
R
Retour
Anynet
+
(HDMI-CEC) :Mar.▶
Configuration
Arrêtautomatique :Oui
MediaPlay(USB)
Anynet
+
(HDMI-CEC)
Application
U
Déplacer
E
Entrer
R
Retour
Anynet
+
(HDMI-CEC) :Mar.
Configuration
Arrêtautomatique :Oui▶
[620-Weuro]BN68-02326A-03L09.ind37 37 2009-10-08 ¿ÀÀü 9:28:20

Français - 38
Boutons de la télécommande du téléviseur disponibles en mode Anynet
+
Type de périph. État de fonctionnement Boutons disponibles
Périphérique
Anynet
+
Après basculement vers le périphérique,
lorsque son menu s'affiche à l'écran.
Touches numériques
▲/▼/◄/►/ENTER
E
Boutons de couleur / Bouton EXIT
Après basculement vers le périphérique,
pendant la lecture d'un fichier.
π
(recherche vers l'arrière) /
μ
(recherche vers
l'avant) /
∫
(Arrêt) /
∂
(Lire) /
∑
(Pause)
Périphérique à
tuner intégré
Après le basculement vers l'appareil,
lorsque vous regardez un programme
télévisé.
P
>
/ P
<
Périphérique audio Lorsque le récepteur est activé.
Y
/ bouton MUTE
La fonction Anynet
+
n'est utilisable que si la source active définie sur la télécommande est TV
.
Le bouton
∏
ne fonctionne que si le périphérique est dans un état où l'enregistrement est possible.
Il est impossible de commander des périphériques Anynet
+
à l'aide des boutons situés sur le téléviseur. Vous ne pouvez
commander des périphériques Anynet
+
qu'au moyen de la télécommande du téléviseur.
Il se peut que la télécommande du téléviseur ne fonctionne pas dans certaines conditions. Dans ce cas, sélectionnez de
nouveau le périphérique Anynet
+
.
Les fonctions d'Anynet
+
n'opèrent pas sur des produits d'autres fabricants.
Les opérations
π
et
μ
peuvent varier en fonction du périphérique.
Enregistrement
Vous pouvez enregistrer un programme télévisé à l'aide d'un enregistreur Samsung.
1. Appuyez sur le bouton TOOLS. Appuyez sur le bouton ENTER
E
pour sélectionner
Anynet
+
(HDMI-CEC).
2. Appuyez sur le bouton ▲ ou ▼ pour sélectionner Recording Immediately puis appuyez
sur le bouton ENTER
E
. L'enregistrement commence.
S'il y a plusieurs périphériques d'enregistrement
Si plusieurs enregistreurs sont connectés, leur liste s'affiche. Appuyez sur le bouton
▲ ou ▼ pour sélectionner un appareil, puis appuyez sur le bouton ENTER
E
.
L'enregistrement commence.
Si le périphérique d'enregistrement ne s'affiche pas, sélectionnez
puis appuyez sur le bouton rouge pour chercher des appareils
3.
Appuyez sur le bouton EXIT pour quitter le menu.
Vous pouvez effectuer un enregistrement en sélectionnant Enregistrement: (nom_périphérique).
Appuyer sur le bouton
∏
permet d'enregistrer ce que vous regardez. Si vous regardez une vidéo provenant d'un autre
périphérique, elle est enregistrée.
Avant d'enregistrer, vérifiez la connexion de la fiche d'antenne au périphérique d'enregistrement. Pour connecter
correctement une antenne à un périphérique d'enregistrement, reportez-vous au mode d'emploir de ce dernier
.
Écoute via un récepteur (home cinéma)
Vous pouvez écouter du son via un récepteur au lieu du haut-parleur du téléviseur.
1. Appuyez sur le bouton TOOLS. Appuyez sur le bouton ENTER
E
pour sélectionner
Anynet
+
(HDMI-CEC).
2. Appuyez sur le bouton ▲ ou ▼ pour sélectionner Récepteur: Appuyez sur le bouton
◄ ou ► pour sélectionner Mar. ou Arr..
3.
Appuyez sur le bouton EXIT pour quitter le menu.
Si votre récepteur ne prend en charge que l'audio, il se peut qu'il ne figure pas dans
la liste des périphériques.
Le récepteur fonctionnera lorsque vous aurez correctement raccordé la fiche d'entrée
optique du récepteur à la prise de sortie numérique (optique) DIGITAL AUDIO OUT
(OPTICAL) du téléviseur.
Lorsque le récepteur (home cinéma) est activé, vous pouvez écouter le son sortant de la prise optique du téléviseur
.
Lorsque le téléviseur affiche un signal DTV (air), il envoie un son 5.1 au récepteur du home cinéma. Lorsque la source est
un composant numérique (par exemple, un DVD) connecté au téléviseur TV via HDMI, le récepteur home cinéma n'émet
qu'un son 2 voies.
Si une coupure de courant se produit alors que l'option Récepteur est réglée sur Mar. (câble d'alimentation débranché
ou panne de courant), il se peut que l'option Sélection Haut-parleur soit réglée sur Ht-parl ext lorsque vous rallumez le
téléviseur.
N
N
N
N
N
N
¦
N
N
N
N
N
¦
N
N
N
N
U
Déplacer
E
Entrer
R
Retour
Voirtélévision
Listed'appareils
Enregistrement:DVDR
DVDRMENU
DVDRINFO
Récepteur:Arr.
Configuration
U
Déplacer
E
Entrer
R
Retour
Voirtélévision
Listed'appareils
Enregistrement:DVDR
DVDRMENU
DVDRINFO
Récepteur:Arr.
Configuration
[620-Weuro]BN68-02326A-03L09.ind38 38 2009-10-08 ¿ÀÀü 9:28:20

Français - 39
Dépannage d'Anynet
+
Problème Solution possible
Anynet
+
ne fonctionne pas. Vérifiez si le périphérique est compatible Anynet
+
. Le système Anynet
+
ne prend en charge
que les périphériques compatibles Anynet
+
.
Ne connectez qu'un seul récepteur (home cinéma).
Vérifiez si le cordon d'alimentation du périphérique Anynet
+
est bien connecté.
Vérifiez la connexion des câbles vidéo/audio/HDMI 1.3 du périphérique Anynet
+
.
Vérifiez qu'Anynet
+
(HDMI-CEC) est défini sur ON dans le menu de configuration
d'Anynet
+
.
Vérifiez si la télécommande du téléviseur est en mode TV.
Vérifiez s'il s'agit d'une télécommande spéciale Anynet
+
.
Anynet
+
ne fonctionne pas dans toutes les conditions. (Recherche de chaînes,
fonctionnement de Media Play, Plug & Play, etc.)
Lorsque vous branchez ou retirez le câble HDMI 1.3, veillez à relancer une recherche de
périphérique ou à éteindre et rallumer votre téléviseur.
Vérifiez si la fonction Anynet
+
du périphérique Anynet
+
est activée.
●
●
●
●
●
●
●
●
●
●
Je veux démarrer Anynet
+
. Assurez-vous que le périphérique Anynet+ est correctement connecté au téléviseur et
que la fonction Anynet
+
(HDMI-CEC) est réglée sur Mar. dans le menu Configuration
d'Anynet
+
.
Appuyez sur le bouton TV de la télécommande pour allumer le téléviseur. Appuyez ensuite
sur le bouton TOOLS pour afficher le menu Anynet
+
puis sélectionnez le menu de votre
choix.
●
●
Je veux quitter Anynet
+
. Sélectionnez Voir télévision dans le menu Anynet
+
.
Appuyez sur le bouton SOURCE de la télécommande, puis sélectionnez un périphérique
non compatible Anynet
+
Appuyez sur P
>
/
<
, PRE-CH et FAV.CH pour modifier le mode TV. (remarque : le bouton
de chaîne ne fonctionne que si aucun périphérique Anynet
+
à tuner intégré n'est connecté).
●
●
●
Le message ‘Connexion à
Anynet +’ apparaît à l'écran.
Il est impossible d'employer la télécommande pendant la configuration d'Anynet
+
ou le
basculement en mode de visualisation.
La télécommande n'est utilisable qu'au terme de la configuration d'Anynet
+
ou du
basculement en mode de visualisation.
●
●
La lecture ne démarre pas sur
l'appareil Anynet
+
.
Vous ne pouvez pas utiliser la fonction de lecture quand une opération Plug & Play est en
cours.
●
Le périphérique connecté ne
s'affiche pas.
Vérifiez si le périphérique prend en charge les fonctions Anynet
+
.
Vérifiez si le câble HDMI 1.3 est correctement connecté.
Vérifiez si Anynet
+
(HDMI-CEC) est réglé sur Mar. dans le menu de configuration Anynet
+
.
Lancez une nouvelle recherche de périphériques Anynet
+
.
Vous ne pouvez connecter un périphérique Anynet
+
qu'à l'aide d'un câble HDMI 1.3.
Certains câbles HDMI peuvent ne pas prendre en charge les fonctions Anynet
+
.
En cas d'arrêt anormal résultant d'une déconnexion du câble HDMI ou du câble
d'alimentation, ou encore d'une panne de courant, effectuez une nouvelle recherche de
périphériques.
●
●
●
●
●
●
Le programme TV ne
s’enregistre pas.
Vérifiez que la fiche d'antenne est correctement branchée sur le périphérique
d'enregistrement.
●
Le son du téléviseur ne sort
pas par le récepteur.
Reliez le téléviseur au récepteur à l'aide du câble optique.
●
¦
[620-Weuro]BN68-02326A-03L09.ind39 39 2009-10-08 ¿ÀÀü 9:28:20

Français - 40
RECOMMENDATIONS
Fonction Télétexte
La plupart des chaînes de télévision offrent des services d'informations écrites via le télétexte. La page d'index du télétexte
contient des instructions sur l'utilisation du service. Vous pouvez, en outre, sélectionner différentes options à l'aide des touches de
la télécommande.
Pour que les informations du télétexte s'affichent correctement, la réception des chaînes doit être stable. Dans le cas
contraire, des informations pourraient manquer ou certaines pages pourraient ne pas s'af
ficher.
Vous pouvez changer de page de télétexte en appuyant sur les touches numériques de la télécommande
1
0
(mode)
Permet de sélectionner le mode
Télétexte (LIST/FLOF). Si vous
appuyez sur cette touche en mode
LISTE, vous basculez en mode
d'enregistrement de liste. En
mode d'enregistrement de liste,
vous pouvez enregistrer une page
télétexte dans une liste à l'aide du
bouton
8
(mémoriser).
2
5
(afficher)
Permet d'afficher le texte masqué
(par exemple, les réponses à un
questionnaire). Pour rétablir le
mode d'affichage normal, appuyez
de nouveaux dessus.
3
4
(taille)
Permet d'afficher la moitié
supérieure de l'écran en
caractères deux fois plus grands.
Pour afficher la moitié inférieure
de l'écran, appuyez de nouveau
sur cette touche. Pour rétablir le
mode d'affichage normal, appuyez
dessus une fois de plus.
4
8
(mémoriser)
Permet d'enregistrer les pages de
télétexte.
5 Boutons de couleur (rouge/vert/
jaune/bleu)
Si une société de télédiffusion
utilise le système FASTEXT, les
différentes rubriques d'une page
de télétexte sont associées à un
code couleur qui permet de les
sélectionner à l'aide des touches
de couleur de la télécommande.
Appuyez sur la touche dont la
couleur correspond à celle de
la rubrique souhaitée. La page
affiche d'autres informations
en couleur que vous pouvez
sélectionner de la même
manière. Pour afficher la page
précédente ou la page suivante,
appuyez sur la touche de
couleur correspondante.
6
/
(télétexte actif/mixte)
Permet d'activer le mode Télétexte
après avoir choisi la chaîne diffusant
le service télétexte. Appuyez deux
fois sur cette touche pour superposer
le télétexte à l'émission en cours de
diffusion.
7
:
(quitter)
Quitte l'affichage du télétexte.
8
1
(page secondaire)
Permet d'afficher une page secondaire.
9
2
(page suivante)
Permet d'afficher la page de télétexte
suivante.
0
3
(page précédente)
Permet d'afficher la page de télétexte
précédente.
!
9
(hold)
Permet de bloquer l'affichage sur
une page précise, si celle-ci est
reliée à plusieurs pages secondaires
qui défilent automatiquement. Pour
reprendre l'affichage de celles-ci,
appuyez de nouveau sur cette touche.
@
6
(index)
Permet d'afficher la page d'index du
télétexte (sommaire) à tout moment.
#
7
(Annuler)
Permet d'afficher le programme lors de
la recherche d'une page.
¦
N
N
INFO
AD
1
2
3
4
5
6
8
7
9
0
!
#
@
[620-Weuro]BN68-02326A-03L09.ind40 40 2009-10-08 ¿ÀÀü 9:28:21

Français - 41
Les pages de télétexte sont organisées en six catégories :
Catégorie Sommaire
A Numéro de la page sélectionnée.
B Identité de la chaîne émettrice.
C
Numéro de la page actuelle ou indications de
recherche.
D Date et heure.
E Texte.
F Informations sur l'état.
Informations FASTEXT.
Les informations du télétexte sont souvent réparties sur plusieurs pages qui s'affichent successivement. Ces pages sont
accessibles en :
entrant le numéro de page ;
sélectionnant un titre dans une liste ;
sélectionnant un titre de couleur (système FASTEXT).
Le téléviseur prend en charge le niveau de télétexte 2.5 qui peut afficher des grap
hiques ou textes supplémentaires.
En fonction de la transmission, des panneaux latéraux vides peuvent apparaître lors de l'af
fichage du télétexte.
Dans ce cas, les graphiques ou textes supplémentaires ne sont pas transmis.
Les téléviseurs plus anciens qui ne prennent pas en charge la version 2.5 ne peuvent pas af
ficher les graphiques et textes
supplémentaires, indépendamment de la transmission télétexte.
Appuyez sur le bouton TV pour quitter l'affichage du télétexte.
Montage du socle
Préréglage : Placez le support du guide et le goulot du couvercle sur le socle et fixez-les
à l'aide des vis.
1. Fixez le téléviseur LCD sur le socle.
Le téléviseur doit être porté par au moins deux personnes.
Veillez à bien faire la distinction entre l'avant et l'arrière du socle lors de
l'assemblage.
Pour être certain d'installer le téléviseur sur son socle au niveau approprié,
n'exercez pas de pression vers le bas excessive sur ses côtés supérieurs gauche
et droit.
2.
Insérez les vis dans l'emplacement
1
, puis dans l'emplacement
2
.
Redressez le produit et serrez les vis. Si vous serrez les vis tandis que le téléviseur
LCD est couché, il se peut qu'il penche d'un côté.
N
N
N
N
N
O
¦
N
N
N
N
N
INFO
AD
Avant
Arrière
1
2
[620-Weuro]BN68-02326A-03L09.ind41 41 2009-10-08 ¿ÀÀü 9:28:22

Français - 42
Branchement du socle
1. Retirez les vis situées à l’arrière du téléviseur.
2. Retirez le support du téléviseur.
Le téléviseur doit être porté par au moins deux personnes.
3.
Recouvrez le trou inférieur à l'aide du cache.
Installation du kit de montage mural
Les éléments du support mural (vendus séparément) permettent de fixer le téléviseur au
mur.
Pour plus d'informations sur l'installation du support mural, reportez-vous aux instructions
fournies avec les éléments de montage mural. Faites appel à un technicien pour vous aider
à installer le support mural.
Samsung Electronics ne saurait être tenu responsable de tout dommage sur le produit ni
de toute blessure subie par vous ou par d'autres personnes si vous choisissez d'effectuer
l'installation murale.
N'installez pas le kit de montage mural lorsque le téléviseur est sous tension. Cela
pourrait entraîner une blessure par choc électrique.
Assemblage des câbles
Insérez les câbles dans le serre-câbles de telle manière qu'ils ne soient pas visibles à travers le
pied transparent.
Verrou antivol Kensington
Le verrou Kensington est un dispositif utilisé pour fixer physiquement le système en cas
d'utilisation dans un lieu public. L'aspect du verrou et la méthode de verrouillage peuvent
différer de l'illustration en fonction du fabricant.
Consultez le manuel fourni avec le verrou Kensington pour obtenir des instructions
d’utilisation.
Le dispositif de verrouillage est vendu séparément.
L'emplacement du verrou Kensington peut varier en fonction du modèle.
1.
Insérez le dispositif de verrouillage dans le logement Kensington du téléviseur LCD (1),
puis tournez-le dans le sens de verrouillage (2).
2.
Branchez le câble du verrou Kensington (3).
3.
Fixez le câble du verrou Kensington sur un bureau ou tout autre objet lourd inamovible.
N
N
3
1
2
¦
N
¦
¦
¦
<Optionnel>
[620-Weuro]BN68-02326A-03L09.ind42 42 2009-10-08 ¿ÀÀü 9:28:24

Français - 43
Sécurisation de l'emplacement d'installation
Respectez les distances requises entre le produit et d'autres objets (p. ex. murs) pour assurer une ventilation adéquate.
Le non-respect de cette consigne pourrait provoquer un incendie ou un problème avec le produit en raison de l'augmentation de la
température interne de ce dernier.
Installez le produit de manière à respecter les distances requises indiquées sur la figure.
En cas d'utilisation d'un support ou de montage mural, n'utilisez que des pièces Samsung Electronics.
L'emploi de pièces d'un autre fabricant risque d'entraîner des problèmes avec le produit ou d'occasionner des blessures
dues à la chute du produit.
L'emploi de pièces d'un autre fabricant risque d'entraîner un problème avec le produit ou de provoquer un incendie en
raison de l'augmentation de la température interne du produit due à une ventilation insuf
fisante.
L'aspect peut varier en fonction du produit.
Installation du produit sur un support Montage mural du produit
10 cm
10 cm
10 cm
10 cm
10 cm
10 cm
10 cm
Fixation du téléviseur au mur
Attention: Si vous tirez ou poussez le téléviseur ou si vous grimpez dessus, il risque de tomber. Veillez en
particulier, à ce que vos enfants ne se suspendent pas au téléviseur, ni ne le déséquilibrent, car cela pourrait le
faire basculer et occasionner des blessures graves pouvant entraîner la mort. Respectez toutes les précautions
de sécurité indiquées dans la brochure relative à la sécurité. Pour une stabilité accrue, installez le dispositif
antichute comme indiqué ci-après.
Pour éviter toute chute du téléviseur :
1.
Glissez les vis dans les colliers, puis fixez-les solidement au mur.
Assurez-vous que les
vis sont solidement fixées au mur.
En fonction du type de mur, il est possible que vous ayez besoin de matériel
supplémentaire, tel que des chevilles.
Les colliers, vis et chaînettes n'étant pas fournis, vous devez les acheter
séparément.
2.
Retirez les vis situées sur la partie centrale arrière du téléviseur, glissez-les dans
les
colliers, puis fixez-les de nouveau sur le téléviseur.
Il est possible que les vis ne soient pas fournies avec le produit. Dans ce cas,
achetez des vis présentant les caractéristiques suivantes.
Caractéristiques des vis
Pour un téléviseur LCD 17 à 29 pouces : M4 X L15
Pour un téléviseur LCD 32 à 40 pouces : M6 X L15
3.
Reliez les bagues fixées au téléviseur et celles fixées sur le mur à l'aide de chaînettes,
puis attachez-les fermement.
Placez le téléviseur à proximité du mur afin qu'il ne bascule pas vers l'arrière.
Il est recommandé de placer la chaînette de façon à ce que les colliers fixés au mur
soient placés à même hauteur ou plus bas que ceux fixés au téléviseur.
Détachez la chaînette avant de déplacer le téléviseur.
4.
Vérifiez que toutes les connexions sont fixées correctement. Vérifiez régulièrement que
les connexions ne présentent aucun signe d'usure. Si vous avez un doute quant à la
sécurité des connexions, contactez un installateur professionnel.
¦
N
N
¦
■
N
N
N
N
N
N
N
Mur
Mur
[620-Weuro]BN68-02326A-03L09.ind43 43 2009-10-08 ¿ÀÀü 9:28:27

Français - 44
Dépannage
Si vous avez des questions relatives au téléviseur, commencez par consulter la liste ci-dessous. Si aucune de ces astuces de
dépannage ne s'applique à votre problème, rendez-vous sur le site ‘www.samsung.com’, puis cliquez sur Support ou contactez le
centre d'appel dont les coordonnées gurent sur la dernière page.
Problème Solution
Qualité de l'image
Exécutez tout d'abord le Test de l'image pour vérier que votre téléviseur afche correctement
l'image de test.
Accédez à MENU - Assistance - Diagnostic automatique - Test de l'image
Si l'image de test s'afche correctement, sa qualité médiocre peut être due à la source ou au signal.
●
La qualité de l'image sur le
téléviseur n'est pas aussi
bonne que dans le magasin.
Si vous êtes équipé d'un décodeur câble/boîtier décodeur analogique, procédez à une mise à
niveau. Utilisez les câbles HDMI ou Composant pour fournir une qualité d'image HD.
Abonné câble/satellite : essayez les chaînes HD (High Definition) à partir de l'alignement des canaux.
Connexion de l'antenne: essayez les chaînes HD après avoir exécuté une mémorisation
automatique.
De nombreuses chaînes HD sont mises à niveaux par rapport à du contenu
SD (Standard Definition).
Réglez la résolution de sortie vidéo du décodeur câble/boîtier décodeur sur 1080i ou 720p.
Veillez à respecter la distance minimale recommandée entre vous et le téléviseur (distance
basée sur la taille et la définition du signal affiché).
●
●
●
N
●
●
L'image est déformée :
macrobloc, petit bloc, points,
pixelisation
La compression de contenus vidéo peut engendrer une déformation de l'image, en
particulier pour les mouvements rapides comme le sport et les films d'action.
Un niveau de signal faible ou une mauvaise qualité peut déformer l'image. Il ne s'agit pas
d'un problème lié au téléviseur.
●
●
Couleur incorrecte ou
manquante avec la
connexion Composant.
Vérifiez que les câbles Composant sont raccordés aux prises appropriées. Des
raccordements desserrés ou incorrects peuvent engendrer des problèmes au niveau de la
couleur ou de l'écran (vide).
●
Luminosité ou couleur
médiocre.
Réglez les options Image dans le menu du téléviseur (mode Image, Couleur, Luminosité,
Netteté).
Réglez l'option Mode éco. dans le menu Configuration.
Essayez de réinitialiser l'image pour afficher son paramètre par défaut
(accédez à MENU - Image - Réinitialisation de l'image).
●
●
●
Ligne pointillée sur le bord
de l'écran.
Si la taille de l'image est réglée sur Adapter à l'écran, remplacez la valeur par 16:9.
Changez la résolution du décodeur câble/boîtier décodeur.
●
●
L'image est en noir et
blanc avec l'entrée AV
(Composite) uniquement.
Raccordez le câble vidéo (jaune) à la prise verte de l'entrée Composant 1 du téléviseur.
●
L'image se ge ou est
déformée lorsque vous
changez de chaînes ou l'image
s'afche avec un décalage.
En cas de raccordement avec le décodeur câble, essayez de réinitialiser ce dernier
(rebranchez le cordon d'alimentation secteur et patientez jusqu'au démarrage du décodeur
câble. Cette opération peut durer jusqu'à 20 minutes).
Réglez la résolution de sortie du décodeur câble sur 1080i ou 720p.
●
●
Qualité sonore
Exécutez tout d'abord le Test du son pour vérier que le système audio de votre téléviseur
fonctionne correctement.
Accédez à MENU - Assistance - Diagnostic automatique - Test du son
Si le système audio fonctionne correctement, le problème lié au son peut provenir de la source ou du signal.
●
Aucun son ou son trop faible
lorsque le niveau du volume
est au maximum.
Vérifiez le volume du périphérique externe connecté à votre téléviseur, puis réglez le volume
du téléviseur en conséquence.
●
Image correcte mais
absence de son.
Réglez l'option Sélection Haut-parleur sur Haut-parleur TV dans le menu Sound.
Vérifiez que les câbles audio d'un périphérique externe sont raccordés aux prises d'entrée
audio appropriées du téléviseur.
Vérifiez l'option de sortie audio du périphérique connecté (par exemple : il se peut que vous deviez
remplacer l'option audio de votre décodeur câble par HDMI si vous utilisez la connexion HDMI).
Si vous utilisez un câble DVI-HDMI, un câble audio distinct est requis.
Désactivez la fonction SRS si le réglage du volume est supérieur à 30.
Retirez la fiche de la prise pour casque (si disponible sur votre téléviseur).
●
●
●
●
●
●
Bruit émis par le
haut-parleur.
Vérifiez le raccordement des câbles. Vérifiez qu'aucun câble vidéo n'est raccordé à une entrée audio.
Pour la connexion de l'antenne/du câble, vérifiez l'intensité du signal. Un niveau de signal
faible peut provoquer une distorsion sonore.
●
●
¦
[620-Weuro]BN68-02326A-03L09.ind44 44 2009-10-08 ¿ÀÀü 9:28:27

Français - 45
Problème Solution
Aucune image, aucune
vidéo
Le téléviseur ne s'allume
pas.
Vérifiez que le cordon d'alimentation secteur est branché correctement dans la prise murale
et sur le téléviseur.
Vérifiez que la prise murale est opérationnelle.
Essayez d'appuyer sur le bouton POWER du téléviseur pour vérifier que la télécommande
fonctionne correctement. Si le téléviseur s'allume, la télécommande peut être à l'origine de
cette mise sous tension. Pour résoudre le problème lié à la télécommande, reportez-vous au
problème ‘La télécommande ne fonctionne pas’ ci-après.
●
●
●
Le téléviseur s'éteint
automatiquement.
Vérifiez que la fonction Veille est réglée sur Marche dans le menu Configuration.
Si vous connectez le téléviseur à votre PC, vérifiez les paramètres d'alimentation de votre
PC.
Vérifiez que le cordon d'alimentation secteur est branché correctement dans la prise murale
et sur le téléviseur.
En l'absence de signal pendant environ 10 à 15
minutes avec la connexion Antenne/câble,
le téléviseur s'éteint.
●
●
●
●
Aucune image/vidéo. Vérifiez le raccordement des câbles (retirez tous les câbles du téléviseur et des
périphériques externes et rebranchez-les).
Réglez la sortie vidéo de votre périphérique externe (décodeur câble/boîtier décodeur
, DVD,
Blu-ray, etc.) pour faire correspondre les connexions à l'entrée du téléviseur. Par exemple,
sortie du périphérique externe : HDMI, entrée du téléviseur : HDMI.
Vérifiez que votre périphérique connecté est sous tension.
Veillez à sélectionner la source appropriée du téléviseur en appuyant sur le bouton
SOURCE de la télécommande.
●
●
●
●
Connexion RF
(câble/antenne)
Impossible de recevoir
toutes les chaînes.
Vérifiez que le câble de l'antenne est raccordé correctement.
Essayez la fonction Plug & Play pour ajouter des chaînes disponibles à la liste
correspondante. Accédez à MENU - Configuration - Plug & Play et attendez que toutes les
chaînes disponibles soient mémorisées.
Vérifiez que l'antenne est positionnée correctement.
●
●
●
L'image est déformée :
macrobloc, petit bloc, points,
pixelisation
La compression de contenus vidéo peut engendrer une déformation de l'image, en
particulier pour les mouvements rapides comme le sport et les films d'action.
Un niveau de signal faible peut déformer l'image. Il ne s'agit pas d'un problème lié au
téléviseur.
●
●
Connexion PC
Message ‘Mode non pris en
charge’.
Réglez la fréquence et la résolution de sortie de votre PC de sorte à ce qu'il corresponde
aux résolutions prises en charge par le téléviseur.
●
Le PC apparaît toujours
dans la liste source même
s'il n'est pas connecté.
C'est normal ; le PC apparaît toujours dans la liste source même s'il n'est pas connecté.
●
La vidéo fonctionne
correctement mais le
système audio n'existe pas
avec une connexion HDMI.
Vérifiez le paramètre de sortie audio de votre PC.
●
[620-Weuro]BN68-02326A-03L09.ind45 45 2009-10-08 ¿ÀÀü 9:28:27

Français - 46
Problème Solution
Autres
L'image ne s'afche pas en
plein écran.
Des barres noires s'affichent de chaque côté des chaînes HD lors de l'affichage du contenu
SD étendu (4:3).
Des barres noires s'affichent en haut et en bas des films dont le format est différent de celui
de votre téléviseur.
Réglez l'option de la taille de l'image sur votre périphérique externe ou le téléviseur en plein
écran.
●
●
●
La télécommande ne
fonctionne pas.
Replacez les piles de la télécommande en respectant la polarité (+ -).
Nettoyez la lentille de la télécommande située en haut de la télécommande.
Essayez de diriger directement la télécommande vers le téléviseur dans un rayon de 1,5 à
1,8
m.
●
●
●
Impossible de contrôler
l'alimentation ou le volume
du téléviseur avec la
télécommande du décodeur
câble/boîtier décodeur.
Programmez la télécommande du décodeur câble/boîtier décodeur pour faire fonctionner le
téléviseur. Consultez le manuel de l'utilisateur relatif au câble/satellite pour obtenir le code
du téléviseur SAMSUNG.
●
Message ‘Mode non pris en
charge’.
Vérifiez la résolution prise en charge du téléviseur et réglez la résolution de sortie du
périphérique externe en conséquence. Reportez-vous aux paramètres de résolution
indiqués dans ce manuel.
●
Odeur de plastique émise
par le téléviseur.
Cette odeur est normale et s'atténuera au fur et à mesure.
●
Informations de signal
du téléviseur n'est pas
disponible dans le menu
de test du diagnostic
automatique.
Cette fonction n'est disponible qu'avec des chaînes numériques avec connexion d'antenne
(RF/coaxial).
●
Le téléviseur penche vers la
droite ou la gauche.
Retirez la base du support du téléviseur et réassemblez-la.
●
Impossible d'assembler la
base du support.
Veillez à placer le téléviseur sur une surface plane. Si vous ne parvenez pas à retirer les vis
du téléviseur, utilisez un tournevis aimanté.
●
Le menu des chaînes est
grisé (non disponible).
Le menu Canal n’est disponible que si la source du téléviseur est sélectionnée.
●
Vos paramètres sont perdus
après 30 minutes ou à
chaque mise hors tension
du téléviseur.
Si le téléviseur est en mode Enr. démo, les paramètres de l'image et audio sont rétablis
toutes les 30 minutes. Remplacez le mode Enr. démo par le mode Util. domicile dans la
procédure Plug & Play. Appuyez sur le bouton SOURCE pour sélectionner le mode TV,
accédez à MENU → Configuration → Plug & Play → ENTER
E
.
●
Perte intermittente du signal
audio ou vidéo.
Vérifiez le raccordement des câbles ; raccordez-les au besoin.
Cette perte peut être provoquée par l'utilisation de câbles trop rigides ou épais. Veillez à
ce que les câbles soient suffisamment souples pour une utilisation à long terme. En cas
d'installation murale, nous vous recommandons d'utiliser des câbles avec des connecteurs
de 90
degrés.
●
●
Il se peut que vous voyiez
de petites particules si vous
regardez de près le bord du
cadre de l'écran du téléviseur.
Elles font partie de la conception du produit et ne constituent pas un défaut.
●
‘Signal brouillé’ ou ‘Aucun
signal/signal faible’ avec la
carte d’interface (CI/CI+)
CARD du CAM.
Vérifiez que la carte d'interface commune CI(CI+) CARD est installée dans le CAM dans la
fente de l'interface commune.
Tirez le CAM du téléviseur et insérez-le de nouveau dans la fente.
●
●
45 minutes après sa mise
hors tension, le téléviseur
s'allume.
Cela est normal car le téléviseur utilise la fonction de liaison radio (OTA) pour mettre à
niveau le microprogramme téléchargé pendant son utilisation.
●
Problème récurrent lié à
l'image/au son.
Vérifiez et changez le signal/la source.
●
Ce téléviseur LCD TFT est équipé d'un écran constitué de sous-pixels dont la fabrication nécessite une technologie
sophistiquée. Il se peut toutefois que des points clairs ou sombres apparaissent à l'écran. Ceux-ci n'ont aucune incidence sur
les performances du produit.
N
[620-Weuro]BN68-02326A-03L09.ind46 46 2009-10-08 ¿ÀÀü 9:28:28

Français - 47
Caractéristiques
Nom du modèle LE40B620 LE46B620
Taille de l'écran
(Diagonale)
40 pouces 46 pouces
Résolution du PC
(Optimale)
1920 x 1080 à 60 Hz 1920 x 1080 à 60 Hz
Son
(Sortie)
10 W X 2 10 W X 2
Dimensions (L x P x H)
Corps
Avec socle
1040 x 79 x 638 mm
1040 x 255 x 699 mm
1172 x 79 x 712 mm
1172 x 275 x 774 mm
Poids
Avec socle
19 kg 25 kg
Considérations environnementales
Température de fonctionnement
Humidité en cours de fonctionnement
Température de stockage
Humidité sur le lieu de stockage
10°C à 40°C (50°F à 104°F)
10% à 80%, sans condensation
-20°C à 45°C (-4°F à 113°F)
5 % à 95 %, sans condensation
Socle orientable
(gauche / droite)
-20˚ ~ 20˚
Nom du modèle LE52B620
Taille de l'écran
(Diagonale)
52 pouces
Résolution du PC
(Optimale)
1920 x 1080 à 60 Hz
Son
(Sortie)
10 W X 2
Dimensions (L x P x H)
Corps
Avec socle
1321 x 81 x 805 mm
1321 x 305 x 866 mm
Poids
Avec socle
32 kg
Considérations environnementales
Température de fonctionnement
Humidité en cours de fonctionnement
Température de stockage
Humidité sur le lieu de stockage
10°C à 40°C (50°F à 104°F)
10% à 80%, sans condensation
-20°C à 45°C (-4°F à 113°F)
5 % à 95 %, sans condensation
Socle orientable
(gauche / droite)
-20˚ ~ 20˚
La conception et les spécifications peuvent être modifiées sans préavis.
Ce périphérique est un appareil numérique de classe B.
Concernant l'alimentation et la consommation électrique, reportez-vous à l'étiquette apposée sur le produit.
¦
N
N
N
[620-Weuro]BN68-02326A-03L09.ind47 47 2009-10-08 ¿ÀÀü 9:28:28

Hinweis zu Digitalfernsehen
1. Die Funktionalitäten für Digital TV (DVB) stehen nur in Ländern/Regionen zur Verfügung, in denen digitale terrestrische DVB-
T-Signale (MPEG2 und MPEG4 AVC) gesendet werden oder in denen Sie Zugang zu einem kompatiblen Kabelfernsehdienst
mit DVB-C (MPEG2 und MPEG4 AAC) haben können. Fragen Sie Ihren örtlichen Händler, wenn Sie Informationen über die
Verfügbarkeit von DVB-T oder DVB-C in Ihrer Gegend benötigen.
2.
DVB-T ist der Standard des europäischen DVB-Konsortiums für die terrestrische Versorgung mit digitalem Fernsehen,
und DVB-C ist der Standard des Konsortiums für die Versorgung mit digitalem Kabelfernsehen. Allerdings werden manche
Unterscheidungsmerkmale wie EPG (elektrische Programmzeitschrift), VOD (Video on Demand) usw
. in dieser Spezifikation
nicht berücksichtigt. Deshalb können sie zum jetzigen Zeitpunkt noch nicht eingesetzt werden.
3.
Zwar hält dieses Fernsehgerät die aktuellen Standards der DVB-T- und DVB-C-Spezifikationen [Version August 2008] ein,
aber es kann nicht garantiert werden, dass die Kompatibilität mit zukünftigen digitalen terrestrischen DVB-T
und DBV-C-
Signalen gewahrt bleibt.
4. In Abhängigkeit von den Ländern/Regionen, in denen dieses Fernsehgerät eingesetzt wird, verlangen manche
Kabelfernsehanbieter zusätzliche Gebühren für solch einen Dienst, und möglicherweise wird verlangt, dass Sie den
Vertragsbedingungen des Unternehmens zustimmen.
5.
Manche Digitalfernsehfunktionen sind in einigen Ländern oder Regionen möglicherweise nicht verfügbar
, und bei DVB-C kann
das Gerät möglicherweise bei manchen Kabelfernsehanbietern nicht störungsfrei zusammenarbeiten.
6. Für weitere Informationen setzen Sie sich bitte mit dem SAMSUNG-Kundendienstzentrum in V
erbindung.
Vorsichtsmaßnahmen beim Anzeigen von Standbildern
Ein Standbild kann zu einer dauerhaften Beschädigung des Bildschirms führen.
Zeigen Sie Standbilder und teilweise unbewegte Bilder nicht länger als 2 Stunden auf dem LCD-Bildschirm an, da das Bild auf
diese Weise einbrennen kann. Das Einbrennen von Standbildern wird auch als ‘Bildkonservierung’ bezeichnet. Sie können
das Einbrennen vermeiden, indem Sie die Helligkeit und den Kontrast des Bildschirms beim
Anzeigen von Standbildern
verringern.
Der Betrieb des LCD-Monitors im Format 4:3 für einen längeren Zeitraum kann links, rechts und in der Mitte
des Monitors Spuren der Bildränder hinterlassen, die durch die unterschiedliche Lichtemission auf dem
Monitor verursacht werden. DVD- oder Spielekonsole-Wiedergabe können einen ähnlichen Ef
fekt
verursachen. Schäden, die durch die o. g. Effekte verursacht wurden, fallen nicht unter die Garantie.
Durch das Anzeigen der Standbilder von Videospielen oder vom PC über einen gewissen Zeitraum hinaus können partielle
Nachbilder entstehen. Um diesen Effekt zu verhindern, verringern Sie Helligkeit und Kontrast, wenn Sie Standbilder anzeigen
möchten.
© 2009 Samsung Electronics Co., Ltd. Alle Rechte vorbehalten.
❑
❑
●
●
●
Die Abbildungen und Illustrationen in diesem Handbuch dienen nur zur Information und können vom tatsächlichen Aussehen des
Geräts abweichen.
Änderungen an Ausführung und technischen Daten vorbehalten.
[620-Weuro]BN68-02326A-03L09.ind1 1 2009-10-08 ¿ÀÀü 9:28:28

Deutsch - 1
Lizenz
TruSurround HD, SRS und das Symbol sind eingetragene Marken von SRS Labs, Inc.
Die TruSurround HD-Technologie wird unter Lizenz von SRS Labs, Inc. in das System integriert.
Hergestellt unter Lizenz der Dolby Laboratories: Dolby sowie das Doppel-D-Symbol sind Warenzeichen der
Dolby Laboratories.
Symbol
N O T
Hinweis Zielwahltaste TOOLS-Taste Drücken
❑
❑
EINRICHTEN IHRES FERNSEHGERÄTS
Bedienfeld .......................................................................................... 2
Zubehör ............................................................................................. 3
Anschlussfeld .................................................................................... 4
Fernbedienung .................................................................................. 6
Batterien in die Fernbedienung einsetzen ......................................... 7
Anzeigen von Menüs ......................................................................... 7
Fernsehgerät in den Standby-Modus schalten .................................. 8
Plug & Play-Funktion (je nach Modell) .............................................. 8
Anzeigen des Bildschirmmenüs ........................................................ 9
KANAL
Kanalmenü ........................................................................................ 9
Verwalten von Kanälen ................................................................... 12
BILD
Kongurieren des Bildmenüs ........................................................... 14
Verwenden Ihres Computers als Computerbildschirm (PC) ............ 18
Fernsehgerät mithilfe des PCs einstellen ........................................ 19
SOUND
Kongurieren des Tonmenüs ........................................................... 20
Tonmodus wählen ............................................................................ 21
EINSTELLUNGEN
Kongurieren der Menüeinstellungen .............................................. 22
Einstellen der Uhrzeit ...................................................................... 24
G
Menü Eingang ................................................................................. 26
Menü Unterstützung ........................................................................ 26
MEDIENWIEDERGABE (USB & DLNA)
Anschließen eines USB-Geräts ....................................................... 28
Media Play funktion ......................................................................... 29
Menü der Optionen für Fotolisten .................................................... 30
Anzeigen eines Fotos oder einer Diashow ...................................... 31
Menü der Optionen für Diashows .................................................... 32
Menü der Optionen für Fotolisten .................................................... 33
Wiedergeben von Musik .................................................................. 34
Menü der Optionen für die Musikwiedergabe .................................. 35
Verwenden des Menüs Einstellungen ............................................. 35
■
■
■
■
■
■
■
■
■
■
■
■
■
■
■
■
■
■
■
■
■
■
■
■
■
■
■
■
■
ANYNET
+
Anschließen von Anynet
+
-Geräten .................................................. 36
Einrichten von Anynet
+
.................................................................... 37
Wechseln zwischen von Anynet
+
-Geräten ...................................... 37
Aufnahme ........................................................................................ 38
Wiedergabe über einen Receiver (Heimkinosystem) ...................... 38
Fehlerbehebung für Anynet
+
........................................................... 39
EMPFEHLUNGEN
Videotextfunktion ............................................................................. 40
Anbringen des Standfußes .............................................................. 41
Lösen des Standfußes ..................................................................... 42
Anbringen der Wandhalterung ......................................................... 42
Verlegen der Kabel .......................................................................... 42
Kensington-Schloss als Diebstahlsicherung .................................... 42
Absichern des Einbaubereichs ........................................................ 43
Befestigen des Fernsehgeräts an der Wand ................................... 43
Fehlerbehebung .............................................................................. 44
Technische Daten ............................................................................ 47
■
■
■
■
■
■
■
■
■
■
■
■
■
■
■
■
INHALT
Deutsch
[620-Weuro]BN68-02326A-03L09.ind1 1 2009-10-08 ¿ÀÀü 9:28:29

Deutsch - 2
EINRICHTEN IHRES FERNSEHGERÄTS
Bedienfeld
Form und Farbe des Geräts können sich je nach Modell unterscheiden.
Die Tasten auf der Frontblende können Sie durch Berühren mit einem Finger bedienen.
1
P
(Versorgung): Drücken Sie diese Taste, um das Fernsehgerät ein- und auszuschalten.
2
BETRIEBSANZEIGE: Beim Einschalten des Fernsehgeräts blinkt die Netzleuchte kurz und erlischt anschließend. Im
Standbymodus leuchtet die Anzeige permanent.
3
z
: Hiermit wechseln Sie den Kanal. Im Bildschirmmenü können Sie die
z
-Schaltflächen wie die Tasten
▼ und ▲ auf der Fernbedienung verwenden.
4
Y
: Hiermit erhöhen oder verringern Sie die Lautstärke.
Im Bildschirmmenü können Sie die
Y
-Schaltflächen wie die Tasten ◄ und ► auf der Fernbedienung verwenden.
5
MENU: Drücken Sie diese Taste, um ein Bildschirmmenü zu den Funktionen Ihres Fernsehgeräts einzublenden.
6
SOURCE
E
: Schaltet zwischen allen verfügbaren Signalquellen um. Im Bildschirmmenü können Sie diese Taste wie die
Eingabetaste (ENTER
E
) auf der Fernbedienung verwenden.
7
FERNBEDIENUNGSSENSOR: Richten Sie die Fernbedienung auf diesen Sensor am Fernsehgerät.
8
LAUTSPRECHER
¦
N
N
6
5
4
3
2
1
87
8
[620-Weuro]BN68-02326A-03L09.ind2 2 2009-10-08 ¿ÀÀü 9:28:29

Deutsch - 3
Zubehör
Fernbedienung und 2 Batterien
(Typ AAA)
Netzkabel Untere Abdeckung
Garantiekarte / Sicherheitshinweise
(nicht überall verfügbar)
Reinigungstuch
Kabelschlauch
(je nach Modell)
● Bedienungsanleitung
Überprüfen Sie die Verpackung Ihres LCD-Fernsehgeräts auf Vollständigkeit. Falls Komponenten fehlen sollten, setzen Sie
sich bitte mit Ihrem Händler in Verbindung.
Die Farbe und die Form der Teile kann je nach Modell unterschiedlich sein.
¦
N
N
[620-Weuro]BN68-02326A-03L09.ind3 3 2009-10-08 ¿ÀÀü 9:28:30

Deutsch - 4
Anschlussfeld
Form und Farbe des Geräts können sich je nach Modell unterscheiden.
1 COMPONENT IN
Zum Anschließen mit Component-Video / -Audio.
2 HDMI IN 1, 2, 3(DVI), 4 / DVI
AUDIO IN
Zum Anschließen an die HDMI-Buchse von Geräten mit HDMI-Ausgang.
Beim Anschluss von Geräten über HDMI-Schnittstelle ist keine zusätzliche Audioverbindung erforderlich.
Was ist HDMI?
HDMI (High-Definition Multimedia Interface) ist eine digitale Schnittstelle, die die Übertragung von digitalen Bild- und
Tonsignalen über ein einziges Kabel ermöglicht.
Der Unterschied zwischen HDMI und DVI besteht darin, dass HDMI-Geräte kleiner als DVI-Geräte sind.
Bei dem Fernsehgerät erfolgt u. U. keine Tonausgabe und das Fernsehbild weist evtl. anormale Farben auf, wenn DVD-
oder Blu-Ray-Player bzw. Kabel- oder Satellitenreceiver (Set-Top-Box) angeschlossen werden, die HDMI-Versionen vor 1.3
unterstützen. Beim Anschluss eines älteren HDMI-Kabels und fehlender Tonausgabe schließen Sie das HDMI-Kabel an den
HDMI IN 3(DVI)-Abschluss und die Audiokabel an die DVI AUDIO IN-Anschlüsse auf der Rückseite des Fernsehgeräts an. Wenn
dies passiert, wenden Sie sich an die Firma, die Ihnen den DVD- oder Blu-Ray-Player bzw. den Kabel- oder Satellitenreceiver
geliefert hat, um die HDMI-Version bestätigen zu lassen. Anschließend fordern Sie ein nötigenfalls Upgrade an.
Verwenden Sie den HDMI IN 3(DVI)-Anschluss für DVI-Verbindungen mit einem externen Gerät. Verwenden Sie ein DVI-
HDMI-Kabel oder einen DVI-HDMI-Adapter (DVI auf HDMI) für den Videoanschluss und die DVI AUDIO IN-Anschlüsse
für die Audioverbindung. Eine Verbindung über HDMI/DVI-Kabel kann nur über den HDMI IN 3(DVI)-Anschluss erfolgen.
HDMI-Kabel für andere Versionen als 1.3 können störendes Flackern des Bildschirms verursachen oder zum völligen
Ausfall des Fernsehgeräts führen.
3 PC IN [PC] / [AUDIO]
Zum Anschließen an den Video- und Audioausgang Ihres Computers
Wenn Ihr PC die Möglichkeit für HDMI-Verbindungen bietet, können Sie diesen Anschluss mit den HDMI IN 1, 2, 3(DVI)
oder 4-Buchsen verbinden.
Wenn Ihr PC die Möglichkeit für DVI-Verbindungen bietet, können Sie diesen Anschluss mit der HDMI IN 3(DVI) / DVI
AUDIO IN-Buchse verbinden.
4 ANT IN
Anschluss an eine Antenne oder eine Kabelfernsehanlage.
5 KENSINGT
ON-SCHLOSS (modellabhängig)
Das (optionale) Kensington-Schloss dient zur Sicherung des Fernsehgeräts bei Verwendung an einem öf
fentlichen Ort. Wenn
Sie ein Schloss verwenden möchten, wenden Sie sich an den Händler, bei dem Sie das Fernsehgerät erworben haben.
Die Position des Kensington-Schlosses ist modellabhängig.
¦
N
N
N
N
N
N
N
N
N
7890 6 5
@
2
#
!
21 34
[Seitenverkleidung des
Fernsehgeräts]
[Rückseite des Fernsehgeräts]
Netzanschluss
[620-Weuro]BN68-02326A-03L09.ind4 4 2009-10-08 ¿ÀÀü 9:28:30

Deutsch - 5
6
H
(KOPFHÖRER)
Kopfhörer können an den Kopfhörerausgang des Geräts angeschlossen werden. W
enn Kopfhörer angeschlossen sind, ist die
Tonwiedergabe über die eingebauten Lautsprecher abgeschaltet.
Wenn Sie Kopfhörer an das Fernsehgerät anschließen, sind die Möglichkeiten zur Nutzung der Tonfunktion
eingeschränkt.
Das Verwenden von Kopfhörern bei hoher Lautstärke über einen längeren Zeitraum kann zu Hörschäden führen.
Wenn Sie Kopfhörer an das Fernsehgerät anschließen, wird über die Lautsprecher kein Ton ausgegeben.
Die Lautstärke der Kopfhörer und des Fernsehgeräts werden getrennt geregelt.
7 DIGIT
AL AUDIO OUT (OPTICAL)
Anschluss für ein Digitalaudio-Gerät wie z. B. ein Heimkinosystem.
Ein Digital Audio-System ist mit dem DIGITAL AUDIO OUT (OPTICAL)-Anschluss verbunden: Vermindern Sie die
Lautstärke des Fernsehers und stellen Sie die Lautstärke mit dem Lautstärkeregler des Systems ein.
5.1-Kanalton ist möglich, wenn das Fernsehgerät an ein externes Gerät angeschlossen ist, das 5.1-Kanalton unterstützt.
Wenn der Receiver (Heimkinosystem) angeschaltet ist, können Sie den Ton so hören, wie er vom optischen Ausgang der
Fernsehgeräts zur Verfügung gestellt wird. Wenn das Fernsehgerät ein (terrestrisches) DTV-Signal anzeigt, überträgt das
Fernsehgerät 5.1-Kanalton an den Receiver des Heimkinosystems. Wenn es sich bei der Signalquelle um eine digitale
Komponente wie beispielsweise einen DVD- oder Blu-Ray-Player bzw. einen Kabe
l- oder Satellitenreceiver (Set-Top-Box)
handelt, der über HDMI an das Fernsehgerät angeschlossen ist, kann der Receiver des Heimkinosystems nur 2-Kanalton
wiedergeben. Wenn Sie 5.1-Kanalton wünschen, müssen Sie den digitalen Ausdioausgang am DVD- oder Blu-Ray-Player
bzw. Kabel- oder Satellitenreceiver (Set-Top-Box) direkt an einen Verstärker oder ein Heimkinosystem anschließen und
nicht an das Fernsehgerät.
8 SER
VICE
Anschluss nur für Servicezwecke
9 AUDIO OUT [R-AUDIO-L]
Zum Anschließen an die Audioeingänge Ihres Verstärker-/Heimkinosystems.
Ein Audioverstärker ist mit den AUDIO OUT [R-AUDIO-L]-Anschlüssen verbunden: Vermindern Sie die Lautstärke des
Fernsehers und stellen Sie die Lautstärke mit dem Lautstärkeregler des Verstärkers ein.
0 EXT1, 2
Ein- und
Ausgänge für externe Geräte wie z. B. Videorecorder, DVD-Player, Spielekonsolen oder Video-Disc-Player.
Im EXT-Modus unterstützt DTV Out nur MPEG SD-Video und -Audio.
Anschlussmöglichkeiten
Anschluss
Eingang Ausgang
Video Audio (L/R) RGB Video + Audio (L/R)
EXT 1 O O O Nur TV- oder DTV-Ausgang verfügbar.
EXT 2 O O X Ausgang frei wählbar.
! A
V IN [VIDEO] / [R-AUDIO-L]
Video- und Audioeingänge für externe Geräte wie z. B. Camcorder oder Videorecorder.
@ USB
Anschluss für Softwareaktualisierungen und Media Play, usw.
# COMMON INTERF
ACE-Steckplatz
Ohne eingelegte “CI(CI+)-Karte” zeigt das Fernsehgerät auf einigen Kanälen ‘Gestörtes Signal’
an.
Die Verbindungsinformationen mit Telefonnummer, Kennung der CI(CI+)-Kartenkennung, Hostkennung und anderen
Angaben wird nach ungefähr 2 bis 3 Minuten angezeigt. Wenn eine Fehlermeldung angezeigt wird, wenden Sie sich bitte
an Ihren Dienstanbieter.
Wenn die Konfiguration der Kanalinformationen abgeschlossen ist, wird die Meldung ‘Udating Completed’ angezeigt. Dies
bedeutet, dass die Kanalliste aktualisiert wurde.
Wenn Sie die CI-Karte wieder einsetzen, wird, je nach Modell, eine Meldung angezeigt, in der Sie das Kennwort für die
Sicherungsstufe eingeben sollen.
Selbst wenn die Sicherungsstufe auf Alle zul. eingestellt ist, wird bei manchen Modellen eine Meldung angezeigt, damit
Sie für Erwachsenenprogramme (ab 18 Jahren) das Kennwort eingeben.
Sie müssen die CI(CI+)-Karte bei einem der örtlichen Kabelnetzbetreiber erwerben. Ziehen Sie die CI(CI+)-Karte
vorsichtig mit den Händen heraus. Sie könnte beim Herunterfallen ansonsten beschädigt werden.
Die Richtung, in der Sie die CI(CI+)Karte einlegen müssen, ist darauf mit einem Pfeil markiert.
Die Position des COMMON INTERFACE-Steckplatzes ist modellabhängig.
CI(CI+)-Karten werden in einigen Ländern, Regionen und von manchen Sendern nicht unterstützt. Fragen Sie
diesbezüglich Ihren offiziellen Händler.
Die CI+-Funktion steht nur im Modell LE********P zur Verfügung.
Bei Problemen wenden Sie sich an den Dienstanbieter.
N
N
N
N
N
N
N
N
–
–
N
N
N
N
N
[620-Weuro]BN68-02326A-03L09.ind5 5 2009-10-08 ¿ÀÀü 9:28:30

Deutsch - 6
Fernbedienung
Die Reichweite der Fernbedienung beträgt ca. 7 m.
Die Leistungsfähigkeit der Fernbedienung kann durch starke Lichteinstrahlung beeinträchtigt werden.
Form und Farbe des Geräts können sich je nach Modell unterscheiden.
1
POWER: Ein- und Ausschalten
des Fernsehgeräts.
2
ZIFFERNTASTEN: Hiermit
wechseln Sie den Kanal.
3
FAV.CH: Zum Anzeigen von
Favorit Kanallisten auf dem
Bildschirm.
4
Y
: Hiermit erhöhen oder
verringern Sie die Lautstärke.
5
SOURCE: Hiermit können
Sie alle verfügbaren
Videosignalquellen anzeigen und
auswählen.
6
INFO: Hiermit können Sie
Informationen auf dem
Fernsehschirm anzeigen.
7
TOOLS: Hiermit können Sie
häufig verwendete Funktionen
schnell auswählen.
8
CH LIST: Zum Anzeigen von
Kanallisten auf dem Bildschirm.
9
FARBTASTEN: Verwenden Sie
diese Tasten bei der Arbeit im
Menü Senderliste, Media Play
usw.
!
DUAL: Auswahl von Toneffekten
@
Verwenden Sie diese Tasten
bei der Arbeit mit Media Play
und Anynet
+
. (
∏
: Mit dieser
Fernbedienung können Sie
die Aufnahmen von Samsung-
Rekordern mit der Anynet
+
-
Funktion fernsteuern.
#
TV: Hiermit können Sie den TV-
Modus direkt aufrufen.
$
PRE-CH: Hiermit können Sie
zum zuletzt angezeigten Kanal
wechseln.
%
MUTE
M
: Drücken Sie
diese Taste, um den Ton
vorübergehend auszuschalten.
^
>
P
<
: Hiermit wechseln Sie
den Kanal.
&
MENU: Hiermit zeigen Sie das
Bildschirmmenü an.
*
GUIDE: Hiermit zeigen Sie den
elektronischen Programmführer
(EPG) an.
(
RETURN: Hiermit wechseln Sie
zurück zum vorherigen Menü
)
E
:
Auswählen von Optionen im
Bildschirmmenü und Ändern von
Menüwerten.
a
EXIT: Drücken Sie diese Taste,
um das Menü zu verlassen.
b
P.SIZE: Auswahl der Bildgröße.
c
MEDIA.P: Hiermit können
Sie Musikdateien und Bilder
abspielen bzw. anzeigen.
d
SUBT.: Mit dieser Taste können
Sie Untertitel anzeigen
e
AD: Auswahl der Audio-
Beschreibung.
Videotextfunktionen
5
0
: Videotext-Modus auswählen
(LIST / FLOF)
6
5
: Verborgenen Inhalt
einblenden
7
4
: Videotextgröße auswählen.
8
8
: Videotextseite speichern
9
Fastext-Thema auswählen
0
/
: Nacheinander Videotext,
Double oder Mix auswählen.
#
:
: Videotext beenden
$
1
: Untergeordnete
Videotextseite
^
2
: Nächste Videotextseite
3
: Vorige Videotextseite
&
6:
Teletext index
(
9:
Nicht umblättern
a
7:
Teletext abbrechen
¦
N
N
N
INFO
C
H
L
I
S
T
AD
1 #
$
^
*
(
)
a
b
c
e
d
%
&
2
3
4
5
6
7
8
9
0
!
@
[620-Weuro]BN68-02326A-03L09.ind6 6 2009-10-08 ¿ÀÀü 9:28:30

Deutsch - 7
Batterien in die Fernbedienung einsetzen
1. Heben Sie die Abdeckung auf der Rückseite der Fernbedienung an, wie in der Abbildung
dargestellt.
2. Legen Sie zwei AAA-Batterien ein.
Achten Sie darauf, dass die Pole der Batterien wie im Batteriefach angezeigt
ausgerichtet sind.
3.
Schieben Sie die Abdeckung wieder auf die Fernbedienung.
Wenn die Fernbedienung für einen längeren Zeitraum nicht verwendet wird, nehmen Sie die Batterien heraus, und lagern
Sie sie an einem kühlen, trockenen Ort. (Bei normaler Nutzung der Fernbedienung halten die Batterien ungefähr ein Jahr.)
Sollte die Fernbedienung nicht funktionieren, überprüfen Sie Folgendes:
Ist das Fernsehgerät eingeschaltet?
Wurden Plus- und Minuspol der Batterien vertauscht?
Sind die Batterien leer?
Liegt ein Stromausfall vor oder ist das Netzkabel des Fernsehgeräts nicht eingesteckt?
Befindet sich eine Leuch tstoffröhre oder ein Neonschild in der Nähe?
BEDIENUNG
Anzeigen von Menüs
Vor dem ersten Einsatz des Fernsehgeräts führen Sie die folgenden Schritte aus, um zu erfahren, wie Sie im Menü navigieren, um
die verschiedenen Funktionen auszuwählen und einzustellen.
Bedienung des Bildschirmmenüs (OSD)
Die Zugriffsmethoden können in Abhängigkeit vom jeweiligen Menü variieren.
1. Drücken Sie die Taste MENU.
2.
Das Hauptmenü wird auf dem Bildschirm angezeigt. Links im Menü sind Symbole zu
sehen: Bild, Ton, Kanal, Einrichtung, Eingang, Anwendung, Unterstützung.
3. Wählen Sie mit den Tasten ▲ oder ▼ eines der Symbole aus.
4.
Drücken Sie die ENTER
E
Taste, um in das Untermenü des jeweiligen Symbols zu
wechseln.
5.
Wählen Sie mit den Tasten ▲ oder ▼ eines der Untermenüs aus.
6.
Erhöhen oder verringern Sie mit den Tasten ◄ oder ► den Wert für ein bestimmtes
Element. Die Methoden zum Anpassen der Werte im Bildschirmmenü können in
Abhängigkeit vom jeweiligen Menü variieren.
7
. Drücken Sie die Taste ENTER
E
, um die Konfiguration abzuschließen. Zum Beenden
drücken Sie die Taste EXIT.
¦
N
N
N
¦
❑
INFO
AD
MENU-Taste
Bildschirmmenü anzeigen.
ENTER
E
/ NAVIGATIONS-Taste
Cursor bewegen und Elemente
auswählen. Markiertes Element
auswählen. Einstellung bestätigen.
RETURN-Taste
Zurück zum vorherigen Menü.
EXIT
Bildschirmmenü schließen.
INFO
AD
INFO
AD
Modus :Standard ▶
Hinter.Licht :7
Kontrast :95
Helligkeit :45
Schärfe :50
Farbe :50
Farbton(G/R) :G50/R50
ErweiterteEinstellungen
Bild
Modus :Standard
Hinter.Licht :7 ▶
Kontrast :95
Helligkeit :45
Schärfe :50
Farbe :50
Farbton(G/R) :G50/R50
ErweiterteEinstellungen
Bildoptionen
Bild
7
U
Verschieben
L
Einstellen
E
Eingeben
R
Zurück
▲
Hintergrund
▼
Hilfesymbol
[620-Weuro]BN68-02326A-03L09.ind7 7 2009-10-08 ¿ÀÀü 9:28:31

Deutsch - 8
Fernsehgerät in den Standby-Modus schalten
Um den Stromverbrauchs zu senken, kann das Gerät in den Standby-Modus geschaltet werden. Der Standby-Modus ist nützlich,
wenn Sie das Gerät vorübergehend ausschalten möchten (z. B. während einer Mahlzeit).
1.
Drücken Sie die Taste POWER
P
auf der Fernbedienung drücken.
Der Bildschirm wird ausgeschaltet, und auf der Vorderseite des Fernsehgeräts leuchtet die Standby-Anzeige auf.
2.
Drücken Sie einfach erneut die Taste POWER
P
, um das Gerät wieder einzuschalten.
Der Standby-Modus ist nicht für längere Phasen der Abwesenheit gedacht (z. B. wenn Sie verreist sind). Ziehen Sie dann
sicherheitshalber den Netzstecker und das Antennenkabel.
Plug & Play-Funktion (je nach Modell)
Wenn das Fernsehgerät zum ersten Mal eingeschaltet wird, werden automatisch die
Grundeinstellungen vorgenommen.
1. Drücken Sie die Taste POWER auf der Fernbedienung.
Sie können auch die Netztaste (POWER
P
) des Fernsehgeräts verwenden.
Die Meldung Select the OSD Language. wird angezeigt.
2.
Drücken Sie die Taste ENTER
E
. Wählen Sie die gewünschte Sprache mit den Tasten
▲ oder ▼ aus. Drücken Sie die Taste ENTER
E
, um Ihre Auswahl zu bestätigen.
3. Wählen Sie durch Drücken der Tasten ◄ oder ► die Option Shop Demo oder
Privatgebrauch, und drücken Sie dann auf ENTER
E
.
Wir empfehlen Ihnen, das Fernsehgerät im Modus Privatgebrauch zu verwenden,
um das optimale Bild für den Privatgebrauch zu erzielen.
Shop Demo ist nur geeignet, wenn das Gerät in einem Verkaufsbereich verwendet wird.
Wenn das Gerät versehentlich auf den Modus Shop Demo eingestellt wird, und Sie möchten wieder zurück zu
Privatgebrauch (Standard) wechseln, gehen Sie so vor: Drücken Sie die Lautstärketaste am Fernsehgerät. W
enn das
Menü "Volume" angezeigt wird, halten Sie die Taste MENU am Fernsehgerät 5 Sekunden lang gedrückt.
4. Drücken Sie die Taste ENTER
E
. Wählen Sie das gewünschte Land mit der Taste ▲ oder ▼ aus. Drücken Sie die Taste
ENTER
E
, um Ihre Auswahl zu bestätigen.
Nachdem Sie im Menü Land das Land eingestellt haben, werden Sie bei manchen Modellen anschließend aufgefordert,
die PIN-Nummer einzurichten.
Die Ziffernkombination 0-0-0-0 dürfen Sie als PIN-Nummer nicht eingeben.
5.
Wählen Sie durch Drücken der Tasten ▲ oder ▼ die Option Antenne oder Kabel, und drücken Sie dann die Taste
ENTER
E
.
Antenne: Terrestrisches Antennensignal.
Kabel: Kabelgebundenes Antennensignal.
6.
Wählen Sie durch Drücken der Tasten ▲ oder ▼ die Signalquelle aus, die gespeichert werden soll. Drücken Sie die Taste
ENTER
E
, um Start auszuwählen.
Wenn Sie das Antennensignal auf Kabel einstellen, können Sie im nächsten Schritt einen Wert für die Suche nach
Digitalkanälen eingeben. Weitere Informationen hierzu finden Sie unter
.
Digital und Analog: Digitale und analoge Kanäle.
Digital: Digitaler Sender
Analog: Analog Sender
Die Kanalsuche wird automatisch gestartet und beendet.
Zum Unterbrechen des Speichervorgangs zu einem beliebigen Zeitpunkt drücken Sie die
Taste ENTER
E
.
Wenn Sie alle verfügbaren Kanäle gespeichert haben, wird die Meldung Uhrmodus einstellen angezeigt.
7
.
Drücken Sie die Taste ENTERE. Wählen Sie durch Drücken der Tasten ▲ oder ▼ die Option Auto, und drücken Sie dann die Taste ENTERE.
Wenn Sie Manuell wählen, wird Datum und Uhrzeit einstellen angezeigt.
Wenn Sie ein digitales Signal empfangen, wird die Zeit automatisch eingestellt. Anderenfalls wählen Sie Manuell, um die Uhr zu stellen.
8
. Die Beschreibung der Verbindungsmethode für optimale HD-Bildqualität wird angezeigt. Lesen Sie die Beschreibung und
drücken Sie die Taste ENTER
E
.
9. Die Meldung Gute Fernsehunterhaltung! wird angezeigt. Drücken Sie abschließend die Taste ENTER
E
.
So setzen Sie diese Funktion zurück:
1. Drücken Sie die Taste MENU, um das Menü anzuzeigen. Wählen Sie durch Drücken der
Tasten ▲ oder ▼ die Option Einstellungen, und drücken Sie dann die Taste ENTER
E
.
2. Drücken Sie die Taste ENTER
E
erneut, um Plug & Play auszuwählen.
3.
Geben Sie nun Ihre vierstellige PIN ein. Der Standard-PIN-Code eines neuen Fernsehgeräts lautet ‘0-0-0-0’.
Wenn Sie die PIN ändern möchten, verwenden Sie die Funktion PIN ändern.
Die Plug & Play-Funktion gibt es nur im TV-Modus.
¦
N
N
¦
N
N
N
N
N
N
N
N
N
N
N
N
N
N
N
N
N
N
INFO
AD
SelecttheOSDLanguage.
MenuLanguage :English ▶
E
Enter
Plug&Play
Plug&Play ▶
Menüsprache :Deutsch
Zeit
Sendungsoptionen
Sicherheit
Allgemein
Einstellungen
[620-Weuro]BN68-02326A-03L09.ind8 8 2009-10-08 ¿ÀÀü 9:28:31

Deutsch - 9
Anzeigen des Bildschirmmenüs
Auf dem Bildschirm werden der aktuelle Kanal und bestimmte Audio/Video-Einstellungen
angezeigt.
Drücken Sie die Taste INFO, um Informationen anzuzeigen.
Drücken Sie die Taste INFO auf der Fernbedienung. Auf dem Bildschirm werden der
Kanal, der Tonmodus sowie die Werte bestimmter Bild- und Toneinstellungen angezeigt.
▲, ▼: Sie können Informationen anderer Kanäle anzeigen. Wenn Sie zum
ausgewählten Sender wechseln möchten, drücken Sie auf die ENTER
E
-Taste.
◄, ►: Sie können die Informationen zum aktuellen Programm dieses Senders
anzeigen.
Drücken Sie noch einmal auf die INFO-Taste und warten Sie ca. 10 Sekunden lang,
bis die Informationen automatisch angezeigt werden.
KANAL
Kanalmenü
Land
Analog Sender
Sie können das Land für Analogsender ändern.
Digitaler Sender
Sie können das Land für Digitalsender ändern.
Der Eingabebildschirm für die PIN wird geöffnet. Geben Sie nun Ihre vierstellige PIN ein.
Autom. speichern
Sie können den verfügbaren Frequenzbereich nach Sendern durchsuchen (verfügbare Sender und Frequenzbereiche sind vom
jeweiligen Land abhängig). Die automatisch zugewiesenen Programmplätze entsprechen unter Umständen nicht den gewünschten
Programmplätzen.
Wenn ein Kanal mit der Funktion Kindersicherung gesperrt wurde, wird das Eingabefenster für die PIN geöffnet.
Antenne / Kabel
Antennensignal zum Speichern auswählen
Digital und Analog: Digitale und analoge Kanäle.
Digital: Digitaler Sender
Analog: Analog Sender
Bei Auswahl von ‘ oder ‘
Wert für die Suche nach Kabelkanälen eingeben.
Schnell
Network ID: Anzeigen der Netzwerkkennung.
Frequenz: Hiermit zeigen Sie die Frequenz des Kanals an. (Je nach Land unterschiedlich)
Modulation: Hiermit zeigen Sie die verfügbaren Modulationswerte an.
Symbolrate: Hiermit zeigen Sie die verfügbaren Symbolraten an.
Das Fernsehgerät durchsucht automatisch alle Kanäle mit aktiven Sendern und speichert sie im Speicher des Fernsehgeräts.
Wenn Sie die automatische Speicherung anhalten möchten, drücken Sie auf ENTER
E
.
Die Meldung Automatische Senderspeicherung beenden? wird angezeigt.
Drücken Sie die Taste ◄ oder ►, um Ja auszuwählen, und drücken Sie dann die Taste ENTER
E
.
¦
O
●
●
N
¦
❑
■
■
N
❑
N
■
●
●
●
●
N
N
N
Land ▶
Autom.speichern
Sendermanuellspeichern
SuchoptionenfürKabe
Ausführlich
Übersicht
Standard :
Ausführlich
Senderliste
Kanal
INFO
AD
DTV Air
15
abc1
18:00 ~ 6:00
18:11 Thu 6 Jan
Life On Venus Avenue
Unclassified
No Detaild Information
' Information
[620-Weuro]BN68-02326A-03L09.ind9 9 2009-10-08 ¿ÀÀü 9:28:31

Deutsch - 10
Sender manuell speichern
Hiermit wird manuell ein Sender gesucht und dieser im Fernsehspeicher abgelegt.
Wenn ein Kanal mit der Funktion Kindersicherung gesperrt wurde, wird das Eingabefenster für die PIN geöffnet.
Digitaler Sender
Zum manuellen Speichern von digitalen Sendern.
Digitaler Sender ist nur im DTV-Modus verfügbar.
Kanal: Stellen Sie die Kanalnummer mit den Tasten ▲, ▼ oder einer Zifferntaste (0~9) ein.
Frequenz: Stellen Sie die Frequenz mithilfe der Zifferntasten ein.
Bandbreite: Einstellen der Bandbreite mit den Tasten ▲, ▼ oder einer Zifferntaste (0~9).
Nach Abschluss des Suchlaufs werden die Kanäle in der Kanalliste aktualisiert.
Analog Sender
Zum manuellen Speichern von analogen Sendern.
Programm (der Programmplatz, der dem Sender zugewiesen werden soll) Stellen Sie den Programmplatz mit den
Tasten ▲,
▼ oder einer Zifferntaste (0~9) ein.
: Einstellen der Fernsehnorm mithilfe der Taste ▲ oder ▼.
: Einstellen des Tonsystems mithilfe der Taste ▲ oder ▼.
Kanal (Wenn Ihnen die Nummer des zu speichernden Senders bekannt ist) Wählen Sie durch Drücken der Tasten
▲ oder ▼ die Option C (terrestrischer Kanal) oder S (Kabelkanal). Drücken Sie die Taste ►, und drücken Sie dann die Tasten
▲, ▼ oder eine Zifferntaste (0~9) , um die gewünschte Nummer auszuwählen.
Die Kanalnummer können Sie auch direkt durch Drücken der Zifferntasten (0~9) auswählen.
Falls kein oder nur schlechter Ton zu hören sein sollte, wählen Sie einen anderen Audiostandard aus.
Suchlauf (Wenn Ihnen die Kanalnummern nicht bekannt sind): Drücken Sie zum Starten des Suchlaufs die Taste ▲ oder ▼.
Der Tuner durchsucht den Frequenzbereich, bis der erste Sender bzw. der ausgewählte Sender empfangen wird.
Speich (Zum Speichern des Kanals und des zugehörigen Programmplatzes): Drücken Sie die
Taste ENTER
E
, um OK zu
wählen.
Kanalmodus
P (Programm-Modus): Nach Abschluss der Einstellungen sind den Sendern Ihrer Region Plätze mit den Nummern von
P00 bis P99 zugewiesen worden. In diesem Modus können Sie Sender durch Eingabe des Programmplatzes auswählen.
C (Antennenempfangsmodus): In diesem Modus können Sie Kanäle durch Eingabe der Nummer anwählen, die jedem
Antennensender zugeordnet ist.
S (Kabelkanal-Modus): In diesem Modus können Sie Sender durch Eingabe der Nummer anwählen, die jedem
Kabelsender zugeordnet ist.
Suchoptionen für Kabel (je nach Land)
Einstellen weiterer Suchoptionen für die Kanalsuche im Kabelnetz (z. B. Frequenz oder Symbolrate).
Startfrequenz (Startfrequenz): Einstellen der Startfrequenz (je nach Land unterschiedlich).
Stoppfrequenz (Stoppfrequenz): Einstellen der Stoppfrequenz (je nach Land unterschiedlich).
Modulation: Hiermit zeigen Sie die verfügbaren Modulationswerte an.
Symbolrate: Hiermit zeigen Sie die verfügbaren Symbolraten an.
Die Informationen des elektronischen Programmführers werden von den Sendern zur Verfügung gestellt. Es kann sein, dass
Programmeinträge leer oder veraltet sind. Dies ist auf die für einen bestimmten Kanal übertragenen Informationen zurückzuführen.
Die Anzeige wird dynamisch aktualisiert, sobald neue Informationen verfügbar sind.
Sie können das Programmführermenü auch durch Drücken der Taste GUIDE aufrufen. (Weitere Informationen zum
Konfigurieren des Standard finden Sie bei den entsprechenden Beschreibungen.)
Ausführlich
Hier werden die Programminformationen in einem Zeitplan mit einer Unterteilung von jeweils 1 Stunde angezeigt. Es wird ein
Zeitfenster von 2 Stunden mit Programminformationen angezeigt. Dieses Fenster kann jedoch in der Zeit nach vorne oder nach
hinten verschoben werden.
Die Informationen für die einzelnen Programme werden im Fenster für den Mini-Programmführer in chronologischer Reihenfolge
des Programmstarts zeilenweise ab dem aktuell laufenden Programm angezeigt.
❑
N
N
■
N
●
●
●
N
■
●
●
●
●
N
N
●
●
N
❑
●
●
●
●
❑
O
■
■
[620-Weuro]BN68-02326A-03L09.ind10 10 2009-10-08 ¿ÀÀü 9:28:31

Deutsch - 11
Mit der Taste GUIDE auf der Fernbedienung können Sie einstellen, ob der Ausführlich oder der angezeigt werden soll.
Senderliste
Detaillierte Verfahrensbeschreibungen zur Verwendung der Senderliste entnehmen Sie den Beschreibungen unter ‘Verwalten von
Kanälen’.
Diese Optionen können Sie auch durch Drücken der Taste CH LIST auf der Fernbedienung aufrufen.
Sendermodus
Durch Drücken der Taste P
>
/
<
wechseln Sie innerhalb der gewählten Senderliste zwischen den Sendern.
Hinzugef. Sender
Es wird nur zwischen Sendern der gespeicherten Senderliste gewechselt.
Favoriten
Es wird nur zwischen den Sendern der Favoritenliste gewechselt.
Feinabstimmung
Bei klarem Empfang ist keine Feinabstimmung nötig, da diese automatisch während der Sendersuche erfolgt. Falls das Signal
jedoch schwach oder das Bild verzerrt ist, müssen Sie unter Umständen eine manuelle Feinabstimmung durchführen.
Gespeicherte feinabgestimmte Kanäle werden mit einem Sternchen ‘*’ auf der rechten Seite der Kanalnummer im Kanal-
Banner markiert.
Wählen Sie zum Zurücksetzen der Feinabstimmung die Option Reset aus, indem Sie zuerst die Taste ▲ oder ▼ und dann die
Taste ENTER
E
drücken.
Eine Feinabstimmung ist nur für Analogfernsehgeräte möglich.
Verwenden des vollständigen Programmführers / Mini-Programmführers
Sie möchten... Dann...
Programm aus der Liste des Programmführers
anzeigen
Wählen Sie mit den Tasten ▲, ▼, ◄, ► das Programm aus.
Programmführer beenden Drücken Sie die blaue Taste.
Sobald Sie ein Programm gewählt haben, wird es zusammen mit einem Uhr-Symbol angezeigt. Nachdem Sie erneut
auf ENTER
E
gedrückt haben, drücken Sie auf ◄ oder ►, um die Option Prog. Löschen zu wählen. Danach wird die
Programmwahl aufgehoben und das Uhr-Symbol wird entfernt.
Programminformationen anzeigen Wählen Sie mit den Tasten ▲, ▼, ◄, ► das gewünschte Programm aus.
Drücken Sie die Taste INFO, wenn das Programm Ihrer Wahl markiert ist.
Der Programmtitel wird oben in der Mitte des Bildschirms angezeigt.
Klicken Sie auf die Taste INFO, wenn Sie genauere Informationen benötigen. Zu diesen Informationen gehören: Kanalnummer
,
Programmdauer, Statusleiste, Kindersicherungsstufe, Bildqualität (HD/SD), Tonmodus, Untertitel oder Teletext, Sprache für
Untertitel oder Teletext sowie Kurzzusammenfassung des markierten Programms. wird ‘...’ angezeigt.
Schalten Sie zwischen Ausführlich und Drücken Sie mehrmals die rote Taste.
Im ausführlichen Programmführer
Schnell zurückblättern (24 Stunden).
Schnell weiterblättern (24 Stunden).
Drücken Sie mehrmals die grüne Taste.
Drücken Sie mehrmals die gelbe Taste.
❑
❑
O
❑
■
■
❑
N
N
N
Ausführlich
E
Ansehen Information Seite Übersicht +24Std. Beenden
DTVCable900ftn2:10Tue1Jun
FreshmenOnCampus
2:00-2:30
NoDetailedInformation
Today
2:00-3:00 3:00-4:00
MintExtra
Loaded
40withDynamiteMC
TheDistillery
SmashHits!Sunday
900ftn
901ITVPlay
902Kerrang!
903Kiss
904oneword
905Hits
▼
StreetHypn..
Kisstory
No
Information
NoInformation
NoInformation
FreshmenO..
900
E
Ansehen Information
Seite
Ausführlich Beenden
Übersicht DTV
Cable900ftn
StreetHypnosis
BoozeBritain
2:00
2:30
5:00
Freshmen
OnCampus
▼
[620-Weuro]BN68-02326A-03L09.ind11 11 2009-10-08 ¿ÀÀü 9:28:32

Deutsch - 12
Verwalten von Kanälen
Mit diesem Menübefehl können Sie Favoriten hinzufügen, löschen oder einstellen und den digitalen Programmführer für
Digitalsendungen verwenden.
Alle Sender
Hiermit zeigen Sie alle verfügbaren Kanäle an.
Hinzugefügte Sender
Hiermit zeigen Sie alle hinzugefügten Kanäle an.
Favorit
Hiermit zeigen Sie alle Favoritenkanäle an.
Durch Drücken der Taste FAV.CH auf der Fernbedienung aufrufen können Sie die
eingerichteten Favoritenkanäle auswählen.
Programmiert
Hiermit zeigen Sie alle vorgemerkten Programme an.
Wählen Sie im Fenster Alle Sender, Hinzugefügte Sender oder Favorit einen Kanal. Drücken Sie hierzu die Tasten ▲ / ▼
und die Taste ENTER
E
. Nun können Sie den gewählten Kanal ansehen.
Verwenden der Farbtasten in Verbindung mit der Kanalliste.
Rot (Sendertyp): Schalten Sie zwischen TV, Radio, Daten / And. und Alle um.
Grün (Zoom): Hiermit vergrößern oder verkleinern Sie die Kanalnummer.
Gelb (Wählen): Hiermit wählen Sie mehrere Kanallisten aus. Sie können die Funktionen zum Hinzufügen / Löschen
/ Hinzufügen zu Favoriten / Löschen aus Favoriten für mehrere Kanäle gleichzeitig verwenden. Markieren Sie die
gewünschten Kanäle und drücken Sie die gelbe Taste, um alle markierten Kanäle zugleich einzustellen. Links neben dem
Namen des gewählten Kanals wird das Symbol
c
angezeigt.
TOOLS (Extras): Hiermit zeigen Sie die Menüs Löschen (oder Hinzufügen), Zu Favoriten hinzufügen (oder Aus
Favoriten löschen), Sperren (oder Freigabe), Timer-Wiedergabe, Sendernamen bearbeiten, Programmplatz
bearbeiten, Sortieren, Alle wählen (oder Alle abwählen), Autom. speichern an. (Der Inhalt des Menüs "Optionen"
hängt von der jeweiligen Situation ab.)
Symbole zur Anzeige des Kanalstatus
A
: Ein analoger Kanal.
c
: Ein Kanal, der durch Drücken der gelben Taste gewählt wurde.
*
: Ein Kanal, der als Favorit eingestellt ist.
(
: Ein Programm, das gerade gesendet wird.
\
: Ein gesperrter Kanal.
)
: Ein vorgemerktes Programm
Optionsmenü für Kanallisten (in Alle Sender / Hinzugefügte Sender / Favorit)
Drücken Sie die Taste TOOLS, um das Optionsmenü zu öffnen.
Der Inhalt des Optionsmenüs hängt vom jeweiligen Kanalstatus ab.
Hinzufüg./Löschen
Sie können Kanäle löschen oder hinzufügen, damit nur die gewünschten Kanäle angezeigt
werden.
Alle gelöschten Kanäle werden im Menü Alle Sender angezeigt.
Wenn der Kanal in grauer Farbe dargestellt wird, wurde er gelöscht.
Das Menü Hinzufügen wird nur für gelöschte Kanäle angezeigt.
Sie können einen Kanal aus dem Menü Hinzugefügte Sender oder Favorit in gleicher
Weise löschen.
Zu Favoriten hinzufügen / Aus Favoriten löschen
Sie können Kanäle, die Sie häufig sehen, als Favorit festlegen.
Drücken Sie die Taste TOOLS, um das Menü Extras anzuzeigen. Sie können das Hinzufügen zu (oder Löschen aus) den
Favoriten auch durch Auswählen von (oder Aus Favoriten löschen) einstellen.
Das Symbol ‘
*
’ wird angezeigt, und der Kanal wird als Favorit festgelegt.
Alle Favoritenkanäle werden im Menü Favorit angezeigt.
Sperren / Freigabe
Sie können einen Kanal sperren, sodass er nicht ausgewählt und angezeigt werden kann.
Diese Funktion ist nur verfügbar, wenn die Kindersicherung aktiviert ist (Ein).
Der Eingabebildschirm für die PIN wird geöffnet. Geben Sie nun Ihre vierstellige PIN ein.
Der Standard-PIN-Code eines neuen Fernsehgeräts lautet ‘0-0-0-0’. Sie können die PIN ändern, indem Sie im Menü den
Befehl PIN ändern wählen.
Das Symbol ‘
\
’ wird angezeigt, und der Kanal wird gesperrt.
¦
■
■
■
O
■
N
N
N
N
N
■
N
N
N
N
■
T
N
N
■
N
N
N
N
AlleSender
824UKTVGold
825UKTVstyle
A
1C--
A
2C--
A
3C--
A
4C--
A
5C--
A
6C--
A
7C--
A
8C--
Alle Sendertyp Zoom Wählen
T
Extras
Löschen
ZuFavoritenhinzufügen
Sperren
Timer-Wiedergabe
Sendernamen
bearbeiten
Sortieren
HinzugefügteSender
824UKTVGold
825UKTVstyle
A
1C--
A
2C--
A
3C--
A
4C--
A
5C--
A
6C--
A
7C--
A
8C--
Alle
Sendertyp Zoom Wählen
T
Extras
[620-Weuro]BN68-02326A-03L09.ind12 12 2009-10-08 ¿ÀÀü 9:28:32

Deutsch - 13
Timer-Wiedergabe
Wenn Sie ein Programm zum Anschauen vorgemerkt haben, wechselt das Fernsehgerät automatisch zum vorgemerkten Kanal in
der Kanalliste, auch wenn Sie gerade einen anderen Kanal anschauen. Um ein Programm vorzumerken, müssen Sie zuerst die
Uhrzeit einstellen.
Sie können nur gespeicherte Kanäle vormerken.
Sie können Kanal, Tag, Monat, Jahr, Stunde und Minute auch direkt über die Zifferntasten auf der Fernbedienung einstellen.
Das Vormerken eines Programms wird im Menü Programmiert angezeigt.
Digitaler Programmführer und Vormerken von Sendungen
Wenn Sie einen digitalen Kanal gewählt haben und die Taste ► drücken, wird der Programmführer für diesen Kanal
angezeigt. Gehen Sie in der oben beschriebenen Weise vor, wenn Sie ein Programm vormerken möchten.
Sendernamen bearbeiten (nur Analogkanäle)
Sie können Kanäle mit Beschriftungen versehen, sodass die ersten Buchstaben des Namens immer dann angezeigt werden, wenn
Sie den Kanal wählen.
Die Namen der digitalen Sender werden automatisch zugewiesen und können nicht geändert werden.
Programmplatz bearbeiten (nur Digitalkanäle)
Sie können die Kanalnummer auch mit den Zifferntasten der Fernbedienung einstellen.
Sortieren (nur Analogkanäle)
Mit diesem Vorgang können Sie die Programmnummern gespeicherter Sender ändern. Das ist möglicherweise nach dem
automatischen Speichern von Sendern erforderlich.
Alle wählen / Alle abwählen
Alle wählen: Sie können alle Kanäle in der Kanalliste auswählen.
Alle abwählen: Nun können Sie die Auswahl aller Kanäle aufheben.
Alle abwählen können Sie nur wählen, wenn mindestens ein Kanal gewählt ist.
Autom. speichern
Genaue Beschreibungen für die Verfahren zum Einstellen der Optionen finden Sie im Kapitel "Kanalmenü".
Wenn ein Kanal mit der Funktion Kindersicherung gesperrt wurde, wird das Eingabefenster für die PIN geöffnet.
Optionsmenü für Kanallisten (in Programmiert)
Mit dieser Menüoption können Sie eine Vormerkung anzeigen, ändern oder löschen.
Drücken Sie die Taste TOOLS, um das Optionsmenü zu öffnen.
Info ändern
Wählen Sie diese Option, um eine Vormerkung zu ändern.
Prog. Löschen
Wählen Sie diese Option, um eine Vormerkung zu stornieren.
Information
Wählen Sie diese Option, um eine Vormerkung anzuzeigen.
(Sie können auch die Vormerkinformationen auswählen).
Alle wählen
Wählen Sie alle vorgemerkten Programme.
■
N
N
N
N
■
N
■
■
■
●
●
N
■
N
N
N
■
■
■
■
Programmiert
1/1/2009
13:595TV1
)
18:592TV3
)
TheEqualizer
20:592TV3
)
McMillan&Wife
21:592TV3
)
M.Spillane’smike
Alle Zoom Wählen
T
Extras
E
Information
Infoändern
Prog.Löschen
Information
Alle
wählen
[620-Weuro]BN68-02326A-03L09.ind13 13 2009-10-08 ¿ÀÀü 9:28:32

Deutsch - 14
BILD
Konfigurieren des Bildmenüs
Modus
Sie können den Bildstandard auswählen, der für Ihre Sehgewohnheiten am besten geeignet ist.
Drücken Sie die Taste TOOLS, um das Menü Extras anzuzeigen. Sie können den
Bildmodus durch Auswahl von einstellen.
Dynamisch
Wählen Sie diese Option für Anzeige mit höherer Auflösung bei starker
Umgebungsbeleuchtung.
Standard
Wählen Sie diese Option für die optimale Anzeige von Fernsehbildern bei normaler Umgebungsbeleuchtung aus.
Natürlich
Stellt das Bild für optimale und augenschonende Anzeige ein.
Diese Funktion ist im PC-Modus nicht verfügbar.
Film
Wählen Sie diese Option für die optimale Anzeige von Filmen in einem abgedunkelten Zimmer.
Hinter.Licht / Kontrast / Helligkeit / Schärfe / Farbe / Farbton (G/R)
Das Gerät verfügt über mehrere Einstellmöglichkeiten für die Bildqualität:
Hinter.Licht: Hiermit stellen Sie die Helligkeit der LCD-Hintergrundbeleuchtung ein.
Kontrast: Hiermit stellen Sie den Kontrast des Bilds ein.
Helligkeit: Hiermit stellen Sie die Helligkeit des Bilds ein.
Schärfe: Hiermit stellen Sie die Kantenauflösung des Bilds ein.
Farbe: Hiermit stellen Sie die Farbsättigung des Bilds ein.
Farbton (G/R): Hiermit stellen Sie die Farbtemperatur ein.
Sie können die Funktion Farbton (G/R) im Analogmodus von TV, Ext., AV des PAL-Systems nicht verwenden.
Wenn Sie Änderungen an Hinter.Licht, Kontrast, Helligkeit, Schärfe, Farbe oder Farbton (G/R) vornehmen, wird das
Bildschirmmenü entsprechend eingestellt.
Im PC-Modus können Sie nur Hinter.Licht, Kontrast und Helligkeit einstellen.
Sie können die Einstellungen für jedes externe Gerät festlegen und speichern, das Sie an einen Eingang des Fernsehgeräts
angeschlossen haben.
Die im Betrieb verbrauchte Energiemenge geht deutlich zurück, wenn Sie die Helligkeit des Bildes reduzieren. Damit senken
Sie die Betriebskosten.
Erweiterte Einstellungen
Bei den neuen Fernsehgeräten von Samsung können Sie die Bildeinstellungen noch genauer
anpassen als mit den früheren Modellen.
Erweiterte Einstellungen stehen in den Modi Standard oder Film zur Verfügung.
Im PC-Modus können von den Erweiterte Einstellungen nur Optimalkontrast, Gamma
und Weißabgleich eingestellt werden.
Sie können den Schwarzwert direkt auf dem Bildschirm auswählen, um die Bildschirmtiefe
anzupassen.
Sie können den Bildschirmkontrast so anpassen, dass ein optimaler Kontrast gewährleistet ist.
Gamma
Sie können die Intensität der Primärfarben (Rot, Grün und Blau) einstellen.
¦
❑
T
■
■
■
N
■
❑
●
●
●
●
●
●
N
N
N
N
N
❑
N
N
■
■
■
Modus :Standard ▶
Hinter.Licht :7
Kontrast :95
Helligkeit :45
Schärfe :50
Farbe :50
Farbton(G/R) :G50/R50
ErweiterteEinstellungen
Bild
7
U
Verschieben
L
Einstellen
E
Eingeben
R
Zurück
▲
Hintergrund
▼
Schwarzton :Aus ▶
Optimalkontrast :Mittel
Gamma :0
Farbraum :Nativ
Weißabgleich
Flesh
Tone :0
Kantenglättung :Ein
U
Navig.
E
Eingabe
R
Zurück
ErweiterteEinstellungen
[620-Weuro]BN68-02326A-03L09.ind14 14 2009-10-08 ¿ÀÀü 9:28:33

Deutsch - 15
Farbraum
Der Farbraum ist eine Farbmatrix bestehend aus den Farben Rot, Grün und Blau. Wählen Sie Ihren bevorzugten Farbraum, um
die Welt in den natürlichsten Farben zu erfahren.
Auto: Bei automatischer Einstellung des Farbraums wird, je nach Programmquelle, der natürlichste Farbton eingestellt.
Nativ: Der native Farbraum ermöglicht tiefe und lebhafte Farbtöne.
Benutzerd.: Hiermit stellen Sie den Farbbereich wunschgemäß ein.
Wenn Sie den Anpassungswert ändern, wird der angepasste Bildschirm aktualisiert.
Sie können die Einstellungen für jedes externe Gerät festlegen und speichern, das Sie an einen Eingang des
Fernsehgeräts angeschlossen haben. Wenn Sie zum Beispiel einen DVD-Player an HDMI 1 angeschlossen und sie
gewählt haben, werden die Einstellungen und Parameter für diesen DVD-Player gespeichert.
Farbe: Rot, Grün, Blau, Gelb, Zyan oder Magenta
Farbe ist verfügbar, wenn der Farbraum auf Benutzerd. eingestellt ist.
Unter Farbe können Sie die RGB-Werte der jeweils gewählten Farbe einstellen.
Wählen Sie Reset, um den eingestellten RGB-Wert zurückzusetzen.
Rot: Hiermit stellen Sie Rotsättigung der gewählten Farbe ein.
Grün: Hiermit stellen Sie Grünsättigung der gewählten Farbe ein.
Blau: Hiermit stellen Sie Blausättigung der gewählten Farbe ein.
Reset: Setzt den Farbraum auf die Standardwerte zurück.
Weißabgleich
Um natürlichere Bildfarben zu erhalten, können Sie die Farbtemperatur anpassen.
R-Offset: Hiermit stellen Sie die Dunkelheit der roten Farbe ein.
G-Offset: Hiermit stellen Sie die Dunkelheit der grünen Farbe ein.
B-Offset: Hiermit stellen Sie die Dunkelheit der blauen Farbe ein.
R-Gain: Hiermit stellen Sie die Helligkeit der roten Farbe ein.
G-Gain: Hiermit stellen Sie die Helligkeit der grünen Farbe ein.
B-Gain: Hiermit stellen Sie die Helligkeit der blauen Farbe ein.
Reset: Der zuvor angepasste Weißabgleich wird auf die Werkseinstellungen zurückgesetzt.
Hautton
Sie können im Bild den Farbton Rosa (Fleischfarbe) betonen.
Wenn Sie den Anpassungswert ändern, wird der angepasste Bildschirm aktualisiert.
Sie können die Objektbegrenzungen im Bild betonen.
Durch Aktivieren des xvYCC-Modus vergrößern Sie die Detailtreue und den Farbraum beim Abspielen von Filmen auf einem
externen Gerät (d.h. DVD-Player), das an den HDMI- oder Komponenteneingang angeschlossen ist.
xvYCC ist verfügbar, wenn der Bildmodus auf Film und der externe Eingang auf HDMI oder Component eingestellt ist.
Diese Funktion wird, je nach externem Gerät, möglicherweise nicht unterstützt.
■
●
●
●
N
N
N
N
N
■
●
●
●
●
●
●
●
■
N
■
■
N
N
[620-Weuro]BN68-02326A-03L09.ind15 15 2009-10-08 ¿ÀÀü 9:28:33

Deutsch - 16
Bildoptionen
Im PC-Modus können von den Bildoptionen nur Farbtemp. und Größe eingestellt
werden.
Warm1, Warm2 oder Warm3 nur aktiviert, wenn der Bildmodus auf Film eingestellt ist.
Sie können die Einstellungen für jedes externe Gerät festlegen und speichern, das Sie an
einen Eingang des Fernsehgeräts angeschlossen haben.
Größe
Gelegentlich möchten Sie vielleicht die Größe des auf Ihrem Monitor angezeigten Bilds ändern.
Ihr Fernsehgerät bietet Ihnen unterschiedliche Bildformate, die jeweils für einen bestimmten Bildsignaltyp ideal geeignet sind.
Möglicherweise verfügt auch Ihr Kabel-/Satellitenreceiver über eigene Bildschirmformate. Im
Allgemeinen sollten Sie doch so viel
wie möglich im 16:9-Format fernsehen.
Diese Optionen können Sie auch durch Drücken der Taste P.SIZE auf der Fernbedienung aufrufen.
Auto Breit: Mit dieser Option stellen Sie das Bildformat automatisch auf das Seitenverhältnis 16:9 ein.
16:9: Wählen Sie diese Option aus, um als Bildformat das Seitenverhältnis 16:9 für DVDs oder Breitbildsendungen
einzustellen.
BreitZoom: Diese Option vergrößert das Bild auf mehr als 4:3.
Zoom: Wählen Sie diese Option aus, um das 16:9-Breitbild auf die volle Bildschirmbreite zu vergrößern.
4:3: Dies ist die Standardeinstellung zum Anzeigen von Videos und herkömmlichen Fernsehsendungen.
Bildanpassung: Mit dieser Funktion wird das ganze Bild auch bei Versorgung mit HDMI- (720p/1080i/1080p) oder
Komponentensignalen (1080i/1080p) vollständig und ohne Beschneidung angezeigt.
Je nach Signalquelle können die Bildgrößenoptionen variieren.
Die verfügbaren Elemente können in Abhängigkeit vom ausgewählten Modus variieren.
Im PC-Modus können nur die Modi 16:9 und 4:3 eingestellt werden.
Sie können die Einstellungen für jedes externe Gerät festlegen und speichern, das Sie an einen Eingang des Fernsehgeräts
angeschlossen haben.
Es kann zu vorübergehender Bildkonservierung kommen, wenn Sie auf dem Gerät mehr als zwei Stunden lang ein
unbewegten Bild angezeigt haben.
BreitZoom: Wählen Sie durch Drücken der Taste ► die Option Position, und drücken Sie dann die Taste ENTER
E
. Mit den
Tasten ▲ oder ▼ können Sie das Bild nach oben oder nach unten verschieben. Drücken Sie dann die Taste ENTER
E
.
Zoom: Wählen Sie durch Drücken der Taste ► die Option Position, und drücken Sie dann die Taste ENTERE. Mit der Taste
▲ oder ▼ können Sie das Bild nach oben oder nach unten verschieben. Drücken Sie dann die
Taste ENTERE. Wählen Sie
durch Drücken der Taste ► die Option Größe, und drücken Sie dann die Taste ENTERE. Drücken Sie die Tasten ▲ oder ▼,
um das Bild in vertikaler Richtung zu vergrößern oder zu verkleinern. Drücken Sie dann die Taste ENTERE.
Auswahl von Bildanpassung im HDMI (1080i / 1080p) oder Komp. modus (1080i / 1080p): Wählen Sie durch Drücken der
Tasten ◄ oder ► die Option Position. Mit den Tasten ▲, ▼, ◄ oder ► können Sie das Bild verschieben.
Reset: Wählen Sie durch Drücken der Tasten ◄ oder ► die Option Reset, und drücken Sie dann die Taste ENTER
E
.
Sie können die Einstellung initialisieren.
Wenn Sie die Funktion Bildanpassung zusammen mit einem 720p HDMI-Signal verwenden, wird wie bei Overscan oben,
unten, links und rechts eine Zeile abgeschnitten.
Wenn Sie die Bildgröße bei einem Fernsehgerät im 16:9-Format auf Auto Breit einstellen, können Sie bestimmen, dass das Bild
als 4:3 WSS (Breitbilddienst) oder gar nicht angezeigt werden soll. Da jedes europäische Land eine andere Bildgröße verwendet,
können die Benutzer sie damit einstellen.
16:9: Mit dieser Option stellen Sie das Breitbildformat 16:9 ein.
BreitZoom: Diese Option vergrößert das Bild auf mehr als 4:3.
Zoom: Hiermit vergrößern Sie das Bild vertikal.
4:3: Hiermit stellen Sie das Bildformat auf den Normal-Modus 4:3 ein.
Diese Funktion ist im Modus Auto Breit verfügbar.
Diese Funktion ist im PC-, Komponenten- oder HDMI-Modus nicht verfügbar.
Wenn das vom Fernsehgerät empfangene Sendesignal schwach ist, können Sie die digitale Rauschunterdrückung aktivieren, um
ggf. statische Bilder oder Doppelbilder auf dem Bildschirm zu verringern.
Bei schwachem Signal wählen Sie diejenige der anderen Optionen, bei der das beste Bild angezeigt wird.
Sie können den Schwarzwert direkt auf dem Bildschirm auswählen, um die Bildschirmtiefe anzupassen.
Diese Funktion ist nur aktiv, wenn ein externes Gerät über HDMI (RGB-Signale) mit dem TV verbunden ist.
❑
N
■
N
N
■
O
●
●
●
●
●
●
N
N
N
N
N
N
N
N
N
■
●
●
●
●
N
N
■
N
■
N
Farbtemp. :Normal ▶
Größe :AutoBreit
Bildschirmmodus :16:9
DigitaleRM :Auto
HDMI-Schwarzp. :Normal
Filmmodus :Aus
Blaumodus :Aus
U
Navig.
E
Eingabe
R
Zurück
Bildoptionen
[620-Weuro]BN68-02326A-03L09.ind16 16 2009-10-08 ¿ÀÀü 9:28:33

Deutsch - 17
Sie können das Fernsehgerät so einstellen, dass eine Filmsignal aus allen Quellen automatisch empfangen und verarbeitet und
das Bild auf die optimale Qualität eingestellt werden kann.
Filmmodus wird bei TV, AV, COMPONENT(480i / 1080i) und HDMI(480i / 1080i). unterstützt.
Aus: Deaktiviert den Filmmodus.
Auto1: Hiermit wird das Bild bei Filmanzeige automatisch auf die beste Qualität eingestellt.
Auto2: Automatische Optimierung von Videotext auf dem Bildschirm (ohne geschlossene Beschriftungen), wenn Sie einen
Film sehen.
Beseitigt das Verschwimmen schneller Szenen mit viel Bewegung und sorgt für ein klareres Bild.
Wenn Sie 100Hz Motion Plus aktivieren, kann es zu Bildrauschen auf dem Bildschirm kommen. In diesem Fall sollten Sie
100Hz Motion Plus deaktivieren Aus.
Aus: Hiermit schalten Sie 100Hz Motion Plus aus.
Klar: Hiermit stellen Sie 100Hz Motion Plus auf den Minimalwert ein.
Standard: Hiermit stellen Sie 100Hz Motion Plus auf einen mittleren Wert ein.
Glätten: Hiermit stellen Sie 100Hz Motion Plus auf den Maximalwert ein.
Benutzerd.: Hiermit passen Sie die Minderung von Unschärfe und Stocken der Bewegungen wunschgemäß ein.
Unschärfeminder.: Hiermit passen Sie die Unschärfeminderung bei Videosignalen an.
Judder-Minderung: Hiermit passen Sie die Minderung stockender Bewegungen beim Abspielen von Filmen an.
Reset: Hiermit setzen Sie die benutzerdenierten Einstellungen zurück.
Demo: Hiermit zeigen Sie den Unterschied mit und ohne Auto Motion Plus 100Hz an.
Diese Funktion ist für Experten zum Ausmessen von AV-Geräten bestimmt. Mit dieser Funktion werden das rote und das grüne
Signal aus dem Videosignal entfernt, sodass nur das blaue Signal angezeigt wird. Damit wird ein Blaufilter erzeugt, mithilfe
dessen die Farbe und der Farbton von Videogeräten wie DVD-Playern, Heimkinosystemen usw. eingestellt werden können.Mit
dieser Funktion können Sie die Farbe und den Farbton auf Werte einstellen, die dem Signalpegel der verschiedenen Videogeräte
angemessen sind. Verwenden Sie hierzu die Streifenmuster für die Farben Rot/Grün/Blau/Cyan/Magenta/Gelb, ohne zusätzlich
den Blaufilter zu verwenden.
Blaumodus ist verfügbar, wenn der Bildmodus auf Film oder Standard eingestellt ist.
Hiermit werden alle Bildeinstellungen auf die Standardwerte zurückgesetzt.
Bildmodus zurücksetzen: Alle aktuellen Bildwerte werden auf die Standardwerte zurückgesetzt.
■
N
●
●
●
N
●
●
●
●
●
–
–
–
●
■
N
❑
N
[620-Weuro]BN68-02326A-03L09.ind17 17 2009-10-08 ¿ÀÀü 9:28:33

Deutsch - 18
Verwenden Ihres Computers als Computerbildschirm (PC)
Im Folgenden sind die typischen Anzeigeeinstellungen für einen Windows-Computer
aufgeführt. Die von Ihrem PC angezeigten Fenster entsprechen je nach installierter Windows-
Version und verwendeter Grafikkarte möglicherweise nicht genau der Abbildung. Dennoch
sind die hier nachfolgenden grundlegenden Konfigurationsinformationen in fast allen Fällen
anwendbar. (Wenden Sie sich andernfalls an den Computerhersteller oder Samsung-Händler.)
1.
Klicken Sie im Startmenü von Windows auf die Systemsteuerung.
2.
Wenn das Fenster der Systemsteuerung angezeigt wird, klicken Sie auf „Darstellung und
Designs”. Ein Dialogfeld wird geöffnet.
3.
Wenn das Fenster der Systemsteuerung angezeigt wird, klicken Sie auf „Anzeige“.
Anschließend wird ein Dialogfeld angezeigt.
4.
Klicken Sie nun im Dialogfeld „Anzeige“ auf die Registerkarte „Einstellungen”.
Das richtige (optimale) Bildformat lautet: 1920
x 1080 Pixel
Wenn das Dialogfeld eine Option für die Bildschirmfrequenz enthält, muss als
Einstellung 60 oder 60 Hz ausgewählt werden. Andernfalls klicken Sie einfach auf OK, um das Dialogfeld zu schließen.
Anzeigemodi
Wenn das Signal des Computers den folgenden Standards entspricht, wird der Bildschirm automatisch darauf eingestellt. Wenn
das Signal des Computers nicht diesen Standards entspricht, stellen Sie einen der aufgeführten Modi ein; Informationen hierzu
entnehmen Sie der Bedienungsanleitung der Grafikkarte des Computers. Andernfalls wird u.
U. nichts auf dem Bildschirm
angezeigt. Für die auf der nächsten Seite gezeigten Anzeigemodi wurde das Bild bereits bei der Produktion optimiert.
D-Sub- und HDMI/DVI-Eingang
Modus
Horizontalfrequenz
(kHz)
Vertikalfrequenz
(Hz)
Pixeltakt (MHz)
Synchronisationspolarität
(H/V)
IBM
640 x 350 31,469 70,086 25,175 +/-
720 x 400 31,469 70,087 28,322 -/+
MAC
640 x 480 35,000 66,667 30,240 -/-
832 x 624 49,726 74,551 57,284 -/-
1152 x 870 68,681 75,062 100,000 -/-
VESA CVT
720 x 576 35,910 59,950 32,750 -/+
1152 x 864 53,783 59,959 81,750 -/+
1280 x 720 44,772 59,855 74,500 -/+
1280 x 720 56,456 74,777 95,750 -/+
1280 x 960 75,231 74,857 130,000 -/+
VESA DMT
640 x 480 31,469 59,940 25,175 -/-
640 x 480 37,861 72,809 31,500 -/-
640 x 480 37,500 75,000 31,500 -/-
800 x 600 37,879 60,317 40,000 +/+
800 x 600 48,077 72,188 50,000 +/+
800 x 600 46,875 75,000 49,500 +/+
1024 x 768 48,363 60,004 65,000 -/-
1024 x 768 56,476 70,069 75,000 -/-
1024 x 768 60,023 75,029 78,750 +/+
1152 x 864 67,500 75,000 108,000 +/+
1280 x 1024 63,981 60,020 108,000 +/+
1280 x 1024 79,976 75,025 135,000 +/+
1280 x 800 49,702 59,810 83,500 -/+
1280 x 800 62,795 74,934 106,500 -/+
1280 x 960 60,000 60,000 108,000 +/+
1360 x 768 47,712 60,015 85,500 +/+
1440 x 900 55,935 59,887 106,500 -/+
1440 x 900 70,635 74,984 136,750 -/+
1680 x 1050 65,290 59,954 146,250 -/+
VESA GTF
1280 x 720 52,500 70,000 89,040 -/+
1280 x 1024 74,620 70,000 128,943 -/-
VESA DMT /
DTV CEA
1920 x 1080p 67,500 60,000 148,500 +/+
Eine Verbindung über HDMI/DVI-Kabel kann nur über den HDMI IN 3 (DVI)-Anschluss erfolgen.
Das Zeilensprungverfahren wird nicht unterstützt.
Das Fernsehgerät funktioniert möglicherweise nicht ordnungsgemäß, wenn kein Standardmodus ausgewählt wird.
Separate- und Composite-Modus werden unterstützt. SOG wird nicht unterstützt.
Ein zu langes oder qualitativ geringwertiges VGA-Kabel kann in hochauflösenden Modi (1920
x 1080) zu Bildrauschen führen.
¦
■
N
N
N
N
N
[620-Weuro]BN68-02326A-03L09.ind18 18 2009-10-08 ¿ÀÀü 9:28:33

Deutsch - 19
Fernsehgerät mithilfe des PCs einstellen
Voreinstellung: Drücken Sie die Taste SOURCE (Quelle), um den Modus „PC“einzustellen.
Autom. Einstellung
Verwenden Sie die Funktion zum automatischen Einstellen, damit sich das Fernsehgerät
automatisch auf das empfangene Videosignal einstellt.
Bei dieser Funktion erfolgt auch automatisch eine Feineinstellung sowie die Anpassung der
Frequenzwerte und Positionen.
Drücken Sie die Taste TOOLS, um das Menü Extras anzuzeigen. Sie können die
automatische Einstellung durch Auswahl von
durchführen.
Diese Funktion ist im DVI-HDMI-Modus nicht verfügbar.
PC-Bildschirm
Grob / Fine
Durch das Einstellen der Bildqualität können Bildstörungen und Rauschen beseitigt oder
verringert werden. Falls sich Bildrauschen durch die Feinabstimmung allein nicht beheben lässt,
stellen Sie zunächst die Frequenz möglichst genau ein (Grob). Nachdem Sie das Bildrauschen
durch die Grob- und Feinabstimmung des Bildes verringert haben, stellen Sie die Position des
Bildes so ein, dass es auf dem Bildschirm zentriert ist.
PC-Position
Passen Sie die Position des PC-Bilds an, wenn es nicht auf das Fernsehbild passt.
Stellen Sie mit den Tasten ▲ oder ▼ die vertikale Position ein. Stellen Sie mit den Tasten
▲ oder ▼ die horizontale Position ein.
Bild zurücksetzen
Sie können alle Bildeinstellungen auf die werkseitig eingestellten Ausgangswerte
zurücksetzen.
¦
N
❑
T
N
❑
■
■
■
Helligkeit :45
Schärfe :50
Autom.Einstellung ▶
PC-Bildschirm
ErweiterteEinstellungen
Bildoptionen
Bild
zurücksetzen
Bild
Coarse 50
Fine 0
PC-Position
Bild
zurücksetzen
U
Navig.
E
Eingabe
R
Zurück
PC-Bildschirm
[620-Weuro]BN68-02326A-03L09.ind19 19 2009-10-08 ¿ÀÀü 9:28:33

Deutsch - 20
SOUND
Konfigurieren des Tonmenüs
Drücken Sie die Taste TOOLS, um das Menü Extras anzuzeigen. Sie können den
Tonmodus durch Auswahl von kongurieren.
Standard: Auswahl des normalen Tonmodus.
Musik: Betont die Musik im Verhältnis zu Stimmen.
Film: Ermöglicht optimale Tonwiedergabe für Filme.
Sprache: Betont Stimmen im Verhältnis zu anderen Tönen.
Benutzerd.: Abrufen ihrer benutzerdefinierten Toneinstellungen.
Equalizer
Sie können den Ton Ihrem persönlichen Geschmack anpassen.
Modus: Auswählen des Tonmodus der definierten Einstellungen.
Balance L/R: Anpassen der Balance zwischen dem linken und dem rechten Lautsprecher.
100Hz / 300Hz / 1KHz / 3KHz / 10KHz (Bandbreitenanpassung): Zum Einstellen der unterschiedlichen
Bandbreitenfrequenzen.
Reset: Hiermit stellen Sie die Equalizereinstellungen auf die Standardwerte zurück.
SRS TEXT (SRS-Text) ist eine patentierte SRS-Technologie, die das Problem mit der Ausgabe von 5.1-Mehrkanalinhalten
über zwei Lautsprecher löst. Mit TruSurround kommen Sie mit jedem Stereo-System mit zwei Lautsprechern, auch den
internen Gerätelautsprechern, in den Genuss überzeugender Virtual Surround-Effekte. Es ist vollständig kompatibel mit allen
Mehrkanalformaten.
Drücken Sie die Taste TOOLS, um das Menü Extras anzuzeigen. Sie können SRS TruSurround HD außerdem durch Auswahl
von anpassen.
Wiedergabesprache
Sie können die Standardsprache für Audio ändern. Zeigt die Sprachinformationen für den eingehenden Audiostream an.
Während Sie ein digitales Programm anschauen, können Sie diese Funktion auswählen.
Sie können nur Sprachen auswählen, die auch tatsächlich übertragen werden.
Wenn Sie für die Tonausgabe sowohl den Hauptlautsprecher als auch den Audioreceiver verwenden, kann es aufgrund der
Geschwindigkeitsunterschiede beim Dekodieren durch die beiden Systeme zu einem Echoeffekt kommen. Verwenden Sie in
diesen Fall die TV-Lautsprecher.
Während Sie ein digitales Programm anschauen, können Sie diese Funktion auswählen.
Entsprechend dem Sendesignal wird Audioformat angezeigt.
Audio für Sehgeschädigte
Dies ist eine zusätzliche Audiofunktion, mit der für sehbehinderte Personen eine zusätzliche Tonspur wiedergegeben wird.
Diese Funktion verarbeitet den Audiostream für die AB (Audio-Beschreibung), sofern diese vom Sender zusammen mit dem
Vordergrundton übertragen wird. Der Benutzer kann die Audio-Beschreibung aktivieren oder deaktivieren und die Lautstärke
einstellen.
Drücken Sie die Taste AD auf der Fernbedienung, um Aus oder Ein zu wählen.
Hiermit wird der Audiokommentar für Sehbehinderte ein- und ausgeschaltet.
Lautst.
Hiermit stellen Sie die Lautstärke des Audiokommentars für Sehbehinderte ein.
Lautst. ist aktiv, wenn Audio für Sehgeschädigte aktiviert Ein ist.
Während Sie ein digitales Programm anschauen, können Sie diese Funktion auswählen.
Aufgrund unterschiedlicher Signalbedingungen unterscheiden sich Fernsehsender in der Lautstärke, so dass es erforderlich
sein kann, die Lautstärke beim Umschalten zwischen Sendern jedes Mal nachzuregeln. Mit der Funktion für automatische
Lautstärkeeinstellung wird die Lautstärke automatisch bei starkem Modulationssignal verringert und bei schwachem
Modulationssignal erhöht.
¦
❑
T
●
●
●
●
●
❑
●
●
●
●
❑
T
❑
N
N
❑
N
N
❑
O
■
■
N
N
❑
Modus :Benutzerd. ▶
Equalizer
SRSTruSurroundHD :Aus
Wiedergabesprache :----
Audioformat :----
AudiofürSehgeschädigte
Auto.Lautst. :Aus
Lautsprecherauswählen :TV-Lautsprecher
Ton
[620-Weuro]BN68-02326A-03L09.ind20 20 2009-10-08 ¿ÀÀü 9:28:34

Deutsch - 21
Lautsprecherauswahl
Wenn Sie fernsehen, während das Gerät an ein Heimkinosystem angeschlossen ist, schalten Sie die Fernsehlautsprecher aus,
damit Sie nur den Ton der (externen) Lautsprecher des Heinkinosystems hören.
Ext. Lautsprecher: Tonwiedergabe über die externen Lautsprecher (Heimkinosystem).
TV-Lautsprecher: Verwenden Sie diese Option, um den Ton über die Fernsehlautsprecher wiederzugeben.
Die Lautstärketasten und MUTE sind deaktiviert, wenn Lautsprecherauswahl auf Ext. Lautsprecher geschaltet ist.
Wenn Sie im Menü Lautsprecherauswahl die Option Ext. Lautsprecher wählen, werden die Audioeinstellungen
eingeschränkt.
Eingebaute Lautsprecher des Fernsehgeräts Audioausgang (Optical) zum Soundsystem
RF / AV / Komp. / PC / HDMI RF / AV / Komp. / PC / HDMI
TV-Lautsprecher Audioausgang Audioausgang
Ext. Lautsprecher Ton aus Audioausgang
Kein Videosignal Ton aus Ton aus
Sie können alle Audioeinstellungen wieder auf die Werkseinstellungen zurücksetzen.
Ton-Modus reset: Alle aktuellen Tonwerte werden auf die Standardwerte zurückgesetzt.
Tonmodus wählen
Sie können den Tonwiedergabemodus durch Drücken der Taste DUAL wählen. Wenn Sie die Taste drücken, wird der aktuelle
Tonwiedergabemodus auf dem Bildschirm angezeigt.
Audiosystem Dual 1 / 2 Standard
A2-Stereo
Mono MONO
Automatischer Wechsel
Stereo STEREO ↔ MONO
Dual DUAL 1 ↔ DUAL 2 DUAL 1
NICAM-
Stereo
Mono MONO
Automatischer Wechsel
Stereo MONO ↔ STEREO
Dual
MONO ↔ DUAL 1
DUAL 2
DUAL 1
Falls das Stereosignal schwach ist und automatisch umgeschaltet wird, sollten Sie zu mono wechseln.
Diese Funktion ist nur bei einem Stereosignal aktiviert. Bei Monosignalen ist es deaktiviert.
Diese Funktion ist nur im TV-Modus verfügbar.
❑
●
●
N
N
❑
N
¦
N
N
N
Tonzurücksetzen
L
Navig.
E
Eingabe
R
Zurück
OptionenfürZurücksetzendesTonsauswählen.
Allezurücksetzen Ton-Modusreset Abbrechen
[620-Weuro]BN68-02326A-03L09.ind21 21 2009-10-08 ¿ÀÀü 9:28:34

Deutsch - 22
EINSTELLUNGEN
Konfigurieren der Menüeinstellungen
Menüsprache
Sie können die Menüsprache festlegen.
Zeit
Genaue Beschreibungen für die Verfahren zum Einstellen der Optionen finden Sie im Kapitel
‘Einstellen der Uhrzeit’.
Sendungsoptionen
Untertitel
Sie können Untertitel aktivieren und deaktivieren. Mit diesem Menü legen Sie den Untertitelmodus fest. Die Menüoption Normal ist
die Grundeinstellung für Untertitel, und die Option Schwerhörig ist für hörgeschädigte Personen bestimmt.
Untertitel aktivieren oder deaktivieren.
Hiermit können Sie den Modus der Untertitelfunktion einstellen.
Untertitelsprache
Hiermit können Sie die Untertitelsprache festlegen.
Wenn das Programm, das Sie gerade sehen, die Funktion Schwerhörig nicht unterstützt, wird selbst bei ausgewählter
Funktion Schwerhörig automatisch die Funktion Normal aktiviert.
Englisch ist der Standardwert in Fällen, wo die ausgewählte Sprache für die Sendung nicht verfügbar ist.
Sie können diese Optionen auswählen, indem Sie einfach die Taste SUBT. auf der Fernbedienung drücken.
(nur Großbritannien)
Wenn das Programm mit Digitaltext gesendet wird, ist diese Funktion aktiviert.
MHEG (Multimedia and Hypermedia Information Coding Experts Group)
Ein internationaler Standard für Datenkompressionssysteme für Multimedia- und Hypermedia-Anwendungen. Dies ist ein
höheres Niveau als das MPEG-System, das solche datenverknüpfenden Hypertextmedien wie Standbilder
, Zeichendienst,
Animations-, Grafik- und Videodateien sowie Multimediadateien umfasst. MHEG ist eine Technologie für Laufzeitinteraktion
mit dem Benutzer, und sie wird auf verschiedenen Gebieten verwendet, z. B. VOD (Video-On-Demand), ITV (Interactive TV),
EC (Electronic Commerce), Teleweiterbildung, Telekonferenzen, digitale Bibliotheken und Netzwerkspiele.
Teletextsprache
Sie können die Videotextsprache durch Auswählen des Sprachtyps einstellen.
Englisch ist der Standardwert in Fällen, wo die ausgewählte Sprache für die Sendung nicht verfügbar ist.
Benutzerdef.
Primäre Wiedergabesprache / Sekundäre Wiedergabesprache / Primäre Untertitelsprache / Sekundäre
Untertitelsprache / Primäre Teletextsprache / Sekundäre Teletextsprache
Mit dieser Funktion können Sie eine der verfügbaren Sprachen wählen. Die hier gewählte Sprache ist die Standardsprache,
wenn der Benutzer einen Kanal auswählt.
Wenn Sie die Spracheinstellung ändern, werden die Untertitelsprache, die Audiosprache und die Videotextsprache im Menü
‘Sprache’ automatisch in die gewünschte Sprache geändert.
Mit den Untermenüs für die Untertitelsprache, Audiosprache und Videotextsprache im Menü ‘Sprache’ zeigen Sie eine
Liste der vom aktuellen Kanal unterstützten Sprachen an, und die aktuelle Auswah
l wird hervorgehoben. Wenn Sie die
Spracheinstellung ändern, gilt die neue Auswahl nur für den aktuellen Kanal. Die geänderte Einstellung hat keinen Einfluss auf
die Einstellung der Untertitelsprache, Audiosprache und Teletext-Sprache im Menü Voreinstellung.
¦
❑
❑
❑
■
●
●
●
N
N
O
■
N
■
N
■
●
Plug&Play
Menüsprache :Deutsch ▶
Zeit
Sendungsoptionen
Sicherheit
Allgemein
Einstellungen
[620-Weuro]BN68-02326A-03L09.ind22 22 2009-10-08 ¿ÀÀü 9:28:34

Deutsch - 23
Common Interface
CI-Menü
Hiermit kann der Benutzer seine Auswahl in dem vom CAM-Modul bereitgestellten Menü treffen.
Wählen Sie das CI-Menü ausgehend vom Menü ‘PC Card’ (PC-Karte).
Anwendungsinformationen
Die folgenden Erklärungen gelten für den Fall, dass ein CAM-Modul in den CI-Schlitz gesteckt ist und angezeigt wird.
In den Anwendungsinformationen wird die CI(CI+)-Karte beschrieben. Sie können das CAM-Modul unabhängig davon
anschließen, ob das Fernsehgerät angeschaltet ist oder nicht.
1.
Sie können das CI-CAM-Modul bei Ihrem nächsten Händler oder durch telefonische Bestellung erwerben.
2.
Schieben Sie die CI(CI+)-Karte in Richtung des Pfeils in das CAM-Modul ein, bis sie fest sitzt.
3.
Schieben Sie das CAM-Modul mit installierter CI(CI+)-Karte in den CI-Steckplatz (Common Interface) hinein.
(Schieben Sie das CAM-Modul in Pfeilrichtung bis zum Anschlag, sodass es parallel mit dem Steckplatz ist.)
4.
Kontrollieren Sie, ob Sie ein Bild sehen oder ein gestörtes Signal.
Sicherheit (je nach Modell)
Ehe das Einstellungsfenster angezeigt wird, wird das Fenster zur Eingabe der PIN geöffnet. Geben Sie nun Ihre vierstellige
PIN ein.
Der Standard-PIN-Code eines neuen Fernsehgeräts lautet 0-0-0-0. Sie können die PIN ändern, indem Sie im Menü den
Befehl PIN ändern wählen.
Bei manchen Modellen müssen Sie für Plug & Play die PIN-Nummer eingeben.
Mit dieser Funktion können Sie nicht autorisierte Benutzer, z. B. Kinder, daran hindern ungeeignete Programme anzuschauen,
indem das Bild blockiert und der Ton stummgeschaltet wird.
Sie können einige der Kanäle in der Kanalliste sperren.
Kindersicherung ist nur im TV-Modus verfügbar.
Sicherungsstufe
Mit dieser Funktion können Sie nicht autorisierte Benutzer, z. B. Kinder, daran hindern, ungeeignete Programme anzuschauen.
Hierzu verwenden Sie eine benutzerdefinierte vierstellige PIN.
Die für Sicherungsstufe verfügbaren Elemente können in Abhängigkeit vom jeweiligen Land variieren.
Nachdem Sicherungsstufe eingestellt wurde, wird das Symbol ‘\’ angezeigt.
Alle zul.: Drücken Sie diese Taste, um alle Altersbeschränkungen aufzuheben.
Keine zul.: Drücken Sie diese Taste, um alle Altersbeschränkungen zu aktivieren.
PIN ändern
Sie können Ihre zum Einrichten des Fernsehgeräts benötigte persönliche Kennnummer ändern.
Wenn Sie den PIN-Code vergessen haben, drücken Sie die Fernbedienungstasten in der angegebenen Reihenfolge, um die
PIN auf 0-0-0-0: POWER (Aus)
(Ein).
Allgemein
Wenn Sie eine Spielekonsole wie PlayStation™ oder Xbox™ anschließen, können Sie durch Auswählen des Spielemenüs ein
realitätsnaheres Spielerlebnis genießen.
Einschränkungen im Spielmodus (Achtung!)
Wenn Sie die Spielekonsole wieder vom Gerät trennen und ein anderes externes Gerät anschließen möchten, beenden
(Aus) Sie über das Einrichtmenü den Spielemodus.
Wenn Sie im Spielemodus das TV-Menü anzeigen, zittert das Bild leicht.
Spielemodus ist im normalen TV-, PC- und Ext.-Modus nicht verfügbar.
Kontrollieren Sie, ob der Spielemodus noch aktiviert (Ein) ist, wenn die Bildqualität bei angeschlossenem externem Gerät
schlecht ist. Deaktivieren Sie den Spielemodus (Aus) und schließen Sie externe Geräte an.
Wenn der Spielemodus aktiviert ist:
Der Bildmodus wird automatisch auf Standard eingestellt und kann nicht geändert werden.
Der Tonmodus wird automatisch auf Benutzerd. eingestellt und kann nicht geändert werden. Passen Sie den Ton unter
Verwendung des Equalizers an.
Die Funktion zum Zurücksetzen der Audioeinstellungen ist aktiviert. Durch Auswählen der Reset-Funktion nach dem Einstellen
des Equalizers wird die Equalizer-Einstellung auf die Werkseinstellungen zurückgesetzt.
■
●
●
❑
N
N
N
■
N
N
■
N
N
N
■
N
❑
■
N
N
N
N
N
[620-Weuro]BN68-02326A-03L09.ind23 23 2009-10-08 ¿ÀÀü 9:28:34

Deutsch - 24
Mit dieser Funktion stellen Sie die Helligkeit des Fernsehgeräts ein, um den Stromverbrauch zu senken. W
enn Sie nachts
fernsehen, stellen Sie Energiesparmod. auf Hoch ein, um sowohl die Augenermüdung als auch den Stromverbrauch zu senken.
Wenn Sie Bild aus wählen, wird der Bildschirm abgeschaltet und Sie können nur noch den T
on hören. Drücken Sie eine beliebige
Taste, um Bild aus zu beenden.
Im Menü Extras wird die Funktion Bild aus nicht unterstützt.
Drücken Sie die Taste TOOLS, um das Menü Extras anzuzeigen. Sie können zudem die Energiesparoption durch Auswahl
von
anpassen.
Sie können die Transparenz des Menüs einstellen.
Es kann eine Melodie abgespielt werden, wenn der Bildschirm an- oder ausgeschaltet wird.
Die Melodie wird nicht abgespielt.
Das Fernsehgerät gibt keinen Ton aus, weil die MUTE-Taste gedrückt wurde.
Das Fernsehgerät gibt keinen Ton aus, weil die Lautstärketaste (-) solange gedrückt wurde, bis der Ton aus war.
Das Fernsehgerät wurde mit dem Sleep-Timer ausgeschaltet.
■
N
T
■
■
N
Einstellen der Uhrzeit
Uhr
Die Uhr muss eingestellt werden, damit Sie die verschiedenen Timerfunktionen des
Fernsehgeräts verwenden können.
Jedes Mal, wenn Sie die Taste INFO drücken, wird die aktuelle Zeit angezeigt.
Wenn Sie das Netzkabel ziehen, müssen Sie die Uhr erneut einstellen.
Uhr-Modus
Sie können die aktuelle Zeit manuell oder automatisch einstellen.
Auto: Hiermit stellen Sie die Uhrzeit automatisch anhand der Zeit aus der digitalen
Übertragung ein.
Manuell: Hiermit stellen Sie die aktuelle Zeit auf einen manuell eingestellten Wert ein.
Je nach Sendestation und Signal erfolgt die automatische Zeiteinstellung möglicherweise
nicht korrekt. In diesem Fall müssen Sie die Zeit manuell einstellen.
Der Antennen- oder Kabelanschluss muss vorhanden sein, um die Zeit automatisch
einzustellen.
Zeit einstellen
Sie können die aktuelle Zeit manuell einstellen.
Diese Funktion ist nur verfügbar, wenn Sie Uhr-Modus auf Manuell eingestellt haben.
Sie können Tag, Monat, Jahr, Stunde und Minute auch direkt über die Zifferntasten auf der Fernbedienung einstellen.
Sleep-Timer
Der Sleep-Timer schaltet das Fernsehgerät automatisch nach einer eingestellten Zeit (30, 60, 90, 120, 150, 180 Minuten) aus.
Drücken Sie die Taste TOOLS, um das Menü Extras anzuzeigen. Sie können den Sleep-Timer durch Auswahl von
Sleep-Timer einstellen.
Um die Sleep-Timer-Funktion abzubrechen, wählen Sie Aus.
Timer 1 / Timer 2 / Timer 3
Sie können drei verschiedene Einstellungen für den Ein-/Ausschalttimer vornehmen.
Voraussetzung dafür ist, dass Sie die Uhr gestellt haben.
Anschaltzeit
Stellen Sie Stunde, Minute ein und aktivieren bzw. deaktivieren Sie die Funktion.
Zum Aktivieren des Timers, wenn Sie mit den Einstellungen fertig sind, wählen Sie Aktivieren.
Ausschaltzeit
Stellen Sie Stunde, Minute ein und aktivieren bzw. deaktivieren Sie die Funktion.
Zum Aktivieren des Timers, wenn Sie mit den Einstellungen fertig sind, wählen Sie Aktivieren.
¦
❑
N
N
■
●
●
N
N
■
N
N
❑
T
N
❑
■
■
Uhr :--:-- ▶
Sleep-Timer :Aus
Timer1 :Deaktiviert
Timer2 :Deaktiviert
Timer3 :Deaktiviert
U
Navig.
E
Eingabe
R
Zurück
Zeit
Anschaltzeit
L
Navig.
U
Einst.
E
Eingabe
R
Zurück
Timer1
Ausschaltzeit
Lautst.
00 00 Deaktiv.
00 00 Deaktiv.
10
Quelle TV-Empfang Kanal
TV ATV 0
Wiederholmodus
Einmal
So Mo Di Mi Do Fr Sa
Plug&Play
Menüsprache :Deutsch
Zeit ▶
Sendungsoptionen
Sicherheit
Allgemein
Einstellungen
[620-Weuro]BN68-02326A-03L09.ind24 24 2009-10-08 ¿ÀÀü 9:28:34

Deutsch - 25
Lautst.
Stellen Sie die gewünschte Lautstärke ein.
Sie können den Inhalt des TV- oder USB-Gerät einstellen, der beim Anschalten des Fernsehers automatisch wiedergegeben wird.
Wählen Sie TV oder USB. (Stellen Sie sicher, dass ein USB-Gerät an das Fernsehgerät angeschlossen ist.)
TV-Empfang (wenn auf TV eingestellt ist)
Wählen Sie ATV oder DTV.
Kanal (wenn auf TV eingestellt ist)
Wählen Sie den gewünschten Kanal.
Inhalt (wenn Source auf USB eingestellt ist)
Sie können auf dem USB-Gerät einen Ordner mit Musik- oder Fotodateien wählen, die beim
Anschalten des Fernsehgeräts
automatisch angezeigt werden.
Die Timerfunktion arbeitet nicht fehlerfrei, wenn es auf dem USB-Speicher keine Musikdatei gibt oder der Ordner mit der
Musikdatei nicht markiert ist.
Wenn auf dem USB-Gerät nur eine Fotodatei gespeichert ist, wird die Diashow nicht wiedergegeben.
Wenn der Ordnername zu lang ist, kann der Ordner nicht ausgewählt werden.
Wenn der Ordnername, der von der Inhaltsfunktion konfiguriert werden soll, zu lang ist, kann der Ordner nicht ausgewählt
werden.
Wiederholmodus
Wählen Sie Einmal, Täglich, Mo~Fr, Mo~Sa, Sa~So oder Manuell.
Wenn Manual gewählt ist, drücken Sie die Taste ►, um den gewünschten Wochentag einzustellen. Drücken Sie die Taste
ENTER
E
, wenn der gewünschte Tag markiert ist, und das Symbol
c
wird angezeigt.
Sie können die Stunden, Minuten und den Kanal auch über die Zifferntasten auf der Fernbedienung einstellen.
Autom. Ausschalten
Wenn Sie den Timer aktivieren, schaltet sich das Fernsehgerät drei Stunden nach dem Einschalten durch den Timer ab,
wenn in dieser Zeit keine Funktionen verwendet wurden Diese Funktion ist nur verfügbar
, wenn der Timer aktiviert ist, und sie
verhindert Schäden durch Überhitzung, wenn das Fernsehgerät zu lange eingeschaltet ist.
■
■
■
■
■
N
N
N
N
■
N
N
N
[620-Weuro]BN68-02326A-03L09.ind25 25 2009-10-08 ¿ÀÀü 9:28:34

Deutsch - 26
Menü Eingang
Hiermit wählen Sie, ob das Fernsehgerät mit einem Fernsehsignal versorgt wird oder an andere
externe Signaleingänge wie z. B. DVD- bzw. Blu-Ray-Player oder an einen Kabelreceiver /
Satellitenreceiver (Set-Top Box) angeschlossen ist. Stellen Sie die gewünschte Signalquelle ein.
Drücken Sie die Taste SOURCE auf der Fernbedienung, um eine externe Signalquelle
anzuzeigen. Stellen Sie mit der TV-Taste den TV-Modus ein.
TV / Ext.1 / Ext.2 / AV / Component / PC / HDMI1 / HDMI2 / HDMI3/DVI / HDMI4
Sie können nur solche externen Geräte wählen, die an das Fernsehgerät angeschlossen
sind. Bei werden die angeschlossenen Signalquellen hervorgehoben und am
Anfang dargestellt. Nicht angeschlossene Signalquellen werden am Ende der Liste
dargestellt.
Ext. und PC bleiben immer aktiviert.
Verwenden der Farbtasten auf der Fernbedienung in Verbindung mit der Kanalliste.
Rot (Aktual.): Aktualisieren der angeschlossenen externen Geräte. Drücken Sie diese
Taste, wenn Ihr Eingangsgerät angeschaltet und angeschlossen ist, aber nicht in der
Liste erscheint.
TOOLS (Extras): Anzeigen der Menüs Name bearb. und Information.
Name bearb.
VCR / DVD / Kabel-STB / Sat-STB / PVR-STB / AV-Receiver / Spiel / Camcorder / PC / DVI / DVI PC / TV / IPTV / Blu-ray / HD
DVD / DMA
Vergeben Sie Namen für die an die Eingangsbuchsen angeschlossenen Geräte, um die Auswahl der Signalquelle zu vereinfachen.
W
enn ein PC mit einer Auflösung von 1920 x 1080 bei 60 Hz an den Anschluss HDMI IN 3(DVI) angeschlossen wird, stellen
Sie unter Name bearb. im Modus Eingang den HDMI3/DVI-Modus auf DVI PC ein.
Wenn Sie ein HDMI/DVI-Kabel mit dem HDMI IN 3(DVI)-Anschluss verbinden, stellen Sie den HDMI3/DVI-Modus im Bereich
Name bearb. des Modus Eingang auf DVI oder DVI PC ein. In diesem Fall ist ein gesonderter Audioanschluss erforderlich.
Menü Unterstützung
Eigendiagnose
Bildtest
Bei schlechter Bildqualität führen Sie einen Bildtest durch. Prüfen Sie das bunte T
estbild auf
dem Bildschirm um festzustellen, ob das Problem weiterhin besteht.
Ja: Wenn das Testbild nicht angezeigt wird oder wenn es verrauscht ist, wählen Sie Ja.
Möglicherweise liegt ein Problem mit dem Fernsehgerät vor. Hilfe erhalten Sie in diesem
Fall beim beim Callcenter von Samsung.
Nein: Wenn das Testbild fehlerlos angezeigt wird, wählen Sie Nein. Möglicherweise liegt
ein Problem mit Ihrer Haustechnik vor. Bitte überprüfen Sie sämtliche Anschlüsse noch
einmal. Wenn das Problem weiterhin besteht, schlagen Sie im Benutzerhandbuch für das
externe Gerät nach.
Audiotest
Bei schlechter Tonqualität führen Sie einen Audiotest durch. Sie können die Tonqualität
kontrollieren, indem Sie über den Fernseher ein im Gerät gespeicherte Melodie abspielen.
Wenn die Fernsehlautsprecher keinen Ton ausgeben, müssen Sie vor dem Audiotest sicherstellen, dass
Lautsprecherauswahl im Audiomenü auf TV-Lautsprecher eingestellt ist.
Die Melodie ist im Test auch dann zu hören, wenn Lautsprecherauswahl auf Ext. Lautsprecher eingestellt ist, oder wenn
der Ton mit der Taste MUTE stumm geschaltet wurde.
Ja: Wenn Sie den Ton beim Test nur durch einen Lautsprecher oder gar nicht hören, wählen Sie Ja. Möglicherweise liegt ein
Problem mit dem Fernsehgerät vor. Hilfe erhalten Sie in diesem Fall beim beim Callcenter von Samsung.
Nein: Wenn Sie den Ton über die Lautsprecher hören können, wählen Sie Nein. Möglicherweise liegt ein Problem mit Ihrer
Haustechnik vor. Bitte überprüfen Sie sämtliche Anschlüsse noch einmal. Wenn das Problem weiterhin besteht, schlagen Sie
im Benutzerhandbuch für das externe Gerät nach.
¦
❑
O
■
N
N
N
❑
■
N
N
¦
❑
■
●
●
■
N
N
●
●
Eigendiagnose ▶
Software-Update
HD-Anschlussplan
Samsung
kontaktieren
Unterstützung
Quellen
Namebearb.
Eingang
Aktual.
T
Extras
Quellen
TV
Ext.1 :----
Ext.2 :----
PC :----
AV :----
Komp. :----
Eigendiagnose
U
Navig.
E
Eingabe
R
Zurück
Bildtest ▶
Audiotest
Signalinformation
[620-Weuro]BN68-02326A-03L09.ind26 26 2009-10-08 ¿ÀÀü 9:28:35

Deutsch - 27
Signalinformation (nur Digitalkanäle)
Im Gegensatz zu analogen Kanälen, deren Empfangsqualität von "verregnet" bis ungestört variieren kann, zeichnen sich digitale
Kanäle (HDTV) dadurch aus, dass sie entweder perfekte Empfangsqualität bieten oder gar keinen Empfang ermöglichen. Deshalb
können Sie anders als bei Analogkanälen keine Feinabstimmung vornehmen. Sie können aber Ihre Antenne so einstellen, dass
der Empfang der verfügbaren Digitalkanäle besser wird.
Wenn die Signalstärkeanzeige ein schwaches Signal anzeigt, verändern Sie die Position Ihre Antenne so, dass die
Signalstärke zunimmt. Machen Sie dies solange, bis Sie die optionale Ausrichtung
mit dem stärksten Signal gefunden haben.
Software-Update
Möglicherweise wird Samsung in der Zukunft Upgrades der TV-Firmware anbieten. Diese
Upgrades können über das Fernsehen ausgeführt werden, sofern es an das Internet
angeschlossen ist, oder durch Herunterladen der neuen Firmware von samsung.com auf ein
USB-Speichergerät.
Aktuelle Version, wenn die Software bereits im Fernsehgerät installiert ist.
Alternative Software (Sicherung) zeigt die alte Version an, die ersetzt wird.
Die Software wird angegeben als Jahr/Monat/Tag_Version. Je aktueller das Datum, desto
neuer die Softwareversion. Installieren Sie möglichst immer die aktuellste Version.
PER USB
Legen Sie ein USB-Laufwerk mit dem gespeicherten Firmwareupgrade von samsung.com in
das Fernsehgerät ein. Achten Sie beim Einspielen des Upgrades darauf, die Stromversorgung
nicht zu unterbrechen und das USB-Laufwerk nicht zu entfernen. Das Fernsehgerät wird
automatisch ab- und wieder angeschaltet, sobald das Firmwareupgrade abgeschlossen ist.
Überprüfen Sie die Firmwareversion, nachdem das Upgrade durchgeführt wurde (die neue
Version hat eine höhere Nummer als die ältere Version).
Nachdem die Software aktualisiert wurde, sind die Video- und Audioeinstellungen wieder auf die
werkseitigen Standardwerte zurückgesetzt. Wir empfehlen, diese Werte aufzuschre
iben, damit
Sie sie nach dem Upgrade einfach wieder einstellen können.
PER Channel
Aktualisierung der Software über das Sendesignal.
Wenn Sie diese Funktion während des Übertragungszeitraums für Software wählen, sucht die Funktion nach verfügbarer
Software und lädt sie herunter.
Die zum Herunterladen der Software erforderliche Zeit hängt vom Signalstatus ab.
Update im Standby
Um die Softwareaktualisierung mit eingeschaltetem Hauptnetz fortzusetzen, wählen Sie mit den
Tasten ▲ oder ▼ „Ein“ aus. 45
Minuten nach Beginn des Standbymodus wird die manuelle Aktualisierung automatisch ausgeführt. Da intern die Stromversorgung
für das Gerät eingeschaltet ist, kann der LCD-Bildschirm leicht beleuchtet sein. Dieser Zustand kann etwas mehr als eine Stunde
andauern, bis die Softwareaktualisierung abgeschlossen ist.
Alternative Software (Sicherung)
Wenn es ein Problem mit der neuen Firmware gibt, durch das der Betrieb beeinflusst wird, können Sie die neue Software durch die
vorherige Version ersetzen.
Wenn die Software geändert wurde, wird die vorhandene Software angezeigt.
Sie können die aktuelle Software durch die alternative Software ersetzen, indem Sie "Alternative Software" wählen.
HD-Anschlussplan
In diesem Menü wird die Verbindungsmethode für optimale HDTV-Qualität vorgeschlagen. Beachten Sie diese Informationen,
wenn Sie externe Geräte an den Fernseher anschließen.
Samsung kontaktieren
Zeigen Sie diese Informationen an, wenn Ihr Fernseher nicht ordnungsgemäß arbeitet oder wenn Sie die Software aktualisieren
möchten. Sie finden hier Informationen zum Callcenter, zum Gerät und zum Herunterladen der Softwaredateien.
■
N
❑
N
N
N
■
■
N
N
■
■
N
N
❑
❑
Seitenverkleidung des
Fernsehgeräts
USB-Laufwerk
AktuelleVersion 2009/01/18_000001
PERUSB ▶
PERChannel
UpdateimStandby :45Min
AlternativeSoftware 2009/01/15_00000
U
Navig.
E
Eingabe
R
Zurück
Software-Update
[620-Weuro]BN68-02326A-03L09.ind27 27 2009-10-08 ¿ÀÀü 9:28:35

Deutsch - 28
MEDIENWIEDERGABE (USB & DLNA)
Anschließen eines USB-Geräts
1. Drücken Sie zum Einschalten des Computers die POWER-Taste.
2. Schließen Sie ein USB-Gerät mit Foto- und/oder Musikdateien an die USB -Buchse seitlich
am Fernsehgerät an.
3.
Wenn das Fenster zur Auswahl der Anwendung angezeigt wird, drücken Sie auf die Taste
ENTER
E
, um Media Play (USB) zu wählen.
MTP (Media Transfer Protocol) wird nicht unterstützt.
Als Dateisystem wird ausschließlich FAT16, FAT32 und NTFS unterstützt.
Einige Typen von USB-Digitalkameras und -Audiogeräten sind eventuell nicht mit
diesem Fernseher kompatibel.
Media Play unterstützt ausschließlich USB-Massenspeichergeräte vom
Typ MSC (Mass Storage Class). MSC-Geräte sind Massenspeicher zur
Übertragung von Daten. Beispiele für MSC sind Speicherkarten und
Flashkartenleser (Weder USB HDD noch HUB werden unterstützt.)
Stellen Sie die Verbindung direkt zum USB-Anschluss Ihres Fernsehgeräts
her. Wenn Sie eine gesonderte Kabelverbindung verwenden, können USB-
Kompatibilitätsprobleme auftreten.
Ehe Sie Ihr Gerät an das Fernsehgerät anschließen, sichern Sie Ihre Dateien,
um eventuellem Datenverlust vorzubeugen. SAMSUNG haftet nicht für Verlust
und Beschädigung von Daten.
Trennen Sie das USB-Gerät nicht, solange Daten geladen werden.
Je höher die Auflösung des Bilds, desto länger dauert es, um es auf dem Bildschirm anzuzeigen.
Die maximal unterstützte JPEG-Auflösung beträgt 15360x8640 Pixel.
Bei nicht unterstützten oder beschädigten Dateien wird die Meldung "Dateiformat wird nicht unterstützt" angezeigt.
MP3-Dateien mit DRM, die von einer nicht-lizenzfreien Site heruntergeladen worden sind, können nicht abgespielt
werden. Digital Rights Management (DRM) ist eine Technologie, die das Erstellen von Inhalten und die Distribution
und das Management der Inhalte integriert und umfassend unterstützt. Dies beinhaltet den Schutz der Rechte und der
Interessen der Content-Provider, die Verhütung von unerlaubtem Kopieren der Inhalte sowie das Management von
Abrechnung und Bezahlung.
Wenn Sie zu einem anderen Foto wechseln, kann das Laden einige Sekunden dauern. In diesem Fall wird das
Ladesymbol angezeigt.
Wenn mehr als ein MSC-Gerät angeschlossen ist, werden einige davon möglicherweise nicht anerkannt. Wenn ein Gerät
hohe elektrische Leistung (mehr als 500 mA oder 5 V) abfordert, wird es möglicherweise nicht versorgt.
Wenn eine Überstrom-Warnung angezeigt wird, während Sie ein USB-Gerät anschließen oder verwenden, wird das Gerät
möglicherweise nicht erkannt oder weist eine Störung auf.
Verwenden der Fernbedienungstasten im Menü Media Play
Taste Vorgang
▲/▼/◄/► Cursor bewegen und Elemente auswählen.
ENTER
E
Markiertes Element auswählen. Bei der Wiedergabe einer Diashow oder einer Musikdatei:
- Durch Drücken der Taste ENTER
E
während der Wiedergabe wird die Wiedergabe
unterbrochen.
- Durch erneutes Drücken der Taste ENTER
E
während der Wiedergabe wird die Wiedergabe
fortgesetzt.
∂
/
∑
Wiedergabe oder Pause der Diashow oder Musikdatei.
RETURN Zurück zum vorherigen Menü.
TOOLS Ausführen verschiedener Funktionen aus dem Photo- und Musikmenü.
∫
Anhalten der aktuellen Präsentation oder Musikdatei.
π
/
μ
Wechsel zur vorherigen Gruppe/nächsten Gruppe.
INFO Anzeigen von Dateiinformationen.
MEDIA.P Beenden des Modus Media Play.
<
P
>
,
EXIT, TV
Beenden des Modus Media Play und Rückehr in den TV-Modus.
¦
N
N
N
N
N
N
N
N
N
N
N
N
N
N
Seitenverkleidung des Fernsehgeräts
USB-Laufwerk
851,86MB/993,02MBFrei
Photo
SUM
SUM
Gerät
PHOTO
R
Zurück
Music Setup
[620-Weuro]BN68-02326A-03L09.ind28 28 2009-10-08 ¿ÀÀü 9:28:35

Deutsch - 29
Media Play funktion
Mit dieser Funktion können Sie auf einem USB-Speichermedium (MSC) gespeicherte Foto- und/oder Musikdateien anzeigen bzw.
wiedergeben.
Möglicherweise treten bei lizenzfreien Multimediadateien weniger Probleme auf.
Öffnen des Menüs Media Play (USB).
1. Drücken Sie die Taste MENU. Wählen Sie durch Drücken der Tasten ▲ oder ▼
die Option Anwendung, und drücken Sie dann die Taste ENTER
E
.
2. Wählen Sie durch Drücken der Tasten ▲ oder ▼ die Option Media Play (USB),
und drücken Sie dann die Taste ENTER
E
.
Das Menü Media Play (USB) wird geöffnet.
Drücken Sie die MEDIA.P-Taste auf der Fernbedienung, um das Media
Play-Menü anzuzeigen.
Drücken Sie die Taste SOURCE auf der Fernbedienung, um die Liste der
Signalquellen anzuzeigen. Drücken Sie dann auf ▲ oder ▼, und wählen Sie
USB.
3
Drücken Sie die rote Taste und dann ▲ oder ▼, um den USB-Speicher zu wählen. Drücken Sie die Taste ENTER
E
.
Diese Funktion kann sich je nach USB-Speicher abweichen.
Der Name des USB-Geräts wird links unten auf dem Bildschirm angezeigt.
4.
Drücken Sie die Tasten ◄ oder ►, um ein Symbol (Photo, Music, Setup) auszuwählen, und drücken Sie dann die Taste
ENTER
E
.
Um den Media Play-Modus zu beenden, drücken Sie auf der Fernbedienung die Taste MEDIA.P.
Sicheres Entfernen von USB-Geräten
Sie können das Gerät sicher vom Fernsehgerät entfernen.
1. Drücken Sie die TOOLS-Taste in der Dateiliste von Media Play oder während
eine Diashow oder Musikdatei wiedergegeben wird.
2.
Wählen Sie durch Drücken der Tasten ▲ oder ▼ die Option Sicher entfernen
und drücken Sie dann die Taste ENTER
E
.
3. Entfernen Sie das USB-Gerät sicher vom Fernsehgerät.
Bildschirmanzeige
Wechseln Sie mit den Auf- und Ab-Tasten entweder zum Abschnitt mit der Gruppenliste oder zum Abschnitt mit der Dateiliste.
Wählen Sie einen Abschnitt und drücken Sie auf die Taste ◄ oder ►, um einen Eintrag auszuwählen.
¦
N
N
O
O
N
N
N
INFO
AD
INFO
AD
851,86MB/993,02MBFrei
Photo
SUM
SUM
Gerät
PHOTO
R
Zurück
Music Setup
SUM Gerät
Wählen
T
Extras
R
Ordnerdarüber
1234.jpg
1235.jpg
1236.jpg
1237.jpg
1233.jpg
1232.jpg
1231.jpg
Diashow
Gruppeabspielen
Information
Sicher
entfernen
5/15
1 2
../Photo/
Abschnitt mit der Gruppenliste
Abschnitt mit der Dateiliste
SUM Gerät
Wählen
T
Extras
R
Ordnerdarüber
1234.jpg
1235.jpg
1236.jpg
1237.jpg
1233.jpg
1232.jpg
1231.jpg
1Datei(en)gew.
2
3 5
4
1 2
1
5/15
c
../Photo/
[620-Weuro]BN68-02326A-03L09.ind29 29 2009-10-08 ¿ÀÀü 9:28:38

Deutsch - 30
1 Anzeigegruppen: Die Sortiergruppe mit der ausgewählten Musikdatei wird hervorgehoben.
2 Ausgewählte Datei: Die gewählte Datei können Sie nun steuern. Die Fotodateien werden als Miniaturbilder angezeigt.
3 Aktuelles Gerät: Zeigt den Namen des aktuell ausgewählten Geräts an. Wählen Sie mit der roten
Taste ein Gerät.
Rote Taste (Gerät): Dient zur Auswahl eines angeschlossenen Geräts.
4 Informationen zur Auswahl von Elementen: Zeigt die Anzahl der Dateien an, die durch Drücken der gelben Taste ausgewählt
wurden.
5 Hilfe
Gelbe Taste (Wählen): Hiermit wählen Sie eine Datei aus der Dateiliste aus. Die ausgewählten Dateien werden mit dem
Symbol
c
gekennzeichnet. Drücken Sie die gelbe Taste noch einmal, um die Auswahl einer Datei zu stornieren.
TOOLS-Taste (Extras): Hiermit zeigen Sie die Optionsmenüs an. (Der Inhalt des Optionsmenüs richtet sich nach dem
jeweiligen Status.)
Menü der Optionen für Fotolisten
1. Drücken Sie die Taste MEDIA.P.
2. Wählen Sie durch Drücken der Tasten ◄ oder ► die Option Photo, und drücken
Sie dann die Taste ENTER
E
.
3. Wählen Sie die gewünschte Musikdatei mit den Tasten ◄ oder ►.
Wählen mehrerer Fotos
Wählen Sie die gewünschte Musikdatei mit den Tasten ◄ oder ►.
Drücken Sie dann die gelbe Taste.
Wiederholen Sie den obigen Vorgang, um mehrere Fotodateien
auszuwählen.
Links neben dem Namen der Fotodatei wird das Symbol
c
angezeigt.
4. Drücken Sie die Taste TOOLS.
Der Inhalt des Optionsmenüs richtet sich nach dem jeweiligen Status.
Diashow
Mit diesem Menübefehl können Sie eine Diashow mit den Fotodateien auf dem USB-Speicher ablaufen lassen.
Gruppe abspielen
Mit diesem Menübefehl können Sie eine Diashow nur mit den Fotodateien aus der aktuell ausgewählten Sortiergruppe ablaufen
lassen.
Alle abwählen (Wenn mindestens eine Datei gewählt ist)
Sie können die Auswahl aller Dateien aufheben.
Das Zeichen
c
zur Darstellung der entsprechenden Datei wird ausgeblendet.
Information
Die Informationen der Fotodatei wie Name, Größe, Auflösung, Änderungsdatum und Pfad werden angezeigt.
Sie können die Informationen von Fotodateien mit den gleichen Verfahren auch während einer Diashow anzeigen.
Drücken Sie die Taste INFO, um Informationen anzuzeigen.
Sicher entfernen
Sie können das Gerät sicher vom Fernsehgerät entfernen.
¦
N
N
❑
❑
❑
N
❑
N
O
❑
INFO
AD
SUM Gerät
Wählen
T
Extras
R
Ordnerdarüber
1234.jpg
1235.jpg
1236.jpg
1237.jpg
1233.jpg
1232.jpg
1231.jpg
Diashow
Gruppeabspielen
Information
Sicher
entfernen
5/15
1 2
../Photo/
[620-Weuro]BN68-02326A-03L09.ind30 30 2009-10-08 ¿ÀÀü 9:28:39

Deutsch - 31
Anzeigen eines Fotos oder einer Diashow
Anzeigen von Diashows
1. Drücken die Taste ▼, um den Dateilistenabschnitt zu wählen.
2.
Drücken Sie die Taste TOOLS.
3.
Wählen Sie durch Drücken der Tasten ▲ oder ▼ die Option Diashow, und
drücken Sie dann die Taste ENTER
E
.
Alle Dateien in der Dateiliste werden für die Diashow verwendet.
Die Bilder werden nacheinander, beginnend mit der aktuell angezeigten Datei
angezeigt.
Die Diashow wird entsprechend der Sortierreihenfolge in der Dateiliste
ausgeführt.
Musikdateien können während der Diashow automatisch abgespielt werden,
wenn Hintergrundmusik aktiviert (Ein) ist.
Drücken Sie die Fernbedienungstaste
∂
(Play)/ENTER
E
, während die
Fotoliste angezeigtwird, um die Diashow zu starten.
Diashow-Steuertasten
Taste Vorgang
ENTER
E
Abspielen/Pause der Diashow.
∂
Abspielen der Diashow.
∑
Diashow anhalten.
∫
Beenden Sie die Diashow und wechseln Sie wieder zur
Fotoliste.
π
/
μ
Ändern der Abspielgeschwindigkeit der Diashow.
TOOLS
Hiermit führen Sie verschiedene Funktionen aus den
Fotomenüs aus.
Abspielen der aktuellen Gruppe
1. Drücken Sie die Taste ▲, um zum Abschnitt mit der Gruppenliste zu wechseln.
2. Drücken Sie die Tasten ◄ und ►, um eine Gruppe auszuwählen.
3.
Drücken Sie die Taste
∂
(Wiedergabe). Eine Diashow mit den Dateien der
gewählten Gruppe beginnt.
Alternative
1.
Wählen Sie im Abschnitt mit der Dateiliste die Dateien aus der gewünschten
Gruppe aus.
Um zur vorherigen/nächsten Gruppe zu wechseln, drücken Sie die Taste
π
(REW) oder
μ
(FF).
2. Drücken Sie die Taste TOOLS.
3.
Wählen Sie durch Drücken der Tasten ▲ oder ▼ die Option Gruppe abspielen, und drücken Sie dann die Taste ENTER
E
.
Nur die Fotos aus der Sortiergruppe mit den ausgewählten Dateien werden für die Diashow verwendet.
So starten Sie eine Diashow nur mit den gewählten Dateien
1. Drücken die Taste ▼, um den Dateilistenabschnitt zu wählen.
2. Wählen Sie das gewünschte Foto mit den Tasten ◄ oder ► aus der Dateiliste aus.
3.
Drücken Sie die gelbe Taste.
4.
Wiederholen Sie den obigen Vorgang, um mehrere Fotodateien auszuwählen.
Links neben dem Namen der Fotodatei wird das Symbol
c
angezeigt.
Wenn Sie nur eine Datei wählen, wird keine Diashow gestartet.
Um die Auswahl sämtlicher Dateien aufzuheben, drücken Sie die Taste TOOLS und wählen Sie dann Alle abwählen.
5.
Drücken Sie die Taste
∂
(Wiedergabe) / ENTER
E
.
Die ausgewählten Dateien werden für die Diashow verwendet.
¦
N
N
N
N
O
N
●
N
N
N
N
N
N
INFO
AD
E
Pause◀▶Vorherige/Weiter
T
Extras
R
Zurück
SUM
1234.jpg
580x7652009/03/025/15
▶Normal
SUM Gerät
Wählen
T
Extras
R
Ordnerdarüber
1234.jpg
1235.jpg
1236.jpg
1237.jpg
1233.jpg
1232.jpg
1231.jpg
Diashow
Gruppeabspielen
Information
Sicher
entfernen
5/15
1 2
../Photo/
SUM Gerät
Wählen
T
Extras
R
Ordnerdarüber
1234.jpg
1235.jpg
1236.jpg
1237.jpg
1233.jpg
1232.jpg
1231.jpg
5/15
1 2
../Photo/
[620-Weuro]BN68-02326A-03L09.ind31 31 2009-10-08 ¿ÀÀü 9:28:42

Deutsch - 32
Alternative:
1. Wählen Sie die gewünschten Fotos mit der gelben Taste aus der Dateiliste aus.
2.
Drücken Sie die Taste TOOLS.
3.
Wählen Sie durch Drücken der Tasten ▲ oder ▼ die Option Diashow, und drücken Sie dann die Taste ENTER
E
.
Die ausgewählten Dateien werden für die Diashow verwendet.
Menü der Optionen für Diashows
1. Während einer Diashow (oder beim Anzeigen eines Fotos) drücken Sie die Taste
TOOLS, um die Option einzustellen.
2.
Wählen Sie durch Drücken der Tasten ▲ oder ▼ die Option, und drücken Sie
dann die Taste ENTER
E
.
Diashow anhalten / Diashow starten
Hiermit können Sie eine Diashow starten oder anhalten.
Sie können die Geschwindigkeit der Diashow festlegen.
Diese Funktion ist nur während einer Diashow verfügbar.
Wenn Sie die Tasten
π
(REW) oder
μ
(FF) während einer Diashow drücken, können Sie auch deren
Abspielgeschwindigkeit ändern.
Drehen
Sie können alle auf einem USB-Speichergerät gespeicherten Dateien drehen.
Wenn Sie die Taste ◄ drücken, wird es nacheinander um 270˚, 180˚, 90˚ und 0˚ gedreht.
Wenn Sie die Taste ► drücken, wird das Foto nacheinander um 90˚, 180˚, 270˚ und 0˚ gedreht.
Die gedrehte Datei wird nicht gespeichert.
Zoom
Sie können alle auf einem USB-Speichergerät gespeicherten Fotos vergrößern. (x1 → x2 → x4)
Um das vergrößerte Foto zu verschieben, drücken sie die Taste ENTER
E
und anschließend ▲/▼/◄/►. Beachten Sie, dass
die Funktion zum Verschieben deaktiviert ist, wenn das vergrößerte Bild kleiner als das ursprüngliche Fenster ist.
Die vergrößerte Datei wird nicht gespeichert.
Hintergrundmusik
Sie können die Hintergrundmusik auswählen, während Sie eine Diashow anzeigen.
Um diese Funktion zu verwenden, müssen auf dem UB-Speicher Musik- und Fotodateien gespeichert sein.
Aus: Die Hintergrundmusik wird nicht wiedergegeben.
Ein: Sofern die Hintergrundmusik verfügbar ist, wird sie abgespielt, wenn Sie diese Funktion aktivieren *Ein).
Musikdatei wählen (0 Datei(en) gew.)
Nur die gewählte Musikdatei wird als Hintergrundmusik eingestellt.
Bildeinstellungen / Toneinstellungen
Sie können die Bild- und Toneinstellungen festlegen.
Information
Die Informationen zur Fotodatei werden angezeigt.
Sicher entfernen
Sie können das Gerät sicher vom Fernsehgerät entfernen.
●
N
¦
❑
❑
N
N
❑
N
N
N
❑
N
N
❑
N
■
●
●
■
❑
❑
❑
Detenerpresentación
Diashow-Geschwindigkeit: Normal
Drehen
Zoom
Hintergrundmusik
Bildeinstellungen
Toneinstellungen
Information
Sicher
entfernen
U
Navig.
E
Eingabe
e
Beenden
Extras
[620-Weuro]BN68-02326A-03L09.ind32 32 2009-10-08 ¿ÀÀü 9:28:42

Deutsch - 33
Menü der Optionen für Fotolisten
1. Drücken Sie die Taste MEDIA.P.
2. Wählen Sie durch Drücken der Tasten ◄ oder ► die Option Music, und drücken
Sie dann die Taste ENTER
E
.
3. Drücken Sie die Taste ◄ oder ► , um die gewünschte Musikdatei zu wählen.
Wählen mehrerer Musikdateien
Wählen Sie mit den Tasten ◄ oder ► die gewünschte Musikdatei.
Drücken Sie dann die gelbe Taste.
Wiederholen Sie den obigen Vorgang, um mehrere Musikdateien
auszuwählen.
Links neben dem Namen der Musikdatei wird das Symbol
c
angezeigt.
4. Drücken Sie die Taste TOOLS.
Der Inhalt des Optionsmenüs richtet sich nach dem jeweiligen Status.
Gruppe abspielen
Mit diesem Menübefehl können Sie nur die Musikdateien aus der aktuell ausgewählten Sortiergruppe abspielen.
Alle abwählen (Wenn mindestens eine Datei gewählt ist)
Sie können die Auswahl aller Dateien aufheben.
Das Zeichen
c
zur Darstellung der entsprechenden Datei wird ausgeblendet.
Information
Die Informationen der Fotodatei wie Name, Größe, Änderungsdatum und Pfad werden angezeigt.
Sie können die Informationen von Musikdateien mit den gleichen Verfahren auch
während Gruppe abspielen anzeigen.
Drücken Sie die Taste INFO, um Informationen anzuzeigen.
Sicher entfernen
Sie können das Gerät sicher vom Fernsehgerät entfernen.
¦
N
N
❑
❑
N
❑
N
O
❑
INFO
AD
SUM Gerät
Wählen
T
Extras
R
Ordnerdarüber
HaHaHa
Gold
Shine
Way
Want
Me
Lies
ILoveYou
GlenHans
OnceOst
2007
Soundtrack
3/37
Traurig
Gruppeabspielen
Information
Sicher
entfernen
5 1 2 34
../Music/
[620-Weuro]BN68-02326A-03L09.ind33 33 2009-10-08 ¿ÀÀü 9:28:43

Deutsch - 34
Wiedergeben von Musik
Wiedergeben einer Musikdatei
1. Drücken die Taste ▼, um den Dateilistenabschnitt zu wählen.
2. Drücken Sie die Taste ◄ oder ► , um eine Musikdatei zu wählen, die abgespielt
werden soll.
3.
Drücken Sie die Taste
∂
(Wiedergabe)/ENTER
E
.
Dieses Menü zeigt nur Dateien mit der Dateinamenserweiterung MP3.
Dateien mit anderer Dateinamenserweiterung werden nicht angezeigt, auch
wenn sie auf dem gleichen USB-Gerät gespeichert wurden.
Die ausgewählte Datei wird zusammen mit der Abspieldauer oben angezeigt.
Um die Musiklautstärke anzupassen, drücken Sie auf der Fernbedienung die
Lautstärketaste auf der Fernbedienung. Wenn Sie den Ton ausschalten möchten, drücken Sie die MUTE-Taste auf der
Fernbedienung.
Wenn der Ton beim Abspielen von MP3-Datei ‘schräg’ ist stellen Sie im Tonmenü den Equalizer und SRS TruSurround
HD ein. (Bei übermodulierten MP3-Dateien kann es zu Tonproblemen kommen.)
Die Abspieldauer einer Musikdatei wird möglicherweise als ‘00:00:00’ angezeigt, wenn am Anfang der Datei keine
Informationen über die Abspieldauer gefunden werden.
π
(REW) oder
μ
(FF) sind bei der Wiedergabe funktionslos.
Regler für Musikwiedergabe
Taste Vorgang
ENTER
E
Wiedergabe/Pause einer Musikdatei.
∂
Spielen Sie die Musikdatei ab.
∑
Hiermit wird die Musikdatei angehalten.
∫
Beenden des Wiedergabemodus und Rückkehr zur Musikliste.
TOOLS Hiermit führen Sie verschiedene Funktionen aus den Musikmenüs aus.
Symbol für Informationen zur Musik-Funktion
p
Hiermit werden alle Musikdateien im Ordner (oder die markierte Datei) wiederholt abgespielt.
Wiederhol-M. ist aktiviert (Ein).
q
Hiermit werden alle Musikdateien im Ordner (oder die markierte Datei) einmal abgespielt.
Wiederhol-M. ist deaktiviert (Aus).
Abspielen einer Musikgruppe
1. Drücken Sie die Taste ▲, um zum Abschnitt mit der Gruppenliste zu wechseln.
2. Drücken Sie die Tasten ◄ und ►, um eine Gruppe auszuwählen.
3.
Drücken Sie die Taste
∂
(Wiedergabe). Die Dateien der ausgewählten Gruppe werden nun abgespielt.
Alternative:
1.
Wählen Sie im Abschnitt mit der Dateiliste die Dateien aus der gewünschten Gruppe aus.
Um zur vorherigen/nächsten Gruppe zu wechseln, drücken Sie die Taste
π
(REW) oder
μ
(FF).
2. Drücken Sie die Taste TOOLS.
3.
Wählen Sie durch Drücken der Tasten ▲ oder ▼ die Option Gruppe abspielen, und drücken Sie dann die TasteENTER
E
.
Die Musikdateien in der Sortiergruppe einschließlich der markierten Datei werden einmal abgespielt.
Abspielen ausgewählter Musikdateien
1. Drücken die Taste ▼, um den Dateilistenabschnitt zu wählen.
2. Wählen Sie mit den Tasten ◄ oder ► die gewünschte Musikdatei.
3.
Drücken Sie die gelbe Taste.
4.
Wiederholen Sie den obigen Vorgang, um mehrere Musikdateien auszuwählen.
Links neben dem Namen der Musikdatei wird das Symbol
c
angezeigt.
Um die Auswahl sämtlicher Dateien aufzuheben, drücken Sie die Taste TOOLS und wählen Sie dann Alle abwählen.
5.
Drücken Sie die Taste
∂
(Wiedergabe)/ENTER
E
.
Die gewählten Dateien werden nun wiedergegeben.
¦
N
N
N
N
N
N
N
N
●
N
N
N
N
N
E
Pause◀▶Zurück/Weiter
T
Extras
R
Zurück
SUM
ILoveYou
HaHaHaWay
▶00:00:04/00:04:043/37
[620-Weuro]BN68-02326A-03L09.ind34 34 2009-10-08 ¿ÀÀü 9:28:43

Deutsch - 35
Menü der Optionen für die Musikwiedergabe
Menü der Optionen für die Musikwiedergabe
Sie können Musikdateien wiederholt abspielen.
Bildeinstellungen / Toneinstellungen
Sie können die Bild- und Toneinstellungen konfigurieren.
Information
Die Informationen zur Musikdatei werden angezeigt.
Sicher entfernen
Sie können das Gerät sicher vom Fernsehgerät entfernen.
¦
❑
❑
❑
❑
Verwenden des Menüs Einstellungen
Mit dem Setup zeigen Sie die im Media Play-Menü vorgenommenen
Benutzereinstellungen an.
1. Drücken Sie die Taste MEDIA.P.
2.
Wählen Sie durch Drücken der Tasten ◄ oder ► die Option sETUP, und drücken
Sie dann die Taste ENTER
E
.
3. Wählen Sie mit den Tasten ▲ oder ▼ die gewünschte Option aus.
4.
Wählen Sie die Option mit den Tasten ◄ oder ► aus.
Um denMedia Play-Modus zu beenden, drücken Sie auf der Fernbedienung
die Taste MEDIA.P.
Hiermit können Sie Musikdateien wiederholt abspielen.
Wählen Sie die Wartezeit bis zum Aktivieren des Bildschirmschoners.
Information
Hiermit zeigen Sie die Informationen zum angeschlossenen Gerät an.
Sicher entfernen
Sie können das Gerät sicher vom Fernsehgerät entfernen.
¦
N
■
■
■
■
Wiederhol-Modus ◀An▶
Bildeinstellungen
Toneinstellungen
Information
Sicher
entfernen
U
Navig.
L
Einst.
e
Beenden
Extras
851,86MB/993,02MBFrei
Photo
SUM
SUM
Gerät
SETUP
e
Beenden
Music Setup
Wiederhol-M. ◀Ein▶
LaufzeitBildschirmsch. :2Std.
Information
Sicher
entfernen
U
Navig.
L
Einst.
R
Zurück
SUM Gerät
[620-Weuro]BN68-02326A-03L09.ind35 35 2009-10-08 ¿ÀÀü 9:28:44

Deutsch - 36
ANYNET
+
Anschließen von Anynet
+
-Geräten
Was ist Anynet
+
?
Bei Anynet
+
handelt es sich um eine Funktion, mit der Sie alle angeschlossenen Samsung-Geräte, die Anynet
+
unterstützen, mit
der Fernbedienung für Ihr Samsung-Fernsehgerät steuern können. Das Anynet
+
-System unterstützt nur Anynet
+
-fähige Samsung-
Geräte. Wenn Sie wissen möchten, ob Ihr Samsung-Gerät diese Funktion unterstützt, suchen Sie das Anynet
+
auf Ihrem Gerät.
Anschließen an ein Fernsehgerät
1. Verbinden Sie einen der Anschlüsse HDMI IN (1, 2, 3(DVI) oder 4) am Fernsehgerät mit dem HDMI OUT-Anschluss am
entsprechenden Anynet
+
-Gerät. Verwenden Sie hierfür ein HDMI-Kabel.
Anschluss an das Heimkinosystem
1. Verbinden Sie einen der Anschlüsse HDMI IN (1, 2, 3(DVI) oder 4) am Fernsehgerät mit dem HDMI OUT-Anschluss am
entsprechenden Anynet
+
-Gerät. Verwenden Sie hierfür ein HDMI-Kabel.
2. Verbinden Sie den HDMI IN-Anschluss des Heimkinosystems mit dem HDMI OUT-Anschluss des entsprechenden Anynet
+
-
Geräts. Verwenden Sie hierfür das HDMI-Kabel.
Verbinden Sie DIGITAL AUDIO OUT (OPTICAL)-Anschluss am Fernsehgerät und den Digital Audio-Eingang des
Heimkinosystems mit Hilfe des Glasfaserkabels.
Bei obiger Vorgehensweise überträgt der optische Anschluss nur 2-Kanalaudio. Die Tonausgabe erfolgt also nur über den
linken und rechten Frontlautsprecher sowie den Subwoofer des Heimkinosystems. W
enn Sie 5.1-Kanalton wünschen,
müssen Sie den DIGITAL AUDIO OUT (OPTICAL)-Ausgang des DVD-Players oder des Kabel-/Sattellitenreceivers (also
Anynet-Gerät 1 oder 2) direkt an einen Verstärker oder ein Heimkinosystem und nicht an das Fernsehgerät anschließen.
Schließen Sie nur ein Heimkinosystem an.
Sie können Anynet
+
-Geräte mithilfe eines HDMI 1.3-Kabels verbinden. Einige HDMI-Kabel unterstützen möglicherweise
keine Anynet
+
-Funktionen.
Anynet
+
arbeitet, wenn das AV-Gerät, das Anynet
+
unterstützt, im Standby-Modus oder angeschaltet ist.
Anynet
+
unterstützt maximal 12 AV-Geräte. Beachten Sie, dass Sie maximal 3 Geräte des gleichen Typs anschließen können.
¦
N
N
N
N
N
N
Anynet
+
Gerät 1
HDMI 1.3-Kabel
HDMI 1.3-KabelHDMI 1.3-Kabel
HDMI 1.3-Kabel
Anynet
+
Gerät 2 Anynet
+
Gerät 3 Anynet
+
Gerät 4
TV
Anynet
+
Gerät 1
HDMI 1.3-Kabel
HDMI 1.3-Kabel
HDMI 1.3-KabelHDMI 1.3-Kabel
TV
HDMI 1.3-Kabel
Optical Cable
Anynet
+
Gerät 2 Anynet
+
Gerät 3 Anynet
+
Gerät 4
Heimkino
[620-Weuro]BN68-02326A-03L09.ind36 36 2009-10-08 ¿ÀÀü 9:28:45

Deutsch - 37
Einrichten von Anynet
+
Drücken Sie die Taste TOOLS, um das Menü Extras anzuzeigen. Sie können das Anynet
+
-
Menü auch durch Auswahl von
+
(HDMI-CEC) auswählen.
Einstellungen
Anynet
+
Damit Sie die Funktionen von Anynet
+
nutzen können, muss Anynet
+
(HDMI-CEC) aktiviert
(Ein) sein.
Wenn die Funktion Anynet
+
(HDMI-CEC) deaktiviert ist, sind auch alle Funktionen in
Verbindung mit Anynet+ deaktiviert.
Automatisches Abschalten von Anynet
+
-Geräten durch Abschalten des Fernsehgeräts
Damit Sie Anynet
+
verwenden können, muss die Geräteauswahl der Fernbedienung auf
TV eingestellt sein.
Wenn Sie Autom. Ausschalten aktivieren (auf Ja setzen), werden auch die
angeschlossenen externen Geräte ausgeschaltet, wenn Sie das Fernsehgerät ausschalten.
Wenn das externe Gerät jedoch gerade aufnimmt, wird es möglicherweise abgeschaltet
oder auch nicht.
Wechseln zwischen von Anynet
+
-Geräten
1. Drücken Sie die Taste TOOLS. Drücken Sie die Taste ENTER
E
, um Anynet
+
(HDMI-
CEC) auszuwählen.
2. Wählen Sie durch Drücken der Tasten ▲ oder ▼ die Option Geräteliste, und drücken Sie
dann die Taste ENTER
E
.
Anynet
+
-Geräte aufgelistet.
Wenn Sie das gewünschte Gerät nicht finden, drücken Sie die rote Taste, um nach
Geräten zu suchen.
3.
Wählen Sie ein bestimmtes Gerät durch Drücken der Tasten ▲ oder ▼, und drücken Sie
dann die Taste ENTER
E
. Das System wechselt zum ausgewählten Gerät.
Nur wenn Sie Anynet
+
(HDMI-CEC) im Anwendung-Menü aktivieren (Ein), wird das
Menü Geräteliste angezeigt.
Das Umschalten zu den ausgewählten Geräten kann bis zu 2 Minuten dauern. Sie können diesen V
organg während des
Umschaltens nicht abbrechen.
Die zum Suchen nach Geräten erforderliche Zeit hängt von der Anzahl der angeschlossenen Geräte ab.
Wenn die Gerätesuche abgeschlossen ist, wird die Anzahl der gefundenen Geräte nicht angezeigt.
Zwar sucht das Fernsehgerät beim Anschalten mit der Netztaste automatisch die Geräteliste, aber die an das Fernsehgerät
angeschlossenen Geräte erscheinen dennoch möglicherweise nicht in der Geräteliste. Drücken Sie die rote
Taste, um die
angeschlossenen Geräte zu suchen.
Wenn Sie mit der Taste SOURCE eine externe Signalquelle eingestellt haben, können Sie die Anynet
+
-Funktion nicht
verwenden. Achten Sie darauf, immer nur mit Geräteliste zu einem Anynet
+
-Gerät zu wechseln.
Anynet
+
-Menü
Der Inhalt des Anynet
+
-Menüs hängt vom Typ und Status der an das Fernsehgerät angeschlossenen Anynet
+
-Geräte ab.
Anynet
+
-Menü Beschreibung
Fernsehen Wechsel vom Anynet
+
-Modus zum Fernsehmodus.
Geräteliste Anzeige der Anynet
+
-Geräteliste.
(Geräte_Name) MENU
Hiermit öffnen Sie die Menüs der angeschlossenen Geräte. Wenn z. B. ein DVD-
Recorder angeschlossen ist, wird das DVD-Menü des DVD-Recorders angezeigt.
(Geräte_Name) INFO
Zeigt das Wiedergabemenü des angeschlossenen Geräts an. Wenn z. B. ein DVD-
Recorder angeschlossen ist, wird das Wiedergabemenü des DVD-Recorders angezeigt.
Aufnahme: (*Aufnahmegerät)
Sofortiges Starten einer Aufnahme mit dem Rekorder (Diese Funktion ist nur für
Geräte mit Aufnahmefunktion verfügbar.)
Aufnahme anhalten:
(*Aufnahmegerät)
Beenden der Aufnahme.
Empfänger Die Tonausgabe erfolgt über den Receiver.
Bei Anschluss von mehr als einem Aufnahmegerät werden sie als (*Aufnahmegerät) angezeigt, bei Anschluss eines einzigen
Aufnahmegeräts erfolgt die Anzeige als (*Geräte_Name).
¦
T
❑
■
N
■
N
N
¦
N
N
N
N
N
N
N
N
N
U
Navig.
E
Eingabe
R
Zurück
Anynet
+
(HDMI-CEC) :
Ein▶
Einstellungen
Autom.Ausschalten :Ja
Medienwiedergabe(USB&DLNA)
Anynet
+
(HDMI-CEC)
Anwendung
U
Navig.
E
Eingabe
R
Zurück
Anynet
+
(HDMI-CEC) :
Ein
Einstellungen
Autom.Ausschalten :Ja▶
U
Navig.
E
Eingabe
R
Zurück
Fernsehen
Geräteliste
Aufnahme:DVDR
DVDRMENU
DVDRINFO
EmpfängerAus
Einstellungen
[620-Weuro]BN68-02326A-03L09.ind37 37 2009-10-08 ¿ÀÀü 9:28:45

Deutsch - 38
Im Anynet
+
-Modus verfügbare Tasten der TV-Fernbedienung
Gerätetyp Betriebsstatus Verfügbare Tasten
Anynet
+
-Gerät
Nach dem Wechseln zum Gerät wird das
Menü des entsprechenden Geräts auf
dem Bildschirm angezeigt.
Zifferntasten
▲/▼/◄/►/ Taste ENTER
E
Farbtasten / EXIT-Taste
Nach dem Wechseln zum Gerät beim
Abspielen einer Datei.
π
(Suche rückwärts) /
μ
(Suche vorwärts)
∫
(Stopp) /
∂
(Wiedergabe) /
∑
(Pause)
Gerät mit
eingebautem Tuner
Nach dem Wechseln zum Gerät beim
Fernsehen.
P
>
/ P
<
-Taste
Audiogerät Beim Aktivieren des Receivers.
Y
/ MUTE-Taste
Die Anynet
+
-Funktion ist nur nutzbar, wenn auf der Fernbedienung das Fernsehgerät als Empfänger eingestellt ist.
Die
∏
-Taste ist nur im Aufnahmestatus belegt.
Sie können Anynet
+
-Geräte nicht mit den Tasten an Ihrem Fernsehgerät bedienen. Sie können Anynet
+
-Geräte nur mit der
TV-Fernbedienung steuern.
Die TV-Fernbedienung funktioniert unter bestimmten Umständen nicht. Wählen Sie in diesem Fall das Anynet
+
-Gerät
nochmals aus.
Die Anynet
+
-Funktionen sind für Geräte anderer Hersteller nicht verfügbar.
Die Funktionen der Tasten
π
,
μ
können je nach Gerät unterschiedlich sein.
Aufnahme
Sie können Fernsehprogramme mit einem Samsung-Recorder aufnehmen.
1. Drücken Sie die Taste TOOLS. Drücken Sie die Taste ENTER
E
, um Anynet
+
(HDMI-
CEC) auszuwählen.
2. Wählen Sie durch Drücken der Tasten ▲ oder ▼ ein die Funktion zum sofortigen
Aufnehmen, und drücken Sie dann die Taste ENTER
E
. Die Aufnahme beginnt.
Bei mehr als einem Aufnahmegerät
Wenn mehrere Aufnahmegeräte angeschlossen sind, werden diese in einer Liste
angezeigt. Wählen Sie durch Drücken der Tasten ▲ oder ▼ ein Gerät, und drücken
Sie dann die Taste ENTER
E
. Die Aufnahme beginnt.
Wenn das Aufnahmegerät nicht angezeigt wird, wählen Sie Device List und drücken
Sie die rote Taste, um nach Geräten zu suchen.
3.
Zum Beenden drücken Sie die Taste EXIT.
Sie können das Signal der jeweiligen Quelle aufnehmen. Wählen Sie hierzu Aufnahme: (Geräte_Name).
Durch Drücken von
∏
wird die gerade laufende Sendung aufgenommen. Wenn Sie Bilder aus einer anderen
Signalquelle anzeigen, wird das Videosignal aus dieser Quelle aufgenommen.
Überprüfen Sie vor der Aufnahme, ob der Antennenstecker ordnungsgemäß am Aufnahmegerät angeschlossen
ist. Informationen zur richtigen Antennenverbindung mit dem Aufnahmegerät finden Sie im Benutzerhandbuch des
Aufnahmegeräts.
Wiedergabe über einen Receiver (Heimkinosystem)
Sie können die Tonwiedergabe über einen Receiver anstelle des TV-Lautsprechers laufen
lassen.
1. Drücken Sie die Taste TOOLS. Drücken Sie die Taste ENTER
E
, um Anynet
+
(HDMI-
CEC) auszuwählen.
2. Wählen Sie mit den Tasten ▲ oder ▼ die Option Empfänger. Drücken Sie die Taste ◄
oder ►, und wählen Sie On oder Off.
3.
Zum Beenden drücken Sie die Taste EXIT.
Wenn Ihr Receiver nur Audiosignale unterstützt, wird er in der Geräteliste
möglicherweise nicht angezeigt.
Der Receiver kann eingesetzt werden, wenn Sie den optischen Eingang des
Receivers mit dem Ausgang DIGITAL AUDIO OUT (OPTICAL) des Fernsehgeräts verbunden haben.
Wenn der Receiver (Heimkinosystem) angeschaltet ist, können Sie den Ton so hören, wie er vom optischen Ausgang der
Fernsehgeräts zur Verfügung gestellt wird. Wenn das Fernsehgerät ein (terrestrisches) DTV-Signal anzeigt, überträgt das
Fernsehgerät 5.1-Kanalton an den Receiver des Heimkinosystems. Wenn es sich bei der Signalquelle um eine digitale
Komponente wie beispielsweise einen DVD-Player handelt, der über HDMI an das Fernsehgerät angeschlossen ist, kann
der Receiver des Heimkinosystems nur 2-Kanalton wiedergeben.
Wenn es zu einer Unterbrechung der Stromversorgung des Fernsehgeräts kommt, während der Empfänger angeschaltet
(Ein) ist (z. B. durch Herausziehen des Netzkabels oder einen Stromausfall), ist möglicherweise Lautsprecher
auswählen auf Ext. Lautsprecher gesetzt, wenn Sie das Fernsehgerät wieder anschalten.
N
N
N
N
N
N
¦
N
N
N
N
N
¦
N
N
N
N
U
Navig.
E
Eingabe
R
Zurück
Fernsehen
Geräteliste
Aufnahme:DVDR
DVDRMENU
DVDRINFO
EmpfängerAus
Einstellungen
U
Navig.
E
Enter
R
Zurück
Fernsehen
Geräteliste
Aufnahme:DVDR
DVDRMENU
DVDRINFO
EmpfängerAus
Einstellungen
[620-Weuro]BN68-02326A-03L09.ind38 38 2009-10-08 ¿ÀÀü 9:28:45

Deutsch - 39
Fehlerbehebung für Anynet
+
Problem Mögliche Lösung
Anynet
+
funktioniert nicht. Überprüfen Sie, ob das Gerät Anynet
+
-tauglich ist. Das Anynet
+
-System unterstützt
nur Anynet
+
-fähige Geräte.
Schließen Sie nur einen Receiver (Heimkinosystem) an.
Prüfen Sie, ob das Netzkabel des Anynet
+
-Geräts richtig angeschlossen ist.
Prüfen Sie die Video/Audio/HDMI 1.3-Kabelverbindungen des Anynet
+
-Geräts.
Prüfen Sie, ob Anynet
+
(HDMI-CEC) im Setupmenü von Anynet
+
aktiviert ist.
Überprüfen Sie, ob die Fernbedienung im TV-Modus arbeitet.
Prüfen Sie, ob es sich um eine ausschließlich für Anynet
+
geeignete Fernbedienung
handelt.
Anynet
+
funktioniert unter bestimmten Umständen nicht. (Kanalsuche, Bedienung von
Media Play, Plug & Play usw.)
Stellen Sie nach dem Anschließen oder Entfernen des HDMI 1.3-Kabels sicher, dass
die Geräte wieder gesucht werden, oder schalten Sie das TV-Gerät aus und wieder ein.
Überprüfen Sie, ob die Anynet
+
-Funktion des Anynet
+
-Geräts eingeschaltet ist.
●
●
●
●
●
●
●
●
●
●
Ich möchte Anynet
+
starten. Prüfen Sie, ob das Anynet+-Gerät ordnungsgemäß an das Fernsehgerät
angeschlossen ist, und kontrollieren Sie zudem, ob AnynetAnynet
+
(HDMI-CEC) im
Anynet
+
-Menü Setup aktiviert (On) ist.
Drücken Sie die TV-Taste auf der TV-Fernbedienung, um zu TV zu wechseln. Drücken
Sie dann die TOOLS-Taste, um das Anynet
+
-Menü anzuzeigen und die gewünschte
Menüoption auszuwählen.
●
●
Ich möchte Anynet
+
beenden. Wählen Sie im Anynet
+
-Menü die Option Fernsehen.
Drücken Sie die Taste SOURCE auf der TV-Fernbedienung, und wählen Sie ein Gerät,
bei dem es sich nicht um ein Anynet
+
-Gerät handelt.
Drücken Sie auf P
>
/
<
, PRE-CH und FAV.CH, um den Fernsehmodus zu
wechseln. (Beachten Sie, dass die Kanaltaste nur funktioniert, wenn kein in den Tuner
integriertes Anynet
+
-Gerät angeschlossen ist.)
●
●
●
Die Meldung "Verbinden mit
Anynet+-Gerät" wird angezeigt.
Sie können die Fernbedienung nicht verwenden, während Sie Anynet
+
konfigurieren,
oder in einen anderen Anzeigemodus wechseln.
Verwenden Sie die Fernbedienung, wenn das Konfigurieren von Anynet
+
oder das
Ändern des Anzeigemodus abgeschlossen ist.
●
●
Keine Wiedergabe mit dem
Anynet
+
-Gerät.
Die Wiedergabefunktion kann nicht verwendet werden, wenn der Plug & Play-Vorgang
läuft.
●
Das angeschlossene Gerät wird
nicht angezeigt.
Prüfen Sie, ob das Gerät die Anynet
+
-Funktionen unterstützt.
Prüfen Sie, ob das HDMI 1.3-Kabel ordnungsgemäß angeschlossen wurde.
Prüfen Sie, ob Anynet
+
(HDMI-CEC) im Konfigurationsmenü von Anynet
+
aktiviert
(auf On) ist.
Suchen Sie noch mal nach Anynet
+
-Geräten
Sie können Anynet
+
-Geräte nur mithilfe eines HDMI 1.3-Kabels verbinden. Einige
HDMI-Kabel unterstützen möglicherweise keine Anynet
+
-Funktionen.
W
enn es durch eine Störung (z. B. Trennen des HDMI-Kabels, des Netzkabels oder
Stromausfall) zu einer Beendigung kommt, wiederholen Sie die Gerätesuche.
●
●
●
●
●
●
Das Fernsehprogramm kann nicht
aufgezeichnet werden.
Prüfen Sie, ob der Antennenstecker des Aufnahmegeräts ordnungsgemäß
angeschlossen ist.
●
Die Ausgabe des Fernsehtons
erfolgt über den Receiver.
Schließen Sie das Glasfaserkabel an das Fernsehgerät und den Receiver an.
●
¦
[620-Weuro]BN68-02326A-03L09.ind39 39 2009-10-08 ¿ÀÀü 9:28:45

Deutsch - 40
EMPFEHLUNGEN
Videotextfunktion
Die meisten Fernsehsender bieten über Videotext Informationen an. Auf der Videotext-Indexseite finden Sie Verwendungshinweise
zum Videotext. Darüber hinaus können Sie über die Tasten der Fernbedienung nach Bedarf verschiedene Optionen einstellen.
Für die korrekte Anzeige von Videotextinformationen muss der Senderempfang einwandfrei sein. Andernfalls können
Informationen unvollständig sein oder einige Seiten nicht angezeigt werden.
Sie können die Videotextseiten durch Drücken der Zifferntasten auf der Fernbedienung wechseln.
1
0
(Modus)
Drücken Sie diese Taste,
um den Videotextmodus
auszuwählen (LISTE/FLOF)
Wenn Sie diese Taste im Modus
LIST (Liste) drücken, wird in
den Listenspeichermodus
umgeschaltet. Im
Listenspeichermodus können
Sie mit der Taste
8
(Speichern)
Videotextseiten in einer Liste
speichern.
2
5
(anzeigen)
Drücken Sie diese Taste,
um verborgenen Text
anzuzeigen (z.
B. Antworten bei
Quizsendungen). Drücken Sie die
Taste erneut, um den Videotext
auszublenden.
3
4
(Größe)
Drücken Sie diese Taste, um
Videotext in doppelt so großen
Buchstaben in der oberen Hälfte
des Bildschirms anzuzeigen.
Drücken Sie die Taste erneut, um
den Text in der unteren Hälfte
des Bildschirms anzuzeigen.
Zum Ausblenden des Videotextes
drücken Sie die Taste erneut.
4
8
(Speichern)
Drücken Sie diese Taste, um
Videotextseiten zu speichern.
5 Farbtasten (rot/grün/gelb/blau)
Wenn der Sender das
FASTEXT-System verwendet,
sind die verschiedenen Themen
auf den Videotextseiten farbig
gekennzeichnet und können
mit den Farbtasten auf der
Fernbedienung angewählt
werden. Drücken Sie die
Farbtaste, die dem Thema
entspricht, das Sie anzeigen
möchten. Die Seite wird mit
anderen farbig markierten
Informationen angezeigt, die
auf dieselbe Art ausgewählt
werden können. Drücken Sie die
entsprechende Farbtaste, um
die vorherige oder nächste Seite
anzuzeigen.
6
/
(Videotext an/mix)
Drücken Sie diese Taste, um den
Videotextmodus zu aktivieren,
nachdem Sie einen Sender ausgewählt
haben, der Videotext anbietet.
Drücken Sie die Taste zweimal, um
die Videotextinformationen gleichzeitig
mit der aktuellen Sendung auf dem
Bildschirm einzublenden.
7
:
(Ende)
Videotext beenden
8
1
(Unterseite)
Drücken Sie diese Taste, um eine
verfügbare untergeordnete Seite
anzuzeigen.
9
2
(Weiterblättern)
Drücken Sie diese Taste, um die
nächste Videotextseite anzuzeigen.
0
3
(Zurückblättern)
Drücken Sie diese Taste, um die
vorherige Videotextseite anzuzeigen.
!
9
(Halten)
Drücken Sie diese Taste, um bei einer
angezeigten Seite, die mit weiteren,
untergeordnete Seiten verknüpft
ist, das automatische Umblättern
zu verhindern. Drücken Sie zum
Fortfahren die Taste erneut.
@
6
(Inhalts)
Drücken Sie diese Taste, um
die Videotext-Indexseite (Index)
anzuzeigen.
#
7
(Abbrechen)
Drücken Sie diese Taste, um beim
Suchen nach einer Seite die Sendung
anzuzeigen.
¦
N
N
INFO
AD
1
2
3
4
5
6
8
7
9
0
!
#
@
[620-Weuro]BN68-02326A-03L09.ind40 40 2009-10-08 ¿ÀÀü 9:28:46

Deutsch - 41
Die Videotextseiten sind in sechs Kategorien unterteilt:
Sportergebnisse Inhalt
A Gewählte Seitennummer
B Senderkennung
C Aktuelle Seitenzahl oder Suchhinweise
D Datum und Uhrzeit
E Text
F Statusinformation
FASTEXT-Informationen
Videotextinformationen sind oft auf mehrere, aufeinander folgende Seiten verteilt, die wie folgt aufgerufen werden können:
Eingabe der Seitennummer
Auswahl eines Titels in einer Liste
Auswahl einer farbigen Überschrift (FASTEXT-System)
Das Fernsehgerät unterstützt Videotext Version 2.5. Damit können zusätzlich Graphik oder Text angezeigt werden.
Je nach Übertragungsmodus können bei der Anzeige von Videotext am linken und rechten Rand Leerbereiche vorkommen.
In diesem Fall wird keine zusätzliche Graphik oder Text übertragen.
Ältere Fernsehgeräte, die Version 2.5 nicht unterstützen, können zusätzliche Graphiken oder Texte unabhängig vom Modus
der Videotextübertragung nicht anzeigen.
Drücken Sie die Taste TV, um Videotext zu beenden.
Anbringen des Standfußes
Voreinstellung: Stellen Sie die Leitschiene und die Halterungsabdeckung auf den
Standfuß, und befestigen Sie diese mit den Schrauben.
1. Verbinden Sie Ihren LCD-Fernseher mit dem Standfuß.
Der Fernseher sollte von mindestens zwei Personen getragen werden.
Verwechseln Sie beim Zusammenbauen nicht die Vorder- und Rückseite des
Standfußes.
Damit sichergestellt ist, dass das Fernsehgerät auf richtiger Höhe mit dem Standfuß
verbunden wird, dürfen Sie oben links und rechts nicht zu stark auf den Fernseher
drücken.
2.
Ziehen Sie zuerst die Schrauben an Position
1
und dann die Schrauben an Position
2
fest.
Stellen Sie das Gerät aufrecht hin und ziehen Sie die Schrauben fest. Wenn Sie d
ie
Schrauben festziehen, während der LCD-Fernseher liegt, kann es passieren, dass er
seitlich geneigt ist.
N
N
N
N
N
O
¦
N
N
N
N
N
INFO
AD
Vorderseite
Rückseite
1
2
[620-Weuro]BN68-02326A-03L09.ind41 41 2009-10-08 ¿ÀÀü 9:28:47

Deutsch - 42
Lösen des Standfußes
1. Entfernen Sie Schrauben von der Rückseite des Fernsehgerätes.
2. Lösen Sie den Standfuß vom Fernsehgerät.
Der Fernseher sollte von mindestens zwei Personen getragen werden.
3.
Decken Sie die Aussparung an der Unterseite des Fernsehgeräts mit der Abdeckung ab.
Anbringen der Wandhalterung
Mit der separat erhältlichen Wandhalterung können Sie das Fernsehgerät an einer Wand
befestigen.
Detaillierte Informationen zum Montieren der Wandhalterung finden Sie in den Anweisungen,
die im Lieferumfang der Wandhalterung enthalten sind. Lassen Sie sich beim Anbringen der
Wandmontagehalterung von einem Techniker helfen.
Samsung Electronics haftet nicht für Schäden an Gerät oder Personen, wenn die Montage
vom Kunden selbst durchgeführt wird.
Installieren Sie die Wandhalterung nicht bei angeschaltetem Fernsehgerät. Sie könnten
dabei einen Stromschlag erhalten und sich verletzen.
Verlegen der Kabel
Verstecken Sie die Kabel im Kabelschlauch, damit Sie durch den transparenten Standfuß hindurch
nicht zu sehen sind.
Kensington-Schloss als Diebstahlsicherung
Ein Kensington-Schloss dient zur physischen Sicherung des Systems bei Verwendung in
öffentlichen Bereichen. Je nach Hersteller können Aussehen und Verriegelungsverfahren
von der Abbildung abweichen.
Informationen zur richtigen Anwendung entnehmen Sie bitte der Bedienungsanleitung des
Kensington-Schlosses.
Das Schloss muss separat erworben werden.
Die Position des Kensington-Schlosses ist modellabhängig.
1.
"Führen Sie das Schloss in den Kensington-Einschub am LCD-Fernseher ein (1), und
drehen Sie es in die Verriegelungsposition (2).
2.
Schließen Sie das Kabel für das Kensington-Schloss an (3).
3.
Befestigen Sie das Kensington-Schloss an einem Tisch oder einem schweren
feststehenden Objekt.
N
N
3
1
2
¦
N
¦
¦
¦
<Optional>
[620-Weuro]BN68-02326A-03L09.ind42 42 2009-10-08 ¿ÀÀü 9:28:49

Deutsch - 43
Absichern des Einbaubereichs
Halten Sie die erforderlichen Abstände zwischen dem Gerät und anderen Objekten (z.B. Wänden) ein, um ausreichende Lüftung
sicherzustellen.
Wenn Sie dies nicht tun, besteht die Gefahr, dass aufgrund eines Anstiegs der Temperatur im Innern des Geräts ein Brand
ausbricht oder andere Probleme mit dem Gerät auftreten.
Stellen Sie das Gerät so auf, dass die in der Abbildung gezeigten Mindestabstände eingehalten werden.
Verwenden Sie nur Teile von Samsung Electronics, wenn Sie einen Standfuß oder eine Wandhalterung einsetzen.
Wenn Sie Teile eines anderen Herstellers verwenden, kann es zu Problemen mit dem Gerät oder zu Verletzungen
kommen, weil das Gerät herunterfällt.
Wenn Sie Teile eines anderen Herstellers verwenden, kann es zu Problemen mit dem Gerät oder zu einem Brand
kommen, weil die Innentemperatur aufgrund schlechter Belüftung des Geräts ansteigt.
Das Aussehen kann sich je nach Gerät unterscheiden.
Aufstellen des Geräts mit dem Standfuß Installieren des Geräts mit einer Wandhalterung
10 cm
10 cm
10 cm
10 cm
10 cm
10 cm
10 cm
Befestigen des Fernsehgeräts an der Wand
Achtung: Das Fernsehgerät kann hinfallen, wenn Sie daran ziehen, es schieben oder darauf klettern. Stellen
Sie insbesondere sicher, dass sich keine Kinder an das Gerät hängen oder es aus dem Gleichgewicht bringen.
Anderenfalls könnte das Gerät umkippen und schwere Verletzungen oder den Tod verursachen. Beachten
Sie alle Anweisungen der beigefügten Sicherheitshinweise. Noch mehr Stabilität erreichen Sie, wenn Sie den
Kippschutz installieren. Gehen Sie hierzu folgendermaßen vor.
So verhindern Sie, dass das Fernsehgerät umkippt:
1. Stecken Sie die Schrauben durch die Halterungen und befestigen Sie sie fest an der
Wand. Vergewissern Sie sich, dass die Schrauben gut halten.
Je nach Ausführung der Wand benötigen Sie zum Befestigen weiteres Material, wie
z.
B. einen Dübel.
Da die benötigten Halterungen, Schrauben und das Band nicht zum Lieferumfang
gehören, müssen Sie diese Teile gesondert erwerben.
2.
Entfernen Sie die Schrauben in der Mitte auf der Rückseite des Fernsehgeräts. Setzen
Sie diese Schrauben in die Halterungen ein und befestigen Sie die Schrauben dann
wieder am Fernsehgerät.
Die Schrauben werden möglicherweise nicht zusammen mit dem Gerät geliefert.
Kaufen Sie in diesem Fall Schrauben entsprechend den folgenden Angaben.
Daten der Schrauben
Für LCD-Fernsehgeräte von 17 – 29 Zoll: M4 X L15
Für LCD-Fernsehgeräte von 32 – 40 Zoll: M6 X L15
3.
Verbinden Sie die Halterungen an der Wand und die Halterung am Fernsehgerät mit
einem festen Band miteinander und ziehen Sie das Band dann fest.
Stellen Sie das Fernsehgerät in der Nähe der Wand auf, damit es nicht nach hinten
kippen kann.
Es ist noch sicherer, wenn die Halterungen an der Wand niedriger als die
Halterungen am Fernsehgerät sind.
Lösen Sie das Band, ehe Sie den Fernsehapparat bewegen.
4.
Kontrollieren Sie, ob alle Anschlüsse weiterhin fest verbunden sind. Prüfen Sie
regelmäßig die Verbindungen auf Zeichen von Ermüdung oder Versagen. Bei Zweifeln
hinsichtlich der Sicherheit Ihrer Halterung wenden Sie sich an einen professionellen
Installationsbetrieb.
¦
N
N
¦
■
N
N
N
N
N
N
N
Wand
Wand
[620-Weuro]BN68-02326A-03L09.ind43 43 2009-10-08 ¿ÀÀü 9:28:52

Deutsch - 44
Fehlerbehebung
Bei Fragen zum Fernsehen schauen Sie zuerst in dieser Liste nach. Wenn keiner dieser Tipps zur Fehlerbehebung weiterhilft,
öffnen Sie die Website 'www.samsung.com' und klicken Sie dort auf Unterstützung oder wenden Sie sich an das in der Liste auf
der letzten Seite angegebene Callcentre.
Problem Lösung
Bildqualität
Führen Sie zu allererst den Bildtest durch, um zu bestätigen, dass Ihr Fernsehgerät das
Testbild korrekt anzeigt.
Wechseln Sie zu MENU - Unterstützung - Eigendiagnose - Bildtest
Wenn das Testbild richtig angezeigt wird, kann das schlechte Bild möglicherweise durch die
Signalquelle oder das Signal verursacht sein.
●
Das Fernsehbild sieht nicht so
gut wie im Geschäft aus.
Wenn Sie einen analogen Kabel-/Satellitenreceiver verwenden, rüsten Sie diesen auf.
Verwenden Sie HDMI- oder Komponentenkabel, um HD Bildqualität zu ermöglichen.
Kabel-/Satellitenanschluss: Probieren Sie HD-Sender (HD, mit hoher Auflösung) aus der Kanalliste.
Antennenanschluss: Probieren Sie HD-Sender, nachdem Sie die Autoprogrammierung
durchgeführt haben.
Viele HD-Kanäle senden aufbereitete SD-Inhalte (Standardauflösung).
Stellen Sie den Kabel-/Satellitenreceiver auf eine Bildauflösung von 1080i oder 720p ein.
Überprüfen Sie, ob Sie beim Fernsehen den Mindestabstand entsprechend der Größe
des Fernsehers und der Auflösung des angezeigten Signals einhalten.
●
●
●
N
●
●
Das Bild ist verzerrt: Große
und kleine Blöcke, Punkte,
Pixelfehler
Durch die Kompression der Videoinhalte kann es zu Bildverzerrungen kommen,
insbesondere bei schnellen Bildern wie bei Sportsendungen und Actionfilmen.
Ein niedriger Signalpegel oder schlechte Qualität kann Bildverzerrungen verursachen.
Das ist kein Problem des Fernsehgeräts.
●
●
Falsche oder fehlende Farbe
bei Komponentenanschluss.
Vergewissern Sie sich, ob die Komponentenkabel mit den richtigen Anschlüssen
verbunden sind. Falsche oder lose Kontakte können Farbprobleme verursachen oder
dazu führen, dass auf dem Bildschirm gar kein Bild angezeigt wird.
●
Schlechte Farbwiedergabe
oder Helligkeit.
Stellen Sie die Bild-Optionen im Fernsehmenü ein. (Bild-Modus, Farbe, Helligkeit, Schärfe)
Stellen Sie die Energiesparmod.-Option im Einstellungen -Menü ein.
Versuchen Sie, die Grundstellung für das Bild wieder herzustellen, damit die
Standardbildeinstellungen verwendet werden. (Wechseln Sie zu MENU - Bild -
Bild zurücksetzen)
●
●
●
Gepunktete Linie am
Bildschirmrand.
Wenn die Bildgröße auf Bildschirmanpassung eingestellt ist, ändern Sie dies in 16:9.
Ändern Sie die Kabel-/Satellitenauflösung.
●
●
Das Bild ist nur beim AV-Eingang
(Composite) schwarzweiß.
Schließen Sie das Videokabel (Gelb) an die grüne Buchse von Komponenteneingang 1
des Fernsehgeräts an.
●
Beim Kanalwechsel friert
das Bild ein bzw. ist verzerrt,
oder die Bildanzeige erfolgt
verzögert.
Bei Anschluss an einen Kabelreceiver versuchen Sie, den Kabelreceiver zurückzusetzen.
(Schließen Sie das Netzkabel wieder an und warten Sie, bis der Kabelreceiver neu
startet. Dies kann bis zu 20 Minuten dauern)
Stellen Sie die Bildauflösung des Kabelreceivers auf 1080i oder 720p ein.
●
●
Tonqualität
Führen Sie zu allererst den Audiotest durch, um zu bestätigen, dass Ihr Fernsehgerät den
Ton korrekt ausgibt.
Wechseln Sie zu MENU - Unterstützung - Eigendiagnose - Audiotest
Wenn der Ton richtig ausgegeben wird, kann das Tonproblem möglicherweise durch die
Signalquelle oder das Signal verursacht sein.
●
Kein Ton oder Ton zu leise bei
maximaler Lautstärke.
Überprüfen Sie die Lautstärke des externen Geräts, das an Ihren Fernseher
angeschlossen ist, und stellen Sie dann die Lautstärke des Fernsehers entsprechend ein.
●
Bild ist gut, aber kein Ton. Stellen Sie die Option Lautsprecher auswählen im Tonmenü auf TV-Lautsprecher ein.
Vergewissern Sie sich, dass die Audiokabel vom externen Gerät an die richtigen
Audioeingänge am Fernsehgerät angeschlossen sind.
Überprüfen Sie, welcher Tonausgang am angeschlossenen Gerät eingestellt ist. (Beispiel:
Sie müssen die Audioeinstellung Ihres Kabelreceivers möglicherweise in HDMI ändern,
wenn HDMI an Ihr Fernsehgerät angeschlossen ist).
Wenn Sie ein DVI/HDMI-Kabel verwenden, ist ein separates Audiokabel erforderlich.
Deaktivieren Sie die SRS-Funktion, wenn Sie die Lautstärke auf mehr als 30 einstellen.
Ziehen Sie den Stecker aus der Kopfhörerbuchse. (sofern an Ihrem Fernseher vorhanden)
●
●
●
●
●
●
Rauschen vom Lautsprecher. Überprüfen Sie die Kabelverbindungen. Vergewissern Sie sich, dass kein Videokabel an
einen Audioeingang angeschlossen ist.
Überprüfen Sie die Signalstärke des Antennen-/Kabelanschlusses. Ein schwaches Signal
kann Verzerrungen verursachen.
●
●
¦
[620-Weuro]BN68-02326A-03L09.ind44 44 2009-10-08 ¿ÀÀü 9:28:52

Deutsch - 45
Problem Lösung
Kein Bild, kein Video
Der Fernseher kann nicht
eingeschaltet werden.
Vergewissern Sie sich, dass das Netzkabel sicher mit der Wandsteckdose und dem
Fernsehgerät verbunden ist.
Vergewissern Sie sich, dass die Netzsteckdose Strom liefert.
Drücken Sie die POWER-Taste am Fernsehgerät, um zu prüfen, ob die Fernbedienung
richtig funktioniert. Wenn das Fernsehgerät eingeschaltet wird, kann dies von der
Fernbedienung verursacht sein. Um das Problem mit der Fernbedienung zu beheben,
lesen Sie den Abschnitt 'Die Fernbedienung funktioniert nicht' weiter unten.
●
●
●
Das Fernsehgerät schaltet sich
automatisch aus.
Prüfen Sie im Menü Einstellungen , ob der Sleep-Timer eingeschaltet (Ein) ist.
Wenn das Fernsehgerät an Ihren PC angeschlossen ist, überprüfen Ihre die
Energiespareinstellungen Ihres PCs.
Vergewissern Sie sich, dass das Netzkabel sicher mit der Wandsteckdose und dem
Fernsehgerät verbunden ist.
Wenn bei Antennen-/Kabelanschluss länger als 10 bis 15 Minuten kein Signal empfangen
wurde, wird das Fernsehgerät automatisch ausgeschaltet.
●
●
●
●
Kein Bild/Video. Überprüfen Sie die Kabelverbindungen. (Unterbrechen Sie kurzzeitig alle
Kabelverbindungen zwischen dem Fernsehgerät und den externen Geräten)
Stellen Sie den Videoausgang Ihres externen Geräts (Kabel-/Satellitenreceiver, DVD-/Blu-
ray-Player) so ein, dass er zur Verbindung mit dem Fernsehgerät passt. Zum Beispiel:
Ausgang des externen Geräts: HDMI, also Fernseheingang: HDMI.
Stellen Sie sicher, dass das angeschlossene Gerät angeschaltet ist.
Vergewissern Sie sich, dass die richtige Signalquelle für den Fernseher eingestellt ist.
Drücken Sie dazu die Taste SOURCE auf der Fernbedienung des Fernsehers.
●
●
●
●
HF-Anschluss
(Terrestrisch/Kabel)
Es werden nicht alle Kanäle
empfangen.
Vergewissern Sie sich, dass das Antennenkabel korrekt angeschlossen ist.
Probieren Sie es mit Plug & Play, um die verfügbaren Kanäle zur Kanalliste
hinzuzufügen. Wechseln Sie zu MENU - Einstellungen - Plug & Play und warten Sie,
bis alle verfügbaren Kanäle gespeichert sind.
Prüfen Sie, ob die Antenne korrekt angeordnet ist.
●
●
●
Das Bild ist verzerrt: Große
und kleine Blöcke, Punkte,
Pixelfehler
Durch die Kompression der Videoinhalte kann es zu Bildverzerrungen kommen,
insbesondere bei schnellen Bildern wie bei Sportsendungen und Actionfilmen.
Ein schwaches Signal kann Verzerrungen verursachen. Das ist kein Problem des
Fernsehgeräts.
●
●
PC-Verbindung
Meldung ‘Modus nicht
unterstützt’.
Stellen Sie die Ausgangsauflösung und Frequenz Ihres PCs so ein, dass sie zu den vom
Fernsehgerät unterstützten Auflösungen passt.
●
Der PC wird immer in der
Liste der Signalquellen
angezeigt, auch wenn keiner
angeschlossen ist.
Das ist normal. Der PC wird immer in der Liste der Signalquellen angezeigt, auch wenn
keiner angeschlossen ist.
●
Video ist bei HDMI-Anschluss
in Ordnung, aber es gibt
keinen Ton.
Prüfen Sie die Einstellungen des Audioausgangs für Ihren PC.
●
[620-Weuro]BN68-02326A-03L09.ind45 45 2009-10-08 ¿ÀÀü 9:28:52

Deutsch - 46
Problem Lösung
Weitere
Das Bild wird nicht als Vollbild
ausgegeben.
Bei HD-Kanälen werden auf beiden Seiten schwarze Balken angezeigt, wenn Sie
aufbereitete SD-Inhalte (4:3) wiedergeben.
Bei Filmen mit einem anderen Seitenverhältnis als am Fernsehgerät eingestellt, werden
oben und unten schwarze Balken angezeigt.
Stellen Sie die Bildgröße an Ihrem externen Gerät oder am Fernseher auf Vollbild
ein.
●
●
●
Die Fernbedienung funktioniert
nicht.
Ersetzen Sie die Batterien der Fernbedienung (richtige Polung beachten).
Reinigen Sie das Sendefenster oben auf der Fernbedienung.
Zeigen Sie mit der Fernbedienung aus 1,5 bis 2 m Entfernung direkt auf das
Fernsehgerät.
●
●
●
Die Lautstärke bzw. Leistung
des Fernsehers kann mit der
Fernbedienung des Kabel-
/Satellitenreceivers nicht
reguliert werden.
Programmieren Sie die Fernbedienung des Kabel-/Satellitenreceivers so, dass
sie das Fernsehgerät anspricht. Den Code für SAMSUNG TV finden Sie in der
Bedienungsanleitung für Ihren Kabel-/Satellitenreceiver.
●
Meldung ‘Modus nicht
unterstützt’.
Überprüfen Sie die unterstützte Auflösung des Fernsehgeräts und stellen Sie die
Ausgangsauflösung des externen Geräts dementsprechend ein. Weitere Informationen
erhalten Sie im Abschnitt zum Einstellen der Auflösung in diesem Handbuch.
●
Plastikgeruch vom Fernsehen. Dieser Geruch ist normal und verschwindet im Lauf der Zeit.
●
Die Option Signalinformation
steht für das Fernsehgerät im
Menü für den Selbsttest nicht
zur Verfügung.
Diese Funktion ist nur bei digitalen Kanälen mit Antennenanschluss (HF/Coax) verfügbar.
●
Das Fernsehgerät ist zur
rechten oder linken Seite
geneigt.
Lösen Sie den Sockel des Standfußes vom Fernsehgerät und wiederholen Sie die
Montage.
●
Sockel des Standfußes kann
nicht montiert werden.
Stellen Sie sicher, dass Ihr Fernsehgerät auf einer ebenen Fläche steht. Wenn Sie die
Schrauben nicht vom Fernseher lösen können, verwenden Sie einen magnetischen
Schraubendreher.
●
Das Kanalmenü wird grau
angezeigt. (nicht verfügbar)
Das Menü Sender ist nur dann verfügbar, wenn eine TV-Signalquelle ausgewählt wurde.
●
Ihre Einstellungen gehen nach
30 Minuten oder bei jedem
Abschalten des Fernsehers
verloren.
Wenn das Fernsehgerät im Modus Shop Demo läuft, werden die Ton- und
Bildeinstellungen alle 30 Minuten zurückgesetzt. Wechseln Sie mit dem
Plug & Play-Prozess vom Modus Shop Demo zu Privatgebrauch. Drücken Sie
diese Taste SOURCE, um den TV-Modus auszuwählen. Wechseln Sie zu MENU →
Einstellungen → Plug & Play → ENTER
E
.
●
Vorübergehender Ausfall von
Bild oder Ton.
Überprüfen und korrigieren Sie ggf. die Kabelverbindungen.
Kann durch Verwenden von übermäßig starren oder dicken Kabeln verursacht werden.
Vergewissern Sie sich, dass die Kabel für langfristigen Gebrauch flexibel genug sind. Bei
Wandmontage empfehlen wir, Kabel mit 90 Grad-Steckern zu verwenden.
●
●
Sie erkennen möglicherweise
kleine Partikel, wenn Sie
den Rahmen um den
Fernsehbildschirm herum
genau betrachten.
Dies ist Teil des Produktdesigns und kein Defekt.
●
‘Verschlüsseltes Signal’ oder
‘Kein Signal/Schwaches Signal’
bei Einsatz einer CAM-Karte
(CI/CI+).
Überprüfen Sie, ob das CAM-Modul mit installierter CI(CI+)-Karte in den CI-Steckplatz
(Common Interface) eingesetzt wurde.
Ziehen Sie das CAM aus dem Fernsehgerät und setzen Sie es wieder in den Steckplatz
ein.
●
●
45 Minuten nach dem
Ausschalten schaltet sich
das Fernsehgerät von selbst
wieder ein.
Das ist Normal. Das Fernsehgerät aktiviert die OTA-Funktion (Over-the-Air) Funktion
selbst, um die beim Fernsehen heruntergeladene Firmware zu aktualisieren.
●
Wiederholtes Bild-/Tonproblem. Überprüfen und ändern Sie Signal/Signalquelle.
●
Der TFT-LCD-Bildschirm enthält Unterpixel. Hierfür ist eine ausgefeilte Fertigungstechnologie erforderlich ist. Allerdings
können ein paar zu helle oder zu dunkle Pixel auf der Bildäche zu sehen sein. Diese Pixelfehler haben keinen Einuss auf
die Geräteleistung.
N
[620-Weuro]BN68-02326A-03L09.ind46 46 2009-10-08 ¿ÀÀü 9:28:53

Deutsch - 47
Technische Daten
Modellname LE40B620 LE46B620
Bildschirmgröße
(Diagonal)
40 Zoll 46 Zoll
PC-Auflösung
(Optimal)
1920
x 1080 bei 60 Hz 1920 x 1080 bei 60 Hz
Ton
(Ausgang)
2 x 10 W 2 x 10 W
Abmessungen (BxTxH)
Gehäuse
Mit Fuß
1040 x 79 x 638 mm
1040 x 255 x 699 mm
1172 x 79 x 712 mm
1172 x 275 x 774 mm
Gewicht
Mit Fuß
19 kg 25 kg
Umgebungsbedingungen
Betriebstemperatur
Luftfeuchtigkeit (bei Betrieb)
Lagerungstemperatur
Luftfeuchtigkeit (Lagerung)
10°C bis 40°C (50°F bis 104°F)
10% bis 80%, nicht kondensierend
-20°C bis 45°C (-4°F bis 113°F)
5% bis 95%, nicht kondensierend
Drehbarer Fuß
(Links und rechts)
-20˚ ~ 20˚
Modellname LE52B620
Bildschirmgröße
(Diagonal)
52 Zoll
PC-Auflösung
(Optimal)
1920
x 1080 bei 60 Hz
Ton
(Ausgang)
2 x 10 W
Abmessungen (BxTxH)
Gehäuse
Mit Fuß
1321 x 81 x 805 mm
1321 x 305 x 866 mm
Gewicht
Mit Fuß
32 kg
Umgebungsbedingungen
Betriebstemperatur
Luftfeuchtigkeit (bei Betrieb)
Lagerungstemperatur
Luftfeuchtigkeit (Lagerung)
10°C bis 40°C (50°F bis 104°F)
10% bis 80%, nicht kondensierend
-20°C bis 45°C (-4°F bis 113°F)
5% bis 95%, nicht kondensierend
Drehbarer Fuß
(Links und rechts)
-20˚ ~ 20˚
Änderungen der technischen Daten und des Geräte-Designs vorbehalten.
Dies ist ein digitales Gerät der Klasse B.
Die technischen Daten zur benötigten Netzspannung finden Sie auf dem Etikett am Produkt.
¦
N
N
N
[620-Weuro]BN68-02326A-03L09.ind47 47 2009-10-08 ¿ÀÀü 9:28:53

Opmerking digitale TV
1. Functionaliteit betreffende digitale tv (DVB) is alleen beschikbaar in landen of gebieden waar DVB-T-signalen (MPEG2 en
MPEG4 AVC) voor digitale televisie per zendmast worden uitgezonden of waar u toegang hebt tot een compatibele DVB-C-
service (MPEG2 en MPEG4 AAC) voor kabel-tv. Vraag aan uw plaatselijke aanbieder of u DVB-T- of DVB-C-signalen kunt
ontvangen.
2.
DVB-T is de Europese DVB-consortiumstandaard voor de uitzending van digitale televisie per zendmast en DVB-C voor de
uitzending van digitale televisie over de kabel. Bepaalde speciale functies zoals EPG (Electric Program Guide), VOD (V
ideo
on Demand) en dergelijke zijn echter niet bij deze specificatie inbegrepen. Deze werken dus mogelijk niet.
3. Hoewel dit televisietoestel aan de huidige DVB-T- en DVB-C-standaarden vanaf [augustus 2008] voldoet, kan de
compatibiliteit met toekomstige digitale DVB-T-signalen per zendmast en digitale DVB-C-signalen per kabel niet worden
gegarandeerd.
4.
Afhankelijk van de landen/gebieden waar dit televisietoestel wordt gebruikt, kunnen leveranciers van kabeltelevisie
aanvullende kosten voor dergelijke services in rekening brengen en moet u wellicht akkoord gaan met hun voorwaarden en
bepalingen.
5.
Bepaalde digitale televisiefuncties zijn mogelijk niet beschikbaar in bepaalde landen of regio's en DVB-C werkt mogelijk niet
goed met bepaalde leveranciers van kabelservices.
6.
Neem voor meer informatie contact op met de klantenservice van SAMSUNG.
Voorzorgsmaatregelen bij weergave van stilstaand beeld
Stilstaande beelden kunnen permanente schade aan uw tv-scherm toebrengen
Laat niet langer dan 2 uur een stilstaand of gedeeltelijk stilstaand beeld op het LCD-scherm staan, dat kan namelijk
beeldretentie veroorzaken. Beeldretentie wordt ook wel inbranden genoemd. Verlaag bij de weergave van een stilstaand beeld
de helderheid en het contrast om beeldretentie te voorkomen.
Als u gedurende langere tijd naar uw LCD-tv kijkt terwijl het beeld in 4:3-formaat wordt weergegeven, kunnen
aan de linker- en rechterkant en in het midden van het scherm randen achterblijven. Dit wordt veroorzaakt
door de verschillen in lichtemissie op het scherm. Schade ontstaan door het bovengenoemde effect valt niet
onder de garantie.
Het gedurende langere tijd weergeven van stilstaande beelden van dvd’s of computerspellen kan (gedeeltelijke)
scherminbranding tot gevolg hebben. Om dit te voorkomen kunt u tijdens het weergeven van stilstaande beelden de
‘helderheid’ en het ‘contrast’ verminderen.
© 2009 Samsung Electronics Co., Ltd. All rights reserved.
❑
❑
●
●
●
De guren en illustraties in deze gebruikershandleiding dienen alleen ter referentie en kunnen afwijken van het werkelijke uiterlijk
van het product.
Productontwerp en -specicaties kunnen zonder aankondiging worden gewijzigd.
[620-Weuro]BN68-02326A-03L09.ind1 1 2009-10-08 ¿ÀÀü 9:28:53

Nederlands - 1
Licentie
TruSurround HD, SRS en het symbool zijn handelsmerken van SRS Labs, Inc. TruSurround HD -
technologie valt onder licentie van SRS Labs, Inc.
Geproduceerd onder licentie van Dolby Laboratories. Dolby en het symbool met de dubbele D zijn
handelsmerken van Dolby Laboratories.
Symbool
N O T
Opmerking
Knop Eenmaal
drukken
De toets
TOOLS
Indrukken
❑
❑
DE TV KLAAR MAKEN VOOR GEBRUIK
Overzicht van het bedieningspaneel ................................................. 2
Accesoires ......................................................................................... 3
Overzicht van het aansluitpaneel ...................................................... 4
Overzicht van de afstandsbediening ................................................. 6
Batterijen in de afstandsbediening plaatsen ...................................... 7
De menu's bekijken ........................................................................... 7
De TV op stand-by zetten .................................................................. 8
Plug & Play-functie (Afhankelijk van het model) ................................ 8
Het scherm bekijken .......................................................................... 9
KANAAL
Het menu Kanaal ............................................................................... 9
Kanalen beheren ............................................................................ 12
BEELD
Het menu beeld congureren .......................................................... 14
Uw tv als een computermonitor (pc) gebruiken ............................... 18
De tv instellen voor uw pc ................................................................ 19
GELUID
Het menu Sound congureren ......................................................... 20
De geluidsmodus selecteren ........................................................... 21
INSTELLINGEN
Het instellingenmenu gebruiken ...................................................... 22
De tijd instellen ................................................................................ 24
INVOER / ONDERSTEUNING
Het menu Invoer .............................................................................. 26
Het menu Ondersteuning ................................................................ 26
MEDIA PLAY (USB)
Een USB-apparaat aansluiten ......................................................... 28
De modus Media Play ..................................................................... 29
Opties voor de fotolijst ..................................................................... 30
Een foto of presentatie bekijken ...................................................... 31
Opties voor de presentatie .............................................................. 32
Opties voor de muzieklijst ................................................................ 33
Muziek afspelen ............................................................................... 34
Opties voor het afspelen van muziek .............................................. 35
Het Instellingenmenu gebruiken ...................................................... 35
■
■
■
■
■
■
■
■
■
■
■
■
■
■
■
■
■
■
■
■
■
■
■
■
■
■
■
■
■
ANYNET
+
Anynet
+
-apparaten aansluiten ......................................................... 36
Anynet
+ instellen
............................................................................. 37
Tussen Anynet
+
-apparaten schakelen ............................................ 37
Opnemen ......................................................................................... 38
Luisteren via een ontvanger (Thuisbioscoop) .................................. 38
Problemen oplossen m.b.t. Anynet
+
................................................ 39
AANBEVELINGEN
Teletekstfunctie ................................................................................ 40
De voet bevestigen .......................................................................... 41
De voet verwijderen ......................................................................... 42
De muurbevestiging installeren ....................................................... 42
De snoeren bij elkaar houden .......................................................... 42
Kensington-slot tegen diefstal ......................................................... 42
Installatieruimte ............................................................................... 43
De tv vastzetten aan de wand ......................................................... 43
Problemen oplossen ........................................................................ 44
Specicaties .................................................................................... 47
■
■
■
■
■
■
■
■
■
■
■
■
■
■
■
■
INHOUD
Nederlands
[620-Weuro]BN68-02326A-03L09.ind1 1 2009-10-08 ¿ÀÀü 9:28:53

Nederlands - 2
DE TV KLAAR MAKEN VOOR GEBRUIK
Overzicht van het bedieningspaneel
De vorm en kleur van het product kunnen variëren, afhankelijk van het model.
De toetsen op het voorpaneel kunnen worden geactiveerd door deze de vinger aan te raken.
1
P
(AAN/UIT): Druk op deze knop om de TV aan of uit te zetten.
2
AAN/UIT-LAMPJE: Als de stroom is ingeschakeld, knippert het lampje even en gaat het vervolgens uit. In de stand-by-modus
blijft het aan.
3
z
: Druk op deze toets om het kanaal te wijzigen. Gebruik in het schermmenu de toetsen
z
zoals u de
toetsen ▼ en ▲ op de afstandsbediening gebruikt.
4
Y
: Druk op deze toets om het volume harder of zachter te zetten.
Gebruik de
Y
-toetsen in het schermmenu zoals u de toetsen ◄ en ► op de afstandsbediening gebruikt.
5
MENU: Druk hierop om een schermmenu met de functies van de tv te openen.
6
SOURCE
E
: Hiermee wisselt u tussen alle beschikbare invoerbronnen. Gebruik deze toets in het schermmenu zoals u de
toets ENTER
E
op de afstandsbediening gebruikt.
7
AFSTANDSBEDIENINGSSENSOR: Richt de afstandsbediening op dit punt van de tv.
8
LUIDSPREKERS
¦
N
N
6
5
4
3
2
1
87
8
[620-Weuro]BN68-02326A-03L09.ind2 2 2009-10-08 ¿ÀÀü 9:28:53

Nederlands - 3
Accesoires
Afstandsbediening en
batterijen (AAA x 2)
Netsnoer Deksel onderkant
Garantiekaart / Veiligheidsvoorschriften
(niet op alle locaties beschikbaar)
Schoonmaakdoekje
Snoerhouder
(Afhankelijk van het model)
● Gebruikershandleiding
Controleer of de volgende onderdelen bij uw LCD-tv zijn geleverd. Neem contact op met uw verkoper als er onderdelen
ontbreken.
De vorm en kleur van het product kunnen variëren, afhankelijk van het model.
¦
N
N
[620-Weuro]BN68-02326A-03L09.ind3 3 2009-10-08 ¿ÀÀü 9:28:54

Nederlands - 4
Overzicht van het aansluitpaneel
De vorm en kleur van het product kunnen variëren, afhankelijk van het model.
1 COMPONENT IN
Aansluiting voor Component-video/-audio.
2 HDMI IN 1, 2, 3(DVI), 4 / DVI AUDIO IN
Maakt verbinding met de HDMI-aansluiting van een apparaat met HDMI-uitvoer.
Voor een HDMI-naar-HDMI-verbinding is geen audioaansluiting nodig.
Wat is HDMI?
HDMI (High-Definition Multimedia Interface) is een aansluiting die de overbrenging van digitale audio- en videosignalen
via één kabel mogelijk maakt.
Het verschil tussen HDMI en DVI is dat het HDMI-apparaat kleiner is dan het DVI-apparaat.
De tv geeft geluid en afbeeldingen mogelijk niet correct weer wanneer dvd-spelers / Blue-ray-spelers / aftakdozen /
satellietontvangers (set-top box) zijn aangesloten die oudere HDMI-versies dan versie 1.3 ondersteunen. W
anneer u een
oudere HDMI-kabel aansluit en er geen geluid klinkt, sluit u de HDMI-kabel aan op de HDMI IN 3(DVI)-aansluiting en
sluit u de geluidskabels aan op de DVI AUDIO IN-aansluitingen aan de achterkant van de tv. Als dit gebeurt, controleert
u de HDMI-versie bij het bedrijf waar u de dvd-speler/Blue-ray-speler/aftakdoos/satellietontvanger (set-top box) hebt
aangeschaft en vraagt u om een upgrade.
Gebruik de HDMI IN 3(DVI)-aansluiting voor een DVI-verbinding met een extern apparaat. Gebruik een DVI-naar-HDMI-
kabel of een DVI-HDMI-adapter (DVI-naar-HDMI) voor video-aansluiting en de DVI AUDIO IN-ingangen voor audio. Bij
gebruik van de HDMI/DVI-kabelverbinding, moet u de HDMI IN 3(DVI)-aansluiting gebruiken.
HDMI-kabels ouder dan versie 1.3 kunnen een slechte weergave veroorzaken of zorgen dat er helemaal geen beeld
wordt weergegeven.
3 PC IN [PC] / [AUDIO]
Aansluiting voor de video- en audio-uitvoer van de computer.
Als uw pc een HDMI-verbinding bezit, kunt u deze op de HDMI IN 1, 2, 3 (DVI) of 4-ingang aansluiten.
Als u uw pc een DVI-aansluiting bezit, kunt u deze op de HDMI IN 3(DVI) / DVI AUDIO IN-ingang aansluiten.
4 ANT IN
Maakt verbinding met een antenne of kabeltv-systeem.
5 KENSINGT
ON-SLOT (afhankelijk van het model)
Het Kensington-slot (optioneel) is een vergrendeling waarmee u het systeem fysiek kunt vastzetten voor gebruik in het
openbaar. Als u een vergrendelingsapparaat wilt gebruiken, neemt u contact op met de leverancier bij wie u de tv hebt
aangeschaft.
De plaats van het Kensington-slot kan variëren afhankelijk van het model.
¦
N
N
N
N
N
N
N
N
N
7890 6 5
@
2
#
!
21 34
[Zijpaneel tv]
[Achterpaneel tv]
Stroominvoer
[620-Weuro]BN68-02326A-03L09.ind4 4 2009-10-08 ¿ÀÀü 9:28:55

Nederlands - 5
6
H
(KOPTELEFOON)
De hoofdtelefoon kan op de hoofdtelefoonuitgang van uw set worden aangesloten. W
anneer de hoofdtelefoon is aangesloten,
wordt het geluid van de interne speakers uitgeschakeld.
U kunt de geluidsfunctie beperkt gebruiken wanneer u de koptelefoon op de tv aansluit.
Langdurig gebruik van een hoofdtelefoon met een hoog volume kan het gehoor beschadigen.
Wanneer een hoofdtelefoon op het systeem is aangesloten, komt er geen geluid uit de luidsprekers.
Het volume van de hoofdtelefoon en het volume van de tv worden op verschillende manieren aangepast.
7 DIGITAL AUDIO OUT (OPTICAL)
Maakt verbinding met een digitaal audio-element, zoals de ontvanger van een thuisbioscoop.
Wanneer een digitaal audiosysteem is aangesloten op de DIGITAL AUDIO OUT (OPTICAL)-aansluiting: verlaag het
volume van de tv en pas het geluidsniveau met de volumeregeling van het systeem aan.
5.1-kanaals audio is mogelijk wanneer de tv op een extern apparaat is aangesloten dat dit ondersteunt.
Wanneer de ontvanger (thuisbioscoop) is ingesteld op Aan, hoort u alleen geluid via de Optical-aansluiting van de
tv. Wanneer de tv een DTV-signaal (lucht) weergeeft, zendt de tv een channel 5.1-geluid naar de ontvanger van de
thuisbioscoop uit. Wanneer de bron een digitaal onderdeel is, zoals een dvd-speler / Blue-ray-speler / aftakdoos /
satellietontvanger (set-top box) en deze op de tv aangesloten is via HDMI, geeft de ontvanger van de thuisbioscoop
alleen een 2-kanaals signaal weer. Als u audio voor kanaal 5.1 wilt horen, sluit u de optische aansluiting van de dvd-
speler / Blue-ray-speler / aftakdoos / satellietontvanger (set-top box) rechtstreeks aan op een versterker of thuisbioscoop,
en niet op de tv.
8 SERVICE
Aansluiting alleen voor onderhoud.
9 AUDIO OUT [R-AUDIO-L]
Voor verbinding met de audio-ingangen op de versterker / thuisbioscoop.
Wanneer er een geluidsversterker op de AUDIO OUT [R-AUDIO-L]-uitgangen is aangesloten: verlaag het volume van de tv
en pas het geluidsniveau met de volumeregeling van de versterker aan.
0 EXT1, 2
Ingangen of uitgangen voor externe apparaten, zoals een videorecorder, dvd-speler
, spelcomputer of videodiscspeler.
In de EXT-modus ondersteunt DTV Out alleen MPEG SD-video en -audio.
Specificaties voor de invoer / uitvoer
Aansluiting
Invoer Uitgang
Video Audio (L / R) RGB Video + Audio(L / R)
EXT 1 O O O Alleen de TV-of DTV-uitgang is beschikbaar.
EXT 2 O O X Uitvoer naar keuze.
! AV IN [VIDEO] / [R-AUDIO-L]
Video- en audio-ingangen voor externe apparaten, zoals een camcorder of videorecorder.
@ USB
Aansluiting voor software-upgrades en Media Play, enz.
# COMMON INTERFACE-sleuf
Wanneer u bij sommige kanalen geen CI-/CI+-kaart hebt geplaatst, wordt ‘Scrambled Signal’ op het scherm
weergegeven.
De koppelingsgegevens met een telefoonnummer, de ID van de CI-/CI+-kaart, de host-ID en andere informatie worden
over ongeveer 2-3 minuten weergegeven. Neem contact op met uw serviceprovider als er een foutbericht wordt
weergegeven.
Wanneer de kanaalgegevens zijn geconfigureerd, wordt het bericht ‘Update voltooid’ weergegeven. Hiermee wordt
aangegeven dat de kanaallijst nu is bijgewerkt.
Afhankelijk van het model kan u worden gevraagd naar het wachtwoord voor Kinderslot wanneer de CI-kaart opnieuw
wordt geplaatst.
Zelfs als Kinderslot is ingesteld op Alles mag kan, afhankelijk van het model, een bericht worden weergegeven voor het
wachtwoord voor programma’s voor volwassenen (18 jaar en ouder).
U moet een CI-/CI+-kaart aanschaffen bij een lokale kabelaanbieder. Verwijder de CI-/CI+-kaart door deze voorzichtig
eruit te trekken, want de kaart kan beschadigen als u deze laat vallen.
Plaats de CI-/CI+-kaart in de richting die op de kaart staat gemarkeerd.
De plaats van het COMMON INTERFACE -slot kan variëren afhankelijk van het model.
CI-/CI+-kaarten worden niet ondersteund in sommige landen, regio’s en zendstations.
Controleer dit bij uw geautoriseerde verkoper.
De functie CI+ is alleen van toepassing op het model LE********P.
Als u problemen ondervindt, neemt u contact op met uw serviceprovider.
N
N
N
N
N
N
N
N
–
–
N
N
N
N
N
[620-Weuro]BN68-02326A-03L09.ind5 5 2009-10-08 ¿ÀÀü 9:28:55

Nederlands - 6
Overzicht van de afstandsbediening
U kunt de afstandsbediening gebruiken tot op een afstand van ongeveer 7 meter vanaf de tv.
Fel licht kan de werking van de afstandsbediening beïnvloeden.
De vorm en kleur van het product kunnen variëren, afhankelijk van het model.
1
POWER: Hiermee schakelt u de
tv in en uit.
2
CIJFERTOETSEN : Druk hierop
om het kanaal te wijzigen.
3
FAV.CH : Hiermee worden
lijsten met favoriete kanalen
weergegeven op het scherm.
4
Y
: Druk op deze toets om
het volume harder of zachter te
zetten.
5
SOURCE : Druk op deze toets
om de beschikbare videobronnen
weer te geven en te selecteren.
6
INFO : Druk op deze toets om
informatie weer te geven op het
tv-scherm.
7
TOOLS : Gebruik deze toets om
snel veelgebruikte functies te
selecteren.
8
CH LIST : Hiermee worden
kanaallijsten weergegeven op het
scherm.
9
GEKLEURDE TOETSEN :
Gebruik deze toetsen in het
menu van Kanalenlijst, Media
Play, enz.
!
DUAL : Keuze geluidseffect
@
Gebruik deze toetsen in de modi
Media Play en Anynet
+
. (
∏
:
Deze afstandsbediening kan
worden gebruikt voor Samsung-
recorders die de functie Anynet
+
ondersteunen)
#
TV : Selecteert rechtstreeks de
TV-modus.
$
PRE-CH : Hiermee kunt u
terugkeren naar het vorig kanaal
waar u naar keek.
%
MUTE
M
: Druk hierop om het
geluid tijdelijk uit te schakelen.
^
>
P
<
: Druk op deze toets
om het kanaal te wijzigen.
&
MENU : Geeft het hoofdmenu
weer.
*
GUIDE: Elektronische
programmagids (EPG)
weergeven
(
RETURN : Terug naar het vorige
menu
)
ENTER
E
: Gebruik deze toets
om items op schermmenu's te
selecteren en menuwaarden te
wijzigen.
a
EXIT : Druk op deze toets om het
menu te verlaten.
b
P.SIZE : Beeldformaat
selecteren.
c
MEDIA.P: Hiermee kunt u
muziekbestanden en foto's
afspelen.
d
SUBT. : Digitale ondertiteling
weergeven
e
AD: Selectie Audio Description.
Teletekstfuncties
5
0
: Teletekstmodus selecteren
(LIST/FLOF)
6
5
: Teletekst tonen
7
4
: Weergaveformaat voor
teletekst selecteren
8
8
: Teletekst opslaan
9
Fastext-onderwerp selecteren
0
/
: Wisselen tussen
Teletekst, Dubbel en Mix.
#
:
: Teletekstweergave verlaten
$
1
: Teletekst-subpagina
^
2
: Volgende teletekstpagina
3
: Vorige teletekstpagina
&
6
: Teletekstindex
(
9
: Teletekst vastzetten
a
7
: Teletekst uitschakelen
¦
N
N
N
INFO
C
H
L
I
S
T
AD
1 #
$
^
*
(
)
a
b
c
e
d
%
&
2
3
4
5
6
7
8
9
0
!
@
[620-Weuro]BN68-02326A-03L09.ind6 6 2009-10-08 ¿ÀÀü 9:28:55

Nederlands - 7
Batterijen in de afstandsbediening plaatsen
1. Open het klepje achter op de afstandsbediening met een opwaartse beweging zoals
aangegeven in de afbeelding.
2. Plaats twee AAA-batterijen.
Zorg ervoor dat de ‘+’ en ‘-’ van de batterijen overeenkomen met de afbeelding in het vakje.
3. Plaats het klepje weer terug.
Verwijder de batterijen en bewaar deze op een koele, droge plaats indien u de
afstandsbediening langere tijd niet gebruikt. (Bij normaal gebruik van de tv gaan de batterijen ongeveer een jaar mee.)
Controleer het volgende als de afstandsbediening niet werkt:
Is de TV ingeschakeld?
Zijn de plus- en minpolen van de batterijen tegengesteld geplaatst?
Zijn de batterijen leeg?
Is er een stroomstoring of zit de stekker niet in het stopcontact?
Schijnt er vlakbij speciaal fluorescerend licht of neonlicht?
BEWERKING
De menu's bekijken
Voordat u de tv gebruikt, moet u de stappen hieronder volgen om in het menu verschillende functies te selecteren en bij te stellen.
Met het schermmenu werken
Afhankelijk van het geselecteerde menu kunnen de toegangsstappen verschillen.
1. Druk op de toets MENU.
2.
Het hoofdmenu verschijnt op het scherm. Aan de linkerkant van het menu worden
pictogrammen weergegeven: Beeld, Geluid, Kanaal, Instellingen, Invoer, Toepassing,
Ondersteuning.
3. Druk op de toets ▲ of ▼ om een van de pictogrammen te selecteren.
4.
Druk op de toets ENTER
E
om het submenu van het pictogram weer te geven.
5. Druk op de toets ▲ of ▼ om het submenu van het pictogram te selecteren.
6.
Druk op de toets ◄ of ► om de waarde van een bepaald item te verhogen of verlagen.
Afhankelijk van het geselecteerde menu kan de aanpassing verschillen.
7
. Druk op de toets ENTER
E
om de configuratie te voltooien. Druk op de toets EXIT om het
menu te verlaten.
¦
N
N
N
¦
❑
INFO
AD
MENU-toets
Geeft het hoofdmenu weer.
ENTER
E
/ richtingstoetsen
Beweeg de cursor en selecteer een item.
Het gemarkeerde item selecteren.
De instelling bevestigen.
RETURN-toets
Terug naar het vorige menu.
EXIT
Het menu verlaten.
INFO
AD
INFO
AD
Modus :Standaard ▶
Backlight :7
Contrast :95
Helderheid :45
Scherpte :50
Kleur :50
Tint(G/R) :G50/R50
Geavanceerdeinstellingen
Beeld
Modus :Standaard
Backlight :7 ▶
Contrast :95
Helderheid :45
Scherpte :50
Kleur :50
Tint(G/R) :G50/R50
Geavanceerdeinstellingen
Afbeeldingsopties
Beeld
7
U
Verpl.
L
Instell.
E
Enter
R
Terug
▲
Backlight
▼
Help-pictogram
[620-Weuro]BN68-02326A-03L09.ind7 7 2009-10-08 ¿ÀÀü 9:28:56

Nederlands - 8
De TV op stand-by zetten
U kunt de TV op stand-by zetten om het energieverbruik te verminderen. De stand-bymodus kan handig zijn als u even wilt
stoppen met kijken (bijvoorbeeld tijdens het eten).
1. Druk op de POWER
P
-toets op de afstandsbediening.
Het beeld wordt uitgeschakeld en op uw tv gaat een stand-bylampje branden.
2.
Druk nogmaals op de POWER
P
-toets.
Laat de TV niet gedurende langere tijd op stand-by staan (zoals tijdens vakanties). Haal ook de stekker uit het stopcontact
en ontkoppel de antenne.
Plug & Play-functie (Afhankelijk van het model)
Wanneer u de tv voor het eerst inschakelt, worden enkele basisinstellingen automatisch
achtereenvolgens uitgevoerd.
1. Druk op de POWER-toets op de afstandsbediening.
U kunt ook de toets AAN/UIT
P
op de tv gebruiken.
Het bericht Select the OSD Language. wordt weergegeven.
2.
Druk op de toets ENTER
E
. Selecteer de gewenste taal door op de toets ▲ of ▼ te
drukken. Druk op de toets ENTER
E
om uw keuze te bevestigen.
3. Druk op de toets ◄ of ► om Winkeldemo of Thuisgebruik te selecteren en vervolgens
op ENTER
E
.
Voor het beste beeld in uw thuisomgeving raden wij u aan om de tv op de modus
Thuisgebruik in te stellen.
Winkeldemo is alleen bedoeld voor gebruik in winkels.
Wanneer het apparaat per ongeluk op de modus Winkeldemo is ingesteld en u terug wilt naar Thuisgebruik (standaard),
doet u het volgende: druk u op de volumeknop op de tv. Wanneer het schermmenu voor het volume wordt weergegeven,
houdt u de MENU-toets op de tv 5 seconden ingedrukt.
4.
Druk op de toets ENTER
E
. Selecteer het gewenste land door op de toets ▲ of ▼ te drukken. Druk op de toets ENTER
E
om uw keuze te bevestigen.
Na het selecteren van uw land in het menu Land moet u op sommige modellen vervolgend een pincode instellen.
Bij het invoeren van de pincode is 0-0-0-0 niet beschikbaar.
5.
Druk op de toets ▲ of ▼ om Ant of Kabel te selecteren en druk vervolgens op de toets ENTER
E
.
Ant: antennesignaal.
Kabel: kabelantennesignaal.
6.
Druk op de toets ▲ of ▼ om de kanaalbron te onthouden. Druk op de toets ENTER
E
om Start te selecteren.
Wanneer u de antennebron als Kabel instelt, kunt u de waarde voor een zoekopdracht voor digitale kanalen opgeven.
Zie voor meer informatie
.
Digitaal en Analoog: digitale en analoge kanalen.
Digitaal: digitale kanalen.
Analoog: analoge kanalen.
Het zoeken van de kanalen start en eindigt automatisch.
Druk op elk gewenst moment op de toets ENTER
E
om de opslagprocedure te onderbreken.
Nadat alle beschikbare kanalen zijn opgeslagen, wordt het bericht De modus Clock instellen weergegeven.
7
. Druk op de toets ENTER
E
. Druk op de toets ▲ of ▼ om Auto te selecteren en druk vervolgens op de toets ENTER
E
.
Wanneer u Handm. selecteert, wordt Huidige datum en tijd instellen weergegeven.
Wanneer u een digitaal signaal hebt ontvangen, wordt de tijd automatisch ingesteld. Indien dit niet het geval is, kiest u
Handm. om de klok in te stellen.
8
. Er wordt een beschrijving weergegeven voor de verbindingsmethode die de beste HD-schermkwaliteit biedt. Neem de
beschrijving door en druk op de toets ENTER
E
.
9. Het bericht Veel kijkplezier. wordt weergegeven. Wanneer u klaar bent, drukt u op de toets ENTER
E
.
Als u deze functie wilt resetten...
1. Druk op de toets MENU om het menu weer te geven. Druk op de toets ▲ of ▼ om
Instellingen te selecteren en druk vervolgens op de toets ENTER
E
.
2. Druk nogmaals op de toets ENTER
E
om Plug & Play te selecteren.
3. Voer uw viercijferige pincode in. De standaardpincode van een nieuw tv-toestel is ‘0-0-0-0’.
Als u de pincode wilt wijzigen, gebruikt u de functie PIN wijzigen.
De functie Plug & Play is alleen in de tv-modus beschikbaar.
¦
N
N
¦
N
N
N
N
N
N
N
N
N
N
N
N
N
N
N
N
N
N
INFO
AD
SelecttheOSDLanguage.
MenuLanguage :English ▶
E
Enter
Plug&Play
Plug&Play ▶
Taalkeuze :Nederlands
Tijd
Uitzenden
Beveiliging
Algemeen
Instellingen
[620-Weuro]BN68-02326A-03L09.ind8 8 2009-10-08 ¿ÀÀü 9:28:56

Nederlands - 9
Het scherm bekijken
Op het scherm worden het huidige kanaal en de status van bepaalde audio-/video-instellingen
weergegeve.
Druk op de toets INFO om de informatie weer te geven.
Druk op de toets INFO op de afstandsbediening. Op de tv worden het kanaal, het type
geluid en de status van bepaalde beeld- en geluidsinstellingen weergegeven.
▲, ▼: U kunt informatie over andere kanalen bekijken. Als u naar het huidige
geselecteerde kanaal wilt gaan, drukt u op de toets ENTER
E
.
◄, ►: U kunt informatie over het gewenste programma op het huidige kanaal
bekijken.
Druk nogmaals op de toets INFO of wacht ongeveer 10 seconden. De weergave
verdwijnt dan automatisch.
KANAAL
Het menu Kanaal
Land
Analoog kanaal
U kunt het land voor analoge kanalen veranderen.
Digitaal kanaal
U kunt het land voor digitale kanalen veranderen.
Het invoerscherm voor de pincode verschijnt. Voer uw viercijferige pincode in.
Automatisch opslaan
U kunt scannen op de beschikbare frequentiebereiken (beschikbaarheid is afhankelijk van uw land). Automatisch toegewezen
programmanummers komen mogelijk niet overeen met de feitelijke of gewenste programmanummers.
Wanneer een kanaal is vergrendeld door de functie Kinderslot, verschijnt het invoerscherm voor de pincode.
Air / Kabel
Antennebron onthouden
Digitaal en Analoog: digitale en analoge kanalen.
Digitaal: digitale kanalen.
Analoog: analoge kanalen.
Bij het selecteren van ‘ of ‘
Geef een waarde op voor het scannen van kabelkanalen.
Snel
Netwerk-ID: Toont de identificatiecode van het netwerk.
Frequentie: Geeft de frequentie voor het kanaal weer. (Verschilt per land)
Modulatie: Geeft de beschikbare modulatiewaarden weer.
Symboolsnelheid: Geeft de beschikbare symbol rates weer.
Scant op alle kanalen met actieve uitzendstations en slaat deze op in het geheugen van de
TV.
Als u Automatisch opslaan wilt stoppen, drukt u op de toets ENTER
E
.
Het bericht Autom. program. stoppen? wordt weergegeven.
Selecteer Ja door op de toets ◄ of ► te drukken en druk vervolgens op de toets ENTER
E
.
¦
O
●
●
N
¦
❑
■
■
N
❑
N
■
●
●
●
●
N
N
N
Land ▶
Automatischopslaan
Handm.opslaan
OptieCableSearch
Volledigegids
Minigids
Standaardgids
:Volledigegids
Kanalenlijst
Kanaal
INFO
AD
DTV Air
15
abc1
18:00 ~ 6:00
18:11 Thu 6 Jan
Life On Venus Avenue
Unclassified
No Detaild Information
' Information
[620-Weuro]BN68-02326A-03L09.ind9 9 2009-10-08 ¿ÀÀü 9:28:56

Nederlands - 10
Handm. opslaan
Scant handmatig op een kanaal en slaat het op in het geheugen van de TV.
Wanneer een kanaal is vergrendeld door de functie Kinderslot, verschijnt het invoerscherm voor de pincode.
Digitaal kanaal
Handmatig opslaan voor digitale kanalen.
Digitaal kanaal is alleen beschikbaar in DTV-modus.
Kanaal: stel het kanaalnummer in met behulp van de toetsen ▲, ▼ of met de cijfertoetsen (0~9).
Frequentie: stel de frequentie in met behulp van de cijfertoetsen.
Bandbreedte: stel de bandbreedte in met behulp van de toetsen ▲, ▼ of met de cijfertoetsen(0~9).
Zodra dit is voltooid, worden de kanalen in de kanalenlijst bijgewerkt.
Analoog kanaal
Handmatig opslaan voor analoge kanalen.
Prog. (Programmanummer dat aan een kanaal wordt toegewezen): stel het programmanummer in met behulp van de toetsen
▲, ▼ of met de cijfertoetsen (0~9).
: stelt de waarde van het kleursysteem in met behulp van de toets▲ of ▼.
: stelt de waarde van het geluidssysteem in met behulp van de toets ▲ of ▼.
Kanaal (Als u het nummer weet van het kanaal dat u wilt opslaan): Druk op de toets ▲ of ▼ om C (Ant kanaal) of S (Kabel
kanaal) te selecteren. Druk op de toets ►, druk vervolgens op de toetsen ▲, ▼ of op de cijfertoetsen (0~9) om het gewenste
nummer te selecteren.
U kunt het kanaalnummer ook direct selecteren door de cijfertoetsen (0~9) in te drukken.
Als er geen geluid is of als het geluid is vervormd, selecteert u nogmaals de gewenste geluidsstandaard.
Zoeken (Als u de kanaalnummers niet weet): druk op de toets ▲ of ▼ om met zoeken te beginnen. De tuner scant het
frequentiebereik totdat het eerste kanaal of het door u geselecteerde kanaal in beeld komt.
Opslaan (Het kanaal en het bijbehorende programmanummer opslaan): instellen op OK door de toets ENTER
E
in te
drukken.
Kanaalmodus
P (Programmamodus): als u klaar bent met instellen, zijn de zendstations die u kunt ontvangen, toegewezen aan de
positienummers P00 tot P99. In deze modus kunt u een kanaalnummer selecteren door het positienummer in te toetsen.
C (Antennekanaalmodus): in deze modus kunt u een kanaal selecteren door het nummer in te toetsen dat aan het
zendstation is toegewezen.
S (Kabelkanaalmodus): in deze stand kunt u een kanaal selecteren door het nummer in te toetsen dat aan het
kabelkanaal is toegewezen.
Optie kabel zoeken (afhankelijk van het land)
Hiermee worden extra zoekopties ingesteld zoals de frequentie en de Symboolsnelheid voor het zoeken naar een kabelnetwerk.
Startfrequentie: Stelt de startfrequentie in (verschilt per land)
Stopfrequentie: Stelt de stopfrequentie in (verschilt per land)
Modulatie: Geeft de beschikbare modulatiewaarden weer.
Symboolsnelheid: Geeft de beschikbare symbol rates weer.
Volledige gids / Minigids
De EPG (elektronische programmagids)-informatie wordt verstrekt door de kabelaanbieders. Programmavermeldingen kunnen
leeg of verouderd zijn ten gevolge van de informatie die voor een bepaald kanaal wordt uitgezonden. De weergave wordt
dynamisch bijgewerkt zodra nieuwe informatie beschikbaar is.
U kunt het gidsmenu ook laten weergeven door simpelweg op de toets GUIDE te drukken. (Raadpleeg de beschrijvingen om
de Standaardgids te configureren.)
Volledige gids
hiermee geeft u de programma-informatie weer als segmenten die per uur zijn gesorteerd. Er wordt programma-informatie voor
twee uur weergegeven waarin u in tijd vooruit of achteruit kunt bladeren.
Minigids
de informatie over elk programma wordt weergegeven door elke regel onder het scherm Minigids van het huidige kanaal, vanaf het
huidige programma en verder in volgorde van het begintijdstip van het programma.
❑
N
N
■
N
●
●
●
N
■
●
●
●
●
N
N
●
●
N
❑
●
●
●
●
❑
O
■
■
[620-Weuro]BN68-02326A-03L09.ind10 10 2009-10-08 ¿ÀÀü 9:28:56

Nederlands - 11
U kunt de Volledige gids of de Minigids laten weergeven wanneer u de toets GUIDE op de afstandsbediening indrukt.
Kanalenlijst
Raadpleeg de ‘Kanalen beheren’-instructies voor de uitgebreide procedures voor het gebruik van de Kanalenlijst.
U kunt deze opties eenvoudig selecteren door op de toets CH LIST op de afstandsbediening te drukken.
Kanaalmodus
Wanneer druk op de toets P
>
/
<
, Kanalen wisselen in de lijst met favoriete kanalen.
Toegev. kanalen
Kanalen worden verwisseld in de opgeslagen lijst kanalen.
Favoriete kanalen
Kanalen worden verwisseld in de favoriete lijst kanalen.
Fijnafstemming
Als de ontvangst goed is, hoeft u het kanaal niet verder af te stellen omdat dat tijdens het zoeken en opslaan automatisch is
gebeurd. Is het signaal echter zwak of vervormd, dan kunt u het kanaal handmatig fijner afstemmen.
Opgeslagen kanalen die handmatig fijner zijn afgesteld, zijn gemarkeerd met een asterisk ‘*’
rechts van het kanaalnummer in
de kanaalbalk.
Wanneer u de fijnafstemming wilt resetten, selecteert u Reset door op de toets ▲ of ▼ te drukken en vervolgens op de toets
ENTER
E
te drukken.
Alleen analoge tv-kanalen kunnen fijn worden afgestemd.
De Volledig / Minigids gebruiken
Wat wilt u doen? Zo moet het:
Een programma in de EPG-lijst bekijken Selecteer een programma door op de toets ▲, ▼, ◄, ► te drukken.
De gids verlaten Druk op de blauwe toets
Wanneer het volgende programma wordt geselecteerd, is dit gepland terwijl het klokpictogram wordt weergegeven. Wanneer
de toets ENTER
E
opnieuw wordt ingedrukt, drukt u op de toets ◄, ► om Progr. annuleren te selecteren. De planning wordt
geannuleerd en het klokpictogram verdwijnt.
Programma-informatie weergeven Selecteer het gewenste programma door op de toets ▲, ▼, ◄, ► te
drukken.
Druk vervolgens op de toets INFO wanneer het door u gekozen
programma wordt geselecteerd.
De programmatitel bevindt zich boven het midden van het scherm.
Druk op de toets INFO voor uitgebreide informatie. De gedetailleerde informatie bevat het kanaalnummer
, de speelduur, de
statusbalk, de leeftijdsbeperking, de videokwaliteit (HD/SD), geluidsmodi, ondertiteling of teletekst, talen voor ondertiteling of
teletekst, en een korte samenvatting van het geselecteerde programma. ‘...’ wordt weergegeven als de samenvatting te lang is.
Wisselen tussen de Volledige gids en de Minigids Druk herhaaldelijk op de rode toets.
Volledige gids
Hiermee bladert u snel terug (24 uur).
Hiermee bladert u snel vooruit (24 uur).
Druk herhaaldelijk op de groene toets.
Druk herhaaldelijk op de gele toets.
❑
❑
O
❑
■
■
❑
N
N
N
Volledigegids
E
Bekijken Informatie Pagina Minigids +24uur Sluiten
DTVCable900ftn2:10Tue1Jun
FreshmenOnCampus2:00-2:30
NoDetailedInformation
Today
2:00-3:00 3:00-4:00
MintExtra
Loaded
40withDynamiteMC
TheDistillery
SmashHits!Sunday
900ftn
901ITVPlay
902Kerrang!
903Kiss
904oneword
905Hits
▼
StreetHypn..
Kisstory
No
Information
NoInformation
NoInformation
FreshmenO..
900
E
Bekijken Informatie Pagina Volledigegids Sluiten
Minigids DTV
Cable900ftn
StreetHypnosis
BoozeBritain
2:00
2:30
5:00
Freshmen
OnCampus
▼
[620-Weuro]BN68-02326A-03L09.ind11 11 2009-10-08 ¿ÀÀü 9:28:57

Nederlands - 12
Kanalen beheren
Met dit menu kunt u favoriete kanalen toevoegen of verwijderen en de programmagids voor digitale uitzendingen gebruiken.
Alle kanalen
Toont alle momenteel beschikbare kanalen.
Toegev. kan.
Toont alle toegevoegde kanalen.
Favoriet
Toont alle favoriete kanalen.
Druk op de afstandsbediening op de toets FAV.CH om de favoriete kanalen die u hebt
ingesteld te selecteren.
Geprogrammeerd
Toont alle momenteel gereserveerde programma’s.
Selecteer een kanaal in het scherm Alle kanalen, Toegev. kan. of Favoriet door op de toetsen ▲ / ▼ te drukken en door op
de toets ENTER
E
te drukken. Vervolgens kunt u naar het geselecteerde kanaal kijken.
De gekleurde toetsen met de Kanalenlijst gebruiken
Rood (Type kanaal): Schakel tussen TV, Radio, Data / Overig en Alle.
Groen (Zoom): Vergroot of verkleint een kanaalnummer.
Geel (Keuze): Selecteert meerdere kanaallijsten. U kunt de functies Toevoegen/Verwijderen, Toevoegen als Favoriet/
Verw. uit Favorieten tegelijkertijd voor meerdere kanalen uitvoeren. Selecteer de gewenste kanalen. Druk op de gele toets
om alle geselecteerde kanalen tegelijkertijd te selecteren. Het symbool
c
verschijnt links van de geselecteerde kanalen.
TOOLS (Extra): Het menu Verwijderen (of Toevoegen), Toevoegen als Favoriet (of Verw. uit Favorieten), Vergrend.
(of Slot uit), Timerweergave, Kanaalnaam bewerken, Kanaalnummer wijzigen, Sorteren, Alles select. (of Niets
select.), Automatisch opslaan wordt weergegeven. (De optiemenu’s kunnen verschillen, afhankelijk van de situatie.)
Pictogrammen kanaalstatus worden weergegeven
A
: Een analoog kanaal.
c
: Een kanaal dat is geselecteerd door op de gele toets te drukken.
*
: Een kanaal dat als favoriet is ingesteld.
(
: Een programma dat momenteel wordt uitgezonden.
\
: Een vergrendeld kanaal.
)
: Een gereserveerd programma
Optiemenu Kanalenlijst (in Alle kanalen / Toegev. kan. / Favoriet)
Druk op de toets TOOLS om het optiemenu te gebruiken.
Menuopties kunnen, afhankelijk van de kanaalstatus, verschillen.
Toevoegen / Verwijderen
U kunt een kanaal toevoegen of verwijderen uit de weergave van de door u gewenste kanalen.
Alle verwijderde kanalen worden getoond op het menu Alle kanalen.
Een grijs gekleurd kanaal geeft aan dat het kanaal is verwijderd.
Het menu Toevoegen verschijnt alleen bij verwijderde kanalen.
U kunt ook op dezelfde manier een kanaal verwijderen uit het menu Toegev. kan. of
Favoriet.
Toevoegen als Favoriet / Verw. uit Favorieten
U kunt kanalen die u veelvuldig bekijkt, instellen als favorieten.
Druk op de toets TOOLS om het menu Extra weer te geven. U kunt ook items aan uw favorieten toevoegen (of daaruit
verwijderen) door (of Verw. uit Favorieten) te selecteren.
Het symbool ‘
*
’ wordt weergegeven en het kanaal wordt ingesteld als favoriet.
Alle favoriete kanalen worden getoond op het menu Favoriet.
Vergrend. / Slot uit
U kunt een kanaal vergrendelen, zodat het kanaal niet geselecteerd en bekeken kan worden.
Deze functie is alleen beschikbaar wanneer Kinderslot is ingesteld op Aan.
Het invoerscherm voor de pincode verschijnt. Voer uw viercijferige pincode in.
De standaardpincode van een nieuw tv-toestel is ‘0-0-0-0’. U kunt de pincode wijzigen door PIN wijzigen uit het menu te
selecteren.
Het symbool ‘
\
’ wordt weergegeven en het kanaal wordt vergrendeld.
¦
■
■
■
O
■
N
N
N
N
N
■
N
N
N
N
■
T
N
N
■
N
N
N
N
Allekanalen
824UKTVGold
825UKTVstyle
A
1C--
A
2C--
A
3C--
A
4C--
A
5C--
A
6C--
A
7C--
A
8C--
Alle Typekanaal Zoom Keuze
T
Extra
Verwijderen
ToevoegenalsFavoriet
Vergrend.
Timerweergave
Kanaalnaam
bewerken
Sorteren
Toegev.kan.
824UKTVGold
825UKTVstyle
A
1C--
A
2C--
A
3C--
A
4C--
A
5C--
A
6C--
A
7C--
A
8C--
Alle
Typekanaal Zoom Keuze
T
Extra
[620-Weuro]BN68-02326A-03L09.ind12 12 2009-10-08 ¿ÀÀü 9:28:57

Nederlands - 13
Timerweergave
Wanneer u een programma dat u wilt bekijken, reserveert, schakelt het kanaal automatisch naar het gereserveerde kanaal in de
kanaallijst, zelfs wanneer u een naar een ander kanaal kijkt. Stel eerst de huidige tijd in om een programma te reserveren.
Alleen kanalen in het geheugen kunnen worden gereserveerd.
U kunt dag, maand, jaar, uur of minuut ook rechtstreeks met de cijfertoetsen op de afstandsbediening instellen.
Een programma reserveren wordt getoond in het menu Geprogrammeerd.
Digitale programmagids en kijkreservering
Wanneer een digitaal kanaal is geselecteerd en u op de toets ► drukt, verschijnt de programmagids voor het kanaal. U kunt
een programma reserveren volgens de hierboven beschreven procedures.
Kanaalnaam bewerken (alleen analoge kanalen)
Kanalen kunnen worden voorzien van een aanduiding, zodat de corresponderende letters verschijnen wanneer het kanaal wordt
geselecteerd.
De namen van de digitale zendkanalen worden automatisch toegewezen en kunnen niet worden veranderd.
Timerweergave (alleen digitale kanalen)
U kunt het kanaalnummer ook bewerken door op de cijfertoetsen op de afstandsbediening te drukken.
Sorteren (alleen analoge kanalen)
Hiermee kunt u de programmanummers van de opgeslagen kanalen wijzigen. Deze bewerking kan nodig zijn na gebruik van de
functie kanalen automatisch opslaan.
Alles select. / Niets select.
Alles select.: u kunt alle kanalen in de kanalenlijst selecteren.
Niets select.: U kunt de selectie van alle kanalen uitschakelen.
U kunt alleen Niets select. kiezen wanneer er een kanaal is geselecteerd.
Automatisch opslaan
Raadpleeg voor meer informatie het gedeelte ‘Het menu Kanaal’.
Wanneer een kanaal is vergrendeld door de functie Kinderslot, verschijnt het invoerscherm voor de pincode.
Optiemenu Kanalenlijst (in Geprogrammeerd)
U kunt een reservering bekijken, bewerken of verwijderen.
Druk op de toets TOOLS om het optiemenu te gebruiken.
Info wijzigen
Selecteren om een reservering te bekijken.
Progr. annuleren
Selecteren om een reservering te annuleren.
Informatie
Selecteren om een kijkreservering weer te geven.
(U kunt de reserveringsinformatie ook wijzigen.)
Alles select.
Alle gereserveerde programma’s selecteren.
■
N
N
N
N
■
N
■
■
■
●
●
N
■
N
N
N
■
■
■
■
Geprogrammeerd
1/1/2009
13:595TV1
)
18:592TV3
)
TheEqualizer
20:592TV3
)
McMillan&Wife
21:592TV3
)
M.Spillane’smike
Alle Zoom Keuze
T
Extra
E
Informatie
Infowijzigen
Progr.annuleren
Informatie
Alles
select.
[620-Weuro]BN68-02326A-03L09.ind13 13 2009-10-08 ¿ÀÀü 9:28:57

Nederlands - 14
BEELD
Het menu beeld configureren
Modus
U kunt het beeld selecteren dat het beste overeenkomt met uw wensen.
Druk op de toets TOOLS om het menu Extra weer te geven. U kunt de beeldmodus ook
instellen door te selecteren.
Dynamisch
Hiermee stelt u het beeld in voor hoge definitie in een lichte ruimte.
Standaard
Hiermee stelt u het beeld in voor optimale weergave in een normale omgeving.
Natural
Kiest de instellingen voor optimale en voor het oog comfortabele weergave.
Deze functie is niet beschikbaar in de pc-modus.
Film
Hiermee stelt u het beeld in voor weergave van films in een donkere ruimte.
Backlight / Contrast / Helderheid / Scherpte / Kleur / Tint(G/R)
Uw tv heeft verschillende instelmogelijkheden waarmee u de beeldkwaliteit kunt beheren.
Backlight: hierdoor wordt de helderheid van de LCD-achtergrondverlichting aangepast.
Contrast: hierdoor wordt het contrastniveau aangepast.
Helderheid: hierdoor wordt de helderheid van het beeld aangepast.
Scherpte: hierdoor wordt de randdefinitie van het beeld aangepast.
Kleur: hierdoor wordt de kleurintensiteit van het beeld aangepast.
Tint(G/R): hiermee past u de tint van de kleur van het beeld aan.
In analoge TV-, Ext.-, AV-modi van het PAL-systeem kunt u de functie Tint(G/R) niet gebruiken.
Wanneer u wijzigingen aanbrengt bij Backlight, Contrast, Helderheid, Scherpte, Kleur of Tint(G/R), wordt het schermmenu
dienovereenkomstig aangepast.
In de pc-modus kunt u alleen wijzigingen aanbrengen in Backlight, Contrast en Helderheid.
De instellingen voor elk extern apparaat dat u op een ingang op de tv hebt aangesloten, kunnen worden aangepast en
opgeslagen.
De hoeveelheid verbruikte energie kan sterk worden verminderd als de helderheid van het beeld wordt teruggebracht. Zo
worden de algemene verbruikskosten ook lager.
Geavanceerde instellingen
Bij deze nieuwe Samsung-tv kunt u zelfs meer precieze beeldinstellingen maken dan bij
voorgaande modellen.
Geavanceerde instellingen zijn alleen beschikbaar in de modi Standaard en Film.
In de pc-modus kunt u alleen wijzigingen aanbrengen in Dynamisch contrast, Gamma en
Witbalans van de items uit het menu Geavanceerde instellingen.
U kunt het zwartniveau op het scherm selecteren om de schermdiepte aan te passen.
U kunt het schermcontrast aanpassen zodat u een optimaal contrast verkrijgt.
Gamma
U kunt de intensiteit van de primaire kleuren aanpassen (rood, groen, blauw).
¦
❑
T
■
■
■
N
■
❑
●
●
●
●
●
●
N
N
N
N
N
❑
N
N
■
■
■
Modus :Standaard ▶
Backlight :7
Contrast :95
Helderheid :45
Scherpte :50
Kleur :50
Tint(G/R) :G50/R50
Geavanceerdeinstellingen
Beeld
7
U
Verpl.
L
Instell.
E
Enter
R
Terug
▲
Backlight
▼
Zwarttinten :Uit ▶
Dynamischcontrast :Middel
Gamma :0
Kleurruimte :Eigen
Witbalans
Huidkleur :
0
Randverbetering :Aan
U
Verpl.
E
Enter
R
Terug
Geavanceerdeinstellingen
[620-Weuro]BN68-02326A-03L09.ind14 14 2009-10-08 ¿ÀÀü 9:28:58

Nederlands - 15
Kleurruimte
De kleurruimte is een kleurenmatrix opgebouwd uit rood, groen en blauw. Selecteer de kleurruimte van uw voorkeur om een zo
natuurgetrouw mogelijke kleurweergave te verkrijgen.
Auto: bij de instelling Auto worden de kleuren automatisch en natuurlijk aangepast op basis van de programmabron.
Eigen: Eigen Kleurruimte biedt diepe en levendige kleurnuances.
Aangepast: hierbij wordt het kleurenschema aan uw voorkeuren aangepast
Als u de waarde van de aanpassing wijzigt, wordt het aangepaste scherm vernieuwd.
De instellingen voor elk extern apparaat dat u hebt aangesloten op een ingang op de tv kunnen worden aangepast en
opgeslagen. Als u bijvoorbeeld een dvd-speler op HDMI 1 hebt aangesloten en deze momenteel geselecteerd is, worden
de instellingen en aanpassingen voor de dvd-speler opgeslagen.
Kleur: Rood, Groen, Blauw, Geel, Cyaan of Magenta
Kleur is beschikbaar wanneer Kleurruimte is ingesteld op Aangepast.
In Kleur kunt u de RGB-waarden voor de geselecteerde kleur instellen.
U kunt de gewijzigde RGB-waarden resetten door Reset te selecteren.
Rood: hiermee wordt het rode verzadigingsniveau van de geselecteerde kleur aangepast.
Groen: hiermee wordt het groene verzadigingsniveau van de geselecteerde kleur aangepast.
Blauw: hiermee wordt het blauwe verzadigingsniveau van de geselecteerde kleur aangepast.
Reset: hiermee wordt de kleurruimte op de standaardwaarden ingesteld.
Witbalans
U kunt de kleurtemperatuur aanpassen voor meer natuurlijke beeldkleuren.
R-basis: hiermee wordt de rode kleurdonkerte aangepast.
G-basis: hiermee wordt de groene kleurdonkerte aangepast.
B-basis: hiermee wordt de blauwe kleurdonkerte aangepast.
R-niveau: hiermee wordt de rode kleurhelderheid aangepast.
G-niveau: hiermee wordt de groene kleurhelderheid aangepast.
B-niveau: hiermee wordt de blauwe kleurhelderheid aangepast.
Reset: de fabrieksinstellingen van de aangepaste witbalans worden hersteld.
Huidkleur
U kunt de roze huidskleurtinten in het beeld benadrukken.
Als u de waarde van de aanpassing wijzigt, wordt het aangepaste scherm vernieuwd.
U kunt randen van objecten benadrukken in het beeld.
Door de xvYCC-modus in te stellen op Aan worden details en kleurruimte vergroot wanneer u naar films kijkt vanaf een extern
apparaat (zoals een dvd-speler) dat is aangesloten op de HDMI of Component IN-aansluitingen.
xvYCC is beschikbaar wanneer de beeldmodus is ingesteld op Film, en wanneer de externe input is ingesteld op de modus
HDMI of Component.
Deze functie wordt mogelijk niet ondersteund, afhankelijk van uw externe apparaat.
■
●
●
●
N
N
N
N
N
■
●
●
●
●
●
●
●
■
N
■
■
N
N
[620-Weuro]BN68-02326A-03L09.ind15 15 2009-10-08 ¿ÀÀü 9:28:58

Nederlands - 16
Afbeeldingsopties
In pc-modus kunt u alleen in de opties voor Kleur tint en Afmet. uit de items in de
Afbeeldingsopties wijzigingen aanbrengen.
Warm1, Warm2 of Warm3 is alleen ingeschakeld in de beeldmodus Film.
De instellingen voor elk extern apparaat dat u op een ingang van de tv hebt aangesloten,
kunnen worden aangepast en opgeslagen.
Afmet.
Soms wilt u misschien de grootte van het schermbeeld aanpassen. De tv bevat diverse
schermformaatopties die elk voor specifieke typen video-invoer zijn ontworpen. Ook de aftakdoos / satellietontvanger heeft
mogelijk een eigen reeks schermformaten. Over het algemeen dient u echter zo veel mogelijk de 16:9-modus te gebruiken.
U kunt deze opties eenvoudig selecteren door op de toets P.SIZE op de afstandsbediening te drukken.
Auto-breed: Hierdoor wordt het beeldformaat automatisch aangepast aan het beeldformaat 16:9.
16:9: hiermee stelt u het beeldformaat in op 16:9, geschikt voor dvd’s of breedbeeldui
tzendingen.
Breedbeeldzoom: Vergroot het formaat van het beeld verder dan 4:3.
Zoom: hiermee vergroot u het 16:9-breedbeeldformaat (in verticale richting) zodat het in het beeld past.
4:3: dit is de standaardinstelling voor een videofilm of bij normale uitzendingen.
Volledig scherm: gebruik deze functie om het volledige, niet-afgekapte beeld weer te geven wanneer er een HDMI-signaal
(720p / 1080i / 1080p) of Component-signaal (720p / 1080i) wordt ontvangen.
Afhankelijk van de ingangsbron kunnen de opties voor beeldformaat variëren.
De beschikbare onderdelen kunnen, afhankelijk van de geselecteerde modus, verschillen.
In de pc-modus kunnen alleen de modi 16:9 en 4:3 worden aangepast.
De instellingen voor elk extern apparaat dat u op een ingang op de tv hebt aangesloten, kunnen worden aangepast en
opgeslagen.
Er kan tijdelijke beeldretentie optreden wanneer er langer dan twee uur een statisch beeld op de tv wordt weergegeven.
Breedbeeldzoom: Druk op de toets ► om Positie te selecteren en druk vervolgens op de toets ENTER
E
. Gebruik de toets
▲ of ▼ om het scherm naar boven of beneden te verplaatsen. Druk vervolgens op de toets ENTER
E
.
Zoom: Druk op de toets ► om Positie te selecteren en druk vervolgens op de toets ENTER
E
. Gebruik de toets ▲ of ▼ om
het beeld naar boven of beneden te verplaatsen. Druk vervolgens op de toets ENTER
E
. Druk op de toets ► om Afmet. te
selecteren en druk vervolgens op de toets ENTER
E
. Druk op de toets ▲ of ▼ om het beeldformaat in verticale richting te
vergroten of te verkleinen. Druk vervolgens op de toets ENTER
E
.
Na het selecteren van Volledig scherm in de modus HDMI (1080i / 1080p) of Component (1080i / 1080p): Selecteer Positie
door op de toets ◄ of ► te drukken. Gebruik de toetsen ▲, ▼, ◄ of ► om de afbeelding te verplaatsen.
Reset: Druk op de toets ▲ of ▼ om Reset te selecteren en druk vervolgens op de toets ENTER
E
. U kunt de instelling
initialiseren.
Als u de functie Volledig scherm gebruikt met een ingangssignaal HDMI 720p, wordt 1 kaderlijn verwijderd aan de bovenkant,
onderkant, linkerkant en rechterkant zoals in de functie Overscan.
Wanneer u het beeldformaat op een tv met een breedte van 16:9 instelt op Auto-breed, kunt u het gewenste beeldformaat
instellen op 4:3 WSS (Wide Screen Service) of niets. Omdat er voor elk land in Europa een ander beeldformaat geldt, is deze
functie bedoeld om het juiste beeldformaat te kiezen.
16:9: stelt het beeld in op de 16:9 breedbeeldmodus.
Breedbeeldzoom: Vergroot het formaat van het beeld verder dan 4:3.
Zoom: hiermee vergroot u het beeld verticaal op het scherm.
4:3: stelt het beeld in op de 4:3 normale modus.
Deze functie is alleen beschikbaar in de modus Auto-breed.
Deze functie is niet beschikbaar in de modus PC, Component of HDMI.
Als het ontvangen tv-signaal zwak is, kunt u de functie Digital Noise Reduction activeren om statische ruis en echobeelden die
mogelijk op het scherm verschijnen, te verminderen.
Als het signaal zwak is, selecteert u één van de andere opties totdat de afbeelding het best wordt weergegeven.
U kunt het zwartniveau op het scherm selecteren om de schermdiepte aan te passen.
Deze functie is allee actief wanneer een extern apparaat via HDMI (RGB-signalen) op de tv is aangesloten.
❑
N
■
N
N
■
O
●
●
●
●
●
●
N
N
N
N
N
N
N
N
N
■
●
●
●
●
N
N
■
N
■
N
Kleurtint :Normaal ▶
Afmet. :Auto-breed
Schermmodus :16:9
Dig.ruisfilter :Auto
HDMI-zwartniveau :Normaal
Filmmodus :Uit
ModusAlleenblauw :Uit
U
Verpl.
E
Enter
R
Terug
Afbeeldingsopties
[620-Weuro]BN68-02326A-03L09.ind16 16 2009-10-08 ¿ÀÀü 9:28:58

Nederlands - 17
De tv kan worden ingesteld om filmsignalen van alle bronnen automatisch te herkennen en te verwerken en om het beeld aan te
passen voor optimale kwaliteit.
Filmmodus wordt ondersteund in TV, AV, COMPONENT(480i / 1080i) en HDMI(480i / 1080i).
Uit: hiermee wordt de functie Film Mode uitgeschakeld.
Auto1: het beeld wordt automatisch aangepast aan de beste kwaliteit voor het weergeven van een film.
Auto2: de videotekst op het scherm (niet de ondertiteling) wordt tijdens het afspelen van een film automatisch
geoptimaliseerd.
Hiermee worden vertragingen verwijderd uit snelle scènes met veel beweging voor een scherper beeld.
Wanneer u 100 Hz Motion Plus inschakelt, kan er ruis ontstaan op het scherm. Als dit gebeurt, stelt u 100Hz Motion Plus in
op Uit.
Uit: Schakelt 100Hz Motion Plus uit.
Helder: Stelt 100Hz Motion Plus in op minimaal.
Standaard: Stelt 100Hz Motion Plus in op medium.
Soepel: Stelt 100Hz Motion Plus in op maximaal.
Aangepast: Stelt het wazigheid- en trilverminderingsniveau bij volgens uw voorkeur.
Wazigheidsverm.: Stelt het wazigheidsverminderingsniveau bij in videobronnen.
Trilvermindering: Stelt het trilverminderingsniveau bij voor videobronnen tijdens het afspelen van lms.
Reset: Herstelt de standaard instellingen.
Demo: Geeft het verschil weer tussen de modi 100Hz Motion Plus aan en -uit.
Deze functie is voor experts op het gebied van AV-apparaten. Deze functie geeft het blauwe signaal weer door het rode en groene
signaal uit het videosignaal te verwijderen, waardoor er een soort blauwfiltereffect ontstaat dat wordt gebruikt om de kleur en tint
van videoapparatuur zoals dvd-spelers en thuisbioscopen aan te passen. Met deze functie kunt u voor elk videoapparaat dat
gebruikmaakt van de kleurenbalkpatronen Rood / Groen / Blauw / Cyaan / Magenta / Geel, de kleur en tint naar wens instellen
overeenkomstig het signaalniveau van elk videoapparaat, zonder dat u een blauwfilter nodig hebt.
Modus Alleen blauw is beschikbaar wanneer de beeldmodus is ingesteld op Film of Standaard.
Hiermee reset u alle fabrieksinstellingen.
Beeldmodus resetten: De huidige beeldwaarden worden vervangen door de standaardwaarden.
■
N
●
●
●
■
N
●
●
●
●
●
–
–
–
●
■
N
❑
N
[620-Weuro]BN68-02326A-03L09.ind17 17 2009-10-08 ¿ÀÀü 9:28:58

Nederlands - 18
Uw tv als een computermonitor (pc) gebruiken
Hieronder ziet u de Windows-beeldscherminstellingen voor een standaardcomputer.
De vensters op uw computer kunnen enigszins afwijken, afhankelijk van de versie van
Windows en de geïnstalleerde videokaart. Maar ook dan zijn in de meeste gevallen dezelfde
basisinstallatiegegevens van toepassing. (Neem contact op met de computerfabrikant of
Samsung-leverancier als dit niet het geval is.)
1.
Klik eerst op het ‘configuratiescherm’ in het menu Start van Windows.
2.
Wanneer het venster configuratiescherm verschijnt, klikt u op ‘Beeldscherm’ om een
dialoogvenster voor het beeldscherm te openen.
3.
Wanneer het configuratiescherm verschijnt, klikt u op ‘Weergave’ om een dialoogvenster
voor het beeldscherm te openen.
4.
Selecteer het tabblad ‘Instellingen’ in het dialoogvenster.
De juiste beeldgrootte (resolutie) - Optimaal: 1920 x 1080 pixels
Als het dialoogvenster een optie bevat voor het instellen van de verticale frequentie,
is de juiste waarde ‘60’ of ‘60 Hz’. Klik anders op ‘OK’ om het dialoogvenster te sluiten.
Weergavemodi
Als het signaal van het systeem overeenkomt met de standaardsignaalmodus, wordt het beeld automatisch ingesteld. Als
het signaal van het systeem niet overeenkomt met de standaardsignaalmodus, stelt u de modus in aan de hand van de
gebruikershandleiding van de videokaart, omdat het beeld anders mogelijk niet wordt weergegeven. Het beeld is tijdens de
fabricage geoptimaliseerd voor de weergavestanden op de volgende pagina.
D-Sub en HDMI/DVI Invoer
Modus Resolutie
Horizontaal
Frequentie (KHz)
Verticaal Frequentie
(Hz)
Pixelklok Frequentie
(MHz)
Sync Polarity
(H / V)
IBM
640 x 350 31,469 70,086 25,175 +/-
720 x 400 31,469 70,087 28,322 -/+
MAC
640 x 480 35,000 66,667 30,240 -/-
832 x 624 49,726 74,551 57,284 -/-
1152 x 870 68,681 75,062 100,000 -/-
VESA CVT
720 x 576 35,910 59,950 32,750 -/+
1152 x 864 53,783 59,959 81,750 -/+
1280 x 720 44,772 59,855 74,500 -/+
1280 x 720 56,456 74,777 95,750 -/+
1280 x 960 75,231 74,857 130,000 -/+
VESA DMT
640 x 480 31,469 59,940 25,175 -/-
640 x 480 37,861 72,809 31,500 -/-
640 x 480 37,500 75,000 31,500 -/-
800 x 600 37,879 60,317 40,000 +/+
800 x 600 48,077 72,188 50,000 +/+
800 x 600 46,875 75,000 49,500 +/+
1024 x 768 48,363 60,004 65,000 -/-
1024 x 768 56,476 70,069 75,000 -/-
1024 x 768 60,023 75,029 78,750 +/+
1152 x 864 67,500 75,000 108,000 +/+
1280 x 1024 63,981 60,020 108,000 +/+
1280 x 1024 79,976 75,025 135,000 +/+
1280 x 800 49,702 59,810 83,500 -/+
1280 x 800 62,795 74,934 106,500 -/+
1280 x 960 60,000 60,000 108,000 +/+
1360 x 768 47,712 60,015 85,500 +/+
1440 x 900 55,935 59,887 106,500 -/+
1440 x 900 70,635 74,984 136,750 -/+
1680 x 1050 65,290 59,954 146,250 -/+
VESA GTF
1280 x 720 52,500 70,000 89,040 -/+
1280 x 1024 74,620 70,000 128,943 -/-
VESA DMT /
DTV CEA
1920 x 1080p 67,500 60,000 148,500 +/+
Bij gebruik van de HDMI/DVI-kabelverbinding, moet u de HDMI IN 3(DVI)-aansluiting gebruiken.
De interlace-modus wordt niet ondersteund.
De tv werkt mogelijk niet normaal als een afwijkend videoformaat wordt geselecteerd.
De Separate- en Composite-modi worden ondersteund. SOG wordt niet ondersteund.
Een VGA-kabel die te lang of van lage kwaliteit is, kan ruis in het beeld veroorzaken bij hoge resoluties (1920x1080).
¦
■
N
N
N
N
N
[620-Weuro]BN68-02326A-03L09.ind18 18 2009-10-08 ¿ÀÀü 9:28:58

Nederlands - 19
De tv instellen voor uw pc
Vooraf instellen: druk op de toets SOURCE om de pc-modus te selecteren.
Autom. afstellen
Gebruik de functie Auto Adjust om de tv automatisch op de ontvangen videosignalen aan te
passen.
Deze functie past ook automatisch de instellingen aan en stelt de frequentiewaarden en -
posities bij.
Druk op de toets TOOLS om het menu Extra weer te geven. U kunt Auto Adjustment ook
instellen door
te kiezen.
Deze functie is niet beschikbaar in de DVI-HDMI-modus.
Scherm
Grof / Fijn
U past de beeldkwaliteit aan om beeldruis te verwijderen of te verminderen. Als door een
fijnafstemming van het kanaal de ruis niet verdwijnt, stelt u de frequentie zo goed mogelijk in
(Grof) en voer opnieuw een fijnafstemming uit. Stel het beeld opnieuw in het midden van het
scherm in nadat de ruis is verminderd.
Positie pc
Pas de positie van het pc-scherm aan als deze niet gelijk is aan het tv-scherm.
Druk op de toets ▲ of ▼ om de verticale positie aan te passen. Druk op de toets ◄ of ► om
de horizontale-positie aan te passen.
Beeld resetten
U kunt alle beeldinstellingen vervangen door fabrieksinstellingen.
¦
N
❑
T
N
❑
■
■
■
Helderheid :45
Scherpte :50
Autom.afstellen ▶
Scherm
Geavanceerdeinstellingen
Afbeeldingsopties
Beeld
resetten
Beeld
Grof 50
Fijn 0
Positie
pc
Beeldresetten
U
Verpl.
E
Enter
R
Terug
Scherm
[620-Weuro]BN68-02326A-03L09.ind19 19 2009-10-08 ¿ÀÀü 9:28:58

Nederlands - 20
GELUID
Het menu Sound configureren
Druk op de toets TOOLS om het menu Extra weer te geven. U kunt het geluid ook instellen
door te selecteren.
Standaard: Selecteert de normale geluidsmodus.
Muziek: Geeft voorrang aan muziek ten opzichte van stemmen.
Film: Geeft optimaal geluid voor films.
Heldere spraak: Geeft voorrang aan stemmen ten opzichte van muziek.
Aangepast: Herstelt uw aangepaste geluidsinstellingen.
Toonregeling
U kunt de geluidsinstellingen aanpassen aan uw persoonlijke voorkeuren.
Modus: Hier selecteert u de geluidsmodus uit de vooraf gedefinieerde instellingen.
Balans L/R: Regelt de balans tussen de linker- en de rechterluidspreker.
100Hz / 300Hz / 1KHz / 3KHz / 10KHz (Aanpassing bandbreedte): Het niveau van verschillende bandbreedtes aanpassen
Reset: Standaardinstellingen van de equalizer resetten.
TruSurround HD is een gepatenteerde SRS-technologie die het probleem oplost dat ontstaat wanneer 5,1-multikanaalgeluid via
twee luidsprekers wordt afgespeeld. TruSurround produceert een meeslepend, virtueel surroundgeluid via ieder afspeelsysteem
met twee luidsprekers, waaronder ook interne luidsprekers van de televisie. Het is volledig compatibel met alle vormen van
multichannel.
Druk op de toets TOOLS om het menu Extra weer te geven. U kunt SRS TruSurround HD ook instellen door
SRS TS HD te selecteren.
Gesproken taal
U kunt de standaardwaarde voor audiotalen wijzigen. Hiermee geeft u de taalinformatie voor het inkomende signaal weer.
Deze functie kan worden geselecteerd terwijl u naar een digitaal kanaal kijkt.
U kunt alleen een taal selecteren uit de talen waarin wordt uitgezonden.
Wanneer de hoofdluidspreker en de audio-ontvanger beide geluid voortbrengen, kan er echo optreden omdat geluid in de
hoofdluidspreker en de audio-ontvanger niet op gelijke snelheid wordt gedecodeerd. Gebruik in dat geval de functie tv-luidspreker.
Deze functie kan worden geselecteerd terwijl u naar een digitaal kanaal kijkt.
Het geluidsformaat wordt weergegeven overeenkomstig het uitzendsignaal.
Audiobeschrijving
Dit is een ondersteunende geluidsfunctie die een aanvullend geluidsspoor laat horen voor blinden en slechtzienden. Deze functie
verwerkt het geluidsspoor (Audio Stream) voor de AD (Audio Description), wanneer dat samen met het hoofdgeluid (Main audio)
wordt uitgezonden. Gebruikers kunnen de Audiobeschrijving Aan of Uit zetten en het volume bepalen.
Druk op de toets AD op de afstandsbediening om Uit of Aan te selecteren.
De geluidsbeschrijving aan-of uitzetten.
Volume
U kunt het volume van de geluidsbeschrijving aanpassen.
Volume is actief wanneer Audiobeschrijving is ingesteld op Aan.
Deze functie kan worden geselecteerd terwijl u naar een digitaal kanaal kijkt.
Elk zendstation kent andere signaalkenmerken, waardoor het lastig kan zijn het volume steeds opnieuw in te stellen wanneer
u van kanaal verandert. Met deze functie kunt u het volume van het gewenste kanaal automatisch laten instellen. Bij een hoog
modulatiesignaal wordt de geluidsweergave verlaagd en bij een laag modulatiesignaal wordt de geluidsweergave verhoogd.
¦
❑
T
●
●
●
●
●
❑
●
●
●
●
❑
T
❑
N
N
❑
N
N
❑
O
■
■
N
N
❑
Modus :Aangepast ▶
Toonregeling
SRSTruSurroundHD :Uit
Gesprokentaal :----
Geluidsformaat :----
Audiobeschrijving
Auto
Volume :Uit
Luidsprekerselectie :TV-luidspreker
Geluid
[620-Weuro]BN68-02326A-03L09.ind20 20 2009-10-08 ¿ÀÀü 9:28:58

Nederlands - 21
Luidsprekerselectie
Wanneer u televisiekijkt terwijl de tv op een thuisbioscoop is aangesloten, schakelt u de luidsprekers van de tv uit zodat u het
geluid uit de (externe) luidsprekers van de thuisbioscoop kunt horen.
Ext. luidspreker: hiermee geeft u het geluid weer via de externe (thuisbioscoop) luidsprekers.
TV-luidspreker: hiermee geeft u het geluid via de tv-luidsprekers weer.
De volumetoetsen en de toets MUTE zijn niet in werking wanneer Luidsprekerselectie is ingesteld op Ext. luidspreker.
Wanneer u Ext. luidspreker selecteert in het menu Luidsprekerselectie worden de geluidsinstellingen beperkt.
Interne luidsprekers van de tv Audio-uitgang (optisch, L/R -uitgang) naar
geluidssysteem
RF / AV / Component / PC / HDMI RF / AV / Component / PC / HDMI
TV-luidspreker Geluidsuitvoer Geluidsuitvoer
Ext. luidspreker Onderdrukt Geluidsuitvoer
Geen videosignaal Onderdrukt Onderdrukt
U kunt de geluidsinstellingen resetten naar de fabrieksinstellingen.
Reset geluidsm.: De huidige geluidswaarden worden vervangen door de
standaardwaarden.
De geluidsmodus selecteren
U kunt de geluidsmodus ook instellen door op de toets DUAL te drukken. Als u op deze toets drukt, wordt de huidige geluidsmodus
weergegeven.
Type geluid Dual 1 / 2 Standaard
A2 Stereo
Mono MONO
Automatisch wijzigen
Stereo STEREO ↔ MONO
Dual DUAL 1 ↔ DUAL 2 DUAL 1
NICAM
Stereo
Mono MONO
Automatisch wijzigen
Stereo MONO ↔ STEREO
Dual
MONO ↔ DUAL 1
DUAL 2
DUAL 1
Wanneer het stereosignaal te zwak is en er automatische zenderverdringing optreedt, kunt u beter naar mono overschakelen.
Deze functie wordt alleen geactiveerd in stereogeluidssignaal. Het wordt gedeactiveerd in monogeluidssignaal.
Deze functie is alleen beschikbaar in de tv-modus.
❑
●
●
N
N
❑
N
¦
N
N
N
Geluidresetten
L
Verpl.
E
Enter
R
Terug
Selecteerderesetoptiesvoorhetgeluid.
Allesresetten Resetgeluidsm. Annuleren
[620-Weuro]BN68-02326A-03L09.ind21 21 2009-10-08 ¿ÀÀü 9:28:59

Nederlands - 22
INSTELLINGEN
Het instellingenmenu gebruiken
Taalkeuze
U kunt de menutaal instellen.
Tijd
Raadpleeg voor meer informatie het gedeelte ‘De tijd instellen’.
Uitzenden
Ondertiteling
U kunt de ondertiteling activeren en deactiveren. Gebruik dit menu om de modus Subtitle in te stellen. Normaal in dit menu is
basisondertiteling en Slechthorenden is ondertiteling voor doven en slechthorenden.
ondertitels in- of uitschakelen.
de ondertitelingsmodus instellen.
Ondertitelingstaal
de ondertitelingstaal instellen.
Wanneer u naar een programma kijkt dat de functie Slechthorenden niet ondersteunt, wordt Normaal automatisch
geactiveerd, zelfs wanneer de modus Slechthorenden is geselecteerd.
Engels is de standaardtaal als de geselecteerde taal niet beschikbaar is in de uitzending.
U kunt deze opties eenvoudig selecteren door op de toets SUBT. op de afstandsbediening te drukken.
(alleen UK)
Als het programma wordt uitgezonden met digitale tekst, is deze functie ingeschakeld.
MHEG (Multimedia and Hypermedia Information Coding Experts Group)
Een internationale standaard voor gegevenscoderingssystemen die in multimedia en hypermedia worden gebruikt. Gegevens
worden gecodeerd op een hoger niveau dan het MPEG-systeem, waaronder hypermedia voor gegevenskoppeling, zoals
stilstaande beelden, tekstservice, animatie, beeld- en videobestanden en multimediagegevens. MHEG is een technologie
voor interactie met de gebruiker tijdens runtime en wordt toegepast op verschillende gebieden, waaronder VOD (V
ideo On
Demand), ITV (interactieve tv), EC (e-commerce), afstandsonderwijs, telefonische vergaderingen, digitale bibliotheken en
netwerkspellen.
Teleteksttaal
U kunt de taal voor teletekst instellen door deze te selecteren.
Engels is de standaardtaal als de geselecteerde taal niet beschikbaar is in de uitzending.
Voorkeur
Eerste taal voor audio / Tweede taal voor audio / Eerste taal ondertitel / Tweede taal ondertitel / Eerste taal teletekst /
Tweede taal teletekst
Met deze functie kunnen gebruikers een van de talen selecteren. De geselecteerde taal wordt standaard gebruikt wanneer u
een kanaal selecteert.
Als u de taalinstelling wijzigt, worden de Ondertitelingstaal, Gesproken taal en T
eleteksttaal in het menu Taalkeuze
automatisch gewijzigd in de geselecteerde taal.
Met Ondertitelingstaal, Gesproken taal en Teleteksttaal in het menu Taalkeuze geeft u een lijst weer met talen die door het
huidige kanaal worden ondersteund. De geselecteerde taal is gemarkeerd. Als u deze taalinstelling wijzigt, is de nieuwe
selectie alleen geldig voor het huidige kanaal. De gewijzigde instelling is niet van invloed op de instellingen voor Eerste taal
ondertitel, Eerste taal voor audio, of Eerste taal teletekst van het menu Voorkeur
.
¦
❑
❑
❑
■
●
●
●
N
N
O
■
N
■
N
■
●
Plug&Play
Taalkeuze :Nederlands ▶
Tijd
Uitzenden
Beveiliging
Algemeen
Instellingen
[620-Weuro]BN68-02326A-03L09.ind22 22 2009-10-08 ¿ÀÀü 9:28:59

Nederlands - 23
Algemene interface
CI-menu
Hiermee kunt u het CAM-menu selecteren.
Selecteer het CI-menu op basis van het menu PC Card.
Toepassingsinfo
Met deze optie geeft u informatie over een CAM in de CI-sleuf weer.
Application Info heeft betrekking op de CI-/CI+-kaart.
U kunt de CAM altijd installeren, ongeacht of de tv is in- of uitgeschakeld.
1.
De CI CAM-module kunt u verkrijgen bij uw lokale leverancier of door deze telefonisch te bestellen.
2.
Steek de CI-/CI+-kaart in de CAM in de richting van de pijl op zijn plaats.
3.
Plaats de CAM met de CI-/CI+-kaart in de COMMON INTERFACE-sleuf. (Duw de CAM in de richting van de pijl volledig
in de sleuf.)
4.
Controleer of u een beeld op een kanaal met een gecodeerd signaal kunt bekijken.
Beveiliging (Afhankelijk van het model
Voordat het instellingenscherm verschijnt, ziet u het invoerscherm voor de pincode. Voer uw viercijferige pincode in.
De standaardpincode van een nieuw tv-toestel is ‘0-0-0-0’. U kunt de pincode wijzigen door PIN wijzigen in het menu te
selecteren.
Op sommige modellen is de pincode vereist bij het uitvoeren van Plug & Play.
Met deze functie kunt u door middel van het uitschakelen van beeld en geluid voorkomen dat onbevoegde gebruikers, zoals
kinderen, ongepaste programma’s bekijken.
U kunt sommige kanalen in de kanalenlijst vergrendelen.
Kinderslot is alleen beschikbaar in de tv-modus.
Kinderslot
Door een pincode (persoonlijk identificatienummer) van vier cijfers in te stellen, kunt u met deze functie voorkomen dat
onbevoegde gebruikers, zoals kinderen, ongeschikte programma’s bekijken.
Het item Kinderslot verschilt per land.
Wanneer Kinderslot is ingesteld, wordt het symbool ‘\’ weergegeven.
Alles mag: druk hierop om alle tv-ratings (leeftijdsbeperkingen) te ontgrendelen.
Alles blok: druk hierop om alle tv-ratings (leeftijdsbeperkingen) te vergrendelen.
PIN wijzigen
U kunt uw pincode die voor het instellen van de tv is vereist, wijzigen.
Als u de pincode bent vergeten, drukt u achtereenvolgens op de volgende toetsen van de afstandsbediening zodat de pincode
opnieuw wordt ingesteld op ‘0-0-0-0’: POWER (Uit) (Aan).
Algemeen
Wanneer u een spelcomputer aansluit, zoals de PlayStation™ of Xbox™, kunt u een realistischere spelervaring krijgen door Game
Mode te selecteren.
Beperkingen van Spelmodus (Let Op)
Om de spelcomputer los te koppelen en een ander extern apparaat aan te sluiten, zet u in het instellingenmenu
Spelmodus op Uit.
Als u in Spelmodus het tv-menu weergeeft zal het beeld een beetje trillen.
Spelmodus is niet beschikbaar in de normale tv-, pc- en Ext-modi.
Als het beeld slecht is wanneer er een extern apparaat is aangesloten op de tv, controleer dan of Spelmodus op Aan is
ingesteld. Zet Spelmodus op Uit en sluit externe apparaten aan.
Als Spelmodus op Aan staat:
De beeldmodus Standaard wordt automatisch geselecteerd en kan niet worden gewijzigd.
De geluidsmodus Aangepast wordt automatisch geselecteerd en kan niet worden gewijzigd. Pas het geluid aan met de
equalizer.
De functie Geluid resetten is geactiveerd. Als u de functie Reset selecteert na het instellen van de Toonregeling, worden de
standaardinstellingen van de Toonregeling hersteld.
■
●
●
❑
N
N
N
■
N
N
■
N
N
N
■
N
❑
■
N
N
N
N
N
[620-Weuro]BN68-02326A-03L09.ind23 23 2009-10-08 ¿ÀÀü 9:28:59

Nederlands - 24
Met deze functie kunt u de helderheid van de tv aanpassen om het energieverbruik te verminderen. W
anneer u ‘s avonds tv kijkt,
kunt u de modus Spaarstand op Hoog zetten. Zo kunt u voorkomen dat uw ogen vermoeid raken en tevens besparen op het
energieverbruik.
Als u de optie Beeld uit selecteert, wordt het scherm uitgeschakeld en hoort u slechts het geluid. Druk op een willekeurige toets
om Beeld uit ongedaan te maken.
In het menu Extra wordt de functie Beeld uit niet ondersteund.
Druk op de toets TOOLS om het menu Extra weer te geven. U kunt de optie Spaarstand ook instellen door
Spaarstand te selecteren.
U kunt de transparantie van het menu instellen.
U kunt een melodie instellen om af te laten spelen bij het in- of uitschakelen van de tv
.
De melodie wordt niet afgespeeld
Wanneer er geen geluid wordt weergegeven omdat de toets MUTE is ingedrukt.
Wanneer er geen geluid van de tv komt doordat het volume met de volume (-) toets omlaag is gebracht.
wanneer de tv door de functie sleep timer is uitgeschakeld.
De tijd instellen
Klok
Het is noodzakelijk de klok in te stellen om de verschillende functies van de tv te kunnen gebruiken.
De huidige tijd wordt telkens weergegeven wanneer u op de toets INFO drukt.
Als u de voedingskabel hebt losgekoppeld, moet u de klok opnieuw instellen.
Klokmodus
U kunt de huidige tijd handmatig of automatisch instellen.
Auto: hierdoor wordt de huidige tijd automatisch ingesteld door de tijd van de digitale
uitzending te gebruiken.
Handm.: hierdoor wordt de huidige tijd handmatig op een bepaalde tijd ingesteld.
Afhankelijk van de zender en het signaal wordt de tijd wellicht niet juist ingesteld. Als dit gebeurt, stelt u de tijd handmatig in.
De antenne of kabel moet aangesloten zijn om de tijd automatisch in te kunnen stellen.
Klok instellen
U kunt de huidige tijd handmatig instellen.
Deze functie is alleen beschikbaar wanneer Klokmodus op Handm. is ingesteld.
U kunt de dag, de maand, het jaar, het uur en de minuut ook rechtstreeks met de cijfertoetsen op de afstandsbediening
instellen.
Slaaptimer
De functie sleep timer schakelt automatisch uit na een van tevoren ingestelde tijd (30, 60, 90, 120, 150 en 180 minuten).
Druk op de toets TOOLS om het menu Extra weer te geven. U kunt de sleep timer ook instellen door te
selecteren.
Om de functie Slaaptimer te annuleren, selecteert u Uit.
Timer 1 / Timer 2 / Timer 3
U kunt drie verschillende timerinstellingen opgeven.
U moet eerst de klok instellen.
Inschakeltijd
Het uur en de minuut instellen en activeren / deactiveren.
(Als u de timer met de gewenste instelling wilt activeren, kiest u Activeren.)
Uitschakeltijd
Het uur en de minuut instellen en activeren / deactiveren.
(Als u de timer met de gewenste instelling wilt activeren, kiest u Activeren.)
■
N
T
■
■
N
¦
❑
N
N
■
●
●
N
N
■
N
N
❑
T
N
❑
■
■
Inschakeltijd
L
Verpl.
U
Instell.
E
Enter
R
Terug
Timer1
Uitschakeltijd
Volume
00 00 Deactiv.
00 00 Deactiv.
10
Bron Antenne Kanaal
TV ATV 0
Herhalen
Eenmaal
Zo Ma Di Wo Do Vr Za
Plug&Play
Taalkeuze :Nederlands
Tijd ▶
Uitzenden
Beveiliging
Algemeen
Instellingen
[620-Weuro]BN68-02326A-03L09.ind24 24 2009-10-08 ¿ÀÀü 9:28:59

Nederlands - 25
Volume
Het gewenste geluidsvolume instellen.
U kunt instellen dat wanneer de tv automatisch wordt ingeschakeld er materiaal van de tv of een USB-apparaat wordt afgespeeld.
Selecteer TV of USB. (Zorg dat een USB-apparaat verbinding heeft met uw tv).
Antenne (wanneer Bron is ingesteld op TV)
Selecteer ATV of DTV.
Kanaal (wanneer Bron is ingesteld op TV)
Selecteer het gewenste kanaal.
Inhoud (wanneer Bron is ingesteld op USB)
U kunt een map in het USB-apparaat selecteren met muziek of foto's die bij het inschakelen van de tv automatisch moeten worden
afgespeeld of weergegeven.
Als het USB-station geen muziekbestanden bevat of de map met muziekbestanden niet is geselecteerd, werkt de timerfunctie
niet goed.
Wanneer er slechts één fotobestand in het USB-apparaat aanwezig is, wordt er geen presentatie weergegeven.
Als de mapnaam te lang is, kan de map niet worden geselecteerd.
Als de naam van de map die door de Contents-functie moet worden geconfigureerd te lang is, kan deze niet worden
geselecteerd.
Herhalen
Selecteer Eenmaal, Dagelijks, Ma~Vr, Ma~Za, Za~Zo of Handm..
Wanneer Handm. is geselecteerd, kunt u op de toets ► drukken om de gewenste dag te selecteren. Druk op de toets
ENTER
E
op de gewenste dag en het symbool
c
verschijnt.
U kunt de uren en minuten ook rechtstreeks met de cijfertoetsen op de afstandsbediening instellen.
Automatisch uitschakelen
Als u de timer instelt op Aan, schakelt de televisie uiteindelijk uit wanneer er binnen 3 uur na het automatisch inschakelen van
het toestel geen toets wordt ingedrukt. Deze functie is alleen beschikbaar in de timermodus
Aan. Hiermee wordt oververhitting
tegengegaan, wat kan gebeuren als het toestel te lang blijft ingeschakeld.
■
■
■
■
■
N
N
N
N
■
N
N
N
[620-Weuro]BN68-02326A-03L09.ind25 25 2009-10-08 ¿ÀÀü 9:28:59

Nederlands - 26
INVOER / ONDERSTEUNING
Het menu Invoer
Bronlijst
Hier selecteert u de tv of een andere, externe invoerbron zoals een dvd-speler / Blu-ray-speler
/ aftakdoos / satellietontvanger (set-top box) die op de tv is aangesloten. Hiermee kunt u de
gewenste ingangsbron selecteren.
Druk op de toets SOURCE op de afstandsbediening om een externe signaalbron weer te
geven. U kunt de modus TV selecteren door op de toets TV te drukken.
TV / Ext.1 / Ext.2 / AV / Component / PC / HDMI1 / HDMI2 / HDMI3/DVI / HDMI4
U kunt alleen de externe apparaten selecteren die op de tv zijn aangesloten. In de
Bronlijst worden aangesloten ingangen gemarkeerd en bovenaan de lijst geplaatst.
Ingangen die niet zijn aangesloten, worden onderaan de lijst geplaatst.
Ext. en PC blijven altijd geactiveerd.
De kleurentoetsen op de afstandsbediening met de Bronlijst gebruiken
Rood (Vernieuwen): de aansluiting met de externe apparaten vernieuwen. Druk hierop
als uw bron is ingeschakeld en verbonden, maar niet in de lijst verschijnt.
TOOLS (Extra): geeft de menu’s Naam wijzigen en Informatie weer.
Naam wijzigen
VCR / DVD / Kabel STB / Satelliet STB / PVR STB / AV-ontvanger / Spelcomputer / Camcorder / PC / DVI / DVI PC / TV /
IPTV / Blu-ray / HD DVD / DMA
Geef het apparaat aangesloten op de ingangen een naam om de selectie van ingangsbron makkelijker te maken.
Wanneer een pc met de resolutie 1920 x 1080 en 60 Hz is aangesloten op de HDMI IN 3(DVI)-poort, kunt u de modus
HDMI3/DVI instellen op DVI PC bij Naam wijzigen van de modus Invoer.
Wanneer u een HDMI/DVI-kabel op de HDMI IN 3(DVI)-poort aansluit, dient u de modus HDMI3/DVI op DVI of DVI PC in te
stellen in het veld Naam wijzigen van de modus Invoer. In dit geval is een afzonderlijke geluidsverbinding vereist.
Het menu Ondersteuning
Zelfdiagnose
Het beeld testen
Als u denkt een probleem te hebben met het beeld voert u de Picture test uit. Controleer het
kleurenpatroon onderin het beeld om te bepalen of het probleem nog aanwezig is.
Ja: als het testpatroon niet wordt weergegeven of als er ruis optreedt in het testpatroon
kiest u Ja. Er kan een probleem zijn met de tv. Neem contact op met het callcenter van
Samsung voor hulp.
Nee: als het testpatroon juist wordt weergegeven kiest u Nee. Er kan een probleem zijn met
uw externe apparatuur. Controleer uw aansluitingen. Als het probleem zich blijft voordoen,
raadpleegt u de gebruikershandleiding van het externe apparaat.
Het geluid testen
Als u denkt een probleem te hebben met het geluid voert u de Sound test uit. U kunt het geluid
controleren door een ingebouwde melodie via de tv af te spelen.
Als u geen geluid hoort via de luidsprekers van de tv controleert u voordat u de Het geluid
testen uitvoert of in het menu Sound Luidsprekerselectie is ingesteld op Luidsprekerselectie.
De melodie kunt u tijdens de test zelfs horen als Tv-luidspreker is ingesteld op Ext. luidspreker of als het geluid is gedempt
via de toets MUTE op de afstandsbediening.
Ja: als u tijdens de geluidstest alleen geluid hoort uit één luidspreker of helemaal geen geluid hoort, kiest u Ja. Er kan een
probleem zijn met de tv. Neem contact op met het callcenter van Samsung voor hulp.
Nee: als u geluid hoort uit de luidsprekers, kiest u Nee. Er kan een probleem zijn met uw externe apparatuur. Controleer uw
aansluitingen. Als het probleem zich blijft voordoen, raadpleegt u de gebruikershandleiding van het externe apparaat.
¦
❑
O
■
N
N
N
❑
■
N
N
¦
❑
■
●
●
■
N
N
●
●
Zelfdiagnose ▶
SoftwareUpgrade
HandleidingHD-verbindingen
ContactopnemenmetSamsung
Ondersteuning
Bronlijst ▶
Naamwijzigen
Invoer
Vernieuwen
T
Extra
Bronlijst
TV
Ext.1 :----
Ext.2 :----
PC :----
AV :----
Component :----
Zelfdiagnose
U
Verpl.
E
Enter
R
Terug
Hetbeeldtesten ▶
Hetgeluidtesten
Signaalinformatie
[620-Weuro]BN68-02326A-03L09.ind26 26 2009-10-08 ¿ÀÀü 9:29:00

Nederlands - 27
Signaalinformatie (alleen digitale kanalen)
De ontvangstkwaliteit van analoge kanalen kan variëren van 'geruis' tot helder, maar digitale (HDTV)-kanalen hebben altijd
perfecte ontvangst. Zo niet, dan ontvangt u de kanalen helemaal niet. In tegenstelling tot analoge kanalen kunt u digitale kanalen
dus niet verder afstellen. U kunt daarentegen wel uw antenne afstellen om de ontvangst van de beschikbare digitale kanalen te
verbeteren.
Als de signaalsterktemeter aangeeft dat het signaal zwak is, verstelt u uw antenne handmatig om de signaalsterkte te
versterken. Blijf de antenne bijstellen totdat u de positie vindt met de sterkste signaal.
Software Upgrade
Samsung kan in de toekomst upgrades voor de firmware van de tv aanbieden. Deze upgrades
kunnen worden uitgevoerd via de tv wanneer deze op internet is aangesloten, of door de nieuwe
firmware van samsung.com op een USB-stick te downloaden.
Huidige versie is de software die al op de tv is geïnstalleerd.
Alternatieve software (Back-up) is de voorgaande versie die vervangen wordt.
De software wordt weergegeven als ‘Jaar/Maand/Dag_Versie’. Hoe recenter de datum, des
te nieuwer is de softwareversie. Het wordt aanbevolen om de nieuwste versie te installeren.
Via USB
Plaats een USB-stick met de firmware-upgrade die van samsung.com is gedownload in de
tv. Let op dat u tijdens het toevoegen van upgrades het apparaat niet uitschakelt of de USB-
geheugenschijf verwijdert. Na voltooiing van het upgraden van de firmware schakelt de tv
automatisch uit en aan. Controleer de firmwareversie nadat het upgraden is voltooid (de nieuwe
versie heeft een hoger nummer dan de oude versie).
Nadat de software is bijgewerkt, zijn alle video- en audio-instellingen weer op de
fabrieksinstellingen teruggezet. Wij raden u aan uw instellingen te noteren, zodat u deze na de
upgrade eenvoudig kunt terugzetten.
Via kanaal
Hiermee worden upgrades voor de software die het gebruik maakt van het uitzendkanaal uitgevoerd.
Als de functie tijdens de softwareoverdracht wordt geselecteerd, zoekt de functie naar beschikbare software en downloadt het
deze.
De benodigde tijd voor het downloaden van de software wordt door de signaalstatus bepaald.
Upgrade standby-modus
Selecteer Aan door op de toets ▲ of ▼ te drukken om de software-upgrade voort te zetten terwijl de stroom is ingeschakeld.
45 minuten nadat de tv op stand-by is gezet, wordt automatisch een handmatige upgrade uitgevoerd. Omdat de tv intern wordt
ingeschakeld, kan dit ertoe leiden dat op de LCD-tv vage beelden verschijnen. Dit kan meer dan een uur duren totdat de software-
upgrade is voltooid.
Alternatieve software (Back-up)
Als er een probleem is met de nieuwe firmware en dit de werking van de tv-functies beïnvloedt, kunt u de voorgaande versie van
de software weer terugzetten.
Als de software is gewijzigd, wordt de huidige software weergegeven.
U kunt de huidige software veranderen in alternatieve software via ‘Alternatieve software’
Handleiding HD-verbindingen
Dit menu geeft de verbindingsmethode weer die de beste kwaliteit biedt voor de HD-tv. Raadpleeg deze informatie wanneer u
externe apparaten op de tv aansluit.
Contact opnemen met Samsung
Bekijk deze informatie wanneer uw tv niet naar behoren werkt of wanneer u de software wilt upgraden. Hier kunt u de informatie
over het callcenter, het product en de downloadmethode van softwarebestanden bekijken.
■
N
❑
N
N
N
■
■
N
N
■
■
N
N
❑
❑
Zijpaneel van de tv
USB-station
Huidigeversie 2009/01/18_000001
ViaUSB ▶
Viakanaal
Upgradestandby-modus :45Min.
Alternatievesoftware 2009/01/15_00000
U
Verpl.
E
Enter
R
Terug
SoftwareUpgrade
[620-Weuro]BN68-02326A-03L09.ind27 27 2009-10-08 ¿ÀÀü 9:29:00

Nederlands - 28
MEDIA PLAY (USB)
Een USB-apparaat aansluiten
1. Druk op de toets POWER
P
om de TV in te schakelen.
2. Sluit een USB-apparaat met foto- en/of muziekbestanden aan op de USB-aansluiting aan de
zijkant van de tv.
3.
Wanneer het Toepassing-selectiescherm wordt weergegeven, drukt u op de toets ENTER
E
om Media Play (USB) te selecteren.
MTP (Media Transfer Protocol) wordt niet ondersteund.
Het bestandssysteem ondersteunt FAT16, FAT32 en NTFS.
Bepaalde types digitale camera's en geluidsapparatuur zijn mogelijk niet compatibel met
dit toestel.
Media Play ondersteunt alleen USB MSC-apparatuur. MSC staat voor Mass
Storage Class, een apparaat waarop grote hoeveelheden gegevens tegelijk
kunnen worden opgeslagen en getransporteerd. Voorbeelden van MSC
zijn flashgeheugens en geheugenkaartlezers (USB harde schijven en hub’s
worden niet ondersteund.)
Sluit het apparaat rechtstreeks aan op de USB-poort van uw TV. Als u een
losse kabelverbinding gebruikt, kunnen USB-compatibiliteitsproblemen
optreden.
Maak een back-up van uw bestanden voordat u het apparaat aansluit op de
TV om beschadiging of verlies van uw gegevens te voorkomen. SAMSUNG is niet verantwoordelijk voor beschadiging of
verlies van gegevens.
Verwijder het USB-apparaat niet terwijl gegevens worden geladen.
Hoe hoger de resolutie van het beeld, des te langer duurt het voordat het op het scherm wordt weergegeven.
De maximaal ondersteunde JPEG-resolutie is 15360 x 8640 pixels.
Bij bestanden die niet worden ondersteund of die zijn beschadigd wordt het bericht ‘Niet-ondersteunde bestandsindeling’
weergegeven.
MP3-bestanden met DRM die tegen betaling zijn gedownload kunnen niet worden afgespeeld. Digital Rights
Management (DRM) is een technologie voor het creëren van inhoud en de distributie en het beheer van de inhoud op een
geïntegreerde en veelzijdige wijze, met inbegrip de bescherming van de rechten en belangen van de producenten, het
voorkomen van het illegaal kopiëren van de inhoud en het beheren van rekeningen en betalingen.
Wanneer u een foto verplaatst kan het laden een paar seconden duren. Op dit moment verschijnt het laadpictogram op
het scherm.
Als er meer dan een MSC-apparaat is aangesloten, worden sommige mogelijk niet herkend.
Als een apparaat meer
energie nodig heeft (meer dan 500 mA of 5 V), wordt het USB-apparaat mogelijk niet ondersteund.
Als er een waarschuwing van te veel energie wordt weergegeven wanneer u een USB-apparaat aansluit, wordt het
apparaat mogelijk niet herkend of werkt het mogelijk niet goed.
De toetsen van de afstandsbediening gebruiken in het menu Media Play
Toets Effect
▲/▼/◄/► Beweeg de cursor en selecteer een item.
ENTER
E
Het gemarkeerde item selecteren. Tijdens het afspelen van een presentatie of muziekbestand:
- Als u tijdens het afspelen op de toets ENTER
E
drukt, wordt het afspelen gepauzeerd.
- Als u in de pauzestand op de toets ENTER
E
drukt, wordt het afspelen hervat.
∂
/
∑
Een presentatie of muziekbestand afspelen of onderbreken.
RETURN Terug naar het vorige menu.
TOOLS Verschillende functies uit de menu’s Photo en Music uitvoeren.
∫
De huidige presentatie of muziek stoppen.
π
/
μ
Naar de voorgaande/volgende groep springen.
INFO Bestandsgegevens weergeven.
MEDIA.P De modus Media Play afsluiten.
<
P
>
,
EXIT, TV
De modus Media Play afsluiten en terugkeren naar de TV-modus.
¦
N
N
N
N
N
N
N
N
N
N
N
N
N
N
Zijpaneel van de tv
USB-station
851.86MB/993.02MBFree
Photo
SUM
SUM
Apparaat
PHOTO
R
Terug
Music Setup
[620-Weuro]BN68-02326A-03L09.ind28 28 2009-10-08 ¿ÀÀü 9:29:00

Nederlands - 29
De modus Media Play
In deze modus kunt u foto- en muziek-bestanden die op een USB MSC-apparaat zijn opgeslagen, bekijken en/of beluisteren.
Werkt mogelijk niet naar behoren met multimediabestanden zonder licentie.
De modus Media Play (USB) activeren
1. Druk op de toets MENU. Druk op de toets ▲ of ▼ om Toepassing te selecteren
en druk vervolgens op de toets ENTER
E
.
2. Druk op de toets ▲ of ▼ om Media Play (USB) te selecteren en druk vervolgens
op de toets ENTER
E
.
Het menu Media Play (USB) wordt weergegeven.
Druk op de toets MEDIA.P op de afstandsbediening om het menu Media
Play te openen.
Druk de toets SOURCE op de afstandsbediening in om de bronnenlijst weer
te geven. Druk vervolgens op de toets ▲ of ▼ om USB te selecteren.
3.
Druk op de rode toets en vervolgens op de toets ▲ of ▼ om het USB-geheugen
te selecteren. Druk op de toets ENTER
E
.
De werking van deze functie kan verschillen, afhankelijk van het USB-geheugen.
De naam van het geselecteerde USB-apparaat verschijnt linksonderaan op het scherm.
4.
Druk op de toets ◄ of ► om een van de pictogrammen (Photo, Music, Setup) te selecteren en druk vervolgens op de toets
ENTER
E
.
U kunt de modus Media Play afsluiten door te drukken op de toets MEDIA.P op de afstandsbediening.
Een USB-geheugen op een veilige manier verwijderen
Hiermee kunt u het apparaat veilig van de TV verwijderen.
1. Druk op de toets TOOLS in het scherm met de Media Play-bestandenlijst, of op
het moment dat er een presentatie of muziekbestand wordt afgespeeld.
2.
Druk op de toets ▲ of ▼ om Veilig verwijderen te selecteren en druk vervolgens
op de toets ENTER
E
.
3. Verwijder het USB-apparaat van de TV.
Schermweergave
Ga met behulp van de toetsen voor omhoog en omlaag naar het gedeelte Groepenlijst of Bestandenlijst. Nadat u een onderdeel
hebt geselecteert, drukt u op de toets ◄ of ► om een item te selecteren.
¦
N
N
O
O
N
N
N
INFO
AD
INFO
AD
851.86MB/993.02MBFree
Photo
SUM
SUM
Apparaat
PHOTO
R
Terug
Music Setup
SUM Apparaat
Keuze
T
Extra
R
Bovenstemap
1234.jpg
1235.jpg
1236.jpg
1237.jpg
1233.jpg
1232.jpg
1231.jpg
Diashow
Huid.afsp.
Informatie
Veilig
verwijderen
5/15
1 2
../Photo/
Het gedeelte Groepenlijst
Het gedeelte Bestandenlijst
SUM Apparaat
Keuze
T
Extra
R
Bovenstemap
1234.jpg
1235.jpg
1236.jpg
1237.jpg
1233.jpg
1232.jpg
1231.jpg
1Ges.best.
2
3 5
4
1 2
1
5/15
c
../Photo/
[620-Weuro]BN68-02326A-03L09.ind29 29 2009-10-08 ¿ÀÀü 9:29:03

Nederlands - 30
1 Groepen weergeven: De sorteergroep met het huidige geselecteerde bestand is gemarkeerd.
2 Huidige geselecteerde bestand: het geselecteerde bestand is het bestand dat u op dat moment kunt bedienen. Fotobestanden
worden als miniatuurafbeeldingen weergegeven.
3 Huidige apparaat: geeft de naam van het huidige geselecteerde apparaat weer. Druk op de rode toets om een apparaat te
selecteren.
Rode toets (Apparaat): hiermee selecteert u een aangesloten apparaat.
4 Informatie over de geselecteerde items: geeft het aantal bestanden weer dat met de gele toets is geselecteerd.
5 Helpitems
Gele toets (Keuze): hiermee selecteert u een bestand in de bestandenlijst. De geselecteerde bestanden worden
gemarkeerd met het symbool
c
. Druk nogmaals op de gele toets om de selectie van een bestand ongedaan te maken.
TOOLS-toets (Extra): hiermee opent u de optiemenu's. (Het optiemenu verandert in overeenstemming met de status van
dat moment.)
Opties voor de fotolijst
1. Druk op de toets MEDIA.P.
2. Druk op de toets ◄ of ► om Photo te selecteren en druk vervolgens op de toets
ENTER
E
.
3. Druk op de toets ◄ of ► om het gewenste fotobestand te selecteren.
Meerdere foto's selecteren
Druk op de toets ◄ of ► om het gewenste fotobestand te selecteren.
Druk vervolgens op de gele toets.
Herhaal deze procedure om meerdere fotobestanden te selecteren.
Naast de geselecteerde foto verschijnt het symbool
c
.
4. Druk op de toets TOOLS.
Het optiemenu verandert in overeenstemming met de status van dat moment.
Presentatie
Via dit menu kunt u een presentatie afspelen van de fotobestanden in het USB-geheugen.
Huid. afsp.
Met dit menu kunt u een presentatie afspelen van de fotobestanden in de geselecteerde sorteergroep.
Niets select. (wanneer ten minste één bestand is geselecteerd)
Hiermee kunt u de selectie van alle bestanden opheffen.
Het symbool
c
van het desbetreffende bestand wordt verborgen.
Informatie
Hiermee worden de bestandsgegevens van de foto weergegeven, met onder meer de naam, grootte, resolutie, wijzigingsdatum en
het pad.
Op dezelfde wijze kunt u de gegevens van fotobestanden tijdens een presentatie bekijken.
Druk op de toets INFO om de informatie weer te geven.
Veilig verwijderen
Hiermee kunt u het apparaat veilig van de TV verwijderen.
¦
N
N
❑
❑
❑
N
❑
N
O
❑
INFO
AD
SUM Apparaat
Keuze
T
Extra
R
Bovenstemap
1234.jpg
1235.jpg
1236.jpg
1237.jpg
1233.jpg
1232.jpg
1231.jpg
Presentatie
Huid.afsp.
Informatie
Veilig
verwijderen
5/15
1 2
../Photo/
[620-Weuro]BN68-02326A-03L09.ind30 30 2009-10-08 ¿ÀÀü 9:29:05

Nederlands - 31
Een foto of presentatie bekijken
Een presentatie bekijken
1. Druk op de toets ▼ om het gedeelte Bestandenlijst te selecteren.
2. Druk op de toets TOOLS.
3.
Druk op de toets ▲ of ▼ om Presentatie te selecteren en druk vervolgens op de
toets ENTER
E
.
Alle bestanden in de Bestandenlijst worden voor de presentatie gebruikt.
Tijdens de presentatie worden de bestanden in volgorde afgebeeld vanaf het
huidige bestand.
De presentatie verloopt in de volgorde waarin de Bestandenlijst is gesorteerd.
U kunt tijdens een presentatie automatisch muziekbestanden laten afspelen als
Achtergr.kl. op Aan is ingesteld.
Druk op het moment dat een fotolijst wordt weergegeven op de toets
∂
(Afspelen)/ENTER
E
op de afstandsbediening om de presentatie te starten.
Bedieningstoetsen voor de presentatie
Toets Effect
ENTER
E
De presentatie afspelen/pauzeren.
∂
De presentatie afspelen.
∑
De presentatie pauzeren.
∫
De presentatie afsluiten en terugkeren naar de fotolijst.
π
/
μ
De snelheid van de presentatie wijzigen.
TOOLS Verschillende functies uit de fotomenu's uitvoeren.
Huidige groep afspelen
1. Druk op de toets ▲ om naar het gedeelte Groepenlijst te gaan.
2. Selecteer een groep met de toetsen ◄ en ►.
3.
Druk op de toets
∂
(Afspelen). Er wordt een presentatie gestart met bestanden
uit de geselecteerde groep.
U kunt ook het volgende doen
1.
Selecteer in het gedeelte Bestandenlijst de bestanden van de gewenste groep.
U kunt naar de voorgaande/volgende groep gaan door te drukken op de
toets
π
(REW) of
μ
(FF).
2. Druk op de toets TOOLS.
3.
Druk op de toets ▲ of ▼ om Huid. afsp. te selecteren en druk vervolgens op de toets ENTER
E
.
Alleen de foto's in de sorteergroep met de geselecteerde bestanden worden voor de presentatie gebruikt.
Een presentatie uitvoeren met alleen de geselecteerde bestanden
1. Druk op de toets ▼ om het gedeelte Bestandenlijst te selecteren.
2. Druk op de toets ◄ of ► om de gewenste foto in de Bestandenlijst te selecteren.
3.
Druk op de gele toets.
4.
Herhaal deze procedure om meerdere foto’s te selecteren.
Links naast de geselecteerde foto verschijnt het symbool
c
.
Als u één bestand selecteert wordt er geen presentatie uitgevoerd.
Als u de selectie van alle bestanden ongedaan wilt maken, drukt u op de toets TOOLS en selecteert u Niets select.
5.
Druk op de toets
∂
(Afspelen)/ENTER
E
.
De geselecteerde bestanden worden voor de presentatie gebruikt.
¦
N
N
N
N
O
N
●
N
N
N
N
N
N
INFO
AD
E
Pauze◀▶Vorig/volg
T
Extra
R
Terug
SUM
1234.jpg
580x7652009/03/025/15
▶Normaal
SUM Apparaat
Keuze
T
Extra
R
Bovenstemap
1234.jpg
1235.jpg
1236.jpg
1237.jpg
1233.jpg
1232.jpg
1231.jpg
Presentatie
Huid.afsp.
Informatie
Veilig
verwijderen
5/15
1 2
../Photo/
SUM Device
Keuze
T
Extra
R
Bovenstemap
1234.jpg
1235.jpg
1236.jpg
1237.jpg
1233.jpg
1232.jpg
1231.jpg
5/15
1 2
../Photo/
[620-Weuro]BN68-02326A-03L09.ind31 31 2009-10-08 ¿ÀÀü 9:29:08

Nederlands - 32
U kunt ook het volgende doen
1. Druk in de Bestandenlijst op de gele toetsen om de gewenste foto's te selecteren.
2.
Druk op de toets TOOLS.
3.
Druk op de toets ▲ of ▼ om Presentatie te selecteren en druk vervolgens op de toets ENTER
E
.
De geselecteerde bestanden worden voor de presentatie gebruikt.
Opties voor de presentatie
1. Druk tijdens een presentatie (of het bekijken van een foto) op de toets TOOLS om
een optie in te stellen.
2.
Druk op de toets ▲ of ▼ om de optie te selecteren en druk vervolgens op de toets
ENTER
E
.
Stop Presentatie / Begin Presentatie
Hiermee kunt u de presentatie starten of stoppen.
Hiermee kunt u de snelheid van de presentatie bepalen.
Deze functie is alleen tijdens een presentatie beschikbaar.
U kunt de snelheid van de presentatie ook wijzigen door tijdens de presentatie op de toets
π
(REW) of
μ
(FF) te drukken.
Roteren
Hiermee kunt u foto's in een USB-geheugen draaien.
Wanneer u op de toets ◄ drukt, wordt het beeld 270˚, 180˚, 90˚ en 0˚ gedraaid.
Wanneer u op de toets ► drukt, wordt het beeld 90˚, 180˚, 270˚ en 0˚ gedraaid.
Het gedraaide bestand wordt niet opgeslagen.
Zoom
Hiermee kunt u foto's in een USB-geheugen op het scherm vergroten. (x1 → x2 → x4)
U kunt de ingezoomde foto verschuiven door op de toets ENTER
E
te drukken en vervolgens op de toetsen ▲/▼/◄/►.
Als de ingezoomde afbeelding kleiner is dan het oorspronkelijke beeldformaat, werkt de verschuivingsfunctie niet.
Het ingezoomde bestand wordt niet opgeslagen.
Achtergr.kl.
Hiermee kunt u achtergrondmuziek instellen bij het weergeven van een presentatie.
U kunt deze functie alleen gebruiken als er zich zowel muziek- als fotobestanden in het USB-geheugen bevinden.
Uit: Er wordt geen achtergrondmuziek afgespeeld.
Aan: Wanneer de achtergrondmuziek beschikbaar is, selecteert u Aan om de muziek af te spelen.
Muziekbest. select. (0 Ges. best.)
Alleen het geselecteerde muziekbestand wordt als achtergrondmuziek ingesteld.
Afbeeldinginstallatie / Geluidsinstellingen
Hiermee kunt u de beeld- en geluidsinstellingen wijzigen.
Informatie
Hiermee kunt u de gegevens van het fotobestand weergeven.
Veilig verwijderen
Hiermee kunt u het apparaat veilig van de TV verwijderen.
●
N
¦
❑
❑
N
N
❑
N
N
N
❑
N
N
❑
N
■
●
●
■
❑
❑
❑
StopPresentatie
Snelheidpresentatie : Normaal
Roteren
Zoom
Achtergr.kl.
Afbeeldinginstallatie
Geluidsinstellingen
Informatie
Veilig
verwijderen
U
Verpl.
E
Enter
e
Sluiten
Extra
[620-Weuro]BN68-02326A-03L09.ind32 32 2009-10-08 ¿ÀÀü 9:29:08

Nederlands - 33
Opties voor de muzieklijst
1. Druk op de toets MEDIA.P.
2. Druk op de toets ◄ of ► om Music te selecteren en druk vervolgens op de toets
ENTER
E
.
3. Druk op de toets ◄ of ► om het gewenste muziekbestand te selecteren.
Meerdere muziekbestanden selecteren.
Druk op de toets ◄ of ► om het gewenste muziekbestand te selecteren.
Druk vervolgens op de gele toets.
Herhaal deze procedure om meerdere muziekbestanden te selecteren.
Naast het geselecteerde muziekbestand verschijnt het symbool
c
.
4. Druk op de toets TOOLS.
Het optiemenu verandert in overeenstemming met de status van dat moment.
Huid. afsp.
Muziekbestanden afspelen binnen de sorteergroep die op dat moment is geselecteerd.
Niets select. (wanneer ten minste één bestand is geselecteerd)
Hiermee kunt u de selectie van alle bestanden opheffen.
Het symbool
c
van het desbetreffende bestand wordt verborgen.
Informatie
Hiermee worden de gegevens van het muziekbestand weergegeven, met onder meer de naam, grootte, wijzigingsdatum en het
pad.
Op dezelfde wijze kunt u de gegevens van muziekbestanden tijdens Huid. afsp. bekijken.
Druk op de toets INFO om de informatie weer te geven.
Veilig verwijderen
Hiermee kunt u het apparaat veilig van de TV verwijderen.
¦
N
N
❑
❑
N
❑
N
O
❑
INFO
AD
SUM Apparaat
Keuze
T
Extra
R
Bovenstemap
HaHaHa
Gold
Shine
Way
Want
Me
Lies
ILoveYou
GlenHans
OnceOst
2007
Soundtrack
3/37
Energetic
Huid.afsp.
Informatie
Veilig
verwijderen
5 1 2 34
../Music/
[620-Weuro]BN68-02326A-03L09.ind33 33 2009-10-08 ¿ÀÀü 9:29:09

Nederlands - 34
Muziek afspelen
Een muziekbestand afspelen
1. Druk op de toets ▼ om het gedeelte Bestandenlijst te selecteren.
2. Druk op de toets ◄ of ► om het gewenste muziekbestand te selecteren.
3.
Druk op de toets
∂
(Afspelen)/ENTER
E
.
In dit menu ziet u alleen bestanden met de extensie MP3. Bestanden met
andere extensies worden niet weergeven, ook al staan ze wel op het USB-
apparaat.
Het geselecteerde bestand wordt bovenaan weergegeven, compleet met
speelduur.
U kunt het volume van de muziek instellen met de volumetoets op de
afstandsbediening. Als u het geluid wilt onderdrukken, drukt u op MUTE op de afstandsbediening.
Als het geluid bij het afspelen van MP3-bestanden ongewoon klinkt, past u de Toonregeling en SRS TruSurround HD in
het geluidsmenu aan. (Een overgemoduleerd MP3-bestand kan geluidsproblemen veroorzaken.
Het kan voorkomen dat de speelduur van een muziekbestand wordt weergegeven als ‘00:00:00’
als de informatie
betreffende de speelduur niet aan het begin van het bestand wordt aangetroffen.
π
(REW) en
μ
(FF) werken niet tijdens het afspelen.
Toetsen voor het afspelen van muziek
Toets Effect
ENTER
E
Het muziekbestand afspelen/pauzeren.
∂
Het muziekbestand afspelen.
∑
Het muziekbestand pauzeren.
∫
De afspeelmodus afsluiten en terugkeren naar de muzieklijst.
TOOLS Verschillende functies uit de muziekmenu's uitvoeren.
Informatiepictogram muziekfunctie
p
Wanneer alle muziekbestanden in de map (of het geselecteerde bestand) worden herhaald.
Herhalen is Aan.
q
Wanneer alle muziekbestanden in de map (of het geselecteerde bestand) eenmaal worden
afgespeeld. Herhalen is Uit.
De muziekgroep afspelen
1. Druk op de toets ▲ om naar het gedeelte Groepenlijst te gaan.
2. Selecteer een groep met de toetsen ◄ en ►.
3.
Druk op de toets
∂
(Afspelen). De bestanden van de geselecteerde groep worden afgespeeld.
U kunt ook het volgende doen
1.
Selecteer in het gedeelte Bestandenlijst de bestanden van de gewenste groep.
U kunt naar de voorgaande/volgende groep gaan door te drukken op de toets
π
(REW) of
μ
(FF).
2. Druk op de toets TOOLS.
3.
Druk op de toets ▲ of ▼ om Huid. afsp. te selecteren en druk vervolgens op de toets ENTER
E
.
De muziekbestanden in de sorteergroep waarin het geselecteerde bestand zich bevindt worden afgespeeld.
De geselecteerde muziekbestanden afspelen
1. Druk op de toets ▼ om het gedeelte Bestandenlijst te selecteren.
2. Druk op de toets ◄ of ► om het gewenste muziekbestand te selecteren.
3.
Druk op de gele toets.
4.
Herhaal deze procedure om meerdere muziekbestanden te selecteren.
Links naast het geselecteerde muziekbestand verschijnt het symbool
c
.
Als u de selectie van alle bestanden ongedaan wilt maken, drukt u op de toets TOOLS en selecteert u Niets select.
5.
Druk op de toets
∂
(Afspelen)/ENTER
E
.
De geselecteerde bestanden wordt afgespeeld.
¦
N
N
N
N
N
N
N
N
●
N
N
N
N
N
E
Pauze◀▶Vorig/volg
T
Extra
R
Terug
SUM
ILoveYou
HaHaHaWay
▶00:00:04/00:04:043/37
[620-Weuro]BN68-02326A-03L09.ind34 34 2009-10-08 ¿ÀÀü 9:29:09

Nederlands - 35
Opties voor het afspelen van muziek
Opties voor het afspelen van muziek
Hiermee kunt u muziekbestanden herhaald afspelen.
Afbeeldinginstallatie / Geluidsinstellingen
Hiermee kunt u de beeld- en geluidsinstellingen configureren.
Informatie
Hiermee kunt u de gegevens van het muziekbestand weergeven.
Veilig verwijderen
Hiermee kunt u het apparaat veilig van de TV verwijderen.
¦
❑
❑
❑
❑
Het Instellingenmenu gebruiken
In Setup vindt u de gebruikersinstellingen van het menu Media Play.
1. Druk op de toets MEDIA.P.
2.
Druk op de toets ◄ of ► om Setup te selecteren en druk vervolgens op de toets
ENTER
E
.
3. Druk op de toets ▲ of ▼ om de gewenste optie te selecteren.
4.
Druk op de toets ◄ of ► om de optie te selecteren.
U kunt de modus Media Play afsluiten door te drukken op de toets MEDIA.P op
de afstandsbediening.
Hiermee kunt u muziekbestanden herhaald laten afspelen.
Hiermee kunt u de wachttijd instellen voor het inschakelen van de schermbeveiliging.
Informatie
Hiermee kunt u de informatie van het aangesloten apparaat weergeven.
Veilig verwijderen
Hiermee kunt u het apparaat veilig van de TV verwijderen.
¦
N
■
■
■
■
Herhalen ◀Aan▶
Afbeeldinginstallatie
Geluidsinstellingen
Informatie
Veilig
verwijderen
U
Verpl.
L
Instell.
e
Sluiten
Extra
851.86MB/993.02MBFree
Photo
SUM
SUM
Apparaat
SETUP
e
Sluiten
Music Setup
Herhalen ◀Aan▶
Uitvoertijdscreensaver :2uur
Informatie
Veilig
verwijderen
U
Verpl.
L
Instell.
R
Terug
SUM Apparaat
[620-Weuro]BN68-02326A-03L09.ind35 35 2009-10-08 ¿ÀÀü 9:29:09

Nederlands - 36
ANYNET
+
Anynet
+
-apparaten aansluiten
Wat is Anynet
+
?
Anynet
+
is een functie waarmee u alle aangesloten Samsung-apparaten die Anynet
+
ondersteunen, kunt bedienen met de
afstandsbediening van de Samsung-tv. Het Anynet
+
-systeem kan alleen worden gebruikt met Samsung-apparaten die de Anynet
+
-
functie bezitten. Om u ervan te verzekeren dat uw Samsung-apparaat deze functie heeft, kunt u controleren of er een Anynet
+
-
logo op het apparaat aanwezig is.
Op een tv aansluiten
1. Verbind de HDMI IN (1, 2, 3 (DVI) of 4)-aansluiting van de tv met behulp van een HDMI-kabel met de HDMI OUT-aansluiting
van het betreffende Anynet
+
-apparaat.
Op een thuisbioscoop aansluiten
1. Verbind de HDMI IN (1, 2, 3(DVI) of 4)-aansluiting van de tv met behulp van een HDMI-kabel met de HDMI OUT-aansluiting
van het betreffende Anynet
+
-apparaat.
2. Verbind de HDMI IN-aansluiting van de thuisbioscoop met behulp van een HDMI-kabel met de HDMI OUT-aansluiting van het
betreffende Anynet
+
-apparaat.
Sluit de optische kabel aan op de DIGITAL AUDIO OUT (OPTICAL)-aansluiting van de tv en de Digital Audio Input-
aansluiting van de thuisbioscoop.
Wanneer de bovenstaande verbinding wordt gevolgd, voert de optische aansluiting op de tv maar van twee kanalen uit.
U hoort alleen geluid uit de linker- en rechterluidspreker van de thuisbioscoop en de subwoofer
. Voor een 5.1-kanaals
audiosignaal sluit u de DIGITAL AUDIO OUT (OPTICAL)-aansluiting van de dvd-speler of satellietontvanger (Anynet-
apparaat 1 of 2) rechtstreeks aan op een versterker of op de thuisbioscoop en niet op de tv.
Alleen één thuisbioscoop aansluiten.
U kunt een Anynet
+
-apparaat aansluiten met een HDMI 1.3-kabel. Sommige HDMI-kabels ondersteunen mogelijk geen
Anynet
+
-functies.
Anynet
+
werkt wanneer het AV-apparaat dat Anynet
+
ondersteunt, op stand-by staat of is ingeschakeld.
Anynet
+
ondersteunt in totaal 12 AV-apparaten. U kunt maximaal 3 apparaten van hetzelfde type aansluiten.
¦
N
N
N
N
N
N
Anynet
+
-apparaat 1
HDMI 1.3-kabel
HDMI 1.3-kabelHDMI 1.3-kabel
HDMI 1.3-kabel
Anynet
+
-apparaat 2 Anynet
+
-apparaat 3 Anynet
+
-apparaat 4
TV
Anynet
+
-apparaat 1
HDMI 1.3-kabel
HDMI 1.3-kabel
HDMI 1.3-kabelHDMI 1.3-kabel
TV
HDMI 1.3-kabel
Optische kabel
Anynet
+
-apparaat 2 Anynet
+
-apparaat 3 Anynet
+
-apparaat 4
Thuisbioscoop
[620-Weuro]BN68-02326A-03L09.ind36 36 2009-10-08 ¿ÀÀü 9:29:10

Nederlands - 37
Anynet
+ instellen
Druk op de toets TOOLS om het menu Extra weer te geven. U kunt ook het Anynet
+
-menu
weergeven door
+
(HDMI-CEC) te kiezen.
Instellingen
AnyNet
+
Om de functie Anynet
+
te gebruiken, dient AnyNet
+
(HDMI-CEC) op Aan te zijn ingesteld.
Wanneer de functie Anynet
+
(HDMI-CEC) is uitgeschakeld, worden alle bewerkingen
betreffende Anynet+ ook uitgeschakeld.
Een Anynet
+
-apparaat instellen om automatisch uit te schakelen wanneer de tv wordt
uitgeschakeld
De actieve bron op de afstandsbediening van de tv dient te worden ingesteld op de tv
als u de functie Anynet
+
wilt kunnen gebruiken.
Wanneer u Automatisch uitschakelen instelt op Ja worden de aangesloten externe
apparaten ook uitgeschakeld wanneer de tv wordt uitgeschakeld. Wanneer een e
xtern
apparaat nog aan het opnemen is, is het mogelijk dat het niet wordt uitgeschakeld.
Tussen Anynet
+
-apparaten schakelen
1. Druk op de toets TOOLS. Druk op de toets ENTER
E
om Anynet
+
(HDMI-CEC) te
selecteren.
2.
Druk op de toets ▲ of ▼ om Apparatenlijst te selecteren en druk vervolgens op de toets
ENTER
E
.
De Anynet
+
-apparaten die op de tv zijn aangesloten, worden weergegeven.
Wanneer u het door u gewenste apparaat niet kunt vinden, kunt u op de rode knop
drukken om op apparaten te scannen.
3.
Druk op de toets ▲ of ▼ om een apparaat te selecteren en druk op de toets ENTER
E
.
Er wordt naar het geselecteerde apparaat overgeschakeld.
Alleen wanneer u AnyNet
+
(HDMI-CEC) instelt op Aan in het menu Toepassing, verschijnt het menu Apparatenlijst.
Het kan 2 minuten voordat er naar de geselecteerde apparaten is overgeschakeld. U kunt de bewerking in de tussentijd niet
annuleren.
De benodigde tijd voor het zoeken naar apparaten wordt bepaald door het aantal aangesloten apparaten.
Wanneer de zoekopdracht is voltooid, wordt het aantal gedetecteerde apparaten niet weergegeven.
Hoewel de tv bij het inschakelen via de aan-uitknop automatisch naar de apparatenlijst zoekt, worden apparaten die op de tv
zijn aangesloten niet altijd automatisch in de lijst weergegeven. Druk op de rode knop om het aangesloten apparaat te zoeken.
Als u een externe invoermodus hebt geselecteerd door op de toets SOURCE te drukken, kunt u de functie Anynet
+
niet
gebruiken. Zorg ervoor dat u naar het Anynet
+
-apparaat overschakelt door gebruik te maken van de Apparatenlijst.
Anynet
+
-menu
Het menu Anynet
+
verandert overeenkomstig het type en de status van de Anynet
+
-apparaten die op de tv zijn aangesloten.
Anynet
+
-menu Beschrijving
Tv weergeven De modus Anynet
+
schakelt over naar de tv-uitzendmodus.
Apparatenlijst Geeft de lijst met Anynet
+
-apparaten weer.
(apparaatnaam) MENU
Toont de menu’s van het aangesloten apparaat. Wanneer er bijvoorbeeld een dvd-
recorder is aangesloten, verschijnt het diskmenu van de dvd-recorder.
(apparaatnaam) INFO
Toont de afspeelmenu’s van het aangesloten apparaat. Wanneer er bijvoorbeeld een
dvd-recorder is aangesloten, verschijnt het afspeelmenu van de dvd-recorder.
Opname: (*recorder)
Begint onmiddellijk met opnemen met de recorder. (Dit is alleen beschikbaar voor
apparaten die de functie recording ondersteunen).
Opname stoppen: (*recorder) Hiermee wordt het opnemen beëindigd.
ontvanger Geluid wordt uitgevoerd via de ontvanger.
Wanneer er meer dan een opnameapparaat is aangesloten, worden deze weergegeven als (*recorder) en wanneer er slechts
een opnameapparaat is aangesloten, wordt dit weergegeven als (*apparaatnaam).
¦
T
❑
■
N
■
N
N
¦
N
N
N
N
N
N
N
N
N
U
Verpl.
E
Enter
R
Terug
Anynet
+
(HDMI-CEC) :Aan▶
Instellingen
Automatischuitschakelen :Ja
MediaPlay(USB)
Anynet
+
(HDMI-CEC)
Toepassing
U
Verpl.
E
Enter
R
Terug
Anynet
+
(HDMI-CEC) :Aan
Instellingen
Automatischuitschakelen :Ja▶
U
Verpl.
E
Enter
R
Sluiten
Tvweergeven
Apparatenlijst
Opname:DVDR
DVDRMENU
DVDRINFO
Ontvanger:Uit
Instellingen
[620-Weuro]BN68-02326A-03L09.ind37 37 2009-10-08 ¿ÀÀü 9:29:11

Nederlands - 38
Beschikbare toetsen op de tv-afstandsbediening in de modus Anynet
+
Type apparaat Bedieningsstatus Beschikbare toetsen
Anynet
+
-apparaat
Nadat u naar het apparaat bent geschakeld,
wanneer het menu van het betreffende
apparaat wordt weergegeven op het scherm.
Numerieke toetsen
▲/▼/◄/►/ toets ENTER
E
Kleurentoetsen / EXIT-toets
Nadat u naar het apparaat bent geschakeld,
terwijl u een bestand afspeelt.
π
(Terugspoelen) /
μ
(Vooruitspoelen)
∫
(Stop) /
∂
(Afspelen) /
∑
(Pauze)
Apparaat met
ingebouwde tuner
Nadat u naar het apparaat bent geschakeld,
wanneer u tv-kijkt.
P
>
/ P
<
toets
Audioapparaat Wanneer de ontvanger is ingeschakeld.
Y
/ MUTE-toets
De functie Anynet
+
werkt alleen wanneer de actieve bron op de afstandsbediening is ingesteld op tv.
De toets
∏
werkt alleen wanneer opname mogelijk is.
U kunt Anynet
+
-apparaten niet met de toetsen op de tv bedienen. U kunt Anynet
+
-apparaten alleen bedienen met de
afstandsbediening van de tv.
De afstandsbediening van de tv werkt mogelijk niet in bepaalde omstandigheden. Selecteer in dat geval opnieuw het
Anynet
+
-
apparaat.
De Anynet
+
-functies werken niet bij producten van andere fabrikanten.
De werking van
π
,
μ
kan, afhankelijk van het apparaat, verschillen.
Opnemen
U kunt een tv-programma opnemen met een Samsung-recorder.
1. Druk op de toets TOOLS. Druk op de toets ENTER
E
om Anynet
+
(HDMI-CEC) te
selecteren.
2.
Druk op de toets ▲ of ▼ om Recording Immediately te selecteren en druk op de toets
ENTER
E
. Het opnemen wordt gestart.
Bij meerdere opnameapparaten
Wanneer er meerdere opnameapparaten zijn aangesloten, wordt er een
apparatenlijst weergegeven. Druk op de toets ▲ of ▼ om een opnameapparaat te
selecteren en druk op de toetsENTER
E
. Het opnemen wordt gestart.
Wanneer het opnameapparaat niet wordt weergegeven, selecteert u Apparatenlijst en drukt u op de rode toets om
apparaten te zoeken.
3.
Druk op de toets EXIT om af te sluiten.
U kunt bronsignalen opnemen door Opnemen: (apparaatnaam) te selecteren.
Wanneer u op de toets
∏
drukt, wordt datgene waar u op dat moment naar kijkt, opgenomen. Wanneer u vanaf een
ander apparaat een video bekijkt, wordt de video van dat apparaat opgenomen.
Controleer voor u begint met opnemen of de antenne correct is aangesloten op het opnameapparaat. Voor het correct
aansluiten van een antenne op een opnameapparaat kunt u de gebruikershandleiding van het opnameapparaat raadplegen.
Luisteren via een ontvanger (Thuisbioscoop)
U kunt geluid beluisteren via een ontvanger in plaats van de luidsprekers van de tv.
1. Druk op de toets TOOLS. Druk op de toets ENTER
E
om Anynet
+
(HDMI-CEC) te
selecteren.
2. Druk op de toets ▲ of ▼ om Ontvanger te selecteren. Druk op de toets ◄ of ► om
Aan of Uit te selecteren.
3.
Druk op de toets EXIT om af te sluiten.
Wanneer uw ontvanger alleen audio ondersteunt, verschijnt deze wellicht niet in de
apparatenlijst.
De ontvanger werkt wanneer u de optical in-aansluiting van de ontvanger correct hebt
aangesloten op de DIGITAL AUDIO OUT (OPTICAL)-aansluiting van de tv.
Wanneer de ontvanger (thuisbioscoop) is ingesteld op Aan, hoort u alleen geluid via de Optical-aansluiting van de tv.
Wanneer de tv een DTV-signaal (antenne) weergeeft, verstuurt de tv een 5.1-kanaals geluidssignaal naar de ontvanger
van de thuisbioscoop. Wanneer de bron een digitaal onderdeel is, zoals een dvd en deze op de tv aangesloten is via
HDMI, wordt er alleen 2-kanaals geluid van de thuisbioscoopontvanger weergegeven.
Wanneer de stroomvoorziening naar de tv wordt onderbroken (bijvoorbeeld doordat het netsnoer wordt losgekoppeld of
door een stroomstoring) en de Ontvanger is ingesteld op Aan is het mogelijk dat de Luidsprekerselectie is ingesteld op
Ext. luidspreker wanneer de tv opnieuw wordt ingeschakeld.
N
N
N
N
N
N
¦
N
N
N
N
N
¦
N
N
N
N
U
Verpl.
E
Enter
R
Terug
Tvweergeven
Apparatenlijst
Opname:DVDR
DVDRMENU
DVDRINFO
Ontvanger:Uit
Instellingen
U
Verpl.
E
Enter
R
Terug
Tvweergeven
Apparatenlijst
Opname:DVDR
DVDRMENU
DVDRINFO
Ontvanger:Uit
Instellingen
[620-Weuro]BN68-02326A-03L09.ind38 38 2009-10-08 ¿ÀÀü 9:29:11

Nederlands - 39
Problemen oplossen m.b.t. Anynet
+
Probleem Mogelijke oplossing
Anynet
+
werkt niet. Controleer of het apparaat een Anynet
+
-apparaat is. Het Anynet
+
-systeem ondersteunt alleen
Anynet
+
-apparaten.
Sluit niet meer dan één ontvanger aan (thuisbioscoop).
Controleer of het netsnoer van het Anynet
+
-apparaat correct is aangesloten.
Controleer de video- / audio- / HDMI 1.3-kabelverbindingen van het Anynet
+
-apparaat.
Controleer of Anynet
+
(HDMI-CEC) op Aan staat ingesteld in het instellingenmenu van Anynet
+
.
Controleer of de afstandsbediening van de tv in de tv-modus staat.
Controleer of het de exclusieve afstandsbediening van Anynet
+
is.
In bepaalde situaties werkt Anynet
+
niet. (Kanalen zoeken, Media Play uitvoeren, Plug & Play,
enzovoort.)
Wanneer u de HDMI 1.3-kabel aansluit of verwijdert, dient u opnieuw naar apparaten te zoeken
of uw televisie uit te schakelen en opnieuw in te schakelen.
Controleer of de functie Anynet
+
van het Anynet
+
-apparaat is ingeschakeld.
●
●
●
●
●
●
●
●
●
●
Ik wil Anynet
+
starten. Controleer of het Anynet+-apparaat op de juiste manier is aangesloten op de tv en controleer of
Anynet
+
(HDMI-CEC) is ingesteld op Aan in het menu Inst. van Anynet
+
.
Druk op de toets TV op de afstandsbediening om naar de tv te schakelen. Druk vervolgens op
de toets TOOLS om het menu van Anynet
+
te tonen en selecteer het door u gewenste menu.
●
●
Ik wil Anynet
+
verlaten. Selecteer Tv weergeven in het menu van Anynet
+
.
Druk op de toets SOURCE op de afstandsbediening van de tv en selecteer een ander apparaat
dan een Anynet
+
-apparaat.
Druk op P
>
/
<
, PRE-CH en FAV.CH om de tv-modus te wijzigen. (De kanaaltoets werkt
alleen wanneer er geen Anynet
+
-apparaat met een ingebouwde tuner is aangesloten.)
●
●
●
Het bericht ‘Connecting
to Anynet+ device...’
verschijnt op het scherm.
U kunt tijdens het configureren van Anynet
+
of het schakelen naar een weergavemodus de
afstandsbediening niet gebruiken.
Gebruik de afstandsbediening wanneer klaar bent met het instellen van Anynet
+
of met het
schakelen naar een weergavemodus.
●
●
Het Anynet
+
-apparaat
speelt niets af.
U kunt de afspeelfunctie niet gebruiken wanneer Plug & Play actief is.
●
Het aangesloten apparaat
wordt niet weergegeven.
Controleer of het apparaat ondersteuning biedt voor functies van Anynet
+
.
Controleer of de HDMI 1.3-kabel op de correcte manier is aangesloten.
Controleer of Anynet
+
(HDMI-CEC) op Aan is ingesteld in het instellingenmenu van Anynet
+
.
Zoek opnieuw naar Anynet
+
-apparaten.
U kunt een Anynet
+
-apparaat alleen aansluiten met een HDMI 1.3-kabel. Sommige HDMI-kabels
ondersteunen mogelijk geen Anynet
+
-functies.
Wanneer het wordt beëindigd door een bijzondere situatie, bijvoorbeeld wanneer de HDMI-kabel
of het netsnoer wordt losgekoppeld, of wanneer er een stroomstoring optreedt, herhaalt u het
scannen op apparaten.
●
●
●
●
●
●
Het televisieprogramma
kan niet worden
opgenomen.
Controleer of de antenneaansluiting op het apparaat voor opname correct is aangesloten.
●
Het geluid van de
televisie wordt niet
uitgevoerd via de
ontvanger.
Maak verbinding tussen de tv en de ontvanger met gebruik van de optische kabel.
●
¦
[620-Weuro]BN68-02326A-03L09.ind39 39 2009-10-08 ¿ÀÀü 9:29:11

Nederlands - 40
AANBEVELINGEN
Teletekstfunctie
De meeste televisiekanalen bieden tekstinformatiediensten via teletekst. Op de indexpagina van de teletekstdienst vindt
u informatie over het gebruik van de dienst. Ook kunt u naar wens verschillende opties selecteren met de toetsen op de
afstandsbediening.
Voor een juiste weergave van teletekstinformatie is een stabiele kanaalontvangst vereist. Anders kan bepaalde informatie
ontbreken of worden bepaalde pagina’s niet weergegeven.
U kunt naar een andere teletekstpagina gaan met de numerieke toetsen op de afstandsbediening.
1
0
(modus)
Druk op deze toets om de
teletekstmodus (LIST/FLOF)
te selecteren. Als u in de
LIST-modus op deze toets
drukt, schakelt u over naar de
lijstopslagmodus. In deze modus
kunt u met behulp van de toets
8
(opslaan) teletekstpagina's in
een lijst opslaan.
2
5
(tonen)
Druk op deze toets om verborgen
tekst weer te geven (bijvoorbeeld
antwoorden op quizvragen).
Druk nogmaals op deze toets om
terug te keren naar de normale
weergave.
3
4
(Afmet.)
Druk op deze toets om de tekst in
de bovenste helft van het scherm
op dubbel formaat weer te geven.
Druk nogmaals op deze toets om
de tekst in de onderste helft van
het scherm op dubbel formaat
weer te geven. Druk nogmaals op
deze knop om terug te keren naar
de normale weergave.
4
8
(opslaan)
Hiermee kunt u teletekstpagina’s
opslaan.
5 Gekleurde toetsen (rood/groen/
geel/blauw)
Als een zendstation
gebruikmaakt van het
FASTEXT-systeem, worden de
verschillende onderwerpen op
een teletekstpagina van een
kleurcodering voorzien, die u
kunt selecteren met behulp
van de gekleurde toetsen.
Druk op de gewenste toets. De
pagina wordt weergegeven met
aanvullende kleurcodegegevens,
die op dezelfde wijze kunnen
worden geselecteerd. Om de
vorige of volgende pagina weer
te geven drukt u op de toets met
de overeenkomstige kleur.
6
/
(Teletekst aan/mix)
Druk op deze toets om teletekst te
activeren nadat u het kanaal dat
de teletekstdienst aanbiedt, hebt
geselecteerd. Druk tweemaal op deze
knop om het huidige televisiebeeld
over de teletekstpagina heen weer te
geven.
7
:
(afsluiten)
De teletekstweergave verlaten.
8
1
(subpagina)
Druk op deze toets om de beschikbare
subpagina’s weer te geven.
9
2
(pagina omhoog)
Druk op deze toets om de volgende
teletekstpagina weer te geven.
0
3
(pagina omlaag)
Druk op deze toets om de vorige
teletekstpagina weer te geven.
!
9
(vastzetten)
Druk op deze toets als u een
roulerende pagina wilt vastzetten.
Druk nogmaals op deze toets om het
rouleren te hervatten.
@
6
(index)
Druk op deze toets voor weergave van
de indexpagina (inhoudspagina) tijdens
het gebruik van teletekst.
#
7
(annuleren)
Hiermee bekijkt u de uitzending tijdens
het zoeken naar een pagina.
¦
N
N
INFO
AD
1
2
3
4
5
6
8
7
9
0
!
#
@
[620-Weuro]BN68-02326A-03L09.ind40 40 2009-10-08 ¿ÀÀü 9:29:11

Nederlands - 41
Onderdeel Inhoud
A Geselecteerd paginanummer.
B Aanduiding zendstation.
C Huidig paginanummer of zoekindicaties.
D Datum en tijd.
E Tekst.
F Statusinformatie.
FASTEXT-informatie.
Teletekstinformatie is vaak verdeeld over verschillende pagina’s die achtereenvolgens worden weergegeven. U kunt
rechtstreeks naar deze pagina’s gaan door:
het paginanummer in te voeren
een titel in een lijst te selecteren
een gekleurde kop te selecteren (FASTEXT-systeem)
Het teletekstniveau dat door de tv wordt ondersteund, is versie 2.5. Hiermee kunnen extra beelden en tekst worden
weergegeven.
Afhankelijk van de transmissie kunnen er bij teletekst lege panelen aan de zijkant worden weergegeven.
In die gevallen worden er geen extra beelden of tekst verzonden.
Oudere tv’s die versie 2.5 niet ondersteunen, kunnen geen extra beelden of tekst weergeven, ongeacht de
teleteksttransmissie.
Druk op de toets TV om de teletekstweergave te verlaten.
De voet bevestigen
Vooraf instellen: plaats de richtvoet en dekselkraag op de voet en maak deze met de
schroeven vast.
1. Bevestig de LCD-tv aan de voet.
De tv moet door twee of meer mensen worden gedragen.
Zorg dat u weet wat de voor- en achterkant van de voet is.
Om te zorgen dat de tv op de juiste manier op de voet wordt bevestigd, is het
belangrijk om niet te veel neerwaartse druk op de linker- en rechterkant van de tv
uit te oefenen.
2.
Gebruik twee schroeven op positie
1
en twee schroeven op positie
2
.
Zet het product rechtop en draai de schroeven vast. Als u de schroeven vastdraait
terwijl de LCD-tv nog ligt, kan deze naar een kant overhellen.
N
N
N
N
N
O
¦
N
N
N
N
N
INFO
AD
Voorkant
Achterkant
1
2
[620-Weuro]BN68-02326A-03L09.ind41 41 2009-10-08 ¿ÀÀü 9:29:13

Nederlands - 42
De voet verwijderen
1. Verwijder de schroeven aan de achterkant van de tv.
2. Verwijder de voet van de tv.
De tv moet door twee of meer mensen worden gedragen.
3.
Bedek het gat in de onderzijde met de afdekking.
De muurbevestiging installeren
Met de onderdelen voor muurbevestiging (apart verkrijgbaar) kunt u de tv aan de muur
bevestigen.
Zie de instructies bij de onderdelen voor muurbevestiging als u wilt weten hoe u de
muurbevestiging installeert. Neem contact op met een technicus voor hulp alvorens de
muurbeugel te bevestigen.
Samsung Electronics is niet verantwoordelijk voor schade aan het product of voor
verwondingen die u zelf of anderen oplopen wanneer u besluit de tv zelfstandig te
installeren.
Monteer de muurbevestiging niet terwijl de tv is ingeschakeld. Dit kan resulteren in
persoonlijk letsel door elektrische schokken.
De snoeren bij elkaar houden
Stop de kabels in de kabelhouder, zodat de kabels niet zichtbaar zijn door de doorzichtige
standaard.
Kensington-slot tegen diefstal
Het Kensington-slot is een vergrendeling waarmee u het systeem fysiek kunt vastzetten
voor gebruik in het openbaar. Afhankelijk van de fabrikant, kan het uiterlijk en de
vergrendelmethode enigszins afwijken van de afbeelding.
Raadpleeg de handleiding bij het Kensington-slot voor het juiste gebruik.
De vergrendeling moet apart worden aangeschaft.
De plaats van het Kensington-slot kan variëren afhankelijk van het model.
1.
Plaats het vergrendelingsapparaat in het Kensington-slot op de LCD-tv (1) en draai
deze in de vergrendelingsrichting (2).
2.
Sluit de Kensington-vergrendelingskabel aan (3).
3.
Maak het Kensington-slot vast aan een bureau of een ander zwaar voorwerp dat niet
kan worden verplaatst.
N
N
3
1
2
¦
N
¦
¦
¦
<Optioneel>
[620-Weuro]BN68-02326A-03L09.ind42 42 2009-10-08 ¿ÀÀü 9:29:15

Nederlands - 43
Installatieruimte
Bewaar de nodige afstand tussen het product en andere objecten (bijv. muren) zodat er een goede ventilatie mogelijk is.
Wanneer u dat niet doet, kunnen er door een stijging van de interne temperatuur brand of problemen bij het product ontstaan.
Plaats het product op zo’n manier dat de in de afbeelding aangegeven vereiste afstanden worden aangehouden.
Bij gebruik van een voet of muurbevestiging mogen er alleen onderdelen worden gebruikt die door Samsung Electronics zijn
geleverd.
Het gebruik van onderdelen van een andere fabrikant kan leiden tot problemen met het product of zelfs tot lichamelijk
letsel doordat het product valt.
Het gebruik van onderdelen van een andere fabrikant kan leiden tot problemen met het product of zelfs tot brand
vanwege een door een slechte ventilatie gestegen interne temperatuur.
Het uiterlijk van het product kan van het afgebeelde apparaat afwijken.
Bij installatie van het product met een voet
Bij installatie van het product met een muurbevestiging
10 cm
10 cm
10 cm
10 cm
10 cm
10 cm
10 cm
De tv vastzetten aan de wand
Voorzichtig: als u duwt of trekt aan de tv of op de tv klimt, kan deze vallen. Zie er met name op toe dat uw
kinderen niet aan de tv gaan hangen of deze uit balans brengen. De tv kan dan omvallen, hetgeen verwondingen
kan veroorzaken of zelfs fatale gevolgen kan hebben. Neem alle voorzorgsmaatregelen die in de bijgesloten
veiligheidsfolder worden genoemd. Om veiligheidsredenen is het raadzaam de antivalvoorziening te installeren
om de stabiliteit van het toestel te verhogen.
Voorkomen dat de tv valt:
1.
Plaats de schroeven in de beugels en bevestig deze stevig aan de wand. Controleer of
de schroeven stevig in de wand zijn gedraaid.
Afhankelijk van het wandtype hebt u mogelijk aanvullend materiaal nodig om het
geheel te verankeren.
De benodigde beugels, schroeven en draad worden niet meegeleverd. Deze
moeten apart worden aangeschaft.
2.
Verwijder de schroeven in het midden aan de achterkant van de tv, steek de schroeven
door de beugels en draai de schroeven weer vast in de tv.
Het is mogelijk dat de schroeven niet bij het product worden meegeleverd. In dat
geval moet u schroeven met de volgende specificaties aanschaffen.
Specificaties van de schroeven
Voor een LCD-tv van 43-74 cm: M4 X L15
Voor een LCD-tv van 81-101 cm: M6 x L15
3.
Verbind de beugels die aan de tv zijn bevestigd met een sterke draad aan de beugels
die aan de wand zijn bevestigd en knoop de draad stevig vast.
Plaats de tv dicht bij de wand zodat deze niet achterover kan vallen.
Het is veilig de draad zodanig aan te brengen dat de beugels die aan de wand zijn
bevestigd zich boven de beugels op de tv of op gelijke hoogte daarmee bevinden.
Haal de draad los voordat u de tv verplaatst.
4.
Controleer of alle bevestigingen goed zijn aangebracht. Controleer de
bevestigingspunten regelmatig op tekenen van moeheid of verzwakking. Neem in geval
van twijfel over de veiligheid van de bevestiging contact op met een professionele
installateur.
¦
N
N
¦
■
N
N
N
N
N
N
N
wand
wand
[620-Weuro]BN68-02326A-03L09.ind43 43 2009-10-08 ¿ÀÀü 9:29:17

Nederlands - 44
Problemen oplossen
Als u vragen hebt over uw tv, raadpleegt u eerst deze lijst. Als geen van deze tips voor probleemoplossing van toepassing is,
brengt u een bezoek aan de website www.samsung.com en klikt u vervolgens op Support. U kunt echter ook contact opnemen met
het Call Center in de lijst op de laatste pagina.
Probleem Oplossing
Beeldkwaliteit
Voer als eerste de functie Het beeld testen uit om te controleren of het testbeeld correct
wordt weergegeven op uw tv.
Ga naar MENU - Ondersteuning - Zelfdiagnose - Het beeld testen
Als het testbeeld correct wordt weergegeven, wordt het slechte beeld mogelijk veroorzaakt
door de bron of het signaal.
●
Het tv-beeld ziet er niet zo fraai
uit als in de winkel.
Als u over een analoge kabl/set-top box beschikt, voert u een upgrade uit naar een box.
Gebruik HDMI- of Component-kabel om beelden van HD-kwaliteit weer te geven.
Kabel/satellietontvanger: Probeer HD-zenders (High Definition) weer te geven vanuit de
zenderlijst.
Antenneverbinding: Probeer HD-zenders weer te geven nadat u de automatische
zenderprogrammering hebt uitgevoerd.
Bij veel HD-zenders is sprake van het opschalen van SD-inhoud (Standard Definition).
Stel de resolutie voor de video-uitvoer van de kabel-/set-top box in op 1080i of 720p.
Controleer of u vanaf de minimaal aanbevolen afstand naar de tv kijkt op basis van het
formaat en de definitie van het signaal dat wordt weergegeven.
●
●
●
N
●
●
Beeld is vervormd:
macroblok, klein blok, puntjes,
pixelvorming
Compressie van video-inhoud kan tot beeldvervorming leiden met name bij uitzendingen
met snelle bewegingen, zoals sportprogramma's en actiefilms.
Een laag signaalniveau of slechte signaalkwaliteit kan beeldvervorming veroorzaken. Er is
hierbij geen sprake van een probleem met de tv.
●
●
Onjuiste of ontbrekende kleuren
bij Component-verbinding.
Zorg ervoor dat de Component-kabels op de juiste ingangen zijn aangesloten. Onjuiste of
losse verbindingen kunnen kleurproblemen veroorzaken of resulteren in een leeg scherm.
●
Problemen met kleur of
helderheid.
Pas de opties voor Beeld aan in het tv-menu. (Beeld, Kleur, Helderheid, Scherpte)
Pas de optie Spaarstand aan in het menu Instellingen.
Zet het beeld terug op de standaardbeeldinstelling. (Ga naar MENU - Beeld - Beeld resetten)
●
●
●
Stippellijn aan de rand van het
scherm.
Als het beeldformaat is ingesteld op Volledig scherm, wijzigt u deze in 16:9.
Wijzig de resolutie van de kabel-/set-top box.
●
●
Beeld is zwart-wit met alleen
AV-invoer (Composite).
Sluit de videokabel (geel) aan op de groene aansluiting van Component-ingang 1 van de tv.
●
Beeld blijft hangen of is
vervormd bij het veranderen
van zender of het beeld wordt
met vertraging weergegeven.
Probeer, bij verbinding met een kabelbox de kabelbox te resetten. (Sluit het netsnoer opnieuw
aan en wacht totdat de kabelbox opnieuw is opgestart. Dit kan tot 20 minuten duren.)
Stel de uitvoerresolutie van de kabelbox in op 1080i of 720p.
●
●
Geluidskwaliteit
Voer als eerste de functie Het geluid testen uit om te controleren of het geluid van uw tv
correct werkt.
Ga naar MENU - Ondersteuning - Zelfdiagnose - Het geluid testen
Als het geluid in orde is, wordt het geluidsprobleem mogelijk veroorzaakt door de bron of het
signaal.
●
Er klinkt geen geluid of het
geluid is te zacht op het
maximale volume.
Controleer het volume van externe apparaten die zijn aangesloten op de tv en pas
vervolgens het tv-volume aan.
●
Beeld is goed maar er klinkt
geen geluid.
Stel de optie Luidspreker selecteren in op TV-luidspreker in het geluidsmenu.
Controleer of de audiokabels van een extern apparaat zijn aangesloten op de juiste
geluidsaansluitingen op de tv.
Controleer de optie voor audio-uitvoer op aangesloten apparaten. (Bijvoorbeeld: mogelijk
moet u de geluidsoptie van uw kabelbox wijzigen in HDMI als u een HDMI-kabel hebt
aangesloten op uw tv.)
Als u gebruikmaakt van een DVI-naar-HDMI-kabel, is een aparte audiokabel vereist.
Schakel de SRS-functie uit als u het volume instelt op een waarde hoger dan 30.
Verwijder de stekker uit de hoofdtelefoonaansluiting. (Indien deze beschikbaar is op uw tv.)
●
●
●
●
●
●
Er klinkt ruis uit de luidspreker. Controleer de kabelverbindingen. Controleer of er geen videokabel is aangesloten op een
audio-ingang.
Controleer de signaalsterkte bij een antenne-/kabelverbinding. Een laag signaalniveau
kan leiden tot vervorming van het geluid.
●
●
¦
[620-Weuro]BN68-02326A-03L09.ind44 44 2009-10-08 ¿ÀÀü 9:29:18

Nederlands - 45
Probleem Oplossing
Geen beeld, geen video
Tv kan niet worden
ingeschakeld.
Controleer of het netsnoer stevig in het stopcontact zit.
Controleer of het stopcontact werkt.
Druk op de POWER-knop op de tv om te controleren of de afstandsbediening correct
werkt. Als de tv nu wel wordt ingeschakeld, kan het probleem bij de afstandsbediening
liggen. U kunt het probleem met de afstandsbediening oplossen aan de hand van het
gedeelte 'Afstandsbediening werkt niet' hieronder.
●
●
●
De vt wordt automatisch
uitgeschakeld.
Controleer of de functie Slaaptimer is ingesteld op Aan in het menu Instellingen.
Als de tv is aangesloten op uw pc, controleert u de stroominstellingen voor uw pc.
Controleer of het netsnoer stevig in het stopcontact zit.
De tv wordt uitgeschakeld als gedurende 10 tot 15 minuten geen signaal wordt ontvangen
bij een antenne-/kabelverbinding.
●
●
●
●
Geen beeld/video. Controleer de kabelverbindingen (verwijder alle kabels van tv en externe apparaten en
sluit ze vervolgens weer aan).
Verbind de video-uitgang van uw externe apparaat (kabel-/set-top box, dvd, Blu-ray, enz.)
met de ingang van de tv. Bijvoorbeeld, uitgang externe apparaat: HDMI, ingang tv: HDMI.
Controleer of het aangesloten apparaat is ingeschakeld.
Selecteer de juiste bron voor de tv door op de knop SOURCE op de afstandsbediening
van de tv te drukken.
●
●
●
●
RF-verbinding
(kabel/antenne)
Niet alle zenders kunnen
worden ontvangen.
Zorg dat de antennekabel stevig is aangesloten.
Voer de functie Plug & Play uit om beschikbare zenders toe te voegen aan de zenderlijst.
Ga naar MENU - Instellingen - Plug & Play en wacht totdat alle beschikbare zenders
zijn opgeslagen.
Controleer of de antenna correct is gepositioneerd.
●
●
●
Beeld is vervormd:
macroblok, klein blok, puntjes,
pixelvorming
Compressie van video-inhoud kan tot beeldvervorming leiden met name bij uitzendingen
met snelle bewegingen, zoals sportprogramma's en actiefilms.
Een laag signaalniveau kan leiden tot vervorming van het beeld. Er is hierbij geen sprake
van een probleem met de tv.
●
●
Pc-verbinding
Melding ‘Niet ondersteund.’. Stel de uitvoerresolutie en frequentie van uw pc zodanig in dat deze overeenkomen met
de resoluties die door de tv worden ondersteund.
●
De pc wordt altijd
weergegeven in de lijst met
bronnen, ook als deze niet is
aangesloten.
Dit is normaal. De pc wordt altijd weergegeven in de lijst met bronnen, ook als deze niet
is aangesloten.
●
Video is in orde maar er is
geen audio beschikbaar bij een
HDMI-verbinding.
Controleer de instelling voor de audio-uitvoer op uw pc.
●
[620-Weuro]BN68-02326A-03L09.ind45 45 2009-10-08 ¿ÀÀü 9:29:18

Nederlands - 46
Probleem Oplossing
Overige
Beeld wordt niet op volledig
scherm weergegeven.
Er worden zwarte balken aan elke kant weergegeven bij HD-zender bij weergave van
opgeschaalde SD-inhoud (4:3).
Er worden zwarte balken weergegeven aan de boven- en onderkant bij films met een
beeldverhouding die afwijkt van de beeldverhouding van uw tv.
Stel de optie voor het beeldformaat op uw externe apparaat of tv in op volledig scherm.
●
●
●
Afstandsbediening werkt niet. Vervang de batterijen van de afstandsbediening. Let hierbij op de correcte polariteit (+ -).
Reinig het transmissievenster aan de bovenkant van de afstandsbediening.
Wijs met de afstandsbediening rechtstreeks naar de tv vanaf een afstand van 1,5 tot 2
meter.
●
●
●
Kan de tv niet in- of
uitschakelen of het
volume bijstellen met de
afstandsbediening voor de
kabel-/set-top box.
Programmeer de afstandsbediening voor de kabel-/set-top box zodanig dat deze werkt
voor de tv. Raadpleeg de gebruikershandleiding van uw kabel/satellietontvanger voor de
tv-code van SAMSUNG.
●
Melding ‘Niet ondersteund.’. Controleer de ondersteunde resolutie van de tv en pas de uitvoerresolutie van het externe
apparaat hierop aan. Raadpleeg de resolutie-instellingen in deze handleiding.
●
Plasticgeur van tv. Deze geur is normaal en verdwijnt na verloop van tijd.
●
TV Signaalinformatie is niet
beschikbaar in het menu Self
Diagnostic Test.
Deze functie is alleen beschikbaar voor digitale zenders me teen antenneverbinding
(RF/coax).
●
Tv helt over naar rechter- of
linkerkant.
Verwijder de standaardvoet van de tv en monteer deze opnieuw.
●
Kan de standaardvoet niet
monteren.
Controleer of de tv op een vlakke ondergrond staat. Als u de schroeven van de tv niet los
krijgt, gebruikt u een gemagnetiseerde schroevendraaier.
●
Het menu Channel wordt
grijs weergegeven. (Niet
beschikbaar.)
Het menu Kanaal is alleen beschikbaar als een tv-bron is geselecteerd.
●
Na 30 minuten of telkens
wanneer de tv wordt
uitgeschakeld gaan uw
instellingen verloren.
Als de tv zich in de modus Winkeldemo bevindt, worden de audio- en beeldinstellingen
elke 30 minuten gereset. Schakel van de modus Winkeldemo over naar de modus
Thuisgebruik in de procedure Plug & Play. Druk op de knop SOURCE om de modus
TV te selecteren, ga naar MENU → Instellingen → Plug & Play → ENTER
E
.
●
Met tussenpozen valt het
geluid of beeld weg.
Controleer de kabelverbindingen en sluit deze opnieuw aan.
Kan zich voordoen als gebruik wordt gemaakt van al te stugge of dikke kabels. Zorg
ervoor dat de kabels flexibel genoeg zijn voor langdurig gebruik. Bij wandmontage
adviseren wij gebruik te maken van kabels met connectoren die een hoek van 90 graden
maken.
●
●
U ziet mogelijk kleine deeltjes
als u dichtbij de rand het
televisiescherm kijkt.
Dit maakt deel uit van het productontwerp en is geen defect.
●
‘Gecodeerd signaal’ of
‘Geen signaal/zwak signaal’
met CAM CARD(CI/CI+).
Controleer of de CI(CI+)-kaart is geïnstalleerd in de COMMON INTERFACE-sleuf van de
CAM.
Trek de CAM uit de tv en plaats deze opnieuw in de desbetreffende sleuf.
●
●
Als de tv wordt uitgeschakeld,
schakelt deze zich 45 minuten
later automatisch zelf weer in.
Dit is normaal. De tv maakt zelfstandig gebruik van de OTA-functie (Over The Air) om een
upgrade uit te voeren van firmware die tijdens het kijken is gedownload.
●
Herhaald optredend
beeld-/geluidsprobleem.
Controleer het signaal of de bron en wijzig deze indien nodig.
●
Dit TFT LCD-panel gebruikt een paneel met subpixels die met geavanceerde technologie zijn geproduceerd. Het scherm kan
echter enkele heldere of donkere pixels bevatten. Deze pixels zijn niet van invloed op de prestaties van het product.
N
[620-Weuro]BN68-02326A-03L09.ind46 46 2009-10-08 ¿ÀÀü 9:29:18

Nederlands - 47
Specificaties
Modelnaam LE40B620 LE46B620
Schermformaat
(Diagonaal)
40 inch 46 inch
Pc-resolutie
(Optimaal)
1920 x 1080 bij 60 Hz 1920 x 1080 bij 60 Hz
Geluid
(Uitgang)
10 W X 2 10 W X 2
Afmetingen (BxHxD)
Behuizing
Met voet
1040 x 79 x 638 mm
1040 x 255 x 699 mm
1172 x 79 x 712 mm
1172 x 275 x 774 mm
Gewicht
Met voet
19 kg 25 kg
Omgevingsvereisten
Gebruikstemperatuur
Gebruiksvochtigheid
Opslagtemperatuur
Opslagvochtigheid
10°C tot 40°C (50°F tot 104°F)
10% tot 80%, niet-condenserend
-20 °C tot 45 °C (-4°F tot 113°F)
5% tot 95%, niet-condenserend
Draaivoet
(Links/rechts)
-20˚ ~ 20˚
Modelnaam LE52B620
Schermformaat
(Diagonaal)
52 inch
Pc-resolutie
(Optimaal)
1920 x 1080 bij 60 Hz
Geluid
(Uitgang)
10 W X 2
Afmetingen (BxHxD)
Behuizing
Met voet
1321 x 81 x 805 mm
1321 x 305 x 866 mm
Gewicht
Met voet
32 kg
Omgevingsvereisten
Gebruikstemperatuur
Gebruiksvochtigheid
Opslagtemperatuur
Opslagvochtigheid
10°C tot 40°C (50°F tot 104°F)
10% tot 80%, niet-condenserend
-20 °C tot 45 °C (-4°F tot 113°F)
5% tot 95%, niet-condenserend
Draaivoet
(Links/rechts)
-20˚ ~ 20˚
Vormgeving en specificaties kunnen zonder kennisgeving worden gewijzigd.
Dit is een digitaal apparaat van klasse B.
Zie voor informatie over de stroomvoorziening en het energieverbruik het etiket op het product.
¦
N
N
N
[620-Weuro]BN68-02326A-03L09.ind47 47 2009-10-08 ¿ÀÀü 9:29:18

Avviso relativo alla trasmissione TV digitale
1. Le funzioni relative alla trasmissione televisiva digitale (DVB) sono disponibili solo nei paesi o nelle aree in cui vengono
trasmessi segnali digitali terrestri DVB-T (MPEG2 E MPEG4 AVC) o laddove l'utente abbia la possibilità di accedere a un
servizio TV via cavo DVB-C (MPEG2 e MPEG4 AAC) compatibile. Verificare con il rivenditore locale la possibilità di ricevere
segnali DVB-T o DVB-C.
2.
DVB-T è lo standard del consorzio europeo DVB per la trasmissione della televisione digitale terrestre mentre DVB-C è lo
standard per la trasmissione della televisione digitale via cavo. T
uttavia, alcune funzioni quali EPG (Electric Program Guide),
VOD (Video on Demand) e altre non sono incluse in queste specifiche. Per questo motivo, al momento non sono disponibili.
3. Sebbene questo apparecchio TV soddisfi i più recenti standard DVB-T e DVB-C, [Agosto, 2008], la compatibilità con future
trasmissioni digitali via cavo DVB-C e terrestri DVB-T non può essere garantita.
4.
In base al paese o all'area in cui si utilizza questo televisore, alcuni fornitori di trasmissioni
TV via cavo potrebbero applicare
una tariffa aggiuntiva per tali servizi e richiedere all'utente di accettare i termini e le condizioni della loro offerta.
5. Alcune funzioni della trasmissione TV digitale potrebbero non essere disponibili in alcuni paesi o regioni e DVB-C potrebbe
non funzionare correttamente con alcuni fornitori di servizi via cavo.
6.
Per maggiori informazioni contattare il locale centro assistenza clienti SAMSUNG.
Precauzioni da adottare quando si visualizza un'immagine fissa
Un'immagine fissa può causare danni permanenti allo schermo TV
Non visualizzare un’immagine fissa o parzialmente fissa sul pannello LCD per oltre 2 ore poiché può causare la ritenzione
dell’immagine sullo schermo. Il fenomeno di ritenzione dell’immagine è anche noto come “bruciatura dello schermo”. Per
evitare il fenomeno di ritenzione dell’immagine, ridurre il grado di luminosità e contrasto dello schermo quando si visualizza
un’immagine fissa.
Su un TV LCD, l’uso del formato 4:3 per un periodo di tempo prolungato può lasciare traccia dei bordi sulla
parte sinistra, destra e centrale del video a causa delle differenti emissioni luminose dello schermo. La
riproduzione di un DVD o l’uso di una console per videogiochi può causare effetti analoghi sullo schermo.
Questo tipo di danni non è coperto dalla Garanzia.
La visualizzazione prolungata di immagini fisse da videogiochi e PC può causare immagini residue parziali. Per evitare questo
problema, ridurre la ‘luminosità’ e il ‘contrasto’ mentre si visualizzano immagini fisse.
© 2009 Samsung Electronics Co., Ltd. Tutti i diritti riservati.
❑
❑
●
●
●
Le gure e le illustrazioni presenti in questo Manuale dell’utente sono fornite unicamente a titolo di riferimento e possono differire
da quelle del prodotto attuale.
Le speciche e il design del prodotto possono variare senza preavviso.
[620-Weuro]BN68-02326A-03L09.ind1 1 2009-10-08 ¿ÀÀü 9:29:19

Italiano - 1
Licenza
TruSurround HD, SRS e il simbolo sono marchi di SRS Labs, Inc. La tecnologiaTruSurround HD è
utilizzata su licenza di SRS Labs, Inc.
Prodotto su licenza di Dolby Laboratories. Dolby e il simbolo della doppia D sono marchi di Dolby
Laboratories.
Simbolo
N O T
Nota Tasto One-Touch Tasto TOOLS Premere
❑
❑
CONTENUTI
Italiano
CONFIGURAZIONE DEL TELEVISORE
Pannello di controllo .......................................................................... 2
Accessori ........................................................................................... 3
Pannello dei collegamenti .................................................................. 4
Telecomando ..................................................................................... 6
Installazione delle batterie nel telecomando ...................................... 7
Visualizzazione dei menu .................................................................. 7
Attivazione modalità standby ............................................................. 8
Funzioni Plug & Play (In base al modello) ......................................... 8
Visualizzazione del display ................................................................ 9
CANALE
Menu Canale ..................................................................................... 9
Gestione dei canali ......................................................................... 12
IMMAGINE
Congurazione del menu Picture .................................................... 14
Uso del televisore come uno schermo PC ...................................... 18
Congurazione del televisore con il PC ........................................... 19
SUONO
Congurazione del menu audio ....................................................... 20
Selezione della modalità audio ........................................................ 21
IMPOSTAZIONE
Congurazione del menu Setup ...................................................... 22
Impostazione dell’orario ................................................................... 24
INGRESSI / SUPPORTO
Menu Ingressi .................................................................................. 26
Menu Supporto ................................................................................ 26
MEDIA PLAY (USB)
Collegamento di un dispositivo USB ............................................... 28
Funzione Media Play ....................................................................... 29
Menu Opzione dell’Elenco foto ........................................................ 30
Visualizzazione di una foto o di una proiezione di diapositive ......... 31
Menu opzioni di Slide Show ............................................................ 32
Menu Opzione dell’Elenco musica .................................................. 33
Riproduzione di un le musicale ...................................................... 34
Menu Opzione della riproduzione di le musicali ............................ 35
Utilizzo del menu Impostazione ....................................................... 35
■
■
■
■
■
■
■
■
■
■
■
■
■
■
■
■
■
■
■
■
■
■
■
■
■
■
■
■
■
ANYNET
+
Collegamento dei dispositivi Anynet
+
.............................................. 36
Congurazione di Anynet
+
............................................................... 37
Passaggio tra dispositivi Anynet
+
.................................................... 37
Registrazione ................................................................................... 38
Ascolto tramite il Ricevitore (Home theater) .................................... 38
Risoluzione dei problemi con Anynet
+
............................................. 39
RACCOMANDAZIONI
Funzione Teletext............................................................................. 40
Installazione del piedistallo .............................................................. 41
Smontare il piedistallo ..................................................................... 42
Installazione del Kit di montaggio a parete ...................................... 42
Assemblaggio dei cavi ..................................................................... 42
Blocco antifurto Kensington ............................................................. 42
Messa in sicurezza della posizione di installazione ......................... 43
Fissaggio del televisore alla parete ................................................. 43
Risoluzione dei problemi ................................................................. 44
Speciche ........................................................................................ 47
Diagrammi a blocchi ........................................................................ 48
■
■
■
■
■
■
■
■
■
■
■
■
■
■
■
■
■
Questo apparecchio è fabbricato in conformità al
D.M.28.08.95 n.548 ed in particolare a quanto specicato nell
Art.2, comma 1. Questo apparecchio è fabbricato nella U.E.
in conformità al D.M.28.08.95 n.548 Art.2, comma 1 ed al
D.M.26.03.92 Art.1
[620-Weuro]BN68-02326A-03L09.ind1 1 2009-10-08 ¿ÀÀü 9:29:19

Italiano - 2
CONFIGURAZIONE DEL TELEVISORE
Pannello di controllo
La forma e il colore del prodotto possono variare in base al modello.
I tasti del pannello anteriore possono essere attivati toccandoli con un dito.
1
P
(ALIMENTAZIONE): Premere per accendere e spegnere il televisore.
2
INDICATORE DI ALIMENTAZIONE: Lampeggia e si spegne quando l’alimentazione è attiva, si accende in modalità standby.
3
z
: Premere per cambiare canale. Nel menu a video, utilizzare i tasti
z
così come si usano i tasti ▼ e ▲ del
telecomando.
4
Y
: Premere per aumentare o diminuire il volume.
Nel menu a video, utilizzare i tasti
Y
così come si usano i tasti ◄ e ► del telecomando.
5
MENU: Premere per visualizzare il menu a video con le funzioni del televisore.
6
SOURCE
E
: Alterna tutte le sorgenti d’ingresso disponibili. Nel menu a video, utilizzare questo tasto come si usa il tasto
ENTER
E
del telecomando.
7
SENSORE DEL TELECOMANDO: Puntare il telecomando in direzione di questo punto sul televisore.
8
ALTOPARLANTI
¦
N
N
6
5
4
3
2
1
87
8
[620-Weuro]BN68-02326A-03L09.ind2 2 2009-10-08 ¿ÀÀü 9:29:19

Italiano - 3
Accessori
Telecomando e batterie (2 tipo AAA) Cavo di alimentazione Copertura-Fondo
Scheda di garanzia / Guida alla
sicurezza (non disponibili in tutte le sedi)
Panno per la pulizia
Ferma cavo
(In base al modello)
● Istruzioni dell'utente
Controllare che nella confezione del TV LCD siano contenuti i seguenti componenti. Se qualsiasi componente risultasse
mancante, contattare il rivenditore.
La forma e il colore dei componenti possono variare in base al modello.
¦
N
N
[620-Weuro]BN68-02326A-03L09.ind3 3 2009-10-08 ¿ÀÀü 9:29:20

Italiano - 4
Pannello dei collegamenti
La forma e il colore del prodotto possono variare in base al modello.
1 COMPONENT IN
Collega Component video / audio.
2 HDMI IN 1, 2, 3(DVI), 4 / DVI
AUDIO IN
Collega alla porta HDMI un dispositivo con uscita HDMI.
Non è necessario un ulteriore collegamento audio per la connessione HDMI-HDMI.
Che cosa significa HDMI?
HDMI (High-Definition Multimedia Interface), è una interfaccia che permette la trasmissione di segnali audio e video
digitali mediante un solo cavo.
La differenza tra HDMI e DVI è che il dispositivo HDMI è di dimensioni inferiori rispetto a quello DVI.
Se sono collegati lettori DVD / Blu-ray / ricevitori via cavo / ricevitori satellitari (STB) che supportano versioni HDMI
precedenti alla 1.3, il televisore potrebbe non riprodurre l’audio o le immagini visualizzate potrebbero presentare colori
anomali. Se collegando un cavo HDMI di una versione precedente non vi è audio, collegare il cavo HDMI alla porta HDMI
IN 3 (DVI) e i cavi audio alla porta DVI AUDIO IN sul retro del televisore. In questo caso, contattare la società fornitrice
del lettore DVD / Blu-ray / ricevitore via cavo / ricevitore satellitare (STB) per verificare la versione HDMI, quindi richiedere
un aggiornamento del firmware.
Utilizzare la porta HDMI IN 3 (DVI) per il collegamento DVI a un dispositivo esterno. Utilizzare un cavo o un adattatore
DVI-HDMI per la connessione video e la porta DVI AUDIO IN per l'audio. Quando si effettua una connessione mediante
cavo HDMI / DVI, è necessario utilizzare la porta HDMI IN 3 (DVI).
I cavi HDMI che non supportano la versione 1.3 possono causare sfarfallio o mancanza di immagini a schermo.
3 PC IN [PC] / [AUDIO]
Collegare alla porta di uscita audio e video del PC.
Se il PC supporta una connessione HDMI, è possibile collegare questa alla porta HDMI IN 1, 2, 3(DVI) o al terminale 4.
Se il PC supporta una connessione DVI, è possibile collegare questa al terminale HDMI IN 3(DVI) / DVI AUDIO IN.
4 ANT IN
Collega a un sistema TV via cavo o antenna.
5 BLOCCO KENSINGT
ON (a seconda del modello)
Il blocco Kensington (opzionale) è un dispositivo usato per assicurare fisicamente il sistema quando viene utilizzato in un
luogo pubblico. Se si desidera utilizzare un dispositivo di blocco, contattare il punto vendita in cui si è acquistato il televisore.
La posizione del blocco Kensington può variare a seconda del modello.
¦
N
N
N
N
N
N
N
N
N
7890 6 5
@
2
#
!
21 34
[Pannello laterale del
televisore]
[Pannello posteriore del televisore]
Ingresso
alimentazione
[620-Weuro]BN68-02326A-03L09.ind4 4 2009-10-08 ¿ÀÀü 9:29:20

Italiano - 5
6
H
(CUFFIE)
Le cuffie possono essere collegate all'uscita prevista sull'apparecchio. Il collegamento delle cuffie disattiva l'audio proveniente
dall'altoparlante interno.
Collegando le cuffie al televisore l’uso della funzione audio è inibita.
L’uso prolungato delle cuffie ad alto volume può causare danni all’udito.
Quando si collegano le cuffie al televisore, gli altoparlanti vengono disattivati.
Il volume delle cuffie e quello del televisore sono regolabili indipendentemente.
7 DIGIT
AL AUDIO OUT (OPTICAL)
Collega a un componente Digital Audio quale un ricevitore Home theatre.
Quando un sistema Digital Audio viene collegato alla porta DIGITAL AUDIO OUT (OPTICAL): Diminuire il volume del
televisore e regolarlo con la manopola di regolazione del sistema.
L'audio 5.1CH è disponibile quando il televisore è collegato a un dispositivo esterno che lo supporta.
Quando il ricevitore (home theatre) è impostato su Acceso, è possibile udire l'audio proveniente dall'uscita ottica del
televisore. Quando il televisore visualizza un segnale DTV (Antenna), invia l’audio a 5.1 canali al ricevitore Home
Theater.
Se la sorgente è un componente digitale, come per es. un lettore DVD / Blu-ray / ricevitore digitale / ricevitore satellitare
(STB) ed è collegata al televisore mediante HDMI, saranno udibili solo 2 canali audio dal ricevitore Home Theater. Per
avere un audio a 5.1 canali, collegare il jack di uscita audio digitale del lettore DVD / Blu-ray / ricevitore digitale / ricevitore
satellitare (STB) direttamente a un amplificatore o all’Home Theatre, non al televisore.
8 SER
VICE
Connettore solo di servizio.
9 AUDIO OUT [R-AUDIO-L]
Collega le porte di ingresso audio dell'amplificatore/Home theatre.
Quando un amplificatore audio viene collegato alle porte AUDIO OUT [R-AUDIO-L]: Diminuire il volume del televisore e
regolarlo con la manopola di regolazione dell'amplificatore.
0 EXT1, 2
Ingressi e uscite di dispositivi esterni quali videoregistratori, DVD, periferiche di gioco o lettori di dischi video.
In modalità EXT, l'uscita DTV supporta solo video e audio SD MPEG.
Specifiche Ingressi/Uscite
Connettore
Ingressi Uscita
Video Audio (L / R) RGB Video + Audio (L/R)
EXT 1 O O O Solo l'uscita TV o DTV è disponibile.
EXT 2 O O X Uscita da selezionare.
! AV IN [VIDEO] / [R-AUDIO-L]
Ingressi video e audio per dispositivi esterni, come una telecamera o un videoregistratore.
@ USB
Connettore per aggiornamenti software e Media Play, ecc.
# COMMON INTERF
ACE Alloggiamento
Se per alcuni canali non si inserisce la ‘SCHEDA CI (CI+)’, il messaggio ‘Scramble Signal’ (Segnale criptato) viene
visualizzato sullo schermo.
Le informazioni di pairing che contengono un numero telefonico, l’ID della SCHEDA
CI (CI+), l’ID host e altri dati,
verranno visualizzate entro 2~3 minuti. Se viene visualizzato un messaggio di errore, contattare il service provider.
Quando la configurazione delle informazioni relative al canale è stata completata, viene visualizzato il messaggio
‘Completato aggiornamento’, a indicare che l’elenco dei canali è stato aggiornato.
A seconda del modello, al reinserimento della scheda CI potrebbe essere richiesta la password per la funzione
Blocco Canale.
A seconda del modello, anche se la funzione Blocco Canale è impostata su Cons tutto, potrebbe essere richiesta la
password per la visione di programmi per adulti (dai 18 anni in su).
È necessario richiedere una ‘SCHEDA CI (CI+)’ al service provider locale. Estrarre con delicatezza la scheda ‘SCHEDA
CI (CI+)’ tirandola con le dita; fare attenzione a non far cadere la ‘SCHEDA CI (CI+)’ poiché potrebbe subire danni.
Inserire la scheda ‘SCHEDA CI (CI+)’ nella direzione indicata sulla scheda stessa.
La posizione del blocco COMMON INTERFACE può variare a seconda del modello.
La ‘SCHEDA CI (CI+)’ non è supportata in alcune nazioni, regioni e da alcune stazioni emittenti; controllare con il
rivenditore autorizzato di zona.
La funzione CI+ è applicabile solo al modello LE********P.
In caso di problemi, contattare il fornitore del servizio.
N
N
N
N
N
N
N
N
–
–
N
N
N
N
N
[620-Weuro]BN68-02326A-03L09.ind5 5 2009-10-08 ¿ÀÀü 9:29:20

Italiano - 6
Telecomando
Il telecomando è utilizzabile fino a una distanza di 7 metri dal televisore.
Una illuminazione troppo intensa può avere conseguenze sulle prestazioni del telecomando.
La forma e il colore del prodotto possono variare in base al modello.
1
POWER: Premere per accendere
e spegnere il televisore.
2
TASTI NUMERICI: Premere per
cambiare canale.
3
E
: Ha la stessa funzione del
tasto ENTER
E
dei tasti di
direzione. Quando si cambia
canale utilizzando i tasti numerici,
e si preme il numero del canale
seguito da ENTER
E
, si passa
immediatamente al canale
selezionato.
4
Y
: Premere per
aumentare o diminuire il volume.
5
SOURCE: Premere per
visualizzare e selezionare le
sorgenti video disponibili.
6
CH LIST: Per visualizzare
l'elenco dei canali sullo schermo.
7
TOOLS: Per selezionare
rapidamente le funzioni più
frequentemente utilizzate.
8
INFO : Premere per visualizzare
le informazioni sullo schermo TV.
9
TASTI COLORATI: Usare questi
tasti nel menu Elenco canali,
Media Play ecc...
!
DUAL : Per la selezione degli
effetti audio
@
Usare questi tasti nelle modalità
Media Play e Anynet
+
. (
∏
:
Questo telecomando può
essere usato per controllare
la registrazione sui registratori
Samsung dotati di funzione
Anynet
+
)
#
TV: Seleziona direttamente la
modalità TV.
$
PRE-CH : Consente di tornare
al canale precedentemente
visualizzato.
%
MUTE
M
: Premere per
escludere temporaneamente
l'audio.
^
>
P
<
: Premere per cambiare
canale.
&
MENU: Visualizza il menu a
video principale.
*
FAV.CH: Utilizzato per
visualizzare gli elenchi dei canali
preferiti.
(
RETURN: Ritorna al menu
precedente.
)
E
: Utile
per selezionare i menu OSD e
modificarne i valori impostati.
a
EXIT: Premere per uscire dal
menu.
b
P.SIZE: Per la selezione della
dimensione dell'immagine
c
MEDIA.P: Permette di riprodurre
brani musicali e immagini.
d
SUBT. : Visualizzazione sottotitoli
digitali
e
GUIDE: Visualizzazione della
Guida elettronica dei programmi
(EPG)
FunzioniTeletext
5
0
: Selezione della modalità
Teletext (LIST / FLOF)
6
8
: Negozio Teletext
7
4
: Selezione formato Teletext
8
5
: Visualizzazione Teletext
9
Selezione argomento Fastext
0
/
: Seleziona
alternativamente le modalità
Teletext, Double o Mix.
#
:
: Uscita dalla schermata
Teletext
$
1
: Pagina secondaria Teletext
^
2
: Pagina Teletext successiva
3
: Pagina Teletext precedente
&
6
: Indice Teletext
(
9
: Mantieni Teletext
a
7
: Annulla Teletext
¦
N
N
N
INFO
C
H
L
I
S
T
AD
1 #
$
^
*
(
)
a
b
c
e
d
%
&
2
3
4
5
6
7
8
9
0
!
@
[620-Weuro]BN68-02326A-03L09.ind6 6 2009-10-08 ¿ÀÀü 9:29:21

Italiano - 7
Installazione delle batterie nel telecomando
1. Sollevare il coperchio sul retro del telecomando come mostrato in figura.
2. Installare le due batterie AAA.
Fare corrispondere i poli ‘+’ e ‘–’ delle batterie con lo schema riportato all’interno del vano.
3. Riposizionare il coperchio.
Se si prevede di non utilizzare il telecomando per un periodo di tempo prolungato,
rimuovere le batterie e riporle in un luogo asciutto e fresco. (Presupponendo un uso
tipico del televisore, le batterie dovrebbero durare circa un anno.)
Se il telecomando non funziona, effettuare il seguente controllo:
Il televisore è acceso?
I poli - e + delle batterie sono invertiti?
Le batterie sono esaurite?
Si è verificata una interruzione di corrente o il cavo di alimentazione è scollegato?
È presente una luce a fluorescenza speciale o un neon nelle vicinanze?
FUNZIONAMENTO
Visualizzazione dei menu
Prima di utilizzare il televisore, seguire questi passaggi per imparare a navigare tra i menu, selezionando e regolando le diverse
funzioni.
Uso dei menu OSD (On Screen Display)
La procedura d'accesso può essere diversa a seconda del menu selezionato.
1. Premere il tasto MENU.
2.
Il menu principale viene visualizzato a schermo. Sul lato sinistro del menu compaiono
alcune icone: immagine, Suono, Canale, Impost, Ingressi, Applicazione, Supporto.
3. Premere il tasto ▲ o ▼ per selezionare una delle icone.
4.
Quindi premere ENTER
E
per accedere ai sotto menu dell'icona.
5. Premere ▲ o ▼ per selezionare uno dei sotto menu dell'icona.
6.
Premere ◄ o ► per diminuire o aumentare il valore di un elemento. L'OSD di regolazione
può differire in base al menu selezionato.
7
. Premere ENTER
E
per completare la configurazione. Per uscire, premere EXIT.
¦
N
N
N
¦
❑
INFO
AD
MENU
Visualizza il menu a video
principale.
Tasti ENTER
E
/ FRECCIA
Sposta il cursore e seleziona
una voce. Attiva la voce
attualmente selezionata. Conferma
l'impostazione.
Tasto RETURN
Ritorna al menu precedente.
EXIT
Esce dal menu a video.
INFO
AD
INFO
AD
Modalità :Standard ▶
Retroillumin :7
Contrasto :95
Luminosità :45
Nitidezza :50
Colore :50
Tinta(V/R) :V50/R50
Impostazioniavanzate
immagine
Modalità :Standard
Retroillumin :7 ▶
Contrasto :95
Luminosità :45
Nitidezza :50
Colore :50
Tinta(V/R) :V50/R50
Impostazioniavanzate
Opzioniimmagine
immagine
7
U
Sposta
L
Regola
E
Conf.
R
Ritorno
▲
Retroillumin
▼
Icona Guida
[620-Weuro]BN68-02326A-03L09.ind7 7 2009-10-08 ¿ÀÀü 9:29:21

Italiano - 8
Attivazione modalità standby
E' possibile attivare la modalità standby del televisore per ridurre il consumo di corrente. La modalità standby è particolarmente
utile quando si desidera disattivare temporaneamente il televisore (ad esempio durante i pasti).
1. Premere POWER
P
sul telecomando.
Lo schermo si spegne e sull’apparecchio compare la spia di standby.
2.
Per riattivare il televisore, premere nuovamente il tasto POWER
P
.
Non lasciare il televisore in modalità standby per lunghi periodi di tempo (partendo per le vacanze ad esempio). E'
consigliabile scollegare il cavo di alimentazione e il cavo dell'antenna dalle prese a muro.
Funzioni Plug & Play (In base al modello)
Se il televisore viene acceso per la prima volta, alcune impostazioni di base vengono
visualizzate automaticamente e in sequenza.
1. Premere POWER sul telecomando.
E' inoltre possibile usare il tasto POWER
P
sul televisore.
Viene visualizzato il messaggio Select the OSD Language..
2.
Premere ENTER
E
. Selezionare la lingua desiderata premendo ▲ o ▼. Premere
ENTER
E
per confermare la scelta.
3. Premere ◄ o ► per selezionare Demo Negozio o Uso dom., quindi premere ENTER
E
.
Si consiglia di impostare la modalità TV su Uso dom. per ottenere la migliore qualità
dell’immagine in un ambiente domestico.
Demo Negozio è intesa solo per un uso commerciale del prodotto.
Se l’unità è stata accidentalmente impostata sulla modalità Demo Negozio e si desidera tornare alla modalità Uso dom.
(Standard): Premere il tasto Volume del televisore. Quando il menu OSD Volume viene visualizzato, tenere premuto il
tasto MENU del televisore per 5 secondi.
4.
Premere ENTER
E
. Selezionare la nazione desiderata premendo il pulsante ▲ o ▼. Premere ENTER
E
per confermare la
scelta.
Dopo aver selezionato il paese nel menu Nazione, alcuni modelli potrebbero richiedere un’opzione aggiuntiva per
l’impostazione del pin.
All’inserimento del codice PIN, 0-0-0-0 non è disponibile.
5.
Premere ▲ o ▼ per selezionare Antenna o Cavo, quindi premere ENTER
E
.
Antenna: Segnale antenna via etere.
Cavo: Segnale antenna via cavo.
6.
Premere il pulsante ▲ o ▼ per selezionare i canali da memorizzare. Premere ENTER
E
per selezionare Avvio.
Quando si imposta la sorgente antenna su Cavo, viene visualizzata una procedura che consente di impostare un valore
per la ricerca dei canali digitali. Per ulteriori informazioni, vedere .
Digitale e Analogico: Canali digitali e analogici.
Digitale: Canale digitale.
Analogico: Canale analogico.
La ricerca dei canali inizia e termina in modo automatico.
Premere ENTER
E
in qualsiasi momento per interrompere il processo di memorizzazione.
Una volta memorizzati tutti i canali disponibili, viene visualizzato il messaggio Imposta la modalità Orologio..
7
. Premere ENTER
E
. Premere ▲ o ▼ per selezionare Automatico, quindi premere ENTER
E
.
Selezionando Manuale, viene visualizzato il messaggio Imposta la data e l'ora correnti..
Ricevendo un segale digitale, l’orario verrà impostato automaticamente. In caso contrario, selezionare Manuale per
impostare l’orologio.
8
. Viene visualizzata la descrizione per il metodo di connessione che fornisce la migliore qualità dello schermo HD. Leggere la
descrizione e premere il tasto ENTER
E
.
9. Viene visualizzato il messaggio Buon divertimento.. Al termine, premere ENTER
E
Per reimpostare questa funzione...
1. Premere il tasto MENU per visualizzare il menu. Premere ▲ o ▼ per selezionare Impost,
quindi premere ENTER
E
.
2. Premere nuovamente ENTER
E
per selezionare Plug & Play.
3. Digitare il PIN a quattro cifre. Il PIN predefinito di un nuovo apparecchio TV è ‘0-0-0-0’.
Per cambiare il codice PIN, utilizzare la funzione Cambia PIN.
La funzione Plug & Play è disponibile solo in modalità TV.
¦
N
N
¦
N
N
N
N
N
N
N
N
N
N
N
N
N
N
N
N
N
N
INFO
AD
Plug&Play ▶
Linguamenu :Inglese
Ora
Modalità
gioco :Spento
Bloccocanali :Acceso
CambiaPIN
BloccoCanale
Sottotitoli
Impostazione
SelecttheOSDLanguage.
MenuLanguage :English ▶
E
Enter
Plug&Play
[620-Weuro]BN68-02326A-03L09.ind8 8 2009-10-08 ¿ÀÀü 9:29:22

Italiano - 9
Visualizzazione del display
Il display identifica il canale corrente e lo stato di determinate impostazioni audio e video.
Premere il tasto INFO per visualizzare le informazioni.
Premere INFO sul telecomando. Il televisore visualizzerà il canale, il tipo di audio e lo
stato di determinate impostazioni immagine e audio.
▲, ▼: E’ possibile visualizzare altre informazioni relative al canale. Se si desidera
spostarsi sul canale selezionato, premere ENTER
E
.
◄, ►: E’ possibile visualizzare le informazioni del programmema desiderato sul
canale corrente.
Premere nuovamente INFO o attendere 10 secondi finché il display scomparirà
automaticamente.
CANALE
Menu Canale
Nazione
Canale analogico
Funzione per la modifica del paese per i canali analogici.
Canale digitale
Funzione per la modifica del paese per i canali digitali.
Comparirà la richiesta del PIN. Digitare il PIN a quattro cifre.
Memorizzazione auto
È possibile effettuare la scansione delle gamme di frequenza disponibili (in base alla nazione).
I numeri di programma assegnati automaticamente potrebbero non corrispondere ai numeri di programma effettivi o desiderati.
Se un canale è stato bloccato mediante la funzione Blocco canali, comparirà la schermata di inserimento del PIN.
Antenna / Cavo
Sorgente antenna per la memorizzazione
Digitale e Analogico: Canali digitali e analogici.
Digitale: Canale digitale.
Analogico: Canale analogico.
o ‘
Inserire un valore per ricercare i canali via cavo.
Rapida
Network ID: Visualizza il codice di identificazione del network.
Frequenza: Visualizza la frequenza del canale. (Varia in base alla nazione)
Modulazione: Visualizza i valori di modulazione disponibili.
Symbol Rate: Visualizza i valori di symbol rate disponibili.
Scorrere tutti i canali per le stazioni emittenti attive e memorizzarle nella memoria del televisore.
Per interrompere la funzione Memorizzazione auto, premere ENTER
E
.
Verrà visualizzato il messaggio Interrompere Memorizzazione auto?.
Selezionare Sì premendo ◄ o ► quindi premere ENTER
E
.
¦
O
●
●
N
¦
❑
■
■
N
❑
N
■
●
●
●
●
N
N
N
Nazione ▶
Memorizzazioneauto
Memorizzazionemanuale
Opzionericercaviacavo
GuidaCompl
MiniGuida
GuidaPredefinita :GuidaCompl
Elencocanali
Canale
INFO
AD
DTV Air
15
abc1
18:00 ~ 6:00
18:11 Thu 6 Jan
Life On Venus Avenue
Unclassified
No Detaild Information
' Information
[620-Weuro]BN68-02326A-03L09.ind9 9 2009-10-08 ¿ÀÀü 9:29:22

Italiano - 10
Memorizzazione manuale
Ricerca un canale manualmente e lo memorizza nella memoria TV.
Se un canale è stato bloccato mediante la funzione Blocco canali, comparirà la schermata di inserimento del PIN.
Canale digitale
Memorizzazione manuale dei canali digitali.
Canale digitale è disponibile solo in modalità DTV.
Canale: Impostare il numero del canale mediante i tasti ▲, ▼ o i tasti numerici (0~9).
Frequenza: Impostare la frequenza utilizzando i tasti numerici.
Larg. di banda: Impostare la larghezza di banda mediante i tasti ▲, ▼ o i tasti numerici (0~9).
Al termine, i canali vengono aggiornati nell'elenco dei canali.
Canale analogico
Memorizzazione manuale dei canali analogici.
Programma (Numero di programma da assegnare a un canale): Impostare il numero del programma mediante i tasti ▲, ▼ o
i tasti numerici (0~9).
: Impostare il sistema colore utilizzando i tasti ▲ o ▼.
: Impostare il sistema audio utilizzando i tasti ▲ o ▼.
Canale (quando si conosce il numero del canale da memorizzare): Premere ▲ o ▼ per selezionare C (Antenna) o S (Cavo).
Premere il tasto ►, quindi premere ▲, ▼ o un tasto numerico (0~9) per selezionare il numero desiderato.
E’ anche possibile selezionare direttamente il numero del canale premendo i tasti numerici (0~9).
Se l’audio è anomalo o assente, riselezionare lo standard audio richiesto.
Ricerca (quando non si conosce il numero del canale): Premere il tasto ▲ o ▼ per avviare la ricerca. Il sintonizzatore ef
fettua
la scansione della gamma di frequenza fino a quando appare il primo canale o il canale selezionato.
Memorizza (quando si memorizza il canale e il numero di programma corrispondente): Impostare su OK premendo
ENTER
E
.
Mod. Canale
P (modalità Programma): Una volta completata la sintonizzazione, alle emittenti della propria area viene assegnato
un numero compreso tra P00 e P99. In questa modalità, è possibile selezionare un canale digitando il numero
corrispondente.
C (modalità Antenna): È possibile selezionare un canale immettendo in questa modalità il numero assegnato a ciascuna
emittente.
S (modalità Cavo): E’ possibile selezionare un canale immettendo in questa modalità il numero assegnato a ciascun
canale via cavo.
Opzione ricerca via cavo (in base alla nazione)
Imposta ulteriori opzioni di ricerca quali frequenza e symbol rate per ricerche network via cavo.
Frequenza inizio (frequenza iniziale): Imposta la frequenza di avvio (Può essere diversa a seconda del paese)
Frequenza arresto (frequenza finale): Imposta la frequenza di arresto (Può essere diversa a seconda del paese)
Modulazione: Visualizza i valori di modulazione disponibili.
Symbol Rate: Visualizza i valori di symbol rate disponibili.
Guida Compl / Mini Guida
Le informazioni EPG (Electronic Programme Guide) sono fornite dall’emittente. Le voci relative ai programmi potrebbero risultare
vuote o non aggiornate, a seconda delle informazioni trasmesse dall'emittente su un determinato canale. La schermata viene
aggiornata automaticamente non appena sono disponibili nuove informazioni.
È anche possibile visualizzare il menu della guida semplicemente premendo il tasto GUIDE. (Per configurare la Guida
Predefinita, vedere le relative descrizioni.)
Guida Compl
Visualizza la informazioni sui programmi ordinate in segmenti di un’ora. Sono comprese due ore di programmi che è possibile
scorrere in avanti o indietro.
Mini Guida
Su ogni riga della Mini guida del canale corrente sono riportate le informazioni relative a ogni programma partendo dal programma
corrente in avanti in ordine di orario.
❑
N
N
■
N
●
●
●
N
■
●
●
●
●
N
N
●
●
N
❑
●
●
●
●
❑
O
■
■
[620-Weuro]BN68-02326A-03L09.ind10 10 2009-10-08 ¿ÀÀü 9:29:22

Italiano - 11
E’ possibile scegliere se visualizzare la Guida Compl o la Mini Guida premendo il tasto GUIDE del telecomando.
Elenco canali
Per le istruzioni dettagliate sull’uso di Elenco canali, vedere la sezione ‘Gestione dei canali’.
È possibile selezionare queste opzioni semplicemente premendo il tasto CH LIST sul telecomando.
Mod. Canale
Premendo il tasto P
>
/
<
, i canali verranno attivati secondo l'elenco canali selezionato.
Canali aggiunti
I canali verranno attivati secondo l'elenco canali memorizzato.
Preferiti
I canali verranno attivati secondo l'elenco canali preferiti.
Sintonia fine
Se la ricezione è chiara, non è necessario sintonizzare il canale poiché questa operazione viene effettuata automaticamente
durante le operazioni di ricerca e memorizzazione. Se tuttavia il segnale risulta debole o distorto, può essere necessario
sintonizzare il canale manualmente.
I canali sintonizzati e memorizzati sono evidenziati da un asterisco “*” alla destra del numero del canale nel relativo riquadro.
Per reimpostare la sintonia, selezionare Reset premendo il pulsante ▲ o ▼, quindi premere ENTER
E
.
E' possibile sintonizzare solo i canali TV analogici.
Uso della Guida Completa / Mini Guida
Per... Eseguire...
Guardare un programma nell'elenco EPG Selezionare il programma premendo il tasto ▲, ▼, ◄, ► .
Uscire dalla guida Premere il tasto blu.
Se si seleziona il programma successivo, appare l’icona dell’orologio che indica la visione programmata. Premendo
nuovamente il tasto ENTER
E
, premere ◄, ► per selezionare Annulla Program; la programmazione verrà annullata e il
simbolo a forma di orologio sparirà.
Visualizzare le informazioni su un programma Selezionare il programma desiderato premendo il tasto ▲, ▼, ◄, ► .
Premere il tasto INFO quando il programma desiderato è evidenziato.
Il titolo del programma appare in alto al centro dello schermo.
Cliccare sul tasto INFO per ottenere maggiori informazioni. Le informazioni dettagliate includono numero del canale, durata,
barra di stato, livello d'età impostato per il programma, informazioni sulla qualità video (HD/SD), modalità audio, sottotitoli o
teletext, lingua dei sottotitoli o del teletext e una breve descrizione del programma evidenziato. ‘...’
appare quando la descrizione
è molto lunga.
Alterna tra la Guida Compl e la Mini Guida Premere ripetutamente il tasto rosso.
In modalità Guida Compl
Scorrere velocemente indietro (24 ore).
Scorrere velocemente avanti (24 ore).
Premere ripetutamente il tasto verde.
Premere ripetutamente il tasto giallo.
❑
❑
O
❑
■
■
❑
N
N
N
GuidaCompl
E
Guarda Informazioni Pagina MiniGuida +24ore Esci
DTVCable900ftn2:10Tue1Jun
FreshmenOnCampus
2:00
-2:30
NoDetailedInformation
Today
2:00-3:00 3:00-4:00
MintExtra
Loaded
40withDynamiteMC
TheDistillery
SmashHits!Sunday
900ftn
901ITVPlay
902Kerrang!
903Kiss
904oneword
905Hits
▼
StreetHypn..
Kisstory
No
Information
NoInformation
NoInformation
FreshmenO..
900
E
Guarda Informazioni Pagina GuidaCompl Esci
MiniGuida DTVCable900ftn
StreetHypnosis
BoozeBritain
2:00
2:30
5:00
Freshmen
OnCampus
▼
[620-Weuro]BN68-02326A-03L09.ind11 11 2009-10-08 ¿ÀÀü 9:29:23

Italiano - 12
Gestione dei canali
Usando questo menu è possibile aggiungere, eliminare o impostare i canali preferiti e utilizzare la guida dei programmi per le
trasmissioni digitali.
Tutti i Canali
Mostra tutti i canali attualmente disponibili.
Canali aggiunti
Mostra tutti i canali aggiunti.
Preferiti
Mostra tutti i canali preferiti.
Per selezionare i canali preferiti impostati, premere FAV.CH sul telecomando.
Programmato
Mostra tutti i canali prenotati.
Selezionare un canale nella schermata Tutti i Canali, Canali aggiunti o Preferiti premendo i tasti ▲ / ▼, quindi premere
ENTER
E
. Ora è possibile guardare il canale selezionato.
Uso dei tasti colorati nell'elenco dei canali
Rosso (Tipo canale): Alterna tra TV, Radio, Dati / Altro e Tutto.
Verde (Zoom): Ingrandisce o riduce il numero di un canale.
Giallo (Selezione): Seleziona più elenchi di canali. E’ possibile utilizzare contemporaneamente le funzioni Aggiungi /
Elimina o Aggiungi a Preferiti/ Elimina da Preferiti per più canali alla volta. Selezionare i canali desiderati e premere il
tasto giallo per impostare tutti i canali selezionati contemporaneamente. Il simbolo
c
compare a sinistra dei canali
selezionati.
TOOLS (Strumenti): Visualizza i menu Elimina (o Aggiungi), Aggiungi a Preferiti (o Elimina da Preferiti), Blocca (o
Sblocco), Timer visione, Modifica nome canale, Modifica numero canale, Ordina, Seleziona tutti (o Deseleziona
tutti), Memorizzazione auto. (Il menu Options può essere diverso in base alla situazione).
Icone sullo stato del canale
A
: Canale analogico.
c
: Canale selezionato mediante il tasto giallo.
*
: Canale impostato come preferito.
(
: Programma attualmente trasmesso.
\
: Canale bloccato.
)
: Programma prenotato
Menu Elenco canali Opzione (in Tutti i Canali / Canali aggiunti / Preferiti)
Premere il tasto TOOLS per usare il menu Option.
Gli elementi del menu Option possono differire in base allo stato del canale.
Agg. / Canc.
E' possibile eliminare o aggiungere un canale per visualizzare i canali desiderati.
Tutti i canali eliminati saranno visibili nel menu Tutti i Canali.
Se il canale in elenco è evidenziato in grigio, significa che il canale è stato eliminato.
Il menu Aggiungi viene visualizzato solo per i canali eliminati.
E’ anche possibile eliminare un canale nel menu Canali aggiunti o Preferiti allo stesso
modo.
Aggiungi a Preferiti / Elimina da Preferiti
I canali che si guardano più di frequente possono essere impostati come preferiti.
Premere il tasto TOOLS per visualizzare il menu Strumenti. E' inoltre possibile impostare aggiunte (o cancellazioni) tra i
canali Preferiti selezionando
(o Elimina da Preferiti).
Il simbolo ‘
*
’ verrà evidenziato e il canale verrà impostato come preferito.
Tutti i canali preferiti saranno visibili nel menu Preferiti.
Blocco / Sblocco
E’ possibile bloccare un canale in modo che non possa essere selezionato e visualizzato.
Questa funzione è disponibile solo quando la funzione Blocco canali è impostata su Acceso.
Comparirà la richiesta del PIN. Digitare il PIN a quattro cifre.
Il PIN predefinito di un nuovo apparecchio TV è ‘0-0-0-0’. E’ possibile modificare il PIN selezionando Cambia PIN nel menu.
Verrà visualizzato il simbolo ‘
\
’ e il canale verrà bloccato.
¦
■
■
■
O
■
N
N
N
N
N
■
N
N
N
N
■
T
N
N
■
N
N
N
N
TuttiiCanali
824UKTVGold
825UKTVstyle
A
1C--
A
2C--
A
3C--
A
4C--
A
5C--
A
6C--
A
7C--
A
8C--
Tutto Tipocanale Zoom Selezione
T
Strumenti
Elimina
AggiungiaPreferiti
Blocco
Timer
visione
Modificanomecanale
Ordina
Canaliaggiunti
824UKTVGold
825UKTVstyle
A
1C--
A
2C--
A
3C--
A
4C--
A
5C--
A
6C--
A
7C--
A
8C--
Tutto
Tipocanale Zoom Selezione
T
Strumenti
[620-Weuro]BN68-02326A-03L09.ind12 12 2009-10-08 ¿ÀÀü 9:29:23

Italiano - 13
Timer visione
Se si è effettuata la prenotazione di un canale, all’ora stabilita verrà visualizzato il canale prenotato anche durante la visione di un
altro canale contenuto nell'Elenco canali. Per prenotare un programma, impostare prima l’orario corrente.
E' possibile prenotare solo i canali memorizzati.
È possibile impostare il canale, il giorno, il mese, l'anno,l'ora e i minuti premendo direttamente i tasti numerici del
telecomando.
Durante le prenotazione di un programma comparirà il menu Programmato.
Digital Programme Guide e Visualizzazione prenotazione
Selezionando un canale digitale e premendo il tasto ►, comparirà la Programme Guide del canale. Per prenotare un
programma seguire le procedure descritte sopra.
Modifica nome canale (solo canali analogici)
Ai canali è possibile attribuire un nome in modo da visualizzarlo durante la visione.
I nomi dei canali digitali trasmessi vengono automaticamente assegnati e non possono essere modificati.
Modifica numero canale (solo canali digitali)
È anche possibile impostare il numero di canale premendo i tasti numerici sul telecomando.
Ordina (solo canali analogici)
Questa operazione consente di modificare i numeri di programma dei canali memorizzati. Questa operazione può essere
necessaria dopo la memorizzazione automatica dei canali.
Seleziona tutto / Deselez tutto
Seleziona tutto: Seleziona tutti i canali presenti nell'elenco dei canali.
Deselez tutto: E' possibile selezionare e deselezionare tutti i canali selezionati.
E’ possibile selezionare Deselez tutto solo quando è stato selezionato almeno un canale.
Memorizzazione auto
Per la descrizione dettagliata delle procedure per l'impostazione delle opzioni, vedere le istruzioni 'Menu Canale'.
Se un canale è stato bloccato mediante la funzione Blocco canali, comparirà la schermata di inserimento del PIN.
Menu Elenco canali Opzione (in Programmato)
E' possibile visualizzare, modificare o annullare una prenotazione.
Premere il tasto TOOLS per usare il menu Option.
Modifica info
Selezionare questa funzione per modificare una prenotazione.
Annulla Program
Selezionare questa funzione per annullare una prenotazione.
Informazioni
Selezionare questa funzione per visualizzare una prenotazione.
(E' inoltre possibile modificare le informazioni relative alla prenotazione.)
Seleziona tutto
Selezionare tutti i programmi prenotati.
■
N
N
N
N
■
N
■
■
■
●
●
N
■
N
N
N
■
■
■
■
Programmato
1/1/2009
13:595TV1
)
18:592TV3
)
TheEqualizer
20:592TV3
)
McMillan&Wife
21:592TV3
)
M.Spillane’smike
Tutto Zoom Selezione
T
Strumenti
E
Informazioni
Modificainfo
AnnullaProgram
Informazioni
Seleziona
tutto
[620-Weuro]BN68-02326A-03L09.ind13 13 2009-10-08 ¿ÀÀü 9:29:23

Italiano - 14
IMMAGINE
Configurazione del menu Picture
Modalità
È possibile selezionare il tipo di immagine che più corrisponde alle proprie esigenze.
Premere il tasto TOOLS per visualizzare il menu Strumenti. E’ inoltre possibile impostare
la modalità dell’immagine selezionando .
Dinamica
Imposta l’immagine da visualizzare in alta definizione in un ambiente luminoso.
Standard
Imposta l’immagine per una visualizzazione ottimale in condizioni di luce normali.
Naturale
Seleziona l'immagine per una visione ottimale, confortevole per la vista.
Questa funzione non è disponibile in modalità PC.
Film
Imposta l'immagine per una visualizzazione confortevole in un ambiente buio.
Retroillumin / Contrasto / Luminosità / Nitidezza / Colore / Tinta (V/R)
Il televisore ha diverse opzioni che consentono di controllare la qualità dell'immagine.
Retroillumin: Regola la luminosità della retroilluminazione dell’LCD.
Contrasto: Regola il livello di contrasto dell'immagine.
Luminosità: Regola il livello di luminosità dell’immagine.
Nitidezza: Regola la definizione dei bordi dell'immagine.
Colore: Regola la saturazione dei colori dell'immagine.
Tinta (V/R): Regola la tonalità delle tinte dell'immagine.
Nelle modalità analogiche TV, Est., AV del sistema PAL, non è possibile utilizzare la funzione Tinta (V/R).
Apportando le modifiche ai valori Retroillumin, Contrasto, Luminosità, Nitidezza, Colore o Tinta (V/R), il menu OSD verrà
regolato di conseguenza.
In modalità PC, è possibile modificare solo i parametri Retroillumin, Contrasto e Luminosità.
Le impostazioni possono essere regolate e memorizzate per ogni dispositivo esterno connesso a un ingresso
TV.
E' possibile ridurre signicativamente il consumo di energia, e i costi ad esso associati, diminuendo la luminosità dello
schermo.
Impostazioni avanzate
I nuovi TV Samsung permettono di impostare ancora più precisamente la visualizzazione delle
immagini rispetto ai modelli precedenti.
Impostazioni avanzate è disponibile in modalità Standard o Film.
In modalità PC, è possibile modificare solo i parametri Contrasto Dinamico, Gamma e
Bilan bianco tra le opzioni della voce Impostazioni avanzate.
Consente di selezionare il livello di nero dello schermo per regolare la profondità dell'immagine.
Consente di regolare in modo ottimale il livello di contrasto dello schermo.
Gamma
Consente di regolare l’intensità dei colori primari (rosso, verde, blu).
¦
❑
T
■
■
■
N
■
❑
●
●
●
●
●
●
N
N
N
N
N
❑
N
N
■
■
■
Modalità :Standard ▶
Retroillumin :7
Contrasto :95
Luminosità :45
Nitidezza :50
Colore :50
Tinta(V/R) :V50/R50
Impostazioniavanzate
immagine
7
U
Sposta
L
Regola
E
Conf.
R
Ritorno
▲
Retroillumin
▼
Tonalitànero :Spenta ▶
ContrastoDinamico :Medio
Gamma :0
Spaziocolore :Nativa
Bilanbianco
Incarnato :0
Miglioraimmbordi :Acceso
U
Sposta
E
Conf.
R
Ritorno
Impostazioniavanzate
[620-Weuro]BN68-02326A-03L09.ind14 14 2009-10-08 ¿ÀÀü 9:29:24

Italiano - 15
Spazio colore
Spazio colore è la matrice di colori composta dai colori rosso, verde e blu. Per scoprire lo straordinario mondo dei colori naturali
basta selezionare lo spazio colore preferito.
Automatico: Auto Spazio colore regola automaticamente la tonalità più naturale dei colori basata sulle sorgenti del
programma.
Nativa: Native Spazio colore offre tonalità di colore ricche e profonde.
Personaliz: Regola la gamma colore per adattarla alle proprie preferenze.
Una volta modificato il valore, lo schermo viene automaticamente regolato di conseguenza.
Le impostazioni possono essere regolate e memorizzate per ogni dispositivo esterno connesso a un ingresso
TV. Ad
esempio, se si ha un lettore DVD connesso alla porta HDMI 1 e correntemente selezionato, verranno memorizzate le
impostazioni e le regolazioni per il lettore DVD.
Colore: Rosso, Verde, Blu, Giallo, Ciano o Magenta
Colore è disponibile quando l’opzione Spazio colore è impostata su Personaliz.
Colore, è possibile regolare i valori RGB per i colori selezionati.
Per reimpostare il valore RGB regolato, selezionare Reset.
Rosso: Regola il livello di saturazione di rosso del colore selezionato.
Verde: Regola il livello di saturazione di verde del colore selezionato.
Blu: Regola il livello di saturazione di blu del colore selezionato.
Reset: Ripristina le impostazioni dello spazio colore ai valori predefiniti.
Bilan bianco
Consente di regolare la temperatura del colore per ottenere immagini più naturali.
R-Offset: Regola l'intensità del colore rosso.
G-Offset: Regola l'intensità del colore verde.
B-Offset: Regola l'intensità del colore blu.
R-Gain: Regola la luminosità del colore rosso.
G-Gain: Regola la luminosità del colore verde.
B-Gain: Regola la luminosità del colore blu.
Reset: Consente di ripristinare i valori predefiniti di bilanciamento del bianco.
Incarnato
E’ possibile enfatizzare il tono ‘incarnato’ dell’immagine.
Una volta modificato il valore, lo schermo viene automaticamente regolato di conseguenza.
E' possibile enfatizzare i contorni degli oggetti dell'immagine.
Impostando la modalità xvYCC su on, si noterà un miglioramento nei dettagli e nel colore durante la visione di un film da un
dispositivo esterno (per es. un lettore DVD) collegato alla porta HDMI o Component IN.
xvYCC è disponibile quando la modalità dell'immagine è impostata a Film, e l'ingresso esterno è impostato su HDMI o Comp..
Questa funzione potrebbe non essere supportata dal dispositivo esterno in uso.
■
●
●
●
N
N
N
N
N
■
●
●
●
●
●
●
●
■
N
■
■
N
N
[620-Weuro]BN68-02326A-03L09.ind15 15 2009-10-08 ¿ÀÀü 9:29:24

Italiano - 16
Opzioni immagine
In modalità PC, è possibile modificare solo i parametri Toni colore e Formato tra le
opzioni della voce Opzioni immagine.
Caldo1, Caldo2 o Caldo3 vengono attivate solo quando la modalità Immagine è Film.
Le impostazioni possono essere regolate e memorizzate per ogni dispositivo esterno
connesso a un ingresso TV.
Formato
Occasionalmente è possibile variare la dimensione dell'immagine sullo schermo. Il televisore
ha diverse possibilità di dimensione, ognuna adatta a dare i migliori risultati con specifici tipi di ingressi video. Il ricevitore via cavo/
satellitare potrebbe anch'esso avere la propria serie di dimensioni preimpostate. In generale, tuttavia, si consiglia la visione il più
possibile nel formato 16:9.
E' possibile selezionare queste opzioni semplicemente premendo il tasto P.SIZE sul telecomando.
Automatico: Regola automaticamente la dimensione dell'immagine su un formato 16:9.
16:9: Regola la dimensione dell’immagine su 16:9, un valore appropriato per visualizzare DVD o trasmissioni panoramiche.
Wide Zoom: Aumenta le dimensioni dell’immagine a oltre 4:3.
Zoom: Ingrandisce il formato 16:9 (in senso verticale) per adattarlo alle dimensioni dello schermo.
4:3: Questa è l’impostazione predefinita per un filmato video o una trasmissione normale.
Adatta a schermo: Utilizzare questa funzione per visualizzare l'immagine completa con segnali HDMI (720p/1080i/1080p) o
Comp. (1080i/1080p).
A seconda del tipo di sorgente di ingresso, le opzioni relative alla dimensione dell'immagine possono variare.
Le voci disponibili variano in base alla modalità selezionata.
In modalità PC, è possibile regolare solo i formati 16:9 e 4:3.
Le impostazioni possono essere regolate e memorizzate per ogni dispositivo esterno connesso a un ingresso
TV.
Se si visualizza una immagine fissa per oltre due ore, sullo schermo potrebbe apparire una immagine residua temporanea.
Wide Zoom: Premere il tasto ► per selezionare Posizione, quindi premere ENTER
E
. Per spostare la schermata in alto o in
basso, utilizzare il tasto ▲ o ▼. Quindi premere il tasto ENTER
E
.
Zoom: Premere il tasto ► per selezionare Posizione, quindi premere ENTER
E
. Per spostare l’immagine in alto o in basso,
utilizzare il tasto ▲ o ▼. Quindi premere il tasto ENTER
E
. Premere il tasto ► per selezionare Formato, quindi premere
ENTER
E
. Premere il tasto ▲ o ▼ per aumentare o ridurre la dimensione dell’immagine in direzione verticale. Quindi
premere il tasto ENTER
E
.
Dopo aver selezionato l’opzione Adatta a schermo in HDMI (1080i / 1080p) o Comp. (1080i / 1080p): Selezionare Posizione
premendo il tasto ◄ o ►. Utilizzare il tasto ▲, ▼, ◄ o ► per spostare l’immagine.
Reset: Premere il tasto ◄ o ► per selezionare Reset, quindi premere ENTER
E
. E' possibile azzerare le impostazioni.
Usando la funzione Adatta a schermo con un ingresso HDMI 720p, 1 riga verrà tagliata all’inizio, alla fine, a sinistra e a
destra come nella funzione Overscan.
Quando si imposta la dimensione dell’immagine su Automatico su un televisore con formato wide 16:9, è possibile determinare o
meno le dimensioni dell’immagine da visualizzare nel formato 4:3 WSS (Wide Screen Service). Ogni nazione europea richiede un
formato dell’immagine diverso e questa funzione deve essere quindi selezionata dall’utente.
16:9: Imposta l’immagine sul formato wide 16:9.
Wide Zoom: Aumenta le dimensioni dell’immagine a oltre 4:3.
Zoom: Ingrandisce verticalmente la dimensione dell'immagine sullo schermo.
4:3: Imposta l’immagine sul formato 4:3.
Questa funzione è disponibile in modalità Automatico.
Questa funzione non è disponibile in modalità PC, Comp. o HDMI.
Se il segnale ricevuto dal televisore è debole, è possibile attivare la funzione Digital Noise Reduction per ridurre i disturbi statici e
l’effetto ‘ghosting’ sullo schermo.
Se il segnale è debole, selezionare una delle altre opzioni disponibili fino a ottenere la migliore qualità visiva.
Consente di selezionare il livello di nero dello schermo per regolare la profondità dell'immagine.
Questa funzione è attiva solo quando un dispositivo esterno viene collegato al televisore mediante una porta HDMI (segnali
RGB).
❑
N
■
N
N
■
O
●
●
●
●
●
●
N
N
N
N
N
N
N
N
N
■
●
●
●
●
N
N
■
N
■
N
Tonicolore :Normale ▶
Formato :Automatico
Modschermo :16:9
DigitalNR :Automatico
LivellodineroHDMI :Normale
ModalitàFilm :Spenta
ModalitàSoloblu :Spenta
U
Sposta
E
Conf.
R
Ritorno
Opzioniimmagine
[620-Weuro]BN68-02326A-03L09.ind16 16 2009-10-08 ¿ÀÀü 9:29:24

Italiano - 17
Il televisore può essere impostato automaticamente nel senso desiderato, per elaborare i segnali dei film provenienti da tutte le
sorgenti e per regolare l'immagine in modo da ottenere una visualizzazione ottimale.
Modalità Film è supportata in modalità TV, AV, COMPONENT (480i / 1080i) e HDMI (480i / 1080i).
Spenta: Disattiva la funzione Modalità Film.
Auto1: Regola automaticamente l'immagine alla migliore qualità possibile per la visione di un film.
Auto2: Ottimizza automaticamente il testo visualizzato sullo schermo (esclusi i sottotitoli) durante la visione di un film.
Elimina l’effetto ‘trascinamento’ dalle scene in rapido movimento per offrire una visione più nitida delle immagini.
Se si attiva 100Hz Motion Plus, lo schermo potrebbe risultare disturbato. In questo caso, impostare 100Hz Motion Plus su
Spenta.
Spenta: Disattiva la modalità 100Hz Motion Plus.
Chiaro: Imposta la modalità 100Hz Motion Plus al minimo.
Standard: Imposta la modalità 100Hz Motion Plus su un valore medio.
Lineare: Imposta la modalità 100Hz Motion Plus su un valore massimo.
Personaliz: Regola lo sfarfallio e il livello di riduzione delle vibrazioni in base alle proprie preferenze.
Rid distorsione: Regola il livello di sfarfallio dalle sorgenti video.
Rid vibrazione: Regola il livello di vibrazioni dalle sorgenti video durante la riproduzione di un video.
Reset: Ripristina le impostazioni personalizzate.
Demo: Visualizza la differenza tra l’attivazione e la disattivazione della modalità 100Hz Motion Plus.
Questa funzione è solo per gli utenti esperti in grado di regolare le misurazioni del dispositivo
AV. Questa funzione visualizza solo
il segnale blu rimuovendo i segnali rosso e verde dal video, in modo da offrire un ef
fetto Blue Filter utile per regolare le opzioni
Colour e Tint delle apparecchiature video quali lettori DVD, impianti Home Theater, ecc. Questa funzione consente di regolare
a livello di segnale le opzioni Colour e Tint di qualsiasi dispositivo video che utilizzi modelli di tipo Color Bar Pattern per i colori
Rosso/Verde/Blu/Ciano/Magenta/Giallo, senza l'uso di un ulteriore Blue Filter.
Modalità Solo blu è disponibile solo quando la modalità immagine è impostata su Film o Standard.
Ripristina tutte le impostazione dell'immagine ai valori predefiniti.
Azzera modalità immagine: I valori dell'immagine corrente tornano alle impostazioni predefinite.
■
N
●
●
●
■
N
●
●
●
●
●
–
–
–
●
■
N
❑
N
[620-Weuro]BN68-02326A-03L09.ind17 17 2009-10-08 ¿ÀÀü 9:29:24

Italiano - 18
Uso del televisore come uno schermo PC
Impostazione del software del PC (basato su Windows XP)
Di seguito vengono illustrate le impostazioni di visualizzazione di Windows per un PC tipico.
Le schermate visualizzate sul PC possono differire in base alla versione di Windows e alla
scheda video installate. Nel caso le schermate risultassero differenti, le stesse informazioni di
base per la configurazione sono applicabili in quasi tutti i casi. (In caso contrario, contattare la
casa costruttrice del computer oppure un rivenditore Samsung.)
1.
Fare clic sul ‘Pannello di controllo’ nel menu Start di Windows.
2.
Quando appare la finestra del pannello di controllo, fare clic su ‘Aspetto e temi’. Verrà
visualizzata una finestra di dialogo.
3.
Quando appare la finestra del pannello di controllo, fare clic su ‘Schermo’. Verrà
visualizzata una finestra di dialogo.
4.
Fare clic sulla scheda ‘Impostazioni’ nella finestra di dialogo.
Impostazione della dimensione corretta (risoluzione) - Ottimale: 1920 x 1080 pixel
Se la finestra di dialogo delle impostazioni contiene un’opzione relativa alla frequenza
verticale, il valore corretto è ‘60’ o ‘60 Hz’. In caso contrario, fare clic su ‘OK’ e uscire dalla finestra di dialogo.
Modalità di visualizzazione
Se il segnale del sistema equivale alla modalità del segnale standard, lo schermo viene automaticamente regolato. Se il segnale
del sistema non equivale alla modalità del segnale standard, regolare la modalità riferendosi alla guida dell'utente della scheda
video; in caso contrario potrebbe non essere visualizzata alcuna immagine. Per le modalità video elencate alla pagina successiva,
l'immagine a schermo è stata ottimizzata durante la produzione.
Ingresso D-Sub e HDMI/DVI
Modalità Risoluzione Frequenza orizzontale
(kHz)
Frequenza verticale
(Hz)
Frequenza di clock dei
pixel (MHz)
Polarità sync
(O/V)
IBM
640 x 350 31,469 70,086 25,175 +/-
720 x 400 31,469 70,087 28,322 -/+
MAC
640 x 480 35,000 66,667 30,240 -/-
832 x 624 49,726 74,551 57,284 -/-
1152 x 870 68,681 75,062 100,000 -/-
VESA CVT
720 x 576 35,910 59,950 32,750 -/+
1152 x 864 53,783 59,959 81,750 -/+
1280 x 720 44,772 59,855 74,500 -/+
1280 x 720 56,456 74,777 95,750 -/+
1280 x 960 75,231 74,857 130,000 -/+
VESA DMT
640 x 480 31,469 59,940 25,175 -/-
640 x 480 37,861 72,809 31,500 -/-
640 x 480 37,500 75,000 31,500 -/-
800 x 600 37,879 60,317 40,000 +/+
800 x 600 48,077 72,188 50,000 +/+
800 x 600 46,875 75,000 49,500 +/+
1024 x 768 48,363 60,004 65,000 -/-
1024 x 768 56,476 70,069 75,000 -/-
1024 x 768 60,023 75,029 78,750 +/+
1152 x 864 67,500 75,000 108,000 +/+
1280 x 1024 63,981 60,020 108,000 +/+
1280 x 1024 79,976 75,025 135,000 +/+
1280 x 800 49,702 59,810 83,500 -/+
1280 x 800 62,795 74,934 106,500 -/+
1280 x 960 60,000 60,000 108,000 +/+
1360 x 768 47,712 60,015 85,500 +/+
1440 x 900 55,935 59,887 106,500 -/+
1440 x 900 70,635 74,984 136,750 -/+
1680 x 1050 65,290 59,954 146,250 -/+
VESA GTF
1280 x 720 52,500 70,000 89,040 -/+
1280 x 1024 74,620 70,000 128,943 -/-
VESA DMT /
DTV CEA
1920 x 1080p 67,500 60,000 148,500 +/+
Quando si effettua una connessione mediante cavo HDMI / DVI, è necessario utilizzare la porta HDMI IN 3(DVI).
La modalità interlacciata non è supportata.
Questo dispositivo potrebbe non funzionare correttamente se si seleziona un formato video non standard.
Le modalità Separate e Composite sono supportate. Il formato SOG non è supportato.
Se il cavo VGA è di scarsa qualità o troppo lungo, in alta risoluzione (1920x1080) le immagini possono risultare disturbate.
¦
■
N
N
N
N
N
[620-Weuro]BN68-02326A-03L09.ind18 18 2009-10-08 ¿ÀÀü 9:29:24

Italiano - 19
Configurazione del televisore con il PC
Preimpostazione: Premere il tasto SOURCE per selezionare la modalità PC.
Regolazione auto
Usare la funzione Auto Adjust per far sì che il televisore regoli automaticamente i segnali video
che riceve.
La funzione sintonizza automaticamente le impostazioni e regola i valori della frequenza e le
posizioni.
Premere il tasto TOOLS per visualizzare il menu Strumenti. E’ anche possibile impostare
la funzione Auto Adjustment selezionando .
Questa funzione non è disponibile in modalità DVI-HDMI.
Schermo
Grossa / Fine
Lo scopo della regolazione della qualità dell’immagine è quello di eliminare o ridurre eventuali
disturbi di visualizzazione. Se non si riesce a eliminare il disturbo mediante sintonizzazione,
regolare la frequenza nel modo migliore possibile (Grossa) ed eseguire nuovamente la
sintonizzazione fine. Una volta ridotto il disturbo, regolare l’immagine in modo che sia
perfettamente centrata sullo schermo.
Posizione PC
Regolare la posizione dello schermo del PC se non si adatta allo schermo del televisore.
Premere il tasto ▲ o ▼ per regolare la posizione verticale. Premere il tasto ◄ o ► per regolare
la posizione orizzontale.
Reset immagine
È possibile sostituire tutte le impostazioni dell'immagine ripristinando i valori di fabbrica.
¦
N
❑
T
N
❑
■
■
■
Luminosità :45
Nitidezza :50
Regolazioneauto ▶
Schermo
Impostazioniavanzate
Opzioniimmagine
Resetimmagine
immagine
Grossa 50
Fine 0
Posizione
PC
Resetimmagine
U
Sposta
E
Conf.
R
Ritorno
Schermo
[620-Weuro]BN68-02326A-03L09.ind19 19 2009-10-08 ¿ÀÀü 9:29:24

Italiano - 20
SUONO
Configurazione del menu audio
Premere il tasto TOOLS per visualizzare il menu Strumenti. E’ inoltre possibile impostare
la modalità audio selezionando .
Standard: Seleziona la modalità audio normale.
Musica: Enfatizza la musica rispetto alle voci.
Film: Offre la migliore qualità audio per la visione di film.
Voce cristallina: Enfatizza i dialoghi rispetti altri altri suoni.
Personaliz: Richiama le impostazioni audio personalizzate.
Equalizzatore
Le impostazioni audio possono essere regolate in base alle proprie preferenze personali.
Modalità: Seleziona la modalità audio tra quelle predefinite.
Bilanciamento L/R: Controlla il bilanciamento degli altoparlanti sinistro e destro.
100Hz / 300Hz / 1KHz / 3KHz / 10KHz (Regolazione larghezza di banda): Per regolare il livello delle diverse frequenze di
larghezza di banda.
Reset: Ripristina le impostazione predefinite dell’equalizzatore.
SRS TruSurround HD è una tecnologia SRS brevettata che risolve il problema della riproduzione di contenuti multicanale 5.1 su
due altoparlanti. TruSurround offre una straordinaria esperienza Surround Sound virtuale attraverso un sistema di riproduzione a
due altoparlanti, inclusi gli altoparlanti interni del televisore. È pienamente compatibile con tutti i formati multicanale.
Premere il tasto TOOLS per visualizzare il menu Strumenti. E’ possibile impostare la funzione SRS TruSurround HD
selezionando .
Lingua audio
È possibile modificare la lingua predefinita. Visualizza le informazioni sulla lingua relative alla trasmissione in corso.
Durante la visione di un canale digitale, è possibile selezionare questa funzione.
E' possibile selezionare solo una delle lingue trasmesse.
Quando l’audio è generato sia dall’altoparlante principale sia dal ricevitore audio, potrebbe prodursi un effetto di eco a causa della
diversa velocità di decodifica dei due dispositivi. In questo caso, attivare la funzione TV Speaker.
Durante la visione di un canale digitale, è possibile selezionare questa funzione.
Il formato audio dipende dal segnale trasmesso dall'emittente.
Descrizione audio
Questa funzione audio ausiliaria fornisce una traccia audio aggiuntiva per aiutare le persone con problemi visivi. Questa funzione
gestisce il flusso audio per l’opzione AD (Descrizione audio), quando è trasmesso insieme all’Audio principale dall'emittente. Gli
utenti possono attivare o disattivare la funzione Descrizione audio selezionando Acceso o Spenta e regolarne il volume.
Premere il tasto AD sul telecomando per selezionare Spenta o Acceso.
Attiva e disattiva la funzione Audio Description.
Volume
E’ possibile regolare il volume della funzione Descrizione audio.
Volume è attivo quando la funzione Descrizione audio è impostata su Acceso.
Durante la visione di un canale digitale, è possibile selezionare questa funzione.
Le condizioni del segnale variano a seconda dell’emittente, ma non è pratico regolare il volume ogni volta che si cambia canale.
Questa funzione consente di regolare automaticamente il volume del canale desiderato diminuendo il livello dell’uscita audio
quando il segnale di modulazione è alto, oppure aumentando il livello dell’uscita audio quando il segnale di modulazione è basso.
¦
❑
T
●
●
●
●
●
❑
●
●
●
●
❑
T
❑
N
N
❑
N
N
❑
O
■
■
N
N
❑
Modalità :Personaliz ▶
Equalizzatore
SRSTruSurroundHD :Spenta
Linguaaudio :----
Formatoaudio :----
Descrizioneaudio
Volumeauto :Spenta
Selezionealtoparlante :AltoparlanteTV
Suono
[620-Weuro]BN68-02326A-03L09.ind20 20 2009-10-08 ¿ÀÀü 9:29:25

Italiano - 21
Selezione altoparlante
Durante la visione del televisore con un sistema Home theatre collegato, disattivare gli altoparlanti in modo da poter ascoltare
l'audio proveniente dagli altoparlanti esterni del sistema Home theatre.
Altoparlante est: Per ascoltare l'audio proveniente dagli altoparlanti esterni (Home Theatre).
Altoparlante TV: Per ascoltare l’audio tramite gli altoparlanti del televisore.
I tasti di regolazione del volume e il tasto MUTE non sono attivi quando Selezione altoparlante è impostato su Altoparlante
est.
Selezionando Altoparlante est nel menu Selezione altoparlante, le impostazioni dell’audio saranno limitate.
Altoparlanti interni del televisore Da Audio Out (Optical, L/R Out) a Sistema audio
RF / AV / Comp. / PC / HDMI RF / AV / Comp. / PC / HDMI
Altoparlante TV Uscita audio Uscita audio
Altoparlante est Muto Uscita audio
Nessun segnale video Muto Muto
E' possibile ripristinare le impostazioni audio ai valori di fabbrica.
Azz mod audio: I valori correnti tornano alle impostazioni predefinite.
Selezione della modalità audio
E' possibile impostare la modalità audio premento il tasto DUAL. Questo tasto consente di visualizzare a schermo la modalità
audio impostata.
Tipo di audio Dual 1 / 2
A2 Stereo
Mono MONO
Cambio automatico
Stereo STEREO ↔ MONO
Dual DUAL 1 ↔ DUAL 2 DUAL 1
NICAM
Stereo
Mono MONO
Cambio automatico
Stereo MONO ↔ STEREO
Dual
MONO ↔ DUAL 1
DUAL 2
DUAL 1
Se il segnale stereo è debole e si verifica un cambio automatico, passare alla modalità Mono.
Questa funzione è attiva solo con segnale audio stereo. Al contrario, non è attiva con segnale audio mono.
Questa funzione è disponibile solo in modalità TV.
❑
●
●
N
N
❑
N
¦
N
N
N
Resetimpostazioniaudio
L
Sposta
E
Conf.
R
Ritorno
Selezionareleopzionidiresetdell'audio.
Azzeratutto Azzmodaudio Annulla
[620-Weuro]BN68-02326A-03L09.ind21 21 2009-10-08 ¿ÀÀü 9:29:25

Italiano - 22
IMPOSTAZIONE
Configurazione del menu Setup
Lingua menu
E' possibile impostare la lingua dei menu.
Ora
Per la descrizione dettagliata delle procedure per l'impostazione delle opzioni, vedere
'Impostazione dell'orario'.
Trasmissione
Sottotitoli
È possibile attivare e disattivare i sottotitoli. Utilizzare questo menu per impostare la modalità sottotitoli. Normale rappresenta il
sottotitolo di base mentre Non udenti è il sottotitolo per le persone con problemi uditivi.
Attiva e disattiva i sottotitoli.
Imposta la modalità dei sottotitoli.
Lingua Sottotitoli
Imposta la lingua dei sottotitoli.
Se il programma che si sta guardando non supporta la funzione Non udenti si attiva automaticamente l’opzione Normale
anche se è selezionata la modalità Non udenti.
La lingua predefinita è l'inglese, nel caso in cui la trasmissione non supporti la lingua selezionata.
È possibile selezionare queste opzioni semplicemente premendo il tasto SUBT. sul telecomando.
(solo RU)
Se il programma è trasmesso con testo digitale, questa funzione è attivata.
MHEG (Multimedia and Hypermedia Information Coding Experts Group)
Uno standard internazionale per i sistemi di codifica dei dati multimediali e ipermediali. È un sistema più complesso rispetto al
formato MPEG in quanto include collegamenti a dati ipermediali come immagini fisse, servizi di caratteri, animazione, grafica
e file video, oltre ai dati multimediali. MHEG è una tecnologia interattiva con vari campi di applicazione, come sistemi VOD
(Video-On-Demand), ITV (Interactive TV), EC (Electronic Commerce), teleformazione, teleconferenza, librerie digitali e giochi
di rete.
Lingua Teletext
E' possibile impostare la lingua del Teletext.
La lingua predefinita è l'inglese, nel caso in cui la trasmissione non supporti la lingua selezionata.
Preferenze
Lingua principale audio / Lingua secondaria audio / Lingua principale sottotitoli / Lingua secondaria sottotitoli /
Lingua principale Teletext / Lingua secondaria Teletext
Mediante questa funzione, gli utenti sono in grado di selezionare una delle lingue disponibili. La lingua selezionata viene
impostata automaticamente durante la selezione di un canale.
Modificando l’impostazione della lingua, le opzioni Lingua Sottotitoli, Lingua audio e Lingua
Teletext del menu Lingua vengono
automaticamente impostate sulla lingua selezionata
Le opzioni Lingua Sottotitoli, Lingua audio, e Lingua Teletext del menu Lingua mostrano l’elenco delle lingue supportate dal
canale corrente, dove l’opzione corrente appare evidenziata. Se si modifica una di queste opzioni, la nuova lingua viene
applicata solo al canale corrente. La nuova impostazione non viene invece applicata alle opzioni Lingua principale sottotitoli,
Lingua principale audio o Lingua principale Teletext del menu Preference.
¦
❑
❑
❑
■
●
●
●
N
N
N
■
N
■
N
■
●
Plug&Play
Linguamenu :Italiano ▶
Ora
Trasmissione
Sicurezza
Generale
Impostazione
[620-Weuro]BN68-02326A-03L09.ind22 22 2009-10-08 ¿ÀÀü 9:29:25

Italiano - 23
Interfaccia comune
Menu CI
Ciò permette all'utente di accedere al menu del modulo CAM.
Selezionare il Menu CI in base alla scheda PC.
Info sull'applicazione
Contiene informazioni sul modulo CAM inserito nello slot CI e le visualizza. Le informazioni sull’applicazione sono relative alla
‘SCHEDA CI (CI+)’. È possibile installare il modulo CAM in qualsiasi momento sia mentre il televisore è acceso sia mentre è
spento.
1.
Acquistare il modulo CI CAM presso il rivenditore locale o via telefono.
2.
Inserire la scheda ‘SCHEDA CI (CI+)’ nel modulo CAM nella direzione indicata dalla freccia.
3.
Inserire il modulo CAM con la ‘SCHEDA CI (CI+)’ installata nell’alloggiamento common interface.
(Inserire completamente il CAM nella direzione indicata dalla freccia in modo che risulti parallelo allo slot.)
4.
Verificare la visione dell’immagine su un canale a segnale criptato.
Sicurezza (In base al modello)
Prima della comparsa dell’immagine, compare la richiesta del PIN. Digitare il PIN a quattro cifre.
Il PIN predefinito di un nuovo apparecchio TV è 0-0-0-0. E' possibile modificare il PIN selezionando Cambia PIN nel menu.
Alcuni modelli richiedono la selezione del PIN impostato per la funzione Plug & Play.
Tramite questa funzione è possibile impedire agli utenti non autorizzati, ad esempio i bambini, di guardare programmi non adatti a
loro, annullando il video e azzerando l’audio.
E' possibile bloccare alcuni canali nell'elenco dei canali.
Blocco canali è disponibile solo in modalità TV.
Blocco Canale
Questa funzione consente di immettere un codice PIN di identificazione personale a 4 cifre definito dall’utente per impedire agli
utenti non autorizzati, come ad esempio i bambini, di vedere programmi non adatti a loro.
La voce Blocco Canale può essere diversa in base alla nazione.
Una volta impostata la funzione Blocco Canale, verrà visualizzato il simbolo ‘
\
’.
Cons tutto: Premere per sbloccare tutte le classificazioni dei canali TV.
Bloc tutto: Premere per bloccare tutte le classificazioni dei canali TV.
Cambia PIN
E' possibile modificare il numero ID necessario per configurare il televisore.
Qualora si sia dimenticato il codice PIN, premere i tasti del telecomando nella sequenza seguente per ripristinare il codice PIN
predenito 0-0-0-0: POWER (Spenta)
(Acceso).
Generale
Durante la connessione a una console per videogiochi come PlayStation™ o Xbox™, il gioco sarà più realistico selezionando il
relativo menu.
Limitazioni della modalità gioco (Attenzione)
Per scollegare una console per videogiochi e collegare un altro dispositivo esterno, impostare la modalità Modalità gioco
su Off nel menu di impostazione.
Visualizzando il menu TV in modalità Modalità gioco si potrebbe verificare un leggero sfarfallio.
Modalità gioco non è disponibile in modalità TV, PC ed Est.
Se la qualità dell'immagine è scadente quando al televisore è collegato un dispositivo esterno, verificare se la Modalità gioco
è impostata su On. Impostare Modalità gioco su Off e collegare i dispositivi esterni.
Se Modalità gioco è Acceso:
La Modalità immagine viene automaticamente impostata su Standard e non può essere modificata.
La Modalità audio viene automaticamente impostata su Personaliz e non può essere modificata. Regolare l'audio
mediante l'equalizzatore.
La funzione Reset Suono viene attivata. La selezione della funzione Reset dopo l'impostazione dell'equalizzatore ripristina le
impostazione di fabbrica dell'equalizzatore.
■
●
●
❑
N
N
N
■
N
N
■
N
N
N
■
N
❑
■
N
N
N
N
N
[620-Weuro]BN68-02326A-03L09.ind23 23 2009-10-08 ¿ÀÀü 9:29:25

Italiano - 24
Questa funzione regola la luminosità del televisore in modo da ridurre il consumo di energia. Durante la visione notturna del
televisore, impostare l’opzione della modalità Risp. energia su Alta in modo da ridurre l’affaticamento degli occhi oltre al consumo
energetico.
Selezionando Immagine off, lo schermo si spegne lasciando attivo solo l’audio. Premere un tasto qualsiasi per uscire dalla
modalità Immagine off.
Nel menu Strumenti, la funzione Immagine off non è supportata.
Premere il tasto TOOLS per visualizzare il menu Strumenti. E' inoltre possibile impostare l'opzione Energy Saving
selezionando
.
E’ possibile impostare la trasparenza del menu.
E' possibile impostare una melodia da attivare a ogni accensione o spegnimento del monitor
.
La modalità Melody non funziona
Se il televisore non emette alcun suono significa che è stato premuto il tasto MUTE.
Se non proviene audio dal televisore, ciò potrebbe essere causato dal volume impostato sul minimo mediante il tasto (-).
Se il televisore è stato spento mediante la funzione Timer stand-by.
Orologio
L’impostazione dell’orologio è necessaria per utilizzare le varie funzioni di timer del televisore.
L’ora corrente appare ogni volta che si preme il tasto INFO.
Se il cavo di alimentazione viene scollegato, è necessario impostare nuovamente l’orologio.
Modalità orologio
E’ possibile impostare manualmente o automaticamente l’orario corrente.
Automatico: Imposta automaticamente l’orario corrente utilizzando l’orario inviato dalla
trasmissione digitale.
Manuale: Imposta manualmente l’ora corrente.
In base all'emittente e al segnale, la funzione dell'impostazione automatica dell'orario
potrebbe non essere corretta. In questo caso, impostare l'orario manualmente.
La connessione Antenna o Cavo deve consentire l'impostazione automatica dell'orario.
Imposta Ora
È possibile impostare manualmente l’ora corrente.
Questa funzione è disponibile solo quando la funzione Modalità orologio è impostata su
Manuale.
È possibile impostare il giorno, il mese, l’anno, l’ora e i minuti premendo direttamente i tasti
numerici del telecomando.
Timer stand-by
Il timer di spegnimento disattiva automaticamente il televisore dopo il tempo impostato (30, 60, 90, 120, 150 e 180 minuti).
Premere il tasto TOOLS per visualizzare il menu Strumenti. E’ inoltre possibile impostare il timer di stand-by selezionando
.
Per annullare la funzione Timer stand-by selezionare Spenta.
Timer 1 / Timer 2 / Timer 3
Possono essere impostate tre diverse opzioni del Timer.
Prima è necessario impostare l’orologio.
Orario TV on
Impostare l’ora e i minuti e attivare / disattivare.
(Per attivare il timer selezionare Attiva).
Orario TV off
Impostare l’ora e i minuti e attivare / disattivare.
(Per attivare il timer selezionare Attiva).
■
N
T
■
■
N
¦
❑
N
N
■
●
●
N
N
■
N
N
❑
T
N
❑
■
■
Orologio :--:-- ▶
Timerstand-by :Spenta
Timer1 :Disattivato
Timer2 :Disattivato
Timer3 :Disattivato
U
Sposta
E
Conf.
R
Ritorno
Ora
Plug&Play
Linguamenu :Inglese
Ora ▶
Modalitàgioco :Spento
Bloccocanali :Acceso
CambiaPIN
BloccoCanale
Sottotitoli
Lingua
Teletext
Preferenze
Impostazione
OrarioTVon
L
Sposta
U
Regola
E
Conf.
R
Ritorno
Timer1
OrarioTVoff
Volume
00 00 Disattiva
00 00 Disattiva
10
Sorgente Antenna Canale
TV ATV 0
Ripetizione
Unavolta
Dom Lun Mar Mer Gio Ven Sab
[620-Weuro]BN68-02326A-03L09.ind24 24 2009-10-08 ¿ÀÀü 9:29:25

Italiano - 25
Volume
Selezionare il livello del volume desiderato.
E' possibile selezionare il contenuto del dispositivo TV o USB da riprodurre all'accensione automatica del televisore. Selezionare
TV o USB. (Assicurarsi che al televisore sia collegato un dispositivo USB.)
Antenna (quando Sorgente è impostata su TV)
Selezionare ATV o DTV.
Canale (quando Sorgente è impostata su TV)
Selezionare il canale desiderato.
Contenuti (quando Sorgente è impostata su USB)
E' possibile selezionare una cartella del dispositivo USB con i file musicali o fotografici da riprodurre all'accensione automatica del
televisore.
Se sulla chiavetta USB non sono presenti file musicali, oppure la cartella contenente file musicali non è selezionata, l’opzione
Timer non funziona correttamente.
Nel caso ci sia un solo file fotografico memorizzato sul dispositivo USB, la funzione Slide Show non è disponibile.
Se il nome della cartella è troppo lungo, la cartella non è selezionabile.
Se il nome della cartella da configurare mediante la funzione Contenuti è troppo lungo, la cartella non è selezionabile.
Ripetizione
Selezionare Una volta, Ogni gg, Lun~Ven, Lun~Sab, Sab~Dom, o Manuale.
Quando viene selezionato Manuale, premere il tasto ► per impostare il giorno della settimana. Premere il tasto ENTER
E
sul giorno desiderato per visualizzare un simbolo
c
.
È possibile impostare l’ora, i minuti e il canale anche premendo i tasti numerici del telecomando.
Spegnimento automatico
Quando il televisore si accende mediante il timer impostato su Acceso, si spegne automaticamente se per 3 ore non viene
premuto alcun tasto di controllo. Questa funzione è disponibile solo se il timer è impostato su
Acceso e impedisce l’eventuale
surriscaldamento del televisore dovuto a un periodo di accensione troppo lungo.
■
■
■
■
■
N
N
N
N
■
N
N
N
[620-Weuro]BN68-02326A-03L09.ind25 25 2009-10-08 ¿ÀÀü 9:29:25

Italiano - 26
Ingressi / Supporto
Menu Ingressi
Elenco sorgenti
Per selezionare il televisore o altre sorgenti esterne di ingresso quali DVD / lettori Blu-ray /
Cable Box /
Ricevitori satellitari (Set-Top Box) collegati al televisore. Utilizzare la funzione per selezionare la
sorgente di ingresso desiderata.
Premere il tasto SOURCE sul telecomando per visualizzare una sorgente del segnale
esterna. La modalità TV può essere selezionata premendo il tasto TV.
TV / Ext.1 / Ext.2 / AV / Component / PC / HDMI1 / HDMI2 / HDMI3/DVI / HDMI4
E’ possibile scegliere solo i dispositivi esterni collegati al televisore. In Elenco sorgenti, gli
ingressi collegati verranno evidenziati e ordinati in cima all'elenco. Gli ingressi non collegati
verranno ordinati in fondo all’elenco.
Ext. e PC rimangono sempre attive.
Uso dei tasti colorati del telecomando nell'elenco delle sorgenti
Rosso (Aggiorna): Aggiorna il collegamento ai dispositivi esterni. Premere questo tasto
se la propria sorgente è accesa e collegata ma non compare nell'elenco.
TOOLS (Strumenti): Visualizza i menu Modifica Nome e Informazioni.
Modifica Nome
VCR / DVD / STB cavo / STB satellite / STB PVR / Ricevitore AV / Giochi / Videocamera / PC / DVI / DVI PC / TV / IPTV /
Blu-ray / HD DVD / DMA
Assegnare un nome al dispositivo collegato ai jack di ingresso per semplificare la selezione della sorgente di ingresso.
Quando un PC con una risoluzione di 1920 x 1080 a 60Hz è collegato alla porta HDMI IN 3(DVI) è necessario impostare la
modalità HDMI3/DVI su DVI PC in Modifica Nome della modalità Ingressi.
Quando si collega un cavo HDMI/DVI alla porta HDMI IN 3 (DVI), impostare la modalità HDMI3/DVI su DVI o DVI PC alla voce
Modifica Nome della modalità Ingressi. In questo caso, è necessaria una connessione separata per il segnale audio.
Menu Supporto
Auto diagnosi
Test immagine
In caso di problemi di visualizzazione dell'immagine, eseguire il test pertinente. Verificare il color
pattern sullo schermo per vedere se il problema persiste.
Sì: Se il test pattern non compare oppure presenta disturbi, selezionare Sì. Potrebbe
essersi verificato un problema con il televisore. Contattare il call center Samsung per
richiedere assistenza.
No: Se il test pattern è visualizzato correttamente, selezionare No. Potrebbe essersi
verificato un problema con i dispositivi esterni. Controllare lo stato dei collegamenti. Se il
problema persiste, consultare il manuale dell'utente dei dispositivi esterni.
Test audio
In caso di problemi di audio, eseguire il test pertinente. Controllare l'audio riproducendo un test
melodico attraverso le casse del televisore.
Se non c'è ritorno audio dagli altoparlanti del televisore, prima di eseguire il test audio
verificare che Selezione altoparlante sia impostato su Altoparlante TV nel menu Suono.
E' possibile ascoltare la melodia durante il test anche se Selezione altoparlante è impostato su Altoparlante est oppure
l'audio è stato disattivato mediante la pressione del tasto MUTE.
Sì: Se durante l'esecuzione del test audio il suono proviene da un solo altoparlante, selezionare Sì. Potrebbe essersi verificato
un problema con il televisore. Contattare il call center Samsung per richiedere assistenza.
No: Se è possibile ascoltare il suono dagli altoparlanti, selezionare No. Potrebbe essersi verificato un problema con i
dispositivi esterni. Controllare lo stato dei collegamenti. Se il problema persiste, consultare il manuale dell'utente dei dispositivi
esterni.
¦
❑
O
■
N
N
N
❑
■
N
N
¦
❑
■
●
●
■
N
N
●
●
Autodiagnosi ▶
Aggiornamentosoftware
GuidaallaconnessioneHD
ContattareSamsung
Supporto
Elencosorgenti
ModificaNome
Ingressi
Aggiorna
T
Strumenti
Elencosorgenti
TV
Ext.1 :----
Ext.2 :----
PC :----
AV :----
Comp. :----
Autodiagnosi
U
Sposta
E
Conf.
R
Ritorno
Testimmagine ▶
Testaudio
Informazionisulsegnale
[620-Weuro]BN68-02326A-03L09.ind26 26 2009-10-08 ¿ÀÀü 9:29:26

Italiano - 27
Informazioni sul segnale (solo canali digitali)
Diversamente dai canali analogici, la cui qualità di ricezione può variare da ‘molto disturbata’
a 'chiara', i canali digitali (HDTV)
sono caratterizzati da una perfetta qualità oppure dalla totale mancanza di ricezione. Non è quindi possibile sintonizzare i canali
digitali. Per migliorare la ricezione dei canali digitali disponibili è tuttavia possibile regolare l'antenna.
Se il misuratore della potenza del segnale indica che il segnale è debole, regolare fisicamente l'antenna per aumentare il
segnale. Continuare a regolare l'antenna fino a trovare la posizione migliore per ricevere il segnale in modo ottimale.
Aggiornamento software
Samsung potrà in futuro rendere disponibili aggiornamenti del firmware del televisore. Tali
aggiornamenti possono essere scaricati mediante il televisore se collegato a Internet, o
scaricando il nuovo firmware dal sito samsung.com su un dispositivo USB.
Versione corrente è il software già installato nel televisore.
Software alternativo (Backup) mostra la versione precedente che verrà sostituita.
Il software è rappresentato da ‘Anno/Mese/Giorno_Versione’. Più recente è la data, più
recente la versione del software. Si consiglia di installare la più recente versione disponibile.
Tramite USB
Inserire un’unità USB contenente l’aggiornamento del firmware scaricato dal sito samsung.com
nel televisore. Fare attenzione a non disattivare l'alimentazione o rimuovere l'unità USB mentre
l'aggiornamento è in corso. Al termine dell'aggiornamento del firmware, il televisore si spegnerà
e riaccenderà automaticamente. Verificare la versione del firmware dopo avere effettuato
l'aggiornamento (la nuova versione avrà un numero superiore rispetto alla precedente.)
Al termine dell'aggiornamento del software, le impostazioni video e audio modificate torneranno
alle impostazioni predefinite di fabbrica. Si consiglia di scrivere le impostazioni in modo da
poterle facilmente ripristinare dopo l’aggiornamento.
Tramite canale
Aggiorna il software mediante il segnale trasmesso.
Se la funzione viene selezionata durante la trasmissione software, questa funzione ricerca il software disponibile e ne scarica
gli aggiornamenti.
Il tempo necessario per scaricare il software è determinato dallo stato del segnale.
Aggiornamento mod Standby
Per continuare l’aggiornamento software anche quando l’alimentazione principale è attiva, selezionare
Acceso premendo il tasto
▲ o ▼ . 45 minuti dopo l’ingresso in modalità Standby, viene effettuato un aggiornamento manuale. Poiché l’alimentazione
dell’unità si attiva internamente, lo schermo LCD potrà attivarsi per breve tempo. Questo fenomeno può continuare per più di
un’ora, fino al termine dell’aggiornamento software.
Software alternativo (Backup)
In caso di problemi con il nuovo firmware che possano influenzare il regolare funzionamento del prodotto, è possibile ripristinare la
versione precedente del software.
Se il software è stato cambiato, viene visualizzata la versione corrente.
E' possibile cambiare la versione del software corrente selezionando ‘Software alternativo’.
Guida alla connessione HD
Questo menu presenta la modalità di connessione in grado di offrire la qualità ottimale per i televisori HD. Consultare queste
informazioni durante la connessione di dispositivi esterni al televisore.
Contattare Samsung
Fare riferimento a queste informazioni in caso di funzionamento anomalo del televisore o se si desidera aggiornare il software. E'
possibile visualizzare le informazioni relative a call centre, prodotto e metodo di scaricamento del software.
■
N
❑
N
N
N
■
■
N
N
■
■
N
N
❑
❑
Pannello laterale del televisore
Unità USB
Versionecorrente 2009/01/18_000001
TramiteUSB ▶
Tramitecanale
AggiornamentomodStandby :45Min
Softwarealternativo 2009/01/15_00000
U
Sposta
E
Conf.
R
Ritorno
Aggiornamentosoftware
[620-Weuro]BN68-02326A-03L09.ind27 27 2009-10-08 ¿ÀÀü 9:29:26

Italiano - 28
MEDIA PLAY (USB)
Collegamento di un dispositivo USB
1. Per accendere il televisore premere il tasto POWER.
2. Collegare un dispositivo USB contenente file fotografici e/o musicali al jack USBposto sul
pannello laterale del televisore.
3.
Quando viene visualizzata la schermata di selezione Applicazione, premere ENTER
E
per
selezionare Media Play (USB).
MTP (Media Transfer Protocol) non è supportato.
Il file system supporta FAT16, FAT32 e NTFS.
Alcuni dispositivi audio e videocamere digitali USB possono non essere compatibili con
questo televisore.
Media Play supporta solo il dispositivo USB MSC (Mass Storage Class). MSC
è un dispositivo di memorizzazione di massa Bulk-Only Transport. Ne sono
esempi i thumb drive e i lettori di schede flash (gli HUB e i dischi fissi USB
non sono supportati).
Collegare direttamente alla porta USB del TV. Se si utilizza un cavo separato,
possono verificarsi problemi di compatibilità USB.
Prima di collegare il dispositivo al televisore, eseguire il backup dei file
per prevenire una perdita accidentale o eventuali danni. SAMSUNG non è
responsabile di eventuali danni ai file dati o perdite di dati.
Non scollegare il dispositivo USB durante il caricamento.
Maggiore è la risoluzione dell’immagine, più lungo è il tempo necessario per visualizzarla sullo schermo.
La risoluzione massima supportata in JPEG è di 15360X8640 pixel.
In caso di file non supportati o danneggiati, comparirà il messaggio ‘Formato file non supportato’.
I file MP3 con DRM precedentemente scaricati da un sito a pagamento non potranno essere riprodotti. Digital Rights
Management (DRM) è una tecnologia che supporta la creazione, la distribuzione e la gestione di contenuti in modo
completo e integrato, compresa la protezione dei diritti e degli interessi dei fornitori dei contenuti, la prevenzione dalla
copia illegale, così come la gestione degli addebiti e dei pagamenti.
Passare da una foto all’altra potrebbe richiedere alcuni secondi. Ora, sullo schermo comparirà l’icona che indica il
caricamento in corso.
Se sono collegati più dispositivi MSC, alcuni di essi potrebbero non essere riconosciuti. Se un dispositivo richiede molta
potenza (più di 500mA o 5V), il dispositivo USB può non essere supportato.
Nel caso in cui, quando si collega o si utilizza un dispositivo USB, venga visualizzato un messaggio che indica la
presenza di sovratensione, il dispositivo potrebbe non essere riconosciuto o non funzionare correttamente.
Utilizzo del tasto Telecomando nel menu Media Play
Tasto Operazioni
▲/▼/◄/► Sposta il cursore e seleziona una voce.
ENTER
E
Attiva la voce attualmente selezionata. Durante la proiezione di diapositive o la riproduzione di
un brano musicale:
- Premendo il tasto ENTER
E
durante una riproduzione, l’esecuzione si arresta in pausa.
- Premendo il tasto ENTER
E
durante una pausa, l’esecuzione riprende.
∂
/
∑
Riproduce o interrompe la proiezione di diapositive o la riproduzione di un brano musicale.
RETURN Ritorna al menu precedente.
TOOLS Esegue varie funzioni nei menu Foto e Musica.
∫
Arresta la proiezione di diapositive o la riproduzione del file musicale in corso.
π
/
μ
Passa al gruppo precedente/successivo.
INFO Mostra le informazioni relative al file.
MEDIA.P Esce dalla modalità Media Play.
<
P
>
,
EXIT, TV
Interrompe la modalità Media Play e torna alla modalità TV.
¦
N
N
N
N
N
N
N
N
N
N
N
N
N
N
Pannello laterale del televisore
Unità USB
851.86MB/993.02MBLibero
Photo
SUM
SUM
Dispositivo
PHOTO
R
Ritorno
Music Setup
[620-Weuro]BN68-02326A-03L09.ind28 28 2009-10-08 ¿ÀÀü 9:29:26

Italiano - 29
Funzione Media Play
Questa funzione consente di visualizzare e riprodurre file fotografici e/o musicali memorizzati su dispositivi USB MSC (Mass
Storage Class).
Utilizzando file multimediali senza licenza, il prodotto potrebbe non funzionare correttamente.
Accesso al menu Media Play (USB)
1. Premere il tasto MENU. Premere il tasto ▲ o ▼ per selezionare Applicazione,
quindi premere il tasto ENTER
E
.
2. Premere il tasto ▲ o ▼ per selezionare Media Play (USB), quindi premere il tasto
ENTER
E
.
Viene visualizzato il menu Media Play (USB).
Premere il tasto MEDIA.P sul telecomando per visualizzare il menu Media
Play.
Premere il tasto SOURCE sul telecomando per visualizzare l'elenco delle
sorgenti. Quindi premere il tasto ▲ o ▼ per selezionare USB.
3.
Premere il tasto rosso, quindi il tasto ▲ o ▼ per selezionare la memoria USB. Premere il tasto ENTER
E
.
Questa funzione può risultare diversa a seconda della memoria USB utilizzata.
Nella parte inferiore sinistra dello schermo comparirà il nome del dispositivo USB selezionato.
4.
Premere il tasto ◄ o ► per selezionare un'icona (Photo, Music, Setup), quindi premere il tasto ENTER
E
.
Per uscire dalla modalità Media Play premere il tasto MEDIA.P sul telecomando.
Rimozione sicura di un dispositivo USB
Il dispositivo può essere rimosso dal televisore in modo sicuro.
1. Premere TOOLS nella schermata di elenco dei file Media Play, o durante la
proiezione di diapositive o la riproduzione di un brano musicale.
2.
Premere il tasto ▲ o ▼ per selezionare Rimozione sicura, quindi premere il
tasto ENTER
E
.
3. Rimuovere il dispositivo USB dal televisore.
Schermo
Passare alla sezione ‘Elenco gruppi’ o ‘Elenco file’ utilizzando i tasti Su e Giù. Dopo avere selezionato una sezione, premere il
tasto ◄ o ► per selezionare una voce.
¦
N
N
O
O
N
N
N
INFO
AD
INFO
AD
851.86MB/993.02MBLibero
Photo
SUM
SUM
Dispositivo
PHOTO
R
Ritorno
Music Setup
SUM Dispositivo
Selezione
T
Strumenti
R
Cartellasuperiore
1234.jpg
1235.jpg
1236.jpg
1237.jpg
1233.jpg
1232.jpg
1231.jpg
Slideshow
Riproducigruppocorrente
Informazioni
Rimozionesicura
5/15
1 2
../Photo/
Sezione Elenco gruppi
Sezione Elenco file
SUM Dispositivo
Selezione
T
Strumenti
R
Cartellasuperiore
1234.jpg
1235.jpg
1236.jpg
1237.jpg
1233.jpg
1232.jpg
1231.jpg
1Fileselez
2
3 5
4
1 2
1
5/15
c
../Photo/
[620-Weuro]BN68-02326A-03L09.ind29 29 2009-10-08 ¿ÀÀü 9:29:29

Italiano - 30
1 Visualizza gruppi: Il gruppo di ordinamento che contiene il file attualmente selezionato viene evidenziato.
2 File attualmente selezionato: Il file selezionato è quello che è possibile controllare. I file fotografici vengono visualizzati come
miniature.
3 Dispositivo corrente: Mostra il nome del dispositivo attualmente selezionato. Premere il tasto Rosso per selezionare un
dispositivo.
Tasto Rosso (Dispositivo): Seleziona un dispositivo connesso.
4 Informazioni sulla selezione degli elementi: Mostra il numero di file selezionati premendo il tasto Giallo.
5 Voci della guida
Tasto Giallo (Selezione): Seleziona il file dall’elenco. I file selezionati vengono evidenziati con un simbolo
c
. Premere
nuovamente il tasto giallo per deselezionare il file.
Tasto TOOLS (Strumenti): Visualizza i menu delle opzioni. (Il menu delle opzioni varia in base allo stato corrente).
1. Premere il tasto MEDIA.P.
2. Premere il tasto ◄ o ► per selezionare Photo, quindi premere il tasto
ENTER
E
.
3. Per selezionare la foto desiderata, premere il tasto ◄ o ►.
Selezione di più foto
Per selezionare la foto desiderata, premere il tasto ◄ o ►. Quindi
premere il tasto giallo.
Ripetere l'operazione per selezionare più file di foto.
Il contrassegno
c
appare per il file di foto selezionato.
4. Premere il tastoTOOLS.
Il menu delle opzioni varia in base allo stato corrente.
Slide show
Questo menu consente di avviare una proiezione di diapositive delle foto contenute nel dispositivo USB.
Riproduci gruppo corrente
Questo menu consente di avviare una proiezione di diapositive solo delle foto contenute nel gruppo di ordinamento selezionato.
Deselez tutto (se è selezionato almeno un file)
È possibile deselezionare tutti i file.
Il contrassegno
c
che indica che il file corrispondente è selezionato è nascosto.
Informazioni
Le informazioni di un file fotografico includono il nome, la dimensione, la risoluzione, la data di modifica e il percorso.
Usando le stesse procedure durante una proiezione di diapositive, è possibile vedere le informazioni relative ai file fotografici.
Premere il tasto INFO per visualizzare le informazioni.
Rimozione sicura
Il dispositivo può essere rimosso dal televisore in modo sicuro.
¦
N
N
❑
❑
❑
N
❑
N
O
❑
INFO
AD
SUM Dispositivo
Selezione
T
Strumenti
R
Cartellasuperiore
1234.jpg
1235.jpg
1236.jpg
1237.jpg
1233.jpg
1232.jpg
1231.jpg
Slideshow
Riproducigruppocorrente
Informazioni
Rimozionesicura
5/15
1 2
../Photo/
[620-Weuro]BN68-02326A-03L09.ind30 30 2009-10-08 ¿ÀÀü 9:29:31

Italiano - 31
Visualizzazione di una foto o di una proiezione di diapositive
Proiezione di diapositive
1. Premere il tasto ▼ per selezionare la sezione Elenco file.
2.
Premere il tastoTOOLS.
3.
Premere il tasto ▲ o ▼ per selezionare Slide show, quindi premere il tasto
ENTER
E
.
Nella proiezione di diapositive verranno utilizzate tutte le foto contenute
nell’Elenco file.
Durante la proiezione di diapositive, i file appaiono in sequenza a partire da quello
correntemente visualizzato.
La proiezione di diapositive prosegue in base all’ordine specificato nell'Elenco file.
Impostando l'opzione Musica di sottof su Acceso durante la proiezione delle
diapositive i brani musicali vengono riprodotti automaticamente.
Quando si visualizza un Elenco foto, per iniziare la proiezione di diapositive
premere il tasto
∂
(Riproduci)/ENTER
E
sul telecomando.
Tasti di controllo per la proiezione di diapositive
Tasto Operazioni
ENTER
E
Riproduci/Arresta la proiezione di diapositive.
∂
Riproduci la proiezione di diapositive.
∑
Arresta la proiezione di diapositive.
∫
Esce dalla proiezione diapositive e torna all'elenco delle
foto.
π
/
μ
Varia la velocità di riproduzione della proiezione.
TOOLS Esegue varie funzioni nei menu Photo.
Riproduce il gruppo corrente
1. Premere il tasto ▲ per passare alla sezione Elenco gruppi.
2. Selezionare un gruppo utilizzando i tasti ◄ e ► .
3.
Premere il tasto
∂
(Riproduci). Viene avviata una proiezione di diapositive con i
file del gruppo selezionato.
In alternativa
1.
Selezionare i file nella sezione Elenco file contenuti nel gruppo desiderato.
Per passare al gruppo successivo/precedente, premere il tasto
π
(REW) o
μ
(FF) .
2. Premere il tasto TOOLS.
3.
Premere il tasto ▲ o ▼ per selezionare Riproduci gruppo corrente, quindi premere il tastoENTER
E
.
Per la proiezione verranno utilizzati solo i file contenuti nel gruppo di ordinamento.
1. Premere il tasto ▼ per selezionare la sezione Elenco file.
2. Premere il tasto ◄ o ► per selezionate la foto desiderata nell'Elenco file.
3.
Premere il tasto giallo.
4.
Ripetere l'operazione per selezionare più foto.
Il contrassegno
c
appare a sinistra della foto selezionata.
Selezionando un solo file, la proiezione di diapositive non avrà inizio.
Per deselezionare tutti i file, premere il tasto TOOLS quindi selezionare Deselez tutto.
5.
Premere il tasto
∂
(Riproduci)/ENTER
E
.
I file selezionati verranno utilizzati per la proiezione di diapositive.
¦
N
N
N
N
O
N
●
N
N
N
N
N
N
INFO
AD
E
Pausa◀▶Precedente/Successivo
T
Strumenti
R
Ritorno
SUM
1234.jpg
580x7652009/03/025/15
▶Normale
SUM Dispositivo
Selezione
T
Strumenti
R
Cartellasuperiore
1234.jpg
1235.jpg
1236.jpg
1237.jpg
1233.jpg
1232.jpg
1231.jpg
Slideshow
Riproducigruppocorrente
Informazioni
Rimozionesicura
5/15
1 2
../Photo/
SUM Dispositivo
Selezione
T
Strumenti
R
Cartellasuperiore
1234.jpg
1235.jpg
1236.jpg
1237.jpg
1233.jpg
1232.jpg
1231.jpg
5/15
1 2
../Photo/
[620-Weuro]BN68-02326A-03L09.ind31 31 2009-10-08 ¿ÀÀü 9:29:34

Italiano - 32
In alternativa
1. Nell'Elenco file, premere il tasto giallo per selezionare le foto desiderate.
2.
Premere il tasto TOOLS.
3.
Premere il tasto ▲ o ▼ per selezionare Slide show, quindi premere il tasto ENTER
E
.
I file selezionati verranno utilizzati per la proiezione di diapositive.
Menu opzioni di Slide Show
1. Durante una proiezione di diapositive (o la visualizzazione di una foto), premere il
tasto TOOLS per impostare l'opzione.
2.
Premere il tasto ▲ o ▼ per selezionare l'opzione, quindi premere ENTER
E
.
Arresta proiezione diapositive / Avvia proiezione diapositive
E’ possibile iniziare o interrompere la proiezione di diapositive.
Selezionare questa opzione per determinare la velocità di proiezione delle diapositive.
La funzione è disponibile solo durante una proiezione.
La velocità di proiezione delle diapositive può essere modificata premendo il tasto
π
(REW) o
μ
(FF) durante le
proiezione.
Ruota
E’ possibile ruotare le foto memorizzate su un dispositivo USB.
Premendo il tasto ◄, la foto verrà ruotata di 270˚, 180˚, 90˚ e 0˚.
Premendo il tasto ►, la foto verrà ruotata di 90˚, 180˚, 270˚ e 0˚.
Il file ruotato non viene memorizzato.
Zoom
E’ possibile ingrandire le foto memorizzate su un dispositivo USB. (x1 → x2 → x4)
Per spostare l'immagine ingrandita, premere il tasto ENTER
E
, quindi i tasti ▲/▼/◄/►. Notare che se l’immagine ingrandita
è più piccola della dimensione dello schermo originale, la funzione di modifica della posizione non avrà alcun effetto.
Il file ingrandito non può essere memorizzato.
Musica di sottof
Durante una proiezione di diapositive è possibile impostare la musica di sottofondo desiderata.
Per usare questa funzione, la musica scelta deve essere memorizzata sul dispositivo USB.
Spenta: la musica di sottofondo non viene riprodotta.
Acceso: Se la musica di sottofondo è disponibile, selezionando Acceso viene riprodotta.
Seleziona file musicale (0 File selez)
Solo il file musicale selezionato viene impostato come musica di sottofondo.
Selez. File musicale / Impostazioni audio
È possibile selezionare le impostazioni delle immagini e dell'audio.
Informazioni
Vengono visualizzate le informazioni relative alla foto.
Rimozione sicura
Il dispositivo può essere rimosso dal televisore in modo sicuro.
●
N
¦
❑
❑
N
N
❑
N
N
N
❑
N
N
❑
N
■
●
●
■
❑
❑
❑
Arrestaproiezionediapositive
Velocitàslideshow : Normale
Ruota
Zoom
Musica
disottofondo
Impostazioniimmagine
Impostazioniaudio
Informazioni
Rimozione
sicura
U
Sposta
E
Conferma
e
Esci
Strumenti
[620-Weuro]BN68-02326A-03L09.ind32 32 2009-10-08 ¿ÀÀü 9:29:35

Italiano - 33
1. Premere il tasto MEDIA.P.
2. Premere il tasto ◄ o ► per selezionare Music, quindi premere il tasto
ENTER
E
.
3. Premere il tasto ◄ o ► per selezionare il brano musicale desiderato.
Selezione di più file musicali
Per selezionare il brano musicale desiderato, premere il tasto ◄ o ►.
Quindi premere il tasto giallo.
Ripetere l'operazione per selezionare più file musicali.
Il contrassegno
c
appare per il file musicale selezionato.
4. Premere il tastoTOOLS.
Il menu delle opzioni varia in base allo stato corrente.
Riproduci gruppo corrente
Il menu Riproduci gruppo corrente consente di riprodurre solo i brani musicali nel gruppo di ordinamento selezionato.
Deselez tutto (se è selezionato almeno un file)
È possibile deselezionare tutti i file.
Il contrassegno
c
che indica che il file corrispondente è selezionato è nascosto.
Informazioni
Le informazioni di un file musicale includono il nome, la dimensione, la data di modifica e il percorso.
Utilizzando le stesse procedure, è possibile visualizzare le informazioni del file musicale con la funzione Riproduci gruppo
corrente attiva.
Premere il tasto INFO per visualizzare le informazioni.
Rimozione sicura
Il dispositivo può essere rimosso dal televisore in modo sicuro.
¦
N
N
❑
❑
N
❑
N
O
❑
INFO
AD
SUM Dispositivo
Selezione
T
Strumenti
R
Cartellasuperiore
HaHaHa
Gold
Shine
Way
Want
Me
Lies
ILoveYou
GlenHans
OnceOst
2007
Soundtrack
3/37
Energetico
Riproducigruppocorrente
Informazioni
Rimozionesicura
5 1 2 34
../Music/
[620-Weuro]BN68-02326A-03L09.ind33 33 2009-10-08 ¿ÀÀü 9:29:35

Italiano - 34
Riproduzione di un file musicale
1. Premere il tasto ▼ per selezionare la sezione Elenco file.
2. Premere il tasto ◄ o ► per selezionare un file musicale da riprodurre.
3.
Premere il tasto
∂
(Riproduci)/ENTER
E
.
Questo menu mostra solo i file con estensione MP3. I file con altre estensioni
non vengono visualizzati, nemmeno se sono stati salvati sul medesimo
dispositivo USB.
Il file selezionato appare in alto con il relativo tempo di riproduzione.
Per regolare il volume della musica, premere il tasto del volume sul
telecomando. Per azzerare il volume, premere il tasto MUTE sul
telecomando.
Se l'audio risulta anomalo quando si riproducono file MP3, regolare le impostazioni Equalizzatore e SRS TruSurround
HD nel menu Sound. (Un file MP3 sovramodulato può causare problemi audio.)
La durata di un filmato può essere visualizzata come ‘00:00:00’ se all'inizio della riproduzione non vengono reperite le
informazioni relative al tempo di riproduzione.
π
(REW) e
μ
(FF) non sono attivi durante la riproduzione.
Tasti di controllo della riproduzione musicale
Tasto Operazioni
ENTER
E
Riproduce/Interrompe il brano musicale.
∂
Riproduce il brano musicale
∑
Interrompe il brano musicale
∫
Esce dalla modalità di riproduzione e torna all’Elenco musica.
TOOLS Esegue varie funzioni nei menu Music.
Icona informazioni sulla funzione Music
p
Quando tutti i brani musicali presenti nella cartella (o i file selezionati) sono stati ripetuti Mod
Ripetiz. è impostata su Acceso.
q
Quando tutti i brani musicali presenti nella cartella (o i file selezionati) sono stati riprodotti una
volta Mod Ripetiz. è impostata su Spenta.
Riproduzione di un gruppo di brani
1. Premere il tasto ▲ per passare alla sezione Elenco gruppi.
2. Selezionare un gruppo utilizzando i tasti ◄ e ► .
3.
Premere il tasto
∂
(Riproduci). Viene avviata la riproduzione dei file del gruppo selezionato.
In alternativa
1.
Selezionare i file nella sezione Elenco file contenuti nel gruppo desiderato.
Per passare al gruppo successivo/precedente, premere il tasto
π
(REW) o
μ
(FF) .
2. Premere il tasto TOOLS.
3.
Premere il tasto ▲ o ▼ per selezionare Riproduci gruppo corrente, quindi premere il tasto ENTER
E
.
Vengono riprodotti i brani musicali inseriti nel gruppo di ordinamento, compresi i brani selezionati.
Riproduzione dei brani musicali selezionati
1. Premere il tasto ▼ per selezionare la sezione Elenco file.
2. Per selezionare il file musicale desiderato, premere il tasto ◄ o ►.
3.
Premere il tasto giallo.
4.
Ripetere l'operazione per selezionare più file musicali.
Il contrassegno
c
appare a sinistra del brano musicale selezionato.
Per deselezionare tutti i file, premere il tasto TOOLS quindi selezionare Deselez tutto.
5.
Premere il tasto
∂
(Riproduci)/ENTER
E
.
Vengono riprodotti i file selezionati.
¦
N
N
N
N
N
N
N
N
●
N
N
N
N
N
E
Pausa◀▶Precedente/Successivo
T
Strumenti
R
Ritorno
SUM
ILoveYou
HaHaHaWay
▶00:00:04/00:04:043/37
[620-Weuro]BN68-02326A-03L09.ind34 34 2009-10-08 ¿ÀÀü 9:29:35

Italiano - 35
Menu Opzione della riproduzione di file musicali
E’ possibile riprodurre ripetutamente i brani musicali.
Impostazioni immagine / Impostazioni audio
È possibile configurare le impostazioni delle immagini e dell'audio.
Informazioni
Vengono visualizzate le informazioni relative al brano musicale.
Rimozione sicura
Il dispositivo può essere rimosso dal televisore in modo sicuro.
¦
❑
❑
❑
❑
Utilizzo del menu Impostazione
Il menu Impostazioni mostra le impostazioni utente del menu Media Play.
1. Premere il tasto MEDIA.P.
2.
Premere il tasto ◄ o ► per selezionare Setup, quindi premere il tasto ENTER
E
.
3. Per selezionare l’opzione desiderata, premere il tasto ▲ o ▼.
4.
Premere ◄ o ► per selezionare per selezionare l'opzione.
Per uscire dalla modalità Media Play premere il tasto MEDIA.P sul
telecomando.
Selezionare questa opzione per riprodurre ripetutamente i brani musicali.
Selezionare questa opzione per impostare il tempo di attesa prima che lo screen saver
entri in funzione.
Informazioni
Selezionare questa opzione per visualizzare le informazioni sul dispositivo collegato.
Rimozione sicura
Il dispositivo può essere rimosso dal televisore in modo sicuro.
¦
N
■
■
■
■
ModRipetiz. ◀Acceso▶
Impostazioniimmagine
Impostazioniaudio
Informazioni
Rimozione
sicura
U
Sposta
L
Regola
e
Esci
Strumenti
851.86MB/993.02MBLibero
Photo
SUM
SUM
Dispositivo
SETUP
e
Esci
Music Setup
ModRipetiz. ◀Acceso▶
Duratasalvaschermo :2ore
Informazioni
Rimozione
sicura
U
Sposta
L
Regola
R
Ritorno
SUM Dispositivo
[620-Weuro]BN68-02326A-03L09.ind35 35 2009-10-08 ¿ÀÀü 9:29:36

Italiano - 36
ANYNET
+
Collegamento dei dispositivi Anynet
+
Cos'è Anynet
+
?
Anynet
+
è una funzione che permette di controllare mediante il telecomando del televisore Samsung tutti i dispositivi Samsung
collegati che supportano Anynet
+
. Il sistema Anynet
+
può essere usato solo con i dispositivi Samsung dotati della funzione
Anynet
+
. Per controllare se il dispositivo Samsung in uso è dotato di questa funzione, verificare la presenza del logo Anynet
+
.
Per effettuare il collegamento a un televisore
1. Collegare la porta HDMI IN (1, 2, 3(DVI)o 4) del televisore alla porta HDMI OUT del dispositivo Anynet
+
corrispondente tramite
un cavo HDMI.
Per effettuare il collegamento a un sistema Home Theatre
1. Collegare la porta HDMI IN (1, 2, 3(DVI) o 4) del televisore alla porta HDMI OUT del dispositivo Anynet
+
corrispondente tramite
un cavo HDMI.
2. Collegare la porta HDMI IN del sistema Home Theatre alla porta HDMI OUT del dispositivo Anynet
+
corrispondente tramite un
cavo HDMI.
Collegare un cavo ottico tra la porta DIGITAL AUDIO OUT (OPTICAL) del televisore all'ingresso Digital Audio del sistema
Home Theatre.
Se si opta per una connessione di questo genere, la presa Ottica permette l’uscita di soli 2 canali audio. In questo modo
sarà possibile sentire l’audio solo dagli altoparlanti frontali sinistro e destro del sistema Home
Theatre e dal subwoofer.
Per avere un audio a 5.1 canali, collegare la porta DIGITAL AUDIO OUT (OPTICAL) del lettore DVD / Ricevitore
satellitare (p. es. dispositivo Anynet 1 o 2) direttamente a un amplificatore o all’Home Theatre, non al televisore.
Collegare solo un sistema Home Theatre.
E’ possibile collegare un dispositivo Anynet
+
tramite un cavo HDMI 1.3. Alcuni cavi HDMI potrebbero non supportare le
funzioni Anynet
+
.
Anynet
+
si attiva solo quando il relativo dispositivo AV che supporta Anynet
+
è acceso o in modalità Standby.
Anynet
+
supporta fino a 12 dispositivi AV. Da notare che è possibile collegare fino a 3 dispositivi dello stesso tipo.
¦
N
N
N
N
N
N
Anynet
+
1
Cavo HDMI 1.3
Cavo HDMI 1.3Cavo HDMI 1.3
Cavo HDMI 1.3
Anynet
+
2 Anynet
+
3 Anynet
+
4
TV
Anynet
+
1
Cavo HDMI 1.3
Cavo HDMI 1.3
Cavo HDMI 1.3Cavo HDMI 1.3
TV
Cavo HDMI 1.3
Cavo ottico
Anynet
+
2 Anynet
+
3 Anynet
+
4
Home Theater
[620-Weuro]BN68-02326A-03L09.ind36 36 2009-10-08 ¿ÀÀü 9:29:37

Italiano - 37
Configurazione di Anynet
+
Premere il tasto TOOLS per visualizzare il menu Strumenti. E' inoltre possibile visualizzare
il menu Anynet
+
selezionando
+
(HDMI-CEC).
Impostazione
Anynet
+
Per utilizzare la funzione Anynet
+
, Anynet
+
(HDMI-CEC) deve essere impostato su Acceso.
Quando la funzione Anynet
+
(HDMI-CEC) è disattivata, sono disattivate anche tutte le
funzioni relative a Anynet+.
Impostazione della disattivazione automatica di un dispositivo Anynet
+
allo spegnimento del
televisore.
La sorgente attiva deve essere impostata sul telecomando in modo che il televisore utilizzi
la funzione Anynet
+
.
Se si imposta Spegnimento auto su Sì, i dispositivi esterni collegati al televisore si
spengono ogniqualvolta si spegne il televisore. Se un dispositivo esterno è in fase di
registrazione, potrebbe non spegnersi automaticamente.
Passaggio tra dispositivi Anynet
+
1. Premere il tasto TOOLS. Premere ENTER
E
per selezionare Anynet
+
(HDMI-CEC).
2. Premere il tasto ▲ o ▼ per selezionare Elenco dispositivi, quindi premere ENTER
E
.
Vengono elencati tutti i dispositivi Anynet
+
collegati al televisore.
Se non si trova il dispositivo desiderato, premere il tasto rosso per eseguire la
scansione dei dispositivi.
3.
Premere il tasto ▲ o ▼ per selezionare un particolare dispositivo, quindi premere
ENTER
E
. Il dispositivo selezionato viene attivato.
Solo all’impostazione di Anynet
+
(HDMI-CEC) su Acceso nel menu Applicazione
comparirà il menu Elenco dispositivi.
Il passaggio al dispositivo selezionato può richiedere fino a 2 minuti. Non è possibile annullare l’operazione durante il
passaggio da un dispositivo all’altro.
Il tempo richiesto per la scansione dei dispositivi dipende dal numero di dispositivi collegati.
Al termine della scansione, il numero di dispositivi trovati non appare.
Sebbene all’accensione del televisore l’apparecchio ricerchi automaticamente tutti i dispositivi collegati, questi non vengono
automaticamente visualizzati nell’elenco dei dispositivi collegati. Per ricercare il dispositivo collegato premere il tasto rosso.
Se si è selezionata una modalità di ingresso esterna tramite il tasto SOURCE non sarà possibile utilizzare la funzione
Anynet
+
. Passare a un dispositivo Anynet
+
utilizzando Elenco dispositivi.
Menu Anynet
+
Il menu Anynet
+
può variare a seconda del tipo e dello stato del dispositivo Anynet
+
collegato al televisore.
Menu Anynet
+
Descrizione
Visualizza TV Anynet
+
passa alla modalità di trasmissione TV.
Elenco dispositivi Visualizza l’elenco dei dispositivi Anynet
+
.
(nome_dispositivo) MENU
Mostra i menu del dispositivo collegato. Ad esempio, se è collegato un registratore
DVD, comparirà il menu del disco del registratore DVD.
(nome_dispositivo) INFO
Mostra i menu di riproduzione del dispositivo collegato. Ad esempio, se è collegato un
registratore DVD, comparirà il menu di riproduzione del registratore DVD.
Registrazione: (*registratore)
Avvia immediatamente la registrazione mediante il registratore. (Questa funzione è
disponibile solo per i dispositivi che supportano la funzione di registrazione.)
Interrompere registrazione:
(*registratore)
Interrompe la registrazione.
Ricevitore L’audio viene riprodotto attraverso il ricevitore.
Se al sistema è collegato più di un dispositivo di registrazione, questi vengono visualizzati come (*registratore); in caso il
dispositivo collegato sia uno solo, verrà rappresentato come (*nome_dispositivo).
¦
T
❑
■
N
■
N
N
¦
N
N
N
N
N
N
N
N
N
U
Sposta
E
Conf.
R
Ritorno
Anynet
+
(HDMI-CEC) :Acceso▶
Impostazione
Spegnimentoauto :Sì
MediaPlay(USB)
Anynet
+
(HDMI-CEC)
Applicazione
U
Sposta
E
Conf.
R
Ritorno
Anynet
+
(HDMI-CEC) :Acceso
Impostazione
Spegnimentoauto :Sì▶
U
Sposta
E
Conf.
R
Ritorno
VisualizzaTV
Elencodispositivi
Registrazione :DVDR
DVDRMENU
DVDRINFO
Ricevitore :Spenta
Impostazione
[620-Weuro]BN68-02326A-03L09.ind37 37 2009-10-08 ¿ÀÀü 9:29:38

Italiano - 38
Tasti del telecomando disponibili in modalità Anynet
+
Tipo dispos Stato operativo Tasti disponibili
Dispositivo Anynet
+
Una volta attivato il dispositivo, quando
il menu del dispositivo corrispondente
appare sullo schermo.
Tasti numerici
▲/▼/◄/►/ tastoENTER
E
Tasti colorati / tasto EXIT
Una volta attivato il dispositivo, quando si
riproduce un file
π
(Ricerca indietro) /
μ
(Ricerca avanti)
∫
(Arresta) /
∂
(Riproduci) /
∑
(Pausa)
Dispositivo con
sintonizzatore
incorporato
Una volta attivato il dispositivo, durante la
visione di un programma televisivo.
P
>
/ P
<
Dispositivo audio Una volta attivato il ricevitore.
Y
/ MUTE
La funzione Anynet
+
è utilizzabile solo quando il telecomando è impostato su TV.
Il tasto
∏
è attivo solo in fase di registrazione.
Non è possibile gestire i dispositivi Anynet
+
utilizzando i pulsanti del televisore. I dispositivi Anynet
+
possono essere gestiti
solo tramite telecomando.
In determinate condizioni, il telecomando del televisore potrebbe non funzionare. In questo caso, selezionare nuovamente il
dispositivo Anynet
+
.
Le funzioni Anynet
+
non sono attive con prodotti di altre marche.
Le operazioni
π
,
μ
possono differire in base al dispositivo in uso.
Registrazione
Con un videoregistratore Samsung è possibile registrare un programma televisivo.
1. Premere il tasto TOOLS. Premere ENTER
E
per selezionare Anynet
+
(HDMI-CEC).
2. Premere il tasto ▲ o ▼ per selezionare Recording Immediately, quindi premere
ENTER
E
. La registrazione ha inizio.
Se sono presenti più dispositivi di registrazione
Se sono collegati più dispositivi di registrazione, questi vengono elencati. Premere il
tasto ▲ o ▼ per selezionare un particolare dispositivo, quindi premere ENTER
E
.
La registrazione ha inizio.
Se il dispositivo di registrazione non è visualizzato,selezionare Elenco dispositivi e
premere il tasto rosso per eseguire la ricerca dei dispositivi
3.
Per uscire, premere EXIT.
E’ possibile registrare il segnale preveniente da una sorgente selezionando Registrazione: (nome_dispositivo).
Premendo il tasto
∏
si eseguirà la registrazione del programma attualmente visualizzato sul televisore. Se si stanno
guardando le immagini provenienti da un altro dispositivo, vengono registrate le immagini di quel dispositivo.
Prima di registrare, controllare che il jack dell’antenna sia correttamente collegato al dispositivo di registrazione. Per
collegare in modo corretto un’antenna a un dispositivo di registrazione, consultare il manuale dell'utente del dispositivo di
registrazione utilizzato.
Ascolto tramite il Ricevitore (Home theater)
È possibile ascoltare l’audio tramite un ricevitore anzichè dagli altoparlanti del televisore.
1. Premere il tasto TOOLS. Premere ENTER
E
per selezionare Anynet
+
(HDMI-CEC).
2. Premere ▲ o ▼ per selezionare Ricevitore. Premere ◄ o ► per selezionare Acceso o
Spenta.
3.
Per uscire, premere EXIT.
Se il ricevitore supporta solo l’audio, potrebbe non comparire nell’elenco dei
dispositivi.
Il ricevitore è operativo solo se è collegata in modo appropriato la porta ottica di
ingresso del ricevitore alla porta DIGITAL AUDIO OUT (OPTICAL) del televisore.
Quando il ricevitore (home theatre) è impostato su Acceso, è possibile udire l'audio proveniente dall'uscita ottica del
televisore. Quando il televisore visualizza un segnale DTV (Antenna), invia l'audio a 5.1 canali al ricevitore Home
Theatre.
Se la sorgente è un componente digitale, come per es. un DVD, ed è collegata al televisore mediante HDMI, saranno
udibili solo 2 canali audio dal ricevitore Home Theatre.
Nel caso di una interruzione di corrente al televisore quando il menu Ricevitore è impostato su Acceso (per lo
scollegamento del cavo o un calo di potenza), la funzione Selezione altoparlante può essere impostata su Altoparlante
est alla riaccensione del televisore.
N
N
N
N
N
N
¦
N
N
N
N
N
¦
N
N
N
N
U
Sposta
E
Conf.
R
Ritorno
VisualizzaTV
Elencodispositivi
Registrazione :DVDR
DVDRMENU
DVDRINFO
Ricevitore :Spenta
Impostazione
U
Sposta
E
Conf.
R
Ritorno
VisualizzaTV
Elencodispositivi
Registrazione:DVDR
DVDRMENU
DVDRINFO
Ricevitore :Spenta
Impostazione
[620-Weuro]BN68-02326A-03L09.ind38 38 2009-10-08 ¿ÀÀü 9:29:38

Italiano - 39
Risoluzione dei problemi con Anynet
+
Problema Possibile soluzione
Anynet
+
non funziona. Controllare se si sta utilizzando un dispositivo Anynet
+
. Il sistema Anynet
+
può essere
utilizzato solo con dispositivi che supportano Anynet
+
.
Collegare un solo ricevitore (Home Theatre).
Controllare che il cavo di alimentazione di Anynet
+
sia correttamente collegato.
Controllare i collegamenti dei cavi Video/Audio/HDMI 1.3 del dispositivo Anynet
+
.
Verificare se Anynet
+
(HDMI-CEC) è impostato su Acceso nel menu Impostazione di
Anynet
+
.
Verificare che il telecomando del televisore sia in modalità TV.
Verificare che sia Anynet
+
la modalità esclusiva del telecomando.
In particolari condizioni, Anynet
+
non funziona. (Ricerca canali, Media Play,
Plug & Play, ecc).
Quando si collega o si rimuove il cavo HDMI 1.3, eseguire una nuova ricerca dei
dispositivi oppure spegnere e riaccendere il televisore.
Controllare che la funzione Anynet
+
del dispositivo Anynet
+
sia attivata.
●
●
●
●
●
●
●
●
●
●
Per avviare Anynet
+
. Verificare che il dispositivo Anynet+ sia collegato correttamente al televisore e che
Anynet
+
(HDMI-CEC) sia impostato su Acceso nel menu Anynet
+
Impostazione.
Premere il tasto TV sul telecomando per passare al controllo del televisore. Premere il
tasto TOOLS per visualizzare il menu Anynet
+
e selezionare l’opzione desiderata.
●
●
Per uscire da Anynet
+
. Selezionare Visualizza TV nel menu Anynet
+
.
Premere il tasto SOURCE sul telecomando del televisore e selezionare un dispositivo
non Anynet
+
.
Premere P
>
/
<
, PRE-CH e FAV.CH per cambiare la modalità TV. (Notare che il tasto
dei canali funziona solo se non è collegato un dispositivo Anynet
+
con sintonizzatore
incorporato.)
●
●
●
Sullo schermo viene visualizzato
il messaggio ‘Connecting to
Anynet+ device...’.
Non è possibile utilizzare il telecomando durante la configurazione di Anynet
+
o il
passaggio a un’altra modalità di visualizzazione.
Utilizzare il telecomando solo al termine dell’impostazione di Anynet
+
o del passaggio
alla nuova modalità di visualizzazione.
●
●
Impossibile avviare la
riproduzione sul dispositivo
Anynet
+
.
Non è possibile utilizzare la funzione di riproduzione mentre è in corso la funzione
Plug & Play.
●
Lo schermo del dispositivo
esterno non appare.
Controllare se il dispositivo supporta le funzioni Anynet
+
.
Verificare che il cavo HDMI 1.3 sia collegato correttamente.
Verificare che Anynet
+
(HDMI-CEC) sia impostato su Acceso nel menu Anynet
+
Impostazione.
Cercare nuovamente altri dispositivi Anynet
+
.
E’ possibile collegare un dispositivo Anynet
+
solo tramite un cavo HDMI 1.3. Alcuni cavi
HDMI potrebbero non supportare le funzioni Anynet
+
.
In caso di chiusura anomala, a causa di uno scollegamento del cavo HDMI, del cavo di
alimentazione oppure di una interruzione di corrente, ripetere la ricerca del dispositivo.
●
●
●
●
●
●
Il programma TV non può essere
registrato.
Verificare se il jack dell’antenna sul dispositivo di registrazione è correttamente collegato.
●
L’audio del televisore non viene
riprodotto attraverso il ricevitore.
Collegare il televisore e il ricevitore mediante il cavo ottico.
●
¦
[620-Weuro]BN68-02326A-03L09.ind39 39 2009-10-08 ¿ÀÀü 9:29:38

Italiano - 40
RACCOMANDAZIONI
Funzione Teletext
La maggior parte delle emittenti televisive fornisce servizi informativi tramite il servizio Teletext. La pagina dell’indice del servizio
Teletext contiene informazioni sull’uso del servizio. Inoltre, è possibile selezionare varie opzioni tramite i tasti del telecomando.
Per visualizzare correttamente le informazioni del servizio Teletext, è necessario che la ricezione del canale sia stabile.
In caso contrario, alcune informazioni potrebbero essere perse o alcune pagine potrebbero non essere visualizzate
correttamente.
E’ possibile cambiare le pagine Teletext premendo i tasti numerici sul telecomando.
1
0
(modalità)
Premere questo tasto per
selezionare la modalità Teletext
(LIST/FLOF). Premendo questo
tasto nella modalità LIST, si attiva
la modalità di memorizzazione
dell’elenco. In modalità di
salvataggio List, è possibile
memorizzare la pagina Teletext
all'interno di un elenco utilizzando
il tasto
8
(memorizza).
2
8
(memorizza)
Utilizzato per memorizzare le
pagine Teletext.
3
4
(Formato)
Premere questo tasto per
raddoppiare le dimensioni dei
caratteri nella metà superiore
dello schermo. Premere di nuovo
il tasto per ingrandire i caratteri
nella metà inferiore dello schermo.
Per tornare alla modalità di
visualizzazione normale, premere
di nuovo il tasto.
4
5
(scopri)
Consente di visualizzare il
testo nascosto (risposte a quiz,
ad esempio). Per tornare alla
modalità di visualizzazione
normale, premere di nuovo il tasto.
5 Tasti colorati (rosso/verde/giallo/
blu)
Se una emittente usa il sistema
FASTEXT, i vari argomenti
trattati in una pagina Teletext
vengono codificati in base
ai colori e possono essere
selezionati premendo i relativi
tasti colorati. Premere il tasto il
cui colore corrisponde a quello
dell’argomento desiderato. La
pagina viene visualizzata con
altre informazioni colorate che
possono essere selezionate allo
stesso modo. Per visualizzare la
pagina successiva o precedente,
premere il tasto colorato
corrispondente.
6
/
(Teletext on/mix)
Premere questo tasto per attivare
la modalità Teletext dopo avere
selezionato un canale che fornisce
questo tipo di servizio. Premere di
nuovo il tasto per sovrapporre le
informazioni del servizio Teletext alla
trasmissione corrente.
7
:
(esci)
Esce dalla visualizzazione del servizio
Teletext.
8
1
(pagina secondaria)
Visualizza la pagina secondaria
disponibile.
9
2
(pagina su)
Consente di visualizzare la pagina
Teletext successiva.
0
3
(pagina giù)
Consente di visualizzare la pagina
Teletext precedente.
!
9
(mantieni)
Consente di mantenere visualizzata
una pagina, se la pagina è collegata
a più pagine secondarie che
scorrono automaticamente. Premerlo
nuovamente per riprendere la
visualizzazione.
@
6
(indice)
In modalità Teletext, premere questo
tasto in qualsiasi momento per
visualizzare la pagina dell’indice
(contenuti).
#
7
(annulla)
Utilizzato per visualizzare le stazioni
emittenti durante la ricerca di una
pagina.
¦
N
N
INFO
C
H
L
I
S
T
AD
1 #
$
^
*
(
)
a
b
c
e
d
%
&
2
3
4
5
6
7
8
9
0
!
@
[620-Weuro]BN68-02326A-03L09.ind40 40 2009-10-08 ¿ÀÀü 9:29:38

Italiano - 41
Le pagine Teletext sono organizzate in base a sei categorie:
Parte Contenuti
A Numero della pagina selezionata.
B Identità della stazione emittente.
C Numero della pagina corrente o stato della ricerca.
D Data e ora.
E Testo.
F Informazioni sullo stato.
Informazioni FASTEXT.
Le informazioni del servizio Teletext sono spesso suddivise su più pagine visualizzate in sequenza alle quali è possibile
accedere come segue:
Digitando il numero di pagina
Selezionando un titolo in un elenco
Selezionando un’intestazione colorata (sistema FASTEXT)
Il servizio Teletext supportato dal televisore è la versione 2.5 che consente di visualizzare ulteriori elementi grafici o di testo.
In base alla trasmissione, possono comparire bande laterali vuote durante la visualizzazione del servizio
Teletext.
In questo caso, non verranno trasmessi ulteriori elementi grafici o di testo.
I televisori meno recenti che non supportano la versione 2.5 non sono in grado di visualizzare alcun elemento grafico o di
testo aggiuntivo, a prescindere dal tipo di trasmissione Teletext.
Premere il tasto TV per uscire dal servizio Teletext.
Installazione del piedistallo
Preimpostazione: Collocare la guida del piedistallo e il collare della copertura sul
piedistallo e avvitarli usando le viti fornite.
1. Assemblare il TV LCD al piedistallo.
Il televisore deve essere sorretto da due o più persone.
Prima di assemblare le due parti, controllare se il lato del piedistallo (anteriore/
posteriore) è quello corretto.
Per installare il televisore sul piedistallo a un'altezza corretta, non applicare una forza
eccessiva verso il basso sul lati sinistro o destro superiori del televisore.
2.
Avvitare le viti nella posizione
1
, quindi avvitare le altre viti nella posizione
2
.
Raddrizzare il prodotto e serrare le viti. Avvitando le viti con lo schermo LCD
appoggiato sul piano, una volta sollevato il prodotto potrebbe risultare inclinato su un
lato.
N
N
N
N
N
O
¦
N
N
N
N
N
INFO
AD
Fronte
Retro
1
2
[620-Weuro]BN68-02326A-03L09.ind41 41 2009-10-08 ¿ÀÀü 9:29:39

Italiano - 42
Smontare il piedistallo
1. Svitare le viti sul retro del televisore.
2. Separare il piedistallo dal televisore.
Il televisore deve essere sorretto da due o più persone.
3.
Coprire il foro sul fondo con l'apposito tappo.
Installazione del Kit di montaggio a parete
Gli articoli del kit di montaggio a parete (venduti separatamente) consentono di montare il
televisore alla parete.
Per informazioni dettagliate sull’installazione del kit di montaggio a parete, consultare le
istruzioni fornite insieme agli articoli del kit. Contattare un tecnico per richiedere assistenza
quando si monta la staffa a parete.
Samsung Electronics non può essere ritenuta responsabile per qualsiasi danno al prodotto o
infortuni causati da una installazione autonoma del televisore da parte dell’utente.
Non installare il Kit di montaggio a parete mentre il televisore è acceso. In caso contrario,
potrebbero verificarsi incidenti con lesioni personali causate da scosse elettriche.
Assemblaggio dei cavi
Racchiudere i cavi nel fermacavi in modo che non siano visibili attraverso il piedistallo trasparente.
Blocco antifurto Kensington
Il blocco Kensington è un dispositivo usato per fissare fisicamente il sistema quando viene
utilizzato in un luogo pubblico. L’aspetto del dispositivo e il metodo di blocco possono variare
in base alla marca del prodotto.
Per informazioni sull’uso, consultare il manuale fornito insieme al blocco Kensington.
Il dispositivo di blocco è in vendita separatamente.
La posizione del blocco Kensington può variare a seconda del modello.
1.
Inserire il dispositivo nell’alloggiamento del blocco Kensington sul TV LCD (1) e
ruotarlo nella direzione di chiusura (2).
2.
Collegare il cavo del blocco Kensington (3).
3.
Fissare il blocco Kensington a un tavolo o un altro oggetto pesante.
N
N
3
1
2
¦
N
¦
¦
¦
<Opzionale>
[620-Weuro]BN68-02326A-03L09.ind42 42 2009-10-08 ¿ÀÀü 9:29:42

Italiano - 43
Messa in sicurezza della posizione di installazione
Mantenere le distanze necessarie tra il prodotto e gli altri elementi presenti (per esempio le pareti) per garantire un’adeguata
ventilazione.
La mancata osservanza di tale precauzione può comportare un pericolo d’incendio o un malfunzionamento a causa del
surriscaldamento del prodotto.
Installare il prodotto mantenendo le distanze indicate in figura.
Quando si usa un piedistallo o un sistema di montaggio a parete, utilizzare solo le parti fornite da Samsung Electronics.
L’uso di parti di altre marche può causare un malfunzionamento o lesioni provocate da una eventuale caduta del prodotto.
L’uso di parti di altre marche può comportare un malfunzionamento o un pericolo di incendio per il surriscaldamento del
prodotto a causa di una ventilazione inadeguata.
L’aspetto del prodotto può variare a seconda del modello.
10 cm
10 cm
10 cm
10 cm
10 cm
10 cm
10 cm
Fissaggio del televisore alla parete
Attenzione: Tirare, spingere o arrampicarsi sul televisore sono azioni che possono provocarne la caduta.
Si raccomanda di non far giocare i bambini con il televisore poiché potrebbero appendersi ad esso
destabilizzandolo; se ciò dovesse verificarsi, il televisore potrebbe cadere provocando lesioni personali gravi
e perfino mortali. Seguire tutte le precauzioni di sicurezza descritte della documentazione allegata. Per una
maggiore stabilità e sicurezza del prodotto, installare il dispositivo anticaduta come segue.
Per evitare una eventuale caduta del televisore:
1.
Avvitare saldamente i ganci alla parete. Verificare che le viti di fissaggio siano ben
serrate.
A seconda del tipo di parete, potrebbe essere necessario utilizzare anche un fisher.
Poiché i ganci, le viti e il cavo di sicurezza non sono forniti in dotazione, è
necessario acquistare tali materiali separatamente.
2.
Rimuovere le viti dal centro del pannello posteriore del televisore, inserirle nei ganci e
quindi avvitarle nuovamente al televisore.
Le viti potrebbero non essere fornite insieme al prodotto. In questo caso, acquistare
le viti separatamente in base alle specifiche qui riportate.
Specifiche delle viti
Per un TV LCD da 17 ~ 29 pollici: M4 X L15
Per un TV LCD da 32 ~ 40 pollici: M6 X L15
3.
Collegare i ganci fissati al televisore a quelli fissati alla parete utilizzando un cavo
resistente, quindi legarlo strettamente.
Installare il televisore il più possibile vicino alla parete in modo che non possa
cadere all’indietro.
Collegare il cavo in modo che i ganci fissati alla parete si trovino allineati o
leggermente più in basso di quelli fissati al televisore.
Slegare il cavo prima di spostare il televisore.
4.
Accertarsi che tutte le connessioni siano adeguatamente fissate. Controllare
periodicamente le connessioni per verificarne l’eventuale usura o rottura. Per qualsiasi
dubbio relativo alla sicurezza delle connessioni effettuate, contattare un installatore
specializzato.
¦
N
N
¦
■
N
N
N
N
N
N
N
Parete
Parete
[620-Weuro]BN68-02326A-03L09.ind43 43 2009-10-08 ¿ÀÀü 9:29:44

Italiano - 44
Risoluzione dei problemi
In caso di domande sul funzionamento del televisore, consultare per prima cosa l'elenco sottostante. Se nessuno dei consigli
sottoriportati si dimostra utile per risolvere il problema, visitare il sito ‘www.samsung.com’, quindi fare clic sulla voce Support
(Assistenza), oppure chiamare il numero del Call Center riportato in ultima pagina.
Problema Soluzione
Qualità dell'immagine
Per prima cosa, eseguire il Test immagine per confermare che il televisore sia in grado di
visualizzare correttamente l'immagine di prova.
Quindi, selezionare MENU - Supporto - Auto diagnosi - Test immagine
Se l'immagine di prova viene visualizzata correttamente, la scarsa qualità dell'immagine
potrebbe essere causata dalla sorgente o dal segnale.
●
La qualità dell'immagine non
sembra all'altezza di quella vista
in negozio.
Se si dispone di un ricevitore via cavo analogico/satellitare, eseguirne l'aggiornamento.
Utilizzare cavi HDMI o Component per ottenere una qualità dell'immagine HD.
Abbonato servizi cavo/satellite: Provare le stazioni HD (High Definition) disponibili
attraverso la griglia dei programmi (channel line up).
Connessione Antenna: Provare le stazioni HD dopo avere eseguito il programma
automatico.
Molti canali HD trasmettono contenuti SD (Standard Definition) aggiornati.
Impostare la risoluzione di uscita video del ricevitore via cavo/satellitare su 1080i o 720p.
Verificare di stare guardando il televisore alla distanza minima raccomandata basata
sulla dimensione dello schermo e la definizione del segnale visualizzato.
●
●
●
N
●
●
L'immagine è distorta: sono visibili
blocchi grandi, blocchi piccoli,
punti e pixel
La compressione di contenuti video può causare la distorsione dell'immagine
specialmente nel caso di immagini caratterizzate da movimenti rapidi, come per
esempio eventi sportivi o film d'azione.
Un segnale debole o di scarsa qualità può causare la distorsione dell'immagine.
Questo non è un problema del televisore.
●
●
Con una connessione Component il
colore risulta incongruo o mancante.
Verificare che i cavi Component siano connessi ai rispettivi jack. Connessioni allentate
o non corrette possono causare problemi di colore o una schermata vuota.
●
Colore o luminosità delle
immagini scadente.
Regolare le opzioni Immagine nel menu TV. (La modalità Immagine, Colore,
Luminosità, Nitidezza)
Regolare l'opzione Risp. energia nel menu Impostazione.
Provare a reimpostare l'immagine visualizzandola con le impostazioni predefinite.
(Selezionare MENU - Immagine - Reset immagine)
●
●
●
E' visibile una linea punteggiata
sul bordo dello schermo.
Se la dimensione dell'immagine è impostata su Adatta a schermo, modificarla
selezionando 16:9.
Cambiare la risoluzione del ricevitore via cavo/satellitare.
●
●
L'immagine risulta in bianco e
nero solo in caso di ingresso AV
(Composite).
Collegare un cavo video (giallo) al jack verde dell'ingresso component 1 del televisore.
●
Quando si cambiano i canali,
l'immagine risulta ferma, distorta
o in ritardo.
Se il televisore è connesso a un ricevitore via cavo, reimpostare il ricevitore.
(Riconnettere il cavo CA e attendere fino al riavvio del ricevitore. L'operazione
potrebbe richiedere fino a 20 minuti di tempo)
Impostare la risoluzione di uscita del ricevitore via cavo su 1080i o 720p.
●
●
Qualità audio
Per prima cosa, eseguire il Test audio per confermare che l'impianto audio del televisore
funzioni in modo appropriato.
Quindi, selezionare MENU - Supporto - Auto diagnosi - Test audio
Se l'audio viene riprodotto correttamente, il problema potrebbe essere causato dalla
sorgente o dal segnale.
●
L'audio non viene riprodotto
oppure il livello del volume risulta
troppo basso anche se impostato
al valore massimo.
Verificare il volume del dispositivo esterno collegato al televisore, quindi regolare il
volume del televisore di conseguenza.
●
L'immagine è buona ma senza
audio.
Impostare l'opzione Selezione altoparlante su Altoparlante TV nel menu audio.
Verificare che i cavi audio provenienti dal dispositivo esterno siano connessi ai
rispettivi jack audio sul televisore.
Verificare l'opzione di uscita audio del dispositivo. (es. Potrebbe essere necessario
cambiare l'opzione del ricevitore via cavo in HDMI in caso di collegamento HDMI al TV.)
Se si usa un cavo DVI-HDMI, è necessario utilizzare un cavo audio separato.
Disattivare la funzione SRS se è stato impostato il volume oltre il valore 30.
Scollegare lo spinotto dal jack della cuffia. (se disponibile sul televisore)
●
●
●
●
●
●
Rumore proveniente
dall'altoparlante.
Verificare le connessioni dei cavi. Verificare che il cavo video non sia connesso a un
ingresso audio.
Per le connessioni Antenna/Cavo, verificare l'intensità del segnale. Un segnale basso
può causare la distorsione dell'audio.
●
●
¦
[620-Weuro]BN68-02326A-03L09.ind44 44 2009-10-08 ¿ÀÀü 9:29:45

Italiano - 45
Problema Soluzione
Nessuna immagine, video spento
Il televisore non si accende. Verificare che la spina del cavo di alimentazione CA sia correttamente collegata a una
presa a muro.
Accertarsi che la presa a muro sia funzionante.
Premere il tasto POWER sul televisore per verificare che il telecomando funzioni
correttamente. Se il televisore si accende, il problema potrebbe essere causato
dal telecomando. Per risolvere il problema causato dal telecomando, consultare il
paragrafo sottostante ‘Il telecomando non funziona’.
●
●
●
Il televisore si spegne
automaticamente.
Verificare che l'opzione Timer stand-by sia impostata su On nel menu Impostazione.
Se il televisore è collegato al PC, verificare le impostazioni di alimentazione del PC.
Verificare che la spina del cavo di alimentazione CA sia correttamente collegata a una
presa a muro e il televisore sia acceso.
Se il televisore non riceve segnale per circa 10 ~ 15 minuti con una connessione
Antenna/Cavo, il televisore si spegne.
●
●
●
●
Nessuna immagine/Video. Verificare le connessioni dei cavi. (Scollegare e ricollegare tutti i cavi del televisore e
dei dispositivi esterni)
Impostare l'uscita video del dispositivo esterno (ricevitore via cavo/satellitare, lettore
DVD, Blu-ray, ecc) in modo che la connessione corrisponda all'ingresso del televisore.
Per esempio, uscita del dispositivo esterno: HDMI, ingresso TV: HDMI.
Verificare che il dispositivo collegato sia acceso.
Selezionare la corretta sorgente del televisore premendo il tasto SOURCE sul
telecomando TV.
●
●
●
●
Connessione RF (Cavo/Antenna)
Impossibile ricevere tutti i canali. Verificare che il cavo dell'antenna sia correttamente collegato.
Provare a impostare Plug & Play per aggiungere i canali disponibili all'elenco canali.
Selezionare MENU - Impostazione - Plug & Play e attendere che tutti i canali
disponibili vengano memorizzati.
Verificare che l'antenna sia posizionata correttamente.
●
●
●
L'immagine è distorta: sono visibili
blocchi grandi, blocchi piccoli,
punti e pixel
La compressione di contenuti video può causare la distorsione dell'immagine
specialmente nel caso di immagini caratterizzate da movimenti rapidi, come per
esempio eventi sportivi o film d'azione.
Un segnale basso può causare la distorsione dell'immagine. Questo non è un
problema del televisore.
●
●
Connessione PC
Messaggio ‘Modo non
supportato’.
Impostare la risoluzione di uscita e la frequenza del PC in modo che corrispondano
alle risoluzioni supportate dal televisore.
●
Nell'elenco sorgenti, il PC è
sempre evidenziato anche se non
è connesso.
E' normale; nell'elenco sorgenti, il PC risulta sempre evidenziato anche quando non è
collegato.
●
La riproduzione del video è
corretta ma manca l'audio con
una connessione HDMI.
Verificare l'impostazione di uscita audio sul PC.
●
[620-Weuro]BN68-02326A-03L09.ind45 45 2009-10-08 ¿ÀÀü 9:29:45

Italiano - 46
Problema Soluzione
Altri
L'immagine non viene riprodotta a
pieno schermo.
Quando si guardano contenuti SD (4:3) aggiornati per la trasmissione su canali HD,
appaiono barre nere su ogni lato dello schermo.
Quando vengono trasmessi film con un rapporto d'immagine diverso da quello del
televisore, appaiono barre nere sui lati superiore e inferiore dello schermo.
Regolare la dimensione dell'immagine sul dispositivo esterno o sul televisore per
visualizzare l'immagine a pieno schermo.
●
●
●
Il telecomando non funziona. Sostituire le batterie del telecomando rispettando la polarità (+ -).
Pulire la finestra di trasmissione posizionata in cima al telecomando.
Puntare il telecomando direttamente verso il televisore a una distanza di 1,5~2 metri.
●
●
●
Impossibile controllare il volume
o le funzioni di accensione/
spegnimento del televisore con
il telecomando del ricevitore via
cavo/satellitare.
Programmare il telecomando del ricevitore via cavo/satellitare in modo che possa
controllare le funzioni del televisore. Consultare il manuale dell'utente del ricevitore via
cavo/satellitare per il codice TV SAMSUNG.
●
Messaggio ‘Modo non
supportato’.
Verificare la risoluzione del televisore supportata e regolare di conseguenza la
risoluzione di uscita del dispositivo esterno. Consultare la sezione di questo manuale
relativa all'impostazione della risoluzione.
●
Il televisore emana odore di
plastica.
E' normale avvertire questo odore che tuttavia svanirà nel corso del tempo.
●
TV Informazioni sul segnale
non è disponibile nel menu Self
Diagnostic Test.
Questa funzione è disponibile solo con canali digitali e connessione antenna
(RF/Coax).
●
Il televisore è inclinato verso
destra o sinistra.
Rimuovere il piedistallo dal televisore quindi rimontarlo.
●
Impossibile montare il piedistallo. Verificare che il televisore sia posizionato su una superficie piana. Se non si riesce a
rimuovere le viti dal televisore, utilizzare un cacciavite con punta magnetica.
●
Il menu dei canali (Channel) è in
colore grigio. (non disponibile)
Il menu Canale è disponibile solo se è selezionata la sorgente del televisore.
●
Le impostazioni andranno
perse dopo 30 minuti o a ogni
spegnimento del televisore.
Se il televisore è in modalità Demo Negozio, ogni 30 minuti verranno azzerate le
impostazioni audio e immagine. Commutare la modalità Demo Negozio in
Uso dom. secondo la procedura Plug & Play. Premere il tasto SOURCE per
selezionare la modalità TV, quindi selezionare MENU → Impostazione →
Plug & Play → ENTER
E
.
●
Perdita intermittente di segnale
audio o video.
Verificare le connessioni e ricollegare i cavi.
Questo problema potrebbe essere causato dall'uso di cavi troppo grossi o rigidi.
Verificare che i cavi siano sufficientemente flessibili da consentire un uso prolungato nel
tempo. In caso di montaggio a parete, si consiglia di utilizzare cavi con connettori da 90°.
●
●
Guardando da vicino il bordo
della cornice dello schermo del
televisore è possibile notare delle
piccole particelle.
Ciò non costituisce un difetto ma fa parte del design del prodotto.
●
‘Segnale criptato’ o ‘Segnale
mancante/Segnale debole’ con la
scheda (CI/CI+) CAM.
Verificare che nel modulo CAM la SCHEDA CI (CI+) sia installata nell'alloggiamento
common interface.
Estrarre il modulo CAM dal televisore e inserirlo nuovamente nell'alloggiamento.
●
●
Una volta spento, dopo 45
minuti il televisore si riaccende
automaticamente.
Ciò è normale, il televisore è dotato della funzione OTA (Over The Air) che permette di
aggiornare il firmware scaricato durante la visione del televisore.
●
Immagini/audio ricorrenti. Verificare e modificare il segnale/la sorgente.
●
Lo schermo LCD TFT usa un pannello composto da sotto pixel che richiedono una speciale tecnologia di produzione. Tuttavia,
alcuni pixel potrebbero risultare più luminosi o più scuri. Questo fenomeno non ha alcun impatto sulle prestazioni del prodotto.
N
[620-Weuro]BN68-02326A-03L09.ind46 46 2009-10-08 ¿ÀÀü 9:29:45

Italiano - 47
Specifiche
Nome modello LE40B620 LE46B620
Dimensione schermo
(Diagonale)
40 poll. 46 poll.
Risoluzione PC
(Ottimale)
1920 x 1080 a 60 Hz 1920 x 1080 a 60 Hz
Audio
(Uscita)
2 x 10W 2 x 10W
Dimensioni (LarxProxAlt)
Corpo
Con piedistallo
1040 x 79 x 638 mm
1040 x 255 x 699 mm
1172 x 79 x 712 mm
1172 x 275 x 774 mm
Peso
Con piedistallo
19 kg 25 kg
Caratteristiche ambientali
Temperatura di esercizio
Umidità di esercizio
Temperatura di stoccaggio
Umidità di stoccaggio
Da 10°C a 40°C (50°F a 104°F)
Dal 10% all’80%, senza condensa
Da -20°C a 45°C (-4°F a 113°F)
Dal 5% al 95%, senza condensa
Piedistallo ruotabile
(Sinistra / Destra)
-20˚ ~ 20˚
Nome modello LE52B620
Dimensione schermo
(Diagonale)
52 poll.
Risoluzione PC
(Ottimale)
1920 x 1080 a 60 Hz
Audio
(Uscita)
2 x 10W
Dimensioni (LarxProxAlt)
Corpo
Con piedistallo
1321 x 81 x 805 mm
1321 x 305 x 866 mm
Peso
Con piedistallo
32 kg
Caratteristiche ambientali
Temperatura di esercizio
Umidità di esercizio
Temperatura di stoccaggio
Umidità di stoccaggio
Da 10°C a 40°C (50°F a 104°F)
Dal 10% all’80%, senza condensa
Da -20°C a 45°C (-4°F a 113°F)
Dal 5% al 95%, senza condensa
Piedistallo ruotabile
(Sinistra / Destra)
-20˚ ~ 20˚
Design e specifiche sono soggetti a modifiche senza preavviso.
Questo prodotto è un’apparecchiatura digitale di Classe B.
Per l’alimentazione elettrica e il consumo di corrente, consultare l’etichetta apposta al prodotto.
¦
N
N
N
[620-Weuro]BN68-02326A-03L09.ind47 47 2009-10-08 ¿ÀÀü 9:29:45

Diagrammi a blocchi
¦
ONENAND
1GB
Chelsea
• ARM11 (@600MHz)
• TSD& PVR
• ATSC/OpenCable
(S-Card/M-Card IF)
• MP2(HD)/1xH.264(HD)
• 1xDivX(HD)
• 2xAudio DSP(Calm)
• 2D & 3D Graphic
• 2xUSB2.0/PCI
• LVDS Tx
• UART * 3
• IIC * 4
Arsenal
• SD AFE
• SIF Decoder
• 150MHz ADC
• VSB & QAM Decoder
• HDMI Decoder
STB MICOM
WT61P6
IR/Key
DDR2 I/F
Hotel/Wall
UART
SP3232
DEBUG
ANYNET
/Debug
SPDIF
Optical
UART
Wise Link
(Divx)
USB 2.0 *2
HDMI
3x1 SW
TMDS351
TMDS
T-NIM
(COFDM/CVBS)
PCI BUS
400MHz
Audio AMP
STA335BWS
SPK
HP
I2S0_SPK/HP
DDR2(128MB)
CVBS
SIF
IIC
RTL8100
For DCM
LAN
WM8593
S/W, A/D
D/A*2, AMP
Display Panel
1080P
LVDS
SIF_I2S
SPDIF
SD VIDEO
HD VIDEO
Interrupt
Local BUS
Buffer
TS parallel
HDMI
(4ea)
DVI Audio
AV In
Component
PC
PC Audio
YPbPr
RGB HV
AV CVBS
EXT 1/2
Audio DAC
WM8521
I2S1_RF
SCART1 LR
INTER
SWITCH
SCART1 CVBS OUT
SCART1 RGB
SCART1 CVBS IN
CLS CVBS OUT
I2S0_MONITO
R
VIDEO
S/W
TEA6425
SCART2 LR
SCART2 CVBS IN
SCART2 CVBS OUT
(SCART1 LR OUT)
(SCART1 LR IN)
[620-Weuro]BN68-02326A-03L09.ind48 48 2009-10-08 ¿ÀÀü 9:29:46

Questa pagina è stata lasciata
intenzionalmente vuota.
[620-Weuro]BN68-02326A-03L09.ind49 49 2009-10-08 ¿ÀÀü 9:29:46

Nota sobre la TV digital
1. Las funciones relacionadas con la TV digital (DVB) sólo están disponibles en países o regiones donde se emitan señales
terrestres digitales DVB-T (MPEG2 y MPEG4 AVC) o donde se tenga acceso a servicios de televisión por cable compatibles
con DVB-C (MPEG2 y MPEG4 AAC). Póngase en contacto con su distribuidor para conocer si puede recibir señales DVB-T o
DVB-C.
2.
DVB-T es una norma del consorcio europeo para la transmisión de la televisión digital terrestre y DVB-C lo es para la
transmisión de la televisión digital por cable. Sin embargo, en esta especificación no se incluyen algunas funciones
diferenciadas, como EPG (Guía electrónica de programas), VOD (Vídeo a la carta) y otras. Por ello, en estos momentos aún
no están disponibles.
3.
Este equipo de televisión cumple las más actuales normas de DVB-T y DVB-C, de [agosto de 2008], pero no se garantiza la
compatibilidad con futuras emisiones de televisión digital terrestre DVB-T y por cable DVB-C.
4.
Según los países o regiones donde se utilice este equipo de TV, algunos proveedores de la televisión por cable pueden
cobrar un pago adicional por este servicio y pueden exigir al usuario su aceptación de los términos y condiciones de su
empresa.
5.
Algunas funciones de televisión digital pueden no estar disponibles en algunos países o regiones y DVB-C o puede no
funcionar correctamente con algunos proveedores del servicio de cable.
6.
Para obtener más información, póngase en contacto con su centro de atención al cliente de SAMSUNG.
Precauciones al mostrar en la pantalla una imagen fija
La imagen fija puede causar daños permanentes en la pantalla del televisor.
No deje una imagen fija, total o parcial, en la pantalla LCD durante más de 2 horas ya que se podría producir una retención
de la imagen en la pantalla. Este fenómeno de retención de imágenes también se denomina ‘quemadura de pantalla’. Para
evitar que se produzca esa persistencia de la imagen, reduzca el nivel de brillo y de contraste de la pantalla cuando muestre
imágenes fijas.
El uso del televisor LCD en formato 4:3 durante un tiempo prolongado puede dejar rastros de bordes en las
partes izquierda, derecha y central de la pantalla debido a las diferencias en la emisión lumínica de la
pantalla. Reproducir un DVD o una videoconsola puede causar un efecto similar en la pantalla. La garantía
no cubre estos daños.
Ver imágenes fijas de videojuegos y PC durante más tiempo del indicado puede producir imágenes fantasma parciales. Para
evitar este efecto, reduzca el ‘brillo’ y el ‘contraste’ cuando vea imágenes fijas.
© 2009 Samsung Electronics Co., Ltd. Reservados todos los derechos.
❑
❑
●
●
●
Las guras y las ilustraciones de este Manual del usuario se proporcionan como referencia solamente y pueden ser diferentes
del aspecto real del producto.
El diseño y las especicaciones del producto están sujetos a cambios sin previo aviso.
[620-Weuro]BN68-02326A-03L09.ind1 1 2009-10-08 ¿ÀÀü 9:29:46

Español - 1
Licencia
TruSurround HD, SRS y el símbolo son marcas registradas de SRS Labs, Inc. La tecnología
TruSurround HD está incorporada bajo licencia de SRS Labs, Inc.
Fabricado bajo licencia de Dolby Laboratories. Dolby y el símbolo de la doble D son marcas comerciales de
Dolby Laboratories.
Símbolo
N O T
Nota
Botón de una
pulsación
Botón TOOLS Pulsar
❑
❑
CONFIGURACIÓN DEL TELEVISOR
Aspecto general del panel de control ................................................ 2
Accesorios ......................................................................................... 3
Aspecto general del panel de conexiones ......................................... 4
Aspecto general del mando a distancia ............................................. 6
Instalación de las pilas en el mando a distancia ............................... 7
Visualización de los menús ............................................................... 7
Cómo poner el televisor en modo de espera ..................................... 8
Función Plug & Play (Según el modelo) ............................................ 8
Visualización de la pantalla ............................................................... 9
CANAL
Menú del canal .................................................................................. 9
Gestión de los canales ................................................................... 12
IMAGEN
Conguración del menú de imagen ................................................. 14
Uso del televisor como una pantalla de ordenador (PC) ................. 18
Ajuste del televisor con el ordenador .............................................. 19
SONIDO
Conguración del menú de sonido .................................................. 20
Selección del modo de sonido ......................................................... 21
CONFIGURACIÓN
Conguración del menú de conguración ....................................... 22
Conguración de la hora ................................................................. 24
ENTRADA/AYUDA
Menú de entrada ............................................................................. 26
Menú de ayuda ................................................................................ 26
REPRODUCTOR MULTIMEDIA (USB)
Conexión de un dispositivo USB ..................................................... 28
Media Play Funciones ..................................................................... 29
Menús de opciones de la lista de fotos ........................................... 30
Visualización de una foto o una presentación ................................. 31
Menú de opciones de la presentación de diapositivas .................... 32
Menú de opciones de la lista de música .......................................... 33
Reproducción de música ................................................................. 34
Menú de opciones de la reproducción de música ........................... 35
Uso del menú de conguración ....................................................... 35
■
■
■
■
■
■
■
■
■
■
■
■
■
■
■
■
■
■
■
■
■
■
■
■
■
■
■
■
■
ACERCA DE ANYNET
+
Conexión de dispositivos Anynet
+
................................................... 36
Conguración de Anynet
+
............................................................... 37
Conexión entre dispositivos Anynet
+ ............................................... 37
Grabación ........................................................................................ 38
Escucha a través de un receptor (sistema Home Cinema) ............. 38
Solución de problemas de Anynet
+
................................................. 39
RECOMENDACIONES
Función de teletexto ........................................................................ 40
Instalación del soporte ..................................................................... 41
Desconexión del soporte ................................................................. 42
Instalación del equipo de montaje en la pared ................................ 42
Montaje de los cables ...................................................................... 42
Bloqueo antirrobo Kensington ......................................................... 42
Seguridad en el espacio de instalación ........................................... 43
Fijación del televisor a la pared ....................................................... 43
Solución de problemas .................................................................... 44
Especicaciones .............................................................................. 47
■
■
■
■
■
■
■
■
■
■
■
■
■
■
■
■
CONTENIDO
Español
[620-Weuro]BN68-02326A-03L09.ind1 1 2009-10-08 ¿ÀÀü 9:29:46

Español - 2
CONFIGURACIÓN DEL TELEVISOR
Aspecto general del panel de control
El color y la forma del producto pueden variar según el modelo.
Los botones del panel frontal se pueden activar al tacto.
1
P
(ENCENDIDO): Púlselo para encender o apagar el TV.
2
INDICADOR DE ENCENDIDO: Parpadea y se apaga cuando se enciende el aparato y se ilumina en el modo en espera.
3
z
: Permiten cambiar de canal. En el menú de la pantalla, utilice los botones
z
del mismo modo que los
botones ▼ y ▲ del mando a distancia.
4
Y
: Púlselos para subir o bajar el volumen.
En el menú en pantalla, utilice estos botones
Y
de igual modo que los botones ◄ y ► del mando a distancia.
5
MENU: Púlselo para ver un menú en pantalla con las opciones del televisor.
6
SOURCE
E
: Cambia entre todas las fuentes de entrada disponibles. En el menú en pantalla, utilice este botón de igual
modo que el botón ENTER
E
del mando a distancia.
7
SENSOR DEL MANDO A DISTANCIA: El mando a distancia debe dirigirse hacia este punto del televisor.
8
ALTAVOCES
¦
N
N
6
5
4
3
2
1
87
8
[620-Weuro]BN68-02326A-03L09.ind2 2 2009-10-08 ¿ÀÀü 9:29:47

Español - 3
Accesorios
Mando a distancia y 2 pilas AAA Cable de alimentación Cubierta del oricio inferior
Tarjeta de garantía / Guía de seguridad
(no disponible en todos los lugares)
Paño de limpieza
Soporte de cables
(Según el modelo)
● Manual de instrucciones
Asegúrese de que los siguientes elementos se incluyen con el TV LCD. Si falta alguno, póngase en contacto con su
distribuidor.
El color y la forma de los componentes pueden variar según el modelo.
¦
N
N
[620-Weuro]BN68-02326A-03L09.ind3 3 2009-10-08 ¿ÀÀü 9:29:48

Español - 4
Aspecto general del panel de conexiones
El color y la forma del producto pueden variar según el modelo.
1 COMPONENT IN
Permite conectar el vídeo/audio de componentes.
2 HDMI IN 1, 2, 3(DVI), 4 / DVI
AUDIO IN
Permite conectar al terminal HDMI un dispositivo que tenga salida HDMI.
No se necesita conexión de sonido para una conexión de HDMI a HDMI.
¿Qué es HDMI?
HDMI, o interfaz multimedia de alta definición, es una interfaz que permite la transmisión de señales digitales de audio y
de vídeo mediante un solo cable.
La diferencia entre los dispositivos HDMI y DVI es que el HDMI es más pequeño que el DVI.
Puede que el televisor no proporcione salida de sonido y muestre imágenes con colores anómalos si hay conectados
reproductores de DVD/Blu-Ray, o bien receptores de cable/satélite (decodificadores) que admiten versiones de HDMI
anteriores a la versión 1.3. Si se conecta un cable antiguo HDMI y no hay sonido, conecte el cable HDMI al terminal
HDMI IN 3(DVI) y los cables de audio a los terminales DVI AUDIO IN de la parte posterior del televisor. Si sucede
esto, póngase en contacto con la empresa suministradora del reproductor de DVD/Blu-Ray/receptor de satélite/cable
(decodificador) para confirmar la versión HDMI y solicitar una actualización.
Use el terminal HDMI IN 3(DVI) para la conexión de DVI a un dispositivo externo. Use un cable de DVI a HDMI o un
adaptador de DVI-HDMI (DVI a HDMI) para la conexión del vídeo y los terminales DVI AUDIO IN para el audio. Cuando
se usa una conexión de cable HDMI/DVI, se debe conectar en el terminal HDMI IN 3(DVI).
Los cables HDMI que no son 1.3 pueden causar un molesto parpadeo o que no se muestre la pantalla
3 PC IN [PC] / [AUDIO]
Permite conectar a las tomas de salida de audio y de vídeo de su PC.
Si el ordenador admite una conexión HDMI, se puede conectar ésta al terminal HDMI IN 1, 2, 3(DVI) o 4.
Si el ordenador admite una conexión DVI, se puede conectar ésta al terminal HDMI IN 3(DVI) / DVI AUDIO IN.
4 ANT IN
Se conecta a un sistema de televisión por cable o antena.
5
(según el modelo)
El bloqueo Kensington (opcional) es un dispositivo que se utiliza para fijar físicamente el sistema cuando se utiliza en un sitio
público. Si desea usar un dispositivo de bloqueo, póngase en contacto con el distribuidor donde adquirió el televisor
.
La ubicación del bloqueo Kensington puede variar según los modelos.
¦
N
N
N
N
N
N
N
N
N
7890 6 5
@
2
#
!
21 34
[Panel lateral
del televisor]
[Panel posterior del TV]
Entrada de
alimentación
[620-Weuro]BN68-02326A-03L09.ind4 4 2009-10-08 ¿ÀÀü 9:29:48

Español - 5
6
H
(AURICULARES)
Los auriculares se pueden conectar a la salida de auriculares del equipo. Cuando los auriculares están conectados, se
desactiva el sonido de los altavoces incorporados.
El uso de la función de sonido está restringido cuando se conectan auriculares al televisor
.
El uso prolongado de los auriculares a un volumen alto puede dañar los oídos.
No recibirá sonido de los altavoces cuando conecte los auriculares al televisor.
El volumen de los auriculares y el del televisor se ajustan por separado.
7 DIGIT
AL AUDIO OUT (OPTICAL)
Se conecta a un componente de audio digital como un receptor del sistema Home Cinema.
Cuando un sistema de audio digital se conecta al terminal DIGITAL AUDIO OUT (OPTICAL): Reduzca el volumen del TV
y ajuste el volumen con el control del sistema.
El audio de 5.1 canales es posible cuando el televisor está conectado a un dispositivo externo que admita 5.1 canales.
Cuando el receptor (sistema Home Cinema) está activado, se puede oír la salida de sonido desde el terminal óptico
del televisor. Cuando se ve la televisión a través de un DTV (aéreo), el televisor envía el sonido de 5.1 canales al
receptor del sistema Home Cinema. Cuando la fuente es un componente digital, como un DVD/Blu-Ray/receptor de
cable o satélite (decodificador), y está conectada al televisor a través de HDMI, sólo se oye el sonido de 2 canales del
receptor del sistema Home Cinema. Si desea oír audio de 5.1 canales, conecte el terminal de salida de audio digital del
DVD/Blu-ray/receptor de cable o satélite (decodificador) directamente a un amplificador o un sistema Home Cinema, no
al televisor.
8 SER
VICE
Conector sólo para servicio.
9 AUDIO OUT [R-AUDIO-L]
Permite conectar los terminales de la entrada de audio del amplificador/sistema de Home Cinema.
Cuando un amplificador de audio se conecta a los terminales AUDIO OUT [R-AUDIO-L]: Reduzca el volumen del TV y ajuste
el volumen con el control del amplificador.
0 EXT1, 2
Terminales de entrada o salida para dispositivos externos, como aparatos de vídeo, reproductores de DVD, consolas de
videojuegos o reproductores de videodiscos.
En el modo EXT, la salida DTV sólo admite vídeo y audio MPEG SD.
Especificaciones de entrada/salida
Conector
Entrada Salida
Vídeo Audio (I/D) RGB Vídeo + Audio (I/D)
EXT 1 O O O Sólo está disponible la salida de TV o DTV.
EXT 2 O O X La salida que puede elegir.
! A
V IN [VIDEO] / [R-AUDIO-L]
Entradas de vídeo y audio para dispositivos externos, como una videocámara o un reproductor de vídeo.
@ USB
Conector para actualizaciones de software, Media Play, etc.
# Ranura COMMON INTERF
ACE
Si no se inserta una ‘TARJETA CI(CI+)’ con algunos canales, en la pantalla aparece ‘Scrambled Signal’.
En 2 o 3 minutos aparecerá en la pantalla la información del enlace que contiene un número telefónico, un identificador
de ‘TARJETA CI(CI+)’, un identificador del sistema y demás información. Si aparece un mensaje de error, póngase en
contacto con su proveedor de servicios.
Si ha terminado la configuración de la información del canal, aparecerá el mensaje ‘Updating Completed’, que indica que
la lista de canales ya se ha actualizado.
Según el modelo, puede que aparezca un mensaje solicitándole la contraseña de Bloqueo paterno al volver a insertar la
tarjeta CI.
Según el modelo, aunque Bloqueo paterno esté congurado como Perm. todo, puede que aparezca un mensaje
solicitándole la contraseña para los programas dirigidos a adultos (más de 18 años).
Debe obtener una ‘TARJETA CI(CI+)’ en un proveedor local de servicios. Para retirar la ‘TARJETA CI(CI+)’, extráigala
cuidadosamente con las manos, puesto que si cae al suelo se puede dañar.
Inserte la ‘TARJETA CI(CI+)’ en la dirección marcada sobre ella.
La ubicación de la ranura COMMON INTERFACE puede variar según los modelos.
La ‘TARJETA CI(CI+)’ no se admite en algunos países, zonas o emisoras; consulte a su distribuidor local.
La función CI+ sólo se aplica al modelo LE********P.
Si tiene algún problema, póngase en contacto con el proveedor del servicio.
N
N
N
N
N
N
N
N
–
–
N
N
N
N
N
[620-Weuro]BN68-02326A-03L09.ind5 5 2009-10-08 ¿ÀÀü 9:29:48

Español - 6
Aspecto general del mando a distancia
Puede utilizar el mando a una distancia del televisor de hasta 7 metros.
El exceso de luz puede influir en el rendimiento del mando a distancia.
El color y la forma del producto pueden variar según el modelo.
1
POWER: Enciende o apaga el
TV.
2
BOTONES NUMÉRICOS:
Permiten cambiar de canal.
3
FAV.CH: Se usa para mostrar las
listas de canales favoritos en la
pantalla.
4
Y
: Púlselos para subir o
bajar el volumen.
5
SOURCE: Púlselo para mostrar y
seleccionar las fuentes de vídeo
disponibles.
6
INFO : Púlselo para mostrar
información en la pantalla.
7
TOOLS: Se usa para seleccionar
rápidamente las funciones que
se usan con mayor frecuencia.
8
CH LIST: Muestra las listas de
canales en la pantalla.
9
BOTONES DE COLORES:
Utilice estos botones en los
menús Lista de canales, Media
Play, etc.
!
DUAL : Selección de efectos de
sonido.
@
Use estos botones en los modos
Media Play y Anynet
+
. (
∏
:
Este mando remoto se puede
usar para controlar la grabación
en las grabadoras de Samsung
con la función Anynet
+
)
#
TV: Selecciona directamente el
modo TV.
$
PRE-CH: Permite volver al
canal que se ha estado viendo
anteriormente.
%
MUTE
M
: púlselo para cortar
temporalmente el sonido.
^
>
P
<
: Permiten cambiar de
canal.
&
MENU: Muestra el menú de
pantalla principal.
*
GUIDE: Visualización de la Guía
electrónica de programas (EPG).
(
RETURN: Vuelve al menú
anterior
)
E
: Úselo para
seleccionar los elementos del
menú en la pantalla y cambiar los
valores del menú.
a
EXIT: Púlselo para salir del
menú.
b
P.SIZE: Selección del tamaño de
la imagen.
c
MEDIA.P: Permite reproducir
archivos de música e imágenes.
d
SUBT. : Visualización de
subtítulos digitales
e
AD: Audio Description selection.
Funciones de teletexto
5
0
: Selección del modo de
teletexto (LIST/FLOF)
6
5
: Mostrar el teletexto
7
4
: Selección del tamaño del
teletexto
8
8
: Guardar teletexto
9
Selección de tema de Fastext
0
/
: Seleccionar
alternativamente Teletext, Double
o Mix.
#
:
: Sale de la pantalla de
teletexto
$
1
: Página secundaria del
teletexto
^
2
: Página siguiente del
teletexto
3
: Página anterior del teletexto
&
6
: Índice del teletexto
(
9
: Retener teletexto
a
7
: Cancelar teletexto
¦
N
N
N
INFO
C
H
L
I
S
T
AD
1 #
$
^
*
(
)
a
b
c
e
d
%
&
2
3
4
5
6
7
8
9
0
!
@
[620-Weuro]BN68-02326A-03L09.ind6 6 2009-10-08 ¿ÀÀü 9:29:48

Español - 7
Instalación de las pilas en el mando a distancia
1.
Levante la tapa de la parte posterior del mando a distancia, como se muestra en la ilustración.
2. Inserte dos pilas de tamaño AAA.
Respete los extremos ‘+’ y ‘–’ de las pilas que se indican en el diagrama del interior del
compartimiento.
3.
Vuelva a poner la tapa.
Saque las pilas y guárdelas en un lugar fresco y seco si no va a utilizar el mando a
distancia durante un período de tiempo prolongado. (Con un uso normal del TV
, las pilas duran alrededor de un año.)
Si el mando a distancia no funciona, haga estas comprobaciones:
¿Está encendido el televisor?
¿Están intercambiados los polos positivos y negativos de las pilas?
¿Se han agotado las pilas?
¿Ha habido un corte de luz o el cable está desenchufado?
¿Hay un fluorescente o un neón a poca distancia?
OPERATION
Visualización de los menús
Antes de utilizar el televisor, siga los pasos que se explican a continuación para aprender a desplazarse por el menú a fin de
seleccionar y ajustar las diferentes funciones.
Funcionamiento de la visualización en pantalla
El paso de acceso puede variar según el menú seleccionado.
1. Pulse el botón MENU.
2.
Se muestra el menú principal en la pantalla. En el lado izquierdo del menú hay los iconos:
Imagen, Sonido, Canal, Configuración, Entrada, Aplicación, Asistencia técnica.
3. Pulse los botones ▲ o ▼ para seleccionar uno de los iconos.
4.
Después pulse el botón ENTER
E
para acceder al submenú del icono.
5. Pulse los botones ▲ o ▼ para seleccionar el submenú del icono.
6.
Pulse los botones ◄ o ► para reducir o aumentar el valor de una opción concreta. La
visualización en pantalla de ajuste puede variar según el menú seleccionado.
7
. Pulse el botón ENTER
E
para completar la configuración. Pulse el botón EXIT para salir.
¦
N
N
N
¦
❑
INFO
AD
MENU
Mostrar el menú principal en
pantalla.
Botones ENTER
E
/DIRECCIÓN
Mover el cursor y seleccionar una
opción. Seleccionar la opción marcada.
Confirmar la configuración.
RETURN
Volver al menú anterior.
EXIT
Salir del menú en pantalla.
INFO
AD
INFO
AD
Modo :Estándar ▶
Luzdefondo :7
Contraste :95
Brillo :45
Nitidez :50
Color :50
Matiz(V/R) :V50/R50
Configuraciónavanzada
Imagen
Modo :Estándar
Luzdefondo :7 ▶
Contraste :95
Brillo :45
Nitidez :50
Color :50
Matiz(V/R) :V50/R50
Configuraciónavanzada
Opcionesdeimagen
Imagen
7
U
Mover
L
Ajustar
E
Entrar
R
Volver
▲
Luzdefondo
▼
Icono de ayuda
[620-Weuro]BN68-02326A-03L09.ind7 7 2009-10-08 ¿ÀÀü 9:29:49

Español - 8
Cómo poner el televisor en modo de espera
El aparato puede ponerse en modo de espera para reducir el consumo eléctrico. El modo de espera es muy útil si desea
interrumpir la visualización momentáneamente (durante la comida, por ejemplo).
1. Pulse el botón POWER
P
del mando a distancia.
La pantalla se apaga y aparece un indicador de modo de espera en el equipo.
2.
Para volver a encenderlo, sólo tiene que volver a pulsar el botón POWER
P
.
No deje el aparato en modo de espera durante períodos largos de tiempo (cuando está de vacaciones, por ejemplo). Lo
mejor es desenchufar el aparato de la red eléctrica y de la antena.
Función Plug & Play (Según el modelo)
Cuando el televisor se enciende por primera vez, los valores se inician correlativamente de
forma automática.
1. Pulse el botón POWER del mando a distancia.
También puede usar el botón POWERP del televisor.
Se muestra el mensaje Select the OSD Language..
2
. Pulse el botón ENTERE. Seleccione el idioma con los botones ▲ o ▼. Pulse el botón
ENTERE para confirmar la elección.
3
. Pulse los botones ◄ o ► para seleccionar Demo tienda o Uso doméstico y, a continuación,
pulse el botón ENTERE.
Es recomendable configurar el televisor en el modo Uso doméstico para obtener la mejor
imagen en un entorno doméstico.
Demo tienda sólo es necesario en los entornos comerciales.
Si la unidad accidentalmente se configura en el modo Demo tienda y se desea volver a Uso doméstico (normal): Pulse el botón
del volumen del televisor. Cuando se muestra la OSD del volumen, mantenga pulsado el botón MENU del televisor durante 5
segundos.
4
. Pulse el botón ENTERE. Seleccione el país pulsando los botones ▲ o ▼. Pulse el botón ENTERE para confirmar la elección.
Después de seleccionar el país en el menú País, algunos modelos pueden presentar una opción adicional para congurar el
código PIN.
Para introducir el código PIN, 0-0-0-0 no está disponible.
5
. Pulse los botones ▲ o ▼ para seleccionar Aérea o Cable y, a continuación, pulse el botón ENTERE.
Aérea: Señal de antena aérea.
Cable: Señal de antena del cable.
6
. Pulse los botones ▲ o ▼ para seleccionar la fuente de canal que desea memorizar. Pulse el botón ENTERE para seleccionar
Empezar.
Al configurar la fuente de antena en Cable, se muestra un paso para permitirle configurar un valor para la búsqueda de canales
digitales. Para obtener más información, consulte
.
Digital y Analógico: Canales digitales y analógicos.
Digital: Canales digitales.
Analógico: Canales analógicos.
La búsqueda de canales se iniciará y terminará automáticamente.
Pulse el botón ENTERE en cualquier momento para interrumpir el proceso de memorización.
Una vez memorizados todos los canales disponibles, se muestra el mensaje Configurar el modo del reloj.
7. Pulse el botón ENTERE. Pulse los botones ▲ o ▼ para seleccionar Auto y, a continuación, pulse el botón ENTERE.
Si selecciona Manual, se muestra Configurar fecha y hora actuales.
Si ha recibido una señal digital, se ajustará la hora automáticamente. En caso negativo, seleccione Manual para ajustar el reloj.
8. Se muestra la descripción del método de conexión para conseguir la mejor calidad de la pantalla HD. Compruebe la descripción y
pulse el botón ENTERE.
9
. Aparecerá el mensaje Disfrute de su televisor. Cuando haya terminado, pulse el botón ENTERE.
Si desea reiniciar esta función...
1. Pulse el botón MENU para ver el menú. Pulse los botones ▲ o ▼ para seleccionar
Configuración y, a continuación, pulse el botón ENTER
E
.
2. Pulse de nuevo el botón ENTER
E
para seleccionar Plug & Play.
3. Escriba su código PIN de 4 dígitos. El código PIN predeterminado para un televisor nuevo
es ‘0-0-0-0’.
Si desea cambiar el número PIN, utilice la función Cambiar PIN.
La función Plug & Play está disponible sólo en el modo TV.
¦
N
N
¦
N
N
N
N
N
N
N
N
N
N
N
N
N
N
N
N
N
N
INFO
AD
Plug&Play ▶
Idiomadelmenú :Español
Hora
Emisión
Seguridad
General
Configuración
SelecttheOSDLanguage.
MenuLanguage :English ▶
E
Enter
Plug&Play
[620-Weuro]BN68-02326A-03L09.ind8 8 2009-10-08 ¿ÀÀü 9:29:49

Español - 9
Visualización de la pantalla
La pantalla identifica el canal actual y el estado de algunos ajustes de audio-vídeo.
Pulse el botón INFO para ver la información.
Pulse el botón INFO del mando a distancia. El televisor mostrará el canal, el tipo de
sonido y el estado de ciertos ajustes de imagen y sonido.
▲, ▼: Puede ver otra información del canal. Si desea ir al canal actualmente
seleccionado, pulse el botón ENTER
E
.
◄, ►: Puede ver la información de programas del canal actual.
Pulse el botón INFO otra vez o espere unos 10 segundos; la información
desaparecerá automáticamente.
CANAL
Menú del canal
País
Canal analógico
Se puede cambiar el país de los canales analógicos.
Canal digital
Se puede cambiar el país de los canales digitales.
Aparece la pantalla para la introducción del número PIN. Escriba su código PIN de 4
dígitos.
Se puede explorar los rangos de frecuencia disponibles (la disponibilidad depende del país). Puede que los números de programa
asignados automáticamente no correspondan a los números de programa reales o deseados.
Si el canal está bloqueado con la función Segur. niños aparece la ventana para la introducción del código PIN.
Aérea / Cable
Fuente de antena que guardar
Digital y Analógico: Canales digitales y analógicos.
Digital: Canales digitales.
Analógico: Canales analógicos.
Al seleccionar ‘ o ‘
Proporcione un valor para explorar los canales de cable.
ID red: Muestra el código de identificación de la red.
Frecuencia: Muestra la frecuencia del canal. (Es diferente en cada país)
Modulación: Muestra los valores de modulación disponibles.
Velocidad símbolo: Muestra las velocidades de símbolo disponibles.
Busca todos los canales de las emisoras activas y los memoriza en el televisor.
Si desea detener el guardado automático, pulse el botón ENTER
E
.
Aparece el mensaje .
Pulse los botones ◄ o ► para seleccionar Sí y, a continuación, pulse el botón ENTER
E
.
¦
O
●
●
N
¦
❑
■
■
N
❑
N
■
●
●
●
●
N
N
N
Country(País) ▶
Guardadoautomático
Guardadomanual
Opcióndebúsquedadecable
Guíacompleta
Miniguía
Guía
predeterminada :Guíacompleta
Listadecanales
Canal
INFO
AD
DTV Air
15
abc1
18:00 ~ 6:00
18:11 Thu 6 Jan
Life On Venus Avenue
Unclassified
No Detaild Information
' Information
[620-Weuro]BN68-02326A-03L09.ind9 9 2009-10-08 ¿ÀÀü 9:29:50

Español - 10
Guardado manual
Busca un canal manualmente y lo memoriza en el televisor.
Si el canal está bloqueado con la función Segur. niños aparece la ventana para la introducción del código PIN.
Canal digital
Almacenamiento manual de canales digitales.
Canal digital sólo está disponible en el modo de TV digital.
Canal: Establezca el número del canal con los botones ▲, ▼ o numéricos (0~9).
Frecuencia: Establezca la frecuencia con los botones numéricos.
Ancho de banda: Establezca el ancho de banda con los botones ▲, ▼ o numéricos (0~9).
Una vez finalizada, la lista de canales se actualiza automáticamente.
Canal analógico
Almacenamiento manual de canales analógicos.
Programa (número de programa que asignar a un canal): Establezca el número del programa con los botones ▲, ▼ o
numéricos (0~9).
: Establezca el sistema del color con los botones ▲ o ▼.
: Establezca el sistema del sonido con los botones ▲ o ▼.
Canal (si conoce el número de canal que desea guardar): Pulse los botones ▲ o ▼ para seleccionar C (canal aéreo) o S
(canal por cable). Pulse el botón ► y después ▲, ▼ o los botones numéricos (0~9) para seleccionar el número que desee.
También puede seleccionar el número de canal directamente pulsando los botones numéricos (0~9).
Si se produce un sonido anormal o no se produce sonido, vuelva a seleccionar el estándar de sonido adecuado.
Buscar (si no se conoce el número de los canales): Pulse los botones ▲ o ▼ para iniciar la búsqueda. El sintonizador
explora el rango de frecuencia hasta que se recibe en la pantalla el primer canal o el canal que se ha seleccionado.
Guardar (cuando guarde el canal y el número de programa asociado): Establezca OK pulsando el botón ENTER
E
.
Modo Canal
P (modo de programa): Al finalizar la sintonización, las estaciones de emisión de su zona se habrán asignado a los
números de posición comprendidos entre P00 y P99. Puede seleccionar un canal introduciendo el número de posición en
este modo.
C (modo de canal aéreo): Puede seleccionar un canal introduciendo el número asignado a cada emisora aérea en este
modo.
S (modo de canal por cable): Puede seleccionar un canal introduciendo el número asignado a cada canal por cable en
este modo.
Opción de búsqueda de cable (según el país)
Establece opciones adicionales de búsqueda, como la frecuencia y la velocidad de símbolo para la búsqueda de red por cable.
Frecuencia inicio (Frecuencia de inicio): Configure la frecuencia de inicio (es diferente en cada país)
Frecuencia parada (Frecuencia de paro): Configure la frecuencia de paro (es diferente en cada país)
Modulación: Muestra los valores de modulación disponibles.
Velocidad símbolo: Muestra las velocidades de símbolo disponibles.
Guía completa / Miniguía
La información de la Guía electrónica de programas (EPG) la proporcionan las emisoras. Las entradas de los programas
pueden aparecer vacías u obsoletas, según la información proporcionada por un canal determinado. La pantalla se actualiza
dinámicamente tan pronto como hay nueva información disponible.
También puede ver el menú de la guía pulsando el botón GUIDE. (Para configurar la Guía predeterminada, siga las
instrucciones.)
Guía completa
Muestra la información de los programas ordenados por hora en segmentos de una hora. Muestra la información de dos horas de
programa que se puede desplazar adelante o atrás en el tiempo.
Miniguía
La información de cada programa se muestra en una línea de la pantalla de la miniguía del canal actual desde el programa actual
en adelante según el orden de la hora de inicio del programa.
❑
N
N
■
N
●
●
●
N
■
●
●
●
●
N
N
●
●
N
❑
●
●
●
●
❑
O
■
■
[620-Weuro]BN68-02326A-03L09.ind10 10 2009-10-08 ¿ÀÀü 9:29:50

Español - 11
Puede decidir que se muestre la Guía completa o la Miniguía cuando se pulsa el botón GUIDE del mando a distancia.
Lista de canales
Para obtener una descripción detallada sobre el uso de la Lista de canales, consulte las instrucciones de 'Gestión de los
canales'.
Puede seleccionar estas opciones simplemente pulsando el botón CH LIST del mando a distancia.
Modo Canal
Cuando pulse el P
>
/
<
, Los canales se cambiarán en la lista de canales seleccionados.
Canales añadidos
Los canales se cambian en la lista de canales memorizados.
Canales favoritos
Los canales se cambian en la lista de canales favoritos.
Sintonización fina
Si la recepción es clara, no tiene que realizar la sintonización fina del canal, ya que esta operación se hace de forma automática
durante la búsqueda y la memorización. Si la señal es débil o está distorsionada, puede que deba realizar manualmente la
sintonización fina del canal.
Los canales que se han ajustado con sintonización fina se marcan con un asterisco ‘*’
a la derecha del número de canal en la
banda del canal.
Para reiniciar la sintonía fina, seleccione Rest. pulsando los botones ▲ o ▼ y, a continuación, pulse el botón ENTER
E
.
Sólo puede ajustarse la sintonización de los canales de televisión analógicos.
Uso de la guía completa y la miniguía
Para... Debe...
Ver un programa en la lista EPG Seleccionar una posición pulsando los botones ▲, ▼, ◄, ►.
Salir de la guía Pulsar el botón azul
Si el programa siguiente está seleccionado, se concreta con un icono de reloj. Si se vuelve a pulsar el botón ENTER
E
y se
pulsan los botones ◄, ► para seleccionar Cancelar progr., la programación se cancela y el icono del reloj desaparece.
Ver información de los programas Seleccionar un programa pulsando los botones ▲, ▼, ◄, ►.
A continuación pulse el botón INFO cuando se resalte el programa
deseado.
El título del programa se muestra en la parte superior del centro de la
pantalla.
Pulse el botón INFO para obtener información detallada. En la información detallada se incluye el número del canal, la hora de
ejecución, la barra de estado, el nivel del control paterno, la información de calidad del vídeo (HD/SD), los modos de sonido,
subtítulos o teletexto, los idiomas de los subtítulos o del teletexto y un resumen breve del programa seleccionado. ‘...’
se
muestra si el resumen es largo.
Intercambiar entre Guía completa y Miniguía Pulsar el botón rojo varias veces.
En la guía completa
Desplazarse rápidamente hacia atrás (24 horas).
Desplazarse rápidamente hacia adelante (24 horas).
Pulsar el botón verde varias veces.
Pulsar el botón amarillo varias veces.
❑
❑
O
❑
■
■
❑
N
N
N
Guíacompleta
E
Ver Información Página Miniguía +24horas Salir
DTVCable900ftn2:10Tue1Jun
FreshmenOnCampus
2:00-2:30
NoDetailedInformation
Hoy
2:00-3:00 3:00-4:00
MintExtra
Loaded
40withDynamiteMC
TheDistillery
SmashHits!Sunday
900ftn
901ITVPlay
902Kerrang!
903Kiss
904oneword
905Hits
▼
StreetHypn..
Kisstory
No
Information
NoInformation
NoInformation
FreshmenO..
900
E
Ver Información Página Guíacompleta Salir
Miniguía DTV
Cable900ftn
StreetHypnosis
BoozeBritain
2:00
2:30
5:00
Freshmen
OnCampus
▼
[620-Weuro]BN68-02326A-03L09.ind11 11 2009-10-08 ¿ÀÀü 9:29:50

Español - 12
Gestión de los canales
Con este menú puede agregar y borrar los canales o configurarlos como favoritos y usar la guía de programas de las emisoras
digitales.
Todos los canales
Muestra todos los canales disponibles actualmente.
Canales añadidos
Muestra todos los canales añadidos.
Favoritos
Muestra todos los canales favoritos.
Si desea seleccionar los canales favoritos que ha configurado, pulse el botón FAV.CH del
mando a distancia.
Programado
Muestra todos los programas actualmente reservados.
Seleccione un canal en la pantalla Todos los canales, Canales añadidos o Favoritos con los botones ▲/▼ y pulse el botón
ENTER
E
. A continuación puede ver el canal seleccionado.
Uso de los botones de colores en la lista de canales
Rojo (Tipo de canal): Cambiar entre TV, Radio, Datos / Otr y Todo.
Verde (Zoom): Aumenta o reduce un número de canal.
Amarillo (Selecc.): Selecciona varias listas de canales. Puede aplicar la función de añadir/borrar o de añadir a
favoritos/borrar de favoritos a varios canales al mismo tiempo. Seleccione los canales que desee y pulse el botón
amarillo para configurar los canales seleccionados al mismo tiempo. Aparece la marca
c
a la izquierda de los canales
seleccionados.
TOOLS (Herramientas): Muestra los menús Borrar (o Añadir ), Añadir a Favoritos (o Borrar de Favoritos), Bloquear
(o Desbloquear), Visual. con temp, Modificac. nombre canal, Modificac. número canal, Ordenar, Seleccionar
todos (o Deselecc. todos), . (Los menús de las opciones pueden cambiar, dependiendo de la
situación.)
Iconos de la pantalla de estado del canal
A
: Canal analógico.
c
: Canal seleccionado con el botón amarillo.
*
: Canal configurado como favorito.
(
: Programa que se está emitiendo.
\
: Canal bloqueado.
)
: Programa reservado
Menús de opciones de la lista de canales (en Todos los canales / Canales añadidos / Favoritos)
Pulse el botón TOOLS para usar el menú de opciones.
Los elementos del menú de opciones pueden variar según el estado del canal.
Añadir / Borrar
Puede suprimir o añadir un canal para que se muestren los canales que desee.
Todos los canales borrados se mostrarán en el menú Todos los canales.
Un canal de color gris quiere decir que se ha suprimido.
El menú Añadir sólo aparece con los canales borrados.
También puede borrar un canal en los menús Canales añadidos o Favoritos de la
misma manera.
Añadir a Favoritos / Borrar de Favoritos
Puede configurar como favoritos los canales que vea con más frecuencia.
Pulse el botón TOOLS para ver el menú Herramientas. También puede establecer el canal favorito que añadir (o suprimir) si
selecciona
(o Borrar de Favoritos).
Se mostrará el símbolo ‘
*
’ y el canal se configurará como favorito.
Todos los canales seleccionados se mostrarán en el menú Favoritos.
Bloquear / Desbloquear
Se puede bloquear un canal para que no se pueda seleccionar ni visualizar.
Está función está disponible sólo cuando Segur. niños está configurado como Act..
Aparece la pantalla para la introducción del número PIN. Escriba su código PIN de 4 dígitos.
El código PIN predeterminado para un televisor nuevo es ‘0-0-0-0’. Se puede cambiar el PIN seleccionando Cambiar PIN en
el menú.
Se muestra el símbolo ‘
\
’ y el canal queda bloqueado.
¦
■
■
■
O
■
N
N
N
N
N
■
N
N
N
N
■
T
N
N
■
N
N
N
N
Todosloscanales
824UKTVGold
825UKTVstyle
A
1C--
A
2C--
A
3C--
A
4C--
A
5C--
A
6C--
A
7C--
A
8C--
Todo Tipodecanal Zoom Selecc.
T
Herramientas
Borrar
AñadiraFavoritos
Bloquear
Visual.
contemp
Modificac.nombrecanal
Ordenar
Canalesañadidos
824UKTVGold
825UKTVstyle
A
1C--
A
2C--
A
3C--
A
4C--
A
5C--
A
6C--
A
7C--
A
8C--
Todo
Tipodecanal Zoom Selecc.
T
Herramientas
[620-Weuro]BN68-02326A-03L09.ind12 12 2009-10-08 ¿ÀÀü 9:29:51

Español - 13
Visual. con temp
Si reserva un programa que desea ver, el canal se cambia automáticamente al canal reservado en la lista de canales aunque esté
viendo otro canal. Para reservar un programa, en primer lugar debe configurar la hora actual.
Sólo se pueden reservar los canales memorizados.
Puede ajustar el canal, el día, el mes, el año, la hora y el minuto directamente pulsando los botones numéricos del mando a
distancia.
La reserva de un programa se muestra en el menú Programado.
Guía de programas digitales y reserva de visualización
Si se ha seleccionado un canal digital y se pulsa el botón ► aparece la guía de programas del canal. Se puede reservar un
programa mediante el procedimiento descrito anteriormente.
Modificac. nombre canal (sólo canales analógicos)
Los canales se pueden etiquetar con el propósito de que al seleccionar éstos se pueda ver su nombre.
Los nombres de los canales digitales se asignan automáticamente y no se pueden renombrar
.
Modificac. número canal (sólo canales digitales)
También puede editar el número del canal pulsando los botones numéricos del mando a distancia.
Ordenar (sólo canales analógicos)
Esta operación permite cambiar los números de programa de los canales memorizados. Puede que sea necesario realizarla
después de la memorización automática.
Seleccionar todos / Deselecc. todos
Seleccionar todos: Puede seleccionar todos los canales de la lista.
Deselecc. todos: Puede anular la selección de todos los canales.
Sólo se puede seleccionar Deselecc. todos si hay canales seleccionados.
Para conocer el procedimiento detallado sobre las opciones de configuración, consulte la instrucciones de ‘Menú del canal’.
Si el canal está bloqueado con la función Segur. niños aparece la ventana para la introducción del código PIN.
Menús de opciones de la lista de canales (en Programado)
Se puede ver, cambiar o borrar una reserva.
Pulse el botón TOOLS para usar el menú de opciones.
Cambiar información
Selecciónelo para cambiar la reserva de visualización.
Cancelar progr.
Selecciónelo para cancelar la reserva de visualización.
Información
Selecciónelo para ver una reserva de visualización.
(También puede cambiar la información de la reserva.)
Seleccionar todos
Seleccionar todos los programas reservados.
■
N
N
N
N
■
N
■
■
■
●
●
N
■
N
N
N
■
■
■
■
Programado
1/1/2009
13:595TV1
)
18:592TV3
)
TheEqualizer
20:592TV3
)
McMillan&Wife
21:592TV3
)
M.Spillane’smike
Todo Zoom Selecc.
T
Herramientas
E
Información
Cambiarinformación
Cancelarprogr.
Información
Seleccionar
todos
[620-Weuro]BN68-02326A-03L09.ind13 13 2009-10-08 ¿ÀÀü 9:29:51

Español - 14
IMAGEN
Configuración del menú de imagen
Modo
Puede seleccionar el tipo de imagen que mejor cumpla sus requisitos de visualización.
Pulse el botón TOOLS para ver el menú Herramientas. También puede configurar el modo
de la imagen seleccionando .
Selecciona la visualización con una definición mejorada, en una habitación luminosa.
Selecciona la visualización óptima de la imagen, en un entorno normal.
Natural
Selecciona la visualización óptima y más confortable de la imagen.
Esta función no está disponible en el modo PC.
Película
Selecciona la visualización para ver películas en una sala oscura.
Luz de fondo / Contraste / Brillo / Nitidez / Color / Matiz (V/R)
El televisor tiene varias opciones de configuración que permiten controlar la calidad de la
imagen.
Luz de fondo: Ajusta el brillo de la luz de fondo de la pantalla LCD.
Contraste: Ajusta el nivel del contraste de la imagen.
Brillo: Ajusta el nivel del brillo de la imagen.
Ajustar: Ajusta la definición de los bordes de la imagen.
Color: Ajusta la saturación del color de la imagen.
Matiz (V/R): Ajusta el matiz del color de la imagen.
En los modos analógicos TV, Ext., AV del sistema PAL no se puede utilizar la función Matiz (V/R).
Cuando haga cambios en Luz de fondo, Contraste, Brillo, Nitidez, Color o Matiz (V/R) el color de la OSD también se
ajustará.
En el modo PC, sólo se pueden hacer cambios en Luz de fondo, Contraste y Brillo.
La configuración de cada dispositivo externo conectado a una entrada del televisor se puede ajustar y guardar
.
La energía consumida durante el uso se puede reducir signicativamente si se disminuye el nivel del brillo de la imagen, ya
que así se reduce el coste total de funcionamiento.
Configuración avanzada
Los nuevos televisores Samsung permiten una configuración más precisa aun de la imagen
que los modelos anteriores.
Configuración avanzada está disponible en los modos o Película.
En el modo PC, sólo se pueden cambiar y Balance de blanco
entre las opciones de Configuración avanzada.
Se puede seleccionar el nivel de negro en la pantalla para ajustar la profundidad de ésta.
Se puede ajustar el contraste de la pantalla para conseguir un contraste óptimo.
Gamma
Se puede ajustar la intensidad de los colores primarios (rojo, verde y azul).
¦
❑
T
■
■
■
N
■
❑
●
●
●
●
●
●
N
N
N
N
N
❑
N
N
■
■
■
Modo :Estándar ▶
Luzdefondo :7
Contraste :95
Brillo :45
Nitidez :50
Color :50
Matiz(V/R) :V50/R50
Configuraciónavanzada
Imagen
7
U
Mover
L
Ajustar
E
Entrar
R
Volver
▲
Luzdefondo
▼
Tonodelnegro :Des. ▶
Contrastedinám. :Medio
Gamma :0
Gamadecolores :Original
Balancedeblanco
Tonodepiel :0
Mejoradelborde :Act.
U
Mover
E
Entrar
R
Volver
Configuraciónavanzada
[620-Weuro]BN68-02326A-03L09.ind14 14 2009-10-08 ¿ÀÀü 9:29:51

Español - 15
Gama de colores
La gama de colores es una matriz compuesta por los colores rojo, verde y azul. Seleccione su espacio de color favorito y disfrute
de unos colores auténticamente naturales.
Auto: Ajusta automáticamente al tono de color más natural de acuerdo con las fuentes del programa.
Original: Proporciona tonos de color profundos y ricos.
Personal: Ajusta la gama del color según las preferencias del usuario.
Al cambiar el valor de ajuste se actualizará la pantalla ajustada.
La configuración de cada dispositivo externo conectado a una entrada del televisor se puede ajustar y guardar
. Por
ejemplo, si se tiene un reproductor DVD conectado a HDMI 1 y está seleccionado, se guardarán la configuración y los
ajustes del reproductor DVD.
o Magenta
Color está disponible si Gama de colores está configurado como Personal.
En Color, se pueden ajustar los valores RGB del color seleccionado.
Para restablecer el valor RGB ajustado, seleccione Rest..
Rojo: Ajusta el nivel de saturación del rojo del color seleccionado.
Verde: Ajusta el nivel de saturación del verde del color seleccionado.
Azul: Ajusta el nivel de saturación del azul del color seleccionado.
Rest.: Restablece el espacio de color en los valores predeterminados.
Balance de blanco
Se puede ajustar la temperatura del color para conseguir colores más naturales.
Rojo -: Ajusta la intensidad del color rojo.
Verde -: Ajusta la intensidad del color verde.
Azul -: Ajusta la intensidad del color azul.
Rojo +: Ajusta el brillo del color rojo.
Verde +: Ajusta el brillo del color verde.
Azul +: Ajusta el brillo del color azul.
Rest.: El balance de blanco anteriormente ajustado se restablecerá con los valores predefinidos de fábrica.
Tono de piel
Permite acentuar el ‘tono piel’ rosado de las imágenes.
Al cambiar el valor de ajuste se actualizará la pantalla ajustada.
Permite acentuar los bordes de los objetos en las imágenes.
Si activa el modo xvYCC se aumenta el detalle y el espacio de color mientras se ven películas desde un dispositivo externo (por
ejemplo, un reproductor DVD) conectado en las tomas HDMI o Component IN.
xvYCC está disponible cuando el modo de imagen está configurado en Película y la entrada externa está establecida en los
modos HDMI o Componente.
Es posible que esta función no se admita, según el dispositivo externo.
■
●
●
●
N
N
N
N
N
■
●
●
●
●
●
●
●
■
N
■
■
N
N
[620-Weuro]BN68-02326A-03L09.ind15 15 2009-10-08 ¿ÀÀü 9:29:51

Español - 16
Opciones de imagen
En el modo PC sólo se pueden hacer cambios en los elementos Tono color y Tamaño del
menú Opciones de imagen.
o sólo están disponibles cuando el modo de imagen está
configurado en Película.
La configuración de cada dispositivo externo conectado a una entrada del televisor se
puede ajustar y guardar.
Tamaño
Es posible que alguna vez desee cambiar el tamaño de la imagen en la pantalla. El televisor se suministra con varias opciones
de tamaño de la pantalla, cada una diseñada para que funcione lo mejor posible con tipos específicos de entrada de vídeo. Es
posible que el receptor de cable o satélite tenga también su propia gama de tamaños de pantalla. Sin embargo, en general, debe
ver el televisor en el modo 16:9 tanto como sea posible.
Puede seleccionar estas opciones pulsando el botón P.SIZE del mando a distancia.
Ancho auto.: Ajusta automáticamente el tamaño de la imagen a la relación de aspecto de la pantalla 16:9.
16:9: Ajusta el tamaño de la imagen a 16:9, adecuado para ver los DVD o las emisiones en formato ancho.
Zoom ancho: Aumenta el tamaño de la imagen más que 4:3.
Zoom: Amplía la imagen ancha de 16:9 (en sentido vertical) para que la imagen ocupe el tamaño de la pantalla.
4:3: Es la configuración predeterminada para una película de vídeo o una emisión normal.
Ajuste pantalla: Use esta función para ver la imagen completa sin cortes cuando la entrada de la señal sea HDMI
(720p/1080i/1080p) o Componente (1080i/1080p).
Según la fuente de entrada, las opciones de tamaño de la imagen pueden variar.
Las opciones disponibles pueden diferir según el modelo seleccionado.
En el modo PC, sólo se pueden ajustar los modos 16:9 y 4:3.
La configuración de cada dispositivo externo conectado a una entrada del televisor se puede ajustar y guardar
.
Puede producirse una retención temporal de imagen cuando se ve una imagen estática durante más de dos horas.
Zoom ancho: Pulse el botón ► para seleccionar Posición y, a continuación, pulse el botón ENTER
E
. Pulse los botones
▲ o ▼ para desplazar la imagen hacia arriba o hacia abajo. Pulse el botón ENTER
E
.
Zoom: Pulse el botón ► para seleccionar Posición y, a continuación, pulse el botón ENTER
E
. Pulse los botones ▲ o ▼
para desplazar la imagen hacia arriba o hacia abajo. Pulse el botón ENTER
E
. Pulse el botón ► para seleccionar Tamaño
y, a continuación, pulse el botón ENTER
E
. Utilice los botones ▲ o ▼ para ampliar o reducir el tamaño de la imagen en
dirección vertical. Pulse el botón ENTER
E
.
Después de seleccionar Ajuste pantalla en los modos HDMI (1080i / 1080p) o Componente (1080i / 1080p): Seleccione
Posición con los botones ◄ o ►. Use los botones ▲, ▼, ◄ o ► para mover la imagen.
Rest.: Pulse los botones ◄ o ► para seleccionar Rest. y, a continuación, pulse el botón ENTER
E
. Puede inicializar la
configuración.
Si se usa la función Ajuste pantalla con la entrada HDMI 720p, en los laterales superior, inferior, derecho e izquierdo de la
pantalla se cortará 1 línea como en la función de sobreexploración.
Cuando se configura el tamaño de la imagen como Ancho auto. en un televisor panorámico 16:9, se puede determinar el tamaño
de la imagen para ver una imagen en pantalla panorámica 4:3 WSS o ninguna. Cada país europeo exige un tamaño de imagen
diferente, de modo que esta función está concebida con la intención de que los usuarios la seleccionen.
16:9: Ajusta la imagen al modo panorámico 16:9.
Zoom ancho: Aumenta el tamaño de la imagen más que 4:3.
Zoom: Aumenta el tamaño de la imagen verticalmente en la pantalla.
4:3: Ajusta la imagen al modo normal 4:3.
Esta función está disponible en el modo Ancho auto..
Esta función no está disponible en los modos PC, Componente o HDMI.
Si la señal de emisión que recibe el televisor es débil, puede activarse la función Digital Noise Reduction para reducir la estática y
las imágenes superpuestas que pueden aparecer en la pantalla.
Cuando la señal sea débil, seleccione alguna de las otras opciones hasta que se vea una imagen de mejor calidad.
Se puede seleccionar el nivel de negro en la pantalla para ajustar la profundidad de ésta.
Esta función sólo está activa cuando un dispositivo externo está conectado al televisor a través de HDMI (señales RGB).
❑
N
■
N
N
■
O
●
●
●
●
●
●
N
N
N
N
N
N
N
N
N
■
●
●
●
●
N
N
■
N
■
N
Tonocolor :Normal ▶
Tamaño :Anchoauto.
ModoPantalla :16:9
DigitalNR :Auto
N.negHDMI :Normal
Mododepelícula :Des.
Sólomodoazul :Des.
U
Mover
E
Entrar
R
Volver
Opcionesdeimagen
[620-Weuro]BN68-02326A-03L09.ind16 16 2009-10-08 ¿ÀÀü 9:29:52

Español - 17
El televisor se puede configurar para que perciba y procese automáticamente las señales de película de todas las fuentes y ajuste
la mejor calidad de imagen.
Modo de película es compatible con TV, AV, COMPONENT(480i/1080i) y HDMI(480i/1080i).
Des.: Desactiva la función del modo de película.
Auto1: Ajusta automáticamente la imagen con la mejor calidad cuando se ve una película.
Auto2: Optimiza automáticamente el texto de vídeo en la pantalla (sin incluir los subtítulos para sordos) cuando se ve una
película.
Elimina los retrasos de las escenas rápidas con mucho movimiento para conseguir imágenes más claras.
Si se habilita 100Hz Motion Plus, se puede producir ruido en la pantalla. Si esto ocurre, establezca 100Hz Motion Plus
como Des..
Des.: Desactiva 100Hz Motion Plus.
Claro: Establece 100Hz Motion Plus en un valor mínimo.
: Establece 100Hz Motion Plus en un valor medio.
Suave: Establece 100Hz Motion Plus en un valor máximo.
Personal: Ajusta el nivel de reducción de desenfoque y vibración según las preferencias del usuario.
Reducc. desenfoque: Ajusta el nivel de reducción de desenfoque en las fuentes de vídeo.
Reducc. vibración: Ajusta el nivel de reducción de la vibración en las fuentes de vídeo al reproducir películas.
Rest.: Restablece la conguración personalizada.
Demo: Muestra la diferencia entre los modos activado y desactivado de 100Hz Motion Plus.
Esta función es para expertos en la medición de dispositivos AV. Esta función muestra sólo una señal azul ya que se eliminan las
señales rojas y verdes de la señal de vídeo a fin de proporcionar un efecto de filtro azul que se usa para ajustar el color y el matiz
de los equipos de vídeo, como reproductores DVD, sistemas Home Cinema, etc. Con esta función, se puede ajustar el color y el
matiz de acuerdo con los valores preferidos adecuados al nivel de la señal de cada dispositivo de vídeo mediante los patrones de
barras de colores rojo/verde/azul/cián/magenta/amarillo, sin usar un filtro azul adicional.
Sólo modo azul está disponible cuando el modo de imagen está configurado como Película o .
Restablece todos los ajustes predeterminados.
Rest. modo imagen: Los valores actuales de la imagen vuelven a la configuración predeterminada.
■
N
●
●
●
■
N
●
●
●
●
●
–
–
–
●
■
N
❑
N
[620-Weuro]BN68-02326A-03L09.ind17 17 2009-10-08 ¿ÀÀü 9:29:52

Español - 18
Uso del televisor como una pantalla de ordenador (PC)
A continuación se muestra la configuración de pantalla de Windows para un ordenador típico.
Probablemente la pantalla real de su PC sea distinta, según la versión concreta de Windows
y de la tarjeta de vídeo que tenga. Aunque las pantallas reales sean diferentes, la información
de configuración básica que se aplica en casi todos los casos es la misma. (En caso contrario,
póngase en contacto con el fabricante del ordenador o con el distribuidor de Samsung.)
1.
Primero, haga clic en ‘Panel de control’ en el menú Inicio de Windows.
2.
Cuando aparezca la ventana del panel de control, haga clic en ‘Apariencia y temas’
y
aparecerá un cuadro de diálogo.
Cuando aparezca la ventana del panel de control, haga clic en ‘Pantalla’ y aparecerá un
cuadro de diálogo.
4.
Seleccione la ficha ‘Configuración’ en el cuadro de diálogo.
Configuración correcta del tamaño (resolución) - Óptima: 1920 x 1080 píxeles
Si existe una opción de frecuencia vertical en el cuadro de diálogo de configuración
de la pantalla, el valor correcto es ‘60’ o ‘60 Hz’. En caso contrario, haga clic en ‘Aceptar’ y salga del cuadro de diálogo.
Modos de pantalla
Si la señal del sistema es igual al modo de señal estándar, la pantalla se ajusta automáticamente. Si la señal del sistema no es
igual al modo de señal estándar, ajuste el modo consultando la guía del usuario de la tarjeta de vídeo; de lo contrario, puede no
haber señal de vídeo. La imagen de pantalla se ha optimizado durante la fabricación para los modos de visualización enumerados
en la página siguiente.
Entradas D-Sub y HDMI/DVI
Modo Resolución Frecuencia horizontal
(kHz)
Frecuencia vertical
(Hz)
Frecuencia de reloj de
píxeles (MHz)
Polaridad sincr.
(H/V)
IBM
640 x 350 31,469 70,086 25,175 +/-
720 x 400 31,469 70,087 28,322 -/+
MAC
640 x 480 35,000 66,667 30,240 -/-
832 x 624 49,726 74,551 57,284 -/-
1152 x 870 68,681 75,062 100,000 -/-
VESA CVT
720 x 576 35,910 59,950 32,750 -/+
1152 x 864 53,783 59,959 81,750 -/+
1280 x 720 44,772 59,855 74,500 -/+
1280 x 720 56,456 74,777 95,750 -/+
1280 x 960 75,231 74,857 130,000 -/+
VESA DMT
640 x 480 31,469 59,940 25,175 -/-
640 x 480 37,861 72,809 31,500 -/-
640 x 480 37,500 75,000 31,500 -/-
800 x 600 37,879 60,317 40,000 +/+
800 x 600 48,077 72,188 50,000 +/+
800 x 600 46,875 75,000 49,500 +/+
1024 x 768 48,363 60,004 65,000 -/-
1024 x 768 56,476 70,069 75,000 -/-
1024 x 768 60,023 75,029 78,750 +/+
1152 x 864 67,500 75,000 108,000 +/+
1280 x 1024 63,981 60,020 108,000 +/+
1280 x 1024 79,976 75,025 135,000 +/+
1280 x 800 49,702 59,810 83,500 -/+
1280 x 800 62,795 74,934 106,500 -/+
1280 x 960 60,000 60,000 108,000 +/+
1360 x 768 47,712 60,015 85,500 +/+
1440 x 900 55,935 59,887 106,500 -/+
1440 x 900 70,635 74,984 136,750 -/+
1680 x 1050 65,290 59,954 146,250 -/+
VESA GTF
1280 x 720 52,500 70,000 89,040 -/+
1280 x 1024 74,620 70,000 128,943 -/-
VESA DMT/
DTV CEA
1920 x 1080p 67,500 60,000 148,500 +/+
Cuando se usa una conexión de cable HDMI/DVI, se debe conectar en el terminal HDMI IN 3(DVI).
No se admite el modo entrelazado.
El aparato puede funcionar incorrectamente si se selecciona un formato de vídeo que no sea estándar
.
Los modos Independiente y Compuesto no se admiten. SOG no se admite.
Un cable VGA demasiado largo o de mala calidad puede provocar que se vea la imagen con ruido en los modos de resolución
alta (1920 x 1080 ).
¦
■
N
N
N
N
N
[620-Weuro]BN68-02326A-03L09.ind18 18 2009-10-08 ¿ÀÀü 9:29:52

Español - 19
Ajuste del televisor con el ordenador
Preselección: Pulse el botón SOURCE para seleccionar el modo PC.
Mediante la función de ajuste automático se puede establecer que el televisor se ajuste
automáticamente de acuerdo con las señales de vídeo que reciba.
La función también ajusta automáticamente con más precisión y ajusta los valores y las
posiciones de la frecuencia.
Pulse el botón TOOLS para ver el menú Herramientas. También puede establecer el
ajuste automático seleccionando
.
Esta función no se puede utilizar en modo DVI-HDMI.
Pantalla
Grueso / Fino
El objetivo del ajuste de la calidad de imagen es eliminar o reducir las interferencias. Si el ruido
no desaparece sólo con la sintonización fina, realice los ajustes de frecuencia hasta el máximo
(Grueso) y vuelva a realizar la sintonización fina. Después de reducir el ruido, vuelva a ajustar
la imagen para que quede alineada en el centro de la pantalla.
Posición de PC
Ajuste la posición de la pantalla del PC si no se acopla a la pantalla del TV
.
Pulse los botones ▲ o ▼ para ajustar la posición vertical. Pulse los botones ◄ o ► para
ajustar la posición horizontal.
Restablecer imagen
Puede recuperar todos los ajustes de imagen predeterminados de fábrica.
¦
N
❑
T
N
❑
■
■
■
Brillo :45
Nitidez :50
Ajusteautomático ▶
Pantalla
Configuraciónavanzada
Opcionesdeimagen
Reiniciodelaimagen
Imagen
Grueso 50
Fino 0
Posición
dePC
Restablecerimagen
U
Mover
E
Entrar
R
Volver
Pantalla
[620-Weuro]BN68-02326A-03L09.ind19 19 2009-10-08 ¿ÀÀü 9:29:52

Español - 20
SONIDO
Configuración del menú de sonido
Pulse el botón TOOLS para ver el menú Herramientas. También puede congurar el modo
del sonido seleccionando .
: Selecciona el modo de sonido normal.
Música: Realza la música respecto de las voces.
Película: Proporciona el mejor sonido para ver películas.
Voz clara: Realza las voces respecto de los sonidos.
Personal: Recupera la configuración de sonido personalizada.
Ecualizador
Es posible ajustar los parámetros del sonido según las preferencias personales.
Modo: Selecciona el modo de sonido entre los valores predefinidos.
Balance L/R: Ajusta el balance entre los altavoces izquierdo y derecho.
100Hz / 300Hz / 1KHz / 3KHz / 10KHz (ajuste de ancho de banda): Para ajustar el nivel de las diferentes frecuencias de
ancho de banda
Rest.: Restablece todos los ajustes predeterminados del ecualizador.
SRS TruSurround HD es una tecnología SRS patentada que solventa el problema de reproducir contenido multicanal 5.1 en dos
altavoces. TruSurround proporciona una experiencia de sonido virtual convincente a través de cualquier sistema de reproducción
con dos altavoces, incluso con los altavoces internos del televisor. Es totalmente compatible con todos los formatos multicanal.
Pulse el botón TOOLS para ver el menú Herramientas. También puede establecer SRS TruSurround HD seleccionando
.
Idioma de audio
Se pueden cambiar los valores predeterminados para los idiomas del audio. Muestra la información del idioma para el flujo de
entrada.
Cuando se visualiza un canal digital se puede seleccionar esta opción.
Sólo se puede seleccionar uno de los idiomas que ofrece la emisora.
Cuando el sonido se emite desde un altavoz principal y un receptor de audio, se puede originar un sonido de eco debido a las
diferencias en la velocidad de decodificación entre el altavoz principal y el receptor de audio. En tales casos, use la función
Altavoz de TV.
Cuando se visualiza un canal digital se puede seleccionar esta opción.
El formato de audio aparece según el tipo de señal de emisión.
Descripción de audio
Es una función auxiliar de audio que proporciona una pista de audio adicional para personas con problemas de vista. Esta función
maneja el flujo de audio de AD (Descripción de audio) cuando se envía desde el emisor con el audio principal. Los usuarios
pueden activar o desactivar la descripción de audio y controlar el volumen.
Pulse el botón AD del mando a distancia para seleccionar Des. o Act..
Activa y desactiva la función de descripción de audio.
Volumen
Puede ajustar el volumen de la descripción de audio.
Volumen está activo cuando Descripción de audio se configura como Act..
Cuando se visualiza un canal digital se puede seleccionar esta opción.
Cada emisora tiene sus propias condiciones de señal y resulta incómodo ajustar el volumen cada vez que se cambia de canal.
Esta función permite ajustar automáticamente el volumen de un canal disminuyendo la salida de sonido cuando la señal de
modulación es alta o aumentando la salida de sonido cuando la señal de modulación es baja.
¦
❑
T
●
●
●
●
●
❑
●
●
●
●
❑
T
❑
N
N
❑
N
N
❑
O
■
■
N
N
❑
Modo :Personal ▶
Ecualizador
SRSTruSurroundHD :Des.
Idiomadeaudio :----
Formatodeaudio :----
Descripcióndeaudio
Volumenautomático :Des.
Seleccionaraltavoz :AltavozdeTV
Sonido
[620-Weuro]BN68-02326A-03L09.ind20 20 2009-10-08 ¿ÀÀü 9:29:52

Español - 21
Seleccionar altavoz
Cuando se ve el televisor conectado a un sistema Home Theatre, se debe apagar los altavoces del televisor para que la salida de
audio del televisor utilice los altavoces del Home Theatre (externos).
Altavoz externo: Utiliza los altavoces externos (Home Cinema) para la salida del sonido.
Altavoz de TV: Utiliza los altavoces del TV para la salida del sonido.
Los botones del volumen y MUTE no funcionan cuando Seleccionar altavoz está configurado como Altavoz externo.
Si se selecciona Altavoz externo en el menú Seleccionar altavoz se limita la configuración del sonido
Altavoces internos del televisor Salida de audio (óptica,R/L Out) para el sistema
de sonido
RF / AV / Componente / PC / HDMI RF / AV / Componente / PC / HDMI
Altavoz TV Salida de sonido Salida de sonido
Altavoz externo Silencio Salida de sonido
Sin señal del vídeo Silencio Silencio
Puede restaurar la configuración del sonido con los valores predeterminados de fábrica.
Rest. modo sonido: Se restablecen los valores del sonido predeterminados.
Selección del modo de sonido
Puede seleccionar el modo de sonido pulsando el botón DUAL. Al pulsarlo, en la pantalla aparece el modo de sonido actual.
Tipo de audio Dual 1 / 2 Predeterminado
A2 estéreo
Mono MONO
Cambio automático
Estéreo Estéreo ↔ MONO
Dual DUAL 1 ↔ DUAL 2 DUAL 1
NICAM
estéreo
Mono MONO
Cambio automático
Estéreo MONO ↔ Estéreo
Dual
MONO ↔ DUAL 1
DUAL 2
DUAL 1
Si la señal de estéreo es débil y el modo cambia de forma automática, cambie a mono.
Esta función sólo está activa en la señal de sonido estéreo. Está desactivada en la señal de sonido monoaural.
Esta función sólo está disponible en el modo TV.
❑
●
●
N
N
❑
N
¦
N
N
N
Reiniciodelsonido
L
Mover
E
Entrar
R
Volver
Seleccionelasopcionespararestablecerelsonido.
Restablecertodo Rest.modosonido Cancelar
[620-Weuro]BN68-02326A-03L09.ind21 21 2009-10-08 ¿ÀÀü 9:29:53

Español - 22
Configuración
Configuración del menú de configuración
Idioma del menú
Se puede establecer el idioma de los menús.
Hora
Para conocer el procedimiento detallado sobre las opciones de configuración, consulte la
instrucciones de ‘Configuración de la hora’.
Emisión
Subtítulos
Se pueden activar o desactivar los subtítulos. Use este menú para configurar el modo de subtítulo. Normal es la opción básica y
Duro de oído es la opción para personas con problemas de audición.
Activa o desactiva los subtítulos.
Ajusta el modo de la función de subtítulos.
Idioma de los subtítulos
Establece el idioma de los subtítulos.
Si el programa que se está viendo no admite la opción Duro de oído, automáticamente se activa Normal aunque se
seleccione Duro de oído.
El inglés es el idioma predeterminado cuando en una emisión no está disponible la selección de idiomas.
Puede seleccionar estas opciones pulsando el botón SUBT. del mando a distancia.
(sólo RU)
Si el programa se emite con texto digital, esta opción está activada.
MHEG (Multimedia and Hypermedia Information Coding Experts Group-Grupo de expertos para la codicación de la
información hipermedia y multimedia)
Es una norma internacional para los sistemas de codificación de datos que se utilizan en hipermedia y multimedia. Es un
nivel superior al sistema MPEG que incluye hipermedia vinculado a datos, como imágenes fijas, servicios de caracteres,
animaciones, gráficos y archivos de vídeo así como datos multimedia. MHEG es una tecnología de interacción de tiempo de
ejecución del usuario que se aplica en varios campos, como VOD (vídeo a la carta), ITV (televisión interactiva), EC (comercio
electrónico), educación a distancia, teleconferencias, bibliotecas digitales y juegos de red.
Idioma del teletexto
Se puede configurar el idioma del teletexto seleccionando el tipo de idioma.
El inglés es el idioma predeterminado cuando en una emisión no está disponible la selección de idiomas.
Preferencia
Idioma principal audio / Idioma secundario audio / Idioma princ. subtítulos / Idioma sec. subtítulos /
Idioma principal del teletexto / Idioma secundario del teletexto
Con esta función los usuarios pueden seleccionar uno de los idiomas. El idioma seleccionado aquí se convierte en el
predeterminado cuando se selecciona un canal.
Si se cambia la configuración del idioma, las opciones de idioma de los subtítulos, del audio o del teletexto del menú de
idioma se cambian automáticamente al idioma seleccionado.
Las opciones de idioma de los subtítulos, del audio y del teletexto, del menú de idioma, muestran una lista de los idiomas
admitidos en el canal actual y la selección se resalta. Si cambia la configuración del idioma, ésta sólo es válida en el canal
actual. Los cambios de configuración no afectan a las opciones de idioma principal de los subtítulos, del audio o del teletexto
del menú de preferencias.
¦
❑
❑
❑
■
●
●
●
N
N
O
■
N
■
N
■
●
Plug&Play
Idiomadelmenú :Español ▶
Hora
Emisión
Seguridad
General
Configuración
[620-Weuro]BN68-02326A-03L09.ind22 22 2009-10-08 ¿ÀÀü 9:29:53

Español - 23
Interfaz común
Menú CI
Permite al usuario realizar selecciones en el menú CAM proporcionado.
Seleccione el menú CI según el menú de la tarjeta PC.
Info. sobre la aplicación
La interfaz común contiene y muestra información acerca del CAM insertado en la ranura CI. La información de la aplicación
insertada se refiere a la ‘TARJETA CI(CI+)’. La instalación del CAM puede efectuarse con el televisor encendido o apagado.
1.
Puede adquirir el módulo del CAM de CI por teléfono o en el distribuidor más cercano a su domicilio.
2.
Inserte la ‘TARJETA CI(CI+)’ en el CAM siguiendo la dirección de la flecha hasta que encaje.
3.
Inserte el CAM con la ‘TARJETA CI(CI+)’ instalada en la ranura para interfaz común. (Inserte el CAM, siguiendo la
dirección de la flecha, hasta el fondo, de modo que quede paralelo a la ranura.)
4.
Compruebe si se ven imágenes en un canal de señal codificada.
Seguridad (Según el modelo)
Antes de que se muestre la pantalla de configuración, aparece la pantalla para la introducción del código PIN. Escriba su
código PIN de 4 dígitos.
El código PIN predeterminado para un televisor nuevo es ‘0-0-0-0’. Se puede cambiar el PIN seleccionando Cambiar PIN en
el menú.
Algunos modelos requieren el código PIN cuando se utiliza Plug & Play.
Esta función permite bloquear el vídeo y el audio para evitar que los usuarios no autorizados (por ejemplo, los niños) puedan ver
programas poco recomendables.
Se pueden bloquear algunos canales en la lista de canales.
Segur. niños sólo está disponible en el modo TV.
Bloqueo paterno
Con esta función se puede impedir por medio de un código PIN (número de identificación personal) de 4 dígitos definido por el
usuario que personas no autorizadas, como los niños, vean programas inadecuados.
El elemento Bloqueo paterno difiere según el país.
Una vez establecido Bloqueo paterno, se muestra el símbolo ‘\’.
Perm. todo: Se pulsa para desbloquear todos los programas de televisión.
Bloq. todo: Se pulsa para bloquear todos los programas de televisión.
Cambiar PIN
Se puede cambiar el número ID personal necesario para configurar el televisor.
Si ha olvidado el código PIN, pulse los botones del mando a distancia en la siguiente secuencia para reiniciar el PIN a 0-0-0-
0: POWER (Apagar)
(Encender).
General
Cuando se conecta una videoconsola como PlayStation™ o Xbox™, se puede experimentar una sensación más realista al
seleccionar el menú de juegos.
Restricciones en el modo de juegos (precauciones)
Para desconectar la consola de videojuegos y conectar otro dispositivo externo, configure Modo Juego en Des. en el
menú de configuración
Cuando se muestra el menú de TV en el Modo Juego, la pantalla tiembla ligeramente.
Modo Juego no está disponible en los modos normales de TV, PC y Ext.
Si la imagen es deficiente cuando se conecta el dispositivo externo al televisor, compruebe si el Modo Juego está en Act. .
Configure Modo Juego en Des. y conecte los dispositivos externos.
Si Modo Juego está activado:
El modo de imagen cambia automáticamente a y no se puede cambiar.
El modo de sonido cambia automáticamente a Personal y no se puede cambiar. Ajuste el sonido con el ecualizador.
La función para establecer el sonido está activada. Si selecciona la función de restablecer el sonido después de configurar el
ecualizador, la configuración de éste recupera los parámetros predeterminados de fábrica.
■
●
●
❑
N
N
N
■
N
N
■
N
N
N
■
N
❑
■
N
N
N
N
N
[620-Weuro]BN68-02326A-03L09.ind23 23 2009-10-08 ¿ÀÀü 9:29:53

Español - 24
Esta función ajusta el brillo del televisor, lo cual reduce el consumo de energía. Si desea ver la televisión por la noche, ajuste la
opción del modo Ahorro energía en Alto; sus ojos se lo agradecerán y, además, reducirá el consumo de energía.
Si se selecciona Imagen desact., la pantalla se apaga y sólo se puede oír el sonido. Pulse cualquier botón para salir de
Imagen desact..
En el menú Herramientas, la función Imagen desact. no se admite.
Pulse el botón TOOLS para ver el menú Herramientas. También puede configurar esta opción seleccionando
.
Puede definir la transparencia de los menús.
Se puede establecer un sonido de melodía que se oiga cuando el televisor se encienda o se apague.
La melodía no se reproduce
Cuando no hay salida de sonido desde el televisor porque se ha activado el botón MUTE.
Cuando no hay salida de sonido desde el televisor porque se ha reducido al mínimo con el botón de volumen (-).
Cuando la función de temporizador ha apagado el televisor.
Configuración de la hora
Reloj
Para usar las diferentes funciones del temporizador del televisor es necesario configurar el
reloj.
La hora actual aparecerá siempre que se pulse el botón INFO.
Si desconecta el cable de alimentación, debe configurar el reloj de nuevo.
Modo de reloj
Se puede configurar la hora actual manual o automáticamente.
Auto: Configure la hora automáticamente mediante la información de la hora de la emisión
digital.
Manual: Configure la hora actual manualmente.
Según la emisora y la señal, la hora automática no se puede ajustar correctamente. En
este caso, ajuste la hora manualmente.
La antena y el cable se deben conectar para ajustar la hora automáticamente.
Ajustar hora
Se puede configurar la hora actual manualmente.
Esta función sólo está disponible si Modo de reloj está configurado como Manual.
Puede ajustar el día, el mes, el año, la hora y el minuto directamente pulsando los botones numéricos del mando a distancia.
Temp. desc.
El temporizador de desconexión apaga automáticamente el televisor después de un período prefijado (30, 60, 90, 120, 150 y 180
minutos).
Pulse el botón TOOLS para ver el menú Herramientas. También puede configurar el temporizador seleccionando
.
Para cancelar la función Temp. desc. seleccione Des..
Temporizador 1 / Temporizador 2 / Temporizador 3
La activación y desactivación del temporizador se puede configurar de tres maneras.
Debe ajustar el reloj en primer lugar.
Hora encendido
Puede configurar la hora y los minutos y activar o desactivar el temporizador.
(Para activar el temporizador con la configuración elegida, establézcalo en Activar.)
Hora apagado
Puede configurar la hora y los minutos y activar o desactivar el temporizador.
(Para activar el temporizador con la configuración elegida, establézcalo en Activar.)
■
N
T
■
■
N
¦
❑
N
N
■
●
●
N
N
■
N
N
❑
T
N
❑
■
■
Reloj :--:-- ▶
Temporizador :Des.
Temporizador1 :Desactivado
Temporizador2 :Desactivado
Temporizador3 :Desactivado
U
Mover
E
Entrar
R
Volver
Hora
Plug&Play
Idiomadelmenú :Inglés
Hora ▶
Emisión
Seguridad
General
Configuración
Horaencendido
L
Mover
U
Ajustar
E
Entrar
R
Volver
Temporizador1
Horaapagado
Volumen
00 00 Desactivar
00 00 Desactivar
10
Fuente Antena Canal
Televisor ATV 0
Repetir
Unavez
Dom Lun Mar Mié Jue Vie Sáb
[620-Weuro]BN68-02326A-03L09.ind24 24 2009-10-08 ¿ÀÀü 9:29:53

Español - 25
Volumen
Configure el nivel de volumen deseado.
Puede seleccionar el contenido de TV o del dispositivo USB que se reproducirá cuando el televisor se encienda automáticamente.
Seleccione TV o USB. (Compruebe que haya un dispositivo USB conectado al televisor.)
Antena (cuando FuenteTV)
Seleccione ATV o DTV.
Canal (cuando FuenteTV)
Permite seleccionar el canal deseado.
Contenido (cuando FuenteUSB)
Se puede seleccionar una carpeta del dispositivo USB con archivos de música o foto que se reproducirán cuando el televisor se
encienda automáticamente.
Si no hay archivos de música en el USB o no se ha seleccionado la carpeta que contenga los archivos de música, el
temporizador no funciona correctamente.
Si sólo hay un archivo de foto en el dispositivo USB, la presentación no se ejecutará.
Si el nombre de la carpeta es demasiado largo, ésta no se seleccionará.
Si el nombre de la carpeta que ha de configurar la función de contenidos es demasiado largo, aquélla no se seleccionará.
Repetir
Seleccione o Manual.
Con Manual seleccionado, pulse el botón ► para seleccionar el día de la semana. Pulse el botón ENTER
E
sobre el día
deseado y aparecerá la marca
c
.
Puede ajustar la hora, los minutos y el canal pulsando los botones numéricos del mando a distancia.
Si activa el temporizador, el televisor se apagará si no se pulsa ningún botón durante 3 horas, después de que el
temporizador lo haya puesto en marcha. Esta función sólo está disponible si el temporizador está activado y evita el
recalentamiento que se puede producir si el televisor está encendido durante demasiado tiempo.
■
■
■
■
■
N
N
N
N
■
N
N
N
[620-Weuro]BN68-02326A-03L09.ind25 25 2009-10-08 ¿ÀÀü 9:29:53

Español - 26
ENTRADA/AYUDA
Menú de entrada
Fuentes
Se utiliza para seleccionar TV u otras fuentes de entrada externas como reproductores de
DVD/Blu-ray o receptores
de cable o satélite (decodificadores), conectados al televisor. Permite seleccionar la fuente de
entrada que se prefiera.
Pulse el botón SOURCE del mando a distancia para ver una fuente de señal externa. El
modo TV se puede seleccionar pulsando el botón TV.
TV / Ext.1 / Ext.2 / AV / Component / PC/HDMI1 / HDMI2 / HDMI3/DVI / HDMI4
Puede elegir solamente los dispositivos externos que estén conectados al televisor. En
Fuentes, las entradas conectadas se resaltan y se ordenan en la parte superior. Las
entradas que no están conectadas se ordenan en la parte inferior.
Ext. y PC siempre permanecen activados.
Uso de los botones de colores del mando a distancia con la lista de fuentes
Rojo (Actualizar): Actualiza los dispositivos externos conectados. Púlselo si la fuente
está activada y conectada pero no se muestra en la lista.
TOOLS (Herramientas): Muestra los menús Editar nombre e Información.
Editar nombre
Blu-ray / HD DVD / DMA
Dé un nombre al dispositivo conectado en las tomas de entrada; de esta manera será más fácil seleccionar el dispositivo de
entrada.
Cuando se conecta un ordenador con una resolución de 1920 x 1080 a 60 Hz al puerto HDMI IN 3(DVI), se debe configurar el
modo HDMI3/DVI como DVI PC en Editar nombre del modo Entrada.
Cuando se conecta un cable HDMI/DVI al puerto HDMI IN 3(DVI), se debe establecer el modo HDMI3/DVI como DVI o
DVI PC en Editar nombre del modo Entrada. En este caso, se necesita una conexión de sonido independiente.
Menú de ayuda
Autodiagnóstico
Prueba de imagen
Si cree que tiene un problema con la imagen, efectúe la prueba de imagen. Compruebe el
patrón del color en la pantalla para ver si persiste el problema.
Sí: Si no se muestra el patrón de prueba o hay ruido en el patrón de prueba, seleccione Sí.
Puede haber un problema en el televisor. Por consiguiente, debe ponerse en contacto con
el centro de servicio de Samsung.
No: Si el patrón de prueba se muestra correctamente, seleccione No. Puede haber un
problema en el equipo externo. Compruebe las conexiones. Si persiste el problema,
consulte el manual del usuario del dispositivo externo.
Prueba de sonido
Si cree que tiene un problema con el sonido, efectúe la prueba de sonido. Puede comprobar el
sonido reproduciendo el sonido de una melodía incorporada a través del televisor
.
Si no oye sonido a través de los altavoces del televisor, antes de realizar la prueba de
sonido compruebe que Seleccionar altavoz está configurado como Altavoz de TV en el menú Sonido.
La melodía se oirá durante la prueba aunque Seleccionar altavoz esté establecido como Altavoz externo o se haya
silenciado el sonido con el botón MUTE.
Sí: Si durante la prueba de sonido sólo se oye sonido de un altavoz o no se oye sonido en ninguno, seleccione Sí. Puede
haber un problema en el televisor. Por consiguiente, debe ponerse en contacto con el centro de servicio de Samsung.
No: Si oye sonido desde los altavoces, seleccione No. Puede haber un problema en el equipo externo. Compruebe las
conexiones. Si persiste el problema, consulte el manual del usuario del dispositivo externo.
¦
❑
O
■
N
N
N
❑
■
N
N
¦
❑
■
●
●
■
N
N
●
●
Autodiagnóstico ▶
Softwaresuperior
GuíadeconexiónHD
ContactoconSamsung
Soportetécnico
Fuentes
Editarnombre
Entrada
Actualizar
T
Herramientas
Fuentes
TV
Ext.1 :----
Ext.2 :----
PC :----
AV :----
Componente :----
Autodiagnóstico
U
Mover
E
Entrar
R
Volver
Pruebadeimagen ▶
Pruebadesonido
Informacióndeseñal
[620-Weuro]BN68-02326A-03L09.ind26 26 2009-10-08 ¿ÀÀü 9:29:54

Español - 27
Información de señal (sólo canales digitales)
A diferencia de los canales analógicos, en los que puede variar la calidad de la recepción desde 'con nieve' hasta nítida, los
canales digitales (HDTV) tienen una calidad de recepción perfecta o no hay recepción. Por ello, a diferencia de los canales
analógicos, no se puede realizar una sintonización fina de un canal digital. Se puede, no obstante, ajustar la antena para mejorar
la recepción de los canales digitales disponibles.
Si el medidor de la intensidad de la señal indica que ésta es débil, mueva la antena para aumentar la intensidad de la señal.
Siga ajustando la antena hasta que encuentre la mejor posición para recibir la señal más fuerte.
Software superior
Samsung puede ofrecer actualizaciones para el firmware del televisor en el futuro. Estas
actualizaciones se pueden llevar a cabo a través del televisor cuando se conecta a Internet o
mediante la descarga del nuevo firmware de samsung.com al dispositivo de memoria USB.
Versión actual es el software ya instalado en el televisor.
Software alternativo (copia de seguridad) muestra la versión anterior que se sustituirá.
El software se representa como ‘Año/Mes/Día_versión’. Cuanto más reciente sea la fecha,
más nueva será la versión de software. Se recomienda la instalación de la última versión.
POR USB
Inserte una unidad USB que contenga la actualización del firmware descargado de samsung.
com. No desconecte la alimentación ni extraiga la unidad USB mientras se aplican las
actualizaciones. El televisor se apagará y se encenderá automáticamente después de
completar la actualización del firmware. Compruebe la versión del firmware después de que
hayan terminado las actualizaciones (la nueva versión tendrá un número superior a la anterior).
Cuando se actualiza el software, la configuración de vídeo y audio que se haya efectuado
vuelve a la configuración predeterminada (de fábrica). Es aconsejable anotar la configuración
para recuperarla fácilmente después de la actualización.
Por canal
Actualiza el software a través de una señal de emisión.
Si selecciona esta función durante la fase de transmisión del software, busca el software
disponible y lo descarga.
El tiempo necesario para la descarga del software lo determina el estado de la señal.
Modo suspensión
Para continuar con la actualización del software con el conmutador de encendido principal activado, actívelo pulsando los
botones ▲ o ▼. 45 minutos después de haber entrado en el modo de suspensión, se inicia automáticamente una actualización
manual. Dado que la alimentación de la unidad está activada internamente, la pantalla LCD puede encenderse ligeramente. Este
fenómeno puede durar 1 hora mientras la actualización del software se completa.
Software alternativo (copia de seguridad)
Si hay problemas con el nuevo firmware que afecten al funcionamiento, puede cambiar el software a la versión anterior
.
Si se ha cambiado el software, se muestra el software existente.
Puede cambiar el software actual a uno alternativo mediante ‘Software alternativo’.
Guía de conexión HD
Este menú presenta el método de conexión que proporciona la mejor calidad de imagen en el televisor de alta definición. Consulte
esta información cuando conecte dispositivos externos al televisor.
Contacto con Samsung
Revise esta información cuando el televisor no funcione correctamente o cuando desee actualizar el software. Puede ver la
información relacionada con el centro de llamadas, el producto y el método de descarga del archivo de software.
■
N
❑
N
N
N
■
■
N
N
■
■
N
N
❑
❑
Panel lateral del TV
Unidad USB
Versiónactual 2009/01/18_000001
PORUSB ▶
Porcanal
StandbyModeUpgrade :45Min
Softwarealternativo 2009/01/15_00000
U
Mover
E
Entrar
R
Volver
Softwaresuperior
[620-Weuro]BN68-02326A-03L09.ind27 27 2009-10-08 ¿ÀÀü 9:29:54

Español - 28
REPRODUCTOR MULTIMEDIA (USB)
Conexión de un dispositivo USB
1. Pulse el botón POWER para encender el televisor.
2. Conecte un dispositivo USB que contenga archivos de fotos o música al terminal USB del
lateral del televisor.
3.
Cuando se muestre la pantalla de selección Aplicación, pulse el botón ENTER
E
para
seleccionar Media Play (USB).
MTP (Protocolo de transferencia de recursos) no se admite.
El sistema de archivos admite FAT16, FAT32 y NTFS.
Ciertos tipos de cámara digital USB y dispositivos de audio quizás no sean compatibles
con este televisor.
Media Play sólo admite dispositivos USB de clase de almacenamiento
masivo (MSC). MSC es un dispositivo de clase de almacenamiento masivo
sólo de transporte de gran capacidad. Ejemplos de dispositivos MSC son
unidades de memoria y lectores de tarjetas flash (no son compatibles los
discos duros USB ni los HUB).
Conecte directamente al puerto USB del televisor. Si utiliza una conexión con
un cable independiente, puede haber problemas de compatibilidad con el
USB.
Antes de conectar el dispositivo al televisor, haga una copia de seguridad
de sus archivos para evitar daños o pérdidas de datos. SAMSUNG no se hace responsable por cualquier daño en los
archivos o pérdida de datos.
No desconecte el dispositivo USB mientras se esté cargando.
Cuanto mayor sea la resolución de la imagen, más tiempo tardará en visualizarse en la pantalla.
La resolución JPEG máxima admitida es 15360 x 8640 píxeles.
Con archivos dañados o que no se admiten, se muestra el mensaje ‘Formato de archivo no admitido’.
Los archivos MP3 con DRM descargados desde un sitio de pago no se pueden reproducir
. La tecnología Gestión de
derechos digitales (DRM) admite la creación de contenidos, la distribución y gestión de éstos de modo integrado y
general, incluida la protección de los derechos e intereses de los proveedores de los contenidos, la prevención de copias
ilegales de los contenidos, así como la gestión de cobros y acuerdos.
Cuando se desplaza a una foto, la carga puede tardar varios segundos. En este punto, aparecerá en la pantalla el icono
de carga.
Si hay más de un dispositivo MSC conectado, alguno de ellos quizás no se reconozca. Si un dispositivo exige mucha
energía (más de 500mA o 5 V), el dispositivo USB quizás no se admita.
Si se muestra un mensaje de advertencia de sobrealimentación al conectar o usar un dispositivo USB, es posible que el
dispositivo no se reconozca o que funcione incorrectamente.
Uso de los botones del mando a distancia en el menú Media Play.
Botón Función
▲/▼/◄/► Mover el cursor y seleccionar una opción.
ENTER
E
Seleccionar la opción marcada. Mientras se está reproduciendo una presentación de
diapositivas o un archivo de música:
- Pulsando el botón ENTER
E
durante la reproducción se hace una pausa en ésta.
- Pulsando el botón ENTER
E
durante la reproducción se reanuda ésta.
∂
/
∑
Reproducir o interrumpir el archivo de presentación de diapositivas o de música.
RETURN Volver al menú anterior.
TOOLS Ejecutar diversas funciones desde los menús de fotos y música.
∫
Detener el archivo de la presentación o de música.
π
/
μ
Saltar al grupo anterior/Saltar al grupo siguiente.
INFO Mostrar información del archivo.
MEDIA.P Salir del modo Media Play.
<
P
>
,
EXIT, TV
Detener el modo Media Play y volver al modo TV.
¦
N
N
N
N
N
N
N
N
N
N
N
N
N
N
Panel lateral del TV
Unidad USB
851,86MB/993,02MBFree
Photo
SUM
SUM
Dispositivo
PHOTO
R
Volver
Music Setup
[620-Weuro]BN68-02326A-03L09.ind28 28 2009-10-08 ¿ÀÀü 9:29:54

Español - 29
Media Play Funciones
Permite ver archivos de fotos y escuchar archivos de música guardados en un dispositivo de clase de almacenamiento masivo
(MSC) USB.
Puede que no funcione correctamente con archivos multimedia sin licencia.
Acceso al menú Media Play (USB)
1. Pulse el botón MENU. Pulse el botón ▲ o ▼ para seleccionar Aplicación y, a
continuación, pulse el botón ENTER
E
.
2. Pulse los botones ▲ o ▼ para seleccionar Media Play (USB) y, a continuación,
pulse el botón ENTER
E
.
Se muestra el menú Media Play (USB).
Pulse el botón MEDIA.P del mando a distancia para que se muestre el menú
Media Play.
Pulse el botón SOURCE del mando a distancia para ver la lista de fuentes.
Pulse los botones ▲ o ▼ para seleccionar USB.
3.
Pulse el botón rojo y, a continuación, los botones ▲ o ▼ para seleccionar la
memoria USB. Pulse el botón ENTER
E
.
La función varía según la memoria USB.
El nombre del dispositivo USB seleccionado aparece en la parte inferior izquierda de la pantalla.
4.
Pulse los botones ◄ o ► para seleccionar un icono (Photo, Music, Setup) y, a continuación, pulse el botón ENTER
E
.
Para salir del modo Media Play, pulse el botón MEDIA.P del mando a distancia.
Extracción segura del dispositivo de memoria USB
Se puede quitar el dispositivo del televisor con seguridad.
1. Pulse el botón TOOLS en la pantalla de la lista de archivos del reproductor
multimedia o mientras se está reproduciendo un presentación de diapositivas o
música.
2.
Pulse el botón ▲ o ▼ para seleccionar Retirar con seguridad y, a continuación,
pulse el botón ENTER
E
.
3. Retire el dispositivo USB del televisor.
Pantalla de visualización
Vaya a ‘Sección de la lista de grupos’o ‘Sección de la lista de archivos’ con los botones arriba/abajo. Después de seleccionar una
sección, pulse los botones ◄ o ► para seleccionar un elemento.
¦
N
N
O
O
N
N
N
INFO
AD
INFO
AD
851,86MB/993,02MBFree
Photo
SUM
SUM
Dispositivo
PHOTO
R
Volver
Music Setup
SUM Dispositivo
Selecc.
T
Herramientas
R
Carpetasuperior
1234.jpg
1235.jpg
1236.jpg
1237.jpg
1233.jpg
1232.jpg
1231.jpg
Secuencia
Rep.gr.act.
Información
Retirar
conseguridad
5/15
1 2
../Photo/
Sección de la lista de grupos
Sección de la lista de archivos
SUM Dispositivo
Selecc.
T
Herramientas
R
Carpetasuperior
1234.jpg
1235.jpg
1236.jpg
1237.jpg
1233.jpg
1232.jpg
1231.jpg
1File(s)Selected
2
3 5
4
1 2
1
5/15
c
../Photo/
[620-Weuro]BN68-02326A-03L09.ind29 29 2009-10-08 ¿ÀÀü 9:29:58

Español - 30
1 Ver grupos: El grupo de clasificación que incluye el archivo seleccionado se resalta.
2 Archivo actualmente seleccionado: Sólo se puede controlar el archivo seleccionado. Los archivos de fotos se muestran como
miniaturas.
3 Dispositivo actual: Muestra el nombre del dispositivo actualmente seleccionado. Pulse el botón rojo para seleccionar un
dispositivo.
Botón rojo (Dispositivo): Selecciona un dispositivo conectado.
4 Información de selección del elemento: Muestra el número de archivos que se han seleccionado mediante la pulsación del
botón amarillo.
5 Elementos de ayuda
Botón amarillo (Selecc.): Selecciona un archivo en la lista de archivos. Los archivos seleccionados se marcan con un
símbolo
c
. Vuelva a pulsar el botón amarillo para cancelar la selección del archivo.
TOOLS (Herramientas): Muestra los menús de opciones. (El menú de opciones cambia de acuerdo con el estado
actual.)
Menús de opciones de la lista de fotos
1. Pulse el botón MEDIA.P.
2. Pulse los botones ◄ o ► para seleccionar Photo y, a continuación, pulse el
botón ENTER
E
.
3. Pulse los botones ◄ o ► para seleccionar el archivo de fotos deseado.
Selección de varias fotos
Pulse los botones ◄ o ► para seleccionar el archivo de fotos deseado.
A continuación pulse el botón amarillo.
Repita el proceso anterior para seleccionar varios archivos de fotos.
Junto al archivo de fotos seleccionado aparece la marca
c
.
4. Pulse el botón TOOLS.
El menú de opciones cambia de acuerdo con el estado actual.
Secuencia
Con este menú puede realizar una presentación de diapositivas de los archivos de fotos del dispositivo de memoria USB .
Rep.gr. act.
Con este menú se puede realizar una presentación de diapositivas de los archivos de fotos del grupo de clasificación actualmente
seleccionado.
Deselecc. todos (Si hay, al menos, un archivo seleccionado)
Puede cancelar la selección de todos los archivos.
La marca
c
indica que el archivo correspondiente seleccionado está oculto.
Información
Se muestra la información del archivo de foto: nombre, tamaño, resolución, fecha de modificación y ruta.
Se puede ver la información de los archivos de fotos durante la presentación siguiendo el mismo procedimiento.
Pulse el botón INFO para ver la información.
Retirar con seguridad
Se puede quitar el dispositivo del televisor con seguridad.
¦
N
N
❑
❑
❑
N
❑
N
O
❑
INFO
AD
SUM Dispositivo
Selecc.
T
Herramientas
R
Carpetasuperior
1234.jpg
1235.jpg
1236.jpg
1237.jpg
1233.jpg
1232.jpg
1231.jpg
Secuencia
Rep.gr.act.
Información
Retirar
conseguridad
5/15
1 2
../Photo/
[620-Weuro]BN68-02326A-03L09.ind30 30 2009-10-08 ¿ÀÀü 9:29:59

Español - 31
Visualización de una foto o una presentación
Visualización de una presentación
1. Pulse el botón ▼ para seleccionar la sección de la lista de archivos.
2. Pulse el botón TOOLS.
3.
Pulse el botón ▲ o ▼ para seleccionar Secuencia y, a continuación, pulse el
botón ENTER
E
.
En la presentación se usan todos los archivos de la sección de la lista de
archivos.
En la presentación, los archivos se muestran en orden a partir del archivo que se
muestra en este momento.
La presentación se ejecuta según el orden de la clasificación de la sección de la
lista de archivos.
Los archivos se música se pueden reproducir automáticamente durante la
presentación si Música de fondo está configurado como Act..
Cuando se muestre una lista de fotos, pulse el botón
∂
(reproducir)/ENTER
E
del mando a distancia para iniciar la presentación.
Botones de control de la presentación
Botón Función
ENTER
E
Reproducir/hacer una pausa en la presentación.
∂
Reproducir la presentación.
∑
Hacer una pausa en la presentación.
∫
Salir de la presentación y volver a la lista de fotos.
π
/
μ
Cambiar la velocidad de la reproducción de la
presentación.
TOOLS Ejecutar varias funciones de los menús de fotos.
Reproducción del grupo actual
1. Pulse el botón ▲ para ir a la sección de la lista de grupos.
2. Seleccione un grupo con los botones ◄ y ►.
3.
Pulse el botón
∂
(reproducir). Se inicia la presentación de diapositivas de los
archivos del grupo seleccionado.
Otra posibilidad
1.
Seleccione los archivos en la sección de la lista de archivos incluidos en el grupo deseado.
Para ir al grupo anterior/siguiente, pulse los botones
π
(REW) o
μ
(FF) .
2. Pulse el botón TOOLS.
3.
Pulse el botón ▲ o ▼ para seleccionar Rep.gr. act. y, a continuación, pulse el botón ENTER
E
.
En la presentación se usan sólo las fotos del grupo de clasificación que incluye los archivos seleccionados.
Para ver una presentación sólo con los archivos seleccionados
1. Pulse el botón ▼ para seleccionar la sección de la lista de archivos.
2. Pulse los botones ◄ o ► para seleccionar la foto que desee en la sección de la lista de archivos.
3.
Pulse el botón amarillo.
4.
Repita el proceso anterior para seleccionar varias fotos.
La marca
c
aparece a la izquierda de la foto seleccionada.
Si selecciona sólo un archivo, la presentación no se efectuará.
Para cancelar la selección de los archivos, pulse el botón TOOLS y seleccione Deselecc. todos.
5.
Pulse el botón
∂
(reproducir)/ENTER
E
.
Los archivos seleccionados se usan en la presentación.
¦
N
N
N
N
O
N
●
N
N
N
N
N
N
INFO
AD
E
Pausa◀▶Ant./Sig.
T
Herramientas
R
Volver
SUM
1234.jpg
580x7652009/03/025/15
▶Normal
SUM Dispositivo
Selecc.
T
Herramientas
R
Carpetasuperior
1234.jpg
1235.jpg
1236.jpg
1237.jpg
1233.jpg
1232.jpg
1231.jpg
Secuencia
Rep.gr.act.
Información
Retirar
conseguridad
5/15
1 2
../Photo/
SUM Dispositivo
Selecc.
T
Herramientas
R
Carpetasuperior
1234.jpg
1235.jpg
1236.jpg
1237.jpg
1233.jpg
1232.jpg
1231.jpg
5/15
1 2
../Photo/
[620-Weuro]BN68-02326A-03L09.ind31 31 2009-10-08 ¿ÀÀü 9:30:03

Español - 32
Otra posibilidad
1. En la sección de la lista de archivos, pulse los botones amarillos para seleccionar las fotos deseadas.
2.
Pulse el botón TOOLS.
3.
Pulse el botón ▲ o ▼ para seleccionar Secuencia y, a continuación, pulse el botón ENTER
E
.
Los archivos seleccionados se usan en la presentación.
Menú de opciones de la presentación de diapositivas
1. Durante una presentación (o la visualización de una foto), pulse el botón TOOLS
para establecer una opción.
2.
Pulse el botón ▲ o ▼ para seleccionar la opción deseada y, a continuación, pulse
el botón ENTER
E
.
Se puede iniciar o detener una presentación.
Se puede seleccionar la velocidad de la presentación.
Esta función está disponible sólo durante la presentación.
Durante la presentación, también se puede cambiar la velocidad de ésta pulsando el botón
π
(REW) o
μ
(FF).
Girar
Puede girar las fotos guardadas en el dispositivo de memoria USB.
Con cada pulsación del botón ◄, la imagen gira 270˚, 180˚, 90˚ y 0˚.
Con cada pulsación del botón ►, la imagen gira 90˚, 180˚, 270˚ y 0˚.
El archivo girado no se guarda.
Zoom
Puede ampliar las fotos guardadas en el dispositivo de memoria USB. (x1 → x2 → x4)
Para mover una foto ampliada, pulse el botón ENTER
y, a continuación, los botones ▲/▼/◄/►. Tenga en cuenta que si una
imagen ampliada es menor que el tamaño de la pantalla original, la función de cambio de ubicación no está operativa.
El archivo ampliado no se guarda.
Música de fondo
Puede seleccionar una música de fondo para la presentación.
Para usar esta función, en el dispositivo USB debe haber archivos de música y fotos almacenados.
Des.: La música de fondo no se reproduce.
Act.: Cuando la música de fondo está disponible, si selecciona Act., la música se reproducirá.
Seleccionar archivo de música (0 Archivos selecc.)
Sólo el archivo de música seleccionado se configura como música de fondo.
Configuración de la imagen / Configuración del sonido
Puede seleccionar la configuración de la imagen y el sonido.
Información
Se muestra la información del archivo de foto.
Retirar con seguridad
Se puede quitar el dispositivo del televisor con seguridad.
●
N
¦
❑
❑
N
N
❑
N
N
N
❑
N
N
❑
N
■
●
●
■
❑
❑
❑
Detenerpresentación
Vel.secuencia : Normal
Girar
Zoom
Música
defondo
Configuracióndelaimagen
Configuracióndelsonido
Información
Retirar
conseguridad
U
Mover
E
Entrar
e
Salir
Herramientas
[620-Weuro]BN68-02326A-03L09.ind32 32 2009-10-08 ¿ÀÀü 9:30:03

Español - 33
Menú de opciones de la lista de música
1. Pulse el botón MEDIA.P.
2. Pulse los botones ◄ o ► para seleccionar Music y, a continuación, pulse el
botón ENTER
E
.
3. Pulse los botones ◄ o ► para seleccionar el archivo de música que desee.
Selección de varios archivos de música
Pulse los botones ◄ o ► para seleccionar el archivo de música que
desee. A continuación pulse el botón amarillo.
Repita el proceso anterior para seleccionar varios archivos de música.
Junto al archivo de música seleccionado aparece la marca
c
.
4. Pulse el botón TOOLS.
El menú de opciones cambia de acuerdo con el estado actual.
Rep.gr. act.
Con este menú sólo puede reproducir archivos de música del grupo de clasificación actualmente seleccionado.
Deselecc. todos (Si hay, al menos, un archivo seleccionado)
Puede cancelar la selección de todos los archivos.
La marca
c
indica que el archivo correspondiente seleccionado está oculto.
Información
Se muestra la información del archivo de música: nombre, tamaño, fecha de modificación y ruta.
Puede ver la información de los archivos de música al Rep.gr. act. con el mismo procedimiento.
Pulse el botón INFO para ver la información.
Retirar con seguridad
Se puede quitar el dispositivo del televisor con seguridad.
¦
N
N
❑
❑
N
❑
N
O
❑
INFO
AD
SUM Dispositivo
Selecc.
T
Herramientas
R
Carpetasuperior
HaHaHa
Gold
Shine
Way
Want
Me
Lies
ILoveYou
GlenHans
OnceOst
2007
Soundtrack
3/37
Enérgico
Rep.gr.act.
Información
Retirar
conseguridad
5 1 2 34
../Music/
[620-Weuro]BN68-02326A-03L09.ind33 33 2009-10-08 ¿ÀÀü 9:30:04

Español - 34
Reproducción de música
Reproducción de un archivo de música
1. Pulse el botón ▼ para seleccionar la sección de la lista de archivos.
2. Pulse los botones ◄ o ► para seleccionar el archivo de música que desee.
3.
Pulse el botón
∂
(reproducir)/ENTER
E
.
Este menú sólo muestra archivos con la extensión MP3. Los archivos con
otras extensiones no se muestran, aunque se hayan guardado en el mismo
dispositivo USB.
El archivo seleccionado se visualiza en la parte superior con su tiempo de
reproducción.
Para ajustar el volumen de la música, pulse el botón del volumen del mando
a distancia. Para silenciar el sonido, pulse el botón MUTE del mando a distancia.
Si, al reproducir archivos MP3, el sonido no se oye correctamente, ajuste Equalizer y SRS TruSurround HD en el menú
Sonido. (Un archivo MP3 con una modulación excesiva puede causar problemas de sonido.)
La duración de la reproducción de un archivo de música puede visualizarse como ‘00:00:00’
si la información del tiempo
de reproducción no se encuentra al inicio del archivo.
π
(REW) o
μ
(FF) no funcionan durante la reproducción.
Botones de control de la reproducción de música
Botón Función
ENTER
E
Reproducir/hacer una pausa en el archivo de música.
∂
Reproducir el archivo de música.
∑
Hacer una pausa en el archivo de música.
∫
Salir del modo de reproducción y volver a la lista de música.
TOOLS Ejecutar varias funciones de los menús de música.
Icono de información de la función de la música
p
Cuando todos los archivos de música de la carpeta (o el archivo seleccionado) se repiten.
Modo de repetición está Act..
q
Cuando todos los archivos de música de la carpeta (o el archivo seleccionado) se reproducen
una vez. Modo de repetición está Des..
Reproducción de un grupo de música
1. Pulse el botón ▲ para ir a la sección de la lista de grupos.
2. Seleccione un grupo con los botones ◄ y ►.
3.
Pulse el botón
∂
(reproducir). Se inicia la reproducción de los archivos del grupo seleccionado.
Otra posibilidad
1.
Seleccione los archivos en la sección de la lista de archivos incluidos en el grupo deseado.
Para ir al grupo anterior/siguiente, pulse los botones
π
(REW) o
μ
(FF) .
2. Pulse el botón TOOLS.
3.
Pulse el botón ▲ o ▼ para seleccionar Rep.gr. act. y, a continuación, pulse el botón ENTER
E
.
Se reproducen los archivos de música incluidos en el archivo seleccionado.
Reproducción de archivos de música seleccionados
1. Pulse el botón ▼ para seleccionar la sección de la lista de archivos.
2. Pulse los botones ◄ o ► para seleccionar el archivo de música deseado.
3.
Pulse el botón amarillo.
4.
Repita el proceso anterior para seleccionar varios archivos de música.
La marca
c
aparece a la izquierda del archivo de música seleccionado.
Para cancelar la selección de los archivos, pulse el botón TOOLS y seleccione Deselecc. todos.
5.
Pulse el botón
∂
(reproducir)/ENTER
E
.
Se reproducen los archivos seleccionados.
¦
N
N
N
N
N
N
N
N
●
N
N
N
N
N
E
Pausa◀▶Ant./Sig.
T
Herramientas
R
Volver
SUM
ILoveYou
HaHaHaWay
▶00:00:04/00:04:043/37
[620-Weuro]BN68-02326A-03L09.ind34 34 2009-10-08 ¿ÀÀü 9:30:05

Español - 35
Menú de opciones de la reproducción de música
Menú de opciones de la reproducción de música
Puede reproducir archivos de música repetidamente.
Configuración de la imagen / Configuración del sonido
Puede ajustar la configuración de la imagen y del sonido.
Información
Se muestra la información del archivo de música.
Retirar con seguridad
Se puede quitar el dispositivo del televisor con seguridad.
¦
❑
❑
❑
❑
Uso del menú de configuración
Muestra la configuración del usuario del menú Media Play.
1. Pulse el botón MEDIA.P.
2.
Pulse los botones ◄ o ► para seleccionar Setup y, a continuación, pulse el botón
ENTER
E
.
3. Pulse el botón ▲ o ▼ para seleccionar la opción deseada.
4.
Pulse el botón ◄ o ► para seleccionar la opción deseada.
Para salir del modo Media Play, pulse el botón MEDIA.P del mando a
distancia.
Puede seleccionar que los archivos de música se repitan continuamente.
Puede configurar el tiempo de espera necesario para que se ejecute el salvapantallas.
Información
Puede configurar que se muestre la información del dispositivo conectado.
Retirar con seguridad
Se puede quitar el dispositivo del televisor con seguridad.
¦
N
■
■
■
■
Mododerepetición ◀Act.▶
Configuracióndelaimagen
Configuracióndelsonido
Información
Retirar
conseguridad
U
Mover
L
Ajustar
e
Salir
Herramientas
851,86MB/993,02MBFree
Photo
SUM
SUM
Dispositivo
Setup
e
Salir
Music Setup
Mododerepetición ◀Act.▶
Tiempoej.salvapantallas :2horas
Información
Retirar
conseguridad
U
Mover
L
Ajustar
R
Volver
SUM Dispositivo
[620-Weuro]BN68-02326A-03L09.ind35 35 2009-10-08 ¿ÀÀü 9:30:05

Español - 36
ACERCA DE ANYNET
+
Conexión de dispositivos Anynet
+
+
?
Anynet
+
es una función que permite controlar con el mando a distancia del televisor Samsung todos los dispositivos de Samsung
conectados que sean compatibles con Anynet
+
. El sistema Anynet
+
sólo se puede usar con dispositivos de Samsung que tengan la
función Anynet
+
. Para asegurarse de que el dispositivo de Samsung tenga dicha función, compruebe si lleva el logotipo Anynet
+
.
Para conectar al televisor
1. Conecte el terminal HDMI IN (1, 2, 3(DVI) o 4) del televisor y el terminal HDMI OUT del dispositivo Anynet
+
correspondiente
mediante un cable HDMI.
Para conectar al sistema Home Cinema
1. Conecte el terminal HDMI IN (1, 2, 3(DVI) o 4) del televisor y el terminal HDMI OUT del dispositivo Anynet
+
correspondiente
mediante un cable HDMI.
2. Conecte el terminal HDMI IN del sistema Home Cinema y el terminal HDMI OUT del dispositivo
Anynet
+
correspondiente
mediante un cable HDMI.
Conecte el cable óptico entre el terminal DIGITAL AUDIO OUT (OPTICAL) del televisor y la entrada de audio digital del
sistema Home Cinema.
Si se sigue la conexión anterior, el terminal Optical sólo produce la salida de 2 canales de audio. Sólo oirá sonido de los
altavoces frontales izquierdo y derecho y del subwoofer del sistema Home Theatre. Para escuchar el canal de audio 5.1,
conecte el terminal DIGITAL AUDIO OUT (OPTICAL) del DVD/decodificador de satélite (es decir, dispositivo Anynet 1 o
2) directamente al amplificador o sistema Home Cinema, no al televisor.
Conecte sólo un sistema Home Cinema.
Puede conectar un dispositivo Anynet
+
mediante el cable HDMI 1.3. Algunos cables HDMI pueden no admitir las
funciones Anynet
+
.
Anynet
+
funciona cuando el dispositivo de AV que admite Anynet
+
se encuentra en estado de espera o de encendido.
Anynet
+
admite hasta 12 dispositivos de AV en total. Tenga en cuenta que puede conectar hasta 3 dispositivos del mismo
tipo.
¦
N
N
N
N
N
N
Dispositivo Anynet
+
1
Cable HDMI 1.3
Cable HDMI 1.3Cable HDMI 1.3
Cable HDMI 1.3
Dispositivo Anynet
+
2 Dispositivo Anynet
+
3 Dispositivo Anynet
+
4
Televisor
Dispositivo Anynet
+
1
Cable HDMI 1.3
Cable HDMI 1.3
Cable HDMI 1.3Cable HDMI 1.3
Televisor
Cable HDMI 1.3
Cable óptico
Dispositivo Anynet
+
2 Dispositivo Anynet
+
3
Dispositivo Anynet
+
4
Home Cinema
[620-Weuro]BN68-02326A-03L09.ind36 36 2009-10-08 ¿ÀÀü 9:30:06

Español - 37
Configuración de Anynet
+
Pulse el botón TOOLS para ver el menú Herramientas. También puede mostrar el menú
Anynet
+
seleccionando
+
(HDMI-CEC).
Configuración
Anynet
+
Para usar la función Anynet
+
, Anynet
+
(HDMI-CEC) debe estar configurado como Act..
Cuando la función Anynet
+
(HDMI-CEC) está desactivada, todas las operaciones
relacionadas con Anynet+ se desactivan.
Configuración de un dispositivo Anynet
+
para que se desactive automáticamente cuando el
televisor se apaga
La fuente activa del mando a distancia del televisor se debe configurar para que éste utilice
la función Anynet
+
.
Si establece como Sí, los dispositivos externos conectados
también se desactivan cuando se apaga el televisor. Si un dispositivo externo todavía está
grabando, puede apagarse o no.
Conexión entre dispositivos Anynet
+
1.
Pulse el botón TOOLS. Pulse el botón ENTER
E
para seleccionar Anynet
+
(HDMI-CEC).
2. Pulse los botones ▲ o ▼ para seleccionar Lista de dispositivos y, a continuación, pulse
el botón ENTER
E
.
Se muestran los dispositivos Anynet
+
conectados al televisor.
Si no encuentra el dispositivo que desea, pulse el botón rojo para buscar los dispositivos.
3. Pulse los botones ▲ o ▼ para seleccionar un dispositivo determinado y, a continuación,
pulse el botón ENTER
E
. Se cambia al dispositivo seleccionado.
Sólo cuando se configura Anynet
+
(HDMI-CEC) como Act. en el menú Aplicación,
aparece el menú Lista de dispositivos.
El cambio a los dispositivos seleccionados puede tardar unos 2 minutos. No se puede cancelar la operación de cambio de
dispositivo mientras ésta se está efectuando.
El tiempo necesario para la búsqueda de dispositivos depende de la cantidad de dispositivos conectados.
Cuando finaliza la búsqueda de dispositivos, no se muestra el número de dispositivos encontrados.
Aunque el televisor busca automáticamente la lista de dispositivos cuando se enciende con el botón de alimentación, es
posible que los dispositivos que se conectan al televisor no aparezcan siempre automáticamente en la lista de dispositivos.
Pulse el botón rojo para buscar el dispositivo conectado.
Si ha seleccionado el modo de entrada externa pulsando el botón SOURCE, no podrá usar la función Anynet
+
. Asegúrese de
cambiar a un dispositivo Anynet
+
mediante la Lista de dispositivos.
Menú Anynet
+
El menú Anynet
+
cambia según el tipo y el estado de los dispositivos Anynet
+
conectados al televisor.
Menú Anynet
+
Descripción
Ver la televisión El modo Anynet
+
cambia al modo de emisión de TV.
Lista de dispositivos Muestra la lista de dispositivos de Anynet
+
.
(nombre_dispositivo) MENU
Muestra los menús del dispositivo conectado. Por ejemplo, si se ha conectado un
grabador de DVD, se muestra el menú del disco del grabador de DVD.
(nombre_dispositivo) INFO
Muestra el menú de reproducción del dispositivo conectado. Por ejemplo, si se ha
conectado un grabador de DVD, se muestra el menú de reproducción del grabador
de DVD.
Grabación: (*grabador)
Inicia inmediatamente la grabación en el grabador. (Sólo está disponible en los
dispositivos que admiten la función de grabación.)
Detener la grabación:
(*grabador)
Detiene la grabación.
Receptor La reproducción del sonido se efectúa a través del receptor.
Cuando hay conectados varios dispositivos de grabación, éstos se muestran como (*grabador), pero si sólo hay conectado un
dispositivo, éste se muestra como (*nombre_dispositivo).
¦
T
❑
■
N
■
N
N
¦
N
N
N
N
N
N
N
N
N
U
Mover
E
Entrar
R
Volver
Anynet
+
(HDMI-CEC) :Act.▶
Configuración
Apagadoautomático :Sí
Reproductormultimedia(USB)
Anynet
+
(HDMI-CEC)
Aplicación
U
Mover
E
Entrar
R
Volver
Anynet
+
(HDMI-CEC) :Act.
Configuración
Apagadoautomático :Sí▶
U
Mover
E
Entrar
R
Volver
Verlatelevisión
Listadedispositivos
Grabación:DVDR
DVDRMENU
DVDRINFO
Receptor:Des.
Configuración
[620-Weuro]BN68-02326A-03L09.ind37 37 2009-10-08 ¿ÀÀü 9:30:07

Español - 38
Botones del mando a distancia del televisor disponibles en el modo Anynet
+
Tipo de dispositivo Estado de funcionamiento Botones disponibles
Dispositivo Anynet
+
Después de cambiar al dispositivo, cuando el
menú de éste aparece en la pantalla.
Botones numéricos
Botones ▲/▼/◄/►/ ENTER
E
Botones de colores/botón EXIT
Después de cambiar al dispositivo, mientras se
reproduce un archivo.
π
(Búsqueda atrás)/
μ
(Búsqueda adelante)/
∫
(Detener)/
∂
(Reproducir)/
∑
(Pausa)
Dispositivo con
sintonizador incorporado
Después de cambiar al dispositivo, mientras se
ve un programa de TV.
P
>
/P
<
Dispositivo de audio Cuando el receptor está activado.
Y
/MUTE
La función Anynet
+
sólo es operativa cuando la fuente activa del mando a distancia del televisor está ajustada en
TV.
El botón
∏
funciona sólo cuando la grabación es posible.
Los dispositivos Anynet
+
no se pueden controlar con los botones del TV. Los dispositivos Anynet
+
sólo se pueden controlar
mediante el mando a distancia del televisor.
El mando a distancia del televisor puede no funcionar en determinadas circunstancias. En ese caso, vuelva a seleccionar el
dispositivo Anynet
+
.
Las funciones Anynet
+
no funcionan con los productos de otros fabricantes.
El funcionamiento de
π
,
μ
puede variar según el dispositivo.
Grabación
La grabadora de Samsung permite efectuar una grabación de un programa de televisión.
1. Pulse el botón TOOLS. Pulse el botón ENTER
E
para seleccionar Anynet
+
(HDMI-
CEC).
2.
Pulse los botones ▲ o ▼ para seleccionar la grabación inmediata y, a continuación, pulse
el botón ENTER
E
. Comienza la grabación.
Cuando hay más de un dispositivo de grabación
Cuando hay varios dispositivos de grabación conectados, éstos se muestran en una
lista. Pulse los botones ▲ o ▼ para seleccionar un dispositivo de grabación y pulse
el botón ENTER
. Comienza la grabación.
Si el dispositivo de grabación no aparece, seleccione Lista de dispositivos y pulse el botón rojo para buscar dispositivos
3.
Pulse el botón EXIT para salir.
Se pueden grabar las transmisiones de la fuente seleccionando Grabar: (nombre_dispositivo).
Si pulsa el botón
∏
, se grabará lo que está viendo en ese momento. Si está viendo un vídeo desde otro dispositivo, se
graba el vídeo de éste.
Antes de grabar, compruebe si la toma de antena está conectada correctamente al dispositivo de grabación. Para conectar
correctamente una antena a un dispositivo de grabación, consulte el manual del usuario del dispositivo de grabación.
Escucha a través de un receptor (sistema Home Cinema)
Se puede escuchar sonido a través de un receptor en lugar de hacerlo mediante el altavoz del
TV.
1.
Pulse el botón TOOLS. Pulse el botón ENTER
E
para seleccionar Anynet
+
(HDMI-
CEC).
2. Pulse los botones ▲ o ▼ para seleccionar Receptor. Pulse los botones ◄ o ► para
seleccionar Act. o Des..
3.
Pulse el botón EXIT para salir.
Si el receptor sólo admite audio, quizás no se muestre la lista de dispositivos.
El receptor funcionará si se ha conectado correctamente el terminal de entrada
óptico del receptor con el terminal DIGITAL AUDIO OUT (OPTICAL) del televisor.
Cuando el receptor (sistema Home Cinema) está activado, se puede oír la salida de sonido desde el terminal óptico del
televisor. Cuando se ve la televisión a través de una señal de DTV (aéreo), el televisor envía el sonido de 5.1 canales
al receptor del sistema Home Cinema. Cuando la fuente es un componente digital, como un DVD, y está conectada al
televisor a través de HDMI, sólo se oye el sonido de 2 canales del receptor del sistema Home Cinema.
Si hay una interrupción en la alimentación del televisor con la opción Receptor configurada en Act. (por desconectar
el cable de alimentación o por un fallo de corriente), puede que Seleccionar altavoz esté establecido como Altavoz
externo al volver a encender el televisor.
N
N
N
N
N
N
¦
N
N
N
N
N
¦
N
N
N
N
U
Mover
E
Entrar
R
Volver
Verlatelevisión
Listadedispositivos
Grabación:DVDR
DVDRMENU
DVDRINFO
Receptor:Des.
Configuración
U
Mover
E
Entrar
R
Volver
Verlatelevisión
Listadedispositivos
Grabación:DVDR
DVDRMENU
DVDRINFO
Receptor:Des.
Configuración
[620-Weuro]BN68-02326A-03L09.ind38 38 2009-10-08 ¿ÀÀü 9:30:07

Español - 39
Solución de problemas de Anynet
+
Problema Posible solución
Anynet
+
no funciona. Compruebe si el dispositivo es un dispositivo Anynet
+
. El sistema Anynet
+
sólo admite
dispositivos Anynet
+
.
Conecte sólo un receptor (sistema Home Cinema).
Compruebe si el cable de alimentación del dispositivo Anynet
+
está debidamente
conectado.
Compruebe las conexiones de los cables de Video/Audio/HDMI 1.3 del dispositivo Anynet
+
.
Compruebe si Anynet
+
(HDMI-CEC) está activado en el menú de configuración de Anynet
+
.
Compruebe si el mando a distancia del televisor está en modo TV.
Compruebe si es un mando a distancia exclusivo para Anynet
+
.
Anynet
+
no funciona en algunas situaciones. (Búsqueda de canales, funcionamiento de
Media Play, Plug & Play, etc.)
Cuando se conecta o se desconecta el cable HDMI 1.3, se han de buscar de nuevo los
dispositivos o volver a apagar y encender el televisor.
Compruebe si la función Anynet
+
del dispositivo Anynet
+
está activada.
●
●
●
●
●
●
●
●
●
●
Deseo iniciar Anynet
+
. Compruebe si el dispositivo Anynet+ está correctamente conectado al televisor y
compruebe si Anynet
+
(HDMI-CEC) está establecido en Act. en el menú Anynet
+
Configuración.
Pulse el botón TV del mando a distancia del televisor para cambiar a TV. A continuación
pulse el botón TOOLS para visualizar el menú Anynet
+
y seleccionar el menú que desee.
●
●
Deseo salir de Anynet
+
. Seleccione Ver la televisión en el menú Anynet
+
.
Pulse el botón SOURCE del mando a distancia del televisor y seleccione un dispositivo que
no sea Anynet
+
.
Pulse P
>
/
<
, PRE-CH y FAV.CH para cambiar el modo TV. (Tenga en cuenta que el
botón de canal sólo funciona cuando no hay ningún dispositivo Anynet
+
con sintonizador
incorporado conectado.)
●
●
●
En la pantalla aparece el
mensaje ‘Connecting to
Anynet+ device...’.
El mando a distancia no se puede utilizar cuando se está configurando Anynet
+
o
cambiando a un modo de visualización.
Utilice el mando a distancia cuando haya terminado la configuración de Anynet
+
o el
cambio al modo de visualización.
●
●
El dispositivo Anynet
+
no
reproduce.
No se puede usar la función de reproducción mientras se efectúa una conexión Plug & Play.
●
El dispositivo conectado no se
muestra.
Compruebe si el dispositivo admite las funciones Anynet
+
.
Compruebe si el cable HDMI 1.3 está debidamente conectado.
Compruebe si Anynet
+
(HDMI-CEC) está establecido como Act. en el menú de
configuración de Anynet
+
.
Vuelva a efectuar una búsqueda de dispositivos Anynet
+
.
Sólo puede conectar un dispositivo Anynet
+
mediante el cable HDMI 1.3. Algunos cables
HDMI pueden no admitir las funciones Anynet
+
.
Si se ha interrumpido por una situación anormal como la desconexión del cable HDMI o
el de alimentación o por un fallo en la corriente eléctrica, deberá repetir la búsqueda del
dispositivo.
●
●
●
●
●
●
El programa de televisión no
se puede grabar.
Compruebe la conexión de la toma de antena del dispositivo de grabación.
●
El sonido del televisor no sale
a través del receptor.
Conecte el cable óptico entre el televisor y el receptor.
●
¦
[620-Weuro]BN68-02326A-03L09.ind39 39 2009-10-08 ¿ÀÀü 9:30:07

Español - 40
RECOMENDACIONES
Función de teletexto
La mayoría de los canales de televisión proporcionan servicios de información escrita mediante el teletexto. La página de índice
de dicho servicio proporciona información sobre el uso de éste. Asimismo, se pueden seleccionar diversas opciones mediante los
botones del mando a distancia para ajustar el servicio a las necesidades del usuario.
Para que la información del teletexto se visualice correctamente, la recepción del canal debe ser estable. En caso contrario,
puede perderse información o algunas páginas pueden no visualizarse.
Puede cambiar páginas de teletexto pulsando los botones numéricos del mando a distancia.
1
0
(modo)
Se utiliza para seleccionar el
modo de teletexto (LIST/FLOF). Si
lo pulsa en el modo LIST, cambia
al modo de guardar lista. En el
modo de guardar lista se puede
guardar la página de teletexto
en la lista mediante el botón
8
(almacenar).
2
5
(mostrar)
Se usa para mostrar el texto
oculto (respuestas a juegos, por
ejemplo). Púlselo de nuevo para
volver a la presentación normal.
3
4
(tamaño)
Se utiliza para mostrar caracteres
de doble tamaño en la parte
superior de la pantalla. Si desea
mostrarlos también en la parte
inferior, vuelva a pulsar el botón.
Púlselo de nuevo una vez para
volver a la presentación normal.
4
8
(guardar)
Se utiliza para guardar las páginas
del teletexto.
5 Botones de colores (rojo/verde/
amarillo/azul)
Si una emisora utiliza el sistema
FASTEXT, los distintos temas
cubiertos en una página de
teletexto se codificarán en
color y podrá seleccionarlos
pulsando los botones de color.
Pulse el correspondiente al tema
deseado. La página muestra
otra información con código de
color que se puede seleccionar
de la misma forma. Pulse el
botón del color correspondiente
para ver la página anterior o la
siguiente.
6
/
(activar teletexto/mezcla)
Se utiliza para activar el modo de
teletexto tras seleccionar el canal que
proporciona el servicio. Pulse dos
veces para superponer el teletexto a la
pantalla de emisión actual.
7
:
(salir)
Sale de la visualización de teletexto.
8
1
(página secundaria)
Se utiliza para mostrar la página
secundaria disponible.
9
2
(avanzar página)
Se utiliza para mostrar la página
siguiente de teletexto.
0
3
(retroceder página)
Se utiliza para mostrar la página
anterior de teletexto.
!
9
(retener)
Se utiliza para retener la presentación
en una página determinada si ésta
está enlazada con varias páginas
secundarias que se muestran
automáticamente. Para reanudar,
vuelva a pulsar el botón.
@
6
(índice)
Se utiliza para mostrar la página
de índice (contenido) en cualquier
momento durante la visualización de
teletexto.
#
7
(cancelar)
Se utiliza para visualizar la emisión
cuando se busca una página.
¦
N
N
INFO
AD
1
2
3
4
5
6
8
7
9
0
!
#
@
[620-Weuro]BN68-02326A-03L09.ind40 40 2009-10-08 ¿ÀÀü 9:30:08

Español - 41
Parte Contenido
A Número de página seleccionado.
B Identidad del canal.
C
Número de página actual o indicaciones de la
búsqueda.
D Fecha y hora.
E Texto.
F Información de estado.
Información FASTEXT.
La información de teletexto se suele dividir en varias páginas que aparecen en secuencia y a las que se puede acceder:
Introduciendo el número de página.
Seleccionando un título de la lista.
Seleccionando un encabezado de color (sistema FASTEXT).
El nivel de teletexto que admite el televisor es la versión 2.5, capaz de mostrar texto o gráficos adicionales.
Según la transmisión, puede haber paneles laterales en blanco al mostrar el teletexto.
En estos casos, el texto o los gráficos adicionales no se transmiten.
Los televisores más antiguos que no admiten la versión 2.5 no son capaces de mostrar texto o gráficos adicionales,
independientemente de la transmisión de teletexto.
Pulse el botón TV para salir de la visualización de teletexto.
Instalación del soporte
Preselección: Coloque el soporte de la guía y el cuello de la cubierta en el soporte y, a
continuación, fíjelo mediante los tornillos.
1. Monte el TV de pantalla LCD en el soporte.
Se necesitan dos o más personas para trasladar el televisor.
Para realizar el montaje debe tener en cuenta cuál es la parte frontal y cuál la
posterior del soporte.
Para asegurar que el televisor esté instalado sobre el soporte al nivel adecuado, no
ejerza una excesiva presión sobre la parte superior del lateral izquierdo o derecho
del televisor.
2.
Apriete los tornillos en la posición
1
y, a continuación, apriete los tornillos en la
posición
2
.
Levante el producto y apriete los tornillos. Si aprieta los tornillos con el TV LCD tumbado, éste se puede inclinar hacia un
lado.
N
N
N
N
N
O
¦
N
N
N
N
N
INFO
AD
Parte frontal
Parte posterior
1
2
[620-Weuro]BN68-02326A-03L09.ind41 41 2009-10-08 ¿ÀÀü 9:30:09

Español - 42
Desconexión del soporte
1. Desmonte los tornillos de la parte posterior del televisor.
2. Separe el soporte del TV.
Se necesitan dos o más personas para trasladar el televisor.
3.
Cubra el orificio inferior con la tapa.
Instalación del equipo de montaje en la pared
Los elementos del montaje en la pared (se venden por separado) permiten instalar el
televisor en una pared.
Si desea más información sobre la instalación de los componentes para montaje en la
pared, consulte las instrucciones que se facilitan con dichos elementos. Si necesita ayuda
con la instalación del soporte mural, póngase en contacto con un técnico.
Samsung Electronics no se hace responsable de los daños causados al producto o al
usuario si éste ha efectuado la instalación del televisor.
No instale el equipo de montaje mural mientras el televisor está encendido. Se podría
producir una descarga eléctrica con riesgo de causar lesiones personales.
Montaje de los cables
Sujete los cables con la funda de cables para que éstos no sean visibles a través del soporte
transparente.
Bloqueo antirrobo Kensington
El bloqueo Kensington es un dispositivo que se utiliza para fijar físicamente el sistema
cuando se utiliza en un sitio público. La apariencia y el método de bloqueo pueden diferir de
la ilustración según los fabricantes.
Consulte el manual que acompaña al bloqueo Kensington para utilizarlo correctamente.
El dispositivo de bloqueo debe adquirirse por separado.
La ubicación del bloqueo Kensington puede variar según los modelos.
1.
Inserte el dispositivo de bloqueo en la ranura Kensington del TV LCD (1) y gírelo en el
sentido del bloqueo (2).
2.
Conecte el cable del bloqueo Kensington (3).
3.
Fije el bloqueo Kensington a la mesa o a un objeto estático pesado.
N
N
3
1
2
¦
N
¦
¦
¦
<Opcional>
[620-Weuro]BN68-02326A-03L09.ind42 42 2009-10-08 ¿ÀÀü 9:30:12

Español - 43
Seguridad en el espacio de instalación
Mantenga la distancia requerida entre el producto y otros objetos (por ejemplo, paredes) para asegurar la ventilación adecuada.
En caso contrario, se podría producir un incendio por un incremento de la temperatura interna del producto.
Instale el producto a la distancia requerida como se muestra en la ilustración.
Cuando utilice un soporte o un montaje mural, use sólo las piezas proporcionadas por Samsung Electronics.
Si utiliza piezas proporcionadas por otros fabricantes, podría tener problemas con el producto o éste se podría caer con
el riesgo de cuasar lesiones personales.
Si utiliza piezas proporcionadas por otros fabricantes, podría tener problemas con el producto o éste se podría incendiar
por el incremento de la temperatura interior debido a una mala ventilación.
El aspecto puede variar según el producto.
Instalación del producto sobre un soporte Instalación del producto en un montaje mural
10 cm
10 cm
10 cm
10 cm
10 cm
10 cm
10 cm
Fijación del televisor a la pared
Precaución: Tirar del televisor, empujarlo o colgarse de él puede provocar su caída. En especial, procure que los
niños no se cuelguen del televisor ni lo desestabilicen; éste podría caerse sobre ellos y causarles lesiones graves
o incluso la muerte. Siga las precauciones de seguridad del folleto de seguridad incluido con el producto. Para
mejorar la estabilidad instale un dispositivo antivuelco, como se explica a continuación.
Para impedir que el televisor se caiga:
1.
Apriete firmemente las grapas sobre la pared con los tornillos. Asegúrese de que
los
tornillos estén bien afirmados en la pared.
Según el tipo de pared quizás necesite algún material adicional para el anclaje.
Las grapas, los tornillos y la cadena no se suministran con el producto; deberá
adquirirlos por separado.
2.
Quite los tornillos de la parte central posterior del televisor y con ellos monte las grapas
en el televisor.
Quizás con el televisor no vayan incluidos los tornillos. En tal caso debe adquirirlos
por separado con estas especificaciones.
Especificaciones de los tornillos
Televisores LCD de 17 ~ 29 pulgadas: M4 x L15
Televisores LCD de 32 ~ 40 pulgadas: M6 x L15
3.
Monte una cadena fuerte entre las grapas del televisor y de la pared de manera que
quede bien tensada.
Instale el televisor cerca de la pared para evitar que caiga hacia atrás.
Las grapas de la pared han de estar a la misma o a menor altura que las grapas del
televisor.
Cuando desee mover el televisor deberá aflojar la cadena.
4.
Compruebe que todas las conexiones estén bien aseguradas. Compruébelas
periódicamente para detectar cualquier signo de fatiga o de fallo. Si tiene dudas sobre la
seguridad de la instalación, póngase en contacto con un instalador profesional.
¦
N
N
¦
■
N
N
N
N
N
N
N
Pared
Pared
[620-Weuro]BN68-02326A-03L09.ind43 43 2009-10-08 ¿ÀÀü 9:30:14

Español - 44
Solución de problemas
Si tiene algún problema con el televisor, consulte esta lista en primer lugar. Si ninguno de los consejos funciona, visite ‘www.
samsung.com’ y haga clic en Support o llame al centro de atención al cliente que encontrará en la lista de la última página.
Problema Solución
Calidad de la imagen
En primer lugar, ejecute Prueba de imagen para conrmar que el televisor muestra
correctamente la imagen de prueba.
Vaya a MENU - Asistencia técnica - Autodiagnóstico - Prueba de imagen
Si la imagen de la prueba se muestra correctamente, la imagen deciente puede provenir
de la fuente o la señal.
●
La imagen del televisor no se ve
tan bien como en la tienda.
Si tiene un receptor de cable/decodificador analógico, cambie a un decodificador. Utilice
cables HDMI o de componentes para conseguir la mejor calidad de imagen de alta definición.
Suscriptor de cable/satélite: Pruebe con emisoras de alta definición (HD) de la oferta
de canales.
Conexión de antena: Pruebe con emisoras de alta definición (HD) después de ejecutar
la programación automática.
Muchos canales de alta definición (HD) mejoran los contenidos SD (definición estándar).
Ajuste la resolución de la salida de vídeo del receptor de cable/decodificador en 1080i o 720p.
Compruebe que está viendo la televisión a la distancia mínima recomendada según el
tamaño y la definición de la señal que está visualizando.
●
●
●
N
●
●
La imagen se ve distorsionada:
macrobloques, microbloques,
puntos, pixelización
La compresión de los contenidos de vídeo puede causar imágenes distorsionadas
especialmente en las escenas de movimiento rápido, como en los deportes y las
películas de acción.
Un nivel de señal débil o de mala calidad puede causar imágenes distorsionadas.
No es un problema del televisor.
●
●
Color de mala calidad o no
hay color en la conexión de
componentes.
Compruebe que los cables de los componentes estén conectados en los terminales
correctos. Las conexiones incorrectas o sueltas pueden originar problemas en el color
o que la pantalla se quede en blanco.
●
Color o brillo de mala calidad. Ajuste las opciones de Imagen en el menú del TV (modo Imagen, Color, Brillo,
Nitidez)
Ajuste la opción Ahorro energía en el menú Configuración.
Intente reiniciar la imagen para ver la configuración de imagen predeterminada. (Vaya
a MENU - Imagen - Reinicio de la imagen)
●
●
●
Línea de puntos en el borde la
pantalla.
Si el tamaño de la imagen está establecido en Ajuste pantalla, cámbielo a 16:9.
Cambie la resolución del receptor de cable/decodificador.
●
●
La imagen se ve sólo en blanco y
negro en la entrada AV (compuesto).
Conecte el cable de vídeo (amarillo) en el terminal verde de la entrada 1 de
componentes del televisor.
●
Imágenes congeladas o
distorsionadas al cambiar de canal o
retraso en la aparición de la imagen.
Si se ha conectado un decodificador de cable, intente reiniciarlo. (Vuelva a conectar el cable
de alimentación y espere a que el decodificador se reinicie. Puede tardar hasta 20 minutos.)
Establezca la resolución de salida del decodificador de cable en 1080i o 720p.
●
●
Calidad del sonido
En primer lugar, ejecute Prueba de sonido para conrmar que el audio del televisor
funciona correctamente.
Vaya a MENU - Asistencia técnica - Autodiagnóstico - Prueba de sonido
Si el audio es correcto, el problema del sonido puede provenir de la fuente o la señal.
●
No se percibe ningún sonido, o muy
bajo, con el volumen al máximo.
Compruebe el volumen del dispositivo externo conectado al televisor y ajuste el
volumen del televisor según sea más conveniente.
●
La imagen es buena pero no hay
sonido.
Establezca la opción Seleccionar altavoz en Altavoz de TV en el menú de sonido.
Compruebe que los cables de audio del dispositivo externo estén conectados a los
terminales de entrada de audio correctos del televisor.
Compruebe la opción de salida de audio del dispositivo conectado. (Por ejemplo,
quizás deba cambiar la opción de audio del decodificador de cable a HDMI si tiene
conectado HDMI al televisor.)
Si se utiliza un cable DVI a HDMI, se necesita un cable de audio independiente.
Desactive la función SRS si va a ajustar el volumen a un valor superior a 30.
Desconecte el terminal de los auriculares (si es posible en su televisor)
●
●
●
●
●
●
Se oye ruido en el altavoz. Compruebe las conexiones de los cables Compruebe que el cable de vídeo no esté
conectado en una entrada de audio.
En la conexión de antena/cable, compruebe la intensidad de la señal. Un nivel de
señal débil puede causar sonido distorsionado.
●
●
¦
[620-Weuro]BN68-02326A-03L09.ind44 44 2009-10-08 ¿ÀÀü 9:30:14

Español - 45
Problema Solución
No hay imagen, ni vídeo
El televisor no se enciende. Compruebe que el cable de alimentación esté bien conectado en la toma de la pared
y en el televisor.
Compruebe que la toma de la pared funciona.
Pulse el botón POWER del televisor para asegurarse de que el mando a distancia
funciona adecuadamente. Si el televisor se enciende, puede ser debido al mando a
distancia. Para solucionar el problema del mando a distancia, consulte 'El mando a
distancia no funciona' a continuación.
●
●
●
El televisor se apaga
automáticamente.
Compruebe si Temp. de desc. está establecido como Act. en el menú
Configuración.
Si el televisor está conectado a un PC, compruebe la configuración de la alimentación
de éste.
Compruebe que el cable de alimentación esté bien conectado en la toma de la pared
y en el televisor.
Si no hay señal durante unos de 10~15 minutos en la conexión de antena/cable, el
televisor se apagará.
●
●
●
●
No hay imagen/vídeo. Compruebe las conexiones de los cables (desconecte y vuelva a conectar todos los
cables del televisor y de los dispositivos externos).
Establezca la salida de vídeo de los dispositivos externos (receptor de cable/
decodificador, DVD, Blu-ray, etc.) de modo que coincida con las conexiones de la
entrada de TV. Por ejemplo, salida del dispositivo externo: HDMI, entrada del TV:
HDMI.
Compruebe que el dispositivo externo esté encendido.
Asegúrese de seleccionar la fuente correcta del TV pulsando el botón SOURCE del
mando a distancia del televisor.
●
●
●
●
Conexión RF (cable/antena)
No se reciben todos los canales. Compruebe que el cable de antena esté firmemente conectado.
Ejecute Plug & Play para añadir los canales disponibles a la lista de canales. Vaya
a MENU - Configuración - Plug & Play y espere hasta que se guarden todos los
canales disponibles.
Compruebe la posición de la antena.
●
●
●
La imagen se ve distorsionada:
macrobloques, microbloques,
puntos, pixelización
La compresión de los contenidos de vídeo puede causar imágenes distorsionadas
especialmente en las escenas de movimiento rápido, como en los deportes y las
películas de acción.
Un nivel de señal débil puede causar imágenes distorsionadas. No es un problema del
televisor.
●
●
Conexión del PC
Mensaje ‘Modo no compatible’. Establezca la frecuencia y la resolución de salida del PC de modo que coincida con la
resolución admitida por el televisor.
●
El PC siempre aparece en la
lista de fuentes aunque no esté
conectado.
Esto es normal; el PC siempre aparece en la lista de fuentes aunque no esté
conectado.
●
El vídeo es correcto pero no se
oye el audio con una conexión
HDMI.
Compruebe la configuración de la salida de audio del PC.
●
[620-Weuro]BN68-02326A-03L09.ind45 45 2009-10-08 ¿ÀÀü 9:30:14

Español - 46
Problema Solución
Otros
La imagen no se muestra en
pantalla completa.
En cada lado se muestran barras negras en los canales de alta definición cuando se
muestran contenidos SD mejorados (4:3).
Barras negras en las partes inferior y superior cuando se ven películas que tienen
diferentes formatos que el televisor.
Ajuste la opción del tamaño de imagen del dispositivo externo o del televisor al modo
de pantalla completa.
●
●
●
El mando a distancia no funciona. Sustituya la pilas del mando a distancia con la polaridad correcta (+ -).
Limpie la ventana de transmisión que se encuentra en la parte superior del mando a
distancia.
Apunte con el mando a distancia directamente al televisor desde una distancia de 1,5
-2 metros.
●
●
●
No se puede controlar la
alimentación o el volumen
del televisor con el mando a
distancia del receptor de cable/
decodicador.
Programe el mando a distancia del receptor de cable/decodificador para que haga
funcionar el televisor. Consulte el manual del decodificador de cable/satélite para
conocer el código del TV SAMSUNG.
●
Mensaje ‘Modo no compatible’. Compruebe la resolución admitida del televisor y ajuste consecuentemente la
resolución de salida del dispositivo externo. Consulte la configuración de la resolución
en este manual.
●
Olor a plástico en el televisor. Este olor es normal y desaparece con el tiempo.
●
La Información de señal del
televisor no está disponible
en el menú de prueba de
autodiagnóstico.
Esta función sólo está disponible en los canales digitales con las conexiones de
antena (RF/coaxial).
●
El televisor está inclinado hacia la
izquierda o hacia la derecha.
Retire la base del soporte de televisor y vuelva a montarla.
●
No se puede montar la base del
soporte.
Compruebe que el televisor esté instalado sobre una superficie plana. Si no puede
quitar los tornillos del televisor, utilice un destornillador magnetizado.
●
El menú del canal se ve de color
gris (no disponible).
El menú Canal sólo está disponible cuando está seleccionada la fuente TV.
●
La conguración se pierde
después de 30 minutos o cada
vez que se apaga el televisor.
Si el televisor está en el modo Demo tienda, la configuración del audio y la imagen
se restablecerá cada 30 minutos. Debe cambiar el modo Demo tienda al modo
Uso doméstico en el procedimiento Plug & Play. Pulse el botón SOURCE para
seleccionar TV, vaya a MENU → Configuración → Plug & Play → ENTER
E
.
●
Pérdida intermitente del audio o
del vídeo.
Compruebe las conexiones de los cables y vuelva a conectarlos.
Se puede deber a que los cables son demasiado rígidos o gruesos. Debe asegurarse
de que los cables sean lo suficientemente flexibles para un largo periodo de uso. En
un montaje mural, es aconsejable utilizar cables con conectores de 90 grados.
●
●
Puede ver pequeñas partículas si
mira de cerca el borde biselado
de la pantalla del televisor.
Esto es una particularidad del diseño del producto y no es un defecto.
●
‘Señal codicada’ o
‘Sin señal/Señal débil’ con
TARJETA (CI/CI+) en CAM.
Compruebe que el CAM tenga la tarjeta CI(CI+) instalada en la ranura para interfaz
común.
Retire el CAM del televisor e insértelo de nuevo en la ranura.
●
●
El televisor se enciende por su
cuenta cuando lleva 45 minutos
apagado.
Esto es normal, ya que el televisor ejecuta la función OTA (en el aire) por sí solo a fin
de actualizar el firmware descargado mientras se veía la televisión.
●
Problema de imagen/sonido
recurrente.
Compruebe y cambie la señal/fuente.
●
El panel LCD TFT utiliza un panel que consta de píxeles de ínmo tamaño que requieren de una tecnología altamente
sosticada para su fabricación. No obstante, puede que existan unos cuantos píxeles brillantes u oscuros en la pantalla.
Estos píxeles no inuirán en el rendimiento del aparato.
N
[620-Weuro]BN68-02326A-03L09.ind46 46 2009-10-08 ¿ÀÀü 9:30:15

Español - 47
Especificaciones
Nombre del modelo LE40B620 LE46B620
Tamaño de pantalla
(Diagonal)
40 pulgadas 46 pulgadas
Resolución de PC
(Óptima)
1920 x 1080 @ 60 Hz 1920 x 1080 @ 60 Hz
Sonido
(Salida)
10 W x 2 10 W x 2
Dimensiones (An x Pr x Al)
Cuerpo principal
Con el soporte
1040 x 79 x 638 mm
1040 x 255 x 699 mm
1172 x 79 x 712 mm
1172 x 275 x 774 mm
Peso
Con el soporte
19 kg 25 kg
Consideraciones medioambientales
Temperatura de funcionamiento
Humedad de funcionamiento
Temperatura de almacenamiento
Humedad de almacenamiento
10 °C a 40 °C (50 °F a 104 °F)
10 % al 80 %, sin condensación
-20 °C a 45 °C (-4 °F a 113 °F)
5 % al 95 %, sin condensación
Soporte giratorio
(Izquierda/derecha)
-20˚ ~ 20˚
Nombre del modelo LE52B620
Tamaño de pantalla
(Diagonal)
52 pulgadas
Resolución de PC
(Óptima)
1920 x 1080 @ 60 Hz
Sonido
(Salida)
10 W x 2
Dimensiones (An x Pr x Al)
Cuerpo principal
Con el soporte
1321 x 81 x 805 mm
1321 x 305 x 866 mm
Peso
Con el soporte
32 kg
Consideraciones medioambientales
Temperatura de funcionamiento
Humedad de funcionamiento
Temperatura de almacenamiento
Humedad de almacenamiento
10 °C a 40 °C (50 °F a 104 °F)
10 % al 80 %, sin condensación
-20 °C a 45 °C (-4 °F a 113 °F)
5 % al 95 %, sin condensación
Soporte giratorio
(Izquierda/derecha)
-20˚ ~ 20˚
El diseño y las especificaciones pueden cambiar sin previo aviso.
Este dispositivo es un aparato digital de la Clase B.
Para conocer la fuente de alimentación y el consumo de energía, consulte la etiqueta adherida al producto.
¦
N
N
N
[620-Weuro]BN68-02326A-03L09.ind47 47 2009-10-08 ¿ÀÀü 9:30:15

Aviso sobre a televisão digital
1. As funcionalidades relacionadas com a televisão digital (DVB) apenas estão disponíveis em países/áreas onde os sinais
digitais terrestres DVB-T (MPEG2 e MPEG4 AVC) sejam transmitidos, ou onde consiga aceder a um serviço de televisão por
cabo compatível com DVB-C (MPEG2 e MPEG4 AAC). Confirme com o seu representante local a possibilidade de receber
sinal DVB-T ou DVB-C.
2.
DVB-T é a norma de consórcio europeia DVB para a transmissão de televisão digital terrestre e DVB-C é a norma para a
transmissão de televisão digital por cabo. Existem, contudo, algumas funções diferenciadas como o EPG (Guia electrónico de
programação), VOD (Vídeo a pedido), entre outras, que não estão incluídas nesta especificação. Por esse motivo, não são
suportadas de momento.
3.
Embora este televisor cumpra as mais recentes normas DVB-T e DVB-C [Agosto de 2008], não é possível garantir a
compatibilidade com as futuras transmissões digitais terrestres DVB-T e transmissões digitais por cabo DVB-C.
4.
Dependendo do país/área onde este televisor é utilizado, alguns fornecedores de televisão por cabo podem cobrar uma taxa
adicional por esses serviços e poderá ser necessário concordar com os termos e condições dos seus negócios.
5.
Algumas funções da televisão digital podem estar indisponíveis em alguns países ou regiões e o DVB-C poderá não funcionar
correctamente com alguns fornecedores de serviços por cabo.
6.
Para mais informações, contacte o centro local de assistência ao cliente da SAMSUNG.
Precauções a ter ao ver imagens fixas
Uma imagem fixa pode danificar permanentemente o ecrã do televisor.
Uma imagem fixa e parcialmente fixa não deve permanecer no painel LCD durante mais do que 2 horas, pois pode provocar
uma retenção de imagem no ecrã. Esta retenção de imagem também é conhecida como queimadura de ecrã. Para evitar a
retenção de imagem, diminua o grau de brilho e de contraste do ecrã ao visualizar uma imagem fixa.
A utilização do televisor LCD no formato 4:3 durante um longo período de tempo pode deixar vestígios de
margens na parte esquerda, direita e central do ecrã, devido a diferenças de emissão de luz. Reproduzir um
DVD ou ligar uma consola de jogos pode causar efeitos semelhantes no ecrã. Os danos causados pelo
efeito acima mencionado não são cobertos pela garantia.
A visualização de imagens fixas de jogos de vídeo ou de PC durante um longo período de tempo pode produzir pós-imagens
parciais. Para evitar este efeito, reduza o ‘brilho’ e o ‘contraste’ quando visualizar imagens fixas.
© 2009 Samsung Electronics Co., Ltd. Todos os direitos reservados.
❑
❑
●
●
●
As imagens e ilustrações neste manual do utilizador servem apenas de referência e podem ser diferentes do produto real.
O design e as especicações do produto podem ser alterados sem aviso prévio.
[620-Weuro]BN68-02326A-03L09.ind1 1 2009-10-08 ¿ÀÀü 9:30:15

Português - 1
Licença
TruSurround HD, SRS e símbolo são marcas comerciais da SRS Labs, Inc.
A tecnologia TruSurround HD está incorporada na licença da SRS Labs, Inc.
Fabricado sob a licença da Dolby Laboratories. Dolby e o símbolo de duplo D são marcas comerciais da
Dolby Laboratories.
Símbolo
N O T
Nota Tecla rápida Botão TOOLS Carregue
❑
❑
CONFIGURAR O TELEVISOR
Apresentação do painel de controlo .................................................. 2
Acessórios ......................................................................................... 3
Apresentação do painel de ligação ................................................... 4
Apresentação do telecomando .......................................................... 6
Colocar pilhas no telecomando ......................................................... 7
Aceder aos menus ............................................................................. 7
Denir o televisor para modo de espera ............................................ 8
Função Plug & Play (Dependendo do modelo) ................................. 8
Visualização no ecrã.......................................................................... 9
CANAL
Menu Canal ....................................................................................... 9
Gerir canais .................................................................................... 12
IMAGEM
Congurar o menu Imagem ............................................................. 14
Utilizar o televisor como monitor de computador (PC) .................... 18
Congurar o televisor com o PC ...................................................... 19
SOM
Congurar o menu Som .................................................................. 20
Seleccionar o modo de Som ........................................................... 21
CONFIGURAR
Denir o menu Congurar ............................................................... 22
Acertar a hora .................................................................................. 24
ENTRADA / SUPORTE
Menu Entrada .................................................................................. 26
Menu Support .................................................................................. 26
MEDIA PLAY (USB)
Ligar um dispositivo USB ................................................................ 28
Função Media Play .......................................................................... 29
Menu de opções da lista de fotograas ........................................... 30
Visualizar uma fotograa ou uma apresentação de diapositivos..... 31
Menu de opções da apresentação de diapositivos ......................... 32
Menu de opções da lista de músicas .............................................. 33
Reproduzir uma música ................................................................... 34
Menu de opções de reprodução de músicas ................................... 35
Utilizar o menu Setup ...................................................................... 35
■
■
■
■
■
■
■
■
■
■
■
■
■
■
■
■
■
■
■
■
■
■
■
■
■
■
■
■
■
ANYNET
+
Ligar dispositivos Anynet
+
............................................................... 36
Congurar a função Anynet
+
........................................................... 37
Alternar entre os dispositivos Anynet
+
............................................ 37
Gravação ......................................................................................... 38
Ouvir através de um Receptor (Home theater) ............................... 38
Resolução de problemas para o Anynet
+
........................................ 39
RECOMENDAÇÕES
Função de teletexto ......................................................................... 40
Instalar a base ................................................................................. 41
Desligar a base ................................................................................ 42
Instalar o kit de montagem na parede ............................................. 42
Montar os cabos .............................................................................. 42
Dispositivo anti-roubo Kensington ................................................... 42
Manter um espaço de instalação seguro ......................................... 43
Fixar o televisor à parede ................................................................ 43
Resolução de problemas ................................................................. 44
Especicações ................................................................................. 47
■
■
■
■
■
■
■
■
■
■
■
■
■
■
■
■
CONTEÚDOS
Português
[620-Weuro]BN68-02326A-03L09.ind1 1 2009-10-08 ¿ÀÀü 9:30:15

Português - 2
CONFIGURAR O TELEVISOR
Apresentação do painel de controlo
A cor e a forma do produto podem variar consoante o modelo.
Para activar os botões do painel frontal, toque neles com o dedo.
1
P
(Ligar/Desligar): Carregue para ligar e desligar o televisor.
2
INDICADOR DE CORRENTE: pisca e apaga-se quando o aparelho está ligado, e acende-se quando está no modo de
espera.
3
z
: Carregue neste botão para mudar de canal. No menu no ecrã, utilize os botões
z
tal como utiliza os
botões ▼ e ▲ do telecomando.
4
Y
: carregue para aumentar ou diminuir o volume.
No menu no ecrã, utilize os botões
Y
tal como utiliza os botões ◄ e ► do telecomando.
5
MENU: carregue para ver o menu das funções do televisor no ecrã.
6
SOURCE
E
: alterna entre todas as fontes de entrada disponíveis. No menu no ecrã, utilize este botão tal como utiliza o
botão ENTER
E
do telecomando.
7
SENSOR DO TELECOMANDO: aponte o telecomando para este ponto no televisor.
8
ALTIFALANTES
¦
N
N
6
5
4
3
2
1
87
8
[620-Weuro]BN68-02326A-03L09.ind2 2 2009-10-08 ¿ÀÀü 9:30:16

Português - 3
Acessórios
Telecomando e pilhas (2 pilhas AAA) Cabo de alimentação Tampa da parte inferior
Cartão de garantia / Manual de
segurança (não estão disponíveis em
todos os locais)
Pano de limpeza
Suporte de cabos
(Dependendo do modelo)
● Manual do utilizador
Verifique se os seguintes acessórios estão incluídos no televisor LCD. Se faltar algum dos acessórios, contacte o revendedor.
A cor e a forma dos acessórios podem variar consoante o modelo.
¦
N
N
[620-Weuro]BN68-02326A-03L09.ind3 3 2009-10-08 ¿ÀÀü 9:30:17

Português - 4
Apresentação do painel de ligação
A cor e a forma do produto podem variar consoante o modelo.
1 COMPONENT IN
Liga o vídeo / áudio do componente.
2 HDMI IN 1, 2, 3(DVI), 4 / DVI AUDIO IN
Estabelece a ligação à tomada HDMI de um dispositivo com uma saída HDMI.
Não é necessária nenhuma ligação de som adicional para a ligação HDMI a HDMI.
O que é HDMI?
HDMI (High-Definition Multimedia Interface - Interface multimédia de alta definição) é uma interface que permite a
transmissão de sinais de áudio e vídeo digital através de um único cabo.
A diferença entre HDMI e DVI é que o dispositivo HDMI é mais pequeno do que o de DVI.
O televisor pode não emitir som e as imagens podem ser apresentadas com cores estranhas quando estão ligados
leitores de DVD / leitores de Blu-ray / caixas de televisão por cabo / receptores de satélite (set-top box) que suportem
versões HDMI anteriores à 1.3. Se ligar um cabo HDMI mais antigo e não ouvir som, ligue o cabo HDMI à tomada
HDMI IN 3(DVI) e os cabos de áudio às tomadas DVI AUDIO IN na parte de trás do televisor. Se isto acontecer, contacte
a empresa fornecedora do leitor de DVD / leitor de Blu-ray / caixa de televisão por cabo / receptor de satélite (set-top
box) para confirmar a versão HDMI e, em seguida, peça uma actualização.
Utilize a tomada HDMI IN 3(DVI) para a ligação DVI a um dispositivo externo. Utilize um cabo DVI para HDMI ou um
adaptador de DVI-HDMI (DVI para HDMI) para uma ligação de vídeo e as tomadas DVI AUDIO IN para áudio. Quando
utilizar uma ligação de cabo HDMI / DVI, tem de utilizar a tomada HDMI IN 3(DVI).
Os cabos HDMI de versões anteriores à 1.3 podem provocar imagens tremidas ou fazer com que não sejam
apresentadas imagens no ecrã.
3 PC IN [PC] / [AUDIO]
Liga-se às tomadas de saída de vídeo e áudio do PC.
Se o seu PC suportar uma ligação HDMI, pode ligar ao terminal HDMI IN 1, 2, 3(DVI) ou 4.
Se o seu PC suportar uma ligação HDMI, pode ligar ao terminal HDMI IN 3(DVI) / DVI AUDIO IN.
4 ANT IN
Estabelece a ligação com uma antena ou sistema de televisão por cabo.
5
(consoante o modelo)
O dispositivo de bloqueio Kensington (opcional) serve para fixar fisicamente o sistema quando utilizado em locais públicos.
Se quiser utilizar um dispositivo de bloqueio, contacte o revendedor onde adquiriu o televisor
.
A localização do dispositivo de bloqueio Kensington pode ser diferente consoante o modelo.
¦
N
N
N
N
N
N
N
N
N
7890 6 5
@
2
#
!
21 34
[Painel lateral do
televisor]
[Painel posterior do televisor]
Entrada de energia
[620-Weuro]BN68-02326A-03L09.ind4 4 2009-10-08 ¿ÀÀü 9:30:17

Português - 5
6
H
(AUSCULTADORES)
Pode ligar auscultadores à saída de auscultadores no seu televisor. Quando os auscultadores estão ligados, o som dos
altifalantes incorporados é desactivado.
A utilização da função de som é limitada quando liga os auscultadores ao televisor.
O uso prolongado dos auscultadores com o volume muito alto pode provocar lesões auditivas.
Não sairá som dos altifalantes quando ligar os auscultadores ao televisor.
O volume dos auscultadores e o volume do televisor são ajustáveis em separado.
7 DIGITAL AUDIO OUT (OPTICAL)
Estabelece a ligação com um componente de áudio digital, tal como um receptor do sistema home theatre.
Quando um sistema de áudio digital estiver ligado à tomada DIGITAL AUDIO OUT (OPTICAL): Diminua o volume do
televisor e regule o nível de volume com o controlo do volume do sistema.
Pode ouvir áudio de 5.1 canais se o televisor estiver ligado a um dispositivo externo que suporte 5.1 canais.
Se o receptor (sistema home theatre) estiver definido para Lig., o som é reproduzido a partir da tomada óptica do
televisor. Se o televisor apresentar um sinal DTV (antena), este vai enviar som de 5.1 canais para o receptor do sistema
home theatre. Se a fonte for um componente digital, como um leitor de DVD / leitor de Blu-ray / caixa de televisão por
cabo / receptor de satélite (set-top box), e estiver ligada ao televisor através de um cabo HDMI, só pode ouvir som de
2 canais a partir do receptor do sistema home theatre. Se quiser ouvir áudio de 5.1 canais, ligue a tomada de saída
de áudio digital ao leitor de DVD / leitor de Blu-ray / caixa de televisão por cabo / receptor de satélite (set-top box)
directamente a um amplificador ou a um sistema home theatre, e não ao televisor.
8 SERVICE
Conector apenas para assistência técnica.
9 AUDIO OUT [R-AUDIO-L]
Liga-se às tomadas de entrada de áudio do amplificador/sistema home theatre.
Quando um amplificador de áudio estiver ligado às tomadas AUDIO OUT [R-AUDIO-L]: diminua o volume do televisor e
regule o nível de volume com o controlo do volume do amplificador.
0 EXT1, 2
Entradas ou saídas para dispositivos externos, tais como videogravadores, consolas de jogos ou leitores de DVD.
No Modo EXT, o DTV Out suporta apenas vídeo e áudio MPEG SD.
Especificação de entradas/saídas
Conector
Entrada Saída
Vídeo Áudio (E / D) RGB Vídeo + Áudio(L/R)
EXT 1 O O O Apenas está disponível a saída TV ou DTV.
EXT 2 O O X Saída que pode escolher.
! AV IN [VIDEO] / [R-AUDIO-L]
Entradas de vídeo e áudio para dispositivos externos como, por exemplo, uma câmara de vídeo ou um videogravador
.
@ USB
Conector para actualizações do software e Media Play, etc.
# Ranhura COMMON INTERFACE
Ao não introduzir o ‘CI(CI+) CARD’ em determinados canais, a mensagem ‘Scrambled Signal’ é apresentada no ecrã.
As informações de associação incluindo um número de telefone, ID do CI(CI+) CARD, ID do anfitrião e outras
informações são apresentadas cerca de 2 a 3 minutos depois. Se for apresentada uma mensagem de erro, contacte o
seu fornecedor de serviços.
Assim que concluir a configuração das informações dos canais, a mensagem ‘Updating Completed’
é apresentada,
indicando que a lista de canais já está actualizada.
Dependendo do modelo, quando o cartão CI for novamente introduzido, pode aparecer uma mensagem a solicitar a
palavra-passe do Bloqueio para crianças.
Dependendo do modelo, mesmo que o Bloqueio para crianças esteja denido para Perm. Tudo pode aparecer uma
mensagem a solicitar a palavra-passe de programas para adultos (18 anos ou mais).
Tem de solicitar um CI(CI+) CARD ao fornecedor de serviços por cabo local. Retire o CI(CI+) CARD puxando-o com
cuidado para não o deixar cair e danificá-lo.
Introduza o CI(CI+) Card na direcção indicada.
A localização da Ranhura COMMON INTERFACE pode ser diferente consoante o modelo.
Uma vez que o “CI(CI+) CARD” não é suportado nalguns países, regiões, estações emissoras, verifique esta situação
junto do seu revendedor autorizado.
A função ‘CI(CI+) CARD’ apenas é aplicável ao modelo LE********P.
Se tiver problemas, contacte o fornecedor de serviços.
N
N
N
N
N
N
N
N
–
–
N
N
N
N
N
[620-Weuro]BN68-02326A-03L09.ind5 5 2009-10-08 ¿ÀÀü 9:30:17

Português - 6
Apresentação do telecomando
Pode utilizar o telecomando até aproximadamente 7 metros de distância do televisor.
O funcionamento do telecomando pode ser afectado por luzes fortes.
A cor e a forma do produto podem variar consoante o modelo.
1
POWER : liga e desliga o
televisor.
2
BOTÕES NUMÉRICOS :
carregue para mudar de canal.
3
FAV.CH : Utilizado para mostrar
a Lista de canais favoritos no
ecrã.
4
Y
: carregue para
aumentar ou diminuir o volume.
5
SOURCE : carregue para
seleccionar as fontes de vídeo
disponíveis.
6
INFO : carregue para apresentar
informações no ecrã do televisor.
7
TOOLS : utilize para seleccionar
funções frequentemente
utilizadas.
8
CH LIST : botão utilizado para
mostrar a lista de canais no ecrã.
9
BOTÕES COLORIDOS : Utilize
estes botões no menu Lista
canais, Media Play, etc.
!
DUAL : Selecção de efeitos
sonoros
@
Utilize estes botões nos
modos Media Play e Anynet
+
.
(
∏
: Este telecomando pode
ser utilizado para controlar
a gravação em gravadores
da Samsung que tenham a
funcionalidade Anynet
+
)
#
TV : selecciona o modo TV
directamente.
$
PRE-CH : permite-lhe
regressar ao canal estava a ver
anteriormente.
%
MUTE
M
: carregue para tirar o
som ao televisor.
^
>
P
<
: carregue para mudar
de canal.
&
MENU : mostra o menu principal
no ecrã.
*
GUIDE : visualização do Guia de
programação electrónico (EPG)
(
RETURN : volta ao menu
anterior.
)
/ ENTER
E
: utilize para
seleccionar as opções de menu
no ecrã e alterar os respectivos
valores.
a
EXIT : carregue para sair do
menu.
b
P.SIZE : Selecção do tamanho
de imagem.
c
MEDIA.P: Permite-lhe reproduzir
ficheiros de música e imagens.
d
SUBT. : visualização de legendas
digitais
e
AD : Selecção da descrição
áudio.
Funçõesde Teletexto
5
0
: Selecção do modo de
teletexto (LIST / FLOF)
6
5
: mostrar teletexto
7
4
: selecção de tamanho do
teletexto
8
8
: memorizar teletexto
9
Selecção de tópicos Fastext
0
/
: seleccionar
alternadamente teletexto, duplo
ou combinado.
#
:
: sair da visualização de
teletexto
$
1
: página secundária de
teletexto
^
2
: página seguinte do teletexto
3
: página anterior do teletexto
&
6
: índice do teletexto
(
9
: modo de espera de teletexto
a
7
: cancelar teletexto
¦
N
N
N
INFO
C
H
L
I
S
T
AD
1 #
$
^
*
(
)
a
b
c
e
d
%
&
2
3
4
5
6
7
8
9
0
!
@
[620-Weuro]BN68-02326A-03L09.ind6 6 2009-10-08 ¿ÀÀü 9:30:18

Português - 7
Colocar pilhas no telecomando
1. Levante a tampa na parte de trás do telecomando tal como apresentado na figura.
2. Coloque duas pilhas de tamanho AAA.
Faça corresponder os pólos ‘+’ e ‘–’ das pilhas com o diagrama existente no
compartimento.
3.
Volte a colocar a tampa.
Se não tencionar utilizar o telecomando durante muito tempo, retire as pilhas e guarde-
as num local fresco e seco. (Em circunstâncias normais de funcionamento do televisor, as pilhas de um telecomando
duram cerca de um ano.)
Se o telecomando não funcionar, verifique os itens abaixo:
O televisor está ligado?
Os pólos + e - das pilhas estão invertidos?
As pilhas estão gastas?
Houve um corte de energia ou o cabo de alimentação está desligado?
Há alguma lâmpada fluorescente especial ou luz de néon por perto?
OPERATION
Aceder aos menus
Antes de utilizar o televisor, siga os passos seguintes para saber como navegar no menu e seleccionar ou ajustar diferentes
funções.
Utilizar os OSD (On Screen Display - Visualização no ecrã)
O passo de acesso pode variar consoante o menu seleccionado.
1. Carregue no botão MENU.
2.
O menu principal aparece no ecrã. No lado esquerdo do menu aparecem ícones : Imagem,
Som, Canal, Configurar, Entrada, Aplicação, Assistência.
3. Carregue no botão ▲ ou ▼ para seleccionar um dos ícones.
4.
Em seguida, carregue no botão ENTER
E
para aceder ao menu secundário do ícone.
5. Carregue no botão ▲ ou ▼ para seleccionar o menu secundário do ícone.
6.
Carregue no botão ◄ ou ► para diminuir ou aumentar o valor de um determinado item. O
OSD de ajuste pode variar consoante o menu seleccionado.
7
. Carregue no botão ENTER
E
para concluir a configuração. Carregue no botão EXIT para
sair.
¦
N
N
N
¦
❑
INFO
AD
MENU Botão
Mostrar o menu principal no ecrã.
ENTER
E
/ DIRECÇÃO Botão
Mover o cursor e seleccionar um
item. Escolhe o item actualmente
seleccionado. Confirmar a
definição.
RETURN Botão
Volta ao menu anterior.
EXIT
Sair do menu no ecrã.
INFO
AD
INFO
AD
Modo :Standard ▶
Retroiluminação :7
Contraste :95
Brilho :45
Nitidez :50
Cor :50
Matiz(Vd/Vm) :Vd50/Vm50
Definiçõesavançadas
Imagem
Modo :Standard
Retroiluminação :7 ▶
Contraste :95
Brilho :45
Nitidez :50
Cor :50
Matiz(Vd/Vm) :Vd50/Vm50
Definiçõesavançadas
Opçõesdeimagem
Imagem
7
U
Mover
L
Ajustar
E
Enter
R
Voltar
▲
Retroiluminação
▼
Ícone Ajuda
[620-Weuro]BN68-02326A-03L09.ind7 7 2009-10-08 ¿ÀÀü 9:30:18

Português - 8
Definir o televisor para modo de espera
Pode definir o seu televisor para o modo de espera, para reduzir o consumo de energia. O modo de espera é útil quando precisa
e interromper a visualização temporariamente (por exemplo, durante a refeição).
1. Carregue no botão POWER
P
no telecomando.
O ecrã apaga-se e aparece o indicador luminoso do modo de espera no televisor
.
2. Para voltar a ligar o televisor, basta carregar no botão POWER
P
novamente.
Não deixe o televisor em modo de espera durante longos períodos de tempo (por exemplo, quando vai de férias).
Aconselha-se que desligue o televisor da corrente eléctrica e da antena.
Função Plug & Play (Dependendo do modelo)
Quando ligar o televisor pela primeira vez, as definições básicas são utilizadas de forma
automática e subsequente.
1.
Carregue no botão POWER do telecomando.
Também pode utilizar o botão POWER
P
do televisor.
A mensagem Select the OSD Language. é apresentada.
2.
Carregue no botão ENTER
E
. Seleccione o idioma apropriado carregando no botão
▲ ou ▼. Carregue no botão ENTER
E
para confirmar a escolha.
3. Carregue no botão ◄ ou ► para seleccionar Demo Loja ou Uso Doméstico e, em
seguida, no botão ENTER
E
.
Recomendamos que defina o televisor para o modo Uso Doméstico, de forma a
usufruir da melhor imagem em sua casa.
Demo Loja destina-se apenas para locais de venda a retalho.
Se o televisor for acidentalmente definido para o modo Demo Loja e quiser voltar ao modo Uso Doméstico (padrão):
carregue no botão de volume do televisor. Quando aparecer o OSD de volume, carregue sem soltar o botão MENU do
televisor durante 5 segundos.
4.
Carregue no botão ENTER
E
. Seleccione o país apropriado carregando nos botões ▲ ou ▼. Carregue no botão ENTER
E
para confirmar a escolha.
Depois de seleccionar o país no menu País alguns modelos permitem avançar para uma opção adicional para denir o pin.
Quando introduz o número PIN, 0-0-0-0 não está disponível.
5.
Carregue no botão ▲ ou ▼ para seleccionar Ar ou Cabo e, em seguida, carregue no botão ENTER
E
.
Ar: sinal de antena.
Cabo: sinal de cabo.
6.
Carregue no botão ▲ ou ▼ para seleccionar a fonte do canal que pretende memorizar
. Carregue no botão ENTER
E
para
seleccionar Iniciar.
Se configurar a fonte de antena para Cabo, pode definir um valor para a procura de canais digitais. Para obter mais
informações, consulte .
Digital e Analógico: canais digitais e analógicos.
Digital: Canais Digitais.
Analógico: Canais Analógicos.
A procura de canais começa e termina automaticamente.
Carregue no botão ENTER
E
a qualquer altura para interromper o processo de memorização.
Depois de todos os canais disponíveis terem sido memorizados, a mensagem Ajustar o Modo Relógio é apresentada.
7
. Carregue no botão ENTER
E
. Carregue no botão ▲ ou ▼ para seleccionar Auto. e, em seguida, carregue no botão ENTER
E
.
Se seleccionar Manual, a mensagem Ajustar data e hora actuais é apresentada.
Se receber um sinal digital, a hora será definida automaticamente. Caso contrário, seleccione Manual para acertar o relógio.
8
. É apresentada uma descrição do método de ligação que permite obter a melhor qualidade com o ecrã HD. Consulte a
descrição e carregue no botão ENTER
E
.
9. A mensagem Desfrute do seu televisor. é apresentada. Quando tiver terminado, carregue no botão ENTER
E
.
Se quiser repor esta função...
1. Carregue no botão MENU para ver o menu. Carregue no botão ▲ ou ▼ para seleccionar
Configurar e, em seguida, carregue no botão ENTER
E
.
2. Carregue novamente no botão ENTER
E
para seleccionar Plug & Play.
3. Introduza o número PIN de 4 dígitos. O número PIN predefinido de um televisor novo é 0-0-0-0.
Se quiser alterar o número PIN, utilize a função Alterar PIN.
A função Plug & Play só está disponível no modo TV.
¦
N
N
¦
N
N
N
N
N
N
N
N
N
N
N
N
N
N
N
N
N
N
INFO
AD
SelecttheOSDLanguage.
MenuLanguage :English ▶
E
Enter
Plug&Play
Plug&Play ▶
IdiomadoMenu :Português
Tempo
Transmissão
Segurança
Geral
Configurar
[620-Weuro]BN68-02326A-03L09.ind8 8 2009-10-08 ¿ÀÀü 9:30:18

Português - 9
Visualização no ecrã
A visualização no ecrã identifica o canal actual e o estado de determinadas definições de
áudio-vídeo.
Carregue no botão INFO para visualizar as informações.
Carregue no botão INFO no telecomando. O canal, o tipo de som e o estado de
determinadas definições de imagem e som são apresentados no televisor.
▲, ▼: pode visualizar outras informações do canal. Se quer passar para o canal
actualmente seleccionado, carregue no botão ENTER
E
.
◄, ►: pode visualizar as informações do programa pretendido no canal actual.
Carregue novamente no botão INFO ou espere aproximadamente 10 segundos e o
ecrã desaparece automaticamente.
CANAL
Menu Canal
País
Canal analógico
Pode alterar o país para os Canais Analógicos.
Canal digital
Pode alterar o país nos canais digitais.
É apresentado o ecrã para a introdução do número PIN. Introduza o número PIN de 4
dígitos.
Memor. auto.
Pode procurar os intervalos de frequência disponíveis (a disponibilidade depende do país em que se encontra). Os números de
programas atribuídos automaticamente podem não corresponder aos números de programas existentes ou pretendidos.
Se o canal estiver bloqueado utilizando a função Bloq. crianças, a janela para a introdução do PIN é apresentada.
Ar / Cabo
Fonte de antena a memorizar
Digital e Analógico: canais digitais e analógicos.
Digital: Canais Digitais.
Analógico: Canais Analógicos.
Se seleccionar ‘ ou ‘
Introduza um valor para procurar canais de cabo.
ID de rede: apresenta o código de identificação de rede.
Frequência: apresenta a frequência para o canal. (Difere de país para país)
Modulação: apresenta os valores de modulação disponíveis.
Taxa de símbolos: apresenta as taxas de símbolos disponíveis.
Procura todos os canais com estações de transmissão activas e guarda-os na memória do televisor
.
Se pretender parar a memorização automática, carregue no botão ENTER
E
.
A mensagem será apresentada.
Seleccione Sim carregando no botão ◄ ou ► e, em seguida, no botão ENTER
E
.
¦
O
●
●
N
¦
❑
■
■
N
❑
N
■
●
●
●
●
N
N
N
País ▶
Memor.auto.
Memor.manual
OpçãodeProcuraporCabo
Guiacompleto
Miniguia
Guiapredef. :Guiacompleto
Listacanais
Canal
INFO
AD
DTV Air
15
abc1
18:00 ~ 6:00
18:11 Thu 6 Jan
Life On Venus Avenue
Unclassified
No Detaild Information
' Information
[620-Weuro]BN68-02326A-03L09.ind9 9 2009-10-08 ¿ÀÀü 9:30:19

Português - 10
Memor. manual
Procura um canal manualmente e armazena na TV.
Se o canal estiver bloqueado utilizando a função Bloq. crianças, a janela para a introdução do PIN é apresentada.
Canal digital
Armazenamento manual de canal digital.
Canal digital só está disponível no modo DTV.
Canal: defina o número do canal utilizando o botão ▲, ▼ ou os botões numéricos (0~9).
Frequência: defina a frequência utilizando os botões numéricos.
Largura banda: defina a banda utilizando o botão ▲, ▼ ou os botões numéricos (0~9).
Quando concluído, os canais são actualizados na lista de canais.
Canal analógico
Armazenamento manual de canal analógico.
Programa (Número do programa que pretende atribuir a um canal): define o número do programa utilizando os botões ▲,
▼
ou numéricos (0~9).
: define os valores do sistema de cores utilizando os botões ▲ ou ▼.
: define os valores do sistema de som utilizando os botões ▲ ou ▼.
Canal (Se souber o número do canal que pretende memorizar): carregue no botão ▲ ou ▼ para seleccionar C (canal de
antena) ou S (canal de cabo). Carregue no botão ► e em seguida, nos botões ▲, ▼ ou numéricos (0~9) para seleccionar o
número pretendido.
Também pode seleccionar o número do canal directamente ao carregar nos botões numéricos (0~9).
Se não ouvir som ou se este não estiver em condições, volte a seleccionar o padrão de som pretendido.
Pesquisa (Se não souber os números dos canais): carregue nos botões ▲ ou ▼ para iniciar a procura. O sintonizador
procura a amplitude de frequências até aparecer no ecrã o primeiro canal, ou o canal seleccionado.
Armaz. (Quando memoriza o canal e o número do programa associado): defina para OK carregando no botão ENTER
E
.
Modo Canal
P (Modo de programa): ao concluir a sintonização, já terão sido atribuídos números de posição (de P00 a P99) às
estações emissoras da sua área. Pode seleccionar um canal, introduzindo o número da posição neste modo.
C (Modo de canal de antena): pode seleccionar um canal, introduzindo o número atribuído a cada estação emissora
neste modo.
S (Modo de canal de cabo): pode seleccionar um canal, introduzindo o número atribuído a cada canal de cabo neste
modo.
Opção de Procura por Cabo (consoante o país)
Define opções de procura adicionais, como a frequência e a taxa de símbolos, para procuras de rede por cabo.
Iniciar frequência (Frequência inicial): define a frequência inicial (Difere consoante o país)
Parar frequência (Frequência final): define a frequência final (Difere consoante o país)
Modulação: apresenta os valores de modulação disponíveis.
Taxa de símbolos: apresenta as taxas de símbolos disponíveis.
Guia completo / Mini guia
As informações do EPG (Guia de programação electrónico) são fornecidas pelas estações emissoras. Pode haver entradas de
programas em branco ou desactualizadas em consequência da transmissão de informações de um determinado canal. O ecrã é
actualizado de forma dinâmica à medida que novas informações ficam disponíveis.
Também pode aceder ao menu do guia carregando no botão GUIDE. (Para configurar a opção Guia predef., consulte as
descrições.)
Guia completo
Apresenta as informações sobre os programas de hora em hora. São apresentadas informações de duas horas de programação,
que pode percorrer para a frente ou para trás no tempo.
Mini guia
As informações sobre cada programa são apresentadas em cada linha do ecrã do Mini-guia do canal actual, a partir do programa
actual, de acordo com a ordem do início dos programas.
❑
N
N
■
N
●
●
●
N
■
●
●
●
●
N
N
●
●
N
❑
●
●
●
●
❑
O
■
■
[620-Weuro]BN68-02326A-03L09.ind10 10 2009-10-08 ¿ÀÀü 9:30:19

Português - 11
Pode decidir entre apresentar a opção Guia completo ou Mini guia quando carregar no botão GUIDE do telecomando.
Lista canais
Para procedimentos detalhados sobre a utilização de Lista canais, consulte as instruções de ‘Gerir canais’.
Para seleccionar estas opções, basta carregar no botão CH LIST do telecomando.
Modo Canal
Ao carregar no botão P
>
/
<
o canal muda de acordo com a lista de canais seleccionados.
Adicionar
A mudança de canal é feita de acordo com a lista de canais memorizados.
Canais favoritos
A mudança de canal é feita de acordo com a lista de canais favoritos.
Sintonia fina
Se a recepção for nítida, não precisa de fazer a sintonização fina do canal, uma vez que é feita automaticamente durante a
procura e memorização. No entanto, se o sinal for fraco ou estiver distorcido, pode ser necessário fazer uma sintonização fina
manual dos canais.
Os canais memorizados, onde foi efectuada a sintonização fina, estão marcados com um asterisco ‘*’
no lado direito do
número do canal, na faixa do canal.
Para repor a sintonização fina, seleccione Reiniciar carregando no botão ▲ ou ▼ e, em seguida, carregue no botão
ENTER
E
.
A sintonização fina apenas pode ser utilizada nos canais analógicos.
Utilizar o Completa / Mini guia
Para... Escolha...
Ver um programa da lista EPG Seleccionar um programa carregando nos botões ▲, ▼, ◄, ►.
Sair do guia Carregar no botão azul
Se seleccionar o programa seguinte, este fica agendado com o ícone de relógio visível. Se carregar novamente no botão
ENTER
E
, carregue no botão ◄, ► para seleccionar Cancelar planos, os agendamentos são cancelados e o ícone do relógio
desaparece.
Ver as informações dos programas Seleccionar um programa à sua escolha, carregando nos botões ▲, ▼,
◄, ►.
Carregue depois no botão INFO quando o programa que escolheu estiver
realçado.
O nome do programa é apresentado na parte de superior do centro do
ecrã.
Clique no botão INFO para obter informações detalhadas. Nas informações detalhadas estão incluídos aspectos como o Número
do canal, Duração do programa, Barra de estado, Autoridade parental, Informação sobre a qualidade de vídeo (HD / SD), Modos
de som, Legendas ou Teletexto, Idiomas das legendas ou do teletexto, e um breve resumo sobre o programa realçado. ‘...’ é
apresentado se o resumo for demasiado longo.
Alternar entre Guia completo e Mini guia Carregue várias vezes no botão vermelho.
In Guia completo
Andar rapidamente para trás (24 horas).
Andar rapidamente para a frente (24 horas).
Carregue várias vezes no botão verde.
Carregue várias vezes no botão amarelo.
❑
❑
O
❑
■
■
❑
N
N
N
Guiacompleto
E
Ver Informação Página Miniguia +24horas Sair
DTVCable900ftn2:10Ter1Jun
FreshmenOnCampus
2:00-2:30
NoDetailedInformation
Hoje
2:00-3:00 3:00-4:00
MintExtra
Loaded
40withDynamiteMC
TheDistillery
SmashHits!Domingo
900ftn
901ITVPlay
902Kerrang!
903Kiss
904oneword
905Hits
▼
StreetHypn..
Kisstory
No
Information
NoInformation
NoInformation
FreshmenO..
900
E
Ver Informação Página Guiacompleto Sair
Miniguia DTVCable900ftn
StreetHypnosis
BoozeBritain
2:00
2:30
5:00
Freshmen
OnCampus
▼
[620-Weuro]BN68-02326A-03L09.ind11 11 2009-10-08 ¿ÀÀü 9:30:19

Português - 12
Gerir canais
Se utilizar este menu, pode adicionar / eliminar ou definir os canais favoritos e utilizar o guia de programas para transmissões
digitais.
Todos os canais
Mostra todos os canais disponíveis.
Canais adicionados
Mostra todos os canais adicionados.
Favoritos
Mostra todos os canais favoritos.
Para seleccionar os canais definidos como favoritos, carregue no botão FAV.CH do telecomando.
Programado
Mostra todos os programas actualmente reservados.
Seleccione um canal no ecrã Todos os canais, Canais adicionados ou Favoritos carregando nos botões ▲ / ▼ e, em
seguida, no botão ENTER
E
. Pode então ver o canal seleccionado.
Utilizar os botões coloridos com a Lista de canais
Vermelho (Tipo de canal): alterna entre e Todas.
Verde (Zoom): aumenta ou diminui o número de um canal.
Amarelo (Selec.): selecciona várias listas de canais. Pode executar a função adicionar/eliminar ou adicionar aos
Favoritos/eliminar dos Favoritos, para vários canais ao mesmo tempo. Escolha os canais pretendidos e carregue no
botão amarelo para definir todos os canais seleccionados ao mesmo tempo. A
marca
c
é apresentada à esquerda dos
canais seleccionados.
TOOLS (Ferramentas): Mostra o menu Apagar (ou Adicionar), Adicionar aos favoritos (ou Apagar dos favoritos),
Bloquear (ou Desbloq.), Visual. temp., Editar nome de canal, Edição do Canal nº , Ordenar, Selec. Todos (ou
Anular selecção), Memor. auto.. (O menu Opções pode variar consoante a situação.)
Ícones do ecrã sobre o estado do canal
A
: um canal analógico.
c
: um canal seleccionado carregando no botão amarelo.
*
: um canal definido como favorito.
(
: um programa que está a ser transmitido.
\
: um canal bloqueado.
)
: um programa reservado
Menu de opções da lista de canais (em Todos os canais / Canais adicionados / Favoritos)
Carregue no botão TOOLS para utilizar o menu de opções.
O menu de opções pode variar dependendo do estado do canal.
Adicionar / Apagar
Pode eliminar ou adicionar um canal a ser apresentado nos canais pretendidos.
Todos os canais eliminados são apresentados no menu Todos os canais.
Um canal a cinzento indica que este foi eliminado.
O menu Adicionar só é apresentado para canais eliminados.
Também pode, do mesmo modo, eliminar um canal do menu Canais adicionados ou
Favoritos.
Adicionar aos favoritos / Apagar dos favoritos
Pode definir os canais que vê frequentemente como favoritos.
Carregue no botão TOOLS para ver o menu Ferramentas. Também pode definir a função adicionar aos (ou eliminar dos)
Favoritos, seleccionando
(ou Apagar dos favoritos).
O símbolo ‘
*
’ é apresentado e o canal é definido como favorito.
Todos os canais favoritos são apresentados no menu Favoritos.
Bloquear / Desbloq.
Pode bloquear um canal para que o mesmo não seja nem seleccionado nem visualizado.
Esta função só está disponível quando a opção Bloq. crianças está definida para Lig..
É apresentado o ecrã para a introdução do número PIN. Introduza o número PIN de 4 dígitos.
O número PIN predefinição de um televisor novo é ‘0-0-0-0’. Pode alterar o PIN, seleccionando a opção Alterar PIN do menu.
O símbolo ‘
\
’ é apresentado e o canal é bloqueado.
¦
■
■
■
O
■
N
N
N
N
N
■
N
N
N
N
■
T
N
N
■
N
N
N
N
Canaisadicionados
824UKTVGold
825UKTVstyle
A
1C--
A
2C--
A
3C--
A
4C--
A
5C--
A
6C--
A
7C--
A
8C--
Todas Tipodecanal Zoom Selec.
T
Ferramentas
824UKTVGold
825UKTVstyle
A
1C--
A
2C--
A
3C--
A
4C--
A
5C--
A
6C--
A
7C--
A
8C--
Todas Tipodecanal Zoom Selec.
T
Ferramentas
Apagar
Adicionaraosfavoritos
Bloquear
Visual.
temp.
Editarnomedecanal
Ordenar
Todososcanais
[620-Weuro]BN68-02326A-03L09.ind12 12 2009-10-08 ¿ÀÀü 9:30:20

Português - 13
Visual. temp.
Se reservar um programa que queira assistir, o televisor muda automaticamente para o canal da lista onde tinha reservado o
programa, mesmo que esteja a visualizar outro canal. Para reservar um programa, defina em primeiro lugar a hora actual.
Apenas canais memorizados podem ser reservados.
Pode definir directamente o canal, o dia, o mês, o ano, a hora e o minuto, ao carregar nos botões numéricos do telecomando.
A reserva de um programa é apresentada no menu Programado.
Guia de programas digitais e Reservas de visualização
Se seleccionar um canal digital e carregar no botão ►, aparece o guia de programas do canal. Pode reservar um programa
se seguir os procedimentos descritos acima.
Editar nome de canal (apenas canais analógicos)
Os canais podem ser etiquetados de modo a que as letras que os definem sejam apresentadas quando os mesmos são
seleccionados.
Os nomes dos canais digitais são atribuídos automaticamente e não podem ser alterados.
Edição do Canal nº (apenas canais digitais)
Pode também editar o número do canal se carregar nos botões numéricos do telecomando.
Ordenar (apenas canais analógicos)
Esta operação permite alterar os números de programa dos canais memorizados. Esta operação pode ser necessária depois de
utilizar a memorização automática.
Selec. Todos / Anular selecção
Selec. Todos: pode seleccionar todos os canais da lista de canais.
Anular selecção: pode retirar a selecção a todos os canais anteriormente seleccionados.
Só pode escolher Anular selecção se houver um canal seleccionado.
Memor. auto.
Para obter informações detalhadas sobre os procedimentos necessários para configurar opções, consulte as instruções de
‘Menu Canal’.
Se o canal estiver bloqueado utilizando a função Bloq. crianças, a janela para a introdução do PIN é apresentada.
Menu de opções da lista de canais (em Programado)
Pode visualizar, modificar ou eliminar uma reserva.
Carregue no botão TOOLS para utilizar o menu de opções.
Alterar informações
Seleccione esta opção para alterar uma reserva em visualização.
Cancelar planos
Seleccione esta opção para cancelar uma reserva de visualização.
Informação
Seleccione esta opção para visualizar uma reserva em visualização.
(Também pode alterar as informações de reserva.)
Selec. Todos
Seleccione todos os programas reservados.
■
N
N
N
N
■
N
■
■
■
●
●
N
■
N
N
N
■
■
■
■
1/1/2009
13:595TV1
)
18:592TV3
)
TheEqualizer
20:592TV3
)
McMillan&Wife
21:592TV3
)
M.Spillane’smike
Todas Zoom Selec.
T
Ferramentas
E
Informação
Alterarinformações
Cancelarplanos
Informação
Selec.
Todos
Programado
[620-Weuro]BN68-02326A-03L09.ind13 13 2009-10-08 ¿ÀÀü 9:30:20

Português - 14
IMAGEM
Configurar o menu Imagem
Modo
Pode seleccionar o tipo de imagem que melhor se adeqúe aos seus requisitos de visualização.
Carregue no botão TOOLS para ver o menu Ferramentas. Também pode definir o modo
de imagem seleccionando .
Dinâmico
Selecciona a imagem para que seja exibida com uma maior definição numa sala iluminada.
Standard
Selecciona a imagem para que seja exibida em condições ideais num ambiente normal.
Natural
Selecciona uma visualização de imagem óptima e confortável para os olhos.
Esta função não está disponível no modo PC.
Filme
Selecciona a imagem ideal para ver filmes numa sala escura.
Retroiluminação / Contraste / Brilho / Nitidez / Cor / Matiz (Vd/Vm)
O televisor tem várias opções de definição que permitem controlar a qualidade da imagem.
Retroiluminação: ajusta o brilho da retro-iluminação do LCD.
Contraste: ajusta o nível de contraste da imagem.
Brilho: ajusta o nível de brilho da imagem.
Nitidez: ajusta a definição das extremidades da imagem.
Cor: ajusta a saturação da cor da imagem.
Matiz (Vd/Vm): ajusta o matiz da cor da imagem.
Nos modos TV, Ext., AV analógicos do sistema PAL, não pode utilizar a função Matiz (Vd/Vm).
Quando faz alterações a Retroiluminação, Contraste, Brilho, Nitidez, Cor ou Matiz (Vd/Vm), o OSD ajusta-se de acordo
com as mesmas.
No modo PC, só pode fazer alterações a Retroiluminação, Contraste e Brilho.
As definições podem ser ajustadas e guardadas para cada dispositivo externo que ligar a uma entrada do televisor
.
O consumo de energia durante a utilização pode ser reduzido de forma signicativa se diminuir o nível de brilho da imagem, o
que signica uma redução no custo geral de funcionamento.
Definições avançadas
O novo televisor da Samsung permite-lhe definir de modo mais preciso as imagens do que os
modelos anteriores.
Definições avançadas está disponível no modo Standard ou Filme.
No modo PC, só pode fazer alterações a Contraste dinâm., Gama e Equilíb. branco de
entre os itens de Definições avançadas.
Pode seleccionar o nível de preto no ecrã para ajustar a intensidade.
Pode ajustar o contraste do ecrã até obter o contraste ideal.
Gama
Pode ajustar a intensidade das cores primárias (vermelho, verde, azul).
¦
❑
T
■
■
■
N
■
❑
●
●
●
●
●
●
N
N
N
N
N
❑
N
N
■
■
■
Modo :Standard ▶
Retroiluminação :7
Contraste :95
Brilho :45
Nitidez :50
Cor :50
Matiz(Vd/Vm) :Vd50/Vm50
Definiçõesavançadas
Imagem
7
U
Mover
L
Ajustar
E
Enter
R
Voltar
▲
Retroiluminação
▼
Tonalidadedepreto :Deslig. ▶
Contrastedinâm. :Médio
Gama :0
Matrizdecores :Nativo
Equilíb.branco
Tomdepele :0
Melhor.extremid. :Lig.
U
Mover
E
Enter
R
Voltar
Definiçõesavançadas
[620-Weuro]BN68-02326A-03L09.ind14 14 2009-10-08 ¿ÀÀü 9:30:21

Português - 15
Matriz de cores
A matriz de cores é um esquema de cores composto por vermelho, verde e azul. Seleccione a sua matriz de cores favorita para
obter uma cor mais natural.
Auto.: a matriz de cores automática ajusta automaticamente a tonalidade de cor mais natural com base em fontes do
programa.
Nativo: a matriz de cores nativa fornece uma tonalidade mais rica e profunda.
Personal.: ajusta o intervalo de cores de acordo com a sua preferência.
Se alterar os valores de ajuste, será efectuada a actualização do ecrã.
As definições podem ser ajustadas e guardadas para cada dispositivo externo que ligar a uma entrada do televisor
. Por
exemplo, se houver um leitor de DVD ligado a HDMI 1 e estiver actualmente seleccionado, as definições e os ajustes são
guardados para o leitor de DVD.
Cor: Vermelho, Verde, Azul, Amarelo, Ciano ou Magenta
Cor está disponível quando Matriz de cores está definido para Personal..
Na opção Cor, pode ajustar os valores RGB para a cor seleccionada.
Para repor o valor RGB ajustado, seleccione Reiniciar.
Vermelho: ajusta o nível de saturação de vermelho da cor seleccionada.
Verde: ajusta o nível de saturação de verde da cor seleccionada.
Azul: ajusta o nível de saturação de azul da cor seleccionada.
Reiniciar: repõe os valores predefinidos da matriz de cores.
Equilíb. branco
Pode ajustar a temperatura da cor de modo a obter imagens com cores mais naturais.
Vrm-Offset: ajusta a escuridão do vermelho.
Verde-Offset: ajusta a escuridão do verde.
Azul-Offset: ajusta a escuridão do azul.
Vrm-Gain: ajusta o brilho do vermelho.
Verde-Gain: ajusta o brilho do verde.
Azul-Gain: ajusta o brilho do azul.
Reiniciar: o equilíbrio do branco ajustado anteriormente volta às predefinições.
Tom de pele
Pode realçar o tom de pele na imagem.
Se alterar os valores de ajuste, será efectuada a actualização do ecrã.
Pode realçar os limites dos objectos na imagem.
Activar o modo xvYCC, aumenta o detalhe e a matriz de cores, se estiver a ver filmes a partir de um dispositivo externo (ou seja,
um leitor de DVD) ligado às tomadas HDMI ou Component IN.
xvYCC está disponível quando o modo de imagem está definido para Filme e a entrada externa está definida para o modo
HDMI ou Componente.
Dependendo do dispositivo externo, esta função pode não ser suportada.
■
●
●
●
N
N
N
N
N
■
●
●
●
●
●
●
●
■
N
■
■
N
N
[620-Weuro]BN68-02326A-03L09.ind15 15 2009-10-08 ¿ÀÀü 9:30:21

Português - 16
Opções de imagem
No modo PC, só pode efectuar alterações às opções Tonalidade e Tamanho de entre os
itens de Opções de imagem.
C. quentes1, C. quentes2 ou C. quentes3 só é activada se o modo de imagem for Filme.
As definições podem ser ajustadas e guardadas para cada dispositivo externo que ligar a
uma entrada do televisor.
Tamanho
Eventualmente, pode pretender alterar o tamanho da imagem no ecrã. O seu televisor inclui
várias opções de tamanho de ecrã, cada uma delas concebida para funcionar em conjunto com tipos específicos de entradas de
vídeo. A sua caixa de televisão por cabo/receptor de satélite pode ter os seus próprios tamanhos de ecrã. No entanto, regra geral,
as imagens apresentadas no televisor encontram-se, maioritariamente, no modo 16:9.
Pode seleccionar estas opções ao carregar no botão P.SIZE no telecomando.
: ajusta automaticamente o tamanho da imagem para o formato 16:9.
16:9: ajusta o tamanho da imagem para 16:9, apropriado para DVD ou transmissão em banda larga.
Zoom amplo: aumenta o tamanho da imagem para mais de 4:3.
Zoom: amplia a imagem de formato 16:9 (na direcção vertical) para se ajustar ao tamanho do ecrã.
4:3: esta é a predefinição para um filme de vídeo ou para uma transmissão normal.
Ajustar ao ecrã: utilize esta função para ver a imagem inteira sem cortes durante a recepção dos sinais HDMI (720p / 1080i /
1080p) ou do componente (1080i / 1080p).
As opções de tamanho da imagem podem variar consoante a fonte de entrada.
As opções disponíveis podem variar consoante o modo seleccionado.
No modo PC, só pode ajustar o modo 16:9 e 4:3.
As definições podem ser ajustadas e guardadas para cada dispositivo externo que ligar a uma entrada do televisor
.
Pode ocorrer uma retenção temporária da imagem ao visualizar uma imagem fixa por um período superior a duas horas.
Zoom amplo: carregue no botão ► para seleccionar Posição em seguida carregue no botão ENTER
E
. carregue nos
botões ▲ ou ▼ para mover a imagem para cima e para baixo. Em seguida, carregue no botão ENTER
E
.
Zoom: carregue no botão ► para seleccionar Posição em seguida carregue no botão ENTER
E
. carregue nos botões
▲ ou ▼ para deslocar a imagem para cima e para baixo. Em seguida, carregue no botão ENTER
E
. Carregue no botão
► para seleccionar Tamanho e em seguida no botão ENTER
E
. Carregue nos botões ▲ ou ▼ para ampliar ou reduzir o
tamanho da imagem na vertical. Em seguida, carregue no botão ENTER
E
.
Depois de seleccionar Ajustar ao ecrã no modo HDMI (1080i / 1080p) ou Componente (1080i / 1080p): seleccione Posição
carregando nos botões ◄ ou ►. Utilize os botões ▲, ▼, ◄ ou ► para mover a imagem.
Reiniciar: Carregue no botão ◄ ou ► para seleccionar Reiniciar e, em seguida, no botão ENTER
E
. Pode inicializar a
definição.
Se utilizar a função Ajustar ao ecrã com uma entrada HDMI 720p, é cortada uma linha na parte de cima, na parte de baixo, à
esquerda e à direita como na função de procura.
Se definir o tamanho da imagem para num televisor panorâmico 16:9, pode determinar o tamanho em que
pretende ver: a imagem 4:3 WSS (Wide Screen Service) ou nenhuma. Cada país europeu requer um tamanho de imagem
diferente pelo que esta função permite aos utilizadores seleccionar o tamanho.
16:9: define a imagem para o modo panorâmico 16:9.
Zoom amplo: aumenta o tamanho da imagem para mais de 4:3.
Zoom: aumenta o tamanho da imagem na vertical.
4:3: define a imagem para o modo normal 4:3.
Esta função está disponível no modo .
Esta função não está disponível nos modos PC, Componente ou HDMI.
Se o sinal de transmissão recebido pelo seu televisor for fraco, pode activar a função de Redução do ruído digital para ajudar a
diminuir os efeitos da electricidade estática ou de fantasma que possam aparecer no ecrã.
Se o sinal for fraco, seleccione uma das outras opções até que apareça no ecrã a melhor imagem.
Pode seleccionar o nível de preto no ecrã para ajustar a intensidade.
Esta função só está activa quando ligar um dispositivo externo ao televisor através de um cabo HDMI (sinais RGB).
❑
N
■
N
N
■
O
●
●
●
●
●
●
N
N
N
N
N
N
N
N
N
■
●
●
●
●
N
N
■
N
■
N
Tonalidade :Normal ▶
Tamanho :WideAutomático
Mododeecrã :16:9
NRDigital :Auto.
Nv.pr.HDMI :Normal
ModoFilme :Deslig.
ModoApenasazul :Deslig.
U
Mover
E
Enter
R
Voltar
Opçõesdeimagem
[620-Weuro]BN68-02326A-03L09.ind16 16 2009-10-08 ¿ÀÀü 9:30:21

Português - 17
O televisor pode ser definido para detectar e processar automaticamente sinais de filme de todas as fontes, e ajustar a imagem a
uma qualidade ideal.
Modo Filme é suportado em TV, AV, COMPONENT(480i / 1080i) e HDMI(480i / 1080i).
Deslig.: desactiva a função Film Mode.
Auto.1: ajusta automaticamente a imagem para obter a melhor qualidade de imagem quando vê um filme.
Auto.2: optimiza automaticamente o texto do vídeo no ecrã (excluindo as legendas fechadas) quando vê um filme.
Elimina o arrastamento em cenas rápidas com muito movimento para obter uma imagem mais nítida.
Se activar 100 Hz Motion Plus, podem surgir interferências no ecrã. Se tal acontecer, defina 100Hz Motion Plus para
Deslig..
Deslig.: desactiva a opção 100Hz Motion Plus.
Nítido: define a opção 100Hz Motion Plus para o valor mínimo.
Standard: define a opção 100Hz Motion Plus para o valor médio.
Suave: define a opção 100Hz Motion Plus para o valor máximo.
Personal.: ajusta o nível de redução da desfocagem e da trepidação de acordo com a sua preferência.
Redução desfocagem: ajusta o nível de redução da desfocagem das fontes de vídeo.
Redução vibração: ajusta o nível de redução da trepidação das fontes de vídeo quando reproduz lmes.
Reiniciar: repõe as denições personalizadas.
Demo: Mostra a diferença entre os modos 100Hz Motion Plus ligado e desligado.
Esta função destina-se a especialistas de medição de dispositivos A
V. Esta função apresenta o sinal azul apenas através da
remoção dos sinais vermelho e verde do sinal de vídeo, de modo a dar um efeito de filtro azul que é utilizado para ajustar a cor e
o matiz de equipamentos de vídeo, tais como leitores de DVD, sistemas home theatre, etc. Se utilizar esta função, pode ajustar a
cor e o matiz para valores preferenciais adequados ao nível de sinal de cada dispositivo de vídeo utilizando os padrões da barra
de cores vermelho / verde / azul / ciano / magenta / amarelo, sem utilizar um filtro azul adicional.
Modo Apenas azul está disponível se o modo de imagem estiver definido para Filme ou Standard.
Repõe os valores predefinidos das definições de imagem.
Repor modo de imagem: Os valores actuais da imagem voltam para a predefinição de fábrica.
■
N
●
●
●
■
N
●
●
●
●
●
–
–
–
●
■
N
❑
N
[620-Weuro]BN68-02326A-03L09.ind17 17 2009-10-08 ¿ÀÀü 9:30:21

Português - 18
Utilizar o televisor como monitor de computador (PC)
As definições de visualização do Windows num computador normal são apresentadas abaixo.
Os ecrãs que aparecem no monitor do seu PC são provavelmente diferentes, dependendo da
sua versão do Windows e da placa de vídeo. Contudo, mesmo que os ecrãs sejam diferentes,
em quase todos os casos, aplicam-se as mesmas informações de configuração básicas. (Se
tal não acontecer, contacte o fabricante do computador ou um revendedor Samsung.)
1.
Em primeiro lugar, clique em ‘Painel de controlo’ no menu Iniciar do Windows.
2.
Quando a janela do painel de controlo for apresentada, clique em ‘Aspecto e T
emas’ e
surgirá uma janela de diálogo.
3.
Quando a janela do painel de controlo for apresentada, clique em ‘Visualização’
e surgirá
uma janela de diálogo.
4. Navegue pelo separador ‘Definições’ na janela de diálogo de visualização.
Definição de tamanho correcta (resolução) - óptima: 1920 X 1080 pixels
Se existir uma opção de frequência vertical na janela de diálogo das definições da
visualização, o valor correcto é ‘60’ ou ‘60 Hz’. Se não for o caso, basta clicar em ‘OK’ e sair da caixa de diálogo.
Modos de visualização
Se o sinal do sistema for igual ao do modo de sinal padrão, o ecrã é automaticamente ajustado. Se o sinal do sistema não for
igual ao do modo de sinal padrão, ajuste o modo consultando o manual do utilizador da sua placa gráfica; caso contrário, o vídeo
não é reproduzido. No caso dos modos de visualização listados na página seguinte, a imagem no ecrã foi optimizada durante o
fabrico.
Entrada D-Sub e HDMI/DVI
Modo Resolução Frequência horizontal
(KHz)
Frequência vertical
(Hz)
Frequência do relógio
em pixels (MHz)
Polaridade de
sincronização
(H/V)
IBM
640 x 350 31,469 70,086 25,175 +/-
720 x 400 31,469 70,087 28,322 -/+
MAC
640 x 480 35,000 66,667 30,240 -/-
832 x 624 49,726 74,551 57,284 -/-
1152 x 870 68,681 75,062 100,000 -/-
VESA CVT
720 x 576 35,910 59,950 32,750 -/+
1152 x 864 53,783 59,959 81,750 -/+
1280 x 720 44,772 59,855 74,500 -/+
1280 x 720 56,456 74,777 95,750 -/+
1280 x 960 75,231 74,857 130,000 -/+
VESA DMT
640 x 480 31,469 59,940 25,175 -/-
640 x 480 37,861 72,809 31,500 -/-
640 x 480 37,500 75,000 31,500 -/-
800 x 600 37,879 60,317 40,000 +/+
800 x 600 48,077 72,188 50,000 +/+
800 x 600 46,875 75,000 49,500 +/+
1024 x 768 48,363 60,004 65,000 -/-
1024 x 768 56,476 70,069 75,000 -/-
1024 x 768 60,023 75,029 78,750 +/+
1152 x 864 67,500 75,000 108,000 +/+
1280 x 1024 63,981 60,020 108,000 +/+
1280 x 1024 79,976 75,025 135,000 +/+
1280 x 800 49,702 59,810 83,500 -/+
1280 x 800 62,795 74,934 106,500 -/+
1280 x 960 60,000 60,000 108,000 +/+
1360 x 768 47,712 60,015 85,500 +/+
1440 x 900 55,935 59,887 106,500 -/+
1440 x 900 70,635 74,984 136,750 -/+
1680 x 1050 65,290 59,954 146,250 -/+
VESA GTF
1280 x 720 52,500 70,000 89,040 -/+
1280 x 1024 74,620 70,000 128,943 -/-
VESA DMT /
DTV CEA
1920 x 1080p 67,500 60,000 148,500 +/+
Quando utilizar uma ligação de cabo HDMI/DVI, tem de utilizar a tomada HDMI IN 3(DVI).
O modo entrelaçado não é suportado.
O aparelho pode não funcionar correctamente se for seleccionado um formato de vídeo não padrão.
São suportados os modos Separado e Composto. SOG não é suportado.
Cabos VGA muito longos ou de baixa qualidade podem causar interferências na imagem em modos de resolução muito altos
(1920 x 1080).
¦
■
N
N
N
N
N
[620-Weuro]BN68-02326A-03L09.ind18 18 2009-10-08 ¿ÀÀü 9:30:21

Português - 19
Configurar o televisor com o PC
Predefinição: carregue no botão SOURCE para seleccionar o modo PC.
Ajuste auto.
Utilize a função de ajuste automático para que o televisor ajuste automaticamente os sinais de
vídeo recebidos.
A função também executa automaticamente a sintonização fina das definições e ajusta as
posições e os valores de frequência.
Carregue no botão TOOLS para ver o menu Ferramentas. Também pode denir o ajuste
automático seleccionando
.
Esta função não está disponível no modo DVI-HDMI.
Ecrã
Grosso / Fino
O objectivo do ajuste da qualidade da imagem é o de remover ou reduzir o ruído da imagem.
Se não conseguir retirar o ruído fazendo apenas a sintonização fina, ajuste a frequência o
melhor possível (Grosso) e volte a fazer a sintonização fina. Depois de reduzido o ruído, volte
a ajustar a imagem de forma a ficar alinhada no centro do ecrã.
Posição do PC
Pode ajustar a posição do ecrã do PC se esta não se ajustar por completo ao televisor
.
Carregue no botão ▲ ou ▼ para ajustar a posição vertical. Carregue nos botões ◄ ou ► para
ajustar a Posição horizontal.
Repor imagem
Pode substituir todas as definições da imagem pelos valores predefinidos.
¦
N
❑
T
N
❑
■
■
■
Brilho :45
Nitidez :50
Ajusteauto. ▶
Ecrã
Definiçõesavançadas
Opçõesdeimagem
Reposiçãodeimagem
Imagem
Grosso 50
Fino 0
Posição
doPC
Reporimagem
U
Mover
E
Enter
R
Voltar
Ecrã
[620-Weuro]BN68-02326A-03L09.ind19 19 2009-10-08 ¿ÀÀü 9:30:21

Português - 20
SOM
Configurar o menu Som
Carregue no botão TOOLS para ver o menu Ferramentas. Também pode denir o modo
de som seleccionando .
Standard: selecciona o modo de som normal.
Música: dá ênfase à música em detrimento das vozes.
Filme: proporciona a melhor qualidade de som para filmes.
Voz nítida: dá ênfase à voz em detrimento de outros sons.
Personal.: volta a chamar as suas definições de som personalizadas.
Equalizador
Pode ajustar as definições de som de acordo com as suas preferências pessoais.
Modo: selecciona o modo de som de entre as predefinições.
Balanço L/R: ajusta o equilíbrio entre os altifalantes esquerdo e direito.
100Hz / 300Hz / 1KHz / 3KHz / 10KHz (Ajuste da largura de banda): para ajustar o nível de diferentes frequências de largura
de banda.
Reiniciar: repõe os valores predefinidos do equalizador.
TruSurround HD é uma tecnologia patenteada da SRS que permite reproduzir conteúdos 5.1 multi-canais apenas com dois
altifalantes. A tecnologia TruSurround proporciona um excelente som surround virtual, através de qualquer sistema de reprodução
com dois altifalantes, incluindo os altifalantes internos de televisores. É totalmente compatível com todos os formatos multi-canal.
Carregue no botão TOOLS para ver o menu Ferramentas. Também pode definir o SRS TruSurround HD seleccionando
.
Pode alterar o valor predefinido dos idiomas de áudio. Apresenta as informações do idioma da transmissão a ser recebida.
Quando estiver a ver um canal digital, pode seleccionar esta função.
Apenas pode seleccionar de entre os idiomas disponíveis pela transmissão.
Se o som for emitido tanto pelo altifalante principal como pelo receptor de áudio, pode ouvir-se um eco devido à diferença na
velocidade de descodificação entre o altifalante principal e o receptor de áudio. Neste caso, utilize a função Altifalante do televisor.
Quando estiver a ver um canal digital, pode seleccionar esta função.
O Formato de áudio é apresentado consoante o sinal de transmissão.
Esta é uma função auxiliar de áudio que fornece uma faixa de áudio adicional para pessoas com deficiências visuais. Esta função
gere o Fluxo de áudio para o AD (Descrição de áudio), quando é enviado pelo transmissor juntamente com o Áudio principal. Os
utilizadores podem ligar ou desligar a Descrição de áudio e regular o volume.
Carregue no botão AD no telecomando para seleccionar Deslig. ou Lig..
Ligue e desligue a função de descrição de áudio.
Volume
Pode regular o volume da descrição de áudio.
Volume está activa quando está definido para Lig..
Quando estiver a ver um canal digital, pode seleccionar esta função.
Cada estação emissora tem condições de sinal específicas e, por isso, não é fácil regular o volume sempre que muda de canal.
Esta função permite regular automaticamente o volume do canal pretendido, baixando o som quando o sinal de modulação está
alto, ou aumentando o som quando o sinal de modulação está baixo.
¦
❑
T
●
●
●
●
●
❑
●
●
●
●
❑
T
❑
N
N
❑
N
N
❑
O
■
■
N
N
❑
Modo :Personal. ▶
Equalizador
SRSTruSurroundHD :Deslig.
Idiomadeáudio :----
Formatoáudio :----
Descriçãoáudio
Volumeauto. :Deslig.
SeleccionarAltifalante :Altifalantedotv.
Som
[620-Weuro]BN68-02326A-03L09.ind20 20 2009-10-08 ¿ÀÀü 9:30:22

Português - 21
Seleccionar Altifalante
Quando vir televisão com um sistema home theatre ligado, desligue os altifalantes do televisor para poder ouvir o som dos
altifalantes (externos) do sistema home theatre.
Altifalante Exter.: opção utilizada para ouvir o som dos altifalantes externos (sistema home theatre).
Altifalante do tv.: opção utilizada para ouvir o som dos altifalantes do televisor.
Os botões de volume e MUTE não funcionam quando Seleccionar Altifalante está definido para Altifalante Exter..
Se seleccionar Altifalante Exter. no menu Seleccionar Altifalante, as definições de som são limitadas
Altifalantes internos do televisor Saída de áudio (saída óptica, L/R) para o sistema
de som
RF / AV / Componente / PC / HDMI RF / AV / Componente / PC / HDMI
Altifalante do tv. Saída de som Saída de som
Altifalante Exter. Silêncio Saída de som
Sem sinal de vídeo Silêncio Silêncio
Pode repor as definições de Som predefinidas.
Repor modo de som: os valores de som actuais voltam à predefinição.
Seleccionar o modo de Som
Para definir o modo de som, carregue no botão DUAL. Quando carrega neste botão, o modo de som actual aparece no ecrã.
Dual 1 / 2
Estéreo A2
Mono MONO
Mudança automática
Estéreo Estéreo ↔ MONO
Dual DUAL 1 ↔ DUAL 2 DUAL 1
NICAM
Estéreo
Mono MONO
Mudança automática
Estéreo MONO ↔ Estéreo
Dual
MONO ↔ DUAL 1
DUAL 2
DUAL 1
Se o sinal de estéreo for fraco e ocorrer uma mudança automática, mude para o modo mono.
Está função apenas está activa no sinal de som estéreo. Está desactivada no sinal de som mono.
Esta função apenas está disponível no modo TV.
❑
●
●
N
N
❑
N
¦
N
N
N
Reposiçãodesom
L
Mover
E
Enter
R
Voltar
Cancelarreposiçãodesom.
Reportudo Repormododesom Cancelar
[620-Weuro]BN68-02326A-03L09.ind21 21 2009-10-08 ¿ÀÀü 9:30:22

Português - 22
CONFIGURAR
Definir o menu Configurar
Idioma do Menu
Pode definir o idioma do menu.
Tempo
Para obter informações detalhadas sobre os procedimentos necessários para configurar
opções, consulte as instruções em ‘Acertar a hora’.
Transmissão
Legenda
Pode activar e desactivar as legendas. Utilize este menu para definir o modo de Legendas.
A opção Normal por baixo do menu
indica que se trata de uma legenda básica e Surdos assinala uma legenda para pessoas com deficiências auditivas.
Activa ou desactiva as legendas.
Define o modo de legenda.
Idioma das legendas
Define o idioma da legenda.
Se o programa que estiver a ver não suportar a função Surdos, a opção Normal é automaticamente activada, mesmo
que o modo Surdos esteja seleccionado.
O inglês é a predefinição para os casos em que o idioma seleccionado não esteja disponível na transmissão.
Para seleccionar estas opções basta carregar no botão SUBT. do telecomando.
(só Reino Unido)
Se o programa for transmitido com texto digital, esta função é activada.
MHEG (Multimedia and Hypermedia Information Coding Experts Group)
É uma norma internacional para sistemas de codificação de dados utilizada em multimédia e hipermédia. Funciona a um nível
mais elevado do que o sistema MPEG, incluindo hipermédia de ligação de dados, como imagens fixas, serviço de caracteres,
animação, gráficos e ficheiros de vídeo, bem como dados multimédia. MHEG é uma tecnologia de interacção com o utilizador
em tempo de execução e está a ser aplicada a diversos campos, incluindo VOD (Video-On- Demand), ITV (Interactive
TV),
EC (Electronic Commerce), tele-educação, teleconferência, bibliotecas digitais e jogos em rede.
Idioma do teletexto
Pode definir o idioma do Teletexto seleccionando o idioma.
O inglês é a predefinição para os casos em que o idioma seleccionado não esteja disponível na transmissão.
Preerência
teletexto / Idioma secund. Teletexto
Ao utilizar esta funcionalidade, os utilizadores podem seleccionar um dos idiomas. O idioma seleccionado aqui é o predefinido
para quando o utilizador selecciona um canal.
Se alterar a definição de idioma, o Idioma das legendas, o Idioma de áudio e o Idioma do teletexto do menu Idioma mudam
automaticamente para o idioma seleccionado.
As opções Idioma das legendas, Idioma de áudio e Idioma do teletexto do menu Idioma apresentam uma lista de idiomas
suportados pelo canal actual e a selecção é realçada. Se alterar esta definição, a nova selecção só é válida para o canal
actual. A definição alterada não muda a definição do Idioma principal, do Idioma principal das legendas, nem do Idioma
principal do teletexto no menu Preferência.
¦
❑
❑
❑
■
●
●
●
N
N
O
■
N
■
N
■
●
Plug&Play
IdiomadoMenu :Português ▶
Tempo
Transmissão
Segurança
Geral
Configurar
[620-Weuro]BN68-02326A-03L09.ind22 22 2009-10-08 ¿ÀÀü 9:30:22

Português - 23
Interface comum
Menu CI
Permite ao utilizador seleccionar a partir do menu fornecido pelo CAM.
Seleccione o menu CI com base no menu do PC Card.
Informação sobre aplicações
Contém informações sobre o CAM introduzido na ranhura CI e apresenta-as no ecrã. Os dados apresentados em
Application
Info referem-se ao ‘CI(CI+) CARD’. Pode instalar o CAM em qualquer altura, independentemente de o televisor estar ligado
ou desligado.
1.
Adquira o módulo CI CAM no revendedor mais próximo ou por telefone.
2.
Introduza o ‘CI(CI+) CARD’ no CAM na direcção da seta até ficar encaixado.
3.
Introduza o CAM com o ‘CI(CI+) CARD’ colocado na ranhura da interface comum.
(Introduza completamente o CAM na direcção da seta, de modo a ficar paralelo à ranhura.)
4.
Verifique se consegue ver uma imagem num canal de sinal codificado.
Segurança (Dependendo do modelo)
Antes de a janela de configuração ser apresentada, surge o ecrã para a introdução do número PIN. Introduza o número PIN
de 4 dígitos.
O número PIN predefinição de um televisor novo é ‘0-0-0-0’. Pode alterar o PIN seleccionando Alterar PIN no menu.
Alguns modelos requerem que o número PIN denido seja seleccionado quando estiver a funcionar o Plug & Play.
Esta função impede que utilizadores não autorizados, como crianças, vejam programas não apropriados, cortando a imagem e o
som.
Pode bloquear canais da lista de canais.
Bloq. crianças só está disponível no modo TV.
Bloqueio para crianças
Esta função impede que que utilizadores não autorizados, como crianças, assistam a programas não apropriados através de um
código PIN (número de identificação pessoal) de 4 dígitos definido pelo utilizador.
O item de Bloqueio para crianças varia consoante o país.
Quando o Bloqueio para crianças está activado, o símbolo ‘\’ é apresentado.
Perm. Tudo: carregue para desbloquear as classificações do televisor.
Bloq. Tudo: carregue para bloquear as classificações do televisor.
Alterar PIN
Pode alterar o seu número de identificação pessoal necessário para configurar o televisor
.
Caso se esqueça do código PIN, carregue nos botões do telecomando pela seguinte sequência, repondo o PIN para 0-0-0-0 :
POWER (Desligar) (Ligar).
Geral
Quando ligar uma consola de jogos, como a PlayStation™ ou Xbox™, pode tirar partido de uma experiência de jogo mais realista
seleccionando o menu Jogos.
Restrições no modo Jogos (Atenção)
Para desligar a consola de jogos e ligar outro dispositivo externo, defina Modo Jogo para Deslig. no menu de
configuração.
Se vir o menu TV no Modo Jogo, o ecrã treme ligeiramente.
Modo Jogo não está disponível nos modos TV, PC e Ext.
Se, depois de ligar o dispositivo externo ao televisor, a imagem não estiver em condições, verifique se a opção Modo Jogo
está definida para Lig.. Defina Modo Jogo para Deslig. e ligue os dispositivos externos.
Se a opção Modo Jogo estiver definida para Lig.:
O modo de imagem muda automaticamente para Standard e não pode ser alterado.
O modo de som muda automaticamente para Personal. e não pode ser alterado. Regule o som utilizando o equalizador.
A função Reset Sound é activada. Se seleccionar a função Reset depois de definir o equalizador, repõe os valores de fábrica.
■
●
●
❑
N
N
N
■
N
N
■
N
N
N
■
N
❑
■
N
N
N
N
N
[620-Weuro]BN68-02326A-03L09.ind23 23 2009-10-08 ¿ÀÀü 9:30:22

Português - 24
Esta função ajusta o brilho do televisor para reduzir o consumo de energia. Quando estiver a ver televisão à noite, defina a opção
Poupança energ. para Alto, de forma a reduzir a fadiga ocular, bem como o consumo de energia.
Se seleccionar Imagem Desligada, o ecrã desliga-se e apenas conseguirá ouvir o som. Carregue em qualquer botão para sair da
função Imagem Desligada.
No menu Ferramentas, a função Imagem Desligada não é suportada.
Carregue no botão TOOLS para ver o menu Ferramentas. Também pode definir a opção Energy Saving seleccionando
Pode definir a transparência do menu.
O som da melodia pode ser definido para quando o televisor é ligado ou desligado.
A Melodia não toca
Quando o televisor não emite som, porque alguém carregou no botão MUTE.
Quando o televisor não emite som, porque alguém reduziu o volume para o valor mínimo com o botão (–).
Quando o televisor é desligado pela função Temporizador..
■
N
T
■
■
N
Acertar a hora
Relógio
Tem de acertar o relógio de modo a que possa utilizar todas as funcionalidades do
temporizador do televisor.
A hora actual é apresentada sempre que carregar no botão INFO.
Se desligar o cabo de alimentação, tem de acertar novamente o relógio.
Modo Relógio
Pode definir a hora actual de forma manual ou automática.
Auto.: defina automaticamente a hora actual, utilizando a hora da transmissão digital.
Manual: defina manualmente a hora actual para uma hora específica.
Consoante a estação de transmissão e o sinal, a hora actual pode não ser acertada
correctamente. Se tal acontecer, acerte a hora manualmente.
A antena ou cabo devem estar ligados para que a hora seja acertada automaticamente.
Ajuste o Relógio
Pode definir manualmente a hora actual.
Esta função só está disponível quando a opção Modo Relógio está definida para Manual.
Pode definir directamente o dia, o mês, o ano, a hora e o minuto, ao carregar nos botões numéricos do telecomando.
Temporizador
O temporizador desliga automaticamente o televisor após o tempo predefinido (30, 60, 90, 120, 150 e 180 minutos).
Carregue no botão TOOLS para ver o menu Ferramentas. Também pode definir o temporizador seleccionando Ferramentas
.
Para cancelar a função Temporizador, seleccione Deslig..
Temporizador 1 / Temporizador 2/ Temporizador 3
Pode configurar três definições diferentes para ligar / desligar através do temporizador.
Deve acertar o relógio primeiro.
Ligar à hora definida
Defina a hora, os minutos e active / desactive.
(Para activar o temporizador com a definição escolhida, defina para Activado.)
Desligar à hora definida
Defina a hora, os minutos e active / desactive.
(Para activar o temporizador com a definição escolhida, defina para Activado.)
¦
❑
N
N
■
●
●
N
N
■
N
N
❑
T
N
❑
■
■
Relógio :--:-- ▶
Temporizador :Deslig.
Temporizador1 :Desactivado
Temporizador2 :Desactivado
Temporizador3 :Desactivado
U
Mover
E
Enter
R
Voltar
Tempo
Ligaràhoradefinida
L
Mover
U
Ajustar
E
Enter
R
Voltar
Temporizador1
Desligaràhoradefinida
Volume
00 00 Desactivado
00 00 Desactivado
10
Fonte Antena Canal
TV ATV 0
Repetir
Umavez
Dom Seg Ter Qua Qui Sex Sáb
Plug&Play
IdiomadoMenu :Português
Tempo ▶
Transmissão
Segurança
Geral
Configurar
[620-Weuro]BN68-02326A-03L09.ind24 24 2009-10-08 ¿ÀÀü 9:30:22

Português - 25
Volume
Seleccione o nível de volume pretendido.
Pode seleccionar o conteúdo do dispositivo TV ou USB a reproduzir quando o televisor se ligar automaticamente. Seleccione TV
ou USB. (Verifique se há um dispositivo USB ligado ao seu televisor.)
Antena (quando a opção FonteTV)
Seleccione ATV ou DTV.
Canal (quando a opção FonteTV)
Seleccione o canal pretendido.
Conteúdos (quando FonteUSB)
Pode seleccionar uma pasta no dispositivo USB, com ficheiros de música ou de fotografia, que queira reproduzir quando o
televisor se ligar automaticamente.
Se não existirem ficheiros de música no USB ou se a pasta que contém um ficheiro de música não estiver seleccionada, a
função Temporizador não funciona correctamente.
Quando há apenas um ficheiro de fotografia no USB, a apresentação de diapositivos não é executada.
Se o nome da pasta for demasiado comprido, não pode seleccionar a pasta.
Se o nome da pasta a ser configurada pela função Conteúdos for demasiado longo, a pasta não pode ser seleccionada.
Repetir
Seleccione ou Manual.
Quando Manual está seleccionado, carregue no botão ► para seleccionar o dia da semana pretendido. Carregue no botão
ENTER
E
sobre o dia pretendido e a marca
c
aparece.
Pode acertar as horas, os minutos e o canal carregando nos botões numéricos do telecomando.
Desligar automaticamente
Quando activar o temporizador, o televisor acabará por se desligar se não carregar em nenhum comando durante 3 horas
depois de o temporizador ter ligado o televisor. Esta função só está disponível no modo Lig. do temporizador e permite evitar
sobreaquecimentos, que podem ocorrer se o televisor permanecer ligado durante muito tempo.
■
■
■
■
■
N
N
N
N
■
N
N
N
[620-Weuro]BN68-02326A-03L09.ind25 25 2009-10-08 ¿ÀÀü 9:30:23

Português - 26
ENTRADA / SUPORTE
Menu Entrada
Lista de fontes
Utilize esta opção para seleccionar o televisor ou outras fontes de entrada externas, como
leitores de DVD / leitores de Blu-ray / caixa de televisão por cabo / receptores de satélite
(set-top box) ligados ao televisor. Utilize para seleccionar a sua fonte de entrada preferida.
Carregue no botão SOURCE do telecomando para ver uma fonte de sinal externo. O modo
TV pode ser seleccionado carregando no botão TV.
TV / Ext.1 / Ext.2 / AV / Componente / PC / HDMI1 / HDMI2 / HDMI3/DVI / HDMI4
Pode escolher apenas os dispositivos externos que estão ligados ao televisor. Em
Lista de fontes, as entradas ligadas são realçadas e ordenadas no topo. As entradas que
não estejam ligadas serão ordenadas na parte de baixo.
Ext. e PC permanecem sempre activados.
Utilizar os Botões coloridos do telecomando com a Lista de fontes
Vermelho (Actualizar): actualiza os dispositivos externos ligados. Carregue nesta
opção se a sua fonte estiver activada e ligada, mas não aparecer na lista.
TOOLS (Ferramentas): apresenta os menus Editar nome e Informação.
Editar nome
VCR / DVD / STB Cabo / Satélite STB / STB PVR / Receptor AV / Jogos / Câmara de Vídeo / PC / DVI / DVI PC / TV / IPTV /
Blu-ray / HD DVD / DMA
Atribua um nome ao dispositivo ligado às tomadas de entrada para facilitar a selecção da fonte de entrada.
Quando um PC com uma resolução de 1920 x 1080@60 Hz está ligado à porta HDMI IN 3(DVI), deve definir o modo HDMI3/
DVI para DVI PC em Editar nome do modo Entrada.
Ao ligar um cabo HDMI/DVI à porta HDMI IN 3(DVI), deve definir o modo HDMI3/DVI para DVI ou DVI PC em
Editar nome
do modo Entrada. Neste caso, é necessária uma ligação de som em separado.
Menu Support
Auto-diagnóstico
Teste de imagem
Caso tenha algum problema com a qualidade da imagem, execute o teste de imagem. V
erifique
o padrão de cores no ecrã para ver se o problema persiste.
Sim: se o padrão de teste não aparecer ou se houver interferências no mesmo, seleccione
Sim. Pode haver algum problema com o televisor. Nesse caso, contacte o centro de
atendimento da Samsung para obter assistência.
Não: se o padrão de teste for visualizado correctamente, seleccione Não. Pode haver
algum problema com o equipamento externo. Verifique as ligações. Se o problema
persistir, consulte o manual do utilizador do dispositivo externo.
Teste de som
Caso tenha algum problema com o som, execute o teste de som. Pode verificar o som
reproduzindo uma melodia incorporada através do televisor.
Se não ouvir som a partir dos altifalantes do televisor, antes de executar um teste de som,
certifique-se de que Seleccionar Altifalante está definido para Altifalante do tv. no menu Som.
A melodia será ouvida durante o teste se Seleccionar Altifalante estiver definido para Altifalante Exter. ou, se não houver
som, carregando no botão MUTE.
Sim: se, durante o teste de som, só conseguir ouvir som de um altifalante ou de nenhum, seleccione Sim. Pode haver algum
problema com o televisor. Nesse caso, contacte o centro de atendimento da Samsung para obter assistência.
Não: se conseguir ouvir som a partir dos altifalantes, seleccione Não. Pode haver algum problema com o equipamento
externo. Verifique as ligações. Se o problema persistir, consulte o manual do utilizador do dispositivo externo.
¦
❑
O
■
N
N
N
❑
■
N
N
¦
❑
■
●
●
■
N
N
●
●
Auto-diagnóstico ▶
Actualizaçãodosoftware
GuiadeligaçãoHD
ContactaraSamsung
Assistência
Listadefontes
Editarnome
Entrada
Actualizar
T
Ferramentas
Listadefontes
TV
Ext.1 :----
Ext.2 :----
PC :----
AV :----
Componente :----
Auto-diagnóstico
U
Mover
E
Enter
R
Voltar
Testedeimagem ▶
Testedesom
Informaçõessobreosinal
[620-Weuro]BN68-02326A-03L09.ind26 26 2009-10-08 ¿ÀÀü 9:30:23

Português - 27
Informações sobre o sinal (apenas canais digitais)
Ao contrário dos canais analógicos, cuja qualidade de recepção pode variar entre ‘com interferências’
e clara, os canais
digitais (HDTV) podem ter uma qualidade de recepção perfeita ou não ter qualquer recepção. Por isso, ao contrário dos canais
analógicos, não pode fazer a sintonização fina aos canais digitais. Pode, contudo, ajustar a antena para melhorar a recepção dos
canais digitais disponíveis.
Se o medidor da intensidade do sinal indicar que o sinal é fraco, ajuste fisicamente a antena para aumentar a intensidade do
sinal. Continue a ajustar a antena até encontrar a melhor posição com o sinal mais forte.
Actualização do software
Futuramente, a Samsung pode oferecer actualizações para o firmware do televisor. Estas
actualizações podem ser efectuadas através do televisor, se este estiver ligado à Internet, ou
através da transferência de novo firmware do site samsung.com para um dispositivo de memória
USB.
Versão actual é o software já instalado no televisor.
Software Alternativo (Cópia de segurança) mostra a versão anterior que vai ser
substituída.
O software é apresentado como ‘Ano/Mês/Dia_Versão’. Quanto mais recente for a data,
mais nova é a versão do software. Recomenda-se a instalação da versão mais recente.
Por USB
Introduza no televisor a unidade USB que contém a actualização do firmware transferida
do site samsung.com. Tenha cuidado para não desligar a corrente ou retirar a unidade USB
enquanto as actualizações estiverem a ser executadas. O televisor desliga-se e volta a ligar
automaticamente após terminar a actualização do firmware. Verifique a versão do firmware
depois de concluir as actualizações (a nova versão terá um número superior à versão anterior).
Quando o software é actualizado, as definições de áudio e de vídeo que fez voltam às
predefinições (de fábrica). Recomenda-se que anote as suas definições para que possa repô-
las facilmente depois da actualização.
Por um canal
Actualiza o software através do sinal de transmissão.
Se a função for seleccionada durante o período de transmissão de software, esta função procura software disponível e
transfere-o.
O tempo necessário para a transferência do software é determinado pelo estado do sinal.
Actual. no Modo de Espera
Para continuar a actualizar o software com o interruptor de corrente principal ligado, seleccione On, carregando nos botões
▲ ou ▼. 45 minutos depois de entrar no modo de espera, uma actualização manual é iniciada automaticamente. Dado que o
aparelho está ligado internamente, o LCD pode ficar aceso durante algum tempo. Este fenómeno pode persistir durante mais de 1
hora até a actualização do software ficar concluída.
Software Alternativo (Cópia de segurança)
Se surgir algum problema com o novo firmware, que esteja a afectar o funcionamento, pode alterar o software para a versão
anterior.
Se o software for alterado, é apresentado o software existente.
Pode substituir o software actual por um software alternativo em ‘Software Alternativo’.
Guia de ligação HD
Este menu apresenta o método de ligação que proporciona a melhor qualidade para um televisor HD. Consulte estas informações
quando ligar dispositivos externos ao televisor.
Contactar a Samsung
Leia estas informações quando o televisor não funcionar correctamente ou caso queira actualizar o software. Esta informação ser-
lhe-á útil no que diz respeito ao centro de atendimento e aos métodos de transferência de ficheiros de software e produtos.
■
N
❑
N
N
N
■
■
N
N
■
■
N
N
❑
❑
Painel lateral do televisor
Unidade USB
Versãoactual 2009/01/18_000001
PorUSB ▶
Porumcanal
StandbyModeUpgrade :45Min
SoftwareAlternativo 2009/01/15_00000
U
Mover
E
Enter
R
Voltar
Actualizaçãodosoftware
[620-Weuro]BN68-02326A-03L09.ind27 27 2009-10-08 ¿ÀÀü 9:30:23

Português - 28
MEDIA PLAY (USB)
Ligar um dispositivo USB
1. Carregue no botão POWER para ligar o televisor.
2. Ligue um dispositivo USB que contenha ficheiros de fotografia e de música à tomada USB
existente na parte lateral do televisor.
3.
Quando surgir o ecrã de selecção Aplicação, carregue no botão ENTER
E
para seleccionar
Media Play (USB).
O MTP (Media Transfer Protocol) não é suportado.
O sistema de ficheiros suporta FAT16, FAT32 e NTFS.
Determinados tipos de câmaras digitais e dispositivos áudio USB podem não ser
compatíveis com este televisor.
Media Play só suporta dispositivos USB de classe de armazenamento de
massa (MSC). MSC é um dispositivo de transporte em volume de classe de
armazenamento de massa. Exemplos de MSC são as pen drives e os leitores
de cartões flash (Tanto USB HDD como HUB não são suportados.)
Ligue directamente à porta USB do televisor. Se estiver a utilizar uma ligação
por cabo em separado, pode ocorrer um problema de compatibilidade USB.
Antes de ligar o dispositivo ao televisor, efectue uma cópia de segurança dos
seus ficheiros de modo a prevenir danos ou perda de dados. A SAMSUNG
não se responsabiliza por qualquer dano ou perda de dados.
Não desligue o dispositivo USB enquanto estiver a carregar.
Quanto maior for a resolução da imagem, mais tempo leva a ser apresentada no ecrã.
A resolução JPEG máxima suportada é de 15360 x 8640 pixels.
Para ficheiros não suportados ou danificados, é apresentada a mensagem ‘Not Supported File Format’.
Não é possível reproduzir ficheiros MP3 com DRM que tenham sido transferidos através de um website pago.
A gestão
de direitos digitais (DRM - Digital Rights Management) é uma tecnologia que suporta a criação, distribuição e gestão
de conteúdos, de forma integrada e abrangente, incluindo a protecção de direitos e interesses dos fornecedores do
conteúdo, a prevenção de cópias ilegais do conteúdo e, também, a gestão de cobranças e de contratos.
Quando pretender visualizar uma fotografia, o carregamento da mesma pode levar alguns segundos. Nesse momento, o
ícone de carregamento aparece no ecrã.
Se houver mais de um dispositivo MSC ligado, alguns deles podem não ser reconhecidos. Se um dispositivo necessitar
de um nível elevado de potência (mais de 500 mA ou 5 V), o dispositivo USB pode não ser suportado.
Se surgir uma mensagem de aviso relativa ao excesso de potência quando ligar ou utilizar um dispositivo USB, este
pode não ser reconhecido ou pode não funcionar correctamente.
Utilizar os botões do telecomando no menu Media Play
Botão Operações
▲/▼/◄/► Move o cursor e selecciona um item.
ENTER
E
Escolhe o item actualmente seleccionado. Durante a reprodução de uma apresentação de
diapositivos ou de um ficheiro de música:
- Se carregar no botão ENTER
E
durante a reprodução, esta é interrompida.
- Se carregar no botão ENTER
E
durante a pausa, a reprodução é retomada.
∂
/
∑
Reproduz ou interrompe a apresentação de diapositivos ou a reprodução de música.
RETURN Volta ao menu anterior.
TOOLS Executa várias funções a partir dos menus Fotografia e Música.
∫
Pára a apresentação de diapositivos ou o ficheiro de música actual.
π
/
μ
Salta para o grupo anterior/salta para o grupo seguinte.
INFO Apresenta as informações do ficheiro.
MEDIA.P Sai do modo Media Play.
<
P
>
,
EXIT, TV
Pára o modo Media Play e volta ao modo TV.
¦
N
N
N
N
N
N
N
N
N
N
N
N
N
N
Painel lateral do televisor
Unidade USB
851,86MB/993,02MBFree
Photo
SUM
SUM
Dispositivo
PHOTO
R
Voltar
Music Setup
[620-Weuro]BN68-02326A-03L09.ind28 28 2009-10-08 ¿ÀÀü 9:30:23

Português - 29
Função Media Play
Esta função permite visualizar e ouvir ficheiros de fotografia e/ou música guardados num dispositivo USB de classe de
armazenamento de massa (MSC).
O equipamento pode não funcionar correctamente com ficheiros multimédia não licenciados.
Entrar no menu Media Play (USB)
1. Carregue no botão MENU. Carregue no botão ▲ ou ▼ para seleccionar
Aplicação e, em seguida, carregue no botão ENTER
E
.
2. Carregue no botão ▲ ou ▼ para seleccionar Media Play (USB), e carregue no
botão ENTER
E
.
O menu Media Play (USB) é apresentado.
Carregue no botão MEDIA.P do telecomando para visualizar o menu Media
Play.
Carregue no botão SOURCE do telecomando para visualizar a lista de
fontes. Em seguida, carregue no botão ▲ ou ▼ para seleccionarUSB.
3.
Carregue no botão vermelho e, em seguida, no botão ▲ ou ▼ para seleccionar a
memória USB. Carregue no botão ENTER
E
.
Esta função difere consoante a memória USB.
O nome do dispositivo USB seleccionado é apresentado no canto inferior esquerdo do ecrã.
4.
Carregue no botão ◄ ou ► para seleccionar um ícone (Photo, Music, Setup) e, em seguida, carregue no botão ENTER
E
.
Para sair do modo Media Play, carregue no botão MEDIA.P do telecomando.
Remover um dispositivo de memória USB com segurança
Pode remover o dispositivo do televisor com segurança.
1. Carregue no botão TOOLS no ecrã da lista de ficheiros Media Play, ou durante a
reprodução de uma apresentação de diapositivos ou de uma música.
2.
Carregue no botão ▲ ou ▼ para seleccionar Remover em segurança e, em
seguida, carregue no botão ENTER
E
.
3. Remova o dispositivo USB do televisor.
Descrição do ecrã
Vá para a ‘Secção da lista de grupos’ ou ‘Secção da lista de ficheiros’ utilizando os botões para cima e para baixo. Após
seleccionar uma secção, carregue nos botões ◄ ou ► para seleccionar um item.
¦
N
N
O
O
N
N
N
INFO
AD
INFO
AD
851,86MB/993,02MBFree
Photo
SUM
SUM
Dispositivo
PHOTO
R
Voltar
Music Setup
SUM Dispositivo
Selec.
T
Ferramentas
R
Moverparapastasuperior.
1234.jpg
1235.jpg
1236.jpg
1237.jpg
1233.jpg
1232.jpg
1231.jpg
Apres.Diap.
Repr.Gr.Act.
Informação
Remover
emsegurança
5/15
1 2
../Photo/
Secção da lista de grupos
Secção da lista de ficheiros
SUM Dispositivo
Selec.
T
Ferramentas
R
Moverparapastasuperior.
1234.jpg
1235.jpg
1236.jpg
1237.jpg
1233.jpg
1232.jpg
1231.jpg
1File(s)Selected
2
3 5
4
1 2
1
5/15
c
../Photo/
[620-Weuro]BN68-02326A-03L09.ind29 29 2009-10-08 ¿ÀÀü 9:30:27

Português - 30
1 Ver grupos: O grupo de ordenação em que se encontra o ficheiro actualmente seleccionado é realçado.
2 Ficheiro actualmente seleccionado: O ficheiro seleccionado é o ficheiro que passou a poder controlar
. Os ficheiros de
fotografia são apresentados como imagens em miniatura.
3 Dispositivo actual: Mostra o nome do dispositivo actualmente seleccionado. Carregue no botão vermelho para seleccionar um
dispositivo.
Botão vermelho (Dispositivo): Selecciona um dispositivo ligado.
4 Informações sobre a selecção de itens: Mostra o número de ficheiros seleccionados carregando no botão amarelo.
5 Itens de ajuda
Botão amarelo (Selec.): selecciona ficheiros da lista de ficheiros. Os ficheiros seleccionados estão marcados com o
símbolo
c
. Carregue novamente no botão amarelo para cancelar a selecção de um ficheiro.
Botão TOOLS (Ferramentas): mostra os menus de opções. (O menu de opções é alterado consoante o estado actual.)
Menu de opções da lista de fotografias
1. Carregue no botão MEDIA.P.
2. Carregue no botão ◄ ou ► para seleccionar Photo e, em seguida, carregue no
botão ENTER
E
.
3. Carregue no botão ◄ ou ► para seleccionar o ficheiro de fotografia pretendido.
Seleccionar várias fotografias
Carregue no botão ◄ ou ► para seleccionar o ficheiro de fotografia
pretendido. Em seguida, carregue no botão amarelo.
Repita a operação acima descrita para seleccionar vários ficheiros de
fotografia.
A marca
c
aparece no ficheiro de fotografia seleccionado.
4. Carregue no botão TOOLS.
O menu de opções é alterado consoante o estado actual.
Apres. Diap.
Neste menu, pode reproduzir uma apresentação de diapositivos utilizando os ficheiros de fotografia no dispositivo de memória
USB.
Repr.Gr.Act.
Neste menu, pode reproduzir uma apresentação de diapositivos utilizando apenas os ficheiros de fotografia no grupo de
ordenação actualmente seleccionado.
Anular selecção
Pode anular a selecção de todos os ficheiros.
A marca
c
indica que o ficheiro correspondente seleccionado está oculto.
Informação
As informações do ficheiro de fotografia apresentadas incluem o nome, o tamanho, a resolução, a data em que foi modificado e o
caminho do mesmo.
Pode visualizar as informações de ficheiros de fotografia durante uma apresentação de diapositivos seguindo o mesmo
procedimento.
Carregue no botão INFO para visualizar as informações.
Remover em segurança
Pode remover o dispositivo do televisor com segurança.
¦
N
N
❑
❑
❑
N
❑
N
O
❑
INFO
AD
SUM Dispositivo
Selec.
T
Ferramentas
R
Moverparapastasuperior.
1234.jpg
1235.jpg
1236.jpg
1237.jpg
1233.jpg
1232.jpg
1231.jpg
Apres.Diap.
Repr.Gr.Act.
Informação
Remover
emsegurança
5/15
1 2
../Photo/
[620-Weuro]BN68-02326A-03L09.ind30 30 2009-10-08 ¿ÀÀü 9:30:29

Português - 31
Visualizar uma fotografia ou uma apresentação de diapositivos
Visualizar uma apresentação de diapositivos
1. Carregue no botão ▼ para seleccionar a secção da lista de ficheiros.
2. Carregue no botão TOOLS.
3.
Carregue no botão ▲ ou ▼ para seleccionar Apres. Diap. e, em seguida,
carregue no botão ENTER
E
.
Todos os ficheiros na secção da lista de ficheiros serão utilizados para a
apresentação de diapositivos.
Durante a apresentação de diapositivos, os ficheiros são apresentados por
ordem a partir do ficheiro actualmente exibido.
O progresso da apresentação de diapositivos é efectuado pela ordem definida na
secção da lista de ficheiros.
Os ficheiros de música podem ser automaticamente reproduzidos durante a
apresentação de diapositivos se a opção Música de fundo estiver definida para
Lig..
Enquanto uma fotografia é apresentada, carregue no botão
∂
(Reproduzir)/
ENTER
E
no telecomando para iniciar a apresentação de diapositivos.
Botões de controlo da apresentação de diapositivos
Botão Operações
ENTER
E
Reproduz/interrompe a apresentação de diapositivos.
∂
Reproduz a apresentação de diapositivos.
∑
Interrompe a apresentação de diapositivos.
∫
Sai da apresentação de diapositivos e volta à lista de
fotografias.
π
/
μ
Altera a velocidade de reprodução da apresentação de
diapositivos.
TOOLS Executa várias funções a partir dos menus de fotografia.
Reproduzir o grupo actual
1. Carregue no botão ▲ para passar à secção da lista de grupos.
2. Seleccione um grupo utilizando os botões ◄ e ►.
3.
Carregue no botão
∂
(Reproduzir). Inicia-se uma apresentação de diapositivos
com os ficheiros do grupo seleccionado.
Em alternativa
1.
Seleccione os ficheiros na Secção da lista de ficheiros que contém o grupo
pretendido.
Para ir para o grupo anterior/seguinte, carregue no botão
π
(REW) ou
μ
(FF).
2. Carregue no botão TOOLS.
3.
Carregue no botão ▲ ou ▼ para seleccionar Repr.Gr.Act. e, em seguida, carregue no botão ENTER
E
.
Apenas as fotografias no grupo de ordenação, incluindo os ficheiros seleccionados, serão utilizados na apresentação de
diapositivos.
1. Carregue no botão ▼ para seleccionar a secção da lista de ficheiros.
2. Carregue no botão ◄ ou ► para seleccionar a fotografia pretendida na secção da lista de ficheiros.
3.
Carregue no botão amarelo.
4.
Repita a operação acima descrita para seleccionar várias fotografias.
A marca
c
aparece à esquerda da fotografia seleccionada.
Se seleccionar um ficheiro, a apresentação de diapositivos não é reproduzida.
Para anular a selecção de todos os ficheiros seleccionados, carregue no botão TOOLS e escolha Anular selecção.
5.
Carregue no botão
∂
(Reproduzir)/ENTER
E
.
Os ficheiros seleccionados serão utilizados para a apresentação de diapositivos.
¦
N
N
N
N
O
N
●
N
N
N
N
N
N
INFO
AD
E
Pausa◀▶Ant./Seg.
T
Ferramentas
R
Voltar
SUM
1234.jpg
580x7652009/03/025/15
▶Normal
SUM Dispositivo
Selec.
T
Ferramentas
R
Moverparapastasuperior.
1234.jpg
1235.jpg
1236.jpg
1237.jpg
1233.jpg
1232.jpg
1231.jpg
Apres.Diap.
Repr.Gr.Act.
Informação
Remover
emsegurança
5/15
1 2
../Photo/
SUM Dispositivo
Selec.
T
Ferramentas
R
Moverparapastasuperior.
1234.jpg
1235.jpg
1236.jpg
1237.jpg
1233.jpg
1232.jpg
1231.jpg
5/15
1 2
../Photo/
[620-Weuro]BN68-02326A-03L09.ind31 31 2009-10-08 ¿ÀÀü 9:30:32

Português - 32
Em alternativa
1. Na secção da lista de ficheiros, carregue nos botões amarelos para seleccionar as fotografias pretendidas.
2.
Carregue no botão TOOLS.
3.
Carregue no botão ▲ ou ▼ para seleccionar Apres. Diap. e, em seguida, carregue no botão ENTER
E
.
Os ficheiros seleccionados serão utilizados para a apresentação de diapositivos.
Menu de opções da apresentação de diapositivos
1. Durante uma apresentação de diapositivos (ou enquanto visualiza uma fotografia), carregue no botão TOOLS para definir a
opção.
2.
Carregue no botão ▲ ou ▼ para seleccionar a opção pretendida e, em seguida, carregue no botão ENTER
E
.
Parar apresentação de slides / Iniciar apresentação de slides
Pode iniciar ou parar uma apresentação de diapositivos.
Pode seleccionar a velocidade da apresentação de diapositivos.
Esta função só está disponível durante uma apresentação de diapositivos.
Também pode alterar a velocidade da apresentação de diapositivos carregando
no botão
π
(REW) ou
μ
(FF) durante a mesma.
Rodar
Pode rodar fotografias guardadas num dispositivo de memória USB.
Sempre que carregar no botão ◄, a fotografia roda 270˚, 180˚, 90˚ e 0˚.
Sempre que carregar no botão ►, a fotografia roda 90˚, 180˚, 270˚ e 0˚.
O ficheiro rodado não é guardado.
Zoom
Pode ampliar fotografias guardadas num dispositivo de memória USB. (x1 → x2 → x4)
Para mover a fotografia ampliada, carregue no botão ENTER
E
e, em seguida, carregue nos botões ▲/▼/◄/►. Quando a
imagem ampliada é mais pequena do que o tamanho original do ecrã, a função de alteração do local não funciona.
O ficheiro ampliado não é guardado.
Música de fundo
Pode seleccionar a música de fundo durante a visualização de uma apresentação de diapositivos.
Para utilizar esta função, devem existir ficheiros de música e fotografia guardados no dispositivo USB.
Deslig.: A música de fundo não é reproduzida.
Lig.: Quando a música de fundo está disponível, se seleccionar Lig., a música é reproduzida.
Selec. fich. música (0 Fic. sel.)
Só o ficheiro de música seleccionado é definido como música de fundo.
Definição de Imagem / Definições do Som
Pode seleccionar as definições de imagem e de som.
Informação
As informações do ficheiro de fotografia são apresentadas.
Remover em segurança
Pode remover o dispositivo do televisor com segurança.
●
N
¦
❑
❑
N
N
❑
N
N
N
❑
N
N
❑
N
■
●
●
■
❑
❑
❑
Pararapresentaçãodeslides
Vel.apr.diap. : Normal
Rodar
Zoom
Música
defundo
DefiniçãodeImagem
DefiniçõesdoSom
Informação
Remover
emsegurança
U
Mover
E
Enter
e
Sair
Ferramentas
[620-Weuro]BN68-02326A-03L09.ind32 32 2009-10-08 ¿ÀÀü 9:30:33

Português - 33
Menu de opções da lista de músicas
1. Carregue no botão MEDIA.P.
2. Carregue no botão ◄ ou ► para seleccionar Music e, em seguida carregue no
botão ENTER
E
.
3. Carregue no botão ◄ ou ► para seleccionar o ficheiro de música pretendido.
Seleccionar vários ficheiros de música
Carregue no botão ◄ ou ► para seleccionar o ficheiro de música
pretendido. Em seguida, carregue no botão amarelo.
Repita a operação acima descrita para seleccionar vários ficheiros de
música.
A marca
c
aparece no ficheiro de música seleccionado.
4. Carregue no botão TOOLS.
O menu de opções é alterado consoante o estado actual.
Repr.Gr.Act.
Neste menu, só pode reproduzir ficheiros de música no grupo de ordenação actualmente seleccionado.
Anular selecção
Pode anular a selecção de todos os ficheiros.
A marca
c
indica que o ficheiro correspondente seleccionado está oculto.
Informação
As informações do ficheiro de música apresentadas incluem o nome, o tamanho, a data em que foi modificado e o caminho do
mesmo.
Pode visualizar as informações do ficheiro de música durante Repr.Gr.Act. utilizando os mesmos procedimentos.
Carregue no botão INFO para visualizar as informações.
Remover em segurança
Pode remover o dispositivo do televisor com segurança.
¦
N
N
❑
❑
N
❑
N
O
❑
INFO
AD
SUM Dispositivo
Selec.
T
Ferramentas
R
Moverparapastasuperior.
HaHaHa
Gold
Shine
Way
Want
Me
Lies
ILoveYou
GlenHans
OnceOst
2007
Soundtrack
3/37
Energetic
Repr.Gr.Act.
Informação
Remover
emsegurança
5 1 2 34
../Music/
[620-Weuro]BN68-02326A-03L09.ind33 33 2009-10-08 ¿ÀÀü 9:30:33

Português - 34
Reproduzir uma música
1. Carregue no botão ▼ para seleccionar a secção da lista de ficheiros.
2. Carregue no botão ◄ ou ► para seleccionar o ficheiro de música que pretende
reproduzir.
3.
Carregue no botão
∂
(Reproduzir)/ENTER
E
.
Este menu só apresenta ficheiros com a extensão MP3. Os ficheiros com
outras extensões não são apresentados, mesmo que estejam guardados no
mesmo dispositivo USB.
O ficheiro seleccionado é apresentado na parte superior, com o respectivo
tempo de reprodução.
Para regular o volume da música, carregue no botão do volume do telecomando. Para cortar o som, carregue no botão
MUTE do telecomando.
Se o som se apresentar irregular durante a reprodução de ficheiros MP3, regule a opção Equalizador e
SRS TruSurround HD no menu Som. (Um ficheiro MP3 com muita modulação pode causar um problema no som.)
A duração de reprodução de um ficheiro de música pode ser apresentada como ‘00:00:00’, se a informação de tempo de
reprodução não for encontrada no início do ficheiro.
π
(REW) ou
μ
(FF) não funcionam durante a reprodução.
Botões de controlo de reprodução de música
Botão Operações
ENTER
E
Reproduz/interrompe o ficheiro de música.
∂
Reproduz o ficheiro de música
∑
Interrompe o ficheiro de música
∫
Sai do modo de reprodução e volta à lista de músicas.
TOOLS Executa várias funções a partir dos menus de música.
Ícone de informações da função de música
p
Quando todos os ficheiros de música da pasta (ou o ficheiro seleccionado) são repetidos.
Modo Repetir está definido para Lig..
q
Quando todos os ficheiros de música da pasta (ou o ficheiro seleccionado) são reproduzidos
uma vez. Modo Repetir está definido para Deslig..
Reproduzir o grupo de música
1. Carregue no botão ▲ para passar à secção da lista de grupos.
2. Seleccione um grupo utilizando os botões ◄ e ►.
3.
Carregue no botão
∂
(Reproduzir). Os ficheiros do grupo seleccionado começam a ser reproduzidos.
Em alternativa
1.
Seleccione os ficheiros na Secção da lista de ficheiros que contém o grupo pretendido.
Para ir para o grupo anterior/seguinte, carregue no botão
π
(REW) ou
μ
(FF).
2. Carregue no botão TOOLS.
3.
Carregue no botão ▲ ou ▼ para seleccionar Repr.Gr.Act. e, em seguida, carregue no botão ENTER
E
.
Os ficheiros de música do grupo de ordenação, incluindo o ficheiro seleccionado, são reproduzidos.
1. Carregue no botão ▼ para seleccionar a secção da lista de ficheiros.
2. Carregue no botão ◄ ou ► para seleccionar o ficheiro de música pretendido.
3.
Carregue no botão amarelo.
4.
Repita a operação acima descrita para seleccionar vários ficheiros de música.
A marca
c
aparece à esquerda do ficheiro de música seleccionado.
Para anular a selecção de todos os ficheiros seleccionados, carregue no botão TOOLS e escolha Anular selecção.
5.
Carregue no botão
∂
(Reproduzir)/ENTER
E
.
Os ficheiros seleccionados são reproduzidos.
¦
N
N
N
N
N
N
N
N
●
N
N
N
N
N
E
Pausa◀▶Ant./Seg.
T
Ferramentas
R
Voltar
SUM
ILoveYou
HaHaHaWay
▶00:00:04/00:04:043/37
[620-Weuro]BN68-02326A-03L09.ind34 34 2009-10-08 ¿ÀÀü 9:30:33

Português - 35
Menu de opções de reprodução de músicas
Menu de opções de reprodução de músicas
Pode reproduzir ficheiros de música várias vezes.
Definição de Imagem / Definições do Som
Pode configurar as definições de imagem e de som.
Informação
As informações do ficheiro de música são apresentadas.
Remover em segurança
Pode remover o dispositivo do televisor com segurança.
¦
❑
❑
❑
❑
Utilizar o menu Setup
A opção Setup apresenta as definições do utilizador do menu Media Play.
1. Carregue no botão MEDIA.P.
2.
Carregue no botão ◄ ou ► para seleccionar Setup e, em seguida, carregue no
botão ENTER
E
.
3. Carregue no botão ▲ ou ▼ para seleccionar a opção pretendida.
4.
Carregue nos botões ◄ ou ► para seleccionar a opção.
Para sair do modo Media Play, carregue no botão MEDIA.P do telecomando.
Seleccione esta opção para reproduzir várias vezes ficheiros de música.
Seleccione esta opção para definir o tempo de espera antes de ser apresentada a
protecção de ecrã.
Informação
Seleccione esta opção para visualizar as informações do dispositivo ligado.
Remover em segurança
Pode remover o dispositivo do televisor com segurança.
¦
N
■
■
■
■
Modorepetir ◀Lig.▶
DefiniçãodeImagem
DefiniçõesdoSom
Informação
Remover
emsegurança
U
Mover
L
Ajustar
e
Sair
Ferramentas
851,86MB/993,02MBFree
Photo
SUM
SUM
Dispositivo
SETUP
e
Sair
Music Setup
ModoRepetir ◀Lig.▶
Tem.exec.prot.ecrã :2h
Informação
Remover
emsegurança
U
Mover
L
Ajustar
R
Voltar
SUM Dispositivo
[620-Weuro]BN68-02326A-03L09.ind35 35 2009-10-08 ¿ÀÀü 9:30:34

Português - 36
ANYNET
+
Ligar dispositivos Anynet
+
O que é o Anynet
+
?
Anynet
+
é uma função que permite controlar, a partir do telecomando, todos os dispositivos Samsung ligados que suportam
Anynet+. O sistema Anynet
+
pode ser utilizado com os dispositivos Samsung que tenham a funcionalidade Anynet
+
. Para se
certificar de que o dispositivo Samsung dispõe desta funcionalidade, verifique se existe um logótipo Anynet
+
.
Para ligar ao televisor
1. Ligue a tomada HDMI IN (1, 2, 3(DVI) ou 4) do televisor e a tomada HDMI OUT do dispositivo Anynet
+
correspondente,
utilizando um cabo HDMI.
Ligar ao sistema home theatre
1. Ligue a tomada HDMI IN (1, 2, 3(DVI) ou 4) do televisor e a tomada HDMI OUT do dispositivo Anynet
+
correspondente
utilizando um cabo HDMI.
2. Ligue a tomada HDMI IN do sistema home theatre e a tomada HDMI OUT do dispositivo
Anynet
+
correspondente utilizando
um cabo HDMI.
Ligue o cabo óptico entre a tomada DIGITAL AUDIO OUT (OPTICAL) do seu televisor e a entrada de áudio digital do
sistema home theatre.
Se seguir a ligação acima descrita, a tomada óptica só emite áudio de 2 canais. O som só é reproduzido no subwoofer e
nos altifalantes frontais esquerdo e direito do sistema home theatre. Para ouvir áudio de 5.1 canais, ligue directamente
a tomada DIGITAL AUDIO OUT (OPTICAL) do leitor de DVD / caixa de satélite (ou seja, o dispositivo Anynet 1 ou 2) ao
amplificador ou ao sistema home theatre, e não ao televisor.
Ligue apenas um sistema home theatre.
Pode ligar um dispositivo Anynet
+
utilizando o cabo HDMI 1.3. Alguns cabos HDMI podem não suportar funções Anynet
+
.
Anynet
+
funciona quando o dispositivo AV que suporta Anynet
+
está no estado de espera ou ligado.
O Anynet
+
suporta até 12 dispositivos AV. Pode ligar até 3 dispositivos do mesmo tipo.
¦
N
N
N
N
N
N
Dispositivo Anynet
+
1
Cabo HDMI 1.3
Cabo HDMI 1.3Cabo HDMI 1.3
Cabo HDMI 1.3
Dispositivo Anynet
+
2 Dispositivo Anynet
+
3 Dispositivo Anynet
+
4
TV
Dispositivo Anynet
+
1
Cabo HDMI 1.3
Cabo HDMI 1.3
Cabo HDMI 1.3Cabo HDMI 1.3
TV
Cabo HDMI 1.3
Cabo óptico
Dispositivo Anynet
+
2 Dispositivo Anynet
+
3
Dispositivo Anynet
+
4
Sistema home theatre
[620-Weuro]BN68-02326A-03L09.ind36 36 2009-10-08 ¿ÀÀü 9:30:35

Português - 37
Configurar a função Anynet
+
Carregue no botão TOOLS para ver o menu Ferramentas. Também pode ver o menu
Anynet
+
seleccionando
+
(HDMI-CEC).
Configurar
Anynet
+
Para utilizar a função Anynet
+
, o Anynet
+
(HDMI-CEC) tem de estar definido para Lig..
Quando a função Anynet
+
(HDMI-CEC) está desactivada, todas as operações
relacionadas com o Anynet+ são desactivadas.
Configurar um dispositivo Anynet
+
para se desligar automaticamente quando o televisor é
desligado.
A fonte activa no telecomando do televisor deve estar definida para TV de modo a poder
utilizar a função Anynet
+
.
Se definir Desligar automat. para Sim, os dispositivos externos ligados também são
desligados quando o televisor for desligado. Se um dispositivo externo ainda estiver a
gravar, este pode não se desligar.
Alternar entre os dispositivos Anynet
+
1. Carregue no botão TOOLS. Carregue no botão ENTER
E
para seleccionar Anynet
+
(HDMI-CEC).
2.
Carregue no botão ▲ ou ▼ para seleccionar Lista dispos. e, em seguida, carregue no
botão ENTER
E
.
É apresentada uma lista dos dispositivos Anynet
+
ligados ao televisor.
Se não encontrar o dispositivo que pretende, carregue no botão vermelho para
procurar dispositivos.
3.
Carregue no botão ▲ ou ▼ para seleccionar um determinado dispositivo e carregue no
botão ENTER
E
. Alterna para o dispositivo seleccionado.
Só quando define Anynet
+
(HDMI-CEC) para Lig. no menu Aplicação, aparece o
menu Lista dispos..
Alternar para os dispositivos seleccionados pode demorar até 2 minutos. Não pode cancelar a operação durante o processo
de comutação.
O tempo necessário para a procura de dispositivos é determinado pelo número de dispositivos ligados.
Quando a procura de dispositivos estiver concluída, não aparece o número de dispositivos encontrados.
Embora o televisor procure automaticamente a lista de dispositivos quando é ligado através do botão de alimentação, os
dispositivos ligados ao televisor podem não ser sempre apresentados automaticamente na lista de dispositivos. Carregue no
botão vermelho para procurar o dispositivo ligado.
Se seleccionou o modo de entrada externa carregando no botão SOURCE, não pode utilizar a função Anynet
+
. Mude para
um dispositivo Anynet
+
utilizando a opção Lista dispos..
Menu Anynet
+
O menu Anynet
+
muda, dependendo do tipo e do estado dos dispositivos Anynet
+
ligados ao televisor.
Menu Anynet
+
Descrição
Ver TV O modo Anynet
+
muda para o modo de transmissão de TV.
Lista dispos. Apresenta a lista de dispositivos Anynet
+
.
MENU(nome_dispositivo)
Apresenta os menus dos dispositivos ligados. Por exemplo, se está ligado um
gravador de DVD, é apresentado o menu do disco do gravador de DVD.
INFO(nome_dispositivo)
Apresenta o menu de reprodução do dispositivo ligado. Por exemplo, se um gravador
de DVD está ligado, é apresentado o menu de reprodução do gravador de DVD.
Gravação: (*gravador)
Começa imediatamente a gravar, utilizando o gravador. (Esta função só está
disponível para dispositivos que suportem a função de gravação.)
Parar gravação: (*gravador) Pára a gravação.
Receiver O som é reproduzido através do receptor.
Se mais do que um dispositivo estiver ligado, são apresentados como (*gravador) e se só estiver ligado um dispositivo, é
apresentado como (*nome_dispositivo).
¦
T
❑
■
N
■
N
N
¦
N
N
N
N
N
N
N
N
N
U
Mover
E
Enter
R
Voltar
Anynet
+
(HDMI-CEC) :Lig.▶
Configurar
Desligarautomat. :Sim
MediaPlay(USB)
Anynet
+
(HDMI-CEC)
Aplicação
U
Mover
E
Enter
R
Voltar
Anynet
+
(HDMI-CEC) :Lig.
Configurar
Desligarautomat. :Sim▶
U
Mover
E
Enter
R
Voltar
VerTV
Listadispos.
Gravação:DVDR
DVDRMENU
DVDRINFO
Receiver:Deslig.
Configurar
[620-Weuro]BN68-02326A-03L09.ind37 37 2009-10-08 ¿ÀÀü 9:30:36

Português - 38
Botões do telecomando do televisor disponíveis no modo Anynet
+
Tipo de
dispositivos
Estado de funcionamento Botões disponíveis
Dispositivo Anynet
+
Depois de alternar para o dispositivo,
quando o menu do dispositivo
correspondente for apresentado no ecrã.
Botões numéricos
Botões ▲/▼/◄/►/ ENTER
E
Botões coloridos / botão EXIT
Depois de alternar para o dispositivo,
enquanto reproduz um ficheiro.
π
(Procura para trás) /
μ
(Procura para
a frente) /
∫
(Parar) /
∂
(Reproduzir) /
∑
(Pausa)
Dispositivo com
sintonizador
incorporado
Depois de comutar para o dispositivo,
quando estiver a ver um programa
televisivo.
P
>
/ P
<
Dispositivo de
áudio
Quando o receptor está activado.
Y
/ MUTE
A função Anynet
+
só funciona quando a fonte activa no telecomando estiver definida para o televisor
.
O botão
∏
só funciona no estado de gravação.
Não consegue controlar os dispositivos Anynet
+
utilizando os botões do televisor. Só consegue controlar os dispositivos
Anynet
+
utilizando o telecomando do televisor.
O telecomando do televisor pode não funcionar sob determinadas condições. Neste caso, volte a seleccionar o dispositivo
Anynet
+
.
As funções Anynet
+
não funcionam com produtos de outros fabricantes.
As operações
π
,
μ
podem diferir, consoante o dispositivo.
Gravação
Pode gravar um programa televisivo utilizando um gravador Samsung.
1. Carregue no botão TOOLS. Carregue no botão ENTERE para seleccionar
Anynet
+
(HDMI-CEC).
2.
Carregue no botão ▲ ou ▼ para seleccionar Recording Immediately e carregue no botão
ENTER
E
. A gravação começa.
Quando há mais do que um dispositivo de gravação
Quando estão ligados vários dispositivos, são listados os dispositivos de gravação.
Carregue no botão ▲ ou ▼ para seleccionar um dispositivo de gravação e carregue
no botão ENTER
E
. A gravação começa.
Quando o dispositivo de gravação não for apresentado, seleccione Lista dispos. e
carregue no botão vermelho para procurar dispositivos
3.
Carregue no botão EXIT para sair.
Pode gravar as transmissões da fonte seleccionando Gravação: (nome_dispositivo).
Se carregar no botão
∏
, grava aquilo que estiver a ver no momento. Se estiver a ver imagens através de outro
dispositivo, essas serão as imagens gravadas.
Antes de gravar, verifique se a tomada da antena está devidamente ligada ao dispositivo de gravação. Para ligar
correctamente uma antena a um dispositivo de gravação, consulte o manual de utilizador do mesmo.
Ouvir através de um Receptor (Home theater)
Pode ouvir o som através de um receptor em vez do altifalante do televisor.
1.
Carregue no botão TOOLS. Carregue no botão ENTERE para seleccionar Anynet
+
(HDMI-CEC).
2. Carregue no botão ▲ ou ▼ para seleccionar Receiver. Carregue no botão ◄ ou ► para
seleccionar Lig. ou Deslig..
3. Carregue no botão EXIT para sair.
Se o receptor só suportar áudio, pode não aparecer na lista de dispositivos.
O receptor funciona quando tiver ligado correctamente a tomada óptica do receptor à
tomada DIGITAL AUDIO OUT (OPTICAL) do televisor.
Se o receptor (sistema home theatre) estiver definido para Lig., o som é reproduzido
a partir da tomada óptica do televisor. Se o televisor apresentar um sinal DTV
(antena), este vai enviar som de 5.1 canais para o receptor home theatre. Se a fonte for um componente digital, como um
leitor de DVD e estiver ligada ao televisor através de um cabo HDMI, só pode ouvir som de 2 canais a partir do receptor
do sistema home theatre.
Se houver uma falha na alimentação do televisor com o Receiver definido para Lig. (desligando o cabo de alimentação
ou por um corte de energia), a opção Seleccionar Altifalante pode ser definida para Altifalante Exter. quando voltar a
ligar o televisor.
N
N
N
N
N
N
¦
N
N
N
N
N
¦
N
N
N
N
U
Mover
E
Enter
R
Voltar
VerTV
Listadispos.
Gravação:DVDR
DVDRMENU
DVDRINFO
Receiver:Deslig.
Configurar
U
Mover
E
Enter
R
Voltar
VerTV
Listadispos.
GravaçãoDVDR
DVDRMENU
DVDRINFO
Receiver:Deslig.
Configurar
[620-Weuro]BN68-02326A-03L09.ind38 38 2009-10-08 ¿ÀÀü 9:30:36

Português - 39
Resolução de problemas para o Anynet
+
Problema Solução possível
O Anynet
+
não funciona. Verifique se o dispositivo é um dispositivo Anynet
+
. O sistema Anynet
+
só suporta dispositivos
Anynet
+
.
Ligue apenas um receptor (sistema home theatre).
Verifique se o cabo de alimentação do dispositivo Anynet
+
está ligado correctamente.
Verifique as ligações por cabo de vídeo/áudio/HDMI 1.3 do dispositivo Anynet
+
.
Verifique se o Anynet
+
(HDMI-CEC) está activado no menu de configuração do Anynet
+
.
Verifique se o telecomando do televisor está no modo TV.
Verifique se é um telecomando exclusivo para Anynet
+
.
O Anynet
+
não funciona em determinadas situações. (Pesquisa de canais, utilização do
Media Play, Plug & Play, etc.)
Quando ligar ou remover o cabo HDMI 1.3, certifique-se de que procura novamente dispositivos
ou que desliga e volta a ligar o televisor.
Certifique-se de que a função Anynet
+
do dispositivo Anynet
+
está activada.
●
●
●
●
●
●
●
●
●
●
Quero iniciar o Anynet
+
. Verifique se o dispositivo Anynet+ está correctamente ligado ao televisor e se o Anynet
+
(HDMI-CEC) está definido para Lig. no menu Configurar da opção Anynet
+
.
Carregue no botão TV do telecomando para mudar para TV. Em seguida, carregue no botão
TOOLS para ver o menu Anynet
+
e seleccione o menu pretendido.
●
●
Quero sair do Anynet
+
. Seleccione Ver TV no menu Anynet
+
.
Carregue no botão SOURCE do telecomando do televisor e seleccione um dispositivo que não
seja Anynet
+
.
Carregue em P
>
/
<
, PRE-CH, e FAV.CH para mudar o modo TV. (O botão de canal só
funciona quando não estiver ligado um dispositivo Anynet
+
com sintonizador incorporado.)
●
●
●
A mensagem ‘Connecting
to Anynet+ device...’
aparece no ecrã.
Não pode utilizar o telecomando quando está a configurar o Anynet
+
ou a mudar para um modo
de visualização.
Utilize o telecomando quando a definição do Anynet
+
ou a mudança para o modo de
visualização estiverem concluídos.
●
●
O dispositivo Anynet
+
não reproduz.
Não pode utilizar a função de reprodução quando o Plug & Play está a decorrer.
●
O dispositivo ligado não é
apresentado.
Verifique se o dispositivo suporta as funções Anynet
+
.
Verifique se o cabo HDMI 1.3 está ligado correctamente.
Verifique se a função Anynet
+
(HDMI-CEC) está definida para Lig. no menu de configuração
Anynet
+
.
Procure novamente dispositivos Anynet
+
.
Pode ligar um dispositivo Anynet
+
utilizando apenas um cabo HDMI 1.3. Alguns cabos HDMI
podem não suportar funções Anynet
+
.
Se for interrompido por uma situação anómala, tal como a desconexão do cabo HDMI ou do
cabo de alimentação, ou por uma falha na corrente, repita a procura de dispositivos.
●
●
●
●
●
●
Não consigo gravar o
programa de televisão.
Verifique se a tomada da antena do dispositivo de gravação está ligada correctamente.
●
O som do televisor não
é reproduzido através do
receptor.
Ligue o cabo óptico entre o televisor e o receptor.
●
¦
[620-Weuro]BN68-02326A-03L09.ind39 39 2009-10-08 ¿ÀÀü 9:30:36

Português - 40
RECOMENDAÇÕES
Função de teletexto
A maioria das estações de televisão fornece serviços de informação por escrito através da função de teletexto. A página de índice
do serviço de teletexto fornece informações sobre como utilizar o serviço. Além disso, pode seleccionar várias opções de acordo
com os seus requisitos, utilizando os botões do telecomando.
Para que as informações de teletexto sejam apresentadas correctamente, é preciso que a recepção dos canais se processe
em boas condições. Caso contrário, podem faltar informações ou podem não aparecer algumas páginas.
Pode mudar as páginas de teletexto carregando nos botões numéricos do telecomando.
1
0
(modo)
Carregue neste botão para
seleccionar o modo de teletexto
(LIST/ FLOF). Se carregar no
modo LIST, muda para o modo
de memorização de lista. No
modo de memorização de lista,
pode guardar teletexto na lista
utilizando o botão
8
(memorizar).
2
5
(mostrar)
Botão utilizado para mostrar
o texto oculto (respostas a
questionários, por exemplo).
Para ver o ecrã normal, carregue
novamente no botão.
3
4
(tamanho)
Carregue neste botão para
visualizar as letras com o dobro
do tamanho na metade superior
do ecrã. Para ver a metade
inferior do ecrã, carregue
novamente neste botão. Para
visualizar o ecrã normal, carregue
novamente no botão.
4
8
(memorizar)
Botão utilizado para memorizar as
páginas de teletexto.
5 Botões coloridos (vermelho/verde/
amarelo/azul)
Se a estação emissora utilizar o
sistema FASTEXT, os diferentes
tópicos apresentados na
página de teletexto aparecem
codificados por cores e podem
ser seleccionados carregando
nos botões coloridos.
Carregue num dos botões que
corresponda à cor pretendida.
A página inclui outras
informações a cores que podem
ser seleccionadas da mesma
forma. Para visualizar a página
anterior ou a página seguinte,
carregue no botão colorido
correspondente.
6
/
(activar teletexto/sobrepor)
Carregue neste botão para activar
o modo de teletexto depois de
seleccionar o canal que disponibiliza
o serviço de teletexto. Carregue duas
vezes neste botão para sobrepor
o ecrã de transmissão actual ao
teletexto.
7
:
(sair)
Para sair da apresentação de teletexto.
8
1
(página secundária)
Botão utilizado para visualizar a página
secundária disponível.
9
2
(página acima)
Botão utilizado para ver a página
seguinte do teletexto.
0
3
(página abaixo)
Botão utilizado para ver a página
anterior do teletexto.
!
9
(modo de espera)
Botão utilizado para manter o
ecrã numa determinada página,
se esta estiver ligada a várias
páginas secundárias que aparecem
automaticamente de forma sequencial.
Para continuar, carregue novamente
neste botão.
@
6
(índice)
Botão utilizado para ver a página
de índice (conteúdos) a qualquer
momento, enquanto está a visualizar
o teletexto.
#
7
(cancelar)
Botão utilizado para ver a emissão
enquanto procura uma página.
¦
N
N
INFO
AD
1
2
3
4
5
6
8
7
9
0
!
#
@
[620-Weuro]BN68-02326A-03L09.ind40 40 2009-10-08 ¿ÀÀü 9:30:37

Português - 41
Parte Conteúdos
A Número da página seleccionada.
B Nome da estação emissora.
C Número da página actual ou indicações da procura.
D Data e hora.
E Texto.
F Informações sobre o estado.
Informações FASTEXT.
As informações do teletexto estão, muitas vezes, divididas em várias páginas apresentadas de forma sequencial às quais
pode aceder:
Introduzindo o número da página
Seleccionando um título numa lista
Seleccionando um título a cores (sistema FASTEXT)
O nível de teletexto suportado pelo televisor é a versão 2.5 que permite também a visualização de gráficos ou textos
adicionais.
Dependendo da transmissão, podem surgir painéis laterais em branco durante a visualização do teletexto.
Nestes casos, não são transmitidos gráficos ou textos adicionais.
Os televisores mais antigos que não suportam a versão 2,5 não permitem a visualização de gráficos ou textos adicionais,
independentemente da transmissão de teletexto.
Carregue no botão TV para sair do teletexto.
Instalar a base
Predefinição: coloque a base guia e o tubo de cobertura no suporte e fixe-o utilizando os
parafusos.
1. Coloque o televisor LCD na base.
O televisor deve ser transportado por duas ou mais pessoas.
Certifique-se de que distingue a parte da frente da parte de trás da base quando está
a montá-la.
Para se assegurar de que o televisor está colocado na base a um nível apropriado,
não exerça demasiada pressão na parte superior esquerda ou direita do televisor.
2.
Aperte os parafusos na posição
1
e, em seguida, aperte-os na posição
2
.
Coloque o produto de pé e aperte os parafusos. Se apertar os parafusos com o
televisor LCD deitado, este pode ficar inclinado.
N
N
N
N
N
O
¦
N
N
N
N
N
INFO
AD
Parte frontal
Parte posterior
1
2
[620-Weuro]BN68-02326A-03L09.ind41 41 2009-10-08 ¿ÀÀü 9:30:38

Português - 42
Desligar a base
1. Retire os parafusos da parte posterior do televisor.
2. Separe a base do televisor.
O televisor deve ser transportado por duas ou mais pessoas.
3.
Tape o orifício inferior com a tampa.
Instalar o kit de montagem na parede
Os acessórios de montagem na parede (vendidos em separado) permitem montar o
televisor na parede.
Para saber mais sobre como instalar o kit de montagem na parede, consulte as instruções
que acompanham os respectivos acessórios. Contacte um técnico para obter assistência na
instalação do suporte de montagem na parede.
Se a instalação for feita pelo cliente, a Samsung Electronics não se responsabiliza por
quaisquer danos no produto nem por ferimentos sofridos pelo cliente ou por outras pessoas.
Não instale o kit de montagem na parede com o televisor ligado. Pode resultar em
ferimentos devido a choques eléctricos.
Montar os cabos
Envolva os cabos no suporte de cabos, para que estes não fiquem invisíveis através da base
transparente.
Dispositivo anti-roubo Kensington
O dispositivo de bloqueio Kensington serve para fixar fisicamente o sistema quando o
utilizar num local público. A aparência e o método de bloqueio podem diferir da ilustração
dependendo do fabricante.
Consulte o manual fornecido com o dispositivo de bloqueio Kensington para uma utilização
correcta.
O dispositivo de bloqueio tem que ser adquirido separadamente.
A localização do dispositivo de bloqueio Kensington pode ser diferente consoante o
modelo.
1.
Introduza o dispositivo de bloqueio na ranhura Kensington do televisor LCD (1) e rode-o
na direcção de bloqueio (2).
2.
Ligue o cabo do dispositivo de bloqueio Kensington (3).
3.
Fixe o dispositivo de bloqueio Kensington a uma secretária ou a um objecto estático
pesado.
N
N
¦
N
¦
¦
¦
<Opcional>
3
1
2
[620-Weuro]BN68-02326A-03L09.ind42 42 2009-10-08 ¿ÀÀü 9:30:40

Português - 43
Manter um espaço de instalação seguro
Mantenha as distâncias recomendadas, entre o produto e outros objectos (por exemplo, uma parede) para garantir a ventilação
adequada.
Caso contrário, pode provocar um incêndio ou danificar o produto devido ao aumento de temperatura no interior do mesmo.
Instale o produto de modo a que as distâncias recomendadas, assinaladas na figura seguinte, sejam respeitadas.
Se utilizar uma base ou suporte para montagem na parede, utilize apenas as peças fornecidas pela Samsung Electronics.
O facto de utilizar peças fornecidas por outro fabricante, pode resultar em danos materiais ou ferimentos graves em caso
de queda do produto.
O facto de utilizar peças fornecidas por outro fabricante, pode resultar em danos materiais ou provocar um incêndio
devido ao aumento de temperatura no interior do produto por ventilação inadequada.
O aspecto exterior pode ser diferente, dependendo do produto.
Se instalar o produto com uma base
Se instalar o produto com um suporte para montagem na parede
10 cm
10 cm
10 cm
10 cm
10 cm
10 cm
10 cm
Fixar o televisor à parede
Cuidado: Se puxar, empurrar ou subir para o televisor pode provocar a queda do mesmo. Em especial,
certifique-se de que as crianças não se penduram nem desestabilizam o televisor, o que poderia provocar a
queda do mesmo e resultar em acidentes graves ou morte. Siga todas as precauções de segurança fornecidas
no folheto de segurança incluído. Para uma maior estabilidade, instale o dispositivo antiqueda por razões de
segurança, como descrito em seguida.
Para evitar a queda do televisor:
1.
Introduza os parafusos nos grampos e aparafuse-os com firmeza à parede. Verifique se
os parafusos foram aparafusados com firmeza à parede.
Pode necessitar de material adicional, tal como uma bucha, consoante o tipo de
parede.
Uma vez que os grampos, parafusos e fios necessários não são fornecidos,
adquira-os em separado.
2.
Retire os parafusos da parte posterior central do televisor, introduza os parafusos nos
grampos e aparafuse os parafusos ao televisor novamente.
Os parafusos podem não ser fornecidos com o produto. Se for esse o caso, adquira
os parafusos com as seguintes especificações.
Especificações dos parafusos
Para um televisor LCD entre 17 e 29 polegadas: M4 X L15
Para um televisor LCD entre 32 e 40 polegadas: M6 X L15
3.
Ligue os grampos fixados ao televisor e os grampos fixados à parede com um fio forte
e, em seguida, aperte-o muito bem.
Instale o televisor perto da parede para que este não caia para trás.
É mais seguro ligar o fio de modo a que os grampos fixados à parede estejam ao
mesmo nível ou abaixo dos grampos fixados ao televisor.
Desaperte o fio antes de transportar o televisor.
4.
Verifique se todas as ligações estão devidamente presas. Verifique regularmente as
ligações para evitar qualquer sinal de gasto ou falha. Se tiver alguma dúvida sobre a
segurança das suas ligações, contacte um instalador profissional.
¦
N
N
¦
■
N
N
N
N
N
N
N
Parede
Parede
[620-Weuro]BN68-02326A-03L09.ind43 43 2009-10-08 ¿ÀÀü 9:30:42

Português - 44
Resolução de problemas
Se tiver alguma dúvida sobre o televisor, consulte primeiro esta lista. Se nenhuma destas sugestões para resolução de problemas
se aplicar, consulte o site ‘www.samsung.com’ e, em seguida, clique em Assistência ou contacte o Centro de atendimento na lista
da última página.
Problema Solução
Qualidade de imagem
Primeiro, execute oTeste de imagempara conrmar se o televisor está a apresentar
correctamente a imagem de teste.
Vá para o MENU - Assistência - Auto-diagnóstico - Teste de imagem
Se a imagem de teste for apresentada correctamente, a imagem de má qualidade pode ser
provocada pela fonte ou sinal.
●
A imagem do televisor não parece
ser de tão boa qualidade como
na loja.
Se tiver uma caixa de televisão por cabo/set top box analógica actualize-a. Utilize
cabos HDMI ou de Componente para obter uma qualidade de imagem HD.
Subscritor de cabo/satélite: Tente estações HD (Alta Definição) a partir de canais codificados.
Ligação de antena: Tente estações HD após executar o Programa automático.
Vários canais HD são actualizados a partir de conteúdos SD (Definição standard).
Ajuste a resolução de saída de vídeo da caixa de televisão por cabo/set top box para
1080i ou 720p.
Certifique-se de que está a ver televisão à distância mínima recomendada, com base
no tamanho e na definição do sinal que está a visualizar.
●
●
●
N
●
●
A imagem está distorcida: macro-
bloco, bloco pequeno, pontos,
pixelização
A compressão de conteúdos de vídeo pode causar uma distorção na imagem,
especialmente nas imagens de movimentos rápidos como no desporto e filmes de acção.
Um nível de sinal baixo ou uma má qualidade pode causar distorção de imagem. Não
é um problema do televisor.
●
●
Cor errada ou inexistente com a
ligação de Componente.
Certifique-se de que os cabos de Componente estão ligados às tomadas correctas. As ligações
incorrectas ou soltas podem provocar problemas na cor ou o ecrã pode ficar em branco.
●
Cor ou brilho fracos.
Ajuste as opções de Imagem no menu do televisor. (ModoImagem, Cor, Brilho, Nitidez)
Ajuste a opção de Poupança energ. no menu Configurar.
Tente a reposição de imagem para visualizar as predefinições da imagem.
(Vá para MENU - Imagem - Reposição de imagem)
●
●
●
Linha pontilhada na extremidade
do ecrã.
Se o tamanho da imagem estiver definido para Ajustar ao ecrã, altere o mesmo para 16:9.
Altere a resolução da caixa de televisão por cabo/set top box.
●
●
A imagem é a preto e branco
apenas com entrada AV
(Composto).
Ligue o cabo de vídeo (amarelo) à tomada verde da entrada de componente 1 do
televisor.
●
A imagem ca bloqueada
ou distorcida quando muda
de canais ou a imagem está
atrasada.
Se estiver ligado a uma caixa de televisão por cabo, tente reiniciar a caixa de televisão
por cabo. (ligue novamente o cabo de CA e espere até que a caixa de televisão cabo
reinicie. Pode demorar até 20 minutos.)
Defina a resolução de saída da caixa de televisão por cabo para 1080i ou 720p.
●
●
Qualidade do som
Primeiro, execute o Teste de som para conrmar se o áudio do televisor está a funcionar
correctamente.
Vá para o MENU - Assistência - Auto-diagnóstico - Teste de som
Se o áudio estiver a funcionar correctamente, o problema de som pode ser provocado pela
fonte ou sinal.
●
Não se ouve som ou o som é
demasiado baixo mesmo com o
volume no máximo.
Verifique o volume do dispositivo externo ligado ao televisor e, em seguida, ajuste o
volume do mesmo.
●
A imagem é boa, mas não tem
som.
Defina a opção Seleccionar Altifalante para Altifalante do tv. no menu do som.
Certifique-se de que os cabos de áudio do dispositivo externo estão ligados às
tomadas de entrada de áudio correctas no televisor.
Verifique a opção de s aída de áudio do dispositivo ligado. (ex: Pode ser necessário
alterar a opção de áudio da caixa de televisão por cabo para HDMI quando tiver o
cabo HDMI ligado ao televisor.)
Se estiver a utilizar um cabo DVI para HDMI, é necessário um cabo de áudio suplementar.
Desactive a função SRS se definir o volume acima do valor 30.
Remova a ficha da tomada dos auscultadores. (se disponível no televisor)
●
●
●
●
●
●
Ruído nos auscultadores. Verifique as ligações dos cabos. Certifique-se de que um cabo de vídeo não está
ligado à entrada de áudio.
Para ligações antena/cabo, verifique a intensidade do sinal. Um nível de sinal baixo
pode causar distorção de imagem.
●
●
¦
[620-Weuro]BN68-02326A-03L09.ind44 44 2009-10-08 ¿ÀÀü 9:30:43

Português - 45
Problema Solução
Sem imagem, sem vídeo
O televisor não liga. Certifique-se de que o cabo de alimentação CA está ligado correctamente à tomada
de parede e ao televisor.
Verifique se a tomada de parede está a funcionar devidamente.
Tente carregar no botão POWER no televisor para ter a certeza de que o telecomando
está a funcionar correctamente. Se o televisor ligar, o problema pode ser causado pelo
telecomando. Para resolver o problema do telecomando, consulte ‘O telecomando não
funciona’ abaixo.
●
●
●
O televisor desliga-se
automaticamente.
Verifique se o Temporizador está definido para Lig. no menu Configurar.
Se ligar o televisor ao PC, verifique as definições de alimentação do PC.
Certifique-se de que o cabo de alimentação CA está ligado correctamente à tomada
de parede e ao televisor.
Se não houver qualquer sinal durante 10 a 15 minutos com a ligação por antena/cabo,
o televisor desliga-se.
●
●
●
●
Sem imagem/vídeo. Verifique as ligações dos cabos (remova e ligue novamente todos os cabos do
televisor e dispositivos externos)
Defina a saída de vídeo do dispositivo externo (cabo/set top box, DVD, Blu-ray,
etc.) para corresponder às ligações de entrada do televisor. Por exemplo, saída do
dispositivo externo: HDMI, entrada do televisor: HDMI.
Certifique-se de que o dispositivo está ligado.
Certifique-se de que selecciona a fonte correcta do televisor, carregando no botão
SOURCE do telecomando.
●
●
●
●
Ligação RF (cabo/antena)
Impossível receber todos os
canais.
Certifique-se de que o cabo de antena está correctamente ligado.
Tente Plug & Play para adicionar canais disponíveis à lista de canais.
Vá para MENU - Configurar - Plug & Play e aguarde até que todos os canais
disponíveis sejam memorizados.
Verifique se a antena está na posição correcta.
●
●
●
A imagem está distorcida: macro-
bloco, bloco pequeno, pontos,
pixelização
A compressão de conteúdos de vídeo pode causar uma distorção na imagem,
especialmente nas imagens de movimentos rápidos como no desporto e filmes de
acção.
Um nível de sinal baixo pode causar distorção de imagem. Não é um problema do
televisor.
●
●
Ligação ao PC
Mensagem ‘Função Não
Disponível’.
Defina a resolução de saída do computador e frequência para que corresponda às
resoluções suportadas pelo televisor.
●
O computador é sempre
apresentado na lista de fontes
mesmo que não esteja ligado.
Isto é normal; o computador é sempre apresentado na lista de fontes mesmo que um
computador não esteja ligado.
●
O vídeo está a funcionar
correctamente, mas não há áudio
com ligação HDMI.
Verifique as definições da saída de áudio no seu computador.
●
[620-Weuro]BN68-02326A-03L09.ind45 45 2009-10-08 ¿ÀÀü 9:30:43

Português - 46
Problema Solução
Outros
A imagem não é apresentada em
ecrã inteiro.
Serão apresentadas barras pretas em ambos os lados nos canais HD sempre que
forem apresentados conteúdos SD (4:3) actualizados.
Serão apresentadas barras pretas na parte superior e inferior dos filmes que tenham
um formato diferente do seu televisor.
Ajuste a opção de tamanho da imagem no seu dispositivo externo ou televisor para
ecrã inteiro.
●
●
●
O telecomando não funciona. Substitua as pilhas do telecomando com o tipo de polaridade correcto (+ -).
Limpe a janela de transmissão localizada na parte de cima do telecomando.
Tente apontar o telecomando directamente para o televisor a 5-6 pés (1,5 m a 1,8 m)
de distância.
●
●
●
Não é possível controlar o
volume e a energia do televisor
com o telecomando da caixa de
televisão por cabo/set top box.
Programe o telecomando da caixa de televisão por cabo/set top box para funcionar
com o televisor. Consulte o manual do utilizador cabo/satélite para identificar o código
do televisor SAMSUNG.
●
Mensagem ‘Função Não
Disponível’.
Verifique a resolução suportada pelo televisor e ajuste a resolução de saída do
dispositivo externo em conformidade. Consulte as definições de resolução neste
manual.
●
Cheiro a plástico proveniente do
televisor.
Este cheiro é normal e dissipa-se com o passar do tempo.
●
TV Informações sobre o sinal
não se encontra disponível no
menu Auto-diagnóstico.
Esta função encontra-se apenas disponível para canais digitais com uma ligação de
antena (RF/coaxial).
●
O televisor está inclinado para a
esquerda ou para a direita.
Remova a base do suporte do televisor e monte novamente.
●
Não é possível montar a base do
suporte.
Certifique-se de que o televisor se encontra sobre uma superfície plana. Se
não conseguir retirar os parafusos do televisor, utilize uma chave de parafusos
magnetizada.
●
O menu do canal está a cinzento.
(indisponível)
O menu Canal só está disponível quando a fonte de TV está seleccionada.
●
Perde as suas denições após
30 minutos ou sempre que o
televisor for desligado.
Se o televisor estiver no modo Demo Loja, as definições de áudio e imagem são
repostas a cada 30 minutos. Altere o modo Demo Loja para o modo Uso Doméstico
no procedimento Plug & Play. Prima o botão SOURCE para seleccionar o modo TV,
vá até MENU → Configurar → Plug & Play → ENTER
E
.
●
Perda intermitente de áudio ou
vídeo.
Verifique as ligações dos cabos e ligue novamente.
Pode ser devido à utilização de cabos excessivamente rígidos ou finos. Certifique-se
de que os cabos são suficientemente flexíveis para uma utilização a longo prazo. Para
montagem na parede, recomenda-se a utilização de cabos com conectores de 90
graus.
●
●
Pode ver pequenas partículas se
olhar de perto para a extremidade
da moldura em volta do ecrã do
televisor.
Tal faz parte do design do produto e não constitui um defeito.
●
‘Sinal codicado’ ou ‘Sem sinal/
Sinal fraco’ com CAM CARD
(CI/CI+).
Verifique se o CAM tem o CI(CI+) CARD colocado na ranhura da interface comum.
Retire o CAM do televisor e introduza-o na ranhura novamente.
●
●
Quando desligado e após 45
minutos, o televisor liga-se.
É normal, o televisor utiliza a função OTA (Over The Air) para actualizar o firmware
transferido enquanto vê televisão.
●
Problema imagem/som
recorrente.
Verifique e altere o sinal/fonte.
●
O LCD TFT utiliza um painel composto por pixels secundários que requerem tecnologia sosticada para serem reproduzidos.
No entanto, podem existir alguns pixels claros ou escuros no ecrã. Estes pixels não afectam o desempenho do produto.
N
[620-Weuro]BN68-02326A-03L09.ind46 46 2009-10-08 ¿ÀÀü 9:30:43

Português - 47
Especificações
Nome do modelo LE40B620 LE46B620
Tamanho do ecrã
(Diagonal)
40 polegadas 46 polegadas
Resolução do PC
(Ideal)
1920 x 1080 @ 60 Hz 1920 x 1080 @ 60 Hz
Som
(Saída)
10W X 2 10W X 2
Dimensões (LxPxA)
Caixa
Com base
1040 x 79 x 638 mm
1040 x 255 x 699 mm
1172 x 79 x 712 mm
1172 x 275 x 774 mm
Peso
Com base
19 kg 25 kg
Considerações ambientais
Temperatura de funcionamento
Humidade de funcionamento
Temperatura de armazenamento
Humidade de armazenamento
10°C a 40°C (50°F a 104°F)
10 a 80%, sem condensação
-20°C a 45°C (-4°F a 113°F)
5 a 95%, sem condensação
Base rotativa
(esquerda / direita)
-20˚ ~ 20˚
Nome do modelo LE52B620
Tamanho do ecrã
(Diagonal)
52 polegadas
Resolução do PC
(Ideal)
1920 x 1080 @ 60 Hz
Som
(Saída)
10W X 2
Dimensões (LxPxA)
Caixa
Com base
1321 x 81 x 805 mm
1321 x 305 x 866 mm
Peso
Com base
32 kg
Considerações ambientais
Temperatura de funcionamento
Humidade de funcionamento
Temperatura de armazenamento
Humidade de armazenamento
10°C a 40°C (50°F a 104°F)
10 a 80%, sem condensação
-20°C a 45°C (-4°F a 113°F)
5 a 95%, sem condensação
Base rotativa
(esquerda / direita)
-20˚ ~ 20˚
O design e as especificações estão sujeitos a alterações sem aviso prévio.
Trata-se de um aparelho digital de classe B.
Para obter informações sobre a fonte de alimentação e o consumo de energia, veja a etiqueta colada ao produto.
¦
N
N
N
[620-Weuro]BN68-02326A-03L09.ind47 47 2009-10-08 ¿ÀÀü 9:30:44

Obvestilo o digitalni televiziji
1. Funkcije, ki so povezane z digitalnim televizijskim signalom (DVB), so na voljo samo v državah/na območjih, kjer se oddajajo
digitalni prizemni signali (MPEG2 in MPEG4 AVC), ali kjer je mogoč dostop do združljive storitve kabelske televizije DVB-C
(MPEG2 in MPEG4 AAC). Pri lokalnem trgovcu preverite, ali imate dostop do signala DVB-T ali DVB-C.
2.
DVB-T je standard DVB evropskega konzorcija za oddajanje digitalne prizemne televizije, DVB-C pa je standard za oddajanje
digitalne televizije prek kabla. V tej specifikaciji pa niso vključene nekatere funkcije, kot so EPG (elektronski programski
vodnik), VOD (video na zahtevo) itd. Torej jih zaenkrat še ni mogoče uporabljati.
3.
Čeprav je televizor v skladu z najnovejšima standardoma DVB-T in DVB-C [avgust 2008], ni mogoče jamčiti združljivosti s
prihodnjimi sistemi digitalne prizemne televizije in digitalne kabelske televizije.
4.
Nekateri ponudniki kabelske televizije morda takšno storitev dodatno zaračunavajo in se boste zato morda morali strinjati z
določbami in pogoji njihovega poslovanja. To je odvisno od države/območja, kjer uporabljate televizor.
5.
V nekaterih državah ali regijah nekatere funkcije digitalne televizije morda niso na voljo in digitalna kabelska televizija morda
ne bo delovala pravilno pri nekaterih ponudnikih kabelskih storitev.
6.
Za dodatne informacije se obrnite na lokalni center SAMSUNG za pomoč strankam.
Mirujoča slika lahko trajno poškoduje televizijski zaslon
Mirujoče in delno mirujoče slike ne prikazujte na zaslonu LCD dlje kot 2 uri, saj lahko povzroči zadrževanje slike na zaslonu.
Tako zadrževanje slike se imenuje tudi ožig zaslona. Da bi se izognili takemu zadrževanju slike, pri prikazovanju mirujoče slike
zmanjšajte stopnjo svetlosti in kontrasta zaslona.
Dolgotrajno gledanje televizorja LCD v formatu slike 4:3 lahko na levi in desni strani ter na sredini zaslona
povzroči sledi okvirja zaradi različnega svetlobnega oddajanja na zaslonu. Predvajanje DVD-ja ali uporaba
igralne konzole ima lahko podobne učinke. Garancija ne vključuje poškodb, ki so nastale na tak način.
Če je na zaslonu dlje časa prikazana mirujoča računalniška slika ali slika iz video igrice, to lahko povzroči delni prikaz
zakasnele slike. Ta učinek preprečite tako, da pri prikazovanju mirujočih slih zmanjšate svetlost in kontrast.
© 2009 Samsung Electronics Co., Ltd. All rights reserved.
❑
❑
●
●
●
Slike in ilustracije v tem uporabniškem priročniku so samo za referenco: Dejanski izdelek je lahko videti drugačen.
Obliko in tehnične lastnosti lahko spremenimo brez predhodnega obvestila.
[620-Weuro]BN68-02326A-03L09.ind1 1 2009-10-08 ¿ÀÀü 9:30:44

Licenca
TruSurround HD, SRS in simbol so blagovne znamke podjetja SRS Labs, Inc. Tehnologija TruSurround
HD je vgrajena pod licenco podjetja SRS Labs, Inc.
Izdelano pod licenco podjetja Dolby Laboratories. Dolby in simbol DD sta blagovni znamki podjetja Dolby
Laboratories.
Simbol
N O T
Opomba Gumb na dotik Gumb TOOLS Pritisnite
❑
❑
NASTAVITEV TELEVIZORJA
Ogled nadzorne plošče ...................................................................... 2
Dodatna oprema ................................................................................ 3
Ogled plošče s priključki .................................................................... 4
Ogled daljinskega upravljalnika ......................................................... 6
Vstavljanje baterij v daljinski upravljalnik ........................................... 7
Ogled menijev .................................................................................... 7
Preklop televizorja v stanje pripravljenosti ......................................... 8
Funkcija Plug & Play (odvisno od modela) ........................................ 8
Ogled prikaza .................................................................................... 9
KANAL
Meni kanala ....................................................................................... 9
Upravljanje kanalov ........................................................................ 12
SLIKA
Konguriranje menija slike ............................................................... 14
Uporaba televizorja kot računalniškega zaslona ............................. 18
Nastavitev televizorja z računalnikom ............................................. 19
ZVOK
Konguriranje menija zvoka ............................................................ 20
Izbira zvočnega načina .................................................................... 21
NASTAVITEV
Konguriranje menija nastavitve ...................................................... 22
Nastavitev časa ............................................................................... 24
VHOD/PODPORA
Meni vhoda ...................................................................................... 26
Meni podpore ................................................................................... 26
PREDVAJANJE PREDSTAVNOSTI (USB)
Priključitev naprave USB ................................................................. 28
Funkcija predvajanja predstavnosti ................................................. 29
Meni z možnostmi za seznam fotograj .......................................... 30
Ogled fotograje ali diaprojekcije ..................................................... 31
Meni z možnostmi za diaprojekcijo .................................................. 32
Meni z možnostmi za seznam glasbe .............................................. 33
Predvajanje glasbe .......................................................................... 34
Meni z možnostmi za predvajanje glasbe ........................................ 35
Uporaba menija nastavitve .............................................................. 35
■
■
■
■
■
■
■
■
■
■
■
■
■
■
■
■
■
■
■
■
■
■
■
■
■
■
■
■
■
ANYNET
+
Povezava naprav, ki podpirajo Anynet
+
........................................... 36
Nastavitev sistema Anynet
+
............................................................ 37
Preklapljanje med napravami, ki podpirajo Anynet
+
........................ 37
Snemanje ........................................................................................ 38
Poslušanje prek sprejemnika (domači kino) .................................... 38
Odpravljanje težav s funkcijo Anynet
+
............................................. 39
A
Funkcija teleteksta ........................................................................... 40
Namestitev stojala ........................................................................... 41
Odstranjevanje stojala ..................................................................... 42
Namestitev kompleta za pritrditev na steno ..................................... 42
Združitev kablov .............................................................................. 42
Ključavnica Kensington proti kraji .................................................... 42
Zaščita prostora za namestitev ........................................................ 43
Pritrditev televizorja na steno .......................................................... 43
Odpravljanje težav ........................................................................... 44
Specikacije ..................................................................................... 47
■
■
■
■
■
■
■
■
■
■
■
■
■
■
■
■
VSEBINA
Slovenščina
[620-Weuro]BN68-02326A-03L09.ind1 1 2009-10-08 ¿ÀÀü 9:30:44

NASTAVITEV TELEVIZORJA
Barva in oblika izdelka sta odvisni od modela.
Gumbe na sprednji plošči aktivirate z dotikom s prstom.
1
P
(NAPAJANJE): Pritisnite za vklop in izklop televizorja.
2
INDIKATOR NAPAJANJA: Utripa in se izklopi, ko je napajanje vklopljeno, in začne svetiti v stanju pripravljenosti.
3
z
: Pritisnite za menjavo kanalov. Gumba
z
v meniju na zaslonu uporabljajte, kot uporabljate gumba ▼ in ▲
na daljinskem upravljalniku.
4
Y
: Pritisnite za znižanje ali zvišanje glasnosti.
Na meniju na zaslonu uporabljajte gumba
Y
, kot uporabljate gumba ◄ in ► na daljinskem upravljalniku.
5
MENU: Pritisnite za ogled menija na zaslonu s funkcijami televizorja.
6
SOURCE
E
: Za preklapljanje med vsemi razpoložljivimi vhodnimi viri. Ta gumb v meniju na zaslonu uporabljajte kot gumb
ENTER
E
na daljinskem upravljalniku.
7
SENZOR DALJINSKEGA UPRAVLJALNIKA: Daljinski upravljalnik usmerite proti tej točki na televizorju.
8
¦
N
N
6
5
4
3
2
1
87
8
[620-Weuro]BN68-02326A-03L09.ind2 2 2009-10-08 ¿ÀÀü 9:30:44

Dodatna oprema
Daljinski upravljalnik in bateriji (AAA x 2) Napajalni kabel Pokrov za podstavek
Garancijska kartica/varnostni priročnik
(ni na voljo na vseh lokacijah)
Čistilna krpa
Držalo za kable
(odvisno od modela)
● Uporabnikova navodila
Preverite, ali so televizorju LCD priloženi naslednji predmeti. Če kateri predmet manjka, se obrnite na prodajalca.
Barva in oblika predmetov sta odvisni od modela.
¦
N
N
[620-Weuro]BN68-02326A-03L09.ind3 3 2009-10-08 ¿ÀÀü 9:30:45

Barva in oblika izdelka sta odvisni od modela.
1 COMPONENT IN
Za povezavo videa / avdia komponente.
2 HDMI IN 1, 2, 3(DVI), 4 / DVI
AUDIO IN
Za povezavo z vtičnico HDMI naprave z izhodom HDMI.
Za povezavo HDMI s HDMI ne potrebujete avdio povezave.
Kaj je HDMI?
Vmesnik HDMI (High-Definition Multimedia Interface) omogoča prenos digitalnih avdio in video signalov prek enega kabla.
Razlika med HDMI-jem in DVI-jem je, da je naprava HDMI manjša od naprave DVI.
Če priključite predvajalnik DVD / Blu-ray / kabelski / satelitski sprejemnik, ki podpira različice HDMI, ki so starejše od
1.3, televizor mogoče ne bo oddajal zvoka oziroma bodo barve nepravilne. Če ste priključili starejši kabel HDMI in ne
slišite zvoka, kabel HDMI vključite na vtičnico HDMI IN 3(DVI), avdio kabla pa na vtičnici DVI AUDIO IN na hrbtni strani
televizorja. V tem primeru se obrnite na prodajalca predvajalnika DVD / Blu-ray / kabelskega / satelitskega sprejemnika,
da preverite različico HDMI, in zahtevajte nadgradnjo.
Vtičnico HDMI IN 3(DVI) uporabite za povezavo DVI z zunanjo napravo. Za video povezavo uporabite kabel za povezavo
vrat DVI in HDMI ali adapter DVI-HDMI (povezava vrat DVI in HDMI), za avdio povezavo pa uporabite vtičnici DVI AUDIO
IN. Če uporabljate kabel HDMI/DVI, uporabite vtičnico HDMI IN 3(DVI).
Pri HDMI kablih, ki niso različice 1.3, se lahko pojavi moteče migljanje ali pa zaslon ni prikazan.
3 PC IN [PC] / [AUDIO]
Za povezavo z vtičnicama za video in avdio izhod na računalniku.
Če vaš računalnik podpira povezavo HDMI, ga lahko povežete s priključkom HDMI IN 1, 2, 3(DVI) ali 4.
Če vaš računalnik podpira povezavo DVI, ga lahko povežete s priključkom HDMI IN 3(DVI) / DVI AUDIO IN.
4 ANT IN
Za povezavo z antenskim ali kabelskim televizijskim sistemom.
5
(odvisno od modela)
Ključavnica Kensington (izbirno) je naprava, ki se uporablja za fizično pritrditev sistema pri uporabi na javnem mestu. Če želite
uporabljati napravo za zaklepanje, se obrnite na trgovca, pri katerem ste kupili televizor
.
Kam se namesti ključavnico Kensington, je odvisno od modela.
¦
N
N
N
N
N
N
N
N
N
7890 6 5
@
2
#
!
21 34
Vhod za napajanje
[620-Weuro]BN68-02326A-03L09.ind4 4 2009-10-08 ¿ÀÀü 9:30:46

6
H
(SLUŠALKE)
Slušalke lahko priključite na izhod za slušalke na televizorju. Ko so priključene slušalke, je zvok iz vgrajenih zvočnikov
onemogočen.
Če imate na televizor priključene slušalke, je uporaba funkcije zvoka je omejena.
Daljša uporaba slušalk pri večji glasnosti lahko poškoduje sluh.
Če na televizor priključite slušalke, zvok ne bo prihajal iz zvočnikov.
Glasnost slušalk se nastavlja ločeno od glasnosti televizorja.
7 DIGIT
AL AUDIO OUT (OPTICAL)
Za povezavo z digitalno avdio komponento, kot je sprejemnik domačega kina.
Če je digitalni avdio sistem povezan z vtičnico DIGITAL AUDIO OUT (OPTICAL): glasnost televizorja znižajte in
prilagodite z regulacijo glasnosti v sistemu.
5.1-kanalni zvok je podprt, če je televizor povezan z zunanjo napravo, ki podpira 5.1-kanalni zvok.
Če je sprejemnik (domači kino) nastavljen na On, zvok prihaja iz optične vtičnice na televizorju. Kadar televizor
prikazuje običajne signale (DTV), pošilja 5.1-kanalni zvok v sprejemnik domačega kina. Če je vir digitalna komponenta,
kot je predvajalnik DVD / Blu-Ray / kabelski / satelitski sprejemnik, in je s televizorjem povezan prek vhoda HDMI, bo
sprejemnik domačega kina predvajal samo 2-kanalni zvok. Za 5.1-kanalni zvok povežite vtičnico za digitalni avdio izhod
na predvajalniku DVD / Blu-ray / kabelskem / satelitskem sprejemniku neposredno z ojačevalnikom ali domačim kinom in
ne s televizorjem.
8 SER
VICE
Spojnik samo za servis.
9 AUDIO OUT [R-AUDIO-L]
Za povezavo z vtičnicama za avdio izhod na ojačevalniku/domačem kinu.
Če je ojačevalnik zvoka povezan z vtičnicama AUDIO OUT [R-AUDIO-L]: glasnost televizorja znižajte in prilagodite z
regulacijo glasnosti na ojačevalniku.
0 EXT 1, 2
Vhodi oziroma izhodi za zunanje naprave, kot so videorekorder, predvajalnik DVD, video igralna naprava ali predvajalnik video
plošč.
V načinu zunanje naprave izhod digitalne televizije podpira samo video in avdio MPEG SD.
Specifikacije za vhod/izhod
Spojnik
Vhod Izhod
Video Avdio (L/D) RGB Video + avdio (L / D)
EXT 1 O O O Na voljo je samo izhod televizorja ali DTV.
EXT 2 O O X Izhod lahko izberete.
! A
V IN [VIDEO] / [R-AUDIO-L]
Video in avdio vhodi za zunanje naprave, kot sta videokamera ali videorekorder.
@ USB
Spojnik za nadgradnje programske opreme, način predvajanja predstavnosti itd.
#
Če ni vstavljena ‘kartica za splošni vmesnik (CI+)’, se pri nekaterih kanalih na zaslonu prikaže sporočilo ‘Scrambled
Signal’.
V 2–3 minutah se prikažejo informacije o združitvi s telefonsko številko, ID-jem ‘kartice za splošni vmesnik (CI+)‘, ID-jem
gostitelja in druge informacije. Če se prikaže sporočilo o napaki, se obrnite na ponudnika storitev
.
Ko je konfiguracija informacij o kanalih končana, se prikaže sporočilo ‘Updating Completed’, kar pomeni, da je seznam
kanalov posodobljen.
Pri nekaterih modelih se ob vstavitvi kartice za splošni vmesnik prikaže poziv za geslo za Parental Lock.
Pri nekaterih modelih se pri programih za odrasle (18 let in več) poziv za geslo prikaže tudi, če je možnost Parental Lock
nastavljena na Allow All.
‘Kartico za splošni vmesnik (CI+)’ dobite pri lokalnem ponudniku kabelskih storitev. ‘Kartico za splošni vmesnik (CI+)’
odstranite tako, da jo previdno izvlečete z rokami, saj se pri padcu lahko poškoduje.
‘Kartico za splošni vmesnik (CI+)’ vstavite v smeri, ki je označena na njej.
Kje se nahaja reža COMMON INTERFACE, je odvisno od modela.
'Kartica za splošni vmesnik (CI+)' ni podprta v nekaterih državah, regijah in pri nekaterih oddajnih postajah. Preverite pri
pooblaščenem prodajalcu.
Funkcija CI+ je na voljo samo pri modelu LE********P.
Če ste naleteli na težave, se obrnite na ponudnika storitev.
N
N
N
N
N
N
N
N
–
–
N
N
N
N
N
[620-Weuro]BN68-02326A-03L09.ind5 5 2009-10-08 ¿ÀÀü 9:30:46

Ogled daljinskega upravljalnika
Daljinski upravljalnik lahko uporabljate do oddaljenosti približno 7 m od televizorja.
Na delovanje daljinskega upravljalnika lahko vpliva močna svetloba.
Barva in oblika izdelka sta odvisni od modela.
1
POWER: Za vklop in izklop
televizorja.
2
: Pritisnite za
menjavo kanala.
3
FAV.CH: Za prikaz seznamov
priljubljenih kanalov na zaslonu.
4
Y
: Pritisnite za znižanje
ali zvišanje glasnosti.
5
SOURCE: Pritisnite za prikaz in
izberite video vire, ki so na voljo.
6
INFO: Pritisnite za prikaz
informacij na televizijskem
zaslonu.
7
TOOLS: Za hitro izbiro pogosto
uporabljenih funkcij.
8
CH LIST: Za prikaz seznamov
kanalov na zaslonu.
9
BARVNI GUMBI: Te gumbe
uporabljajte v menijih Channel
list, Media Play itd.
!
DUAL: Za izbiro zvočnega učinka
@
Te gumbe uporabljajte v načinih
Media Play in Anynet
+
.
(
∏
: Ta daljinski upravljalnik
lahko uporabite za upravljanje
snemanja na snemalnikih
Samsung s funkcijo Anynet
+
)
#
TV: Za neposredno izbiro načina
televizorja.
$
PRE-CH: Za vrnitev na prej
gledani kanal.
%
MUTE
M
: Pritisnite za začasen
izklop zvoka.
^
>
P
<
: Pritisnite za menjavo
kanalov.
&
MENU: Za prikaz glavnega
menija na zaslonu.
*
GUIDE: Prikaz elektronskega
programskega vodnika (EPG).
(
RETURN: Za vrnitev na prejšnji
meni.
)
ENTER
E
: Uporabite za
izbiranje elementov menija na
zaslonu in spreminjanje vrednosti
menija.
a
EXIT: Pritisnite za izhod iz
menija.
b
P.SIZE: Izbira velikosti slike.
c
MEDIA.P: Za predvajanje
glasbenih datotek in slik.
d
SUBT.: Prikaz digitalnih
podnapisov.
e
AD: Izbira zvočnega opisa.
Funkcije teleteksta
5
0
: Izbira načina teleteksta
(SEZNAM/FLOF)
6
5
: Prikaz teleteksta
7
4
: Za izbiro velikosti teleteksta
8
8
: Za shranjevanje teleteksta
9
Za izbiro teme Fastext
0
/
: Izmenična izbira
možnosti Teletext, Double ali Mix.
#
:
: Za izhod iz teleteksta
$
1
: Podstran teleteksta
^
2
: Naslednja stran teleteksta
3
: Prejšnja stran teleteksta
&
6:
Za kazalo teleteksta
(
9:
Za zadržanje strani
teleteksta
a
7:
Za preklic teleteksta
¦
N
N
N
INFO
C
H
L
I
S
T
AD
1 #
$
^
*
(
)
a
b
c
e
d
%
&
2
3
4
5
6
7
8
9
0
!
@
[620-Weuro]BN68-02326A-03L09.ind6 6 2009-10-08 ¿ÀÀü 9:30:46

Vstavljanje baterij v daljinski upravljalnik
1. Odprite pokrovček na hrbtni strani daljinskega upravljalnika, kot je prikazano na sliki.
2. Vstavite dve bateriji AAA.
Poskrbite, da sta pola ‘+’ in ‘–’ baterije usmerjena skladno s prikazom v predelu za
baterije.
3.
Pokrovček namestite nazaj.
Če daljinskega upravljalnika ne boste uporabljali dalj časa, odstranite baterije in jih
shranite na hladnem in suhem mestu. (Pri običajni uporabi televizorja je življenjska doba baterij približno eno leto.)
Če daljinski upravljalnik ne deluje, preverite naslednje:
Ali je televizor vklopljen?
Ali so poli baterij plus in minus zamenjani?
Ali sta bateriji prazni?
Ali je prišlo do izpada napajanja oziroma je napajalni kabel izključen?
Ali je v bližini posebna fluorescentna luč ali neonska tabla?
OPERATION
Ogled menijev
Pred uporabo televizorja sledite spodnjim korakom, da se naučite krmariti po meniju in izbrati in prilagoditi različne funkcije.
Uporaba prikaza na zaslonu
Korak za dostop se lahko razlikuje glede na izbrani meni.
1. Pritisnite gumb MENU.
2.
Na zaslonu se prikaže glavni meni. Na levi strani menija so ikone: Picture, Sound,
Channel, Setup, Input, Application, Support.
3. Za izbiro ene od ikon pritiskajte gumb ▲ ali ▼.
4.
Nato za dostop do podmenija ikone pritisnite gumb ENTER
E
.
5. Za izbiro podmenija ikone pritiskajte gumb ▲ ali ▼.
6.
S pritiskanjem gumba ◄ ali ► povečajte ali zmanjšajte vrednost določenega elementa.
Nastavitev prikaza na zaslonu se lahko razlikuje glede na izbrani meni.
7
. Pritisnite gumb ENTER
E
, da dokončate konfiguracijo. Za izhod pritisnite gumb EXIT.
¦
N
N
N
¦
❑
INFO
AD
MENU
Za prikaz glavnega menija na
zaslonu.
ENTER
E
/ SMERNI gumbi
Za premikanje kazalca in izbiro
elementa. Za izbiro trenutno
izbranega elementa. Za potrditev
nastavitve.
RETURN
Za vrnitev v prejšnji meni.
EXIT
Za izhod iz menija na zaslonu.
INFO
AD
INFO
AD
Mode :Standard ▶
Backlight :7
Contrast :95
Brightness :45
Sharpness :50
Colour :50
Tint(G/R) :G50/R50
AdvancedSettings
Picture
Mode :Standard
Backlight :7 ▶
Contrast :95
Brightness :45
Sharpness :50
Colour :50
Tint(G/R) :G50/R50
AdvancedSettings
PictureOptions
Picture
7
U
Move
L
Adjust
E
Enter
R
Return
▲
Backlight
▼
Ikona pomoči
[620-Weuro]BN68-02326A-03L09.ind7 7 2009-10-08 ¿ÀÀü 9:30:47

Preklop televizorja v stanje pripravljenosti
Televizor lahko preklopite v stanje pripravljenosti in s tem zmanjšate porabo energije. Stanje pripravljenosti je uporabno, če želite
začasno prekiniti gledanje (na primer med jedjo).
1. Pritisnite gumb POWER
P
na daljinskem upravljalniku.
Zaslon se izklopi in na televizorju začne svetiti indikator stanja pripravljenosti.
2.
Za ponoven vklop televizorja enostavno znova pritisnite gumb POWER
P
.
Televizorja ne puščajte v stanju pripravljenosti dlje časa (na primer, ko greste na dopust). Priporočamo tudi, da izključite
napajanje in anteno.
Funkcija Plug & Play (odvisno od modela)
Pri prvem vklopu televizorja se samodejno prikažejo osnovne nastavitve.
1. Pritisnite gumb POWER na daljinskem upravljalniku.
Uporabite lahko tudi gumb POWER
P
na televizorju.
Prikaže se sporočilo Select the OSD Language..
2.
Pritisnite gumb ENTER
E
. S pritiskanjem gumba ▲ ali ▼ izberite ustrezno državo. Za
potrditev izbire pritisnite gumb ENTER
E
.
3. S pritiskanjem gumba ◄ ali ► izberite Store Demo ali Home Use in nato pritisnite gumb
ENTER
E
.
Priporočamo, da televizor nastavite na način Home Use, saj to zagotavlja najboljšo
sliko v domačem okolju.
Store Demo je namenjen samo uporabi v trgovinah.
Če je naprava po pomoti nastavljena na način Store Demo, in se želite vrniti na način Home Use (standardno): na
televizorju pritisnite gumb za glasnost. Ko je na zaslonu prikaz glasnosti, 5 sekund držite pritisnjen gumb MENU na
televizorju.
4.
Pritisnite gumb ENTER
E
. S pritiskanjem gumba ▲ ali ▼ izberite ustrezno državo. Za potrditev izbire pritisnite gumb
ENTER
E
.
Ko uporabnik izbere državo v meniju Country, se pri nekaterih modelih prikaže dodatna možnost za nastavitev številke
PIN.
Ko vnašate številko PIN, 0-0-0-0 ni na voljo.
5.
S pritiskanjem gumba ▲ ali ▼ izberite Air ali Cable in nato pritisnite gumb ENTER
E
.
Air: signal običajne antene.
Cable: signal kabelske antene.
6.
S pritiskanjem gumba ▲ ali ▼ izberite kanal, ki ga želite shraniti. Pritisnite gumb ENTER
E
, da izberete Start.
Ko vir antene nastavljate na Cable, pridete do koraka, pri katerem lahko nastavite vrednost za iskanje digitalnih kanalov
.
Za več informacij si oglejte .
Digital & Analogue: digitalni in analogni kanali.
Digital: digitalni kanali.
Analogue: analogni kanali.
Iskanje kanalov se bo samodejno začelo in končalo.
Če želite shranjevanje kadar koli prekiniti, pritisnite gumb ENTER
E
.
Ko so shranjeni vsi kanali, ki so na voljo, se prikaže sporočilo Set the Clock Mode..
7
. Pritisnite gumb ENTER
E
. S pritiskanjem gumba ▲ ali ▼ izberite Auto in nato pritisnite gumb ENTER
E
.
Če izberete Manual, se prikaže Set current date and time.
Če ste prejeli digitalni signal, se bo čas samodejno nastavil. Če se ne, izberite Manual, da nastavite uro.
8
. Prikaže se opis za način povezave za najboljšo kakovost zaslona v visoki ločljivosti. Preverite opis in pritisnite gumb
ENTER
E
.
9. Prikaže se sporočilo Enjoy your TV. Ko končate, pritisnite gumb ENTER
E
.
Za ponastavitev te funkcije ...
1. Za prikaz menija pritisnite gumb MENU. S pritiskanjem gumba ▲ ali ▼ izberite Setup in
nato pritisnite gumb ENTER
E
.
2. Znova pritisnite gumb ENTER
E
, da izberete Plug & Play.
3. Vnesite 4-mestno kodo PIN. Privzeta koda PIN novega televizorja je ‘0-0-0-0’.
Če želite spremeniti številko PIN, uporabite funkcijo Change PIN.
Funkcija Plug & Play je na voljo samo v načinu televizorja.
¦
N
N
¦
N
N
N
N
N
N
N
N
N
N
N
N
N
N
N
N
N
N
INFO
AD
SelecttheOSDLanguage.
MenuLanguage :English ▶
E
Enter
Plug&Play
Plug&Play ▶
MenuLanguage :English
Time
Broadcast
Security
General
Setup
[620-Weuro]BN68-02326A-03L09.ind8 8 2009-10-08 ¿ÀÀü 9:30:47

Ogled prikaza
Prikaz označuje trenutni kanal in stanje določenih zvočnih in slikovnih nastavitev.
Za ogled informacij pritisnite gumb INFO.
Pritisnite gumb INFO na daljinskem upravljalniku. Na televizorju se bodo prikazali kanal,
vrsta zvoka in stanje določenih slikovnih in zvočnih nastavitev.
▲, ▼: Za ogled drugih informacij o kanalu. Če se želite pomakniti na trenutno izbran
kanal, pritisnite gumb ENTER
E
.
◄, ►: Ogledate si lahko informacije o želeni oddaji na trenutnem kanalu.
Znova pritisnite gumb INFO ali počakajte približno 10 sekund, da prikaz samodejno
izgine.
KANAL
Meni kanala
Country
Analogue Channel
Spremenite lahko državo analognih kanalov.
Digital Channel
Spremenite lahko državo digitalnih kanalov.
Prikaže se zaslon za vnos kode PIN. Vnesite 4-mestno kodo PIN.
Auto Store
Poiščete lahko razpoložljive frekvenčne razpone (razpoložljivost je odvisna od države). Samodejno dodeljene številke programov
mogoče ne ustrezajo dejanskim ali želenim številkam programov.
Če je kanal zaklenjen s funkcijo Child Lock, se prikaže okno za vnos PIN-a.
Air / Cable
Vir antene za shranjevanje
Digital & Analogue: digitalni in analogni kanali.
Digital: digitalni kanali.
Analogue: analogni kanali.
ali '
Vnesite vrednost za iskanje kabelskih kanalov.
Network ID: Za prikaz identifikacijske kode omrežja.
Frequency: Za prikaz frekvence kanala. (Razlikuje se od države do države.)
Modulation: Za prikaz vrednosti modulacije, ki so na voljo.
Symbol Rate: Za prikaz razpoložljivih simbolnih hitrosti.
Poišče vse kanale aktivnih televizijskih postaj in jih shrani v pomnilnik televizorja.
Če želite ustaviti izvajanje funkcije samodejnega shranjevanja, pritisnite gumb ENTER
E
.
Prikaže se sporočilo Stop Auto Store?.
S pritiskanjem gumba ◄ ali ► izberite Yes in nato pritisnite gumb ENTER
E
.
¦
O
●
●
N
¦
❑
■
■
N
❑
N
■
●
●
●
●
N
N
N
Country ▶
AutoStore
ManualStore
CableSearchOption
FullGuide
MiniGuide
DefaultGuide :FullGuide
ChannelList
Channel
INFO
AD
DTV Air
15
abc1
18:00 ~ 6:00
18:11 Thu 6 Jan
Life On Venus Avenue
Unclassified
No Detaild Information
' Information
[620-Weuro]BN68-02326A-03L09.ind9 9 2009-10-08 ¿ÀÀü 9:30:47

Manual Store
Ročno poišče kanal in ga shrani v pomnilnik televizorja.
Če je kanal zaklenjen s funkcijo Child Lock, se prikaže okno za vnos PIN-a.
Digital Channel
Ročno shranjevanje digitalnih kanalov.
Digital Channel je na voljo samo v načinu DTV.
Channel: Z gumboma ▲, ▼ ali številskimi gumbi (0–9) nastavite številko kanala.
Frequency: S številskimi gumbi nastavite frekvenco.
Bandwidth: Z gumboma ▲, ▼ ali številskimi gumbi (0–9) nastavite pasovno širino.
Ko se iskanje dokonča, so posodobljeni kanali v seznamu kanalov.
Analogue Channel
Ročno shranjevanje analognega kanala.
Programme (številka programa, ki naj bo dodeljena kanalu): z gumbom ▲, ▼ ali številskimi gumbi (0–9) nastavite številko
programa.
: z gumbom ▲ ali ▼ nastavite vrednost barvnega sistema.
: z gumbom ▲ ali ▼ nastavite vrednost zvočnega sistema.
Channel (če poznate številko kanala za shranjevanje): S pritiskanjem gumba ▲ ali ▼ izberite C (običajna antena) ali
S (kabelski kanal). Pritisnite gumb ► in nato s pritiskanjem gumbov ▲, ▼ ali številskih gumbov (0–9) izberite želeno številko.
Številko kanala lahko izberete tudi neposredno s pritiskanjem številskih gumbov (0~9).
Če ni zvoka ali le-ta ni normalen, znova izberite zahtevani zvočni standard.
Search (če ne poznate številk kanalov): za začetek iskanja pritisnite gumb ▲ ali ▼. Kanalnik pregleda frekvenčni razpon,
dokler se na zaslonu ne prikaže prvi kanal ali izbrani kanal.
Store (če shranite kanal in z njim povezano številko programa): nastavite na OK s pritiskom gumba ENTER
E
.
Kanalni način
P (programski način): Po končani naravnavi so oddajnim postajam na vašem območju dodeljene številke položajev od
P00 do P99. Kanal lahko izberete z vnosom številke položaja v tem načinu.
C (način zunanje antene): Kanal lahko izberete z vnosom dodeljene številke za posamezno oddajno postajo v tem načinu.
S (način kabelskega kanala): Kanal lahko izberete z vnosom dodeljene številke za vsak kabelski kanal v tem načinu.
Cable Search Option
Za nastavitev dodatnih možnosti iskanja za kabelsko omrežje, kot sta frekvenca in hitrost simbolov.
Freq.Start (Začetna frekvenca): za nastavitev začetne frekvence (razlikuje se od države do države)
Freq.Stop (Končna frekvenca): za nastavitev končne frekvence (razlikuje se od države do države)
Modulation: za prikaz vrednosti modulacije, ki so na voljo.
Symbol Rate: za prikaz razpoložljivih simbolnih hitrosti.
Full Guide / Mini Guide
Informacije EPG (elektronski programski vodnik) posredujejo izdajatelji televizijskega programa. Informacije o programu so lahko
zastarele ali jih ni, kar je posledica oddajanja informacij določene televizijske postaje. Zaslon se bo dinamično posodobil takoj, ko
bodo na voljo nove informacije.
Meni vodnika lahko prikažete tudi enostavno s pritiskom gumba GUIDE. (Za konfiguriranje funkcije Default Guide si oglejte
opise.)
Full Guide
Informacije o programu so prikazane za eno uro. Prikazane so informacije o dveh urah programa, po katerih se lahko pomikate
naprej ali nazaj glede na čas.
Mini Guide
Informacije o posameznih oddajah so prikazane v ločenih vrsticah na zaslonu mini vodnika trenutnega kanala, od trenutne oddaje
navzgor, glede na vrstni red začetka oddaj.
❑
N
N
■
N
●
●
●
N
■
●
●
●
●
N
N
●
●
N
❑
●
●
●
●
❑
O
■
■
[620-Weuro]BN68-02326A-03L09.ind10 10 2009-10-08 ¿ÀÀü 9:30:48

Odločite se lahko, ali želite prikazati Full Guide ali Mini Guide, ko pritisnete gumb GUIDE na daljinskem upravljalniku.
Channel List
Za podrobne postopke uporabe funkcij Channel List si oglejte navodila 'Managing Channels'.
Te možnosti lahko enostavno izberete s pritiskanjem gumba CH LIST na daljinskem upravljalniku.
Channel Mode
Ko pritisnete gumb P
>
/
<
, preklopite med kanali, ki so na izbranem seznamu kanalov.
Added Ch.
Preklop med kanali, ki so na seznamu shranjenih kanalov.
Favourite Ch.
Preklop med kanali, ki so na seznamu priljubljenih kanalov.
Fine Tune
Če je sprejem jasen, fina naravnava kanala ni potrebna, ker se samodejno izvede med iskanjem in shranjevanjem. Če je signal
šibak ali popačen, boste kanal mogoče morali ročno fino naravnati.
Shranjeni fino naravnani kanali so označeni z zvezdico ‘*’ na desni strani številke kanala na traku s kanalom.
Če želite ponastaviti fino naravnavo, s pritiskanjem gumba ▲ ali ▼ izberite Reset in nato pritisnite gumb ENTER
E
.
Fino naravnavo je mogoče uporabiti samo pri analognih TV-kanalih.
Uporaba popolnega / mini vodnika
Za ... Storite naslednje ...
Gledanje programa s seznama EPG S pritiskanjem gumbov ▲, ▼, ◄, ► izberite program.
Izhod iz vodnika Pritisnite modri gumb
Če je izbran naslednji program, je dodan na razpored s prikazano ikono ure. Če znova pritisnete gumb ENTER
E
, s pritiskanjem
gumbov ◄ in ► izberite Cancel Schedules. Določanje razporeda se prekliče in ikona ure izgine.
Ogled informacij o programu S pritiskanjem gumbov ▲, ▼, ◄, ► izberite želeni program.
Ko je označen želeni program, pritisnite gumb INFO.
Naslov programa je na zgornjem osrednjem delu zaslona.
Če želite podrobne informacije, kliknite gumb INFO. Podrobne informacije vključujejo številko kanala, čas predvajanja, informacije
o statusni vrstici, starševskem nadzoru, kakovosti videa (HD/SD), zvočnih načinih, podnaslovih ali teletekstu, jeziku podnaslovov
ali teleteksta ter kratek povzetek označenega programa. ‘...’ se prikaže, če je povzetek dolg.
Preklapljanje med možnostma Full Guide in Mini
Guide
Pritiskajte rdeči gumb.
V možnosti Full Guide
Hiter pomik nazaj (24 ur).
Hiter pomik naprej (24 ur).
Pritiskajte zeleni gumb.
Pritiskajte rumeni gumb.
❑
❑
O
❑
■
■
❑
N
N
N
FullGuide
E
Watch Information Page MiniGuide +24Hours Exit
DTVCable900ftn2:10Tue1Jun
FreshmenOnCampus
2:00
-2:30
NoDetailedInformation
Today
2:00-3:00 3:00-4:00
MintExtra
Loaded
40withDynamiteMC
TheDistillery
SmashHits!Sunday
900ftn
901ITVPlay
902Kerrang!
903Kiss
904oneword
905Hits
▼
StreetHypn..
Kisstory
No
Information
NoInformation
NoInformation
FreshmenO..
900
E
Watch Information Page FullGuide Exit
MiniGuide DTVCable900ftn
StreetHypnosis
BoozeBritain
2:00
2:30
5:00
Freshmen
OnCampus
▼
[620-Weuro]BN68-02326A-03L09.ind11 11 2009-10-08 ¿ÀÀü 9:30:48

Upravljanje kanalov
S tem menijem lahko dodate / izbrišete ali nastavite priljubljene kanale in uporabljate programski vodnik za digitalne prenose.
All Channels
Prikaže vse trenutno razpoložljive kanale.
Added Channels
Prikaz vseh dodanih kanalov.
Favourites
Prikaz vseh priljubljenih kanalov.
Če želite izbrati priljubljene kanale, ki ste jih nastavili, pritisnite gumb FAV.CH na
daljinskem upravljalniku.
Programmed
Prikaz trenutno rezerviranih oddaj.
Izberite kanal na zaslonu All Channels, Added Channels ali Favourites s pritiskanjem gumba ▲ / ▼ in pritiskom gumba
ENTER
E
. Nato lahko gledate izbrani kanal.
Uporaba barvnih gumbov skupaj z možnostjo Channel List
Rdeči (Channel Type): Preklapljanje med možnostmi TV, Radio, Data / Other in All.
Zeleni (Zoom): Povečanje ali pomanjšanje številke kanala.
Rumeni (Select): Izbira več seznamov kanalov. Istočasno lahko dodate/izbrišete več kanalov, jih dodate priljubljenim/
izbrišete izmed priljubljenih. Če želite istočasno nastaviti vse izbrane kanale, izberite želene kanale in pritisnite rumeni
gumb. Levo od izbranih kanalov se prikaže oznaka
c
.
TOOLS (Tools): Za prikaz menija Delete (ali Add), Add to Favourite (ali Delete from Favourite), Lock (ali Unlock),
Timer Viewing, Edit Channel Name, Edit Channel Number, Sort, Select All (ali Deselect All), Auto Store. (Meniji
možnosti so lahko drugačni, odvisno od okoliščin.)
Ikone stanja kanala
A
: analogni kanal.
c
: kanal, izbran s pritiskom rumenega gumba.
*
: kanal, ki je nastavljen kot priljubljeni.
(
: oddaja, ki se trenutno predvaja.
\
: zaklenjen kanal.
)
: rezervirana oddaja.
All Channels / Added Channels / Favourites)
Če želite uporabljati meni z možnostmi, pritisnite gumb TOOLS.
Elementi menija z možnostmi se lahko razlikujejo, odvisno od stanja kanala.
Add / Delete
Lahko izbrišete ali dodate kanal, da prikažete želene kanale.
Vsi izbrisani kanali bodo prikazani v meniju All Channels.
Če je kanal obarvan sivo, to pomeni, da je bil izbrisan.
Meni Add se prikaže samo pri izbrisanih kanalih.
Na enak način lahko izbrišete kanal v meniju Added Channels ali Favourites.
Add to Favourite / Delete from Favourite
Kanale, ki jih pogosto gledate, lahko nastavite kot priljubljene.
Pritisnite gumb TOOLS, da prikažete meni Tools. Nastavite lahko tudi dodajanje ali brisanje izmed priljubljenih z izbiro Tools
(ali Delete from Favourite).
Prikazan bo simbol ‘
*
’ in kanal bo nastavljen kot priljubljeni.
Vsi priljubljeni kanali bodo prikazani v meniju Favourite.
Lock / Unlock
Kanal lahko zaklenete, tako da ga ni mogoče izbrati in gledati.
Ta funkcija je na voljo samo, če je možnost Child Lock nastavljena na On.
Prikaže se zaslon za vnos kode PIN. Vnesite 4-mestno kodo PIN.
Privzeta koda PIN novega televizorja je ‘0-0-0-0’. Kodo PIN lahko spremenite tako, da v meniju izberete Change PIN.
Prikazan bo simbol ‘
\
’ in kanal bo zaklenjen.
¦
■
■
■
O
■
N
N
N
N
N
■
N
N
N
N
■
T
N
N
■
N
N
N
N
AllChannels
824UKTVGold
825UKTVstyle
A
1C--
A
2C--
A
3C--
A
4C--
A
5C--
A
6C--
A
7C--
A
8C--
All ChannelType Zoom Select
T
Tools
Delete
AddtoFavourite
Lock
Timer
Viewing
EditChannelName
Sort
AddedChannels
824UKTVGold
825UKTVstyle
A
1C--
A
2C--
A
3C--
A
4C--
A
5C--
A
6C--
A
7C--
A
8C--
All ChannelType Zoom Select
T
Tools
[620-Weuro]BN68-02326A-03L09.ind12 12 2009-10-08 ¿ÀÀü 9:30:49

Timer Viewing
Če rezervirate oddajo, ki si jo želite ogledati, se kanal na seznamu kanalov samodejno preklopi v rezerviranega, tudi če gledate
drug kanal. Če želite rezervirati oddajo, najprej nastavite trenutni čas.
Rezervirati je mogoče samo shranjene kanale.
Kanal, dan, mesec, leto, uro in minute lahko nastavite neposredno s pritiskanjem številskih gumbov na daljinskem
upravljalniku.
Rezerviranje programa bo prikazano v meniju Programmed.
Programski vodnik za digitalne kanale in rezerviranje oddaj
Če je izbran digitalni kanal in pritisnete gumb ►, se prikaže programski vodnik za ta kanal. Oddajo lahko rezervirate po zgoraj
opisanih postopkih.
Edit Channel Name (samo pri analognih kanalih)
Kanale lahko označite, tako da se vsakič, ko izberete določen kanal, prikaže njegovo ime.
Digitalnim kanalom so imena samodejno dodeljena in jih ni mogoče spremeniti.
Edit Channel Number (samo pri digitalnih kanalih)
Urejate lahko tudi številke kanalov, in sicer s pritiskanjem številskih gumbov na daljinskem upravljalniku.
Sort (samo pri analognih kanalih)
Ta postopek omogoča spreminjanje številk programov shranjenih kanalov. To postopek boste mogoče morali izvesti po uporabi
funkcije samodejnega shranjevanja.
Select All / Deselect All
Select All: izberete lahko vse kanale na seznamu kanalov.
Deselect All: prekličete lahko izbor vseh izbranih kanalov.
Možnost Deselect All lahko izberete samo, če je kateri kanal izbran.
Auto Store
Za podrobne postopke nastavljanja možnosti si oglejte navodila ‘Meni kanala’.
Če je kanal zaklenjen s funkcijo Child Lock, se prikaže okno za vnos PIN-a.
Programmed)
Rezervacijo si lahko ogledate, jo spremenite ali izbrišete.
Če želite uporabljati meni z možnostmi, pritisnite gumb TOOLS.
Change Info
Za spremembo rezervacije oddaje.
Cancel Schedules
Za preklic rezervacije oddaje.
Information
Za ogled rezervacije oddaje.
(Lahko tudi spremenite podatke o rezervaciji.)
Select All
Za izbiro vseh rezerviranih oddaj.
■
N
N
N
N
■
N
■
■
■
●
●
N
■
N
N
N
■
■
■
■
Programmed
1/1/2009
13:595TV1
)
18:592TV3
)
TheEqualizer
20:592TV3
)
McMillan&Wife
21:592TV3
)
M.Spillane’smike
All Zoom Select
T
Tools
E
Information
ChangeInfo
CancelSchedules
Information
Select
All
[620-Weuro]BN68-02326A-03L09.ind13 13 2009-10-08 ¿ÀÀü 9:30:49

SLIKA
Konfiguriranje menija slike
Izberete lahko vrsto slike, ki najbolj ustreza vašim zahtevam.
Pritisnite gumb TOOLS, da prikažete meni Tools. Slikovni način lahko nastavite tudi z
izbiro možnosti .
Dynamic
Za izbiro slike za višjo ločljivost v svetlem prostoru.
Standard
Za izbiro slike za optimalen prikaz v normalnem okolju.
Natural
Za izbiro slike za optimalen prikaz, ki je udoben za gledanje.
Funkcija ni na voljo v načinu računalnika.
Movie
Za izbiro slike za gledanje filmov v temnem prostoru.
Backlight / Contrast / Brightness / Sharpness / Colour / Tint(G/R)
Televizor ima več možnosti nastavitev za nadzor kakovosti slike.
Backlight: za prilagoditev svetlosti osvetlitve LCD-ja.
Contrast: za prilagoditev ravni kontrasta slike.
Brightness: za prilagoditev ravni svetlosti slike.
Sharpness: za prilagoditev nastavitve robov slike.
Colour: za prilagoditev nasičenosti barv slike.
Tint(G/R): ta prilagoditev barvnega odtenka slike.
V analognih načinih sistema PAL TV, Ext., AV funkcije Tint(G/R) ni mogoče uporabljati.
Če spremenite možnost Backlight, Contrast, Brightness, Sharpness, Colour ali Tint(G/R), se prikaz na zaslonu ustrezno
prilagodi.
V načinu računalnika je mogoče spreminjati samo možnosti Backlight, Contrast in Brightness.
Prilagajate in shranjujete lahko nastavitve vseh zunanjih naprav, ki so povezane na vhod televizorja.
Količino porabljene energije lahko opazno zmanjšate, če znižate raven svetlosti slike, s čimer boste tudi znižali celotne tekoče
stroške.
Advanced Settings
Novi Samsungov televizor omogoča še natančnejše slikovne nastavitve kot prejšnji modeli.
Advanced Settings je na voljo v načinu Standard ali Movie.
V načinu računalnika je med elementi Advanced Settings mogoče spreminjati samo
Dynamic Contrast, Gamma in White Balance.
Na zaslonu lahko izberete raven črne in tako prilagodite globino zaslona.
Prilagodite lahko kontrast zaslona, tako da je optimalen.
Gamma
Nastavite lahko intenzivnost primarnih barv (rdeča, zelena, modra).
¦
❑
T
■
■
■
N
■
❑
●
●
●
●
●
●
N
N
N
N
N
❑
N
N
■
■
■
Mode :Standard ▶
Backlight :7
Contrast :95
Brightness :45
Sharpness :50
Colour :50
Tint(G/R) :G50/R50
AdvancedSettings
Picture
7
U
Move
L
Adjust
E
Enter
R
Return
▲
Backlight
▼
BlackTone :Off ▶
DynamicContrast :Medium
Gamma :0
ColourSpace :Native
WhiteBalance
FleshTone :0
EdgeEnhancement :On
U
Move
E
Enter
R
Return
AdvancedSettings
[620-Weuro]BN68-02326A-03L09.ind14 14 2009-10-08 ¿ÀÀü 9:30:49

Colour Space
Barvni prostor je barvna matrika, ki je sestavljena iz rdeče, zelene in modre barve. Izberite najljubši barvni prostor za prikaz
najnaravnejših barv.
Auto: Samodejni barvni prostor se samodejno prilagodi na najnaravnejši barvni ton glede vire programa.
Native: nastavitev naravnega barvnega prostora omogoča globoke in bogate barvne tone.
Custom: prilagoditev barvnega razpona po vaših željah.
Če spremenite vrednost nastavitve, se osveži prilagojeni zaslon.
Prilagajate in shranjujete lahko nastavitve vseh zunanjih naprav, ki so priključene
na vhod televizorja. Na primer, če je z
vhodom HDMI 1 povezan predvajalnik DVD in je trenutno izbran, se shranijo nastavitve in prilagoditve za predvajalnik
DVD.
Colour: Red, Green, Blue, Yellow, Cyan ali Magenta
Colour je na voljo, če je možnost Colour Space nastavljena na Custom.
Pri možnosti Colour lahko prilagodite vrednosti RGB za izbrano barvo.
Za ponastavitev prilagojene vrednosti RGB izberite Reset.
Red: za prilagoditev ravni nasičenosti rdeče za izbrano barvo.
Green: za prilagoditev ravni nasičenosti zelene za izbrano barvo.
Blue: za prilagoditev ravni nasičenosti modre za izbrano barvo.
Reset: za ponastavitev barvnega prostora na privzete vrednosti.
White Balance
Prilagodite lahko barvno temperaturo za naravnejše barve slike.
R-Offset: Za prilagoditev temnosti rdeče.
G-Offset: Za prilagoditev temnosti zelene.
B-Offset: Za prilagoditev temnosti modre.
R-Gain: Za prilagoditev svetlosti rdeče.
G-Gain: Za prilagoditev svetlosti zelene.
B-Gain: Za prilagoditev svetlosti modre.
Reset: Predhodno prilagojena izravnava belin bo ponastavljena na tovarniške vrednosti.
Flesh Tone
Poudarite lahko rožnati ton slike.
Če spremenite vrednost nastavitve, se osveži prilagojeni zaslon.
Poudarite lahko robove predmetov na sliki.
Nastavitev načina xvYCC na On poveča količino podrobnosti in barvni prostor pri gledanju filmov iz zunanje naprave (npr
. iz
predvajalnika DVD), ki je priključena na vtičnico HDMI ali Component IN.
xvYCC je na voljo, če je slikovni način nastavljen na Movie in če je zunanji vhod nastavljen na način HDMI ali način
komponente.
Funkcija morda ni podprta, kar je odvisno od zunanje naprave.
■
●
●
●
N
N
N
N
N
■
●
●
●
●
●
●
●
■
N
■
■
N
N
[620-Weuro]BN68-02326A-03L09.ind15 15 2009-10-08 ¿ÀÀü 9:30:49

Picture Options
V načinu računalnika je med elementi Picture Options mogoče spreminjati samo Colour
Tone in Size .
Warm1, Warm2 ali Warm3 je aktivna samo, če je slikovni način nastavljen na Movie.
Spreminjate in prilagajate lahko nastavitve vseh zunanjih naprav, ki so priključene na vhod
televizorja.
Size
Morda boste včasih želeli spremeniti velikost slike na zaslonu. T
elevizor ima na voljo več
možnosti velikosti zaslona; vsaka od njih je zasnovana tako, da zagotavlja optimalno delovanje za posamezne vrste video vhoda.
Tudi kabelski/satelitski sprejemnik ima lahko na voljo več možnosti velikosti zaslona. Na splošno je priporočljivo, da televizijo čim
več časa gledate v načinu 16:9.
Te možnosti lahko enostavno izberete s pritiskom gumba P.SIZE na daljinskem upravljalniku.
Auto Wide: velikost slike se samodejno prilagodi razmerju stranic 16:9.
16:9: velikost slike prilagodi razmerju stranic 16:9, ki je primerno za DVD-je in širokozaslonsko oddajanje.
Wide Zoom: povečava slike nad 4:3.
Zoom: povečava slike, široke 16:9, da jo prilagodi velikosti zaslona (v navpični smeri).
4:3: privzeta nastavitev za video film in običajno oddajanje.
Screen Fit: funkcijo uporabite za ogled celotne slike brez prirezovanja pri vhodnem signalu HDMI (720p/1080i/1080p) ali
komponente (1080i/1080p).
Možnosti velikosti slike se lahko razlikujejo glede na vhodni vir.
Razpoložljivi elementi se lahko razlikujejo glede na izbrani način.
V načinu računalnika je mogoče prilagajati samo načina 16:9 in 4:3.
Prilagajate in shranjujete lahko nastavitve vseh zunanjih naprav, ki so povezane na vhod televizorja.
Če je na televizorju več kot dve uri prikazana negibna slika, se lahko pojavi začasno zadržanje slike.
Wide Zoom: S pritiskanjem gumba ► izberite Position, nato pritisnite gumb ENTER
E
. S pritiskanjem gumba ▲ ali ▼
pomaknite sliko navzgor/navzdol. Nato pritisnite gumb ENTER
E
.
Zoom: S pritiskanjem gumba ► izberite Position, nato pritisnite gumb ENTER
E
. S pritiskanjem gumba ▲ ali ▼ pomaknite
sliko navzgor ali navzdol. Nato pritisnite gumb ENTER
E
. S pritiskanjem gumba ► izberite Size, nato pritisnite gumb
ENTER
E
. Pritiskajte gumb ▲ ali ▼, da povečate ali zmanjšate velikost slike v navpični smeri. Nato pritisnite gumb
ENTER
E
.
Ko izberete Screen Fit v načinu HDMI (1080i/1080p) ali Component (1080i/1080p): S pritiskanjem gumba ◄ ali ► izberite
Position. Z gumbom ▲, ▼, ◄ ali ► pomaknite sliko.
Reset: S pritiskanjem gumba ◄ ali ► izberite Reset in nato pritisnite gumb ENTER
E
. Nastavitev lahko inicializirate.
Če funkcijo Screen Fit uporabite pri vhodu HDMI 720p, bo odrezana po 1 vrstica zgoraj, spodaj, levo in desno, kot pri funkciji
zmanjšanja prevelike slike.
Ko pri širokozaslonskem televizorju 16:9 velikost slike nastavite na Auto Wide, lahko določite velikost za sliko 4:3 WSS ali pa ne
določite teh nastavitev. V posameznih evropskih državah so zahtevane različne velikosti slike, zato to funkcijo izbere uporabnik.
16:9: nastavitev slike na široki način 16:9.
Wide Zoom: povečava slike nad 4:3.
Zoom: navpična povečava slike na zaslonu.
4:3: nastavitev slike na običajni način 4:3.
Ta funkcija je na voljo v načinu Auto Wide.
Funkcija ni na voljo v načinih računalnika, komponente in HDMI-ja.
Če je sprejeti televizijski signal šibak, lahko aktivirate funkcijo digitalnega odpravljanja šumov za zmanjšanje statičnih motenj in
odsevov na zaslonu.
Če je signal šibak, izberite eno od ostalih možnosti, tako da je slika prikazana z največjo kakovostjo.
Na zaslonu lahko izberete raven črne in tako prilagodite globino zaslona.
Ta funkcija je aktivna samo, če je zunanja naprava na televizor priključena prek vhoda HDMI (signali RGB).
❑
N
■
N
N
■
O
●
●
●
●
●
●
N
N
N
N
N
N
N
N
N
■
●
●
●
●
N
N
■
N
■
N
ColourTone :Normal ▶
Size :AutoWide
ScreenMode :16:9
DigitalNR :Auto
HDMIBlackLevel :Normal
FilmMode :Off
BlueOnlyMode :Off
U
Move
E
Enter
R
Return
PictureOptions
[620-Weuro]BN68-02326A-03L09.ind16 16 2009-10-08 ¿ÀÀü 9:30:50

Televizor lahko nastavite tako, da samodejno zazna in obdela filmske signale iz vseh virov in prilagodi sliko na optimalno kakovost.
Film Mode je podprta v načinih TV, AV, COMPONENT (480i/1080i) in HDMI (480i/1080i).
Off: za izklop filmskega načina.
Auto1: za samodejno prilagoditev slike na najboljšo kakovost, ko gledate film.
Auto2: za samodejno optimiziranje besedila videa na zaslonu, ko gledate film (ne velja za razširjene podnapise).
Odstrani nejasnost, ki nastane pri hitrih prizorih z veliko gibanja, tako da je slika jasnejša.
Če omogočite 100 Hz Motion Plus, se lahko na zaslonu pojavijo šumi. V tem primeru nastavite 100Hz Motion Plus na Off.
Off: za izklop načina naprednega 100 Hz gibanja.
Clear: za nastavitev naprednega 100 Hz gibanja na najnižjo vrednost.
Standard: za nastavitev naprednega 100 Hz gibanja na srednjo vrednost.
Smooth: za nastavitev naprednega 100 Hz gibanja na najvišjo vrednost.
Custom: za prilagoditev ravni zmanjšanja zamegljenosti in tresenja po vaših željah.
Blur Reduction: za prilagoditev ravni zmanjšanja zamegljenosti signalov iz video virov.
Judder Reduction: za prilagoditev ravni zmanjšanja tresenja signalov iz video virov, ko gledate filme.
Reset: za ponastavitev nastavitev po meri.
Demo: za prikaz razlike med vklopljenim in izklopljenim načinom naprednega 100 Hz gibanja.
Ta funkcija je namenjena strokovnjakom za merjenje naprav AV. Ta funkcija prikazuje modri signal tako, da se iz video signala
odstranita rdeči in zeleni signal, s čimer se ustvari učinek modrega filtra, ki se uporablja za prilagajanje barve in obarvanosti video
opreme, kot so predvajalnik DVD, domači kino itd. Z uporabo te funkcije lahko prilagodite barvo in obarvanost na želene vrednosti,
ki so primerne za stopnjo signala vseh video naprav, ki uporabljajo vzorce rdeče / zelene / modre / turkizne / škrlatne / rumene
barvne lestvice, brez uporabe dodatnega filtra za modro.
Blue Only Mode je na voljo, če je slikovni način nastavljen na Movie ali Standard.
Ponastavitev vseh slikovnih nastavitev na privzete vrednosti.
Reset Picture Mode: Trenutne slikovne vrednosti se vrnejo na privzete nastavitve.
■
N
●
●
●
■
N
●
●
●
●
●
●
■
N
❑
N
[620-Weuro]BN68-02326A-03L09.ind17 17 2009-10-08 ¿ÀÀü 9:30:50

Spodaj so prikazane nastavitve zaslona za tipični računalnik v OS Windows. Dejanski prikazi
na računalniškem zaslonu bodo najbrž drugačni, odvisno od različice operacijskega sistema
Windows in grafične kartice. Četudi se dejanski prikazi razlikujejo, v večini primerov veljajo
iste osnovne nastavitvene informacije. (Sicer se obrnite na proizvajalca računalnika ali
Samsungovega prodajalca.)
1.
Najprej kliknite možnost ‘Nadzorna plošča’ v meniju Start v OS Windows.
2.
Ko se prikaže okno nadzorne plošče, kliknite ‘Videz in teme’ in prikazalo se bo pogovorno
okno zaslona.
3.
Ko se prikaže okno nadzorne plošče, kliknite ‘Zaslon’ in prikazalo se bo pogovorno okno
zaslona.
4.
Pomaknite se na zavihek ‘Nastavitve’ v pogovornem oknu zaslona.
Ustrezna nastavitev velikosti (ločljivost) – Optimalna: 1920 x 1080 slikovnih pik
Če je v pogovornem oknu nastavitev zaslona na voljo možnost za navpično
frekvenco, je njena ustrezna vrednost ‘60’ ali ‘60 Hz’. Sicer samo kliknite ‘V redu’ in zaprite pogovorno okno.
Če je signal iz sistema enak načinu standardnega signala, se zaslon samodejno prilagodi. Če signal iz sistema ni enak načinu
standardnega signala, prilagodite način v skladu z navodili za uporabo grafične kartice, sicer slika morda ne bo prikazana. Za
načine prikaza, navedene na naslednji strani, je bila slika zaslona optimizirana med izdelavo.
Vhod D-Sub in HDMI/DVI
Vodoravna frekvenca
(KHz)
(Hz)
(MHz)
Polariteta sinhr.
(V/N)
IBM
640 x 350 31,469 70,086 25,175 +/-
720 x 400 31,469 70,087 28,322 -/+
MAC
640 x 480 35,000 66,667 30,240 -/-
832 x 624 49,726 74,551 57,284 -/-
1152 x 870 68,681 75,062 100,000 -/-
VESA CVT
720 x 576 35,910 59,950 32,750 -/+
1152 x 864 53,783 59,959 81,750 -/+
1280 x 720 44,772 59,855 74,500 -/+
1280 x 720 56,456 74,777 95,750 -/+
1280 x 960 75,231 74,857 130,000 -/+
VESA DMT
640 x 480 31,469 59,940 25,175 -/-
640 x 480 37,861 72,809 31,500 -/-
640 x 480 37,500 75,000 31,500 -/-
800 x 600 37,879 60,317 40,000 +/+
800 x 600 48,077 72,188 50,000 +/+
800 x 600 46,875 75,000 49,500 +/+
1024 x 768 48,363 60,004 65,000 -/-
1024 x 768 56,476 70,069 75,000 -/-
1024 x 768 60,023 75,029 78,750 +/+
1152 x 864 67,500 75,000 108,000 +/+
1280 x 1024 63,981 60,020 108,000 +/+
1280 x 1024 79,976 75,025 135,000 +/+
1280 x 800 49,702 59,810 83,500 -/+
1280 x 800 62,795 74,934 106,500 -/+
1280 x 960 60,000 60,000 108,000 +/+
1360 x 768 47,712 60,015 85,500 +/+
1440 x 900 55,935 59,887 106,500 -/+
1440 x 900 70,635 74,984 136,750 -/+
1680 x 1050 65,290 59,954 146,250 -/+
VESA GTF
1280 x 720 52,500 70,000 89,040 -/+
1280 x 1024 74,620 70,000 128,943 -/-
VESA DMT/
DTV CEA
1920 x 1080p 67,500 60,000 148,500 +/+
Če uporabljate kabel HDMI/DVI, uporabite vtičnico HDMI IN 3(DVI).
Način prepletanja ni podprt.
Če izberete nestandardno obliko video zapisa, televizor morda ne bo deloval pravilno.
Podprta sta načina za ločeno in kompozitno. SOG ni podrt.
Če je kabel VGA predolg ali nizke kakovosti, lahko v načinih visoke ločljivosti (1920 x 1080) povzroči šum slike.
¦
■
N
N
N
N
N
[620-Weuro]BN68-02326A-03L09.ind18 18 2009-10-08 ¿ÀÀü 9:30:50

Prednastavitev: Pritisnite gumb SOURCE, da izberete način računalnika.
Auto Adjustment
S funkcijo samodejne prilagoditve televizor samodejno prilagodi sprejete video signale.
S to funkcijo tudi samodejno fino naravnate nastavitve in prilagodite vrednosti in položaje
frekvence.
Pritisnite gumb TOOLS, da prikažete meni Tools. Samodejno prilagoditev lahko nastavite
tudi z izbiro možnosti
.
Ta funkcija ne deluje v načinu DVI-HDMI.
Screen
Coarse / Fine
Namen prilagajanja kakovosti slike je odstraniti ali zmanjšati šum slike. Če šum ni odstranjen
s fino naravnavo, čim bolje prilagodite frekvenco (Coarse) in znova fino naravnajte. Po
zmanjšanju šumov znova nastavite sliko tako, da bo poravnana na sredino zaslona.
PC Position
nastavite položaj računalniškega zaslona, če se ta ne prilega televizijskemu zaslonu.
S pritiskanjem gumba ▲ ali ▼ prilagodite navpični položaj. S pritiskanjem gumba ◄ ali ►
prilagodite vodoravni položaj.
Image Reset
vse slikovne nastavitve lahko zamenjate s tovarniškimi vrednostmi.
¦
N
❑
T
N
❑
■
■
■
Brightness :45
Sharpness :50
AutoAdjustment ▶
Screen
AdvancedSettings
PictureOptions
PictureReset
Picture
Coarse 50
Fine 0
PC
Position
ImageReset
U
Move
E
Enter
R
Return
Screen
[620-Weuro]BN68-02326A-03L09.ind19 19 2009-10-08 ¿ÀÀü 9:30:50

ZVOK
Konfiguriranje menija zvoka
Pritisnite gumb TOOLS, da prikažete meni Tools. Zvočni način lahko nastavite tudi z izbiro
možnosti .
Standard: za izbiro običajnega zvočnega načina.
Music: glasba je bolj poudarjena kot glasovi.
Movie: za najboljši zvok za filme.
Clear Voice: glas je bolj poudarjen kot drugi zvoki.
Custom: za priklic zvočnih nastavitev po meri.
Equalizer
Zvočne nastavitve lahko prilagodite, kot vam najbolj ustreza.
Mode: za izbiro zvočnega načina med vnaprej določenimi nastavitvami.
Balance L/R: za prilagoditev ravnovesja med desnim in levim zvočnikom.
100Hz / 300Hz / 1KHz / 3KHz / 10KHz (nastavitev pasovne širine): za nastavitev stopnje frekvenc različnih pasovnih širin.
Reset: Ponastavitev nastavitev izenačevalnika na privzete vrednosti.
SRS TruSurround HD je patentirana tehnologija SRS za predvajanje 5.1-večkanalne vsebine preko dveh zvočnikov. TruSurround
proizvaja odličen, navidezni prostorski na katerem koli sistemu z dvema zvočnikoma, tudi prek notranjih zvočnikov televizorja.
Tehnologija je popolnoma združljiva z vsemi večkanalnimi oblikami zapisa.
Pritisnite gumb TOOLS, da prikažete meni Tools. Funkcijo SRS TruSurround HD lahko nastavite tudi z izbiro možnosti Tools
.
Audio Language
Spremenite lahko privzeto vrednost za jezik avdia. Prikaže informacije o jeziku za dohodni tok.
To funkcijo je mogoče izbrati pri gledanju digitalnega kanala.
Izbirate lahko samo med jeziki, ki so dejansko oddajani.
Pri istočasnem oddajanju zvoka iz glavnega zvočnika in avdio sprejemnika lahko pride do odmeva zaradi različne hitrosti
odkodiranja za glavni zvočnik in avdio sprejemnik. V tem primeru uporabite funkcijo zvočnika televizorja.
To funkcijo je mogoče izbrati pri gledanju digitalnega kanala.
Možnost Audio Format je prikazana v skladu z oddajanim signalom.
Audio Description
To je dodatna funkcija za zvok, ki omogoča dodatne zvočne posnetke za slabovidne. Ta funkcija je namenjena zvočnemu toku
za AD (Audio Description), če jo oddajnik pošlje skupaj z glavnim zvokom. Uporabniki lahko zvočni opis vklopijo in izklopijo ter
upravljajo glasnost.
S pritiskom gumba AD na daljinskem upravljalniku izberite Off ali On.
Vklop ali izklop funkcije zvočnega opisa.
Volume
Prilagodite lahko glasnost zvočnega opisa.
Volume je aktivna, če je možnost Audio Description nastavljena na On.
To funkcijo je mogoče izbrati pri gledanju digitalnega kanala.
Stanje signalov posameznih postaj se razlikuje, zato ni enostavno prilagajati glasnosti ob vsaki zamenjavi kanala. Ta funkcija
omogoča samodejno prilagajanje glasnosti želenega kanala z znižanjem glasnosti v primeru visokega modulacijskega signala ali
zvišanjem glasnosti v primeru nizkega modulacijskega signala.
¦
❑
T
●
●
●
●
●
❑
●
●
●
●
❑
T
❑
N
N
❑
N
N
❑
O
■
■
N
N
❑
Mode :Custom ▶
Equalizer
SRSTruSurroundHD :Off
AudioLanguage :----
AudioFormat :----
AudioDescription
AutoVolume :Off
SpeakerSelect :TVSpeaker
Zvok
[620-Weuro]BN68-02326A-03L09.ind20 20 2009-10-08 ¿ÀÀü 9:30:50

Speaker Select
Če je televizor povezan z domačim kinom, izklopite zvočnika televizorja, tako da lahko poslušate zvok iz (zunanjih) zvočnikov
domačega kina.
External Speaker: za poslušanje zvoka iz zunanjih zvočnikov (domačega kina).
TV Speaker: za poslušanje zvoka iz zvočnikov televizorja.
Gumba za glasnost in gumb MUTE ne delujejo, če je možnost Speaker Select nastavljena na External Speaker.
Če izberete External Speaker v meniju Speaker Select, bodo zvočne nastavitve omejene.
Notranji zvočniki televizorja Avdio izhod (optični, izhod L/D) v zvočnem sistemu
RF/AV/komponenta/računalnik/ HDMI RF/AV/komponenta/računalnik/ HDMI
Izhod zvoka Izhod zvoka
Nemo Izhod zvoka
Ni video signala Nemo Nemo
Zvočne nastavitve lahko obnovite na tovarniške vrednosti.
Reset Sound Mode: za vrnitev trenutnih zvočnih vrednosti na privzete nastavitve.
Zvočni način nastavite s pritiskom gumba DUAL. Ko ga pritisnete, se na zaslonu prikaže trenutni zvočni način.
Vrsta zvoka Dual 1/2 Privzeto
A2 Stereo
Mono MONO
Samodejen preklop
Stereo STEREO ↔ MONO
Dual DUAL 1 ↔ DUAL 2 DUAL 1
NICAM
Stereo
Mono MONO
Samodejen preklop
Stereo MONO ↔ STEREO
Dual
MONO ↔ DUAL 1
DUAL 2
DUAL 1
Če je stereo signal šibak in pride do samodejnega preklopa, preklopite na Mono.
Ta funkcija je aktivirana samo v stereo zvočnem signalu. V mono zvočnem signalu je deaktivirana.
Ta funkcija je na voljo samo v načinu televizorja.
❑
●
●
N
N
❑
N
¦
N
N
N
SoundReset
L
Move
E
Enter
R
Return
Cancelsoundreset.
ResetAll ResetSoundMode Cancel
[620-Weuro]BN68-02326A-03L09.ind21 21 2009-10-08 ¿ÀÀü 9:30:51

NASTAVITEV
Konfiguriranje menija nastavitve
Menu Language
Za nastavitev jezika menija.
Time
Za podrobne postopke nastavljanja možnosti si oglejte navodila ‘Nastavitev časa’.
Broadcast
Subtitle
Aktivirate in deaktivirate lahko podnapise. S tem menijem nastavite način podnapisov
. Menijska možnost Normal predstavlja
osnovne podnapise, Hard of hearing pa podnapise za osebe z okvaro sluha.
Vklop ali izklop podnapisov.
Za nastavitev načina podnapisov.
Subtitle Language
Za nastavitev jezika podnapisov.
Če program, ki ga gledate, ne podpira funkcije Hard of hearing, se samodejno aktivira Normal, tudi če je izbran način
Hard of hearing.
Če program ne omogoča izbranega jezika, je privzeti jezik angleščina.
Te možnosti lahko enostavno izberete s pritiskom gumba SUBT. na daljinskem upravljalniku.
(samo v VB)
Ta funkcija je omogočena, če je program oddajan z digitalnim besedilom.
MHEG (Multimedia and Hypermedia Information Coding Experts Group)
Mednarodni standard za sisteme za kodiranje podatkov, ki se uporablja za večpredstavnost in hiperpredstavnost. Je na višjem
nivoju kot sistem MPEG in vključuje hiperpredstavnost s povezanimi podatki, kot so slike, znakovne storitve, animacije, grafike
in video datoteke ter večpredstavnostne podatke. MHEG je tehnologija, ki omogoča sodelovanje uporabnika med delovanjem,
in se uporablja na različnih področjih, kot so VOD (video na zahtevo), ITV (interaktivna
TV), EC (elektronsko poslovanje),
teleizobraževanje, telekonference, digitalne knjižnice in omrežne igre.
Teletext Language
Nastavite lahko jezik teleteksta, in sicer tako, da izberete vrsto jezika.
Če program ne omogoča izbranega jezika, je privzeti jezik angleščina.
Preference
Primary Audio Language / Secondary Audio Language / Primary Subtitle Language / Secondary Subtitle Language /
Primary Teletext Language / Secondary Teletext Language
S to funkcijo lahko uporabnik izbere enega od jezikov. Tukaj izbrani jezik je privzeti jezik, ko uporabnik izbere kanal.
Če spremenite nastavitev jezika, se možnosti menija Language Subtitle Language,
Audio Language in Teletext Language
samodejno spremenijo v izbrani jezik.
V meniju jezika možnosti jezika podnapisov, jezika avdia in jezika teleteksta prikazujejo seznam jezikov, ki jih podpira trenutni
kanal; označen je izbor. Če spremenite to nastavitev jezika, nov izbor velja samo za trenutni kanal. S spremembo nastavitve
se ne spremenijo nastavitve menija Preference: Primary Subtitle Language, Primary
Audio Language in Primary Teletext
Language.
¦
❑
❑
❑
■
●
●
●
N
N
O
■
N
■
N
■
●
Plug&Play
MenuLanguage :English ▶
Time
Broadcast
Security
General
Setup
[620-Weuro]BN68-02326A-03L09.ind22 22 2009-10-08 ¿ÀÀü 9:30:51

Common Interface
CI Menu
Uporabniku omogoča, da lahko izbira iz menija, ki ga omogoča CAM.
Meni splošnega vmesnika izberite glede na računalniško kartico.
Application Info.
Prikaže informacije o CAM-u, ki je vstavljen v režo za splošni vmesnik. Informacije o aplikaciji se nanašajo na ‘kartico
splošnega vmesnika (CI+)’. CAM lahko namestite kadar koli, ne glede na to, ali je televizor VKLOPLJEN ali IZKLOPLJEN.
1.
Modul CI CAM kupite pri najbližjem prodajalcu ali po telefonu.
2.
‘Kartico za splošni vmesnik (CI+)’ vstavite v CAM v smeri puščici tako, da se prilega.
3.
CAM z nameščeno ‘kartico za splošni vmesnik (CI+)’ vstavite v režo za splošni vmesnik.
(CAM vstavite v smeri puščice do konca, tako da je vzporeden z režo.)
4.
Preverite, ali na kanalu z motenim signalom vidite sliko.
Security (odvisno od modela)
Preden se prikaže nastavitveni zaslon, se prikaže zaslon za vnos kode PIN. Vnesite 4-mestno kodo PIN.
Privzeta koda PIN novega televizorja je ‘0-0-0-0’. Kodo PIN lahko spremenite tako, da v meniju izberete Change PIN.
Pri nekaterih modelih je potrebno za uporabo funkcije Plug & Play izbrati nastavljeno številko PIN.
Ta funkcija preprečuje gledanje neprimernega programa nepooblaščenim uporabnikom (na primer otrokom) tako, da prepreči
predvajanje slike in zvoka.
Zaklenete lahko nekatere kanale na seznamu kanalov.
Child Lock je na voljo samo v načinu televizorja.
Parental Lock
Ta funkcija nepooblaščenim uporabnikom, na primer otrokom, preprečuje gledanje neprimernega programa, in sicer s 4- mestno
kodo PIN (osebna identifikacijska številka), ki jo določi uporabnik.
Element Parental Lock se razlikuje od države do države.
Ko je vklopljena funkcija starševskega nadzora Parental Lock, je prikazan znak ‘\’.
Allow All: pritisnite, da odklenete vse oznake televizorja.
Block All: pritisnite, da zaklenete vse oznake televizorja.
Change PIN
Spremenite lahko osebno identifikacijsko številko, ki je potrebna za nastavitev televizorja.
Če PIN pozabite, pritisnite gumbe na daljinskem upravljalniku v naslednjem zaporedju, s čimer PIN ponastavite na 0-0-0-0:
POWER (Izklop)
(Vklop).
General
Če priključite igralno konzolo, kot je PlayStation™ ali Xbox™, lahko uživate v bolj realistični izkušnji igre, če izberete meni iger
.
Omejitve v načinu iger (pozor)
Da izklopite igralno konzolo in povežete drugo zunanjo napravo, v meniju nastavitve nastavite Game Mode na Off.
Če meni televizorja prikažete v načinu Game Mode, se zaslon rahlo trese.
Game Mode ni na voljo v običajnem načinu televizorja, računalnika in zunanje naprave.
Če je takrat, ko je na televizor povezana zunanja naprava, slika slabe kakovosti, preverite, ali je možnost Game Mode
nastavljena na On. Način Game Mode nastavite na Off in povežite zunanje naprave.
Če je možnost Game Mode vklopljena:
Slikovni način se samodejno spremeni v način Standard in ga ni mogoče spremeniti.
Zvočni način se samodejno spremeni v način Custom in ga ni mogoče spremeniti. Z izenačevalnikom prilagodite zvok.
Aktivira se funkcija ponastavitve zvoka. Če po nastavitvi izenačevalnika izberete funkcijo ponastavitve, se nastavitve
izenečevalnika ponastavijo na tovarniške vrednosti.
■
●
●
❑
N
N
N
■
N
N
■
N
N
N
■
N
❑
■
N
N
N
N
N
[620-Weuro]BN68-02326A-03L09.ind23 23 2009-10-08 ¿ÀÀü 9:30:51

Ta funkcija prilagodi svetlost televizorja, tako da se zmanjša poraba energije. Če televizor gledate ponoči, nastavite možnost
načina Energy Saving na High, da zmanjšate utrujanje oči in tudi porabo energije.
Če izberete Picture Off, se izklopi slika in predvaja se samo zvok. Za izklop funkcije Picture Off pritisnite kateri koli gumb.
V meniju Tools funkcija Picture Off ni podprta.
Pritisnite gumb TOOLS, da prikažete meni Tools. Možnost varčevanja energije lahko nastavite tudi z izbiro možnosti
Energy Saving.
Za nastavitev prosojnosti menija.
Nastavite lahko, da se ob vklopu ali izklopu televizorja predvaja melodija.
Melodija se ne predvaja
Ko iz televizorja ne prihaja zvok, ker ste pritisnili gumb MUTE.
Ko iz televizorja ne prihaja zvok, ker ste z gumbom za glasnost (-) znižali glasnost na najnižjo vrednost.
Ko se televizor izklopi s funkcijo izklopnega časovnika.
■
N
T
■
■
N
Clock
Uro morate nastaviti, da lahko uporabljate različne funkcije časovnika televizorja.
Ob vsakem pritisku gumba INFO se bo prikazal trenutni čas.
Če izključite napajalni kabel, morate uro znova nastaviti.
Clock Mode
Trenutni čas lahko nastavite ročno ali samodejno.
Auto: samodejna nastavitev trenutnega časa z uporabo digitalno oddajanega časa.
Manual: ročna nastavitev trenutnega časa.
Samodejni čas morda ne bo pravilen, odvisno od oddajne postaje in signala. V tem primeru
čas nastavite ročno.
Da je mogoča samodejna nastavitev časa, mora biti povezana antena ali kabel.
Clock Set
Trenutni čas lahko nastavite ročno.
Ta funkcija je na voljo samo, če je način Clock Mode nastavljena na Manual.
Dan, mesec, leto, uro in minute lahko nastavite neposredno s pritiskanjem številskih gumbov na daljinskem upravljalniku.
Sleep Timer
Izklopni časovnik samodejno izklopi televizor po prednastavljenem času (30, 60, 90, 120, 150 in 180 minut).
Pritisnite gumb TOOLS, da prikažete meni Tools. Izklopni časovnik lahko nastavite tudi z izbiro možnosti
Timer.
Če želite preklicati delovanje funkcije Sleep Timer, izberite Off.
Timer 1 / Timer 2 / Timer 3
Opravite lahko tri različne nastavitve vklopa / izklopa časovnika.
Najprej morate nastaviti uro.
On Time
nastavitev ure, minut in aktiviranje / deaktiviranje.
(Če želite aktivirati časovnik z izbrano nastavitvijo, nastavite na Activate.)
Off Time
nastavitev ure, minut in aktiviranje / deaktiviranje.
(Če želite aktivirati časovnik z izbrano nastavitvijo, nastavite na Activate.)
¦
❑
N
N
■
●
●
N
N
■
N
N
❑
T
N
❑
■
■
Clock :--:-- ▶
SleepTimer :Off
Timer1 :Inactivated
Timer2 :Inactivated
Timer3 :Inactivated
U
Move
E
Enter
R
Return
Time
OnTime
L
Move
U
Adjust
E
Enter
R
Return
Timer1
OffTime:
Volume
00 00 Inactivate
00 00 Inactivate
10
Source Antenna Channel
TV ATV 0
Repeat
Once
Sun Mon Tue Wed Thu Fri Sat
Plug&Play
MenuLanguage :English
Time ▶
Broadcast
Security
General
Setup
[620-Weuro]BN68-02326A-03L09.ind24 24 2009-10-08 ¿ÀÀü 9:30:51

Volume
Za nastavitev želene glasnosti.
Izberete lahko, ali naj se ob samodejnem vklopu televizorja začne predvajati vsebina TV-ja ali naprave USB. Izberite TV ali USB.
(Poskrbite, da je s televizorjem povezana naprava USB.)
AntennaSource nastavljena na TV)
Za izbiro ATV-ja ali DTV-ja.
ChannelSource nastavljena na TV)
Za izbiro želenega kanala.
ContentsSource nastavljena na USB)
Izberete lahko, katera mapa z glasbenimi ali foto datotekami v napravi USB naj se začne predvajati ob samodejnem vklopu
televizorja.
Če na ključu USB ni glasbene datoteke ali mapa z glasbeno datoteko ni izbrana, funkcija časovnika ne deluje pravilno.
Če je na USB-ju samo ena foto datoteka, se diaprojekcija ne izvede.
Če je ime mape predolgo, mape ni mogoče izbrati.
Če je ime mape, ki jo želite konfigurirati s funkcijo vsebine, predolgo, mape ni mogoče izbrati.
Repeat
Izberite Once, Everyday, Mon~Fri, Mon~Sat, Sat~Sun ali Manual.
Če je izbrana možnost Manual, s pritiskanjem gumba ► izberite želeni dan v tednu. Za želeni dan pritisnite gumb ENTER
E
in prikazala se bo oznaka
c
.
Uro, minute in kanal lahko nastavite s pritiskanjem številskih gumbov na daljinskem upravljalniku.
Samodejni izklop
Če vklopite časovnik, se bo televizor izklopil, če tri ure potem, ko je časovnik vklopil televizor
, ni bila pritisnjena nobena
kontrola. Ta funkcija je na voljo samo, ko je vklopljen časovnik, in preprečuje pregrevanje, do katerega lahko pride, če je
televizor predolgo vklopljen.
■
■
■
■
■
N
N
N
N
■
N
N
N
[620-Weuro]BN68-02326A-03L09.ind25 25 2009-10-08 ¿ÀÀü 9:30:51

VHOD/PODPORA
Meni vhoda
Source List
Uporabite za izbiro televizorja ali drugega zunanjega vhodnega vira, kot je predvajalnik DVD
/ Blu-Ray / kabelski / satelitski sprejemnik, povezanega s televizorjem. Uporabite za izbiro
želenega vhodnega vira.
Če si želite ogledati zunanji signalni vir, pritisnite gumb SOURCE na daljinskem
upravljalniku. Način TV lahko izberete s pritiskom gumba TV.
TV / Ext.1 / Ext.2 / AV / Component / PC / HDMI1 / HDMI2 / HDMI3/DVI / HDMI4
Izberete lahko samo zunanje naprave, ki so povezane s televizorjem. Na seznamu Source
List se bodo povezani vhodi označili in pomaknili na vrh. Nepovezani vhodi pa se bodo
pomaknili na dno.
Možnosti Ext. in PC sta vedno aktivirani.
Uporaba barvnih gumbov na daljinskem upravljalniku za seznam virov
Rdeči (Refresh): za osvežitev povezanih zunanjih naprav. Pritisnite, če je je vir vklopljen
in povezan, vendar ni prikazan na seznamu.
TOOLS (Tools): prikaz menijev Edit Name in Information.
Edit Name
VCR / DVD / Cable STB / Satellite STB / PVR STB / AV Receiver / Game / Camcorder / PC / DVI / DVI PC / TV / IPTV / Blu-ray
/ HD DVD / DMA
Poimenujte napravo, ki je priključena na vhodne vtičnice, da boste lažje izbrali vhodne vire.
Če je na vrata HDMI IN 3(DVI) povezan računalnik z ločljivostjo 1920 x 1080 pri 60 Hz, nastavite način HDMI3/DVI na DVI PC
v možnosti Edit Name načina Input.
Po priklopu kabla HDMI/DVI na vrata HDMI IN 3(DVI) nastavite način HDMI3/DVI na DVI ali DVI PC v možnosti Edit Name
načina Input. V tem primeru je potrebna ločena avdio povezava.
Meni podpore
Self Diagnosis
Picture Test
Če menite, da imate težave s sliko, izvedite preskus slike. Oglejte si barvni vzorec na zaslonu,
da preverite, ali težava še vedno obstaja.
Yes: Če se poskusni vzorec ne prikaže ali pa je na njem šum, izberite Yes. Vzrok težave je
morda televizor. Za pomoč pokličite Samsungov klicni center.
No: Če je poskusni vzorec pravilno prikazan, izberite No. Vzrok težave je morda zunanja
oprema. Preverite povezave. Če težave niste odpravili, si oglejte uporabniški priročnik za
zunanjo napravo.
Sound Test
Če menite, da imate težave z zvokom, izvedite preskus zvoka. Zvok lahko preverite s
predvajanjem vgrajene melodije prek televizorja.
Če iz zvočnikov televizorja ne prihaja zvok, pred izvedbo preskusa zvoka preverite, ali je
možnost Speaker Select nastavljena na TV speaker v meniju zvoka.
Med preskusom se melodija predvaja tudi, če je možnost Speaker Select nastavljena na External Speaker ali če je bil zvok
izklopljen s pritiskom gumba MUTE.
Yes: če med preskusom zvoka slišite zvok samo iz enega zvočnika ali pa ga ne slišite, izberite Yes. Vzrok težave je morda
televizor. Za pomoč pokličite Samsungov klicni center.
No: če slišite zvok iz zvočnikov, izberite No. Vzrok težave je morda zunanja oprema. Preverite povezave. Če težave niste
odpravili, si oglejte uporabniški priročnik za zunanjo napravo.
¦
❑
O
■
N
N
N
❑
■
N
N
¦
❑
■
●
●
■
N
N
●
●
SelfDiagnosis ▶
SoftwareUpgrade
HDConnectionGuide
ContactSamsung
Support
SourceList
EditName
Input
Refresh
T
Tools
SourceList
TV
Ext.1 :----
Ext.2 :----
PC :----
AV :----
Component :----
SelfDiagnosis
U
Move
E
Enter
R
Return
PictureTest ▶
SoundTest
SignalInformation
[620-Weuro]BN68-02326A-03L09.ind26 26 2009-10-08 ¿ÀÀü 9:30:52

Signal Information (samo pri digitalnih kanalih)
Za razliko od analognih kanalov, pri katerih lahko kakovost sprejetega signala sega od ‘sneženja’ do jasne slike, je kakovost
sprejetih digitalnih kanalov (HDTV) popolna ali pa sploh ni slike. Zato digitalnega kanala ni mogoče fino naravnati, kot je to mogoče
pri analognem. Lahko pa prilagodite anteno, da izboljšate sprejem digitalnih kanalov
, ki so na voljo.
Če merilnik jakosti signalov kaže, da je signal šibek, fizično prilagodite anteno, da povečate jakost signalov
. Nadaljujte s
prilagajanjem antene, dokler ne najdete najboljšega položaja z najmočnejšim signalom.
Software Upgrade
Samsung bo morda v prihodnje ponudil posodobitve vdelane programske opreme televizorja. Te
nadgradnje lahko izvedete prek televizorja, če je ta povezan z internetom, ali s prenosom nove
vdelane programske opreme s spletnega mesta samsung.com v pomnilniško napravo USB.
Current Version je programska oprema, ki je že nameščena v televizorju.
Alternative Software (varnostna kopija) prikažete prejšnjo različico, ki jo boste zamenjali.
Programska oprema je zapisana v obliki ‘leto/mesec/dan_različica’. Novejši ko je datum,
novejša je različica. Priporočamo, da namestite najnovejšo različico.
By USB
Pogon USB, na katerem je nadgradnja vdelane programske opreme, prenesena s spletnega
mesta samsung.com, vstavite v televizor Pazite, da med posodobitvijo ne odklopite napajanja
ali odstranite pogona USB. Ko bo nadgradnja vdelane programske opreme končana, se bo
televizor samodejno izklopil in znova vklopil. Po končani nadgradnji preverite različico vdelane
programske opreme (novejša različica ima višjo številko kot starejša).
Ko je programska oprema nadgrajena, se uporabniške nastavitve videa in zvoka vrnejo na
privzete (tovarniške) vrednosti. Priporočamo, da si vaše nastavitve zapišete, tako da jih boste
po nadgradnji brez težav ponastavili.
By Channel
Nadgradnja programske opreme z uporabo oddajnega signala.
Če med časom prenosa programske opreme izberete to funkcijo, zaženete iskanje in prenos razpoložljive programske
opreme.
Koliko časa se prenaša programska oprema, je odvisno od stanja signala.
Standby Mode Upgrade
Če želite nadaljevati nadgradnjo programske opreme z vklopljenim glavnim napajanjem, s pritiskanjem gumba ▲ ali ▼
izberite On.
45 minut po preklopu v stanje pripravljenosti se samodejno izvede ročna nadgradnja. Ker je napajanje enote vklopljeno notranje,
lahko zaslon izdelka LCD rahlo sveti. Ta pojav lahko traja več kot 1 uro, dokler se nadgradnja programske opreme ne dokonča.
Alternative Software (varnostna kopija)
Če imate težave z novo vdelano programsko opremo in ta vpliva na delovanje, lahko obstoječo programsko opremo zamenjate s
prejšnjo različico.
Če ste zamenjali programsko opremo, je prikazana trenutna.
Trenutno programsko opremo lahko zamenjate z drugo z uporabo možnosti ‘Alternative Software’.
HD Connection Guide
Ta meni predstavlja način povezave za optimalno kakovost televizorja visoke ločljivosti. Te informacije si oglejte, če na televizor
povezujete zunanje naprave.
Contact Samsung
Te informacije si oglejte, če televizor ne deluje pravilno ali če želite nadgraditi programsko opremo. Ogledate si lahko informacije o
klicnih centrih, izdelku in načinu prenosa datoteke s programsko opremo.
■
N
❑
N
N
N
■
■
N
N
■
■
N
N
❑
❑
Pogon USB
CurrentVersion 2009/01/18_000001
ByUSB ▶
ByChannel
StandbyModeUpgrade :45Min
AlternativeSoftware 2009/01/15_00000
U
Move
E
Enter
R
Return
SoftwareUpgrade
[620-Weuro]BN68-02326A-03L09.ind27 27 2009-10-08 ¿ÀÀü 9:30:52

PREDVAJANJE PREDSTAVNOSTI (USB)
1. Za vklop televizorja pritisnite gumb POWER.
2. Napravo USB, v kateri so foto in/ali glasbene datoteke, priključite na vtičnico USB USB ob
strani televizorja.
3.
Ko je prikazan zaslon za izbiro možnosti Application, pritiskajte gumb ENTER
E
, da izberete
Media Play (USB).
Protokol MTP (Media Transfer Protocol) ni podprt.
Datotečni sistem podpira FAT16, FAT32 in NTFS.
Nekatere vrste digitalnih fotoaparatov in avdio naprav z USB morda ne bodo združljive s
tem televizorjem.
Media Play podpira samo naprave USB MSC (Mass Storage Class). MSC
je samo masovna prenosna naprava. Primeri MSC naprav so Thumb zunanji
pogoni in čitalci kartic (USB trdi disk in HUB nista podprta).
Priključite neposredno na vrata USB na televizorju. Če uporabljate ločeno
kabelsko povezavo, lahko pride do težav pri združljivosti s standardom USB.
Preden napravo priključite na televizor, naredite varnostno kopijo datotek,
da se ne poškodujejo in da ne izgubite podatkov. Podjetje SAMSUNG ne
odgovarja za poškodbe datotek ali izgubo podatkov.
Med nalaganjem naprave USB ne izključite.
Višja kot je ločljivost slike, dalj časa se bo slika nalagala na zaslon.
Največja podprta ločljivost datotek JPEG je 15360 x 8640 slikovnih pik.
Pri nepodprtih ali poškodovanih datotekah se prikaže sporočilo ‘Not Supported File Format’.
Datotek MP3 z DRM-jem, prenesenih z mesta, ki ni brezplačno, ni mogoče predvajati. Upravljanje digitalnih pravic (DRM)
je tehnologija, ki omogoča ustvarjanje, posredovanje in upravljanje vsebine v neokrnjeni in celoviti obliki, vključno z
zaščito pravic in interesov ponudnikov vsebine, preprečevanjem nezakonitega kopiranja ter upravljanjem zaračunavanja
in obračunavanja.
Pri pomiku na fotografijo bo nalaganje morda trajalo nekaj časa. Medtem se bo na zaslonu prikazala ikona za nalaganje.
Če je povezanih več kot ena naprava MSC, nekatere od njih morda ne bodo prepoznane. Če naprava potrebuje visoko
moč (več kot 500 mA ali 5 V), naprava USB morda ne bo podrta.
Če se med priključevanjem ali uporabo naprave USB prikaže opozorilo o previsoki moči, naprava morda ne bo
prepoznana ali ne bo delovala pravilno.
Uporaba gumba daljinskega upravljalnika v meniju Media Play
Gumb Delovanje
▲/▼/◄/► Za premikanje kazalca in izbiro elementa.
ENTER
E
Za izbiro trenutno izbranega elementa. Med predvajanjem diaprojekcije ali glasbene datoteke:
– Če med predvajanjem pritisnete gumb ENTER
E
, začasno ustavite predvajanje.
– Če med začasno zaustavitvijo pritisnete gumb ENTER
E
, se predvajanje nadaljuje.
∂
/
∑
Za predvajanje ali začasno zaustavitev diaprojekcije, glasbe.
RETURN Za vrnitev v prejšnji meni.
TOOLS Za izbiro različnih funkcij v menijih fotografij in glasbe.
∫
Za zaustavitev trenutne diaprojekcije ali glasbene datoteke.
π
/
μ
Za skok na prejšnjo/naslednjo skupino.
INFO Za prikaz informacij o datoteki.
MEDIA.P Za izhod iz načina Media Play.
<
P
>
,
EXIT, TV
Za ustavitev načina Media Play in vrnitev v način televizorja.
¦
N
N
N
N
N
N
N
N
N
N
N
N
N
N
Pogon USB
851.86MB/993.02MBFree
Photo
SUM
SUM
Device
PHOTO
R
Return
Music Setup
[620-Weuro]BN68-02326A-03L09.ind28 28 2009-10-08 ¿ÀÀü 9:30:53

Funkcija predvajanja predstavnosti
Ta funkcija omogoča ogled in poslušanje foto in/ali glasbenih datotek, ki so shranjene v napravi USB MSC (Mass Storage Class).
Morda ne bo mogoče predvajati večpredstavnostnih datotek brez veljavnih licenc.
Odpiranje menija Media Play (USB)
1. Pritisnite gumb MENU. S pritiskanjem gumba ▲ ali ▼ izberite možnost
Application, nato pritisnite gumb ENTER
E
.
2. S pritiskanjem gumba ▲ ali ▼ izberite možnost Media Play (USB) in nato
pritisnite gumb ENTER
E
.
Prikaže se meni Media Play (USB).
Pritisnite gumb MEDIA.P na daljinskem upravljalniku, da prikažete meni
Media Play.
Pritisnite gumb SOURCE na daljinskem upravljalniku, da si ogledate seznam
virov. Nato s pritiskanjem gumba ▲ ali ▼ izberite USB.
3.
Pritisnite rdeči gumb, nato s pritiskanjem gumba ▲ ali ▼ izberite pomnilnik USB.
Pritisnite gumb ENTER
E
.
Ta funkcija je odvisna od pomnilnika USB.
Ime izbrane naprave USB se prikaže na spodnjem levem delu zaslona.
4.
S pritiskanjem gumba ◄ ali ► izberite ikono (Photo, Music, Movie, Setup) in nato pritisnite gumb ENTER
E
.
Za izhod iz načina Media Play pritisnite gumb MEDIA.P na daljinskem upravljalniku.
Varna odstranitev pomnilniške naprave USB
Za varno odstranjevanje naprave s televizorja.
1. Na zaslonu s seznamom datotek za predvajanje predstavnosti ali med
predvajanjem diaprojekcije ali glasbe pritisnite gumb TOOLS.
2.
S pritiskanjem gumba ▲ ali ▼ izberite možnost Remove Safely in nato pritisnite
gumb ENTER
E
.
3. Odstranite napravo USB s televizorja.
Prikaz na zaslonu
Z uporabo gumba za navzgor ali navzdol se pomaknite na ‘Razdelek s seznamom skupin’ ali ‘Razdelek s seznamom datotek’. Ko
ste izbrali razdelek, s pritiskanjem gumba ◄ ali ► izberite element.
¦
N
N
O
O
N
N
N
INFO
AD
INFO
AD
851.86MB/993.02MBFree
Photo
SUM
SUM
Device
PHOTO
R
Return
Music Setup
SUM Device
Select
T
Tools
R
UpperFolder
1234.jpg
1235.jpg
1236.jpg
1237.jpg
1233.jpg
1232.jpg
1231.jpg
SlideShow
PlayCurrentGroup
Information
Remove
Safely
5/15
1 2
../Photo/
Razdelek s seznamom skupin
Razdelek s seznamom datotek
SUM Device
Select
T
Tools
R
UpperFolder
1234.jpg
1235.jpg
1236.jpg
1237.jpg
1233.jpg
1232.jpg
1231.jpg
1File(s)Selected
2
3 5
4
1 2
1
5/15
c
../Photo/
[620-Weuro]BN68-02326A-03L09.ind29 29 2009-10-08 ¿ÀÀü 9:30:56

1 Ogled skupin: Označena je skupina razvrščanja, v kateri je trenutno izbrana datoteka.
2 Trenutno izbrana datoteka: izbrana datoteka je datoteka, ki jo lahko zdaj upravljate. Foto datoteke so prikazane kot sličice.
3 Trenutna naprava: prikazuje ime trenutno izbrane naprave. Če želite izbrati napravo, pritisnite rdeči gumb.
Rdeči gumb (Device): za izbiro priključene naprave.
4 Informacije o izbiri elementov: prikazuje število datotek, ki jih izberete z rumenim gumbom.
5 Elementi pomoči
Rumeni gumb (Select): za izbiro datoteke s seznama datotek. Izbrane datoteke so označene s simbolom
c
. Če želite
izbiro datoteke preklicati, znova pritisnite rumeni gumb.
TOOLS (Tools): za prikaz menijev z možnostmi. (Meni z možnostmi se spremeni glede na trenutno stanje.)
1. Pritisnite gumb MEDIA.P.
2. S pritiskanjem gumba ◄ ali ► izberite Photo in nato pritisnite gumb ENTER
E
.
3. S pritiskanjem gumba ◄ ali ► izberite želeno foto datoteko.
Izbiranje več fotografij
S pritiskanjem gumba ◄ ali ► izberite želeno foto datoteko. Nato
pritisnite rumeni gumb.
Če želite izbrati več foto datotek, ponovite zgornji postopek.
Poleg izbrane foto datoteke se prikaže oznaka
c
.
4. Pritisnite gumb TOOLS.
Meni z možnostmi se spremeni glede na trenutno stanje.
Slide Show
V tem meniju lahko predvajate diaprojekcijo foto datotek, shranjenih v pomnilniški napravi USB.
Play Current Group
V tem meniju lahko predvajate diaprojekcijo, sestavljeno samo iz foto datotek v trenutno izbrani skupini razvrščanja.
Deselect All
Za preklic izbire vseh datotek.
Oznaka
c
, ki pomeni, da je določena datoteka izbrana, se skrije.
Information
Prikažejo se informacije o foto datoteki, med drugim ime, velikost, ločljivost, datum spremembe in pot.
Na enak način si lahko ogledate informacije o foto datotekah tudi med diaprojekcijo.
Za ogled informacij pritisnite gumb INFO.
Remove Safely
Za varno odstranjevanje naprave s televizorja.
¦
N
N
❑
❑
❑
N
❑
N
O
❑
INFO
AD
SUM Device
Select
T
Tools
R
UpperFolder
1234.jpg
1235.jpg
1236.jpg
1237.jpg
1233.jpg
1232.jpg
1231.jpg
SlideShow
PlayCurrentGroup
Information
Remove
Safely
5/15
1 2
../Photo/
[620-Weuro]BN68-02326A-03L09.ind30 30 2009-10-08 ¿ÀÀü 9:30:58

Ogled fotografije ali diaprojekcije
Ogled diaprojekcije
1. S pritiskanjem gumba ▼ izberite razdelek s seznamom datotek.
2. Pritisnite gumb TOOLS.
3.
Z gumbom ▲ ali ▼ izberite Slide Show, nato pritisnite gumb ENTER
E
.
V diaprojekcijo bodo vključene vse datoteke iz razdelka s seznamom
datotek.
Med diaprojekcijo so datoteke prikazane v zaporedju od trenutno prikazane
datoteke naprej.
Fotografije v diaprojekciji si sledijo tako, kot so razvrščene v razdelku s
seznamom datotek.
Med diaprojekcijo se lahko samodejno predvajajo glasbene datoteke, če je
možnost Background Music nastavljena na On.
Ko je prikazan seznam fotografij, za začetek diaprojekcije pritisnite gumb
∂
(Predvajaj)/ENTER
E
na daljinskem upravljalniku.
Kontrolni gumbi za diaprojekcijo
Gumb Delovanje
ENTER
E
Za predvajanje/začasno zaustavitev diaprojekcije.
∂
Za predvajanje diaprojekcije.
∑
Za začasno zaustavitev diaprojekcije.
∫
Za ustavitev diaprojekcije in vrnitev na seznam fotografij.
π
/
μ
Za spremembo hitrosti predvajanja diaprojekcije.
TOOLS Za izbiro različnih funkcij v menijih za fotografije.
Predvajanje trenutne skupine
1. S pritiskanjem gumba ▲ se pomaknite na razdelek s seznamom skupin.
2. S pritiskanjem gumba ◄ in ► izberite skupino.
3.
Pritisnite gumb
∂
(Predvajaj). Zažene se diaprojekcija z datotekami izbrane
skupine.
1.
V razdelku s seznamom datotek izberite datoteke, ki so v želeni skupini.
Za pomik na prejšnjo/naslednjo skupino pritisnite gumb
π
(REW) ali
μ
(FF).
2. Pritisnite gumb TOOLS.
3.
S pritiskanjem gumba ▲ ali ▼ izberite Play Current Group, nato pritisnite gumb ENTER
E
.
V diaprojekciji se bodo predvajale samo fotografije iz izbrane skupine, vključno z izbranimi datotekami.
Za predvajanje diaprojekcije, sestavljene samo iz izbranih datotek
1. S pritiskanjem gumba ▼ izberite razdelek s seznamom datotek.
2. Z gumbom ◄ ali ► izberite želeno fotografijo v razdelku s seznamom datotek.
3.
Pritisnite rumeni gumb.
4.
Če želite izbrati več fotografij, ponovite zgornji postopek.
Levo od izbrane fotografije se prikaže oznaka
c
.
Če izberete eno datoteko, diaprojekcija ni mogoča.
Če želite preklicati izbiro vseh izbranih datotek, pritisnite gumb TOOLS in izberite Deselect All.
5.
Pritisnite gumb
∂
(Predvajaj)/ENTER
E
.
Izbrane datoteke se bodo predvajale v diaprojekciji.
¦
N
N
N
N
O
N
●
N
N
N
N
N
N
INFO
AD
E
Pause◀▶Previous/Next
T
Tools
R
Return
SUM
1234.jpg
580x7652009/03/025/15
▶Normal
SUM Device
Select
T
Tools
R
UpperFolder
1234.jpg
1235.jpg
1236.jpg
1237.jpg
1233.jpg
1232.jpg
1231.jpg
SlideShow
PlayCurrentGroup
Information
Remove
Safely
5/15
1 2
../Photo/
SUM Device
Select
T
Tools
R
UpperFolder
1234.jpg
1235.jpg
1236.jpg
1237.jpg
1233.jpg
1232.jpg
1231.jpg
5/15
1 2
../Photo/
[620-Weuro]BN68-02326A-03L09.ind31 31 2009-10-08 ¿ÀÀü 9:31:02

1. Ko se premaknete v razdelek s seznamom datotek, pritiskajte rumene gumbe, da izberete želene fotografije.
2.
Pritisnite gumb TOOLS.
3.
Z gumbom ▲ ali ▼ izberite Slide Show, nato pritisnite gumb ENTER
E
.
Izbrane datoteke se bodo predvajale v diaprojekciji.
1. Med diaprojekcijo (ali ogledom fotografije) pritisnite gumb TOOLS, da nastavite
možnost.
2.
S pritiskanjem gumba ▲ ali ▼ izberite želeno možnost, nato pritisnite gumb
ENTER
E
.
Stop Slide Show / Start Slide Show
Diaprojekcijo lahko zaženete ali ustavite.
Za izbiro hitrosti diaprojekcije.
Ta funkcija je na voljo samo med diaprojekcijo.
Med predvajanjem diaprojekcije lahko hitrost spremenite tudi s pritiskanjem gumba
π
(REW) ali
μ
(FF).
Rotate
Fotografije, shranjene v pomnilniški napravi USB, lahko zasukate.
Vsakič ko pritisnete gumb ◄, zasukate sliko za 270˚, 180˚, 90˚ ali 0˚.
Vsakič ko pritisnete gumb ►, zasukate sliko za 90˚, 180˚, 270˚ ali 0˚.
Zasukana fotografija se ne shrani.
Zoom
Fotografije, shranjene v pomnilniški napravi USB, lahko povečate. (x 1 → x 2 → x 4)
Če želite povečano fotografijo premakniti, najprej pritisnite gumb ENTER
E
, nato pa pritiskajte gumbe ▲/▼/◄/►. Če je
povečana slika manjša od originalne velikosti zaslona, slike ni mogoče premakniti na drugo mesto.
Povečana fotografija se ne shrani.
Background Music
Med ogledom diaprojekcije lahko izberete glasbo za ozadje.
To funkcijo je mogoče uporabiti samo, če so v napravi USB shranjene glasbene in foto datoteke.
Off: Glasba za ozadje se ne predvaja.
On: Če je glasba za ozadje na voljo in izberete On, se predvaja glasba.
Select Music File (0 File(s) Selected)
Za glasbo za ozadje se nastavi samo izbrana glasbena datoteka.
Picture Setting / Sound Setting
Za izbiro slikovnih in zvočnih nastavitev.
Information
Prikaz informacij o foto datoteki.
Remove Safely
Za varno odstranjevanje naprave s televizorja.
●
N
¦
❑
❑
N
N
❑
N
N
N
❑
N
N
❑
N
■
●
●
■
❑
❑
❑
StopSlideShow
SlideShowSpeed : Normal
Rotate
Zoom
Background
Music
PictureSetting
SoundSetting
Information
Remove
Safely
U
Move
E
Enter
e
Exit
Tools
[620-Weuro]BN68-02326A-03L09.ind32 32 2009-10-08 ¿ÀÀü 9:31:02

1. Pritisnite gumb MEDIA.P.
2. S pritiskanjem gumba ◄ ali ► izberite Music in nato pritisnite gumb ENTER
E
.
3. S pritiskanjem gumba ◄ ali ► izberite želeno glasbeno datoteko.
Izbiranje več glasbenih datotek
S pritiskanjem gumba ◄ ali ► izberite želeno glasbeno datoteko. Nato
pritisnite rumeni gumb.
Če želite izbrati več glasbenih datotek, ponovite zgornji postopek.
Poleg izbrane glasbene datoteke se prikaže oznaka
c
.
4. Pritisnite gumb TOOLS.
Meni z možnostmi se spremeni glede na trenutno stanje.
Play Current Group
V tem meniju lahko predvajate samo glasbene datoteke v trenutno izbrani skupini.
Deselect All
Za preklic izbire vseh datotek.
Oznaka
c
, ki pomeni, da je določena datoteka izbrana, se skrije.
Information
Prikažejo se informacije o glasbeni datoteki, med drugim ime, velikost, datum spremembe in pot.
Na enak način si lahko ogledate informacije o glasbenih datotekah, ko se izvaja funkcija Play Current Group.
Za ogled informacij pritisnite gumb INFO.
Remove Safely
Za varno odstranjevanje naprave s televizorja.
¦
N
N
❑
❑
N
❑
N
O
❑
INFO
AD
SUM Device
Select
T
Tools
R
UpperFolder
HaHaHa
Gold
Shine
Way
Want
Me
Lies
ILoveYou
GlenHans
OnceOst
2007
Soundtrack
3/37
Energetic
PlayCurrentGroup
Information
Remove
Safely
5 1 2 34
../Music/
[620-Weuro]BN68-02326A-03L09.ind33 33 2009-10-08 ¿ÀÀü 9:31:03

Predvajanje glasbe
Predvajanje glasbene datoteke
1. S pritiskanjem gumba ▼ izberite razdelek s seznamom datotek.
2. S pritiskanjem gumba ◄ ali ► izberite glasbeno datoteko za predvajanje.
3.
Pritisnite gumb
∂
(Predvajaj)/ENTER
E
.
Ta meni prikazuje samo datoteke s končnico za datoteke MP3. Datoteke z
drugimi končnicami niso prikazane, tudi če so shranjene v isti napravi USB.
Izbrana datoteka je prikazana na vrhu, skupaj s časom predvajanja.
Glasnost glasbe prilagodite z gumbom za glasnost na daljinskem
upravljalniku. Za izklop zvoka pritisnite gumb MUTE na daljinskem
upravljalniku.
Če zvok pri predvajanju datotek MP3 ni sprejemljiv, prilagodite Equalizer in SRS TruSurround v meniju zvoka. (Preveč
modulirana datoteka MP3 lahko povzroči težave z zvokom.)
Trajanje predvajanja glasbene datoteke bo morda prikazano kot ‘00:00:00’, če na začetku datoteke ni informacij o času
predvajanja.
π
(REW) in
μ
(FF) med predvajanjem ne delujeta.
Kontrolni gumbi za predvajanje glasbe
Gumb Delovanje
ENTER
E
Za predvajanje/začasno zaustavitev filmske datoteke.
∂
Za predvajanje glasbene datoteke
∑
Za začasno zaustavitev glasbene datoteke
∫
Za izhod iz načina predvajanja in vrnitev na seznam glasbe.
TOOLS Za izbiro različnih funkcij v menijih za glasbo.
Ikona za informacije o glasbenih funkcijah
p
Če se ponovijo vse glasbene datoteke v mapi (ali izbrani datoteki). Možnost Repeat Mode je
nastavljena na On.
q
Če se vse glasbene datoteke v mapi (ali izbrani datoteki) predvajajo enkrat. Možnost Repeat
Mode je nastavljena na Off.
Predvajanje glasbene skupine
1. S pritiskanjem gumba ▲ se pomaknite na razdelek s seznamom skupin.
2. S pritiskanjem gumba ◄ in ► izberite skupino.
3.
Pritisnite gumb
∂
(Predvajaj). Datoteke izbrane skupine se bodo začele predvajati.
1.
V razdelku s seznamom datotek izberite datoteke, ki so v želeni skupini.
Za pomik na prejšnjo/naslednjo skupino pritisnite gumb
π
(REW) ali
μ
(FF).
2. Pritisnite gumb TOOLS.
3.
S pritiskanjem gumba ▲ ali ▼ izberite Play Current Group, nato pritisnite gumb ENTER
E
.
Predvajajo se glasbene datoteke v skupini razvrščanja, vključno z izbrano datoteko.
Predvajanje izbranih glasbenih datotek
1. S pritiskanjem gumba ▼ izberite razdelek s seznamom datotek.
2. S pritiskanjem gumba ◄ ali ► izberite želeno glasbeno datoteko.
3.
Pritisnite rumeni gumb.
4.
Če želite izbrati več glasbenih datotek, ponovite zgornji postopek.
Levo od izbrane glasbene datoteke se prikaže oznaka
c
.
Če želite preklicati izbiro vseh izbranih datotek, pritisnite gumb TOOLS in izberite Deselect All.
5.
Pritisnite gumb
∂
(Predvajaj)/ENTER
E
.
Predvajale se bodo izbrane datoteke.
¦
N
N
N
N
N
N
N
N
●
N
N
N
N
N
E
Pause◀▶Previous/Next
T
Tools
R
Return
SUM
ILoveYou
HaHaHaWay
▶00:00:04/00:04:043/37
[620-Weuro]BN68-02326A-03L09.ind34 34 2009-10-08 ¿ÀÀü 9:31:03

Za ponavljajoče se predvajanje glasbenih datotek.
Picture Setting / Sound Setting
Za konfiguriranje slikovnih in zvočnih nastavitev.
Information
Za prikaz informacij o glasbeni datoteki.
Remove Safely
Za varno odstranjevanje naprave s televizorja.
¦
❑
❑
❑
❑
Uporaba menija nastavitve
V meniju nastavitve so prikazane uporabniške nastavitve menija Media Play.
1. Pritisnite gumb MEDIA.P.
2.
S pritiskanjem gumba ◄ ali ► izberite Setup in nato pritisnite gumb ENTER
E
.
3. S pritiskanjem ▲ ali ▼ izberite želeno možnost.
4.
Z gumbom ◄ ali ► izberite možnost.
Za izhod iz načina Media Play pritisnite gumb MEDIA.P na daljinskem
upravljalniku.
Za ponavljajoče predvajanje glasbenih datotek.
Za nastavitev časa, po preteku katerega naj se prikaže ohranjevalnik zaslona.
Information
Za ogled informacij o priključeni napravi.
Remove Safely
Za varno odstranjevanje naprave s televizorja.
¦
N
■
■
■
■
RepeatMode ◀On▶
PictureSetting
SoundSetting
Information
Remove
Safely
U
Move
L
Adjust
e
Exit
Tools
851.86MB/993.02MBFree
Photo
SUM
SUM
Device
SETUP
e
Exit
Music Setup
MusicRepeatMode ◀On▶
ScreenSaverRunTime :2hours
Information
Remove
Safely
U
Move
L
Adjust
R
Return
SUM Device
[620-Weuro]BN68-02326A-03L09.ind35 35 2009-10-08 ¿ÀÀü 9:31:03

ANYNET
+
Povezava naprav, ki podpirajo Anynet
+
Kaj je Anynet
+
?
Anynet
+
je funkcija, ki omogoča upravljanje vseh povezanih Samsungovih naprav, ki podpirajo Anynet
+
, z daljinskim
upravljalnikom Samsungovega televizorja. Sistem Anynet
+
lahko uporabljate pri Samsungovih napravah, ki imajo funkcijo Anynet
+
.
Prepričajte se, da ima vaša Samsungova naprava to funkcijo, in sicer tako, da preverite, ali je na njej logotip Anynet
+
.
Povezava s televizorjem
1. Vtičnico HDMI IN (1, 2, 3(DVI) ali 4) na televizorju in vtičnico HDMI OUT na ustrezni napravi, ki podpira Anynet
+
, povežite s
kablom HDMI.
1. Vtičnico HDMI IN (1, 2, 3(DVI) ali 4) na televizorju in vtičnico HDMI OUT na ustrezni napravi, ki podpira Anynet
+
, povežite s
kablom HDMI.
2. Vtičnico HDMI IN na domačem kinu in vtičnico HDMI OUT na ustrezni napravi, ki podpira Anynet
+
, povežite s kablom HDMI.
Z optičnim kablom povežite vtičnico DIGITAL AUDIO OUT (OPTICAL) na televizorju in digitalni avdio vhod na domačem
kinu.
Če uporabite zgornjo povezavo, omogoča optična vtičnica samo izhod 2-kanalnega zvoka. Slišali boste samo zvok iz
sprednjega levega in desnega zvočnika domačega kina in globokotonca. Za 5.1-kanalni zvok povežite vtičnico DIGITAL
AUDIO OUT (OPTICAL) na predvajalniku DVD/satelitskem sprejemniku (npr. naprava, ki podpira Anynet, 1 ali 2)
neposredno z ojačevalnikom ali domačim kinom in ne s televizorjem.
Povežite samo en domači kino.
Napravo, ki podpira Anynet
+
, lahko povežete s kablom HDMI 1.3. Nekateri kabli HDMI morda ne podpirajo funkcij
Anynet
+
.
Anynet
+
deluje, če je naprava AV, ki podpira Anynet
+
, v stanju pripravljenosti ali je vklopljena.
Anynet
+
podpira skupno največ 12 naprav AV. Povežete lahko do 3 naprave iste vrste.
¦
N
N
N
N
N
N
Naprava, ki podpira Anynet
+
, 1
Kabel HDMI 1.3
Kabel HDMI 1.3Kabel HDMI 1.3
Kabel HDMI 1.3
Naprava, ki podpira Anynet
+
, 2 Naprava, ki podpira Anynet
+
, 3 Naprava, ki podpira Anynet
+
, 4
Televizor
Naprava, ki podpira Anynet
+
, 1
Kabel HDMI 1.3
Kabel HDMI 1.3
Kabel HDMI 1.3Kabel HDMI 1.3
Televizor
Kabel HDMI 1.3
Optical Cable
Naprava, ki podpira Anynet
+
, 2 Naprava, ki podpira Anynet
+
, 3 Naprava, ki podpira Anynet
+
, 4
Home Theatre
[620-Weuro]BN68-02326A-03L09.ind36 36 2009-10-08 ¿ÀÀü 9:31:05

Nastavitev sistema Anynet
+
Pritisnite gumb TOOLS, da prikažete meni Tools. Meni Anynet
+
lahko prikažete tudi tako,
da izberete
+
(HDMI-CEC).
Setup
Anynet
+
Če želite uporabljati funkcijo Anynet
+
, mora biti možnost Anynet
+
(HDMI-CEC) nastavljena na
On.
Ko je funkcija Anynet
+
(HDMI-CEC) onemogočena, so deaktivirane vse operacije,
povezane s sistemom Anynet+.
Nastavitev samodejnega izklopa naprave, ki podpira Anynet
+
, ob izklopu televizorja.
Da lahko uporabljate funkcijo Anynet
+
, mora biti aktivni vir na daljinskem upravljalniku
televizorja nastavljen na televizor.
Če nastavite Auto Turn Off na Yes, se bodo ob izklopu televizorja izklopile tudi povezane
zunanje naprave. Če zunanja naprava še snema, se morda ne bo izklopila.
Preklapljanje med napravami, ki podpirajo Anynet
+
1. Pritisnite gumb TOOLS. Pritisnite gumb ENTER
E
, da izberete Anynet
+
(HDMI-CEC).
2. S pritiskanjem gumba ▲ ali ▼ izberite Device List, nato pritisnite gumb ENTER
E
.
Anynet
+
, ki so povezane s televizorjem.
Če ne uspete najti želene naprave, pritisnite rdeči gumb za iskanje naprav.
3.
S pritiskanjem gumba ▲ ali ▼ izberite določeno napravo in nato pritisnite gumb
ENTER
E
. Izvede se preklop na želeno napravo.
Samo če nastavite Anynet
+
(HDMI-CEC) na On v meniju Application, se prikaže
meni Device List.
Preklop na izbrane naprave traja največ 2 minuti. Operacije preklopa, ki poteka, ni
mogoče preklicati.
Čas, ki je potreben za iskanje naprav, je odvisen od števila povezanih naprav.
Ko je iskanje naprav končano, se ne prikaže število najdenih naprav.
Čeprav televizor samodejno preišče seznam naprav, ko ga vklopite z gumbom za napajanje, naprave, ki so priključene nanj,
morda ne bodo samodejno prikazale na seznamu naprav. Pritisnite rdeči gumb, da poiščete povezano napravo.
Če ste način zunanjega vhoda izbrali s pritiskanjem gumba SOURCE, funkcije Anynet
+
ni mogoče uporabiti. Ne pozabite
preklopiti na napravo, ki podpira Anynet
+
, z uporabo možnosti Device List.
Meni Anynet
+
Vsebina menija Anynet
+
je odvisna od vrste in stanja naprav, ki podpirajo Anynet
+
in ki so priključene na televizor.
Meni Anynet
+
Opis
View TV Način Anynet
+
se preklopi v način televizijskega oddajanja.
Device List Prikaže seznam naprav, ki podpirajo Anynet
+
.
(ime_naprave) MENU
Za prikaz menijev povezane naprave. Npr. če je priključen snemalnik DVD, se prikaže
meni diska snemalnika DVD.
(ime_naprave) INFO
Za prikaz menija predvajanja povezane naprave. Npr. če je priključen snemalnik DVD,
se prikaže meni predvajanja snemalnika DVD.
Recording: (*snemalnik)
Za takojšen začetek snemanja s snemalnikom. (Na voljo samo za naprave, ki
podpirajo snemanje.)
Stop Recording: (*snemalnik) Za ustavitev snemanja.
Receiver Zvok se predvaja prek sprejemnika.
Če je povezanih več snemalnih naprav, so prikazane kot (*snemalnik), če pa je povezana samo ena snemalna naprava, pa je
prikazana kot (*ime_naprave).
¦
T
❑
■
N
■
N
N
¦
N
N
N
N
N
N
N
N
N
U
Move
E
Enter
R
Return
Anynet
+
(HDMI-CEC) :
On▶
Setup
AutoTurnOff :Yes
MediaPlay(USB)
Anynet
+
(HDMI-CEC)
Application
U
Move
E
Enter
R
Return
Anynet
+
(HDMI-CEC) :
On
Setup
AutoTurnOff :Yes▶
U
Move
E
Enter
R
Return
ViewTV
DeviceList
Recording:DVDR
DVDRMENU
DVDRINFO
Receiver:Off
Setup
[620-Weuro]BN68-02326A-03L09.ind37 37 2009-10-08 ¿ÀÀü 9:31:05

+
Vrsta naprave Stanje delovanja Gumbi na voljo
Naprava, ki podpira
Anynet
+
Po preklopu na napravo, ko se na zaslonu
prikaže meni ustrezne naprave.
Številski gumbi
Gumbi ▲/▼/◄/►/ ENTER
E
barvni gumbi / gumb EXIT
Po preklopu na napravo, medtem ko se
predvaja datoteka.
π
(Previjanje nazaj) /
μ
(Previjanje naprej) /
∫
(Ustavi) /
∂
(Predvajaj) /
∑
(Začasno
zaustavi)
Naprava z
vgrajenim
kanalnikom
Po preklopu na napravo, ko gledate
televizijski program.
gumb P
>
/ P
<
Avdio naprava Ko je sprejemnik aktiviran.
Y
/ gumb MUTE
Funkcija Anynet
+
deluje samo, če je aktivni vir na daljinskem upravljalniku televizorja nastavljen na televizor
.
Gumb
∏
deluje samo v stanju za snemanje.
Naprav, ki podpirajo Anynet
+
, ni mogoče upravljati z gumbi na televizorju. Naprave, ki podpirajo Anynet
+
, lahko upravljate
samo z daljinskim upravljalnikom televizorja.
Daljinski upravljalnik televizorja v določenih razmerah morda ne bo deloval. V tem primeru znova izberite napravo, ki podpira
Anynet
+
.
Funkcije Anynet
+
niso združljive z izdelki drugih proizvajalcev.
Delovanje
π
,
μ
se lahko razlikuje, odvisno od naprave.
Snemanje
S snemalnikom Samsung lahko posnamete televizijski program.
1. Pritisnite gumb TOOLS. Pritisnite gumb ENTER
E
, da izberete Anynet
+
(HDMI-CEC).
2. S pritiskanjem gumba ▲ ali ▼ izberite Recording Immediately in pritisnite gumb
ENTER
E
. Snemanje se začne.
Če je več snemalnih naprav
Če je povezanih več snemalnih naprav, so navedene. S pritiskanjem gumba ▲ ali ▼
izberite snemalno napravo in nato pritisnite gumb ENTER
E
. Snemanje se začne.
Če snemalna naprava ni prikazana, izberite Device List in pritisnite rdeči gumb za
iskanje naprav
3.
Pritisnite gumb EXIT za izhod.
Tokove vira lahko posnamete tako, da izberete Recording: (ime_naprave).
S pritiskom gumba
∏
posnamete, kar trenutno gledate. Če gledate video vsebino iz druge naprave, se snema ta
vsebina.
Pred snemanjem preverite, ali je vtičnica za anteno ustrezno povezana s snemalno napravo. Da anteno pravilno povežete
s snemalno napravo, si oglejte uporabniški priročnik za snemalno napravo.
Zvok lahko poslušate prek sprejemnika namesto prek zvočnikov televizorja.
1. Pritisnite gumb TOOLS. Pritisnite gumb ENTER
E
, da izberete Anynet
+
(HDMI-CEC).
2. S pritiskanjem gumba ▲ ali ▼ izberite Receiver. S pritiskanjem gumba ◄ ali ► izberite
On ali Off.
3.
Pritisnite gumb EXIT za izhod.
Če snemalnik podpira samo zvok, morda ni prikazan na seznamu naprav.
Sprejemnik bo deloval, če ste ustrezno povezali optično vhodno vtičnico sprejemnika
in vtičnico DIGITAL AUDIO OUT (OPTICAL) na televizorju.
Če je sprejemnik (domači kino) nastavljen na On, zvok prihaja iz optične vtičnice
na televizorju. Kadar televizor prikazuje običajne signale (DTV), pošilja 5.1-kanalni zvok v sprejemnik domačega kina.
Če je vir digitalna komponenta, kot je predvajalnik DVD, in je s televizorjem povezan prek vhoda HDMI, bo sprejemnik
domačega kina predvajal samo 2-kanalni zvok.
Če pride do prekinitve napajanja televizorja, ko je možnost Receiver nastavljena na On (izključitev napajalnega kabla ali
okvara napajanja), je lahko ob vnovičnem vklopu televizorja možnost Speaker Select nastavljena na External Speaker.
N
N
N
N
N
N
¦
N
N
N
N
N
¦
N
N
N
N
U
Move
E
Enter
R
Return
ViewTV
DeviceList
Recording:DVDR
DVDRMENU
DVDRINFO
Receiver:Off
Setup
U
Move
E
Enter
R
Return
ViewTV
DeviceList
Recording:DVDR
DVDRMENU
DVDRINFO
Receiver:Off
Setup
[620-Weuro]BN68-02326A-03L09.ind38 38 2009-10-08 ¿ÀÀü 9:31:05

+
Anynet
+
ne deluje. Preverite, ali naprava podpira Anynet
+
. Sistem Anynet
+
podpira samo naprave, ki podpirajo
Anynet
+
.
Povežite samo en sprejemnik (domači kino).
Preverite, ali je napajalni kabel naprave, ki podpira Anynet
+
, pravilno povezan.
Preverite, ali je video kabel/avdio kabel/kabel HDMI 1.3 za napravo, ki podpira Anynet
+
, pravilno
povezan.
Preverite, ali je možnost Anynet
+
(HDMI-CEC) v meniju nastavitve funkcije Anynet
+
nastavljena
na On.
Preverite, ali je daljinski upravljalnik televizorja nastavljen na način televizorja.
Preverite, ali daljinski upravljalnik podpira Anynet
+
.
V določenih razmerah Anynet
+
ne deluje. (Iskanje kanalov, uporaba načina Media Play,
Plug & Play itd.)
Ko povezujete ali odstranjujete kabel HDMI 1.3, znova poiščite naprave ali izklopite in znova
vklopite televizor.
Preverite, ali je funkcija Anynet
+
naprave v sistemu Anynet
+
vklopljena.
●
●
●
●
●
●
●
●
●
●
Želim zagnati Anynet
+
. Preverite, ali je naprava, ki podpira Anynet+, pravilno povezana s televizorjem in ali je možnost
Anynet
+
(HDMI-CEC) nastavljena na On v meniju funkcije Anynet
+
Setup.
Če želite preklopiti na televizor, pritisnite gumb TV na daljinskem upravljalniku televizorja. Nato
pritisnite gumb TOOLS, da prikažete meni Anynet
+
, in izberite želeni meni.
●
●
Želim zapreti Anynet
+
. V meniju Anynet
+
izberite View TV.
Pritisnite gumb SOURCE na daljinskem upravljalniku televizorja in izberite napravo, ki ne
podpira funkcije Anynet
+
.
Pritisnite P
>
/
<
, PRE-CH in FAV.CH, da preklopite način televizorja. (Upoštevajte, da gumb
za kanale deluje samo, če naprava, ki podpira Anynet
+
in ki je vdelana v kanalnik, ni povezana.)
●
●
●
Na zaslonu se prikaže
sporočilo ‘Connecting to
Anynet+ device...’.
Med konfiguriranjem sistema Anynet
+
in preklapljanjem v način gledanja ni mogoče uporabljati
daljinskega upravljalnika.
Daljinski upravljalnik lahko uporabite, potem ko nastavite sistem Anynet
+
ali preklopite v način
gledanja.
●
●
Naprava, ki podpira
Anynet
+
, ne predvaja.
Funkcije predvajanja ne morete uporabiti, ko se izvaja funkcija Plug &Play.
●
Povezana naprava ni
prikazana.
Preverite, ali naprava podpira funkcije Anynet
+
.
Preverite, ali je kabel HDMI 1.3 pravilno povezan.
Preverite, ali je možnost Anynet
+
(HDMI-CEC) nastavljena na On v meniju Setup sistema
Anynet
+
.
Ponovite iskanje naprav, ki podpirajo Anynet
+
.
Napravo, ki podpira Anynet
+
, lahko povežete samo s kablom HDMI 1.3. Nekateri kabli HDMI
morda ne podpirajo funkcij Anynet
+
.
Če pride do prekinitve zaradi nepredvidljivih okoliščin, kot je izključitev kabla HDMI, napajalnega
kabla ali okvare napajanja, ponovite iskanje naprav.
●
●
●
●
●
●
Televizijskega programa
ni mogoče posneti.
Preverite, ali je vtičnica za anteno na snemalni napravi pravilno povezana.
●
Zvok televizorja ne
prihaja iz sprejemnika.
Televizor in sprejemnik povežite z optičnim kablom.
●
¦
[620-Weuro]BN68-02326A-03L09.ind39 39 2009-10-08 ¿ÀÀü 9:31:06

Funkcija teleteksta
Večina televizijskih postaj nudi informacije v pisni obliki prek teleteksta. Na začetni stran teleteksta boste dobili informacije o tem,
kako uporabljati storitev. Poleg tega lahko z gumbi na daljinskem upravljalniku izbirate različne možnosti, ki bodo zadovoljile vaše
potrebe.
Za pravilen prikaz informacij teleteksta mora biti sprejem kanala stabilen. V nasprotnem primeru lahko manjka kakšna
informacija, ali pa nekatere strani ne morejo biti prikazane.
Strani teleteksta lahko spremenite s pritiskom številskih gumbov na daljinskem upravljalniku.
1
0
(način)
Pritisnite za izbiro načina
teleteksta (SEZNAM/FLOF). Če
ga pritisnete v načinu SEZNAM,
bo preklopil v način shranjevanja
seznama. V načinu shranjevanja
seznama lahko z gumbom
8
(shrani) shranite stran
teleteksta na seznam.
2
5
(razkrij)
Uporabite za prikaz skritega
besedila (na primer odgovori na
vprašanja iz kviza). Če se želite
vrniti na običajni prikaz zaslona,
znova pritisnite gumb.
3
4
(velikost)
Pritisnite za prikaz črk dvojne
velikosti na zgornji polovici
zaslona. Za spodnjo polovico
zaslona pritisnite znova. Za prikaz
običajnega zaslona pritisnite še
enkrat.
4
8
(shrani)
Uporabite za shranjevanje strani
teleteksta.
5 Barvni gumbi (rdeči/zeleni/rumeni/
modri)
Če televizijska postaja uporablja
sistem FASTEXT, so različne
teme na strani teleteksta
označene z različnimi barvami,
izberete pa jih lahko s pritiskom
na barvne gumbe. Pritisnite
enega od njih, odvisno od vaših
želja. Prikaže se stran z ostalimi
obarvanimi informacijami, ki
jih lahko izberete na isti način.
Za prikaz prejšnje ali naslednje
strani pritisnite ustrezni barvni
gumb.
6
/
(teletekst vklopljen/mešano)
Ko ste izbrali kanal, ki omogoča
storitev teleteksta, pritisnite ta gumb,
da aktivirate teletekst. Pritisnite
dvakrat, da teletekst prekrijete s
trenutno sliko.
7
:
(izhod)
Izhod iz prikaza teleteksta.
8
1
(podstran)
Za prikaz podstrani, ki je na voljo.
9
2
(stran gor)
Za prikaz naslednje strani teleteksta.
0
3
(stran dol)
Za prikaz prejšnje strani teleteksta.
!
9
(zadrži)
Uporabite, da zadržite prikazano stran,
če je izbrana stran povezana z več
drugimi stranmi, ki sledijo samodejno.
Če želite nadaljevati, znova pritisnite
gumb.
@
6
(kazalo)
Za prikaz strani s kazalom kadar koli,
ko gledate teletekst.
#
7
(prekliči)
Za prikaz oddaje med iskanjem strani.
¦
N
N
INFO
AD
1
2
3
4
5
6
8
7
9
0
!
#
@
[620-Weuro]BN68-02326A-03L09.ind40 40 2009-10-08 ¿ÀÀü 9:31:06

Strani teleteksta so organizirane v šestih kategorijah:
Del Vsebina
A Številka izbrane strani.
B Identiteta televizijskega kanala.
C Številka trenutne strani ali indikatorji iskanja.
D Datum in čas.
E Besedilo.
F Informacije o stanju.
Informacije FASTEXT.
Informacije teleteksta so pogosto razdeljene na več zaporednih strani, do katerih imate dostop z:
vnosom številke strani
izbiro naslova na seznamu
izbiro obarvanega naslova (sistem FASTEXT)
Televizor podira različico teleteksta 2.5, v kateri je mogoče prikazati dodatne grafike ali besedilo.
Teletekst je lahko prikazan s praznimi deli strani, odvisno od prenosa.
V teh primerih dodatne grafike ali besedilo ni oddajano.
Starejši televizorji, ki ne podpirajo različice 2.5, ne morejo prikazati dodatnih grafik ali besedila, ne glede na to, ali se le-to
oddaja.
Pritisnite gumb TV za izhod iz teleteksta.
Namestitev stojala
Prednastavitev: Na stojalo namestite vodilo stojala in ovoj in ga privijte z vijaki.
1. Pritrdite televizor LCD na stojalo.
Televizor naj nosita vsaj dve osebi.
Pri sestavljanju bodite pozorni na sprednji in hrbtni del stojala.
Da bo televizor nameščen na stojalo na ustrezni višini, ne pritiskajte preveč na zgornjo
levo ali desno stran televizorja.
2.
Privijte vijaka v položaj
1
in nato vijaka v položaj
2
.
Izdelek postavite pokonci in privijte vijake. Če vijake privijete na ležečem televizorju
LCD, se le-ta lahko nagne v eno stran.
N
N
N
N
N
O
¦
N
N
N
N
N
INFO
AD
Spredaj
Zadaj
1
2
[620-Weuro]BN68-02326A-03L09.ind41 41 2009-10-08 ¿ÀÀü 9:31:07

Odstranjevanje stojala
1. Odstranite vijake s hrbtne strani televizorja.
2. Stojalo ločite od televizorja.
Televizor naj nosita vsaj dve osebi.
3.
Spodnjo luknjo pokrijte s pokrovom.
Namestitev kompleta za pritrditev na steno
Z elementi za pritrditev na steno (naprodaj posebej) lahko televizor pritrdite na steno.
Za podrobne informacije o pritrditvi na steno si oglejte navodila, ki so priložena elementom
za pritrditev na steno. Če nameščate nosilec za pritrditev na steno, se za pomoč obrnite na
tehnika.
Samsung Electronics ne odgovarja za poškodovanje izdelka ali telesne poškodbe, če se
odločite, da boste sami namestiti televizor.
Kompleta za pritrditev na steno ne nameščajte, ko je televizor vklopljen. To lahko
povzroči telesne poškodbe zaradi električnega udara.
Kable ovijte z držalom za kable, tako da jih ni mogoče videti skozi prozorno stojalo.
Ključavnica Kensington je naprava, ki se uporablja za fizično pritrditev sistema, ko se ta
uporablja na javnem mestu. Videz in način zaklepanja se lahko razlikujeta od slike, odvisno
od proizvajalca.
Za pravilno uporabo si oglejte priročnik, ki je priložen ključavnici Kensington.
Napravo za zaklep je treba kupiti posebej.
Kam se namesti ključavnico Kensington, je odvisno od modela.
1.
Napravo za zaklepanje vstavite v režo Kensington na televizorju LCD (1) in jo obrnite v
smeri zaklepanja (2).
2.
Priključite kabel ključavnice Kensington (3).
3.
Ključavnico Kensington pritrdite na mizo ali težak nepremičen predmet.
N
N
3
1
2
¦
N
¦
¦
¦
<Dodatno>
[620-Weuro]BN68-02326A-03L09.ind42 42 2009-10-08 ¿ÀÀü 9:31:10

Izdelek mora biti na zahtevani oddaljenosti od ostalih predmetov (npr. sten), da zagotovite ustrezno prezračevanje.
Sicer lahko pride do požara ali težave z izdelkom zaradi povišanja notranje temperature izdelka.
Izdelek namestite na zahtevani oddaljenosti, ki je navedena na sliki.
Če želite uporabiti stojalo ali opremo za pritrditev na steno, uporabite samo dele, ki jih nudi podjetje Samsung Electronics.
Čer uporabite dele drugih proizvajalcev, lahko pride do težav z izdelkom ali do telesne poškodbe zaradi padca izdelka.
Če uporabite dele drugih proizvajalcev, lahko pride do težav z izdelkom ali do požara zaradi povišanja notranje
temperature izdelka, ki je posledica slabega prezračevanja.
Videz se lahko razlikuje glede na izdelek.
Namestitev izdelka s stojalom Namestitev izdelka z opremo za pritrditev na steno
10 cm
10 cm
10 cm
10 cm
10 cm
10 cm
10 cm
Pritrditev televizorja na steno
Pozor: Televizorja ni dovoljeno vleči, potiskati ali nanj plezati, saj lahko pade. Posebno bodite pozorni na to, da
se na televizor ne nagibajo ali ga premikajo otroci, saj se lahko prevrne, kar lahko povzroči težje poškodbe ali
smrt. Upoštevajte varnostne ukrepe, navedene na priloženem letaku z varnostnimi ukrepi. Da zagotovite več
stabilnosti, namestite varnostni pripomoček za preprečevanje padcev, kot je opisano v nadaljevanju.
1. Namestite vijaka v objemki in ju trdno privijte na steno. Preverite, ali sta vijaka trdno
privita na steno.
Morda boste potrebovali dodaten material, kot je sidrni vložek, odvisno od vrste
stene.
Ker vijaka, objemki in vrvica, ki so potrebni za to, niso priloženi, jih kupite posebej.
2.
Odstranite vijaka iz osrednjega dela hrbtne strani televizorja, namestite ju v objemki in
privijte nazaj na televizor.
Vijaka morda nista priložena izdelku. V tem primeru kupite vijaka z naslednjimi
specifikacijami.
Specifikacije vijakov
Za 17–29-palčni televizor LCD: M4 x L15
Za 32–40-palčni televizor LCD: M6 x L15
3.
Objemki, nameščeni na televizorju, in objemki, pritrjeni na steno, povežite z močno
vrvico in jo zavežite.
Televizor namestite blizu stene, tako da ne more pasti nazaj.
Vrvico je varno privezati tako, da sta objemki na steni v višini objemk na televizorju
ali nižje.
Preden televizor premaknete, odvežite vrvico.
4.
Preverite, ali so vsi spoji trdni. Redno preverjajte, ali so spoji poškodovani. Če niste
prepričani o varni namestitvi, se obrnite na strokovnjaka za namestitev.
¦
N
N
¦
■
N
N
N
N
N
N
N
Stena
Stena
[620-Weuro]BN68-02326A-03L09.ind43 43 2009-10-08 ¿ÀÀü 9:31:12

Če imate vprašanja glede televizorja, si najprej oglejte ta seznam. Če noben od nasvetov za odpravljanje težav ni ustrezen,
obiščite spletno mesto ‘www.samsung.com’ in nato kliknite Support ali pa pokličite klicni center, ki je na seznamu na zadnji strani.
Rešitev
Kakovost slike
Najprej izvedite Picture Test, da preverite, ali televizor pravilno prikazuje preskusno sliko.
Pojdite na MENU - Support - Self Diagnosis - Picture test
Če je preskusna slika pravilno prikazana, je slika morda slabe kakovosti zaradi vira ali signala.
●
Televizijska slika ni videti tako
dobro kot v trgovini.
Če imate analogni kabelski/običajni sprejemnik, nadgradite na sprejemnik. Za sliko
visoke ločljivosti uporabite kabel HDMI ali komponentni kabel.
Naročnik na kabelsko/satelitsko televizijo: Poskusite s postajami visoke ločljivosti (HD
(High Definition)) od kanala navzgor.
Povezava antene: Izvedite samodejni program in nato poskusite s postajami visoke
ločljivosti.
Številni kanali visoke ločljivosti prikazujejo izboljšano vsebino standardne ločljivosti.
Prilagodite ločljivost video izhoda kabelskega/običajnega sprejemnika na 1080i ali 720p.
Prepričajte se, da televizijo gledate vsaj z minimalne razdalje, priporočene glede
velikosti in ločljivosti prikazanega signala.
●
●
●
N
●
●
Slika je popačena: veliki bloki,
majhni bloki, slikovne pike
Pri stiskanju video vsebine lahko pride so popačenja slike, še posebej pri gibljivih
slikah, kot so pri športu ali akcijskih filmih.
Slika je lahko popačena zaradi nizke stopnje signala ali slabe kakovosti. Ne gre za
okvaro televizorja.
●
●
Ko je povezana komponenta, je
barva napačna ali pa je ni.
Preverite, ali so komponentni kabli priključeni na ustrezne vtičnice. Nepravilna ali slaba
povezava povezava lahko povzroči težave z barvami ali prazen zaslon.
●
Blede barve ali šibka svetlost. V meniju televizorja prilagodite možnosti Picture. (način Picture, Colour, Brightness,
Sharpness)
Prilagodite možnost Energy Saving v meniju Setup.
Poskusite s ponastavitvijo slike, da si ogledate privzeto nastavitev slike. (Pojdite na
MENU - Picture - Picture Reset.)
●
●
●
Na robu zaslona je pikčasta črta. Če je velikost slike nastavljena na Screen Fit, jo spremenite na 16:9.
Spremenite ločljivost kabelskega/običajnega sprejemnika.
●
●
Samo pri vhodnem signalu AV
(kompozitnem) je slika črno-bela.
Povežite video kabel (rumeni) na zelena vrata komponentnega vhoda 1 na televizorju.
●
Slika zmrzne ali je popačena pri
preklapljanju kanalov ali pa je
zakasnjena.
Če je priključen kabelski sprejemnik, ga ponastavite. (Znova povežite kabel za izmenični
tok in počakajte, da se kabelski sprejemnik znova zažene. To lahko traja do 20 minut.)
Nastavite ločljivost izhoda kabelskega sprejemnika na 1080i ali 720p.
●
●
Kakovost zvoka
Najprej izvedite Sound Test, da preverite, ali zvok televizorja pravilno deluje.
Pojdite na MENU - Support - Self Diagnosis - Sound Test
Če je zvok v redu, težavo z zvokom morda povzroča vir ali signal.
●
Ni zvoka ali zvok je pri največji
glasnosti pretih.
Preverite glasnost zunanje naprave, ki je povezana na televizor, nato ustrezno
prilagodite glasnost televizorja.
●
Slika je dobra, vendar ni zvoka. V meniju zvoka nastavite možnost Speaker Select na TV speaker.
Prepričajte se, da so avdio kabli zunanje naprave priključeni na ustrezne avdio vtičnice
na televizorju.
Preverite možnost avdio izhoda povezane naprave. (Npr.: če imate na televizor priključen
HDMI, je potrebno možnost zvoka kabelskega sprejemnika spremeniti na HDMI.)
Če uporabljate kabel za povezavo vrat DVI in HDMI, potrebujete ločeni avdio kabel.
Če je glasnost višja od vrednosti 30, izklopite funkcijo SRS.
Izključite vtič iz vtičnice za slušalke. (Če je ta na televizorju.)
●
●
●
●
●
●
Iz zvočnika prihaja hrup. Preverite, ali so kabli ustrezno povezani. Preverite, ali je video kabel priključen na
avdio vhod.
Pri povezavi antene/kabelske televizije preverite moč signala. Zaradi nizke stopnje
signala je lahko popačen zvok.
●
●
¦
[620-Weuro]BN68-02326A-03L09.ind44 44 2009-10-08 ¿ÀÀü 9:31:12

Rešitev
Ni slike, ni videa
Televizorja ni mogoče vklopiti. Poskrbite, da je napajalni kabel za izmenični tok trdno priključen na stensko vtičnico in
televizor.
Preverite, ali stenska vtičnica deluje.
Pritisnite gumb POWER na televizorju, da preverite, ali daljinski upravljalnik deluje
pravilno. Če se televizor vklopi, je morda razlog daljinski upravljalnik. Za odpravo
težave z daljinskim upravljalnikom si oglejte spodnji razdelek ‘Daljinski upravljalnik ne
deluje’.
●
●
●
Televizor se samodejno izklopi. Preverite, ali je možnost Sleep Timer nastavljena na On v meniju Setup.
Če je televizija povezana z računalnikom, preverite nastavitve napajanja v računalniku.
Poskrbite, da je napajalni kabel za izmenični tok trdno priključen na stensko vtičnico in
televizor.
Če pri povezavi antene/kabelske televizije 10–15 minut ni signala, se televizor izklopi.
●
●
●
●
Ni slike/videa. Preverite povezavo kablov (izključite in znova priključite vse kable televizorja in
zunanjih naprav.)
Nastavite video izhod zunanje naprave (kabelskega/običajnega sprejemnika,
predvajalnika DVD, Blu-ray itd.) tako, da ustreza povezavam vhoda televizorja. Na
primer: izhod zunanje naprave: HDMI, izhod televizorja: HDMI.
Preverite, ali se povezana naprava napaja.
S pritiskom gumba SOURCE na daljinskem upravljalniku izberite ustrezen vir
televizorja.
●
●
●
●
Povezava RF
(kabelska televizija/antena)
Sprejem vseh signalov ni mogoč. Poskrbite, da je kabel antene ustrezno priključen.
Poskusite z uporabo funkcije Plug & Play, da dodate razpoložljive kanale na seznam
kanalov. Pojdite na MENU - Setup - Plug & Play in počakajte, da se shranijo vsi
razpoložljivi kanali.
Preverite, ali je antena ustrezno postavljena.
●
●
●
Slika je popačena: veliki bloki,
majhni bloki, slikovne pike
Pri stiskanju video vsebine lahko pride so popačenja slike, še posebej pri gibljivih
slikah, kot so pri športu ali akcijskih filmih.
Zaradi nizke stopnje signala je lahko popačena slika. Ne gre za okvaro televizorja.
●
●
Povezava računalnika
Sporočilo ‘Način ni podprt’. Nastavite ločljivost in frekvenco izhoda računalnika tako, da ustrezata ločljivostim, ki jih
podpira televizor.
●
Računalnik je ves čas prikazan
na seznamu virov, tudi če ni
povezan.
To je normalno, računalnik je prikazan na seznamu virov, tudi če ni povezan.
●
Pri povezavi HDMI je video v
redu, vendar ni zvoka.
Preverite nastavitev avdio izhoda v računalniku.
●
[620-Weuro]BN68-02326A-03L09.ind45 45 2009-10-08 ¿ÀÀü 9:31:12

Rešitev
Drugo
Slika ni prikazana celozaslonsko. Na kanalih visoke ločljivosti je pri prikazu izboljšane vsebine standardne ločljivosti (4:3)
na obeh straneh zaslona črna obroba.
Pri filmih z drugačnim razmerjem stranic slike, kot je razmerje na televizorju, je nad
sliko in pod njo prikazana črna obroba.
Prilagodite možnost velikosti slike na zunanji napravi ali televizorju na celozaslonsko.
●
●
●
Daljinski upravljalnik ne deluje. Znova namestite bateriji v daljinski upravljalnik tako, da je polariteta (+ -) pravilna.
Očistite oddajno okno na zgornjem delu daljinskega upravljalnika.
Poskusite z usmeritvijo daljinskega upravljalnika neposredno v televizor na
oddaljenosti 1,5–1,8 metra.
●
●
●
Z daljinskim upravljalnikom
kabelskega/običajnega
sprejemnika ne morem upravljati
napajanja ali glasnosti televizorja.
Daljinski upravljalnik kabelskega/običajnega sprejemnika TV programirajte tako, da bo
z njim mogoče upravljati televizor. V uporabniškem priročniku kabelskega/satelitskega
sprejemnika poiščite kodo televizorja SAMSUNG.
●
Sporočilo ‘Način ni podprt’. Preverite, katere ločljivosti podpira televizor, in ustrezno prilagodite ločljivost izhoda
zunanje naprave. V tem priročniku si preberite o nastavitvah ločljivosti.
●
Televizor oddaja vonj po plastiki. Ta vonj je normalen in bo sčasoma izginil.
●
Možnost televizorja
Signal Information ni na
voljo v meniju preskusa
samodiagnostike.
Ta funkcija je na voljo samo pri digitalnih kanalih s povezavo antene
(RF/koaksialni kabel).
●
Televizor je nagnjen desno ali
levo.
Odstranite spodnji del stojala s televizorja in ga znova sestavite.
●
Spodnjega dela stojala ni mogoče
sestaviti.
Zagotovite, da je televizor na ravni površini. Če ne uspete odstraniti vijakov s
televizorja, uporabite magnetizirani izvijač.
●
Meni kanalov je siv (ni na voljo). Meni Channel je na voljo samo, če je izbran vir televizorja.
●
Nastavitve se izbrišejo po 30
minutah ali ob vsakem izklopu
televizorja.
Če je televizor v načinu Store Demo, se bodo nastavitve zvoka in slike ponastavile
vsakih 30 minut. Način Store Demo preklopite v način Home Use v postopku
Plug & Play. S pritiskanjem gumba SOURCE izberite način TV, nato pojdite na
MENU → Setup → Plug & Play → ENTER
E
.
●
Ponavljajoča se izguba avdio ali
video signala.
Preverite, ali so kabli ustrezno povezani, in jih znova povežite.
Razlog so lahko premalo upogljivi ali predebeli kabli. Zagotovite, da so kabli dovolj
upogljivi za dolgotrajno uporabo. Pri stenski namestitvi priporočamo uporabo kablov z
90-stopinjskimi priključki.
●
●
Če od blizu pogledate rob okvirja
televizijskega zaslona, boste
morda videli delce.
To je del zasnove izdelka in ni napaka.
●
Pri uporabi kartice CAM-a
za splošni vmesnik (CI+) je
prikazano ‘Kodiran signal’ ali
‘Šibek signal ali ni signala’.
Preverite, ali je v reži CAM-a za splošni vmesnik nameščena kartica za splošni
vmesnik (CI+).
Izvlecite CAM iz televizorja in ga znova vstavite v režo.
●
●
Televizor se 45 minut po izklopu
znova vklopi.
To je normalno. Televizor sam upravlja funkcijo OTA (Over The Air), da nadgradi
vgrajeno programsko opremo, ki se je prenesla med gledanjem.
●
Ponavljajoča se težava s sliko/
zvokom.
Preverite in spremenite signal/vir.
●
Ta plošča TFT LCD uporablja ploščo, ki je sestavljena iz osnovnih slikovnih pik, za izdelavo katerih je potrebna posebna
tehnologija. Kljub temu je lahko na zaslonu nekaj svetlih ali temnih slikovnih pik. Te svetlobne pike ne bodo vplivale na
delovanje izdelka.
N
[620-Weuro]BN68-02326A-03L09.ind46 46 2009-10-08 ¿ÀÀü 9:31:12

Specifikacije
Ime modela LE40B620 LE46B620
Velikost zaslona
(diagonala) 40 palcev 46 palcev
(optimalno) 1920 x 1080 pri 60 Hz 1920 x 1080 pri 60 Hz
Zvok
(Izhod) 10 W x 2 10 W x 2
Osrednji del
S stojalom
1040 x 79 x 638 mm
1040 x 255 x 699 mm
1172 x 79 x 712 mm
1172 x 275 x 774 mm
S stojalom 19 kg 25 kg
Okoljski vidiki
Delovna temperatura
Delovna vlažnost
Temperatura shranjevanja
Vlažnost pri shranjevanju
10°C do 40°C (50°F do 104°F)
10% do 80%, brez kondenzacije
-20°C do 45°C (-4°F do 113°F)
5 % do 95 %, brez kondenzacije
Vrtenje stojala
(levo/desno) -20˚ ~ 20˚
Ime modela LE52B620
Velikost zaslona
(diagonala) 52 palcev
(optimalno) 1920 x 1080 pri 60 Hz
Zvok
(Izhod) 10 W x 2
Osrednji del
S stojalom
1321 x 81 x 805 mm
1321 x 305 x 866 mm
S stojalom 32 kg
Okoljski vidiki
Delovna temperatura
Delovna vlažnost
Temperatura shranjevanja
Vlažnost pri shranjevanju
10°C do 40°C (50°F do 104°F)
10% do 80%, brez kondenzacije
-20°C do 45°C (-4°F do 113°F)
5 % do 95 %, brez kondenzacije
Vrtenje stojala
(levo/desno) -20˚ ~ 20˚
Zasnovo in specifikacije lahko spremenimo brez obvestila.
Naprava je digitalni aparat razreda B.
Za napajanje in porabo energije si oglejte nalepko na izdelku.
¦
N
N
N
[620-Weuro]BN68-02326A-03L09.ind47 47 2009-10-08 ¿ÀÀü 9:31:12

1. Digital TV(DVB) ile ilgili olan işlevler, yalnız DVB-T (MPEG2 ve MPEG4 AVC) dijital yer üstü sinyallerinin yayınlandığı ya da
uyumlu bir DVB-C(MPEG2 ve MPEG4 AAC) kablolu TV servisine erişiminizin olduğu ülkelerde/alanlarda kullanılabilir. Lütfen
bölgenizdeki DVB-T ya da DVB-C sinyallerinin alınma olasılığı hakkında yerel bayiniz ile görüşünüz.
2.
DVB-T; dijital yer üstü televizyonların yayını için bir DVB Avrupa Birliği standardıdır ve DVB-C ise, kablolu dijital TV'lerin yayını
içindir Ancak, EPG (Elektrikli Program Kılavuzu), VOD (Talep üzerine video) ve diğerleri gibi bazı ayrıştırılmış özellikler, bu
spesifikasyona dahil edilmemiştir. Bu nedenle, şu anda desteklenmemektedirler.
3.
Bu TV seti [Ağustos, 2008] itibarıyla geçerli DVB-T ve DVB-C standartlarını karşılasa bile, gelecekteki DVB-T dijital karasal
yayın ve DVB-C dijital kablo yayınları ile uyumluluğu garanti edilemez.
4.
Bu TV setinin kullanıldığı ülkelere bağlı olarak bazı kablolu TV sağlayıcıları, bu tür bir hizmet için ek ödeme talep edebilirler ve
onların koşullarına ve durumlarına uymanız gerekebilir.
5.
Bazı Dijital TV fonksiyonları, bazı ülkelerde ya da bölgelerde kullanımda olmayabilir ve DVB-C, kablolu hizmet
sağlayıcılarından bazıları ile doğru şekilde çalışmayabilir.
6.
Daha fazla bilgi için lütfen yerel SAMSUNG müşteri hizmetleri merkeziniz ile iletişim kurun.
Sabit Görüntünün Gösterilmesiyle ilgili Önlemler
Sabit görüntü TV ekranında kalıcı hasara neden olabilir
Ekranda görüntü takılmasına neden olabileceğinden LCD panelde tamamı veya bir bölümü sabit görüntüyü 2 saatten fazla
tutmayın. Bu görüntü takılmasına 'ekran yanması' da denir. Bu tür bir görüntü takılmasını önlemek için hareketsiz bir görüntü
ekrandayken parlaklık ve kontrast değerlerini düşük bir seviyeye ayarlayın.
LCD televizyonu uzun süre 4:3 formatında izlemek, farklı ışık emisyonundan dolayı ekranın solunda, sağında
ve ortasında çizgi şeklinde izler bırakabilir. DVD ya da oyun konsolunu oynatmak da ekranda benzer etkiye
yol açabilir. Yukarıdaki etkinin neden olduğu hasarlar Garanti kapsamında değildir.
Video oyunlarından ve bilgisayardan uzun süre durağan resimlerin görüntülenmesi kısmi görüntü izi oluşturabilir. Bu etkiyi
önlemek için, durağan görüntüleri görüntülerken 'parlaklık' ve 'kontrast' derecelerini azaltın.
© 2009 Samsung Electronics Co., Ltd. Tüm hakları saklıdır.
❑
❑
●
●
●
Bu Kullanıcı Kılavuzundaki şekiller ve resimler yalnızca referans amaçlı verilmiştir ve gerçek ürünün görünümünden farklı olabilir.
Ürün tasarımı ve belirtimleri herhangi bir bildirim yapılmaksızın değiştirilebilir.
[620-Weuro]BN68-02326A-03L09.ind1 1 2009-10-08 ¿ÀÀü 9:31:13

Türkçe - 1
Lisans
TruSurround HD, SRS ve sembolü SRS Labs, Inc.'in ticari markalarıdır. TruSurround HD teknolojisi
SRS Labs, Inc. lisansı ile bu cihaza dahil edilmiştir.
Dolby Laboratories lisansı altında üretilmiştir. Dolby ve double-D (çift D) sembolü, Dolby Laboratories'in ticari
markalarıdır.
Sembol
N O T
Not Tek Basmalı Düğme TOOLS Düğmesi Basın
❑
❑
TV'NIZIN AYARLANMASI
Kontrol Paneline Bakış ...................................................................... 2
Aksesuarlar ........................................................................................ 3
Bağlantı Paneline Bakış .................................................................... 4
Uzaktan Kumandaya Bakış ............................................................... 6
Uzaktan Kumandaya Pil Takma ......................................................... 7
Menülere bakış .................................................................................. 7
Televizyonunuzun Bekleme Moduna Alınması .................................. 8
Plug & Play Özelliği (Modele bağlı olarak) ........................................ 8
Monitöre Bakış ................................................................................... 9
KANAL
Kanal Menüsü .................................................................................... 9
Kanalları Yönetme .......................................................................... 12
M
Resim Menüsünü Yapılandırma ....................................................... 14
TV'nizi Bilgisayar (PC) Ekranı Olarak Kullanma .............................. 18
TV'nizin PC'nizle Ayarlanması ......................................................... 19
SES
Ses Menüsünü Yapılandırma ........................................................... 20
Ses Modunun Seçilmesi .................................................................. 21
KURULUM
Kurulum Menüsünün Yapılandırılması ............................................. 22
Saati Ayarlama................................................................................. 24
K
Giriş Menüsü ................................................................................... 26
Destek Menüsü ................................................................................ 26
MEDIA PLAY (USB)
Bir USB Aygıtını Bağlama ................................................................ 28
Media Play İşlevi .............................................................................. 29
Fotoğraf Listesi Seçenek Menüsü ................................................... 30
Fotoğraf ya da Slayt Gösterisi İzleme .............................................. 31
Slayt Gösterisi Seçenek Menüsü ..................................................... 32
Müzik Listesi Seçenek Menüsü ....................................................... 33
Müzik Çalma .................................................................................... 34
Müzik Çalma Seçenek Menüsü ....................................................... 35
Kurulum Menüsünü Kullanma ......................................................... 35
■
■
■
■
■
■
■
■
■
■
■
■
■
■
■
■
■
■
■
■
■
■
■
■
■
■
■
■
■
ANYNET
+
Anynet
+
Cihazlarına Bağlanma ....................................................... 36
Anynet
+
Kurulumu ........................................................................... 37
Anynet
+
Cihazları arasında geçiş yapma ........................................ 37
Kaydediliyor ..................................................................................... 38
Bir Alıcı (Ev sineması) üzerinden dinleme ....................................... 38
Anynet
+
için Sorun Giderme ............................................................ 39
R
Teletekst Özelliği .............................................................................. 40
Standı Takma ................................................................................... 41
Standın Çıkarılması ......................................................................... 42
Duvara Montaj Kitinin Takılması ...................................................... 42
Kabloların Montajı ............................................................................ 42
Hırsıza Karşı Kensington Kilidi ........................................................ 42
Kurulum Alanının Sabitlenmesi ....................................................... 43
TV'yi Duvara Sabitleme ................................................................... 43
Sorun Giderme ................................................................................ 44
Teknik Özellikler ............................................................................... 47
■
■
■
■
■
■
■
■
■
■
■
■
■
■
■
■
Türkçe
[620-Weuro]BN68-02326A-03L09.ind1 1 2009-10-08 ¿ÀÀü 9:31:13

Türkçe - 2
TV'NIZIN AYARLANMASI
Ürünün rengi ve şekli, modele bağlı olarak farklılık gösterebilir.
Ön panel düğmeleri parmağınızla dokunarak etkinleştirilebilir.
1
P
: TV'yi açıp kapatmak için basın.
2
: Güç açıkken yanıp söner ve kapanır; bekleme modunda sürekli yanar.
3
z
: Kanalları değiştirmek için basın. Ekran menüsünde, uzaktan kumandada ▼ ve ▲ düğmelerini kullandığınız gibi
z
düğmelerini kullanın.
4
Y
: Ses seviyesini artırmak veya azaltmak için basın.
Ekran menüsünde, uzaktan kumandada ◄ ve ► düğmelerini kullandığınız gibi
Y
düğmelerini kullanın.
5
MENU: TV'nizin özellikler ekran menüsünü görmek için basın.
6
SOURCE
E
: Mevcut tüm giriş kaynakları arasında geçiş yapar. Ekran menüsünde, bu düğmeyi uzaktan kumanda üzerindeki
ENTER
E
düğmesini kullandığınız gibi kullanın.
7
: Uzaktan kumandayı TV üzerinde bu noktaya doğru tutun.
8
HOPARLÖRLER
¦
N
N
6
5
4
3
2
1
87
8
[620-Weuro]BN68-02326A-03L09.ind2 2 2009-10-08 ¿ÀÀü 9:31:13

Türkçe - 3
Aksesuarlar
Uzaktan Kumanda ve Piller (AAA x 2) Güç Kablosu Kapak-Alt
Garanti Kartı / Güvenlik Kılavuzu
(Her yerde yoktur)
Temizleme Bezi
Tutucu-Tel Kablo
(Modele bağlı olarak)
● Kullanıcı Talimatları
LCD TV'nizle birlikte aşağıdaki öğelerin verildiğinden emin olun. Öğelerden herhangi biri eksikse bayinizle görüşün.
Öğelerin rengi ve şekli, modele bağlı olarak farklılık gösterebilir.
¦
N
N
[620-Weuro]BN68-02326A-03L09.ind3 3 2009-10-08 ¿ÀÀü 9:31:14

Türkçe - 4
Ürünün rengi ve şekli, modele bağlı olarak farklılık gösterebilir.
1 COMPONENT IN
Komponent video / sesi bağlar.
2 HDMI IN 1, 2, 3(DVI), 4 / DVI
AUDIO IN
HDMI çıkışlı bir cihazın HDMI jakına bağlanır.
HDMI - HDMI bağlantıları için ses bağlantısı gerekmez.
HDMI nedir?
HDMI(Yüksek Tanımlı Multimedya Arayüzü), dijital ses ve video sinyallerinin tek bir kablo kullanılarak iletilmesini sağlayan
bir arayüzdür.
HDMI ve DVI arasındaki fark, HDMI cihazının DVI cihazından daha küçük olmasıdır
.
1.3'ten daha eski HDMI sürümlerini destekleyen DVD/Blu-ray oynatıcı/Kablo TV alıcısı/Uydu alıcısı (Set Üstü Kutusu)
bağlandığında TV'den ses gelmeyebilir ve resimlerin rengi anormal olabilir. Eski bir HDMI kablosu bağlandığında ses
gelmezse, HDMI kablosunu HDMI IN 3(DVI) jakına ve ses kablolarını TV'nin arka tarafındaki DVI AUDIO IN jaklarına
takın. Böyle bir durumda, HDMI sürümünü doğrulamak için DVD/Blu-ray oynatıcı/Kablo
TV Alıcısı /Uydu alıcısı (Set Üstü
Kutusu) sağlayan şirkete başvurun ve ardından güncelleme isteğinde bulunun.
Harici bir cihaza DVI bağlantısı yapmak için HDMI IN 3(DVI) jakını kullanın. Video bağlantısı için bir DVI - HDMI kablosu
ya da DVI - HDMI adaptörü (DVI'dan HDMI'a) kullanın, ses için ise DVI AUDIO IN jaklarını kullanın. HDMI / DVI kablo
bağlantısı kullanırken HDMI IN 3(DVI) jakını kullanmalısınız.
1.3 olmayan HDMI kabloları sinir bozucu yanıp sönmelere veya ekranda görüntünün kaybolmasına neden olabilir
.
3 PC IN [PC] / [AUDIO]
PC'nizin üzerindeki video ve ses çıkış jaklarına bağlanır.
PC'niz bir HDMI bağlantısını destekliyorsa, bunu HDMI IN 1, 2, 3(DVI) ya da 4 terminaline bağlayabilirsiniz.
PC'niz bir DVI bağlantısını destekliyorsa, bunu HDMI IN 3(DVI) / DVI AUDIO IN terminaline bağlayabilirsiniz.
4 ANT IN
Bir antene ya da kablolu TV sistemine bağlanır.
5
(modele bağlıdır)
Kensington kilidi, (isteğe bağlı) halka açık bir ortamda kullanıldığında sistemi fiziksel olarak sabitlemek için kullanılan bir
aygıttır. Bir kilitleme cihazı kullanmak isterseniz, TV'yi satın aldığınız bayi ile görüşün.
Kensington Kilidinin konumu, modeline bağlı olarak farklılık gösterebilir.
¦
N
N
N
N
N
N
N
N
N
7890 6 5
@
2
#
!
21 34
[TV Yan Paneli]
[TV Arka Paneli]
[620-Weuro]BN68-02326A-03L09.ind4 4 2009-10-08 ¿ÀÀü 9:31:14

Türkçe - 5
6
H
(KULAKLIK)
Kulaklık, cihazınızın kulaklık çıkışına takılabilir. Kulaklık takılıyken, dahili hoparlörlerden gelen ses kapatılacaktır.
Kulaklıklar TV'ye bağlandığında ses işlevi kısıtlanır.
Yüksek ses seviyesinde uzun süre kulaklık kullanmak, işitmenize zarar verebilir.
TV’ye kulaklık taktığınızda, hoparlörlerden ses duymazsınız.
Kulaklık ses düzeyi ve TV ses düzeyi ayrı olarak ayarlanır.
7 DIGIT
AL AUDIO OUT (OPTICAL)
Ev sineması alıcısı gibi bir Dijital Ses bileşenine bağlanır.
DIGITAL AUDIO OUT (OPTICAL) jakına bir Dijital Ses Sistemi bağlandığında: TV'nin sesini kısın ve ses seviyesini
sistemin ses kontrolü ile ayarlayın.
TV, 5.1CH destekleyen bir harici aygıta bağlandığında 5.1CH ses alınabilir.
Alıcı (ev sineması) Açık olarak ayarlandığında TV’nin Optik jakından çıkan sesi duyabilirsiniz. TV bir DTV (karasal yayın)
sinyali görüntülediğinde, TV, 5.1 kanal sesi Ev sineması alıcısına gönderecektir. Kaynak, DVD / Blu-ray oynatıcı / Kablo
TV alıcısı / Uydu alıcısı (Set-Üstü Kutusu) gibi dijital bir bileşen olduğunda ve TV'ye HDMI ile bağlandığında, Ev Sineması
alıcısından yalnızca 2 kanal ses duyulacaktır. 5.1 kanal ses dinlemek istiyorsanız, DVD / Blu-ray oynatıcı / Kablo TV
alıcısı / Uydu alıcısı (Set-Üstü Kutusu) üstüdeki dijital ses çıkışı jakını TV'ye değil doğrudan bir
Amplifikatör ya da Ev
Sinemasına bağlayın.
8 SER
VICE
Yalnızca servis için konnektör
9 AUDIO OUT [R-AUDIO-L]
Amplifikatör/Ev sinemanızdaki ses giriş jaklarına bağlanır.
Bir ses amplifikatörü AUDIO OUT [R-AUDIO-L] jaklarına bağlandığında: TV'nin sesini kısın ve ses seviyesini Amplifikatörün
ses kontrolü ile ayarlayın.
0 EXT1, 2
VCR, DVD, video oyun cihazları ya da video disk çalarlar gibi harici cihazlar için giriş ya da çıkış bağlantıları.
EXT modunda; DTV Out, yalnız MPEG SD Video ve Audio'yu destekler.
Giriş/Çıkış Özellikleri
Konektör
Giriş Çıkış
Video Ses (Sol / Sağ) RGB Video + Ses (Sol / Sağ)
EXT 1 O O O Yalnızca TV veya DTV çıkışı kullanılabilir.
EXT 2 O O X Seçebileceğiniz çıkış.
! A
V IN [VIDEO] / [R-AUDIO-L]
Kamera veya VCR gibi harici cihazlar için video kamera ve ses girişleri.
@ USB
Yazılım yükseltmeleri ve Media Play, vb için konektör.
#
Bazı kanallara ‘CI(CI+) KARTI’ yerleştirilmediğinde, ekranda ‘Karışmış Sinyal’ görüntülenir.
Bir telefon numarası, ‘CI(CI+) KARTI’ Kimliği, Ana Makine Kimliği ve diğer bilgileri içeren eşleştirme bilgileri yaklaşık 2~3
dakika içinde görüntülenecektir. Bir hata iletisi görüntülenirse, lütfen hizmet sağlayıcınızla görüşün.
Kanal bilgileri yapılandırması tamamlandığında, kanal listesinin artık güncellendiğini belirten 'Güncelleme
Tamamlandı'
mesajı görüntülenir.
Modele bağlı olarak, CI Kartını tekrar taktığınızda Ebeveyn Kilidi parolanızı isteyen bir mesaj belirebilir.
Modele bağlı olarak, Ebeveyn Kilidi olarak ayarlanmış olsa da, yetişkinlere (18 yaş ve üzeri) yönelik
programlar için parolanızı isteyen bir mesaj belireblir.
Yerel bir kablo hizmet sağlayıcısından bir ‘CI(CI+) KARTI’ kimliği edinmeniz gerekir. ‘CI(CI+) KARTI’ düştüğünde hasar
görebileceğinden, ‘CI(CI+) KARTI’nı elinizle dışarı doğru çekerek dikkatlice çıkarın.
‘CI(CI+) KARTI’nı üzerinde belirtilen yönde yerleştirin.
COMMON INTERFACE Yuvasının yeri, modeline bağlı olarak farklılık gösterebilir.
Bazı ülkelerde, bölgelerde, radyo istasyonlarında ‘CI(CI+) CARD’ desteklenmez ye
tkili bayinize danışın.
CI+ işlevi yalnızca LE********P modeline uygulanabilir.
Eğer sorun yaşarsanız, lütfen servis sağlayıcınız ile irtibat kurun.
N
N
N
N
N
N
N
N
–
–
N
N
N
N
N
[620-Weuro]BN68-02326A-03L09.ind5 5 2009-10-08 ¿ÀÀü 9:31:15

Türkçe - 6
Uzaktan kumandayı TV'den en fazla 23 fit kadar uzakta kullanabilirsiniz.
Uzaktan kumandanın performansı parlak ışıktan etkilenebilir.
Ürünün rengi ve şekli, modele bağlı olarak farklılık gösterebilir.
1
POWER: TV'yi açar ve kapatır.
2
: Kanalı
değiştirmek için basın.
3
FAV.CH: Ekranda Favori Kanal
Listelerini görüntülemek için
kullanılır.
4
Y
: Ses seviyesini artırmak
veya azaltmak için basın.
5
SOURCE: Kullanılabilir video
kaynaklarını görüntülemek ve
seçmek için basın.
6
INFO : TV ekranında bilgi
görüntülemek için basın.
7
TOOLS: Sık kullanılan işlevleri
hızla seçmek için kullanın.
8
CH LIST: Ekranda Kanal
Listelerini görüntülemek için
kullanılır.
9
: Bu
düğmeleri, Kanal listesi, Media
Play menüsü, vs.'de kullanın.
!
DUAL: Ses efekti seçimi
@
Bu düğmeleri Kanal Listesi,
Media Play ve Anynet
+
içinde
kullanın. (
∏
: Bu uzaktan
kumanda, Anynet
+
özelliği olan
Samsung kaydedicilerde kaydı
kontrol etmek için kullanılabilir)
#
TV: Doğrudan TV modunu seçer.
$
PRE-CH: Önceki izlediğiniz
kanala dönmenizi sağlar.
%
MUTE
M
: Sesi geçici olarak
kesmek için basın.
^
>
P
<
: Kanalları değiştirmek
için basın.
&
MENU: Ana ekran menüsünü
görüntüler.
*
GUIDE: Elektronik Program
Kılavuzu (EPG) ekranı
(
RETURN: Önceki menüye geri
döner
)
E
:
Ekran üzerindeki menü öğelerini
seçmek ve menü değerlerini
değiştirmek için kullanın.
a
EXIT: Menüden çıkmak için
basın.
b
P.SIZE: Resim boyutu seçimi
c
MEDIA.P: Müzik dosyalarınızı ve
resimlerinizi oynatabilirsiniz.
d
SUBT. : Dijital altyazı görünümü
e
AD: Sesli Açıklama seçimi.
5
0
: Teletekst modu seçimi
(LIST / FLOF)
6
5
: Teletekst gösterimi
7
4
: Teletekst boyutu seçimi
8
8
: Teletekst hafızaya alma
9
Fastekst konu seçimi
0
/
: Alternatif olarak
Teletekst, Çift ya da Karışık
seçin.
#
:
: Teletekst gösteriminden
çıkış
$
1
: Teletekst alt sayfası
^
2
: Teletekst sonraki sayfa
3
: Teletekst önceki sayfa
&
6
: Teletekst dizini
(
9
: Teletekst tutma
a
7
: Teletekst iptal
¦
N
N
N
INFO
C
H
L
I
S
T
AD
1 #
$
^
*
(
)
a
b
c
e
d
%
&
2
3
4
5
6
7
8
9
0
!
@
[620-Weuro]BN68-02326A-03L09.ind6 6 2009-10-08 ¿ÀÀü 9:31:15

Türkçe - 7
Uzaktan Kumandaya Pil Takma
1. Resimde gösterildiği gibi uzaktan kumandanın arkasındaki kapağı kaldırın.
2. İki AAA boyutunda pil takın.
Pil uçlarındaki '+' ve '–' işaretlerinin bölme içindeki şekille eşleşmesine dikkat edin.
3.
Kapağı çıkarın.
Uzaktan kumandayı uzunca bir süre kullanmayacaksanız, pilleri çıkarın ve serin, kuru bir
yerde saklayın. (Normal TV kullanımına göre piller yaklaşık bir yıl dayanmalıdır.)
Uzaktan kumanda çalışmazsa, aşağıdakileri kontrol edin:
TV açık mı?
Pillerin artı ve eksi uçları ters olarak mı takılmış?
Piller bitmiş mi?
Elektrik kesintisi veya güç kablosunun çıkması gibi bir durum var mı?
Yakınlarda özel flüoresan lambası veya neon işareti var mı?
OPERATION
TV'yi kullanmadan önce, değişik fonksiyonları seçmek ve ayarlamak için menüde nasıl dolaşılabileceğini öğrenmek amacıyla
aşağıdaki adımları izleyin.
Erişim adımı seçilen menüye göre farklılık gösterebilir.
1. MENU düğmesine basın.
2.
Ana menü ekranda görünür. Menünün sol tarafında simgeler bulunur: Görüntü, Ses,
3. Simgelerden birini seçmek için ▲ ya da ▼ düğmesine basın.
4.
Ardından simgenin alt menüsüne erişmek için ENTER
E
düğmesine basın.
5. Simgenin alt menüsünü seçmek için ▲ ya da ▼ düğmesine basın.
6.
Belirli bir öğenin değerini azaltmak veya artırmak için ◄ ya da ► düğmesine basın. OSD
ayarlama işlemi seçilen menüye göre farklılık gösterebilir.
7
. Yapılandırmayı tamamlamak için ENTER
E
düğmesine basın. Çıkmak için EXIT
düğmesine basın.
¦
N
N
N
¦
❑
INFO
AD
MENU Düğmesi
Ana ekran menüsünü görüntüler.
ENTER
E
/ DIRECTION düğmeleri
İmleci hareket ettirir ve öğeyi seçer.
Geçerli olarak seçili olan öğeyi seçer.
Ayarları onaylar.
RETURN Düğmesi
Önceki menüye geri döner.
EXIT
Ekran menüsünden çıkar.
INFO
AD
INFO
AD
Modu :Standart ▶
ArkaAydınlatma :7
Kontrast :95
Parlaklık :45
Netlik :50
Renk :50
Ton(G/R) :G50/R50
GelişmişAyarlar
Görüntü
Modu :Standart
ArkaAydınlatma :7 ▶
Kontrast :95
Parlaklık :45
Netlik :50
Renk :50
Ton(G/R) :G50/R50
GelişmişAyarlar
ResimSeçenekleri
Görüntü
7
U
Taşı
L
Ayarla
E
Giriş
R
Geri
▲
ArkaAydınlatma
▼
Yardım simgesi:
[620-Weuro]BN68-02326A-03L09.ind7 7 2009-10-08 ¿ÀÀü 9:31:15

Türkçe - 8
Cihazınız, güç tüketimini azaltmak için bekleme moduna alınabilir. Bekleme modu izlemeyi geçici olarak (örneğin yemek sırasında)
kesmek istediğinizde yararlı olur.
1. Uzaktan kumandadaki POWER
P
düğmesine basın.
Ekrandaki görüntü kapanır ve cihazınızın üzerinde bir bekleme göstergesi yanar.
2.
Ayarınızı eski durumuna getirmek için sadece POWER
P
yeniden basın.
Cihazınızı uzun süre (örneğin, tatile gittiğinizde) bekleme modunda bırakmayın. Cihazı elektrik şebekesinden ve anten
bağlantılarından ayırmak en doğru işlemdir.
TV ilk kez açıldığında, temel ayarlar otomatik olarak başlar ve birbiri ardına devam eder.
1. Uzaktan kumandadaki POWER düğmesine basın.
Ayrıca TV'deki POWER
P
düğmesini de kullanabilirsiniz.
Select the OSD Language. mesajı gösterilir.
2.
ENTER
E
düğmesine basın. ▲ veya ▼ düğmesine basarak uygun dili seçin. Seçiminizi
onaylamak için ENTER
E
düğmesine basın.
3. ◄ ya da ► düğmesine basarak Dükkan Demo veya seçimini yapın,
ardından ENTER
E
düğmesine basın.
Ev ortamınızda en iyi resim için TV'yi moduna ayarlamanızı öneririz.
Dükkan Demosu modu yalnızca satış ortamlarında kullanmak içindir.
Cihaz yanlışlıkla Dükkan Demosu moduna alınmışsa ve (Standart) moduna geri dönmek istiyorsanız:
TV'deki ses düğmesine basın. Ses OSD görüntülendiğinde televizyon üzerindeki MENU düğmesini 5 saniye boyunca
basılı tutun.
4.
ENTER
E
düğmesine basın. ▲ veya ▼ düğmesine basarak uygun ülkeyi seçin. Seçiminizi onaylamak için ENTER
E
düğmesine basın.
menüsünden ülkeyi seçtikten sonra, bazı modeller pin numarasını ayarlamak için ek bir seçenek içerebilir
.
PIN numarasını girdiğinizde, 0-0-0-0 kullanılabilir değildir.
5.
veya Kablo seçimini yapmak için ▲ veya ▼ düğmesine ve ardından ENTER
E
düğmesine basın.
Dış anten sinyalidir.
Kablo: Kablolu anten sinyalidir.
6.
▲ veya ▼ düğmesine basarak hafızaya alınacak kanal kaynağını seçin. öğesini seçmek için ENTER
E
düğmesine
basın.
Anten kaynağını Kablo olarak ayarladığınızda, dijital kanal araması için bir değer ayarlamanızı sağlayan bir adım belirir
.
Daha fazla bilgi için, kısmına bakın.
Dijital ve Analog: Dijital ve Analog kanallar.
Dijital: Dijital kanallar.
Analog: Analog kanallar.
Kanal arama otomatik olarak başlatılır ve sonlandırılır.
Kayda alma işlemini herhangi bir anda kesmek için ENTER
E
düğmesine basın.
Kullanılabilir tüm kanallar hafızaya alındıktan sonra, mesajı gösterilir.
7
. ENTER
E
düğmesine basın. Oto seçimini yapmak için ▲ veya ▼ düğmesine ve adından ENTER
E
düğmesine basın.
Manuel seçeneğini seçerseniz, gösterilir.
Bir dijital sinyal alırsanız, zaman otomatik olarak ayarlanacaktır.
Ayarlanmazsa, saati ayarlamak için Manuel seçeneğini
seçin.
8. En iyi HD ekranını sağlayan bağlantı yönteminin açıklaması görüntülenir.
Açıklamayı kontrol edin ve ENTER
E
düğmesine
basın.
9.
mesajı görüntülenir. Bitirdiğinizde ENTER
E
düğmesine basın.
1. Menüyü görüntülemek için MENU düğmesine basın. Kurulum seçimini yapmak için
▲ ya da ▼ düğmesine, ardından ENTER
E
düğmesine basın.
2. Plug & Play seçeneğini seçmek için ENTER
E
düğmesine tekrar basın.
3. 4 basamaklı PIN numaranızı girin. Yeni bir TV'nin varsayılan PIN numarası '0-0-0-0'dır.
PIN numarasını değiştirmek istiyorsanız, işlevini kullanın.
Plug & Play özelliği yalnızca TV modunda kullanılabilir.
¦
N
N
¦
N
N
N
N
N
N
N
N
N
N
N
N
N
N
N
N
N
N
INFO
AD
SelecttheOSDLanguage.
MenuLanguage :English ▶
E
Enter
Plug&Play
TakveÇalıştır ▶
MenüDili :Türkçe
Zaman
Yayın
Güvenlik
Genel
Kurulum
[620-Weuro]BN68-02326A-03L09.ind8 8 2009-10-08 ¿ÀÀü 9:31:16

Türkçe - 9
Ekran, geçerli kanalı ve bazı belirli ses-video ayarlarının durumunu tanımlar.
Bilgileri görüntülemek için INFO düğmesine basın.
Uzaktan kumandadaki INFO düğmesine basın. TV; kanalı, sesin türünü ve belirli görüntü ve
ses ayarlarının durumunu görüntüleyecektir.
▲, ▼: Diğer kanal bilgilerini görüntüleyebilirsiniz. Geçerli durumda seçili kanala
gitmek istediğinizde, ENTER
E
düğmesine basın.
◄, ►: Geçerli kanalda istenen programın bilgilerini görüntüleyebilirsiniz.
INFO düğmesine bir kez daha basın veya yaklaşık 10 saniye bekleyin, ekran
otomatik olarak kaybolur.
KANAL
Kanal Menüsü
Analog Kanal
Analog kanallar için ülkeyi değiştirebilirsiniz.
Dijital Kanal
Dijital kanallar için ülkeyi değiştirebilirsiniz.
PIN numarası giriş ekranı görünür. 4 basamaklı PIN numaranızı girin.
Kullanabileceğiniz frekans aralıklarını tarayabilirsiniz (ve kullanılabilirlik ülkenize göre değişir). Otomatik olarak yerleştirilen program
numaraları, gerçek ya da istenen program numaralarına uymayabilir.
Bir kanal Çocuk Kilidi işlevi kullanılarak kilitlenmişse, PIN giriş penceresi görünür.
Anten / Kablo
Hafızaya alınacak anten kaynağıdır
Dijital ve Analog: Dijital ve Analog kanallar.
Dijital: Dijital kanallar.
Analog: Analog kanallar.
Kablo kanallarını taramak için bir değer girin.
Network ID: Ağ kimliği kodunu görüntüler.
Frekans: Kanalın frekansını görüntüler. (Her ülkede farklıdır)
Modülasyon: Kullanılabilir modülasyon değerlerini görüntüler.
: Kullanılabilir sembol hızlarını görüntüler.
Etkin yayın istasyonları olan tüm kanalları tarar ve bunları TV'nin hafızasına kaydeder.
Otomatik Kayıt işlemini durdurmak istiyorsanız, ENTER
E
düğmesine basın.
mesajı gösterilecektir.
◄ ya da ► düğmesine basarak Evet seçeneğini seçin, ardından ENTER
E
düğmesine basın.
¦
O
●
●
N
¦
❑
■
■
N
❑
N
■
●
●
●
●
N
N
N
INFO
AD
Ülke ▶
Otomatikkayıt
Ellekayıt
KabloluAramaSeçeneği
TamKılavuz
MiniKılavuz
VarsayılanKılavuz :TamKılavuz
KanalListesi
Kanal
DTV Air
15
abc1
18:00 ~ 6:00
18:11 Thu 6 Jan
Life On Venus Avenue
Unclassified
No Detaild Information
' Information
[620-Weuro]BN68-02326A-03L09.ind9 9 2009-10-08 ¿ÀÀü 9:31:16

Türkçe - 10
Bir kanalı elle tarar ve bunu TV'nin hafızasına kaydeder.
Bir kanal Çocuk Kilidi işlevi kullanılarak kilitlenmişse, PIN giriş penceresi görünür.
Dijital Kanal
Dijital kanalların elle kaydedilmesi.
Dijital Kanal yalnızca DTV modunda geçerlidir.
Kanal: ▲, ▼ ya da sayı (0~9) düğmelerini kullanarak Kanal numarasını ayarlayın.
Frekans: Sayı düğmelerini kullanarak frekansı ayarlayın.
: ▲, ▼ ya da sayı (0~9) düğmelerini kullanarak bant genişliğini ayarlayın.
Tamamlandığında, kanal listesindeki kanallar güncellenir.
Analog Kanal
Analog kanalların elle kaydedilmesi.
Program (Kanala atanacak program numarası): ▲, ▼ ya da sayı (0~9) düğmelerini kullanarak program numarasını ayarlar.
: ▲ veya ▼ düğmesini kullanarak renk sistemi değerini ayarlar.
: ▲ veya ▼ düğmesini kullanarak ses sistemi değerini ayarlar.
Kanal (Kaydedilecek kanal numarasını biliyorsanız): ▲ veya ▼ düğmesine basarak C (Karasal kanal) ya da S (Kablo kanalı)
seçimini yapın. ► düğmesine basın, ardından gerekli numarayı seçmek için ▲, ▼ ya da sayı (0~9) düğmelerine basın.
Kanal numarasını, sayı (0~9) düğmelerine basarak da doğrudan seçebilirsiniz.
Normal olmayan bir ses varsa veya ses yoksa, gerekli ses standardını yeniden seçin.
Ara (Kanal numaralarını bilmediğinizde): Aramayı başlatmak için ▲ veya ▼ düğmesine basın. Kanal ayarcısı ilk kanal ya da
sizin seçtiğiniz kanal ekranda görüntülenene kadar frekans aralığını tarar.
(Kanal ve ilgili program numarasını kaydettiğinizde): ENTER
E
düğmesine basarak Tamam ayarına getirin.
Kanal modu
P (Program modu): Ayarlama tamamlanırken, bölgenizdeki yayın istasyonları, P00 ile P99 arasındaki konum numaralarına
atanırlar. Bu modda iken konum numarasını girerek bir kanalı seçebilirsiniz.
C (Karasal kanal modu): Bu modda iken, antenle alınan her bir istasyona atanmış numarayı girerek bir kanal
seçebilirsiniz.
S (Kablo kanalı modu): Bu modda iken, kablo ile alınan her bir istasyona atanmış numarayı girerek bir kanal seçebilirsiniz.
Kablo TV şebekesi araması için frekans ve simge hızı gibi ek arama seçeneklerini ayarlar.
(Frekans Başlatma): Başlangıç frekansını ayarlayın (Her ülke için farklıdır)
(Frekans Durdurma): Bitiş frekansını ayarlayın (Her ülke için farklıdır)
Modülasyon: Kullanılabilir modülasyon değerlerini görüntüler.
: Kullanılabilir sembol hızlarını görüntüler.
EPG (Elektronik Program Kılavuzu) bilgileri yayıncılar tarafından sağlanır. Herhangi bir kanalda bilgi yayını sebebiyle boş veya
güncelliğini yitirmiş program girişleri görünebilir. Yeni bilgiler gelir gelmez ekran dinamik şekilde güncellenir.
Kılavuz menüsünü görüntülemek için GUIDE düğmesine basmanız da yeterlidir. ( öğesini yapılandırmak
için açıklamalara bakın.)
Program bilgilerini zamana göre sıralanmış Bir saatlik dilimler şeklinde görüntüler. Zamana göre ileri ya da geri kaydırılabilen iki
saatlik program bilgileri görüntülenir.
Her programın bilgisi geçerli kanalın Mini Kılavuz ekranının her satırında geçerli programdan ileriye doğru program başlangıç
zaman sırasına doğru gösterilir.
❑
N
N
■
N
●
●
●
N
■
●
●
●
●
N
N
●
●
N
❑
●
●
●
●
❑
O
■
■
[620-Weuro]BN68-02326A-03L09.ind10 10 2009-10-08 ¿ÀÀü 9:31:16

Türkçe - 11
Uzaktan kumandadaki GUIDE düğmesi basıldığında ya da görüntülemeyi seçebilirsiniz.
Kanal Listesi
Kanal Listesi kullanma hakkında ayrıntılı prosedürler için 'Kanalları Yönetmek' talimatlarına bakın.
Uzaktan kumanda üzerindeki CH LIST düğmesine basarak bu seçenekleri belirleyebilirsiniz.
Kanal modu
P
>
/
<
düğmesine basıldığında, Kanallar seçilen kanal listesi içerisinde değiştirilir.
Eklenen Kanallar
Kanallar hafızaya alınan kanal listesi içerisinde değiştirilir.
Favori Kanallar
Kanallar sık kullanılan kanal listesi içerisinde değiştirilir.
Alınan görüntü netse, arama ve kaydetme işlemi sırasında otomatik olarak yapılmış olduğu için kanalın ince ayarını yapmanıza
gerek yoktur. Ancak sinyal zayıf ya da bozuksa, kanalın ince ayarını elle yapmanız gerekebilir.
İnce ayarlanan kanalların, kanal etiketindeki kanal numarasının sağ tarafında bir yıldız '*' işareti bulunur
.
İnce ayarı sıfırlamak için, ▲ veya ▼ düğmesine basarak seçeneğini seçin ve ardından ENTER
E
düğmesine basın.
Yalnızca Analog TV kanallarında ince ayar yapılabilir.
Amaç...
EPG listesindeki bir programı seyretmek ▲, ▼, ◄, ► düğmesine basarak bir program seçin.
Kılavuzdan çıkmak Mavi düğmeye basın
Sonraki program seçilirse, saat simgesi görüntülenerek program zamanlanır. Eğer ENTER
E
düğmesine tekrar basılırsa, ◄, ►
düğmesine basarak seçeneğini seçin, saat simgesinin kaybolması ile zamanlama işlemi iptal edilir.
Program bilgilerini izlemek ▲, ▼, ◄, ► düğmesine basarak istediğiniz bir programı seçin.
Ardından istediğiniz program vurgulandığında INFO düğmesine basın.
Program başlığı, ekran merkezinin üst kısmındadır.
Ayrıntılı bilgi için INFO düğmesine basın. Ayrıntılı bilgi içinde Kanal Numarası, Çalışma Süresi, Durum Çubuğu, Ebeveyn Seviyesi,
Video Kalitesi Bilgileri (HD / SD), Ses Modları, Altyazı veya Teletekst, Altyazı veya Teletekst dilleri ve vurgulanan programın kısa
özeti bulunur. ‘...’ özet uzunsa görüntülenecektir.
ile arasında geçiş yapma Kırmızı düğmeye art arda basın.
Tam Kılavuz'da
Geriye hızlı hareket (24 saat).
İleriye hızlı hareket (24 saat).
Yeşil düğmeye art arda basın.
Sarı düğmeye art arda basın.
❑
❑
O
❑
■
■
❑
N
N
N
TamKılavuz
E
İzle Bilgi Sayfa MiniKılavuz +24Saat Çıkış
DTVCable900ftn2:10Tue1Jun
FreshmenOnCampus
2:00
-2:30
NoDetailedInformation
Bugün
2:00-3:00 3:00-4:00
MintExtra
Loaded
40withDynamiteMC
TheDistillery
SmashHits!Pazar
900ftn
901ITVPlay
902Kerrang!
903Kiss
904oneword
905Hits
▼
StreetHypn..
Kisstory
No
Information
NoInformation
NoInformation
FreshmenO..
900
E
İzle Bilgi Sayfa TamKılavuz Çıkış
MiniKılavuz DTVCable900ftn
StreetHypnosis
BoozeBritain
2:00
2:30
5:00
Freshmen
OnCampus
▼
[620-Weuro]BN68-02326A-03L09.ind11 11 2009-10-08 ¿ÀÀü 9:31:16

Türkçe - 12
Bu menüyü kullanarak favori kanalları ekleyebilir / silebilir ya da ayarlayabilir ve dijital yayınlar için program kılavuzunu
kullanabilirsiniz.
Tüm Kanallar
O anda mevcut tüm kanalları gösterir.
Eklenen Kanallar
Tüm eklenmiş kanalları gösterir.
Favori
Tüm favori kanalları gösterir.
Ayarladığınız favori kanalları seçmek için uzaktan kumandadaki FAV.CH düğmesine basın.
Tüm geçerli rezerv edilmiş kanalları gösterir.
Tüm Kanallar, Eklenen Kanallar ya da Favori ekranında ▲ / ▼ düğmelerine ve ENTER
E
düğmesine basarak bir kanal
seçin. Ardından seçilen kanalı izleyebilirsiniz.
Kanal Listesinde Renk düğmelerinin kullanılması
Kırmızı (Kanal Tipi): ve Tümü seçenekleriniz arasında geçiş yapın.
Yeşil (Zoom): Bir kanal numarasını büyütür ya da küçültür.
Sarı (Seç): Birden fazla kanal listesi seçer. Aynı anda birden fazla kanal için ekleme / silme, favorilere ekleme /
favorilerden silme işlevlerini gerçekleştirebilirsiniz. Tüm seçilmiş kanalları aynı anda ayarlamak için gerekli kanalı seçin ve
Sarı düğmeye basın. Seçilen kanalların solunda
c
işareti görünür.
TOOLS (Araçlar): Sil (veya Ekle), (veya ), Kilit (veya Kilit aç),
(veya Tüm seçimleri
), menüsü. (Seçenekler menüleri duruma göre değişebilir.)
Kanal Durum Ekranı Simgeleri
A
: Bir Analog kanal.
c
: Sarı düğmeye basılarak seçilen bir kanal.
*
: Favori olarak ayarlanmış bir kanal.
(
: Geçerli olarak yayınlanmakta olan bir kanal.
\
: Kilitlenmiş bir kanal.
)
: Rezerv edilmiş bir program
Kanal Listesi Seçenek Menüsü (Tüm Kanallar / Eklenen Kanallar / Favori)
Seçenek menüsünü kullanmak için TOOLS düğmesine basın.
Seçenek menüsü öğeleri kanal durumuna göre değişebilir.
Ekle / Sil
İstediğiniz kanalları görüntülemek için bir kanalı silebilir ya da ekleyebilirsiniz.
Silinen tüm kanallar Tüm Kanallar menüsünde gösterilecektir.
Gri renkli bir kanal, kanalın silindiğini gösterir.
Ekle menüsü yalnızca silinmiş kanallar için görünür.
Ayrıca bir kanalı Eklenen Kanallar ya da Favori menüsünde de aynı şekilde silebilirsiniz.
Sık seyrettiğiniz kanalları favoriler olarak ayarlayabilirsiniz.
Araçlar menüsünü görüntülemek için TOOLS düğmesine basın. Ayrıca Favorilerde yapılan ekleme (ya da silme) işlemini
(ya da ) öğelerini seçerek de yapabilirsiniz.
'
*
' sembolü gösterilecek ve kanal bir favori olarak ayarlanacaktır.
Tüm favori kanallar Favori menüsünde gösterilecektir.
Kilit / Kilit aç
Bir kanalı kilitleyebilirsiniz, böylece kanal seçilemez ve izlenemez.
Bu işlev yalnızca Çocuk Kilidi öğesi olarak ayarlandığında kullanılabilir.
PIN numarası giriş ekranı görünür. 4 basamaklı PIN numaranızı girin.
Yeni bir TV'nin varsayılan PIN numarası '0-0-0-0' dır. Menüden seçimini yaparak PIN'i değiştirebilirsiniz.
'
\
' sembolü gösterilecek ve kanal kilitlenecektir.
¦
■
■
■
O
■
N
N
N
N
N
■
N
N
N
N
■
T
N
N
■
N
N
N
N
TümKanallar
824UKTVGold
825UKTVstyle
A
1C--
A
2C--
A
3C--
A
4C--
A
5C--
A
6C--
A
7C--
A
8C--
Tümü KanalTipi Zoom Seçim
T
Araçlar
Sil
SıkKullanılanlaraEkle
Kilit
Zmnlycyl
Syrtm
KanalAdıDüzenleme
Sınıflama
EklenenKanallar
824UKTVGold
825UKTVstyle
A
1C--
A
2C--
A
3C--
A
4C--
A
5C--
A
6C--
A
7C--
A
8C--
Tümü KanalTipi Zoom Seçim
T
Araçlar
[620-Weuro]BN68-02326A-03L09.ind12 12 2009-10-08 ¿ÀÀü 9:31:17

Türkçe - 13
Zmnlycyl Syrtm
İzlemek istediğiniz bir programı rezerv ettiyseniz, başka bir kanal izliyor olsanız bile kanal otomatik olarak Kanal Listesindeki rezerv
edilmiş kanala geçecektir. Bir programı rezerv etmek için önce geçerli zamanı ayarlayın.
Yalnızca hafızaya alınmış kanallar rezerv edilebilir.
Uzaktan kumanda üzerindeki numara düğmelerine basarak kanal, gün, ay, yıl, sa
at ve dakika ayarlarını doğrudan
yapabilirsiniz.
Bir programın rezerv edilmesi menüsünde gösterilecektir.
Dijital Program Kılavuzu ve İzleme Rezervasyonu
Bir dijital kanal seçildiğinde ve ► düğmesine bastığınızda kanalın Program Kılavuzu görünür
. Yukarıda anlatılan prosedürlere
göre bir programı rezerve edebilirsiniz.
Kanallar çağrı harfleri kanal seçildiğinde görünecek şekilde etiketlenebilir.
Dijital yayın kanallarının adları otomatik olarak atanır ve yeniden adlandırılamaz.
Uzaktan kumanda üzerindeki numara düğmelerine basarak da kanal numarasını düzenleyebilirsiniz.
Bu işlem, kayıtlı kanalların program numarasını değiştirmenize olanak verir. Bu işlem otomatik kaydetme kullanıldıktan sonra
gerekli olabilir.
Tümünü Seç: Kanal listesindeki tüm kanalları seçebilirsiniz.
: Seçilmiş kanalların hepsini seçilmemiş konuma getirebilirsiniz.
Ancak seçilmiş bir kanal olduğunda seçimini yapabilirsiniz.
Seçeneklerin ayarlanması hakkındaki ayrıntılı prosedürler için ‘Kanal Menüsü’ talimatlarına bakın.
Bir kanal Çocuk Kilidi işlevi kullanılarak kilitlenmişse, PIN giriş penceresi görünür.
Kanal Listesi Seçenek Menüsü ( içinde)
Bir rezervasyonu görüntüleyebilir, değiştirebilir ya da silebilirsiniz.
Seçenek menüsünü kullanmak için TOOLS düğmesine basın.
Bir izleme rezervasyonunu değiştirmek için seçin.
Bir izleme rezervasyonunu iptal etmek için seçin.
Bilgi
Bir izleme rezervasyonunu izlemek için seçin.
(Ayrıca rezervasyon bilgisini de değiştirebilirsiniz.)
Tümünü Seç
Tüm rezerv edilmiş programları seçin.
■
N
N
N
N
■
N
■
■
■
●
●
N
■
N
N
N
■
■
■
■
Programlandı
1/1/2009
13:595TV1
)
18:592TV3
)
TheEqualizer
20:592TV3
)
McMillan&Wife
21:592TV3
)
M.Spillane’smike
Tümü Zoom Seçim
T
Araçlar
E
Bilgi
BilgileriDeğiştirme
PrgrmlrDğştrm
Bilgi
Tümünü
Seç
[620-Weuro]BN68-02326A-03L09.ind13 13 2009-10-08 ¿ÀÀü 9:31:17

Türkçe - 14
Modu
İzleme gereksinimlerinize en uygun resim türünü seçebilirsiniz.
Araçlar menüsünü görüntülemek için TOOLS düğmesine basın. Ayrıca
Modu seçimini yaparak resim modunu ayarlayabilirsiniz.
Dinamik
Aydınlık bir odada artırılmış tanımlamalı görüntü için resim türünü seçer.
Standart
Normal bir odada en iyi görüntü için resim türünü seçer.
En iyi ve göze en rahat görünen görünüm için resimleri seçer.
Bu işlev PC modunda kullanılamaz.
Sinema
Karanlık bir odada film izlemek için görüntü türünü seçer.
Televizyonunuzda, resim kalitesini kontrol etmenizi sağlayacak çeşitli ayar seçenekleri
bulunmaktadır.
: LCD arka aydınlatmanın parlaklığını ayarlar.
Kontrast: Resmin kontrast seviyesini ayarlar.
: Resmin parlaklık seviyesini ayarlar
Netlik: Resmin kenar tanımlamasını ayarlar.
Renk: Resmin renk doygunluğunu ayarlar.
Ton (G/R): Resmin renk tonunu ayarlar.
PAL sistemin analog TV,Harici, AV modlarında Ton (G/R) İşlevini kullanamazsınız.
ya da Ton (G/R) öğelerinde değişiklik yaptığınızda OSD buna uygun
şekilde ayarlanır.
PC modunda, yalnızca
ve ayarlarında değişiklik yapabilirsiniz.
Ayarlar, TV'nin bir girişine bağladığınız her harici cihaz için ayarlanabilir ve saklanabilir.
Resmin parlaklık düzeyi azaltılırsa kullanım süresince tüketilen enerji önemli ölçüde azaltılabilir ve bu, toplam çalışma
maliyetini düşürür.
Samsung'un yeni TV'leri önceki modellere göre daha hassas resim ayarları yapmanıza izin verir.
menüsü, Standart veya Sinema modunda kullanılabilir.
PC modunda
öğeleri arasından yalnızca Dinamik Kontrast, Gamma ve
Beyaz Dengesi öğelerinde değişiklik yapabilirsiniz.
Ekran derinliğini ayarlamak için ekrandaki siyahlık düzeyini seçebilirsiniz.
En iyi kontrast sağlanacak şekilde ekran kontrastını ayarlayabilirsiniz.
Gamma
Birincil renk (kırmızı, yeşil, mavi) yoğunluğunu ayarlayabilirsiniz.
¦
❑
T
■
■
■
N
■
❑
●
●
●
●
●
●
N
N
N
N
N
❑
N
N
■
■
■
Modu :Standart ▶
ArkaAydınlatma :7
Kontrast :95
Parlaklık :45
Netlik :50
Renk :50
Ton(G/R) :G50/R50
GelişmişAyarlar
Görüntü
7
U
Taşı
L
Ayarla
E
Giriş
R
Geri
▲
ArkaAydınlatma
▼
SiyahTonu :Kpalı ▶
DinamikKontrast :Orta
Gamma :0
RenkAlanı :Doğal
BeyazDengesi
TenTonu :0
KenarGeliştirme :Açık
U
Taşı
E
Giriş
R
Geri
GelişmişAyarlar
[620-Weuro]BN68-02326A-03L09.ind14 14 2009-10-08 ¿ÀÀü 9:31:17

Türkçe - 15
Renk alanı kırmızı, yeşil ve mavi renklerden oluşan bir renk tablosudur. En doğal renkleri yaşamak için beğendiğiniz renk alanını
seçin.
Oto: Auto Colour Space, program kaynaklarına dayalı en doğal renk tonunu otomatik olarak ayarlar.
: Native Colour Space, derinliği olan zengin bir renk tonu sunar.
Özel: Renk aralığını tercihinize göre ayarlar.
Ayar değerinin değiştirilmesi ayarlanmış ekranı yenileyecektir.
Ayarlar, TV'nin bir girişine bağladığınız her harici cihaz için ayarlanabilir ve saklanabilir. Örneğin HDMI 1'e bağlanmış bir
DVD oynatıcınız varsa ve o anda seçiliyse, ayarlar ve düzenlemeler DVD oynatıcı için kaydedilecektir
.
ya da Macenta
Renk, öğesi Özel olarak ayarlandığında kullanılabilir.
Renk içinde seçilen rengin RGB değerlerini ayarlayabilirsiniz.
Ayarlanan RGB değerini sıfırlamak için seçeneğini seçin.
: Seçilen rengin kırmızı doygunluk seviyesini ayarlar.
: Seçilen rengin yeşil doygunluk seviyesini ayarlar.
Mavi: Seçilen rengin mavi doygunluk seviyesini ayarlar.
: Renk alanını varsayılan değerlere sıfırlar.
Beyaz Dengesi
Daha doğal resim renkleri için renk sıcaklığını ayarlayabilirsiniz.
R-Ofseti: Kırmızı renk karanlık seviyesini ayarlar.
G-Ofseti: Yeşil renk karanlık seviyesini ayarlar.
B-Ofseti: Mavi renk karanlık seviyesini ayarlar.
: Kırmızı renk parlaklık seviyesini ayarlar.
: Yeşil renk parlaklık seviyesini ayarlar.
: Mavi renk parlaklık seviyesini ayarlar.
: Daha önce ayarlanmış beyaz dengesi fabrika ayarlarına dönecektir.
Ten Tonu
Resimdeki pembe 'cilt tonu'nu vurgulayabilirsiniz.
Ayar değerinin değiştirilmesi ayarlanmış ekranı yenileyecektir.
Resimdeki nesne sınırlarını vurgulayabilirsiniz.
xvYCC modunu açık konuma getirmek HDMI veya Parça giriş jaklarıyla bağlanan harici cihazlardan (örn: DVD çalar) film
seyrederken detay ve renk alanını artırır.
xvYCC, resim modu Sinema olarak ayarlandığında ve harici giriş HDMI ya da Komponent moda ayarlandığında kullanılabilir
.
Bu işlev harici cihaza bağlı olarak desteklenmeyebilir.
■
●
●
●
N
N
N
N
N
■
●
●
●
●
●
●
●
■
N
■
■
N
N
[620-Weuro]BN68-02326A-03L09.ind15 15 2009-10-08 ¿ÀÀü 9:31:17

Türkçe - 16
Resim Seçenekleri
PC modunda Resim Seçenekleri öğeleri arasından yalnızca Renk Tonu ve Boyut
ayarlarında değişiklik yapabilirsiniz.
ya da yalnızca resim modu Sinema olduğunda etkinleşir.
Ayarlar, TV'nin bir girişine bağladığınız her harici cihaz için ayarlanabilir ve saklanabilir.
Boyut
Ara sıra ekrandaki görüntü boyutunu değiştirmek isteyebilirsiniz. TV'niz çeşitli ekran boyutu
seçenekleri ile birlikte gelir, bunların her biri belirli video giriş türleriniz ile en iyi çalışacak
şekilde tasarlanmıştır. Kablo TV alıcınız/uygu alıcınızın da kendi ekran boyutu ayarları olabilir. Bununla birlikte genel olarak TV'yi
olabildiğince 16:9 modun da izlemeniz gerekir.
Uzaktan kumanda üzerindeki P.SIZE düğmesine basarak bu seçenekleri belirleyebilirsiniz.
: Resim boyutunu otomatik olarak 16:9 en-boy oranına ayarlar.
16:9: Resim boyutunu, DVD'ler ya da geniş yayınlar için uygun 16:9 oranına getirir.
: Resmin boyutunu 4:3'ten daha fazla büyütür.
Zoom: 16:9 geniş resmi büyüterek (dikey yönde) ekran boyutuna sığdırır.
4:3: Video filmleri ya da normal yayın için bu varsayılan ayardır.
: HDMI (720p/1080i/1080p) veya Parça (1080i/1080p) sinyalleri girişi alınırken herhangi bir yerini kesmeden tam
görüntüyü görmek için bu işlevi kullanın.
Giriş kaynağına bağlı olarak, resim boyutu farklılık gösterebilir.
Kullanılabilir öğeler, seçilen moda bağlı olarak farklı olabilir.
PC Modunda, yalnızca 16:9 ve 4:3 modu ayarlanabilir.
Ayarlar, TV'nin bir girişine bağladığınız her harici cihaz için ayarlanabilir ve saklanabilir.
Cihazda iki saatten fazla durağan bir görüntü izlediğinizde geçici görüntü takılması oluşabilir
.
: ► düğmesine basarak Konum seçeneğini seçin ve ardından ENTER
E
düğmesine basın. Resmi yukarı /
aşağı hareket ettirmek için ▲ veya ▼ düğmesine basın. Ardından ENTER
E
düğmesine basın.
Zoom: ► düğmesine basarak Position seçeneğini seçin ve ardından ENTER
E
düğmesine basın. Resmi yukarı ve aşağı
hareket ettirmek için ▲ veya ▼ düğmesine basın. Ardından ENTER
E
düğmesine basın. ► düğmesine basarak Boyut
seçeneğini seçin ve ardından ENTER
E
düğmesine basın. Resim boyutunu dikey yönde büyütmek ya da küçültmek için
▲ veya ▼ düğmesine basın. Ardından ENTER
E
düğmesine basın.
HDMI (1080i / 1080p) ya da Parça (1080i / 1080p) modunda seçeneğini seçtikten sonra: ◄ veya ► düğmesine
basarak Konum seçeneğini belirleyin. Resmi hareket ettirmek için ▲, ▼, ◄ veya ► düğmesini kullanın.
: ◄ ya da ► düğmesine basarak seçeneğini seçin ve ardından ENTER
E
düğmesine basın. Ayarları
başlatabilirsiniz.
HDMI 720p girişiyle işlevini kullanırsanız, overscan işlevinde olduğu gibi 1 satır üstten, alttan, soldan ve sağdan
kesilir.
Resim boyutunu 16:9 geniş açı TV'de ayarına getirirken, 4:3 WSS (Geniş Ekran Hizmeti) görüntü görmek istediğiniz
görüntü boyutuna karar verebilir ya da hiçbir şey yapmayabilirsiniz. Her A
vrupa ülkesi farklı resim boyutu gerektirir, dolayısıyla bu
işlev kullanıcıların seçmesi için tasarlanmıştır.
16:9: Resmi 16:9 geniş moduna ayarlar.
: Resmin boyutunu 4:3'ten daha fazla büyütür.
Zoom: Resmin boyutunu ekranda dikey olarak büyütür.
4:3: Resmi 4:3 normal moduna ayarlar.
Bu işlev modunda kullanılabilir.
Bu işlev PC, Komponent veya HDMI modunda kullanılamaz.
TV'nizin aldığı yayın sinyali zayıfsa, ekranda görülebilecek parazit ya da gölgeleri gidermek için Dijital Gürültü
Azaltma özelliği
kullanılabilir.
Sinyal zayıfsa, en iyi resmi elde edinceye kadar diğer seçenekleri deneyin.
Ekran derinliğini ayarlamak için ekrandaki siyahlık düzeyini seçebilirsiniz.
Bu işlev, yalnızca harici cihaz TV'ye HDMI (RGB sinyalleri) yoluyla bağlıysa etkinleşir.
❑
N
■
N
N
■
O
●
●
●
●
●
●
N
N
N
N
N
N
N
N
N
■
●
●
●
●
N
N
■
N
■
N
RenkTonu :Normal ▶
Boyut :OtoGeniş
EkranModu :16:9
Dijitalazal :Oto
HDMISiyahlıkDüzeyi :Normal
Filmmodu :Kpalı
YalnızcaMaviModu :Kpalı
U
Taşı
E
Giriş
R
Geri
ResimSeçenekleri
[620-Weuro]BN68-02326A-03L09.ind16 16 2009-10-08 ¿ÀÀü 9:31:18

Türkçe - 17
TV, tüm kaynaklardan film sinyallerini otomatik olarak algılamak ve işlemek ve en iyi kalite için resmi ayarlamak üzere ayarlanabilir.
Film modu TV, AV, COMPONENT (480i / 1080i) ve HDMI (480i / 1080i) tarafından desteklenir.
: Film Modu işlevini kapatır.
Oto1: Film seyrederken resmi en iyi kaliteye otomatik olarak ayarlar.
Oto2: Bir film seyrederken ekrandaki video metnini (altyazılar hariç) otomatik olarak en iyi duruma getirir
.
Daha net resimler elde etmek için birçok hareket içeren hızlı sahnelerden yavaş hareketleri kaldırır
.
100 Hz Motion Plus özelliğini etkinleştirirseniz, ekranda parazit olabilir. Bu olursa 100Hz Motion Plus öğesini olarak
ayarlayın.
: 100Hz Motion Plus’ı kapalı konumuna getirir.
: 100Hz Motion Plus’ı en düşük ayara getirir.
Standart: 100Hz Motion Plus’ı orta olarak ayarlar.
: 100Hz Motion Plus’ı en yüksek ayara getirir.
Özel: Tercihlerinize uyması için bulanıklık ve titreme azaltma düzeyini ayarlar.
Bulanklk Azaltma: Video kaynaklarındaki bulanıklık azaltma düzeyini ayarlar.
Titreme Azaltma: Filmleri oynatırken video kaynaklarının titreme azaltma düzeyini ayarlar.
: Özel ayarları sıfırlar.
Demo: 100Hz Motion Plus’ın açık ve kapalı modları arasındaki farkı gösterir.
Bu işlev AV cihazı ölçüm uzmanları içindir. DVD çalar, Ev Sinema, vb. gibi video cihazlarının Color ve Tint'lerini ayarlamakta
kullanılan bir Blue Filter etkisi sağlamak için, bu işlev mavi sinyali sadece kırmızı ve yeşil sinyaller video sinyallerinden silindiğinde
ekrana getirir.Bu işlevi kullanarak, Color ve Tint'i, Kırmızı / Yeşil/Mavi / Cam Göbeği / Macenta Color Bar Patterns'i kullanan her
video cihazının sinyal düzeyine uygun tercih edilen değerlere ayarlayabilirsiniz.
, resim modu Sinema ya da Standart olarak ayarlandığında kullanılabilir.
Tüm resim ayarlarını varsayılan değerlere sıfırlar.
: Mevcut resim değerleri varsayılan ayarlara döner.
■
N
●
●
●
■
N
●
●
●
●
●
–
–
–
●
■
N
❑
N
[620-Weuro]BN68-02326A-03L09.ind17 17 2009-10-08 ¿ÀÀü 9:31:18

Türkçe - 18
Tipik bir bilgisayarın Windows ekran ayarları aşağıda gösterilmektedir. Kullandığınız
Windows'un sürümüne ve video kartınıza bağlı olarak PC'nizin gerçek ekranı büyük olasılıkla
bundan farklıdır. Ancak, sizin bilgisayarınızda açılan ekranlar farklı görünse de, çoğu durumda
aynı temel ayar bilgileri geçerli olacaktır. (Değilse, bilgisayar üreticinize ya da Samsung
Bayiine başvurun.)
1.
İlk olarak Windows başlat menüsünden 'Denetim Masası'nı tıklatın.
2.
Denetim masası penceresi göründüğünde, 'Görünüm ve Temalar' öğesini tıklatın, bir
iletişim kutusu açılır.
3.
Denetim masası penceresi göründüğünde, 'Ekran'ı tıklatın, bir ekran iletişim kutusu açılır
.
4. Ekran iletişim kutusunda 'Ayarlar' sekmesine gidin.
Doğru boyut ayarı (çözünürlük) - En iyi: 1920 X 1080 piksel
Ekran ayarları iletişim kutunuzda düşey frekans seçeneği varsa, doğru değer '60' ya
da '60 Hz'dir. Yoksa, 'TAMAM' düğmesini tıklatın ve iletişim kutusundan çıkın.
Sistemden gelen sinyal, standart sinyal moduyla aynıysa, ekran otomatik olarak ayarlanır. Sistemden gelen sinyal, standart sinyal
moduna eşit değilse, Videokart kullanıcı kılavuzuna bakarak modu ayarlayın, aksi halde görüntü gelmeyebilir. Sonraki sayfada
listelenen görüntü modları için ekran görüntüsü üretim sırasında en iyi duruma getirilmiştir
.
Modu Çözünürlük
Yatay Frekans
(KHz)
Dikey Frekans
(Hz)
Piksel Saati
Senkronizasyon
Polaritesi (Y/D)
IBM
640 x 350 31,469 70,086 25,175 +/-
720 x 400 31,469 70,087 28,322 -/+
MAC
640 x 480 35,000 66,667 30,240 -/-
832 x 624 49,726 74,551 57,284 -/-
1152 x 870 68,681 75,062 100,000 -/-
VESA CVT
720 x 576 35,910 59,950 32,750 -/+
1152 x 864 53,783 59,959 81,750 -/+
1280 x 720 44,772 59,855 74,500 -/+
1280 x 720 56,456 74,777 95,750 -/+
1280 x 960 75,231 74,857 130,000 -/+
VESA DMT
640 x 480 31,469 59,940 25,175 -/-
640 x 480 37,861 72,809 31,500 -/-
640 x 480 37,500 75,000 31,500 -/-
800 x 600 37,879 60,317 40,000 +/+
800 x 600 48,077 72,188 50,000 +/+
800 x 600 46,875 75,000 49,500 +/+
1024 x 768 48,363 60,004 65,000 -/-
1024 x 768 56,476 70,069 75,000 -/-
1024 x 768 60,023 75,029 78,750 +/+
1152 x 864 67,500 75,000 108,000 +/+
1280 x 1024 63,981 60,020 108,000 +/+
1280 x 1024 79,976 75,025 135,000 +/+
1280 x 800 49,702 59,810 83,500 -/+
1280 x 800 62,795 74,934 106,500 -/+
1280 x 960 60,000 60,000 108,000 +/+
1360 x 768 47,712 60,015 85,500 +/+
1440 x 900 55,935 59,887 106,500 -/+
1440 x 900 70,635 74,984 136,750 -/+
1680 x 1050 65,290 59,954 146,250 -/+
VESA GTF
1280 x 720 52,500 70,000 89,040 -/+
1280 x 1024 74,620 70,000 128,943 -/-
VESA DMT /
DTV CEA
1920 x 1080p 67,500 60,000 148,500 +/+
HDMI / DVI kablo bağlantısı kullanırken HDMI IN 3(DVI) jakını kullanmalısınız.
Geçmeli tarama modu desteklenmemektedir.
Standartlara uymayan bir video biçimi seçilirse cihaz normal olarak çalışmayabilir.
Ayrı ve Kompozit modlar desteklenmektedir. SOG desteklenmemektedir.
Çok uzun veya düşük kaliteli VGA kablosu yüksek çözünürlük modlarında (1920x1080) resimde parazite yol açabilir.
¦
■
N
N
N
N
N
[620-Weuro]BN68-02326A-03L09.ind18 18 2009-10-08 ¿ÀÀü 9:31:18

Türkçe - 19
Ön ayar: PC modunu seçmek için SOURCE düğmesine basın.
Otomatik Ayarlama
TV'nin aldığı video sinyallerini otomatik ayarlaması için Otomatik Ayarlama işlevini kullanın.
İşlev ayrıca ayarların ince ayarlamalarını da yapar ve frekans değerleri ile konumlarını düzenler
.
Araçlar menüsünü görüntülemek için TOOLS düğmesine basın. Auto Adjustment değerini
ayrıca
öğesini seçerek de ayarlayabilirsiniz.
Bu işlev DVI-HDMI modunda çalışmaz.
Ekran
Resim kalitesi ayarının amacı, resimdeki parazitleri ortadan kaldırmak veya azaltmaktır
.
Parazitleri yalnızca İnce ayarıyla ortadan kaldıramazsanız, frekans ayarlarını en iyi şekilde
ayarlayın (Kaba) ve yeniden İnce ayar işlemi yapın. Parazit azaldığında, görüntüyü ekranın
ortasına gelecek şekilde yeniden ayarlayın.
PC Konumu
TV ekranına sığmıyorsa, PC'nin ekran konumunu ayarlayın.
Dikey Konum ayarlaması için ▲ ya da ▼ düğmesine basın.
Yatay Konum ayarlaması için ◄ veya ► düğmesine basın.
Tüm görüntü ayarlarını, fabrika standart değerlerine getirebilirsiniz.
¦
N
❑
T
N
❑
■
■
■
Parlaklık :45
Netlik :50
OtomatikAyarlama ▶
Ekran
GelişmişAyarlar
ResimSeçenekleri
ResimSıfırlama
Görüntü
Kaba 50
İnce 0
PCKonumu
GörüntüSıfırla
U
Taşı
E
Giriş
R
Geri
Ekran
[620-Weuro]BN68-02326A-03L09.ind19 19 2009-10-08 ¿ÀÀü 9:31:18

Türkçe - 20
SES
Araçlar menüsünü görüntülemek için TOOLS düğmesine basın. Ayrıca
Modu seçimini yaparak da ses modunu ayarlayabilirsiniz.
Standart: Normal ses modunu seçer.
Müzik: Müziği diğer seslerin üstünde vurgular.
Sinema: Filmler için en iyi sesi sağlar.
: İnsan sesini diğer seslerin üstünde vurgular.
Özel: Kişiselleştirilmiş ses ayarlarınızı geri çağırır.
Ekolayzer
Ses ayarları kişisel tercihlerinize göre değiştirilebilir.
Modu: Ön tanımlı ayarlar arasından ses modunu seçer.
Balans L/R: Sağ ve sol hoparlör arasındaki dengeyi ayarlar.
100Hz / 300Hz / 1KHz / 3KHz / 10KHz (Bant Genişliği Ayarı): Farklı bant genişliği frekanslarının seviyelerini ayarlamak için.
: Ekolayzır ayarlarını varsayılan değerlere sıfırlar.
SRS TruSurround HD, 5.1 çok kanallı içeriği iki hoparlör üzerinden oynatma sorununu çözen patentli bir SRS teknolojisidir.
TruSurround özelliği, televizyonun içinde bulunan sabit televizyon hoparlörleri dahil olmak üzere, her tür iki hoparlörlü yeniden
oynatma sistemi üzerinden şaşırtıcı düzeyde gerçek surround ses deneyiminin elde edilmesini sağlar
. Tüm çok kanallı formatlarla
tam uyumludur.
Araçlar menüsünü görüntülemek için TOOLS düğmesine basın. Ayrıca öğesini seçerek de SRS
TruSurround HD'yi ayarlayabilirsiniz.
Ses Dili
Ses dillerinin varsayılan ayarını değiştirebilirsiniz. Gelen akışın dil bilgilerini görüntüler.
Bir dijital kanal izlerken bu işlev seçilebilir.
Yalnızca gerçekte yayınlanan diller arasından dil seçebilirsiniz.
Hem ana hoparlörden hem ses alıcısından ses verildiğinde, ana hoparlör ve ses alıcısı arasındaki şifre çözme hızı farkından dolayı
ses yankısı oluşabilir. Bu durumda, TV Hoparlörü işlevini kullanın.
Bir dijital kanal izlerken bu işlev seçilebilir.
Yayın sinyaline göre Ses Biçimi görüntülenir.
Bu, görme özürlü kişilere ilave ses bandı kanalı sağlayan yardımcı bir ses işlevidir. Bu işlev AD (Audio Description) için, yayıncıdan
gelen ana sesle birlikte gönderildiğinde Audio Stream'i kullanır. Kullanıcılar Sesli Açıklama değerini Açık veya Kpalı konumlarına
getirebilirler ve sesi kontrol edebilirler.
veya ayarına getirmek için uzaktan kumandadaki AD düğmesine basın.
Ses açıklaması işlevini açar ya da kapatır.
Düzey
Ses açıklama seviyesini ayarlayabilirsiniz.
Düzey ayarı, öğesi olarak ayarlandığında etkindir.
Bir Dijital kanal izlerken bu işlev seçilebilir.
Her yayın istasyonunun kendi sinyal koşulları vardır ve kanal her değiştiğinde ses seviyesini ayarlamak kolay değildir. Bu özellik
modülasyon sinyali yüksekse ses çıkışını düşürerek ya da modülasyon sinyali çok zayıfsa ses çıkışını yükselterek, istenen kanalın
ses düzeyini otomatik olarak ayarlamanızı sağlar.
¦
❑
T
●
●
●
●
●
❑
●
●
●
●
❑
T
❑
N
N
❑
N
N
❑
O
■
■
N
N
❑
Modu :Özel ▶
Ekolayzer
SRSTruSurroundHD :Kpalı
SesDili :----
SesBiçimi :----
SesliAçıklama
Otosesayar :Kpalı
HoparlörüSeçin :TVHoparlörü
Ses
[620-Weuro]BN68-02326A-03L09.ind20 20 2009-10-08 ¿ÀÀü 9:31:18

Türkçe - 21
Hoparlör Seçimi
TV'yi bir Ev sinemasına bağlayarak izlediğinizde, TV hoparlörlerini kapatın, bu sayede Ev sinemasının (harici) hoparlörlerinden
gelen sesi dinleyebilirsiniz.
Harici Hoparlör: Harici (Ev Sineması) Hoparlörlerinin sesini dinlemek için kullanılır.
TV Hoparlörü: TV Hoparlörlerinin sesini dinlemek için kullanılır.
Ses düğmeleri ve MUTE düğmeleri, Hoparlör Seçimi öğesi Harici Hoparlör olarak ayarlandığında çalışmaz.
Hoparlör Seçimi menüsünde Harici Hoparlör seçeneğini seçerseniz ses ayarları sınırlandırılacaktır.
TV'nin Dahili Hoparlörleri Ses Sistemine Ses Çıkışı (Optik, Sol / Sağ Çıkış)
RF / AV / Parça / PC / HDMI RF / AV / Parça / PC / HDMI
TV Hoparlörü Ses Çıkışı Ses Çıkışı
Harici Hoparlör Sessiz Ses Çıkışı
Video Sinyali Yok Sessiz Sessiz
Ses ayarlarını fabrika varsayılan değerlerine geri yükleyebilirsiniz.
: Mevcut ses değerleri varsayılan ayarlara döner.
Ses Modunun Seçilmesi
DUAL düğmesine basarak ses modunu ayarlayabilirsiniz. Bastığınızda, ekranda o anda geçerli ses modu gösterilir.
Ses Türü Çift 1 / 2
A2 Stereo
Mono MONO
Otomatik değiştirme
Stereo STEREO
↔
MONO
Çift DUAL 1
↔
DUAL 2
NICAM
Stereo
Mono MONO
Otomatik değiştirme
Stereo MONO
↔
Stereo
Çift
MONO
↔
DUAL 1
Stereo sinyali zayıfsa ve otomatik geçiş meydana geliyorsa mono moduna geçin.
Bu işlev yalnızca stereo ses sinyalinde etkinleştirilir. Mono ses sinyalinde devre dışı bırakılır.
Bu işlev sadece TV modunda kullanılabilir.
❑
●
●
N
N
❑
N
¦
N
N
N
SesSıfırlama
L
Taşı
E
Giriş
R
Geri
Sessıfırlamaseçeneklerinibelirleyin.
TümünüSıfırla SesModunuSıfırla İptal
[620-Weuro]BN68-02326A-03L09.ind21 21 2009-10-08 ¿ÀÀü 9:31:18

Türkçe - 22
Kurulum
Menü Dili
Menü dilini ayarlayabilirsiniz.
Zaman
Seçeneklerin ayarlanması hakkındaki ayrıntılı prosedürler için ‘Saati Ayarlama’ talimatlarına
bakın.
Altyazıları etkinleştirebilir veya devre dışı bırakabilirsiniz. Altyazı Modunu ayarlam
ak için bu menüyü kullanın. Menü altındaki
Normal, temel altyazı, seçeneği ise işitme engelli kişilere yönelik altyazıdır.
Altyazıları açar ya da kapatır.
Altyazı işlevi modunu ayarlar.
Altyazı dilini ayarlar.
Seyrettiğiniz program işlevini desteklemiyorsa, modu seçilse bile otomatik olarak Normal
ayarı etkinleşir.
Seçilen dilin yayında kullanılabilir olmaması durumunda İngilizce varsayılan dildir.
Uzaktan kumanda üzerindeki SUBT. düğmesine basarak da bu seçenekleri belirleyebilirsiniz.
Program dijital metinle yayınlanırsa bu özellik etkinleştirilir.
MHEG (Multimedia and Hypermedia Information Coding Experts Group)
Çoklu ortam ve hiper ortamda kullanılan veri kodlama sistemlerinin Uluslararası bir standardıdır
. Bu, hareketsiz görüntü,
karakter hizmeti, animasyon, grafik ve video dosyaları gibi veri birleştiren hiper ortam ve çoklu ortam verilerini içeren MPEG
sisteminden daha yüksek düzeydedir. MHEG, kullanıcı çalışma süresi etkileşim teknolojisi olup aralarında VOD (Video-On-
Demand), ITV (Interactive TV), EC (Electronic Commerce), tele-eğitim, tele-konferans, dijital kitaplıklar ve ağ oyunlarının
bulunduğu çeşitli ortamlara uygulanır.
Teletekst Dili
Dil türünü seçerek teletekst dilini ayarlayabilirsiniz.
Seçilen dilin yayında kullanılabilir olmaması durumunda İngilizce varsayılan dildir.
Tercih
Bu özelliği kullanarak kullanıcılar dillerden birini seçebilir. Kullanıcı bir kanal seçtiğinde, burada seçilen dil varsayılan olarak
kullanılır.
Dil ayarını değiştirirseniz, Language menüsünün Altyazı Dili, Ses Dili ve Teletekst Dili ayarları otomatik olarak seçilen dile
geçer.
Language menüsünün Altyazı Dili, Ses Dili ve Teletekst Dili öğeleri, geçerli kanalın desteklediği dillerin bir listesini gösterir
ve seçim vurgulanır. Bu dil ayarını değiştirirseniz, yeni seçim sadece o anki kanal için geçerlidir. Değiştirilen ayar, Tercihler
menüsünün Birinci Altyazı Dili, Birinci Yayın Dili veya Birinci Teletekst Dili ayarını değiştirmez.
¦
❑
❑
❑
■
●
●
●
O
O
O
■
N
■
N
■
●
Plug&Play
MenüDili :Türkçe ▶
Zaman
Yayın
Güvenlik
Genel
Kurulum
[620-Weuro]BN68-02326A-03L09.ind22 22 2009-10-08 ¿ÀÀü 9:31:19

Türkçe - 23
Genel Arayüz
CI Menüsü
Bu, kullanıcının CAM sağlanan menüden seçim yapmasına olanak sağlar.
Menü PC Kartına göre CI Menü'yü seçin.
Uygulama Bilgisi.
Bu, CI'ya takılı CAM hakkındaki bilgileri içerir ve görüntüler. Uygulama Bilgileri ‘CI(CI+) KARTI’ hakkındadır. TV ON ya da OFF
da olsa her an CAM öğesini yükleyebilirsiniz.
1.
En yakın bayinizi ziyaret ederek veya telefonla arayarak CI CAM modülünü satın alın.
2.
‘CI(CI+) KARTI’nı yerine oturana kadar CAM birimine ok yönünde yerleştirin.
3.
‘CI(CI+) KARTI’ takılı olan CAM birimini genel arayüz yuvasına yerleştirin. (CAM'ı yuvayla paralel olacak şekilde ucuna
doğru ok yönünde yerleştirin.)
4.
Karışmış sinyal kanalında bir resim görüp göremediğinizi kontrol edin.
Güvenlik
Kurulum penceresi görünmeden önce PIN numarası giriş ekranı görünür. 4 basamaklı PIN numaranızı girin.
Yeni bir TV'nin varsayılan PIN numarası '0-0-0-0' dır. Menüden seçimini yaparak PIN'i değiştirebilirsiniz.
Bazı modeller Plug & Play ‘ı çalıştırırken, ayarlanan PIN numarasının seçimini gerektirebilir.
Bu özellik çocuklar ve benzeri yetkisiz kullanıcıların uygunsuz programları izlemesini ses ve görüntüyü kapatarak önleyebilmenizi
sağlar.
Kanal Listesi'ndeki bazı kanalları kilitleyebilirsiniz.
Çocuk Kilidi yalnızca TV modunda kullanılabilir.
Ebeveyn Kilidi
Bu özellik, kullanıcının belirlediği 4 haneli PIN (Kişisel Kimlik Belirleme Numarası) kodu sayesinde çocuklar gibi izin verilmeyen
kullanıcıların uygunsuz programları izlemesini engellemenizi sağlar.
Ebeveyn Kilidi öğesi ülkeye göre değişir.
Ebeveyn Kilidi ayarlandığında, ‘\’ sembolu görüntülenir.
: Tüm TV derecelendirmelerinin kilidini kaldırmak için basın.
Tmn Engll: Tüm TV derecelendirmelerini kilitlemek için basın.
TV'nin kurulumu için gereken kişisel kimlik numaranızı değiştirebilirsiniz.
PIN kodunu unutursanız, PIN'in '0-0-0-0' olarak sıfırlanması için uzaktan kumanda düğmelerine aşağıdaki sırayla basın:
POWER (Kapalı)
(Açık).
Genel
PlayStation™ ya da Xbox™ gibi bir oyun konsoluna bağladığınızda, oyun menüsünü seçerek daha gerçekçi bir oyun deneyiminin
keyfini çıkartabilirsiniz.
Oyun modundaki kısıtlamalar (Dikkat)
Oyun konsoluyla bağlantıyı kesip başka bir harici cihaza bağlanmak için, ayar menüsünde Oyun Modu öğesini
olarak ayarlayın.
Oyun Modu işlevinde TV menüsünü görüntülerseniz, ekran hafifçe sallanır.
Oyun Modu, normal TV, PC ve Ext. modunda kullanılamaz.
Harici cihaz TV'ye bağlandığında resim kalitesi çok kötüyse Oyun Modu işlevinin olarak ayarlanıp ayarlanmadığını
kontrol edin. Oyun Modu öğesini olarak ayarlayın ve harici aygıtları bağlayın.
Oyun Modu Açıksa:
Resim modu otomatik olarak Standart ayarına getirilir ve değiştirilemez.
Ses modu otomatik olarak Özel ayarına getirilir ve değiştirilemez. Ekolayzırı kullanarak sesi ayarlayın.
Sesi Sıfırla işlevi etkinleştirilir. Ekolayzırı ayarladıktan sonra Sıfırla işlevinin seçilmesi, ekolayzırı fabrika ayarlarına getirir.
■
●
●
❑
N
N
N
■
N
N
■
N
N
N
■
N
❑
■
N
N
N
N
N
[620-Weuro]BN68-02326A-03L09.ind23 23 2009-10-08 ¿ÀÀü 9:31:19

Türkçe - 24
Bu özellik, güç tüketimini azaltmak için TV'nin parlaklığını ayarlar. Gece TV izlerken Enrj. Tasarrufu modu seçeneğini Yüksek
ayarına getirerek, gözlerinizin yorulmasını engelleyebilir ve güç tüketimini azaltabilirsiniz.
seçeneğini seçerseniz, ekran kapanır ve yalnızca sesi duyabilirsiniz.
’dan çıkmak için herhangi bir
düğmeye basın.
Araçlar menüsünde,
işlevi desteklenmez.
Araçlar menüsünü görüntülemek için TOOLS düğmesine basın. Enerji Tasarrufu seçeneğini ayrıca
Tasarrufu öğesini seçerek de ayarlayabilirsiniz.
Menünün Şeffaflığını ayarlayabilirsiniz.
TV Açıldığında veya Kapandığında bir melodi sesi çıkması sağlanabilir.
Melodi aşağıdaki durumlarda çalışmaz
MUTE düğmesine basıldığı için TV'den hiç ses gelmediğinde.
Ses, ses (–) düğmesi ile minimuma düşürüldüğünden TV'den hiç ses gelmediğinde.
TV, Uyku Zamanlayıcısı işlevi yoluyla kapatıldığında.
■
O
T
■
■
N
Saati Ayarlama
Zaman
TV'nin çeşitli saat özelliklerini kullanabilmek için saatin ayarlanması gereklidir.
INFO düğmesine her basışınızda geçerli zaman görüntülenecektir.
Elektrik kablosunun bağlantısını keserseniz, saati yeniden ayarlamanız gerekir.
Saat Modu
Geçerli saati elle ya da otomatik olarak ayarlayabilirsiniz.
Oto: Geçerli saati, dijital yayından gelen saat ile otomatik olarak ayarlayın.
Manuel: Geçerli saati belirli bir saate elle ayarlayın.
Yayın istasyonuna ve sinyale bağlı olarak, otomatik saat doğru olarak ayarlanabilir. Bu
durumda saati elle ayarlayın.
Saati otomatik olarak ayarlamak için anten veya kablo bağlı olmalıdır.
Geçerli saati elle ayarlayabilirsiniz.
Bu işlev yalnızca Saat Modu öğesi Manuel olarak ayarlandığında kullanılabilir.
Uzaktan kumanda üzerindeki sayı düğmelerine basarak gün, ay, yıl, saat ve dakika ayarlarını doğrudan yapabilirsiniz.
Önceden ayarlanan zaman (30, 60, 90, 120, 150 ve 180 dakika) geçtiğinde uyku zamanlayıcısı TV'yi otomatik olarak kapatır.
Araçlar menüsünü görüntülemek için TOOLS düğmesine basın. Uyku zamanlayıcısını ayrıca
öğesini seçerek de ayarlayabilirsiniz.
işlevini iptal etmek için ayarını seçin.
Üç farklı açık/kapalı zamanlayıcı ayarı yapılabilir.
Önce saati ayarlamanız gerekir.
Saati, dakikayı ve etkinleştir/devre dışı bırak ayarını yapın.
(Zamanlayıcıyı seçtiğiniz ayarla etkinleştirmek için ayarına getirin.)
Saati, dakikayı ve etkinleştir/devre dışı bırak ayarını yapın.
(Zamanlayıcıyı seçtiğiniz ayarla etkinleştirmek için ayarına getirin.)
¦
❑
N
N
■
●
●
N
N
■
N
N
❑
T
N
❑
■
■
AçılışZamanı
L
Taşı
U
Ayarla
E
Giriş
R
Geri
Zamanlayıcı1
KapanışZamanı
Ses
00 00 DevreDışıBırak
00 00 DevreDışıBırak
10
Kaynak Anten Kanal
TV ATV 0
Tekrarla
Birkez
Paz Pzt Sal Çar Per Cum Cts
Saat :--:-- ▶
KapanışAyarı :Kpalı
Zamanlayıcı1 :Etkindeğil
Zamanlayıcı2 :Etkindeğil
Zamanlayıcı3 :Etkindeğil
U
Taşı
E
Giriş
R
Geri
Zaman
TakveÇalıştır
MenüDili :Türkçe
Zaman ▶
Yayın
Güvenlik
Genel
Kurulum
[620-Weuro]BN68-02326A-03L09.ind24 24 2009-10-08 ¿ÀÀü 9:31:19

Türkçe - 25
Ses
İstenilen ses düzeyini seçin.
TV otomatik olarak açıldığında oynatılacak olan TV veya USB kaynağını seçebilirsiniz. TV ya da USB seçin. (Bir USB cihazının
TV'nize bağlı olduğundan emin olun.)
Anten (KaynakTV
ATV ya da DTV'yi seçin.
Kanal (KaynakTV
İstediğiniz kanalı seçin.
(
TV otomatik olarak açıldığında USB Cihazı üzerinde müzik ya da fotoğraf dosyalarının oynatılacağı bir klasör seçebilirsiniz.
USB üzerinde hiç müzik dosyası yoksa veya bir müzik dosyası içeren klasör seçilmediyse, Zamanlayıcı işlevi doğru bir şekilde
çalışmaz.
USB'deyalnız bir görüntü dosyası varsa, Slide show yürütülmeyecektir.
Klasör adı çok uzunsa, seçilemeyebilir.
İçerik fonksiyonu tarafından yapılandırılacak olan klasör adı çok uzunsa, seçilemez.
Tekrarla
Bir Kez, Her gün, Pts~Cum, Pts~Cts, Cts~Paz ya da Manuel seçeneğini seçin.
Manuel seçildiğinde, haftanın istenilen gününü seçmek için ► düğmesine basın. İstenilen gün üstünde ENTER
E
düğmesine
basın,
c
işareti görünecektir.
Uzaktan kumanda üzerindeki numara düğmelerini kullanarak saat, dakika ve kanalı ayarlayabilirsiniz.
Otomatik Kapanma
Zamanlayıcıyı açık olarak ayarlandığınızda, zamanlayıcı tarafından açılmasından sonra 3 saat boyunca herhangi bir kumanda
kullanılmadığında televizyon kapatılır. Bu işlev yalnızca zamanlayıcı açık modundayken kullanılabilir ve TV'nin çok uzun süre
açık kalmasından kaynaklanabilecek aşırı ısınmayı önler.
■
■
■
■
■
N
N
N
N
■
N
N
N
[620-Weuro]BN68-02326A-03L09.ind25 25 2009-10-08 ¿ÀÀü 9:31:19

Türkçe - 26
Kaynak Listesi
TV'yi ya da DVD / Blu-ray oynatıcılar / Kablo TV alıcısı / Uydu alıcısı (Set Üstü Kutu) gibi
TV'ye bağlanacak diğer harici giriş kaynaklarını seçmek için kullanın. T
ercih ettiğiniz giriş
kaynağını seçmek için kullanın.
Bir harici sinyal kaynağını izlemek için uzaktan kumandadaki SOURCE düğmesine basın.
TV modu, TV düğmesine basılarak seçilebilir.
TV / Harici1 / Harici2 / AV / Parça / PC / HDMI1 / HDMI2 / HDMI3/DVI / HDMI4
Yalnızca TV'ye bağlı harici aygıtları seçebilirsiniz. Kaynak Listesi listesinde bağlanan
girişler vurgulanacak ve üstte sıralanacaktır. Bağlanmamış girişler altta sıralanacaktır.
Ext. ve PC her zaman etkin durumda kalır.
Kaynak listesinde uzaktan kumandadaki Renk düğmelerinin kullanılması
Kırmızı (Yenile): Bağlanan harici cihazları yeniler. Kaynak bileşeniniz açık ve bağlıysa,
ancak listede görünmüyorsa buna basın.
TOOLS (Araçlar): ve Bilgi menülerini görüntüler.
IPTV / Blu-ray / HD DVD / DMA
Giriş kaynağı seçiminizi kolaylaştırmak için giriş jaklarına bağlı cihazlara isim verin.
1920 x 1080@60 Hz çözünürlüğü olan bir PC HDMI IN 3 (DVI) bağlantı noktasına takıldığında, modu,
menüsündeki HDMI3/DVI modunu DVI PC olarak ayarlamanız gerekir.
HDMI IN 3(DVI) bağlantı noktasına bir HDMI/DVI kablosu bağlandığında, modunun
bölümünde HDMI3/
DVI modunu DVI veya DVI PC olarak ayarlamanız gerekir. Bu durumda, ayrı bir ses bağlantısı gereklidir.
Destek Menüsü
Görüntü Testi
Resim sorunu olduğunu düşünüyorsanız, resim testini gerçekleştirin. Sorunun devam edip
etmediğini görmek için ekrandaki renk desenini kontrol edin.
Evet: Test deseni görünmüyorsa veya test deseninde parazit varsa, Evet öğesini seçin.
TV'de bir sorun olabilir. Bu nedenle yardım almak için Samsung'un çağrı merkeziyle
görüşün.
: Test deseni düzgün olarak görüntülenirse, seçimini yapın. Harici
ekipmanınızda sorun olabilir. Bağlantılarınızı kontrol edin. Sorun devam ederse, harici
cihazın kullanıcı kılavuzuna bakın.
Ses Testi
Ses sorunu olduğunu düşünüyorsanız, ses testini gerçekleştirin. TV'nizde yerleşik
melodi sesini
çalarak sesi kontrol edebilirsiniz.
Ses testini gerçekleştirmeden önce TV hoparlörlerinden ses işitmezseniz, Sound
menüsündeki Hoparlör Seçimi değerinin TV Hoparlörü olduğundan emin olun.
Hoparlör Seçimi, Harici Hoparlör olarak ayarlansa veya MUTE düğmesine basılarak ses kapatılsa bile melodi test sırasında
duyulacaktır.
Evet: Ses testi sırasında sesi tüm hoparlörlerden değil de yalnızca bir hoparlörden duyuyorsanız, Evet seçimini yapın. TV'de
bir sorun olabilir. Bu nedenle yardım almak için Samsung'un çağrı merkeziyle görüşün.
: Hoparlörlerden ses duyabiliyorsanız, seçimini yapın. Harici ekipmanınızda sorun olabilir. Bağlantılarınızı kontrol
edin. Sorun devam ederse, harici cihazın kullanıcı kılavuzuna bakın.
¦
❑
O
■
N
N
N
❑
■
N
N
¦
❑
■
●
●
■
N
N
●
●
KendiKendiniTanıma ▶
YazılımYükseltme
HDBağlantısıKılavuzu
Samsung'aBaşvurun
Destek
KaynakListesi
İsimDeğiştir
Giriş
Yenile
T
Araçlar
KaynakListesi
TV
Harici1 :----
Harici2 :----
PC :----
AV :----
Komponent :----
KendiKendiniTanıma
U
Taşı
E
Giriş
R
Geri
GörüntüTesti ▶
SesTesti
SinyalBilgileri
[620-Weuro]BN68-02326A-03L09.ind26 26 2009-10-08 ¿ÀÀü 9:31:19

Türkçe - 27
Sinyal Bilgileri
'Net olmayan'dan nete alış kalitesi değişebilen analog kanallardan farklı olarak, dijital (HDTV) kanallar mükemmel alım kalitesine
sahiptir veya hiç almazsınız. Bu yüzden, analog kanallardan farklı olarak, bir dijital kanala ince ayar yapamazsınız.
Ancak,
kullanılabilir dijital kanalların alımını artırmak için anteninizi ayarlayabilirsiniz.
Sinyal gücü ölçer sinyalin zayıf olduğunu gösteriyorsa, sinyal gücünü artırmak için anteninizi fiziksel olarak ayarlayın. En güçlü
sinyale sahip en iyi konumu buluncaya kadar anteninizi ayarlamaya devam edin.
Samsung, gelecekte TV yerleşik belleği için yükseltmeler sunabilir. Bu yükseltmeler Internet'e
bağlandığında TV aracılığıyla da ya da yeni yerleşik belleği samsung.com adresinden bir USB
bellek aygıtına alarak gerçekleştirilebilir.
Geçerli Sürüm, TV'nizde yüklü olarak gelen yazılımdır.
(Yedek) değiştirilecek olan önceki sürümü gösterir.
Yazılım ‘Yıl/Ay/Gün_Sürüm’ şeklinde sunulur. Tarih ne kadar yakınsa yazılım sürümü o
kadar yenidir. En son sürümün yüklenmesi önerilir .
Çevrimiçi olarak
samsung.com adresinden indirilen yerleşik bellek yükseltmesini içeren bir USB sürücüyü
TV'ye
takın. Yükseltmeler uygulanırken lütfen güç bağlantısını kesmemeye ya da USB sürücüsünü
çıkarmamaya dikkat edin. Yerleşik bellek yükseltmesinin tamamlanmasından sonra TV otomatik
olarak kapanıp açılacaktır. Yükseltmeler tamamlandıktan sonra lütfen yerleşik bellek sürümünü
kontrol edin (yeni sürümün eski sürümden daha büyük bir numarası olacaktır).
Yazılım yükseltildiğinde yaptığınız görüntü ve ses ayarları varsayılan (fabrika) ayarlarına geri
dönecektir. Ayarlarınızı bir yere yazmanızı öneririz, bu sayede yükseltmeden sonra kolayca
sıfırlayabilirsiniz.
Kanal yoluyla
Yazılımı yayın sinyalini kullanarak yükseltir.
İşlev, yazılım iletimi süresinde seçilirse, bu fonksiyon mevcut yazılımı arar ve yazılımı indirir.
Yazılımın indirilmesi için gereken süre siyal durumuna göre belirlenir.
Bekleme Modunda Yükseltme
Ana güç açıkken yazılım güncellemesine devam etmek isterseniz, ▲ veya ▼ düğmesine basarak On seçeneğini belirleyin.
Bekleme moduna girildikten 45 dakika sonra elle yükseltme otomatik olarak yürütülür
. Cihazın gücü içerden açıldığı için, LCD
ürünün ekranı hafifçe açık olabilir. Yazılım yükseltmesi tamamlanıncaya kadar 1 saatten uzun süre bu durum devam edebilir.
(Yedekleme)
Yeni yerleşik bellek ile ilgili bir sorun oluşursa ve bu çalışmayı engelliyorsa, yazılımı önceki sürümü ile değiştirebilirsiniz.
Yazılım değiştirilmişse mevcut yazılım görüntülenir.
’ seçeneğini kullanarak geçerli yazılımı alternatif yazılım ile değiştirebilirsiniz.
Bu menü, HD TV'de en yüksek kaliteye ulaşmak için gereken bağlantı yöntemini sunar. TV'ye harici cihazlar bağlarken buradaki
bilgilere başvurun.
TV'niz doğru çalışmadığında ya da yazılım yükseltmesi istediğinizde bu bilgilere göz atın. Çağrı merkezi, ürün ve yazılım dosyası
indirme yöntemi konusundaki bilgilere göz atabilirsiniz.
■
N
❑
N
N
N
■
■
N
N
■
■
N
N
❑
❑
TV Yan Paneli
USB Drive
GeçerliSürüm 2009/01/18_000001
USBile ▶
Kanalyoluyla
BeklemeModundaYükseltme :45Dak
AlternatifYazılım 2009/01/15_00000
U
Taşı
E
Giriş
R
Geri
YazılımYükseltme
[620-Weuro]BN68-02326A-03L09.ind27 27 2009-10-08 ¿ÀÀü 9:31:20

Türkçe - 28
MEDIA PLAY (USB)
1. POWER düğmesine basarak, TV'yi açın.
2. Fotoğraf ve müzik dosyalarını içeren bir USB aygıtını TV'nin yan tarafındaki USB jakına takın.
3.
Uygulama seçimi ekranda görüntülendiğinde, Media Play (USB) seçimini yapmak için
ENTER
E
düğmesine basın.
MTP (Media Transfer Protocol) desteklenmez.
Dosya sistemi FAT16, FAT32 ve NTFS'yi destekler.
Bazı USB Dijital fotoğraf makinesi ve ses aygıtları bu TV ile uyumlu olmayabilir.
Media Play sadece USB Toplu Depolama Sınıfı aygıtını (MSC) destekler.
MSC, Toplu Depolama Sınıfı Sadece-Toplu Nakil aygıtıdır. MSC örnekleri
Parmak sürücüler ve Flaş Kart Okuyucularıdır (hem USB HDD hem de HUB
desteklenmemektedir.)
Lütfen doğrudan TV'nizin USB bağlantı noktasına bağlayın. Ayrı bir kablo
bağlantısı kullanıyorsanız, bir USB uyumluluk sorunu oluşabilir.
Aygıtınızı TV'nize bağlamadan önce, dosyalarınızın hasar görmesini ya da
kaybolmasını önlemek için yedekleyin. SAMSUNG, veri dosyası hasarı ve veri
kaybından sorumlu değildir.
Yükleme işlemi devam ederken, USB aygıtını çıkarmayın.
Görüntünün çözünürlüğü arttıkça ekranda görüntülenme süresi de artacaktır.
Desteklenen maksimum JPEG çözünürlüğü 15360X8640 pikseldir.
Desteklenmeyen ya da bozuk dosyalar için, 'Not Supported File Format' (Desteklenemeyen Dosya Formatı) mesajı
görüntülenir.
Ücretli bir siteden indirilen DRM'li MP3 dosyaları yürütülemez. Dijital Haklar Yönetimi (DRM) faturalandırma ve ödemeleri
yönetmenin yanı sıra içerik sağlayıcıların hak ve çıkarlarının korunması ve içeriklerin yasa dışı yollarla kopyalanmasının
engellenmesi ile birlikte içeriğin tümleşik ve kapsamlı bir şekilde oluşturulmasını, dağıtılmasını ve yönetilmesini
destekleyen bir teknolojidir.
Bir fotoğraf taşınırken, yükleme işlemi birkaç saniye sürebilir. Bu noktada, ekranda yükleme simgesi görüntülenir.
Birden fazla MSC aygıtı bağlıysa, bazıları tanınmayabilir. Aygıt yüksek güç (500mA veya 5V'den fazla) gerektiriyorsa, USB
aygıtı desteklenmeyebilir.
Bir USB aygıtı bağlanırken veya kullanılırken aşırı güç uyarı mesajı görüntülenirse, aygıt tanınmayabilir veya yanlış
çalışabilir.
Media Play
▲/▼/◄/► İmleci hareket ettirir ve öğeyi seçer.
ENTER
E
Geçerli olarak seçili olan öğeyi seçer. Bir slayt gösterisi, film ya da müzik dosyası oynatırken:
- Oynatma sırasında ENTER
E
düğmesine basıldığında, oynatma işlemi duraklatılır.
- Duraklama sırasında ENTER
E
düğmesine basıldığında, oynatma işlemi devam eder.
∂
/
∑
Slayt Gösterisini, müziği durdurur ya da oynatır.
RETURN Önceki menüye geri döner.
TOOLS Fotoğraf ve Müzik menülerindeki çeşitli işlevleri çalıştırır.
∫
Mevcut slayt gösterisini veya müzik dosyasını durdurur.
π
/
μ
Bir önceki gruba atlar/Bir sonraki gruba atlar.
INFO Dosya bilgilerini görüntüler.
MEDIA.P Media Play modundan çıkar.
<
P
>
,
EXIT, TV
Media Play modunu durdurur ve TV moduna geri döner.
¦
N
N
N
N
N
N
N
N
N
N
N
N
N
N
TV Yan Paneli
USB Drive
851.86MB/993.02MBBoş
Photo
SUM
SUM
Aygıt
PHOTO
R
Geri
Music Setup
[620-Weuro]BN68-02326A-03L09.ind28 28 2009-10-08 ¿ÀÀü 9:31:20

Türkçe - 29
Bu işlev, bir USB Yığın Depolama Sınıfı (MSC) aygıtında kayıtlı olan fotoğraf müzik ve/veya film dosyalarınızı izlemenize ve
dinlemenize olanak sağlar.
Lisanslı olmayan multimedya dosyaları ile düzgün çalışmayabilir.
Media Play (USB) Menüsüne girme
1. MENU düğmesine basın. Uygulama seçeneğini seçmek için ▲ veya ▼
düğmesine, ardından da ENTER
E
düğmesine basın.
2. ▲ ya da ▼ düğmesine basarak Media Play (USB) i seçin, ardından ENTER
E
düğmesine basın.
Media Play (USB) menüsü görüntülenir.
Media Play menüsünü görüntülemek için uzaktan kumandadaki MEDIA.P
düğmesine basın.
Kaynak listesini görüntülemek için uzaktan kumandadaki SOURCE
düğmesine basın. Ardından USB'yi seçmek için ▲ veya ▼ düğmesine basın.
3.
Kırmızı düğmeye basın, ardından USB Hafızasını seçmek için ▲ ya da ▼
düğmelerine basın. ENTER
E
düğmesine basın.
Bu işlev, USB hafızasına dayanarak farklılık gösterebilir.
Seçilen USB aygıtının adı, ekranın sol alt köşesinde görüntülenir.
4.
Bir simge seçmek için (Photo, Music, Setup) ◄ veya ► düğmesine basın, ardından ENTER
E
düğmesine basın.
Media Play modundan çıkmak için, uzaktan kumandadaki MEDIA.P düğmesine basın.
Aygıtı TV'den güvenle ayırabilirsiniz.
1. Media Play dosya listesi ekranındayken veya bir Slayt Gösterisi ya da müzik
oynatılırken, TOOLS düğmesine basın.
2.
seçeneğini seçmek için ▲ ya da ▼ düğmesine basın, ardından
ENTER
E
düğmesine basın.
3. USB aygıtını TV'den ayırın.
Ekran Görünümü
Yukarı ve Aşağı düğmelerini kullanarak 'Grup Listesi Bölümü' ya da 'Dosya Listesi Bölümü' kısmına ilerleyin. Bir bölüm seçtikten
sonra, öğe seçmek için ◄ veya ► düğmelerine basın.
¦
N
N
O
O
N
N
N
INFO
AD
INFO
AD
851.86MB/993.02MBBoş
Photo
SUM
SUM
Aygıt
PHOTO
R
Geri
Music Setup
SUM Aygıt
Seçim
T
Araçlar
R
ÜstKlasör
1234.jpg
1235.jpg
1236.jpg
1237.jpg
1233.jpg
1232.jpg
1231.jpg
SlaytGösterisi
GeçerliGrubuOynat
Bilgi
Güvenli
Kaldır
5/15
1 2
../Photo/
Grup Listesi Bölümü
Dosya Listesi Bölümü
SUM Aygıt
Seçim
T
Araçlar
R
ÜstKlasör
1234.jpg
1235.jpg
1236.jpg
1237.jpg
1233.jpg
1232.jpg
1231.jpg
1SeçlnDsylr
2
3 5
4
1 2
1
5/15
c
../Fotoğraf/
[620-Weuro]BN68-02326A-03L09.ind29 29 2009-10-08 ¿ÀÀü 9:31:23

Türkçe - 30
1 Grupları Göster: Geçerli olarak seçili dosyayı içeren sıralama grubu vurgulanır.
2 Geçerli olarak seçili olan dosya: Seçili dosya artık denetleyebileceğiniz dosyadır. Fotoğraf dosyaları küçük resimler olarak
görüntülenir.
3 Geçerli Aygıt: Geçerli olarak seçili olan aygıt adını görüntüler. Bir aygıt seçmek için Kırmızı düğmeye basın.
Kırmızı () düğme: Bağlı bir aygıtı seçer.
4 Öğe Seçim Bilgileri: Sarı düğmeye basılarak seçilen dosyaların sayısını görüntüler
.
5 Yardım Öğeleri
Sarı (Seçim) düğme: Dosya listesinden dosya seçer. Seçilen dosyaların yanında
c
işareti görüntülenir. Dosya seçimini
iptal etmek için tekrar Sarı düğmeye basın.
TOOLS (Araçlar) düğmesi: Seçenek menülerini görüntüler. (Seçenek menüsü geçerli duruma göre değişir.)
1. MEDIA.P düğmesine basın.
2. Photo öğesini seçmek için ◄ veya ► düğmesine basın, sonra ENTER
E
düğmesine basın.
3. İstediğiniz fotoğraf dosyasını seçmek için ◄ veya ► düğmesine basın.
Birden Çok Fotoğraf Seçme
İstediğiniz fotoğraf dosyasını seçmek için ◄ veya ► düğmesine basın.
Ardından Sarı düğmeye basın.
Birden çok fotoğraf dosyasını seçmek için yukarıdaki işlemi tekrar edin.
Seçili fotoğraf dosyalarında
c
işareti görünür.
4. TOOLS düğmesine basın.
Seçenek menüsü geçerli duruma göre değişir.
Slayt Gösterisi
Bu menüyü kullanarak, USB bellek aygıtındaki fotoğraf dosyalarından oluşan bir Slayt Gösterisi oynatabilirsiniz.
Geçerli Grubu Oynat
Bu menüyü kullanarak, yalnızca geçerli olarak seçili olan sıralama grubundaki fotoğraflardan oluşan bir Slayt Gösterisi
oynatabilirsiniz.
(En az bir dosya seçiliyken)
Tüm dosyaların seçimini kaldırabilirsiniz.
İlgili dosyanın seçildiğini gösteren
c
işareti gizlidir.
Bilgi
Ad, boyut, çözünürlük, değiştirildiği tarih ve yol dahil olmak üzere, fotoğraf dosyası bilgileri görüntülenir.
Bir Slayt Gösterisi sırasında da aynı yöntemleri kullanarak, fotoğraf dosyalarının
bilgilerini görüntüleyebilirsiniz.
Bilgileri görüntülemek için INFO düğmesine basın.
Aygıtı TV'den güvenle ayırabilirsiniz.
¦
N
N
❑
❑
❑
N
❑
N
O
❑
INFO
AD
SUM Aygıt
Seçim
T
Araçlar
R
ÜstKlasör
1234.jpg
1235.jpg
1236.jpg
1237.jpg
1233.jpg
1232.jpg
1231.jpg
SlaytGösterisi
GeçerliGrubuOynat
Bilgi
Güvenli
Kaldır
5/15
1 2
../Fotoğraf/
[620-Weuro]BN68-02326A-03L09.ind30 30 2009-10-08 ¿ÀÀü 9:31:24

Türkçe - 31
1. Dosya Listesi Bölümünü seçmek için ▼ düğmesine basın.
2. TOOLS düğmesine basın.
3.
Slayt Gösterisi öğesini seçmek için ▲ veya ▼ düğmesine, ardından ENTER
E
düğmesine basın.
Slayt Gösterisi için Dosya Listesi Bölümündeki tüm dosyalar kullanılır.
Slayt gösterisi sırasında, dosyalar geçerli olarak gösterilen dosyadan başlayarak
sıra ile görüntülenir.
Slayt Gösterisi, Dosya Listesi Bölümündeki sıralamaya göre ilerler.
ayarı olarak ayarlandıysa, Slayt Gösterisi sırasında müzik
dosyaları otomatik olarak oynatılır.
Bir fotoğraf listesi görüntülenirken, slayt gösterisini başlatmak için uzaktan
kumandadaki
∂
(Oynat)/ENTER
E
düğmesine basın.
ENTER
E
Slayt Gösterisini başlatır/duraklatır.
∂
Slayt Gösterisini başlatır.
∑
Slayt Gösterisini duraklatır.
∫
Slayt Gösterisinden çıkar ve fotoğraf listesine geri döner.
π
/
μ
Slayt Gösterisinin oynatma hızını değiştirir.
TOOLS Fotoğraf menülerindeki çeşitli işlevleri çalıştırır.
Geçerli grubu oynatma
1. Grup Listesi Bölümüne gitmek için ▲ düğmesine basın.
2. ◄ ve ► düğmelerini kullanarak bir grup seçin.
3.
∂
(Oynat) düğmesine basın. Seçili gruptaki dosyaları içeren bir slayt gösterisi
başlar.
Alternatif olarak
1.
Dosya Listesi Bölümünde, istenilen grubu içeren dosyaları seçin.
Önceki/sonraki gruba geçmek için,
π
(Geri) ya da
μ
(Hızlı İleri)
düğmesine basın.
2. TOOLS düğmesine basın.
3.
Geçerli Grubu Oynat öğesini seçmek için ▲ veya ▼ düğmesine, ardından ENTER
E
düğmesine basın.
Slayt Gösterisi için seçili dosyalar dahil olmak üzere, sadece sıralama grubundaki fotoğraflar kullanılır
.
1. Dosya Listesi Bölümünü seçmek için ▼ düğmesine basın.
2. Dosya Listesi bölümündeki istediğiniz fotoğrafı seçmek için ◄ ya da ► düğmesine basın.
3.
Sarı düğmeye basın.
4.
Birden çok fotoğraf seçmek için yukarıdaki işlemi tekrar edin.
Seçilen fotoğrafın solunda
c
işareti görüntülenir.
Bir dosya seçerseniz, Slayt Gösterisi gerçekleştirilmez.
Seçili tüm dosyaların seçimlerini kaldırmak için TOOLS düğmesine basın ve öğesini seçin.
5.
∂
(Oynat)/ENTER
E
düğmesine basın.
Slayt Gösterisi için seçilen dosyalar kullanılır.
¦
N
N
N
N
O
N
●
N
N
N
N
N
N
INFO
AD
E
Duraklat◀▶Önc/Snrk
T
Araçlar
R
Geri
SUM
1234.jpg
580x7652009/03/025/15
▶Normal
SUM Aygıt
Seçim
T
Araçlar
R
ÜstKlasör
1234.jpg
1235.jpg
1236.jpg
1237.jpg
1233.jpg
1232.jpg
1231.jpg
SlaytGösterisi
GeçerliGrubuOynat
Bilgi
Güvenli
Kaldır
5/15
1 2
../Fotoğraf/
SUM Aygıt
Seçim
T
Araçlar
R
ÜstKlasör
1234.jpg
1235.jpg
1236.jpg
1237.jpg
1233.jpg
1232.jpg
1231.jpg
5/15
1 2
../Fotoğraf/
[620-Weuro]BN68-02326A-03L09.ind31 31 2009-10-08 ¿ÀÀü 9:31:27

Türkçe - 32
Alternatif olarak
1. Dosya Listesi bölümündeki istediğiniz fotoğrafları seçmek için Sarı düğmeleri tıklatın.
2.
TOOLS düğmesine basın.
3.
Slayt Gösterisi öğesini seçmek için ▲ veya ▼ düğmesine, ardından ENTER
E
düğmesine basın.
Slayt Gösterisi için seçilen dosyalar kullanılır.
Slayt Gösterisi Seçenek Menüsü
1. Bir slayt gösterisi (veya bir fotoğraf görüntülerken) sırasında, seçeneği ayarlamak
için TOOLS düğmesine basın.
2.
İstenilen seçeneği seçmek için ▲ ya da ▼ düğmesine basın, ardından ENTER
E
düğmesine basın.
Bir Slayt Gösterisini başlatabilir ya da durdurabilirsiniz.
Slayt gösterisinin hızını seçebilirsiniz.
Bu işlev yalnızca bir slayt gösterisi sırasında kullanılabilir.
Slayt Gösterisinin hızını, Slayt Gösterisi devam ederken
π
(Geri) ya da
μ
(Hızlı İleri) düğmesine basarak da
değiştirebilirsiniz.
Döndür
USB bellek aygıtında bulunan fotoğrafları döndürebilirsiniz.
◄ düğmesine bastığınızda, fotoğraf sırasıyla 270˚, 180˚, 90˚ ve 0˚ döner.
► düğmesine bastığınızda, fotoğraf sırasıyla 90˚, 180˚, 270˚ ve 0˚ döner.
Döndürülen dosya kaydedilmez.
Zoom
USB bellek aygıtında bulunan fotoğrafları büyütebilirsiniz. (x1 → x2 → x4)
Büyütülen fotoğraf görüntüsünü taşımak için, önce ENTER
E
düğmesine, ardından da ▲/▼/◄/► düğmelerine basın.
Büyütülen resim orijinal ekran boyutundan küçük olduğunda konum değiştirme işlevinin çalışmadığını unutmayın.
Büyütülen dosya kaydedilmez.
Bir Slayt Gösterisini izlerken, fon müziğini seçebilirsiniz.
Bu özelliği kullanabilmek için, USB aygıtında kayıtlı müzik ve fotoğraf dosyaları olmalıdır
.
: Fon müziği çalınmaz.
: Fon müziği kullanılabilirken seçimini yaparsanız müzik çalınır.
Yalnızca seçilen müzik dosyası fon müziği olarak ayarlanır.
Resim ve ses ayarlarını seçebilirsiniz.
Bilgi
Fotoğraf dosyası bilgileri görüntülenir.
Aygıtı TV'den güvenle ayırabilirsiniz.
●
N
¦
❑
❑
N
N
❑
N
N
N
❑
N
N
❑
N
■
●
●
■
❑
❑
❑
SlaytGösterisiniDurdur
SlaytGösterisiHızı : Normal
Döndür
Zoom
Fon
Müziği
ResimAyarı
SesAyarları
Bilgi
Güvenli
Kaldır
U
Taşı
E
Giriş
e
Çıkış
Araçlar
[620-Weuro]BN68-02326A-03L09.ind32 32 2009-10-08 ¿ÀÀü 9:31:28

Türkçe - 33
Müzik Listesi Seçenek Menüsü
1. MEDIA.P düğmesine basın.
2. Music öğesini seçmek için ◄ veya ► düğmesine basın, sonra ENTER
E
düğmesine basın.
3.
İstenen Müzik dosyasını seçmek için ◄ veya ►düğmesine basın.
Birden Fazla Müzik Dosyasını Seçme
İstediğiniz müzik dosyasını seçmek için ◄ veya ► düğmesine basın.
Ardından Sarı düğmeye basın.
Birden fazla müzik dosyasını seçmek için yukarıdaki işlemi tekrar edin.
Seçili müzik dosyalarında
c
işareti görünür.
4. TOOLS düğmesine basın.
Seçenek menüsü geçerli duruma göre değişir.
Geçerli Grubu Oynat
Bu menüyü kullanarak, sadece geçerli olarak seçili olan sıralama grubundaki müzik dosyalarını çalabilirsiniz.
(En az bir dosya seçiliyken)
Tüm dosyaların seçimini kaldırabilirsiniz.
İlgili dosyanın seçildiğini gösteren
c
işareti gizlidir.
Bilgi
Ad, boyut, değiştirildiği tarih ve yol da dahil olmak üzere, müzik dosyası bilgileri görüntülenir.
Aynı yöntemleri kullanarak Geçerli Grubu Oynat sırasında müzik dosyası bilgilerini görüntüleyebilirsiniz.
Bilgileri görüntülemek için INFO düğmesine basın.
Aygıtı TV'den güvenle ayırabilirsiniz.
¦
N
N
❑
❑
N
❑
N
O
❑
INFO
AD
SUM Aygıt
Seçim
T
Araçlar
R
ÜstKlasör
HaHaHa
Gold
Shine
Way
Want
Me
Lies
ILoveYou
GlenHans
OnceOst
2007
Soundtrack
3/37
Energetic
GeçerliGrubuOynat
Bilgi
Güvenli
Kaldır
5 1 2 34
../Müzik/
[620-Weuro]BN68-02326A-03L09.ind33 33 2009-10-08 ¿ÀÀü 9:31:28

Türkçe - 34
Müzik Çalma
1. Dosya Listesi Bölümünü seçmek için ▼ düğmesine basın.
2. Çalınacak müzik dosyasını seçmek için ◄ veya ►düğmesine basın.
3.
∂
(Oynat)/ENTER
E
düğmesine basın.
Bu menü sadece MP3 dosya uzantılı dosyaları gösterir. Başka dosya
uzantılarına sahip dosyalar, aynı USB aygıtına kaydedilmiş olsalar bile
görüntülenmez.
Seçili dosya, oynatma süresi ile birlikte en üstte görüntülenir.
Müziğin sesini ayarlamak için, uzaktan kumandadaki ses düğmesine basın.
Sessiz moda almak için, uzaktan kumandadaki MUTE düğmesine basın.
MP3 dosyalarını çalarken ses garip geliyorsa, Ses menüsünde Ekolayzer ve SRS TruSurround HD ayarını yapın. (Aşırı
değiştirilmiş MP3 dosyalarında ses sorunu olabilir.)
Dosyanın başlangıcında oynatma süresi bilgisi bulunamazsa, bir müzik dosyanın oynatma süresi '00:00:00' olarak
görüntülenebilir.
π
(Geri) ya da
μ
(Hızlı ileri) düğmeleri, oynatma işlemi sırasında çalışmaz.
ENTER
E
Müzik dosyasını başlatır/duraklatır.
∂
Müzik dosyasını çalar.
∑
Müzik dosyasını duraklatır.
∫
Çalma modundan çıkar ve müzik listesine geri döner.
TOOLS Müzik menülerindeki çeşitli işlevleri çalıştırır.
p
Klasördeki tüm müzik dosyaları (veya seçili dosya) tekrarlandığında. Tekrar Modu
ayarındadır.
q
Klasördeki tüm müzik dosyaları (veya seçili dosya) bir kez çalındığında. Tekrar Modu
ayarındadır.
Müzik grubunu çalma
1. Grup Listesi Bölümüne gitmek için ▲ düğmesine basın.
2. ◄ ve ► düğmelerini kullanarak bir grup seçin.
3.
∂
(Oynat) düğmesine basın. Seçili gruptaki dosyalar oynatılmaya başlar.
Alternatif olarak
1.
Dosya Listesi Bölümünde, istenilen grubu içeren dosyaları seçin.
Önceki/sonraki gruba geçmek için,
π
(Geri) ya da
μ
(Hızlı İleri) düğmesine basın.
2. TOOLS düğmesine basın.
3.
Geçerli Grubu Oynat öğesini seçmek için ▲ veya ▼ düğmesine, ardından ENTER
E
düğmesine basın.
Seçili dosya da dahil olmak üzere, sıralama grubundaki müzik dosyaları çalınır.
1. Dosya Listesi Bölümünü seçmek için ▼ düğmesine basın.
2. İstediğiniz müzik dosyasını seçmek için ◄ veya ► düğmesine basın.
3.
Sarı düğmeye basın.
4.
Birden fazla müzik dosyasını seçmek için yukarıdaki işlemi tekrar edin.
Seçilen müzik dosyasının solunda
c
görüntülenir.
Seçili tüm dosyaların seçimlerini kaldırmak için TOOLS düğmesine basın ve öğesini seçin.
5.
∂
(Oynat)/ENTER
E
düğmesine basın.
Seçili dosyalar çalınır.
¦
N
N
N
N
N
N
N
N
●
N
N
N
N
N
E
Duraklat◀▶Önc/Snrk
T
Araçlar
R
Geri
SUM
ILoveYou
HaHaHaWay
▶00:00:04/00:04:043/37
[620-Weuro]BN68-02326A-03L09.ind34 34 2009-10-08 ¿ÀÀü 9:31:29

Türkçe - 35
Müzik Çalma Seçenek Menüsü
Müzik Çalma Seçenek Menüsü
Müzik dosyalarını tekrar tekrar çalabilirsiniz.
Resim ve ses ayarlarını yapılandırabilirsiniz.
Bilgi
Müzik dosyası bilgileri görüntülenir.
Aygıtı TV'den güvenle ayırabilirsiniz.
¦
❑
❑
❑
❑
Kurulum Menüsünü Kullanma
Kurulum Menüsü Media Play menüsünün kullanıcı ayarlarını gösterir.
1. MEDIA.P düğmesine basın.
2.
Setup öğesini seçmek için ◄ veya ► düğmesine basın, sonra ENTER
E
düğmesine basın.
3. İstediğiniz seçeneğin seçmek için ▲ veya ▼ düğmesine basın.
4.
İstediğiniz seçeneğin seçmek için ◄ veya ► düğmesine basın.
Media Play modundan çıkmak için, uzaktan kumandadaki MEDIA.P düğmesine
basın.
Müzik dosyalarını tekrar tekrar oynatmak için seçin.
Ekran koruyucu çalışmaya başlamadan önceki bekleme süresini belirleyin.
Bilgi
Bağlı aygıtın bilgilerini görüntülemek için seçin.
Aygıtı TV'den güvenle ayırabilirsiniz.
¦
N
■
■
■
■
TekrarModu ◀Açık▶
ResimAyarı
SesAyarları
Bilgi
Güvenli
Kaldır
U
Taşı
L
Ayarla
e
Çıkış
Araçlar
851.86MB/993.02MBBoş
Photo
SUM
SUM
Aygıt
SETUP
e
Çıkış
Music Setup
TekrarModu ◀Açık▶
EkrKrycÇalışmaZmn :2saat
Bilgi
Güvenli
Kaldır
U
Taşı
L
Ayarla
R
Geri
SUM Aygıt
[620-Weuro]BN68-02326A-03L09.ind35 35 2009-10-08 ¿ÀÀü 9:31:29

Türkçe - 36
ANYNET
+
Anynet
+
Anynet
+
nedir?
Anynet
+
, Anynet
+
özelliğini destekleyen bağlı tüm Samsung cihazlarını Samsung TV'nizin uzaktan kumandası ile kumanda
etmenizi sağlar. Anynet
+
sistemi yalnızca Anynet
+
özelliği olan Samsung cihazları ile kullanılabilir. Samsung cihazınızda bu
özelliğin olup olmadığından emin olmak için üstünde bir Anynet
+
logosu olup olmadığını kontrol edin.
1. TV'deki HDMI IN (1, 2, 3(DVI) ya da 4) jakı ile Anynet
+
aygıtında karşılık gelen HDMI OUT jakını bir HDMI kablosu kullanarak
bağlayın.
1. TV'deki HDMI IN (1, 2, 3(DVI) ya da 4) jakı ile Anynet
+
aygıtında karşılık gelen HDMI OUT jakını bir HDMI kablosu kullanarak
bağlayın.
2. HDMI kablosunu kullanarak ev sinemasının HDMI IN jakını ve karşılık gelen Anynet
+
cihazının HDMI OUT jakını bağlayın.
TV'nizdeki DIGITAL AUDIO OUT (OPTICAL) jakı ile Ev Sinemasındaki Dijital Ses Girişi arasına optik kablo bağlayın.
Yukarıdaki bağlantıyı izlerken Optik jak yalnızca 2 kanal ses çıkışı verir. Yalnızca Ev Sineması'nın Ön Sol ve Sağ
hoparlörleri ile subwoofer'dan ses duyacaksınız. 5.1 kanal ses dinlemek istiyorsanız, DVD / Uydu
Alıcısındaki (örn.
Anynet Cihazı 1 ya da 2) DIGITAL AUDIO OUT (OPTICAL) jakını TV'ye değil doğrudan Amplifikatör ya da Ev Sinemasına
bağlayın.
Yalnızca bir Ev Sineması bağlayın.
Bir Anynet
+
cihazını HDMI 1.3 kablosu kullanarak bağlayabilirsiniz. Bazı HDMI kabloları Anynet
+
işlevlerini
desteklemeyebilir.
Anynet
+
sistemini destekleyen AV cihazı, Standby veya On durumdayken Anynet
+
çalışır.
Anynet
+
toplamda en fazla 12 AV cihazını destekler. Aynı türden en fazla 3 cihazı bağlayabileceğinizi unutmayın.
¦
N
N
N
N
N
N
Anynet
+
HDMI 1.3 Kablosu
HDMI 1.3 KablosuHDMI 1.3 Kablosu
HDMI 1.3 Kablosu
Anynet
+
Anynet
+
Anynet
+
TV
Anynet
+
HDMI 1.3 Kablosu
HDMI 1.3 Kablosu
HDMI 1.3 KablosuHDMI 1.3 Kablosu
TV
HDMI 1.3 Kablosu
Optik Kablo
Anynet
+
Anynet
+
Anynet
+
[620-Weuro]BN68-02326A-03L09.ind36 36 2009-10-08 ¿ÀÀü 9:31:30

Türkçe - 37
Anynet
+
Kurulumu
Araçlar menüsünü görüntülemek için TOOLS düğmesine basın. Anynet
+
menüsünü ayrıca
+
(HDMI-CEC) öğesini seçerek de görüntüleyebilirsiniz.
Kurulum
Anynet
+
Anynet
+
İşlevini kullanmak için, Anynet
+
(HDMI-CEC), olarak ayarlanmalıdır.
Anynet
+
(HDMI-CEC) işlevi devre dışı olduğunda, tüm Anynet+ ile ilgili işlemler devre dışı
bırakılır.
TV Kapanınca bir Anynet
+
Cihazını Otomatik Olarak Kapatma.
Anynet
+
işlevinin kullanılması için etkin kaynağın TV uzaktan kumandasında TV olarak
ayarlanması gerekir.
Otomatik Kapatma öğesini Evet olarak ayarlarsanız, TV kapandığında bağlanan harici
aygıtlar da kapanır. Bir harici cihaz hala kayıt yapmaya devam ediyorsa, kapanabilir de
kapanmayabilir de.
Anynet
+
1. TOOLS düğmesine basın. Anynet
+
(HDMI-CEC) seçeneğini seçmek için ENTER
E
düğmesine basın.
2. Cihaz Listesi seçeneğini seçmek için ▲ ya da ▼ düğmesine basın, ardından ENTER
E
düğmesine basın.
TV'ye bağlı Anynet
+
aygıtları listelenir.
İstediğiniz bir cihazı bulamıyorsanız cihazları taramak için kırmızı düğmeye basın.
3.
▲ veya ▼ düğmesine basarak belirli bir cihazı seçin ve ardından ENTER
E
düğmesine
basın. Seçilen cihaza geçiş yapılır.
Yalnızca Uygulama menüsünde Anynet
+
(HDMI-CEC) öğesini olarak
ayarladığınızda, Cihaz Listesi menüsü görünür.
Seçilen cihazlara geçiş yapılması 2 dakika kadar sürebilir. Geçiş işlemi sırasında işlemi iptal edemezsiniz.
Cihazların taranması için gereken zaman, bağlı cihazların sayısına göre belirlenir.
Cihaz taraması tamamlanınca, bulunan cihazların sayısı görüntülenmez.
TV, güç düğmesiyle açıldığında otomatik olarak cihazları arasa da, TV'ye bağlanan cihazlar her zaman cihaz listesinde
otomatik olarak görüntülenmeyebilir. Bağlanan cihazları aramak için kırmızı düğmeye basın.
Harici giriş modunu SOURCE düğmesine basarak seçtiyseniz, Anynet
+
işlevini kullanamazsınız. Cihaz Listesi seçeneğini
kullanarak bir Anynet
+
cihazına geçiş yaptığınızdan emin olun.
Anynet
+
Menüsü
Anynet
+
menüsü, TV'ye bağlı Anynet
+
cihazlarının türüne ve durumuna bağlı olarak değişiklik gösterir.
Anynet
+
Menüsü Açıklama
TV'yi görüntüle Anynet
+
modu TV yayın modu olarak değişir.
Cihaz Listesi Anynet
+
cihaz listesini görüntüler.
(cihaz_adı) MENU
Bağlı cihaz menülerini gösterir. Örn, bir DVD kaydedici bağlanmışsa DVD kaydedicinin
disk menüsü görünecektir.
(cihaz_adı) INFO
Bağlı cihazın oynatma menüsünü gösterir. Örn, bir DVD kaydedici bağlanmışsa DVD
kaydedicinin oynatma menüsü görünecektir.
Kaydediliyor: (*kaydedici)
Hemen kaydediciyi kullanarak kaydı başlatır. (Bu yalnızca kayıt işlevini destekleyen
cihazlar için geçerlidir.)
: (*kaydedici) Kaydı durdurur.
Ses alıcıdan çalınır.
Birden fazla kayıt cihazı bağlı ise, bunlar (*kaydedici) olarak gösterilir ve yalnızca bir kayıt cihazı bağlıysa (*cihaz_adı)
şeklinde temsil edilir.
¦
T
❑
■
N
■
N
N
¦
N
N
N
N
N
N
N
N
N
U
Taşı
E
Giriş
R
Geri
Anynet
+
(HDMI-CEC) :Açık ▶
Kurulum
OtomatikKapatma :Evet
MediaPlay(USB)
Anynet
+
(HDMI-CEC)
Uygulama
U
Taşı
E
Giriş
R
Geri
Anynet
+
(HDMI-CEC) :Açık
Kurulum
OtomatikKapatma :Evet ▶
U
Taşı
E
Giriş
R
Geri
TV'yigörüntüle
CihazListesi
Kaydediliyor:DVDR
DVDRMENU
DVDRINFO
Alıcı:Kpalı
Kurulum
[620-Weuro]BN68-02326A-03L09.ind37 37 2009-10-08 ¿ÀÀü 9:31:31

Türkçe - 38
Anynet
+
Cihaz Türü
Anynet
+
Cihazı
Cihaza geçiş yaptıktan sonra, karşılık
gelen cihazın menüsü ekranda
görüntülendiğinde.
Sayısal düğmeler
▲/▼/◄/►/ ENTER
E
düğmeleri
Renk düğmeleri / EXIT düğmesi
Cihaza geçiş yaptıktan sonra, dosya
oynatırken.
π
(Geri arama) /
μ
(İleri arama) /
∫
(Durdur) /
∂
(Oynat) /
∑
(Duraklat)
Dahili Kanal
Arayıcılı cihaz
Cihaza geçiş yaptıktan sonra, TV
programı izlerken.
P
>
/ P
<
düğmesi
Ses Cihazı Alıcı etkinleştirildiğinde.
Y
/ MUTE düğmesi
Anynet
+
işlevi yalnızca TV uzaktan kumandasında etkin kaynak TV olarak ayarlandığında çalışır.
∏
düğmesi yalnızca kaydedilebilir durumdayken çalışır.
Anynet
+
cihazlarını, TV'nin düğmelerini kullanarak kontrol edemezsiniz. Anynet
+
cihazlarını yalnızca TV uzaktan kumandasını
kullanarak kontrol edebilirsi niz.
TV uzaktan kumandası belli koşullar altında çalışmayabilir. Bu durumda, Anynet
+
cihazını yeniden seçin.
Anynet
+
işlevleri diğer üreticilerin ürünleri için çalışmaz.
π
,
μ
işlemleri aygıta göre değişebilir.
Kaydediliyor
Bir Samsung kaydedici kullanarak bir TV programının kaydını yapabilirsiniz.
1. TOOLS düğmesine basın. Anynet
+
(HDMI-CEC) seçeneğini seçmek için ENTER
E
düğmesine basın.
2.
Hemen Kaydetmeyi seçmek için ▲ ya da ▼ düğmesine ve ENTER
E
düğmesine basın.
Kayıt başlar.
Birden fazla kayıt cihazı olduğunda
Birden çok kayıt cihazı bağlandığında, kayıt cihazları listelenir. ▲ veya ▼ düğmesine
basarak bir kayıt cihazı seçin ve ardından ENTER
E
düğmesine basın. Kayıt başlar.
Kayıt cihazı görüntülenmediğinde Device List seçeneğini seçin ve cihazları aramak
için Kırmızı düğmeye basın
3.
Çıkmak için EXIT düğmesine basın.
Kaynak akışlarını Kaydediliyor seçeneğini seçerek kaydedebilirsiniz: (cihaz_adı) seçimini yaparak kaydedebilirsiniz.
∏
düğmesine basıldığında o anda izlediğiniz şey kaydedilecektir. Başka bir cihazdan video izliyorsanız cihazdaki video
kaydedilir.
Kaydetmeden önce anten jakının kayıt cihazına düzgün bağlanıp bağlanmadığını kontrol edin. Bir anteni bir kayıt cihazına
doğru şekilde bağlamak için kayıt cihazının kullanıcı kılavuzuna başvurun.
TV hoparlörü yerine bir alıcı yoluyla ses dinleyebilirsiniz.
1. TOOLS düğmesine basın. Anynet
+
(HDMI-CEC) seçeneğini seçmek için ENTER
E
düğmesine basın.
2. seçimini yapmak için ▲ ya da ▼ düğmesine basın. ya da seçeneğini
seçmek için ◄ veya ► düğmesine basın.
3.
Çıkmak için EXIT düğmesine basın.
Alıcınız yalnızca sesi destekliyorsa cihaz listesinde görünmeyebilir.
Alıcı, alıcının optik giriş jakını TV'nin DIGITAL AUDIO OUT (OPTICAL) jakına doğru
şekilde bağladığınızda çalışacaktır.
Alıcı (ev sineması) Açık olarak ayarlandığında TV’nin Optik jakından çıkan sesi duyabilirsiniz. TV bir DTV (karasal yayın)
sinyali görüntülediğinde, TV, 5.1 kanal sesi Ev sineması alıcısına gönderecektir. Kaynak, DVD gibi bir dijital bileşen
olduğunda TV'ye HDMI aracılığıyla bağlandığında, Ev Sineması alıcısından yalnızca 2 kanal ses duyulacaktır.
, konumundayken televizyon elektriği kesildiğinde (güç kablosunu prizden çıkarmak suretiyle veya bir elektrik
kesintisi nedeniyle), TV’yi tekrar açtığınız zaman Hoparlörü Seçin öğesi Harici Hoparlör olarak ayarlanmış olabilir.
N
N
N
N
N
N
¦
N
N
N
N
N
¦
N
N
N
N
U
Taşı
E
Giriş
R
Geri
TV'yigörüntüle
CihazListesi
Kaydediliyor:DVDR
DVDRMENU
DVDRINFO
Alıcı:Kpalı
Kurulum
U
Taşı
E
Giriş
R
Geri
TV'yigörüntüle
CihazListesi
Kaydediliyor:DVDR
DVDRMENU
DVDRINFO
Alıcı:Kpalı
Kurulum
[620-Weuro]BN68-02326A-03L09.ind38 38 2009-10-08 ¿ÀÀü 9:31:31

Türkçe - 39
Anynet
+
için Sorun Giderme
Sorun
Anynet
+
çalışmıyor. Cihazın bir Anynet
+
cihazı olup olmadığını kontrol edin. Anynet
+
, yalnızca Anynet
+
cihazlarını
destekler.
Yalnızca bir alıcı (ev sineması) bağlayın.
Anynet
+
cihazının güç kablosunun düzgün takılıp takılmadığını kontrol edin.
Anynet
+
cihazının Video/Ses/HDMI 1.3 kablo bağlantılarını kontrol edin.
Anynet
+
(HDMI-CEC) seçeneğinin Anynet
+
kurulum menüsünde Açık ayarında olup olmadığını
kontrol edin.
TV uzaktan kumandasının TV modunda olup olmadığını kontrol edin.
Cihazın Anynet
+
özel uzaktan kumandası olup olmadığını kontrol edin.
Anynet
+
belirli koşullarda çalışmaz.
(Kanallar aranırken, Media Play, Plug & Play Çalışırken, vb.)
HDMI 1.3 kablosunu takarken veya çıkarırken, cihazları tekrar arattığınızdan emin olun veya
TV'nizi yeniden başlatın.
Anynet
+
cihazının Anynet
+
İşlevinin açık olduğunu kontrol edin.
●
●
●
●
●
●
●
●
●
●
Anynet
+
sistemini
başlatmak istiyorum.
Anynet+ cihazının TV'ye doğru bağlandığını ve Anynet
+
(HDMI-CEC) öğesinin Anynet
+
Kurulum menüsünde olarak ayarlandığını kontrol edin.
TV'ye geçiş yapmak için TV uzaktan kumandasında TV düğmesine basın. Ardından Anynet
+
menüsünü görüntülemek ve dilediğiniz menüyü seçmek için TOOLS düğmesine basın.
●
●
Anynet
+
sisteminden
çıkmak istiyorum.
Anynet
+
menüsünde seçimini yapın.
TV uzaktan kumandasındaki SOURCE düğmesine basın ve Anynet
+
cihazlarından başka bir
cihaz seçin.
TV modunu değiştirmek için P
>
/
<
, PRE-CH ve FAV.CH düğmelerine basınız.
(Kanal düğmesinin yalnızca kanal ayarcısı gömülü Anynet
+
cihazı bağlı olmadığında çalıştığını
unutmayın.)
●
●
●
Ekranda 'Anynet+
cihazına bağlanılıyor...'
mesajı görünür.
Anynet
+
yapılandırırken ya da izleme moduna geçiş yaparken uzaktan kumandayı
kullanamazsınız.
Anynet
+
ayarı ya da izleme moduna geçiş tamamlandığında uzaktan kumandayı kullanın.
●
●
Anynet
+
cihazı
oynatılmıyor.
Tak ve Çalıştır yürütülüyorken oynatma işlevini kullanamazsınız.
●
Bağlanmış cihaz
görüntülenmiyor.
Cihazın Anynet
+
işlevlerini destekleyip desteklemediğini kontrol edin.
HDMI 1.3 kablosunun düzgün bağlanıp bağlanmadığını kontrol edin.
Anynet
+
(HDMI-CEC) öğesinin Anynet
+
kurulum menüsünde olarak ayarlandığını kontrol
edin.
Anynet
+
cihazlarını yeniden arayın.
Bir Anynet
+
cihazını yalnızca HDMI 1.3 kablosu kullanarak bağlayabilirsiniz. Bazı HDMI kabloları
Anynet
+
işlevlerini desteklemeyebilir.
HDMI kablosu veya güç kablosu bağlantısının kesilmesi veya elektrik kesintisi gibi normal
olmayan bir durumla sonlanmışsa, lütfen cihaz taramasını tekrarlayın.
●
●
●
●
●
●
TV programı
kaydedilemiyor.
Kayıt cihazındaki anten jakının düzgün bağlanıp bağlanmadığını kontrol edin.
●
TV sesi alıcıdan çıkmıyor. TV ve alıcı arasına optik kabloyu bağlayın.
●
¦
[620-Weuro]BN68-02326A-03L09.ind39 39 2009-10-08 ¿ÀÀü 9:31:31

Türkçe - 40
Televizyon istasyonlarının çoğu, Teletekst aracılığı ile yazılı bilgi hizmeti sunar. Teletekst hizmetinin dizin sayfasında nasıl
kullanılacağıyla ilgili bilgiler bulunur. Ayrıca uzaktan kumanda düğmelerini kullanarak gereksinimlerine uygun seçenekleri
belirleyebilirsiniz.
Teletekst bilgilerinin doğru görünmesi için kanal alışının düzenli olması gerekir. Aksi takdirde bilgiler eksik olabilir ya da bazı
sayfalar görüntülenmeyebilir.
Uzaktan kumandanın sayısal tuşlarına basarak Teletekst sayfalarını değiştirebilirsiniz.
1
0
(mod)
Teletekst modunu seçmek
için basın (LIST/FLOF). LIST
modundayken basarsanız, Liste
kaydetme moduna geçer. Liste
kaydetme modunda,
8
(kaydet)
düğmesine basarak teletekst
sayfasını listeye kaydedebilirsiniz.
2
5
(göster)
Gizli metinleri (örneğin test
oyunları yanıtlarını) göstermek
için kullanılır. Normal ekranı
görüntülemek için yeniden basın.
3
4
(boyut)
Ekranın üst yarısında çift
boyutlu harfleri görüntülemek
için basın. Ekranın alt yarısı için
yeniden basın. Normal ekranı
görüntülemek için bir kez daha
basın.
4
8
(kaydet)
Teletekst sayfalarını kaydetmek
için kullanılır.
5 Renkli düğmeler (kırmızı/yeşil/sarı/
mavi)
Yayın şirketi FASTEKST
sistemini kullanıyorsa, Teletekst
sayfasında yer alan çeşitli
konuların renkleri farklıdır ve bu
konular renk düğmeleri basılarak
seçilebilir. İstediğiniz sayfaya
karşılık gelen renk düğmesine
basın. Görünen sayfa, aynı
biçimde seçilebilecek diğer
renklere ayrılmış bilgiler içerir.
Önceki ya da sonraki sayfayı
görüntülemek için ilgili renk
düğmesine basın.
6
/
(Teletekst açık/karışık)
Teletekst hizmeti sağlayan kanalı
seçtikten sonra Teletekst modunu
etkinleştirmek için bu düğmeye basın.
Teleteksti, normal yayın ekranının
üzerine bindirmek için iki kez basın.
7
:
(çıkış)
Teletekst gösteriminden çıkış.
8
1
(alt sayfa)
Varsa alt sayfayı görüntülemek için
kullanılır.
9
2
(sayfa yukarı)
Bir sonraki Teletekst sayfasını
görüntülemek için kullanılır.
0
3
(sayfa aşağı)
Bir önceki Teletekst sayfasını
görüntülemek için kullanılır.
!
9
(tut)
Seçilen sayfada, otomatik olarak
takip eden başka sayfalar bağlıysa,
bulunduğunuz sayfayı tutmak için
kullanılır. Devam ettirmek için yeniden
basın.
@
6
(dizin)
Teleteksti görüntülerken istediğiniz
zaman dizin (içindekiler) sayfasını
görüntülemek için kullanılır.
#
7
(iptal)
Sayfa aranırken yayını göstermek için
kullanılır.
¦
N
N
INFO
AD
1
2
3
4
5
6
8
7
9
0
!
#
@
[620-Weuro]BN68-02326A-03L09.ind40 40 2009-10-08 ¿ÀÀü 9:31:31

Türkçe - 41
Bölüm
A Seçilen sayfa numarası.
B Yayın yapan kanalın adı.
C Geçerli sayfa numarası ya da arama göstergeleri.
D Tarih ve saat.
E Metin.
F Durum bilgileri.
FASTEKST bilgileri.
Teleteks bilgileri çoğunlukla art arda sıralanmış birden çok sayfaya bölünmüştür ve bunlara:
Sayfa numarasını girerek
Listeden bir konu seçerek
Renklere göre ayrılmış başlık seçerek (FASTEKST sistemi) erişilebilir
TV'nin desteklediği Teletekst düzeyi ek grafik ve metin de görüntüleyebilen sürüm 2.5'tir.
Aktarıma bağlı olarak, Teletekst görüntülenirken boş yan paneller oluşabilir.
Bu gibi durumlarda, ek grafik veya metin aktarılmaz.
Sürüm 2.5'i desteklemeyen eski TV'lerin Teletekst aktarımına bakılmaksızın ek grafik veya metin görüntüleme özelliği yoktur.
Teletekst ekranından çıkmak için TV düğmesine basın.
Ön ayar: Standın üzerine Stand Kılavuzunu ve Kapak Başlığını yerleştirin ve vidaları
kullanarak sıkıştırın.
1. LCD TV'nizi standa takın.
TV'yi iki veya daha fazla kişi taşımalıdır.
Standı takarken standın önü ve arkasını karıştırmamaya dikkat edin.
TV'nin standa düzgün bir seviyede takıldığından emin olmak için, TV'nin üst sol veya
sağ kenarına aşağı doğru aşırı güç uygulamayın.
2.
1
konumuna vidaları sıkıştırın ve sonra
2
konumuna iki vidayı sıkıştırın.
Ürünü yukarı kaldırın ve vidaları sıkıştırın. LCD TV aşağı yerleşmişken vidaları
sıkıştırırsanız bir tarafa eğilebilir.
N
N
N
N
N
O
¦
N
N
N
N
N
INFO
AD
Ön
Arka
1
2
[620-Weuro]BN68-02326A-03L09.ind41 41 2009-10-08 ¿ÀÀü 9:31:33

Türkçe - 42
1. TV’nin arkasındaki vidaları çıkarın.
2. Standı TV'den ayırın.
TV'yi iki veya daha fazla kişi taşımalıdır.
3.
Alt deliği kapakla örtün.
Duvara montaj öğeleri (ayrı satılır) ile TV'yi duvara monte edebilirsiniz.
Duvara Montaj kitinin takılmasıyla ilgili daha fazla bilgi için, Duvara Montaj öğeleriyle
birlikte verilen talimatlara bakın. Duvara montaj braketini takarken yardım için bir
teknisyenle görüşün.
Samsung Electronics, TV'yi kendiniz monte etmeyi seçtiğinizde kendinize ya da
başkalarına vereceğiniz hasarlardan sorumlu değildir.
Duvara Montaj Kitinizi TV'niz açıkken kurmayın. Elektrik çarpması sonucunda
kişisel yaralanmaya neden olabilir.
Tutucu-Tel Kablo içindeki kabloları, saydam standdan görülmeyecek şekilde sarın.
Kensington Kilidi, televizyonu halka açık bir ortamda kullanıyorsanız, sistemi fiziksel olarak
sabitlemek için kullanılan bir cihazdır. Üreticiye bağlı olarak, görünüm ve kilitleme yöntemi
resimde gösterilenden farklı olabilir.
Doğru kullanım için Kensington Kilidiyle birlikte verilen kılavuza başvurun.
Kilitleme cihazının ayrıca satın alınması gerekmektedir.
Kensington Kilidinin konumu, modeline bağlı olarak farklılık gösterebilir.
1.
Kilitleme cihazını LCD TV'deki Kensington yuvasına takın (1) ve kilitleme yönünde
döndürün (2).
2.
Kensington Kilidi kablosunu (3).
3.
Kensington Kilidini masa veya ağır bir sabit nesneye sabitleyin.
N
N
3
1
2
¦
N
¦
¦
¦
<İsteğe bağlı>
[620-Weuro]BN68-02326A-03L09.ind42 42 2009-10-08 ¿ÀÀü 9:31:35

Türkçe - 43
Uygun havalandırma için, ürün ve diğer nesneler (duvar gibi) arasında gerekli mesafeyi bırakın.
Buna dikkat edilmemesi ürünün dahili sıcaklığında gerçekleşecek artış nedeniyle yangına veya üründe bir soruna neden olabilir
.
Ürünü şekilde gösterildiği mesafeyi bırakarak monte edin.
Bir stand veya duvar montajı kullanırken, yalnızca Samsung Electronics tarafından sağlanan parçaları kullanın.
Başka bir üretici tarafından sağlanan parçaların kullanılması, ürünün düşmesi nedeniyle üründe bir soruna veya
yaralanmaya neden olabilir.
Başka bir üretici tarafından sağlanan parçaların kullanılması, yetersiz havalandırma nedeniyle ürünün dahili sıcaklığı
artacağından üründe bir soruna veya yangına neden olabilir.
Görünüm ürüne bağlı olarak değişiklik gösterebilir.
10 cm
10 cm
10 cm
10 cm
10 cm
10 cm
10 cm
TV'yi Duvara Sabitleme
Dikkat: TV'yi çekme, itme veya üzerine çıkma TV'yi düşürebilir. Özellikle çocuklarınızın TV'ye asılmamasına
veya TV'nin dengesini bozmamasına özen gösterin; böyle bir durumda, TV devrilebilir ve ciddi yaralanmalara
veya ölüme neden olabilir. Güvenlik Notundaki tüm güvenlik önlemlerine uyun. Birimin daha dengeli durması için,
güvenlik amacıyla aşağıdaki talimatları uygulayarak düşmeyi önleyici cihazı takın.
1. Vidaları sıkıştırıcı parçalara yerleştirin ve duvara sıkı bir şekilde sabitleyin. Vidaların,
duvara sağlam bir şekilde takıldıklarını onaylayın.
Duvar tipine bağlı olarak dübel gibi ek malzemelere ihtiyacınız olabilir.
Gerekli sıkıştırıcı parçalar, vidalar ve bağ ürünle birlikte sağlanmadığı için, lütfen
bunları ayrı olarak satın alın.
2.
TV'nin arkasında ortadaki vidaları çıkarın, sıkıştırıcı parçaların içinden geçirin ve daha
sonra, yeniden TV'ye takıp sıkıştırın.
Vidalar ürünle birlikte verilmemiş olabilir. Bu durumda, lütfen aşağıdaki özelliklere
uygun vidaları alın.
Vida Özellikleri
17 ~ 29 İnç LCD TV için: M4 X L15
32 ~ 40 İnç LCD TV için: M6 X L15
3.
TV'ye ve duvara sabitlenmiş sıkıştırıcı parçaları sağlam bir bağ ile birleştirin ve daha
sonra, bağı sıkı bir şekilde bağlayın.
TV'yi arkaya doğru düşmemesi için duvara yakın bir yere yerleştirin.
Bağı, duvardaki sıkıştırıcı parçalar, TV'ye sabitlenen sıkıştırıcı parçalarla aynı hizada
veya daha aşağıda olacak şekilde bağlayabilirsiniz.
TV'yi taşımadan önce bağı çözün.
4.
Tüm bağlantıların uygun şekilde sabitlendiğini doğrulayın. Belirli aralıklarla bağlantılarda
yorgunluk belirtisi olup olmadığını kontrol edin. Bağlantılarınızın güvenliğiyle ilgili
herhangi bir şüpheniz varsa, bir kurulum uzmanıyla görüşün.
¦
N
N
¦
■
N
N
N
N
N
N
N
Duvar
Duvar
[620-Weuro]BN68-02326A-03L09.ind43 43 2009-10-08 ¿ÀÀü 9:31:37

Türkçe - 44
Sorun Giderme
TV'ye ilişkin herhangi bir sorunuz varsa, öncelikle bu listeye başvurun. Bu sorun giderme ipuçlarının hiçbiri işe yaramazsa, lütfen
‘www.samsung.com’ sitesini ziyaret edin ve ardından Destek düğmesini tıklatın veya son sayfa listesindeki Çağrı Merkezi ile
iletişime geçin.
Sorun Çözüm
Görüntü Kalitesi
Öncelikle, lütfen TV'nizin test görüntüyü düzgün bir şekilde görüntülediğini onaylamak için,
Görüntü Testi işlemini gerçekleştirin.
MENU - Destek -
- Görüntü Testi
Test görüntü düzgün bir şekilde görüntüleniyorsa, bozuk resmin nedeni kaynak veya sinyal
olabilir.
●
TV görüntüsü mağazada olduğu
kadar iyi görünmüyor.
Analog bir Kablo/Set üstü kutuya sahipseniz, Kutuya yükseltin. HD resim kalitesi elde
etmek için HDMI veya Komponent kabloları kullanın.
Kablolu TV/Uydu aboneliği : Kanal hattındaki HD (Yüksek Tanımlı) istasyonlarını deneyin.
Anten bağlantısı: Otomatik program işlemi gerçekleştirdikten sonra HD istasyonlarını
deneyin.
Pek çok HD kanalı SD (Standart Tanımlı) içeriğinden daha yüksek kalitededir.
Kablo/Set üstü kutu video çıkış çözünürlüğünü 1080i veya 720p olarak ayarlayın.
TV'yi görüntülemekte olduğunuz sinyalin boyutuna ve tanımına bağlı olarak önerilen
minimum mesafede izlediğinizi onaylayın.
●
●
●
N
●
●
Resim bozuk : makroblok, küçük
blok, noktalar, piksellenme
Video içeriklerinin sıkıştırılması özellikle de spor programları ve aksiyon filmleri gibi
hızlı hareket eden görüntüler üzerinde resim bozulmasına yol açabilir.
Düşük sinyal düzeyi veya kötü kalite, resim bozulmasına yol açabilir. Bu
TV'yle ilgili bir
sorun değildir.
●
●
Komponent bağlantısında
yanlışlık veya kayıp renk.
Komponent kablolarının doğru jaklara takıldığından emin olun. Yanlış veya gevşek
bağlantılar renk sorunlarına yol açabilir veya ekran boş olur.
●
Bozuk renk veya parlaklık.
TV menüsünde Görüntü seçeneklerini ayarlayın. (Görüntü modu, Renk, , Netlik)
Kurulum menüsünde Enrj. Tasarrufu seçeneğini ayarlayın.
Varsayılan resim ayarını görüntülemek için resmi sıfırlamayı deneyin.
(MENU - Görüntü - bölümüne gidin)
●
●
●
Ekranın kenarında noktalı satır. Resim boyutu olarak ayarlandıysa, 16:9 olarak değiştirin.
Kablo/set üstü kutu çözünürlüğünü değiştirin.
●
●
Resim yalnızca AV (Kompozit)
girişi sırasında siyah beyaz.
Video kablosunu (Sarı) TV'nin 1 numaraları Yeşil komponent girişi jakına takın.
●
Kanallar değiştirilirken resim
donuyor veya bozuluyor ya da
resim gecikiyor.
Kablo kutusuyla birlikte bağlandıysa, lütfen kablo kutusunu sıfırlamayı deneyin.
(AC kablosunu tekrar bağlayın ve kablo kutusu yeniden yükleninceye kadar bekleyin.
Bu 20 dakika kadar sürebilir)
Kablo kutusunun çıkış çözünürlüğünü 1080i veya 720p olarak ayarlayın.
●
●
Ses Kalitesi
Öncelikle, lütfen TV'nizin ses seviyesinin düzgün bir şekilde çalıştığını onaylamak için,
Ses Testi işlemini gerçekleştirin.
MENU - Destek - - Ses Testi
Ses seviyesi Tamamsa, ses sorunu kaynaktan veya sinyalden kaynaklanıyor olabilir.
●
Hiç ses yok veya maksimum ses
düzeyinde ses çok düşük.
Lütfen TV'nize bağlı harici cihazın ses düzeyini kontrol edin ve ardından TV ses
düzeyini uygun şekilde ayarlayın.
●
Resim iyi ancak ses yok. Hoparlörü Seçin seçeneğini ses menüsünde TV Hoparlörü olarak ayarlayın.
Harici cihazdaki ses kablolarının TV'deki doğru ses giriş jaklarına bağlandığından emin olun.
Bağlı cihazın ses çıkış seçeneğini kontrol edin. (örn: TV'nize bağlı bir HDMI varsa,
kablo kutunuzun ses seçeneğini HDMI olarak ayarlamanız gerekebilir.
DVI - HDMI kablosu kullanıyorsanız, ayrı bir ses kablosu gerekir.
Ses seviyesini 30 değerinin üzerine ayarlıyorsanız, SRS işlevini devre dışı bırakın.
Fişi kulaklık jakından çıkarın. (TV'nizde mevcutsa)
●
●
●
●
●
●
Hoparlörden ses geliyor. Kablo bağlantılarını kontrol edin. Ses girişine bir video kablosu bağlanmadığından
emin olun.
Anten/Kablo bağlantısı için, sinyal kuvvetini kontrol edin. Düşük sinyal seviyesi ses
bozukluğuna yol açabilir.
●
●
¦
[620-Weuro]BN68-02326A-03L09.ind44 44 2009-10-08 ¿ÀÀü 9:31:38

Türkçe - 45
Sorun Çözüm
Resim Yok, Video Yok
TV açılmıyor. AC güç kablosu fişinin duvardaki prize ve TV'ye düzgün bir şekilde takıldığından emin
olun.
Prizin çalıştığından emin olun.
Uzaktan kumandanın düzgün bir şekilde çalıştığından emin olmak için, TV'deki
POWER düğmesine basın. TV açılırsa, bu durum Uzaktan Kumandadan kaynaklanıyor
olabilir. Uzaktan Kumanda sorununu çözmek için, aşağıdaki 'Uzaktan kumanda
çalışmıyor' bölümüne bakın.
●
●
●
TV otomatik olarak kapanıyor. ayarının Kurulum menüsünde olarak ayarlanıp ayarlanmadığını
kontrol edin.
TV, PC'nize bağlanmışsa PC güç ayarlarınızı kontrol edin.
AC güç kablosu fişinin duvardaki prize ve TV'ye düzgün bir şekilde takıldığından emin
olun.
Anten/Kablo bağlantısından yaklaşık 10 ~ 15 dakika boyunca hiçbir sinyal alınmazsa,
TV kapatılır.
●
●
●
●
Resim/Video yok. Kablo bağlantılarını kontrol edin (TV'nin ve harici cihazların tüm kablolarını çıkarın ve
tekrar takın).
Harici cihazınızın (Kablo/Set Üstü Kutu, DVD, Blu-ray vb.) video çıkışını TV girişine
yapılan bağlantılarla eşleşecek şekilde ayarlayın. Örneğin, harici cihazın çıkışı: HDMI,
TV'nin girişi: HDMI.
Bağlanan cihazınızın açık olduğundan emin olun.
TV uzaktan kumandasının SOURCE düğmesine basarak TV'nin doğru kaynağını
seçtiğinizden emin olun.
●
●
●
●
RF (Kablo/Anten) Bağlantısı
Tüm kanalları alamıyor. Anten kablosunun doğru bir şekilde bağlandığından emin olun.
Kanal listesine mevcut kanalları eklemek için, lütfen Plug & Play işlemini
deneyin. MENU - Kurulum - Plug & Play bölümüne gidin ve mevcut tüm kanallar
kaydedilinceye kadar bekleyin.
Antenin düzgün bir şekilde konumlandırıldığını onaylayın.
●
●
●
Resim bozuk : makroblok, küçük
blok, noktaralar, piksellenme
Video içeriklerinin sıkıştırılması özellikle de spor programları ve aksiyon filmleri gibi
hızlı hareket eden görüntüler üzerinde resim bozulmasına yol açabilir.
Düşük sinyal resim bozukluğuna yol açabilir. Bu TV'yle ilgili bir sorun değildir.
●
●
PC Bağlantısı
‘Desteklenmeyen Mod’ mesajı. PC'nizin çıkış çözünürlüğünü ve frekansını TV tarafından desteklenen çözünürlüklere
uygun olacak şekilde ayarlayın.
●
PC bağlı olmasa bile her zaman
kaynak listesinde gösterilir.
Bu normaldir; PC, bir PC bağlı olmasa bile her zaman kaynak listesinde gösterilir.
●
HDMI bağlantısıyla video düzgün,
ancak hiç ses yok.
PC'nizdeki ses çıkış ayarını kontrol edin.
●
[620-Weuro]BN68-02326A-03L09.ind45 45 2009-10-08 ¿ÀÀü 9:31:38

Türkçe - 46
Sorun Çözüm
Diğerleri
Resim tam ekran olarak
görüntülenmiyor.
Yüksek kalitede SD (4:3) içerikleri görüntülenirken, HD kanallarında her bir kenar
üzerinde siyah çubuklar görüntülenir.
TV'nizden farklı açı oranlarına sahip filmlerde Üst ve Alt kısımda siyah çubuklar
görüntülenir.
Harici cihazınızdaki ve TV'nizdeki resim boyutu seçeneğini tam ekran olarak ayarlayın.
●
●
●
Uzaktan kumanda çalışmıyor. Uzaktan kumanda pillerini doğru polaritede (+ -) olacak şekilde değiştirin.
Uzaktan kumandanın üzerinde bulunan iletim penceresini temizleyin.
Uzaktan kumandayı TV'den 1,5-2 m uzaktayken kullanmayı deneyin.
●
●
●
TV gücü veya ses düzeyi
Kablo/Set üstü kutusu uzaktan
kumandasıyla kontrol edilemiyor.
Kablo/Set üstü kutusu uzaktan kumandasını TV'yi çalıştıracak şekilde programlayın.
SAMSUNG TV kodu için, Kablolu TV/Uydu kullanıcı kılavuzuna bakın.
●
‘Desteklenmeyen Mod’ mesajı. TV'nin desteklenen çözünürlüğünü kontrol edin ve harici cihazın çıktı çözünürlüğünü
uygun şekilde ayarlayın. Bu kılavuzdaki çözünürlük ayarlarına bakın.
●
TV'den gelen plastik kokusu. Bu koku normaldir ve zaman içinde geçecektir.
●
TV Sinyal Bilgileri, Self Diagnostic
Test menüsünde mevcut değil.
Bu işlev yalnızca Anten (RF/Koaks) bağlantılı dijital kanallar için mevcuttur.
●
TV sağ veya sol tarafa eğiliyor. Stand tabanını TV'den çıkarın ve tekrar takın.
●
Stand tabanı takılamıyor. TV'nin düzgün bir yüzeyde konumlandırıldığından emin olun. Vidalar TV'den
çıkarılamıyorsa, lütfen mıknatıslı tornavida kullanın.
●
Kanal menüsü gri. (mevcut değil) Kanal menüsü yalnızca TV kaynağı seçili olduğunda mevcuttur.
●
Ayarlarınız her 30 dakikada
bir veya her TV kapatıldığında
kaybolur.
TV Dükkan Demo modundaysa, ses ve resim ayarlarını her 30 dakikada bir sıfırlar.
Lütfen Dükkan Demo modunu, Plug & Play prosedüründeki moduyla
değiştirin. TV modunu seçmek için, SOURCE düğmesine basın, MENU → Kurulum →
Plug & Play → ENTER
E
bölümüne gidin.
●
Geçici ses veya görüntü kaybı. Kablo bağlantılarını kontrol edin ve tekrar bağlayın.
Çık sıkı veya ince kablo kullanımı nedeniyle olabilir. Kabloların uzun süreli kullanım için
yeterince esnek olduğundan emin olun. Duvar montajıysa, 90 derecelik konektörlere
sahip kablolar kullanmanızı öneririz.
●
●
TV ekranını çevreleyen
çerçevenin kenarlarına yakından
baktığınızda küçük partiküller
görebilirsiniz.
Bu ürün tasarımının bir parçasıdır ve kusur değildir.
●
CAM CARD(CI/CI+) ile ‘Karışmış
sinyal’ veya ‘Sinyal yok/Güçsüz
sinyal’.
CAM'ın genel arayüz yuvasına takılı CI(CI+) Kartı olduğundan emin olun.
CAM'ı TV'den çekin ve yuvaya tekrar takın.
●
●
Kapatıldıktan 45 dakika sonra, TV
kendiliğinden açılıyor.
Bu normaldir, TV izleme sırasında yüklenen güvenlik duvarını güncellemek için
OTA (Over The Air) işlevini kendiliğinden çalıştırır.
●
Tekrarlanan resim/ses sorunu. Sinyali/kaynağı kontrol edin ve değiştirin.
●
TFT LCD paneli, karmaşık bir üretim teknolojisi gerektiren iç piksellerden oluşan bir panel kullanmaktadır. Bununla birlikte,
ekranda birkaç parlak veya karanlık piksel bulunabilir. Bu piksellerin ürünün performansına olumsuz etkisi olmaz.
N
[620-Weuro]BN68-02326A-03L09.ind46 46 2009-10-08 ¿ÀÀü 9:31:38

Türkçe - 47
Teknik Özellikler
LE40B620R3WXXC LE46B620R3WXXC
Ekran Boyutu
(Çapraz) 40 inches 46 inches
(En iyi) 1920 x 1080 @ 60 Hz 1920 x 1080 @ 60 Hz
Ses
(Çıkış) 10W X 2 10W X 2
Boyutlar (GxDxY)
Gövde
Standla
1040 x 79 x 638 mm
1040 x 255 x 699 mm
1172 x 79 x 712 mm
1172 x 275 x 774 mm
Standla 19 kg 25 kg
Çalışma Sıcaklığı
Çalışma Nem Oranı
Saklama Sıcaklığı
Saklama Nem Oranı
10°C ila 40°C (50°F ila 104°F)
%10 ile %80 arası, yoğunlaşmayan
-20°C ila 45°C (-4°F ila 113°F)
%5 ile %95 arası, yoğunlaşmayan
Döner Stand
(Sol / Sağ) -20˚ ~ 20˚
LE52B620R3WXXC
Ekran Boyutu
(Çapraz) 52 inches
(En iyi) 1920 x 1080 @ 60 Hz
Ses
(Çıkış) 10W X 2
Boyutlar (GxDxY)
Gövde
Standla
1321 x 81 x 805 mm
1321 x 305 x 866 mm
Standla 18 kg
Çalışma Sıcaklığı
Çalışma Nem Oranı
Saklama Sıcaklığı
Saklama Nem Oranı
10°C ila 40°C (50°F ila 104°F)
%10 ile %80 arası, yoğunlaşmayan
-20°C ila 45°C (-4°F ila 113°F)
%5 ile %95 arası, yoğunlaşmayan
Döner Stand
(Sol / Sağ) -20˚ ~ 20˚
Tasarım ve özellikler önceden haber verilmeden değiştirilebilir.
Bu cihaz, bir Sınıf B dijital cihaz aparatıdır.
Güç kaynağı ve Güç Tüketimi için ürün üzerindeki etikete bakın.
¦
N
N
N
[620-Weuro]BN68-02326A-03L09.ind47 47 2009-10-08 ¿ÀÀü 9:31:38

EEE Yönetmeliğine
Uygundur.
Esentepe Mah. Anadolu Cad. No: 5 PK38 34870 Kartal-İstanbul/TÜRKİYE
Tel: +90 (216) 586 78 00 Fax: +90 (216) 473 60 32
ANADOLU
ELEKTRONiK
Bu ürünün ortalama yaşam süresi 10 yıldır.
İmalatçı SAMSUNG ELECTRONICS CO., LTD.
416 Maetan-3 Dong, Yeongtong-Gu, Suwon City Gyeonggi-Do, Korea, 443-742
Tel: +82-2-2255-0114 / Fax: +82-2-2255-0117
Model code LVD EMC
LE40B620R3WXXC NEMKO Korea Co.,Ltd Co.,Ltd Samsung Electronics co., Ltd.
LE46B620R3WXXC KTL(Korea Testing Laboratory) Samsung Electronics co., Ltd.
LE52B620R3WXXC KTL(Korea Testing Laboratory) Samsung Electronics co., Ltd.
NEMKO Korea Co.,Ltd 296, Osan-Ri, Mohyeon-Myeon, Cheoin-Gu, Yongin-Si, Gyeonggi-Do, Korea 449-582
Tel: + 82-31-322-2333 / Fax: +82-31-322-2332
KTL(Korea Testing Laboratory) 222-13, Guro-3dong, Guro-gu, Seoul, 152-718, Korea
Tel: +82-2-860-1114 / Fax: +82-2-838-2675
DIGITAL EMC CO., LTD. 683-3, Yubang-Dong, Yongin-Si, Kyunggi-Do, Korea. 449-080
Tel: +82-31-321-2664 / Fax: +82-31-321-1664
CTK Co., Ltd. 386-1, Ho-dong, Cheoin-gu, Yongin-si, Gyeonggi-do, 449-100, Korea
Tel: +82-31-339-9970 / Fax: +82-31-339-9855
Samsung Electronics co., Ltd. Suwon EMC test Lab 416 Maetan-3 Dong, Yeongtong-Gu, Suwon-City Gyeonggi-Do, Korea,
443-742
Tel: +82-31-200-2185 / Fax: +82-31-200-2189
[620-Weuro]BN68-02326A-03L09.ind48 48 2009-10-08 ¿ÀÀü 9:31:38

Bu sayfa bilerek boş
bırakılmıştır.
[620-Weuro]BN68-02326A-03L09.ind49 49 2009-10-08 ¿ÀÀü 9:31:38

Correct Disposal of This Product (Waste Electrical & Electronic Equipment)
(Applicable in the European Union and other European countries with separate collection systems)
This marking on the product, accessories
or literature indicates that the product and its electronic accessories (e.g. charger, headset, USB cable) should not be disposed of with other
household waste at the end of their working life. To prevent possible harm to the environment or human health from uncontrolled waste
disposal, please separate these items from other types of waste and recycle them responsibly to promote the sustainable reuse of material
resources. Household users should contact either the retailer where they purchased this product, or their local government ofce, for details
of where and how they can take these items for environmentally safe recycling. Business users should contact their supplier and check the
terms and conditions of the purchase contract. This product and its electronic accessories should not be mixed with other commercial wastes
for disposal.
[English]
Les bons gestes de mise au rebut de ce produit (Déchets d’équipements électriques et électroniques)
(Applicable dans les pays de l’Union Européenne et dans d’autres pays européens pratiquant le tri sélectif)
Ce symbole sur le produit, ses accessoires ou sa documentation indique que ni le produit, ni ses accessoires électroniques usagés
(chargeur, casque audio, câble USB, etc.) ne peuvent être jetés avec les autres déchets ménagers. La mise au rebut incontrôlée des
déchets présentant des risques environnementaux et de santé publique, veuillez séparer vos produits et accessoires usagés des autres
déchets. Vous favoriserez ainsi le recyclage de la matière qui les compose dans le cadre d’un développement durable. Les particuliers sont
invités à contacter le magasin leur ayant vendu le produit ou à se renseigner auprès des autorités locales pour connaître les procédures et
les points de collecte de ces produits en vue de leur recyclage. Les entreprises et professionnels sont invités à contacter leurs fournisseurs
et à consulter les conditions de leur contrat de vente. Ce produit et ses accessoires ne peuvent être jetés avec les autres déchets
professionnels et commerciaux.
[Français]
Korrekte Entsorgung von Altgeräten (Elektroschrott)
(In den Ländern der Europäischen Union und anderen europäischen Ländern mit einem separaten Sammelsystem)
Die Kennzeichnung auf dem Produkt, Zubehörteilen bzw. auf der dazugehörigen Dokumentation gibt an, dass das Produkt und Zubehörteile
(z. B. Ladegerät, Kopfhörer, USB-Kabel) nach ihrer Lebensdauer nicht zusammen mit dem normalen Haushaltsmüll entsorgt werden dürfen.
Entsorgen Sie dieses Gerät und Zubehörteile bitte getrennt von anderen Abfällen, um der Umwelt
bzw. der menschlichen Gesundheit
nicht durch unkontrollierte Müllbeseitigung zu schaden. Helfen Sie mit, das Altgerät und Zubehörtei
le fachgerecht zu entsorgen, um die
nachhaltige Wiederverwertung von stofichen Ressourcen zu fördern. Private Nutzer wenden sich an den Händler
, bei dem das Produkt
gekauft wurde, oder kontaktieren die zuständigen Behörden, um in Erfahrung zu bringen, wo Sie das
Altgerät bzw. Zubehörteile für eine
umweltfreundliche Entsorgung abgeben können. Gewerbliche Nutzer wenden sich an ihren Lieferanten und gehen nach den Bedingungen
des Verkaufsvertrags vor. Dieses Produkt und elektronische Zubehörteile dürfen nicht zusammen mit anderem Gewerbemüll entsorgt
werden.
[Deutsch]
Correcte verwijdering van dit product (elektrische & elektronische afvalapparatuur)
Dit merkteken op het product, de accessoires of het informatiemateriaal duidt erop dat het product en zijn elektronische accessoires (bv
.
lader, headset, USB-kabel) niet met ander huishoudelijk afval verwijderd mogen worden aan het einde van hun gebruiksduur. Om mogelijke
schade aan het milieu of de menselijke gezondheid door ongecontroleerde afvalverwijdering te voorkomen, moet u deze artikelen van
andere soorten afval scheiden en op een verantwoorde manier recyclen, zodat het duurzame hergebruik van materiaalbronnen wordt
bevorderd. Huishoudelijke gebruikers moeten contact opnemen met de winkel waar ze dit product hebben gekocht of met de gemeente
waar ze wonen om te vernemen waar en hoe ze deze artikelen milieuvriendelijk kunnen laten recyclen. Zakelijke gebruikers moeten
contact opnemen met hun leverancier en de algemene voorwaarden van de koopovereenkomst nalezen. Dit product en zijn elektronische
accessoires mogen niet met ander bedrijfsafval voor verwijdering worden gemengd.
[Nederlands]
Corretto smaltimento del prodotto (riuti elettrici ed elettronici)
(Applicabile nell’Unione Europea e in altri paesi europei con sistema di raccolta differenziata)
Il marchio riportato sul prodotto, sugli accessori o sulla documentazione indica che il prodotto e i relativi accessori elettronici (quali
caricabatterie, cufa e cavo USB) non devono essere smaltiti con altri riuti domestici al termine del ciclo di vita. Per evitare eventuali danni
all’ambiente o alla salute causati dall’inopportuno smaltimento dei riuti, si invita l’utente a separare il prodotto e i suddetti accessori da altri
tipi di riuti e di riciclarli in maniera responsabile per favorire il riutilizzo sostenibile delle risorse materiali. Gli utenti domestici sono invitati a
contattare il rivenditore presso il quale è stato acquistato il prodotto o l’ufcio locale preposto per tutte le informazioni relative alla raccolta
differenziata e al riciclaggio per questo tipo di materiali. Gli utenti aziendali sono invitati a contattare il proprio fornitore e vericare i termini
e le condizioni del contratto di acquisto. Questo prodotto e i relativi accessori elettronici non devono essere smaltiti unitamente ad altri riuti
commerciali.
[Italiano]
Eliminación correcta de este producto (Residuos de aparatos eléctricos y electrónicos)
(Aplicable en la Unión Europea y en países europeos con sistemas de recogida selectiva de residuos)
La presencia de este símbolo en el producto, accesorios o material informativo que lo acompañan, indica que al nalizar su vida útil ni el
producto ni sus accesorios electrónicos (como el cargador, cascos, cable USB) deberán eliminarse junto con otros residuos domésticos.
Para evitar los posibles daños al medio ambiente o a la salud humana que representa la eliminación incontrolada de residuos, separe
estos productos de otros tipos de residuos y recíclelos correctamente. De esta forma se promueve la reutilización sostenible de recursos
materiales. Los usuarios particulares pueden contactar con el establecimiento donde adquirieron el producto o con las autoridades locales
pertinentes para informarse sobre cómo y dónde pueden llevarlo para que sea sometido a un reciclaje ecológico y seguro. Los usuarios
comerciales pueden contactar con su proveedor y consultar las condiciones del contrato de compra. Este producto y sus accesorios
electrónicos no deben eliminarse junto a otros residuos comerciales.
[Español]
Eliminação Correcta Deste Produto (Resíduos de Equipamentos Eléctricos e Electrónicos)
Esta marca apresentada no produto, nos acessórios ou na literatura – indica que o produto e os seus acessórios electrónicos (por exemplo,
o carregador, o auricular, o cabo USB) não deverão ser eliminados juntamente com os resíduos domésticos no nal do seu período de
vida útil. Para impedir danos ao ambiente ou à saúde humana causados pela eliminação incontrolada de resíduos, deverá separar estes
equipamentos de outros tipos de resíduos e reciclá-los de forma responsável, para promover uma reutilização sustentável dos recursos
materiais. Os utilizadores domésticos deverão contactar o estabelecimento onde adquiriram este produto ou as entidades ociais locais
para obterem informações sobre onde e de que forma podem entregar estes equipamentos para permitir efectuar uma reciclagem segura
em termos ambientais. Os utilizadores prossionais deverão contactar o seu fornecedor e consultar os termos e condições do contrato de
compra. Este produto e os seus acessórios electrónicos não deverão ser misturados com outros resíduos comerciais para eliminação.
[Português]
[620-Weuro]BN68-02326A-03L09.ind1 1 2009-10-08 ¿ÀÀü 9:31:38

Ustrezno odstranjevanje tega izdelka (odpadna električna in elektronska oprema)
Oznaka na izdelku, dodatni opremi ali dokumentaciji pomeni, da izdelka in njegove elektronske dodatne opreme (npr
. električni polnilnik,
slušalke, kabel USB) ob koncu dobe uporabe ni dovoljeno odvreči med gospodinjske odpadke. T
e izdelke ločite od drugih vrst odpadkov
in jih odgovorno predajte v recikliranje ter tako spodbudite trajnostno vnovično uporabo materialnih virov
. Tako boste preprečili morebitno
tveganje za okolje ali zdravje ljudi zaradi nenadzoro vanega odstranjevanja odpadkov. Uporabniki
v gospodinjstvih naj se za podrobnosti
o tem, kam in kako lahko te izdelke predajo v okolju prijazno recikliranje, obrnejo na trgovino, kjer so izdelek kupili, ali na krajevni upravni
organ. Poslovni uporabniki naj se obrnejo na dobavitelja in preverijo pogoje kupne pogodbe. T
ega izdelka in njegove elektronske dodatne
opreme pri odstranjevanju ni dovoljeno mešati z drugimi gospodarskimi odpadki.
Korrekt avfallshantering av produkten (elektriska och elektroniska produkter)
Denna markering på produkten, tillbehören och i manualen anger att produkten och de elektroniska tillbehören (t.ex. laddare, headset,
USB-kabel) inte bör sorteras tillsammans med annat hushållsavfall när de kasseras. T
ill förebyggande av skada på miljö och hälsa bör
dessa föremål hanteras separat för ändamålsenlig återvinning av beståndsdelarna. Hushållsanvändare bör kontakta den återförsäljare
som sålt produkten eller sin kommun för vidare information om var och hur produkten och tillbehören kan återvinnas på ett miljösäkert sätt.
Företagsanvändare bör kontakta leverantören samt veriera angivna villkor i köpekontraktet. Produkten och de elektroniska tillbehören bör
inte hanteras tillsammans med annat kommersiellt avfall.
[Svenska]
Korrekt affaldsbortskaffelse af dette produkt (elektrisk & elektronisk udstyr)
Mærket på dette produkt, på tilbehør eller i den medfølgende dokumentation betyder, at produktet og elektronisk tilbehør hertil (f.eks.
oplader, hovedsæt, USB-ledning) ikke må bortskaffes sammen med almindeligt husholdningsaffald efter endt levetid. For at undgå skadelige
miljø- eller sundhedspåvirkninger på grund af ukontrolleret affaldsbortskaffelse skal ovennævnte bortskaffes særskilt fra andet affald og
indleveres behørigt til fremme for bæredygtig materialegenvinding. Forbrugere bedes kontakte forhandleren, hvor de har købt produktet,
eller kommunen for oplysning om, hvor og hvordan de kan indlevere ovennævnte med henblik på miljøforsvarlig genvinding. V
irksomheder
bedes kontakte leverandøren og læse betingelserne og vilkårene i købekontrakten. Dette produkt og elektronisk tilbehør hertil bør ikke
bortskaffes sammen med andet erhvervsaffald.
[Dansk]
Korrekt avhending av dette produktet (Avfall fra elektrisk og elektronisk utstyr)
Denne merkingen som vises på produktet, dets tilbehør eller dokumentasjon, indikerer at produktet eller det elektroniske tilbehøret (for
eksempel lader, headset, USB-kabel) ikke skal kastes sammen med annet husholdningsavfall ved slutten av levetiden. For å hindre
potensiell skade på miljøet eller helseskader grunnet ukontrollert avfallsavhending ber vi om at dette avfallet holdes adskilt fra andre
typer avfall og resirkuleres på ansvarlig måte for å fremme bærekraftig gjenbruk av materielle ressurser
. Private forbrukere bør kontakte
enten forhandleren de kjøpte produktet av, eller lokale myndigheter, for detaljer om hvor og hvordan disse artiklene kan resirkuleres på
en miljøvennlig måte. Forretningsbrukere bør kontakte sin leverandør og undersøke vilkårene i kjøpskontrakten. Dette produktet og det
elektroniske tilbehøret skal ikke blandes med annet kommersielt avfall som skal kastes.
[Norsk]
Tuotteen turvallinen hävittäminen (elektroniikka ja sähkölaitteet)
Oheinen merkintä tuotteessa, lisävarusteissa tai käyttöohjeessa merkitsee, että tuotetta tai lisävarusteina toimitettavia sähkölaitteita (esim.
laturia, kuulokkeita tai USB kaapelia) ei saa hävittää kotitalousjätteen mukana niiden käyttöiän päätyttyä. V
irheellisestä jätteenkäsittelystä
ympäristölle ja terveydelle aiheutuvien haittojen välttämiseksi tuote ja lisävarusteet on eroteltava muusta jätteestä ja kierrätettävä
kestävän kehityksen mukaista uusiokäyttöä varten. Kotikäyttäjät saavat lisätietoja tuotteen ja lisävarusteiden turvallisesta kierrätyksestä
ottamalla yhteyttä tuotteen myyneeseen jälleenmyyjään tai paikalliseen ympäristöviranomaiseen. Yrityskäyttäjien tulee ottaa yhteyttä
tavarantoimittajaan ja selvittää hankintasopimuksen ehdot. Tuotetta tai sen lisävarusteita ei saa hävittää muun kaupallisen jätteen seassa.
[Suomi]
A termék hulladékba helyezésének módszere(WEEE – Elektromos és elektronikus berendezések hulladékai)
Ez a jelzés a terméken, tartozékain vagy dokumentációján arra utal, hogy hasznos élettartama végén a terméket és elektronikus tartozékait
(pl. töltőegység, fejhallgató, USB kábel) nem szabad a háztartási hulladékkal együtt kidobni. A
szabálytalan hulladékba helyezés által
okozott környezet- és egészségkárosodás megelőzése érdekében ezeket a tárgyakat különítse el a többi hulladéktól, és felelősségteljesen
gondoskodjon az újrahasznosításukról az anyagi erőforrások fenntartható újrafelhasználásának elősegítése érdekében.
A háztartási
felhasználók a termék forgalmazójától vagy a helyi önkormányzati szervektől kérjenek tanácsot arra vonatkozóan, hová és hogyan vihetik
el az elhasznált termékeket a környezetvédelmi szempontból biztonságos újrahasznosítás céljából.
Az üzleti felhasználók lépjenek
kapcsolatba beszállítójukkal, és vizsgálják meg az adásvételi szerződés feltételeit. Ezt a terméket és tartozékait nem szabad az egyéb
közületi hulladékkal együtt kezelni.
[Magyar]
Prawidłowe usuwanie produktu (zużyty sprzęt elektryczny i elektroniczny)
To oznaczenie umieszczone na produkcie, akcesoriach lub dokumentacji oznacza, że po zakończeniu eksploatacji nie należy tego produktu
ani jego akcesoriów (np. ładowarki, zestawu słuchawkowego, przewodu USB) wyrzucać wraz ze zwykłymi odpadami gospodarstwa
domowego. Aby uniknąć szkodliwego wpływu na środowisko naturalne i zdrowie ludzi wskutek niekontrolowanego usuwania odpadów,
prosimy o oddzielenie tych przedmiotów od odpadów innego typu oraz o odpowiedzialny recykling i praktykowanie ponownego
wykorzystania materiałów. W celu uzyskania informacji na temat miejsca i sposobu bezpiecznego dla środowiska recyklingu tych
przedmiotów, użytkownicy w gospodarstwach domowych powinni skontaktować się z punktem sprzedaży detalicznej, w którym dokonali
zakupu produktu, lub z organem władz lokalnych. Użytkownicy w rmach powinni skontaktować się ze swoim dostawcą i sprawdzić warunki
umowy zakupu. Produktu ani jego akcesoriów nie należy usuwać razem z innymi odpadami komercyjnymi.
[Polski]
[620-Weuro]BN68-02326A-03L09.ind2 2 2009-10-08 ¿ÀÀü 9:31:38

Σωστή Απόρριψη αυτού του Προϊόντος (Απόβλητα Ηλεκτρικού & Ηλεκτρονικού Εξοπλισμού)
(Ισχύει για την Ευρωπαϊκή Ένωση και για άλλες ευρωπαϊκές χώρες με χωριστά συστήματα συλλογής) Αυτό το σήμα που εμφανίζεται επάνω
στο προϊόν, στα εξαρτήματά του ή στα εγχειρίδια που το συνοδεύουν, υποδεικνύει ότι το προϊόν και τα ηλεκτρονικά του εξαρτήματα (π.χ.
φορτιστής, ακουστικά, καλώδιο USB) δεν θα πρέπει να ρίπτονται μαζί με τα υπόλοιπα οικιακά απορρίμματα μετά το τέλος του κύκλου ζωής
τους. Προκειμένου να αποφευχθούν ενδεχόμενες βλαβερές συνέπειες στο περιβάλλον ή την υγεία εξαιτίας της ανεξέλεγκτης διάθεσης
απορριμμάτων, σας παρακαλούμε να διαχωρίσετε αυτά τα προϊόντα από άλλους τύπους απορριμμάτων και να τα ανακυκλώσετε, ώστε
να βοηθήσετε στην βιώσιμη επαναχρησιμοποίηση των υλικών πόρων. Οι οικιακοί χρήστες θα πρέπει να έλθουν σε επικοινωνία είτε με
το κατάστημα απ’ όπου αγόρασαν αυτό το προϊόν, είτε με τις κατά τόπους υπηρεσίες, προκειμένου να πληροφορηθούν τις λεπτομέρειες
σχετικά με τον τόπο και τον τρόπο με τον οποίο μπορούν να δώσουν αυτά τα προϊόντα για ασφαλή προς το περιβάλλον ανακύκλωση.
Οι επιχειρήσεις-χρήστες θα πρέπει να έλθουν σε επαφή με τον προμηθευτή τους και να ελέγξουν τους όρους και τις προϋποθέσεις του
συμβολαίου αγοράς. Αυτό το προϊόν και τα ηλεκτρονικά του εξαρτήματα δεν θα πρέπει να αναμιγνύονται με άλλα συνηθισμένα απορρίμματα
προς διάθεση.
Правилно третиране на изделието след края на експлоатационния му живот
(Отпадъци, представляващи електрическо и електронно оборудване)(Важи за държавите на Европейския съюз и други европейски
държави със системи за разделно сметосъбиране)
Този знак, поставен върху изделието, негови принадлежности или печатни материали, означава, че продуктът и принадлежностите
(например зарядно устройство, слушалки, USB кабел) не бива да се изхвърлят заедно с другите битови отпадъци, когато изтече
експлоатационният му живот. Отделяйте тези устройства от другите видови отпадъци и ги предавайте за рециклиране. Спазвайки
това правило не излагате на опасност здравето на други хора и предпазвате околната среда от замърсяване, предизвикано от
безконтролно изхвърляне на отпадъци. Освен това, подобно отговорно поведение създава възможност за повторно (екологично
съобразно) използване на материалните ресурси. Домашните потребители трябва да се свържат с търговеца на дребно, от когото
са закупили изделието, или със съответната местна държавна агенция, за да получат подробни инструкции къде и кога могат
да занесат тези устройства за рециклиране, безопасно за околната среда. Корпоративните потребители следва да се свържат с
доставчика си и да проверят условията на договора за покупка. Това изделие и неговите електронни принадлежности не бива да се
сместват с другите отпадъци на търговското предприятие.
Správná likvidace výrobku (Elektrický a elektronický odpad)
Toto označení na výrobku, jeho příslušenství nebo dokumentaci znamená, že výrobek a jeho elektronické příslušenství (například nabíječku,
náhlavní sadu, USB kabel) je po skončení životnosti zakázáno likvidovat jako běžný komunální odpad. Možným negativním dopadům na
životní prostředí nebo lidské zdraví způsobeným nekontrolovanou likvidací zabráníte oddělením zmíněných produktů od ostatních typů
odpadu a jejich zodpovědnou recyklací za účelem udržitelného využívání druhotných surovin. Uživatelé z řad domácností by si měli od
prodejce, u něhož produkt zakoupili, nebo u příslušného městského úřadu vyžádat informace, kde a jak mohou tyto výrobky odevzdat k
bezpečné ekologické recyklaci. Podnikoví uživatelé by měli kontaktovat dodavatele a zkontrolovat všechny podmínky kupní smlouvy
. Tento
výrobek a jeho elektronické příslušenství nesmí být likvidován spolu s ostatním průmyslovým odpadem.
Správna likvidácia tohoto výrobku (Elektrotechnický a elektronický odpad)
(Platné pre Európsku úniu a ostatné európske krajiny so systémom triedeného odpadu)
Toto označenie na výrobku, príslušenstve alebo v sprievodnej brožúre hovorí, že po skončení životnosti by produkt ani jeho elektronické
príslušenstvo (napr. nabíjačka, náhlavná súprava, USB kábel) nemali byť likvidované s ostatným domovým odpadom. Prípadnému
poškodeniu životného prostredia alebo ľudského zdravia môžete predísť tým, že budete tieto výrobky oddeľovať od ostatného odpadu a
vrátite ich na recykláciu. Používatelia v domácnostiach by pre podrobné informácie, ako ekologicky bezpečne naložiť s týmito výrobkami,
mali kontaktovať buď predajcu, ktorý im ich predal, alebo príslušný úrad v mieste ich bydliska. Priemyselní používatelia by mali kontaktovať
svojho dodávateľa a preveriť si podmienky kúpnej zmluvy. Tento výrobok a ani jeho elektronické príslušenstvo by nemali byť likvidované
spolu s ostatným priemyselným odpadom.
[Slovensky]
Cum se elimină corect acest produs (Deşeuri de echipamente electrice şi electronice)
(Aplicabil în ţările Uniunii Europene şi în alte ţări cu sisteme de colectare selectivă)
Acest simbol de pe produs, accesorii şi documentaţie indică faptul că produsul şi accesoriile sale electronice (încărcător
, căşti, cablu USB)
nu trebuie eliminate împreună cu alte deşeuri menajere la nalul duratei lor de utilizare. Dat ind că eliminarea necontrolată a deşeurilor
poate dăuna mediului înconjurător sau sănătăţii umane, vă rugăm să separaţi aceste articole de alte tipuri de deşeuri şi să le reciclaţi în
mod responsabil, promovând astfel reutilizarea durabilă a resurselor materiale. Utilizatorii casnici trebuie să-l contacteze pe distribuitorul
care le-a vândut produsul sau să se intereseze la autorităţile locale unde şi cum pot să ducă aceste articole pentru a reciclate în mod
ecologic. Utilizatorii comerciali trebuie să-şi contacteze furnizorul şi să consulte termenii şi condiţiile din contractul de achiziţie.
Acest produs
şi accesoriile sale electronice nu trebuie eliminate împreună cu alte deşeuri comerciale.
Izstrādājuma pareiza likvidēšana (Attiecas uz nolietotām elektriskām un elektroniskām ierīcēm)
(Spēkā Eiropas Savienībā un pārējās Eiropas valstīs, kas izmanto atkritumu dalītu savākšanu)
Šis uz izstrādājuma un tā piederumiem vai pievienotajā dokumentācijā izvietotais marķējums norāda, ka izstrādājumu un tā elektroniskos
piederumus (piem., uzlādes ierīci, austiņas, USB kabeli) pēc ekspluatācijas laika beigām nedrīkst likvidēt kopā ar citiem sadzīves
atkritumiem. Lai nepieļautu atkritumu nekontrolētas likvidēšanas radītu varbūtēju kaitējumu videi un cilvēku veselībai, lūdzam minētās ierīces
nošķirt no citiem atkritumiem un disciplinēti nodot pienācīgai pārstrādei, tā sekmējot materiālo resursu atkārtotu izmantošanu. Lai uzzinātu,
kur un kā minētās ierīces iespējams nodot ekoloģiski drošai pārstrādei, mājsaimniecībām jāsazinās ar izstrādājuma pārdevēju vai savu
pašvaldību. Iestādēm un uzņēmumiem jāsazinās ar izstrādājuma piegādātāju un jāiepazīstas ar pirkuma līguma nosacījumiem. Izstrādājumu
un tā elektroniskos piederumus nedrīkst nodot likvidēšanai kopā ar citiem iestāžu un uzņēmumu atkritumiem.
[Latviešu]
[620-Weuro]BN68-02326A-03L09.ind3 3 2009-10-08 ¿ÀÀü 9:31:39

Tinkamas šio gaminio išmetimas (elektros ir elektroninės įrangos atliekos)
Šis ženklas, pateiktas ant gaminio, jo priedų ar dokumentacijoje, nurodo, kad gaminio ir jo elektroninių priedų (pvz., įkroviklio, ausinių,
USB kabelio) negalima išmesti kartu su kitomis buitinėmis atliekomis gaminio naudojimo laikui pasibaigus. Kad būtų išvengta galimos
nekontroliuojamo atliekų išmetimo žalos aplinkai arba žmonių sveikatai ir skatinamas aplinką tausojantis antrinių žaliavų panaudojimas,
atskirkite šiuos elementus nuo kitų rūšių atliekų ir atiduokite perdirbti. Informacijos kur ir kaip pristatyti šiuos elementus saugiai perdirbti,
privatūs vartotojai turėtų kreiptis į parduotuvę, kurioje šį gaminį pirko, arba į vietos valdžios institucijas. V
erslo vartotojai turėtų kreiptis
į savo tiekėją ir peržiūrėti pirkimo sutarties sąlygas. Tvarkant atliekas, šio gaminio ir jo elektroninių priedų negalima maišyti su kitomis
pramoninėmis atliekomis.
Õige viis toote kasutuselt kõrvaldamiseks (elektriliste ja elektrooniliste seadmete jäätmed)
Selline tähistus tootel või selle tarvikutel või dokumentidel näitab, et toodet ega selle elektroonilisi tarvikuid (nt laadija, peakomplekt, USB-
kaabel) ei tohi kasutusaja lõppemisel kõrvaldada koos muude olmejäätmetega. Selleks et vältida jäätmete kontrollimatu kõrvaldamisega
seotud võimaliku kahju tekitamist keskkonnale või inimeste tervisele ning edendada materiaalsete vahendite säästvat taaskasutust,
eraldage need esemed muudest jäätmetest ja suunake need vastutustundlikult taasringlusse. Kodukasutajad saavad teavet nende esemete
keskkonnaohutu ringlussevõtu kohta kas toote müüjalt või keskkonnaametist. Firmad peaksid võtma ühendust tarnijaga ning kontrollima
ostulepingu tingimusi ja sätteid. Toodet ega selle elektroonilisi tarvikuid ei tohi panna muude hävitamiseks mõeldud kaubandusjäätmete
hulka.
[Eesti]
[620-Weuro]BN68-02326A-03L09.ind4 4 2009-10-08 ¿ÀÀü 9:31:39

Correct disposal of batteries in this product
(Applicable in the European Union and other European countries with separate battery return systems.)
This marking on the battery, manual or packaging indicates that the batteries in this product should not be disposed of with other household
waste at the end of their working life. Where marked, the chemical symbols Hg, Cd or Pb indicate that the battery contains mercury
, cadmium
or lead above the reference levels in EC Directive 2006/66. If batteries are not properly disposed of, these substances can cause harm to
human health or the environment. To protect natural resources and to promote material reuse, please separate batteries from other types of
waste and recycle them through your local, free battery return system.
[English]
Elimination des batteries de ce produit
(Applicable aux pays de l’Union européenne et aux autres pays européens dans lesquels des systèmes de collecte sélective sont mis en
place.)
Le symbole sur la batterie, le manuel ou l’emballage indique que les batteries de ce produit ne doivent pas être éliminées en n de vie avec
les autres déchets ménagers. L’indication éventuelle des symboles chimiques Hg, Cd ou Pb signie que la batterie contient des quantités de
mercure, de cadmium ou de plomb supérieures aux niveaux de référence stipulés dans la directive CE 2006/66. Si les batteries ne sont pas
correctement éliminées, ces substances peuvent porter préjudice à la santé humaine ou à l’environnement.
An de protéger les ressources
naturelles et d’encourager la réutilisation du matériel, veillez à séparer les batteries des autres types de déchets et à les recycler via votre
système local de collecte gratuite des batteries.
[Français]
Korrekte Entsorgung der Batterien dieses Produkts
(In den Ländern der Europäischen Union und anderen europäischen Ländern mit einem separaten Altbatterie-Rücknahmesystem)
Die Kennzeichnung auf der Batterie bzw. auf der dazugehörigen Dokumentation oder Verpackung gibt an, dass die Batterie zu diesem
Produkt nach seiner Lebensdauer nicht zusammen mit dem normalen Haushaltsmüll entsorgt werden darf. W
enn die Batterie mit den
chemischen Symbolen Hg, Cd oder Pb gekennzeichnet ist, liegt der Quecksilber-, Cadmium- oder Blei-Gehalt der Batterie über den in der
EG-Richtlinie 2006/66 festgelegten Referenzwerten. Wenn Batterien nicht ordnungsgemäß entsorgt werden, können sie der menschlichen
Gesundheit bzw. der Umwelt schaden. Bitte helfen Sie, die natürlichen Ressourcen zu schützen und die nachhaltige Wiederverwertung
von stofichen Ressourcen zu fördern, indem Sie die Batterien von anderen Abfällen getrennt übe
r Ihr örtliches kostenloses Altbatterie-
Rücknahmesystem entsorgen.
[Deutsch]
Correcte behandeling van een gebruikte accu uit dit product
(Van toepassing op de Europese Unie en andere Europese landen met afzonderlijke inzamelingssystemen voor accu’s en batterijen.)
Dit merkteken op de accu, handleiding of verpakking geeft aan dat de accu in dit product aan het einde van de levensduur niet samen met
ander huishoudelijk afval mag worden weggegooid. De chemische symbolen Hg, Cd of Pb geven aan dat het kwik-, cadmium- of loodgehalte
in de accu hoger is dan de referentieniveaus in de Richtlijn 2006/66/EC. Indien de gebruikte accu niet op de juiste wijze wordt behandeld,
kunnen deze stoffen schadelijk zijn voor de gezondheid van mensen of het milieu. Ter bescherming van de natuurlijke hulpbronnen en ter
bevordering van het hergebruik van materialen, verzoeken wij u afgedankte accu’s en batterijen te scheiden van andere soorten afval en
voor recycling aan te bieden bij het gratis inzamelingssysteem voor accu’s en batterijen in uw omg
eving.
[Nederlands]
Corretto smaltimento delle batterie del prodotto
(Applicabile nei paesi dell’Unione Europea e in altri paesi europei con sistemi di conferimento differenziato delle batterie.)
Il marchio riportato sulla batteria o sulla sua documentazione o confezione indica che le batterie di questo prodotto non devono essere
smaltite con altri riuti domestici al termine del ciclo di vita. Dove rafgurati, i simboli chimici Hg, Cd o Pb indicano che la batteria contiene
mercurio, cadmio o piombo in quantità superiori ai livelli di riferimento della direttiva UE 2006/66. Se le batterie non vengono smaltite
correttamente, queste sostanze possono causare danni alla salute umana o all’ambiente. Per proteggere le risorse naturali e favorire il
riutilizzo dei materiali, separare le batterie dagli altri tipi di riuti e riciclarle utilizzando il sistema di conferimento gratuito previsto nella propria
area di residenza.
[Italiano]
Eliminación correcta de las baterías de este producto
(Aplicable en la Unión Europea y en otros países europeos con sistemas de recogida selectiva de baterías.)
La presencia de esta marca en las baterías, el manual o el paquete del producto indica que cuando haya nalizado la vida útil de las
baterías no deberán eliminarse junto con otros residuos domésticos. Los símbolos químicos Hg, Cd o Pb, si aparecen, indican que la batería
contiene mercurio, cadmio o plomo en niveles superiores a los valores de referencia admitidos por la Directiva 2006/66 de la Unión Europea.
Si las baterías no se desechan convenientemente, estas sustancias podrían provocar lesiones personales o dañar el medioambiente. Para
proteger los recursos naturales y promover el reciclaje, separe las baterías de los demás residuos y recíclelas mediante el sistema de
recogida gratuito de su localidad.
[Español]
Eliminação correcta das baterias existentes neste produto
(Aplicável na União Europeia e noutros países europeus com sistemas de recolha de baterias separados.)
Esta marca, apresentada na bateria, manual ou embalagem, indica que as baterias existentes neste produto não devem ser eliminadas
juntamente com os resíduos domésticos indiferenciados no nal do seu período de vida útil. Onde existentes, os símbolos químicos Hg, Cd
ou Pb indicam que a bateria contém mercúrio, cádmio ou chumbo acima dos níveis de referência indicados na Directiva CE 2006/66. Se as
baterias não forem correctamente eliminadas, estas substâncias poderão ser prejudiciais para a saúde humana ou para o meio ambiente.
Para proteger os recursos naturais e promover a reutilização dos materiais, separe as baterias dos outros tipos de resíduos e recicle-as
através do sistema gratuito de recolha local de baterias.
[Português]
Ustrezno odstranjevanje baterij v tem izdelku
(Uporabno v EU in ostalih evropskih državah s sistemi ločenega odstranjevanja baterij)
Ta oznaka na bateriji, v navodilih ali na embalaži pomeni, da baterij ob izteku njihove življenjske dobe v tem izdelku ne smete odstraniti
skupaj z ostalimi gospodinjskimi odpadki. Oznake za kemijske elemente Hg, Cd ali Pb pomenijo, da baterija vsebuje živo srebro, kadmij ali
svinec v količinah, ki presegajo referenčne nivoje v direktivi EC 2006/66. Če te baterije niso ustrezno odstranjene, te snovi lahko škodujejo
zdravju ljudi oziroma okolju. Za zaščito naravnih virov in za vzpodbujanje ponovne uporabe materialov prosimo, ločite te baterije od ostalih
odpadkov in jih oddajte na predvidenih lokalnih zbirnih reciklažnih mestih.
Korrekt avfallshantering av batterierna i denna produkt
(Gäller EU och andra europeiska länder med särskild batteriåtervinning.) Denna markering på batteriet, i manualen eller på förpackningen
anger att batterierna i denna produkt inte bör slängas tillsammans med annat hushållsavfall. De kemiska symbolerna Hg, Cd eller Pb
visar i förekommande fall att batterierna innehåller kvicksilver, kadmium eller bly i mängder översti
gande de gränsvärden som anges i
EU-direktivet 2006/66. Om batterierna inte slängs på ett ansvarsfullt sätt kan dessa substanser utgöra en fara för hälsa eller miljö. Hjälp till
att skydda naturresurser och bidra till materialåtervinning genom att sortera batterierna separat från annat avfall och lämna in dem på en
återvinningsstation.
[Svenska]
[620-Weuro]BN68-02326A-03L09.ind5 5 2009-10-08 ¿ÀÀü 9:31:39

KKorrekt bortskaffelse af batterierne i dette produkt
(Gælder i EU og andre europæiske lande med særlige retursystemer for batterier).
Mærket på dette batteri, dokumentationen eller emballagen betyder, at batterierne i dette produkt efter endt levetid ikke må bo
rtskaffes
sammen med andet husholdningsaffald. Mærkning med de kemiske symboler Hg, Cd eller Pb betyder, at batteriet indeholder kviksølv,
cadmium eller bly over grænseværdierne i EU-direktiv 2006/66. Hvis batterierne ikke bortskaffes korrekt, kan disse stof
fer være skadelige
for menneskers helbred eller for miljøet. For at beskytte naturens ressourcer og fremme genbrug, skal batterier holdes adskilt fra andre typer
affald og genanvendes via dit lokale, gratis batteriretursystem.
[Dansk]
Korrekt avhending av batterier i dette produkt
(Kommer til anvendelse i Den europeiske union og i andre europeiske land med separate systemer for retur av batterier
.)
Denne merkingen på batteriet, håndboken eller emballasjen angir at batteriene i dette produktet ikke skal kastes sammen med annet
husholdningsavfall ved slutten av sin levetid. Der det er merket, angir de kjemiske symbolene Hg, Cd eller Pb at batteriet inneholder
kvikksølv, kadmium eller bly over referansenivåene i EF-direktiv 2006/66. Hvis batteriene ikke avhendes på riktig måte, kan disse stoffene
skade menneskers helse eller miljøet. For å beskytte naturressurser og for å fremme gjenbruk av materialer
, ber vi deg adskille batterier fra
andre typer avfall og resirkulere dem ved å levere dem på din lokale, gratis mottaksstasjon.
[Norsk]
Tuotteen paristojen oikea hävittäminen
(Koskee Euroopan Unionia ja muita Euroopan maita, joissa on erillinen paristojen palautusjärjestelmä.)
Pariston, käyttöoppaan tai pakkauksen tämä merkintä tarkoittaa, että tämän tuotteen sisältämiä paristoja ei saa hävittää muun
kotitalousjätteen seassa, kun niiden käyttöikä on päättynyt. Kemiallinen symboli Hg, Cd tai Pb ilmaisee, että paristo sisältää elohopeaa,
kadmiumia tai lyijyä ylin EU: n direktiivien 2006/66 viiterajojen. Jos paristoja ei hävitetä oikein, nämä aineet voivat vahingoittaa ihmisten
terveyttä tai ympäristöä. Suojaa luonnonvaroja ja edistä materiaalien uusiokäyttöä - erottele paristot muusta jätteestä ja toimita ne
kierrätettäväksi paikalliseen maksuttomaan paristojen palautusjärjestelmään.
[Suomi]
A termékhez tartozó akkumulátorok megfelelő ártalmatlanítása
(Az Európai Unió területén és más, önálló akkumulátorleadó rendszerrel rendelkező európai országok területén alkalmazandó.)
Az akkumulátoron, a kézikönyvön vagy a csomagoláson szereplő jelzés arra utal, hogy hasznos élettartama végén a terméket nem
szabad egyéb háztartási hulladékkal együtt kidobni. Ahol szerepel a jelzés, a Hg, Cd vagy Pb kémiai elemjelölések arra utalnak, hogy
az akkumulátor az EK 2006/66. számú irányelvben rögzített referenciaszintet meghaladó mennyiségű higanyt, kadmiumot vagy ólmot
tartalmaz. Az akkumulátorok nem megfelelő kezelése esetén ezek az anyagok veszélyt jelenthetnek az egészségre vagy a környezetre.
A természeti erőforrások megóvása és az anyagok újrafelhasználásának ösztönzése érdekében kérjük, különítse el az akkumulátorokat a
többi hulladéktól és vigye vissza a helyi, ingyenes akkumulátorleadó helyre.
[Magyar]
Sposób poprawnego usuwania baterii, w które wyposażony jest niniejszy produkt
(Dotyczy obszaru Unii Europejskiej oraz innych krajów europejskich posiadających oddzielne systemy zwrotu zużytych baterii.)
Niniejsze oznaczenie na baterii, instrukcji obsługi lub opakowaniu oznacza, że po upływie okresu użytkowania baterie, w które wyposażony
był dany produkt, nie mogą zostać usunięte wraz z innymi odpadami pochodzącymi z gospodarstw domowych. Przy zastosowaniu takiego
oznaczenia symbole chemiczne (Hg, Cd lub Pb) wskazują, że dana bateria zawiera rtęć, kadm lub ołów w ilości przewyższającej poziomy
odniesienia opisane w dyrektywie WE 2006/66. Jeśli baterie nie zostaną poprawnie zutylizowane, substancje te mogą powodować
zagrożenie dla zdrowia ludzkiego lub środowiska naturalnego. Aby chronić zasoby naturalne i promować ponowne wykorzystanie
materiałów, należy oddzielać baterie od innego typu odpadów i poddawać je utylizacji poprzez lokalny, bezpłatny system zwrotu baterii.
[Polski]
Σωστή απόρριψη των μπαταριών αυτού του προϊόντος
(Ισχύει στην Ευρωπαϊκή Ένωση και άλλες ευρωπαϊκές χώρες με συστήματα ξεχωριστής ανακύκλωσης μπαταριών.)
Αυτή η επισήμανση πάνω στη μπαταρία, το εγχειρίδιο ή τη συσκευασία υποδεικνύει ότι οι μπαταρίες αυτού του προϊόντος δεν πρέπει να
απορρίπτονται μαζί με άλλα οικιακά απορρίμματα στο τέλος του κύκλου ζωής τους. Όπου υπάρχουν, τα χημικά σύμβολα Hg, Cd ή Pb
υποδεικνύουν ότι η μπαταρία περιέχει υδράργυρο, κάδμιο ή μόλυβδο πάνω από τα επίπεδα αναφοράς της Ευρωπαϊκής Οδηγίας 2006/66.
Αν οι μπαταρίες δεν απορριφθούν σωστά, αυτές οι ουσίες ενδέχεται να προκαλέσουν βλαβερές συνέπειες στην ανθρώπινη υγεία ή το
περιβάλλον. Παρακαλούμε διαχωρίζετε τις μπαταρίες από άλλους τύπους απορριμμάτων και ανακυκλώνετέ τις μέσω του τοπικού σας,
δωρεάν συστήματος ανακύκλωσης μπαταριών, για την προστασία των φυσικών πόρων και την προώθηση της επαναχρησιμοποίησης
υλικών.
Правилно изхвърляне на батериите в този продукт
(Приложимо в Европейския съюз и други европейски държави със самостоятелни системи за връщане на батерии.)
Това обозначение върху батерията, ръководството или опаковката, показва, че батериите в този продукт не бива да се изхвърлят
с другите битови отпадъци в края на техния полезен живот. Където са маркирани, химическите символи Hg, Cd или Pb показват,
че батерията съдържа живак, кадмий или олово над контролните нива в Директива 2006/66 на ЕО. Ако батериите не се изхвърлят
правилно, тези вещества могат да предизвикат увреждане на човешкото здраве или на околната среда. За да предпазите
природните ресурси и за да съдействате за многократната употреба на материалните ресурси, моля отделяйте батериите от
другите видове отпадъчни продукти и ги рециклирайте посредством Вашата локална система за безплатно връщане на батерии.
[620-Weuro]BN68-02326A-03L09.ind6 6 2009-10-08 ¿ÀÀü 9:31:39

Správná likvidace baterií v tomto výrobku
(Platí v Evropské unii a dalších evropských zemích s vlastními systémy zpětného odběru baterií.)
Tato značka na baterii, návodu nebo obalu znamená, že baterie v tomto výrobku nesmí být na konci své životnosti likvidovány společně s
jiným domovním odpadem. Případně vyznačené symboly chemikálií Hg, Cd nebo Pb upozorňují na to, že baterie obsahuje rtuť, kadmium
nebo olovo v množství překračujícím referenční úrovně stanovené směrnicí ES 2006/66. Pokud baterie nejsou správně zlikvidovány
, mohou
tyto látky poškodit zdraví osob nebo životní prostředí. Pro ochranu přírodních zdrojů a pro podporu opakovaného využívání materiálů
oddělte, prosím, baterie od ostatních typů odpadu a nechte je recyklovat prostřednictvím místního bezplatného systému zpětného odběru
baterií.
Správna likvidácia batérií v tomto výrobku
(Aplikovateľné v krajinách Európskej únie a v ostatných európskych krajinách, v ktorých existujú systémy separovaného zberu batérií.)
Toto označenie na batérii, príručke alebo balení hovorí, že batérie v tomto výrobku by sa po skončení ich životnosti nemali likvidovať spolu
s ostatným domovým odpadom. V prípade takéhoto označenia chemické symboly Hg, Cd alebo Pb znamenajú, že batéria obsahuje ortuť,
kadmium alebo olovo v množstve presahujúcom referenčné hodnoty smernice 2006/66/ES. Pri nevhodnej likvidácii batérií môžu tieto látky
poškodiť zdravie alebo životné prostredie. Za účelom ochrany prírodných zdrojov a podpory opätovného použitia materiálu batérie likvidujte
oddelene od iných typov odpadou a recyklujte ich prostredníctvom miestneho systému bezplatného zberu batérií.
[Slovensky]
Dispoziţii privind eliminarea corectă a bateriilor acestui produs
(aplicabile în Uniunea Europeană şi în alte ţări europene cu sisteme separate de colectare a bateriilor)
Acest marcaj de pe baterie, de pe manualul de utilizare sau de pe ambalaj indică faptul că bateriile acestui produs nu trebuie eliminate
împreună cu alte deşeuri menajere la sfârşitul ciclului lor de viaţă. Dacă sunt marcate, simbolurile chimice Hg, Cd sau Pb indică faptul că
bateria conţine mercur, cadmiu sau plumb peste nivelurile de referinţă prevăzute în Directiva CE 2006/66. În cazul în care bateriile nu sunt
eliminate corespunzător, aceste substanţe pot dăunătoare pentru sănătatea omului sau pentru mediu. În vederea protejării resurselor
naturale şi a promovării refolosirii materialelor, vă rugăm să separaţi bateriile de celelalte tipuri de deşeuri şi să le reciclaţi prin intermediul
sistemului gratuit de returnare a bateriilor la nivel local.
Šī izstrādājuma bateriju pareiza utilizācija
(Piemērojama Eiropas Savienībā un citās Eiropas valstīs ar atsevišķām bateriju nodošanas sistēmām.)
Šis marķējums uz baterijas, rokasgrāmatā vai uz iepakojuma norāda, ka šī izstrādājuma bateriju pēc tās kalpošanas laika beigām nedrīkst
izmest ar citiem sadzīves atkritumiem. Ja uz baterijas ir atzīmēti ķīmiskie simboli, piem., Hg, Cd vai Pb, tie norāda, ka baterija satur
dzīvsudrabu, kadmiju vai svinu, kura saturs ir lielāks par EK Direktīvā 2006/66 minētajiem lielumiem. Ja baterijas tiek nepareizi likvidētas, šīs
vielas var radīt kaitējumu cilvēku veselībai vai videi. Lai aizsargātu dabas resursus un veicinātu materiālu otrreizēju izmantošanu, šķirojiet
baterijas atsevišķi no citiem atkritumu veidiem un nododiet tās otrreizējai pārstrādei, izmantojot bateriju vietējo bezmaksas nodošanas
sistēmu.
[Latviešu]
Tinkamas šio produkto akumuliatorių tvarkymas
(Taikoma Europos Sąjungoje ir kitose Europos šalyse, kuriose galioja atskiros akumuliatorių grąžinimo sistemos.)
Šis ženklas yra pateikiamas ant akumuliatoriaus, jo dokumentacijoje ar ant pakuotės nurodo, kad šio produkto akumuliatorių, pasibaigus
jų tarnavimo laikui, negalima išmesti kartu su kitomis buitinėmis atliekomis. Cheminiai simboliai Hg, Cd arba Pb rodo, kad akumuliatoriuje
yra gyvsidabrio, kadmio ar švino, kurio kiekis viršija normą, nurodytą ES direktyvoje 2006/66. Jei akumuliatoriai nebus tinkamai išmesti,
šios medžiagos gali sukelti žalos žmonių sveikatai ar aplinkai. T
am, kad būtų apsaugoti gamtos ištekliai ir skatinamas antrinių žaliavų
panaudojimas, pašome atskirti akumuliatorių nuo kitų rūšių atliekų ir atiduoti perdirbti vietinėje akumuliatorių grąžinimo sistemai.
Őige viis toote akude kasutusest kőrvaldamiseks
(Rakendatav Euroopa Liidus ja teistes Euroopa riikides, kus on kasutusel spetsiaalsed akude kogumissüsteemid).
Selline tähistus akul, dokumentidel vői pakendil näitab, et toote akusid ei tohi kasutusaja lőppemisel kőrvaldada koos muude
olmejäätmetega. Keemilised elemendid Hg, Cd, vői Pb näitavad, et aku elavhőbeda, kaadmiumi vői plii sisaldus on EÜ direktiivi 2006/66
sihttasemest suurem. Kui akusid ei kőrvaldata őigel viisil, vőib nende sisu pőhjustada tervise-vői keskkonnakahjustusi. Selleks, et kaitsta
loodusvarasid ja edendada materjalide taaskasutamist, eraldage akud muudest jäätmetest ja suunake need taaskasutusse kohaliku, tasuta
teenusena pakutava akude tagastussüsteemi abil.
[Eesti]
[620-Weuro]BN68-02326A-03L09.ind7 7 2009-10-08 ¿ÀÀü 9:31:39
-
 1
1
-
 2
2
-
 3
3
-
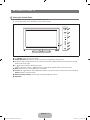 4
4
-
 5
5
-
 6
6
-
 7
7
-
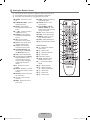 8
8
-
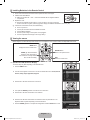 9
9
-
 10
10
-
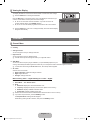 11
11
-
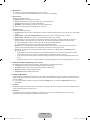 12
12
-
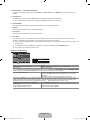 13
13
-
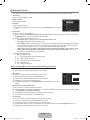 14
14
-
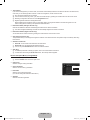 15
15
-
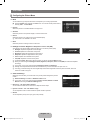 16
16
-
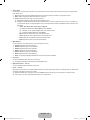 17
17
-
 18
18
-
 19
19
-
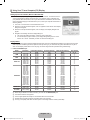 20
20
-
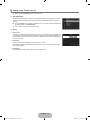 21
21
-
 22
22
-
 23
23
-
 24
24
-
 25
25
-
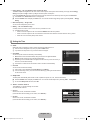 26
26
-
 27
27
-
 28
28
-
 29
29
-
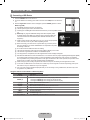 30
30
-
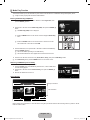 31
31
-
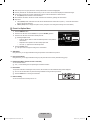 32
32
-
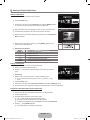 33
33
-
 34
34
-
 35
35
-
 36
36
-
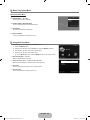 37
37
-
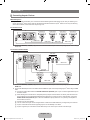 38
38
-
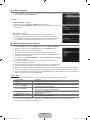 39
39
-
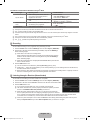 40
40
-
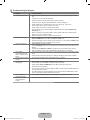 41
41
-
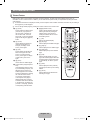 42
42
-
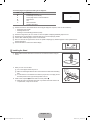 43
43
-
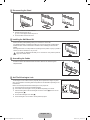 44
44
-
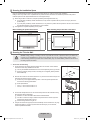 45
45
-
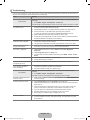 46
46
-
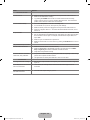 47
47
-
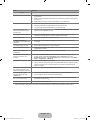 48
48
-
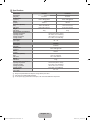 49
49
-
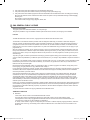 50
50
-
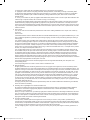 51
51
-
 52
52
-
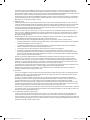 53
53
-
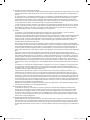 54
54
-
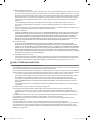 55
55
-
 56
56
-
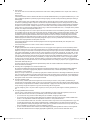 57
57
-
 58
58
-
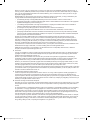 59
59
-
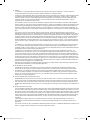 60
60
-
 61
61
-
 62
62
-
 63
63
-
 64
64
-
 65
65
-
 66
66
-
 67
67
-
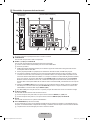 68
68
-
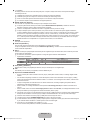 69
69
-
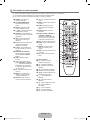 70
70
-
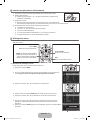 71
71
-
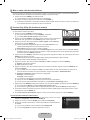 72
72
-
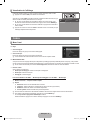 73
73
-
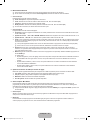 74
74
-
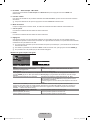 75
75
-
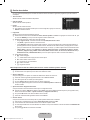 76
76
-
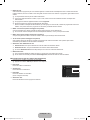 77
77
-
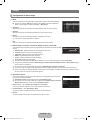 78
78
-
 79
79
-
 80
80
-
 81
81
-
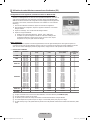 82
82
-
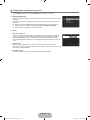 83
83
-
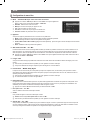 84
84
-
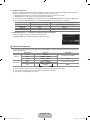 85
85
-
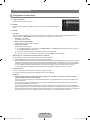 86
86
-
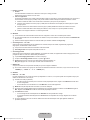 87
87
-
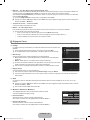 88
88
-
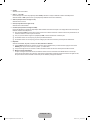 89
89
-
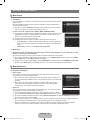 90
90
-
 91
91
-
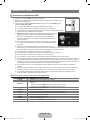 92
92
-
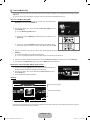 93
93
-
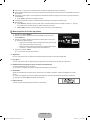 94
94
-
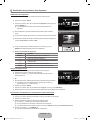 95
95
-
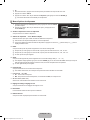 96
96
-
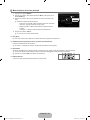 97
97
-
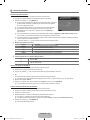 98
98
-
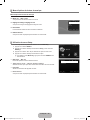 99
99
-
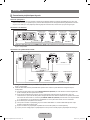 100
100
-
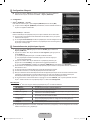 101
101
-
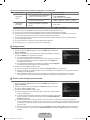 102
102
-
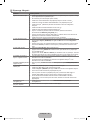 103
103
-
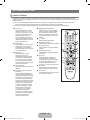 104
104
-
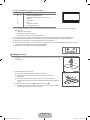 105
105
-
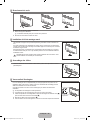 106
106
-
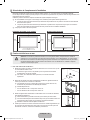 107
107
-
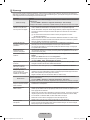 108
108
-
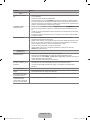 109
109
-
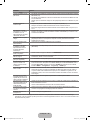 110
110
-
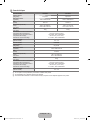 111
111
-
 112
112
-
 113
113
-
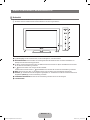 114
114
-
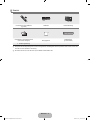 115
115
-
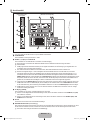 116
116
-
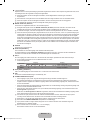 117
117
-
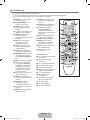 118
118
-
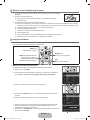 119
119
-
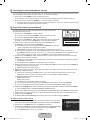 120
120
-
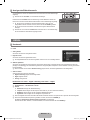 121
121
-
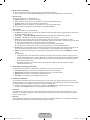 122
122
-
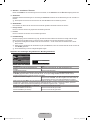 123
123
-
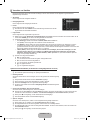 124
124
-
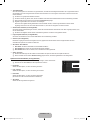 125
125
-
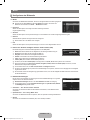 126
126
-
 127
127
-
 128
128
-
 129
129
-
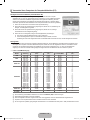 130
130
-
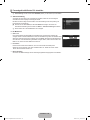 131
131
-
 132
132
-
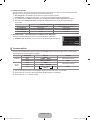 133
133
-
 134
134
-
 135
135
-
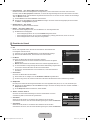 136
136
-
 137
137
-
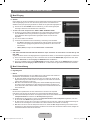 138
138
-
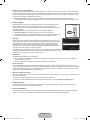 139
139
-
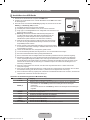 140
140
-
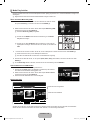 141
141
-
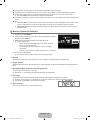 142
142
-
 143
143
-
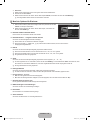 144
144
-
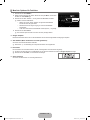 145
145
-
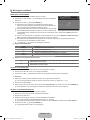 146
146
-
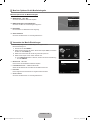 147
147
-
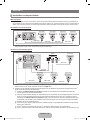 148
148
-
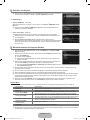 149
149
-
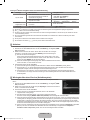 150
150
-
 151
151
-
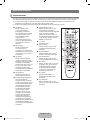 152
152
-
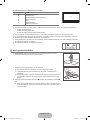 153
153
-
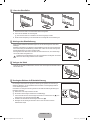 154
154
-
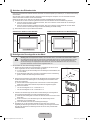 155
155
-
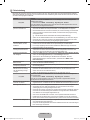 156
156
-
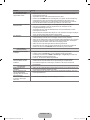 157
157
-
 158
158
-
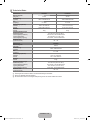 159
159
-
 160
160
-
 161
161
-
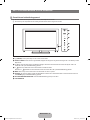 162
162
-
 163
163
-
 164
164
-
 165
165
-
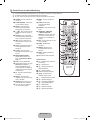 166
166
-
 167
167
-
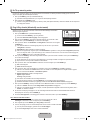 168
168
-
 169
169
-
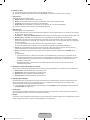 170
170
-
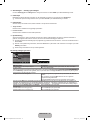 171
171
-
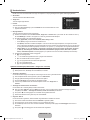 172
172
-
 173
173
-
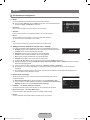 174
174
-
 175
175
-
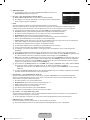 176
176
-
 177
177
-
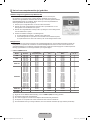 178
178
-
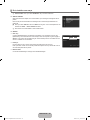 179
179
-
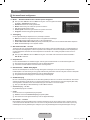 180
180
-
 181
181
-
 182
182
-
 183
183
-
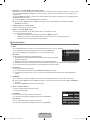 184
184
-
 185
185
-
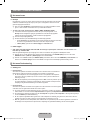 186
186
-
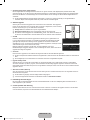 187
187
-
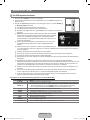 188
188
-
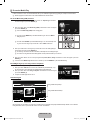 189
189
-
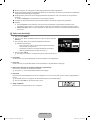 190
190
-
 191
191
-
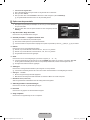 192
192
-
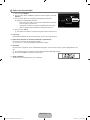 193
193
-
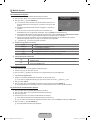 194
194
-
 195
195
-
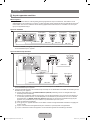 196
196
-
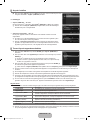 197
197
-
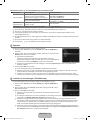 198
198
-
 199
199
-
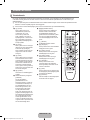 200
200
-
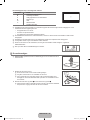 201
201
-
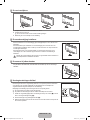 202
202
-
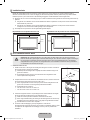 203
203
-
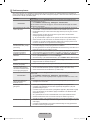 204
204
-
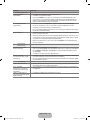 205
205
-
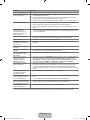 206
206
-
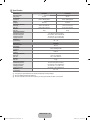 207
207
-
 208
208
-
 209
209
-
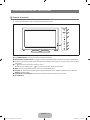 210
210
-
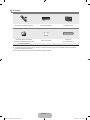 211
211
-
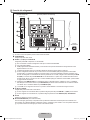 212
212
-
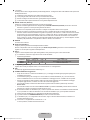 213
213
-
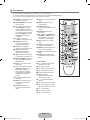 214
214
-
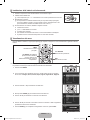 215
215
-
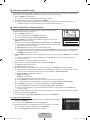 216
216
-
 217
217
-
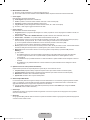 218
218
-
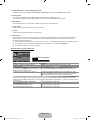 219
219
-
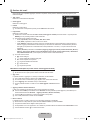 220
220
-
 221
221
-
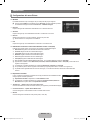 222
222
-
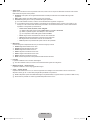 223
223
-
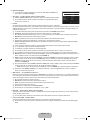 224
224
-
 225
225
-
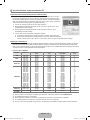 226
226
-
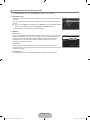 227
227
-
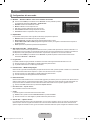 228
228
-
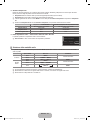 229
229
-
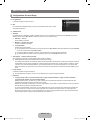 230
230
-
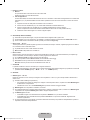 231
231
-
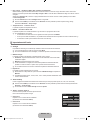 232
232
-
 233
233
-
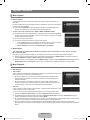 234
234
-
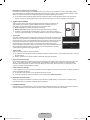 235
235
-
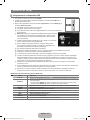 236
236
-
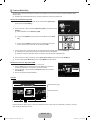 237
237
-
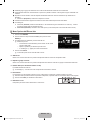 238
238
-
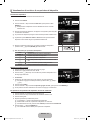 239
239
-
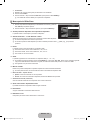 240
240
-
 241
241
-
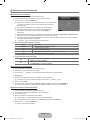 242
242
-
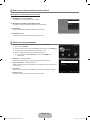 243
243
-
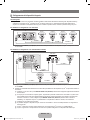 244
244
-
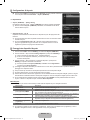 245
245
-
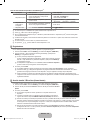 246
246
-
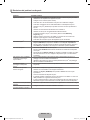 247
247
-
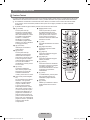 248
248
-
 249
249
-
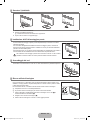 250
250
-
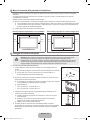 251
251
-
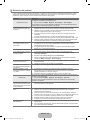 252
252
-
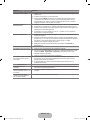 253
253
-
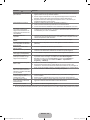 254
254
-
 255
255
-
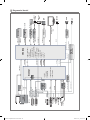 256
256
-
 257
257
-
 258
258
-
 259
259
-
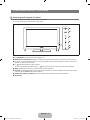 260
260
-
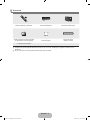 261
261
-
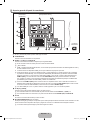 262
262
-
 263
263
-
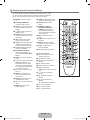 264
264
-
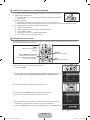 265
265
-
 266
266
-
 267
267
-
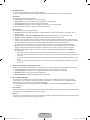 268
268
-
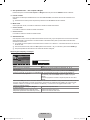 269
269
-
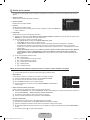 270
270
-
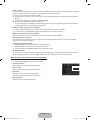 271
271
-
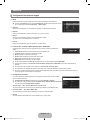 272
272
-
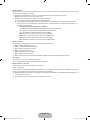 273
273
-
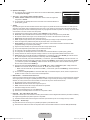 274
274
-
 275
275
-
 276
276
-
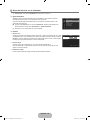 277
277
-
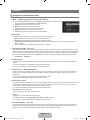 278
278
-
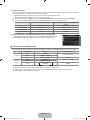 279
279
-
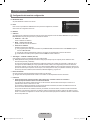 280
280
-
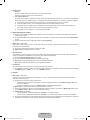 281
281
-
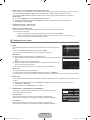 282
282
-
 283
283
-
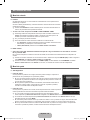 284
284
-
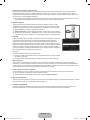 285
285
-
 286
286
-
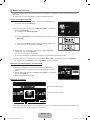 287
287
-
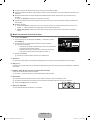 288
288
-
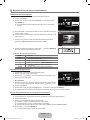 289
289
-
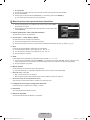 290
290
-
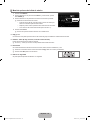 291
291
-
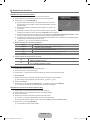 292
292
-
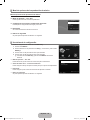 293
293
-
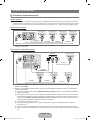 294
294
-
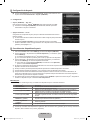 295
295
-
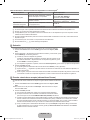 296
296
-
 297
297
-
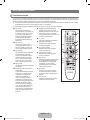 298
298
-
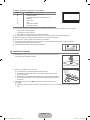 299
299
-
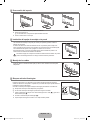 300
300
-
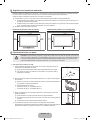 301
301
-
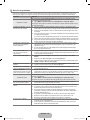 302
302
-
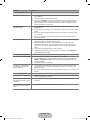 303
303
-
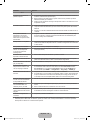 304
304
-
 305
305
-
 306
306
-
 307
307
-
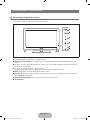 308
308
-
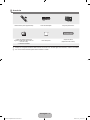 309
309
-
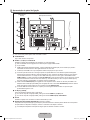 310
310
-
 311
311
-
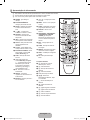 312
312
-
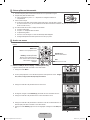 313
313
-
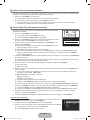 314
314
-
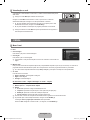 315
315
-
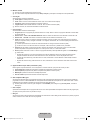 316
316
-
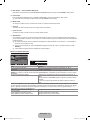 317
317
-
 318
318
-
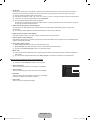 319
319
-
 320
320
-
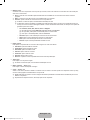 321
321
-
 322
322
-
 323
323
-
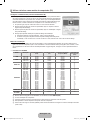 324
324
-
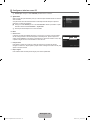 325
325
-
 326
326
-
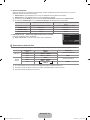 327
327
-
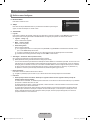 328
328
-
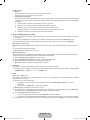 329
329
-
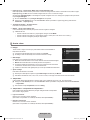 330
330
-
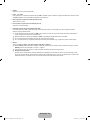 331
331
-
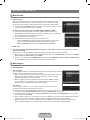 332
332
-
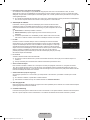 333
333
-
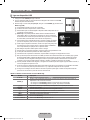 334
334
-
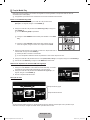 335
335
-
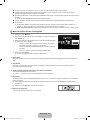 336
336
-
 337
337
-
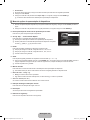 338
338
-
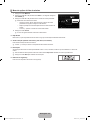 339
339
-
 340
340
-
 341
341
-
 342
342
-
 343
343
-
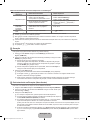 344
344
-
 345
345
-
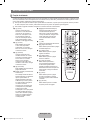 346
346
-
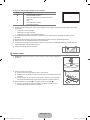 347
347
-
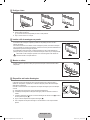 348
348
-
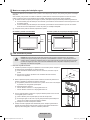 349
349
-
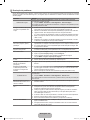 350
350
-
 351
351
-
 352
352
-
 353
353
-
 354
354
-
 355
355
-
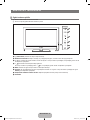 356
356
-
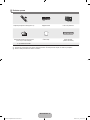 357
357
-
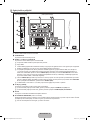 358
358
-
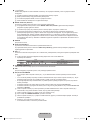 359
359
-
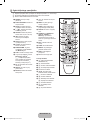 360
360
-
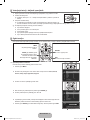 361
361
-
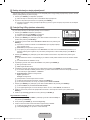 362
362
-
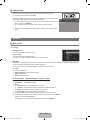 363
363
-
 364
364
-
 365
365
-
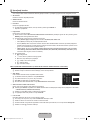 366
366
-
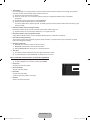 367
367
-
 368
368
-
 369
369
-
 370
370
-
 371
371
-
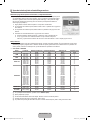 372
372
-
 373
373
-
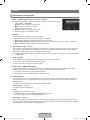 374
374
-
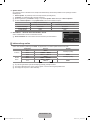 375
375
-
 376
376
-
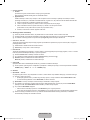 377
377
-
 378
378
-
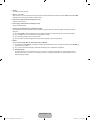 379
379
-
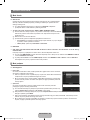 380
380
-
 381
381
-
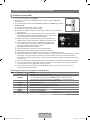 382
382
-
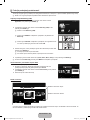 383
383
-
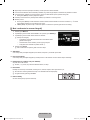 384
384
-
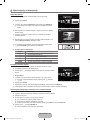 385
385
-
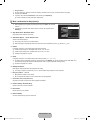 386
386
-
 387
387
-
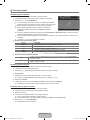 388
388
-
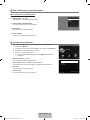 389
389
-
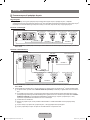 390
390
-
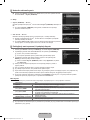 391
391
-
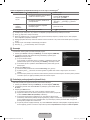 392
392
-
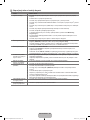 393
393
-
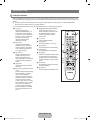 394
394
-
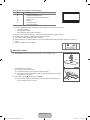 395
395
-
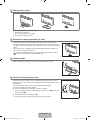 396
396
-
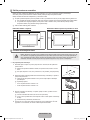 397
397
-
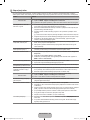 398
398
-
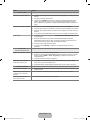 399
399
-
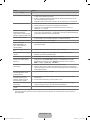 400
400
-
 401
401
-
 402
402
-
 403
403
-
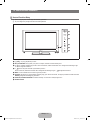 404
404
-
 405
405
-
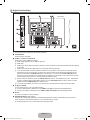 406
406
-
 407
407
-
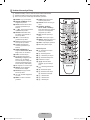 408
408
-
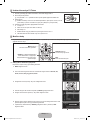 409
409
-
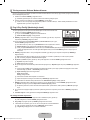 410
410
-
 411
411
-
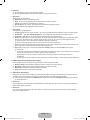 412
412
-
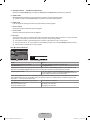 413
413
-
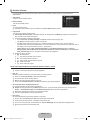 414
414
-
 415
415
-
 416
416
-
 417
417
-
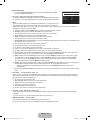 418
418
-
 419
419
-
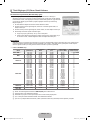 420
420
-
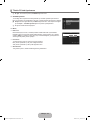 421
421
-
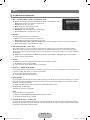 422
422
-
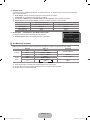 423
423
-
 424
424
-
 425
425
-
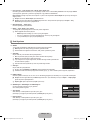 426
426
-
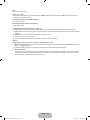 427
427
-
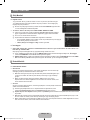 428
428
-
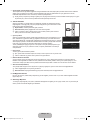 429
429
-
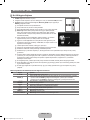 430
430
-
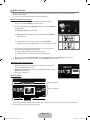 431
431
-
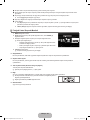 432
432
-
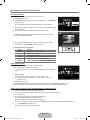 433
433
-
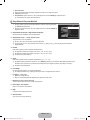 434
434
-
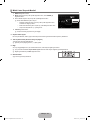 435
435
-
 436
436
-
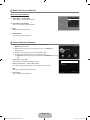 437
437
-
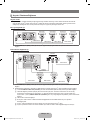 438
438
-
 439
439
-
 440
440
-
 441
441
-
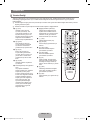 442
442
-
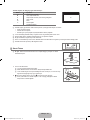 443
443
-
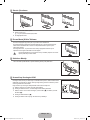 444
444
-
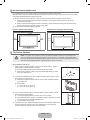 445
445
-
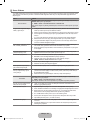 446
446
-
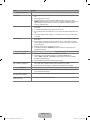 447
447
-
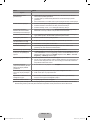 448
448
-
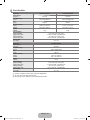 449
449
-
 450
450
-
 451
451
-
 452
452
-
 453
453
-
 454
454
-
 455
455
-
 456
456
-
 457
457
-
 458
458


in andere talen
- italiano: Samsung LE40B620 Manuale utente
- français: Samsung LE40B620 Manuel utilisateur
- español: Samsung LE40B620 Manual de usuario
- Deutsch: Samsung LE40B620 Benutzerhandbuch
- português: Samsung LE40B620 Manual do usuário
- Türkçe: Samsung LE40B620 Kullanım kılavuzu
Gerelateerde papieren
-
Samsung LE46A655A1F Handleiding
-
Samsung LE32B350F1W Handleiding
-
Samsung LE32B460 Handleiding
-
Samsung LE22B350F2W Handleiding
-
Samsung LE22B650T6W Handleiding
-
Samsung LE32M87 Handleiding
-
Samsung UE46B6000VP Handleiding
-
Samsung LE37B551A6P Handleiding
-
Samsung LE22C330F2W Handleiding
-
Samsung LE22C430C4W Handleiding