Hotpoint DIFP 68T1 A EU Gebruikershandleiding
- Categorie
- Vaatwassers
- Type
- Gebruikershandleiding

Operating instructions
Contents
Product Fiche, 2
Precautions, advice and Assistance, 3-4
General safety
Disposal
Saving energy and respecting the environment
Assistance
Installation, 5-6
Positioning and levelling
Connecting the water and electricity supplies
Advice regarding the first wash cycle
Technical data
Description of the appliance, 7
Overall view
Control panel
Loading the racks, 8-9
Lower rack
Cutlery basket
Upper rack
Adjusting upper rack
Start-up and use, 10
Starting the dishwasher
Measuring out the detergent
Wash cycles, 11
Table of wash cycles
Special wash cycles and Options, 12
Rinse aid and refined salt, 13
Measuring out the rinse aid
Measuring out the refined salt
Care and maintenance, 14
Shutting off the water and electricity supplies
Cleaning the dishwasher
Preventing unpleasant odours
Cleaning the sprayer arms
Cleaning the water inlet filter
Cleaning the filters
Leaving the machine unused for extended periods
Troubleshooting, 15
English,1
EN
DIFP 68T1
DISHWASHER
NL
Nederlands, 16

EN
2
Product Fiche
Brand
INDESIT
Model
DIFP 68T1
Rated capacity in standard place settings (1)
14
Energy efciency class on a scale from A+++ (low consumption) to D (high consumption)
A+
Energy consumption per year in kWh (2)
293.0
Energy consumption of the standard cleaning cycle in kWh
1.03
Power consumption of the off-mode in W
0.5
Power consumption of the left-on mode in W
5.0
Water consumption per year in litres (3)
3080.0
Drying efcacy class on a scale from G (low efcacy) to A (high efcacy)
A
Programme time for standard cleaning cycle in minutes
190
The duration of the left-on mode in minutes
10
Noise in dB(A) Re 1pW
46
Built-in model
Yes
NOTES
1) The information on the label and che relates to the standard cleaning cycle, this programme is suitable to clean normally
soiled tableware and it is the most efcient programme in terms of combined energy and water consumption. The standard
cleaning cycle corresponds to the Eco cycle.
2) Based on 280 standard cleaning cycles using cold water ll and the consumption of the low power modes. Actual energy
consumption depends on how the appliance is used.
3) Based on 280 standard cleaning cycles. Actual water consumption depends on how the appliance is used.
Product fiche

EN
3
* Only available in selected models.
Precautions, advice and
Assistance
This appliance was designed and
manufactured in compliance with international
safety standards The following information has
been provided for safety reasons and should
therefore be read carefully.
Keep this instruction manual in a safe place for
future reference. If the appliance is sold, given
away or moved, please ensure the manual is kept
with the machine.
Please read these instructions carefully: they
contain important information on installation, use
and safety.
This appliance is designed for domestic use or
similar applications, for example:
- staff kitchen areas in shops, offices and other
work environments;
- farmhouses;
- use by guests in hotels, motels and other
residential settings;
- bed & breakfasts.
General safety
• The appliance should not be operated by
people (including children) with reduced
physical, sensory or mental capacities, or by
inexperienced people who are not familiar with
the product, unless supervision or instructions
on how to use it are provided by someone who
assumes responsibility for their safety.
• Anadultmustsupervisechildrenatalltimesto
prevent them from playing with the appliance.
• The appliance was designed for domestic
use inside the home and is not intended for
commercial or industrial use.
• Theappliancemustbeusedbyadultsonlyto
wash domestic crockery in accordance with
the instructions in this manual.
• Theappliancemustnotbeinstalledoutdoors,
even in covered areas. It is extremely dangerous
to leave the machine exposed to rain and
storms.
• Donottouchtheappliancewhenbarefoot.
• Whenunpluggingtheappliancealwayspullthe
plug from the mains socket. Do not pull on the
cable.
• Thewatersupplytapmustbeshutoffandthe
plug should be removed from the electrical
socket before cleaning or maintaining the
appliance.
• Iftheappliancebreaksdown,donotunderany
circumstances touch the internal parts in an
attempt to perform the repair work yourself.
• Donotlean or sit on the open door of the
appliance: this may cause the appliance to
overturn.
•Thedoorshouldnotbeleftopenasitmaycreate
a dangerous obstacle.
• Keepdetergentandrinseaidoutofreachof
children.
• Thepackagingmaterialshouldnotbeusedas
a toy for children.
Disposal
• Disposalofpackagingmaterial:observelocal
legislation so that the packaging may be
reused.
• The European Directive 2012/19/EU relating
toWasteElectricalandElectronicEquipment
(WEEE) states that household appliances
should not be disposed of using the normal
solidurbanwastecycle.Exhaustedappliances
should be collected separately in order to
optimise the re-using and recycling rate of the
materials inside the machine, while preventing
potential damage to the environment and public
health. The crossed-out dustbin symbol is
marked on all products to remind the owners
of their obligations regarding separated waste
collection.
For further information relating to the correct
disposal of household appliances, owners may
contact the relevant public authority or the local
appliance dealer.
Saving energy and respecting the
environment
Saving water and energy
• Onlybeginawashcyclewhenthedishwasher
isfull.Whilewaitingforthedishwashertobe
filled, prevent unpleasant odours using the Soak
cycle
(seeWashcycles)
.
• Selectawashcyclethatissuitedtothetype
of crockery and to the soil level of the crockery
using the Table of wash cycles:
-fordisheswithanormalsoillevelusetheEco
washcycle, whichensures low energy/water
consumption levels.
- If the load is smaller than usual activate the
Half Load option*
(see Start-up and use).
• Ifyourelectricitysupplycontractgivesdetailsof
electricity-saving time bands, run wash cycles
when electricity prices are lower. The Delayed
Start button *
(see Start-up and use)
helps you
organise the wash cycles accordingly.

EN
4
Phosphate-free and chlorine-free detergents
containing enzymes
• Westronglyrecommendthatyouusedetergents
that do not contain phosphates or chlorine, as
these products are harmful to the environment.
• Enzymesprovideaparticularlyeffectiveaction
at temperatures around 50°C. As a result
detergentscontainingenzymescanbeusedin
conjunction with low-temperature wash cycles
in order to achieve the same results as a normal
65°Cwashcycle.
•To avoidwasting detergent,use theproduct
in appropriate quantities based on the
manufacturer’s recommendations, the hardness
of the water, the soil level and the quantity
of crockery to be washed. Even if they are
biodegradable, detergents contain substances
which may alter the balance of nature.
Assistance
Before contacting Assistance:
• Checkwhethertheproblemcanberesolvedusingthe
Troubleshooting guide
(see Troubleshooting).
• Restarttheprogrammetocheckwhethertheproblem
has ceased to exist.
• If the problem persists, contactthe Authorised
Technical Assistance Service.
Never use the services of unauthorised technicians.
Please have the following information to hand:
• Thetypeofmalfunction.
• Theappliancemodel(Mod.).
• Theserialnumber(S/N).
This information can be found on the appliance data plate
(see Description of the appliance)
.

EN
5
Installation
* Only available in selected models.
If the appliance must be moved at any time, keep it in an
upright position; if absolutely necessary, it may be tilted onto its
back.
Positioning and levelling
1.Remove the appliance from all packaging and check that
it has not been damaged during transportation. If it has been
damaged, contact the retailer and do not proceed any further
with the installation process.
2.Arrangethedishwashersothatitssidesorbackpanelarein
contact with the adjacent cabinets or the wall. This appliance
can also be recessed under a single worktop*
(see the Assembly
Instruction sheet.)
3. Position the dishwasher on a level sturdy floor. If the floor
is uneven, the front feet of the appliance should be adjusted
untilitreachesahorizontalposition.Iftheapplianceislevelled
correctly, it will be more stable and much less likely to move or
cause vibrations and noise while it is operating.
4*. To adjust the height of the rear foot, turn the red hexagonal
bushing on the lower central part at the front of the dishwasher
using a hexagonal spanner with an opening of 8 mm. Turn the
spanner in a clockwise direction to increase the height and in an
anticlockwise direction to decrease it
(see Building-in Instruction
sheet attached to the documentation.)
Connecting the water and electricity supplies
Connection to the water and electricity supplies should only
beperformedbyaqualifiedtechnician.
The dishwasher should not stand on the water hoses or
electricity supply cable.
The appliance must be connected to the water supply
network using new hoses.
Never use old or second hand hose sets. Do not reuse hose
sets from any previously installed dishwasher.
The water inlet and outlet hoses and the electricity supply cable
may be positioned towards the right or the left in order to achieve
the best possible installation.
Connecting the water inlet hose
• Toasuitablecoldwaterconnectionpoint:beforeattaching
the hose, run the water until it is perfectly clear so that any
impurities that may be present in the water do not clog the
appliance; after performing this operation, screw the inlet
hose tightly onto a tap with a ¾ gas threaded connection.
• Toasuitablehotwaterconnectionpoint:your dishwasher
may be supplied with hot water from the mains supply (if you
have a central heating system with radiators) provided that it
doesnotexceedatemperatureof60°C.
Screw the hose to the tap as described for connection to a
cold water supply.
If the inlet hose is not long enough, contact a specialist store
or an authorised technician
(see Assistance.)
The water pressure must be within the values indicated in
the Technical Data table
(see adjacent information.)
The hose should not be bent or compressed.
Connecting the water outlet hose
Connect the outlet hose (without bending it) to a drain duct with
a minimum diameter of 4 cm.
Theoutlethosemustbeataheightrangingfrom40to80cm
fromthefloor/surfacewherethedishwasherrests(A).
Before connecting the water outlet hose to the sink drain, remove
the plastic plug (B).
Anti-flooding protection
To ensure floods do not occur, the dishwasher:
- is provided with a special system which blocks the water supply
in the event of anomalies or leaks from inside the appliance.
Somemodelsarealsoequippedwiththesupplementarysafety
device New Acqua Stop*, which guarantees anti-flooding
protection even in the event of a supply hose rupture.
WARNING: HAZARDOUS VOLTAGE!
Under no circumstances should the water inlet hose be cut, as
it contains live electrical parts.
Electrical connection
Before inserting the plug into the electrical socket, make sure
that:
• Thesocketisearthedandcomplieswithcurrentregulations.
• thesocketcanwithstandthemaximumloadoftheappliance,
which is indicated on the data plate located on the inside of
the door
(see Description of the appliance);
• Thepowersupplyvoltagefallswithinthevaluesindicatedon
the data plate on the inside of the door.
• Thesocketiscompatiblewiththeplugoftheappliance.If
this is not the case, ask an authorised technician to replace
the plug (
see Assistance
); do not use extension cables or
multiple sockets.
Once the appliance has been installed, the power supply
cable and the electrical socket should be easily accessible.
The cable should not be bent or compressed.
If the power supply cable is damaged, it must be replaced
by the manufacturer or its Technical Assistance Service in order
topreventallpotentialhazards
(see Assistance.)

EN
6
Anti-condensation strip*
After installing the dishwasher, open the door and stick the
adhesive transparent strip under the wooden shelf in order
to protect it from any condensation which may form.
Advice regarding the first wash cycle
After the installation, remove the stoppers from the racks and the
retaining elastic elements from the upper rack, if any.
Immediately before the fist washing, completely fill the salt
dispenser with water and add only then approximately 1
kg of salt
(seechapterentitledRinseaidandrefinedsalt)
.
The water may overflow: this is normal and is not a cause
for concern. Select the water hardness value
(see chapter
entitledRinseaidandrefinedsalt).
- After the salt has been
poured into the machine, the LOW SALT indicator light*
switches off.
If the salt container is not filled, the water softener and
the heating element may be damaged as a result.
Technical data
Dimensions
width 59,5 cm
height 82 cm
depth 57 cm
Capacity 14 standard place-settings
Water supply pressure
0,05 ÷ 1MPa (0.5 ÷ 10 bar)
7,25 – 145 psi
Power supply voltage See appliance data plate
Total absorbed power See appliance data plate
Fuse See appliance data plate
This dishwasher conforms to the
following European Community
Directives:
-2006/95/EC (Low Voltage)
-2004/108/EC (Electromagnetic
Compatibility)
-2009/125/EC (Comm. Reg.
1016/2010) (Ecodesign)
-97/17/EC (Labelling)
-2012/19/EU Waste Electrical
and Electronic Equipment
(WEEE)
The machine has a buzzer/set of tones
(depending on the
dishwasher model
) to inform the user that a command has
been implemented: power on, cycle end etc.
The symbols/indicator lights/LEDs on the control panel/
display may vary in colour and may have a flashing or fixed
light
(depending on the dishwasher model)
.
The display provides useful information concerning the type
of wash cycle, drying/wash-cycle phase, remaining time,
temperature etc etc.

EN
7
Overall view
Description of the
appliance
***Only in completely built-in models.
* Only available in selected models.
The number and type of wash cycles and options may vary depending on the dishwasher model.
Control panel
1. Upper rack
2. Upper sprayer arm
3. Tip-up dispensers
4. Rackheightadjuster
5. Lower rack
6. Lower sprayer arm
7. Washingfilter
8. Salt dispenser
9. Detergent dispenser, rinse-aid dispenser and
Active Oxygen device*
10. Data plate
11. Control panel***
Select wash cycle button
Salt indicator light
Rinse aid indicator light
Wash cycle number and
remaining time indicator light
Delayed start button
ON-OFF/Reset button
and indicator light
Delayed start indicator light

EN
8
Loading the racks
Tips
Before loading the racks, remove all food residues from the
crockeryandemptyliquids fromglassesandcontainers.No
preventive rinsing is needed under running water.
Arrange the crockery so that it is held in place firmly and does
not tip over; and arrange the containers with the openings facing
downwards and the concave/convex parts placed obliquely,
thus allowing the water to reach every surface and flow freely.
Make sure that the lids, handles, trays and frying pans do not
prevent the sprayer arms from rotating. Place any small items
in the cutlery basket.
Since plastic dishes and non-stick frying pans usually retain more
water drops, their drying will be not so good as that of ceramic
or stainless-steel dishes.
Lightweight items such as plastic containers should be placed
in the upper rack and arranged so that they cannot move.
After loading the appliance, make sure that the sprayer arms
can rotate freely.
Lower rack
The lower rack can hold pans, lids, dishes, salad bowls, cutlery
etc. Large plates and lids should ideally be placed at the sides.
Very soiled dishes and pans should be placed in the lower rack
because in this sector the water sprays are stronger and allow
a higher washing performance.
Several dishwasher models are fitted with tip-up sectors*.
They can be used in a vertical position when arranging dishes
orinahorizontalposition(lower)toloadpansandsaladbowls
easily.
Cutlery basket
The basket is equipped with top grilles for improved cutlery
arrangement. The cutlery basket should be positioned only at
the front of the lower rack
Knives and other utensils with sharp edges must be placed
in the cutlery basket with the points facing downwards or they
mustbepositionedhorizontallyinthetip-upcompartmentson
the upper rack
Upper rack
Load this rack with delicate and lightweight crockery such as
glasses, cups, saucers and shallow salad bowls.
Several dishwasher models are fitted with tip-up sectors*.
They can be used in a vertical position when arranging tea/
dessert saucers or in a lower position to load bowls and food
containers.
*Only available in selected models with different numbers and
positions.

EN
9
* Only available in selected models.
Adjusting the height of the upper rack
In order to make it easier to arrange the crockery, the upper rack
may be moved to a higher or lower position.
The height of the upper rack should be adjusted WHEN THE
RACK IS EMPTY.
NEVER raise or lower the rack on one side only.
IftherackisequippedwithaLift-Up device*
(see figure)
, lift
it up by holding its sides. To restore the lower position, press
the levers (A) at the sides of the rack and follow the rack down.
Unsuitable crockery
• Woodencrockeryandcutlery.
• Delicatedecoratedglasses,artistichandicraftandantique
crockery. Their decorations are not resistant.
• Parts in synthetic material which do not withstand high
temperatures.
• Copperandtincrockery.
• Crockerysoiledwithash,wax,lubricatinggreaseorink.
Thecoloursofglassdecorationsandaluminium/silverpiecescan
change and fade during the washing process. Some types of
glass(e.g.crystalobjects)canbecomeopaqueafteranumber
of wash cycles too.
Damage to glass and crockery
Caused by:
• Typeofglassandglassproductionprocess.
• Chemicalcompositionofdetergent.
• Watertemperatureofrinsecycle.
Tips:
• Only use glasses and porcelain guaranteed by the
manufacturer as dishwasher safe.
• Useadelicatedetergentsuitableforcrockery.
• Collectglassesandcutleryfromthedishwasherassoonas
the wash cycle is over.
Theupperrackcanbeadjustedforheightbasedonrequirements:
high position to place bulky crockery in the lower rack and low
positiontomakethemostofthetip-upcompartments/sectors
by creating more space upwards.
Tip-up compartments with adjustable position
The side tip-up compartments can be positioned at three
differentheightstooptimizethearrangementofcrockeryinside
the rack.
Wineglassescanbeplacedsafelyinthetip-upcompartments
by inserting the stem of each glass into the corresponding slots.
Cutlery tray*
Some dishwasher models are fitted with a sliding tray which
can be used to hold serving utensils or small cups. For
optimum washing performance, avoid positioning bulky
crockery directly below the tray.
The cutlery tray can be removed
(see Figure).
Before loading the tray, make
sure the supports are prop-
erly coupled to the upper rack
(see Figure).

EN
10
Start-up and use
* Only available in selected models.
Starting the dishwasher
1. Turn the water tap on.
2.OpenthedoorandpressON-OFFbutton.
3. Measure out the detergent.
(see adjacent information).
4. Load the racks
(see Loading the racks)
.
5. Select the wash cycle in accordance with the type of crockery
and its soil level
(see table of wash cycles)
by pressing the P
button.
6. Select the wash options*.
(see Special wash cycles and
options)
.
7. Start the wash cycle by shutting the door.
8. The end of the wash cycle is indicated by beeps and by the
flashing of the wash cycle number on the display. Open the door,
switchofftheappliancebypressingtheON/OFFbutton,shut
off the water tap and unplug the appliance from the electricity
socket.
9.Waitforafewminutesbeforeremovingthecrockery,inorder
to avoid burns. Unload the racks, beginning with the lower level.
- The machine will switch off automatically during
certain extended periods of inactivity, in order to
minimise electricity consumption.
If the crockery is only lightly soiled or if it has been rinsed
with water before being placed in the dishwasher, reduce the
amount of detergent used accordingly.
Modifying a wash cycle in progress
If a mistake was made during the wash cycle selection process,
it is possible to change the cycle, provided that it has only just
begun: open the door taking care to avoid the escaping steam,
bypressingandholdingtheON/OFFbutton,themachinewill
switchoff.SwitchthemachinebackonusingtheON/OFFbutton
and select the new wash cycle and any options desired; start
the cycle by closing the door.
Adding extra crockery
Withoutswitchingoffthemachine,openthedoor,takingcare
to avoid the escaping steam, and place the crockery inside the
dishwasher. Shut the door and the cycle will begin from the point
at which it was interrupted.
Accidental interruptions
If the door is opened during the wash cycle, or if there is a power
cut, the cycle stops. It starts again from the point at which it
was interrupted once the door has been shut or the electricity
supply is restored.
Measuring out the detergent
A good wash result also depends on the correct
amount of detergent being used. Exceeding the stated
amount does not result in a more effective wash and
increases environmental pollution.
Based on how soiled the items are, the amount can be
adjusted to individual cases using powder or liquid
detergent.
In the case of normally soiled items, use approximately
either 35 gr (powder detergent) or 35 ml (liquid detergent).
If tablets are used, one tablet will be enough.
If the crockery is only lightly soiled or if it has been rinsed
with water before being placed in the dishwasher, reduce
the amount of detergent used accordingly.
For good washing results also follow the instructions shown
on the detergent box.
For further questions please ask the detergent producers'
Advice Offices.
To open the detergent dispenser use the opening device “A”.
Introduce the detergent into the dry dispenser “B” only.
Place the amount of detergent for pre-washing directly
inside the tub.
1.WhenmeasuringoutthedetergentrefertotheTableofwash
cyclestoaddtheproperquantity.CompartmentB comprises
a level showing the maximum quantity of liquid or powder
detergent that can be added to each cycle.
2.Removedetergentresiduesfromtheedgesofthedispenser
and close the cover until it clicks.
3. Close the lid of the detergent dispenser by pulling it up until
the closing device is secured in place.
The detergent dispenser automatically opens up at the right time
according to the wash cycle.
If all-in-one detergents are used, we recommend using the TABS
option, because it adjusts the cycle so that the best washing
and drying results are always achieved.
Only use detergent which has been specifically designed
for dishwashers.
DO NOT USE washing-up liquid.
Using excessive detergent may result in foam residue
remaining in the machine after the cycle has ended.
The use of tablets is only recommended for models which
offer the MULTI-FUNCTIONAL TABLETS option.
To achieve the best results from each washing and drying
cycle, powder detergent, liquid rinse aid and salt should
be used.

EN
11
Wash cycles
The number and type of wash cycles and options may vary depending on the dishwasher model.
Wash-cycledataismeasuredunderlaboratoryconditionsaccordingtoEuropeanStandardEN50242.
Based on the different conditions of use, the wash-cycle duration and data can change.
Wash Cycle Drying Options
Wash Cycle
Duration
Water
Consumption (l/
cycle)
Energy
Consumption
(kWh/cycle)
1. Eco Yes
Delayed start
03:10’ 11 1,03
2. Auto Intensive Yes
Delayed start
02:00’ - 3:10’ 14 - 15,5 1,55 - 1,8
3. Auto Normal Yes
Delayed start
1:30’ - 02:30’ 14,5 - 16 1,2 - 1,35
4. Delicate Yes
Delayed start
01:40’ 11 1,1
5. Rapid 40’ No
Delayed start
00:40’ 9,5 0,9
6. Prewash No
Delayed start
00:12’ 4,5 0,01
7. Half Load Yes
Delayed start
01:20’ 12,0 1,15
8. Extra No
Delayed start
01:00’ 11 n.a.
Instructions on wash-cycle selection and detergent dosage:
1. TheECOwashcycleisthestandardcycletowhichtheenergylabeldatarefers.Itcanbeusedtowashcrockerywithanormal
soil level and is the most efficient cycle in terms of energy and water consumption for this type of crockery.
29gr/ml+6gr/ml**–1Tab
(**Quantity of pre-washing detergent)
2. Heavilysoileddishesandpans(nottobeusedfordelicateitems).35gr/ml–1Tab
3.Normallysoiledpansanddishes.29gr/ml+6gr/ml**–1Tab
4.Cyclefordelicateitems,whicharemoresensitivetohightemperatures35gr/ml–1Tab
5.Fastcycletobeusedforslightlydirtydishes(idealfor2placesettings)25gr/ml–1Tab
6. Pre-wash while awaiting completion of the load with the dishes from the next meal. No detergent.
7. Idealcycleforsmallloadsofcrockerywithanormalsoillevel.25gr/ml-1Tab
8. Large crockery.
(Do not use on delicate items)
Standbyconsumption:Left-onmodeconsumption:5,0W-Offmodeconsumption:0.5W
n.a. = non applicable

EN
12
Special wash cycles and Options
* Only available in selected models.
Notes:
Optimum performance levels when using the “Rapid" cycle
can be achieved by respecting the specified number of place
settings.
To reduce consumption, only run the dishwasher when
it is full.
Note for Test Laboratories: forinformationoncomparativeEN
testing conditions, please send an email to the following address:
Wash options
If an option is not compatible with the selected wash cycle
(see table of wash cycles), the corresponding LED flashes
rapidly 3 times and beeps will sound.
Delayed start
The start of the wash cycle may be delayed for a
period of time between 1 and 12 hours.
1. Press the DELAYED START button: the corresponding
symbol appears on the display; each time you press the
button,thetime(1h,2h,etc.uptomax.12h)fromthestart
of the selected wash cycle will be increased.
2.Selectthecycleandclosethedoor:thetimerwillbegin
counting down;
3. Once this time has elapsed, the indicator light switches
off and the wash cycle begins.
To adjust the delay time and select a smaller period of time,
presstheDELAYEDSTARTbutton.Tocancelit,pressthe
button repeatedly until the selected delayed start indicator
light switches off. The wash cycle will start automatically as
soon as the door is shut.
The Delayed Start function cannot be set once a wash cycle
has been started.
Wash cycle EXTRA
EXTRA makesitpossibleto carry out a heavy-duty wash
cycle of large crockery up to a max height of 53cm:
baking pans, oven grids, dripping pans, hob grids, large
saucepans, serving dishes, pizza dishes, stainless-steel
hood filters.
Removetheupperracktoloadbulkycrockery.
Release the two locks (right
and left) and pull out the rack.
Whentheupperrackisfitted,
the locks must be always
closed.
In order for the water to reach the crockery everywhere,
arrange it as shown in the Figure.
The cycle can also be used on large delicate crockery
usingtheoptionExtraLight
(seeWashOptions).
Do not start the dishwasher without the upper rack
using wash cycles other than EXTRA.
To carry out the wash cycle Extra and Extra with the
Light* option pour the detergent directly into the tub
and not into the dispenser.

EN
13
Rinse aid and refined salt
Only use products which have been specifically designed
for dishwashers.
Do not use table/industrial salt or washing-up liquid.
Follow the instructions given on the packaging.
If using a multi-functional product it is not necessary to add
any rinse aid. However, we recommend that you add salt,
especially if you live in an area where the water is hard or
very hard.
(Follow the instructions given on the packaging).
If you do not add salt or rinse aid, the LOW SALT* and
LOW RINSE AID indicator lights will stay lit.
Measuring out the rinse aid
Rinseaidmakesiteasierforthecrockerytodry,aswaterrunsoff
the surfaces more readily and therefore does not leave streaks
or marks. The rinse aid dispenser should be filled:
• WhentheLOWRINSEAIDindicatorlight* on the control panel
is illuminated, a reserve supply of rinse aid is still available
for1-2cycles;
1. Open the dispenser “D” by pressing and pulling up the tab
on the lid;
2. Carefully introduce the rinse aid as far as the maximum
reference notch of the filling space - avoid spilling it. If this
happens, clean the spill immediately with a dry cloth.
3. Press the lid down until you hear a click to close it.
NEVER pour the rinse aid directly into the appliance tub.
Adjusting the amount of rinse aid
If you are not completely satisfied with the drying results, you
mayadjustthequantityofrinseaidused.Switchonandoffthe
dishwasherusingtheON/OFFbutton.PresstheP button three
times.PresstheON/OFFbutton,thesetlevelappearsonthe
display
(set to factory level).
Adjust the rinse aid supply level with the P button.
Press the ON/OFF button to save the adjustment setting.
TherinseaidlevelcanbesettoZERO,insuchacasetherinse
aid will not be supplied and the low rinse aid indicator light in
case of running out.
A maximum of 4 levels can be set according to the dishwasher
model.
•Iftherearestreaksonthecrockery,settoalownumber(1-2).
•Incaseofdropsofwaterorlimescalemarks,set toahigh
number number (3-4).
Setting the water hardness
Everydishwasherisequippedwithawatersoftenerwhich,by
using refined salt designed especially for this type of appliance,
supplies water without limescale which is then used to wash
the crockery.
This dishwasher offers a setting which helps to reduce pollution
and optimises washing performance in accordance with the
water hardness level in your area. This information can be
obtained from your local water supplier.
SwitchonandoffthedishwasherusingtheON/OFFbutton.Press
and hold the P button for a few seconds until you hear a beep.
SwitchonthedishwasherwiththeON/OFFbutton,thesetlevel
appears on the display
(water softener set to medium level).
Adjust the water hardness level with the P button,
(1-2-3-4-5*
see water hardness table)
up to a max. of 5 levels.
Press the ON/OFF button to save the adjustment setting.
Evenifusingmulti-functionaltablets,thesaltdispensershould
still be filled.
(°dH=hardnessmeasuredinGermandegrees-°f=hardness
measuredinFrenchdegrees–mmol/l=millimolesperlitre)
Measuring out the refined salt
In order to obtain the best possible results from a wash cycle,
make sure that the salt dispenser is never empty.
Refinedsaltremoveslimescalefromthewater,thusavoiding
the formation of deposits on crockery.
The salt dispenser is located in the lower part of the dishwasher
(see Description)
and should be filled:
• Whenthegreenfloat* cannot be seen by simply looking at
the cap of the salt dispenser;
• WhentheLOWRINSEAIDindicatorlightonthecontrolpanel
is illuminated *;
1. Remove the lower rack and unscrew
the cap (anticlockwise).
2.Thefirsttimeyoudothis:fillthewater
tank right up to its edge.
3. Position the funnel*
(see figure)
and
fill the salt dispenser up to the edge
(approximately 1 kg). It is normal for a
little water to leak out.
4.Removethefunnel*andwipeanysaltresiduesawayfrom
the opening; rinse the cap under running water and then screw
it on, the head facing downwards so as to let the water flow out
of the four slots (star-shaped arrangement) in the lower part of
the cap (cap with green float*).
It is advisable to perform this procedure every time you add
salt to the dispenser.
Make sure the cap is screwed on tightly so that no detergent can
get into the container during the wash cycle (this could damage
the water softener beyond repair).
Whennecessary,measureoutthesaltbeforeawashcycle
so that any saline solution which has leaked out of the salt
dispenser is removed.
* Only available in selected models.
Water Hardness Table
Average salt dispenser
capacity duration**
level °dH °fH mmol/l months
1 0 - 6 0 - 10 0 - 1 7 months
2 6 - 11 11 - 20 1,1 - 2 5 months
3 12 - 17 21 - 30 2,1 - 3 3 months
4 17 - 34 31 - 60 3,1 - 6 2 months
5*
34 - 50 61 - 90 6,1 - 9 2/3 weeks
For values between 0°f and 10°f, we do not recommend the use of salt.
* a setting of 5 may increase cycle duration.
** 1 wash cycle per day.
M
A
X

EN
14
Care and maintenance
* Only available in selected models.
Shutting off the water and electricity
supplies
• Turnoffthewatertapaftereverywashcycletoavoidleaks.
• Always unplug the appliance when cleaning it and when
performing maintenance work.
Cleaning the dishwasher
• Theexternalsurfacesofthemachineandthecontrolpanel
can be cleaned using a non-abrasive cloth which has been
dampened with water. Do not use solvents or abrasive
products.
• Anymarksontheinsideoftheappliancemayberemoved
using a cloth dampened with water and a little vinegar.
Preventing unpleasant odours
• Alwayskeepthedooroftheapplianceajarinordertoavoid
moisture from forming and being trapped inside the machine.
• Cleanthesealsaroundthedooranddetergentdispensers
regularly using a damp sponge. This will avoid food becoming
trapped in the seals, which is the main cause behind the
formation of unpleasant odours.
Cleaning the sprayer arms
Food residue may become encrusted onto the sprayer arms
and block the holes used to spray the water. It is therefore
recommended that you check the arms from time to time and
clean them with a small non-metallic brush.
The two sprayer arms may both be removed.
To remove the upper sprayer arm,
turn the plastic locking ring in an
anti-clockwise direction. The upper
sprayer arm should be replaced
so that the side with the greater
number of holes is facing upwards.
The lower sprayer arm can be
removed by pressing on the side
tabs and pulling it upwards.
Cleaning the water inlet filter*
If the water hoses are new or have not been used for an extended
period of time, let the water run to make sure it is clear and free
of impurities before performing the necessary connections. If this
precaution is not taken, the water inlet could become blocked
and damage the dishwasher.
Clean the water inlet filter at the tap outlet regularly.
- Turn off the water tap.
- Unscrew the end of the water inlet hose, remove the filter and
clean it carefully under running water.
-Re-placethefilterandscrewthewaterhosebackintoposition.
Cleaning the filters
The filter assembly consists of three filters which remove food
residues from the washing water and then recirculate the water.
They should be cleaned if you wish to achieve the best results
in every wash.
Clean the filters regularly.
The dishwasher should not be used without filters or if the
filter is loose.
•Afterseveralwashes,checkthefilterassemblyandifnecessary
clean it thoroughly under running water, using a non-metallic
brush and following the instructions below:
1. Turn the cylindrical filter C in an anti-clockwise direction and
pull it out
(fig. 1).
2.RemovethecupfilterB by exerting a slight pressure on the
side flaps
(fig.2);
3. Slide out the stainless-steel plate filter A.
(fig. 3).
4. Inspect the trap and remove any food residues. NEVER
REMOVE the wash-cycle pump protection
(black detail) (fig.4).
After cleaning the filters, re-place the filter assembly and fix it in
position correctly; this is essential for maintaining the efficient
operation of the dishwasher.
Leaving the machine unused for extended
periods
• Disconnecttheappliancefromtheelectricitysupplyandshut
off the water tap.
• Leavethedooroftheapplianceajar.
• Whenyoureturn,runawashcyclewhenthedishwasheris
empty.

EN
15
Troubleshooting
Whenevertheappliancefailstowork,checkforasolutionfromthefollowinglistbeforecallingforAssistance.
* Only available in selected models.
Problem: Possible causes / Solutions:
The dishwasher does not start or
cannot be controlled.
• Switch off the appliance by pressing the ON/OFF button, switch it back on after approximately
one minute and reset the program.
• The appliance has not been plugged in properly.
• The dishwasher door has not been shut properly.
The door won’t close. • The lock was released. Strongly push the door until a “clacking” noise is heard.
No water drains out from the
dishwasher.
• The dishwasher cycle has not yet nished.
• The water inlet hose is bent (see Installation).
• The drain duct is blocked.
• The lter is clogged up with food residues.
The dishwasher makes excessive
noise.
• The dishes are rattling against each other or against the sprayer arms.
• Excessive foam presence: the detergent has not been measured out correctly or it is not
suitable for use in dishwashers. (see Start-up and use).
The dishes and glasses are covered
in a white lm or limescale deposits.
• The level of the rened salt is low or the dosage setting is not suited to the hardness of the
water (see Rinse aid and salt).
• The lid on the salt dispenser is not closed properly.
• The rinse aid has been used up or the dosage is too low.
The dishes and glasses are streaked
or have a bluish tinge.
• The rinse aid dosage is too high.
The crockery has not been dried
properly.
• A wash cycle without a drying programme has been selected.
• The rinse aid has been used up or the dosage is too low (see Rinse aid and salt).
• The rinse aid dispenser setting is not high enough.
• The crockery is made from non-stick material or plastic.
The dishes are not clean.
• The racks are overloaded (see Loading the racks).
• The crockery has not been arranged well.
• The sprayer arms cannot move freely.
• The wash cycle is too gentle (see Wash cycles).
• Excessive foam presence: the detergent has not been measured out correctly or it is not
suitable for use in dishwashers. (see Start-up and use).
• The lid on the rinse aid compartment has not been shut correctly.
• The lter is dirty or blocked (see Care and maintenance).
• The rened salt level is low (see Rinse aid and salt).
The dishwasher does not take any
water in - Tap shut-off alarm
(beeps are heard and H appears for
some minutes on the display)
(the ON/OFF indicator light ashes and
number 6 appears on the display).
• There is no water in the mains supply.
• The water inlet hose is bent (see Installation).
• Turn on the tap and the appliance will start after a few minutes.
• The appliance lock has been activated because no action was taken when the beeps sounded.
Switch off the machine using the ON/OFF button, turn on the tap and switch the machine back
on after a few seconds by pressing the same button. Re-program the appliance and restart the
wash cycle.

1616
Gebruiksaanwijzing
Inhoud
Productkaart, 17
Voorzorgsmaatregelen en advies, 18
Algemene veiligheid
Afvalverwijdering
Energiebesparing en respect voor het milieu
Installatie, Service 19-20
Plaatsing en waterpas zetten
Hydraulische en elektrische aansluitingen
Aanwijzingen voor de eerste afwascyclus
Technische gegevens
Service
Beschrijving van het apparaat, 21
Aanzichttekening
Bedieningspaneel
Het laden van de rekken, 22-23
Onderrek
Bestekkorf
Bovenrek
Besteklade
Starten en gebruik, 24
Het starten van de afwasautomaat
Het vaatwasmiddel toevoegen
Programma’s, 25
Programmatabel
Speciale programma’s en Opties, 26
Glansmiddel en onthardingszout, 27
Het glansmiddel toevoegen
Het onthardingszout toevoegen
Onderhoud en verzorging, 28
Water en elektrische stroom afsluiten
Reinigen van de afwasautomaat
Vermijden van vervelende luchtjes
Reinigen van de sproeiarmen
Reinigen van het watertoevoerfilter
Reinigen van de filters
Als u langere tijd geen gebruik maakt van de
afwasautomaat
Storingen en oplossingen, 29
Nederlands, 16
NL
DIFP 68T1
AFWASAUTOMAAT
Gebruiksaanwijzing
AFWASAUTOMAAT

NL
17
Productkaart
Productkaart
Merk
INDESIT
Model
DIFP 68T1
Beladingscapaciteit in standaard couverts (1)
14
Energie-efciëntieklasse op een schaal van A+++ (laag gebruik) tot D (hoog gebruik)
A+
Jaarlijks energieverbruik in kWh (2)
293.0
Energieverbruik van de standaard wascyclus in kWh
1.03
Energieverbruik in de off-modus in W
0.5
Energieverbruik in de aan-modus in W
5.0
Jaarlijks waterverbruik in liters (3)
3080.0
Droogeffectiviteit op een schaal van G (minimale effectiviteit) tot A (maximale effectiviteit).
A
Tijdsduur van het standaardprogramma in minuten
190
Tijdsduur van de aan-modus in minuten
10
Geluidsniveau in dB(A) re 1 pW
46
Inbouwmodel
Ja
N.B.
1) De informatie op het energielabel en de productkaart is gebaseerd op de standaardwascyclus. Dit programma is geschikt
om normaal vervuild vaatwerk te wassen en is het meest efciënte programma wat betreft water- en energieverbruik. De
standaardwascyclus correspondeert met de Eco-cyclus.
2) Gebaseerd op 280 standaard wascycli met gebruik van koud water en het energieverbruik in de aan- en uit-modus. Het werkelijke
energieverbruik is afhankelijk van de manier waarop het apparaat wordt gebruikt.
3) Gebaseerd op 280 standaard wascycli. Het werkelijke waterverbruik is afhankelijk van de manier waarop het apparaat wordt
gebruikt.

NL
18
Voorzorgsmaatregelen en advies
Hetapparaat is ontworpen en gebouwd
overeenkomstig de internationale veiligheidsnormen.
Deze aanwijzingen zijn geschreven om
veiligheidsredenen en moeten zorgvuldig worden
doorgenomen.
Bewaar dit boekje zorgvuldig voor eventuele
toekomstige raadpleging. Wanneer u het product
weggeeft, verkoopt of wanneer u verhuist, dient u dit
boekje bij het apparaat te bewaren.
Lees de aanwijzingen zorgvuldig door: er staat
belangrijke informatie in over installatie, gebruik en
veiligheid.
Dit apparaat is ontworpen voor huishoudelijk gebruik
of gelijksoortige toepassingen, bijvoorbeeld:
- delen van winkels, kantoren en andere werkomgevingen
die als keuken worden gebruikt, voor het personeel;
- boerderijen;
- gebruik door klanten in hotels, motels en andersoortige
verblijfsmogelijkheden;
- bed and breakfasts.
Algemene veiligheid
• Dezeafwasmachinemagnietgebruiktwordendoor
personen (inclusief kinderen) met beperkte fysieke,
zintuiglijke of mentale capaciteiten, of gebrek aan
ervaring en kennis, tenzij zij onder toezicht staan
van of instructies met betrekking tot het gebruik
ontvangen door een persoon die verantwoordelijk
is voor hun veiligheid.
• Volwassenen dienen toezicht te houden om te
voorkomen dat kinderen met het apparaat spelen.
• Ditapparaatisontwikkeldvoorniet-professioneel
gebruik binnenshuis.
• Ditapparaatmoetwordengebruiktvoorhetwassen
van huishoudelijke vaat en alleen door volwassenen
volgens de aanwijzingen die terug zijn te vinden in
dit boekje.
• De afwasautomaat mag niet buitenshuis worden
geïnstalleerd, ook niet in overdekte toestand. Het
is zeer gevaarlijk hem bloot te stellen aan regen en
onweer.
• Raakdeafwasautomaatnietblootsvoetsaan.
• Haaldestekkernietuithetstopcontactdooreraan
te trekken, maar door hem beet te pakken.
• Voordatudeafwasautomaatreinigtofonderhoud
uitvoert moet u de waterkraan afsluiten en de stekker
uit het stopcontact halen.
• Inhetgevalvaneenstoringmaguingeenenkel
geval aan de interne mechanismen sleutelen om
een reparatie trachten uit te voeren.
• Leunniettegendeopendeuraanengaernietop
zitten. Het apparaat zou om kunnen vallen.
• Dedeurdientnietinopenstaandestandgelatente
worden omdat men erover zou kunnen struikelen.
• Houdwas-englansmiddelenbuitenhetbereikvan
kinderen.
• Hetverpakkingsmateriaalisgeenspeelgoedvoor
kinderen.
Afvalverwijdering
• Houd u aan de locale normen, zodat het
verpakkingsmateriaal kan worden hergebruikt.
• De Europese richtlijn 2012/19/EU betreffende
afgedankte elektrische en elektronische apparatuur
(AEEA),voorzietdatelektrischeapparatennietmet
het gewone huisvuil mogen worden meegegeven.
Afgedankte apparaten moeten gescheiden worden
ingezameld om het recyclen en herwinnen van de
gebruikte materialen te optimaliseren en potentiële
schade voor de gezondheid en het milieu te
voorkomen. Het symbool van de afvalemmer met
een kruis staat op alle producten om de consument
eraan te herinneren dit product gescheiden in te
zamelen.
Voor meer informatie betreffendehet verwijderen
van elektronische apparatuur kan de consument
zich wenden tot de gemeentelijke reinigingsdienst
of de verkoper.
Energiebesparing en respect voor het milieu
Water en energie besparen
• Startdeafwasautomaatalleenalshijvolgeladenis.
• Als u moet wachten totdat de afwasautomaat
gevuld is, kunt u vervelende luchtjes vermijden
door het programma
Inweken te gebruiken (zie
Programma's)
.
• Selecteereenprogrammawatgeschiktisvoorhet
type vaat en het soort vuil, door de Programmatabel
te raadplegen:
- voor een gemiddeld vuile vaat gebruikt u
het programma Eco, dat een laag energie- en
waterverbruik garandeert.
- als u een kleine vaat heeft activeert u de optie Halve
lading*
(zieStartenengebruik).
• Alsuelektriciteitsbedrijfopbepaaldetijdenofdagen
goedkopere tarieven heeft, kunt u de afwasautomaat
op deze tijden gebruiken. De optie Uitgestelde
start*
(zieStartenengebruik)
kan u erbij helpen het
wassen op deze wijze te organiseren.
Afwasmiddelen zonder fosfaten, zonder chloor
en met enzymen.
• Weradenusterkaanafwasmiddelenzonderfosfaten
of chloor te gebruiken omdat deze geschikter zijn
voor het behoud van het milieu.
• Enzymen zorgen voor een effectieve werking
op temperaturen van ongeveer 50°C. Daarom
kunt u met afwasmiddelen met enzymen op lage
temperaturen resultaten bereiken die u anders pas
op65°Czouhebben.
• Doseer het afwasmiddel goed, op basis van de
aanwijzingen van de fabrikant, van de waterhardheid,
de hoeveelheid vuil en de hoeveelheid vaat, om zo
verspillingen te voorkomen. Ook al zijn sommige
afwasmiddelen biologisch afbreekbaar, toch
bevatten zij elementen die het evenwicht van de
natuur verstoren.

NL
19
Installatie - Service
* Alleen aanwezig op bepaalde modellen.
Als u het apparaat verplaatst moet u het verticaal houden;
als dit niet mogelijk is moet u het naar achteren kantelen.
Plaatsing en waterpas zetten
1.Haal het apparaatuit deverpakkingen controleerdathet
geen schade heeft opgelopen tijdens het transport. Als het
apparaat beschadigd is, moet u het niet aansluiten maar de
dealer inschakelen.
2.Devaatwassermoetmetdezijkantofdeachterkanttegen
de aangrenzende kastjes of de wand worden geïnstalleerd. Dit
apparaat kan ook onder het aanrecht worden ingebouwd*
(zie
Installatieblad)
.
3. Plaats de vaatwasser op een rechte en stevige vloer.
Compenseer eventuele onregelmatigheden door de voorste
stelvoetjes los- of vast te draaien, totdat het apparaat horizontaal
staat. Een correcte nivellering geeft stabiliteit en voorkomt
trillingen, geluiden en verplaatsingen.
4*. Om de hoogte van het achterste stelvoetje te regelen moet
udraaienaandezeshoekigerodebeslagringaandeonder-/
voorzijde in het midden van de vaatwasser. Gebruik hiervoor
een zeshoekige sleutel met een opening van 8 mm. Draai
rechtsom om de hoogte te vermeerderen, linksom om de hoogte
te verminderen.
(zie bijgeleverd instructieblad voor inbouw)
Hydraulische en elektrische aansluitingen
Het voor de installatie aanpassen aan het elektrische en
hydraulische systeem mag alleen door erkende technici worden
uitgevoerd.
De afwasautomaat mag niet bovenop de buizen of de
elektrische voedingskabel worden geplaatst.
Het apparaat dient aangesloten te zijn op de waterleiding
met nieuwe buizen.
Gebruik geen oude buizen.
De buizen voor de toe- en afvoer van het water, en de elektrische
voedingskabel kunnen voor een betere installatie zowel naar
rechts of naar links worden gericht.
Aansluiting van de buis voor de watertoevoer
• schroefdetoevoerbuisopeenkraanmetschroefdraadvan
3/4 gas. Voor u hem vastschroeft moet uhet water laten
lopen tot het compleet helder is. Zo voorkomt u dat eventuele
onzuiverheden het apparaat doen verstoppen.
• Aansluiting op de warmwaterkraan: als er een centrale
verwarming is met radiatoren kan de vaatwasser worden
gevoed met warm water mits dit water niet warmer is dan
60°C.
Schroefde buisaan de kraanzoals beschrevenvoor de
koudwateraansluiting
Als de lengte van de toevoerbuis niet toereikend is, dient u
zich te wenden tot een speciaalzaak of tot een erkende monteur
(zieService)
.
De waterdruk moet zich bevinden tussen de waarden die
staan vermeld in de tabel met Technische gegevens
(zie hiernaast)
.
Zorg ervoor dat de buis niet is geknikt of samengedrukt.
Aansluiting van de buis op de waterafvoer
Verbind de afvoerbuis, zonder hem te buigen, aan een
afvoerleiding met een minimum doorsnede van 4 cm.
Deafvoerbuismoetzichopeenhoogtevantussende40en
de80cmvandevloerofvanhetdraagvlakvandevaatwasser
af bevinden (A).
Voorudeafvoerbuisaansluitopdesifonvandewasbakmoet
u de plastic dop verwijderen (B).
Lekkagebeveiliging
Om lekkages te voorkomen is de vaatwasser:
- voorzien van een systeem dat de watertoevoer onderbreekt in
geval van storingen of lekkages van binnenuit.
Enkele modellen zijn voorzien van een aanvullend
beveiligingsmechanisme New Acqua Stop*, dat de lekkage
ook voorkomt in het geval de toevoerbuis kapotgaat.
GEVAARLIJKE SPANNING!
De toevoerbuis mag in geen geval worden doorgesneden: hij
bevat onderdelen die onder spanning staan.
Elektrische aansluiting
Voordat u de stekker in het stopcontact steekt, moet u zich
ervan verzekeren dat:
• het stopcontact geaard is en voldoet aan de geldende
normen;
• hetstopcontactinstaatishetmaximalevermogenvanhet
apparaat te dragen. Dit vermogen staat op het typeplaatje
aan de binnenkant van de deur
(zie hoofdstuk Beschrijving van de vaatwasser);
• despanningswaardenzichbevindentussendewaardendie
staan aangegeven op het typeplaatje aan de binnenkant van
de deur;
• destekkervanhetapparaatenhetstopcontactovereenkomen.
Als dit niet het geval is moet u een bevoegde monteur
inschakelen om de stekker te laten vervangen
(zieService)
;
gebruik geen verlengsnoeren of dubbelstekkers.
Wanneer het apparaat is geïnstalleerd, moeten de
elektrische voedingskabel en het stopcontact makkelijk te
bereiken zijn.
De kabel mag niet worden gebogen of samengedrukt.
Inhetgevaldevoedingskabelbeschadigdis,dientdeze
vervangen te worden door de fabrikant of door uw Technische
Servicedienst,zodatelkrisicovermedenwordt.
(ZieService)

NL
20
Anticondensstrip*
Nadat u de afwasautomaat heeft ingebouwd opent u de deur
en plakt u de doorzichtige plakstrip onder het houten werkvlak,
zodat u het beschermt tegen eventuele condens.
Aanwijzingen voor de eerste afwascyclus
Na de installatie moet u de beschermelementen op de rekken
verwijderen zoals ook de elastieken op het bovenrek (waar
aanwezig).
Direct voor de eerste wascyclus, moet u het zoutreservoir
volledig met water vullen en ongeveer 1 kg onthardingszout
toevoegen (zie hoofdstuk Glansmiddel en onthardingszout):
het is normaal dat er tijdens deze handeling water overloopt.
Selecteerdehardheidvanhetwater(ziehoofdstukGlansmiddel
en onthardingszout).
- Na het vullen van het onthardingszout gaat het controlelampje
ZOUTTOEVOEGEN*uit.
Als u geen onthardingszout toevoegt kan de waterontharder
en het verwarmingselement worden beschadigd.
Technische gegevens
Afmetingen
breedte cm 59,5
hoogte cm 82
diepte cm 57
Capaciteit 14 bordensets
Waterdruk toevoer
0,05 ÷ 1 MPa (0,5 ÷ 10 bar)
7,25 – 145 psi
Netspanning Zie typeplaatje
Totaal
opnemingsvermogen
Zie typeplaatje
Zekering Zie typeplaatje
Deze afwasautomaat voldoet
aan de volgende
EU richtlijnen:
- 2006/95/EC
(Laagspanning) - 2004/108/
EC (Elektromagnetische
Compatibiliteit)
- 2009/125/EC (Comm. Reg.
1016/2010) (Ecodesign)
-97/17/EC (Etikettering)
- 2012/19/EC (AEEA)
Het apparaat beschikt over een aantal geluidssignalen/tonen
(aan de hand van het model vaatwasser
) die waarschuwen dat
de betreffende functie van start is gegaan: inschakeling,
einde cyclus, etc.
De symbolen/controlelampjes/leds op het bedieningspaneel/
display kunnen van kleur veranderen, knipperen of vast
aanstaan.
(aan de hand van het model vaatwasser)
.
Het display toont nuttige informatie betreffende het type
ingestelde cyclus, de was- of droogfase, de resterende tijd,
de temperatuur, enz... enz…
Service
Voordat u de Servicedienst inschakelt:
• Dientutecontrolerenofudestoringzelfkuntoplossen
(zieStoringenenOplossingen).
• Starthetprogrammaopnieuwomtecontrolerenofhet
probleem is opgelost.
• AlsditniethetgevalisdientudeerkendeTechnische
Servicedienstinteschakelen.
Wendt u nooit tot niet erkende technici.
U dient door te geven:
• hettypestoring;
• hetmodelvanhetapparaat(Mod.);
• hetserienummer(S/N).
Deze informatie bevindt zich op het typeplaatje op het
apparaat
(zie Beschrijving van het apparaat).
* Alleen aanwezig op bepaalde modellen.

NL
21
Aanzichttekening
Beschrijving van het
apparaat
***Alleen op modellen voor volledige inbouw.
* Alleen aanwezig op bepaalde modellen.
Het aantal en het soort programma’s en opties verschilt aan de hand van het model afwasautomaat.
1. Bovenrek
2. Bovenste sproeiarmen
3. Opklaprekjes
4. Regelinghoogtebovenrek
5. Onderrek
6. Onderste sproeiarmen
7. Filter
8. Zoutreservoir
9. Wasmiddelbakje, reservoir glansspoelmiddel
enActiveOxigenmechanisme*
10. Typeplaatje
11. Bedieningspaneel***
Bedieningspaneel
Toets Selecteren Programma
Controlelampje
Onthardingszout
Controlelampje Glansspoelmiddel
Led programmanummer
en resterende tijd
Toets Uitgestelde Start
Toets en
controlelampje
ON-OFF/Reset
Controlelampje Uitgestelde Start

NL
22
Het laden van de rekken
Advies
Voordat u de vaat inlaadt moet u overtollige etensresten
verwijderen en glazen en bekers legen. Het is niet noodzakelijk
de vaat met water af te spoelen voor u hem in de vaatwasser
laadt.
Plaats de vaat dusdanig zodat hij stevig vaststaat en niet om
kan vallen. Pannen, bakken en glazen moeten met de opening
naar onder worden geplaatst en holle of bolle elementen moeten
schuin worden geplaatst zodat het water alle oppervlakken kan
bereiken en daarna vrijuit kan wegspoelen.
Zorg er voor dat deksels, handvatten, koekenpannen en schalen
het draaien van de sproeiarmen niet beletten. Plaats kleine
voorwerpen in de bestekkorf.
Plastic voorwerpen en pannen met antiaanbaklaag houden
waterdruppels langer vast. Hun droogtegraad zal lager zijn dan
die van voorwerpen van aardewerk of staal.
Lichte voorwerpen (zoals plastic bakken) moeten bij voorkeur op
het bovenrek worden geplaatst, en zodanig dat zij niet kunnen
bewegen.
Nadat u alles heeft ingeladen moet u controleren of de
sproeiarmen vrij kunnen ronddraaien.
Onderrek
Inhetonderrekkuntupannen,deksels,borden,slakommen,
bestek, etc. plaatsen. Grote borden en deksels moeten bij
voorkeur aan de zijkant van het rek worden geplaatst.
Het is aan te raden zeer vuile vaat in het onderrek te plaatsen,
aangezien in dit deel van de vaatwasser de kracht van de
waterstroom groter is waardoor de wasprestaties verbeteren.
Enkelemodellenvaatwasserbeschikkenoveruitklapbaredelen*,
deze kunnen in verticale positie worden gezet voor het plaatsen
van borden, of in horizontale positie (neer), om pannen en
slakommen beter te plaatsen.
Bestekkorf
De bestekkorf is voorzien van roosters aan de bovenkant
waarmee u het bestek beter kunt neerzetten. De korf mag alleen
aan de voorzijde van het onderrek worden geplaatst.
Messenenanderepuntigevoorwerpenmoetenmetde
punten naar beneden in de bestekkorf worden geplaatst of op
de opklaprekjes in het bovenrek gelegd in horizontale positie.
Bovenrek
Laad lichte en breekbare vaat zoals glazen, kopjes, bordjes,
lage slakommen, in het bovenrek.
Enkele modellen vaatwasser beschikken over uitklapbare
delen*, die in verticale stand kunnen worden gebruikt om
bordjes te rangschikken, of die kunnen worden neergelegd om
bakjes of houders op te plaatsen
*Alleen op bepaalde modellen beschikbaar en variërend in
aantal en positie.

NL
23
Het regelen van de hoogte van het bovenrek
Om de vaat beter te kunnen verdelen, kunt u het bovenrek hoger
of lager zetten.
We raden u aan de hoogte van het bovenrek te regelen als
het REK LEEG IS.
Verplaats het rek NOOIT aan een enkele kant.
Als het rek beschikt over een Lift-Up*
(zie afbeelding)
, tilt u het
rek op door het aan de zijkanten vast te houden. Til hem dan
naar boven op. Om naar de lagere stand terug te keren, drukt
u op de handels (A) aan de zijkanten van het rek en helpt u het
rek weer naar beneden te gaan.
Niet geschikte vaat
• Houtenbestekofvaat.
• Breekbare, versierde glazen, met de hand vervaardigd
vaatwerk en antiek vaatwerk. Deze decoraties zijn niet
vaatwasserbestendig.
• Dedeleninsynthetischmateriaalzijnniethittebestendig.
• Vaatwerkvankoperoftin.
• Vaatwerkdatvuilismetas,was,smeerolieofinkt.
De decoraties op glas en aluminium en zilveren delen kunnen
tijdens het wassen verkleuren of witter worden. Ook enkele
soorten glas (bv. kristallen voorwerpen) kunnen na vele
wasbeurten mat worden.
Schade aan glas en vaatwerk
Oorzaken:
• Typeglasenproceduresvoorhetmakenvanglas.
• Chemischesamenstellingvanhetwasmiddel.
• Watertemperatuurvanhetspoelprogramma.
Advies:
• Gebruik alleen glazen en porselein waarvan door de
producent wordt gegarandeerd dat het vaatwasserbestendig
is.
• Gebruik alleen wasmiddel dat geschikt is voor breekbaar
vaatwerk.
• Verwijder glazen en bestek z.s.m. na het einde van het
programma uit de vaatwasser.
Het bovenrek kan naar believen in hoogte worden aangepast:
naar boven toe als men in het onderrek volumineuze vaat wil
plaatsen, naar beneden toe om goed te kunnen profiteren van
alle plek in de opklaprekjes of de uitklapbare delen, zodat er
naar boven toe meer plaats is.
Opklaprekjes met verschillende standen
De opklaprekjes aan de zijkant kunnen op drie verschillende
hoogten worden gezet om de plaatsing van de vaat in het rek
te optimaliseren.
Wijnglazen kunnen op een stabiele wijze op de opklaprekjes
worden geplaatst door de voet van het glas in de speciale
gaten te steken.
Besteklade*
Enkelemodellenvaatwasserbeschikkenovereenverschuifbare
bestekladediekanwordengebruiktomextrabestekofkleine
kopjes te bewaren. Voor optimale wasprestaties moet u
vermijden te grote vaat onder de besteklade te plaatsen.
De besteklade kan indien gewenst worden verwijderd.
(zie
afbeelding)
Voorudebestekladeopzijnplaatszet,moetucontroleren
of de steunen goed aan het bovenrek zijn vastgehaakt.
(zie
afbeelding)
* Alleen aanwezig op bepaalde modellen.

NL
24
Starten en gebruik
* Alleen aanwezig op bepaalde modellen.
Het vaatwasmiddel toevoegen
Een goed wasresultaat hangt ook af van een correcte
dosering van het vaatwasmiddel. Teveel vaatwasmiddel
betekent niet automatisch een efficiëntere reiniging.
Bovendien is dit niet goed voor het milieu.
Aan de hand van de hoeveelheid vuil kan de dosering
worden aangepast m.b.v. een vaatwasmiddel in poeder- of
in vloeibare vorm.
Normaal gebruikt men voor een gemiddeld vuile was ca. 35
g. (poeder), of 35 ml (vloeibaar). Als u wastabletten gebruikt,
is één voldoende.
Als de vaat niet zo vuil is of reeds is afgespoeld, dient u de
dosis vaatwasmiddel aanzienlijk te beperken.
Voor een juist wasresultaat dient u de instructies te volgen
die op de verpakking van het vaatwasmiddel staan.
In het geval van verdere vragen raden wij u aan contact op
te nemen met de klantenservice van de wasmiddelfabrikant.
Om het wasmiddelbakje te openen, drukt u op het
openingsmechanisme "A"
Doe het vaatwasmiddel alleen in het droge bakje "B". Het
vaatwasmiddel dat nodig is voor de voorwas moet direct in
de vaatwasmachine worden geplaatst.
1.Doseer het vaatwasmiddel met behulp van de Programmatabel
om de juiste hoeveelheid te gebruiken.
In het kuipje B staat een niveau vermeld waar de maximum
hoeveelheid vloeibaar- of poedervaatwasmiddel voor elke cyclus
kan worden gegoten.
2.Verwijderdeeventuelewasmiddelrestenvanderandvanhet
bakje en sluit het deksel met een klik.
3.Sluithetdekselvanhetwasmiddelbakjedoorhetnaarboven
toe te drukken, totdat het afsluitmechanisme op zijn plaats is.
Het wasmiddelbakje gaat automatisch op het juiste moment
open, aan de hand van het type programma.
Als u gecombineerde vaatwasmiddelen gebruikt, raden we u aan
defunctieTABStegebruiken,waarmeeuhetafwasprogramma
juist afstemt. Zo zult u altijd het beste was- en droogresultaat
bereiken.
Gebruik alleen een specifiek vaatwasmiddel.
GEBRUIK NOOIT vaatwasmiddel voor met de hand wassen.
Een overmatig gebruik van vaatwasmiddel kan
schuimresiduen achterlaten aan het einde van de wascyclus.
We raden u aan alleen tabletten te gebruiken bij modellen
waar de optie MULTIFUNCTIE TABLETTEN bestaat.
De beste was- en droogprestaties bereikt u met het gebruik
van een vaatwasmiddel in poedervorm, een vloeibaar
glansspoelmiddel en onthardingszout.
Start de vaatwasser
1.Opendewaterkraan.
2.OpendedeurendrukopdeON-OFFtoets:decontrolelampjes
ON/OFF,deoptiesenhetdisplaygaanaan.
3. Doseer het vaatwasmiddel.
(zie hiernaast).
4. Laad de rekken in
(zie De rekken laden)
.
5.Selecteer hetprogramma aande handvan hetsoort vaat
en het type vuil
(zie de programmatabel)
door op de toets P
te drukken.
6. Selecteer de wasopties*.
(zie Speciale programma's en
Opties)
.
7.Starthetprogrammadoordedeurtesluiten.
8. Het einde van het programma wordt aangegeven door
geluidssignalen. Het nummer van het programma knippert op
het display. Open de deur, schakel het apparaat uit met de
ON-OFF toets, doe de waterkraan dicht en haal de stekker uit
het stopcontact.
9.Wachtenkeleminutenvoordatudevaateruithaalt,omte
voorkomen dat u zich verbrandt. Laad de vaat uit, beginnend
met het onderrek.
- Om het energieverbruik te verminderen gaat de
automaat, wanneer hij voor langere tijd NIET gebruikt
wordt, automatisch uit.
PROGRAMMI AUTO*:enkele modellen wasautomaat
beschikken over een speciale sensor die kan waarnemen hoe
vuil de vaat is en het meest efficiënte en zuinige wasprogramma
kiezen.
De duur van de Automatische programma’s hangt als gevolg af
van wat de sensor waarneemt.
Als de vaat niet zo vuil is of reeds is afgespoeld, dient u de
dosis vaatwasmiddel aanzienlijk te beperken.
Het wijzigen van een reeds gestart programma
Als u een verkeerd programma heeft geselecteerd kunt u dit
wijzigen, mits het net gestart is: open de deur en zorg ervoor
u niet te branden met de vrijkomende stoom. Door langere tijd
tedrukkenopdeON/OFFtoetsgaathetapparaatuit.Doehet
apparaatweeraanmetdeON/OFFtoetsenselecteerhetnieuwe
programmaendeeventueleopties.Startdevaatwasserdoor
de deur te sluiten.
Overige vaat toevoegen
Zonder de vaatwasser uit te zetten opent u de deur. Pas op de
vrijkomendehetestoom,endoedevaatindevaatwasser.Sluit
de deur: de wascyclus wordt hervat.
Onvoorziene onderbrekingen
Als tijdens het wassen de deur wordt geopend of er een
stroomonderbreking plaatsvindt, wordt het programma
onderbroken. Als de deur weer dichtgaat of wanneer de stroom
terugkeert zal het worden hervat op het punt waar het werd
onderbroken.

NL
25
Programma’s
Het aantal en het soort programma’s en opties verschilt aan de hand van het model afwasautomaat.
Degegevensvandeprogramma’szijngemeteninlaboratoriumomstandighedenvolgensdeEuropesevormEN50242.
Aan de hand van de verschillende gebruiksmogelijkheden kunnen de duur en de programmagegevens verschillen.
Programma
Programma’s
met
droogfunctie
Opties
Duur van het
programma
Waterverbruik
(l/cyclus)
Energieverbruik
(KWh/cyclus)
1. Eco Ja
Uitgestelde Start
03:10’ 11 1,03
2. Auto Intensief Ja
Uitgestelde Start
02:00’ - 3:10’ 14 - 15,5 1,55 - 1,8
3. Auto Normaal Ja
Uitgestelde Start
1:30’ - 02:30’ 14,5 - 16 1,2 - 1,35
4. Teer vaatwerk Ja
Uitgestelde Start
01:40’ 11 1,1
5. Express 40’ Nee
Uitgestelde Start
00:40’ 9,5 0,9
6. Weken Nee
Uitgestelde Start
00:12’ 4,5 0,01
7. Halve lading Ja
Uitgestelde Start
01:20’ 12,0 1,15
8. Extra Nee
Uitgestelde Start
01:00’ 11 n.a.
Aanwijzingen voor het kiezen van het programma en de dosering van het afwasmiddel
1.HetECOwasprogrammaishetstandaardprogrammawaaropdegegevensophetenergielabelbetrekkinghebben:deze
cyclus is geschikt voor het reinigen van normaal vuile afwas en is het meest efficiënte programma voor wat betreft energie- en
waterverbruikvoorditsoortvaat.29gr/ml+6gr/ml**–1Tab(**Hoeveelheidvaatwasmiddelvanvoorwas)
2.Zeervuilevaatenpannen(niettegebruikenvoorteervaatwerk).35gr/ml–1Tab
3.Normaalvuilevaatenpannen.29gr/ml+6gr/ml**–1Tab
4.Cyclusvoorteervaatwerkdatgevoeligisvoorhogetemperaturen.35gr/ml–1Tab
5.Snellecyclusvoornietzovuilevaat.(ideaalvoor2couverts)25gr/ml–1Tab
6.Voorwasinafwachtingvandeladingvandevolgendemaaltijd.Geenafwasmiddel
7. Idealecyclusvoorhetwassenvaneenkleine,middelmatigvuilevaat.25gr/ml-1Tab
8. Vaatvangroteafmetingen
(Niet voor breekbare onderdelen)
Verbruikinstand-by:Verbruikinleft-onmodus:5W-verbruikinoffmodus:0,5W.
n.a. = niet beschikbaar

NL
26
Speciale programma's en Opties
N.B.:
de beste prestaties van de programma's "Rapid en Express
30'"wordenbereiktalsuhetaantalaangegevencouvertsniet
overschrijdt.
Vooreenzuinigerverbruikdeafwasmachinevolgeladenlaten
draaien.
Aanwijzing voor de Proeflaboratoria: voor gedetailleerde
informatieoverdeomstandighedenvandeEN-vergelijkingsproef
kunt u contact opnemen met:
Afwasopties
Als een optie niet compatibel is met het geselecteerde
programma (zie programmatabel) zal de betreffende led
3 maal snel knipperen en hoort u enkele korte pieptonen.
Uitgestelde start
Het is mogelijk de start van het programma 1 tot 12
uur uit te stellen:
1.DrukopdetoetsUITGESTELDESTART:hetdisplaytoonthet
betreffendesymbool.Elkekeerdatuopdetoetsdruktneemt
detijdtoe(1hr,2hr,etc.totaanmax.12hr)vanafdestartvan
het geselecteerde programma.
2. Selecteer het programma en sluit de deur::hetterugtellen
begint;
3. Als de tijd verstreken is gaat het controlelampje uit en start
het programma.
Om de uitgestelde start te wijzigen en een korter uitstel te
selecterenmoetuopdetoetsUITGESTELDESTARTdrukken.
Om dit te annuleren drukt u enkele keren op de toets totdat het
controlelampje van de uitgestelde start uitgaat. Het programma
gaat van start op het moment dat de deur dichtgaat.
Programma EXTRA
MethetprogrammaEXTRAishetmogelijkopintensievewijze
borden en pannen van grote afmetingen te wassen, tot aan een
maximum hoogte van 53 cm: ovenschalen en ovenroosters,
lekplaten, pannenroosters van kookplaten, grote pannen,
serveerschotelsenpizzaborden,afzuigkapfiltersvanRVS.
Om vaat van grote afmetingen in de vaatwasser te laden dient
u eerst het bovenrek te verwijderen.
Open de twee klemmen aan
de rechterkant en linkerkant en
verwijder het rek.
Als het bovenrek op zijn plaats
zit, moeten de klemmen altijd
goed dicht zitten.
Om ervoor te zorgen dat de waterstraal alle delen van de vaat
bereikt,moetudevaatexactzoplaatsenalsindeafbeelding.
De cyclus kan ook worden gebruikt voor tere vaat van grote
afmetingen,m.b.v.deoptieExtraLight
(zie Wasopties).
Schakel de vaatwasser nooit in als het bovenrek niet op zijn
plaats is bij afwascycli anders dan het programma EXTRA.
Als u de Cyclus Extra en Extra uitvoert met de optie Light*,
dient u het vaatwasmiddel direct in de kuip te schenken en
niet in de dispenser.
* Alleen aanwezig op bepaalde modellen.

NL
27
Glansmiddel en zout
Gebruik uitsluitend producten die speciaal voor
vaatwasmachines bestemd zijn.
Gebruik geen keukenzout of industrieel zout en ook geen
wasmiddelen voor handwas.
Volg de aanwijzingen op de verpakking.
Als u een multifunctioneel product gebruikt, is het niet nodig
een glansmiddel toe te voegen. Wij raden u echter wel aan
onthardingszout toe te voegen, als het water hard of zeer
hard is.
(Volgdeaanwijzingenopdeverpakking).
Als u geen zout of glansmiddel toevoegt, is het normaal
dat de controlelampjes ZOUT TOEVOEGEN* e n
GLANSMIDDEL TOEVOEGEN* blijven branden.
Het glansmiddel toevoegen
Het glansmiddel bevordert het drogen van de vaat door het
water van het oppervlak af te laten glijden. Op deze manier
voorkomt u strepen of vlekken. Het glansmiddelreservoir moet
worden gevuld:
• als op het bedieningspaneel het controlelampje
GLANSMIDDELTOEVOEGENaangaat* is er nog voldoende
glansmiddelovervoor1-2wasbeurten;
1.Opendehouder“D” door het lipje op het deksel in te drukken
en omhoog te halen;
2. Doe het glansmiddel voorzichtig in het bakje tot aan het
streepje. Zorg ervoor dat u niet morst. Als u wel morst, moet u
het product gelijk met een droge doek verwijderen.
3.Sluithetdekselmeteenklik.
Giet het glansmiddel NOOIT direct in de machine.
De dosis glansmiddel regelen
Als u niet tevreden bent over de droogresultaten, kunt u de dosis
glansmiddelregelen.SchakelhetapparaatinmetdeON/OFF
toets. Druk 3 keer op de P toets. Doe de vaatwasser aan met de
ON/OFFtoets.Hetingesteldeniveauverschijntophetdisplay
(ingesteld op fabriekswaarden).
Regelhetniveauvandetoevoervanhetglansmiddelmetde
P toets.
Druk op de ON/OFF toets om de ingestelde regeling op te
slaan.
Hetglansmiddelniveaukanworden ingesteldopNUL.Indat
geval zal er geen glansmiddel worden toegevoegd en zal het
controlelampje glansmiddel toevoegen niet aangaan als het
product op is.
Ukuntmaximaal4niveausinstellen,aandehandvanhetmodel
vaatwasser.
• alsuopdevaatstrepenaantreft,moetueenlagerestand
instellen(1-2).
• als u waterdruppels of kalkaanslag aantreft, moet u een
hogere stand instellen (3-4).
Instellen waterhardheid
Elkevaatwasserisvoorzienvaneenwaterontharderdie,met
behulp van speciaal onthardingszout, kalkvrij water levert voor
het wassen van de vaat.
In deze afwasautomaat kan de waterontharder aan de hand
van de waterhardheid worden geregeld voor het beperken van
de vervuiling en het optimaliseren van de wasprestaties. Dit
gegeven kunt u bij uw plaatselijke waterbedrijf opvragen.
SchakelhetapparaatinmetdeON/OFFtoets.HouddePtoets
enkele seconden ingedrukt tot u een geluidssignaal hoort.
DoedevaatwasseraanmetdeON/OFFtoets.Hetingestelde
niveau verschijnt op het display
(de waterontharder staat op
een gemiddeld niveau).
RegelhetniveauvandewaterhardheidmetdePtoets,
(1-2-3-
4-5* zie tabel waterhardheid)
totmaximaal5niveaus.
Druk op de ON/OFF toets om de ingestelde regeling op te
slaan.
Als u multifunctie tabletten gebruikt moet u toch het zoutreservoir
vullen.
(°dH=waterhardheidinDuitsegraden-°fH=waterhardheid
inFransegraden-mmol/l=millimol/liter)
Het onthardingszout toevoegen
Om goede wasresultaten te bereiken, moet u altijd controleren
of het zoutreservoir voldoende gevuld is.
Het onthardingszout verwijdert het kalk uit het water en zorgt
ervoor dat er geen kalkaanslag op de vaat achterblijft.
Het zoutreservoir bevindt zich aan de onderzijde van de
vaatwasmachine
(zie Beschrijving)
en moet worden gevuld:
• alsdegroenedrijver* niet zichtbaar is als u naar de zoutdop
kijkt;
• als op het bedieningspaneel het controlelampje ZOUT
TOEVOEGEN* aangaat;
1.Haalhetonderreknaarvorenendraaide
dop van het zoutreservoir tegen de klok in.
2.Alleenvoordeeersteafwasbeurt:vulhet
reservoir tot aan de rand met water.
3. Plaats de trechter*
(zie afbeelding)
en
vul het reservoir tot aan de rand met zout
(ca.1kg);hetisnormaaldaterwatwater
overloopt.
4.Verwijderdetrechter*,reinigdeeventuelezoutrestenopde
opening. Spoel de dop onder het water af voor u hem weer
terugschroeft door hem ondersteboven onder de waterstraal te
plaatsen en het water uit de 4 gleuven aan de onderzijde van
de dop te laten stromen. (dop met groene drijver*)
We raden u aan bovenstaande handeling elke keer uit te
voeren als u zout bijvult.
Schroefdedopweeropzijnplaats,zodatertijdenshetwassen
geen afwasmiddel in het reservoir kan komen (de waterontharder
zou onherstelbaar kunnen worden beschadigd).
Wanneer noodzakelijk, voegt u het zout toe vóór een
wascyclus, zodat de overgelopen zoutoplossing uit het
zoutreservoir wordt verwijderd.
* Alleen aanwezig op bepaalde modellen.
Tabel Waterhardheid
Gemiddelde duur**
zoutreservoir
niveau °dH °fH mmol/l maanden
1 0 - 6 0 - 10 0 - 1 7 maanden
2 6 - 11 11 - 20 1,1 - 2 5 maanden
3 12 - 17 21 - 30 2,1 - 3 3 maanden
4 17 - 34 31 - 60 3,1 - 6 2 maanden
5*
34 - 50 61 - 90 6,1 - 9 2/3 weken
Van 0°f tot 10°f raden wij u aan geen zout te gebruiken.
* als u 5 instelt, kan de duur iets langer zijn.
** met 1 wascyclus per dag
M
A
X

NL
28
Onderhoud en
verzorging
Water en elektrische stroom afsluiten
• Sluitnaelkeafwasbeurtdewaterkraanafomlekkagete
voorkomen.
• Haaldestekkeruithetstopcontacttijdensreinigingen
onderhoud.
Reinigen van de afwasautomaat
• Debuitenkantenhetbedieningspaneelkunnenworden
gereinigd met een natte, niet schurende doek. Gebruik
geen oplosmiddelen of schuurmiddelen.
• De vlekken aan de binnenkant van de afwasautomaat
kunnen worden verwijderd met een natte doek en wat
azijn.
Vermijden van vervelende luchtjes
• Laatdedeuraltijdopeenkieromhetophopenvanvocht
te voorkomen.
• Reiniggeregelddeafdichtingenrondomdedeurende
wasmiddelbakjes met een vochtige spons. Zo vermijdt u
het ophopen van etensresten die de hoofdoorzaak zijn
van vervelende luchtjes.
Reinigen van de sproeiarmen
Het kan gebeuren dat er etensresten aan de sproeiarmen
blijven kleven en de gaatjes waar water uit komt verstoppen:
u doet er goed aan ze regelmatig te controleren en te reinigen
met een niet-metalen borsteltje.
De twee sproeiarmen kunnen beide uit elkaar worden
gehaald.
Om de bovenste sproeiarm uit
elkaar te halen dient u de plastic
dop linksom los te schroeven.
De bovenste sproeiarm moet
worden gemonteerd met de
gaten naar boven gericht.
De onderste sproeiarm haalt
u uit elkaar door druk uit te
oefenen op de lipjes aan de
zijkant en door hem daarna
naar boven te trekken.
Reinigen van het watertoevoerfilter*
Als de waterleiding nieuw is of lange tijd niet gebruikt, laat
dan voordat u de aansluiting tot stand brengt het water lopen
totdat het helder is en vrij van vuildeeltjes. Als u dit niet doet
loopt u het risico dat het punt waar het water binnenkomt
verstopt raakt en uw afwasautomaat beschadigt.
Reiniggeregeldhetwatertoevoerfilterbijdekraan.
- Doe de waterkraan dicht.
-Schroefhetuiteindevandewatertoevoerbuislos,verwijder
het filter en reinig het voorzichtig onder stromend water.
- Doe het filter op zijn plaats en schroef de buis vast.
Reinigen van de filters
De filtergroep wordt gevormd door drie filters die etensresten
uit het waswater verwijderen en zorgen dat het weer schoon
in het watercircuit terechtkomt: voor een optimaal resultaat
moeten de filters regelmatig worden schoongemaakt.
Reinigdefiltersregelmatig.
De afwasautomaat mag niet zonder filters of met een los
filter worden gebruikt.
• Controleer na enkelewasbeurten de filtergroep. Reinig
hem indien noodzakelijk grondig onder stromend water met
behulpvaneenniet-metalenborsteltje.Volgonderstaande
aanwijzingen:
1.draaihetcilindrischefilterClinksomentrekhemnaar
buiten
(afb.1).
2.VerwijderhetglasfilterBdooreenlichtedrukuitte
oefenen op de lipjes aan de zijkant
(Afb.2);
3.Haal het roestvrijstalen bordfilter A van zijn plek
(afb. 3).
4.Controleerhetafvoerputjeenverwijdereventuele
etensresten. VERWIJDER NOOIT de bescherming van de
waspomp
(zwart element) (afb. 4).
Na het reinigen van de filters dient u de filtergroep weer op
zijn plaats te zetten. Dit is fundamenteel voor een goede
werking van de afwasautomaat.
Als u langere tijd geen gebruik maakt van
de afwasautomaat
• Schakeldestroomuitensluitdewaterkraanaf.
• Laatdedeuropeenkierstaan.
•Laatalsuterugkeertdeafwasautomaateenkeerleeg
draaien.
* Alleen aanwezig op bepaalde modellen.

NL
29
*Alleen aanwezig op bepaalde modellen.
Storingen en
oplossingen
Als er storingen zijn in de werking van het apparaat dient u eerst de volgende punten na te gaan voor u zich tot de
Servicedienstwendt.
Storingen: Mogelijke oorzaken / Oplossingen:
De vaatwasser start niet of volgt de
opdrachten niet op
• Schakel het apparaat uit met de ON/OFF toets, schakel het na een minuut
weer in en stel het programma opnieuw in.
• De stekker zit niet goed in het stopcontact.
• De deur van de vaatwasser is niet goed dicht.
De deur gaat niet dicht • Het slot zit niet goed vast. Druk stevig tegen de deur totdat u een klik hoort.
De vaatwasser pompt het water
niet af.
• Het programma is nog niet geëindigd.
• De waterafvoerbuis is geknikt (zie Installatie).
• De afvoer van de wasbak is verstopt.
• Het filter is verstopt met etensresten.
De vaatwasser maakt lawaai.
• De vaat stoot tegen elkaar of tegen de sproeiarmen.
• Teveel schuim: u heeft teveel afwasmiddel gebruikt of het afwasmiddel is niet
geschikt voor afwasautomaten. (zie Starten en gebruik).
Er blijven op vaat en glazen
kalkafzettingen of een witte
aanslag achter.
• Er zit niet genoeg zout in het reservoir of de afregeling is niet toereikend voor
de waterhardheid (zie Glansmiddel en onthardingszout).
• Het deksel van het zoutreservoir is niet goed dicht.
• Het glansmiddel is op of de dosering is ontoereikend.
Er blijven op vaat en glazen
strepen of blauwe kringen
achter.
• Er wordt teveel glansmiddel gebruikt
De vaat is niet droog genoeg.
• U heeft een programma zonder drogen ingesteld.
• Het glansmiddel is op of de dosering is ontoereikend (zie Glansmiddel en
onthardingszout).
• De regeling van het glansmiddel is niet juist.
• Het vaatwerk is voorzien van een antiaanbaklaag of is van plastic.
De vaat is niet schoon.
• De rekken zijn te vol geladen (zie De rekken laden).
• De vaat is niet goed verdeeld.
• De sproeiarmen kunnen niet vrijuit draaien.
• Het wasprogramma is niet energiek genoeg (zie Programma’s).
• Teveel schuim: u heeft teveel afwasmiddel gebruikt of het afwasmiddel is niet
geschikt voor afwasautomaten. (zie Starten en gebruik).
• Het deksel van het zoutreservoir is niet goed afgesloten.
• Het filter is vuil of verstopt (zie Onderhoud en verzorging).
• Er zit geen onthardingszout meer in het reservoir (zie Glansmiddel en
onthardingszout).
De vaatwasser vult zich niet
met water - Alarm kraan dicht.
(u hoort enkele geluidssignalen en op
het display verschijnt enkele minuten
lang H)
(het controlelampje ON/OFF knippert
en op het display verschijnt het nummer
6).
• Er zit geen water in de centrale waterleiding.
• De watertoevoerbuis is geknikt (zie Installatie).
• Open de kraan en het apparaat start na enkele minuten vanzelf.
• Het apparaat is geblokkeerd omdat u niet heeft ingegrepen na de pieptoon.
Schakel de machine uit met de ON/OFF toets, open de kraan en schakel
hem na enkele seconden opnieuw in door middel van dezelfde toets.
Herprogrammeer het apparaat en start het opnieuw.

NL
30

NL
31

NL
32
195115454.01
08/2013jk-XeroxFabriano
-
 1
1
-
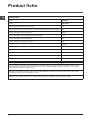 2
2
-
 3
3
-
 4
4
-
 5
5
-
 6
6
-
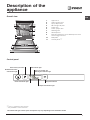 7
7
-
 8
8
-
 9
9
-
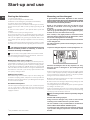 10
10
-
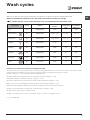 11
11
-
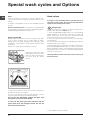 12
12
-
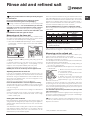 13
13
-
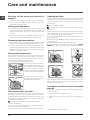 14
14
-
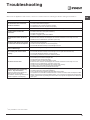 15
15
-
 16
16
-
 17
17
-
 18
18
-
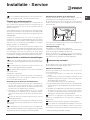 19
19
-
 20
20
-
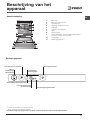 21
21
-
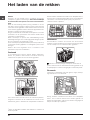 22
22
-
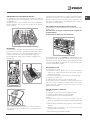 23
23
-
 24
24
-
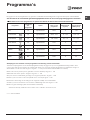 25
25
-
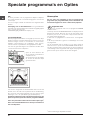 26
26
-
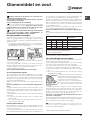 27
27
-
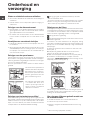 28
28
-
 29
29
-
 30
30
-
 31
31
-
 32
32


Hotpoint DIFP 68T1 A EU Gebruikershandleiding
- Categorie
- Vaatwassers
- Type
- Gebruikershandleiding
in andere talen
- English: Hotpoint DIFP 68T1 A EU User guide
Gerelateerde papieren
Andere documenten
-
Hotpoint Ariston LTF 11H121 Operating Instructions Manual
-
Indesit DIFP 68B1 de handleiding
-
KitchenAid KIF 5O41 PLETGS Gebruikershandleiding
-
Whirlpool ELTF 11M121 C EU Gebruikershandleiding
-
-
Indesit CDIFP 67T9 C FR Setup and user guide
-
Indesit LSB 7M121 W EU Gebruikershandleiding
-
-
-