Indesit PIM 640 AST (IX) Gebruikershandleiding

Type
Gebruikershandleiding
English
Operating Instructions
HOB
Français
Mode d’emploi
TABLE DE CUISSON
Español
Manual de instrucciones
ENCIMERA
Portuges
Instruções para a utilização
PLANO
Italiano
Istruzioni per l’uso
PIANO
Sommario
Istruzioni per l’uso,1
Avvertenze,3
Assistenza,8
Descrizione dell’apparecchio,10
Installazione,13
Avvio e utilizzo,17
Precauzioni e consigli,17
Manutenzione e cura,18
Anomalie e rimedi,18
Contents
Operating Instructions,1
Warnings,3
Assistance,8
Description of the appliance,10
Installation,19
Start-up and use,23
Precautions and tips,23
Maintenance and care,24
Troubleshooting,24
Sommaire
Mode d’emploi,1
Avertissements,4
Assistance,8
Description de l’appareil,10
Installation,25
Mise en marche et utilisation,29
Précautions et conseils,29
Nettoyage et entretien,30
Anomalies et remèdes,30
Sumario
Manual de instrucciones,1
Advertencias,4
Asistencia,9
Descripción del aparato,10
Instalación,31
Puesta en funcionamiento y uso,35
Precauciones y consejos,35
Mantenimiento y cuidados,36
Anomalías y soluciones,36
Índice
Instruções para a utilização,1
Advertências,5
Assistência,9
Descrição do aparelho,11
Instalação,37
Início e utilização,41
Precauções e conselhos,41
Manutenção e cuidados,42
Anomalias e soluções,42
PIM 640 AST (IX)
Deutsch
Bedienungsanleitung
KOCHMULDE
Nederlands
Gebruiksaanwijzing
KOOKPLAAT
Inhaltsverzeichnis
Bedienungsanleitung,2
Hinweise,5
Kundendienst,9
Beschreibung Ihres Gerätes,11
Installation,43
Inbetriebsetzung und Gebrauch,47
Vorsichtsmaßregeln und Hinweise,47

Störungen und Abhilfe,48
Inhoud
Gebruiksaanwijzing,2
Belangrijk,6
Service,9
Beschrijving van het apparaat,11
Het installeren,49
Starten en gebruik,53
Voorzorgsmaatregelen en advies,53
Onderhoud en verzorging,54
Storingen en oplossingen,54



1
3
4
5
66
62
62
62
61













3
Avvertenze
ATTENZIONE: Questo apparecchio e le sue parti
accessibili diventano molto caldi durante l’uso.
Bisogna fare attenzione ed evitare di toccare gli
elementi riscaldanti. Tenere lontani i bambini inferiori
agli 8 anni se non continuamente sorvegliati. Il
presente apparecchio può essere utilizzato dai
bambini a partire dagli 8 anni e da persone con

con mancanza di esperienza e di conoscenza se
si trovano sotto adeguata sorveglianza oppure se
sono stati istruiti circa l’uso dell’apparecchio in modo
sicuro e se si rendono conto dei pericoli correlati. I
bambini non devono giocare con l’apparecchio. Le
operazioni di pulizia e di manutenzione non devono
essere effettuate dai bambini senza sorveglianza.
ATTENZIONE: Lasciare un fornello incustodito con
grassi e olii può essere pericoloso e può provocare un
incendio. Non bisogna MAI tentare di spegnere una


un coperchio o con una coperta ignifuga.
ATTENZIONE: Rischio di incendio: non lasciare

Non utilizzare mai pulitori a vapore o ad alta pressione
per la pulizia dell’apparecchio.
     
prima di aprirlo. Non chiudere il coperchio in vetro
(se presente) con i bruciatori gas o la piastra elettrica
ancora caldi.
L’apparecchio non è destinato a essere messo in
funzione per mezzo di un temporizzatore esterno
oppure di un sistema di comando a distanza
separato.
ATTENZIONE: l’uso di protezioni del piano
inappropriate può causare incidenti.
Warnings
WARNING: The appliance and its accessible parts
become hot during use. Care should be taken to
avoid touching heating elements. Children less than 8
years of age shall be kept away unless continuously
supervised. This appliance can be used by children
aged from 8 years and above and persons with
reduced physical, sensory or mental capabilities or
lack of experience and knowledge if they have been
given supervision or instruction concerning use of the
appliance in a safe way and understand the hazards
involved. Children shall not play with the appliance.
Cleaning and user maintenance shall not be made
by children without supervision.
WARNING: Unattended cooking on a hob with fat or





cooking surfaces.
Never use steam cleaners or pressure cleaners on
the appliance.

not close the glass cover (if present) when the gas
burners or electric hotplates are still hot.
The appliance is not intended to be operated by
means of an external timer or separate remote
control system.
CAUTION: the use of inappropriate hob guards can
cause accidents.
4
Avertissements
       
accessibles deviennent très chauds pendant leur
fonctionnement. Il faut faire attention à ne pas toucher
les éléments chauffants. Ne pas faire approcher les

sous surveillance constante. Le présent appareil peut
être utilisé par des enfants de plus de 8 ans et par

sensorielles ou mentales réduites ou n’ayant pas
l’expérience ou les connaissances indispensables,


utilisation de l’appareil en toute sécurité et à condition

enfants ne doivent pas jouer avec l’appareil. Les
opérations de nettoyage et d’entretien ne doivent
pas être effectuées par des enfants non surveillés.
ATTENTION : Laisser un récipient de cuisson avec
de l’huile ou de la graisse sur un foyer est dangereux

essayer d’éteindre une flamme ou un incendie
avec de l’eau ! Il faut éteindre l’appareil et couvrir la

une couverture anti-feu.
      
d’objets sur les surfaces de cuisson.
Ne jamais nettoyer l’appareil avec des nettoyeurs
vapeur ou haute pression.

couvercle avant de l’ouvrir. Ne pas abaisser le


Cet appareil ne peut pas être allumé au moyen
d’un temporisateur extérieur ou d’un système de
commande à distance séparé.
ATTENTION : l’utilisation de protections de table
inappropriées peut causer des incendies.
Advertencias
ATENCIÓN: Este aparato y sus partes accesibles se
vuelven muy calientes durante el uso. Por lo tanto, es
importante evitar tocar los elementos calentadores.
Mantenga alejados a los niños menores de 8 años si
no son continuamente vigilados. El presente aparato
puede ser utilizado por niños mayores de 8 años y
por personas con capacidades físicas, sensoriales
o mentales disminuidas o sin experiencia ni
conocimientos, si se encuentran bajo una adecuada
vigilancia o si han sido instruidos sobre el uso del
aparato de modo seguro y comprenden los peligros
relacionados con el mismo. Los niños no deben
jugar con el aparato. Las operaciones de limpieza y
de mantenimiento no deben ser realizadas por niños
sin vigilancia.

sin vigilancia puede ser peligroso y provocar un

con agua, se debe apagar el aparato y cubrir la llama,
por ejemplo, con una tapa o con una manta ignífuga.
ATENCIÓN: Riesgo de incendio: no deje objetos

No utilice nunca limpiadores a vapor o de alta presión
para la limpieza del aparato.

antes de abrirla. No cierre la tapa de vidrio (si existe)

están calientes.
El aparato no se debe poner en funcionamiento a
través de un temporizador externo o de un sistema
de mando a distancia.
ATENCIÓN: el uso de protecciones inapropiadas
de la placa de cocción puede provocar accidentes.
5
Advertências
ATENÇÃO: Este aparelho e as suas partes

É preciso ter atenção e evitar tocar os elementos

menos de 8 anos, caso não estejam a ser vigiadas.
O presente aparelho pode ser utilizado por crianças
com mais de 8 anos e por pessoas com capacidades
físicas, sensoriais ou mentais reduzidas ou com
pouca experiência e conhecimentos, caso sejam

instruções em relação ao uso do aparelho de
forma segura e tenham conhecimento dos perigos
associados. As crianças não devem brincar com o
aparelho. As operações de limpeza e manutenção
não devem ser efectuadas por crianças sem
vigilância.
ATENÇÃO: Deixar um fogão com gordura e óleo sem
vigilância pode ser perigoso e provocar um incêndio.
NUNCA tente apagar as chamas com água. É
necessário desligar o aparelho e cobrir as chamas
com uma tampa ou com uma manta ignífuga.
ATENÇÃO: Risco de incêndio: não deixe objectos
sobre as superfícies de cozedura.

de alta pressão para limpar o aparelho.
  
abri-la. Não feche a tampa de vidro (se presente) se


O aparelho não é destinado a ser colocado em
funcionamento por meio de um temporizador externo
ou por um sistema de comando à distância separado.
ATENÇÃO: O uso de protecções do plano

Hinweise
ZUR BEACHTUNG: Bei Gebrauch wird dieses
Gerät und alle zugänglichen Teile sehr heiß.
Es ist darauf zu achten, dass die Heizelemente
       
nicht ständig beaufsichtigt sind, von dem Gerät

und Personen mit eingeschränkten körperlichen,
geistigen oder Wahrnehmungsfähigkeiten oder
aber ohne ausreichende Erfahrung und Kenntnis
verwendet werden, vorausgesetzt sie werden
ausreichend überwacht oder sie wurden in den
sicheren Gebrauch des Geräts eingewiesen und
haben eine ausreichende Wahrnehmung der mit
dem Gebrauch des Geräts verbundenen Gefahren.
Erlauben Sie Kindern nicht, mit dem Gerät zu spielen.
Reinigungs- und Wartungsarbeiten dürfen nicht von
unbewachten Kindern ausgeführt werden.
ZUR BEACHTUNG: Lassen Sie keine Fette oder Öle
unbewacht auf dem Herd stehen. Das ist gefährlich
und kann einen Brand verursachen. NIEMALS eine
 
Sie das Gerät aus und ersticken Sie die Flamme mit
einem Deckel oder einer feuerfesten Decke.
ZUR BEACHTUNG: Brandgefahr: Keine
Gegenstände auf den Kochstellen liegen lassen.
Verwenden Sie zur Reinigung des Kochfeldes keine
Dampf- oder Hochdruckreinigungsgeräte.
Trocknen Sie eventuell auf der Herdabdeckung

Schließen Sie die Glasabdeckung (falls vorhanden)
nicht, wenn die Gasbrenner oder die Elektroplatte
noch heiß sind.
Dieses Gerät kann nicht mit einem externen Timer
oder einem getrennten Fernsteuerungssystem
betrieben werden.
ZUR BEACHTUNG: Die Verwendung ungeeigneter
Schutzvorrichtungen kann Unfälle verursachen.
6
Belangrijk
PAS OP: Dit apparaat en zijn bereikbare onderdelen
worden tijdens gebruik zeer heet. Zorg ervoor de
verwarmende elementen niet aan te raken. Zorg
ervoor dat kinderen die kleiner dan 8 jaar oud zijn
niet dichtbij het apparaat kunnen komen, tenzij onder
constant toezicht. Het huidige apparaat mag alleen
door kinderen van 8 jaar en ouder en door personen
met een beperkt lichamelijk, sensorieel of geestelijk
vermogen, of zonder ervaring en kennis worden
  
mits ze zijn onderricht m.b.t. het veilige gebruik van
het apparaat en zich bewust zijn van de betreffende
gevaren. Voorkom dat kinderen met het apparaat
spelen. De reinigings- en onderhoudshandelingen
mogen niet door kinderen worden uitgevoerd, tenzij
onder toezicht.
PAS OP: Het kan gevaarlijk zijn een fornuis met vet
of olie onbewaakt te laten. Er kan brand ontstaan.

met water. U dient daarentegen het apparaat uit te
schakelen en de vlam te bedekken met bijvoorbeeld
een (blus)deken.
PAS OP: Brandgevaar: laat nooit voorwerpen op het
kookoppervlak liggen.
Gebruik nooit huishoudapparaten met stoom of hoge
druk voor het reinigen van de kookplaat.
Verwijder eventuele geknoeide vloeistoffen van de
dekplaat voordat u hem opent. Doe het glazen deksel
(waar aanwezig) niet omlaag als de gasbranders of
de elektrische plaat nog warm zijn.
Het apparaat is niet geschikt om te worden
ingeschakeld m.b.v. een externe timer of door een
gescheiden afstandsbedieningssysteem.
PAS OP: het gebruik van ongeschikte
kookplaatbeschermingen kan ongelukken
veroorzaken.

      
 
 



   



 

   
   

    




   




   


   
  




 


7




8

8































8
Assistenza
Comunicare:
il tipo di anomalia
il modello della macchina (Mod.)
 
Queste ultime informazioni si trovano sulla targhetta caratteristiche posta
sull’apparecchio.
Non ricorrete mai a tecnici non autorizzati e rifiutate sempre
l’installazione di pezzi di ricambio non originali.
Assistenza Attiva 7 giorni su 7
Se nasce il bisogno di assistenza o manutenzione basta chiamare il Numero
Unico Nazionale 199.199.199* per essere messi subito in contatto con il
Centro Assistenza Tecnica più vicino al luogo da cui si chiama.
È attivo 7 giorni su 7, sabato e domenica compresi, e non lascia mai inascoltata
una richiesta.
Estensione di garanzia Airbag
Airbag è il servizio esclusivo creato da Ariston che integra e prolunga nel
tempo i contenuti della garanzia standard: con una modica cifra protegge
il cliente da ogni imprevisto riguardante l’assistenza e la manutenzione

che aderisce al programma Airbag avrà diritto gratuitamente a:
l’intervento entro 48 ore dalla chiamata;
il contributo per spese di trasferta del Tecnico (diritto di chiamata);
la manodopera;
le parti di ricambio originali;
il trasporto dell’elettrodomestico non riparabile in loco.

la sostituzione a prezzo agevolato in funzione dell’anzianità del prodotto.
* Al costo di 14,25 centesimi di Euro al minuto (iva inclusa) dal Lun. al Ven.
dalle 08:00 alle 18:30, il Sab. dalle 08:00 alle 13:00 e di 5,58 centesimi di
Euro al minuto (iva inclusa) dal Lun. al Ven. dalle 18:30 alle 08:00, il Sab. dalle

Per chi chiama da radiomobile le tariffe sono legate al piano tariffario
dell’operatore telefonico utilizzato.
Le suddette tariffe potrebbero essere soggette a variazione da parte
dell’operatore telefonico; per maggiori informazioni consultare il sito www.
aristonchannel.com.
Assistance
! Never use the services of an unauthorised technician.
Please have the following information to hand:
the type of problem encountered.
the appliance model (Mod.).
 
The latter two pieces of information can be found on the data plate located
on the appliance.
The following information are applicable only for the UK and Republic of
Ireland.
Repairs and After Sales
For product help and advice, repairs, spare parts or accessories, we’re here
to help.
For local repair engineers - 03448 111 606
ROI - 0818 313 413
For Parts and Accessories visit:
parts.hotpoint.co.uk/shop
Please remember to register your appliance at www.hotpointservice.co.uk
to activate your 10 year parts guarantee.
Assistance
Indiquez-lui :
le type d’anomalie
le modèle de votre appareil (Mod.)
 
   

9
Asistencia
Comunique:
el tipo de anomalía
 
 
Esta información se encuentra en la placa de características ubicada en el

La siguiente información es válida solo para España.
Para otros países de habla hispana consulte a su vendedor.
Ampliación de garantía
Llame al 902.363.539 y le informaremos sobre el fantástico plan de ampliación
de garantía hasta 5 años.
Consiga una cobertura total adicional de
Piezas y componentes
Mano de obra de los técnicos
Desplazamiento a su domicilio de los técnicos
Y NO PAGUE AVERIAS NUNCA MAS
Servicio de asistencia técnica (SAT)
Llame al 902.133.133 y nuestros técnicos intervendrán con rapidez y
     
funcionamiento.

la limpieza y mantenimiento de su electrodoméstico a precios competitivos.
ESTAMOS A SU SERVICIO
Assistência
Comunique:
o tipo de avaria
 
 


Kundendienst
Geben Sie bitte Folgendes an:
die genaue Beschreibung des Fehlers
das Gerätemodell (Mod.)
 


Service
U moet doorgeven:
het type storing
het model apparaat (Mod.)
 
Deze informatie bevindt zich op het typeplaatje links onderin het koelgedeelte.


 
 
 
     




.(Mod.
.(
            

10
Descrizione dell’apparecchio
Vista d’insieme
1. Griglie di appoggio per RECIPIENTI DI COTTURA
2. BRUCIATORI GAS
3. Manopole di comando dei BRUCIATORI GAS
4. Pulsante di accensione dei BRUCIATORI GAS
5. Candela di accensione dei BRUCIATORI GAS
6. DISPOSITIVO DI SICUREZZA
BRUCIATORI GAS
più adatto al diametro del recipiente da utilizzare.
Manopole di comando dei BRUCIATORI GAS per la regolazione della

Candela di accensione dei BRUCIATORI GAS permette l’accensione
automatica del bruciatore prescelto.
DISPOSITIVO DI SICUREZZA in caso di spegnimento accidentale della

Description of the appliance
Overall view
1. Support Grid for COOKWARE
2. GAS BURNERS
3. Control Knobs for GAS BURNERS
4. GAS BURNERS button
5. Ignition for GAS BURNERS
6. SAFETY DEVICES
GAS BURNERS differ in size and power. Use the diameter of the cookware
to choose the most appropriate burner to cook with.
Control Knobs for GAS BURNERS
GAS BURNER IGNITION
SAFETY DEVICE* stops the gas flow if the flame is accidentally
extinguished.
Description de l’appareil
Vue d’ensemble
1. Grilles support de CASSEROLES
2. BRÛLEURS À GAZ
3. Manettes de commande des BRÛLEURS GAZ
4. Bouton d’allumage des BRÛLEURS GAZ
5. Bougie d’allumage des BRÛLEURS GAZ
6. DISPOSITIF DE SÉCURITÉ
BRÛLEURS GAZ ils ont plusieurs dimensions et puissances. Choisissez

Manettes de commande des BRÛLEURS GAZ pour le réglage de la

La bougie d’allumage des BRÛLEURS GAZ permet l’allumage

DISPOSITIF DE SÉCURITÉ
coupez immédiatement l’arrivée du gaz.
Descripción del aparato
Vista en conjunto
1. Parrillas de apoyo para RECIPIENTES DE COCCIÓN
2. QUEMADORES A GAS
3. Mandos de los QUEMADORES A GAS
4. Botón de encendido de los QUEMADORES A GAS
5. Bujía de encendido de los QUEMADORES A GAS
6. DISPOSITIVO DE SEGURIDAD
QUEMADORES A GAS: son de distintas dimensiones y potencias. Elija

Mandos de los QUEMADORES A GAS para la regulación de la llama.
Bujía de encendido de los QUEMADORES A GAS: permite el encendido

DISPOSITIVO DE SEGURIDAD: si se apaga accidentalmente la llama,
interrumpe la salida de gas.
6
5
1
2
4
3
11
Descrição do aparelho
Vista de conjunto
1. Grades de suporte para RECIPIENTES DE COZEDURA
2. QUEIMADORES A GÁS
3. Selectores de comando dos QUEIMADORES A GÁS
4. Botão para acender os QUEIMADORES A GÁS
5. Vela para acender os QUEIMADORES A GÁS
6. DISPOSITIVO DE SEGURANÇA
Os QUEIMADORES são de diferentes tamanhos e potências. Escolha o

Selectores de comando dos QUEIMADORES A GÁS para a regulação
da chama.
Vela para acender os QUEIMADORES A GÁS permite o acendimento

DISPOSITIVO DE SEGURANÇA
acidentalmente, interrompe a saída do gás.
Beschreibung Ihres Gerätes
Geräteansicht
1. KOCHMULDENROSTE
2. GASBRENNER
3. Reglerknöpfe für GASBRENNER
4. Taste zur Zündung der GASBRENNER
5. GASBRENNER-ZÜNDKERZE
6. SICHERHEITSVORRICHTUNG
GASBRENNER: Diese weisen unterschiedliche Durchmesser und
Leistungen auf. Wählen Sie den Brenner, der dem Durchmesser des
eingesetzten Topfes entspricht.
Reglerknöpfe für GASBRENNER zur Regulierung der Flamme.
GASBRENNER-ZÜNDKERZE: zur automatischen Zündung des
gewählten Brenners.
SICHERHEITSVORRICHTUNG: Diese spricht an, wenn die Flamme
unversehens erlöschen sollte und unterbricht automatisch die Gaszufuhr.
Beschrijving van het apparaat
Algemeen aanzicht
1. Roosters voor PANNEN
2. GASBRANDERS
3. Knoppen voor het regelen van de GASBRANDERS
4. Ontstekingsknop voor de GASBRANDERS
5. Bougie voor ontsteking van de GASBRANDERS
6. VEILIGHEIDSMECHANISME
GASBRANDERS hebben verschillende afmetingen en vermogen. Kies
de brander die het best overeenkomt met de diameter van de pan die u
wilt gebruiken.
Knoppen van de GASBRANDERS voor het regelen van de vlam.
Bougie voor het ontsteken van de GASBRANDERS: zorgt voor een
automatische ontsteking van de gekozen brander.
VEILIGHEIDSMECHANISME zorgt ervoor dat de gastoevoer wordt
onderbroken als de vlam per ongeluk uitgaat.


1. 
2. 
3. 
4. 
5. 
6. 
    


 

 

   

6
5
1
2
4
3
12


1 .
2 .
3 .
4 .
5 .
6 .





6
5
1
2
4
3
IT
13
Installazione
!    
momento. In caso di vendita, di cessione o di trasloco, assicurarsi che resti
insieme all’apparecchio per informare il nuovo proprietario sul funzionamento
e sui relativi avvertimenti.
! Leggere attentamente le istruzioni: ci sono importanti informazioni
sull’installazione, sull’uso e sulla sicurezza.
Posizionamento
! Gli imballaggi non sono giocattoli per bambini e vanno eliminati secondo le
norme per la raccolta differenziata (vedi Precauzioni e consigli).
!    

persone, animali o cose.
! Questo apparecchio può essere installato e funzionare solo in locali
permanentemente ventilati secondo le prescrizioni delle Norme Nazionali in

Il locale deve prevedere un sistema di scarico all’esterno dei fumi della
combustione, realizzato tramite una cappa o tramite un elettroventilatore
che entri automaticamente in funzione ogni volta che si accende
l’apparecchio.
In camino o in canna fumaria ramificata
(riservata agli apparecchi di cottura)
Direttamente
all’esterno
      
necessaria alla regolare combustione. La portata di aria necessaria alla
combustione non deve essere inferiore a 2 m
3
   
installata.
Il sistema può essere realizzato prelevando
direttamente l’aria dall’esterno dell’edificio
tramite un condotto di almeno 100 cm
2
di
sezione utile e tale che non possa essere
accidentalmente ostruito.
Ovvero, in maniera indiretta da locali adiacenti,
dotati di un condotto di ventilazione con
l’esterno come sopra descritto, e che non
siano parti comuni dell’immobile, o ambienti
con pericolo di incendio, o camere da letto.
Un utilizzo intensivo e prolungato dell’apparecchio può necessitare di una


se già esistente.
 
Quindi i locali contenenti bidoni di GPL debbono prevedere delle aperture

fughe di gas. Pertanto i bidoni di GPL, siano essi vuoti o parzialmente
pieni, non debbono essere installati o depositati in locali o vani a livello
A
Esempi di aperture di
ventilazione
per l’aria comburente
Maggiorazione della fessura
fra porta e pavimento
Locale
adiacente
Locale
da ventilare
più basso del suolo (cantinati, ecc.). É opportuno tenere nel locale solo
il bidone in utilizzo, collocato in modo da non essere soggetto all’azione
diretta di sorgenti di calore (forni, camini, stufe, ecc.) capaci di portarlo a
temperature superiori ai 50°C.
Incasso
Per una corretta installazione del piano di cottura vanno osservate le seguenti
precauzioni:
 
debbono essere situati ad almeno 200 mm dal bordo del piano stesso.
 


Posizionare i pensili adiacenti alla cappa ad un’altezza minima dal top di

Allorchè il piano di cottura venga installato sotto

distanza minima dal top pari a 700 mm.
 
    

consigliabile usare tutti i ganci a disposizione.
555 mm
55 mm
475 mm
Prima dell’installazione, togliere le griglie e i bruciatori del piano cottura e
capovolgerlo, facendo attenzione a non danneggiare le termocoppie e le
candele.
Applicare le guarnizioni in dotazione con
l’apparecchio sui bordi esterni del piano
cottura, per impedire il passaggio d’aria,

Per una corretta applicazione assicurarsi



20
30
Posizione gancio per top H=20mm Posizione gancio per top H=30mm
Avanti
40
Posizione gancio per top H=40mm Dietro
600mm min.
420mm min.
650mm min.
14
IT
! Usare i ganci contenuti nella “confezione accessori”
Nel caso in cui il piano non sia installato su di un forno incasso, è
necessario inserire un pannello di legno come isolamento. Esso dovrà
essere posizionato ad una distanza minima di 20 mm. dalla parte inferiore
del piano stesso.
Aerazione
Per garantire una buona aerazione è necessario eliminare la parete posteriore
del vano. È preferibile installare il forno in modo che appoggi su due listelli
in legno oppure su un piano continuo che abbia un’apertura di almeno 45 x

560 mm.
45 mm.
Nel caso di installazione sopra un forno da incasso senza ventilazione forzata
di raffreddamento, per consentire un’adeguata areazione all’interno del mobile

! E’ possibile installare il piano PIM 640 AST solo sopra forni incasso dotati
di ventilazione di raffreddamento.
Collegamento elettrico
I piani dotati di cavo di alimentazione tripolare, sono predisposti per
    
alimentazione indicate sulla targhetta caratteristiche (posta sulla parte
inferiore del piano). Il conduttore di terra del cavo è contraddistinto dai colori
giallo-verde. Nel caso di installazione sopra un forno da incasso l’allaccio

sia per ragioni di sicurezza elettrica che per facilitare l’eventuale estraibilità
del forno.
Allacciamento del cavo di alimentazione alla rete
Montare sul cavo una spina normalizzata per il carico indicato nella targhetta
caratteristiche.
In caso di collegamento diretto alla rete è necessario interporre tra
l’apparecchio e la rete un interruttore onnipolare con apertura minima fra i
contatti di 3 mm dimensionato al carico e rispondente alle norme in vigore (il

deve essere posizionato in modo tale che in nessun punto superi di 50°C la
temperatura ambiente.
! L’installatore è responsabile del corretto collegamento elettrico e
dell’osservanza delle norme di sicurezza.
Prima di effettuare l’allacciamento accertarsi che:
la presa abbia la messa a terra e sia a norma di legge;
la presa sia in grado di sopportare il carico massimo di potenza della
macchina, indicato nella targhetta caratteristiche;
la tensione di alimentazione sia compresa nei valori nella targhetta
caratteristiche;
la presa sia compatibile con la spina dell’apparecchio. In caso contrario
sostituire la presa o la spina; non usare prolunghe e multiple.
! Ad apparecchio installato, il cavo elettrico e la presa della corrente devono
essere facilmente raggiungibili.
! Il cavo non deve subire piegature o compressioni.
! Il cavo deve essere controllato periodicamente e sostituito solo da tecnici
autorizzati (vedi Assistenza).
!
rispettate.
Collegamento gas
Il collegamento dell’apparecchio alla tubazione o alla bombola del gas dovrà
essere effettuato come prescritto dalle Norme Norme Nazionali in vigore,
solo dopo essersi accertati che esso è regolato per il tipo di gas con cui sarà
alimentato. In caso contrario eseguire le operazioni indicate al paragrafo
“Adattamento ai diversi tipi di gas”.

di pressione conformi alle Norme Nazionali in vigore.
! Per un sicuro funzionamento, per un adeguato uso dell’energia e maggiore
durata dell’apparecchiatura, assicurarsi che la pressione di alimentazione
rispetti i valori indicati nella tabella 1 “Caratteristiche dei bruciatori ed ugelli”.
Attenzione! Prima del collegamento rimuovere il tappo dal tubo di
collegamento del gas..
Allaccio con tubo rigido (rame o acciaio)
! L’allaccio all’impianto gas deve essere effettuato in modo da non provocare
sollecitazioni di alcun genere all’apparecchio.
Sulla rampa di alimentazione dell’apparecchio è presente un raccordo a “L”
orientabile, la cui tenuta è assicurata da una guarnizione. Nel caso risulti
necessario ruotare il raccordo sostituire tassativamente la guarnizione
di tenuta (in dotazione con l’apparecchio). Il raccordo di entrata del gas



     
cilindrico.
La messa in opera di tali tubi deve essere effettuata in modo che la loro
lunghezza, in condizioni di massima estensione, non sia maggiore di 2000

venga a contatto con parti mobili o schiacciato.
! Utilizzare esclusivamente tubi, guarnizioni di tenuta metalliche in alluminio
o guarnizioni in gomma conformi alle Norme Nazionali in vigore.
Controllo Tenuta
! Ad installazione ultimata controllare la perfetta tenuta di tutti i raccordi

Adattamento ai diversi tipi di gas


sull’imballo), occorre sostituire gli ugelli dei bruciatori effettuando le seguenti
IT
15
operazioni:
 
2. Svitare gli ugelli, servendosi di una chiave a tubo da 7mm. e sostituirli

bruciatori ed ugelli”).
3. Rimontare le parti eseguendo all’inverso le operazioni.
4. Al termine dell’operazione, sostituite la vecchia etichetta taratura con

Centri Assistenza Tecnica.
Regolazione aria primaria dei bruciatori
I bruciatori non necessitano di nessuna regolazione dell’aria primaria.
Regolazione minimi
1. Portare il rubinetto sulla posizione di minimo;
2. Togliere la manopola ed agire sulla vite
   
    

      

4. Negli apparecchi provvisti del dispositivo di sicurezza (termocoppia), in
caso di mancato funzionamento del dispositivo con bruciatori al minimo
aumentare la portata dei minimi stessi agendo sulla vite di regolazione.
5. Effettuata la regolazione, ripristinate i sigilli posti sui by-pass con ceralacca

!
! Al termine dell’operazione sostituire la vecchia etichetta di taratura con

Assistenza Tecnica.
!
prevista, è necessario installare, sulla tubazione d’ingresso un appropriato
regolatore di pressione (secondo le Norme Nazionali in vigore).
Collegamenti
elettrici
TARGHETTA CARATTERISTICHE
vedi targhetta caratteristiche
Questa apparecchiatura è conforme alle
seguenti Direttive Comunitarie:
- 2006/95/CE del 12/12/06 (Bassa
Tensione) e successive modificazioni
- 2004/108/CE del 15/12/04 (Compatibilità
Elettromagnetica) e successive
modificazioni
- 93/68/CEE del 22/07/93 e successive
modificazioni.
- 2009/142/CE del 30/11/09 (Gas) e
successive modificazioni.
- 2012/19/UE e successive modificazioni.
Regolamento (EU) No 66/2014 che integra la
Direttiva 2009/125/EC.
Norma EN 30-2-1
ECODESIGN
16
IT
SS
ATC
Pressioni di
alimentazione
Nominale (mbar)
Minima (mbar)
Massima (mbar)
28-30
20
35
37
25
45
20
17
25
Tabella 1
Bruciatore Diametro
(mm)
Semi Rapido (S)
Ausiliario (A)
Tripla Corona (TC)
75
55
130
Ridotta Nominale
By-pass
1/100
(mm)
Ugello
1/100
(mm)
Portata*
(g/h)
*** **
Ugello
1/100
(mm)
Portata*
(l/h)
1,90
1,00
3,25
0,40
0,40
1,50
70
50
91
138
73
236
136
71
232
106
79
133
181
95
309
Gas liquido Gas naturale
Caratteristiche dei bruciatori ed ugelli
* A 15°C e 1013,25 mbar-gas secco
** Propano P.C.S. = 50.37 MJ/Kg
*** Butano P.C.S. = 49.47 MJ/Kg
Naturale P. C.S. = 37.78 MJ/m
3
Potenza termica
kW (p.c.s.*)
28
28
61
IT
17
Avvio e utilizzo
! Su ciascuna manopola è indicata la posizione del bruciatore gas
corrispondente.
Bruciatori gas
Il bruciatore prescelto può essere regolato dalla manopola corrispondente
come segue:
 
Massimo
Minimo

accenditore, premere a fondo e ruotare la manopola corrispondente in senso

Nei modelli dotati di dispositivo di sicurezza, è necessario mantenere premuta
       

Nei modelli dotati di candela di accensione, per accendere il bruciatore

, poi premere a fondo e ruotare la manopola corrispondente in senso

!
la manopola di comando e ritentare l’accensione dopo almeno 1 minuto.


Consigli pratici per l’uso dei bruciatori

 

utilizzare sempre recipienti a fondo piatto e con coperchio.
      
minimo.
Ø Diametro recipienti (cm)
Semi Rapido (S)
Ausiliario (A)
Tripla Corona (TC)
16 - 20
10 - 14
24 - 26
Bruciatore

paragrafo “Caratteristiche dei bruciatori ed ugelli”.
Precauzioni e consigli
! L’apparecchio è stato progettato e costruito in conformità alle norme
internazionali di sicurezza.
Queste avvertenze sono fornite per ragioni di sicurezza e devono essere
lette attentamente.
Sicurezza generale
Questo apparecchio riguarda un apparecchio da incasso di classe
3.
Gli apparecchi gas necessitano, per un corretto funzionamento, di
un regolare ricambio d’aria. Accertarsi che nella loro installazione
siano rispettati i requisiti richiesti nel paragrafo relativo al
“Posizionamento”.
Le istruzioni sono valide solo per i paesi di destinazione i cui simboli

L’apparecchio è stato concepito per un uso di tipo non professionale
all’interno dell’abitazione.
L’apparecchio non va installato all’aperto, nemmeno se lo spazio è riparato,
perché è molto pericoloso lasciarlo esposto a pioggia e temporali.
Non toccare la macchina a piedi nudi o con le mani o i piedi bagnati o
umidi.
L’apparecchio deve essere usato per cuocere alimenti, solo da persone
adulte e secondo le istruzioni riportate in questo libretto. Ogni altro uso
(ad esempio: riscaldamento di ambienti) è da considerarsi improprio
e quindi pericoloso. Il costruttore non può essere considerato
responsabile per eventuali danni derivanti da usi impropri, erronei ed
irragionevoli.
Non ostruire le aperture di ventilazione e di smaltimento di calore.
 
l’apparecchio non è utilizzato.
    
afferrando la spina.
Non fare pulizia o manutenzione senza aver prima staccato la spina dalla
rete elettrica.
In caso di guasto, in nessun caso accedere ai meccanismi interni per
tentare una riparazione. Contattare l’Assistenza (vedi Assistenza).
Assicurarsi che i manici delle pentole siano sempre rivolti verso l’interno
del piano cottura per evitare che vengano urtati accidentalmente.
Non chiudere il coperchio in vetro (se presente) con i bruciatori gas o la
piastra elettrica ancora caldi.
Non utilizzare pentole instabili o deformate.
Non è previsto che l’apparecchio venga utilizzato da persone (bambini

inesperte o che non abbiano familiarità con il prodotto, a meno che non
vengano sorvegliate da una persona responsabile della loro sicurezza o
non abbiano ricevuto istruzioni preliminari sull’uso dell’apparecchio.
Evitare che i bambini giochino con l’apparecchio.
L’apparecchio non è destinato a essere messo in funzione per
mezzo di un temporizzatore esterno oppure di un sistema di
comando a distanza separato.
Smaltimento
Smaltimento del materiale di imballaggio: attenersi alle norme locali,

 


dismessi devono essere raccolti separatamente per ottimizzare il tasso
di recupero e riciclaggio dei materiali che li compongono ed impedire
potenziali danni per la salute e l’ambiente. Il simbolo del cestino barrato
è riportato su tutti i prodotti per ricordare gli obblighi di raccolta separata.
     
consegnare il RAEE al negoziante, che è tenuto a ritirarlo gratuitamente;
i RAEE di “piccolissime dimensioni” (nessun lato sopra i 25 cm) possono


ulteriori informazioni sulla corretta dismissione degli elettrodomestici i
detentori potranno rivolgersi al servizio pubblico preposto o ai rivenditori.
Risparmiare e rispettare l’ambiente
Cucinare gli alimenti in pentole chiuse con coperchi idonei e usare meno

consumo in termini di energia.
Usare pentole e padelle piatte.
18
IT
Se si stanno cucinando alimenti con un tempo di cottura più lungo,
consigliamo di usare una pentola a pressione, che è due volte più rapida
e consente di salvare un terzo di energia.
Manutenzione e cura
Escludere la corrente elettrica
Prima di ogni operazione isolare l’apparecchio dalla rete di alimentazione
elettrica.
Pulire l’apparecchio
!


! Non utilizzare mai pulitori a vapore o ad alta pressione per la pulizia
dell’apparecchio.
     

 
calda e detersivo avendo cura di eliminare le eventuali incrostazioni.
 
ad una accurata pulizia della parte terminale dei dispositivi di accensione

ostruiti.
L’acciaio inox può rimanere macchiato se a contatto per lungo tempo



Manutenzione rubinetti gas

difficoltà nella rotazione, pertanto sarà necessario provvedere alla
sostituzione del rubinetto stesso.
! Questa operazione deve essere effettuata da un tecnico autorizzato
dal costruttore.
Anomalie e rimedi
Può accadere che il piano non funzioni o non funzioni bene. Prima di chiamare

siano interruzioni nelle reti di alimentazione gas ed elettrica, ed in particolare
i rubinetti gas a monte del piano siano aperti.

Avete controllato se:
Sono ostruiti i fori di uscita del gas del bruciatore.
Sono montate correttamente tutte le parti mobili che compongono il
bruciatore.
Ci sono correnti d’aria nelle vicinanze del piano.

Avete controllato se:
Non avete premuto a fondo la manopola.
Non avete mantenuto premuta a fondo la manopola per un tempo

Sono ostruiti i fori di fuoriuscita del gas in corrispondenza del dispositivo
di sicurezza.
Il bruciatore in posizione di minimo non rimane acceso.
Avete controllato se:
Sono ostruiti i fori di fuoriuscita del gas.
Ci sono correnti d’aria nelle vicinanze del piano.
La regolazione del minimo non è corretta.
I recipienti sono instabili.
Avete controllato se:
Il fondo del recipiente è perfettamente piano.
Il recipiente è centrato sul bruciatore o sulla piastra elettrica.
Le griglie sono state invertite.
GB
19
Installation
! Before operating your new appliance please read this instruction booklet
carefully. It contains important information for safe use, installation and care
of the appliance.
! Please keep these operating instructions for future reference. Pass them on
to possible new owners of the appliance.
Positioning
! Keep packaging material out of the reach of children. It can become a choking
or suffocation hazard (see Precautions and tips).
!
instructions provided. Incorrect installation may cause harm to people and
animals or may damage property.
! This unit may be installed and used only in permanently ventilated rooms

must be observed:
 
any combustion fumes. This may consist of a hood or an electric fan that
automatically starts each time the appliance is switched on.
In a chimney stack or branched flue.
(exclusively for cooking appliances)
Directly to
the Outside
The room must also allow proper air circulation, as air is needed for

3

per kW of installed power.
The air circulation system may take air directly
from the outside by means of a pipe with an
inner cross section of at least 100 cm
2
; the
opening must not be vulnerable to any type
of blockages.
The system can also provide the air needed for
combustion indirectly, i.e. from adjacent rooms
    
above. However, these rooms must not be
communal rooms, bedrooms or rooms that

Intensive and prolonged use of the appliance may necessitate
supplemental ventilation, e.g. opening a window or increasing the power
of the air intake system (if present).
 

gas to escape in the event of a leak. As a result LPG cylinders, whether
partially or completely full, must not be installed or stored in rooms or
storage areas that are below ground level (cellars, etc.). It is advisable to
keep only the cylinder being used in the room, positioned so that it is not

A
Examples of
ventilation holes
for comburant air.
Enlarging the ventilation slot
between window and floor.
Adjacent
Room
Room to be
Vented
etc. ) which could raise the temperature of the cylinder above 50°C.
Fitting the appliance
The following precautions must be taken when installing the hob:
Kitchen cabinets adjacent to the appliance and taller than the top of the
hob must be at least 200 mm from the edge of the hob.
Hoods must be installed according to their relative installation instruction

Place the wall cabinets adjacent to the hood at a minimum height of 420

If the hob is installed beneath a wall cabinet,
the latter must be situated at a minimum of 700
mm above the hob.
 
Fastening hooks are provided, allowing you to fasten the hob to tops that
are between 20 and 40 mm thick. To ensure the hob is securely fastened
to the top, we recommend you use all the hooks provided.
555 mm
55 mm
475 mm
Before the installation remove the grids and burners from the hob and turn it
upside down, making sure you don’t damage the thermocouples and spark
plugs.
Apply the seals that come with the
appliance along the outer edges of
the hob to prevent any passage of air,
humidity and water (see Figure).
For proper application make sure the
surfaces to be sealed are clean, dry and

Hook fastening diagram
20
30
Hooking position for top H=20mm Hooking position for top H=30mm
Front
40
Hooking position for top H=40mm Back
600mm min.
420mm min.
650mm min.
20
GB
! Use the hooks contained in the “accessory pack”.
Where the hob is not installed over a built-in oven, a wooden panel must
be installed as insulation. This must be placed at a minimum distance of
20 mm from the lower part of the hob.
Ventilation
      
removed. It is advisable to install the oven so that it rests on two strips of

mm (see diagrams).
560 mm.
45 mm.
Where a hob is installed above an oven without a forced ventilation cooling


! The PIM 640 AST hob can only be installed above built-in ovens with a
cooling ventilation system.
Electrical connection


plate (this is located on the lower part of the appliance). The earth wire in the
cable has a green and yellow cover. If the appliance is to be installed above
a built-in electric oven, the electrical connection of the hob and the oven must
be carried out separately, both for electrical safety purposes and to make
extracting the oven easier.
Connecting the supply cable to the mains
Install a standardised plug corresponding to the load indicated on the data
plate.
The appliance must be directly connected to the mains using an omnipolar
circuit-breaker with a minimum contact opening of 3 mm installed between
the appliance and the mains.
The circuit-breaker must be suitable for the charge indicated and must comply
with current electrical regulations (the earthing wire must not be interrupted
by the circuit-breaker). The supply cable must not come into contact with
surfaces with temperatures higher than 50°C.
! The installer must ensure that the correct electrical connection has been
made and that it is compliant with safety regulations.
Before connecting to the power supply, make sure that:
the appliance is earthed and the plug is compliant with the law.
the socket can withstand the maximum power of the appliance, which is
indicated on the data plate.
the voltage is in the range between the values indicated on the data plate.
the socket is compatible with the plug of the appliance. If the socket is
incompatible with the plug, ask an authorised technician to replace it. Do
not use extension cords or multiple sockets.
! Once the appliance has been installed, the power supply cable and the
electrical socket must be easily accessible.
! The cable must not be bent or compressed.
! The cable must be checked regularly and replaced by authorised technicians
only (see Assistance).
! The manufacturer declines any liability should these safety measures not
be observed.
Gas connection
The appliance should be connected to the main gas supply or to a gas
cylinder in compliance with current national regulations. Before carrying out
the connection, make sure the cooker is compatible with the gas supply you
wish to use. If this is not the case, follow the instructions indicated in the
paragraph “Adapting to different types of gas.”
       
complies with current national regulations.
! Check that the pressure of the gas supply is consistent with the values

     
energy consumption.
Attention! Before connection remove a transport plug from the connecting
hole of the cooker gas pipeline.
Connection with a rigid pipe (copper or steel)
! Connection to the gas system must be carried out in such a way as not to
place any strain of any kind on the appliance.




Connecting a flexible jointless stainless steel pipe to a threaded
attachment

These pipes must be installed so that they are never longer than 2000 mm
when fully extended. Once connection has been carried out, make sure that

! Only use pipes and seals that comply with current national regulations.
Checking the tightness of the connection
!

Adapting to different types of gas
To adapt the hob to a different type of gas other than default type (indicated
on the rating plate at the base of the hob or on the packaging), the burner
nozzles should be replaced as follows:
1. Remove the hob grids and slide the burners off their seats.
2. Unscrew the nozzles using a 7 mm socket spanner, and replace them
with nozzles for the new type of gas (see table 1 “Burner and nozzle
characteristics”).
GB
21
3. Reassemble the parts following the above procedure in the reverse order.
 
indicating the new type of gas used. Sticker are available from any of our
Service Centres.
Adjusting the burners’ primary air

Setting the burners to minimum
 
2. Remove the knob and adjust the adjustment
screw, which is positioned in or next to the tap

 


 


5. Once the adjustment has been made, replace the seals on the by-passes
using sealing wax or a similar substance.
!
fastened as tightly as possible.
!     
indicating the new type of gas used. Stickers are available from any of our
Service Centres.
! Should the gas pressure used be different (or vary slightly) from the

inlet pipe (in order to comply with current national regulations).
Electrical
connections
DATA PLATE
EU Regulation no. 66/2014 implementing
Directive 2009/125/EC.
standard EN 30-2-1
ECODESIGN
see data plate
This appliance conforms to the following
European Economic Community directives:
- 2006/95/EC dated 12/12/06 (Low Voltage)
and subsequent amendments
- 2004/108/EC dated 15/12/04
(Electromagnetic Compatibility) and
subsequent amendments
- 93/68/EEC dated 22/07/93 and subsequent
amendments.
- 2009/142/EC dated 30/11/06 (Gas) and
subsequent amendments
- 2012/19/EU and subsequent amendments.
22
GB
Supply
pressures
Nominal (mbar)
Minimum (mbar)
Maximum (mbar)
28-30
20
35
37
25
45
20
17
25
Table 1
Burner Diameter
(mm)
Thermal
power
kW (p.c.s.*)
Semi Rapid (S)
Auxiliary (A)
Triple Crown
75
55
130
Reduced Nominal
By-pass
1/100
(mm)
Nozzle
1/100
(mm)
Flow*
(g/h)
*** **
Nozzle
1/100
(mm)
Flow*
(l/h)
1,90
1,00
3,25
0,40
0,40
1,50
70
50
91
138
73
236
136
71
232
106
79
133
181
95
309
Liquid gas Natural gas
Burner and nozzle specifications
*
At 15°C and 1013,25 mbar - dry gas
**
Propane P.C.S. = 50.37 MJ/Kg
***
Butane P.C.S. = 49.47 MJ/Kg
Natural P. C.S. = 37.78 MJ/m
3
28
28
61
SS
ATC
GB
23
Start-up and use
! The position of the corresponding gas burner is shown on every knob.
Gas burners
Each burner can be adjusted to one of the following settings using the
corresponding control knob:
 
Maximum
Minimum
To light one of the burners, hold a lit match or lighter near the burner and, at
the same time, press down and turn the corresponding knob anti-clockwise
to the maximum setting.

for approximately 2-3 seconds to allow the automatic device keeping the


 symbol), then pressing
down the corresponding knob as far as possible and turning it anticlockwise
towards the maximum setting.
!
at least 1 minute before trying to relight it.
To switch off the burner, turn the knob in a clockwise direction until it stops

Practical advice on using the burners

 
do not extend beyond the bottom of the cookware.
 
when the contents of the pan reach boiling point, turn the knob to minimum.
Semi Rapid (S)
Auxiliary (A)
Triple Crown (TC)
Ø Cookware Diameter (cm)
16 - 20
10 - 14
24 - 26
Burner
To identify the type of burner, refer to the designs in the section entitled, “Burner

Precautions and tips
! This appliance has been designed and manufactured in compliance with
international safety standards. The following warnings are provided for safety
reasons and must be read carefully.
General safety
This is a class 3 built-in appliance.
 
operation. When installing the hob, follow the instructions provided
in the paragraph on “Positioning” the appliance.
These instructions are only valid for the countries whose symbols
appear in the manual and on the serial number plate.
The appliance was designed for domestic use inside the home and is
not intended for commercial or industrial use.
The appliance must not be installed outdoors, even in covered areas. It is
extremely dangerous to leave the appliance exposed to rain and storms.
Do not touch the appliance with bare feet or with wet or damp hands and
feet.
The appliance must be used by adults only for the preparation of food,
in accordance with the instructions outlined in this booklet. Any other
use of the appliance (e.g. for heating the room) constitutes improper
use and is dangerous. The manufacturer may not be held liable for
any damage resulting from improper, incorrect and unreasonable
use of the appliance.
The openings used for ventilation and dispersion of heat must never be
covered.
 ” position when the appliance
is not in use.
When unplugging the appliance always pull the plug from the mains socket,
do not pull on the cable.
Never carry out any cleaning or maintenance work without having detached
the plug from the mains.
In case of malfunction, under no circumstances should you attempt to repair
the appliance yourself. Repairs carried out by inexperienced persons may
cause injury or further malfunctioning of the appliance. Contact a Service
Centre (see Assistance).
Always make sure that pan handles are turned towards the centre of the
hob in order to avoid accidental burns.
Do not close the glass cover (if present) when the gas burners or electric
hotplates are still hot.
Do not use unstable or deformed pans.
The appliance should not be operated by people (including children)
with reduced physical, sensory or mental capacities, by inexperienced
individuals or by anyone who is not familiar with the product. These
individuals should, at the very least, be supervised by someone who
assumes responsibility for their safety or receive preliminary instructions
relating to the operation of the appliance.
Do not let children play with the appliance.
The appliance is not intended to be operated by means of an external
timer or separate remote-control system.
Disposal
When disposing of packaging material: observe local legislation so that
the packaging may be reused.
 

not be disposed of in the normal unsorted municipal waste stream. Old
appliances must be collected separately in order to optimise the recovery
and recycling of the materials they contain and reduce the impact on
human health and the environment.The crossed out “wheeled bin” symbol
on the product reminds you of your obligation, that when you dispose of
the appliance it must be separately collected.
Consumers should contact their local authority or retailer for information
concerning the correct disposal of their old appliance.
Respecting and conserving the environment
 
water as possible. Cooking with the lid off will greatly increase energy
consumption.
 
If you are cooking something that takes a long time, it’s worth using a
pressure cooker, which is twice as fast and saves a third of the energy.
24
GB
Maintenance and care
Switching the appliance off
Disconnect your appliance from the electricity supply before carrying out
any work on it.
Cleaning the appliance
! Do not use abrasive or corrosive detergents such as stain removers, anti-rust
products, powder detergents or sponges with abrasive surfaces: these may
scratch the surface beyond repair.
! Never use steam cleaners or pressure cleaners on the appliance.
It is usually enough to wash the hob with a damp sponge and dry it with
absorbent kitchen roll.
 
warm water and soap and any burnt-on substances removed.
For hobs which ligth automatically, the terminal part of the electronic instant

should be checked for blockages.
Stainless steel can be marked by hard water that has been left on the
surface for a long time, or by aggressive detergents containing phosphorus.
After cleaning, rinse and dry any remaining drops of water.
Gas tap maintenance

the tap must be replaced.
! 
by the manufacturer.
Troubleshooting
It may happen that the appliance does not function properly or at all. Before
calling the service centre for assistance, check if anything can be done. First,
check to see that there are no interruptions in the gas and electrical supplies,
and, in particular, that the gas valves for the mains are open.

Check whether:
The gas holes on the burner are clogged.
All the movable parts that make up the burner are mounted correctly.
There are draughts near the appliance.

Check to make sure that:
You pressed the knob all the way in.
You keep the knob pressed in long enough to activate the safety device.
The gas holes are not blocked in the area corresponding to the safety
device.
The burner does not remain lit when set to minimum.
Check to make sure that:
The gas holes are not blocked.
There are no draughts near the appliance.
The minimum setting has been adjusted properly.
The cookware is unstable.
Check to make sure that:
 
The cookware is positioned correctly at the centre of the burner.
The pan support grids have been positioned correctly.
FR
BE
NL
25
Installation
! Conservez ce mode d’emploi pour pouvoir le consulter à tout moment.

l’appareil pour informer le nouveau propriétaire sur son fonctionnement et lui
fournir les conseils correspondants.
! Lisez attentivement les instructions : elles contiennent des conseils
importants sur l’installation, l’utilisation et la sécurité de votre appareil
Conditions réglementaires d’installation (Pour la France)




être effectuée conformément aux textes réglementaires et règles de l’art en
vigueur et règlement sanitaire départemental.
Positionnement
! Les emballages ne sont pas des jouets pour enfants, il faut les mettre au
rebut en respectant la réglementation sur le tri sélectif des déchets (voir
Précautions et conseils).
! L’installation doit être effectuée par un professionnel du secteur
conformément aux instructions du fabricant. Une mauvaise installation peut
causer des dommages à des personnes, des animaux ou des biens.
!
sont aérés en permanence, selon les Normes Nationales en vigueur.
Il faut observer les conditions suivantes:
La pièce doit prévoir un système d’évacuation vers l’extérieur des fumées


En cas de cheminée ou conduit de fumée ramifié
(réservé aux appareils de cuisson)
Directement
à l'externe
 

doit pas être inférieur à 2 m
3

Le système peut être réalisé en prélevant
l’air directement de l’extérieur du bâtiment au
moyen d’un conduit d’au moins100 cm
2
de

accidentellement.
Ou, de manière indirecte depuis des locaux

avec l’extérieur comme susmentionné; ces
locaux ne doivent pas être des parties
communes du bâtiment, des chambres à

A
Exemples d'ouverture
de ventilation
pour l'air comburant
Agrandissement de la fissure
entre la porte et le sol
Local
adjacent
Local à
ventiler
Une utilisation intensive et prolongée de l’appareil peut nécessiter d’une
aération supplémentaire, comme par exemple l’ouverture d’une fenêtre


(Pour la France et la Belgique
(Pour la France et la Belgique)   
       
contiennent donc des bouteilles de G.P.L doivent prévoir des ouvertures


partiellement pleines, ne devront donc pas être installées ou entreposées


en train d’utiliser, placée de façon à ne pas être sujette à l’action directe de

des températures dépassant 50°C.
Encastrement
Pour une installation correcte de la table de cuisson, il faut se conformer aux
instructions suivantes :
Les meubles jouxtant la table, dont la hauteur dépasse celle du plan de
cuisson, doivent être placés à au moins 200 mm du bord du plan.
Les hottes doivent être installées conformément aux instructions reportées
dans leur notice d’installation et à au moins 650 mm de distance (voir

Les éléments hauts jouxtant la hotte doivent être placés à au moins 420

En cas d’installation de la table de cuisson sous
un élément haut, ce dernier devra être monté à
au moins 700 mm de distance du plan.
 


fournis.
555 mm
55 mm
475 mm


bougies ne soient pas endommagés.
   
l’appareil sur les bords extérieurs du
plan de cuisson pour empêcher le
passage de l’air, de l’humidité et de l’eau

Pour une application correcte, s’assurer


600mm min.
420mm min.
650mm min.
26
FR
BE
NL

20
30
Position du crochet pour top Position du crochet pour top
H=20mm H=30mm
Devant
40
Position du crochet pour top Derrière
H=40mm
! Utilisez tous les crochets compris dans le “sachet accessoires”
Si la table n’est pas installée au-dessus d’un four à encastrer, il faut monter
un panneau d’isolation en bois. Il faut le monter à au moins 20 mm de
distance du bord inférieur de la table.
Aération
Pour garantir une bonne aération, la cavité d’encastrement doit être dépourvue



560 mm.
45 mm.
En cas d’installation au-dessus d’un four encastrable dépourvu de ventilation
de refroidissement forcée, il faudra prévoir des prises d’air d’entrée et de

Raccordement électrique
Les tables munies d’un cordon d’alimentation tripolaire, sont prévues pour un

      




Branchement du câble d’alimentation au réseau électrique


En cas de raccordement direct au réseau, il faut intercaler entre l’appareil
et le réseau un interrupteur à coupure omnipolaire ayant au moins 3 mm
d’écartement entre les contacts, dimensionné à la charge et conforme aux

Le câble d’alimentation ne doit atteindre, en aucun point, des températures
dépassant de 50°C la température ambiante.
!
et du respect des normes de sécurité.

la prise est bien munie d’une terre conforme à la loi;
la prise est bien apte à supporter la puissance maximale de l’appareil,

 

 

!
doivent être facilement accessibles
! Le câble ne doit être ni plié ni excessivement écrasé.
!
technicien agréé (voir Assistance).
! Nous déclinons toute responsabilité en cas de non respect des normes
énumérées ci-dessus.
Raccordement gaz
Raccorder l’appareil à la bouteille ou à la canalisation du gaz conformément

bien réglé pour le type de gaz d’alimentation utilisé. Dans le cas contraire,
effectuer les opérations décrites au paragraphe “Adaptation aux différents

pression conformes aux Normes en vigueur.
! Pour un fonctionnement en toute sécurité, pour l’emploi correct de l’énergie et



Attention! Avant le branchement, retirez le bouchon pour le transport sur la
prise du tube du gaz du plan de cuisson.
Pour relier l’appareil à la canalisation du gaz

la Hollande, il faut avant tout installer le raccord
R” (disponible sur demande auprès du Service

G” sur le raccord en forme de “L” situé sur le
   
    

Le raccordement doit être réalisé au moyen:
- ou d’un tuyau rigide
       

En amont de l’appareil il faut installer un robinet d’arrêt du gaz; il devra être
L
G
R
FR
BE
NL
27
installé de manière à pouvoir facilement le manoeuvrer, selon les Normes
Nationales en vigueur.
Raccordement par tuyau rigide (cuivre ou acier)
! Le raccordement à l’installation de gaz doit être effectué de manière à ce

La rampe d’alimentation de l’appareil est munie d’un raccord en “L” orientable
dont l’étanchéité est assurée par un joint. S’il vous faut inverser le raccord, vous
devez obligatoirement remplacer le joint d’étanchéité (fourni avec l’appareil).





au maximum de leur extension, ils ne dépassent pas 2000 mm de long. Après

à des parties mobiles et n’est pas écrasé.
!
aux textes réglementaires applicables dans le pays.

!

Adaptation aux différents types de gaz (pour la France et la Belgique)



       
logement.
2. Dévissez les injecteurs à l’aide d’une clé à tube de 7 mm et remplacez-
les par les injecteurs adaptés au nouveau type de gaz (voir tableau 1

3. Remontez les différentes parties en effectuant les opérations dans le sens
inverse.
 
au nouveau gaz utilisé, disponible dans nos Services Après-vente.
 

 
1. Placez le robinet sur la position de minima;
2. Déposez la manette et tournez la vis de
réglage positionnée à l’intérieur ou sur le


 



4. En cas de mauvais fonctionnement du dispositif de sécurité gaz

minima, augmentez leur débit en agissant sur la vis de réglage.
5. Après avoir procédé à ce réglage, reposez les scellés sur les by-pass en

!
!
nouveau gaz utilisé, disponible dans nos Services Après-vente.
! Si la pression du gaz utilisé est différente (ou variable) par rapport à la
pression prévue, il faut installer, sur la tuyauterie d’entrée un régulateur de
pression approprié (conformément aux textes réglementaires applicables
dans le pays).
Raccordements
électriques
PLAQUETTE SIGNALETIQUE
Cet appareil est conforme aux Directives
Communautaires suivantes :
- 2006/95/CE du 12/12/06 (Basse Tension)
et modifications successives
- 2004/108/CE du 15/12/04 (Compatibilité
Electromagnétique) et modifications
successives
- 93/68/CEE du 22/07/93 et modifications
successives.
- 2009/142/CE du 30/11/09 (Gaz) et
modifications successives
- 2012/19/UE et modifications successives.
Règlement n°66/2014 de l'UE intégrant la
Directive 2009/125/EC.
Norme EN 30-2-1
ÉCOCONCEPTION
voir plaquette signalétique
28
FR
BE
NL
Tableau 1
(Pour la France et la Belgique)
Diamètre
(mm)
Puissance
thermique
kW (p.c.s.*)
Nominal (mbar)
Minimum (mbar)
Maximum (mbar)
20
17
25
28-30
20
35
37
25
45
Semi Rapide (S)
Auxiliarie (A)
Triple Couronne (TC)
Pression de
alimentation (FR)
Brûleur
75
55
130
1,90
1,00
3,25
NominalRéduit
0,40
0,40
1,50
By-pass
1/100
(mm)
Injecteur
1/100
(mm)
Débit*
g/h
***
70
50
91
Débit*
l/h
106
79
133
181
95
309
138
73
236
**
136
71
232
Caractéristiques des brûleurs et des injecteurs
Injecteur
1/100
(mm)
Gaz Liquides
Gaz Naturel
210
111
360
G20
G25
20
15
25
25
20
30
20
15
30
28-30
20
35
37
25
45
Pression de
alimentation (BE)
Nominal (mbar)
Minimum (mbar)
Maximum (mbar)
28
28
61
Semi Rapide (S)
Auxiliaire (A)
Triple Couronne (TC)
Pression de
alimentation
* A 15°C et 1013,25 mbar-gaz sec
** Propane P.C.S. = 50.37 MJ/Kg
*** Butane P. C.S. = 49.47 MJ/Kg
Naturel G20 P.C.S. = 37.78 MJ/m3
Naturel G25 P.C.S. = 32.49 MJ/m3
Tableau 1 (Pour la Hollande)
Diamètre
(mm)
Puissance thermique
kW (p.c.s.*)
Nominal (mbar)
Minimum (mbar)
Maximum (mbar)
Nominal Réduit
Débit*
l/h
Injecteur
1/100
(mm)
Gaz Naturel
G25
25
20
30
Brûleur
75
55
130
1,90
1,00
1,50
0,40
0,40
3,25
106
79
133
210
111
360
SS
ATC
FR
BE
NL
29
Mise en marche et utilisation
!     
manette.


 
Maximum
Minimum

fond et tournez la manette correspondante dans le sens inverse des aiguilles
d’une montre pour sélectionner la position de puissance maximale.

au moins 2-3 secondes de suite sur la manette pour permettre au dispositif
de se réchauffer.
      
appuyez d’abord sur le bouton d’allumage repéré par le symbole , appuyez
ensuite à fond sur la manette correspondante et tournez-la dans le sens

!



Conseils pratiques pour l’utilisation des brûleurs
Pour obtenir un meilleur rendement, n’oubliez pas :
 

de toujours utiliser des casseroles à fond plat et avec couvercle.
de tourner la manette dans la position minimum au moment de l’ébullition.
Ø Diamètre de récipients (cm)
Semi Rapide (S)
Auxiliaire (A)
Triple Couronne (TC)
16 - 20
10 - 14
24 - 26
Brûleurs


Précautions et conseils
!      
internationales de sécurité. Ces conseils sont fournis pour des raisons de
sécurité et doivent être lus attentivement.
Sécurité générale




soient respectés.
Les instructions fournies ne sont applicables qu’aux pays dont
les symboles sont reportés dans la notice et sur la plaquette
d’immatriculation.
Cet appareil a été conçu pour un usage familial, de type non
professionnel.
Cet appareil ne doit pas être installé en extérieur, même dans un endroit
abrité, il est en effet très dangereux de le laisser exposé à la pluie et aux
orages.
Ne touchez pas à l’appareil si vous êtes pieds nus ou si vous avez les
mains ou les pieds mouillés ou humides.
   
par des adultes conformément aux instructions du mode d’emploi.
Toute autre utilisation (comme par exemple le chauffage d’une
pièce) est impropre et donc dangereux. Le fabricant décline toute
responsabilité en cas de dommages provoqués par un usage
impropre ou erroné.
     
doivent pas être bouchés
     

 
courant.
N’effectuez aucune opération de nettoyage ou d’entretien sans avoir

En cas de panne, n’essayez en aucun cas d’accéder aux mécanismes
internes pour tenter de réparer l’appareil. Contactez le service d’Assistance
(voir Assistance).
     
     
d’accident.
 

N’utilisez pas de casseroles instables ou déformées.
Cet appareil n’est pas prévu pour être utilisé par des personnes (y
     
mentales sont réduites, ou des personnes dénuées d’expérience ou de

personne responsable de leur sécurité, d’une surveillance ou d’instructions
préalables concernant d’utilisation de l’appareil.
 

externe ou un système de télécommande séparée.
Mise au rebut
Mise au rebut du matériel d’emballage : conformez-vous aux
réglementations locales, les emballages pourront ainsi être recyclés.
 




réduire l’impact sur la santé humaine et l’environnement. Le symbole de
la ‘‘poubelle barrée’ est apposée sur tous les produits pour rappeler les
obligations de collecte séparée. Les consommateurs devront contacter
les autorités locales ou leur revendeur concernant la démarche à suivre
pour l’enlèvement de leur vieil appareil.
Economies et respect de l’environnement
Faites cuire vos aliments dans des casseroles ou des poêles à couvercle
et utilisez le moins d’eau possible. Faire cuire les aliments dans des
casseroles ouvertes augmente considérablement la consommation
d’énergie.
30
FR
BE
NL
Utilisez exclusivement des casseroles et poêles à fond plat.
     
      
économise un tiers de l’énergie.
Nettoyage et entretien
Mise hors tension
Avant toute opération de nettoyage ou d’entretien coupez l’alimentation

Nettoyage de l’appareil
!

de rayer irrémédiablement la surface.
! Ne nettoyez jamais l’appareil avec des nettoyeurs vapeur ou haute pression.
Pour un entretien courant, passez une éponge humide sur la surface et
séchez avec du papier essuie-tout.
 
à l’eau chaude avec du détergent en éliminant soigneusement toute
incrustation.
     
   

sont pas bouchés.
Des taches peuvent se former sur l’acier inox si ce dernier reste trop
longtemps au contact d’une eau très calcaire ou de détergents agressifs
(contenant du phosphore). Il est conseillé de rincer abondamment
et d’essuyer après le nettoyage. Mieux vaut essuyer aussitôt tout
débordement d’eau.
Entretien robinets gaz


! Cette opération doit être effectuée par un technicien agréé par le fabricant.
Anomalies et remèdes


avant tout s’il n’y a pas de coupure de gaz ou de courant, et si les robinets
du gaz en amont de l’appareil sont bien ouverts.

Avez-vous contrôlé si :
 
    
correctement.
il y a des courants d’air dans les environs du plan de cuisson

Avez-vous contrôlé si :
vous avez bien appuyé à fond sur la manette.
vous avez bien appuyé à fond sur la manette pendant un laps de temps

 
pas par hasard bouchés.
Le brûleur s’éteint quand il est réglé sur la position de minimum.
Avez-vous contrôlé si :
 
il y a des courants d’air dans les environs du plan de cuisson
les minima n’ont pas bien été réglés.
Les casseroles sont instables.
Avez-vous contrôlé si :
le fond de la casserole est parfaitement plat
 
la position des grilles n’a pas par hasard été inversée.
ES
31
Instalación
! Es importante conservar este manual para poder consultarlo en todo
      
permanezca junto al aparato para informar al nuevo propietario sobre su
funcionamiento y sobre las advertencias correspondientes.
! Lea atentamente las instrucciones: contienen importante información sobre
la instalación, el uso y la seguridad.
Colocación
! Los embalajes no son juguetes para niños y se deben eliminar respetando
las normas para la recolección de residuos (ver Precauciones y consejos).
! La instalación se debe realizar siguiendo estas instrucciones y por personal

a personas, animales o cosas.
! Este aparato puede ser instalado y funcionar sólo en lugares ventilados
permanentemente, de acuerdo a las prescripciones de las Normas Nacionales

El ambiente debe poseer un sistema de descarga de los humos de la
combustión al exterior, utilizando una campana o un electroventilador

el aparato.
En chimenea o tubo de chimenea ramificado
(reservado a los aparatos de cocción)
Directamente
al externo
       
necesario para una combustión normal. El caudal de aire necesario para
la combustión no debe ser inferior a 2 m
3

potencia instalada.
El sistema puede tomar aire del exterior del

2
,

pueda ser obstruido accidentalmente.
También puede hacerlo de manera indirecta,

conducto de ventilación hacia el exterior, como

en común del inmueble, ambientes con peligro
de incendio o dormitorios.
 
suplementaria, por ejemplo, la apertura de una ventana o una aireación

 
      
botellas de GPL deben tener aberturas hacia el exterior para permitir la
evacuación desde abajo de eventuales escapes de gas. Además, las
botellas de GPL, vacías o parcialmente llenas, no deben ser instaladas
A
Ejemplos de aperture
de ventilación
para aire comburente
Aumento de la ranura entre
puerta y suelo
Habitación
adyacente
Habitación
por ventilar
o depositadas en ambientes o espacios a un nivel más bajo del suelo


directa de fuentes de calor (hornos, chimeneas, estufas, etc.) capaces de
llevarla a temperaturas superiores a 50°C.
Empotramiento
Para una correcta instalación de la encimera se deben observar las siguientes
precauciones:
 
de trabajo, deben estar situados a 200 mm., como mínimo, del borde de
la misma.
      
establecidos en los manuales de instrucción de las mismas, siempre

 

   
de un armario de pared, éste último deberá

de trabajo de 700 mm.
El espacio para el mueble deberá tener las dimensiones indicadas en la



555 mm
55 mm
475 mm
      
encimera e inviértala teniendo cuidado de no dañar los termopares y las
bujías.
  
el aparato en los bordes externos de la
encimera para impedir el paso de aire,

  
   
deben sellar estén limpias, secas y sin
grasa o aceites.

20
30
Posición del gancho para Posición del gancho para
H=20mm H=30mm
600mm min.
420mm min.
650mm min.
32
ES
Adelante
40
Posición del gancho para Atrás
H=40mm
!
Cuando la encimera no se instale sobre un horno empotrado, es necesario
introducir un panel de madera como aislamiento. El mismo deberá colocarse
a una distancia mínima de 20 mm. de la pared inferior de la encimera.
Aireación
Para garantizar una buena aireación es necesario eliminar la pared posterior
del hueco para el horno. Es preferible instalar el horno apoyado sobre dos


560 mm.
45 mm.
Cuando la instalación se realice sobre un horno empotrado sin ventilación forzada
de enfriamiento, se debe garantizar la presencia de tomas para la entrada y


! Es posible instalar la encimera PIM 640 AST sólo sobre hornos empotrados
dotados de ventilación.
Conexión eléctrica

funcionar con corriente alterna, a la tensión y frecuencia de alimentación
indicadas en la placa de características (ubicada en la parte inferior de la
encimera). El conductor de puesta a tierra del cable se distingue por los
colores amarillo-verde. Cuando se realiza la instalación sobre un horno
empotrado, la conexión eléctrica de la encimera y la del horno se deben
realizar por separado, ya sea por razones de seguridad eléctrica, como
para facilitar la eventual extracción del horno.
Conexión del cable de alimentación eléctrica a la red
Instale en el cable un enchufe normalizado para la carga indicada en la placa
de características.
En el caso de conexión directa a la red, es necesario interponer entre el
aparato y la red, un interruptor omnipolar con una distancia mínima entre

las normas vigentes (el conductor de tierra no debe ser interrumpido por el
interruptor). El cable de alimentación eléctrica se debe colocar de modo tal

temperatura ambiente.
! El instalador es responsable de la correcta conexión eléctrica y del
cumplimiento de las normas de seguridad.

 
 
indicada en la placa de características;
la tensión de alimentación eléctrica esté comprendida dentro de los valores
indicados en la placa de características;
la toma sea compatible con el enchufe del aparato. Si no es así, sustituya
la toma o el enchufe; no utilice prolongaciones ni conexiones múltiples.
! Una vez instalado el aparato, el cable eléctrico y la toma de corriente deben
ser fácilmente accesibles.
! El cable no debe sufrir pliegues ni compresiones.
! El cable debe ser revisado periódicamente y sustituido sólo por técnicos
autorizados (ver Asistencia).
! La empresa declina toda responsabilidad cuando estas normas no sean
respetadas.
Conexión de gas
La conexión del aparato a la tubería o a la botella de gas se deberá efectuar
de acuerdo a lo prescripto por las Normas Nacionales vigentes, sólo después

cual será alimentado. Si no es así, realice las operaciones indicadas en el
párrafo “Adaptación a los distintos tipos de gas”.

de presión conformes con las Normas Nacionales vigentes.
! Para un funcionamiento seguro, un adecuado uso de la energía y una


e inyectores”.
Atención! Antes de efectuar la conexión, retire el tapón para el transporte

Conexión con tubo rígido (cobre o acero)
!
esfuerzos de ningún tipo al aparato.
En el tubo de alimentación del aparato se encuentra una unión en “L”
 
necesario girar la unión, sustituya siempre la junta estanca (suministrada
con el aparato).


uniones roscadas




ES
33

! Utilice exclusivamente tubos y juntas estancas conformes a la Normas
Nacionales en vigencia.
Control de la estanqueidad
!
uniones utilizando una solución jabonosa pero nunca una llama.
Adaptación a los distintos tipos de gas



efectuando las siguientes operaciones:
 
     
      

3. Vuelva a colocar las piezas realizando las operaciones en sentido
contrario.
 

Centros de Asistencia Técnica.
 

Regulación de los mínimos
1. Lleve la llave hasta la posición de mínimo;
2. Quite el mando y accione el tornillo de
regulación situado en el interior o al costado
de la varilla de la llave hasta conseguir una

 

4. En los aparatos provistos del dispositivo de seguridad (termopar), si dicho
    
capacidad de los mínimos utilizando para ello el tornillo de regulación.
5. Una vez efectuada la regulación, vuelva a colocar los precintos ubicados

!
!

Centros de Asistencia Técnica.
! Cuando la presión del gas utilizado sea distinta de la prevista (o variable), es
necesario instalar, en la tubería de entrada, un regulador de presión conforme
con las Normas Nacionales en vigencia.
ver placa de características
Conexiones
eléctricas
PLACA DE CARACTERÍSTICAS
Este aparato es conforme con las siguientes
Normas Comunitarias:
- 2006/95/CE del 12/12/06 (Baja Tensión) y
posteriores modificaciones
- 2004/108/CE del 15/12/04 (Compatibilidad
Electromagnética) y posteriores modificaciones
- 93/68/CEE del 22/07/93 y posteriores
modificaciones.
- 2009/142/CE del 30/11/09 (Gas) y posteriores
modificaciones
- 2012/19/UE y posteriores modificaciones
successives.
Reglamento (UE) nº 66/2014, por el que se
aplica la Directiva 2009/125/CE.
Reglamento EN 30-2-1
ECODISEÑO
34
ES
SS
ATC
Tabla 1
Nominal (mbar)
Mínima (mbar)
Màxima (mbar)
20
17
25
28-30
20
35
37
25
45
Semi Ràpido (S)
Auxiliar (A)
Corona Triple (TC)
Presiones de
suministro
Quemador Diametro
(mm)
75
55
130
NominalReducida
0,40
0,40
1,50
By-pass
1/100
(mm)
Inyector
1/100
(mm)
Capacidad*
g/h
***
70
50
91
Capacidad*
l/h
106
79
133
181
95
309
138
73
236
**
136
71
232
Características de los quemadores e inyectores
Inyector
1/100
(mm)
Gas líquido Gas Natural
* A 15°C y 1013,25 mbar-gas seco
** Propano P.C.S. = 50.37 MJ/Kg
*** Butano P.C.S. = 49,47 MJ/Kg
Natural P. C.S. = 37.78 MJ/m³
1,90
1,00
3,25
Potencia t
é
rmica
kW (p.c.s*)
28
28
61
ES
35
Puesta en funcionamiento y uso
!      
correspondiente.
Quemadores a gas

siguiente manera:
 
Máximo
Mínimo
      
un encendedor, pulse a fondo y gire el mando correspondiente en sentido
antihorario hasta la posición de máxima potencia.





, luego pulse a fondo y gire el mando correspondiente en sentido antihorario
hasta la posición de máxima potencia.
!
vuelva a intentar encenderlo después de 1 minuto, como mínimo.


Consejos prácticos para el uso de los quemadores
Si desea obtener el máximo rendimiento, es útil recordar lo siguiente:
 

utilice siempre recipientes con el fondo plano y con tapa.
cuando se produce la ebullición, gire el mando hasta la posición de mínimo.
Semi Rápido (S)
Auxiliar (A)
Corona Triple (TC)
Ø Diámetro Recipientes (cm)
16 - 20
10 - 14
24 - 26
Quemador


Precauciones y consejos
! El aparato ha sido proyectado y fabricado en conformidad con las normas
internacionales de seguridad.
Estas advertencias se suministran por razones de seguridad y deben ser
leídas atentamente.
Seguridad general
 
Para su correcto funcionamiento, los aparatos a gas necesitan un

los requisitos contenidos en el párrafo correspondiente a la
“Colocación”.
Las instrucciones son válidas sólo para los países de destino, cuyos

El aparato ha sido fabricado para un uso de tipo no profesional en el
interior de una vivienda.
El aparato no se debe instalar al aire libre, tampoco si el espacio está

tormentas.
 
El aparato debe ser utilizado para cocinar alimentos, sólo por
personas adultas y siguiendo las instrucciones contenidas en este
manual. Cualquier otro uso (como por ejemplo: calefacción de
ambientes) se debe considerar impropio y, por lo tanto, peligroso.
El fabricante no puede ser considerado responsable por los daños
derivados de usos impropios, erróneos e irracionales.
No obstruya las aberturas de ventilación y de eliminación del calor.
 ” cuando no
se utiliza el aparato.
No desconecte el aparato de la toma de corriente tirando del cable sino
sujetando el enchufe.
No realice la limpieza o el mantenimiento sin haber desconectado primero
el aparato de la red eléctrica.
En caso de avería, no acceda nunca a los mecanismos internos para
intentar una reparación. Llame al Servicio de Asistencia Técnica (ver
Asistencia).
 

 
eléctrica todavía están calientes.
No utilice ollas inestables o deformadas.
 
con reducidas capacidades físicas, sensoriales o mentales, por personas


hayan recibido instrucciones preliminares sobre el uso del aparato.
 
El aparato no se debe poner en funcionamiento a través de un
temporizador externo o de un sistema de mando a distancia.
Eliminación
Eliminación del material de embalaje: respete las normas locales, de esta
manera los embalajes podrán ser reutilizados.
       
Eléctricos y Electrónicos (RAEE), los electrodomésticos viejos no pueden

recogidos selectivamente para optimizar la recuperación y reciclado de

en la salud humana y el medioambiente. El símbolo del cubo de basura
tachado se marca sobre todos los productos para recordar al consumidor
la obligación de separarlos para la recogida selectiva.
El consumidor debe contactar con la autoridad local o con el vendedor para
informarse en relación a la correcta eleminación de su electrodoméstico
viejo.
Ahorrar y respetar el medioambiente
 
bien y usen la menor cantidad de agua posible. Cocinar sin la tapa,
aumentará enormemente el consumo de energía.
Utilice ollas y sartenes completamente planos.


energía.
36
ES
Mantenimiento y cuidados
Cortar la corriente eléctrica

alimentación eléctrica.
Limpiar el aparato
!


! No utilice nunca limpiadores a vapor o de alta presión para la limpieza del
aparato.
 
esponja húmeda, secándola luego con un papel absorbente para cocina.
 
agua caliente y detergente tratando siempre de eliminar las incrustaciones.
     
realizar frecuentemente una cuidadosa limpieza de la parte terminal de


 
largo tiempo con agua fuertemente calcárea o con detergentes agresivos
    
secar después de la limpieza. Es además importante secar los posibles
derrames de agua.
Mantenimiento de las llaves de gas

para girar, en esos casos será necesario proceder a la sustitución de dicha
llave.
! Esta operación la debe efectuar un técnico autorizado por el fabricante.
Anomalías y soluciones




aparato, estén abiertas.
El quemador no se enciende o la llama no es uniforme.
Controle si:
 
 

Hay corriente de aire en las cercanías de la encimera.
La llama no permanece encendida en los modelos con seguridad.
Controle si:
No ha presionado a fondo el mando.
 
como para activar el dispositivo de seguridad.
 
de seguridad.
El quemador en posición de mínimo no permanece encendido.
Controle si:
 
Hay corriente de aire en las cercanías de la encimera.
La regulación del mínimo es correcta.
Los recipientes no permanecen estables.
Controle si:
El fondo del recipiente es perfectamente plano.
 
Las parrillas fueron invertidas.
37
PT
Instalação
!      
      
mesmo permanece com o aparelho para informar o novo proprietário sobre
o funcionamento e sobre as respectivas advertências.
! Leia com atenção as instruções: há informações importantes sobre a
instalação, a utilização e a segurança.
Posicionamento
!
em conformidade com as regras de colecta diferenciada (veja em Precauções
e Conselhos).
! A instalação deve ser realizada segundo estas instruções e por pessoal

animais ou objectos.
! Este aparelho pode ser instalado e funcionar somente em local
permanentemente ventilado segundo a posição de Normas em vigor. Devem

O local deve prever um sistema de descarga para o externo dos fumos
de combustão, realizado mediante uma capa ou um ventilador eléctrico
      
aparelho.
Em chaminé ou tubo de chaminé ramificado
(reservado aos aparelhos de cocçáo)
Directamente
para fora
       
      
combustão não deve ser inferior a 3 m
3

O sistema pode ser realizado capturando o ar
directamente desde a parte externa do edifício
através de um tubo de pelo menos 100 cm
2
de

Outro sistema possível, seria o de capturar
o ar em forma indirecta, a partir de locais

do imóvel, ambientes com perigo de incêndio,
  
conduto de ventilação comunicadora com a
parte externa.
Uma utilização intensa e prolongada do aparelho pode precisar de
arejamento adicional como, por exemplo, a abertura de uma janela ou

se já existente.
 


para baixo dos eventuais escapes de gás. Portanto os cilindros de GLP,
mesmo vazios ou parcialmente cheios, não devem ser instalados nem
A
Exemplos de abertura
de ventilação
para ar comburente
Aumento da fenda entre
porta e soalho
Local
adjacente
Local a ser
ventilado

etc.). É oportuno deixar na cozinha apenas o cilindro sendo utilizado,
colocado de maneira a não ser sujeito à acção directa de fontes de calor

superiores a 50°C.
Encaixe
Para instalar correctamente o plano de cozedura é necessário obedecer as
seguintes regras:
       
trabalho, devem ser situados ao menos 200 mm do bordo do mesmo
plano.
 
livretes de instruções dos próprios exaustores e, em todo o caso, a uma

posicionar as partes suspensas adjacentes à capa em uma altura mínima

Se o plano de cozedura for instalado embaixo
de uma prateleira, esta deverá estar pelo
menos a 700 mm do plano de trabalho.
 
    
top desde 20 até 40 mm. de espessura. Para prender bem o plano é

555 mm
55 mm
475 mm


  
o aparelho nos rebordos externos
do plano de cozedura para impedir
a passagem de ar, humidade e água

Para uma aplicação correcta, assegure-


Esquema para prender os ganchos
20
30
Posição do gancho para H=20mm Posição do gancho para H=30mm
600mm min.
420mm min.
650mm min.
38
PT
Frente
40
Posição do gancho para H=40mm Atrás
! Utilize os ganchos fornecidos dentro da “embalagem dos acessórios”.
Se o plano de cozedura não for instalado sobre um forno de encaixar,
é necessário inserir um painel de madeira como isolamento. O mesmo
deverá ser posicionado a uma distância mínima de 20 mm da parte
inferior do plano.
Ventilação
Para garantir uma boa ventilação é necessário eliminar a parede traseira do

de madeira, ou sobre uma tábua com uma abertura de pelo menos 45 x 560

560 mm.
45 mm.
No caso de instalação sobre um forno de encaixar sem ventilação forçada de


! É possível instalar o plano PIM 640 AST somente sobre fornos de encaixe

Ligação eléctrica
     
predispostos para o funcionamento com uma corrente alternada na

(situada na parte inferior do plano). A ligação à terra do cabo distingue-se
pelas cores amarelo - verde. No caso de instalação acima de um forno de
encaixar, a ligação eléctrica do plano e a do forno precisam ser realizadas
separadamente, seja por razões de segurança eléctrica, seja para facilitar
uma eventual remoção do forno.



No caso de uma ligação directa à rede, será necessário interpor, entre o
aparelho e a rede, um interruptor omnipolar com abertura mínima entre os
contactos de 3 mm. na dimensão certa para a carga e em conformidade
com as normas em vigor (a ligação à terra não deve ser interrompida pelo

nenhum ponto ultrapasse de 50°C a temperatura do ambiente.
! O técnico instalador é responsável pela realização certa da ligação eléctrica
e da obediência das regras de segurança.

a tomada tenha uma ligação à terra e seja em conformidade com a
legislação;
a tomada tenha a capacidade de suportar a carga máxima de potência

 
 

múltiplas.
! Depois de ter instalado o aparelho, o acesso ao cabo eléctrico e à tomada
da corrente deve ser fácil.
! O cabo não deve ser dobrado nem comprimido.
!     
técnicos autorizados (veja a Assistência Técnica).
!
forem obedecidas.
Ligação do gás
A ligação do aparelho à tubagem ou à botija do gás deverá efectuar-se
conforme prescrito pelas Normas Nacionais em vigor, somente após ter

alimentado. Em caso contrário, efectuar as operações indicadas no parágrafo
“Adaptação a diferentes tipos de gás”.

pressão em conformidade com as Normas Nacionais em vigor.
! Para garantir um funcionamento seguro, uma utilização de energia

de alimentação respeite os valores indicados na tabela 1 “Características

Atenção! Antes da ligação, remova a tampa para o transporte do furo de
engate do tubo do gás do plano de cozedura.
Ligação com tubo rígido (cobre ou aço)
! A ligação do sistema de gás deve ser realizada de maneira a não provocar
solicitações de nenhum género ao aparelho.
Na rampa de alimentação do aparelho há uma junta em “L” dirigível, cuja
retenção é assegurada por uma guarnição. Se for preciso girar a união será
absolutamente necessário trocar a guarnição de vedação (fornecida com

macho cilíndrica.

engates de rosca

     
comprimento, em condições de máxima extensão, não seja maior de 2.000


39
PT
! Utilize exclusivamente tubos em conformidade com os regulamentos e
guarnições de retenção em conformidade com os regulamentos nacionais
em vigor.
Controle da vedação
! Ao terminar a instalação controlar a vedação de todas as juntas utilizando
uma solução de sabão e nunca uma chama.
Adaptação aos diferentes tipos de gás



as seguintes operações:
 
2. Desparafusar os bicos utilizando uma chave a tubo de 7mm, e substituí-
       

3. Monte outra vez as partes, realizando estas operações na ordem contrária.
 

centros de assistência técnica.
 

Regulação dos mínimos
 
2. Retire o selector e ajuste o parafuso de
regulação situado no interior ou ao lado da
    
chama regular.
 

    

mínimo, aumente a capacidade dos próprios mínimos mediante o parafuso
de regulação.
5. Depois de realizar a regulação, restabeleça os lacres situados nos ‘by-

!
até o fundo.
!

Assistência Técnica.
!
é necessário instalar na tubagem de entrada um regulador de pressão
(conforme as Normas Nacionais em vigor).
Ligações
eléctricas
PLACA DAS CARACTERÍSTICAS
Este aparelho é em conformidade com as seguintes
Directivas da Comunidade Europeia:
- 2006/95/CE de 12/12/06 (Baixa Tensão) e
posteriores modificações
- 2004/108/CE de 15/12/04 (Compatibilidade
Electromagnética) e posteriores modificações
- 93/68/CEE de 22/07/93 e posteriores modificações.
- 2009/142/CE de 30/11/09 (Gás) e posteriores
modificações
- 2012/19/UE e posteriores modificações.
Regulamento UE no. 66/2014 integrando a Directiva
2009/125/CE.
Regulamento EN 30-2-1
CONCEPÇÃO
ECOLÓGICA
ver quadro das características
40
PT
SS
ATC
Tabela 1
Nominal (mbar)
Minima (mbar)
Màxima
(mbar)
20
17
25
28-30
20
35
37
25
45
Semi Ràpido (S)
Auxiliar (A)
Coroa Tripla (TC)
Pressões de
alimentação
Queimador Diâmetro
(mm)
Potência térmica
kW (p.c.s.*)
75
55
130
1,90
1.00
3,25
NominalReduzida
0,40
0,40
1,50
By-pass
1/100
(mm)
Bico
1/100
(mm)
Capacidade*
g/h
***
70
50
91
Capacidade*
l/h
106
79
133
181
95
309
138
73
236
**
136
71
232
Características dos queimadores e bicos
Bico
1/100
(mm)
Gás Líquido Gás Natural
* A 15°C e 1013,25 mbars-gás seco
** Propano P.C.S. = 50,37 MJ/Kg.
*** Butano P. C.S. = 49,47 MJ/Kg.
Natural P. C.S. = 37,78 MJ/m
3
28
28
61
41
PT
Início e utilização
!     
correspondente.
Queimadores a gás

seguinte maneira :
 
Máximo
Mínimo

fósforo ou acendedor automático, pressione e faça girar o selector escolhido
no sentido anti-horário até a posição de máxima potência.
Nos modelos dotados de dispositivo de segurança, é necessário manter


     

em seguida pressionar e girar o selector correspondente no sentido
anti-horário até a posição de máxima potência.
!    
comando e tente acender novamente somente após um minuto no mínimo.


Conselhos práticos para utilização dos queimadores
Para obter a máxima performance é bom lembrar-se do seguinte:
     

dos recipientes.
utilize sempre recipientes de fundo chato e com tampa.
 
mínimo.
Ø Diâmetro Recipientes (cm)
Semi Rápido (S)
Auxiliar (A)
Coroa Tripla (TC)
16 - 20
10 - 14
24 - 26
Queimador


Precauções e conselhos
! Este aparelho foi projectado e fabricado em conformidade com as normas
internacionais de segurança. Estas advertências são fornecidas por razões
de segurança e devem ser lidas com atenção.
Segurança geral
Este aparelho refere-se a um aparelho de encaixar de classe 3
Para os aparelhos a gás funcionarem correctamente é necessário
uma troca de ar regular do ambiente. Assegurar-se que sejam
respeitados os requisitos do parágrafo “Posicionamento” no
momento da instalação”.
As instruções são válidas somente para os países de destino para

do aparelho.
 
âmbito de moradas.
Este aparelho não deve ser instalado ao ar livre, mesmo num sítio

 
estiverem molhados ou húmidos.
O aparelho deve ser utilizado para cozinhar alimentos, somente por
pessoas adultas e conforme as instruções contidas neste livrete.
Qualquer outro uso (como por exemplo, aquecedor de ambientes) deve
ser considerado impróprio e portanto perigoso. O fabricante não pode
ser considerado responsável por eventuais danos derivados de usos
impróprios, errados e irrazoáveis.
Não tape as aberturas de ventilação e de eliminação de calor.
 
não estiver a utilizar o aparelho.
 

 
rede eléctrica.
Se houver avarias, em nenhum caso mexa nos mecanismos internos
para tentar repará-las. Contacte a Assistência Técnica (veja a Assistência
técnica).
 
lado interno do plano de cozedura para evitar batidas acidentais.
 

Não utilize panelas instáveis ou deformadas.
      
crianças) com reduzidas capacidades físicas, sensoriais ou mentais, por

      

do aparelho.
 
O aparelho não é destinado a ser colocado em funcionamento por
meio de um temporizador externo ou por um sistema de comando

Eliminação
Eliminação do material de embalagem: obedeça as regras locais, de

 


desactualizados devem ser recolhidos separadamente para optimizar a

potenciais danos para a saúde humana e para o ambiente. O símbolo
constituído por um contentor de lixo barrado com uma cruz deve ser colocado
em todos os produtos por forma a recordar a obrigatoriedade de recolha
separada.
Os consumidores devem contactar as autoridades locais ou os pontos de
venda para solicitar informação referente ao local apropriado onde devem
depositar os electrodomésticos velhos.
Economia e respeito do meio ambiente
Cozinhar os seus alimentos em panelas ou caçarolas fechadas com
tampas bem ajustadas e usar o mínimo de água possível. Cozinhar com
a tampa aberta aumentará aumentará ortemente o consumo de energia.
42
PT
Usar exclusivamente panelas e caçarolas planas.
 

energia.
Manutenção e cuidados
Desligar a corrente eléctrica

eléctrica.
Limpeza do aparelho
! Evite o emprego de detergentes abrasivos ou corrosivos, tais como tira-
manchas e produtos contra ferrugem, detergentes em pó e esponjas com
superfície abrasiva. podem arranhar irremediavelmente a superfície.
!
limpar a aparelhagem.
 
húmida e, em seguida, enxugar com papel absorvente de cozinha.
   
    
eliminar as eventuais crostas.
Nos planos com acendimento automático, é necessário proceder



 
tempo com água fortemente calcária ou com detergentes agressivos
(contendo fósforo). É aconselhado enxaguar com água abundante
e enxugar depois da limpeza. Para mais é bom enxugar eventuais
vazamentos de água.
Manutenção das torneiras do gás


torneira mesma.
! Esta operação deve ser efectuada por um técnico autorizado pelo
fabricador.
Anomalias e soluções
Pode acontecer do plano não funcionar ou não funcionar bem. Antes de
     

de gás e electricidade, especialmente se as torneiras do gás antes do plano
estão abertas.
O queimador não se acende ou a chama não é uniforme.
Foi controlado se:
 
     

Há correntes de ar nas proximidades do plano.
A chama não permanece acesa nas versões com segurança.
Foi controlado se:
O botão não foi premido até o fundo.
 
para activar o dispositivo de segurança.
Estão entupidos os furos de saída do gás em correspondência ao
dispositivo de segurança.
O queimador em posição de mínimo não permanece aceso.
Foi controlado se:
Estão entupidos os furos de saída do gás.
Há correntes de ar nas proximidades do plano.
A regulação do mínimo não está correcta.
Os recipientes são instáveis.
Foi controlado se:
O fundo do recipiente é perfeitamente plano.
 
As grades foram invertidas.
43
BE
Installation
! Bewahren Sie diese Bedienungsanleitung bitte sorgfältig auf, damit Sie sie
jederzeit zu Rate ziehen können. Sorgen Sie dafür, dass sie im Falle eines
Verkaufs, eines Umzugs oder einer Übergabe an einen anderen Benutzer
das Gerät stets begleitet, damit auch der Nachbesitzer die Möglichkeit hat,
darin nachschlagen zu können.
! Lesen Sie bitte folgende Hinweise aufmerksam durch, sie liefern wichtige
Informationen hinsichtlich der Installation, dem Gebrauch und der Sicherheit.
! Die Kochmulden sind werkseitig für den Betrieb mit (siehe Typenschild und
Gaseinstellungsschild des Gerätes):Erdgas Kategorie II2E+3+ eingestellt.
Aufstellung
! Verpackungsmaterial ist kein Spielzeug für Kinder. Es ist entsprechend
den Vorschriften zur getrennten Müllsammlung zu entsorgen (siehe
Vorsichtsmaßregeln und Hinweise).
! Die Installation ist gemäß den vorliegenden Anweisungen und von
   
Menschen und Tiere gefährden oder Sachschaden verursachen.
! Dieses Gerät darf nur in ständig belüfteten, und gemäß den national gültigen
Normen und Vorschriften entsprechenden Räumen installiert und in Betrieb
genommen werden. Folgende Anforderungen müssen gegeben sein:
Der Raum muss mit einem Abluftsystem für die bei der Verbrennung
entstehenden Abgase ausgestattet sein; dies kann entweder über einen
Abzugsschacht, oder durch einen sich bei der Inbetriebnahme des Gerätes
automatisch einschaltenden Elektroventilator erfolgen.
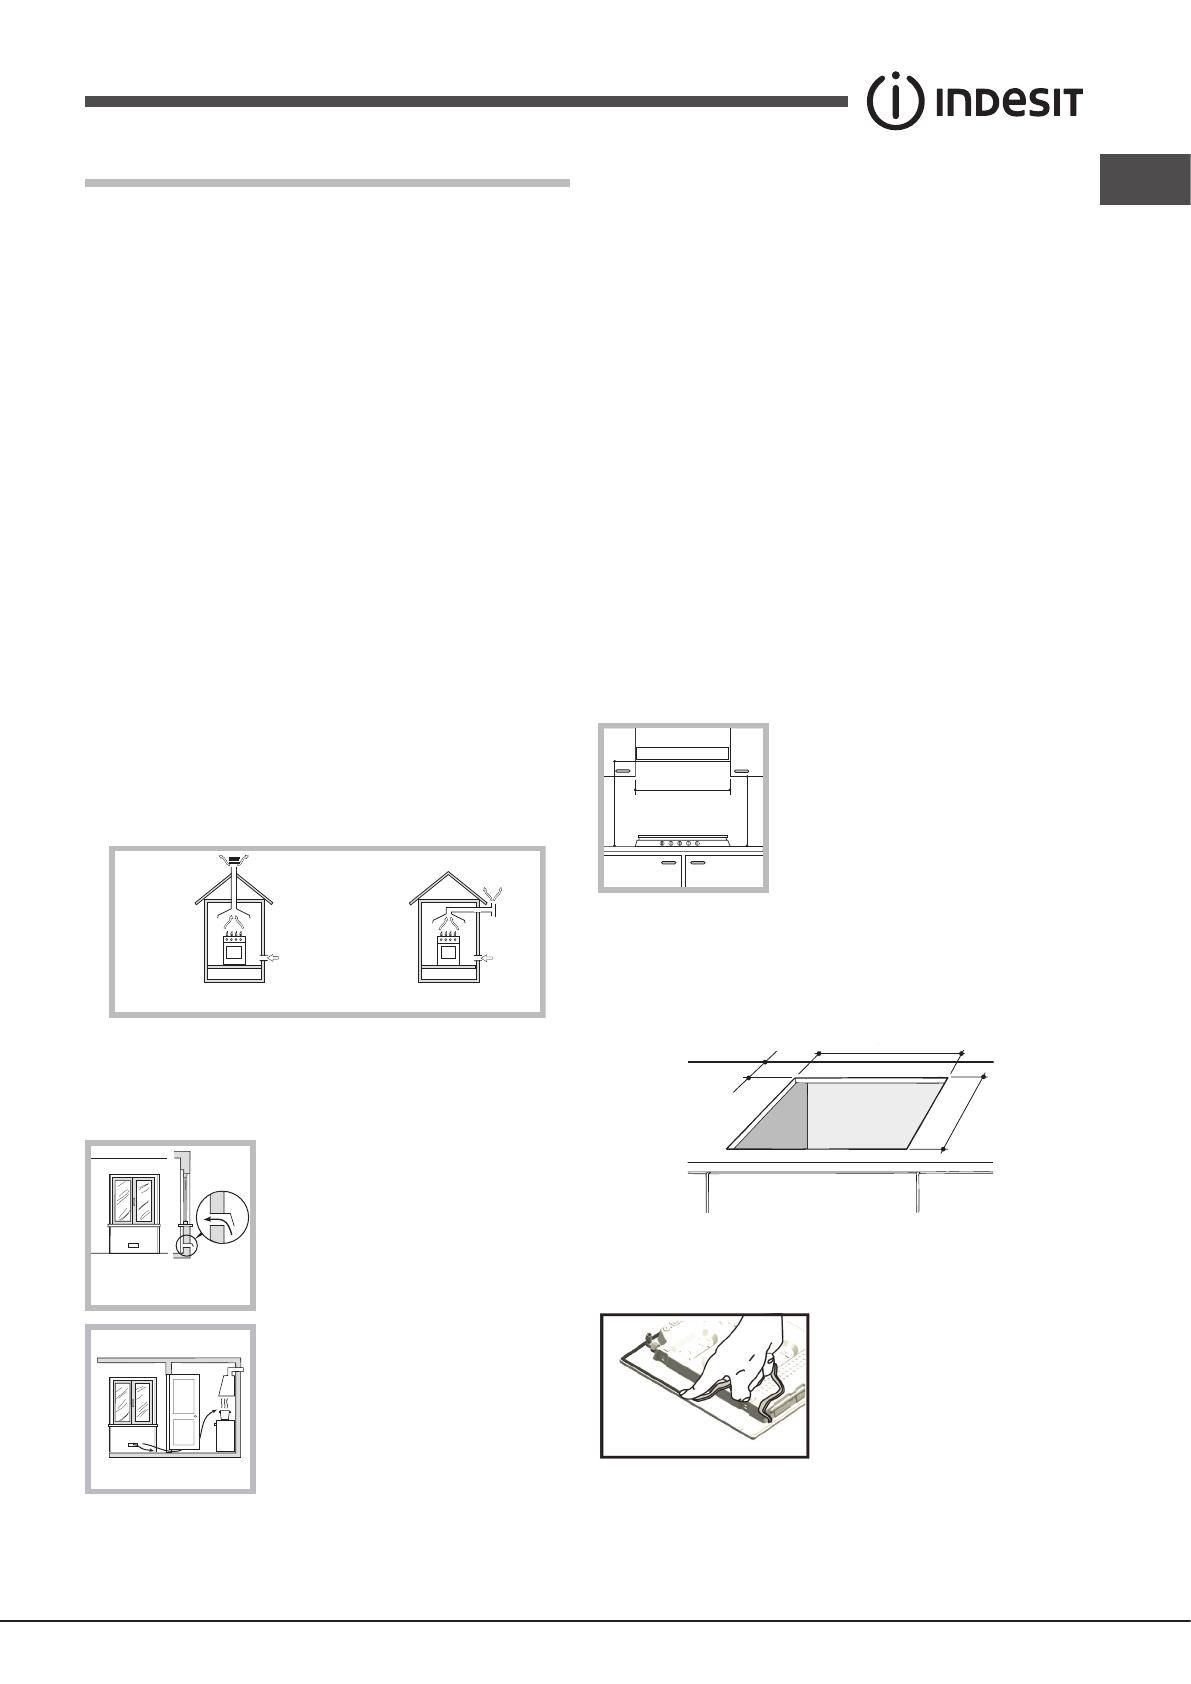
In Abzugsschächte oder Kamine mit Direkt ins Freie
Abzweigungen (ausschließlich für Kochgeräte bestimmt)
Direkt ins
Freie
Der Raum muss außerdem mit einem für eine einwandfreie Verbrennung
notwendigen Belüftungssystem ausgestattet sein. Das erforderliche
Luftvolumen darf 2 m
3
   
unterschreiten.
Das System kann mittels eines
Belüftungsschachtes, mit Luftaufnahme direkt

mindestens 100 cm
2
verwirklicht werden, der so
ausgelegt sein muss, dass ein unabsichtliches
Verstopfen vermieden wird.
Oder auf indirekte Weise durch angrenzende
Räume, die mit einem ins Freie führenden
Belüftungsschacht, wie oben angegeben,
versehen sind, bei denen es sich nicht um
Gebäudeteile gemeinsamen Gebrauchs, noch
um Räumlichkeiten, in denen Brandgefahr
bestehen kann oder um Schlafzimmer handeln
darf.
Eine intensive, lang anhaltende Nutzung des Geräts kann eine zusätzliche
Lüftung erforderlich machen, beispielsweise das Öffnen eines Fensters
oder Herstellung eines stärkeren Luftzugs durch Erhöhen der Leistung
der mechanischen Absaugung, sofern eine solche vorhanden ist.
A
Beispiele von
Zuluftöffnungen
für die Verbrennungsluft
Vergrößerung des Lichtspaltes
zwischen Tür und Fußboden
Angrenzender
Raum
Zu belüftender
Raum
Die Flüssiggase, die schwerer als Luft sind, stauen sich im unteren
Raumbereich. Räume, in denen Gasflaschen mit GPL-Flüssiggas
gelagert werden, müssen demnach in Bodenhöhe mit geeigneten
Abzugsöffnungen ins Freie ausgestattet werden, damit das Gas im
Falle eventueller Gasverluste nach unten hin abziehen kann. Demnach
    
Erde liegen (Keller usw.) installiert oder gelagert werden, auch dann
nicht, wenn sie bereits leer oder nur noch halb gefüllt sein sollten. Es
     
Raum zu bewahren, und diese so aufzustellen, dass sie keiner direkten

Temperaturanstieg von mehr als 50°C bewirken könnten, ausgesetzt wird.
Einbau
Um eine korrekte Installation der Kochmulde zu gewährleisten, sind folgende
Vorsichtsmaßregeln zu beachten:
angrenzende Schränke, deren Höhe die der Arbeitsplatte überschreiten,
müssen einen Abstand vom Rand der Kochmulde von mindestens 200
mm aufweisen.
dunstabzugshauben sind gemäß den in den Gebrauchsanleitungen der
Dunstabzugshaube aufgeführten Anweisungen zu installieren und zwar
in einem Abstand von mindestens 650 mm (siehe Abbildung).
die an die Dunstabzugshaube angrenzenden Hängeschränke sind in
einem Abstand von mindestens 420 mm von der Arbeitsplatte aufzuhängen
(siehe Abbildung).
Sollte die Kochmulde unter einem
Hängeschrank installiert werden, muss
zwischen Hängeschrank und Arbeitsplatte ein
Abstand von mindestens 700 mm bestehen.
Der Schrankausschnitt muss die auf der Abbildung angegebenen
Abmessungen aufweisen.
Die Kochmulde wird mit Hilfe von Haken auf der zwischen 20 und 40
mm starken Arbeitsplatte befestigt. Um eine optimale Befestigung der
Kochmulde zu gewährleisten, sollten sämtliche zur Verfügung stehenden
Haken verwendet werden.
555 mm
55 mm
475 mm
Nehmen Sie vor der Installation die Roste und Brenner vom Kochfeld ab und
drehen Sie es um. Achten Sie darauf, die Thermoelemente und Zündkerzen
nicht zu beschädigen.
Bringen Sie die mitgelieferte Dichtung
rund um den Rand des Kochfeldes
an. Damit wird verhindert, dass Luft,
Feuchtigkeit und Wasser eindringen
können (siehe Abbildung).
Achten Sie darauf, dass die Flächen,
auf die die Dichtung aufgebracht wird,

600mm min.
420mm min.
650mm min.
44
BE
Haken-Befestigungsschema
20
30
Position der Haken für Position der Haken für
Arbeitsplatten H=20mm Arbeitsplatten H=30mm
Vorne
40
Position der Haken für Hinten
Arbeitsplatten H=40mm
!
Wird die Kochmulde nicht über einem Einbaubackofen installiert, ist unter
der Kochmulde eine Holzplatte zur Isolierung anzubringen. Dabei muss ein
Mindestabstand von 20 mm von der Kochmuldenunterseite eingehalten
werden.
Belüftung
Um eine einwandfreie Belüftung zu gewährleisten, muss die Rückwand
des Schrankumbaus abgenommen werden. Der Backofen sollte möglichst
so installiert werden, dass er auf zwei Holzleisten oder aber auf einer

45 x 560 mm verfügt (siehe Abbildungen).
560 mm.
45 mm.
Bei Installation über einem Einbaubackofen ohne Kühlsystem-
Zwangsbelüftung müssen Ab- und Zuluftöffnungen vorgesehen werden, um
eine geeignete Belüftung im Innern des Umbauschrankes zu gewährleisten
(siehe Abbildungen).
! Die Kochmulde PIM 640 AST darf nur dann über Einbaubacköfen installiert
werden, wenn diese über ein Kühlgebläse verfügen.
Elektroanschluss
Die mit einem Dreileiterkabel ausgerüsteten Kochmulden sind für den Betrieb

   
     
über einem Einbaubackofen installiert, müssen der Elektroanschluss der
Kochmulde sowie der des Backofens getrennt voneinander vorgenommen
werden. Dadurch wird eine ausreichende elektrische Sicherheit gewährleistet
und das Herausziehen des Backofens erleichtert.
Anschluss des Versorgungskabels an das Stromnetz
Versehen Sie das Netzkabel mit einem Normstecker für die auf dem
Typenschild angegebene Belastung (siehe nebenstehende Tabelle).
Wird das Gerät direkt an das Stromnetz angeschlossen, ist zwischen
Stromnetz und Gerät ein allpoliger, der Last und den einschlägigen
Vorschriften entsprechender Schalter mit einer Mindestöffnung der Kontakte
von 3 mm zwischenzuschalten. (Der Erdleiter darf vom Schalter nicht
unterbrochen werden.) Das Versorgungskabel muss so verlegt werden,
dass es an keiner Stelle einer Temperatur ausgesetzt wird, die 50°C über
der Raumtemperatur liegt.
! Der Installateur ist für den ordnungsgemäßen elektrischen Anschluss sowie
die Einhaltung der Sicherheitsvorschriften verantwortlich.
Vor dem Anschluss stellen Sie bitte sicher, dass:
die Steckdose geerdet ist und den gesetzlichen Bestimmungen entspricht;
die Netzsteckdose für die auf dem Typenschild angegebene maximale
Leistungsaufnahme des Gerätes ausgelegt ist;
die Netzspannung im Bereich der auf dem Typenschild angegebenen
Werte liegt;
die Netzsteckdose mit dem Netzstecker kompatibel ist. Sollte dies nicht
der Fall sein, wechseln Sie bitte die Netzsteckdose oder den Netzstecker
aus; verwenden Sie keine Verlängerungen und Mehrfachsteckdosen.
! Netzkabel und Steckdose müssen bei installiertem Gerät leicht zugänglich
sein.
! Das Netzkabel darf nicht gebogen oder eingeklemmt werden.
! Das Kabel muss regelmäßig kontrolliert werden und darf nur durch
autorisiertes Fachpersonal ausgetauscht werden (siehe Kundendienst).
! Der Hersteller lehnt jede Verantwortung ab, falls diese Vorschriften nicht
eingehalten werden sollten.
Anschluss an die Gasleitung

gemäß den Vorschriften der gültigen Richtlinien erfolgen und nur nachdem
man sich vergewissert hat, dass es auf die Gasart, mit der es betrieben wird,
eingestellt ist. Sollte dem nicht so sein, dann befolgen Sie bitte die Anleitungen
des Abschnitts “Anpassung an die verschiedenen Gasarten”. Bei Betrieb mit

Achtung! Bevor der Anschluss vorgenommen wird, ist der zum Transport
angebrachte Verschlussdeckel von der Einführöffnung des Gasschlauchs
der Kochplatte zu entfernen.
45
BE
Zum Anschluss des Gerätes an die
Erdgasleitung (II2E+3+) ist in erster Linie
das Anschlussstück R(auf Anfrage
erhältlich in Kundendienststellen) mit der
entsprechenden Dichtung “G” an den am

L” (siehe Abbildung) zu montieren. Bei dem
Anschlussstück handelt es sich um einen

Der Anschluss ist mittels eines:
- starren Rohres
- oder mittels eines durchgehenden und mit Anschlussverschraubungen
versehenen Inox-Stahlschlauches vorzunehmen.
Zwischen Gerät und Gasleitung ist ein gut zugänglicher Gashahn zu
installieren.
Anschluss mittels eines starren Anschlussrohres (Kupfer oder Stahl)
! Der Anschluss an die Gasleitung muss so durchgeführt werden, dass das
Gerät keinerlei Zugspannungen ausgesetzt wird.
     
Anschlussstück, dessen Dichtheit durch einen Dichtring gewährleistet wird.
Muss das Anschlussstück verdreht (in eine andere Richtung gedreht) werden,
ist es absolut erforderlich, den Dichtring (im Beipack) auszutauschen. Bei dem
Anschlussstück für den Gaseingang handelt es sich um einen zylindrischen

Anschluss mittels Inox-Schläuchen mit hermetischen Wänden
Bei dem Anschlussstück für den Gaseingang handelt es sich um einen

Der Anschluss bzw. das Verlegen dieser Schläuche muss so erfolgen, dass
sie bei größter Ausdehnung eine Länge von 2000 mm nicht überschreiten.
Stellen Sie nach erfolgtem Anschluss bitte sicher, dass der Inox-Schlauch
nicht mit beweglichen Teilen in Berührung kommt oder an irgendeiner Stelle
eingedrückt wird.
! Verwenden Sie ausschließlich Schläuche und Dichtringe, die den
jeweilig gültigen inländischen Normen entsprechen.
Kontrolle auf Dichtheit
! Nach Abschluss der Installationsarbeiten überprüfen Sie bitte alle Anschlüsse
auf Dichtheit; verwenden Sie hierzu auf keinen Fall eine Flamme, sondern
eine Seifenlösung.
Anpassung an die verschiedenen Gasarten
Wird die Kochmulde auf eine andere Gasart eingestellt, als die, für die sie
vorgesehen wurde (ersichtlich aus dem Etikett auf der Kochmuldenunterseite
oder auf der Verpackung), müssen die Düsen der Brenner auf folgende Weise
ausgetauscht werden:
1. Nehmen Sie die Kochmuldenroste ab und ziehen die Brenner aus ihren
Sitzen heraus.
2. Schrauben Sie die Düsen mit Hilfe eines 7 mm Steckschlüssels ab und
ersetzen Sie sie durch die entsprechenden Düsen der neuen Gasart (siehe
Tabelle 1 “Merkmale der Brenner und Düsen”).
3. Setzen Sie sämtliche Teile in umgekehrter Reihenfolge wieder ein.
4. Ersetzen Sie anschließend das Etikett der alten Eichung mit dem in
unseren Kundendienst-Zentren erhältlichen Etikett der neu eingestellten
Gasart.
Einstellung der Brenner-Primärluft
An den Brennern ist keine Primärlufteinstellung erforderlich.
L
G
R
• Minimumeinstellung
1. Drehen Sie den Brenner auf Minimum;
2. Ziehen Sie den Reglerknopf ab und
verstellen Sie dann die innen oder seitlich der

bis eine kleine, gleichmäßige Flamme erreicht
wird.
3. Vergewissern Sie sich, dass bei raschem Drehen von Maximum auf
Minimum die Flamme des Brenners nicht erlischt.
4. Bei den mit einer Sicherheitsvorrichtung (Thermoelement) ausgestatteten
Geräten muss bei Nichtfunktionieren der Vorrichtung bei auf Minimum
eingestellten Brennern der Durchfluss der Minimumleistung (durch
Regulieren der Einstellschraube) erhöht werden.
5. Nach erfolgter Neuregelung sind die auf den Bypass-Linien angebrachten
Siegel mit Siegellack oder ähnlichem Material zu erneuern.
! Bei Flüssiggasen muss die Einstellschraube ganz angezogen werden.
! Ersetzen Sie anschließend das Etikett der alten Eichung mit einem der neuen
Gasart entsprechenden Etikett (in unseren Kundendienstzentren erhältlich).
! Sollte der Gasdruck der Anlage von den vorgesehenen Werten abweichen,
oder nicht konstant sein, muss das Zuleitungsrohr mit einem geeigneten
Druckregler (gemäß den national gültigen Normen und Vorschriften) installiert
werden.
Elektrischer
Anschluss
TYPENSCHILD
Dieses Gerät entspricht den folgenden
EG-Richtlinien:
- 2006/95/EG vom 12/12/06 (Niederspannung)
und nachfolgenden Änderungen
- 2004/108/EG vom 15/12/04
(elektromagnetische Verträglichkeit) und
nachfolgenden Änderungen
- 93/68/EWG vom 22.07.93 und nachfolgenden
Änderungen.
- 2009/142/EG vom 30.11.09 und
nachfolgenden Änderungen.
- 2012/19/EU und nachfolgenden Änderunge.
EU-Richtlinienr. 66/2014 ergänzend zu Richtlinie
2009/125/EU.
EN 30-2-1Richtlinie
ECODESIGN
siehe Typenschild
46
BE
Tabelle 1
Durch-
messer
(mm)
Nominal (mbar)
Minimum (mbar)
Maximum (mbar)
20
17
25
28-30
20
35
37
25
45
Mittelstarker Brenner (S)
Hilfsbrenner (A)
Drei Flammenkränze (TC)
Versorgungsdrücke
Brenner
75
55
130
1,90
1,00
3,25
NominalReduziert
0,40
0,40
1,50
By-pass
1/100
(mm)
28
28
61
Düse
1/100
(mm)
Menge*
g/h
***
70
50
91
Menge*
l/h
106
79
133
181
95
309
138
73
236
**
136
71
232
Merkmale der Brenner und Düsen
Düse
1/100
(mm)
Flüssiga
sE
rdgas
210
111
360
G20G25
25
20
30
* Bie 15°C und 1013,25 mbar-Trockengas
** Propangas oberer Heizwert = 50,37 MJ/kg
*** Butan oberer Heizwert = 49,47 MJ/kg
Erdgas G20 oberer Heizwert = 37,78 MJ/m³
Erdgas G25 oberer Heizwert = 32,49 MJ/m³
Wärmeleistung
kW (p.c.s.*)
SS
ATC
47
BE
Inbetriebsetzung und Gebrauch
!
Gasbrenner
Der gewählte Brenner kann mittels des entsprechenden Reglerknopfes auf
folgende Einstellungen gedreht werden:
 
Maximum
Minimum
    
oder einen Gasanzünder an den Brenner, drücken den entsprechenden
Reglerknopf fest ein, und drehen diesen dann gegen den Uhrzeigersinn auf
Höchstleistung.
Bei den mit einer Sicherheitsvorrichtung ausgestatteten Brennern muss der
Reglerknopf für ca. 2-3 Sekunden gedrückt werden, bis die Vorrichtung, dank
derer die Flamme automatisch gezündet wird, heiß wird.
Bei den mit Zündkerze ausgestatteten Modellen muss, zur Zündung des
gewählten Brenners, zuerst die durch das Symbol , gekennzeichnete
Zündtaste gedrückt werden. Daraufhin drücken Sie den entsprechenden
Reglerknopf bis zum Anschlag ein und drehen ihn auf Höchstleistung.
! Sollte der Brenner ungewollterweise erlöschen, drehen Sie den Reglerknopf
auf Position ‘AUS’ und versuchen ein erneutes Anzünden erst nach
Verstreichen von mindestens 1 Minute.
Zum Ausschalten des Brenners wird der Reglerknopf im Uhrzeigersinn auf

Praktische Hinweise zum Gebrauch der Brenner
Um optimale Leistungen zu gewährleisten, ist Folgendes zu beachten:
verwenden Sie die für den jeweiligen Brenner geeignete Topfgröße
(siehe Tabelle) um zu vermeiden, dass die Flammen über den Topfboden
herausschlagen.
     
Deckel.
drehen Sie den Brenner auf klein, sobald das Gargut kocht.
Mittelstarker Brenner (S)
Hilfsbrenner (A)
Drei Flammenkränze (TC)
Ø Kochgeschirrdurchmesser (cm)
16 - 20
10 - 14
24 - 26
Brenner
Zur Erkennung des Brennertyps verweisen wir auf die im Abschnitt

Vorsichtsmaßregeln und Hinweise
! Das Gerät wurde entsprechend den strengsten internationalen
Sicherheitsvorschriften entworfen und gebaut. Nachstehende Hinweise
werden aus Sicherheitsgründen geliefert und sollten aufmerksam gelesen
werden.
Allgemeine Sicherheit
Dieses Gerät bezieht sich auf ein Einbaugerät der Klasse 3.
Gasgeräte erfordern eine ordnungsgemäße Belüftung um einen
einwandfreien Betrieb zu gewährleisten. Vergewissern Sie
sich deshalb davon, dass bei der Installation die im Abschnitt
“Aufstellung” aufgeführten Anforderungen gegeben sind.
Die Anweisungen gelten nur für die Bestimmungsländer, deren
Symbole im Handbuch und auf dem Typenschild angegeben sind.
Dieses Gerät ist für den nicht professionellen Einsatz im privaten Haushalt
bestimmt.
Das Gerät darf nicht im Freien aufgestellt werden, auch nicht, wenn es
sich um einen geschützten Platz handelt. Es ist gefährlich, das Gerät
Gewittern und Unwettern auszusetzen.
Berühren Sie das Gerät nicht mit nassen oder feuchten Händen oder
Füßen und auch nicht, wenn Sie barfuß sind.
Das Gerät darf nur von Erwachsenen und gemäß den Hinweisen
der vorliegenden Bedienungsanleitung zur Zubereitung von
Lebensmitteln verwendet werden. Jeder andere Einsatz (zum
Beispiel: zum Beheizen von Räumen) ist als unsachgemäß und
gefährlich anzusehen. Der Hersteller haftet nicht für eventuelle,
durch unsachgemäßen, falschen oder unangemessenen Gebrauch
verursachte Schäden.
Die zur Belüftung und Wärmeableitung vorgesehenen Öffnungen dürfen
nicht zugestellt bzw. abgedeckt werden.
Vergewissern Sie sich stets, dass sich die Reglerknöpfe auf der Position

Ziehen Sie den Netzstecker nicht am Netzkabel aus der Steckdose,
sondern nur am Netzstecker selbst.
Ziehen Sie vor der Reinigung oder vor Wartungsmaßnahmen stets den
Netzstecker aus der Steckdose.
Bei etwaigen Störungen versuchen Sie bitte nicht, Innenteile selbst zu
reparieren. Kontaktieren Sie den Kundendienst (siehe Kundendienst).
Stellen Sie Stieltöpfe und Pfannen immer mit nach innen gerichteten Griffen
auf die Kochstelle, um jegliches Risiko durch unbeabsichtigtes Anstoßen
auszuschließen.
Schließen Sie die Glasabdeckung (falls vorhanden) nicht, wenn die
Gasbrenner oder die Elektroplatte noch heiß sind.
Gebrauchen Sie bitte kein unstabiles oder verformtes Kochgeschirr.
Das Gerät ist nicht zur Verwendung durch Personen (einschließlich
Kinder) mit eingeschränkten körperlichen, geistigen oder
Wahrnehmungsfähigkeiten oder aber ohne ausreichende Erfahrung und
Produktkenntnis geeignet, sofern sie nicht durch eine für ihre Sicherheit
verantwortliche Person beaufsichtigt werden oder zuvor Anleitungen zum
Gerätegebrauch erhalten haben.
Kinder dürfen nicht mit dem Gerät spielen.
Dieses Gerät kann nicht mit einem externen Timer oder einem
getrennten Fernsteuerungssystem betrieben werden.
Entsorgung
Entsorgung des Verpackungsmaterials: Befolgen Sie die lokalen
Vorschriften; Verpackungsmaterial kann wiederverwertet werden.
     
Elektronik-Altgeräte (WEEE) dürfen Elektrohaushalts-Altgeräte nicht
über den herkömmlichen Haushaltsmüllkreislauf entsorgt werden.
Altgeräte müssen separat gesammelt werden, um die Wiederverwertung
und das Recycling der beinhalteten Materialien zu optimieren und die

„durchgestrichene Mülltonne“ auf jedem Produkt erinnert Sie an Ihre
  
müssen.
48
BE
Endverbraucher können sich an Abfallämter der Gemeinden
wenden, um mehr Informationen über die korrekte Entsorgung ihrer
Elektrohaushaltsgeräte zu erhalten.
Energie sparen und Umwelt schonen
Kochen Sie Ihre Nahrung in Töpfen und Pfannen mit passend
geschlossenen Deckeln und verwenden Sie möglichst wenig Wasser.
Ohne Deckel zu kochen führt zu einem erheblichen Energieverbrauch.
 
Falls Sie etwas kochen, dass eine längere Zeit benötigt, ist es angebracht
wenn Sie ein Schnellkochtopf benutzen, welches zweimal so schnell ist
und ein drittel der Energie spart.

Abschalten Ihres Gerätes vom Stromnetz

Reinigung Ihres Gerätes
! Der Einsatz von Scheuermitteln oder scharfen oder chemischen
Reinigungsmitteln, wie Backofensprays, Fleckenentferner,
Rostentfernungsmittel, Reiniger in Pulverform und Scheuerschwämme,
     
zu vermeiden.
! Verwenden Sie zur Reinigung der Kochmulde keine Dampf- oder
Hochdruckreinigungsgeräte.
      
Schwamm abzuwischen und mit Küchenpapier abzutrocknen.
Die abnehmbaren Teile müssen regelmäßig mit warmem Wasser und
Spülmittel gereinigt und von eventuellen Verkrustungen befreit werden.
Bei den mit automatischer Zündung versehenen Kochmulden müssen die

werden, wobei zu kontrollieren ist, dass die Löcher der Flammenkränze
nicht verstopft sind.
Auf den Edelstahlteilen können Flecken hinterbleiben, wenn stark
kalkhaltiges Wasser oder scharfe (phosphorhaltige) Spülmittel für längere
Zeit darauf stehenbleiben. Es ist ratsam, diese Teile nach der Reinigung
gut nachzuspülen und trockenzureiben. Übergekochtes Wasser muss
ebenfalls beseitigt werden.
Wartung der Gashähne
Im Laufe der Zeit könnte der Gashahn blockieren oder sich nur schwer drehen
lassen. In einem solchen Fall ist der Hahn auszutauschen.
! Diese Arbeit darf nur durch einen vom Hersteller anerkannten Techniker
durchgeführt werden.
Störungen und Abhilfe
Bevor Sie bei eventuellen Betriebsstörungen den Kundendienst anfordern,
sollten einige Kontrollen vorab durchgeführt werden. Vergewissern Sie sich
in erster Linie, dass auch keine Unterbrechung in der Strom- bzw. Gaszufuhr
Ihrer Anlage besteht, vor allem, ob der Gashaupthahn auch aufgedreht wurde.
Der Brenner zündet bzw. hält die Flamme nicht.
Bitte kontrollieren Sie, ob:
Die Gasaustrittsöffnungen der Gasbrenner verstopft sind;
Alle abnehmbaren Brennerteile ordnungsgemäß montiert wurden;
Durchzug in Kochmuldennähe besteht;
Bei den mit Sicherheitsvorrichtungen versehenen Modellen erlischt
die Flamme.
Bitte kontrollieren Sie, ob:
Der Reglerknopf auch bis zum Anschlag durchgedrückt wurde;
Der Reglerknopf lange genug gedrückt wurde, um die Aktivierung der
Sicherheitsvorrichtung zu ermöglichen;
 
verstopft sind.
Bei Einstellung des Brenners auf Minimum erlischt die Flamme.
Bitte kontrollieren Sie, ob:
Die Gasaustrittsöffnungen verstopft sind;
Durchzug in Kochmuldennähe besteht;
Das Minimum korrekt eingestellt ist.
Das Kochgeschirr steht nicht sicher.
Bitte kontrollieren Sie, ob:
Der Topfboden auch vollständig eben ist;
Der Topf auch genau auf die Brennermitte gestellt wurde;
Die Kochmuldenroste vertauscht wurden.
NL
BE
49
Het installeren
! Bewaar dit boekje zorgvuldig voor eventuele verdere raadpleging. Wanneer
u het product weggeeft, verkoopt, of wanneer u verhuist, dient u dit boekje
bij het apparaat te bewaren zodat alle nodige informatie voorhanden blijft.
! Lees de gebruiksaanwijzingen zorgvuldig door: er staat belangrijke informatie
in over installatie, gebruik en veiligheid.
Plaatsing
! Het verpakkingsmateriaal is niet bestemd voor kinderen en dient daarom
te worden weggegooid volgens de geldende normen voor gescheiden
afvalverzameling ( zie Voorzorgsmaatregelen en advies).
! De installatie moet worden uitgevoerd door een bevoegde installateur en
volgens de instructies van de fabrikant. Een verkeerde installatie kan schade
berokkenen aan personen, dieren of dingen.
! Dit apparaat mag alleen geïnstalleerd worden en funktioneren in goed
geventileerde vertrekken volgens de voorschriften van de van kracht zijnde
Nationaal geldende normen. De volgende eisen moeten in acht genomen
worden:
Het vertrek moet voor de verbrandingsrook over een afvoersysteem naar
buiten toe beschikken. Dit kan gebeuren door middel van een afzuigkap
of een elektrische ventilator die automatisch aangaan elke keer als het
apparaat wordt aangezet.
In het gevaal van een schoorsteen of vertakte
rookleiding (gereserveerd voor fornuizen)
Rechtstreeks
naar buiten
Het vertrek moet een luchttoevoersysteem hebben dat dient voor de
normale verbranding van het gas. De luchttoevoer die nodig is voor een
normale verbranding moet niet minder dan 2 m
3

vermogen.
Dit systeem kan worden uitgevoerd door lucht
direct van buiten te onttrekken door middel van
een buis met een doorsnede van minstens 100
cm
2
en die zodanig is geplaatst dat hij niet per
ongeluk verstopt kan raken.
Een andere manier is door op indirecte wijze
lucht te onttrekken aan de aangrenzende
vertrekken die door middel van een
ventilatiebuis, zoals boven beschreven,
met buiten zijn verbonden en die geen
gemeenschappelijke delen zijn van het huis
en ook geen ruimtes met hoog brandgevaar
of slaapkamers.
Bij een intensief en langdurig gebruikvan het apparaat kan een extra
ventilatie nodig zijn, bijvoorbeeld door een raam te openen of betere
ventilatie door de het vermogen van de reeds aanwezige mechanische
afzuiging te verhogen.
(voor België) De gassen van vloeibaar gemaakte gasmengsels (LPG)
zijn zwaarder dan lucht en blijven laag hangen. Om deze reden moeten

hebben voor het afvoeren van eventueel ontsnapt gas. Lege of halfvolle
A
Voorbeelden
ventilatie-opening
voor verbrandingslucht
Verhoging van de spleet
tussen deur en vloer
Aangrenzend
vertrek
Te ventileren
vertrek
LPG-flessen mogen dus niet worden geïnstalleerd of bewaard in
vertrekken die lager liggen dan de vloer (kelders, enz.). Het is beter alleen

hij niet in rechtstreeks contact staat met warmtebronnen (oven, open
haard, kachel, enz.) die hem tot temperaturen van meer dan 50°C zouden
kunnen brengen.
Inbouw
Voor een juiste installatie van de kookplaat moeten de volgende
voorzorgsmaatregelen in acht worden genomen:
de meubels die direct naast de kookplaat staan en hierboven uitsteken,
moeten op minstens 200 mm van de rand van de plaat staan.
een afzuigkap moet worden geïnstalleerd volgens de voorschriften die u
kunt vinden in het instructieboekje van de afzuigkap zelf en in ieder geval
op een afstand van minstens 650 mm (zie afbeelding).
hang de keukenkastjes naast de kap op een minimum hoogte van 420
mm van het keukenblad (zie afbeelding).
Als de kookplaat onder een keukenkastje
wordt geplaatst, moet deze zich op een afstand
van minstens 700 mm van het keukenblad
bevinden.
De opening van het meubel moet de afmetingen hebben die in de
afbeelding zijn aangegeven.
De bevestigingsklemmen maken een bevestiging mogelijk van de
kookplaat aan een keukenblad van tussen de 20 en 40 mm dik. Voor een
goede bevestiging raden wij u aan alle bijgeleverde haken te gebruiken.
555 mm
55 mm
475 mm
Voor de installatie dient u de pannendragers en de branders van de kookplaat
te verwijderen en hem ondersteboven neer te zetten. Zorg ervoor de
thermokoppels en de bougies niet te beschadigen.
Doe de afdichtingen die bij het apparaat
zijn geleverd op de buitenste boorden
van de kookplaat om te voorkomen dat
er lucht, vocht of water doorkomt (zie
afbeelding).
Voor een correcte bevestiging moet
u ervoor zorgen dat de af te sluiten

Schema voor de bevestiging van de haken
20
30
Stand haak voor keukenblad Stand haak voor keukenblad
H=20mm H=30mm
600mm min.
420mm min.
650mm min.
50
NL
BE
Voor
40
Stand haak voor keukenblad Achter
H=40mm
! Gebruik de haken die u vindt in de “toebehorenverpakking”
Als de kookplaat niet boven een inbouwoven wordt geïnstalleerd, moet
u een houten isolatieplank aanbrengen. Deze moet op een minimum
afstand van 20 mm van de onderkant van de kookplaat worden geplaatst.
Ventilatie
Om een goede ventilatie te bereiken moet u de achterkant van het meubel
verwijderen. Het verdient de voorkeur de oven op twee houten balken
te plaatsen, of eventueel op een enkele plank die een opening heeft van
tenminste 45 x 560 mm (zie afbeeldingen).
560 mm.
45 mm.
Als de kookplaat wordt geïnstalleerd boven een inbouwoven die niet beschikt
over een afkoelmechanisme met ventilator, moet de nodige ventilatie binnen
het meubel worden bereikt door het creëren van openingen voor de toe- en
afvoer van de lucht. (zie afbeeldingen).
! Het is alleen mogelijk de PIM 640 AST kookplaat boven inbouwovens te
installeren als deze zijn voorzien van afkoelingsventilatie.
Elektrische aansluiting
De kookplaten met driepolige voedingskabel werken met de wisselstroom,
      
onderkant van de kookplaat). De aarding van de kabel wordt aangegeven
door de kleuren geel-groen. Als het fornuis wordt geïnstalleerd boven een
inbouwoven moeten de elektrische aansluitingen van fornuis en oven apart
worden uitgevoerd, zowel voor veiligheidsredenen als voor het eventueel
makkelijker verwijderen van de oven.
Het aansluiten van de voedingskabel aan het elektrische net
Gebruik voor de voedingskabel een stekker die genormaliseerd is voor de
lading aangegeven op het typeplaatje.
Wanneer het apparaat rechtstreeks op het net wordt aangesloten moet u
tussen het apparaat en het net een meerpolige schakelaar aanbrengen met
een afstand tussen de contacten van minstens 3mm, aangepast aan het
elektrische vermogen en voldoend aan de geldende normen (de aarding
mag niet worden onderbroken door de schakelaar). De voedingskabel moet
zodanig worden geplaatst dat hij nergens een temperatuur bereikt van 50°C
hoger dan de kamertemperatuur.
! De installateur is verantwoordelijk voor een correcte elektrische aansluiting
en het in acht nemen van de veiligheidsnormen.
Voor het aansluiten moet u controleren dat:
het stopcontact geaard is en voldoet aan de geldende normen;
het stopcontact in staat is het maximale vermogen van het apparaat te
dragen, zoals aangegeven op het typeplaatje;
de spanning zich bevindt tussen de waarden die staan aangegeven op
het typeplaatje;
het stopcontact en de stekker overeenkomen. Als dat niet zo is, dient
u ofwel de stekker ofwel het stopcontact te vervangen; gebruik geen
verlengsnoeren of dubbelstekkers.
! Wanneer het apparaat geïnstalleerd is moeten het snoer en het stopcontact
gemakkelijk te bereiken zijn.
! De kabel mag niet worden gebogen of samengedrukt.
! De kabel moet van tijd tot tijd worden gecontroleerd en mag alleen door
erkende monteurs worden vervangen (zie Service).
! De fabrikant kan nergens aansprakelijk voor worden gesteld als deze normen
niet worden nageleefd.
Gasaansluiting
De aansluiting van het apparaat aan de gasbuizen moet worden uitgevoerd
zoals voorgeschreven door de geldende normen, en nadat men er zeker van
is dat het fornuis is ingesteld voor het type gas dat men gaat gebruiken. In
het omgekeerde geval (voor België) gaat u te werk zoals beschreven in de
paragraaf “Aanpassing aan verschillende types gas”.
Let op! Voordat het wordt aangesloten, verwijder de dop van de opening voor
de gasaansluiting van de kookplaat.
Om het apparaat aan de gasbuizen aan
te sluiten (II2E+3+ voor Belgie en I2L voor
Nederland), dient men eerst de verbinder
te monteren.”R” (Deze is op aanvraag
verkrijgbaar bij de technische-service-dienst)
Tevens dient men zijn pakking op de verbinder
G”,die er uit ziet als een “L” , van de voedings-
struktuur te monteren. De verbinder is gedraad:

De aansluiting voert men uit met behulp van:
- een onbuigbare buis
 
met bedradingsverbinder.
Daarbij dient het apparaat uitgerust te zijn van een gaskraantje die gemakkelijk
draaibaar dient te zijn, dient dit gaskraantje aan de huidige Nationale Normen
te voldoen.
Aansluiting met onbuigzame buis (koper of staal)
! De aansluiting aan de gasleiding moet zodanig worden uitgevoerd dat het
apparaat niet beweegt.
Op de voedingsstructuur van het apparaat bevindt zich een “L”-vormig,
richtbaar verbindingsstuk waarvan de afdichting is verzekerd door een
pakking. Als het verbindingsstuk gedraaid moet worden is het absoluut
L
G
R
NL
BE
51
noodzakelijk de pakking te vervangen (bij het apparaat geleverd). Het
verbindingsstuk waardoor het gas toegang krijgt tot het fornuis is voorzien


wand voorzien van aanhechtingen met schroefdraad.
Het verbindingsstuk waardoor het gas toegang krijgt tot het fornuis is voorzien

De in werking stelling van deze buizen moet zodanig worden bewerkstelligd
dat hun lengte in uitgerolde toestand niet meer dan 2000 mm is. Nadat de

buis niet in contact komt met de beweegbare delen of dat hij vastgekneld raakt.
! Gebruik uitsluitend buizen en afdichtingen die voldoen aan de geldende
landelijke normen.
Controleren gasdichtheid
! Nadat het installeren heeft plaats gevonden moet de perfecte gasdichtheid
van alle verbindingsstukken worden gecontroleerd met een zeepoplossing
en nooit met een vlam.
Aanpassen aan de verschillende soorten gas (voor België)
Voor het aanpassen van de kookplaat aan een ander soort gas dan waarvoor
hij is bestemd (aangegeven op het typeplaatje aan de onderkant van de
kookplaat of op de verpakking), moeten de straalpijpjes van de branders op
de volgende wijze worden vervangen:
1. Verwijder de roosters van de kookplaat en schuif de branders uit hun
plaats.
2. Schroef de straalpijpjes los met een steeksleutel van 7mm en vervang
ze met de straalpijpjes geschikt voor het nieuwe type gas (zie tabel 1
“Kenmerken van de branders en de straalpijpen”).
3. Zet de onderdelen weer op hun plaats door de handelingen in omgekeerde
volgorde uit te voeren.
4. Aan het einde van deze handelingen moet u het oude etiket dat de
gasinstelling aangeeft vervangen met het etiket dat overeenkomt met het
nieuwe gas dat u gaat gebruiken, verkrijgbaar bij onze Technische Service
Centers.
Regelen primaire lucht van de straalpijpjes (voor België)
De branders hebben geen regeling van de primaire lucht nodig.
Het regelen van de minimumstand (voor België)
1. Zet het kraantje op de minimumstand;
2. Verwijder de knop en draai aan het
regelschroefje in of naast de spil van het
kraantje totdat u een kleine, regelmatige vlam
bereikt.
3. Controleer of de brander aanblijft als u de knop snel van hoog naar laag
draait.
4. Als bij de apparaten met een veiligheidsmechanisme (thermo-element)
dit systeem niet werkt als de branders op de minimum stand staan, moet
u het minimum verhogen door aan de stelschroef te draaien.
5. Als de regeling voltooid is moet u de zegels op de bypass schroefjes weer
op hun plaats brengen met zegellak of dergelijk materiaal.
! Bij vloeibaar gas moet het regelschroefje geheel dicht worden geschroefd.
! Aan het einde van deze handelingen moet u het oude etiket van de
gasinstelling vervangen met het etiket dat correspondeert met het nieuwe
gas, verkrijgbaar bij onze Technische Service Centers.
! Als de gasdruk van het gebruikte gas verschillend (of variabel) is dan hetgeen
is voorzien, moet op de toevoerbuis een drukteregelaar worden aangebracht
die voldoet aan de geldende landelijke normen.
Elektrische
aansluitingen
TYPEPLAATJE
Dit apparaat voldoet aan de volgende EU
Richtlijnen:
- 2006/95/EG van 12/12/06 (Laagspanning)
en daaropvolgende wijzigingen
- 2004/108/EG van 15/12/04
(Elektromagnetische Compatibiliteit) en
daaropvolgende wijzigingen
- 93/68/EG van 22/07/93 en daaropvolgende
wijzigingen.
- 2009/142/EG van 30/11/09 (Gas) en
daaropvolgende wijzigingen.
- 2012/19/EU en daaropvolgende wijzigingen.
EU reglement nr. 66/2014 met integratie van
richtlijn 2009/125/EC.
EN 30-2-1reglement
ECODESIGN
zie typeplaatje
52
NL
BE
Spanning van
voeding
Nominale (mbar)
Minimum (mbar)
Maximum (mbar)
28-30
20
35
37
25
45
20
17
25
25
20
30
Brander Doorsnee
(mm)
Nominaal
Thermisch vermogen
kW (p.c.s.*)
Gereduceerd
By-pass
1/100
(mm)
Straal.
1/100
(mm)
Bereik*
g/h
*** **
Straal.
1/100
(mm)
Bereik*
l/h
G20G25
Half-snel (S)
Spaarbrander
(A)
Drievoudige Ring (TC)
Table 1 (Voor Belgie) Vloeibaar gas Aardgas
75
55
130
0,40
0,40
1,50
1,90
1,00
3,25
70
50
91
138
73
236
136
71
232
181
95
309
210
111
360
Kenmerken van de branders en de straalpijpjes
28
28
61
106
79
133
Ta
bel 1 (Voor Nederland)
Spanning van
voeding
Nominale (mbar)
Minimum (mbar)
Maximum (mbar)
25
20
30
Brander Doorsnee
(mm)
Nominaal
Thermisch vermogen
kW (p.c.s.*)
Gereduceerd
Straal.
1/100
(mm)
Bereik*
l/h
G25
Aardgas
75
55
130
0,40
0,40
1,50
1,90
1,00
3,25
106
79
133
210
111
360
* A 15°C et 1013,25 mbar-gaz sec
** Propane P.C.S. = 50,37 MJ/kg
*** Butane P.C.S. = 49,47 MJ/kg
Aardgas
G20 P. C.S. = 37,78 MJ/m³
Aardgas
G25 P. C.S. = 32,49 MJ/m³
Halp Snel (S)
Spaarbrander
(A)
Drievoudige Ring (TC)
SS
ATC
NL
BE
53
Starten en gebruik
! Op iedere knop staat aangegeven waar de gasbrander zich precies bevindt.
Gasbranders
De gekozen brander kan met de betreffende knop als volgt worden geregeld:
 
Maximum
Minimum
Om een van de branders aan te steken dient u er een vlam of aansteker bij
te houden, de knop stevig in te drukken en tegen de klok in te draaien tot u
het maximum vermogen heeft bereikt.
In de uitvoeringen die zijn voorzien van een veiligheidsmechanisme moet u
de knop circa 2-3 seconden lang ingedrukt houden totdat het element dat
automatisch de vlam ontstoken houdt, warm wordt.
In de uitvoeringen voorzien van een bougie moet u om de gekozen brander
aan te steken om te beginnen de ontstekingsknop (aangegeven door het
symbool , ) indrukken, dan de betreffende knop stevig indrukken en tegen
de klok indraaien tot u het maximum vermogen heeft bereikt.
! Mocht een gasbrander per ongeluk uitgaan, draai dan de knop uit en wacht
minstens 1 minuut voordat u hem weer probeert aan te steken.
Om de brander uit te doen moet u de knop geheel met de klok meedraaien

Praktisch advies voor het gebruik van de branders
Voor een optimaal rendement dient u het volgende te onthouden:
gebruik voor iedere brander de pan die erop past (zie tabel) om te vermijden
dat de vlammen er onderuit vandaan komen.
gebruik alleen pannen met een platte bodem en met een deksel erop.
draai de knop op het minimum zodra het kookpunt is bereikt.
Ø Diameter pan (cm)
Half-snel (S)
Spaarbrander (A)
Drievoudige Ring (TC)
16 - 20
10 - 14
24 - 26
Brander
Voor het herkennen van het soort brander verwijzen wij u naar de afbeeldingen
in paragraaf “Kenmerken van de branders en straalpijpen”.
Voorzorgsmaatregelen en advies
! Dit apparaat is ontworpen en vervaardigd volgens de geldende internationale
veiligheidsvoorschriften. Deze aanwijzingen zijn geschreven voor uw veiligheid
en u dient ze derhalve goed door te nemen.
Algemene veiligheidsmaatregelen
Dit is een inbouwapparaat van klasse 3.
Gasfornuizen hebben voor een goede werking behoefte aan een
regelmatige luchtverversing. Controleer dat bij het installeren aan
de vereisten wordt voldaan beschreven in de paragraaf “Plaatsing”.
Deze instructies gelden alleen voor de landen wiens symbolen in de
gebruiksaanwijzing en op het typeplaatje staan.
Dit apparaat is vervaardigd voor niet-professioneel gebruik binnenshuis.
Het apparaat dient niet buitenshuis te worden geplaatst, ook niet in
overdekte toestand. Het is erg gevaarlijk als het in aanraking komt met
regen of onweer.
Raak het apparaat niet blootsvoets aan of met natte handen of voeten.
Het apparaat dient gebruikt te worden om voedsel te bereiden.
Het mag uitsluitend door volwassenen worden gebruikt en alleen
volgens de instructies die in deze handleiding beschreven staan.
Elk ander gebruik (bv.: verwarming van ruimten) is als oneigenlijk te
beschouwen en dus gevaarlijk. De fabrikant kan niet aansprakelijk
worden gesteld voor eventuele schade die te wijten is aan onjuist,
verkeerd of onredelijk gebruik.
Laat de ventilatieopeningen en warmteafvoer vrij.
 ” staan als de oven niet
wordt gebruikt.
Haal de stekker nooit uit het stopcontact door aan het snoer te trekken
maar door de stekker zelf beet te pakken.
Maak de oven niet schoon of voer geen onderhoud uit als de stekker nog
in het stopcontact zit.
Als de oven defect is, mag u nooit aan het interne systeem sleutelen om
een reparatie proberen uit te voeren. Neem contact op met de Technische
Dienst (zie Service).
Richt de handvaten van de pannen altijd naar de binnenzijde van de
kookplaat zodat u er niet per ongeluk tegenaan stoot.
Doe het glazen deksel (waar aanwezig) niet omlaag als de gasbranders
of de elektrische platen nog warm zijn.
Gebruik geen instabiele of vervormde pannen.
Dit apparaat mag niet worden gebruikt door personen (kinderen
inbegrepen) met een beperkt lichamelijk, sensorieel of geestelijk vermogen
of personen die niet de nodige ervaring of kennis hebben met het apparaat,
tenzij onder toezicht van een persoon die verantwoordelijk is voor hun
veiligheid of nadat hun is uitgelegd hoe het apparaat werkt.
Voorkom dat kinderen met het apparaat spelen.
Het apparaat is niet geschikt om te worden ingeschakeld m.b.v. een
externe timer ofwel door een gescheiden afstandsbedieningssysteem.
Afvalverwijdering
Verwijdering van het verpakkingsmateriaal: houd u aan de plaatselijke
normen, zodat het verpakkingsmateriaal hergebruikt kan worden.
    
en Electronische Apparatuur (WEEE), vereist dat oude huishoudelijke
electrische apparaten niet mogen vernietigd via de normale ongesorteerde
afvalstroom. Oude apparaten moeten apart worden ingezameld om zo
het hergebruik van de gebruikte materialen te optimaliseren en de
negatieve invloed op de gezondheid en het milieu te reduceren. Het
symbool op het product van de “afvalcontainer met een kruis erdoor”
herinnert u aan uw verplichting, dat wanneer u het apparaat vernietigt,
het apparaat apart moet worden ingezameld.
Consumenten moeten contact opnemen met de locale autoriteiten voor
informatie over de juiste wijze van vernietiging van hun oude apparaat.
Energiebesparing en milieubehoud
Bereid uw etenswaren in afgesloten potten of pannen met goed passende
deksels en gebruik zo weinig mogelijk water. Koken zonder deksel zal het
energieverbruik enorm verhogen.
Gebruik enkel vlakke potten en pannen.
Als u iets bereidt dat lang duurt, kunt u eventueel een snelkookpan
gebruiken die twee maal sneller werkt en een derde van de energie
bespaart.
54
NL
BE
Onderhoud en verzorging
De elektrische stroom afsluiten
Sluit altijd eerst de stroom af voordat u tot enige handeling overgaat.
Schoonmaken van het apparaat
! Vermijd het gebruik van schuurmiddelen of bijtende middelen, zoals
vlekkenmiddelen en roestverwijderende producten, schoonmaakmiddelen
in poedervorm of schuursponzen: deze kunnen het oppervlak onherstelbaar
krassen.
! Gebruik nooit stoom- of hogedrukreinigers voor het reinigen van het apparaat.
Voor normaal onderhoud moet u de kookplaat met een vochtige spons
reinigen en afdrogen met keukenpapier.
De vlamverspreiders moeten regelmatig in een warm sopje worden
gewassen zodat eventuele etensresten makkelijker kunnen worden
verwijderd.
Bij kookplaten die zijn voorzien van een automatische ontsteking moet het
uiteinde van de elektronische ontstekingselementen regelmatig worden
gereinigd en moet u controleren dat de gaatjes van de vlamverspreiders
niet verstopt zijn.
Roestvrij staal kan vlekken gaan vertonen als er voor langere tijd
kalkhoudend water of agressieve schoonmaakmiddelen (fosforhoudend)
op hebben gelegen. Spoel en droog het dus na het schoonmaken goed
af. Droog watervlekken altijd gelijk af.
Onderhoud gaskranen
Met verloop van tijd kan een kraan stroef worden of vast blijven zitten; in dat
geval is het noodzakelijk hem te vervangen.
! Dit moet worden uitgevoerd door een door de fabrikant bevoegde
installateur.
Storingen en oplossingen
Het kan gebeuren dat het kookvlak niet (afdoende) functioneert. Voordat u
de servicedienst belt dient u te controleren of u het euvel zelf kunt oplossen.

het bijzonder of de hoofdgasleiding open staat.
De brander gaat niet aan of de vlam is niet gelijkmatig.
Heeft u gecontroleerd of:
De openingen van de vlamverspreiders niet verstopt zijn.
Alle onderdelen van de brander goed in elkaar zitten.
Het niet tocht dichtbij het kookvlak.
De vlam blijft niet aan in de uitvoeringen met veiligheidsmechanisme.
Heeft u gecontroleerd of:
U de knop goed heeft ingedrukt.
U de knop lang genoeg heeft ingedrukt voor het activeren van het
veiligheidsmechanisme.
De gaten van de vlamverspreiders dichtbij het veiligheidsmechanisme
niet verstopt zijn.
De brander blijft niet aan als hij op minimum staat.
Heeft u gecontroleerd of:
De gaten van de vlamverspreiders niet verstopt zijn.
Het niet tocht dichtbij het kookvlak.
De minimum stand niet goed is ingesteld.
De pannen zijn wankel.
Heeft u gecontroleerd of:
De bodem van de pan helemaal plat is.
De pan in het midden van de brander of de kookplaat staat.
De roosters niet zijn verwisseld.
55
UA

!


!     
   


!

!
     

!


   

   

В димохід або відвід системи димоходів
(тільки для кухонних приладів)
Безпосередньо
назовні
 

    
3
 

  
 

   

2


  
  
  
  
 
   
  
 

    
 


 
  
  
A
Приклади вентиляційних
отворів для відводу повітря з
продуктами горіння.
Збільшений вентиляційний
отвір між вікном і підлогою
Сусіднє
приміщення
Приміщення, що
має вентилюватися

    
    
   
   



     

 

   
  

 

  
    

    

   



555 mm
55 mm
475 mm


 

   


  



20
30
 
H=20mm H=30mm
600mm min.
420mm min.
650mm min.
56
UA

40
 
H=40mm
!
    
  







560 mm.
45 mm.
   
   
   

!


 



    
    


 

  


    



!


 
 

 
 


!    

!
!   

!









!   
  
  




!


   

   

  


    
57
UA

 

!


!     





 
 


 

    
    
      

 

 
 
 


     

  
  


  

! 

!   


!
   
    

Електричні
з'єднання
Таблиця
(дивіться таблицю)
Дана плита відповідає наступним
директивам
Європейського економічного
співтовариства:
- 2006/95/ЄC від 12/12/06 (Низька Напруга)
інаступні поправки
- 2004/108/ЄC від15/12/04
(Електромагнітна Сумісність) та
наступніпоправки
- 93/68/ЄЕС від 22/07/93 та наступні
поправки.
- 2009/142/ЄC від 30/11/09 (Газ) і наступні
зміни та доповнення.
- 2012/19/ЄU і наступні зміни та
доповнення.
58
UA
Номінальний (мбар)
Мінімальний (мбар)
Максимальний (мбар)
Характеристики пальників і насадок
Та
блиця 1 Зріджений газ Природний газ
37
25
45
28-30
20
35
20
17
25
Напівшвидка
(S)
Допоміжна
(A)
Потрійна
(TC)
Тиск, що подається
Пальник
Діаметр
(мм)
Теплова
потужність
кВт
(p.c.s.*)
75
55
130
1.90
1.00
1.50
Номiн. Зменш.
0.40
0.40
3.25
By-pass
1/100
(
мм
)
28
28
61
Форсунка
1/100
(
мм
)
Витрати*
г/год
***
70
50
91
Витрати*
л/год
106
79
133
181
95
309
138
73
236
**
136
71
232
Форсунка
1/100
(
мм
)
*
При 15°C і 1013,25 мбар-сухий газ
**
Пропан P. C.S. = 49.47 МДж/кг
***
Бутан P.C.S. = 49.47 МДж/кг
Природний газ P. C.S. = 37.78 МДж/м
3
SS
ATC
59
UA

!     




 


     


  
  


 

  

!

    



    
    

 
 
Напівшвидка
(S)
Допоміжна
(A)
Потрійна
(TC)
16 - 20
10 - 14
24 - 26
Конфорка
Ø Діаметр посуду (cм)
    


!   
  


 
 
    

      

 
   

     

      


   
    


   

  

 

 

   

 

 

    

   

 

 

 

 
  
     
  



 

 

   

   
   
   
    



60
UA

     


 
 






!     


!

    

 

 
   

 

    

!


  

!



   
   




Перевірити:
 
 
 

Перевірити й переконатися:
 
 

 

Перевірити й переконатися:
 
 
 

Перевірити й переконатися:
 
 
 
IT
61
AR
61

!

!










!






 





 








 

 
62
IT
62
AR

!


  




2-3


 

!







 Ø
(S20 - 16
(A14 - 10
(A26 - 24

!


3






































    EU  
         WEEE)
     
           













IT
63
AR
63

1




(*p.c.s
 




1001



** ***

1001



(S751.900.402870138136106181
(A551.000.40285073717995
(TC1303.251.506191236232133306




28-30
20
35
37
25
45
20
17
25
1013,2515
50.37 = .P.C.S 
49.47 = .P.C.S 
3
37.78 = .P.C.S 
1)
SS
ATC
64
IT
64
AR






-

-

-

- 

-


-

-
2


 3

 4

 5
!
!


!

IT
65
AR
65
!


20


45 x 560












3


50
!


 



 

!
!

!
!





1!


!
L


.


.
2000

!

!




 1
7 2
1
 3
 4




 1
66
IT
66
AR

!

!


!
!

!
B.S. 6891





3
2


2
100




















50



200
650

420


770









4020


555 mm
55 mm
475 mm

30
20
 
30 20

40
 
40
650
IT
67
AR
67
68
IT
68
AR
195125806.02
03/2015 - XEROX FABRIANO
Indesit Company S.p.A.
V
iale Aristide Merloni,47
60044 Fabriano (AN)
www.indesit.com
  • Page 1 1
  • Page 2 2
  • Page 3 3
  • Page 4 4
  • Page 5 5
  • Page 6 6
  • Page 7 7
  • Page 8 8
  • Page 9 9
  • Page 10 10
  • Page 11 11
  • Page 12 12
  • Page 13 13
  • Page 14 14
  • Page 15 15
  • Page 16 16
  • Page 17 17
  • Page 18 18
  • Page 19 19
  • Page 20 20
  • Page 21 21
  • Page 22 22
  • Page 23 23
  • Page 24 24
  • Page 25 25
  • Page 26 26
  • Page 27 27
  • Page 28 28
  • Page 29 29
  • Page 30 30
  • Page 31 31
  • Page 32 32
  • Page 33 33
  • Page 34 34
  • Page 35 35
  • Page 36 36
  • Page 37 37
  • Page 38 38
  • Page 39 39
  • Page 40 40
  • Page 41 41
  • Page 42 42
  • Page 43 43
  • Page 44 44
  • Page 45 45
  • Page 46 46
  • Page 47 47
  • Page 48 48
  • Page 49 49
  • Page 50 50
  • Page 51 51
  • Page 52 52
  • Page 53 53
  • Page 54 54
  • Page 55 55
  • Page 56 56
  • Page 57 57
  • Page 58 58
  • Page 59 59
  • Page 60 60
  • Page 61 61
  • Page 62 62
  • Page 63 63
  • Page 64 64
  • Page 65 65
  • Page 66 66
  • Page 67 67
  • Page 68 68

Indesit PIM 640 AST (IX) Gebruikershandleiding

Type
Gebruikershandleiding