Dell OptiPlex 7050 Snelstartgids
- Categorie
- Interface-hubs
- Type
- Snelstartgids

Quick Start Guide
Snelstartgids
Guide d'information rapide
Schnellstart-Handbuch
Guida introduttiva rapida
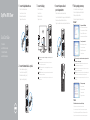
OptiPlex 7050 Tower
1
2
3 4 5Connect the keyboard and mouse
Sluit het toetsenbord en de muis aan
Connecter le clavier et la souris
Tastatur und Maus anschließen
Collegare la tastiera e il mouse
Connect the network cable — optional
Sluit de netwerkkabel aan (optioneel)
Connecter le câble réseau (facultatif)
Netzwerkkabel anschließen (optional)
Collegare il cavo di rete (opzionale)
Connect the display
Sluit het beeldscherm aan
Connecter l'écran
Bildschirm anschließen
Collegare lo schermo
NOTE: If you ordered your computer with a discrete graphics card, connectthe display to the
discrete graphics card.
N.B.: Als u uw computer inclusief een discrete grafische kaart heeft gekocht, sluit u het
beeldscherm aan op de discrete grafische kaart.
REMARQUE : si l'ordinateur a été livré avec une carte graphique dédiée en option, connecter
l'écran à la carte graphique.
ANMERKUNG: Wenn Sie einen Computer mit separater Grafikkarte bestellt haben, schließen Sie
die Anzeige über die separate Grafikkarte an.
N.B.: se il computer è stato ordinato con una scheda grafica discreta, collegare lo schermo alla
scheda grafica discreta.
Connect the power cable and
press the power button
Sluit de stroomkabel aan en druk op de aan-uitknop
Connecter le câble d'alimentation et appuyer sur le bouton d'alimentation
Stromkabel anschließen und Betriebsschalter drücken
Collegare il cavo di alimentazione e premere il pulsante di alimentazione
Finish operating system setup
Voltooi de installatie van het besturingssysteem
Terminer la configuration du système d'exploitation
Betriebssystem-Setup abschließen
Terminare la configurazione del sistema operativo
Windows 7
Set a password for Windows
Stel een wachtwoord voor Windows in
Définir un mot de passe pour Windows
Kennwort für Windows einrichten
Impostare una password per Windows
Connect to your network
Maak verbinding met uw netwerk
Se connecter à un réseau
Mit dem Netzwerk verbinden
Connettere alla rete
NOTE: If you are connecting to a secured wireless network, enter the password for the
wireless network access when prompted.
N.B.: als u verbinding maakt met een beveiligd draadloos netwerk, vul dan het wachtwoord
voor het netwerk in wanneer daar om gevraagd wordt.
REMARQUE : dans le cas d'une connexion à un réseau sans fil sécurisé, saisir le mot de passe
d'accès au réseau sans fil lorsque l'invite apparaît.
ANMERKUNG: Wenn Sie sich mit einem geschützten Wireless-Netzwerk verbinden, geben Sie
das Kennwort für das Wireless-Netzwerk ein, wenn Sie dazu aufgefordert werden.
N.B.: per collegarsi a una rete senza fili protetta, inserire la password di accesso alla rete senza
fili quando richiesto.
Protect your computer
Beveilig de computer
Protéger votre ordinateur
Computer schützen
Proteggere il computer
Ubuntu
Follow the instructions on the screen to finish setup.
Volg de instructies op het scherm om de setup te voltooien.
Suivre les instructions qui s'affichent à l'écran pour terminer la configuration.
Folgen Sie den Anweisungen auf dem Bildschirm, um das Setup abzuschließen.
Seguire le istruzioni visualizzate sullo schermo per terminare la configurazione.

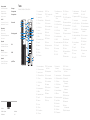
Features
Kenmerken | Caractéristiques | Funktionen | Funzioni
Product support and manuals
Productondersteuning en handleidingen
Support produits et manuels
Produktsupport und Handbücher
Supporto prodotto e manuali
Dell.com/support
Dell.com/support/manuals
Dell.com/support/windows
Contact Dell
Contact opnemen met Dell | Contacter Dell
Kontaktaufnahme mit Dell | Contattare Dell
Dell.com/contactdell
Regulatory and safety
Regelgeving en veiligheid
Réglementations et sécurité
Sicherheitshinweise und Zulassungsinformationen
Normative e sicurezza
Dell.com/regulatory_compliance
Regulatory model
Beschreven model | Modèle réglementaire
Muster-Modellnummer | Modello normativo
D18M
Regulatory type
Beschreven type | Type réglementaire
Muster-Typnummer | Tipo di conformità
D18M003
Computer model
Computermodel | Modèle de l'ordinateur
Computermodell | Modello computer
OptiPlex 7050 Tower
© 2016 Dell Inc.
© 2016 Microsoft Corporation.
© 2016 Canonical Ltd.
Printed in China.
2016-11
1. Aan-uitknop en voedingslampje
2. 5.25-inch extern compartiment
3. Optisch station (optioneel)
4. USB 2.0-poort met PowerShare
5. USB 3.0-poort
6. USB 3.0 Type-C-poort
7. Lijnuitgang
8. Activiteitenlampje vaste schijf
9. HDMI-poort
10. Geheugenkaartlezer (optioneel)
11. DisplayPort
12. Headsetpoort
13. Seriële poort
14. USB 2.0-poort
15. PS/2-toetsenbordpoort
16. USB 3.0-poorten
17. USB 2.0-poorten (ondersteunt
Smart Power On)
18. Uitbreidingskaartsleuven
19. Poort voor stroomkabel
20. Diagnostisch lampje voeding
21. Slot voor kabelbehuizing
22. Vergrendeling
23. VGA-poort (optioneel)
24. PS/2-muispoort
25. Netwerkpoort
26. Kensington-veiligheidskabelslot
27. Padlock-ring
1. Bouton d’alimentation et voyant
d’alimentation
2. Compartiment pour lecteur de
5,25pouces
3. Lecteur optique (en option)
4. Port USB 2.0 avec PowerShare
5. Port USB 3.0
6. Port USB 3.0 de type C
7. Port de ligne de sortie
8. Voyant d’activité du disque dur
9. Port HDMI
10. Lecteur de cartes mémoire (en option)
11. Port DisplayPort
12. Port pour casque
13. Port série
14. Port USB 2.0
15. Port PS/2 pour clavier
16. Ports USB 3.0
17. Ports USB 2.0 (compatible Smart
Power On)
18. Logements pour cartes d’extension
19. Port du connecteur d’alimentation
20. Voyant de diagnostic du bloc
d’alimentation
21. Passage pour verrou du cache des
câbles
22. Loquet de déverrouillage
23. Port VGA (en option)
24. Port PS/2 pour souris
25. Port réseau
26. Passage pour câble de sécurité
Kensington
27. Anneau pour cadenas
1. Betriebsschalter und
Betriebsanzeige
2. Externer 5,25-Zoll-Schacht
3. Optisches Laufwerk (optional)
4. USB 2.0-Anschluss mit PowerShare
5. USB 3.0-Anschluss
6. USB 3.0 Typ-C-Anschluss
7. Ausgangsanschluss
8. Festplatten-Aktivitätsanzeige
9. HDMI-Anschluss
10. Medienkarten-Lesegerät (optional)
11. DisplayPort-Anschluss
12. Kopfhöreranschluss
13. Serielle Schnittstelle
14. USB 2.0-Anschluss
15. PS/2-Tastaturanschluss
16. USB 3.0-Anschlüsse
17. USB 2.0-Anschlüsse (unterstützt
Smart Power On)
18. Erweiterungskartensteckplätze
19. Netzanschluss-Port
20. Diagnoseanzeige der
Stromversorgung
21. Verriegelungsschlitz für
Kabelabdeckung
22. Entriegelungsriegel
23. VGA-Anschluss (optional)
24. PS/2-Mausanschluss
25. Netzwerkanschluss
26. Kensington-
Sicherheitskabeleinschub
27. Ring für das Vorhängeschloss
1. Indicatore di alimentazione e
pulsante di alimentazione
2. Alloggiamento esterno da 5,25 pollici
3. Unità ottica (opzionale)
4. Porta USB 2.0 con PowerShare
5. Porta USB 3.0
6. Porta USB 3.0 di tipo C
7. Porta della linea di uscita
8. Indicatore di attività del disco rigido
9. Porta HDMI
10. Lettore scheda di memoria
(opzionale)
11. DisplayPort
12. Porta auricolare
13. Porta seriale
14. Porta USB 2.0
15. Porta tastiera PS/2
16. Porte USB 3.0
17. Porte USB 2.0 (supportano
l’accensione intelligente)
18. Slot delle schede di espansione
19. Porta connettore di alimentazione
20. Indicatore di diagnostica
dell’alimentatore
21. Slot blocco copertura cavo
22. Dispositivo di sblocco
23. Porta VGA (opzionale)
24. Porta mouse PS/2
25. Porta di rete
26. Slot per cavo di sicurezza
Kensington
27. Anello del lucchetto
1. Power button and power light
2. 5.25-inch external bay
3. Optical drive (optional)
4. USB 2.0 port with PowerShare
5. USB 3.0 port
6. USB 3.0 Type-C port
7. Line-out port
8. Hard drive activity light
9. HDMI port
10. Memory card reader (optional)
11. DisplayPort
12. Headset port
13. Serial port
14. USB 2.0 port
15. PS/2 keyboard port
16. USB 3.0 ports
17. USB 2.0 ports (supports Smart
Power On)
18. Expansion card slots
19. Power connector port
20. Power supply diagnostic light
21. Cable cover lock slot
22. Release latch
23. VGA port (optional)
24. PS/2 mouse port
25. Network port
26. Kensington security cable slot
27. Padlock ring
Documenttranscriptie
1 Connect the keyboard and mouse OptiPlex 7050 Tower Sluit het toetsenbord en de muis aan Connecter le clavier et la souris Tastatur und Maus anschließen Collegare la tastiera e il mouse 3 Connect the display Sluit het beeldscherm aan Connecter l'écran Bildschirm anschließen Collegare lo schermo 4 Connect the power cable and press the power button Sluit de stroomkabel aan en druk op de aan-uitknop Connecter le câble d'alimentation et appuyer sur le bouton d'alimentation Stromkabel anschließen und Betriebsschalter drücken Collegare il cavo di alimentazione e premere il pulsante di alimentazione 5 Finish operating system setup Voltooi de installatie van het besturingssysteem Terminer la configuration du système d'exploitation Betriebssystem-Setup abschließen Terminare la configurazione del sistema operativo Windows 7 Quick Start Guide Set a password for Windows Stel een wachtwoord voor Windows in Définir un mot de passe pour Windows Kennwort für Windows einrichten Impostare una password per Windows Connect to your network Maak verbinding met uw netwerk Se connecter à un réseau Mit dem Netzwerk verbinden Connettere alla rete Snelstartgids Guide d'information rapide Schnellstart-Handbuch Guida introduttiva rapida NOTE: If you ordered your computer with a discrete graphics card, connect the display to the discrete graphics card. 2 Connect the network cable — optional Sluit de netwerkkabel aan (optioneel) Connecter le câble réseau (facultatif) Netzwerkkabel anschließen (optional) Collegare il cavo di rete (opzionale) N.B.: Als u uw computer inclusief een discrete grafische kaart heeft gekocht, sluit u het beeldscherm aan op de discrete grafische kaart. REMARQUE : si l'ordinateur a été livré avec une carte graphique dédiée en option, connecter l'écran à la carte graphique. ANMERKUNG: Wenn Sie einen Computer mit separater Grafikkarte bestellt haben, schließen Sie die Anzeige über die separate Grafikkarte an. N.B.: se il computer è stato ordinato con una scheda grafica discreta, collegare lo schermo alla scheda grafica discreta. NOTE: If you are connecting to a secured wireless network, enter the password for the wireless network access when prompted. N.B.: als u verbinding maakt met een beveiligd draadloos netwerk, vul dan het wachtwoord voor het netwerk in wanneer daar om gevraagd wordt. REMARQUE : dans le cas d'une connexion à un réseau sans fil sécurisé, saisir le mot de passe d'accès au réseau sans fil lorsque l'invite apparaît. ANMERKUNG: Wenn Sie sich mit einem geschützten Wireless-Netzwerk verbinden, geben Sie das Kennwort für das Wireless-Netzwerk ein, wenn Sie dazu aufgefordert werden. N.B.: per collegarsi a una rete senza fili protetta, inserire la password di accesso alla rete senza fili quando richiesto. Protect your computer Beveilig de computer Protéger votre ordinateur Computer schützen Proteggere il computer Ubuntu Follow the instructions on the screen to finish setup. Volg de instructies op het scherm om de setup te voltooien. Suivre les instructions qui s'affichent à l'écran pour terminer la configuration. Folgen Sie den Anweisungen auf dem Bildschirm, um das Setup abzuschließen. Seguire le istruzioni visualizzate sullo schermo per terminare la configurazione. Product support and manuals Productondersteuning en handleidingen Support produits et manuels Produktsupport und Handbücher Supporto prodotto e manuali Contact Dell Contact opnemen met Dell | Contacter Dell Kontaktaufnahme mit Dell | Contattare Dell Regulatory and safety Regelgeving en veiligheid Réglementations et sécurité Sicherheitshinweise und Zulassungsinformationen Normative e sicurezza Regulatory model Beschreven model | Modèle réglementaire Muster-Modellnummer | Modello normativo Dell.com/support Dell.com/support/manuals Dell.com/support/windows Dell.com/contactdell Features Kenmerken | Caractéristiques | Funktionen | Funzioni 1. Power button and power light 16. USB 3.0 ports 2. 5.25-inch external bay 17. 3. Optical drive (optional) USB 2.0 ports (supports Smart Power On) 4. USB 2.0 port with PowerShare 18. Expansion card slots 5. USB 3.0 port 19. Power connector port USB 3.0 Type-C port 20. Power supply diagnostic light 6. Dell.com/regulatory_compliance D18M Regulatory type Beschreven type | Type réglementaire Muster-Typnummer | Tipo di conformità D18M003 Computer model Computermodel | Modèle de l'ordinateur Computermodell | Modello computer OptiPlex 7050 Tower © 2016 Dell Inc. © 2016 Microsoft Corporation. Printed in China. © 2016 Canonical Ltd. 2016-11 7. Line-out port 21. 8. Hard drive activity light 22. Release latch 9. HDMI port 23. VGA port (optional) 10. Memory card reader (optional) 24. PS/2 mouse port 11. DisplayPort 25. Network port 12. Headset port 26. Kensington security cable slot 13. Serial port 27. 14. USB 2.0 port 15. PS/2 keyboard port 1. Aan-uitknop en voedingslampje 2. 5.25-inch extern compartiment 3. Optisch station (optioneel) Cable cover lock slot Padlock ring 1. 2. 3. 4. 5. 6. 7. 8. 9. 10. 11. 12. 13. 14. Bouton d’alimentation et voyant d’alimentation Compartiment pour lecteur de 5,25 pouces Lecteur optique (en option) Port USB 2.0 avec PowerShare Port USB 3.0 Port USB 3.0 de type C Port de ligne de sortie Voyant d’activité du disque dur Port HDMI Lecteur de cartes mémoire (en option) Port DisplayPort Port pour casque Port série Port USB 2.0 15. 16. 17. 27. Port PS/2 pour clavier Ports USB 3.0 Ports USB 2.0 (compatible Smart Power On) Logements pour cartes d’extension Port du connecteur d’alimentation Voyant de diagnostic du bloc d’alimentation Passage pour verrou du cache des câbles Loquet de déverrouillage Port VGA (en option) Port PS/2 pour souris Port réseau Passage pour câble de sécurité Kensington Anneau pour cadenas Betriebsschalter und Betriebsanzeige 16. USB 3.0-Anschlüsse 17. USB 2.0-Anschlüsse (unterstützt Smart Power On) USB 2.0-poorten (ondersteunt Smart Power On) 1. 18. Uitbreidingskaartsleuven 2. Externer 5,25-Zoll-Schacht 17. 18. 19. 20. 21. 22. 23. 24. 25. 26. 4. USB 2.0-poort met PowerShare 19. Poort voor stroomkabel 3. Optisches Laufwerk (optional) 18. Erweiterungskartensteckplätze 5. USB 3.0-poort 20. Diagnostisch lampje voeding 4. USB 2.0-Anschluss mit PowerShare 19. Netzanschluss-Port 6. USB 3.0 Type-C-poort 21. 5. USB 3.0-Anschluss 7. Lijnuitgang 22. Vergrendeling 6. USB 3.0 Typ-C-Anschluss 20. Diagnoseanzeige der Stromversorgung 8. Activiteitenlampje vaste schijf 23. VGA-poort (optioneel) 7. Ausgangsanschluss 21. 9. Slot voor kabelbehuizing HDMI-poort 24. PS/2-muispoort 8. Festplatten-Aktivitätsanzeige 10. Geheugenkaartlezer (optioneel) 25. Netwerkpoort 9. HDMI-Anschluss 11. DisplayPort 26. Kensington-veiligheidskabelslot 10. Medienkarten-Lesegerät (optional) 12. Headsetpoort 27. 11. DisplayPort-Anschluss 13. Seriële poort 12. Kopfhöreranschluss 14. USB 2.0-poort 13. Serielle Schnittstelle 15. PS/2-toetsenbordpoort 14. USB 2.0-Anschluss USB 3.0-poorten 15. PS/2-Tastaturanschluss 16. Padlock-ring Verriegelungsschlitz für Kabelabdeckung 22. Entriegelungsriegel 23. VGA-Anschluss (optional) 24. PS/2-Mausanschluss 25. Netzwerkanschluss 26. KensingtonSicherheitskabeleinschub 27. Ring für das Vorhängeschloss Indicatore di alimentazione e pulsante di alimentazione 15. Porta tastiera PS/2 16. Porte USB 3.0 2. Alloggiamento esterno da 5,25 pollici 17. 3. Unità ottica (opzionale) Porte USB 2.0 (supportano l’accensione intelligente) 1. 4. Porta USB 2.0 con PowerShare 18. Slot delle schede di espansione 5. Porta USB 3.0 19. Porta connettore di alimentazione 6. Porta USB 3.0 di tipo C 7. Porta della linea di uscita 20. Indicatore di diagnostica dell’alimentatore 8. Indicatore di attività del disco rigido 21. 9. Porta HDMI 22. Dispositivo di sblocco 10. Lettore scheda di memoria (opzionale) 23. Porta VGA (opzionale) 11. DisplayPort 25. Porta di rete 12. Porta auricolare 13. Porta seriale 26. Slot per cavo di sicurezza Kensington 14. Porta USB 2.0 27. Slot blocco copertura cavo 24. Porta mouse PS/2 Anello del lucchetto-
 1
1
-
 2
2


Dell OptiPlex 7050 Snelstartgids
- Categorie
- Interface-hubs
- Type
- Snelstartgids
in andere talen
- English: Dell OptiPlex 7050 Quick start guide
- italiano: Dell OptiPlex 7050 Guida Rapida
- français: Dell OptiPlex 7050 Guide de démarrage rapide
- Deutsch: Dell OptiPlex 7050 Schnellstartanleitung