Nordland NVH10168 Handleiding
- Categorie
- Combi-koelkasten
- Type
- Handleiding

Gebruiksaanwijzing User manual
Vriezer
NVH10168
Freezer

INHOUD
Veiligheidsinformatie 2
Bedieningspaneel 4
Het eerste gebruik 6
Dagelijks gebruik 6
Nuttige aanwijzingen en tips 6
Onderhoud en reiniging 7
Problemen oplossen 8
Technische gegevens 10
Montage 10
Het milieu 13
Wijzigingen voorbehouden
VEILIGHEIDSINFORMATIE
In het belang van uw veiligheid en om een
correct gebruik te kunnen waarborgen is
het van belang dat u, alvorens het apparaat
te installeren en in gebruik te nemen, deze
gebruiksaanwijzing, inclusief de tips en
waarschuwingen, grondig doorleest. Om
onnodige vergissingen en ongevallen te
voorkomen is het belangrijk ervoor te zor-
gen dat alle mensen die het apparaat ge-
bruiken, volledig bekend zijn met de werk-
ing ervan en de veiligheidsvoorzieningen.
Bewaar deze instructies en zorg ervoor dat
zij bij het apparaat blijven als het wordt ver-
plaatst of verkocht, zodat iedereen die het
apparaat gedurende zijn hele levensduur
gebruikt, naar behoren is geïnformeerd over
het gebruik en de veiligheid van het appa-
raat.
Voor de veiligheid van mensen en eigen-
dommen dient u zich aan de voorzorgs-
maatregelen uit dit instructieboekje te hou-
den, de fabrikant is niet verantwoordelijk
voor schade die door het niet opvolgen van
de aanwijzingen veroorzaakt is.
Veiligheid van kinderen en kwetsbare
mensen
• Dit apparaat is niet bedoeld voor gebruik
door personen (waaronder begrepen kin-
deren) met verminderde fysieke, zintuiglij-
ke vermogens of een gebrek aan ervaring
en kennis, tenzij dit onder toezicht ge-
beurt van een voor hun veiligheid verant-
woordelijke persoon of tenzij zij van een
dergelijke persoon instructie hebben ont-
vangen over het gebruik van het appa-
raat.
Houd kinderen uit de buurt om te voorko-
men dat ze met het apparaat gaan spe-
len.
• Houd alle verpakkingsmateriaal buiten
het bereik van kinderen. Gevaar voor ver-
stikking.
• Als u het apparaat afdankt trek dan de
stekker uit het stopcontact, snij de voe-
dingskabel door (zo dicht mogelijk bij het
apparaat) en verwijder de deur om te
voorkomen dat kinderen een elektrische
schok krijgen of zichzelf in het apparaat
opsluiten.
• Als dit apparaat, dat voorzien is van een
magnetische deursluiting, een ouder ap-
paraat vervangt, dat voorzien is van een
veerslot (slot) op de deur of het deksel,
zorg er dan voor dat u het slot onbruik-
baar maakt voordat u het oude apparaat
weggooit. Dit voorkomt dat kinderen er in
opgesloten kunnen raken.
Algemene veiligheid
Let op! Houd de ventilatie-openingen
altijd vrij van obstructies.
• Dit apparaat is bedoeld voor het bewaren
van levensmiddelen en/of dranken in een
gewoon huishouden, zoals uitgelegd in
dit instructieboekje.
• Gebruik geen mechanische hulpmiddelen
of kunstgrepen om het ontdooiproces te
versnellen.
• Gebruik geen andere elektrische appara-
ten (bijvoorbeeld ijsmachines) in koelkas-
ten, tenzij ze voor dit doel goedgekeurd
zijn door de fabrikant.
• Let op dat u het koelcircuit niet bescha-
digt.
• Het koelmiddel isobutaan (R600a) be-
vindt zich in het koelcircuit van het appa-
raat, dit is een natuurlijk gas dat welis-
waar milieuvriendelijk is, maar ook uiterst
ontvlambaar.
Controleer of de onderdelen van het
koelcircuit tijdens transport en installatie
van het apparaat niet beschadigd zijn ge-
raakt.
Indien het koelcircuit beschadigd is:
2

– open vuur en ontstekingsbronnen ver-
mijden
– de ruimte waar het apparaat zich be-
vindt grondig ventileren
• Het is gevaarlijk om wijzigingen aan te
brengen in de specificaties of dit product
op enigerlei wijze te modificeren. Een be-
schadigd netsnoer kan kortsluiting, brand
en/of een elektrische schok veroorzaken.
Waarschuwing! Alle elektrische on-
derdelen (netsnoer, stekker, compres-
sor) mogen om gevaar te voorkomen
uitsluitend worden vervangen door een
erkende onderhoudsdienst of gekwalifi-
ceerd onderhoudspersoneel.
1. Het netsnoer mag niet verlengd wor-
den.
2. Verzeker u ervan dat de stekker niet
platgedrukt of beschadigd wordt door
de achterkant van het apparaat. Een
platgedrukte of beschadigde stekker
kan oververhit raken en brand veroor-
zaken.
3. Verzeker u ervan dat u de stekker van
het apparaat kunt bereiken.
4. Trek niet aan het snoer.
5. Als de stekker los zit, steek hem dan
niet in het stopcontact. Dan bestaat
er een risico op een elektrische schok
of brand.
6. U mag het apparaat niet gebruiken
zonder de afdekking van het lampje
1)
voor de binnenverlichting.
• Dit apparaat is zwaar. Wees voorzichtig
als u het apparaat verplaatst.
• Haal geen artikelen uit het vriesvak en
raak ze niet aan als uw handen vochtig/
nat zijn, dit kan uw huid beschadigen of
vrieswonden veroorzaken.
• Stel het apparaat niet langdurig bloot aan
direct zonlicht.
•
Gloeilampjes
2)
gebruikt voor dit apparaat
is een speciaal lampje voor huishoudelijke
apparaten. De lampjes zijn niet geschikt
voor de verlichting van ruimtes.
Plaats geen bevroren voedsel bovenop
omdat kou en damp condenswater
kunnen produceren aan de binnenkant.
De druppelende vloeistof kan storingen
veroorzaken. Leg daarom geen
bevroren dingen op de bovenkant.
Dagelijks gebruik
• Zet geen hete potten op de kunststof on-
derdelen in het apparaat.
• Bewaar geen brandbare gassen of vloei-
stoffen in het apparaat, deze kunnen ont-
ploffen.
• Zet geen levensmiddelen direct tegen de
luchtopening in de achterwand.
3)
• Diepgevroren voedsel mag niet opnieuw
worden ingevroren als het eenmaal ont-
dooid is.
• Bewaar voorverpakte diepvriesproducten
volgens de aanwijzingen van de fabrikant.
• U dient zich strikt te houden aan de aan-
bevelingen van de fabrikant van het ap-
paraat met betrekking tot het bewaren
van voedsel. Raadpleeg de betreffende
aanwijzingen.
• Leg geen koolzuurhoudende of mousse-
rende dranken in de vriezer, deze veroor-
zaken druk op de fles die daardoor kan
ontploffen, dit kan schade toebrengen
aan het apparaat.
• IJslollies kunnen vrieswonden veroorza-
ken als ze rechtstreeks vanuit het appa-
raat geconsumeerd worden.
Onderhoud en reiniging
• Schakel het apparaat uit en trek de stek-
ker uit het stopcontact voordat u onder-
houdshandelingen verricht.
• Maak het apparaat niet schoon met me-
talen voorwerpen.
• Gebruik geen scherpe voorwerpen om ijs
van het apparaat te krabben. Gebruik
een kunststof schraper.
• Gebruik nooit een haardroger of ander
verwarmingsapparaat om het ontdooien
te versnellen. Oververhitting kan de
kunststof binnenkant beschadigen, en
door binnendringend vocht kan het ap-
paraat onder stroom komen staan.
1) Als er een afdekking voor het lampje is voorzien.
2) Als er is voorzien in een lamp.
3) Als het apparaat vorstvrij is.
3

Installatie
Belangrijk! Voor de aansluiting van
elektriciteit dienen de instructies in de
desbetreffende paragrafen nauwgezet te
worden opgevolgd.
• Pak het apparaat uit en controleer of er
beschadigingen zijn. Sluit het apparaat
niet aan als het beschadigd is. Meld mo-
gelijke beschadigingen onmiddellijk bij de
winkel waar u het apparaat gekocht
heeft. Gooi in dat geval de verpakking
niet weg.
• Wij adviseren u om 4 uur te wachten
voordat u het apparaat aansluit, dan kan
de olie terugvloeien in de compressor.
• Rond het apparaat dient adequate lucht-
circulatie te zijn, anders kan dit tot over-
verhitting leiden. Om voldoende ventilatie
te verkrijgen de instructies met betrekking
tot de installatie opvolgen.
• De achterkant dient zo mogelijk tegen
een muur geplaatst te worden, teneinde
te voorkomen dat hete onderdelen (com-
pressor, condensator) aangeraakt kun-
nen worden en brandwonden veroorza-
ken.
• Het apparaat mag niet vlakbij radiatoren
of kooktoestellen geplaatst worden.
• Verzeker u ervan dat de stekker bereik-
baar is nadat het apparaat geïnstalleerd
is.
• Sluit het apparaat alleen aan op een
drinkwaterleiding.
4)
Onderhoud
• Alle elektrotechnische werkzaamheden
die noodzakelijk zijn voor het uitvoeren
van onderhoud aan het apparaat, dienen
uitgevoerd te worden door een gekwalifi-
ceerd elektricien of competent persoon.
• Dit product mag alleen worden onder-
houden door een erkend onderhouds-
centrum en er dient alleen gebruik te
worden gemaakt van originele reserveon-
derdelen.
Bescherming van het milieu
Dit apparaat bevat geen gassen die de
ozonlaag kunnen beschadigen, niet in
het koelcircuit en evenmin in de isola-
tiematerialen. Het apparaat mag niet
worden weggegooid bij het normale
huishoudelijke afval. Het isolatieschuim
bevat ontvlambare gassen: het appa-
raat moet weggegooid worden con-
form de van toepassing zijnde regels
die u bij de lokale overheidsinstanties
kunt verkrijgen. Voorkom beschadiging
aan de koeleenheid, vooral aan de ach-
terkant bij de warmtewisselaar. De ma-
terialen die gebruikt zijn voor dit appa-
raat en die voorzien zijn van het sym-
bool
zijn recyclebaar.
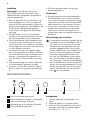
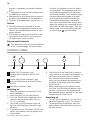
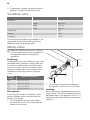
BEDIENINGSPANEEL
1 2 3 4 5
1 Groen controlelampje aan/uit
2 Thermostaatknop en aan/uit schakelaar
3 Geel controlelampje Snelvries
4 Geluidsignaal en schakelaar Snelvries
5 Rood indicatielampje alarm
Inschakelen
1. Laat na plaatsing het apparaat 4 uur
staan.
2. Steek de stekker in het stopcontact.
3. Draai de Thermostaatknop naar rechts
naar een temperatuur met een lagere
stand dan << - 16 °C >>.
4) Indien er een wateraansluiting voorzien is.
4

4. Het groene controlelampje aan/uit gaat
branden en het rode controlelampje
alarm gaat knipperen.
5. Als het groene aan/uit controlelampje
gaat branden betekent dit dat het appa-
raat is ingeschakeld.
6. Als het rode controlelampje gaat bran-
den betekent dit een onjuiste tempera-
tuur in het vriesvak. Bovendien klinkt er
een reeks geluiden dat kan worden ge-
stopt door eenmaal te drukken op het
Geluidsignaal en Snelvries.
7. Als de vriezer voor de eerste keer wordt
ingeschakeld, gaat het rode controle-
lampje knipperen tot de temperatuur is
bereikt die nodig is voor het invriezen
van voedsel.
Uitschakelen
1. Draai de thermostaatknop op de stand
"O" om het apparaat uit te schakelen.
2. Trek de stekker uit het stopcontact om
de stroomtoevoer naar het apparaat af
te sluiten.
Temperatuurregeling
De temperatuur in het apparaat wordt gere-
geld door de thermostaatknop op het be-
dieningspaneel.
Ga als volgt te werk om het apparaat in
werking te stellen:
• draai de thermostaatknop op een lagere
stand om de minimale koude te verkrij-
gen.
• draai de thermostaatknop op een hogere
stand om de maximale koude te verkrij-
gen.
Een gemiddelde instelling is over het al-
gemeen het meest geschikt.
De exacte instelling moet echter gekozen
worden rekening houdend met het feit dat
de temperatuur in het apparaat afhankelijk
is van:
• de omgevingstemperatuur
• hoe vaak de deur geopend wordt
• de hoeveelheid voedsel die bewaard
wordt
• de plaats van het apparaat.
Rood indicatielampje alarm
Onder normale omstandigheden zorgt de
temperatuur in de vriezer ervoor dat het
voedsel lang kan worden bewaard.
Als de temperatuur boven een bepaald ni-
veau komt (-12 °C), klinkt er een alarm en
gaat het lampje knipperen. Het lichtalarm is
een rood alarmlampje dat gaat knipperen
en u hoort een reeks geluiden.
U kunt het alarm stoppen door eenmaal op
de Stop geluidsignaal te drukken.
Als de vriezer voor de eerste keer
wordt ingeschakeld, gaat het rode con-
trolelampje knipperen tot de tempera-
tuur is bereikt die nodig is voor het in-
vriezen van voedsel.
Functie Snelvriezen
Indien meer dan 3-4 kg voedsel wordt inge-
vroren:
1. Druk op de Snelvriesknop gedurende
2-3 seconden om de functie Snelvriezen
te activeren 6-24 uur voordat er vers
voedsel in de vriezer wordt geplaats, het
gele indicatielampje Snelvries gaat bran-
den. De compressor zal constant gaan
lopen om ervoor te zorgen dat het verse
voedsel zo snel mogelijk wordt ingevro-
ren.
2. Het is mogelijk om de functie te allen tij-
de te deactiveren door op de schakelaar
Snelvries gedurende 2 - 3 seconden te
drukken.
3. Plaats het voedsel in de vriesvakken (de
tweede en derde vakken), voor optimale
vriesprestaties kunt u het vriesplateau
en -laden verwijderen (indien van toe-
passing) en het in te vriezen voedsel di-
rect op de verdamper plaatsen. Als u
kleinere hoeveelheden levensmiddelen
wilt invriezen hoeft u het vriesplateau en
de laden niet te verwijderen.
4. Als de levensmiddelen volledig zijn diep-
gevroren (dit kan tot 24 uur duren) kunt
u de snelvriesfunctie uitschakelen door
de toets Snelvries gedurende 2-3 se-
conden in te drukken. Het gele lampje
Snelvries gaat dan ook uit.
5. Verplaats het bevroren voedsel van het
bovenste vriesvak naar de andere drie
vakken (bewaarvakken) om plaats te
maken voor in te vriezen voedsel.
5

Als de snelvriesfunctie per ongeluk niet
wordt uitgeschakeld, dan gebeurt dit
48 uur later automatisch. Het gele con-
trolelampje gaat ook uit.
HET EERSTE GEBRUIK
De binnenkant schoonmaken
Voordat u het apparaat voor de eerste keer
gebruikt, wast u de binnenkant en de inter-
ne accessoires met lauwwarm water en een
beetje neutrale zeep om de typische geur
van een nieuw product weg te nemen.
Droog daarna grondig af.
Belangrijk! Gebruik geen oplosmiddelen of
schuurpoeders. Deze beschadigen de lak.
DAGELIJKS GEBRUIK
Vers voedsel invriezen
De vriesvakken (de tweede en derde vak-
ken) zijn geschikt voor het invriezen van
vers voedsel en voor het voor een lange pe-
riode bewaren van ingevroren en diepge-
vroren voedsel.
Activeer om vers voedsel in te vriezen de
functie snelvriezen.
De maximale hoeveelheid voedsel die in 24
uur kan worden ingevroren wordt aangege-
ven op het typeplaatje, een etiket dat zich
aan de binnenkant van het apparaat be-
vindt.
Het invriesproces duurt 24 uur. Vries tijdens
deze periode geen ander voedsel in.
Het vriesplateau kan gebruikt worden voor
het invriezen van klein fruit (frambozen,
aardbeien, bessen, enz.).
Leg een dunne laag onverpakt fruit in de
doos Nadat het fruit is ingevroren kan het
verpakt, gesorteerd en in de opslagvakken
geplaatst worden.
Het bewaren van ingevroren voedsel
Als u het apparaat voor het eerst of na een
periode dat het niet gebruikt is inschakelt,
het apparaat minstens 2 uur op een hoge
instelling laten werken voordat u er produc-
ten in plaatst.
Belangrijk! In het geval van onbedoelde
ontdooiing, bijvoorbeeld als de stroom
langer is uitgevallen dan de duur die op de
kaart met technische kenmerken onder
"tijdsduur" is vermeld, moet het ontdooide
voedsel snel geconsumeerd worden of
onmiddellijk bereid worden en dan weer
worden ingevroren (nadat het afgekoeld is).
Ontdooien
Diepgevroren of ingevroren voedsel, kan
voordat het wordt gebruikt, ontdooid wor-
den op kamertemperatuur.
Kleine stukken kunnen zelfs rechtstreeks
vanuit de vriezer gekookt worden als ze nog
bevroren zijn: in dat geval zal de bereiding
iets langer duren.
NUTTIGE AANWIJZINGEN EN TIPS
Normale bedrijfsgeluiden
• U kunt een zwak gorgelend en borrelend
geluid horen wanneer het koelmiddel
door leidingen wordt gepompt. Dat is
normaal.
• Als de compressor aan staat, wordt het
koelmiddel rondgepompt en dan zult u
een zoemend en kloppend geluid van de
compressor horen. Dat is normaal.
• De thermische uitzetting kan een plotse-
ling krakend geluid veroorzaken. Dit is
een natuurlijk, niet gevaarlijk fysisch ver-
schijnsel. Dat is normaal.
• Als de compressor in- of uitgeschakeld
wordt, zult u een zacht "klikje" van de
thermostaat horen. Dat is normaal.
Tips voor het invriezen
Om u te helpen om het beste van het in-
vriesproces te maken, volgen hier een paar
belangrijke tips:
• de maximale hoeveelheid voedsel die in
24 uur ingevroren kan worden. is vermeld
op het typeplaatje;
6

• het invriesproces duurt 24 uur. Voeg ge-
durende deze periode niet meer in te
vriezen voedsel toe;
• vries alleen vers en grondig schoonge-
maakte levensmiddelen van uitstekende
kwaliteit in;
• bereid het voedsel in kleine porties voor,
zo kan het snel en volledig worden inge-
vroren en zo kunt u later alleen die hoe-
veelheid laten ontdooien die u nodig
heeft;
• wikkel het voedsel in aluminiumfolie of
plastic en zorg ervoor dat de pakjes
luchtdicht zijn;
• leg vers, nog niet ingevroren voedsel niet
tegen het al ingevroren voedsel, om te
voorkomen dat dit laatste warm wordt;
• smalle pakjes zijn makkelijker op te ber-
gen dan dikke; zout maakt voedsel min-
der lang houdbaar;
• water bevriest, als dit rechtstreeks uit het
vriesvak geconsumeerd wordt, kan het
aan de huid vastvriezen;
• het is aan te bevelen de invriesdatum op
elk pakje te vermelden, dan kunt u zien
hoe lang het al bewaard is;
Tips voor het bewaren van ingevroren
voedsel
Om de beste resultaten van dit apparaat te
verkrijgen, dient u:
• er zich van te verzekeren dat de com-
mercieel ingevroren levensmiddelen op
geschikte wijze door de detailhandelaar
werden opgeslagen;
• ervoor te zorgen dat de ingevroren le-
vensmiddelen zo snel mogelijk van de
winkel naar uw vriezer gebracht worden;
• de deur niet vaker te openen of open te
laten staan dan strikt noodzakelijk.
• Als voedsel eenmaal ontdooid is, bederft
het snel en kan het niet opnieuw worden
ingevroren.
• Bewaar het voedsel niet langer dan de
door de fabrikant aangegeven bewaarpe-
riode.
ONDERHOUD EN REINIGING
Let op! Voordat u welke
onderhoudshandeling dan ook verricht,
de stekker uit het stopcontact trekken.
Het koelcircuit van dit apparaat bevat
koolwaterstoffen; onderhoud en herla-
den mag alleen uitgevoerd worden
door bevoegde technici.
Periodieke reiniging
Het apparaat moet regelmatig worden
schoongemaakt:
• maak de binnenkant en de accessoires
schoon met lauw water en wat neutrale
zeep.
• controleer de afdichtingen regelmatig en
wrijf ze schoon om u ervan te verzekeren
dat ze schoon zijn en vrij van restjes zijn.
• spoel ze af en maak ze grondig droog.
Belangrijk! Trek niet aan leidingen en/of
kabels aan de binnenkant van de kast en
verplaats of beschadig ze niet.
Gebruik nooit schoonmaakmiddelen,
schuurpoeders, erg geparfumeerde reini-
gingsproducten en waspolijstmiddelen om
de binnenkant schoon te maken, aangezien
deze het oppervlak beschadigen en een
sterke geur achterlaten.
Maak de condensor (zwart rooster) en de
compressor op de achterkant van het ap-
paraat schoon met een borstel of stofzui-
ger. Deze handeling zal de prestatie van het
apparaat verbeteren en het elektriciteitsver-
bruik besparen.
Belangrijk! Zorg ervoor dat u het
koelsysteem niet beschadigt.
Veel normaal verkrijgbare keukenreinigers
bevatten chemicaliën die de kunststoffen
die in dit apparaat gebruikt zijn kunnen aan-
tasten/beschadigen. Daarom wordt het
aanbevolen de buitenkant van dit apparaat
alleen schoon te maken met warm water
met een beetje afwasmiddel.
Steek, na het schoonmaken van het appa-
raat, de stekker weer in het stopcontact.
De vriezer ontdooien
Een zekere hoeveelheid rijp zal zich altijd
vormen op de schappen van de vriezer en
rond het bovenste vak.
Ontdooi de vriezer wanneer de rijplaag een
dikte van ongeveer 3-5 mm bereikt heeft.
7

Belangrijk! Zet ongeveer 12 uur voordat u
gaat ontdooien, de thermostaatknop op
een hogere stand om voldoende
koudereserve op te bouwen voor de
onderbreking tijdens de werking.
Volg onderstaande aanwijzingen om de rijp
te verwijderen:
1. Schakel het apparaat uit en trek de
stekker uit het stopcontact.
2. Verwijder al het ingevroren voedsel, wik-
kel het in een paar lagen krantenpapier
en leg het op een koele plaats.
Let op! Raak ingevroren voedsel niet
met natte handen aan. Uw handen
kunnen dan aan de producten
vastvriezen.
3. Laat de deur open staan en steek de
kunststof schraper in de daarvoor be-
doelde opening in het midden van de
bodem, plaats er een opvangbak onder
om het dooiwater op te vangen.
Om het ontdooiproces te versnellen
kunt u een bak warm water in het vries-
vak zetten. Verwijder bovendien stuk-
ken ijs die afbreken voordat het ont-
dooien voltooid is.
4. Na afloop van het ontdooien de binnen-
kant grondig droog maken en de schra-
per bewaren voor toekomstig gebruik.
5. Schakel het apparaat in.
6. Zet de Thermostaatknop op stand <<
-18 °C >> en laat het minstens 4 uur in
de Snelvriesstand staan.
7. Plaats na 4 uur het eerder verwijderde
voedsel terug in de laden.
Waarschuwing! Gebruik nooit
scherpe metalen om de rijp van de
verdamper te krabben, deze zou
beschadigd kunnen raken.
Gebruik geen mechanische of andere
middelen om het ontdooiproces te ver-
snellen, behalve die middelen die door
de fabrikant zijn aanbevolen.
Een temperatuurstijging tijdens het ont-
dooien van de ingevroren levensmidde-
len, kan de veilige bewaartijd verkorten.
Periodes dat het apparaat niet gebruikt
wordt
Als het apparaat gedurende lange tijd niet
gebruikt wordt, neem dan de volgende
voorzorgsmaatregelen:
1. Trek de stekker uit het stopcontact.
2. Haal al het voedsel eruit.
3. Ontdooi het apparaat en toebehoren en
maak alles schoon.
4. Laat de deur/deuren op een kier staan
om de vorming van onaangename
luchtjes te voorkomen.
Belangrijk! Als uw apparaat aan blijft
staan, vraag dan iemand om het zo nu en
dan te controleren, om te voorkomen dat
het bewaarde voedsel bederft, als de
stroom uitvalt.
PROBLEMEN OPLOSSEN
Waarschuwing! Voordat u problemen
oplost, trekt u eerst de stekker uit het
stopcontact.
Het opsporen van storingen die niet in
deze handleiding vermeld zijn, dient te
worden uitgevoerd door een gekwalifi-
ceerd technicus of deskundig persoon.
Belangrijk! Er zijn tijdens de normale
werking geluiden te horen (compressor,
koelcircuit).
8

Belangrijk! Het apparaat werkt niet
continu dus als de compressor stopt,
betekent dit niet dat er geen stroom is.
Daarom moet u geen elektrische
onderdelen van het apparaat aanraken
voordat u de stroom heeft uitgeschakeld.
Probleem Mogelijke oorzaak Oplossing
Het apparaat maakt la-
waai
Het apparaat wordt niet goed
ondersteund
Controleer of het apparaat stabiel
staat (alle vier de voetjes moeten
op de vloer staan)
De compressor werkt
continu
De thermostaatregeling is ver-
keerd ingesteld
Stel een hogere temperatuur in
Deuren sluiten niet goed af of
zijn niet goed gesloten
Controleer of de deuren goed
sluiten en of de pakkingen onbe-
schadigd en schoon zijn
De deur is te vaak open gedaan Laat de deur niet langer open
staan dan noodzakelijk
Er zijn grote hoeveelheden voed-
sel tegelijk in de vriezer geplaatst
Wacht een paar uur en controleer
dan nogmaals de temperatuur
Het voedsel dat in het apparaat
is geplaatst, was te warm
Laat voedsel afkoelen tot kamer-
temperatuur voordat u het opslaat
De kamertemperatuur is te
hoog.
Verlaag de kamertemperatuur.
Er is te veel rijp en ijs De producten zijn niet op de
juiste wijze verpakt
Pak de producten beter in
Deuren sluiten niet goed af of
zijn niet goed gesloten
Controleer of de deuren goed
sluiten en of de pakkingen onbe-
schadigd en schoon zijn
De thermostaatknop staat mis-
schien niet goed
Stel een hogere temperatuur in
Het is te warm in de vrie-
zer
De thermostaatknop staat mis-
schien niet goed
Stel een lagere temperatuur in
De deur sluit niet stevig of is niet
op de juiste manier gesloten
Controleer of de deur goed sluit
en de pakking onbeschadigd en
schoon is
Er zijn grote hoeveelheden voed-
sel tegelijk in de vriezer geplaatst
Leg kleinere hoeveelheden voed-
sel tegelijk in de vriezer.
Het voedsel dat in het apparaat
is geplaatst, was te warm
Laat voedsel afkoelen tot kamer-
temperatuur voordat u het op-
slaat.
In te vriezen producten zijn te
dicht bij elkaar geplaatst
Plaats de producten zodanig dat
koude lucht daartussen kan circu-
leren
Het is te koud in de vrie-
zer
De thermostaatknop staat mis-
schien niet goed
Stel een hogere temperatuur in
Het apparaat werkt hele-
maal niet. De koeling en
de verlichting werken
niet
De stekker zit niet goed in het
stopcontact
Sluit de stekker goed aan
De stroom bereikt het apparaat
niet
Probeer een ander elektrisch ap-
paraat op het stopcontact aan te
sluiten
9

Probleem Mogelijke oorzaak Oplossing
Het apparaat staat niet aan Schakel het apparaat in
Er staat geen spanning op het
stopcontact (probeer een ander
apparaat er op aan te sluiten)
Bel een elektricien
Het apparaat koelt hele-
maal niet
De stekker zit niet goed in het
stopcontact
Sluit de stekker goed aan
Er staat geen spanning op het
stopcontact (probeer een ander
apparaat er op aan te sluiten)
Bel een elektricien
Het apparaat staat niet aan Schakel het apparaat in
Thermostaatknop is niet aan Controleer de Thermostaatknop
Het controlelampje knip-
pert groen
Probleem met de temperatuur
van de sensor
Neem contact op met de klanten-
service
De deur sluiten
1. Maak de afdichtingen van de deur
schoon.
2. Stel de deur, indien nodig, af. Raad-
pleeg "Montage".
3. Vervang, indien nodig, de defecte deur-
afdichtingen. Neem contact met de ser-
vice-afdeling.
TECHNISCHE GEGEVENS
Afmetingen
Hoogte 1250 mm
Breedte 545 mm
Diepte 640 mm
Tijdsduur 18 uur
Spanning 230 V
Frequentie 50 Hz.
De technische gegevens staan op het type-
plaatje aan de linker binnenkant in het ap-
paraat en op het energielabel.
MONTAGE
Lees voor uw eigen veiligheid en
correcte werking van het apparaat
eerst de "veiligheidsinformatie"
aandachtig door, alvorens het apparaat
te installeren.
Opstelling
Dit apparaat kan ook in een droge, goed
geventileerde binnenruimte (garage of kel-
der) geïnstalleerd worden, maar voor de
beste prestatie kunt u het apparaat beter
installeren op een plaats waar de omge-
vingstemperatuur overeenkomt met de kli-
maatklasse die staat aangegeven op het ty-
peplaatje van het apparaat.
Klimaat-
klasse
Omgevingstemperatuur
SN +10°C tot + 32°C
N +16°C tot + 32°C
ST +16°C tot + 38°C
T +16°C tot + 43°C
10

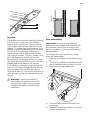
Afstandsstukken achterkant
In het zakje met de handleiding zitten twee
afstandhouders die gemonteerd moeten
worden zoals te zien is in de afbeelding.
1. Plaats de afstandhouders in de openin-
gen. Zorg er voor dat de pijl (A) is gepo-
sitioneerd, zoals in de afbeelding te zien
is.
2. Draai de houders 45° linksom totdat ze
vergrendelen op de juiste plaats.
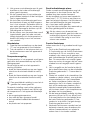
Waterpas zetten
Zorg ervoor dat het apparaat waterpas
staat wanneer u het plaatst. Deze stand
kan bereikt worden met de twee afstelbare
voetjes (2) die aan de voorkant en onder-
kant van het apparaat bevestigd zijn. Stel
de voetjes indien nodig bij door het af-
standsstuk (1) te verwijderen.
2
1
Plaats
Het apparaat moet ver van hittebronnen,
zoals radiatoren, boilers, direct zonlicht
enz., vandaan worden geïnstalleerd. Zorg er
voor dat lucht vrij kan circuleren aan de
achterkant van het keukenkastje. Als het
apparaat onder een muur met een afdakje
wordt geplaatst, moet de minimale afstand
tussen de bovenkant van het keukenkastje
en de muur ten minste 100 mm bedragen
om de beste prestatie te garanderen. Voor
de beste prestatie dient u het apparaat
echter niet onder een afdakje te zetten. De
afstelbare voetjes aan de onderkant van het
apparaat garanderen een nauwkeurig hori-
zontale uitlijning.
Als het keukenkastje in een hoek is ge-
plaatst en de zijkant bevat scharnieren die
naar de muur wijzen, moet de afstand tus-
sen de muur en het keukenkastje ten min-
ste 10 mm zijn om de deur ver genoeg
open te krijgen zodat de planken verwijderd
kunnen worden.
Waarschuwing! Het moet mogelijk
zijn het apparaat van de
hoofdstroomtoevoer af te halen; de
stekker moet daarom na installatie
gemakkelijk toegankelijk zijn.
15mm
15mm 100mm
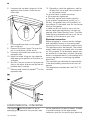
Omkeerbaarheid van de deur
Belangrijk! Om de volgende handelingen
uit te voeren, raden we aan dat dit wordt
gedaan met de hulp van een tweede
persoon die de deuren van het apparaat
stevig vasthoudt tijdens de
werkzaamheden.
11

Om de draairichting van de deur te veran-
deren, gaat u als volgt te werk:
1. Trek de stekker uit het stopcontact.
2. Kantel het apparaat voorzichtig naar
achteren zodat de compressor de vloer
niet kan raken.
3. Schroef beide verstelbare voetjes los.
4. Draai de schroeven van het onderste
scharnier van de deur los.
5. Haal de deur uit de koelkast door hem
iets naar beneden te trekken.
6. Schroef het bovenste scharnier van de
koelkastdeur los en monteer het aan de
andere kant.
7. Bevestig de bovenste deur op het bo-
venste scharnier.
8. Verwijder het onderste scharnier. Breng
de pin over in de richting van de pijl.
9. Draai de schroef los en monteer deze
aan de andere kant.
10. Monteer het onderste scharnier op de
andere kant, verander de stand van de
deur niet.
11. Draai de ene schroef in het gat op de
andere kant, schroef ook de afstelbare
voetjes (2 stuks) vast.
12.
Verwijder en monteer het handvat
5)
op
de tegenoverliggende zijde.
13. Zet het apparaat op zijn plaats, zet het
waterpas, wacht minstens vier uur en
steek dan de stekker in het stopcon-
tact.
Controleer goed en verzeker u ervan dat:
• alle schroeven zijn aangehaald,
• de deur goed open en dicht gaat.
Als de omgevingstemperatuur laag is (bijv.
in de winter), kan het zijn dat de pakking
niet precies op de kast past. Wacht in dat
geval tot de pakking op natuurlijke wijze
passend wordt.
Als u bovenstaande handelingen liever niet
zelf uitvoert, neem dan contact op met de
dichtstbijzijnde Klantenservice. De deskun-
dige van de Klantenservice zal de draairich-
ting van de deuren op uw kosten verande-
ren.
Elektrische aansluiting
Zorg er vóór het aansluiten voor dat het vol-
tage en de frequentie op het typeplaatje
overeenkomen met de stroomtoevoer in uw
huis.
Het apparaat moet geaard zijn. De net-
snoerstekker is voorzien van een contact
voor dit doel. Als het stopcontact niet ge-
aard is, sluit het apparaat dan aan op een
afzonderlijk aardepunt, in overeenstemming
5) indien aanwezig
12

met de geldende regels, raadpleeg hiervoor
een gekwalificeerd elektricien.
De fabrikant neemt geen verantwoordelijk-
heid op zich als de bovenstaande veilig-
heidsmaatregelen niet worden nageleefd.
Dit apparaat voldoet aan de EU. richtlijnen.
HET MILIEU
Het symbool op het product of op de
verpakking wijst erop dat dit product niet
als huishoudafval mag worden behandeld,
maar moet worden afgegeven bij een
verzamelpunt waar elektrische en
elektronische apparatuur wordt gerecycled.
Als u ervoor zorgt dat dit product op de
juiste manier wordt verwijderd, voorkomt u
mogelijke negatieve gevolgen voor mens en
milieu die zich zouden kunnen voordoen in
geval van verkeerde afvalverwerking. Voor
gedetailleerdere informatie over het
recyclen van dit product, kunt u contact
opnemen met de gemeente, de
gemeentereiniging of de winkel waar u het
product hebt gekocht.
13

CONTENTS
Safety information 14
Control panel 16
First use 17
Daily use 18
Helpful Hints and Tips 18
Care and cleaning 19
What to do if… 20
Technical data 22
Installation 22
Environmental concerns 24
Subject to change without notice
SAFETY INFORMATION
In the interest of your safety and to ensure
the correct use, before installing and first
using the appliance, read this user manual
carefully, including its hints and warnings.
To avoid unnecessary mistakes and acci-
dents, it is important to ensure that all peo-
ple using the appliance are thoroughly fa-
miliar with its operation and safety features.
Save these instructions and make sure that
they remain with the appliance if it is moved
or sold, so that everyone using it through its
life will be properly informed on appliance
use and safety.
For the safety of life and property keep the
precautions of these user's instructions as
the manufacturer is not responsible for
damages caused by omission.
Children and vulnerable people safety
• This appliance is not intended for use by
persons (including children) with reduced
physical, sensory or mental capabilities,
or lack of experience and knowledge, un-
less they have been given supervision or
instruction concerning use of the appli-
ance by a person responsible for their
safety.
Children should be supervised to ensure
that they do not play with the appliance.
• Keep all packaging well away from chil-
dren. There is risk of suffocation.
• If you are discarding the appliance pull
the plug out of the socket, cut the con-
nection cable (as close to the appliance
as you can) and remove the door to pre-
vent playing children to suffer electric
shock or to close themselves into it.
• If this appliance featuring magnetic door
seals is to replace an older appliance
having a spring lock (latch) on the door or
lid, be sure to make that spring lock un-
usable before you discard the old appli-
ance. This will prevent it from becoming a
death trap for a child.
General safety
Caution! Keep ventilation openings
clear of obstruction.
• The appliance is intended for keeping
foodstuff and/or beverages in a normal
household as explained in this instruction
booklet.
• Do not use a mechanical device or any
artificial means to speed up the thawing
process.
• Do not use other electrical appliances
(such as ice cream makers) inside of re-
frigerating appliances, unless they are ap-
proved for this purpose by the manufac-
turer.
• Do not damage the refrigerant circuit.
• The refrigerant isobutane (R600a) is con-
tained within the refrigerant circuit of the
appliance, a natural gas with a high level
of environmental compatibility, which is
nevertheless flammable.
During transportation and installation of
the appliance, be certain that none of the
components of the refrigerant circuit be-
come damaged.
If the refrigerant circuit should become
damaged:
– avoid open flames and sources of igni-
tion
– thoroughly ventilate the room in which
the appliance is situated
• It is dangerous to alter the specifications
or modify this product in any way. Any
damage to the cord may cause a short-
circuit, fire and/or electric shock.
14

Warning! Any electrical component
(power cord, plug, compressor) must
be replaced by a certified service agent
or qualified service personnel to avoid
hazard.
1. Power cord must not be lengthened.
2. Make sure that the power plug is not
squashed or damaged by the back of
the appliance. A squashed or dam-
aged power plug may overheat and
cause a fire.
3. Make sure that you can come to the
mains plug of the appliance.
4. Do not pull the mains cable.
5. If the power plug socket is loose, do
not insert the power plug. There is a
risk of electric shock or fire.
6. You must not operate the appliance
without the lamp cover
6)
of interior
lighting.
• This appliance is heavy. Care should be
taken when moving it.
• Do not remove nor touch items from the
freezer compartment if your hands are
damp/wet, as this could cause skin abra-
sions or frost/freezer burns.
• Avoid prolonged exposure of the appli-
ance to direct sunlight.
•
Bulb lamps
7)
used in this appliance are
special purpose lamps selected for
household appliances use only. They are
not suitable for household room illumina-
tion.
Do not place frozen food on the top
since cold and vapour may produce
water condensate within its inner side.
The resulting drip liquid may cause
malfunctions. Therefore, do not place
nor leave frozen items of any kind on
the top.
Daily Use
• Do not put hot pot on the plastic parts in
the appliance.
• Do not store flammable gas and liquid in
the appliance, because they may ex-
plode.
• Do not place food products directly
against the air outlet on the rear wall.
8)
• Frozen food must not be re-frozen once
it has been thawed out.
• Store pre-packed frozen food in accord-
ance with the frozen food manufacturer's
instructions.
• Appliance's manufacturers storage rec-
ommendations should be strictly adhered
to. Refer to relevant instructions.
• Do not place carbonated or fizzy drinks in
the freezer compartment as it creates
pressure on the container, which may
cause it to explode, resulting in damage
to the appliance.
• Ice lollies can cause frost burns if con-
sumed straight from the appliance.
Care and cleaning
• Before maintenance, switch off the appli-
ance and disconnect the mains plug from
the mains socket.
• Do not clean the appliance with metal
objects.
• Do not use sharp objects to remove frost
from the appliance. Use a plastic scraper.
• Never use a hair drier or other heating
appliances to speed up defrosting. Ex-
cessive heat may damage the plastic in-
terior, and humidity could enter the elec-
tric system making it live.
Installation
Important! For electrical connection
carefully follow the instructions given in
specific paragraphs.
• Unpack the appliance and check if there
are damages on it. Do not connect the
appliance if it is damaged. Report possi-
ble damages immediately to the place
you bought it. In that case retain packing.
• It is advisable to wait at least four hours
before connecting the appliance to allow
the oil to flow back in the compressor.
• Adequate air circulation should be
around the appliance, lacking this leads
to overheating. To achieve sufficient ven-
tilation follow the instructions relevant to
installation.
• Wherever possible the back of the prod-
uct should be against a wall to avoid
touching or catching warm parts (com-
6) If the lamp cover is foreseen.
7) If the lamp is foreseen.
8) If the appliance is Frost Free.
15

pressor, condenser) to prevent possible
burn.
• The appliance must not be located close
to radiators or cookers.
• Make sure that the mains plug is accessi-
ble after the installation of the appliance.
•
Connect to potable water supply only.
9)
Service
• Any electrical work required to do the
servicing of the appliance should be car-
ried out by a qualified electrician or com-
petent person.
• This product must be serviced by an au-
thorized Service Centre, and only genu-
ine spare parts must be used.
Environment Protection
This appliance does not contain gasses
which could damage the ozone layer,
in either its refrigerant circuit or insula-
tion materials. The appliance shall not
be discarded together with the urban
refuse and rubbish. The insulation foam
contains flammable gases: the appli-
ance shall be disposed according to
the applicable regulations to obtain
from your local authorities. Avoid dam-
aging the cooling unit, especially at the
rear near the heat exchanger. The ma-
terials used on this appliance marked
by the symbol
are recyclable.
CONTROL PANEL
1 2 3 4 5
1 Green On/Off Indicator Light
2 Temperature Regulator and On/Off
Switch
3 Yellow Fast Freeze Indicator Light
4 Acoustic Signal Stop and Fast Freeze
Switch
5 Red Alarm Indicator Light
Switching on
1. Allow the appliance to stand for 4 hrs
after installation.
2. Insert the plug into the wall socket.
3. Turn the Temperature Regulator clock-
wise to a temperature lower than << -
16 °C >> position.
4. The Green On/Off Indicator Light will
light up and Red Alarm Indicator Light
will blink.
5. The lighting up of the Green On/Off Indi-
cator Light means that the appliance is
switched on.
6. The blinking of the Red Alarm Indicator
Light means an improper temperature in
the freezing compartment. In addition,
an intermittent sound can be heard,
which can be stopped by pressing the
Acoustic Signal Stop and Fast Freeze
Switch once.
7. When switching on the freezer for the
first time, the Red Alarm Indicator Light
will blink until the internal temperature
has reached a level required for the safe
conservation of frozen food.
Switching off
1. To turn off the appliance, turn the Tem-
perature Regulator to the "O" position.
2. To disconnect the appliance from the
power disconnect the mains plug from
the wall socket.
9) If a water connection is foreseen.
16

Temperature regulation
The temperature within the appliance is
controlled by the Temperature Regulator
situated on the control panel.
To operate the appliance, proceed as fol-
lows:
• turn the Temperature Regulator toward
lower settings to obtain the minimum
coldness.
• turn the Temperature Regulator toward
higher settings to obtain the maximum
coldness.
A medium setting is generally the most
suitable.
However, the exact setting should be chos-
en keeping in mind that the temperature in-
side the appliance depends on:
• room temperature
• how often the door is opened
• the quantity of food stored
• the location of the appliance.
Red Alarm Indicator Light
Under normal operating conditions, the in-
ternal temperature of the freezer will ensure
the long-term conservation of the stored
food.
When such temperature rises above a cer-
tain level (-12 °C), the appliance will trigger
an acoustic and light alarm. The light alarm
is a blink red light (Red Alarm Indicator
Light), while the acoustic alarm is an inter-
mittent sound.
You can stop the acoustic alarm by press-
ing the Acoustic Signal Stop Switch once.
When switching on the freezer for the
first time, the Red Alarm Indicator Light
will blink until the internal temperature
has reached a level required for the
safe conservation of frozen food.
Fast Freeze function
If more than 3-4 kg of food is to be frozen:
1. Press the Fast Freeze Switch for 2-3
seconds to activate the fast-freeze func-
tion 6-24 hours before placing the fresh
food in the freezer, the Yellow Fast
Freeze Indicator Light will illuminate. The
compressor will now run continuously,
to ensure that the fresh food is frozen as
quickly as possible.
2. It is possible to deactivate the function
at any time by pressing the Fast Freeze
Switch for 2-3 seconds.
3. Place the foods in the freezing compart-
ments (the second and third boxes), for
maximum freezing performance remove
the freezer tray and drawers (if the
drawer is foreseen) and then place the
foods to be frozen directly on the evap-
orator. In case of freezing smaller food
volumes do not need to remove the
freezer tray and drawers.
4. Once the food is completely frozen (it
may take up to 24 hours) you can man-
ually switch off the fast-freeze function
by pressing the Fast Freeze Switch for
2- 3 seconds and the Yellow Fast
Freeze Indicator light will also go out.
5. Move frozen food from the freezing
compartments into the other three com-
partments (storing compartments) to
make room for another freezing.
If the Fast Freeze Switch is accidentally
left on, the fast-freeze function will be
automatically switched off 48 hours lat-
er. The Yellow Fast Freeze Indicator
light will also go out.
FIRST USE
Cleaning the interior
Before using the appliance for the first time,
wash the interior and all internal accesso-
ries with lukewarm water and some neutral
soap so as to remove the typical smell of a
brand-new product, then dry thoroughly.
Important! Do not use detergents or abra-
sive powders, as these will damage the fin-
ish.
17

DAILY USE
Freezing fresh food
The freezer compartments (the second and
the third boxes) are suitable for freezing
fresh food and storing frozen and deep-fro-
zen food for a long time.
To freeze fresh food activate the fast freeze
function.
The maximum amount of food that can be
frozen in 24 hours is specified on the rating
plate, a label located on the inside of the
appliance.
The freezing process lasts 24 hours: during
this period do not add other food to be fro-
zen.
The freezing tray can be used for freezing
small fruits (raspberry, strawberry, currant,
etc.).
Place a thin layer of the unpacked fruits in
the tray. Once they are frozen, the fruits can
be packed, sorted and placed in the storing
compartments.
Storage of frozen food
When first starting-up or after a period out
of use, before putting the products in the
compartment let the appliance run at least
2 hours on the higher settings.
Important! In the event of accidental
defrosting, for example due to a power
failure, if the power has been off for longer
than the value shown in the technical
characteristics chart under "rising time", the
defrosted food must be consumed quickly
or cooked immediately and then re-frozen
(after cooling).
Thawing
Deep-frozen or frozen food, prior to being
used, can be thawed at room temperature.
Small pieces may even be cooked still fro-
zen, directly from the freezer: in this case,
cooking will take longer.
HELPFUL HINTS AND TIPS
Normal Operating Sounds
• You may hear a faint gurgling and a bub-
bling sound when the refrigerant is pum-
ped through the coils or tubing. This is
correct.
• When the compressor is on, the refriger-
ant is being pumped around and you will
hear a whirring sound and a pulsating
noise from the compressor. This is cor-
rect.
• The thermic dilatation might cause a sud-
den cracking noise. It is natural, not dan-
gerous physical phenomenon. This is
correct.
• When the compressor switches on or
switches off, you will hear a faint "click" of
the temperature regulator. This is correct.
Hints for freezing
To help you make the most of the freezing
process, here are some important hints:
• the maximum quantity of food which can
be frozen in 24 hrs. is shown on the rat-
ing plate;
• the freezing process takes 24 hours. No
further food to be frozen should be add-
ed during this period;
• only freeze top quality, fresh and thor-
oughly cleaned, foodstuffs;
• prepare food in small portions to enable it
to be rapidly and completely frozen and
to make it possible subsequently to thaw
only the quantity required;
• wrap up the food in aluminium foil or pol-
ythene and make sure that the packages
are airtight;
• do not allow fresh, unfrozen food to
touch food which is already frozen, thus
avoiding a rise in temperature of the lat-
ter;
• lean foods store better and longer than
fatty ones; salt reduces the storage life of
food;
• water ices, if consumed immediately after
removal from the freezer compartment,
can possibly cause the skin to be freeze
burnt;
• it is advisable to show the freezing in date
on each individual pack to enable you to
keep tab of the storage time.
Hints for storage of frozen food
To obtain the best performance from this
appliance, you should:
18

• make sure that the commercially frozen
foodstuffs were adequately stored by the
retailer;
• be sure that frozen foodstuffs are trans-
ferred from the foodstore to the freezer in
the shortest possible time;
• not open the door frequently or leave it
open longer than absolutely necessary.
• Once defrosted, food deteriorates rapidly
and cannot be refrozen.
• Do not exceed the storage period indica-
ted by the food manufacturer.
CARE AND CLEANING
Caution! Unplug the appliance before
carrying out any maintenance
operation.
This appliance contains hydrocarbons
in its cooling unit; maintenance and re-
charging must therefore only be carried
out by authorized technicians.
Periodic cleaning
The equipment has to be cleaned regularly:
• clean the inside and accessories with
lukewarm water and some neutral soap.
• regularly check the door seals and wipe
clean to ensure they are clean and free
from debris.
• rinse and dry thoroughly.
Important! Do not pull, move or damage
any pipes and/or cables inside the cabinet.
Never use detergents, abrasive powders,
highly perfumed cleaning products or wax
polishes to clean the interior as this will
damage the surface and leave a strong
odour.
Clean the condenser (black grill) and the
compressor at the back of the appliance
with a brush or a vacuum cleaner. This op-
eration will improve the performance of the
appliance and save electricity consumption.
Important! Take care of not to damage the
cooling system.
Many proprietary kitchen surface cleaners
contain chemicals that can attack/damage
the plastics used in this appliance. For this
reason it is recommended that the outer
casing of this appliance is only cleaned with
warm water with a little washing-up liquid
added.
After cleaning, reconnect the equipment to
the mains supply.
Defrosting the freezer
A certain amount of frost will always form
on the freezer shelves and around the top
compartment.
Defrost the freezer when the frost layer rea-
ches a thickness of about 3-5 mm.
Important! About 12 hours prior to
defrosting, set the Temperature Regulator
toward higher settings , in order to build up
sufficient chill reserve for the interruption in
operation.
To remove the frost, follow the instructions
below:
1. Switch off the appliance and disconnect
the mains plug from the mains socket.
2. Remove any stored food, wrap it in sev-
eral layers of newspaper and put it in a
cool place.
Caution! Do not touch frozen goods
with wet hands. Hands can freeze to
the goods.
3. Leave the door open and insert the
plastic scraper in the appropriate seat-
ing at the bottom centre, placing a basin
underneath to collect the defrost water.
In order to speed up the defrosting
process, place a pot of warm water in
the freezer compartment. In addition,
remove pieces of ice that break away
before defrosting is complete.
19

4. When defrosting is completed, dry the
interior thoroughly and keep the scraper
for future use.
5. Switch on the appliance.
6. Turn the Temperature Regulator to the
<< -18 °C >> position and leave to run
for at least 4 hours in quick freeze
mode.
7. After 4 hours reload the previously re-
moved food into the compartments.
Warning! Never use sharp metal tools
to scrape off frost from the evaporator
as you could damage it.
Do not use a mechanical device or any
artificial means to speed up the thaw-
ing process other than those recom-
mended by the manufacturer.
A temperature rise of the frozen food
packs, during defrosting, may shorten
their safe storage life.
Periods of non-operation
When the appliance is not in use for long
periods, take the following precautions:
1. disconnect the appliance from electricity
supply
2. remove all food
3. defrost and clean the appliance and all
accessories
4. leave the door/doors open to prevent
unpleasant smells.
Important! If the cabinet will be kept on,
ask somebody to check it once in a while to
prevent the food inside from spoiling in
case of a power failure.
WHAT TO DO IF…
Warning! Before troubleshooting,
disconnect the mains plug from the
mains socket.
Only a qualified electrician or compe-
tent person must do the troubleshoot-
ing that is not in this manual.
Important! There are some sounds during
normal use (compressor, refrigerant
circulation).
Important! The appliance operates
discontinuously, so the stopping of
compressor does not mean being no
current. That is why you must not touch the
electrical parts of the appliance before
breaking the circuit.
Problem Possible cause Solution
The appliance is noisy
The appliance is not supported
properly
Check if the appliance stands sta-
ble (all the four feet should be on
the floor)
The compressor oper-
ates continually
The thermostatic control is set
incorrectly
Set a warmer temperature
Doors are not shut properly or
do not close tightly
Check if the doors close well and
the gaskets are undamaged and
clean
The door has been opened too
frequently
Do not leave the door open longer
than necessary
Large quantities of food to be
frozen were put in at the same
time
Wait some hours and then check
the temperature again
20

Problem Possible cause Solution
Food placed in the appliance
was too warm
Allow food to cool to room tem-
perature before storing
The room temperature is too
high.
Decrease the room temperature
There is too much frost
and ice
Products are not wrapped prop-
erly
Wrap the products better
Doors are not shut properly or
do not close tightly
Check if the doors close well and
the gaskets are undamaged and
clean
The Temperature regulator may
be set incorrectly
Set a warmer temperature
It is too warm in the
freezer
Temperature regulator may be
set incorrectly
Set a lower temperature
The door does not close tightly
or it is not shut properly
Check if the door closes well and
the gasket is undamaged and
clean
Large quantities of food to be
frozen were put in at the same
time
Insert smaller quantities of food to
be frozen at any one time.
Food placed in the appliance
was too warm
Allow food to cool to room tem-
perature before storing.
Products to be frozen are
placed too closely to each other
Place the products in a way so
that cold air could circulate
among them
It is too cold inside the
freezer
Temperature regulator may be
set incorrectly
Set a warmer temperature
The appliance does not
work at all. Neither cool-
ing nor lighting works
Plug is not connected to the
mains socket properly
Connect the mains plug properly
Power does not reach the appli-
ance
Try connecting another electrical
device to the power outlet
The appliance is not switched
on
Switch on the appliance
There is no voltage in the mains
socket (try to connect another
appliance into it)
Call an electrician
The appliance does not
cool at all
Plug is not connected to the
mains socket properly
Connect the mains plug properly
There is no voltage in the mains
socket (try to connect another
appliance into it)
Call an electrician
The appliance is not switched
on
Switch on the appliance
Temperature Regulator is not on Check the Temperature Regulator
Green indicator flashing Temperature sensor problem Call the service personnel
Closing the door
1. Clean the door gaskets.
2. If necessary, adjust the door. Refer to
"Installation".
21

3. If necessary, replace the defective door
gaskets. Contact the Service Center.
TECHNICAL DATA
Dimension
Height 1250 mm
Width 545 mm
Depth 640 mm
Rising Time 18 h
Voltage 230 V
Frequency 50 Hz
The technical information are situated in the
rating plate on the internal left side of the
appliance and in the energy label.
INSTALLATION
Read the "Safety Information" carefully
for your safety and correct operation of
the appliance before installing the
appliance.
Positioning
This appliance can be installed in a dry, well
ventilated indoor (garage or cellar) also, but
for optimum performance install this appli-
ance at a location where the ambient tem-
perature corresponds to the climate class
indicated on the rating plate of the appli-
ance:
Climate
class
Ambient temperature
SN +10°C to + 32°C
N +16°C to + 32°C
ST +16°C to + 38°C
T +16°C to + 43°C
Rear spacers
In the bag with the documentation, there
are two spacers which must be fitted as
shown in the figure.
1. Fit the spacers into the holes. Make
sure that the arrow (A) is positioned as
shown in the picture.
2. Turn counter-clockwise the spacers
through 45° until they lock into place.
Levelling
When placing the appliance ensure that it
stands level. This can be achieved by two
adjustable feet at the bottom in front (2). If
necessary adjust the feet by removing the
spacer (1).
22

2
1
Location
The appliance should be installed well away
from sources of heat such as radiators,
boilers, direct sunlight etc. Ensure that air
can circulate freely around the back of the
cabinet. To ensure best performance, if the
appliance is positioned below an overhang-
ing wall unit, the minimum distance be-
tween the top of the cabinet and the wall
unit must be at least 100 mm . Ideally, how-
ever, the appliance should not be posi-
tioned below overhanging wall units. Accu-
rate levelling is ensured by one or more ad-
justable feet at the base of the cabinet.
If the cabinet is placed in a corner and the
side with the hinges facing the wall, the dis-
tance between the wall and the cabinet
must be at least 10 mm to allow the door to
open enough so that the shelves can be re-
moved.
Warning! It must be possible to
disconnect the appliance from the
mains power supply; the plug must
therefore be easily accessible after
installation.
15mm
15mm 100mm
Door reversibility
Important! To carry out the following
operations, we suggest that this be made
with another person that will keep a firm
hold on the doors of the appliance during
the operations.
To change the opening direction of the
door, do these steps:
1. Remove the plug from the power sock-
et.
2. Tilt back the appliance carefully so that
the compressor cannot touch the floor.
3. Unscrew both adjustable feet.
4. Unscrew the screws of the door bot-
tom hinge.
5. Take off the appliance door by pulling it
slightly downwards.
23

6. Unscrew the top door hinge pin of the
appliance then screw it back on the
other side.
7. Fit the appliance door on the upper
door hinge pin.
8. Remove the lower hinge. Put over the
pin in the direction of the arrow.
9. Unscrew and install the screw on the
opposite side.
10. Install the lower hinge on the opposite
side leaving the position of the door un-
changed.
11. Screw in the one screw in the place set
free on the other side as well as the ad-
justable feet (2 pieces).
12.
Remove and install the handle
10)
on the
opposite side.
13. Reposition, level the appliance, wait for
at least four hours and then connect it
to the power socket.
Do a final check to make sure that:
• All screws are tightened.
• The door opens and closes correctly.
If the ambient temperature is cold (i.e. in
Winter), the gasket may not fit perfectly to
the cabinet. In that case, wait for the natural
fitting of the gasket.
In case you do not want to carry out the
above mentioned operations, contact the
nearest After Sales Service Force. The After
Sales Service specialist will carry out the re-
versibility of the doors at your cost.
Electrical connection
Before plugging in, ensure that the voltage
and frequency shown on the rating plate
correspond to your domestic power supply.
The appliance must be earthed. The power
supply cable plug is provided with a contact
for this purpose. If the domestic power sup-
ply socket is not earthed, connect the appli-
ance to a separate earth in compliance with
current regulations, consulting a qualified
electrician.
The manufacturer declines all responsibility
if the above safety precautions are not ob-
served.
This appliance complies with the E.E.C. Di-
rectives.
ENVIRONMENTAL CONCERNS
The symbol on the product or on its
packaging indicates that this product may
not be treated as household waste. Instead
it should be taken to the appropriate
collection point for the recycling of electrical
10) If foreseen
24

and electronic equipment. By ensuring this
product is disposed of correctly, you will
help prevent potential negative
consequences for the environment and
human health, which could otherwise be
caused by inappropriate waste handling of
this product. For more detailed information
about recycling of this product, please
contact your local council, your household
waste disposal service or the shop where
you purchased the product.
25

26

27

200383400-B-012011
-
 1
1
-
 2
2
-
 3
3
-
 4
4
-
 5
5
-
 6
6
-
 7
7
-
 8
8
-
 9
9
-
 10
10
-
 11
11
-
 12
12
-
 13
13
-
 14
14
-
 15
15
-
 16
16
-
 17
17
-
 18
18
-
 19
19
-
 20
20
-
 21
21
-
 22
22
-
 23
23
-
 24
24
-
 25
25
-
 26
26
-
 27
27
-
 28
28


Nordland NVH10168 Handleiding
- Categorie
- Combi-koelkasten
- Type
- Handleiding
in andere talen
- English: Nordland NVH10168 User manual
Gerelateerde papieren
Andere documenten
-
Aeg-Electrolux A51700GSW0 Handleiding
-
Aeg-Electrolux A51700GSW0 Handleiding
-
Proline PLC102 Handleiding
-
Zanussi ZFU719EW Handleiding
-
Zanussi ZFU19400WA Handleiding
-
Zanussi ZFU319EW Handleiding
-
Aeg-Electrolux SC81842-5I Handleiding
-
-
-