Pagina wordt geladen...
Pagina wordt geladen...

33
de
eng
gre
fra
ned
ita
esp
por
arb
Avant de commencer
• Déballer votre aspirateur LX9 ainsi que le système
d’accessoires AeroPro pour vérier que tous les
accessoires sont bien inclus*.
• Lire les instructions d’utilisation.
• Le chapitre Consignes de sécurité doit être lu avec une
attention particulière.
*Suivant les modèles.
Electrolux LX9 pour un nettoyage plus ecace !
Table des matières :
Consignes de sécurité .....................................7
Informations consommateur et appareil en n de vie ......7
Comment utiliser cet aspirateur ..........................14
Astuces pour un résultat impeccable .....................18
Compactage de la poussière .............................21
Vidange de la poussière ..................................24
Remplacement des ltres ................................25
Nettoyage du suceur AeroPro et changement de la pile logée
dans la poignée télécommande ..........................30
Gestion des pannes ......................................32
Introducción
• Desembale el modelo LX9, así como el sistema AeroPro,
y compruebe que están incluidos todos los accesorios*.
• Lea el manual de instrucciones.
• Preste especial atención al capítulo de consejos de seguridad.
* Los accesorios pueden variar según el modelo.
Disfrute de la aspiradora Electrolux LX9!
Índice:
Consejo de seguridad. . . . . . . . . . . . . . . . . . . . . . . . . . . . . . . . . . . . 10
Información al consumidor y política de sostenibilidad ........ 10
Cómo utilizar la aspiradora ..............................16
Sugerencias sobre cómo obtener los mejores resultados .......18
Compresión de polvo ....................................21
Vaciado de polvo ........................................24
Cambio de los ltros .....................................25
Limpieza de la boquilla AeroPro y cambio de la pila en el
asa con mando a distancia ..............................30
Solución de problemas ..................................33
Prima di iniziare
• Disimballare il modello LX9 e il sistema AeroPro e
controllare che tutti gli accessori siano inclusi*.
• Leggere le Istruzioni per l’uso.
• Prestare particolare attenzione al capitolo Norme di
sicurezza.
* Gli accessori possono variare da modello a modello.
Buona pulizia con Electrolux LX9!
Sommario:
Norme di sicurezza .......................................9
Informazioni per l’utente e politica di sostenibilità .........9
Utilizzo dell’aspirapolvere ................................14
Suggerimenti per ottenere risultati di pulizia ottimali. . . . . . . . 18
Compattazione della polvere ............................21
Svuotamento della polvere ..............................24
Sostituzione dei ltri .....................................25
Pulizia della bocchetta AeroPro e sostituzione della batteria
nell’impugnatura con comando a distanza ..............30
Ricerca ed eliminazione dei guasti .......................32
Before starting
• Unpack your LX9 model and the accessory
system and check that all accessories are included.*
• Read the User Manual carefully.
• Pay special attention to the Safety advice chapter.
* Accessories may vary from model to model.
Enjoy your AEG LX9!
Table of contents:
Safety advice .............................................5
Consumer information and sustainability policy .........5
Overview of the vacuum cleaner ........................14
How to use the vacuum cleaner .........................18
Tips on how to get the best results . . . . . . . . . . . . . . . . . . . . . . . 21
Dust compacting ........................................24
Dust emptying ..........................................25
Replacing the lters .....................................26
Cleaning the AeroPro nozzle and changing the battery
in remote handle ........................................30
Troubleshooting ........................................32
Vorbereitungen
• Packen Sie Ihren LX9 Staubsauger aus und prüfen Sie,
ob alle Zubehörteile enthalten sind*.
• Lesen Sie die Bedienungsanleitung.
• Beachten Sie dabei besonders das Kapitel mit den
Sicherheitshinweisen.
* Zubehör kann je nach Modell variieren.
Wir wünschen Ihnen viel Freude mit Ihrem AEG LX9!
Inhaltsverzeichnis:
Sicherheitshinweise ......................................4
Verbraucherinformationen und
Nachhaltigkeitsgrundsätze. . . . . . . . . . . . . . . . . . . . . . . . . . . . . . . 4
Übersicht über den Staubsauger .........................14
Verwendung des Staubsaugers ..........................18
Tipps für beste Ergebnisse ...............................21
Staubverdichtung .......................................24
Entleeren ................................................25
Austauschen der Filter ...................................26
Reinigen der AeroPro-Düse und Batteriewechsel der
Fernbedienung im Handgri. ............................30
Fehlersuche .............................................32
Πριν την εκκίνηση
• Βγάλτε από τη συσκευασία το μοντέλο LX9 που
διαθέτετε και το σύστημα AeroPro και ελέγξτε εάν
περιλαμβάνονται όλα τα εξαρτήματα*.
• Διαβάστε τις Οδηγίες Λειτουργίας.
• Προσέξτε ιδιαίτερα το κεφάλαιο “Υποδείξεις
ασφαλείας”.
* Τα εξαρτήματα ίσως διαφέρουν από μοντέλο σε μοντέλο.
Απολαύστε την LX9 της AEG!
Πίνακας περιεχομένων:
Υποδείξεις ασφαλείας ....................................6
Πληροφορίες για τον καταναλωτή και πολιτική
βιωσιμότητας. . . . . . . . . . . . . . . . . . . . . . . . . . . . . . . . . . . . . . . . . . . . . 6
Επισκόπηση της ηλεκτρικής σκούπας ....................14
Πώς να χρησιμοποιήσετε την ηλεκτρική σκούπα. . . . . . . . . .18
Συμβουλές για να επιτύχετε τα καλύτερα αποτελέσματα
καθαρισμού .............................................21
Συμπίεση σκόνης ........................................24
Άδειασμα της σκόνης ....................................25
Αντικατάσταση των φίλτρων .............................26
Καθαρισμός του ακροφυσίου AeroPro και αλλαγή της μπαταρίας στη
χειρολαβή με το τηλεχειριστήριο
...............................30
Επίλυση προβλημάτων ..................................32
Voordat u begint
• Pak uw LX9-model en het AeroPro-systeem uit en
controleer of alle accessoires aanwezig zijn*.
• Lees de gebruiksaanwijzing.
• Geef vooral aandacht aan de veiligheidsinstructies.
* Accessoires kunnen per model verschillen.
Veel plezier met uw Electrolux LX9!
Inhoud:
Veiligheidsadvies .........................................8
Klantinformatie en milieubeleid ..........................8
Gebruik van de stofzuiger ...............................14
Tips voor de beste resultaten ............................18
Stof samenpersen .......................................21
Stof legen Stof legen .....................................24
De lters vervangen .....................................25
Het AeroPro-mondstuk schoonmaken en de batterij
van de afstandsbediening vervangen ....................30
Problemen oplossen .....................................32
Antes de começar
• Desembale o seu modelo LX9 e o sistema AeroPro e
verique se foram incluídos todos os acessórios*.
• Leia as Instruções de Funcionamento.
• Preste especial atenção ao capítulo Avisos de segurança.
* Os acessórios podem variar de modelo para modelo.
Tire o máximo partido do seu Electrolux LX9!
Índice:
Avisos de segurança .....................................11
Informação ao consumidor e política de
sustentabilidade .........................................11
Como utilizar o aspirador ................................16
Sugestões para obter os melhores resultados
de limpeza ..............................................18
Compactação do pó ....................................21
Remoção do pó .........................................24
Substituição dos ltros ...................................25
Limpeza da escova AeroPro e substituição das pilhas
na pega com controlo remoto ...........................30
Resolução de problemas .................................33
LX9
ElectroluxLX9
12 . . . . . . . . . . . . . . . . . . . . . . . . . . . . . . . .
12 . . . . . . . . . . . . . . .
16 . . . . . . . . . . . . . . . . . . . . . .
18 . . . . . . . . . . . . . . . . .
24 . . . . . . . . . . . . . . . . . . . . . . . . . . . . . . . .
25 . . . . . . . . . . . . . . . . . . . . . . . . . . . . . . . .
26 . . . . . . . . . . . . . . . . . . . . . . . . . . . . . . . .
AeroPro
30 . . . . . . . . . . . . . . . . .
33 . . . . . . . . . . . . . . . . . . . . .
Pagina wordt geladen...
Pagina wordt geladen...
Pagina wordt geladen...
Pagina wordt geladen...

8
de
eng
gre
fra
ned
ita
esp
por
arb
Veiligheidsvereiste en waarschuwing
Dit apparaat kan worden gebruikt door kinderen
van 8 jaar en ouder en door mensen met beperkte
lichamelijke, zintuiglijke of verstandelijke vermogens
of een gebrek aan ervaring en kennis, indien zij onder
toezicht staan of instructies hebben gekregen over
het veilig gebruiken van het apparaat en indien zij de
eventuele gevaren begrijpen.
WAARSCHUWING: Turbomondstukaccessoires* zijn
voorzien van een roterende borstel waarin deeltjes
vast kunnen komen te zitten. Het Turbo mondstuk
is niet geschikt voor tapijten met diepe polen en
lange franjes, antislip tapijten zoals deurmatten of
waterbestendige tapijten. Let bij het gebruik van
deze accessoires goed op en gebruik ze alleen op
de bedoelde oppervlakken. Schakel de stofzuiger
uit voordat u vastgelopen deeltjes verwijdert of de
borstel schoonmaakt.
Let op dat kinderen niet met het apparaat spelen.
Trek altijd de stekker uit het stopcontact voordat u
het apparaat gaat reinigen of onderhouden.
Gebruik de stofzuiger nooit zonder lters.
Waarschuwing
Dit apparaat bevat elektrische verbindingen.
• Zuig nooit vloeistoen op.
• Dompel het apparaat nooit in water om het
schoon te maken.
• Controleer de slang regelmatig en gebruik deze
niet als u beschadigingen opmerkt.
Bovengenoemde zaken kunnen schade aan de
motor veroorzaken. Dergelijke schade valt niet
onder de garantie.
De stofzuiger is uitsluitend bestemd voor
huishoudelijk gebruik.
Gebruik de stofzuiger nooit in deze situaties
• In de buurt van ontvlambare gassen, enz.
• Bij scherpe voorwerpen.
• Voor hete of koude as, brandende
sigarettenpeuken, enz.
• Voor jn stof van bijvoorbeeld gips, beton of bloem.
Voorzorgsmaatregelen betreende het
elektrische snoer
• Controleer regelmatig of de stekker en het snoer
niet beschadigd zijn. Gebruik de stofzuiger nooit
als het snoer beschadigd is.
• Als het snoer is beschadigd, mag dit alleen bij
een erkend Electrolux Service Centre worden
vervangen om risico te vermijden. Schade aan het
snoer van de stofzuiger valt niet onder de garantie.
• Nooit door middel van het snoer de stofzuiger
naar u toe trekken of optillen.
Alle servicebeurten en reparaties moeten uitgevoerd
worden door een erkend Electrolux Service Centre.
Bewaar de stofzuiger op een droge plaats.
Klantinformatie en milieubeleid
Electrolux wijst alle aansprakelijkheid van de
hand voor schade die ontstaat als gevolg van
onjuist gebruik van het apparaat of onbevoegde
aanpassingen van het apparaat. Zie het bijgesloten
garantieboekje voor meer informatie over de
garantie en contactpersonen voor klanten.
Als u opmerkingen hebt over de stofzuiger of over
de handleiding, kunt u een e-mail sturen naar
Milieubeleid
Het ontwerp van dit product is zeer
milieuvriendelijk. Alle kunststof onderdelen kunnen
worden hergebruikt. Ga voor meer informatie naar
onze website: www.electrolux.com
Het verpakkingsmateriaal is geselecteerd op
millieuvriendelijkheid en kan worden gerecycled.
Pagina wordt geladen...
Pagina wordt geladen...
Pagina wordt geladen...
Pagina wordt geladen...
Pagina wordt geladen...
Pagina wordt geladen...

15
de
eng
gre
fra
ned
ita
esp
por
arb
Beschreibung Ihres LX9:
1. LED Display*
2. Elektronische Leistungsregelung*
3. Filter
4. Filtergitter
5. Netzkabel
6. Hinterräder
7. Filtergitterentriegelung
8. Taste Ein/Aus
9. Aufrolltaste für das Netzkabel
10. Feinstaubbehälter
11. Waschbarer Hauptlter
12. Staubbehälter
13. Verdichterhebel
14. AeroPro-Schlauch
15. AeroPro-Gri mit Fernbedienung*
16. AeroPro Ergo-Gri*
17. Luftstromventilklappe*
18. AeroPro-Teleskoprohr
19. Parkfunktion
20. FlowMotion Flüsterdüse
21. AeroPro-Hartbodendüse*
22. AeroPro-Turbodüse*
23. AeroPro 3-in-1-Kombidüse
24. 2 Parkaufnahmen
25. Tragegri
Description of your LX9
1. LED Display*
2. Electronic power regulation*
3. Filter
4. Filter grill
5. Power cord
6. Rear wheels
7. Filter grill release
8. On/O button
9. Cord reqind button
10. Fine dust container
11. Washable main lter
12. Dust bin
13. Compactor handle
14. AeroPro hose
15. AeroPro remote control handle*
16. AeroPro ergo handle*
17. Airow regulation valve*
18. AeroPro telescopic tube
19. Parking clip
20. FlowMotion nozzle
21. AeroPro Parketto nozzle*
22. AeroPro turbo nozzle*
23. AeroPro 3 in 1 nozzle
24. 2 parking slots
25. Carrying handle
Περιγραφή της LX9:
1. Οθόνη LED*
2. Ηλεκτρονική ρύθμιση ισχύος*
3. Φίλτρο
4. Σχάρα φίλτρου
5. Καλώδιο ρεύματος
6. Πίσω τροχοί
7. Αποδέσμευση σχάρας φίλτρου
8. Κουμπί ενεργοποίησης/απενεργοποίησης
9. Κουμπί περιέλιξης καλωδίου
10. Δοχείο συλλογής λεπτής σκόνης
11. Πλενόμενο κύριο φίλτρο
12. Δοχείο σκόνης
13. Λαβή συμπιεστή
14. Εύκαμπτος σωλήνας AeroPro
15. Λαβή με τηλεχειριστήριο AeroPro*
16. Λαβή AeroPro ergo*
17. Βαλβίδα ρύθμισης ροής αέρα*
18. Τηλεσκοπικός σωλήνας AeroPro
19. Κλιπ στάθμευσης
20. Αθόρυβο ακροφύσιο FlowMotion
21. Ακροφύσιο AeroPro parketto*
22. Ακροφύσιο AeroPro turbo*
23. Στόμιο AeroPro 3σε1
24. 2 υποδοχές στάθμευσης
25. Χειρολαβή μεταφοράς
Content
Description de votre LX9:
1. Écran LED*
2. Régulateur de puissance électronique*
3. Filtre
4. Grille de ltre
5. Cordon d’alimentation
6. Roulettes arrière Roulettes arrière
7. Verrouillage de la grille de ltre
8. Bouton Marche/Arrêt
9. Bouton d’enroulement du câble d’alimentation
10. Bac à poussière ne
11. Filtre principal lavable
12. Bac à poussière
13. Poignée du compacteur
14. Flexible AeroPro
15. Poignée de exible avec commandes à distance
AeroPro*
16. Poignée de exible AeroPro ergonomique*
17. Vanne de régulation de la circulation d’air*
18. Tube télescopique AeroPro
19. Systeme de rangement Clip
20. Brosse FlowMotion
21. Suceur spécial sols durs / parquets AeroPro*
22. Turbobrosse AeroPro*
23. Suceur AeroPro 3en1
24. 2fentes de rangement
25. Poignée de transport
Descrizione dell’LX9:
1. Display a LED*
2. Regolazione elettronica della potenza*
3. Filtro
4. Griglia del ltro
5. Cavo di alimentazione
6. Ruote posteriori
7. Sblocco della griglia del ltro
8. Pulsante On/O
9. Pulsante di riavvolgimento cavo
10. Contenitore della polvere ne
11. Filtro principale lavabile
12. Contenitore della polvere
13. Manico del compattatore
14. Tubo essibile AeroPro
15. Impugnatura telecomando AeroPro*
16. Impugnatura AeroPro con comando a distanza*
17. Valvola di regolazione del usso d’aria*
18. Tubo telescopico AeroPro
19. Gancio di fermo
20. FlowMotion AeroPro
21. Bocchetta parketto AeroPro*
22. Bocchetta turbo AeroPro*
23. Bocchetta AeroPro 3in1
24. 2fentes de rangement
25. Maniglia per il trasporto
Beschrijving van uw LX9:
1. LED-display*
2. Knop voor elektronische vermogen*
3. Filter
4. Filterrooster
5. Netsnoer
6. Achterwielen
7. Vrijgifteknop van het lterrooster
8. Aan/uit-toets
9. Netsnoerintrekknop
10. Reservoir voor jne stofdeeltjes
11. Uitwasbare hoofdlter
12. Stofbak
13. Compactorhendel
14. AeroPro-slang
15. AeroPro-handvat met afstandsbediening*
16. Ergonomische AeroPro-handgreep*
17. Luchtstroomregelklep*
18. AeroPro telescopische buis
19. Opbergklem
20. FlowMotion mondstuk
21. AeroPro-parketmondstuk*
22. AeroPro-turbomondstuk*
23. AeroPro-3in1-zuigmond
24. 2 opbergsleuven
25. Draaghandgreep
Pagina wordt geladen...
Pagina wordt geladen...
Pagina wordt geladen...
Pagina wordt geladen...

2020
de
eng
gre
fra
ned
ita
esp
por
arb
How to use the vacuum cleaner
7. Regulate air ow by pushing the valve up and down. * 8. Push the power regulation to the right to increase
power, push to the left to reduce power.
*
9. Press the On/O button to turn on and o . Press ‘+’
to increase power and press ‘-‘ to reduce power.
*
7. Regeln Sie den Luftstrom durch Verschieben der
Ventilklappe. *
8. Drehen Sie die Leistungsregelung nach rechts, um
die Leistung zu erhöhen oder nach links, um sie zu
verringern.*
9. Drücken Sie die Taste Ein/Aus, um das Gerät ein-
oder auszuschalten. Drücken Sie auf „+“, um die
Leistung zu erhöhen oder auf „-“, um sie zu verringern. *
7. Μπορείτε να ρυθμίσετε τη ροή αέρα, πιέζοντας τη
βαλβίδα προς τα πάνω και προς τα κάτω. *
8. Πιέστε το κουμπί ρύθμισης ισχύος προς τα δεξιά
για να αυξήσετε την ισχύ και προς τα αριστερά για
να τη μειώσετε. *
9. Πατήστε το κουμπί ενεργοποίησης/
απενεργοποίησης για να ενεργοποιήσετε και να
απενεργοποιήσετε τη συσκευή. Πατήστε το «+» για
να αυξήσετε την ισχύ και το «-» για να τη μειώσετε. *
How to use the vacuum cleaner
7. Regule el caudal de aire presionando la válvula
hacia arriba y hacia abajo. *
8. Presione la regulación de potencia hacia la
derecha para aumentar la potencia y hacia la
izquierda para reducirla. *
9. Pulse la tecla de encendido/apagado para
encender y apagar. Pulse ”+” para aumentar la
potencia y ”-” para reducirla. *
7. Réglez mécaniquement la puissance en poussant
la valve de réglage du débit d’air* vers le haut
et le bas. *
8. Tournez le variateur de puissance* vers la droite
pour augmenter la puissance et vers la gauche
pour réduire la puissance. *
9. Appuyez sur le pédale Marche/Arrêt pour mettre
en marche et arrêter l’appareil. Appuyez sur la
touche «+»* pour augmenter la puissance et sur la
touche «-»* pour réduire la puissance. *
7. Regolare il usso dell’aria premendo verso l’alto e
il basso la valvola. *
8. Premere il regolatore di potenza verso destra per
aumentare la potenza e verso sinistra per ridurla. *
9. Premere il pulsante On/O per accendere e
spegnere la macchina. Premere ”+” per aumentare la
potenza e ”-” per ridurla. *
7. Regel de luchtstroom door de klep omhoog en
omlaag te schuiven. *
8. Druk de knop voor het vermogen naar rechts om
de zuigkracht te verhogen en naar links om de
zuigkracht te verlagen. *
9. Druk op de aan/uit-toets om het apparaat aan en
uit te zetten. Druk op ’+’ voor meer zuigkracht en op
’-’ voor minder zuigkracht. *
7. Regule o uxo de ar deslocando a válvula para
cima ou para baixo. *
8. Desloque o regulador de potência para a direita
para aumentar a potência ou para a esquerda para
diminuir a potência. *
9. Prima o botão On/O para ligar e desligar.
Prima ‘+’ para aumentar a potência e prima ‘-‘ para
reduzir a potência. *
.9
.7
8

2121
de
eng
gre
fra
ned
ita
esp
por
arb
Insert the nozzle parking clip into one of the two parking slots on the side
or on the back of the machine.
Schieben Sie den Parkfunktions-Clip der Düse in eine der beiden
Parkaufnahmen, die sich seitlich oder auf der Rückseite des Geräts be nden.
Tips on how to get the best results
*
*
Εισαγάγετε το κλιπ στάθμευσης του ακροφυσίου σε μια από τις δύο υποδοχές
στάθμευσης που βρίσκονται στο πλάι ή στο πίσω μέρος της συσκευής.
Inserte la sujeción de almacenamiento de la boquilla en una de las dos
ranuras en el lateral o la parte posterior de la unidad.
Insérez le crochet de xation de l’embout dans l’une des deux encoches de
rangement se trouvant sur le côté ou à l’arrière de l’appareil.
Inserire il gancetto della spazzola in una delle due fessure di arresto, sul
lato o sul retro della macchina.
Steek de clip voor bevestiging van het mondstuk in een van de twee
sleuven, aan de zij- of achterkant van het apparaat.
Introduza o clipe de repouso do bocal numa das ranhuras de repouso: na
parte lateral e na parte de trás do aparelho.

22
de
eng
gre
fra
ned
ita
esp
por
arb
For optimum performance check the 5 power levels during use. (1=Lowest mode, 5= Highest mode)*
On manually controlled models, the air ow is adjusted by the air valve(17). *
Um die optimale Saugleistung einzustellen, regeln Sie die Leistung beim Staubsaugen über die 5 Leistungsstufen.
(1 = Normalbetrieb, 5 = Maximale Leistung)*
Bei Modellen mit manueller Steuerung wird der Luftstrom mit der Ventilklappe (17) geregelt.*
Pour obtenir des performances optimales, véri ez les cinq niveaux de puissance pendant l’utilisation.
(1=mode normal, 5=mode maximal)*
Sur les modèles à commande manuelle, la circulation d’air se règle en utilisant la vanne d’air (17).*
Per ottenere la massima aspirazione, controllare i cinque livelli di potenza durante l’uso.
(1=modalità normale, 5= modalità massima)*
Sui modelli a controllo manuale, il usso dell’aria viene regolato con la valvola dell’aria (17).*
22
Για τα καλύτερα δυνατά αποτελέσματα, ελέγξτε τα πέντε επίπεδα ισχύος κατά τη χρήση.
(1=Κανονική λειτουργία, 5= Μέγιστο επίπεδο λειτουργίας)*
Σε μοντέλα με χειροκίνητο έλεγχο, η ροή αέρα ρυθμίζεται από τη βαλβίδα αέρα (17).*
A.
B.
C.
C.
D.
E.
F.
G.
G.
Para un rendimiento óptimo, compruebe los cinco niveles durante el uso. (1=modo normal, 5=modo máximo)*
En los modelos de control manual, el caudal de aire se ajusta con la válvula (17).*
Voor de beste prestatie dient u tijdens het gebruik de vijf krachtniveaus uit te proberen.
(1=Normale modus, 5= Maximale modus)*
Op handmatig bediende modellen wordt de luchtstroom aangepast door middel van de luchtklep (17).*
Para obter um desempenho óptimo, veri que os cinco níveis de potência durante a utilização.
(1 = Modo Normal, 5 = Modo Máximo)*
Nos modelos de controlo manual, o uxo de ar é regulado na válvula de ar (17).*
*( = 5 = 1)
* .(17)
Tips on how to get the best results
Pagina wordt geladen...

2424
de
eng
gre
fra
ned
ita
esp
por
arb
1. Dust compacting: When max level is reached,
compact dust gently.
2. Lift the compactor handle gently to compact dust,
repeat if necessary.
3. Pull compactor handle back and continue cleaning
until compacted dust reaches max level.
Dust compacting
1. Staubverdichtung: Bei Erreichen des höchsten
Füllstands kann der Staub vorsichtig verdichtet werden.
2. Verdichterhebel langsam anheben, um den Staub
zu verdichten und diesen Schritt, falls erforderlich,
wiederholen.
3. Schieben Sie den Verdichterhebel zurück und
fahren mit der Reinigung fort, bis der höchste
Füllstand wieder erreicht wird.
1. Συμπίεση σκόνης: Όταν το επίπεδο σκόνης φτάσει
στο μέγιστο, συμπιέστε απαλά τη σκόνη.
2. Ανασηκώστε απαλά τη λαβή του συμπιεστή για να
συμπιέσετε τη σκόνη. Επαναλάβετε, εάν απαιτείται.
3. Τραβήξτε προς τα πίσω τη λαβή του συμπιεστή
και συνεχίστε το καθάρισμα, μέχρι η συμπιεσμένη
σκόνη να φτάσει στο ανώτατο όριο.
1. Compresión de polvo: Cuando se alcance el nivel
máximo, comprima el polvo suavemente.
2. Para ello, levante la tapa del compresor suavemente
para comprimir el polvo; repita si fuera necesario.
3. Vuelva a colocar la tapa y siga limpiando hasta que
el polvo comprimido alcance el nivel máximo.
1. Compactage de la poussière: lorsque le niveau
maximal ”max” sur le bac à poussière est atteint,
compactez la poussière sans forcer.
2. Soulevez doucement la poignée du compacteur
pour compacter la poussière. Répétez cette
opération si nécessaire.
3. Tirez la poignée du compacteur pour la remettre
dans sa position initiale et continuez le nettoyage
jusqu’à ce que la poussière compactée atteigne le
niveau maximal.
1. Compattazione della polvere: quando si raggiunge il
livello massimo, compattare la polvere delicatamente.
2. Sollevare il manico del compattatore delicatamente
per compattare le polvere, ripetere se necessario.
3. Tirare indietro il manico del compattatore e
continuare a pulire no a quando la polvere
compattata raggiunge il livello massimo.
1. Stof samenpersen: Wanneer het maximale niveau is
bereikt, perst u de stof zachtjes samen.
2. Hiervoor moet u (soms herhaaldelijk) de
compactorhendel zachtjes optillen.
3. Trek de compactorhendel terug en blijf doorgaan
met zuigen totdat het samengeperste stof het
maximale niveau heeft bereikt.
1. Compactação do pó: Quando o nível máximo for
atingido, deve compactar o pó com cuidado.
2. Levante a pega do compactador com cuidado para
compactar o pó. Repita se for necessário.
3. Puxe a pega do compactador para trás e prossiga
com a limpeza até que o pó compactado atinja o
nível máximo.
MAX
.1
.2
.3

2525
de
eng
gre
fra
ned
ita
esp
por
arb
1. Dust emptying: When compacted dust reaches
maximum level, lift dust container from machine by
pulling the compactor handle.
2. Unlock button and push downwards to release
bottom lid.
3. Empty compacted dust into the dustbin. Re t in
reverse order.
1. Entleeren: Bei Erreichen des höchsten Füllstands
den Staubbehälter aus dem Gerät durch Anheben
des Verdichterhebels entnehmen.
2. Entriegeln Sie die Taste und schieben Sie den
Bodendeckel nach unten, um ihn zu entfernen.
3. Filterinhalt in einen Abfallbehälter entleeren.
Der Einbau erfolgt in umgekehrter Reihenfolge.
1. Άδειασμα της σκόνης: Όταν η συμπιεσμένη σκόνη
φτάσει στο ανώτατο όριο, ανασηκώστε το δοχείο σκόνης
από τη συσκευή, τραβώντας τη λαβή του συμπιεστή.
2. Απασφαλίστε το κουμπί για να αποδεσμεύσετε το
κάτω καπάκι.
3. Αδειάστε τη συμπιεσμένη σκόνη στον κάδο
απορριμμάτων. Ακολουθήστε τη διαδικασία
αντίστροφα για την επανατοποθέτηση.
Dust emptying
1. Vaciado de polvo: Cuando el polvo comprimido
alcance el nivel máximo, levante el contenedor de
polvo de la unidad tirando de la tapa del compresor.
2. Desbloquee el botón para soltar la tapa inferior. 3. Vacíe el polvo comprimido en la papelera.
Vuelva a colocarlo en orden inverso.
1. Vidange de la poussière: Lorsque la poussière
compactée atteint le niveau maximal, sortez le
bac à poussière de l’appareil en le soulevant par la
poignée du compacteur.
2. Déverrouillez le bouton et poussez vers le bas pour
détacher le couvercle inférieur.
3. Videz la poussière compactée dans une poubelle.
Réinstallez le bac en e ectuant ces étapes dans
l’ordre inverse.
1. Svuotamento della polvere: quando la polvere
compattata raggiunge il livello massimo, estrarre
il contenitore della polvere dalla macchina tirando il
manico del compattatore.
2. Agire sul pulsante di Sblocco per sbloccare il
coperchio inferiore.
3. Svuotare la polvere compattata nel cestino della
spazzatura. Per il montaggio procedere nell’ordine inverso.
1. Stof legen: Wanneer het samengeperste stof het
maximale niveau heeft bereikt, tilt u het stofreservoir uit
het apparaat door aan de compactorhendel te trekken.
2. Ontgrendelknop om het onderste deksel vrij te geven. 3. Gooi het samengeperste stof in de vuilnisbak.
Breng het reservoir weer aan door de hiervoor beschreven
stappen in omgekeerde volgorde uit te voeren.
1. Remoção do pó: Quando o pó compactado atingir
o nível máximo, puxe a pega do compactador para
remover o recipiente do pó do aparelho.
2. Botão Unlock (Desbloqueio) para libertar
a tampa inferior.
3. Esvazie o pó compactado para um balde do lixo.
Volte a instalar pela ordem inversa.
MAX
.1
.2 .3

26
de
eng
gre
fra
ned
ita
esp
por
arb
Washing the filter
1. Press buttons to pull out the ne dust container
from the bottom of the machine.
2. Remove the lter from the ne dust container. 3. Wash the lter with cold water.
1. Drücken Sie die Tasten, um den Feinstaubbehälter
aus dem Boden des Geräts zu entnehmen.
2. Filter aus dem Feinstaubbehälter entnehmen. 3. Reinigen Sie den Filter mit kaltem Wasser.
1. Πιέστε τα κουμπιά για να τραβήξετε και να
αφαιρέσετε το δοχείο λεπτής σκόνης από το κάτω
μέρος της συσκευής.
2. Αφαιρέστε το φίλτρο από το δοχείο λεπτής σκόνης 3. Πλύνετε το φίλτρο με κρύο νερό.
1. Appuyez sur les boutons pour sortir le bac à
poussière ne du bas de l’appareil.
2. Retirez le ltre du bac à poussière ne. 3. Lavez le ltre à l’eau courante froide.
1. Pulse los botones para extraer el contendor de
polvo no de la parte inferior de la unidad.
2. Retire el ltro del contenedor de polvo no 3. Lave el ltro con agua fría.
1. Premere i pulsanti per estrarre il contenitore della
polvere ne dal fondo della macchina.
2. Estrarre il ltro dal contenitore della polvere ne 3. Lavare il ltro con acqua fredda.
1. Druk op de toetsen om het reservoir voor
jne stofdeeltjes uit de onderkant van het
apparaat te halen.
2. Haal het lter uit het reservoir voor jne
stofdeeltjes.
3. Was het lter met koud water.
1. Prima os botões para remover o recipiente do pó
no pela parte inferior do aparelho.
2. Remova o ltro do recipiente do pó no. 3. Lave o ltro com água fria.
.1
.2
.درﺎﺒﻟا ءﺎﳌﺎﺑ ﱰﻠﻔﻟا ﻞﺴﻏا .3

27
de
eng
gre
fra
ned
ita
esp
por
arb
Cleaning the fine dust filter
5. Filters should be washed at least once every 6
months and replaced every 2 years.
Filter reference: AEF 137, AEF13W
6. Open the ne dust container lid and tap gently to
empty dust every 6 months.
4. Dry lter by squeezing it. Let dry for 24 hours before
tting it back to the machine.
4. Trocknen Sie den Filter durch Zusammendrücken.
Lassen Sie den Filter 24 Stunden trocknen, bevor Sie
ihn wieder in das Gerät einsetzen.
5. Die Filter sollten mindestens alle 6 Monate
ausgewaschen und nach 2 Jahren ersetzt werden.
Filterbestellnummer: AEF 137, AEF13W
6. Ö nen Sie die Abdeckung des Feinstaubbehälters
und entleeren Sie den Staub alle 6 Monate durch
ein leichtes Klopfen.
4. Στεγνώστε το φίλτρο στύβοντάς το. Αφήστε το
φίλτρο να στεγνώσει για 24 ώρες πριν το τοποθετήσετε
ξανά στη συσκευή.
5. Τα φίλτρα πρέπει να πλένονται τουλάχιστον κάθε
6 μήνες και να αντικαθίστανται κάθε 2 χρόνια. Αρ.
αναφοράς φίλτρου: AEF 137, AEF13W
6. Ανοίγετε το καπάκι του δοχείου συλλογής λεπτής
σκόνης και χτυπάτε το απαλά για να αδειάσετε τη
σκόνη κάθε 6 μήνες.
4. Seque el ltro escurriéndolo. Déjelo secar durante
24 horas antes de volver a colocarlo en la unidad.
5. Los ltros se deben lavar al menos una vez cada 6
meses y cambiar cada 2 años. Referencia del ltro:
EF 137, EFH13W
6. Abra la tapa del contenedor de polvo no y golpee
suavemente para vaciar el polvo cada 6 meses.
4. Séchez le ltre en le pressant. Laissez-le sécher pendant
24heures avant de le remettre en place dans l’appareil.
5. Nous recommandons de laver ce ltre au moins
une fois tous les 6mois et de le remplacer par un
ltre neuf tous les 2ans. Référence du ltre:
EF 137, EFH13W
6. Tous les 6mois, ouvrez le couvercle du bac à
poussière ne et tapotez-le doucement pour vider
la poussière.
4. Asciugare il ltro strizzandolo. Lasciarlo ad
asciugare per 24 ore prima di inserirlo nuovamente
nella macchina.
5. I ltri andrebbero lavati almeno una volta ogni 6
mesi e sostituiti ogni 2 anni. Riferimento ltro:
EF 137, EFH13W
6. Aprire il contenitore della polvere ne e picchiettare
delicatamente per svuotare la polvere ogni 6 mesi.
4. Droog het lter door het in te knijpen. Laat het lter
24 uur drogen voordat u het weer in het apparaat
terugplaatst.
5. Filtreid tuleks pesta iga 6 kuu tagant ning välja
vahetada iga 2 aasta tagant. Teave ltrite kohta:
EF 137, EFH13W
6. Was het stofreservoir om de 6 maanden. Open hiertoe
het deksel van het reservoir voor jne stofdeeltjes en
tik er zachtjes op om het stof te verwijderen.
4. Esprema o ltro para facilitar a secagem.
Deixe secar durante 24 horas antes de voltar a
colocá-lo no aparelho.
5. Os ltros devem ser lavados pelo menos uma vez
em cada 6 meses e substituídos a cada 2 anos.
Referência do ltro: EF 137, EFH13W
6. A cada 6 meses, abra a tampa do recipiente do pó
no e bata com cuidado para o esvaziar.
24
.4
6 .5
EFH13W ،EF137 :
.6
6

2828
de
eng
gre
fra
ned
ita
esp
por
arb
7. Open the ne dust container lid and wash the dust
container with water. Wash the ne dust container
every 2 years
8. Let dry for 24 hours before putting the lter and
ne dust container back to the machine body.
If dust has entered the nose cone,
clean it with your hand.
7. Feinstaubbehälter alle 2 Jahre reinigen. 8. Lassen Sie den Behälter 24 Stunden trocknen,
bevor Sie ihn und den Filter und wieder in das
Gerät einsetzen.
Hat der Staub bereits den Kegel erreicht,
wischen Sie ihn mit der Hand ab.
Cleaning the fine dust container
!
!
!
7. Πλένετε το δοχείο συλλογής σκόνης με
νερό κάθε 2 χρόνια.
8. Αφήνετε να στεγνώσει για 24 ώρες πριν
τοποθετήσετε ξανά το φίλτρο και το δοχείο
συλλογής λεπτής σκόνης στον κορμό της συσκευής.
Εάν έχει εισέλθει σκόνη στον κώνο του ρύγχους,
καθαρίστε την με το χέρι σας.
7. Vervang het stofreservoir om de 2 jaar. 8. Laat het lter en het lter voor jne stofdeeltjes 24
uur drogen voordat u ze weer in de behuizing van
het apparaat terugplaatst.
Als er stof in de neuskegel terecht is gekomen,
reinig deze dan handmatig.
!
7. Lave o recipiente do pó com água a cada 2 anos. 8. Deixe secar durante 24 horas antes de voltar a
colocar o ltro e o recipiente do pó no no aparelho.
Se tiver entrado pó para o cone, limpe-o com a mão.
!
7. Lave o recipiente do pó com água a cada 2 anos. 8. Deixe secar durante 24 horas antes de voltar a
colocar o ltro e o recipiente do pó no no aparelho.
Se tiver entrado pó para o cone, limpe-o com a mão.
!
7. Tous les 2ans, nettoyez le bac à poussière avec de l’eau. 8. Laissez-le sécher pendant 24heures avant de
remettre le ltre et le bac à poussière ne en place
dans l’appareil.
Si de la poussière s’est in ltrée dans le cône
d’aspiration, retirez-la à la main.
!
7. Tous les 2ans, nettoyez le bac à poussière avec de l’eau. 8. Laissez-le sécher pendant 24heures avant de
remettre le ltre et le bac à poussière ne en place
dans l’appareil.
Si de la poussière s’est in ltrée dans le cône
d’aspiration, retirez-la à la main.
!
.7
24 .8
!

2929
de
eng
gre
fra
ned
ita
esp
por
arb
1. Press the release buttons to open the back lid. 2. Remove the lter and rinse with cold water. 3. Let dry for 24 hours before placing it back to the
machine. Replace lter every 2 years. Filter reference:
AEF 13W
1. Drücken Sie die Entriegelungstasten, um die
hintere Abdeckung zu ö nen.
2. Filter entnehmen und mit kaltem
Wasser reinigen.
3. Lassen Sie den Filter 24 Stunden trocknen, bevor
Sie ihn wieder in das Gerät einsetzen.
Ersetzen Sie den Filter alle 2 Jahre.
Filterbestellnummer: AEF 13W
1. Πιέστε τα κουμπιά απασφάλισης για να ανοίξετε το
πίσω καπάκι.
2. Αφαιρέστε το φίλτρο και ξεπλύνετέ το με κρύο
νερό.
3. Αφήστε το να στεγνώσει για 24 ώρες πριν το
τοποθετήσετε ξανά στη συσκευή. Αντικαθιστάτε
το φίλτρο κάθε 2 χρόνια. Αρ. αναφοράς φίλτρου: AEF
13W
1. Pulse los botones de desbloqueo para abrir
la tapa posterior.
2. Retire el ltro y aclárelo con agua fría. 3. Déjelo secar durante 24 horas antes de volver a
colocarlo en la unidad. Cambie el ltro cada 2 años.
Referencia del ltro: EFH13W
1. Appuyez sur les boutons de déverrouillage pour
ouvrir le couvercle arrière.
2. Sortez le ltre et rincez-le à l’eau froide. 3. Laissez-le sécher pendant 24heures avant de le
remettre en place dans l’appareil. Changez le ltre
tous les 2ans. Référence du ltre: EFH13W
1. Premere i tasti di sgancio per aprire il coperchio
posteriore .
2. Estrarre il ltro e lavarlo con acqua fredda. 3. Lasciarlo ad asciugare per 24 ore prima di inserirlo
nuovamente nella macchina. Sostituire il ltro ogni 2
anni. Riferimento ltro: EFH13W
1. Druk op de vrijgaveknoppen om het deksel aan de
achterkant te openen.
2. Verwijder het lter en spoel het met
koud water.
3. Laat het lter 24 uur drogen voordat u het weer in
het apparaat terugplaatst. Vervang het lter om de
2 jaar. Filterreferentie: EFH13W
1. Prima os botões de libertação para abrir a tampa
da parte de trás.
2. Remova o ltro e lave-o com água fria. 3. Deixe secar durante 24 horas antes de voltar a
colocá-lo no aparelho. Substitua o ltro a cada 2
anos. Referência do ltro: EFH13W
.1 .2
24 .3
EFH13W :

30
de
eng
gre
fra
ned
ita
esp
por
arb
Cleaning the AeroPro Silent Nozzle
1. Disconnect the nozzle from the tube. Use the hose
handle to clean the nozzle.
2. If the wheels are stuck, clean them by removing the
wheel cap with a small screwdriver.
3. Unscrew the wheel axis and clean all parts. Ret in
reverse order.
1. Die Düse vom Rohr abnehmen. Mit dem Schlauchgri
die Düse absaugen.
2. Wenn die Räder blockiert sind, zum Reinigen die
Radabdeckung mit einem kleinen Schraubendreher
abhebeln.
3. Die Radachse abschrauben und alle Teile reinigen.
Zusammenbau in umgekehrter Reihenfolge.
1. Αποσυνδέστε το ακροφύσιο από το σωλήνα.
Χρησιμοποιήστε τη λαβή του εύκαμπτου σωλήνα, για
να καθαρίσετε το ακροφύσιο.
2. Εάν οι τροχοί κολλήσουν, καθαρίστε τους
αφαιρώντας το κάλυμμά τους με ένα μικρό κατσαβίδι.
3. Ξεβιδώστε τον άξονα και καθαρίστε όλα τα μέρη.
Τοποθετήστε τα ξανά ακολουθώντας τη διαδικασία
αντίστροφα.
1. Haal het mondstuk los van de buis. Gebruik de
slanggreep om het mondstuk te reinigen.
2. Als de wieltjes klem zitten, verwijdert u met een
kleine schroevendraaier de wieldop om het wieltje
schoon te maken.
3. Schroef de wielas los en maak alle onderdelen schoon.
Plaats de onderdelen in omgekeerde volgorde terug.
1. Separe o bocal do tubo. Utilize a pega da mangueira
para limpar o bocal.
2. Se as rodas estiverem presas, limpe-as removendo a
capa da roda com uma pequena chave de fendas.
3. Desaparafuse o eixo da roda e limpe todas as peças.
Volte a montar pela ordem inversa.
1. Desconecte la boquilla del tubo. Utilice el asa del tubo
exible para limpiar la boquilla.
2. Si las ruedas están atascadas, quite la tapa de las
ruedas con un destornillador pequeño para limpiarlas.
3. Desatornille el eje de la rueda y limpie todas las
piezas. Realice el montaje en orden inverso.
1. Désassembler le suceur du tube. Utiliser la poignée du
exible pour nettoyer le suceur.
2. Si les roues sont bloquées, les nettoyer en retirant
leur cache à l’aide d’un petit tournevis.
3. Dévisser l’axe des roues et nettoyer toutes les pièces.
Remonter dans l’ordre inverse.
1. Togliere la bocchetta dal tubo. Per pulire la bocchetta,
utilizzare l’impugnatura del tubo essibile.
2. Se le ruote sono bloccate, pulirle rimuovendo i
copriruota con l’ausilio di un piccolo cacciavite.
3. Svitare l’asse delle ruote e pulire tutte le parti.
Rimontare i componenti in ordine inverso.
.2
.3
.1

31
de
eng
gre
fra
ned
ita
esp
por
arb
Changing the battery on the remote control handle
1. Change battery when light indicator is blinking or
when it is not responding when pressing any button. *
2. Use only Lithium batteries type CR1632. Batteries
must be removed from the appliance before it is
scrapped and are to be disposed of safely. *
1. Batterie ersetzen, wenn die Kontrolllampe blinkt
oder das Gerät nach beliebigem Tastendruck nicht
mehr reagiert. *
2. Nur Batterien des Typs LITHIUM CR1632
verwenden. Vor dem Entsorgen des Geräts die
Batterie entfernen und sicher entsorgen. *
1. Αλλάζετε την μπαταρία όταν η λυχνία ένδειξης
αναβοσβήνει ή όταν δεν ανταποκρίνεται όταν
πατάτε τα κουμπιά. *
2. Χρησιμοποιήστε μόνο μπαταρίες τύπου LITHIUM
CR1632. Πριν απορρίψετε τη συσκευή, πρέπει να
αφαιρέσετε τις μπαταρίες και να τις απορρίψετε με
ασφάλεια. *
Hiermit erklärt Electrolux Home Care & SDA, dass die
Staubsauger mit Funkgerät der Modelle HER2 und
HER3 der Richtlinie 2014/53 / EU entsprechen.
Electrolux Home Care and SDA, declares that the
Vacuum Cleaner with radio equipment type HER2 and
HER3 is in compliance with Directive 2014/53/EU.
Με την παρούσα η Electrolux Home Care and SDA
δηλώνει πως η Ηλεκτρική Σκούπα με ασύρματο
εξοπλισμό τύπου HER2 και HER3 συμμορφώνεται με
την Οδηγία 2014/53/ΕΕ.
Electrolux Home Care and SDA déclare par la
présenteque l‘aspirateur pourvu d‘un équipement
radio detype HER2 et HER3 est conforme ŕ la Directive
2014/53/UE.
Hierbij verklaart Electrolux Home Care and SDA dat de
stofzuiger met radioapparatuur van het type HER2 en
HER3 voldoet aan de eisen van Richtlijn 2014/53/EU.
Con il presente documento, Electrolux Home
Care& SDA, dichiara che l‘aspirapolvere
conattrezzaturaradio tipo HER2 e HER3 è conforme
alla Direttiva 2014/53/UE.
Por la presente, Electrolux Home Care y SDA declaran
que la Aspiradora con equipo de radio tipo HER2 y
HER3cumple con la Directiva 2014/53/EU.
A Electrolux Home Care and SDA declara pela
presente que o Aspirador com equipamento de rádio
de tipo HER2 e HER3 está em conformidade com a
Diretiva 2014/53/EU.
1. Vervang de batterij wanneer het indicatielampje
knippert of wanneer het apparaat niet reageert
wanneer u op een willekeurige knop drukt. *
2. Gebruik alleen batterijen van het type LITHIUM
CR1632. Voordat u het apparaat wegdoet, moet u de
batterijen eruit halen en deze op verantwoorde wijze
afvoeren. *
1. Substitua a bateria quando a luz indicadora estiver
a piscar ou quando o aparelho não responder às
pressões em qualquer botão. *
2. Utilize apenas pilhas do tipo LITHIUM CR1632. As
pilhas devem ser removidas do aparelho antes de este
ser deitado fora e devem ser eliminadas de um modo
seguro. *
1. Cambie la batería cuando el indicador luminoso
parpadee o cuando no responda al pulsar
cualquier botón. *
2. Utilice sólo pilas de tipo LITHIUM CR1632. Se deben
quitar las pilas del aparato antes de desecharlo y se
deben desechar de forma segura. *
1. Changez la pile lorsque l’indicateur clignote ou si
l’appareil ne réagit pas lorsque vous appuyez sur
un bouton. *
2. Utiliser uniquement des piles de type LITHIUM
CR1632. Les piles doivent être retirées de l’appareil
avant que ce dernier ne soit jeté, et doivent être triées
pour un recyclage en toute sécurité. *
1. Sostituire la batteria quando la spia lampeggia
o quando non risponde più alla pressione di
qualsiasi pulsante. *
2. Utilizzare solo batterie del tipo LITIO CR1632. È
necessario rimuovere le batterie prima di rottamare e
smaltire l’apparecchio in modo sicuro. *
.1
CR1632 .2

de
eng
gre
fra
ned
ita
esp
por
arb
Troubleshooting
The vacuum cleaner does not start
• Check that the cable is connected to the mains.
• Check that the plug and cable are not damaged.
• Check for a blown fuse.
• Check if the battery indicator lamp responds. *
Clearing the hose
Clear the hose by “squeezing“ it. However, be careful in case the obstruction has been
caused by glass or needles caught inside the hose.
Note: The warranty does not cover any damage to hoses caused by cleaning them.
Water has entered the vacuum cleaner
It will be necessary to replace the motor at an authorized AEG service centre. Damage to
the motor caused by the penetration of water is not covered by the warranty.
For any further problems, contact an authorized AEG service centre.
Der Staubsauger lässt sich nicht einschalten.
• Prüfen, ob das Netzkabel an die Netzsteckdose angeschlossen ist.
• Prüfen, ob der Stecker und das Kabel beschädigt sind.
• Prüfen, ob eine Sicherung durchgebrannt ist.
• Prüfen, ob Batterieanzeige reagiert (nur bestimmte Modelle). *
Schlauchverstopfung beseitigen
Verstopfung des Schlauchs durch Biegen und Beugen lockern und lösen. Dabei jedoch
vorsichtig vorgehen, falls die Blockierung durch Scherben oder spitze Gegenstände (z. B.
Nadeln) im Schlauch verursacht wurde.
Hinweis: Die Garantie deckt keinerlei durch Reinigung verursachte Schäden an den Schläuchen ab.
Wasser ist in den Staubsauger eingedrungen.
Es ist notwendig, den Motor in einem autorisierten AEG-Servicezentrum auszutauschen.
Schäden am Motor, die durch eingedrungenes Wasser verursacht wurden, werden nicht
durch die Garantie abgedeckt.
Falls weitere Probleme auftreten, wenden Sie sich an die AEG Kundenbetreuung.
Η ηλεκτρική σκούπα δεν λειτουργεί
• Βεβαιωθείτε ότι το καλώδιο είναι συνδεδεμένο με το ρεύμα.
• Βεβαιωθείτε ότι η πρίζα και το καλώδιο δεν παρουσιάζουν βλάβη.
• Ελέγξτε για καμένη ασφάλεια.
• Ελέγξτε εάν η ενδεικτική λυχνία της μπαταρίας ανταποκρίνεται (μόνο σε ορισμένα μοντέλα). *
Καθαρισμός του εύκαμπτου σωλήνα
Καθαρίστε τον εύκαμπτο σωλήνα “πιέζοντάς” τον. Ωστόσο, να είστε προσεκτικοί στην
περίπτωση που η απόφραξη έχει προκληθεί από γυαλιά ή βελόνες που έχουν πιαστεί μέσα
στον εύκαμπτο σωλήνα.
Σημείωση: Η εγγύηση δεν καλύπτει οποιαδήποτε ζημιά προκληθεί στους εύκαμπτους σωλήνες
ως αποτέλεσμα του καθαρισμού τους.
Έχει μπει νερό στην ηλεκτρική σκούπα
Θα πρέπει να γίνει αντικατάσταση του κινητήρα σε ένα εξουσιοδοτημένο κέντρο
εξυπηρέτησης της AEG. Τυχόν βλάβες του κινητήρα που προκαλούνται από διείσδυση
νερού δεν καλύπτονται από την εγγύηση.
Για τυχόν άλλα προβλήματα, επικοινωνήστε με ένα εξουσιοδοτημένο κέντρο εξυπηρέτησης
της AEG.
Stofzuiger doet het niet
• Controleer of de stekker in het stopcontact zit.
• Controleer of de stekker en het snoer niet beschadigd zijn.
• Controleer of de zekeringen niet doorgebrand zijn.
• Controleer of het indicatielampje van de batterij reageert (alleen sommige modellen). *
De slang leegmaken
Knijp in de slang om verstoppingen te verwijderen. Wees echter voorzichtig als de kans
bestaat dat de verstopping wordt veroorzaakt door glas of naalden in de slang.
Let op. De garantie geldt niet voor beschadigingen die zijn ontstaan tijdens het reinigen van de slang.
Er is water in de stofzuiger gekomen
De motor moet door een erkend Electrolux Service Centre worden vervangen. Schade aan
de motor veroorzaakt door binnendringend water valt niet onder de garantie.
Voor alle verdere problemen raadpleegt u een erkend Electrolux Service Centre.
L’aspirateur ne se met pas en marche :
• Vérier que le câble est branché au secteur.
• Vérier que la prise et le câble ne sont pas abîmés.
• Vérier qu’aucun fusible n’a sauté.
• Vérier que le voyant des piles fonctionne (suivant les modèles). *
Débouchage du exible
Déboucher le exible en appuyant dessus. Cependant, prendre garde de ne pas se blesser
en cas d’obstruction par du verre ou des aiguilles coincés dans le exible.
Remarque : la garantie ne couvre pas les dommages portés au exible lors de son nettoyage.
De l’eau a été aspirée
Le moteur doit être remplacé par un Centre Service Agréé Electrolux. Les dommages
portés au moteur par l’entrée d’eau ou de liquides ne sont pas couverts par la garantie.
Pour tout autre problème, contacter un Centre Service Agréé Electrolux.
L’aspirapolvere non si accende
• Controllare che il cavo sia collegato all’alimentazione di rete.
• Controllare che la spina e il cavo non siano danneggiati.
• Controllare che non vi sia un fusibile bruciato.
• Controllare che la spia luminosa della batteria risponda ai comandi (solo in alcune modalità). *
Pulizia del tubo essibile
Liberare il tubo essibile esercitando una lieve pressione. Tuttavia, prestare attenzione nel
caso in cui l’ostruzione sia stata causata da frammenti di vetro o aghi all’interno del essibile.
Nota: La garanzia non copre alcun danno al tubo qualora sia causato dalla pulizia del pezzo.
Inltrazione d’acqua nell’aspirapolvere
Sarà necessario far sostituire il motore presso un centro di assistenza autorizzato Electrolux.
I danni al motore causati dall’inltrazione d’acqua non sono coperti dalla garanzia.
Per altri problemi contattare un centro di assistenza Electrolux autorizzato.
32
Pagina wordt geladen...

34
English
Recycle the materials with the symbol
Put the packaging in applicable containers to recycle it.
Help protect the environment and human health and to
recycle waste of electrical and electronic appliances.
Do not dispose appliances marked with the symbol
with the household waste. Return the product to your
local recycling facility or contact your municipal o ce.
Recycle the materials with the symbol
Deutsch
Recyceln Sie Materialien mit dem Symbol
Entsorgen Sie die Verpackung in den entsprechenden
Recyclingbehältern. Recyceln Sie zum Umwelt- und
Gesundheitsschutz elektrische und elektronische Geräte.
Entsorgen Sie Geräte mit diesem Symbol
nicht mit
dem Hausmüll. Bringen Sie das Gerät zu Ihrer örtlichen
Sammelstelle oder wenden Sie sich an Ihr Gemeindeamt.
Ελληνικά
Ανακυκλώστε τα υλικά που φέρουν το σύμβολο
Τοποθετήστε τα υλικά συσκευασίας σε κατάλληλα
δοχεία για ανακύκλωση. Συμβάλλετε στην προστασία
του περιβάλλοντος και της ανθρώπινης υγείας
ανακυκλώνοντας τις άχρηστες ηλεκτρικές και
ηλεκτρονικές συσκευές. Μην απορρίπτετε με τα
οικιακά απορρίμματα συσκευές που φέρουν το σύμβολο
. Επιστρέψτε το προϊόν στην τοπική σας μονάδα
ανακύκλωσης ή επικοινωνήστε με τη δημοτική αρχή.
Français
Recyclez les matériaux portant le symbole . Déposez
les emballages dans les conteneurs prévus à cet e et.
Contribuez à la protection de l’environnement et à votre
sécurité, recyclez vos produits électriques et électroniques.
Ne jetez pas les appareils portant le symbole avec les
ordures ménagères. Emmenez un tel produit dans votre centre
local de recyclage ou contactez vos services municipaux.
Nederlands
Recycle de materialen met het symbool . Gooi de
verpakking in een geschikte verzamelcontainer om het
te recyclen. Help om het milieu en de volksgezondheid
te beschermen en recycle het afval van elektrische en
elektronische apparaten. Gooi apparaten gemarkeerd
met het symbool niet weg met het huishoudelijk
afval. Breng het product naar het milieustation bij u in
de buurt of neem contact op met de gemeente.
Italiano
Riciclare i materiali con il simbolo .
Buttare l’imballaggio negli appositi contenitori per il
riciclaggio. Aiutare a proteggere l’ambiente e la salute
umana e a riciclare ri uti derivanti da apparecchiature
elettriche ed elettroniche. Non smaltire le apparecchiature
che riportano il simbolo insieme ai normali ri uti
domestici. Portare il prodotto al punto di riciclaggio più
vicino o contattare il comune di residenza.
Español
Recicle los materiales con el símbolo . Coloque el
material de embalaje en los contenedores adecuados
para su reciclaje. Ayude a proteger el medio ambiente y
la salud pública, así como a reciclar residuos de aparatos
eléctricos y electrónicos. No deseche los aparatos
marcados con el símbolo junto con los residuos
domésticos. Lleve el producto a su centro de reciclaje
local o póngase en contacto con su o cina municipal.
Recicle los materiales con el símbolo . Coloque el
Recyclez les matériaux portant le symbole . Déposez
Recycle de materialen met het symbool . Gooi de
Riciclare i materiali con il simbolo .
Português
Recicle os materiais que apresentem o símbolo
Coloque a embalagem nos contentores indicados para
reciclagem. Ajude a proteger o ambiente e a saúde pública
através da reciclagem de aparelhos eléctricos e electrónicos.
Não elimine os aparelhos que tenham o símbolo
] juntamente com os resíduos domésticos. Coloque o
produto num ponto de recolha para reciclagem local ou
contacte as suas autoridades municipais.
Pagina wordt geladen...
Pagina wordt geladen...
Documenttranscriptie
3 Vorbereitungen • Packen Sie Ihren LX9 Staubsauger aus und prüfen Sie, ob alle Zubehörteile enthalten sind*. • Lesen Sie die Bedienungsanleitung. • Beachten Sie dabei besonders das Kapitel mit den Sicherheitshinweisen. Before starting • Unpack your LX9 model and the accessory system and check that all accessories are included.* • Read the User Manual carefully. • Pay special attention to the Safety advice chapter. * Zubehör kann je nach Modell variieren. Enjoy your AEG LX9! Wir wünschen Ihnen viel Freude mit Ihrem AEG LX9! Inhaltsverzeichnis: Sicherheitshinweise. . . . . . . . . . . . . . . . . . . . . . . . . . . . . . . . . . . . . . . 4 Verbraucherinformationen und Nachhaltigkeitsgrundsätze. . . . . . . . . . . . . . . . . . . . . . . . . . . . . . . 4 Übersicht über den Staubsauger. . . . . . . . . . . . . . . . . . . . . . . . . 14 Verwendung des Staubsaugers. . . . . . . . . . . . . . . . . . . . . . . . . . 18 Tipps für beste Ergebnisse. . . . . . . . . . . . . . . . . . . . . . . . . . . . . . . 21 Staubverdichtung. . . . . . . . . . . . . . . . . . . . . . . . . . . . . . . . . . . . . . . 24 Entleeren. . . . . . . . . . . . . . . . . . . . . . . . . . . . . . . . . . . . . . . . . . . . . . . . 25 Austauschen der Filter. . . . . . . . . . . . . . . . . . . . . . . . . . . . . . . . . . . 26 Reinigen der AeroPro-Düse und Batteriewechsel der Fernbedienung im Handgriff.. . . . . . . . . . . . . . . . . . . . . . . . . . . . 30 Fehlersuche. . . . . . . . . . . . . . . . . . . . . . . . . . . . . . . . . . . . . . . . . . . . . 32 * Accessories may vary from model to model. Table of contents: Safety advice. . . . . . . . . . . . . . . . . . . . . . . . . . . . . . . . . . . . . . . . . . . . . . 5 Consumer information and sustainability policy . . . . . . . . . . 5 Overview of the vacuum cleaner . . . . . . . . . . . . . . . . . . . . . . . . 14 How to use the vacuum cleaner . . . . . . . . . . . . . . . . . . . . . . . . . 18 Tips on how to get the best results . . . . . . . . . . . . . . . . . . . . . . . 21 Dust compacting. . . . . . . . . . . . . . . . . . . . . . . . . . . . . . . . . . . . . . . . 24 Dust emptying . . . . . . . . . . . . . . . . . . . . . . . . . . . . . . . . . . . . . . . . . . 25 Replacing the filters . . . . . . . . . . . . . . . . . . . . . . . . . . . . . . . . . . . . . 26 Cleaning the AeroPro nozzle and changing the battery in remote handle. . . . . . . . . . . . . . . . . . . . . . . . . . . . . . . . . . . . . . . . 30 Troubleshooting . . . . . . . . . . . . . . . . . . . . . . . . . . . . . . . . . . . . . . . . 32 Avant de commencer • Déballer votre aspirateur LX9 ainsi que le système d’accessoires AeroPro pour vérifier que tous les accessoires sont bien inclus*. • Lire les instructions d’utilisation. • Le chapitre Consignes de sécurité doit être lu avec une attention particulière. Voordat u begint • Pak uw LX9-model en het AeroPro-systeem uit en controleer of alle accessoires aanwezig zijn*. • Lees de gebruiksaanwijzing. • Geef vooral aandacht aan de veiligheidsinstructies. *Suivant les modèles. Veel plezier met uw Electrolux LX9! Electrolux LX9 pour un nettoyage plus efficace ! Table des matières : Consignes de sécurité. . . . . . . . . . . . . . . . . . . . . . . . . . . . . . . . . . . . . . 7 Informations consommateur et appareil en fin de vie. . . . . . . 7 Comment utiliser cet aspirateur. . . . . . . . . . . . . . . . . . . . . . . . . . 14 Astuces pour un résultat impeccable. . . . . . . . . . . . . . . . . . . . . 18 Compactage de la poussière. . . . . . . . . . . . . . . . . . . . . . . . . . . . . 21 Vidange de la poussière. . . . . . . . . . . . . . . . . . . . . . . . . . . . . . . . . . 24 Remplacement des filtres. . . . . . . . . . . . . . . . . . . . . . . . . . . . . . . . 25 Nettoyage du suceur AeroPro et changement de la pile logée dans la poignée télécommande. . . . . . . . . . . . . . . . . . . . . . . . . . 30 Gestion des pannes. . . . . . . . . . . . . . . . . . . . . . . . . . . . . . . . . . . . . . 32 Introducción • Desembale el modelo LX9, así como el sistema AeroPro, y compruebe que están incluidos todos los accesorios*. • Lea el manual de instrucciones. • Preste especial atención al capítulo de consejos de seguridad. * Accessoires kunnen per model verschillen. Inhoud: Veiligheidsadvies. . . . . . . . . . . . . . . . . . . . . . . . . . . . . . . . . . . . . . . . . . 8 Klantinformatie en milieubeleid. . . . . . . . . . . . . . . . . . . . . . . . . . . 8 Gebruik van de stofzuiger . . . . . . . . . . . . . . . . . . . . . . . . . . . . . . . 14 Tips voor de beste resultaten . . . . . . . . . . . . . . . . . . . . . . . . . . . . 18 Stof samenpersen. . . . . . . . . . . . . . . . . . . . . . . . . . . . . . . . . . . . . . . 21 Stof legen Stof legen. . . . . . . . . . . . . . . . . . . . . . . . . . . . . . . . . . . . . 24 De filters vervangen . . . . . . . . . . . . . . . . . . . . . . . . . . . . . . . . . . . . . 25 Het AeroPro-mondstuk schoonmaken en de batterij van de afstandsbediening vervangen. . . . . . . . . . . . . . . . . . . . 30 Problemen oplossen. . . . . . . . . . . . . . . . . . . . . . . . . . . . . . . . . . . . . 32 Antes de começar • Desembale o seu modelo LX9 e o sistema AeroPro e verifique se foram incluídos todos os acessórios*. • Leia as Instruções de Funcionamento. • Preste especial atenção ao capítulo Avisos de segurança. * Os acessórios podem variar de modelo para modelo. * Los accesorios pueden variar según el modelo. Tire o máximo partido do seu Electrolux LX9! Disfrute de la aspiradora Electrolux LX9! Índice: Avisos de segurança. . . . . . . . . . . . . . . . . . . . . . . . . . . . . . . . . . . . . . 11 Informação ao consumidor e política de sustentabilidade. . . . . . . . . . . . . . . . . . . . . . . . . . . . . . . . . . . . . . . . . . 11 Como utilizar o aspirador. . . . . . . . . . . . . . . . . . . . . . . . . . . . . . . . 16 Sugestões para obter os melhores resultados de limpeza . . . . . . . . . . . . . . . . . . . . . . . . . . . . . . . . . . . . . . . . . . . . . . 18 Compactação do pó . . . . . . . . . . . . . . . . . . . . . . . . . . . . . . . . . . . . 21 Remoção do pó . . . . . . . . . . . . . . . . . . . . . . . . . . . . . . . . . . . . . . . . . 24 Substituição dos filtros. . . . . . . . . . . . . . . . . . . . . . . . . . . . . . . . . . . 25 Limpeza da escova AeroPro e substituição das pilhas na pega com controlo remoto . . . . . . . . . . . . . . . . . . . . . . . . . . . 30 Resolução de problemas. . . . . . . . . . . . . . . . . . . . . . . . . . . . . . . . . 33 Índice: Consejo de seguridad. . . . . . . . . . . . . . . . . . . . . . . . . . . . . . . . . . . . 10 Información al consumidor y política de sostenibilidad. . . . . . . . . 10 Cómo utilizar la aspiradora. . . . . . . . . . . . . . . . . . . . . . . . . . . . . . 16 Sugerencias sobre cómo obtener los mejores resultados. . . . . . . 18 Compresión de polvo. . . . . . . . . . . . . . . . . . . . . . . . . . . . . . . . . . . . 21 Vaciado de polvo. . . . . . . . . . . . . . . . . . . . . . . . . . . . . . . . . . . . . . . . 24 Cambio de los filtros. . . . . . . . . . . . . . . . . . . . . . . . . . . . . . . . . . . . . 25 Limpieza de la boquilla AeroPro y cambio de la pila en el asa con mando a distancia . . . . . . . . . . . . . . . . . . . . . . . . . . . . . . 30 Solución de problemas . . . . . . . . . . . . . . . . . . . . . . . . . . . . . . . . . . 33 Πριν την εκκίνηση • Βγάλτε από τη συσκευασία το μοντέλο LX9 που διαθέτετε και το σύστημα AeroPro και ελέγξτε εάν περιλαμβάνονται όλα τα εξαρτήματα*. • Διαβάστε τις Οδηγίες Λειτουργίας. • Προσέξτε ιδιαίτερα το κεφάλαιο “Υποδείξεις ασφαλείας”. * Τα εξαρτήματα ίσως διαφέρουν από μοντέλο σε μοντέλο. Απολαύστε την LX9 της AEG! Πίνακας περιεχομένων: Υποδείξεις ασφαλείας . . . . . . . . . . . . . . . . . . . . . . . . . . . . . . . . . . . . . 6 Πληροφορίες για τον καταναλωτή και πολιτική βιωσιμότητας. . . . . . . . . . . . . . . . . . . . . . . . . . . . . . . . . . . . . . . . . . . . . 6 Επισκόπηση της ηλεκτρικής σκούπας. . . . . . . . . . . . . . . . . . . . 14 Πώς να χρησιμοποιήσετε την ηλεκτρική σκούπα. . . . . . . . . . 18 Συμβουλές για να επιτύχετε τα καλύτερα αποτελέσματα καθαρισμού. . . . . . . . . . . . . . . . . . . . . . . . . . . . . . . . . . . . . . . . . . . . . 21 Συμπίεση σκόνης. . . . . . . . . . . . . . . . . . . . . . . . . . . . . . . . . . . . . . . . 24 Άδειασμα της σκόνης. . . . . . . . . . . . . . . . . . . . . . . . . . . . . . . . . . . . 25 Αντικατάσταση των φίλτρων. . . . . . . . . . . . . . . . . . . . . . . . . . . . . 26 Καθαρισμός του ακροφυσίου AeroPro και αλλαγή της μπαταρίας στη χειρολαβή με το τηλεχειριστήριο. . . . . . . . . . . . . . . . . . . . . . . . . . . . . . . 30 Επίλυση προβλημάτων . . . . . . . . . . . . . . . . . . . . . . . . . . . . . . . . . . 32 Prima di iniziare • Disimballare il modello LX9 e il sistema AeroPro e controllare che tutti gli accessori siano inclusi*. • Leggere le Istruzioni per l’uso. • Prestare particolare attenzione al capitolo Norme di sicurezza. * Gli accessori possono variare da modello a modello. de eng gre fra ned Buona pulizia con Electrolux LX9! Sommario: Norme di sicurezza . . . . . . . . . . . . . . . . . . . . . . . . . . . . . . . . . . . . . . . . 9 Informazioni per l’utente e politica di sostenibilità. . . . . . . . . . 9 Utilizzo dell’aspirapolvere. . . . . . . . . . . . . . . . . . . . . . . . . . . . . . . . 14 Suggerimenti per ottenere risultati di pulizia ottimali. . . . . . . . 18 Compattazione della polvere. . . . . . . . . . . . . . . . . . . . . . . . . . . . 21 Svuotamento della polvere. . . . . . . . . . . . . . . . . . . . . . . . . . . . . . 24 Sostituzione dei filtri. . . . . . . . . . . . . . . . . . . . . . . . . . . . . . . . . . . . . 25 Pulizia della bocchetta AeroPro e sostituzione della batteria nell’impugnatura con comando a distanza . . . . . . . . . . . . . . 30 Ricerca ed eliminazione dei guasti . . . . . . . . . . . . . . . . . . . . . . . 32 ita قبل البدء والوحدات الملحقة من العبوة وتحققLX9 أخرج المكنسة الكهربائية طراز • ِ *.من وجود جميع الملحقات .• اقرأ دليل المستخدم بعناية .• انتبه بشكل خاص إلى الفصل المتعلق بنصائح السالمة arb Electrolux منLX9 تمتع باستخدام.‹قد تختلف الملحقات من طراز آلخر :جدول المحتويات 12. . . . . . . . . . . . . . . . . . . . . . . . . . . . . . . . . نصائح للسالمة 12. . . . . . . . . . . . . . . .معلومات المستهلك وسياسة االستدامة 16. . . . . . . . . . . . . . . . . . . . . . كيفية استخدام المكنسة الكهربائية 18. . . . . . . . . . . . . . . . . نصائح للحصول على أفضل النتائج 24. . . . . . . . . . . . . . . . . . . . . . . . . . . . . . . . . ضغط الغبار 25. . . . . . . . . . . . . . . . . . . . . . . . . . . . . . . . . تفريغ الغبار 26. . . . . . . . . . . . . . . . . . . . . . . . . . . . . . . . . استبدال الفلتر وتغييرAeroPro تنظيف فوهة 30. . . . . . . . . . . . . . . . . البطارية في مقبض التحكم عن بُعد 33. . . . . . . . . . . . . . . . . . . . . استكشاف األخطاء وإصالحها esp por 8 de eng gre fra Veiligheidsvereiste en waarschuwing Dit apparaat kan worden gebruikt door kinderen van 8 jaar en ouder en door mensen met beperkte lichamelijke, zintuiglijke of verstandelijke vermogens of een gebrek aan ervaring en kennis, indien zij onder toezicht staan of instructies hebben gekregen over het veilig gebruiken van het apparaat en indien zij de eventuele gevaren begrijpen. WAARSCHUWING: Turbomondstukaccessoires* zijn voorzien van een roterende borstel waarin deeltjes vast kunnen komen te zitten. Het Turbo mondstuk is niet geschikt voor tapijten met diepe polen en lange franjes, antislip tapijten zoals deurmatten of waterbestendige tapijten. Let bij het gebruik van deze accessoires goed op en gebruik ze alleen op de bedoelde oppervlakken. Schakel de stofzuiger uit voordat u vastgelopen deeltjes verwijdert of de borstel schoonmaakt. ned Let op dat kinderen niet met het apparaat spelen. ita Trek altijd de stekker uit het stopcontact voordat u het apparaat gaat reinigen of onderhouden. esp por arb Gebruik de stofzuiger nooit zonder filters. Waarschuwing Dit apparaat bevat elektrische verbindingen. • Zuig nooit vloeistoffen op. • Dompel het apparaat nooit in water om het schoon te maken. • Controleer de slang regelmatig en gebruik deze niet als u beschadigingen opmerkt. • Voor hete of koude as, brandende sigarettenpeuken, enz. • Voor fijn stof van bijvoorbeeld gips, beton of bloem. Voorzorgsmaatregelen betreffende het elektrische snoer • Controleer regelmatig of de stekker en het snoer niet beschadigd zijn. Gebruik de stofzuiger nooit als het snoer beschadigd is. • Als het snoer is beschadigd, mag dit alleen bij een erkend Electrolux Service Centre worden vervangen om risico te vermijden. Schade aan het snoer van de stofzuiger valt niet onder de garantie. • Nooit door middel van het snoer de stofzuiger naar u toe trekken of optillen. Alle servicebeurten en reparaties moeten uitgevoerd worden door een erkend Electrolux Service Centre. Bewaar de stofzuiger op een droge plaats. Klantinformatie en milieubeleid Electrolux wijst alle aansprakelijkheid van de hand voor schade die ontstaat als gevolg van onjuist gebruik van het apparaat of onbevoegde aanpassingen van het apparaat. Zie het bijgesloten garantieboekje voor meer informatie over de garantie en contactpersonen voor klanten. Als u opmerkingen hebt over de stofzuiger of over de handleiding, kunt u een e-mail sturen naar [email protected] Bovengenoemde zaken kunnen schade aan de motor veroorzaken. Dergelijke schade valt niet onder de garantie. Milieubeleid Het ontwerp van dit product is zeer milieuvriendelijk. Alle kunststof onderdelen kunnen worden hergebruikt. Ga voor meer informatie naar onze website: www.electrolux.com De stofzuiger is uitsluitend bestemd voor huishoudelijk gebruik. Het verpakkingsmateriaal is geselecteerd op millieuvriendelijkheid en kan worden gerecycled. Gebruik de stofzuiger nooit in deze situaties • In de buurt van ontvlambare gassen, enz. • Bij scherpe voorwerpen. Content 15 Beschreibung Ihres LX9: 1. LED Display* 2. Elektronische Leistungsregelung* 3. Filter 4. Filtergitter 5. Netzkabel 6. Hinterräder 7. Filtergitterentriegelung 8. Taste Ein/Aus 9. Aufrolltaste für das Netzkabel 10. Feinstaubbehälter 11. Waschbarer Hauptfilter 12. Staubbehälter 13. Verdichterhebel 14. AeroPro-Schlauch 15. AeroPro-Griff mit Fernbedienung* 16. AeroPro Ergo-Griff* 17. Luftstromventilklappe* 18. AeroPro-Teleskoprohr 19. Parkfunktion 20. FlowMotion Flüsterdüse 21. AeroPro-Hartbodendüse* 22. AeroPro-Turbodüse* 23. AeroPro 3-in-1-Kombidüse 24. 2 Parkaufnahmen 25. Tragegriff Description of your LX9 1. LED Display* 2. Electronic power regulation* 3. Filter 4. Filter grill 5. Power cord 6. Rear wheels 7. Filter grill release 8. On/Off button 9. Cord reqind button 10. Fine dust container 11. Washable main filter 12. Dust bin 13. Compactor handle 14. AeroPro hose 15. AeroPro remote control handle* 16. AeroPro ergo handle* 17. Airflow regulation valve* 18. AeroPro telescopic tube 19. Parking clip 20. FlowMotion nozzle 21. AeroPro Parketto nozzle* 22. AeroPro turbo nozzle* 23. AeroPro 3 in 1 nozzle 24. 2 parking slots 25. Carrying handle Περιγραφή της LX9: 1. Οθόνη LED* 2. Ηλεκτρονική ρύθμιση ισχύος* 3. Φίλτρο 4. Σχάρα φίλτρου 5. Καλώδιο ρεύματος 6. Πίσω τροχοί 7. Αποδέσμευση σχάρας φίλτρου 8. Κουμπί ενεργοποίησης/απενεργοποίησης 9. Κουμπί περιέλιξης καλωδίου 10. Δοχείο συλλογής λεπτής σκόνης 11. Πλενόμενο κύριο φίλτρο 12. Δοχείο σκόνης 13. Λαβή συμπιεστή 14. Εύκαμπτος σωλήνας AeroPro 15. Λαβή με τηλεχειριστήριο AeroPro* 16. Λαβή AeroPro ergo* 17. Βαλβίδα ρύθμισης ροής αέρα* 18. Τηλεσκοπικός σωλήνας AeroPro 19. Κλιπ στάθμευσης 20. Αθόρυβο ακροφύσιο FlowMotion 21. Ακροφύσιο AeroPro parketto* 22. Ακροφύσιο AeroPro turbo* 23. Στόμιο AeroPro 3σε1 24. 2 υποδοχές στάθμευσης 25. Χειρολαβή μεταφοράς Description de votre LX9: 1. Écran LED* 2. Régulateur de puissance électronique* 3. Filtre 4. Grille de filtre 5. Cordon d’alimentation 6. Roulettes arrière Roulettes arrière 7. Verrouillage de la grille de filtre 8. Bouton Marche/Arrêt 9. Bouton d’enroulement du câble d’alimentation 10. Bac à poussière fine 11. Filtre principal lavable 12. Bac à poussière 13. Poignée du compacteur 14. Flexible AeroPro 15. Poignée de flexible avec commandes à distance AeroPro* 16. Poignée de flexible AeroPro ergonomique* 17. Vanne de régulation de la circulation d’air* 18. Tube télescopique AeroPro 19. Systeme de rangement Clip 20. Brosse FlowMotion 21. Suceur spécial sols durs / parquets AeroPro* 22. Turbobrosse AeroPro* 23. Suceur AeroPro 3 en 1 24. 2 fentes de rangement 25. Poignée de transport Beschrijving van uw LX9: 1. LED-display* 2. Knop voor elektronische vermogen* 3. Filter 4. Filterrooster 5. Netsnoer 6. Achterwielen 7. Vrijgifteknop van het filterrooster 8. Aan/uit-toets 9. Netsnoerintrekknop 10. Reservoir voor fijne stofdeeltjes 11. Uitwasbare hoofdfilter 12. Stofbak 13. Compactorhendel 14. AeroPro-slang 15. AeroPro-handvat met afstandsbediening* 16. Ergonomische AeroPro-handgreep* 17. Luchtstroomregelklep* 18. AeroPro telescopische buis 19. Opbergklem 20. FlowMotion mondstuk 21. AeroPro-parketmondstuk* 22. AeroPro-turbomondstuk* 23. AeroPro-3in1-zuigmond 24. 2 opbergsleuven 25. Draaghandgreep Descrizione dell’LX9: 1. Display a LED* 2. Regolazione elettronica della potenza* 3. Filtro 4. Griglia del filtro 5. Cavo di alimentazione 6. Ruote posteriori 7. Sblocco della griglia del filtro 8. Pulsante On/Off 9. Pulsante di riavvolgimento cavo 10. Contenitore della polvere fine 11. Filtro principale lavabile 12. Contenitore della polvere 13. Manico del compattatore 14. Tubo flessibile AeroPro 15. Impugnatura telecomando AeroPro* 16. Impugnatura AeroPro con comando a distanza* 17. Valvola di regolazione del flusso d’aria* 18. Tubo telescopico AeroPro 19. Gancio di fermo 20. FlowMotion AeroPro 21. Bocchetta parketto AeroPro* 22. Bocchetta turbo AeroPro* 23. Bocchetta AeroPro 3in1 24. 2 fentes de rangement 25. Maniglia per il trasporto de eng gre fra ned ita esp por arb 20 How to use the vacuum cleaner 7. Regeln Sie den Luftstrom durch Verschieben der Ventilklappe. * 8. Drehen Sie die Leistungsregelung nach rechts, um die Leistung zu erhöhen oder nach links, um sie zu verringern.* 9. Drücken Sie die Taste Ein/Aus, um das Gerät einoder auszuschalten. Drücken Sie auf „+“, um die Leistung zu erhöhen oder auf „-“, um sie zu verringern. * 7. Regulate airflow by pushing the valve up and down. * 8. Push the power regulation to the right to increase power, push to the left to reduce power.* 9. Press the On/Off button to turn on and off. Press ‘+’ to increase power and press ‘-‘ to reduce power. * 7. Μπορείτε να ρυθμίσετε τη ροή αέρα, πιέζοντας τη βαλβίδα προς τα πάνω και προς τα κάτω. * 8. Πιέστε το κουμπί ρύθμισης ισχύος προς τα δεξιά για να αυξήσετε την ισχύ και προς τα αριστερά για να τη μειώσετε. * 7. Réglez mécaniquement la puissance en poussant la valve de réglage du débit d’air* vers le haut et le bas. * 8. Tournez le variateur de puissance* vers la droite pour augmenter la puissance et vers la gauche pour réduire la puissance. * 7. Regel de luchtstroom door de klep omhoog en omlaag te schuiven. * 8. Druk de knop voor het vermogen naar rechts om de zuigkracht te verhogen en naar links om de zuigkracht te verlagen. * 9. Πατήστε το κουμπί ενεργοποίησης/ απενεργοποίησης για να ενεργοποιήσετε και να απενεργοποιήσετε τη συσκευή. Πατήστε το «+» για να αυξήσετε την ισχύ και το «-» για να τη μειώσετε. * 9. Appuyez sur le pédale Marche/Arrêt pour mettre en marche et arrêter l’appareil. Appuyez sur la touche « + »* pour augmenter la puissance et sur la touche « - »* pour réduire la puissance. * 9. Druk op de aan/uit-toets om het apparaat aan en uit te zetten. Druk op ’+’ voor meer zuigkracht en op ’-’ voor minder zuigkracht. * 7. Regolare il flusso dell’aria premendo verso l’alto e il basso la valvola. * 8. Premere il regolatore di potenza verso destra per aumentare la potenza e verso sinistra per ridurla. * 9. Premere il pulsante On/Off per accendere e spegnere la macchina. Premere ”+” per aumentare la potenza e ”-” per ridurla. * esp 7. Regule el caudal de aire presionando la válvula hacia arriba y hacia abajo. * 8. Presione la regulación de potencia hacia la derecha para aumentar la potencia y hacia la izquierda para reducirla. * 9. Pulse la tecla de encendido/apagado para encender y apagar. Pulse ”+” para aumentar la potencia y ”-” para reducirla. * por 7. Regule o fluxo de ar deslocando a válvula para cima ou para baixo. * 8. Desloque o regulador de potência para a direita para aumentar a potência ou para a esquerda para diminuir a potência. * 9. Prima o botão On/Off para ligar e desligar. Prima ‘+’ para aumentar a potência e prima ‘-‘ para reduzir a potência. * arb قم بتنظيم دفﻖ الهواء عن طريﻖ دفﻊ الصمام ألعلﻰ * .وألسفل وادفعه،ادفﻊ زر تنظيم الطاقة إلﻰ اليمين لزيادة الطاقة *.إلﻰ اليسار لخفض الطاقة إيقاف التﺷﻐيل للتﺷﻐيل وإيقاف/اﺿﻐط علﻰ زر التﺷﻐيل ‘-’ ‘ لزيادة الطاقة واضغط على+’ اضغط على.التﺷﻐيل * .لخفضها de eng gre fra ned ita .7 .8 .9 Tips on how to get the best results 21 Schieben Sie den Parkfunktions-Clip der Düse in eine der beiden Parkaufnahmen, die sich seitlich oder auf der Rückseite des Geräts befinden. de Insert the nozzle parking clip into one of the two parking slots on the side or on the back of the machine. eng Εισαγάγετε το κλιπ στάθμευσης του ακροφυσίου σε μια από τις δύο υποδοχές στάθμευσης που βρίσκονται στο πλάι ή στο πίσω μέρος της συσκευής. * gre Insérez le crochet de fixation de l’embout dans l’une des deux encoches de rangement se trouvant sur le côté ou à l’arrière de l’appareil. fra Steek de clip voor bevestiging van het mondstuk in een van de twee sleuven, aan de zij- of achterkant van het apparaat. ned Inserire il gancetto della spazzola in una delle due fessure di arresto, sul lato o sul retro della macchina. ita Inserte la sujeción de almacenamiento de la boquilla en una de las dos ranuras en el lateral o la parte posterior de la unidad. esp Introduza o clipe de repouso do bocal numa das ranhuras de repouso: na parte lateral e na parte de trás do aparelho. por أدخل مشبك تخزين الفوهة في إحدى فتحتي التخزين على جانب الجهاز أو .على ظهره arb * 22 Tips on how to get the best results A. C. B. C. de F. E. eng G. D. gre fra ned ita G. Um die optimale Saugleistung einzustellen, regeln Sie die Leistung beim Staubsaugen über die 5 Leistungsstufen. (1 = Normalbetrieb, 5 = Maximale Leistung)* Bei Modellen mit manueller Steuerung wird der Luftstrom mit der Ventilklappe (17) geregelt.* For optimum performance check the 5 power levels during use. (1=Lowest mode, 5= Highest mode)* On manually controlled models, the airflow is adjusted by the air valve(17). * Για τα καλύτερα δυνατά αποτελέσματα, ελέγξτε τα πέντε επίπεδα ισχύος κατά τη χρήση. (1=Κανονική λειτουργία, 5= Μέγιστο επίπεδο λειτουργίας)* Σε μοντέλα με χειροκίνητο έλεγχο, η ροή αέρα ρυθμίζεται από τη βαλβίδα αέρα (17).* esp Pour obtenir des performances optimales, vérifiez les cinq niveaux de puissance pendant l’utilisation. (1 = mode normal, 5 = mode maximal)* Sur les modèles à commande manuelle, la circulation d’air se règle en utilisant la vanne d’air (17).* por Voor de beste prestatie dient u tijdens het gebruik de vijf krachtniveaus uit te proberen. (1=Normale modus, 5= Maximale modus)* Op handmatig bediende modellen wordt de luchtstroom aangepast door middel van de luchtklep (17).* arb Per ottenere la massima aspirazione, controllare i cinque livelli di potenza durante l’uso. (1=modalità normale, 5= modalità massima)* Sui modelli a controllo manuale, il flusso dell’aria viene regolato con la valvola dell’aria (17).* Para un rendimiento óptimo, compruebe los cinco niveles durante el uso. (1=modo normal, 5=modo máximo)* En los modelos de control manual, el caudal de aire se ajusta con la válvula (17).* Para obter um desempenho óptimo, verifique os cinco níveis de potência durante a utilização. (1 = Modo Normal, 5 = Modo Máximo)* Nos modelos de controlo manual, o fluxo de ar é regulado na válvula de ar (17).* ُ = أعلى وضع(* في5 ،= أقل وضع الطرز 1) .االستخدام تحقﻖ من مستويات الطاقة الخمسة أﺛناء،للحصول علﻰ األداء األمﺛل يتم تعديل دفق الهواء عن طريق صمام الهواء،ذات التحكم اليدوي * .(17) 24 Dust compacting MAX 1. Staubverdichtung: Bei Erreichen des höchsten Füllstands kann der Staub vorsichtig verdichtet werden. 2. Verdichterhebel langsam anheben, um den Staub zu verdichten und diesen Schritt, falls erforderlich, wiederholen. 3. Schieben Sie den Verdichterhebel zurück und fahren mit der Reinigung fort, bis der höchste Füllstand wieder erreicht wird. eng 1. Dust compacting: When max level is reached, compact dust gently. 2. Lift the compactor handle gently to compact dust, repeat if necessary. 3. Pull compactor handle back and continue cleaning until compacted dust reaches max level. gre 1. Συμπίεση σκόνης: Όταν το επίπεδο σκόνης φτάσει στο μέγιστο, συμπιέστε απαλά τη σκόνη. 2. Ανασηκώστε απαλά τη λαβή του συμπιεστή για να συμπιέσετε τη σκόνη. Επαναλάβετε, εάν απαιτείται. 3. Τραβήξτε προς τα πίσω τη λαβή του συμπιεστή και συνεχίστε το καθάρισμα, μέχρι η συμπιεσμένη σκόνη να φτάσει στο ανώτατο όριο. 1. Compactage de la poussière : lorsque le niveau maximal ”max” sur le bac à poussière est atteint, compactez la poussière sans forcer. 2. Soulevez doucement la poignée du compacteur pour compacter la poussière. Répétez cette opération si nécessaire. 1. Stof samenpersen: Wanneer het maximale niveau is bereikt, perst u de stof zachtjes samen. 2. 3. Tirez la poignée du compacteur pour la remettre dans sa position initiale et continuez le nettoyage jusqu’à ce que la poussière compactée atteigne le niveau maximal. 3. Trek de compactorhendel terug en blijf doorgaan met zuigen totdat het samengeperste stof het maximale niveau heeft bereikt. 1. Compattazione della polvere: quando si raggiunge il livello massimo, compattare la polvere delicatamente. 2. Sollevare il manico del compattatore delicatamente per compattare le polvere, ripetere se necessario. 3. Tirare indietro il manico del compattatore e continuare a pulire fino a quando la polvere compattata raggiunge il livello massimo. esp 1. Compresión de polvo: Cuando se alcance el nivel máximo, comprima el polvo suavemente. 2. Para ello, levante la tapa del compresor suavemente para comprimir el polvo; repita si fuera necesario. 3. Vuelva a colocar la tapa y siga limpiando hasta que el polvo comprimido alcance el nivel máximo. por 1. Compactação do pó: Quando o nível máximo for atingido, deve compactar o pó com cuidado. 2. Levante a pega do compactador com cuidado para compactar o pó. Repita se for necessário. 3. Puxe a pega do compactador para trás e prossiga com a limpeza até que o pó compactado atinja o nível máximo. arb اضغط الغبار، عند بلوغ أقصى مستوى:ﺿﻐط الﻐبار .برفق كرر اﻹجراء ّ ِ .ارفﻊ مقبض الﺿاﻏط برفﻖ لﺿﻐط الﻐبار .إذا لزم األمر اسحب مقبض الﺿاﻏط إلﻰ الوراء ﺛم واصل التنظيف .حتﻰ يصل الﻐبار المﺿﻐوط إلﻰ أقصﻰ مستوى de fra ned ita .1 Hiervoor moet u (soms herhaaldelijk) de compactorhendel zachtjes optillen. .2 .3 25 Dust emptying MAX 1. Entleeren: Bei Erreichen des höchsten Füllstands den Staubbehälter aus dem Gerät durch Anheben des Verdichterhebels entnehmen. 2. Entriegeln Sie die Taste und schieben Sie den Bodendeckel nach unten, um ihn zu entfernen. 3. Filterinhalt in einen Abfallbehälter entleeren. Der Einbau erfolgt in umgekehrter Reihenfolge. de 1. Dust emptying: When compacted dust reaches maximum level, lift dust container from machine by pulling the compactor handle. 2. Unlock button and push downwards to release bottom lid. 3. Empty compacted dust into the dustbin. Refit in reverse order. eng 1. Άδειασμα της σκόνης: Όταν η συμπιεσμένη σκόνη φτάσει στο ανώτατο όριο, ανασηκώστε το δοχείο σκόνης από τη συσκευή, τραβώντας τη λαβή του συμπιεστή. 2. Απασφαλίστε το κουμπί για να αποδεσμεύσετε το κάτω καπάκι. 3. Αδειάστε τη συμπιεσμένη σκόνη στον κάδο απορριμμάτων. Ακολουθήστε τη διαδικασία αντίστροφα για την επανατοποθέτηση. gre 1. Vidange de la poussière : Lorsque la poussière compactée atteint le niveau maximal, sortez le bac à poussière de l’appareil en le soulevant par la poignée du compacteur. 1. Stof legen: Wanneer het samengeperste stof het maximale niveau heeft bereikt, tilt u het stofreservoir uit het apparaat door aan de compactorhendel te trekken. 2. Déverrouillez le bouton et poussez vers le bas pour détacher le couvercle inférieur. 3. Videz la poussière compactée dans une poubelle. Réinstallez le bac en effectuant ces étapes dans l’ordre inverse. fra 2. Ontgrendelknop om het onderste deksel vrij te geven. 3. Gooi het samengeperste stof in de vuilnisbak. Breng het reservoir weer aan door de hiervoor beschreven stappen in omgekeerde volgorde uit te voeren. ned 1. Svuotamento della polvere: quando la polvere compattata raggiunge il livello massimo, estrarre il contenitore della polvere dalla macchina tirando il manico del compattatore. 1. Vaciado de polvo: Cuando el polvo comprimido alcance el nivel máximo, levante el contenedor de polvo de la unidad tirando de la tapa del compresor. 1. Remoção do pó: Quando o pó compactado atingir o nível máximo, puxe a pega do compactador para remover o recipiente do pó do aparelho. عندما يصل الﻐبار المﺿﻐوط إلﻰ أقصﻰ:تفريﻎ الﻐبار ارفع حاوية الغبار من الجهاز عن طريق سحب،مستوى .مقبض الضاغط .1 2. Agire sul pulsante di Sblocco per sbloccare il coperchio inferiore. 3. Svuotare la polvere compattata nel cestino della spazzatura. Per il montaggio procedere nell’ordine inverso. ita 2. Desbloquee el botón para soltar la tapa inferior. 3. Vacíe el polvo comprimido en la papelera. Vuelva a colocarlo en orden inverso. esp 3. Esvazie o pó compactado para um balde do lixo. Volte a instalar pela ordem inversa. por 2. Botão Unlock (Desbloqueio) para libertar a tampa inferior. .افتﺢ الزر واﺿﻐط ألسفل لتحرير الﻐطاء السفلي .2 .قم بتفريﻎ الﻐبار المﺿﻐوط في صندوق النفايات .أعِد التركيب بعكس الترتيب .3 arb 26 Washing the filter 1. Drücken Sie die Tasten, um den Feinstaubbehälter aus dem Boden des Geräts zu entnehmen. 2. Filter aus dem Feinstaubbehälter entnehmen. 3. Reinigen Sie den Filter mit kaltem Wasser. 1. Press buttons to pull out the fine dust container from the bottom of the machine. 2. Remove the filter from the fine dust container. 3. Wash the filter with cold water. 1. Πιέστε τα κουμπιά για να τραβήξετε και να αφαιρέσετε το δοχείο λεπτής σκόνης από το κάτω μέρος της συσκευής. 2. Αφαιρέστε το φίλτρο από το δοχείο λεπτής σκόνης 3. Πλύνετε το φίλτρο με κρύο νερό. 1. Appuyez sur les boutons pour sortir le bac à poussière fine du bas de l’appareil. 2. Retirez le filtre du bac à poussière fine. 3. Lavez le filtre à l’eau courante froide. 1. Druk op de toetsen om het reservoir voor fijne stofdeeltjes uit de onderkant van het apparaat te halen. 2. Haal het filter uit het reservoir voor fijne stofdeeltjes. 3. Was het filter met koud water. 1. Premere i pulsanti per estrarre il contenitore della polvere fine dal fondo della macchina. 2. Estrarre il filtro dal contenitore della polvere fine 3. Lavare il filtro con acqua fredda. 1. Pulse los botones para extraer el contendor de polvo fino de la parte inferior de la unidad. 2. Retire el filtro del contenedor de polvo fino 3. Lave el filtro con agua fría. esp por 1. Prima os botões para remover o recipiente do pó fino pela parte inferior do aparelho. 2. Remova o filtro do recipiente do pó fino. 3. Lave o filtro com água fria. arb اﺿﻐط علﻰ الزرين ﻹخراج حاوية الﻐبار الناعم من .أسفل الجهاز de eng gre fra ned ita .1 .أخرج الفلتر من حاوية الﻐبار الناعم .2 .اﻏﺴﻞ اﻟﻔﻠﱰ ﺑﺎﳌﺎء اﻟﺒﺎرد .3 27 Cleaning the fine dust filter 4. Trocknen Sie den Filter durch Zusammendrücken. Lassen Sie den Filter 24 Stunden trocknen, bevor Sie ihn wieder in das Gerät einsetzen. 5. Die Filter sollten mindestens alle 6 Monate ausgewaschen und nach 2 Jahren ersetzt werden. Filterbestellnummer: AEF 137, AEF13W 6. Öffnen Sie die Abdeckung des Feinstaubbehälters und entleeren Sie den Staub alle 6 Monate durch ein leichtes Klopfen. 4. Dry filter by squeezing it. Let dry for 24 hours before fitting it back to the machine. 5. Filters should be washed at least once every 6 months and replaced every 2 years. Filter reference: AEF 137, AEF13W 6. Open the fine dust container lid and tap gently to empty dust every 6 months. 4. Στεγνώστε το φίλτρο στύβοντάς το. Αφήστε το φίλτρο να στεγνώσει για 24 ώρες πριν το τοποθετήσετε ξανά στη συσκευή. 5. Τα φίλτρα πρέπει να πλένονται τουλάχιστον κάθε 6 μήνες και να αντικαθίστανται κάθε 2 χρόνια. Αρ. αναφοράς φίλτρου: AEF 137, AEF13W 6. Ανοίγετε το καπάκι του δοχείου συλλογής λεπτής σκόνης και χτυπάτε το απαλά για να αδειάσετε τη σκόνη κάθε 6 μήνες. gre 4. Séchez le filtre en le pressant. Laissez-le sécher pendant 24 heures avant de le remettre en place dans l’appareil. 6. Tous les 6 mois, ouvrez le couvercle du bac à poussière fine et tapotez-le doucement pour vider la poussière. fra 4. Droog het filter door het in te knijpen. Laat het filter 24 uur drogen voordat u het weer in het apparaat terugplaatst. 5. Nous recommandons de laver ce filtre au moins une fois tous les 6 mois et de le remplacer par un filtre neuf tous les 2 ans. Référence du filtre: EF 137, EFH13W 5. Filtreid tuleks pesta iga 6 kuu tagant ning välja vahetada iga 2 aasta tagant. Teave filtrite kohta: EF 137, EFH13W 6. Was het stofreservoir om de 6 maanden. Open hiertoe het deksel van het reservoir voor fijne stofdeeltjes en tik er zachtjes op om het stof te verwijderen. ned 4. Asciugare il filtro strizzandolo. Lasciarlo ad asciugare per 24 ore prima di inserirlo nuovamente nella macchina. 5. I filtri andrebbero lavati almeno una volta ogni 6 mesi e sostituiti ogni 2 anni. Riferimento filtro: EF 137, EFH13W 6. Aprire il contenitore della polvere fine e picchiettare delicatamente per svuotare la polvere ogni 6 mesi. ita 4. Seque el filtro escurriéndolo. Déjelo secar durante 24 horas antes de volver a colocarlo en la unidad. 5. Los filtros se deben lavar al menos una vez cada 6 meses y cambiar cada 2 años. Referencia del filtro: EF 137, EFH13W 6. Abra la tapa del contenedor de polvo fino y golpee suavemente para vaciar el polvo cada 6 meses. esp 4. Esprema o filtro para facilitar a secagem. Deixe secar durante 24 horas antes de voltar a colocá-lo no aparelho. 5. Os filtros devem ser lavados pelo menos uma vez em cada 6 meses e substituídos a cada 2 anos. Referência do filtro: EF 137, EFH13W 6. A cada 6 meses, abra a tampa do recipiente do pó fino e bata com cuidado para o esvaziar. por افتﺢ ﻏطاء حاوية الﻐبار الناعم واﻏسلها برفﻖ تحت . أﺷهر6 ماء الصنبور ﻹفراﻏها من الﻐبار كل arb ساعة قبل24 دعه يجف لمدة.جفّف الفلتر بالﺿﻐط عليه .تركيبه مجددًا في الجهاز .4 أﺷهر 6 يجب ﻏسل الفلتر مرة واحدة علﻰ األقل كل EFH13W ،EF137 : مرجﻊ المرﺷﺢ.واستبدالها كل عامين .5 .6 de eng 28 de eng gre fra Cleaning the fine dust container 7. Feinstaubbehälter alle 2 Jahre reinigen. 8. Lassen Sie den Behälter 24 Stunden trocknen, bevor Sie ihn und den Filter und wieder in das Gerät einsetzen. ! Hat der Staub bereits den Kegel erreicht, wischen Sie ihn mit der Hand ab. 7. Open the fine dust container lid and wash the dust container with water. Wash the fine dust container every 2 years 8. Let dry for 24 hours before putting the filter and fine dust container back to the machine body. ! If dust has entered the nose cone, clean it with your hand. 7. Πλένετε το δοχείο συλλογής σκόνης με νερό κάθε 2 χρόνια. 8. Αφήνετε να στεγνώσει για 24 ώρες πριν τοποθετήσετε ξανά το φίλτρο και το δοχείο συλλογής λεπτής σκόνης στον κορμό της συσκευής. ! Εάν έχει εισέλθει σκόνη στον κώνο του ρύγχους, καθαρίστε την με το χέρι σας. 7. Tous les 2 ans, nettoyez le bac à poussière avec de l’eau. 8. Laissez-le sécher pendant 24 heures avant de remettre le filtre et le bac à poussière fine en place dans l’appareil. ! Si de la poussière s’est infiltrée dans le cône d’aspiration, retirez-la à la main. 7. Vervang het stofreservoir om de 2 jaar. 8. Laat het filter en het filter voor fijne stofdeeltjes 24 uur drogen voordat u ze weer in de behuizing van het apparaat terugplaatst. ! Als er stof in de neuskegel terecht is gekomen, reinig deze dan handmatig. 7. Tous les 2 ans, nettoyez le bac à poussière avec de l’eau. 8. Laissez-le sécher pendant 24 heures avant de remettre le filtre et le bac à poussière fine en place dans l’appareil. ! Si de la poussière s’est infiltrée dans le cône d’aspiration, retirez-la à la main. 7. Lave o recipiente do pó com água a cada 2 anos. 8. Deixe secar durante 24 horas antes de voltar a colocar o filtro e o recipiente do pó fino no aparelho. ! Se tiver entrado pó para o cone, limpe-o com a mão. 7. Lave o recipiente do pó com água a cada 2 anos. 8. Deixe secar durante 24 horas antes de voltar a colocar o filtro e o recipiente do pó fino no aparelho. ! Se tiver entrado pó para o cone, limpe-o com a mão. ned ita esp por arb افتﺢ ﻏطاء حاوية الﻐبار الناعم واﻏسل حاوية الﻐبار . اغسل حاوية الغبار الناعم كل عامين.بالماء .7 ساعة قبل وﺿﻊ الفلتروحاوية24 دعها تجف لمدة .الﻐبار الناعم مجددًا في جسم الجهاز .8 ،! في حال دخول الغبار في الجزء المخروطي األمامي ِّ .نظفه بيدك 29 1. Drücken Sie die Entriegelungstasten, um die hintere Abdeckung zu öffnen. 2. Filter entnehmen und mit kaltem Wasser reinigen. 3. Lassen Sie den Filter 24 Stunden trocknen, bevor Sie ihn wieder in das Gerät einsetzen. Ersetzen Sie den Filter alle 2 Jahre. Filterbestellnummer: AEF 13W de 1. Press the release buttons to open the back lid. 2. Remove the filter and rinse with cold water. 3. Let dry for 24 hours before placing it back to the machine. Replace filter every 2 years. Filter reference: AEF 13W eng 1. Πιέστε τα κουμπιά απασφάλισης για να ανοίξετε το πίσω καπάκι. 2. Αφαιρέστε το φίλτρο και ξεπλύνετέ το με κρύο νερό. 1. Appuyez sur les boutons de déverrouillage pour ouvrir le couvercle arrière. 2. Sortez le filtre et rincez-le à l’eau froide. 3. Αφήστε το να στεγνώσει για 24 ώρες πριν το τοποθετήσετε ξανά στη συσκευή. Αντικαθιστάτε το φίλτρο κάθε 2 χρόνια. Αρ. αναφοράς φίλτρου: AEF 13W 3. Laissez-le sécher pendant 24 heures avant de le remettre en place dans l’appareil. Changez le filtre tous les 2 ans. Référence du filtre: EFH13W 1. Druk op de vrijgaveknoppen om het deksel aan de achterkant te openen. 2. Verwijder het filter en spoel het met koud water. 3. Laat het filter 24 uur drogen voordat u het weer in het apparaat terugplaatst. Vervang het filter om de 2 jaar. Filterreferentie: EFH13W ned 1. Premere i tasti di sgancio per aprire il coperchio posteriore . 2. Estrarre il filtro e lavarlo con acqua fredda. 3. Lasciarlo ad asciugare per 24 ore prima di inserirlo nuovamente nella macchina. Sostituire il filtro ogni 2 anni. Riferimento filtro: EFH13W ita 1. Pulse los botones de desbloqueo para abrir la tapa posterior. 2. Retire el filtro y aclárelo con agua fría. 3. Déjelo secar durante 24 horas antes de volver a colocarlo en la unidad. Cambie el filtro cada 2 años. Referencia del filtro: EFH13W esp 1. Prima os botões de libertação para abrir a tampa da parte de trás. 2. Remova o filtro e lave-o com água fria. 3. Deixe secar durante 24 horas antes de voltar a colocá-lo no aparelho. Substitua o filtro a cada 2 anos. Referência do filtro: EFH13W por .اﺿﻐط علﻰ زري التحرير لفتﺢ الﻐطاء الخلفي .1 .أخرج فلتر واﺷطفه بالماء البارد .2 . ساعة قبل وﺿعه مجددًا في الجهاز24 دعه يجف لمدة EFH13W : مرجع مرشح.استبدل الفلتر كل عامين .3 gre fra arb 30 Cleaning the AeroPro Silent Nozzle 1. Die Düse vom Rohr abnehmen. Mit dem Schlauchgriff die Düse absaugen. 2. Wenn die Räder blockiert sind, zum Reinigen die Radabdeckung mit einem kleinen Schraubendreher abhebeln. 3. Die Radachse abschrauben und alle Teile reinigen. Zusammenbau in umgekehrter Reihenfolge. 1. Disconnect the nozzle from the tube. Use the hose handle to clean the nozzle. 2. If the wheels are stuck, clean them by removing the wheel cap with a small screwdriver. 3. Unscrew the wheel axis and clean all parts. Refit in reverse order. 1. Αποσυνδέστε το ακροφύσιο από το σωλήνα. Χρησιμοποιήστε τη λαβή του εύκαμπτου σωλήνα, για να καθαρίσετε το ακροφύσιο. 2. Εάν οι τροχοί κολλήσουν, καθαρίστε τους αφαιρώντας το κάλυμμά τους με ένα μικρό κατσαβίδι. 3. Ξεβιδώστε τον άξονα και καθαρίστε όλα τα μέρη. Τοποθετήστε τα ξανά ακολουθώντας τη διαδικασία αντίστροφα. 1. Désassembler le suceur du tube. Utiliser la poignée du flexible pour nettoyer le suceur. 2. Si les roues sont bloquées, les nettoyer en retirant leur cache à l’aide d’un petit tournevis. 3. Dévisser l’axe des roues et nettoyer toutes les pièces. Remonter dans l’ordre inverse. 1. Haal het mondstuk los van de buis. Gebruik de slanggreep om het mondstuk te reinigen. 2. Als de wieltjes klem zitten, verwijdert u met een kleine schroevendraaier de wieldop om het wieltje schoon te maken. 3. Schroef de wielas los en maak alle onderdelen schoon. Plaats de onderdelen in omgekeerde volgorde terug. ita 1. Togliere la bocchetta dal tubo. Per pulire la bocchetta, utilizzare l’impugnatura del tubo flessibile. 2. Se le ruote sono bloccate, pulirle rimuovendo i copriruota con l’ausilio di un piccolo cacciavite. 3. Svitare l’asse delle ruote e pulire tutte le parti. Rimontare i componenti in ordine inverso. esp 1. Desconecte la boquilla del tubo. Utilice el asa del tubo flexible para limpiar la boquilla. 2. Si las ruedas están atascadas, quite la tapa de las ruedas con un destornillador pequeño para limpiarlas. 3. Desatornille el eje de la rueda y limpie todas las piezas. Realice el montaje en orden inverso. por 1. Separe o bocal do tubo. Utilize a pega da mangueira para limpar o bocal. 2. Se as rodas estiverem presas, limpe-as removendo a capa da roda com uma pequena chave de fendas. 3. Desaparafuse o eixo da roda e limpe todas as peças. Volte a montar pela ordem inversa. arb استخدم مقبض الخرطوم.افصل الفوهة من األنبوب .لتنظيف الفوهة فنظفها عن طريق إزالة غطاء،إذا كانت العجالت عالقة .العجلة باستخدام مفك صغير أعِد التركيب.فك محور العجلة ونظف كل األجزاء .بعكس الترتيب de eng gre fra ned .1 .2 .3 Changing the battery on the remote control handle 31 1. Batterie ersetzen, wenn die Kontrolllampe blinkt oder das Gerät nach beliebigem Tastendruck nicht mehr reagiert. * 2. Nur Batterien des Typs LITHIUM CR1632 verwenden. Vor dem Entsorgen des Geräts die Batterie entfernen und sicher entsorgen. * Hiermit erklärt Electrolux Home Care & SDA, dass die Staubsauger mit Funkgerät der Modelle HER2 und HER3 der Richtlinie 2014/53 / EU entsprechen. de 1. Change battery when light indicator is blinking or when it is not responding when pressing any button. * 2. Use only Lithium batteries type CR1632. Batteries must be removed from the appliance before it is scrapped and are to be disposed of safely. * Electrolux Home Care and SDA, declares that the Vacuum Cleaner with radio equipment type HER2 and HER3 is in compliance with Directive 2014/53/EU. eng 1. Αλλάζετε την μπαταρία όταν η λυχνία ένδειξης αναβοσβήνει ή όταν δεν ανταποκρίνεται όταν πατάτε τα κουμπιά. * Με την παρούσα η Electrolux Home Care and SDA δηλώνει πως η Ηλεκτρική Σκούπα με ασύρματο εξοπλισμό τύπου HER2 και HER3 συμμορφώνεται με την Οδηγία 2014/53/ΕΕ. Electrolux Home Care and SDA déclare par la présente que l‘aspirateur pourvu d‘un équipement radio de type HER2 et HER3 est conforme ŕ la Directive 2014/53/UE. Hierbij verklaart Electrolux Home Care and SDA dat de stofzuiger met radioapparatuur van het type HER2 en HER3 voldoet aan de eisen van Richtlijn 2014/53/EU. 1. Sostituire la batteria quando la spia lampeggia o quando non risponde più alla pressione di qualsiasi pulsante. * 2. Χρησιμοποιήστε μόνο μπαταρίες τύπου LITHIUM CR1632. Πριν απορρίψετε τη συσκευή, πρέπει να αφαιρέσετε τις μπαταρίες και να τις απορρίψετε με ασφάλεια. * 2. Utiliser uniquement des piles de type LITHIUM CR1632. Les piles doivent être retirées de l’appareil avant que ce dernier ne soit jeté, et doivent être triées pour un recyclage en toute sécurité. * 2. Gebruik alleen batterijen van het type LITHIUM CR1632. Voordat u het apparaat wegdoet, moet u de batterijen eruit halen en deze op verantwoorde wijze afvoeren. * 2. Utilizzare solo batterie del tipo LITIO CR1632. È necessario rimuovere le batterie prima di rottamare e smaltire l’apparecchio in modo sicuro. * 1. Cambie la batería cuando el indicador luminoso parpadee o cuando no responda al pulsar cualquier botón. * 2. Utilice sólo pilas de tipo LITHIUM CR1632. Se deben quitar las pilas del aparato antes de desecharlo y se deben desechar de forma segura. * 1. Substitua a bateria quando a luz indicadora estiver a piscar ou quando o aparelho não responder às pressões em qualquer botão. * 2. Utilize apenas pilhas do tipo LITHIUM CR1632. As pilhas devem ser removidas do aparelho antes de este ser deitado fora e devem ser eliminadas de um modo seguro. * يجب. فقطCR1632 استخدم بطاريات الليﺛيوم من النوع.2 1. Changez la pile lorsque l’indicateur clignote ou si l’appareil ne réagit pas lorsque vous appuyez sur un bouton. * 1. Vervang de batterij wanneer het indicatielampje knippert of wanneer het apparaat niet reageert wanneer u op een willekeurige knop drukt. * قم بتﻐيير البطارية عندما يُومض المؤﺷر الﺿوئي أو * .عندما ال يستجيب عند الضغط على أي زر .1 إزالة البطاريات من الجهاز قبل أن تصبح هالكة ويجب * .التخلص منها بطريقة آمنة Con il presente documento, Electrolux Home Care & SDA, dichiara che l‘aspirapolvere con attrezzatura radio tipo HER2 e HER3 è conforme alla Direttiva 2014/53/UE. Por la presente, Electrolux Home Care y SDA declaran que la Aspiradora con equipo de radio tipo HER2 y HER3 cumple con la Directiva 2014/53/EU. A Electrolux Home Care and SDA declara pela presente que o Aspirador com equipamento de rádio de tipo HER2 e HER3 está em conformidade com a Diretiva 2014/53/EU. ةكرش رقتElectrolux Home Care and SDA هذه بجومب ةيكلساللا ةزهجألاب ةدوزملا ةيئابرهكلا ةسنكملا نأ ةقيثولا يعون نمHER2 وHER3 هيجوت عم ةقفاوتم2014/53/EU. gre fra ned ita esp por arb 32 de eng gre fra ned ita esp por arb Troubleshooting Der Staubsauger lässt sich nicht einschalten. • Prüfen, ob das Netzkabel an die Netzsteckdose angeschlossen ist. • Prüfen, ob der Stecker und das Kabel beschädigt sind. • Prüfen, ob eine Sicherung durchgebrannt ist. • Prüfen, ob Batterieanzeige reagiert (nur bestimmte Modelle). * The vacuum cleaner does not start • Check that the cable is connected to the mains. • Check that the plug and cable are not damaged. • Check for a blown fuse. • Check if the battery indicator lamp responds. * Schlauchverstopfung beseitigen Verstopfung des Schlauchs durch Biegen und Beugen lockern und lösen. Dabei jedoch vorsichtig vorgehen, falls die Blockierung durch Scherben oder spitze Gegenstände (z. B. Nadeln) im Schlauch verursacht wurde. Clearing the hose Clear the hose by “squeezing“ it. However, be careful in case the obstruction has been caused by glass or needles caught inside the hose. Hinweis: Die Garantie deckt keinerlei durch Reinigung verursachte Schäden an den Schläuchen ab. Note: The warranty does not cover any damage to hoses caused by cleaning them. Wasser ist in den Staubsauger eingedrungen. Es ist notwendig, den Motor in einem autorisierten AEG-Servicezentrum auszutauschen. Schäden am Motor, die durch eingedrungenes Wasser verursacht wurden, werden nicht durch die Garantie abgedeckt. Water has entered the vacuum cleaner It will be necessary to replace the motor at an authorized AEG service centre. Damage to the motor caused by the penetration of water is not covered by the warranty. Falls weitere Probleme auftreten, wenden Sie sich an die AEG Kundenbetreuung. For any further problems, contact an authorized AEG service centre. Η ηλεκτρική σκούπα δεν λειτουργεί • Βεβαιωθείτε ότι το καλώδιο είναι συνδεδεμένο με το ρεύμα. • Βεβαιωθείτε ότι η πρίζα και το καλώδιο δεν παρουσιάζουν βλάβη. • Ελέγξτε για καμένη ασφάλεια. • Ελέγξτε εάν η ενδεικτική λυχνία της μπαταρίας ανταποκρίνεται (μόνο σε ορισμένα μοντέλα). * L’aspirateur ne se met pas en marche : • Vérifier que le câble est branché au secteur. • Vérifier que la prise et le câble ne sont pas abîmés. • Vérifier qu’aucun fusible n’a sauté. • Vérifier que le voyant des piles fonctionne (suivant les modèles). * Καθαρισμός του εύκαμπτου σωλήνα Καθαρίστε τον εύκαμπτο σωλήνα “πιέζοντάς” τον. Ωστόσο, να είστε προσεκτικοί στην περίπτωση που η απόφραξη έχει προκληθεί από γυαλιά ή βελόνες που έχουν πιαστεί μέσα στον εύκαμπτο σωλήνα. Débouchage du flexible Déboucher le flexible en appuyant dessus. Cependant, prendre garde de ne pas se blesser en cas d’obstruction par du verre ou des aiguilles coincés dans le flexible. Σημείωση: Η εγγύηση δεν καλύπτει οποιαδήποτε ζημιά προκληθεί στους εύκαμπτους σωλήνες ως αποτέλεσμα του καθαρισμού τους. Έχει μπει νερό στην ηλεκτρική σκούπα Θα πρέπει να γίνει αντικατάσταση του κινητήρα σε ένα εξουσιοδοτημένο κέντρο εξυπηρέτησης της AEG. Τυχόν βλάβες του κινητήρα που προκαλούνται από διείσδυση νερού δεν καλύπτονται από την εγγύηση. Remarque : la garantie ne couvre pas les dommages portés au flexible lors de son nettoyage. De l’eau a été aspirée Le moteur doit être remplacé par un Centre Service Agréé Electrolux. Les dommages portés au moteur par l’entrée d’eau ou de liquides ne sont pas couverts par la garantie. Pour tout autre problème, contacter un Centre Service Agréé Electrolux. Για τυχόν άλλα προβλήματα, επικοινωνήστε με ένα εξουσιοδοτημένο κέντρο εξυπηρέτησης της AEG. Stofzuiger doet het niet • Controleer of de stekker in het stopcontact zit. • Controleer of de stekker en het snoer niet beschadigd zijn. • Controleer of de zekeringen niet doorgebrand zijn. • Controleer of het indicatielampje van de batterij reageert (alleen sommige modellen). * De slang leegmaken Knijp in de slang om verstoppingen te verwijderen. Wees echter voorzichtig als de kans bestaat dat de verstopping wordt veroorzaakt door glas of naalden in de slang. Let op. De garantie geldt niet voor beschadigingen die zijn ontstaan tijdens het reinigen van de slang. Er is water in de stofzuiger gekomen De motor moet door een erkend Electrolux Service Centre worden vervangen. Schade aan de motor veroorzaakt door binnendringend water valt niet onder de garantie. Voor alle verdere problemen raadpleegt u een erkend Electrolux Service Centre. L’aspirapolvere non si accende • Controllare che il cavo sia collegato all’alimentazione di rete. • Controllare che la spina e il cavo non siano danneggiati. • Controllare che non vi sia un fusibile bruciato. • Controllare che la spia luminosa della batteria risponda ai comandi (solo in alcune modalità). * Pulizia del tubo flessibile Liberare il tubo flessibile esercitando una lieve pressione. Tuttavia, prestare attenzione nel caso in cui l’ostruzione sia stata causata da frammenti di vetro o aghi all’interno del flessibile. Nota: La garanzia non copre alcun danno al tubo qualora sia causato dalla pulizia del pezzo. Infiltrazione d’acqua nell’aspirapolvere Sarà necessario far sostituire il motore presso un centro di assistenza autorizzato Electrolux. I danni al motore causati dall’infiltrazione d’acqua non sono coperti dalla garanzia. Per altri problemi contattare un centro di assistenza Electrolux autorizzato. 34 Deutsch English Ελληνικά Recyceln Sie Materialien mit dem Symbol Entsorgen Sie die Verpackung in den entsprechenden Recyclingbehältern. Recyceln Sie zum Umwelt- und Gesundheitsschutz elektrische und elektronische Geräte. Recycle the materials with the symbol Put the packaging in applicable containers to recycle it. Help protect the environment and human health and to recycle waste of electrical and electronic appliances. nicht mit Entsorgen Sie Geräte mit diesem Symbol dem Hausmüll. Bringen Sie das Gerät zu Ihrer örtlichen Sammelstelle oder wenden Sie sich an Ihr Gemeindeamt. Do not dispose appliances marked with the symbol with the household waste. Return the product to your local recycling facility or contact your municipal office. Ανακυκλώστε τα υλικά που φέρουν το σύμβολο Τοποθετήστε τα υλικά συσκευασίας σε κατάλληλα δοχεία για ανακύκλωση. Συμβάλλετε στην προστασία του περιβάλλοντος και της ανθρώπινης υγείας ανακυκλώνοντας τις άχρηστες ηλεκτρικές και ηλεκτρονικές συσκευές. Μην απορρίπτετε με τα οικιακά απορρίμματα συσκευές που φέρουν το σύμβολο . Επιστρέψτε το προϊόν στην τοπική σας μονάδα ανακύκλωσης ή επικοινωνήστε με τη δημοτική αρχή. Français Nederlands Italiano Recyclez les matériaux portant le symbole . Déposez les emballages dans les conteneurs prévus à cet effet. Contribuez à la protection de l’environnement et à votre sécurité, recyclez vos produits électriques et électroniques. avec les Ne jetez pas les appareils portant le symbole ordures ménagères. Emmenez un tel produit dans votre centre local de recyclage ou contactez vos services municipaux. Recycle de materialen met het symbool . Gooi de verpakking in een geschikte verzamelcontainer om het te recyclen. Help om het milieu en de volksgezondheid te beschermen en recycle het afval van elektrische en elektronische apparaten. Gooi apparaten gemarkeerd met het symbool niet weg met het huishoudelijk afval. Breng het product naar het milieustation bij u in de buurt of neem contact op met de gemeente. Riciclare i materiali con il simbolo . Buttare l’imballaggio negli appositi contenitori per il riciclaggio. Aiutare a proteggere l’ambiente e la salute umana e a riciclare rifiuti derivanti da apparecchiature elettriche ed elettroniche. Non smaltire le apparecchiature che riportano il simbolo insieme ai normali rifiuti domestici. Portare il prodotto al punto di riciclaggio più vicino o contattare il comune di residenza. Español Português Recicle los materiales con el símbolo . Coloque el material de embalaje en los contenedores adecuados para su reciclaje. Ayude a proteger el medio ambiente y la salud pública, así como a reciclar residuos de aparatos eléctricos y electrónicos. No deseche los aparatos marcados con el símbolo junto con los residuos domésticos. Lleve el producto a su centro de reciclaje local o póngase en contacto con su oficina municipal. Recicle os materiais que apresentem o símbolo Coloque a embalagem nos contentores indicados para reciclagem. Ajude a proteger o ambiente e a saúde pública através da reciclagem de aparelhos eléctricos e electrónicos. Não elimine os aparelhos que tenham o símbolo ] juntamente com os resíduos domésticos. Coloque o produto num ponto de recolha para reciclagem local ou contacte as suas autoridades municipais. العربية أعد تدوير المواد الموضوع عليها الرمز .ضع العبوة في الحاويات المخصصة إلعادة تدويرها ساعد في حماية البيئة وصحة اإلنسان وفي إعادة تدوير نفايات ِ .األجهزة الكهربائية واإللكترونية مع ال تتخلص من األجهزة الموضوع عليها الرمز أعد المنتج إلى ِمرفق إعادة التدوير المحلي ِ .النفايات المنزلية .لديك أو اتصل بمكتب البلدية-
 1
1
-
 2
2
-
 3
3
-
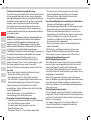 4
4
-
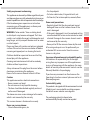 5
5
-
 6
6
-
 7
7
-
 8
8
-
 9
9
-
 10
10
-
 11
11
-
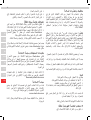 12
12
-
 13
13
-
 14
14
-
 15
15
-
 16
16
-
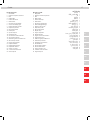 17
17
-
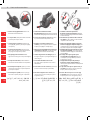 18
18
-
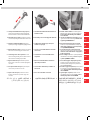 19
19
-
 20
20
-
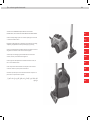 21
21
-
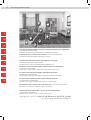 22
22
-
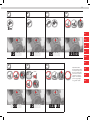 23
23
-
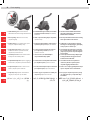 24
24
-
 25
25
-
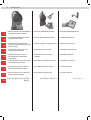 26
26
-
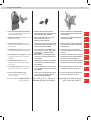 27
27
-
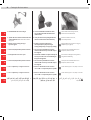 28
28
-
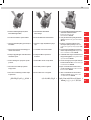 29
29
-
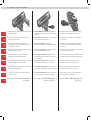 30
30
-
 31
31
-
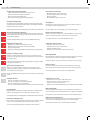 32
32
-
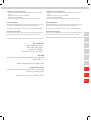 33
33
-
 34
34
-
 35
35
-
 36
36


in andere talen
- English: AEG LX9 User manual
- italiano: AEG LX9 Manuale utente
- français: AEG LX9 Manuel utilisateur
- español: AEG LX9 Manual de usuario
- Deutsch: AEG LX9 Benutzerhandbuch
- português: AEG LX9 Manual do usuário