Aeg-Electrolux L75484EFL Handleiding
- Categorie
- Wasmachines
- Type
- Handleiding

L 75484 EFL NL Gebruiksaanwijzing 2
EN User manual 34

INHOUD
1. VEILIGHEIDSINFORMATIE . . . . . . . . . . . . . . . . . . . . . . . . . . . . . . . . . . . . . . . . . . . . . . . . . . . . 3
2. VEILIGHEIDSVOORSCHRIFTEN . . . . . . . . . . . . . . . . . . . . . . . . . . . . . . . . . . . . . . . . . . . . . . . . 4
3. TECHNISCHE INFORMATIE . . . . . . . . . . . . . . . . . . . . . . . . . . . . . . . . . . . . . . . . . . . . . . . . . . . 5
4. BESCHRIJVING VAN HET PRODUCT . . . . . . . . . . . . . . . . . . . . . . . . . . . . . . . . . . . . . . . . . . . 6
5. BEDIENINGSPANEEL . . . . . . . . . . . . . . . . . . . . . . . . . . . . . . . . . . . . . . . . . . . . . . . . . . . . . . . . 7
6. PROGRAMMA’S . . . . . . . . . . . . . . . . . . . . . . . . . . . . . . . . . . . . . . . . . . . . . . . . . . . . . . . . . . . . 11
7. VERBRUIKSWAARDEN . . . . . . . . . . . . . . . . . . . . . . . . . . . . . . . . . . . . . . . . . . . . . . . . . . . . . . 14
8. VOOR HET EERSTE GEBRUIK . . . . . . . . . . . . . . . . . . . . . . . . . . . . . . . . . . . . . . . . . . . . . . . . 15
9. BEDIENING VAN HET APPARAAT . . . . . . . . . . . . . . . . . . . . . . . . . . . . . . . . . . . . . . . . . . . . . 15
10. AANWIJZINGEN EN TIPS . . . . . . . . . . . . . . . . . . . . . . . . . . . . . . . . . . . . . . . . . . . . . . . . . . . . 19
11. ONDERHOUD EN REINIGING . . . . . . . . . . . . . . . . . . . . . . . . . . . . . . . . . . . . . . . . . . . . . . . . 20
12. PROBLEEMOPLOSSING . . . . . . . . . . . . . . . . . . . . . . . . . . . . . . . . . . . . . . . . . . . . . . . . . . . . . 25
13. MONTAGE . . . . . . . . . . . . . . . . . . . . . . . . . . . . . . . . . . . . . . . . . . . . . . . . . . . . . . . . . . . . . . . . 27
VOOR PERFECTE RESULTATEN
Bedankt dat u voor dit AEG product heeft gekozen. Dit apparaat is ontworpen om vele jaren
uitstekend te presteren, met innovatieve technologieën die het leven gemakkelijker helpen
maken – functies die gewone apparaten wellicht niet hebben. Neem een paar minuten de tijd
om het door te lezen zodat u er optimaal van kunt profiteren.
Ga naar onze website voor:
Advies over gebruik, brochures, het oplossen van problemen en
onderhoudsinformatie:
www.aeg.com
Registreer uw product voor een betere service:
www.aeg.com/productregistration
Koop accessoires, verbruiksartikelen en originele reserveonderdelen voor uw
apparaat:
www.aeg.com/shop
KLANTENSERVICE
Wij raden altijd het gebruik van originele onderdelen aan.
Zorg er als u contact opneemt met de klantenservice voor dat u de volgende gegevens bij de
hand hebt.
De informatie staat op het typeplaatje. model, productnummer, serienummer.
Waarschuwing - Belangrijke veiligheidsinformatie.
Algemene informatie en tips
Milieu-informatie
Wijzigingen voorbehouden.
2
www.aeg.com

1. VEILIGHEIDSINFORMATIE
Lees zorgvuldig de meegeleverde instructies voor in-
stallatie en gebruik van het apparaat. De fabrikant is
niet verantwoordelijk voor letsel en schade veroorzaakt
door een foutieve installatie. Bewaar de instructies van
het apparaat voor toekomstig gebruik.
1.1 Veiligheid van kinderen en kwetsbare mensen
WAARSCHUWING!
Gevaar voor verstikking, letsel of permanente inva-
liditeit.
• Dit apparaat kan worden gebruikt door kinderen van
8 jaar en ouder en door mensen met beperkte licha-
melijke, zintuiglijke of verstandelijke vermogens of
een gebrek aan ervaring en kennis, indien zij onder
toezicht staan of instructies hebben gekregen over
het veilig gebruiken van het apparaat en indien zij de
eventuele gevaren begrijpen.
• Laat kinderen niet met het apparaat spelen.
• Houd alle verpakkingsmaterialen uit de buurt van kin-
deren.
• Houd alle reinigingsmiddelen uit de buurt van kinde-
ren.
• Houd kinderen en huisdieren uit de buurt van het ap-
paraat als de deur open is.
• Als het apparaat is uitgerust met een kinderbeveili-
ging, raden wij aan dit te activeren.
• Reiniging en onderhoud mag niet worden uitgevoerd
door kinderen zonder toezicht.
1.2 Algemene veiligheid
• Schakel het apparaat uit en trek de stekker uit het
stopcontact voordat u onderhoudshandelingen ver-
richt.
NEDERLANDS 3

• De specificatie van het apparaat mag niet worden
veranderd.
• Respecteer het maximale laadvermogen van 8 kg
(raadpleeg hoofdstuk “Programmaschema”).
• Als de voedingskabel beschadigd is, moet de fabri-
kant of diens technische dienst of een gekwalificeerd
persoon deze vervangen teneinde gevaarlijke situ-
aties te voorkomen.
• De waterdruk (minimaal en maximaal) moet liggen
tussen 0,5 bar (0,05 MPa) en 8 bar (0,8 MPa)
• De ventilatie-openingen in de onderkant (indien van
toepassing) mogen niet worden afgedekt door tapijt
• Het apparaat moet met de nieuwe slangset worden
aangesloten op een kraan. Oude slangsets mogen
niet opnieuw worden gebruikt.
2.
VEILIGHEIDSVOORSCHRIFTEN
2.1 Montage
• Verwijder alle verpakkingsmaterialen.
• Bewaar de transportbouten. Als u het
apparaat gaat verplaatsen, moet de
trommel worden geblokkeerd.
• Installeer en gebruik geen beschadigd
apparaat.
• Gebruik of installeer het apparaat niet
als de temperatuur lager is dan 0 °C of
als het is blootgesteld aan het weer.
• Volg de installatie-instructies op die
zijn meegeleverd met het apparaat.
• Zorg ervoor dat de vloer van de plaats
waar u het apparaat installeert, vlak,
stabiel, hittebestendig en schoon is.
• Plaats het apparaat niet op een plek
waar de deur niet helemaal open kan.
• Wees voorzichtig met het verplaatsen
van het apparaat, het is zwaar. Draag
altijd veiligheidshandschoenen.
• Zorg dat er lucht tussen het apparaat
en de vloer kan circuleren.
• Pas de stelvoeten aan om de nodige
ruimte tussen het apparaat en de
vloerbedekking te creëren.
Aansluiting op het
elektriciteitsnet
WAARSCHUWING!
Gevaar voor brand en elektrische
schokken.
• Dit apparaat moet worden geaard.
• Controleer of de elektrische informatie
op het typeplaatje overeenkomt met
de stroomvoorziening. Zo niet, neem
dan contact op met een elektromon-
teur.
• Gebruik altijd een correct geïnstal-
leerd, schokbestendig stopcontact.
• Gebruik geen meerwegstekkers en
verlengsnoeren.
• Zorg dat u de hoofdstekker en kabel
niet beschadigt. Indien de voedings-
kabel moet worden vervangen, dan
MOET dit gebeuren door onze Klan-
tenservice.
4
www.aeg.com

• Steek de stekker pas in het stopcon-
tact als de installatie is voltooid. Zorg
ervoor dat het netsnoer na installatie
bereikbaar is.
• Trek niet aan het aansluitnoer om het
apparaat los te koppelen. Trek altijd
aan de stekker.
• Raak de stroomkabel of stekker niet
aan met natte handen.
• Dit apparaat voldoet aan de EU-richt-
lijnen.
Aansluiting aan de
waterleiding
• Zorg dat u de waterslangen niet be-
schadigt.
• Het apparaat moet met de nieuwe
slangset worden aangesloten op een
kraan. Oude slangsets mogen niet op-
nieuw worden gebruikt.
• Laat het water stromen tot het schoon
is voordat u het apparaat aansluit op
nieuwe leidingen of leidingen die lang
niet zijn gebruikt.
• Zorg dat er geen lekkages zijn als u
het apparaat de eerste keer gebruikt.
2.2 Gebruik van het apparaat
WAARSCHUWING!
Gevaar voor letsel, elektrische
schokken, brand, brandwonden
en schade aan het apparaat.
• Gebruik dit apparaat in een huishou-
delijke omgeving.
• De specificatie van het apparaat mag
niet worden veranderd.
• Volg de veiligheidsinstructies op de
verpakking van het vaatwasmiddel op.
• Plaats geen ontvlambare producten of
items die vochtig zijn door ontvlamba-
re producten in, bij of op het appa-
raat.
• Raak het glas van de deur niet aan als
een programma in werking is. Het glas
kan heet worden.
• Zorg dat u alle metalen onderdelen uit
het wasgoed verwijdert.
• Plaats geen bak om mogelijke water-
lekkage op te vangen onder het appa-
raat. Neem contact op met de service-
dienst om te raadplegen welke acces-
soires gebruikt mogen worden.
2.3 Onderhoud en reiniging
WAARSCHUWING!
Gevaar voor letsel of schade aan
het apparaat.
• Schakel het apparaat uit en trek de
stekker uit het stopcontact voordat u
onderhoudshandelingen verricht.
• Gebruik geen waterstralen of stoom
om het apparaat te reinigen.
• Maak het apparaat schoon met een
vochtige, zachte doek. Gebruik alleen
neutrale schoonmaakmiddelen. Ge-
bruik geen schuurmiddelen, schuur-
sponsjes, oplosmiddelen of metalen
voorwerpen.
2.4 Verwijdering
WAARSCHUWING!
Gevaar voor letsel of verstikking.
• Haal de stekker uit het stopcontact.
• Snijd het netsnoer van het apparaat af
en gooi dit weg.
• Verwijder de deurgreep om te voorko-
men dat kinderen en huisdieren opge-
sloten raken in het apparaat.
3. TECHNISCHE INFORMATIE
Afmetingen Breedte / hoogte / diep-
te
600 / 850 / 605 mm
Totale diepte 640 mm
NEDERLANDS 5

Aansluiting aan het elek-
triciteitsnet:
Voltage
Totale stroom
Zekering
Frequentie
230 V
2200 W
10A
50 Hz
De beschermkap biedt bescherming tegen vaste
stoffen en vochtigheid, behalve op de plaatsen
waar de lage spanningsapparatuur geen bescher-
ming heeft tegen vocht
IPX4
Waterdruk Minimaal 0,5 bar (0,05 MPa)
Maximaal 8 bar (0,8 MPa)
Watertoevoer
1)
Koud water
Maximale belading Katoen 8 kg
Centrifugeersnelheid Maximaal 1400 toeren per minuut
1)
Sluit de slang aan op een kraan met 3/4”-schroefdraad.
4. BESCHRIJVING VAN HET PRODUCT
1 2 3 8
9
5
6
7
4
1
0
1
1
1
2
1
Bovenblad
2
Afwasmiddeldoseerbakje
3
Bedieningspaneel
4
Handgreep
5
Typeplaatje
6
Afvoerpomp
7
Stelvoetjes
8
Afvoerslang
9
Watertoevoerklep
10
Hoofdkabel
11
Transportbouten
12
Stelvoetjes
6
www.aeg.com

4.1 Accessoires
1 2
34
1
Moersleutel
Om de transportbouten te verwijde-
ren.
2
Plastic dopjes
Voor het afdichten van de gaten aan
de achterzijde van het apparaat na-
dat u de transportbouten hebt ver-
wijderd.
3
Toevoerslang met geïntegreerd
beschermingssysteem tegen wa-
teroverlast
Om mogelijke wateroverlast te voor-
komen.
4
Plastic slanggeleider
Om een afvoerslang op de rand van
een gootsteen te bevestigen.
4.2 Kinderbeveiliging
• Als u deze beveiliging activeert, kunt u
de deur niet sluiten. Dit voorkomt dat
u kinderen of huisdieren in de trom-
mel opsluit. Voor het inschakelen van
de kinderbeveiliging verplaatst u het
draaigedeelte met een muntstuk
rechtsom totdat de groef horizontaal
staat. Voor het uitschakelen van de
kinderbeveiliging verplaatst u het
draaigedeelte met een muntstuk links-
om totdat de groef weer verticaal
staat.
5. BEDIENINGSPANEEL
Marche/Arrêt
Katoen
Blanc/Couleurs
+Voorwas
+Prélavage
Extra Stil
Extra Silence
Synthetica
Synthétiques
Strijkvrij
Repassage Facile
Fijne Was
Délicats
Wol/Zijde
Aan/Uit
Laine/Soie
Centrif./Pompen
Essorage/Vidange
Spoelen
Rinçage
Gordijnen
Rideaux
Kort Intensief
Intensif
Jeans
Super Eco
20 Min. - 3 kg
+Voorwas
+Prélavage
Temp.°C
T/min.
Start/Pauze
Départ/Pause
Startuitstel
Départ
Différé
Gain de
Te mp s
Vlekken
Extra
Spoelen
Rinçage +
Taches
Tijd Besparen
Katoen Eco
Coton Eco
1 2 3
45678910
NEDERLANDS 7

1
Aan-/Uittoets (Aan/Uit - Marche/Ar-
rêt)
2
Programmaschakelaar
3
Display
4
Toets Start/Pauze (Start/Pauze - Dé-
part/Pause)
5
Toets Startuitstel (Startuitstel - Dé-
part Différé)
6
Toets Tijd Besparen (Tijd Besparen -
Gain de Temps)
7
Toets Extra spoelen (Extra Spoelen -
Rinçage+)
8
Toets Vlekken (Vlekken - Taches)
9
Toets Kort centrifugeren (T/min.)
10
Toets Temperatuur (Temp. ºC)
5.1 Aan/uit-toets
1
Druk op deze toets om het apparaat in
of uit te schakelen. Er klinkt een geluid
als het apparaat wordt ingeschakeld.
De AUTO Stand-by functie schakelt het
apparaat automatisch uit om stroom te
besparen als:
• Er een programma is geselecteerd,
maar na 5 minuten van de instelling
nog niet op de toets is gedrukt.
4
.
– Alle instellingen worden geannu-
leerd
–
Druk op de knop
1
om het appa-
raat weer in te schakelen.
– Stel het wasprogramma en alle mo-
gelijke opties
• 5 minuten na afloop van het waspro-
gramma. Raadpleeg 'Aan het einde
van het programma'.
5.2 Programmaschakelaar
2
Draai deze knop om een programma in
te stellen. Het bijbehorende program-
ma-indicatielampje gaat branden.
5.3 Display
3
A B C D
Op het display verschijnt:
A • De maximum temperatuur van het programma.
B • De standaard centrifugesnelheid van het programma.
•
"Niet centrifugeren"
1)
en "Spoelstop"-symbolen.
C •
De displaysymbolen.
2)
Symbolen Beschrijving
Wasfase
Spoelfases
Centrifugefase
Kinderbeveiliging
8
www.aeg.com

U kunt de deur van het apparaat niet openen als het sym-
bool brandt.
U kunt de deur van het apparaat openen als het symbool
uit gaat.
Het symbool blijft aan, maar het programma is voltooid:
• Er staat water in de trommel.
• De functie 'Spoelstop' is aan.
Startuitstel
D • De programmatijd
Als het programma start, vermindert de tijd in stappen van 1 minuut.
• De uitgestelde start
Als u op de toets startuitstel drukt, toont de display de uitstelde start-
tijd.
•Alarmcodes
Als er een storing in het apparaat optreedt, worden er alarmcodes op
de display weergegeven. Raadpleeg het hoofdstuk "Probleemoplos-
sing".
•Err
Het display toont dit bericht enkele seconden als:
– U een functie instelt die niet van toepassing is voor het programma.
– U het programma wijzigt als het in werking is.
Het lampje van de toets Start/Pauze
4
knippert.
•
Als het programma is voltooid.
1)
Alleen beschikbaar voor het programma Centrifugeren/Afpompen.
2)
De symbolen verschijnen op de display als de bijbehorende fase of functie is ingesteld.
5.4 Toets Start/Pauze
4
Druk op toets
4
om het programma te
starten of te onderbreken.
5.5 Toets startuitstel
5
Druk op toets
5
om de start van een
programma vanaf 30 minuten tot 20 uur
uit te stellen.
5.6 Toets tijdbesparing
6
Druk op de toets
6
om de programma-
tijd te verminderen.
• Druk een keer om een verkort pro-
gramma in te stellen voor wasgoed
met dagelijks vuil.
• Druk twee keer voor het instellen van
een extra snel programma voor was-
goed dat bijna niet vuil is.
Sommige programma's accepte-
ren uitsluitend een van de twee
functies.
5.7 Toets extra spoelen
7
Druk op toets
7
om spoelfases toe te
voegen aan het programma.
Gebruik deze functie voor personen die
allergisch zijn voor wasmiddelen en in
gebieden waar het water erg zacht is.
5.8 Toets Vlekken
8
Druk op toets
8
om de vlekkenfase toe
te voegen aan het programma.
Gebruik deze functie voor wasgoed met
vlekken die moeilijk te verwijderen zijn.
Als u deze functie instelt, doet u vlekken-
verwijderaar in het vakje
.
NEDERLANDS 9

Deze functie verlengt de duur
van het wasprogramma.
Deze functie is niet beschikbaar
bij een temperatuur lager dan
40°C.
5.9 Toets centrifugeren
9
Druk op deze toets om:
• De maximale snelheid van de centrifu-
gefase te verlagen als u een program-
ma instelt.
De display toont alleen de centri-
fugesnelheden die voor het inge-
stelde programma beschikbaar
zijn.
• Schakel de centrifugefase uit.
• Schakel de functie 'Spoelstop' in. Stel
deze functie in om kreukvorming in
stoffen te voorkomen. Het apparaat
pompt geen water af als het program-
ma is voltooid.
Centrifugefase is uit.
De functie 'Spoelstop'
is aan.
5.10 Temperatuurtoets
10
Druk op knop
10
om de standaard tem-
peratuur te wijzigen.
- - = koud water
5.11 Geluidssignalenfunctie
U hoort geluidssignalen als:
• U het apparaat inschakelt.
• U het apparaat uitschakelt.
• U op een toets drukt.
• Het programma is voltooid.
• Het apparaat ondervindt een storing.
Voor het uitschakelen/inschakelen van
de geluidssignalen, drukt u tegelijkertijd
op toets
8
en toets
7
gedurende 6
seconden.
Als u de geluidssignalen uitscha-
kelt, blijven ze alleen werken als
u op de toetsen drukt en er een
storing optreedt.
5.12 Functie kinderslot
Deze functie voorkomt dat kinderen spe-
len met het bedieningspaneel.
• Druk om de functie te activeren, tege-
lijkertijd op toets
10
en toets
9
tot-
dat de display het symbool
toont.
• Druk om de functie te deactiveren, te-
gelijkertijd op toets
10
en toets
9
totdat het symbool uitgaat.
U kunt de volgende functie activeren:
• Voordat u drukt op de toets Start/Pau-
ze
4
: kan het apparaat niet starten.
• Nadat u drukt op de toets Start/Pauze
4
, worden alle toetsen en de pro-
grammaschakelaar uitgeschakeld.
5.13 Permanente extra
spoelfunctie
Met deze functie kunt u de extra spoel-
functie permanent aan laten als u een
nieuw programma instelt.
• Druk om de functie te activeren, tege-
lijkertijd op toets
6
en toets
5
tot-
dat het lampje van toets
7
brandt.
• Druk om de functie uit te schakelen,
tegelijkertijd op toets
6
en toets
5
totdat het lampje van toets
7
uit
gaat.
10
www.aeg.com

6. PROGRAMMA’S
Programma
Huishoudelijk
Type lading
max. gewicht van
belading
Cyclus-
beschrijving
Functies
Katoen - Blanc/
Couleurs
Katoen
95° - Koud
Wit en bont katoen,
normaal vervuild.
max. 8 kg
Wassen
Spoelgangen
Lang centrifuge-
ren
AANPASSEN
TOERENTAL
SPOELSTOP
VLEKKEN
1)
EXTRA SPOELEN
TIJDBESPARING
2)
Katoen + Voor-
was - Coton +
Prélavage
Katoen + Voor-
was
95° - Koud
Wit en bont katoen,
zwaar vervuild.
max. 8 kg
Voorspoelen
Wassen
Spoelgangen
Lang centrifuge-
ren
AANPASSEN
TOERENTAL
SPOELSTOP
VLEKKEN
1)
EXTRA SPOELEN
TIJDBESPARING
2)
Extra Stil - Ex-
tra Silence
Extra Stil
95° - Koud
Wit en bont katoen,
normaal vervuild.
max. 8 kg
Stop met water in
de trommel
Spoelgangen
Lang centrifuge-
ren
VLEKKEN PLUS
EXTRA SPOELEN
TIJDBESPARING
2)
Synthetica -
Synthétiques
Synthetica
60° - Koud
Synthetische of ge-
mengde stoffen,
normaal vervuild.
max. 4 kg
Wassen
Spoelgangen
Kort centrifugeren
AANPASSEN
TOERENTAL
SPOELSTOP
VLEKKEN
1)
EXTRA SPOELEN
TIJDBESPARING
2)
Synthetica +
Voorwas - Syn-
thetiques +
Prélavage
Synthetisch en
voorwas
60° - Koud
Synthetische of ge-
mengde stoffen,
zwaar vervuild.
max. 4 kg
Voorspoelen
Wassen
Spoelgangen
Kort centrifugeren
AANPASSEN
TOERENTAL
SPOELSTOP
VLEKKEN
1)
EXTRA SPOELEN
TIJDBESPARING
2)
Strijkvrij - Re-
passage Faci-
le
3)
Strijkvrij
60° - Koud
Synthetica, normaal
vervuild.
max. 4 kg
Wassen
Spoelgangen
Kort centrifugeren
SPOELSTOP
EXTRA SPOELEN
TIJDBESPARING
NEDERLANDS
11

Programma
Huishoudelijk
Type lading
max. gewicht van
belading
Cyclus-
beschrijving
Functies
Fijne Was - Dé-
licats
Fijne Was
40° - Koud
Fijn wasgoed zoals
acryl, viscose, poly-
ester stoffen, nor-
maal vervuild.
max. 4 kg
Wassen
Spoelgangen
Kort centrifugeren
AANPASSEN
TOERENTAL
SPOELSTOP
VLEKKEN
1)
EXTRA SPOELEN
TIJDBESPARING
2)
Wol/Zijde - Lai-
ne/Soie
Wol/Zijde
40° - Koud
In de machine was-
bare wol. Met de
hand wasbare wol
en fijn wasgoed met
het symbool 'hand-
was'.
max. 2 kg
Wassen
Spoelgangen
Kort centrifugeren
AANPASSEN
TOERENTAL
SPOELSTOP
Centrifugeren/
Pompen - Esso-
rage /Vidan-
ge
4)
Centr./Pompen
Alle stoffen
De maximale bela-
ding van wasgoed is
afhankelijk van het
type wasgoed.
Afvoer van het
water
Centrifugefase op
de maximale snel-
heid.
AANPASSEN
TOERENTAL
NIET CENTRIFU-
GEREN
Spoelen - Rin-
çage
Spoeling
Handwasartikelen. Een spoelgang
met nabehande-
lingsmiddel
Lang centrifuge-
ren
AANPASSEN
TOERENTAL
SPOELSTOP
EXTRA SPOE-
LING
5)
Gordijnen - Ri-
deaux
Gordijnen
40° - Koud
Stel dit programma
in om gordijnen te
wassen. Er wordt
automatisch een
voorwasfase toege-
voegd om het stof
uit de gordijnen te
reinigen.
Voeg geen wasmid-
del aan het voor-
wasvakje toe.
max. 2 kg
Voorspoelen
Wassen
Spoelgangen
Kort centrifugeren
AANPASSEN
TOERENTAL
SPOELSTOP
EXTRA SPOELEN
Jeans
60° - Koud
Alle wasgoed van
spijkerstof. Stoffen
van jersey met hi-
techmaterialen.
max. 8 kg
Wassen
Spoelgangen
Kort centrifugeren
AANPASSEN
TOERENTAL
SPOELSTOP
EXTRA SPOELEN
TIJDBESPARING
2)
12
www.aeg.com

Programma
Huishoudelijk
Type lading
max. gewicht van
belading
Cyclus-
beschrijving
Functies
Kort Intiensief -
Intensif
Kort Intensief
60°-40°
Snel wasprogram-
ma, te gebruiken
voor licht vervuilde
witte/kleurechte ka-
toenen en gemende
stoffen.
max. 5 kg
Wassen
Spoelgangen
Lang centrifuge-
ren
AANPASSEN
TOERENTAL
SPOELSTOP
EXTRA SPOELEN
20 Min. - 3 kg
40°-30°
Katoenen en syn-
thetische kleding
met lichte vervuiling
of slechts eenmaal
gedragen.
max. 3 kg
Wassen
Spoelgangen
Kort centrifugeren
AANPASSEN
TOERENTAL
Super Eco
6)
Koud
Gemengde stoffen
(katoen en syntheti-
sche stoffen).
max. 3 kg
Wassen
Spoelgangen
Lang centrifuge-
ren
AANPASSEN
TOERENTAL
SPOELSTOP
EXTRA SPOELEN
Katoen
Eco - Coton
Eco
7)
Katoen Eco
60° - 40°
Wit en bont katoen,
normaal vervuild.
max. 8 kg
Wassen
Spoelgangen
Lang centrifuge-
ren
AANPASSEN
TOERENTAL
SPOELSTOP
VLEKKEN PLUS
EXTRA SPOELEN
TIJDBESPARING
1)
De functie Vlekken is niet beschikbaar bij een temperatuur lager dan 40°C.
2)
Als u de functie Super snel instelt, adviseren wij u de hoeveelheid belading te
verminderen. Het is mogelijk om de volledige lading te gebruiken, maar een goed
wasresultaat kan niet worden gegarandeerd.
3)
De was- en centrifugefase is zacht om te voorkomen dat het wasgoed gaat kreuken. De
wasautomaat voegt extra spoelgangen toe.
4)
De standaardinstelling van de centrifugeersnelheid is gebaseerd op katoenen wasgoed.
Stel de centrifugesnelheid in. Zorg ervoor dat het geschikt is voor het soort wasgoed.
Voor het uitsluitend selecteren van het programma AFPOMPEN, stelt u de functie NIET
CENTRIFUGEREN in.
5)
Druk op de toets EXTRA SPOELING om spoelgangen toe te voegen. Met een lage
centrifugesnelheid voert het apparaat behoedzame spoelbeurten uit met kort
centrifugeren
6)
Stel dit programma in om de tijd en het water- en energieverbruik te verlagen.
7)
Standaardprogramma's voor de Energielabel verbruikswaarden. Volgens de
regelgeving 1061/2010 zijn deze programma's respectievelijk het “standaard 60°C
katoenprogramma” en het “standaard 40°C katoenprogramma”. Dit zijn de meest
efficiënte programma's qua elektriciteits- en waterverbruik bij het wassen van normaal
vervuild katoenen wasgoed.
Stel dit programma in voor een goed wasresultaat en om het stroomverbruik te
verlagen. De tijd van het wasprogramma wordt verlengd.
De watertemperatuur van de wasfase kan verschillen van de temperatuur die is
aangegeven voor het geselecteerde programma.
NEDERLANDS 13

7. VERBRUIKSWAARDEN
Bij start van het programma toont het display de programmaduur voor de
maximale laadcapaciteit.
Tijdens de wasfase wordt de programmaduur automatisch berekend en de-
ze kan flink worden verlaagd als de wasgoedlading lager is dan de maxima-
le laadcapaciteit (bijv. katoen 60°C, maximale laadcapaciteit 8 kg, de pro-
grammaduur is langer dan 2 uur, lading 1 kg, de programmaduur is nog
geen uur).
Als het apparaat de echte programmaduur berekent, knippert er een punt
in het display.
De gegevens van deze tabel zijn gemiddelden. Verschillende oorzaken kun-
nen de gegevens wijzigen: de hoeveelheid en het type wasgoed, het water
en de omgevingstemperatuur.
Programma’s Lading
(kg)
Energiever-
bruik (kWh)
Waterver-
bruik (liter)
Gemiddel-
de pro-
gramma-
duur (minu-
ten)
Resterend
vocht
(%)
1)
Katoen 60 °C 8 1.6 72 168 52
Katoen 40 °C 8 1.0 72 164 52
Synthetische
stoffen 40 °C
4 0.6 50 110 35
Fijne was 40
°C
4 0.7 60 91 35
Wol/Handwas
30 °C
2 0.35 57 58 30
Standaard katoenprogramma's
Standaard 60
°C katoen
8 0.89 58 225 52
Standaard 60
°C katoen
4 0.75 45 170 52
Standaard 40
°C katoen
4 0.50 44 165 52
1)
Aan het einde van de centrifugeerfase.
Uit-modus (W) Modus aan laten (W)
0.48 0.48
De gegevens in de bovenstaande grafieken komen overeen met de regelge-
ving van de Europese commissie 1015/2010 implementatierichtlijn 2009/125/
EC.
14
www.aeg.com

8. VOOR HET EERSTE GEBRUIK
1.
Giet 2 liter water in het vakje voor
het hoofdwasmiddel van de wasmid-
dellade om het afvoersysteem te ac-
tiveren.
2.
Giet een klein beetje wasmiddel in
het vakje van het hoofdwasmiddel
van de wasmiddellade. Stel het pro-
gramma voor katoen in op de hoog-
ste temperatuur zonder wasgoed en
start het programma. Dit verwijdert
al het mogelijke vuil uit de trommel
en de kuip.
9. BEDIENING VAN HET APPARAAT
1.
Draai de waterkraan open.
2.
Steek de stekker in het stopcontact.
3.
Druk op toets
1
om het apparaat in
te schakelen.
4.
Plaats het wasgoed in de machine.
5.
Gebruik de juiste hoeveelheid was-
middelen en toevoegingen.
6.
U dient het juiste programma in te
stellen en te starten voor het type la-
ding en de mate van vervuiling.
9.1 Wasgoed in de machine
doen
1.
Open de deur van het apparaat.
2.
Plaats het wasgoed een voor een in
de trommel. Schud de items voor u
ze in de wasautomaat plaatst. Zorg
ervoor dat u niet te veel was in de
trommel plaatst.
3.
Sluit de deur.
Zorg ervoor dat er geen wasgoed tussen
de deur blijft klemmen. Er kan waterlek-
kage of beschadigd wasgoed ontstaan.
NEDERLANDS 15

9.2 Wasmiddel en additieven (wasverzachter, vlekkenmiddel)
toevoegen
Het wasmiddelvakje van de voorwasfase en het inweekprogram-
ma.
Voeg inweek- en voorwasmiddelen toe voordat u het program-
ma start.
Het vakje voor het wasmiddel van de wasfase.
Als u een vloeibaar wasmiddel gebruikt, dient u dit direct voor
het starten van het programma te plaatsen.
Vakje voor vloeibare nabehandelingsmiddelen (wasverzachter,
stijfsel).
Plaats het product in het vakje voordat u het programma start.
Dit is het maximale niveau voor vloeibare nabehandelingsmid-
delen.
Het vakje voor de vlekverwijderaar.
Plaats het product in het vakje en stel de vlekfunctie in voordat
u het programma start.
Klepje voor poeder of vloeibaar wasmiddel.
Draai het klepje (omhoog of omlaag) in de juiste stand om poe-
der of vloeibaar wasmiddel te gebruiken.
Volg altijd de instructies op de verpakking van de wasmiddelen.
16
www.aeg.com

De stand van de klep controleren
1.
Trek de wasmiddeldoseerlade uit tot
deze stopt.
2.
Druk de hendel in om de lade uit te
trekken.
3.
Draai de klep omhoog om poeder-
wasmiddel te gebruiken.
4.
Draai de klep omlaag om vloeibaar
wasmiddel te gebruiken.
Met de klep in de stand OM-
LAAG:
– Gebruik geen gelatineachtige
of dikke vloeibare wasmidde-
len.
– Giet niet meer vloeibaar was-
middel in het vakje dan de li-
miet op de klep.
– Stel de voorwasfase niet in.
– Stel de startuitstelfunctie niet
in.
5.
Meet het wasmiddel en wasverzach-
ter af.
6.
Sluit de wasmiddeldoseerlade voor-
zichtig. Zorg bij het sluiten van de
lade dat de klep geen blokkering
veroorzaakt.
9.3 Een programma instellen
en starten
1.
Draai de programmaschakelaar. Het
bijbehorende programma-indicatie-
lampje gaat branden.
2.
Het lampje van toets
4
knippert in
het rood.
3.
Op het display verschijnt de stan-
daard temperatuur en centrifuge-
snelheid. Om de temperatuur en/of
de centrifugesnelheid te wijzigen,
drukt u op de bijbehorende toetsen.
4.
Stel de beschikbare functies in. Het
lampje van de ingestelde functie
NEDERLANDS 17

gaat aan, of de display toont het bij-
behorende symbool.
5.
Druk op toets
4
om het program-
ma te starten. Het lampje van toets
4
is aan.
De afvoerpomp kan even werken
als het apparaat gevuld wordt
met water.
9.4 Een programma
onderbreken
1.
Als u op de toets
4
drukt: Het indi-
catielampje knippert.
2.
Als u opnieuw op toets
4
drukt.
Het wasprogramma gaat verder.
9.5 Een programma annuleren
1.
Druk op toets
1
om het program-
ma te annuleren en om het apparaat
uit te schakelen.
2.
Druk opnieuw op toets
1
om het
apparaat in te schakelen. U kunt nu
een nieuw wasprogramma kiezen.
Het apparaat pompt geen water
weg.
9.6 Een functie wijzigen
U kunt slechts enkele functies wijzigen
voordat ze gaan werken.
1.
Als u op de toets
4
drukt: Het indi-
catielampje knippert.
2.
De ingestelde functie wijzigen.
9.7 Het startuitstel instellen
1.
Druk herhaaldelijk op toets
5
tot
het aantal minuten of uren op de
display verschijnt. De bijbehorende
symbolen gaan branden.
2.
Druk op toets
4
, het apparaat be-
gint met aftellen van de uitgestelde
start.
Nadat het aftelproces voltooid is,
wordt het wasprogramma automa-
tisch gestart.
Voordat u op toets
4
drukt om
het apparaat te starten, kunt u de
instelling van de uitgestelde start
annuleren of wijzigen.
U kunt de uitgestelde start niet
instellen bij het Stoom program-
ma.
9.8 De uitgestelde start
annuleren
1.
Als u op de toets
4
drukt: Het bij-
behorende indicatielampje knippert.
2.
Druk herhaaldelijk op toets
5
tot
de display 0’ toont.
3.
Als u op de toets
4
drukt: Het pro-
gramma wordt gestart.
9.9 Deur openen
Als een programma of het startuitstel in
werking is, is de deur van de wasmachi-
ne vergrendeld.
De deur van het apparaat openen:
1.
Druk op toets
4
. Het deurvergren-
delingssymbool in de display gaat
uit.
2.
Open de deur van het apparaat.
3.
Sluit de deur van de machine en
druk op toets
4
. Het programma
of startuitstel gaat verder.
Als de temperatuur en het water-
peil in de trommel te hoog zijn,
blijft het symbool voor de deur-
vergrendeling aan en kunt u de
deur niet openen. U opent in dat
geval de deur als volgt:
1.
Schakel het apparaat uit.
2.
Wacht enkele minuten.
3.
Zorg ervoor dat er zich geen
water in de trommel bevindt.
Als u het apparaat uit zet, dient u
het programma opnieuw in te
stellen.
9.10 Aan het einde van het
programma
• Het apparaat stopt automatisch.
• De geluidssignalen klinken.
•
In de display gaat het symbool
aan.
18
www.aeg.com

• Het indicatielampje van de toets Start/
Pauze
4
gaat uit.
• Het deurvergrendelingssymbool gaat
uit.
•
Druk op toets
1
om het apparaat uit
te schakelen. Vijf minuten na afloop
van het programma schakelt energie-
besparingsfuncie het apparaat auto-
matisch uit.
Als u het apparaat weer inscha-
kelt, wordt het einde van het als
laatste ingestelde programma in
de display weergegeven. Draai
de programmaknop om een
nieuwe cyclus in te stellen.
• Haal het wasgoed uit de wasmachine.
Zorg ervoor dat de trommel leeg is.
• Laat de deur iets open staan om de
vorming van schimmel en onaangena-
me luchtjes te voorkomen.
• Draai de waterkraan dicht.
Het wasprogramma is voltooid, maar
er staat water in de trommel:
– De trommel draait regelmatig om
kreukvorming van het wasgoed te
voorkomen.
– De deur blijft vergrendeld.
– U moet het water afvoeren om de
deur te kunnen openen.
Het water wegpompen:
1.
Verlaag zo nodig de centrifugesnel-
heid.
2.
Druk op de toets Start/Pauze
4
.
Het apparaat voert het water af en
centrifugeert.
3.
Als het programma is voltooid, gaat
het deurvergrendelingssymbool uit
en kunt u de deur openen.
4.
Schakel het apparaat uit.
Na ongeveer 18 uur begint het
apparaat automatisch met het af-
voeren van water en centrifuge-
ren.
10. AANWIJZINGEN EN TIPS
10.1 Wasgoed sorteren
• Verdeel het wasgoed in: wit, bont,
synthetisch, fijne was en wol.
• Volg de wasinstructies die u op de
waslabels van het wasgoed vindt.
• Was witte en bonte artikelen niet sa-
men.
• Sommige bonte weefsels kunnen uit-
lopen als zij de eerste keer worden ge-
wassen. We raden daarom aan om dit
soort kleding de eerste keer dan ook
apart te wassen.
• Knoop kussenslopen dicht, sluit ritsen,
haakjes en drukknopen. Maak riemen
vast.
• Maak alle zakken leeg en vouw alle ar-
tikelen open.
• Draai meerlagige stoffen, wollen en
kleding met geverfde opdrukken bin-
nenstebuiten.
• Verwijder hardnekkige vlekken.
• Was delen met zware vervuiling met
een speciaal wasmiddel.
• Wees voorzichtig met de gordijnen.
Verwijder de haken of stop de gordij-
nen in een zak of kussensloop.
• Niet in de machine wassen:
– Wasgoed zonder zomen of met
scheuren
– Beugelbeha's.
– Gebruik een waszakje om kleine
stuk wasgoed te wassen.
• Een zeer kleine lading kan problemen
veroorzaken bij de centrifugefase. Als
dit gebeurt, kunt u de artikelen hand-
matig verdelen in de trommel en de
centrifugefase opnieuw starten.
10.2 Hardnekkige vlekken
Voor sommige vlekken is water en was-
middel niet voldoende.
NEDERLANDS 19

We raden u aan om deze vlekken te ver-
wijderen voordat u deze artikelen in de
machine stopt.
Er zijn speciale vlekverwijderaars ver-
krijgbaar. Gebruik een speciale vlekver-
wijderaar die geschikt is voor het type
vlek en stof.
10.3 Wasmiddelen en
nabehandelingsmiddelen
• Gebruik alleen wasmiddelen en nabe-
handelingsproducten die bedoeld zijn
voor gebruik in een wasautomaat.
• Vermeng geen verschillende soorten
wasmiddel met elkaar.
• Gebruik niet meer dan de benodigde
hoeveelheid wasmiddel om het milieu
te beschermen.
• Volg altijd de instructies die u vindt op
de verpakking van deze producten.
• Gebruik de juiste producten voor het
type en de kleur stof, de programma-
temperatuur en de mate van vervui-
ling.
• Stel geen voorwasfase in als u vloeiba-
re wasmiddelen gebruikt.
• Als uw machine geen wasmiddellade
heeft met klepje, voeg dan het vloei-
bare wasmiddel toe met een doseer-
bal.
10.4 Waterhardheid
Als de waterhardheid in uw gebied hoog
of gemiddeld is, raden we u het gebruik
van waterverzachter voor wasautomaten
aan. In gebieden waar de waterhardheid
zacht is, is het gebruik van een waterver-
zachter niet nodig.
Neem contact op met de plaatselijke
waterautoriteit voor de waterhardheid in
uw gebied.
Volg altijd de instructies die u vindt op
de verpakking van de producten.
Gelijkwaardige eenheden meten de wa-
terhardheid:
• Duitse graden (°dH).
• Franse graden (°TH)
• mmol/l (millimol per liter - een interna-
tionale eenheid voor de hardheid van
water).
• Clarke-graden.
Waterhardheidstabel
Niveau Type
Waterhardheid
°dH °TH mmol/l Clarke
1 zacht 0-7 0-15 0-1.5 0-9
2 medium 8-14 16-25 1.6-2.5 10-16
3 hard 15-21 26-37 2.6-3.7 17-25
4 erg hard > 21 > 37 >3.7 >25
11. ONDERHOUD EN REINIGING
WAARSCHUWING!
Haal de stekker uit het stopcontact voor-
dat u het apparaat reinigt.
11.1 Ontkalken
Het water dat wij gebruiken, bevat kalk.
Als het nodig is dient u waterverzachter
te gebruiken om deze kalk te verwijde-
ren.
Gebruik een speciaal product voor was-
automaten. Volg altijd de instructies die
u vindt op de verpakking van de produ-
cent.
Doe dit apart van het wassen van was-
goed.
20
www.aeg.com

11.2 Buitenkant reinigen
Het apparaat alleen schoonmaken met
zeep en warm water. Maak alle opper-
vlakken volledig droog.
LET OP!
Gebruik geen brandspiritus, op-
losmiddelen of chemische pro-
ducten.
11.3 Onderhoudswasbeurt
Bij programma's met lage temperaturen
is het mogelijk dat er wat wasmiddel
achterblijft in de trommel. Voer regelma-
tig een onderhoudswas uit. Om dit te
doen:
• Haal al het wasgoed uit de trommel.
• Stel het heetste wasprogramma in
voor katoen
• Gebruik de juiste hoeveelheid poe-
derwasmiddel met biologische eigen-
schappen.
Houd de deur enige tijd open na elke
wasbeurt, om schimmels te voorkomen
en onprettige geurtjes te verwijderen.
11.4 Deurrubber
Controleer het deurrubber regelmatig
en verwijder voorwerpen uit de binnen-
kant.
11.5 Trommel
Controleer de trommel regelmatig om
kalk en roestdeeltjes te voorkomen.
Gebruik alleen speciale producten om
roestdeeltjes uit de trommel te verwijde-
ren.
Ga als volgt te werk:
• Reinig de trommel met een speciaal
product voor roestvrij staal.
• Start een kort programma voor katoen
op de maximale temperatuur met een
kleine hoeveelheid wasmiddel.
11.6 Wasmiddeldoseerlade
De wasmiddeldoseerlade reinigen:
1
2
1.
Druk op de hendel.
2.
Trek de doseerlade naar buiten.
NEDERLANDS 21

3.
Verwijder het bovenste gedeelte
van het vakje voor vloeibare nabe-
handelingsmiddelen.
4.
Maak alle onderdelen schoon met
water.
5.
Maak de ruimte van de wasmiddel-
doseerlade schoon met een borstel.
6.
Plaats de wasmiddeldoseerlade te-
rug in de ruimte.
11.7 Afvoerpomp
Controleer de afvoerpomp regel-
matig en zorg dat deze schoon
is.
De pomp schoonmaken als:
• Het apparaat geen water wegpompt.
• De trommel niet kan draaien.
• Het apparaat een ongebruikelijk ge-
luid maakt door een blokkade in de af-
voerpomp.
• De display een alarmcode weergeeft
door een probleem met de wateraf-
voer.
WAARSCHUWING!
1.
Trek de stekker uit het stop-
contact.
2.
Verwijder het filter niet als
het apparaat in gebruik is.
Reinig de afvoerpomp niet
als het water in de machine
heet is. Het water moet koud
zijn voordat u de afvoer-
pomp kunt reinigen.
De afvoerpomp reinigen:
1.
Open het afvoerpompdeurtje.
2.
Trek de klep naar voren om hem te
verwijderen.
22
www.aeg.com

3.
Plaats een bak onder de uitsparing
van de afvoerpomp om het uitstro-
mende water op te vangen.
4.
Druk de twee hendels in en trek het
afvoerkanaal naar voren om het wa-
ter eruit te laten stromen.
1
2
5.
Als de bak vol met water is, duwt u
het afvoerkanaal terug en leegt u de
bak. Herhaal stap 4 en 5 tot er geen
water meer uit de afvoerpomp
stroomt.
6.
Duw het afvoerkanaal terug en draai
het filter om het te verwijderen.
7.
Verwijder stof en voorwerpen uit de
pomp.
8.
Zorg dat het schoepenrad op de
juiste wijze kan draaien. Neem als
dit niet lukt, contact op met de klan-
tenservice.
1
2
9.
Reinig het filter onder de water-
kraan en plaats het terug in de spe-
ciale geleiders van de pomp.
10.
Zorg ervoor dat het filter stevig vast-
zit om waterlekkage te voorkomen.
11.
Plaats de klep terug en sluit het af-
voerpompdeurtje.
11.8 Het filter van de
toevoerslang en het klepfilter
Het kan nodig zijn filters te reinigen als:
• Het apparaat niet met water wordt ge-
vuld.
• De machine langdurig water vult.
•
Het lampje van toets
4
knippert en
de display het bijbehorende alarm
weergeeft. Raadpleeg 'Probleemop-
lossing'.
WAARSCHUWING!
Trek de stekker uit het stopcon-
tact.
NEDERLANDS 23

De watertoevoerfilters schoonmaken:
1.
Draai de waterkraan dicht.
2.
Verwijder de watertoevoerslang van
de kraan.
3.
Reinig het filter in de toevoerslang
met een harde borstel.
4.
Verwijder de toevoerslang achter de
machine.
5.
Reinig het filter in de klep met een
harde borstel of een handdoek.
45°
20°
6.
Installeer de watertoevoerslang op-
nieuw. Zorg ervoor dat de koppelin-
gen stevig vast zitten om lekkage te
voorkomen.
7.
Draai de waterkraan open.
11.9 Noodafvoer
Het apparaat kan geen water afvoeren
door een storing.
Als dit optreedt, voert u stap (1) tot en
met (6) van "De afvoerpomp reinigen"
uit.
Maak de pomp zo nodig schoon.
Plaats het afvoerkanaal terug en sluit de
afvoerpompklep.
Als u het water afvoert met de noodaf-
voerprocedure, dient u het afvoersys-
teem opnieuw te activeren:
1.
Giet 2 liter water in het vakje voor
het hoofdwasmiddel van de wasmid-
deldoseerlade.
2.
Start het programma om water af te
voeren.
11.10 Voorzorgsmaatregelen
bij vorst
Als het apparaat is geïnstalleerd in een
gebied waar de temperatuur lager is dan
0 °C, dan dient u het resterende water
uit de afvoerslang en de afvoerpomp te
verwijderen.
1.
Trek de stekker uit het stopcontact.
2.
Draai de waterkraan dicht.
3.
Verwijder de watertoevoerslang.
4.
Plaats de twee uiteinden van de toe-
voerslang in een bak en laat het wa-
ter uit de slang stromen.
5.
Leeg de afvoerpomp. Raadpleeg de
noodafvoerprocedure.
6.
Als de afvoerpomp leeg is, instal-
leert u de toevoerslang opnieuw.
24
www.aeg.com

WAARSCHUWING!
Zorg ervoor dat de temperatuur
hoger is dan 0 °C voordat u het
apparaat opnieuw gebruikt.
De fabrikant is niet verantwoor-
delijk voor schade die door lage
temperaturen is veroorzaakt.
12. PROBLEEMOPLOSSING
Het apparaat start niet of stopt tijdens
het programma.
Probeer eerst het probleem zelf op te
lossen (zie tabel). Indien dit niet lukt,
neem contact op met de service afde-
ling.
Bij sommige problemen werken de
geluidssignalen en toont de display
een alarmcode:
•
- Het apparaat wordt niet gevuld
met water.
•
- Het apparaat pompt geen wa-
ter weg.
•
- De deur is open of niet goed
gesloten.
•
- Anti-overstromingsbeveiliging
is aan.
WAARSCHUWING!
Schakel het apparaat uit voordat
u controles uitvoert.
Probleem Mogelijke oorzaak Mogelijke oplossing
Het apparaat
neemt geen wa-
ter.
De waterkraan is dicht. Draai de waterkraan open.
De watertoevoerslang is
beschadigd.
Controleer of de watertoevoers-
lang niet is beschadigd.
De filters in de water-
toevoerslang zijn ver-
stopt.
Reinig de filters Zie het hoofd-
stuk "Onderhoud en reiniging".
De waterkraan is ver-
stopt of aangezet met
kalkaanslag.
Maak de waterkraan schoon.
De aansluiting van de
watertoevoerslang is
niet correct.
Zorg dat de aansluiting altijd
correct is.
De waterdruk is te laag. Neem contact op met het wa-
terleidingbedrijf.
Het apparaat
pompt geen water
weg.
De waterafvoerslang is
beschadigd.
Controleer of de waterafvoers-
lang niet is beschadigd.
Het filter in de afvoer-
pomp is geblokkeerd.
Reinig het filter of maak de af-
voerpomp schoon. Zie het
hoofdstuk "Onderhoud en reini-
ging".
NEDERLANDS 25

Probleem Mogelijke oorzaak Mogelijke oplossing
De aansluiting van de
waterafvoerslang is niet
correct.
Zorg dat de aansluiting altijd
correct is.
Er is een wasprogram-
ma zonder afvoerfase
ingesteld.
Stel het afvoerprogramma in.
De functie 'Spoelstop' is
aan.
Stel het afpompprogramma in.
De deur is open of
niet goed geslo-
ten.
Sluit de deur goed.
Anti-overstro-
mingsbeveilliging
is aan.
• Schakel het apparaat uit en
trek de stekker uit het stop-
contact.
• Draai de waterkraan dicht.
• Neem contact op met het ser-
vicecentrum.
Het apparaat cen-
trifugeert niet.
De centrifugafase is uit. Stel het centrifugeprogramma
in.
Het filter in de afvoer-
pomp is geblokkeerd.
Reinig het filter of maak de af-
voerpomp schoon. Zie het
hoofdstuk "Onderhoud en reini-
ging".
Balansproblemen met
de waslading.
Verdeel de artikelen handmatig
in de trommel en start de centri-
fugefase opnieuw.
Het programma
start niet.
De stekker zit niet goed
in het stopcontact.
Steek de stekker in het stopcon-
tact.
De zekering in de me-
terkast is doorgebrand.
Vervang de zekering.
U heeft niet op toets
4
gedrukt.
Als u op de toets
4
drukt:
De uitgestelde start is
ingesteld.
Annuleer de uitgestelde start
om het programma direct te
starten.
Het kinderslot is geacti-
veerd.
Het kinderslot uitschakelen.
Er ligt water op de
vloer.
Lekkages van de koppe-
lingen van de waterslan-
gen.
Zorg dat de koppelingen goed
zijn aangedraaid.
Lekkages van de afvoer-
pomp.
Zorg dat het filter van de afvoer-
pomp goed is bevestigd.
26
www.aeg.com

Probleem Mogelijke oorzaak Mogelijke oplossing
De waterafvoerslang is
beschadigd.
Verzeker u ervan dat de water-
toevoerslang niet is bescha-
digd.
U kunt de deur
van het apparaat
niet openen.
Het wasprogramma is
bezig.
Laat het wasprogramma beëin-
digen.
Er staat water in de
trommel.
Kies het programma Pompen of
Centrifugeren.
Het apparaat
maakt een abnor-
maal geluid.
Het apparaat staat niet
waterpas.
Het apparaat waterpas afstellen.
Raadpleeg "Installatie".
De verpakking en/of de
transportbouten zijn
niet verwijderd.
Verwijder de verpakking en/of
de transportbouten. Raadpleeg
"Installatie".
De lading is erg klein. Meer wasgoed in de machine
doen.
Het apparaat vult
zich met water en
pompt het direct
weer af.
Het uiteinde van de af-
voerslang is te laag.
Zorg dat de afvoerslang op de
juiste hoogte staat.
Het wasresultaat is
niet bevredigend.
Het door u gebruikte
wasmiddel was niet cor-
rect of onvoldoende.
Gebruik meer wasmiddel of ge-
bruik een ander middel.
U heeft de hardnekkige
vlekken niet voor het
wassen uit het wasgoed
gehaald.
Gebruik speciale producten om
hardnekkige vlekken te verwij-
deren.
Onjuiste temperatuur
ingesteld.
Zorg dat u de juiste tempera-
tuur instelt.
Te veel wasgoedbela-
ding.
Verminder de hoeveelheid was-
goed.
Schakel het apparaat na de controle in.
Het programma gaat verder vanaf het
punt waar het werd onderbroken.
Als het probleem opnieuw optreedt,
neem dan contact op met onze service
afdeling.
Indien het display andere alarmcodes
meldt, neem dan contact op met onze
service afdeling.
13. MONTAGE
13.1 Set bevestigingsplaatjes
(4055171146)
Verkrijgbaar bij uw geautoriseerde ver-
kooppunt.
Zet het apparaat goed vast met de be-
vestigingsplaatjes als u het apparaat op
een plint plaatst.
Volg de instructies die bij de set zijn
meegeleverd.
NEDERLANDS 27

13.2 Uitpakken
1.
Gebruik de handschoenen. De ex-
terne folie eraf trekken. Gebruik zo
nodig een mes.
2.
Verwijder de kartonnen deksel.
3.
Verwijder de piepschuim verpak-
kingsmaterialen.
4.
De interne folie eraf trekken.
5.
Open de deur. Verwijder het piep-
schuim blok van de deur en alle an-
dere onderdelen uit de trommel.
28
www.aeg.com

6.
Plaats het piepschuim verpakkings-
materiaal op de vloer achter het ap-
paraat. Plaats het apparaat met de
achterzijde voorzichtig op het kar-
tonnen deksel. Zorg dat u de slan-
gen niet beschadigt.
1
2
7.
Verwijder de piepschuim bescher-
ming van de onderkant.
8.
Zet het apparaat weer rechtop.
9.
Verwijder het aansluitsnoer en de
afvoerslang van de slanghouders.
10.
Draai de drie transportbouten los.
Gebruik de bij het apparaat gelever-
de moersleutel.
11.
Trek de bouten met de plastic tus-
senstukken eruit.
NEDERLANDS 29

12.
Doe de plastic dopjes in de gaatjes.
U vindt deze doppen in de zak van
de gebruikershandleiding.
WAARSCHUWING!
Verwijder alle transportbouten
en verpakking voordat u het ap-
paraat installeert.
Wij raden u aan om alle trans-
portbouten en verpakking te be-
waren voor als u het apparaat
gaat verplaatsen.
13.3 Plaatsing en waterpas zetten
x4
• Installeer het apparaat op een vlakke
harde vloer.
• Zorg ervoor dat de vloerbedekking de
luchtcirculatie onder het apparaat niet
stopt.
• Zorg ervoor dat het apparaat geen
muren of andere apparaten raakt.
• Gebruik de stelvoetjes om het appa-
raat waterpas te zetten. Een juiste af-
stelling van het apparaat voorkomt tril-
lingen en lawaai en het bewegen van
het apparaat als deze in bedrijf is.
• Het apparaat moet waterpas en sta-
biel staan.
LET OP!
Plaats geen karton, hout of ver-
gelijkbare materialen onder de
voeten van het apparaat om de-
ze waterpas te stellen.
30
www.aeg.com

13.4 De toevoerslang
20
O
20
O
20
O
45
O
45
O
45
O
• Sluit de slang aan op het apparaat.
Draai de toevoerslang alleen naar links
of rechts. Maak de ringmoer los om
hem in de juiste stand te zetten.
• Sluit de watertoevoerslang aan op een
koudwaterkraan met 3/4-schroef-
draad.
LET OP!
Zorg ervoor dat de koppelingen
niet lekken.
Gebruik geen verlengslang als
de toevoerslang te kort is. Neem
contact op met de klantenservice
voor vervanging van de toevoers-
lang.
Waterstop
A
De watertoevoerslang is voorzien van
een waterstop. Dit toestel voorkomt lek-
kage in de slang door natuurlijke slijta-
ge. Het rode gedeelte in het venster «A»
toont deze storing.
Als dit gebeurt, draait u de kraan dicht
en neemt u contact op met de klanten-
service om de slang te laten vervangen.
13.5 Waterafvoer
Er zijn verschillende procedures om de
afvoerslang aan te sluiten:
NEDERLANDS 31

Met de plastic slanggeleider.
• Op de rand van een gootsteen.
• Zorg dat de plastic geleider niet kan
bewegen als het apparaat water af-
voert. Bevestig de geleider op de wa-
terkraan of wand.
• Op een standpijp met ventilatieope-
ning.
Raadpleeg de illustratie. Rechtstreeks
in een afvoerpijp op een hoogte van
niet minder dan 60 cm en niet meer
dan 100 cm. Het einde van de afvoers-
lang moet altijd geventileerd zijn,
d.w.z. dat de binnendiameter van de
afvoerpijp groter moet zijn dan de bui-
tendiameter van de afvoerslang.
Zonder de plastic slanggeleider.
• Op een gootsteenafvoer.
Raadpleeg de illustratie. Plaats de af-
voerslang in de gootsteenafvoer en
draai vast met een clip. Zorg dat de af-
voerslang een bocht maakt om te
voorkomen dat resterende deeltjes uit
de gootsteen in het apparaat komen.
• Direct op een ingebouwde afvoer-
pomp in de kamerwand en zet vast
met een klem.
32
www.aeg.com

U kunt de afvoerslang maximaal
400 cm verlengen. Neem contact
op met de klantenservice voor
de andere afvoerslang en het
verlengstuk.
14. MILIEUBESCHERMING
Recycle de materialen met het
symbool
. Gooi de verpakking in
een geschikte verzamelcontainer om
het te recyclen.
Help om het milieu en de
volksgezondheid te beschermen en
recycle het afval van elektrische en
elektronische apparaten. Gooi
apparaten gemarkeerd met het
symbool
niet weg met het
huishoudelijk afval. Breng het
product naar het milieustation bij u
in de buurt of neem contact op met
de gemeente.
NEDERLANDS 33

CONTENTS
1. SAFETY INFORMATION . . . . . . . . . . . . . . . . . . . . . . . . . . . . . . . . . . . . . . . . . . . . . . . . . . . . . 35
2. SAFETY INSTRUCTIONS . . . . . . . . . . . . . . . . . . . . . . . . . . . . . . . . . . . . . . . . . . . . . . . . . . . . . 36
3. TECHNICAL INFORMATION . . . . . . . . . . . . . . . . . . . . . . . . . . . . . . . . . . . . . . . . . . . . . . . . . 37
4. PRODUCT DESCRIPTION . . . . . . . . . . . . . . . . . . . . . . . . . . . . . . . . . . . . . . . . . . . . . . . . . . . . 38
5. CONTROL PANEL . . . . . . . . . . . . . . . . . . . . . . . . . . . . . . . . . . . . . . . . . . . . . . . . . . . . . . . . . . 39
6. PROGRAMMES . . . . . . . . . . . . . . . . . . . . . . . . . . . . . . . . . . . . . . . . . . . . . . . . . . . . . . . . . . . . 42
7. CONSUMPTION VALUES . . . . . . . . . . . . . . . . . . . . . . . . . . . . . . . . . . . . . . . . . . . . . . . . . . . . 45
8. BEFORE FIRST USE . . . . . . . . . . . . . . . . . . . . . . . . . . . . . . . . . . . . . . . . . . . . . . . . . . . . . . . . . 46
9. USING THE APPLIANCE . . . . . . . . . . . . . . . . . . . . . . . . . . . . . . . . . . . . . . . . . . . . . . . . . . . . . 46
10. HINTS AND TIPS . . . . . . . . . . . . . . . . . . . . . . . . . . . . . . . . . . . . . . . . . . . . . . . . . . . . . . . . . . . 50
11. CARE AND CLEANING . . . . . . . . . . . . . . . . . . . . . . . . . . . . . . . . . . . . . . . . . . . . . . . . . . . . . . 51
12. TROUBLESHOOTING . . . . . . . . . . . . . . . . . . . . . . . . . . . . . . . . . . . . . . . . . . . . . . . . . . . . . . . 55
13. INSTALLATION . . . . . . . . . . . . . . . . . . . . . . . . . . . . . . . . . . . . . . . . . . . . . . . . . . . . . . . . . . . . 58
FOR PERFECT RESULTS
Thank you for choosing this AEG product. We have created it to give you impeccable
performance for many years, with innovative technologies that help make life simpler –
features you might not find on ordinary appliances. Please spend a few minutes reading to get
the very best from it.
Visit our website for:
Get usage advice, brochures, trouble shooter, service information:
www.aeg.com
Register your product for better service:
www.aeg.com/productregistration
Buy Accessories, Consumables and Original spare parts for your appliance:
www.aeg.com/shop
CUSTOMER CARE AND SERVICE
We recommend the use of original spare parts.
When contacting Service, ensure that you have the following data available.
The information can be found on the rating plate. Model, PNC, Serial Number.
Warning / Caution-Safety information
General information and tips
Environmental information
Subject to change without notice.
34
www.aeg.com

1. SAFETY INFORMATION
Before the installation and use of the appliance, careful-
ly read the supplied instructions. The manufacturer is
not responsible if an incorrect installation and use cau-
ses injuries and damages. Always keep the instructions
with the appliance for future reference.
1.1 Children and vulnerable people safety
WARNING!
Risk of suffocation, injury or permanent disability.
• This appliance can be used by children aged from 8
years and above and persons with reduced physical,
sensory or mental capabilities or lack of experience
and knowledge if they have been given supervision or
instruction concerning use of the appliance in a safe
way and understand the hazards involved.
• Do not let children play with the appliance.
• Keep all packaging away from children.
• Keep all detergents away from children.
• Keep children and pets away from the appliance door
when it is open.
• If the appliance has a child safety device, we recom-
mend you activate it.
• Cleaning and user maintenance shall not be made by
children without supervision.
1.2 General Safety
• Before maintenance, deactivate the appliance and
disconnect the mains plug from the mains socket.
• Do not change the specification of this appliance.
• Obey the maximum load volume of 8 kg (refer to the
“Programme chart” chapter).
ENGLISH 35

• If the supply cord is damaged, it must be replaced by
the manufacturer, its service agent or similarly quali-
fied persons in order to avoid a hazard.
• The operating water pressure (minimum and maxi-
mum) must be between 0,5 bar (0,05 MPa) and 8 bar
(0,8 MPa)
• The ventilation openings in the base (if applicable)
must not be obstructed by a carpet.
• The appliance is to be connected to the water mains
using the new supplied hose-sets. Old hose sets must
not be reused.
2.
SAFETY INSTRUCTIONS
2.1 Installation
• Remove all the packaging and the
transit bolts.
• Keep the transit bolts. When you
move the appliance again you must
block the drum.
• Do not install or use a damaged appli-
ance.
• Do not install or use the appliance
where the temperature is less than 0
°C or where it is exposed to the
weather.
• Obey the installation instruction sup-
plied with the appliance.
• Make sure that the floor where you in-
stall the appliance is flat, stable, heat
resistant and clean.
• Do not install the appliance where the
appliance door can not be fully
opened.
• Always be careful when you move the
appliance because it is heavy. Always
wear safety gloves.
• Make sure that there is air circulation
between the appliance and the floor.
• Adjust the feet to have the necessary
space between the appliance and the
carpet.
Electrical connection
WARNING!
Risk of fire and electrical shock.
• The appliance must be earthed.
• Make sure that the electrical informa-
tion on the rating plate agrees with
the power supply. If not, contact an
electrician.
• Always use a correctly installed shock-
proof socket.
• Do not use multi-plug adapters and
extension cables.
• Make sure not to cause damage to the
mains plug and to the mains cable.
Should the appliance power supply
cable need to be replaced, this must
be carried out by our Service Centre.
• Connect the mains plug to the mains
socket only at the end of the installa-
tion. Make sure that there is access to
the mains plug after the installation.
• Do not pull the mains cable to discon-
nect the appliance. Always pull the
mains plug.
• Do not touch the mains cable or the
mains plug with wet hands.
• This appliance complies with the
E.E.C. Directives.
36
www.aeg.com

Water connection
• Make sure not to cause damage to the
water hoses.
• The appliance is to be connected to
the water mains using the new sup-
plied hose-sets. Old hose sets must
not be reused.
• Before you connect the appliance to
new pipes or pipes not used for a long
time, let the water flow until it is clean.
• The first time you use the appliance,
make sure that there is no leakage.
2.2 Use
WARNING!
Risk of injury, electrical shock,
fire, burns or damage to the ap-
pliance.
• Use this appliance in a household en-
vironment.
• Do not change the specification of this
appliance.
• Obey the safety instructions on the
detergent packaging.
• Do not put flammable products or
items that are wet with flammable
products in, near or on the appliance.
• Do not touch the glass of the door
while a programme operates. The
glass can be hot.
• Make sure that you remove all metal
objects from the laundry.
• Do not put a container to collect pos-
sible water leakage under the appli-
ance. Contact the Service to ensure
which accessories can be used.
2.3 Care and Cleaning
WARNING!
Risk of injury or damage to the
appliance.
• Before maintenance, deactivate the
appliance and disconnect the mains
plug from the mains socket.
• Do not use water spray and steam to
clean the appliance.
• Clean the appliance with a moist soft
cloth. Only use neutral detergents. Do
not use abrasive products, abrasive
cleaning pads, solvents or metal ob-
jects.
2.4 Disposal
WARNING!
Risk of injury or suffocation.
• Disconnect the appliance from the
mains supply.
• Cut off the mains cable and discard it.
• Remove the door catch to prevent
children and pets to get closed in the
appliance.
3. TECHNICAL INFORMATION
Dimensions Width / Height / Depth 600 / 850 / 605 mm
Total depth 640 mm
Electrical connection: Voltage
Overall power
Fuse
Frequency
230 V
2200 W
10 A
50 Hz
Level of protection against ingress of solid particles
and moisture ensured by the protective cover, ex-
cept where the low voltage equipment has no pro-
tection against moisture
IPX4
ENGLISH 37

Water supply pressure Minimum 0,5 bar (0,05 MPa)
Maximum 8 bar (0,8 MPa)
Water supply
1)
Cold water
Maximum load Cotton 8 kg
Spin speed Maximum 1400 rpm
1)
Connect the water inlet hose to a water tap with a 3/4'' thread.
4. PRODUCT DESCRIPTION
1 2 3 8
9
5
6
7
4
1
0
1
1
1
2
1
Worktop
2
Detergent dispenser
3
Control panel
4
Door handle
5
Rating plate
6
Drain pump
7
Feet for the appliance level
8
Water drain hose
9
Water inlet valve
10
Mains cable
11
Transit bolts
12
Feet for the appliance level
38
www.aeg.com

4.1 Accessories
1 2
34
1
Spanner
To remove the transit bolts.
2
Plastic caps
To close the holes on the rear side
of the cabinet after the removal of
the transit bolts.
3
Anti-flood inlet hose
To prevent possible leakage
4
Plastic hose guide
To connect the drain hose on the
edge of a sink.
4.2 Child safety device
• When you activate this device, you
cannot close the door. This prevents
children or pets to be closed in the
drum. To activate the device, turn it
clockwise, until the groove is horizon-
tal. To deactivate the device, turn it
counterclockwise, until the groove is
vertical.
5. CONTROL PANEL
Marche/Arrêt
Katoen
Blanc/Couleurs
+Voorwas
+Prélavage
Extra Stil
Extra Silence
Synthetica
Synthétiques
Strijkvrij
Repassage Facile
Fijne Was
Délicats
Wol/Zijde
Aan/Uit
Laine/Soie
Centrif./Pompen
Essorage/Vidange
Spoelen
Rinçage
Gordijnen
Rideaux
Kort Intensief
Intensif
Jeans
Super Eco
20 Min. - 3 kg
+Voorwas
+Prélavage
Temp.°C
T/min.
Start/Pauze
Départ/Pause
Startuitstel
Départ
Différé
Gain de
Te mp s
Vlekken
Extra
Spoelen
Rinçage +
Taches
Tijd Besparen
Katoen Eco
Coton Eco
1 2 3
45678910
1
On/Off button (Aan/Uit - Marche/Ar-
rêt)
2
Programme knob
3
Display
4
Start Pause button (Start/Pauze - Dé-
part/Pause)
5
Delay start button (Startuitstel - Dé-
part Différé)
6
Time saving button (Tijd Besparen -
Gain de Temps)
7
Extra rinse button (Extra Spoelen -
Rinçage+)
8
Stain button (Vlekken - Taches)
ENGLISH 39

9
Spin reduction button (T/min.)
10
Temperature button (Temp. ºC)
5.1 On Off button
1
Press this button to activate or deacti-
vate the appliance. A tune sounds when
the appliance is activated.
The AUTO Stand-by function automati-
cally deactivates the appliance to de-
crease the energy consumption when:
• You do not use the appliance for 5 mi-
nutes before you press button
4
.
– All settings are cancelled.
–
Press button
1
to activate the ap-
pliance again.
– Set again the washing programme
and all possible options.
• After 5 minutes from the end of the
washing programme. Refer to 'At the
end of programme'.
5.2 Programme knob
2
Turn this knob to set a programme. The
related programme indicator comes on.
5.3 Display
3
A B C D
The display shows:
A • The maximum temperature of the programme.
B • The default spin speed of the programme.
•
'No Spin'
1)
and 'Rinse Hold' symbols.
C •
The display symbols.
2)
Symbols Description
Washing phase
Rinse phases
Spin phase
Child lock
You cannot open the appliance door when the symbol is
on.
You can open the door only when the symbol goes off.
If the programme is completed but the symbol stays on:
• There is water in the drum.
• The 'Rinse Hold' function is on.
Delay start
40
www.aeg.com

D • The programme time
When the programme starts, the time decreases with steps of 1 mi-
nute.
• The delay start
When you press the delay start button, the display shows the delay
start time.
• Alarm codes
If the appliance has a malfunction, the display shows alarm codes. Re-
fer to 'Troubleshooting' chapter.
•Err
The display shows this message for some seconds if:
– You set a function that is not applicable for the programme.
– You change the programme while it operates.
The indicator of the Start/Pause button
4
flashes.
•
When the programme is completed.
1)
Only available for Spin/Drain programme.
2)
The symbols appear on the display when the related phase or function is set.
5.4 Start/Pause button
4
Press button
4
to start or interrupt a
programme.
5.5 Delay start button
5
Press button
5
to delay the start of a
programme from 30 minutes to 20 hours.
5.6 Time save button
6
Press the button
6
to decrease the
programme duration.
• Press one time to set 'Shortened dura-
tion' for items with daily soil.
• Press two times to set 'Extra Quick' for
items with almost no soil.
Some programmes accept only
one of the two functions.
5.7 Extra rinse button
7
Press button
7
to add rinsing phases to
a programme.
Use this function for persons allergic to
detergents and in areas where the water
is soft.
5.8 Stain button
8
Press button
8
to add the stain phase
to a programme.
Use this function for laundry with hard
stains to remove.
When you set this function, put the stain
remover into compartment
.
This function increases the pro-
gramme duration.
This function is not available with
a temperature lower than 40° C.
5.9 Spin button
9
Press this button to:
• Decrease the maximum speed of the
spin phase when you set a pro-
gramme.
The display shows only the spin
speeds available with the set
programme.
• Deactivate the spin phase.
• Activate the 'Rinse Hold' function. Set
this function to prevent fabric creases.
The appliance does not drain the wa-
ter when the programme is comple-
ted.
ENGLISH 41

Spin phase is off.
'Rinse Hold' function is
on.
5.10 Temperature button
10
Press button
10
to change the default
temperature.
- - = cold water
5.11 Acoustic signals function
You can hear the acoustic signals when:
• You activate the appliance.
• You deactivate the appliance.
• You press the buttons.
• The programme is completed.
• The appliance has a malfunction.
To deactivate/activate the acoustic sig-
nals, press button
8
and button
7
at
the same time for 6 seconds.
If you deactivate the acoustic sig-
nals, they continue operate only
when you press the buttons and
when a malfunction occurs.
5.12 Child lock function
This function prevents children to play
with the control panel.
• To activate the function, press button
10
and button
9
at the same time
until the display shows the symbol
.
• To deactivate the function, press but-
ton
10
and button
9
at the same
time until the symbol
goes off.
You can activate the function:
• Before you press the Start/Pause but-
ton
4
: the appliance cannot start.
• After you press the Start/Pause button
4
, all the buttons and the pro-
gramme knob are deactivated.
5.13 Permanent extra rinse
function
With this function you can keep the extra
rinse function permanently on when you
set a new programme.
• To activate the function press button
6
and button
5
at the same time
until the indicator of button
7
is on.
• To deactivate the function press but-
ton
6
and button
5
at the same
time until the indicator of button
7
is
off.
6. PROGRAMMES
Programme
Temperature
Type of load
max. weight of
load
Cycle
description
Functions
Katoen - Blanc/
Couleurs
Cottons
95° - Cold
White and coloured
cotton with normal
soil.
max. 8 kg
Wash
Rinses
Long spin
SPIN REDUCTION
RINSE HOLD
STAIN
1)
EXTRA RINSE
TIME SAVING
2)
42
www.aeg.com

Programme
Temperature
Type of load
max. weight of
load
Cycle
description
Functions
Katoen + Voor-
was - Coton +
Prélavage
Cottons + Pre-
wash
95° - Cold
White and coloured
cotton with heavy
soil.
max. 8 kg
Prewash
Wash
Rinses
Long spin
SPIN REDUCTION
RINSE HOLD
STAIN
1)
EXTRA RINSE
TIME SAVING
2)
Extra Stil - Ex-
tra Silence
Extra Silent
95° - Cold
White and coloured
cotton with normal
soil.
max. 8 kg
Stop with water in
the drum
Rinses
Long spin
STAIN
EXTRA RINSE
TIME SAVING
2)
Synthetica -
Synthétiques
Synthetics
60° - Cold
Synthetic or mixed
fabric items with
normal level of soil.
max. 4 kg
Wash
Rinses
Short spin
SPIN REDUCTION
RINSE HOLD
STAIN
1)
EXTRA RINSE
TIME SAVING
2)
Synthetica +
Voorwas - Syn-
thetiques +
Prélavage
Synthetics +
Prewash
60° - Cold
Synthetic or mixed
fabric items with
heavy soil.
max. 4 kg
Prewash
Wash
Rinses
Short spin
SPIN REDUCTION
RINSE HOLD
STAIN
1)
EXTRA RINSE
TIME SAVING
2)
Strijkvrij - Re-
passage Fac-
ile
3)
Easy Iron
60° - Cold
Synthetic fabric
items with normal
soil.
max. 4 kg
Wash
Rinses
Short spin
RINSE HOLD
EXTRA RINSE
TIME SAVING
Fijne Was -
Délicats
Delicates
40° - Cold
Delicate fabrics as
acrylics, viscose,
polyester items with
normal soil.
max. 4 kg
Wash
Rinses
Short spin
SPIN REDUCTION
RINSE HOLD
STAIN
1)
EXTRA RINSE
TIME SAVING
2)
Wol/Zijde -
Laine/Soie
Wool Silk
40° - Cold
Machine washable
wool. Hand washa-
ble wool and deli-
cate fabrics with
«hand washing»
care symbol.
max. 2 kg
Wash
Rinses
Short spin
SPIN REDUCTION
RINSE HOLD
Centrifugeren/
Pompen - Es-
sorage /Vi-
dange
4)
Spin/Drain
All fabrics
The maximum load
of the laundry is re-
lated to the type of
laundry.
Drainage of the
water
Spin phase at the
maximum speed.
SPIN REDUCTION
NO SPIN
ENGLISH 43

Programme
Temperature
Type of load
max. weight of
load
Cycle
description
Functions
Spoelen - Rin-
çage
Rinse
Hand washed items. One rinse with ad-
ditive
Long spin
SPIN REDUCTION
RINSE HOLD
EXTRA RINSE
5)
Gordijnen - Ri-
deaux
Curtains
40° - Cold
Set this programme
to wash curtains. It
adds automatically
the prewash phase
to clean the dust
from the curtains.
Do not put the de-
tergent into the pre-
wash compartment.
max. 2 kg
Prewash
Wash
Rinses
Short spin
SPIN REDUCTION
RINSE HOLD
EXTRA RINSE
Jeans
60° - Cold
All items in jeans.
Jersey made items
with hi-tech materi-
als.
max. 8 kg
Wash
Rinses
Short spin
SPIN REDUCTION
RINSE HOLD
EXTRA RINSE
TIME SAVING
2)
Kort Intiensief -
Intensif
Quick intensive
60°-40°
Quick washing pro-
gramme, to be used
for lightly soiled
white/fast coloured
cottons and mixed
fabrics.
max. 5 kg
Wash
Rinses
Long spin
SPIN REDUCTION
RINSE HOLD
EXTRA RINSE
20 Min. - 3 kg
40°-30°
Cotton and synthet-
ic items with light
soil or worn only
one time.
max. 3 kg
Wash
Rinses
Short spin
SPIN REDUCTION
Super Eco
6)
Cold
Mixed fabrics (cot-
ton and synthetic
items).
max. 3 kg
Wash
Rinses
Long spin
SPIN REDUCTION
RINSE HOLD
EXTRA RINSE
Katoen
Eco - Coton
Eco
7)
Cottons Eco
60° - 40°
White and fast col-
oured cotton with
normal soil.
max. 8 kg
Wash
Rinses
Long spin
SPIN REDUCTION
RINSE HOLD
STAIN
EXTRA RINSE
TIME SAVING
1)
The Stain function is not available with a temperature lower than 40°C
2)
if you set the Extra Quick function we recommend to decrease the quantity of the load.
It is possible to keep the full load but the washing results are not good.
3)
The wash and spin phase is soft to prevent the creases of the laundry. The appliance
adds some rinses.
44
www.aeg.com

4)
The default phase of the spin speed is related to cotton items. Set the spin speed. Make
sure that it agrees with the laundry. To select the DRAIN programme only, set the
function NO SPIN.
5)
Press EXTRA RINSE button to add rinses. With a low spin speed the appliance performs
delicate rinses and a short spin
6)
Set this programme to decrease the time and the consumption of energy and water.
7)
Standard programmes for the Energy Label consumption values. According to
regulation 1061/2010, these programmes are respectively the «standard 60 °C cotton
programme» and the «standard 40 °C cotton programme». They are the most efficient
programmes in terms of combined energy and water consumption for washing normally
soiled cotton laundry.
Set this programme to have a good washing results and decrease the energy
consumption. The time of the washing programme is extended.
The washing temperature of the washing phase may differ from the temperature
declared for the selected programme
7. CONSUMPTION VALUES
At programme start the display shows the duration programme for the max-
imum load capacity.
During the washing phase the programme duration is automatically calcula-
ted and can greatly be reduced if the laundry load is lower than the maxi-
mum load capacity (e.g. Cotton 60°C, maximum load capacity 8 kg, the pro-
gramme duration exceeds 2 hours; real load 1 kg, the programme duration
don’t reach 1 hour).
When the appliance is calculating the real programme duration a dot blinks
in the display.
The data of this table are approximate. Different causes can change the da-
ta: the quantity and type of laundry, the water and ambient temperature.
Programmes Load
(Kg)
Energy
consump-
tion (kWh)
Water con-
sumption
(litre)
Approxi-
mate pro-
gramme
duration
(minutes)
Remain-
ing mois-
ture (%)
1)
Cottons 60 °C 8 1.6 72 168 52
Cottons 40 °C 8 1.0 72 164 52
Synthetics 40
°C
4 0.6 50 110 35
Delicates 40
°C
4 0.7 60 91 35
Wool/Hand
wash 30 °C
2 0.35 57 58 30
Standard cotton programmes
Standard 60
°C cotton
8 0.89 58 225 52
ENGLISH 45

Programmes Load
(Kg)
Energy
consump-
tion (kWh)
Water con-
sumption
(litre)
Approxi-
mate pro-
gramme
duration
(minutes)
Remain-
ing mois-
ture (%)
1)
Standard 60
°C cotton
4 0.75 45 170 52
Standard 40
°C cotton
4 0.50 44 165 52
1)
At the end of spin phase.
Off Mode (W) Left On Mode (W)
0.48 0.48
The information given in the charts above are in compliance with the EU Com-
mission regulation 1015/2010 implementing directive 2009/125/EC.
8. BEFORE FIRST USE
1.
To activate the drain system, put 2 li-
tre of water in the main wash com-
partment of the detergent dispens-
er.
2.
Put a small quantity of detergent in
the main wash compartment of the
detergent dispenser. Set and start a
programme for cotton at the highest
temperature without laundry. This
removes all possible dirt from the
drum and the tub.
9. USING THE APPLIANCE
1.
Open the water tap.
2.
Connect the mains plug to the mains
socket.
3.
Press button
1
to activate the ap-
pliance.
4.
Put the laundry in the appliance.
5.
Use the correct quantity of deter-
gent and additives.
6.
Set and start the correct programme
for the type of laundry and soil.
9.1 Loading the laundry
1.
Open the appliance door.
2.
Put the laundry in the drum, one
item at a time. Shake the items be-
fore you put them in the appliance.
Make sure not to put too much laun-
dry in the drum.
3.
Close the door.
46
www.aeg.com

Make sure that no laundry stays between
the seal and the door. There is a risk of
water leakage or damage to the laundry.
9.2 Filling the detergent and additives
The detergent compartment for the prewash phase and the
soak programme.
Add the detergent for prewash and soak before the start of the
programme.
The detergent compartment for the washing phase.
If you use a liquid detergent, put it immediately before you start
the programme.
Liquid additives compartment (fabric conditioner, starch).
Put the product in the compartment before you start the pro-
gramme.
This is the maximum level for the quantity of liquid additives.
The compartment for the stain remover.
Put the product in the compartment and set the stain function
before you start the programme.
Flap for powder or liquid detergent
Turn it (up or down) in the correct position to use powder or liq-
uid detergent.
Always obey the instructions that you find on the packaging of the de-
tergent products.
ENGLISH 47

Check the position of the flap
1.
Pull out the detergent dispenser un-
til it stops.
2.
Press the lever down to remove the
dispenser.
3.
To use powder detergent, turn the
flap up.
4.
To use liquid detergent, turn the
flap down.
With the flap in the position
DOWN:
– Do not use gelatinous or thick
liquid detergents.
– Do not put more liquid deter-
gent than the limit showed in
the flap.
– Do not set the prewash phase.
– Do not set the delay start func-
tion.
5.
Measure out the detergent and the
fabric conditioner.
6.
Carefully close the detergent dis-
penser. Make sure that the flap
does not cause a blockage when
you close the drawer.
9.3 Setting and starting a
programme
1.
Turn the programme knob. The rela-
ted programme indicator comes on.
2.
The indicator of button
4
flashes
with red colour.
3.
The display shows the default tem-
perature and spin speed. To change
the temperature and/or the spin
speed, press the related buttons.
4.
Set the available functions. The indi-
cator of the set function comes on or
the display shows the related sym-
bol.
48
www.aeg.com

5.
Press button
4
to start the pro-
gramme. The indicator of button
4
is on.
The drain pump can operate for
a short time when the appliance
fills water.
9.4 Interrupt a programme
1.
Press button
4
. The indicator
flashes.
2.
Press button
4
again. The washing
programme continues.
9.5 Cancel a programme
1.
Press button
1
to cancel the pro-
gramme and to deactivate the appli-
ance.
2.
Press button
1
again to activate
the appliance. Now, you can set a
new washing programme.
The appliance does not drain the
water.
9.6 Change a function
You can change only some functions be-
fore they operate.
1.
Press button
4
. The indicator
flashes.
2.
Change the function set.
9.7 Set the delay start
1.
Press button
5
again and again un-
til the display shows the number of
minutes or hours. The related sym-
bols comes on.
2.
Press button
4
, the appliance
starts the countdown of the delay
start.
When the countdown is completed,
the programme starts automatically.
Before you press button
4
to
start the appliance, you can can-
cel or change the set of the delay
start.
You cannot set the delay start
with the Steam programme.
9.8 Cancel the delay start
1.
Press button
4
. The related indica-
tor flashes.
2.
Press button
5
again and again un-
til the display shows 0’.
3.
Press button
4
. The programme
starts.
9.9 Open the door
While a programme or the delay start
operates, the appliance door is locked.
To open the appliance door:
1.
Press button
4
. The door lock
symbol in the display goes off.
2.
Open the appliance door.
3.
Close the appliance door and press
button
4
. The programme or the
delay start continues.
If the temperature and level of
the water in the drum are too
high, the door lock symbol stays
on and you cannot open the
door. To open the door do the
steps that follow:
1.
Deactivate the appliance.
2.
Wait for some minutes.
3.
Make sure that no water is in
the drum.
If you deactivate the appliance, it
is necessary to set the pro-
gramme again.
9.10 At the end of the
programme
• The appliance stops automatically.
• The acoustic signals operate.
•
In the display
comes on.
• The indicator of the Start/Pause but-
ton
4
goes off.
• The door lock symbol goes off.
•
Press button
1
to deactivate the ap-
pliance. After five minutes from the
end of the programme, the energy
saving function automatically deacti-
vates the appliance.
ENGLISH 49

When you activate the appliance
again, the display show the end
of the last set programme. Turn
the programme knob to set a
new cycle.
• Remove the laundry from the appli-
ance. Make sure that the drum is emp-
ty.
• Keep the door ajar, to prevent mildew
and odours.
• Close the water tap.
The washing programme is
completed, but there is water in the
drum:
– The drum turns regularly to prevent
the creases in the laundry.
– The door stays locked.
– You must drain the water to open the
door.
To drain the water:
1.
If necessary, decrease the spin
speed.
2.
Press the Start/Pause button
4
.
The appliance drain the water and
spin.
3.
When the programme is completed
and the door lock symbol goes off,
you can open the door
4.
Deactivate the appliance.
The appliance drain and spin au-
tomatically after approximately
18 hours.
10. HINTS AND TIPS
10.1 The laundry load
• Divide the laundry in: white, coloured,
synthetics, delicates and wool.
• Obey the washing instructions that are
on the laundry care labels.
• Do not wash together white and col-
oured items.
• Some coloured items can discolour
with the first wash. We recommend
that you wash them separately for the
first times.
• Button up pillowcases, close zippers,
hooks and poppers. Tie up belts.
• Empty the pockets and unfold the
items.
• Turn inside out multilayered fabrics,
wool and items with painted illustra-
tions.
• Remove hard stains.
• Wash with a special detergent heavy
soil stains.
• Be careful with the curtains. Remove
the hooks or put the curtains in a
washing bag or pillowcase.
• Do not wash in the appliance :
– Laundry without hems or with cuts
– Underwired bras.
– Use a washing bag to wash small
items.
• A very small load can cause balance
problems with the spin phase. If this
occurs, adjust manually the items in
the tub and start the spin phase again.
10.2 Stubborn stains
For some stains, water and detergent is
not sufficient.
We recommend that you remove these
stains before you put the items in the
appliance.
Special stain removers are available. Use
the special stain remover that is applica-
ble to the type of stain and fabric.
10.3 Detergents and additives
• Only use detergents and additives
specially made for washing machines.
• Do not mix different types of deter-
gents.
• To help the environment, do not use
more than the correct quantity of de-
tergent.
• Obey the instructions that you find on
the on packaging of these products.
• Use the correct products for the type
and colour of the fabric, the pro-
gramme temperature and the level of
soil.
50
www.aeg.com

• If you use liquid detergents, do not set
the prewash phase.
• If your appliance has not the deter-
gent dispenser with the flap device,
add the liquid detergents with a dos-
ing ball.
10.4 Water hardness
If the water hardness in your area is high
or moderate, we recommend that you
use a water softener for washing ma-
chines. In areas where the water hard-
ness is soft it is not necessary to use a
water softener.
To know the water hardness in your area,
contact your local water authority.
Obey the instructions that you find on
the packaging of the products.
Equivalent scales measure the water
hardness:
• German degrees (°dH).
• French degrees (°TH).
• mmol/l (millimol for each litre - inter-
national unit for the hardness of wa-
ter).
• Clarke degrees.
Water hardness table
Level Type
Water hardness
°dH °T.H. mmol/l Clarke
1 soft 0-7 0-15 0-1.5 0-9
2 medium 8-14 16-25 1.6-2.5 10-16
3 hard 15-21 26-37 2.6-3.7 17-25
4 very hard > 21 > 37 >3.7 >25
11. CARE AND CLEANING
WARNING!
Disconnect the appliance from the mains
supply before you clean it.
11.1 Descaling
The water we use contains limescale. If it
becomes necessary, use a water softener
to remove limescales.
Use a special product made for washing
machines. Obey the instructions that you
find on the packaging of the manufactur-
er.
Do this separately from the laundry
wash.
11.2 External cleaning
Clean the appliance only with soap and
warm water. Fully dry all the surfaces.
CAUTION!
Do not use alcohol, solvents or
chemical products.
11.3 Maintenance wash
With the low temperature programmes it
is possible that some detergent stays in
the drum. Make regularly a maintenance
wash. To do this:
• Empty the laundry from the drum.
• Set the hottest cotton wash pro-
gramme
• Use a correct quantity of powder de-
tergent with biological properties.
After each wash, keep the door open for
a while to prevent mould and to let un-
pleasant smells go out.
ENGLISH 51

11.4 Door seal
Regularly examine the seal and remove
all objects from the inner part.
11.5 Drum
Regularly examine the drum to prevent
limescale and rust particles.
Only use special products to remove rust
particles from the drum.
To do this:
• Clean the drum with special product
for stainless steel.
• Start a short programme for cotton at
the maximum temperature with a
small quantity of detergent.
11.6 Detergent dispenser
To clean the dispenser:
1
2
1.
Press the lever.
2.
Pull the dispenser out.
3.
Remove the top part of the liquid
additive compartment.
4.
Clean all the parts with water.
5.
Clean the dispenser recess with a
brush.
6.
Put back the dispenser in the recess.
52
www.aeg.com

11.7 Drain pump
Regularly examine the drain
pump and make sure that it is
clean.
Clean the pump if:
• The appliance does not drain the wa-
ter.
• The drum cannot turn.
• The appliance makes an unusual noise
because of the blockage of the drain
pump.
• The display shows an alarm code be-
cause of the problem with water drain.
WARNING!
1.
Disconnect the mains plug
from the mains socket.
2.
Do not remove the filter
while the appliance oper-
ates. Do not clean the drain
pump if the water in the ap-
pliance is hot. The water
must be cold before you
clean the drain pump.
To clean the drain pump:
1.
Open the drain pump door.
2.
Pull the flap out to remove it.
3.
Put a container below the recess of
the drain pump to collect the water
that flows out.
4.
Press the two levers and pull for-
ward the drainage duct to let the
water flow out.
1
2
5.
When the container is full of water,
put the drainage duct back again
and empty the container. Do steps 4
and 5 again and again until no more
water flows out from the drain
pump.
6.
Pull back the drainage duct and turn
the filter to remove it.
ENGLISH 53

7.
Remove fluff and objects from the
pump.
8.
Make sure that the impeller of the
pump can turn. If this does not oc-
cur, contact the service centre.
1
2
9.
Clean the filter under the water tap
and put it back in the pump into the
special guides.
10.
Make sure that you tighten correctly
the filter to prevent leakages.
11.
Put the flap back and close the drain
pump door.
11.8 The inlet hose filter and
the valve filter
It could be necessary to clean the filters
when:
• The appliance does not fill with water.
• The appliance fills with the water for a
long time.
•
The indicator of button
4
flashes and
the display shows the related alarm.
Refer to 'Troubleshooting'.
WARNING!
Disconnect the mains plug from
the mains socket.
To clean the water inlet filters:
1.
Close the water tap.
2.
Remove the water inlet hose from
the water tap.
3.
Clean the filter in the inlet hose with
a stiff brush.
54
www.aeg.com

4.
Remove the inlet hose behind the
appliance.
5.
Clean the filter in the valve with a
stiff brush or a towel.
45°
20°
6.
Install again the inlet hose. Make
sure that the couplings are tight to
prevent leakages.
7.
Open the water tap.
11.9 Emergency drain
Because of a malfunction, the appliance
cannot drain the water.
If this occurs, do steps (1) through (6) of
'To clean the drain pump'.
If necessary, clean the pump.
Put the drainage duct back and close the
drain pump flap.
When you drain the water with the emer-
gency drain procedure, you must acti-
vate again the drain system:
1.
Put 2 litres of water in the main wash
compartment of the detergent dis-
penser.
2.
Start the programme to drain the
water.
11.10 Frost precautions
If the appliance is installed in an area
where the temperature can be less than
0 °C, remove the remaining water from
the inlet hose and the drain pump.
1.
Disconnect the mains plug from the
mains socket.
2.
Close the water tap.
3.
Remove the water inlet hose
4.
Put the two ends of the inlet hose in
a container and let the water flow
out of the hose.
5.
Empty the drain pump. Refer to the
emergency drain procedure
6.
When the drain pump is empty, in-
stall the inlet hose again.
WARNING!
Make sure that the temperature
is more than 0 °C before you use
the appliance again.
The manufacturer is not responsi-
ble for damages caused by low
temperatures.
12. TROUBLESHOOTING
The start of the appliance does not oc-
cur or it stops during operation.
First try to find a solution to the problem
(refer to the table). If not, contact the
service centre.
With some problems, the acoustic
signals operate and the display shows
an alarm code:
•
- The appliance does not fill with
water.
ENGLISH 55

•
- The appliance does not drain
the water.
•
- The appliance door is open or
not closed correctly.
•
- The anti-flood device is on.
WARNING!
Deactivate the appliance before
you do the checks.
Problem Possible cause Possible solution
The appliance
does not fill with
water.
The water tap is closed. Open the water tap.
The water inlet hose is
damaged.
Make sure that the water inlet
hose has no damages.
The filters in the water
inlet hose is blocked .
Clean the filters. Refer to 'Care
and cleaning'.
The water tap is blocked
or is furred with lime-
scale.
Clean the water tap.
The connection of the
water inlet hose is not
correct.
Make sure that the connection
is correct.
The water pressure is
too low.
Contact your local water author-
ity.
The appliance
does not drain the
water.
The water drain hose is
damaged.
Make sure that the water drain
hose has no damages.
The filter of the drain
pump is blocked.
Clean the filter of the drain
pump. Refer to 'Care and clean-
ing'.
The connection of the
water drain hose is not
correct.
Make sure that the connection
is correct.
A washing programme
without the drain phase
is set.
Set the drain programme.
The function Rinse &
Hold is on.
Set the drain programme.
The appliance
door is open or
not closed cor-
rectly.
Close the door correctly.
The anti-flood de-
vice is on.
• Disconnect the appliance.
• Close the water tap.
• Contact the service centre.
The spin phase
does not operate.
The spin phase is off. Set the spin programme.
56
www.aeg.com

Problem Possible cause Possible solution
The filter of the drain
pump is blocked.
Clean the filter of the drain
pump. Refer to 'Care and clean-
ing'.
Balance problems with
the laundry load.
Adjust manually the items in the
tub and start the spin phase
again.
The programme
does not start.
The mains plug is not
connected in the mains
socket.
Put in the mains plug.
Blow out fuse in the
household fuse box.
Replace the fuse.
You did not press but-
ton
4
.
Press button
4
.
The delay start is set. To start immediately the pro-
gramme, cancel the delay start.
The Child Lock function
is activated.
Deactivate the Child Lock func-
tion.
There is water on
the floor.
Leakages from the cou-
plings of the water ho-
ses.
Make sure that the couplings
are tight.
Leakages from the drain
pump.
Make sure that the drain pump
filter is tight.
The water drain hose is
damaged.
Make sure that the water inlet
hose has no damages.
You cannot open
the appliance
door.
The washing pro-
gramme is in operation.
Let the washing programme
end.
There is water in the
drum.
Set the drain or the spin pro-
gramme.
The appliance
makes an unusual
noise.
Incorrect level of the ap-
pliance.
Adjust the level of the appli-
ance. Refer to 'Installation'.
You did not remove the
packaging and/or the
transit bolts.
Remove the packaging and/or
the transit bolts. Refer to 'Instal-
lation'.
The load is very small. Add more laundry in the drum.
The appliance fills
with water and
drain immediately.
The end of the drain
hose is too low.
Make sure that the drain hose is
in the correct position.
The washing re-
sults are not satis-
factory.
The detergent you used
was not sufficient or cor-
rect.
Increase the detergent quantity
or use a different one.
ENGLISH 57

Problem Possible cause Possible solution
You did not remove the
stubborn stains before
you wash the laundry.
Use special products to remove
the stubborn stains.
Incorrect temperature
was set.
Make sure that you set the cor-
rect temperature.
Too much laundry load. Decrease the laundry load.
After the check, activate the appliance.
The programme continues from the
point of interruption.
If the problem occurs again, contact the
service centre.
If the display shows other alarm codes,
contact the service centre.
13. INSTALLATION
13.1 Fixing plate kit
(4055171146)
Available from your authorized dealer.
If you install the appliance on a plinth,
secure the appliance in the fixing plates.
Follow the instructions supplied with the
kit.
13.2 Unpacking
1.
Use the gloves. Remove the external
film. If necessary, use a cutter.
2.
Remove the cardboard top.
3.
Remove the polystyrene packaging
materials.
58
www.aeg.com

4.
Remove the internal film.
5.
Open the door. Remove the poly-
styrene piece from the door seal
and all the items from the drum.
6.
Put one of the polystyrene packag-
ing elements on the floor behind
the appliance. Carefully put down
the appliance with the rear side on
it. Make sure not to damage the ho-
ses.
1
2
7.
Remove the polystyrene protection
from the bottom.
8.
Pull up the appliance in vertical po-
sition.
ENGLISH 59

9.
Remove the power supply cable and
the drain hose from the hose hold-
ers.
10.
Remove the three bolts. Use the key
supplied with the appliance.
11.
Pull out the plastic spacers.
12.
Put the plastic caps in the holes.
You can find these caps in the user
manual bag.
WARNING!
Remove all the packaging and
the transit bolts before you install
the appliance.
We recommend that you keep
the packaging and the transit
bolts for when you move the ap-
pliance.
60
www.aeg.com

13.3 Positioning and levelling
x4
• Install the appliance on a flat hard
floor.
• Make sure that carpets do not stop
the air circulation below the appliance.
• Make sure that the appliance does not
touch the wall or other units
• Loosen or tighten the feet to adjust
the level. A correct adjustment of the
appliance level prevents the vibration,
noise and the movement of the appli-
ance when in operation.
• The appliance must be level and sta-
ble.
CAUTION!
Do not put cardboard, wood or
equivalent materials below the
appliance feet to adjust the level.
13.4 The inlet hose
20
O
20
O
20
O
45
O
45
O
45
O
• Connect the hose to the appliance.
Turn the inlet hose only left or right.
Loose the ring nut to set it in the cor-
rect position.
ENGLISH 61

• Connect the water inlet hose to the
cold water tap with 3/4 thread.
CAUTION!
Make sure that there are no leaks
from the couplings.
Do not use an extension hose if
the inlet hose is too short. Con-
tact the service centre for the re-
placement of the inlet hose.
Water-stop device
A
The inlet hose has a water stop device.
This device prevents water leaks in the
hose because of its natural ageing. The
red sector in the window «A» shows this
fault .
If this occur, close the water tap and
contact the service centre to replace the
hose.
13.5 Water drainage
There are different procedures to con-
nect the drain hose:
With the plastic hose guide.
62
www.aeg.com

• On the edge of a sink.
• Make sure that the plastic guide can-
not move when the appliance drains.
Attach the guide to the water tap or
the wall.
• To a stand pipe with vent-hole.
Refer to the illustration. Directly into a
drain pipe at a height of not less than
60 cm and not more than 100 cm. The
end of the drain hose must always be
ventilated , i.e. the inner diameter of
the drainpipe must be larger than the
external diameter of the drain hose.
Without the plastic hose guide.
• To a sink spigot.
Refer to the illustration. Put the drain
hose in the spigot and tighten it with a
clip. Make sure that the drain hose
makes a loop to prevent that remain-
ing particles go in the appliance from
the sink.
• Directly to a built-in drain pipe in the
room wall and tighten it with a clip.
You can extend the drain hose to
maximum 400 cm. Contact the
service centre for the other drain
hose and the extension.
ENGLISH 63

14. ENVIRONMENT CONCERNS
Recycle the materials with the
symbol
. Put the packaging in
applicable containers to recycle it.
Help protect the environment and
human health and to recycle waste
of electrical and electronic
appliances. Do not dispose
appliances marked with the symbol
with the household waste. Return the
product to your local recycling
facility or contact your municipal
office.
64
www.aeg.com

ENGLISH 65

66
www.aeg.com

ENGLISH 67

www.aeg.com/shop
132931261-A-022013
-
 1
1
-
 2
2
-
 3
3
-
 4
4
-
 5
5
-
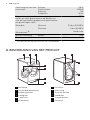 6
6
-
 7
7
-
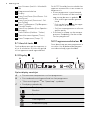 8
8
-
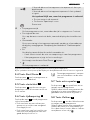 9
9
-
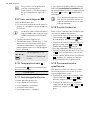 10
10
-
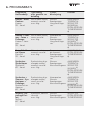 11
11
-
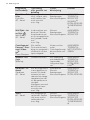 12
12
-
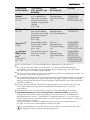 13
13
-
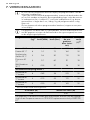 14
14
-
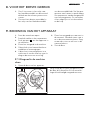 15
15
-
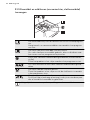 16
16
-
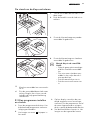 17
17
-
 18
18
-
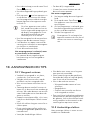 19
19
-
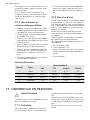 20
20
-
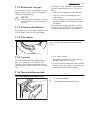 21
21
-
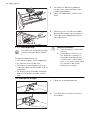 22
22
-
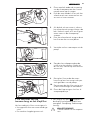 23
23
-
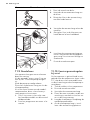 24
24
-
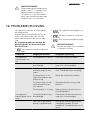 25
25
-
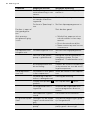 26
26
-
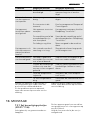 27
27
-
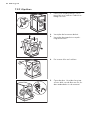 28
28
-
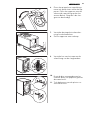 29
29
-
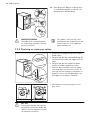 30
30
-
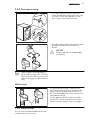 31
31
-
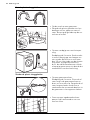 32
32
-
 33
33
-
 34
34
-
 35
35
-
 36
36
-
 37
37
-
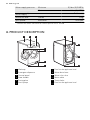 38
38
-
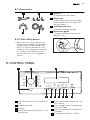 39
39
-
 40
40
-
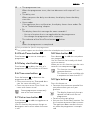 41
41
-
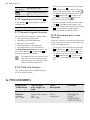 42
42
-
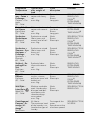 43
43
-
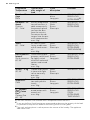 44
44
-
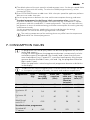 45
45
-
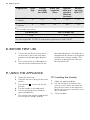 46
46
-
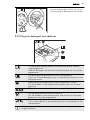 47
47
-
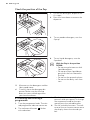 48
48
-
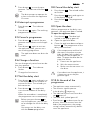 49
49
-
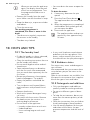 50
50
-
 51
51
-
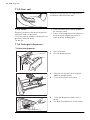 52
52
-
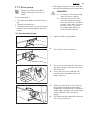 53
53
-
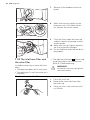 54
54
-
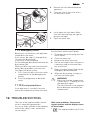 55
55
-
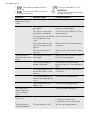 56
56
-
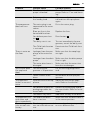 57
57
-
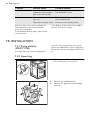 58
58
-
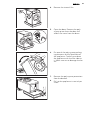 59
59
-
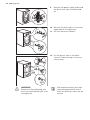 60
60
-
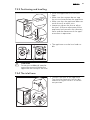 61
61
-
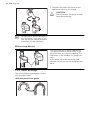 62
62
-
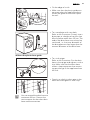 63
63
-
 64
64
-
 65
65
-
 66
66
-
 67
67
-
 68
68


Aeg-Electrolux L75484EFL Handleiding
- Categorie
- Wasmachines
- Type
- Handleiding
in andere talen
- English: Aeg-Electrolux L75484EFL User manual