
PCI AUDIO MIDI CARD
OWNER'S MANUAL
SW1000XG-E.qx 4/2/99 4:31 PM Page 1

2
CANADA
This Class B digital apparatus complies with Canadian ICES-003.
Cet appareil numérique de la classe B est conforme à la norme NMB-003 du Canada.
1. IMPORTANT NOTICE: DO NOT MODIFY
THIS UNIT!
This product, when installed as indicated in the
instructions contained in this manual, meets FCC
requirements. Modifications not expressly approved
by Yamaha may void your authority, granted by the
FCC, to use the product.
2. IMPORTANT: When connecting this product to
accessories and/or another product use only high
quality shielded cables. Cable/s supplied with this
product MUST be used. Follow all installation instruc-
tions. Failure to follow instructions could void your
FCC authorization to use this product in the USA.
3. NOTE: This product has been tested and found to
comply with the requirements listed in FCC
Regulations, Part 15 for Class “B” digital devices.
Compliance with these requirements provides a rea-
sonable level of assurance that your use of this prod-
uct in a residential environment will not result in
harmful interference with other electronic devices.
This equipment generates/uses radio frequencies
and, if not installed and used according to the
instructions found in the users manual, may cause
interference harmful to the operation of other elec-
tronic devices. Compliance with FCC regulations
does not guarantee that interference will not occur in
all installations. If this product is found to be the
source of interference, which can be determined by
turning the unit “OFF” and “ON”, please try to elimi-
nate the problem by using one of the following meas-
ures:
Relocate either this product or the device that is
being affected by the interference.
Utilize power outlets that are on different branch (cir-
cuit breaker or fuse) circuits or install AC line filter/s.
In the case of radio or TV interference,
relocate/reorient the antenna. If the antenna lead-in
is 300 ohm ribbon lead, change the lead-in to co-
axial type cable.
If these corrective measures do not produce satis-
factory results, please contact the local retailer
authorized to distribute this type of product. If you
can not locate the appropriate retailer, please con-
tact Yamaha Corporation of America, Electronic
Service Division, 6600 Orangethorpe Ave, Buena
Park, CA90620
The above statements apply ONLY to those products
distributed by Yamaha Corporation of America or its
subsidiaries.
FCC INFORMATION (U.S.A.)
* This applies only to products distributed by YAMAHA CORPORATION OF AMERICA.
• This applies only to products distributed by Yamaha Canada Music Ltd.
• Ceci ne s’applique qu’aux produits distribués par Yamaha Canada Musique Ltée.
SW1000XG-E.qx 4/2/99 4:31 PM Page 2

Introduction
Thank you very much for purchasing Yamaha’s SW1000XG.
In this package you will find a sound card that offers both high quality XG sound and a com-
plete digital audio environment. To help you take utmost advantage of the advanced features of
your new SW1000XG, we have packed it together with a variety of applications that work togeth-
er with your sound card to help you bring your musical ideas to reality. Since the SW1000XG
puts this remarkable MIDI + audio music control environment right inside your computer, you
can do everything right from your PC—even mastering compact disks.
Read this manual carefully before using your SW1000XG to make sure you get the most enjoy-
ment out of your investment in quality sound.
After you finish reading your owner’s manual, be sure to keep it someplace safe where you can
refer to it whenever you have a question about your sound card.
Special Notices
• The SW1000XG software and this owner’s manual are exclusive copyrights of Yamaha
Corporation.
• Copying of the software or reproduction of this manual in whole or in part by any means is
expressly forbidden without the written consent of the manufacturer.
• Yamaha makes no representations or warranties with regard to the use of the software and
documentation and cannot be held responsible for the results of the use of this manual and
the software.
• This disk is a CD-ROM. Do not attempt to play the disk on an audio CD player. Doing so
may result in irreparable damage to your audio CD player.
• Copying of the commercially available music sequence data and/or digital audio files is strict-
ly prohibited except for your personal use.
• The company names and product names in this Owner’s Manual are the trademarks or regis-
tered trademarks of their respective companies.
• The screen displays as illustrated in this Owner’s Manual are for instructional purposes, and
may appear somewhat different from the screens which appear on your computer.
• Future upgrades of application and system software and any changes in specifications and
functions will be announced separately.
Windows Operation
This owner’s manual assumes that you are already familiar with basic Windows operation. If you
are not, please refer to the owner’s manual which came with your Windows software before
using SW1000XG.
3
● Do not expose the soundcard to direct sunlight, excessive
humidity, high temperatures, excessive dust or strong vibrations.
● Before handling the soundcard, be sure to touch a metal surface
to discharge any static electricity which may be in your body.
● When holding the soundcard, do not touch the inside area of the
circuit board or apply excessive pressure to the card, and be
sure to protect the card from contact with water or other liquids.
● Before installing the soundcard in the computer, unplug the
power connector of your computer.
● Before connecting the computer to other devices, turn off the
power switches of all devices.
● It is possible that computer malfunctions or operator actions
might destroy data that was created with the included application
software. We recommend that you back up all important data
onto floppy disks. Yamaha is not responsible for loss of data
through computer malfunctions or operator actions.
● The soundcard contains no user-serviceable parts, so never
touch the inside area of the circuit board or tamper with the elec-
tronic circuitry in any way. Doing so may result in electrical shock
or damage to the soundcard.
Precautions
YAMAHA CANNOT BE HELD RESPONSIBLE FOR
DAMAGE CAUSED BY IMPROPER CARE AND USE
OF THE SOUNDCARD AND SOFTWARE.
SW1000XG-E.qx 4/2/99 4:31 PM Page 3

4
SW1000XG Features
AWM Wave Table
• Using the AWM2 (Advanced Wave Memory 2) tone generator, the wave table built into the SW1000XG
offers high quality sound with 1267 normal voices and 46 drum kits playing with 32 part/64 polyphony
(the maximum number of simultaneous sounds). The quality of sound rivals that of Yamaha’s MU100 tone
generator, which is top-class, even among tone generators for personal computer-based music system.
Full Array of Effects
• The SW1000XG comes equipped with a total of six effect blocks: reverb (12 types), chorus (14 types),
variation (70 types), insertion 1/2 (43 types for each), and five band multi EQ (four types). The
SW1000XG does more than offer effects for an ensemble as a whole. It also lets you craft detailed
effect settings for each instrument part, creating an elaborate world of sound using just one sound card.
The effects can be applied not only to the internal tone generator, but also to input from external
audio sources such as wave data (digital audio) or to microphone input.
GM/XG Compatible
• Because the SW1000XG sound card is compatible with the GM standard and Yamaha’s exclusive XG
extensions to GM, you can enjoy playing commercially available GM and XG song collections with
high quality sound.
GM
GM (General MIDI System Level 1) is an addition to the MIDI standard which ensures that any
GM-compatible music data can be accurately played by any GM-compatible tone generator,
regardless of maker. With the GM standard, you can assign any of the 128 GM-compatible voices
to each of the 16 parts, or MIDI channels. (Channel 10 is fixed as the drum part.)
XG
XG is a new MIDI format created by Yamaha which significantly improves and expands upon the
General MIDI standard by providing a greater variety of high-quality voices plus considerably
enhanced effect operation—while being fully compatible with GM.
MIDI Interface Function
• You can connect your sound card to an external MIDI keyboard or other MIDI device using the MIDI
adapter cable that was included with your SW1000XG.
Expanded Capability with an XG Plug-In Board
• You can add expanded functions like a VL (physical model) tone generator to the standard AWM2 tone
generator in your SW1000XG sound card by simply connecting an XG Plug-In System compatible plug-
in option board (PLG100 series).
Digital Audio Recording/Playback
• The SW1000XG features six stereo wave playback devices and two stereo wave recording devices.
Among the two stereo recording devices, one is for external audio input (A/D input) only, and the
other mixes external audio input (A/D input), AWM2 tone generator sound, and wave tracks in the
sequence software.
Using the included XGworks for SW1000XG software as an example, wave data on multiple tracks can
be sent to the SW1000XG sound card audio parts (maximum 12 parts), and played simultaneously with
each part having effects applied.
Mic/Line input can be recorded on a wave track (in either stereo or mono) in time with playback of
MIDI tracks (or MIDI tracks and wave tracks). With this feature, it’s easy to lay down multiple record-
ings for things like vocals, with the AWM2 tone generator of the SW1000XG playing in the background.
When you make a song using this feature, you can play back all the MIDI tracks and wave tracks
simultaneously, then record the entire output together on a single wave track. When you do this, all
the tracks of a song can be united into one as wave data, then mastered. The mastered audio data can
then be used as a file for writing on a CD-R disk.
Digital Output
• Stereo digital out (S/PDIF) connector is equipped on the SW1000XG. Also, when you connect an
optional digital mixing card (DS2416), you can send digital output from the SW1000XG to the DS2416
on one pair of stereo outputs and six individual outputs. This means that even if no external digital
mixer is available, you can control every aspect of your music, including digital mixing, from within
your computer.
SW1000XG-E.qx 4/2/99 4:31 PM Page 4

Table of Contents
Introduction .......................................................................................................3
Special Notices ..............................................................................................................................3
Windows Operation......................................................................................................................3
SW1000XG Features ...........................................................................................4
Before Using .......................................................................................................6
Package Contents ..........................................................................................................................6
Items You Will Need that Are Not Included...............................................................................6
Introducing the Included Software ..................................................................7
SW1000XG Sound Card Connections ...............................................................9
The Terminals on the SW1000XG................................................................................................9
Installing Your Sound Card ........................................................................................................10
Installing the Plug-In Board .......................................................................................................12
Installing the Digital Mixing Card ..............................................................................................12
Installation of the Driver.................................................................................13
Installing the driver for Windows95 OSR2 (4.00.950B)............................................................13
Installing the driver for Windows95 (4.00.950 or 4.00.950A) ..................................................15
Installation of the Software.............................................................................16
Installing XGworks for SW1000XG and Wave Editor TWE......................................................16
Installing XG Plug-In Software...................................................................................................19
SW1000XG Overview and Features.................................................................22
Sound Module Modes .................................................................................................................22
Voices ...........................................................................................................................................22
Selecting Voices ...........................................................................................................................23
Effect Types .................................................................................................................................23
A/D Input ....................................................................................................................................24
About the Plug-In System...........................................................................................................24
Supplementary Items for XGworks 2.0..........................................................25
Simultaneous Playback of Multiple Wave Tracks and Playback Part-Way Through ..............25
System Setup Dialog ...................................................................................................................25
Track View Window ...................................................................................................................28
XG Editor Window......................................................................................................................29
Wave Data Can Also Be Saved in a Song .................................................................................31
Opening the Wave Editor TWE..................................................................................................31
SW1000XG Mixer ........................................................................................................................32
MIDI Implementation Chart............................................................................40
Specifications of the SW1000XG Sound Card ................................................42
Troubleshooting...............................................................................................43
* The screen displays as illustrated in this manual are for instructional purposes, and may appear somewhat different from
the screens which appear on your computer.
5
SW1000XG-E.qx 4/2/99 4:31 PM Page 5

Before Using
Package Contents
Before using your new SW1000XG, check that all the items below are included in the package. In
the rare case that some item is missing, contact the store where you purchased your sound card
as soon as possible.
SW1000XG sound card
• MIDI adapter cable (1)
• Plug-in board connection cable (1)
• Spacers for plug-in board (4)
CD-ROM
Owner’s Manual (this book)
Items You Will Need that Are Not Included
To use your SW1000XG sound card and the included software, you will also need the following
hardware and software:
Computer: CPU/Memory An IBM compatible personal computer
with a 166 MHz or higher Pentium CPU,
and at least 32 MB of memory.
Hard Disk To use the software included with
SW1000XG, the software and drivers must
be installed. To install and use the soft-
ware, at least 20 MB of hard disk space is
required.
CD-ROM Drive All the software that came with your sound
card is included on the supplied CD-ROM.
To install the software and to read the
demo songs, a CD-ROM drive is required.
Mouse Operations in the included software are
mainly done using a mouse.
PCI Expansion Slot To install the sound card, an empty PCI
slot is required.
Operating System Windows 95 is required.
If the Windows 95 version installed on your computer is OSR2 or higher, you can use IRQ shar-
ing. Because versions of Windows 95 earlier than that do not allow IRQ sharing, conflicts with
other boards may happen or installation may not be possible. Should this occur, change the IRQ
settings or remove the conflicting board.
n You can check which version of Windows 95 is installed on your computer by clicking [My Computer], then
[Control Panel], then [System]. If the version number displayed on the [General] page is 4.00.950 B, you have OSR2.
If the number is 4.00.950 or 4.00.950 A, you have a previous version of Windows 95.
6
SW1000XG-E.qx 4/2/99 4:31 PM Page 6

Introducin
g
the
Included Software
The software programs that are included in this package are introduced here. For information
about installing each of them, see “Installation of the Software” on page 16.
• XGworks for SW1000XG
This is MIDI sequence software for Windows 95. Besides letting you enter and edit MIDI data,
XGworks supports digital recording and features an XG Editor that makes it easy to edit the XG
voices. These and other advanced features are just the tools you need to enjoy creating high
quality music. For details about XGworks, see the included XGworks 2.0 Owner’s Manual (PDF
file in the supplied CD-ROM’s “Document” folder).
n To view PDF files, you must first install the Acrobat Reader. A program for doing this has been provided in the
Acrobat folder on the CD-ROM that came with your SW1000XG sound card. To install Acrobat Reader, double-
click on the ar32e301.exe installation program in that folder.
Because the version of XGworks in this package is an upgrade specially developed for
your SW1000XG sound card, some important supplemental information has been
included in this manual, starting from page 25. Please read this information together
with your XGworks manual.
• Wave Editor TWE
This software lets you edit the waveform data in wave files (extension .WAV) that have been
recorded onto WAVE tracks in XGworks. Wave files can also be recorded using Wave Editor
TWE. For detailed information about using this program after installation, click on the [Start]
button in Windows 95, then select [YAMAHA XGworks for SW1000XG] from the [Program]
menu. Selecting [WAVE Editor TWE Manual] will display the online manual for the wave editor
(PDF file).
n To view PDF files, you must first install the Acrobat Reader. A program for doing this has been provided in the
Acrobat folder on the CD-ROM that came with your SW1000XG sound card. To install Acrobat Reader, double-
click on the ar32e301.exe installation program in that folder.
n Besides wave files with the extension .WAV, the Wave Editor TWE software also supports recording and editing
AIFF files. However, these files cannot be used in XGworks.
• VL Visual Editor
The VL Visual Editor is editing software for the optional PLG100-VL board (→ P. 24) sold sepa-
rately. For detailed information on using it, install the software, then start the VL Visual Editor
in XGworks. Select [Contents] from the [Help] menu to read the online help.
• VH Effect Editor
The VH Effect Editor is editing software for the optional PLG100-VH board (→ P. 24) sold sepa-
rately. For detailed information on using it, install the software, then start the VH Effect Editor
in XGworks. Select [Contents] from the [Help] menu to read the online help.
• DX Easy Editor
The DX Easy Editor is simple editing software for the optional PLG100-DX board (→ P. 24) sold
separately. For detailed information on using it, install the software, then start the DX Easy
Editor in XGworks. Select [Contents] from the [Help] menu to read the online help.
7
SW1000XG-E.qx 4/2/99 4:31 PM Page 7

• DX Simulator
The DX Simulator is editing software for the optional PLG100-DX board (→ P. 24) sold sepa-
rately. Using exactly the same user interface as the famous Yamaha DX7, you can create finely-
crafted sounds. For detailed information on using this program, install the software, then start
the DX Simulator in XGworks. Select [Contents] from the [Help] menu to read the online help.
• SW1000XG Windows95 Driver
This driver is necessary for playing sounds using the SW1000XG sound card. See page 13 for
instructions on installing this driver.
• SW1000XG Demo Songs
The SW1000XG demo songs showcase the high quality expressive power of the SW1000XG
sound card. Since they feature both MIDI and audio tracks, you can enjoy them by playing
them in XGworks for SW1000XG.
They are included in the supplied CD-ROM’s “Demo” folder.
n Besides the SW1000XG demo songs with both MIDI and audio tracks, other demo songs that are standard MIDI
files have also been provided in this package. These standard MIDI files will be installed together with XGworks.
• SW1000XG Data Lists
The voice list, materials about the effects, and the MIDI data format for your SW1000XG sound
card have all been provided in PDF file format for your reference. They are collected in the file
“Data_E.PDF,” which is in the Document folder of the CD-ROM that came with your sound
card.
n To view PDF files, you must first install the Acrobat Reader. A program for doing this has been provided in the
Acrobat folder on the CD-ROM that came with your SW1000XG sound card. To install Acrobat Reader, double-
click on the ar32e301.exe installation program in that folder.
8
SW1000XG-E.qx 4/2/99 4:31 PM Page 8

9
SW1000XG Sound
Card Connections
The Terminals on the SW1000XG
Before handling the sound card, make sure to eliminate any static electricity in your clothes or body by touching a
metal surface that is definitely grounded. Also, be careful to avoid touching any parts on the sound card’s circuit
board, or any of the connectors.
1 External Audio Input (A/D input) Terminal
This terminal is stereo line input for audio signals from external devices such as a mike, gui-
tar, bass, or CD player. It connects to a stereo mini-jack cable.
2 Line Out L/R Terminal
This terminal is for external output of audio signals in stereo. It connects to an audio device
or mixer with RCA pin jack cables.
The white terminal is L (left) and the red terminal is R (right).
3 Digital Out Terminal
This terminal is for digital output of audio signals in stereo. It connects to a digital audio
device or mixer with digital input through a S/PDIF type cable.
4 MINI DIN 6 Pin Terminal
This terminal is for connecting to an external MIDI device such as a keyboard, using the
included MIDI adapter cable.
5 Plug-In Board (PLG100 Series) Connector
This terminal connects to an optional plug-in board compatible with the XG plug-in system
(PLG100 series). These boards can be used to expand the functions of the XG tone generator
that is standard on the SW1000XG sound card.
6 Digital Mixing Card (DS2416) Connector
This terminal connects to the digital mixing card (DS2416) sold separately. Output from the
SW1000XG can be sent to a digital mixing card equivalent to the Yamaha O2R digital mixer
over a pair of stereo outputs and six individual outputs. Even when no external digital mixer
is available, you can control every aspect of your music including digital mixing — all from
within your computer.
1
5 6
2
3
4
Microphone, etc.
Powered speakers
DAT, etc.
MIDI IN
MIDI OUT
MIDI OUT
MIDI IN
MIDI Keyboard
MIDI adapter cable (included)
00:00:00
DAT
Digital Mixing Card (DS2416)
SW1000XG
Plug-In Board (PLG 100 series)
To Serial In Connector
To XG plug-in board connector
MIDI KEYBOARD CBX-K1
SW1000XG-E.qx 4/2/99 4:31 PM Page 9

Installing Your Sound Card
The SW1000XG sound card can be installed in your computer by simply following these steps:
n Before installing your sound card, check to be sure that there is an empty PCI card slot in your computer. If you
are going to use a slot where there is already a PCI card installed, uninstall the driver software for that card, then
turn off the power to the computer and remove the card. Restarting the computer after doing this will cause it to
recognize that the card that was in that slot has been completely removed. After completing this series of opera-
tions, turn off the power to your computer again before following the installation procedure below.
n If you will be installing a plug-in board (PLG100 series) or digital mixing card (DS2416) on your sound card, be
sure to also read the instructions for doing that (→ P. 12).
1. Unplug the computer power cord from the electrical outlet.
There is a serious danger of electric shock if you attempt to install the sound card while the computer power is
turned on. Be absolutely sure to turn OFF the power and unplug the computer before proceeding with the installa-
tion.
2. Remove the cover from the main body of the computer.
n The method for removing the cover and the location of the PCI slots varies for each computer model. Refer
to the owner’s manual for your computer to obtain this information.
3. Remove the cover for the PCI slot.
10
SW1000XG-E.qx 4/2/99 4:31 PM Page 10

4. Remove the sound card from its anti-static bag.
Before handling the sound card, make sure to eliminate any static electricity in your clothes or body by touch-
ing a metal surface that is definitely grounded. Also, be careful to avoid touching any parts on the sound
card’s circuit board, or any of the connectors.
5. Insert the connector on the sound card into the connector on the computer. Hold the card
by both ends with both hands, and slowly push the card into the computer slot. When doing
this, make sure that you are not installing the card upside down.
6. Secure the sound card with the screw if this is required in your computer, then reinstall the
cover for the main body of the computer.
n The method for securing the PCI expansion card, and for reinstalling the cover varies for each computer
model. Refer to the owner’s manual for your computer to obtain this information.
7. Connect the external devices you will use with your sound card (such as speakers, mixer, or
MIDI keyboard) to the appropriate connectors on the SW1000XG.
n When removing your sound card, follow the steps above in reverse order.
11
SW1000XG-E.qx 4/2/99 4:31 PM Page 11

12
Installing the Plug-In Board
Refer to the illustration below to install an optional plug-in board (PLG100 series).
Making sure that the plug-in board is facing in the correct direction, carefully press the cable
from the plug-in board into the plug-in board connector on the sound card.
n This should be done before the sound card is installed in the computer.
n For information about each plug-in board, see page 24 and the owner’s manual that comes with each board.
Installing the Digital Mixing Card
Refer to the illustration below to install an optional digital mixing card (DS2416).
Making sure that the flat cable from the digital mixing card (DS2416) is facing in the correct
direction, carefully press the cable into the digital mixing card connector on the sound card.
n This should be done before the sound card is installed in the computer.
n For information about the digital mixing card (DS2416), refer to the owner’s manual that comes with the card.
Green line
Serial In Connector
Serial out Connector
DS2416
SW1000XG sound card
Connector to SW1000XG
Connector to DS2416
Green line
Make sure that
the flat cable from
the DS2416 is
facing in the
correct direction.
Make sure that the flat cable is
facing in the correct direction.
Flat cable's
connector
SW1000XG sound card
Yellow line
Plug-in board
Spacer
Connector to SW1000XG
Connector to plug-in board
Yellow line
First, put the four spacers in
the SW1000XG, then fit
the plug-in board above
the sound card.
Hooks To plug-in board
To SW1000XG
Spacer
Output from the SW1000XG to the DS2416 digital mixing card
In the initial setting, all parts of the SW1000XG are mixed in stereo and sent to the DS2416.
However, you can send a specific part as an individual output to the DS2416, apart from the
stereo output.
The SW1000XG is equipped with 6 individual outputs and each part (either MIDI multi part
or audio part) can be assigned to any of the individual out 1 to 6, 1+2, 3+4 or 5+6.
For details, see MIDI Data Format tables <1-6> and <1-7>(MIDI Parameter Change tables),
descriptions on “Output Select”.
The Output Select can be set using the XGworks’ XG Editor Window (The properties dialog
box which opens when clicking on the [DETAIL] button of the part unit). If you are opening
the multi part’s properties dialog box, the Output Select can be set in the General page of
the Detail screen.
SW1000XG-E.qx 4/2/99 4:31 PM Page 12

Installation of the
Driver
To use SW1000XG sound card, the appropriate driver (SW1000XG Windows95 Driver) should be
properly installed in your computer. The driver can be installed from the supplied CD-ROM by
following the steps described below.
n Before installing the driver, make sure that the sound card itself is installed in the computer. (→ P. 10)
n Open the “General” page of the System Properties in your Windows’ Control Panel. If your Windows95 version is
shown as “4.00.950B”, refer to “Installing the driver for Windows95 OSR2 (4.00.950B)”. If your Windows95 version
is shown as “4.00.950” or “4.00.950A”, refer to “Installing the driver for Windows95 (4.00.950 or 4.00.950A)”.
Installing the driver for Windows95 OSR2 (4.00.950B)
1. Turn on the power of your computer. If you turn on it for the first time after installing the
sound card in your computer, the Updated Device Driver Wizard will appear automatically.
2. Insert the supplied CD-ROM in the CD-ROM drive and click [Next]. The message saying
“Windows was unable to locate a driver for this device” will be displayed.
13
SW1000XG-E.qx 4/2/99 4:31 PM Page 13

14
3. Click [Other Locations]. Select Other Location dialog box will be displayed.
4. Type the name of the CD-ROM drive (E:\, F:\, etc.) and the folder (Win95drv) in the
“Location” box.
e.g. E:\Win95drv, F:\Win95drv
5. Click [OK]. The message saying “Windows found the following updated driver for this
device” will be displayed.
6. Click [Finish]. Insert Disk dialog box will be displayed.
SW1000XG-E.qx 4/2/99 4:31 PM Page 14

7. Click [OK]. Copying Files dialog box will be displayed.
8. Type the name of the CD-ROM drive and the folder in the “Copy files from:” box, as you did
in step 4.
e.g. E:\Win95drv, F:\Win95drv\
9. Click [OK]. Files will be copied.
10.
Restart the computer.
This completes the installation of the driver.
Installing the driver for Windows95 (4.00.950 or 4.00.950A)
1. Turn on the power of your computer. If you turn on it for the first time after installing the
sound card in your computer, the New Hardware Found window will appear automatically.
2. Insert the supplied CD-ROM in the CD-ROM drive, select “Driver from disk provided by
hardware manufacturer” and click [OK]. Install From Disk dialog box will be displayed.
3. Type the name of the CD-ROM drive (E:\, F:\, etc.) and the folder (Win95drv) in the “Copy
manufacturer’s files from:” box.
e.g. E:\Win95drv, F:\Win95drv
4. Click [OK]. Insert Disk dialog box will be displayed.
5. Click [OK]. Copying Files dialog box will be displayed.
6. Type the name of the CD-ROM drive and the folder in the “Copy files from:” box, as you did
in step 3.
e.g. E:\Win95drv, F:\Win95drv\
7. Click [OK]. Files will be copied.
8. Restart the computer.
This completes the installation of the driver.
15
SW1000XG-E.qx 4/2/99 4:31 PM Page 15

Installation of the
Software
This package contains software which can bring out full advantage of the SW1000XG sound card,
including MIDI sequence software XGworks for SW1000XG, Wave Editor TWE and various XG
plug-in software.
This section explains you how to install them from the supplied CD-ROM.
Installing XGworks for SW1000XG and Wave
Editor TWE
The following software can be installed by following the steps described below. For information
on each software, see page 7.
• XGworks for SW1000XG
• SW1000XG Mixer
• Wave Editor TWE
n SW1000XG Mixer is a plug-in software for XGworks for SW1000XG, which can control mixing of audio parts when
you record wave data to XGworks’ wave track and/or when you play back XGworks’ wave track.
1. Insert the supplied CD-ROM in the CD-ROM drive.
2. Open “My Computer” by double-clicking its icon.
3. Double-click the CD-ROM icon and then double-click Setup.exe contained in the CD-ROM’s
“XGworks” folder. Welcome dialog box will appear.
16
SW1000XG-E.qx 4/2/99 4:31 PM Page 16

17
4. Click [Next]. Software License Agreement dialog box will appear. Read this thoroughly before
moving on to the next step.
5. Click [Yes]. Choose Destination Location dialog box will appear. If you want to change the
destination, click [Browse] and select the destination.
6. Click [Next]. Setup Type dialog box will appear. You can select the type of installation.
n Selecting “Typical” is recommended for most users.
SW1000XG-E.qx 4/2/99 4:31 PM Page 17

7. Click [Next]. Select Components dialog box will appear. You can select the preferred applica-
tion language version.
8. Click [Next]. Select Program Folder dialog box will appear. You can change the folder name
to which the program will be installed.
9. Click [Next]. Files will be copied.
10.
Restart the computer.
This completes the installation of XGworks for SW1000XG, SW1000XG Mixer and Wave Editor TWE.
18
SW1000XG-E.qx 4/2/99 4:31 PM Page 18

19
Installing XG Plug-In Software
The following software can be installed by following the steps described below. For information
on each software, see page 7.
• VL Visual Editor
• VH Effect Editor
• DX Easy Editor & DX Simulator
n Before installing the XG plug-in software, make sure that the XGworks for SW1000XG is installed in the computer.
1. Insert the supplied CD-ROM in the CD-ROM drive.
2. Open “My Computer” by double-clicking its icon.
3. Double-click the CD-ROM icon and then double-click Setup.exe contained in the CD-ROM’s
“Plug” folder. Welcome dialog box will appear.
4. Click [Next]. Software License Agreement dialog box will appear. Read this thoroughly before
moving on to the next step.
SW1000XG-E.qx 4/2/99 4:31 PM Page 19

5. Click [Yes]. Before Setup dialog box will appear. Read this thoroughly before moving on to the next step.
6. Click [Yes]. Language dialog box will appear. You can select the preferred application lan-
guage version.
7. Click [Next]. Programs dialog box will appear. You can select which plug-in software to be
installed.
20
SW1000XG-E.qx 4/2/99 4:31 PM Page 20

8. Click [Next]. Choose Destination Location dialog box will appear. If you want to change the
destination, click [Browse] and select the destination.
n To use XG plug-in software on XGworks, these plug-ins should be installed in the folder containing
XGworks.exe. (Normally, “XGworks for SW1000XG” folder located in the Program Files’ Yamaha folder.)
9. Click [Next]. Files will be copied and then the message saying “Setup is completed” will
appear.
10.
Click [OK].
This completes the installation of XG plug-in software.
21
SW1000XG-E.qx 4/2/99 4:31 PM Page 21

SW1000XG Overview
and Features
Sound Module Modes
The SW1000XG features both XG and TG300B sound module modes. Normally, the SW1000XG
plays in XG mode. However, since it automatically recognizes which mode to select based on
incoming MIDI data, you can easily change the mode by MIDI System Exclusive messages that
you program in sequencer data, at the head of your composition.
n Turning on the power of your computer with the SW1000XG sound card installed will automatically initialize all
SW1000XG settings, or parameter values.
n Since the SW1000XG requires about half a second to change modes when it receives a mode change message, be
sure to insert at least one blank measure at the top in order to allow enough time for the mode to change before
your actual music data begins.
XG Mode
In XG mode the SW1000XG will play XG-compatible multitimbral data, as well as multitimbral
data created for the GM System Level 1 format.
In XG mode the SW1000XG can:
• Play up to 32 Parts + 14 Audio Parts.
• Choose from 1,074 Normal Voices and 36 Drum Voices.
TG300B Mode
In TG300B mode the SW1000XG will play multitimbral music data created for TG300B-compatible
tone generators. TG300B mode also provides compatibility with the GM System Level 1 format.
In TG300B mode the SW1000XG can:
• Play up to 32 Parts + 14 Audio Parts.
• Choose from 614 Normal Voices and 10 Drum Voices.
Voices
An SW1000XG Voice can be made up of one or two elements (i.e., sounds), depending on the
complexity of the Voice. Many Voices are made up of only one element. Two-element Voices are
made up of two one-element Voices, and may be configured in a variety of ways.
The number of elements in use determines the maximum number of simultaneous notes
(polyphony) which the SW1000XG can play at any given time, depending on the amount of
incoming MIDI Note data. For details about the number of elements used in each Voice, see the
XG/TG300B Normal Voice Lists of the “Data_E.pdf” file contained in the supplied CD-ROM’s
“Document” folder.
Normal Voices and Drum Voices
The SW1000XG has two types of Voices—Normal Voices and Drum Voices. (In this Owner’s
Manual, in general the word Voice refers to a Normal Voice.)
The distinction between a Normal Voice and a Drum Voice is as follows:
• A Normal Voice is simply a pitched Voice which can be played on a musical scale from low to
high, such as a piano or trumpet. The SW1000XG has 1,267 Normal Voices.
• A Drum Voice is a complete set of drum and other percussion sounds, each sound having a
fixed pitch. Each sound is assigned to a specific MIDI Note number (which also corresponds to
a key on a MIDI keyboard). The SW1000XG has 46 Drum Voices.
22
SW1000XG-E.qx 4/2/99 4:31 PM Page 22

Maximum Polyphony
The SW1000XG can play a maximum of 64 notes polyphony at once. However, the actual num-
ber of notes that will play at any given time is determined by the number of elements in use
across the 32 Parts.
For example, if you use only one-element Voices, you can achieve the full 64 notes maximum
polyphony. If you use one or more two-element Voices, however, maximum polyphony will be
reduced accordingly.
The SW1000XG is a last-note-priority tone generator, which means that if it receives more than 64
notes of MIDI Note data at any time, earlier (first) notes will automatically cut off to accommo-
date the most recent (last) incoming notes.
Part Priority
Each of the SW1000XG’s 32 Parts corresponds to each of the 32 MIDI channels. If incoming Note
data exceeds the maximum polyphony, the SW1000XG will prioritize which Parts are played first,
in the following order, from higher priority to lower:
Channel 10 (Drum Part), 1, 2, 3, 4, 5, 6, 7, 8, 9, 11, 12, 13, 14, 15, 16, 26 (Drum Part), 17, 18,
19, 20, 21, 22, 23, 24, 25, 27, 28, 29, 30, 31, 32
Therefore, if you are creating your own music data using sequencer software, you should assign
your most important Parts (such as melody and bass) to higher priority MIDI channels (i.e., lower
MIDI channel numbers) in order to preserve the integrity of your composition. Note that with the
GM System Level 1, the Drum Part is always assigned to MIDI channel 10.
Selecting Voices
The SW1000XG not only contains the 128 basic GM Voices and GM drum set, but many variation
Voices as well—to give you access to a total of 1,267 Normal Voices and 46 Drum Voices.
In XG mode, the basic 128 GM Voices can be accessed by selecting Program numbers 1 – 128.
Other Voices can be accessed by selecting both bank numbers and Program numbers. The Voice
bank can be selected via MIDI Control Change Bank Select (MSB and LSB) messages. In XG
mode, the MSB value determines the Voice type (Normal, Drum), while the LSB value actually
selects the bank (excluding the SFX bank).
When the SW1000XG is in TG300B mode, the Voice banks can be selected with appropriate MSB
numbers, as LSB is fixed.
Lists of all available Voices along with bank and program numbers are provided on the Voice
Lists of the “Data_E.pdf” file contained in the supplied CD-ROM’s “Document” folder.
Note that the 128 MIDI Program Change numbers consist of 0 through 127, whereas the 128
SW1000XG program numbers consist of 1 through 128. Depending on the sequencing hardware
and software you use, you may have to convert the SW1000XG program numbers to the appro-
priate Program Change numbers.
Effect Types
The SW1000XG features dozens of extremely versatile digital effects generated by Yamaha’s
advanced Digital Signal Processing (DSP) technology—which add a completely new dimension to
your SW1000XG’s sound.
These effects are configured, or routed, in one of two ways—to be either a System Effect or an
Insertion Effect. The difference is as follows:
SYSTEM EFFECT Applies the designated effect to all 32 Parts.
INSERTION EFFECT Applies the designated effect to only one specific Part.
Reverb and Chorus are “System Effects”, and Insertion 1 and 2 are “Insertion Effects”. The
Variation effect can be configured as either a “System Effect” or an “Insertion Effect”.
* Effects can be applied to Audio Parts as well as the internal AWM2 voices of the SW1000XG.
23
SW1000XG-E.qx 4/2/99 4:31 PM Page 23

A/D Input
The SW1000XG features A/D Input jack for connection of external audio sources such as a micro-
phone, guitar, bass, or CD player.
Audio signal received via A/D INPUT jack is processed through the effect sections and mixed
with the internal AWM2 voices of the SW1000XG.
If you use the supplied “XGworks for SW1000XG”, you can record audio signal via A/D INPUT
jack to its WAVE tracks.
About the Plug-In System
Your SW1000XG sound card is compatible with the “XG Plug-In System.” When you install one of
the optional XG Plug-In Boards on the SW1000XG, the functions of the SW1000XG and the XG
Plug-In board will be organically combined, just as though the XG Plug-In Board had been built
right into the SW1000XG circuits.
If one of the tone generator-type XG Plug-In Boards is installed on the SW1000XG, one part of
the SW1000XG will be assigned to the tone generator on the plug-in board, while the parts of the
SW1000XG itself will remain exactly the same. All effects—system effects, insertion effects, system
EQ, and others—can be applied.
When an effect-type plug-in board is mounted on the SW1000XG, its effects will function as XG
insertion effects.
About Optional XG Plug-In Boards
PLG100-VL
This XG Plug-In Board is equipped with an S-VA tone generator, which generates sounds based
on physical models. There are 256 voices built in, from realistic orchestral instrument voices to
voices for instruments that exist only in the imagination. You can perform with the same awe-
some expressive power as the VL70-m virtual acoustic tone generator.
Using the VL Visual Editor included on the CD-ROM that came with your sound card, it’s easy
and fun to create your own sounds, even without knowing the physical models.
PLG100-VH
This XG Plug-In Board is equipped with harmonic effects optimized for vocals. Four effects are
built in, letting you do things like add harmony voices to vocals input from the A/D input ter-
minal just by playing the desired notes on the keyboard (vocoder harmony), or adding the har-
mony that corresponds to a specified chord (chordal harmony). In addition, you can change the
tone of the input, and have fun with unique effects like chorus effects and voice change effects.
You can edit the harmony effects with the VH Effect Editor that is included on the CD-ROM
that came with your sound card.
PLG100-DX
This XG Plug-In Board is equipped with a 16 polyphony FM tone generator that works just like
the well-known Yamaha DX7. This board lets you feature the flashy sounds of an FM tone gen-
erator in your song.
You can enjoy creating the FM tone generator sounds on your computer screen using the DX
Easy Editor and DX Simulator that are included on the CD-ROM that came with your sound
card.
24
SW1000XG-E.qx 4/2/99 4:31 PM Page 24

25
Supplementary Items
for XGworks 2.0
The XGworks for SW1000XG software that is included in this package has been specially tailored
to work with the SW1000XG. For that reason, you will find here an introduction to some func-
tions and some supplementary information not included in the XGworks 2.0 Owner’s Manual that
came with your sound card.
n XGworks 2.0 Ouner’s Manual is provided as a PDF file in the supplied CD-ROM’s “Document” folder.
Simultaneous Playback of Multiple Wave Tracks and Playback
Part-Way Through
Data from multiple wave tracks can be sent to the SW1000XG audio parts (maximum 12 parts)
and played back simultaneously with effects applied to each part individually. Also, playback of
the wave tracks can be started midway in the song.
n Song files (.xws files) containing wave tracks cannot be fast forwarded using the XGworks Play Control. Even if the
mouse button is held down over the FWD button, the song will be forwarded at normal playback speed.
System Setup Dialog
The functions and items below have been added to the System Setup dialog.
n The System Setup dialog is opened by clicking on [Setup] on the menu bar, then selecting [System Setup] from the
pull-down menu. For details, see page 210 of the XGworks V2.0 Owner’s Manual.
Device Page of the System Setup Dialog
The number of Wave Out settings has been increased to six. A maximum of six output devices
using wave data can be specified.
SW1000XG-E.qx 4/2/99 4:31 PM Page 25

26
Device Selection
When using the SW1000XG sound card, select the devices as follows:
•MIDI In
Select “SW1000 MIDI IN.” When you are going to connect an external MIDI keyboard to the
sound card’s MINI DIN 6 pin terminal using the included MIDI adapter cable, you can have
the keyboard performance play through the SW1000XG sound card (you must select
“SW1000 #1 (or #2) Synthesizer” for MIDI Thru and MIDI Out, as mentioned below).
•MIDI Thru
Select “SW1000 #1 (or #2) Synthesizer”. The MIDI signal that comes in through the MIDI In
device above will be played through the SW1000XG sound card.
If “SW1000 MIDI OUT” is selected, and you have connected an external MIDI tone generator
to the sound card’s MINI DIN 6 pin terminal using the included MIDI adapter cable, you can
play the music through that tone generator.
n ”SW1000 #1 Synthesizer” is the MIDI output device for Part numbers 1 to 16. “SW1000 #2 Synthesizer” is the
MIDI output device for Part numbers 17 to 32.
•MIDI Out
Select “SW1000 #1 (or #2) Synthesizer”. The MIDI signal (performance data) that is output
from XGworks will be played through the SW1000XG sound card.
If “SW1000 MIDI OUT” is selected, and you have connected an external MIDI tone generator
to the sound card’s MINI DIN 6 pin terminal using the included MIDI adapter cable, you can
play the music through that tone generator.
n ”SW1000 #1 Synthesizer” is the MIDI output device for Part numbers 1 to 16. “SW1000 #2 Synthesizer” is the
MIDI output device for Part numbers 17 to 32.
•Wave In
Select “SW1000 #1 (or #2) WAVE IN”.
“SW1000 #1 WAVE IN” is a wave input device specially for the SW1000XG sound card exter-
nal audio input (A/D input).
n When effects are applied to the A/D input audio signal, those effects are ignored. Even when recorded on a
XGworks wave track, only the raw sound is recorded.
“SW1000 #2 WAVE IN” is the wave input device for all sound heard using the SW1000XG
sound card (the mixture of A/D input, XGworks wave tracks, and the sound from the AWM2
tone generator on the sound card).
n Unlike “SW1000 #1 WAVE IN”, the effect component will be input if effects are applied.
•Wave Out
Select “SW1000 #1 - #6 WAVE OUT”.
Correspondence between each wave out device (#1 - #6) and SW1000XG audio part is as follows:
SW1000 #1 WAVE OUT: Wave output is sent to the SW1000XG audio parts PCI 1 and PCI 2.
SW1000 #2 WAVE OUT: Wave output is sent to the SW1000XG audio parts PCI 3 and PCI 4.
SW1000 #3 WAVE OUT: Wave output is sent to the SW1000XG audio parts PCI 5 and PCI 6.
SW1000 #4 WAVE OUT: Wave output is sent to the SW1000XG audio parts PCI 7 and PCI 8.
SW1000 #5 WAVE OUT: Wave output is sent to the SW1000XG audio parts PCI 9 and PCI 10.
SW1000 #6 WAVE OUT: Wave output is sent to the SW1000XG audio parts PCI 11 and PCI 12.
PCI is the SW1000XG sound card’s audio part which receives wave output from the XGworks
wave track. There are total of 12 PCI parts and the mixing between these PCI parts can be
controlled by using the SW1000XG mixer (→ P. 32).
SW1000XG-E.qx 4/2/99 4:31 PM Page 26

MIDI Out Filter Page on the System Setup Dialog
The Realtime Message item has been added. By checking a box, output of realtime messages can
be prevented. When the box is not checked (when output is permitted), the messages will be
output on MIDI Out port number 1 (set on the Device page of the System Setup dialog).
n Realtime message information is XGworks stop, start and song position information, and if a song is played back
on the XGworks side, that information will be sent as MIDI output in realtime. If a MIDI keyboard with a built in
sequencer is used as a tone generator, the built in sequencer in the keyboard will play back in sync with the
XGworks playback. If synchronized playback is not required, this box should be checked.
27
SW1000XG-E.qx 4/2/99 4:31 PM Page 27

28
Track View Window
Track Parameter Section
The Track Parameter Ch (channel) display has been changed to the Ch/Pan display, and the fol-
lowing function has been added:
n For details about the Track View Window, see page 41 of the XGworks V2.0 Owner’s Manual.
n When using the SW1000XG sound card, set the Track Parameter Section Port displays as follows:
When the track type is MIDI: SW1000 #1 (or #2) Synthesizer
When the track type is WAVE: SW1000 #1 - #6 WAVE OUT
When WAVE is selected as the track type in the TYPE display, it becomes possible to set the pan
(stereo position) of the wave data in the Ch/Pan display.
n When MIDI is selected as the track type, the output MIDI channel is set in the Ch/Pan display.
❑ Range of settings: L7-L1, C, R1-R7
Each wave out device (SW1000 #1 - #6 WAVE OUT) corresponds to two audio parts of the
SW1000XG sound card. For example, wave output through the SW1000 #1 WAVE OUT is sent to
the SW1000XG audio parts PCI 1 and PCI 2 (→ P. 26).
In case of monaural wave track:
Setting the Ch/Pan value to L1-L7 will send more wave data to the odd numbered PCI part (PCI
1, 3, 5, 7, 9 or 11). Setting the Ch/Pan value to R1-R7 will send more wave data to the even num-
bered PCI part (PCI 2, 4, 6, 8, 10 or 12). Setting the Ch/Pan value to C will send wave data
equally to both odd and even numbered PCI parts.
In case of stereo wave track:
Regardless of the Ch/Pan setting, wave data will be sent equally to both odd and even numbered PCI parts.
By using the SW1000XG mixer (→ P. 32), you can control panning of each PCI part individually.
SW1000XG-E.qx 4/2/99 4:31 PM Page 28

29
XG Editor Window
The following functions have been added to the XG Editor Window:
n The XG Editor Window is opened by clicking the XG Editor Window button on the toolbar. For details about the
toolbar, see page 13 of the XGworks V2.0 Owner’s Manual.
Part Unit
The A/D tabs on the Part Unit have been changed to Audio.
When you click the Audio tab, an audio part list is displayed. The Voice column will display
“Analog” when an audio signal from the external audio input (A/D input) terminal of the
SW1000XG sound card is input to the SW1000XG Mixer (→ P. 32) and will display “PCI” when an
audio signal from an XGworks WAVE track is input to the SW1000XG mixer (→ P. 32). Variation
effects and insertion effects 1/2 can be assigned to each type of audio signal.
When the Detail button is clicked, the dialog for the selected Audio part (the part with the yellow
Voice column) will open and you will be able to make detailed settings for that part. For informa-
tion about the settings, see the MIDI Parameter Change table (Audio Part) and MIDI Parameter
Change table (Audio Part Configuration) of the MIDI data format in the SW1000XG Data List (in
the PDF file “Data_E.PDF,” which is in the Document folder of the CD-ROM that came with your
sound card).
When you double-click on the left side of the VOICE column for any part, the voice list dialog
will open. For information about the settings, see the “A/D Input Preset List” in the SW1000XG
Data List (in the PDF file “Data_E.PDF,” which is in the Document folder of the CD-ROM that
came with your sound card). For details about using the Voice list dialog, see page 25 of the
XGworks V2.0 Owner’s Manual.
When you double-click on the right side of the VOICE column for any part, the Audio Input
Category dialog will open, and you can set the categories for that audio part.
SW1000XG-E.qx 4/2/99 4:31 PM Page 29

30
Audio Input Category Dialog
Category
For each of the parts 1 to 16 displayed in the Part Unit, select the category of the audio sig-
nal to be sent to the sound card. By clicking the up and down scroll buttons, you can select
from categories such as Off, Analog, or PCI.
When using the SW1000XG sound card, select Analog or PCI. Analog is used when an audio
signal from the external audio input (A/D input) terminal of the SW1000XG sound card is
input to the SW1000XG Mixer (→ P. 32). PCI is used when an audio signal from an XGworks
WAVE track is input to the SW1000XG Mixer (→ P. 32).
Serial Number
Select the part number for the category of audio signal that was selected in the Category box.
Click the up and down scroll buttons, and select a number from 1 to 128. Make the settings
as follows when using the SW1000XG sound card:
When “Analog” is selected for the category, select 1 or 2. This is because a maximum of two
external audio input parts can be received by the SW1000XG sound card.
When “PCI” is selected for the category, select it in the range of 1 to 12. This is because
XGworks for SW1000XG wave track data can be sent to the SW1000XG sound card’s maxi-
mum of 12 audio parts.
After setting up each item, click [OK]. The dialog will close and the settings will take effect. If
you want to cancel the operation, click on [Cancel]. The dialog will close, and the settings
will return to their original state. If you click [Default], the Category and Serial Number for
the parts will return to the default settings.
n Use the default settings whenever possible. When the default settings are selected, Part 1 will be 1 of Analog,
Part 2 will be 2 of Analog, Part 3 will be 1 of PCI, Part 4 will be 2 of PCI, continuing until Part 14 is part 12 of
PCI. (Part 15 and 16 will be OFF.)
n If settings besides the default ones are made, it will no longer be possible to correctly control volume and
stereo balance for the parts with the Windows standard mixer (the “Volume Control” activated by double-
clicking on the speaker icon on the task bar).
n For any category, settings besides “Analog” and “PCI” can be selected. However, since these selections were
added for the sake of keeping capability with future devices that have many types of audio parts, there is no
ordinary need to select them.
For details about the Part Unit, see page 176 of the XGworks V2.0 Owner’s Manual.
SW1000XG-E.qx 4/2/99 4:31 PM Page 30

Wave Data Can Also Be Saved in a Song
As explained in the section “Saving the Song” on page 40 of the XGworks V2.0 Owner’s Manual,
songs that include wave data must be saved as .XWS files (XGworks original song file). However
the wave data (.WAV file) itself was not included in the conventional type of .XWS file (see
“About WAV Files” on P. 39 of the XGworks V2.0 Owner’s Manual). XGworks for SW1000XG now
can save .XWS files with the wave data (.WAV file) itself included.
Select [XGworks Original File with Wave (*.XWS)] in the Save as type box of the [Save As] dialog
(→ XGworks V2.0 Owner’s Manual P. 202) to save the .XWS file with the wave data included.
n It is possible that .XWS files with wave data included will be much larger in size than expected. If this happens, the
file can also be saved as a conventional .XWS file (.XWS file without the wave data itself included) or as a .MID
file.
Opening the Wave Editor TWE
Wave data editing software called WAVE Editor TWE has been included with your sound card. To
use it, simply open it in XGworks for SW1000XG.
n You must already have Wave Editor TWE installed before you open it. You can have Wave Editor TWE installed at
the same time that you install XGworks for SW1000XG. For details, see page 16.
With the wave block you want to edit selected in the Track View Window of XGworks, click on
the [Job] menu on the menu bar, then select [Wave Editor TWE] from the pull-down menu.
31
SW1000XG-E.qx 4/2/99 4:31 PM Page 31

For detailed information about using Wave Editor TWE after installation, click on the [Start] button
in Windows 95, then select [YAMAHA XGworks for SW1000XG] from the [Program] menu.
Selecting [WAVE Editor TWE Manual] will display the online manual for the wave editor (PDF
file).
n To view PDF files, you must first install the Acrobat Reader. A program for doing this has been provided in the
Acrobat folder on the CD-ROM that came with your SW1000XG sound card. To install Acrobat Reader, double-click
on the ar32e301.exe installation program in that folder.
n Besides wave files with the extension .WAV, the Wave Editor TWE software also supports recording/editing AIFF
files. However, these files cannot be used in XGworks.
SW1000XG Mixer
A specialized mixer for audio parts has been added. Volume adjustment and control of pan and
effects for each audio part can be easily done.
By moving sliders and knobs, volume and effects can be set for audio signal parts input into the
SW1000XG sound card from the external audio input (A/D input) terminal (displaying A1 and A2
in the Input column) and audio signal parts input into the SW1000XG sound card from XGworks
wave tracks (displaying P1 to P12 in the Input column). Because these operations pass through
the MIDI output port that is setup in the Setup dialog (→ P. 34), and are sent to the sound card
as MIDI messages, you can monitor (hear) the changes in the volume or tone of your audio parts
in realtime.
You can enter SW1000XG mixer settings anywhere you want in the song as system exclusive
events. You can also save the settings separate from the song in a SW1000XG mixer parameter
file (extension .SWM).
n You must already have the SW1000XG Mixer plug-in software installed before using it. You can have SW1000XG
Mixer installed at the same time that you install XGworks for SW1000XG. For details, see page 16.
Opening the SW1000XG Mixer
Click on the [Plug-In] menu on the menu bar, then select [SW1000XG Mixer] from the pull-down
menu.
32
SW1000XG-E.qx 4/2/99 4:31 PM Page 32

33
Name and Function of Every Part
Title Bar
On the title Bar, there are the application icon, and the Minimize, Maximize and Close buttons.
For details about the title bar, see P. 199 of the XGworks V2.0 Owner’s Manual.
Toolbar
1 Open Button
This opens the [Open] (file open) dialog. You can select an SW1000XG Mixer parameter file
(.SWM) that has SW1000XG Mixer settings saved in it and read them into the SW1000XG Mixer.
If the parameter settings being edited are not saved, a confirmation dialog will appear asking if
you want to save the parameters currently being edited before reading the file. This button has
the same function as the [Open SW1000XG Mixer Parameter File] command on the menu bar
[File] menu.
n Using the [Open] dialog is the same as opening a song file except for specifying SW1000XG Mixer Parameter File
(extension .SWM) in the file type box. For details about the [Open] dialog, see page 201 of the XGworks V2.0
Owner’s Manual.
2 Save Button
This saves the SW1000XG Mixer parameter file currently being edited, overwriting any previous
version. When saving SW1000XG Mixer settings as a parameter file for the first time, the [Save
As] dialog will open. This button has the same function as the [Save SW1000XG Mixer
Parameter File] command on the menu bar [File] menu.
n Using the [Save As] dialog is the same as saving a song file except for specifying SW1000XG Mixer Parameter File
(extension .SWM) in the file type box. For details about the [Save As] dialog, see page 202 of the XGworks V2.0
Owner’s Manual.
3 Setup Button
Opens the Setup Dialog. This is used for choosing things like the MIDI output port used for
sending parameters set in the SW1000XG Mixer and the device number. This button has the
same function as the [SW1000XG Mixer Setup] command on the menu bar [Setup] menu.
1 2 3 4 5 6 7
Titile Bar
Master Volume
Unit
Toolbar
Audio Part Unit
SW1000XG-E.qx 4/2/99 4:31 PM Page 33

34
Setup Dialog
Port ……………Click on the box, then select the MIDI port from the drop-down list that
is displayed. Control operations done in the SW1000XG Mixer will be
sent as MIDI information to the audio parts of the XG tone generator
corresponding to the port selected here.
n When using the SW1000XG sound card, select [SW1000 #1 (or #2) Synthesizer] in the Port box.
Device Number …This is the number that is set for sending system exclusive data (in this
case, information on SW1000XG Mixer operations) to the connected XG
tone generator. Select the same number as the connected XG tone gen-
erator’s device number.
Track……………Click on the box, then from the drop-down list that is displayed, select
the track to use when entering the SW1000XG Mixer settings into the
song. This is connected with the “Track” setting on the Insert dialog
mentioned later (→ P. 36).
Play Monitor …When this box is checked by clicking on it, the SW1000XG Mixer
parameter setting events that have been entered into a song will be
read, and the knobs and sliders in the SW1000XG Mixer can be operat-
ed in realtime. When there is no check the events in the song will not
be read.
n SW1000XG Mixer parameter setting events can be inserted into the song using the Insert dialog men-
tioned later (→ P. 36).
Set each item by clicking on it, then click on [OK]. The dialog will close and the settings
will take effect. To cancel the operation before finishing it, click [Cancel]. The dialog will
close, and the settings will stay in their original state.
4 Audio Preset Setting Button
This opens the audio preset dialog. Suitable effects can be selected for each audio part.
n Because the effects set here are unique to the audio parts, they are different than the reverb, chorus and varia-
tion effects of the XG tone generator.
SW1000XG-E.qx 4/2/99 4:31 PM Page 34

35
Audio Preset Dialog
Audio Source Category List
Displays the category of the audio signal. In order to apply appropriate effects to the
audio signal, one of the categories on this list must first be selected by clicking on it.
Once a category is selected, a list of effect names included in that category will appear
in the effect list below. The following six categories are available for each part.
Mic ……………This category is appropriate for vocals or live instruments.
Guitar …………This category is appropriate for the sound of an electric guitar.
Keyboard ……This category is appropriate for keyboard sounds (mono) such as synthesizers.
Audio …………This category is appropriate for general line input (mono).
Stereo Keyboard
…This category is appropriate for keyboard sounds (stereo) such as synthesizers.
Stereo Audio …This category is appropriate for general line input (stereo).
Effect List
This displays the effect names included in the category selected in the audio source cate-
gory list. Select the effect you want to use by clicking on it in the list. The effects dis-
played here will vary according to the category selected above.
Part Select Box
Click on the box, then from the drop-down list that is displayed, select the part number for
the audio category list and the effect list. Two parts can each be displayed at one time.
n In all, parts 1 to 14 can be selected. The far left side on the audio part unit (→ P. 36) is part 1. They are
numbered in order from left to right. The far right side on the audio part unit is part 14.
Click Monitor
When this box is checked by clicking on it, you can hear the selected effect the moment
you click on it in the effect list.
Set each item by clicking on it, then click on [OK]. The dialog will close and the settings will
take effect. To cancel the operation before finishing it, click [Cancel]. The dialog will close,
and the settings will stay in their original state.
n For parts where the audio signal from the external audio input (A/D input) terminal is input to the SW1000XG
sound card (parts that have A1 or A2 displayed in the input column of the part unit), even though an effect is
applied with this dialog, and the part is recorded on an XGworks wave track, the effect will not be recorded
together with the audio signal. When the recorded wave track is played back, only the raw sound without the
effects will be heard.
To output the same effects that existed when the song was recorded, the same effects must be set, even for audio
signal parts output from an XGworks wave track (parts that have P1 to P12 displayed in the Input column).
Audio Source
Category List
Effect List
Part Select Box
Click Monitor
SW1000XG-E.qx 4/2/99 4:31 PM Page 35

36
5 Send Button
When you click on this button, the setting information in the SW1000XG Mixer is sent as MIDI
data through the MIDI output port selected in the Setup dialog (→ P. 34) to the XG tone gener-
ator (sound card).
6 Insert Button
Opens the Insert Dialog. The parameter settings made in the SW1000XG Mixer will be insert-
ed/entered into the song as system exclusive data events.
Insert Dialog
Track……………Select the track for insertion. This is connected to “Track” on the setup
dialog (→ P. 34).
Meas ……………Specify the measure for insertion.
Beat ……………Specify the insertion position in beat units.
Clock …………Specify the insertion position in clock units.
Interval Time
……When multiple events are being inserted, specify the insertion interval
from event to event in clock units.
Offset …………When you check the box by clicking on it, only event parameter settings
that are different than the initial SW1000XG Mixer settings will be inserted
into the song as events. This avoids having the song data become too
loaded with repeated insertions of events with the same values.
n When inserting events in the song using Offset, a SW1000XG Mixer initial settings event must be previ-
ously inserted at the beginning of the song.
After specifying the track for insertion in the Track box, specify the position in the song
using Meas (measure), Beat, and Clock units, and click the [OK] button. The current effect,
pan, and volume settings will be inserted as events in the specified track at the specified
location. To cancel the operation before finishing it, click [Cancel]. The dialog will close, and
the events will not be inserted.
7 Record Button
When this button is clicked, song playback will begin (from the current location), and at the
same time, recording of every parameter for the SW1000XG Mixer (knob or slider) operation
will begin. When this button is again clicked, song playback and recording of parameter opera-
tions will stop.
During recording, every movement of a knob or slider will be recorded. When you want
parameters like pan and volume are changed continuously, this function is extremely useful
because it lets you record smooth changes in the values.
Audio Part Unit
The knobs and sliders for the various audio part settings, like volume, pan, and effects are arranged
vertically for each part. From left to right: Part 1, Part 2, Part 3, and so on. The part on the far right
side is part 14. Each control can be easily adjusted by clicking or dragging with the mouse.
SW1000XG-E.qx 4/2/99 4:31 PM Page 36

37
If any knob or slider is operated (clicked or dragged) while pressing the <Ctrl> key on the
computer keyboard, the knobs and sliders belonging to every part that is input into the
SW1000XG sound card from the external audio input (A/D input) terminal (parts that have A1
or A2 displayed in the input column) or to every part that is input into the SW1000XG sound
card from an XGworks wave track (parts that have P1 to P12 displayed in the input column)
will move together with it. For example, if the pan knob for the P1 part is rotated to the left
while holding the <Ctrl> key, the pan knobs for all parts P2 to P12 will simultaneously rotate
the same amount to the left.
If both the <Ctrl> and the <Shift> key are pressed at the same time and a control is operated
(clicked or dragged), the same control belonging to every part that is input into the SW1000XG
sound card from the external audio input (A/D input) terminal (parts that have A1 or A2 dis-
played in the input column) or to every part that is input into the SW1000XG sound card from
an XGworks wave track (parts that have P1 to P12 displayed in the input column) will move
together in the opposite direction. For example, if the pan knob for the P1 part is rotated to the
left while holding the <Ctrl> and the <Shift> key, the pan knobs for all parts P2 to P12 will
simultaneously rotate the same amount to the right.
If a control is operated (clicked or dragged) while the <Ctrl> and <Alt> keys are both being
pressed, the knobs or sliders of the two parts that form a stereo pair will move together.
n The following pairs of parts in the Input column form stereo pairs: A1 and A2, P1 and P2, P3 and P4, P5 and P6,
P7 and P8, P9 and P10, and P11 and P12.
n The value of each knob and slider can be controlled from the computer keyboard. Pressing the <Home> or
<Page Up> key will increment the value (increase it). Pressing the <End> or <Page Down> key will decrement
the value (decrease it).
n When the SW1000XG Mixer is opened, each knob and slider will always be set at its default amount. Even after
changing the settings by moving the knobs and sliders, any knob or slider can be returned to its default value by
simply double-clicking it.
1 Level Meter
Displays the audio input level for the part which is set as “A1” or “A2” in the Input (
2
) setting.
n Depending on the Wave In device set in the System Setup dialog (→ P. 25), the audio input level display will be
as follows:
SW1000 #1 WAVE IN The level will be displayed only for the external audio input (A/D input) of the
SW1000XG sound card.
SW1000 #2 WAVE IN The level will be displayed for a mixture of the A/D input, XGworks wave tracks and
the sound from the AWM2 tone generator on the sound card.
2 Input
Sets the type of each part’s audio signal. When you double-click on the input display box, the
Input Category dialog will be displayed.
1
2
3
4
5
6
7
8
9
SW1000XG-E.qx 4/2/99 4:31 PM Page 37

38
Input Category Dialog
Click one of the boxes for Parts 1 to 14, then select the type of audio signal to be controlled
in that part from the drop-down list that is displayed.
“Analog” is for when an audio signal from the external audio input (A/D input) terminal is
input to the SW1000XG sound card. This type can be selected for a maximum of two parts.
“PCI” is for when an audio signal from an XGworks WAVE track is input to the SW1000XG
sound card. This type can be selected for a maximum of 12 parts.
After setting up each item, click [OK]. The dialog will close and the settings will take effect. If
you want to cancel the operation, click on [Cancel]. The dialog will close, and the settings
will return to their original state. If you click [Default], the SW1000XG Mixer assignments for
each part will return to the default settings.
n Use the default settings whenever possible. When the default settings are selected, Part 1 will Analog 1, Part 2
will be Analog 2, Part 3 will be PCI 1, Part 4 will be PCI 2, continuing until Part 14 is PCI 12.
n If settings besides the default ones are made, it will no longer be possible to correctly control volume and
stereo balance for the parts with the Windows standard mixer (the “Volume Control” activated by double-
clicking on the speaker icon on the task bar).
3 Dry Knob
This is used to set the send level of the dry signal for each part. As the knob is rotated to the
right by dragging it, the send level will increase. When the knob is all the way to the left, no
sound will be played.
4 Reverb Knob (Rev)
This is used to set the depth of reverb for each part. As the knob is rotated to the right by
dragging it, the reverb effect will deepen. When the knob is all the way to the left, the reverb
effect is zero.
n Depending on the character of the audio signal, the manner in which the reverb effect is applied may vary.
5 Chorus Knob (Cho)
This is used to set the depth of chorus for each part. As the knob is rotated to the right by
dragging it, the chorus effect will deepen. When the knob is all the way to the left, the chorus
effect is zero.
n Depending on the character of the audio signal, the manner in which the chorus effect is applied may vary.
SW1000XG-E.qx 4/2/99 4:32 PM Page 38

39
6 Variation Knob (Var)
This is used to set the depth of Variation effects for each part. As the knob is rotated to the
right by dragging it, the Variation effects will deepen. When the knob is all the way to the left,
the Variation effects will be zero.
n Variation effect is a function used in the XG tone generator. It has a great many effect programs besides reverb
and chorus, such as delay, rotary speaker, auto pan, amp simulator, and auto wah-wah.
n Depending on the Character of the audio signal, the manner in which the Variation effect is applied may vary.
7 Mute Button
By clicking on any of these buttons and turning it ON (it will be highlighted), you can mute
playback for that part. If you click the button again, the part will return to normal playback.
You can also mute multiple parts.
8 Pan Knob
This is used to set the stereo orientation for each part. As the knob is rotated to the right by
dragging it, the orientation of the playback sound on that part will move to the right. Moving
the knob to the left will cause the orientation of the playback sound on that part to move to
the left.
9 Volume Fader
By dragging any slider up and down, you can set the volume for the corresponding part.
Master Volume Unit
1 Level Meter
Displays the overall volume level.
n Depending on the Wave In device set in the System Setup dialog (→ P. 25), the level dis-
play will be as follows:
SW1000 #1 WAVE IN....Nothing will be displayed.
SW1000 #2 WAVE IN....The level will be displayed for a mixture of the A/D Input,
XGworks wave tracks and the sound from the AWM2 tone gener-
ator on the sound card.
2 Master Fader
By dragging the slider up and down, you can change the overall volume set-
ting.
n If you select SW1000 #2 WAVE IN as the Wave In device in the System Setup dialog (→ P.
25), you can set the level of the mixture of the A/D Input, XGworks wave tracks and the
sound from the AWM2 tone generator on the sound card. When you record them, or mix
them down to an XGworks wave track, this Master Fader can be used to adjust the record-
ing level.
1
2
SW1000XG-E.qx 4/2/99 4:32 PM Page 39

40
MIDI Implementation Chart
YAMAHA [ PCI Audio MIDI Card ]
Model SW1000XG MIDI Implementation Chart
Date :01-JUN-1998
Version : 1.0
Function...
Transmitted Recognized Remarks
Basic
Channel
Default
Changed
Mode
Default
Messages
Altered
Note
Number : True voice
Velocity Note ON
Note OFF
After
Touch
Key's
Ch's
Pitch Bend
0,32
1,5,7,10,11
6,38
64-67
71-74
84
91,93,94
96-97
98-99
100-101
Control
Change
x
x
x
x
**************
x
**************
x
x
x
x
x
x
x
x
x
x
x
x
x
x
x
1 - 16
1 - 16
3
3, 4 (m=1) *2
x
0 - 127
0 - 127
o 9nH,v=1-127
x
o *1
o *1
o 0-24 semi *1
o *1
o *1
o *1
o *1
o *1
o *1
o *1
o *1
o *1
o *1
Bank Select
Data Entry
Sound Controller
Portamento Cntrl
Effect Depth
RPN Inc,Dec
NRPN LSB,MSB
RPN LSB,MSB
SW1000XG-E.qx 4/2/99 4:32 PM Page 40

41
Prog
Change : True #
System Exclusive
:
Common :
:
Song Pos.
Song Sel.
Tune
System :
Real Time:
Clock
Commands
Aux : All Sound Off
: Reset All Cntrls
: Local ON/OFF
Mes- : All Notes OFF
sages : Active Sens
: Reset
Notes: *1 receive if switch is on.
*2 m is always treated as "1" regardless of its value.
*3 receive if exclusive switch is on.
Mode 1 : OMNI ON , POLY Mode 2 : OMNI ON ,MONO
Mode 3 : OMNI OFF, POLY Mode 4 : OMNI OFF,MONO
o : Yes
x : No
x
**************
x
x
x
x
x
x
x
x
x
x
x
x
o 0 - 127
o *3
x
x
x
x
x
o(120,126,127)
o(121)
x
o(123-125)
o
x
SW1000XG-E.qx 4/2/99 4:32 PM Page 41

Specifications of the
SW1000XG Sound Card
System Requirements
CPU: Pentium/166MHz or greater
Memory: 32MB or more
Hard disk: 20MB or more
Operating system:Windows95
PCI slot
CD-ROM drive (for software installation)
Other equipments (mouse, audio speakers, headphones, etc.)
Tone Generation
AWM2 (Advanced Wave Memory 2) tone generation system
Number of voices: 1,267 normal voices, 46 drum voices
Maximum polyphony: 64
Multitimbral capability: 32 parts
Sound module mode
XG (Extended General MIDI): 1,074 normal voices, 36 drum voices
TG300B: 614 normal voices, 10 drum voices
Effects
Reverb: 12 types
Chorus: 14 types
Variation: 70 types
Insertion 1/2: 43 types each
5 band multi EQ: 4 types
Digital Audio
Waveform playback devices (x6)
*6 stereo files or 12 monaural files can be played simultaneously
Waveform recording devices (x2)
Connectors
External audio in (A/D Input)
Line out L/R
Digital out (S/PDIF)
MINI DIN 6 pins (for MIDI connection)
Connector for XG plug-in board (PLG100 series)
Connector for digital mixing card (DS2416)
Others
Dimensions (W x D x H): 198mm x 127 mm x 21.6mm (7-3/4” x 5” x 7/8”)
Weight: 140g (5 oz)
Included items: SW1000XG sound card
MIDI adapter cable (x1)
Plug-in board connection cable (x1)
Plug-in board spacers(x4)
CD-ROM
Owner’s manual
Specifications and descriptions in this manual are for information purposes only. Yamaha Corp. reserves
the right to change or modify products or specifications at any time without prior notice. Since specifica-
tions, equipment or options may not be the same in every locale, please check with your Yamaha dealer.
42
SW1000XG-E.qx 4/2/99 4:32 PM Page 42

Troubleshooting
Even though the SW1000XG sound card is easy to use, it may occasionally not function as you
expected it to. If that happens, check the possible problems and solutions below before assuming
the instrument is faulty.
■ Song data with an XG/GM mark does not play correctly.
• Are Mute Lock,Audio Lock, EQ Lock, and Output Select Lock each set to OFF? (→
MIDI Data Format <Table 2-2>)
• Are Rcv System On Message and Rcv Bank Select both set to ON? (
→ MIDI Data
Format <Table 2-2>)
• Is the sound module mode (XG mode or TG300B mode) correctly set? (
→ P. 22)
■ Song Data made with TG300 does not play correctly.
• Because the filter and effect settings are different from the TG300, the manner in
which the song data plays may be different.
■ There is no sound.
• Are all devices (such as speakers, headphones, and digital mixing card) correctly
connected? (→ P. 9, 12)
• Has the volume been turned down too low (such as on the external speakers, or
the Windows standard “volume control” mixer)?
• Is Mute or Solo set (such as in the XGworks Track View Window)?
• Has any incorrect volume or expression data been inserted in the MIDI applica-
tion?
• Is the MIDI driver correctly installed? (→ P. 13) Have the correct MIDI devices
been selected? (→ P. 25)
• Is Individual Out to the DS2416 set for the parts that are not playing? (
→ P. 12)
■ Distorted Sound/Weak Sound
• Are the volume settings on any amps or playback devices made correctly?
• Have any unwanted effects been set?
43
SW1000XG-E.qx 4/2/99 4:32 PM Page 43

■ Volume is low.
• Is volume or expression set too low in the part control?
• Are the velocity sense settings in the part edit made incorrectly?
• Is the MIDI volume information not being received?
■ Distorted sound/weak sound on the A/D input
• Is the input source selected correctly? (→ P. 35)
■ No effects applied at all.
• Has send/return been raised sufficiently?
■ Effects not applied to some parts
• Has the send level been raised sufficiently for each of the parts or drum part
instruments?
■ The tone is strange
• Are the bank select/program change settings made correctly?
■ The pitch is strange.
• Are the master tune, transpose and note shift settings correct?
■ Interruptions in the sound
• Has the maximum polyphony limit of 64 voices been exceeded? (→ P. 23)
Keep in mind that when one channel is specified for multiple parts, all the multi-
ple parts will begin playing simultaneously with one Key On.
■ MIDI bulk data is not being received correctly
• Is the device number specification correct?
• Was the dump interval time set too short when the data was saved?
44
SW1000XG-E.qx 4/2/99 4:32 PM Page 44

■ No sound is output when wave data is played
• If the wave data is being played with standard Windows wave playback software
(such as the Sound Recorder), the wave data is output to the destination speci-
fied in the multimedia properties (audio) dialog.
However, out of the devices that can be seen on the “Preferred device” drop-
down list, only the first eight devices down from the top can be specified. If any
device below the eighth device is specified, the first device on the list will actu-
ally be used as the output device.
If more than eight devices are displayed on the drop-down list, with a combina-
tion of output devices something like “Another Sound Card,”“DS2416” and
“SW1000XG,” and “Another Sound Card” is displayed as the first device on the list,
specifying the eighth device of the DS2416 will cause the sound to be played
from the “Another Sound Card” device.
■ Sound output from DOS games is strange
• SW1000XG is not guaranteed to work with DOS games played in Windows95.
■ The SW1000XG Mixer controls do not work
• Are the ports correctly specified in the Setup dialog? If the SW1000XG sound
card is being used,“SW1000 #1 (or #2) Synthesizer” must be selected (→ P. 34).
■ SW1000XG mixer controls for even-numbered audio parts
(such as A2, P2, P4) do not work.
• Are the corresponding odd-numbered parts (such as A1, P1, P3) set for stereo
mode? In other words, is Stereo set in the Mono/Stereo Mode selection in the
XGworks XG Editor (in the properties dialog opened by clicking the [Detail] but-
ton for the Audio Part Unit). If Stereo Mode is set here, only the odd-number
parts can be controlled.
■ SW1000XG does not operate
• Is the SW1000XG card correctly installed in the PCI bus slot?
• In older computer types, the PCI slot cannot function as the bus master. Even if
SW1000XG is installed in such a slot, it will not operate correctly. See the
Owner’s Manual that came with your computer for details.
• There may be a conflict between the SW1000XG and another PCI card. If this
happens, either remove the conflicting card, or try inserting the SW1000XG into
the slot where the conflicting card has been inserted and vice versa. If a
Windows95 version before OSR2 is being used, and the problem cannot be
solved, change the IRQ setting or remove the conflicting card.
45
SW1000XG-E.qx 4/2/99 4:32 PM Page 45

For details of products, please contact your nearest Yamaha or
the authorized distributor listed below.
Pour plus de détails sur les produits, veuillez-vous adresser à
Yamaha ou au distributeur le plus proche de vous figurant
dans la liste suivante.
46
Die Einzelheiten zu Produkten sind bei Ihrer unten aufge-
führten Niederlassung und bei Yamaha Vertragshändlern in
den jeweiligen Bestimmungsländern erhältlich.
Para detalles sobre productos, contacte su tienda Yamaha más
cercana o el distribuidor autorizado que se lista debajo.
NORTH AMERICA
CANADA
Yamaha Canada Music Ltd.
135 Milner Avenue, Scarborough, Ontario,
M1S 3R1, Canada
Tel: 416-298-1311
U.S.A.
Yamaha Corporation of America
6600 Orangethorpe Ave., Buena Park, Calif. 90620,
U.S.A.
Tel: 714-522-9011
CENTRAL & SOUTH AMERICA
MEXICO
Yamaha de Mexico S.A. De C.V.,
Departamento de ventas
Javier Rojo Gomez No.1149, Col. Gpe Del
Moral, Deleg. Iztapalapa, 09300 Mexico, D.F.
Tel: 686-00-33
BRAZIL
Yamaha Musical do Brasil LTDA.
Av. Rebou•as 2636, S‹o Paulo, Brasil
Tel: 011-853-1377
ARGENTINA
Yamaha Music Argentina S.A.
Viamonte 1145 Piso2-B 1053,
Buenos Aires, Argentina
Tel: 1-371-7021
PANAMA AND OTHER LATIN
AMERICAN COUNTRIES/
CARIBBEAN COUNTRIES
Yamaha de Panama S.A.
Torre Banco General, Piso 7, Urbanizaci—n Marbella,
Calle 47 y Aquilino de la Guardia,
Ciudad de Panam‡, Panam‡
Tel: 507-269-5311
EUROPE
THE UNITED KINGDOM
Yamaha-Kemble Music (U.K.) Ltd.
Sherbourne Drive, Tilbrook, Milton Keynes,
MK7 8BL, England
Tel: 01908-366700
IRELAND
Danfay Ltd.
61D, Sallynoggin Road, Dun Laoghaire, Co. Dublin
Tel: 01-2859177
GERMANY/SWITZERLAND
Yamaha Europa GmbH.
Siemensstra§e 22-34, 25462 Rellingen,
F.R. of Germany
Tel: 04101-3030
AUSTRIA
Yamaha Music Austria
Schleiergasse 20, A-1100 Wien Austria
Tel: 01-60203900
THE NETHERLANDS
Yamaha Music Nederland
Kanaalweg 18G, 3526KL, Utrecht, The Netherlands
Tel: 030-2828411
BELGIUM
Yamaha Music Belgium
Keiberg Imperiastraat 8, 1930 Zaventem, Belgium
Tel: 02-7258220
FRANCE
Yamaha Musique France,
Division Professionnelle
BP 70-77312 Marne-la-VallŽe Cedex 2, France
Tel: 01-64-61-4000
ITALY
Yamaha Musica Italia S.P.A.,
Combo Division
Viale Italia 88, 20020 Lainate (Milano), Italy
Tel: 02-935-771
SPAIN
Yamaha-Hazen Electronica Musical, S.A.
Jorge Juan 30, 28001, Madrid, Spain
Tel: 91-577-7270
PORTUGAL
Valentim de Carvalho CI SA
Estrada de Porto Salvo, Pa•o de Arcos 2780 Oeiras,
Portugal
Tel: 01-443-3398/4030/1823
GREECE
Philippe Nakas S.A.
Navarinou Street 13, P.Code 10680, Athens, Greece
Tel: 01-364-7111
SWEDEN
Yamaha Scandinavia AB
J. A. Wettergrens Gata 1
Box 30053
S-400 43 Gšteborg, Sweden
Tel: 031 89 34 00
DENMARK
YS Copenhagen Liaison Office
Generatorvej 8B
DK-2730 Herlev, Denmark
Tel: 44 92 49 00
FINLAND
Warner Music Finland OY/Fazer Music
Aleksanterinkatu 11, P.O. Box 260
SF-00101 Helsinki, Finland
Tel: 0435 011
NORWAY
Norsk filial av Yamaha Scandinavia AB
Grini N¾ringspark 1
N-1345 ¯sterŒs, Norway
Tel: 67 16 77 70
ICELAND
Skifan HF
Skeifan 17 P.O. Box 8120
IS-128 Reykjavik, Iceland
Tel: 525 5000
OTHER EUROPEAN COUNTRIES
Yamaha Europa GmbH.
Siemensstra§e 22-34, 25462 Rellingen, F.R. of
Germany
Tel: 04101-3030
AFRICA
Yamaha Corporation,
International Marketing Division
Nakazawa-cho 10-1, Hamamatsu, Japan 430-8650
Tel: 053-460-2312
MIDDLE EAST
TURKEY/CYPRUS
Yamaha Europa GmbH.
Siemensstra§e 22-34, 25462 Rellingen,
F.R. of Germany
Tel: 04101-3030
OTHER COUNTRIES
Yamaha Corporation,
International Marketing Division
Nakazawa-cho 10-1, Hamamatsu, Japan 430-8650
Tel: 053-460-2312
ASIA
HONG KONG
Tom Lee Music Co., Ltd.
11/F., Silvercord Tower 1, 30 Canton Road,
Tsimshatsui, Kowloon, Hong Kong
Tel: 2737-7688
INDONESIA
PT. Yamaha Music Indonesia (Distributor)
PT. Nusantik
Gedung Yamaha Music Center, Jalan Jend. Gatot
Subroto Kav. 4, Jakarta 12930, Indonesia
Tel: 21-520-2577
KOREA
Cosmos Corporation
#131-31, Neung-Dong, Sungdong-Ku, Seoul
Korea
Tel: 02-466-0021~5
MALAYSIA
Yamaha Music Malaysia, Sdn., Bhd.
16-28, Jalan SS 2/72, Petaling Jaya, Selangor,
Malaysia
Tel: 3-717-8977
PHILIPPINES
Yupangco Music Corporation
339 Gil J. Puyat Avenue, P.O. Box 885 MCPO,
Makati, Metro Manila, Philippines
Tel: 819-7551
SINGAPORE
Yamaha Music Asia Pte., Ltd.
Blk 202 Hougang, Street 21 #02-01,
Singapore 530202
Tel: 747-4374
TAIWAN
Yamaha KHS Music Co., Ltd.
10F, 150, Tun-Hwa Northroad,
Taipei, Taiwan, R.O.C.
Tel: 02-2713-8999
THAILAND
Siam Music Yamaha Co., Ltd.
121/60-61 RS Tower 17th Floor,
Ratchadaphisek RD., Dindaeng,
Bangkok 10320, Thailand
Tel: 02-641-2951
THE PEOPLEÕS REPUBLIC OF CHI-
NAAND OTHER ASIAN COUNTRIES
Yamaha Corporation,
International Marketing Division
Nakazawa-cho 10-1, Hamamatsu, Japan 430-8650
Tel: 053-460-2317
OCEANIA
AUSTRALIA
Yamaha Music Australia Pty. Ltd.
17-33 Market Street, South Melbourne, Vic. 3205,
Australia
Tel: 3-699-2388
NEW ZEALAND
Music Houses of N.Z. Ltd.
146/148 Captain Springs Road, Te Papapa, Auckland,
New Zealand
Tel: 9-634-0099
COUNTRIES AND TRUST
TERRITORIES IN PACIFIC OCEAN
Yamaha Corporation,
International Marketing Division
Nakazawa-cho 10-1, Hamamatsu, Japan 430-8650
Tel: 053-460-2317
HEAD OFFICE Yamaha Corporation, XG Division
Nakazawa-cho 10-1, Hamamatsu, Japan 430-8650
Tel: 053-460-2936
XG1-01
SW1000XG-E.qx 4/2/99 4:32 PM Page 46

47
SW1000XG-E.qx 4/2/99 4:32 PM Page 47

M.D.G., EMI Division, ©Yamaha Corporation 1998
SW1000XG-E.qx 4/2/99 4:32 PM Page 48
Documenttranscriptie
SW1000XG-E.qx 4/2/99 P C I 4:31 PM Page 1 A U D I O M I D I O W N E R' S M AN UA L C A R D SW1000XG-E.qx 4/2/99 4:31 PM Page 2 FCC INFORMATION (U.S.A.) 1. IMPORTANT NOTICE: DO NOT MODIFY THIS UNIT! tronic devices. Compliance with FCC regulations does not guarantee that interference will not occur in all installations. If this product is found to be the source of interference, which can be determined by turning the unit “OFF” and “ON”, please try to eliminate the problem by using one of the following measures: Relocate either this product or the device that is being affected by the interference. Utilize power outlets that are on different branch (circuit breaker or fuse) circuits or install AC line filter/s. In the case of radio or TV interference, relocate/reorient the antenna. If the antenna lead-in is 300 ohm ribbon lead, change the lead-in to coaxial type cable. If these corrective measures do not produce satisfactory results, please contact the local retailer authorized to distribute this type of product. If you can not locate the appropriate retailer, please contact Yamaha Corporation of America, Electronic Service Division, 6600 Orangethorpe Ave, Buena Park, CA90620 The above statements apply ONLY to those products distributed by Yamaha Corporation of America or its subsidiaries. This product, when installed as indicated in the instructions contained in this manual, meets FCC requirements. Modifications not expressly approved by Yamaha may void your authority, granted by the FCC, to use the product. 2. IMPORTANT: When connecting this product to accessories and/or another product use only high quality shielded cables. Cable/s supplied with this product MUST be used. Follow all installation instructions. Failure to follow instructions could void your FCC authorization to use this product in the USA. 3. NOTE: This product has been tested and found to comply with the requirements listed in FCC Regulations, Part 15 for Class “B” digital devices. Compliance with these requirements provides a reasonable level of assurance that your use of this product in a residential environment will not result in harmful interference with other electronic devices. This equipment generates/uses radio frequencies and, if not installed and used according to the instructions found in the users manual, may cause interference harmful to the operation of other elec- * This applies only to products distributed by YAMAHA CORPORATION OF AMERICA. CANADA This Class B digital apparatus complies with Canadian ICES-003. Cet appareil numérique de la classe B est conforme à la norme NMB-003 du Canada. • This applies only to products distributed by Yamaha Canada Music Ltd. • Ceci ne s’applique qu’aux produits distribués par Yamaha Canada Musique Ltée. 2 SW1000XG-E.qx 4/2/99 4:31 PM Page 3 Precautions ● Do not expose the soundcard to direct sunlight, excessive humidity, high temperatures, excessive dust or strong vibrations. ● It is possible that computer malfunctions or operator actions might destroy data that was created with the included application software. We recommend that you back up all important data onto floppy disks. Yamaha is not responsible for loss of data through computer malfunctions or operator actions. ● Before handling the soundcard, be sure to touch a metal surface to discharge any static electricity which may be in your body. ● When holding the soundcard, do not touch the inside area of the circuit board or apply excessive pressure to the card, and be sure to protect the card from contact with water or other liquids. ● The soundcard contains no user-serviceable parts, so never touch the inside area of the circuit board or tamper with the electronic circuitry in any way. Doing so may result in electrical shock or damage to the soundcard. ● Before installing the soundcard in the computer, unplug the power connector of your computer. YAMAHA CANNOT BE HELD RESPONSIBLE FOR DAMAGE CAUSED BY IMPROPER CARE AND USE OF THE SOUNDCARD AND SOFTWARE. ● Before connecting the computer to other devices, turn off the power switches of all devices. Introduction Thank you very much for purchasing Yamaha’s SW1000XG. In this package you will find a sound card that offers both high quality XG sound and a complete digital audio environment. To help you take utmost advantage of the advanced features of your new SW1000XG, we have packed it together with a variety of applications that work together with your sound card to help you bring your musical ideas to reality. Since the SW1000XG puts this remarkable MIDI + audio music control environment right inside your computer, you can do everything right from your PC—even mastering compact disks. Read this manual carefully before using your SW1000XG to make sure you get the most enjoyment out of your investment in quality sound. After you finish reading your owner’s manual, be sure to keep it someplace safe where you can refer to it whenever you have a question about your sound card. Special Notices • The SW1000XG software and this owner’s manual are exclusive copyrights of Yamaha Corporation. • Copying of the software or reproduction of this manual in whole or in part by any means is expressly forbidden without the written consent of the manufacturer. • Yamaha makes no representations or warranties with regard to the use of the software and documentation and cannot be held responsible for the results of the use of this manual and the software. • This disk is a CD-ROM. Do not attempt to play the disk on an audio CD player. Doing so may result in irreparable damage to your audio CD player. • Copying of the commercially available music sequence data and/or digital audio files is strictly prohibited except for your personal use. • The company names and product names in this Owner’s Manual are the trademarks or registered trademarks of their respective companies. • The screen displays as illustrated in this Owner’s Manual are for instructional purposes, and may appear somewhat different from the screens which appear on your computer. • Future upgrades of application and system software and any changes in specifications and functions will be announced separately. Windows Operation This owner’s manual assumes that you are already familiar with basic Windows operation. If you are not, please refer to the owner’s manual which came with your Windows software before using SW1000XG. 3 SW1000XG-E.qx 4/2/99 4:31 PM Page 4 SW1000XG Features AWM Wave Table • Using the AWM2 (Advanced Wave Memory 2) tone generator, the wave table built into the SW1000XG offers high quality sound with 1267 normal voices and 46 drum kits playing with 32 part/64 polyphony (the maximum number of simultaneous sounds). The quality of sound rivals that of Yamaha’s MU100 tone generator, which is top-class, even among tone generators for personal computer-based music system. Full Array of Effects • The SW1000XG comes equipped with a total of six effect blocks: reverb (12 types), chorus (14 types), variation (70 types), insertion 1/2 (43 types for each), and five band multi EQ (four types). The SW1000XG does more than offer effects for an ensemble as a whole. It also lets you craft detailed effect settings for each instrument part, creating an elaborate world of sound using just one sound card. The effects can be applied not only to the internal tone generator, but also to input from external audio sources such as wave data (digital audio) or to microphone input. GM/XG Compatible • Because the SW1000XG sound card is compatible with the GM standard and Yamaha’s exclusive XG extensions to GM, you can enjoy playing commercially available GM and XG song collections with high quality sound. GM GM (General MIDI System Level 1) is an addition to the MIDI standard which ensures that any GM-compatible music data can be accurately played by any GM-compatible tone generator, regardless of maker. With the GM standard, you can assign any of the 128 GM-compatible voices to each of the 16 parts, or MIDI channels. (Channel 10 is fixed as the drum part.) XG XG is a new MIDI format created by Yamaha which significantly improves and expands upon the General MIDI standard by providing a greater variety of high-quality voices plus considerably enhanced effect operation—while being fully compatible with GM. MIDI Interface Function • You can connect your sound card to an external MIDI keyboard or other MIDI device using the MIDI adapter cable that was included with your SW1000XG. Expanded Capability with an XG Plug-In Board • You can add expanded functions like a VL (physical model) tone generator to the standard AWM2 tone generator in your SW1000XG sound card by simply connecting an XG Plug-In System compatible plugin option board (PLG100 series). Digital Audio Recording/Playback • The SW1000XG features six stereo wave playback devices and two stereo wave recording devices. Among the two stereo recording devices, one is for external audio input (A/D input) only, and the other mixes external audio input (A/D input), AWM2 tone generator sound, and wave tracks in the sequence software. Using the included XGworks for SW1000XG software as an example, wave data on multiple tracks can be sent to the SW1000XG sound card audio parts (maximum 12 parts), and played simultaneously with each part having effects applied. Mic/Line input can be recorded on a wave track (in either stereo or mono) in time with playback of MIDI tracks (or MIDI tracks and wave tracks). With this feature, it’s easy to lay down multiple recordings for things like vocals, with the AWM2 tone generator of the SW1000XG playing in the background. When you make a song using this feature, you can play back all the MIDI tracks and wave tracks simultaneously, then record the entire output together on a single wave track. When you do this, all the tracks of a song can be united into one as wave data, then mastered. The mastered audio data can then be used as a file for writing on a CD-R disk. Digital Output • Stereo digital out (S/PDIF) connector is equipped on the SW1000XG. Also, when you connect an optional digital mixing card (DS2416), you can send digital output from the SW1000XG to the DS2416 on one pair of stereo outputs and six individual outputs. This means that even if no external digital mixer is available, you can control every aspect of your music, including digital mixing, from within your computer. 4 SW1000XG-E.qx 4/2/99 4:31 PM Page 5 Table of Contents Introduction .......................................................................................................3 Special Notices ..............................................................................................................................3 Windows Operation......................................................................................................................3 SW1000XG Features ...........................................................................................4 Before Using .......................................................................................................6 Package Contents ..........................................................................................................................6 Items You Will Need that Are Not Included ...............................................................................6 Introducing the Included Software ..................................................................7 SW1000XG Sound Card Connections ...............................................................9 The Terminals on the SW1000XG................................................................................................9 Installing Your Sound Card ........................................................................................................10 Installing the Plug-In Board .......................................................................................................12 Installing the Digital Mixing Card ..............................................................................................12 Installation of the Driver.................................................................................13 Installing the driver for Windows95 OSR2 (4.00.950B)............................................................13 Installing the driver for Windows95 (4.00.950 or 4.00.950A) ..................................................15 Installation of the Software.............................................................................16 Installing XGworks for SW1000XG and Wave Editor TWE......................................................16 Installing XG Plug-In Software...................................................................................................19 SW1000XG Overview and Features.................................................................22 Sound Module Modes .................................................................................................................22 Voices ...........................................................................................................................................22 Selecting Voices ...........................................................................................................................23 Effect Types .................................................................................................................................23 A/D Input ....................................................................................................................................24 About the Plug-In System...........................................................................................................24 Supplementary Items for XGworks 2.0..........................................................25 Simultaneous Playback of Multiple Wave Tracks and Playback Part-Way Through ..............25 System Setup Dialog ...................................................................................................................25 Track View Window ...................................................................................................................28 XG Editor Window......................................................................................................................29 Wave Data Can Also Be Saved in a Song .................................................................................31 Opening the Wave Editor TWE..................................................................................................31 SW1000XG Mixer ........................................................................................................................32 MIDI Implementation Chart............................................................................40 Specifications of the SW1000XG Sound Card ................................................42 Troubleshooting ...............................................................................................43 * The screen displays as illustrated in this manual are for instructional purposes, and may appear somewhat different from the screens which appear on your computer. 5 SW1000XG-E.qx 4/2/99 4:31 PM Page 6 Before Using Package Contents Before using your new SW1000XG, check that all the items below are included in the package. In the rare case that some item is missing, contact the store where you purchased your sound card as soon as possible. SW1000XG sound card • MIDI adapter cable • Plug-in board connection cable • Spacers for plug-in board (1) (1) (4) CD-ROM Owner’s Manual (this book) Items You Will Need that Are Not Included To use your SW1000XG sound card and the included software, you will also need the following hardware and software: Computer: CPU/Memory An IBM compatible personal computer with a 166 MHz or higher Pentium CPU, and at least 32 MB of memory. Hard Disk To use the software included with SW1000XG, the software and drivers must be installed. To install and use the software, at least 20 MB of hard disk space is required. CD-ROM Drive All the software that came with your sound card is included on the supplied CD-ROM. To install the software and to read the demo songs, a CD-ROM drive is required. Mouse Operations in the included software are mainly done using a mouse. PCI Expansion Slot To install the sound card, an empty PCI slot is required. Operating System Windows 95 is required. If the Windows 95 version installed on your computer is OSR2 or higher, you can use IRQ sharing. Because versions of Windows 95 earlier than that do not allow IRQ sharing, conflicts with other boards may happen or installation may not be possible. Should this occur, change the IRQ settings or remove the conflicting board. n You can check which version of Windows 95 is installed on your computer by clicking [My Computer], then [Control Panel], then [System]. If the version number displayed on the [General] page is 4.00.950 B, you have OSR2. If the number is 4.00.950 or 4.00.950 A, you have a previous version of Windows 95. 6 SW1000XG-E.qx 4/2/99 4:31 PM Page 7 Introducing the Included Software The software programs that are included in this package are introduced here. For information about installing each of them, see “Installation of the Software” on page 16. • XGworks for SW1000XG This is MIDI sequence software for Windows 95. Besides letting you enter and edit MIDI data, XGworks supports digital recording and features an XG Editor that makes it easy to edit the XG voices. These and other advanced features are just the tools you need to enjoy creating high quality music. For details about XGworks, see the included XGworks 2.0 Owner’s Manual (PDF file in the supplied CD-ROM’s “Document” folder). n To view PDF files, you must first install the Acrobat Reader. A program for doing this has been provided in the Acrobat folder on the CD-ROM that came with your SW1000XG sound card. To install Acrobat Reader, doubleclick on the ar32e301.exe installation program in that folder. Because the version of XGworks in this package is an upgrade specially developed for your SW1000XG sound card, some important supplemental information has been included in this manual, starting from page 25. Please read this information together with your XGworks manual. • Wave Editor TWE This software lets you edit the waveform data in wave files (extension .WAV) that have been recorded onto WAVE tracks in XGworks. Wave files can also be recorded using Wave Editor TWE. For detailed information about using this program after installation, click on the [Start] button in Windows 95, then select [YAMAHA XGworks for SW1000XG] from the [Program] menu. Selecting [WAVE Editor TWE Manual] will display the online manual for the wave editor (PDF file). n To view PDF files, you must first install the Acrobat Reader. A program for doing this has been provided in the Acrobat folder on the CD-ROM that came with your SW1000XG sound card. To install Acrobat Reader, doubleclick on the ar32e301.exe installation program in that folder. n Besides wave files with the extension .WAV, the Wave Editor TWE software also supports recording and editing AIFF files. However, these files cannot be used in XGworks. • VL Visual Editor The VL Visual Editor is editing software for the optional PLG100-VL board (→ P. 24) sold separately. For detailed information on using it, install the software, then start the VL Visual Editor in XGworks. Select [Contents] from the [Help] menu to read the online help. • VH Effect Editor The VH Effect Editor is editing software for the optional PLG100-VH board (→ P. 24) sold separately. For detailed information on using it, install the software, then start the VH Effect Editor in XGworks. Select [Contents] from the [Help] menu to read the online help. • DX Easy Editor The DX Easy Editor is simple editing software for the optional PLG100-DX board (→ P. 24) sold separately. For detailed information on using it, install the software, then start the DX Easy Editor in XGworks. Select [Contents] from the [Help] menu to read the online help. 7 SW1000XG-E.qx 4/2/99 4:31 PM Page 8 • DX Simulator The DX Simulator is editing software for the optional PLG100-DX board (→ P. 24) sold separately. Using exactly the same user interface as the famous Yamaha DX7, you can create finelycrafted sounds. For detailed information on using this program, install the software, then start the DX Simulator in XGworks. Select [Contents] from the [Help] menu to read the online help. • SW1000XG Windows95 Driver This driver is necessary for playing sounds using the SW1000XG sound card. See page 13 for instructions on installing this driver. • SW1000XG Demo Songs The SW1000XG demo songs showcase the high quality expressive power of the SW1000XG sound card. Since they feature both MIDI and audio tracks, you can enjoy them by playing them in XGworks for SW1000XG. They are included in the supplied CD-ROM’s “Demo” folder. n Besides the SW1000XG demo songs with both MIDI and audio tracks, other demo songs that are standard MIDI files have also been provided in this package. These standard MIDI files will be installed together with XGworks. • SW1000XG Data Lists The voice list, materials about the effects, and the MIDI data format for your SW1000XG sound card have all been provided in PDF file format for your reference. They are collected in the file “Data_E.PDF,” which is in the Document folder of the CD-ROM that came with your sound card. n To view PDF files, you must first install the Acrobat Reader. A program for doing this has been provided in the Acrobat folder on the CD-ROM that came with your SW1000XG sound card. To install Acrobat Reader, doubleclick on the ar32e301.exe installation program in that folder. 8 SW1000XG-E.qx 4/2/99 4:31 PM Page 9 SW1000XG Sound Card Connections The Terminals on the SW1000XG Before handling the sound card, make sure to eliminate any static electricity in your clothes or body by touching a metal surface that is definitely grounded. Also, be careful to avoid touching any parts on the sound card’s circuit board, or any of the connectors. To XG plug-in board connector To Serial In Connector Plug-In Board (PLG 100 series) 5 6 Digital Mixing Card (DS2416) 1 Microphone, etc. SW1000XG 2 Powered speakers DAT 00:00:00 DAT, etc. MIDI KEYBOARD CBX-K1 MIDI OUT MIDI IN MIDI Keyboard 3 4 MIDI IN MIDI OUT MIDI adapter cable (included) 1 External Audio Input (A/D input) Terminal This terminal is stereo line input for audio signals from external devices such as a mike, guitar, bass, or CD player. It connects to a stereo mini-jack cable. 2 Line Out L/R Terminal This terminal is for external output of audio signals in stereo. It connects to an audio device or mixer with RCA pin jack cables. The white terminal is L (left) and the red terminal is R (right). 3 Digital Out Terminal This terminal is for digital output of audio signals in stereo. It connects to a digital audio device or mixer with digital input through a S/PDIF type cable. 4 MINI DIN 6 Pin Terminal This terminal is for connecting to an external MIDI device such as a keyboard, using the included MIDI adapter cable. 5 Plug-In Board (PLG100 Series) Connector This terminal connects to an optional plug-in board compatible with the XG plug-in system (PLG100 series). These boards can be used to expand the functions of the XG tone generator that is standard on the SW1000XG sound card. 6 Digital Mixing Card (DS2416) Connector This terminal connects to the digital mixing card (DS2416) sold separately. Output from the SW1000XG can be sent to a digital mixing card equivalent to the Yamaha O2R digital mixer over a pair of stereo outputs and six individual outputs. Even when no external digital mixer is available, you can control every aspect of your music including digital mixing — all from within your computer. 9 SW1000XG-E.qx 4/2/99 4:31 PM Page 10 Installing Your Sound Card The SW1000XG sound card can be installed in your computer by simply following these steps: n Before installing your sound card, check to be sure that there is an empty PCI card slot in your computer. If you are going to use a slot where there is already a PCI card installed, uninstall the driver software for that card, then turn off the power to the computer and remove the card. Restarting the computer after doing this will cause it to recognize that the card that was in that slot has been completely removed. After completing this series of operations, turn off the power to your computer again before following the installation procedure below. n If you will be installing a plug-in board (PLG100 series) or digital mixing card (DS2416) on your sound card, be sure to also read the instructions for doing that (→ P. 12). 1. Unplug the computer power cord from the electrical outlet. There is a serious danger of electric shock if you attempt to install the sound card while the computer power is turned on. Be absolutely sure to turn OFF the power and unplug the computer before proceeding with the installation. 2. Remove the cover from the main body of the computer. n The method for removing the cover and the location of the PCI slots varies for each computer model. Refer to the owner’s manual for your computer to obtain this information. 3. Remove the cover for the PCI slot. 10 SW1000XG-E.qx 4/2/99 4:31 PM Page 11 4. Remove the sound card from its anti-static bag. Before handling the sound card, make sure to eliminate any static electricity in your clothes or body by touching a metal surface that is definitely grounded. Also, be careful to avoid touching any parts on the sound card’s circuit board, or any of the connectors. 5. Insert the connector on the sound card into the connector on the computer. Hold the card by both ends with both hands, and slowly push the card into the computer slot. When doing this, make sure that you are not installing the card upside down. 6. Secure the sound card with the screw if this is required in your computer, then reinstall the cover for the main body of the computer. n The method for securing the PCI expansion card, and for reinstalling the cover varies for each computer model. Refer to the owner’s manual for your computer to obtain this information. 7. Connect the external devices you will use with your sound card (such as speakers, mixer, or MIDI keyboard) to the appropriate connectors on the SW1000XG. n When removing your sound card, follow the steps above in reverse order. 11 SW1000XG-E.qx 4/2/99 4:31 PM Page 12 Installing the Plug-In Board Refer to the illustration below to install an optional plug-in board (PLG100 series). Making sure that the plug-in board is facing in the correct direction, carefully press the cable from the plug-in board into the plug-in board connector on the sound card. SW1000XG sound card Plug-in board Make sure that the flat cable is facing in the correct direction. Connector to SW1000XG Connector to plug-in board Yellow line Flat cable's connector Yellow line Hooks To plug-in board Spacer First, put the four spacers in the SW1000XG, then fit the plug-in board above the sound card. Spacer To SW1000XG n This should be done before the sound card is installed in the computer. n For information about each plug-in board, see page 24 and the owner’s manual that comes with each board. Installing the Digital Mixing Card Refer to the illustration below to install an optional digital mixing card (DS2416). Making sure that the flat cable from the digital mixing card (DS2416) is facing in the correct direction, carefully press the cable into the digital mixing card connector on the sound card. Serial out Connector Green line Serial In Connector Green line Connector to DS2416 Connector to SW1000XG Make sure that the flat cable from the DS2416 is facing in the correct direction. SW1000XG sound card DS2416 n This should be done before the sound card is installed in the computer. n For information about the digital mixing card (DS2416), refer to the owner’s manual that comes with the card. Output from the SW1000XG to the DS2416 digital mixing card In the initial setting, all parts of the SW1000XG are mixed in stereo and sent to the DS2416. However, you can send a specific part as an individual output to the DS2416, apart from the stereo output. The SW1000XG is equipped with 6 individual outputs and each part (either MIDI multi part or audio part) can be assigned to any of the individual out 1 to 6, 1+2, 3+4 or 5+6. For details, see MIDI Data Format tables <1-6> and <1-7>(MIDI Parameter Change tables), descriptions on “Output Select”. The Output Select can be set using the XGworks’ XG Editor Window (The properties dialog box which opens when clicking on the [DETAIL] button of the part unit). If you are opening the multi part’s properties dialog box, the Output Select can be set in the General page of the Detail screen. 12 SW1000XG-E.qx 4/2/99 4:31 PM Page 13 Installation of the Driver To use SW1000XG sound card, the appropriate driver (SW1000XG Windows95 Driver) should be properly installed in your computer. The driver can be installed from the supplied CD-ROM by following the steps described below. n Before installing the driver, make sure that the sound card itself is installed in the computer. (→ P. 10) n Open the “General” page of the System Properties in your Windows’ Control Panel. If your Windows95 version is shown as “4.00.950B”, refer to “Installing the driver for Windows95 OSR2 (4.00.950B)”. If your Windows95 version is shown as “4.00.950” or “4.00.950A”, refer to “Installing the driver for Windows95 (4.00.950 or 4.00.950A)”. Installing the driver for Windows95 OSR2 (4.00.950B) 1. Turn on the power of your computer. If you turn on it for the first time after installing the sound card in your computer, the Updated Device Driver Wizard will appear automatically. 2. Insert the supplied CD-ROM in the CD-ROM drive and click [Next]. The message saying “Windows was unable to locate a driver for this device” will be displayed. 13 SW1000XG-E.qx 4/2/99 4:31 PM Page 14 3. Click [Other Locations]. Select Other Location dialog box will be displayed. 4. Type the name of the CD-ROM drive (E:\, F:\, etc.) and the folder (Win95drv) in the “Location” box. e.g. E:\Win95drv, F:\Win95drv 5. Click [OK]. The message saying “Windows found the following updated driver for this device” will be displayed. 6. Click [Finish]. Insert Disk dialog box will be displayed. 14 SW1000XG-E.qx 4/2/99 4:31 PM Page 15 7. Click [OK]. Copying Files dialog box will be displayed. 8. Type the name of the CD-ROM drive and the folder in the “Copy files from:” box, as you did in step 4. e.g. E:\Win95drv, F:\Win95drv\ 9. Click [OK]. Files will be copied. 10.Restart the computer. This completes the installation of the driver. Installing the driver for Windows95 (4.00.950 or 4.00.950A) 1. Turn on the power of your computer. If you turn on it for the first time after installing the sound card in your computer, the New Hardware Found window will appear automatically. 2. Insert the supplied CD-ROM in the CD-ROM drive, select “Driver from disk provided by hardware manufacturer” and click [OK]. Install From Disk dialog box will be displayed. 3. Type the name of the CD-ROM drive (E:\, F:\, etc.) and the folder (Win95drv) in the “Copy manufacturer’s files from:” box. e.g. E:\Win95drv, F:\Win95drv 4. Click [OK]. Insert Disk dialog box will be displayed. 5. Click [OK]. Copying Files dialog box will be displayed. 6. Type the name of the CD-ROM drive and the folder in the “Copy files from:” box, as you did in step 3. e.g. E:\Win95drv, F:\Win95drv\ 7. Click [OK]. Files will be copied. 8. Restart the computer. This completes the installation of the driver. 15 SW1000XG-E.qx 4/2/99 4:31 PM Page 16 Installation of the Software This package contains software which can bring out full advantage of the SW1000XG sound card, including MIDI sequence software XGworks for SW1000XG, Wave Editor TWE and various XG plug-in software. This section explains you how to install them from the supplied CD-ROM. Installing XGworks for SW1000XG and Wave Editor TWE The following software can be installed by following the steps described below. For information on each software, see page 7. • XGworks for SW1000XG • SW1000XG Mixer • Wave Editor TWE n SW1000XG Mixer is a plug-in software for XGworks for SW1000XG, which can control mixing of audio parts when you record wave data to XGworks’ wave track and/or when you play back XGworks’ wave track. 1. Insert the supplied CD-ROM in the CD-ROM drive. 2. Open “My Computer” by double-clicking its icon. 3. Double-click the CD-ROM icon and then double-click Setup.exe contained in the CD-ROM’s “XGworks” folder. Welcome dialog box will appear. 16 SW1000XG-E.qx 4/2/99 4:31 PM Page 17 4. Click [Next]. Software License Agreement dialog box will appear. Read this thoroughly before moving on to the next step. 5. Click [Yes]. Choose Destination Location dialog box will appear. If you want to change the destination, click [Browse] and select the destination. 6. Click [Next]. Setup Type dialog box will appear. You can select the type of installation. n Selecting “Typical” is recommended for most users. 17 SW1000XG-E.qx 4/2/99 4:31 PM Page 18 7. Click [Next]. Select Components dialog box will appear. You can select the preferred application language version. 8. Click [Next]. Select Program Folder dialog box will appear. You can change the folder name to which the program will be installed. 9. Click [Next]. Files will be copied. 10. Restart the computer. This completes the installation of XGworks for SW1000XG, SW1000XG Mixer and Wave Editor TWE. 18 SW1000XG-E.qx 4/2/99 4:31 PM Page 19 Installing XG Plug-In Software The following software can be installed by following the steps described below. For information on each software, see page 7. • VL Visual Editor • VH Effect Editor • DX Easy Editor & DX Simulator n Before installing the XG plug-in software, make sure that the XGworks for SW1000XG is installed in the computer. 1. Insert the supplied CD-ROM in the CD-ROM drive. 2. Open “My Computer” by double-clicking its icon. 3. Double-click the CD-ROM icon and then double-click Setup.exe contained in the CD-ROM’s “Plug” folder. Welcome dialog box will appear. 4. Click [Next]. Software License Agreement dialog box will appear. Read this thoroughly before moving on to the next step. 19 SW1000XG-E.qx 4/2/99 4:31 PM Page 20 5. Click [Yes]. Before Setup dialog box will appear. Read this thoroughly before moving on to the next step. 6. Click [Yes]. Language dialog box will appear. You can select the preferred application language version. 7. Click [Next]. Programs dialog box will appear. You can select which plug-in software to be installed. 20 SW1000XG-E.qx 4/2/99 4:31 PM Page 21 8. Click [Next]. Choose Destination Location dialog box will appear. If you want to change the destination, click [Browse] and select the destination. n To use XG plug-in software on XGworks, these plug-ins should be installed in the folder containing XGworks.exe. (Normally, “XGworks for SW1000XG” folder located in the Program Files’ Yamaha folder.) 9. Click [Next]. Files will be copied and then the message saying “Setup is completed” will appear. 10. Click [OK]. This completes the installation of XG plug-in software. 21 SW1000XG-E.qx 4/2/99 4:31 PM Page 22 SW1000XG Overview and Features Sound Module Modes The SW1000XG features both XG and TG300B sound module modes. Normally, the SW1000XG plays in XG mode. However, since it automatically recognizes which mode to select based on incoming MIDI data, you can easily change the mode by MIDI System Exclusive messages that you program in sequencer data, at the head of your composition. n Turning on the power of your computer with the SW1000XG sound card installed will automatically initialize all SW1000XG settings, or parameter values. n Since the SW1000XG requires about half a second to change modes when it receives a mode change message, be sure to insert at least one blank measure at the top in order to allow enough time for the mode to change before your actual music data begins. XG Mode In XG mode the SW1000XG will play XG-compatible multitimbral data, as well as multitimbral data created for the GM System Level 1 format. In XG mode the SW1000XG can: • Play up to 32 Parts + 14 Audio Parts. • Choose from 1,074 Normal Voices and 36 Drum Voices. TG300B Mode In TG300B mode the SW1000XG will play multitimbral music data created for TG300B-compatible tone generators. TG300B mode also provides compatibility with the GM System Level 1 format. In TG300B mode the SW1000XG can: • Play up to 32 Parts + 14 Audio Parts. • Choose from 614 Normal Voices and 10 Drum Voices. Voices An SW1000XG Voice can be made up of one or two elements (i.e., sounds), depending on the complexity of the Voice. Many Voices are made up of only one element. Two-element Voices are made up of two one-element Voices, and may be configured in a variety of ways. The number of elements in use determines the maximum number of simultaneous notes (polyphony) which the SW1000XG can play at any given time, depending on the amount of incoming MIDI Note data. For details about the number of elements used in each Voice, see the XG/TG300B Normal Voice Lists of the “Data_E.pdf” file contained in the supplied CD-ROM’s “Document” folder. Normal Voices and Drum Voices The SW1000XG has two types of Voices—Normal Voices and Drum Voices. (In this Owner’s Manual, in general the word Voice refers to a Normal Voice.) The distinction between a Normal Voice and a Drum Voice is as follows: • A Normal Voice is simply a pitched Voice which can be played on a musical scale from low to high, such as a piano or trumpet. The SW1000XG has 1,267 Normal Voices. • A Drum Voice is a complete set of drum and other percussion sounds, each sound having a fixed pitch. Each sound is assigned to a specific MIDI Note number (which also corresponds to a key on a MIDI keyboard). The SW1000XG has 46 Drum Voices. 22 SW1000XG-E.qx 4/2/99 4:31 PM Page 23 Maximum Polyphony The SW1000XG can play a maximum of 64 notes polyphony at once. However, the actual number of notes that will play at any given time is determined by the number of elements in use across the 32 Parts. For example, if you use only one-element Voices, you can achieve the full 64 notes maximum polyphony. If you use one or more two-element Voices, however, maximum polyphony will be reduced accordingly. The SW1000XG is a last-note-priority tone generator, which means that if it receives more than 64 notes of MIDI Note data at any time, earlier (first) notes will automatically cut off to accommodate the most recent (last) incoming notes. Part Priority Each of the SW1000XG’s 32 Parts corresponds to each of the 32 MIDI channels. If incoming Note data exceeds the maximum polyphony, the SW1000XG will prioritize which Parts are played first, in the following order, from higher priority to lower: Channel 10 (Drum Part), 1, 2, 3, 4, 5, 6, 7, 8, 9, 11, 12, 13, 14, 15, 16, 26 (Drum Part), 17, 18, 19, 20, 21, 22, 23, 24, 25, 27, 28, 29, 30, 31, 32 Therefore, if you are creating your own music data using sequencer software, you should assign your most important Parts (such as melody and bass) to higher priority MIDI channels (i.e., lower MIDI channel numbers) in order to preserve the integrity of your composition. Note that with the GM System Level 1, the Drum Part is always assigned to MIDI channel 10. Selecting Voices The SW1000XG not only contains the 128 basic GM Voices and GM drum set, but many variation Voices as well—to give you access to a total of 1,267 Normal Voices and 46 Drum Voices. In XG mode, the basic 128 GM Voices can be accessed by selecting Program numbers 1 – 128. Other Voices can be accessed by selecting both bank numbers and Program numbers. The Voice bank can be selected via MIDI Control Change Bank Select (MSB and LSB) messages. In XG mode, the MSB value determines the Voice type (Normal, Drum), while the LSB value actually selects the bank (excluding the SFX bank). When the SW1000XG is in TG300B mode, the Voice banks can be selected with appropriate MSB numbers, as LSB is fixed. Lists of all available Voices along with bank and program numbers are provided on the Voice Lists of the “Data_E.pdf” file contained in the supplied CD-ROM’s “Document” folder. Note that the 128 MIDI Program Change numbers consist of 0 through 127, whereas the 128 SW1000XG program numbers consist of 1 through 128. Depending on the sequencing hardware and software you use, you may have to convert the SW1000XG program numbers to the appropriate Program Change numbers. Effect Types The SW1000XG features dozens of extremely versatile digital effects generated by Yamaha’s advanced Digital Signal Processing (DSP) technology—which add a completely new dimension to your SW1000XG’s sound. These effects are configured, or routed, in one of two ways—to be either a System Effect or an Insertion Effect. The difference is as follows: SYSTEM EFFECT Applies the designated effect to all 32 Parts. INSERTION EFFECT Applies the designated effect to only one specific Part. Reverb and Chorus are “System Effects”, and Insertion 1 and 2 are “Insertion Effects”. The Variation effect can be configured as either a “System Effect” or an “Insertion Effect”. * Effects can be applied to Audio Parts as well as the internal AWM2 voices of the SW1000XG. 23 SW1000XG-E.qx 4/2/99 4:31 PM Page 24 A/D Input The SW1000XG features A/D Input jack for connection of external audio sources such as a microphone, guitar, bass, or CD player. Audio signal received via A/D INPUT jack is processed through the effect sections and mixed with the internal AWM2 voices of the SW1000XG. If you use the supplied “XGworks for SW1000XG”, you can record audio signal via A/D INPUT jack to its WAVE tracks. About the Plug-In System Your SW1000XG sound card is compatible with the “XG Plug-In System.” When you install one of the optional XG Plug-In Boards on the SW1000XG, the functions of the SW1000XG and the XG Plug-In board will be organically combined, just as though the XG Plug-In Board had been built right into the SW1000XG circuits. If one of the tone generator-type XG Plug-In Boards is installed on the SW1000XG, one part of the SW1000XG will be assigned to the tone generator on the plug-in board, while the parts of the SW1000XG itself will remain exactly the same. All effects—system effects, insertion effects, system EQ, and others—can be applied. When an effect-type plug-in board is mounted on the SW1000XG, its effects will function as XG insertion effects. About Optional XG Plug-In Boards PLG100-VL This XG Plug-In Board is equipped with an S-VA tone generator, which generates sounds based on physical models. There are 256 voices built in, from realistic orchestral instrument voices to voices for instruments that exist only in the imagination. You can perform with the same awesome expressive power as the VL70-m virtual acoustic tone generator. Using the VL Visual Editor included on the CD-ROM that came with your sound card, it’s easy and fun to create your own sounds, even without knowing the physical models. PLG100-VH This XG Plug-In Board is equipped with harmonic effects optimized for vocals. Four effects are built in, letting you do things like add harmony voices to vocals input from the A/D input terminal just by playing the desired notes on the keyboard (vocoder harmony), or adding the harmony that corresponds to a specified chord (chordal harmony). In addition, you can change the tone of the input, and have fun with unique effects like chorus effects and voice change effects. You can edit the harmony effects with the VH Effect Editor that is included on the CD-ROM that came with your sound card. PLG100-DX This XG Plug-In Board is equipped with a 16 polyphony FM tone generator that works just like the well-known Yamaha DX7. This board lets you feature the flashy sounds of an FM tone generator in your song. You can enjoy creating the FM tone generator sounds on your computer screen using the DX Easy Editor and DX Simulator that are included on the CD-ROM that came with your sound card. 24 SW1000XG-E.qx 4/2/99 4:31 PM Page 25 Supplementary Items for XGworks 2.0 The XGworks for SW1000XG software that is included in this package has been specially tailored to work with the SW1000XG. For that reason, you will find here an introduction to some functions and some supplementary information not included in the XGworks 2.0 Owner’s Manual that came with your sound card. n XGworks 2.0 Ouner’s Manual is provided as a PDF file in the supplied CD-ROM’s “Document” folder. Simultaneous Playback of Multiple Wave Tracks and Playback Part-Way Through Data from multiple wave tracks can be sent to the SW1000XG audio parts (maximum 12 parts) and played back simultaneously with effects applied to each part individually. Also, playback of the wave tracks can be started midway in the song. n Song files (.xws files) containing wave tracks cannot be fast forwarded using the XGworks Play Control. Even if the mouse button is held down over the FWD button, the song will be forwarded at normal playback speed. System Setup Dialog The functions and items below have been added to the System Setup dialog. n The System Setup dialog is opened by clicking on [Setup] on the menu bar, then selecting [System Setup] from the pull-down menu. For details, see page 210 of the XGworks V2.0 Owner’s Manual. Device Page of the System Setup Dialog The number of Wave Out settings has been increased to six. A maximum of six output devices using wave data can be specified. 25 SW1000XG-E.qx 4/2/99 4:31 PM Page 26 Device Selection When using the SW1000XG sound card, select the devices as follows: •MIDI In Select “SW1000 MIDI IN.” When you are going to connect an external MIDI keyboard to the sound card’s MINI DIN 6 pin terminal using the included MIDI adapter cable, you can have the keyboard performance play through the SW1000XG sound card (you must select “SW1000 #1 (or #2) Synthesizer” for MIDI Thru and MIDI Out, as mentioned below). •MIDI Thru Select “SW1000 #1 (or #2) Synthesizer”. The MIDI signal that comes in through the MIDI In device above will be played through the SW1000XG sound card. If “SW1000 MIDI OUT” is selected, and you have connected an external MIDI tone generator to the sound card’s MINI DIN 6 pin terminal using the included MIDI adapter cable, you can play the music through that tone generator. n ”SW1000 #1 Synthesizer” is the MIDI output device for Part numbers 1 to 16. “SW1000 #2 Synthesizer” is the MIDI output device for Part numbers 17 to 32. •MIDI Out Select “SW1000 #1 (or #2) Synthesizer”. The MIDI signal (performance data) that is output from XGworks will be played through the SW1000XG sound card. If “SW1000 MIDI OUT” is selected, and you have connected an external MIDI tone generator to the sound card’s MINI DIN 6 pin terminal using the included MIDI adapter cable, you can play the music through that tone generator. n ”SW1000 #1 Synthesizer” is the MIDI output device for Part numbers 1 to 16. “SW1000 #2 Synthesizer” is the MIDI output device for Part numbers 17 to 32. •Wave In Select “SW1000 #1 (or #2) WAVE IN”. “SW1000 #1 WAVE IN” is a wave input device specially for the SW1000XG sound card external audio input (A/D input). n When effects are applied to the A/D input audio signal, those effects are ignored. Even when recorded on a XGworks wave track, only the raw sound is recorded. “SW1000 #2 WAVE IN” is the wave input device for all sound heard using the SW1000XG sound card (the mixture of A/D input, XGworks wave tracks, and the sound from the AWM2 tone generator on the sound card). n Unlike “SW1000 #1 WAVE IN”, the effect component will be input if effects are applied. •Wave Out Select “SW1000 #1 - #6 WAVE OUT”. Correspondence between each wave out device (#1 - #6) and SW1000XG audio part is as follows: SW1000 #1 WAVE OUT: SW1000 #2 WAVE OUT: SW1000 #3 WAVE OUT: SW1000 #4 WAVE OUT: SW1000 #5 WAVE OUT: SW1000 #6 WAVE OUT: Wave Wave Wave Wave Wave Wave output is sent to the SW1000XG audio parts PCI 1 output is sent to the SW1000XG audio parts PCI 3 output is sent to the SW1000XG audio parts PCI 5 output is sent to the SW1000XG audio parts PCI 7 output is sent to the SW1000XG audio parts PCI 9 output is sent to the SW1000XG audio parts PCI 11 and PCI 2. and PCI 4. and PCI 6. and PCI 8. and PCI 10. and PCI 12. PCI is the SW1000XG sound card’s audio part which receives wave output from the XGworks wave track. There are total of 12 PCI parts and the mixing between these PCI parts can be controlled by using the SW1000XG mixer (→ P. 32). 26 SW1000XG-E.qx 4/2/99 4:31 PM Page 27 MIDI Out Filter Page on the System Setup Dialog The Realtime Message item has been added. By checking a box, output of realtime messages can be prevented. When the box is not checked (when output is permitted), the messages will be output on MIDI Out port number 1 (set on the Device page of the System Setup dialog). n Realtime message information is XGworks stop, start and song position information, and if a song is played back on the XGworks side, that information will be sent as MIDI output in realtime. If a MIDI keyboard with a built in sequencer is used as a tone generator, the built in sequencer in the keyboard will play back in sync with the XGworks playback. If synchronized playback is not required, this box should be checked. 27 SW1000XG-E.qx 4/2/99 4:31 PM Page 28 Track View Window Track Parameter Section The Track Parameter Ch (channel) display has been changed to the Ch/Pan display, and the following function has been added: n For details about the Track View Window, see page 41 of the XGworks V2.0 Owner’s Manual. n When using the SW1000XG sound card, set the Track Parameter Section Port displays as follows: When the track type is MIDI: SW1000 #1 (or #2) Synthesizer When the track type is WAVE: SW1000 #1 - #6 WAVE OUT When WAVE is selected as the track type in the TYPE display, it becomes possible to set the pan (stereo position) of the wave data in the Ch/Pan display. n When MIDI is selected as the track type, the output MIDI channel is set in the Ch/Pan display. ❑ Range of settings: L7-L1, C, R1-R7 Each wave out device (SW1000 #1 - #6 WAVE OUT) corresponds to two audio parts of the SW1000XG sound card. For example, wave output through the SW1000 #1 WAVE OUT is sent to the SW1000XG audio parts PCI 1 and PCI 2 (→ P. 26). In case of monaural wave track: Setting the Ch/Pan value to L1-L7 will send more wave data to the odd numbered PCI part (PCI 1, 3, 5, 7, 9 or 11). Setting the Ch/Pan value to R1-R7 will send more wave data to the even numbered PCI part (PCI 2, 4, 6, 8, 10 or 12). Setting the Ch/Pan value to C will send wave data equally to both odd and even numbered PCI parts. In case of stereo wave track: Regardless of the Ch/Pan setting, wave data will be sent equally to both odd and even numbered PCI parts. By using the SW1000XG mixer (→ P. 32), you can control panning of each PCI part individually. 28 SW1000XG-E.qx 4/2/99 4:31 PM Page 29 XG Editor Window The following functions have been added to the XG Editor Window: n The XG Editor Window is opened by clicking the XG Editor Window button on the toolbar. For details about the toolbar, see page 13 of the XGworks V2.0 Owner’s Manual. Part Unit The A/D tabs on the Part Unit have been changed to Audio. When you click the Audio tab, an audio part list is displayed. The Voice column will display “Analog” when an audio signal from the external audio input (A/D input) terminal of the SW1000XG sound card is input to the SW1000XG Mixer (→ P. 32) and will display “PCI” when an audio signal from an XGworks WAVE track is input to the SW1000XG mixer (→ P. 32). Variation effects and insertion effects 1/2 can be assigned to each type of audio signal. When the Detail button is clicked, the dialog for the selected Audio part (the part with the yellow Voice column) will open and you will be able to make detailed settings for that part. For information about the settings, see the MIDI Parameter Change table (Audio Part) and MIDI Parameter Change table (Audio Part Configuration) of the MIDI data format in the SW1000XG Data List (in the PDF file “Data_E.PDF,” which is in the Document folder of the CD-ROM that came with your sound card). When you double-click on the left side of the VOICE column for any part, the voice list dialog will open. For information about the settings, see the “A/D Input Preset List” in the SW1000XG Data List (in the PDF file “Data_E.PDF,” which is in the Document folder of the CD-ROM that came with your sound card). For details about using the Voice list dialog, see page 25 of the XGworks V2.0 Owner’s Manual. When you double-click on the right side of the VOICE column for any part, the Audio Input Category dialog will open, and you can set the categories for that audio part. 29 SW1000XG-E.qx 4/2/99 4:31 PM Page 30 Audio Input Category Dialog Category For each of the parts 1 to 16 displayed in the Part Unit, select the category of the audio signal to be sent to the sound card. By clicking the up and down scroll buttons, you can select from categories such as Off, Analog, or PCI. When using the SW1000XG sound card, select Analog or PCI. Analog is used when an audio signal from the external audio input (A/D input) terminal of the SW1000XG sound card is input to the SW1000XG Mixer (→ P. 32). PCI is used when an audio signal from an XGworks WAVE track is input to the SW1000XG Mixer (→ P. 32). Serial Number Select the part number for the category of audio signal that was selected in the Category box. Click the up and down scroll buttons, and select a number from 1 to 128. Make the settings as follows when using the SW1000XG sound card: When “Analog” is selected for the category, select 1 or 2. This is because a maximum of two external audio input parts can be received by the SW1000XG sound card. When “PCI” is selected for the category, select it in the range of 1 to 12. This is because XGworks for SW1000XG wave track data can be sent to the SW1000XG sound card’s maximum of 12 audio parts. After setting up each item, click [OK]. The dialog will close and the settings will take effect. If you want to cancel the operation, click on [Cancel]. The dialog will close, and the settings will return to their original state. If you click [Default], the Category and Serial Number for the parts will return to the default settings. n Use the default settings whenever possible. When the default settings are selected, Part 1 will be 1 of Analog, Part 2 will be 2 of Analog, Part 3 will be 1 of PCI, Part 4 will be 2 of PCI, continuing until Part 14 is part 12 of PCI. (Part 15 and 16 will be OFF.) n If settings besides the default ones are made, it will no longer be possible to correctly control volume and stereo balance for the parts with the Windows standard mixer (the “Volume Control” activated by doubleclicking on the speaker icon on the task bar). n For any category, settings besides “Analog” and “PCI” can be selected. However, since these selections were added for the sake of keeping capability with future devices that have many types of audio parts, there is no ordinary need to select them. For details about the Part Unit, see page 176 of the XGworks V2.0 Owner’s Manual. 30 SW1000XG-E.qx 4/2/99 4:31 PM Page 31 Wave Data Can Also Be Saved in a Song As explained in the section “Saving the Song” on page 40 of the XGworks V2.0 Owner’s Manual, songs that include wave data must be saved as .XWS files (XGworks original song file). However the wave data (.WAV file) itself was not included in the conventional type of .XWS file (see “About WAV Files” on P. 39 of the XGworks V2.0 Owner’s Manual). XGworks for SW1000XG now can save .XWS files with the wave data (.WAV file) itself included. Select [XGworks Original File with Wave (*.XWS)] in the Save as type box of the [Save As] dialog (→ XGworks V2.0 Owner’s Manual P. 202) to save the .XWS file with the wave data included. n It is possible that .XWS files with wave data included will be much larger in size than expected. If this happens, the file can also be saved as a conventional .XWS file (.XWS file without the wave data itself included) or as a .MID file. Opening the Wave Editor TWE Wave data editing software called WAVE Editor TWE has been included with your sound card. To use it, simply open it in XGworks for SW1000XG. n You must already have Wave Editor TWE installed before you open it. You can have Wave Editor TWE installed at the same time that you install XGworks for SW1000XG. For details, see page 16. With the wave block you want to edit selected in the Track View Window of XGworks, click on the [Job] menu on the menu bar, then select [Wave Editor TWE] from the pull-down menu. 31 SW1000XG-E.qx 4/2/99 4:31 PM Page 32 For detailed information about using Wave Editor TWE after installation, click on the [Start] button in Windows 95, then select [YAMAHA XGworks for SW1000XG] from the [Program] menu. Selecting [WAVE Editor TWE Manual] will display the online manual for the wave editor (PDF file). n To view PDF files, you must first install the Acrobat Reader. A program for doing this has been provided in the Acrobat folder on the CD-ROM that came with your SW1000XG sound card. To install Acrobat Reader, double-click on the ar32e301.exe installation program in that folder. n Besides wave files with the extension .WAV, the Wave Editor TWE software also supports recording/editing AIFF files. However, these files cannot be used in XGworks. SW1000XG Mixer A specialized mixer for audio parts has been added. Volume adjustment and control of pan and effects for each audio part can be easily done. By moving sliders and knobs, volume and effects can be set for audio signal parts input into the SW1000XG sound card from the external audio input (A/D input) terminal (displaying A1 and A2 in the Input column) and audio signal parts input into the SW1000XG sound card from XGworks wave tracks (displaying P1 to P12 in the Input column). Because these operations pass through the MIDI output port that is setup in the Setup dialog (→ P. 34), and are sent to the sound card as MIDI messages, you can monitor (hear) the changes in the volume or tone of your audio parts in realtime. You can enter SW1000XG mixer settings anywhere you want in the song as system exclusive events. You can also save the settings separate from the song in a SW1000XG mixer parameter file (extension .SWM). n You must already have the SW1000XG Mixer plug-in software installed before using it. You can have SW1000XG Mixer installed at the same time that you install XGworks for SW1000XG. For details, see page 16. Opening the SW1000XG Mixer Click on the [Plug-In] menu on the menu bar, then select [SW1000XG Mixer] from the pull-down menu. 32 SW1000XG-E.qx 4/2/99 4:31 PM Page 33 Name and Function of Every Part Titile Bar Toolbar Audio Part Unit Master Volume Unit Title Bar On the title Bar, there are the application icon, and the Minimize, Maximize and Close buttons. For details about the title bar, see P. 199 of the XGworks V2.0 Owner’s Manual. Toolbar 1 2 3 4 5 6 7 1 Open Button This opens the [Open] (file open) dialog. You can select an SW1000XG Mixer parameter file (.SWM) that has SW1000XG Mixer settings saved in it and read them into the SW1000XG Mixer. If the parameter settings being edited are not saved, a confirmation dialog will appear asking if you want to save the parameters currently being edited before reading the file. This button has the same function as the [Open SW1000XG Mixer Parameter File] command on the menu bar [File] menu. n Using the [Open] dialog is the same as opening a song file except for specifying SW1000XG Mixer Parameter File (extension .SWM) in the file type box. For details about the [Open] dialog, see page 201 of the XGworks V2.0 Owner’s Manual. 2 Save Button This saves the SW1000XG Mixer parameter file currently being edited, overwriting any previous version. When saving SW1000XG Mixer settings as a parameter file for the first time, the [Save As] dialog will open. This button has the same function as the [Save SW1000XG Mixer Parameter File] command on the menu bar [File] menu. n Using the [Save As] dialog is the same as saving a song file except for specifying SW1000XG Mixer Parameter File (extension .SWM) in the file type box. For details about the [Save As] dialog, see page 202 of the XGworks V2.0 Owner’s Manual. 3 Setup Button Opens the Setup Dialog. This is used for choosing things like the MIDI output port used for sending parameters set in the SW1000XG Mixer and the device number. This button has the same function as the [SW1000XG Mixer Setup] command on the menu bar [Setup] menu. 33 SW1000XG-E.qx 4/2/99 4:31 PM Page 34 Setup Dialog Port ……………Click on the box, then select the MIDI port from the drop-down list that is displayed. Control operations done in the SW1000XG Mixer will be sent as MIDI information to the audio parts of the XG tone generator corresponding to the port selected here. n When using the SW1000XG sound card, select [SW1000 #1 (or #2) Synthesizer] in the Port box. Device Number …This is the number that is set for sending system exclusive data (in this case, information on SW1000XG Mixer operations) to the connected XG tone generator. Select the same number as the connected XG tone generator’s device number. Track……………Click on the box, then from the drop-down list that is displayed, select the track to use when entering the SW1000XG Mixer settings into the song. This is connected with the “Track” setting on the Insert dialog mentioned later (→ P. 36). Play Monitor …When this box is checked by clicking on it, the SW1000XG Mixer parameter setting events that have been entered into a song will be read, and the knobs and sliders in the SW1000XG Mixer can be operated in realtime. When there is no check the events in the song will not be read. n SW1000XG Mixer parameter setting events can be inserted into the song using the Insert dialog men- tioned later (→ P. 36). Set each item by clicking on it, then click on [OK]. The dialog will close and the settings will take effect. To cancel the operation before finishing it, click [Cancel]. The dialog will close, and the settings will stay in their original state. 4 Audio Preset Setting Button This opens the audio preset dialog. Suitable effects can be selected for each audio part. n Because the effects set here are unique to the audio parts, they are different than the reverb, chorus and varia- tion effects of the XG tone generator. 34 SW1000XG-E.qx 4/2/99 4:31 PM Page 35 Audio Preset Dialog Audio Source Category List Effect List Part Select Box Click Monitor Audio Source Category List Displays the category of the audio signal. In order to apply appropriate effects to the audio signal, one of the categories on this list must first be selected by clicking on it. Once a category is selected, a list of effect names included in that category will appear in the effect list below. The following six categories are available for each part. Mic ……………This category is appropriate for vocals or live instruments. Guitar …………This category is appropriate for the sound of an electric guitar. Keyboard ……This category is appropriate for keyboard sounds (mono) such as synthesizers. Audio …………This category is appropriate for general line input (mono). Stereo Keyboard …This category is appropriate for keyboard sounds (stereo) such as synthesizers. Stereo Audio …This category is appropriate for general line input (stereo). Effect List This displays the effect names included in the category selected in the audio source category list. Select the effect you want to use by clicking on it in the list. The effects displayed here will vary according to the category selected above. Part Select Box Click on the box, then from the drop-down list that is displayed, select the part number for the audio category list and the effect list. Two parts can each be displayed at one time. n In all, parts 1 to 14 can be selected. The far left side on the audio part unit (→ P. 36) is part 1. They are numbered in order from left to right. The far right side on the audio part unit is part 14. Click Monitor When this box is checked by clicking on it, you can hear the selected effect the moment you click on it in the effect list. Set each item by clicking on it, then click on [OK]. The dialog will close and the settings will take effect. To cancel the operation before finishing it, click [Cancel]. The dialog will close, and the settings will stay in their original state. n For parts where the audio signal from the external audio input (A/D input) terminal is input to the SW1000XG sound card (parts that have A1 or A2 displayed in the input column of the part unit), even though an effect is applied with this dialog, and the part is recorded on an XGworks wave track, the effect will not be recorded together with the audio signal. When the recorded wave track is played back, only the raw sound without the effects will be heard. To output the same effects that existed when the song was recorded, the same effects must be set, even for audio signal parts output from an XGworks wave track (parts that have P1 to P12 displayed in the Input column). 35 SW1000XG-E.qx 4/2/99 4:31 PM Page 36 5 Send Button When you click on this button, the setting information in the SW1000XG Mixer is sent as MIDI data through the MIDI output port selected in the Setup dialog (→ P. 34) to the XG tone generator (sound card). 6 Insert Button Opens the Insert Dialog. The parameter settings made in the SW1000XG Mixer will be inserted/entered into the song as system exclusive data events. Insert Dialog Track……………Select the track for insertion. This is connected to “Track” on the setup dialog (→ P. 34). Meas ……………Specify the measure for insertion. Beat ……………Specify the insertion position in beat units. Clock …………Specify the insertion position in clock units. Interval Time ……When multiple events are being inserted, specify the insertion interval from event to event in clock units. Offset …………When you check the box by clicking on it, only event parameter settings that are different than the initial SW1000XG Mixer settings will be inserted into the song as events. This avoids having the song data become too loaded with repeated insertions of events with the same values. n When inserting events in the song using Offset, a SW1000XG Mixer initial settings event must be previ- ously inserted at the beginning of the song. After specifying the track for insertion in the Track box, specify the position in the song using Meas (measure), Beat, and Clock units, and click the [OK] button. The current effect, pan, and volume settings will be inserted as events in the specified track at the specified location. To cancel the operation before finishing it, click [Cancel]. The dialog will close, and the events will not be inserted. 7 Record Button When this button is clicked, song playback will begin (from the current location), and at the same time, recording of every parameter for the SW1000XG Mixer (knob or slider) operation will begin. When this button is again clicked, song playback and recording of parameter operations will stop. During recording, every movement of a knob or slider will be recorded. When you want parameters like pan and volume are changed continuously, this function is extremely useful because it lets you record smooth changes in the values. Audio Part Unit The knobs and sliders for the various audio part settings, like volume, pan, and effects are arranged vertically for each part. From left to right: Part 1, Part 2, Part 3, and so on. The part on the far right side is part 14. Each control can be easily adjusted by clicking or dragging with the mouse. 36 SW1000XG-E.qx 4/2/99 4:31 PM Page 37 If any knob or slider is operated (clicked or dragged) while pressing the <Ctrl> key on the computer keyboard, the knobs and sliders belonging to every part that is input into the SW1000XG sound card from the external audio input (A/D input) terminal (parts that have A1 or A2 displayed in the input column) or to every part that is input into the SW1000XG sound card from an XGworks wave track (parts that have P1 to P12 displayed in the input column) will move together with it. For example, if the pan knob for the P1 part is rotated to the left while holding the <Ctrl> key, the pan knobs for all parts P2 to P12 will simultaneously rotate the same amount to the left. If both the <Ctrl> and the <Shift> key are pressed at the same time and a control is operated (clicked or dragged), the same control belonging to every part that is input into the SW1000XG sound card from the external audio input (A/D input) terminal (parts that have A1 or A2 displayed in the input column) or to every part that is input into the SW1000XG sound card from an XGworks wave track (parts that have P1 to P12 displayed in the input column) will move together in the opposite direction. For example, if the pan knob for the P1 part is rotated to the left while holding the <Ctrl> and the <Shift> key, the pan knobs for all parts P2 to P12 will simultaneously rotate the same amount to the right. If a control is operated (clicked or dragged) while the <Ctrl> and <Alt> keys are both being pressed, the knobs or sliders of the two parts that form a stereo pair will move together. n The following pairs of parts in the Input column form stereo pairs: A1 and A2, P1 and P2, P3 and P4, P5 and P6, P7 and P8, P9 and P10, and P11 and P12. n The value of each knob and slider can be controlled from the computer keyboard. Pressing the <Home> or <Page Up> key will increment the value (increase it). Pressing the <End> or <Page Down> key will decrement the value (decrease it). n When the SW1000XG Mixer is opened, each knob and slider will always be set at its default amount. Even after changing the settings by moving the knobs and sliders, any knob or slider can be returned to its default value by simply double-clicking it. 1 2 3 4 5 6 7 8 9 1 Level Meter Displays the audio input level for the part which is set as “A1” or “A2” in the Input (2) setting. n Depending on the Wave In device set in the System Setup dialog (→ P. 25), the audio input level display will be as follows: SW1000 #1 WAVE IN SW1000 #2 WAVE IN The level will be displayed only for the external audio input (A/D input) of the SW1000XG sound card. The level will be displayed for a mixture of the A/D input, XGworks wave tracks and the sound from the AWM2 tone generator on the sound card. 2 Input Sets the type of each part’s audio signal. When you double-click on the input display box, the Input Category dialog will be displayed. 37 SW1000XG-E.qx 4/2/99 4:32 PM Page 38 Input Category Dialog Click one of the boxes for Parts 1 to 14, then select the type of audio signal to be controlled in that part from the drop-down list that is displayed. “Analog” is for when an audio signal from the external audio input (A/D input) terminal is input to the SW1000XG sound card. This type can be selected for a maximum of two parts. “PCI” is for when an audio signal from an XGworks WAVE track is input to the SW1000XG sound card. This type can be selected for a maximum of 12 parts. After setting up each item, click [OK]. The dialog will close and the settings will take effect. If you want to cancel the operation, click on [Cancel]. The dialog will close, and the settings will return to their original state. If you click [Default], the SW1000XG Mixer assignments for each part will return to the default settings. n Use the default settings whenever possible. When the default settings are selected, Part 1 will Analog 1, Part 2 will be Analog 2, Part 3 will be PCI 1, Part 4 will be PCI 2, continuing until Part 14 is PCI 12. n If settings besides the default ones are made, it will no longer be possible to correctly control volume and stereo balance for the parts with the Windows standard mixer (the “Volume Control” activated by doubleclicking on the speaker icon on the task bar). 3 Dry Knob This is used to set the send level of the dry signal for each part. As the knob is rotated to the right by dragging it, the send level will increase. When the knob is all the way to the left, no sound will be played. 4 Reverb Knob (Rev) This is used to set the depth of reverb for each part. As the knob is rotated to the right by dragging it, the reverb effect will deepen. When the knob is all the way to the left, the reverb effect is zero. n Depending on the character of the audio signal, the manner in which the reverb effect is applied may vary. 5 Chorus Knob (Cho) This is used to set the depth of chorus for each part. As the knob is rotated to the right by dragging it, the chorus effect will deepen. When the knob is all the way to the left, the chorus effect is zero. n Depending on the character of the audio signal, the manner in which the chorus effect is applied may vary. 38 SW1000XG-E.qx 4/2/99 4:32 PM Page 39 6 Variation Knob (Var) This is used to set the depth of Variation effects for each part. As the knob is rotated to the right by dragging it, the Variation effects will deepen. When the knob is all the way to the left, the Variation effects will be zero. n Variation effect is a function used in the XG tone generator. It has a great many effect programs besides reverb and chorus, such as delay, rotary speaker, auto pan, amp simulator, and auto wah-wah. n Depending on the Character of the audio signal, the manner in which the Variation effect is applied may vary. 7 Mute Button By clicking on any of these buttons and turning it ON (it will be highlighted), you can mute playback for that part. If you click the button again, the part will return to normal playback. You can also mute multiple parts. 8 Pan Knob This is used to set the stereo orientation for each part. As the knob is rotated to the right by dragging it, the orientation of the playback sound on that part will move to the right. Moving the knob to the left will cause the orientation of the playback sound on that part to move to the left. 9 Volume Fader By dragging any slider up and down, you can set the volume for the corresponding part. Master Volume Unit 1 1 Level Meter Displays the overall volume level. n Depending on the Wave In device set in the System Setup dialog (→ P. 25), the level display will be as follows: SW1000 #1 WAVE IN....Nothing will be displayed. SW1000 #2 WAVE IN....The level will be displayed for a mixture of the A/D Input, XGworks wave tracks and the sound from the AWM2 tone generator on the sound card. 2 Master Fader By dragging the slider up and down, you can change the overall volume setting. n 2 If you select SW1000 #2 WAVE IN as the Wave In device in the System Setup dialog (→ P. 25), you can set the level of the mixture of the A/D Input, XGworks wave tracks and the sound from the AWM2 tone generator on the sound card. When you record them, or mix them down to an XGworks wave track, this Master Fader can be used to adjust the recording level. 39 40 Change Control 0,32 1,5,7,10,11 6,38 64-67 71-74 84 91,93,94 96-97 98-99 100-101 Key's Ch's After Touch Pitch Bend Note ON Note OFF Velocity *1 *1 *1 *1 *1 *1 *1 *1 *1 *1 *1 *1 *1 o 9nH,v=1-127 x o o o 0-24 semi o o o o o o o o o o x x x x x x x x x x x x x *2 x x 0 - 127 0 - 127 x ************** True voice Mode : 3 3, 4 (m=1) x x x ************** Default Messages Altered Sound Controller Portamento Cntrl Effect Depth RPN Inc,Dec NRPN LSB,MSB RPN LSB,MSB Data Entry Bank Select Remarks Date :01-JUN-1998 Version : 1.0 4:32 PM Note Number 1 - 16 1 - 16 Recognized x x Transmitted Default Changed Function... [ PCI Audio MIDI Card ] Model SW1000XG MIDI Implementation Chart 4/2/99 Basic Channel YAMAHA SW1000XG-E.qx Page 40 MIDI Implementation Chart : True # 41 x x x x x o(120,126,127) o(121) x o(123-125) o x x x x x x x x x x x x Mode 2 : OMNI ON ,MONO Mode 4 : OMNI OFF,MONO *1 receive if switch is on. *2 m is always treated as "1" regardless of its value. *3 receive if exclusive switch is on. All Sound Off Reset All Cntrls Local ON/OFF All Notes OFF Active Sens Reset Mode 1 : OMNI ON , POLY Mode 3 : OMNI OFF, POLY Notes: : : : Mes- : sages : : Aux Clock Commands Song Pos. Song Sel. Tune o : Yes x : No 4:32 PM System : Real Time: : : : *3 o o 0 - 127 x x ************** 4/2/99 Common System Exclusive Prog Change SW1000XG-E.qx Page 41 SW1000XG-E.qx 4/2/99 4:32 PM Page 42 Specifications of the SW1000XG Sound Card System Requirements CPU: Pentium/166MHz or greater Memory: 32MB or more Hard disk: 20MB or more Operating system:Windows95 PCI slot CD-ROM drive (for software installation) Other equipments (mouse, audio speakers, headphones, etc.) Tone Generation AWM2 (Advanced Wave Memory 2) tone generation system Number of voices: 1,267 normal voices, 46 drum voices Maximum polyphony: 64 Multitimbral capability: 32 parts Sound module mode XG (Extended General MIDI): 1,074 normal voices, 36 drum voices TG300B: 614 normal voices, 10 drum voices Effects Reverb: 12 types Chorus: 14 types Variation: 70 types Insertion 1/2: 43 types each 5 band multi EQ: 4 types Digital Audio Waveform playback devices (x6) *6 stereo files or 12 monaural files can be played simultaneously Waveform recording devices (x2) Connectors External audio in (A/D Input) Line out L/R Digital out (S/PDIF) MINI DIN 6 pins (for MIDI connection) Connector for XG plug-in board (PLG100 series) Connector for digital mixing card (DS2416) Others Dimensions (W x D x H): 198mm x 127 mm x 21.6mm (7-3/4” x 5” x 7/8”) Weight: 140g (5 oz) Included items: SW1000XG sound card MIDI adapter cable (x1) Plug-in board connection cable (x1) Plug-in board spacers(x4) CD-ROM Owner’s manual Specifications and descriptions in this manual are for information purposes only. Yamaha Corp. reserves the right to change or modify products or specifications at any time without prior notice. Since specifications, equipment or options may not be the same in every locale, please check with your Yamaha dealer. 42 SW1000XG-E.qx 4/2/99 4:32 PM Page 43 Troubleshooting Even though the SW1000XG sound card is easy to use, it may occasionally not function as you expected it to. If that happens, check the possible problems and solutions below before assuming the instrument is faulty. ■ Song data with an XG/GM mark does not play correctly. • Are Mute Lock,Audio Lock, EQ Lock, and Output Select Lock each set to OFF? (→ MIDI Data Format <Table 2-2>) • Are Rcv System On Message and Rcv Bank Select both set to ON? (→ MIDI Data Format <Table 2-2>) • Is the sound module mode (XG mode or TG300B mode) correctly set? (→ P. 22) ■ Song Data made with TG300 does not play correctly. • Because the filter and effect settings are different from the TG300, the manner in which the song data plays may be different. ■ There is no sound. • Are all devices (such as speakers, headphones, and digital mixing card) correctly connected? (→ P. 9, 12) • Has the volume been turned down too low (such as on the external speakers, or the Windows standard “volume control” mixer)? • Is Mute or Solo set (such as in the XGworks Track View Window)? • Has any incorrect volume or expression data been inserted in the MIDI application? • Is the MIDI driver correctly installed? (→ P. 13) Have the correct MIDI devices been selected? (→ P. 25) • Is Individual Out to the DS2416 set for the parts that are not playing? (→ P. 12) ■ Distorted Sound/Weak Sound • Are the volume settings on any amps or playback devices made correctly? • Have any unwanted effects been set? 43 SW1000XG-E.qx 4/2/99 4:32 PM Page 44 ■ Volume is low. • Is volume or expression set too low in the part control? • Are the velocity sense settings in the part edit made incorrectly? • Is the MIDI volume information not being received? ■ Distorted sound/weak sound on the A/D input • Is the input source selected correctly? (→ P. 35) ■ No effects applied at all. • Has send/return been raised sufficiently? ■ Effects not applied to some parts • Has the send level been raised sufficiently for each of the parts or drum part instruments? ■ The tone is strange • Are the bank select/program change settings made correctly? ■ The pitch is strange. • Are the master tune, transpose and note shift settings correct? ■ Interruptions in the sound • Has the maximum polyphony limit of 64 voices been exceeded? (→ P. 23) Keep in mind that when one channel is specified for multiple parts, all the multiple parts will begin playing simultaneously with one Key On. ■ MIDI bulk data is not being received correctly • Is the device number specification correct? • Was the dump interval time set too short when the data was saved? 44 SW1000XG-E.qx 4/2/99 4:32 PM Page 45 ■ No sound is output when wave data is played • If the wave data is being played with standard Windows wave playback software (such as the Sound Recorder), the wave data is output to the destination specified in the multimedia properties (audio) dialog. However, out of the devices that can be seen on the “Preferred device” dropdown list, only the first eight devices down from the top can be specified. If any device below the eighth device is specified, the first device on the list will actually be used as the output device. If more than eight devices are displayed on the drop-down list, with a combination of output devices something like “Another Sound Card,”“DS2416” and “SW1000XG,” and “Another Sound Card” is displayed as the first device on the list, specifying the eighth device of the DS2416 will cause the sound to be played from the “Another Sound Card” device. ■ Sound output from DOS games is strange • SW1000XG is not guaranteed to work with DOS games played in Windows95. ■ The SW1000XG Mixer controls do not work • Are the ports correctly specified in the Setup dialog? If the SW1000XG sound card is being used,“SW1000 #1 (or #2) Synthesizer” must be selected (→ P. 34). ■ SW1000XG mixer controls for even-numbered audio parts (such as A2, P2, P4) do not work. • Are the corresponding odd-numbered parts (such as A1, P1, P3) set for stereo mode? In other words, is Stereo set in the Mono/Stereo Mode selection in the XGworks XG Editor (in the properties dialog opened by clicking the [Detail] button for the Audio Part Unit). If Stereo Mode is set here, only the odd-number parts can be controlled. ■ SW1000XG does not operate • Is the SW1000XG card correctly installed in the PCI bus slot? • In older computer types, the PCI slot cannot function as the bus master. Even if SW1000XG is installed in such a slot, it will not operate correctly. See the Owner’s Manual that came with your computer for details. • There may be a conflict between the SW1000XG and another PCI card. If this happens, either remove the conflicting card, or try inserting the SW1000XG into the slot where the conflicting card has been inserted and vice versa. If a Windows95 version before OSR2 is being used, and the problem cannot be solved, change the IRQ setting or remove the conflicting card. 45 SW1000XG-E.qx 4/2/99 4:32 PM Page 46 For details of products, please contact your nearest Yamaha or the authorized distributor listed below. Die Einzelheiten zu Produkten sind bei Ihrer unten aufgeführten Niederlassung und bei Yamaha Vertragshändlern in den jeweiligen Bestimmungsländern erhältlich. Pour plus de détails sur les produits, veuillez-vous adresser à Yamaha ou au distributeur le plus proche de vous figurant dans la liste suivante. Para detalles sobre productos, contacte su tienda Yamaha más cercana o el distribuidor autorizado que se lista debajo. NORTH AMERICA CANADA Yamaha Canada Music Ltd. 135 Milner Avenue, Scarborough, Ontario, M1S 3R1, Canada Tel: 416-298-1311 U.S.A. Yamaha Corporation of America 6600 Orangethorpe Ave., Buena Park, Calif. 90620, U.S.A. Tel: 714-522-9011 CENTRAL & SOUTH AMERICA MEXICO ITALY Yamaha Musica Italia S.P.A., Combo Division Viale Italia 88, 20020 Lainate (Milano), Italy Tel: 02-935-771 SPAIN Yamaha-Hazen Electronica Musical, S.A. Jorge Juan 30, 28001, Madrid, Spain Tel: 91-577-7270 PORTUGAL Valentim de Carvalho CI SA Estrada de Porto Salvo, Pa•o de Arcos 2780 Oeiras, Portugal Tel: 01-443-3398/4030/1823 GREECE Yamaha de Mexico S.A. De C.V., Departamento de ventas Javier Rojo Gomez No.1149, Col. Gpe Del Moral, Deleg. Iztapalapa, 09300 Mexico, D.F. Tel: 686-00-33 BRAZIL Yamaha Musical do Brasil LTDA. Av. Rebou•as 2636, S‹o Paulo, Brasil Tel: 011-853-1377 ARGENTINA Philippe Nakas S.A. Navarinou Street 13, P.Code 10680, Athens, Greece Tel: 01-364-7111 SWEDEN Yamaha Scandinavia AB J. A. Wettergrens Gata 1 Box 30053 S-400 43 Gšteborg, Sweden Tel: 031 89 34 00 DENMARK Yamaha Music Argentina S.A. Viamonte 1145 Piso2-B 1053, Buenos Aires, Argentina Tel: 1-371-7021 PANAMA AND OTHER LATIN AMERICAN COUNTRIES/ CARIBBEAN COUNTRIES Yamaha de Panama S.A. Torre Banco General, Piso 7, Urbanizaci—n Marbella, Calle 47 y Aquilino de la Guardia, Ciudad de Panam‡, Panam‡ Tel: 507-269-5311 EUROPE THE UNITED KINGDOM Yamaha-Kemble Music (U.K.) Ltd. Sherbourne Drive, Tilbrook, Milton Keynes, MK7 8BL, England Tel: 01908-366700 IRELAND Danfay Ltd. 61D, Sallynoggin Road, Dun Laoghaire, Co. Dublin Tel: 01-2859177 GERMANY/SWITZERLAND Yamaha Europa GmbH. Siemensstra§e 22-34, 25462 Rellingen, F.R. of Germany Tel: 04101-3030 AUSTRIA Yamaha Music Austria Schleiergasse 20, A-1100 Wien Austria Tel: 01-60203900 THE NETHERLANDS Yamaha Music Nederland Kanaalweg 18G, 3526KL, Utrecht, The Netherlands Tel: 030-2828411 BELGIUM Yamaha Music Belgium Keiberg Imperiastraat 8, 1930 Zaventem, Belgium Tel: 02-7258220 FRANCE Yamaha Musique France, Division Professionnelle BP 70-77312 Marne-la-VallŽe Cedex 2, France Tel: 01-64-61-4000 YS Copenhagen Liaison Office Generatorvej 8B DK-2730 Herlev, Denmark Tel: 44 92 49 00 FINLAND Warner Music Finland OY/Fazer Music Aleksanterinkatu 11, P.O. Box 260 SF-00101 Helsinki, Finland Tel: 0435 011 NORWAY Norsk filial av Yamaha Scandinavia AB Grini N¾ringspark 1 N-1345 ¯sterŒs, Norway Tel: 67 16 77 70 ASIA HONG KONG Tom Lee Music Co., Ltd. 11/F., Silvercord Tower 1, 30 Canton Road, Tsimshatsui, Kowloon, Hong Kong Tel: 2737-7688 INDONESIA PT. Yamaha Music Indonesia (Distributor) PT. Nusantik Gedung Yamaha Music Center, Jalan Jend. Gatot Subroto Kav. 4, Jakarta 12930, Indonesia Tel: 21-520-2577 KOREA Cosmos Corporation #131-31, Neung-Dong, Sungdong-Ku, Seoul Korea Tel: 02-466-0021~5 MALAYSIA Yamaha Music Malaysia, Sdn., Bhd. 16-28, Jalan SS 2/72, Petaling Jaya, Selangor, Malaysia Tel: 3-717-8977 PHILIPPINES Yupangco Music Corporation 339 Gil J. Puyat Avenue, P.O. Box 885 MCPO, Makati, Metro Manila, Philippines Tel: 819-7551 SINGAPORE Yamaha Music Asia Pte., Ltd. Blk 202 Hougang, Street 21 #02-01, Singapore 530202 Tel: 747-4374 TAIWAN Yamaha KHS Music Co., Ltd. 10F, 150, Tun-Hwa Northroad, Taipei, Taiwan, R.O.C. Tel: 02-2713-8999 THAILAND Siam Music Yamaha Co., Ltd. 121/60-61 RS Tower 17th Floor, Ratchadaphisek RD., Dindaeng, Bangkok 10320, Thailand Tel: 02-641-2951 ICELAND Skifan HF Skeifan 17 P.O. Box 8120 IS-128 Reykjavik, Iceland Tel: 525 5000 OTHER EUROPEAN COUNTRIES Yamaha Europa GmbH. Siemensstra§e 22-34, 25462 Rellingen, F.R. of Germany Tel: 04101-3030 AFRICA Yamaha Corporation, International Marketing Division Nakazawa-cho 10-1, Hamamatsu, Japan 430-8650 Tel: 053-460-2312 MIDDLE EAST TURKEY/CYPRUS Yamaha Europa GmbH. Siemensstra§e 22-34, 25462 Rellingen, F.R. of Germany Tel: 04101-3030 OTHER COUNTRIES Yamaha Corporation, International Marketing Division Nakazawa-cho 10-1, Hamamatsu, Japan 430-8650 Tel: 053-460-2312 HEAD OFFICE XG1-01 46 THE PEOPLEÕS REPUBLIC OF CHINAAND OTHER ASIAN COUNTRIES Yamaha Corporation, International Marketing Division Nakazawa-cho 10-1, Hamamatsu, Japan 430-8650 Tel: 053-460-2317 OCEANIA AUSTRALIA Yamaha Music Australia Pty. Ltd. 17-33 Market Street, South Melbourne, Vic. 3205, Australia Tel: 3-699-2388 NEW ZEALAND Music Houses of N.Z. Ltd. 146/148 Captain Springs Road, Te Papapa, Auckland, New Zealand Tel: 9-634-0099 COUNTRIES AND TRUST TERRITORIES IN PACIFIC OCEAN Yamaha Corporation, International Marketing Division Nakazawa-cho 10-1, Hamamatsu, Japan 430-8650 Tel: 053-460-2317 Yamaha Corporation, XG Division Nakazawa-cho 10-1, Hamamatsu, Japan 430-8650 Tel: 053-460-2936 SW1000XG-E.qx 4/2/99 4:32 PM Page 47 47 SW1000XG-E.qx 4/2/99 4:32 PM Page 48 M.D.G., EMI Division, ©Yamaha Corporation 1998-
 1
1
-
 2
2
-
 3
3
-
 4
4
-
 5
5
-
 6
6
-
 7
7
-
 8
8
-
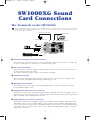 9
9
-
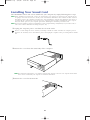 10
10
-
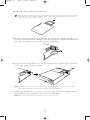 11
11
-
 12
12
-
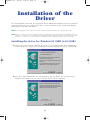 13
13
-
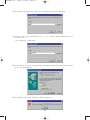 14
14
-
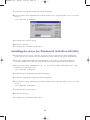 15
15
-
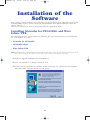 16
16
-
 17
17
-
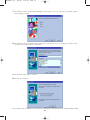 18
18
-
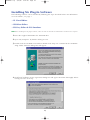 19
19
-
 20
20
-
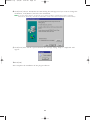 21
21
-
 22
22
-
 23
23
-
 24
24
-
 25
25
-
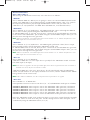 26
26
-
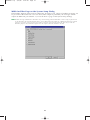 27
27
-
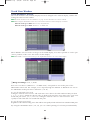 28
28
-
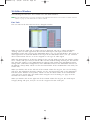 29
29
-
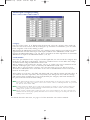 30
30
-
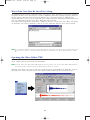 31
31
-
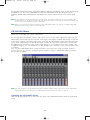 32
32
-
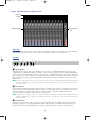 33
33
-
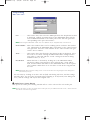 34
34
-
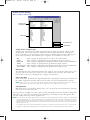 35
35
-
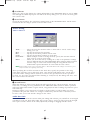 36
36
-
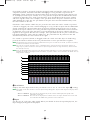 37
37
-
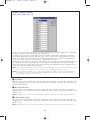 38
38
-
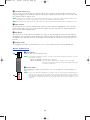 39
39
-
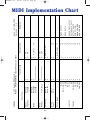 40
40
-
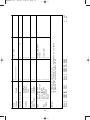 41
41
-
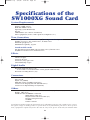 42
42
-
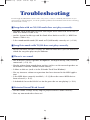 43
43
-
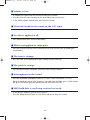 44
44
-
 45
45
-
 46
46
-
 47
47
-
 48
48


in andere talen
- English: Yamaha SW1000XG Owner's manual
- italiano: Yamaha SW1000XG Manuale del proprietario
- русский: Yamaha SW1000XG Инструкция по применению
- français: Yamaha SW1000XG Le manuel du propriétaire
- español: Yamaha SW1000XG El manual del propietario
- Deutsch: Yamaha SW1000XG Bedienungsanleitung
- português: Yamaha SW1000XG Manual do proprietário
- dansk: Yamaha SW1000XG Brugervejledning
- suomi: Yamaha SW1000XG Omistajan opas
- čeština: Yamaha SW1000XG Návod k obsluze
- svenska: Yamaha SW1000XG Bruksanvisning
- Türkçe: Yamaha SW1000XG El kitabı
- polski: Yamaha SW1000XG Instrukcja obsługi
- română: Yamaha SW1000XG Manualul proprietarului