
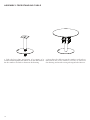
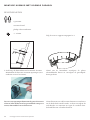
KOSMOS
© design by dirk wynants
PRODUCT
KOSMOS – KOSMOS WITH PARASOL – FREESTANDING TABLE –
MAINTENANCE
READ INSIDE
ASSEMBLY INSTRUCTIONS,
HOW TO USE, USEFUL TIPS
FOR KEEPING YOUR TOOL FOR
TOGETHERNESS IN SHAPE
LANGUAGES
EN – NL – DE – FR – IT – ES
MORE
WWW.EXTREMIS.BE

2 inhoud
content p. 3
assembly kosmos p. 6
assembly with kosmos shade p. 8
adjusting adjustable table p. 10
covers p. 11
bulb replacement p. 12
onderhoud p. 13
assembly freestanding table p. 14
inhoud p. 17
montage kosmos p. 20
montage met kosmos shade p. 22
bijregelen verstelbare kabel p. 24
montage hoezen p. 25
lamp vervangen p. 26
onderhoud p. 27
monatage vrijstaande tafel p. 28

INHOUD
english 3
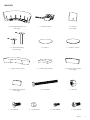
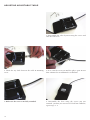
6 x bolt M6x14 6 x lock nut M6 5 x bolt M4x10 8 x bolt M6x12
3 x small backrest cushion
(low / high)
6 x bolt M8x80 6 x nut M8
2 x large seating cushion 1 x small seating cushion 4 x large backrest cushion
(low / high)
1 x adjustable table leg
xed table leg
1 x tabletop 1 x tabletop cushion
1 x le & right half of the seat
(low / high)
1 x small seat frame 1 x backrest
(low / high)

4 inhoud
4 x bolt M8 x 70
1 x plastic spacer 1 x cap 50 x 50 1 x cap 60 x 60
1 x shade frame with fabric 1 x vertical shade pole
KOSMOS SHQDE
OPTION

english 5
3 x bolt M6x25 8 x bolt M6x12
1 x tabletop 1 x tube 1 x base plate
VRIJSTAANDE TAFEL
OPTION

+/- 45 min.
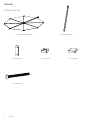
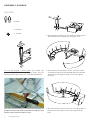
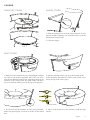
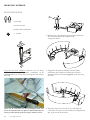
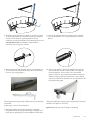
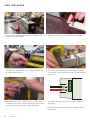
6 montage kosmos
Now unscrew the leveling feet that are not touching the
ground surface from above with a at screwdriver and
further ensure that the whole is level.
3. Place the backrest between the two seat halves and six
M6x14 bolts and cap nuts. M6. Now tighten all the
bolts.
in case you bought a xed table, rst mount the
aluminium prole to the small seat frame and the
tabletop connection on top of it, with M6*30mm bolts.
2. Now connect the two halves of the seat to the small
seat frame using three bolts M6x80 and three M8 nuts.
Attention: do not tighten them yet. Do not tighten
them yet.
1. First mount the table leg to the small seat frame with 4
bolts M6x30. Now remove the transport screw.
2 people
screwdriver
ASSEMBLY KOSMOS
UTILITIES

sitting lounging
english 7
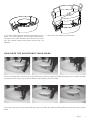
To use the table again, you need to hold down the lever under the table top while pulling the table up with the other
hand.
To turn the table into a sofa bed, press the table down with your right hand while pressing the lever under the table
top with your left. Always press in the middle of the tabletop, not on the edge.
HOW DOES THE ADJUSTABLE TABLE WORK
4. Screw the table top down with the countersunk screws
M6x2. e control element for the height adjustment is
fastened with 4 bolts M4x10 at the bottom of the table
top. is control element must point towards the seat
opening
5. Now place the cushions in the Kosmos.

+/- 45 min.
sitting lounging
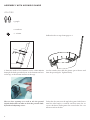
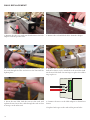
e two free openings are used to tilt the parasol
slightly backwards in order to level the parasol cloth,
by means of adjusting screws.
To do this, rst unscrew the top bolts again a little looser
until the ideal angle is reached, and then turn the set
screws clockwise until against the vertical tube.Use a #4
Allen wrench to do this.
5. From the inside of the furniture, insert 4 bolts M8x70
through the holes provided (two at the bottom and two
at the top). at the bottom and two at the top).
On the outside, then slide the plastic spacer Erover and
then the parasol pole. Tighten rmly.
Follow the rst 4 steps from pages 4-5.
ASSEMBLY WITH KOSMOS SHADE
UTILITIES
2 people
screwdriver
8

sitting lounging
8. Install the appropriate caps on the parasol frame and
the vertical tube. Now place the cushions in the Kosmos
as in step 5 on page 5.
10. Now open the parasol. Does the magnetic lock not
hold, rst loosen the velcro strap and open the parasol
again. Only now you can close the velcro again. In closed
position one has to x the leather leather strap on the
umbrella frame to be attached to the two to the two
outer ribs to prevent the parasol from the parasol from
opening.
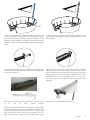
6. Take the parasol frame with cloth and go with the cord
as close as possible to the end of the parasol pole. Lower
the cord through the opening until it emerges at the
bottom. Aer assembly, a certied electrician to t the
end of the cable with a suitable plug. with an appropriate
plug.
7. Now insert the parasol through the opening in the
vertical tube until it locks in place and lock in place with
bolts M6x12.
english 9
This strap can also be used to hold the parasol open:
a) In case of rain: creates drains.
b) After not using the parasol for a long time: it is possible
that the magnetic clasp does not hold temporarily, due
to internal tension in the parasol fabric. If this is the
case, please place the strap on the magnetic ribs as
long as necessary in order to stretch the fabric again.
Optional: screw the lamp into its socket.

10
5. Make sure the screw is not fully extended. 6. Reassemble the lever using the screws you just
removed. you have just unscrewed. If still not sucient,
repeat steps 1 - 3.
3. Check for any slack between the cable & mounting
screw.
4. If so, turn the screw out until the play is gone & turn
then continue for an additional 2 revolutions.
1. Disassemble the valve by unscrewing the screws and
turn the valve over.
ADJUSTING ADJUSTABLE TABLE

pull to untie
english 11
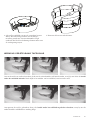
4. At the back of the Kosmos, tie the string attached,
under the parasol pole. It is best to do this as described
here.
5. Close at the front the velcro fasteners and the snap
closure.
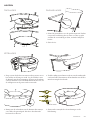
1. Make sure the cushions are nice and upright, and put
the table to the highest position. Place the seat cover
over the the Kosmos with the pie-shaped opening in the
entrance of the seating unit. e table comes out above
the cover, and the table leg sits in the tip of the pie piece.
2. Pull the side ap all the way up to the bottom of the
of the furniture. Position the corner seams of the cover
nicely on top of the corner piece.
SEAT COVER
1. Slide the parasol cover over the closed parasol. If your
parasol includes lighting, care should be taken to avoid
breaking the lamp. break.
2. Close the zipper.
SHADE COVER
COVERS
TABLETOP COVER

12
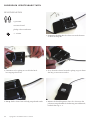
5. Insert the new LED, slide the nut over the cord, and
tighten the nut. Insert the cable through the tube so that
it emerges at the other end.
6. Connect the wires to the LED adapter as shown here
shown.
7. Replace both caps on the ends of the parasol tube.
3. Remove the tube cap in the center of the parasol, pull
the cord through the tube and unscrew the nut from the
lighting base.
4. Remove the broken LED from the tube and twist the
bulb o so that it can be attached to the new LED bulb.
on the new LED bulb. Do not forget to place the rubber
ring to place it.
1. Remove the tube cap with switch and remove the LED
adapter from the parasol tube.
2. Remove the red and black cables from the adapter.
BULB REPLACEMENT

english 13
MAINTENANCE
CUSHIONS
Easily cleaned with warm water
and a microber cloth. Do not
use solvents, bleaches, abrasives,
chemical detergents or waxes.
For outdoor use, the optional
cover should be placed over the
entire furniture when not in use,
as the cushions are not 100%
waterproof for ventilation reasons.
e cushions should be cleaned
regularly to preserve their
appearance and to prevent the
formation of dirt and bacteria.
Lacquers and inks,
cleaning products,
detergents and solvents such as
thinner, acetone or alcohol can be
very eective in removing stains,
but cause direct damage and
contribute to the deterioration
of the material. e use of such
cleaning agents is at your own risk
TABLETOP
HPL (high presure laminate): can
be cleaned with standard cleaners
as one uses for the kitchen. For
stubborn stains we use “HG plastic,
paint and wallpaper intensive
cleaner”. For more info: www.
hginternational.com
WARNING
Never sit on the backrest to avoid
damage to the cushions and
aluminum plate.
SHADE
Clean the parasol fabric and cover
by rinsing with water and hand
soap, and gently rubbing with a
so brush. Initially, make sure
the parasol fabric does not get
too dirty and place the cover over
the parasol as much as possible.
Never spray the parasol
with a high pressure cleaner.
Brush very gently, be extra careful
on the seams, they can come
loose with too hard friction.
Aer cleaning, the fabric has to be
dried completely in open position.
Do not use detergents.
ese will damage the
protective layer of the textile.
For stubborn stains, we recommend
“awning, tarpaulin and tents
refresher’ of the brand ‘HG’. See
www.hg.eu for more info. Follow
strictly the instructions on the bottle
Translated with www.DeepL.com/
Translator (free version)!
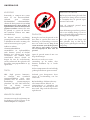
WARNINGS
In case of strong winds or non-use,
close the parasol and apply the cover
to prevent the parasol from blowing
open or becoming dirty.
Never leave the opened parasol
unattended.
Do not leave the Kosmos parasol
closed if it is not completely dry. Do
not leave it closed for long periods in
humid conditions.
If you do not use the parasol for
a long time, store it as follows:
perfectly dry in a dry environment.

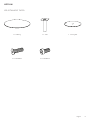
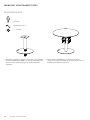
1. Take the base plate and mount it by means of 3
countersunk hexagonal bolts M10 x 25 on the underside of
the the stainless steel tube as shown in the drawing.
2. Now place the table top on the stainless steel tube as
indicated in the on the stainless steel tube as shown in
the drawing and attach it using 8 hexagon bolts M6 x 12.
ASSEMBLY FREESTANDING TABLE
14

english 15

16 inhoud
content p. 3
assembly kosmos p. 6
assembly with kosmos shade p. 8
adjusting adjustable table p. 10
covers p. 11
bulb replacement p. 12
onderhoud p. 13
assembly freestanding table p. 14
inhoud p. 17
montage kosmos p. 20
montage met kosmos shade p. 22
bijregelen verstelbare kabel p. 24
montage hoezen p. 25
lamp vervangen p. 26
onderhoud p. 27
monatage vrijstaande tafel p. 28

nederlands 17
INHOUD
1 x linkse en rechtse zetelhel
(laag of hoog)
1 x zetelframe klein 1 x rugsteun
(laag of hoog)
1 x verstelbare tafelpoot
of vaste tafelpoot
1 x tafelblad 1 x tafelkussen
2 x groot zitkussen 1 x klein zitkussen 4 x groot rugkussen
(laag of hoog)
3 x klein rugkussen
(laag of hoog)
6 x vijs M8x80 6 x moer M8
6 x vijs M6x14 6 x dopmoer M6 5 x vijs M4x10 8 x vijs M6x12
4 x vijs M6x30 ???

1 x parasolframe met doek 1 x parasolpaal
4 x bout M8 x 70
KOSMOS PARASOL
OPTIONEEL
18 inhoud
1 x plastic plaat 1 x dop 50 x 50 1 x dop 60 x 60

1 x tafelblad 1 x buis 1 x voetplaat
VRIJSTAANDE TAFEL
OPTIONEEL
nederlands 19
3 x verzonken binnenzekantbout M6x25 8 x binnenzeskantbout M6x12

MONTAGE KOSMOS
BENODIGDHEDEN
extremis sleutel
2 personen
philips schroevendraaier
1. Monteer eerst de tafelpoot op het kleine zetelframe
met 4 bouten M6x30. Verwijder nu de
transportschroef.
+/- 45 min.
In geval van vaste tafelpoot: monteer eerst de lange
rechthoekige buis op het kleine zetelframe en de
tafelbladconnectie er bovenop, met bijgeleverde bouten
M6 x 30.
2. Koppel nu de beide zetelhelen aan het kleine
zetelframe met behulp van telkens drie bouten
M6x80 en drie moeren M8. Opgelet: span deze nog
niet aan.
Draai nu de stelvoetjes die het grondoppervlak niet
raken van bovenaf met een platte schroevendraaier uit
en zorg verder dat het geheel waterpas komt te staan.
3. Plaats de rugsteun tussen de twee zetelhelen en
schroef dit vast met zes bouten M6x14 en dopmoeren
M6. Span nu alle bouten aan.
20 montage kosmos

WERKING VERSTELBAAR TAFELBLAD
nederlands 21
4. Schroef het tafelblad vast met de verzonken bouten
M6x2. Het bedieningselement voor de hoogte-
instelling wordt met 4 bouten M4x10 bevestigd
onderaan het blad. Dit bedieningselement moet naar
de zetelopening wijzen.
5. Plaats nu de kussens in de Kosmos.
sitting lounging
Om opnieuw de tafel te gebruiken, dien je de hendel onder het tafelblad ingedrukt te houden, terwijl je met de
andere hand het tafelblad mee omhoog helpt.
Om van de tafel een zetelbed te maken, druk met de rechterhand de tafel naar beneden, terwijl je met links de hendel
onder het tafelblad indrukt. Druk altijd in het midden van het tafelblad, en niet aan de rand.

22 montage kosmos met kosmos parasol
MONTAGE KOSMOS MET KOSMOS PARASOL
BENODIGDHEDEN
extremis sleutel
2 personen
philips schroevendraaier
+/- 45 min.
Volg de eerste 4 stappen van pagina’s 4-5.
5. Steek langs de binnenkant van het meubel 4 bouten
M8x70 door de daarvoor voorziene openingen (twee
onderaan en twee bovenaan).
Schuif aan de buitenkant vervolgens de plastic
afstandshouder Erover en vervolgens de parasolpaal.
Draai goed aan.
De twee vrije openingen dienen om de parasol iets naar
achter te laten hellen en zo het parasoldoek waterpas te
zetten, door middel van stelschroeven.
Schroef hiervoor eerst de bovenste bouten weer wat losser
tot de ideale hoek wordt bereikt, en draai vervolgens de
stelschroees in wijzerzin tot tegen de vertikale buis.
Gebruik hiervoor een inbussleutel #4.
sitting lounging

nederlands 23
6. Neem het parasolframe met doek en ga met het snoer
zo dicht mogelijk bij het uiteinde van de parasolpaal.
Laat het snoer door de opening zakken tot het
onderaan tevoorschijn komt. Na de montage dient een
erkend elektriciën het uiteinde van de kabel te
voorzien van een gepaste stekker.
7. Steek nu de parasol door de opening in de vertikale
buis tot dit blokkeert en vergrendel met de bouten
M6x12.
Dit riempje kan ook gebruikt worden om de parasol open
te houden:
a) Bij regen: creëert afvoerkanalen.
b) Na lange tijd de parasol niet gebruikt te hebben:
mogelijks houdt de magneetsluiting het tijdelijk niet,
door interne spanning in het parasoldoek. Plaats dan
zolang als nodig het riempje op de magnetische baleinen
zodat de stof opnieuw wat rekt.
Optioneel: draai nu ook de lamp in de tting.
sitting lounging
8. Monteer de passende doppen op het parasolframe en
de vertikale buis. Plaats nu de kussens in de Kosmos
zoals in stap 5 op pagina 5.
10. Open nu de parasol. Houdt de magneetsluiting het
niet, maak dan eerst de velcroband los en open de
parasol opnieuw. Pas nu mag je de velcroband
opnieuw sluiten. In gesloten toestand dient men het
lederen riempje op het parasolframe vast te maken
aan de twee buitenste baleinen om te verhinderen dat
de parasol open gaat.

24 bijregelen verstelbare tafel + hoezen
BIJREGELEN VERSTELBARE TAFEL
BENODIGDHEDEN
extremis sleutel
2 personen
philips schroevendraaier
+/- 45 min.
1. Demonteer de klep door de schroeven uit de draaien
en draai de klep om.
3. Controleer of er speling tussen de kabel & de
bevestigingsschroef zit.
4. Zo ja, draai de schroef uit tot de speling weg is & draai
dan nog 2 extra toeren verder.
5. Let op dat de schroef niet volledig uitgedraaid wordt. 6. Monteer de hendel opnieuw d.m.v. de schroeven die
je daarnet uitgedraaid hebt. Indien nog niet voldoende,
herhaal dan stap 1 - 3.

nederlands 25
HOEZEN
1. Zorg ervoor dat de kussens mooi rechtop staan, en zet
het tafeltje in de hoogste stand. Leg de zetelhoes over
de Kosmos met de taartvormige opening in de inkom
van het zitmeubel. De tafel komt boven de hoes uit, en
de tafelpoot zit in de punt van het taartstuk.
2. Trek de zijap overal mooi strak tot aan de onderzijde
van het meubel. Positioneer de hoeknaden van de hoes
mooi bovenop het hoekstuk.
4. Knoop aan de achterkant van de Kosmos het touwtje
vast, onder de parasolpaal. Het beste kan dit zoals
hiernaast beschreven.
5. Sluit aan de voorzijde de velcrosluitingen en de
kliksluiting.
ZETELHOES
pull to untie
1. Schuif de parasolhoes over de gesloten parasol. Indien
uw parasol verlichting bevat, moet er zeker op gelet
worden dit voorzichting te doen, zodat de lamp niet
breekt.
2. Sluit de rits.
PARASOLHOESTAFELHOES

LAMP VERVANGEN
26 onderhoud
1. Verwijder de buisdop met schakelaar en haal de LED
adapter uit de parasolbuis.
2. Haal het rode en het zwarte kabeltje uit de adapter.
3. Verwijder de buisdop in het centrum van de parasol,
trek het snoer doorheen de buis en draai de moer van
de verlichtingssokkel los.
4. Verwijder de kapotte LED uit de buis en draai de bol
er af, zodat deze op de nieuwe LED lamp bevestigd
kan worden. Vergeet hierbij niet ook de rubberen ring
te plaatsen.
5. Plaats de nieuwe LED, schuif de moer over het snoer,
en span de moer aan. Steek de kabel door de buis zodat
deze aan het andere uiteinde tevoorschijn komt.
6. Verbind de kabeltjes met de LED adapter zoals hier
afgebeeld.
7. Plaats beide doppen opnieuw op de uiteinden van de
parasolbuis.

nederlands 27
ONDERHOUD
KUSSENS
Eenvoudig te reinigen met warm
water en een microvezeldoek.
Gebruik geen solventen,
bleekmiddelen, schuurmiddelen,
chemische detergenten of waxen. Bij
buitentoepassing dient telkens de
optionele hoes over het hele meubel
geplaatst worden wanneer dit niet
in gebruik is, gezien de kussens
om ventilatie redenen niet 100%
waterdicht zijn.
De kussens moeten regelmatig
gereinigd worden om zo hun uiterlijk
te behouden en om de vorming van
vuil en bacteriën tegen te gaan.
Lakken en inkten,
schoonmaakmiddelen,
wasmiddelen en oplosmiddelen
zoals thinner, aceton of alcohol
kunnen zeer eectief zijn in het
verwijderen van vlekken, maar
veroorzaken directe schade en
dragen bij aan de verslechtering
van het materiaal. Het gebruik van
dergelijke reinigingsmiddelen is op
eigen risico.
TAFEL
HPL (high presure laminate):
te reinigen met standaard
reinigingsmiddelen zoals men
gebruikt voor de keuken. Voor
hardnekkige verontreinigingen
gebruiken wij zelf “HG kunststof,
verf en behang intensief
reiniger”. Voor meer info: www.
hginternational.com
WAARSCHUWING
Ga nooit zitten op de rugleuning om
beschadiging aan de kussens en de
aluminiumplaat te vermijden.
PARASOL
Reinig het zeil van de parasol en de
hoes door te spoelen met water en
handzeep, en voorzichtig te wrijven
met een zachte borstel. Zorg er in
eerste instantie voor dat de parasol
stof niet te vuil wordt en plaats
zo veel mogelijk de hoes over de
parasol.
Spuit de parasol nooit af met een
hoge drukreiniger.
Borstel zeer zacht, wees extra
voorzichtig op de naden, deze
kunnen loskomen bij te harde
wrijving.
Na het reinigen moet de stof volledig
gedroogd worden in open toestand.
Gebruik geen detergenten. Deze
tasten de beschermlaag van het
textiel aan.
Bij hardnekkige vlekken raden wij
aan ‘zonnescherm-,dekzeil- en
tentenopfrisser’ te gebruiken van
het merk ‘HG’. Zie www.hg.eu voor
meer info. Volg strikt de instructies
op de acon!
WAARSCHUWING
Bij hevige wind of niet gebruik, sluit
de parasol en breng de hoes aan om
te vermijden dat de parasol open
waait of vuil wordt.
Laat de geopende parasol nooit
onbewaakt achter.
Laat de Kosmos parasol niet gesloten
als ze niet volledig droog is. Laat ze
niet gedurende lange tijd gesloten in
vochtige omstandigheden.
Als u de parasol voor lange tijd
niet gebruikt, berg ze dan op als
volgt: perfect gedroogd in een droge
omgeving.

28 montage vrijstaande tafel
MONTAGE VRIJSTAANDE TAFEL
BENODIGDHEDEN
persoon
inbussleutel nr. 4
+/- 15 min.
1. Neem de voetplaat en monteer deze d.m.v. 3 verzonken
binnenzeskantbouten M10 x 25 aan de onderkant van
de inoxen buis zoals aangegeven op bovenstaande
tekening.
2. Plaats nu het tafelblad op de inoxen buis zoals
aangegeven op de tekening en bevestig deze d.m.v. 8
binnenzeskantbouten M6 x 12.

nederlands 29


www.extremis.com
Our headquarters:
Couthoflaan 20b
B-8972, Poperinge
info@extremis.com
+ 32 57 346020
Connect with us:
All rights reserved. Unless otherwise specified, all designs and photographs contained in this publication are copyright protected
and are the property of Extremis. No part of this publication may be copied or distributed without Extremis’ prior written consent.
The names of the authors of photographs to which we do not hold rights are mentioned here. We have done our utmost to provide a
comprehensive list of names. In the event of an alleged breach, please contact the editorial sta. © Extremis
20220714
-
 1
1
-
 2
2
-
 3
3
-
 4
4
-
 5
5
-
 6
6
-
 7
7
-
 8
8
-
 9
9
-
 10
10
-
 11
11
-
 12
12
-
 13
13
-
 14
14
-
 15
15
-
 16
16
-
 17
17
-
 18
18
-
 19
19
-
 20
20
-
 21
21
-
 22
22
-
 23
23
-
 24
24
-
 25
25
-
 26
26
-
 27
27
-
 28
28
-
 29
29
-
 30
30
-
 31
31
-
 32
32


