HP OfficeJet 5740 e-All-in-One Printer series Referentie gids
- Categorie
- Multifunctionals
- Type
- Referentie gids

Printed in [English]
© Copyright 2017 HP Development Company, L.P.
*B9S76-90078*
*B9S76-90078*
B9S76-90078
English
The information
contained herein
is subject to change
without notice.
www.hp.com/eu/m/OJ5740
Scan to nd out more!
Standard data rates may apply. Might not be available in all languages.
Learn more
Electronic Help: Install the electronic Help by selecting it from the recommended software during software
installation. Learn about product features, printing, troubleshooting, and support. Find notices, environmental,
and regulatory information, including the European Union Regulatory Notice and compliance statements, in the
Technical Information section.
• Windows® 8.1: Click the down arrow in lower left corner of the Start screen, select the printer name, click
Help, and then select Search HP Help.
• Windows® 8: On the Start screen, right-click an empty area on the screen, click All Apps on the app bar,
click the icon with the printer’s name, and then click Help.
• Windows® 7, Windows Vista®, and Windows® XP: Click Start > All Programs > HP > HP Oicejet 5740
series > Help.
• OS X: Click Help > Help Center. In the Help Viewer window, click Help for all your apps, and then click
HP Oicejet 5740 series.
Readme: Contains HP support information, operating system requirements, and recent printer updates.
• Windows: Insert the software CD in your computer, and then browse to the ReadMe.chm le. Double-click
ReadMe.chm to open, and then select the ReadMe in your language.
• Mac: Open the Documents folder located at the top-level of the software installer. Double-click ReadMe,
and then select the ReadMe in your language.
On the Web: Additional help and information: www.hp.com/go/support. Printer registration:
www.register.hp.com. Declaration of Conformity: www.hp.eu/certicates. Ink usage:
www.hp.com/go/inkusage.
Get started
1. Follow the illustrations on the setup yer to set up your printer.
2. Install software.
Windows®
Go to 123.hp.com/OJ5740, and then follow the on-screen instructions. If your computer is not connected
to the Internet, insert the software CD in your computer. If CD does not start, browse to Computer,
double-click the CD/DVD drive icon with the HP logo, double-click setup.exe, and then follow the
on-screen instructions.
OS X/iOS
To install the latest HP software on a Mac, go to 123.hp.com/OJ5740. HP software for Mac is not included
on the software CD that came with the printer.
This product is Apple AirPrint enabled. The printer and iOS device or Mac must be on the same local
network.
Note: Always make sure that the paper tray is loaded with the desired paper. After closing the tray, ensure
that this paper is selected on the printer control panel.
HP Oicejet 5740 e-All-in-One Series
DEEN FR
PTES NL
IT

2
Safety information
Always follow basic safety precautions when using this printer to reduce the risk of injury from re or
electric shock.
1. Read and understand all instructions in the documentation that comes with the printer.
2. Observe all warnings and instructions marked on the printer.
3. Unplug this printer from wall outlets before cleaning.
4. Do not install or use this printer near water, or when you are wet.
5. Install the printer securely on a stable surface.
6. Install the printer in a protected location where no one can step on or trip over the power cord,
and the power cord cannot be damaged.
7. If the printer does not operate normally, see the help le (which is available on your
computer after you install the software).
8. There are no user-serviceable parts inside. Refer servicing to qualied service personnel.
9. Use only with the power cord and power adapter (if provided) supplied by HP.
1
Wireless light: Indicates the status of the printer wireless connection.
• Solid blue light indicates that wireless connection has been established and you can print.
• Slow blinking light indicates that wireless is on, but the printer is not connected to a
network. Make sure your printer is within the range of wireless signal.
• Fast blinking light indicates wireless error. Refer to the message on the printer display.
• If wireless is turned o, the wireless light is o and the display screen shows Wireless O.
2
On button: Turns the printer on or o.
3
Back button: Returns to the previous screen.
4
Help button: Shows help content if it is available for the current operation.
5
Home button: Returns to the Home screen, the screen that is displayed when you rst turn on
the printer.
6
Control panel display: Touch the screen to select menu options, or scroll through the menu
items.
7
Near Field Communication (NFC) button: Indicates the area where you can print documents and
images from a mobile device (such as a smartphone or tablet) by touching the device on the
printer.
Control panel
English

3
MacWindows
Basic troubleshooting
If you are unable to print:
1. Make sure the cable connections are secure.
2. Make sure the printer is powered on. The On button will be lit white.
3. Check the wireless status light to make sure your printer is connected to a network.
4. Visit the HP Diagnostic Tools website at www.hp.com/go/tools to download free diagnostic utilities (tools)
that you can use to x common printer problems.
Make sure that the printer is set as your default
printing device:
• Windows 8.1 and Windows 8: Point to or tap the
upper-right corner of the screen to open the Charms
bar, click the Settings icon, click or tap Control
Panel, and then click or tap View devices and
printers.
• Windows 7: From the Windows Start menu, click
Devices and Printers.
• Windows Vista: On the Windows taskbar, click Start,
click Control Panel, and then click Printer.
• Windows XP: On the Windows taskbar, click Start,
click Control Panel, and then click Printers and
Faxes.
Make sure that your printer has a check mark in the
circle next to it. If your printer is not selected as the
default printer, right-click the printer icon and choose
Set as Default Printer from the menu.
Check your print queue:
1. In System Preferences, click Printers & Scanners
(Print & Fax in OS X v10.7 Lion and OS X v10.8
Mountain Lion).
2. Click Open Print Queue.
3. Click a print job to select it.
4. Use the following buttons to manage the print job:
• Cancel icon: Cancel the selected print job.
• Resume: Continue a paused print job.
5. If you made any changes, try to print again.
Restart and reset:
1. Restart the computer.
2. Reset the printer.
a. Turn o the printer and unplug the power cord.
b. Wait a minute, then plug the power cord back in
and turn on the printer.
Acknowledgements: Windows XP, Windows Vista, Windows 7, Windows 8, and Windows 8.1 are U.S. registered
trademarks of Microsoft Corporation.
Mac, OS X, and AirPrint are trademarks of Apple Inc., registered in the U.S. and other countries.
If you are using a USB cable and you are still unable
to print, or the software installation fails:
1. Remove the CD from the CD/DVD drive, and then
disconnect the USB cable from the computer.
2. Restart the computer.
3. Insert the printer software CD in the CD/DVD drive,
and then follow the on-screen instructions to install
the printer software. Do not connect the USB cable
until you are told to do so.
4. After the installation nishes, restart the computer.
If you are using wireless and you are still unable to
print:
Go to the Networking section on the next page for
more information.
Uninstall the software:
1. If the printer is connected to your computer through
USB, disconnect the printer from your computer.
2. Open the Applications/Hewlett-Packard folder.
3. Double-click HP Uninstaller, and then follow the
on-screen instructions.
Reset the printing system:
1. In System Preferences, click Printers & Scanners
(Print & Fax in OS X v10.7 Lion and OS X v10.8
Mountain Lion).
2. Press and hold the Control key as you click the list
at the left, and then choose Reset printing system.
3. Add the printer you want to use.
Anonymous usage information storage: The HP cartridges store a limited set of anonymous information about
the usage of the printer. For more information and instructions for disabling this storage, see the electronic Help.
English

4
Wireless networking
If connecting your printer to the network was unsuccessful
• Conrm that wireless is enabled on your printer.
1. From the printer control panel, touch (Wireless).
2. If it shows Wireless O, touch (Settings), and then touch Wireless Settings.
3. In the Wireless Settings screen, select On for the Wireless option.
• Conrm that your printer is connected to your network.
1. From your printer control panel, touch (Wireless).
2. Touch (Settings).
3. Touch Print Reports, and then touch Wireless Test Report. The Wireless Test Report is automatically printed.
4. Check the top of the report to see if something failed during the test.
– See the Diagnostics Results section for all tests that were performed, to determine whether or not your
printer passed.
– From the Current Conguration section, nd out the Network Name (SSID) to which your printer is
currently connected. Make sure that the printer is connected to the same network as your computer.
Note: If your computer is connected to a Virtual Private Network (VPN), temporarily disconnect from the VPN
before proceeding with the installation. After installation you will need to disconnect from the VPN to access
your printer over your home network.
• Make sure security software is not blocking communication over your network.
Security software, such as rewalls, can block communication between your computer and printer when
installing over a network. If your printer cannot be found, temporarily disable your rewall and check if the
problem goes away. For more help and tips on security software, go to: www.hp.com/go/wpc-rewall.
• Restart components of the wireless network.
Turn o the router and the printer, and then turn them back on in this order: router rst and then printer.
Sometimes, turning o devices and then turning them back on helps resolve network communication issues.
If you still cannot connect, turn o the router, the printer, and the computer, and then turn them back on in this
order: router rst, then printer, and then computer.
Note: If the wireless connection cannot be made, the printer can also be connected to the network using an
Ethernet cable.
If you still have problems, visit the HP Wireless Printing Center (www.hp.com/go/wirelessprinting). This
website contains the most complete, up-to-date information about wireless printing, as well as information to
help you prepare your wireless network; solve problems when connecting the printer to the wireless network;
and resolve security software issues.
Note: If you are using a computer running Windows, you can use the Print and Scan Doctor tool, which can help
solve many problems you might have with the printer. To download this tool, visit www.hp.com/go/tools.
If you want to share your printer with multiple computers on your network
First install your printer on your home network. After you have successfully connected your printer to your home
network, you can share your printer with other computers on the same network. For each additional computer you
only need to install the HP printer software.
Need networking help?
www.hp.com/go/wirelessprinting
The HP Wireless Printing Center at www.hp.com/go/wirelessprinting can help you prepare your wireless network,
set up or recongure your printer, and troubleshoot networking problems.
English

English
5
If you want to use the printer wirelessly without a router
Use Wi-Fi Direct to print wirelessly without a router, from your computer, smartphone, or other wireless enabled
device. To use Wi-Fi Direct from a computer, the printer software must be installed on the computer.
1. Make sure that Wi-Fi Direct on your printer is turned on:
a. From the Home screen on the printer display, touch (Wi-Fi Direct).
b. If Status is O, touch (Wi-Fi Direct Settings) and turn Wi-Fi Direct on.
2. Connect your wireless enabled device to your printer:
a. Turn on the Wi-Fi connection on your mobile device. For more information, see the documentation provided
with the mobile device.
b. From the mobile device, connect to a new network. Use the process you normally use to connect to a new
wireless network or hotspot. Choose the Wi-Fi Direct name from the list of wireless networks shown such as
DIRECT-**-HP Oicejet-5740 (where ** are the unique characters to identify your printer).
c. Enter the Wi-Fi Direct password when prompted.
3. Print as you normally do from your computer or mobile device.
Note: Wi-Fi Direct connection does not provide Internet access.
Visit the HP Wireless Printing Center at www.hp.com/go/wirelessprinting for more information about Wi-Fi
Direct.
If you want to change from a USB connection to a wireless connection
First make sure that you have already successfully installed your printer software.
Windows
1. Do one of the following according to your operating system:
• Windows 8.1: Click the down arrow in lower left corner of the Start screen, select the printer name, and
then click Utilities.
• Windows 8: On the Start screen, right-click an empty area on the screen, click All Apps on the app bar.
• Windows 7, Windows Vista, and Windows XP: From the computer’s Start menu, select All Programs or
Programs, and then select HP.
2. Select HP Oicejet 5740 series.
3. Select Printer Setup & Software.
4. Select Convert a USB connected printer to wireless. Follow the on-screen instructions.
Mac
Use HP Utility in Applications/Hewlett-Packard to change the software connection to wireless for this printer.
Wireless networking (continued)
If you want to print with AirPrint
This printer is Apple AirPrint®-enabled. You can print wirelessly from your iOS device or Mac.
• Your printer and iOS device or Mac must be on the same wireless network.
• With Apple AirPrint®, you cannot scan documents from the printer to your iOS device.
This product is designed for use in open environments (e.g., in homes and not connected to the public internet) in
which anyone may access and use the printer. As a result, the Wi-Fi Direct setting is in “Automatic” mode by default,
without an administrator password; this allows anyone in wireless range to connect and access all functions and
settings of the printer. If higher security levels are desired, HP recommends changing the Wi-Fi Direct Connection
Method from “Automatic” to “Manual” and establishing an administrator password.

6
Set up fax
1. Connect the phone line.
Note: HP printers are designed specically for use with traditional analog phone services. If you are in a digital
phone environment (such as DSL/ADSL, PBX, ISDN, or FoIP), you might need to use digital-to-analog lters
or converters when setting up the printer for faxing. Contact your phone company to determine which setup
options are best for you.
If the phone line is only used for fax
a. Connect one end of the phone cord to the phone wall jack.
b. Connect the other end to the port labeled 1-LINE on the back of the printer.
If you have subscribed to a DSL/ADSL service, connect a DSL/ADSL lter between the 1-LINE port and the phone
wall jack.
2. Test fax setup.
The fax test checks hardware, veries phone cord type and connection status, and checks for a dial tone and an
active phone line. To run the test:
a. From the Home screen on the printer display, press the Up and Down buttons to select Fax, and then
press OK.
b. Select Settings, select Advanced Settings, select Fax Setup Wizard, and then follow on-screen instructions.
1
Phone wall jack
2
Fax port (1-LINE)
Note: Do not insert into the port labeled 2-EXT.
3
DSL/ADSL lter (provided by the telephone
company or service provider)
If additional devices are connected to the phone line
If you have other devices to connect, connect them as shown in the diagram below:
1
Phone wall jack
2
Parallel splitter
3
DSL/ADSL modem
4
Telephone answering machine
5
Telephone
6
ISDN wall jack
7
Terminal adapter or ISDN router
8
Broadband modem
9
DSL/ADSL lter
10
Analog telephone adaptor
* TAM: Telephone answering machine
** FoIP: Fax over Internet Protocol
English

English
7
Send a standard fax
1. Load your original print-side down on the right front corner of the scanner glass or print-side up in the
Document Feeder.
2. From the printer control panel display, touch Fax.
3. Touch Send Now.
4. Enter the fax number by using the keypad.
To add a pause in the fax number, press * repeatedly, until a dash (-) appears on the display.
5. Touch Black or Color.
If the printer detects an original loaded in the document feeder, it sends the document to the number you
entered.
If the recipient reports problems with the quality of the fax you sent, try changing the resolution or contrast of
your fax.
Use fax
Send a fax using an extension phone
1. Dial the number by using the keypad on the extension phone.
Do not use the keypad on the printer control panel when sending a fax using this method.
2. If the recipient answers the phone, you can engage in a conversation before sending the fax.
If a fax machine answers the call, you will hear fax tones from the receiving fax machine.
3. Load your original print-side down on the right front corner of the scanner glass or print-side up in the
document feeder.
4. From the printer control panel display, touch Fax.
5. Touch Send Fax.
6. Touch Black or Color.
If you were on the phone with the recipient, ask the recipient to start receiving the fax when they hear fax
tones on the fax machine. When the printer begins faxing, you can hang up the phone or remain on the line.
You might not hear fax tones during fax transmission.
For more information about other ways you can send faxes, such as scheduling a fax to be sent later or
sending faxes from a computer, see the electronic Help.
Receive a fax automatically
By default, the printer automatically answers incoming calls and receives faxes.
To receive faxes manually, turn o Auto Answer from the printer control panel.
The printer will answer calls after the number of rings specied in the Rings to Answer setting.
If an answering machine is connected to the printer, the Rings to Answer setting for the printer must be set to a
higher number than the answering machine.
1. Make sure the printer is turned on and paper is loaded.
2. From the printer display, touch Fax.
3. Touch Setup, and then touch Preferences.
4. Select On for the Auto Answer option.
Note: If you have subscribed to a voice mail service on the same phone line that you will use for faxing, you
cannot receive faxes automatically. You must be available to respond in person to incoming fax calls. (If you want
to receive faxes automatically, contact your phone company to subscribe to a distinctive ring service or to obtain
a separate phone line for faxing.)
The printer can store received faxes in its internal memory. To reprint these faxes, see “Reprint received faxes
from memory” on the next page.

8
Use fax (continued)
Receive a fax manually
If you are on the phone with another person, you can receive faxes manually without hanging up the phone.
1. Make sure the printer is turned on and paper is loaded.
2. Remove any originals from the document feeder.
Set Rings to Answer to a higher number to allow you time to answer the incoming call before the printer does.
Or turn o Auto Answer so that the printer does not automatically answer incoming calls.
3. Ask the sender to start sending the fax.
4. When you hear fax tones, from the Home screen on the printer control panel, touch Fax, touch Send and
Receive, and then touch Receive Now.
When the printer begins to receive the fax, you can hang up the phone or remain on the line. You might not hear
fax tones during fax transmission.
Reprint received faxes from memory
If Backup Fax Reception is turned on, incoming faxes will be stored in memory even when the printer has an error
condition.
Note: All faxes stored in memory might be deleted from memory when the printer is turned o.
1. Make sure paper is loaded in the printer.
2. From the Home screen on the printer display, touch Fax.
3. Touch Reprint.
The faxes are displayed in the reverse order from when they were received, with the most recently received fax
printed rst.
4. To stop printing, select Cancel.
Print a report or log
Fax reports provide useful system information about the printer.
1. From the Home screen on the printer display, touch Setup and then touch Fax Setup.
2. Touch Reports and then touch Fax Conrmation.
3. Touch to select one of the options.
English

9
Check the printer fax settings
• The Auto Answer feature is turned on for the
printer to receive fax automatically.
• If you have subscribed to a voice mail service from
the phone company or service provider, ensure that
the Rings to Answer on the printer is set to be more
than that of the telephone answering machine.
The printer will monitor the line and decide if an
incoming call is a normal phone call or fax call. If it
is a fax call, the printer will start a fax connection
automatically. Otherwise, you might have to receive
the fax manually by selecting Fax on the printer
display.
• If multiple phone numbers are assigned to the
same physical phone line and the line is shared
by multiple devices, ensure that the printer is set
to the correct distinctive ring setting for receiving
faxes.
Check the physical fax connections
• Connect the phone cable from the 1-LINE port on
the back of the printer to the phone wall jack and
connect a phone cable from the 2-EXT port on the
back of the printer to an extension phone. From the
extension phone, call the phone number that failed
to receive the faxes.
• If you were trying to fax to an external number, be
sure to include any required access code or numbers
prior to entering the number. You might also
need to add a pause in the number to prevent the
printer from dialing too fast; to add a pause, press *
repeatedly until a dash (-) appears on the display.
• If you cannot make any outgoing calls because no
dial tone is detected or the line is noisy, try using
another phone cable in place of the one connected
to the 1-LINE phone port, or move the printer to
another location which has a separate phone line (if
possible) and see if there are similar problems.
• If you are in a digital phone environment (such
as FoIP, fax over VoIP), reduce the fax speed and
turn o the Error Code Modulation (ECM) from the
printer control panel. If needed, contact your phone
company to nd out if there are problems with the
phone line or to learn more about the capabilities of
the phone network.
Solve fax problems
If you still have problems using fax after successfully
completing the fax test, follow the steps below:
Cannot send but can receive faxes
1. Perform a copy or scan to ensure that the printer is
working properly.
2. Check the physical fax connections.
3. Check if other fax devices can send to the same
phone number. The receiving fax device might have
blocked your phone number, or it might be having
technical problems.
4. If the problem persists, print the fax test report and
fax log (and if available, the Caller ID report and
Junk Fax report), and then contact HP for further
help.
Cannot receive but can send faxes
1. Check the fax settings on the printer.
2. Check the physical fax connections.
3. Check if other devices connected to the same phone
line can receive faxes. The phone line might be
faulty or the sending fax device might be having
problems sending faxes. You might also want
to check if you have blocked the sender’s phone
number.
4. Check the problem with the sender. If the problem
persists, print the fax test report and fax log (and if
available, the Caller ID report and Junk Fax report),
and then contact HP for further help.
Cannot send and receive faxes
1. Perform a copy or scan to ensure that the printer is
working properly.
2. Check the physical fax connections.
3. Check the fax settings on the printer.
4. Check if other devices connected to this phone line
can send or receive faxes. There might be a problem
with the phone line.
5. Reset the printer by turning o the printer and,
if possible, the main switch of the power supply.
Wait for a few seconds before turning on the power
again. Try to send or receive a fax on the printer.
6. If the problem persists, print the fax test report and
fax log (and if available, the Caller ID report and
Junk Fax report), and then contact HP for further
help.
7. Note: If you have subscribed to a voice mail service
on the same phone line used for faxing, you will
have to receive faxes manually.
English

10
HP printer limited warranty statement
A. Extent of limited warranty
1. HP Inc. (HP) warrants to the end-user customer that the HP products specified above will be free from defects in materials
and workmanship for the duration specified above, which duration begins on the date of purchase by the customer.
2. For software products, HP’s limited warranty applies only to a failure to execute programming instructions. HP does not
warrant that the operation of any product will be interrupted or error free.
3. HP's limited warranty covers only those defects that arise as a result of normal use of the product, and does not cover any
other problems, including those that arise as a result of:
a. Improper maintenance or modification;
b. Software, media, parts, or supplies not provided or supported by HP;
c. Operation outside the product's specifications;
d. Unauthorized modification or misuse.
4. For HP printer products, the use of a non-HP cartridge or a refilled cartridge does not affect either the warranty to the
customer or any HP support contract with the customer. However, if printer failure or damage is attributable to the use of a
non-HP or refilled cartridge or an expired ink cartridge, HP will charge its standard time and materials charges to service the
printer for the particular failure or damage.
5. If HP receives, during the applicable warranty period, notice of a defect in any product which is covered by HP's warranty, HP
shall either repair or replace the product, at HP's option.
6. If HP is unable to repair or replace, as applicable, a defective product which is covered by HP's warranty, HP shall, within a
reasonable time after being notified of the defect, refund the purchase price for the product.
7. HP shall have no obligation to repair, replace, or refund until the customer returns the defective product to HP.
8. Any replacement product may be either new or like-new, provided that it has functionality at least equal to that of the
product being replaced.
9. HP products may contain remanufactured parts, components, or materials equivalent to new in performance.
10. HP's Limited Warranty Statement is valid in any country where the covered HP product is distributed by HP. Contracts for
additional warranty services, such as on-site service, may be available from any authorized HP service facility in countries
where the product is distributed by HP or by an authorized importer.
B. Limitations of warranty
TO THE EXTENT ALLOWED BY LOCAL LAW, NEITHER HP NOR ITS THIRD PARTY SUPPLIERS MAKES ANY OTHER WARRANTY OR
CONDITION OF ANY KIND, WHETHER EXPRESS OR IMPLIED WARRANTIES OR CONDITIONS OF MERCHANTABILITY,
SATISFACTORY QUALITY, AND FITNESS FOR A PARTICULAR PURPOSE.
C. Limitations of liability
1. To the extent allowed by local law, the remedies provided in this Warranty Statement are the customer's sole and exclusive
remedies.
2. TO THE EXTENT ALLOWED BY LOCAL LAW, EXCEPT FOR THE OBLIGATIONS SPECIFICALLY SET FORTH IN THIS WARRANTY
STATEMENT, IN NO EVENT SHALL HP OR ITS THIRD PARTY SUPPLIERS BE LIABLE FOR DIRECT, INDIRECT, SPECIAL, INCIDENTAL,
OR CONSEQUENTIAL DAMAGES, WHETHER BASED ON CONTRACT, TORT, OR ANY OTHER LEGAL THEORY AND WHETHER
ADVISED OF THE POSSIBILITY OF SUCH DAMAGES.
D. Local law
1. This Warranty Statement gives the customer specific legal rights. The customer may also have other rights which vary from
state to state in the United States, from province to province in Canada, and from country to country elsewhere in the world.
2. To the extent that this Warranty Statement is inconsistent with local law, this Warranty Statement shall be deemed modified
to be consistent with such local law. Under such local law, certain disclaimers and limitations of this Warranty Statement
may not apply to the customer. For example, some states in the United States, as well as some governments outside the
United States (including provinces in Canada), may:
a. Preclude the disclaimers and limitations in this Warranty Statement from limiting the statutory rights of a consumer
(e.g., the United Kingdom);
b. Otherwise restrict the ability of a manufacturer to enforce such disclaimers or limitations; or
c. Grant the customer additional warranty rights, specify the duration of implied warranties which the manufacturer cannot
disclaim, or allow limitations on the duration of implied warranties.
3. THE TERMS IN THIS WARRANTY STATEMENT, EXCEPT TO THE EXTENT LAWFULLY PERMITTED, DO NOT EXCLUDE, RESTRICT, OR
MODIFY, AND ARE IN ADDITION TO, THE MANDATORY STATUTORY RIGHTS APPLICABLE TO THE SALE OF THE HP PRODUCTS TO
SUCH CUSTOMERS.
HP product Duration of limited warranty
Software Media 90 days
Printer 1 year
Print or Ink cartridges Until the HP ink is depleted or the “end of warranty” date
printed on the cartridge has been reached, whichever
occurs first. This warranty does not cover HP ink products
that have been refilled, remanufactured, refurbished,
misused, or tampered with.
Printheads (only applies to products with customer 1 year
replaceable printheads)
Accessories 1 year unless otherwise stated
English

11
HP Limited Warranty
The HP limited Warranty is a commercial guarantee voluntarily provided by HP. The name and address of the HP entityresponsible for the
performance of the HP Limited Warranty in your country is as follows:
U.K: HP Inc UK Limited, Cain Road, Amen Corner, Bracknell, Berkshire, RG12 1HN
Ireland: Hewlett-Packard Ireland Limited, Liffey Park Technology Campus, Barnhall Road, Leixlip, Co.Kildare
Malta: Hewlett-Packard Europe B.V., Amsterdam, Meyrin Branch, Route du Nant-d’Avril 150, 1217 Meyrin, Switzerland
United Kingdom: The HP Limited Warranty benefits apply in addition to any legal rights to a guarantee from seller of nonconformity of goods
with the contract of sale. These rights expire six years from delivery of goods for products purchased in England or Wales and five years from
delivery of goods for products purchased in Scotland. However various factors may impact your eligibility to receive these rights. For further
information, please consult the following link: Consumer Legal Guarantee or you may visit the European Consumer Centers website.Consumers
have the right to choose whether to claim service under the HP Limited Warranty or against the seller under the legal guarantee.
Ireland: The HP Limited Warranty benefits apply in addition to any statutory rights from seller in relation to onconformity of goods with the
contract of sale. However various factors may impact your eligibility to receive these rights. Consumer statutory rights are not limited or affected
in any manner by HP Care Pack. For further information, please consult the following link: Consumer Legal Guarantee or you may visit the
European Consumer Centers website.Consumers have the right to choose whether to claim service under the HP Limited Warranty or against the
seller under the legal guarantee.
Malta: The HP Limited Warranty benefits apply in addition to any legal rights to a two-year guarantee from seller of nonconformity of goods with
the contract of sale; however various factors may impact your eligibility to receive these rights. Consumer statutory rights are not limited or
affected in any manner by the HP Limited Warranty. For further information, please consult the following link: Consumer Legal Guarantee or you
may visit the European Consumer Centers website.
Consumers have the right to choose whether to claim service under the HP Limited Warranty or against the seller under two-year legal
guarantee.
For further information, please consult the following link: Consumer Legal Guarantee (www.hp.com/go/eu-legal) or you may visit the European
Consumer Centers website(http://ec.europa.eu/consumers/solving_consumer_disputes/non-judicial_redress/ecc-net/index_en.htm).
English

Die in diesem
Dokument enthaltenen
Informationen können
ohne vorherige
Ankündigung geändert
werden.
Bitte scannen, um weitere Infos zu erhalten!
Es gelten ggf. Standarddatenraten. Ist ggf. nicht in allen Sprachen verfügbar.
Weitere Infos
Elektronische Hilfe: Installieren Sie die elektronische Hilfe, indem Sie diese beim Installieren der Software in der
empfohlenen Software auswählen. Über die Hilfe erhalten Sie weitere Informationen zu Leistungsmerkmalen des Produkts,
Druck, Fehlerbehebung und Support. Hinweise, Erklärungen zum Umweltschutz und rechtliche Hinweise einschließlich
rechtlichem Hinweis der Europäischen Union und Konformitätserklärung nden Sie im Abschnitt „Technische Daten“.
• Windows® 8.1: Klicken Sie in der Startanzeige links unten auf den Pfeil nach unten, wählen Sie den Druckernamen aus
und klicken Sie auf Hilfe. Wählen Sie dann HP Hilfe durchsuchen aus.
• Windows® 8: Klicken Sie mit der rechten Maustaste auf einen leeren Bereich der Startanzeige. Klicken Sie dann in der
App-Leiste auf Alle Apps und anschließend auf das Symbol mit dem Namen Ihres Druckers. Klicken Sie dann auf Hilfe.
• Windows® 7, Windows Vista® und Windows® XP: Klicken Sie auf Start > Alle Programme > HP > HP Oicejet 5740
series > Hilfe.
• OS X: Klicken Sie auf Hilfe > Help Center. Klicken Sie im Help Viewer-Fenster auf Hilfe für alle Ihre Apps. Klicken Sie
dann auf HP Oicejet 5740 series.
Readme-Datei: Enthält HP Supportinformationen, Betriebssystemanforderungen und neueste Informationen zum Drucker.
• Windows: Legen Sie die Software-CD in den Computer ein und blättern Sie dann zur Datei ReadMe.chm. Doppelklicken
Sie zum Önen auf ReadMe.chm und wählen Sie dann die ReadMe in Ihrer Sprache aus.
• Macintosh: Önen Sie den Ordner Dokumente, der sich auf der obersten Ebene des Softwareinstallationsprogramms
bendet. Doppelklicken Sie auf ReadMe. Wählen Sie dann die ReadMe in Ihrer Sprache aus.
Im Internet: Weitere Hilfe und Informationen: www.hp.com/go/support. Druckerregistrierung: www.register.hp.com.
Konformitätserklärung: www.hp.eu/certicates. Tintenverbrauch: www.hp.com/go/inkusage.
Erste Schritte
1. Befolgen Sie die Einrichtungsanweisungen, um den Drucker zu kongurieren.
2. Installieren Sie die Software.
Windows®
Rufen Sie 123.hp.com/OJ5740 auf und befolgen Sie die angezeigten Anweisungen. Wenn der Computer nicht mit dem
Internet verbunden ist, legen Sie die Software-CD in den Computer ein. Wenn die CD nicht startet, navigieren Sie zu
Computer, doppelklicken Sie auf das Symbol für das CD/DVD-Laufwerk mit dem HP Logo. Doppelklicken Sie auf
setup.exe und befolgen Sie die angezeigten Anweisungen.
OS X/iOS
Besuchen Sie 123.hp.com/OJ5740, um die neueste HP Software auf einem Mac zu installieren. Die HP Software für Mac
ist auf der Software-CD, die zum Lieferumfang des Druckers gehört, nicht enthalten.
Dieses Produkt ist für Apple AirPrint aktiviert. Der Drucker und das iOS-Gerät bzw. der Mac müssen sich im selben
lokalen Netzwerk benden.
Hinweis: Stellen Sie stets sicher, dass das gewünschte Papier im Papierfach eingelegt ist. Vergewissern Sie sich nach
dem Schließen des Fachs, dass das entsprechende Papier über das Bedienfeld des Druckers ausgewählt wurde.
HP Oicejet 5740 e-All-in-One Series
Deutsch
www.hp.com/eu/m/OJ5740

13
Sicherheitsinformationen
Beachten Sie beim Einsatz dieses Druckers immer die grundlegenden Sicherheitsmaßnahmen, um die Verletzungsgefahr durch
Feuer oder einen elektrischen Schlag zu verringern.
1. Lesen und beachten Sie unbedingt die Anweisungen in der Dokumentation, die dem Drucker beiliegt.
2. Beachten Sie alle Warnhinweise und Anweisungen, die am Drucker angebracht sind.
3. Ziehen Sie vor dem Reinigen des Druckers den Netzstecker aus der Steckdose.
4. Installieren oder verwenden Sie diesen Drucker nicht in der Nähe von Wasser bzw. wenn Ihre Hände nass sind.
5. Sorgen Sie für einen sicheren Stand des Druckers auf einer stabilen Auageäche.
6. Wählen Sie für den Drucker einen geschützten Standort, an dem keine Personen auf das Netzkabel treten oder darüber
stolpern können. Das Netzkabel darf nicht beschädigt werden.
7. Wenn der Drucker nicht einwandfrei funktioniert, nden Sie weitere Informationen in der Hilfedatei (die nach der
Installation der Software auf dem Computer verfügbar ist).
8. Im Inneren des Produkts benden sich keine Teile, die vom Endnutzer instand gesetzt werden können. Überlassen Sie
Wartungsarbeiten qualiziertem Wartungspersonal.
9. Verwenden Sie das Produkt ausschließlich mit dem Netzkabel und dem Netzteil (sofern im Lieferumfang enthalten), die
von HP geliefert wurden.
1
Wireless (LED): Zeigt den Status der Wireless-Verbindung des Druckers an.
• Eine blau leuchtende LED zeigt an, dass die Wireless-Verbindung hergestellt wurde und Sie drucken
können.
• Eine langsam blinkende LED zeigt an, dass der Wireless-Betrieb aktiviert ist, aber der Drucker nicht mit
einem Netzwerk verbunden ist. Stellen Sie sicher, dass sich der Drucker in Reichweite des Funksignals
bendet.
• Eine schnell blinkende LED zeigt einen Wireless-Fehler an. Lesen Sie die Meldung auf dem
Druckerdisplay.
• Wenn der Wireless-Betrieb deaktiviert ist, leuchtet die Wireless-LED nicht, und auf dem Display wird
Wireless Aus angezeigt.
2
Netztaste: Dient zum Ein-/Ausschalten des Druckers.
3
Zurück (Taste): Dient zum Zurückkehren zur vorherigen Anzeige.
4
Hilfe (Taste): Zeigt, falls verfügbar, den Hilfetext für die aktuelle Operation an.
5
Startanzeige (Taste): Ruft wieder die Startanzeige auf, d. h. die Anzeige, die beim ersten Einschalten des
Druckers angezeigt wird.
6
Bedienfelddisplay: Tippen Sie auf die Anzeige, um Menüoptionen auszuwählen oder in den Menüoptionen zu
blättern.
7
Near Field Communication (NFC, Taste): Gibt den Bereich an, in dem Sie den Drucker mit einem mobilen
Gerät (wie einem Smartphone oder Tablet) berühren müssen, um Dokumente oder Bilder vom Gerät aus zu
drucken.
Bedienfeld
Deutsch

14
MacWindows
Allgemeine Fehlerbehebung
Wenn kein Drucken möglich ist:
1. Vergewissern Sie sich, dass alle Kabel korrekt angeschlossen sind.
2. Vergewissern Sie sich, dass der Drucker eingeschaltet ist und mit Strom versorgt wird. Die Netztaste (Ein) leuchtet weiß.
3. Überprüfen Sie die Wireless-Status-LED, um sicherzustellen, dass der Drucker mit einem Netzwerk verbunden ist.
4. Besuchen Sie die Website für die HP Diagnosetools unter www.hp.com/go/tools, um kostenlose Diagnoseprogramme (Tools)
herunterzuladen. Diese dienen zum Beheben allgemeiner Druckerprobleme.
Vergewissern Sie sich, dass der Drucker als Standarddrucker
festgelegt ist:
• Windows 8.1 und Windows 8: Zeigen oder tippen Sie auf
die obere rechte Ecke der Anzeige, um die Charms-Leiste
zu önen. Klicken Sie dann auf das Symbol Einstellungen.
Klicken oder tippen Sie auf Systemsteuerung und dann
auf Geräte und Drucker anzeigen.
• Windows 7: Klicken Sie im Windows-Menü „Start“ auf
Geräte und Drucker.
• Windows Vista: Klicken Sie in der Windows-Taskleiste
auf Start. Klicken Sie dann auf Systemsteuerung und
Drucker.
• Windows XP: Klicken Sie in der Windows-Taskleiste auf
Start. Klicken Sie dann auf Systemsteuerung und Drucker
und Faxgeräte.
Vergewissern Sie sich, dass der Kreis neben dem Drucker
mit einem Häkchen markiert ist. Wenn Ihr Drucker nicht
als Standarddrucker ausgewählt ist, klicken Sie mit der
rechten Maustaste auf das Druckersymbol und wählen Sie im
daraufhin angezeigten Menü die Option Als Standarddrucker
festlegen aus.
Überprüfen Sie die Druckwarteschlange:
1. Klicken Sie in den Systemeinstellungen auf Drucker &
Scanner (Drucken & Faxen unter OS X 10.7 Lion und
OS X 10.8 Mountain Lion).
2. Klicken Sie auf Druckwarteschlange önen.
3. Klicken Sie auf einen Druckauftrag, um ihn auszuwählen.
4. Verwenden Sie zum Verwalten des Druckauftrags die
folgenden Schaltächen:
• Abbrechen (Symbol): Ausgewählten Druckauftrag
abbrechen.
• Fortsetzen: Angehaltenen Druckauftrag fortsetzen.
5. Wenn Änderungen vorgenommen wurden, starten Sie
einen erneuten Druckversuch.
Starten Sie den Drucker neu und setzen Sie ihn zurück:
1. Starten Sie den Computer neu.
2. Setzen Sie den Drucker zurück.
a. Schalten Sie den Drucker aus und ziehen Sie das
Netzkabel ab.
b. Warten Sie eine Minute, schließen Sie das Netzkabel
wieder an und schalten Sie den Drucker ein.
Marken: Windows XP, Windows Vista, Windows 7 und Windows 8 und Windows 8.1 sind in den USA eingetragene Marken der
Microsoft Corporation.
Mac, OS X und AirPrint sind in den USA und/oder anderen Ländern eingetragene Marken von Apple Inc.
Wenn Sie ein USB-Kabel benutzen und weiterhin kein Druck
möglich ist oder die Softwareinstallation scheitert:
1. Nehmen Sie die CD aus dem CD-/DVD-Laufwerk heraus
und lösen Sie das USB-Kabel vom Computer.
2. Starten Sie den Computer neu.
3. Legen Sie die CD mit der Druckersoftware in das CD/
DVD-Laufwerk ein und führen Sie die Installation
der Druckersoftware entsprechend den angezeigten
Anweisungen durch. Schließen Sie das USB-Kabel erst an,
wenn Sie dazu aufgefordert werden.
4. Starten Sie den Computer nach Abschluss der Installation
neu.
Wenn Sie die Wireless-Funktionen benutzen und weiterhin
kein Druck möglich ist:
Weitere Informationen erhalten Sie im Abschnitt „Netzwerke“
auf der nächsten Seite.
Deinstallieren Sie die Software:
1. Ist der Drucker über ein USB-Kabel mit dem Computer
verbunden, trennen Sie den Drucker von Ihrem Computer.
2. Önen Sie den Ordner Programme/Hewlett-Packard.
3. Doppelklicken Sie auf das Symbol für das
HP Deinstallationsprogramm und befolgen
Sie die angezeigten Anweisungen.
Setzen Sie das Drucksystem zurück:
1. Klicken Sie in den Systemeinstellungen auf Drucker &
Scanner (Drucken & Faxen unter OS X 10.7 Lion und
OS X 10.8 Mountain Lion).
2. Halten Sie die Taste Strg gedrückt, während Sie auf
die Liste auf der linken Seite klicken. Wählen Sie dann
Drucksystem zurücksetzen aus.
3. Fügen Sie den Drucker hinzu, den Sie verwenden möchten.
Speicher für anonyme Nutzungsdaten: Von den HP Patronen wird eine begrenzte Menge an anonymen Daten zur
Druckernutzung gespeichert. Weitere Informationen und Anweisungen zum Deaktivieren dieses Speichers nden Sie in der
elektronischen Hilfe.
Deutsch

15
Wireless-Netzwerke
Wenn keine Verbindung zum Netzwerk hergestellt werden konnte
• Vergewissern Sie sich, dass der Wireless-Betrieb auf dem Drucker aktiviert ist.
1. Tippen Sie auf dem Bedienfeld des Druckers auf (Wireless).
2. Wird Wireless Aus angezeigt, tippen Sie auf (Einstellungen) und dann auf Wireless-Einst.
3. Wählen Sie dann in der Anzeige Wireless-Einst. für die Option Wireless den Wert Ein aus.
• Vergewissern Sie sich, dass der Drucker mit dem Netzwerk verbunden ist.
1. Tippen Sie auf dem Bedienfeld des Druckers auf (Wireless).
2. Tippen Sie auf (Einstellungen).
3. Tippen Sie auf Berichte drucken und dann auf Wireless-Testbericht. Der Wireless-Testbericht wird automatisch gedruckt.
4. Prüfen Sie am Anfang des Berichts, ob beim Test ein Fehler aufgetreten ist.
– Prüfen Sie anhand des Abschnitts Diagnoseergebnisse, ob alle Tests ausgeführt und vom Drucker bestanden wurden.
– Unter Aktuelle Konguration nden Sie den Namen (die SSID) des Netzwerks, mit dem der Drucker zurzeit verbunden
ist. Vergewissern Sie sich, dass der Drucker mit demselben Netzwerk verbunden ist wie der Computer.
Hinweis: Wenn Ihr Computer mit einem Virtual Private Network (VPN) verbunden ist, trennen Sie vorübergehend die
Verbindung zum VPN, bevor Sie mit der Installation fortfahren. Sie müssen nach der Installation die Verbindung zum VPN
trennen, um über das eigene Heimnetzwerk auf den Drucker zugreifen zu können.
• Vergewissern Sie sich, dass die Kommunikation über das Netzwerk nicht durch Sicherheitssoftware blockiert wird.
Sicherheitssoftware wie Firewalls kann die Kommunikation zwischen dem Computer und dem Drucker blockieren, wenn die
Software über ein Netzwerk installiert wird. Sollte der Drucker nicht gefunden werden, deaktivieren Sie vorübergehend die
Firewall und überprüfen Sie, ob das Problem dadurch behoben wurde. Weitere Hilfe und Tipps zu Sicherheitssoftware erhalten
Sie unter: www.hp.com/go/wpc-rewall_de-de.
• Starten Sie die Komponenten des Wireless-Netzwerks neu.
Schalten Sie den Router und den Drucker aus und schalten Sie diese in der genannten Reihenfolge wieder ein: zuerst den
Router und dann den Drucker. Manchmal lassen sich Probleme mit der Netzwerkkommunikation durch Ausschalten und
erneutes Einschalten beheben. Falls Sie immer noch keine Verbindung herstellen können, schalten Sie Router, Drucker und
Computer aus und danach in dieser Reihenfolge wieder ein: zuerst den Router, dann den Drucker und anschließend den
Computer.
Hinweis: Lässt sich keine Wireless-Verbindung herstellen, kann der Drucker auch über ein Ethernet-Kabel mit dem Netzwerk
verbunden werden.
Sollten weiterhin Probleme auftreten, besuchen Sie das HP Wireless-Druckcenter (www.hp.com/go/wirelessprinting). Diese
Website enthält die umfassendsten und neuesten Informationen zum Wireless-Druck sowie Informationen zum Vorbereiten
Ihres Wireless-Netzwerks, Lösen von Problemen beim Verbinden des Druckers mit dem Wireless-Netzwerk und Lösen von
Problemen in Bezug auf die Sicherheitssoftware.
Hinweis: Auf einem Windows-Computer können Sie das Tool HP Print and Scan Doctor verwenden. Sollten Probleme mit
dem Drucker auftreten, unterstützt Sie dieses Tool bei der Lösung vielfältiger Probleme. Sie können dieses Tool unter
www.hp.com/go/tools herunterladen.
Wenn Sie den Drucker mit mehreren Computern im Netzwerk gemeinsam verwenden möchten
Installieren Sie zuerst den Drucker in Ihrem Heimnetzwerk. Sobald der Drucker mit Ihrem Heimnetzwerk verbunden ist, können Sie
den Drucker gemeinsam mit anderen Computern im selben Netzwerk benutzen. Sie müssen bei jedem weiteren Computer nur die
HP Druckersoftware installieren.
Benötigen Sie Hilfe zum Netzwerkbetrieb?
www.hp.com/go/wirelessprinting
Im HP Wireless-Druckcenter unter www.hp.com/go/wirelessprinting erhalten Sie Hilfe zum Vorbereiten Ihres Wireless-
Netzwerks, zum Einrichten und erneuten Kongurieren des Druckers und zum Beheben von Netzwerkproblemen.
Deutsch

16
Wenn der Drucker ohne Router über eine Wireless-Verbindung verwendet werden soll
Verwenden Sie Wi-Fi Direct, um drahtlos (wireless) und ohne Router von Ihrem Computer, Ihrem Smartphone oder einem anderen
wireless-fähigen Gerät aus zu drucken. Die Druckersoftware muss auf einem Computer installiert sein, um Wi-Fi Direct vom
Computer aus verwenden zu können.
1. Vergewissern Sie sich, dass Wi-Fi Direct auf Ihrem Drucker aktiviert ist:
a. Tippen Sie auf dem Druckerdisplay in der Startanzeige auf (Wi-Fi Direct).
b. Ist für Status der Wert Aus angegeben, tippen Sie auf (Wi-Fi Direct – Einstellungen) und schalten Sie Wi-Fi Direct ein.
2. Verbinden Sie Ihr wireless-fähiges Gerät mit dem Drucker:
a. Aktivieren Sie die Wi-Fi-Verbindung auf Ihrem mobilen Gerät. Weitere Informationen hierzu nden Sie in der
Dokumentation zum mobilen Gerät.
b. Stellen Sie vom mobilen Gerät aus eine Verbindung zu einem neuen Netzwerk her. Führen Sie dabei Ihre üblichen
Arbeitsschritte aus, um eine Verbindung zu einem neuen Wireless-Netzwerk oder einem Hotspot herzustellen. Wählen Sie
den Namen für Wi-Fi Direct in der angezeigten Liste mit den Wireless-Netzwerken aus wie DIRECT-**-HP Oicejet-5740.
(Dabei stehen die Sternchen ** für die eindeutigen Zeichen zur Kennzeichnung des Druckers.)
c. Geben Sie bei der entsprechenden Auorderung das Kennwort für Wi-Fi Direct ein.
3. Drucken Sie in derselben Weise wie mit dem Computer oder einem mobilen Gerät.
Hinweis: Über eine Verbindung für Wi-Fi Direct wird kein Zugri auf das Internet bereitgestellt.
Im HP Wireless-Druckcenter unter www.hp.com/go/wirelessprinting nden Sie weitere Informationen zu Wi-Fi Direct.
So wechseln Sie von einer USB-Verbindung zu einer Wireless-Verbindung
Die Druckersoftware muss bereits korrekt installiert sein.
Windows
1. Befolgen Sie die Anweisungen für Ihr Betriebssystem:
• Windows 8.1: Klicken Sie auf der Startanzeige links unten auf den Pfeil nach unten, wählen Sie den Druckernamen aus
und klicken Sie dann auf Dienstprogramme.
• Windows 8: Klicken Sie auf der Startanzeige mit der rechten Maustaste auf einen leeren Bereich und dann auf der App-
Leiste auf Alle Apps.
• Windows 7, Windows Vista und Windows XP: Wählen Sie auf dem Computer im Menü Start die Option Alle Programme
oder Programme und dann HP aus.
2. Wählen Sie HP Oicejet 5740 series aus.
3. Wählen Sie Druckereinrichtung und -software aus.
4. Wählen Sie Bei Druckerverbindung von USB zu Wireless wechseln aus. Befolgen Sie die angezeigten Anweisungen.
Mac
Verwenden Sie das HP Dienstprogramm unter Programme/Hewlett-Packard, um bei der Softwareverbindung für diesen Drucker
zu Wireless zu wechseln.
Wireless-Netzwerke (Forts.)
Wenn Sie mit AirPrint drucken möchten
Dieser Drucker ist für Apple AirPrint® aktiviert. Sie können drahtlos von Ihrem iOS-Gerät oder Mac drucken.
• Der Drucker und das iOS-Gerät bzw. der Mac müssen sich im selben lokalen Netzwerk benden.
• Mit Apple AirPrint® können Sie keine Dokumente von Ihrem Drucker zum iOS-Gerät scannen.
Dieses Produkt ist für die Verwendung in oenen Umgebungen (z. B. zu Hause ohne Verbindung mit dem öentlichen Internet)
gedacht, in denen jeder auf den Drucker zugreifen und diesen verwenden kann. Infolgedessen wird für Wi-Fi Direct standardmäßig
der automatische Modus ohne Administratorkennwort eingestellt. Dies ermöglicht es allen Benutzern in Wireless-Reichweite, eine
Verbindung herzustellen und auf alle Funktionen und Einstellungen des Druckers zuzugreifen. Wenn höhere Sicherheitsstufen
gewünscht sind, empehlt HP, die Verbindungsmethode für Wi-Fi Direct von „Automatisch“ in „Manuell“ zu ändern und ein
Administratorkennwort einzurichten.
Deutsch

17
Faxeinrichtung
1. Schließen Sie das Telefonkabel an.
Hinweis: HP Drucker wurden speziell für die Verwendung herkömmlicher analoger Telefondienste entwickelt. Wenn Sie in einer
digitalen Telefonumgebung (wie DSL/ADSL, PBX, ISDN oder FoIP) arbeiten, müssen Sie ggf. Digital-zu-Analog-Filter oder -Konverter
verwenden, wenn Sie die Faxfunktion auf dem Drucker einrichten. Informieren Sie sich bei Ihrer Telefongesellschaft über die
Einrichtungsoptionen, die sich bei Ihnen am besten eignen.
Wenn die Telefonleitung nur für Faxe verwendet wird
a. Schließen Sie ein Ende des Telefonkabels an der Telefonsteckdose an.
b. Schließen Sie das andere Ende des Kabels an den Anschluss 1-LINE auf der Rückseite des Druckers an.
Wenn Sie mit DSL/ADSL arbeiten, schließen Sie einen DSL-/ADSL-Filter zwischen dem Anschluss 1-LINE und der
Telefonsteckdose an.
2. Testen Sie die Faxeinrichtung.
Beim Faxtest werden die Hardware, der Telefonkabeltyp und der Verbindungsstatus geprüft. Außerdem werden das Rufsignal
und die Telefonleitung geprüft. So führen Sie den Faxtest aus
a. Drücken Sie auf dem Druckerdisplay in der Startanzeige die Schaltächen Nach oben und Nach unten, um Fax
auszuwählen. Drücken Sie dann OK.
b. Wählen Sie Einstellungen, Erweiterte Einstellungen und Faxeinrichtungsassistent aus. Befolgen Sie dann die
angezeigten Anweisungen.
1
Telefonsteckdose
2
Faxanschluss (1-LINE)
Hinweis: Schließen Sie das Kabel nicht am Anschluss
2-EXT an.
3
DSL-/ADSL-Filter (von der Telefongesellschaft oder
vom Dienstanbieter bereitgestellt)
Wenn weitere Geräte an der Telefonleitung angeschlossen werden
Wenn Sie weitere Geräte anschließen müssen, schließen Sie diese wie im Diagramm weiter unten dargestellt an:
1
Telefonsteckdose
2
Splitter für parallele Leitungen
3
DSL-/ADSL-Modem
4
Telefonanrufbeantworter
5
Telefon
6
ISDN-Steckdose
7
Terminaladapter oder ISDN-Router
8
Breitbandmodem
9
DSL-/ADSL-Filter
10
Adapter für Analogtelefone
* TAM: Telefonanrufbeantworter
** FoIP: Fax über Internetprotokoll
Deutsch

18
Senden einer Standardfaxnachricht
1. Legen Sie das Original mit der bedruckten Seite nach unten an der rechten vorderen Ecke des Scannerglases an oder mit
der bedruckten Seite nach oben in den Vorlageneinzug ein.
2. Tippen Sie auf dem Bedienfelddisplay des Druckers auf Faxen.
3. Tippen Sie auf Jetzt senden.
4. Geben Sie die Faxnummer über das Tastenfeld ein.
Um eine Pause in die Faxnummer einzufügen, drücken Sie wiederholt die Taste *, bis auf der Anzeige ein
Gedankenstrich (–) erscheint.
5. Tippen Sie auf Schwarz oder Farbe.
Wird vom Drucker ein Original im Vorlageneinzug festgestellt, wird das Dokument an die eingegebene Nummer
gesendet.
Wenn der Empfänger die Qualität der von Ihnen gesendeten Faxnachricht bemängelt, ändern Sie probeweise die Auösung
oder den Kontrast der Faxnachricht.
Verwenden der Faxfunktion
Senden einer Faxnachricht von einem Nebenstellentelefon aus
1. Wählen Sie die Nummer über das Tastenfeld des Nebenstellentelefons.
Verwenden Sie bei dieser Methode nicht die Tasten des Druckerbedienfelds.
2. Wenn der Empfänger den Telefonanruf entgegennimmt, können Sie sich mit ihm unterhalten, bevor Sie die Faxnachricht
senden.
Wenn ein Faxgerät den Anruf entgegennimmt, hören Sie Faxtöne vom empfangenden Faxgerät.
3. Legen Sie das Original mit der bedruckten Seite nach unten an der rechten vorderen Ecke des Scannerglases an oder mit
der bedruckten Seite nach oben in den Vorlageneinzug ein.
4. Tippen Sie auf dem Bedienfelddisplay des Druckers auf Faxen.
5. Tippen Sie auf Fax senden.
6. Tippen Sie auf Schwarz oder Farbe.
Wenn Sie mit dem Empfänger telefonieren, bitten Sie ihn, den Faxempfang zu starten, wenn er Faxtöne am Faxgerät
hört. Nachdem der Faxversand vom Drucker gestartet wurde, können Sie den Hörer auegen oder in der Leitung bleiben.
Während der Faxübertragung hören Sie ggf. keine Faxtöne.
Weitere Informationen zu weiteren Methoden zum Senden von Faxen, z. B. das Versenden zu einem späteren Zeitpunkt oder
von einem Computer aus, nden Sie in der elektronischen Hilfe.
Automatischer Faxempfang
Standardmäßig beantwortet der Drucker automatisch eingehende Anrufe und empfängt Faxe.
Schalten Sie zum manuellen Empfang von Faxen Autom. Antwort über das Druckerbedienfeld aus.
Eingehende Anrufe werden vom Drucker dann angenommen, wenn die Anzahl der in der Einstellung Signale bis Antwort
festgelegten Rufsignale erreicht wurde.
Falls ein Anrufbeantworter am Drucker angeschlossen ist, muss die Einstellung für Signale bis Antwort bis zur Entgegennahme
eines Anrufs für den Drucker auf einen höheren Wert eingestellt werden als für den Anrufbeantworter.
1. Stellen Sie sicher, dass der Drucker eingeschaltet und Papier eingelegt ist.
2. Tippen Sie auf dem Druckerdisplay auf Faxen.
3. Tippen Sie auf Einrichtung und dann auf Voreinstellungen.
4. Wählen Sie für die Option Autom. Antwort den Wert Ein aus.
Hinweis: Wenn Sie an der Telefonleitung, die Sie zum Faxen verwenden, einen Voicemail-Dienst nutzen, können Faxnachrichten
nicht automatisch empfangen werden. Sie müssen in diesem Fall eingehende Faxanrufe persönlich entgegennehmen. (Wenn
Sie Faxnachrichten automatisch empfangen möchten, wenden Sie sich an Ihre Telefongesellschaft, um einen Dienst zur
Rufsignalunterscheidung oder eine separate Telefonleitung für den Faxbetrieb zu beantragen.)
Der Drucker kann empfangene Faxe im internen Speicher speichern. Informationen zum Drucken dieser Faxe nden Sie auf der
nächsten Seite im Abschnitt „Erneutes Drucken empfangener Faxe aus dem Speicher”.
Deutsch

19
Verwenden der Faxfunktion (Fortsetzung)
Manuelles Empfangen einer Faxnachricht
Wenn Sie ein Telefongespräch mit einer anderen Person führen, können Sie Faxnachrichten manuell empfangen, ohne den Hörer
aufzulegen.
1. Stellen Sie sicher, dass der Drucker eingeschaltet und Papier eingelegt ist.
2. Entfernen Sie alle Originale aus dem Vorlageneinzug.
Legen Sie für die Einstellung Signale bis Antwort einen höheren Wert fest, damit Sie den Anruf vor dem Drucker
entgegennehmen können. Oder deaktivieren Sie die Einstellung Autom. Antwort, damit eingehende Anrufe nicht automatisch
vom Drucker angenommen werden.
3. Bitten Sie den Absender, den Faxversand zu starten.
4. Wenn Sie Faxtöne hören, tippen Sie auf dem Druckerbedienfeld in der Startanzeige auf Faxen, Senden und empfangen und
dann auf Jetzt empfangen.
Nachdem der Faxempfang vom Drucker gestartet wurde, können Sie den Hörer auegen oder in der Leitung bleiben. Während
der Faxübertragung hören Sie ggf. keine Faxtöne.
Erneutes Drucken empfangener Faxe aus dem Speicher
Wenn Faxempfang sichern aktiviert ist, werden eingehende Faxnachrichten selbst dann im Speicher abgelegt, wenn auf dem
Drucker eine Fehlerbedingung auftritt.
Hinweis: Alle gespeicherten Faxnachrichten werden gelöscht, wenn die Stromversorgung des Druckers unterbrochen wird.
1. Vergewissern Sie sich, dass Papier im Drucker eingelegt ist.
2. Tippen Sie auf dem Druckerdisplay in der Startanzeige auf das Symbol Faxen.
3. Tippen Sie auf Abzüge.
Die Faxe werden in der umgekehrten Reihenfolge angezeigt, in der sie empfangen wurden, d.h. das zuletzt empfangene Fax
wird zuerst ausgegeben.
4. Drücken Sie zum Stoppen des Druckvorgangs auf Abbrechen.
Drucken eines Berichts oder Protokolls
Faxberichte enthalten nützliche Systeminformationen zum Drucker.
1. Tippen Sie auf dem Druckerdisplay in der Startanzeige auf Einrichtung und dann auf Faxeinrichtung.
2. Tippen Sie auf Berichte und anschließend auf Faxbestätigung.
3. Tippen Sie, um eine der Optionen auszuwählen.
Deutsch

20
Überprüfen der Faxeinstellungen des Druckers
• Die Funktion Autom. Antwort ist für den Drucker aktiviert,
um Faxnachrichten automatisch zu empfangen.
• Wenn Sie einen Voicemail-Dienst Ihres
Telekommunikationsanbieters nutzen, vergewissern
Sie sich, dass für Rufsignale bis Antwort auf dem
Drucker ein höherer Wert eingestellt wurde als für
den Anrufbeantworter. Der Drucker überwacht die
Telefonleitung und entscheidet, ob es sich beim
eingehenden Anruf um einen normalen Telefonanruf
oder einen Faxanruf handelt. Handelt es sich um
einen Faxanruf, wird vom Drucker automatisch eine
Faxverbindung gestartet. Ansonsten müssen Sie das Fax
möglicherweise manuell empfangen, indem Sie auf dem
Druckerdisplay Faxen auswählen.
• Wenn derselben physischen Telefonleitung mehrere
Telefonnummern zugewiesen sind und die Leitung von
mehreren Geräten gemeinsam genutzt wird, müssen Sie
sicherstellen, dass die Sonderrufsignaleinstellung für das
empfangende Faxgerät korrekt ist.
Überprüfen der physischen Faxverbindungen
• Verbinden Sie das Telefonkabel des Anschlusses 1-LINE
an der Rückseite des Druckers mit der Telefonsteckdose.
Verbinden Sie ein Telefonkabel am Anschluss 2-EXT an der
Rückseite des Druckers mit einem Nebenstellentelefon.
Rufen Sie vom Nebenstellentelefon die Telefonnummer
an, über die keine Faxnachrichten empfangen werden
konnten.
• Wenn Sie versuchen, an eine externe Nummer zu
faxen, müssen Sie ggf. erforderliche Zugriscodes
und -nummern vor der eigentlichen Nummer eingeben.
Außerdem müssen Sie möglicherweise eine Pause in die
Nummer einfügen, um zu verhindern, dass der Drucker
zu schnell wählt. Um eine Pause einzufügen, drücken
Sie wiederholt die Taste *, bis auf der Anzeige ein
Gedankenstrich (–) erscheint.
• Wenn keine ausgehenden Anrufe möglich sind, weil kein
Rufsignal in der Leitung zu hören ist bzw. Störgeräusche
zu hören sind, tauschen Sie das Telefonkabel am
Telefonanschluss 1-LINE aus. Stellen Sie den Drucker
(falls möglich) an einem Ort auf, an dem eine separate
Telefonleitung verfügbar ist. Prüfen Sie, ob ähnliche
Probleme auftreten.
• Wenn Sie in einer digitalen Telefonumgebung arbeiten
(wie FoIP, Fax over VoIP), verwenden Sie das Bedienfeld
des Druckers, um die Faxgeschwindigkeit zu reduzieren
oder ECM (Error Code Modulation) zu deaktivieren.
Wenden Sie sich bei Bedarf an Ihre Telefongesellschaft,
um festzustellen, ob Probleme mit der Telefonleitung
vorliegen, oder um sich über die Möglichkeiten des
Telefonnetzes zu informieren.
Lösen von Faxproblemen
Sollten nach erfolgreicher Durchführung des Faxtests
Probleme mit dem Faxen auftreten, gehen Sie wie folgt vor:
Faxe können empfangen, aber nicht gesendet werden
1. Kopier- oder Scanauftrag ausführen, um sicherzustellen,
dass der Drucker einwandfrei funktioniert.
2. Physische Anschlussverbindungen zum Faxgerät
überprüfen.
3. Überprüfen, ob andere Faxgeräte Faxnachrichten an dieselbe
Telefonnummer senden können. Auf dem empfangenden
Faxgerät könnte Ihre Telefonnummer gesperrt sein, oder es
könnten dort technische Probleme vorliegen.
4. Tritt das Problem weiterhin auf, drucken Sie den
Testbericht oder das Faxprotokoll (und, falls verfügbar,
den Anrufer-ID- und Junk-Fax-Bericht). Wenden Sie sich
für weitere Unterstützung an HP.
Faxe können gesendet, aber nicht empfangen werden
1. Faxeinstellungen auf dem Drucker überprüfen.
2. Physische Anschlussverbindungen zum Faxgerät
überprüfen.
3. Überprüfen, ob andere Faxgeräte, die an derselben
Telefonleitung angeschlossen sind, Faxnachrichten
empfangen können. Die Telefonleitung ist ggf. defekt, oder
auf dem Faxgerät des Absenders treten Probleme beim
Senden von Faxnachrichten auf. Außerdem empehlt es
sich zu überprüfen, ob die Telefonnummer des Absenders
von Ihnen gesperrt wurde.
4. Problem mit dem Absender besprechen. Tritt das
Problem weiterhin auf, drucken Sie den Testbericht oder
das Faxprotokoll (und, falls verfügbar, den Anrufer-
ID- und Junk-Fax-Bericht). Wenden Sie sich für weitere
Unterstützung an HP.
Faxe können weder gesendet noch empfangen werden
1. Kopier- oder Scanauftrag ausführen, um sicherzustellen,
dass der Drucker einwandfrei funktioniert.
2. Physische Anschlussverbindungen zum Faxgerät überprüfen.
3. Faxeinstellungen auf dem Drucker überprüfen.
4. Überprüfen, ob andere Faxgeräte, die an derselben
Telefonleitung angeschlossen sind, Faxnachrichten senden
oder empfangen können. Möglicherweise liegt ein Problem
mit der Telefonleitung vor.
5. Drucker zurücksetzen, indem Sie den Drucker ausschalten,
und, falls möglich, die Stromversorgung über den
Hauptschalter unterbrechen. Warten Sie einige Sekunden,
bis Sie den Drucker wieder einschalten. Versuchen Sie,
eine Faxnachricht zu senden oder zu empfangen.
6. Tritt das Problem weiterhin auf, drucken Sie den
Testbericht oder das Faxprotokoll (und, falls verfügbar,
den Anrufer-ID- und Junk-Fax-Bericht). Wenden Sie sich
für weitere Unterstützung an HP.
7. Hinweis: Wenn Sie an der Telefonleitung, die Sie zum
Faxen verwenden, einen Voicemail-Dienst nutzen, müssen
Faxnachrichten manuell empfangen werden.
Deutsch

21
Erklärung zur beschränkten Gewährleistung für HP Drucker
A. Umfang der beschränkten Gewährleistung
1. HP Inc. (HP) gewährleistet dem Endkunden, dass die oben genannten HP Produkte während des oben genannten
Gewährleistungszeit-raums frei von Material- und Verarbeitungsfehlern sind. Der Gewährleistungszeitraum beginnt mit
dem Kaufdatum.
2. Bei Softwareprodukten gilt die eingeschränkte Garantie von HP nur für die Nichtausführung von Programmieranweisungen.
HP übernimmt keine Garantie dafür, dass die Verwendung jeglicher Produkte unterbrechungsfrei bzw. ohne Fehler verläuft.
3. Die beschränkte Gewährleistung von HP gilt nur für Mängel, die sich bei normaler Benutzung des Produkts ergeben, und
erstreckt sich nicht auf Fehler, die durch Folgendes verursacht wurden:
a. Unsachgemäße Wartung oder Abänderung des Produkts;
b. Software, Druckmedien, Ersatzteile oder Verbrauchsmaterial, die nicht von HP geliefert oder unterstützt werden;
c. Betrieb des Produkts, der nicht den technischen Daten entspricht;
d. Unberechtigte Abänderung oder falsche Verwendung.
4. Bei HP Druckerprodukten wirkt sich die Verwendung einer nicht von HP hergestellten bzw. einer aufgefüllten Patrone nicht
auf die Garantie für den Kunden bzw. auf jegliche Unterstützungsverträge mit dem Kunden aus. Wenn der Ausfall bzw. die
Beschädigung des Druckers jedoch auf die Verwendung einer nicht von HP hergestellten bzw. einer aufgefüllten Patrone
oder einer abgelaufenen Tintenpatrone zurückzuführen ist, stellt HP für die Wartung des Druckers bei diesem Ausfall bzw.
dieser Beschädigung die standardmäßigen Arbeits- und Materialkosten in Rechnung.
5. Wenn HP während des jeweils zutreffenden Gewährleistungszeitraums von einem Schaden an einem unter die
Gewährleistung von HP fallenden Produkt in Kenntnis gesetzt wird, wird das betreffende Produkt nach Wahl von HP
entweder repariert oder ersetzt.
6. Sollte HP nicht in der Lage sein, ein fehlerhaftes, unter die Gewährleistung fallendes Produkt zu reparieren oder zu ersetzen,
erstattet HP innerhalb eines angemessenen Zeitraums nach Benachrichtigung über den Schaden den vom Endkunden
bezahlten Kaufpreis für das Produkt zurück.
7. HP ist erst dann verpflichtet, das mangelhafte Produkt zu reparieren, zu ersetzen oder den Kaufpreis zurückzuerstatten,
wenn der Endkunde dieses an HP zurückgesandt hat.
8. Ersatzprodukte können entweder neu oder neuwertig sein, solange sie über mindestens denselben Funktionsumfang
verfügen wie das zu ersetzende Produkt.
9. HP Produkte können aufgearbeitete Teile, Komponenten oder Materialien enthalten, die in der Leistung neuen Teilen
entsprechen.
10. Die Erklärung zur beschränkten Gewährleistung von HP gilt in jedem Land, in dem die aufgeführten Produkte von HP
vertrieben werden. Weitergehende auf der Gewährleistung beruhende Dienstleistungen (z.B. Vor-Ort-Service) können mit
jeder autorisierten HP Serviceeinrichtung in den Ländern vereinbart werden, in denen das Produkt durch HP oder einen
autorisierten Importeur vertrieben wird.
B. Einschränkungen der Gewährleistung
WEDER HP NOCH DESSEN ZULIEFERER ÜBERNEHMEN ÜBER DAS NACH GELTENDEM RECHT ZULÄSSIGE AUSMASS HINAUS
ANDERE AUSDRÜCKLICHE ODER STILLSCHWEIGENDE GEWÄHRLEISTUNGEN ODER ZUSICHERUNGEN HINSICHTLICH DER
MARKTGÄNGIGKEIT, ZUFRIEDEN STELLENDEN QUALITÄT UND EIGNUNG FÜR EINEN BESTIMMTEN ZWECK.
C. Haftungsbeschränkung
1. Sofern durch die geltende Gesetzgebung keine anderen Bestimmungen festgelegt sind, stehen dem Endkunden über die in
dieser Gewährleistungsvereinbarung genannten Leistungen hinaus keine weiteren Ansprüche zu.
2. IN DEM NACH GELTENDEM RECHT ZULÄSSIGEN MASS UND MIT AUSNAHME DER IN DIESER GEWÄHRLEISTUNGSVEREINBARUNG
AUSDRÜCKLICH ANGEGEBENEN VERPFLICHTUNGEN SIND WEDER HP NOCH DESSEN ZULIEFERER ERSATZPFLICHTIG FÜR
DIREKTE, INDIREKTE, BESONDERE, ZUFÄLLIGE ODER FOLGESCHÄDEN, UNABHÄNGIG DAVON, OB DIESE AUF DER GRUNDLAGE
VON VERTRÄGEN, UNERLAUBTEN HANDLUNGEN ODER ANDEREN RECHTSTHEORIEN GELTEND GEMACHT WERDEN UND OB HP
ODER DESSEN ZULIEFERER VON DER MÖGLICHKEIT EINES SOLCHEN SCHADENS UNTERRICHTET WORDEN SIND.
D. Geltendes Recht
1. Diese Gewährleistungsvereinbarung stattet den Endkunden mit bestimmten Rechten aus. Der Endkunde hat unter
Umständen noch weitere Rechte, die in den Vereinigten Staaten von Bundesstaat zu Bundesstaat, in Kanada von Provinz zu
Provinz, und allgemein von Land zu Land verschieden sein können.
2. Soweit diese Gewährleistungsvereinbarung nicht dem geltenden Recht entspricht, soll sie als dahingehend abgeändert
gelten, dass die hierin enthaltenen Bestimmungen dem geltenden Recht entsprechen. Unter dem geltenden Recht treffen
bestimmte Erklärungen und Einschränkungen dieser Gewährleistungsvereinbarung möglicherweise nicht auf den
Endkunden zu. In einigen US-Bundesstaaten und in einigen anderen Ländern (sowie in einigen kanadischen Provinzen):
a. werden die Rechte des Verbrauchers nicht durch die Erklärungen und Einschränkungen dieser
Gewährleistungsvereinbarung beschränkt (z.B. in Großbritannien);
b. ist ein Hersteller nicht berechtigt, solche Erklärungen und Einschränkungen durchzusetzen;
c. verfügt ein Endkunde über weitere Gewährleistungsansprüche; insbesondere kann die Dauer stillschweigender
Gewährleistungen durch das geltende Recht geregelt sein und darf vom Hersteller nicht eingeschränkt werden, oder eine
zeitliche Einschränkung der stillschweigenden Gewährleistung ist zulässig.
3. DURCH DIESE GEWÄHRLEISTUNGSVEREINBARUNG WERDEN DIE ANSPRÜCHE DES ENDKUNDEN, DIE DURCH DAS IN DIESEN
LÄNDERN GELTENDE RECHT IM ZUSAMMENHANG MIT DEM KAUF VON HP PRODUKTEN GEWÄHRT WERDEN, NUR IM
GESETZLICH ZULÄSSIGEN RAHMEN AUSGESCHLOSSEN, EINGESCHRÄNKT ODER GEÄNDERT. DIE BEDINGUNGEN DIESER
GEWÄHRLEISTUNGS-VEREINBARUNG GELTEN ZUSÄTZLICH ZU DEN GESETZLICHEN ENDKUNDENRECHTEN.
HP Produkt Dauer der beschränkten Gewährleistung
Softwaremedien 90 Tage
Drucker 1 Jahr
Druckpatronen Bis die HP Tinte verbraucht oder das auf der Druckpatrone
angegebene Enddatum für die Garantie erreicht ist, je nachdem,
welcher Fall zuerst eintritt. Diese Garantie gilt nicht für
nachgefüllte, nachgearbeitete, recycelte, zweckentfremdete
oder in anderer Weise manipulierte HP Tintenprodukte.
Druckköpfe (gilt nur für Produkte, deren Druckkopf vom 1 Jahr
Kunden ausgewechselt werden kann)
Zubehör 1 Jahr (wenn nicht anders angegeben)
Deutsch

22
HP Herstellergarantie
Die beschränkte HP Herstellergarantie ist eine von HP auf freiwilliger Basis angebotene kommerzielle Garantie. Der Name und die
Adresse der HP Gesellschaft, die in Ihrem Land für die Gewährung der beschränkten HP Herstellergarantie verantwortlich ist, sind
wie folgt:
Deutschland: HP Deutschland GmbH, Schickardstr. 32, D-71034 Böblingen
Österreich: HP PPS Austria GmbH., Wienerbergstrasse 41, A-1120 Wien
Luxemburg: Hewlett-Packard Luxembourg S.C.A., 75, Parc d’Activités Capellen, Rue Pafebruc, L-8308 Capellen
Belgien: HP Belgium BVBA, Hermeslaan 1A, B-1831 Diegem
Die Rechte aus der beschränkten HP Herstellergarantie gelten zusätzlich zu den gesetzlichen Ansprüchen wegen Sachmängeln auf
eine zweijährige Gewährleistung ab dem Lieferdatum. Ob Sie Anspruch auf diese Rechte haben, hängt von zahlreichen Faktoren ab.
Die Rechte des Kunden sind in keiner Weise durch die beschränkte HP Herstellergarantie eingeschränkt bzw. betroffen. Weitere
Hinweise finden Sie auf der folgenden Website: Gewährleistungsansprüche für Verbraucher oder Sie können die Website des
Europäischen Verbraucherzentrums besuchen. Verbraucher haben das Recht zu wählen, ob sie eine Leistung von HP gemäß der
beschränkten HP Herstellergarantie in Anspruch nehmen oder ob sie sich gemäß der gesetzlichen zweijährigen Haftung für
Sachmängel (Gewährleistung) sich an den jeweiligen Verkäufer wenden.
Weitere Informationen erhalten Sie über den folgenden Link: Consumer Legal Guarantee (www.hp.com/go/eu-legal). Sie können
dazu auch die European Consumer Centers Website
(http://ec.europa.eu/consumers/solving_consumer_disputes/non-judicial_redress/ecc-net/) besuchen.
Deutsch

Les informations
mentionnées
peuvent être modiées
sans préavis.
Numérisation du code pour plus d'informations!
Les débits de données standard peuvent s'appliquer. Les informations peuvent être indisponibles dans certaines langues.
En savoir plus
Aide électronique: installez l'Aide électronique en sélectionnant cette option parmi les logiciels recommandés pendant
l'installation du logiciel. Découvrez les fonctionnalités du produit, comment imprimer, résoudre des problèmes et obtenir une
assistance. Obtenez des avis, des informations environnementales et réglementaires, y compris les déclarations de conformité
et les avis d'application de la réglementation de l'Union européenne, dans la section Informations techniques.
• Windows®8.1: cliquez sur la èche du bas située en bas à gauche de l'écran d'accueil, sélectionnez le nom de
l'imprimante, cliquez sur Aide, puis sur Rechercher dans l'aide HP.
• Windows®8: cliquez avec le bouton droit de la souris sur une zone vide de l'écran d'accueil. Dans la barre d'applications,
choisissez Toutes les applications, puis cliquez sur l'icône portant le nom de l'imprimante et sélectionnez Aide.
• Windows® 7, Windows Vista® et Windows® XP: cliquez sur Démarrer > Tous les programmes > HP > HP Oicejet série
5740 > Aide.
• OS X: cliquez sur Aide > Centre d'aide. Dans la fenêtre d'aichage de l'Aide, cliquez sur Aide applicable à toutes les
apps, puis sur HP Oicejet série 5740.
Fichier LisezMoi : contient des informations sur le supportHP, la conguration requise du système d'exploitation et les mises
à jour récentes de l'imprimante.
• Windows: insérez le CD du logiciel dans votre ordinateur, puis recherchez le chier ReadMe.chm. Double-cliquez sur le
chier ReadMe.chm pour l'ouvrir, puis sélectionnez le chier ReadMe.chm dans votre langue.
• Mac: ouvrez le dossier Documents situé au niveau supérieur de l'installateur du logiciel. Double-cliquez sur ReadMe,
puis sélectionnez le chier ReadMe dans votre langue.
Sur le Web: aide et informations supplémentaires: www.hp.com/go/support. Enregistrement de l'imprimante:
www.register.hp.com. Déclaration de conformité: www.hp.eu/certicates. Utilisation de l'encre: www.hp.com/go/inkusage.
Démarrage
1. Suivez les illustrations gurant sur le prospectus pour congurer votre imprimante.
2. Installez le logiciel.
Windows®
Allez sur 123.hp.com/OJ5740 et suivez les instructions à l'écran. Si votre ordinateur n'est pas connecté à Internet,
insérez le CD du logiciel dans votre ordinateur. Si le CD ne s'exécute pas, allez dans Ordinateur, double-cliquez sur
l'icône du lecteur CD/DVD à l'eigie du logo HP, double-cliquez ensuite sur setup.exe, et suivez les instructions qui
s'aichent.
OS X/iOS
Pour installer le dernier logiciel HP sur un Mac, allez sur 123.hp.com/OJ5740. Le logiciel HP pour Mac n'est pas inclus
sur le CD du logiciel fourni avec l'imprimante.
Ce produit est compatible avec Apple AirPrint. L'imprimante et le périphérique iOS ou Mac doivent être connectés au
même réseau local.
Remarque : pensez toujours à vérier que le bac contient le type de papier souhaité. Une fois bac refermé, veillez à ce
que ce papier ait été sélectionné sur le panneau de commande de l'imprimante.
HP Oicejet série 5740 e-All-in-One
www.hp.com/eu/m/OJ5740
Français

24
Informations de sécurité
Respectez toujours les précautions de sécurité élémentaires quand vous utilisez cette imprimante an de réduire les risques de
blessures dues au feu ou d'électrocution.
1. Lisez attentivement toutes les instructions contenues dans la documentation livrée avec l'imprimante.
2. Suivez tous les avertissements et toutes les instructions indiqués sur l'imprimante.
3. Débranchez cette imprimante des prises murales avant de procéder à un nettoyage.
4. N'installez jamais cette imprimante près d'un point d'eau et évitez de la manipuler avec les mains humides.
5. Installez l'imprimante en toute sécurité sur une surface stable.
6. Installez l'imprimante en un lieu protégé où personne ne puisse marcher sur le cordon d'alimentation ou trébucher
dessus,et où ce dernier ne puisse pas être endommagé.
7. Si l'imprimante ne fonctionne pas normalement, consultez le chier d'aide (auquel vous pouvez accéder sur votre
ordinateur après avoir installé le logiciel).
8. Le produit ne contient aucune pièce dont l'entretien doit être réalisé par l'utilisateur. Conez les opérations d'entretien et
de réparation à un technicien qualié.
9. Utilisez uniquement le cordon d'alimentation et l'adaptateur secteur éventuellement fournis parHP.
1
Voyant sans l : indique que l'état de la connexion sans l de l'imprimante.
• Un voyant bleu gé indique que la connexion sans l a été établie et que vous pouvez imprimer.
• Un voyant clignotant lentement indique que l'option sans l est activée mais que l'imprimante n'est
connectée à aucun réseau. Assurez-vous que l'imprimante se trouve dans la plage de signaux sans l.
• Un voyant qui clignote rapidement indique une erreur de connexion sans l. Reportez-vous aux
messages aichés sur l'écran de l'imprimante.
• Si la liaison sans l est désactivée, le voyant de la liaison sans l est éteint et l'écran d'aichage
indique Sans l désactivé.
2
Bouton Marche/Arrêt: Permet d'allumer ou d'éteindre l'imprimante.
3
Bouton Retour: retourne à l'écran précédent.
4
Bouton Aide: aiche le contenu de l'aide si elle disponible pour l'opération en cours.
5
Bouton Accueil: renvoie à l'écran d'accueil qui s'aiche lorsque vous mettez pour la première fois
l'imprimante sous tension.
6
Écran du panneau de commande: touchez l'écran pour sélectionner les options du menu et parcourez les
éléments du menu.
7
Bouton Communication en champ proche (CCP): ce bouton indique la zone dans laquelle vous pouvez
imprimer des documents et des images d'un périphérique mobile (comme un smartphone ou une tablette),
en touchant simplement le périphérique sur l'imprimante.
Panneau de commande
Français

25
MacWindows
Résolution des problèmes de base
Si vous ne parvenez pas à imprimer:
1. Assurez-vous que les câbles sont correctement branchés.
2. Assurez-vous que l'imprimante est sous tension. Le bouton Marche/Arrêt s'allumera en blanc.
3. Observez le voyant d'état de la connexion sans l pour savoir si votre imprimante est connectée à un réseau.
4. Consultez le site Web Outils de diagnostic HP sur www.hp.com/go/tools pour télécharger des utilitaires de diagnostic gratuits
(outils) que vous pouvez utiliser pour résoudre les problèmes les plus courants.
Assurez-vous que l'imprimante est dénie en tant que
périphérique d'impression par défaut:
• Windows 8.1 et Windows 8: allez dans le coin supérieur
droit de l'écran pour ouvrir la barre des applications,
cliquez sur l'icône Paramètres, puis sur Panneau de
commande et enn sur Aicher les périphériques et les
imprimantes.
• Windows 7: dans le menu Démarrer de Windows, cliquez
sur Périphériques et imprimantes.
• Windows Vista: dans la barre des tâches de Windows,
cliquez sur Démarrer, sélectionnez Panneau de
conguration, puis Imprimantes.
• Windows XP: dans la barre des tâches de Windows,
cliquez sur Démarrer, Panneau de conguration, puis
Imprimantes et télécopieurs.
Assurez-vous que le cercle jouxtant le nom de votre
imprimante comporte une marque de sélection. Si votre
imprimante n'est pas sélectionnée en tant qu'imprimante par
défaut, cliquez avec le bouton droit sur l'icône de l'imprimante
et sélectionnez Dénir comme imprimante par défaut dans
le menu.
Contrôlez votre le d'attente d'impression:
1. dans Préférences du système, cliquez sur Imprimantes et
scanners (Impression et télécopie dans OS X v10.7 Lion
et OS X v10.8 Mountain Lion).
2. Cliquez sur Ouvrir la liste d'attente d'impression.
3. Cliquez sur une tâche d'impression pour la sélectionner.
4. Utilisez les boutons de contrôle de l'impression ci-après.
• Icône Annuler : annule la tâche d'impression
sélectionnée.
• Reprendre: reprend la tâche d'impression mise en
attente.
5. Si vous avez eectué des modications, lancez une
nouvelle impression.
Redémarrez et réinitialisez:
1. Redémarrez l’ordinateur.
2. Réinitialisez l'imprimante.
a. Mettez l'imprimante hors tension, puis débranchez le
cordon d'alimentation.
b. Patientez environ une minute avant de le reconnecter.
Mettez sous tension l'imprimante.
Mentions légales: WindowsXP, Windows Vista, Windows7, Windows8 et Windows 8.1 sont des marques déposées de Microsoft
Corporation aux États-Unis.
Mac, OS X et AirPrint sont des marques déposées d'Apple, Inc. aux États-Unis et dans d'autres pays.
Si vous utilisez un câble USB et vous ne pouvez toujours pas
imprimer ou l'installation du logiciel échoue:
1. Retirez le CD du lecteur de CD/DVD de votre ordinateur,
puis débranchez le câbleUSB de l'ordinateur.
2. Redémarrez l’ordinateur.
3. Insérez le CD du logiciel d'impression dans le lecteur de
CD/DVD de l'ordinateur, puis suivez les instructions à
l'écran pour installer le logiciel. Ne branchez le câble USB
que lorsque vous y êtes invité.
4. Une fois l'installation terminée, redémarrez l'ordinateur.
Si vous utilisez le sans l et vous ne parvenez toujours pas
à imprimer:
Consultez la section Réseau sur la page suivante pour en
savoir plus.
Désinstallation du logiciel:
1. Si l'imprimante est connectée à votre ordinateur par câble
USB, débranchez-la de votre ordinateur.
2. Ouvrez le dossier Applications/Hewlett-Packard.
3. Double-cliquez sur Programme d'installation HP, puis
suivez les instructions à l'écran.
Réinitialisation du système d'impression :
1. dans Préférences du système, cliquez sur Imprimantes et
scanners (Impression et télécopie dans OS X v10.7 Lion
et OS X v10.8 Mountain Lion).
2. Appuyez sur la touche Contrôle et maintenez-la enfoncée
tout en cliquant sur la liste à gauche, puis sélectionnez
Réinitialiser le système d'impression.
3. Ajoutez l'imprimante que vous souhaitez utiliser.
Stockage des informations anonymes sur l'utilisation: Les cartouches HP contiennent une quantité limitée d'informations
anonymes sur la consommation de l'imprimante. Pour obtenir plus d'informations et d'instructions sur la désactivation de cette
collecte d'informations, reportez-vous à l'Aide en ligne.
Français

26
Réseau sans l
Si la connexion de votre imprimante au réseau n'a pas pu être établie
• Vériez si la fonction Sans l est activée sur votre imprimante.
1. Sur le panneau de commande de l'imprimante, touchez (Sans l).
2. Si vous voyez apparaître Sans l désactivé, appuyez sur (Paramètres), puis sur Paramètres sans l.
3. Sur l'écran Paramètres sans l, sélectionnez Activé pour l'option Sans l.
• Vériez que votre imprimante est connectée à votre réseau.
1. Sur le panneau de commande de l'imprimante, touchez (Sans l).
2. Touchez (Paramètres).
3. Touchez Rapports d'impression, puis sélectionnez Rapport de test sans l. Le rapport de test sans l est
automatiquement imprimé.
4. Vériez le haut du rapport pour voir si quelque chose a échoué lors du test.
– Consultez la section Résultats de diagnostics pour vérier si tous les tests ont été eectués et si, oui ou non, votre
imprimante les a réussis.
– Dans la section Conguration actuelle, recherchez le nom de réseau (SSID) auquel votre imprimante est actuellement
connectée. Vériez que l'imprimante est connectée au même réseau que votre ordinateur.
Remarque : si votre imprimante est connectée à un réseau privé virtuel (VPN), déconnectez-vous temporairement duVPN
avant de procéder à l'installation. Une fois l'installation terminée, vous devrez être déconnecté duVPN pour accéder à
l'imprimante sur le réseau domestique.
• Assurez-vous que les logiciels de protection ne bloquent pas la connexion à votre réseau.
Les logiciels de protection tels que les pare-feu peuvent bloquer la connexion entre votre ordinateur et votre imprimante
lorsque le logiciel est installé sur un réseau. Si votre imprimante est introuvable, désactivez temporairement votre
pare-feu et vériez si le problème est résolu. Pour plus d'aide et d'astuces sur les logiciels de sécurité, allez sur:
www.hp.com/go/wpc-rewall_fr-fr.
• Redémarrage des composants du réseau sans l.
Mettez le routeur et l'imprimante hors tension, puis rallumez-les. Pour ce faire, veillez à respecter l'ordre suivant. Commencez
par le routeur, puis rallumez l'imprimante. Pour résoudre les problèmes de communication réseau, il suit parfois de mettre
les appareils hors tension et de les rallumer. Si vous ne parvenez toujours pas à établir de connexion, éteignez le routeur,
l'imprimante et l'ordinateur. Pour les rallumer, veillez à respecter l'ordre suivant. Commencez par le routeur, puis mettez
l'imprimante sous tension et terminez par l'ordinateur.
Remarque : si vous ne parvenez pas à établir la connexion sans l, vous pouvez également connecter l'imprimante au réseau
à l'aide d'un câble Ethernet.
Si vous rencontrez toujours des problèmes, consultez le Centre d'impression sans l HP (www.hp.com/go/wirelessprinting).
Ce site Web contient les informations mises à jour les plus complètes sur l'impression sans l, ainsi que des informations pour
vous aider à préparer votre réseau sans l; résoudre des problèmes lors de la connexion de l'imprimante au réseau sans l et
résoudre des problèmes de logiciels de sécurité.
Remarque : si vous utilisez un ordinateur exécutant Windows, vous pouvez utiliser l'outil Print and Scan Doctor, qui peut vous
aider à résoudre de nombreux problèmes avec l'imprimante. Pour télécharger cet outil, consultez le site www.hp.com/go/tools.
Si vous souhaitez partager votre imprimante avec d'autres ordinateurs connectés
à votre réseau
Installez d'abord votre imprimante sur votre réseau domestique. Après avoir connecté votre imprimante à votre réseau
domestique, vous pouvez la partager avec d'autres ordinateurs connectés au même réseau. Il vous suit d'installer le logiciel de
l'imprimanteHP pour chaque ordinateur supplémentaire.
Besoin d'aide supplémentairepour vous connecter?
www.hp.com/go/wirelessprinting
Le Centre d'impression sans lHP sur www.hp.com/go/wirelessprinting peut vous aider à préparer votre réseau sans l, installer
ou recongurer votre imprimante et résoudre les problèmes de connexion.
Français

27
Si vous souhaitez utiliser votre imprimante sans l et sans routeur
Utilisez la fonction Wi-Fi Direct pour imprimer sans routeur depuis votre ordinateur, votre smartphone ou tout autre périphérique
équipé d'une fonction Wi-Fi. Pour utiliser la fonctionnalité Wi-Fi Direct, le logiciel d'impression doit être installé sur l'ordinateur.
1. Veillez à ce que la fonction Wi-Fi Direct soit activée sur votre imprimante.
a. Sur l'écran d'accueil du panneau de commande de l'imprimante, tapez sur (Wi-Fi Direct).
b. Si son État est Désactivé, touchez (Paramètres Wi-Fi Direct) et activez Wi-Fi Direct.
2. Connectez votre périphérique Wi-Fi à votre imprimante:
a. Activez la connexion Wi-Fi sans l sur votre périphérique mobile. Pour plus d'informations, reportez-vous à la
documentation fournie avec le périphérique mobile.
b. Connectez-vous à un nouveau réseau depuis LE périphérique mobile. Utilisez la procédure habituelle pour vous connecter
à un nouveau réseau ou point d'accès sans l Sélectionnez le nom Wi-Fi Direct dans la liste des réseaux sans l détectés,
comme DIRECT-**-HP Oicejet-5740 (** étant les caractères uniques qui permettent d'identier votre imprimante).
c. À l’invite, saisissez le mot de passe Wi-Fi Direct.
3. Imprimez comme vous le faites habituellement à partir de votre ordinateur ou de votre périphérique mobile.
Remarque : une connexion Wi-Fi Direct ne donne toutefois pas accès à Internet.
Rendez-vous dans le Centre d'impression sans l HP sur www.hp.com/go/wirelessprinting pour en savoir plus sur l'option
sans l Wi-Fi Direct.
Si vous souhaitez passer d'une connexion USB à une connexion sans l
Vous devez d'abord avoir installé le logiciel de votre imprimante avec succès.
Windows
1. Optez pour l'une des procédures suivantes en fonction de votre système d’exploitation:
• Windows 8,1: cliquez sur la èche du bas située en bas à gauche de l'écran d'accueil, sélectionnez l'e nom de
l'imprimante et cliquez sur Utilitaires.
• Windows 8: à partir de l'écran Démarrer, cliquez avec le bouton droit sur une zone vierge de l'écran, puis cliquez sur
Toutes les applications sur la barre des applications.
• Windows 7, Windows Vista et Windows XP: dans le menu Démarrer de l'ordinateur, sélectionnez Tous les programmes
ou Programmes, puis sélectionnez HP.
2. Sélectionnez HPOicejet série5740.
3. Sélectionnez Conguration et logiciel d'imprimante.
4. Sélectionnez Convertir une imprimanteUSB en imprimante sans l. Suivez les instructions à l'écran.
Mac
Utilisez Utilitaire HP dans Applications/Hewlett-Packard pour changer la connexion logicielle en une connexion sans l pour
cette imprimante.
Réseau sans l (suite)
Si vous souhaitez imprimer avec AirPrint
L'imprimante est compatible avec Apple AirPrint®. Vous pouvez imprimer sans l depuis votre périphérique iOS ou votre Mac.
• Votre imprimante et votre périphérique iOS ou Mac doivent être connectés au même réseau sans l.
• Avec Apple AirPrint®, vous ne pouvez pas numériser des documents à l'aide de votre imprimante sur votre périphérique iOS.
Ce produit est conçu pour une utilisation en environnements ouverts (par exemple, à domicile et sans connexion à un réseau
Internet public), dans lesquels toute personne peut accéder à l’imprimante et l’utiliser. Le paramètre Wi-Fi Direct est donc en
mode “Automatique” par défaut, sans mot de passe administrateur. Cette conguration permet à toute personne située à portée
du réseau sans l de se connecter et d’accéder à toutes les fonctions et tous les paramètres de l’imprimante. Si vous souhaitez un
niveau de sécurité plus élevé, HP conseille de modier la méthode de connexion Wi-Fi Direct de “Automatique” à “Manuel” et de
dénir un mot de passe administrateur.
Français

28
Conguration du télécopieur
1. Se connecter à la ligne téléphonique.
Remarque : Les imprimantes HP sont spécialement conçues pour fonctionner avec les services de téléphonie analogique
traditionnels. En environnement de téléphonie numérique (ADSL/DSL, PBX, RNIS ou FoIP), l'utilisation de ltres ou
convertisseurs numérique/analogique peut être nécessaire lors de la conguration de l'imprimante en mode télécopie.
Contactez votre opérateur téléphonique pour connaître les options qui vous conviennent le mieux.
Si la ligne téléphonique n'est utilisée que pour envoyer et recevoir des télécopies
a. Connectez une extrémité du cordon téléphonique à la prise murale téléphonique.
b. Connectez l'autre extrémité au port nommé 1-LINE à l'arrière de l'imprimante.
Si vous êtes abonné à un service DSL/ADSL, connectez un ltre DSL/ADSL entre le port 1-LINE et la prise murale téléphonique.
2. Test de la conguration du télécopieur.
Le test du télécopieur vérier le matériel, le type de câble de téléphone et l'état de la connexion. Il vérie également la
présence d'une tonalité et si la ligne est active. Pour exécuter le test:
a. Sur l'écran d'accueil de l'imprimante, appuyez sur les boutons Haut et Bas pour sélectionner Télécopieur, et cliquez sur OK.
b. Sélectionnez Paramètres, Paramètres avancés et Assist cfg fax, puis suivez les instructions à l'écran.
1
Prise de téléphone murale
2
Port de télécopie (1-LINE)
Remarque : Ne connectez rien au port nommé 2-EXT.
3
Filtre DSL/ADSL (fourni par l'opérateur téléphonique ou
le prestataire de service)
Si d'autres périphériques sont connectés à la ligne téléphonique
Si vous avez d'autres périphériques à connecter, connectez-les comme indiqué dans le diagramme ci-dessous:
1
Prise de téléphone murale
2
Séparateur parallèle
3
Modem DSL/ADSL
4
Répondeur téléphonique
5
Téléphone
6
Prise téléphonique RNIS
7
Adaptateur terminal ou routeur RNIS
8
Modem haut débit
9
Filtre DSL/ADSL
10
Adaptateur téléphonique analogique
* TAM: répondeur téléphonique
** FoIP: protocole FoIP (télécopie sur Internet)
Français

29
Envoi d'une télécopie standard
1. Placez l'original face imprimée vers le bas, dans l'angle avant droit de la vitre du scanner ou face imprimée vers le haut
dans le bac d'alimentation automatique.
2. Sur le panneau de commande de l'imprimante, touchez Télécopieur.
3. Touchez Envoyer maintenant.
4. Saisissez le numéro du télécopieur à l'aide du clavier numérique.
Pour ajouter une pause au numéro de télécopie, appuyez à plusieurs reprises sur * jusqu'à ce qu'un tiret (-) s'aiche
à l'écran.
5. Touchez Noir ou Couleur.
Si l'imprimante détecte un original chargé dans le bac d'alimentation automatique, elle envoie le document au numéro
que vous avez saisi.
Si le destinataire vous informe que la qualité de la télécopie envoyée n'est pas satisfaisante, essayez de modier la
résolution ou le contraste sur votre télécopieur.
Utilisation du télécopieur
Envoi d'une télécopie depuis un poste téléphonique
1. Composez le numéro à l'aide du clavier du téléphone.
N'utilisez pas le clavier sur le panneau de commande de l'imprimante lors de l'envoi d'une télécopie en utilisant cette
méthode.
2. Si le destinataire répond au téléphone, vous pouvez lui parler avant d'envoyer la télécopie.
Si un télécopieur prend en charge l'appel, vous entendrez la tonalité du télécopieur de destination.
3. Placez l'original face imprimée vers le bas, dans l'angle avant droit de la vitre du scanner ou face imprimée vers le haut
dans le bac d'alimentation automatique.
4. Sur le panneau de commande de l'imprimante, touchez Télécopieur.
5. Cliquez sur Envoyer une télécopie.
6. Touchez Noir ou Couleur.
Si vous êtes au téléphone avec le destinataire, demandez-lui de commencer la réception de la télécopie lors de l'émission de
la tonalité du télécopieur. Une fois que l'imprimante commence à recevoir la télécopie, vous pouvez raccrocher ou rester en
ligne. Il se peut que vous n'entendiez pas la tonalité au cours de la transmission de la télécopie.
Pour obtenir plus d'informations sur les autres méthodes d'envoi de télécopie telles que la planication d'envoi d'une
télécopie ultérieurement ou l'envoi d'une télécopie depuis un ordinateur, consultez l'Aide électronique.
Réception d'une télécopie en mode automatique
Par défaut, l'imprimante répond automatiquement aux appels entrants et reçoit les télécopies.
Pour recevoir manuellement des télécopies, désactivez le paramètre Réponse automatique du panneau de commande de
l'imprimante.
L'imprimante répondra aux appels au bout du nombre de sonneries spécié par le paramètre Sonneries avant réponse.
si un répondeur est raccordé à l'imprimante, le paramètre Sonneries avant réponse doit être déni à une valeur supérieure
à celle du répondeur.
1. Pour ce faire, assurez-vous que l'imprimante est sous tension et que le bac contient du papier.
2. Sur l'écran de l'imprimante, touchez Télécopieur.
3. Touchez Congurer, puis Préférences.
4. Cliquez sur Activé pour activer l'option Réponse automatique.
Remarque : si vous êtes abonné à un service de messagerie vocale sur la ligne téléphonique utilisée pour les télécopies, la
réception automatique des télécopies est impossible. Cela signie que vous devez pouvoir répondre personnellement aux
appels entrants de télécopie. Si vous souhaitez plutôt recevoir les télécopies automatiquement, contactez votre opérateur
téléphonique pour vous abonner à un service de sonneries diérenciées ou pour obtenir une ligne téléphonique distincte pour la
télécopie.
L'imprimante peut stocker les télécopies reçues dans sa mémoire interne. Pour réimprimer ces télécopies, voir «Réimpression
des télécopies reçues en mémoire» sur la page suivante.
Français

30
Utilisation du télécopieur (suite)
Réception d'une télécopie en mode manuel
Si vous êtes au téléphone avec une autre personne, vous pouvez recevoir les télécopies manuellement sans raccrocher le
téléphone.
1. Pour ce faire, assurez-vous que l'imprimante est sous tension et que le bac contient du papier.
2. Retirez les originaux du bac d'alimentation des documents.
congurez le paramètre Sonneries avant réponse sur une valeur plus élevée pour pouvoir répondre à un appel entrant avant
la mise en marche de l'imprimante. Sinon, désactivez le paramètre Réponse automatique an que l'imprimante ne réponde
pas automatiquement aux appels entrants.
3. Demandez à l'expéditeur de commencer l'envoi de la télécopie.
4. Lorsque vous entendez des tonalités du télécopieur, touchez Télécopieur sur l'écran d'accueil du panneau de commande de
l'imprimante, puis Envoyer et recevoir et Recevoir maintenant.
Une fois que l'imprimante commence à recevoir la télécopie, vous pouvez raccrocher ou rester en ligne. Il se peut que vous
n'entendiez pas la tonalité au cours de la transmission de la télécopie.
Réimpression des télécopies reçues en mémoire
Si l'option Récept sauv. téléc. est activée, les télécopies entrantes seront stockées en mémoire même lorsque l'erreur indique une
condition d'erreur.
Remarque : Toutes les télécopies stockées en mémoire risquent d'être supprimées de la mémoire lorsque l'imprimante est
désactivée.
1. Assurez-vous que du papier se trouve dans l'imprimante.
2. Sur l'écran d'accueil de l'imprimante, tapez sur Télécopieur.
3. Touchez Réimprimer.
Les télécopies sont aichées dans l'ordre inverse de la réception, c'est-à-dire, les plus récentes en premier lieu.
4. Pour arrêter l'impression, sélectionnez Annuler.
Imprimer un rapport ou un journal
Ces derniers fournissent des informations utiles concernant l'imprimante.
1. Sur l'écran d'accueil de l'imprimante, touchez Congurer, puis Congurer le télécopieur.
2. Touchez Rapports, puis touchez Conrmation télécopie.
3. Touchez l’une des options suivantes pour la sélectionner.
Français

31
Vérier les paramètres de télécopie de l'imprimante
• La fonctionnalité Réponse automatique est activée pour
que l'imprimante reçoive automatiquement les télécopies.
• Si vous êtes abonné à un service de messagerie vocale
fourni par l'opérateur téléphonique ou le prestataire
de service, assurez-vous que l'option Sonneries avant
réponse est dénie sur l'imprimante à une fréquence plus
importante que sur le répondeur de votre téléphone.
L'imprimante va vérier la ligne et décider si un appel
entrant provient d'un appel téléphonique normal ou d'un
appel de télécopie. S'il s'agit d'un appel de télécopie,
l'imprimante va commencer la connexion de télécopie
automatiquement. Il se peut que vous deviez recevoir la
télécopie manuellement en sélectionnant Télécopieur sur
l'écran de l'imprimante Fax .
• Si plusieurs numéros de téléphone sont attribués à la
même ligne téléphonique et que celle-ci est partagée
entre plusieurs périphériques, assurez-vous que
l'imprimante est dénie sur le paramètre de sonnerie
correspondant à la réception de télécopies.
Vérier les connexions physiques du télécopieur
• Connectez le câble téléphonique au port nommé 1-LINE
derrière l'imprimante à la prise murale et connectez un
câble téléphonique depuis le port nommé 2-EXT derrière
l'imprimante au téléphone. Depuis votre numéro de
téléphone, appelez le numéro de téléphone qui n'a pas pu
recevoir les télécopies.
• Si vous essayez de télécopier vers un numéro externe,
assurez-vous d'inclure des numéros ou un code d'accès
nécessaire avant de saisir tout numéro. Vous pourrez
toujours ajouter une pause dans le numéro an
d'empêcher l'imprimante de numéroter trop rapidement.
Pour ajouter une pause, appuyez sur * de manière répétée
jusqu'à ce qu'un tiret (-) apparaisse sur l'écran.
• Si vous ne pouvez pas eectuer d'appel sortant parce qu'il
n'existe aucune tonalité de numérotation ou que la ligne
est bruyante, essayez d'utiliser un câble téléphonique
autre que celui connecté au port téléphonique 1-LINE ou
déplacez l'imprimante vers un autre emplacement qui
dispose d'une ligne téléphonique distincte (si possible) et
vériez si des problèmes semblables existent.
• Si vous vous trouvez dans un environnement téléphonique
numérique (FoIP, fax over VoIP), réduisez la vitesse de
télécopie et désactivez l'option Error Code Modulation
(ECM) du panneau de commande de l'imprimante. Le cas
échéant, contactez votre opérateur téléphonique en cas
de problèmes avec la ligne téléphonique ou pour en savoir
davantage sur les capacités du réseau téléphonique.
Résolution des problèmes de télécopie
Si vous rencontrez toujours des problèmes pour utiliser le
télécopieur après avoir eectué le test de télécopie, suivez les
étapesci-dessous:
Le télécopieur ne peut pas envoyer de télécopies mais peut
en recevoir
1. Eectuez une copie ou une numérisation pour vous
assurer que l'imprimante fonctionne correctement.
2. Vériez les connexions physiques du télécopieur.
3. Vériez si d'autres télécopieurs peuvent envoyer des
télécopies au même numéro de téléphone. Le télécopieur
a peut-être bloqué votre numéro de téléphone ou il a
peut-être des problèmes techniques.
4. Si le problème persiste, imprimez le rapport de test de
télécopieur et le journal des télécopies (et si disponible,
le Rapport ID d'appel et le Rapport sur les télécopies
indésirables), puis contactez HP pour obtenir plus d'aide.
Le télécopieur ne peut pas recevoir de télécopies mais peut
en envoyer
1. Vériez les paramètres de télécopie de l'imprimante.
2. Vériez les connexions physiques du télécopieur.
3. Vériez si d'autres périphériques connectés à la même
ligne téléphonique peuvent recevoir des télécopies. Il se
peut que la ligne téléphonique soit défectueuse ou que le
télécopieur en émission rencontre des problèmes lors de
l'envoi de télécopies. Vous souhaitez peut-être vérier si
vous avez bloqué le numéro de téléphone de l'expéditeur.
4. Vériez le problème avec l'expéditeur. Si le problème
persiste, imprimez le rapport de test de télécopieur et
le journal des télécopies (et si disponible, le Rapport ID
d'appel et le Rapport sur les télécopies indésirables), puis
contactez HP pour obtenir plus d'aide.
Le télécopieur ne peut ni envoyer de télécopies ni en
recevoir
1. Eectuez une copie ou une numérisation pour vous
assurer que l'imprimante fonctionne correctement.
2. Vériez les connexions physiques du télécopieur.
3. Vériez les paramètres de télécopie de l'imprimante.
4. Vériez si d'autres périphériques connectés à la même
ligne téléphonique peuvent envoyer ou recevoir des
télécopies. Votre ligne téléphonique a peut-être un
problème.
5. Redénissez l'imprimante en l'éteignant et, si possible,
en éteignant le disjoncteur électrique. Attendez quelques
secondes avant de rallumer l'imprimante. Essayez
d'envoyer ou de recevoir une télécopie sur l'imprimante.
6. Si le problème persiste, imprimez le rapport de test de
télécopieur et le journal des télécopies (et si disponible,
le Rapport ID d'appel et le Rapport sur les télécopies
indésirables), puis contactez HP pour obtenir plus d'aide.
7. Remarque : Si vous êtes abonné à un service de
messagerie vocale sur la même ligne téléphonique
que celle utilisée pour les télécopies, vous recevrez les
télécopies manuellement.
Français

32
Déclaration de garantie limitée de l'imprimante HP
A. Extension de garantie limitée
1. HP Inc. (HP) garantit au client utilisateur final que les produits HP décrits précédemment sont exempts de défauts de
matériaux et malfaçons pendant la durée indiquée ci-dessus, à compter de la date d'achat par le client.
2. Pour les logiciels, la garantie limitée HP est valable uniquement en cas d'impossibilité d'exécuter les instructions de
programmation. HP ne garantit pas que le fonctionnement du logiciel ne connaîtra pas d'interruptions ni d'erreurs.
3. La garantie limitée HP ne couvre que les défauts qui apparaissent dans le cadre de l'utilisation normale du produit et ne
couvre aucun autre problème, y compris ceux qui surviennent du fait :
a. d'une mauvaise maintenance ou d'une modification ;
b. de logiciels, de supports, de pièces ou de consommables non fournis ou non pris en charge par HP ;
c. du fonctionnement du produit hors de ses caractéristiques ; ou
d. d'une modification non autorisée ou d'une mauvaise utilisation.
4. Pour les imprimantes HP, l'utilisation d'une cartouche d'un autre fournisseur ou d'une cartouche rechargée n'entraîne pas la
résiliation de la garantie ni d'un contrat de support HP. Toutefois, si la panne ou les dégâts peuvent être attribués à
l'utilisation d'une cartouche d'un autre fournisseur, d'une cartouche rechargée ou d'une cartouche périmée, HP facturera les
montants correspondant au temps et au matériel nécessaires à la réparation de l'imprimante.
5. Si, pendant la période de garantie applicable, HP est informé d'une défaillance concernant un produit couvert par la garantie
HP, HP choisira de réparer ou de remplacer le produit défectueux.
6. Si HP est dans l'incapacité de réparer ou de remplacer, selon le cas, un produit défectueux couvert par la garantie HP, HP
devra, dans un délai raisonnable après avoir été informé du défaut, rembourser le prix d'achat du produit.
7. HP ne sera tenu à aucune obligation de réparation, de remplacement ou de remboursement tant que le client n'aura pas
retourné le produit défectueux à HP.
8. Tout produit de remplacement peut être neuf ou comme neuf, pourvu que ses fonctionnalités soient au moins équivalentes
à celles du produit remplacé.
9. Les produits HP peuvent contenir des pièces, des composants ou des matériels reconditionnés équivalents à des neufs en
termes de performances.
10. La garantie limitée HP est valable dans tout pays dans lequel le produit HP couvert est distribué par HP. Des contrats
apportant des services de garantie supplémentaires, tels que la réparation sur site, sont disponibles auprès des services de
maintenance agréés par HP dans les pays dans lequel le produit est distribué par HP ou par un importateur agréé.
B. Restrictions de garantie
DANS LA MESURE OÙ LES LOIS LOCALES L'AUTORISENT, HP OU SES FOURNISSEURS TIERS NE FONT AUCUNE AUTRE GARANTIE
OU CONDITION, EXPRESSE OU IMPLICITE, EN CE QUI CONCERNE LES PRODUITS HP ET NIENT TOUTE GARANTIE IMPLICITE DE
COMMERCIALISATION, DE QUALITÉ SATISFAISANTE OU D'ADAPTATION À UN BUT
PARTICULIER.
C. Restrictions de responsabilité
1. Dans la mesure où les lois locales l'autorisent, les recours énoncés dans cette déclaration de garantie constituent les recours
exclusifs du client.
2. DANS LA MESURE OÙ LES LOIS LOCALES L'AUTORISENT, EXCEPTION FAITE DES OBLIGATIONS SPÉCIFIQUEMENT ÉNONCÉES
DANS LA PRÉSENTE DÉCLARATION DE GARANTIE, HP OU SES FOURNISSEURS TIERS NE POURRONT ÊTRE TENUS POUR
RESPONSABLES DE DOMMAGES DIRECTS, INDIRECTS, SPÉCIAUX OU ACCIDENTELS, QU'ILS SOIENT BASÉS SUR UN CONTRAT, UN
PRÉJUDICE OU TOUTE AUTRE THÉORIE LÉGALE, QUE CES DOMMAGES SOIENT RÉPUTÉS POSSIBLES OU NON.
D. Lois locales
1. Cette déclaration de garantie donne au client des droits juridiques spécifiques. Le client peut également posséder d'autres
droits selon les états des Etats-Unis, les provinces du Canada, et les autres pays ou régions du monde.
2. Si cette déclaration de garantie est incompatible avec les lois locales, elle sera considérée comme étant modifiée pour être
conforme à la loi locale. Selon ces lois locales, certaines renonciations et limitations de cette déclaration de garantie
peuvent ne pas s'appliquer au client. Par exemple, certains états des Etats-Unis, ainsi que certains gouvernements hors des
Etats-Unis (y compris certaines provinces du Canada), peuvent :
a. exclure les renonciations et limitations de cette déclaration de garantie des droits statutaires d'un client (par exemple au
Royaume-Uni) ;
b. restreindre d'une autre manière la possibilité pour un fabricant d'imposer ces renonciations et limitations ; ou
c. accorder au client des droits de garantie supplémentaires, spécifier la durée des garanties implicites que le fabricant ne
peut nier, ou ne pas autoriser les limitations portant sur la durée des garanties implicites.
3. EXCEPTÉ DANS LA MESURE AUTORISÉE PAR LA LÉGISLATION, LES TERMES DE LA PRÉSENTE DÉCLARATION DE GARANTIE
N'EXCLUENT, NE LIMITENT NI NE MODIFIENT LES DROITS STATUTAIRES OBLIGATOIRES APPLICABLES À LA VENTE DES
PRODUITS HP AUXDITS CLIENTS, MAIS VIENNENT S'Y AJOUTER.
Produit HP Durée de la garantie limitée
Supports logiciels 90 jours
Imprimante 1 an
Cartouches d'encre Jusqu'à épuisement de l'encre HP ou jusqu'à expiration de la date
de garantie imprimée sur la cartouche (selon le cas qui se produira
en premier). Cette garantie ne couvre pas les produits utilisant de
l'encre HP qui ont été reconditionnés, mal utilisés ou altérés.
Têtes d'impression (ne s'applique qu'aux produits avec 1 an
des têtes d'impression pouvant être remplacées par le client)
Accessoires 1 an, sauf indication contraire
Garantie du fabricant HP
La garantie limitée HP est une garantie commerciale fournie volontairement par HP. Voici les coordonnées de l’entité HP
responsable de l’exécution de la garantie limitée HP dans votre pays :
France: HP France SAS, société par actions simplifiée identifiée sous le numéro 448 694 133 RCS Evry, 1 Avenue du Canada, 91947,
Les Ulis
G.D. Luxembourg: Hewlett-Packard Luxembourg S.C.A., 75, Parc d’Activités Capellen, Rue Pafebruc, L-8308 Capellen
Belgique: HP Belgium BVBA, Hermeslaan 1A, B-1831 Diegem
France
Les avantages de la garantie limitée HP s’appliquent en complément des droits dont vous disposez au titre des garanties légales
applicables dont le bénéfice est soumis à des conditions spécifiques. Vos droits en tant que consommateur au titre de la garantie
légale de conformité mentionnée aux articles L. 211-4 à L. 211-13 du Code de la Consommation et de celle relatives aux défauts de
la chose vendue, dans les conditions prévues aux articles 1641 à 1648 et 2232 du Code de Commerce ne sont en aucune façon
limités ou affectés par la garantie limitée HP. Pour de plus amples informations, veuillez consulter le lien suivant : Garanties légales
accordées au consommateur. Vous pouvez également consulter le site Web des Centres européens des consommateurs. Les
consommateurs ont le droit de choisir d’exercer leurs droits au titre de la garantie limitée HP, ou auprès du vendeur au titre des
garanties légales applicables mentionnées ci-dessus.
POUR RAPPEL :
Garantie Légale de Conformité
Article L211-4 du Code de la Consommation :
« Le vendeur est tenu de livrer un bien conforme au contrat et répond des défauts de conformité existant lors de la délivrance.
Il répond également des défauts de conformité résultant de l’emballage, des instructions de montage ou de l’installation lorsque
celle-ci a été mise à sa charge par le contrat ou a été réalisée sous sa responsabilité ».
Article L211-5 du Code de la Consommation :
« Pour être conforme au contrat, le bien doit :
1° Etre propre à l’usage habituellement attendu d’un bien semblable et, le cas échéant :
- correspondre à la description donnée par le vendeur et posséder les qualités que celui-ci a présentées à l’acheteur sous forme
d’échantillon ou de modèle ;
- présenter les qualités qu’un acheteur peut légitimement attendre eu égard aux déclarations publiques faites par le vendeur, par le
producteur ou par son représentant, notamment dans la publicité ou l’étiquetage ;
2° Ou présenter les caractéristiques définies d’un commun accord par les parties ou être propre à tout usage spécial recherché par
l’acheteur, porté à la connaissance du vendeur et que ce dernier a accepté ».
Article L211-12 du Code de la Consommation :
« L’action résultant du défaut de conformité se prescrit par deux ans à compter de la délivrance du bien ».
Garantie des vices cachés
Article 1641 du Code Civil : « Le vendeur est tenu de la gar
antie à raison des défauts cachés de la chose vendue qui la rendent
impropre à l’usage auquel on la destine, ou qui diminuent tellement cet usage que l’acheteur ne l’aurait pas acquise, ou n’en aurait
donné qu’un moindre prix, s’il les avait connus. »
Article 1648 alinéa 1 du Code Civil :
« L’action résultant des vices rédhibitoires doit être intentée par l’acquéreur dans un délai de deux ans à compter de la découverte du
vice. »
G.D. Luxembourg & Belgique
Les avantages de la garantie limitée HP s'appliquent en complément des droits dont vous disposez au titre de la garantie de
non-conformité des biens avec le contrat de vente. Cependant, de nombreux facteurs peuvent avoir un impact sur le bénéfice de ces
droits. Vos droits en tant que consommateur au titre de ces garanties ne sont en aucune façon limités ou affectés par la garantie
limitée HP. Pour de plus amples informations, veuillez consulter le lien suivant : Garanties légales accordées au consommateur ou
vous pouvez également consulter le site Web des Centres européens des consommateurs. Les consommateurs ont le droit de
choisir de réclamer un service sous la garantie limitée HP ou auprès du vendeur au cours d'une garantie légale de deux ans.
Pour plus d’information, consultez le lien suivant : Garantie légale du consommateur (www.hp.com/go/eu-legal) ou visitez le site
des Centres Européens des Consommateurs
(http://ec.europa.eu/consumers/solving_consumer_disputes/non-judicial_redress/ecc-net/).
Français

33
A. Extension de garantie limitée
1. HP Inc. (HP) garantit au client utilisateur final que les produits HP décrits précédemment sont exempts de défauts de
matériaux et malfaçons pendant la durée indiquée ci-dessus, à compter de la date d'achat par le client.
2. Pour les logiciels, la garantie limitée HP est valable uniquement en cas d'impossibilité d'exécuter les instructions de
programmation. HP ne garantit pas que le fonctionnement du logiciel ne connaîtra pas d'interruptions ni d'erreurs.
3. La garantie limitée HP ne couvre que les défauts qui apparaissent dans le cadre de l'utilisation normale du produit et ne
couvre aucun autre problème, y compris ceux qui surviennent du fait :
a. d'une mauvaise maintenance ou d'une modification ;
b. de logiciels, de supports, de pièces ou de consommables non fournis ou non pris en charge par HP ;
c. du fonctionnement du produit hors de ses caractéristiques ; ou
d. d'une modification non autorisée ou d'une mauvaise utilisation.
4. Pour les imprimantes HP, l'utilisation d'une cartouche d'un autre fournisseur ou d'une cartouche rechargée n'entraîne pas la
résiliation de la garantie ni d'un contrat de support HP. Toutefois, si la panne ou les dégâts peuvent être attribués à
l'utilisation d'une cartouche d'un autre fournisseur, d'une cartouche rechargée ou d'une cartouche périmée, HP facturera les
montants correspondant au temps et au matériel nécessaires à la réparation de l'imprimante.
5. Si, pendant la période de garantie applicable, HP est informé d'une défaillance concernant un produit couvert par la garantie
HP, HP choisira de réparer ou de remplacer le produit défectueux.
6. Si HP est dans l'incapacité de réparer ou de remplacer, selon le cas, un produit défectueux couvert par la garantie HP, HP
devra, dans un délai raisonnable après avoir été informé du défaut, rembourser le prix d'achat du produit.
7. HP ne sera tenu à aucune obligation de réparation, de remplacement ou de remboursement tant que le client n'aura pas
retourné le produit défectueux à HP.
8. Tout produit de remplacement peut être neuf ou comme neuf, pourvu que ses fonctionnalités soient au moins équivalentes
à celles du produit remplacé.
9. Les produits HP peuvent contenir des pièces, des composants ou des matériels reconditionnés équivalents à des neufs en
termes de performances.
10. La garantie limitée HP est valable dans tout pays dans lequel le produit HP couvert est distribué par HP. Des contrats
apportant des services de garantie supplémentaires, tels que la réparation sur site, sont disponibles auprès des services de
maintenance agréés par HP dans les pays dans lequel le produit est distribué par HP ou par un importateur agréé.
B. Restrictions de garantie
DANS LA MESURE OÙ LES LOIS LOCALES L'AUTORISENT, HP OU SES FOURNISSEURS TIERS NE FONT AUCUNE AUTRE GARANTIE
OU CONDITION, EXPRESSE OU IMPLICITE, EN CE QUI CONCERNE LES PRODUITS HP ET NIENT TOUTE GARANTIE IMPLICITE DE
COMMERCIALISATION, DE QUALITÉ SATISFAISANTE OU D'ADAPTATION À UN BUT
PARTICULIER.
C. Restrictions de responsabilité
1. Dans la mesure où les lois locales l'autorisent, les recours énoncés dans cette déclaration de garantie constituent les recours
exclusifs du client.
2. DANS LA MESURE OÙ LES LOIS LOCALES L'AUTORISENT, EXCEPTION FAITE DES OBLIGATIONS SPÉCIFIQUEMENT ÉNONCÉES
DANS LA PRÉSENTE DÉCLARATION DE GARANTIE, HP OU SES FOURNISSEURS TIERS NE POURRONT ÊTRE TENUS POUR
RESPONSABLES DE DOMMAGES DIRECTS, INDIRECTS, SPÉCIAUX OU ACCIDENTELS, QU'ILS SOIENT BASÉS SUR UN CONTRAT, UN
PRÉJUDICE OU TOUTE AUTRE THÉORIE LÉGALE, QUE CES DOMMAGES SOIENT RÉPUTÉS POSSIBLES OU NON.
D. Lois locales
1. Cette déclaration de garantie donne au client des droits juridiques spécifiques. Le client peut également posséder d'autres
droits selon les états des Etats-Unis, les provinces du Canada, et les autres pays ou régions du monde.
2. Si cette déclaration de garantie est incompatible avec les lois locales, elle sera considérée comme étant modifiée pour être
conforme à la loi locale. Selon ces lois locales, certaines renonciations et limitations de cette déclaration de garantie
peuvent ne pas s'appliquer au client. Par exemple, certains états des Etats-Unis, ainsi que certains gouvernements hors des
Etats-Unis (y compris certaines provinces du Canada), peuvent :
a. exclure les renonciations et limitations de cette déclaration de garantie des droits statutaires d'un client (par exemple au
Royaume-Uni) ;
b. restreindre d'une autre manière la possibilité pour un fabricant d'imposer ces renonciations et limitations ; ou
c. accorder au client des droits de garantie supplémentaires, spécifier la durée des garanties implicites que le fabricant ne
peut nier, ou ne pas autoriser les limitations portant sur la durée des garanties implicites.
3. EXCEPTÉ DANS LA MESURE AUTORISÉE PAR LA LÉGISLATION, LES TERMES DE LA PRÉSENTE DÉCLARATION DE GARANTIE
N'EXCLUENT, NE LIMITENT NI NE MODIFIENT LES DROITS STATUTAIRES OBLIGATOIRES APPLICABLES À LA VENTE DES
PRODUITS HP AUXDITS CLIENTS, MAIS VIENNENT S'Y AJOUTER.
Produit HP Durée de la garantie limitée
Supports logiciels 90 jours
Imprimante 1 an
Cartouches d'encre Jusqu'à épuisement de l'encre HP ou jusqu'à expiration de la date
de garantie imprimée sur la cartouche (selon le cas qui se produira
en premier). Cette garantie ne couvre pas les produits utilisant de
l'encre HP qui ont été reconditionnés, mal utilisés ou altérés.
Têtes d'impression (ne s'applique qu'aux produits avec 1 an
des têtes d'impression pouvant être remplacées par le client)
Accessoires 1 an, sauf indication contraire
Garantie du fabricant HP
La garantie limitée HP est une garantie commerciale fournie volontairement par HP. Voici les coordonnées de l’entité HP
responsable de l’exécution de la garantie limitée HP dans votre pays :
France: HP France SAS, société par actions simplifiée identifiée sous le numéro 448 694 133 RCS Evry, 1 Avenue du Canada, 91947,
Les Ulis
G.D. Luxembourg: Hewlett-Packard Luxembourg S.C.A., 75, Parc d’Activités Capellen, Rue Pafebruc, L-8308 Capellen
Belgique: HP Belgium BVBA, Hermeslaan 1A, B-1831 Diegem
France
Les avantages de la garantie limitée HP s’appliquent en complément des droits dont vous disposez au titre des garanties légales
applicables dont le bénéfice est soumis à des conditions spécifiques. Vos droits en tant que consommateur au titre de la garantie
légale de conformité mentionnée aux articles L. 211-4 à L. 211-13 du Code de la Consommation et de celle relatives aux défauts de
la chose vendue, dans les conditions prévues aux articles 1641 à 1648 et 2232 du Code de Commerce ne sont en aucune façon
limités ou affectés par la garantie limitée HP. Pour de plus amples informations, veuillez consulter le lien suivant : Garanties légales
accordées au consommateur. Vous pouvez également consulter le site Web des Centres européens des consommateurs. Les
consommateurs ont le droit de choisir d’exercer leurs droits au titre de la garantie limitée HP, ou auprès du vendeur au titre des
garanties légales applicables mentionnées ci-dessus.
POUR RAPPEL :
Garantie Légale de Conformité
Article L211-4 du Code de la Consommation :
« Le vendeur est tenu de livrer un bien conforme au contrat et répond des défauts de conformité existant lors de la délivrance.
Il répond également des défauts de conformité résultant de l’emballage, des instructions de montage ou de l’installation lorsque
celle-ci a été mise à sa charge par le contrat ou a été réalisée sous sa responsabilité ».
Article L211-5 du Code de la Consommation :
« Pour être conforme au contrat, le bien doit :
1° Etre propre à l’usage habituellement attendu d’un bien semblable et, le cas échéant :
- correspondre à la description donnée par le vendeur et posséder les qualités que celui-ci a présentées à l’acheteur sous forme
d’échantillon ou de modèle ;
- présenter les qualités qu’un acheteur peut légitimement attendre eu égard aux déclarations publiques faites par le vendeur, par le
producteur ou par son représentant, notamment dans la publicité ou l’étiquetage ;
2° Ou présenter les caractéristiques définies d’un commun accord par les parties ou être propre à tout usage spécial recherché par
l’acheteur, porté à la connaissance du vendeur et que ce dernier a accepté ».
Article L211-12 du Code de la Consommation :
« L’action résultant du défaut de conformité se prescrit par deux ans à compter de la délivrance du bien ».
Garantie des vices cachés
Article 1641 du Code Civil : « Le vendeur est tenu de la garantie à raison des défauts cachés de la chose vendue qui la rendent
impropre à l’usage auquel on la destine, ou qui diminuent tellement cet usage que l’acheteur ne l’aurait pas acquise, ou n’en aurait
donné qu’un moindre prix, s’il les avait connus. »
Article 1648 alinéa 1 du Code Civil :
« L’action résultant des vices rédhibitoires doit être intentée par l’acquéreur dans un délai de deux ans à compter de la découverte du
vice. »
G.D. Luxembourg & Belgique
Les avantages de la garantie limitée HP s'appliquent en complément des droits dont vous disposez au titre de la garantie de
non-conformité des biens avec le contrat de vente. Cependant, de nombreux facteurs peuvent avoir un impact sur le bénéfice de ces
droits. Vos droits en tant que consommateur au titre de ces garanties ne sont en aucune façon limités ou affectés par la garantie
limitée HP. Pour de plus amples informations, veuillez consulter le lien suivant : Garanties légales accordées au consommateur ou
vous pouvez également consulter le site Web des Centres européens des consommateurs. Les consommateurs ont le droit de
choisir de réclamer un service sous la garantie limitée HP ou auprès du vendeur au cours d'une garantie légale de deux ans.
Pour plus d’information, consultez le lien suivant : Garantie légale du consommateur (www.hp.com/go/eu-legal) ou visitez le site
des Centres Européens des Consommateurs
(http://ec.europa.eu/consumers/solving_consumer_disputes/non-judicial_redress/ecc-net/).
Français

Le informazioni
contenute nel presente
documento sono
soggette a modica
senza preavviso.
Scopri di più con la scansione!
Potrebbero essere in vigore le tarie dati standard. Potrebbe non essere disponibile in tutte le lingue.
Approfondimenti
Guida in formato elettronico: installare la guida in formato elettronico selezionandola dal software consigliato durante la
procedura di installazione. È possibile trovare informazioni sulle funzionalità dei prodotti, sulla stampa, sulla risoluzione dei
problemi e sul supporto. Avvisi, requisiti ambientali e informazioni sulle normative, inclusi l’Avviso normativo per l’Unione
Europea e le dichiarazioni di conformità, sono disponibili nella sezione Informazioni tecniche.
• Windows® 8.1: fare clic sul pulsante freccia giù nell'angolo inferiore sinistro della schermata Start, selezionare il nome
della stampante, fare clic su Guida, quindi su Cerca nella Guida HP.
• Windows® 8: nella schermata Start, fare clic con il pulsante destro del mouse su un’area vuota dello schermo, fare clic su
Tutte le app sulla barra delle app, quindi sull’icona con il nome della stampante e selezionare Guida.
• Windows® 7, Windows Vista® e Windows® XP: fare clic su Start > Tutti i programmi > HP > HP Oicejet 5740 series >
Guida.
• OS X: fare clic su Aiuto > Centro assistenza. Nella nestra Visore Aiuto, fare clic su Aiuto per tutte le tue app, quindi su
HP Oicejet 5740 series.
Leggimi: contiene informazioni sul supporto HP, sui requisiti del sistema operativo e sugli recenti aggiornamenti della
stampante.
• In Windows: inserire il CD del software nel computer, quindi individuare il le ReadMe.chm. Fare doppio clic sul le
ReadMe.chm per aprirlo, quindi selezionare il le ReadMe nella propria lingua.
• In Mac: aprire la cartella Documenti nel livello superiore del programma di installazione del software. Fare doppio clic
sul le ReadMe, quindi selezionare il le ReadMe nella propria lingua.
Sul Web: per ulteriori informazioni e assistenza, visitare il sito www.hp.com/go/support. Per la registrazione della stampante,
visitare il sito www.register.hp.com. Per leggere la dichiarazione di conformità, visitare il sito www.hp.eu/certicates.
Utilizzo dell'inchiostro: www.hp.com/go/inkusage.
Avvio
1. Attenersi alle istruzioni riportate nel pieghevole di installazione per congurare la stampante.
2. Installare il software.
Windows®
Visitare il sito 123.hp.com/OJ5740 e seguire le istruzioni visualizzate sullo schermo. Se il computer non è connesso
a Internet, inserire il CD del software nel computer. Se il CD non viene avviato, selezionare Computer, fare doppio clic
sull'icona dell'unità CD/DVD con il logo HP, fare doppio clic su setup.exe, quindi seguire le istruzioni visualizzate sullo
schermo.
OS X/iOS
Per installare il software HP più aggiornato su un computer Mac, accedere al sito 123.hp.com/OJ5740. Il software HP
per Mac non è incluso nel CD del software in dotazione con la stampante.
Questo prodotto è abilitato per Apple AirPrint. La stampante e il dispositivo iOS o Mac devono trovarsi nella stessa rete
locale.
Nota: assicurarsi sempre che nel vassoio carta sia caricato il tipo di carta desiderato. Una volta chiuso il vassoio,
vericare che nel pannello di controllo sia selezionato il tipo di carta appropriato.
HP Oicejet 5740 e-All-in-One Series
Italiano
www.hp.com/eu/m/OJ5740

35
Informazioni sulla sicurezza
Quando si utilizza la stampante, seguire sempre le precauzioni di sicurezza fondamentali al ne di ridurre il rischio di lesioni alle
persone derivanti da incendi o scosse elettriche.
1. Si consiglia di leggere attentamente tutte le istruzioni contenute nei documenti forniti insieme alla stampante.
2. Seguire tutte le avvertenze e le istruzioni indicate sulla stampante.
3. Prima di eettuare la pulizia, scollegare la stampante dalle prese a muro.
4. Non installare né usare la stampante in prossimità di acqua o quando si è bagnati.
5. Installare la stampante su una supercie stabile, in modo che risulti ferma e al sicuro.
6. Installare la stampante in un luogo protetto dove non si possa inciampare sul cavo di alimentazione o calpestarlo,
rischiando in tal modo di danneggiarlo.
7. Se la stampante non funziona correttamente, consultare il le della guida (disponibile nel computer in seguito
all'installazione del software).
8. All'interno non vi sono parti su cui l'utente possa eettuare riparazioni. Per la manutenzione rivolgersi a personale tecnico
qualicato.
9. Utilizzare solo con il cavo di alimentazione e l'adattatore forniti da HP (se inclusi).
1
Spia wireless: indica lo stato della connessione wireless della stampante.
• Se la spia blu è accesa, la connessione wireless è stata stabilita ed è possibile stampare.
• Se la spia lampeggia lentamente, la funzionalità wireless è attivata, ma la stampante non è collegata a
una rete. Vericare che la stampante si trovi nel raggio d'azione del segnale wireless.
• Se la spia lampeggia rapidamente si è vericato un errore wireless. Fare riferimento al messaggio sul
display della stampante.
• Se la modalità wireless è disattivata, la relativa spia risulta spenta e sul display viene visualizzato il
messaggio Wireless disattivato.
2
Pulsante di accensione: consente di accendere o spegnere la stampante.
3
Pulsante Indietro: consente di tornare alla schermata precedente.
4
Pulsante ?: mostra il contenuto della guida disponibile per l’operazione corrente.
5
Pulsante Pagina iniziale: consente di tornare alla schermata iniziale, visualizzata all’accensione della
stampante.
6
Display del pannello di controllo: toccare lo schermo per selezionare le opzioni o scorrere le voci di menu.
7
Pulsante NFC (Near Field Communication) Indica l'area in cui è possibile stampare rapidamente documenti
e immagini da un dispositivo mobile (smartphone o tablet, ad esempio) semplicemente toccando il
dispositivo sulla stampante.
Pannello di controllo
Italiano

36
MacWindows
Risoluzione dei problemi più comuni
Se non è possibile stampare:
1. Assicurarsi che i cavi siano collegati saldamente.
2. Assicurarsi che la stampante sia accesa. Il pulsante di accensione (On) deve essere acceso con una luce bianca.
3. Controllare la spia di stato della connessione wireless per vericare che la stampante sia connessa a una rete.
4. Visitare il sito Web dedicato agli strumenti di diagnostica HP www.hp.com/go/tools per scaricare i programmi di utilità
(strumenti) di diagnostica gratuiti utilizzabili per risolvere i problemi più comuni della stampante.
Assicurarsi che la stampante sia impostata come unità di
stampa predenita:
• Windows 8.1 e Windows 8: selezionare o toccare l'angolo
superiore destro della schermata per aprire la barra degli
accessi, fare clic sull'icona Impostazioni, fare clic o toccare
Pannello di controllo, quindi fare clic o toccare Visualizza
dispositivi e stampanti.
• Windows 7: dal menu Start di Windows, fare clic su
Dispositivi e stampanti.
• Windows Vista: sulla barra delle applicazioni di Windows,
fare clic su Start, Pannello di controllo, Stampanti.
• Windows XP: sulla barra delle applicazioni di Windows,
fare clic su Start, Pannello di controllo, Stampanti e fax.
Assicurarsi che la stampante sia selezionata con un segno
di spunta all'interno di un cerchio. Se la stampante non è
selezionata come predenita, fare clic con il pulsante destro
del mouse sull'icona della stampante e scegliere Imposta
come stampante predenita dal menu.
Controllare la coda di stampa:
1. In Preferenze di sistema, fare clic su Stampanti e scanner
(Stampa e Fax in OS X v10,7 Lion e OS X v10,8 Mountain
Lion).
2. Fare clic su Apri coda di stampa.
3. Fare clic su un processo di stampa per selezionarlo.
4. Utilizzare i pulsanti seguenti per gestire il processo di
stampa:
• Icona Annulla: annulla il processo di stampa selezionato.
• Riprendi: continua un processo di stampa messo in
pausa.
5. Qualora siano state apportate delle modiche, provare a
stampare di nuovo.
Riavviare e ricongurare:
1. Riavviare il computer.
2. Reimpostare la stampante.
a. Spegnere la stampante e scollegare il cavo di
alimentazione.
b. Attendere un minuto, quindi ricollegare il cavo di
alimentazione e accendere la stampante.
Riconoscimenti: Windows XP, Windows Vista, Windows 7, Windows 8 e Windows 8.1 sono marchi registrati di Microsoft
Corporation negli Stati Uniti.
Mac, OS X e AirPrint sono marchi di Apple Inc. registrati negli Stati Uniti e in altri paesi.
Se si utilizza un cavo USB e non si riesce ancora a stampare
o se non è stato possibile completare l'installazione del
software:
1. Estrarre il CD dall’unità CD/DVD del computer e scollegare
il cavo USB dal computer.
2. Riavviare il computer.
3. Inserire il CD del software della stampante nell’unità
CD/DVD e seguire le istruzioni visualizzate sullo schermo
per installare il software della stampante. Non collegare il
cavo USB nché non verrà espressamente richiesto.
4. Al termine dell'installazione, riavviare il computer.
Se si utilizza una connessione wireless e non si riesce
ancora a stampare:
Accedere alla sezione Connessione alla rete nella pagina
successiva per ulteriori informazioni.
Per disinstallare il software:
1. Se la stampante è collegata al computer tramite cavo USB,
scollegare la stampante dal computer.
2. Aprire la cartella Applicazioni/Hewlett-Packard.
3. Fare doppio clic su HP Uninstaller e seguire le istruzioni
visualizzate sullo schermo.
Per ripristinare il sistema di stampa:
1. In Preferenze di sistema, fare clic su Stampanti e scanner
(Stampa e Fax in OS X v10,7 Lion e OS X v10,8 Mountain
Lion).
2. Tenere premuto il tasto CTRL e contemporaneamente
fare clic sull'elenco a sinistra, quindi scegliere Ripristina
sistema di stampa.
3. Aggiungere la stampante da utilizzare.
Memorizzazione dei dati di utilizzo anonimi: le cartucce HP memXorizzano un insieme di informazioni anonime sull'utilizzo
della stampante. Per ulteriori informazioni e istruzioni sulla disabilitazione della memorizzazione, consultare la guida in formato
elettronico.
Italiano

37
Per condividere la stampante con più computer sulla rete
In primo luogo, installare la stampante nella rete domestica. Una volta collegata la stampante alla rete domestica, è possibile
condividerla con altri computer sulla stessa rete. Per ogni computer aggiuntivo è suiciente installare una sola volta il software
della stampante HP.
Connettività wireless
In caso di mancata connessione della stampante alla rete
• Vericare che la modalità wireless sia abilitata sulla stampante.
1. Sul pannello di controllo della stampante, toccare .
2. Se viene visualizzato il messaggio Wireless disattivato, toccare (Impostazioni), quindi Impostazioni wireless.
3. Nella schermata Impostazioni wireless, selezionare On per l'opzione Wireless.
• Confermare che la stampante è connessa alla rete.
1. Toccare (Wireless) sul pannello di controllo della stampante.
2. Toccare (Impostazioni).
3. Toccare Stampa rapporti, quindi toccare Rapporto di test wireless. Il rapporto di test wireless viene stampato
automaticamente.
4. Nella parte iniziale del rapporto, controllare se si sono vericati eventuali errori durante il test.
– Fare riferimento alla sezione Risultati diagnostica di tutti i test eseguiti per stabilire se la stampante ha superato i test.
– Nella sezione Congurazione corrente, individuare il nome della rete (SSID) a cui la stampante è attualmente connessa.
Vericare che la stampante sia connessa alla stessa rete del computer.
Nota: se il computer è connesso a una rete privata virtuale (VPN), disconnetterlo temporaneamente dalla rete VPN prima di
proseguire con l’installazione. Dopo l’installazione sarà necessario disconnettersi dalla VPN per accedere alla stampante sulla
rete domestica.
• Assicurarsi che il software di protezione non ostacoli la comunicazione sulla rete.
Il software di protezione, ad esempio un rewall, può bloccare la comunicazione tra il computer e la stampante durante
l’installazione in rete. Se non è possibile individuare la stampante, disabilitare temporaneamente il rewall e vericare se il problema
è risolto. Per ulteriore assistenza e suggerimenti sul software di protezione, visitare il sito: www.hp.com/go/wpc-rewall_it-it.
• Riavviare i componenti della rete wireless.
Spegnere il router e la stampante, quindi riaccenderli nel seguente ordine: prima il router, quindi la stampante. Talvolta, la
disattivazione e la successiva riattivazione dei dispositivi consentono di risolvere problemi di comunicazione di rete. Se non
è ancora possibile eseguire la connessione, disattivare il router, la stampante e il computer, quindi riattivarli nel seguente
ordine: prima il router, quindi la stampante e inne il computer.
Nota: se non è possibile stabilire una connessione wireless, collegare la stampante alla rete utilizzando un cavo Ethernet.
se i problemi persistono, visitare HP Wireless Printing Center (www.hp.com/go/wirelessprinting). Questo sito Web contiene
informazioni complete e aggiornate sulla stampa wireless, nonché informazioni sulla preparazione della rete wireless, per
la risoluzione dei problemi di connessione tra stampante e rete wireless e per la risoluzione di problemi di protezione del
software.
Nota: se si utilizza un computer con sistema operativo Windows, è possibile utilizzare lo strumento Print and Scan Doctor, che
consente di risolvere diversi problemi della stampante. Per scaricare lo strumento, visitare il sito www.hp.com/go/tools.
Serve aiuto con la rete?
www.hp.com/go/wirelessprinting
Centro stampa wireless di HP, all’indirizzo www.hp.com/go/wirelessprinting, può aiutare a preparare la rete wireless, congurare
o ricongurare la stampante e risolvere i problemi di rete.
Italiano

38
Per utilizzare la stampante in modalità wireless senza router
Utilizzare la connessione Wi-Fi Direct per stampare in modalità wireless, senza router, dal computer, dallo smartphone o da un
altro dispositivo wireless. Per utilizzare la connessione Wi-Fi Direct da un computer, è necessario che il software della stampante
sia installato nel computer in uso.
1. Vericare che la connessione Wi-Fi Direct della stampante sia attivata:
a. Nella schermata iniziale sul display della stampante, toccare (Wi-Fi Direct).
b. Se lo Stato è Disattivata, toccare (Impostazioni Wi-Fi Direct) e attivare Wi-Fi Direct.
2. Connettere il dispositivo wireless alla stampante:
a. Attivare la connessione Wi-Fi sul dispositivo mobile. Per ulteriori informazioni, vedere la documentazione fornita con il
dispositivo mobile.
b. Dal dispositivo mobile, stabilire la connessione a una rete. Utilizzare il processo utilizzato di norma per la connessione a
una nuova rete wireless o hotspot. Scegliere il nome della connessione Wi-Fi Direct dall'elenco di reti wireless visualizzato,
ad esempio DIRECT-**-HP Oicejet-5740 (dove ** sono i caratteri univoci che identicano la stampante).
c. Quando viene richiesto, immettere la password di Wi-Fi Direct.
3. Stampare normalmente dal computer o dal dispositivo mobile.
Nota: la connessione Wi-Fi Direct non consente l'accesso a Internet.
Per ulteriori informazioni sulla connessione Wi-Fi Direct, visitare il Centro stampa wireless HP all'indirizzo
www.hp.com/go/wirelessprinting.
Passaggio da una connessione USB a una connessione wireless
In primo luogo, è necessario avere già provveduto a installare correttamente il software della stampante.
Windows
1. Eseguire una delle operazioni riportate di seguito in base al sistema operativo in uso:
• Windows 8.1: fare clic sul pulsante freccia nell'angolo inferiore sinistro della schermata Start, selezionare il nome della
stampante, quindi fare clic su Utilità.
• Windows 8: nella schermata Start, fare clic con il pulsante destro del mouse su un'area vuota dello schermo, quindi fare
clic su Tutte le app nella barra delle applicazioni.
• Windows 7, Windows Vista e Windows XP: dal menu Start del computer, selezionare Tutti i programmi o Programmi,
quindi selezionare HP.
2. Selezionare HP Oicejet 5740 series.
3. Selezionare Software e congurazione stampante.
4. Selezionare Converti una stampante con collegamento USB in wireless. Seguire le istruzioni visualizzate sullo schermo.
Mac
Utilizzare HP Utility in Applicazioni/Hewlett-Packard per impostare la connessione del software sulla modalità wireless per la
stampante.
Connettività wireless (continua)
Per stampare con AirPrint
Questa stampante è abilitata per Apple AirPrint®. È possibile stampare in modalità wireless dal dispositivo iOS o Mac utilizzato.
• La stampante e il dispositivo iOS o Mac devono utilizzare la stessa rete wireless.
• Con Apple AirPrint®, non è possibile eseguire la scansione di documenti dalla stampante al dispositivo iOS in uso.
Questo prodotto è destinato all’utilizzo in ambienti aperti (ad esempio, in abitazioni non connesse a una rete Internet pubblica) in
cui a tutti è consentito accedere alla stampante e utilizzarla. Di conseguenza, Wi-Fi Direct è congurato in modalità “Automatico”
per impostazione predenita, senza alcuna password di amministratore; ciò consente a chiunque si trovi entro la portata della
connessione wireless di connettersi e accedere a tutte le funzioni e impostazioni della stampante. Per livelli di sicurezza più
elevati, HP consiglia di modicare il metodo di connessione di Wi-Fi Direct da “Automatico” a “Manuale” e di creare e impostare
una password di amministratore.
Italiano

39
Impostazione del fax
1. Connessione alla linea telefonica.
Nota: le stampanti HP sono espressamente progettate per essere utilizzate con i servizi telefonici analogici tradizionali. In
ambienti telefonici digitali (ad esempio DSL/ADSL, PBX, ISDN o FoIP), potrebbe essere necessario utilizzare ltri o convertitori
digitale-analogico per congurare le impostazioni fax della stampante. Contattare la compagnia telefonica per stabilire quali
opzioni di congurazione soddisfano meglio i requisiti ambientali.
Se la linea telefonica è utilizzata solo per le chiamate fax
a. Collegare un'estremità del cavo telefonico al jack telefonico per presa a muro.
b. Collegare l'altra estremità del cavo alla porta 1-LINE sul retro della stampante.
Se si utilizza un abbonamento DSL/ADSL, collegare un ltro DSL/ADSL tra la porta 1-LINE e il jack telefonico per presa a muro.
2. Test congurazione fax.
Con il test fax vengono vericati l'hardware, il tipo di cavo telefonico, lo stato della connessione, il segnale di linea e
l'operatività della linea telefonica. Per eseguire il test:
a. Nella schermata principale sul display della stampante, premere i pulsanti Su e Giù per selezionare Fax, quindi premere OK.
b. Selezionare Impostazioni, quindi Impostazioni avanzate, Congurazione guidata Fax e seguire le istruzioni visualizzate
sullo schermo.
1
Jack telefonico per presa a muro
2
Porta fax (1-LINE)
Nota: non inserire nella porta 2-EXT.
3
Filtro DSL/ADSL (fornito dalla compagnia telefonica o
dal provider del servizio)
Se alla linea telefonica sono collegati dispositivi aggiuntivi
Se si desidera collegare altri dispositivi, fare riferimento al diagramma riportato di seguito.
1
Jack telefonico per presa a muro
2
Splitter per connessione parallela
3
Modem DSL/ADSL
4
Segreteria telefonica
5
Telefono
6
Jack ISDN per presa a muro
7
Adattatore terminale o router ISDN
8
Modem banda larga
9
Filtro DSL/ADSL
10
Adattatore telefono analogico
* TAM: Segreteria telefonica
** FoIP: Invio di fax su Protocollo Internet (FoIP)
Italiano

40
Invio di un fax standard
1. Caricare l'originale con il lato di stampa rivolto verso il basso nell'angolo anteriore destro del vetro dello scanner o con il
lato di stampa rivolto verso l'alto nell'alimentatore automatico di documenti (ADF).
2. Sul display del pannello di controllo della stampante, toccare Fax.
3. Toccare Invia ora.
4. Immettere il numero di fax utilizzando il tastierino numerico.
Per inserire una pausa nel numero del fax, premere ripetutamente * no a visualizzare un trattino (-) sul display.
5. Toccare Nero o Colore.
Se la stampante rileva un originale caricato nell'alimentatore documenti, invierà il documento al numero specicato.
Se il destinatario rileva dei problemi in merito alla qualità del fax inviato, cercare di modicare la risoluzione o il contrasto
del fax.
Uso del fax
Invio di un fax utilizzando un telefono interno
1. Digitare il numero tramite la tastiera del telefono dell'interno.
Quando si invia un fax utilizzando questo metodo, non usare il tastierino numerico sul pannello di controllo della
stampante.
2. Se il destinatario risponde al telefono, è possibile iniziare una conversazione prima di inviare il fax.
Se a rispondere alla chiamata è l'apparecchio fax, è possibile ascoltare i segnali fax dall'apparecchio fax del destinatario.
3. Caricare l'originale con il lato di stampa rivolto verso il basso nell'angolo anteriore destro del vetro dello scanner o con il
lato di stampa rivolto verso l'alto nell'alimentatore automatico di documenti (ADF).
4. Sul display del pannello di controllo della stampante, toccare Fax.
5. Toccare Invia fax.
6. Toccare Nero o Colore.
Se si è al telefono con il destinatario, chiedergli di avviare la ricezione del fax dopo l'ascolto del segnale sull'apparecchio fax.
Quando la stampante inizia a inviare il fax, è possibile riagganciare il telefono o rimanere in linea. Non vengono uditi i toni
del fax durante la trasmissione.
Per ulteriori informazioni su altre modalità di invio dei fax, come l'invio pianicato di fax in momenti successivi o l'invio di fax
da computer, vedere la Guida in formato elettronico.
Ricezione automatica di un fax
Per impostazione predenita, la stampante risponde alle chiamate in entrata e riceve i fax automaticamente.
Per ricevere i fax manualmente, disattivare Risposta automatica sul pannello di controllo della stampante.
La stampante risponderà automaticamente alle chiamate dopo il numero di squilli specicati nell'impostazione Squilli prima di
rispondere.
Se alla stampante è collegata una segreteria telefonica, è necessario che l'opzione della stampante Squilli no risp. sia
impostata su un numero superiore rispetto alla segreteria telefonica.
1. Vericare che la stampante sia accesa e che la carta sia caricata.
2. Sul display della stampante, toccare Fax.
3. Toccare Congurazione, quindi Preferenze.
4. Selezionare On per l'opzione Risposta automatica.
Nota: se è stato sottoscritto un servizio di posta vocale sulla stessa linea telefonica utilizzata per le chiamate fax, non sarà
possibile ricevere i fax automaticamente. Ciò signica che si dovrà rispondere di persona alle chiamate fax in entrata. Se invece
si desidera ricevere automaticamente i fax, contattare la società telefonica per abbonarsi a un servizio di dierenziazione degli
squilli oppure per ottenere una linea telefonica separata per la trasmissione fax.
La stampante può memorizzare i fax ricevuti nella memoria interna. Per ristampare i fax ricevuti, vedere "Ristampa dei fax
ricevuti memorizzati" nella pagina successiva.
Italiano

41
Uso del fax (continua)
Ricezione manuale di un fax
Se si è impegnati in una conversazione con un altro utente, è possibile ricevere fax manualmente senza riagganciare il telefono.
1. Vericare che la stampante sia accesa e che la carta sia caricata.
2. Rimuovere gli originali dall'alimentatore documenti.
Impostare l'opzione Squilli no risp. su un valore più elevato per consentire all'utente di rispondere alla chiamata in entrata
prima che risponda la stampante. In alternativa, disattivare l'impostazione Risposta automatica in modo che la stampante
non risponda automaticamente alle chiamate in entrata.
3. Chiedere al mittente di iniziare a inviare il fax.
4. Quando si ascoltano i toni del fax, nella schermata principale sul pannello di controllo della stampante toccare Fax, quindi
Invia e ricevi e inne Ricevi ora.
Quando la stampante inizia a ricevere il fax, è possibile riagganciare il telefono o rimanere in linea. Non vengono uditi i toni del
fax durante la trasmissione.
Ristampa dei fax ricevuti dalla memoria
Se l'opzione Ricezione con backup fax è attivata, i fax in entrata verranno archiviati in memoria anche quando la stampante si
trova in una condizione di errore.
Nota: tutti i fax archiviati nella memoria possono essere eliminati quando la stampante è spenta.
1. Assicurarsi che la carta sia caricata nella stampante.
2. Nella schermata iniziale sul display della stampante, toccare Fax.
3. Toccare Ristampa.
I fax vengono visualizzati nell'ordine inverso di ricezione, ovvero il fax ricevuto più di recente viene stampato per primo.
4. Per interrompere la stampa, selezionare Annulla.
Stampa di un rapporto o di un log
I rapporti del fax orono utili informazioni di sistema sulla stampante.
1. Nella schermata iniziale sul display della stampante, toccare Congurazione, quindi Congurazione fax.
2. Toccare Rapporti, quindi Conferma fax.
3. Toccare per selezionare una delle opzioni.
Italiano

42
Controllo delle impostazioni fax della stampante
• La funzione Risposta automatica è attivata per la
ricezione automatica di fax dalla stampante.
• Se si è abbonati a un servizio di posta vocale oerto
dalla compagnia telefonica o dal provider di servizi,
assicurarsi che l'opzione Squilli no risp. sulla stampante
sia impostata su un valore superiore rispetto a quello
della segreteria telefonica. La stampante esegue il
monitoraggio della linea e stabilisce se una chiamata
in arrivo sia normale o fax. In caso di chiamata fax, la
stampante avvia la connessione fax automaticamente.
Altrimenti, sarà necessario ricevere il fax manualmente
selezionando Fax sul display della stampante.
• Se alla stessa linea telefonica sica sono assegnati più
numeri di telefono e la linea è condivisa da più dispositivi,
assicurarsi che la stampante sia congurata per la corretta
impostazione univoca per gli squilli, relativa alla ricezione
dei fax.
Verica delle connessioni siche del fax
• Collegare il cavo telefonico dalla porta 1-LINE sul retro
della stampante al jack telefonico per presa a muro e
quindi un cavo telefonico dalla porta 2-EXT sul retro della
stampante a un telefono interno. Dal telefono dell'interno,
telefonare al numero di telefono da cui non era possibile
ricevere i fax.
• Se si tenta di inviare un fax al numero di un interno,
assicurarsi di includere eventuali codici o numeri
di accesso necessari prima di comporre il numero.
Potrebbe inoltre essere possibile aggiungere una pausa
alla composizione del numero al ne di impedire una
composizione troppo rapida. per inserire una pausa,
premere ripetutamente * no a visualizzare un trattino (-)
sul display.
• Se non è possibile eettuare chiamate in uscita perché
non si rileva alcun segnale di linea o la linea è disturbata,
provare a sostituire il cavo telefonico collegato alla porta
telefonica 1-LINE o spostare la stampante in un'altra
ubicazione con una linea telefonica separata (se possibile)
e rilevare eventuali problemi simili.
• In ambienti telefonici digitali (ad esempio, FoIP, fax
over VoIP), ridurre la velocità dei fax e attivare Error
Code Modulation (ECM) dal pannello di controllo della
stampante. Se necessario, contattare la compagnia
telefonica per vericare se ci sono problemi di linea o per
ulteriori informazioni sulle capacità della rete telefonica.
Risoluzione dei problemi del fax
Se i problemi con il fax persistono anche se il test del fax è
risultato positivo, attenersi alle procedure seguenti:
Riesco a inviare i fax ma non a riceverli
1. Eseguire una copia o una scansione per assicurarsi che la
stampante funzioni correttamente.
2. Vericare i collegamenti sici del fax.
3. Vericare se è possibile inviare fax da altri dispositivi con
lo stesso numero di telefono. Il dispositivo di ricezione fax
potrebbe aver bloccato il numero di telefono o potrebbero
esserci problemi tecnici.
4. Se il problema persiste, stampare il rapporto con il test
del fax e il registro fax (e, se disponibili, i rapporti per ID
chiamante e fax indesiderati), quindi contattare HP per
ulteriore assistenza.
Riesco a ricevere i fax ma non a inviarli
1. Controllare le impostazioni fax sulla stampante.
2. Vericare i collegamenti sici del fax.
3. Vericare se altri dispositivi connessi alla stessa
linea telefonica consentono la ricezione di fax. La
linea telefonica potrebbe essere danneggiata oppure
potrebbero essersi vericati problemi con il dispositivo
di invio fax. Vericare anche se il numero telefonico del
mittente è bloccato.
4. Vericare il problema con il mittente. Se il problema
persiste, stampare il rapporto con il test del fax e il
registro fax (e, se disponibili, i rapporti per ID chiamante
e fax indesiderati), quindi contattare HP per ulteriore
assistenza.
Non riesco né a inviare né a ricevere i fax
1. Eseguire una copia o una scansione per assicurarsi che la
stampante funzioni correttamente.
2. Vericare i collegamenti sici del fax.
3. Controllare le impostazioni fax sulla stampante.
4. Vericare se altri dispositivi connessi alla stessa linea
telefonica consentono la ricezione o l'invio di fax. Potrebbe
essersi vericato un problema con la linea telefonica.
5. Ripristinare la stampante spegnendola e, se possibile,
spegnere anche l'interruttore principale di alimentazione.
Attendere qualche secondo, poi riattivare l'alimentazione.
Provare a inviare o a ricevere un fax sulla stampante.
6. Se il problema persiste, stampare il rapporto con il test
del fax e il registro fax (e, se disponibili, i rapporti per ID
chiamante e fax indesiderati), quindi contattare HP per
ulteriore assistenza.
7. Nota: se è stato sottoscritto un servizio di posta vocale
sulla stessa linea telefonica utilizzata per i fax, sarà
possibile solo la ricezione manuale dei fax.
Italiano

43
Dichiarazione di garanzia limitata della stampante HP
A.
Durata della garanzia limitata
1. HP Inc. (HP) garantisce all'utente finale che per il periodo sopra indicato, a partire dalla data dell'acquisto, i prodotti
HP specificati sono privi di difetti di materiali e di manodopera. Il cliente è responsabile della conservazione della prova di
acquisto.
2. Per i prodotti software, la garanzia limitata HP si applica solo in caso di mancata esecuzione delle istruzioni di
programmazione. HP non garantisce che il funzionamento dei prodotti HP sia ininterrotto e privo di errori.
3. La garanzia HP si applica solo agli eventuali difetti derivanti dall'uso normale del prodotto e non da:
a. Manutenzione non corretta oppure modifiche improprie o inadeguate;
b. Software, supporti, parti o componenti non forniti o supportati da HP;
c. Uso non rispondente alle specifiche del prodotto;
d. Uso improprio o modifiche non autorizzate.
4. Per le stampanti HP, l'utilizzo di una cartuccia non HP o di una cartuccia ricaricata non ha effetti sulla garanzia o su eventuali
contratti di assistenza con il cliente. Tuttavia, qualora il malfunzionamento o il danneggiamento della stampante sia dovuto
all'uso di una cartuccia di stampa non HP o ricaricata, o di una cartuccia scaduta, al cliente verranno addebitati i costi di
manodopera e di materiale sostenuti per la riparazione.
5. Se, durante il periodo della garanzia, HP verrà a conoscenza di un difetto di un prodotto hardware coperto dalla garanzia HP,
a sua discrezione HP sostituirà o riparerà il prodotto difettoso.
6. Se HP non fosse in grado di riparare o sostituire adeguatamente un prodotto difettoso coperto dalla garanzia HP entro un
tempo ragionevole, HP rimborserà il prezzo d'acquisto del prodotto.
7. HP non ha alcun obbligo di riparazione, sostituzione o rimborso fino al momento della restituzione del prodotto difettoso.
8. I prodotti sostitutivi possono essere nuovi o di prestazioni equivalenti a un prodotto nuovo, purché dotati di funzioni almeno
uguali a quelle del prodotto sostituito.
9. I prodotti HP possono contenere parti, componenti o materiali ricondizionati equivalenti ai nuovi per prestazioni.
10. La garanzia limitata HP è valida in qualunque paese in cui i prodotti HP sopraelencati sono distribuiti da HP. Eventuali
contratti per servizi di garanzia aggiuntivi, come l'assistenza 'on-site', possono essere richiesti a un centro di assistenza HP
autorizzato che si occupi della distribuzione del prodotto o a un importatore autorizzato.
B.
Garanzia limitata
IN CONFORMITÀ ALLE DISPOSIZIONI DI LEGGE VIGENTI, È ESCLUSA QUALSIASI GARANZIA O CONDIZIONE,
SCRITTA OPPURE VERBALE, ESPRESSA O IMPLICITA DA PARTE DI HP O DI SUOI FORNITORI. HP ESCLUDE
SPECIFICATAMENTE QUALSIASI GARANZIA O CONDIZIONE IMPLICITA DI COMMERCIABILITÀ, QUALITÀ
SODDISFACENTE E IDONEITÀ AD USO PARTICOLARE.
C.
Responsabilità limitata
1. Le azioni offerte dalla presente garanzia sono le sole a disposizione del cliente.
2. IN CONFORMITÀ ALLE DISPOSIZIONI DI LEGGE VIGENTI, FATTA ECCEZIONE PER GLI OBBLIGHI ESPRESSI
SPECIFICAMENTE NELLA PRESENTE GARANZIA HP, IN NESSUN CASO HP O I RELATIVI FORNITORI SARANNO
RESPONSABILI DI DANNI DIRETTI, INDIRETTI, SPECIALI, ACCIDENTALI O CONSEGUENTI, O ALTRI DANNI
DERIVANTI DALL'INADEMPIMENTO DEL CONTRATTO, ILLECITO CIVILE O ALTRO.
D.
Disposizioni locali
1. Questa garanzia HP conferisce al cliente diritti legali specifici. Il cliente può anche godere di altri diritti legali che variano da
stato a stato negli Stati Uniti, da provincia a provincia in Canada, e da paese/regione a paese/regione nel resto del mondo.
2. Laddove la presente garanzia HP risulti non conforme alle leggi locali, essa verrà modificata secondo tali leggi.
Per alcune
normative locali, alcune esclusioni e limitazioni della presente garanzia HP possono non essere applicabili. Ad esempio, in
alcuni stati degli Stati Uniti e in alcuni governi (come le province del Canada), è possibile:
a. Impedire che le esclusioni e le limitazioni contenute nella garanzia HP limitino i diritti statutari del consumatore (come
avviene nel Regno Unito).
b. Limitare la possibilità da parte del produttore di rafforzare tali esclusioni o limitazioni.
c. Concedere al cliente diritti aggiuntivi, specificare la durata delle garanzie implicite che il produttore non può escludere
o consentire limitazioni alla durata delle garanzie implicite.
3. I TERMINI CONTENUTI NELLA PRESENTE DICHIARAZIONE DI GARANZIA, FATTI SALVI I LIMITI IMPOSTI DALLA
LEGGE, NON ESCLUDONO, LIMITANO O MODIFICANO, BENSÌ INTEGRANO, I DIRITTI LEGALI APPLICABILI ALLA
VENDITA DEI PRODOTTI HP AI CLIENTI DI TALI PAESI.
Garanzia del Produttore
La Gar
anzia limitata HP è una garanzia commerciale fornita volontariamente da HP. Di seguito sono indicati nome e indirizzo della
società HP r
esponsabile della fornitura dei servizi coperti dalla Garanzia limitata HP nel vostro Paese:
Italia:
HP Italy S.r.l., Via G. Di Vittorio 9, 20063 Cernusco S/Naviglio
I vantaggi del
la Garanzia limitata HP vengono concessi ai consumatori in aggiunta ai diritti derivanti dalla garanzia di due anni
f
ornita dal venditore in caso di non conformità dei beni rispetto al contratto di vendita. Tuttavia, diversi fattori possono avere un
impatt
o sulla possibilita’ di beneficiare di tali diritti. I diritti spettanti ai consumatori in forza della garanzia legale non sono in alcun
modo limitati, né modificati da
lla Garanzia limitata HP. Per ulteriori informazioni, si prega di consultare il seguente link: Garanzia
le
gale per i clienti, oppure visitare il sito Web dei Centri europei per i consumatori. I consumatori hanno il diritto di scegliere se
richieder
e un servizio usufruendo della Garanzia limitata HP oppure rivolgendosi al venditore per far valere la garanzia legale
di due
anni.
P
er ulteriori informazioni consultare il seguente collegamento: Garanzia legale per il consumatore (www.hp.com/go/eu-legal)
oppur
e visitare il sito Web dei centri europei dei consumatori
(http://
ec.europa.eu/consumers/solving_consumer_disputes/non-judicial_redress/ecc-net/).
Prodotto HP Durata della garanzia limitata
Supporti del software 90 giorni
Stampante 1 anno
Cartucce di stampa o di inchiostro Fino ad esaurimento dell'inchiostro HP o fino al raggiungimento
della data di "scadenza della garanzia" stampata sulla cartuccia,
a seconda di quale evento si verifichi per primo. La presente
garanzia non copre i prodotti con inchiostro HP che siano stati
ricaricati, ricostruiti, ricondizionati, utilizzati in modo improprio
o manomessi.
Testine di stampa (si applica solo ai prodotti con testine 1 anno
di stampa sostituibili dal cliente)
Accessori 1 anno salvo diversamente definito
Italiano

La información contenida
en este documento
puede sufrir modicaciones
sin previo aviso.
¡Escanee para descubrir más!
Es posible que se apliquen tarifas estándares para datos. Es posible que no esté disponible en todos los idiomas.
Más información
Ayuda electrónica: Instale la Ayuda electrónica seleccionándola en el software recomendado durante la instalación del
software. Obtenga información sobre las funciones del producto, la impresión, la resolución de problemas y el soporte.
En la sección Información técnica, encontrará información sobre avisos, medio ambiente y normativa, incluidos los avisos
reglamentarios de la Unión Europea y las declaraciones de cumplimiento.
• Windows® 8.1: Haga clic en la echa hacia abajo en la esquina inferior izquierda de la pantalla Inicio, seleccione el
nombre de la impresora, haga clic en Ayuda y luego seleccione Buscar ayuda de HP.
• Windows® 8: En la pantalla Inicio, haga clic con el botón derecho del ratón en una parte vacía de la misma. A
continuación, en la barra de aplicaciones, haga clic en Todas las aplicaciones. Haga clic en el icono con el nombre de la
impresora y, por último, haga clic en Ayuda.
• Windows® 7, Windows Vista® y Windows® XP: Haga clic en Inicio > Todos los programas > HP > HP Oicejet 5740
series > Ayuda.
• OS X: Haga clic en Ayuda > Centro de ayuda. En la ventana del Visor de ayuda, haga clic en Ayuda para todas las
aplicaciones y, luego, en HP Oicejet 5740 series.
Léame: Contiene información de soporte de HP, los requisitos del sistema operativo y las actualizaciones recientes
de la impresora.
• Windows: Inserte el CD de software en el equipo y vaya a ReadMe.chm. Haga clic en ReadMe.chm para abrirlo y elija
ReadMe en su idioma.
• Mac: Abra la carpeta Documentos que se encuentra en el nivel superior del instalador de software. Haga doble clic en
ReadMe y seleccione ReadMe en su idioma.
En la Web: Información y ayuda adicionales: www.hp.com/support. Registro de la impresora: www.register.hp.com.
Declaración de conformidad: www.hp.eu/certicates. Uso de la tinta: www.hp.com/go/inkusage.
Primeros pasos
1. Siga las ilustraciones del folleto para congurar la impresora.
2. Instale el software.
Windows®
Visite 123.hp.com/OJ5740 y siga las instrucciones que aparecerán en la pantalla. Si el equipo no está conectado a
Internet, inserte el CD de software en el equipo. Si el CD no se inicia, vaya a Equipo, haga doble clic en el icono de la
unidad CD/DVD con el logotipo de HP, haga doble clic en setup.exe y siga las instrucciones en la pantalla.
OS X/iOS
Para instalar el software HP más actualizado en un equipo Mac, visite 123.hp.com/OJ5740. El software HP para Mac no
está incluido en el CD de software que viene con la impresora.
Este producto es compatible con Apple AirPrint. La impresora y el dispositivo iOS o Mac deben estar en la misma red
local.
Nota: Verique siempre que se haya cargado el papel deseado en la bandeja. Una vez cerrada la bandeja, asegúrese de
seleccionar el papel en el panel de control de la impresora.
HP Oicejet 5740 e-All-in-One Series
www.hp.com/eu/m/OJ5740
Español

45
Información de seguridad
Tome siempre las precauciones básicas de seguridad cuando use esta impresora, así podrá reducir los riesgos de sufrir lesiones
físicas como consecuencia de un incendio o una descarga eléctrica.
1. Lea y comprenda todas las instrucciones de la documentación suministrada con la impresora.
2. Tenga presente todos los avisos y las instrucciones indicadas en la impresora.
3. Antes de limpiarla, desenchufe la impresora de la toma de corriente de la pared.
4. No instale ni utilice esta impresora si está mojada o cerca de agua.
5. Instale la impresora de manera segura sobre una supercie estable.
6. Instale la impresora en un lugar protegido donde nadie pueda pisar el cable de alimentación eléctrica ni tropezar con él,
y donde el cable no sufra daños.
7. Si la impresora no funciona con normalidad, consulte la ayuda electrónica (disponible en su equipo después de instalar el
software).
8. En el interior no hay piezas que el usuario pueda reparar. Las tareas de reparación se deben encomendar al personal de
servicio cualicado.
9. Use la impresora solo con el cable y el adaptador de alimentación (si se incluyen) suministrados por HP.
1
Indicador luminoso de conexiones inalámbricas: Indica el estado de la conexión inalámbrica de la impresora.
• La luz azul indica que se ha establecido la conexión inalámbrica y que se puede imprimir.
• Cuando la luz parpadea lentamente, la función inalámbrica está encendida, pero la impresora no está
conectada a ninguna red. Asegúrese de que la impresora esté dentro del rango de la señal inalámbrica.
• Cuando la luz indicadora parpadea rápidamente, se produjo un error en la conexión inalámbrica.
Consulte el mensaje en la pantalla de la impresora.
• Si la conexión inalámbrica está desactivada, la luz indicadora del estado de conexión inalámbrica
estará apagada y la pantalla muestra Inalámbrica desactivada.
2
Botón Encender: Enciende o apaga la impresora.
3
Botón Atrás: Vuelve a la pantalla anterior.
4
Botón Ayuda: Muestra el contenido de la ayuda disponible para la operación actual.
5
Botón Inicio: Vuelve a la pantalla Inicio, la pantalla que se muestra al encender la impresora por primera vez.
6
Pantalla del panel de control: Toque la pantalla para seleccionar opciones de menú o desplazarse por los
elementos del menú.
7
Botón de Comunicación de Campo Cercano (NFC): Indica que se pueden imprimir documentos e imágenes
rápidamente desde un dispositivo móvil (por ejemplo, un teléfono inteligente o una tableta) con solo tocar
el dispositivo en la impresora.
Panel de control
Español

46
MacWindows
Solución de problemas básicos
Si no puede imprimir:
1. Compruebe que los cables estén bien conectados.
2. Compruebe que la impresora esté encendida. El botón Encender estará encendido con luz blanca.
3. Compruebe el estado de conexión inalámbrica para asegurarse de que la impresora esté conectada a una red.
4. Visite el sitio web Herramientas de Diagnóstico de HP en www.hp.com/go/tools para descargar utilidades (herramientas)
gratuitas de diagnóstico que podrá utilizar para solucionar los problemas de impresión habituales.
Compruebe que la impresora esté denida como dispositivo
de impresión predeterminado:
• Windows 8.1 y Windows 8: Señale o toque la esquina
derecha superior de la pantalla para abrir la barra Accesos,
haga clic en el icono Ajustes, haga clic o toque el Panel
de control y luego haga clic o toque Ver dispositivos e
impresoras.
• Windows 7: En el menú Inicio de Windows, haga clic en
Dispositivos e impresoras.
• Windows Vista: En la barra de tareas de Windows, haga clic
en Inicio, Panel de control y, luego, Impresora.
• Windows XP: En la barra de tareas de Windows, haga clic
en Inicio, Panel de control y, luego, en Impresoras
y faxes.
Compruebe que haya una marca de vericación dentro de un
círculo negro junto a la impresora. Si la impresora no está
seleccionada como predeterminada, haga clic con el botón
derecho en el icono de la impresora y elija Establecer como
impresora predeterminada en el menú.
Compruebe la cola de impresión:
1. En Preferencias del sistema, haga clic en Impresoras
y escáneres (Impresoras y faxes en OS X v10.7 Lion
y OS X v10.8 Mountain Lion).
2. Haga clic en Abrir cola de impresión.
3. Haga clic sobre un trabajo de impresión para seleccionarlo.
4. Utilice los botones siguientes para administrar el trabajo
de impresión:
• Icono Cancelar: cancela el trabajo de impresión
seleccionado.
• Reanudar: continúa un trabajo de impresión que se ha
detenido.
5. Si ha hecho algún cambio, intente volver a imprimir.
Reiniciar y restablecer:
1. Reinicie el ordenador.
2. Restablezca la impresora.
a. Apague la impresora y desconecte el cable de
alimentación.
b. Espere un minuto, vuelva a conectar el cable
y encienda la impresora.
Reconocimientos: Windows XP, Windows Vista, Windows 7, Windows 8 y Windows 8.1 son marcas comerciales registradas de
Microsoft Corporation en EE.UU.
Mac, OS X y AirPrint son marcas registradas de Apple Inc. en los EE.UU. y otros países.
Si utiliza un cable USB y sigue sin poder imprimir o la
instalación del software falla:
1. Extraiga el CD de la unidad de CD/DVD y, a continuación,
desconecte el cable USB del equipo.
2. Reinicie el equipo.
3. Inserte el CD del software de la impresora en la unidad
de CD/DVD y siga las instrucciones que aparecerán en
la pantalla para instalar el software de la impresora. No
conecte el cable USB hasta que se le indique.
4. Reinicie el equipo cuando nalice la instalación.
Si utiliza la conexión inalámbrica y sigue sin poder imprimir:
Vaya a la sección de Redes en la página siguiente para obtener
más información.
Para desinstalar el software:
1. Si la impresora está conectada al equipo a través del
puerto USB, desconecte la impresora del equipo.
2. Abra la carpeta Applications/Hewlett-Packard.
3. Haga doble clic en Desinstalador de HP y siga las
instrucciones que aparecen en pantalla.
Para restablecer el sistema de impresión:
1. En Preferencias del sistema, haga clic en Impresoras
y escáneres (Impresoras y faxes en OS X v10.7 Lion
y OS X v10.8 Mountain Lion).
2. Mantenga pulsada la tecla Control mientras hace clic en
la lista de la izquierda y luego seleccione Restablecer
sistema de impresión.
3. Añada la impresora que desea utilizar.
Almacenamiento de información de uso anónimo: Los cartuchos HP almacenan cierta información anónima sobre el uso de la
impresora. Si desea obtener más información e instrucciones para desactivar el almacenamiento, consulte la Ayuda electrónica.
Español

47
Si desea compartir la impresora con varios equipos en la red
Primero, instale la impresora en la red doméstica. Después de conectar correctamente la impresora a la red doméstica, puede
compartirla con otros equipos en la misma red. Por cada equipo adicional solo deberá instalar el software de la impresora HP.
Conexión inalámbrica en red
Si no puede establecer la conexión entre la impresora y la red
• Conrme que esté activada la función inalámbrica de la impresora.
1. En el panel de control de la impresora, toque (Inalámbrica).
2. Si aparece Inalámbrica desactivada, toque (Conguración) y, luego, Conguración inalámbrica.
3. En la pantalla Conguración inalámbrica, seleccione Activada para la opción Inalámbrica.
• Compruebe que la impresora esté conectada a la red.
1. En el panel de control de la impresora, toque (Inalámbrica).
2. Toque (Conguración).
3. Pulse Imprimir informes y, a continuación, Informe de prueba inalámbrica. El Informe de prueba inalámbrica se imprime
automáticamente.
4. Consulte la parte superior del informe para ver si hubo fallos durante la prueba.
– Consulte la sección Resultado del diagnóstico para ver todas las pruebas realizadas y si la impresora las ha pasado o no.
– En la sección Conguración actual, busque el Nombre de red (SSID) al que está conectada actualmente la impresora.
Compruebe que la impresora esté conectada a la misma red que el equipo.
Nota: Si el equipo está conectado a una Red Privada Virtual (VPN), desconéctelo de forma temporal antes de continuar con la
instalación. Tras la instalación, debe desconectar la impresora de la VPN para acceder a ella a través de la red doméstica.
• Asegúrese de que ningún software de seguridad esté bloqueando la comunicación con la red.
El software de seguridad, como el cortafuegos, puede bloquear la comunicación entre su equipo y la impresora, cuando se instala
en una red. Si no encuentra la impresora, desactive el cortafuegos de forma temporal y verique si el problema desaparece. Para
obtener ayuda y consejos sobre el software de seguridad, visite: www.hp.com/go/wpc-rewall_es-es.
• Reinicie los componentes de la red inalámbrica.
Apague el enrutador y la impresora y, a continuación, vuelva a encenderlos en el siguiente orden: primero el enrutador y
después la impresora. A veces, si apaga y vuelve a encender los dispositivos, se resuelven problemas de comunicación de red.
Si aún no puede conectarse, apague el enrutador, la impresora y el equipo, y vuelva a encenderlos en este orden: primero el
enrutador, luego la impresora y, por último, el equipo.
Nota: Si no logra establecer la conexión inalámbrica, también puede conectar la impresora a la red con un cable Ethernet.
Si los problemas persisten, visite el Centro de impresión inalámbrica HP (www.hp.com/go/wirelessprinting). Esta página
web contiene la información actual más completa sobre la impresión inalámbrica, así como información para ayudarle a
preparar su red inalámbrica; solucionar problemas cuando conecte la impresora a la red inalámbrica; y resolver los problemas
de software de seguridad.
Nota: Si está utilizando un equipo que ejecuta Windows, puede utilizar la herramienta Print and Scan Doctor, que puede
ayudarle a resolver muchos problemas de la impresora. Para descargar esta herramienta, visite www.hp.com/go/tools.
¿Necesita ayuda con el trabajo en red?
www.hp.com/go/wirelessprinting
El Centro de impresión inalámbrica HP en www.hp.com/go/wirelessprinting le ayudará a preparar la red inalámbrica, congurar
o recongurar su impresora y solucionar problemas del trabajo en red.
Español

48
Si desea usar la impresora de forma inalámbrica sin un enrutador
Use Wi-Fi Direct para imprimir de forma inalámbrica sin un enrutador desde su equipo, teléfono inteligente o dispositivo
inalámbrico. Para utilizar Wi-Fi Direct en su equipo, debe instalar el software de la impresora.
1. Asegúrese de que esté encendido Wi-Fi Direct en la impresora:
a. En la pantalla Inicio de la pantalla de la impresora, toque (Wi-Fi Direct).
b. Si el Estado es Desactivado, toque (Conguración de Wi-Fi) y active Wi-Fi Direct.
2. Conecte su dispositivo inalámbrico a la impresora:
a. Activación de la conexión Wi-Fi en su dispositivo móvil. Para obtener más información, consulte la documentación
proporcionada con el dispositivo móvil.
b. Desde el dispositivo móvil, conéctese a una nueva red. Utilice el proceso que normalmente utiliza para conectarse a una
nueva red inalámbrica o hotspot. Elija el nombre de Wi-Fi Direct de la lista de redes inalámbricas, como DIRECT-**-HP
Oicejet-5740 (donde ** son caracteres únicos que permiten identicar la impresora).
c. Escriba la contraseña de Wi-Fi Direct cuando el sistema lo solicite.
3. Imprima de normalmente desde el ordenador o dispositivo móvil.
Nota: La conexión de Wi-Fi Direct no proporciona acceso a Internet.
Visite el Centro de impresión inalámbrica de HP en www.hp.com/go/wirelessprinting para obtener más información sobre
Wi-Fi Direct.
Si desea cambiar de una conexión USB a una conexión inalámbrica
Primero, asegúrese de haber instalado el software de la impresora correctamente.
Windows
1. Lleve a cabo uno de los pasos siguientes en función del sistema operativo:
• Windows 8.1: Haga clic en la echa hacia abajo en la esquina inferior izquierda de la pantalla Inicio, seleccione el nombre
de la impresora y, a continuación, haga clic en Utilidades.
• Windows 8: Haga clic con el botón derecho del ratón en una parte vacía de la pantalla Inicio, luego, haga clic en Todas
las aplicaciones de la barra de aplicaciones.
• Windows 7, Windows Vista y Windows XP: En el menú Inicio, seleccione Todos los programas o Programas y, luego,
seleccione HP.
2. Seleccione HP Oicejet 5740 series.
3. Seleccione Conguración de impresora y software.
4. Seleccione Convertir una impresora conectada con USB a inalámbrica. Siga las instrucciones que aparecen en la pantalla.
Mac
Utilice la Utilidad HP en Aplicaciones/Hewlett-Packard para cambiar la conexión del software a inalámbrica para esta impresora.
Conexión inalámbrica en red (continuación)
Para imprimir con AirPrint
Esta impresora es compatible con Apple AirPrint®. Puede imprimir de forma inalámbrica desde su dispositivo iOS o Mac.
• La impresora y el dispositivo iOS o Mac deben estar en la misma red inalámbrica.
• Con Apple AirPrint®, puede escanear documentos desde la impresora al dispositivo iOS.
Este producto está diseñado para su uso en entornos abiertos (p. ej., en hogares y sin conexión a Internet) en el que cualquier
persona pueda acceder y utilizar la impresora. Como resultado, el ajuste de Wi-Fi Direct es en modo “Automático” de forma
predeterminada, sin contraseña de administrador; esto permite que cualquier persona que se encuentre en el campo inalámbrico
pueda conectar y acceder a todas las funciones y ajustes de la impresora. Si se desean niveles de seguridad más estrictos,
HP recomienda cambiar el método de conexión Wi-Fi Direct de “Automático” a “Manual” y establecer una contraseña de
administrador.
Español

49
Conguración del fax
1. Conecte una línea telefónica.
Nota: Las impresoras HP están diseñadas expresamente para usar los servicios telefónicos analógicos tradicionales. Si se
encuentra en un entorno telefónico digital (como DSL/ADSL, PBX, ISDN o FoIP), es posible que tenga que usar ltros de modo
digital a analógico o dispositivos de conversión cuando congure la impresora para enviar faxes. Contacte con su compañía
telefónica para determinar qué opciones de conguración son óptimas para usted.
Si la línea telefónica solo se usa para fax
a. Conecte un extremo del cable telefónico a la toma de teléfono de la pared.
b. Conecte el otro extremo al puerto con la etiqueta 1-LINE en la parte posterior de la impresora.
Si se ha suscrito a un servicio DSL/ADSL, conecte un ltro DSL/ADSL entre el puerto 1-LINE y la entrada de pared.
2. Pruebe la conguración de fax.
La prueba de fax comprueba el hardware, verica el tipo de cable telefónico y el estado de la conexión, si hay tono de llamada
y una línea telefónica activa. Para ejecutar la prueba:
a. En la pantalla Inicio del panel de la impresora, pulse los botones Arriba y Abajo para seleccionar Fax. A continuación,
pulse OK.
b. Seleccione Conguración, Conguración avanzada, elija Asistente para conguración de fax y, después, siga las
instrucciones en pantalla.
1
Toma telefónica de la pared
2
Puerto de fax (1-LINE)
Nota: No lo inserte en el puerto con la etiqueta 2-EXT.
3
Filtro DSL/ADSL (facilitado por la compañía telefónica o
el proveedor de servicios)
Si hay dispositivos adicionales conectados a la línea telefónica
Si tiene que conectar otros dispositivos, hágalo como se muestra en el siguiente diagrama:
1
Toma telefónica de la pared
2
Bifurcador paralelo
3
Módem DSL/ADSL
4
Contestador automático
5
Teléfono
6
Enchufe de pared ISDN
7
Adaptador de terminal o enrutador ISDN
8
Módem de banda ancha
9
Filtro DSL/ADSL
10
Adaptador de teléfono analógico
* TAM: Contestador automático
** FoIP: Fax sobre IP
Español

50
Enviar un fax estándar
1. Cargue el original con la cara impresa hacia abajo en la esquina frontal derecha del cristal del escáner o con la cara
impresa hacia arriba en el alimentador de documentos.
2. En la pantalla del panel de control de la impresora, toque Fax.
3. Toque Enviar ahora.
4. Introduzca el número de fax con el teclado numérico.
Para añadir una pausa en el número de fax, pulse * varias veces hasta que aparezca un guión (-) en la pantalla.
5. Toque Negro o Color.
Si la impresora detecta un original cargado en el alimentador de documentos, envía el documento al número
especicado.
Si el destinatario tiene problemas con la calidad del fax enviado, intente cambiar la resolución o el contraste del fax.
Uso del fax
Enviar un fax con un teléfono de extensión
1. Marque el número en el teclado numérico del teléfono de extensión.
No utilice el teclado numérico del panel de control de la impresora cuando envíe un fax con este método.
2. Si el destinatario responde al teléfono, puede entablar una conversación antes de enviar el fax.
Si la llamada la recibe el equipo de fax, oirá los tonos del fax.
3. Cargue el original con la cara impresa hacia abajo en la esquina frontal derecha del cristal del escáner o con la cara
impresa hacia arriba en el alimentador de documentos.
4. En la pantalla del panel de control de la impresora, toque Fax.
5. Toque Enviar fax.
6. Toque Negro o Color.
Si estaba al teléfono con el destinatario, pídale que empiece a recibir el fax cuando escuche los tonos del fax. Cuando la
impresora comience a enviar el fax, puede colgar el teléfono o permanecer en la línea. Puede que no escuche tonos de fax
durante la transmisión del fax.
Para obtener más información sobre otras formas de enviar faxes, como programar un fax para que se envíe más tarde
o enviar faxes desde un equipo, consulte la Ayuda electrónica.
Recibir un fax automáticamente
La impresora responde automáticamente las llamadas entrantes y recibe faxes de forma predeterminada.
Para recibir faxes manualmente, apague la Respuesta automática en el panel de control de la impresora.
La impresora responderá las llamadas después de la cantidad de timbres estipulada en la conguración de Timbres antes de
responder.
Si un contestador automático está conectado a la impresora, el ajuste de Timbres antes de responder para la impresora debe
jarse en un número mayor que el del contestador automático.
1. Compruebe que la impresora esté encendida y que haya papel cargado.
2. En la pantalla de la impresora, toque Fax.
3. Toque Conguración y, luego, Preferencias.
4. Seleccione Activar para la opción Respuesta automática.
Nota: Si se ha suscrito a un servicio de correo de voz en la misma línea telefónica que usará para fax, no podrá recibir faxes
automáticamente. Debe estar preparado para responder personalmente a las llamadas de fax entrantes. (Si desea recibir los
faxes automáticamente, contacte con su compañía telefónica para suscribirse a un servicio de timbre distintivo o para adquirir
otra línea de teléfono para el fax).
La impresora puede almacenar faxes en la memoria interna. Para reimprimir estos faxes, consulte “Reimprimir faxes recibidos
desde la memoria” en la página siguiente.
Español

51
Usar fax (continuación)
Recibir un fax manualmente
Si está al teléfono con otra persona, puede recibir faxes manualmente sin colgar el teléfono.
1. Compruebe que la impresora esté encendida y que haya papel cargado.
2. Retire los originales del alimentador de documentos.
Establezca Timbres antes de responder en un número mayor para darle tiempo a responder a la llamada entrante antes
de que lo haga la impresora. También puede desactivar la Respuesta automática para que la impresora no responda
automáticamente a las llamadas entrantes.
3. Pida al remitente que empiece a enviar el fax.
4. Cuando escuche el tono de fax, en la pantalla de inicio del panel de control de la impresora, toque Fax, luego, Enviar y recibir
y, por último, Recibir ahora.
Cuando la impresora comience a recibir el fax, puede colgar el teléfono o permanecer en la línea. Puede que no escuche tonos
de fax durante la transmisión del fax.
Reimprimir los faxes recibidos desde la memoria
Si la función Recepción de Fax está activada, los faxes entrantes se almacenan en la memoria, incluso cuando la impresora
presenta algún error.
Nota: Es posible que se borren los faxes almacenados en la memoria cuando apague la impresora.
1. Asegúrese de que haya papel cargado en la impresora.
2. En la pantalla Inicio de la impresora, toque Fax.
3. Toque Reimprimir.
Los faxes se muestran en orden inverso al que se recibieron, comenzando por la impresión del fax recibido más recientemente.
4. Para detener la impresión, seleccione Cancelar.
Imprimir un informe o registro
Los informes de fax proporcionan información útil del sistema acerca de la impresora.
1. En la pantalla Inicio de la impresora, toque Conguración y, luego, Conguración de fax.
2. Toque Informes y, luego, Conrmación de fax.
3. Toque para seleccionar una de las opciones.
Español

52
Compruebe los ajustes de fax de la impresora
• La función Respuesta automática está activada para que
la impresora reciba faxes automáticamente.
• Si se ha suscrito a un servicio de correo de voz de la
compañía telefónica o del proveedor de servicios,
asegúrese de que la función Timbres antes de responder
en la impresora esté establecida de forma que sean más
que los del contestador automático del teléfono. La
impresora supervisará la línea y decidirá si una llamada
entrante es una llamada normal de teléfono o de fax. Si
es una llamada de fax, la impresora iniciará una conexión
de fax automáticamente. De lo contrario, puede que tenga
que recibir el fax manualmente seleccionando Fax en
el panel de la impresora.
• Si se asignan varios números de teléfono a la misma
línea telefónica física y la línea es compartida por
varios dispositivos, asegúrese de que la impresora esté
establecida en el ajuste de timbre distintivo correcto para
recibir faxes.
Verique las conexiones físicas de fax
• Conecte el cable telefónico del puerto 1-LINE, en la parte
posterior de la impresora, a la entrada de pared y conecte
un cable telefónico del puerto 2-EXT, en la parte posterior
de la impresora, a un teléfono de extensión. Desde el
teléfono de extensión, llame al número de teléfono que no
podía recibir los faxes.
• Si intentaba enviar un fax a un número externo, asegúrese
de incluir cualquier código de acceso o número requeridos
antes de introducir el número. Puede que también tenga
que añadir una pausa en el número para evitar que la
impresora marque demasiado rápido. Para añadir una
pausa, pulse * varias veces hasta que aparezca un guión
(-) en la pantalla.
• Si no puede realizar llamadas salientes porque no se
detecta ningún tono de llamada o la línea es ruidosa,
intente utilizar otro cable telefónico en lugar del
conectado al puerto del teléfono 1-LINE o cambie la
impresora a otra ubicación que tenga una línea telefónica
separada (si es posible) y compruebe si hay problemas
similares.
• Si se encuentra en un entorno de teléfono digital (como
FoIP, fax a través de VoIP), reduzca la velocidad del fax
y desactive la Modulación del Código de Error (ECM)
en el panel de control de la impresora. Si es necesario,
contacte con su compañía telefónica para determinar si
hay problemas con la línea de teléfono o para obtener más
información sobre las capacidades de la red telefónica.
Solucionar problemas de fax
Si sigue teniendo problemas para usar el fax después de
completar la prueba del fax correctamente, realice los
siguientes pasos:
No puedo enviar faxes, pero sí recibirlos
1. Haga una copia o un escaneo para vericar el
funcionamiento correcto de la impresora.
2. Compruebe las conexiones físicas del fax.
3. Compruebe si otros dispositivos pueden enviar faxes al
mismo número de teléfono. Es posible que el dispositivo
de fax del destinatario haya bloqueado su número de
teléfono o que tenga problemas técnicos.
4. Si el problema continúa, imprima el informe de prueba
del fax y el registro de faxes (y, si están disponibles,
el informe de ID de llamadas y el informe de Faxes no
deseados) y luego contacte con HP para obtener más
asistencia.
No puedo recibir faxes, pero sí enviarlos
1. Compruebe los ajustes de fax de la impresora.
2. Compruebe las conexiones físicas del fax.
3. Compruebe si otros dispositivos conectados a la misma
línea telefónica pueden recibir faxes. Es posible que la
línea telefónica esté defectuosa o que el dispositivo de fax
del remitente tenga problemas para enviar faxes. También
debe comprobar si ha bloqueado el número de teléfono
del remitente.
4. Compruebe el problema con el remitente. Si el problema
continúa, imprima el informe de prueba del fax y el
registro de faxes (y, si están disponibles, el informe de ID
de llamadas y el informe de Faxes no deseados) y luego
contacte con HP para obtener más asistencia.
No puedo enviar ni recibir faxes
1. Haga una copia o un escaneo para vericar el
funcionamiento correcto de la impresora.
2. Compruebe las conexiones físicas del fax.
3. Compruebe los ajustes de fax de la impresora.
4. Compruebe si otros dispositivos conectados a esta línea
telefónica pueden enviar y recibir faxes. Puede que haya
un problema con la línea telefónica.
5. Restablezca la impresora apagando la impresora y,
si es posible, el conmutador principal de la fuente de
alimentación. Espere unos segundos antes de volver a
encender la alimentación. Intente enviar o recibir un fax en
la impresora.
6. Si el problema continúa, imprima el informe de prueba
del fax y el registro de faxes (y, si están disponibles,
el informe de ID de llamadas y el informe de Faxes no
deseados) y luego contacte con HP para obtener más
asistencia.
7. Nota: Si se ha suscrito a un servicio de correo de voz en
la misma línea telefónica que usará para fax, tendrá que
recibir faxes manualmente.
Español

53
Declaración de garantía limitada de la impresora HP
A.
Alcance de la garantía limitada
1. HP Inc. (HP) garantiza al usuario final que el producto de HP especificado no tendrá defectos de materiales ni mano de obra por el
periodo anteriormente indicado, cuya duración empieza el día de la compra por parte del cliente.
2. Para los productos de software, la garantía limitada de HP se aplica únicamente a la incapacidad del programa para ejecutar las
instrucciones. HP no garantiza que el funcionamiento de los productos se interrumpa o no contenga errores.
3. La garantía limitada de HP abarca sólo los defectos que se originen como consecuencia del uso normal del producto, y no cubre
otros problemas, incluyendo los originados como consecuencia de:
a. Mantenimiento o modificación indebidos;
b. Software, soportes de impresión, piezas o consumibles que HP no proporcione o no admita;
c. Uso que no se ajuste a las especificaciones del producto;
d. Modificación o uso incorrecto no autorizados.
4. Para los productos de impresoras de HP, el uso de un cartucho que no sea de HP o de un cartucho recargado no afecta ni a la
garantía del cliente ni a cualquier otro contrato de asistencia de HP con el cliente. No obstante, si el error o el desperfecto en la
impresora se atribuye al uso de un cartucho que no sea de HP, un cartucho recargado o un cartucho de tinta caducado, HP cobrará
aparte el tiempo y los materiales de servicio para dicho error o desperfecto.
5. Si durante la vigencia de la garantía aplicable, HP recibe un aviso de que cualquier producto presenta un defecto cubierto por la
garantía, HP reparará o sustituirá el producto defectuoso como considere conveniente.
6. Si HP no logra reparar o sustituir, según corresponda, un producto defectuoso que esté cubierto por la garantía, HP reembolsará al
cliente el precio de compra del producto, dentro de un plazo razonable tras recibir la notificación del defecto.
7. HP no tendrá obligación alguna de reparar, sustituir o reembolsar el precio del producto defectuoso hasta que el cliente lo haya
devuelto a HP.
8. Los productos de sustitución pueden ser nuevos o seminuevos, siempre que sus prestaciones sean iguales o mayores que las del
producto sustituido.
9. Los productos HP podrían incluir piezas, componentes o materiales refabricados equivalentes a los nuevos en cuanto al
rendimiento.
10. La Declaración de garantía limitada de HP es válida en cualquier país en que los productos HP cubiertos sean distribuidos por HP.
Es posible que existan contratos disponibles para servicios de garantía adicionales, como el servicio in situ, en cualquier
suministrador de servicios autorizado por HP, en aquellos países donde HP o un importador autorizado distribuyan el producto.
B.
Limitaciones de la garantía
HASTA DONDE LO PERMITAN LAS LEYES LOCALES, NI HP NI SUS TERCEROS PROVEEDORES OTORGAN NINGUNA OTRA GARANTÍA O
CONDICIÓN DE NINGÚN TIPO, YA SEAN GARANTÍAS O CONDICIONES DE COMERCIABILIDAD EXPRESAS O IMPLÍCITAS, CALIDAD
SATISFACTORIA E IDONEIDAD PARA UN FIN DETERMINADO.
C.
Limitaciones de responsabilidad
1. Hasta donde lo permitan las leyes locales, los recursos indicados en esta Declaración de garantía son los únicos y exclusivos
recursos de los que dispone el cliente.
2. HASTA EL PUNTO PERMITIDO POR LA LEY LOCAL, EXCEPTO PARA LAS OBLIGACIONES EXPUESTAS ESPECÍFICAMENTE EN ESTA
DECLARACIÓN DE GARANTÍA, EN NINGÚN CASO HP O SUS PROVEEDORES SERÁN RESPONSABLES DE LOS DAÑOS DIRECTOS,
INDIRECTOS, ESPECIALES, INCIDENTALES O CONSECUENCIALES, YA ESTÉ BASADO EN CONTRATO, RESPONSABILIDAD
EXTRACONTRACTUAL O CUALQUIER OTRA TEORÍA LEGAL, Y AUNQUE SE HAYA AVISADO DE LA POSIBILIDAD DE TALES DAÑOS.
D.
Legislación local
1. Esta Declaración de garantía confiere derechos legales específicos al cliente. El cliente podría también gozar de otros derechos
que varían según el estado (en Estados Unidos), la provincia (en Canadá), o la entidad gubernamental en cualquier otro país del
mundo.
2. Hasta donde se establezca que esta Declaración de garantía contraviene las leyes locales, dicha Declaración de garantía se
considerará modificada para acatar tales leyes locales. Bajo dichas leyes locales, puede que algunas de las declinaciones de
responsabilidad y limitaciones estipuladas en esta Declaración de garantía no se apliquen al cliente. Por ejemplo, algunos estados
en Estados Unidos, así como ciertas entidades gubernamentales en el exterior de Estados Unidos (incluidas las provincias de
Canadá) pueden:
a. Evitar que las renuncias y limitaciones de esta Declaración de garantía limiten los derechos estatutarios del cliente (por
ejemplo, en el Reino Unido);
b. Restringir de otro modo la capacidad de un fabricante de aumentar dichas renuncias o limitaciones; u
c. Ofrecer al usuario derechos adicionales de garantía, especificar la duración de las garantías implícitas a las que no puede
renunciar el fabricante o permitir limitaciones en la duración de las garantías implícitas.
3. LOS TÉRMINOS ENUNCIADOS EN ESTA DECLARACIÓN DE GARANTÍA, SALVO HASTA DONDE LO PERMITA LA LEY, NO EXCLUYEN,
RESTRINGEN NI MODIFICAN LOS DERECHOS ESTATUTARIOS OBLIGATORIOS PERTINENTES A LA VENTA DE PRODUCTOS HP A DICHOS
CLIENTES, SINO QUE SON ADICIONALES A LOS MISMOS.
Información sobre la Garantía Limitada del Fabricante HP
Su Gar
antía limitada de HP es una garantía comercial voluntariamente proporcionada por HP. El nombre y dirección de las entidades HP
que pr
oporcionan la Garantía limitada de HP (garantía comercial adicional del fabricante) en su país es:
España
: Hewlett-Packard Española S.L. Calle Vicente Aleixandre, 1 Parque Empresarial Madrid - Las Rozas, E-28232 Madrid
Los beneficios de la Garantía limitada de HP son adicionales a la garantía legal de 2 años a la que los consumidores tienen dere
cho a recibir
del
vendedor en virtud del contrato de compraventa; sin embargo, varios factores pueden afectar su derecho a recibir los beneficios bajo
dicha ga
rantía legal. A este respecto, la Garantía limitada de HP no limita o afecta en modo alguno los derechos legales del consumidor.
Pa
ra más información, consulte el siguiente enlace: Garantía legal del consumidor o puede visitar el sitio web de los Centros europeos de
lo
s consumidores. Los clientes tienen derecho a elegir si reclaman un servicio acogiéndose a la Garantía limitada de HP o al vendedor de
co
nformidad con la garantía legal de dos años.
Pa
ra más información, consulte el siguiente vínculo: la garantía legal del consumidor (www.hp.com/go/eu-legal) o puede visitar el sitio
web del centro europeo del consumidor (http://
ec.europa.eu/consumers/solving_consumer_disputes/non-judicial_redress/ecc-net/).
Producto HP Duración de la garantía limitada
Medio de almacenamiento del software 90 días
Impresora 1 año
Cartuchos de tinta o impresión La garantía es válida hasta que se agote la tinta HP o hasta que se
alcance la fecha de “fin de garantía” indicada en el cartucho,
cualquiera de los hechos que se produzca en primer lugar. Esta
garantía no cubrirá los productos de tinta HP que se hayan
rellenado o manipulado, se hayan vuelto a limpiar, se hayan
utilizado incorrectamente o se haya alterado su composición.
Cabezales de impresión (sólo se aplica a productos 1 año
con cabezales de impresión que el cliente puede sustituir)
Accesorios 1 año, a no ser que se especifique otro dato
Español

As informações neste
documento
podem ser alteradas
sem aviso.
Digitalize para saber mais!
Taxas de dados padrão podem se aplicar. Pode não estar disponível em todos os idiomas.
Mais informações
Ajuda Eletrônica: instale a Ajuda eletrônica selecionando-a no software recomendado durante a instalação do software.
Saiba mais sobre recursos do equipamento, impressão, solução de problemas e suporte. Veja, na seção Informações
Técnicas, noticações e informações ambientais e de regulamentação, incluindo a Noticação de Regulamentação da União
Europeia e as declarações de conformidade.
• Windows® 8.1: clique na seta para baixo, no canto esquerdo inferior da tela Iniciar, selecione o nome da impressora,
clique em Ajuda e selecione Pesquisar na Ajuda da HP.
• Windows® 8: na tela Iniciar, clique com o botão direito em uma área vazia, clique em Todos os Apps na barra de
aplicativos, depois clique no ícone com o nome da impressora e clique em Ajuda.
• Windows® 7, Windows Vista® e Windows® XP: clique em Iniciar > Todos os Programas > HP > HP Oicejet 5740 series >
Ajuda.
• OS X: clique em Ajuda > Central de Ajuda. Na janela do Visualizador de Ajuda, clique em Ajuda para todos os seus
aplicativos e clique em HP Oicejet 5740 series.
Leiame: contém informações de suporte da HP, requisitos de sistema operacional e atualizações recentes para a impressora.
• Windows: insira o CD do software no seu computador e navegue até o arquivo ReadMe.chm. Clique duas vezes em
ReadMe.chm para abri-lo e selecione o Leiame em seu idioma.
• Mac: abra a pasta Documentos localizada no nível superior do instalador do software. Clique duas vezes em Leiame
e selecione o arquivo Leiame em seu idioma.
Na web: ajuda e informações adicionais: www.hp.com/go/support. Registro da impressora: www.register.hp.com.
Declaração de Conformidade: www.hp.eu/certicates. Consumo de tinta: www.hp.com/go/inkusage.
Introdução
1. Siga as imagens do folheto de conguração para congurar a impressora.
2. Instale o software.
Windows®
Acesse 123.hp.com/OJ5740 e siga as instruções na tela. Se seu computador não estiver conectado à internet, insira o
CD do software no computador. Se o CD não iniciar, navegue até Computador, clique duas vezes no ícone da unidade de
CD/DVD com o logotipo HP e clique duas vezes em setup.exe. Siga as instruções na tela.
OS X/iOS
Para instalar o software HP mais recente em um Mac, acesse 123.hp.com/OJ5740. O software HP para Mac não está
incluído no CD de software que acompanha a impressora.
Este produto está habilitado para o Apple AirPrint. A impressora e o dispositivo iOS ou Mac devem estar na mesma rede
local.
Observação: sempre verique se a bandeja de papel está carregada com o papel desejado. Após fechar a bandeja,
certique-se de que esse papel esteja selecionado no painel de controle da impressora.
HP Oicejet 5740 e-All-in-One Series
Português
www.hp.com/eu/m/OJ5740

55
Informações sobre segurança
Siga sempre as recomendações básicas de segurança ao usar esta impressora, reduzindo o risco de incêndio ou choque elétrico.
1. Leia e compreenda todas as instruções da documentação que acompanha a impressora.
2. Observe todas as advertências e instruções indicadas na impressora.
3. Desligue a impressora da tomada elétrica antes de limpá-la.
4. Não instale nem use esta impressora perto da água ou quando você estiver molhado.
5. Instale a impressora de forma segura, em superfície estável.
6. Instale a impressora em local protegido, onde ninguém possa pisar ou tropeçar no o de alimentação, e onde o o não
possa ser danicado.
7. Se a impressora não funcionar normalmente, consulte o arquivo de ajuda (disponível no computador após a instalação do
software).
8. Não há nenhum componente interno que possa ser reparado pelo usuário. Os reparos devem ser feitos por técnicos
qualicados.
9. Use o dispositivo apenas com o cabo e o adaptador de alimentação (se houver) fornecidos pela HP.
1
Luz de conexão sem o: indica o status da conexão sem o da impressora.
• A luz azul sólida indica que a conexão sem o foi estabelecida e é possível fazer impressões.
• A luz piscando lentamente indica que a conexão sem o está ativa, mas a impressora não está
conectada a uma rede. Verique se sua impressora está dentro do alcance do sinal da rede sem o.
• A luz piscando rapidamente indica erro na conexão sem o. Consulte a mensagem no visor da
impressora.
• Se a conexão sem o estiver desativada, a luz da rede sem o cará apagada, e a tela exibirá Conexão
Sem Fio Desativada.
2
Botão Liga/Desliga: liga ou desliga a impressora.
3
Botão Voltar: Retorna à tela anterior.
4
Botão Ajuda: mostra o conteúdo da ajuda, caso esteja disponível para a operação atual.
5
Botão Início: retorna para a tela inicial, que é exibida quando você liga a impressora pela primeira vez.
6
Visor do painel de controle: toque na tela para selecionar as opções de menu ou percorra os itens de menu.
7
Botão Near Field Communication (NFC): indica a área em que é possível imprimir documentos e imagens
com um dispositivo móvel (como smartphone ou tablet), bastando encostar no dispositivo na impressora.
Painel de controle
Português

56
MacWindows
Solução de problemas básicos
Se você não conseguir imprimir:
1. Certique-se de que as conexões dos cabos estejam rmes.
2. Verique se a impressora está ligada. O botão Liga/Desliga acenderá na cor branca.
3. Observe a luz de status da conexão sem o para vericar se a impressora está conectada à rede.
4. Visite o site HP Diagnostic Tools em www.hp.com/go/tools para baixar utilitários de diagnóstico gratuitos (ferramentas) que
você pode usar para solucionar problemas comuns da impressora.
Verique se a impressora está denida como seu
dispositivo padrão de impressão:
• Windows 8.1 e Windows 8: Aponte para ou toque no
canto superior direito da tela para abrir a barra Botões,
clique no ícone Congurações, clique ou toque em Painel
de Controle e clique ou toque em Exibir dispositivos e
impressoras.
• Windows 7: No menu Iniciar do Windows, clique em
Dispositivos e Impressoras.
• Windows Vista: na barra de tarefas do Windows, clique em
Iniciar, Painel de Controle e depois em Impressoras.
• Windows XP: Na barra de tarefas do Windows, clique em
Iniciar, Painel de controle e Impressoras e aparelhos de
fax.
Verique se a impressora tem uma marca de seleção no
círculo próximo a ela. Se a sua impressora não estiver
selecionada como a impressora padrão, clique com o botão
direito do mouse no ícone da correspondente a ela e selecione
Denir como impressora padrão no menu.
Verique a la de impressão:
1. Em Preferências de Sistema, clique em Impressoras e
Scanners (Impressão e Fax no OS X v10.7 Lion e OS X v10.8
Mountain Lion).
2. Clique em Abrir Fila de Impressão.
3. Clique em um trabalho de impressão para selecioná-lo.
4. Utilize os seguintes botões para gerenciar o trabalho de
impressão:
• Ícone Cancelar: Cancela o trabalho de impressão
selecionado.
• Continuar: Continua um trabalho de impressão pausado.
5. Caso tenha feito alguma alteração, tente imprimir
novamente.
Reinicie:
1. Reinicie o computador.
2. Redena a impressora.
a. Desligue a impressora e desconecte o cabo de
alimentação.
b. Aguarde um minuto e reconecte o cabo de
alimentação. Ligue a impressora.
Declarações: Windows XP, Windows Vista, Windows 7, Windows 8 e Windows 8.1 são marcas comerciais registradas da Microsoft
Corporation nos Estados Unidos.
Mac, OS X e AirPrint são marcas comerciais da Apple Inc., registradas nos Estados Unidos e em outros países.
Se você estiver usando um cabo USB e ainda não for possível
imprimir ou se a instalação do software falhar:
1. Remova o CD da unidade de CD/DVD do computador e
desconecte o cabo USB do computador.
2. Reinicie o computador.
3. Insira o CD do software da impressora na unidade de CD/
DVD do computador e siga as instruções na tela para
instalar o software. Não conecte o cabo USB até ser
instruído a isso.
4. Após o término da instalação, reinicie o computador.
Se você estiver usando conexão sem o e ainda não
conseguiu imprimir:
Vá até a seção Rede na próxima página para obter mais
informações.
Desinstale o software:
1. Se a impressora estiver conectada ao seu computador por
conexão USB, desconecte a impressora do computador.
2. Abra a pasta Aplicativos/Hewlett-Packard.
3. Clique duas vezes em Desinstalador HP e siga as instruções
na tela.
Redena o sistema de impressão:
1. Em Preferências de Sistema, clique em Impressoras e
Scanners (Impressão e Fax no OS X v10.7 Lion e OS X v10.8
Mountain Lion).
2. Mantenha pressionada a tecla Control e clique na lista
à esquerda, depois selecione Redenir sistema de
impressão.
3. Adicione a impressora que você deseja usar.
Armazenamento de informações anônimas de uso: os cartuchos HP armazenam um conjunto limitado de informações anônimas
sobre a utilização da impressora. Para obter mais informações e instruções sobre como desativar a coleta de informações de
utilização, consulte o guia do usuário.
Português

57
Se você desejar compartilhar a impressora com vários computadores na rede
Primeiro, instale a impressora em sua rede doméstica. Após conectar com sucesso sua impressora à rede doméstica, é possível
compartilhá-la com outros computadores dessa mesma rede. Em cada computador adicional, é preciso apenas instalar
o software da impressora HP.
Rede sem o
Se a conexão da impressora com a rede não foi estabelecida com êxito
• Verique se a conexão sem o está habilitada na impressora.
1. No painel de controle da impressora, toque em (sem o).
2. Caso Conexão Sem Fio Desativada seja exibido, toque em (Congurações) e em Congurações Sem Fio.
3. Na tela Congurações Sem Fio, selecione Ativar na opção Sem Fio.
• Verique se a impressora está conectada à sua rede.
1. No painel de controle da impressora, toque em (Sem Fio).
2. Toque em (Congurações).
3. Toque em Imprimir Relatórios e em seguida toque em Relatório de Teste de Rede Sem Fio. O Relatório de Teste de Rede
Sem Fio é impresso automaticamente.
4. Verique, no topo do relatório, se algo falhou durante o teste.
– Consulte a seção Resultados do Diagnóstico de todos os testes realizados, para saber se a impressora foi aprovada ou
não.
– Na seção Conguração Atual, localize o Nome da Rede (SSID) à qual a impressora está conectada atualmente.
Certique-se de que a impressora esteja conectada à mesma rede que o computador.
Observação: Se seu computador estiver conectado a uma Rede Privada Virtual (VPN), desconecte-a temporariamente antes
de dar continuidade à instalação. Após a instalação, você precisará se desconectar da VPN para acessar a impressora em sua
rede doméstica.
• Verique se o software de segurança não está bloqueando a comunicação em sua rede.
Os softwares de segurança, como os rewalls, podem bloquear a comunicação entre o computador e a impressora durante
a instalação em rede. Se sua impressora não puder ser encontrada, desative temporariamente seu rewall e verique se o
problema desaparece. Para mais ajuda e dicas de software de segurança, visite: www.hp.com/go/wpc-rewall_br-pt.
• Reinicie os componentes da rede sem o.
Desligue o roteador e a impressora e religue-os nesta ordem: primeiro o roteador e depois a impressora. Às vezes, basta
desligar e religar esses dispositivos para resolver problemas de comunicação da rede. Se ainda não conseguir se conectar,
desligue o roteador, a impressora e o computador e religue-os nesta ordem: primeiro o roteador, depois a impressora e depois
o computador.
Observação: se não for possível estabelecer a conexão sem o, a impressora também pode ser conectada à rede usando um
cabo Ethernet.
Se você ainda tiver problemas, visite o Centro de Impressão Sem Fio HP (www.hp.com/go/wirelessprinting). Esse site
contém as informações mais completas e atualizadas sobre impressão sem o, assim como informações para ajudar você
a preparar a sua rede sem o, resolver problemas de conexão da impressora com a rede sem o e resolver problemas com
software de segurança.
Observação: se você estiver usando um computador com Windows, poderá usar a ferramenta Técnico em Impressão e
Digitalização, que pode ajudar a resolver muitos problemas que você possa ter com a impressora. Para baixar a ferramenta,
acesse www.hp.com/go/tools.
Precisa de mais ajuda?
www.hp.com/go/wirelessprinting
O Centro de Impressão Sem Fio HP em www.hp.com/go/wirelessprinting pode ajudar você a preparar sua rede sem o, instalar e
recongurar a impressora e solucionar problemas com a rede.
Português

58
Se desejar usar a impressora em rede sem o sem roteador
Use o Wi-Fi Direct para imprimir por rede sem o sem usar roteador, por meio de seu computador, smartphone ou outro
dispositivo habilitado para rede sem o. Para usar o Wi-Fi Direct em um computador, o software da impressora deverá estar
instalado nesse computador.
1. Verique se o Wi-Fi Direct em seu computador está ligado:
a. Na tela inicial do visor da impressora, toque em (Wi-Fi Direct).
b. Se o Status for Desativado, toque em (Congurações do Wi-Fi Direct) e ative-o.
2. Conecte seu dispositivo habilitado para conexão sem o à impressora:
a. Ative a conexão Wi-Fi em seu dispositivo móvel. Para mais informações, consulte a documentação que acompanha o
dispositivo móvel.
b. No dispositivo móvel, conecte-se a uma nova rede. Siga o procedimento normal usado para conectar-se a uma nova rede sem
o ou hotspot. Escolha o nome Wi-Fi Direct na lista de redes sem o exibidas, por exemplo, DIRECT-**-HP Oicejet-5740
(em que ** são os caracteres exclusivos de identicação de sua impressora).
c. Insira sua senha Wi-Fi Direct quando solicitado.
3. Imprima como você normalmente faria em seu computador ou dispositivo móvel.
Observação: a conexão do Wi-Fi Direct não oferece acesso à internet.
Visite o Centro de Impressão Sem Fio HP em www.hp.com/go/wirelessprinting para mais informações sobre o Wi-Fi Direct.
Se você desejar trocar de uma conexão USB para uma conexão sem o
Primeiro, verique se você já instalou com êxito o software da impressora.
Windows
1. Siga estas etapas de acordo com seu sistema operacional:
• Windows 8.1: Clique na seta para baixo, no canto esquerdo inferior da tela Iniciar, selecione o nome da impressora e
clique em Utilitários.
• Windows 8: Na tela Iniciar, clique com o botão direito em uma área vazia e clique em Todos os Apps na barra de
aplicativos.
• Windows 7, Windows Vista e Windows XP: No menu Iniciar do computador, selecione Todos os Programas ou
Programas e selecione HP.
2. Selecione HP Oicejet 5740 series.
3. Selecione Conguração da Impressora e Software.
4. Selecione Converter impressora conectada via USB em sem o. Siga as instruções na tela.
Mac
Use o Utilitário HP em Aplicativos/Hewlett-Packard para mudar a conexão no software dessa impressora para sem o.
Rede sem o (continuação)
Se desejar imprimir com o AirPrint
Esta impressora está habilitada para o Apple AirPrint®. É possível imprimir por conexão sem o usando seu dispositivo iOS ou Mac.
• Sua impressora e o dispositivo iOS ou Mac devem estar na mesma rede sem o.
• Com o Apple AirPrint®, não é possível digitalizar documentos da impressora para o dispositivo iOS.
Este produto foi projetado para ser usado em ambientes abertos (p. ex., em casas e não conectados à internet pública), nos
quais qualquer um pode acessar e usar a impressora. Como resultado, a conguração Wi-Fi Direct ca em modo “Automático” por
padrão, sem a senha de administrador; isso permite que qualquer pessoal ao alcance da rede sem o se conecte e acesse todas as
funções e congurações da impressora. Se desejar níveis mais altos de segurança, a HP recomenda que você altere o método de
conexão do Wi-Fi Direct de “Automático” para “Manual” e estabeleça uma senha de administrador.
Português

59
Congurar fax
1. Conecte a linha telefônica.
Observação: as impressoras HP foram projetadas especicamente para uso com serviços convencionais de telefone analógico. Se
você estiver em um ambiente de telefone digital (como DSL/ADSL, PBX, ISDN ou FoIP), ao congurar a impressora para trabalhar com
faxes, será necessário usar ltros digital para analógico ou conversores. Entre em contato com sua companhia telefônica para saber
quais são as melhores opções de conguração para você.
Se a linha telefônica é usada somente para fax
a. Conecte uma ponta do cabo telefônico à tomada telefônica na parede.
b. Conecte a outra ponta à porta identicada como 1-LINE na parte posterior da impressora.
Se você for assinante de um serviço DSL/ADSL, conecte um ltro DSL/ADSL entre a porta 1-LINE e a tomada telefônica na
parede.
2. Teste a conguração de fax.
O teste de fax verica o hardware, o tipo de cabo telefônico e o status da conexão, e também busca o tom de discagem e uma
linha telefônica ativa. Para executar o teste:
a. Na tela Início do visor da impressora, pressione os botões para cima e para baixo para selecionar Fax e então pressione
OK.
b. Selecione Congurações, Congurações Avançadas, Assistente de Conguração de Fax e depois siga as instruções na
tela.
1
Tomada telefônica na parede
2
Porta de fax (1-LINE)
Observação: não o conecte à porta identicada como
2-EXT.
3
Filtro DSL/ADSL (fornecido pela companhia telefônica
ou prestadora de serviços de telefonia)
Se dispositivos adicionais estiverem conectados à linha telefônica
Se você deseja conectar outros dispositivos, conecte-os conforme mostrado no diagrama abaixo:
1
Tomada telefônica na parede
2
Divisor paralelo
3
Modem DSL/ADSL
4
Secretária eletrônica do telefone
5
Telefone
6
Tomada de ISDN na parede
7
Adaptador de terminal ou roteador
ISDN
8
Modem de banda larga
9
Filtro DSL/ADSL
10
Adaptador de telefone analógico
* TAM: secretária eletrônica do telefone
** FoIP: Fax over Internet Protocol
Português

60
Enviar um fax-padrão
1. Coloque o original com o lado impresso voltado para baixo no canto frontal direito do vidro do scanner ou com o lado
impresso voltado para cima no alimentador de documentos.
2. No painel de controle da impressora, toque em Fax.
3. Toque em Enviar agora.
4. Digite o número do fax usando o teclado.
Para adicionar uma pausa no número do fax, pressione * várias vezes, até que um traço (-) seja exibido no visor.
5. Toque em Preto ou Cor.
Se a impressora detectar um original carregado no alimentador de documentos, o documento será enviado para
o número inserido.
Se o destinatário relatar problemas na qualidade do fax que você enviou, tente alterar a resolução ou o contraste do fax.
Usar o fax
Enviar fax usando uma extensão telefônica
1. Disque o número usando o teclado numérico na extensão telefônica.
Não use o teclado numérico do painel de controle da impressora ao enviar o fax se estiver usando este método.
2. Se o destinatário atender ao telefone, você poderá conversar antes de enviar o fax.
Se o aparelho de fax atender à chamada, você ouvirá o tom do fax do aparelho receptor.
3. Coloque o original com o lado impresso voltado para baixo no canto frontal direito do vidro do scanner ou com o lado
impresso voltado para cima no alimentador de documentos.
4. No painel de controle da impressora, toque em Fax.
5. Toque em Enviar Fax.
6. Toque em Preto ou Cor.
Se você estiver no telefone com o destinatário, peça a ele para iniciar o recebimento do fax quando ouvir os tons de fax do
aparelho. Quando a impressora começar a receber o fax, você poderá desligar o telefone ou permanecer na linha. Você pode
não ouvir os tons de fax durante a transmissão.
Para mais informações sobre outras maneiras de enviar faxes, como programar para que o fax seja enviado depois ou como
enviar faxes pelo computador, veja a Ajuda eletrônica.
Receber um fax automaticamente
Por padrão, a impressora atende às chamadas e recebe faxes automaticamente.
Para receber faxes manualmente, desative o Atendimento Automático no painel de controle da impressora.
A impressora atenderá às chamadas após o número de toques especicado na conguração Toques para Atender.
Se determinada secretária eletrônica estiver conectada à impressora, a conguração Toques para Atender da impressora
deverá ser denida com um número maior do que o da secretária eletrônica.
1. Verique se a impressora está ligada e se há papel carregado.
2. No visor da impressora, toque em Fax.
3. Toque em Congurar, depois toque em Preferências.
4. Selecione Ativar na opção Resposta Automática.
Observação: se você assina algum serviço de correio de voz na mesma linha telefônica que você usará o fax, não será possível
receber faxes automaticamente. Você deverá atender pessoalmente às chamadas de fax recebidas. (Se você deseja receber
faxes automaticamente, entre em contato com a empresa telefônica para assinar um serviço de toque diferenciado ou adquirir
uma linha telefônica separada para envio e recebimento de fax.)
A impressora consegue armazenar faxes recebidos em sua memória interna. Para reimprimir esses faxes, consulte "Reimprimir
os faxes recebidos armazenados na memória" na próxima página.
Português

61
Usar o fax (continuação)
Receber um fax manualmente
Se você estiver no telefone com outra pessoa, será possível receber faxes manualmente sem desligar o telefone.
1. Verique se a impressora está ligada e se há papel carregado.
2. Remova os originais do alimentador de documentos.
Dena Toques para Atender com um número mais alto para que você tenha tempo de atender à chamada recebida antes
da impressora. Ou desative o Atendimento Automático para que a impressora não atenda automaticamente as chamadas
recebidas.
3. Peça ao remetente para iniciar o envio do fax.
4. Ao ouvir os tons de fax, na tela inicial do painel de controle da impressora, toque em Fax, toque em Enviar e Receber e em
Receber Agora.
Quando a impressora começar a receber o fax, você poderá desligar o telefone ou permanecer na linha. Você pode não ouvir
os tons de fax durante a transmissão.
Imprimir novamente os faxes recebidos que estão armazenados na memória
Se a Recepção de Fax de Backup estiver ativada, os faxes recebidos serão armazenados na memória, até mesmo se a impressora
estiver em condição de erro.
Observação: todos os faxes armazenados podem ser excluídos da memória quando a impressora for desligada.
1. Verique se há papel na impressora.
2. Na tela Inicial do visor da impressora, toque em Fax.
3. Toque em Reimprimir.
Os faxes são exibidos na ordem inversa daquela em que foram recebidos, começando por aqueles recebidos e impressos mais
recentemente.
4. Para interromper a impressão, selecione Cancelar.
Imprimir um relatório ou log
Os relatórios de fax fornecem informações úteis do sistema sobre a impressora.
1. Na tela inicial do visor da impressora, toque em Congurar e em Congurar Fax.
2. Toque em Relatórios e, em seguida, toque em Conrmação de Fax.
3. Toque para selecionar uma das opções.
Português

62
Verique as congurações de fax da impressora
• O recurso de Atendimento Automático é ativado para que
a impressora receba os faxes automaticamente.
• Se você assinou um serviço de correio de voz da
companhia telefônica ou prestadora de serviços,
certique-se de que Toques para Atender na impressora
esteja com um número maior do que o da secretária
eletrônica do telefone. A impressora monitorará a linha
e decidirá se determinada chamada recebida é uma
chamada telefônica comum ou uma chamada de fax. Caso
seja uma chamada de fax, a impressora iniciará a conexão
de fax automaticamente. Caso contrário, será necessário
receber o fax manualmente selecionando Fax no visor da
impressora.
• Se estiverem atribuídos múltiplos números de telefone
à mesma linha telefônica física, e se a linha for
compartilhada por diversos dispositivos, certique-se de
que a impressora esteja denida com a conguração de
toque diferenciado correta para receber faxes.
Vericar as conexões físicas de fax
• Conecte o cabo telefônico da porta 1-LINE, na parte
posterior da impressora, à tomada telefônica e conecte
outro cabo telefônico da porta 2-EXT, na parte posterior
da impressora, a uma extensão telefônica. Na extensão
telefônica, ligue para o número que não pôde receber os
faxes.
• Se você estava tentando enviar faxes para um número
externo, certique-se de incluir os números ou códigos de
acesso requeridos antes de inserir o número. Também pode
ser necessário adicionar uma pausa no número, para evitar
que a impressora disque muito rápido; para adicionar uma
pausa, pressione * várias vezes até que um traço (-) seja
exibido no visor.
• Se não for possível fazer nenhuma chamada externa
porque nenhum tom de discagem foi detectado ou porque
há ruídos na linha, tente usar outro cabo telefônico no
lugar daquele conectado à porta telefônica 1-LINE ou
coloque a impressora em outro local que tenha uma
linha telefônica separada (se possível) e veja se ocorrem
problemas similares.
• Se você estiver em um ambiente telefônico digital
(como o FoIP, fax over VoIP) reduza a velocidade do fax e
desligue a Modulação de Código de Erro (ECM) no painel
de controle da impressora. Caso seja necessário, entre em
contato com a companhia telefônica para descobrir se há
problemas com a linha telefônica ou para saber mais sobre
os recursos da rede telefônica.
Solucionar problemas de fax
Se você ainda tiver problemas ao utilizar o fax após a
conclusão bem-sucedida do teste de fax, siga as etapas
abaixo:
Não é possível enviar, mas é possível receber faxes
1. Faça uma cópia ou digitalização para ter certeza de que a
impressora está funcionando corretamente.
2. Verique as conexões físicas de fax.
3. Verique se outros dispositivos de fax conseguem fazer
o envio para o mesmo número de telefone. O dispositivo
de fax do destinatário pode ter bloqueado seu número de
telefone ou pode estar tendo problemas técnicos.
4. Se o problema persistir, imprima o relatório de teste do fax
e o log de fax (e se disponível, o relatório do ID do Chamador
e o relatório de Faxes Indesejados), depois entre em contato
com a HP para obter mais ajuda.
Não é possível receber, mas é possível enviar faxes
1. Verique as congurações de fax da impressora.
2. Verique as conexões físicas de fax.
3. Verique se outros dispositivos conectados à mesma linha
telefônica estão recebendo faxes. A linha telefônica pode
estar com falha ou o dispositivo de fax remetente pode
estar com problemas de envio de fax. Também é possível
vericar se o número de telefone do remetente está
bloqueado.
4. Verique o problema com o remetente. Se o problema
persistir, imprima o relatório de teste do fax e o log de fax (e
se disponível, o relatório do ID do Chamador e o relatório de
Faxes Indesejados), depois entre em contato com a HP para
obter mais ajuda.
Não é possível enviar nem receber faxes
1. Faça uma cópia ou digitalização para ter certeza de que a
impressora está funcionando corretamente.
2. Verique as conexões físicas de fax.
3. Verique as congurações de fax da impressora.
4. Verique se outros dispositivos conectados a essa linha
telefônica estão enviando ou recebendo faxes. Pode haver
algum problema com a linha telefônica.
5. Redena a impressora desligando-a e, se possível,
desligando a chave principal da fonte de alimentação.
Aguarde alguns segundos antes de reativar a alimentação.
Tente enviar ou receber algum fax na impressora.
6. Se o problema persistir, imprima o relatório de teste do fax
e o log de fax (e se disponível, o relatório do ID do Chamador
e o relatório de Faxes Indesejados), depois entre em contato
com a HP para obter mais ajuda.
7. Observação: se você assina algum serviço de correio de voz
na mesma linha telefônica usada para o fax, você terá que
receber os faxes manualmente.
Português

63
Declaração de garantia limitada da impressora HP
A.
Extensão da garantia limitada
1. A HP Inc. (HP) garante ao cliente final que os produtos HP especificados acima estarão livres de defeitos de materiais e
fabricação pelo período mencionado acima, que se inicia na data da compra pelo cliente.
2. No caso de produtos de software, a garantia limitada HP cobre apenas falhas de execução de instruções de programação. A
HP não garante que a operação de qualquer produto será ininterrupta ou livre de erros.
3. A garantia limitada HP cobre somente os defeitos surgidos como resultado de uso normal do produto, e não cobre outros
problemas, incluindo os que surgirem como resultado de:
a. Manutenção ou modificação inadequada;
b. Software, mídia, peças ou suprimentos não fornecidos ou aceitos pela HP;
c. Operação fora das especificações do produto;
d. Modificação não autorizada ou uso indevido.
4. Para produtos de impressoras HP, o uso de um cartucho não HP ou de um cartucho recondicionado não afeta a garantia ao
cliente nem qualquer contrato de suporte HP com o cliente. No entanto, se uma falha ou um dano da impressora puderem ser
atribuídos ao uso de um cartucho não HP ou recondicionado ou a um cartucho de tinta expirado, a HP cobrará suas taxas
padrão referentes a tempo e materiais para fazer a manutenção na impressora quanto à falha ou ao dano em questão.
5. Se a HP for informada, durante o período de garantia aplicável, sobre um defeito em qualquer produto coberto pela garantia
HP, poderá optar por substituir ou consertar o produto.
6. Se a HP não puder consertar ou substituir o produto defeituoso coberto pela garantia HP, como for aplicável, ela irá, dentro de
um período de tempo razoável após a notificação do defeito, ressarcir o valor pago pelo produto.
7. A HP não tem obrigação de consertar, substituir ou ressarcir o valor pago até o cliente retornar o produto defeituoso à HP.
8. Qualquer produto de reposição pode ser novo ou em estado de novo, desde que a sua funcionalidade seja ao menos igual
àquela do produto que está sendo substituído.
9. Os produtos HP podem conter peças manufaturadas, componentes ou materiais equivalentes a novos no desempenho.
10. A Declaração de garantia limitada da HP é válida em qualquer país onde o produto coberto HP for distribuído pela HP.
Contratos para serviços de garantia adicionais, como serviços nas instalações do cliente, podem estar disponíveis em
qualquer representante de serviços HP em países onde o produto é distribuído pela HP ou por importador autorizado.
B.
Limitações da garantia
DENTRO DOS LIMITES PERMITIDOS PELAS LEIS LOCAIS, NEM A HP NEM OS SEUS FORNECEDORES FAZEM QUALQUER OUTRA
GARANTIA OU CONDIÇÃO DE QUALQUER NATUREZA, EXPRESSA OU IMPLÍCITA, GARANTIAS OU CONDIÇÕES IMPLÍCITAS DE
COMERCIABILIDADE, QUALIDADE SATISFATÓRIA E ADEQUAÇÃO A UM PROPÓSITO PARTICULAR.
C.
Limitações de responsabilidade
1. Para a extensão permitida pela lei local, as soluções fornecidas nesta Declaração de Garantia são as únicas e exclusivas do
cliente.
2. DENTRO DOS LIMITES PERMITIDOS PELAS LEIS LOCAIS, EXCETO PELAS OBRIGAÇÕES ESPECIFICAMENTE MENCIONADAS NESTA
DECLARAÇÃO DE GARANTIA, EM HIPÓTESE ALGUMA A HP OU OS SEUS FORNECEDORES SERÃO RESPONSÁVEIS POR DANOS
DIRETOS, INDIRETOS, ESPECIAIS, INCIDENTAIS OU CONSEQUENCIAIS, SEJAM ELES BASEADOS EM CONTRATO, AÇÃO DE PERDAS E
DANOS OU QUALQUER OUTRO RECURSO JURÍDICO, MESMO QUE A HP TENHA SIDO AVISADA DA POSSIBILIDADE DE TAIS DANOS.
D.
Lei local
1. Esta Declaração de Garantia fornece ao cliente direitos legais específicos. O cliente pode também ter outros direitos que
podem variar de estado para estado nos Estados Unidos, de província para província no Canadá e de país para país em outros
lugares no mundo.
2. Na medida em que esta declaração de garantia for inconsistente com as leis locais, deve ser considerada emendada para se
tornar consistente com tais leis. Sob elas, certas limitações desta declaração e isenções de responsabilidade podem não ser
aplicáveis ao cliente. Por exemplo, alguns estados dos Estados Unidos, assim como alguns governos fora dos EUA (incluindo
províncias canadenses), poderão:
a. Impedir que isenções de responsabilidades e limitações nesta Declaração de garantia limitem os direitos legais de um
consumidor (por exemplo, Reino Unido);
b. Ou restringir a capacidade de um fabricante para impor tais renúncias ou limitações; ou
c. Conceder ao cliente direitos de garantia adicionais, especificar a duração de garantias implícitas das quais fabricantes não
podem se isentar ou permitir limitações na duração de garantias implícitas.
3. OS TERMOS DESTA DECLARAÇÃO DE GARANTIA, EXCETO PARA OS LIMITES LEGALMENTE PERMITIDOS, NÃO EXCLUEM,
RESTRIGEM OU SE MODIFICAM, E SÃO UM ACRÉSCIMO AOS DIREITOS LEGAIS APLICÁVEIS À VENDA DE PRODUTOS HP A TAIS
CLIENTES.
Informações relativas à Garantia Limitada da HP
A Ga
rantia Limitada HP é uma garantia comercial fornecida voluntariamente pela HP. O nome e a morada da entidade HP responsável
pela pr
estação da Garantia Limitada HP no seu país são os seguintes:
Po
rtugal: HPCP – Computing and Printing Portugal, Unipessoal, Lda., Edificio D. Sancho I, Quinta da Fonte, Porto Salvo, Lisboa,
Oeir
as, 2740 244
As vantagens da Ga
rantia Limitada HP aplicam-se cumulativamente com quaisquer direitos decorrentes da legislação aplicável à
garantia de dois anos do vendedor
, relativa a defeitos do produto e constante do contrato de venda. Existem, contudo, vários fatores
que poder
ão afetar a sua elegibilidade para beneficiar de tais direitos. Os direitos legalmente atribuídos aos consumidores não são
limitados ou af
etados de forma alguma pela Garantia Limitada HP. Para mais informações, consulte a ligação seguinte: Garantia legal
do c
onsumidor ou visite o Web site da Rede dos Centros Europeus do Consumidor. Os consumidores têm o direito de escolher se
pr
etendem reclamar assistência ao abrigo da Garantia Limitada HP ou contra o vendedor ao abrigo de uma garantia jurídica de dois
anos
.
Pa
ra obter mais informações, consulte o link Garantia legal para o consumidor (www.hp.com/go/eu-legal) ou acesse o site dos
Eu
ropean Consumer Centres (http://ec.europa.eu/consumers/solving_consumer_disputes/non-judicial_redress/ecc-net/).
Produto HP Duração da garantia limitada
Mídia de software 90 dias
Impressora 1 ano
Cartuchos de impressão ou de tinta Até que a tinta HP acabe ou até a data do “fim da garantia”
impressa no cartucho, o que ocorrer primeiro. Esta garantia não
cobre produtos de tinta HP que tenham sido reabastecidos,
refabricados, recondicionados, adulterados ou utilizados de forma
incorreta.
Cabeças de impressão (aplicável somente aos produtos 1 ano
com cabeças de impressão substituíveis pelo cliente)
Acessórios 1 ano, a não ser que haja outra indicação
Português

www.hp.com/eu/m/OJ5740
De informatie in dit
document kan worden
aangepast zonder
kennisgeving vooraf.
Scan voor meer informatie!
Mogelijk moet u standaard kosten betalen. Mogelijk niet in alle talen beschikbaar.
Meer informatie
Elektronische Help: Installeer de elektronische Help door deze functie tijdens de software-installatie
te selecteren uit de lijst Aanbevolen software. Kom alles te weten over de productkenmerken, de
afdrukmogelijkheden, het opsporen van fouten en de ondersteuning. In het gedeelte Technische informatie
vindt u richtlijnen, informatie over het milieu en wettelijke informatie, waaronder de richtlijnen van de
Europese Unie over de conformiteitverklaring.
• Windows® 8,1: Klik op de pijl omlaag in de linkerbenedenhoek van het Start-scherm, selecteer de
printernaam, klik op Help en selecteer vervolgens Zoeken HP Help.
• Windows® 8: Klik op het Start-scherm met de rechtermuisknop op een leeg gebied van het scherm, klik op
All Apps op de app-balk, klik op het pictogram met de naam van uw printer en klik vervolgens op Help.
• Windows® 7, Windows Vista® en Windows® XP: Klik op Start > Alle Programma's > HP > HP Oicejet 5740
series > Help.
• OS X: Klik op Help > Helpcenter. Klik in het Helpvenster op Help voor al uw apps en klik vervolgens op HP
Oicejet 5740 series.
LeesMij: Bevat ondersteuningsinformatie van HP, de systeemvereisten voor het besturingssysteem en recente
printerupdates.
• Windows: Plaats de software-cd in uw computer en ga naar het bestand ReadMe.chm. Dubbelklik op
ReadMe.chm om het bestand te openen en kies vervolgens het Leesmij-bestand in uw taal.
• Mac: Open de map Documenten in het bovenste niveau van de software-installatie. Dubbelklik op Leesmij-
bestand en selecteer het Leesmij-bestand in uw taal.
Op internet: Extra hulp en informatie: www.hp.com/go/support. Registratie van de printer:
www.register.hp.com. Conformiteitverklaring: www.hp.eu/certicates. Inktverbruik: www.hp.com/go/inkusage.
Aan de slag
1. Volg de illustraties op de instelyer om uw printer in te stellen.
2. Installeer de software.
Windows®
Ga naar 123.hp.com/OJ5740 en volg de instructies op het scherm. Als de computer niet met internet is
verbonden, plaatst u de software-cd in uw computer. Als de cd niet start, bladert u naar Computer, dubbelklikt
u op het cd-/dvd-station met het HP-logo, dubbelklikt u op setup.exe, en volgt u de instructies op het scherm.
OS X/iOS
Om de laatste HP-software op een Mac te installeren, gaat u naar 123.hp.com/OJ5740. De cd bij de printer
bevat geen HP-software voor Mac.
Dit product is geschikt voor Apple AirPrint. De printer en iOS-apparaat of Mac moeten met hetzelfde netwerk
verbonden zijn.
Opmerking: Zorg er steeds voor dat het gewenste papier zich in de papierlade bevindt. Nadat u de lade
sluit, controleert u of het papier is geselecteerd op het bedieningspaneel van de printer.
HP Oicejet 5740 e-All-in-One Series
Nederlands

65
Veiligheidsinformatie
Neem bij gebruik van deze printer altijd voorzorgsmaatregelen om het risico op letsel door brand of elektrische
schokken te beperken.
1. Lees en begrijp alle instructies in de documentatie bij uw printer.
2. Neem alle op deze printer vermelde waarschuwingen en instructies in acht.
3. Haal de stekker van het netsnoer uit het stopcontact voordat u deze printer reinigt.
4. Installeer en gebruik de printer niet in de nabijheid van water of wanneer u nat bent.
5. Zorg dat de printer stevig op een stabiele ondergrond staat.
6. Zet de printer op een veilige plaats waar niemand op het netsnoer kan trappen of erover kan struikelen en
waar het netsnoer niet kan worden beschadigd.
7. Als de printer niet normaal werkt, raadpleeg dan de elektronische help (die op uw computer na installatie van
de software beschikbaar is).
8. U mag zelf geen onderdelen repareren. Voor reparatie- of onderhoudswerkzaamheden dient u contact op te
nemen met een bevoegd technicus.
9. Gebruik het netsnoer en de adapter die door HP werden geleverd.
1
Lampje draadloos: Geeft de status van de draadloze verbinding van de printer weer.
• Een blauw lampje geeft aan dat de draadloze verbinding werd gemaakt en dat u kunt
afdrukken.
• Een langzaam knipperend lampje geeft aan dat de draadloze functie is ingeschakeld, maar
de printer niet is aangesloten op een netwerk. Zorg ervoor dat uw printer binnen bereik is van
het draadloze signaal.
• Een snel knipperend lampje geeft een fout met de draadloze functie aan. Raadpleeg het
bericht op het printerbeeldscherm.
• Als draadloos is uitgeschakeld, is het lampje draadloos uit. Op het scherm verschijnt
Draadloos uit.
2
Aan/uit-knop: hiermee zet u de printer uit of aan.
3
Terug-knop: Hiermee gaat u terug naar het vorige scherm.
4
Help-knop: Toont de helpinhoud als deze beschikbaar is voor de huidige bewerking.
5
Start-knop: Hiermee keert u terug naar het Startscherm, het scherm dat verschijnt wanneer u
de printer voor het eerst inschakelt.
6
Scherm van bedieningspaneel: Druk op het scherm om menuopties te selecteren of scroll door
de menupunten.
7
Knop Near Field Communication (NFC): Geeft de zone aan waar u snel documenten en
afbeeldingen kunt afdrukken vanaf een mobiel apparaat (bijv. smartphone of tablet) door het
tegen de printer te houden.
Bedieningspaneel
Nederlands

66
MacWindows
Basisprocedures voor probleemoplossing
Als u niet kunt afdrukken:
1. Controleer of de kabels goed zijn aangesloten.
2. Controleer of de printer is ingeschakeld. De Aan-knop zal wit oplichten.
3. Controleer het statuslampje Draadloos om te controleren of uw printer met een netwerk is verbonden.
4. Ga naar de HP Diagnostic Tools website op www.hp.com/go/tools om gratis diagnosetools te downloaden die
u kunt gebruiken om printerproblemen op te lossen.
Controleer of de printer is ingesteld als uw
standaardprinter:
• Windows 8.1 en Windows 8: Wijs naar of tik op de
rechterbovenhoek van het scherm om de Charms-
balk te openen. Klik op het pictogram Instellingen
klik of tik op Conguratiescherm en klik of tik
vervolgens op Overzicht Apparaten en printers.
• Windows 7: Klik vanuit het Start-menu van Windows
op Apparaten en printers.
• Windows Vista: Klik op de taakbalk van Windows op
Start, klik op Conguratiescherm en vervolgens op
Printers.
• Windows XP: Klik op de taakbalk van Windows
op Start, klik op Conguratiescherm en klik
vervolgens op Printers en faxapparaten.
Controleer of uw printer is aangevinkt in het rondje
ernaast. Indien uw printer niet is geselecteerd als de
standaardprinter, klik dan met de rechtermuisknop
op het printerpictogram en kies Als standaardprinter
instellen uit het menu.
Controleer de afdrukwachtrij:
1. In Systeemvoorkeuren klikt u op Printers en
scanners (Print & Fax in OS X v10.7 Lion en
OS X v10.8 Mountain Lion).
2. Klik op Afdrukwachtrij openen.
3. Klik op een afdruktaak om deze te selecteren.
4. Gebruik de volgende knoppen om de afdruktaak te
beheren:
• Pictogram Annuleren: De geselecteerde afdruktaak
annuleren.
• Doorgaan: Een onderbroken afdruktaak hervatten.
5. Als u wijzigingen hebt doorgevoerd, probeert u
opnieuw af te drukken.
Herstarten en terugstellen:
1. Start de computer opnieuw op.
2. Reset de printer.
a. Schakel de printer uit en haal de stekker uit het
stopcontact.
b. Wacht een minuut en sluit het netsnoer opnieuw
aan. Schakel de printer in.
Dankbetuigingen: Windows XP, Windows Vista, Windows 7, Windows 8 en Windows 8.1 zijn in de Verenigde Staten
gedeponeerde handelsmerken van Microsoft Corporation.
Mac, OS X en AirPrint zijn in de Verenigde Staten en andere landen gedeponeerde handelsmerken van Apple Inc.
Als u een USB-kabel gebruikt en nog niet kunt
afdrukken of de software-installatie niet lukt:
1. Verwijder de cd uit het cd/dvd-station en koppel
vervolgens de USB-kabel los van de computer.
2. Start de computer opnieuw op.
3. Plaats de cd met printersoftware in het cd-/dvd-
station en volg de instructies op het scherm om de
printersoftware te installeren. Sluit de USB-kabel
niet aan voor u daarom wordt gevraagd.
4. Zodra de installatie klaar is, start u de computer
opnieuw.
Als u de draadloze functies gebruikt en nog niet kunt
afdrukken:
Ga naar het deel Netwerken op de volgende pagina
voor meer informatie.
De software verwijderen:
1. Koppel de printer los van de computer als u hem
hebt aangesloten met een USB-kabel.
2. Open de map Toepassingen/Hewlett-Packard.
3. Dubbelklik op HP Verwijderen en volg de instructies
op het scherm.
Het afdruksysteem resetten:
1. In Systeemvoorkeuren klikt u op Printers en
scanners (Print & Fax in OS X v10.7 Lion en
OS X v10.8 Mountain Lion).
2. Druk op de Ctrl-toets en houd ze ingedrukt wanneer
u op de lijst links klikt. Kies dan Afdruksysteem
resetten.
3. Voeg de printer toe die u wilt gebruiken.
Opslag anonieme gebruiksinformatie: De HP-cartridges slaan een beperkte hoeveelheid anonieme informatie
op over het gebruik van de printer. Voor meer informatie en instructies voor het uitschakelen van deze opslag,
raadpleegt u de elektronische Help.
Nederlands

67
Als u uw printer met meerdere computers op uw netwerk wilt delen
Eerst installeert u uw printer in het thuisnetwerk. Als u de printer met het thuisnetwerk hebt verbonden, kunt u
hem delen met andere computers op hetzelfde netwerk. Voor elke bijkomende computer moet u enkel nog de HP-
printersoftware installeren.
Draadloos netwerk-gebruik
Als u er niet in slaagde om de printer met het netwerk te verbinden
• Bevestig dat de functie Draadloos is ingeschakeld op uw printer.
1. Raak op het bedieningspaneel van de printer, (Draadloos) aan.
2. Als Draadloos uit wordt weergegeven raakt u (Instellingen) aan en raakt u vervolgens Instellingen
draadloos aan.
3. In het scherm Instellingen draadloos selecteert u Aan voor de optie Draadloos.
• Controleer of uw printer is verbonden met uw netwerk.
1. Raak op het bedieningspaneel van de printer, (Draadloos) aan.
2. Raak (Instellingen) aan.
3. Raak Rapporten afdrukken aan en selecteer en vervolgens Testrapport draadloos.Het draadloze
testrapport wordt automatisch afgedrukt.
4. Controleer de bovenste rapporttekst om na te gaan of er iets misging tijdens de test.
– Bekijk het gedeelte Diagnostische resultaten van alle uitgevoerde tests en kijk of uw printer is geslaagd.
– In het gedeelte Huidige conguratie zoekt u de netwerknaam (SSID) waarmee uw printer momenteel is
verbonden. Controleer of de printer is aangesloten op een netwerk met internettoegang.
Opmerking: Indien uw printer is verbonden met een Virtual Private Network (VPN), kunt u hem tijdelijk
loskoppelen van het VPN alvorens u verdergaat met de installatie. Na de installatie moet u loskoppelen van het
VPN om toegang te krijgen tot uw printer via uw thuisnetwerk.
• Zorg ervoor dat beveiligingssoftware de communicatie via uw netwerk niet blokkeert.
Beveiligingssoftware, zoals rewalls, kan de communicatie tussen uw computer en printer blokkeren wanneer
u via een netwerk installeert. Indien uw printer niet wordt gevonden, kunt u de rewall tijdelijk uitschakelen en
controleren of het probleem verdwijnt. Voor meer hulp en tips over beveiligingssoftware kunt u surfen naar:
www.hp.com/go/wpc-rewall_nl-nl.
• Start de onderdelen van het draadloze netwerk opnieuw.
Schakel de router en de printer uit en zet ze vervolgens weer aan in deze volgorde: eerst de router en dan
de printer. Soms wordt een netwerkcommunicatieprobleem opgelost door de apparaten uit- en weer in te
schakelen. Als u nog steeds geen verbinding kunt maken, zet u de router, de printer en uw computer uit en zet u
deze vervolgens weer aan in deze volgorde: eerst de router, dan de printer en dan de computer.
Opmerking: Indien u geen draadloze verbinding tot stand kunt brengen, kan de printer ook met het netwerk
worden verbonden met behulp van een ethernetkabel.
Als u nog steeds problemen ondervindt, ga dan naar het HP Wireless Printing Center
(www.hp.com/go/wirelessprinting). Deze website bevat de meest volledige en bijgewerkte informatie over
draadloos afdrukken. Bovendien kunt u er terecht voor informatie over de voorbereiding van uw draadloos
netwerk, verbindingsproblemen oplossen bij het aansluiten van de printer op een draadloos netwerk;
problemen oplossen met beveiligingssoftware.
Opmerking: Als u een computer gebruikt onder Windows, kunt u het hulpprogramma Print and Scan
Doctor gebruiken. Dit programma helpt u bij het oplossen van mogelijke problemen met de printer. Om dit
hulpprogramma te downloaden gaat u naar www.hp.com/go/tools.
Meer netwerkhulp nodig?
www.hp.com/go/wirelessprinting
Het HP Wireless Printing Center op www.hp.com/go/wirelessprinting kan u helpen om uw draadloos netwerk voor
te bereiden, uw printer te installeren of opnieuw te congureren en netwerkproblemen op te lossen.
Nederlands

68
Als u de printer draadloos wilt gebruiker zonder een router
Gebruik Wi-Fi Direct om draadloos zonder router af te drukken vanaf uw computer, smartphone of een ander
draadloos apparaat. Om Wi-Fi Direct rechtstreeks te gebruiken vanaf een computer moet de printersoftware op de
computer zijn geïnstalleerd.
1. Zorg ervoor dat Wi-Fi Direct op uw computer is ingeschakeld:
a. Raak vanaf het Start-scherm op het printerscherm (Wi-Fi Direct) aan.
b. Als Status is ingesteld op Uit raakt u (Instellingen Wi-Fi Direct) aan en schakelt u Wi-Fi Direct in.
2. Uw draadloos apparaat met uw printer verbinden:
a. Schakel de Wi-Fi-verbinding in op uw mobiel apparaat. Raadpleeg voor meer informatie de documentatie bij
de computer.
b. Maak een nieuwe netwerkverbinding op uw mobiel apparaat. Gebruik uw normale werkwijze om een
verbinding te maken met een nieuw draadloos netwerk of een hotspot. Kies de naam van Wi-Fi Direct uit de
lijst van draadloze netwerken zoals DIRECT-**-HP Oicejet-5740 (waarbij ** de unieke tekens zijn om uw
printer te identiceren).
c. Voer het Wi-Fi Direct-wachtwoord in wanneer u hierom wordt gevraagd.
3. Druk af zoals u dat gewoonlijk zou doen vanaf uw computer of mobiele apparaat.
Opmerking: De Wi-Fi Direct-verbinding biedt geen internettoegang.
Surf naar het HP Wireless Printing Center op www.hp.com/go/wirelessprinting voor meer informatie over Wi-Fi
Direct.
Als u van een USB-verbinding wilt overgaan naar een draadloze verbinding
Zorg ervoor dat de printersoftware correct werd geïnstalleerd.
Windows
1. Voer, afhankelijk van uw besturingssysteem, een van de volgende handelingen uit:
• Windows 8.1: Klik op de pijl naar beneden in de linkerbenedenhoek van het Start-scherm, selecteer de
printernaam en klik op Hulpprogramma's.
• Windows 8: In het Start-scherm klikt u met de rechtermuisknop op het scherm. Klik op Alle apps in de
app-balk.
• Windows 7, Windows Vista en Windows XP: Selecteer in het menu Start van de computer Alle
programma's of Programma's, selecteer vervolgens HP.
2. Selecteer HP Oicejet 5740 series.
3. Selecteer Printerinstellingen en softwareselectie.
4. Selecteer Een USB-aangesloten printer naar draadloos converteren. Volg de aanwijzingen op het scherm op.
Mac
Gebruik het HP Hulpprogramma in Toepassingen/Hewlett-Packard om de softwareverbinding te wijzigen naar
draadloos voor deze printer.
Draadloos netwerk-gebruik (vervolg)
Als u wilt printen met AirPrint
Dit product is geschikt voor Apple AirPrint®. U kunt draadloos afdrukken vanaf uw iOS-apparaat of Mac.
• Uw printer en iOS-apparaat of Mac moeten met hetzelfde draadloos netwerk verbonden zijn.
• Met Apple AirPrint® kunt u geen documenten van uw printer naar uw iOS-apparaat scannen.
Dit product is bedoeld voor gebruik in een open omgeving (bijv. thuis en niet verbonden met het openbare internet)
waar iedereen toegang heeft tot de printer en deze mag gebruiken. Als gevolg hiervan is de instelling Wi-Fi Direct
standaard ingesteld op “Automatisch”, zonder administratorwachtwoord, hierdoor kan iedereen binnen het
draadloze bereik een verbinding maken met de printer en alle functies en instellingen ervan gebruiken. Indien een
hoger beveiligingsniveau is vereist, adviseert HP de verbindingswijze van Wi-Fi Direct te wijzigen van “Automatisch”
naar “Handmatig” en een administratorwachtwoord in te stellen.
Nederlands

69
Fax instellen
1. De telefoonlijn aansluiten
Opmerking: HP-printers zijn speciek ontworpen voor gebruik in combinatie met traditionele analoge
telefoonservices. In een digitale telefoonomgeving (zoals DSL/ADSL, PBX, ISDN of FoIP) moet u eventueel
digitaal-naar-analoog lters of converters gebruiken bij het instellen van de printer voor faxen. Neem contact op
met uw telefoonbedrijf om na te gaan welke installatieopties voor u geschikt zijn.
Als de telefoonlijn uitsluitend wordt gebruikt voor fax
a. Sluit een uiteinde van het snoer aan op een wandcontactdoos voor telefoon.
b. Sluit het andere uiteinde aan op de poort met het label 1-LINE aan de achterzijde van de printer.
Als u een abonnement hebt op een DSL/ADSL-service, plaats dan een DSL/ADSL-lter tussen de poort 1-LINE en
de wandcontactdoos telefoon.
2. De fax-setup testen.
De faxtest controleert de hardware, het type telefoonsnoer en de verbindingsstatus. Bovendien wordt
gecontroleerd of er een kiestoon is en of de telefoonlijn actief is. De test uitvoeren:
a. Druk in het Start-scherm van het printerscherm op de knoppen Omhoog en Omlaag om Fax te selecteren en
vervolgens drukt u op OK.
b. Selecteer Instellingen, Geavanceerde Instellingen, Installatiewizard voor de fax, en volg dan de instructies
op het scherm.
1
Wandcontactdoos telefoon
2
Faxpoort (1-LINE)
Opmerking: sluit het snoer niet aan op poort
2-EXT.
3
DSL/ADSL-lter (geleverd door uw
telefoonbedrijf of service provider)
Indien bijkomende apparaten zijn aangesloten op de telefoonlijn
Als u andere apparaten moet aansluiten, volg dan onderstaande afbeelding:
1
Wandcontactdoos telefoon
2
Parallelle splitter
3
DSL/ADSL-modem
4
Antwoordapparaat telefoon
5
Telefoon
6
ISDN-wandcontactdoos
7
Terminaladapter of ISDN-router
8
Breedbandmodem
9
DSL/ADSL-lter
10
Analoge telefoonadapter
* TAP: Antwoordapparaat telefoon
** FoIP: Fax over internetprotocol
Nederlands

70
Een standaardfax versturen
1. Plaats het origineel met de afdrukzijde naar beneden tegen de rechterbenedenhoek van de glasplaat of
met de afdrukzijde naar boven in de invoerlade.
2. Druk op het scherm van het bedieningspaneel van de printer op Fax.
3. Raak of aan Nu verzenden.
4. Voer het faxnummer in met behulp van het toetsenblok.
Om een pauze in het faxnummer toe te voegen, drukt u meermaals op * tot een streepje (-) verschijnt op
het beeldscherm.
5. Raak Zwart of Kleur aan.
Als de printer een origineel in de documentinvoer detecteert, wordt dit document naar het ingevoerde
nummer gestuurd.
Als u van de ontvanger te horen krijgt dat de kwaliteit van de door u verzonden fax niet goed is, kunt u de
resolutie of het contrast van de fax wijzigen.
Fax gebruiken
Een fax via een extra telefoontoestel verzenden
1. Kies het nummer met behulp van het toetsenblok op de telefoon.
Gebruik het toetsenblok op het bedieningspaneel van de printer niet wanneer u een fax verzendt met
behulp van deze methode.
2. Als de ontvanger de telefoon opneemt, kunt u met de ontvanger spreken voordat u de fax verzendt.
Als een faxapparaat de oproep beantwoordt, hoort u de faxtonen van het ontvangende faxapparaat.
3. Plaats het origineel met de afdrukzijde naar beneden tegen de rechterbenedenhoek van de glasplaat of
met de afdrukzijde naar boven in de invoerlade.
4. Druk op het scherm van het bedieningspaneel van de printer op Fax.
5. Druk op Nieuwe fax verzenden.
6. Raak Zwart of Kleur aan.
Als u met de ontvanger in gesprek bent, vraagt u om de ontvangst van de fax te starten zodra hij of zij de
faxtonen hoort op het faxtoestel. Zodra de printer begint te faxen, kunt u de telefoon ophangen of aan de lijn
blijven. Mogelijk hoort u de faxtonen tijdens het doorsturen niet.
Voor meer informatie over andere manieren om faxen te verzenden, zoals het plannen van een faxverzending
of het verzenden van faxen naar een computer, verwijzen we naar de elektronische Help.
Een fax automatisch ontvangen
Standaard beantwoordt de printer inkomende gesprekken en worden faxen ontvangen.
Om handmatig faxen te ontvangen schakelt u Automatisch antwoorden uit op het bedieningspaneel van de printer.
De printer beantwoordt oproepen na het aantal beltonen dat is opgegeven bij de instelling Aantal beltonen voor
antwoord.
Als er een antwoordapparaat op de printer is aangesloten, moet voor de printer een hoger aantal beltonen voor
antwoorden worden ingesteld dan voor het antwoordapparaat.
1. Controleer of de printer is ingeschakeld en of er papier in de lade aanwezig is.
2. Druk vanaf het printerscherm op Fax.
3. Raak aan en raak vervolgens aan Setup Preferences.
4. Selecteer Aan voor de optie Automatisch antwoorden.
Opmerking: Als u geabonneerd bent op een voicemailservice op dezelfde telefoonlijn die u voor faxen gebruikt, kunt
u niet automatisch faxen ontvangen. U moet zelf aanwezig zijn om binnenkomende faxoproepen te beantwoorden.
(Als u uw faxen liever automatisch ontvangt, moet u contact opnemen met uw telefoonbedrijf om u te abonneren op
een service voor specieke belsignalen of om een aparte telefoonlijn aan te vragen voor het faxen.)
De printer kan ontvangen faxen bewaren in het interne geheugen. Om de faxen opnieuw af te drukken raadpleegt
u "Ontvangen faxen opnieuw afdrukken uit het geheugen" verder op de volgende pagina.
Nederlands

71
Fax gebruiken (vervolg)
Een faxbericht handmatig ontvangen
Als u in gesprek bent met een andere persoon, kunt u de faxen handmatig ontvangen zonder de telefoon op te
hangen.
1. Controleer of de printer is ingeschakeld en of er papier in de lade aanwezig is.
2. Verwijder eventuele originelen uit de documentinvoerlade.
Stel Aantal beltonen voor antwoord in op een hoge waarde zodat u de binnenkomende oproepen kunt
beantwoorden voordat de printer de oproep beantwoordt. U kunt de instelling Automatisch beantwoorden ook
uitschakelen zodat de printer binnenkomende oproepen niet automatisch beantwoordt.
3. Vraag aan uw contactpersoon om de fax te verzenden.
4. Als u faxtonen hoort raakt u vanaf het Start-scherm op het bedieningspaneel van de printer Fax aan, vervolgens
raakt u Verzenden en ontvangen aan en tot slot Nu ontvangen.
Zodra de printer de fax begint te ontvangen, kunt u de telefoon ophangen of aan de lijn blijven. Mogelijk hoort u
de faxtonen tijdens het doorsturen niet.
Ontvangen faxen vanuit het geheugen afdrukken
Als Een back-up maken van een faxontvangst is ingeschakeld, worden ontvangen faxberichten in het geheugen
bewaard, ook wanneer de printer in storing is.
Opmerking: Alle in het geheugen bewaarde faxberichten worden uit het geheugen gewist wanneer de printer
wordt uitgeschakeld.
1. Zorg dat er papier in de papierlade zit.
2. Raak vanaf het Start-scherm op het printerscherm Fax aan.
3. Raak Opnieuw afdrukken aan.
De faxen worden weergegeven in omgekeerde volgorde als die waarin ze zijn ontvangen waarbij de meest recent
ontvangen fax het eerst wordt afgedrukt.
4. Om het afdrukken te stoppen selecteert u Annuleren.
Een rapport of logboek afdrukken
Faxrapporten bevatten nuttige systeeminformatie over de printer.
1. Raak vanaf het Start-scherm op het printerscherm Instellingen aan en raak vervolgens Faxinstellingen aan.
2. Raak Rapporten aan en raak vervolgens Faxbevestiging aan.
3. Raak het scherm aan om een van de opties te selecteren.
Nederlands

72
Controleer de faxinstellingen op de printer
• De functie Automatisch antwoorden is
ingeschakeld om automatisch faxen te ontvangen.
• Als u bent geabonneerd op een voicemailservice
bij uw telefoonbedrijf of service provider, zorg er
dan voor dat het Aantal beltonen voor antwoord
is ingesteld op een hogere waarde dan voor het
antwoordapparaat van de telefoon. De printer
bewaakt de lijn en beslist of een inkomend gesprek
een normaal telefoongesprek is of een faxbericht.
Als het gaat om een faxbericht start de printer de
faxverbinding automatisch. Anders moet u de fax
handmatig ontvangen door Fax te selecteren op het
printerscherm.
• Indien meerdere telefoonnummers aan dezelfde
fysieke telefoonlijn zijn toegekend en de lijn al
wordt gedeeld met meerdere apparaten, zorg er
dan voor dat de printer is ingesteld op de correcte
beltoon om faxen te ontvangen.
Controleer de fysieke faxverbindingen
• Sluit het telefoonsnoer verbonden met de
poort 1-LINE aan de achterzijde van de printer
aan op de wandtelefooncontactdoos telefoon
en sluit het telefoonsnoer van de poort 2-EXT
aan de achterzijde van de printer aan op een
telefoontoestel. Gebruik deze telefoon om het
nummer op te bellen dat de fax niet kon ontvangen.
• Als u probeerde om naar een extern nummer te
faxen, zorg er dan voor om de toegangscodes of
voornummers in te toetsen voor u het netnummer
invoert. Mogelijk moet u tussen cijfers even
pauzeren om te voorkomen dat de printer het
nummer te snel tot stand brengt. Om een pauze toe
te voegen, drukt u meermaals op * tot een streepje
(-) verschijnt op het beeldscherm.
• Als u geen uitgaande oproepen tot stand kunt
brengen omdat u geen kiestoon krijgt of er te veel
ruis op de lijn zit, probeer het dan met een ander
telefoonsnoer op de 1-LINE-poort of verplaats
de printer naar een andere plaats met een
afzonderlijke telefoonlijn (indien mogelijk). Kijk dan
of u gelijkaardige problemen ondervindt.
• Als u werkt met een digitale telefoonomgeving
(zoals FoIP, fax over VoIP), verlaag dan de
faxsnelheid en schakel Error Code Modulation (ECM)
uit op het bedieningspaneel van de printer. Neem
indien nodig contact op met uw telefoonbedrijf om
na te gaan of er problemen zijn met de telefoonlijn
of voor meer informatie over het telefoonnetwerk.
Faxproblemen oplossen
Als u nog steeds problemen ondervindt met uw fax
nadat u de faxtest op pagina 5 hebt uitgevoerd, moet u
de onderstaande procedure volgen:
Kan geen faxen verzenden maar wel ontvangen
1. Voer een kopieeropdracht uit of maak een scan om
na te gaan of de printer correct werkt.
2. Controleer de fysieke faxverbindingen.
3. Controleer of andere faxapparaten werken op
hetzelfde telefoonnummer. Het ontvangende
faxapparaat kan uw telefoonnummer hebben
geblokkeerd of er zijn mogelijk technische problemen.
4. Als het probleem niet kan worden opgelost, kunt u het
faxtestrapport en faxlogboek (en indien beschikbaar
de rapporten Beller-ID en junkfaxen) afdrukken en
contact opnemen met HP voor verdere hulp.
Kan geen faxen ontvangen maar wel verzenden
1. Controleer de faxinstellingen op de printer
2. Controleer de fysieke faxverbindingen.
3. Controleer of andere apparaten op dezelfde
telefoonlijn faxen kunnen ontvangen. De
telefoonlijn kan in storing zijn of het verzendende
faxapparaat heeft mogelijk problemen met het
verzenden van faxen. Misschien kunt u ook nagaan
of u het telefoonnummer van de afzender niet hebt
geblokkeerd.
4. Neem contact op met de afzender. Als het probleem
niet kan worden opgelost, kunt u het faxtestrapport
en faxlogboek (en indien beschikbaar de rapporten
Beller-ID en junkfaxen) afdrukken en contact
opnemen met HP voor verdere hulp.
Kan geen faxen verzenden en ontvangen
1. Voer een kopieeropdracht uit of maak een scan om
na te gaan of de printer correct werkt.
2. Controleer de fysieke faxverbindingen.
3. Controleer de faxinstellingen op de printer
4. Controleer of andere apparaten op deze telefoonlijn
faxen kunnen verzenden of ontvangen. Er is
mogelijk een probleem met de telefoonlijn.
5. Reset de printer door deze uit te schakelen. Schakel
indien mogelijk ook de hoofdschakelaar van de
stroomvoorziening uit. Wacht enkele seconden
en schakel de stroom weer in. Probeer een fax te
verzenden of te ontvangen op de printer.
6. Als het probleem niet kan worden opgelost, kunt u het
faxtestrapport en faxlogboek (en indien beschikbaar
de rapporten Beller-ID en junkfaxen) afdrukken en
contact opnemen met HP voor verdere hulp.
7. Opmerking: Als u geabonneerd bent op een
voicemailservice op dezelfde telefoonlijn die u
voor faxen gebruikt, moet u de faxen handmatig
ontvangen.
A. Duur van beperkte garantie
1. HP Inc. (HP) garandeert de eindgebruiker dat bovenstaande HP-producten vrij van materiaal- en fabricagedefecten zijn
gedurende de hierboven aangegeven periode, die begint op de datum van aankoop door de klant. De klant moet een
bewijs van de datum van aankoop kunnen overleggen.
2. Met betrekking tot softwareproducten is de beperkte garantie van HP uitsluitend geldig voor het niet kunnen uitvoeren
van programmeringsinstructies. HP garandeert niet dat de werking van een product ononderbroken of vrij van fouten is.
3. De beperkte garantie van HP geldt alleen voor defecten die zich voordoen als resultaat van een normaal gebruik van het
product en is niet van toepassing in de volgende gevallen:
a. onjuist of onvoldoende onderhoud of wijziging van het product;
b. software, interfaces, afdrukmateriaal, onderdelen of benodigdheden die niet door HP worden geleverd of ondersteund;
c. gebruik dat niet overeenstemt met de specificaties van het product;
d. onrechtmatige wijzigingen of verkeerd gebruik.
4. Voor HP-printerproducten is het gebruik van een cartridge die niet door HP is geleverd of een nagevulde cartridge niet van
invloed op de garantie aan de klant of een contract voor ondersteuning dat met de klant is gesloten. Als echter een defect
of beschadiging van de printer toegewezen kan worden aan het gebruik van een cartridge die niet van HP afkomstig is, een
nagevulde cartridge of een verlopen inktcartridge, brengt HP de gebruikelijke tijd- en materiaalkosten voor het repareren
van de printer voor het betreffende defect of de betreffende beschadiging in rekening.
5. Als HP tijdens de van toepassing zijnde garantieperiode kennisgeving ontvangt van een defect in een softwareproduct, in
afdrukmateriaal of in een inktproduct dat onder de garantie van HP valt, wordt het defecte product door HP vervangen. Als
HP tijdens de van toepassing zijnde garantieperiode kennisgeving ontvangt van een defect in een hardwareproduct dat onder
de garantie van HP valt, wordt naar goeddunken van HP het defecte product door HP gerepareerd of vervangen.
6. Als het defecte product niet door HP respectievelijk gerepareerd of vervangen kan worden, zal HP de aankoopprijs voor het
defecte product dat onder de garantie valt, terugbetalen binnen een redelijke termijn nadat HP kennisgeving van het
defect heeft ontvangen.
7. HP is niet verplicht tot reparatie, vervanging of terugbetaling tot de klant het defecte product aan HP geretourneerd heeft.
8. Een eventueel vervangingsproduct mag nieuw of bijna nieuw zijn, vooropgesteld dat het ten minste dezelfde
functionaliteit heeft als het product dat wordt vervangen.
9. De beperkte garantie van HP is geldig in alle landen/regio's waar het gegarandeerde product door HP wordt gedistribueerd,
met uitzondering van het Midden-Oosten, Afrika, Argentinië, Brazilië, Mexico, Venezuela en de tot Frankrijk behorende
zogenoemde "Départements d'Outre Mer". Voor de hierboven als uitzondering vermelde landen/regio's, is de garantie
uitsluitend geldig in het land/de regio van aankoop. Contracten voor extra garantieservice, zoals service op de locatie van
de klant, zijn verkrijgbaar bij elk officieel HP-servicekantoor in landen/regio's waar het product door HP of een officiële
importeur wordt gedistribueerd.
10. Er wordt geen garantie gegeven op HP-inktcartridges die zijn nagevuld, opnieuw zijn gepr
oduceerd, zijn opgeknapt en
verkeerd zijn gebruikt of waarmee op enigerlei wijze is geknoeid.
B. Garantiebeperkingen
IN ZOVERRE DOOR HET PLAATSELIJK RECHT IS TOEGESTAAN, BIEDEN NOCH HP, NOCH LEVERANCIERS (DERDEN) ANDERE
UITDRUKKELIJKE OF STILZWIJGENDE GARANTIES OF VOORWAARDEN MET BETREKKING TOT DE PRODUCTEN VAN HP EN
WIJZEN ZIJ MET NAME DE STILZWIJGENDE GARANTIES EN VOORWAARDEN VAN VERKOOPBAARHEID, BEVREDIGENDE
KWALITEIT EN GESCHIKTHEID VOOR EEN BEPAALD DOEL AF.
C. Beperkte aansprakelijkheid
1. Voor zover bij de plaatselijke wetgeving toegestaan, zijn de verhaalsmogelijkheden in deze beperkte garantie de enige en
exclusieve verhaalsmogelijkheden voor de klant.
2. VOORZOVER DOOR HET PLAATSELIJK RECHT IS TOEGESTAAN, MET UITZONDERING VAN DE SPECIFIEKE VERPLICHTINGEN IN DEZE
GARANTIEVERKLARING, ZIJN HP EN LEVERANCIERS (DERDEN) ONDER GEEN BEDING AANSPRAKELIJK VOOR DIRECTE, INDIRECTE,
SPECIALE EN INCIDENTELE SCHADE OF GEVOLGSCHADE, OF DIT NU GEBASEERD IS OP CONTRACT, DOOR BENADELING OF ENIGE
ANDERE JURIDISCHE THEORIE, EN ONGEACHT OF HP VAN DE MOGELIJKHEID VAN DERGELIJKE SCHADE OP DE HOOGTE IS.
D. Lokale wetgeving
1. Deze garantieverklaring verleent de klant specifieke juridische rechten. De klant kan over andere rechten beschikken die in de V.S. van
staat tot staat, in Canada van provincie tot provincie en elders van land tot land of van regio tot regio kunnen verschillen.
2. In zoverre deze garantieverklaring niet overeenstemt met de plaatselijke wetgeving, zal deze garantieverklaring als
aangepast en in overeenstemming met dergelijke plaatselijke wetgeving worden beschouwd. Krachtens een dergelijke
plaatselijke wetgeving is het mogelijk dat bepaalde afwijzingen en beperkingen in deze garantieverklaring niet op de klant
van toepassing zijn. Sommige staten in de Verenigde Staten en bepaalde overheden buiten de Verenigde Staten (inclusief
provincies in Canada) kunnen bijvoorbeeld:
a. voorkomen dat de afwijzingen en beperkingen in deze garantieverklaring de wettelijke rechten van een klant beperken
(bijvoorbeeld het Verenigd Koninkrijk);
b. op andere wijze de mogelijkheid van een fabrikant beperken om dergelijke niet-aansprakelijkheidsverklaringen of
beperkingen af te dwingen;
c. de klant aanvullende garantierechten verlenen, de duur van de impliciete garantie bepalen waarbij het niet mogelijk is dat de
fabrikant zich niet aansprakelijk verklaart of beperkingen ten aanzien van de duur van impliciete garanties niet toestaan.
3. DE IN DEZE VERKLARING GESTELDE GARANTIEVOORWAARDEN VORMEN, BEHALVE IN DE WETTELIJK TOEGESTANE MATE, GEEN
UITSLUITING, BEPERKING OF WIJZIGING VAN, MAAR EEN AANVULLING OP DE VERPLICHTE EN WETTELIJK VOORGESCHREVEN RECHTEN DIE
VAN TOEPASSING ZIJN OP DE VERKOOP VAN HP-PRODUCTEN.
HP-product Duur van beperkte garantie
Softwaremedia 90 dagen
Printer 1 jaar
Print- of inktcartridges Tot het HP-cartridge leeg is of de "einde garantie"-datum (vermeld op de
inktcartridge) is bereikt, afhankelijk van wat het eerst van toepassing is.
Deze garantie dekt geen HP-inktproducten die opnieuw zijn gevuld,
opnieuw zijn gefabriceerd of zijn gerepareerd, noch HP-inktproducten die
op verkeerde wijze zijn gebruikt of behandeld.
Printkoppen (geldt alleen voor producten met printkoppen 1 jaar
die door de klant kunnen worden v
ervangen)
Accessoires 1 jaar tenzij anders vermeld
Nederlands

73
Beperkte garantieverklaring voor de HP-printer
A. Duur van beperkte garantie
1. HP Inc. (HP) garandeert de eindgebruiker dat bovenstaande HP-producten vrij van materiaal- en fabricagedefecten zijn
gedurende de hierboven aangegeven periode, die begint op de datum van aankoop door de klant. De klant moet een
bewijs van de datum van aankoop kunnen overleggen.
2. Met betrekking tot softwareproducten is de beperkte garantie van HP uitsluitend geldig voor het niet kunnen uitvoeren
van programmeringsinstructies. HP garandeert niet dat de werking van een product ononderbroken of vrij van fouten is.
3. De beperkte garantie van HP geldt alleen voor defecten die zich voordoen als resultaat van een normaal gebruik van het
product en is niet van toepassing in de volgende gevallen:
a. onjuist of onvoldoende onderhoud of wijziging van het product;
b. software, interfaces, afdrukmateriaal, onderdelen of benodigdheden die niet door HP worden geleverd of ondersteund;
c. gebruik dat niet overeenstemt met de specificaties van het product;
d. onrechtmatige wijzigingen of verkeerd gebruik.
4. Voor HP-printerproducten is het gebruik van een cartridge die niet door HP is geleverd of een nagevulde cartridge niet van
invloed op de garantie aan de klant of een contract voor ondersteuning dat met de klant is gesloten. Als echter een defect
of beschadiging van de printer toegewezen kan worden aan het gebruik van een cartridge die niet van HP afkomstig is, een
nagevulde cartridge of een verlopen inktcartridge, brengt HP de gebruikelijke tijd- en materiaalkosten voor het repareren
van de printer voor het betreffende defect of de betreffende beschadiging in rekening.
5. Als HP tijdens de van toepassing zijnde garantieperiode kennisgeving ontvangt van een defect in een softwareproduct, in
afdrukmateriaal of in een inktproduct dat onder de garantie van HP valt, wordt het defecte product door HP vervangen. Als
HP tijdens de van toepassing zijnde garantieperiode kennisgeving ontvangt van een defect in een hardwareproduct dat onder
de garantie van HP valt, wordt naar goeddunken van HP het defecte product door HP gerepareerd of vervangen.
6. Als het defecte product niet door HP respectievelijk gerepareerd of vervangen kan worden, zal HP de aankoopprijs voor het
defecte product dat onder de garantie valt, terugbetalen binnen een redelijke termijn nadat HP kennisgeving van het
defect heeft ontvangen.
7. HP is niet verplicht tot reparatie, vervanging of terugbetaling tot de klant het defecte product aan HP geretourneerd heeft.
8. Een eventueel vervangingsproduct mag nieuw of bijna nieuw zijn, vooropgesteld dat het ten minste dezelfde
functionaliteit heeft als het product dat wordt vervangen.
9. De beperkte garantie van HP is geldig in alle landen/regio's waar het gegarandeerde product door HP wordt gedistribueerd,
met uitzondering van het Midden-Oosten, Afrika, Argentinië, Brazilië, Mexico, Venezuela en de tot Frankrijk behorende
zogenoemde "Départements d'Outre Mer". Voor de hierboven als uitzondering vermelde landen/regio's, is de garantie
uitsluitend geldig in het land/de regio van aankoop. Contracten voor extra garantieservice, zoals service op de locatie van
de klant, zijn verkrijgbaar bij elk officieel HP-servicekantoor in landen/regio's waar het product door HP of een officiële
importeur wordt gedistribueerd.
10. Er wordt geen garantie gegeven op HP-inktcartridges die zijn nagevuld, opnieuw zijn gepr
oduceerd, zijn opgeknapt en
verkeerd zijn gebruikt of waarmee op enigerlei wijze is geknoeid.
B. Garantiebeperkingen
IN ZOVERRE DOOR HET PLAATSELIJK RECHT IS TOEGESTAAN, BIEDEN NOCH HP, NOCH LEVERANCIERS (DERDEN) ANDERE
UITDRUKKELIJKE OF STILZWIJGENDE GARANTIES OF VOORWAARDEN MET BETREKKING TOT DE PRODUCTEN VAN HP EN
WIJZEN ZIJ MET NAME DE STILZWIJGENDE GARANTIES EN VOORWAARDEN VAN VERKOOPBAARHEID, BEVREDIGENDE
KWALITEIT EN GESCHIKTHEID VOOR EEN BEPAALD DOEL AF.
C. Beperkte aansprakelijkheid
1. Voor zover bij de plaatselijke wetgeving toegestaan, zijn de verhaalsmogelijkheden in deze beperkte garantie de enige en
exclusieve verhaalsmogelijkheden voor de klant.
2. VOORZOVER DOOR HET PLAATSELIJK RECHT IS TOEGESTAAN, MET UITZONDERING VAN DE SPECIFIEKE VERPLICHTINGEN IN DEZE
GARANTIEVERKLARING, ZIJN HP EN LEVERANCIERS (DERDEN) ONDER GEEN BEDING AANSPRAKELIJK VOOR DIRECTE, INDIRECTE,
SPECIALE EN INCIDENTELE SCHADE OF GEVOLGSCHADE, OF DIT NU GEBASEERD IS OP CONTRACT, DOOR BENADELING OF ENIGE
ANDERE JURIDISCHE THEORIE, EN ONGEACHT OF HP VAN DE MOGELIJKHEID VAN DERGELIJKE SCHADE OP DE HOOGTE IS.
D. Lokale wetgeving
1. Deze garantieverklaring verleent de klant specifieke juridische rechten. De klant kan over andere rechten beschikken die in de V.S. van
staat tot staat, in Canada van provincie tot provincie en elders van land tot land of van regio tot regio kunnen verschillen.
2. In zoverre deze garantieverklaring niet overeenstemt met de plaatselijke wetgeving, zal deze garantieverklaring als
aangepast en in overeenstemming met dergelijke plaatselijke wetgeving worden beschouwd. Krachtens een dergelijke
plaatselijke wetgeving is het mogelijk dat bepaalde afwijzingen en beperkingen in deze garantieverklaring niet op de klant
van toepassing zijn. Sommige staten in de Verenigde Staten en bepaalde overheden buiten de Verenigde Staten (inclusief
provincies in Canada) kunnen bijvoorbeeld:
a. voorkomen dat de afwijzingen en beperkingen in deze garantieverklaring de wettelijke rechten van een klant beperken
(bijvoorbeeld het Verenigd Koninkrijk);
b. op andere wijze de mogelijkheid van een fabrikant beperken om dergelijke niet-aansprakelijkheidsverklaringen of
beperkingen af te dwingen;
c. de klant aanvullende garantierechten verlenen, de duur van de impliciete garantie bepalen waarbij het niet mogelijk is dat de
fabrikant zich niet aansprakelijk verklaart of beperkingen ten aanzien van de duur van impliciete garanties niet toestaan.
3. DE IN DEZE VERKLARING GESTELDE GARANTIEVOORWAARDEN VORMEN, BEHALVE IN DE WETTELIJK TOEGESTANE MATE, GEEN
UITSLUITING, BEPERKING OF WIJZIGING VAN, MAAR EEN AANVULLING OP DE VERPLICHTE EN WETTELIJK VOORGESCHREVEN RECHTEN DIE
VAN TOEPASSING ZIJN OP DE VERKOOP VAN HP-PRODUCTEN.
HP-product Duur van beperkte garantie
Softwaremedia 90 dagen
Printer 1 jaar
Print- of inktcartridges Tot het HP-cartridge leeg is of de "einde garantie"-datum (vermeld op de
inktcartridge) is bereikt, afhankelijk van wat het eerst van toepassing is.
Deze garantie dekt geen HP-inktproducten die opnieuw zijn gevuld,
opnieuw zijn gefabriceerd of zijn gerepareerd, noch HP-inktproducten die
op verkeerde wijze zijn gebruikt of behandeld.
Printkoppen (geldt alleen voor producten met printkoppen 1 jaar
die door de klant kunnen worden v
ervangen)
Accessoires 1 jaar tenzij anders vermeld
Nederlands

74
HP Fabrieksgarantie
De Beperkte Garantie van HP is een commerciële garantie vrijwillig verstrekt door HP. De naam en het adres van de HP-entiteit die
verantwoordelijk is voor het uitvoeren van de Beperkte Garantie van HP in uw land is als volgt:
Nederland: HP Nederland B.V., Startbaan 16, 1187 XR Amstelveen
België: HP Belgium BVBA, Hermeslaan 1A, B-1831 Diegem
De voordelen van de Beperkte Garantie van HP vormen een aanvulling op de wettelijke garantie voor consumenten gedurende
twee jaren na de levering te verlenen door de verkoper bij een gebrek aan conformiteit van de goederen met de relevante
verkoopsovereenkomst. Niettemin kunnen diverse factoren een impact hebben op uw eventuele aanspraak op deze wettelijke
rechten. De wettelijke rechten van de consument worden op geen enkele wijze beperkt of beïnvloed door de Beperkte Garantie
van HP. Raadpleeg voor meer informatie de volgende webpagina: Wettelijke garantie van de consument of u kan de website van
het Europees Consumenten Centrum bezoeken. Consumenten hebben het recht om te kiezen tussen enerzijds de Beperkte
Garantie van HP of anderzijds het aanspreken van de verkoper in toepassing van de wettelijke garantie.
Klik voor meer informatie op de volgende link: Wettelijke Garantie Consument (www.hp.com/go/eu-legal) of raadpleeg de website
van het Europees Consumenten Centrum
(http://ec.europa.eu/consumers/solving_consumer_disputes/non-judicial_redress/ecc-net/).
Nederlands
Documenttranscriptie
HP Officejet 5740 e-All-in-One Series Get started 1. Follow the illustrations on the setup flyer to set up your printer. 2. Install software. Go to 123.hp.com/OJ5740, and then follow the on-screen instructions. If your computer is not connected to the Internet, insert the software CD in your computer. If CD does not start, browse to Computer, double-click the CD/DVD drive icon with the HP logo, double-click setup.exe, and then follow the on-screen instructions. OS X/iOS To install the latest HP software on a Mac, go to 123.hp.com/OJ5740. HP software for Mac is not included on the software CD that came with the printer. This product is Apple AirPrint enabled. The printer and iOS device or Mac must be on the same local network. Note: Always make sure that the paper tray is loaded with the desired paper. After closing the tray, ensure that this paper is selected on the printer control panel. Learn more Electronic Help: Install the electronic Help by selecting it from the recommended software during software installation. Learn about product features, printing, troubleshooting, and support. Find notices, environmental, and regulatory information, including the European Union Regulatory Notice and compliance statements, in the Technical Information section. •• Windows® 8.1: Click the down arrow in lower left corner of the Start screen, select the printer name, click Help, and then select Search HP Help. •• Windows® 8: On the Start screen, right-click an empty area on the screen, click All Apps on the app bar, click the icon with the printer’s name, and then click Help. •• Windows® 7, Windows Vista®, and Windows® XP: Click Start > All Programs > HP > HP Officejet 5740 series > Help. •• OS X: Click Help > Help Center. In the Help Viewer window, click Help for all your apps, and then click HP Officejet 5740 series. Readme: Contains HP support information, operating system requirements, and recent printer updates. •• Windows: Insert the software CD in your computer, and then browse to the ReadMe.chm file. Double-click ReadMe.chm to open, and then select the ReadMe in your language. •• Mac: Open the Documents folder located at the top-level of the software installer. Double-click ReadMe, and then select the ReadMe in your language. On the Web: Additional help and information: www.hp.com/go/support. Printer registration: www.register.hp.com. Declaration of Conformity: www.hp.eu/certificates. Ink usage: www.hp.com/go/inkusage. Scan to find out more! Standard data rates may apply. Might not be available in all languages. www.hp.com/eu/m/OJ5740 EN DE FR ES PT NL The information contained herein is subject to change without notice. IT *B9S76-90078* *B9S76-90078* B9S76-90078 Printed in [English] © Copyright 2017 HP Development Company, L.P. English Windows® Control panel English 1 Wireless light: Indicates the status of the printer wireless connection. •• Solid blue light indicates that wireless connection has been established and you can print. •• Slow blinking light indicates that wireless is on, but the printer is not connected to a network. Make sure your printer is within the range of wireless signal. •• Fast blinking light indicates wireless error. Refer to the message on the printer display. •• If wireless is turned off, the wireless light is off and the display screen shows Wireless Off. 2 On button: Turns the printer on or off. 3 Back button: Returns to the previous screen. 4 Help button: Shows help content if it is available for the current operation. 5 Home button: Returns to the Home screen, the screen that is displayed when you first turn on the printer. 6 Control panel display: Touch the screen to select menu options, or scroll through the menu items. 7 Near Field Communication (NFC) button: Indicates the area where you can print documents and images from a mobile device (such as a smartphone or tablet) by touching the device on the printer. Safety information Always follow basic safety precautions when using this printer to reduce the risk of injury from fire or electric shock. 1. Read and understand all instructions in the documentation that comes with the printer. 2. Observe all warnings and instructions marked on the printer. 3. Unplug this printer from wall outlets before cleaning. 4. Do not install or use this printer near water, or when you are wet. 5. Install the printer securely on a stable surface. 6. Install the printer in a protected location where no one can step on or trip over the power cord, and the power cord cannot be damaged. 7. If the printer does not operate normally, see the help file (which is available on your computer after you install the software). 8. There are no user-serviceable parts inside. Refer servicing to qualified service personnel. 9. Use only with the power cord and power adapter (if provided) supplied by HP. 2 Basic troubleshooting If you are unable to print: 1. Make sure the cable connections are secure. 2. Make sure the printer is powered on. The On button will be lit white. 4. Visit the HP Diagnostic Tools website at www.hp.com/go/tools to download free diagnostic utilities (tools) that you can use to fix common printer problems. Windows Mac Make sure that the printer is set as your default printing device: Check your print queue: •• Windows 8.1 and Windows 8: Point to or tap the upper-right corner of the screen to open the Charms bar, click the Settings icon, click or tap Control Panel, and then click or tap View devices and printers. •• Windows 7: From the Windows Start menu, click Devices and Printers. •• Windows Vista: On the Windows taskbar, click Start, click Control Panel, and then click Printer. •• Windows XP: On the Windows taskbar, click Start, click Control Panel, and then click Printers and Faxes. 1. In System Preferences, click Printers & Scanners (Print & Fax in OS X v10.7 Lion and OS X v10.8 Mountain Lion). 2. Click Open Print Queue. 3. Click a print job to select it. 4. Use the following buttons to manage the print job: •• Cancel icon: Cancel the selected print job. •• Resume: Continue a paused print job. 5. If you made any changes, try to print again. Restart and reset: 1. Restart the computer. Make sure that your printer has a check mark in the circle next to it. If your printer is not selected as the default printer, right-click the printer icon and choose Set as Default Printer from the menu. 2. Reset the printer. If you are using a USB cable and you are still unable to print, or the software installation fails: Reset the printing system: 1. Remove the CD from the CD/DVD drive, and then disconnect the USB cable from the computer. 2. Restart the computer. 3. Insert the printer software CD in the CD/DVD drive, and then follow the on-screen instructions to install the printer software. Do not connect the USB cable until you are told to do so. 4. After the installation finishes, restart the computer. If you are using wireless and you are still unable to print: Go to the Networking section on the next page for more information. English 3. Check the wireless status light to make sure your printer is connected to a network. a. Turn off the printer and unplug the power cord. b. Wait a minute, then plug the power cord back in and turn on the printer. 1. In System Preferences, click Printers & Scanners (Print & Fax in OS X v10.7 Lion and OS X v10.8 Mountain Lion). 2. Press and hold the Control key as you click the list at the left, and then choose Reset printing system. 3. Add the printer you want to use. Uninstall the software: 1. If the printer is connected to your computer through USB, disconnect the printer from your computer. 2. Open the Applications/Hewlett-Packard folder. 3. Double-click HP Uninstaller, and then follow the on-screen instructions. Anonymous usage information storage: The HP cartridges store a limited set of anonymous information about the usage of the printer. For more information and instructions for disabling this storage, see the electronic Help. Acknowledgements: Windows XP, Windows Vista, Windows 7, Windows 8, and Windows 8.1 are U.S. registered trademarks of Microsoft Corporation. Mac, OS X, and AirPrint are trademarks of Apple Inc., registered in the U.S. and other countries. 3 Wireless networking Need networking help? www.hp.com/go/wirelessprinting The HP Wireless Printing Center at www.hp.com/go/wirelessprinting can help you prepare your wireless network, set up or reconfigure your printer, and troubleshoot networking problems. English If connecting your printer to the network was unsuccessful •• Confirm that wireless is enabled on your printer. 1. From the printer control panel, touch 2. If it shows Wireless Off, touch (Wireless). (Settings), and then touch Wireless Settings. 3. In the Wireless Settings screen, select On for the Wireless option. •• Confirm that your printer is connected to your network. 1. From your printer control panel, touch 2. Touch (Wireless). (Settings). 3. Touch Print Reports, and then touch Wireless Test Report. The Wireless Test Report is automatically printed. 4. Check the top of the report to see if something failed during the test. –– See the Diagnostics Results section for all tests that were performed, to determine whether or not your printer passed. –– From the Current Configuration section, find out the Network Name (SSID) to which your printer is currently connected. Make sure that the printer is connected to the same network as your computer. Note: If your computer is connected to a Virtual Private Network (VPN), temporarily disconnect from the VPN before proceeding with the installation. After installation you will need to disconnect from the VPN to access your printer over your home network. •• Make sure security software is not blocking communication over your network. Security software, such as firewalls, can block communication between your computer and printer when installing over a network. If your printer cannot be found, temporarily disable your firewall and check if the problem goes away. For more help and tips on security software, go to: www.hp.com/go/wpc-firewall. •• Restart components of the wireless network. Turn off the router and the printer, and then turn them back on in this order: router first and then printer. Sometimes, turning off devices and then turning them back on helps resolve network communication issues. If you still cannot connect, turn off the router, the printer, and the computer, and then turn them back on in this order: router first, then printer, and then computer. Note: If the wireless connection cannot be made, the printer can also be connected to the network using an Ethernet cable. If you still have problems, visit the HP Wireless Printing Center (www.hp.com/go/wirelessprinting). This website contains the most complete, up-to-date information about wireless printing, as well as information to help you prepare your wireless network; solve problems when connecting the printer to the wireless network; and resolve security software issues. Note: If you are using a computer running Windows, you can use the Print and Scan Doctor tool, which can help solve many problems you might have with the printer. To download this tool, visit www.hp.com/go/tools. If you want to share your printer with multiple computers on your network First install your printer on your home network. After you have successfully connected your printer to your home network, you can share your printer with other computers on the same network. For each additional computer you only need to install the HP printer software. 4 Wireless networking (continued) If you want to change from a USB connection to a wireless connection First make sure that you have already successfully installed your printer software. Windows 1. Do one of the following according to your operating system: •• Windows 8: On the Start screen, right-click an empty area on the screen, click All Apps on the app bar. •• Windows 7, Windows Vista, and Windows XP: From the computer’s Start menu, select All Programs or Programs, and then select HP. English •• Windows 8.1: Click the down arrow in lower left corner of the Start screen, select the printer name, and then click Utilities. 2. Select HP Officejet 5740 series. 3. Select Printer Setup & Software. 4. Select Convert a USB connected printer to wireless. Follow the on-screen instructions. Mac Use HP Utility in Applications/Hewlett-Packard to change the software connection to wireless for this printer. If you want to use the printer wirelessly without a router Use Wi-Fi Direct to print wirelessly without a router, from your computer, smartphone, or other wireless enabled device. To use Wi-Fi Direct from a computer, the printer software must be installed on the computer. 1. Make sure that Wi-Fi Direct on your printer is turned on: a. From the Home screen on the printer display, touch b. If Status is Off, touch (Wi-Fi Direct). (Wi-Fi Direct Settings) and turn Wi-Fi Direct on. 2. Connect your wireless enabled device to your printer: a. Turn on the Wi-Fi connection on your mobile device. For more information, see the documentation provided with the mobile device. b. From the mobile device, connect to a new network. Use the process you normally use to connect to a new wireless network or hotspot. Choose the Wi-Fi Direct name from the list of wireless networks shown such as DIRECT-**-HP Officejet-5740 (where ** are the unique characters to identify your printer). c. Enter the Wi-Fi Direct password when prompted. 3. Print as you normally do from your computer or mobile device. Note: Wi-Fi Direct connection does not provide Internet access. Visit the HP Wireless Printing Center at www.hp.com/go/wirelessprinting for more information about Wi-Fi Direct. This product is designed for use in open environments (e.g., in homes and not connected to the public internet) in which anyone may access and use the printer. As a result, the Wi-Fi Direct setting is in “Automatic” mode by default, without an administrator password; this allows anyone in wireless range to connect and access all functions and settings of the printer. If higher security levels are desired, HP recommends changing the Wi-Fi Direct Connection Method from “Automatic” to “Manual” and establishing an administrator password. If you want to print with AirPrint This printer is Apple AirPrint®-enabled. You can print wirelessly from your iOS device or Mac. •• Your printer and iOS device or Mac must be on the same wireless network. •• With Apple AirPrint®, you cannot scan documents from the printer to your iOS device. 5 Set up fax 1. Connect the phone line. Note: HP printers are designed specifically for use with traditional analog phone services. If you are in a digital phone environment (such as DSL/ADSL, PBX, ISDN, or FoIP), you might need to use digital-to-analog filters or converters when setting up the printer for faxing. Contact your phone company to determine which setup options are best for you. If the phone line is only used for fax English a. Connect one end of the phone cord to the phone wall jack. b. Connect the other end to the port labeled 1-LINE on the back of the printer. If you have subscribed to a DSL/ADSL service, connect a DSL/ADSL filter between the 1-LINE port and the phone wall jack. 1 2 3 Phone wall jack Fax port (1-LINE) Note: Do not insert into the port labeled 2-EXT. DSL/ADSL filter (provided by the telephone company or service provider) If additional devices are connected to the phone line If you have other devices to connect, connect them as shown in the diagram below: * TAM: Telephone answering machine 1 2 3 4 5 6 7 8 9 10 Phone wall jack Parallel splitter DSL/ADSL modem Telephone answering machine Telephone ISDN wall jack Terminal adapter or ISDN router Broadband modem DSL/ADSL filter Analog telephone adaptor ** FoIP: Fax over Internet Protocol 2. Test fax setup. The fax test checks hardware, verifies phone cord type and connection status, and checks for a dial tone and an active phone line. To run the test: a. From the Home screen on the printer display, press the Up and Down buttons to select Fax, and then press OK. b. Select Settings, select Advanced Settings, select Fax Setup Wizard, and then follow on-screen instructions. 6 Use fax Send a standard fax 1. Load your original print-side down on the right front corner of the scanner glass or print-side up in the Document Feeder. 2. From the printer control panel display, touch Fax. 4. Enter the fax number by using the keypad. To add a pause in the fax number, press * repeatedly, until a dash (-) appears on the display. 5. Touch Black or Color. If the printer detects an original loaded in the document feeder, it sends the document to the number you entered. English 3. Touch Send Now. If the recipient reports problems with the quality of the fax you sent, try changing the resolution or contrast of your fax. Send a fax using an extension phone 1. Dial the number by using the keypad on the extension phone. Do not use the keypad on the printer control panel when sending a fax using this method. 2. If the recipient answers the phone, you can engage in a conversation before sending the fax. If a fax machine answers the call, you will hear fax tones from the receiving fax machine. 3. Load your original print-side down on the right front corner of the scanner glass or print-side up in the document feeder. 4. From the printer control panel display, touch Fax. 5. Touch Send Fax. 6. Touch Black or Color. If you were on the phone with the recipient, ask the recipient to start receiving the fax when they hear fax tones on the fax machine. When the printer begins faxing, you can hang up the phone or remain on the line. You might not hear fax tones during fax transmission. For more information about other ways you can send faxes, such as scheduling a fax to be sent later or sending faxes from a computer, see the electronic Help. Receive a fax automatically By default, the printer automatically answers incoming calls and receives faxes. To receive faxes manually, turn off Auto Answer from the printer control panel. The printer will answer calls after the number of rings specified in the Rings to Answer setting. If an answering machine is connected to the printer, the Rings to Answer setting for the printer must be set to a higher number than the answering machine. 1. Make sure the printer is turned on and paper is loaded. 2. From the printer display, touch Fax. 3. Touch Setup, and then touch Preferences. 4. Select On for the Auto Answer option. Note: If you have subscribed to a voice mail service on the same phone line that you will use for faxing, you cannot receive faxes automatically. You must be available to respond in person to incoming fax calls. (If you want to receive faxes automatically, contact your phone company to subscribe to a distinctive ring service or to obtain a separate phone line for faxing.) The printer can store received faxes in its internal memory. To reprint these faxes, see “Reprint received faxes from memory” on the next page. 7 Use fax (continued) Receive a fax manually If you are on the phone with another person, you can receive faxes manually without hanging up the phone. 1. Make sure the printer is turned on and paper is loaded. 2. Remove any originals from the document feeder. English Set Rings to Answer to a higher number to allow you time to answer the incoming call before the printer does. Or turn off Auto Answer so that the printer does not automatically answer incoming calls. 3. Ask the sender to start sending the fax. 4. When you hear fax tones, from the Home screen on the printer control panel, touch Fax, touch Send and Receive, and then touch Receive Now. When the printer begins to receive the fax, you can hang up the phone or remain on the line. You might not hear fax tones during fax transmission. Reprint received faxes from memory If Backup Fax Reception is turned on, incoming faxes will be stored in memory even when the printer has an error condition. Note: All faxes stored in memory might be deleted from memory when the printer is turned off. 1. Make sure paper is loaded in the printer. 2. From the Home screen on the printer display, touch Fax. 3. Touch Reprint. The faxes are displayed in the reverse order from when they were received, with the most recently received fax printed first. 4. To stop printing, select Cancel. Print a report or log Fax reports provide useful system information about the printer. 1. From the Home screen on the printer display, touch Setup and then touch Fax Setup. 2. Touch Reports and then touch Fax Confirmation. 3. Touch to select one of the options. 8 Solve fax problems Cannot send but can receive faxes 1. Perform a copy or scan to ensure that the printer is working properly. 2. Check the physical fax connections. 3. Check if other fax devices can send to the same phone number. The receiving fax device might have blocked your phone number, or it might be having technical problems. 4. If the problem persists, print the fax test report and fax log (and if available, the Caller ID report and Junk Fax report), and then contact HP for further help. Cannot receive but can send faxes 1. Check the fax settings on the printer. 2. Check the physical fax connections. 3. Check if other devices connected to the same phone line can receive faxes. The phone line might be faulty or the sending fax device might be having problems sending faxes. You might also want to check if you have blocked the sender’s phone number. 4. Check the problem with the sender. If the problem persists, print the fax test report and fax log (and if available, the Caller ID report and Junk Fax report), and then contact HP for further help. Cannot send and receive faxes 1. Perform a copy or scan to ensure that the printer is working properly. 2. Check the physical fax connections. 3. Check the fax settings on the printer. 4. Check if other devices connected to this phone line can send or receive faxes. There might be a problem with the phone line. 5. Reset the printer by turning off the printer and, if possible, the main switch of the power supply. Wait for a few seconds before turning on the power again. Try to send or receive a fax on the printer. 6. If the problem persists, print the fax test report and fax log (and if available, the Caller ID report and Junk Fax report), and then contact HP for further help. Check the printer fax settings •• The Auto Answer feature is turned on for the printer to receive fax automatically. •• If you have subscribed to a voice mail service from the phone company or service provider, ensure that the Rings to Answer on the printer is set to be more than that of the telephone answering machine. The printer will monitor the line and decide if an incoming call is a normal phone call or fax call. If it is a fax call, the printer will start a fax connection automatically. Otherwise, you might have to receive the fax manually by selecting Fax on the printer display. English If you still have problems using fax after successfully completing the fax test, follow the steps below: •• If multiple phone numbers are assigned to the same physical phone line and the line is shared by multiple devices, ensure that the printer is set to the correct distinctive ring setting for receiving faxes. Check the physical fax connections •• Connect the phone cable from the 1-LINE port on the back of the printer to the phone wall jack and connect a phone cable from the 2-EXT port on the back of the printer to an extension phone. From the extension phone, call the phone number that failed to receive the faxes. •• If you were trying to fax to an external number, be sure to include any required access code or numbers prior to entering the number. You might also need to add a pause in the number to prevent the printer from dialing too fast; to add a pause, press * repeatedly until a dash (-) appears on the display. •• If you cannot make any outgoing calls because no dial tone is detected or the line is noisy, try using another phone cable in place of the one connected to the 1-LINE phone port, or move the printer to another location which has a separate phone line (if possible) and see if there are similar problems. •• If you are in a digital phone environment (such as FoIP, fax over VoIP), reduce the fax speed and turn off the Error Code Modulation (ECM) from the printer control panel. If needed, contact your phone company to find out if there are problems with the phone line or to learn more about the capabilities of the phone network. 7. Note: If you have subscribed to a voice mail service on the same phone line used for faxing, you will have to receive faxes manually. 9 HP printer limited warranty statement English 10 HP product Duration of limited warranty Software Media 90 days Printer 1 year Print or Ink cartridges Until the HP ink is depleted or the “end of warranty” date printed on the cartridge has been reached, whichever occurs first. This warranty does not cover HP ink products that have been refilled, remanufactured, refurbished, misused, or tampered with. Printheads (only applies to products with customer replaceable printheads) 1 year Accessories 1 year unless otherwise stated A. Extent of limited warranty 1. HP Inc. (HP) warrants to the end-user customer that the HP products specified above will be free from defects in materials and workmanship for the duration specified above, which duration begins on the date of purchase by the customer. 2. For software products, HP’s limited warranty applies only to a failure to execute programming instructions. HP does not warrant that the operation of any product will be interrupted or error free. 3. HP's limited warranty covers only those defects that arise as a result of normal use of the product, and does not cover any other problems, including those that arise as a result of: a. Improper maintenance or modification; b. Software, media, parts, or supplies not provided or supported by HP; c. Operation outside the product's specifications; d. Unauthorized modification or misuse. 4. For HP printer products, the use of a non-HP cartridge or a refilled cartridge does not affect either the warranty to the customer or any HP support contract with the customer. However, if printer failure or damage is attributable to the use of a non-HP or refilled cartridge or an expired ink cartridge, HP will charge its standard time and materials charges to service the printer for the particular failure or damage. 5. If HP receives, during the applicable warranty period, notice of a defect in any product which is covered by HP's warranty, HP shall either repair or replace the product, at HP's option. 6. If HP is unable to repair or replace, as applicable, a defective product which is covered by HP's warranty, HP shall, within a reasonable time after being notified of the defect, refund the purchase price for the product. 7. HP shall have no obligation to repair, replace, or refund until the customer returns the defective product to HP. 8. Any replacement product may be either new or like-new, provided that it has functionality at least equal to that of the product being replaced. 9. HP products may contain remanufactured parts, components, or materials equivalent to new in performance. 10. HP's Limited Warranty Statement is valid in any country where the covered HP product is distributed by HP. Contracts for additional warranty services, such as on-site service, may be available from any authorized HP service facility in countries where the product is distributed by HP or by an authorized importer. B. Limitations of warranty TO THE EXTENT ALLOWED BY LOCAL LAW, NEITHER HP NOR ITS THIRD PARTY SUPPLIERS MAKES ANY OTHER WARRANTY OR CONDITION OF ANY KIND, WHETHER EXPRESS OR IMPLIED WARRANTIES OR CONDITIONS OF MERCHANTABILITY, SATISFACTORY QUALITY, AND FITNESS FOR A PARTICULAR PURPOSE. C. Limitations of liability 1. To the extent allowed by local law, the remedies provided in this Warranty Statement are the customer's sole and exclusive remedies. 2. TO THE EXTENT ALLOWED BY LOCAL LAW, EXCEPT FOR THE OBLIGATIONS SPECIFICALLY SET FORTH IN THIS WARRANTY STATEMENT, IN NO EVENT SHALL HP OR ITS THIRD PARTY SUPPLIERS BE LIABLE FOR DIRECT, INDIRECT, SPECIAL, INCIDENTAL, OR CONSEQUENTIAL DAMAGES, WHETHER BASED ON CONTRACT, TORT, OR ANY OTHER LEGAL THEORY AND WHETHER ADVISED OF THE POSSIBILITY OF SUCH DAMAGES. D. Local law 1. This Warranty Statement gives the customer specific legal rights. The customer may also have other rights which vary from state to state in the United States, from province to province in Canada, and from country to country elsewhere in the world. 2. To the extent that this Warranty Statement is inconsistent with local law, this Warranty Statement shall be deemed modified to be consistent with such local law. Under such local law, certain disclaimers and limitations of this Warranty Statement may not apply to the customer. For example, some states in the United States, as well as some governments outside the United States (including provinces in Canada), may: a. Preclude the disclaimers and limitations in this Warranty Statement from limiting the statutory rights of a consumer (e.g., the United Kingdom); b. Otherwise restrict the ability of a manufacturer to enforce such disclaimers or limitations; or c. Grant the customer additional warranty rights, specify the duration of implied warranties which the manufacturer cannot disclaim, or allow limitations on the duration of implied warranties. 3. THE TERMS IN THIS WARRANTY STATEMENT, EXCEPT TO THE EXTENT LAWFULLY PERMITTED, DO NOT EXCLUDE, RESTRICT, OR MODIFY, AND ARE IN ADDITION TO, THE MANDATORY STATUTORY RIGHTS APPLICABLE TO THE SALE OF THE HP PRODUCTS TO SUCH CUSTOMERS. HP Limited Warranty The HP limited Warranty is a commercial guarantee voluntarily provided by HP. The name and address of the HP entityresponsible for the performance of the HP Limited Warranty in your country is as follows: United Kingdom: The HP Limited Warranty benefits apply in addition to any legal rights to a guarantee from seller of nonconformity of goods with the contract of sale. These rights expire six years from delivery of goods for products purchased in England or Wales and five years from delivery of goods for products purchased in Scotland. However various factors may impact your eligibility to receive these rights. For further information, please consult the following link: Consumer Legal Guarantee or you may visit the European Consumer Centers website.Consumers have the right to choose whether to claim service under the HP Limited Warranty or against the seller under the legal guarantee. Ireland: The HP Limited Warranty benefits apply in addition to any statutory rights from seller in relation to onconformity of goods with the contract of sale. However various factors may impact your eligibility to receive these rights. Consumer statutory rights are not limited or affected in any manner by HP Care Pack. For further information, please consult the following link: Consumer Legal Guarantee or you may visit the European Consumer Centers website.Consumers have the right to choose whether to claim service under the HP Limited Warranty or against the seller under the legal guarantee. English U.K: HP Inc UK Limited, Cain Road, Amen Corner, Bracknell, Berkshire, RG12 1HN Ireland: Hewlett-Packard Ireland Limited, Liffey Park Technology Campus, Barnhall Road, Leixlip, Co.Kildare Malta: Hewlett-Packard Europe B.V., Amsterdam, Meyrin Branch, Route du Nant-d’Avril 150, 1217 Meyrin, Switzerland Malta: The HP Limited Warranty benefits apply in addition to any legal rights to a two-year guarantee from seller of nonconformity of goods with the contract of sale; however various factors may impact your eligibility to receive these rights. Consumer statutory rights are not limited or affected in any manner by the HP Limited Warranty. For further information, please consult the following link: Consumer Legal Guarantee or you may visit the European Consumer Centers website. Consumers have the right to choose whether to claim service under the HP Limited Warranty or against the seller under two-year legal guarantee. For further information, please consult the following link: Consumer Legal Guarantee (www.hp.com/go/eu-legal) or you may visit the European Consumer Centers website(http://ec.europa.eu/consumers/solving_consumer_disputes/non-judicial_redress/ecc-net/index_en.htm). 11 HP Officejet 5740 e-All-in-One Series Erste Schritte 1. Befolgen Sie die Einrichtungsanweisungen, um den Drucker zu konfigurieren. 2. Installieren Sie die Software. Windows® Rufen Sie 123.hp.com/OJ5740 auf und befolgen Sie die angezeigten Anweisungen. Wenn der Computer nicht mit dem Internet verbunden ist, legen Sie die Software-CD in den Computer ein. Wenn die CD nicht startet, navigieren Sie zu Computer, doppelklicken Sie auf das Symbol für das CD/DVD-Laufwerk mit dem HP Logo. Doppelklicken Sie auf setup.exe und befolgen Sie die angezeigten Anweisungen. OS X/iOS Besuchen Sie 123.hp.com/OJ5740, um die neueste HP Software auf einem Mac zu installieren. Die HP Software für Mac ist auf der Software-CD, die zum Lieferumfang des Druckers gehört, nicht enthalten. Dieses Produkt ist für Apple AirPrint aktiviert. Der Drucker und das iOS-Gerät bzw. der Mac müssen sich im selben lokalen Netzwerk befinden. Hinweis: Stellen Sie stets sicher, dass das gewünschte Papier im Papierfach eingelegt ist. Vergewissern Sie sich nach dem Schließen des Fachs, dass das entsprechende Papier über das Bedienfeld des Druckers ausgewählt wurde. Deutsch Weitere Infos Elektronische Hilfe: Installieren Sie die elektronische Hilfe, indem Sie diese beim Installieren der Software in der empfohlenen Software auswählen. Über die Hilfe erhalten Sie weitere Informationen zu Leistungsmerkmalen des Produkts, Druck, Fehlerbehebung und Support. Hinweise, Erklärungen zum Umweltschutz und rechtliche Hinweise einschließlich rechtlichem Hinweis der Europäischen Union und Konformitätserklärung finden Sie im Abschnitt „Technische Daten“. •• Windows® 8.1: Klicken Sie in der Startanzeige links unten auf den Pfeil nach unten, wählen Sie den Druckernamen aus und klicken Sie auf Hilfe. Wählen Sie dann HP Hilfe durchsuchen aus. •• Windows® 8: Klicken Sie mit der rechten Maustaste auf einen leeren Bereich der Startanzeige. Klicken Sie dann in der App-Leiste auf Alle Apps und anschließend auf das Symbol mit dem Namen Ihres Druckers. Klicken Sie dann auf Hilfe. •• Windows® 7, Windows Vista® und Windows® XP: Klicken Sie auf Start > Alle Programme > HP > HP Officejet 5740 series > Hilfe. •• OS X: Klicken Sie auf Hilfe > Help Center. Klicken Sie im Help Viewer-Fenster auf Hilfe für alle Ihre Apps. Klicken Sie dann auf HP Officejet 5740 series. Readme-Datei: Enthält HP Supportinformationen, Betriebssystemanforderungen und neueste Informationen zum Drucker. •• Windows: Legen Sie die Software-CD in den Computer ein und blättern Sie dann zur Datei ReadMe.chm. Doppelklicken Sie zum Öffnen auf ReadMe.chm und wählen Sie dann die ReadMe in Ihrer Sprache aus. •• Macintosh: Öffnen Sie den Ordner Dokumente, der sich auf der obersten Ebene des Softwareinstallationsprogramms befindet. Doppelklicken Sie auf ReadMe. Wählen Sie dann die ReadMe in Ihrer Sprache aus. Im Internet: Weitere Hilfe und Informationen: www.hp.com/go/support. Druckerregistrierung: www.register.hp.com. Konformitätserklärung: www.hp.eu/certificates. Tintenverbrauch: www.hp.com/go/inkusage. Bitte scannen, um weitere Infos zu erhalten! Es gelten ggf. Standarddatenraten. Ist ggf. nicht in allen Sprachen verfügbar. www.hp.com/eu/m/OJ5740 Die in diesem Dokument enthaltenen Informationen können ohne vorherige Ankündigung geändert werden. Bedienfeld 1 Wireless (LED): Zeigt den Status der Wireless-Verbindung des Druckers an. •• Eine blau leuchtende LED zeigt an, dass die Wireless-Verbindung hergestellt wurde und Sie drucken können. •• Eine schnell blinkende LED zeigt einen Wireless-Fehler an. Lesen Sie die Meldung auf dem Druckerdisplay. •• Wenn der Wireless-Betrieb deaktiviert ist, leuchtet die Wireless-LED nicht, und auf dem Display wird Wireless Aus angezeigt. 2 Netztaste: Dient zum Ein-/Ausschalten des Druckers. 3 Zurück (Taste): Dient zum Zurückkehren zur vorherigen Anzeige. 4 Hilfe (Taste): Zeigt, falls verfügbar, den Hilfetext für die aktuelle Operation an. 5 Startanzeige (Taste): Ruft wieder die Startanzeige auf, d. h. die Anzeige, die beim ersten Einschalten des Druckers angezeigt wird. 6 Bedienfelddisplay: Tippen Sie auf die Anzeige, um Menüoptionen auszuwählen oder in den Menüoptionen zu blättern. 7 Near Field Communication (NFC, Taste): Gibt den Bereich an, in dem Sie den Drucker mit einem mobilen Gerät (wie einem Smartphone oder Tablet) berühren müssen, um Dokumente oder Bilder vom Gerät aus zu drucken. Deutsch •• Eine langsam blinkende LED zeigt an, dass der Wireless-Betrieb aktiviert ist, aber der Drucker nicht mit einem Netzwerk verbunden ist. Stellen Sie sicher, dass sich der Drucker in Reichweite des Funksignals befindet. Sicherheitsinformationen Beachten Sie beim Einsatz dieses Druckers immer die grundlegenden Sicherheitsmaßnahmen, um die Verletzungsgefahr durch Feuer oder einen elektrischen Schlag zu verringern. 1. Lesen und beachten Sie unbedingt die Anweisungen in der Dokumentation, die dem Drucker beiliegt. 2. Beachten Sie alle Warnhinweise und Anweisungen, die am Drucker angebracht sind. 3. Ziehen Sie vor dem Reinigen des Druckers den Netzstecker aus der Steckdose. 4. Installieren oder verwenden Sie diesen Drucker nicht in der Nähe von Wasser bzw. wenn Ihre Hände nass sind. 5. Sorgen Sie für einen sicheren Stand des Druckers auf einer stabilen Auflagefläche. 6. Wählen Sie für den Drucker einen geschützten Standort, an dem keine Personen auf das Netzkabel treten oder darüber stolpern können. Das Netzkabel darf nicht beschädigt werden. 7. Wenn der Drucker nicht einwandfrei funktioniert, finden Sie weitere Informationen in der Hilfedatei (die nach der Installation der Software auf dem Computer verfügbar ist). 8. Im Inneren des Produkts befinden sich keine Teile, die vom Endnutzer instand gesetzt werden können. Überlassen Sie Wartungsarbeiten qualifiziertem Wartungspersonal. 9. Verwenden Sie das Produkt ausschließlich mit dem Netzkabel und dem Netzteil (sofern im Lieferumfang enthalten), die von HP geliefert wurden. 13 Allgemeine Fehlerbehebung Wenn kein Drucken möglich ist: 1. Vergewissern Sie sich, dass alle Kabel korrekt angeschlossen sind. 2. Vergewissern Sie sich, dass der Drucker eingeschaltet ist und mit Strom versorgt wird. Die Netztaste (Ein) leuchtet weiß. 3. Überprüfen Sie die Wireless-Status-LED, um sicherzustellen, dass der Drucker mit einem Netzwerk verbunden ist. 4. Besuchen Sie die Website für die HP Diagnosetools unter www.hp.com/go/tools, um kostenlose Diagnoseprogramme (Tools) herunterzuladen. Diese dienen zum Beheben allgemeiner Druckerprobleme. Windows Mac Vergewissern Sie sich, dass der Drucker als Standarddrucker festgelegt ist: Überprüfen Sie die Druckwarteschlange: •• Windows 8.1 und Windows 8: Zeigen oder tippen Sie auf die obere rechte Ecke der Anzeige, um die Charms-Leiste zu öffnen. Klicken Sie dann auf das Symbol Einstellungen. Klicken oder tippen Sie auf Systemsteuerung und dann auf Geräte und Drucker anzeigen. Deutsch •• Windows 7: Klicken Sie im Windows-Menü „Start“ auf Geräte und Drucker. •• Windows Vista: Klicken Sie in der Windows-Taskleiste auf Start. Klicken Sie dann auf Systemsteuerung und Drucker. 1. Klicken Sie in den Systemeinstellungen auf Drucker & Scanner (Drucken & Faxen unter OS X 10.7 Lion und OS X 10.8 Mountain Lion). 2. Klicken Sie auf Druckwarteschlange öffnen. 3. Klicken Sie auf einen Druckauftrag, um ihn auszuwählen. 4. Verwenden Sie zum Verwalten des Druckauftrags die folgenden Schaltflächen: •• Abbrechen (Symbol): Ausgewählten Druckauftrag abbrechen. •• Fortsetzen: Angehaltenen Druckauftrag fortsetzen. •• Windows XP: Klicken Sie in der Windows-Taskleiste auf Start. Klicken Sie dann auf Systemsteuerung und Drucker und Faxgeräte. 5. Wenn Änderungen vorgenommen wurden, starten Sie einen erneuten Druckversuch. Starten Sie den Drucker neu und setzen Sie ihn zurück: Vergewissern Sie sich, dass der Kreis neben dem Drucker mit einem Häkchen markiert ist. Wenn Ihr Drucker nicht als Standarddrucker ausgewählt ist, klicken Sie mit der rechten Maustaste auf das Druckersymbol und wählen Sie im daraufhin angezeigten Menü die Option Als Standarddrucker festlegen aus. Wenn Sie ein USB-Kabel benutzen und weiterhin kein Druck möglich ist oder die Softwareinstallation scheitert: 1. Starten Sie den Computer neu. 1. Nehmen Sie die CD aus dem CD-/DVD-Laufwerk heraus und lösen Sie das USB-Kabel vom Computer. 2. Starten Sie den Computer neu. 3. Legen Sie die CD mit der Druckersoftware in das CD/ DVD-Laufwerk ein und führen Sie die Installation der Druckersoftware entsprechend den angezeigten Anweisungen durch. Schließen Sie das USB-Kabel erst an, wenn Sie dazu aufgefordert werden. 4. Starten Sie den Computer nach Abschluss der Installation neu. Wenn Sie die Wireless-Funktionen benutzen und weiterhin kein Druck möglich ist: Weitere Informationen erhalten Sie im Abschnitt „Netzwerke“ auf der nächsten Seite. 2. Setzen Sie den Drucker zurück. a. Schalten Sie den Drucker aus und ziehen Sie das Netzkabel ab. b. Warten Sie eine Minute, schließen Sie das Netzkabel wieder an und schalten Sie den Drucker ein. Setzen Sie das Drucksystem zurück: 1. Klicken Sie in den Systemeinstellungen auf Drucker & Scanner (Drucken & Faxen unter OS X 10.7 Lion und OS X 10.8 Mountain Lion). 2. Halten Sie die Taste Strg gedrückt, während Sie auf die Liste auf der linken Seite klicken. Wählen Sie dann Drucksystem zurücksetzen aus. 3. Fügen Sie den Drucker hinzu, den Sie verwenden möchten. Deinstallieren Sie die Software: 1. Ist der Drucker über ein USB-Kabel mit dem Computer verbunden, trennen Sie den Drucker von Ihrem Computer. 2. Öffnen Sie den Ordner Programme/Hewlett-Packard. 3. Doppelklicken Sie auf das Symbol für das HP Deinstallationsprogramm und befolgen Sie die angezeigten Anweisungen. Speicher für anonyme Nutzungsdaten: Von den HP Patronen wird eine begrenzte Menge an anonymen Daten zur Druckernutzung gespeichert. Weitere Informationen und Anweisungen zum Deaktivieren dieses Speichers finden Sie in der elektronischen Hilfe. Marken: Windows XP, Windows Vista, Windows 7 und Windows 8 und Windows 8.1 sind in den USA eingetragene Marken der Microsoft Corporation. Mac, OS X und AirPrint sind in den USA und/oder anderen Ländern eingetragene Marken von Apple Inc. 14 Wireless-Netzwerke Benötigen Sie Hilfe zum Netzwerkbetrieb? www.hp.com/go/wirelessprinting Im HP Wireless-Druckcenter unter www.hp.com/go/wirelessprinting erhalten Sie Hilfe zum Vorbereiten Ihres WirelessNetzwerks, zum Einrichten und erneuten Konfigurieren des Druckers und zum Beheben von Netzwerkproblemen. Wenn keine Verbindung zum Netzwerk hergestellt werden konnte •• Vergewissern Sie sich, dass der Wireless-Betrieb auf dem Drucker aktiviert ist. 1. Tippen Sie auf dem Bedienfeld des Druckers auf 2. Wird Wireless Aus angezeigt, tippen Sie auf (Wireless). (Einstellungen) und dann auf Wireless-Einst. 3. Wählen Sie dann in der Anzeige Wireless-Einst. für die Option Wireless den Wert Ein aus. •• Vergewissern Sie sich, dass der Drucker mit dem Netzwerk verbunden ist. 1. Tippen Sie auf dem Bedienfeld des Druckers auf 2. Tippen Sie auf (Wireless). (Einstellungen). 4. Prüfen Sie am Anfang des Berichts, ob beim Test ein Fehler aufgetreten ist. –– Prüfen Sie anhand des Abschnitts Diagnoseergebnisse, ob alle Tests ausgeführt und vom Drucker bestanden wurden. –– Unter Aktuelle Konfiguration finden Sie den Namen (die SSID) des Netzwerks, mit dem der Drucker zurzeit verbunden ist. Vergewissern Sie sich, dass der Drucker mit demselben Netzwerk verbunden ist wie der Computer. Deutsch 3. Tippen Sie auf Berichte drucken und dann auf Wireless-Testbericht. Der Wireless-Testbericht wird automatisch gedruckt. Hinweis: Wenn Ihr Computer mit einem Virtual Private Network (VPN) verbunden ist, trennen Sie vorübergehend die Verbindung zum VPN, bevor Sie mit der Installation fortfahren. Sie müssen nach der Installation die Verbindung zum VPN trennen, um über das eigene Heimnetzwerk auf den Drucker zugreifen zu können. •• Vergewissern Sie sich, dass die Kommunikation über das Netzwerk nicht durch Sicherheitssoftware blockiert wird. Sicherheitssoftware wie Firewalls kann die Kommunikation zwischen dem Computer und dem Drucker blockieren, wenn die Software über ein Netzwerk installiert wird. Sollte der Drucker nicht gefunden werden, deaktivieren Sie vorübergehend die Firewall und überprüfen Sie, ob das Problem dadurch behoben wurde. Weitere Hilfe und Tipps zu Sicherheitssoftware erhalten Sie unter: www.hp.com/go/wpc-firewall_de-de. •• Starten Sie die Komponenten des Wireless-Netzwerks neu. Schalten Sie den Router und den Drucker aus und schalten Sie diese in der genannten Reihenfolge wieder ein: zuerst den Router und dann den Drucker. Manchmal lassen sich Probleme mit der Netzwerkkommunikation durch Ausschalten und erneutes Einschalten beheben. Falls Sie immer noch keine Verbindung herstellen können, schalten Sie Router, Drucker und Computer aus und danach in dieser Reihenfolge wieder ein: zuerst den Router, dann den Drucker und anschließend den Computer. Hinweis: Lässt sich keine Wireless-Verbindung herstellen, kann der Drucker auch über ein Ethernet-Kabel mit dem Netzwerk verbunden werden. Sollten weiterhin Probleme auftreten, besuchen Sie das HP Wireless-Druckcenter (www.hp.com/go/wirelessprinting). Diese Website enthält die umfassendsten und neuesten Informationen zum Wireless-Druck sowie Informationen zum Vorbereiten Ihres Wireless-Netzwerks, Lösen von Problemen beim Verbinden des Druckers mit dem Wireless-Netzwerk und Lösen von Problemen in Bezug auf die Sicherheitssoftware. Hinweis: Auf einem Windows-Computer können Sie das Tool HP Print and Scan Doctor verwenden. Sollten Probleme mit dem Drucker auftreten, unterstützt Sie dieses Tool bei der Lösung vielfältiger Probleme. Sie können dieses Tool unter www.hp.com/go/tools herunterladen. Wenn Sie den Drucker mit mehreren Computern im Netzwerk gemeinsam verwenden möchten Installieren Sie zuerst den Drucker in Ihrem Heimnetzwerk. Sobald der Drucker mit Ihrem Heimnetzwerk verbunden ist, können Sie den Drucker gemeinsam mit anderen Computern im selben Netzwerk benutzen. Sie müssen bei jedem weiteren Computer nur die HP Druckersoftware installieren. 15 Wireless-Netzwerke (Forts.) So wechseln Sie von einer USB-Verbindung zu einer Wireless-Verbindung Die Druckersoftware muss bereits korrekt installiert sein. Windows 1. Befolgen Sie die Anweisungen für Ihr Betriebssystem: •• Windows 8.1: Klicken Sie auf der Startanzeige links unten auf den Pfeil nach unten, wählen Sie den Druckernamen aus und klicken Sie dann auf Dienstprogramme. •• Windows 8: Klicken Sie auf der Startanzeige mit der rechten Maustaste auf einen leeren Bereich und dann auf der AppLeiste auf Alle Apps. •• Windows 7, Windows Vista und Windows XP: Wählen Sie auf dem Computer im Menü Start die Option Alle Programme oder Programme und dann HP aus. 2. Wählen Sie HP Officejet 5740 series aus. 3. Wählen Sie Druckereinrichtung und -software aus. 4. Wählen Sie Bei Druckerverbindung von USB zu Wireless wechseln aus. Befolgen Sie die angezeigten Anweisungen. Mac Deutsch Verwenden Sie das HP Dienstprogramm unter Programme/Hewlett-Packard, um bei der Softwareverbindung für diesen Drucker zu Wireless zu wechseln. Wenn der Drucker ohne Router über eine Wireless-Verbindung verwendet werden soll Verwenden Sie Wi-Fi Direct, um drahtlos (wireless) und ohne Router von Ihrem Computer, Ihrem Smartphone oder einem anderen wireless-fähigen Gerät aus zu drucken. Die Druckersoftware muss auf einem Computer installiert sein, um Wi-Fi Direct vom Computer aus verwenden zu können. 1. Vergewissern Sie sich, dass Wi-Fi Direct auf Ihrem Drucker aktiviert ist: a. Tippen Sie auf dem Druckerdisplay in der Startanzeige auf b. Ist für Status der Wert Aus angegeben, tippen Sie auf (Wi-Fi Direct). (Wi-Fi Direct – Einstellungen) und schalten Sie Wi-Fi Direct ein. 2. Verbinden Sie Ihr wireless-fähiges Gerät mit dem Drucker: a. Aktivieren Sie die Wi-Fi-Verbindung auf Ihrem mobilen Gerät. Weitere Informationen hierzu finden Sie in der Dokumentation zum mobilen Gerät. b. Stellen Sie vom mobilen Gerät aus eine Verbindung zu einem neuen Netzwerk her. Führen Sie dabei Ihre üblichen Arbeitsschritte aus, um eine Verbindung zu einem neuen Wireless-Netzwerk oder einem Hotspot herzustellen. Wählen Sie den Namen für Wi-Fi Direct in der angezeigten Liste mit den Wireless-Netzwerken aus wie DIRECT-**-HP Officejet-5740. (Dabei stehen die Sternchen ** für die eindeutigen Zeichen zur Kennzeichnung des Druckers.) c. Geben Sie bei der entsprechenden Aufforderung das Kennwort für Wi-Fi Direct ein. 3. Drucken Sie in derselben Weise wie mit dem Computer oder einem mobilen Gerät. Hinweis: Über eine Verbindung für Wi-Fi Direct wird kein Zugriff auf das Internet bereitgestellt. Im HP Wireless-Druckcenter unter www.hp.com/go/wirelessprinting finden Sie weitere Informationen zu Wi-Fi Direct. Dieses Produkt ist für die Verwendung in offenen Umgebungen (z. B. zu Hause ohne Verbindung mit dem öffentlichen Internet) gedacht, in denen jeder auf den Drucker zugreifen und diesen verwenden kann. Infolgedessen wird für Wi-Fi Direct standardmäßig der automatische Modus ohne Administratorkennwort eingestellt. Dies ermöglicht es allen Benutzern in Wireless-Reichweite, eine Verbindung herzustellen und auf alle Funktionen und Einstellungen des Druckers zuzugreifen. Wenn höhere Sicherheitsstufen gewünscht sind, empfiehlt HP, die Verbindungsmethode für Wi-Fi Direct von „Automatisch“ in „Manuell“ zu ändern und ein Administratorkennwort einzurichten. Wenn Sie mit AirPrint drucken möchten Dieser Drucker ist für Apple AirPrint® aktiviert. Sie können drahtlos von Ihrem iOS-Gerät oder Mac drucken. •• Der Drucker und das iOS-Gerät bzw. der Mac müssen sich im selben lokalen Netzwerk befinden. •• Mit Apple AirPrint® können Sie keine Dokumente von Ihrem Drucker zum iOS-Gerät scannen. 16 Faxeinrichtung 1. Schließen Sie das Telefonkabel an. Hinweis: HP Drucker wurden speziell für die Verwendung herkömmlicher analoger Telefondienste entwickelt. Wenn Sie in einer digitalen Telefonumgebung (wie DSL/ADSL, PBX, ISDN oder FoIP) arbeiten, müssen Sie ggf. Digital-zu-Analog-Filter oder -Konverter verwenden, wenn Sie die Faxfunktion auf dem Drucker einrichten. Informieren Sie sich bei Ihrer Telefongesellschaft über die Einrichtungsoptionen, die sich bei Ihnen am besten eignen. Wenn die Telefonleitung nur für Faxe verwendet wird a. Schließen Sie ein Ende des Telefonkabels an der Telefonsteckdose an. b. Schließen Sie das andere Ende des Kabels an den Anschluss 1-LINE auf der Rückseite des Druckers an. Wenn Sie mit DSL/ADSL arbeiten, schließen Sie einen DSL-/ADSL-Filter zwischen dem Anschluss 1-LINE und der Telefonsteckdose an. 2 3 Telefonsteckdose Faxanschluss (1-LINE) Hinweis: Schließen Sie das Kabel nicht am Anschluss 2-EXT an. DSL-/ADSL-Filter (von der Telefongesellschaft oder vom Dienstanbieter bereitgestellt) Wenn weitere Geräte an der Telefonleitung angeschlossen werden Deutsch 1 Wenn Sie weitere Geräte anschließen müssen, schließen Sie diese wie im Diagramm weiter unten dargestellt an: * TAM: Telefonanrufbeantworter 1 2 3 4 5 6 7 8 9 10 Telefonsteckdose Splitter für parallele Leitungen DSL-/ADSL-Modem Telefonanrufbeantworter Telefon ISDN-Steckdose Terminaladapter oder ISDN-Router Breitbandmodem DSL-/ADSL-Filter Adapter für Analogtelefone ** FoIP: Fax über Internetprotokoll 2. Testen Sie die Faxeinrichtung. Beim Faxtest werden die Hardware, der Telefonkabeltyp und der Verbindungsstatus geprüft. Außerdem werden das Rufsignal und die Telefonleitung geprüft. So führen Sie den Faxtest aus a. Drücken Sie auf dem Druckerdisplay in der Startanzeige die Schaltflächen Nach oben und Nach unten, um Fax auszuwählen. Drücken Sie dann OK. b. Wählen Sie Einstellungen, Erweiterte Einstellungen und Faxeinrichtungsassistent aus. Befolgen Sie dann die angezeigten Anweisungen. 17 Verwenden der Faxfunktion Senden einer Standardfaxnachricht 1. Legen Sie das Original mit der bedruckten Seite nach unten an der rechten vorderen Ecke des Scannerglases an oder mit der bedruckten Seite nach oben in den Vorlageneinzug ein. 2. Tippen Sie auf dem Bedienfelddisplay des Druckers auf Faxen. 3. Tippen Sie auf Jetzt senden. 4. Geben Sie die Faxnummer über das Tastenfeld ein. Um eine Pause in die Faxnummer einzufügen, drücken Sie wiederholt die Taste *, bis auf der Anzeige ein Gedankenstrich (–) erscheint. 5. Tippen Sie auf Schwarz oder Farbe. Wird vom Drucker ein Original im Vorlageneinzug festgestellt, wird das Dokument an die eingegebene Nummer gesendet. Wenn der Empfänger die Qualität der von Ihnen gesendeten Faxnachricht bemängelt, ändern Sie probeweise die Auflösung oder den Kontrast der Faxnachricht. Senden einer Faxnachricht von einem Nebenstellentelefon aus Deutsch 1. Wählen Sie die Nummer über das Tastenfeld des Nebenstellentelefons. Verwenden Sie bei dieser Methode nicht die Tasten des Druckerbedienfelds. 2. Wenn der Empfänger den Telefonanruf entgegennimmt, können Sie sich mit ihm unterhalten, bevor Sie die Faxnachricht senden. Wenn ein Faxgerät den Anruf entgegennimmt, hören Sie Faxtöne vom empfangenden Faxgerät. 3. Legen Sie das Original mit der bedruckten Seite nach unten an der rechten vorderen Ecke des Scannerglases an oder mit der bedruckten Seite nach oben in den Vorlageneinzug ein. 4. Tippen Sie auf dem Bedienfelddisplay des Druckers auf Faxen. 5. Tippen Sie auf Fax senden. 6. Tippen Sie auf Schwarz oder Farbe. Wenn Sie mit dem Empfänger telefonieren, bitten Sie ihn, den Faxempfang zu starten, wenn er Faxtöne am Faxgerät hört. Nachdem der Faxversand vom Drucker gestartet wurde, können Sie den Hörer auflegen oder in der Leitung bleiben. Während der Faxübertragung hören Sie ggf. keine Faxtöne. Weitere Informationen zu weiteren Methoden zum Senden von Faxen, z. B. das Versenden zu einem späteren Zeitpunkt oder von einem Computer aus, finden Sie in der elektronischen Hilfe. Automatischer Faxempfang Standardmäßig beantwortet der Drucker automatisch eingehende Anrufe und empfängt Faxe. Schalten Sie zum manuellen Empfang von Faxen Autom. Antwort über das Druckerbedienfeld aus. Eingehende Anrufe werden vom Drucker dann angenommen, wenn die Anzahl der in der Einstellung Signale bis Antwort festgelegten Rufsignale erreicht wurde. Falls ein Anrufbeantworter am Drucker angeschlossen ist, muss die Einstellung für Signale bis Antwort bis zur Entgegennahme eines Anrufs für den Drucker auf einen höheren Wert eingestellt werden als für den Anrufbeantworter. 1. Stellen Sie sicher, dass der Drucker eingeschaltet und Papier eingelegt ist. 2. Tippen Sie auf dem Druckerdisplay auf Faxen. 3. Tippen Sie auf Einrichtung und dann auf Voreinstellungen. 4. Wählen Sie für die Option Autom. Antwort den Wert Ein aus. Hinweis: Wenn Sie an der Telefonleitung, die Sie zum Faxen verwenden, einen Voicemail-Dienst nutzen, können Faxnachrichten nicht automatisch empfangen werden. Sie müssen in diesem Fall eingehende Faxanrufe persönlich entgegennehmen. (Wenn Sie Faxnachrichten automatisch empfangen möchten, wenden Sie sich an Ihre Telefongesellschaft, um einen Dienst zur Rufsignalunterscheidung oder eine separate Telefonleitung für den Faxbetrieb zu beantragen.) Der Drucker kann empfangene Faxe im internen Speicher speichern. Informationen zum Drucken dieser Faxe finden Sie auf der nächsten Seite im Abschnitt „Erneutes Drucken empfangener Faxe aus dem Speicher”. 18 Verwenden der Faxfunktion (Fortsetzung) Manuelles Empfangen einer Faxnachricht Wenn Sie ein Telefongespräch mit einer anderen Person führen, können Sie Faxnachrichten manuell empfangen, ohne den Hörer aufzulegen. 1. Stellen Sie sicher, dass der Drucker eingeschaltet und Papier eingelegt ist. 2. Entfernen Sie alle Originale aus dem Vorlageneinzug. Legen Sie für die Einstellung Signale bis Antwort einen höheren Wert fest, damit Sie den Anruf vor dem Drucker entgegennehmen können. Oder deaktivieren Sie die Einstellung Autom. Antwort, damit eingehende Anrufe nicht automatisch vom Drucker angenommen werden. 3. Bitten Sie den Absender, den Faxversand zu starten. 4. Wenn Sie Faxtöne hören, tippen Sie auf dem Druckerbedienfeld in der Startanzeige auf Faxen, Senden und empfangen und dann auf Jetzt empfangen. Nachdem der Faxempfang vom Drucker gestartet wurde, können Sie den Hörer auflegen oder in der Leitung bleiben. Während der Faxübertragung hören Sie ggf. keine Faxtöne. Wenn Faxempfang sichern aktiviert ist, werden eingehende Faxnachrichten selbst dann im Speicher abgelegt, wenn auf dem Drucker eine Fehlerbedingung auftritt. Hinweis: Alle gespeicherten Faxnachrichten werden gelöscht, wenn die Stromversorgung des Druckers unterbrochen wird. 1. Vergewissern Sie sich, dass Papier im Drucker eingelegt ist. Deutsch Erneutes Drucken empfangener Faxe aus dem Speicher 2. Tippen Sie auf dem Druckerdisplay in der Startanzeige auf das Symbol Faxen. 3. Tippen Sie auf Abzüge. Die Faxe werden in der umgekehrten Reihenfolge angezeigt, in der sie empfangen wurden, d. h. das zuletzt empfangene Fax wird zuerst ausgegeben. 4. Drücken Sie zum Stoppen des Druckvorgangs auf Abbrechen. Drucken eines Berichts oder Protokolls Faxberichte enthalten nützliche Systeminformationen zum Drucker. 1. Tippen Sie auf dem Druckerdisplay in der Startanzeige auf Einrichtung und dann auf Faxeinrichtung. 2. Tippen Sie auf Berichte und anschließend auf Faxbestätigung. 3. Tippen Sie, um eine der Optionen auszuwählen. 19 Lösen von Faxproblemen Sollten nach erfolgreicher Durchführung des Faxtests Probleme mit dem Faxen auftreten, gehen Sie wie folgt vor: Faxe können empfangen, aber nicht gesendet werden 1. Kopier- oder Scanauftrag ausführen, um sicherzustellen, dass der Drucker einwandfrei funktioniert. 2. Physische Anschlussverbindungen zum Faxgerät überprüfen. 3. Überprüfen, ob andere Faxgeräte Faxnachrichten an dieselbe Telefonnummer senden können. Auf dem empfangenden Faxgerät könnte Ihre Telefonnummer gesperrt sein, oder es könnten dort technische Probleme vorliegen. 4. Tritt das Problem weiterhin auf, drucken Sie den Testbericht oder das Faxprotokoll (und, falls verfügbar, den Anrufer-ID- und Junk-Fax-Bericht). Wenden Sie sich für weitere Unterstützung an HP. Faxe können gesendet, aber nicht empfangen werden 1. Faxeinstellungen auf dem Drucker überprüfen. Deutsch 2. Physische Anschlussverbindungen zum Faxgerät überprüfen. 3. Überprüfen, ob andere Faxgeräte, die an derselben Telefonleitung angeschlossen sind, Faxnachrichten empfangen können. Die Telefonleitung ist ggf. defekt, oder auf dem Faxgerät des Absenders treten Probleme beim Senden von Faxnachrichten auf. Außerdem empfiehlt es sich zu überprüfen, ob die Telefonnummer des Absenders von Ihnen gesperrt wurde. 4. Problem mit dem Absender besprechen. Tritt das Problem weiterhin auf, drucken Sie den Testbericht oder das Faxprotokoll (und, falls verfügbar, den AnruferID- und Junk-Fax-Bericht). Wenden Sie sich für weitere Unterstützung an HP. Faxe können weder gesendet noch empfangen werden 1. Kopier- oder Scanauftrag ausführen, um sicherzustellen, dass der Drucker einwandfrei funktioniert. 2. Physische Anschlussverbindungen zum Faxgerät überprüfen. 3. Faxeinstellungen auf dem Drucker überprüfen. 4. Überprüfen, ob andere Faxgeräte, die an derselben Telefonleitung angeschlossen sind, Faxnachrichten senden oder empfangen können. Möglicherweise liegt ein Problem mit der Telefonleitung vor. 5. Drucker zurücksetzen, indem Sie den Drucker ausschalten, und, falls möglich, die Stromversorgung über den Hauptschalter unterbrechen. Warten Sie einige Sekunden, bis Sie den Drucker wieder einschalten. Versuchen Sie, eine Faxnachricht zu senden oder zu empfangen. 6. Tritt das Problem weiterhin auf, drucken Sie den Testbericht oder das Faxprotokoll (und, falls verfügbar, den Anrufer-ID- und Junk-Fax-Bericht). Wenden Sie sich für weitere Unterstützung an HP. 7. Hinweis: Wenn Sie an der Telefonleitung, die Sie zum Faxen verwenden, einen Voicemail-Dienst nutzen, müssen Faxnachrichten manuell empfangen werden. 20 Überprüfen der Faxeinstellungen des Druckers •• Die Funktion Autom. Antwort ist für den Drucker aktiviert, um Faxnachrichten automatisch zu empfangen. •• Wenn Sie einen Voicemail-Dienst Ihres Telekommunikationsanbieters nutzen, vergewissern Sie sich, dass für Rufsignale bis Antwort auf dem Drucker ein höherer Wert eingestellt wurde als für den Anrufbeantworter. Der Drucker überwacht die Telefonleitung und entscheidet, ob es sich beim eingehenden Anruf um einen normalen Telefonanruf oder einen Faxanruf handelt. Handelt es sich um einen Faxanruf, wird vom Drucker automatisch eine Faxverbindung gestartet. Ansonsten müssen Sie das Fax möglicherweise manuell empfangen, indem Sie auf dem Druckerdisplay Faxen auswählen. •• Wenn derselben physischen Telefonleitung mehrere Telefonnummern zugewiesen sind und die Leitung von mehreren Geräten gemeinsam genutzt wird, müssen Sie sicherstellen, dass die Sonderrufsignaleinstellung für das empfangende Faxgerät korrekt ist. Überprüfen der physischen Faxverbindungen •• Verbinden Sie das Telefonkabel des Anschlusses 1-LINE an der Rückseite des Druckers mit der Telefonsteckdose. Verbinden Sie ein Telefonkabel am Anschluss 2-EXT an der Rückseite des Druckers mit einem Nebenstellentelefon. Rufen Sie vom Nebenstellentelefon die Telefonnummer an, über die keine Faxnachrichten empfangen werden konnten. •• Wenn Sie versuchen, an eine externe Nummer zu faxen, müssen Sie ggf. erforderliche Zugriffscodes und -nummern vor der eigentlichen Nummer eingeben. Außerdem müssen Sie möglicherweise eine Pause in die Nummer einfügen, um zu verhindern, dass der Drucker zu schnell wählt. Um eine Pause einzufügen, drücken Sie wiederholt die Taste *, bis auf der Anzeige ein Gedankenstrich (–) erscheint. •• Wenn keine ausgehenden Anrufe möglich sind, weil kein Rufsignal in der Leitung zu hören ist bzw. Störgeräusche zu hören sind, tauschen Sie das Telefonkabel am Telefonanschluss 1-LINE aus. Stellen Sie den Drucker (falls möglich) an einem Ort auf, an dem eine separate Telefonleitung verfügbar ist. Prüfen Sie, ob ähnliche Probleme auftreten. •• Wenn Sie in einer digitalen Telefonumgebung arbeiten (wie FoIP, Fax over VoIP), verwenden Sie das Bedienfeld des Druckers, um die Faxgeschwindigkeit zu reduzieren oder ECM (Error Code Modulation) zu deaktivieren. Wenden Sie sich bei Bedarf an Ihre Telefongesellschaft, um festzustellen, ob Probleme mit der Telefonleitung vorliegen, oder um sich über die Möglichkeiten des Telefonnetzes zu informieren. HP Produkt Dauer der beschränkten Gewährleistung Softwaremedien 90 Tage Drucker 1 Jahr Druckpatronen Bis die HP Tinte verbraucht oder das auf der Druckpatrone angegebene Enddatum für die Garantie erreicht ist, je nachdem, welcher Fall zuerst eintritt. Diese Garantie gilt nicht für nachgefüllte, nachgearbeitete, recycelte, zweckentfremdete oder in anderer Weise manipulierte HP Tintenprodukte. Druckköpfe (gilt nur für Produkte, deren Druckkopf vom Kunden ausgewechselt werden kann) 1 Jahr Zubehör 1 Jahr (wenn nicht anders angegeben) A. Umfang der beschränkten Gewährleistung 1. HP Inc. (HP) gewährleistet dem Endkunden, dass die oben genannten HP Produkte während des oben genannten Gewährleistungszeit-raums frei von Material- und Verarbeitungsfehlern sind. Der Gewährleistungszeitraum beginnt mit dem Kaufdatum. 2. Bei Softwareprodukten gilt die eingeschränkte Garantie von HP nur für die Nichtausführung von Programmieranweisungen. HP übernimmt keine Garantie dafür, dass die Verwendung jeglicher Produkte unterbrechungsfrei bzw. ohne Fehler verläuft. 3. Die beschränkte Gewährleistung von HP gilt nur für Mängel, die sich bei normaler Benutzung des Produkts ergeben, und erstreckt sich nicht auf Fehler, die durch Folgendes verursacht wurden: a. Unsachgemäße Wartung oder Abänderung des Produkts; b. Software, Druckmedien, Ersatzteile oder Verbrauchsmaterial, die nicht von HP geliefert oder unterstützt werden; c. Betrieb des Produkts, der nicht den technischen Daten entspricht; d. Unberechtigte Abänderung oder falsche Verwendung. 4. Bei HP Druckerprodukten wirkt sich die Verwendung einer nicht von HP hergestellten bzw. einer aufgefüllten Patrone nicht auf die Garantie für den Kunden bzw. auf jegliche Unterstützungsverträge mit dem Kunden aus. Wenn der Ausfall bzw. die Beschädigung des Druckers jedoch auf die Verwendung einer nicht von HP hergestellten bzw. einer aufgefüllten Patrone oder einer abgelaufenen Tintenpatrone zurückzuführen ist, stellt HP für die Wartung des Druckers bei diesem Ausfall bzw. dieser Beschädigung die standardmäßigen Arbeits- und Materialkosten in Rechnung. 5. Wenn HP während des jeweils zutreffenden Gewährleistungszeitraums von einem Schaden an einem unter die Gewährleistung von HP fallenden Produkt in Kenntnis gesetzt wird, wird das betreffende Produkt nach Wahl von HP entweder repariert oder ersetzt. 6. Sollte HP nicht in der Lage sein, ein fehlerhaftes, unter die Gewährleistung fallendes Produkt zu reparieren oder zu ersetzen, erstattet HP innerhalb eines angemessenen Zeitraums nach Benachrichtigung über den Schaden den vom Endkunden bezahlten Kaufpreis für das Produkt zurück. 7. HP ist erst dann verpflichtet, das mangelhafte Produkt zu reparieren, zu ersetzen oder den Kaufpreis zurückzuerstatten, wenn der Endkunde dieses an HP zurückgesandt hat. 8. Ersatzprodukte können entweder neu oder neuwertig sein, solange sie über mindestens denselben Funktionsumfang verfügen wie das zu ersetzende Produkt. 9. HP Produkte können aufgearbeitete Teile, Komponenten oder Materialien enthalten, die in der Leistung neuen Teilen entsprechen. 10. Die Erklärung zur beschränkten Gewährleistung von HP gilt in jedem Land, in dem die aufgeführten Produkte von HP vertrieben werden. Weitergehende auf der Gewährleistung beruhende Dienstleistungen (z.B. Vor-Ort-Service) können mit jeder autorisierten HP Serviceeinrichtung in den Ländern vereinbart werden, in denen das Produkt durch HP oder einen autorisierten Importeur vertrieben wird. B. Einschränkungen der Gewährleistung WEDER HP NOCH DESSEN ZULIEFERER ÜBERNEHMEN ÜBER DAS NACH GELTENDEM RECHT ZULÄSSIGE AUSMASS HINAUS ANDERE AUSDRÜCKLICHE ODER STILLSCHWEIGENDE GEWÄHRLEISTUNGEN ODER ZUSICHERUNGEN HINSICHTLICH DER MARKTGÄNGIGKEIT, ZUFRIEDEN STELLENDEN QUALITÄT UND EIGNUNG FÜR EINEN BESTIMMTEN ZWECK. C. Haftungsbeschränkung 1. Sofern durch die geltende Gesetzgebung keine anderen Bestimmungen festgelegt sind, stehen dem Endkunden über die in dieser Gewährleistungsvereinbarung genannten Leistungen hinaus keine weiteren Ansprüche zu. 2. IN DEM NACH GELTENDEM RECHT ZULÄSSIGEN MASS UND MIT AUSNAHME DER IN DIESER GEWÄHRLEISTUNGSVEREINBARUNG AUSDRÜCKLICH ANGEGEBENEN VERPFLICHTUNGEN SIND WEDER HP NOCH DESSEN ZULIEFERER ERSATZPFLICHTIG FÜR DIREKTE, INDIREKTE, BESONDERE, ZUFÄLLIGE ODER FOLGESCHÄDEN, UNABHÄNGIG DAVON, OB DIESE AUF DER GRUNDLAGE VON VERTRÄGEN, UNERLAUBTEN HANDLUNGEN ODER ANDEREN RECHTSTHEORIEN GELTEND GEMACHT WERDEN UND OB HP ODER DESSEN ZULIEFERER VON DER MÖGLICHKEIT EINES SOLCHEN SCHADENS UNTERRICHTET WORDEN SIND. D. Geltendes Recht 1. Diese Gewährleistungsvereinbarung stattet den Endkunden mit bestimmten Rechten aus. Der Endkunde hat unter Umständen noch weitere Rechte, die in den Vereinigten Staaten von Bundesstaat zu Bundesstaat, in Kanada von Provinz zu Provinz, und allgemein von Land zu Land verschieden sein können. 2. Soweit diese Gewährleistungsvereinbarung nicht dem geltenden Recht entspricht, soll sie als dahingehend abgeändert gelten, dass die hierin enthaltenen Bestimmungen dem geltenden Recht entsprechen. Unter dem geltenden Recht treffen bestimmte Erklärungen und Einschränkungen dieser Gewährleistungsvereinbarung möglicherweise nicht auf den Endkunden zu. In einigen US-Bundesstaaten und in einigen anderen Ländern (sowie in einigen kanadischen Provinzen): a. werden die Rechte des Verbrauchers nicht durch die Erklärungen und Einschränkungen dieser Gewährleistungsvereinbarung beschränkt (z.B. in Großbritannien); b. ist ein Hersteller nicht berechtigt, solche Erklärungen und Einschränkungen durchzusetzen; c. verfügt ein Endkunde über weitere Gewährleistungsansprüche; insbesondere kann die Dauer stillschweigender Gewährleistungen durch das geltende Recht geregelt sein und darf vom Hersteller nicht eingeschränkt werden, oder eine zeitliche Einschränkung der stillschweigenden Gewährleistung ist zulässig. 3. DURCH DIESE GEWÄHRLEISTUNGSVEREINBARUNG WERDEN DIE ANSPRÜCHE DES ENDKUNDEN, DIE DURCH DAS IN DIESEN LÄNDERN GELTENDE RECHT IM ZUSAMMENHANG MIT DEM KAUF VON HP PRODUKTEN GEWÄHRT WERDEN, NUR IM GESETZLICH ZULÄSSIGEN RAHMEN AUSGESCHLOSSEN, EINGESCHRÄNKT ODER GEÄNDERT. DIE BEDINGUNGEN DIESER GEWÄHRLEISTUNGS-VEREINBARUNG GELTEN ZUSÄTZLICH ZU DEN GESETZLICHEN ENDKUNDENRECHTEN. Deutsch Erklärung zur beschränkten Gewährleistung für HP Drucker 21 HP Herstellergarantie Die beschränkte HP Herstellergarantie ist eine von HP auf freiwilliger Basis angebotene kommerzielle Garantie. Der Name und die Adresse der HP Gesellschaft, die in Ihrem Land für die Gewährung der beschränkten HP Herstellergarantie verantwortlich ist, sind wie folgt: Deutschland: HP Deutschland GmbH, Schickardstr. 32, D-71034 Böblingen Österreich: HP PPS Austria GmbH., Wienerbergstrasse 41, A-1120 Wien Luxemburg: Hewlett-Packard Luxembourg S.C.A., 75, Parc d’Activités Capellen, Rue Pafebruc, L-8308 Capellen Belgien: HP Belgium BVBA, Hermeslaan 1A, B-1831 Diegem Die Rechte aus der beschränkten HP Herstellergarantie gelten zusätzlich zu den gesetzlichen Ansprüchen wegen Sachmängeln auf eine zweijährige Gewährleistung ab dem Lieferdatum. Ob Sie Anspruch auf diese Rechte haben, hängt von zahlreichen Faktoren ab. Die Rechte des Kunden sind in keiner Weise durch die beschränkte HP Herstellergarantie eingeschränkt bzw. betroffen. Weitere Hinweise finden Sie auf der folgenden Website: Gewährleistungsansprüche für Verbraucher oder Sie können die Website des Europäischen Verbraucherzentrums besuchen. Verbraucher haben das Recht zu wählen, ob sie eine Leistung von HP gemäß der beschränkten HP Herstellergarantie in Anspruch nehmen oder ob sie sich gemäß der gesetzlichen zweijährigen Haftung für Sachmängel (Gewährleistung) sich an den jeweiligen Verkäufer wenden. Weitere Informationen erhalten Sie über den folgenden Link: Consumer Legal Guarantee (www.hp.com/go/eu-legal). Sie können dazu auch die European Consumer Centers Website (http://ec.europa.eu/consumers/solving_consumer_disputes/non-judicial_redress/ecc-net/) besuchen. Deutsch 22 HP Officejet série 5740 e-All-in-One Démarrage 1. Suivez les illustrations figurant sur le prospectus pour configurer votre imprimante. 2. Installez le logiciel. Windows® Allez sur 123.hp.com/OJ5740 et suivez les instructions à l'écran. Si votre ordinateur n'est pas connecté à Internet, insérez le CD du logiciel dans votre ordinateur. Si le CD ne s'exécute pas, allez dans Ordinateur, double-cliquez sur l'icône du lecteur CD/DVD à l'effigie du logo HP, double-cliquez ensuite sur setup.exe, et suivez les instructions qui s'affichent. OS X/iOS Pour installer le dernier logiciel HP sur un Mac, allez sur 123.hp.com/OJ5740. Le logiciel HP pour Mac n'est pas inclus sur le CD du logiciel fourni avec l'imprimante. Ce produit est compatible avec Apple AirPrint. L'imprimante et le périphérique iOS ou Mac doivent être connectés au même réseau local. Remarque : pensez toujours à vérifier que le bac contient le type de papier souhaité. Une fois bac refermé, veillez à ce que ce papier ait été sélectionné sur le panneau de commande de l'imprimante. En savoir plus Aide électronique : installez l'Aide électronique en sélectionnant cette option parmi les logiciels recommandés pendant l'installation du logiciel. Découvrez les fonctionnalités du produit, comment imprimer, résoudre des problèmes et obtenir une assistance. Obtenez des avis, des informations environnementales et réglementaires, y compris les déclarations de conformité et les avis d'application de la réglementation de l'Union européenne, dans la section Informations techniques. •• Windows® 8.1 : cliquez sur la flèche du bas située en bas à gauche de l'écran d'accueil, sélectionnez le nom de l'imprimante, cliquez sur Aide, puis sur Rechercher dans l'aide HP. •• Windows® 7, Windows Vista® et Windows® XP : cliquez sur Démarrer > Tous les programmes > HP > HP Officejet série 5740 > Aide. •• OS X : cliquez sur Aide > Centre d'aide. Dans la fenêtre d'affichage de l'Aide, cliquez sur Aide applicable à toutes les apps, puis sur HP Officejet série 5740. Fichier LisezMoi : contient des informations sur le support HP, la configuration requise du système d'exploitation et les mises à jour récentes de l'imprimante. •• Windows : insérez le CD du logiciel dans votre ordinateur, puis recherchez le fichier ReadMe.chm. Double-cliquez sur le fichier ReadMe.chm pour l'ouvrir, puis sélectionnez le fichier ReadMe.chm dans votre langue. •• Mac : ouvrez le dossier Documents situé au niveau supérieur de l'installateur du logiciel. Double-cliquez sur ReadMe, puis sélectionnez le fichier ReadMe dans votre langue. Sur le Web : aide et informations supplémentaires : www.hp.com/go/support. Enregistrement de l'imprimante : www.register.hp.com. Déclaration de conformité : www.hp.eu/certificates. Utilisation de l'encre : www.hp.com/go/inkusage. Numérisation du code pour plus d'informations! Les débits de données standard peuvent s'appliquer. Les informations peuvent être indisponibles dans certaines langues. www.hp.com/eu/m/OJ5740 Les informations mentionnées peuvent être modifiées sans préavis. Français •• Windows® 8 : cliquez avec le bouton droit de la souris sur une zone vide de l'écran d'accueil. Dans la barre d'applications, choisissez Toutes les applications, puis cliquez sur l'icône portant le nom de l'imprimante et sélectionnez Aide. Panneau de commande 1 Voyant sans fil : indique que l'état de la connexion sans fil de l'imprimante. •• Un voyant bleu figé indique que la connexion sans fil a été établie et que vous pouvez imprimer. •• Un voyant clignotant lentement indique que l'option sans fil est activée mais que l'imprimante n'est connectée à aucun réseau. Assurez-vous que l'imprimante se trouve dans la plage de signaux sans fil. •• Un voyant qui clignote rapidement indique une erreur de connexion sans fil. Reportez-vous aux messages affichés sur l'écran de l'imprimante. •• Si la liaison sans fil est désactivée, le voyant de la liaison sans fil est éteint et l'écran d'affichage indique Sans fil désactivé. Français 2 Bouton Marche/Arrêt : Permet d'allumer ou d'éteindre l'imprimante. 3 Bouton Retour : retourne à l'écran précédent. 4 Bouton Aide : affiche le contenu de l'aide si elle disponible pour l'opération en cours. 5 Bouton Accueil : renvoie à l'écran d'accueil qui s'affiche lorsque vous mettez pour la première fois l'imprimante sous tension. 6 Écran du panneau de commande : touchez l'écran pour sélectionner les options du menu et parcourez les éléments du menu. 7 Bouton Communication en champ proche (CCP) : ce bouton indique la zone dans laquelle vous pouvez imprimer des documents et des images d'un périphérique mobile (comme un smartphone ou une tablette), en touchant simplement le périphérique sur l'imprimante. Informations de sécurité Respectez toujours les précautions de sécurité élémentaires quand vous utilisez cette imprimante afin de réduire les risques de blessures dues au feu ou d'électrocution. 1. Lisez attentivement toutes les instructions contenues dans la documentation livrée avec l'imprimante. 2. Suivez tous les avertissements et toutes les instructions indiqués sur l'imprimante. 3. Débranchez cette imprimante des prises murales avant de procéder à un nettoyage. 4. N'installez jamais cette imprimante près d'un point d'eau et évitez de la manipuler avec les mains humides. 5. Installez l'imprimante en toute sécurité sur une surface stable. 6. Installez l'imprimante en un lieu protégé où personne ne puisse marcher sur le cordon d'alimentation ou trébucher dessus,et où ce dernier ne puisse pas être endommagé. 7. Si l'imprimante ne fonctionne pas normalement, consultez le fichier d'aide (auquel vous pouvez accéder sur votre ordinateur après avoir installé le logiciel). 8. Le produit ne contient aucune pièce dont l'entretien doit être réalisé par l'utilisateur. Confiez les opérations d'entretien et de réparation à un technicien qualifié. 9. Utilisez uniquement le cordon d'alimentation et l'adaptateur secteur éventuellement fournis par HP. 24 Résolution des problèmes de base Si vous ne parvenez pas à imprimer : 1. Assurez-vous que les câbles sont correctement branchés. 2. Assurez-vous que l'imprimante est sous tension. Le bouton Marche/Arrêt s'allumera en blanc. 3. Observez le voyant d'état de la connexion sans fil pour savoir si votre imprimante est connectée à un réseau. Windows Mac Assurez-vous que l'imprimante est définie en tant que périphérique d'impression par défaut : Contrôlez votre file d'attente d'impression : 1. dans Préférences du système, cliquez sur Imprimantes et scanners (Impression et télécopie dans OS X v10.7 Lion et OS X v10.8 Mountain Lion). 2. Cliquez sur Ouvrir la liste d'attente d'impression. 3. Cliquez sur une tâche d'impression pour la sélectionner. 4. Utilisez les boutons de contrôle de l'impression ci-après. •• Icône Annuler : annule la tâche d'impression sélectionnée. •• Reprendre : reprend la tâche d'impression mise en attente. 5. Si vous avez effectué des modifications, lancez une nouvelle impression. •• Windows 8.1 et Windows 8 : allez dans le coin supérieur droit de l'écran pour ouvrir la barre des applications, cliquez sur l'icône Paramètres, puis sur Panneau de commande et enfin sur Afficher les périphériques et les imprimantes. •• Windows 7 : dans le menu Démarrer de Windows, cliquez sur Périphériques et imprimantes. •• Windows Vista : dans la barre des tâches de Windows, cliquez sur Démarrer, sélectionnez Panneau de configuration, puis Imprimantes. •• Windows XP : dans la barre des tâches de Windows, cliquez sur Démarrer, Panneau de configuration, puis Imprimantes et télécopieurs. Assurez-vous que le cercle jouxtant le nom de votre imprimante comporte une marque de sélection. Si votre imprimante n'est pas sélectionnée en tant qu'imprimante par défaut, cliquez avec le bouton droit sur l'icône de l'imprimante et sélectionnez Définir comme imprimante par défaut dans le menu. Si vous utilisez un câble USB et vous ne pouvez toujours pas imprimer ou l'installation du logiciel échoue : 1. Retirez le CD du lecteur de CD/DVD de votre ordinateur, puis débranchez le câble USB de l'ordinateur. 2. Redémarrez l’ordinateur. 3. Insérez le CD du logiciel d'impression dans le lecteur de CD/DVD de l'ordinateur, puis suivez les instructions à l'écran pour installer le logiciel. Ne branchez le câble USB que lorsque vous y êtes invité. 4. Une fois l'installation terminée, redémarrez l'ordinateur. Si vous utilisez le sans fil et vous ne parvenez toujours pas à imprimer : Consultez la section Réseau sur la page suivante pour en savoir plus. Redémarrez et réinitialisez : 1. Redémarrez l’ordinateur. 2. Réinitialisez l'imprimante. a. Mettez l'imprimante hors tension, puis débranchez le cordon d'alimentation. b. Patientez environ une minute avant de le reconnecter. Mettez sous tension l'imprimante. Réinitialisation du système d'impression : 1. dans Préférences du système, cliquez sur Imprimantes et scanners (Impression et télécopie dans OS X v10.7 Lion et OS X v10.8 Mountain Lion). 2. Appuyez sur la touche Contrôle et maintenez-la enfoncée tout en cliquant sur la liste à gauche, puis sélectionnez Réinitialiser le système d'impression. 3. Ajoutez l'imprimante que vous souhaitez utiliser. Français 4. Consultez le site Web Outils de diagnostic HP sur www.hp.com/go/tools pour télécharger des utilitaires de diagnostic gratuits (outils) que vous pouvez utiliser pour résoudre les problèmes les plus courants. Désinstallation du logiciel : 1. Si l'imprimante est connectée à votre ordinateur par câble USB, débranchez-la de votre ordinateur. 2. Ouvrez le dossier Applications/Hewlett-Packard. 3. Double-cliquez sur Programme d'installation HP, puis suivez les instructions à l'écran. Stockage des informations anonymes sur l'utilisation : Les cartouches HP contiennent une quantité limitée d'informations anonymes sur la consommation de l'imprimante. Pour obtenir plus d'informations et d'instructions sur la désactivation de cette collecte d'informations, reportez-vous à l'Aide en ligne. Mentions légales : Windows XP, Windows Vista, Windows 7, Windows 8 et Windows 8.1 sont des marques déposées de Microsoft Corporation aux États-Unis. Mac, OS X et AirPrint sont des marques déposées d'Apple, Inc. aux États-Unis et dans d'autres pays. 25 Réseau sans fil Besoin d'aide supplémentaire pour vous connecter ? www.hp.com/go/wirelessprinting Le Centre d'impression sans fil HP sur www.hp.com/go/wirelessprinting peut vous aider à préparer votre réseau sans fil, installer ou reconfigurer votre imprimante et résoudre les problèmes de connexion. Si la connexion de votre imprimante au réseau n'a pas pu être établie •• Vérifiez si la fonction Sans fil est activée sur votre imprimante. 1. Sur le panneau de commande de l'imprimante, touchez 2. Si vous voyez apparaître Sans fil désactivé, appuyez sur (Sans fil). (Paramètres), puis sur Paramètres sans fil. 3. Sur l'écran Paramètres sans fil, sélectionnez Activé pour l'option Sans fil. •• Vérifiez que votre imprimante est connectée à votre réseau. 1. Sur le panneau de commande de l'imprimante, touchez 2. Touchez (Sans fil). (Paramètres). 3. Touchez Rapports d'impression, puis sélectionnez Rapport de test sans fil. Le rapport de test sans fil est automatiquement imprimé. 4. Vérifiez le haut du rapport pour voir si quelque chose a échoué lors du test. –– Consultez la section Résultats de diagnostics pour vérifier si tous les tests ont été effectués et si, oui ou non, votre imprimante les a réussis. –– Dans la section Configuration actuelle, recherchez le nom de réseau (SSID) auquel votre imprimante est actuellement connectée. Vérifiez que l'imprimante est connectée au même réseau que votre ordinateur. Remarque : si votre imprimante est connectée à un réseau privé virtuel (VPN), déconnectez-vous temporairement du VPN avant de procéder à l'installation. Une fois l'installation terminée, vous devrez être déconnecté du VPN pour accéder à l'imprimante sur le réseau domestique. Français •• Assurez-vous que les logiciels de protection ne bloquent pas la connexion à votre réseau. Les logiciels de protection tels que les pare-feu peuvent bloquer la connexion entre votre ordinateur et votre imprimante lorsque le logiciel est installé sur un réseau. Si votre imprimante est introuvable, désactivez temporairement votre pare-feu et vérifiez si le problème est résolu. Pour plus d'aide et d'astuces sur les logiciels de sécurité, allez sur : www.hp.com/go/wpc-firewall_fr-fr. •• Redémarrage des composants du réseau sans fil. Mettez le routeur et l'imprimante hors tension, puis rallumez-les. Pour ce faire, veillez à respecter l'ordre suivant. Commencez par le routeur, puis rallumez l'imprimante. Pour résoudre les problèmes de communication réseau, il suffit parfois de mettre les appareils hors tension et de les rallumer. Si vous ne parvenez toujours pas à établir de connexion, éteignez le routeur, l'imprimante et l'ordinateur. Pour les rallumer, veillez à respecter l'ordre suivant. Commencez par le routeur, puis mettez l'imprimante sous tension et terminez par l'ordinateur. Remarque : si vous ne parvenez pas à établir la connexion sans fil, vous pouvez également connecter l'imprimante au réseau à l'aide d'un câble Ethernet. Si vous rencontrez toujours des problèmes, consultez le Centre d'impression sans fil HP (www.hp.com/go/wirelessprinting). Ce site Web contient les informations mises à jour les plus complètes sur l'impression sans fil, ainsi que des informations pour vous aider à préparer votre réseau sans fil ; résoudre des problèmes lors de la connexion de l'imprimante au réseau sans fil et résoudre des problèmes de logiciels de sécurité. Remarque : si vous utilisez un ordinateur exécutant Windows, vous pouvez utiliser l'outil Print and Scan Doctor, qui peut vous aider à résoudre de nombreux problèmes avec l'imprimante. Pour télécharger cet outil, consultez le site www.hp.com/go/tools. Si vous souhaitez partager votre imprimante avec d'autres ordinateurs connectés à votre réseau Installez d'abord votre imprimante sur votre réseau domestique. Après avoir connecté votre imprimante à votre réseau domestique, vous pouvez la partager avec d'autres ordinateurs connectés au même réseau. Il vous suffit d'installer le logiciel de l'imprimante HP pour chaque ordinateur supplémentaire. 26 Réseau sans fil (suite) Si vous souhaitez passer d'une connexion USB à une connexion sans fil Vous devez d'abord avoir installé le logiciel de votre imprimante avec succès. Windows 1. Optez pour l'une des procédures suivantes en fonction de votre système d’exploitation : •• Windows 8,1 : cliquez sur la flèche du bas située en bas à gauche de l'écran d'accueil, sélectionnez l'e nom de l'imprimante et cliquez sur Utilitaires. •• Windows 8 : à partir de l'écran Démarrer, cliquez avec le bouton droit sur une zone vierge de l'écran, puis cliquez sur Toutes les applications sur la barre des applications. •• Windows 7, Windows Vista et Windows XP : dans le menu Démarrer de l'ordinateur, sélectionnez Tous les programmes ou Programmes, puis sélectionnez HP. 2. Sélectionnez HP Officejet série 5740. 3. Sélectionnez Configuration et logiciel d'imprimante. 4. Sélectionnez Convertir une imprimante USB en imprimante sans fil. Suivez les instructions à l'écran. Mac Utilisez Utilitaire HP dans Applications/Hewlett-Packard pour changer la connexion logicielle en une connexion sans fil pour cette imprimante. Si vous souhaitez utiliser votre imprimante sans fil et sans routeur Utilisez la fonction Wi-Fi Direct pour imprimer sans routeur depuis votre ordinateur, votre smartphone ou tout autre périphérique équipé d'une fonction Wi-Fi. Pour utiliser la fonctionnalité Wi-Fi Direct, le logiciel d'impression doit être installé sur l'ordinateur. 1. Veillez à ce que la fonction Wi-Fi Direct soit activée sur votre imprimante. a. Sur l'écran d'accueil du panneau de commande de l'imprimante, tapez sur (Wi-Fi Direct). (Paramètres Wi-Fi Direct) et activez Wi-Fi Direct. 2. Connectez votre périphérique Wi-Fi à votre imprimante : a. Activez la connexion Wi-Fi sans fil sur votre périphérique mobile. Pour plus d'informations, reportez-vous à la documentation fournie avec le périphérique mobile. b. Connectez-vous à un nouveau réseau depuis LE périphérique mobile. Utilisez la procédure habituelle pour vous connecter à un nouveau réseau ou point d'accès sans fil Sélectionnez le nom Wi-Fi Direct dans la liste des réseaux sans fil détectés, comme DIRECT-**-HP Officejet-5740 (** étant les caractères uniques qui permettent d'identifier votre imprimante). Français b. Si son État est Désactivé, touchez c. À l’invite, saisissez le mot de passe Wi-Fi Direct. 3. Imprimez comme vous le faites habituellement à partir de votre ordinateur ou de votre périphérique mobile. Remarque : une connexion Wi-Fi Direct ne donne toutefois pas accès à Internet. Rendez-vous dans le Centre d'impression sans fil HP sur www.hp.com/go/wirelessprinting pour en savoir plus sur l'option sans fil Wi-Fi Direct. Ce produit est conçu pour une utilisation en environnements ouverts (par exemple, à domicile et sans connexion à un réseau Internet public), dans lesquels toute personne peut accéder à l’imprimante et l’utiliser. Le paramètre Wi-Fi Direct est donc en mode “Automatique” par défaut, sans mot de passe administrateur. Cette configuration permet à toute personne située à portée du réseau sans fil de se connecter et d’accéder à toutes les fonctions et tous les paramètres de l’imprimante. Si vous souhaitez un niveau de sécurité plus élevé, HP conseille de modifier la méthode de connexion Wi-Fi Direct de “Automatique” à “Manuel” et de définir un mot de passe administrateur. Si vous souhaitez imprimer avec AirPrint L'imprimante est compatible avec Apple AirPrint®. Vous pouvez imprimer sans fil depuis votre périphérique iOS ou votre Mac. •• Votre imprimante et votre périphérique iOS ou Mac doivent être connectés au même réseau sans fil. •• Avec Apple AirPrint®, vous ne pouvez pas numériser des documents à l'aide de votre imprimante sur votre périphérique iOS. 27 Configuration du télécopieur 1. Se connecter à la ligne téléphonique. Remarque : Les imprimantes HP sont spécialement conçues pour fonctionner avec les services de téléphonie analogique traditionnels. En environnement de téléphonie numérique (ADSL/DSL, PBX, RNIS ou FoIP), l'utilisation de filtres ou convertisseurs numérique/analogique peut être nécessaire lors de la configuration de l'imprimante en mode télécopie. Contactez votre opérateur téléphonique pour connaître les options qui vous conviennent le mieux. Si la ligne téléphonique n'est utilisée que pour envoyer et recevoir des télécopies a. Connectez une extrémité du cordon téléphonique à la prise murale téléphonique. b. Connectez l'autre extrémité au port nommé 1-LINE à l'arrière de l'imprimante. Si vous êtes abonné à un service DSL/ADSL, connectez un filtre DSL/ADSL entre le port 1-LINE et la prise murale téléphonique. 1 2 3 Prise de téléphone murale Port de télécopie (1-LINE) Remarque : Ne connectez rien au port nommé 2-EXT. Filtre DSL/ADSL (fourni par l'opérateur téléphonique ou le prestataire de service) Si d'autres périphériques sont connectés à la ligne téléphonique Si vous avez d'autres périphériques à connecter, connectez-les comme indiqué dans le diagramme ci-dessous : Français * TAM : répondeur téléphonique 1 2 3 4 5 6 7 8 9 10 Prise de téléphone murale Séparateur parallèle Modem DSL/ADSL Répondeur téléphonique Téléphone Prise téléphonique RNIS Adaptateur terminal ou routeur RNIS Modem haut débit Filtre DSL/ADSL Adaptateur téléphonique analogique ** FoIP : protocole FoIP (télécopie sur Internet) 2. Test de la configuration du télécopieur. Le test du télécopieur vérifier le matériel, le type de câble de téléphone et l'état de la connexion. Il vérifie également la présence d'une tonalité et si la ligne est active. Pour exécuter le test : a. Sur l'écran d'accueil de l'imprimante, appuyez sur les boutons Haut et Bas pour sélectionner Télécopieur, et cliquez sur OK. b. Sélectionnez Paramètres, Paramètres avancés et Assist cfg fax, puis suivez les instructions à l'écran. 28 Utilisation du télécopieur Envoi d'une télécopie standard 1. Placez l'original face imprimée vers le bas, dans l'angle avant droit de la vitre du scanner ou face imprimée vers le haut dans le bac d'alimentation automatique. 2. Sur le panneau de commande de l'imprimante, touchez Télécopieur. 3. Touchez Envoyer maintenant. 4. Saisissez le numéro du télécopieur à l'aide du clavier numérique. Pour ajouter une pause au numéro de télécopie, appuyez à plusieurs reprises sur * jusqu'à ce qu'un tiret (-) s'affiche à l'écran. 5. Touchez Noir ou Couleur. Si l'imprimante détecte un original chargé dans le bac d'alimentation automatique, elle envoie le document au numéro que vous avez saisi. Si le destinataire vous informe que la qualité de la télécopie envoyée n'est pas satisfaisante, essayez de modifier la résolution ou le contraste sur votre télécopieur. Envoi d'une télécopie depuis un poste téléphonique 1. Composez le numéro à l'aide du clavier du téléphone. N'utilisez pas le clavier sur le panneau de commande de l'imprimante lors de l'envoi d'une télécopie en utilisant cette méthode. 2. Si le destinataire répond au téléphone, vous pouvez lui parler avant d'envoyer la télécopie. Si un télécopieur prend en charge l'appel, vous entendrez la tonalité du télécopieur de destination. 3. Placez l'original face imprimée vers le bas, dans l'angle avant droit de la vitre du scanner ou face imprimée vers le haut dans le bac d'alimentation automatique. 4. Sur le panneau de commande de l'imprimante, touchez Télécopieur. 6. Touchez Noir ou Couleur. Si vous êtes au téléphone avec le destinataire, demandez-lui de commencer la réception de la télécopie lors de l'émission de la tonalité du télécopieur. Une fois que l'imprimante commence à recevoir la télécopie, vous pouvez raccrocher ou rester en ligne. Il se peut que vous n'entendiez pas la tonalité au cours de la transmission de la télécopie. Pour obtenir plus d'informations sur les autres méthodes d'envoi de télécopie telles que la planification d'envoi d'une télécopie ultérieurement ou l'envoi d'une télécopie depuis un ordinateur, consultez l'Aide électronique. Français 5. Cliquez sur Envoyer une télécopie. Réception d'une télécopie en mode automatique Par défaut, l'imprimante répond automatiquement aux appels entrants et reçoit les télécopies. Pour recevoir manuellement des télécopies, désactivez le paramètre Réponse automatique du panneau de commande de l'imprimante. L'imprimante répondra aux appels au bout du nombre de sonneries spécifié par le paramètre Sonneries avant réponse. si un répondeur est raccordé à l'imprimante, le paramètre Sonneries avant réponse doit être défini à une valeur supérieure à celle du répondeur. 1. Pour ce faire, assurez-vous que l'imprimante est sous tension et que le bac contient du papier. 2. Sur l'écran de l'imprimante, touchez Télécopieur. 3. Touchez Configurer, puis Préférences. 4. Cliquez sur Activé pour activer l'option Réponse automatique. Remarque : si vous êtes abonné à un service de messagerie vocale sur la ligne téléphonique utilisée pour les télécopies, la réception automatique des télécopies est impossible. Cela signifie que vous devez pouvoir répondre personnellement aux appels entrants de télécopie. Si vous souhaitez plutôt recevoir les télécopies automatiquement, contactez votre opérateur téléphonique pour vous abonner à un service de sonneries différenciées ou pour obtenir une ligne téléphonique distincte pour la télécopie. L'imprimante peut stocker les télécopies reçues dans sa mémoire interne. Pour réimprimer ces télécopies, voir « Réimpression des télécopies reçues en mémoire » sur la page suivante. 29 Utilisation du télécopieur (suite) Réception d'une télécopie en mode manuel Si vous êtes au téléphone avec une autre personne, vous pouvez recevoir les télécopies manuellement sans raccrocher le téléphone. 1. Pour ce faire, assurez-vous que l'imprimante est sous tension et que le bac contient du papier. 2. Retirez les originaux du bac d'alimentation des documents. configurez le paramètre Sonneries avant réponse sur une valeur plus élevée pour pouvoir répondre à un appel entrant avant la mise en marche de l'imprimante. Sinon, désactivez le paramètre Réponse automatique afin que l'imprimante ne réponde pas automatiquement aux appels entrants. 3. Demandez à l'expéditeur de commencer l'envoi de la télécopie. 4. Lorsque vous entendez des tonalités du télécopieur, touchez Télécopieur sur l'écran d'accueil du panneau de commande de l'imprimante, puis Envoyer et recevoir et Recevoir maintenant. Une fois que l'imprimante commence à recevoir la télécopie, vous pouvez raccrocher ou rester en ligne. Il se peut que vous n'entendiez pas la tonalité au cours de la transmission de la télécopie. Réimpression des télécopies reçues en mémoire Si l'option Récept sauv. téléc. est activée, les télécopies entrantes seront stockées en mémoire même lorsque l'erreur indique une condition d'erreur. Remarque : Toutes les télécopies stockées en mémoire risquent d'être supprimées de la mémoire lorsque l'imprimante est désactivée. 1. Assurez-vous que du papier se trouve dans l'imprimante. 2. Sur l'écran d'accueil de l'imprimante, tapez sur Télécopieur. 3. Touchez Réimprimer. Les télécopies sont affichées dans l'ordre inverse de la réception, c'est-à-dire, les plus récentes en premier lieu. Français 4. Pour arrêter l'impression, sélectionnez Annuler. Imprimer un rapport ou un journal Ces derniers fournissent des informations utiles concernant l'imprimante. 1. Sur l'écran d'accueil de l'imprimante, touchez Configurer, puis Configurer le télécopieur. 2. Touchez Rapports, puis touchez Confirmation télécopie. 3. Touchez l’une des options suivantes pour la sélectionner. 30 Résolution des problèmes de télécopie Si vous rencontrez toujours des problèmes pour utiliser le télécopieur après avoir effectué le test de télécopie, suivez les étapes ci-dessous : Vérifier les paramètres de télécopie de l'imprimante Le télécopieur ne peut pas envoyer de télécopies mais peut en recevoir •• Si vous êtes abonné à un service de messagerie vocale fourni par l'opérateur téléphonique ou le prestataire de service, assurez-vous que l'option Sonneries avant réponse est définie sur l'imprimante à une fréquence plus importante que sur le répondeur de votre téléphone. L'imprimante va vérifier la ligne et décider si un appel entrant provient d'un appel téléphonique normal ou d'un appel de télécopie. S'il s'agit d'un appel de télécopie, l'imprimante va commencer la connexion de télécopie automatiquement. Il se peut que vous deviez recevoir la télécopie manuellement en sélectionnant Télécopieur sur l'écran de l'imprimante Fax . 2. Vérifiez les connexions physiques du télécopieur. 3. Vérifiez si d'autres télécopieurs peuvent envoyer des télécopies au même numéro de téléphone. Le télécopieur a peut-être bloqué votre numéro de téléphone ou il a peut-être des problèmes techniques. 4. Si le problème persiste, imprimez le rapport de test de télécopieur et le journal des télécopies (et si disponible, le Rapport ID d'appel et le Rapport sur les télécopies indésirables), puis contactez HP pour obtenir plus d'aide. 1. Vérifiez les paramètres de télécopie de l'imprimante. •• Si plusieurs numéros de téléphone sont attribués à la même ligne téléphonique et que celle-ci est partagée entre plusieurs périphériques, assurez-vous que l'imprimante est définie sur le paramètre de sonnerie correspondant à la réception de télécopies. 2. Vérifiez les connexions physiques du télécopieur. Vérifier les connexions physiques du télécopieur 3. Vérifiez si d'autres périphériques connectés à la même ligne téléphonique peuvent recevoir des télécopies. Il se peut que la ligne téléphonique soit défectueuse ou que le télécopieur en émission rencontre des problèmes lors de l'envoi de télécopies. Vous souhaitez peut-être vérifier si vous avez bloqué le numéro de téléphone de l'expéditeur. •• Connectez le câble téléphonique au port nommé 1-LINE derrière l'imprimante à la prise murale et connectez un câble téléphonique depuis le port nommé 2-EXT derrière l'imprimante au téléphone. Depuis votre numéro de téléphone, appelez le numéro de téléphone qui n'a pas pu recevoir les télécopies. 4. Vérifiez le problème avec l'expéditeur. Si le problème persiste, imprimez le rapport de test de télécopieur et le journal des télécopies (et si disponible, le Rapport ID d'appel et le Rapport sur les télécopies indésirables), puis contactez HP pour obtenir plus d'aide. •• Si vous essayez de télécopier vers un numéro externe, assurez-vous d'inclure des numéros ou un code d'accès nécessaire avant de saisir tout numéro. Vous pourrez toujours ajouter une pause dans le numéro afin d'empêcher l'imprimante de numéroter trop rapidement. Pour ajouter une pause, appuyez sur * de manière répétée jusqu'à ce qu'un tiret (-) apparaisse sur l'écran. Le télécopieur ne peut pas recevoir de télécopies mais peut en envoyer Le télécopieur ne peut ni envoyer de télécopies ni en recevoir 1. Effectuez une copie ou une numérisation pour vous assurer que l'imprimante fonctionne correctement. 2. Vérifiez les connexions physiques du télécopieur. 3. Vérifiez les paramètres de télécopie de l'imprimante. 4. Vérifiez si d'autres périphériques connectés à la même ligne téléphonique peuvent envoyer ou recevoir des télécopies. Votre ligne téléphonique a peut-être un problème. 5. Redéfinissez l'imprimante en l'éteignant et, si possible, en éteignant le disjoncteur électrique. Attendez quelques secondes avant de rallumer l'imprimante. Essayez d'envoyer ou de recevoir une télécopie sur l'imprimante. 6. Si le problème persiste, imprimez le rapport de test de télécopieur et le journal des télécopies (et si disponible, le Rapport ID d'appel et le Rapport sur les télécopies indésirables), puis contactez HP pour obtenir plus d'aide. Français 1. Effectuez une copie ou une numérisation pour vous assurer que l'imprimante fonctionne correctement. •• La fonctionnalité Réponse automatique est activée pour que l'imprimante reçoive automatiquement les télécopies. •• Si vous ne pouvez pas effectuer d'appel sortant parce qu'il n'existe aucune tonalité de numérotation ou que la ligne est bruyante, essayez d'utiliser un câble téléphonique autre que celui connecté au port téléphonique 1-LINE ou déplacez l'imprimante vers un autre emplacement qui dispose d'une ligne téléphonique distincte (si possible) et vérifiez si des problèmes semblables existent. •• Si vous vous trouvez dans un environnement téléphonique numérique (FoIP, fax over VoIP), réduisez la vitesse de télécopie et désactivez l'option Error Code Modulation (ECM) du panneau de commande de l'imprimante. Le cas échéant, contactez votre opérateur téléphonique en cas de problèmes avec la ligne téléphonique ou pour en savoir davantage sur les capacités du réseau téléphonique. 7. Remarque : Si vous êtes abonné à un service de messagerie vocale sur la même ligne téléphonique que celle utilisée pour les télécopies, vous recevrez les télécopies manuellement. 31 Déclaration de garantie limitée de l'imprimante HP Produit HP Supports logiciels Imprimante Cartouches d'encre Têtes d'impression (ne s'applique qu'aux produits avec des têtes d'impression pouvant être remplacées par le client) Accessoires Français 32 Durée de la garantie limitée 90 jours 1 an Jusqu'à épuisement de l'encre HP ou jusqu'à expiration de la date de garantie imprimée sur la cartouche (selon le cas qui se produira en premier). Cette garantie ne couvre pas les produits utilisant de l'encre HP qui ont été reconditionnés, mal utilisés ou altérés. 1 an 1 an, sauf indication contraire A. Extension de garantie limitée 1. HP Inc. (HP) garantit au client utilisateur final que les produits HP décrits précédemment sont exempts de défauts de matériaux et malfaçons pendant la durée indiquée ci-dessus, à compter de la date d'achat par le client. 2. Pour les logiciels, la garantie limitée HP est valable uniquement en cas d'impossibilité d'exécuter les instructions de programmation. HP ne garantit pas que le fonctionnement du logiciel ne connaîtra pas d'interruptions ni d'erreurs. 3. La garantie limitée HP ne couvre que les défauts qui apparaissent dans le cadre de l'utilisation normale du produit et ne couvre aucun autre problème, y compris ceux qui surviennent du fait : a. d'une mauvaise maintenance ou d'une modification ; b. de logiciels, de supports, de pièces ou de consommables non fournis ou non pris en charge par HP ; c. du fonctionnement du produit hors de ses caractéristiques ; ou d. d'une modification non autorisée ou d'une mauvaise utilisation. 4. Pour les imprimantes HP, l'utilisation d'une cartouche d'un autre fournisseur ou d'une cartouche rechargée n'entraîne pas la résiliation de la garantie ni d'un contrat de support HP. Toutefois, si la panne ou les dégâts peuvent être attribués à l'utilisation d'une cartouche d'un autre fournisseur, d'une cartouche rechargée ou d'une cartouche périmée, HP facturera les montants correspondant au temps et au matériel nécessaires à la réparation de l'imprimante. 5. Si, pendant la période de garantie applicable, HP est informé d'une défaillance concernant un produit couvert par la garantie HP, HP choisira de réparer ou de remplacer le produit défectueux. 6. Si HP est dans l'incapacité de réparer ou de remplacer, selon le cas, un produit défectueux couvert par la garantie HP, HP devra, dans un délai raisonnable après avoir été informé du défaut, rembourser le prix d'achat du produit. 7. HP ne sera tenu à aucune obligation de réparation, de remplacement ou de remboursement tant que le client n'aura pas retourné le produit défectueux à HP. 8. Tout produit de remplacement peut être neuf ou comme neuf, pourvu que ses fonctionnalités soient au moins équivalentes à celles du produit remplacé. 9. Les produits HP peuvent contenir des pièces, des composants ou des matériels reconditionnés équivalents à des neufs en termes de performances. 10. La garantie limitée HP est valable dans tout pays dans lequel le produit HP couvert est distribué par HP. Des contrats apportant des services de garantie supplémentaires, tels que la réparation sur site, sont disponibles auprès des services de maintenance agréés par HP dans les pays dans lequel le produit est distribué par HP ou par un importateur agréé. B. Restrictions de garantie DANS LA MESURE OÙ LES LOIS LOCALES L'AUTORISENT, HP OU SES FOURNISSEURS TIERS NE FONT AUCUNE AUTRE GARANTIE OU CONDITION, EXPRESSE OU IMPLICITE, EN CE QUI CONCERNE LES PRODUITS HP ET NIENT TOUTE GARANTIE IMPLICITE DE COMMERCIALISATION, DE QUALITÉ SATISFAISANTE OU D'ADAPTATION À UN BUT PARTICULIER. C. Restrictions de responsabilité 1. Dans la mesure où les lois locales l'autorisent, les recours énoncés dans cette déclaration de garantie constituent les recours exclusifs du client. 2. DANS LA MESURE OÙ LES LOIS LOCALES L'AUTORISENT, EXCEPTION FAITE DES OBLIGATIONS SPÉCIFIQUEMENT ÉNONCÉES DANS LA PRÉSENTE DÉCLARATION DE GARANTIE, HP OU SES FOURNISSEURS TIERS NE POURRONT ÊTRE TENUS POUR RESPONSABLES DE DOMMAGES DIRECTS, INDIRECTS, SPÉCIAUX OU ACCIDENTELS, QU'ILS SOIENT BASÉS SUR UN CONTRAT, UN PRÉJUDICE OU TOUTE AUTRE THÉORIE LÉGALE, QUE CES DOMMAGES SOIENT RÉPUTÉS POSSIBLES OU NON. D. Lois locales 1. Cette déclaration de garantie donne au client des droits juridiques spécifiques. Le client peut également posséder d'autres droits selon les états des Etats-Unis, les provinces du Canada, et les autres pays ou régions du monde. 2. Si cette déclaration de garantie est incompatible avec les lois locales, elle sera considérée comme étant modifiée pour être conforme à la loi locale. Selon ces lois locales, certaines renonciations et limitations de cette déclaration de garantie peuvent ne pas s'appliquer au client. Par exemple, certains états des Etats-Unis, ainsi que certains gouvernements hors des Etats-Unis (y compris certaines provinces du Canada), peuvent : a. exclure les renonciations et limitations de cette déclaration de garantie des droits statutaires d'un client (par exemple au Royaume-Uni) ; b. restreindre d'une autre manière la possibilité pour un fabricant d'imposer ces renonciations et limitations ; ou c. accorder au client des droits de garantie supplémentaires, spécifier la durée des garanties implicites que le fabricant ne peut nier, ou ne pas autoriser les limitations portant sur la durée des garanties implicites. 3. EXCEPTÉ DANS LA MESURE AUTORISÉE PAR LA LÉGISLATION, LES TERMES DE LA PRÉSENTE DÉCLARATION DE GARANTIE N'EXCLUENT, NE LIMITENT NI NE MODIFIENT LES DROITS STATUTAIRES OBLIGATOIRES APPLICABLES À LA VENTE DES PRODUITS HP AUXDITS CLIENTS, MAIS VIENNENT S'Y AJOUTER. La garantie limitée HP est une garantie commerciale fournie volontairement par HP. Voici les coordonnées de l’entité HP responsable de l’exécution de la garantie limitée HP dans votre pays : France: HP France SAS, société par actions simplifiée identifiée sous le numéro 448 694 133 RCS Evry, 1 Avenue du Canada, 91947, Les Ulis G.D. Luxembourg: Hewlett-Packard Luxembourg S.C.A., 75, Parc d’Activités Capellen, Rue Pafebruc, L-8308 Capellen Belgique: HP Belgium BVBA, Hermeslaan 1A, B-1831 Diegem France Les avantages de la garantie limitée HP s’appliquent en complément des droits dont vous disposez au titre des garanties légales applicables dont le bénéfice est soumis à des conditions spécifiques. Vos droits en tant que consommateur au titre de la garantie légale de conformité mentionnée aux articles L. 211-4 à L. 211-13 du Code de la Consommation et de celle relatives aux défauts de la chose vendue, dans les conditions prévues aux articles 1641 à 1648 et 2232 du Code de Commerce ne sont en aucune façon limités ou affectés par la garantie limitée HP. Pour de plus amples informations, veuillez consulter le lien suivant : Garanties légales accordées au consommateur. Vous pouvez également consulter le site Web des Centres européens des consommateurs. Les consommateurs ont le droit de choisir d’exercer leurs droits au titre de la garantie limitée HP, ou auprès du vendeur au titre des garanties légales applicables mentionnées ci-dessus. POUR RAPPEL : Garantie Légale de Conformité Article L211-4 du Code de la Consommation : « Le vendeur est tenu de livrer un bien conforme au contrat et répond des défauts de conformité existant lors de la délivrance. Il répond également des défauts de conformité résultant de l’emballage, des instructions de montage ou de l’installation lorsque celle-ci a été mise à sa charge par le contrat ou a été réalisée sous sa responsabilité ». Article L211-5 du Code de la Consommation : « Pour être conforme au contrat, le bien doit : 1° Etre propre à l’usage habituellement attendu d’un bien semblable et, le cas échéant : - correspondre à la description donnée par le vendeur et posséder les qualités que celui-ci a présentées à l’acheteur sous forme d’échantillon ou de modèle ; - présenter les qualités qu’un acheteur peut légitimement attendre eu égard aux déclarations publiques faites par le vendeur, par le producteur ou par son représentant, notamment dans la publicité ou l’étiquetage ; 2° Ou présenter les caractéristiques définies d’un commun accord par les parties ou être propre à tout usage spécial recherché par l’acheteur, porté à la connaissance du vendeur et que ce dernier a accepté ». Article L211-12 du Code de la Consommation : « L’action résultant du défaut de conformité se prescrit par deux ans à compter de la délivrance du bien ». Garantie des vices cachés Article 1641 du Code Civil : « Le vendeur est tenu de la garantie à raison des défauts cachés de la chose vendue qui la rendent impropre à l’usage auquel on la destine, ou qui diminuent tellement cet usage que l’acheteur ne l’aurait pas acquise, ou n’en aurait donné qu’un moindre prix, s’il les avait connus. » Article 1648 alinéa 1 du Code Civil : « L’action résultant des vices rédhibitoires doit être intentée par l’acquéreur dans un délai de deux ans à compter de la découverte du vice. » G.D. Luxembourg & Belgique Les avantages de la garantie limitée HP s'appliquent en complément des droits dont vous disposez au titre de la garantie de non-conformité des biens avec le contrat de vente. Cependant, de nombreux facteurs peuvent avoir un impact sur le bénéfice de ces droits. Vos droits en tant que consommateur au titre de ces garanties ne sont en aucune façon limités ou affectés par la garantie limitée HP. Pour de plus amples informations, veuillez consulter le lien suivant : Garanties légales accordées au consommateur ou vous pouvez également consulter le site Web des Centres européens des consommateurs. Les consommateurs ont le droit de choisir de réclamer un service sous la garantie limitée HP ou auprès du vendeur au cours d'une garantie légale de deux ans. Pour plus d’information, consultez le lien suivant : Garantie légale du consommateur (www.hp.com/go/eu-legal) ou visitez le site des Centres Européens des Consommateurs (http://ec.europa.eu/consumers/solving_consumer_disputes/non-judicial_redress/ecc-net/). Français Garantie du fabricant HP 33 HP Officejet 5740 e-All-in-One Series Avvio 1. Attenersi alle istruzioni riportate nel pieghevole di installazione per configurare la stampante. 2. Installare il software. Windows® Visitare il sito 123.hp.com/OJ5740 e seguire le istruzioni visualizzate sullo schermo. Se il computer non è connesso a Internet, inserire il CD del software nel computer. Se il CD non viene avviato, selezionare Computer, fare doppio clic sull'icona dell'unità CD/DVD con il logo HP, fare doppio clic su setup.exe, quindi seguire le istruzioni visualizzate sullo schermo. OS X/iOS Per installare il software HP più aggiornato su un computer Mac, accedere al sito 123.hp.com/OJ5740. Il software HP per Mac non è incluso nel CD del software in dotazione con la stampante. Questo prodotto è abilitato per Apple AirPrint. La stampante e il dispositivo iOS o Mac devono trovarsi nella stessa rete locale. Nota: assicurarsi sempre che nel vassoio carta sia caricato il tipo di carta desiderato. Una volta chiuso il vassoio, verificare che nel pannello di controllo sia selezionato il tipo di carta appropriato. Approfondimenti Guida in formato elettronico: installare la guida in formato elettronico selezionandola dal software consigliato durante la procedura di installazione. È possibile trovare informazioni sulle funzionalità dei prodotti, sulla stampa, sulla risoluzione dei problemi e sul supporto. Avvisi, requisiti ambientali e informazioni sulle normative, inclusi l’Avviso normativo per l’Unione Europea e le dichiarazioni di conformità, sono disponibili nella sezione Informazioni tecniche. •• Windows® 8.1: fare clic sul pulsante freccia giù nell'angolo inferiore sinistro della schermata Start, selezionare il nome della stampante, fare clic su Guida, quindi su Cerca nella Guida HP. •• Windows® 8: nella schermata Start, fare clic con il pulsante destro del mouse su un’area vuota dello schermo, fare clic su Tutte le app sulla barra delle app, quindi sull’icona con il nome della stampante e selezionare Guida. •• Windows® 7, Windows Vista® e Windows® XP: fare clic su Start > Tutti i programmi > HP > HP Officejet 5740 series > Guida. •• OS X: fare clic su Aiuto > Centro assistenza. Nella finestra Visore Aiuto, fare clic su Aiuto per tutte le tue app, quindi su HP Officejet 5740 series. Leggimi: contiene informazioni sul supporto HP, sui requisiti del sistema operativo e sugli recenti aggiornamenti della stampante. •• In Windows: inserire il CD del software nel computer, quindi individuare il file ReadMe.chm. Fare doppio clic sul file ReadMe.chm per aprirlo, quindi selezionare il file ReadMe nella propria lingua. •• In Mac: aprire la cartella Documenti nel livello superiore del programma di installazione del software. Fare doppio clic sul file ReadMe, quindi selezionare il file ReadMe nella propria lingua. Italiano Sul Web: per ulteriori informazioni e assistenza, visitare il sito www.hp.com/go/support. Per la registrazione della stampante, visitare il sito www.register.hp.com. Per leggere la dichiarazione di conformità, visitare il sito www.hp.eu/certificates. Utilizzo dell'inchiostro: www.hp.com/go/inkusage. Scopri di più con la scansione! Potrebbero essere in vigore le tariffe dati standard. Potrebbe non essere disponibile in tutte le lingue. www.hp.com/eu/m/OJ5740 Le informazioni contenute nel presente documento sono soggette a modifica senza preavviso. Pannello di controllo 1 Spia wireless: indica lo stato della connessione wireless della stampante. •• Se la spia blu è accesa, la connessione wireless è stata stabilita ed è possibile stampare. •• Se la spia lampeggia lentamente, la funzionalità wireless è attivata, ma la stampante non è collegata a una rete. Verificare che la stampante si trovi nel raggio d'azione del segnale wireless. •• Se la spia lampeggia rapidamente si è verificato un errore wireless. Fare riferimento al messaggio sul display della stampante. •• Se la modalità wireless è disattivata, la relativa spia risulta spenta e sul display viene visualizzato il messaggio Wireless disattivato. 2 Pulsante di accensione: consente di accendere o spegnere la stampante. 3 Pulsante Indietro: consente di tornare alla schermata precedente. 4 Pulsante ?: mostra il contenuto della guida disponibile per l’operazione corrente. 5 Pulsante Pagina iniziale: consente di tornare alla schermata iniziale, visualizzata all’accensione della stampante. 6 Display del pannello di controllo: toccare lo schermo per selezionare le opzioni o scorrere le voci di menu. 7 Pulsante NFC (Near Field Communication) Indica l'area in cui è possibile stampare rapidamente documenti e immagini da un dispositivo mobile (smartphone o tablet, ad esempio) semplicemente toccando il dispositivo sulla stampante. Informazioni sulla sicurezza 1. Si consiglia di leggere attentamente tutte le istruzioni contenute nei documenti forniti insieme alla stampante. 2. Seguire tutte le avvertenze e le istruzioni indicate sulla stampante. 3. Prima di effettuare la pulizia, scollegare la stampante dalle prese a muro. 4. Non installare né usare la stampante in prossimità di acqua o quando si è bagnati. Italiano Quando si utilizza la stampante, seguire sempre le precauzioni di sicurezza fondamentali al fine di ridurre il rischio di lesioni alle persone derivanti da incendi o scosse elettriche. 5. Installare la stampante su una superficie stabile, in modo che risulti ferma e al sicuro. 6. Installare la stampante in un luogo protetto dove non si possa inciampare sul cavo di alimentazione o calpestarlo, rischiando in tal modo di danneggiarlo. 7. Se la stampante non funziona correttamente, consultare il file della guida (disponibile nel computer in seguito all'installazione del software). 8. All'interno non vi sono parti su cui l'utente possa effettuare riparazioni. Per la manutenzione rivolgersi a personale tecnico qualificato. 9. Utilizzare solo con il cavo di alimentazione e l'adattatore forniti da HP (se inclusi). 35 Risoluzione dei problemi più comuni Se non è possibile stampare: 1. Assicurarsi che i cavi siano collegati saldamente. 2. Assicurarsi che la stampante sia accesa. Il pulsante di accensione (On) deve essere acceso con una luce bianca. 3. Controllare la spia di stato della connessione wireless per verificare che la stampante sia connessa a una rete. 4. Visitare il sito Web dedicato agli strumenti di diagnostica HP www.hp.com/go/tools per scaricare i programmi di utilità (strumenti) di diagnostica gratuiti utilizzabili per risolvere i problemi più comuni della stampante. Windows Mac Assicurarsi che la stampante sia impostata come unità di stampa predefinita: Controllare la coda di stampa: •• Windows 8.1 e Windows 8: selezionare o toccare l'angolo superiore destro della schermata per aprire la barra degli accessi, fare clic sull'icona Impostazioni, fare clic o toccare Pannello di controllo, quindi fare clic o toccare Visualizza dispositivi e stampanti. •• Windows 7: dal menu Start di Windows, fare clic su Dispositivi e stampanti. •• Windows Vista: sulla barra delle applicazioni di Windows, fare clic su Start, Pannello di controllo, Stampanti. •• Windows XP: sulla barra delle applicazioni di Windows, fare clic su Start, Pannello di controllo, Stampanti e fax. Assicurarsi che la stampante sia selezionata con un segno di spunta all'interno di un cerchio. Se la stampante non è selezionata come predefinita, fare clic con il pulsante destro del mouse sull'icona della stampante e scegliere Imposta come stampante predefinita dal menu. Se si utilizza un cavo USB e non si riesce ancora a stampare o se non è stato possibile completare l'installazione del software: 1. Estrarre il CD dall’unità CD/DVD del computer e scollegare il cavo USB dal computer. 2. Riavviare il computer. Italiano 3. Inserire il CD del software della stampante nell’unità CD/DVD e seguire le istruzioni visualizzate sullo schermo per installare il software della stampante. Non collegare il cavo USB finché non verrà espressamente richiesto. 4. Al termine dell'installazione, riavviare il computer. Se si utilizza una connessione wireless e non si riesce ancora a stampare: Accedere alla sezione Connessione alla rete nella pagina successiva per ulteriori informazioni. 1. In Preferenze di sistema, fare clic su Stampanti e scanner (Stampa e Fax in OS X v10,7 Lion e OS X v10,8 Mountain Lion). 2. Fare clic su Apri coda di stampa. 3. Fare clic su un processo di stampa per selezionarlo. 4. Utilizzare i pulsanti seguenti per gestire il processo di stampa: •• Icona Annulla: annulla il processo di stampa selezionato. •• Riprendi: continua un processo di stampa messo in pausa. 5. Qualora siano state apportate delle modifiche, provare a stampare di nuovo. Riavviare e riconfigurare: 1. Riavviare il computer. 2. Reimpostare la stampante. a. Spegnere la stampante e scollegare il cavo di alimentazione. b. Attendere un minuto, quindi ricollegare il cavo di alimentazione e accendere la stampante. Per ripristinare il sistema di stampa: 1. In Preferenze di sistema, fare clic su Stampanti e scanner (Stampa e Fax in OS X v10,7 Lion e OS X v10,8 Mountain Lion). 2. Tenere premuto il tasto CTRL e contemporaneamente fare clic sull'elenco a sinistra, quindi scegliere Ripristina sistema di stampa. 3. Aggiungere la stampante da utilizzare. Per disinstallare il software: 1. Se la stampante è collegata al computer tramite cavo USB, scollegare la stampante dal computer. 2. Aprire la cartella Applicazioni/Hewlett-Packard. 3. Fare doppio clic su HP Uninstaller e seguire le istruzioni visualizzate sullo schermo. Memorizzazione dei dati di utilizzo anonimi: le cartucce HP memXorizzano un insieme di informazioni anonime sull'utilizzo della stampante. Per ulteriori informazioni e istruzioni sulla disabilitazione della memorizzazione, consultare la guida in formato elettronico. Riconoscimenti: Windows XP, Windows Vista, Windows 7, Windows 8 e Windows 8.1 sono marchi registrati di Microsoft Corporation negli Stati Uniti. Mac, OS X e AirPrint sono marchi di Apple Inc. registrati negli Stati Uniti e in altri paesi. 36 Connettività wireless Serve aiuto con la rete? www.hp.com/go/wirelessprinting Centro stampa wireless di HP, all’indirizzo www.hp.com/go/wirelessprinting, può aiutare a preparare la rete wireless, configurare o riconfigurare la stampante e risolvere i problemi di rete. In caso di mancata connessione della stampante alla rete •• Verificare che la modalità wireless sia abilitata sulla stampante. 1. Sul pannello di controllo della stampante, toccare . 2. Se viene visualizzato il messaggio Wireless disattivato, toccare (Impostazioni), quindi Impostazioni wireless. 3. Nella schermata Impostazioni wireless, selezionare On per l'opzione Wireless. •• Confermare che la stampante è connessa alla rete. 1. Toccare (Wireless) sul pannello di controllo della stampante. 2. Toccare (Impostazioni). 3. Toccare Stampa rapporti, quindi toccare Rapporto di test wireless. Il rapporto di test wireless viene stampato automaticamente. 4. Nella parte iniziale del rapporto, controllare se si sono verificati eventuali errori durante il test. –– Fare riferimento alla sezione Risultati diagnostica di tutti i test eseguiti per stabilire se la stampante ha superato i test. –– Nella sezione Configurazione corrente, individuare il nome della rete (SSID) a cui la stampante è attualmente connessa. Verificare che la stampante sia connessa alla stessa rete del computer. Nota: se il computer è connesso a una rete privata virtuale (VPN), disconnetterlo temporaneamente dalla rete VPN prima di proseguire con l’installazione. Dopo l’installazione sarà necessario disconnettersi dalla VPN per accedere alla stampante sulla rete domestica. •• Assicurarsi che il software di protezione non ostacoli la comunicazione sulla rete. Il software di protezione, ad esempio un firewall, può bloccare la comunicazione tra il computer e la stampante durante l’installazione in rete. Se non è possibile individuare la stampante, disabilitare temporaneamente il firewall e verificare se il problema è risolto. Per ulteriore assistenza e suggerimenti sul software di protezione, visitare il sito: www.hp.com/go/wpc-firewall_it-it. •• Riavviare i componenti della rete wireless. Spegnere il router e la stampante, quindi riaccenderli nel seguente ordine: prima il router, quindi la stampante. Talvolta, la disattivazione e la successiva riattivazione dei dispositivi consentono di risolvere problemi di comunicazione di rete. Se non è ancora possibile eseguire la connessione, disattivare il router, la stampante e il computer, quindi riattivarli nel seguente ordine: prima il router, quindi la stampante e infine il computer. se i problemi persistono, visitare HP Wireless Printing Center (www.hp.com/go/wirelessprinting). Questo sito Web contiene informazioni complete e aggiornate sulla stampa wireless, nonché informazioni sulla preparazione della rete wireless, per la risoluzione dei problemi di connessione tra stampante e rete wireless e per la risoluzione di problemi di protezione del software. Nota: se si utilizza un computer con sistema operativo Windows, è possibile utilizzare lo strumento Print and Scan Doctor, che consente di risolvere diversi problemi della stampante. Per scaricare lo strumento, visitare il sito www.hp.com/go/tools. Italiano Nota: se non è possibile stabilire una connessione wireless, collegare la stampante alla rete utilizzando un cavo Ethernet. Per condividere la stampante con più computer sulla rete In primo luogo, installare la stampante nella rete domestica. Una volta collegata la stampante alla rete domestica, è possibile condividerla con altri computer sulla stessa rete. Per ogni computer aggiuntivo è sufficiente installare una sola volta il software della stampante HP. 37 Connettività wireless (continua) Passaggio da una connessione USB a una connessione wireless In primo luogo, è necessario avere già provveduto a installare correttamente il software della stampante. Windows 1. Eseguire una delle operazioni riportate di seguito in base al sistema operativo in uso: •• Windows 8.1: fare clic sul pulsante freccia nell'angolo inferiore sinistro della schermata Start, selezionare il nome della stampante, quindi fare clic su Utilità. •• Windows 8: nella schermata Start, fare clic con il pulsante destro del mouse su un'area vuota dello schermo, quindi fare clic su Tutte le app nella barra delle applicazioni. •• Windows 7, Windows Vista e Windows XP: dal menu Start del computer, selezionare Tutti i programmi o Programmi, quindi selezionare HP. 2. Selezionare HP Officejet 5740 series. 3. Selezionare Software e configurazione stampante. 4. Selezionare Converti una stampante con collegamento USB in wireless. Seguire le istruzioni visualizzate sullo schermo. Mac Utilizzare HP Utility in Applicazioni/Hewlett-Packard per impostare la connessione del software sulla modalità wireless per la stampante. Per utilizzare la stampante in modalità wireless senza router Utilizzare la connessione Wi-Fi Direct per stampare in modalità wireless, senza router, dal computer, dallo smartphone o da un altro dispositivo wireless. Per utilizzare la connessione Wi-Fi Direct da un computer, è necessario che il software della stampante sia installato nel computer in uso. 1. Verificare che la connessione Wi-Fi Direct della stampante sia attivata: a. Nella schermata iniziale sul display della stampante, toccare b. Se lo Stato è Disattivata, toccare (Wi-Fi Direct). (Impostazioni Wi-Fi Direct) e attivare Wi-Fi Direct. 2. Connettere il dispositivo wireless alla stampante: a. Attivare la connessione Wi-Fi sul dispositivo mobile. Per ulteriori informazioni, vedere la documentazione fornita con il dispositivo mobile. b. Dal dispositivo mobile, stabilire la connessione a una rete. Utilizzare il processo utilizzato di norma per la connessione a una nuova rete wireless o hotspot. Scegliere il nome della connessione Wi-Fi Direct dall'elenco di reti wireless visualizzato, ad esempio DIRECT-**-HP Officejet-5740 (dove ** sono i caratteri univoci che identificano la stampante). c. Quando viene richiesto, immettere la password di Wi-Fi Direct. 3. Stampare normalmente dal computer o dal dispositivo mobile. Nota: la connessione Wi-Fi Direct non consente l'accesso a Internet. Italiano Per ulteriori informazioni sulla connessione Wi-Fi Direct, visitare il Centro stampa wireless HP all'indirizzo www.hp.com/go/wirelessprinting. Questo prodotto è destinato all’utilizzo in ambienti aperti (ad esempio, in abitazioni non connesse a una rete Internet pubblica) in cui a tutti è consentito accedere alla stampante e utilizzarla. Di conseguenza, Wi-Fi Direct è configurato in modalità “Automatico” per impostazione predefinita, senza alcuna password di amministratore; ciò consente a chiunque si trovi entro la portata della connessione wireless di connettersi e accedere a tutte le funzioni e impostazioni della stampante. Per livelli di sicurezza più elevati, HP consiglia di modificare il metodo di connessione di Wi-Fi Direct da “Automatico” a “Manuale” e di creare e impostare una password di amministratore. Per stampare con AirPrint Questa stampante è abilitata per Apple AirPrint®. È possibile stampare in modalità wireless dal dispositivo iOS o Mac utilizzato. •• La stampante e il dispositivo iOS o Mac devono utilizzare la stessa rete wireless. •• Con Apple AirPrint®, non è possibile eseguire la scansione di documenti dalla stampante al dispositivo iOS in uso. 38 Impostazione del fax 1. Connessione alla linea telefonica. Nota: le stampanti HP sono espressamente progettate per essere utilizzate con i servizi telefonici analogici tradizionali. In ambienti telefonici digitali (ad esempio DSL/ADSL, PBX, ISDN o FoIP), potrebbe essere necessario utilizzare filtri o convertitori digitale-analogico per configurare le impostazioni fax della stampante. Contattare la compagnia telefonica per stabilire quali opzioni di configurazione soddisfano meglio i requisiti ambientali. Se la linea telefonica è utilizzata solo per le chiamate fax a. Collegare un'estremità del cavo telefonico al jack telefonico per presa a muro. b. Collegare l'altra estremità del cavo alla porta 1-LINE sul retro della stampante. Se si utilizza un abbonamento DSL/ADSL, collegare un filtro DSL/ADSL tra la porta 1-LINE e il jack telefonico per presa a muro. 1 2 3 Jack telefonico per presa a muro Porta fax (1-LINE) Nota: non inserire nella porta 2-EXT. Filtro DSL/ADSL (fornito dalla compagnia telefonica o dal provider del servizio) Se alla linea telefonica sono collegati dispositivi aggiuntivi Se si desidera collegare altri dispositivi, fare riferimento al diagramma riportato di seguito. Jack telefonico per presa a muro Splitter per connessione parallela Modem DSL/ADSL Segreteria telefonica Telefono Jack ISDN per presa a muro Adattatore terminale o router ISDN Modem banda larga Filtro DSL/ADSL Adattatore telefono analogico ** FoIP: Invio di fax su Protocollo Internet (FoIP) 2. Test configurazione fax. Con il test fax vengono verificati l'hardware, il tipo di cavo telefonico, lo stato della connessione, il segnale di linea e l'operatività della linea telefonica. Per eseguire il test: Italiano * TAM: Segreteria telefonica 1 2 3 4 5 6 7 8 9 10 a. Nella schermata principale sul display della stampante, premere i pulsanti Su e Giù per selezionare Fax, quindi premere OK. b. Selezionare Impostazioni, quindi Impostazioni avanzate, Configurazione guidata Fax e seguire le istruzioni visualizzate sullo schermo. 39 Uso del fax Invio di un fax standard 1. Caricare l'originale con il lato di stampa rivolto verso il basso nell'angolo anteriore destro del vetro dello scanner o con il lato di stampa rivolto verso l'alto nell'alimentatore automatico di documenti (ADF). 2. Sul display del pannello di controllo della stampante, toccare Fax. 3. Toccare Invia ora. 4. Immettere il numero di fax utilizzando il tastierino numerico. Per inserire una pausa nel numero del fax, premere ripetutamente * fino a visualizzare un trattino (-) sul display. 5. Toccare Nero o Colore. Se la stampante rileva un originale caricato nell'alimentatore documenti, invierà il documento al numero specificato. Se il destinatario rileva dei problemi in merito alla qualità del fax inviato, cercare di modificare la risoluzione o il contrasto del fax. Invio di un fax utilizzando un telefono interno 1. Digitare il numero tramite la tastiera del telefono dell'interno. Quando si invia un fax utilizzando questo metodo, non usare il tastierino numerico sul pannello di controllo della stampante. 2. Se il destinatario risponde al telefono, è possibile iniziare una conversazione prima di inviare il fax. Se a rispondere alla chiamata è l'apparecchio fax, è possibile ascoltare i segnali fax dall'apparecchio fax del destinatario. 3. Caricare l'originale con il lato di stampa rivolto verso il basso nell'angolo anteriore destro del vetro dello scanner o con il lato di stampa rivolto verso l'alto nell'alimentatore automatico di documenti (ADF). 4. Sul display del pannello di controllo della stampante, toccare Fax. 5. Toccare Invia fax. 6. Toccare Nero o Colore. Se si è al telefono con il destinatario, chiedergli di avviare la ricezione del fax dopo l'ascolto del segnale sull'apparecchio fax. Quando la stampante inizia a inviare il fax, è possibile riagganciare il telefono o rimanere in linea. Non vengono uditi i toni del fax durante la trasmissione. Per ulteriori informazioni su altre modalità di invio dei fax, come l'invio pianificato di fax in momenti successivi o l'invio di fax da computer, vedere la Guida in formato elettronico. Ricezione automatica di un fax Per impostazione predefinita, la stampante risponde alle chiamate in entrata e riceve i fax automaticamente. Per ricevere i fax manualmente, disattivare Risposta automatica sul pannello di controllo della stampante. Italiano La stampante risponderà automaticamente alle chiamate dopo il numero di squilli specificati nell'impostazione Squilli prima di rispondere. Se alla stampante è collegata una segreteria telefonica, è necessario che l'opzione della stampante Squilli fino risp. sia impostata su un numero superiore rispetto alla segreteria telefonica. 1. Verificare che la stampante sia accesa e che la carta sia caricata. 2. Sul display della stampante, toccare Fax. 3. Toccare Configurazione, quindi Preferenze. 4. Selezionare On per l'opzione Risposta automatica. Nota: se è stato sottoscritto un servizio di posta vocale sulla stessa linea telefonica utilizzata per le chiamate fax, non sarà possibile ricevere i fax automaticamente. Ciò significa che si dovrà rispondere di persona alle chiamate fax in entrata. Se invece si desidera ricevere automaticamente i fax, contattare la società telefonica per abbonarsi a un servizio di differenziazione degli squilli oppure per ottenere una linea telefonica separata per la trasmissione fax. La stampante può memorizzare i fax ricevuti nella memoria interna. Per ristampare i fax ricevuti, vedere "Ristampa dei fax ricevuti memorizzati" nella pagina successiva. 40 Uso del fax (continua) Ricezione manuale di un fax Se si è impegnati in una conversazione con un altro utente, è possibile ricevere fax manualmente senza riagganciare il telefono. 1. Verificare che la stampante sia accesa e che la carta sia caricata. 2. Rimuovere gli originali dall'alimentatore documenti. Impostare l'opzione Squilli fino risp. su un valore più elevato per consentire all'utente di rispondere alla chiamata in entrata prima che risponda la stampante. In alternativa, disattivare l'impostazione Risposta automatica in modo che la stampante non risponda automaticamente alle chiamate in entrata. 3. Chiedere al mittente di iniziare a inviare il fax. 4. Quando si ascoltano i toni del fax, nella schermata principale sul pannello di controllo della stampante toccare Fax, quindi Invia e ricevi e infine Ricevi ora. Quando la stampante inizia a ricevere il fax, è possibile riagganciare il telefono o rimanere in linea. Non vengono uditi i toni del fax durante la trasmissione. Ristampa dei fax ricevuti dalla memoria Se l'opzione Ricezione con backup fax è attivata, i fax in entrata verranno archiviati in memoria anche quando la stampante si trova in una condizione di errore. Nota: tutti i fax archiviati nella memoria possono essere eliminati quando la stampante è spenta. 1. Assicurarsi che la carta sia caricata nella stampante. 2. Nella schermata iniziale sul display della stampante, toccare Fax. 3. Toccare Ristampa. I fax vengono visualizzati nell'ordine inverso di ricezione, ovvero il fax ricevuto più di recente viene stampato per primo. 4. Per interrompere la stampa, selezionare Annulla. Stampa di un rapporto o di un log I rapporti del fax offrono utili informazioni di sistema sulla stampante. 1. Nella schermata iniziale sul display della stampante, toccare Configurazione, quindi Configurazione fax. 2. Toccare Rapporti, quindi Conferma fax. Italiano 3. Toccare per selezionare una delle opzioni. 41 Risoluzione dei problemi del fax Se i problemi con il fax persistono anche se il test del fax è risultato positivo, attenersi alle procedure seguenti: Riesco a inviare i fax ma non a riceverli 1. Eseguire una copia o una scansione per assicurarsi che la stampante funzioni correttamente. 2. Verificare i collegamenti fisici del fax. 3. Verificare se è possibile inviare fax da altri dispositivi con lo stesso numero di telefono. Il dispositivo di ricezione fax potrebbe aver bloccato il numero di telefono o potrebbero esserci problemi tecnici. 4. Se il problema persiste, stampare il rapporto con il test del fax e il registro fax (e, se disponibili, i rapporti per ID chiamante e fax indesiderati), quindi contattare HP per ulteriore assistenza. Riesco a ricevere i fax ma non a inviarli 1. Controllare le impostazioni fax sulla stampante. 2. Verificare i collegamenti fisici del fax. 3. Verificare se altri dispositivi connessi alla stessa linea telefonica consentono la ricezione di fax. La linea telefonica potrebbe essere danneggiata oppure potrebbero essersi verificati problemi con il dispositivo di invio fax. Verificare anche se il numero telefonico del mittente è bloccato. 4. Verificare il problema con il mittente. Se il problema persiste, stampare il rapporto con il test del fax e il registro fax (e, se disponibili, i rapporti per ID chiamante e fax indesiderati), quindi contattare HP per ulteriore assistenza. Non riesco né a inviare né a ricevere i fax 1. Eseguire una copia o una scansione per assicurarsi che la stampante funzioni correttamente. 2. Verificare i collegamenti fisici del fax. 3. Controllare le impostazioni fax sulla stampante. 4. Verificare se altri dispositivi connessi alla stessa linea telefonica consentono la ricezione o l'invio di fax. Potrebbe essersi verificato un problema con la linea telefonica. Italiano 5. Ripristinare la stampante spegnendola e, se possibile, spegnere anche l'interruttore principale di alimentazione. Attendere qualche secondo, poi riattivare l'alimentazione. Provare a inviare o a ricevere un fax sulla stampante. 6. Se il problema persiste, stampare il rapporto con il test del fax e il registro fax (e, se disponibili, i rapporti per ID chiamante e fax indesiderati), quindi contattare HP per ulteriore assistenza. 7. Nota: se è stato sottoscritto un servizio di posta vocale sulla stessa linea telefonica utilizzata per i fax, sarà possibile solo la ricezione manuale dei fax. 42 Controllo delle impostazioni fax della stampante •• La funzione Risposta automatica è attivata per la ricezione automatica di fax dalla stampante. •• Se si è abbonati a un servizio di posta vocale offerto dalla compagnia telefonica o dal provider di servizi, assicurarsi che l'opzione Squilli fino risp. sulla stampante sia impostata su un valore superiore rispetto a quello della segreteria telefonica. La stampante esegue il monitoraggio della linea e stabilisce se una chiamata in arrivo sia normale o fax. In caso di chiamata fax, la stampante avvia la connessione fax automaticamente. Altrimenti, sarà necessario ricevere il fax manualmente selezionando Fax sul display della stampante. •• Se alla stessa linea telefonica fisica sono assegnati più numeri di telefono e la linea è condivisa da più dispositivi, assicurarsi che la stampante sia configurata per la corretta impostazione univoca per gli squilli, relativa alla ricezione dei fax. Verifica delle connessioni fisiche del fax •• Collegare il cavo telefonico dalla porta 1-LINE sul retro della stampante al jack telefonico per presa a muro e quindi un cavo telefonico dalla porta 2-EXT sul retro della stampante a un telefono interno. Dal telefono dell'interno, telefonare al numero di telefono da cui non era possibile ricevere i fax. •• Se si tenta di inviare un fax al numero di un interno, assicurarsi di includere eventuali codici o numeri di accesso necessari prima di comporre il numero. Potrebbe inoltre essere possibile aggiungere una pausa alla composizione del numero al fine di impedire una composizione troppo rapida. per inserire una pausa, premere ripetutamente * fino a visualizzare un trattino (-) sul display. •• Se non è possibile effettuare chiamate in uscita perché non si rileva alcun segnale di linea o la linea è disturbata, provare a sostituire il cavo telefonico collegato alla porta telefonica 1-LINE o spostare la stampante in un'altra ubicazione con una linea telefonica separata (se possibile) e rilevare eventuali problemi simili. •• In ambienti telefonici digitali (ad esempio, FoIP, fax over VoIP), ridurre la velocità dei fax e attivare Error Code Modulation (ECM) dal pannello di controllo della stampante. Se necessario, contattare la compagnia telefonica per verificare se ci sono problemi di linea o per ulteriori informazioni sulle capacità della rete telefonica. Prodotto HP Durata della garanzia limitata Supporti del software 90 giorni Stampante 1 anno Cartucce di stampa o di inchiostro Fino ad esaurimento dell'inchiostro HP o fino al raggiungimento della data di "scadenza della garanzia" stampata sulla cartuccia, a seconda di quale evento si verifichi per primo. La presente garanzia non copre i prodotti con inchiostro HP che siano stati ricaricati, ricostruiti, ricondizionati, utilizzati in modo improprio o manomessi. Testine di stampa (si applica solo ai prodotti con testine di stampa sostituibili dal cliente) 1 anno Accessori 1 anno salvo diversamente definito A. Durata della garanzia limitata 1. HP Inc. (HP) garantisce all'utente finale che per il periodo sopra indicato, a partire dalla data dell'acquisto, i prodotti HP specificati sono privi di difetti di materiali e di manodopera. Il cliente è responsabile della conservazione della prova di acquisto. 2. Per i prodotti software, la garanzia limitata HP si applica solo in caso di mancata esecuzione delle istruzioni di programmazione. HP non garantisce che il funzionamento dei prodotti HP sia ininterrotto e privo di errori. 3. La garanzia HP si applica solo agli eventuali difetti derivanti dall'uso normale del prodotto e non da: a. Manutenzione non corretta oppure modifiche improprie o inadeguate; b. Software, supporti, parti o componenti non forniti o supportati da HP; c. Uso non rispondente alle specifiche del prodotto; d. Uso improprio o modifiche non autorizzate. 4. Per le stampanti HP, l'utilizzo di una cartuccia non HP o di una cartuccia ricaricata non ha effetti sulla garanzia o su eventuali contratti di assistenza con il cliente. Tuttavia, qualora il malfunzionamento o il danneggiamento della stampante sia dovuto all'uso di una cartuccia di stampa non HP o ricaricata, o di una cartuccia scaduta, al cliente verranno addebitati i costi di manodopera e di materiale sostenuti per la riparazione. 5. Se, durante il periodo della garanzia, HP verrà a conoscenza di un difetto di un prodotto hardware coperto dalla garanzia HP, a sua discrezione HP sostituirà o riparerà il prodotto difettoso. 6. Se HP non fosse in grado di riparare o sostituire adeguatamente un prodotto difettoso coperto dalla garanzia HP entro un tempo ragionevole, HP rimborserà il prezzo d'acquisto del prodotto. 7. HP non ha alcun obbligo di riparazione, sostituzione o rimborso fino al momento della restituzione del prodotto difettoso. 8. I prodotti sostitutivi possono essere nuovi o di prestazioni equivalenti a un prodotto nuovo, purché dotati di funzioni almeno uguali a quelle del prodotto sostituito. 9. I prodotti HP possono contenere parti, componenti o materiali ricondizionati equivalenti ai nuovi per prestazioni. 10. La garanzia limitata HP è valida in qualunque paese in cui i prodotti HP sopraelencati sono distribuiti da HP. Eventuali contratti per servizi di garanzia aggiuntivi, come l'assistenza 'on-site', possono essere richiesti a un centro di assistenza HP autorizzato che si occupi della distribuzione del prodotto o a un importatore autorizzato. B. Garanzia limitata IN CONFORMITÀ ALLE DISPOSIZIONI DI LEGGE VIGENTI, È ESCLUSA QUALSIASI GARANZIA O CONDIZIONE, SCRITTA OPPURE VERBALE, ESPRESSA O IMPLICITA DA PARTE DI HP O DI SUOI FORNITORI. HP ESCLUDE SPECIFICATAMENTE QUALSIASI GARANZIA O CONDIZIONE IMPLICITA DI COMMERCIABILITÀ, QUALITÀ SODDISFACENTE E IDONEITÀ AD USO PARTICOLARE. C. Responsabilità limitata 1. Le azioni offerte dalla presente garanzia sono le sole a disposizione del cliente. 2. IN CONFORMITÀ ALLE DISPOSIZIONI DI LEGGE VIGENTI, FATTA ECCEZIONE PER GLI OBBLIGHI ESPRESSI SPECIFICAMENTE NELLA PRESENTE GARANZIA HP, IN NESSUN CASO HP O I RELATIVI FORNITORI SARANNO RESPONSABILI DI DANNI DIRETTI, INDIRETTI, SPECIALI, ACCIDENTALI O CONSEGUENTI, O ALTRI DANNI DERIVANTI DALL'INADEMPIMENTO DEL CONTRATTO, ILLECITO CIVILE O ALTRO. D. Disposizioni locali 1. Questa garanzia HP conferisce al cliente diritti legali specifici. Il cliente può anche godere di altri diritti legali che variano da stato a stato negli Stati Uniti, da provincia a provincia in Canada, e da paese/regione a paese/regione nel resto del mondo. 2. Laddove la presente garanzia HP risulti non conforme alle leggi locali, essa verrà modificata secondo tali leggi. Per alcune normative locali, alcune esclusioni e limitazioni della presente garanzia HP possono non essere applicabili. Ad esempio, in alcuni stati degli Stati Uniti e in alcuni governi (come le province del Canada), è possibile: a. Impedire che le esclusioni e le limitazioni contenute nella garanzia HP limitino i diritti statutari del consumatore (come avviene nel Regno Unito). b. Limitare la possibilità da parte del produttore di rafforzare tali esclusioni o limitazioni. c. Concedere al cliente diritti aggiuntivi, specificare la durata delle garanzie implicite che il produttore non può escludere o consentire limitazioni alla durata delle garanzie implicite. 3. I TERMINI CONTENUTI NELLA PRESENTE DICHIARAZIONE DI GARANZIA, FATTI SALVI I LIMITI IMPOSTI DALLA LEGGE, NON ESCLUDONO, LIMITANO O MODIFICANO, BENSÌ INTEGRANO, I DIRITTI LEGALI APPLICABILI ALLA VENDITA DEI PRODOTTI HP AI CLIENTI DI TALI PAESI. Garanzia del Produttore Italiano Dichiarazione di garanzia limitata della stampante HP La Garanzia limitata HP è una garanzia commerciale fornita volontariamente da HP. Di seguito sono indicati nome e indirizzo della società HP responsabile della fornitura dei servizi coperti dalla Garanzia limitata HP nel vostro Paese: Italia: HP Italy S.r.l., Via G. Di Vittorio 9, 20063 Cernusco S/Naviglio I vantaggi della Garanzia limitata HP vengono concessi ai consumatori in aggiunta ai diritti derivanti dalla garanzia di due anni fornita dal venditore in caso di non conformità dei beni rispetto al contratto di vendita. Tuttavia, diversi fattori possono avere un impatto sulla possibilita’ di beneficiare di tali diritti. I diritti spettanti ai consumatori in forza della garanzia legale non sono in alcun modo limitati, né modificati dalla Garanzia limitata HP. Per ulteriori informazioni, si prega di consultare il seguente link: Garanzia legale per i clienti, oppure visitare il sito Web dei Centri europei per i consumatori. I consumatori hanno il diritto di scegliere se richiedere un servizio usufruendo della Garanzia limitata HP oppure rivolgendosi al venditore per far valere la garanzia legale di due anni. Per ulteriori informazioni consultare il seguente collegamento: Garanzia legale per il consumatore (www.hp.com/go/eu-legal) oppure visitare il sito Web dei centri europei dei consumatori (http://ec.europa.eu/consumers/solving_consumer_disputes/non-judicial_redress/ecc-net/). 43 HP Officejet 5740 e-All-in-One Series Primeros pasos 1. Siga las ilustraciones del folleto para configurar la impresora. 2. Instale el software. Windows® Español Visite 123.hp.com/OJ5740 y siga las instrucciones que aparecerán en la pantalla. Si el equipo no está conectado a Internet, inserte el CD de software en el equipo. Si el CD no se inicia, vaya a Equipo, haga doble clic en el icono de la unidad CD/DVD con el logotipo de HP, haga doble clic en setup.exe y siga las instrucciones en la pantalla. OS X/iOS Para instalar el software HP más actualizado en un equipo Mac, visite 123.hp.com/OJ5740. El software HP para Mac no está incluido en el CD de software que viene con la impresora. Este producto es compatible con Apple AirPrint. La impresora y el dispositivo iOS o Mac deben estar en la misma red local. Nota: Verifique siempre que se haya cargado el papel deseado en la bandeja. Una vez cerrada la bandeja, asegúrese de seleccionar el papel en el panel de control de la impresora. Más información Ayuda electrónica: Instale la Ayuda electrónica seleccionándola en el software recomendado durante la instalación del software. Obtenga información sobre las funciones del producto, la impresión, la resolución de problemas y el soporte. En la sección Información técnica, encontrará información sobre avisos, medio ambiente y normativa, incluidos los avisos reglamentarios de la Unión Europea y las declaraciones de cumplimiento. •• Windows® 8.1: Haga clic en la flecha hacia abajo en la esquina inferior izquierda de la pantalla Inicio, seleccione el nombre de la impresora, haga clic en Ayuda y luego seleccione Buscar ayuda de HP. •• Windows® 8: En la pantalla Inicio, haga clic con el botón derecho del ratón en una parte vacía de la misma. A continuación, en la barra de aplicaciones, haga clic en Todas las aplicaciones. Haga clic en el icono con el nombre de la impresora y, por último, haga clic en Ayuda. •• Windows® 7, Windows Vista® y Windows® XP: Haga clic en Inicio > Todos los programas > HP > HP Officejet 5740 series > Ayuda. •• OS X: Haga clic en Ayuda > Centro de ayuda. En la ventana del Visor de ayuda, haga clic en Ayuda para todas las aplicaciones y, luego, en HP Officejet 5740 series. Léame: Contiene información de soporte de HP, los requisitos del sistema operativo y las actualizaciones recientes de la impresora. •• Windows: Inserte el CD de software en el equipo y vaya a ReadMe.chm. Haga clic en ReadMe.chm para abrirlo y elija ReadMe en su idioma. •• Mac: Abra la carpeta Documentos que se encuentra en el nivel superior del instalador de software. Haga doble clic en ReadMe y seleccione ReadMe en su idioma. En la Web: Información y ayuda adicionales: www.hp.com/support. Registro de la impresora: www.register.hp.com. Declaración de conformidad: www.hp.eu/certificates. Uso de la tinta: www.hp.com/go/inkusage. ¡Escanee para descubrir más! Es posible que se apliquen tarifas estándares para datos. Es posible que no esté disponible en todos los idiomas. www.hp.com/eu/m/OJ5740 La información contenida en este documento puede sufrir modificaciones sin previo aviso. 1 Indicador luminoso de conexiones inalámbricas: Indica el estado de la conexión inalámbrica de la impresora. Español Panel de control •• La luz azul indica que se ha establecido la conexión inalámbrica y que se puede imprimir. •• Cuando la luz parpadea lentamente, la función inalámbrica está encendida, pero la impresora no está conectada a ninguna red. Asegúrese de que la impresora esté dentro del rango de la señal inalámbrica. •• Cuando la luz indicadora parpadea rápidamente, se produjo un error en la conexión inalámbrica. Consulte el mensaje en la pantalla de la impresora. •• Si la conexión inalámbrica está desactivada, la luz indicadora del estado de conexión inalámbrica estará apagada y la pantalla muestra Inalámbrica desactivada. 2 Botón Encender: Enciende o apaga la impresora. 3 Botón Atrás: Vuelve a la pantalla anterior. 4 Botón Ayuda: Muestra el contenido de la ayuda disponible para la operación actual. 5 Botón Inicio: Vuelve a la pantalla Inicio, la pantalla que se muestra al encender la impresora por primera vez. 6 Pantalla del panel de control: Toque la pantalla para seleccionar opciones de menú o desplazarse por los elementos del menú. 7 Botón de Comunicación de Campo Cercano (NFC): Indica que se pueden imprimir documentos e imágenes rápidamente desde un dispositivo móvil (por ejemplo, un teléfono inteligente o una tableta) con solo tocar el dispositivo en la impresora. Información de seguridad Tome siempre las precauciones básicas de seguridad cuando use esta impresora, así podrá reducir los riesgos de sufrir lesiones físicas como consecuencia de un incendio o una descarga eléctrica. 1. Lea y comprenda todas las instrucciones de la documentación suministrada con la impresora. 2. Tenga presente todos los avisos y las instrucciones indicadas en la impresora. 3. Antes de limpiarla, desenchufe la impresora de la toma de corriente de la pared. 4. No instale ni utilice esta impresora si está mojada o cerca de agua. 5. Instale la impresora de manera segura sobre una superficie estable. 6. Instale la impresora en un lugar protegido donde nadie pueda pisar el cable de alimentación eléctrica ni tropezar con él, y donde el cable no sufra daños. 7. Si la impresora no funciona con normalidad, consulte la ayuda electrónica (disponible en su equipo después de instalar el software). 8. En el interior no hay piezas que el usuario pueda reparar. Las tareas de reparación se deben encomendar al personal de servicio cualificado. 9. Use la impresora solo con el cable y el adaptador de alimentación (si se incluyen) suministrados por HP. 45 Solución de problemas básicos Si no puede imprimir: 1. Compruebe que los cables estén bien conectados. 2. Compruebe que la impresora esté encendida. El botón Encender estará encendido con luz blanca. 3. Compruebe el estado de conexión inalámbrica para asegurarse de que la impresora esté conectada a una red. 4. Visite el sitio web Herramientas de Diagnóstico de HP en www.hp.com/go/tools para descargar utilidades (herramientas) gratuitas de diagnóstico que podrá utilizar para solucionar los problemas de impresión habituales. Español Windows Mac Compruebe que la impresora esté definida como dispositivo de impresión predeterminado: Compruebe la cola de impresión: 1. En Preferencias del sistema, haga clic en Impresoras y escáneres (Impresoras y faxes en OS X v10.7 Lion y OS X v10.8 Mountain Lion). 2. Haga clic en Abrir cola de impresión. 3. Haga clic sobre un trabajo de impresión para seleccionarlo. 4. Utilice los botones siguientes para administrar el trabajo de impresión: •• Icono Cancelar: cancela el trabajo de impresión seleccionado. •• Reanudar: continúa un trabajo de impresión que se ha detenido. 5. Si ha hecho algún cambio, intente volver a imprimir. •• Windows 8.1 y Windows 8: Señale o toque la esquina derecha superior de la pantalla para abrir la barra Accesos, haga clic en el icono Ajustes, haga clic o toque el Panel de control y luego haga clic o toque Ver dispositivos e impresoras. •• Windows 7: En el menú Inicio de Windows, haga clic en Dispositivos e impresoras. •• Windows Vista: En la barra de tareas de Windows, haga clic en Inicio, Panel de control y, luego, Impresora. •• Windows XP: En la barra de tareas de Windows, haga clic en Inicio, Panel de control y, luego, en Impresoras y faxes. Compruebe que haya una marca de verificación dentro de un círculo negro junto a la impresora. Si la impresora no está seleccionada como predeterminada, haga clic con el botón derecho en el icono de la impresora y elija Establecer como impresora predeterminada en el menú. Si utiliza un cable USB y sigue sin poder imprimir o la instalación del software falla: 1. Extraiga el CD de la unidad de CD/DVD y, a continuación, desconecte el cable USB del equipo. 2. Reinicie el equipo. 3. Inserte el CD del software de la impresora en la unidad de CD/DVD y siga las instrucciones que aparecerán en la pantalla para instalar el software de la impresora. No conecte el cable USB hasta que se le indique. 4. Reinicie el equipo cuando finalice la instalación. Si utiliza la conexión inalámbrica y sigue sin poder imprimir: Vaya a la sección de Redes en la página siguiente para obtener más información. Reiniciar y restablecer: 1. Reinicie el ordenador. 2. Restablezca la impresora. a. Apague la impresora y desconecte el cable de alimentación. b. Espere un minuto, vuelva a conectar el cable y encienda la impresora. Para restablecer el sistema de impresión: 1. En Preferencias del sistema, haga clic en Impresoras y escáneres (Impresoras y faxes en OS X v10.7 Lion y OS X v10.8 Mountain Lion). 2. Mantenga pulsada la tecla Control mientras hace clic en la lista de la izquierda y luego seleccione Restablecer sistema de impresión. 3. Añada la impresora que desea utilizar. Para desinstalar el software: 1. Si la impresora está conectada al equipo a través del puerto USB, desconecte la impresora del equipo. 2. Abra la carpeta Applications/Hewlett-Packard. 3. Haga doble clic en Desinstalador de HP y siga las instrucciones que aparecen en pantalla. Almacenamiento de información de uso anónimo: Los cartuchos HP almacenan cierta información anónima sobre el uso de la impresora. Si desea obtener más información e instrucciones para desactivar el almacenamiento, consulte la Ayuda electrónica. Reconocimientos: Windows XP, Windows Vista, Windows 7, Windows 8 y Windows 8.1 son marcas comerciales registradas de Microsoft Corporation en EE. UU. Mac, OS X y AirPrint son marcas registradas de Apple Inc. en los EE. UU. y otros países. 46 Conexión inalámbrica en red ¿Necesita ayuda con el trabajo en red? www.hp.com/go/wirelessprinting Si no puede establecer la conexión entre la impresora y la red •• Confirme que esté activada la función inalámbrica de la impresora. 1. En el panel de control de la impresora, toque 2. Si aparece Inalámbrica desactivada, toque (Inalámbrica). (Configuración) y, luego, Configuración inalámbrica. Español El Centro de impresión inalámbrica HP en www.hp.com/go/wirelessprinting le ayudará a preparar la red inalámbrica, configurar o reconfigurar su impresora y solucionar problemas del trabajo en red. 3. En la pantalla Configuración inalámbrica, seleccione Activada para la opción Inalámbrica. •• Compruebe que la impresora esté conectada a la red. 1. En el panel de control de la impresora, toque 2. Toque (Inalámbrica). (Configuración). 3. Pulse Imprimir informes y, a continuación, Informe de prueba inalámbrica. El Informe de prueba inalámbrica se imprime automáticamente. 4. Consulte la parte superior del informe para ver si hubo fallos durante la prueba. –– Consulte la sección Resultado del diagnóstico para ver todas las pruebas realizadas y si la impresora las ha pasado o no. –– En la sección Configuración actual, busque el Nombre de red (SSID) al que está conectada actualmente la impresora. Compruebe que la impresora esté conectada a la misma red que el equipo. Nota: Si el equipo está conectado a una Red Privada Virtual (VPN), desconéctelo de forma temporal antes de continuar con la instalación. Tras la instalación, debe desconectar la impresora de la VPN para acceder a ella a través de la red doméstica. •• Asegúrese de que ningún software de seguridad esté bloqueando la comunicación con la red. El software de seguridad, como el cortafuegos, puede bloquear la comunicación entre su equipo y la impresora, cuando se instala en una red. Si no encuentra la impresora, desactive el cortafuegos de forma temporal y verifique si el problema desaparece. Para obtener ayuda y consejos sobre el software de seguridad, visite: www.hp.com/go/wpc-firewall_es-es. •• Reinicie los componentes de la red inalámbrica. Apague el enrutador y la impresora y, a continuación, vuelva a encenderlos en el siguiente orden: primero el enrutador y después la impresora. A veces, si apaga y vuelve a encender los dispositivos, se resuelven problemas de comunicación de red. Si aún no puede conectarse, apague el enrutador, la impresora y el equipo, y vuelva a encenderlos en este orden: primero el enrutador, luego la impresora y, por último, el equipo. Nota: Si no logra establecer la conexión inalámbrica, también puede conectar la impresora a la red con un cable Ethernet. Si los problemas persisten, visite el Centro de impresión inalámbrica HP (www.hp.com/go/wirelessprinting). Esta página web contiene la información actual más completa sobre la impresión inalámbrica, así como información para ayudarle a preparar su red inalámbrica; solucionar problemas cuando conecte la impresora a la red inalámbrica; y resolver los problemas de software de seguridad. Nota: Si está utilizando un equipo que ejecuta Windows, puede utilizar la herramienta Print and Scan Doctor, que puede ayudarle a resolver muchos problemas de la impresora. Para descargar esta herramienta, visite www.hp.com/go/tools. Si desea compartir la impresora con varios equipos en la red Primero, instale la impresora en la red doméstica. Después de conectar correctamente la impresora a la red doméstica, puede compartirla con otros equipos en la misma red. Por cada equipo adicional solo deberá instalar el software de la impresora HP. 47 Conexión inalámbrica en red (continuación) Si desea cambiar de una conexión USB a una conexión inalámbrica Primero, asegúrese de haber instalado el software de la impresora correctamente. Windows 1. Lleve a cabo uno de los pasos siguientes en función del sistema operativo: •• Windows 8.1: Haga clic en la flecha hacia abajo en la esquina inferior izquierda de la pantalla Inicio, seleccione el nombre de la impresora y, a continuación, haga clic en Utilidades. Español •• Windows 8: Haga clic con el botón derecho del ratón en una parte vacía de la pantalla Inicio, luego, haga clic en Todas las aplicaciones de la barra de aplicaciones. •• Windows 7, Windows Vista y Windows XP: En el menú Inicio, seleccione Todos los programas o Programas y, luego, seleccione HP. 2. Seleccione HP Officejet 5740 series. 3. Seleccione Configuración de impresora y software. 4. Seleccione Convertir una impresora conectada con USB a inalámbrica. Siga las instrucciones que aparecen en la pantalla. Mac Utilice la Utilidad HP en Aplicaciones/Hewlett-Packard para cambiar la conexión del software a inalámbrica para esta impresora. Si desea usar la impresora de forma inalámbrica sin un enrutador Use Wi-Fi Direct para imprimir de forma inalámbrica sin un enrutador desde su equipo, teléfono inteligente o dispositivo inalámbrico. Para utilizar Wi-Fi Direct en su equipo, debe instalar el software de la impresora. 1. Asegúrese de que esté encendido Wi-Fi Direct en la impresora: a. En la pantalla Inicio de la pantalla de la impresora, toque b. Si el Estado es Desactivado, toque (Wi-Fi Direct). (Configuración de Wi-Fi) y active Wi-Fi Direct. 2. Conecte su dispositivo inalámbrico a la impresora: a. Activación de la conexión Wi-Fi en su dispositivo móvil. Para obtener más información, consulte la documentación proporcionada con el dispositivo móvil. b. Desde el dispositivo móvil, conéctese a una nueva red. Utilice el proceso que normalmente utiliza para conectarse a una nueva red inalámbrica o hotspot. Elija el nombre de Wi-Fi Direct de la lista de redes inalámbricas, como DIRECT-**-HP Officejet-5740 (donde ** son caracteres únicos que permiten identificar la impresora). c. Escriba la contraseña de Wi-Fi Direct cuando el sistema lo solicite. 3. Imprima de normalmente desde el ordenador o dispositivo móvil. Nota: La conexión de Wi-Fi Direct no proporciona acceso a Internet. Visite el Centro de impresión inalámbrica de HP en www.hp.com/go/wirelessprinting para obtener más información sobre Wi-Fi Direct. Este producto está diseñado para su uso en entornos abiertos (p. ej., en hogares y sin conexión a Internet) en el que cualquier persona pueda acceder y utilizar la impresora. Como resultado, el ajuste de Wi-Fi Direct es en modo “Automático” de forma predeterminada, sin contraseña de administrador; esto permite que cualquier persona que se encuentre en el campo inalámbrico pueda conectar y acceder a todas las funciones y ajustes de la impresora. Si se desean niveles de seguridad más estrictos, HP recomienda cambiar el método de conexión Wi-Fi Direct de “Automático” a “Manual” y establecer una contraseña de administrador. Para imprimir con AirPrint Esta impresora es compatible con Apple AirPrint®. Puede imprimir de forma inalámbrica desde su dispositivo iOS o Mac. •• La impresora y el dispositivo iOS o Mac deben estar en la misma red inalámbrica. •• Con Apple AirPrint®, puede escanear documentos desde la impresora al dispositivo iOS. 48 Configuración del fax 1. Conecte una línea telefónica. Nota: Las impresoras HP están diseñadas expresamente para usar los servicios telefónicos analógicos tradicionales. Si se encuentra en un entorno telefónico digital (como DSL/ADSL, PBX, ISDN o FoIP), es posible que tenga que usar filtros de modo digital a analógico o dispositivos de conversión cuando configure la impresora para enviar faxes. Contacte con su compañía telefónica para determinar qué opciones de configuración son óptimas para usted. a. Conecte un extremo del cable telefónico a la toma de teléfono de la pared. b. Conecte el otro extremo al puerto con la etiqueta 1-LINE en la parte posterior de la impresora. Si se ha suscrito a un servicio DSL/ADSL, conecte un filtro DSL/ADSL entre el puerto 1-LINE y la entrada de pared. 1 2 3 Español Si la línea telefónica solo se usa para fax Toma telefónica de la pared Puerto de fax (1-LINE) Nota: No lo inserte en el puerto con la etiqueta 2-EXT. Filtro DSL/ADSL (facilitado por la compañía telefónica o el proveedor de servicios) Si hay dispositivos adicionales conectados a la línea telefónica Si tiene que conectar otros dispositivos, hágalo como se muestra en el siguiente diagrama: * TAM: Contestador automático 1 2 3 4 5 6 7 8 9 10 Toma telefónica de la pared Bifurcador paralelo Módem DSL/ADSL Contestador automático Teléfono Enchufe de pared ISDN Adaptador de terminal o enrutador ISDN Módem de banda ancha Filtro DSL/ADSL Adaptador de teléfono analógico ** FoIP: Fax sobre IP 2. Pruebe la configuración de fax. La prueba de fax comprueba el hardware, verifica el tipo de cable telefónico y el estado de la conexión, si hay tono de llamada y una línea telefónica activa. Para ejecutar la prueba: a. En la pantalla Inicio del panel de la impresora, pulse los botones Arriba y Abajo para seleccionar Fax. A continuación, pulse OK. b. Seleccione Configuración, Configuración avanzada, elija Asistente para configuración de fax y, después, siga las instrucciones en pantalla. 49 Uso del fax Enviar un fax estándar 1. Cargue el original con la cara impresa hacia abajo en la esquina frontal derecha del cristal del escáner o con la cara impresa hacia arriba en el alimentador de documentos. 2. En la pantalla del panel de control de la impresora, toque Fax. 3. Toque Enviar ahora. 4. Introduzca el número de fax con el teclado numérico. Español Para añadir una pausa en el número de fax, pulse * varias veces hasta que aparezca un guión (-) en la pantalla. 5. Toque Negro o Color. Si la impresora detecta un original cargado en el alimentador de documentos, envía el documento al número especificado. Si el destinatario tiene problemas con la calidad del fax enviado, intente cambiar la resolución o el contraste del fax. Enviar un fax con un teléfono de extensión 1. Marque el número en el teclado numérico del teléfono de extensión. No utilice el teclado numérico del panel de control de la impresora cuando envíe un fax con este método. 2. Si el destinatario responde al teléfono, puede entablar una conversación antes de enviar el fax. Si la llamada la recibe el equipo de fax, oirá los tonos del fax. 3. Cargue el original con la cara impresa hacia abajo en la esquina frontal derecha del cristal del escáner o con la cara impresa hacia arriba en el alimentador de documentos. 4. En la pantalla del panel de control de la impresora, toque Fax. 5. Toque Enviar fax. 6. Toque Negro o Color. Si estaba al teléfono con el destinatario, pídale que empiece a recibir el fax cuando escuche los tonos del fax. Cuando la impresora comience a enviar el fax, puede colgar el teléfono o permanecer en la línea. Puede que no escuche tonos de fax durante la transmisión del fax. Para obtener más información sobre otras formas de enviar faxes, como programar un fax para que se envíe más tarde o enviar faxes desde un equipo, consulte la Ayuda electrónica. Recibir un fax automáticamente La impresora responde automáticamente las llamadas entrantes y recibe faxes de forma predeterminada. Para recibir faxes manualmente, apague la Respuesta automática en el panel de control de la impresora. La impresora responderá las llamadas después de la cantidad de timbres estipulada en la configuración de Timbres antes de responder. Si un contestador automático está conectado a la impresora, el ajuste de Timbres antes de responder para la impresora debe fijarse en un número mayor que el del contestador automático. 1. Compruebe que la impresora esté encendida y que haya papel cargado. 2. En la pantalla de la impresora, toque Fax. 3. Toque Configuración y, luego, Preferencias. 4. Seleccione Activar para la opción Respuesta automática. Nota: Si se ha suscrito a un servicio de correo de voz en la misma línea telefónica que usará para fax, no podrá recibir faxes automáticamente. Debe estar preparado para responder personalmente a las llamadas de fax entrantes. (Si desea recibir los faxes automáticamente, contacte con su compañía telefónica para suscribirse a un servicio de timbre distintivo o para adquirir otra línea de teléfono para el fax). La impresora puede almacenar faxes en la memoria interna. Para reimprimir estos faxes, consulte “Reimprimir faxes recibidos desde la memoria” en la página siguiente. 50 Usar fax (continuación) Recibir un fax manualmente Si está al teléfono con otra persona, puede recibir faxes manualmente sin colgar el teléfono. 1. Compruebe que la impresora esté encendida y que haya papel cargado. Establezca Timbres antes de responder en un número mayor para darle tiempo a responder a la llamada entrante antes de que lo haga la impresora. También puede desactivar la Respuesta automática para que la impresora no responda automáticamente a las llamadas entrantes. 3. Pida al remitente que empiece a enviar el fax. 4. Cuando escuche el tono de fax, en la pantalla de inicio del panel de control de la impresora, toque Fax, luego, Enviar y recibir y, por último, Recibir ahora. Español 2. Retire los originales del alimentador de documentos. Cuando la impresora comience a recibir el fax, puede colgar el teléfono o permanecer en la línea. Puede que no escuche tonos de fax durante la transmisión del fax. Reimprimir los faxes recibidos desde la memoria Si la función Recepción de Fax está activada, los faxes entrantes se almacenan en la memoria, incluso cuando la impresora presenta algún error. Nota: Es posible que se borren los faxes almacenados en la memoria cuando apague la impresora. 1. Asegúrese de que haya papel cargado en la impresora. 2. En la pantalla Inicio de la impresora, toque Fax. 3. Toque Reimprimir. Los faxes se muestran en orden inverso al que se recibieron, comenzando por la impresión del fax recibido más recientemente. 4. Para detener la impresión, seleccione Cancelar. Imprimir un informe o registro Los informes de fax proporcionan información útil del sistema acerca de la impresora. 1. En la pantalla Inicio de la impresora, toque Configuración y, luego, Configuración de fax. 2. Toque Informes y, luego, Confirmación de fax. 3. Toque para seleccionar una de las opciones. 51 Solucionar problemas de fax Si sigue teniendo problemas para usar el fax después de completar la prueba del fax correctamente, realice los siguientes pasos: Compruebe los ajustes de fax de la impresora No puedo enviar faxes, pero sí recibirlos •• Si se ha suscrito a un servicio de correo de voz de la compañía telefónica o del proveedor de servicios, asegúrese de que la función Timbres antes de responder en la impresora esté establecida de forma que sean más que los del contestador automático del teléfono. La impresora supervisará la línea y decidirá si una llamada entrante es una llamada normal de teléfono o de fax. Si es una llamada de fax, la impresora iniciará una conexión de fax automáticamente. De lo contrario, puede que tenga que recibir el fax manualmente seleccionando Fax en el panel de la impresora. 1. Haga una copia o un escaneo para verificar el funcionamiento correcto de la impresora. 2. Compruebe las conexiones físicas del fax. Español 3. Compruebe si otros dispositivos pueden enviar faxes al mismo número de teléfono. Es posible que el dispositivo de fax del destinatario haya bloqueado su número de teléfono o que tenga problemas técnicos. 4. Si el problema continúa, imprima el informe de prueba del fax y el registro de faxes (y, si están disponibles, el informe de ID de llamadas y el informe de Faxes no deseados) y luego contacte con HP para obtener más asistencia. 1. Compruebe los ajustes de fax de la impresora. •• Si se asignan varios números de teléfono a la misma línea telefónica física y la línea es compartida por varios dispositivos, asegúrese de que la impresora esté establecida en el ajuste de timbre distintivo correcto para recibir faxes. 2. Compruebe las conexiones físicas del fax. Verifique las conexiones físicas de fax 3. Compruebe si otros dispositivos conectados a la misma línea telefónica pueden recibir faxes. Es posible que la línea telefónica esté defectuosa o que el dispositivo de fax del remitente tenga problemas para enviar faxes. También debe comprobar si ha bloqueado el número de teléfono del remitente. •• Conecte el cable telefónico del puerto 1-LINE, en la parte posterior de la impresora, a la entrada de pared y conecte un cable telefónico del puerto 2-EXT, en la parte posterior de la impresora, a un teléfono de extensión. Desde el teléfono de extensión, llame al número de teléfono que no podía recibir los faxes. 4. Compruebe el problema con el remitente. Si el problema continúa, imprima el informe de prueba del fax y el registro de faxes (y, si están disponibles, el informe de ID de llamadas y el informe de Faxes no deseados) y luego contacte con HP para obtener más asistencia. •• Si intentaba enviar un fax a un número externo, asegúrese de incluir cualquier código de acceso o número requeridos antes de introducir el número. Puede que también tenga que añadir una pausa en el número para evitar que la impresora marque demasiado rápido. Para añadir una pausa, pulse * varias veces hasta que aparezca un guión (-) en la pantalla. No puedo recibir faxes, pero sí enviarlos No puedo enviar ni recibir faxes 1. Haga una copia o un escaneo para verificar el funcionamiento correcto de la impresora. 2. Compruebe las conexiones físicas del fax. 3. Compruebe los ajustes de fax de la impresora. 4. Compruebe si otros dispositivos conectados a esta línea telefónica pueden enviar y recibir faxes. Puede que haya un problema con la línea telefónica. 5. Restablezca la impresora apagando la impresora y, si es posible, el conmutador principal de la fuente de alimentación. Espere unos segundos antes de volver a encender la alimentación. Intente enviar o recibir un fax en la impresora. 6. Si el problema continúa, imprima el informe de prueba del fax y el registro de faxes (y, si están disponibles, el informe de ID de llamadas y el informe de Faxes no deseados) y luego contacte con HP para obtener más asistencia. 7. Nota: Si se ha suscrito a un servicio de correo de voz en la misma línea telefónica que usará para fax, tendrá que recibir faxes manualmente. 52 •• La función Respuesta automática está activada para que la impresora reciba faxes automáticamente. •• Si no puede realizar llamadas salientes porque no se detecta ningún tono de llamada o la línea es ruidosa, intente utilizar otro cable telefónico en lugar del conectado al puerto del teléfono 1-LINE o cambie la impresora a otra ubicación que tenga una línea telefónica separada (si es posible) y compruebe si hay problemas similares. •• Si se encuentra en un entorno de teléfono digital (como FoIP, fax a través de VoIP), reduzca la velocidad del fax y desactive la Modulación del Código de Error (ECM) en el panel de control de la impresora. Si es necesario, contacte con su compañía telefónica para determinar si hay problemas con la línea de teléfono o para obtener más información sobre las capacidades de la red telefónica. Producto HP Medio de almacenamiento del software Impresora Cartuchos de tinta o impresión Duración de la garantía limitada 90 días 1 año La garantía es válida hasta que se agote la tinta HP o hasta que se alcance la fecha de “fin de garantía” indicada en el cartucho, cualquiera de los hechos que se produzca en primer lugar. Esta garantía no cubrirá los productos de tinta HP que se hayan rellenado o manipulado, se hayan vuelto a limpiar, se hayan utilizado incorrectamente o se haya alterado su composición. Cabezales de impresión (sólo se aplica a productos con cabezales de impresión que el cliente puede sustituir) Accesorios 1 año 1 año, a no ser que se especifique otro dato A. Alcance de la garantía limitada 1. HP Inc. (HP) garantiza al usuario final que el producto de HP especificado no tendrá defectos de materiales ni mano de obra por el periodo anteriormente indicado, cuya duración empieza el día de la compra por parte del cliente. 2. Para los productos de software, la garantía limitada de HP se aplica únicamente a la incapacidad del programa para ejecutar las instrucciones. HP no garantiza que el funcionamiento de los productos se interrumpa o no contenga errores. 3. La garantía limitada de HP abarca sólo los defectos que se originen como consecuencia del uso normal del producto, y no cubre otros problemas, incluyendo los originados como consecuencia de: a. Mantenimiento o modificación indebidos; b. Software, soportes de impresión, piezas o consumibles que HP no proporcione o no admita; c. Uso que no se ajuste a las especificaciones del producto; d. Modificación o uso incorrecto no autorizados. 4. Para los productos de impresoras de HP, el uso de un cartucho que no sea de HP o de un cartucho recargado no afecta ni a la garantía del cliente ni a cualquier otro contrato de asistencia de HP con el cliente. No obstante, si el error o el desperfecto en la impresora se atribuye al uso de un cartucho que no sea de HP, un cartucho recargado o un cartucho de tinta caducado, HP cobrará aparte el tiempo y los materiales de servicio para dicho error o desperfecto. 5. Si durante la vigencia de la garantía aplicable, HP recibe un aviso de que cualquier producto presenta un defecto cubierto por la garantía, HP reparará o sustituirá el producto defectuoso como considere conveniente. 6. Si HP no logra reparar o sustituir, según corresponda, un producto defectuoso que esté cubierto por la garantía, HP reembolsará al cliente el precio de compra del producto, dentro de un plazo razonable tras recibir la notificación del defecto. 7. HP no tendrá obligación alguna de reparar, sustituir o reembolsar el precio del producto defectuoso hasta que el cliente lo haya devuelto a HP. 8. Los productos de sustitución pueden ser nuevos o seminuevos, siempre que sus prestaciones sean iguales o mayores que las del producto sustituido. 9. Los productos HP podrían incluir piezas, componentes o materiales refabricados equivalentes a los nuevos en cuanto al rendimiento. 10. La Declaración de garantía limitada de HP es válida en cualquier país en que los productos HP cubiertos sean distribuidos por HP. Es posible que existan contratos disponibles para servicios de garantía adicionales, como el servicio in situ, en cualquier suministrador de servicios autorizado por HP, en aquellos países donde HP o un importador autorizado distribuyan el producto. B. Limitaciones de la garantía HASTA DONDE LO PERMITAN LAS LEYES LOCALES, NI HP NI SUS TERCEROS PROVEEDORES OTORGAN NINGUNA OTRA GARANTÍA O CONDICIÓN DE NINGÚN TIPO, YA SEAN GARANTÍAS O CONDICIONES DE COMERCIABILIDAD EXPRESAS O IMPLÍCITAS, CALIDAD SATISFACTORIA E IDONEIDAD PARA UN FIN DETERMINADO. C. Limitaciones de responsabilidad 1. Hasta donde lo permitan las leyes locales, los recursos indicados en esta Declaración de garantía son los únicos y exclusivos recursos de los que dispone el cliente. 2. HASTA EL PUNTO PERMITIDO POR LA LEY LOCAL, EXCEPTO PARA LAS OBLIGACIONES EXPUESTAS ESPECÍFICAMENTE EN ESTA DECLARACIÓN DE GARANTÍA, EN NINGÚN CASO HP O SUS PROVEEDORES SERÁN RESPONSABLES DE LOS DAÑOS DIRECTOS, INDIRECTOS, ESPECIALES, INCIDENTALES O CONSECUENCIALES, YA ESTÉ BASADO EN CONTRATO, RESPONSABILIDAD EXTRACONTRACTUAL O CUALQUIER OTRA TEORÍA LEGAL, Y AUNQUE SE HAYA AVISADO DE LA POSIBILIDAD DE TALES DAÑOS. D. Legislación local 1. Esta Declaración de garantía confiere derechos legales específicos al cliente. El cliente podría también gozar de otros derechos que varían según el estado (en Estados Unidos), la provincia (en Canadá), o la entidad gubernamental en cualquier otro país del mundo. 2. Hasta donde se establezca que esta Declaración de garantía contraviene las leyes locales, dicha Declaración de garantía se considerará modificada para acatar tales leyes locales. Bajo dichas leyes locales, puede que algunas de las declinaciones de responsabilidad y limitaciones estipuladas en esta Declaración de garantía no se apliquen al cliente. Por ejemplo, algunos estados en Estados Unidos, así como ciertas entidades gubernamentales en el exterior de Estados Unidos (incluidas las provincias de Canadá) pueden: a. Evitar que las renuncias y limitaciones de esta Declaración de garantía limiten los derechos estatutarios del cliente (por ejemplo, en el Reino Unido); b. Restringir de otro modo la capacidad de un fabricante de aumentar dichas renuncias o limitaciones; u c. Ofrecer al usuario derechos adicionales de garantía, especificar la duración de las garantías implícitas a las que no puede renunciar el fabricante o permitir limitaciones en la duración de las garantías implícitas. 3. LOS TÉRMINOS ENUNCIADOS EN ESTA DECLARACIÓN DE GARANTÍA, SALVO HASTA DONDE LO PERMITA LA LEY, NO EXCLUYEN, RESTRINGEN NI MODIFICAN LOS DERECHOS ESTATUTARIOS OBLIGATORIOS PERTINENTES A LA VENTA DE PRODUCTOS HP A DICHOS CLIENTES, SINO QUE SON ADICIONALES A LOS MISMOS. Español Declaración de garantía limitada de la impresora HP Información sobre la Garantía Limitada del Fabricante HP Su Garantía limitada de HP es una garantía comercial voluntariamente proporcionada por HP. El nombre y dirección de las entidades HP que proporcionan la Garantía limitada de HP (garantía comercial adicional del fabricante) en su país es: España: Hewlett-Packard Española S.L. Calle Vicente Aleixandre, 1 Parque Empresarial Madrid - Las Rozas, E-28232 Madrid Los beneficios de la Garantía limitada de HP son adicionales a la garantía legal de 2 años a la que los consumidores tienen derecho a recibir del vendedor en virtud del contrato de compraventa; sin embargo, varios factores pueden afectar su derecho a recibir los beneficios bajo dicha garantía legal. A este respecto, la Garantía limitada de HP no limita o afecta en modo alguno los derechos legales del consumidor. Para más información, consulte el siguiente enlace: Garantía legal del consumidor o puede visitar el sitio web de los Centros europeos de los consumidores. Los clientes tienen derecho a elegir si reclaman un servicio acogiéndose a la Garantía limitada de HP o al vendedor de conformidad con la garantía legal de dos años. Para más información, consulte el siguiente vínculo: la garantía legal del consumidor (www.hp.com/go/eu-legal) o puede visitar el sitio web del centro europeo del consumidor (http://ec.europa.eu/consumers/solving_consumer_disputes/non-judicial_redress/ecc-net/). 53 HP Officejet 5740 e-All-in-One Series Introdução 1. Siga as imagens do folheto de configuração para configurar a impressora. 2. Instale o software. Windows® Acesse 123.hp.com/OJ5740 e siga as instruções na tela. Se seu computador não estiver conectado à internet, insira o CD do software no computador. Se o CD não iniciar, navegue até Computador, clique duas vezes no ícone da unidade de CD/DVD com o logotipo HP e clique duas vezes em setup.exe. Siga as instruções na tela. OS X/iOS Para instalar o software HP mais recente em um Mac, acesse 123.hp.com/OJ5740. O software HP para Mac não está incluído no CD de software que acompanha a impressora. Este produto está habilitado para o Apple AirPrint. A impressora e o dispositivo iOS ou Mac devem estar na mesma rede local. Observação: sempre verifique se a bandeja de papel está carregada com o papel desejado. Após fechar a bandeja, certifique-se de que esse papel esteja selecionado no painel de controle da impressora. Português Mais informações Ajuda Eletrônica: instale a Ajuda eletrônica selecionando-a no software recomendado durante a instalação do software. Saiba mais sobre recursos do equipamento, impressão, solução de problemas e suporte. Veja, na seção Informações Técnicas, notificações e informações ambientais e de regulamentação, incluindo a Notificação de Regulamentação da União Europeia e as declarações de conformidade. •• Windows® 8.1: clique na seta para baixo, no canto esquerdo inferior da tela Iniciar, selecione o nome da impressora, clique em Ajuda e selecione Pesquisar na Ajuda da HP. •• Windows® 8: na tela Iniciar, clique com o botão direito em uma área vazia, clique em Todos os Apps na barra de aplicativos, depois clique no ícone com o nome da impressora e clique em Ajuda. •• Windows® 7, Windows Vista® e Windows® XP: clique em Iniciar > Todos os Programas > HP > HP Officejet 5740 series > Ajuda. •• OS X: clique em Ajuda > Central de Ajuda. Na janela do Visualizador de Ajuda, clique em Ajuda para todos os seus aplicativos e clique em HP Officejet 5740 series. Leiame: contém informações de suporte da HP, requisitos de sistema operacional e atualizações recentes para a impressora. •• Windows: insira o CD do software no seu computador e navegue até o arquivo ReadMe.chm. Clique duas vezes em ReadMe.chm para abri-lo e selecione o Leiame em seu idioma. •• Mac: abra a pasta Documentos localizada no nível superior do instalador do software. Clique duas vezes em Leiame e selecione o arquivo Leiame em seu idioma. Na web: ajuda e informações adicionais: www.hp.com/go/support. Registro da impressora: www.register.hp.com. Declaração de Conformidade: www.hp.eu/certificates. Consumo de tinta: www.hp.com/go/inkusage. Digitalize para saber mais! Taxas de dados padrão podem se aplicar. Pode não estar disponível em todos os idiomas. www.hp.com/eu/m/OJ5740 As informações neste documento podem ser alteradas sem aviso. 1 Luz de conexão sem fio: indica o status da conexão sem fio da impressora. 2 Botão Liga/Desliga: liga ou desliga a impressora. 3 Botão Voltar: Retorna à tela anterior. 4 Botão Ajuda: mostra o conteúdo da ajuda, caso esteja disponível para a operação atual. 5 Botão Início: retorna para a tela inicial, que é exibida quando você liga a impressora pela primeira vez. 6 Visor do painel de controle: toque na tela para selecionar as opções de menu ou percorra os itens de menu. 7 Botão Near Field Communication (NFC): indica a área em que é possível imprimir documentos e imagens com um dispositivo móvel (como smartphone ou tablet), bastando encostar no dispositivo na impressora. •• A luz azul sólida indica que a conexão sem fio foi estabelecida e é possível fazer impressões. •• A luz piscando lentamente indica que a conexão sem fio está ativa, mas a impressora não está conectada a uma rede. Verifique se sua impressora está dentro do alcance do sinal da rede sem fio. •• A luz piscando rapidamente indica erro na conexão sem fio. Consulte a mensagem no visor da impressora. •• Se a conexão sem fio estiver desativada, a luz da rede sem fio ficará apagada, e a tela exibirá Conexão Sem Fio Desativada. Português Painel de controle Informações sobre segurança Siga sempre as recomendações básicas de segurança ao usar esta impressora, reduzindo o risco de incêndio ou choque elétrico. 1. Leia e compreenda todas as instruções da documentação que acompanha a impressora. 2. Observe todas as advertências e instruções indicadas na impressora. 3. Desligue a impressora da tomada elétrica antes de limpá-la. 4. Não instale nem use esta impressora perto da água ou quando você estiver molhado. 5. Instale a impressora de forma segura, em superfície estável. 6. Instale a impressora em local protegido, onde ninguém possa pisar ou tropeçar no fio de alimentação, e onde o fio não possa ser danificado. 7. Se a impressora não funcionar normalmente, consulte o arquivo de ajuda (disponível no computador após a instalação do software). 8. Não há nenhum componente interno que possa ser reparado pelo usuário. Os reparos devem ser feitos por técnicos qualificados. 9. Use o dispositivo apenas com o cabo e o adaptador de alimentação (se houver) fornecidos pela HP. 55 Solução de problemas básicos Se você não conseguir imprimir: 1. Certifique-se de que as conexões dos cabos estejam firmes. 2. Verifique se a impressora está ligada. O botão Liga/Desliga acenderá na cor branca. 3. Observe a luz de status da conexão sem fio para verificar se a impressora está conectada à rede. 4. Visite o site HP Diagnostic Tools em www.hp.com/go/tools para baixar utilitários de diagnóstico gratuitos (ferramentas) que você pode usar para solucionar problemas comuns da impressora. Windows Mac Verifique se a impressora está definida como seu dispositivo padrão de impressão: Verifique a fila de impressão: 1. Em Preferências de Sistema, clique em Impressoras e Scanners (Impressão e Fax no OS X v10.7 Lion e OS X v10.8 Mountain Lion). •• Windows 8.1 e Windows 8: Aponte para ou toque no canto superior direito da tela para abrir a barra Botões, clique no ícone Configurações, clique ou toque em Painel de Controle e clique ou toque em Exibir dispositivos e impressoras. Português •• Windows 7: No menu Iniciar do Windows, clique em Dispositivos e Impressoras. •• Windows Vista: na barra de tarefas do Windows, clique em Iniciar, Painel de Controle e depois em Impressoras. •• Windows XP: Na barra de tarefas do Windows, clique em Iniciar, Painel de controle e Impressoras e aparelhos de fax. Verifique se a impressora tem uma marca de seleção no círculo próximo a ela. Se a sua impressora não estiver selecionada como a impressora padrão, clique com o botão direito do mouse no ícone da correspondente a ela e selecione Definir como impressora padrão no menu. Se você estiver usando um cabo USB e ainda não for possível imprimir ou se a instalação do software falhar: 1. Remova o CD da unidade de CD/DVD do computador e desconecte o cabo USB do computador. 2. Reinicie o computador. 3. Insira o CD do software da impressora na unidade de CD/ DVD do computador e siga as instruções na tela para instalar o software. Não conecte o cabo USB até ser instruído a isso. 4. Após o término da instalação, reinicie o computador. 2. Clique em Abrir Fila de Impressão. 3. Clique em um trabalho de impressão para selecioná-lo. 4. Utilize os seguintes botões para gerenciar o trabalho de impressão: •• Ícone Cancelar: Cancela o trabalho de impressão selecionado. •• Continuar: Continua um trabalho de impressão pausado. 5. Caso tenha feito alguma alteração, tente imprimir novamente. Reinicie: 1. Reinicie o computador. 2. Redefina a impressora. a. Desligue a impressora e desconecte o cabo de alimentação. b. Aguarde um minuto e reconecte o cabo de alimentação. Ligue a impressora. Redefina o sistema de impressão: 1. Em Preferências de Sistema, clique em Impressoras e Scanners (Impressão e Fax no OS X v10.7 Lion e OS X v10.8 Mountain Lion). 2. Mantenha pressionada a tecla Control e clique na lista à esquerda, depois selecione Redefinir sistema de impressão. 3. Adicione a impressora que você deseja usar. Se você estiver usando conexão sem fio e ainda não conseguiu imprimir: Desinstale o software: Vá até a seção Rede na próxima página para obter mais informações. 1. Se a impressora estiver conectada ao seu computador por conexão USB, desconecte a impressora do computador. 2. Abra a pasta Aplicativos/Hewlett-Packard. 3. Clique duas vezes em Desinstalador HP e siga as instruções na tela. Armazenamento de informações anônimas de uso: os cartuchos HP armazenam um conjunto limitado de informações anônimas sobre a utilização da impressora. Para obter mais informações e instruções sobre como desativar a coleta de informações de utilização, consulte o guia do usuário. Declarações: Windows XP, Windows Vista, Windows 7, Windows 8 e Windows 8.1 são marcas comerciais registradas da Microsoft Corporation nos Estados Unidos. Mac, OS X e AirPrint são marcas comerciais da Apple Inc., registradas nos Estados Unidos e em outros países. 56 Rede sem fio Precisa de mais ajuda? www.hp.com/go/wirelessprinting O Centro de Impressão Sem Fio HP em www.hp.com/go/wirelessprinting pode ajudar você a preparar sua rede sem fio, instalar e reconfigurar a impressora e solucionar problemas com a rede. Se a conexão da impressora com a rede não foi estabelecida com êxito •• Verifique se a conexão sem fio está habilitada na impressora. 1. No painel de controle da impressora, toque em (sem fio). 2. Caso Conexão Sem Fio Desativada seja exibido, toque em (Configurações) e em Configurações Sem Fio. 3. Na tela Configurações Sem Fio, selecione Ativar na opção Sem Fio. •• Verifique se a impressora está conectada à sua rede. 1. No painel de controle da impressora, toque em (Sem Fio). (Configurações). 3. Toque em Imprimir Relatórios e em seguida toque em Relatório de Teste de Rede Sem Fio. O Relatório de Teste de Rede Sem Fio é impresso automaticamente. 4. Verifique, no topo do relatório, se algo falhou durante o teste. –– Consulte a seção Resultados do Diagnóstico de todos os testes realizados, para saber se a impressora foi aprovada ou não. –– Na seção Configuração Atual, localize o Nome da Rede (SSID) à qual a impressora está conectada atualmente. Certifique-se de que a impressora esteja conectada à mesma rede que o computador. Português 2. Toque em Observação: Se seu computador estiver conectado a uma Rede Privada Virtual (VPN), desconecte-a temporariamente antes de dar continuidade à instalação. Após a instalação, você precisará se desconectar da VPN para acessar a impressora em sua rede doméstica. •• Verifique se o software de segurança não está bloqueando a comunicação em sua rede. Os softwares de segurança, como os firewalls, podem bloquear a comunicação entre o computador e a impressora durante a instalação em rede. Se sua impressora não puder ser encontrada, desative temporariamente seu firewall e verifique se o problema desaparece. Para mais ajuda e dicas de software de segurança, visite: www.hp.com/go/wpc-firewall_br-pt. •• Reinicie os componentes da rede sem fio. Desligue o roteador e a impressora e religue-os nesta ordem: primeiro o roteador e depois a impressora. Às vezes, basta desligar e religar esses dispositivos para resolver problemas de comunicação da rede. Se ainda não conseguir se conectar, desligue o roteador, a impressora e o computador e religue-os nesta ordem: primeiro o roteador, depois a impressora e depois o computador. Observação: se não for possível estabelecer a conexão sem fio, a impressora também pode ser conectada à rede usando um cabo Ethernet. Se você ainda tiver problemas, visite o Centro de Impressão Sem Fio HP (www.hp.com/go/wirelessprinting). Esse site contém as informações mais completas e atualizadas sobre impressão sem fio, assim como informações para ajudar você a preparar a sua rede sem fio, resolver problemas de conexão da impressora com a rede sem fio e resolver problemas com software de segurança. Observação: se você estiver usando um computador com Windows, poderá usar a ferramenta Técnico em Impressão e Digitalização, que pode ajudar a resolver muitos problemas que você possa ter com a impressora. Para baixar a ferramenta, acesse www.hp.com/go/tools. Se você desejar compartilhar a impressora com vários computadores na rede Primeiro, instale a impressora em sua rede doméstica. Após conectar com sucesso sua impressora à rede doméstica, é possível compartilhá-la com outros computadores dessa mesma rede. Em cada computador adicional, é preciso apenas instalar o software da impressora HP. 57 Rede sem fio (continuação) Se você desejar trocar de uma conexão USB para uma conexão sem fio Primeiro, verifique se você já instalou com êxito o software da impressora. Windows 1. Siga estas etapas de acordo com seu sistema operacional: •• Windows 8.1: Clique na seta para baixo, no canto esquerdo inferior da tela Iniciar, selecione o nome da impressora e clique em Utilitários. •• Windows 8: Na tela Iniciar, clique com o botão direito em uma área vazia e clique em Todos os Apps na barra de aplicativos. •• Windows 7, Windows Vista e Windows XP: No menu Iniciar do computador, selecione Todos os Programas ou Programas e selecione HP. 2. Selecione HP Officejet 5740 series. 3. Selecione Configuração da Impressora e Software. 4. Selecione Converter impressora conectada via USB em sem fio. Siga as instruções na tela. Mac Português Use o Utilitário HP em Aplicativos/Hewlett-Packard para mudar a conexão no software dessa impressora para sem fio. Se desejar usar a impressora em rede sem fio sem roteador Use o Wi-Fi Direct para imprimir por rede sem fio sem usar roteador, por meio de seu computador, smartphone ou outro dispositivo habilitado para rede sem fio. Para usar o Wi-Fi Direct em um computador, o software da impressora deverá estar instalado nesse computador. 1. Verifique se o Wi-Fi Direct em seu computador está ligado: a. Na tela inicial do visor da impressora, toque em b. Se o Status for Desativado, toque em (Wi-Fi Direct). (Configurações do Wi-Fi Direct) e ative-o. 2. Conecte seu dispositivo habilitado para conexão sem fio à impressora: a. Ative a conexão Wi-Fi em seu dispositivo móvel. Para mais informações, consulte a documentação que acompanha o dispositivo móvel. b. No dispositivo móvel, conecte-se a uma nova rede. Siga o procedimento normal usado para conectar-se a uma nova rede sem fio ou hotspot. Escolha o nome Wi-Fi Direct na lista de redes sem fio exibidas, por exemplo, DIRECT-**-HP Officejet-5740 (em que ** são os caracteres exclusivos de identificação de sua impressora). c. Insira sua senha Wi-Fi Direct quando solicitado. 3. Imprima como você normalmente faria em seu computador ou dispositivo móvel. Observação: a conexão do Wi-Fi Direct não oferece acesso à internet. Visite o Centro de Impressão Sem Fio HP em www.hp.com/go/wirelessprinting para mais informações sobre o Wi-Fi Direct. Este produto foi projetado para ser usado em ambientes abertos (p. ex., em casas e não conectados à internet pública), nos quais qualquer um pode acessar e usar a impressora. Como resultado, a configuração Wi-Fi Direct fica em modo “Automático” por padrão, sem a senha de administrador; isso permite que qualquer pessoal ao alcance da rede sem fio se conecte e acesse todas as funções e configurações da impressora. Se desejar níveis mais altos de segurança, a HP recomenda que você altere o método de conexão do Wi-Fi Direct de “Automático” para “Manual” e estabeleça uma senha de administrador. Se desejar imprimir com o AirPrint Esta impressora está habilitada para o Apple AirPrint®. É possível imprimir por conexão sem fio usando seu dispositivo iOS ou Mac. •• Sua impressora e o dispositivo iOS ou Mac devem estar na mesma rede sem fio. •• Com o Apple AirPrint®, não é possível digitalizar documentos da impressora para o dispositivo iOS. 58 Configurar fax 1. Conecte a linha telefônica. Observação: as impressoras HP foram projetadas especificamente para uso com serviços convencionais de telefone analógico. Se você estiver em um ambiente de telefone digital (como DSL/ADSL, PBX, ISDN ou FoIP), ao configurar a impressora para trabalhar com faxes, será necessário usar filtros digital para analógico ou conversores. Entre em contato com sua companhia telefônica para saber quais são as melhores opções de configuração para você. Se a linha telefônica é usada somente para fax a. Conecte uma ponta do cabo telefônico à tomada telefônica na parede. b. Conecte a outra ponta à porta identificada como 1-LINE na parte posterior da impressora. Se você for assinante de um serviço DSL/ADSL, conecte um filtro DSL/ADSL entre a porta 1-LINE e a tomada telefônica na parede. 2 3 Tomada telefônica na parede Porta de fax (1-LINE) Observação: não o conecte à porta identificada como 2-EXT. Filtro DSL/ADSL (fornecido pela companhia telefônica ou prestadora de serviços de telefonia) Se dispositivos adicionais estiverem conectados à linha telefônica Português 1 Se você deseja conectar outros dispositivos, conecte-os conforme mostrado no diagrama abaixo: * TAM: secretária eletrônica do telefone ** FoIP: Fax over Internet Protocol 1 2 3 4 5 6 Tomada telefônica na parede 7 Adaptador de terminal ou roteador ISDN 8 9 10 Modem de banda larga Divisor paralelo Modem DSL/ADSL Secretária eletrônica do telefone Telefone Tomada de ISDN na parede Filtro DSL/ADSL Adaptador de telefone analógico 2. Teste a configuração de fax. O teste de fax verifica o hardware, o tipo de cabo telefônico e o status da conexão, e também busca o tom de discagem e uma linha telefônica ativa. Para executar o teste: a. Na tela Início do visor da impressora, pressione os botões para cima e para baixo para selecionar Fax e então pressione OK. b. Selecione Configurações, Configurações Avançadas, Assistente de Configuração de Fax e depois siga as instruções na tela. 59 Usar o fax Enviar um fax-padrão 1. Coloque o original com o lado impresso voltado para baixo no canto frontal direito do vidro do scanner ou com o lado impresso voltado para cima no alimentador de documentos. 2. No painel de controle da impressora, toque em Fax. 3. Toque em Enviar agora. 4. Digite o número do fax usando o teclado. Para adicionar uma pausa no número do fax, pressione * várias vezes, até que um traço (-) seja exibido no visor. 5. Toque em Preto ou Cor. Se a impressora detectar um original carregado no alimentador de documentos, o documento será enviado para o número inserido. Se o destinatário relatar problemas na qualidade do fax que você enviou, tente alterar a resolução ou o contraste do fax. Enviar fax usando uma extensão telefônica Português 1. Disque o número usando o teclado numérico na extensão telefônica. Não use o teclado numérico do painel de controle da impressora ao enviar o fax se estiver usando este método. 2. Se o destinatário atender ao telefone, você poderá conversar antes de enviar o fax. Se o aparelho de fax atender à chamada, você ouvirá o tom do fax do aparelho receptor. 3. Coloque o original com o lado impresso voltado para baixo no canto frontal direito do vidro do scanner ou com o lado impresso voltado para cima no alimentador de documentos. 4. No painel de controle da impressora, toque em Fax. 5. Toque em Enviar Fax. 6. Toque em Preto ou Cor. Se você estiver no telefone com o destinatário, peça a ele para iniciar o recebimento do fax quando ouvir os tons de fax do aparelho. Quando a impressora começar a receber o fax, você poderá desligar o telefone ou permanecer na linha. Você pode não ouvir os tons de fax durante a transmissão. Para mais informações sobre outras maneiras de enviar faxes, como programar para que o fax seja enviado depois ou como enviar faxes pelo computador, veja a Ajuda eletrônica. Receber um fax automaticamente Por padrão, a impressora atende às chamadas e recebe faxes automaticamente. Para receber faxes manualmente, desative o Atendimento Automático no painel de controle da impressora. A impressora atenderá às chamadas após o número de toques especificado na configuração Toques para Atender. Se determinada secretária eletrônica estiver conectada à impressora, a configuração Toques para Atender da impressora deverá ser definida com um número maior do que o da secretária eletrônica. 1. Verifique se a impressora está ligada e se há papel carregado. 2. No visor da impressora, toque em Fax. 3. Toque em Configurar, depois toque em Preferências. 4. Selecione Ativar na opção Resposta Automática. Observação: se você assina algum serviço de correio de voz na mesma linha telefônica que você usará o fax, não será possível receber faxes automaticamente. Você deverá atender pessoalmente às chamadas de fax recebidas. (Se você deseja receber faxes automaticamente, entre em contato com a empresa telefônica para assinar um serviço de toque diferenciado ou adquirir uma linha telefônica separada para envio e recebimento de fax.) A impressora consegue armazenar faxes recebidos em sua memória interna. Para reimprimir esses faxes, consulte "Reimprimir os faxes recebidos armazenados na memória" na próxima página. 60 Usar o fax (continuação) Receber um fax manualmente Se você estiver no telefone com outra pessoa, será possível receber faxes manualmente sem desligar o telefone. 1. Verifique se a impressora está ligada e se há papel carregado. 2. Remova os originais do alimentador de documentos. Defina Toques para Atender com um número mais alto para que você tenha tempo de atender à chamada recebida antes da impressora. Ou desative o Atendimento Automático para que a impressora não atenda automaticamente as chamadas recebidas. 3. Peça ao remetente para iniciar o envio do fax. 4. Ao ouvir os tons de fax, na tela inicial do painel de controle da impressora, toque em Fax, toque em Enviar e Receber e em Receber Agora. Imprimir novamente os faxes recebidos que estão armazenados na memória Se a Recepção de Fax de Backup estiver ativada, os faxes recebidos serão armazenados na memória, até mesmo se a impressora estiver em condição de erro. Observação: todos os faxes armazenados podem ser excluídos da memória quando a impressora for desligada. 1. Verifique se há papel na impressora. Português Quando a impressora começar a receber o fax, você poderá desligar o telefone ou permanecer na linha. Você pode não ouvir os tons de fax durante a transmissão. 2. Na tela Inicial do visor da impressora, toque em Fax. 3. Toque em Reimprimir. Os faxes são exibidos na ordem inversa daquela em que foram recebidos, começando por aqueles recebidos e impressos mais recentemente. 4. Para interromper a impressão, selecione Cancelar. Imprimir um relatório ou log Os relatórios de fax fornecem informações úteis do sistema sobre a impressora. 1. Na tela inicial do visor da impressora, toque em Configurar e em Configurar Fax. 2. Toque em Relatórios e, em seguida, toque em Confirmação de Fax. 3. Toque para selecionar uma das opções. 61 Solucionar problemas de fax Se você ainda tiver problemas ao utilizar o fax após a conclusão bem-sucedida do teste de fax, siga as etapas abaixo: Verifique as configurações de fax da impressora Não é possível enviar, mas é possível receber faxes •• Se você assinou um serviço de correio de voz da companhia telefônica ou prestadora de serviços, certifique-se de que Toques para Atender na impressora esteja com um número maior do que o da secretária eletrônica do telefone. A impressora monitorará a linha e decidirá se determinada chamada recebida é uma chamada telefônica comum ou uma chamada de fax. Caso seja uma chamada de fax, a impressora iniciará a conexão de fax automaticamente. Caso contrário, será necessário receber o fax manualmente selecionando Fax no visor da impressora. 1. Faça uma cópia ou digitalização para ter certeza de que a impressora está funcionando corretamente. 2. Verifique as conexões físicas de fax. 3. Verifique se outros dispositivos de fax conseguem fazer o envio para o mesmo número de telefone. O dispositivo de fax do destinatário pode ter bloqueado seu número de telefone ou pode estar tendo problemas técnicos. 4. Se o problema persistir, imprima o relatório de teste do fax e o log de fax (e se disponível, o relatório do ID do Chamador e o relatório de Faxes Indesejados), depois entre em contato com a HP para obter mais ajuda. Não é possível receber, mas é possível enviar faxes Português 1. Verifique as configurações de fax da impressora. 2. Verifique as conexões físicas de fax. 3. Verifique se outros dispositivos conectados à mesma linha telefônica estão recebendo faxes. A linha telefônica pode estar com falha ou o dispositivo de fax remetente pode estar com problemas de envio de fax. Também é possível verificar se o número de telefone do remetente está bloqueado. 4. Verifique o problema com o remetente. Se o problema persistir, imprima o relatório de teste do fax e o log de fax (e se disponível, o relatório do ID do Chamador e o relatório de Faxes Indesejados), depois entre em contato com a HP para obter mais ajuda. Não é possível enviar nem receber faxes 1. Faça uma cópia ou digitalização para ter certeza de que a impressora está funcionando corretamente. 2. Verifique as conexões físicas de fax. 3. Verifique as configurações de fax da impressora. 4. Verifique se outros dispositivos conectados a essa linha telefônica estão enviando ou recebendo faxes. Pode haver algum problema com a linha telefônica. 5. Redefina a impressora desligando-a e, se possível, desligando a chave principal da fonte de alimentação. Aguarde alguns segundos antes de reativar a alimentação. Tente enviar ou receber algum fax na impressora. 6. Se o problema persistir, imprima o relatório de teste do fax e o log de fax (e se disponível, o relatório do ID do Chamador e o relatório de Faxes Indesejados), depois entre em contato com a HP para obter mais ajuda. 7. Observação: se você assina algum serviço de correio de voz na mesma linha telefônica usada para o fax, você terá que receber os faxes manualmente. 62 •• O recurso de Atendimento Automático é ativado para que a impressora receba os faxes automaticamente. •• Se estiverem atribuídos múltiplos números de telefone à mesma linha telefônica física, e se a linha for compartilhada por diversos dispositivos, certifique-se de que a impressora esteja definida com a configuração de toque diferenciado correta para receber faxes. Verificar as conexões físicas de fax •• Conecte o cabo telefônico da porta 1-LINE, na parte posterior da impressora, à tomada telefônica e conecte outro cabo telefônico da porta 2-EXT, na parte posterior da impressora, a uma extensão telefônica. Na extensão telefônica, ligue para o número que não pôde receber os faxes. •• Se você estava tentando enviar faxes para um número externo, certifique-se de incluir os números ou códigos de acesso requeridos antes de inserir o número. Também pode ser necessário adicionar uma pausa no número, para evitar que a impressora disque muito rápido; para adicionar uma pausa, pressione * várias vezes até que um traço (-) seja exibido no visor. •• Se não for possível fazer nenhuma chamada externa porque nenhum tom de discagem foi detectado ou porque há ruídos na linha, tente usar outro cabo telefônico no lugar daquele conectado à porta telefônica 1-LINE ou coloque a impressora em outro local que tenha uma linha telefônica separada (se possível) e veja se ocorrem problemas similares. •• Se você estiver em um ambiente telefônico digital (como o FoIP, fax over VoIP) reduza a velocidade do fax e desligue a Modulação de Código de Erro (ECM) no painel de controle da impressora. Caso seja necessário, entre em contato com a companhia telefônica para descobrir se há problemas com a linha telefônica ou para saber mais sobre os recursos da rede telefônica. Declaração de garantia limitada da impressora HP Duração da garantia limitada Mídia de software 90 dias Impressora 1 ano Cartuchos de impressão ou de tinta Até que a tinta HP acabe ou até a data do “fim da garantia” impressa no cartucho, o que ocorrer primeiro. Esta garantia não cobre produtos de tinta HP que tenham sido reabastecidos, refabricados, recondicionados, adulterados ou utilizados de forma incorreta. Cabeças de impressão (aplicável somente aos produtos com cabeças de impressão substituíveis pelo cliente) 1 ano Acessórios 1 ano, a não ser que haja outra indicação A. Extensão da garantia limitada 1. A HP Inc. (HP) garante ao cliente final que os produtos HP especificados acima estarão livres de defeitos de materiais e fabricação pelo período mencionado acima, que se inicia na data da compra pelo cliente. 2. No caso de produtos de software, a garantia limitada HP cobre apenas falhas de execução de instruções de programação. A HP não garante que a operação de qualquer produto será ininterrupta ou livre de erros. 3. A garantia limitada HP cobre somente os defeitos surgidos como resultado de uso normal do produto, e não cobre outros problemas, incluindo os que surgirem como resultado de: a. Manutenção ou modificação inadequada; b. Software, mídia, peças ou suprimentos não fornecidos ou aceitos pela HP; c. Operação fora das especificações do produto; d. Modificação não autorizada ou uso indevido. 4. Para produtos de impressoras HP, o uso de um cartucho não HP ou de um cartucho recondicionado não afeta a garantia ao cliente nem qualquer contrato de suporte HP com o cliente. No entanto, se uma falha ou um dano da impressora puderem ser atribuídos ao uso de um cartucho não HP ou recondicionado ou a um cartucho de tinta expirado, a HP cobrará suas taxas padrão referentes a tempo e materiais para fazer a manutenção na impressora quanto à falha ou ao dano em questão. 5. Se a HP for informada, durante o período de garantia aplicável, sobre um defeito em qualquer produto coberto pela garantia HP, poderá optar por substituir ou consertar o produto. 6. Se a HP não puder consertar ou substituir o produto defeituoso coberto pela garantia HP, como for aplicável, ela irá, dentro de um período de tempo razoável após a notificação do defeito, ressarcir o valor pago pelo produto. 7. A HP não tem obrigação de consertar, substituir ou ressarcir o valor pago até o cliente retornar o produto defeituoso à HP. 8. Qualquer produto de reposição pode ser novo ou em estado de novo, desde que a sua funcionalidade seja ao menos igual àquela do produto que está sendo substituído. 9. Os produtos HP podem conter peças manufaturadas, componentes ou materiais equivalentes a novos no desempenho. 10. A Declaração de garantia limitada da HP é válida em qualquer país onde o produto coberto HP for distribuído pela HP. Contratos para serviços de garantia adicionais, como serviços nas instalações do cliente, podem estar disponíveis em qualquer representante de serviços HP em países onde o produto é distribuído pela HP ou por importador autorizado. B. Limitações da garantia DENTRO DOS LIMITES PERMITIDOS PELAS LEIS LOCAIS, NEM A HP NEM OS SEUS FORNECEDORES FAZEM QUALQUER OUTRA GARANTIA OU CONDIÇÃO DE QUALQUER NATUREZA, EXPRESSA OU IMPLÍCITA, GARANTIAS OU CONDIÇÕES IMPLÍCITAS DE COMERCIABILIDADE, QUALIDADE SATISFATÓRIA E ADEQUAÇÃO A UM PROPÓSITO PARTICULAR. C. Limitações de responsabilidade 1. Para a extensão permitida pela lei local, as soluções fornecidas nesta Declaração de Garantia são as únicas e exclusivas do cliente. 2. DENTRO DOS LIMITES PERMITIDOS PELAS LEIS LOCAIS, EXCETO PELAS OBRIGAÇÕES ESPECIFICAMENTE MENCIONADAS NESTA DECLARAÇÃO DE GARANTIA, EM HIPÓTESE ALGUMA A HP OU OS SEUS FORNECEDORES SERÃO RESPONSÁVEIS POR DANOS DIRETOS, INDIRETOS, ESPECIAIS, INCIDENTAIS OU CONSEQUENCIAIS, SEJAM ELES BASEADOS EM CONTRATO, AÇÃO DE PERDAS E DANOS OU QUALQUER OUTRO RECURSO JURÍDICO, MESMO QUE A HP TENHA SIDO AVISADA DA POSSIBILIDADE DE TAIS DANOS. D. Lei local 1. Esta Declaração de Garantia fornece ao cliente direitos legais específicos. O cliente pode também ter outros direitos que podem variar de estado para estado nos Estados Unidos, de província para província no Canadá e de país para país em outros lugares no mundo. 2. Na medida em que esta declaração de garantia for inconsistente com as leis locais, deve ser considerada emendada para se tornar consistente com tais leis. Sob elas, certas limitações desta declaração e isenções de responsabilidade podem não ser aplicáveis ao cliente. Por exemplo, alguns estados dos Estados Unidos, assim como alguns governos fora dos EUA (incluindo províncias canadenses), poderão: a. Impedir que isenções de responsabilidades e limitações nesta Declaração de garantia limitem os direitos legais de um consumidor (por exemplo, Reino Unido); b. Ou restringir a capacidade de um fabricante para impor tais renúncias ou limitações; ou c. Conceder ao cliente direitos de garantia adicionais, especificar a duração de garantias implícitas das quais fabricantes não podem se isentar ou permitir limitações na duração de garantias implícitas. 3. OS TERMOS DESTA DECLARAÇÃO DE GARANTIA, EXCETO PARA OS LIMITES LEGALMENTE PERMITIDOS, NÃO EXCLUEM, RESTRIGEM OU SE MODIFICAM, E SÃO UM ACRÉSCIMO AOS DIREITOS LEGAIS APLICÁVEIS À VENDA DE PRODUTOS HP A TAIS CLIENTES. Português Produto HP Informações relativas à Garantia Limitada da HP A Garantia Limitada HP é uma garantia comercial fornecida voluntariamente pela HP. O nome e a morada da entidade HP responsável pela prestação da Garantia Limitada HP no seu país são os seguintes: Portugal: HPCP – Computing and Printing Portugal, Unipessoal, Lda., Edificio D. Sancho I, Quinta da Fonte, Porto Salvo, Lisboa, Oeiras, 2740 244 As vantagens da Garantia Limitada HP aplicam-se cumulativamente com quaisquer direitos decorrentes da legislação aplicável à garantia de dois anos do vendedor, relativa a defeitos do produto e constante do contrato de venda. Existem, contudo, vários fatores que poderão afetar a sua elegibilidade para beneficiar de tais direitos. Os direitos legalmente atribuídos aos consumidores não são limitados ou afetados de forma alguma pela Garantia Limitada HP. Para mais informações, consulte a ligação seguinte: Garantia legal do consumidor ou visite o Web site da Rede dos Centros Europeus do Consumidor. Os consumidores têm o direito de escolher se pretendem reclamar assistência ao abrigo da Garantia Limitada HP ou contra o vendedor ao abrigo de uma garantia jurídica de dois anos. Para obter mais informações, consulte o link Garantia legal para o consumidor (www.hp.com/go/eu-legal) ou acesse o site dos European Consumer Centres (http://ec.europa.eu/consumers/solving_consumer_disputes/non-judicial_redress/ecc-net/). 63 HP Officejet 5740 e-All-in-One Series Aan de slag 1. Volg de illustraties op de instelflyer om uw printer in te stellen. 2. Installeer de software. Windows® Ga naar 123.hp.com/OJ5740 en volg de instructies op het scherm. Als de computer niet met internet is verbonden, plaatst u de software-cd in uw computer. Als de cd niet start, bladert u naar Computer, dubbelklikt u op het cd-/dvd-station met het HP-logo, dubbelklikt u op setup.exe, en volgt u de instructies op het scherm. OS X/iOS Om de laatste HP-software op een Mac te installeren, gaat u naar 123.hp.com/OJ5740. De cd bij de printer bevat geen HP-software voor Mac. Dit product is geschikt voor Apple AirPrint. De printer en iOS-apparaat of Mac moeten met hetzelfde netwerk verbonden zijn. Opmerking: Zorg er steeds voor dat het gewenste papier zich in de papierlade bevindt. Nadat u de lade sluit, controleert u of het papier is geselecteerd op het bedieningspaneel van de printer. Meer informatie Nederlands Elektronische Help: Installeer de elektronische Help door deze functie tijdens de software-installatie te selecteren uit de lijst Aanbevolen software. Kom alles te weten over de productkenmerken, de afdrukmogelijkheden, het opsporen van fouten en de ondersteuning. In het gedeelte Technische informatie vindt u richtlijnen, informatie over het milieu en wettelijke informatie, waaronder de richtlijnen van de Europese Unie over de conformiteitverklaring. •• Windows® 8,1: Klik op de pijl omlaag in de linkerbenedenhoek van het Start-scherm, selecteer de printernaam, klik op Help en selecteer vervolgens Zoeken HP Help. •• Windows® 8: Klik op het Start-scherm met de rechtermuisknop op een leeg gebied van het scherm, klik op All Apps op de app-balk, klik op het pictogram met de naam van uw printer en klik vervolgens op Help. •• Windows® 7, Windows Vista® en Windows® XP: Klik op Start > Alle Programma's > HP > HP Officejet 5740 series > Help. •• OS X: Klik op Help > Helpcenter. Klik in het Helpvenster op Help voor al uw apps en klik vervolgens op HP Officejet 5740 series. LeesMij: Bevat ondersteuningsinformatie van HP, de systeemvereisten voor het besturingssysteem en recente printerupdates. •• Windows: Plaats de software-cd in uw computer en ga naar het bestand ReadMe.chm. Dubbelklik op ReadMe.chm om het bestand te openen en kies vervolgens het Leesmij-bestand in uw taal. •• Mac: Open de map Documenten in het bovenste niveau van de software-installatie. Dubbelklik op Leesmijbestand en selecteer het Leesmij-bestand in uw taal. Op internet: Extra hulp en informatie: www.hp.com/go/support. Registratie van de printer: www.register.hp.com. Conformiteitverklaring: www.hp.eu/certificates. Inktverbruik: www.hp.com/go/inkusage. Scan voor meer informatie! Mogelijk moet u standaard kosten betalen. Mogelijk niet in alle talen beschikbaar. www.hp.com/eu/m/OJ5740 De informatie in dit document kan worden aangepast zonder kennisgeving vooraf. Bedieningspaneel 1 Lampje draadloos: Geeft de status van de draadloze verbinding van de printer weer. •• Een blauw lampje geeft aan dat de draadloze verbinding werd gemaakt en dat u kunt afdrukken. •• Een langzaam knipperend lampje geeft aan dat de draadloze functie is ingeschakeld, maar de printer niet is aangesloten op een netwerk. Zorg ervoor dat uw printer binnen bereik is van het draadloze signaal. •• Een snel knipperend lampje geeft een fout met de draadloze functie aan. Raadpleeg het bericht op het printerbeeldscherm. 2 Aan/uit-knop: hiermee zet u de printer uit of aan. 3 Terug-knop: Hiermee gaat u terug naar het vorige scherm. 4 Help-knop: Toont de helpinhoud als deze beschikbaar is voor de huidige bewerking. 5 Start-knop: Hiermee keert u terug naar het Startscherm, het scherm dat verschijnt wanneer u de printer voor het eerst inschakelt. 6 Scherm van bedieningspaneel: Druk op het scherm om menuopties te selecteren of scroll door de menupunten. 7 Knop Near Field Communication (NFC): Geeft de zone aan waar u snel documenten en afbeeldingen kunt afdrukken vanaf een mobiel apparaat (bijv. smartphone of tablet) door het tegen de printer te houden. Nederlands •• Als draadloos is uitgeschakeld, is het lampje draadloos uit. Op het scherm verschijnt Draadloos uit. Veiligheidsinformatie Neem bij gebruik van deze printer altijd voorzorgsmaatregelen om het risico op letsel door brand of elektrische schokken te beperken. 1. 2. 3. 4. 5. 6. Lees en begrijp alle instructies in de documentatie bij uw printer. Neem alle op deze printer vermelde waarschuwingen en instructies in acht. Haal de stekker van het netsnoer uit het stopcontact voordat u deze printer reinigt. Installeer en gebruik de printer niet in de nabijheid van water of wanneer u nat bent. Zorg dat de printer stevig op een stabiele ondergrond staat. Zet de printer op een veilige plaats waar niemand op het netsnoer kan trappen of erover kan struikelen en waar het netsnoer niet kan worden beschadigd. 7. Als de printer niet normaal werkt, raadpleeg dan de elektronische help (die op uw computer na installatie van de software beschikbaar is). 8. U mag zelf geen onderdelen repareren. Voor reparatie- of onderhoudswerkzaamheden dient u contact op te nemen met een bevoegd technicus. 9. Gebruik het netsnoer en de adapter die door HP werden geleverd. 65 Basisprocedures voor probleemoplossing Als u niet kunt afdrukken: 1. Controleer of de kabels goed zijn aangesloten. 2. Controleer of de printer is ingeschakeld. De Aan-knop zal wit oplichten. 3. Controleer het statuslampje Draadloos om te controleren of uw printer met een netwerk is verbonden. 4. Ga naar de HP Diagnostic Tools website op www.hp.com/go/tools om gratis diagnosetools te downloaden die u kunt gebruiken om printerproblemen op te lossen. Nederlands Windows Mac Controleer of de printer is ingesteld als uw standaardprinter: •• Windows 8.1 en Windows 8: Wijs naar of tik op de rechterbovenhoek van het scherm om de Charmsbalk te openen. Klik op het pictogram Instellingen klik of tik op Configuratiescherm en klik of tik vervolgens op Overzicht Apparaten en printers. •• Windows 7: Klik vanuit het Start-menu van Windows op Apparaten en printers. •• Windows Vista: Klik op de taakbalk van Windows op Start, klik op Configuratiescherm en vervolgens op Printers. •• Windows XP: Klik op de taakbalk van Windows op Start, klik op Configuratiescherm en klik vervolgens op Printers en faxapparaten. Controleer of uw printer is aangevinkt in het rondje ernaast. Indien uw printer niet is geselecteerd als de standaardprinter, klik dan met de rechtermuisknop op het printerpictogram en kies Als standaardprinter instellen uit het menu. Als u een USB-kabel gebruikt en nog niet kunt afdrukken of de software-installatie niet lukt: 1. Verwijder de cd uit het cd/dvd-station en koppel vervolgens de USB-kabel los van de computer. 2. Start de computer opnieuw op. 3. Plaats de cd met printersoftware in het cd-/dvdstation en volg de instructies op het scherm om de printersoftware te installeren. Sluit de USB-kabel niet aan voor u daarom wordt gevraagd. 4. Zodra de installatie klaar is, start u de computer opnieuw. Als u de draadloze functies gebruikt en nog niet kunt afdrukken: Ga naar het deel Netwerken op de volgende pagina voor meer informatie. Controleer de afdrukwachtrij: 1. In Systeemvoorkeuren klikt u op Printers en scanners (Print & Fax in OS X v10.7 Lion en OS X v10.8 Mountain Lion). 2. Klik op Afdrukwachtrij openen. 3. Klik op een afdruktaak om deze te selecteren. 4. Gebruik de volgende knoppen om de afdruktaak te beheren: •• Pictogram Annuleren: De geselecteerde afdruktaak annuleren. •• Doorgaan: Een onderbroken afdruktaak hervatten. 5. Als u wijzigingen hebt doorgevoerd, probeert u opnieuw af te drukken. Herstarten en terugstellen: 1. Start de computer opnieuw op. 2. Reset de printer. a. Schakel de printer uit en haal de stekker uit het stopcontact. b. Wacht een minuut en sluit het netsnoer opnieuw aan. Schakel de printer in. Het afdruksysteem resetten: 1. In Systeemvoorkeuren klikt u op Printers en scanners (Print & Fax in OS X v10.7 Lion en OS X v10.8 Mountain Lion). 2. Druk op de Ctrl-toets en houd ze ingedrukt wanneer u op de lijst links klikt. Kies dan Afdruksysteem resetten. 3. Voeg de printer toe die u wilt gebruiken. De software verwijderen: 1. Koppel de printer los van de computer als u hem hebt aangesloten met een USB-kabel. 2. Open de map Toepassingen/Hewlett-Packard. 3. Dubbelklik op HP Verwijderen en volg de instructies op het scherm. Opslag anonieme gebruiksinformatie: De HP-cartridges slaan een beperkte hoeveelheid anonieme informatie op over het gebruik van de printer. Voor meer informatie en instructies voor het uitschakelen van deze opslag, raadpleegt u de elektronische Help. Dankbetuigingen: Windows XP, Windows Vista, Windows 7, Windows 8 en Windows 8.1 zijn in de Verenigde Staten gedeponeerde handelsmerken van Microsoft Corporation. Mac, OS X en AirPrint zijn in de Verenigde Staten en andere landen gedeponeerde handelsmerken van Apple Inc. 66 Draadloos netwerk-gebruik Meer netwerkhulp nodig? www.hp.com/go/wirelessprinting Het HP Wireless Printing Center op www.hp.com/go/wirelessprinting kan u helpen om uw draadloos netwerk voor te bereiden, uw printer te installeren of opnieuw te configureren en netwerkproblemen op te lossen. Als u er niet in slaagde om de printer met het netwerk te verbinden •• Bevestig dat de functie Draadloos is ingeschakeld op uw printer. 1. Raak op het bedieningspaneel van de printer, (Draadloos) aan. 2. Als Draadloos uit wordt weergegeven raakt u draadloos aan. (Instellingen) aan en raakt u vervolgens Instellingen 3. In het scherm Instellingen draadloos selecteert u Aan voor de optie Draadloos. •• Controleer of uw printer is verbonden met uw netwerk. 1. Raak op het bedieningspaneel van de printer, 2. Raak (Draadloos) aan. (Instellingen) aan. 3. Raak Rapporten afdrukken aan en selecteer en vervolgens Testrapport draadloos.Het draadloze testrapport wordt automatisch afgedrukt. 4. Controleer de bovenste rapporttekst om na te gaan of er iets misging tijdens de test. –– Bekijk het gedeelte Diagnostische resultaten van alle uitgevoerde tests en kijk of uw printer is geslaagd. Opmerking: Indien uw printer is verbonden met een Virtual Private Network (VPN), kunt u hem tijdelijk loskoppelen van het VPN alvorens u verdergaat met de installatie. Na de installatie moet u loskoppelen van het VPN om toegang te krijgen tot uw printer via uw thuisnetwerk. •• Zorg ervoor dat beveiligingssoftware de communicatie via uw netwerk niet blokkeert. Beveiligingssoftware, zoals firewalls, kan de communicatie tussen uw computer en printer blokkeren wanneer u via een netwerk installeert. Indien uw printer niet wordt gevonden, kunt u de firewall tijdelijk uitschakelen en controleren of het probleem verdwijnt. Voor meer hulp en tips over beveiligingssoftware kunt u surfen naar: www.hp.com/go/wpc-firewall_nl-nl. •• Start de onderdelen van het draadloze netwerk opnieuw. Schakel de router en de printer uit en zet ze vervolgens weer aan in deze volgorde: eerst de router en dan de printer. Soms wordt een netwerkcommunicatieprobleem opgelost door de apparaten uit- en weer in te schakelen. Als u nog steeds geen verbinding kunt maken, zet u de router, de printer en uw computer uit en zet u deze vervolgens weer aan in deze volgorde: eerst de router, dan de printer en dan de computer. Opmerking: Indien u geen draadloze verbinding tot stand kunt brengen, kan de printer ook met het netwerk worden verbonden met behulp van een ethernetkabel. Als u nog steeds problemen ondervindt, ga dan naar het HP Wireless Printing Center (www.hp.com/go/wirelessprinting). Deze website bevat de meest volledige en bijgewerkte informatie over draadloos afdrukken. Bovendien kunt u er terecht voor informatie over de voorbereiding van uw draadloos netwerk, verbindingsproblemen oplossen bij het aansluiten van de printer op een draadloos netwerk; problemen oplossen met beveiligingssoftware. Opmerking: Als u een computer gebruikt onder Windows, kunt u het hulpprogramma Print and Scan Doctor gebruiken. Dit programma helpt u bij het oplossen van mogelijke problemen met de printer. Om dit hulpprogramma te downloaden gaat u naar www.hp.com/go/tools. Nederlands –– In het gedeelte Huidige configuratie zoekt u de netwerknaam (SSID) waarmee uw printer momenteel is verbonden. Controleer of de printer is aangesloten op een netwerk met internettoegang. Als u uw printer met meerdere computers op uw netwerk wilt delen Eerst installeert u uw printer in het thuisnetwerk. Als u de printer met het thuisnetwerk hebt verbonden, kunt u hem delen met andere computers op hetzelfde netwerk. Voor elke bijkomende computer moet u enkel nog de HPprintersoftware installeren. 67 Draadloos netwerk-gebruik (vervolg) Als u van een USB-verbinding wilt overgaan naar een draadloze verbinding Zorg ervoor dat de printersoftware correct werd geïnstalleerd. Windows 1. Voer, afhankelijk van uw besturingssysteem, een van de volgende handelingen uit: •• Windows 8.1: Klik op de pijl naar beneden in de linkerbenedenhoek van het Start-scherm, selecteer de printernaam en klik op Hulpprogramma's. •• Windows 8: In het Start-scherm klikt u met de rechtermuisknop op het scherm. Klik op Alle apps in de app-balk. •• Windows 7, Windows Vista en Windows XP: Selecteer in het menu Start van de computer Alle programma's of Programma's, selecteer vervolgens HP. 2. Selecteer HP Officejet 5740 series. 3. Selecteer Printerinstellingen en softwareselectie. 4. Selecteer Een USB-aangesloten printer naar draadloos converteren. Volg de aanwijzingen op het scherm op. Mac Gebruik het HP Hulpprogramma in Toepassingen/Hewlett-Packard om de softwareverbinding te wijzigen naar draadloos voor deze printer. Als u de printer draadloos wilt gebruiker zonder een router Gebruik Wi-Fi Direct om draadloos zonder router af te drukken vanaf uw computer, smartphone of een ander draadloos apparaat. Om Wi-Fi Direct rechtstreeks te gebruiken vanaf een computer moet de printersoftware op de computer zijn geïnstalleerd. 1. Zorg ervoor dat Wi-Fi Direct op uw computer is ingeschakeld: Nederlands a. Raak vanaf het Start-scherm op het printerscherm b. Als Status is ingesteld op Uit raakt u (Wi-Fi Direct) aan. (Instellingen Wi-Fi Direct) aan en schakelt u Wi-Fi Direct in. 2. Uw draadloos apparaat met uw printer verbinden: a. Schakel de Wi-Fi-verbinding in op uw mobiel apparaat. Raadpleeg voor meer informatie de documentatie bij de computer. b. Maak een nieuwe netwerkverbinding op uw mobiel apparaat. Gebruik uw normale werkwijze om een verbinding te maken met een nieuw draadloos netwerk of een hotspot. Kies de naam van Wi-Fi Direct uit de lijst van draadloze netwerken zoals DIRECT-**-HP Officejet-5740 (waarbij ** de unieke tekens zijn om uw printer te identificeren). c. Voer het Wi-Fi Direct-wachtwoord in wanneer u hierom wordt gevraagd. 3. Druk af zoals u dat gewoonlijk zou doen vanaf uw computer of mobiele apparaat. Opmerking: De Wi-Fi Direct-verbinding biedt geen internettoegang. Surf naar het HP Wireless Printing Center op www.hp.com/go/wirelessprinting voor meer informatie over Wi-Fi Direct. Dit product is bedoeld voor gebruik in een open omgeving (bijv. thuis en niet verbonden met het openbare internet) waar iedereen toegang heeft tot de printer en deze mag gebruiken. Als gevolg hiervan is de instelling Wi-Fi Direct standaard ingesteld op “Automatisch”, zonder administratorwachtwoord, hierdoor kan iedereen binnen het draadloze bereik een verbinding maken met de printer en alle functies en instellingen ervan gebruiken. Indien een hoger beveiligingsniveau is vereist, adviseert HP de verbindingswijze van Wi-Fi Direct te wijzigen van “Automatisch” naar “Handmatig” en een administratorwachtwoord in te stellen. Als u wilt printen met AirPrint Dit product is geschikt voor Apple AirPrint®. U kunt draadloos afdrukken vanaf uw iOS-apparaat of Mac. •• Uw printer en iOS-apparaat of Mac moeten met hetzelfde draadloos netwerk verbonden zijn. •• Met Apple AirPrint® kunt u geen documenten van uw printer naar uw iOS-apparaat scannen. 68 Fax instellen 1. De telefoonlijn aansluiten Opmerking: HP-printers zijn specifiek ontworpen voor gebruik in combinatie met traditionele analoge telefoonservices. In een digitale telefoonomgeving (zoals DSL/ADSL, PBX, ISDN of FoIP) moet u eventueel digitaal-naar-analoog filters of converters gebruiken bij het instellen van de printer voor faxen. Neem contact op met uw telefoonbedrijf om na te gaan welke installatieopties voor u geschikt zijn. Als de telefoonlijn uitsluitend wordt gebruikt voor fax a. Sluit een uiteinde van het snoer aan op een wandcontactdoos voor telefoon. b. Sluit het andere uiteinde aan op de poort met het label 1-LINE aan de achterzijde van de printer. Als u een abonnement hebt op een DSL/ADSL-service, plaats dan een DSL/ADSL-filter tussen de poort 1-LINE en de wandcontactdoos telefoon. 1 2 3 Wandcontactdoos telefoon Faxpoort (1-LINE) Opmerking: sluit het snoer niet aan op poort 2-EXT. DSL/ADSL-filter (geleverd door uw telefoonbedrijf of service provider) Indien bijkomende apparaten zijn aangesloten op de telefoonlijn Als u andere apparaten moet aansluiten, volg dan onderstaande afbeelding: * TAP: Antwoordapparaat telefoon Wandcontactdoos telefoon Parallelle splitter DSL/ADSL-modem Antwoordapparaat telefoon Telefoon ISDN-wandcontactdoos Nederlands 1 2 3 4 5 6 7 8 9 10 Terminaladapter of ISDN-router Breedbandmodem DSL/ADSL-filter Analoge telefoonadapter ** FoIP: Fax over internetprotocol 2. De fax-setup testen. De faxtest controleert de hardware, het type telefoonsnoer en de verbindingsstatus. Bovendien wordt gecontroleerd of er een kiestoon is en of de telefoonlijn actief is. De test uitvoeren: a. Druk in het Start-scherm van het printerscherm op de knoppen Omhoog en Omlaag om Fax te selecteren en vervolgens drukt u op OK. b. Selecteer Instellingen, Geavanceerde Instellingen, Installatiewizard voor de fax, en volg dan de instructies op het scherm. 69 Fax gebruiken Een standaardfax versturen 1. Plaats het origineel met de afdrukzijde naar beneden tegen de rechterbenedenhoek van de glasplaat of met de afdrukzijde naar boven in de invoerlade. 2. Druk op het scherm van het bedieningspaneel van de printer op Fax. 3. Raak of aan Nu verzenden. 4. Voer het faxnummer in met behulp van het toetsenblok. Om een pauze in het faxnummer toe te voegen, drukt u meermaals op * tot een streepje (-) verschijnt op het beeldscherm. 5. Raak Zwart of Kleur aan. Als de printer een origineel in de documentinvoer detecteert, wordt dit document naar het ingevoerde nummer gestuurd. Als u van de ontvanger te horen krijgt dat de kwaliteit van de door u verzonden fax niet goed is, kunt u de resolutie of het contrast van de fax wijzigen. Een fax via een extra telefoontoestel verzenden Nederlands 1. Kies het nummer met behulp van het toetsenblok op de telefoon. Gebruik het toetsenblok op het bedieningspaneel van de printer niet wanneer u een fax verzendt met behulp van deze methode. 2. Als de ontvanger de telefoon opneemt, kunt u met de ontvanger spreken voordat u de fax verzendt. Als een faxapparaat de oproep beantwoordt, hoort u de faxtonen van het ontvangende faxapparaat. 3. Plaats het origineel met de afdrukzijde naar beneden tegen de rechterbenedenhoek van de glasplaat of met de afdrukzijde naar boven in de invoerlade. 4. Druk op het scherm van het bedieningspaneel van de printer op Fax. 5. Druk op Nieuwe fax verzenden. 6. Raak Zwart of Kleur aan. Als u met de ontvanger in gesprek bent, vraagt u om de ontvangst van de fax te starten zodra hij of zij de faxtonen hoort op het faxtoestel. Zodra de printer begint te faxen, kunt u de telefoon ophangen of aan de lijn blijven. Mogelijk hoort u de faxtonen tijdens het doorsturen niet. Voor meer informatie over andere manieren om faxen te verzenden, zoals het plannen van een faxverzending of het verzenden van faxen naar een computer, verwijzen we naar de elektronische Help. Een fax automatisch ontvangen Standaard beantwoordt de printer inkomende gesprekken en worden faxen ontvangen. Om handmatig faxen te ontvangen schakelt u Automatisch antwoorden uit op het bedieningspaneel van de printer. De printer beantwoordt oproepen na het aantal beltonen dat is opgegeven bij de instelling Aantal beltonen voor antwoord. Als er een antwoordapparaat op de printer is aangesloten, moet voor de printer een hoger aantal beltonen voor antwoorden worden ingesteld dan voor het antwoordapparaat. 1. Controleer of de printer is ingeschakeld en of er papier in de lade aanwezig is. 2. Druk vanaf het printerscherm op Fax. 3. Raak aan en raak vervolgens aan Setup Preferences. 4. Selecteer Aan voor de optie Automatisch antwoorden. Opmerking: Als u geabonneerd bent op een voicemailservice op dezelfde telefoonlijn die u voor faxen gebruikt, kunt u niet automatisch faxen ontvangen. U moet zelf aanwezig zijn om binnenkomende faxoproepen te beantwoorden. (Als u uw faxen liever automatisch ontvangt, moet u contact opnemen met uw telefoonbedrijf om u te abonneren op een service voor specifieke belsignalen of om een aparte telefoonlijn aan te vragen voor het faxen.) De printer kan ontvangen faxen bewaren in het interne geheugen. Om de faxen opnieuw af te drukken raadpleegt u "Ontvangen faxen opnieuw afdrukken uit het geheugen" verder op de volgende pagina. 70 Fax gebruiken (vervolg) Een faxbericht handmatig ontvangen Als u in gesprek bent met een andere persoon, kunt u de faxen handmatig ontvangen zonder de telefoon op te hangen. 1. Controleer of de printer is ingeschakeld en of er papier in de lade aanwezig is. 2. Verwijder eventuele originelen uit de documentinvoerlade. Stel Aantal beltonen voor antwoord in op een hoge waarde zodat u de binnenkomende oproepen kunt beantwoorden voordat de printer de oproep beantwoordt. U kunt de instelling Automatisch beantwoorden ook uitschakelen zodat de printer binnenkomende oproepen niet automatisch beantwoordt. 3. Vraag aan uw contactpersoon om de fax te verzenden. 4. Als u faxtonen hoort raakt u vanaf het Start-scherm op het bedieningspaneel van de printer Fax aan, vervolgens raakt u Verzenden en ontvangen aan en tot slot Nu ontvangen. Zodra de printer de fax begint te ontvangen, kunt u de telefoon ophangen of aan de lijn blijven. Mogelijk hoort u de faxtonen tijdens het doorsturen niet. Ontvangen faxen vanuit het geheugen afdrukken Als Een back-up maken van een faxontvangst is ingeschakeld, worden ontvangen faxberichten in het geheugen bewaard, ook wanneer de printer in storing is. Opmerking: Alle in het geheugen bewaarde faxberichten worden uit het geheugen gewist wanneer de printer wordt uitgeschakeld. 1. Zorg dat er papier in de papierlade zit. 2. Raak vanaf het Start-scherm op het printerscherm Fax aan. De faxen worden weergegeven in omgekeerde volgorde als die waarin ze zijn ontvangen waarbij de meest recent ontvangen fax het eerst wordt afgedrukt. 4. Om het afdrukken te stoppen selecteert u Annuleren. Een rapport of logboek afdrukken Nederlands 3. Raak Opnieuw afdrukken aan. Faxrapporten bevatten nuttige systeeminformatie over de printer. 1. Raak vanaf het Start-scherm op het printerscherm Instellingen aan en raak vervolgens Faxinstellingen aan. 2. Raak Rapporten aan en raak vervolgens Faxbevestiging aan. 3. Raak het scherm aan om een van de opties te selecteren. 71 Faxproblemen oplossen Nederlands 72 Als u nog steeds problemen ondervindt met uw fax nadat u de faxtest op pagina 5 hebt uitgevoerd, moet u de onderstaande procedure volgen: Kan geen faxen verzenden maar wel ontvangen 1. Voer een kopieeropdracht uit of maak een scan om na te gaan of de printer correct werkt. 2. Controleer de fysieke faxverbindingen. 3. Controleer of andere faxapparaten werken op hetzelfde telefoonnummer. Het ontvangende faxapparaat kan uw telefoonnummer hebben geblokkeerd of er zijn mogelijk technische problemen. 4. Als het probleem niet kan worden opgelost, kunt u het faxtestrapport en faxlogboek (en indien beschikbaar de rapporten Beller-ID en junkfaxen) afdrukken en contact opnemen met HP voor verdere hulp. Kan geen faxen ontvangen maar wel verzenden 1. Controleer de faxinstellingen op de printer 2. Controleer de fysieke faxverbindingen. 3. Controleer of andere apparaten op dezelfde telefoonlijn faxen kunnen ontvangen. De telefoonlijn kan in storing zijn of het verzendende faxapparaat heeft mogelijk problemen met het verzenden van faxen. Misschien kunt u ook nagaan of u het telefoonnummer van de afzender niet hebt geblokkeerd. 4. Neem contact op met de afzender. Als het probleem niet kan worden opgelost, kunt u het faxtestrapport en faxlogboek (en indien beschikbaar de rapporten Beller-ID en junkfaxen) afdrukken en contact opnemen met HP voor verdere hulp. Kan geen faxen verzenden en ontvangen 1. Voer een kopieeropdracht uit of maak een scan om na te gaan of de printer correct werkt. 2. Controleer de fysieke faxverbindingen. 3. Controleer de faxinstellingen op de printer 4. Controleer of andere apparaten op deze telefoonlijn faxen kunnen verzenden of ontvangen. Er is mogelijk een probleem met de telefoonlijn. 5. Reset de printer door deze uit te schakelen. Schakel indien mogelijk ook de hoofdschakelaar van de stroomvoorziening uit. Wacht enkele seconden en schakel de stroom weer in. Probeer een fax te verzenden of te ontvangen op de printer. 6. Als het probleem niet kan worden opgelost, kunt u het faxtestrapport en faxlogboek (en indien beschikbaar de rapporten Beller-ID en junkfaxen) afdrukken en contact opnemen met HP voor verdere hulp. 7. Opmerking: Als u geabonneerd bent op een voicemailservice op dezelfde telefoonlijn die u voor faxen gebruikt, moet u de faxen handmatig ontvangen. Controleer de faxinstellingen op de printer •• De functie Automatisch antwoorden is ingeschakeld om automatisch faxen te ontvangen. •• Als u bent geabonneerd op een voicemailservice bij uw telefoonbedrijf of service provider, zorg er dan voor dat het Aantal beltonen voor antwoord is ingesteld op een hogere waarde dan voor het antwoordapparaat van de telefoon. De printer bewaakt de lijn en beslist of een inkomend gesprek een normaal telefoongesprek is of een faxbericht. Als het gaat om een faxbericht start de printer de faxverbinding automatisch. Anders moet u de fax handmatig ontvangen door Fax te selecteren op het printerscherm. •• Indien meerdere telefoonnummers aan dezelfde fysieke telefoonlijn zijn toegekend en de lijn al wordt gedeeld met meerdere apparaten, zorg er dan voor dat de printer is ingesteld op de correcte beltoon om faxen te ontvangen. Controleer de fysieke faxverbindingen •• Sluit het telefoonsnoer verbonden met de poort 1-LINE aan de achterzijde van de printer aan op de wandtelefooncontactdoos telefoon en sluit het telefoonsnoer van de poort 2-EXT aan de achterzijde van de printer aan op een telefoontoestel. Gebruik deze telefoon om het nummer op te bellen dat de fax niet kon ontvangen. •• Als u probeerde om naar een extern nummer te faxen, zorg er dan voor om de toegangscodes of voornummers in te toetsen voor u het netnummer invoert. Mogelijk moet u tussen cijfers even pauzeren om te voorkomen dat de printer het nummer te snel tot stand brengt. Om een pauze toe te voegen, drukt u meermaals op * tot een streepje (-) verschijnt op het beeldscherm. •• Als u geen uitgaande oproepen tot stand kunt brengen omdat u geen kiestoon krijgt of er te veel ruis op de lijn zit, probeer het dan met een ander telefoonsnoer op de 1-LINE-poort of verplaats de printer naar een andere plaats met een afzonderlijke telefoonlijn (indien mogelijk). Kijk dan of u gelijkaardige problemen ondervindt. •• Als u werkt met een digitale telefoonomgeving (zoals FoIP, fax over VoIP), verlaag dan de faxsnelheid en schakel Error Code Modulation (ECM) uit op het bedieningspaneel van de printer. Neem indien nodig contact op met uw telefoonbedrijf om na te gaan of er problemen zijn met de telefoonlijn of voor meer informatie over het telefoonnetwerk. Beperkte garantieverklaring voor de HP-printer Printkoppen (geldt alleen voor producten met printkoppen die door de klant kunnen worden vervangen) Accessoires Duur van beperkte garantie 90 dagen 1 jaar Tot het HP-cartridge leeg is of de "einde garantie"-datum (vermeld op de inktcartridge) is bereikt, afhankelijk van wat het eerst van toepassing is. Deze garantie dekt geen HP-inktproducten die opnieuw zijn gevuld, opnieuw zijn gefabriceerd of zijn gerepareerd, noch HP-inktproducten die op verkeerde wijze zijn gebruikt of behandeld. 1 jaar 1 jaar tenzij anders vermeld A. Duur van beperkte garantie 1. HP Inc. (HP) garandeert de eindgebruiker dat bovenstaande HP-producten vrij van materiaal- en fabricagedefecten zijn gedurende de hierboven aangegeven periode, die begint op de datum van aankoop door de klant. De klant moet een bewijs van de datum van aankoop kunnen overleggen. 2. Met betrekking tot softwareproducten is de beperkte garantie van HP uitsluitend geldig voor het niet kunnen uitvoeren van programmeringsinstructies. HP garandeert niet dat de werking van een product ononderbroken of vrij van fouten is. 3. De beperkte garantie van HP geldt alleen voor defecten die zich voordoen als resultaat van een normaal gebruik van het product en is niet van toepassing in de volgende gevallen: a. onjuist of onvoldoende onderhoud of wijziging van het product; b. software, interfaces, afdrukmateriaal, onderdelen of benodigdheden die niet door HP worden geleverd of ondersteund; c. gebruik dat niet overeenstemt met de specificaties van het product; d. onrechtmatige wijzigingen of verkeerd gebruik. 4. Voor HP-printerproducten is het gebruik van een cartridge die niet door HP is geleverd of een nagevulde cartridge niet van invloed op de garantie aan de klant of een contract voor ondersteuning dat met de klant is gesloten. Als echter een defect of beschadiging van de printer toegewezen kan worden aan het gebruik van een cartridge die niet van HP afkomstig is, een nagevulde cartridge of een verlopen inktcartridge, brengt HP de gebruikelijke tijd- en materiaalkosten voor het repareren van de printer voor het betreffende defect of de betreffende beschadiging in rekening. 5. Als HP tijdens de van toepassing zijnde garantieperiode kennisgeving ontvangt van een defect in een softwareproduct, in afdrukmateriaal of in een inktproduct dat onder de garantie van HP valt, wordt het defecte product door HP vervangen. Als HP tijdens de van toepassing zijnde garantieperiode kennisgeving ontvangt van een defect in een hardwareproduct dat onder de garantie van HP valt, wordt naar goeddunken van HP het defecte product door HP gerepareerd of vervangen. 6. Als het defecte product niet door HP respectievelijk gerepareerd of vervangen kan worden, zal HP de aankoopprijs voor het defecte product dat onder de garantie valt, terugbetalen binnen een redelijke termijn nadat HP kennisgeving van het defect heeft ontvangen. 7. HP is niet verplicht tot reparatie, vervanging of terugbetaling tot de klant het defecte product aan HP geretourneerd heeft. 8. Een eventueel vervangingsproduct mag nieuw of bijna nieuw zijn, vooropgesteld dat het ten minste dezelfde functionaliteit heeft als het product dat wordt vervangen. 9. De beperkte garantie van HP is geldig in alle landen/regio's waar het gegarandeerde product door HP wordt gedistribueerd, met uitzondering van het Midden-Oosten, Afrika, Argentinië, Brazilië, Mexico, Venezuela en de tot Frankrijk behorende zogenoemde "Départements d'Outre Mer". Voor de hierboven als uitzondering vermelde landen/regio's, is de garantie uitsluitend geldig in het land/de regio van aankoop. Contracten voor extra garantieservice, zoals service op de locatie van de klant, zijn verkrijgbaar bij elk officieel HP-servicekantoor in landen/regio's waar het product door HP of een officiële importeur wordt gedistribueerd. 10. Er wordt geen garantie gegeven op HP-inktcartridges die zijn nagevuld, opnieuw zijn geproduceerd, zijn opgeknapt en verkeerd zijn gebruikt of waarmee op enigerlei wijze is geknoeid. B. Garantiebeperkingen IN ZOVERRE DOOR HET PLAATSELIJK RECHT IS TOEGESTAAN, BIEDEN NOCH HP, NOCH LEVERANCIERS (DERDEN) ANDERE UITDRUKKELIJKE OF STILZWIJGENDE GARANTIES OF VOORWAARDEN MET BETREKKING TOT DE PRODUCTEN VAN HP EN WIJZEN ZIJ MET NAME DE STILZWIJGENDE GARANTIES EN VOORWAARDEN VAN VERKOOPBAARHEID, BEVREDIGENDE KWALITEIT EN GESCHIKTHEID VOOR EEN BEPAALD DOEL AF. C. Beperkte aansprakelijkheid 1. Voor zover bij de plaatselijke wetgeving toegestaan, zijn de verhaalsmogelijkheden in deze beperkte garantie de enige en exclusieve verhaalsmogelijkheden voor de klant. 2. VOORZOVER DOOR HET PLAATSELIJK RECHT IS TOEGESTAAN, MET UITZONDERING VAN DE SPECIFIEKE VERPLICHTINGEN IN DEZE GARANTIEVERKLARING, ZIJN HP EN LEVERANCIERS (DERDEN) ONDER GEEN BEDING AANSPRAKELIJK VOOR DIRECTE, INDIRECTE, SPECIALE EN INCIDENTELE SCHADE OF GEVOLGSCHADE, OF DIT NU GEBASEERD IS OP CONTRACT, DOOR BENADELING OF ENIGE ANDERE JURIDISCHE THEORIE, EN ONGEACHT OF HP VAN DE MOGELIJKHEID VAN DERGELIJKE SCHADE OP DE HOOGTE IS. D. Lokale wetgeving 1. Deze garantieverklaring verleent de klant specifieke juridische rechten. De klant kan over andere rechten beschikken die in de V.S. van staat tot staat, in Canada van provincie tot provincie en elders van land tot land of van regio tot regio kunnen verschillen. 2. In zoverre deze garantieverklaring niet overeenstemt met de plaatselijke wetgeving, zal deze garantieverklaring als aangepast en in overeenstemming met dergelijke plaatselijke wetgeving worden beschouwd. Krachtens een dergelijke plaatselijke wetgeving is het mogelijk dat bepaalde afwijzingen en beperkingen in deze garantieverklaring niet op de klant van toepassing zijn. Sommige staten in de Verenigde Staten en bepaalde overheden buiten de Verenigde Staten (inclusief provincies in Canada) kunnen bijvoorbeeld: a. voorkomen dat de afwijzingen en beperkingen in deze garantieverklaring de wettelijke rechten van een klant beperken (bijvoorbeeld het Verenigd Koninkrijk); b. op andere wijze de mogelijkheid van een fabrikant beperken om dergelijke niet-aansprakelijkheidsverklaringen of beperkingen af te dwingen; c. de klant aanvullende garantierechten verlenen, de duur van de impliciete garantie bepalen waarbij het niet mogelijk is dat de fabrikant zich niet aansprakelijk verklaart of beperkingen ten aanzien van de duur van impliciete garanties niet toestaan. 3. DE IN DEZE VERKLARING GESTELDE GARANTIEVOORWAARDEN VORMEN, BEHALVE IN DE WETTELIJK TOEGESTANE MATE, GEEN UITSLUITING, BEPERKING OF WIJZIGING VAN, MAAR EEN AANVULLING OP DE VERPLICHTE EN WETTELIJK VOORGESCHREVEN RECHTEN DIE VAN TOEPASSING ZIJN OP DE VERKOOP VAN HP-PRODUCTEN. Nederlands HP-product Softwaremedia Printer Print- of inktcartridges 73 HP Fabrieksgarantie De Beperkte Garantie van HP is een commerciële garantie vrijwillig verstrekt door HP. De naam en het adres van de HP-entiteit die verantwoordelijk is voor het uitvoeren van de Beperkte Garantie van HP in uw land is als volgt: Nederland: HP Nederland B.V., Startbaan 16, 1187 XR Amstelveen België: HP Belgium BVBA, Hermeslaan 1A, B-1831 Diegem De voordelen van de Beperkte Garantie van HP vormen een aanvulling op de wettelijke garantie voor consumenten gedurende twee jaren na de levering te verlenen door de verkoper bij een gebrek aan conformiteit van de goederen met de relevante verkoopsovereenkomst. Niettemin kunnen diverse factoren een impact hebben op uw eventuele aanspraak op deze wettelijke rechten. De wettelijke rechten van de consument worden op geen enkele wijze beperkt of beïnvloed door de Beperkte Garantie van HP. Raadpleeg voor meer informatie de volgende webpagina: Wettelijke garantie van de consument of u kan de website van het Europees Consumenten Centrum bezoeken. Consumenten hebben het recht om te kiezen tussen enerzijds de Beperkte Garantie van HP of anderzijds het aanspreken van de verkoper in toepassing van de wettelijke garantie. Klik voor meer informatie op de volgende link: Wettelijke Garantie Consument (www.hp.com/go/eu-legal) of raadpleeg de website van het Europees Consumenten Centrum (http://ec.europa.eu/consumers/solving_consumer_disputes/non-judicial_redress/ecc-net/). Nederlands 74-
 1
1
-
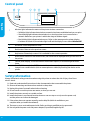 2
2
-
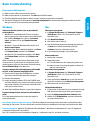 3
3
-
 4
4
-
 5
5
-
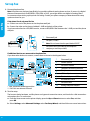 6
6
-
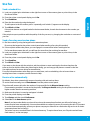 7
7
-
 8
8
-
 9
9
-
 10
10
-
 11
11
-
 12
12
-
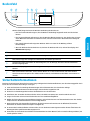 13
13
-
 14
14
-
 15
15
-
 16
16
-
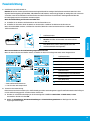 17
17
-
 18
18
-
 19
19
-
 20
20
-
 21
21
-
 22
22
-
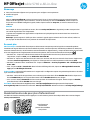 23
23
-
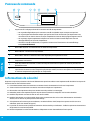 24
24
-
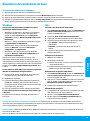 25
25
-
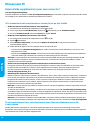 26
26
-
 27
27
-
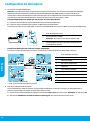 28
28
-
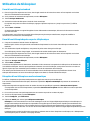 29
29
-
 30
30
-
 31
31
-
 32
32
-
 33
33
-
 34
34
-
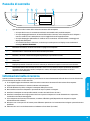 35
35
-
 36
36
-
 37
37
-
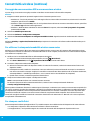 38
38
-
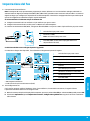 39
39
-
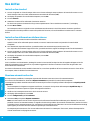 40
40
-
 41
41
-
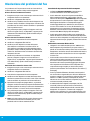 42
42
-
 43
43
-
 44
44
-
 45
45
-
 46
46
-
 47
47
-
 48
48
-
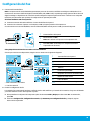 49
49
-
 50
50
-
 51
51
-
 52
52
-
 53
53
-
 54
54
-
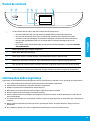 55
55
-
 56
56
-
 57
57
-
 58
58
-
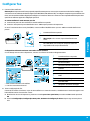 59
59
-
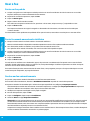 60
60
-
 61
61
-
 62
62
-
 63
63
-
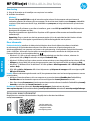 64
64
-
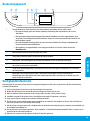 65
65
-
 66
66
-
 67
67
-
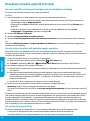 68
68
-
 69
69
-
 70
70
-
 71
71
-
 72
72
-
 73
73
-
 74
74


HP OfficeJet 5740 e-All-in-One Printer series Referentie gids
- Categorie
- Multifunctionals
- Type
- Referentie gids
in andere talen
- English: HP OfficeJet 5740 e-All-in-One Printer series Reference guide
- italiano: HP OfficeJet 5740 e-All-in-One Printer series Guida di riferimento
- français: HP OfficeJet 5740 e-All-in-One Printer series Guide de référence
- español: HP OfficeJet 5740 e-All-in-One Printer series Guia de referencia
- Deutsch: HP OfficeJet 5740 e-All-in-One Printer series Referenzhandbuch
- português: HP OfficeJet 5740 e-All-in-One Printer series Guia de referência
Gerelateerde papieren
-
HP OfficeJet 3834 de handleiding
-
HP OfficeJet 7610 Wide Format e-All-in-One series Gebruikershandleiding
-
-
HP Officejet 4630 e-All-in-One Printer series de handleiding
-
HP ENVY Photo 6234 All-in-One Printer de handleiding
-
HP ENVY 7645 e-All-in-One Printer Referentie gids
-
-
-
HP ENVY Photo 7822 All-in-One Printer de handleiding
-
HP OfficeJet 7510 Wide Format All-in-One Printer series de handleiding