HQ-Power HQHZ10001 Handleiding
- Categorie
- Mist machine
- Type
- Handleiding


HQHZ10001/HQHZ10002
V. 02 – 19/01/2022 2 ©Velleman Group nv
HQHZ10001
HQHZ10002

HQHZ10001/HQHZ10002
V. 02 – 19/01/2022 3 ©Velleman Group nv

HQHZ10001/HQHZ10002
V. 02 – 19/01/2022 4 ©Velleman Group nv
terminator
eindweerstand
résistance de terminaison
terminación
Terminierung
How to turn the controller line from 3-pins into 5-pins (plug and socket).
Controller line van 3-pin naar 5-pin aanpassen (stekker en contact).
Modifier la ligne du contrôleur de 3 broches en 5 broches (fiche et contact).
Modificar la línea del controlador de 3 polos y 5 polos (conector y contacto).
Die Controller-Linie von 3-Pin nach 5-Pin anzupassen (Stecker und Kontakt).

HQHZ10001/HQHZ10002
V. 02 – 19/01/2022 5 ©Velleman Group nv
USER MANUAL
1. Introduction
To all residents of the European Union
Important environmental information about this product
This symbol on the device or the package indicates that disposal of the device after its
lifecycle could harm the environment. Do not dispose of the unit (or batteries) as unsorted
municipal waste; it should be taken to a specialized company for recycling. This device should
be returned to your distributor or to a local recycling service. Respect the local environmental
rules.
If in doubt, contact your local waste disposal authorities.
Thank you for choosing HQPower™! Please read the manual thoroughly before bringing this device into
service. If the device was damaged in transit, do not install or use it and contact your dealer.
2. Safety Instructions
Read and understand this manual and all safety signs before using this appliance.
Be very careful during the installation: touching live wires can cause life-threatening
electroshocks.
Always disconnect mains power when device not in use or when servicing or
maintenance activities are performed. Handle the power cord by the plug only.
Indoor use only. Keep this device away from rain, moisture, splashing and dripping
liquids. Never put objects filled with liquids on top of or close to the device.
Keep this device away from children and unauthorized users.
Caution: device heats up during use.
Do not connect this device to a dimmer pack.
• Install the device at a minimal distance of 12 m from flammable and explosive
objects or substances.
• Respect a minimum distance of 3 m between the device’s output and any
surface.
There are no user-serviceable parts inside the device. Refer to an authorized dealer
for service and/or spare parts.
• This device can be used by children aged from 8 years and above, and persons with reduced
physical, sensory or mental capabilities or lack of experience and knowledge if they have been given
supervision or instruction concerning the use of the device in a safe way and understand the hazards
involved. Children shall not play with the device. Cleaning and user maintenance shall not be made
by children without supervision.
• This device falls under protection class 1. It is therefore essential that the device be earthed. Have a
qualified person carry out the electric connection.
• Make sure that the available voltage does not exceed the voltage stated in the specifications of this
manual.
• Do not crimp the power cord and protect it against damage. Have an authorised dealer replace it if
necessary.
• Use an appropriate safety cable to fix the device (e.g. VDLSC7N or VDLSC8N).
• The maximum ambient temperature is 45 °C. Do not operate the device at higher temperatures.

HQHZ10001/HQHZ10002
V. 02 – 19/01/2022 6 ©Velleman Group nv
3. General Guidelines
Refer to the Velleman® Service and Quality Warranty on the last pages of this manual.
Keep this device away from dust and extreme temperatures. Make sure the ventilation
openings are clear at all times. For sufficient air circulation, leave at least 6" (± 15 cm) in
front of the openings.
Protect this device from shocks and abuse. Avoid brute force when operating the device.
• Familiarise yourself with the functions of the device before actually using it. Do not allow operation by
unqualified people. Any damage that may occur will most probably be due to unprofessional use of the device.
• All modifications of the device are forbidden for safety reasons. Damage caused by user modifications
to the device is not covered by the warranty.
• Only use the device for its intended purpose. All other uses may lead to short circuits, burns, electroshocks,
lamp explosion, crash, etc. Using the device in an unauthorised way will void the warranty.
• Damage caused by disregard of certain guidelines in this manual is not covered by the warranty and
the dealer will not accept responsibility for any ensuing defects or problems.
• Mechanical wear and LEDs are not covered by warranty.
• A qualified technician should install and service this device.
• Do not switch the device on immediately after it has been exposed to changes in temperature.
Protect the device against damage by leaving it switched off until it has reached room temperature.
• This device is designed for professional use on stage, in discos, theatres, etc.
• Use the appropriate power supply (see Technical Specifications below).
• There may be some smoke or a particular smell when the device is activated for the first time. This is
normal and any smoke or smell will gradually disappear.
• Use the original packaging if the device is to be transported.
• Keep this manual for future reference.
4. Overview
Refer to the illustrations on page 2 of this manual.
1
power input + fuse
6
tiltable output nozzle
2
on-off switch
7
carrying handle
3
remote control input
8
fluid tank
4
manual fog button
9
on-board control panel
5
fan speed regulator
10
DMX input and output
5. Installation
• Only install and use the device on a flat and stable surface. The device may not be tilted.
• Install the device in a location where you can easily access the power cord.
• Install the device in a well-ventilated area.
• The carrying construction must be able to support 10 times the weight of the device for 1 hour
without deforming.
• Never stand directly below the device when it is being mounted, removed or serviced. Have a
qualified technician check the device once a year and once before you bring it into service.
• Install the device in a location with few passers-by that is inaccessible to unauthorised persons.
• Make sure there is no flammable material within a 0.5 m radius of the device.

HQHZ10001/HQHZ10002
V. 02 – 19/01/2022 7 ©Velleman Group nv
6. Operation
6.1 HQHZ10001
1. interval button
2. duration button
3. output button
4. timer button
5. continuous button
6. manual button
1. Make sure to fill the tank with hazer liquid.
2. Switch on the device.
3. Set the output level and press the manual button on the remote control to trigger the fog output.
The device will continue to output fog as long as the button is pressed.
You can also choose a continuous or timed output.
4. Switch off the device after use.
Buttons 1 and 2 only work in timer mode.
The manual fog button on the rear of the device must not be activated
while activating the timer button on the remote control.
6.2 HQHZ10002
Control Panel Description
FUNCTION
enter the programming mode
VOLUME
output volume control
TIMER
start timer operation
MANUAL
manual fog output
UP
upwards through the menu list
DOWN
downwards through the menu list
Preparing your Haze Machine
1. Remove the fluid tank from its compartment. Also, remove the cap.
2. Verify that the plastic hoses attached to the cap are in place and in good condition.
3. Pour fog fluid into the tank and close the tank.
4. Replace the tank into its compartment. Make sure the plastic hose entering the haze machine from
the fluid tank is not bent or kinked.
5. Connect the haze machine to the mains, switch it on and let it warm up. The haze machine is ready-
to-use after approximately 7 to 8 minutes.
In any operation mode, the display must read READY TO FOG to output
fog.

HQHZ10001/HQHZ10002
V. 02 – 19/01/2022 8 ©Velleman Group nv
Start-Up
1. Make sure the haze machine is switched off before connecting it to the mains.
2. Switch on the haze machine.
3. Press <VOLUME>.
4. Adjust the fog output volume with <UP> or <DOWN>.
DMX Configuration
To set the haze machine in DMX mode:
1. Connect the haze machine to the mains, switch it on and let it warm up.
2. Connect a DMX cable to the DMX input of the haze machine and the DMX output of a controller (not
included).
3. To activate the DMX function, press <FUNCTION> repeatedly until DMX512 ADD is displayed.
Select the start address from 1 to 512 with <UP> or <DOWN>.
Make sure that the starting address of the interconnected haze machines
do not overlap.
A DMX terminator is recommended for installations where the DMX cable has to run a long distance or is
in an electrically noisy environment (e.g. discos). The terminator prevents corruption of the digital
control signal by electrical noise. The DMX terminator is simply an XLR plug with a 120 Ω resistor
between pins 2 and 3, which is then plugged into the XLR output socket of the last device in the chain.
Setting the Output Volume
1. Press <FUNCTION> repeatedly until VOLUME OUT is displayed.
2. Select the desired output volume (1-100 % or non-stop) with <UP> or <DOWN>.
3. Press <VOLUME> to confirm.
4. Press <VOLUME> again to trigger the fog at the set output.
The haze machine will memorize the set output after switch-off. To reset
the fog output, repeat the steps above.
Activating the Fluid Sensor
The integrated fluid sensor measures the fluid level in the tank. To activate the fluid sensor:
1. Press <FUNCTION> repeatedly until FLUID SENSOR is displayed.
2. Select ON with <UP> or <DOWN>.
3. Select OFF with <UP> or <DOWN> to deactivate the fluid sensor.
Setting the Fan
1. Press <FUNCTION> repeatedly until FAN SET is displayed.
2. Select ON with <UP> or <DOWN>.
3. Select OFF with <UP> or <DOWN> to deactivate the fan.

HQHZ10001/HQHZ10002
V. 02 – 19/01/2022 9 ©Velleman Group nv
Timer Mode
In timer mode, the haze machine will output fog in pre-configured time intervals (see Timer Mode
Parameters below).
1. Press <TIMER> until a timer is displayed.
2. The haze machine starts outputting fog when the counter reaches zero (0).
3. Set the timer duration in the DURATION SET menu option; set the output volume in the TIMER OUT
menu option.
4. The cycle repeats itself until you press <TIMER> again or until the haze machine runs out of fluid.
Manual Mode
In manual mode, the haze machine will output fog for as long as the button remains pressed. The output
volume will be at 100 % output volume.
1. Keep <MANUAL> pressed to output fog.
2. Release <MANUAL> to stop the fog output.
Time Mode Parameters
These parameters determine the interval and output volume in timer mode.
1. Press <FUNCTION> repeatedly until INTERVAL SET is displayed.
2. Select the interval time (1-200 sec.) with <UP> or <DOWN>.
3. Press <FUNCTION> repeatedly until DURATION SET is displayed.
4. Select the duration time (1-200 sec.) with <UP> or <DOWN>.
5. Press <FUNCTION> repeatedly until TIMER OUT is displayed.
6. Select the desired output volume (1-100 % or non-stop) with <UP> or <DOWN>.
When the haze machine is connected to a DMX controller, this controller
will take priority to the on-board control panel of the haze machine.
Remove the DMX cable before using the on-board control panel.
7. Troubleshooting
problem
possible cause
possible solution
The fuse keeps blowing.
Excessive load on the circuit.
Make sure that the total load
does not exceed 80 % of the
fuse’s nominal current.
Short-circuit along the power
line.
Check the power line.
The haze machine does not
power.
No power on the mains.
Check the mains.
Loose or damaged power cord.
Check the power cord.
Blown fuse.
Replace the blown fuse.
Internal problem.
Send the haze machine for
repair.
The haze machine does not
respond to DMX.
Wrong starting address.
Set the correct DMX address on
the haze machine.
Wrong manipulation on the
controller.
Manipulate the correct controls
on the controller.
Incorrect; loose or damaged
DMX cord.
Check the DMX cord.
Internal problem.
Send the haze machine for
repair.
Interference with radio signals.
Keep the DMX cable away from
radio equipment.
DMX cable too long.
Install an optically-coupled DMX
amplifier before the machine.
Too many products connected.
Install an optically-coupled DMX
amplifier.
Terminator not connected.
Connect the terminator.

HQHZ10001/HQHZ10002
V. 02 – 19/01/2022 10 ©Velleman Group nv
8. Cleaning and Maintenance
Before starting any cleaning or maintenance activities:
1. Unplug the device's power cord from the outlet.
2. Let the device cool down.
Cleaning
• Make sure to empty the tank before cleaning.
• Use normal glass cleaner and a soft cloth to wipe off the outside casing.
• Clean the external optics with glass cleaner and a soft cloth every 20 days.
• Always be sure to dry all parts completely before plugging the unit back in.
• Cleaning frequency depends on the environment in which the unit operates (i.e. smoke, fog residue,
dust, dew).
• Do not immerse the device in any liquid.
Maintenance
• All screws should be tightened and free of corrosion.
• The housing, the lenses, the mounting supports and the installation location (e.g. ceiling, suspension,
trussing) should not be deformed, modified or tampered with; e.g. do not drill extra holes in
mounting supports, do not change the location of the connections…
• Mechanically moving parts must not show any signs of wear and tear.
• The electric power supply cables must not show any damage. Have a qualified technician maintain
the device.
• There are no user-serviceable parts, apart from the fuse and the lamp.
• Refer to an authorized dealer for service and/or spare parts.
9. Technical Specifications
power supply ......................................................................... 220-240 V~, 50/60 Hz
warm-up time............................................................................................... 3 min.
fluid consumption ............................................................................. 60-80 ml/min.
IP rating ........................................................................................................ IP20
options
high-density hazer liquid (5 L) ............................................................. VDLHLH5
HQHZ10001
power consumption .......................................................................................600 W
fuse ............................................................................................................... F5A
output .................................................................... ca. 170 m³/6,000 ft³ per minute
tank capacity ................................................................................................. 1.2 L
remote controller wire length.......................................................................... 3.5 m
dimensions .............................................................................. 320 x 170 x 220 mm
HQHZ10002
power consumption ..................................................................................... 1000 W
fuse ............................................................................................................... F6A
output .................................................................. ca. 225 m³/10,000 ft³ per minute
tank capacity ................................................................................................. 2.3 L
dimensions .............................................................................. 420 x 170 x 300 mm
Use this device with original accessories only. Velleman Group nv cannot be held responsible
in the event of damage or injury resulting from (incorrect) use of this device. For more info
concerning this product and the latest version of this manual, please visit our website
www.velleman.eu. The information in this manual is subject to change without prior notice.
© COPYRIGHT NOTICE
The copyright to this manual is owned by Velleman Group nv. All worldwide rights reserved.
No part of this manual may be copied, reproduced, translated or reduced to any electronic medium or
otherwise without the prior written consent of the copyright holder.

HQHZ10001/HQHZ10002
V. 02 – 19/01/2022 11 ©Velleman Group nv
HANDLEIDING
1. Inleiding
Aan alle ingezetenen van de Europese Unie
Belangrijke milieu-informatie betreffende dit product
Dit symbool op het toestel of de verpakking geeft aan dat, als het na zijn levenscyclus wordt
weggeworpen, dit toestel schade kan toebrengen aan het milieu. Gooi dit toestel (en
eventuele batterijen) niet bij het gewone huishoudelijke afval; het moet bij een
gespecialiseerd bedrijf terechtkomen voor recyclage. U moet dit toestel naar uw verdeler of
naar een lokaal recyclagepunt brengen. Respecteer de plaatselijke milieuwetgeving.
Hebt u vragen, contacteer dan de plaatselijke autoriteiten betreffende de verwijdering.
Dank u voor uw aankoop! Lees deze handleiding grondig door voor u het toestel in gebruik neemt. Werd
het toestel beschadigd tijdens het transport, installeer het dan niet en raadpleeg uw dealer.
2. Veiligheidsvoorschriften
Lees en begrijp deze handleiding en de veiligheidsinstructies vóór ingebruikname.
Wees voorzichtig bij de installatie: raak geen kabels aan die onder stroom staan, om
dodelijke elektroshocks te vermijden.
Trek de stekker uit het stopcontact voordat u het toestel reinigt of als u het niet
gebruikt. Houd de voedingskabel altijd vast bij de stekker en niet bij de kabel.
Gebruik het toestel enkel binnenshuis. Bescherm het toestel tegen regen,
vochtigheid en opspattende vloeistoffen. Plaats nooit objecten gevuld met vloeistof op
of naast het toestel.
Houd dit toestel buiten het bereik van kinderen en onbevoegden.
Opgelet: de behuizing wordt zeer warm tijdens gebruik.
Sluit dit toestel niet aan op een dimmerpack.
• Installeer het toestel op een minimumafstand van 12 m van ontvlambare en
explosieve voorwerpen of stoffen.
• Zorg voor een minimumafstand van 3 m tussen de lichtuitgang van het
toestel en het belichte oppervlak.
Er zijn geen onderdelen in het toestel die door de gebruiker gerepareerd kunnen
worden. Contacteer uw verdeler voor eventuele reserveonderdelen.
• Dit toestel is geschikt voor gebruik door kinderen vanaf 8 jaar, door personen met fysieke,
zintuiglijke of verstandelijke beperkingen, of door personen met gebrek aan ervaring en kennis, op
voorwaarde dat dit onder toezicht gebeurt van een persoon die verantwoordelijk is voor hun
veiligheid of hun aanwijzingen heeft gegeven, hoe zij het toestel moeten gebruiken en zich bewust
zijn van de risico's die het gebruik van het toestel met zich meebrengt. Kinderen mogen niet met het
toestel spelen. De reiniging en het onderhoud van het toestel mogen niet worden uitgevoerd door
kinderen, tenzij ze onder toezicht staan.
• Dit toestel valt onder beschermingsklasse 1. Het toestel moet dus geaard zijn. Een geschoolde
technicus moet de elektrische aansluiting verzorgen.
• De beschikbare netspanning mag niet hoger zijn dan de spanning in de specificaties achteraan de handleiding.
• De voedingskabel mag niet beschadigd zijn of ingekort worden. Laat uw dealer zo nodig een nieuwe
kabel plaatsen.
• Maak het toestel vast met een geschikte veiligheidskabel (bv. VDLSC7N of VDLSC8N).
• Zorg voor een minimumafstand van 3 m tussen de lichtuitgang van het toestel en het belichte
oppervlak.

HQHZ10001/HQHZ10002
V. 02 – 19/01/2022 12 ©Velleman Group nv
• Bedek de lens nooit.
• De maximale omgevingstemperatuur bedraagt 45 °C. Gebruik het toestel nooit bij hogere
temperaturen.
3. Algemene richtlijnen
Raadpleeg de Velleman® service- en kwaliteitsgarantie achteraan deze handleiding.
Bescherm tegen stof en extreme temperaturen. Zorg ervoor dat de ventilatieopeningen
niet verstopt geraken. Voorzie een minimumafstand van 15 cm tussen het toestel en elk
ander voorwerp.
Bescherm tegen schokken. Vermijd brute kracht tijdens de bediening van het toestel.
• Leer eerst de functies van het toestel kennen voor u het gaat gebruiken. Ongeschoolde personen
mogen dit toestel niet gebruiken. Meestal is beschadiging het gevolg van ondeskundig gebruik van
het toestel.
• Om veiligheidsredenen mag u geen wijzigingen aan het apparaat aanbrengen. Schade door
wijzigingen die de gebruiker heeft aangebracht aan het toestel valt niet onder de garantie.
• Gebruik het toestel enkel waarvoor het gemaakt is. Andere toepassingen kunnen leiden tot
kortsluitingen, brandwonden, elektrische schokken, enz. De garantie vervalt automatisch bij
ongeoorloofd gebruik.
• De garantie geldt niet voor schade door het negeren van bepaalde richtlijnen in deze handleiding en
uw dealer zal de verantwoordelijkheid afwijzen voor defecten of problemen die hier rechtstreeks
verband mee houden.
• De leds en mechanische schade vallen niet onder de garantie.
• Laat dit toestel installeren en onderhouden door een geschoolde technicus.
• Schakel het toestel niet onmiddellijk in nadat het werd blootgesteld aan temperatuurschommelingen.
Om beschadiging te vermijden, moet u wachten tot het toestel de kamertemperatuur heeft bereikt.
• Dit toestel is ontworpen voor professioneel gebruik op podia, in disco's, enz.
• Gebruik een geschikte voeding (zie Technische specificaties hieronder). .
• Wanneer u het toestel voor het eerst gebruikt, kan dit gepaard gaan met een bepaalde geur. Dit is
normaal en de eventuele rook of geur zal geleidelijk verdwijnen.
• Gebruik de oorspronkelijke verpakking tijdens het transport.
• Bewaar deze handleiding voor verdere raadpleging.
4. Omschrijving
Raadpleeg de afbeeldingen op pagina 2 van deze handleiding.
1
voedingsingang + zekering
6
regelbare neveluitgang
2
aan/uit-schakelaar
7
handgreep
3
ingang voor de afstandsbediening
8
vloeistofreservoir
4
knop voor de manuele neveluitstoot
9
ingebouwd controlepaneel
5
instelknop ventilatorsnelheid
10
DMX-ingang en -uitgang
5. Montage
• Plaats en gebruik het toestel enkel op een vlak en stabiel oppervlak. Kantel het toestel niet.
• Plaats het toestel zodanig dat de voedingskabel gemakkelijk bereikbaar is.
• Plaats het toestel in een goed geventileerde ruimte.
• De draagconstructie waaraan het toestel wordt bevestigd, moet gedurende 1 uur 10 x het gewicht
van dit toestel kunnen dragen zonder te vervormen.
• Sta nooit recht onder het toestel wanneer u het monteert, verwijdert of herstelt. Laat het toestel
controleren door een geschoolde technicus voor u het in gebruik neemt en laat het 1 x per jaar
volledig nakijken.
• Installeer het toestel op een plaats waar weinig mensen voorbijkomen en die niet toegankelijk is voor
onbevoegden.
• Verwijder alle brandbaar materiaal in een straal van 0.5 m rond het toestel.

HQHZ10001/HQHZ10002
V. 02 – 19/01/2022 13 ©Velleman Group nv
6. Gebruik
6.1 HQHZ10001
1. knop INTERVAL
(interval instellen)
2. knop DURATION
uitstootduur (duur
instellen)
3. knop OUTPUT
(uitstootvolume
instellen)
4. knop TIMER (timer
in-/uitschakelen)
5. knop CONTINUOUS
(continue
neveluitstoot)
6. knop MANUAL
(manuele
neveluitstoot)
1. Vul het reservoir met nevelvloeistof.
2. Schakel het toestel in.
3. Stel het uitgangsniveau in en druk op de knop MANUAL van de afstandsbediening, om de
neveluitstoot te activeren. Het toestel blijft nevel uitstoten, zolang u de knop ingedrukt houdt.
U kunt ook kiezen tussen een continue of een geprogrammeerde neveluitstoot.
4. Schakel het toestel uit na gebruik.
De knoppen 1 en 2 werken enkel in timermodus.
Zorg ervoor dat bij het activeren van de timerknop op de
afstandsbediening, dat de knop voor de manuele neveluitstoot aan de
achterkant van het toestel niet geactiveerd wordt.
6.2 HQHZ10002
Beschrijving van het controlepaneel
FUNCTION
programmeermodus openen
VOLUME
instelknop uitstootvolume
TIMER
de timer activeren
MANUAL
manuele neveluitstoot
UP
naar boven in het menu scrollen
DOWN
naar onder in het menu scrollen

HQHZ10001/HQHZ10002
V. 02 – 19/01/2022 14 ©Velleman Group nv
De nevelmachine voorbereiden
1. Verwijder het vloeistofreservoir. Verwijder ook de dop.
2. Controleer of de plastic slangen van de dop correct aangesloten en niet beschadigd zijn.
3. Giet nevelvloeistof in het reservoir en sluit deze.
4. Plaats het reservoir opnieuw in het toestel. Zorg ervoor dat de plastic slang van het reservoir niet
geplooid of gekneld is.
5. Steek de stekker in het stopcontact, schakel de nevelmachine in en laat deze opwarmen. De
nevelmachine is na ongeveer 7 tot 8 minuten gebruiksklaar.
In alle bedrijfsmodi moet het display READY TO FOG weergeven, voordat u
nevel kunt uitstoten.
Opstarten
1. Zorg ervoor dat de nevelmachine uitgeschakeld is voor u de stekker in het stopcontact steekt.
2. Schakel de nevelmachine in.
3. Druk op <VOLUME>.
4. Stel het uitstootvolume in met <UP> of <DOWN>.
DMX-configuratie
Om de DMX-modus in te schakelen:
1. Steek de stekker in het stopcontact, schakel de nevelmachine in en laat deze opwarmen.
2. Sluit de DMX-kabel aan op de DMX-ingang van de nevelmachine en op de DMX-uitgang van een
controller (niet meegeleverd).
3. Om de DMX-functie in te schakelen, druk herhaaldelijk op <FUNCTION> tot DMX512 ADD wordt
weergegeven. Selecteer het startadres van 1 tot 512 met <UP> of <DOWN>.
Zorg ervoor dat het startadres niet met het startadres van andere
aangesloten nevelmachines overeenkomt.
Een DMX-eindweerstand is aanbevolen als de DMX-kabel vrij lang is of wordt gebruikt in een omgeving
met veel elektrische ruis (bv. een discotheek). De eindweerstand voorkomt corruptie van het digitale
controlesignaal door elektrische ruis. De DMX-eindweerstand is niets meer dan een XLR-stekker met een
weerstand van 120 Ω van pin 2 naar 3. Deze XLR-stekker wordt dan aangesloten op de XLR-uitgang van
het laatste toestel in de reeks.
Het uitgangsvolume instellen
1. Druk herhaaldelijk op <FUNCTION> tot VOLUME OUT wordt weergegeven.
2. Selecteer het gewenste uitgangsvolume (1-100% of continu) met <UP> of <DOWN>.
3. Druk op <VOLUME> om te bevestigen.
4. Druk nogmaals op <VOLUME> om de neveluitstoot te activeren.
De nevelmachine slaat het ingestelde uitstootvolume op na het
uitschakelen. Om het uitstootvolume te resetten, herhaal de bovenstaande
stappen.
De vloeistofsensor inschakelen
De ingebouwde vloeistofsensor meet het vloeistofniveau in het reservoir. Om de vloeistofsensor in te
schakelen:
1. Druk herhaaldelijk op <FUNCTION> tot FLUID SENSOR wordt weergegeven.
2. Selecteer ON met <UP> of <DOWN>.
3. Selecteer OFF met <UP> of <DOWN> om de vloeistofsensor uit te schakelen.

HQHZ10001/HQHZ10002
V. 02 – 19/01/2022 15 ©Velleman Group nv
De ventilator instellen
1. Druk herhaaldelijk op <FUNCTION> tot FAN SET wordt weergegeven.
2. Selecteer ON met <UP> of <DOWN>.
3. Selecteer OFF met <UP> of <DOWN> om de ventilator uit te schakelen.
Timermodus
In timermodus wordt nevel op vooraf ingestelde tijdsintervallen uitgestoten (zie Parameters van de
timermodus).
1. Druk op <TIMER> tot een timer wordt weergegeven.
2. De nevelmachine start de neveluitstoot wanneer de teller 0 bereikt.
3. Selecteer DURATION SET, om de duur van de timer in te stellen. Selecteer TIMER OUT, om het
uitstootvolume in te stellen.
4. De cyclus herhaalt zich tot u <<TIMER> nogmaals indrukt of tot het reservoir geen nevelvloeistof
meer bevat.
Manuele modus
In manuele modus blijft de nevelmachine nevel uitstoten zolang u de knop ingedrukt houdt. Het
uitstootvolume staat op het maximum.
1. Houd <MANUAL> ingedrukt om nevel uit te stoten.
2. Laat <MANUAL> los om de neveluitstoot te stoppen.
Parameters van de timermodus
Deze parameters bepalen het interval en het volume in timermodus.
1. Druk herhaaldelijk op <FUNCTION> tot INTERVAL SET wordt weergegeven.
2. Selecteer het interval (1-200 s) met <UP> of <DOWN>.
3. Druk herhaaldelijk op <FUNCTION> tot DURATION SET wordt weergegeven.
4. Selecteer de duur (1-200 s) met <UP> of <DOWN>.
5. Druk herhaaldelijk op <FUNCTION> tot TIMER OUT wordt weergegeven.
6. Selecteer het gewenste uitstootvolume (1-100% of continu) met <UP> of <DOWN>.
Als de nevelmachine aangesloten is op een DMX-controller, dan heeft deze
prioriteit. Ontkoppel de DMX-kabel voor u het ingebouwde controlepaneel
gebruikt.
7. Problemen en oplossingen
probleem
mogelijke oorzaak
mogelijke oplossing
De zekering blijft doorbranden.
Het circuit is te zwaar belast.
Zorg ervoor dat de totale last
80 % van de nominale stroom
van de zekering niet
overschrijdt.
Kortsluiting in de
voedingskabel.
Controleer de voedingskabel.
De nevelmachine schakelt niet
in.
Er is geen stroom.
Controleer het lichtnet.
De voedingskabel is ontkoppeld
of beschadigd.
Controleer de voedingskabel.
Doorgebrande zekering.
Vervang de doorgebrande
zekering.
Intern probleem.
Laat de nevelmachine
repareren.

HQHZ10001/HQHZ10002
V. 02 – 19/01/2022 16 ©Velleman Group nv
De nevelmachine reageert niet
op DMX.
Verkeerd startadres.
Stel het correcte DMX-adres in
op de nevelmachine.
Verkeerd gebruik van de
controller.
Gebruik de correcte knoppen.
Verkeerd; De DMX-kabel is
ontkoppeld of beschadigd.
Controleer de DMX-kabel.
Intern probleem.
Laat de nevelmachine
repareren.
Storing.
Houd de DMX-kabel buiten het
bereik van radiotoestellen.
De DMX-kabel is te lang.
Installeer een optisch
gekoppelde DMX-versterker.
Er zijn teveel toestellen
aangesloten.
Installeer een optisch
gekoppelde DMX-versterker.
De eindweerstand is niet
aangesloten.
Sluit de eindweerstand aan.
8. Reiniging en onderhoud
Voor het reinigen of onderhoud:
1. Ontkoppel het toestel van het lichtnet.
2. Laat het toestel afkoelen.
Reiniging
• Leeg het reservoir voordat u het toestel reinigt.
• Gebruik een glasreiniger en een zachte doek om de behuizing te reinigen.
• Reinig de externe lenzen om de 20 dagen met een glasreiniger en een zachte doek.
• Zorg ervoor dat alle onderdelen volledig droog zijn voordat u het toestel opnieuw aansluit.
• De frequentie van de reiniging hangt van de omgeving af (bijv. rook, stof, vocht).
• Dompel het toestel nooit onder in een vloeistof.
Onderhoud
• Alle schroeven moeten goed zijn aangespannen en mogen geen sporen van roest vertonen.
• De behuizing, de lenzen, de montagebeugels en de montageplaats (bijvoorbeeld plafond, ophanging
of gebinte) mogen niet vervormd of aangepast worden; bv. geen extra gaten in montagebeugels
boren, de aansluitingen niet verplaatsen ...
• Mechanisch bewegende delen mogen geen sporen van slijtage vertonen.
• De voedingskabels mogen niet beschadigd zijn. Laat het toestel onderhouden door een geschoolde
technicus.
• Er zijn geen door de gebruiker vervangbare onderdelen in dit toestel, behalve de zekering en de
lamp.
• Contacteer uw verdeler voor eventuele reserveonderdelen.

HQHZ10001/HQHZ10002
V. 02 – 19/01/2022 17 ©Velleman Group nv
9. Technische specificaties
voeding ................................................................................ 220-240 V~, 50/60 Hz
opwarmtijd ................................................................................................... 3 min
vloeistofverbruik ................................................................................ 60-80 ml/min
IP-norm ......................................................................................................... IP20
optioneel
high-density vloeistof voor nevelmachine (5 L) ...................................... VDLHLH5
HQHZ10001
verbruik .......................................................................................................600 W
zekering ......................................................................................................... F5A
uitstoot ................................................................... ± 170 m³ / 6.000 ft³ per minuut
tankinhoud .................................................................................................... 1.2 L
kabellengte van de afstandsbediening ............................................................. 3.5 m
afmetingen.............................................................................. 320 x 170 x 220 mm
HQHZ10002
verbruik ..................................................................................................... 1000 W
zekering ......................................................................................................... F6A
uitstoot ................................................................. ± 225 m³ / 10.000 ft³ per minuut
tankinhoud .................................................................................................... 2.3 L
afmetingen.............................................................................. 420 x 170 x 300 mm
Gebruik dit toestel enkel met originele accessoires. Velleman Group nv is niet aansprakelijk
voor schade of kwetsuren bij (verkeerd) gebruik van dit toestel. Voor meer informatie over dit
product en de laatste versie van deze handleiding, zie www.velleman.eu. De informatie in
deze handleiding kan te allen tijde worden gewijzigd zonder voorafgaande kennisgeving.
© AUTEURSRECHT
Velleman Group nv heeft het auteursrecht voor deze handleiding. Alle wereldwijde rechten
voorbehouden. Het is niet toegestaan om deze handleiding of gedeelten ervan over te nemen, te
kopiëren, te vertalen, te bewerken en op te slaan op een elektronisch medium zonder voorafgaande
schriftelijke toestemming van de rechthebbende.

HQHZ10001/HQHZ10002
V. 02 – 19/01/2022 18 ©Velleman Group nv
MODE D'EMPLOI
1. Introduction
Aux résidents de l'Union européenne
Informations environnementales importantes concernant ce produit
Ce symbole sur l'appareil ou l'emballage indique que l’élimination d’un appareil en fin de vie
peut polluer l'environnement. Ne pas jeter un appareil électrique ou électronique (et des piles
éventuelles) parmi les déchets municipaux non sujets au tri sélectif ; une déchetterie traitera
l’appareil en question. Renvoyer l'appareil à votre fournisseur ou à un service de recyclage
local. Il convient de respecter la réglementation locale relative à la protection de
l’environnement.
En cas de questions, contacter les autorités locales pour élimination.
Nous vous remercions de votre achat ! Lire attentivement le présent mode d'emploi avant la mise en
service de l’appareil. Si l'appareil a été endommagé pendant le transport, ne pas l’installer et consulter
votre revendeur.
2. Consignes de sécurité
Lire et comprendre ce mode d'emploi et toutes les consignes de sécurité avant
d'utiliser l'appareil.
Être prudent lors de l'installation : toucher un câble sous tension peut causer des
électrochocs mortels.
Toujours déconnecter l’appareil s’il n’est pas utilisé et avant le nettoyage ou
l'entretien. Tirer sur la fiche pour débrancher l'appareil ; non pas le câble.
Utiliser à l'intérieur uniquement. Protéger l'appareil de la pluie, de l'humidité,
d'éclaboussures et des projections d’eau. Ne jamais placer d’objets contenant du
liquide sur ou près de l’appareil.
Garder l'appareil hors de la portée des enfants et des personnes non autorisées.
Attention : l'appareil chauffe pendant l’usage.
Ne pas connecter cet appareil à un variateur.
• Installer l'appareil à une distance minimale de 12 m de tout objet ou produit
inflammable ou explosif.
• Respecter une distance minimale de 3 m entre la sortie lumière de
l’appareil et la surface illuminée.
Il n’y a aucune pièce réparable par l’utilisateur dans l'appareil. Commander des pièces
de rechange éventuelles chez votre revendeur.
• Cet appareil peut être utilisé par des enfants âgés de 8 ans et plus et des personnes manquant
d’expérience et de connaissances ou dont les capacités physiques, sensorielles ou mentales sont
réduites, si elles ont été formées et encadrées quant à l'utilisation de l'appareil d'une manière sûre et
connaissent les risques encourus. Ne pas laisser les enfants jouer avec l'appareil. Le nettoyage et
l'entretien ne doivent pas être effectués par des enfants sans surveillance.
• Cet appareil ressort à la classe de protection 1. L'appareil doit donc être mis à la terre. La connexion
électrique doit être effectuée par un technicien qualifié.
• S'assurer que la tension réseau ne dépasse pas la tension mentionnée dans les spécifications à la fin
de ce mode d'emploi.
• Le câble d’alimentation ne peut pas être replissé ou endommagé. Demander à votre revendeur de le
remplacer si nécessaire.
• Utiliser un câble de sécurité approprié pour fixer l'appareil (p. ex. VDLSC7N ou VDLSC8N).
• Respecter une distance minimale de 3 m entre la sortie lumière de l’appareil et la surface illuminée.

HQHZ10001/HQHZ10002
V. 02 – 19/01/2022 19 ©Velleman Group nv
• Ne pas couvrir la lentille.
• La température ambiante maximale s'élève à 45 °C. Ne pas utiliser l'appareil à des températures plus
élevées.
3. Directives générales
Se référer à la garantie de service et de qualité Velleman® en fin de ce mode d'emploi.
Protéger contre la poussière et les températures extrêmes. Veiller à ce que les fentes de
ventilation ne soient pas bloquées. Laisser une distance de minimum 15 cm entre
l’appareil et tout autre objet.
Protéger l’appareil des chocs et de l'abus. Traiter l'appareil avec circonspection pendant
l’opération.
• Se familiariser avec le fonctionnement de l'appareil avant de l'utiliser. Seules des personnes
qualifiées sont autorisées à utiliser cet appareil. La plupart des dégâts sont causés par un usage non
professionnel de l'appareil.
• Toute modification est interdite pour des raisons de sécurité. Les dommages occasionnés par des
modifications par le client ne tombent pas sous la garantie.
• N’utiliser l'appareil qu’à sa fonction prévue. Tout autre usage peut causer des courts-circuits, des
brûlures, des électrochocs, explosion de lampe, chute, etc. Un usage impropre annule d'office la
garantie.
• La garantie ne se s’applique pas aux dommages survenus en négligeant certaines directives de ce
mode d'emploi et votre revendeur déclinera toute responsabilité pour les problèmes et les défauts qui
en résultent.
• Les LEDs et l’usure mécanique ne tombent pas sous la garantie.
• Confier l’installation et l’entretien à un technicien qualifié.
• Ne pas brancher immédiatement l’appareil après exposition à des variations de température. Afin
d’éviter des dommages, attendre jusqu’à ce que l’appareil ait atteint la température ambiante.
• Cet appareil a été développé pour un usage professionnel dans des discothèques, des théâtres, etc.
• Utiliser une source d'alimentation appropriée (voir Spécifications techniques ci-dessous).
• La première mise en service peut s’accompagner d’une odeur particulière. C'est normal, la fumée ou
l'odeur disparaîtra graduellement.
• Transporter l’appareil dans son emballage originel.
• Garder ce mode d'emploi pour toute référence ultérieure.
4. Description
Se référer aux illustrations en page 2 de ce mode d'emploi.
1
entrée d'alimentation + fusible
6
buse inclinable
2
interrupteur on-off
7
poignée de transport
3
entrée pour la télécommande
8
réservoir
4
bouton de sortie de fumée manuelle
9
panneau de contrôle incorporé
5
réglage de la vitesse du ventilateur
10
entrée et sortie DMX
5. Installation
• Installer l'appareil uniquement sur une surface plate et horizontale. Ne pas incliner l'appareil.
• Installer l'appareil afin de pouvoir accéder facilement au câble d'alimentation.
• Installer l'appareil dans un endroit bien ventilé.
• La construction portante de l’appareil doit être capable de supporter 10 fois le poids de l’appareil
pendant une heure, sans qu’une déformation de la construction en résulte.
• Éviter de se positionner en dessous de l’appareil pour l’enlever ou lors du montage ou du nettoyage.
Un technicien qualifié doit réviser l’appareil avant la mise en service et ensuite une fois par an.
• Installer l’appareil à un endroit où il n'y a pas beaucoup de passage et inaccessible à des personnes
non autorisées.
• Enlever tout matériau inflammable dans un rayon de 0.5 m autour de l’appareil.

HQHZ10001/HQHZ10002
V. 02 – 19/01/2022 20 ©Velleman Group nv
6. Emploi
6.1 HQHZ10001
1. bouton INTERVAL
(régler l'intervalle)
2. bouton DURATION
(régler la durée)
3. bouton OUTPUT
(régler la sortie de
fumée)
4. bouton TIMER
(activer/désactiver le
minuteur)
5. bouton CONTINUOUS
(sortie de fumée
continue)
6. bouton MANUAL
(sortie de fumée
manuelle)
1. Remplir le réservoir avec du liquide à brouillard
2. Allumer l'appareil.
3. Régler le niveau de sortie et appuyer sur le bouton MANUAL de la télécommande pour activer la
sortie de fumée. L’appareil continue à émettre de fumée tant que le bouton est appuyé.
Il est également possible de choisir entre une sortie de fumée continue ou programmée.
4. Eteindre l'appareil après utilisation.
Les boutons 1 et 2 fonctionnent uniquement en mode minuteur.
S’assurer que, en activant le bouton du minuteur sur la télécommande, le
bouton pour la sortie de fumée sur la partie arrière de l’appareil n’est pas
activé.
6.2 HQHZ10002
Description du panneau de contrôle
FONCTION
accéder au mode de programmation
VOLUME
contrôle du volume de la sortie de fumée
TIMER
activer le minuteur
MANUEL
sortie de fumée manuelle
UP
naviguer vers le haut dans le menu
DOWN
naviguer vers le bas dans le menu

HQHZ10001/HQHZ10002
V. 02 – 19/01/2022 21 ©Velleman Group nv
Préparer la machine à brouillard
1. Retirer le réservoir. Retirer également le bouchon.
2. S’assurer que les tuyaux en plastique du bouchon sont fixés correctement et ne sont pas
endommagés.
3. Verser du liquide dans le réservoir et fermer le.
4. Remettre le réservoir dans l’appareil. S’assurer que le tuyau en plastique qui entre dans le réservoir
n’est pas plié ou coincé.
5. Brancher l’appareil, activer le et laisser le chauffer. La machine à brouillard est prête à l’emploi
après environ 7 à 8 minutes.
Dans tous les modes de fonctionnement, l’afficheur doit visualiser READY
TO FOG pour émettre de la fumée.
Démarrage
1. S’assurer que la machine à brouillard est éteinte avant de la brancher.
2. Allumer la machine à brouillard.
3. Appuyer sur <VOLUME>.
4. Ajuster la sortie de fumée avec <UP> ou <DOWN>.
Configuration DMX
Pour activer le mode DMX :
1. Brancher la machine à brouillard, allumer la et laisser la chauffer.
2. Connecter un câble DMX à l’entrée DMX de la machine à brouillard et à la sortie DMX d’un contrôleur
(non incl.).
3. Pour activer la fonction DMX, appuyer plusieurs fois sur <FUNCTION> jusqu’à ce que DMX512 ADD
s’affiche. Sélectionner l’adresse de départ de 1 à 512 avec <UP> ou <DOWN>.
S’assurer que l’adresse de départ de plusieurs machines à brouillard
interconnectées ne coïncident pas.
Une résistance de terminaison DMX est à recommander si le câble DMX doit couvrir une grande distance
ou s’il est utilisé dans un environnement avec beaucoup de bruit électrique (p. ex. une discothèque). La
terminaison évite la corruption du signal de contrôle numérique par le bruit électrique. La résistance de
terminaison DMX n’est rien d’autre qu’une fiche XLR avec une résistance de 120 Ω de broche 2 vers
broche 3, qui est à son tour connectée à la sortie XLR du dernier appareil de la série.
Régler le volume de sortie
1. Appuyer plusieurs fois sur <FUNCTION> jusqu'à ce que VOLUME OUT s'affiche.
2. Sélectionner le volume de sortie souhaité (1-100 % ou sortie continue) avec <UP> ou <DOWN>.
3. Appuyer sur <VOLUME> pour confirmer.
4. Appuyer à nouveau sur <VOLUME> pour activer la sortie de fumée.
La machine à fumée mémorisera la sortie de fumée programmée après
l'extinction. Pour réinitialiser la sortie de fumée, répéter les étapes décrites
ci-dessus.
Activer le capteur de niveau de liquide
Le capteur de niveau de liquide incorporé mesure le niveau de liquide. Pour activer le capteur de niveau
de liquide :
1. Appuyer plusieurs fois sur <FUNCTION> jusqu'à ce que FLUID SENSOR s'affiche.
2. Sélectionner ON avec <UP> ou <DOWN>.
3. Sélectionner OFF avec <UP> ou <DOWN> pour désactiver le capteur de niveau de liquide.

HQHZ10001/HQHZ10002
V. 02 – 19/01/2022 22 ©Velleman Group nv
Régler le ventilateur
1. Appuyer plusieurs fois sur <FUNCTION> jusqu'à ce que FAN SET s'affiche.
2. Sélectionner ON avec <UP> ou <DOWN>.
3. Sélectionner OFF avec <UP> ou <DOWN> pour désactiver le ventilateur.
Mode minuteur
En mode minuteur, la machine à brouillard émettra de la fumée à des intervalles préprogrammés (voir
Paramètres du mode minuteur).
1. Appuyer sur <TIMER> jusqu'à ce qu'un minuteur s'affiche.
2. La machine à brouillard commencera à émettre de la fumée lorsque le compteur atteint zéro (0).
3. Sélectionner DURATION SET pour régler la durée du minuteur. Sélectionner TIMER OUT pour régler
le volume de sortie.
4. Le cycle continue de se répéter jusqu’à ce que <TIMER> est appuyé à nouveau ou jusqu’à ce que
le réservoir est vide.
Mode manuel
En mode manuel, la machine à brouillard émettre de la fumée tant que le bouton est appuyé. Le volume
de sortie sera dans la position maximale.
1. Maintenir enfoncé <MANUAL> pour émettre de la fumée.
2. Relâcher <MANUAL> pour arrêter la sortie de fumée.
Paramètres du mode minuteur
Ces paramètres déterminent l’intervalle et le volume de la sortie en mode minuteur.
1. Appuyer plusieurs fois sur <FUNCTION> jusqu'à ce que INTERVAL SET s'affiche.
2. Sélectionner l’intervalle (de 1 à 200 s) avec <UP> ou <DOWN>.
3. Appuyer plusieurs fois sur <FUNCTION> jusqu'à ce que DURATION SET s'affiche.
4. Sélectionner la durée (de 1 à 200 s) avec <UP> ou <DOWN>.
5. Appuyer plusieurs fois sur <FUNCTION> jusqu'à TIMER OUT s'affiche.
6. Sélectionner la sortie de fumée souhaitée (1-100 % ou sortie continue) avec <UP> ou <DOWN>.
Si la machine à brouillard est connectée à un contrôleur DMX, celui-ci aura
priorité. Déconnecter le câble DMX avant d’utiliser le panneau de contrôle
incorporé.
7. Problèmes et solutions
problème
cause possible
solution éventuelle
Le fusible continue de sauter.
Trop de charge sur le circuit.
S’assurer que la charge totale
ne dépasse pas 80 % du
courant nominal du fusible.
Court-circuit dans le câble
d’alimentation.
Contrôler le câble
d'alimentation.
La machine à brouillard ne
s'allume pas.
Il n'y a pas de courant
électrique.
Contrôler le réseau électrique.
Câble d'alimentation est
déconnecté ou endommagé.
Contrôler le câble
d'alimentation.
Fusible sauté.
Remplacer le fusible sauté.
Problème interne.
Laisser réparer la machine à
brouillard.

HQHZ10001/HQHZ10002
V. 02 – 19/01/2022 23 ©Velleman Group nv
La machine à brouillard ne
réagit pas au DMX.
Adresse de départ incorrecte.
Introduire l’adresse DMX
correcte.
Usage incorrect du contrôleur.
Utiliser les boutons corrects.
Incorrect Le câble DMX est
déconnecté ou endommagé.
Contrôler le câble DMX.
Problème interne.
Laisser réparer la machine à
brouillard.
Interférence.
Tenir le câble DMX loin de la
portée d'équipement radio.
Le câble DMX est trop long.
Installer un amplificateur DMX
connecté optiquement.
Trop d’appareils connectés.
Installer un amplificateur DMX
connecté optiquement.
La terminaison n'est pas
connectée.
Connecter la terminaison.
8. Nettoyage et entretien
Avant tout nettoyage ou entretien :
1. Débrancher le câble d'alimentation.
2. Laisser refroidir l'appareil.
Nettoyage
• Vider le réservoir avant le nettoyage.
• Utiliser un nettoyant à vitres normal et un chiffon doux pour nettoyer le boîtier.
• Nettoyer les lentilles externes avec un nettoyant à vitres et un chiffon doux au moins tous les 20
jours.
• Laisser bien sécher toutes les pièces avant de reconnecter l'appareil.
• La fréquence de nettoyage dépend de l'environnement d'installation (p. ex. fumée, résidus de
brouillard, poussière, condensation).
• Ne jamais immerger l’appareil dans un liquide.
Entretien
• Serrer les vis et vérifier qu’elles ne rouillent pas.
• Ne pas déformer, modifier ou altérer le boîtier, les lentilles, les supports de montage et
l'emplacement d'installation (par exemple des plafonds, constructions portantes) par exemple ne pas
percer des trous additionnels dans un support, ne pas modifier l'emplacement des connexions ...
• Les parties mécaniques mobiles ne peuvent pas être usées.
• Les câbles d'alimentation ne peuvent pas être endommagés. Confie l'entretien à un technicien
qualifié.
• Il n’y a aucune pièce réparable par l’utilisateur sauf le fusible et la lampe.
• Commander des pièces de rechange éventuelles chez votre revendeur.
9. Spécifications techniques
alimentation .......................................................................... 220-240 V~, 50/60 Hz
temps de chauffe .......................................................................................... 3 min.
consommation de liquide .................................................................... 60-80 ml/min
norme IP ....................................................................................................... IP20
optionnel
liquide haute densité pour machine à brouillard (5 L) .............................. VDLHLH5

HQHZ10001/HQHZ10002
V. 02 – 19/01/2022 24 ©Velleman Group nv
HQHZ10001
consommation ..............................................................................................600 W
fusible ............................................................................................................ F5A
sortie ..................................................................... ± 170 m³ / 6.000 ft³ par minute
capacité du réservoir ...................................................................................... 1.2 L
longueur du câble de la télécommande ............................................................ 3.5 m
dimensions .............................................................................. 320 x 170 x 220 mm
HQHZ10002
consommation ............................................................................................ 1000 W
fusible ............................................................................................................ F6A
sortie ................................................................... ± 225 m³ / 10.000 ft³ par minute
capacité du réservoir ...................................................................................... 2.3 L
dimensions .............................................................................. 420 x 170 x 300 mm
N'employer cet appareil qu’avec des accessoires d’origine. Velleman Group nv ne peut, dans la
mesure conforme au droit applicable être tenue responsable des dommages ou lésions
(directs ou indirects) pouvant résulter de l’utilisation de cet appareil. Pour plus d’information
concernant cet article et la dernière version de cette notice, visiter notre site web
www.velleman.eu. Toutes les informations présentées dans ce mode d'emploi peuvent être
modifiées sans notification préalable.
© DROITS D’AUTEUR
Velleman Group nv est l’ayant droit des droits d’auteur de ce mode d'emploi. Tous droits
mondiaux réservés. Toute reproduction, traduction, copie ou diffusion, intégrale ou partielle, du
contenu de ce mode d'emploi par quelque procédé ou sur tout support électronique que ce soit est
interdite sans l’accord préalable écrit de l’ayant droit.

HQHZ10001/HQHZ10002
V. 02 – 19/01/2022 25 ©Velleman Group nv
MANUAL DEL USUARIO
1. Introducción
A los ciudadanos de la Unión Europea
Importantes informaciones sobre el medio ambiente concerniente a este producto
Este símbolo en este aparato o el embalaje indica que, si tira las muestras inservibles,
podrían dañar el medio ambiente. No tire este aparato (ni las pilas, si las hubiera) en la
basura doméstica; debe ir a una empresa especializada en reciclaje. Devuelva este aparato a
su distribuidor o a la unidad de reciclaje local. Respete las leyes locales en relación con el
medio ambiente.
Si tiene dudas, contacte con las autoridades locales para residuos.
¡Gracias por elegir HQPower™! Lea atentamente las instrucciones del manual antes de usar el aparato. Si
ha sufrido algún daño en el transporte no lo instale y póngase en contacto con su distribuidor.
2. Instrucciones de seguridad
Lea y comprenda este manual y todas las instrucciones de seguridad antes de usar el
aparato.
Cuidado durante la instalación: puede sufrir una peligrosa descarga eléctrica al tocar
un cable conectado a la red eléctrica.
Desconecte siempre el aparato de la red eléctrica si no va a usarlo durante un largo
período de tiempo y antes de su limpieza o mantenimiento. Tire siempre del enchufe
para desconectar el cable de red, nunca del propio cable.
Utilice el aparato sólo en interiores. No exponga este equipo a lluvia, humedad ni
a ningún tipo de salpicadura o goteo. Nunca ponga un objeto con líquido en el
aparato.
Mantenga el aparato lejos del alcance de personas no capacitadas y niños.
Cuidado: el aparato se calienta durante el uso.
No conecte este aparato a un dimmer.
• Instale el aparato a una distancia mínima de 12 m de cualquier objeto o producto
inflamable o explosivo.
• Respete una distancia de mín. 3 m entre la salida de y el área iluminada.
El usuario no habrá de efectuar el mantenimiento de ninguna pieza. Contacte con su
distribuidor si necesita piezas de recambio.
• Este aparato no es apto para niños menores de 8 años ni para personas con capacidades físicas,
sensoriales o mentales reducidas ni para personas con una falta de experiencia y conocimientos del
producto, salvo si están bajo la vigilancia de una persona que pueda garantizar la seguridad.
Asegúrese de que los niños no jueguen con este dispositivo. Nunca deje que los niños limpien o
manipulen el aparato sin supervisión.
• Este aparato pertenece a la clase de protección 1. Por lo tanto, es esencial que el aparato esté puesto
a tierra. La conexión eléctrica debe llevarla a cabo un técnico cualificado.
• Asegúrese de que la tensión de red no sea mayor que la tensión indicada en las especificaciones.
• No aplaste el cable de alimentación y protéjalo contra posibles daños. Si es necesario, pida a su
distribuidor reemplazar el cable de alimentación.
• Fije el aparato con un cable de seguridad adecuado (p.ej. VDLSC7N o VDLSC8N).
• Respete una distancia de mín. 3 m entre la salida de luz y el área iluminada.
• No cubra la lente.
• La temperatura ambiente máx. es 45 °C. No utilice el aparato a temperaturas más altas.

HQHZ10001/HQHZ10002
V. 02 – 19/01/2022 26 ©Velleman Group nv
3. Normas generales
Véase la Garantía de servicio y calidad Velleman® al final de este manual del usuario.
No exponga este equipo a polvo ni temperaturas extremas. Asegúrese de que los orificios
de ventilación no estén bloqueados. Deje una distancia de mín. 6" (± 15 cm) entre el
aparato y cualquier otro objeto para asegurar una ventilación suficiente.
Proteja el aparato contra choques y golpes. Evite usar excesiva fuerza durante el manejo.
• Familiarícese con el funcionamiento del aparato antes de utilizarlo. Sólo personas cualificadas pueden
manejar este aparato. La mayoría de los daños son causados por un uso inadecuado.
• Por razones de seguridad, las modificaciones no autorizadas del aparato están prohibidas. Los daños
causados por modificaciones no autorizadas, no están cubiertos por la garantía.
• Utilice sólo el aparato para las aplicaciones descritas en este manual a fin de evitar
p.ej. cortocircuitos, quemaduras, descargas eléctricas, etc. Su uso incorrecto anula la garantía
completamente.
• Los daños causados por descuido de las instrucciones de seguridad de este manual invalidarán su
garantía y su distribuidor no será responsable de ningún daño u otros problemas resultantes.
• El desgaste mecánico y los LEDs no están cubiertos por la garantía.
• La instalación y el mantenimiento deben ser realizados por un técnico cualificado.
• No conecte el aparato si ha estado expuesto a grandes cambios de temperatura. Espere hasta que el
aparato llegue a la temperatura ambiente.
• Este aparato ha sido diseñado para uso profesional en una discoteca, un teatro, etc.
• Utilice una alimentación adecuada (véase Especificaciones)
• Puede producirse humo u olor durante la primera puesta en marcha. Es normal y el humo o el olor
desaparecerá poco a poco.
• Transporte el aparato en su embalaje original.
• Guarde este manual del usuario para cuando necesite consultarlo.
4. Descripción
Véase las figuras en la página 2 de este manual del usuario.
1
entrada de alimentación + fusible
6
boquilla inclinable
2
interruptor ON/OFF
7
asa
3
entrada para el mando a distancia
8
depósito
4
botón para la emisión de humo manual
9
panel de control incorporado
5
regulador de la velocidad del
ventilador
10
entrada y salida DMX
5. Instalación
• Instale el aparato sólo en una superficie plana. No incline el aparato.
• Instale el aparato de forma que el cable de alimentación sea fácilmente accesible.
• Instale el aparato en un lugar bien aireado.
• El soporte donde irá el aparato, debe ser capaz de sostener 10 veces el peso de éste durante una
hora, sin que se produzca una deformación de dicho soporte.
• Evite ponerse debajo del aparato durante el montaje, la limpieza, etc. Un técnico especializado debe
revisar el aparato antes de la puesta en marcha. Después, debe revisarlo una vez al año.
• Instale el aparato fuera del alcance de personas no autorizadas y en un lugar con poca gente.
• Quite todo material inflamable en un radio de 0,5 m alrededor del aparato.

HQHZ10001/HQHZ10002
V. 02 – 19/01/2022 27 ©Velleman Group nv
6. Funcionamiento
6.1 HQHZ10001
1. botón INTERVAL
(ajustar el intervalo)
2. botón DURATION
(ajustar la duración)
3. botón OUTPUT
(ajustar la emisión
de humo)
4. botón TIMER ON/OFF
(activar/desactivar el
temporizador)
5. botón CONTINUOUS
(emisión de humo
continua)
6. botón MANUAL
(emisión de humo
manual)
1. Llene el depósito con líquido de niebla.
2. Active el aparato.
3. Ajuste el nivel de salida y pulse el botón MANUAL del mando a distancia para activar la emisión de
humo. El aparato sigue emitiendo humo mientras pulse el botón.
También puede elegir entre una emisión de humo continua o programada.
4. Desactive el aparato después del uso.
Los botones 1 y 2 sólo funcionan en el modo temporizador.
Asegúrese de que, al activar el botón del temporizador en el mando a
distancia, el botón para la emisión manual de humo en la parte trasera del
aparato no esté activado.
6.2 HQHZ10002
Descripción del panel de control
FUNCTION
entrar en el modo de programación
VOLUME
control del volumen de emisión de humo
TIMER
activar el temporizador
MANUAL
emisión de humo manual
UP
desplazarse hacia arriba en el menú
DOWN
desplazarse hacia abajo en el menú

HQHZ10001/HQHZ10002
V. 02 – 19/01/2022 28 ©Velleman Group nv
Preparar la máquina de niebla
1. Saque el depósito. Retire también la tapa.
2. Asegúrese de que los tubos de plástico de la tapa estén fijados correctamente y no estén dañados.
3. Eche el líquido en el depósito y ciérrelo.
4. Vuelva a poner el depósito en su lugar. Asegúrese de que el tubo de plástico que entra en el
depósito no esté doblado ni aplastado.
5. Enchufe el aparato, actívelo y deje que se caliente. La máquina de niebla está lista para su uso
después de aproximadamente 7 - 8 minutos.
En cualquier modo de funcionamiento, la pantalla debe visualizar READY
TO FOG para emitir humo.
Puesta en marcha
1. Asegúrese de que la máquina de niebla esté desactivada antes de enchufarla.
2. Active la máquina de niebla.
3. Pulse <VOLUME>.
4. Ajuste el volumen de la emisión de humo con <UP> o <DOWN>.
Configuración DMX
Para activar el modo DMX:
1. Enchufe el aparato, actívelo y deje que se caliente.
2. Conecte un cable DMX a la entrada DMX de la máquina de niebla y la salida DMX de un controlador
(no incl.).
3. Para activar la función DMX, pulse <FUNCTION> varias veces hasta que se visualice DMX512 ADD.
Seleccione la dirección inicial de 1 a 512 con <UP> o <DOWN>.
Asegúrese de que la dirección inicial de varias máquinas de niebla
interconectadas no coincidan.
Se recomienda una terminación si el cable DMX debe cubrir una gran distancia o si se usa en un medio
ambiente con mucho ruido eléctrico (ej. una discoteca). La terminación evita la corrupción de la señal de
control digital por ruido eléctrico. La terminación DMX no es más que un conector XLR con una
resistencia de 120Ω de polo 2 a polo 3. Este conector XLR está conectado a la salida XLR del último
aparato de la serie.
Ajustar el volumen de emisión de humo
1. Pulse <FUNCTION> varias veces hasta que se visualice VOLUME OUT.
2. Seleccione el volumen de emisión deseado (1-100 % o emisión continua) con <UP> o <DOWN>.
3. Pulse <VOLUME> para confirmar.
4. Vuelva a pulsar <VOLUME> para activar la emisión de humo.
La máquina de niebla memorizará el volumen de emisión de humo
programado después de su desactivación. Para reiniciar la emisión de
humo, repita los pasos descritos arriba.
Activar el sensor de nivel de líquidos
El sensor de nivel de líquido incorporado mide el nivel de líquido. Para activar el sensor de nivel de
líquido
1. Pulse <FUNCTION> varias veces hasta que se visualice FLUID SENSOR.
2. Seleccione ON con <UP> o <DOWN>.
3. Seleccione OFF con <UP> o <DOWN> para desactivar el sensor de nivel de líquido.

HQHZ10001/HQHZ10002
V. 02 – 19/01/2022 29 ©Velleman Group nv
Activar o desactivar el ventilador
1. Pulse <FUNCTION> varias veces hasta que se visualice FAN SET.
2. Seleccione ON con <UP> o <DOWN>.
3. Seleccione OFF con <UP> o <DOWN> para desactivar el ventilador.
Modo temporizador
En el modo temporizador, la máquina de niebla emitirá humo en intervalos preprogramados (véase
Parámetros del modo temporizador ).
1. Pulse <TIMER> hasta que se visualice un temporizador.
2. La máquina de niebla empezará a emitir humo en cuanto el contador alcance cero (0).
3. Seleccione DURATION SET para ajustar la duración del temporizador. Seleccione TIMER OUT para
ajustar el volumen de emisión.
4. El ciclo sigue repitiéndos hasta que vuelva a pulsar <TIMER> hasta que el depósito esté vacio.
Modo manual
En el modo manual, la máquina de niebla emitirá humo mientras mantenga pulsado el botón. El volumen
de emisión estará en la posición máxima.
1. Mantenga pulsado <MANUAL> para emitir humo.
2. Suelte <MANUAL> para parar la emisión de humo.
Parámetros del modo temporizador
Estos parámetros determinan el intervalo y el volumen de emisión en el modo temporizador.
1. Pulse <FUNCTION> varias veces hasta que se visualice INTERVAL SET.
2. Seleccione el intervalo (de 1 a 200 seg.). con <UP> o <DOWN>.
3. Pulse<FUNCTION> varias veces hasta que se visualice DURATION SET.
4. Seleccione la duración (de 1 a 200 seg.). con <UP> o <DOWN>.
5. Pulse <FUNCTION> varias veces hasta que se visualice TIMER OUT.
6. Seleccione el volumen de emisión deseado (1-100 % o emisión continua) con <UP> o <DOWN>.
Si la máquina de niebla está conectada a un controlador DMX, tendrá
prioridad. Retire el cable DMX antes de utilizar el panel de control
incorporado.
7. Solución de problemas
problema
causa posible
solución posible
El fusible se funde a cada vez.
Demasiado carga en el circuito.
Asegúrese de que la carga total
no sobrepase los 80 % de la
corriente nominal del fusible.
Cortocircuito en el cable de
alimentación
Compruebe el cable de
alimentación.
La máquina de niebla no se
activa
No hay corriente eléctrica.
Compruebe la red eléctrica.
Cable de alimentación suelto o
dañado.
Compruebe el cable de
alimentación.
El fusible está fundido.
Reemplace el fusible fundido.
Problema interno.
Deje que se repare la máquina
de niebla.

HQHZ10001/HQHZ10002
V. 02 – 19/01/2022 30 ©Velleman Group nv
La máquina de niebla no
reacciona al DMX.
Ha introducido una dirección
inicial incorrecta.
Introduzca la dirección inicial
correcta.
Uso incorrecto del controlador.
Utilice los controles correctos.
Incorrecto El cable DMX está
suelto o dañado
Controle el cable DMX.
Problema interno.
Deje que se repare la máquina
de niebla.
Interferencias
Mantenga el cable DMX fuera
del alcance de equipo de radio.
El cable DMX es demasiado
largo.
Instale un amplificador DMX
conectado ópticamente.
Están conectados demasiado
aparatos.
Instale un amplificador DMX
conectado ópticamente.
No está conectada la
terminación.
Conecte la terminación.
8. Limpieza y mantenimiento
Antes de iniciar cualquier actividad de limpieza o mantenimiento:
1. Desconecte el aparato de la red eléctrica.
2. Deje que el aparato se enfríe.
Limpieza
• Vacíe el depósito antes de la limpieza.
• Utilice limpiacristales y un paño suave para limpiar la caja.
• Limpie las lentes externas con limpiacristales y un paño suave cada 20 años.
• Asegúrese siempre de que todas las partes están secas antes de volver a enchufar el aparato a la red
eléctrica.
• La frecuencia de la limpieza depende del ambiente, en que se utilice el aparato (p.ej. humo, el uso de
máquinas de humo, polvo, etc.)
• No sumerja el aparato en un líquido.
Mantenimiento
• Apriete bien las tuercas y los tornillos y verifique que no hay señales de oxidación.
• No modifique la caja, los soportes y las ópticas p.ej. no taladre agujeros adicionales en un soporte o
no modifique las conexiones, etc.
• Las partes móviles no pueden mostrar ningún rastro de desgaste y deben estar bien equilibradas.
• No dañe los cables de alimentación. Contacte con un técnico especializado para instalar el aparato. El
mantenimiento debe ser realizado por un técnico cualificado.
• El usuario no habrá de efectuar el mantenimiento de ninguna pieza salvo la lámpara.
• Contacte con su distribuidor si necesita piezas de recambio.
9. Especificaciones
alimentación .......................................................................... 220-240 V~, 50/60 Hz
tiempo de calentamiento ................................................................................ 3 min.
consumo de líquido ........................................................................... 60-80 ml/min.
grado de protección IP ..................................................................................... IP20
opciones
líquido de niebla de alta densidad (5 l) .................................................. VDLHLH5

HQHZ10001/HQHZ10002
V. 02 – 19/01/2022 31 ©Velleman Group nv
HQHZ10001
consumo ......................................................................................................600 W
fusible ............................................................................................................ F5A
salida .......................................................................... ± 170 m³/6,000 ft³ por min.
capacidad del depósito..................................................................................... 1.2 l
longitud del cable del controlador .................................................................... 3.5 m
dimensiones ............................................................................ 320 x 170 x 220 mm
HQHZ10002
consumo .................................................................................................... 1000 W
fusible ............................................................................................................ F6A
salida ........................................................................ ± 225 m³/10,000 ft³ por min.
capacidad del depósito..................................................................................... 2.3 l
dimensiones ............................................................................ 420 x 170 x 300 mm
Utilice este aparato sólo con los accesorios originales. Velleman Group nv no será responsable
de daños ni lesiones causados por un uso (indebido) de este aparato. Para más información
sobre este producto y la versión más reciente de este manual del usuario, visite nuestra
página www.velleman.eu. Se pueden modificar las especificaciones y el contenido de este
manual sin previo aviso.
© DERECHOS DE AUTOR
Velleman Group nv dispone de los derechos de autor para este manual del usuario. Todos los
derechos mundiales reservados. Está estrictamente prohibido reproducir, traducir, copiar, editar y
guardar este manual del usuario o partes de ello sin el consentimiento previo por escrito del propietario
del copyright.

HQHZ10001/HQHZ10002
V. 02 – 19/01/2022 32 ©Velleman Group nv
BEDIENUNGSANLEITUNG
1. Einführung
An alle Einwohner der Europäischen Union
Wichtige Umweltinformationen über dieses Produkt
Dieses Symbol auf dem Produkt oder der Verpackung zeigt an, dass die Entsorgung dieses
Produktes nach seinem Lebenszyklus der Umwelt Schaden zufügen kann. Entsorgen Sie die
Einheit (oder verwendeten Batterien) nicht als unsortierter Hausmüll; die Einheit oder
verwendeten Batterien müssen von einer spezialisierten Firma zwecks Recycling entsorgt
werden. Diese Einheit muss an den Händler oder ein örtliches Recycling-Unternehmen
retourniert werden. Respektieren Sie die örtlichen Umweltvorschriften.
Falls Zweifel bestehen, wenden Sie sich für Entsorgungsrichtlinien an Ihre örtliche Behörde.
Vielen Dank, dass Sie sich für HQPower™ entschieden haben! Lesen Sie diese Bedienungsanleitung vor
Inbetriebnahme sorgfältig durch. Überprüfen Sie, ob Transportschäden vorliegen. Sollte dies der Fall
sein, verwenden Sie das Gerät nicht und wenden Sie sich an Ihren Händler.
2. Sicherheitshinweise
Lesen und begreifen Sie diese Bedienungsanleitung und die Sicherheitshinweise vor
Inbetriebnahme.
Seien Sie während der Installation des Gerätes sehr vorsichtig: Das Berühren von
unter Spannung stehenden Leitungen könnte zu lebensgefährlichen elektrischen
Schlägen führen.
Trennen Sie das Gerät bei Nichtbenutzung und vor jeder Reinigung vom Netz. Fassen
Sie dazu den Netzstecker an der Grifffläche an und ziehen Sie nie an der Netzleitung.
Verwenden Sie das Gerät nur im Innenbereich. Schützen Sie das Gerät vor
Regen und Feuchte. Setzen Sie das Gerät keiner Flüssigkeit wie z.B. Tropf- oder
Spritzwasser, aus. Stellen Sie keine mit Flüssigkeit befüllten Gegenstände auf das
Gerät.
Halten Sie Kinder und Unbefugte vom Gerät fern.
Achtung: Das Gerät wird während des Gebrauchs sehr heiß.
Verbinden Sie das Gerät nie mit einem Dimmer.
• Sorgen Sie für einen Abstand von min. 12 m zwischen dem Gerät und
entflammbaren und explosiven Gegenständen oder Stoffen.
• Beachten Sie eine minimale Entfernung von 3 m zwischen der
Lichtausbeute und irgendeiner beleuchteten Fläche.
Es gibt keine zu wartenden Teile. Bestellen Sie eventuelle Ersatzteile bei Ihrem
Fachhändler.
• Dieses Gerät kann von Kindern ab 8 Jahren und darüber sowie von Personen mit verringerten
physischen, sensorischen oder mentalen Fähigkeiten oder Mangel an Erfahrung und Wissen benutzt
werden, wenn sie beaufsichtigt oder bezüglich des sicheren Gebrauchs des Gerätes unterwiesen
wurden und die daraus resultierenden Gefahren verstehen. Kinder sollten nicht mit dem Gerät
spielen. Ohne Aufsicht ist Kinder die Reinigung und Bedienung des Wagenhebers untersagt.
• Der Aufbau des Gerätes entspricht der Schutzklasse 1. Gemäß den Vorschriften muss das Gerät
geerdet sein. Der elektrische Anschluss darf nur von einer Fachkraft durchgeführt werden.
• Vergewissern Sie sich, dass die anzuschließende Netzspannung nicht höher ist als die Netzspannung
beschrieben in dieser Bedienungsanleitung.
• Achten Sie darauf, dass die Netzleitung nicht gequetscht werden kann. Bei Beschädigungen soll eine
Fachkraft das Kabel ersetzen.
• Sichern Sie die Montage mit einem geeigneten Sicherheitsfangseil (z.B. VDLSC7N oder VDLSC8N).

HQHZ10001/HQHZ10002
V. 02 – 19/01/2022 33 ©Velleman Group nv
• Beachten Sie eine minimale Entfernung von 3 m zwischen der Lichtausbeute und irgendeiner
beleuchteten Fläche.
• Bedecken Sie nie die Linse.
• Die max. Umgebungstemperatur ist 45 °C. Benutzen Sie das Gerät nicht bei höheren Temperaturen.
3. Allgemeine Richtlinien
Siehe Velleman® Service- und Qualitätsgarantie am Ende dieser Bedienungsanleitung.
Schützen Sie das Gerät vor Staub und vor extremen Temperaturen. Beachten Sie, dass
die Lüftungsschlitze nicht blockiert werden. Beachten Sie eine minimale Entfernung von 6"
(± 15 cm) zwischen dem Gerät und jedem anderen Gegenstand.
Vermeiden Sie Erschütterungen. Wenden Sie bei der Bedienung keine Gewalt an.
• Nehmen Sie das Gerät erst in Betrieb, nachdem Sie sich mit seinen Funktionen vertraut gemacht
haben. Lassen Sie das Gerät nicht von Personen bedienen, die sich nicht mit dem Gerät auskennen.
Meist ist die Beschädigung des Gerätes das Ergebnis von unfachmännischer Bedienung.
• Eigenmächtige Veränderungen sind aus Sicherheitsgründen verboten. Bei Schäden verursacht durch
eigenmächtige Änderungen erlischt der Garantieanspruch.
• Verwenden Sie das Gerät nur für Anwendungen beschrieben in dieser Bedienungsanleitung. Jede
andere Verwendung ist mit Gefahren wie Kurzschluss, Brandwunden, elektrischem Schlag usw.
verbunden. Bei falscher Anwendung dieses Gerätes erlischt der Garantieanspruch.
• Bei Schäden, die durch Nichtbeachtung der Bedienungsanleitung verursacht werden, erlischt der
Garantieanspruch. Für daraus resultierende Folgeschäden übernimmt der Hersteller keine Haftung.
• Die LEDs und mechanische Abnutzung fallen nicht unter die Garantie.
• Lassen Sie dieses Gerät von einem Fachmann installieren und warten.
• Das Gerät bei Temperaturschwankungen nicht sofort einschalten. Schützen Sie das Gerät vor
Beschädigung, indem Sie es ausgeschaltet lassen bis es die Zimmertemperatur erreicht hat.
• Dieses Gerät wurde für den professionellen Einsatz auf Bühnen, in Discotheken, Theatern, usw. entworfen.
• Verwenden Sie eine geeignete Stromversorgung (siehe 'Technische Daten')
• Beim ersten Gebrauch könnte es Rauch oder einen spezifischen Geruch geben. Das ist normal und
wird nach einiger Zeit allmählich verschwinden.
• Verwenden Sie die Originalverpackung, wenn das Gerät transportiert werden soll.
• Bewahren Sie diese Bedienungsanleitung für künftige Einsichtnahme auf.
4. Beschreibung
Siehe Abbildungen, Seite 2 dieser Bedienungsanleitung.
1
Netzeingang + Sicherung
6
kippbares Mundstück
2
EIN/AUS-Schalter
7
Tragegriff
3
Eingang für die Fernbedienung
8
Tank
4
Taste für den manuellen Nebelausstoß
9
integriertes Bedienfeld
5
Regler für die Geschwindigkeit des
Ventilators
10
DMX-Eingang und –Ausgang
5. Installation
• Installieren und verwenden Sie das Gerät nur auf einer ebenen Oberfläche. Kippen Sie das Gerät nicht.
• Installieren Sie das Gerät so, dass Sie das Stromkabel einfach erreichen können.
• Stellen Sie das Gerät in einem gut gelüfteten Raum auf.
• Die Konstruktion muss während einer Stunde eine Punktlast von maximal 10 x dem Gewicht des
Gerätes tragen können, ohne dass Verformung verursacht wird.
• Stehen Sie während der Montage, Entfernung oder Wartung nie direkt unter dem Gerät. Lassen Sie
das Gerät jährlich und vor der Inbetriebnahme von einem Fachmann prüfen.
• Montieren Sie das Gerät an einem Ort, wo niemand es berühren kann und wo wenige Leute vorübergehen.
• Entfernen Sie alle entflammbaren Materialien in einem Abstand von 0,5 m.

HQHZ10001/HQHZ10002
V. 02 – 19/01/2022 34 ©Velleman Group nv
6. Anwendung
6.1 HQHZ10001
1. Taste INTERVAL (das
Intervall einstellen)
2. Taste DURATION (die
Dauer einstellen)
3. Taste OUTPUT (den
Ausstoß-Volumen
einstellen)
4. Taste TIMER ON/OFF
5. Taste CONTINUOUS
(kontinuierlicher
Nebelausstoß)
6. Taste MANUAL
(manueller
Nebelausstoß)
1. Füllen Sie den Tank mit Nebelfluid.
2. Schalten Sie das Gerät ein.
3. Stellen Sie den Ausgangspegel ein und drücken Sie die Taste MANUAL der Fernbedienung, um den
Nebelausstoß zu aktivieren. Solange Sie die Taste gedrückt halten, bleibt das Gerät Nebel
ausstoßen.
Sie können auch zwischen einem kontinuierlichen oder einem programmierten Nebelausstoß wählen.
4. Schalten Sie das Gerät nach Gebrauch ab.
Die Tasten 1 und 2 funktionieren nur im Timer-Modus.
Stellen Sie beim Aktivieren des Timer-Modus der Fernbedienung sicher,
dass die Taste für den manuellen Nebelausstoß auf der Rückseite des
Gerätes nicht aktiviert ist.
6.2 HQHZ10002
Beschreibung des Bedienfelds
FUNCTION
in den Programmiermodus wechseln
VOLUME
Kontrolle des Ausstoß-Volumens
TIMER
den Timer starten
MANUAL
manueller Nebelausstoß
UP
nach oben im Menü scrollen
DOWN
nach unten im Menü scrollen

HQHZ10001/HQHZ10002
V. 02 – 19/01/2022 35 ©Velleman Group nv
Die Nebelmaschine vorbereiten
1. Entfernen Sie den Tank. Entfernen Sie auch den Verschlussdeckel.
2. Überprüfen Sie, ob die Kurstoffschläuche des Verschlussdeckels korrekt angeschlossen und nicht
beschädigt sind.
3. Gießen Sie die Nebelflüssigkeit in den Tank und schließen Sie ihn.
4. Setzen Sie den Tank wieder ein. Achten Sie darauf, dass der Kunststoffschlauch vom Tank nicht
gebogen oder geknickt ist.
5. Stecken Sie den Stecker in die Steckdose, schalten Sie die Nebelmaschine ein und lassen Sie diese
aufwärmen. Die Nebelmaschine ist nach etwa 7 bis 8 Minuten betriebsbereit.
In allen Betriebsmodi muss READY TO FOG im Display erscheinen, bevor
Sie Nebel ausstoßen können.
Inbetriebnahme
1. Beachten Sie, dass die Nebelmaschine ausgeschaltet ist bevor Sie den Stecker in die Steckdose
stecken.
2. Schalten Sie die Nebelmaschine ein.
3. Drücken Sie <VOLUME>.
4. Stellen Sie den Ausstoß-Volumen mit <UP> oder <DOWN> ein.
DMX-Konfiguration
Um den DMX-Modus einzuschalten:
1. Stecken Sie den Stecker in die Steckdose, schalten Sie die Nebelmaschine ein und lassen Sie diese
aufwärmen.
2. Verbinden Sie das DMX-Kabel mit dem DMX-Eingang der Nebelmaschine und dem DMX-Ausgang
eines Controllers (nicht mitgeliefert).
3. Um die DMX-Funktion einzuschalten, drücken Sie wiederholt auf <FUNCTION> bis DMX512 ADD
angezeigt wird. Wählen Sie die Startadresse von 1 bis 512 mit <UP> oder <DOWN>.
Stellen Sie sicher, dass die Startadresse nicht mit die Startadresse anderer
angeschlossenen Nebelmaschinen übereinstimmt.
Ein DMX-Abschlusswiderstand ist empfehlenswert für Installationen, bei denen das DMX-Kabel lang ist
oder in einer Umgebung mit vielem elektrischem Rauschen (z.B. Discos). Der Abschlusswiderstand
verhindert die Korruption des digitalen Kontrollsignals durch elektrische Störungen. Der DMX-
Abschlusswiderstand ist nur eine XLR-Buchse mit einem 120 Ω Widerstand zwischen 2 und 3, die den
XLR-Ausgang des letzten Geräts in der Kette angeschlossen wird.
Den Ausstoß-Volumen einstellen
1. Drücken Sie wiederholt auf <FUNCTION> bis VOLUME OUT angezeigt wird.
2. Wählen Sie den gewünschten Ausstoß-Volumen (1-100 % oder kontinuierlich) mit <UP> oder
<DOWN>.
3. Drücken Sie auf <VOLUME>, um zu bestätigen.
4. Drücken Sie wieder auf <VOLUME>, um den Nebelausstoß zu aktivieren.
Die Nebelmaschine speichert den eingestellten Ausstoß-Volumen nach dem
Abschalten. Um den Ausstoß-Volumen rückzusetzen, wiederholen Sie diese
Schritte.
Den Fluidsensor einschalten
Der integrierte Fluidsensor misst den Flüssigkeitspegel im Tank. Um den Fluidsensor einzuschalten:
1. Drücken Sie wiederholt auf <FUNCTION> bis FLUID SENSOR angezeigt wird.
2. Wählen Sie ON mit <UP> oder <DOWN>.
3. Wählen Sie OFF mit <UP> oder <DOWN>, um den Fluidsensor auszuschalten.

HQHZ10001/HQHZ10002
V. 02 – 19/01/2022 36 ©Velleman Group nv
Den Ventilator einstellen
1. Drücken Sie wiederholt auf <FUNCTION> bis FAN SET angezeigt wird.
2. Wählen Sie ON mit <UP> oder <DOWN>.
3. Wählen Sie OFF mit <UP> or <DOWN>, um den Ventilator auszuschalten.
Timer-Modus
Im Timer-Modus, wird der Nebel in programmierten Intervallen ausgestoßen (siehe Parameter des
Timer-Modus ).
1. Drücken Sie auf <TIMER> bis ein Timer angezeigt wird.
2. Die Nebelmaschine startet den Nebelausstoß wenn der Zähler Null (0) erreicht.
3. Wählen Sie DURATION SET, um die Dauer des Timers einzustellen. Wählen Sie TIMER OUT, um den
Ausstoß-Volumen einzustellen.
4. Der Zyklus wiederholt sich bis Sie <TIMER> wieder drücken oder bis die Nebelmaschine kein
Nebelfluid mehr hat.
Manueller Modus
Im manuellen Modus, bleibt die Nebelmaschine Nebel ausstoßen bis die Taste gedrückt wird. Der
Ausstoß-Volumen steht auf Maximum.
1. Halten Sie <MANUAL> gedrückt, um Nebel auszustoßen.
2. Lassen Sie <MANUAL> los um den Nebelausstoß zu stoppen.
Parameter des Timer-Modus
Diese Parameter bestimmen das Intervall und das Volumen im Timer-Modus.
1. Drücken Sie wiederholt auf <FUNCTION> bis INTERVAL SET angezeigt wird.
2. Wählen Sie das Intervall (1-200 Sek.) mit <UP> oder <DOWN>.
3. Drücken Sie wiederholt auf <FUNCTION> bis DURATION SET angezeigt wird.
4. Wählen Sie die Dauer (1-200 Sek.) mit <UP> oder <DOWN>.
5. Drücken Sie wiederholt auf <FUNCTION> bis TIMER OUT angezeigt wird.
6. Wählen Sie den gewünschten Ausstoß-Volumen (1-100 % oder kontinuierlich) mit <UP> oder
<DOWN>.
Ist die Nebelmaschine mit einem DMX-Controller verbunden, dann ist
diese Prioritär. Entfernen Sie das DMX-Kabel vor Gebrauch des
Bedienfelds.
7. Problemlösung
Problem
Mögliche Ursache
Lösung
Die Sicherung bleibt
durchbrennen.
Der Kreis ist zu stark belastet.
Vergewissern Sie sich davon,
dass die Gesamtlast 80 % des
Nennstroms der Sicherung nicht
überschreitet.
Kurzschluss im Stromkabel
Überprüfen Sie das Stromkabel.
Die Nebelmaschine schaltet
nicht ein.
Es gibt keinen Strom.
Überprüfen Sie das Netz.
Das Stromkabel ist locker oder
beschädigt
Überprüfen Sie das Stromkabel.
Durchgebrannte Sicherung
Ersetzen Sie die
durchgebrannte Sicherung.
Internes Problem.
Lassen Sie die Nebelmaschine
reparieren.

HQHZ10001/HQHZ10002
V. 02 – 19/01/2022 37 ©Velleman Group nv
Die Nebelmaschine reagiert
nicht auf DMX.
Falsche Startadresse.
Stellen Sie die korrekte DMX-
Startadresse ein.
Falsche Bedienung des
Controllers.
Benutzen Sie die korrekte
Tasten.
Falsch; Das DMX-Kabel ist
locker oder beschädigt.
Überprüfen Sie das DMX-Kabel.
Internes Problem.
Lassen Sie die Nebelmaschine
reparieren.
Interferenzen.
Halten Sie das DMX-Kabel von
Funkgeräte fern.
Das DMX-Kabel ist zu lang.
Installieren Sie einen optisch
gekoppelten DMX-Verstärker.
Es sind zu viel Geräte
angeschossen.
Installieren Sie einen optisch
gekoppelten DMX-Verstärker.
Die Terminierung ist nicht
angeschlossen.
Verbinden Sie die
Terminierung.
8. Reinigung und Wartung
Vor dem Reinigen oder Warten:
1. Trennen Sie das Gerät vom Netz.
2. Lassen Sie das Gerät abkühlen.
Reinigung
• Entleeren Sie den Tank vor Reinigung.
• Verwenden Sie einen Glasreiniger und ein sanftes Tuch, um das Gehäuse zu reinigen.
• Reinigen Sie die externen Linsen alle 20 Tage mit Glasreiniger und ein sanftes Tuch.
• Beachten Sie, dass alle Teile trocken sind, bevor Sie das Gerät wieder mit dem Netz verbinden.
• Die Häufigkeit der Reinigung hängt von der Umgebung ab, in der das Gerät betrieben wird (z.B.
Rauch, Einsatz von Nebelmaschine, Staub usw.)
• Tauchen Sie das Gerät nie in eine Flüssigkeit ein.
Wartung
• Verwendete Schrauben müssen fest angespannt werden und dürfen keine Rostspuren zeigen.
• Das Gehäuse, die Linsen, die Montagebügel und der Montageort (z.B. Decke oder Gebinde) dürfen
nicht angepasst werden, z.B. bohren Sie keine zusätzlichen Löcher in Montagebügeln, verändern Sie
die Anschlüsse nicht usw.
• Mechanisch bewegende Teile dürfen keine Spuren von Abnutzung aufweisen.
• Sorgen Sie dafür, dass die Netzkabel nicht beschädigt sind. Lassen Sie das Gerät von einer Fachkraft
warten.
• Außer der Lampe gibt es keine zu wartenden Teile.
• Bestellen Sie eventuelle Ersatzteile bei Ihrem Fachhändler.
9. Technische Daten
Stromversorgung ................................................................... 220-240 V~, 50/60 Hz
Aufheizzeit ................................................................................................... 3 Min.
Fluidverbrauch .................................................................................. 60-80 ml/min.
IP-Schutzart ................................................................................................... IP20
Optionen
Nebelfluid mit hoher Dichte (5 l) .......................................................... VDLHLH5

HQHZ10001/HQHZ10002
V. 02 – 19/01/2022 38 ©Velleman Group nv
HQHZ10001
Stromverbrauch ............................................................................................600 W
Sicherung ....................................................................................................... F5A
Betriebsmodus.............................................................. ± 170 m³/6,000 ft³ pro Min.
Tankinhalt ...................................................................................................... 1.2 l
Kabellänge der Fernbedienung ........................................................................ 3.5 m
Abmessungen .......................................................................... 320 x 170 x 220 mm
HQHZ10002
Stromverbrauch .......................................................................................... 1000 W
Sicherung ....................................................................................................... F6A
Betriebsmodus............................................................. ± 225 m³/10,000 ft³ pro Min.
Tankinhalt ...................................................................................................... 2.3 l
Abmessungen .......................................................................... 420 x 170 x 300 mm
Verwenden Sie dieses Gerät nur mit originellen Zubehörteilen. Velleman Group nv übernimmt
keine Haftung für Schaden oder Verletzungen bei (falscher) Anwendung dieses Gerätes. Für
mehr Informationen zu diesem Produkt und die neueste Version dieser Bedienungsanleitung,
siehe www.velleman.eu. Alle Änderungen ohne vorherige Ankündigung vorbehalten.
© URHEBERRECHT
Velleman Group nv besitzt das Urheberrecht für diese Bedienungsanleitung. Alle weltweiten
Rechte vorbehalten. Ohne vorherige schriftliche Genehmigung des Urhebers ist es nicht gestattet,
diese Bedienungsanleitung ganz oder in Teilen zu reproduzieren, zu kopieren, zu übersetzen, zu
bearbeiten oder zu speichern.

HQHZ10001/HQHZ10002
V. 02 – 19/01/2022 39 ©Velleman Group nv
INSTRUKCJA OBSŁUGI
1. Wstęp
Przeznaczona dla mieszkańców Unii Europejskiej.
Ważne informacje dotyczące środowiska.
Niniejszy symbol umieszczony na urządzeniu bądź opakowaniu wskazuje, że utylizacja
produktu może być szkodliwa dla środowiska. Nie należy wyrzucać urządzenia (lub baterii) do
zbiorczego pojemnika na odpady komunalne, należy je przekazać specjalistycznej firmie
zajmującej się recyklingiem. Niniejsze urządzenie należy zwrócić dystrybutorowi lub lokalnej
firmie świadczącej usługi recyklingu. Przestrzegać lokalnych zasad dotyczących środowiska.
W razie wątpliwości należy skontaktować się z lokalnym organem odpowiedzialnym za
utylizację odpadów.
Dziękujemy za wybór produktu HQPower™! Prosimy o dokładne zapoznanie się z instrukcją obsługi przed
użyciem urządzenia. Nie montować ani nie używać urządzenia, jeśli zostało uszkodzone podczas
transportu - należy skontaktować się ze sprzedawcą.
2. Wskazówki bezpieczeństwa
Przed zastosowaniem urządzenia należy zapoznać się z niniejszą instrukcją oraz
symbolami bezpieczeństwa.
Podczas instalacji należy zachować szczególną ostrożność: dotykanie przewodów pod
napięciem może prowadzić do zagrażającego życiu porażenia prądem elektrycznym.
Jeżeli urządzenie nie jest użytkowane, a także podczas serwisowania i konserwacji,
należy odłączać zasilanie sieciowe. Przewód zasilający należy trzymać wyłącznie za
wtyczkę.
Wyłącznie do użytku wewnątrz pomieszczeń. Chronić urządzenie przed
deszczem, wilgocią, rozpryskami i ściekającymi cieczami. Nigdy nie stawiać
przedmiotów wypełnionych cieczą na urządzeniu.
Chronić urządzenie przed dziećmi i nieupoważnionymi użytkownikami.
Uwaga: urządzenie nagrzewa się podczas pracy.
Nie podłączać urządzenia do ściemniacza.
• Zainstalować urządzenie w odległości min. 12 m od łatwopalnych i wybuchowych
obiektów lub substancji.
• Należy zachować minimalną odległość 3 m między wylotem urządzenia a
jakąkolwiek powierzchnią.
W urządzeniu nie występują części, które mogą być serwisowane przez użytkownika.
W sprawie serwisowania i/lub części zamiennych należy zwrócić się do
autoryzowanego sprzedawcy.
• Z niniejszego urządzenia mogą korzystać dzieci powyżej 8 roku życia i osoby o ograniczonych
zdolnościach fizycznych, zmysłowych bądź umysłowych, jak również osoby nieposiadające
doświadczenia lub znajomości urządzenia, jeśli znajdują się one pod nadzorem innych osób lub jeśli
zostały pouczone na temat bezpiecznego sposobu użycia urządzenia oraz zdają sobie sprawę ze
związanych z nim zagrożeń. Dzieci nie mogą używać urządzenia do zabawy. Prace związane z
czyszczeniem i konserwacją nie mogą być wykonywane przez dzieci pozostawione bez nadzoru.
• Urządzenie podlega klasie ochrony 1. Dlatego też konieczne jest uziemienie urządzenia. Połączenia
elektryczne powinna wykonać wykwalifikowana osoba.
• Należy upewnić się, że napięcie nie przekracza wartości określonej w specyfikacjach w niniejszej
instrukcji.

HQHZ10001/HQHZ10002
V. 02 – 19/01/2022 40 ©Velleman Group nv
• Nie zaginać przewodu zasilającego i chronić przed uszkodzeniami. W razie konieczności wymianę
kabla powinien przeprowadzać autoryzowany dystrybutor.
• Do mocowania urządzenia stosować odpowiednie linki bezpieczeństwa (np. VDLSC7 lub VDLSC8).
• Maksymalna temperatura otoczenia wynosi 45 °C. Nie używać urządzenia w wyższych
temperaturach.
3. Informacje ogólne
Proszę zapoznać się z informacjami w części Usługi i gwarancja jakości Velleman® na końcu
niniejszej instrukcji.
Chronić urządzenie przed pyłem i zbyt wysoką temperaturą. Otwory wentylacyjne nie
mogą być zablokowane. Aby zapewnić odpowiednią cyrkulację powietrza, należy
pozostawić przynajmniej 15 cm wolnej przestrzeni przed otworami.
Chronić urządzenie przed wstrząsami i użytkowaniem niezgodnym z przeznaczeniem.
Podczas obsługi urządzenia unikać stosowania siły.
• Przed rozpoczęciem pracy z urządzeniem należy zapoznać się z jego funkcjami. Nie pozwolić, aby
urządzenie obsługiwał niewykwalifikowany personel. Większość usterek jest zazwyczaj skutkiem
nieprofesjonalnego użytkowania urządzenia.
• Wprowadzanie zmian w urządzeniu jest zabronione ze względów bezpieczeństwa. Uszkodzenia
spowodowane zmianami wprowadzonymi przez użytkownika nie podlegają gwarancji.
• Stosować urządzenie wyłącznie zgodnie z przeznaczeniem. Jakiekolwiek inne zastosowania mogą
prowadzić do zwarcia, oparzeń, porażenia prądem, wybuchu lampy, wypadku itd. Używanie
urządzenia w niedozwolony sposób spowoduje unieważnienie gwarancji.
• Gwarancja nie obejmuje uszkodzeń spowodowanych nieprzestrzeganiem niniejszej instrukcji, a
sprzedawca nie ponosi odpowiedzialności za wynikłe uszkodzenia lub problemy.
• Zużycie części mechanicznych oraz diody LED nie są objęte gwarancją.
• Jedynie wykwalifikowany pracownik powinien instalować oraz serwisować urządzenie.
• Nie włączać urządzenia tuż po tym, jak zostało narażone na zmiany temperatury. Chronić urządzenie
przed uszkodzeniem, pozostawiając je wyłączone do momentu osiągnięcia temperatury pokojowej.
• Niniejsze urządzenie przeznaczone jest do profesjonalnego użytku na scenie, w dyskotekach,
teatrach, itp.
• Używać odpowiedniego zasilacza (patrz specyfikacja techniczna poniżej).
• Przy pierwszym uruchomieniu urządzenia może pojawić się dym lub specyficzny zapach. Jest to
typowe zjawisko, a dym lub zapach będą stopniowo zanikać.
• Podczas transportu należy stosować oryginalne opakowanie.
• Zachować niniejszą instrukcję na przyszłość.
4. Przegląd
Patrz rysunki na stronie 2 niniejszej instrukcji.
1
wejście zasilania + bezpiecznik
6
dysza wylotowa o zmiennym kącie
nachylenia
2
przełącznik ON-OFF
7
rączka do przenoszenia
3
wejście pilota
8
zbiornik płynu
4
przycisk ręcznego wytwarzania mgły
9
wbudowany panel sterowania
5
regulator prędkości wentylatora
10
wejście + wyjście DMX
5. Montaż
• Urządzenie może być montowane i używane wyłącznie na płaskiej, stabilnej powierzchni. Urządzenia
nie należy przechylać.
• Zamontować urządzenie w miejscu, w którym kabel zasilania jest łatwo dostępny.
• Zamontować urządzenie w dobrze wentylowanym miejscu.
• Konstrukcja nośna musi utrzymać przez godzinę bez odkształcania obciążenie 10 razy większe niż
ciężar urządzenia.
• Podczas montażu, zdejmowania lub serwisowania nigdy nie stawać bezpośrednio pod urządzeniem.

HQHZ10001/HQHZ10002
V. 02 – 19/01/2022 41 ©Velleman Group nv
Raz do roku oraz przed przekazaniem do serwisu urządzenie powinien sprawdzić wykwalifikowany
technik.
• Należy zamontować urządzenie w mało uczęszczanym miejscu, oraz w taki sposób, aby było
niedostępne dla nieupoważnionych użytkowników.
• Należy upewnić się, że w promieniu 0,5 m od urządzenia nie znajduje się materiał łatwopalny.
6. Obsługa
6.1 HQHZ10001
7. przycisk interwału
8. przycisk czasu
trwania
9. przycisk
uruchomienia
10. przycisk timera
11. przycisk działania
ciągłego
12. przycisk
uruchomienia
ręcznego
1. Upewnić się, że zbiornik jest napełniony płynem do wytwarzania mgły.
2. Uruchomić urządzenie.
3. Ustawić poziom na wylocie i nacisnąć przycisk uruchomienia ręcznego na pilocie, aby uruchomić
wypływ mgły. Urządzenie będzie wytwarzać mgłę do momentu zwolnienia przycisku.
Można też ustawić wytwarzanie ciągłe lub czasowe.
4. Wyłączyć urządzenie po użyciu.
Przyciski 1 i 2 działają wyłącznie w trybie czasowym.
Nie należy używać przycisku ręcznego uruchamiania mgły w tylnej części
urządzenia jednocześnie aktywując przycisk trybu czasowego na pilocie.
6.2 HQHZ10002
Opis panelu sterowania
FUNCTION
wejście w tryb programowania
POJEMNOŚĆ
sterowanie ilością mgły na wylocie
TIMER
uruchomienie zegara
MANUAL
ręczne wytwarzanie mgły
UP
przejście w górę na liście menu
W DÓŁ
przejście w dół na liście menu

HQHZ10001/HQHZ10002
V. 02 – 19/01/2022 42 ©Velleman Group nv
Przygotowywanie wytwornicy mgły
1. Wyjąć zbiornik płynu z gniazda. Zdjąć też zatyczkę.
2. Sprawdzić, czy plastikowe przewody przymocowane do zatyczki są na miejscu i w dobrym stanie.
3. Wlać płyn do wytwarzania mgły do zbiornika i zamknąć go.
4. Umieścić go z powrotem na miejscu. Upewnić się, że plastikowy przewód łączący maszynę ze
zbiornikiem płynu nie jest zgięty lub załamany.
5. Podłączyć maszynę do sieci, uruchomić i poczekać, aż się rozgrzeje. Maszyna będzie gotowa do
użytku po około 7-8 minutach.
We wszystkich trybach pracy, aby możliwe było wytwarzanie mgły, na
wyświetlaczu musi znajdować się napis READY TO FOG.
Uruchamianie
1. Przed podłączeniem maszyny do sieci upewnić się, że jest ona wyłączona.
2. Uruchomić maszynę.
3. Nacisnąć <VOLUME>.
4. Wyregulować ilość wytwarzanej mgły przyciskiem <UP> lub <DOWN>.
Konfiguracja DMX
Aby przełączyć maszynę w tryb DMX:
1. Podłączyć maszynę do sieci, uruchomić i poczekać, aż się rozgrzeje.
2. Podłączyć kabel DMX do wejścia DMX maszyny i wyjścia DMX sterownika (brak w zestawie).
3. Aby aktywować funkcję DMX, naciskać przycisk <FUNCTION> do momentu wyświetlenia
komunikatu DMX512 ADD. Wybrać adres startowy od 1 do 512 przyciskiem <UP> lub<DOWN>.
Upewnić się, że adresy startowe połączonych wytwornic mgły nie
pokrywają się.
Do instalacji wymagających zastosowania przewodu DMX na długich odcinkach lub instalacji w miejscach,
w których występują szumy elektryczne (np. w dyskotekach), zaleca się używanie terminatora DMX.
Terminator zapobiega przekłamaniu cyfrowego sygnału sterującego wywołanemu szumem elektrycznym.
Terminator DMX jest zwykłą wtyczką XLR z opornikiem 120 Ω zainstalowanym między pinami 2 i 3, którą
podłącza się do gniazda wyjściowego XLR ostatniego urządzenia w szeregu.
Ustawianie ilości wytwarzanej mgły
1. Naciskać przycisk <FUNCTION> do momentu, aż pojawi się komunikat VOLUME OUT.
2. Wybrać żądaną ilość (1-100% lub non-stop) przyciskiem <UP> lub <DOWN>.
3. Nacisnąć przycisk <VOLUME>, aby zatwierdzić.
4. Nacisnąć <VOLUME> ponownie, aby uruchomić wypływ mgły z zadaną intensywnością.
Wytwornica mgły zapamięta ustawienia nawet po wyłączeniu. Aby
ponownie ustawić ilość mgły, powtórzyć powyższe kroki.
Aktywacja czujnika płynu
Wbudowany czujnik płynu mierzy poziom płynu w zbiorniku. Aby uruchomić czujnik płynu:
1. Naciskać przycisk <FUNCTION> do momentu, aż wyświetli się komunikat FLUID SENSOR.
2. Wybrać ON przyciskiem <UP> lub <DOWN>.
3. Wybrać OFF przyciskiem <UP> lub <DOWN>, aby wyłączyć czujnik.
Ustawianie wentylatora
1. Naciskać przycisk <FUNCTION> do momentu wyświetlenia komunikatu FAN SET.
2. Wybrać ON przyciskiem <UP> lub <DOWN>.
3. Wybrać OFF przyciskiem <UP> lub <DOWN>, aby wyłączyć wentylator.

HQHZ10001/HQHZ10002
V. 02 – 19/01/2022 43 ©Velleman Group nv
Tryb czasowy
W trybie czasowym wytwornica mgły będzie wytwarzać mgłę we wstępnie skonfigurowanych odstępach
czasowych (patrz Parametry trybu czasowego poniżej).
1. Naciskać <TIMER> do momentu wyświetlenia zegara.
2. Maszyna zacznie wytwarzać mgłę, gdy licznik dotrze do (0).
3. Ustawić czas zegara w opcji menu DURATION SET; ustawić ilość wytwarzanej mgły w opcji menu
TIMER OUT.
4. Cykl będzie się powtarzać do momentu ponownego naciśnięcia przycisku <TIMER>, albo do
momentu, gdy w maszynie skończy się płyn.
Tryb ręczny
W trybie ręcznym maszyna będzie wytwarzać mgłę do momentu puszczenia przycisku. Ilość wytwarzanej
mgły będzie wynosiła 100%.
1. Aby wytwarzać mgłę, trzymać wciśnięty przycisk <MANUAL>.
2. Zwolnić przycisk <MANUAL>, aby zatrzymać wytwarzanie mgły.
Parametry trybu czasowego
Te parametry określają interwał oraz ilość wytwarzanej mgły w trybie czasowym.
1. Naciskać przycisk <FUNCTION> do momentu wyświetlenia komunikatu INTERVAL SET.
2. Ustawić czas interwału (1-200 s) przyciskiem <UP> lub <DOWN>.
3. Naciskać przycisk <FUNCTION> do momentu wyświetlenia komunikatu DURATION SET.
4. Ustawić czas trwania (1-200 s) przyciskiem <UP> lub <DOWN>.
5. Naciskać przycisk <FUNCTION> do momentu, aż pojawi się komunikat TIMER OUT.
6. Wybrać żądaną ilość (1-100% lub non-stop) przyciskiem <UP> lub <DOWN>.
Jeżeli wytwornica mgły jest podłączona do sterownika DMX, sterownik ten
będzie miał priorytet przed panelem sterowania maszyny. Przed użyciem
panelu sterowania należy wyjąć kabel DMX.
7. Wykrywanie i usuwanie usterek
problem
możliwa przyczyna
możliwe rozwiązanie
Bezpiecznik wciąż się przepala
Nadmierne obciążenie obwodu
Upewnić się, że całkowite
obciążenie nie przekracza 80%
prądu znamionowego
bezpiecznika.
Zwarcie na kablu zasilającym.
Sprawdzić kabel zasilający.
Maszyna się nie uruchamia.
Brak zasilania w sieci.
Sprawdzić zasilanie w sieci.
Poluzowany lub uszkodzony
kabel zasilania.
Sprawdzić kabel zasilania.
Przepalony bezpiecznik.
Wymienić bezpiecznik.
Problem wewnętrzny.
Wysłać maszynę do naprawy.
Maszyna nie odpowiada na
sygnały DMX.
Nieprawidłowy adres startowy.
Wybrać prawidłowy adres
startowy DMX na maszynie.
Nieprawidłowa obsługa
sterownika.
Użyć sterownika w prawidłowy
sposób.
Niewłaściwy, poluzowany lub
uszkodzony kabel DMX.
Sprawdzić kabel DMX.
Problem wewnętrzny.
Wysłać maszynę do naprawy.
Interferencja z sygnałami
radiowymi.
Trzymać kabel DMX z dala od
sprzętu radiowego.
Kabel DMX zbyt długi.
Zamontować izolowany
wzmacniacz DMX przed
maszyną.
Zbyt wiele podłączonych
produktów.
Zamontować izolowany
wzmacniacz DMX.
Terminator niepodłączony.
Podłączyć terminator.

HQHZ10001/HQHZ10002
V. 02 – 19/01/2022 44 ©Velleman Group nv
8. Czyszczenie i konserwacja
Przed rozpoczęciem jakichkolwiek prac związanych z czyszczeniem lub konserwacją:
1. Odłączyć przewód zasilający urządzenia od gniazda.
2. Pozostawić urządzenie do schłodzenia.
Czyszczenie
• Przed czyszczeniem upewnić się, że zbiornik jest pusty.
• Do wytarcia zewnętrznej obudowy użyć normalnego środka do czyszczenia szkła i miękkiej szmatki.
• Zewnętrzne elementy optyczne należy czyścić środkiem do mycia szkła i miękką szmatką co 20 dni.
• Przed ponownym podłączeniem urządzenia należy sprawdzić, czy wszystkie jego części są całkowicie
suche.
• Częstotliwość czyszczenia zależy od warunków środowiskowych, w których urządzenie jest
eksploatowane (tj. dym, mgła, pył, rosa).
• Nie zanurzać urządzenia w cieczach.
Konserwacja
• Wszystkie śruby powinny być dokręcone i bez śladów korozji.
• Obudowa, soczewki, wsporniki montażowe oraz miejsce instalacji (np. sufit, podwieszenie, belka
kratowa) nie powinny być odkształcone, zmieniane lub poddawane modyfikacjom np. poprzez
wiercenie dodatkowych otworów we wspornikach montażowych, zmianę lokalizacji połączeń...
• Ruchome części mechaniczne nie mogą nosić śladów zużycia.
• Kable zasilające nie mogą być narażone na uszkodzenia. Konserwację urządzenia powinien
przeprowadzić wykwalifikowany technik.
• W urządzeniu nie ma części podlegających konserwacji przez użytkownika, za wyjątkiem
bezpiecznika i lampy.
• W sprawie serwisowania i/lub części zamiennych należy zwrócić się do autoryzowanego sprzedawcy.
9. Specyfikacja techniczna
zasilanie ............................................................................... 220-240 V~, 50/60 Hz
czas nagrzewania urządzenia .......................................................................... 3 min.
zużycie płynu ................................................................................... 60-80 ml/min.
klasa IP ......................................................................................................... IP20
opcje
płyn do mgły o wysokiej gęstości (5 L) .................................................. VDLHLH5
HQHZ10001
pobór mocy ..................................................................................................600 W
bezpiecznik ..................................................................................................... F5A
wyjście .................................................................... ok. 170 m³/6.000 ft³ na minutę
pojemność zbiornika ....................................................................................... 1.2 L
długość kabla pilota ....................................................................................... 3.5 m
wymiary ................................................................................. 320 x 170 x 220 mm

HQHZ10001/HQHZ10002
V. 02 – 19/01/2022 45 ©Velleman Group nv
HQHZ10002
pobór mocy ................................................................................................ 1000 W
bezpiecznik ..................................................................................................... F6A
wyjście .................................................................. ok. 225 m³/10.000 ft³ na minutę
pojemność zbiornika ....................................................................................... 2.3 L
wymiary ................................................................................. 420 x 170 x 300 mm
Należy używać wyłącznie oryginalnych akcesoriów. Firma Velleman Group nv nie ponosi
odpowiedzialności za uszkodzenia lub urazy wynikające z (niewłaściwego) korzystania z
niniejszego urządzenia. Aby uzyskać więcej informacji dotyczących produktu oraz najnowszą
wersję niniejszej instrukcji, należy odwiedzić naszą stronę internetową www.velleman.eu.
Informacje zawarte w niniejszej instrukcji obsługi mogą ulec zmianie bez wcześniejszego
powiadomienia.
© INFORMACJA O PRAWACH AUTORSKICH
Właścicielem praw autorskich do niniejszej instrukcji jest firma Velleman Group nv. Wszelkie
prawa są zastrzeżone na całym świecie. Żadna część niniejszej instrukcji nie może być kopiowana,
powielana, tłumaczona ani przenoszona na jakikolwiek nośnik elektroniczny (lub w inny sposób) bez
wcześniejszej pisemnej zgody właściciela praw autorskich.

HQHZ10001/HQHZ10002
V. 02 – 19/01/2022 46 ©Velleman Group nv
MANUAL DO UTILIZADOR
1. Introdução
Aos cidadãos da União Europeia
Importantes informações sobre o meio ambiente no que respeita a este produto
Este símbolo no aparelho ou na embalagem indica que, enquanto desperdícios, poderão
causar danos no meio ambiente. Não coloque a unidade (ou as pilhas) no depósito de lixo
municipal; deve dirigir-se a uma empresa especializada em reciclagem. Devolva o aparelho ao
seu distribuidor ou ao posto de reciclagem local. Respeite a legislação local relativa ao meio
ambiente.
Em caso de dúvidas, contacte com as autoridades locais para os resíduos.
Agradecemos o facto de ter escolhido a HQPower™! Leia atentamente as instruções do manual antes de
usar o aparelho. Caso o aparelho tenha sofrido algum dano durante o transporte não o instale e entre em
contacto com o seu distribuidor.
2. Instruções de segurança
Leia este manual atentamente antes da utilização ou instalação.
Cuidado durante durante a instalação pois tocar em cabos ligados à corrente pode
provocar choques elétricos mortais.
Desligue sempre a ficha da tomada quando o aparelho não estiver a ser usado ou
quando estiverem a decorrer quaisquer operações de manutenção. Segure sempre na
ficha para desligar o cabo da rede, nunca no próprio cabo.
Usar apenas no interior. Proteger o aparelho contra a chuva e humidade ou
qualquer tipo de salpicos ou gotas. Nunca coloque recipientes com líquidos em cima
do aparelho.
Mantenha o aparelho fora do alcance de crianças e pessoas não autorizadas.
Atenção!: o exterior do aparelho aquece durante o funcionamento.
Não ligue este aparelho a um sistema de dimmer.
• Instale o aparelho a uma distância mínima de 12 m de quaisquer substâncias ou
objetos explosivos ou inflamáveis.
• Respeite uma distância mínima de 3 m entre a saída do dispositivo e
qualquer tipo de superfície.
O utilizador não terá de fazer a manutenção das peças. Contacte um agente
autorizado para assistência e/ou peças de substituição.
• Este aparelho pode ser usado por crianças com idade igual ou superior a 8 anos e pessoas com
capacidades físicas, mentais e sensoriais reduzidas, ou com falta de experiência e conhecimentos
acerca do aparelho, desde que sejam supervisionadas e informadas acerca da utilização do aparelho
e possíveis acidentes. As crianças não devem brincar com o aparelho. A limpeza e manutenção não
devem ser feitas por crianças sem a devida supervisão.
• Este é um aparelho de classe 1 a nível de proteção. Isto implica uma ligação a terra. A ligação
elétrica deve ser feita por uma pessoa qualificada.
• Certifique-se que a tensão de rede não é superior à tensão indicada nas especificações.
• Não danifique o cabo de alimentação e proteja-o contra possíveis danos causados por uma qualquer
superfície afiada. Caso seja necessário, peça ao seu distribuidor para substituir o cabo de
alimentação.
• Use um cabo de segurança apropriado para fixar o aparelho (por ex. VDLSC7N ou VDLSC8N).
• A temperatura ambiente máxima é de 45 °C. Não utilize o aparelho sob temperaturas elevadas.

HQHZ10001/HQHZ10002
V. 02 – 19/01/2022 47 ©Velleman Group nv
3. Normas gerais
Consulte a Garantia de Serviço e Qualidade Velleman® na parte final deste manual do utilizador.
Não exponha o equipamento ao pó nem a temperaturas extremas. Certifique-se sempre
que os orifícios de ventilação não se encontram bloqueados. Para uma suficiente
circulação de ar deve deixar pelo menos 15 cm à frente das entradas.
Proteja o aparelho de quedas e má utilização. Evite usar força excessiva ao utilizar o
aparelho.
• Familiarize-se com as funções do aparelho antes de o utilizar. O aparelho só deve ser manuseado por
pessoas qualificadas. Os danos que possam ocorrer serão provavelmente causados por uma
utilização não profissional do aparelho.
• Por razões de segurança, estão proibidas quaisquer modificações do aparelho desde que não
autorizadas. Os danos causados por modificações não autorizadas do aparelho não estão cobertos
pela garantia.
• Utilize o aparelho apenas para as aplicações descritas neste manual. Todos os outros usos podem
levar a um curto-circuito, queimaduras, eletrochoques, explosão de lâmpada, de colisão, etc. Uma
utilização incorreta anula a garantia completamente.
• Danos causados pelo não cumprimento das normas de segurança referidas neste manual anulam a
garantia e o seu distribuidor não será responsável por quaisquer danos ou outros problemas daí
resultantes.
• Os componentes mecânicos e os LEDs não estão cobertos pela garantia.
• A instalação e a manutenção devem ser feitas por pessoal especializado.
• Não ligue o aparelho depois de exposto a variações de temperatura. Para evitar danos, espere que o
aparelho atinge a temperatura ambiente.
• Este aparelho destina-se a uso profissional em palcos, discotecas, teatros, etc.
• Use a fonte de alimentação adequada (ver Especificações Técnicas mais abaixo).
• Pode surgir algum fumo ou um cheiro estranho quando o aparelho é utilizado pela primeira vez. Isto
é normal e tanto o fumo como o cheiro desaparecem gradualmente.
• Transporte o aparelho na embalagem original.
• Guarde este manual para posterior consulta.
4. Descrição
Veja as imagens na página 2 deste manual.
1
entrada de corrente + fusível
6
bocal de saída inclinável
2
interruptor on/off
7
pega de transporte
3
entrada para o controlo remoto
8
tanque
4
botão de nevoeiro manual
9
painel de controlo
5
regulador da velocidade da ventoinha
10
entrada e saída DMX
5. Instalação
• Instale e utilize o aparelho somente numa superfície plana e estável. O aparelho não é inclinável.
• Instale o aparelho num local em que possa facilmente aceder ao cabo de alimentação.
• Instale o aparelho numa área bem ventilada.
• A estrutura de transporte tem de ser capaz de suportar 10 vezes o peso do dispositivo durante 1
hora sem se deformar.
• Evite estar debaixo do projetor durante a montagem, limpeza, etc. Um técnico especializado deverá
inspecionar o aparelho antes de ser colocado em funcionamento. Depois, deverá ser inspecionado
uma vez por ano.
• Instale o dispositivo num local que não seja de grande passagem e inacessível a pessoas não
autorizadas.
• Certifique-se de que não existem materiais inflamáveis num raio de 0.5 m em torno do aparelho.

HQHZ10001/HQHZ10002
V. 02 – 19/01/2022 48 ©Velleman Group nv
6. Utilização
6.1 HQHZ10001
13. botão de intervalo
14. botão de duração
15. botão de saída
16. botão de
temporização
17. botão de para
funcionamento
contínuo
18. botão de
funcionamento
manual
1. Certifique-se de que enche o tanque com o fluido.
2. Ligue o aparelho.
3. Defina o nível de saída e pressione o botão manual no controlo remoto para fazer sair o nevoeiro. O
aparelho continuará a produzir nevoeiro enquanto o botão estiver pressionado.
Também pode optar pelo funcionamento contínuo ou temporizado.
4. Desligue o aparelho após a utilização.
Os botões 1 e 2 apenas funcionam no modo temporizador.
O botão manual na parte traseira do aparelho não pode estar ativo quando
pretende ativar o botão de temporização do controlo remoto.
6.2 HQHZ10002
Descrição do Painel de Controlo
FUNÇÃO
entrar no modo de programação
VOLUME
controlo do volume de saída
TIMER
iniciar funcionamento temporizado
MANUAL
saída de nevoeiro manual
PARA CIMA
subir na lista de menus
PARA BAIXO
descer na lista de menus
Preparar a Máquina de Nevoeiro
1. Retire tanque do se compartimento. Retire também a tampa.
2. Verifique se as mangueiras de plástico conectadas à tampa estão no devido lugar e em boas
condições.
3. Verta o líquido para o interior do tanque e feche-o.
4. Volte a colocar o tanque no compartimento. Certifique-se de que a mangueira plástica que liga o
tanque à máquina não está dobrada ou torcida.

HQHZ10001/HQHZ10002
V. 02 – 19/01/2022 49 ©Velleman Group nv
5. Ligue a máquina à corrente elétrica, ligue-a e deixe-a aquecer. A máquina estará pronta a usar após
aproximadamente 7 a 8 minutos.
Em qualquer um dos modos de funcionamento tem de aparecer no viror
"READY TO FOG" para que se comece a produzir nevoeiro.
Iniciar
1. Certifique-se de a máquina de nevoeiro está desligada antes de a ligar à corrente elétrica.
2. Ligue a máquina.
3. Pressione <VOLUME>.
4. Ajuste o volume de saída do nevoeiro com <UP> ou <DOWN>.
Configuração DMX
Colocar a máquina de nevoeiro no modo DMX:
1. Ligue a máquina de nevoeiro à corrente elétrica, ligue no interruptor e deixe-a aquecer.
2. Ligue um cabo DMX à entrada DMX da máquina e à saída DMX de um controlador (não incluído).
3. Para ativar a função DMX, pressione <FUNCTION> repetidamente até aparecer DMX512 ADD.
Selecione o endereço de iniciação de 1 a 512 com <UP> ou <DOWN>.
Certifique-se de que o endereço de iniciação das máquinas interligadas
não se sobrepõem.
Recomenda-se um terminal DMX para instalações onde o cabo DMX precisa de percorrer uma longa
distância ou está em um ambiente com ruído eléctrico (por exemplo, discotecas). O terminal impede a
corrupção do sinal de controlo digital por ruído elétrico. O terminal DMX é simplesmente um conector XLR
com um resistor de 120 Ω entre os pinos 2 e 3, que é então ligado à tomada de saída XLR do último
dispositivo da cadeia.
Configurar o Volume de Saída
1. Pressione <FUNCTION> repetidamnete até aparecer VOLUME OUT.
2. Selecione o volume de saída pretendido (1-100 % ou sem-parar) com <UP> ou <DOWN>.
3. Pressione <VOLUME> para confirmar.
4. Pressione <VOLUME> novamente para fazer sair o nevoeiro no modo de saída configurado.
A máquina memoriza a configuração de saída mesmo após ser desligada.
Para eliminar a configuração anterior repita os passos acima referidos.
Ativar o Sensor de Fluido
O sensor de fluido integrado mede o nível de fluido existente no tanque. Para ativar o sensor de fluido:
1. Pressione <FUNCTION> repetidamente até aparecer FLUID SENSOR.
2. Selecione ON com <UP> ou <DOWN>.
3. Selecione OFF com <UP> ou <DOWN> para desativar o sensor de fluido.
Configurar a Ventoinha
1. Pressione <FUNCTION> repetidamente até aparecer FAN SET.
2. Selecione ON com <UP> ou <DOWN>.
3. Selecione OFF com <UP> ou <DOWN> para desativar a ventoinha.

HQHZ10001/HQHZ10002
V. 02 – 19/01/2022 50 ©Velleman Group nv
Modo de Temporizador
No modo de temporizador, a máquina irá produzir nevoeiro em intervalos de tempo pré-definidos(ver
Parâmetros do Modo Temporizador abaixo).
1. Pressione <TIMER> até aparecer o temporizador.
2. A máquina começa a produzir nevoeiro assim que o contador chegar a zero (0).
3. Define o tempo de duração na opção de menu DURATION SET; defina o volume de saída na opção
de menu TIMER OUT.
4. O ciclo repete-se até que pressione <TIMER> novamente ou até que a máquina fique sem fluido.
Modo Manual
No modo manual, a máquina produz nevoeiro enquanto o botão continuar pressionado. O volume de
saída está na opção de 100 %.
1. Mantenha o botão <MANUAL> pressionado para produzir nevoeiro.
2. Liberte o botão <MANUAL> para interromper a emissão de nevoeiro.
Parâmetros do Modo Temporizado
Estes parâmetros determinam o intervalo de tempo e o volume de saída no modo temporizado.
1. Pressione <FUNCTION> repetidamente até aparecer INTERVAL SET.
2. Selecione o intervalo de tempo (1-200 seg.) com <UP> ou <DOWN>.
3. Pressione <FUNCTION> repetidamente até aparecer DURATION SET.
4. Selecione o tempo de duração (1-200 seg.) com <UP> ou <DOWN>.
5. Pressione <FUNCTION> repetidamente até aparecer TIMER OUT.
6. Selecione o volume de saída pretendido (1-100 % ou sem-parar) com <UP> ou <DOWN>.
Sempre que a máquina de nevoeiro está ligada a uma controlador DMX,
este controlador terá prioridade sobre o painel de controlo da máquina.
Retire o cabo DMX se pretende usar o painel de controlo.
7. Resolução de problemas
problema
causa possível
solução possível
O fusível continua a fundir.
Excesso de carga no circuito.
Certifique-se de que a carga
total não excede 80 % da
corrente nominal do fusível.
Curto-circuito ao longo do cabo
de corrente.
Verifique o cabo.
A máquina não liga.
Não há corrente na tomada.
Verifique a tomada.
Cabo desligado ou danificado.
Verifique o cabo.
Fusível fundido.
Substitua o fusível fundido.
Problema interno.
Mande reparar a máquina.
A máquina de nevoeiro não
responde ao DMX.
Endereço de iniciação incorreto.
Defina o endereço DMX
corrento na máquina.
Manipulação incorreta no
controlador.
Manipule os controlos corretos
no controlador.
Incorrecto; Cabo DMX solto ou
danificado.
Verifique o cabo DMX.
Problema interno.
Mande reparar a máquina.
Interferência com sinais de
rádio.
Mantenha o cabo DMX afastado
do equipamento de rádio.
Cabo DMX demasiado
comprido.
Instale um amplificador DMX
acoplado opticamente antes da
máquina.
Demasiados produtos
conectados.
Instale um amplificador DMX
acoplado opticamente.
Terminal não conectado.
Conecte o terminal.

HQHZ10001/HQHZ10002
V. 02 – 19/01/2022 51 ©Velleman Group nv
8. Limpeza e manutenção
Antes de qualquer operação de limpeza ou manutenção:
1. Desligue o cabo de alimentação da corrente elétrica.
2. Deixe o aparelho arrefecer.
Limpeza
• Certifique-se de que despeja o tanque antes da limpeza.
• Use um limpa-vidros vulgar e um pano macio para limpar o exterior do aparelho.
• Limpe as ópticas exteriores com um limpa-vridro e um pano macio a cada 20 dias.
• Certifique-se de que seca muito bem todas as peças antes de voltar a colocar o unidade em
funcionamento.
• A frequência da limpeza depende do ambiente no qual a unidade está a funcionar (por ex. fumo,
resíduos de nevoeiro, poeira, orvalho).
• Não mergulhe o aparelho em qualquer tipo de líquido.
Manutenção
• Todos os parafusos devem estar bem apertados e não apresentar sinais de corrosão.
• A caixa, as lentes, os suportes de montagem e o local de instalação (por exemplo, teto, suspensão,
amarras) não devem apresentar-se deformados, modificados ou adulterados; ou seja, não faça furos
adicionais nos suportes de montagem, não altere a localização das ligações...
• As peças mecânicas móveis não devem apresentar qualquer sinal de desgaste.
• Não danifique os cabos de alimentação. Contacte um técnico especializado para instalar o aparelho.
• Não existem peças cuja manutenção seja feita pelo utilizador, exceto o fusível e a lâmpada.
• Contacte um agente autorizado para assistência e/ou peças de substituição.
9. Especificações
alimentação .......................................................................... 220-240 V~, 50/60 Hz
tempo de aquecimento .................................................................................. 3 min.
consumo de fluido ......................................................................... 60 - 80 ml / min.
grau de proteção IP ......................................................................................... IP20
opções
líquido de alta densidade (5 L) ............................................................. VDLHLH5
HQHZ10001
consumo ......................................................................................................600 W
fusível ............................................................................................................ F5A
saída ...................................................................... ca. 170 m³/6,000 ft³ por minuto
capacidade do tanque ..................................................................................... 1.2 L
comprimento do cabo do controlo remoto ........................................................ 3.5 m
dimensões .............................................................................. 320 x 170 x 220 mm
HQHZ10002
consumo .................................................................................................... 1000 W
fusível ............................................................................................................ F6A
saída .................................................................... ca. 225 m³/10,000 ft³ por minuto
capacidade do tanque ..................................................................................... 2.3 L
dimensões .............................................................................. 420 x 170 x 300 mm
Utilize este aparelho apenas com acessórios originais. A Velleman Group nv não será
responsável por quaisquer danos ou lesões causadas pelo uso (indevido) do aparelho. Para
mais informação sobre este produto e para aceder à versão mais recente deste manual do
utilizador, visite a nossa página www.velleman.eu. Podem alterar-se as especificações e o
conteúdo deste manual sem aviso prévio.
© DIREITOS DE AUTOR
A Velleman Group nv detém os direitos de autor deste manual do utilizador. Todos os direitos
mundiais reservados. É estritamente proibido reproduzir, traduzir, copiar, editar e gravar este manual
do utilizador ou partes deste sem prévia autorização escrita por parte da detentora dos direitos.

Velleman® Service and Quality Warranty
Since its foundation in 1972, Velleman® acquired extensive experience in
the electronics world and currently distributes its products in over 85
countries.
All our products fulfil strict quality requirements and legal stipulations in
the EU. In order to ensure the quality, our products regularly go through
an extra quality check, both by an internal quality department and by
specialized external organisations. If, all precautionary measures
notwithstanding, problems should occur, please make appeal to our
warranty (see guarantee conditions).
General Warranty Conditions Concerning Consumer Products (for
EU):
• All consumer products are subject to a 24-month warranty on production
flaws and defective material as from the original date of purchase.
• Velleman® can decide to replace an article with an equivalent article, or
to refund the retail value totally or partially when the complaint is valid and
a free repair or replacement of the article is impossible, or if the expenses
are out of proportion.
You will be delivered a replacing article or a refund at the value of 100%
of the purchase price in case of a flaw occurred in the first year after the
date of purchase and delivery, or a replacing article at 50% of the
purchase price or a refund at the value of 50% of the retail value in case
of a flaw occurred in the second year after the date of purchase and
delivery.
• Not covered by warranty:
- all direct or indirect damage caused after delivery to the article (e.g. by
oxidation, shocks, falls, dust, dirt, humidity...), and by the article, as well
as its contents (e.g. data loss), compensation for loss of profits;
- consumable goods, parts or accessories that are subject to an aging
process during normal use, such as batteries (rechargeable, non-
rechargeable, built-in or replaceable), lamps, rubber parts, drive belts...
(unlimited list);
- flaws resulting from fire, water damage, lightning, accident, natural
disaster, etc.…;
- flaws caused deliberately, negligently or resulting from improper
handling, negligent maintenance, abusive use or use contrary to the
manufacturer’s instructions;
- damage caused by a commercial, professional or collective use of the
article (the warranty validity will be reduced to six (6) months when the
article is used professionally);
- damage resulting from an inappropriate packing and shipping of the
article;
- all damage caused by modification, repair or alteration performed by a
third party without written permission by Velleman®.
• Articles to be repaired must be delivered to your Velleman® dealer,
solidly packed (preferably in the original packaging), and be completed
with the original receipt of purchase and a clear flaw description.
• Hint: In order to save on cost and time, please reread the manual and
check if the flaw is caused by obvious causes prior to presenting the
article for repair. Note that returning a non-defective article can also
involve handling costs.
• Repairs occurring after warranty expiration are subject to shipping costs.
• The above conditions are without prejudice to all commercial warranties.
The above enumeration is subject to modification according to the
article (see article’s manual).
Velleman® service- en kwaliteitsgarantie
Velleman® heeft sinds zijn oprichting in 1972 een ruime ervaring
opgebouwd in de elektronicawereld en verdeelt op dit moment producten
in meer dan 85 landen. Al onze producten beantwoorden aan strikte
kwaliteitseisen en aan de wettelijke bepalingen geldig in de EU. Om de
kwaliteit te waarborgen, ondergaan onze producten op regelmatige
tijdstippen een extra kwaliteitscontrole, zowel door onze eigen
kwaliteitsafdeling als door externe gespecialiseerde organisaties. Mocht
er ondanks deze voorzorgen toch een probleem optreden, dan kunt u
steeds een beroep doen op onze waarborg (zie waarborgvoorwaarden).
Algemene waarborgvoorwaarden consumentengoederen (voor
Europese Unie):
• Op alle consumentengoederen geldt een garantieperiode van 24
maanden op productie- en materiaalfouten en dit vanaf de oorspronkelijke
aankoopdatum.
• Indien de klacht gegrond is en een gratis reparatie of vervanging van
een artikel onmogelijk is of indien de kosten hiervoor buiten verhouding
zijn, kan Velleman® beslissen het desbetreffende artikel te vervangen
door een gelijkwaardig artikel of de aankoopsom van het artikel
gedeeltelijk of volledig terug te betalen. In dat geval krijgt u een
vervangend product of terugbetaling ter waarde van 100% van de
aankoopsom bij ontdekking van een gebrek tot één jaar na aankoop en
levering, of een vervangend product tegen 50% van de kostprijs of
terugbetaling van 50 % bij ontdekking na één jaar tot 2 jaar.
• Valt niet onder waarborg:
- alle rechtstreekse of onrechtstreekse schade na de levering veroorzaakt
aan het toestel (bv. door oxidatie, schokken, val, stof, vuil, vocht...), en
door het toestel, alsook zijn inhoud (bv. verlies van data), vergoeding voor
eventuele winstderving.
- verbruiksgoederen, onderdelen of hulpstukken die onderhevig zijn aan
veroudering door normaal gebruik zoals bv. batterijen (zowel oplaadbare
als niet-oplaadbare, ingebouwd of vervangbaar), lampen, rubberen
onderdelen, aandrijfriemen... (onbeperkte lijst).
- defecten ten gevolge van brand, waterschade, bliksem, ongevallen,
natuurrampen, enz.
- defecten veroorzaakt door opzet, nalatigheid of door een
onoordeelkundige behandeling, slecht onderhoud of abnormaal gebruik of
gebruik van het toestel strijdig met de voorschriften van de fabrikant.
- schade ten gevolge van een commercieel, professioneel of collectief
gebruik van het apparaat (bij professioneel gebruik wordt de
garantieperiode herleid tot 6 maand).
- schade veroorzaakt door onvoldoende bescherming bij transport van het
apparaat.
- alle schade door wijzigingen, reparaties of modificaties uitgevoerd door
derden zonder toestemming van Velleman®.
• Toestellen dienen ter reparatie aangeboden te worden bij uw
Velleman®-verdeler. Het toestel dient vergezeld te zijn van het
oorspronkelijke aankoopbewijs. Zorg voor een degelijke verpakking (bij
voorkeur de originele verpakking) en voeg een duidelijke foutomschrijving
bij.
• Tip: alvorens het toestel voor reparatie aan te bieden, kijk nog eens na
of er geen voor de hand liggende reden is waarom het toestel niet naar
behoren werkt (zie handleiding). Op deze wijze kunt u kosten en tijd
besparen. Denk eraan dat er ook voor niet-defecte toestellen een kost
voor controle aangerekend kan worden.
• Bij reparaties buiten de waarborgperiode zullen transportkosten
aangerekend worden.
• Elke commerciële garantie laat deze rechten onverminderd.
Bovenstaande opsomming kan eventueel aangepast worden
naargelang de aard van het product (zie handleiding van het
betreffende product).
Garantie de service et de qualité Velleman®
Depuis 1972, Velleman® a gagné une vaste expérience dans le secteur
de l’électronique et est actuellement distributeur dans plus de 85 pays.
Tous nos produits répondent à des exigences de qualité rigoureuses et à
des dispositions légales en vigueur dans l’UE. Afin de garantir la qualité,
nous soumettons régulièrement nos produits à des contrôles de qualité
supplémentaires, tant par notre propre service qualité que par un service
qualité externe. Dans le cas improbable d’un défaut malgré toutes les
précautions, il est possible d’invoquer notre garantie (voir les conditions
de garantie).
Conditions générales concernant la garantie sur les produits grand
public (pour l’UE) :
• tout produit grand public est garanti 24 mois contre tout vice de
production ou de matériaux à dater du jour d’acquisition effective ;
• si la plainte est justifiée et que la réparation ou le remplacement d’un
article est jugé impossible, ou lorsque les coûts s’avèrent
disproportionnés, Velleman® s’autorise à remplacer ledit article par un
article équivalent ou à rembourser la totalité ou une partie du prix d’achat.
Le cas échéant, il vous sera consenti un article de remplacement ou le
remboursement complet du prix d’achat lors d’un défaut dans un délai de
1 an après l’achat et la livraison, ou un article de remplacement
moyennant 50% du prix d’achat ou le remboursement de 50% du prix
d’achat lors d’un défaut après 1 à 2 ans.
• sont par conséquent exclus :
- tout dommage direct ou indirect survenu à l’article après livraison (p.ex.
dommage lié à l’oxydation, choc, chute, poussière, sable, impureté…) et
provoqué par l’appareil, ainsi que son contenu (p.ex. perte de données) et
une indemnisation éventuelle pour perte de revenus ;
- toute pièce ou accessoire nécessitant un remplacement causé par un
usage normal comme p.ex. piles (rechargeables comme non
rechargeables, intégrées ou remplaçables), ampoules, pièces en
caoutchouc, courroies… (liste illimitée) ;
- tout dommage qui résulte d’un incendie, de la foudre, d’un accident,
d’une catastrophe naturelle, etc. ;
- out dommage provoqué par une négligence, volontaire ou non, une
utilisation ou un entretien incorrect, ou une utilisation de l’appareil
contraire aux prescriptions du fabricant ;

- tout dommage à cause d’une utilisation commerciale, professionnelle ou
collective de l’appareil (la période de garantie sera réduite à 6 mois lors
d’une utilisation professionnelle) ;
- tout dommage à l’appareil qui résulte d’une utilisation incorrecte ou
différente que celle pour laquelle il a été initialement prévu comme décrit
dans la notice ;
- tout dommage engendré par un retour de l’appareil emballé dans un
conditionnement non ou insuffisamment protégé.
- toute réparation ou modification effectuée par une tierce personne sans
l’autorisation explicite de Velleman Group nv ; - frais de transport de et
vers Velleman® si l’appareil n’est plus couvert sous la garantie.
• toute réparation sera fournie par l’endroit de l’achat. L’appareil doit
nécessairement être accompagné du bon d’achat d’origine et être dûment
conditionné (de préférence dans l’emballage d’origine avec mention du
défaut) ;
• tuyau : il est conseillé de consulter la notice et de contrôler câbles, piles,
etc. avant de retourner l’appareil. Un appareil retourné jugé défectueux
qui s’avère en bon état de marche pourra faire l’objet d’une note de frais à
charge du consommateur ;
• une réparation effectuée en-dehors de la période de garantie fera l’objet
de frais de transport ;
• toute garantie commerciale ne porte pas atteinte aux conditions
susmentionnées.
La liste susmentionnée peut être sujette à une complémentation
selon le type de l’article et être mentionnée dans la notice d’emploi.
Garantía de servicio y calidad Velleman®
Desde su fundación en 1972 Velleman® ha adquirido una amplia
experiencia como distribuidor en el sector de la electrónica en más de 85
países. Todos nuestros productos responden a normas de calidad
rigurosas y disposiciones legales vigentes en la UE. Para garantizar la
calidad, sometemos nuestros productos regularmente a controles de
calidad adicionales, tanto a través de nuestro propio servicio de calidad
como de un servicio de calidad externo. En el caso improbable de que
surgieran problemas a pesar de todas las precauciones, es posible
recurrir a nuestra garantía (véase las condiciones de garantía).
Condiciones generales referentes a la garantía sobre productos de
venta al público (para la Unión Europea):
• Todos los productos de venta al público tienen un período de garantía
de 24 meses contra errores de producción o errores en materiales desde
la adquisición original;
• Si la queja está fundada y si la reparación o sustitución de un artículo no
es posible, o si los gastos son desproporcionados, Velleman® autoriza
reemplazar el artículo por un artículo equivalente o reembolsar la
totalidad o una parte del precio de compra. En este caso, usted recibirá
un artículo de recambio o el reembolso completo del precio de compra si
encuentra algún fallo hasta un año después de la compra y entrega, o un
artículo de recambio al 50% del precio de compra o el reembolso del 50%
del precio de compra si encuentra un fallo después de 1 año y hasta los 2
años después de la compra y entrega.
Por consiguiente, están excluidos entre otras cosas:
- todos los daños causados directa o indirectamente al aparato (p.ej. por
oxidación, choques, caída,...) y a su contenido (p.ej. pérdida de datos)
después de la entrega y causados por el aparato, y cualquier
indemnización por posible pérdida de ganancias;
- partes o accesorios, que estén expuestos al desgaste causado por un
uso normal, como por ejemplo baterías (tanto recargables como no
recargables, incorporadas o reemplazables), bombillas, partes de goma,
etc. (lista ilimitada);
- defectos causados por un incendio, daños causados por el agua, rayos,
accidentes, catástrofes naturales, etc.;
- defectos causados a conciencia, descuido o por malos tratos, un
mantenimiento inapropiado o un uso anormal del aparato contrario a las
instrucciones del fabricante;
- daños causados por un uso comercial, profesional o colectivo del
aparato (el período de garantía se reducirá a 6 meses con uso
profesional);
- daños causados por un uso incorrecto o un uso ajeno al que está
previsto el producto inicialmente como está descrito en el manual del
usuario;
- daños causados por una protección insuficiente al transportar el
aparato.
- daños causados por reparaciones o modificaciones efectuadas por una
tercera persona sin la autorización explícita de Velleman®;
- se calcula gastos de transporte de y a Velleman® si el aparato ya no
está cubierto por la garantía.
• Cualquier artículo que tenga que ser reparado tendrá que ser devuelto a
su distribuidor Velleman®. Devuelva el aparato con la factura de compra
original y transpórtelo en un embalaje sólido (preferentemente el
embalaje original). Incluya también una buena descripción del fallo;
• Consejo: Lea el manual del usuario y controle los cables, las pilas, etc.
antes de devolver el aparato. Si no se encuentra un defecto en el artículo
los gastos podrían correr a cargo del cliente;
• Los gastos de transporte correrán a carga del cliente para una
reparación efectuada fuera del período de garantía.
• Cualquier gesto comercial no disminuye estos derechos.
La lista previamente mencionada puede ser adaptada según el tipo
de artículo (véase el manual del usuario del artículo en cuestión).
Velleman® Service- und Qualitätsgarantie
Seit der Gründung in 1972 hat Velleman® sehr viel Erfahrung als Verteiler
in der Elektronikwelt in über 85 Ländern aufgebaut.
Alle Produkte entsprechen den strengen Qualitätsforderungen und
gesetzlichen Anforderungen in der EU. Um die Qualität zu gewährleisten
werden unsere Produkte regelmäßig einer zusätzlichen Qualitätskontrolle
unterworfen, sowohl von unserer eigenen Qualitätsabteilung als auch von
externen spezialisierten Organisationen. Sollten, trotz aller
Vorsichtsmaßnahmen, Probleme auftreten, nehmen Sie bitte die Garantie
in Anspruch (siehe Garantiebedingungen).
Allgemeine Garantiebedingungen in Bezug auf Konsumgüter (für die
Europäische Union):
• Alle Produkte haben für Material- oder Herstellungsfehler eine
Garantieperiode von 24 Monaten ab Verkaufsdatum.
• Wenn die Klage berechtigt ist und falls eine kostenlose Reparatur oder
ein Austausch des Gerätes unmöglich ist, oder wenn die Kosten dafür
unverhältnismäßig sind, kann Velleman® sich darüber entscheiden,
dieses Produkt durch ein gleiches Produkt zu ersetzen oder die
Kaufsumme ganz oder teilweise zurückzuzahlen. In diesem Fall erhalten
Sie ein Ersatzprodukt oder eine Rückzahlung im Werte von 100% der
Kaufsumme im Falle eines Defektes bis zu 1 Jahr nach Kauf oder
Lieferung, oder Sie bekommen ein Ersatzprodukt im Werte von 50% der
Kaufsumme oder eine Rückzahlung im Werte von 50 % im Falle eines
Defektes im zweiten Jahr.
• Von der Garantie ausgeschlossen sind:
- alle direkten oder indirekten Schäden, die nach Lieferung am Gerät und
durch das Gerät verursacht werden (z.B. Oxidation, Stöße, Fall, Staub,
Schmutz, Feuchtigkeit, ...), sowie auch der Inhalt (z.B. Datenverlust),
Entschädigung für eventuellen Gewinnausfall.
- Verbrauchsgüter, Teile oder Zubehörteile, die durch normalen Gebrauch
dem Verschleiß ausgesetzt sind, wie z.B. Batterien (nicht nur aufladbare,
sondern auch nicht aufladbare, eingebaute oder ersetzbare), Lampen,
Gummiteile, Treibriemen, usw. (unbeschränkte Liste).
- Schäden verursacht durch Brandschaden, Wasserschaden, Blitz,
Unfälle, Naturkatastrophen, usw.
- Schäden verursacht durch absichtliche, nachlässige oder
unsachgemäße Anwendung, schlechte Wartung, zweckentfremdete
Anwendung oder Nichtbeachtung von Benutzerhinweisen in der
Bedienungsanleitung.
- Schäden infolge einer kommerziellen, professionellen oder kollektiven
Anwendung des Gerätes (bei gewerblicher Anwendung wird die
Garantieperiode auf 6 Monate zurückgeführt).
- Schäden verursacht durch eine unsachgemäße Verpackung und
unsachgemäßen Transport des Gerätes.
- alle Schäden verursacht durch unautorisierte Änderungen, Reparaturen
oder Modifikationen, die von einem Dritten ohne Erlaubnis von Velleman®
vorgenommen werden.
• Im Fall einer Reparatur, wenden Sie sich an Ihren Velleman®-Verteiler.
Legen Sie das Produkt ordnungsgemäß verpackt (vorzugsweise die
Originalverpackung) und mit dem Original-Kaufbeleg vor. Fügen Sie eine
deutliche Fehlerbeschreibung hinzu.
• Hinweis: Um Kosten und Zeit zu sparen, lesen Sie die
Bedienungsanleitung nochmals und überprüfen Sie, ob es keinen auf de
Hand liegenden Grund gibt, ehe Sie das Gerät zur Reparatur
zurückschicken. Stellt sich bei der Überprüfung des Gerätes heraus, dass
kein Geräteschaden vorliegt, könnte dem Kunden eine
Untersuchungspauschale berechnet.
• Für Reparaturen nach Ablauf der Garantiefrist werden Transportkosten
berechnet.
• Jede kommerzielle Garantie lässt diese Rechte unberührt.
Die oben stehende Aufzählung kann eventuell angepasst werden
gemäß der Art des Produktes (siehe Bedienungsanleitung des
Gerätes).

Velleman ® usługi i gwarancja jakości
Od czasu założenia w 1972, Velleman® zdobył bogate doświadczenie w
dziedzinie światowej elektroniki. Obecnie firma dystrybuuje swoje
produkty w ponad 85 krajach.
Wszystkie nasze produkty spełniają surowe wymagania jakościowe oraz
wypełniają normy i dyrektywy obowiązujące w krajach UE. W celu
zapewnienia najwyższej jakości naszych produktów, przechodzą one
regularne oraz dodatkowo wyrywkowe badania kontroli jakości, zarówno
naszego wewnętrznego działu jakości jak również wyspecjalizowanych
firm zewnętrznych. Pomimo dołożenia wszelkich starań czasem mogą
pojawić się problemy techniczne, prosimy odwołać się do gwarancji (patrz
warunki gwarancji).
Ogólne Warunki dotyczące gwarancji:
• Wszystkie produkty konsumenckie podlegają 24-miesięcznej gwarancji
na wady produkcyjne i materiałowe od daty zakupu.
• W przypadku, gdy usterka jest niemożliwa do usunięcia lub koszt
usunięcia jest nadmiernie wysoki Velleman ® może zdecydować o
wymianie artykułu na nowy, wolny od wad lub zwrócić zapłaconą kwotę.
Zwrot gotówki może jednak nastąpić z uwzględnieniem poniższych
warunków:
- zwrot 100% ceny zakupu w przypadku, gdy wada wystąpiła w ciągu
pierwszego roku od daty zakupu i dostawy
- wymiana wadliwego artykułu na nowy, wolny od wad z odpłatnością
50% ceny detalicznej lub zwrot 50% kwoty ceny nabycia w przypadku gdy
wada wystąpiła w drugim roku od daty zakupu i dostawy.
• Produkt nie podlega naprawie gwarancyjnej:
- gdy wszystkie bezpośrednie lub pośrednie szkody spowodowane są
działaniem czynników środowiskowych lub losowych (np. przez utlenianie,
wstrząsy, upadki, kurz, brud, ...), wilgotności;
- gwarant nie ponosi odpowiedzialności za szkody wynikających z utraty
danych;
- produkty konsumenckie, części zamienne lub akcesoria podatne na
process starzenia, wynikającego z normalnego użytkowania, np: baterie
(ładowalne, nieładowalne, wbudowane lub wymienne), żarówki, paski
napędowe, gumowe elementy napędowe... (nieograniczona lista);
- usterka wynika z działania pożaru, zalania wszelkimi cieczami,
uderzenia pioruna, upadku lub klęski żywiołowej, itp.;
- usterka wynika z zaniedbań eksploatacyjnych tj. umyślne bądź
nieumyślne zaniechanie czyszczenia, konserwacji, wymiany materiałów
ekspolatacyjnych, niedbalstwa lub z niewłaściwego obchodzenia się lub
niezgodnego użytkowania z instrukcją producenta;
- szkody wynikające z nadmiernego użytkowania gdy nie jest do tego celu
przeznaczony tj. działalność komerycjna, zawodowa lub wspólne
użytkowanie przez wiele osób - okres obowiązywania gwarancji zostanie
obniżony do 6 (sześć) miesięcy;
- Szkody wynikające ze źle zabezpieczonej wysyłki produktu;
- Wszelkie szkody spowodowane przez nieautoryzowaną naprawę,
modyfikację, przeróbkę produktu przez osoby trzecie jak również bez
pisemnej zgody firmy Velleman ®.
• Uszkodzony produkt musi zostać dostarczony do sprzedawcy ®
Velleman, solidnie zapakowany (najlepiej w oryginalnym opakowaniu),
wraz z wyposażeniem z jakim produkt został sprzedany. W przypadku
wysyłki towaru w opakowaniu innym niż oryginalnym ryzyko usterki
produktu oraz tego skutki przechodzą na właściciela produktu. Wraz z
niesprawnym produktem należy dołączyć jasny i szczegółowy opis jego
usterki, wady;
• Wskazówka: Aby zaoszczędzić na kosztach i czasie, proszę
szczegółowo zapoznać się z instrukcja obsługi; czy przyczyną wady są
okoliczności techniczne czy też wynikaja wyłącznie z nieznajomości
obsługi produktu. W przypadku wysyłki sprawnego produktu do serwisu
nabywca może zostać obciążony kosztmi obsługi oraz transportu.
• W przypadku napraw pogwarancyjnych lub odpłatnych klient ponosi
dodatkowo koszt wysyłki produktu do i z serwisu.
wymienione wyżej warunki są bez uszczerbku dla wszystkich
komercyjnych gwarancji.
Powyższe postanowienia mogą podlegać modyfikacji w zależności
od wyrobu (patrz art obsługi).
Garantia de serviço e de qualidade Velleman®
Desde a sua fundação em 1972 Velleman® tem adquirido uma amplia
experiencia no sector da eletrónica com uma distribuição em mais de 85
países.
Todos os nossos produtos respondem a exigências rigorosas e a
disposições legais em vigor na UE. Para garantir a qualidade,
submetemos regularmente os nossos produtos a controles de qualidade
suplementares, com o nosso próprio serviço qualidade como um serviço
de qualidade externo. No caso improvável de um defeito mesmo com as
nossas precauções, é possível invocar a nossa garantia. (ver as
condições de garantia).
Condições gerais com respeito a garantia sobre os produtos grande
público (para a UE):
• qualquer produto grande público é garantido 24 mês contra qualquer
vício de produção ou materiais a partir da data de aquisição efectiva;
• no caso da reclamação ser justificada e que a reparação ou substituição
de um artigo é impossível, ou quando os custo são desproporcionados,
Velleman® autoriza-se a substituir o dito artigo por um artigo equivalente
ou a devolver a totalidade ou parte do preço de compra. Em outro caso,
será consentido um artigo de substituição ou devolução completa do
preço de compra no caso de um defeito no prazo de 1 ano depois da data
de compra e entrega, ou um artigo de substituição pagando o valor de
50% do preço de compra ou devolução de 50% do preço de compra para
defeitos depois de 1 a 2 anos.
• estão por consequência excluídos:
- todos os danos directos ou indirectos depois da entrega do artigo (p.ex.
danos ligados a oxidação, choques, quedas, poeiras, areias,
impurezas…) e provocado pelo aparelho, como o seu conteúdo (p.ex.
perca de dados) e uma indemnização eventual por perca de receitas;
- consumíveis, peças ou acessórios sujeitos a desgaste causado por um
uso normal, como p.ex. pilhas (recarregáveis, não recarregáveis,
incorporadas ou substituíveis), lâmpadas, peças em borracha correias…
(lista ilimitada);
- todos os danos que resultem de um incêndio, raios, de um acidente, de
una catastrophe natural, etc.;
- danos provocados por negligencia, voluntária ou não, uma utilização ou
manutenção incorrecta, ou uma utilização do aparelho contrária as
prescrições do fabricante ;
- todos os danos por causa de uma utilização comercial, profissional ou
colectiva do aparelho ( o período de garantia será reduzido a 6 meses
para uma utilização profissional);
- todos os danos no aparelho resultando de uma utilização incorrecta ou
diferente daquela inicialmente prevista e descrita no manual de utilização;
- todos os danos depois de uma devolução não embalada ou mal
protegida ao nível do acondicionamento.
- todas as reparações ou modificações efectuadas por terceiros sem a
autorização de Velleman Group nv;
- despesas de transporte de e para Velleman® se o aparelho não estiver
coberto pela garantia.
• qualquer reparação será fornecida pelo local de compra. O aparelho
será obrigatoriamente acompanhado do talão ou factura de origem e bem
acondicionado (de preferência dentro da embalagem de origem com
indicação do defeito ou avaria);
• dica: aconselha-mos a consulta do manual e controlar cabos, pilhas,
etc. antes de devolver o aparelho. Um aparelho devolvido que estiver em
bom estado será cobrado despesas a cargo do consumidor;
• uma reparação efectuada fora da garantia, será cobrado despesas de
transporte;
• qualquer garantia comercial não prevalece as condições aqui
mencionadas.
A lista pode ser sujeita a um complemento conforme o tipo de artigo
e estar mencionada no manual de utilização.
Made in PRC
Imported by Velleman Group nv
Legen Heirweg 33, 9890 Gavere, Belgium
www.velleman.eu
-
 1
1
-
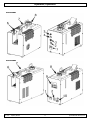 2
2
-
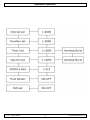 3
3
-
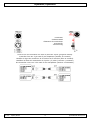 4
4
-
 5
5
-
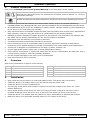 6
6
-
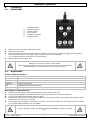 7
7
-
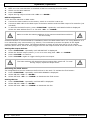 8
8
-
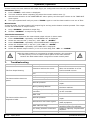 9
9
-
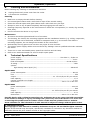 10
10
-
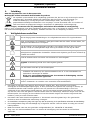 11
11
-
 12
12
-
 13
13
-
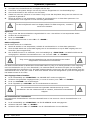 14
14
-
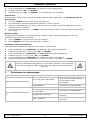 15
15
-
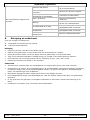 16
16
-
 17
17
-
 18
18
-
 19
19
-
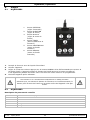 20
20
-
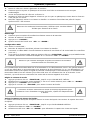 21
21
-
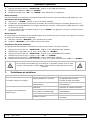 22
22
-
 23
23
-
 24
24
-
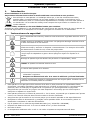 25
25
-
 26
26
-
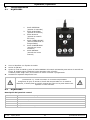 27
27
-
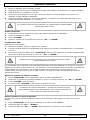 28
28
-
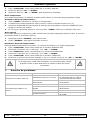 29
29
-
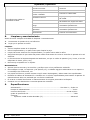 30
30
-
 31
31
-
 32
32
-
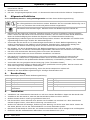 33
33
-
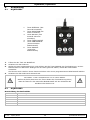 34
34
-
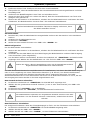 35
35
-
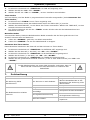 36
36
-
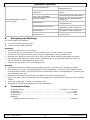 37
37
-
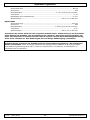 38
38
-
 39
39
-
 40
40
-
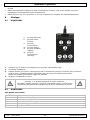 41
41
-
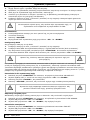 42
42
-
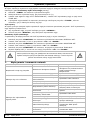 43
43
-
 44
44
-
 45
45
-
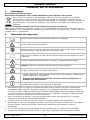 46
46
-
 47
47
-
 48
48
-
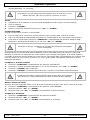 49
49
-
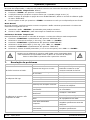 50
50
-
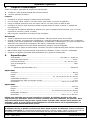 51
51
-
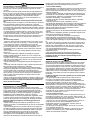 52
52
-
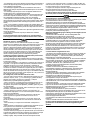 53
53
-
 54
54


HQ-Power HQHZ10001 Handleiding
- Categorie
- Mist machine
- Type
- Handleiding
in andere talen
- français: HQ-Power HQHZ10001 Manuel utilisateur
- español: HQ-Power HQHZ10001 Manual de usuario
- Deutsch: HQ-Power HQHZ10001 Benutzerhandbuch
- português: HQ-Power HQHZ10001 Manual do usuário
- polski: HQ-Power HQHZ10001 Instrukcja obsługi