Pagina wordt geladen...

WARNING- When using any electrical or electronic product, basic precautions should always be followed. These precautions
include, but are not limited to, the following:
1. Read all Safety Instructions, Installation Instructions, Special Message Section items, and any Assembly Instructions found
in this manual BEFORE making any connections, including connection to the main supply.
2. Do not attempt to service this product beyond that described in the user-maintenance instructions. All other servicing should
be referred to qualified service personnel.
3. Main Power Supply Verification: Yamaha products are manufactured specifically for the supply voltage in the area where
they are to be sold. If you should move, or if any doubt exists about the supply voltage in your area, please contact your dealer for
supply voltage verification and (if applicable) instructions. The required supply voltage is printed on the name plate. For name plate
location, please refer to the graphic found in the Special Message Section of this manual.
4. DANGER-Grounding Instructions: This product must be grounded and therefore has been equipped with a three pin
attachment plug. If this product should malfunction, the ground pin provides a path of low resistance for electrical current, reducing
the risk of electrical shock. If your wall socket will not accommodate this type plug, contact an electrician to have the outlet replaced
in accordance with local electrical codes. Do NOT modify the plug or change the plug to a different type!
5. WARNING: Do not place this product or any other objects on the power cord or place it in a position where anyone
could walk on, trip over, or roll anything over power or connecting cords of any kind. The use of an extension cord is not
recommended! If you must use an extension cord, the minimum wire size for a 25' cord (or less) is 18 AWG. NOTE: The smaller
the AWG number, the larger the current handling capacity. For longer extension cords, consult a local electrician.
6. Ventilation: Electronic products, unless specifically designed for enclosed installations, should be placed in locations that
do not interfere with proper ventilation. If instructions for enclosed installations are not provided, it must be assumed that
unobstructed ventilation is required.
7. Temperature considerations: Electronic products should be installed in locations that do not seriously contribute to their
operating temperature. Placement of this product close to heat sources such as; radiators, heat registers etc., should be avoided.
8. This product was NOT designed for use in wet/damp locations and should not be used near water or exposed to rain. Examples
of wet /damp locations are; near a swimming pool, spa, tub, sink, or wet basement.
9. This product should be used only with the components supplied or; a cart ,rack, or stand that is recommended by the
manufacturer. If a cart, rack, or stand is used, please observe all safety markings and instructions that accompany the accessory
product.
10. The power supply cord (plug) should be disconnected from the outlet when electronic products are to be left unused for
extended periods of time. Cords should also be disconnected when there is a high probability of lightening and/or electrical storm
activity.
11. Care should be taken that objects do not fall and liquids are not spilled into the enclosure through any openings that may exist.
12. Electrical/electronic products should be serviced by a qualified service person when:
a. The power supply cord has been damaged; or
b. Objects have fallen, been inserted, or liquids have been spilled into the enclosure through openings; or
c. The product has been exposed to rain; or
d. The product does not operate, exhibits a marked change in performance; or
e. The product has been dropped, or the enclosure of the product has been damaged.
13. This product, either alone or in combination with an amplifier and headphones or speaker/s, may be capable of producing
sound levels that could cause permanent hearing loss. DO NOT operate for a long period of time at a high volume level or at a level
that is uncomfortable. If you experience any hearing loss or ringing in the ears, you should consult an audiologist.
IMPORTANT: The louder the sound, the shorter the time period before damage occurs.
14. Some Yamaha products may have benches and/or accessory mounting fixtures that are either supplied as a part of the product
or as optional accessories. Some of these items are designed to be dealer assembled or installed. Please make sure that benches are
stable and any optional fixtures (where applicable) are well secured BEFORE using. Benches supplied by Yamaha are designed for
seating only. No other uses are recommended.
INFORMATION RELATING TO PERSONAL INJURY, ELECTRICAL SHOCK,
AND FIRE HAZARD POSSIBILITIES HAS BEEN INCLUDED IN THIS LIST.
IMPORTANT SAFETY INSTRUCTIONS
PLEASE KEEP THIS MANUAL
92-469-3
● Per prevenire possibili danni, evitare di utilizzare
l’amplificatore nelle seguenti situazioni:
• luoghi direttamente esposti al sole o accanto ad
apparecchi che generano calore.
• luoghi soggetti a temperature estremamente fred-
de o calde.
• luoghi soggetti a livelli estremi di umidità o polve-
re.
• luoghi soggetti a forti urti o vibrazioni.
● Prima di effettuare qualsiasi collegamento, assicu-
rarsi che l’AA5 e qualunque altra apparecchiatura
esterna siano spenti.
● Per proteggere gli altoparlanti da possibili danni,
impostare sempre la manopola VOLUME su “0” pri-
ma di accendere o spegnere l’apparecchio.
● Non applicare eccessiva forza ai controlli ed agli
interruttori.
● Non tenere l’AA5 per la sua maniglia di trasporto
facendolo oscillare. La maniglia potrebbe staccarsi
o spezzarsi dall’unità, causando danni al suo case o
alle sue parti elettroniche. Potrebbero anche aversi
infortuni.
Avvertenze
● Il vostro amplificatore di controllo Yamaha è uno
strumento di precisione. È necessario maneggiarlo
con cura ed evitare cadute e maltrattamenti.
● Per sicurezza, staccare sempre la spina di alimenta-
zione dalla presa di corrente alternata in caso di
fulmini.
● Per evitare di captare rumori indesiderati, posizio-
nare l’amplificatore lontano da illuminazioni al neon
e luci fluorescenti.
● Per evitare danni e rischi di scossa elettrica, non
aprire in nessun caso l’apparecchio per accedere ai
circuiti interni.
● Non utilizzare mai per la pulizia benzene o solventi:
gli agenti chimici contenuti possono causare alla
verniciatura danni o perdita di colore. Usare sempre
un panno soffice e asciutto per rimuovere polvere e
sporcizia.
Vi ringraziamo per aver acquistato questo amplificatore di controllo Yamaha AA5.
Prima di farne uso, per motivi di sicurezza è bene leggere sino in fondo questo manuale di istruzioni.
Conservarlo poi in un luogo sicuro per poterlo consultare ancora in caso di bisogno.
Amplificatore di controllo
AA5
Manuale di istruzioni
Specifiche Tecniche
●Potenza d’uscita : 4 W in mono (2 W + 2 W in stereo con l’uso di AUX IN) ●Altoparlante : 12 cm x
2 ●Controllori/selettori : VOLUME, TONE, POWER ●Pannello posteriore : INPUT (prese
monofoniche standard), AUX IN (minispinotto stereo), LINE OUT (prese monofoniche standard), DC IN 6–
9V ( ) ●Alimentazione : quattro batterie AA o adattatore di corrente opzionale ●Durata delle
batterie : 60 ore consecutive (con batterie alcaline) o tre mesi a un’ora di uso al giorno ●Dimensioni (L x
A x P) : 172 x 158 x 158 mm * Esclusa la maniglia di trasporto ●Peso : 1,8 kg * Escluse le batterie
●Accessori : adattatore di corrente (PA-D09)
* Le specifiche e l’aspetto possono subire variazioni senza preavviso.
● Gebruik uw versterker liever niet op de volgende
lokaties om eventuele schade te voorkomen:
• In direct zonlicht of naast verwarmingselementen.
• Extreme koude of warme lokaties.
• Lokaties die tentoongesteld worden aan hoge
vochtigheid of overdreven stof.
• Lokaties die onderhevig zijn aan sterke schok-
ken of vibraties.
● Zorg ervoor, alvorens enige aansluitingen te maken,
dat de AA5 en eventuele externe apparaat uitstaat.
● Zet, om de luidspreker tegen mogelijke beschadi-
gingen te beschermen, altijd de VOLUME knop op
“0” alvorens de versterker aan te zetten.
● Oefen geen overdreven kracht op de schakelaars
en knoppen uit.
● Slinger de AA5 niet aan de handgreep rond. Hier-
door kan de handgreep loskomen zodat de behui-
zing of de interne elektronica beschadigd raakt. Dit
kan ook leiden tot persoonlijk letsel.
Voorzorgsmaatregelen
● Uw Yamaha Monitor Versterker is een precisie mu-
ziekinstrument. Behandel het toestel met zorg, laat
het niet vallen en stoot er niet tegen.
● Haal altijd voor de veiligheid de stroomkabel uit het
stopcontact als het in uw woonomgeving onweert.
● Plaats de versterker niet in de buurt van neon ver-
lichting of fluoriscentie verlichting om te voorkomen
dat deze storen.
● Open, om schade en een mogelijke electrische schok
te voorkomen, nooit de kast en de knoei nooit met
de interne elektronika.
● Gebruik nooit benzine, verdunner of andere vluch-
tige stoffen om de versterker schoon te maken, aan-
gezien deze chemicaliën schade of verkleuringen
kunnen veroorzaken. Gebruik altijd een droge, zachte
doek om stof en vuil weg te vegen.
Hartelijk dank voor het aanschaffen van deze Yamaha AA5 Monitor Versterker.
Voor u dit toestel in gebruik neemt, dient u deze handleiding zorgvuldig door te lezen zodat u het doelmatig en
veilig kunt gebruiken.
Bewaar de handleiding nadat u hem gelezen hebt, zodat u er later nog eens iets in kunt opzoeken.
Monitor Versterker
AA5
Handleiding
Specificaties
●Uitgangsvermogen : 4W mono (2 W + 2 W stereo, bij gebruik van AUX IN) ●Luidspreker : 12 cm
x 2 ●Bedieningsknoppen/Schakelaars : VOLUME, TONE, POWER ●Aansluitingen : INPUT
(standaard mono penstekkeraansluitingen), AUX IN (stereo ministekker-aansluiting), LINE OUT (standaard
mono penstekkeraansluitingen), DC IN 6–9V ( ) ●Stroomvoorziening : AA batterij x 4 of los
verkrijgbare netstroomadapter ●Levensduur batterijen : 60 uur bij doorlopend gebruik (op alkali batte-
rijen), ongeveer 3 maanden bij 1 uur gebruik per dag. ●Afmetingen (B x H x D) : 172 x 158 x 158 mm *
exclusief handvat ●Gewicht : 1.8 kg * exclusief batterijent ●Accessoire : Netstroomadapter (PA-D09)
* Specificaties en uiterlijk kunnen wijzigen zonder dat hier vantevoren kennis van wordt gegeven.
R0 Printed in Indonesia
FCC INFORMATION (U.S.A.)
the user’s manual, may cause interference harmful to the operation of
other electronic devices. Compliance with FCC regulations does not
guarantee that interference will not occur in all installations. If this
product is found to be the source of interference, which can be
determined by turning the unit “OFF” and “ON”, please try to
eliminate the problem by using one of the following measures:
Relocate either this product or the device that is being affected by the
interference.
Utilize power outlets that are on different branch (circuit breaker or
fuse) circuits or install AC line filter/s.
In the case of radio or TV interference, relocate/reorient the antenna.
If the antenna lead-in is 300 ohm ribbon lead, change the lead-in to
co-axial type cable.
If these corrective measures do not produce satisfactory results,
please contact the local retailer authorized to distribute this type of
product. If you cannot locate the appropriate retailer, please contact
Yamaha Corporation of America, Electronic Service Division, 6600
Orangethorpe Ave, Buena Park, CA 90620
1. IMPORTANT NOTICE: DO NOT MODIFY THIS
UNIT!
This product, when installed as indicated in the instructions contained
in this manual, meets FCC requirements. Modifications not expressly
approved by Yamaha may void your authority, granted by the FCC,
to use the product.
2. IMPORTANT: When connecting this product to accessories and/
or another product use only high-quality shielded cables. Cable/s
supplied with this product MUST be used. Follow all installation
instructions. Failure to follow instructions could void your FCC
authorization to use this product in the USA.
3. NOTE: This product has been tested and found to comply with the
requirements listed in FCC Regulations, Part 15 for Class “B” digital
devices. Compliance with these requirements provides a reasonable
level of assurance that your use of this product in a residential
environment will not result in harmful interference with other
electronic devices. This equipment generates/uses radio frequencies
and, if not installed and used according to the instructions found in
CANADA
THIS DIGITAL APPARATUS DOES NOT EXCEED THE “CLASS B” LIMITS FOR RADIO NOISE EMISSIONS FROM DIGITAL APPARATUS SET
OUT IN THE RADIO INTERFERENCE REGULATION OF THE CANADIAN DEPARTMENT OF COMMUNICATIONS.
LE PRESENT APPAREIL NUMERIQUE N’EMET PAS DE BRUITS RADIOELECTRIQUES DEPASSANT LES LIMITES APPLICABLES AUX
APPAREILS NUMERIQUES DE LA “CLASSE B” PRESCRITES DANS LE REGLEMENT SUR LE BROUILLAGE RADIOELECTRIQUE EDICTE PAR
LE MINISTERE DES COMMUNICATIONS DU CANADA.
• This applies only to products distributed by Yamaha Canada Music Ltd.
• Ceci ne s’applique qu’aux produits distribués par Yamaha Canada Musique Ltée.
•
The above statements apply ONLY to those products distributed by Yamaha Corporation of America or its subsidiaries.

Nomenclature and Functions Nomenclature et fonctions
q INPUT: Raccordez un instrument tel qu’une guitare, etc., à cette
prise d’entrée (fiche téléphonique monaurale standard).
* Avant de faire les connexions, réglez l’interrupteur d’alimentation en position OFF.
w VOLUME: Ajuste le volume des haut-parleurs. Tournez vers la
droite pour augmenter le volume. Une rotation maximum vers la
gauche ne produit aucun son.
e TONE: Ajuste la qualité acoustique du haut-parleur. Tournez vers
la droite pour augmenter le niveau des hautes fréquences.
r AUX IN: Raccordez un appareil audio extérieur tel qu’un lecteur
de disque, un lecteur MD, etc., à cette prise d’entrée (mini stéréo).
t LINE OUT: Convertit l’impédance du signal de la prise INPUT et
transmet le signal par l’intermédiaire de cette prise (en dérivation
du circuit TONE). Le fait de connecter le signal provenant de
cette prise à la prise INPUT d’un autre AA5 permet au son d’un
système de 4 haut-parleurs (2x2) d’être délivré.
y DC IN: Lorsqu’un adaptateur d’alimentation secteur est utilisé,
raccordez-le ici.
* Utilisez l’adaptateur d’alimentation secteur ou un adaptateur d’alimentation
secteur pouvant délivrer du courant continue 6-9 V/1 A ou moins (
).
u POWER: Il s’agit ici de l’interrupteur d’alimentation. Lorsqu’il est
réglé en position ON, la lampe témoin placée près de la prise
INPUT s’allume.
* Afin de protéger les haut-parleurs, réglez la commande de volume w sur “0”
lors de la commutation de l’alimentation sur ON ou OFF. Par ailleurs, réglez-
la sur sa position “OFF” quand le AA-5 n’est pas utilisé.
i Logement des piles: Lorsqu’une alimentation sur pile est utili-
sée, introduisez correctement quatre piles de taille AA dans le
logement de pile comme cela est représenté sur l’illustration ci-
dessous (faites très attention aux indications de polarité).
* Avec l’épuisement progressif des piles, le niveau sonore se détériore et du bruit
se manifeste. En pareil cas, remplacez les piles tout en respectant les précau-
tions indiquées ci-dessous.
• Veillez à ce que toutes les piles soient insérées avec leurs pôles
convenablement alignés. Un alignement incorrect des pôles peut être à l’ori-
gine d’un incendie.
• Remplacez toutes les piles en même temps. Ne mélangez pas des piles usées
avec des piles neuves, etc., ou ne mélangez pas différents types de pile
(alcaline, manganèse, différentes marques, différents types du même fabri-
cant, etc.) car ceci peut être à l’origine d’un incendie.
* Quand il n’est pas prévu d’utiliser l’appareil sur une période prolongée, reti-
rez les piles de l’appareil. Le fait de laisser les piles dans l’appareil fera qu’el-
les s’épuiseront, ce qui aura pour résultat de l’endommager à la suite de
suintement de liquide.
o Poignée de transport: La poignée est amovible. Lors du trans-
port, assurez-vous que la poignée de transport est solidement
retenue par la goupille de bandoulière. Si toutefois la poignée
n’était pas solidement retenue, l’appareil risque de tomber par
terre et d’être abîmé voire de blesser quelqu’un.
!0 Embase filetée d’appareil photo (à la base): Utilisez l’embase
filetée d’appareil photo (1/4 de po.) à la base l’appareil pour fixer
le AA5 sur un trépied d’appareil photo.
* Faites en sorte d’utiliser un trépied capable de supporter des poids de plus de 2 kg.
Bedienteile und Funktionen
q INPUT: Schließen Sie ein Instrument wie eine E-Gitarre o. dgl.
an diese Buchse (Standard-Mono-Klinkenbuchse) an.
* Stellen Sie den POWER-Schalter vor dem Anschluß auf OFF (aus).
w VOLUME: Zum Einstellen der Lautsprecherlautstärke. Drehen Sie
den Regler für mehr Lautstärke nach rechts und für weniger Laut-
stärke nach links.
e TONE: Zum Einstellen des Lautsprecherklangs. Beim Drehen
nach links werden die Höhen betont.
r AUX IN: An diese Eingangsbuchse (Stereo-Miniklinkenbuchse)
können Sie ein externes Audiogerät wie CD-Player, MD-Player
usw. anschließen.
t LINE OUT: An dieser Buchse wird das über die INPUT-Buchse
eingegebene Signal direkt (unter Umgehung der TONE-Regel-
schaltung) als Hochpegelsignal ausgegeben. Durch Verbinden
dieser Buchse mit der INPUT-Buchse eines weiteren AA5 kön-
nen Sie ein 4-Lautsprecher-System (2x2) zusammenstellen.
y DC IN: Hier können Sie für Netzbetrieb einen Netzadapter an-
schließen.
* Verwenden Sie den mitgelieferten Netzadapter oder ein anderes geeignetes
Netzteil (6 bis 9 V Gleichstrom/max. 1 A,
).
u POWER: Mit diesem Schalter wird das Gerät ein- und ausge-
schaltet. Bei eingeschaltetem Gerät (ON) leuchtet die Anzeige-
lampe neben der INPUT-Buchse.
* Zum Schutz der Lautsprecher stellen Sie vor dem Ein- oder Ausschalten den
VOLUME-Regler w auf “0”. Vergessen Sie nach Gebrauch nicht, den POWER-
Schalter auf “OFF” (aus) zu stellen.
i Batteriefach: Hier legen Sie für Batteriebetrieb vier Batterien der
Größe AA ein, wie in der unteren Abbildung dargestellt (unbe-
dingt auf korrekte Ausrichtung der Batteriepole achten).
* Bei abnehmender Batteriespannung klingt der Ton mehr und mehr verzerrt
und verrauscht. Ersetzen Sie in diesem Fall die Batterien unter Beachtung der
folgenden Vorsichtsmaßregeln durch frische.
• Achten Sie darauf, daß die Batteriepole den Markierungen entsprechend
ausgerichtet werden. Falsche Ausrichtung kann einen Brand verursachen.
• Ersetzen Sie stets alle Batterien durch neue. Wenn gebrauchte und neue
Batterien oder unterschiedliche Batterien (Alkali- und Manganbatterien,
Batterien verschiedener Hersteller, unterschiedliche Typen desselben Her-
stellers) gemischt werden, kann dies einen Brand verursachen.
* Wenn das Gerät voraussichtlich längere Zeit nicht gebraucht wird, nehmen Sie
die Batterien aus dem Fach. Eingelegte Batterien entladen sich mit der Zeit
und können auslaufen, was oft eine schwere Beschädigung mit sich bringt.
o Tragegriff: Der Tragegriff kann abgenommen werden. Achten
Sie beim Heben und Tragen darauf, dass der Griff sicher am Knauf
befestigt ist. Ein Lösen des Griffs kann einen Fall des Geräts und
eine Beschädigung bzw. Verletzung verursachen.
!0 Stativgewinde (Unterseite): Dieses Gewinde (1/4-Zoll) erlaubt
die Aufstellung des AA5 auf einem Kamerastativ.
* Sie müssen ein Stativ mit einer Tragfähigkeit von mindestens 2 kg verwenden.
Nomenclatura y funciones
q INPUT: Conecte un instrumento, como pueda ser una guitarra,
etc., a esta toma de entrada (miniclavija monofónica estándar).
* Antes de realizar las conexiones, ponga el interruptor de la alimentación en la
posición OFF.
w VOLUME: Ajusta el volumen del altavoz. Gírelo hacia la derecha
para subir el volumen. Si lo gira completamente hacia la izquier-
da, no produce volumen.
e TONE: Ajusta el tono del altavoz. Gírelo hacia la derecha para
acentuar las altas frecuencias.
r AUX IN: Conecte un dispositivo de audio exterior, como pueda
ser un reproductor de CD, reproductor de MD, etc., a esta toma
de entrada (mini estéreo).
t LINE OUT: Convierte la impedancia de la señal de la toma de
entrada INPUT y emite la señal por esta toma (pasando por alto
el circuito de tono (TONE)). Si se conecta la señal que sale por
esta toma a la toma de entrada (INPUT) de otro AA5, podrá emi-
tir el sonido por un sistema de 4 altavoces (2x2).
y DC IN: Cuando se emplee un adaptador de alimentación de CA,
conéctelo a esta toma.
* Emplee el adaptador de CA suministrado, o un adaptador de alimentación de
CA que tenga salida de 6-9 V CC/1 A o menos ( ).
u POWER: Éste es el interruptor de la alimentación. Cuando se
pone en la posición ON, se enciende la luz que está al lado de la
toma INPUT.
* Para proteger los altavoces, ajuste el control de volumen w en la posición “0”
antes de conectar o desconectar la alimentación. Déjelo también en la posi-
ción “OFF” cuando no utilice el AA5.
i Caja de las pilas: Cuando emplee la alimentación de las pilas,
inserte adecuadamente cuatro pilas del tamaño AA en la caja de
las pilas como se muestra en la ilustración siguiente (tenga cui-
dado con las marcas de las polaridades).
* A medida que se gasta la carga de las pilas, el sonido se va distorsionando y
sale acompañado de ruido. En estos casos, reemplace las pilas siguiendo las
precauciones siguientes.
• Asegúrese de insertar todas las pilas con sus polaridades correctamente ali-
neadas. Si las polaridades no están bien alineadas, puede producirse fuego.
• Reemplace todas las pilas al mismo tiempo. No mezcle pilas usadas con
pilas nuevas, etc. ni tampoco mezcle pilas de tipos distintos (alcalinas,
manganesas, marcas distintas, tipos distintos de la misma marca, etc.) por-
que podría producirse fuego.
* Cuando no se proponga utilizar el aparato durante períodos prolongados de
tiempo, extraiga las pilas de la unidad. Si se dejan las pilas en la unidad,
pueden producirse reducciones de la carga, lo cual puede ser causa daños
debido a las fugas de las pilas.
o
Asa para el transporte: El asa es extraíble. Cuando efectúe el trans-
porte, asegúrese de que el asa esté montada con seguridad en el
pasador de correa. Si el asa no está montada con seguridad, la uni-
dad podría caerse, pudiéndose dañar o causar heridas personales.
!0 Rosca de cámara (parte inferior): Emplee la rosca de cámara
(1/4 de pulgada) de la parte inferior de la unidad para montar el
AA5 en un trípode de cámara.
* Asegúrese de emplear un trípode que pueda soportar pesos de más de 2 kg.
Nome e funzione delle varie parti
q INPUT: Collegare a questa presa di ingresso (spinotto monofonico
standard) uno strumento come una chitarra.
* Prima di procedere con i collegamenti, portare l’interruttore di accensione sul-
la posizione OFF.
w VOLUME: Regola il volume di riproduzione del diffusore. Girare
questa manopola verso destra per aumentare il volume. Girarla
del tutto verso sinistra per azzerare il volume.
e TONE: Regola la qualità del suono prodotti dal diffusore. Girare
questa manopola verso destra per aumentare gli acuti.
r AUX IN: Collegare a questa presa di ingresso (minispinotto stereo)
un dispositivo audio esterno come un lettore CD o un lettore MD.
t LINE OUT: L’apparecchio converte l’impedenza del segnale del-
l’ingresso INPUT ed emette tale segnale da questa presa, evitan-
do i circuiti TONE. Mandando il segnale da questa presa ad una
presa INPUT di un altro AA5, si può riprodurre il suono contempo-
raneamente con quattro diffusori (2 x 2).
y DC IN: Se si usa un adattatore di corrente alternata, collegarlo a
questa presa.
* Usare l’adattatore di corrente alternata in dotazione o un altro adattatore che
produca corrente continua da 6-9 V/1 A o meno (
).
u POWER: Questo è l’interruttore di accensione. Quando si trova
nella posizione ON, la luce accanto alla presa INPUT si accende.
* Per proteggere i diffusori, prima di accendere o spegnere l’apparecchio portare
sempre il controllo del volume w. Inoltre, quando l’AA5 non è in uso, portarne
l’interruttore di accensione sulla posizione “OFF”.
i Alloggiamento delle batterie: Per alimentare l’apparecchio a bat-
terie, inserire correttamente quattro batterie di formato AA nel modo
visto in figura (facendo attenzione alle loro polarità).
* Mano a mano che le batterie si scaricano, il suono si distorce e si fa rumoroso.
In tal caso, sostituire le batterie nel modo seguente.
• Controllare che le batterie siano inserite con le polarità orientate corretta-
mente. Se orientate in modo scorretto, le batterie possono incendiarsi.
• Sostituire sempre tutte le batterie allo stesso tempo. Non mescolare batte-
rie vecchie e nuove. Non mescolare batterie di tipo diverso, ad esempio
alcaline, al manganese, di marca diversa o di tipo diverso anche della stes-
sa marca, dato che ciò potrebbe causare incendi.
*
Se si prevede di non dover usare l’apparecchio per qualche tempo, toglierne le
batterie. Lasciandone nell’apparecchio esse si scaricano e possono perdere acido.
o Maniglia di trasporto: Maniglia di trasporto: la maniglia di tra-
sporto è rimovibile. Durante il trasporto, controllare che sia fer-
mata bene all’attacco per tracolla di chitarra. Se non lo fosse,
quest’unità potrebbe cadere causando ferite e danni.
!0 Filettatura per treppiedi (fondo): Usare la filettatura per trep-
piedi da 1/4 di pollice sul fondo dell’apparecchio per installare
l’AA5 su di un treppiedi per fotocamere.
* Accertarsi che il treppiedi sia in grado di sopportare carichi da oltre 2 kg.
Benamingen en functies
q INPUT: Op deze ingangsaansluiting kunt u een instrument zoals
een gitaar enz. aansluiten (standaard mono stekker-aansluiting).
* Voor u aansluitingen gaat maken moet u de aan/uit knop op OFF (uit) zetten.
w VOLUME: Hiermee stelt u het geproduceerde volume in. Draai
naar rechts om het volume te verhogen. Draai helemaal links om
de geluidsweergave uit te schakelen.
e TONE: Toonregeling van de geluidsweergave. Draai naar rechts
om de hoge tonen te versterken.
r AUX IN: Op deze ingangsaansluiting kunt u externe audio-appa-
ratuur zoals een CD-speler, MD-speler enz. aansluiten (stereo mini-
stekker).
t LINE OUT: Past de impedantie van het ingangssignaal van de
INPUT aansluiting aan reproduceert dit signaal (zonder invloed
van de TONE toonregeling). Als u deze aansluiting verbindt met
de INPUT van een andere AA5, verkrijgt u geluidsweergave via
een systeem met 4 luidsprekers (2x2).
y DC IN: Hierop kunt u een netstroomadapter aansluiten.
* Gebruik de meegeleverde netstroomadapter, of een netstroomadapter die maxi-
maal 6-9 V/1 A gelijkstroom of minder produceert (
).
u POWER: Dit is de aan/uit knop. Als het toestel aan staat (ON), zal
het lampje naast INPUT gaan branden.
*
Ter bescherming van de luidsprekers moet u het volume w op “0” zetten wanneer u
het toestel aan/uit zet. Zet de AA5 ook uit wanneer u het toestel niet gebruikt.
i Batterijhouder: Wanneer u de versterker op batterijen wilt ge-
bruiken, moet u vier AA formaat batterijen op de juiste manier,
zoals u kunt zien in de afbeelding hieronder, in de batterijhouder
doen (let goed op de plus en min polen van de batterijen).
*
Wanneer de batterijen leeg raken zal de geluidsweergave meer ruis bevatten en gemak-
kelijker vervormen. Let bij het vervangen van de batterijen op de volgende punten.
• Zorg ervoor dat de batterijen met de polen in de juiste richting ingezet wor-
den. Als de plus en min polen niet goed zitten, kan er zelfs brand ontstaan.
• Vervang alle batterijen tegelijkertijd. Gebruik geen oude en nieuwe batte-
rijen of verschillende soorten batterijen (alkali, mangaan, verschillende fa-
brikanten, verschillende types van dezelfde fabrikant enz.) door elkaar; ook
dit kan brand veroorzaken.
* Wanneer u het toestel langere tijd niet zult gebruiken, dient u de batterijen eruit
te halen. Als u de batterijen in het toestel laat zitten zullen ze leeg lopen en
kunnen ze gaan lekken waardoor het toestel beschadigd kan worden.
o Handvat: Het handvat kan losgemaakt worden. In gebruik moet u
ervoor zorgen dat het handvat goed vast zit aan de riempen. Als
het handvat niet goed vast zit, kan het toestel uit uw handen val-
len en beschadigd raken of schade of letsel veroorzaken.
!0 Statiefaansluiting (onderkant): Met de standaard statief-
aansluiting (1/4 inch) aan de onderkant van het toestel kunt u de
AA5 gemakkelijk op een gewoon camerastatief zetten.
* Zorg er wel voor dat het statief dat u wilt gebruiken stevig genoeg is voor ge-
wichten van 2 kg of meer.
q INPUT: Connect an instrument such as a guitar, etc., to this input
jack (standard monaural phone jack).
* Before making connections, set the power switch to its OFF position.
w VOLUME: Adjusts the speaker volume. Rotate to the right to in-
crease volume. Rotating fully to the left produces no volume.
e TONE: Adjusts the speaker's tone quality. Rotate to the right to
increase high frequencies.
r AUX IN: Connect an external audio device such as a CD player,
MD player, etc., to this input jack (stereo mini).
t LINE OUT: Converts the impedance of the INPUT jack’s signal
and sends the signal out through this jack (bypassing the TONE
circuit). Connecting the signal from this jack to the INPUT jack on
another AA5 allows sound output from a 4-speaker system (2x2).
y DC IN: When using an AC power adaptor, connect it here.
* Use the supplied AC power adaptor, or an AC power adaptor that delivers
DC6-9V/1A or less (
).
u POWER: This is the power switch. When set to the ON position,
the lamp next to the INPUT jack lights.
* To protect the speakers, set the volume control w to "0" when switching the
power ON/OFF. Also, set the power to its "OFF" position when the AA5 is not
in use.
i Battery Box: When using battery power, properly insert four AA
size batteries into the battery box as shown in the illustration be-
low (take careful notice of the polarity markings).
* As battery power gets low, the sound will become distorted and noisy. In this
case, replace the batteries following the cautions below.
• Make sure all batteries are inserted with their poles properly aligned. Im-
properly aligned poles can cause fire.
• Replace all batteries at the same time. Do not mix old with new batteries,
etc., or mix different battery types (alkaline, manganese, different manu-
facturers, different types by the same manufacturer, etc.) as it can result in
fire.
* When the device is not to be used for an extended period of time, remove the
batteries from the unit. Leaving the batteries in the unit will result in depletion
of power, which can result in damage due to leakage.
o Carrying Handle: The handle is removable. When transporting,
make sure that the handle is attached securely to the strap pin. If
the handle is not securely attached, the unit can drop causing
damage or injury.
!0 Camera Screw (Bottom): Use the camera screw (1/4-inch) on
the bottom of the unit to attach the AA5 to a camera tripod.
* Make sure to use a tripod that can accommodate weights of more than 2kg.

■ Connecting an instrument (Fig. 1)
Connect the output jack (LINE OUT, etc.) on the Yamaha Silent Gui-
tar, or other similar instrument, to the INPUT jack on the AA5.
Placing the AA5 in various positions (changing speaker direction or
facing the wall, etc.) allows for different sound variations.
* If the sound is distorted, reduce the VOLUME level on the instrument.
■ Connecting an audio device or computer (Fig. 2)
Connect the headphones (PHONES) jack on the computer or audio
device such as a CD player, etc., to the AUX IN jack on the AA5.
Sound output will be in stereo if a stereo source is connected in ste-
reo.
* Use the volume control on the source device to control its volume output level.
■ Connecting an additional AA5 (Fig. 3)
Connect the LINE OUT jack on one of the AA5s to the INPUT jack on
the other AA5 to create a 2W x 4 speaker system. Three or four AA5s
can be connected in the same manner.
Using the AA5 (Connections)
Before making any connections, make sure that unit's
power and the power on all related devices is
switched OFF.
AA Batteries x4 / 4 piles AA
AA-Batterie x 4 / 4 pilas tamaño AA
Batterie AA x 4 / AA batterijen x 4
Left / gauche
links / Izquierdo
sinistro / links
■ Raccordement de l’instrument (Fig. 1)
Raccordez la prise de sortie (LINE OUT, etc.) d’une guitare Silent
Guitar Yamaha ou d’un instrument similaire à la prise INPUT du AA5.
En disposant le AA5 dans diverses positions (en changeant l’orienta-
tion du haut-parleur ou en le dirigeant vers le mur, etc.) il est possible
d’obtenir diverses sortes de sonorités.
* Si une distorsion du son se produit, réduisez niveau de sortie de l’instrument.
■ Raccordement d’un appareil audio ou d’un ordi-
nateur (Fig. 2)
Raccordez la prise d’un casque d’écoute (PHONES) de l’ordinateur
ou de l’appareil audio tel qu’un lecteur de disque CD, etc., à la prise
AUX IN du AA5. Le son délivré sera en stéréo si une source stéréo
est connectée en stéréo.
* Utilisez la commande de volume du périphérique source pour contrôler son niveau
de sortie.
■ Raccordement d’un AA5 supplémentaire (Fig. 3)
Raccordez la prise LINE OUT d’un des AA5 à la prise INPUT d’un
autre AA5 pour créer un système de 4 haut-parleurs x 2 W. Trois ou
quatre AA5 peuvent être connectés de la même manière.
Utilisation du AA-5 (connexions)
Avant de faire n’importe quelle connexion, assurez-
vous que l’alimentation de l’appareil et que l’alimen-
tation de tous les appareils connexes est coupée.
■ Anschluß eines Instruments (Abb. 1)
Verbinden Sie die Ausgangsbuchse (LINE OUT usw.) des Yamaha
Silent Guitar oder eines ähnlichen Instruments mit der INPUT-Buchse
am AA5.
Durch Verändern des AA5-Stellwinkels (andere Lautsprecheraus-
richtung, Beschallung gegen eine Wand u. dgl.) lassen sich verschie-
dene Sound-Variationen erzielen.
* Bei Klangverzerrungen vermindern Sie die Lautstärke am Instrument.
■
Anschluß eines Audiogeräts oder Computers (Abb. 2)
Verbinden Sie die Kopfhörerbuchse (PHONES) des Computers oder
Audiogeräts (CD-Player usw.) mit der AUX IN-Buchse des AA5. Bei
Anschluß einer Stereoquelle über ein Stereokabel wird der Ton stereo
wiedergegeben.
* Die Lautstärke wird mit dem entsprechenden Regler des angeschlossenen Quellen-
geräts eingestellt.
■ Anschluß eines zusätzlichen AA5 (Abb. 3)
Verbinden Sie die LINE OUT-Buchse dieses AA5 mit der INPUT-
Buchse des anderen AA5. Sie erhalten dadurch ein 4 x 2 W
Lautsprechersystem. Auf diese Weise können auch drei oder vier AA5
zusammengeschaltet werden
Verwendung des AA5 (Anschlüsse)
Schalten Sie dieses Gerät und alle anzuschließenden
Geräte vor dem Herstellen von Verbindungen AUS.
■ Conexión de un instrumento (Fig. 1)
Conecte la toma de salida (LINE OUT, etc.) de la Guitar Silenciosa
de Yamaha, o de otro instrumento similar, a la toma INPUT del AA5.
El AA5 puede ponerse en varias posiciones (cambiando la orienta-
ción de los altavoces o encarado a la pared, etc.) para obtener soni-
dos y variaciones distintos.
* Si el sonido sale distorsionado, reduzca el nivel de volumen (VOLUME) en el ins-
trumento.
■ Conexión de un dispositivo de audio o de un
ordenador (Fig. 2)
Conecte la toma de auriculares (PHONES) del ordenador o disposi-
tivo de audio, como pueda ser un reproductor de CD, etc., a la toma
de entrada AUX IN del AA5. El sonido saldrá en estéreo si el aparato
estéreo conectado se conecta en estéreo.
* Emplee el control de volumen del dispositivo de fuente de sonido para controlar su
nivel de volumen de salida.
■ Conexión de otro AA5 adicional (Fig. 3)
Conecte la toma de salida LINE OUT de uno de los AA5 a la toma de
entrada INPUT del otro AA5 para crear un sistema de 4 altavoces de
2 W. Podrán conectarse tres o cuatro AA5 del mismo modo.
Empleo del AA5 (Conexiones)
Antes de hacer cualquier conexión, asegúrese de que
la alimentación de la unidad y la alimentación de
todos los dispositivos relacionados esté desconec-
ta.
■ Collegamento di uno strumento (Fig. 1)
Collegare la presa di uscita (LINE OUT, ecc.) di una Silent Guitar
Yamaha o altro simile strumento alla presa INPUT dell’AA5.
Installando l’AA5 in posizioni diverse, vale a dire cambiando l’orien-
tamento degli altoparlanti o rivolgendolo verso un muro, è possibile
ottenere sonorità diverse.
* Se il suono prodotto è distorto, ridurre il livello del VOLUME dello strumento.
■ Collegamento ad un dispositivo audio o compu-
ter (Fig. 2)
Collegare la presa PHONES del dispositivo audio, ad esempio un
lettore CD, o del computer alla presa AUX IN dell’AA5. Il suono pro-
dotto è stereofonico se il segnale originale era stereofonico.
* Per controllare il volume di riproduzione, usare il controllo del volume del dispositivo
sorgente.
■ Collegamento di un AA5 addizionale (Fig. 3)
Collegare la presa LINE OUT di uno degli AA5 alla presa INPUT
dell’altro AA5 per creare un sistema di diffusori da 2 W x 4. Si posso-
no collegare in questo modo tre o quattro AA5.
Uso dell’AA5 (collegamenti)
Prima di fare dei collegamenti, controllare che sia
quest’unità che tutte quelle ad essa collegate siano
spente.
■ Aansluiten van een instrument (Afb. 1)
Verbind de uitgangsaansluiting (LINE OUT enz.) van een Yamaha
Silent Guitar of ander soortgelijk instrument, met de INPUT aanslui-
ting van de AA5.
Door de opstelling van de AA5 te veranderen (richting van de luid-
sprekers, naar de muur gericht enz.) kunt u de geluidsweergave ma-
nipuleren.
* Als de geluidsweergave vervormd wordt, dient u het VOLUME op het instrument te
verlagen.
■ Aansluiten van audio-apparatuur of een compu-
ter (Afb. 2)
Verbind de hoofdtelefoonaansluiting (PHONES) van de computer of
andere audio-apparatuur zoals een CD-speler enz. met de AUX IN
aansluiting van de AA5. Als de signaalbron in stereo is, zal het geluid
in stereo worden weergegeven.
* Gebruik de volumeregeling van de signaalbron om het volume te regelen.
■ Aansluiten van een extra AA5 (Afb. 3)
Verbind de LINE OUT aansluiting van de ene AA5 met de INPUT
aansluiting van de andere AA5 om een 2 W luidsprekersysteem met
4 luidsprekers te verkrijgen. Op deze manier kunt u zelfs drie of vier
AA5 versterkers op elkaar aansluiten.
Gebruiken van de AA5 (Aansluitingen)
Voor u aansluitingen gaat maken moet u dit toestel
en alle andere apparatuur uit zetten.
[Fig. 1]
LINE OUT
INPUT
AUX IN
PHONES PHONES PHONES
[Fig. 2]
[Fig. 3]
Right / droit
rechts / derecho
destro / rechts
LINE OUT
INPUT
INPUTLINE OUT
q
w
e r
t
y
u
i
!0
o
Speaker (left)
Haut-parleur (gauche)
Lautsprecher (links)
Altavoz (Izquierdo)
Altoparlante (sinistro)
Luidspreker (links)
Speaker (right)
Haut-parleur (droit)
Lautsprecher (rechts)
Altavoz (derecho)
Altoparlante (destro)
Luidspreker (rechts)
Documenttranscriptie
Amplificatore di controllo AA5 Manuale di istruzioni Monitor Versterker AA5 Handleiding Vi ringraziamo per aver acquistato questo amplificatore di controllo Yamaha AA5. Hartelijk dank voor het aanschaffen van deze Yamaha AA5 Monitor Versterker. Prima di farne uso, per motivi di sicurezza è bene leggere sino in fondo questo manuale di istruzioni. Voor u dit toestel in gebruik neemt, dient u deze handleiding zorgvuldig door te lezen zodat u het doelmatig en Conservarlo poi in un luogo sicuro per poterlo consultare ancora in caso di bisogno. veilig kunt gebruiken. Bewaar de handleiding nadat u hem gelezen hebt, zodat u er later nog eens iets in kunt opzoeken. Avvertenze ● Per prevenire possibili danni, evitare di utilizzare l’amplificatore nelle seguenti situazioni: • luoghi direttamente esposti al sole o accanto ad apparecchi che generano calore. • luoghi soggetti a temperature estremamente fredde o calde. • luoghi soggetti a livelli estremi di umidità o polvere. • luoghi soggetti a forti urti o vibrazioni. ● Prima di effettuare qualsiasi collegamento, assicurarsi che l’AA5 e qualunque altra apparecchiatura esterna siano spenti. ● Per proteggere gli altoparlanti da possibili danni, impostare sempre la manopola VOLUME su “0” prima di accendere o spegnere l’apparecchio. ● Non applicare eccessiva forza ai controlli ed agli interruttori. ● Il vostro amplificatore di controllo Yamaha è uno strumento di precisione. È necessario maneggiarlo con cura ed evitare cadute e maltrattamenti. ● Per sicurezza, staccare sempre la spina di alimentazione dalla presa di corrente alternata in caso di fulmini. ● Per evitare di captare rumori indesiderati, posizionare l’amplificatore lontano da illuminazioni al neon e luci fluorescenti. ● Per evitare danni e rischi di scossa elettrica, non aprire in nessun caso l’apparecchio per accedere ai circuiti interni. ● Non utilizzare mai per la pulizia benzene o solventi: gli agenti chimici contenuti possono causare alla verniciatura danni o perdita di colore. Usare sempre un panno soffice e asciutto per rimuovere polvere e sporcizia. ● Non tenere l’AA5 per la sua maniglia di trasporto facendolo oscillare. La maniglia potrebbe staccarsi o spezzarsi dall’unità, causando danni al suo case o alle sue parti elettroniche. Potrebbero anche aversi infortuni. Specifiche Tecniche ●Potenza d’uscita : 4 W in mono (2 W + 2 W in stereo con l’uso di AUX IN) ●Altoparlante : 12 cm x 2 ●Controllori/selettori : VOLUME, TONE, POWER ●Pannello posteriore : INPUT (prese monofoniche standard), AUX IN (minispinotto stereo), LINE OUT (prese monofoniche standard), DC IN 6– ) ●Alimentazione : quattro batterie AA o adattatore di corrente opzionale ●Durata delle 9V ( batterie : 60 ore consecutive (con batterie alcaline) o tre mesi a un’ora di uso al giorno ●Dimensioni (L x A x P) : 172 x 158 x 158 mm * Esclusa la maniglia di trasporto ●Peso : 1,8 kg * Escluse le batterie ●Accessori : adattatore di corrente (PA-D09) Voorzorgsmaatregelen ● Gebruik uw versterker liever niet op de volgende lokaties om eventuele schade te voorkomen: • In direct zonlicht of naast verwarmingselementen. • Extreme koude of warme lokaties. • Lokaties die tentoongesteld worden aan hoge vochtigheid of overdreven stof. • Lokaties die onderhevig zijn aan sterke schokken of vibraties. ● Zorg ervoor, alvorens enige aansluitingen te maken, dat de AA5 en eventuele externe apparaat uitstaat. ● Zet, om de luidspreker tegen mogelijke beschadigingen te beschermen, altijd de VOLUME knop op “0” alvorens de versterker aan te zetten. ● Oefen geen overdreven kracht op de schakelaars en knoppen uit. ● Slinger de AA5 niet aan de handgreep rond. Hierdoor kan de handgreep loskomen zodat de behuizing of de interne elektronica beschadigd raakt. Dit kan ook leiden tot persoonlijk letsel. ● Uw Yamaha Monitor Versterker is een precisie muziekinstrument. Behandel het toestel met zorg, laat het niet vallen en stoot er niet tegen. ● Haal altijd voor de veiligheid de stroomkabel uit het stopcontact als het in uw woonomgeving onweert. ● Plaats de versterker niet in de buurt van neon verlichting of fluoriscentie verlichting om te voorkomen dat deze storen. ● Open, om schade en een mogelijke electrische schok te voorkomen, nooit de kast en de knoei nooit met de interne elektronika. ● Gebruik nooit benzine, verdunner of andere vluchtige stoffen om de versterker schoon te maken, aangezien deze chemicaliën schade of verkleuringen kunnen veroorzaken. Gebruik altijd een droge, zachte doek om stof en vuil weg te vegen. Specificaties ●Uitgangsvermogen : 4W mono (2 W + 2 W stereo, bij gebruik van AUX IN) ●Luidspreker : 12 cm x 2 ●Bedieningsknoppen/Schakelaars : VOLUME, TONE, POWER ●Aansluitingen : INPUT (standaard mono penstekkeraansluitingen), AUX IN (stereo ministekker-aansluiting), LINE OUT (standaard mono penstekkeraansluitingen), DC IN 6–9V ( ) ●Stroomvoorziening : AA batterij x 4 of los verkrijgbare netstroomadapter ●Levensduur batterijen : 60 uur bij doorlopend gebruik (op alkali batterijen), ongeveer 3 maanden bij 1 uur gebruik per dag. ●Afmetingen (B x H x D) : 172 x 158 x 158 mm * exclusief handvat ●Gewicht : 1.8 kg * exclusief batterijent ●Accessoire : Netstroomadapter (PA-D09) * Specificaties en uiterlijk kunnen wijzigen zonder dat hier vantevoren kennis van wordt gegeven. * Le specifiche e l’aspetto possono subire variazioni senza preavviso. IMPORTANT SAFETY INSTRUCTIONS INFORMATION RELATING TO PERSONAL INJURY, ELECTRICAL SHOCK, AND FIRE HAZARD POSSIBILITIES HAS BEEN INCLUDED IN THIS LIST. WARNING- When using any electrical or electronic product, basic precautions should always be followed. These precautions include, but are not limited to, the following: 1. Read all Safety Instructions, Installation Instructions, Special Message Section items, and any Assembly Instructions found in this manual BEFORE making any connections, including connection to the main supply. 2. Do not attempt to service this product beyond that described in the user-maintenance instructions. All other servicing should be referred to qualified service personnel. 3. FCC INFORMATION (U.S.A.) 1. IMPORTANT NOTICE: DO NOT MODIFY THIS UNIT! This product, when installed as indicated in the instructions contained in this manual, meets FCC requirements. Modifications not expressly approved by Yamaha may void your authority, granted by the FCC, to use the product. Main Power Supply Verification: Yamaha products are manufactured specifically for the supply voltage in the area where they are to be sold. If you should move, or if any doubt exists about the supply voltage in your area, please contact your dealer for supply voltage verification and (if applicable) instructions. The required supply voltage is printed on the name plate. For name plate location, please refer to the graphic found in the Special Message Section of this manual. 2. IMPORTANT: 4. 3. NOTE: DANGER-Grounding Instructions: This product must be grounded and therefore has been equipped with a three pin attachment plug. If this product should malfunction, the ground pin provides a path of low resistance for electrical current, reducing the risk of electrical shock. If your wall socket will not accommodate this type plug, contact an electrician to have the outlet replaced in accordance with local electrical codes. Do NOT modify the plug or change the plug to a different type! 5. WARNING: Do not place this product or any other objects on the power cord or place it in a position where anyone could walk on, trip over, or roll anything over power or connecting cords of any kind. The use of an extension cord is not recommended! If you must use an extension cord, the minimum wire size for a 25' cord (or less) is 18 AWG. NOTE: The smaller the AWG number, the larger the current handling capacity. For longer extension cords, consult a local electrician. When connecting this product to accessories and/ or another product use only high-quality shielded cables. Cable/s supplied with this product MUST be used. Follow all installation instructions. Failure to follow instructions could void your FCC authorization to use this product in the USA. This product has been tested and found to comply with the requirements listed in FCC Regulations, Part 15 for Class “B” digital devices. Compliance with these requirements provides a reasonable level of assurance that your use of this product in a residential environment will not result in harmful interference with other electronic devices. This equipment generates/uses radio frequencies and, if not installed and used according to the instructions found in the user’s manual, may cause interference harmful to the operation of other electronic devices. Compliance with FCC regulations does not guarantee that interference will not occur in all installations. If this product is found to be the source of interference, which can be determined by turning the unit “OFF” and “ON”, please try to eliminate the problem by using one of the following measures: Relocate either this product or the device that is being affected by the interference. Utilize power outlets that are on different branch (circuit breaker or fuse) circuits or install AC line filter/s. In the case of radio or TV interference, relocate/reorient the antenna. If the antenna lead-in is 300 ohm ribbon lead, change the lead-in to co-axial type cable. If these corrective measures do not produce satisfactory results, please contact the local retailer authorized to distribute this type of product. If you cannot locate the appropriate retailer, please contact Yamaha Corporation of America, Electronic Service Division, 6600 Orangethorpe Ave, Buena Park, CA 90620 • The above statements apply ONLY to those products distributed by Yamaha Corporation of America or its subsidiaries. 6. Ventilation: Electronic products, unless specifically designed for enclosed installations, should be placed in locations that do not interfere with proper ventilation. If instructions for enclosed installations are not provided, it must be assumed that unobstructed ventilation is required. 7. Temperature considerations: Electronic products should be installed in locations that do not seriously contribute to their operating temperature. Placement of this product close to heat sources such as; radiators, heat registers etc., should be avoided. 8. This product was NOT designed for use in wet/damp locations and should not be used near water or exposed to rain. Examples of wet /damp locations are; near a swimming pool, spa, tub, sink, or wet basement. 9. This product should be used only with the components supplied or; a cart ,rack, or stand that is recommended by the manufacturer. If a cart, rack, or stand is used, please observe all safety markings and instructions that accompany the accessory product. 10. CANADA THIS DIGITAL APPARATUS DOES NOT EXCEED THE “CLASS B” LIMITS FOR RADIO NOISE EMISSIONS FROM DIGITAL APPARATUS SET OUT IN THE RADIO INTERFERENCE REGULATION OF THE CANADIAN DEPARTMENT OF COMMUNICATIONS. LE PRESENT APPAREIL NUMERIQUE N’EMET PAS DE BRUITS RADIOELECTRIQUES DEPASSANT LES LIMITES APPLICABLES AUX APPAREILS NUMERIQUES DE LA “CLASSE B” PRESCRITES DANS LE REGLEMENT SUR LE BROUILLAGE RADIOELECTRIQUE EDICTE PAR LE MINISTERE DES COMMUNICATIONS DU CANADA. • This applies only to products distributed by Yamaha Canada Music Ltd. • Ceci ne s’applique qu’aux produits distribués par Yamaha Canada Musique Ltée. The power supply cord (plug) should be disconnected from the outlet when electronic products are to be left unused for extended periods of time. Cords should also be disconnected when there is a high probability of lightening and/or electrical storm activity. 11. 12. a. b. c. d. e. Care should be taken that objects do not fall and liquids are not spilled into the enclosure through any openings that may exist. Electrical/electronic products should be serviced by a qualified service person when: The power supply cord has been damaged; or Objects have fallen, been inserted, or liquids have been spilled into the enclosure through openings; or The product has been exposed to rain; or The product does not operate, exhibits a marked change in performance; or The product has been dropped, or the enclosure of the product has been damaged. 13. This product, either alone or in combination with an amplifier and headphones or speaker/s, may be capable of producing sound levels that could cause permanent hearing loss. DO NOT operate for a long period of time at a high volume level or at a level that is uncomfortable. If you experience any hearing loss or ringing in the ears, you should consult an audiologist. IMPORTANT: The louder the sound, the shorter the time period before damage occurs. 14. Some Yamaha products may have benches and/or accessory mounting fixtures that are either supplied as a part of the product or as optional accessories. Some of these items are designed to be dealer assembled or installed. Please make sure that benches are stable and any optional fixtures (where applicable) are well secured BEFORE using. Benches supplied by Yamaha are designed for seating only. No other uses are recommended. 92-469-3 PLEASE KEEP THIS MANUAL R0 Printed in Indonesia Nomenclature and Functions Nomenclature et fonctions Bedienteile und Funktionen q INPUT: Connect an instrument such as a guitar, etc., to this input jack (standard monaural phone jack). q INPUT: Raccordez un instrument tel qu’une guitare, etc., à cette prise d’entrée (fiche téléphonique monaurale standard). q INPUT: Schließen Sie ein Instrument wie eine E-Gitarre o. dgl. an diese Buchse (Standard-Mono-Klinkenbuchse) an. * Before making connections, set the power switch to its OFF position. w VOLUME: Adjusts the speaker volume. Rotate to the right to increase volume. Rotating fully to the left produces no volume. e TONE: Adjusts the speaker's tone quality. Rotate to the right to increase high frequencies. r AUX IN: Connect an external audio device such as a CD player, MD player, etc., to this input jack (stereo mini). t LINE OUT: Converts the impedance of the INPUT jack’s signal and sends the signal out through this jack (bypassing the TONE circuit). Connecting the signal from this jack to the INPUT jack on another AA5 allows sound output from a 4-speaker system (2x2). y DC IN: When using an AC power adaptor, connect it here. * Use the supplied AC power adaptor, or an AC power adaptor that delivers DC6-9V/1A or less ( ). u POWER: This is the power switch. When set to the ON position, the lamp next to the INPUT jack lights. * To protect the speakers, set the volume control w to "0" when switching the power ON/OFF. Also, set the power to its "OFF" position when the AA5 is not in use. i Battery Box: When using battery power, properly insert four AA size batteries into the battery box as shown in the illustration below (take careful notice of the polarity markings). * As battery power gets low, the sound will become distorted and noisy. In this case, replace the batteries following the cautions below. • Make sure all batteries are inserted with their poles properly aligned. Improperly aligned poles can cause fire. • Replace all batteries at the same time. Do not mix old with new batteries, etc., or mix different battery types (alkaline, manganese, different manufacturers, different types by the same manufacturer, etc.) as it can result in fire. * When the device is not to be used for an extended period of time, remove the batteries from the unit. Leaving the batteries in the unit will result in depletion of power, which can result in damage due to leakage. o Carrying Handle: The handle is removable. When transporting, make sure that the handle is attached securely to the strap pin. If the handle is not securely attached, the unit can drop causing damage or injury. !0 Camera Screw (Bottom): Use the camera screw (1/4-inch) on the bottom of the unit to attach the AA5 to a camera tripod. * Make sure to use a tripod that can accommodate weights of more than 2kg. * Avant de faire les connexions, réglez l’interrupteur d’alimentation en position OFF. * Stellen Sie den POWER-Schalter vor dem Anschluß auf OFF (aus). w VOLUME: Ajuste le volume des haut-parleurs. Tournez vers la droite pour augmenter le volume. Une rotation maximum vers la gauche ne produit aucun son. e TONE: Ajuste la qualité acoustique du haut-parleur. Tournez vers la droite pour augmenter le niveau des hautes fréquences. r AUX IN: Raccordez un appareil audio extérieur tel qu’un lecteur de disque, un lecteur MD, etc., à cette prise d’entrée (mini stéréo). t LINE OUT: Convertit l’impédance du signal de la prise INPUT et transmet le signal par l’intermédiaire de cette prise (en dérivation du circuit TONE). Le fait de connecter le signal provenant de cette prise à la prise INPUT d’un autre AA5 permet au son d’un système de 4 haut-parleurs (2x2) d’être délivré. y DC IN: Lorsqu’un adaptateur d’alimentation secteur est utilisé, raccordez-le ici. w VOLUME: Zum Einstellen der Lautsprecherlautstärke. Drehen Sie den Regler für mehr Lautstärke nach rechts und für weniger Lautstärke nach links. * Utilisez l’adaptateur d’alimentation secteur ou un adaptateur d’alimentation secteur pouvant délivrer du courant continue 6-9 V/1 A ou moins ( ). y DC IN: Hier können Sie für Netzbetrieb einen Netzadapter anschließen. u POWER: Il s’agit ici de l’interrupteur d’alimentation. Lorsqu’il est réglé en position ON, la lampe témoin placée près de la prise INPUT s’allume. e TONE: Zum Einstellen des Lautsprecherklangs. Beim Drehen nach links werden die Höhen betont. r AUX IN: An diese Eingangsbuchse (Stereo-Miniklinkenbuchse) können Sie ein externes Audiogerät wie CD-Player, MD-Player usw. anschließen. t LINE OUT: An dieser Buchse wird das über die INPUT-Buchse eingegebene Signal direkt (unter Umgehung der TONE-Regelschaltung) als Hochpegelsignal ausgegeben. Durch Verbinden dieser Buchse mit der INPUT-Buchse eines weiteren AA5 können Sie ein 4-Lautsprecher-System (2x2) zusammenstellen. * Verwenden Sie den mitgelieferten Netzadapter oder ein anderes geeignetes Netzteil (6 bis 9 V Gleichstrom/max. 1 A, ). * Afin de protéger les haut-parleurs, réglez la commande de volume w sur “0” lors de la commutation de l’alimentation sur ON ou OFF. Par ailleurs, réglezla sur sa position “OFF” quand le AA-5 n’est pas utilisé. u POWER: Mit diesem Schalter wird das Gerät ein- und ausgeschaltet. Bei eingeschaltetem Gerät (ON) leuchtet die Anzeigelampe neben der INPUT-Buchse. i Logement des piles: Lorsqu’une alimentation sur pile est utilisée, introduisez correctement quatre piles de taille AA dans le logement de pile comme cela est représenté sur l’illustration cidessous (faites très attention aux indications de polarité). * Zum Schutz der Lautsprecher stellen Sie vor dem Ein- oder Ausschalten den VOLUME-Regler w auf “0”. Vergessen Sie nach Gebrauch nicht, den POWERSchalter auf “OFF” (aus) zu stellen. * Avec l’épuisement progressif des piles, le niveau sonore se détériore et du bruit se manifeste. En pareil cas, remplacez les piles tout en respectant les précautions indiquées ci-dessous. • Veillez à ce que toutes les piles soient insérées avec leurs pôles convenablement alignés. Un alignement incorrect des pôles peut être à l’origine d’un incendie. • Remplacez toutes les piles en même temps. Ne mélangez pas des piles usées avec des piles neuves, etc., ou ne mélangez pas différents types de pile (alcaline, manganèse, différentes marques, différents types du même fabricant, etc.) car ceci peut être à l’origine d’un incendie. * Quand il n’est pas prévu d’utiliser l’appareil sur une période prolongée, retirez les piles de l’appareil. Le fait de laisser les piles dans l’appareil fera qu’elles s’épuiseront, ce qui aura pour résultat de l’endommager à la suite de suintement de liquide. o Poignée de transport: La poignée est amovible. Lors du transport, assurez-vous que la poignée de transport est solidement retenue par la goupille de bandoulière. Si toutefois la poignée n’était pas solidement retenue, l’appareil risque de tomber par terre et d’être abîmé voire de blesser quelqu’un. !0 Embase filetée d’appareil photo (à la base): Utilisez l’embase filetée d’appareil photo (1/4 de po.) à la base l’appareil pour fixer le AA5 sur un trépied d’appareil photo. * Faites en sorte d’utiliser un trépied capable de supporter des poids de plus de 2 kg. i Batteriefach: Hier legen Sie für Batteriebetrieb vier Batterien der Größe AA ein, wie in der unteren Abbildung dargestellt (unbedingt auf korrekte Ausrichtung der Batteriepole achten). * Bei abnehmender Batteriespannung klingt der Ton mehr und mehr verzerrt und verrauscht. Ersetzen Sie in diesem Fall die Batterien unter Beachtung der folgenden Vorsichtsmaßregeln durch frische. • Achten Sie darauf, daß die Batteriepole den Markierungen entsprechend ausgerichtet werden. Falsche Ausrichtung kann einen Brand verursachen. • Ersetzen Sie stets alle Batterien durch neue. Wenn gebrauchte und neue Batterien oder unterschiedliche Batterien (Alkali- und Manganbatterien, Batterien verschiedener Hersteller, unterschiedliche Typen desselben Herstellers) gemischt werden, kann dies einen Brand verursachen. * Wenn das Gerät voraussichtlich längere Zeit nicht gebraucht wird, nehmen Sie die Batterien aus dem Fach. Eingelegte Batterien entladen sich mit der Zeit und können auslaufen, was oft eine schwere Beschädigung mit sich bringt. o Tragegriff: Der Tragegriff kann abgenommen werden. Achten Sie beim Heben und Tragen darauf, dass der Griff sicher am Knauf befestigt ist. Ein Lösen des Griffs kann einen Fall des Geräts und eine Beschädigung bzw. Verletzung verursachen. !0 Stativgewinde (Unterseite): Dieses Gewinde (1/4-Zoll) erlaubt die Aufstellung des AA5 auf einem Kamerastativ. * Sie müssen ein Stativ mit einer Tragfähigkeit von mindestens 2 kg verwenden. Nomenclatura y funciones Nome e funzione delle varie parti Benamingen en functies q INPUT: Conecte un instrumento, como pueda ser una guitarra, etc., a esta toma de entrada (miniclavija monofónica estándar). q INPUT: Collegare a questa presa di ingresso (spinotto monofonico standard) uno strumento come una chitarra. q INPUT: Op deze ingangsaansluiting kunt u een instrument zoals een gitaar enz. aansluiten (standaard mono stekker-aansluiting). * Antes de realizar las conexiones, ponga el interruptor de la alimentación en la posición OFF. * Prima di procedere con i collegamenti, portare l’interruttore di accensione sulla posizione OFF. w VOLUME: Ajusta el volumen del altavoz. Gírelo hacia la derecha para subir el volumen. Si lo gira completamente hacia la izquierda, no produce volumen. e TONE: Ajusta el tono del altavoz. Gírelo hacia la derecha para acentuar las altas frecuencias. r AUX IN: Conecte un dispositivo de audio exterior, como pueda ser un reproductor de CD, reproductor de MD, etc., a esta toma de entrada (mini estéreo). t LINE OUT: Convierte la impedancia de la señal de la toma de entrada INPUT y emite la señal por esta toma (pasando por alto el circuito de tono (TONE)). Si se conecta la señal que sale por esta toma a la toma de entrada (INPUT) de otro AA5, podrá emitir el sonido por un sistema de 4 altavoces (2x2). y DC IN: Cuando se emplee un adaptador de alimentación de CA, conéctelo a esta toma. * Emplee el adaptador de CA suministrado, o un adaptador de alimentación de CA que tenga salida de 6-9 V CC/1 A o menos ( ). u POWER: Éste es el interruptor de la alimentación. Cuando se pone en la posición ON, se enciende la luz que está al lado de la toma INPUT. * Para proteger los altavoces, ajuste el control de volumen w en la posición “0” antes de conectar o desconectar la alimentación. Déjelo también en la posición “OFF” cuando no utilice el AA5. i Caja de las pilas: Cuando emplee la alimentación de las pilas, inserte adecuadamente cuatro pilas del tamaño AA en la caja de las pilas como se muestra en la ilustración siguiente (tenga cuidado con las marcas de las polaridades). * A medida que se gasta la carga de las pilas, el sonido se va distorsionando y sale acompañado de ruido. En estos casos, reemplace las pilas siguiendo las precauciones siguientes. • Asegúrese de insertar todas las pilas con sus polaridades correctamente alineadas. Si las polaridades no están bien alineadas, puede producirse fuego. • Reemplace todas las pilas al mismo tiempo. No mezcle pilas usadas con pilas nuevas, etc. ni tampoco mezcle pilas de tipos distintos (alcalinas, manganesas, marcas distintas, tipos distintos de la misma marca, etc.) porque podría producirse fuego. * Cuando no se proponga utilizar el aparato durante períodos prolongados de tiempo, extraiga las pilas de la unidad. Si se dejan las pilas en la unidad, pueden producirse reducciones de la carga, lo cual puede ser causa daños debido a las fugas de las pilas. o Asa para el transporte: El asa es extraíble. Cuando efectúe el transporte, asegúrese de que el asa esté montada con seguridad en el pasador de correa. Si el asa no está montada con seguridad, la unidad podría caerse, pudiéndose dañar o causar heridas personales. !0 Rosca de cámara (parte inferior): Emplee la rosca de cámara (1/4 de pulgada) de la parte inferior de la unidad para montar el AA5 en un trípode de cámara. * Asegúrese de emplear un trípode que pueda soportar pesos de más de 2 kg. w VOLUME: Regola il volume di riproduzione del diffusore. Girare questa manopola verso destra per aumentare il volume. Girarla del tutto verso sinistra per azzerare il volume. e TONE: Regola la qualità del suono prodotti dal diffusore. Girare questa manopola verso destra per aumentare gli acuti. r AUX IN: Collegare a questa presa di ingresso (minispinotto stereo) un dispositivo audio esterno come un lettore CD o un lettore MD. t LINE OUT: L’apparecchio converte l’impedenza del segnale dell’ingresso INPUT ed emette tale segnale da questa presa, evitando i circuiti TONE. Mandando il segnale da questa presa ad una presa INPUT di un altro AA5, si può riprodurre il suono contemporaneamente con quattro diffusori (2 x 2). y DC IN: Se si usa un adattatore di corrente alternata, collegarlo a questa presa. * Usare l’adattatore di corrente alternata in dotazione o un altro adattatore che produca corrente continua da 6-9 V/1 A o meno ( ). u POWER: Questo è l’interruttore di accensione. Quando si trova nella posizione ON, la luce accanto alla presa INPUT si accende. * Per proteggere i diffusori, prima di accendere o spegnere l’apparecchio portare sempre il controllo del volume w. Inoltre, quando l’AA5 non è in uso, portarne l’interruttore di accensione sulla posizione “OFF”. i Alloggiamento delle batterie: Per alimentare l’apparecchio a batterie, inserire correttamente quattro batterie di formato AA nel modo visto in figura (facendo attenzione alle loro polarità). * Mano a mano che le batterie si scaricano, il suono si distorce e si fa rumoroso. In tal caso, sostituire le batterie nel modo seguente. • Controllare che le batterie siano inserite con le polarità orientate correttamente. Se orientate in modo scorretto, le batterie possono incendiarsi. • Sostituire sempre tutte le batterie allo stesso tempo. Non mescolare batterie vecchie e nuove. Non mescolare batterie di tipo diverso, ad esempio alcaline, al manganese, di marca diversa o di tipo diverso anche della stessa marca, dato che ciò potrebbe causare incendi. * Se si prevede di non dover usare l’apparecchio per qualche tempo, toglierne le batterie. Lasciandone nell’apparecchio esse si scaricano e possono perdere acido. o Maniglia di trasporto: Maniglia di trasporto: la maniglia di trasporto è rimovibile. Durante il trasporto, controllare che sia fermata bene all’attacco per tracolla di chitarra. Se non lo fosse, quest’unità potrebbe cadere causando ferite e danni. !0 Filettatura per treppiedi (fondo): Usare la filettatura per treppiedi da 1/4 di pollice sul fondo dell’apparecchio per installare l’AA5 su di un treppiedi per fotocamere. * Accertarsi che il treppiedi sia in grado di sopportare carichi da oltre 2 kg. * Voor u aansluitingen gaat maken moet u de aan/uit knop op OFF (uit) zetten. w VOLUME: Hiermee stelt u het geproduceerde volume in. Draai naar rechts om het volume te verhogen. Draai helemaal links om de geluidsweergave uit te schakelen. e TONE: Toonregeling van de geluidsweergave. Draai naar rechts om de hoge tonen te versterken. r AUX IN: Op deze ingangsaansluiting kunt u externe audio-apparatuur zoals een CD-speler, MD-speler enz. aansluiten (stereo ministekker). t LINE OUT: Past de impedantie van het ingangssignaal van de INPUT aansluiting aan reproduceert dit signaal (zonder invloed van de TONE toonregeling). Als u deze aansluiting verbindt met de INPUT van een andere AA5, verkrijgt u geluidsweergave via een systeem met 4 luidsprekers (2x2). y DC IN: Hierop kunt u een netstroomadapter aansluiten. * Gebruik de meegeleverde netstroomadapter, of een netstroomadapter die maximaal 6-9 V/1 A gelijkstroom of minder produceert ( ). u POWER: Dit is de aan/uit knop. Als het toestel aan staat (ON), zal het lampje naast INPUT gaan branden. * Ter bescherming van de luidsprekers moet u het volume w op “0” zetten wanneer u het toestel aan/uit zet. Zet de AA5 ook uit wanneer u het toestel niet gebruikt. i Batterijhouder: Wanneer u de versterker op batterijen wilt gebruiken, moet u vier AA formaat batterijen op de juiste manier, zoals u kunt zien in de afbeelding hieronder, in de batterijhouder doen (let goed op de plus en min polen van de batterijen). * Wanneer de batterijen leeg raken zal de geluidsweergave meer ruis bevatten en gemakkelijker vervormen. Let bij het vervangen van de batterijen op de volgende punten. • Zorg ervoor dat de batterijen met de polen in de juiste richting ingezet worden. Als de plus en min polen niet goed zitten, kan er zelfs brand ontstaan. • Vervang alle batterijen tegelijkertijd. Gebruik geen oude en nieuwe batterijen of verschillende soorten batterijen (alkali, mangaan, verschillende fabrikanten, verschillende types van dezelfde fabrikant enz.) door elkaar; ook dit kan brand veroorzaken. * Wanneer u het toestel langere tijd niet zult gebruiken, dient u de batterijen eruit te halen. Als u de batterijen in het toestel laat zitten zullen ze leeg lopen en kunnen ze gaan lekken waardoor het toestel beschadigd kan worden. o Handvat: Het handvat kan losgemaakt worden. In gebruik moet u ervoor zorgen dat het handvat goed vast zit aan de riempen. Als het handvat niet goed vast zit, kan het toestel uit uw handen vallen en beschadigd raken of schade of letsel veroorzaken. !0 Statiefaansluiting (onderkant): Met de standaard statiefaansluiting (1/4 inch) aan de onderkant van het toestel kunt u de AA5 gemakkelijk op een gewoon camerastatief zetten. * Zorg er wel voor dat het statief dat u wilt gebruiken stevig genoeg is voor gewichten van 2 kg of meer. e w r Using the AA5 (Connections) t q y Before making any connections, make sure that unit's power and the power on all related devices is switched OFF. Utilisation du AA-5 (connexions) Avant de faire n’importe quelle connexion, assurezvous que l’alimentation de l’appareil et que l’alimentation de tous les appareils connexes est coupée. ■ Connecting an instrument (Fig. 1) ■ Raccordement de l’instrument (Fig. 1) Connect the output jack (LINE OUT, etc.) on the Yamaha Silent Guitar, or other similar instrument, to the INPUT jack on the AA5. Placing the AA5 in various positions (changing speaker direction or facing the wall, etc.) allows for different sound variations. Raccordez la prise de sortie (LINE OUT, etc.) d’une guitare Silent Guitar Yamaha ou d’un instrument similaire à la prise INPUT du AA5. En disposant le AA5 dans diverses positions (en changeant l’orientation du haut-parleur ou en le dirigeant vers le mur, etc.) il est possible d’obtenir diverses sortes de sonorités. * If the sound is distorted, reduce the VOLUME level on the instrument. * Si une distorsion du son se produit, réduisez niveau de sortie de l’instrument. ■ Connecting an audio device or computer (Fig. 2) Connect the headphones (PHONES) jack on the computer or audio device such as a CD player, etc., to the AUX IN jack on the AA5. Sound output will be in stereo if a stereo source is connected in stereo. * Use the volume control on the source device to control its volume output level. ■ Connecting an additional AA5 (Fig. 3) i Connect the LINE OUT jack on one of the AA5s to the INPUT jack on the other AA5 to create a 2W x 4 speaker system. Three or four AA5s can be connected in the same manner. u Verwendung des AA5 (Anschlüsse) Schalten Sie dieses Gerät und alle anzuschließenden Geräte vor dem Herstellen von Verbindungen AUS. Speaker (right) Haut-parleur (droit) Lautsprecher (rechts) Altavoz (derecho) Altoparlante (destro) Luidspreker (rechts) !0 Raccordez la prise d’un casque d’écoute (PHONES) de l’ordinateur ou de l’appareil audio tel qu’un lecteur de disque CD, etc., à la prise AUX IN du AA5. Le son délivré sera en stéréo si une source stéréo est connectée en stéréo. * Utilisez la commande de volume du périphérique source pour contrôler son niveau de sortie. ■ Raccordement d’un AA5 supplémentaire (Fig. 3) Raccordez la prise LINE OUT d’un des AA5 à la prise INPUT d’un autre AA5 pour créer un système de 4 haut-parleurs x 2 W. Trois ou quatre AA5 peuvent être connectés de la même manière. o Speaker (left) Haut-parleur (gauche) Lautsprecher (links) Altavoz (Izquierdo) Altoparlante (sinistro) Luidspreker (links) ■ Raccordement d’un appareil audio ou d’un ordinateur (Fig. 2) AA Batteries x4 / 4 piles AA AA-Batterie x 4 / 4 pilas tamaño AA Batterie AA x 4 / AA batterijen x 4 ■ Anschluß eines Instruments (Abb. 1) Verbinden Sie die Ausgangsbuchse (LINE OUT usw.) des Yamaha Silent Guitar oder eines ähnlichen Instruments mit der INPUT-Buchse am AA5. Durch Verändern des AA5-Stellwinkels (andere Lautsprecherausrichtung, Beschallung gegen eine Wand u. dgl.) lassen sich verschiedene Sound-Variationen erzielen. * Bei Klangverzerrungen vermindern Sie die Lautstärke am Instrument. ■ Anschluß eines Audiogeräts oder Computers (Abb. 2) Verbinden Sie die Kopfhörerbuchse (PHONES) des Computers oder Audiogeräts (CD-Player usw.) mit der AUX IN-Buchse des AA5. Bei Anschluß einer Stereoquelle über ein Stereokabel wird der Ton stereo wiedergegeben. * Die Lautstärke wird mit dem entsprechenden Regler des angeschlossenen Quellengeräts eingestellt. ■ Anschluß eines zusätzlichen AA5 (Abb. 3) Empleo del AA5 (Conexiones) Antes de hacer cualquier conexión, asegúrese de que la alimentación de la unidad y la alimentación de todos los dispositivos relacionados esté desconecta. ■ Conexión de un instrumento (Fig. 1) Conecte la toma de salida (LINE OUT, etc.) de la Guitar Silenciosa de Yamaha, o de otro instrumento similar, a la toma INPUT del AA5. El AA5 puede ponerse en varias posiciones (cambiando la orientación de los altavoces o encarado a la pared, etc.) para obtener sonidos y variaciones distintos. * Si el sonido sale distorsionado, reduzca el nivel de volumen (VOLUME) en el instrumento. ■ Conexión de un dispositivo de audio o de un ordenador (Fig. 2) Conecte la toma de auriculares (PHONES) del ordenador o dispositivo de audio, como pueda ser un reproductor de CD, etc., a la toma de entrada AUX IN del AA5. El sonido saldrá en estéreo si el aparato estéreo conectado se conecta en estéreo. * Emplee el control de volumen del dispositivo de fuente de sonido para controlar su nivel de volumen de salida. Verbinden Sie die LINE OUT-Buchse dieses AA5 mit der INPUTBuchse des anderen AA5. Sie erhalten dadurch ein 4 x 2 W Lautsprechersystem. Auf diese Weise können auch drei oder vier AA5 zusammengeschaltet werden ■ Conexión de otro AA5 adicional (Fig. 3) Uso dell’AA5 (collegamenti) Gebruiken van de AA5 (Aansluitingen) Conecte la toma de salida LINE OUT de uno de los AA5 a la toma de entrada INPUT del otro AA5 para crear un sistema de 4 altavoces de 2 W. Podrán conectarse tres o cuatro AA5 del mismo modo. [Fig. 1] INPUT Prima di fare dei collegamenti, controllare che sia quest’unità che tutte quelle ad essa collegate siano spente. LINE OUT ■ Collegamento di uno strumento (Fig. 1) [Fig. 2] Collegare la presa di uscita (LINE OUT, ecc.) di una Silent Guitar Yamaha o altro simile strumento alla presa INPUT dell’AA5. Installando l’AA5 in posizioni diverse, vale a dire cambiando l’orientamento degli altoparlanti o rivolgendolo verso un muro, è possibile ottenere sonorità diverse. AUX IN * Se il suono prodotto è distorto, ridurre il livello del VOLUME dello strumento. PHONES PHONES PHONES ■ Collegamento ad un dispositivo audio o computer (Fig. 2) Left / gauche links / Izquierdo sinistro / links [Fig. 3] Right / droit rechts / derecho destro / rechts Collegare la presa PHONES del dispositivo audio, ad esempio un lettore CD, o del computer alla presa AUX IN dell’AA5. Il suono prodotto è stereofonico se il segnale originale era stereofonico. * Per controllare il volume di riproduzione, usare il controllo del volume del dispositivo sorgente. ■ Collegamento di un AA5 addizionale (Fig. 3) INPUT LINE OUT LINE OUT INPUT Collegare la presa LINE OUT di uno degli AA5 alla presa INPUT dell’altro AA5 per creare un sistema di diffusori da 2 W x 4. Si possono collegare in questo modo tre o quattro AA5. Voor u aansluitingen gaat maken moet u dit toestel en alle andere apparatuur uit zetten. ■ Aansluiten van een instrument (Afb. 1) Verbind de uitgangsaansluiting (LINE OUT enz.) van een Yamaha Silent Guitar of ander soortgelijk instrument, met de INPUT aansluiting van de AA5. Door de opstelling van de AA5 te veranderen (richting van de luidsprekers, naar de muur gericht enz.) kunt u de geluidsweergave manipuleren. * Als de geluidsweergave vervormd wordt, dient u het VOLUME op het instrument te verlagen. ■ Aansluiten van audio-apparatuur of een computer (Afb. 2) Verbind de hoofdtelefoonaansluiting (PHONES) van de computer of andere audio-apparatuur zoals een CD-speler enz. met de AUX IN aansluiting van de AA5. Als de signaalbron in stereo is, zal het geluid in stereo worden weergegeven. * Gebruik de volumeregeling van de signaalbron om het volume te regelen. ■ Aansluiten van een extra AA5 (Afb. 3) Verbind de LINE OUT aansluiting van de ene AA5 met de INPUT aansluiting van de andere AA5 om een 2 W luidsprekersysteem met 4 luidsprekers te verkrijgen. Op deze manier kunt u zelfs drie of vier AA5 versterkers op elkaar aansluiten.-
 1
1
-
 2
2
-
 3
3
-
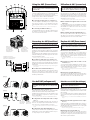 4
4


