
www.dell.com | support.dell.com
Dell Precision™ T7400
Quick Reference Guide
Model DCDO

Notes, Notices, and Cautions
NOTE: A NOTE indicates important information that helps you make better use of
your computer.
NOTICE: A NOTICE indicates either potential damage to hardware or loss of data
and tells you how to avoid the problem.
CAUTION: A CAUTION indicates a potential for property damage, personal injury,
or death.
____________________
Information in this document is subject to change without notice.
© 2007 Dell Inc. All rights reserved.
Reproduction in any manner whatsoever without the written permission of Dell Inc. is strictly forbidden.
Trademarks used in this text: Dell, the DELL logo, and Dell Precision are trademarks of Dell Inc.;
Microsoft, Windows, and Windows Vista are either trademarks or registered trademarks of Microsoft
Corporation in the United States and/or other countries.
Other trademarks and trade names may be used in this document to refer to either the entities claiming
the marks and names or their products. Dell Inc. disclaims any proprietary interest in trademarks and
trade names other than its own.
Model DCDO
September 2007 P/N HR707 Rev. A00

Contents 3
Contents
Finding Information . . . . . . . . . . . . . . . . . . . . 5
Setting Up Your Computer
. . . . . . . . . . . . . . . . . 9
Changing Between Tower and Desktop
Orientations
. . . . . . . . . . . . . . . . . . . . . 9
Installing Your Computer in an Enclosure
. . . . . 10
Transferring Information to a New Computer
. . . 13
Power Protection Devices
. . . . . . . . . . . . . 16
About Your Computer
. . . . . . . . . . . . . . . . . . 18
Front View (Tower Orientation)
. . . . . . . . . . 18
Back View (Tower Orientation)
. . . . . . . . . . 20
Back Panel Connectors
. . . . . . . . . . . . . . 21
Cleaning Your Computer
. . . . . . . . . . . . . . . . 23
Computer, Keyboard, and Monitor
. . . . . . . . . 23
Mouse (Non-Optical)
. . . . . . . . . . . . . . . . 23
Floppy Drive
. . . . . . . . . . . . . . . . . . . . 24
CDs and DVDs
. . . . . . . . . . . . . . . . . . . 24
Troubleshooting Tools
. . . . . . . . . . . . . . . . . . 24
Power Lights
. . . . . . . . . . . . . . . . . . . . 24
Diagnostic Lights
. . . . . . . . . . . . . . . . . . 26
Beep Codes
. . . . . . . . . . . . . . . . . . . . 30
System Messages
. . . . . . . . . . . . . . . . . 31
Hardware Troubleshooter
. . . . . . . . . . . . . 32
Dell Diagnostics
. . . . . . . . . . . . . . . . . . 33
Troubleshooting
. . . . . . . . . . . . . . . . . . 37
Index . . . . . . . . . . . . . . . . . . . . . . . . . . . . . . . 53

4 Contents

Quick Reference Guide 5
Finding Information
NOTE: Some features or media may be optional and may not ship with your
computer. Some features or media may not be available in certain countries.
NOTE: Additional information may ship with your computer.
What Are You Looking For? Find It Here
• A diagnostic program for my computer
• Drivers for my computer
• My device documentation
• Desktop System Software (DSS)
Drivers and Utilities Disc
NOTE: The Drivers and Utilities disc may be
optional and may not ship with your computer.
Documentation and drivers are already
installed on your computer. You can use
the Drivers and Utilities disc to reinstall
drivers (see "Reinstalling Drivers and
Utilities" in your User’s Guide) and to run
the Dell™ Diagnostics (see "Dell
Diagnostics" on page 33).
NOTE: Drivers and documentation updates
can be found at support.dell.com.
• How to remove and replace parts
•Specifications
• How to configure system settings
• How to troubleshoot and solve problems
Dell Precision™ User’s Guide
Microsoft
®
Windows
®
XP and Microsoft
Windows Vista™ Help and Support Center
1
Click
Start
→
Help and Support
→
Dell
User and System Guides
→
System
Guides
.
2
Click the
User’s Guide
for your computer.

6 Quick Reference Guide
• Warranty information
• Terms and Conditions (U.S. only)
• Safety instructions
• Regulatory information
• Ergonomics information
• End User License Agreement
Dell™ Product Information Guide
• Service Tag and Express Service Code
•Microsoft
®
Windows
®
Product Key
Service Tag and Microsoft Windows
Product Key
These labels are located on your computer:
• Use the Service Tag to identify your
computer when you use
support.dell.com
or contact Dell support.
• Enter the Express Service Code to direct
your call when contacting Dell support.
NOTE: As an increased security measure,
the newly designed Microsoft Windows
license label incorporates a missing portion,
or hole, to discourage removal of the label.
What Are You Looking For? Find It Here

Quick Reference Guide 7
• Solutions — Troubleshooting hints and
tips, articles from technicians, online
courses, and frequently asked questions
• Community — Online discussion with
other Dell customers
• Upgrades — Upgrade information for
components, such as the memory, hard
drive, and operating system
• Customer Care — Contact information,
service call and order status, and
warranty and repair information
• Service and support — Service call
status, support history, service contract,
and online discussions with support
• Dell Technical Update Service —
Proactive e-mail notification of software
and hardware updates for your computer
• Reference — Computer documentation,
details on my computer configuration,
product specifications, and white papers
• Downloads — Certified drivers, patches,
and software updates
Dell Support Website — support.dell.com
NOTE: Select your region or business
segment to view the appropriate support site.
• Desktop System Software (DSS) — If you
reinstall the operating system for your
computer, you should also reinstall the
DSS utility. DSS automatically detects
your computer and operating system and
installs the updates appropriate for your
configuration, providing critical updates
for your operating system and support for
processors, optical drives, USB devices, for
example. DSS is necessary for correct
operation of your Dell computer.
To download Desktop System Software:
1
Go to
support.dell.com
, select your
country/region, and then click
Drivers
& Downloads
.
2
Click
Select Model
or
Enter a Tag
,
make the appropriate selections or enter
the appropriate information for your
computer, and then click
Confirm
.
3
Scroll down to
System and Configuration
Utilities
→
Desktop System Software
,
and then click
Download Now
.
NOTE: The support.dell.com user interface
may vary depending on your selections.
What Are You Looking For? Find It Here

8 Quick Reference Guide
• How to use Windows XP
• How to use Windows Vista
• How to work with programs and files
• How to personalize my desktop
Windows Help and Support Center
1
Click
Start
→
Help and Support
.
2
Type a word or phrase that describes
your problem and click the arrow icon.
3
Click the topic that describes
your problem.
4
Follow the instructions on the screen.
• How to reinstall my operating system
Operating System Disc
The operating system is already installed
on your computer. To reinstall your
operating system, use the Operating System
disc that came with your computer (see
"Restoring Your Operating System" in your
User’s Guide).
After you reinstall your operating system,
use the optional Drivers and Utilities disc
to reinstall drivers for the devices that
came with your computer.
Your operating system product key label is
located on your computer.
NOTE: The color of your operating system
installation disc varies according to the
operating system you ordered.
What Are You Looking For? Find It Here

Quick Reference Guide 9
Setting Up Your Computer
Changing Between Tower and Desktop Orientations
CAUTION: Before you begin any of the procedures in this section, follow the
safety instructions in the
Product Information Guide
.
NOTE: To change your computer to either the tower or the desktop orientation, you
must use an optional kit available from Dell. See "Product Information" in your
User’s Guide for more details on ordering from Dell.
NOTE: The tower computer supports one more 3.5-inch drive in the front than does
the desktop computer.
1
Follow the procedures in "Before You Begin" in your
User’s Guide
.
2
Remove the computer cover (see "Removing the Computer Cover" in your
User’s Guide
).
3
Remove the front panel (see "Removing the Front Panel" in your
User’s Guide
).
4
Remove the drive panel and prepare the drive panel by adding or removing
inserts, as needed (see "Drive Panels" in your
User’s Guide
).
Switching From Tower to Desktop Orientation
1
Remove all installed floppy drives or media card readers by following the steps
in "Removing a Floppy Drive or Media Card Reader (Tower Computer)" in
your
User’s Guide
, and then reinstall a single floppy drive or media card reader
by following the steps in "Installing a Floppy Drive or Media Card Reader
(Desktop Computer)" in your
User’s Guide
.
2
Remove all installed optical drives by following the steps in "Removing an
Optical Drive (Tower Computer)" in your
User’s Guide
, and then reinstall
the drives by following the steps in "Installing an Optical Drive (Desktop
Computer)" in your
User’s Guide
.
• How to use Linux
• E-mail discussions with users of Dell
Precision products and the Linux
operating system
• Additional information regarding Linux
and my Dell Precision computer
Dell Supported Linux Sites
• linux.dell.com
• lists.us.dell.com/mailman/listinfo/linux-
precision
What Are You Looking For? Find It Here

10 Quick Reference Guide
Switching From Desktop to Tower Orientation
1
Remove the floppy drive or media card reader (if installed) by following
the steps in "Removing a Floppy Drive or a Media Card Reader (Desktop
Computer)" in your
User’s Guide
, and then reinstall the floppy drive or
media card reader by following the steps in "Installing a Floppy Drive or
Media Card Reader (Tower Computer)" in your
User’s Guide
.
2
Remove all installed optical drives by following the steps in "Removing an
Optical Drive (Desktop Computer)" in your
User’s Guide
, and reinstall the
drives by following the steps in "Installing an Optical Drive (Tower Computer)"
in your
User’s Guide
.
Installing Your Computer in an Enclosure
Installing your computer in an enclosure can restrict airflow, can cause your
computer to overheat, and may impact your computer’s performance. Follow
the guidelines below when installing your computer in an enclosure.
NOTICE: The operating temperature specified in this manual reflects the maximum
ambient operating temperature. The ambient room temperature must be a consideration
when installing your computer in an enclosure. For details about your computer’s
specifications, see "Specifications" in your User’s Guide.

Quick Reference Guide 11
• Leave 10.2 cm (4 in) minimum clearance on all vented sides of the computer
to permit the airflow required for proper ventilation.
• If your computer is installed in a corner on or under a desk, leave 5.1 cm
(2 in) minimum clearance from the back of the computer to the wall to
permit the airflow required for proper ventilation.
• If your enclosure has doors, ensure that they allow at least 30 percent
airflow through the enclosure (front and back).

12 Quick Reference Guide
• Do not install your computer in an enclosure that does not allow airflow.
Restricting the airflow
can cause your computer to overheat and may
impact your computer’s performance
.

Quick Reference Guide 13
Transferring Information to a New Computer
You can use your operating system wizards to help you transfer files and other
data from one computer to another computer.
Microsoft Windows XP
The Microsoft
Windows XP operating system provides the Files and Settings
Transfer Wizard to transfer data, such as:
• E-mail messages
• Toolbar settings
•Window sizes
• Internet bookmarks
You can transfer data from one computer to another computer over a network or
serial connection, or by storing the data on removable media, such as a writable
CD or DVD.
NOTE: You can transfer information from one computer to another computer by directly
connecting a serial cable to the input/output (I/O) ports of the two computers. To transfer
data over a serial connection, you must use the Network Connections utility in the Control
Panel to perform additional configuration steps, such as setting up an advanced
connection and designating the host computer and the guest computer.
For instructions on setting up a direct cable connection between two computers,
see Microsoft Knowledge Base Article #305621, titled How to Set Up a Direct Cable
Connection Between Two Computers in Windows XP. This information may not be
available in certain countries.
Using the Files and Settings Transfer Wizard requires the Operating System
disc that came with your computer or a wizard disk, which the wizard can
create for you.
NOTE: For more information about transferring data, search support.dell.com for
document #154781 (What Are The Different Methods To Transfer Files From My Old
Computer To My New Dell™ Computer Using the Microsoft Windows XP Operating
System?).
NOTE: Access to the Dell Knowledge Base document may not be available in
certain countries.

14 Quick Reference Guide
Files and Settings Transfer Wizard (With the Operating System Disc)
NOTE: The Files and Settings Transfer Wizard designates the source computer from
which data is to be transferred as the old computer, and designates the destination
computer to which the data is going to be transferred as the new computer.
PREPARE THE DESTINATION COMPUTER FOR THE FILE TRANSFER —
1
Click
Start
→
All Programs
→
Accessories
→
System Tools
→
Files and
Settings Transfer Wizard
.
2
Under
Which computer is this?
, click
New computer
, and then click
Next
.
3
Under
Do you have a Windows XP CD?
, click
I will use the wizard from
the Windows XP CD
, and then click
Next
.
4
Review the information under
Now go to your old computer
, and then go
to the source computer. Do
not
click
Next
.
COPY DATA FROM THE SOURCE COMPUTER —
1
Insert the Windows XP
Operating System
disc into the source computer.
The
Welcome to Microsoft Windows XP
screen appears.
2
Click
Perform additional tasks
.
3
Under
What do you want to do?
, click
Transfer files and settings
.
The
Files and Settings Transfer Wizard
window appears.
4
Click
Next
.
5
Under
Which computer is this?
, click
Old Computer
, and then click
Next
.
6
Under
Select a transfer method
, click the transfer method of your choice,
and then click
Next
.
7
Under
What do you want to transfer?
, click to select the data you want to
transfer, and then click
Next
.
The selected data is copied and the
Completing the Collection Phase
screen appears.
8
Click
Finish
.
TRANSFER DATA TO THE DESTINATION COMPUTER —
1
Go to the destination computer.
2
Under
Now go to your old computer
, click
Next
.

Quick Reference Guide 15
3
Under
Where are the files and settings?
, click to select the method you
chose for transferring your settings and files, and then click
Next
.
The wizard reads the collected files and settings and applies them to the
destination computer. When the transfer is complete, the
Finished
screen appears.
4
Click
Finished
, and then restart the computer.
Files and Settings Transfer Wizard (Without the Operating System Disc)
To run the Files and Settings Transfer Wizard without the Operating System
disc, you must create a wizard disk. The wizard disk allows you to create
a backup image file on removable media.
NOTE: The Files and Settings Transfer Wizard designates the source computer from
which data is to be transferred as the old computer, and designates the destination
computer to which the data is going to be transferred as the new computer.
CREATE A WIZARD DISK —
1
On the destination computer, click
Start
→
All Programs
→
Accessories
→
System Tools
→
Files and Settings Transfer Wizard
.
2
Under
Which computer is this?
, click
New computer
, and then click
Next
.
3
Under
Do you have a Windows XP CD?
, click
I want to create a Wizard
Disk in the following drive
, and then click
Next
.
4
Insert a writable CD or DVD, and then click
OK
.
5
Review the information under
Now go to your old computer
, and then go
to the source computer. Do
not
click
Next
.
COPY DATA FROM THE SOURCE COMPUTER —
1
Insert the wizard disk into the source computer.
2
Click
Start
→
Run
.
3
Click
Browse...
and navigate to
fastwiz
on the wizard disk, and then click
OK
.
4
Under
Which computer is this?
, click
Old Computer
, and then click
Next
.
5
Under
Select a transfer method
, click the transfer method of your choice,
and then click
Next
.

16 Quick Reference Guide
6
Under
What do you want to transfer?
, click to select the data you want to
transfer, and then click
Next
.
The selected data is copied and the
Completing the Collection Phase
screen appears.
7
Click
Finish
.
TRANSFER DATA TO THE DESTINATION COMPUTER —
1
Go to the destination computer.
2
Under
Now go to your old computer
, click
Next
.
3
Under
Where are the files and settings?
, click to select the method you
chose for transferring your settings and files, and then click
Next
.
The wizard reads the collected files and settings and applies them to the
destination computer. When the transfer is complete, the
Finished
screen appears.
4
Click
Finished
, and then restart the computer.
Microsoft Windows Vista
1
Click the Windows Vista Start button , and then click
Transfer files and
settings
→
Start Windows Easy Transfer
.
2
In the
User Account Control
dialog box, click
Continue
.
3
Click
Start a new transfer
or
Continue a transfer in progress
.
Follow the instructions provided on the screen by the Windows Easy Transfer
wizard.
Power Protection Devices
Several devices are available to protect against power fluctuations and failures:
• Surge protectors
• Line conditioners
• Uninterruptible power supplies (UPS)

Quick Reference Guide 17
Surge Protectors
Surge protectors and power strips equipped with surge protection help prevent
damage to your computer from voltage spikes that can occur during electrical
storms or after power interruptions. Some surge protector manufacturers include
warranty coverage for certain types of damage. Carefully read the device warranty
when choosing a surge protector and compare joule ratings to determine the
relative effectiveness of different devices. A device with a higher joule rating offers
more protection.
NOTICE: Most surge protectors do not protect against power fluctuations or power
interruptions caused by nearby lightning strikes. When lightning occurs in your area,
disconnect the telephone line from the telephone wall jack and disconnect your
computer from the electrical outlet.
Many surge protectors have a telephone jack for modem protection. See the
surge protector documentation for modem connection instructions.
NOTICE: Not all surge protectors offer network adapter protection. Disconnect the
network cable from the network wall jack during electrical storms.
Line Conditioners
NOTICE: Line conditioners do not protect against power interruptions.
Line conditioners are designed to maintain AC voltage at a fairly constant level.
Uninterruptible Power Supplies
NOTICE: Loss of power while data is being saved to the hard drive may result in
data loss or file damage.
NOTE: To ensure maximum battery operating time, connect only your computer to
a UPS. Connect other devices, such as a printer, to a separate power strip that
provides surge protection.
A UPS protects against power fluctuations and interruptions. UPS devices
contain a battery that provides temporary power to connected devices when AC
power is interrupted. The battery charges while AC power is available. See the
UPS manufacturer documentation for information on battery operating time
and to ensure that the device is approved by Underwriters Laboratories (UL).

18 Quick Reference Guide
About Your Computer
Front View (Tower Orientation)
1–3 5.25-inch
drive bays
Can hold a CD/DVD drive, or a media card reader, floppy
drive, or a SATA hard drive in a 5.25-inch drive bay carrier.
The hard-drive carrier is only for use in the 5.25-inch drive
bays. The floppy-drive/media card reader and hard-drive
carriers are not interchangeable.
1
2
3
4
5
6
7
8
11
10
13
12
9

Quick Reference Guide 19
4 5.25-inch drive
bay with special
3.5-inch drive
panel plate
Can hold a CD/DVD drive, or a media card reader, a floppy
drive, or a SATA hard drive in a 5.25-inch drive bay carrier. The
drive-panel plate shown here is only for use with a floppy drive
or media card reader; you can install the plate in front of any of
the four 5.25-inch drive bays. For more information, see "Drive
Panels" in your User’s Guide.
The hard-drive carrier is only for use in the 5.25-inch drive bays.
The floppy-drive/media card reader and hard-drive carriers are
not interchangeable.
5 hard-drive
activity light
The hard drive light is on when the computer reads data from
or writes data to the hard drive. The light might also be on
when a device such as your CD drive is operating.
6 IEEE 1394
connector
Use the IEEE 1394 connector for high-speed data devices
such as digital video cameras and external storage devices.
7USB 2.0
connectors (2)
Use the front USB connectors for devices that you connect
occasionally, such as flash memory keys, cameras, or bootable
USB devices.
Dell recommends that you use the back USB connectors for
devices that typically remain connected, such as printers
and keyboards.
8 power button,
power light
Press the power button to turn on the computer. The light in
the center of this button indicates the power state. For more
information, see "Controls and Lights" in your User’s Guide.
NOTE: To avoid losing data, do not use the power button to
turn off the computer. Instead, perform an operating system
shutdown.
9 Dell badge You can rotate the Dell badge so that "Dell" is read horizontally,
depending on whether you use the desktop or tower orientation.
10 headphone
connector
Use the headphone connector to attach headphones.
11 microphone
connector
Use the microphone connector to attach a personal computer
microphone for voice or musical input into a sound or
telephony program.
12 diagnostic
lights (4)
Use these lights to help you troubleshoot a computer
problem based on the diagnostic code. For more information,
see "Diagnostic Lights" in your User’s Guide.
13 network link light The network link light is on when a good connection exists
between a 10-Mbps, 100-Mbps, or 1000-Mbps (or 1-Gbps)
network and the computer.

20 Quick Reference Guide
Back View (Tower Orientation)
CAUTION: Ensure that none of the computer air vents are blocked. Blocking them
can cause serious thermal problems.
1 power connector Connect the power cable.
2 card slots Slots 2–6 support full-length cards, including one PCI, two PCI
Express 2.0 x16, and two PCI-X slots. Slots 1 and 7 support
half-length cards, including one PCI Express x8 (wired as x4)
and one PCI-X slot.
3 back panel
connectors
Plug USB, audio, and other devices into the appropriate
connector (see "Back Panel Connectors" on page 21 for more
information).
1
3
2

Quick Reference Guide 21
Back Panel Connectors
1 parallel connector Connect a parallel device, such as a printer, to the parallel
connector. If you have a USB printer, plug it into a USB connector.
NOTE: The integrated parallel connector is automatically
disabled if the computer detects an installed card containing
a parallel connector configured to the same address. For more
information, see "System Setup Options" in your User’s Guide.
2 mouse connector Plug a standard PS/2 mouse into the green mouse connector.
Turn off the computer and any attached devices before you
connect a mouse to the computer. If you have a USB mouse,
plug it into a USB connector.
3 IEEE 1394
connector
Use the IEEE 1394 connector for high-speed data devices such
as digital video cameras and external storage devices.
4 line-in connector Use the blue line-in connector to attach a playback device
such as an MP3 player, CD drive, or VCR. On computers with
a sound card, use the connector on the card.
5 line-out connector Use the green line-out connector to attach headphones and
most speakers with integrated amplifiers. On computers with
a sound card, use the connector on the card.
1
2
3456 78
11
10
9

22 Quick Reference Guide
6 link integrity light Green — A good connection exists between a 10-Mbps
network and the computer.
Orange — A good connection exists between a 100-Mbps
network and the computer.
Yellow — A good connection exists between a 1000-Mbps
(or 1-Gbps) network and the computer.
Off — The computer is not detecting a physical connection
to the network.
7 network adapter
connector
To attach your computer to a network or broadband device,
connect one end of a network cable to either a network jack or
your network or broadband device. Connect the other end of
the network cable to the network adapter connector on your
computer. A click indicates that the network cable has been
securely attached.
Do not plug a telephone cable into the network connector.
On computers with an additional network connector card, use
the connectors on the card and on the back of the computer
when setting up multiple network connections (such as
a separate intra- and extranet).
It is recommended that you use Category 5 wiring and connectors
for your network. If you must use Category 3 wiring, force the
network speed to 10 Mbps to ensure reliable operation.
8network
activity light
Flashes a yellow light when the computer is transmitting or
receiving network data. A high volume of network traffic may
make this light appear to be in a steady "on" state.
9 USB 2.0
connectors (5)
It is recommended that you use the front USB connectors for
devices that you connect occasionally, such as flash memory
keys, cameras, or bootable USB devices.
Use the back USB connectors for devices that typically remain
connected, such as printers and keyboards.
10 keyboard
connector
If you have a standard PS/2 keyboard, plug it into the purple
keyboard connector. If you have a USB keyboard, plug it into
a USB connector.
11 serial
connectors (2)
Connect a serial device, such as a handheld device, to the
serial port. If necessary, the address for this port can be
modified through the system setup program (see "System
Setup" in you User’s Guide).

Quick Reference Guide 23
Cleaning Your Computer
CAUTION: Before you begin any of the procedures in this section, follow the
safety instructions in the
Product Information Guide
.
Computer, Keyboard, and Monitor
CAUTION: Before you clean your computer, disconnect the computer from the
electrical outlet. Clean your computer with a soft cloth dampened with water. Do
not use liquid or aerosol cleaners, which may contain flammable substances.
• Use a vacuum cleaner with a brush attachment to gently remove dust from
the slots and holes on your computer and from between the keys on the
keyboard.
NOTICE: Do not wipe the display screen with a soap or alcohol solution. Doing so
may damage the antiglare coating.
• To clean your monitor screen, lightly dampen a soft, clean cloth with water.
If possible, use a special screen-cleaning tissue or solution suitable for the
monitor’s antistatic coating.
• Wipe the keyboard, computer, and plastic part of the monitor with a soft
cleaning cloth moistened with water.
Do not soak the cloth or let water drip inside your computer or keyboard.
Mouse (Non-Optical)
1
Turn the retainer ring on the underside of your mouse counterclockwise,
and then remove the ball.
2
Wipe the ball with a clean, lint-free cloth.
3
Blow carefully into the ball cage to dislodge dust and lint.
4
Clean the rollers inside the ball cage with a cotton swab moistened lightly
with isopropyl alcohol.
5
Recenter the rollers in their channels, as needed. Ensure that fluff from the
swab is not left on the rollers.
6
Replace the ball and retainer ring, and then turn the retainer ring clockwise
until it clicks into place.

24 Quick Reference Guide
Floppy Drive
NOTICE: Do not attempt to clean drive heads with a swab. The heads may become
misaligned and prevent the drive from operating.
Clean your floppy drive using a commercially available cleaning kit. These kits
contain pretreated floppy disks to remove contaminants that accumulate during
normal operation.
CDs and DVDs
NOTICE: Always use compressed air to clean the lens in the CD/DVD drive, and
follow the instructions that come with the compressed air. Never touch the lens
in the drive.
1
Hold the disc by its outer edge. You can also touch the inside edge of the
center hole.
NOTICE: To prevent damaging the surface, do not wipe in a circular motion around
the disc.
2
With a soft, lint-free cloth, gently wipe the bottom of the disc (the unlabeled
side) in a straight line from the center to the outer edge of the disc.
For stubborn dirt, try using water or a diluted solution of water and mild
soap. You can also purchase commercial products that clean discs and
provide some protection from dust, fingerprints, and scratches. Cleaning
products for CDs are safe to use on DVDs.
Troubleshooting Tools
Power Lights
CAUTION: Before you begin any of the procedures in this section, follow the
safety instructions in the
Product Information Guide
.
The power button light located on the front of the computer illuminates and
blinks or remains solid to indicate different states:
• If the power light is green and the computer is not responding, "Diagnostic
Lights" on page 26.
• If the power light is blinking green, the computer is in standby mode. Press
a key on the keyboard, move the mouse, or press the power button to resume
normal operation.

Quick Reference Guide 25
• If the power light is off, the computer is either turned off or is not
receiving power.
– Reseat the power cable into both the power connector on the back of
the computer and the electrical outlet.
– If the computer is plugged into a power strip, ensure that the power
strip is plugged into an electrical outlet and that the power strip is
turned on.
– Bypass power protection devices, power strips, and power extension
cables to verify that the computer turns on properly.
– Ensure that the electrical outlet is working by testing it with another
device, such as a lamp.
– Ensure that the main power cable and front panel cable are securely
connected to the system board (see "System Board Components" in
your
User’s Guide
).
• If the power light is blinking amber, the computer is receiving electrical
power, but an internal power problem might exist.
– Ensure that the voltage selection switch is set to match the AC power
at your location, if applicable.
– Ensure that the processor power cable is securely connected to the
system board (see "System Board Components" in your
User’s Guide
).
• If the power light is steady amber, a device may be malfunctioning or
incorrectly installed.
– Remove and then reinstall the memory modules (see "Removing the
Front Panel" in your
User’s Guide
).
– Remove and then reinstall any cards (see "Cards" in your
User’s Guide
).
• Eliminate interference. Some possible causes of interference are:
– Power, keyboard, and mouse extension cables
– Too many devices on a power strip
– Multiple power strips connected to the same electrical outlet

26 Quick Reference Guide
Diagnostic Lights
CAUTION: Before you begin any of the procedures in this section, follow the
safety instructions in the
Product Information Guide
.
To help troubleshoot a problem, your computer has four lights labeled 1, 2, 3, and
4 on the front panel (see "Front View (Tower Orientation)" on page 18). When
the computer starts normally, the lights flash, and then turn off. If the computer
malfunctions, use the sequence of the lights to help identify the problem.
NOTE: After the computer completes POST, all four lights turn off before booting to
the operating system.
Diagnostic Light Codes During POST
Light Pattern Problem Description Suggested Resolution
The computer is in
a normal off
condition or
a possible pre-BIOS
failure has occurred.
Plug the computer into a working electrical
outlet and press the power button.
A possible BIOS
failure has occurred;
the computer is in the
recovery mode.
• Run the BIOS Recovery utility, wait
for recovery completion, and then
restart the computer.
• If the problem persists, contact Dell
(see
"Contacting Dell" in your
User’s Guide
).
A possible processor
failure has occurred.
• Reseat the processor (see "Processor"
in your User’s Guide
).
• If the problem persists, contact Dell
(see
"Contacting Dell" in your
User’s Guide
).

Quick Reference Guide 27
Memory modules
are detected, but
amemory failure
has occurred.
• If two or more memory modules are
installed, remove the modules
(see "Memory"
in your User’s Guide
),
reinstall one module, and then restart
the computer. If the computer starts
normally, continue to install additional
memory modules (one at a time) until
you have identified a faulty module or
reinstalled all modules without error.
• If available, install working memory of
the same type into your computer
(see "Memory"
in your User’s Guide
).
• If the problem persists, contact Dell
(see
"Contacting Dell" in your
User’s Guide
).
A possible graphics
card failure has
occurred.
• Reseat any installed graphics cards
(see "Cards"
in your User’s Guide
).
• If available, install a working graphics
card into your computer.
• If the problem persists, contact Dell
(see
"Contacting Dell" in your
User’s Guide
).
A possible floppy or
hard drive failure has
occurred.
• Reseat all power and data cables and
restart the computer.
• If the problem persists, contact Dell
(see
"Contacting Dell" in your
User’s Guide
).
A possible USB failure
has occurred.
• Reinstall all USB devices, check cable
connections, and then restart the
computer.
• If the problem persists, contact Dell
(see
"Contacting Dell" in your
User’s Guide
).
Light Pattern Problem Description Suggested Resolution

28 Quick Reference Guide
No memory
modules are detected.
• If two or more memory modules are
installed, remove the modules
(see "Memory"
in your User’s Guide
),
reinstall one module, and then restart
the computer. If the computer starts
normally, continue to install additional
memory modules (one at a time) until
you have identified a faulty module or
reinstalled all modules without error.
• If available, install working memory of
the same type into your computer
(see "Memory"
in your User’s Guide
).
• If the problem persists, contact Dell
(see
"Contacting Dell" in your
User’s Guide
).
System board failure
has occurred.
Contact Dell (see "Contacting Dell" in
your User’s Guide).
Memory modules
are detected, but
amemory
configuration or
compatibility
error exists.
• Ensure that no special requirements
for memory module/connector
placement exist (see "Memory"
in
your User’s Guide
).
• Ensure that the memory you are using
is supported by your computer
(see "Memory"
in your User’s Guide
).
• If the problem persists, contact Dell
(see
"Contacting Dell" in your
User’s Guide).
A possible system
board resource and/or
hardware failure has
occurred.
• Perform the procedures in "Restoring
Your Operating System"
in your
User’s Guide
.
• If the problem persists, contact Dell
(see "Contacting Dell"
in your
User’s Guide
).
Light Pattern Problem Description Suggested Resolution

Quick Reference Guide 29
A possible
expansion card
failure has occurred.
1
Determine if a conflict exists by
removing an expansion card (not
a graphics card) and restarting the
computer (see "Cards"
in your
User’s Guide
).
2
If the problem persists, reinstall the
card you removed, and then remove
a different card and restart
the computer.
3
Repeat this process for each expansion
card installed. If the computer starts
normally, troubleshoot the last card
removed from the computer for resource
conflicts (see "Restoring Your Operating
System"
in your User’s Guide
).
4
If the problem persists, contact Dell
(see
"Contacting Dell" in your
User’s Guide
).
Another failure
has occurred.
• Ensure that all hard drive and CD/DVD
drive cables are properly connected to
the system board (see "System Board
Components"
in your User’s Guide
).
• If there is an error message on the
screen identifying a problem with
a device (such as the floppy drive or
hard drive), check the device to make
sure it is functioning properly.
• If the operating system is attempting to
boot from a device (such as the floppy
drive or CD/DVD drive), check the
system setup program (see "System
Setup"
in your User’s Guide
) to ensure
the boot sequence is correct for the
devices installed on your computer.
• If the problem persists, contact Dell
(see
"Contacting Dell" in your
User’s Guide
).
Light Pattern Problem Description Suggested Resolution

30 Quick Reference Guide
Beep Codes
Your computer may emit a series of beeps during start up. The series of beeps is
called a beep code and can be used to help identify a problem with your computer.
If your computer emits a series of beeps during start-up:
1
Write down the beep code.
2
Run the Dell Diagnostics to identify the cause (see "Dell Diagnostics" on
page 33).
Code Cause
2 short, 1 long BIOS checksum error
1 long, 3 short, 2 short Memory error
1 short F12 key pressed
Code
(repetitive
short beeps)
Description Suggested Remedy
1BIOS checksum
failure. Possible
motherboard failure.
Contact Dell (see "Contacting Dell" in
your User’s Guide).
2 No memory modules
are detected.
• If two or more memory modules are
installed, remove the modules
(see "Memory"
in your User’s Guide
),
reinstall one module, and then restart
the computer. If the computer starts
normally, continue to install additional
memory modules (one at a time) until
you have identified a faulty module or
reinstalled all modules without error.
• If available, install working memory of
the same type into your computer
(see "Memory"
in your User’s Guide
).
• If the problem persists, contact Dell
(see
"Contacting Dell" in your
User’s Guide
).
3Possible
motherboard failure.
Contact Dell (see "Contacting Dell" in
your User’s Guide).

Quick Reference Guide 31
System Messages
NOTE: If the message you received is not listed in the following table, see the
documentation for either the operating system or the program that was running
when the message appeared.
A
LERT! PREVIOUS ATTEMPTS AT BOOTING THIS SYSTEM HAVE FAILED AT
CHECKPOINT [NNNN]. FOR HELP IN RESOLVING THIS PROBLEM, PLEASE NOTE THIS
CHECKPOINT AND CONTACT DELL TECHNICAL SUPPORT — The computer failed to
complete the boot routine three consecutive times for the same error (see "Contacting
Dell" in your User’s Guide for assistance).
CMOS
CHECKSUM ERROR — Possible motherboard failure or the real-time clock
battery charge is low. Replace the battery (see "Replacing the Battery" or "Contacting
Dell" in your User’s Guide for assistance).
CPU
FAN FAILURE — CPU fan failure. Replace the CPU fan (see "Removing the
Processor" in your User’s Guide).
F
LOPPY DISKETTE SEEK FAILURE — A cable may be loose, or the computer
configuration information may not match the hardware configuration. Check cable
connections (see "Contacting Dell" in your User’s Guide for assistance).
4 RAM Read/Write
failure.
• Ensure that no special requirements for
memory module/connector placement
exist (see "Memory"
in your User’s Guide
).
• Ensure that the memory you are using is
supported by your computer
(see "Memory"
in your User’s Guide
).
• If the problem persists, contact Dell (see
"Contacting Dell" in your User’s Guide).
5 Real time clock failure.
Possible battery failure
or motherboard failure.
• Replace the battery (see "Replacing the
Battery"
in your User’s Guide
).
• If the problem persists, contact Dell (see
"Contacting Dell" in your User’s Guide).
6Video BIOS
Test Failure.
Dell (see "Contacting Dell" in your
User’s Guide).
Code
(repetitive
short beeps)
Description Suggested Remedy

32 Quick Reference Guide
DISKETTE READ FAILURE — The floppy disk may be defective or a cable may be
loose. Replace the floppy disk and/or check for a loose cable connection.
H
ARD-DISK READ FAILURE — Possible hard drive failure during hard-drive boot test
(see "Contacting Dell" in your User’s Guide for assistance).
K
EYBOARD FAILURE — Keyboard failure or the keyboard cable is loose (see "Keyboard
Problems" in your User’s Guide).
N
O BOOT DEVICE AVAILABLE — The system cannot detect a bootable device or partition.
• If the floppy drive is your boot device, ensure that the cables are connected and that
a bootable floppy disk is in the drive.
• If the hard drive is your boot device, ensure that the cables are connected and that
the drive is installed properly and partitioned as a boot device.
• Enter the system setup program and ensure that the boot sequence information is
correct (see "Entering System Setup"
in your User’s Guide
).
NO TIMER TICK INTERRUPT — System board failure or a chip on the system board
might be malfunctioning (see "Contacting Dell" in your User’s Guide for assistance).
N
ON-SYSTEM DISK OR DISK ERROR — Replace the floppy disk with one that has
a bootable operating system or remove the floppy disk from drive A and restart
the computer.
N
OT A BOOT DISKETTE — Insert a bootable floppy disk and restart your computer.
NOTICE - H
ARD DRIVE SELF MONITORING SYSTEM HAS REPORTED THAT
A PARAMETER HAS EXCEEDED ITS NORMAL OPERATING RANGE. DELL RECOMMENDS
THAT YOU BACK UP YOUR DATA REGULARLY. A PARAMETER OUT OF RANGE MAY OR
MAY NOT INDICATE A POTENTIAL HARD DRIVE PROBLEM — S.M.A.R.T error,
possible HDD failure. This feature can be enabled or disabled in BIOS setup.
Hardware Troubleshooter
If a device is either not detected during the operating system setup or is detected,
but incorrectly configured, you can use the Hardware Troubleshooter to resolve
the incompatibility.
Windows XP:
1
Click
Start
→
Help and Support
.
2
Ty pe
hardware troubleshooter
in the search field and press
<Enter> to start the search.
3
In the
Fix a Problem
section, click
Hardware Troubleshooter
.
4
In the
Hardware Troubleshooter
list, select the option that best describes
the problem and click
Next
to follow the remaining troubleshooting steps.

Quick Reference Guide 33
Windows Vista:
1
Click the Windows Vista start button , and click
Help and Support
.
2
Ty pe
hardware troubleshooter
in the search field and press
<Enter> to start the search.
3
In the search results, select the option that best describes the problem and
follow the remaining troubleshooting steps.
Dell Diagnostics
CAUTION: Before you begin any of the procedures in this section, follow the
safety instructions in the
Product Information Guide
.
When to Use the Dell Diagnostics
If you experience a problem with your computer, perform the checks in "Lockups
and Software Problems" (see "Troubleshooting" in your User’s Guide) and run the
Dell Diagnostics before you contact Dell for assistance.
You can run the Dell Diagnostics from your hard drive or from the Drivers and
Utilities disc.
See "System Setup" in your User’s Guide to review your computer’s configuration
information, and ensure that the device that you want to test displays in the
system setup program and is active.
NOTE: The Dell Diagnostics works only on Dell computers.
NOTE: Print the following procedures before you run the Dell diagnostics.
Starting the Dell Diagnostics From Your Hard Drive
The Dell Diagnostics is located on a separate diagnostic utility partition on
your hard drive.
NOTE: If your computer cannot display a screen image, see "Contacting Dell" in
your User’s Guide.
1
Turn on (or restart) your computer.

34 Quick Reference Guide
2
When the DELL logo appears, press <F12> immediately.
NOTE: Keyboard failure may result when a key is held down for extended
periods of time. To avoid possible keyboard failure, press and release <F12> in
even intervals to open the Boot Device Menu.
NOTE: If at any time a message appears stating that no diagnostics utility
partition has been found, run the Dell Diagnostics from your Drivers and
Utilities disc (see "Starting the Dell Diagnostics From the Drivers and Utilities
Disc" on page 34)
.
If you wait too long and the operating system logo appears, continue to
wait until you see the Microsoft Windows desktop, and then shut down
your computer and try again.
3
At the
Boot Device Menu
, use the up- and down-arrow keys or press the
appropriate number on the keyboard to highlight
Boot to Utility Partition
,
and then press <Enter>.
NOTE: The Quickboot feature changes the boot sequence for the current
boot only. Upon restart, the computer boots according to the boot sequence
specified in the system setup program.
4
At the Dell Diagnostics
Main Menu
, left-click with the mouse, or press
<Tab> and then <Enter>, to select the test you want to run (see "Dell
Diagnostics Main Menu" on page 35).
NOTE: Write down any error codes and problem descriptions exactly as they
appear and follow the instructions on the screen.
5 After all tests have completed, close the test window to return to the
Dell Diagnostics Main Menu.
6 Close the Main Menu window to exit the Dell Diagnostics and restart
the computer.
Starting the Dell Diagnostics From the Drivers and Utilities Disc
1
Turn on your computer.
2
Press the eject button on the front of the optical drive to open the drive tray.
3
Place the
Drivers and Utilities
disc in the center of the drive tray, and then
press the eject button or gently push on the tray to close it.
4
Restart the computer.

Quick Reference Guide 35
5
When the DELL logo appears, press <F12> immediately.
NOTE: Keyboard failure may result when a key on the keyboard is held down
for extended periods of time. To avoid possible keyboard failure, press and
release <F12> in even intervals until the Boot Device Menu appears.
If you wait too long and the operating system logo appears, continue to
wait until you see the Microsoft Windows desktop, and then shut down
your computer and try again.
6
At the
Boot Device Menu
, use the up- and down-arrow keys or press the
appropriate number on the keyboard to highlight
Onboard or USB
CD-ROM
, and then press <Enter>.
NOTE: The Quickboot feature changes the boot sequence for the current
boot only. Upon restart, the computer boots according to the boot sequence
specified in the system setup program.
7
Press <1> to select the Dell Diagnostics.
8
At the
Dell Diagnostics Menu
, press <1> to select the Dell Diagnostics.
9
At the Dell Diagnostics
Main Menu
, left-click with the mouse, or press
<Tab> and then <Enter>, to select the test you want to run (see "Dell
Diagnostics Main Menu" on page 35).
NOTE: Write down any error codes and problem descriptions exactly as they
appear and follow the instructions on the screen.
10 After all tests have completed, close the test window to return to the
Dell Diagnostics Main Menu.
11 Remove the Drivers and Utilities disc, close the Main Menu window to
exit the Dell Diagnostics, and then restart the computer.
Dell Diagnostics Main Menu
The following tests can be run from the Dell Diagnostics Main Menu:
Option Function
Express Test Performs a quick test of system devices. The test typically
takes 10 to 20 minutes and requires no interaction on your
part. Run Express Test first to increase the possibility of
tracing the problem quickly.

36 Quick Reference Guide
For any problem encountered during a test, a message appears with an error
code and a description of the problem. Write down the error code and problem
description exactly as it appears and follow the instructions on the screen. If
you cannot resolve the problem, contact Dell (see "Contacting Dell" in your
User’s Guide).
NOTE: The Service Tag for your computer is located at the top of each test screen.
When contacting Dell support, have your Service Tag ready.
The following tabs provide additional information for tests run from the
Custom Test or Symptom Tree option:
Extended Test Performs a thorough check of system devices. The test
typically takes an hour or more and periodically requires
your input to answer specific questions.
Custom Test Tests a specific device in the system and can be used to
customize the tests you want to run.
Symptom Tree Lists a number of common symptoms and allows you to select
a test based on the symptom of the problem you are having.
Tab Function
Results Displays the results of the test and any error conditions
encountered.
Errors Displays error conditions encountered, error codes, and the
problem description.
Help Describes the test and any requirements for running the test.
Configuration
(Custom Test only)
Displays the hardware configuration for the selected device.
The Dell Diagnostics obtains configuration information for
all devices from the system setup program, memory, and
various internal tests, and it displays the information in the
device list in the left pane of the screen.
NOTE: The device list may not display the names of all the
components installed on your computer or all devices attached
to your computer.
Parameters
(Custom Test only)
Allows you to customize the test, if applicable, by changing
the test settings.
Option Function

Quick Reference Guide 37
Troubleshooting
Follow these tips when you troubleshoot your computer:
• If you added or removed a part before the problem started, review the
installation procedures and ensure that the part is correctly installed.
• If a peripheral device does not work, ensure that the device is properly
connected.
• If an error message appears on the screen, write down the exact message.
This message may help support personnel diagnose and fix the problem(s).
• If an error message occurs in a program, see the program’s documentation.
NOTE: The procedures in this document were written for the Windows default
view, so they may not apply if you set your Dell™ computer to the Windows
Classic view.
Battery Problems
CAUTION: There is a danger of a new battery exploding if it is incorrectly
installed. Replace the battery only with the same or equivalent type recommended
by the manufacturer. Discard used batteries according to the manufacturer's
instructions.
CAUTION: Before you begin any of the procedures in this section, follow the
safety instructions in the
Product Information Guide
.
R
EPLACE THE BATTERY — If you have to repeatedly reset time and date information
after turning on the computer, or if an incorrect time or date displays during start-up,
replace the battery (see "Replacing the Battery" in your User’s Guide). If the battery
still does not work properly, contact Dell (see "Contacting Dell" in your User’s Guide).
Drive Problems
CAUTION: Before you begin any of the procedures in this section, follow the
safety instructions in the
Product Information Guide
.
E
NSURE THAT MICROSOFT WINDOWS RECOGNIZES THE DRIVE —
Windows XP:
•Click
Start
and click
My Computer
.
Windows Vista:
•Click
Start
and click
Computer
.
If the drive is not listed, perform a full scan with your antivirus software to check
for and remove viruses. Viruses can sometimes prevent Windows from recognizing
the drive.

38 Quick Reference Guide
TEST THE DRIVE —
• Insert another disc to eliminate the possibility that the original drive is defective.
• Insert a bootable floppy disk and restart the computer.
CLEAN THE DRIVE OR DISK — See
"Cleaning Your Computer
" on page 23.
C
HECK THE CABLE CONNECTIONS
RUN THE HARDWARE TROUBLESHOOTER — See "Restoring Your Operating System"
in your User’s Guide.
R
UN THE DELL DIAGNOSTICS — See "Dell Diagnostics" on page 33.
Optical Drive Problems
NOTE: High-speed optical drive vibration is normal and may cause noise, which
does not indicate a defect in the drive or the disc.
NOTE: Because of different regions worldwide and different disc formats, not all
DVD titles work in all DVD drives.
A
DJUST THE WINDOWS VOLUME CONTROL —
• Click the speaker icon in the lower-right corner of your screen.
• Ensure that the volume is turned up by clicking the slidebar and dragging it up.
• Ensure that the sound is not muted by clicking any boxes that are checked.
CHECK THE SPEAKERS AND SUBWOOFER — See "Sound and Speaker Problems" on
page 49.
Problems Writing to an Optical Drive
CLOSE OTHER PROGRAMS — The optical drive must receive a steady stream of data
during the writing process. If the stream is interrupted, an error occurs. Try closing all
programs before you write to the optical.
T
URN OFF STANDBY MODE IN WINDOWS BEFORE WRITING TO A DISC — Search for
the keyword standby in Windows Help and Support for information on power
management modes.
Hard Drive Problems
RUN CHECK DISK —
Windows XP:
1
Click
Start
and click
My Computer
.
2
Right-click
Local Disk C:
.
3
Click
Properties
→
Tools
→
Check Now
.
4
Click
Scan for and attempt recovery of bad sectors
and click
Start
.

Quick Reference Guide 39
Windows Vista:
1
Click
Start
and click
Computer
.
2
Right-click
Local Disk C:
.
3
Click
Properties
→
Tools
→
Check Now
.
The
User Account Control
window may appear. If you are an administrator on the
computer, click
Continue
; otherwise, contact your administrator to continue the
desired action.
4
Follow the instructions on the screen.
E-Mail, Modem, and Internet Problems
CAUTION: Before you begin any of the procedures in this section, follow the
safety instructions in the
Product Information Guide
.
NOTE: Connect the modem to an analog telephone jack only. The modem does not
operate while it is connected to a digital telephone network.
NOTE: Do not plug a telephone cable into the network adapter connector
(see "Back Panel Connectors" in your User’s Guide).
C
HECK THE MICROSOFT OUTLOOK EXPRESS SECURITY SETTINGS — If you cannot
open your e-mail attachments:
1
In Outlook Express, click
Tools
→
Options
→
Security
.
2
Click
Do not allow attachments
to remove the check mark, as needed.
CHECK THE TELEPHONE LINE CONNECTION
CHECK THE TELEPHONE JACK
CONNECT THE MODEM DIRECTLY TO THE TELEPHONE WALL JACK
USE A DIFFERENT TELEPHONE LINE —
• Verify that the telephone line is connected to the jack on the modem (the jack has
either a green label or a connector-shaped icon next to it).
• Ensure that you hear a click when you insert the telephone line connector into
the modem.
• Disconnect the telephone line from the modem and connect it to a telephone; then
listen for a dial tone.
• If you have other telephone devices sharing the line, such as an answering machine,
fax machine, surge protector, or line splitter, bypass them and use the telephone to
connect the modem directly to the telephone wall jack. If you are using a line that is
3 meters (10 feet) or more in length, try a shorter line.

40 Quick Reference Guide
RUN THE MODEM DIAGNOSTIC TOOL —
Windows XP:
1
Click
Start
→
All
Programs
→
Modem Helper
.
2
Follow the instructions on the screen to identify and resolve modem problems.
Modem Helper is not available on certain computers.
Windows Vista:
1
Click
Start
→
All Programs
→
Modem Diagnostic Tool
.
2
Follow the instructions on the screen to identify and resolve modem problems.
Modem diagnostics are not available on all computers.
VERIFY THAT THE MODEM IS COMMUNICATING WITH WINDOWS —
Windows XP:
1
Click
Start
→
Control Panel
→
Printers and Other Hardware
→
Phone and Modem
Options
→
Modems
.
2
Click the COM port for your modem, and then click
Properties
→
Diagnostics
→
Query Modem
to verify that the modem is communicating with Windows.
If all commands receive responses, the modem is operating properly.
Windows Vista:
1
Click
Start
→
Control Panel
→
Hardware and Sound
→
Phone and Modem
Options
→
Modems
.
2
Click the COM port for your modem, and then click
Properties
→
Diagnostics
→
Query Modem
to verify that the modem is communicating with Windows.
If all commands receive responses, the modem is operating properly.
ENSURE THAT YOU ARE CONNECTED TO THE INTERNET — Ensure that you have
subscribed to an Internet provider. With the Outlook Express e-mail program open,
click File. If Work Offline has a check mark next to it, click the check mark to remove
it and connect to the Internet. For help, contact your Internet service provider.
Error Messages
CAUTION: Before you begin any of the procedures in this section, follow the
safety instructions in the
Product Information Guide
.
If the error message is not listed, see the documentation for the operating system or
the program that was running when the message appeared.
A
FILENAME CANNOT CONTAIN ANY OF THE FOLLOWING CHARACTERS: \ / : * ? “ <
> | — Do not use these characters in filenames.

Quick Reference Guide 41
A REQUIRED .DLL FILE WAS NOT FOUND — The program that you are trying to open
is missing an essential file. To remove and then reinstall the program:
Windows XP:
1
Click
Start
→
Control Panel
→
Add or Remove Programs
→
Programs and Features
.
2
Select the program you want to remove.
3
Click
Uninstall
.
4
See the program documentation for installation instructions.
Windows Vista:
1
Click
Start
→
Control Panel
→
Programs
→
Programs and Features
.
2
Select the program you want to remove.
3
Click
Uninstall
.
4
See the program documentation for installation instructions.
drive letter
:\ IS NOT ACCESSIBLE. THE DEVICE IS NOT READY — The drive
cannot read the disk. Insert a disk into the drive and try again.
I
NSERT BOOTABLE MEDIA — Insert a bootable floppy disk, CD, or DVD.
N
ON-SYSTEM DISK ERROR — Remove the floppy disk from the floppy drive and restart
your computer.
N
OT ENOUGH MEMORY OR RESOURCES. CLOSE SOME PROGRAMS AND TRY
AGAIN — Close all windows and open the program that you want to use. In some
cases, you may have to restart your computer to restore computer resources. If so, run
the program that you want to use first.
O
PERATING SYSTEM NOT FOUND — Contact Dell (see "Contacting Dell" in your
User’s Guide).
IEEE 1394 Device Problems
CAUTION: Before you begin any of the procedures in this section, follow the
safety instructions in the
Product Information Guide
.
E
NSURE THAT THE CABLE FOR THE IEEE 1394 DEVICE IS PROPERLY INSERTED INTO
THE DEVICE AND INTO THE CONNECTOR ON THE COMPUTER
ENSURE THAT THE IEEE 1394 DEVICE IS ENABLED IN SYSTEM SETUP — See
"System Setup Options" in your User’s Guide.
E
NSURE THAT THE IEEE 1394 DEVICE IS RECOGNIZED BY WINDOWS —
Windows XP:
1
Click
Start
and click
Control Panel
.
2
Under
Pick a Category
, click
Performance and Maintenance
→
System
→
System
Properties
→
Hardware
→
Device Manager
.

42 Quick Reference Guide
Windows Vista:
1
Click
Start
→
Control Panel
→
Hardware and Sound
.
2
Click
Device Manager
.
If your IEEE 1394 device is listed, Windows recognizes the device.
E
NSURE THAT THE IEEE 1394 CARD IS PROPERLY SEATED
ENSURE THAT THE IEEE 1394 CABLE IS CONNECTED SECURELY TO THE SYSTEM
BOARD CONNECTOR AND THE CONNECTOR ON THE FRONT I/O PANEL
IF YOU HAVE PROBLEMS WITH A DELL IEEE 1394 DEVICE — Contact Dell
(see "Contacting Dell" in your User’s Guide).
I
F YOU HAVE PROBLEMS WITH AN IEEE 1394 DEVICE NOT PROVIDED BY DELL —
Contact the IEEE 1394 device manufacturer.
Keyboard Problems
CAUTION: Before you begin any of the procedures in this section, follow the
safety instructions in the
Product Information Guide
.
C
HECK THE KEYBOARD CABLE —
• Ensure that the keyboard cable is firmly connected to the computer.
• Shut down the computer (see "Turning Off Your Computer"
in your User’s Guide
),
reconnect the keyboard cable as shown on the setup diagram for your computer, and
then restart the computer.
• Ensure that the cable is not damaged or frayed and check cable connectors for bent or
broken pins. Straighten any bent pins.
• Remove any keyboard extension cables and connect the keyboard directly to the computer.
TEST THE KEYBOARD — Connect a properly working keyboard to the computer, and
then try using the keyboard.
R
UN THE HARDWARE TROUBLESHOOTER — See "Restoring Your Operating System"
in your User’s Guide.
Lockups and Software Problems
CAUTION: Before you begin any of the procedures in this section, follow the
safety instructions in the
Product Information Guide
.
The computer does not start up
CHECK THE DIAGNOSTIC LIGHTS — See "Diagnostic Lights" on page 26.
E
NSURE THAT THE POWER CABLE IS FIRMLY CONNECTED TO THE COMPUTER AND TO
THE ELECTRICAL OUTLET

Quick Reference Guide 43
The computer stops responding
NOTICE: You may lose data if you are unable to perform an operating system shutdown.
T
URN THE COMPUTER OFF — If you are unable to get a response by pressing a key on
your keyboard or moving your mouse, press and hold the power button for at least
8 to 10 seconds (until the computer turns off), and then restart your computer.
A program stops responding
END THE PROGRAM —
1
Press <Ctrl><Shift><Esc> simultaneously to access the Task Manager.
2
Click the
Applications
tab.
3
Click to select the program that is no longer responding.
4
Click
End Task
.
A program crashes repeatedly
NOTE: Most software includes installation instructions in its documentation or on
a floppy disk, CD, or DVD.
C
HECK THE SOFTWARE DOCUMENTATION — If necessary, uninstall and then reinstall
the program.
A program is designed for an earlier Windows operating system
RUN THE PROGRAM COMPATIBILITY WIZARD —
Windows XP:
The Program Compatibility Wizard configures a program so that it runs in an
environment similar to non-Windows XP operating system environments.
1
Click
Start
→
All Programs
→
Accessories
→
Program Compatibility Wizard
→
Next
.
2
Follow the instructions on the screen.
Windows Vista:
The Program Compatibility Wizard configures a program so that it runs in an
environment similar to non-Windows Vista operating system environments.
1
Click
Start
→
Control Panel
→
Programs
→
Use an older program with this
version of Windows
.
2
In the welcome screen, click
Next
.
3
Follow the instructions on the screen.

44 Quick Reference Guide
A solid blue screen appears
TURN THE COMPUTER OFF — If you are unable to get a response by pressing a key on
your keyboard or moving your mouse, press and hold the power button for at least
8 to 10 seconds (until the computer turns off), and then restart your computer.
Other software problems
CHECK THE SOFTWARE DOCUMENTATION OR CONTACT THE SOFTWARE
MANUFACTURER FOR TROUBLESHOOTING INFORMATION —
• Ensure that the program is compatible with the operating system installed on
your computer.
• Ensure that your computer meets the minimum hardware requirements needed to run
the software. See the software documentation for information.
• Ensure that the program is installed and configured properly.
• Verify that the device drivers do not conflict with the program.
• If necessary, uninstall and then reinstall the program.
BACK UP YOUR FILES IMMEDIATELY
USE A VIRUS-SCANNING PROGRAM TO CHECK THE HARD DRIVE, FLOPPY DISKS,
CD
S, OR DVDS
SAVE AND CLOSE ANY OPEN FILES OR PROGRAMS AND SHUT DOWN YOUR
COMPUTER THROUGH THE START MENU
Memory Problems
CAUTION: Before you begin any of the procedures in this section, follow the
safety instructions in the
Product Information Guide
.
I
F YOU RECEIVE AN INSUFFICIENT MEMORY MESSAGE —
• Save and close any open files and exit any open programs you are not using to see if
that resolves the problem.
• See the software documentation for minimum memory requirements. If necessary,
install additional memory (see "Installing a Memory Module"
in your User’s Guide
).
• Reseat the memory modules (see "Removing the Front Panel"
in your User’s Guide
)
to ensure that your computer is successfully communicating with the memory.
• Run the Dell Diagnostics (see "Dell Diagnostics" on page 33).
IF YOU EXPERIENCE OTHER MEMORY PROBLEMS —
• Reseat the memory modules (see "Removing the Front Panel"
in your User’s Guide
)
to ensure that your computer is successfully communicating with the memory.

Quick Reference Guide 45
• Ensure that you are following the memory installation guidelines (see "Installing
aMemory Module"
in your User’s Guide
).
• Ensure that the memory you are using is supported by your computer. For more
information about the type of memory supported by your computer, see "Removing
the Front Panel"
in your User’s Guide
.
• Run the Dell Diagnostics (see "Dell Diagnostics" on page 33).
Mouse Problems
CAUTION: Before you begin any of the procedures in this section, follow the
safety instructions in the
Product Information Guide
.
C
HECK THE MOUSE CABLE —
• Ensure that the cable is not damaged or frayed and check cable connectors for bent or
broken pins. Straighten any bent pins.
• Remove any mouse extension cables, and connect the mouse directly to the computer.
• Verify that the mouse cable is connected as shown on the setup diagram for your computer.
RESTART THE COMPUTER —
1
Simultaneously press <Ctrl><Esc> to display the
Start
menu.
2
Press <u>,
press the up- and down-arrow keys
to highlight
Shut down
or
Tu rn
Off
, and then press <Enter>.
3
After the computer turns off, reconnect the mouse cable as shown on the
setup diagram.
4
Turn on the computer.
TEST THE MOUSE — Connect a properly working mouse to the computer, and then
try using the mouse.
C
HECK THE MOUSE SETTINGS —
Windows XP:
1
Click
Start
→
Control Panel
→
Mouse
.
2
Adjust the settings as needed.
Windows Vista:
1
Click
Start
→
Control Panel
→
Hardware and Sound
→
Mouse
.
2
Adjust the settings as needed.
REINSTALL THE MOUSE DRIVER — See "Drivers" in your User’s Guide.
R
UN THE HARDWARE TROUBLESHOOTER — See "Restoring Your Operating System"
in your User’s Guide.

46 Quick Reference Guide
Network Problems
CAUTION: Before you begin any of the procedures in this section, follow the
safety instructions in the
Product Information Guide
.
C
HECK THE NETWORK LIGHT ON THE FRONT OF THE COMPUTER — If the link
integrity light is off (see "Controls and Lights" in your User’s Guide), no network
communication is occurring. Replace the network cable.
C
HECK THE NETWORK CABLE CONNECTOR — Ensure that the network cable is
firmly inserted into the network connector on the back of the computer and the
network jack.
R
ESTART THE COMPUTER AND ATTEMPT TO LOG ON TO THE NETWORK AGAIN
CHECK YOUR NETWORK SETTINGS — Contact your network administrator or the
person who set up your network to verify that your network settings are correct and
that the network is functioning.
R
UN THE HARDWARE TROUBLESHOOTER — See "Restoring Your Operating System"
in your User’s Guide.
Power Problems
CAUTION: Before you begin any of the procedures in this section, follow the
safety instructions in the
Product Information Guide
.
I
F THE POWER LIGHT IS GREEN AND THE COMPUTER IS NOT RESPONDING — See
"Diagnostic Lights" on page 26.
I
F THE POWER LIGHT IS BLINKING GREEN — The computer is in standby mode.
Press a key on the keyboard, move the mouse, or press the power button to resume
normal operation.
I
F THE POWER LIGHT IS OFF — The computer is either turned off or is not receiving
power.
• Reseat the power cable in the power connector on the back of the computer and the
electrical outlet.
• Bypass power strips, power extension cables, and other power protection devices to
verify that the computer turns on properly.
• Ensure that any power strips being used are plugged into an electrical outlet and are
turned on.
• Ensure that the electrical outlet is working by testing it with another device, such as
alamp.
• Ensure that the main power cable and front panel cable are securely connected to the
system board (see "System Board Components"
in your User’s Guide
).

Quick Reference Guide 47
IF THE POWER LIGHT IS BLINKING AMBER — The computer is receiving electrical
power, but an internal power problem may exist.
• Ensure that the voltage selection switch is set to match the AC power at your location
(if applicable).
• Ensure that all components and cables are properly installed and securely connected
to the system board (see "System Board Components"
in your User’s Guide
).
IF THE POWER LIGHT IS STEADY AMBER — A device may be malfunctioning or
incorrectly installed.
• Remove and then reinstall all memory modules (see "Removing the Front Panel"
in
your User’s Guide
).
• Remove and then reinstall any expansion cards, including graphics cards (see "Cards"
in your User’s Guide
).
ELIMINATE INTERFERENCE — Some possible causes of interference are:
• Power, keyboard, and mouse extension cables
• Too many devices connected to the same power strip
• Multiple power strips connected to the same electrical outlet
Printer Problems
CAUTION: Before you begin any of the procedures in this section, follow the
safety instructions in the
Product Information Guide
.
NOTE: If you need technical assistance for your printer, contact the printer’s
manufacturer.
C
HECK THE PRINTER DOCUMENTATION — See the printer documentation for setup
and troubleshooting information.
E
NSURE THAT THE PRINTER IS TURNED ON
CHECK THE PRINTER CABLE CONNECTIONS —
• See the printer documentation for cable connection information.
• Ensure that the printer cables are securely connected to the printer and the computer.
TEST THE ELECTRICAL OUTLET — Ensure that the electrical outlet is working by
testing it with another device, such as a lamp.
V
ERIFY THAT THE PRINTER IS RECOGNIZED BY WINDOWS —
Windows XP:
1
Click
Start
→
Control Panel
→
Printers and Other Hardware
→
View installed
printers or fax printers
.
2
If the printer is listed, right-click the printer icon.

48 Quick Reference Guide
3
Click
Properties
→
Ports
. For a parallel printer, ensure that the
Print to the following
port(s)
: setting is
LPT1 (Printer Port)
. For a USB printer, ensure that the
Print to the
following port(s)
: setting is
USB
.
Windows Vista:
1
Click
Start
→
Control Panel
→
Hardware and Sound
→
Printer
.
2
If the printer is listed, right-click the printer icon.
3
Click
Properties,
and then click
Ports
.
4
Adjust the settings, as needed.
REINSTALL THE PRINTER DRIVER — See the printer documentation for information
on reinstalling the printer driver.
Scanner Problems
CAUTION: Before you begin any of the procedures in this section, follow the
safety instructions in the
Product Information Guide
.
NOTE: If you need technical assistance for your scanner, contact the scanner’s
manufacturer.
C
HECK THE SCANNER DOCUMENTATION — See the scanner documentation for setup
and troubleshooting information.
U
NLOCK THE SCANNER — Ensure that your scanner is unlocked (if the scanner has
a locking tab or button).
R
ESTART THE COMPUTER AND TRY THE SCANNER AGAIN
CHECK THE CABLE CONNECTIONS —
• See the scanner documentation for information on cable connections.
• Ensure that the scanner cables are securely connected to the scanner and the computer.
VERIFY THAT THE SCANNER IS RECOGNIZED BY MICROSOFT WINDOWS —
Windows XP:
1
Click
Start
→
Control Panel
→
Printers and Other Hardware
→
Scanners and Cameras
.
2
If your scanner is listed, Windows recognizes the scanner.
Windows Vista:
1
Click
Start
→
Control Panel
→
Hardware and Sound
→
Scanners and Cameras
.
2
If the scanner is listed, Windows recognizes the scanner.
REINSTALL THE SCANNER DRIVER — See the scanner documentation for instructions.

Quick Reference Guide 49
Sound and Speaker Problems
CAUTION: Before you begin any of the procedures in this section, follow the
safety instructions in the
Product Information Guide
.
No sound from speakers
NOTE: The volume control in MP3 and other media players may override the Windows
volume setting. Always check to ensure that the volume on the media player(s) has
not been turned down or off.
C
HECK THE SPEAKER CABLE CONNECTIONS — Ensure that the speakers are connected
as shown on the setup diagram supplied with the speakers. If you purchased a sound card,
ensure that the speakers are connected to the card.
E
NSURE THAT THE SUBWOOFER AND THE SPEAKERS ARE TURNED ON — See the
setup diagram supplied with the speakers. If your speakers have volume controls, adjust
the volume, bass, or treble to eliminate distortion.
A
DJUST THE WINDOWS VOLUME CONTROL — Click or double-click the speaker icon
in the lower-right corner of your screen. Ensure that the volume is turned up and that
the sound is not muted.
D
ISCONNECT HEADPHONES FROM THE HEADPHONE CONNECTOR — Sound from the
speakers is automatically disabled when headphones are connected to the computer’s
front-panel headphone connector.
T
EST THE ELECTRICAL OUTLET — Ensure that the electrical outlet is working by testing
it with another device, such as a lamp.
E
LIMINATE POSSIBLE INTERFERENCE — Turn off nearby fans, fluorescent lights, or
halogen lamps to check for interference.
R
UN THE SPEAKER DIAGNOSTICS
REINSTALL THE SOUND DRIVER — See "Drivers" in your User’s Guide.
R
UN THE HARDWARE TROUBLESHOOTER — See "Restoring Your Operating System"
in your User’s Guide.
No sound from headphones
CHECK THE HEADPHONE CABLE CONNECTION — Ensure that the headphone cable is
securely inserted into the headphone connector (see "About Your Computer" in your
User’s Guide).
A
DJUST THE WINDOWS VOLUME CONTROL — Click or double-click the speaker icon
in the lower-right corner of your screen. Ensure that the volume is turned up and that
the sound is not muted.

50 Quick Reference Guide
Video and Monitor Problems
CAUTION: Before you begin any of the procedures in this section, follow the
safety instructions in the
Product Information Guide
.
NOTICE: If your computer came with a PCI Express graphics card installed,
removal of the card is not necessary when installing additional graphics cards;
however, the card is required for troubleshooting purposes. If you remove the card,
store it in a safe and secure location. For information about your graphics card, go
to support.dell.com.
The screen is blank
NOTE: For troubleshooting procedures, see the monitor documentation.
C
HECK THE MONITOR CABLE CONNECTION —
• Ensure that the monitor cable is connected to the correct graphics card (for dual graphics
card configurations).
• If you are using a DVI-to-VGA adapter, ensure that the adapter is correctly attached to
the graphics card and monitor.
• Ensure that the monitor cable is connected as shown on the setup diagram for your
computer.
• Remove any video extension cables and connect the monitor directly to the computer.
• Swap the computer and monitor power cables to determine if the monitor’s power
cable is defective.
• Check the connectors for bent or broken pins (it is normal for monitor cable connectors
to have missing pins).
CHECK THE MONITOR POWER LIGHT —
• If the power light is lit or blinking, the monitor has power.
• If the power light is off, firmly press the button to ensure that the monitor is
turned on.
• If the power light is blinking, press a key on the keyboard or move the mouse to
resume normal operation.
TEST THE ELECTRICAL OUTLET — Ensure that the electrical outlet is working by
testing it with another device, such as a lamp.
C
HECK THE DIAGNOSTIC LIGHTS — See "Diagnostic Lights" on page 26.

Quick Reference Guide 51
The screen is difficult to read
CHECK THE MONITOR CABLE CONNECTION —
• Ensure that the monitor cable is connected to the correct graphics card (for dual
graphics card configurations).
• If you are using the optional
DVI-to-VGA
adapter, ensure that the adapter is correctly
attached to the graphics card and monitor.
• Ensure that the monitor cable is connected as shown on the setup diagram for your
computer.
• Remove any video extension cables and connect the monitor directly to the computer.
• Swap the computer and monitor power cables to determine if the monitor’s power
cable is defective.
• Check the connectors for bent or broken pins (it is normal for monitor cable connectors
to have missing pins).
CHECK THE MONITOR POWER LIGHT —
• If the power light is lit or blinking, the monitor has power.
• If the power light is off, firmly press the button to ensure that the monitor is
turned on.
• If the power light is blinking, press a key on the keyboard or move the mouse to
resume normal operation.
TEST THE ELECTRICAL OUTLET — Ensure that the electrical outlet is working by
testing it with another device, such as a lamp.
C
HECK THE DIAGNOSTIC LIGHTS — See "Diagnostic Lights" on page 26.
C
HECK THE MONITOR SETTINGS — See the monitor documentation for instructions
on adjusting the contrast and brightness, demagnetizing (degaussing) the monitor,
and running the monitor self-test.
M
OVE THE SUBWOOFER AWAY FROM THE MONITOR — If your speaker system
includes a subwoofer, ensure that the subwoofer is positioned at least 60 centimeters
(2 feet) away from the monitor.
M
OVE THE MONITOR AWAY FROM EXTERNAL POWER SOURCES — Fans, fluorescent
lights, halogen lamps, and other electrical devices can cause the screen image to appear
shaky. Turn off nearby devices to check for interference.
R
OTATE THE MONITOR TO ELIMINATE SUNLIGHT GLARE AND POSSIBLE
INTERFERENCE

52 Quick Reference Guide
ADJUST THE WINDOWS DISPLAY SETTINGS —
Windows XP:
1
Click
Start
→
Control Panel
→
Appearance and Themes
.
2
Click the area you want to change or click the
Display
icon.
3
Try different settings for
Color quality
and
Screen resolution
.
Windows Vista:
1
Click
Start
→
Control Panel
→
Hardware and Sound
→
Personalization
→
Display Settings
.
2
Adjust
Resolution
and
Colors settings,
as needed.
3D image quality is poor
CHECK THE GRAPHICS CARD POWER CABLE CONNECTION — Ensure that the power
cable for the graphics card(s) is correctly attached to the card.
C
HECK THE MONITOR SETTINGS — See the monitor documentation for instructions
on adjusting the contrast and brightness, demagnetizing (degaussing) the monitor,
and running the monitor self-test.
Only part of the screen is readable
TURN ON THE COMPUTER AND THE MONITOR AND ADJUST THE MONITOR
BRIGHTNESS AND CONTRAST CONTROLS — If the monitor works, the graphics
card(s) may be defective.
Contact Dell (see "Contacting Dell"
in your User’s Guide
).

Index 53
Index
B
battery
problems, 37
beep codes, 30
C
CD-RW drive
problems, 38
Check Disk, 38
computer
beep codes, 30
crashes, 42-44
stops responding, 42-43
conflicts
software and hardware
incompatibilities, 32
connectors
headphone, 19
IEEE 1394, 19, 21
keyboard, 22
line-out, 21
mouse, 21
network adapter, 22
parallel, 21
serial, 22
sound, 21
USB, 19, 22
D
Dell Diagnostics, 33
Dell support site, 7
Desktop System Software, 7
diagnostic lights, 26
diagnostics
beep codes, 30
Dell Diagnostics, 33
lights, 19, 26
display. See monitor
documentation
End User License Agreement, 6
ergonomics, 6
online, 7
Product Information Guide, 6
regulatory, 6
safety, 6
User’s Guide, 5
warranty, 6
Drivers and Utilities CD/DVD, 5
drives
problems, 37
E
e-mail
problems, 39
End User License Agreement, 6

54 Index
ergonomics information, 6
error messages
beep codes, 30
diagnostic lights, 26
problems, 40
Express Service Code, 6
F
Files and Settings Transfer
Wizard (Windows XP), 13
H
hard drive
activity light, 19
problems, 38
hardware
beep codes, 30
conflicts, 32
Dell Diagnostics, 33
Hardware Troubleshooter, 32
headphone
connector, 19
Help and Support Center, 8
help file
Windows Help and Support
Center, 8
I
IEEE 1394
connectors, 19, 21
problems, 41
Internet
problems, 39
IRQ conflicts, 32
K
keyboard
connector, 22
problems, 42
L
labels
Express Service Code, 6
Microsoft Windows, 6
Service Tag, 6
lights
back of computer, 26
diagnostic, 19, 26
hard drive activity, 19
link integrity, 22
network, 22
network activity, 22
M
memory
problems, 44
messages
error, 40
system, 31

Index 55
modem
problems, 39
monitor
blank, 50
hard to read, 51
problems, 50
mouse
connector, 21
problems, 45
N
network
connector, 22
problems, 46
O
operating system
reinstalling, 8
Operating System CD/DVD, 8
optical drive
problems, 38
P
power
button, 19
line conditioners, 16
problems, 46
protection devices, 16
surge protectors, 16
UPS, 16
power light
conditions, 46
printer
connecting, 13
problems, 47
setting up, 13
problems
battery, 37
beep codes, 30
blue screen, 44
CD-RW drive, 38
computer crashes, 42-44
computer stops
responding, 42-43
conflicts, 32
Dell Diagnostics, 33
diagnostic lights, 26
drives, 37
e-mail, 39
error messages, 40
general, 42
hard drive, 38
IEEE 1394, 41
Internet, 39
keyboard, 42
memory, 44
modem, 39
monitor hard to read, 51
monitor is blank, 50
mouse, 45
network, 46
optical drive, 38
power, 46
power light conditions, 46
printer, 47

56 Index
problems (continued)
program crashes, 43
program stops responding, 43
scanner, 48
screen hard to read, 51
screen is blank, 50
software, 43-44
video and monitor, 50
volume adjusting, 49
Product Information Guide, 6
R
regulatory information, 6
S
S.M.A.R.T, 32
safety instructions, 6
scanner
problems, 48
screen. See monitor
Service Tag, 6
software
conflicts, 32
problems, 43-44
sound connectors
line-out, 21
support website, 7
T
transferring information to a new
computer
Files and Settings Transfer Wizard
(Windows XP), 13
Windows Easy Transfer
(Windows Vista), 16
troubleshooting
beep codes, 30
conflicts, 32
Dell Diagnostics, 33
diagnostic lights, 26
Hardware Troubleshooter, 32
Help and Support Center, 8
power lights, 24
problems, 37
system messages, 31
U
uninterruptible power supply.
See UPS
UPS, 16
USB
connector, 22
connectors, 19
User’s Guide, 5
V
video
problems, 50
volume
adjusting, 49

Index 57
W
warranty information, 6
Windows Vista
Help and Support Center, 8
reinstalling, 8
Windows Easy Transfer, 16
Windows XP
Files and Settings Transfer
Wizard, 13
Hardware Troubleshooter, 32
Help and Support Center, 8
reinstalling, 8
wizards
Files and Settings Transfer Wizard
(Windows XP), 13
Program Compatibility
Wizard, 43
Windows Easy Transfer
(Windows Vista), 16

58 Index

www.dell.com | support.dell.com
Dell Precision™ T7400
Naslaggids
Model DCDO

Opmerkingen, kennisgevingen en waarschuwingen
OPMERKING: Een OPMERKING duidt belangrijke informatie aan voor een beter
gebruik van de computer.
KENNISGEVING: Een KENNISGEVING duidt potentiële schade aan hardware of
potentieel gegevensverlies aan en vertelt u hoe het probleem kan worden
vermeden.
WAARSCHUWING: Een WAARSCHUWING duidt het risico van schade aan
eigendommen, lichamelijk letsel of overlijden aan.
____________________
De informatie in dit document kan zonder voorafgaande kennisgeving worden gewijzigd.
© 2007 Dell Inc. Alle rechten voorbehouden.
Verveelvoudiging op welke wijze dan ook zonder de schriftelijke toestemming van Dell Inc. is strikt
verboden.
Handelsmerken die in deze tekst gebruikt zijn: Dell, het DELL-logo en Dell Precision zijn handelsmerken
van Dell Inc.; Microsoft, Windows, en Windows Vista zijn handelsmerken of gedeponeerde handelsmerken
van Microsoft Corporation in de Verenigde Staten en/of andere landen.
Overige handelsmerken en handelsnamen worden in deze tekst gebruikt om te verwijzen of naar de eenheden
van de merken en namen of naar hun producten. Dell Inc. claimt op geen enkele wijze enig eigendomsrecht
ten aanzien van andere merken of handelsnamen dan haar eigen merken en handelsnamen.
Model DCDO
September 2007 O/N HR707 Rev. A00

Inhoud 61
Inhoud
Informatie zoeken . . . . . . . . . . . . . . . . . . . . 63
De computer installeren
. . . . . . . . . . . . . . . . 69
Wisselen tussen tower- en desktopstand
. . . . . 69
De computer in een kast installeren
. . . . . . . . 70
Informatie naar een nieuwe computer
overbrengen
. . . . . . . . . . . . . . . . . . . . 73
Voedingsbeschermingsapparaten
. . . . . . . . . 76
Over de computer
. . . . . . . . . . . . . . . . . . . . 78
Vooraanzicht (towerstand)
. . . . . . . . . . . . . 78
Achteraanzicht (towerstand)
. . . . . . . . . . . 80
Connectoren op het achterpaneel
. . . . . . . . . 81
De computer reinigen
. . . . . . . . . . . . . . . . . . 83
Computer, toetsenbord en monitor
. . . . . . . . . 83
Muis (niet-optisch)
. . . . . . . . . . . . . . . . . 83
Diskettestation
. . . . . . . . . . . . . . . . . . . 84
Cd's en dvd's
. . . . . . . . . . . . . . . . . . . . 84
Hulpprogramma's voor probleemoplossing
. . . . . . 84
Aan/uit-lampjes
. . . . . . . . . . . . . . . . . . 84
Controlelampjes
. . . . . . . . . . . . . . . . . . 86
Pieptooncodes
. . . . . . . . . . . . . . . . . . . 90
Systeemberichten
. . . . . . . . . . . . . . . . . 92
Probleemoplosser voor hardware
. . . . . . . . . 93
Dell Diagnostics (Dell-diagnostiek)
. . . . . . . . 94
Problemen oplossen
. . . . . . . . . . . . . . . . 98
Index . . . . . . . . . . . . . . . . . . . . . . . . . . . . . . 115

62 Inhoud

Naslaggids 63
Informatie zoeken
OPMERKING: Sommige functies of media kunnen optioneel zijn en niet bij uw
computer zijn geleverd. Sommige functies of media zijn in bepaalde landen niet
beschikbaar.
OPMERKING: Mogelijk is er bij uw computer aanvullende informatie geleverd.
Waar bent u naar op zoek? Hier kunt u het vinden
• Een diagnostisch programma voor
de computer
• Stuurprogramma's voor de computer
• Documentatie voor mijn toestel
• Desktop System Software (DSS)
De schijf Drivers and Utilities
OPMERKING: De schijf Drivers and Utilities
is optioneel en is mogelijk niet met uw
computer meegeleverd.
Documentatie en stuurprogramma's zijn
al geïnstalleerd op de computer. U kunt
de cd Drivers and Utilities gebruiken om
de stuurprogramma's opnieuw te installeren
(zie "Stuur- en hulpprogramma's opnieuw
installeren" in de Gebruikshandleiding) of
om Dell™ Diagnostics (Dell-diagnostiek)
te gebruiken (zie "Dell Diagnostics (Dell-
diagnostiek)" op pagina 94).
OPMERKING: Updates van de
stuurprogramma's en documentatie vindt
u op support.dell.com.

64 Naslaggids
• Onderdelen verwijderen en vervangen
• Specificaties
• Systeeminstellingen configureren
• Problemen vaststellen en oplossen
Dell Precision™ Gebruikshandleiding
Microsoft
®
Windows
®
XP en
Microsoft Windows Vista™ Help en
ondersteuning
1
Klik op
Start
→
Help en ondersteuning
→
Dell User and System Guides
(gebruiks-
en systeemhandleidingen)
→
System
Guides
(systeemhandleidingen).
2
Klik op de
Gebruikshandleiding
van uw
computer.
• Garantie-informatie
• Algemene voorwaarden (alleen
Vere nigde S t ate n )
• Veiligheidsinstructies
• Informatie over regelgeving
• Ergonomische informatie
• Licentieovereenkomst voor
eindgebruikers
Dell™ Productinformatiegids
Waar bent u naar op zoek? Hier kunt u het vinden

Naslaggids 65
• Serviceplaatje en code voor express-service
•Microsoft
®
Windows
®
-productcode
Servicelabel en Microsoft Windows-
productcode
Deze labels bevinden zich op de computer:
• Gebruik de code van het serviceplaatje
om de computer te identificeren als
u gebruikmaakt van
support.dell.com
of contact opneemt met de technische
ondersteuning van Dell.
• Voer de code voor express-service in
zodat uw telefonische verzoek naar de
juiste medewerker van de Dell-
ondersteuningsdienst wordt doorgeleid.
OPMERKING: Voor een betere beveiliging
heeft het nieuwe Microsoft Windows-
licentielabel nu een ontbrekende gedeelte
of gat om te weerhouden dat het label
wordt verwijderd.
Waar bent u naar op zoek? Hier kunt u het vinden

66 Naslaggids
• Oplossingen — Hints en tips voor
probleemoplossing, artikelen van technici,
on line cursussen en veelgestelde vragen
• Community — Online discussies met
andere gebruikers van Dell-producten
• Upgrades — Upgrade-informatie over
onderdelen als het geheugen, de vaste
schijf en het besturingssysteem
• Klantenservice — Contactgegevens, de
status van reparatieverzoeken en
bestellingen, informatie over garantie en
reparatie
• Service en ondersteuning — De status
van reparatieverzoeken,
ondersteuningshistorie, het servicecontract,
on line discussies met medewerkers van
de ondersteuningsdienst
• De technische updateservice van Dell —
Proactieve meldingen per e-mail van
software- en hardware-updates voor uw
computer
• Referentiemateriaal —
Computerdocumentatie, details over
mijn computerinstellingen,
productspecificaties en white papers
• Downloads — Geautoriseerde
stuurprogramma's, patches en
software-updates
Dell Support-website — support.dell.com
OPMERKING: Selecteer uw regio of
business-segment om bij de juiste
ondersteuningssite te komen.
Waar bent u naar op zoek? Hier kunt u het vinden

Naslaggids 67
• Desktop System Software (DSS) — Als
u het besturingsysteem van de computer
opnieuw installeert, moet u het
DSS-hulpprogramma ook opnieuw
installeren. DSS detecteert automatisch
de computer en het besturingssysteem
en installeert de updates die voor uw
configuratie van belang zijn, en biedt
daarbij essentiële updates voor uw
besturingssysteem en ondersteuning
voor processors, optische schijven,
USB-apparaten en meer. DSS is nodig
voor een juiste werking van de
Dell-computer.
Ga als volgt te werk om Desktop System
Software te downloaden:
1
Ga naar
support.dell.com
, selecteer uw
land/regio en klik op
Drivers & Downloads
(stuurprogramma's en downloads).
2
Klik op
Select Model
(model selecteren)
of
Enter a Tag
(nummer van serviceplaatje
invoeren), maak de juiste selecties of
voer de juiste informatie voor de computer
in en klik op
Confirm
(bevestigen).
3
Schuif naar
System and Configuration
Utilities
(systeem- en
configuratiehulpprogramma's)
→
Desktop System Software
en klik op
Download Now
(nu downloaden).
OPMERKING: De gebruikersinterface van
support.dell.com kan verschillen afhankelijk
van uw selecties.
• Met Windows XP werken
• Met Windows Vista werken
• Aan het werk met programma's en
bestanden
• Hoe pas ik mijn bureaublad aan
Help en ondersteuning van Windows
1
Klik op
Start
→
Help en ondersteuning
.
2
Geef met een of meer woorden een
beschrijving van het probleem en klik
vervolgens op het pijltje.
3
Klik op het onderwerp dat uw probleem
beschrijft.
4
Volg de instructies op het scherm.
Waar bent u naar op zoek? Hier kunt u het vinden

68 Naslaggids
• Het besturingssysteem opnieuw
installeren
De schijf Operating System
Het besturingssysteem is al op de
computer geïnstalleerd. Wanneer u het
besturingssysteem opnieuw wilt installeren,
moet u de schijf Operating Systeem
gebruiken die bij de computer is geleverd
(zie "Het besturingssysteem herstellen" in
de Gebruikshandleiding).
Nadat u het besturingssysteem opnieuw
hebt geïnstalleerd, gebruikt u de optionele
schijf Drivers and Utilities om de
stuurprogramma's opnieuw te installeren
voor de apparaten die zijn meegeleverd
bij de computer.
Het productsleutellabel voor het
besturingssysteem bevindt zich op de
computer.
OPMERKING: De kleur van de
installatieschijf is afhankelijk van het
besturingssysteem dat u hebt besteld.
• Met Linus werken
• E-maildiscussies met gebruikers van Dell
Precision-producten en het Linux-
besturingssysteem.
• Extra informatie over Linux en mijn
Dell Precision-computer
Door Dell ondersteunde Linux-sites
• linux.dell.com
• lists.us.dell.com/mailman/listinfo/linux-
precision
Waar bent u naar op zoek? Hier kunt u het vinden

Naslaggids 69
De computer installeren
Wisselen tussen tower- en desktopstand
WAARSCHUWING: Raadpleeg de veiligheidsinstructies in de
Productinformatiegids
voordat u begint met de procedures in dit gedeelte.
OPMERKING: Wanneer u de computer in de tower- of desktopstand wilt zetten,
moet u een optionele kit gebruiken die beschikbaar is bij Dell. Zie "Productinformatie" in
de Gebruikshandleiding voor meer gegevens over het bestellen bij Dell.
OPMERKING: De towercomputer heeft één 3,5-inch station aan de voorkant meer
dan de desktopcomputer.
1
Volg de procedures in "Voordat u begint" in de
Gebruikshandleiding
.
2
Verwijder de computerkap (zie "De computerkap verwijderen" in de
Gebruikshandleiding
).
3
Verwijder het frontpaneel (zie "Het frontpaneel verwijderen" in de
Gebruikshandleiding
).
4
Verwijder het stationspaneel en maak dit klaar door invoegingen toe te
voegen of te verwijderen waar dit nodig is (zie "Stationspanelen" in de
Gebruikshandleiding
).
Overschakelen van tower- naar desktopstand
1
Verwijder alle geplaatste diskettestations of mediakaartlezers door de
volgende stappen te volgen in "Een diskettestation of mediakaartlezer
verwijderen (towercomputer)" in de
Gebruikshandleiding
, en installeer
weer één diskettestation of mediakaartlezer door de volgende stappen te
volgen in "Een diskettestation of mediakaartlezer installeren
(desktopcomputer)" in de
Gebruikshandleiding
.
2
Verwijder alle geïnstalleerde optische stations door de volgende stappen te
volgen in "Een optisch station verwijderen (towercomputer)" in de
Gebruikshandleiding
, en plaats de stations terug door de stappen te volgen
in "Een optisch station installeren (desktopcomputer)" in de
Gebruikshandleiding
.

70 Naslaggids
Overschakelen van desktop- naar towerstand
1
Verwijder het diskettestation of mediakaartlezer (indien geïnstalleerd)
door de volgende stappen te volgen in "Een diskettestation of mediakaartlezer
verwijderen (desktopcomputer)" in de
Gebruikshandleiding
, en installeer het
diskettestation of de mediakaartlezer opnieuw door de volgende stappen te
volgen in "Een diskettestation of mediakaartlezer installeren (towercomputer)"
in de
Gebruikshandleiding
.
2
Verwijder alle geïnstalleerde optische stations door de volgende stappen te
volgen in "Een optisch station verwijderen (desktopcomputer)" in de
Gebruikshandleiding
, en plaats de stations terug door de stappen te volgen
in "Een optisch station installeren (towercomputer)" in de
Gebruikshandleiding
.
De computer in een kast installeren
Wanneer u de computer in een kast installeert, kunt u de luchtstroom
beperken, waardoor de computer oververhit raakt en de prestaties van de
computer kunnen verslechteren. Volg de richtlijnen hieronder wanneer u de
computer in een kast installeert.
KENNISGEVING: De bedrijfstemperatuur die in deze handleiding is opgegeven,
geeft de maximale bedrijfstemperatuur van de werkruimte weer. Wanneer u de
computer in een kast installeert, moet u rekening houden met de temperatuur in de
werkruimte. Zie "Specificaties" in de Gebruikshandleiding voor meer computergegevens.

Naslaggids 71
• Houd 10,2 cm ruimte vrij aan alle geventileerde kanten van de computer
om te zorgen dat er genoeg lucht kan worden aangezogen voor ventilatie.
• Als de computer in een hoek wordt geplaatst of onder een bureau, moet
u ervoor zorgen dat er minstens 5,1 cm tussen de achterkant van de
computer en de muur vrij is om te zorgen dat er genoeg lucht kan worden
aangezogen voor ventilatie.
• Als de kast deuren heeft, moeten deze ten minste dertig procent van de
luchtstroom doorlaten (voor- en achterkant).

72 Naslaggids
• Installeer de computer niet in een kast zonder luchtstroom. Als u de
luchtstroom tegenhoudt,
kan de computer oververhit raken en kunnen
de prestaties ervan verslechteren
.

Naslaggids 73
Informatie naar een nieuwe computer overbrengen
Met de wizards van het besturingssysteem kunt u bestanden en andere gegevens
van de ene naar de andere computer overbrengen.
Microsoft Windows XP
Het Microsoft
Windows XP-besturingssysteem biedt de wizard Bestanden en
instellingen overzetten voor het overbrengen van gegevens, zoals:
• E-mailberichten
• Werkbalkinstellingen
• Vensterformaten
• Internetbladwijzers
U kunt gegevens via een netwerk, een seriële verbinding of een verwisselbaar
medium, zoals een beschrijfbare cd, van de ene naar de andere computer
overbrengen.
OPMERKING: U kunt gegevens van de ene computer naar de andere overzetten
door direct op de in-/uitvoerpoorten (I/O) van de twee computers een seriële kabel
aan te sluiten. Wilt u de gegevens inderdaad via een seriële verbinding overbrengen,
moet u via het Configuratiescherm het hulpprogramma Netwerkverbindingen
gebruiken en extra configuratiestappen uitvoeren, zoals het instellen van een
geavanceerde verbinding en de hostcomputer en de gastcomputer toewijzen.
Zie het artikel #305621 in de Microsoft Knowledge Base genaamd How to Set Up
a Direct Cable Connection Between Two Computers in Windows XP (Een directe
kabelverbinding instellen tussen twee computers in Windows XP) voor instructies
over het instellen van een directe kabelverbinding tussen twee computers. Deze
informatie is mogelijk niet in alle landen verkrijgbaar.
Als u de wizard Bestanden en instellingen overzetten gebruikt, hebt u de schijf
met het besturingssysteem nodig dat bij de computer werd geleverd of een
wizardschijf, die u met de wizard kunt maken.
OPMERKING: Zoek voor meer informatie over het overzetten van gegevens in
support.dell.com naar document #154781 (What Are The Different Methods To
Transfer Files From My Old Computer to My New Dell™ Computer Using the
Microsoft Windows XP Operating System? (Welke methoden zijn er om bestanden
van mijn oude computer naar mijn nieuwe Dell-computer over te brengen?).
OPMERKING: Toegang tot het document in de Dell Knowledge Base is niet in alle
landen mogelijk.

74 Naslaggids
De wizard Bestanden en instellingen overzetten (met de schijf Operating System)
OPMERKING: De wizard Bestanden en instellingen overzetten wijst de
broncomputer, waarvan de gegevens komen, aan als de oude computer en de
doelcomputer, waar de gegevens heengaan, als de nieuwe computer.
DE DOELCOMPUTER VOORBEREIDEN OP DE BESTANDSOVERDRACHT —
1
Klik op
Start
→
Alle programma's
→
Bureau-accessoires
→
Systeemwerkset
→
Wizard Bestanden en instellingen overzetten
.
2
Klik in het scherm
Oude of nieuwe computer?
op
Nieuwe computer
en
vervolgens op
Volgende
.
3
Klik in het scherm
Hebt u de cd-rom met Windows XP bij de hand?
op
Ik
wil de wizard op de cd-rom met Windows XP gebruiken
en vervolgens op
Volgende
.
4
Bekijk de gegevens onder
Ga nu naar de oude computer
en ga naar de
broncomputer. Klik
niet
op
Volgende
.
GEGEVENS VANAF DE BRONCOMPUTER KOPIËREN —
1
Plaats de schijf Windows XP
Operating System
in de broncomputer.
Het scherm
Welkom bij Microsoft Windows XP
verschijnt.
2
Klik op
Andere taken uitvoeren
.
3
Klik onder
Wat wilt u doen?
op
Bestanden en instellingen overzetten
.
Het venster
Wizard Bestanden en instellingen overzetten
.
4
Klik op
Volgende
.
5
Klik in het scherm
Oude of nieuwe computer?
op
Oude computer
en
vervolgens op
Volgende
.
6
Klik onder
Op welke manier wilt u uw bestanden en instellingen overzetten?
op de gewenste overdrachtsmethode en klik op
Volgende
.
7
Klik in het scherm
Wat wilt u overzetten?
op de gegevens die u wilt
overbrengen en klik op
Volgende
.
De geselecteerde gegevens worden gekopieerd en het scherm
Gegevens
verzamelen
verschijnt.
8
Klik op
Voltooien
.

Naslaggids 75
GEGEVENS NAAR DE DOELCOMPUTER OVERZETTEN —
1
Ga naar de doelcomputer.
2
Klik onder
Ga nu naar de oude computer
op
Volgende
.
3
Selecteer in het scherm
Waar bevinden zich de bestanden en instellingen?
de gewenste methode voor het overbrengen van instellingen en bestanden
en klik op
Volgende
.
De wizard leest de verzamelde bestanden en instellingen en past ze op de
doelcomputer toe. Wanneer de overdracht is voltooid, verschijnt het
scherm
Voltooid
.
4
Klik op
Voltooid
en start de computer opnieuw op.
De wizard Bestanden en instellingen overzetten (zonder de schijf Operating System)
Wanneer u de wizard Bestanden en instellingen overbrengen wilt uitvoeren
zonder de schijf Operating System, moet u een wizardschijf maken. Met de
wizardschijf kunt u een reservekopiebestand maken op een verwisselbaar medium.
OPMERKING: De wizard Bestanden en instellingen overzetten wijst de
broncomputer, waarvan de gegevens komen, aan als de oude computer en de
doelcomputer, waar de gegevens heengaan, als de nieuwe computer.
EEN WIZARDDISKETTE MAKEN —
1
Klik op de doelcomputer op
Start
→
Alle programma's
→
Bureau-accessoires
→
Systeemwerkset
→
Wizard Bestanden en instellingen overzetten
.
2
Klik in het scherm
Oude of nieuwe computer?
op
Nieuwe computer
en
vervolgens op
Volgende
.
3
Klik in het scherm
Hebt u de cd-rom met Windows XP bij de hand?
op
Ik
wil de wizarddiskette in het volgende diskettestation maken
en klik op
Volgende
.
4
Plaats een schrijfbare cd of dvd en klik op
OK
.
5
Bekijk de gegevens onder
Ga nu naar de oude computer
en ga naar de
broncomputer. Klik
niet
op
Volgende
.
GEGEVENS VANAF DE BRONCOMPUTER KOPIËREN —
1
Plaats de wizardschijf in de broncomputer.
2
Klik op
Start
→
Uitvoeren
.
3
Klik op
Bladeren...
en ga naar
fastwiz
op de wizardschijf en klik op
OK
.

76 Naslaggids
4
Klik in het scherm
Oude of nieuwe computer?
op
Oude computer
en
vervolgens op
Volgende
.
5
Klik onder
Op welke manier wilt u uw bestanden en instellingen
overzetten?
op de gewenste overdrachtsmethode en klik op
Volgende
.
6
Klik in het scherm
Wat wilt u overzetten?
op de gegevens die u wilt
overbrengen en klik op
Volgende
.
De geselecteerde gegevens worden gekopieerd en het scherm
Gegevens
verzamelen
verschijnt.
7
Klik op
Voltooien
.
GEGEVENS NAAR DE DOELCOMPUTER OVERZETTEN —
1
Ga naar de doelcomputer.
2
Klik onder
Ga nu naar de oude computer
op
Volgende
.
3
Selecteer in het scherm
Waar bevinden zich de bestanden en instellingen?
de gewenste methode voor het overbrengen van instellingen en bestanden
en klik op
Volgende
.
De wizard leest de verzamelde bestanden en instellingen en past ze op de
doelcomputer toe. Wanneer de overdracht is voltooid, verschijnt het
scherm
Voltooid
.
4
Klik op
Voltooid
en start de computer opnieuw op.
Microsoft Windows Vista
1
Klik op de knop Start van Windows Vista en klik daarna op
Bestanden
en instellingen overzetten
→
Windows Easy Transfer starten
.
2
Klik in het dialoogvenster
Gebruikersaccountbeheer
op
Doorgaan
.
3
Klik op
Een nieuwe transfer starten
of
Doorgaan met een reeds gestarte
transfer
.
Volg de instructies van de wizard Windows Easy Transfer op het scherm.
Voedingsbeschermingsapparaten
Er zijn een aantal apparaten beschikbaar die beveiligen tegen
stroomschommelingen of -storingen:
• Piekbeveiligers
• Spanningsstabilisatoren
• Continue stroomvoorzieningen (UPS)

Naslaggids 77
Piekbeveiligers
Piekbeveiligers en contactdozen met piekbeveiliging helpen schade aan de
computer door spanningspieken voorkomen die kunnen optreden tijdens
elektrische stormen of na stroomonderbrekingen. Sommige fabrikanten van
piekbeveiligers geven garantie voor bepaalde typen schade. Lees de garantie
van het apparaat zorgvuldig door wanneer u een stroomstootbeveiliging kiest
en vergelijk de joulewaarden om het relatieve effect van verschillende apparaten
te bepalen. Een apparaat met een hogere joulewaarde biedt meer bescherming.
KENNISGEVING: De meeste piekbeveiligers beveiligen niet tegen
stroomschommelingen of -onderbrekingen die zijn veroorzaakt door onweer.
Wanneer het onweert bij u in de buurt, ontkoppelt u de telefoonlijn van het
wandcontact en haalt u de stekker van de computer uit het stopcontact.
Veel piekbeveiligers hebben een telefoonaansluiting voor modembeveiliging.
Zie de documentatie van de piekbeveiliger voor instructies voor een
modemverbinding.
KENNISGEVING: Niet alle piekbeveiligers bieden beveiliging voor netwerkadapters.
Ontkoppel de netwerkkabel tijdens elektrische stormen altijd van de
netwerkwandaansluiting.
Spanningsstabilisatoren
KENNISGEVING: Spanningsstabilisatoren beveiligen niet tegen
stroomonderbrekingen.
Spanningsstabilisatoren zijn ontworpen om netspanning te behouden met
een vrij constant niveau.
Continue stroomvoorzieningen
KENNISGEVING: Als de stroom uitvalt terwijl de gegevens op de vaste schijf worden
opgeslagen, kunnen er gegevens verloren gaan of bestanden beschadigd raken.
OPMERKING: Voor een maximale werkingsduur van de batterij moet u alleen de
computer op een UPS aansluiten. Sluit andere apparaten, zoals een printer, op een
aparte contactdoos die is voorzien van een piekbeveiliging.
Een UPS beschermt tegen stroomschommelingen en -onderbrekingen.
UPS-apparaten bevatten een batterij die tijdelijk stroom levert aan apparaten
die erop zijn aangesloten wanneer de netstroom uitvalt. De batterij wordt
opgeladen wanneer er netstroom beschikbaar is. Raadpleeg de documentatie
van de UPS-fabrikant voor informatie over de werkingsduur van de batterij en
om te controleren of het apparaat is goedgekeurd door Underwriters
Laboratories (UL).

78 Naslaggids
Over de computer
Vooraanzicht (towerstand)
1–3 5,25-inch
stations-
compartimenten
Ondersteunt een cd/dvd-station of een mediakaartlezer,
diskettestation of SATA vaste schijf in een 5,25-inch
stationcompartimenthouder.
De vaste-schijfhouder kan alleen in de 5,25-inch
stationscompartimenten worden gebruikt. Het diskettestation
of de-mediakaartlezer is niet uitwisselbaar met de
vaste-schijfhouders.
1
2
3
4
5
6
7
8
11
10
13
12
9

Naslaggids 79
4 5,25-inch sta-
tionscompartime
nt met 3.5-inch
stationspaneel
Ondersteunt een cd/dvd-station of een mediakaartlezer,
een diskettestation of SATA vaste schijf in een 5,25-inch
stationcompartimenthouder. Het stationspaneel dat hier wordt
weergegeven, wordt alleen gebruikt met een diskettestation
of mediakaartlezer; het kan voor elk van de vier 5,25-inch
stationscompartimenten worden geïnstalleerd. Zie
"Stationspanelen" in de Gebruikshandleiding voor meer
informatie.
De vaste-schijfhouder kan alleen in de 5,25-inch
stationscompartimenten worden gebruikt. Het diskettestation
of de-mediakaartlezer is niet uitwisselbaar met de
vaste-schijfhouders.
5 activiteitenlampje
vaste schijf
Het lampje van de vaste schijf brandt wanneer de computer
gegevens leest van of schrijft naar de vaste schijf. Het
lampje brandt soms ook wanneer een apparaat, zoals het
cd-station, is ingeschakeld.
6 IEEE 1394-
connector
Gebruik de IEEE 1394-connector voor apparaten met hoge
gegevenssnelheden zoals digitale videocamera's en externe
opslagapparaten.
7USB 2.0-
connectoren (2)
Gebruik de voorste USB-connectoren voor apparaten die
u af en toe aansluit, zoals sleutels met flashgeheugen of
camera's of opstartbare USB-apparaten.
Het is raadzaam om de USB-connectoren aan de achterzijde
te gebruiken voor apparaten die normaal gesproken altijd
aangesloten zijn, zoals printers en toetsenborden.
8 aan/uit-knop,
aan/uit-lampje
Druk op de aan-/uit-knop om de computer in te schakelen.
Het lampje in het midden van deze knop geeft de
energie stand aan. Zie "Schakelaars en lampjes" in de
Gebruikshandleiding voor meer informatie.
OPMERKING: Ter voorkoming van gegevensverlies moet
u de computer niet met de aan/uit-knop uitschakelen.
Schakel in plaats daarvan het besturingssysteem uit.
9 Dell-badge U kunt de Dell-badge zo draaien dat "Dell" horizontaal
leesbaar is, afhankelijk van of u de dekstop- of de
towerstand gebruikt.
10 hoofdtelefoon-
connector
Sluit hoofdtelefoons aan op de hoofdtelefoonconnector.
11 microfoon-
connector
Gebruik de microfoonconnector om een computermicrofoon
op uw computer aan te sluiten voor spraak of muziek in een
geluids- of telefonieprogramma.

80 Naslaggids
Achteraanzicht (towerstand)
WAARSCHUWING: Zorg ervoor dat geen van de systeemventilatieopeningen
geblokkeerd zijn. Anders krijgt u ernstige oververhittingsproblemen.
12 diagnostische
lampjes (4)
Gebruik de lampjes om een computerprobleem op te lossen
aan de hand van de diagnostische code. Zie "Diagnostische
lampjes" in de Gebruikshandleiding voor meer informatie.
13 netwerkverbin-
dingslampje
Het netwerkverbindingslampje brandt als er een goede
verbinding is tussen een 10-Mbps, 100-Mbps, of 1000-Mbps
(of 1-Gbps) netwerk en de computer.
1 voedingsconnector Sluit de stroomkabel aan.
2 kaartsleuven Sleuven 2-6 ondersteunen volle-lengte kaarten, waaronder
één PCI-sleuf, twee PCI Express 2.0 x16-sleuven en twee PCI-
X-sleuven. Sleuven 1 en 7 ondersteunen halve-lengte
kaarten, waaronder één PCI Express x8- (bedraad als x4) en
één PCI-X-sleuf.
3 aansluitingen op
het achterpaneel
Steek het USB- en audio-apparaat en andere apparaten in de
juiste connector (zie "Connectoren op het achterpaneel" op
pagina 81 voor meer informatie.
1
3
2

Naslaggids 81
Connectoren op het achterpaneel
1 parallelle
connector
Sluit een parallel apparaat, bijvoorbeeld een printer, aan op de
parallelle connector. Als u een USB-printer hebt, moet u deze
aansluiten op een USB-connector.
OPMERKING: De ingebouwde parallelle aansluiting wordt
automatisch uitgeschakeld zodra de computer een geïnstalleerde
kaart detecteert met een parallelle aansluiting die op hetzelfde
adres is geconfigureerd. Zie "System Setup-opties" in de
Gebruikershandleiding voor meer informatie.
2 muisconnector Sluit een standaard PS/2-muis aan op de groene
muisconnector. Schakel de computer en alle aangesloten
apparaten uit, voordat u een muis op de computer aansluit.
Als u een USB-muis hebt, moet u deze aansluiten op een
USB-connector.
3 IEEE 1394-
connector
Gebruik de IEEE 1394-connector voor apparaten met hoge
gegevenssnelheden zoals digitale videocamera's en externe
opslagapparaten.
4 lijningang Gebruik de blauwe lijningang om een afspeelapparaat aan te
sluiten, zoals een MP3-, cd- of videospeler. Gebruik op
computers met een geluidskaart de aansluiting op de kaart.
5 lijnuitgang Op de groene lijnuitgang kunt u een hoofdtelefoon en de meeste
speakers met geïntegreerde versterkers aansluiten. Gebruik op
computers met een geluidskaart de aansluiting op de kaart.
12345678
11 10 9

82 Naslaggids
6 verbindings-
integriteitslampje
Groen — Er is een goede verbinding tussen een 10-Mbps
netwerk en de computer.
Oranje — Er is een goede verbinding tussen een 100-Mbps
netwerk en de computer.
Geel — Er is een goede verbinding tussen een 1000-Mbps
(of 1-Gbps) netwerk en de computer.
Uit — De computer detecteert geen fysieke verbinding met
het netwerk.
7 connector voor
netwerkadapter
Wanneer u de computer op een netwerk of breedbandapparaat
wilt aansluiten, verbindt u het ene uiteinde van een netwerkkabel
met een netwerkplug of met uw netwerk of breedbandapparaat.
Sluit het andere uiteinde van de netwerkkabel aan op de aansluiting
voor de netwerkadapter op de computer. Als u een klik hoort,
is de netwerkkabel goed bevestigd.
Sluit geen telefoonkabel aan op de netwerkconnector.
Op computers met een extra netwerkadapter kunt u de
connectoren op de kaart en aan de achterzijde van de computer
gebruiken voor het instellen van meerdere netwerkverbindingen
(zoals een apart intra- of extranet).
U wordt aangeraden om Category 5-bedrading en -ingangen
voor uw netwerk te gebruiken. Als u toch gebruikmaakt van
Category 3-bedrading, moet u de netwerksnelheid verhogen tot
10 Mbps om een betrouwbare werking te garanderen.
8 activiteitenlampje
netwerk
Een geel lampje knippert op het moment dat de computer
netwerkgegevens verzendt of ontvangt. Bij veel verkeer kan het
lijken alsof dit lampje continu brandt.
9 USB 2.0-
connectoren (5)
Gebruik de voorste USB-connectoren voor apparaten die u af
en toe aansluit, zoals sleutels met flashgeheugen of camera's,
of voor opstartbare USB-apparaten.
Gebruik de achterste USB-connectoren voor apparaten die
normaal gesproken aangesloten blijven, zoals printers en
toetsenborden.
10 toetsenbord-
connector
Als u een standaard PS/2-toetsenbord hebt, moet u dit
aansluiten op de paarse toetsenbordaansluiting. Als u een USB-
toetsenbord hebt, moet u dit aansluiten op een USB-connector.
11 seriële
connectoren (2)
Sluit een serieel apparaat, bijvoorbeeld een handheld-apparaat,
aan op de seriële poort. Indien nodig kan het adres voor deze
poort via System Setup worden gewijzigd (zie "System Setup" in
de Gebruikshandleiding).

Naslaggids 83
De computer reinigen
WAARSCHUWING: Raadpleeg de veiligheidsinstructies in de
Productinformatiegids
voordat u begint met de procedures in dit gedeelte.
Computer, toetsenbord en monitor
WAARSCHUWING: Haal de stekker uit het stopcontact voordat u de computer
schoonmaakt. Maak uw computer schoon met een zachte, met water bevochtigde
doek. Gebruik geen vloeibare reinigingsmiddelen of reinigingsmiddelen uit een
spuitbus die ontvlambare stoffen kunnen bevatten.
• Gebruik een stofzuiger met borstelhulpstuk om voorzichtig het stof uit de
sleuven en gaten in de computer en van tussen de toetsen op het toetsenbord
te verwijderen.
KENNISGEVING: Veeg het monitorscherm niet schoon met een zeep- of
alcoholoplossing. Anders kan de ontspiegelde coating beschadigd raken.
• U reinigt het monitorscherm door het met een vochtige doek te reinigen.
Gebruik indien mogelijk een speciaal schermdoekje of oplossing die beschikbaar
is voor de antistatische laag.
• Veeg het toetsenbord, de computer en het plastic gedeelte van de monitor
schoon met een zacht reinigingsdoekje die bevochtigd is met water.
Zorg dat het doekje niet volledig is doorweekt of dat er water in uw computer
of toetsenbord drupt.
Muis (niet-optisch)
1
Draai het plaatje aan de onderkant van de muis tegen de klok in en verwijder
de bal.
2
Reinig de bal met een schone, pluisvrije doek.
3
Blaas voorzichtig in het balhuis om stof en pluisjes los te maken.
4
Reinig de wieltjes in het balhuis met een wattenstaafje dat licht is bevochtigd
met isopropanol.
5
Plaats de wieltjes indien nodig weer in het midden in de kanalen. Zorg dat
er geen pluisjes van het wattenstaafje achterblijven.
6
Plaats het balletje en de zekeringring terug en draai daarna de zekeringring
met de klok mee totdat deze op zijn plaats klikt.

84 Naslaggids
Diskettestation
KENNISGEVING: Maak de aandrijfkoppen niet met een wattenstokje schoon. De
koppen kunnen verkeerd uitgelijnd raken waardoor het station niet meer werkt.
Reinig het diskettestation met een speciale, in de winkel verkrijgbare reinigingskit.
Deze kits bevatten voorbehandelde diskettes waarmee het vuil dat zich bij
normaal gebruik ophoopt, wordt verwijderd.
Cd's en dvd's
KENNISGEVING: Gebruik altijd druklucht om de lens in het cd/dvd-station te
reinigen en volg de instructies die met het drukluchtproduct worden meegeleverd.
Raak de lens in het station nooit aan.
1
Houd de cd of dvd aan de buitenste rand. U kunt de disk ook vasthouden
aan de binnenste rand rond het gat.
KENNISGEVING: Voorkom schade aan het oppervlak door geen circulaire beweging
te maken bij het reinigen van de schijf.
2
Veeg met een zachte, stofvrije doek in een rechte lijn vanuit het midden
naar de buitenkant van de schijf de onderkant van de schijf schoon
(de niet gelabelde kant).
Voor hardnekkig vuil kunt u water of een oplossing van water en een milde
zeep gebruiken. U kunt ook speciale producten aanschaffen voor het
reinigen van de disk en ter bescherming tegen stof, vingervlekken en
krassen. Reinigingsproducten voor cd's zijn veilig te gebruiken voor dvd's.
Hulpprogramma's voor probleemoplossing
Aan/uit-lampjes
WAARSCHUWING: Raadpleeg de veiligheidsinstructies in de
Productinformatiegids
voordat u begint met de procedures in dit gedeelte.
Het lampje van de aan/uit-knop op de voorkant van de computer licht op en
knippert of brandt ononderbroken om verschillende toestanden aan te geven:
• Als het aan/uit-lampje groen is en de computer niet reageert
"Controlelampjes" op pagina 86.
• Als het aan/uit-lampje groen knippert, staat de computer in de stand-by-
modus. Druk op een toets op het toetsenbord, beweeg de muis of druk op
de aan/uit-knop om de normale werking te hervatten.

Naslaggids 85
• Als het aan/uit-lampje uit is, is de computer uitgeschakeld of krijgt deze
geen stroom.
– Steek de stroomkabel terug in de stroomconnector aan de achterkant
van de computer en het stopcontact.
– Als de computer is aangesloten op een contactdoos, moet u nagaan of
de contactdoos is aangesloten op een stopcontact en of de
contactdoos is ingeschakeld.
– Omzeil voedingsbeschermingsapparaten, contactdozen en verlengkabels
om te controleren of de computer aangaat.
– Controleer of er stroom uit het stopcontact komt, door er een ander
apparaat, zoals een lamp, op aan te sluiten.
– Controleer of de hoofdvoedingskabel en de kabel van het frontpaneel
goed op de systeemkaart is aangesloten (zie "Systeemkaartcomponenten"
in de
Gebruikshandleiding
).
• Als het aan/uit-lampje oranje knippert, krijgt de computer wel stroom,
maar is er een probleem met de interne stroom.
– Ga na of de stroomselectieschakelaar zo is ingesteld dat deze overeenkomt
met de netstroom op uw locatie, indien van toepassing.
– Controleer of de stroomkabel goed op de systeemkaart is aangesloten
(zie "Systeemkaartcomponenten" in de
Gebruikshandleiding
).
• Als het aan/uit-lampje oranje brandt, is er een apparaat defect of verkeerd
geïnstalleerd.
– Verwijder de geheugenmodules en plaats ze weer terug (zie "Het
frontpaneel verwijderen" in de
Gebruikshandleiding
).
– Verwijder alle kaarten en plaats ze vervolgens weer terug (zie "Kaarten"
in de
Gebruikshandleiding
).
• Hef interferentie op. Enkele mogelijke oorzaken van interferentie zijn:
– Stroom-, toetsenbord- en muisverlengkabels
– Te veel apparaten aangesloten op een contactdoos
– Meerdere contactdozen aangesloten op hetzelfde stopcontact

86 Naslaggids
Controlelampjes
WAARSCHUWING: Raadpleeg de veiligheidsinstructies in de
Productinformatiegids
voordat u begint met de procedures in dit gedeelte.
De vier lampjes op het voorpaneel van de computer zijn gelabeld met 1, 2, 3
en 4 om u te helpen het probleem te achterhalen (zie "Vooraanzicht
(towerstand)" op pagina 78). Wanneer de computer normaal wordt opgestart,
beginnen de lampjes te knipperen en gaan vervolgens uit. Als de computer
defect is, gebruikt u de volgorde van de lampjes om het probleem te achterhalen.
OPMERKING: Wanneer de computer klaar is met de POST, gaan alle vier de
lampjes uit voordat de computer vanaf het besturingssysteem wordt opgestart.
Diagnosecodes tijdens POST
Lichtpatroon Omschrijving
probleem
Mogelijke oplossing
De computer staat
in een normale uit-
stand of er is een
pre-BIOS-storing
opgetreden.
Sluit de computer aan op een werkend
stopcontact en druk op de aan/uit-knop.
Er is mogelijk een
BIOS-storing
opgetreden; de
computer staat in
de herstelmodus.
• Voer het hulpprogramma BIOS-Herstel
uit, wacht totdat het herstel is voltooid en
start de computer opnieuw op.
• Als het probleem aanhoudt, moet u contact
opnemen met Dell (zie
"Contact met Dell
opnemen" in de
Gebruikshandleiding
).
Er is mogelijk een
processorfout
opgetreden.
• Plaats de processor opnieuw (zie "Processor"
in de
Gebruikshandleiding
).
• Als het probleem aanhoudt, moet u contact
opnemen met Dell (zie
"Contact met Dell
opnemen" in de
Gebruikshandleiding
).

Naslaggids 87
Er zijn
geheugenmodules
gedetecteerd, maar
er is een
geheugenstoring
opgetreden.
• Als er twee of meer geheugenmodules zijn
geïnstalleerd, verwijdert u deze (zie
"Geheugen"
in de
Gebruikshandleiding
),
plaatst u een ervan weer terug en start u de
computer opnieuw op. Als de computer
normaal opstart, gaat u verder met de
installatie van de andere geheugenmodules
(één tegelijk), totdat u de defecte module
hebt opgespoord of alle modules zonder
problemen hebt geïnstalleerd.
• Installeer een werkend geheugen van
hetzelfde type in de computer, indien
beschikbaar (zie "Geheugen"
in de
Gebruikshandleiding
).
• Als het probleem aanhoudt, moet u contact
opnemen met Dell (zie
"Contact met Dell
opnemen" in de
Gebruikshandleiding
).
Er is mogelijk een
probleem met de
grafische kaart.
• Plaats alle geïnstalleerde kaarten opnieuw
(zie "Kaarten"
in de
Gebruikshandleiding
).
• Installeer een werkende grafische kaart in
de computer, indien beschikbaar.
• Als het probleem aanhoudt, moet u contact
opnemen met Dell (zie
"Contact met Dell
opnemen" in de
Gebruikshandleiding
).
Er is mogelijk een
probleem met het
diskettestation of
de vaste schijf.
• Sluit alle stroom- en datakabels opnieuw
aan en start de computer opnieuw op.
• Als het probleem aanhoudt, moet u contact
opnemen met Dell (zie
"Contact met Dell
opnemen" in de
Gebruikshandleiding
).
Er is mogelijk een
fout in de USB-
aansluiting
opgetreden.
• Installeer alle USB-apparaten opnieuw,
controleer kabelaansluitingen en start de
computer opnieuw op.
• Als het probleem aanhoudt, moet u contact
opnemen met Dell (zie
"Contact met Dell
opnemen" in de
Gebruikshandleiding
).
Lichtpatroon Omschrijving
probleem
Mogelijke oplossing

88 Naslaggids
Er zijn geen
geheugenmodules
gevonden.
• Als er twee of meer geheugenmodules zijn
geïnstalleerd, verwijdert u deze (zie
"Geheugen"
in de
Gebruikshandleiding
),
plaatst u een ervan weer terug en start u de
computer opnieuw op. Als de computer
normaal opstart, gaat u verder met de
installatie van de andere geheugenmodules
(één tegelijk), totdat u de defecte module
hebt opgespoord of alle modules zonder
problemen hebt geïnstalleerd.
• Installeer een werkend geheugen van
hetzelfde type in de computer, indien
beschikbaar (zie "Geheugen"
in de
Gebruikshandleiding
).
• Als het probleem aanhoudt, moet
u contact opnemen met Dell
(zie
"Contact met Dell opnemen" in de
Gebruikshandleiding
).
Er is een probleem
met de systeemkaart.
Neem contact op met Dell (zie "Contact
opnemen met Dell" in de Gebruikshandleiding).
Er zijn
geheugenmodules
gevonden, maar er
is sprake van een
configuratie- of
compatibiliteitsfout
in het geheugen.
• Controleer of er geen speciale eisen zijn
voor het plaatsen van
geheugenmodules/connectoren
(zie "Geheugen"
in de
Gebruikshandleiding
).
• Ga na of het geheugen dat u gebruikt, door
de computer wordt ondersteund
(zie "Geheugen"
in de
Gebruikshandleiding
).
• Als het probleem aanhoudt, moet
u contact opnemen met Dell
(zie
"Contact opnemen met Dell" in de
Gebruikshandleiding
).
Lichtpatroon Omschrijving
probleem
Mogelijke oplossing

Naslaggids 89
Er is mogelijk een
probleem
opgetreden met de
systeemkaartbron
en/of hardware.
• Voer de procedures uit in "Het
besturingssysteem herstellen"
in de
Gebruikshandleiding
.
• Als het probleem aanhoudt, moet u contact
opnemen met Dell (zie "Contact met Dell
opnemen"
in de
Gebruikshandleiding
).
Er is mogelijk een
fout in de
uitbreidingskaart
opgetreden.
1
Ga na of er een conflict bestaat door een
uitbreidingskaart te verwijderen (geen
grafische kaart) en de computer opnieuw
op te starten (zie "Kaarten"
in de
Gebruikshandleiding
).
2
Als het probleem aanhoudt, plaatst u de
verwijderde kaart terug, verwijdert u een
andere kaart en start u de computer
opnieuw op.
3
Herhaal dit proces bij elke geïnstalleerde
uitbreidingskaarten. Als de computer
normaal wordt opgestart, controleert u de
laatste kaart die u uit de computer hebt
verwijderd, op bronconflicten (zie "Het
besturingssysteem herstellen"
in de
Gebruikshandleiding
).
4
Als het probleem aanhoudt, moet u contact
opnemen met Dell (zie
"Contact met Dell
opnemen" in de
Gebruikshandleiding
).
Lichtpatroon Omschrijving
probleem
Mogelijke oplossing

90 Naslaggids
Pieptooncodes
De computer kan tijdens het opstarten een reeks pieptonen ten gehore brengen.
Deze pieptonen worden samen een pieptooncode genoemd en kunnen een
probleem met de computer identificeren.
Doe als volgt als uw computer tijdens het opstarten een reeks pieptonen ten
gehore brengt:
1
Schrijf de pieptooncode op.
2
Voer Dell Diagnostics (Dell-diagnostiek) uit om de oorzaak te achterhalen
(zie "Dell Diagnostics (Dell-diagnostiek)" op pagina 94).
Er is nog een fout
opgetreden.
• Controleer of alle kabels van de vaste schijf
en cd/dvd-stations goed op de
systeemkaart zijn aangesloten
(zie "Systeemkaartcomponenten"
in de
Gebruikshandleiding
).
• Als er een foutbericht op het scherm
verschijnt over een probleem met een
apparaat (zoals de diskette of vaste schijf),
gaat u na of het apparaat goed functioneert.
• Als u het besturingssysteem probeert op te
starten vanaf een apparaat (zoals het
diskette- of cd\dvd-station), controleert
u het System Setup-programma (zie
"System Setup"
in de
Gebruikshandleiding
om na te gaan of de opstartsequentie juist
is voor de apparaten die op de computer
zijn geïnstalleerd.
• Als het probleem aanhoudt, moet u contact
opnemen met Dell (zie
"Contact met Dell
opnemen" in de
Gebruikshandleiding
).
Code Oorzaak
2 korte, 1 lange Fout in de BIOS-controlesom
1 lange, 3 korte, 2 korte Geheugenfout
1 korte Toets F12 is ingedrukt
Lichtpatroon Omschrijving
probleem
Mogelijke oplossing

Naslaggids 91
Code
(zich herhalende
korte pieptonen)
Omschrijving Mogelijke oplossing
1 Fout in de BIOS-
controlesom.
Mogelijke
moederbordfout.
Neem contact op met Dell (zie "Contact
opnemen met Dell" in de Gebruikshandleiding).
2Er zijn geen
geheugenmodules
gevonden.
• Als er twee of meer geheugenmodules zijn
geïnstalleerd, verwijdert u deze (zie
"Geheugen"
in de
Gebruikshandleiding
),
plaatst u een ervan weer terug en start u de
computer opnieuw op. Als de computer
normaal opstart, gaat u verder met de
installatie van de andere geheugenmodules
(één tegelijk), totdat u de defecte module
hebt opgespoord of alle modules zonder
problemen hebt geïnstalleerd.
• Installeer een werkend geheugen van hetzelfde
type in de computer, indien beschikbaar
(zie "Geheugen"
in de
Gebruikshandleiding
).
• Als het probleem aanhoudt, moet u contact
opnemen met Dell (zie
"Contact met Dell
opnemen" in de
Gebruikshandleiding
).
3 Mogelijke
moederbordfout.
Neem contact op met Dell (zie "Contact
opnemen met Dell" in de Gebruikshandleiding).
4RAM-
lees/schrijffout.
• Controleer of er geen speciale eisen zijn
voor het plaatsen van
geheugenmodules/connectoren
(zie "Geheugen"
in de
Gebruikshandleiding
).
• Ga na of het geheugen dat u gebruikt, door
de computer wordt ondersteund
(zie "Geheugen"
in de
Gebruikshandleiding
).
• Als het probleem aanhoudt, moet u contact
opnemen met Dell (zie
"Contact opnemen
met Dell" in de
Gebruikshandleiding
).

92 Naslaggids
Systeemberichten
OPMERKING: Als het door u ontvangen bericht niet in de onderstaande tabel
wordt vermeld, raadpleegt u de documentatie bij het besturingssysteem of het
programma dat werd uitgevoerd toen het bericht verscheen.
W
AARSCHUWING! PREVIOUS ATTEMPTS AT BOOTING THIS SYSTEM HAVE FAILED AT
CHECKPOINT [NNNN]. NOTEER, OM DIT PROBLEEM OP TE LOSSEN, HET AANGEGEVEN
CONTROLEPUNT EN NEEM DAN CONTACT OP MET DE AFDELING TECHNISCHE
ONDERSTEUNING VAN DELL — De computer heeft tevergeefs drie opeenvolgende
pogingen gedaan om de opstartroutine te voltooien voor dezelfde fout (zie de
Gebruikshandleiding voor ondersteuning).
CMOS
CHECKSUM ERROR (FOUT IN CMOS-CONTROLESOM)—Mogelijke
moederbordfout of de RTC-batterij is bijna leeg. Vervang de batterij (zie "De batterij
vervangen" of "Contact opnemen met Dell" in de Gebruikshandleiding voor ondersteuning).
CPU
FAN FAILURE (DEFECTE PROCESSORVENTILATOR)—Defecte processorventilator.
Vervang de processorventilator (zie "De processor verwijderen" in de Gebruikshandleiding).
F
LOPPY DISKETTE SEEK FAILURE (ZOEKFOUT OP DISKETTE)—Er kan een kabel
loszitten of de computerconfiguratie-informatie komt niet overeen met de
hardwareconfiguratie. Controleer de kabelaansluitingen (zie "Contact opnemen met
Dell" in de Gebruikshandleiding voor ondersteuning).
D
ISKETTE READ FAILURE (LEESFOUT DISKETTE)—De diskette is defect of er zit een
kabel los. Vervang de diskette en/of controleer of er een kabel los zit.
H
ARD-DISK READ FAILURE (LEESFOUT VASTE SCHIJF)—Er is mogelijk een fout
opgetreden met de vaste schijf tijdens de HD-opstarttest (zie "Contact opnemen met
Dell" in de Gebruikshandleiding voor ondersteuning).
K
EYBOARD FAILURE (TOETSENBORD WERKT NIET)—Toetsenbord is defect of de
toetsenbordkabel zit los (zie "Toetsenbordproblemen" in de Gebruikshandleiding).
5 Fout met real-
timeklok. Mogelijke
batterij- of
moederbordfout.
• Vervang de batterij (zie "De batterij vervangen"
in de
Gebruikshandleiding
).
• Als het probleem aanhoudt, moet u contact
opnemen met Dell (zie
"Contact opnemen
met Dell" in de
Gebruikshandleiding
).
6 Fout met Video-
BIOS-test.
Dell (zie "Contact opnemen met Dell" in de
Gebruikshandleiding).
Code
(zich herhalende
korte pieptonen)
Omschrijving Mogelijke oplossing

Naslaggids 93
NO BOOT DEVICE AVAILABLE (GEEN OPSTARTAPPARAAT BESCHIKBAAR)—Het
systeem kan geen opstartbaar apparaat of opstartbare partitie vinden.
• Als het diskettestation uw opstartapparaat is, controleert u of de kabels zijn
aangesloten en of het station een opstartbare diskette bevat.
• Is de vaste schijf uw opstartbron, dan controleert u of de kabels zijn aangesloten en
of het station juist is geïnstalleerd en als opstartbron is gepartitioneerd.
• Open System Setup en ga na of de opstartsequentie-informatie correct is
(zie "System Setup openen"
in de
Gebruikshandleiding
).
NO TIMER TICK INTERRUPT (GEEN TIMERTIKONDERBREKING)—Er is een probleem
met de systeemkaart of een chip op de systeemkaart werkt niet goed (zie "Contact
opnemen met Dell" in de Gebruikshandleiding voor ondersteuning).
N
ON-SYSTEM DISK OR DISK ERROR (GEEN SYSTEEMSCHIJF OF SCHIJFFOUT)—
Vervang de diskette door een diskette voor het opstarten van het besturingssysteem of
verwijder de diskette uit station A en start de computer opnieuw op.
N
OT A BOOT DISKETTE (GEEN OPSTARTDISKETTE)—Plaats een opstartbare diskette
en start de computer opnieuw op.
KENNISGEVING - H
ET ZELFCONTROLEREND SYSTEEM VAN DE VASTE SCHIJF
HEEFT AANGEGEVEN DAT EEN VAN DE PARAMETERS HET NORMALE GEBRUIKSBEREIK
HEEFT OVERSCHREDEN. DELL RAADT AAN OM REGELMATIG EEN RESERVEKOPIE TE
MAKEN VAN UW GEGEVENS. EEN PARAMETER DAT BUITEN HET BEREIK LIGT, KAN
WEL OF NIET DUIDEN OP EEN PROBLEEM MET DE VASTE SCHIJF — S.M.A.R.T-fout,
mogelijke HDD-fout. Deze functie kan worden in- en uitgeschakeld in BIOS Setup.
Probleemoplosser voor hardware
Als een apparaat niet wordt ontdekt tijdens het installeren van het
besturingssysteem of wel wordt ontdekt maar verkeerd is geconfigureerd, kunt u de
probleemoplosser voor hardware gebruiken om de incompatibiliteit op te lossen.
Windows XP:
1
Klik op
Start
→
Help en ondersteuning
.
2
Ty p
probleemoplosser voor hardware
in het zoekveld en druk
op <Enter> om de zoekactie te starten.
3
Klik in het gedeelte
Een probleem oplossen
op
Probleemoplosser voor
hardware
.
4
Selecteer in de lijst
Probleemoplosser voor hardware
de optie die het
probleem het beste omschrijft en klik op
Volgende
om de overige stappen
voor probleemoplossing te volgen.

94 Naslaggids
Windows Vista:
1
Klik op de knop Start van Windows Vista
en klik op
Help en
ondersteuning
.
2
Ty p
probleemoplosser voor hardware
in het zoekveld en druk
op <Enter> om de zoekactie te starten.
3
Selecteer in de zoekresultaten de optie die het probleem het beste omschrijft
en volg de overige stappen voor probleemoplossing.
Dell Diagnostics (Dell-diagnostiek)
WAARSCHUWING: Raadpleeg de veiligheidsinstructies in de
Productinformatiegids
voordat u begint met de procedures in dit gedeelte.
Wanneer u Dell Diagnostics (Dell-diagnostiek) gebruikt
Als er zich een probleem voordoet met uw computer, moet u eerst de
controles uitvoeren die zijn beschreven in "Vastlopen en softwareproblemen"
(zie "Problemen oplossen" in de Gebruikshandleiding) en vervolgens Dell
Diagnostics (Dell-diagnostiek), voordat u contact opneemt met Dell voor
ondersteuning.
U kunt Dell Diagnostics (Dell-diagnostiek) vanaf uw vaste schijf of vanaf de
optionele schijf Drivers and Utilities uitvoeren.
Zie "System Setup" in de Gebruikshandleiding om de configuratiegegevens
van uw computer door te nemen en zorg dat het apparaat dat u wilt testen, in
het programma wordt weergegeven en actief is.
OPMERKING: Dell Diagnostics (Dell-diagnostiek) werkt alleen op Dell-computers.
OPMERKING: Druk de volgende procedures af voordat u Dell diagnostics (Dell
diagnostiek) uitvoert.
Dell Diagnostics (Dell-diagnostiek) starten vanaf de vaste schijf
Dell Diagnostics (Dell-diagnostiek) bevindt zich op een aparte partitie op de
vaste schijf.
OPMERKING: Als de computer geen beeld op het scherm kan weergeven, raadpleegt
u "Contact opnemen met Dell" in de Gebruikshandleiding.
1
Zet de computer aan of start deze opnieuw op.

Naslaggids 95
2
Wanneer het DELL-logo verschijnt, drukt u direct op <F12>.
OPMERKING: Soms gebeurt het dat het toetsenbord niet meer werkt nadat
een van de toetsen heel lang achter elkaar wordt ingedrukt. U voorkomt dit
door in gelijkmatige intervals op <F12> te drukken totdat het
opstartapparaatmenu verschijnt.
OPMERKING: Als er een bericht wordt weergegeven dat er geen partitie met
een diagnostisch hulpprogramma is gevonden, voert u Dell Diagnostics
(Dell-diagnostiek) uit vanaf de schijf Drivers and Utilities (zie "Dell Diagnostics
(Dell-diagnostiek) starten vanaf de schijf Drivers and Utilities" op pagina 95)
.
Als u te lang wacht en het logo van het besturingssysteem wordt weergegeven,
moet u blijven wachten tot het bureaublad van Microsoft Windows wordt
weergegeven. Daarna sluit u de computer af en probeert u het opnieuw.
3
Maak in het
opstartapparaatmenu
gebruik van de pijlen omhoog en
omlaag of druk op het juiste cijfer op het toetsenbord om
Boot to Utility
Partition
(opstarten vanaf partitie van hulpprogramma) te markeren en
druk op <Enter>.
OPMERKING: De Quickboot-functie verandert alleen de opstartvolgorde van
de huidige opstartsessie. Wanneer de computer opnieuw wordt opgestart,
wordt de opstartvolgorde aangehouden die in het System Setup-programma
is opgegeven.
4
Klik in het
hoofdmenu
van Dell Diagnostics (Dell-diagnostiek) op de
linkermuisknop of druk op <Tab> en vervolgens op <Enter> om de test
te selecteren die u wilt uitvoeren (zie "Hoofdmenu Dell Diagnostics (Dell-
diagnostiek)" op pagina 97).
OPMERKING: Schrijf de foutcodes en de probleembeschrijvingen exact op
en volg de instructies op het scherm.
5 Nadat u alle testen hebt uitgevoerd, sluit u het testvenster om terug te
keren naar het hoofdmenu van Dell Diagnostics (Dell-diagnostiek).
6 Sluit het venster met het hoofdmenu om Dell Diagnostics (Dell-diagnostiek)
af te sluiten en start de computer opnieuw op.
Dell Diagnostics (Dell-diagnostiek) starten vanaf de schijf Drivers and Utilities
1
Zet de computer aan.
2
Druk op de uitwerpknop aan de voorkant van het optische station om de
lade te openen.

96 Naslaggids
3
Plaats de schijf
Drivers and Utilities
in het midden van de stationslade en
druk op de uitwerpknop of druk voorzichtig tegen de lade om deze te sluiten.
4
Start de computer opnieuw op.
5
Wanneer het DELL-logo verschijnt, drukt u direct op <F12>.
OPMERKING: Soms gebeurt het dat het toetsenbord niet meer werkt nadat
een van de toetsen heel lang achter elkaar wordt ingedrukt. U voorkomt dit
door in gelijkmatige intervals op <F12> te drukken totdat het
opstartapparaatmenu verschijnt.
Als u te lang wacht en het logo van het besturingssysteem wordt
weergegeven, moet u blijven wachten tot het bureaublad van Microsoft
Windows wordt weergegeven. Daarna sluit u de computer af en probeert
u het opnieuw.
6
Maak in het
opstartapparaatmenu
gebruik van de pijlen omhoog en
omlaag of druk op het juiste cijfer op het toetsenbord om
Onboard or USB
CD-ROM
(op kaart of USB CD-ROM) te markeren en druk op <Enter>.
OPMERKING: De Quickboot-functie verandert alleen de opstartvolgorde van
de huidige opstartsessie. Wanneer de computer opnieuw wordt opgestart,
wordt de opstartvolgorde aangehouden die in het System Setup-programma
is opgegeven.
7
Druk op <1> om Dell Diagnostics (Dell-diagnostiek) te selecteren.
8
Druk in het
menu van Dell Diagnostics
(Dell-diagnostiek) op <1> om
Dell Diagnostics (Dell-diagnostiek) te selecteren.
9
Klik in het
hoofdmenu
van Dell Diagnostics (Dell-diagnostiek) op de
linkermuisknop of druk op <Tab> en vervolgens op <Enter> om de test
te selecteren die u wilt uitvoeren (zie "Hoofdmenu Dell Diagnostics
(Dell-diagnostiek)" op pagina 97).
OPMERKING: Schrijf de foutcodes en de probleembeschrijvingen exact op
en volg de instructies op het scherm.
10 Nadat u alle testen hebt uitgevoerd, sluit u het testvenster om terug te
keren naar het hoofdmenu van Dell Diagnostics (Dell-diagnostiek).
11 Verwijder de schijf Drivers and Utilities, sluit het venster met het
hoofdmenu om Dell Diagnostics (Dell-diagnostiek) af te sluiten en start
de computer opnieuw op.

Naslaggids 97
Hoofdmenu Dell Diagnostics (Dell-diagnostiek)
De volgende tests kunnen vanaf het hoofdmenu van Dell Diagnostics
(Dell-diagnostiek) worden uitgevoerd.
Als er tijdens een test een probleem wordt gedetecteerd, wordt er een bericht
weergegeven met de foutcode en een beschrijving van het probleem. Schrijf
de foutcode en de probleembeschrijving exact op en volg de instructies op het
scherm. Als u het probleem niet kunt oplossen, moet u contact opnemen met
Dell (zie het gedeelte "Contact met Dell opnemen" in de Gebruikershandleiding).
OPMERKING: Het serviceplaatje voor de computer bevindt zich boven aan elk
testvenster. Zorg dat u het servicelabel bij de hand hebt als u contact opneemt met
Dell Support.
Onderstaande tabbladen bieden meer informatie over tests die via de optie
Custom Test (Aangepaste test) of Symptom Tree (Symptomenstructuur)
worden uitgevoerd:
Optie Functie
Snelle test Hiermee wordt een snelle test uitgevoerd op systeemapparaten.
De test neemt normaliter 10 tot 20 minuten in beslag en
vereist geen interactie van uw kant. Als u de snelle test eerst
uitvoert, vergroot u de kans om het probleem snel op te sporen.
Uitgebreide test Hiermee wordt een grondige controle van systeemapparaten
uitgevoerd. De test neemt normaliter 1 uur of meer in beslag.
Zo nu en dan zult u specifieke vragen moeten beantwoorden.
Custom Test
(Aangepaste test)
Test een specifiek apparaat in het systeem en kan worden
gebruikt om de testen aan te passen die u wilt uitvoeren.
Symptom Tree
(Symptomenstructuur)
Geeft een overzicht van de problemen die vaak voorkomen
en stelt u in staat om een test te selecteren op basis van de
symptomen van het probleem dat u ondervindt.
Tabblad Functie
Results Hier worden de resultaten van de test weergegeven, samen
met eventuele foutcondities die zijn aangetroffen.
Errors Hier worden aangetroffen foutcondities, foutcodes en
probleembeschrijvingen weergegeven.

98 Naslaggids
Problemen oplossen
Maak gebruik van de volgende tips voor het oplossen van problemen met
uw computer:
• Als u problemen krijgt na het toevoegen of verwijderen van een onderdeel,
gaat u de installatieprocedures na en controleert u of het onderdeel correct
is geïnstalleerd.
• Als een randapparaat niet werkt, controleert u of het apparaat goed is
aangesloten.
• Als er een foutmelding op het scherm verschijnt, schrijft u deze exact over.
Met dit bericht kan het personeel sneller achterhalen wat het probleem is
en een oplossing vinden.
• Als er een foutmelding in een programma verschijnt, raadpleegt u de
documentatie van het programma.
OPMERKING: De procedures in dit document zijn geschreven voor de
standaardweergave van Windows, dus mogelijk zijn ze niet van toepassing als u de
klassieke weergave van Windows op uw Dell™-computer hebt ingesteld.
Help Hier wordt de test beschreven en worden eventuele vereisten
voor het uitvoeren van de test vermeld.
Configuration
(Alleen Aangepaste
test)
Hier wordt de hardwareconfiguratie beschreven voor het
geselecteerde apparaat.
Dell Diagnostics (Dell-diagnostiek) haalt configuratiegegevens
op voor alle apparaten uit de systeeminstellingen, het geheugen,
verschillende interne tests en geeft de informatie weer in de
lijst met apparaten in het linkervenster van het scherm.
OPMERKING: Mogelijk worden in het apparaatoverzicht niet de
namen van alle onderdelen weergegeven die zijn geïnstalleerd in
of aangesloten op de computer.
Parameters
(Alleen
Aangepaste test)
Hiermee kunt u de test aanpassen door de testinstellingen
te wijzigen, indien van toepassing.
Tabblad Functie

Naslaggids 99
Batterijproblemen
WAARSCHUWING: Als een nieuwe batterij niet goed wordt geplaatst, kan deze
exploderen. Vervang de batterij alleen door eenzelfde of vergelijkbaar type
batterij die de fabrikant aanraadt. Gooi gebruikte batterijen weg volgens de
instructies van de fabrikant.
WAARSCHUWING: Raadpleeg de veiligheidsinstructies in de
Productinformatiegids
voordat u begint met de procedures in dit gedeelte.
V
ERVANG DE BATTERIJ — Als u herhaaldelijk de tijd- en datuminformatie opnieuw
moet instellen na het inschakelen van de computer, of als tijdens het opstarten de
verkeerde datum en tijd wordt weergegeven, moet u de batterij vervangen (zie "De
batterij vervangen" in de Gebruikshandleiding). Als de batterij nog steeds niet goed
werkt, moet u contact opnemen met Dell (zie "Contact opnemen met Dell" in de
Gebruikshandleiding).
Problemen met stations
WAARSCHUWING: Raadpleeg de veiligheidsinstructies in de
Productinformatiegids
voordat u begint met de procedures in dit gedeelte.
C
ONTROLEER OF HET STATION DOOR MICROSOFT WINDOWS WORDT HERKEND —
Windows XP:
• Klik op
Start
en daarna op
Deze computer
.
Windows Vista:
• Klik op
Start
en daarna op
Computer
.
Als het station niet wordt vermeld, moet u een volledige scan uitvoeren met uw
antivirussoftware om te controleren op virussen en deze te verwijderen. Virussen
kunnen ervoor zorgen dat een bepaald station niet door Windows wordt herkend.
T
EST HET STATION —
• Plaats een andere schijf om de mogelijkheid uit te sluiten dat het oorspronkelijke
station defect is.
• Plaats een opstartbare diskette en start de computer opnieuw op.
MAAK HET STATION OF DE SCHIJF SCHOON — Zie
"De computer reinigen" op
pagina 83
.
C
ONTROLEER DE KABELAANSLUITINGEN
VOER DE PROBLEEMOPLOSSER VOOR HARDWARE UIT — Raadpleeg "Het
besturingssysteem herstellen" in de Gebruikershandleiding.
V
OER DELL DIAGNOSTICS (DELL-DIAGNOSTIEK) UIT — Zie "Dell Diagnostics (Dell-
diagnostiek)" op pagina 94.

100 Naslaggids
Problemen met optische stations
OPMERKING: Trillingen bij optische stations met hoge snelheden zijn normaal en
kunnen geluid produceren, wat niet in hoeft te houden dat het station of de schijf defect is.
OPMERKING: Er worden in verschillende regio's wereldwijd verschillende
schijfindelingen gebruikt. Daarom werken niet alle dvd-titels in alle dvd-stations.
S
TEL DE WINDOWS-VOLUMEREGELING BIJ —
• Klik op het luidsprekerpictogram in de rechteronderhoek van het scherm.
• Zorg ervoor dat het volume omhoog is bijgesteld door op de schuifbalk te klikken en
deze omhoog te slepen.
• Ga na of het geluid niet is gedempt door op een of meer ingeschakelde vakjes te klikken.
CONTROLEER DE LUIDSPREKERS EN DE SUBWOOFER — Zie "Problemen met geluid
en luidsprekers" op pagina 111.
Problemen met schrijven naar een optisch station
SLUIT ANDERE PROGRAMMA'S — Het optische station moet tijdens het schrijven
een continue stroom gegevens ontvangen. Als de stroom wordt onderbroken, treedt er
een fout op. Probeer alle programma's te sluiten voordat u naar het station schrijft.
S
CHAKEL DE STAND-BYMODUS IN WINDOWS UIT VOORDAT U NAAR EEN SCHIJF
SCHRIJFT — Zoek op het trefwoord stand-by in Windows Help en ondersteuning for
informatie over energiebeheermodi.
Problemen met de vaste schijf
VOER SCHIJF CONTROLEREN UIT —
Windows XP:
1
Klik op
Start
en daarna op
Deze computer
.
2
Klik met de rechtermuisknop op
Lokaal station (C:)
.
3
Klik op
Eigenschappen
→
Extra
→
Nu controleren
.
4
Klik op
Beschadigde sectoren zoeken en repareren
en daarna op
Start
.
Windows Vista:
1
Klik op
Start
en daarna op
Computer
.
2
Klik met de rechtermuisknop op
Lokaal station (C:)
.
3
Klik op
Eigenschappen
→
Extra
→
Nu controleren
.
Het venster
Gebruikersaccountbeheer
kan verschijnen. Als u een beheerder op de
computer bent, klikt u op
Doorgaan
; anders neemt u contact op met de beheerder om
de gewenste actie door te gaan.
4
Volg de instructies op het scherm.

Naslaggids 101
E-mail-, modem- en internetproblemen
WAARSCHUWING: Raadpleeg de veiligheidsinstructies in de
Productinformatiegids
voordat u begint met de procedures in dit gedeelte.
OPMERKING: Sluit de modem alleen aan op een analoge telefoonaansluiting. De
modem werkt niet als deze is aangesloten op een digitaal telefoonnetwerk.
OPMERKING: Sluit geen telefoonkabel aan op de connector voor de netwerkadapter
(zie "Connectoren op het achterpaneel" in de Gebruikshandleiding).
C
ONTROLEER DE BEVEILIGINGSINSTELLINGEN VAN MICROSOFT OUTLOOK EXPRESS —
Als u uw emailbijlagen niet kunt openen:
1
Klik in Outlook Express op
Extra
→
Opties
→
Beveiliging
.
2
Klik indien nodig op
Geen bijlagen toestaan
om het vinkje te verwijderen.
CONTROLEER DE TELEFOONLIJNAANSLUITING
CONTROLEER DE TELEFOONAANSLUITING
SLUIT HET MODEM RECHTSTREEKS AAN OP DE TELEFOONWANDAANSLUITING
GEBRUIK EEN ANDERE TELEFOONLIJN —
• Controleer of de telefoonlijn is aangesloten op de aansluiting op de modem (naast de
aansluiting bevindt zich een groen label of een pictogram in de vorm van een connector).
• Zorg ervoor dat u een klik hoort wanneer u de telefoonlijnconnector in de modem steekt.
• Ontkoppel de telefoonlijn van de modem en sluit deze op een telefoon aan. Luister
vervolgens of er een kiestoon is.
• Als er andere telefoonapparaten zijn die de lijn gebruiken, zoals een fax,
overspanningsbeveiliging of een lijnsplitter, moet u deze omzeilen en de telefoon
gebruiken om de modem rechtstreeks op de telefoonwandaansluiting aan te sluiten.
Als u een lijn gebruikt die 3 meter of langer is, moet u een kortere lijn uitproberen.
VOER HET DIAGNOSTISCHE HULPPROGRAMMA VOOR MODEMS UIT —
Windows XP:
1
Klik op
Start
→
Alle
programma's
→
Modem Helper
.
2
Volg de instructies op het scherm om het probleem met de modem te achterhalen en
op te lossen. Modem Helper is op bepaalde computers niet beschikbaar.
Windows Vista:
1
Klik op
Start
→
Alle programma's
→
Modem Diagnostic Tool
.
2
Volg de instructies op het scherm om het probleem met de modem te achterhalen en
op te lossen. Het diagnostische hulpprogramma voor modems is niet op alle
computers beschikbaar.
CONTROLEER OF DE MODEM COMMUNICEERT MET WINDOWS —
Windows XP:

102 Naslaggids
1
Klik op
Start
→
Configuratiescherm
→
Printers en andere hardware
→
Telefoon- en
modemopties
→
Modems
.
2
Klik op de COM-poort voor uw modem en kies vervolgens
Eigenschappen
→
Diagnostische gegevens
→
Instellingen opvragen
om te controleren of de modem
communiceert met Windows.
Als u op alle opdrachten respons krijgt, werkt de modem naar behoren.
Windows Vista:
1
Klik op
Start
→
Configuratiescherm
→
Hardware en geluiden
→
Telefoon- en
modemopties
→
Modems
.
2
Klik op de COM-poort voor uw modem en kies vervolgens
Eigenschappen
→
Diagnostische gegevens
→
Instellingen opvragen
om te controleren of de modem
communiceert met Windows.
Als u op alle opdrachten respons krijgt, werkt de modem naar behoren.
CONTROLEER OF U VERBINDING HEBT MET INTERNET — U moet een abonnement
hebben bij een internetprovider. Open het e-mailprogramma Outlook Express en klik
op Bestand. Als er een vinkje staat naast Off line werken, moet u op het vinkje klikken
om het te verwijderen en verbinding te maken met internet. Voor hulp neemt u contact
op met uw internetaanbieder.
Foutberichten
WAARSCHUWING: Raadpleeg de veiligheidsinstructies in de
Productinformatiegids
voordat u begint met de procedures in dit gedeelte.
Als het foutbericht niet wordt vermeld, raadpleegt u de documentatie bij het
besturingssysteem of het programma dat werd uitgevoerd toen het bericht verscheen.
A
FILENAME CANNOT CONTAIN ANY OF THE FOLLOWING CHARACTERS (DE VOLGENDE
TEKENS MOGEN NIET VOORKOMEN IN EEN BESTANDSNAAM): \ / : * ? “ < > | —
Gebruik deze tekens niet in bestandsnamen.
A
REQUIRED .DLL FILE WAS NOT FOUND (EEN VEREIST .DLL-BESTAND IS NIET
GEVONDEN)—Er ontbreekt een essentieel bestand voor het programma dat u probeert
te openen. Het programma verwijderen en opnieuw installeren:
Windows XP:
1
Klik op
Start
→
Configuratiescherm
→
Software
→
Programma's wijzigen of verwijderen
.
2
Selecteer het programma dat u wilt verwijderen.
3
Klik op
Verwijderen/Wijzigen
.
4
Raadpleeg de documentatie bij het programma voor installatie-instructies.

Naslaggids 103
Windows Vista:
1
Klik op
Start
→
Configuratiescherm
→
Programma's
→
Programma's en onderdelen
.
2
Selecteer het programma dat u wilt verwijderen.
3
Klik op
Verwijderen/Wijzigen
.
4
Raadpleeg de documentatie bij het programma voor installatie-instructies.
drive letter
:\ IS NOT ACCESSIBLE. HET APPARAAT IS NIET GEREED — Het
station kan de schijf niet lezen. Plaats een schijf in het station en probeer het opnieuw.
I
NSERT BOOTABLE MEDIA (PLAATS EEN OPSTARTBAAR MEDIUM)—Plaats een
opstartbare diskette, cd of dvd.
N
ON-SYSTEM DISK ERROR (GEEN SYSTEEMSCHIJF)—Haal de diskette uit het
diskettestation en start de computer opnieuw op.
N
OT ENOUGH MEMORY OR RESOURCES. CLOSE SOME PROGRAMS AND TRY AGAIN
(
ONVOLDOENDE GEHEUGEN OF BRONNEN; SLUIT EEN AANTAL PROGRAMMA'S AF EN
PROBEER HET OPNIEUW)—Sluit alle vensters en open het programma dat u wilt
gebruiken. In een aantal gevallen moet u de computer opnieuw opstarten om
computerbronnen te herstellen. In dat geval voert u eerst het programma uit dat u wilt
gebruiken.
O
PERATING SYSTEM NOT FOUND (BESTURINGSSYSTEEM NIET GEVONDEN)—Neem
contact op met Dell (zie "Contact opnemen met Dell" in de Gebruikshandleiding).
Problemen met IEEE 1394-apparaten
WAARSCHUWING: Raadpleeg de veiligheidsinstructies in de
Productinformatiegids
voordat u begint met de procedures in dit gedeelte.
C
ONTROLEER OF DE KABEL VOOR HET IEEE 1394-APPRAAT CORRECT OP HET
APPARAAT EN DE CONNECTOR OP DE COMPUTER IS AANGESLOTEN
CONTROLEER OF HET IEEE 1394-APPARAAT IN SYSTEM SETUP IS INGESCHAKELD —
Raadpleeg "System Setup-options" in de Gebruikshandleiding.
C
ONTROLEER OF WINDOWS HET IEEE 1394-APPARAAT HERKENT —
Windows XP:
1
Klik op de knop
Start
en vervolgens op
Configuratiescherm
.
2
Klik onder
Kies een categorie
op
Prestaties en onderhoud
→
Systeem
→
Systeemeigenschappen
→
Hardware
→
Apparaatbeheer
.
Windows Vista:
1
Klik op
Start
→
Configuratiescherm
→
Hardware en geluiden
.
2
Klik op
Apparaatbeheer.
Als uw IEEE 1394-apparaat wordt vermeld, herkent Windows het apparaat.
C
ONTROLEER OF DE IEEE 1394-KAART CORRECT IS GEPLAATST

104 Naslaggids
ZORG DAT DE IEEE 1394-KABEL GOED IS AANGESLOTEN OP DE CONNECTOR VAN DE
SYSTEEMKAART EN DE CONNECTOR OP HET I/O-FRONTPANEEL
ALS ER PROBLEMEN ZIJN MET EEN DELL IEEE 1394-APPARAAT — Neem contact
op met Dell (zie "Contact opnemen met Dell" in de Gebruikshandleiding).
A
LS ER PROBLEMEN ZIJN MET EEN IEEE 1394-APPARAAT DAT NIET DOOR DELL IS
GELEVERD — Neem contact op met de fabrikant van het IEEE 1394-apparaat.
Toetsenbordproblemen
WAARSCHUWING: Raadpleeg de veiligheidsinstructies in de
Productinformatiegids
voordat u begint met de procedures in dit gedeelte.
C
ONTROLEER DE TOETSENBORDKABEL —
• Controleer of de toetsenbordkabel stevig is aangesloten op de computer.
• Schakel de computer uit (zie "De computer uitschakelen"
in de
Gebruikshandleiding
),
sluit de toetsenbordkabel opnieuw aan, zoals wordt weergegeven in het setupdiagram
voor uw computer, en start de computer opnieuw op.
• Controleer of de kabel is beschadigd of getwist en controleer de connectoren op
gebroken of verbogen pinnen. Maak eventueel verbogen pinnen recht.
• Verwijder alle toetsenbordverlengkabels en sluit het toetsenbord direct aan op de computer.
TEST HET TOETSENBORD — Sluit een goed werkend toetsenbord aan op de computer
en probeer of dit werkt.
V
OER DE PROBLEEMOPLOSSER VOOR HARDWARE UIT — Raadpleeg "Het
besturingssysteem herstellen" in de Gebruikshandleiding.
Vastlopen en softwareproblemen
WAARSCHUWING: Raadpleeg de veiligheidsinstructies in de
Productinformatiegids
voordat u begint met de procedures in dit gedeelte.
De computer start niet op
CONTROLEER DE DIAGNOSTISCHE LAMPJES — Zie "Controlelampjes" op pagina 86.
C
ONTROLEER OF DE VOEDINGSKABEL GOED IS AANGESLOTEN OP DE COMPUTER EN
HET STOPCONTACT
De computer reageert niet meer
KENNISGEVING: U loopt het risico gegevens te verliezen als u het besturingssysteem
niet afsluit.

Naslaggids 105
SCHAKEL DE COMPUTER UIT — Als u geen reactie krijgt door op een toets op het
toetsenbord te drukken of de muis te bewegen, moet u de aan/uit-knop minstens
8-10 seconden ingedrukt houden (totdat de computer uitgaat). Start de computer
vervolgens opnieuw op.
programma reageert niet meer
BEËINDIG HET PROGRAMMA —
1
Druk tegelijkertijd op <Ctrl><Shift> en <Esc> om Taakbeheer te openen.
2
Klik op de tab
Toepassingen
.
3
Selecteer het programma dat niet meer reageert.
4
Klik op
Taak beëindigen
.
Een programma loopt regelmatig vast
OPMERKING: Bij software worden normaliter installatie-instructies geleverd in de
vorm van een installatiehandleiding of op een diskette, cd of dvd.
R
AADPLEEG DE SOFTWAREDOCUMENTATIE — Indien noodzakelijk verwijdert u het
programma en installeert u het opnieuw.
Er is een programma dat is ontwikkeld voor een eerdere versie van het Microsoft
Windows-besturingssysteem
VOER DE WIZARD PROGRAMMACOMPATIBILITEIT UIT —
Windows XP:
De wizard Programmacompatibiliteit configureert een programma op zodanige wijze
dat het in een omgeving wordt uitgevoerd die lijkt op andere dan WindowsXP-
besturingssysteemomgevingen.
1
Klik op
Start
→
Alle programma's
→
Bureau-accessoires
→
Wizard
Programmacompatibiliteit
→
Volgende
.
2
Volg de instructies op het scherm.
Windows Vista:
De wizard Programmacompatibiliteit configureert een programma op zodanige wijze
dat het in een omgeving wordt uitgevoerd die lijkt op andere dan Windows Vista-
besturingssysteemomgevingen.
1
Klik op
Start
→
Configuratiescherm
→
Programma's
→
Een ouder programma
met deze versie van Windows gebruiken
.
2
Klik in het welkomstscherm op
Volgende
.
3
Volg de instructies op het scherm.

106 Naslaggids
Er verschijnt een blauw scherm
SCHAKEL DE COMPUTER UIT — Als u geen reactie krijgt door op een toets op het
toetsenbord te drukken of de muis te bewegen, moet u de aan/uit-knop minstens
8-10 seconden ingedrukt houden (totdat de computer uitgaat). Start de computer
vervolgens opnieuw op.
Andere softwareproblemen
RAADPLEEG DE SOFTWAREDOCUMENTATIE OF NEEM CONTACT OP MET DE
SOFTWAREFABRIKANT VOOR INFORMATIE OVER PROBLEEMOPLOSSING —
• Ga na of het programma compatibel is met het besturingssysteem dat op de computer
is geïnstalleerd.
• Controleer of de computer voldoet aan de minimale hardwarevereisten voor de
software. Raadpleeg de documentatie bij de software voor meer informatie.
• Controleer of het programma op juiste wijze is geïnstalleerd en geconfigureerd.
• Controleer of de stuurprogramma's voor het apparaat niet met het programma conflicteren.
• Indien noodzakelijk verwijdert u het programma en installeert u het opnieuw.
MAAK METEEN RESERVEKOPIEËN VAN UW BESTANDEN
GEBRUIK EEN VIRUSSCANNER OM DE VASTE SCHIJF, DISKETTES, CD'S OF DVD'S TE
SCANNEN
BEWAAR EN SLUIT ALLE GEOPENDE BESTANDEN OF PROGRAMMA'S EN SLUIT DE
COMPUTER AF VIA HET MENU START
Problemen met geheugen
WAARSCHUWING: Raadpleeg de veiligheidsinstructies in de
Productinformatiegids
voordat u begint met de procedures in dit gedeelte.
A
LS ER EEN BERICHT VERSCHIJNT DAT AANGEEFT DAT ER ONVOLDOENDE
GEHEUGEN IS —
• Bewaar en sluit alle geopende bestanden of programma's die u niet gebruikt om
erachter te komen of daarmee het probleem is opgelost.
• Raadpleeg de documentatie bij de software voor de minimale geheugeneisen. Plaats
indien nodig extra geheugen (zie "Een geheugenmodule installeren"
in de
Gebruikshandleiding
).
• Druk de geheugenmodules stevig vast (zie "Het frontpaneel verwijderen"
in de
Gebruikshandleiding
) om ervoor te zorgen dat de computer ermee kan communiceren.
• Voer Dell Diagnostics (Dell-diagnostiek) uit (zie "Dell Diagnostics (Dell-diagnostiek)"
op pagina 94).

Naslaggids 107
ALS ER ANDERE PROBLEMEN MET HET GEHEUGEN ZIJN —
• Druk de geheugenmodules stevig vast (zie "Het frontpaneel verwijderen"
in de
Gebruikshandleiding
) om ervoor te zorgen dat de computer ermee kan communiceren.
• Volg de installatierichtlijnen voor het geheugen goed op (zie "Een geheugenmodule
installeren"
in de
Gebruikshandleiding
).
• Ga na of het geheugen dat u gebruikt door de computer wordt ondersteund.
Raadpleeg "Het frontpaneel verwijderen"
in de
Gebruikshandleiding
voor meer
informatie over het geheugen dat door de computer wordt ondersteund.
• Voer Dell Diagnostics (Dell-diagnostiek) uit (zie "Dell Diagnostics (Dell-diagnostiek)"
op pagina 94).
Problemen met de muis
WAARSCHUWING: Raadpleeg de veiligheidsinstructies in de
Productinformatiegids
voordat u begint met de procedures in dit gedeelte.
C
ONTROLEER DE MUISKABEL —
• Controleer of de kabel is beschadigd of getwist en controleer de connectoren op
gebroken of verbogen pinnen. Maak eventueel verbogen pinnen recht.
• Verwijder alle muisverlengkabels en sluit de muis direct aan op de computer.
• Ga na of de muiskabel is aangesloten zoals in het setupdiagram voor de computer
wordt weergegeven.
START DE COMPUTER OPNIEUW OP —
1
Druk tegelijkertijd op <Ctrl><Esc> om het menu
Start
weer te geven.
2
Druk op <u>,
vervolgens op de pijlen omhoog en omlaag
om de opties
Afsluiten
of
Uitschakelen
te markeren en druk ten slotte op <Enter>.
3
Nadat de computer is uitgeschakeld, sluit u de muiskabel weer aan, zoals in het
setupdiagram te zien is.
4
Zet de computer aan.
TEST DE MUIS — Sluit een correct werkende muis aan op de computer en probeer
deze muis uit.
C
ONTROLEER DE MUISINSTELLINGEN —
Windows XP:
1
Klik op
Start
→
Configuratiescherm
→
Muis
.
2
Wijzig de instellingen, indien nodig.
Windows Vista:
1
Klik op
Start
→
Configuratiescherm
→
Hardware en geluiden
→
Muis
.
2
Wijzig de instellingen, indien nodig.

108 Naslaggids
INSTALLEER HET MUISSTUURPROGRAMMA OPNIEUW — Raadpleeg
"Stuurprogramma's" in de Gebruikshandleiding.
V
OER DE PROBLEEMOPLOSSER VOOR HARDWARE UIT — Raadpleeg "Het
besturingssysteem herstellen" in de Gebruikshandleiding.
Netwerkproblemen
WAARSCHUWING: Raadpleeg de veiligheidsinstructies in de
Productinformatiegids
voordat u begint met de procedures in dit gedeelte.
C
ONTROLEER HET NETWERKLAMPJE OP DE VOORKANT VAN DE COMPUTER — Als
het verbindingsintegriteitslampje is uitgeschakeld (zie "Schakelaars en lampjes" in de
Gebruikshandleiding), is er geen netwerkcommunicatie. Vervang de netwerkkabel.
C
ONTROLEER DE NETWERKKABELCONNECTOR — Controleer of de netwerkkabel
stevig in de netwerkconnector aan de achterkant van de computer en de
netwerkaansluiting is gestoken.
S
TART DE COMPUTER OPNIEUW OP EN MELDT U WEER AAN BIJ HET NETWERK
CONTROLEER UW NETWERKINSTELLINGEN — Neem contact op met uw
netwerkbeheerder of de persoon die uw netwerk heeft ingesteld om te controleren of
uw netwerkinstellingen juist zijn en dat het netwerk functioneert.
V
OER DE PROBLEEMOPLOSSER VOOR HARDWARE UIT — Raadpleeg "Het
besturingssysteem herstellen" in de Gebruikershandleiding.
Voedingsproblemen
WAARSCHUWING: Raadpleeg de veiligheidsinstructies in de
Productinformatiegids
voordat u begint met de procedures in dit gedeelte.
A
LS HET AAN/UIT-LAMPJE GROEN IS EN DE COMPUTER NIET REAGEERT — Zie
"Controlelampjes" op pagina 86.
A
LS HET AAN/UIT-LAMPJE GROEN KNIPPERT — De computer bevindt zich in de
standbymodus. Druk op een toets op het toetsenbord, beweeg de muis of druk op de
aan/uit-knop om de normale werking te hervatten.
A
LS HET AAN/UIT-LAMPJE IS UITGESCHAKELD — De computer is uitgeschakeld of
krijgt geen stroom.
• Steek de stroomkabel terug in de stroomkabelconnector aan de achterkant van de
computer en het stopcontact.
• Omzeil contactdozen, verlengkabels en andere voedingsbeschermingsapparaten om te
controleren of de computer aangaat.

Naslaggids 109
• Zorg dat alle contactdozen die worden gebruikt, in een stopcontact zijn gestoken en
zijn ingeschakeld.
• Controleer of er stroom uit het stopcontact komt, door er een ander apparaat, zoals
een lamp, op aan te sluiten.
• Controleer of de hoofdvoedingskabel en de kabel van het frontpaneel goed op de
systeemkaart is aangesloten (zie "Systeemkaartcomponenten"
in de
Gebruikshandleiding
).
ALS HET AAN/UIT-LAMPJE ORANJE KNIPPERT — De computer krijgt stroom, maar
er is een probleem met de interne stroom.
• Ga na of de stroomselectieschakelaar zo is ingesteld dat deze overeenkomt met de
netstroom op uw locatie (indien toepasbaar).
• Controleer of alle componenten en kabels correct zijn geïnstalleerd en aangesloten op
de systeemkaart (zie "Systeemkaartcomponenten"
in de
Gebruikshandleiding
).
ALS HET AAN/UIT-LAMPJE ORANJE BRANDT — Mogelijk is er een apparaat dat niet
goed werkt of onjuist is geïnstalleerd.
• Verwijder alle geheugenmodules en plaats ze weer terug (zie "Het frontpaneel
verwijderen"
in de
Gebruikshandleiding
).
• Verwijder alle uitbreidingskaarten, inclusief de grafische kaart, en plaats ze vervolgens
weer terug (zie "Kaarten"
in de
Gebruikshandleiding
).
HEF INTERREFERENTIE OP — Enkele mogelijke oorzaken van interferentie zijn:
• Stroom-, toetsenbord- en muisverlengkabels
• Te veel apparaten aangesloten op dezelfde contactdoos
• Meerdere contactdozen aangesloten op hetzelfde stopcontact
Printerproblemen
WAARSCHUWING: Raadpleeg de veiligheidsinstructies in de
Productinformatiegids
voordat u begint met de procedures in dit gedeelte.
OPMERKING: Als u technische ondersteuning voor uw printer nodig hebt, moet
u contact opnemen met de printerfabrikant.
R
AADPLEEG DE DOCUMENTATIE BIJ DE PRINTER — Raadpleeg de documentatie bij
de printer voor meer informatie over de instellingen en het oplossen van problemen.
C
ONTROLEER OF DE PRINTER IS INGESCHAKELD
CONTROLEER DE PRINTERKABELAANSLUITINGEN —
• Raadpleeg de documentatie bij de printer voor informatie over kabelaansluitingen.
• Controleer of de printerkabels goed zijn aangesloten op de printer en de computer.

110 Naslaggids
TEST HET STOPCONTACT — Controleer of er stroom uit het stopcontact komt, door
er een ander apparaat, zoals een lamp, op aan te sluiten.
C
ONTROLEER OF WINDOWS DE PRINTER HERKENT —
Windows XP:
1
Klik op
Start
→
Configuratiescherm
→
Printers en andere hardware
→
Reeds geïnstalleerde
printers en faxprinters weergeven
.
2
Als de printer hier niet wordt vermeld, klikt u met de rechtermuisknop op het
printerpictogram.
3
Klik op
Eigenschappen
→
Poorten
. Controleer bij een parallelle printer, of onder
Afdrukken naar de volgende poort(en):
de optie
LPT1 (Printerpoort)
is ingesteld.
Controleer of bij een USB-printer onder
Afdrukken naar de volgende poort(en):
de
optie
USB
is ingesteld.
Windows Vista:
1
Klik op
Start
→
Configuratiescherm
→
Hardware en geluiden
→
Printer
.
2
Als de printer hier niet wordt vermeld, klikt u met de rechtermuisknop op het
printerpictogram.
3
Klik op
Eigenschappen
en daarna op
Poorten
.
4
Wijzig de instellingen, indien nodig.
INSTALLEER HET PRINTERSTUURPROGRAMMA OPNIEUW — Raadpleeg de
documentatie bij de printer voor informatie over het opnieuw installeren van het
printerstuurprogramma.
Scannerproblemen
WAARSCHUWING: Raadpleeg de veiligheidsinstructies in de
Productinformatiegids
voordat u begint met de procedures in dit gedeelte.
OPMERKING: Als u technische ondersteuning voor uw scanner nodig hebt, moet
u contact opnemen met de scannerfabrikant.
R
AADPLEEG DE DOCUMENTATIE BIJ DE SCANNER — Raadpleeg de documentatie bij
de scanner voor installatie- en probleemoplossingsinformatie.
O
NTGRENDEL DE SCANNER — Zorg ervoor dat uw scanner is ontgrendeld (als deze
voorzien is van een vergrendelingslipje of -knop).
S
TART DE COMPUTER OPNIEUW OP EN PROBEER OPNIEUW TE WERKEN MET DE
SCANNER
CONTROLEER DE KABELAANSLUITINGEN —
• Raadpleeg de documentatie bij de scanner voor informatie over kabelaansluitingen.
• Controleer of de scannerkabels goed zijn aangesloten op de scanner en de computer.

Naslaggids 111
CONTROLEER OF MICROSOFT WINDOWS DE SCANNER HERKENT —
Windows XP:
1
Klik op
Start
→
Configuratiescherm
→
Printers en andere hardware
→
Scanners en
camera's
.
2
Als uw scanner wordt vermeld, herkent Windows de scanner.
Windows Vista:
1
Klik op
Start
→
Configuratiescherm
→
Hardware en geluiden
→
Scanners en
camera's
.
2
Als de scanner wordt vermeld, herkent Windows de scanner.
INSTALLEER HET SCANNERSTUURPROGRAMMA OPNIEUW — Raadpleeg de
documentatie bij de scanner voor instructies.
Problemen met geluid en luidsprekers
WAARSCHUWING: Raadpleeg de veiligheidsinstructies in de
Productinformatiegids
voordat u begint met de procedures in dit gedeelte.
Geen geluid uit de luidsprekers
OPMERKING: De volumeregeling in MP3-spelers en andere mediaspelers neemt
voorrang op de Windows-volume-instelling. Controleer altijd of het volume van
mediaspelers niet is verlaagd of uitgeschakeld.
C
ONTROLEER DE KABELAANSLUITINGEN VAN DE LUIDSPREKERS — Controleer of de
luidsprekers zijn aangesloten zoals wordt weergegeven in de schematische weergave
die bij de luidsprekers is geleverd. Als u een geluidskaart hebt gekocht, controleer dan
of de luidsprekers op de kaart zijn aangesloten.
C
ONTROLEER OF DE SUBWOOFER EN DE LUIDSPREKERS ZIJN INGESCHAKELD —
Raadpleeg de schematische weergave die bij de luidsprekers is geleverd. Als uw
luidsprekers volumeregelaars hebben, past u het volume, de basinstellingen en de
instellingen voor de hoge tonen aan om vervorming te voorkomen.
S
TEL DE WINDOWS-VOLUMEREGELING BIJ — Klik of dubbelklik op het
luidsprekerpictogram in de rechterbenedenhoek van het scherm. Controleer of het
volume is ingeschakeld en het geluid niet wordt gedempt.
M
AAK DE HOOFDTELEFOON LOS VAN DE HOOFDTELEFOONCONNECTOR — Het geluid
uit de luidsprekers wordt automatisch uitgeschakeld wanneer er een hoofdtelefoon
wordt aangesloten op de hoofdtelefoonconnector in het frontpaneel van de computer.
T
EST HET STOPCONTACT — Controleer of er stroom uit het stopcontact komt, door
er een ander apparaat, zoals een lamp, op aan te sluiten.
H
EF MOGELIJKE INTERFERENTIE OP — Schakel ventilatoren, fluorescerende lampen of
halogeenlampen in de buurt van de luidsprekers uit om te controleren op interferentie.

112 Naslaggids
VOER DE LUIDSPREKERDIAGNOSTIEK UIT
INSTALLEER HET GELUIDSSTUURPROGRAMMA OPNIEUW — Raadpleeg
"Stuurprogramma's" in de Gebruikshandleiding.
V
OER DE PROBLEEMOPLOSSER VOOR HARDWARE UIT — Raadpleeg "Het
besturingssysteem herstellen" in de Gebruikershandleiding.
Geen geluid uit de hoofdtelefoon
CONTROLEER DE KABELAANSLUITING VAN DE HOOFDTELEFOON — Controleer of de
kabel van de hoofdtelefoon stevig in de hoofdtelefoonconnector is gestoken
(zie "Over de computer" in de Gebruikshandleiding).
S
TEL DE WINDOWS-VOLUMEREGELING BIJ — Klik of dubbelklik op het
luidsprekerpictogram in de rechterbenedenhoek van het scherm. Controleer of het
volume is ingeschakeld en het geluid niet wordt gedempt.
Video- en monitorproblemen
WAARSCHUWING: Raadpleeg de veiligheidsinstructies in de
Productinformatiegids
voordat u begint met de procedures in dit gedeelte.
KENNISGEVING: Als de computer is geleverd met een PCI Express-kaart al
geïnstalleerd, hoeft de kaart niet verwijderd te worden wanneer u extra grafische
kaarten wilt installeren; de kaart is vereist voor het oplossen van problemen. Berg
de kaart na verwijdering op een veilige plaats op. Ga naar support.dell.com voor
informatie over de grafische kaart.
Het scherm is leeg
OPMERKING: Zie de documentatie bij de monitor voor probleemoplossingsprocedures.
C
ONTROLEER DE KABELAANSLUITING VAN DE MONITOR —
• Ga na of de monitorkabel op de juiste grafische kaart is aangesloten (bij configuraties
met dubbele grafische kaart).
• Als u een DVI-naar-VGA-adapter gebruikt, moet u nagaan of de adapter goed is
aangesloten op de grafische kaart en monitor.
• Ga na of de monitorkabel is aangesloten zoals in het setupdiagram voor de computer
wordt weergegeven.
• Verwijder alle videoverlengkabels en sluit de monitor direct aan op de computer.
• Wissel de stroomkabels van de computer en de monitor om te bepalen of de
stroomkabel van de monitor defect is.
• Controleer de connectoren op gebogen of gebroken pinnen (het is normaal dat bij
connectoren van monitorkabels pinnen ontbreken).

Naslaggids 113
CONTROLEER HET AAN/UIT-LAMPJE VAN DE MONITOR —
• Als het aan/uit-lampje brandt of knippert, krijgt de monitor stroom.
• Als het aan/uit-lampje uit is, drukt u eens stevig op de knop om er zeker van te zijn dat
de monitor is ingeschakeld.
• Knippert het aan/uit-lampje, dan drukt op een toets op het toetsenbord of beweegt
u de muis om de normale werking te hervatten.
TEST HET STOPCONTACT — Controleer of er stroom uit het stopcontact komt, door
er een ander apparaat, zoals een lamp, op aan te sluiten.
C
ONTROLEER DE DIAGNOSTISCHE LAMPJES — Zie "Controlelampjes" op pagina 86.
Het scherm is moeilijk te lezen
CONTROLEER DE KABELAANSLUITING VAN DE MONITOR —
• Ga na of de monitorkabel op de juiste grafische kaart is aangesloten (bij configuraties
met dubbele grafische kaart).
• Als u de optionele
DVI-naar-VGA
-adapter gebruikt, moet u nagaan of de adapter
goed is aangesloten op de grafische kaart en monitor.
• Ga na of de monitorkabel is aangesloten zoals in het setupdiagram voor de computer
wordt weergegeven.
• Verwijder alle videoverlengkabels en sluit de monitor direct aan op de computer.
• Wissel de stroomkabels van de computer en de monitor om te bepalen of de
stroomkabel van de monitor defect is.
• Controleer de connectoren op gebogen of gebroken pinnen (het is normaal dat bij
connectoren van monitorkabels pinnen ontbreken).
CONTROLEER HET AAN/UIT-LAMPJE VAN DE MONITOR —
• Als het aan/uit-lampje brandt of knippert, krijgt de monitor stroom.
• Als het aan/uit-lampje uit is, drukt u eens stevig op de knop om er zeker van te zijn dat
de monitor is ingeschakeld.
• Knippert het aan/uit-lampje, dan drukt op een toets op het toetsenbord of beweegt
u de muis om de normale werking te hervatten.
TEST HET STOPCONTACT — Controleer of er stroom uit het stopcontact komt, door
er een ander apparaat, zoals een lamp, op aan te sluiten.
C
ONTROLEER DE DIAGNOSTISCHE LAMPJES — Zie "Controlelampjes" op pagina 86.
C
ONTROLEER DE MONITORINSTELLINGEN — Raadpleeg de documentatie bij de
monitor voor instructies voor het aanpassen van het contrast, de helderheid en het
demagnetiseren (degaussing) van de monitor en het uitvoeren van de zelftest.

114 Naslaggids
PLAATS DE SUBWOOFER UIT DE BUURT VAN DE MONITOR — Als uw
luidsprekersysteem is voorzien van een subwoofer, moet u ervoor zorgen dat de
subwoofer zich minimaal op een afstand van 60 cm van de monitor bevindt.
Z
ET DE MONITOR UIT DE BUURT VAN EXTERNE STROOMBRONNEN — Ventilatoren,
tl-lampen, halogeenlampen en andere elektrische apparaten kunnen het schermbeeld
er trillerig uit laten zien. Schakel de apparaten in de buurt van de monitor uit om te
controleren op interferentie.
D
RAAI DE MONITOR OM DEZE UIT DIRECT ZONLICHT TE HALEN EN MOGELIJKE
STORING OP TE LOSSEN
PAS DE WINDOWS-BEELDSCHERMINSTELLINGEN AAN —
Windows XP:
1
Klik op
Start
→
Configuratiescherm
→
Vormgeving en thema's
.
2
Klik op het gedeelte dat u wilt wijzigen of klik op het pictogram
Beeldscherm
.
3
Probeer de verschillende instellingen uit voor
Kleurkwaliteit
en
Beeldschermresolutie
.
Windows Vista:
1
Klik op
Start
→
Configuratiescherm
→
Hardware en geluiden
→
Persoonlijke
instellingen
→
Beeldscherminstellingen
.
2
Pas indien nodig de instellingen aan voor
Resolutie
en
Hoeveelheid kleuren
.
kwaliteit van 3D-afbeeldingen is slecht
CONTROLEER DE AANSLUITING VAN DE STROOMKABEL VAN DE GRAFISCHE KAART —
Ga na of de stroomkabel van de grafische kaart (en) goed op de kaart is aangesloten.
C
ONTROLEER DE MONITORINSTELLINGEN — Raadpleeg de documentatie bij de
monitor voor instructies voor het aanpassen van het contrast, de helderheid en het
demagnetiseren (degaussing) van de monitor en het uitvoeren van de zelftest.
Slechts een deel van het scherm is leesbaar
ZET DE COMPUTER EN DE MONITOR AAN EN STEL DE HELDERHEIDS- EN
CONTRASTREGELAARS VAN DE MONITOR BIJ — Als de monitor werkt, zijn de
grafische kaarten mogelijk defect.
Neem contact op met Dell (zie "Contact opnemen
met Dell"
in de Gebruikshandleiding
).

Index 115
Index
A
aan/uit
beschermingsapparaten, 76
knop, 79
piekbeveiligers, 76
problemen, 108
spanningsstabilisatoren, 76
UPS, 76
aan/uit-lampje
omstandigheden, 108
aansluitingen
geluid, 81
hoofdtelefoon, 79
IEEE 1394, 79, 81
lijnuitgang, 81
muis, 81
netwerkadapter, 82
parallelle, 81
seriële, 82
toetsenbord, 82
USB, 79, 82
B
batterij
problemen, 99
beeldscherm. Zie monitor
berichten
fout, 102
systeem, 92
besturingssysteem
opnieuw installeren, 68
C
cd/dvd Operating System, 68
Cd-rw-station
problemen, 100
Code voor express-service, 65
computer
crasht, 104, 106
pieptooncodes, 90
reageert niet meer, 104
conflicten
soft- en
hardware-incompatibiliteit, 93
continue stroomvoorziening.
Zie UPS
D
De cd/dvd Drivers and
Utilities, 63
Dell Diagnostics
(Dell-diagnostiek), 94
Dell-ondersteuningssite, 66
Desktop System Software, 67
diagnostiek
Dell Diagnostics
(Dell-diagnostiek), 94
lampjes, 80, 86
pieptooncodes, 90

116 Index
diagnostische lampjes, 86
documentatie
ergonomie, 64
garantie, 64
Gebruikshandleiding, 64
Licentieovereenkomst voor
eindgebruikers, 64
on line, 66
Productinformatiegids, 64
regelgeving, 64
veiligheid, 64
E
e-mail
problemen, 101
ergonomische informatie, 64
F
foutberichten
diagnostische lampjes, 86
pieptooncodes, 90
problemen, 102
G
garantie-informatie, 64
Gebruikshandleiding, 64
geheugen
problemen, 106
geluidsconnectoren
lijnuitgang, 81
H
hardware
conflicten, 93
Dell Diagnostics
(Dell-diagnostiek), 94
pieptooncodes, 90
Hardwareprobleemoplosser, 93
Help en ondersteuning, 67
Help-bestand
Help en ondersteuning
van Windows, 67
hoofdtelefoon
connector, 79
I
IEEE 1394
aansluitingen, 79, 81
problemen, 103
informatie naar een nieuwe
computer overbrengen
Windows Easy Transfer
(Windows Vista), 76
informatie naar nieuwe
computer overbrengen
wizard Bestanden en instellingen
overzetten (XP), 73
informatie over regelgeving, 64
Internet
problemen, 101
IRQ-conflicten, 93

Index 117
L
labels
Code voor express-service, 65
Microsoft Windows, 65
Serviceplaatje, 65
lampjes
achterkant van de computer, 86
diagnostische, 80, 86
netwerk, 82
netwerkactiviteit, 82
vaste-schijfactiviteit, 79-80
verbindingsintegriteit, 82
Licentieovereenkomst voor
eindgebruikers, 64
M
modem
problemen, 101
monitor
leeg, 112
moeilijk te lezen, 113
problemen, 112
muis
connector, 81
problemen, 107
N
netwerk
connector, 82
problemen, 108
O
ondersteuningswebsite, 66
optisch station
problemen, 100
P
pieptooncodes, 90
printer
aansluiten, 73
instellen, 73
problemen, 109
probleemoplossing
aan/uit-lampjes, 84
conflicten, 93
Dell Diagnostics
(Dell-diagnostiek), 94
diagnostische lampjes, 86
Hardwareprobleemoplosser, 93
Help en ondersteuning, 67
pieptooncodes, 90
problemen, 98
systeemberichten, 92
problemen
aan/uit, 108
algemene, 104
batterij, 99
blauw scherm, 106
Cd-rw-station, 100
computer crasht, 104, 106
computer reageert niet meer, 104
conflicten, 93
Dell Diagnostics
(Dell-diagnostiek), 94

118 Index
problemen (Vervolg)
diagnostische lampjes, 86
e-mail, 101
foutberichten, 102
geheugen, 106
IEEE 1394, 103
Internet, 101
modem, 101
muis, 107
netwerk, 108
omstandigheden
aan/uit-lampje, 108
optisch station, 100
pieptooncodes, 90
printer, 109
programma crasht, 105
programma reageert niet
meer, 105
scanner, 110
scherm is leeg, 112
scherm moeilijk te lezen, 113
software, 105-106
stations, 99
toetsenbord, 104
vaste schijf, 100
video en monitor, 112
volume aanpassen, 111
Productinformatiegids, 64
S
S.M.A.R.T, 93
scanner
problemen, 110-111
scherm. Zie monitor
Schijf controleren, 100
Serviceplaatje, 65
software
conflicten, 93
problemen, 105-106
stations
problemen, 99
T
toetsenbord
connector, 82
problemen, 104
U
UPS, 76
USB
aansluitingen, 79
connector, 82
V
vaste schijf
activiteitenlampje, 79-80
problemen, 100
veiligheidsinstructies, 64
video
problemen, 112
volume
aanpassen, 111

Index 119
W
Windows Vista
Help en ondersteuning, 67
opnieuw installeren, 68
Windows Easy Transfer, 76
Windows XP
Bestanden en instellingen
overzetten, 73
Help en ondersteuning, 67
opnieuw installeren, 68
wizard Bestanden en instellingen
overzetten (XP), 73
wizards
Windows Easy Transfer
(Windows Vista), 76
wizard Bestanden en instellingen
overzetten (XP), 73
Wizard
Programmacompatibiliteit, 105
X
XP
Hardwareprobleemoplosser, 93

120 Index

www.dell.com | support.dell.com
Dell Precision™ T7400
Guide de référence rapide
Modèle DCDO

Remarques, avis et précautions
REMARQUE : une REMARQUE indique des informations importantes qui peuvent
vous aider à mieux utiliser votre ordinateur.
AVIS : un AVIS vous avertit d'un risque de dommage matériel ou de perte de
données et vous indique comment éviter le problème.
PRÉCAUTION : une PRÉCAUTION indique un risque potentiel d'endommagement
du matériel, de blessure corporelle ou de mort.
____________________
Les informations contenues dans ce document sont sujettes à modification sans préavis.
© 2007 Dell Inc. Tous droits réservés.
Toute reproduction sous quelque forme que ce soit est interdite sans l'autorisation préalable et écrite
de Dell, Inc..
Marques utilisées dans ce document : Dell, le logo DELL et Dell Precision sont des marques de Dell
Inc. ; Microsoft, Windows, et Windows Vista sont des marques ou des marques déposées de Microsoft
aux Etats-Unis et dans d'autres pays.
Les autres marques et noms de produits pouvant être utilisés dans ce document sont reconnus comme
appartenant à leurs propriétaires respectifs. Dell Inc. rejette tout intérêt propriétaire dans les marques
et les noms commerciaux autres que les siens.
Modèle DCDO
Septembre 2007 N/P HR707 Rév. A00

Table des matières 123
Table des matières
Recherche d'informations . . . . . . . . . . . . . . . 125
Configuration de votre ordinateur
. . . . . . . . . . . 131
Passage du mode tour en mode bureau
. . . . . . 131
Installation de votre ordinateur dans un
espace fermé
. . . . . . . . . . . . . . . . . . . . 132
Transfert d'informations vers un nouvel
ordinateur
. . . . . . . . . . . . . . . . . . . . . 135
Périphériques de protection contre les
surtensions électriques
. . . . . . . . . . . . . . 138
A propos de votre ordinateur
. . . . . . . . . . . . . . 140
Vue avant (mode tour)
. . . . . . . . . . . . . . . 140
Vue arrière (mode tour)
. . . . . . . . . . . . . . 142
Connecteurs du panneau arrière
. . . . . . . . . 143
Nettoyage de votre ordinateur
. . . . . . . . . . . . . 145
Ordinateur, clavier et moniteur
. . . . . . . . . . 145
Souris (non optique)
. . . . . . . . . . . . . . . . 145
Lecteur de disquette
. . . . . . . . . . . . . . . . 146
CD et DVD
. . . . . . . . . . . . . . . . . . . . . 146
Outils de dépannage
. . . . . . . . . . . . . . . . . . 146
Voyants d'alimentation
. . . . . . . . . . . . . . . 146
Voyants de diagnostic
. . . . . . . . . . . . . . . 148
Codes sonores
. . . . . . . . . . . . . . . . . . . 152
Messages système
. . . . . . . . . . . . . . . . . 154
Dépanneur des conflits matériels
. . . . . . . . . 156
Dell Diagnostics
. . . . . . . . . . . . . . . . . . 156
Dépannage
. . . . . . . . . . . . . . . . . . . . . 160
Index . . . . . . . . . . . . . . . . . . . . . . . . . . . . . . 179

124 Table des matières

Guide de référence rapide 125
Recherche d'informations
REMARQUE : certaines fonctions ou supports disponibles en option ne sont pas
livrés avec le système. Certaines fonctions ou supports de données peuvent ne pas
être disponibles dans certains pays.
REMARQUE : Il est possible que des informations supplémentaires soient livrées
avec votre ordinateur.
Que recherchez-vous ? Trouvez-le ici
• Un programme de diagnostic pour
mon ordinateur
• Des pilotes pour mon ordinateur
• La documentation concernant mes
périphériques
• Le logiciel DSS (Desktop System Software)
Disque Drivers and Utilities
REMARQUE : Le disque Drivers and
Utilities peut être en option et n'est pas
forcément livré avec votre ordinateur.
La documentation et les pilotes sont déjà
installés sur l'ordinateur. Vous pouvez
utiliser le disque Drivers and Utilities pour
réinstaller les pilotes (voir «Réinistallation
des pilotes et des utilitaires» de votre Guide
d'utilisation), ou exécuter Dell Diagnostics
(voir «Dell Diagnostics» à la page 156).
REMARQUE : Les dernières mises à jour
des pilotes et de la documentation se
trouvent à l'adresse support.dell.com.

126 Guide de référence rapide
• Comment retirer et remettre en place
des composants
• Caractéristiques
• Comment configurer les
paramètres système
• Comment dépanner et résoudre
les problèmes
Guide d'utilisation Dell Precision™
Centre d'aide et de support Microsoft
®
Windows
®
XP et Microsoft Windows Vista™
1
Cliquez sur
Démarrer
→
Aide et
support
→
Guides utilisateur et système
Dell
→
Guides système
.
2
Cliquez sur le
Guide d'utilisation
de
votre ordinateur.
• Des informations sur la garantie
• Les termes et conditions de la
garantie (États-Unis uniquement)
• Des consignes de sécurité
• Des informations sur les
réglementations
• Des informations sur l'ergonomie
• Contrat de licence utilisateur final
Guide d'information sur le produit Dell™
Que recherchez-vous ? Trouvez-le ici

Guide de référence rapide 127
• Le numéro de service et le code de
service express
• Clé du produit Microsoft
®
Windows
®
Numéro de service et clé du produit
Microsoft Windows
Ces étiquettes sont apposées sur
l'ordinateur :
• Utilisez le numéro de service pour
identifier votre ordinateur lorsque vous
accédez au site web
support.dell.com
ou lorsque vous appelez le support Dell.
• Entrez le code de service express pour
orienter votre appel lorsque vous
contactez le service de support Dell.
REMARQUE : Par mesure de sécurité
supplémentaire, la nouvelle étiquette de
licence Microsoft Windows a une partie
manquante ou trou pour dissuader le
décollement de l'étiquette.
Que recherchez-vous ? Trouvez-le ici

128 Guide de référence rapide
• Solutions — Astuces de dépannage,
articles de techniciens, cours en ligne
et questions fréquemment posées
• Forum clients — Discussion en ligne
avec d'autres clients Dell
• Mises à niveau — Informations de mise
à niveau pour les composants, tels que
la mémoire, le disque dur et le
système d'exploitation
• Service clientèle — Coordonnées, appels
de service et état des commandes, garantie
et informations sur les réparations
• Service et support — Etat des appels de
service, historique du support, contrat
de service, discussions en ligne avec le
support technique
• Service de mise à jour technique Dell —
Avertissement par e-mail des mises à jour
logicielles et matérielles correspondant
à votre ordinateur
• Référence — Documentation de
l'ordinateur, détails sur la configuration
de l'ordinateur, caractéristiques de
produit et livres blancs
• Téléchargements — Pilotes, correctifs et
mises à jour logicielles agréés
Site web de Support Dell — support.dell.com
REMARQUE : Sélectionnez votre région
ou votre secteur d’activité pour voir le site
de support qui vous concerne.
Que recherchez-vous ? Trouvez-le ici

Guide de référence rapide 129
• DSS (Desktop System Software) — Si
vous réinstallez le système d'exploitation
de votre ordinateur, vous devez également
réinstaller l'utilitaire DSS. DSS détecte
automatiquement votre ordinateur et
votre système d'exploitation et y installe
les mises à jour correspondant à votre
configuration, notamment les mises
à niveau critiques pour votre système
d'exploitation et la prise en charge des
processeurs, lecteurs optiques et
périphériques USB, par exemple. Il est
indispensable au fonctionnement de votre
ordinateur Dell.
Pour télécharger Desktop System Software :
1
Allez à l'adresse
support.dell.com
,
sélectionnez votre pays/région, puis
cliquez sur
Drivers & Downloads
(Pilotes et téléchargement).
2
Cliquez sur
Select Model
(Sélectionner
un modèle) ou
Enter a Tag
(Numéro de
série), Faites les choix ou entrez les
informations correspondant à votre
ordinateur, puis cliquez sur le bouton
Confirm
(Confirmer).
3
Faites défiler jusqu'à
System and
Configuration Utilities
(Utilitaires
systèmes et utilitaires de
configuration)
→
Desktop System
Software
, puis cliquez sur
Download
Now
(Télécharger maintenant).
REMARQUE : L'interface utilisateur
support.dell.com peut varier selon vos
sélections.
• Comment utiliser Windows XP
• Comment utiliser Windows Vista
• Comme utiliser les programmes et
les fichiers
• Comment personnaliser mon bureau
Centre d'aide et de support de Windows
1
Cliquez sur
Démarrer
→
Aide et support
.
2
Tapez un mot ou une phrase décrivant
votre problème et cliquez sur l'icône en
forme de flèche.
3
Cliquez sur la rubrique appropriée.
4
Suivez les instructions affichées.
Que recherchez-vous ? Trouvez-le ici

130 Guide de référence rapide
• Comment réinstaller mon
système d'exploitation
Disque Operating System
Le système d'exploitation est déjà installé
sur l'ordinateur. Pour réinsaller le système
d'exploitation, utiliez le disque Operating
System livré avec votre ordinateur
(voir «Restauration de votre système
d'exploitation» dans le Guide d'utilisation).
Après avoir réinstallé votre système
d'exploitation, utilisez le disque Drivers
and Utilities en option pour réinstaller les
pilotes des périphériques livrés avec
votre ordinateur.
L'étiquette de la Product key (clé de produit)
de votre système d'exploitation se trouve
sur l'ordinateur.
REMARQUE : La couleur du disque
d'installation du système d'exploitation
dépend du système d'exploitation commandé.
• Comment utiliser Linux
• Discussions par e-mail avec d'autres
utilisateurs des ordinateurs Dell Precision
et du système d'exploitation Linux
• Des informations supplémentaires sur
Linux et mon Dell Precision
Sites Dell d'informations sur Linux
• linux.dell.com
• lists.us.dell.com/mailman/listinfo/linux-
precision
Que recherchez-vous ? Trouvez-le ici

Guide de référence rapide 131
Configuration de votre ordinateur
Passage du mode tour en mode bureau
PRECAUTION : Avant de commencer toute procédure de cette section, consultez
et respectez les consignes de sécurité du
Guide d'information sur le produit
.
REMARQUE : Pour passer du mode tour en mode bureau ou inversement, vous
devez utiliser un kit en option disponible auprès de Dell. Voir «Informations produit»
dans le Guide d'utilisation pour plus de détails sur la commande de produits auprès
de Dell.
REMARQUE : En mode tour, cet ordinateur accepte un lecteur 3,5 pouces à l'avant
de plus qu'en mode Bureau.
1
Suivez les procédures de la section «Avant de commencer» du
Guide
d'utilisation
.
2
Déposez le capot de l'ordinateur (voir «Dépose du capot de l'ordinateur»
dans le
Guide d'utilisation
).
3
Déposez le panneau avant (voir «Dépose du panneau avant» dans le
Guide
d'utilisation
).
4
Déposez le panneau des lecteurs et préparez-le en ajoutant ou retirant des
caches, selon les besoins (voir «Panneau des lecteurs» dans le
Guide d'utilisation
).
Passage du mode tour au mode bureau
1
Déposez tous les lecteurs de disquette ou lecteurs de carte mémoire
installés en suivant la procédure de «Dépose d'un lecteur de disquette ou
d'un lecteur de carte (mode tour)» dans le
Guide d'utilisation
, puis reposez
un seul lecteur de disquette ou de carte mémoire en suivant la procédure
de «Installation d'un lecteur de disquette ou d'un lecteur de carte (mode
bureau)» dans le
Guide d'utilisation
.
2
Déposez tous les lecteurs optiques en suivant la procédure de «Dépose
d'un lecteur optique (mode tour)» dans le
Guide d'utilisation
, puis reposez
les lecteurs en suivant la procédure de «Installation d'un lecteur optique
(mode bureau)» dans le
Guide d'utilisation
.

132 Guide de référence rapide
Passage du mode bureau au mode tour
1
Déposez le lecteur de disquette ou de carte mémoire (le cas échéant) en
suivant la procédure de «Dépose d'un lecteur de disquette ou d'un lecteur
de carte (mode bureau)» dans le
Guide d'utilisation
, puis reposez le lecteur
de disquette ou de carte mémoire en suivant la procédure de «Installation
d'un lecteur de disquette ou d'un lecteur de carte (mode tour)» dans le
Guide d'utilisation
.
2
Déposez tous les lecteurs optiques en suivant la procédure de «Dépose
d'un lecteur optique (mode bureau)» dans le
Guide d'utilisation
, puis
reposez les lecteurs en suivant la procédure de «Installation d'un lecteur
optique (mode tour)» dans le
Guide d'utilisation
.
Installation de votre ordinateur dans un espace fermé
L'installation de votre ordinateur dans un espace fermé peut limiter le débit
d'air et causer une surchauffe de votre ordinateur, qui aurait une influence sur
ses performances. Respectez les règles ci-dessous pour installer votre ordinateur
dans un espace fermé.
AVIS : La température de fonctionnement mentionnée dans ce manuel désigne la
température ambiante maximale en utilisation. La température ambiante de la pièce
doit être prise en compte pour l'installation de votre ordinateur dans un espace
fermé. Pour plus de détails sur les caractéristiques de votre ordinateur, voir
«Caractéristiques» dans le Guide d'utilisation.

Guide de référence rapide 133
• Laissez un dégagement d'au moins 10,2 cm (4 po) de tous les côtés de
l'ordinateur comportant des prises d'air pour assurer le débit d'air nécessaire
pour une ventilation correcte.
• Si votre ordinateur est installé dans un coin ou sous un bureau, laissez un
dégagement minimum de 5,1 cm (2 po) de l'arrière de l'ordinateur au mur
pour permettre un débit d'air suffisant pour une ventilation correcte.
• Si l'espace fermé qui reçoit l'ordinateur dispose de portes, vérifiez qu'elles
laissent au moins un passage d'air de 30 pour cent à travers le caisson
(à l'avant et à l'arrière).

134 Guide de référence rapide
• N'installez pas votre ordinateur dans un caisson sans circulation d'air.
La limitation de la circulation d'air
peut entraîner une surchauffe de votre
ordinateur qui aurait une influence sur ses performances
.

Guide de référence rapide 135
Transfert d'informations vers un nouvel ordinateur
Vous pouvez utiliser les assistants du système d'exploitation pour vous aider
à transférer les fichiers et autres données d'un ordinateur à l'autre.
Microsoft Windows XP
Le système d'exploitation Microsoft
Windows XP propose un assistant Transfert
de fichiers et de paramètres pour transférer les données telles que :
• messages électroniques
• paramètres de barre d'outils
• dimensions des fenêtres
• signets Internet
Vous pouvez transférer les données d'un ordinateur à l'autre par un réseau ou une
connexion série, ou par enregistrement des données sur des supports amovibles,
par exemple CD ou DVD enregistrables.
REMARQUE : Vous pouvez transférer des informations d'un ordinateur à l'autre par
connexion directe d'un câble série sur les ports d'entrée-sortie (E/S) des deux
ordinateurs. Pour transférer des données sur une connexion série, vous devez utiliser
le programme Connexions réseau du Panneau de configuration pour effectuer une
configuration supplémentaire, par exemple définition d'une connexion évoluée et
désignation de l'ordinateur source et de l'ordinateur cible.
Pour obtenir des instructions sur la configuration d'une connexion par câble directe,
entre deux ordinateurs, reportez-vous à l'article n° 305621 du Microsoft Knowledge
Base (Base de connaissances de Microsoft), intitulé How to Set Up a Direct Cable
Connection Between Two Computers in Windows XP (Comment configurer une
connexion par câble directe, entre deux ordinateurs, dans Windows XP). Ces
informations peuvent ne pas être disponibles dans certains pays.
L'utilisation de l'assistant de Transfert de fichiers et de paramètres nécessite le
disque Operating System livré avec votre ordinateur ou un disque d'assistant,
que l'assistant peut créer pour vous.
REMARQUE : Pour plus d'informations sur le transfert de données, recherchez
dans support.dell.com le document n° 154781 (What Are The Different Methods
To Transfer Files From My Old Computer To My New Dell™ Computer Using the
Microsoft Windows XP Operating System ?).
REMARQUE : L'accès à ce document de la base de connaissances Dell peut ne
pas être possible dans certains pays.

136 Guide de référence rapide
Assistant de Transfert de fichiers et de paramètres (avec le disque Operating System)
REMARQUE : L'assistant de Transfert de fichiers et de paramètres désigne
l'ordinateur source depuis lequel les données doivent être transférées comme
ancien ordinateur, et l'ordinateur destination vers lequel les données seront
transférées comme nouvel ordinateur.
P
RÉPAREZ L'ORDINATEUR DESTINATION DU TRANSFERT DE FICHIERS —
1
Cliquez sur
Démarrer
→
Tous les programmes
→
Accessoires
→
Outils
système
→
Assistant Transfert de fichiers et de paramètres
.
2
Sous
De quel ordinateur s'agit-il ?
, cliquez sur
Nouvel ordinateur
, puis
cliquez sur
Suivant
.
3
Sous
Avez-vous un CD-ROM de Windows XP ?
, cliquez sur
J'utiliserai
l'Assistant du CD-ROM Windows XP
, puis cliquez sur
Suivant
.
4
Consultez les informations sous
Allez maintenant à votre ancien
ordinateur
, puis passez à l'ordinateur source. Ne cliquez
pas
sur
Suivant
.
COPIE DES DONNÉES DEPUIS L'ORDINATEUR SOURCE —
1
Insérez le disque
Operating System
Windows XP dans l'ordinateur source.
L'écran
Bienvenue à Microsoft Windows XP
apparaît.
2
Cliquez sur
Effectuer des tâches supplémentaires
.
3
Dans la catégorie
Que voulez-vous faire ?
, sélectionnez
Transférer des
fichiers et des paramètres
.
La fenêtre
Assistant Transfert de fichiers et de paramètres
apparaît.
4
Cliquez sur
Suivant
.
5
Sous
De quel ordinateur s'agit-il ?
, cliquez sur
Ancien ordinateur
, puis
cliquez sur
Suivant
.
6
Sous
Sélectionner une méthode de transfert
, cliquez sur la méthode de
transfert de votre choix, puis cliquez sur
Suivant
.
7
Sous
Que voulez-vous transférer ?
, cliquez pour sélectionner les données
à transférer, puis cliquez sur
Suivant
.
Les données sélectionnées sont copiées et l'écran
Achèvement de la phase
de collecte
apparaît.
8
Cliquez sur
Terminer
.

Guide de référence rapide 137
TRANSFERT DES DONNÉES VERS L'ORDINATEUR DE DESTINATION —
1
Passez à l'ordinateur destination.
2
Sous
Allez maintenant à votre ancien ordinateur
, cliquez sur
Suivant
.
3
Sous
Où sont les fichiers et les paramètres ?
, sélectionnez la méthode de
transfert des fichiers et paramètres, puis cliquez sur
Suivant
.
L'assistant lit les fichiers et paramètres collectés et les applique sur l'ordinateur
destination. Quand le transfert est terminé, l'écran
Terminé
apparaît.
4
Cliquez sur
Terminer
puis redémarrez l'ordinateur.
Assistant de Transfert de fichiers et de paramètres (sans le disque Operating System)
Pour exécuter l'Assistant Transfert de fichiers et de paramètres sans le disque
Operating System, vous devez créer un disque d'assistant. Le disque d'assistant
permet de créer un fichier d'image de sauvegarde sur un support amovible.
REMARQUE : L'assistant de Transfert de fichiers et de paramètres désigne
l'ordinateur source depuis lequel les données doivent être transférées comme
ancien ordinateur, et l'ordinateur destination vers lequel les données seront
transférées comme nouvel ordinateur.
C
RÉATION D'UN DISQUE D'ASSISTANT —
1
Sur l'ordinateur destination, cliquez sur
Démarrer
→
Tous les programmes
→
Accessoires
→
Outils système
→
Assistant Transfert de fichiers et de paramètres
.
2
Sous
De quel ordinateur s'agit-il ?
, cliquez sur
Nouvel ordinateur
, puis
cliquez sur
Suivant
.
3
Sous
Avez-vous un CD-ROM de Windows XP ?
, cliquez sur
Je veux créer
une disquette de l'assistant dans le lecteur suivant
, puis cliquez sur
Suivant
.
4
Insérez un CD ou DVD enregistrable, puis cliquez sur
OK
.
5
Consultez les informations sous
Allez maintenant à votre ancien ordinateur
,
puis passez à l'ordinateur source. Ne cliquez
pas
sur
Suivant
.
COPIE DES DONNÉES DEPUIS L'ORDINATEUR SOURCE —
1
Insérez le disque de l'assistant dans l'ordinateur source.
2
Cliquez sur
Démarrer
→
Exécuter
.
3
Cliquez sur
Parcourir...
et trouvez
fastwiz
sur le disque de l'assistant, puis
cliquez sur
OK
.

138 Guide de référence rapide
4
Sous
De quel ordinateur s'agit-il ?
, cliquez sur
Ancien ordinateur
, puis
cliquez sur
Suivant
.
5
Sous
Sélectionner une méthode de transfert
, cliquez sur la méthode de
transfert de votre choix, puis cliquez sur
Suivant
.
6
Sous
Que voulez-vous transférer ?
, cliquez pour sélectionner les données
à transférer, puis cliquez sur
Suivant
.
Les données sélectionnées sont copiées et l'écran
Achèvement de la phase
de collecte
apparaît.
7
Cliquez sur
Terminer
.
TRANSFERT DES DONNÉES VERS L'ORDINATEUR DE DESTINATION —
1
Passez à l'ordinateur destination.
2
Sous
Allez maintenant à votre ancien ordinateur
, cliquez sur
Suivant
.
3
Sous
Où sont les fichiers et les paramètres ?
, sélectionnez la méthode de
transfert des fichiers et paramètres, puis cliquez sur
Suivant
.
L'assistant lit les fichiers et paramètres collectés et les applique sur l'ordinateur
destination. Quand le transfert est terminé, l'écran
Ter min é
apparaît.
4
Cliquez sur
Terminer
puis redémarrez l'ordinateur.
Microsoft Windows Vista
1
Cliquez sur le bouton Démarrer de Windows Vista , puis cliquez sur
Transfert de fichiers et de paramètres Windows
→
Démarrer
Transfert Windows
.
2
Dans la boîte de dialogue
Contrôle du compte utilisateur
, cliquez
sur
Continuer
.
3
Cliquez sur
Démarrer un nouveau transfert
ou
Continuer un transfert
en cours
.
Suivez les instructions fournies à l'écran par l'assistant Transfert Windows.
Périphériques de protection contre les surtensions électriques
Plusieurs périphériques peuvent vous protéger contre les fluctuations de la
tension et les pannes d'alimentation :
• Protecteurs de surtension
•Filtres de ligne
• Onduleurs

Guide de référence rapide 139
Protecteurs de surtension
Les protecteurs de surtension et les rampes d'alimentation équipées d'une
protection contre la surtension réduisent les risques d'endommagement de votre
ordinateur provoqués par les pointes de tension pouvant survenir au cours d'un
orage électrique ou après une coupure de courant. Certains fabricants offrent
également une garantie contre certains types de dégâts. Lisez attentivement la
garantie de l'appareil lors du choix d'un protecteur de surtension et comparez les
valeurs nominales en Joules pour déterminer les efficacités relatives de différents
appareils. Un protecteur doté d'une valeur nominale en joules plus élevée offre
une meilleure protection.
AVIS : La plupart des protecteurs de surtension ne protègent pas contre les fluctuations
de tension ou les coupures de courant. Lorsqu'un orage est proche, débranchez la ligne
téléphonique de la prise murale et déconnectez votre ordinateur de la prise de courant.
De nombreux protecteurs de surtension sont équipés d'une prise téléphonique
pour assurer la protection du modem. Consultez la documentation du protecteur
de surtension pour obtenir des instructions sur la connexion du modem.
AVIS : Certains protecteurs de surtension n'offrent pas de protection pour les cartes
réseau. Déconnectez le câble de réseau de la prise réseau murale pendant les orages.
Filtres de ligne
AVIS : Les filtres de ligne n'offrent pas de protection contre les coupures de courant.
Ils sont conçus pour maintenir la tension CA à un niveau relativement constant.
Onduleurs
AVIS : Une baisse de tension pendant l'enregistrement des données sur le disque
dur peut provoquer une perte de données ou la corruption du fichier.
REMARQUE : Pour optimiser le temps de fonctionnement de la batterie, connectez
uniquement votre ordinateur à un onduleur. Connectez les autres périphériques, tels
que l'imprimante, à une rampe d'alimentation différente équipée d'un protecteur de
surtension.
Les onduleurs protègent contre les fluctuations de tension et les coupures de
courant. Ils incluent une batterie qui alimente temporairement les périphériques
connectés lorsque l'alimentation secteur est coupée. La batterie se charge lorsque
l'alimentation secteur est disponible. Consultez la documentation fournie par le
fabricant de l'onduleur afin d'obtenir des informations sur la durée de
fonctionnement de la batterie et vous assurer que le dispositif est approuvé par
Underwriters Laboratories (UL).

140 Guide de référence rapide
A propos de votre ordinateur
Vue avant (mode tour)
1–3 baies de lecteurs
5,25 pouces
Chaque baie peut contenir un lecteur de CD/DVD ou un
lecteur de carte/de disquette, voire un disque dur SATA
(avec le support 5,25 pouces approprié).
Le berceau de disque dur est prévu seulement pour une baie
de lecteur de 5,25 pouces. Le lecteur de disquette/de carte
et le disque dur ne sont pas interchangeables.
1
2
3
4
5
6
7
8
11
10
13
12
9

Guide de référence rapide 141
4 baie de lecteur
5,25 pouces avec
face avant
spéciale pour
lecteur 3,5 pouces
Chaque baie peut contenir un lecteur de CD/DVD ou un
lecteur de carte/de disquette, voire un disque dur SATA (avec
le support 5,25 pouces approprié). La face avant présentée ici
est pour un lecteur de disquette ou un lecteur de carte ; elle
peut être posée devant n'importe laquelle des quatre baies
5,25 pouces. Pour plus d'informations sur Dell QuickSet,
voir «Panneaux des lecteurs» dans le Guide d'utilisation.
Le berceau de disque dur est prévu seulement pour une baie
de lecteur de 5,25 pouces. Le lecteur de disquette/de carte
et le disque dur ne sont pas interchangeables.
5 voyant d'activité
du disque dur
Ce voyant s'allume lorsque l'ordinateur lit ou écrit des données
sur le disque dur. Le voyant peut également être allumé
lorsqu'un périphérique, comme le lecteur de CD, fonctionne.
6 connecteur
IEEE 1394
Le connecteur IEEE 1394 permet de brancher des
périphériques de données à haut débit tels que des appareils
photo numériques et des périphériques de stockage externes.
7 connecteurs
USB 2.0 (2)
Utilisez les connecteurs USB à l'avant de l'ordinateur pour
les périphériques que vous connectez occasionnellement
comment les clés de mémoire flash, les appareils photo, ou
les périphériques USB amorçables.
Dell recommande d'utiliser les connecteurs USB à l'arrière
pour les périphériques qui restent connectés, comme une
imprimante ou un clavier.
8 bouton
d'alimentation,
voyant
d'alimentation
Appuyez sur le bouton d'alimentation pour allumer
l'ordinateur. Le voyant au centre de ce bouton indique l'état
de marche. Pour plus d'informations, voir «Boutons et
voyants» dans votre Guide d'utilisation.
REMARQUE : pour ne pas perdre de données, n'utilisez pas
le bouton d'alimentation pour éteindre l'ordinateur. Procédez
plutôt à un arrêt du système d'exploitation.
9 Badge Dell Vous pouvez faire pivoter le badge Dell pour que «Dell» soit lisible
horizontalement, selon que vous utilisez le mode bureau ou tour.
10 prise casque Utilisez cette prise pour brancher un casque.
11 connecteur de
microphone
Utilisez cette prise pour brancher un microphone afin
d'entrer des données vocales ou musicales dans un
programme audio ou de téléphonie.
12 voyants de
diagnostic (4)
Utilisez ces voyants pour vous aider à résoudre les problèmes
grâce au code de diagnostic. Pour plus d'informations,
voir «Voyants de diagnostic» dans votre Guide d'utilisation.

142 Guide de référence rapide
Vue arrière (mode tour)
PRECAUTION : Assurez-vous qu'aucune sortie d'air de l'ordinateur n'est
bloquée. Les bloquer peut provoquer de sérieux problèmes de température.
13 voyant de liaison
réseau
Ce voyant s'allume lorsqu'une connexion de bonne qualité
est établie entre l'ordinateur et un réseau à 10, 100 ou
1000 Mbps (1 Gbps).
1 connecteur
d'alimentation
Branchez le câble d'alimentation.
2 logements de cartes Les logements 2 à 6 prennent en charge les cartes pleine
longueur, dont un logement PCI, deux PCI Express 2.0 x16,
et deux PCI-X. Les logements 1 et 7 prennent en charge
les cartes demi-longueur, dont un logement PCI Express x8
(cablé en x4) et un PCI-X.
3 connecteurs du
panneau arrière
Reliez chaque périphérique USB, audio et les autres
périphériques au connecteur approprié (voir «Connecteurs
du panneau arrière» à la page 143 pour plus d'informations).
1
3
2

Guide de référence rapide 143
Connecteurs du panneau arrière
1 connecteur
parallèle
Permet de raccorder un périphérique parallèle (imprimante, etc.).
Si vous avez une imprimante USB, raccordez-la à un
connecteur USB.
REMARQUE : le connecteur parallèle intégré est désactivé
automatiquement si l'ordinateur détecte qu'une carte installée
contient un connecteur parallèle paramétré sur la même adresse.
Pour plus d'informations, voir «Options du programme de
configuration du système» dans Guide d'utilisation.
2 connecteur de
la souris
Raccordez une souris PS/2 standard au connecteur de souris
(vert). Eteignez l'ordinateur et tous les périphériques
connectés avant de brancher une souris à l'ordinateur. Si vous
disposez d'une souris USB, reliez-la à un connecteur USB.
3 connecteur
IEEE 1394
Le connecteur IEEE 1394 permet de brancher des
périphériques de données à haut débit tels que des appareils
photo numériques et des périphériques de stockage externes.
4 Connecteur de
ligne d'entrée
Utilisez le connecteur d'entrée ligne bleu pour raccorder un
appareil d'enregistrement/de lecture, tel qu'un lecteur MP3,
un lecteur de CD ou un magnétoscope. Si votre ordinateur
contient une carte audio, utilisez le connecteur qui se trouve
sur cette dernière.
5 connecteur de
sortie ligne
Utilisez le connecteur de ligne de sortie (vert) pour brancher des
écouteurs et la plupart des haut-parleurs avec amplificateurs
intégrés. Si votre ordinateur contient une carte audio, utilisez le
connecteur qui se trouve sur cette dernière.
1
2
3
4
56 7
8
11 10
9

144 Guide de référence rapide
6 voyant d'intégrité
de la liaison
Vert — Une connexion de bonne qualité est établie entre un
réseau à 10 Mbps et l'ordinateur.
Orange — Une connexion de bonne qualité est établie entre
un réseau à 100 Mbps et l'ordinateur.
Jaune — une connexion de bonne qualité est établie entre
l'ordinateur et un réseau à 1000 Mbps (soit 1 Gbps).
Eteint — l'ordinateur ne détecte pas de connexion physique
avec le réseau.
7 connecteur de
carte réseau
Pour brancher l'ordinateur à un périphérique réseau ou haut
débit, branchez l'une des extrémités d'un câble réseau à une
prise réseau, un périphérique réseau ou un périphérique haut
débit. Enfichez ensuite l'autre extrémité du câble réseau dans
le connecteur de carte réseau de l'ordinateur. Un déclic
indique que le câble réseau est correctement inséré.
Ne branchez pas un câble téléphonique au connecteur réseau.
Si votre ordinateur est équipé d'une carte réseau supplémentaire,
utilisez les connecteurs de cette dernière et ceux situés à l'arrière
du système pour configurer plusieurs connexions réseau (intranet
ou extranet distinct).
Il est recommandé d'utiliser un câblage et des connecteurs de
catégorie 5 pour votre réseau. Si vous devez utiliser un câblage
de catégorie 3, forcez le débit du réseau à 10 Mbps pour
garantir un fonctionnement fiable.
8 voyant d'activité
réseau
Ce voyant clignote lorsque l'ordinateur transmet ou reçoit des
données sur le réseau. Un trafic réseau important peut donner
l'impression que ce voyant est fixe.
9 connecteurs
USB 2.0 (5)
Il est recommandé d'utiliser les connecteurs USB situés
à l'avant pour les périphériques que vous connectez
occasionnellement (clés de mémoire flash, appareils photo ou
pour les périphériques USB amorçables).
Utilisez les connecteurs USB situés à l'arrière du système pour
les périphériques qui restent connectés (imprimante ou clavier).
10 connecteur de
clavier
Si vous disposez d'un clavier PS/2 standard, reliez-le au
connecteur violet. Si vous disposez d'un clavier USB, reliez-le
à un connecteur USB.
11 connecteurs
série (2)
Le port série permet de raccorder un périphérique série (assistant
de poche, etc.). Son adresse peut être modifiée à l'aide du
programme de configuration du système, si nécessaire
(voir «Programme de configuration du système» dans votre
Guide d'utilisation).

Guide de référence rapide 145
Nettoyage de votre ordinateur
PRECAUTION : Avant de commencer toute procédure de cette section, consultez
et respectez les consignes de sécurité du
Guide d'information sur le produit
.
Ordinateur, clavier et moniteur
PRECAUTION : Débranchez l'ordinateur de la prise électrique avant de le
nettoyer. Utilisez un tissu doux humidifié. N'utilisez pas de liquide ni d'aérosol
nettoyants, ceux-ci peuvent contenir des substances inflammables.
• Utilisez un aspirateur muni d'une brosse pour ôter délicatement la poussière
des baies et ouvertures de l'ordinateur ainsi qu'entre les touches du clavier.
AVIS : N'essuyez pas le moniteur avec une solution à base d'alcool ou de savon.
Vous risqueriez d'endommager le revêtement antireflet.
• Pour nettoyer votre écran, humidifiez légèrement un chiffon doux et propre
avec de l'eau. Si possible, utilisez un chiffon conçu spécialement pour le
nettoyage des écrans et adapté au revêtement antistatique du moniteur.
• Nettoyez le clavier, l'ordinateur et les parties en plastique de l'écran avec
un chiffon doux imbibé d'eau.
Ne trempez pas le chiffon et ne laissez pas de solution couler à l'intérieur
de l'ordinateur ou du clavier.
Souris (non optique)
1
Faites pivoter l'anneau de retenue situé sous de la souris dans le sens
inverse des aiguilles d'une montre puis retirez la bille.
2
Essuyez la bille à l'aide d'un chiffon propre et non pelucheux.
3
Soufflez doucement dans la cavité de la bille pour en déloger la poussière
et les peluches.
4
Nettoyez les rouleaux dans la cavité de la bille avec un coton-tige légèrement
imbibé d'alcool isopropylique.
5
Vérifiez le centrage des rouleaux dans leurs logements, si nécessaire. Assurez-
vous que le coton-tige n'a pas laissé de peluches sur les roulements.
6
Remettez en place la bille et l'anneau de retenue, puis tournez ce dernier
dans le sens des aiguilles d'une montre pour le remettre en place.

146 Guide de référence rapide
Lecteur de disquette
AVIS : Ne tentez pas de nettoyer les têtes du lecteur à l'aide d'un coton-tige. Les
têtes peuvent être désalignées et empêcher le fonctionnement du lecteur.
Nettoyez votre lecteur de disquette à l'aide d'un kit de nettoyage du commerce.
Ces kits contiennent des disquettes prétraitées permettant d'enlever les dépôts
accumulés au cours d'une utilisation normale.
CD et DVD
AVIS : Utilisez toujours de l'air comprimé pour nettoyer la lentille du lecteur et
suivez les instructions fournies avec l'air comprimé. Ne touchez jamais la lentille
se trouvant à l'intérieur du lecteur.
1
Maintenez le disque par le bord extérieur. Vous pouvez aussi le tenir par
le bord intérieur du trou central.
AVIS : Pour éviter d'endommager la surface, n'essuyez pas le disque de
façon circulaire.
2
A l'aide d'un chiffon doux et non pelucheux, essuyez doucement la face
inférieure du disque (à l'opposé de l'étiquette) de façon rectiligne, du centre
au bord du disque.
Si la poussière ne part pas, utilisez un peu d'eau ou une solution diluée
d'eau et de savon doux. Vous pouvez également acheter des produits de
nettoyage pour disques vendus dans le commerce et protéger vos disques
contre la poussière, les empreintes et les rayures. Les produits de nettoyage
pour CD peuvent être utilisés sur les DVD sans aucun risque.
Outils de dépannage
Voyants d'alimentation
PRECAUTION : Avant de commencer toute procédure de cette section, consultez
et respectez les consignes de sécurité du
Guide d'information sur le produit
.
Le voyant d'alimentation à l'avant de l'ordinateur s'allume et clignote ou reste
allumé, selon l'état :
• Si le voyant d'alimentation est vert et si l'ordinateur ne répond pas,
«Voyants de diagnostic» à la page 148.

Guide de référence rapide 147
• Si le voyant clignote en vert, l'ordinateur est en mode Veille. Appuyez sur
une touche du clavier, déplacez la souris ou appuyez sur le bouton
d'alimentation pour revenir au fonctionnement normal.
• Si le voyant d'alimentation est éteint, l'ordinateur est éteint ou n'est pas
alimenté.
– Réinsérez correctement le câble d'alimentation dans le connecteur
situé à l'arrière de l'ordinateur et dans la prise électrique.
– Si l'ordinateur est branché sur une barrette d'alimentation, vérifiez que
celle-ci est branchée sur une prise électrique et qu'elle est allumée.
– Retirez temporairement les périphériques de protection contre les
surtensions, les barrettes d'alimentation et les rallonges pour vérifier
que la mise sous tension de l'ordinateur s'effectue correctement.
– Vérifiez que la prise électrique fonctionne en la testant avec un autre
appareil, comme une lampe, par exemple.
– Vérifiez que le câble d'alimentation principal et le câble du panneau avant
sont correctement branchés à la carte système (voir «Composants de la
carte système» dans le
Guide d'utilisation
).
• Si le voyant d'alimentation clignote en orange, l'ordinateur est alimenté,
mais un incident lié à l'alimentation interne s'est peut-être produit.
– Vérifiez que le sélecteur de tension est correctement réglé pour
l'alimentation en CA du pays où vous vous trouvez, le cas échéant.
– Vérifiez que le câble d'alimentation du processeur est correctement
branché à la carte système (voir «Composants de la carte système»
dans le
Guide d'utilisation
).
• Si le voyant d'alimentation est orange fixe, un périphérique est défectueux
ou mal installé.
– Déposez puis reposez les modules de mémoire (voir «Dépose du
panneau avant» dans le
Guide d'utilisation
).
– Déposez puis reposez toutes les cartes (voir «Cartes» dans le
Guide
d'utilisation
).
• Eliminez les interférences. Les interférences peuvent être dues à divers facteurs :
– Rallonges pour le clavier, la souris et l'alimentation
– Trop de périphériques raccordés à une même barrette d'alimentation
– Plusieurs barrettes d'alimentation raccordées à la même prise électrique

148 Guide de référence rapide
Voyants de diagnostic
PRECAUTION : Avant de commencer toute procédure de cette section, consultez
et respectez les consignes de sécurité du
Guide d'information sur le produit
.
Les quatre voyants numérotés 1, 2, 3 et 4 sur le panneau avant peuvent vous aider
à résoudre certains incidents (voir «Vue avant (mode tour)» à la page 140).
Lorsque l'ordinateur démarre normalement, les voyants clignotent puis
s'éteignent. En cas d'incident, utilisez la séquence des voyants pour identifier son
origine.
REMARQUE : Quand l'ordinateur a terminé l'autotest de démarrage (POST), les
quatre voyants s'éteignent avant l'amorçage du système d'exploitation.
Codes des voyants de diagnostic pendant l'autotest de démarrage
Couleurs des voyants Description du
problème
Solution proposée
L'ordinateur est en
condition d'arrêt
normale ou une
panne est survenue
avant le BIOS.
Raccordez l'ordinateur à une prise
électrique qui fonctionne et appuyez
sur le bouton d'alimentation.
Echec éventuel du
BIOS ; l'ordinateur
est en mode
Récupération.
• Exécutez l'utilitaire de sauvegarde du
BIOS, attendez que la récupération soit
terminée et redémarrez l'ordinateur.
• Si le problème persiste, contactez Dell
(voir
«Pour prendre contact avec
Dell» dans le
Guide d'utilisation
).
Panne possible
du processeur.
• Réinstallez le processeur (voir
«Processeur»
dans le
Guide d'utilisation
).
• Si le problème persiste, contactez Dell
(voir
«Pour prendre contact avec
Dell» dans le
Guide d'utilisation
).

Guide de référence rapide 149
Les modules de
mémoire sont détectés,
mais une panne de
mémoire est survenue.
• Si deux modules de mémoire ou plus
sont installés, retirez-les,
(voir «Mémoire»
dans votre
Guide
d'utilisation
), puis réinstallez-en un,
et redémarrez l'ordinateur. Si
l'ordinateur démarre normalement,
continuez à installer les modules de
mémoire supplémentaires (un à la fois)
jusqu'à l'identification d'un module
défectueux ou à la réinstallation de
tous les modules sans erreur.
• Dans la mesure du possible, installez
des modules de même type (voir
«Mémoire»
dans le
Guide d'utilisation
).
• Si le problème persiste, contactez Dell
(voir
«Pour prendre contact avec Dell»
dans le
Guide d'utilisation
).
Panne possible de la
carte graphique.
• Réinstallez les cartes graphiques
installées (voir «Cartes»
dans le
Guide d'utilisation
).
• Le cas échéant, installez une carte
graphique au fonctionnement connu
dans votre ordinateur.
• Si le problème persiste, contactez Dell
(voir
«Pour prendre contact avec Dell»
dans le
Guide d'utilisation
).
Panne possible du
lecteur de disquette
ou du disque dur.
• Réinstallez correctement tous les
câbles d'alimentation et les câbles de
données, puis redémarrez l'ordinateur.
• Si le problème persiste, contactez Dell
(voir
«Pour prendre contact avec Dell»
dans le
Guide d'utilisation
).
Couleurs des voyants Description du
problème
Solution proposée

150 Guide de référence rapide
Panne USB possible.
• Réinstallez tous les périphériques
USB, vérifiez les connexions des
câbles et redémarrez l'ordinateur.
• Si le problème persiste, contactez Dell
(voir
«Pour prendre contact avec Dell»
dans le
Guide d'utilisation
).
Aucun module de
mémoire n'est détecté.
• Si deux modules de mémoire ou plus
sont installés, retirez-les,
(voir «Mémoire»
dans votre
Guide
d'utilisation
), puis réinstallez-en un, et
redémarrez l'ordinateur. Si l'ordinateur
démarre normalement, continuez
à installer les modules de mémoire
supplémentaires (un à la fois) jusqu'à
l'identification d'un module
défectueux ou à la réinstallation de
tous les modules sans erreur.
• Dans la mesure du possible, installez
des modules de même type (voir
«Mémoire»
dans le
Guide d'utilisation
).
• Si le problème persiste, contactez Dell
(voir
«Pour prendre contact avec
Dell» dans le
Guide d'utilisation
).
La carte système
est en panne.
Contactez Dell (voir «Pour prendre contact
avec Dell» dans le Guide d'utilisation).
Des modules de
mémoire sont détectés
mais il existe une
erreur de compatibilité
ou de configuration de
mémoire.
• Vérifiez si des contraintes particulières
doivent être respectées en ce qui
concerne l'installation des modules
dans les logements (voir «Mémoire»
dans le
Guide d'utilisation
).
• Vérifiez que la mémoire utilisée est
compatible avec votre ordinateur (voir
«Mémoire»
dans le
Guide d'utilisation
).
• Si le problème persiste, contactez Dell
(voir
«Pour prendre contact avec Dell»
dans le
Guide d'utilisation
).
Couleurs des voyants Description du
problème
Solution proposée

Guide de référence rapide 151
Panne d'une ressource
de la carte système ou
d'un élément matériel.
• Suivez la procédure de «Restauration
de votre système d’exploitation»
dans
le
Guide d'utilisation
.
• Si le problème persiste, contactez Dell
(voir «Pour prendre contact avec Dell»
dans le
Guide d'utilisation
).
Panne possible d'une
carte d'extension.
1
Déterminez s'il existe un conflit en
retirant une carte d'extension (autre
que la carte graphique) puis en
redémarrant l'ordinateur (voir «Cartes»
dans le
Guide d'utilisation
).
2
Si l'incident persiste, réinstallez la
carte retirée, puis enlevez une autre
carte et redémarrez l'ordinateur.
3
Recommencez cette procédure pour
chaque carte installée. Si l'ordinateur
démarre normalement, dépannez la
dernière carte retirée de l'ordinateur
pour résoudre les conflits de
ressources (voir «Restauration de votre
système d'exploitation»
dans le
Guide
d'utilisation
).
4
Si le problème persiste, contactez Dell
(voir
«Pour prendre contact avec Dell»
dans le
Guide d'utilisation
).
Couleurs des voyants Description du
problème
Solution proposée

152 Guide de référence rapide
Codes sonores
L'ordinateur peut émettre une série de signaux sonores lors du démarrage. La
série de bips est appelée un code sonore permettant d'identifier un problème
sur votre ordinateur.
Si votre ordinateur émet une série de signaux sonores lors du démarrage :
1
Notez le code sonore.
2
Exécutez Dell Diagnostics pour identifier la cause (voir «Dell Diagnostics»
à la page 156).
Autre panne possible.
• Vérifiez que tous les câbles de disque
dur et de lecteur de CD/DVD sont bien
branchés sur la carte système
(voir «Composants de la carte système»
dans le
Guide d'utilisation
).
• En cas de message d'erreur à l'écran
signalant un problème sur un
périphérique (lecteur de disquette ou
disque dur), vérifiez ce périphérique
pour vous assurer qu'il fonctionne
correctement.
• Si le système d'exploitation tente de
démarrer sur un périphérique (lecteur
de disquette ou de CD/DVD), vérifiez
le programme de configuration du
système (voir «Programme de
configuration du système»
dans le
Guide d'utilisation
) pour vous assurer
que la séquence d'amorçage est
correcte pour les périphériques
installés sur votre ordinateur.
• Si le problème persiste, contactez Dell
(voir
«Pour prendre contact avec Dell»
dans le
Guide d'utilisation
).
Code Cause
2 courts, 1 long Erreur de somme de contrôle de BIOS
1 long, 3 courts, 2 courts Erreur de mémoire
1 court Touche F12 enfoncée
Couleurs des voyants Description du
problème
Solution proposée

Guide de référence rapide 153
Code
(signaux courts
répétitifs)
Description Remède suggéré
1 Echec de la somme de
contrôle du BIOS.
Panne possible de la
carte mère.
Contactez Dell (voir «Pour prendre contact
avec Dell» dans le Guide d'utilisation).
2 Aucun module de
mémoire n'est détecté.
• Si deux modules de mémoire ou plus sont
installés, retirez-les, (voir «Mémoire»
dans
votre
Guide d'utilisation
), puis réinstallez-
en un, et redémarrez l'ordinateur.
Si l'ordinateur démarre normalement,
continuez à installer les modules de
mémoire supplémentaires (un à la fois)
jusqu'à l'identification d'un module
défectueux ou à la réinstallation de tous
les modules sans erreur.
• Dans la mesure du possible, installez des
modules de même type (voir «Mémoire»
dans le
Guide d'utilisation
).
• Si le problème persiste, contactez Dell
(voir
«Pour prendre contact avec Dell»
dans le
Guide d'utilisation
).
3 Panne possible de la
carte mère.
Contactez Dell (voir «Pour prendre contact
avec Dell» dans le Guide d'utilisation).
4 Défaillance de
lecture/écriture en
mémoire.
• Vérifiez si des contraintes particulières
doivent être respectées en ce qui
concerne l'installation des modules dans
les logements (voir «Mémoire»
dans le
Guide d'utilisation
)
.
• Vérifiez que la mémoire utilisée est
compatible avec votre ordinateur (voir
«Mémoire»
dans le
Guide d'utilisation
)
.
• Si le problème persiste, contactez Dell
(voir
«Pour prendre contact avec Dell»
dans le
Guide d'utilisation
).

154 Guide de référence rapide
Messages système
REMARQUE : Si le message affiché par l'ordinateur ne figure pas dans la liste
suivante, reportez-vous à la documentation du système d'exploitation ou du
programme qui était en cours d'exécution lorsque l'incident s'est produit.
A
LERT ! PREVIOUS ATTEMPTS AT BOOTING THIS SYSTEM HAVE FAILED AT
CHECKPOINT [NNNN]. FOR HELP IN RESOLVING THIS PROBLEM, PLEASE NOTE THIS
CHECKPOINT AND CONTACT DELL TECHNICAL SUPPORT (ALERTE ! LES TENTATIVES
DE DÉPANNAGE ONT ÉCHOUÉ AU POINT DE CONTRÔLE [NNNN]. POUR VOUS AIDER
À RÉSOUDRE CE PROBLÈME, NOTEZ CE POINT DE CONTRÔLE ET CONTACTEZ LE
SUPPORT TECHNIQUE DELL)—L'ordinateur n'a pas pu achever son programme
d'amorçage trois fois consécutives pour la même erreur (voir «Pour prendre contact
avec Dell» dans le Guide d'utilisation pour de l'aide).
CMOS
CHECKSUM ERROR (ERREUR DE SOMME DE CONTRÔLE CMOS) — Panne
possible de la carte mère ou de l'horloge en temps réel quand le niveau de charge de la
pile est faible. Remplacez la pile (voir «Repose de la pile» ou «Prendre contact avec
Dell» dans le Guide d'utilisation pour de l'aide).
CPU
FAN FAILURE (PANNE DE VENTILATEUR D'ALIMENTATION)—Panne de
ventilateur de processeur. Remplacez le ventilateur de processeur (voir «Dépose du
processeur» dans le Guide d'utilisation).
F
LOPPY DISKETTE SEEK FAILURE (ECHEC DE RECHERCHE SUR DISQUETTE)—Un
câble est peut-être desserré ou les informations de configuration de l'ordinateur peuvent
ne pas correspondre à la configuration matérielle. Vérifiez les branchements des câbles
(voir «Pour prendre contact avec Dell» dans le Guide d'utilisation pour de l'aide).
D
ISKETTE READ FAILURE (ECHEC DE LECTURE DE LA DISQUETTE)—La disquette
peut être défectueuse ou un câble mal branché. Remplacez la disquette ou recherchez
un mauvais branchement de câble.
5 Défaillance d'horloge
temps réel. Panne de
pile ou de carte
mère possible.
• Remplacez la pile (voir «Repose de la pile»
dans le
Guide d'utilisation
).
• Si le problème persiste, contactez Dell
(voir
«Pour prendre contact avec Dell»
dans le
Guide d'utilisation
).
6 Echec du test de
BIOS vidéo.
Contactez Dell (voir «Pour prendre contact
avec Dell» dans le Guide d'utilisation).
Code
(signaux courts
répétitifs)
Description Remède suggéré

Guide de référence rapide 155
HARD-DISK READ FAILURE (ECHEC DE LECTURE DE DISQUE DUR)—Panne
éventuelle de disque dur pendant le test au démarrage (voir «Pour prendre contact
avec Dell» dans le Guide d'utilisation pour de l'aide).
K
EYBOARD FAILURE (PANNE DE CLAVIER)—Panne de clavier ou câble de clavier
débranché (voir «Problèmes de clavier» dans le Guide d'utilisation).
N
O BOOT DEVICE AVAILABLE (AUCUN PÉRIPHÉRIQUE D 'AMORÇAGE N'EST
DISPONIBLE)—Le système ne peut pas détecter de périphérique ou de partition
d'amorçage.
• Si le lecteur de disquette est votre périphérique d'amorçage, vérifiez que les câbles
sont branchés et qu'il y a une disquette amorçable dans le lecteur.
• Si le disque dur est le périphérique d'amorçage, assurez-vous que les câbles sont
branchés, et que le disque est installé et partitionné comme périphérique d'amorçage.
• Accédez au programme de configuration du système et vérifiez que les informations
de la séquence d'amorçage sont correctes (voir «Accès au programme de
configuration du système»
dans le
Guide d'utilisation
).
NO TIMER TICK INTERRUPT (AUCUNE INTERRUPTION DE TIC D'HORLOGE)—Panne
de carte système ou une puce sur la carte système peut être défectueuse (voir «Pour
prendre contact avec Dell» dans le Guide d'utilisation pour de l'aide).
N
ON-SYSTEM DISK OR DISK ERROR (ERREUR DISQUE OU DISQUE NON-SYSTÈME)—
Remplacez la disquette par une autre dotée d'un système d'exploitation amorçable, ou
retirez la disquette du lecteur A et redémarrez l'ordinateur.
N
OT A BOOT DISKETTE (DISQUETTE NON AMORÇABLE)—Insérez une disquette
d'amorçage dans le lecteur et redémarrez l'ordinateur.
NOTICE - H
ARD DRIVE SELF MONITORING SYSTEM HAS REPORTED THAT
A PARAMETER HAS EXCEEDED ITS NORMAL OPERATING RANGE. DELL RECOMMENDS
THAT YOU BACK UP YOUR DATA REGULARLY. A PARAMETER OUT OF RANGE MAY OR
MAY NOT INDICATE A POTENTIAL HARD DRIVE PROBLEM (AVIS – LE SYSTÈME DE
SURVEILLANCE AUTOMATIQUE DU DISQUE DUR SIGNALE QU'UN PARAMÈTRE
A DÉPASSÉ SA PLAGE D'UTILISATION NORMALE. DELL RECOMMANDE DE
SAUVEGARDER RÉGULIÈREMENT VOS DONNÉES. UN PARAMÈTRE HORS PLAGE PEUT
SIGNALER OU NON UN PROBLÈME POTENTIEL SUR LE DISQUE DUR)—Erreur
SMART, panne éventuelle du disque dur. Cette fonction peut être activée ou désactivée
dans le programme de configuration du BIOS.

156 Guide de référence rapide
Dépanneur des conflits matériels
Si un périphérique n'est pas détecté pendant la configuration du système
d'exploitation ou est détecté mais n'est pas configuré correctement, utilisez le
Dépanneur des conflits matériels pour résoudre cette incompatibilité.
Windows XP :
1
Cliquez sur
Démarrer
→
Aide et support
.
2
Entrez
Dépanneur des conflits matériels
dans le champ de
recherche puis appuyez sur <Entrée> pour lancer la recherche.
3
Dans la section
Résolution d'un problème
, cliquez sur
Dépanneur des
conflits matériels
.
4
Dans la liste
Dépanneur des conflits matériels
, sélectionnez l'option
décrivant le mieux le problème puis cliquez sur
Suivant
pour accéder aux
étapes suivantes de dépannage.
Windows Vista :
1
Cliquez sur le bouton Démarrer Windows Vista , puis sur
Aide et support
.
2
Entrez
Dépanneur des conflits matériels
dans le champ de
recherche puis appuyez sur <Entrée> pour lancer la recherche.
3
Dans les résultats de recherche, sélectionnez l'option décrivant le mieux le
problème et suivez les étapes suivantes de dépannage.
Dell Diagnostics
PRECAUTION : Avant de commencer toute procédure de cette section, consultez
et respectez les consignes de sécurité du
Guide d'information sur le produit
.
Quand utiliser Dell Diagnostics
Si vous rencontrez un problème avec votre ordinateur, procédez aux
vérifications décrites dans la section «Problèmes de blocage et problèmes
logiciels» (voir «Dépannage» dans le Guide d'utilisation) et exécutez Dell
Diagnostics avant de contacter Dell pour obtenir une assistance.
Vous pouvez exécuter Dell Diagnostics depuis le disque dur ou depuis le
disque Drivers and Utilities.

Guide de référence rapide 157
Reportez-vous à «Programme de configuration du système» de votre Guide
d'utilisation pour vérifier les informations de configuration de votre
ordinateur et vous assurer que le périphérique que vous souhaitez tester
s'affiche dans le programme de configuration du système et qu'il est actif.
REMARQUE : Dell Diagnostics ne fonctionne que sur les ordinateurs Dell.
REMARQUE : Imprimez les procédures ci-dessous avant d'exécuter Dell Diagnostics.
Démarrage de Dell Diagnostics à partir du disque dur
Dell Diagnostics se trouve sur une partition utilitaire de diagnostic séparée de
votre disque dur.
REMARQUE : Si votre ordinateur n'affiche pas une image à l'écran,
voir «Prendre contact avec Dell» dans le Guide d'utilisation).
1
Mettez l'ordinateur sous tension (ou redémarrez-le).
2
Lorsque le logo DELL s'affiche, appuyez immédiatement sur <F12>.
REMARQUE : Une panne de clavier peut apparaître si une touche est
maintenue enfoncée trop longtemps. Pour éviter une panne de clavier,
appuyez sur la touche <F12> et relâchez-la à intervalles réguliers pour ouvrir
le menu Boot Device Menu.
REMARQUE : Si un message apparaît pour indiquer qu'aucune partition de
diagnostic n'a été trouvée, lancez Dell Diagnostics depuis le disque Drivers
and Utilities (voir «Démarrage de Dell Diagnostics à partir du disque Drivers
and Utilities» à la page 158)
.
Si vous attendez trop longtemps et que le logo du système d'exploitation
apparaît, patientez jusqu'à ce que le bureau de Microsoft Windows s'affiche,
puis arrêter l'ordinateur avant de recommencer.
3
Sur le menu
Boot Device Menu
(Menu de démarrage), utilisez les flèches
haut et bas ou tapez le nombre approprié sur le clavier pour sélectionner
Boot to Utility Partition
(Démarrer sur la partition d'utilitaire) puis
appuyez sur <Entrée>.
REMARQUE : La fonction Quickboot modifie la séquence de démarrage pour
le démarrage en cours seulement. Au redémarrage, l'ordinateur démarre selon
la séquence de démarrage indiquée dans le programme de configuration du
système.

158 Guide de référence rapide
4
Sur le
Main Menu
(Menu principal) de Dell Diagnostics, cliquez avec le
bouton gauche de la souris ou appuyez sur <Tab> puis sur <Entrée> pour
sélectionner le test à exécuter (voir «Menu principal de Dell Diagnostics» à la
page 159).
REMARQUE : Notez les codes d'erreur et descriptions de problèmes
exactement telles qu'elles apparaissent et suivez les instructions à l'écran.
5 Quand tous les tests sont terminés, fermez la fenêtre de test pour revenir
au Main Menu (
Menu
Principal) de Dell Diagnostics.
6 Fermez la fenêtre Main Menu (
Menu
Principal) pour quitter Dell
Diagnostics et redémarrer l'ordinateur.
Démarrage de Dell Diagnostics à partir du disque Drivers and Utilities
1
Allumez l'ordinateur.
2
Appuyez sur le bouton d'éjection à l'avant du lecteur optique pour ouvrir
le plateau.
3
Placez le disque
Drivers and Utilities
au centre du tiroir du lecteur, puis
appuyez sur le bouton d'éjection ou repoussez doucement le tiroir pour
le fermer.
4
Redémarrez l'ordinateur.
5
Lorsque le logo DELL s'affiche, appuyez immédiatement sur <F12>.
REMARQUE : Une panne de clavier peut apparaître si une touche de clavier
est maintenue enfoncée trop longtemps. Pour éviter une panne de clavier
possible, appuyez sur <F12> et relâchez la touche régulièrement
jusqu'à l'apparition du Boot Device Menu (Menu de démarrage).
Si vous attendez trop longtemps et que le logo du système d'exploitation
apparaît, patientez jusqu'à ce que le bureau de Microsoft Windows s'affiche,
puis arrêter l'ordinateur avant de recommencer.
6
Sur le menu
Boot Device Menu
(Menu de démarrage), utilisez les flèches
haut et bas ou tapez le numéro voulu sur le clavier pour sélectionner
Onboard
or USB CD-ROM
(CD-ROM intégré ou USB) puis appuyez sur <Entrée>.
REMARQUE : La fonction Quickboot modifie la séquence de démarrage pour
le démarrage en cours seulement. Au redémarrage, l'ordinateur démarre selon
la séquence de démarrage indiquée dans le programme de configuration du
système.
7
Appuyez sur <1> pour démarrer Dell Diagnostics.

Guide de référence rapide 159
8
Dans le
Menu de Dell Diagnostics
, appuyer sur <1> pour sélectionner
Dell Diagnostics.
9
Sur le
Main Menu
(Menu principal) de Dell Diagnostics, cliquez avec
le bouton gauche de la souris ou appuyez sur <Tab> puis sur <Entrée>
pour sélectionner le test à exécuter (voir «Menu principal de Dell
Diagnostics» à la page 159).
REMARQUE : Notez les codes d'erreur et descriptions de problèmes
exactement telles qu'elles apparaissent et suivez les instructions à l'écran.
10 Quand tous les tests sont terminés, fermez la fenêtre de test pour revenir
au Main Menu (
Menu
Principal) de Dell Diagnostics.
11 Retirez le disque Drivers and Utilities et fermez la fenêtre Main Menu
(
Menu
Principal) pour quitter Dell Diagnostics et redémarrer
l'ordinateur.
Menu principal de Dell Diagnostics
Les tests ci-dessous peuvent être exécutés à partir du Main Menu
(Menu principal) de Dell Diagnostics :
Option Fonction
Express Test (Test rapide) Exécute un test rapide des périphériques systèmes. En règle
générale, le test prend 10 à 20 minutes et n'exige aucune
intervention de votre part. Effectuez tout d'abord un Test
rapide pour trouver le problème plus rapidement.
Extended Test
(Test complet)
Exécute un test approfondi des périphériques systèmes.
Le test prend le plus souvent une heure ou plus et vous
demande régulièrement de répondre à des
questions spécifiques.
Custom Test
(Test personnalisé)
Teste un périphérique particulier du système et peut
permettre de personnaliser les tests à exécuter.
Symptom Tree
(Arborescence des
symptômes)
Répertorie les symptômes les plus communs et vous permet
de sélectionner un test selon le symptôme du problème
auquel vous êtes confronté.

160 Guide de référence rapide
Si un problème est rencontré lors d'un test, un message affiche le code
d'erreur et une description du problème. Notez le code d'erreur et la
description du problème exactement tels qu'ils apparaissent et suivez les
instructions à l'écran. Si vous ne pouvez pas résoudre le problème, contactez
Dell (voir «Prendre contact avec Dell» dans le Guide d'utilisation).
REMARQUE : Le numéro de service de votre ordinateur est situé en haut de
chaque écran de test. Pour prendre contact avec Dell, vérifiez que vous disposez
de l'étiquette de service.
Les onglets fournissent des informations supplémentaires pour les tests
exécutés à partir du Custom Test (Test personnalisé) ou de Symptom Tree
(Arborescence des symptômes) :
Dépannage
Lorsque vous dépannez votre ordinateur, suivez les conseils ci-dessous :
• Si vous veniez d'ajouter ou de retirer une pièce lorsque le problème est
apparu, vérifiez la procédure d'installation et assurez-vous que la pièce est
correctement installée.
Onglet Fonction
Results (Résultats) Affiche les résultats du test et les erreurs rencontrées.
Errors (Erreurs) Affiche les erreurs rencontrées, leur code et la description
de l'incident.
Help (Aide) Décrit le test et les conditions requises pour exécuter le test.
Configuration
(Test personnalisé
seulement)
Affiche la configuration matérielle du périphérique sélectionné.
Dell Diagnostics obtient des informations de configuration
de tous les périphériques à partir du programme de
configuration du système, de la mémoire et de divers tests
internes et les affiche dans la liste des périphériques, dans
le volet gauche de l'écran.
REMARQUE : Cette liste ne contient pas nécessairement le
nom de tous les composants installés sur l'ordinateur ni de
tous les périphériques connectés.
Parameters (Paramètres)
(Test personnalisé
seulement)
Permet le cas échéant de personnaliser le test en modifiant
ses paramètres.

Guide de référence rapide 161
• Si un périphérique ne fonctionne pas, vérifiez qu'il est correctement connecté.
• Si un message d'erreur apparaît à l'écran, consignez-le par écrit, mot pour
mot. Ce message peut aider le personnel du support à diagnostiquer et
à résoudre le ou les incidents.
• Si un message d'erreur apparaît dans un programme, reportez-vous à la
documentation de ce programme.
REMARQUE : Les procédures présentées dans ce document concernent l'affichage
par défaut de Windows. Par conséquent, elles risquent de ne pas fonctionner si votre
ordinateur Dell™ est réglé sur le mode d'affichage classique de Windows.
Problèmes de pile
PRECAUTION : Une nouvelle pile mal installée risque d'exploser. Remplacez
la pile par une pile de type identique ou d'un type équivalent recommandé par
le fabricant. Débarrassez-vous des piles usagées conformément aux instructions
du fabricant.
PRECAUTION : Avant de commencer toute procédure de cette section, consultez
et respectez les consignes de sécurité du
Guide d'information sur le produit
.
R
EMPLACEZ LA PILE — Si vous devez fréquemment réinitialiser les informations
concernant l'heure et la date après avoir allumé l'ordinateur ou si l'heure et la date
affichées au démarrage sont incorrectes, remplacez la pile (voir «Repose de la pile»
dans le Guide d'utilisation). Si la pile ne fonctionne toujours pas correctement,
contactez Dell (voir «Pour prendre contact avec Dell» dans le Guide d'utilisation).
Problèmes de lecteur
PRECAUTION : Avant de commencer toute procédure de cette section, consultez
et respectez les consignes de sécurité du
Guide d'information sur le produit
.
V
ÉRIFIEZ QUE LE LECTEUR EST RECONNU PAR MICROSOFT WINDOWS —
Windows XP :
• Cliquez sur
Démarrer
, puis cliquez sur
Poste de travail
.
Windows Vista :
• Cliquez sur
Démarrer
, puis sur
Ordinateur
.
Si le lecteur n'est pas répertorié, effectuez une analyse complète avec votre logiciel
antivirus pour rechercher d'éventuels virus et les supprimer. Les virus peuvent parfois
empêcher Windows de reconnaître le lecteur.

162 Guide de référence rapide
TEST DU LECTEUR —
• Insérez un autre disque pour éliminer la possibilité que le premier soit défectueux.
• Insérez une disquette d'amorçage et redémarrez l'ordinateur.
NETTOYEZ LE LECTEUR OU LE DISQUE — Voir «Nettoyage de votre ordinateur» à la
page 145.
V
ÉRIFIEZ LA CONNEXION DES CÂBLES
EXÉCUTEZ LE DÉPANNEUR DES CONFLITS MATÉRIELS — Voir «Restauration de votre
système d’exploitation» du Guide d'utilisation.
E
XÉCUTEZ DELL DIAGNOSTICS — Voir «Dell Diagnostics» à la page 156.
Problèmes de lecteur optique
REMARQUE : Il peut arriver que le lecteur optique haute vitesse vibre et produise
du bruit. Cela ne signifie en aucun cas que le lecteur ou le disque est défectueux.
REMARQUE : Selon les régions du monde et les différents formats de disque,
certains titres DVD ne fonctionnent pas dans certains lecteurs DVD.
R
ÉGLEZ LE CONTRÔLE DE VOLUME DE WINDOWS —
• Cliquez sur l'icône représentant un haut-parleur, dans l'angle inférieur droit de votre écran.
• Assurez-vous d'avoir monté le volume en cliquant sur le curseur et en le faisant glisser
vers le haut.
• Vérifiez que le son n'est pas mis en sourdine en cliquant sur l'une des cases à cocher activées.
VÉRIFIEZ LES HAUT-PARLEURS ET LE CAISSON D'EXTRÊMES GRAVES — Voir
«Problèmes de son et de haut-parleurs» à la page 174.
Problèmes d'écriture vers un lecteur optique
FERMEZ TOUS LES PROGRAMMES — Le lecteur optique doit recevoir un flux régulier
de données pendant la gravure. Si le flux est interrompu, une erreur peut se produire.
Fermez tous les programmes avant de lancer l'écriture sur le lecteur.
D
ÉSACTIVEZ LE MODE VEILLE DANS WINDOWS AVANT DE LANCER L'ÉCRITURE SUR
UN DISQUE — Lancez une recherche à l'aide du mot clé veille dans le Centre d'aide et
de support de Windows pour plus d'informations sur les modes d'économie d'énergie.

Guide de référence rapide 163
Problèmes de disque dur
LANCEZ LA VÉRIFICATION DU DISQUE —
Windows XP :
1
Cliquez sur
Démarrer
, puis cliquez sur
Poste de travail
.
2
Avec le bouton droit, cliquez sur
Disque local C:.
3
Cliquez sur
Propriétés
→
Outils
→
Vérifier maintenant
.
4
Cliquez sur
Analyser et tenter la restauration des secteurs défectueux
, puis sur
Démarrer
.
Windows Vista :
1
Cliquez sur
Démarrer
, puis sur
Ordinateur
.
2
Avec le bouton droit, cliquez sur
Disque local C:.
3
Cliquez sur
Propriétés
→
Outils
→
Vérifier maintenant
.
La fenêtre
Contrôle du compte utilisateur
peut apparaître. Si vous êtes administrateur
de l'ordinateur, cliquez sur
Continuer
; sinon, prenez contact avec votre administrateur
pour poursuivre l'action voulue.
4
Suivez les instructions affichées.
Problèmes liés à la messagerie électronique, au modem ou à Internet
PRECAUTION : Avant de commencer toute procédure de cette section, consultez
et respectez les consignes de sécurité du
Guide d'information sur le produit
.
REMARQUE : Connectez le modem uniquement à une prise téléphonique analogique.
Le modem ne fonctionne pas s'il est connecté à un réseau téléphonique numérique.
REMARQUE : Ne branchez pas de câble téléphonique sur le connecteur réseau
(voir «Connecteurs du panneau arrière» dans le Guide d'utilisation).
V
ÉRIFIEZ LES PARAMÈTRES DE SÉCURITÉ DE MICROSOFT OUTLOOK EXPRESS — Si
vous n'arrivez pas à ouvrir vos pièces jointes :
1
Dans Outlook Express, cliquez sur
Outils
→
Options
→
Sécurité
.
2
Cliquez sur
Ne pas autoriser l'ouverture ou l'enregistrement des pièces jointes
susceptibles de contenir un virus
pour supprimer la coche, le cas échéant.
VÉRIFIEZ LA CONNEXION DE LA LIGNE TÉLÉPHONIQUE
INSPECTEZ LA PRISE TÉLÉPHONIQUE
CONNECTEZ DIRECTEMENT LE MODEM À LA PRISE TÉLÉPHONIQUE MURALE
UTILISEZ UNE AUTRE LIGNE TÉLÉPHONIQUE —
• Vérifiez que la ligne téléphonique est connectée à la prise du modem (cette dernière
est reconnaissable à l'étiquette verte ou à l'icône en forme de connecteur qui se trouve
à côté d'elle).

164 Guide de référence rapide
• Vérifiez que vous entendez un déclic lorsque vous insérez le connecteur de la ligne
téléphonique dans le modem.
• Débranchez la ligne téléphonique du modem et connectez-la à un téléphone, puis
attendez la tonalité.
• Si d'autres appareils partagent cette ligne (répondeur, télécopieur, protecteur de surtension
ou séparateur de ligne), débranchez-les et branchez le modem directement à la prise
téléphonique murale. Si vous utilisez un câble qui mesure 3 mètres (10 pieds) ou plus,
essayez-en un plus court.
EXÉCUTEZ L'OUTIL DE DIAGNOSTIC DU MODEM —
Windows XP :
1
Cliquez sur
Démarrer
→
Tous les
programmes
→
Assistant du modem
.
2
Suivez les instructions affichées à l'écran pour identifier et résoudre les problèmes liés
au modem. Cette application d'assistance du modem n'est pas disponible sur
certains ordinateurs.
Windows Vista :
1
Cliquez sur
Démarrer
→
Tous les programmes
→
Outil de diagnostic du modem
.
2
Suivez les instructions affichées à l'écran pour identifier et résoudre les problèmes liés
au modem. Les diagnostics du modem ne sont disponibles que sur certains ordinateurs.
VÉRIFIEZ QUE LE MODEM COMMUNIQUE AVEC WINDOWS —
Windows XP :
1
Cliquez sur
Démarrer
→
Panneau de configuration
→
Imprimantes et autres
périphériques
→
Options de modem et téléphonie
→
Modems
.
2
Cliquez sur le port COM de votre modem, puis sur
Propriétés
→
Diagnostics
→
Interroger le modem
pour vérifier que le modem communique avec Windows.
Si toutes les commandes reçoivent des réponses, le modem fonctionne correctement.
Windows Vista :
1
Cliquez sur
Démarrer
→
Panneau de configuration
→
Matériel et audio
→
Options de modem et téléphonie
→
Modems
.
2
Cliquez sur le port COM de votre modem, puis sur
Propriétés
→
Diagnostics
→
Interroger le modem
pour vérifier que le modem communique avec Windows.
Si toutes les commandes reçoivent des réponses, le modem fonctionne correctement.
VÉRIFIEZ QUE VOUS ÊTES CONNECTÉ À INTERNET — Vérifiez que vous avez bien
souscrit un abonnement auprès d'un fournisseur de services Internet Une fois le
programme de messagerie électronique Outlook Express ouvert, cliquez sur Fichier.
Si une coche apparaît en regard de l'option Travailler hors connexion, cliquez sur la
coche pour la supprimer et vous connecter à Internet. Contactez votre prestataire de
services Internet pour obtenir une assistance.

Guide de référence rapide 165
Messages d'erreur
PRECAUTION : Avant de commencer toute procédure de cette section, consultez
et respectez les consignes de sécurité du
Guide d'information sur le produit
.
Si le message d'erreur n'est pas répertorié, consultez la documentation du système
d'exploitation ou du programme que vous étiez en train d'utiliser au moment où
le message est apparu.
A
FILENAME CANNOT CONTAIN ANY OF THE FOLLOWING CHARACTERS : (UN NOM DE
FICHIER NE PEUT CONTENIR AUCUN DES CARACTÈRES SUIVANTS : ) \ / : * ? “ < >
|— N'utilisez pas ces caractères dans les noms de fichiers.
A
REQUIRED .DLL FILE WAS NOT FOUND (UN FICHIER .DLL REQUIS EST
INTROUVABLE)—Il manque un fichier essentiel au programme que vous essayez
d'ouvrir. Pour supprimer, puis réinstaller le programme :
Windows XP :
1
Cliquez sur
Démarrer
→
Panneau de configuration
→
Ajout/suppression de
programmes
→
Modifier ou supprimer des programmes
.
2
Sélectionnez le programme à supprimer.
3
Cliquez sur
Désinstaller
.
4
Consultez la documentation du programme pour obtenir des instructions d'installation.
Windows Vista :
1
Cliquez sur
Démarrer
→
Panneau de configuration
→
Programmes
→
Programmes
et fonctionnalités
.
2
Sélectionnez le programme à supprimer.
3
Cliquez sur
Désinstaller
.
4
Consultez la documentation du programme pour obtenir des instructions d'installation.
drive letter
: \ IS NOT ACCESSIBLE. THE DEVICE IS NOT READY (X : \ N'EST PAS
ACCESSIBLE. LE PÉRIPHÉRIQUE N'EST PAS PRÊT)—Le lecteur ne peut pas lire le
disque. Insérez un disque dans le lecteur et réessayez.
I
NSERT BOOTABLE MEDIA (INTRODUISEZ UN SUPPORT AMORÇABLE)—Introduisez
une disquette, un CD ou un DVD amorçable.
N
ON-SYSTEM DISK ERROR (ERREUR DISQUE NON-SYSTÈME)—Retirez la disquette
du lecteur et redémarrez l'ordinateur.
N
OT ENOUGH MEMORY OR RESOURCES. CLOSE SOME PROGRAMS AND TRY AGAIN
(M
ÉMOIRE OU RESSOURCES INSUFFISANTES. FERMEZ DES PROGRAMMES ET
RÉESSAYEZ)—Fermez toutes les fenêtres et ouvrez le programme de votre choix.
Dans certains cas, vous devrez peut-être redémarrer l'ordinateur afin de restaurer ses
ressources. Si c'est le cas, exécutez le programme dès que le redémarrage est terminé.
O
PERATING SYSTEM NOT FOUND (SYSTÈME D'EXPLOITATION INTROUVABLE)—
Contactez Dell (voir «Pour prendre contact avec Dell» dans le Guide d'utilisation).

166 Guide de référence rapide
Problèmes de périphérique IEEE 1394
PRECAUTION : Avant de commencer toute procédure de cette section, consultez
et respectez les consignes de sécurité du
Guide d'information sur le produit
.
V
ÉRIFIEZ QUE LE CÂBLE DU PÉRIPHÉRIQUE IEEE 1394 EST CORRECTEMENT INSÉRÉ
DANS LE PÉRIPHÉRIQUE ET DANS LE CONNECTEUR DE L'ORDINATEUR
VÉRIFIEZ QUE LE PÉRIPHÉRIQUE IEEE 1394 EST ACTIVÉ DANS LE PROGRAMME DE
CONFIGURATION DU SYSTÈME — Voir «Options du programme de configuration du
système» dans le Guide d'utilisation.
A
SSUREZ-VOUS QUE LE PÉRIPHÉRIQUE IEEE 1394 EST RECONNU PAR WINDOWS —
Windows XP :
1
Cliquez sur
Démarrer
, puis sur
Panneau de configuration
.
2
Sous
Choisissez une catégorie
, cliquez sur
Performances et maintenance
→
Système
→
Propriétés système
→
Matériel
→
Gestionnaire de périphériques
.
Windows Vista :
1
Cliquez sur
Démarrer
→
Panneau de configuration
→
Matériel et audio
.
2
Cliquez sur
Gestionnaire de périphériques
.
Si votre périphérique IEEE 1394 est répertorié, Windows le reconnaît.
V
ÉRIFIEZ QUE LA CARTE IEEE 1394 EST CORRECTEMENT INSTALLÉE
VÉRIFIEZ QUE LE CÂBLE IEEE 1394 EST BRANCHÉ CORRECTEMENT AU CONNECTEUR
DE LA CARTE SYSTÈME ET AU CONNECTEUR DU PANNEAU D'ENTRÉE-SORTIE AVANT
SI VOUS RENCONTREZ DES PROBLÈMES AVEC UN PÉRIPHÉRIQUE IEEE 1394 FOURNI
PAR DELL — Contactez Dell (voir «Pour prendre contact avec Dell» dans le
Guide d'utilisation).
S
I VOUS RENCONTREZ DES PROBLÈMES AVEC UN PÉRIPHÉRIQUE IEEE 1394 NON
FOURNI PAR DELL — Contactez le fabricant du périphérique IEEE 1394.
Problèmes de clavier
PRECAUTION : Avant de commencer toute procédure de cette section, consultez
et respectez les consignes de sécurité du
Guide d'information sur le produit
.
V
ÉRIFIEZ LE CÂBLE DU CLAVIER —
• Vérifiez que le câble du clavier est fermement connecté à l'ordinateur.
• Arrêtez l'ordinateur (voir
«
Extinction de votre ordinateur
»
dans le
Guide d'utilisation
),
rebranchez le câble de clavier comme indiqué sur le schéma d'installation de votre
ordinateur, puis redémarrez l'ordinateur.

Guide de référence rapide 167
• Vérifiez que le câble n'est pas endommagé et que les broches des connecteurs du câble
ne sont pas tordues ou cassées. Redressez les broches tordues.
• Si vous utilisez des rallonges, retirez-les et branchez le clavier directement sur l'ordinateur.
TESTEZ LE CLAVIER — Connectez un clavier en bon état à l'ordinateur et essayez
de l'utiliser.
E
XÉCUTEZ LE DÉPANNEUR DES CONFLITS MATÉRIELS — Voir «Restauration de votre
système d’exploitation» du Guide d'utilisation.
Problèmes de blocage et problèmes logiciels
PRECAUTION : Avant de commencer toute procédure de cette section, consultez
et respectez les consignes de sécurité du
Guide d'information sur le produit
.
L'ordinateur ne démarre pas
VÉRIFIEZ LES VOYANTS DE DIAGNOSTIC — Voir «Voyants de diagnostic» à la
page 148.
V
ÉRIFIEZ QUE LE CORDON D 'ALIMENTATION EST BIEN BRANCHÉ SUR L'ORDINATEUR
ET SUR LA PRISE ÉLECTRIQUE.
L'ordinateur ne répond plus
AVIS : Vous pouvez perdre des données si vous n'arrivez pas à arrêter correctement
le système d'exploitation.
E
TEIGNEZ L'ORDINATEUR — Si vous n'obtenez aucune réponse lorsque vous appuyez
sur une touche du clavier ou lorsque vous déplacez la souris, appuyez sur le bouton
d'alimentation et maintenez-le enfoncé pendant au moins 8 à 10 secondes (jusqu'à ce
que l'ordinateur s'éteigne), puis redémarrez votre ordinateur.
Un programme ne répond plus
FIN DU PROGRAMME —
1
Appuyez simultanément sur <Ctrl><Maj><Echap> pour accéder au Gestionnaire
des tâches.
2
Cliquez sur l'onglet
Applications
.
3
Sélectionnez le programme qui ne répond plus.
4
Cliquez sur
Fin de tâche
.

168 Guide de référence rapide
Un programme se bloque fréquemment
REMARQUE : Les logiciels sont généralement fournis avec des instructions
d'installation contenues dans la documentation, sur disquette, sur CD ou sur DVD.
C
ONSULTEZ LA DOCUMENTATION DU LOGICIEL — Si nécessaire, supprimez puis
réinstallez le programme.
Un programme est conçu pour une version antérieure du système
d'exploitation Windows
EXÉCUTEZ L'ASSISTANT COMPATIBILITÉ DES PROGRAMMES —
Windows XP :
L'Assistant Compatibilité des programmes configure un programme pour qu'il
fonctionne dans un environnement similaire aux environnements des systèmes
d'exploitation non Windows XP.
1
Cliquez sur
Démarrer
→
Tous les programmes
→
Accessoires
→
Assistant Compatibilité
des programmes
→
Suivant
.
2
Suivez les instructions affichées.
Windows Vista :
L'Assistant Compatibilité des programmes configure un programme pour qu'il
fonctionne dans un environnement voisin des environnements des systèmes
d'exploitation non Windows Vista.
1
Cliquez sur
Démarrer
→
Panneau de configuration
→
Programmes
→
Utiliser
un programme ancien avec cette version de Windows
.
2
Dans l'écran d'accueil, cliquez sur
Suivant
.
3
Suivez les instructions affichées.
Un écran bleu uni apparaît
ETEIGNEZ L'ORDINATEUR — Si vous n'obtenez aucune réponse lorsque vous appuyez
sur une touche du clavier ou lorsque vous déplacez la souris, appuyez sur le bouton
d'alimentation et maintenez-le enfoncé pendant au moins 8 à 10 secondes (jusqu'à ce
que l'ordinateur s'éteigne), puis redémarrez votre ordinateur.
Autres problèmes logiciels
CONSULTEZ LA DOCUMENTATION DU LOGICIEL OU CONTACTEZ LE FABRICANT POUR
OBTENIR DES INFORMATIONS DE DÉPANNAGE —
• Assurez-vous que le programme est compatible avec le système d'exploitation installé
sur votre ordinateur.
• Assurez-vous que l'ordinateur est conforme aux exigences matérielles requises pour
que le logiciel fonctionne. Voir la documentation du logiciel pour plus d'informations.

Guide de référence rapide 169
• Assurez-vous que le programme est correctement installé et configuré.
• Assurez-vous que les pilotes de périphérique n'entrent pas en conflit avec
le programme.
• Si nécessaire, supprimez puis réinstallez le programme.
SAUVEGARDEZ VOS FICHIERS IMMÉDIATEMENT
UTILISEZ UN PROGRAMME DE RECHERCHE DES VIRUS POUR VÉRIFIER LE DISQUE
DUR, LES DISQUETTES, LES CD OU DVD
E
NREGISTREZ LES FICHIERS OUVERTS ET QUITTEZ TOUS LES PROGRAMMES, PUIS
ÉTEIGNEZ L'ORDINATEUR PAR LE MENU DÉMARRER
Problèmes de mémoire
PRECAUTION : Avant de commencer toute procédure de cette section, consultez
et respectez les consignes de sécurité du
Guide d'information sur le produit
.
S
I LE MESSAGE MÉMOIRE INSUFFISANTE S 'AFFICHE —
• Enregistrez et fermez tous les fichiers ouverts et quittez tous les programmes en cours
d'exécution que vous n'utilisez pas pour voir si cela permet de résoudre le problème.
• Consultez la documentation du logiciel pour prendre connaissance des besoins en
mémoire minimum. Si nécessaire, installez de la mémoire supplémentaire (voir
«Installation d'un module de mémoire»
dans le
Guide d'utilisation
).
• Réinstallez les modules de mémoire (voir «Dépose du panneau avant»
dans le
Guide
d'utilisation
) pour vous assurer que votre ordinateur communique correctement avec
la mémoire.
• Exécutez Dell Diagnostics (voir «Dell Diagnostics» à la page 156).
SI VOUS RENCONTREZ D'AUTRES PROBLÈMES DE MÉMOIRE —
• Réinstallez les modules de mémoire (voir «Dépose du panneau avant»
dans le
Guide
d'utilisation
) pour vous assurer que votre ordinateur communique correctement avec
la mémoire.
• Assurez-vous de suivre les consignes d'installation de la mémoire (voir «Installation
d'un module de mémoire»
dans le
Guide d'utilisation
).
• Vérifiez que la mémoire utilisée est compatible avec votre ordinateur. Pour plus
d'informations sur le type de mémoire compatibles avec votre ordinateur, voir «Dépose
du panneau avant»
dans le
Guide d'utilisation
.
• Exécutez Dell Diagnostics (voir «Dell Diagnostics» à la page 156).

170 Guide de référence rapide
Problèmes de souriss
PRECAUTION : Avant de commencer toute procédure de cette section, consultez
et respectez les consignes de sécurité du
Guide d'information sur le produit
.
V
ÉRIFIEZ LE CÂBLE DE LA SOURIS —
• Vérifiez que le câble n'est pas endommagé et que les broches des connecteurs du câble
ne sont pas tordues ou cassées. Redressez les broches tordues.
• Si vous utilisez des rallonges, retirez-les et branchez la souris directement sur l'ordinateur.
• Vérifiez que le câble de la souris est branché comme indiqué sur le schéma d'installation
de votre ordinateur.
REDÉMARREZ L'ORDINATEUR —
1
Appuyez simultanément sur <Ctrl><Echap> pour afficher le menu
Démarrer
.
2
Appuyez sur <u>,
appuyez sur les touches fléchées vers le haut ou vers le bas
pour sélectionner
Arrêter
ou
Arrêter l'ordinateur
, puis appuyez sur <Entrée>.
3
Après l'arrêt de l'ordinateur, rebranchez le câble de la souris comme indiqué sur le
schéma d'installation.
4
Allumez l'ordinateur.
TESTEZ LA SOURIS — Branchez une souris qui fonctionne correctement et essayez
de l'utiliser.
V
ÉRIFIEZ LES PARAMÈTRES DE LA SOURIS —
Windows XP :
1
Cliquez sur
Démarrer
→
Panneau de configuration
→
Souris
.
2
Réglez les paramètres selon les besoins.
Windows Vista :
1
Cliquez sur
Démarrer
→
Panneau de configuration
→
Matériel et audio
→
Souris
.
2
Réglez les paramètres selon les besoins.
RÉINSTALLEZ LE PILOTE DE LA SOURIS — Voir «Pilotes» dans le Guide d'utilisation.
E
XÉCUTEZ LE DÉPANNEUR DES CONFLITS MATÉRIELS — Voir «Restauration de votre
système d’exploitation» du Guide d'utilisation.
Problèmes de réseau
PRECAUTION : Avant de commencer toute procédure de cette section, consultez
et respectez les consignes de sécurité du
Guide d'information sur le produit
.
V
ÉRIFIEZ LE VOYANT RÉSEAU À L'AVANT DE L 'ORDINATEUR — Si le voyant
d'intégrité du lien est éteint (voir «Boutons et voyants» dans le Guide d'utilisation), il
n'y a pas de communication sur le réseau. Remplacez le câble réseau.

Guide de référence rapide 171
VÉRIFIEZ LE CONNECTEUR DU CÂBLE DE RÉSEAU — Vérifiez que le câble réseau est
fermement inséré dans le connecteur réseau situé à l'arrière de l'ordinateur et dans la
prise réseau murale.
R
EDÉMARREZ L'ORDINATEUR ET RECONNECTEZ-VOUS AU RÉSEAU
VÉRIFIEZ LES PARAMÈTRES DU RÉSEAU — Contactez l'administrateur ou la personne
qui a configuré le réseau pour vérifier que les paramètres sont corrects et que le
réseau fonctionne.
E
XÉCUTEZ LE DÉPANNEUR DES CONFLITS MATÉRIELS — Voir «Restauration de votre
système d’exploitation» du Guide d'utilisation.
Problèmes d'alimentation
PRECAUTION : Avant de commencer toute procédure de cette section, consultez
et respectez les consignes de sécurité du
Guide d'information sur le produit
.
S
I LE VOYANT D'ALIMENTATION EST VERT ET SI L'ORDINATEUR NE RÉPOND PAS —
Voir «Voyants de diagnostic» à la page 148.
S
I LE VOYANT D'ALIMENTATION CLIGNOTE EN VERT — L'ordinateur est en mode
veille. Appuyez sur une touche du clavier, déplacez la souris ou appuyez sur le bouton
d'alimentation pour revenir au fonctionnement normal.
S
I LE VOYANT D'ALIMENTATION EST ÉTEINT — L'ordinateur est éteint ou n'est pas
sur alimentation secteur.
• Réinsérez le cordon d'alimentation dans le connecteur situé à l'arrière de l'ordinateur
et dans la prise électrique.
• Supprimez les barrettes d'alimentation, rallonges de câble et autres dispositifs de
protection d'alimentation pour vérifier que l'ordinateur s'allume normalement.
• Vérifiez que les barrettes d'alimentation utilisées sont branchées sur une prise
électrique et sont allumées.
• Vérifiez que la prise électrique fonctionne en la testant avec un autre appareil, comme
une lampe, par exemple.
• Vérifiez que le câble d'alimentation principal et le câble du panneau avant sont
correctement branchés à la carte système (voir «Composants de la carte système»
dans
le
Guide d'utilisation
).
SI LE VOYANT D'ALIMENTATION CLIGNOTE EN ORANGE — L'ordinateur reçoit du
courant, mais un incident d'alimentation interne s'est peut-être produit.
• Vérifiez que le sélecteur de tension est correctement réglé pour l'alimentation en CA
du pays où vous vous trouvez, le cas échéant.
• Vérifiez que tous les composants et câbles sont correctement installés et bien
branchés sur la carte système (voir «Composants de la carte système»
dans le
Guide d'utilisation
).

172 Guide de référence rapide
SI LE VOYANT D'ALIMENTATION EST ORANGE FIXE — Un périphérique est
défectueux ou mal installé.
• Déposez puis reposez tous les modules de mémoire (voir «Dépose du panneau avant»
dans le
Guide d'utilisation
).
• Déposez et reposez toutes les cartes d'extension y compris les cartes graphiques
(voir «Cartes»
dans le
Guide d'utilisation
).
ELIMINEZ LES INTERFÉRENCES — Les interférences peuvent être dues à divers facteurs :
• Rallonges pour le clavier, la souris et l'alimentation
• Trop de périphériques raccordés à une même barrette d'alimentation
• Plusieurs barrettes d'alimentation raccordées à la même prise électrique
Problèmes d'imprimante
PRECAUTION : Avant de commencer toute procédure de cette section, consultez
et respectez les consignes de sécurité du
Guide d'information sur le produit
.
REMARQUE : Si vous avez besoin d'une assistance technique pour votre
imprimante, contactez le fabricant.
C
ONSULTEZ LA DOCUMENTATION DE L'IMPRIMANTE — Reportez-vous à la
documentation de l'imprimante pour obtenir des informations sur sa configuration
et son dépannage.
V
ÉRIFIEZ QUE L'IMPRIMANTE EST ALLUMÉE
VÉRIFIEZ LES CONNEXIONS DES CÂBLES DE L'IMPRIMANTE —
• Consultez la documentation de l'imprimante pour obtenir des informations sur la
connexion des câbles.
• Assurez-vous que les câbles de l'imprimante sont solidement connectés à l'imprimante
et à l'ordinateur.
TESTEZ LA PRISE ÉLECTRIQUE — Vérifiez que la prise électrique fonctionne en
la testant avec un autre appareil, comme une lampe, par exemple.
V
ÉRIFIEZ QUE L'IMPRIMANTE EST RECONNUE PAR WINDOWS —
Windows XP :
1
Cliquez sur
Démarrer
→
Panneau de configuration
→
Imprimantes et autres
périphériques
→
Afficher les imprimantes et télécopieurs installés
.
2
Si votre imprimante est répertoriée, faites un clic droit sur son icône.
3
Cliquez sur
Propriétés
→
Ports
. Pour une imprimante parallèle, vérifiez que l'option
Impression sur les ports suivants :
est
LPT1 (port imprimante)
. Pour une imprimante
USB, vérifiez que l'option
Impression sur les ports suivants :
est
USB
.

Guide de référence rapide 173
Windows Vista :
1
Cliquez sur
Démarrer
→
Panneau de configuration
→
Matériel et
audio
→
Imprimante
.
2
Si votre imprimante est répertoriée, faites un clic droit sur son icône.
3
Cliquez sur
Propriétés
, puis sur l'onglet
Ports
.
4
Réglez les paramètres selon les besoins.
RÉINSTALLATION DU PILOTE DE L'IMPRIMANTE — Reportez-vous à la documentation
de l'imprimante pour obtenir des informations sur la réinstallation du pilote.
Problèmes de scanner
PRECAUTION : Avant de commencer toute procédure de cette section, consultez
et respectez les consignes de sécurité du
Guide d'information sur le produit
.
REMARQUE : Si vous avez besoin d'une assistance technique pour votre scanner,
contactez le fabricant.
C
ONSULTEZ LA DOCUMENTATION DU SCANNER — Reportez-vous à la documentation
du scanner pour obtenir des informations de configuration et de dépannage.
D
ÉVERROUILLEZ LE SCANNER — Vérifiez que votre scanner est déverrouillé (s'il comporte
un bouton ou une languette de verrouillage).
R
EDÉMARREZ L'ORDINATEUR ET RÉESSAYEZ
VÉRIFIEZ LA CONNEXION DES CÂBLES —
• Consultez la documentation du scanner pour obtenir des informations sur la connexion
des câbles.
• Assurez-vous que les câbles du scanner sont solidement connectés au scanner et
à l'ordinateur.
VÉRIFIEZ QUE LE SCANNER EST RECONNU PAR MICROSOFT WINDOWS —
Windows XP :
1
Cliquez sur
Démarrer
→
Panneau de configuration
→
Imprimantes et autres
périphériques
→
Scanners et appareils photo
.
2
Si votre scanner est répertorié, Windows le reconnaît.
Windows Vista :
1
Cliquez sur
Démarrer
→
Panneau de configuration
→
Matériel et audio
→
Scanneurs et appareils photos
.
2
Si le scanner est répertorié, Windows le reconnaît.
RÉINSTALLEZ LE PILOTE DU SCANNER — Consultez la documentation du scanner
pour obtenir des instructions.

174 Guide de référence rapide
Problèmes de son et de haut-parleurs
PRECAUTION : Avant de commencer toute procédure de cette section, consultez
et respectez les consignes de sécurité du
Guide d'information sur le produit
.
Les haut-parleurs n'émettent aucun son
REMARQUE : Le réglage du volume des lecteurs MP3 ou autre support peut
annuler l'effet du paramètre de volume de Windows. Vérifiez toujours que le
volume sur le ou les lecteurs de support a été réduit ou coupé.
V
ÉRIFIEZ LES CONNEXIONS DES CÂBLES DES HAUT-PARLEURS — Vérifiez que les
haut-parleurs sont raccordés comme indiqué dans le schéma d'installation fourni avec
ceux-ci. Si vous disposez d'une carte son, assurez-vous que les haut-parleurs sont
connectés à la carte.
A
SSUREZ-VOUS QUE LE CAISSON DE BASSE ET LES HAUT-PARLEURS SONT
ALLUMÉS — Consultez le schéma d'installation fourni avec les haut-parleurs. Si ces
derniers sont munis d'un contrôle du volume, réglez le volume, les graves ou les aigus
pour éliminer toute distorsion.
R
ÉGLEZ LE CONTRÔLE DE VOLUME DE WINDOWS — Cliquez ou double-cliquez sur
l'icône représentant un haut-parleur, dans l'angle inférieur droit de votre écran.
Vérifiez que le volume est suffisamment élevé et que le son n'est pas mis en sourdine.
D
ÉCONNECTEZ LE CASQUE DU CONNECTEUR DE CASQUE — Le son des haut-parleurs
est automatiquement désactivé lorsque le casque est connecté au connecteur de
casque du panneau avant de l'ordinateur.
T
ESTEZ LA PRISE ÉLECTRIQUE — Vérifiez que la prise électrique fonctionne en la
testant avec un autre appareil, comme une lampe, par exemple.
E
LIMINEZ LES SOURCES POTENTIELLES D'INTERFÉRENCES — Eteignez les
ventilateurs, tubes au néon ou lampes halogène proches afin de vérifier s'ils produisent
des interférences.
E
XÉCUTEZ LES DIAGNOSTICS DU HAUT-PARLEUR
RÉINSTALLATION DU PILOTE AUDIO — Voir «Pilotes» dans le Guide d'utilisation.
E
XÉCUTEZ LE DÉPANNEUR DES CONFLITS MATÉRIELS — Voir «Restauration de votre
système d'exploitation» du Guide d'utilisation.
Les écouteurs n'émettent aucun son
VÉRIFIEZ LA CONNEXION DES CÂBLES DU CASQUE — Vérifiez que le câble du casque
est correctement inséré dans le connecteur approprié (voir «A propos de votre ordinateur»
dans le Guide d'utilisation).

Guide de référence rapide 175
RÉGLEZ LE CONTRÔLE DE VOLUME DE WINDOWS — Cliquez ou double-cliquez sur
l'icône représentant un haut-parleur, dans l'angle inférieur droit de votre écran.
Vérifiez que le volume est suffisamment élevé et que le son n'est pas mis en sourdine.
Incidents liés à l'affichage et au moniteur
PRECAUTION : Avant de commencer toute procédure de cette section, consultez
et respectez les consignes de sécurité du
Guide d'information sur le produit
.
AVIS : Si votre ordinateur a été livré avec une carte graphique PCI Express
installée, il n'est pas nécessaire de retirer la carte pour installer des cartes
graphiques supplémentaires ; mais cette carte est nécessaire pour le dépannage.
Si vous retirez la carte, rangez-la en lieu sûr. Pour plus d'informations sur votre
carte graphique, consultez support.dell.com.
L'écran est vide
REMARQUE : Pour les procédures de dépannage, consultez la documentation
du moniteur.
V
ÉRIFIEZ LA CONNEXION DU CÂBLE DU MONITEUR —
• Vérifiez que le câble du moniteur est branché sur la carte graphique correcte (pour les
configurations à carte graphique double).
• Si vous utilisez un adaptateur DVI vers VGA, vérifiez que l'adaptateur est branché
correctement à la carte graphique et au moniteur.
• Vérifiez que le câble du moniteur est branché comme indiqué sur le schéma d'installation
de votre ordinateur.
• Si vous utilisez des rallonges, retirez-les et branchez le moniteur directement sur l'ordinateur.
• Echangez les câbles d'alimentation de l'ordinateur et du moniteur pour déterminer si
le câble d'alimentation est défectueux.
• Recherchez sur les connecteurs des broches tordues ou cassées (il est normal que les
connecteurs de câble de moniteur aient des broches manquantes).
VÉRIFIEZ LE VOYANT D'ALIMENTATION DU MONITEUR —
• Si le voyant d'alimentation est allumé ou clignote, le moniteur est sous tension.
• Si ce voyant est éteint, appuyez sur le bouton pour vérifier que le moniteur est allumé.
• S'il clignote, appuyez sur une touche du clavier ou déplacez la souris pour revenir au
fonctionnement normal.
TESTEZ LA PRISE ÉLECTRIQUE — Vérifiez que la prise électrique fonctionne en
la testant avec un autre appareil, comme une lampe, par exemple.
V
ÉRIFIEZ LES VOYANTS DE DIAGNOSTIC — Voir «Voyants de diagnostic» à la
page 148.

176 Guide de référence rapide
L'écran est difficilement lisible
VÉRIFIEZ LA CONNEXION DU CÂBLE DU MONITEUR —
• Vérifiez que le câble du moniteur est branché sur la carte graphique correcte (pour les
configurations à carte graphique double).
• Si vous utilisez un adaptateur en option
DVI vers VGA
, vérifiez que l'adaptateur est
branché correctement à la carte graphique et au moniteur.
• Vérifiez que le câble du moniteur est branché comme indiqué sur le schéma
d'installation de votre ordinateur.
• Si vous utilisez des rallonges, retirez-les et branchez le moniteur directement sur l'ordinateur.
• Echangez les câbles d'alimentation de l'ordinateur et du moniteur pour déterminer si
le câble d'alimentation est défectueux.
• Recherchez sur les connecteurs des broches tordues ou cassées (il est normal que les
connecteurs de câble de moniteur aient des broches manquantes).
VÉRIFIEZ LE VOYANT D'ALIMENTATION DU MONITEUR —
• Si le voyant d'alimentation est allumé ou clignote, le moniteur est sous tension.
• Si ce voyant est éteint, appuyez sur le bouton pour vérifier que le moniteur est allumé.
• S'il clignote, appuyez sur une touche du clavier ou déplacez la souris pour revenir au
fonctionnement normal.
TESTEZ LA PRISE ÉLECTRIQUE — Vérifiez que la prise électrique fonctionne en la
testant avec un autre appareil, comme une lampe, par exemple.
V
ÉRIFIEZ LES VOYANTS DE DIAGNOSTIC — Voir «Voyants de diagnostic» à la
page 148.
V
ÉRIFIEZ LES PARAMÈTRES DU MONITEUR — Reportez-vous à la documentation du
moniteur pour savoir comment régler le contraste et la luminosité, démagnétiser le
moniteur et exécuter l'autotest.
E
LOIGNEZ LE CAISSON D'EXTRÊMES GRAVES DU MONITEUR — Si votre système de
haut-parleurs inclut un caisson d'extrêmes graves, vérifiez que celui-ci se trouve à au
moins 60 centimètres du moniteur.
E
LOIGNEZ LE MONITEUR DES SOURCES D'ALIMENTATION EXTERNES — Les
ventilateurs, lampes fluorescentes, halogènes ou tout autre appareil électrique peuvent
occasionner un léger tremblement de l'image. Éteignez les appareils se trouvant
à proximité du moniteur pour vérifier s'ils produisent des interférences.
F
AITES PIVOTER LE MONITEUR POUR ÉLIMINER LES REFLETS DU SOLEIL ET LES
INTERFÉRENCES POSSIBLES

Guide de référence rapide 177
RÉGLEZ LES PARAMÈTRES D'AFFICHAGE DE WINDOWS —
Windows XP :
1
Cliquez sur
Démarrer
→
Panneau de configuration
→
Apparence et thèmes
.
2
Cliquez sur la zone que vous souhaitez modifier ou cliquez sur l'icône
Affichage/Ecran
.
3
Essayez différents paramètres de
Qualité couleur
et
Résolution de l'écran
.
Windows Vista :
1
Cliquez sur
Démarrer
→
Panneau de configuration
→
Matériel et audio
→
Personnalisation
→
Paramètres d'affichage
.
2
Réglez la
Résolution
et les
Paramètres de couleur
,
selon les besoins.
La qualité de l'image 3D est insuffisante
VÉRIFIEZ LE BRANCHEMENT DU CÂBLE D'ALIMENTATION DE LA CARTE
GRAPHIQUE — Vérifiez que le câble d'alimentation de la ou les cartes graphiques est
branché correctement sur la carte.
V
ÉRIFIEZ LES PARAMÈTRES DU MONITEUR — Reportez-vous à la documentation du
moniteur pour savoir comment régler le contraste et la luminosité, démagnétiser le
moniteur et exécuter l'autotest.
Seule une partie de l'écran est lisible
ALLUMEZ L'ORDINATEUR ET LE MONITEUR, PUIS RÉGLEZ LA LUMINOSITÉ ET LE
CONTRASTE — Si le moniteur fonctionne, la ou les cartes graphiques peuvent être
défectueuses.
Contactez Dell (voir «Pour prendre contact avec Dell»
dans le
Guide d'utilisation
).

178 Guide de référence rapide

Index 179
Index
A
affichage. Voir moniteur
alimentation
bouton, 141
filtres de ligne, 138
onduleur, 138
périphériques de protection, 138
problèmes, 171
protecteurs de surtension, 138
assistant Transfert de fichiers
et de paramètres
(Windows XP), 135
assistants
assistant Compatibilité des
programmes, 168
assistant Transfert de fichiers et
de paramètres
(Windows XP), 135
Windows Easy Transfer
(Windows Vista), 138
C
casque
connecteur, 141
CD/DVD Drivers and
Utilities, 125
CD/DVD Operating System, 130
Centre d'aide et de support, 129
clavier
connecteur, 144
problèmes, 166
Code de service express, 127
codes sonores, 152
conflits
logiciels ou matériels, 156
conflits d'interruption, 156
connecteurs
audio, 143
carte réseau, 144
casque, 141
clavier, 144
IEEE 1394, 141, 143
parallèle, 143
série, 144
sortie ligne, 143
souris, 143
USB, 141, 144
connecteurs audio
sortie ligne, 143
Consignes de sécurité, 126
Contrat de licence utilisateur
final, 126

180 Index
D
Dell Diagnostics, 156
dépannage
Centre d'aide et de support, 129
codes sonores, 152
conflits, 156
Dell Diagnostics, 156
dépanneur matériel, 156
messages système, 154
problèmes, 160
voyants d'alimentation, 146
voyants de diagnostic, 148
dépanneur matériel, 156
diagnostics
codes sonores, 152
Dell Diagnostics, 156
voyants, 141, 148
disque dur
problèmes, 163
voyant d'activité, 141-142
Documentation
Contrat de licence utilisateur
final, 126
en ligne, 128
ergonomie, 126
garantie, 126
Guide d'informations sur le
produit, 126
Guide d'utilisation, 126
réglementation, 126
sécurité, 126
DSS (Desktop System
Software), 129
E
écran. Voir moniteur
e-mail
problèmes, 163
étiquettes
Code de service express, 127
Microsoft Windows, 127
Service Tag
(Numéro de service), 127
F
fichier d'aide
Centre d'aide et de support de
Windows, 129
G
Guide d'informations sur le
produit, 126
Guide d'utilisation, 126
I
IEEE 1394
connecteurs, 141, 143
problèmes, 166
imprimante
configuration, 135
connexion, 135
problèmes, 172

Index 181
Informations sur
l'ergonomie, 126
Informations sur la garantie, 126
Informations sur les
réglementations, 126
Internet
problèmes, 163
L
lecteur de CD-RW
problèmes, 162
lecteur optique
problèmes, 162
lecteurs
problèmes, 161
logiciel
conflits, 156
problèmes, 167-168
M
matériel
codes sonores, 152
conflits, 156
Dell Diagnostics, 156
mémoire
problèmes, 169
messages
erreur, 165
système, 154
messages d'erreur
codes sonores, 152
problèmes, 165
voyants de diagnostic, 148
modem
problèmes, 163
moniteur
illisible, 176
problèmes, 175
vierge, 175
O
onduleur, 138
onduleur. Voir Onduleur
ordinateur
blocage, 167-168
codes sonores, 152
ne répond plus, 167
P
pile
problèmes, 161
problèmes
affichage difficile à lire, 176
alimentation, 171
blocage de l'ordinateur, 167-168
blocages de programme, 168
clavier, 166
codes sonores, 152
conditions d'éclairage, 171
conflits, 156
Dell Diagnostics, 156
disque dur, 163
écran bleu, 168
écran vide, 175

182 Index
problèmes (Suite)
e-mail, 163
généralités, 167
IEEE 1394, 166
imprimante, 172
Internet, 163
l'ordinateur ne répond plus, 167
lecteur de CD-RW, 162
lecteur optique, 162
lecteurs, 161
logiciel, 167-168
mémoire, 169
messages d'erreur, 165
modem, 163
moniteur vide, 175
pile, 161
réglage du volume, 174
réseau, 170
scanner, 173
souris, 170
un programme ne répond
plus, 167
vidéo et moniteur, 175
voyants de diagnostic, 148
R
réseau
connecteur, 144
problèmes, 170
S
scanner
problèmes, 173
Service Tag
(Numéro de service), 127
site de support Dell, 128
site Web de support
technique, 128
SMART, 155
souris
connecteur, 143
problèmes, 170
système d'exploitation
réinstallation, 130
T
transfert d'informations vers un
nouvel ordinateur
Windows Easy Transfer
(Windows Vista), 138
transfert d’informations vers un
nouvel ordinateur
assistant Transfert de fichiers et
de paramètres
(Windows XP), 135
U
USB
connecteur, 144
connecteurs, 141

Index 183
V
vérification du disque, 163
vidéo
problèmes, 175
volume
réglage, 174
voyant d'alimentation
conditions, 171
voyants
activité du disque dur, 141-142
activité réseau, 144
arrière de l'ordinateur, 148
diagnostic, 141, 148
intégrité de la liaison, 144
réseau, 144
voyants de diagnostic, 148
W
Windows Vista
Centre d'aide et de support, 129
réinstallation, 130
Windows Easy Transfer, 138
Windows XP
assistant Transfert de fichiers et
de paramètres, 135
Centre d'aide et de support, 129
dépanneur matériel, 156
réinstallation, 130

184 Index

www.dell.com | support.euro.dell.com
Dell Precision™ T7400
Kurzanleitung
Modell DCDO

Anmerkungen, Hinweise und Vorsichtshinweise
ANMERKUNG: Eine ANMERKUNG macht auf wichtige Informationen
aufmerksam, mit denen Sie den Computer besser einsetzen können.
HINWEIS: Ein HINWEIS warnt vor möglichen Beschädigungen der Hardware oder
vor Datenverlust und zeigt auf, wie derartige Probleme vermieden werden können.
VORSICHT: Durch VORSICHT werden Sie auf Gefahrenquellen hingewiesen, die
materielle Schäden, Verletzungen oder sogar den Tod von Personen zur Folge
haben können.
____________________
Irrtümer und technische Änderungen vorbehalten.
© 2007 Dell Inc. Alle Rechte vorbehalten.
Die Vervielfältigung oder Wiedergabe in jeglicher Weise ohne schriftliche Genehmigung von Dell
Inc. sind strengstens untersagt.
In diesem Text verwendete Marken: Dell, das DELL-Logo und Dell Precision sind Marken von Dell
Inc.; Microsoft, Windows, und Windows Vista sind entweder Marken oder eingetragene Marken von
Microsoft Corporation in den USA und/oder in anderen Ländern.
Alle anderen in diesem Dokument genannten Marken und Handelsbezeichnungen sind Eigentum der
jeweiligen Hersteller und Firmen. Dell Inc. erhebt keinen Anspruch auf Marken und Handelsbezeichnungen
mit Ausnahme der eigenen.
Modell DCDO
September 2007 Teilenr. HR707 Rev. A00

Inhalt 187
Inhalt
Informationsquellen . . . . . . . . . . . . . . . . . . . 189
Einrichten des Computers
. . . . . . . . . . . . . . . . 195
Wechseln zwischen Tower- und
Desktop-Ausrichtung
. . . . . . . . . . . . . . . 195
Installieren des Computers in einem Schrank
. . . 196
Übertragen von Daten auf einen anderen
Computer
. . . . . . . . . . . . . . . . . . . . . . 199
Überspannungsschutzgeräte
. . . . . . . . . . . 203
Wissenswertes über Ihren Computer
. . . . . . . . . . 205
Vorderansicht (Tower-Ausrichtung)
. . . . . . . . 205
Rückansicht (Tower-Ausrichtung)
. . . . . . . . . 207
Anschlüsse auf der Rückseite
. . . . . . . . . . . 208
Reinigen des Computers
. . . . . . . . . . . . . . . . 210
Computer, Tastatur und Bildschirm
. . . . . . . . 210
Mechanische Maus
. . . . . . . . . . . . . . . . 210
Diskettenlaufwerk
. . . . . . . . . . . . . . . . . 211
CDs und DVDs
. . . . . . . . . . . . . . . . . . . 211
Hilfsmittel zur Fehlerbehebung
. . . . . . . . . . . . . 212
Betriebsanzeige
. . . . . . . . . . . . . . . . . . 212
Diagnoseanzeigen
. . . . . . . . . . . . . . . . . 213
Signaltoncodes
. . . . . . . . . . . . . . . . . . . 218
Systemmeldungen
. . . . . . . . . . . . . . . . . 220
Hardware-Ratgeber
. . . . . . . . . . . . . . . . 222
Dell Diagnostics
. . . . . . . . . . . . . . . . . . 223
Fehlerbehebung
. . . . . . . . . . . . . . . . . . 227
Stichwortverzeichnis . . . . . . . . . . . . . . . . . 247

188 Inhalt

Kurzanleitung 189
Informationsquellen
ANMERKUNG: Einige Funktionen und Medien sind optional und möglicherweise nicht
im Lieferumfang Ihres Computers enthalten. Einige Funktionen sind möglicherweise in
bestimmten Ländern nicht verfügbar.
ANMERKUNG: Im Lieferumfang des Computers kann weiteres, hier nicht behandeltes
Informationsmaterial enthalten sein.
Welche Ressourcen benötigen Sie? Hier finden Sie das Gesuchte
• Diagnoseprogramm für den
Computer
• Treiber für den Computer
• Dokumentation zu dem Gerät
• Desktop System Software (DSS)
Drivers and Utilities-Datenträger
ANMERKUNG: Der Drivers and
Utilities-Datenträger ist optional und
möglicherweise nicht im Lieferumfang
Ihres Computers enthalten.
Dokumentation und Treiber sind bereits
auf dem Computer installiert. Sie können
den Drivers and Utilities-Datenträger dazu
verwenden, Treiber neu zu installieren
(siehe „Neuinstallieren von Treibern und
Dienstprogrammen” in Ihrem
Benutzerhandbuch) oder um Dell
Diagnostics auszuführen (siehe „Dell
Diagnostics” auf Seite 223).
ANMERKUNG: Treiber- und
Dokumentationsaktualisierungen finden
Sie unter support.dell.com.

190 Kurzanleitung
• Anleitungen zum Entfernen und
Ersetzen von Teilen
• Technische Daten
• Anleitungen zum Konfigurieren
von Systemeinstellungen
• Anleitungen zur Fehlerbehebung
und zum Beheben von Störungen
Dell Precision™-Benutzerhandbuch
Hilfe- und Supportcenter von Microsoft
®
Windows
®
XP und Microsoft Windows
Vista™
1
Klicken Sie auf
Start
→
Hilfe und
Support
→
Dell Benutzer- und
Systemhandbücher
→
Systemhandbücher
.
2
Klicken Sie auf das
Benutzerhandbuch
für Ihren Computer.
• Garantieinformationen
• Verkaufs- und Lieferbedingungen
(nur für die USA)
• Sicherheitshinweise
• Betriebsbestimmungen
• Hinweise zur Ergonomie
• Endbenutzer-Lizenzvertrag
Dell™-Produktinformationshandbuch
Welche Ressourcen benötigen Sie? Hier finden Sie das Gesuchte

Kurzanleitung 191
• Service-Tag-Nummer und Express-
Servicecode
•Microsoft
®
Windows
®
-Product Key
Service-Tag-Nummer und Microsoft
Windows-Product Key
Die Aufkleber befinden sich an Ihrem
Computer:
• Geben Sie die Service-Tag-Nummer auf
der Website
support.dell.com
oder beim
Anruf beim technischen Support an, um
den Computer identifizieren zu können.
• Geben Sie beim Anruf beim technischen
Support den Express-Servicecode an, um
zu einem geeigneten Ansprechpartner
weitergeleitet zu werden.
ANMERKUNG: Das neu entworfene
Microsoft Windows-Lizenzetikett ist mit
einem zusätzlichen Sicherheitsmerkmal
ausgestattet, das einem Loch ähnelt und
davon abhalten soll, das Etikett zu entfernen.
Welche Ressourcen benötigen Sie? Hier finden Sie das Gesuchte

192 Kurzanleitung
• Lösungen — Hinweise zum Beheben
von Störungen, Veröffentlichungen von
Technikern, Online-Schulungen und
häufig gestellte Fragen (FAQs)
• Community — Onlinediskussionen mit
anderen Dell-Kunden
• Upgrades — Informationen zu
Aufrüstungen von Komponenten,
beispielsweise Arbeitsspeicher,
Festplatte und Betriebssystem
• Kundenbetreuung —
Kontaktinformationen, Serviceanfrage
und Bestellstatus, Garantie und
Reparaturinformationen
• Service und Support — Status von
Serviceanfragen und Supporthistorie,
Servicekontakt und Onlinediskussionen
mit dem technischen Support
• Dell Technical Update Service —
Proaktive E-Mail-Benachrichtigung über
Software- und Hardwareupdates für
Ihren Computer
• Referenz — Computerdokumentation,
Einzelheiten zur Computerkonfiguration,
Produktangaben und Whitepapers
• Downloads — Zugelassene Treiber,
Patches und Softwareaktualisierungen
Dell Support-Website — support.dell.com
ANMERKUNG: Wählen Sie Ihre Region
oder Ihren Geschäftsbereich aus, um die
zugehörige Support-Website anzuzeigen.
Welche Ressourcen benötigen Sie? Hier finden Sie das Gesuchte

Kurzanleitung 193
• Desktop System Software (DSS) — Wenn
Sie das Betriebssystem auf dem Computer
neu installieren, sollten Sie auch das DSS-
Dienstprogramm neu installieren. DSS
erkennt automatisch Ihren Computertyp
und das Betriebssystem und installiert die
für Ihre Konfiguration geeigneten
Aktualisierungen. Die Software stellt
wichtige Aktualisierungen für Ihr
Betriebssystem und Support für
Hardwarekomponenten, beispielsweise
Prozessoren, optische Laufwerke, USB-
Geräte usw., bereit. DSS ist für den
ordnungsgemäßen Betrieb des Dell
Computers erforderlich.
So laden Sie Desktop System Software
herunter:
1
Wechseln Sie zur Website
support.dell.com
, wählen Sie die
gewünschte Länder- oder
Regionsoption aus und klicken Sie auf
Treiber und Downloads
.
2
Klicken Sie auf
Modell auswählen
oder
Tag-Nummer eingeben
, treffen Sie die
geeignete Auswahl oder geben Sie die
geeigneten Informationen zu Ihrem
Computer ein und klicken Sie
anschließend auf
Bestätigen
.
3
Führen Sie einen Bildlauf nach unten
aus bis zu
System- und
Konfigurationsdienstprogramme
→
Desktop System Software
und klicken
Sie dann auf
Jetzt herunterladen.
ANMERKUNG: Die Benutzeroberfläche von
support.dell.com kann je nach den von Ihnen
gewählten Optionen variieren.
• Anleitungen zum Arbeiten mit
Windows XP
• Anleitung zum Arbeiten mit
Windows Vista
• Anleitung zum Arbeiten mit
Programmen und Dateien
• Anleitungen zum persönlichen Einrichten
des Desktops
Hilfe- und Supportcenter von Windows
1
Klicken Sie auf
Start
→
Hilfe und Support
.
2
Geben Sie ein Wort oder einen Ausdruck
zur Identifizierung Ihres Problems ein
und klicken Sie anschließend auf das
Pfeilsymbol.
3
Klicken Sie auf das Thema, das Ihr
Problem beschreibt.
4
Folgen Sie den Anweisungen auf dem
Bildschirm.
Welche Ressourcen benötigen Sie? Hier finden Sie das Gesuchte

194 Kurzanleitung
• Anleitung zur Neuinstallation des
Betriebssystems
Betriebssystem-Datenträger
Das Betriebssystem ist bereits auf dem
Computer installiert. Zum Neuinstallieren
des Betriebssystems können Sie den
Betriebssystem-Datenträger verwenden,
der im Lieferumfang Ihres Computers
enthalten ist (siehe „Wiederherstellen des
Betriebssystems” im Benutzerhandbuch).
Nach der Neuinstallation des
Betriebssystems können Sie mit dem Drivers
and Utilities-Datenträger die erforderlichen
Treiber für die mit Ihrem Computer
ausgelieferten Geräte neu installieren.
Das Etikett mit dem Product Key des
Betriebssystems finden Sie am Computer.
ANMERKUNG: Die Farbe des Datenträgers
zur Betriebssysteminstallation richtet sich
nach dem von Ihnen bestellten
Betriebssystem.
• Anleitung zum Arbeiten mit Linux
• E-Mail-Diskussionen mit Benutzern von
Dell Precision-Produkten und dem
Betriebssystem Linux
• Zusätzliche Informationen zu Linux
und Dell Precision-Computern
Linux-Websites von Dell
• linux.dell.com
• lists.us.dell.com/mailman/listinfo/linux-
precision
Welche Ressourcen benötigen Sie? Hier finden Sie das Gesuchte

Kurzanleitung 195
Einrichten des Computers
Wechseln zwischen Tower- und Desktop-Ausrichtung
VORSICHT: Bevor Sie gemäß den in diesem Abschnitt beschriebenen
Anleitungen verfahren, lesen Sie zunächst die Sicherheitshinweise im
Produktinformationshandbuch
.
ANMERKUNG: Wenn Sie die Gehäuseausrichtung des Computers von der Tower- in
die Desktop-Ausrichtung bzw. umgekehrt ändern möchten, müssen Sie ein optionales,
von Dell erhältliches Kit verwenden. Einzelheiten zum Bestellen von Produkten bei Dell
finden Sie im Abschnitt „Produktinformationen” im Benutzerhandbuch.
ANMERKUNG: Der Tower-Computer unterstützt ein 3,5-Zoll-Laufwerk an der
Vorderseite mehr als der Desktop-Computer.
1
Befolgen Sie die Anweisungen im Abschnitt „Bevor Sie beginnen” des
Benutzerhandbuchs
.
2
Entfernen Sie die Computerabdeckung (siehe „Entfernen der
Computerabdeckung” im
Benutzerhandbuch
).
3
Entfernen Sie die Frontblende (siehe „Entfernen der Frontblende” im
Benutzerhandbuch
).
4
Entfernen Sie die Laufwerkblende und bereiten Sie die Laufwerkblende
vor, indem Sie die notwendige Anzahl von Einsätzen hinzufügen bzw.
entfernen (siehe „Laufwerkblenden” im
Benutzerhandbuch
).
Wechseln von der Tower- zur Desktop-Ausrichtung
1
Entfernen Sie alle ggf. installierten Diskettenlaufwerke oder Speicherkartenleser,
indem Sie wie unter „Entfernen eines Diskettenlaufwerks oder
Speicherkartenlesers (Tower-Computer)” im
Benutzerhandbuch
beschrieben
vorgehen, und reinstallieren Sie anhand der Anleitung unter „Installieren eines
Diskettenlaufwerks oder Speicherkartenlesers (Desktop-Computer)” im
Benutzerhandbuch
ein Diskettenlaufwerk oder einen Speicherkartenleser.
2
Entfernen Sie alle installierten optischen Laufwerke, indem Sie wie unter
„Entfernen eines optischen Laufwerks (Tower-Computer)” im
Benutzerhandbuch
beschrieben vorgehen, und reinstallieren Sie die
Laufwerke anhand der Anleitung unter „Installieren eines optischen
Laufwerks (Desktop-Computer)” im
Benutzerhandbuch
.

196 Kurzanleitung
Wechseln von der Desktop- zur Tower-Ausrichtung
1
Entfernen Sie das ggf. installierten Diskettenlaufwerk bzw. den ggf.
installierten Speicherkartenleser, indem Sie wie unter „Entfernen eines
Diskettenlaufwerks oder Speicherkartenlesers (Desktop-Computer)” im
Benutzerhandbuch
beschrieben vorgehen, und reinstallieren Sie anhand
der Anleitung unter „Installieren eines Diskettenlaufwerks oder
Speicherkartenlesers (Tower-Computer)” im
Benutzerhandbuch
das
Diskettenlaufwerk bzw. den Speicherkartenleser.
2
Entfernen Sie alle installierten optischen Laufwerke, indem Sie wie unter
„Entfernen eines optischen Laufwerks (Desktop-Computer)” im
Benutzerhandbuch
beschrieben vorgehen, und reinstallieren Sie die
Laufwerke anhand der Anleitung unter „Installieren eines optischen
Laufwerks (Tower-Computer)” im
Benutzerhandbuch
.
Installieren des Computers in einem Schrank
Die Installation Ihres Computers in einem Schrank kann den Luftstrom
einschränken und die Leistung des Computers beeinträchtigen und sogar zu
seiner Überhitzung führen. Beachten Sie die folgenden Richtlinien, wenn Sie
den Computer in einem Schrank installieren.
HINWEIS: Die in diesem Handbuch angegebenen Spezifikationen für die
Betriebstemperatur beziehen sich auf die maximale Betriebsumgebungstemperatur.
Bei der Installation des Computers in einem Schrank ist die umgebende
Raumtemperatur zu berücksichtigen. Einzelheiten zu den technischen Daten Ihres
Computers finden Sie unter „Technische Daten” im Benutzerhandbuch.

Kurzanleitung 197
• Achten Sie darauf, an allen belüfteten Seiten des Computers einen
Mindestabstand von 10,2 cm einzuhalten, um den für eine ordnungsgemäße
Belüftung erforderlichen Luftstrom zu gewährleisten.
• Wenn Sie den Computer in einer Raumecke auf oder unter einem Tisch
platzieren, sollten Sie einen Abstand von mindestens 5,1 cm zwischen der
Rückseite des Computers und der Wand frei lassen, um den für eine
ordnungsgemäße Belüftung erforderlichen Luftstrom zu gewährleisten.
• Wenn der Schrank mit Türen ausgestattet ist, müssen diese einen Luftstrom
von mindestens 30 Prozent durch den Schrank (Vorder- und Rückseite)
gewährleisten.

198 Kurzanleitung
• Installieren Sie den Computer nicht in einem Schrank, der keinen Luftstrom
zulässt. Eine Einschränkung des Luftstroms
kann zur Überhitzung des
Computers führen und seine Leistung beeinträchtigen
.

Kurzanleitung 199
Übertragen von Daten auf einen anderen Computer
Sie können mithilfe der Assistenten Ihres Betriebssystems Dateien und andere
Daten von einem Computer auf einen anderen Computer übertragen.
Microsoft Windows XP
Das Betriebssystem Microsoft
Windows XP enthält den Assistenten zum
Übertragen von Dateien und Einstellungen, mit dem folgende Daten übertragen
werden können:
•E-Mail-Nachrichten
• Symbolleisteneinstellungen
• Fenstergrößen
• Internetlesezeichen
Sie können diese Daten über eine Netzwerkverbindung oder eine serielle
Verbindung oder durch Speichern der Daten auf einem Wechselmedium (zum
Beispiel einer beschreibbaren CD oder DVD) auf den Zielcomputer übertragen.
ANMERKUNG: Sie können Daten von einem Quellcomputer auf einen Zielcomputer
übertragen, indem Sie beide Computer mit einem seriellen Kabel verbinden, das Sie
direkt an den jeweiligen E/A-Anschluss (Eingabe/Ausgabe) anschließen. Um Daten
über eine serielle Verbindung zu übertragen, müssen Sie das Dienstprogramm
„Netzwerkverbindungen” in der Systemsteuerung öffnen und zusätzliche
Konfigurationsschritte ausführen, wie z. B. das Einrichten einer erweiterten Verbindung
und Zuweisen von Host- und Gast-Computer.
Anleitungen zum Einrichten einer direkten Kabelverbindung zwischen zwei Computern
finden Sie im Knowledge-Base-Artikel Nr. 305621 von Microsoft mit dem Titel So wird's
gemacht: Herstellen einer direkten Kabelverbindung zwischen zwei Computern in
Windows XP. Diese Informationen sind möglicherweise nicht in allen Ländern verfügbar.
Die Verwendung des Assistenten zum Übertragen von Dateien und Einstellungen
erfordert den mitgelieferten Betriebssystem-Datenträger oder eine Assistent-
Diskette, die Sie mit dem Assistenten erstellen können.
ANMERKUNG: Weitere Informationen zur Übertragung von Daten erhalten Sie, indem
Sie unter support.dell.com nach dem Dokument Nummer Nr. 154781 mit dem Titel What
Are The Different Methods To Transfer Files From My Old Computer To My New Dell™
Computer Using the Windows XP Operating System? (Beschreibung der verschiedenen
Methoden zum Übertragen von Dateien von einem alten Computer auf einen neuen
Dell™-Computer unter Verwendung des Betriebssystems Microsoft Windows XP,
Dokument in englischer Sprache) suchen.
ANMERKUNG: Möglicherweise ist das Dell-Knowledge Base-Dokument nicht für
alle Ländern verfügbar.

200 Kurzanleitung
Assistent zum Übertragen von Dateien und Einstellungen unter Verwendung des
Betriebssystem-Datenträgers
ANMERKUNG: Im Assistenten zum Übertragen von Dateien und Einstellungen
wird der Computer, von dem Daten übertragen werden sollen, als Quellcomputer
und der Computer, auf den die Daten übertragen werden sollen, als Zielcomputer
bezeichnet.
B
EREITEN SIE DEN ZIELCOMPUTER AUF DIE DATEIÜBERTRAGUNG VOR —
1
Klicken Sie auf
Start
→
Alle Programme
→
Zubehör
→
Systemprogramme
→
Übertragen von Dateien und Einstellungen
.
2
Klicken Sie unter
Um welchen Computer handelt es sich?
auf
Zielcomputer
und dann auf
Weiter
.
3
Klicken Sie unter
Verfügen Sie über eine Windows XP-CD?
auf
Assistent
der Windows XP-CD verwenden
und klicken Sie dann auf
Weiter
.
4
Überprüfen Sie die Informationen unter
Wechseln Sie jetzt zum
Quellcomputer
und wechseln Sie dann zum Quellcomputer. Klicken Sie
nicht
auf
Weiter
.
KOPIEREN SIE DATEN VOM QUELLCOMPUTER —
1
Legen Sie in den Quellcomputer den
Betriebssystem
-Datenträger für
Windows XP ein.
Die Seite
Willkommen bei Microsoft Windows XP
wird angezeigt.
2
Klicken Sie auf
Zusätzliche Aufgaben durchführen
.
3
Klicken Sie unter
Wählen Sie eine der folgenden Optionen
auf
Dateien
und Einstellungen übertragen
.
Das Fenster
Assistent zum Übertragen von Dateien und Einstellungen
wird angezeigt.
4
Klicken Sie auf
Weiter
.
5
Klicken Sie unter
Um welchen Computer handelt es sich?
auf
Quellcomputer
und klicken Sie dann auf
Weiter
.
6
Klicken Sie unter
Übertragungsmethode auswählen
auf die gewünschte
Übertragungsmethode und dann auf
Weiter
.
7
Klicken Sie unter
Was soll übertragen werden?
auf die zu übertragenden
Daten und dann auf
Weiter
.
Die ausgewählten Dateien und Einstellungen werden kopiert. Anschließend
wird die Seite
Fertigstellen des Sammlungsvorgangs
angezeigt.
8
Klicken Sie auf
Fertig stellen
.

Kurzanleitung 201
ÜBERTRAGEN SIE DIE DATEN AUF DEN ZIELCOMPUTER —
1
Wechseln Sie zum Zielcomputer.
2
Klicken Sie unter
Wechseln Sie jetzt zum Quellcomputer
auf
Weiter
.
3
Wählen Sie unter
Wo befinden sich die Dateien und Einstellungen?
das
gewünschte Übertragungsverfahren für die Einstellungen und Dateien
und klicken Sie dann auf
Weiter
.
Der Assistent liest die zusammengestellten Dateien und Einstellungen ein und
wendet sie auf den Zielcomputer an. Wenn die Übertragung abgeschlossen ist,
wird die Seite
Fertig gestellt
angezeigt.
4
Klicken Sie auf
Fertig gestellt
und starten Sie den Computer neu.
Assistent zum Übertragen von Dateien und Einstellungen unter Verwendung des
Betriebssystem-Datenträgers
Um den Assistenten zum Übertragen von Dateien und Einstellungen ohne
den Betriebssystem-Datenträger auszuführen, müssen Sie eine Assistent-
Diskette erstellen. Mit dieser Assistent-Diskette können Sie eine Speicher-
Abbilddatei auf einem Wechselmedium erstellen.
ANMERKUNG: Im Assistenten zum Übertragen von Dateien und Einstellungen
wird der Computer, von dem Daten übertragen werden sollen, als Quellcomputer
und der Computer, auf den die Daten übertragen werden sollen, als Zielcomputer
bezeichnet.
E
RSTELLEN SIE EINE ASSISTENT-DISKETTE —
1
Klicken Sie auf dem Zielcomputer auf
Start
→
Alle Programme
→
Zubehör
→
Systemprogramme
→
Übertragen von Dateien und Einstellungen
.
2
Klicken Sie unter
Um welchen Computer handelt es sich?
auf
Zielcomputer
und dann auf
Weiter
.
3
Klicken Sie unter
Verfügen Sie über eine Windows XP-CD?
auf
Assistent-
Diskette auf folgendem Laufwerk erstellen
und klicken Sie dann auf
Weiter
.
4
Legen Sie eine beschreibbare CD oder DVD ein und klicken Sie auf
OK
.
5
Überprüfen Sie die Informationen unter
Wechseln Sie jetzt zum
Quellcomputer
und wechseln Sie dann zum Quellcomputer. Klicken Sie
nicht
auf
Weiter
.

202 Kurzanleitung
KOPIEREN SIE DATEN VOM QUELLCOMPUTER —
1
Legen Sie in den Quellcomputer das Wechselmedium mit der Assistent-
Diskette ein.
2
Klicken Sie auf
Start
→
Ausführen
.
3
Klicken Sie auf
Durchsuchen...
, navigieren Sie zu
fastwiz
auf dem
Wechselmedium mit der Assistent-Diskette und klicken Sie anschließend
auf
OK
.
4
Klicken Sie unter
Um welchen Computer handelt es sich?
auf
Quellcomputer
und klicken Sie dann auf
Weiter
.
5
Klicken Sie unter
Übertragungsmethode auswählen
auf die gewünschte
Übertragungsmethode und dann auf
Weiter
.
6
Klicken Sie unter
Was soll übertragen werden?
auf die zu übertragenden
Daten und dann auf
Weiter
.
Die ausgewählten Dateien und Einstellungen werden kopiert. Anschließend
wird die Seite
Fertigstellen des Sammlungsvorgangs
angezeigt.
7
Klicken Sie auf
Fertig stellen
.
ÜBERTRAGEN SIE DIE DATEN AUF DEN ZIELCOMPUTER —
1
Wechseln Sie zum Zielcomputer.
2
Klicken Sie unter
Wechseln Sie jetzt zum Quellcomputer
auf
Weiter
.
3
Wählen Sie unter
Wo befinden sich die Dateien und Einstellungen?
das
gewünschte Übertragungsverfahren für die Einstellungen und Dateien
und klicken Sie dann auf
Weiter
.
Der Assistent liest die zusammengestellten Dateien und Einstellungen ein und
wendet sie auf den Zielcomputer an. Wenn die Übertragung abgeschlossen ist,
wird die Seite
Fertig gestellt
angezeigt.
4
Klicken Sie auf
Fertig gestellt
und starten Sie den Computer neu.
Microsoft Windows Vista
1
Klicken Sie auf die „Start”-Schaltfläche von Windows Vista und
klicken Sie auf
Dateien und Einstellungen übertragen
→
Windows-Easy
Transfer starten
.
2
Klicken Sie im Dialogfeld
Benutzerkontensteuerung
auf
Fortsetzen
.
3
Klicken Sie auf
Neuen Transfer starten
oder auf
Gestarteten Transfer fortsetzen
.
Folgen Sie den Anweisungen des Windows-EasyTransfer-Assistenten auf dem
Bildschirm.

Kurzanleitung 203
Überspannungsschutzgeräte
Es sind verschiedene Geräte erhältlich, die vor Schwankungen und Ausfällen
der Stromversorgung schützen:
• Überspannungsschutz
• Leitungsfilter
• Unterbrechungsfreie Stromversorgungen (USV)
Überspannungsschutz
Überspannungsschutzgeräte sowie Steckerleisten mit Überspannungsschutz
schützen den Computer vor Schäden durch Spannungsspitzen, die während
Gewittern oder infolge von Stromunterbrechungen auftreten können. Einige
Hersteller von Überspannungsschutzgeräten gewähren darüber hinaus Garantien
für bestimmte Schäden. Lesen Sie deshalb die Garantiebestimmungen
aufmerksam durch, bevor Sie sich für einen Überspannungsschutz entscheiden,
und vergleichen Sie die Joule-Werte, um einen Eindruck von der relativen
Effektivität der einzelnen Modelle zu erhalten. Je höher der Joule-Wert eines
Geräts, desto mehr Schutz bietet es.
HINWEIS: Die meisten Überspannungsschutzgeräte bieten keinen Schutz vor
Spannungsschwankungen oder Stromausfällen infolge von Blitzeinschlägen. Wenn
sich in Ihrer Nähe ein Gewitter entlädt, sollten Sie das Telefonkabel aus der
Telefonwandbuchse ziehen und Ihren Computer von der Steckdose trennen.
Viele Überspannungsschutzgeräte verfügen über eine Telefonsteckdose zum
Schutz des Modems. Anweisungen zum Anschließen an ein Modem finden
Sie in der Dokumentation zum Überspannungsschutzgerät.
HINWEIS: Nicht alle Überspannungsschutzgeräte schützen den Netzwerkadapter.
Trennen Sie daher bei einem Gewitter stets das Netzwerkkabel von der
Netzwerkwandsteckerbuchse.

204 Kurzanleitung
Leitungsfilter
HINWEIS: Leitungsfilter bieten keinen Schutz vor Stromunterbrechungen.
Leitungsfilter halten die Spannung auf einem relativ konstanten Wert.
Unterbrechungsfreie Stromversorgungen
HINWEIS: Eine Unterbrechung der Stromversorgung, während Daten auf der
Festplatte gespeichert werden, kann zu Datenverlust oder Schäden an Dateien führen.
ANMERKUNG: Um eine maximale Betriebsdauer zu gewährleisten, sollten Sie nur
den Computer an das USV-Gerät anschließen. Schließen Sie andere Geräte, wie zum
Beispiel einen Drucker, an eine getrennte Steckerleiste mit Überspannungsschutz an.
USV-Geräte bieten Schutz vor Schwankungen und Unterbrechungen der
Stromversorgung. USV-Geräte enthalten einen Akku, der vorübergehend
die Versorgung der angeschlossenen Geräte übernimmt, wenn die
Netzstromversorgung unterbrochen wird. Wenn Netzstrom verfügbar ist,
wird der Akku aufgeladen. Informationen zur Akkubetriebsdauer und zur
Zulassung des Geräts durch die Underwriters Laboratories (UL) finden Sie
in der Herstellerdokumentation zu dem USV-Gerät.

Kurzanleitung 205
Wissenswertes über Ihren Computer
Vorderansicht (Tower-Ausrichtung)
1–3 5,25-Zoll-
Laufwerkschächte
Für den Einbau eines CD/DVD-Laufwerks, eines
Speicherkartenlesers, eines Diskettenlaufwerks oder eines
SATA-Festplattenlaufwerks in einem 5,25-Zoll-Laufwerkträger.
Der Festplatten-Laufwerkträger ist nur für die Verwendung in den
5,25-Zoll-Laufwerkschächten bestimmt. Diskettenlaufwerk bzw.
Speicherkartenleser und Festplatten-Laufwerkträger sind nicht
wechselseitig austauschbar.
1
2
3
4
5
6
7
8
11
10
13
12
9

206 Kurzanleitung
4 5,25-Zoll-
Laufwerkschacht
mit einer speziellen
3,5-Zoll-
Laufwerkblende
Für den Einbau eines CD/DVD-Laufwerks, eines
Speicherkartenlesers, eines Diskettenlaufwerks oder eines
SATA-Festplattenlaufwerks in einem 5,25-Zoll-Laufwerkträger.
Die hier gezeigte Laufwerkblende ist nur für die Verwendung in
Verbindung mit einem Diskettenlaufwerk oder
Speicherkartenleser bestimmt und kann frontseitig vor jedem
der vier 5,25-Zoll-Laufwerkschächte installiert werden.
Weitere Informationen finden Sie unter „Laufwerkblenden”
im Benutzerhandbuch.
Der Festplatten-Laufwerkträger ist nur für die Verwendung in den
5,25-Zoll-Laufwerkschächten bestimmt. Diskettenlaufwerk bzw.
Speicherkartenleser und Festplatten-Laufwerkträger sind nicht
wechselseitig austauschbar.
5 Festplattenaktivit-
ätsanzeige
Die Festplattenanzeige leuchtet, wenn der Computer auf das
Festplattenlaufwerk zugreift. Sie leuchtet eventuell auch,
wenn auf ein anderes Gerät, zum Beispiel das CD-Laufwerk,
zugegriffen wird.
6 IEEE 1394-
Anschluss
Hier werden Geräte, wie zum Beispiel digitale Videokameras
und externe Speichergeräte, angeschlossen, die sich für
Hochgeschwindigkeits-Datenübertragungen nach dem
IEEE 1394-Standard eignen.
7USB 2.0-
Anschlüsse (2)
Verbinden Sie Geräte, die Sie nur gelegentlich nutzen,
beispielsweise Flash-Speichersticks, Kameras oder startfähige
USB-Geräte, mit den vorderen USB-Anschlüssen.
Für Geräte, die in der Regel ständig angeschlossen sind,
beispielsweise Drucker und Tastaturen, sollten Sie die
rückseitigen USB-Anschlüsse verwenden.
8 Betriebsschalter,
Betriebsanzeige
Drücken Sie den Betriebsschalter, um den Computer
einzuschalten. Die Leuchtanzeige in der Mitte des Schalters
zeigt den Betriebsstatus an. Weitere Informationen finden Sie
unter „Bedienelemente und Anzeigen” im Benutzerhandbuch.
ANMERKUNG: Schalten Sie den Computer nicht über den
Betriebsschalter aus, um Datenverlust zu verhindern. Fahren
Sie stattdessen das Betriebssystem herunter.
9 Dell-Emblem Sie können das Dell-Emblem drehen, so dass der Text „Dell”
in der verwendeten Ausrichtung (Desktop oder Tower)
horizontal zu lesen ist.
10
Kopfhöreranschluss
Hier können Sie einen Kopfhörer anschließen.
11 Mikrofonanschluss Verwenden Sie den Mikrofonanschluss, um ein PC-Mikrofon
zur Sprach- oder Musikeingabe für ein Sound- oder
Telefonieprogramm anzuschließen.

Kurzanleitung 207
Rückansicht (Tower-Ausrichtung)
VORSICHT: Vergewissern Sie sich, dass die Lüftungsschlitze des Computers
nicht blockiert sind. Ihre Blockade würde zu ernsthaften Problemen mit einer
Überhitzung des Systems führen.
12
Diagnoseanzeigen (4)
Die Diagnoseanzeigen erleichtern die Fehlersuche bei
Computerproblemen. Weitere Informationen finden Sie unter
„Diagnoseanzeigen” im Benutzerhandbuch.
13 Netzwerkverbindu-
ngsanzeige
Diese Anzeige leuchtet, wenn eine funktionierende
Verbindung zwischen einem 10-MBit/s-, 100-MBit/s- oder
1000-MBit/s- (1 GBit/s) Netzwerk und dem Computer besteht.
1 Netzanschluss Schließen Sie hier das Stromkabel an.
2 Kartensteckplätze
Die Steckplatze 2 bis 6 unterstützen Karten voller Baulänge und
umfassen einen PCI-Steckplatz, zwei PCI Express 2.0 x16-
Steckplätze sowie zwei PCI-X-Steckplätze. Die Steckplätze 1 und 7
unterstützen Karten halber Baulänge und umfassen einen PCI
Express x8-Steckplatz (verdrahtet als x4) und einen PCI-X-Steckplatz.
3 Anschlüsse auf
der Rückseite
Verbinden Sie USB-Geräte, Audiogeräte und sonstige Geräte mit
dem entsprechenden Anschluss. (Weitere Informationen hierzu
finden Sie unter „Anschlüsse auf der Rückseite” auf Seite 208.)
1
3
2

208 Kurzanleitung
Anschlüsse auf der Rückseite
1 Paralleler
Anschluss
Hie können Sie ein Gerät anschließen, das über eine parallele
Schnittstelle angesteuert werden kann, beispielsweise einen
Drucker. Wenn Sie einen USB-Drucker verwenden, verbinden
Sie ihn mit einem USB-Anschluss.
ANMERKUNG: Der integrierte parallele Anschluss wird
automatisch deaktiviert, wenn der Computer eine installierte
Karte mit einem parallelen Anschluss ermittelt, der für die gleiche
Adresse konfiguriert wurde. Weitere Informationen finden Sie
unter „System-Setup-Optionen” im Benutzerhandbuch.
2 Mausanschluss Verbinden Sie eine Standard-PS/2-Maus mit dem grünen
Mausanschluss. Schalten Sie den Computer und alle
angeschlossenen Geräte vor dem Anschließen einer Maus
aus. Wenn Sie eine USB-Maus verwenden, verbinden Sie sie
mit einem USB-Anschluss.
3 IEEE 1394-
Anschluss
Hier werden Geräte, wie zum Beispiel digitale Videokameras
und externe Speichergeräte, angeschlossen, die sich für
Hochgeschwindigkeits-Datenübertragungen nach dem
IEEE 1394-Standard eignen.
4Line-In-
Ausschluss
Am blauen Line-In-Anschluss können Sie ein Wiedergabegerät
anschließen, beispielsweise einen MP3-Player, ein CD-Laufwerk
oder einen Videorecorder. Bei Computern mit einer Soundkarte
muss der Anschluss auf der Karte verwendet werden.
5Line-Out-
Ausschluss
Am grünen Line Out Anschluss können Sie Kopfhörer und
handelsübliche Lautsprecher mit eingebautem Verstärker
anschließen. Bei Computern mit einer Soundkarte muss der
Anschluss auf der Karte verwendet werden.
1
234
56 7 8
11 10 9

Kurzanleitung 209
6
Verbindungsinteg-
ritätsanzeige
Grün — Es besteht eine funktionierende Verbindung zwischen
einem 10-MBit/s-Netzwerk und dem Computer.
Orange — Es besteht eine funktionierende Verbindung
zwischen einem 100-MBit/s-Netzwerk und dem Computer.
Gelb — Es besteht eine funktionierende Verbindung zwischen
einem 1000-Mb/s-Netzwerk (1 Gb/s) und dem Computer.
Aus — Es wurde keine physische Verbindung zum Netzwerk
festgestellt.
7 Netzwerk-
anschluss
Um den Computer an ein Netzwerk- oder Breitbandgerät
anzuschließen, verbinden Sie ein Ende eines Netzwerkkabels mit
einer Netzwerkbuchse oder mit dem Netzwerk- oder
Breitbandgerät. Verbinden Sie das andere Ende des
Netzwerkkabels mit dem Netzwerkanschluss am Computer. Ein
Klicken zeigt an, dass das Netzwerkkabel sicher angeschlossen ist.
Verbinden Sie kein Telefonkabel mit dem Netzwerkanschluss.
Verwenden Sie bei Computern mit einer zusätzlichen
Netzwerkkarte beim Einrichten von mehreren
Netzwerkverbindungen (etwa für separates Intra- und
Extranet) den Anschluss auf der Karte und den auf dem
rückseitigen Anschlussfeld des Computers.
Für den Anschluss an ein Netzwerk werden Kabel und
Steckverbinder der Kategorie 5 empfohlen. Wenn Sie Kabel
der Kategorie 3 verwenden müssen, wählen Sie eine
Netzwerkgeschwindigkeit von 10 Mbit/s, um zuverlässigen
Betrieb zu gewährleisten.
8 Netzwerkaktivi-
tätsanzeige
Die Anzeige blinkt gelb, wenn der Computer Netzwerkdaten sendet
oder empfängt. Hohe Netzwerkbelastung hat möglicherweise zur
Folge, dass diese Anzeige stetig leuchtet.
9USB-2.0-
Anschlüsse (5)
Verbinden Sie Geräte, die Sie nur gelegentlich nutzen,
beispielsweise Flash-Speichersticks, Kameras oder startfähige
USB-Geräte, möglichst mit den vorderen USB-Anschlüssen.
Für Geräte, die in der Regel ständig angeschlossen sind,
beispielsweise Drucker und Tastaturen, sollten Sie die rückseitigen
USB-Anschlüsse verwenden.
10 Tastaturanschluss Wenn Sie eine Standard-PS/2-Tastatur verwenden, verbinden
Sie sie mit dem lilafarbenen Tastaturanschluss. Wenn Sie eine
USB-Tastatur verwenden, verbinden Sie sie mit einem USB-
Anschluss.
11 Serielle
Anschlüsse (2)
Serielle Geräte (Geräte, die über eine serielle Schnittstelle
angesteuert werden können, wie etwa Handheld-Computer)
werden mit dem seriellen Anschluss verbunden. Sofern
erforderlich, kann die Adresse für diesen Anschluss im System-
Setup-Programm geändert werden (siehe „System-Setup” im
Benutzerhandbuch).

210 Kurzanleitung
Reinigen des Computers
VORSICHT: Bevor Sie gemäß den in diesem Abschnitt beschriebenen
Anleitungen verfahren, lesen Sie zunächst die Sicherheitshinweise im
Produktinformationshandbuch
.
Computer, Tastatur und Bildschirm
VORSICHT: Trennen Sie den Computer vor der Reinigung vom Stromnetz. Reinigen
Sie den Computer mit einem weichen, mit Wasser befeuchteten Tuch. Verwenden Sie
keine flüssigen Reinigungsmittel oder Sprühreiniger, die eventuell entflammbare
Stoffe enthalten.
• Entfernen Sie vorsichtig mithilfe eines Staubsaugers mit Bürstenaufsatz
den Staub aus den Öffnungen und Vertiefungen des Computers sowie
zwischen den Tasten der Tastatur.
HINWEIS: Wischen Sie den Bildschirm nicht mit Seife oder einer alkoholischen
Lösung ab. Dies könnte die Entspiegelungsbeschichtung beschädigen.
• Zum Reinigen des Bildschirms befeuchten Sie ein weiches, sauberes Tuch leicht
mit Wasser. Verwenden Sie möglichst ein spezielles Bildschirmreinigungstuch
oder eine Lösung, die für die antistatische Beschichtung des Monitors
geeignet ist.
• Wischen Sie Tastatur, Computer und Kunststoffteile des Bildschirms mit
einem weichen Reinigungstuch ab, das Sie mit Wasser befeuchten.
Achten Sie darauf, das Tuch nicht völlig mit der Flüssigkeit zu durchtränken,
und verhindern Sie, dass Wasser in den Computer oder die Tastatur tröpfelt.
Mechanische Maus
1
Drehen Sie den Halterungsring auf der Unterseite der Maus entgegen dem
Uhrzeigersinn und entnehmen Sie anschließend die Rollkugel.
2
Wischen Sie die Kugel mit einem sauberen, fusselfreien Tuch ab.
3
Blasen Sie vorsichtig in die Öffnung auf der Mausunterseite, um Staub
und Fusseln zu entfernen.
4
Reinigen Sie die Räder innerhalb des Kugelgehäuses mit einem
Wattetupfer, den Sie leicht mit Isopropylalkohol befeuchtet haben.

Kurzanleitung 211
5
Richten Sie die Rollen wieder ordnungsgemäß aus, wenn dies erforderlich
ist. Stellen Sie sicher, dass keine Fusseln des Wattestäbchens auf den
Rollen verbleiben.
6
Setzen Sie die Kugel und den Haltering wieder ein und drehen Sie den
Haltering im Uhrzeigersinn, bis er mit einem Klicken einrastet.
Diskettenlaufwerk
HINWEIS: Versuchen Sie nicht, die Laufwerkköpfe mit einem Wattestäbchen zu
reinigen. Sie könnten dabei die Ausrichtung der Köpfe beeinträchtigen, was dazu
führt, dass das Laufwerk nicht mehr ordnungsgemäß arbeiten kann.
Reinigen Sie das Diskettenlaufwerk mit einem handelsüblichen Reinigungs-
Kit. Solche Kits enthalten vorbehandelte Disketten, mit denen Ablagerungen
und Verunreinigungen der Köpfe, die im normalen Betrieb entstehen,
entfernt werden können.
CDs und DVDs
HINWEIS: Reinigen Sie die Linse im CD-/DVD-Laufwerk nur mit Druckluft. Befolgen
Sie dabei die Anweisungen zur Anwendung des Druckluftgerätes. Berühren Sie
niemals die Linse im Laufwerk.
1
Halten Sie die Disk an der Außenkante fest. Sie können auch am Innenrand
der Öffnung in der Mitte anfassen.
HINWEIS: Reinigen Sie die Disk keinesfalls in kreisförmigen Bewegungen, damit
die Oberfläche nicht beschädigt wird.
2
Wischen Sie mit einem weichen, staubfreien Tuch über die Unterseite
(die unbedruckte Seite) der Disk, immer von der Mitte zu den Außenkanten.
Hartnäckige Verschmutzungen können Sie mit etwas Wasser oder einer
Lösung aus Wasser und milder Seife reinigen. Darüber hinaus sind im Handel
Produkte zur Reinigung von Disks erhältlich, die daneben einen gewissen
Schutz vor Verunreinigungen, Fingerabdrücken und Kratzern bieten.
Reinigungsprodukte für CDs eignen sich in der Regel auch für DVDs.

212 Kurzanleitung
Hilfsmittel zur Fehlerbehebung
Betriebsanzeige
VORSICHT: Bevor Sie gemäß den in diesem Abschnitt beschriebenen
Anleitungen verfahren, lesen Sie zunächst die Sicherheitshinweise im
Produktinformationshandbuch
.
Die Betriebsanzeige an der Vorderseite des Computers blinkt oder leuchtet
stetig, um verschiedene Betriebszustände anzuzeigen:
• Wenn die Betriebsanzeige grün leuchtet und der Computer nicht reagiert,
lesen Sie den Abschnitt unter „Diagnoseanzeigen” auf Seite 213.
• Wenn die Betriebsanzeige mit grünem Licht blinkt, befindet sich der
Computer im Standby- bzw. im Energiesparmodus. Drücken Sie eine
Taste auf der Tastatur, bewegen Sie die Maus oder drücken Sie den
Betriebsschalter, um den Normalbetrieb wieder aufzunehmen.
• Wenn die Betriebsanzeige nicht leuchtet oder blinkt, ist der Computer
ausgeschaltet oder er wird nicht mit Strom versorgt.
– Schließen Sie das Netzkabel wieder am Netzanschluss an der
Rückseite des Computers und an der Stromsteckdose an.
– Wenn der Computer an eine Steckerleiste angeschlossen ist, vergewissern
Sie sich, dass die Steckerleiste an eine Steckdose angeschlossen und
eingeschaltet ist.
– Entfernen Sie Überspannungsschutz-Zwischenstecker, Steckdosenleisten
und Verlängerungskabel, um festzustellen, ob sich der Computer
einschalten lässt.
– Stellen Sie sicher, dass die Steckdose Strom liefert, indem Sie
probeweise ein anderes Gerät, beispielsweise eine Lampe, anschließen.
– Stellen Sie sicher, dass das Hauptstromkabel und das Kabel der
Frontblende fest mit der Systemplatine verbunden sind (siehe
„Komponenten der Systemplatine” im
Benutzerhandbuch
).

Kurzanleitung 213
• Wenn die Betriebsanzeige mit gelbem Licht blinkt, wird der Computer
mit Strom versorgt, doch es kann ein Problem mit der internen
Stromversorgung vorliegen.
– Vergewissern Sie sich, dass gegebenenfalls der Spannungswahlschalter
auf die örtliche Netzspannung eingestellt ist.
– Stellen Sie sicher, dass das Stromversorgungskabel des Prozessors fest
mit der Systemplatine verbunden sind (siehe „Komponenten der
Systemplatine” im
Benutzerhandbuch
).
• Wenn die Betriebsanzeige stetig gelb leuchtet, besteht möglicherweise ein
Problem mit einer Fehlfunktion eines Gerätes oder ein Gerät ist nicht
ordnungsgemäß installiert.
– Entfernen Sie die Speichermodule und installieren Sie sie neu (siehe
„Entfernen der Frontblende” im
Benutzerhandbuch
).
– Entfernen Sie die installierten Karten und installieren Sie sie neu
(siehe „Karten” im
Benutzerhandbuch
).
• Beseitigen Sie Störungsquellen. Mögliche Ursachen von Störungen sind:
– Netz-, Tastatur- und Mausverlängerungskabel
– Zu viele Geräte an einer Steckdosenleiste
– Mehrere Steckdosenleisten, die mit der gleichen Steckdose verbunden sind
Diagnoseanzeigen
VORSICHT: Bevor Sie gemäß den in diesem Abschnitt beschriebenen
Anleitungen verfahren, lesen Sie zunächst die Sicherheitshinweise im
Produktinformationshandbuch
.
Um das Beheben von Störungen zu erleichtern, befinden sich auf der Vorderseite
des Computers vier Leuchtanzeigen, die mit 1, 2, 3 und 4 gekennzeichnet sind
(siehe „Vorderansicht (Tower-Ausrichtung)” auf Seite 205). Wenn der Computer
gestartet wird, blinken die Anzeigen und erlöschen dann. Fehlfunktionen des
Computers lassen sich anhand der Leuchtmuster leichter identifizieren.
ANMERKUNG: Nach dem Abschluss des POST-Vorgangs (PC-Selbsttest beim
Einschalten) erlöschen alle Anzeigen, bevor das Betriebssystem gestartet wird.

214 Kurzanleitung
Diagnose-Leuchtcodes während des POST-Vorgangs
Anzeigemuster Problembeschreibung Lösungsvorschlag
Der Computer
befindet sich in einem
normalen Aus-Zustand
oder es ist
möglicherweise ein
Fehler vor der
BIOS-Aktivierung
aufgetreten.
Schließen Sie den Computer an eine
funktionierende Steckdose an und
drücken Sie den Netzschalter.
Es ist möglicherweise
ein BIOS-Fehler
aufgetreten. Der
Computer befindet
sich im Wiederhers-
tellungsmodus.
• Führen Sie das Dienstprogramm zur
BIOS-Wiederherstellung aus und
warten Sie, bis die Wiederherstellung
erfolgreich abgeschlossen ist. Starten
Sie den Computer anschließend neu.
• Wenn das Problem weiterhin besteht,
wenden Sie sich an Dell (siehe
„Kontaktaufnahme mit Dell” im
Benutzerhandbuch
).
Ein möglicher
Prozessorfehler
ist aufgetreten.
• Setzen Sie den Prozessor erneut ein
(siehe „Prozessor”
im
Benutzerhandbuch
).
• Wenn das Problem weiterhin besteht,
wenden Sie sich an Dell (siehe
„Kontaktaufnahme mit Dell” im
Benutzerhandbuch
).

Kurzanleitung 215
Speichermodule
werden erkannt,
es ist jedoch ein
Speicherfehler
aufgetreten.
• Wenn zwei oder mehr Speichermodule
installiert sind, entfernen Sie die Module
(siehe „Speicher”
im
Benutzerhandbuch
)
und installieren Sie ein Modul erneut.
Starten Sie anschließend den Computer
neu. Wenn der Computer normal startet,
installieren Sie weitere Speichermodule
(jeweils eines bei jedem Test), bis Sie ein
fehlerhaftes Modul gefunden oder alle
Module ohne Fehler installiert haben.
• Sofern verfügbar, installieren Sie
ordnungsgemäß funktionierende
Speichermodule des gleichen Typs in
Ihrem Computer (siehe „Speicher”
im
Benutzerhandbuch
).
• Wenn das Problem weiterhin besteht,
wenden Sie sich an Dell (siehe
„Kontaktaufnahme mit Dell” im
Benutzerhandbuch
).
Möglicher Fehler
der Videokarte.
• Setzen Sie alle installierten Videokarten
neu ein (siehe „Karten” im
Benutzerhandbuch
).
• Sofern verfügbar, installieren Sie eine
ordnungsgemäß funktionierende
Videokarte in Ihrem Computer.
• Wenn das Problem weiterhin besteht,
wenden Sie sich an Dell (siehe
„Kontaktaufnahme mit Dell” im
Benutzerhandbuch
).
Möglicher Fehler beim
Diskettenlaufwerk oder
Festplattenlaufwerk.
• Schließen Sie alle Stromversorgungs-
und Datenkabel neu an und starten
Sie den Computer neu.
• Wenn das Problem weiterhin besteht,
wenden Sie sich an Dell (siehe
„Kontaktaufnahme mit Dell” im
Benutzerhandbuch
).
Anzeigemuster Problembeschreibung Lösungsvorschlag

216 Kurzanleitung
Ein möglicher USB-
Fehler ist aufgetreten.
• Installieren Sie alle USB-Geräte neu,
überprüfen Sie die Kabelverbindungen
und starten Sie dann den Computer neu.
• Wenn das Problem weiterhin besteht,
wenden Sie sich an Dell (siehe
„Kontaktaufnahme mit Dell” im
Benutzerhandbuch
).
Es werden keine
Speichermodule
erkannt.
• Wenn zwei oder mehr Speichermodule
installiert sind, entfernen Sie die Module
(siehe „Speicher”
im
Benutzerhandbuch
)
und installieren Sie ein Modul erneut.
Starten Sie anschließend den Computer
neu. Wenn der Computer normal startet,
installieren Sie weitere Speichermodule
(jeweils eines bei jedem Test), bis Sie ein
fehlerhaftes Modul gefunden oder alle
Module ohne Fehler installiert haben.
• Sofern verfügbar, installieren Sie
ordnungsgemäß funktionierende
Speichermodule des gleichen Typs in
Ihrem Computer (siehe „Speicher”
im
Benutzerhandbuch
).
• Wenn das Problem weiterhin besteht,
wenden Sie sich an Dell (siehe
„Kontaktaufnahme mit Dell” im
Benutzerhandbuch
).
Ein Fehler der
Systemplatine ist
aufgetreten.
Wenden Sie sich an Dell (siehe
„Kontaktaufnahme mit Dell” im
Benutzerhandbuch).
Anzeigemuster Problembeschreibung Lösungsvorschlag

Kurzanleitung 217
Speichermodule
werden erkannt; es ist
jedoch ein Fehler mit
der Speicher-
konfiguration oder ein
Kompatibilitätsfehler
aufgetreten.
• Stellen Sie sicher, dass keine
besonderen Anforderungen
hinsichtlich der Anordnung der
Speichermodule/Speicheranschlüsse
bestehen (siehe „Speicher” im
im
Benutzerhandbuch
).
• Stellen Sie sicher, dass die verwendeten
Speichermodule von Ihrem Computer
unterstützt werden (siehe „Speicher”
im
Benutzerhandbuch
).
• Wenn das Problem weiterhin besteht,
wenden Sie sich an Dell
(siehe
„Kontaktaufnahme mit Dell”
im
Benutzerhandbuch
).
Ein möglicher
Systemplatinen-
ressourcen- und/oder
Hardwarefehler ist
aufgetreten.
• Führen Sie die Anweisungen unter
„Wiederherstellen des Betriebssystems”
im
Benutzerhandbuch
aus.
• Wenn das Problem weiterhin besteht,
wenden Sie sich an Dell
(siehe „Kontaktaufnahme mit Dell”
im
Benutzerhandbuch
).
Möglicher
Erweiterungskartenf-
ehler.
1
Stellen Sie fest, ob ein Konflikt
vorliegt, indem Sie eine Karte
(keine Videokarte) entfernen und den
Computer neu starten (siehe „Karten”
im
Benutzerhandbuch
).
2
Besteht das Problem weiterhin, setzen
Sie die entfernte Karte wieder ein,
entfernen Sie eine andere Karte und
starten Sie den Computer erneut.
3
Wiederholen Sie diesen Vorgang
nacheinander mit jeder installierten
Erweiterungskarte. Wenn der Computer
normal startet, überprüfen Sie die zuletzt
aus dem Computer entfernte Karte auf
Ressourcenkonflikte (siehe
„Wiederherstellen des Betriebssystems”
im
Benutzerhandbuch
).
4
Wenn das Problem weiterhin besteht,
wenden Sie sich an Dell (siehe
„Kontaktaufnahme mit Dell” im
Benutzerhandbuch
).
Anzeigemuster Problembeschreibung Lösungsvorschlag

218 Kurzanleitung
Signaltoncodes
Während des Startvorgangs gibt der Computer möglicherweise eine Folge von
Signaltönen aus. Anhand dieser Folge von Signaltönen, die auch als Signalcode
bezeichnet werden, lässt sich ein Problem mit Ihrem Computer identifizieren.
Wenn der Computer während des Startvorgangs eine Folge von Signaltönen
ausgibt:
1
Notieren Sie den Signaltoncode.
2
Führen Sie Dell Diagnostics aus (siehe „Dell Diagnostics” auf Seite 223),
um die Ursache zu ermitteln.
Ein anderes Problem
ist aufgetreten.
• Stellen Sie sicher, dass alle
Festplattenlaufwerks- und CD/DVD-
Laufwerkskabel ordnungsgemäß an der
Systemplatine angeschlossen sind (siehe
„Komponenten der Systemplatine” im
Benutzerhandbuch
).
• Wenn eine Fehlermeldung auf dem
Bildschirm ein Problem mit einem Gerät
(beispielsweise dem Diskettenlaufwerk
oder dem Festplattenlaufwerk) anzeigt,
überprüfen Sie das Gerät, um sich zu
vergewissern, dass es ordnungsgemäß
funktioniert.
• Wenn das Betriebssystem versucht, von
einem Gerät (zum Beispiel einem
Disketten- oder CD/DVD-Laufwerk) zu
starten, überprüfen Sie im System-
Setup-Programm (siehe „System-Setup”
im
Benutzerhandbuch
), ob die
Startreihenfolge für die in Ihrem
Computer installierten Geräte korrekt ist.
• Wenn das Problem weiterhin besteht,
wenden Sie sich an Dell (siehe
„Kontaktaufnahme mit Dell” im
Benutzerhandbuch
).
Code Ursache
2 kurz, 1 lang BIOS-Prüfsummenfehler
1 lang, 3 kurz, 2 kurz Speicherfehler
1 kurz F12-Taste wurde gedrückt
Anzeigemuster Problembeschreibung Lösungsvorschlag

Kurzanleitung 219
Code
(Folge
kurzer Signaltöne)
Beschreibung Vorgeschlagene Abhilfe
1BIOS-
Prüfsummenfehler.
Möglicher Fehler der
Systemplatine.
Wenden Sie sich an Dell
(siehe „Kontaktaufnahme mit Dell” im
Benutzerhandbuch).
2 Es werden keine
Speichermodule
erkannt.
• Wenn zwei oder mehr Speichermodule
installiert sind, entfernen Sie die Module
(siehe „Speicher”
im
Benutzerhandbuch
)
und installieren Sie ein Modul erneut.
Starten Sie anschließend den Computer
neu. Wenn der Computer normal startet,
installieren Sie weitere Speichermodule
(jeweils eines bei jedem Test), bis Sie ein
fehlerhaftes Modul gefunden oder alle
Module ohne Fehler installiert haben.
• Sofern verfügbar, installieren Sie
ordnungsgemäß funktionierende
Speichermodule des gleichen Typs in
Ihrem Computer (siehe „Speicher”
im
Benutzerhandbuch
).
• Wenn das Problem weiterhin besteht,
wenden Sie sich an Dell
(siehe „Kontaktaufnahme mit Dell” im
Benutzerhandbuch
).
3 Möglicher Fehler der
Systemplatine.
Wenden Sie sich an Dell
(siehe „Kontaktaufnahme mit Dell” im
Benutzerhandbuch).

220 Kurzanleitung
Systemmeldungen
ANMERKUNG: Wenn eine angezeigte Meldung in der folgenden Tabelle nicht
aufgeführt ist, lesen Sie in der Dokumentation zu dem Betriebssystem oder
Programm nach, das beim Auftreten der Störung ausgeführt wurde.
A
LERT! PREVIOUS ATTEMPTS AT BOOTING THIS SYSTEM HAVE FAILED AT
CHECKPOINT [NNNN]. FOR HELP IN RESOLVING THIS PROBLEM, PLEASE NOTE THIS
CHECKPOINT AND CONTACT DELL TECHNICAL SUPPORT - (ACHTUNG! FRÜHERE
V
ERSUCHE, DAS SYSTEM ZU STARTEN, SIND BEI PRÜFPUNKT [NNNN]
FEHLGESCHLAGEN. NOTIEREN SIE SICH DIESEN PRÜFPUNKT UND WENDEN SIE SICH
AN DEN TECHNISCHEN SUPPORT VON DELL)—Der Computer konnte den
Startvorgang dreimal hintereinander aufgrund desselben Fehlers nicht abschließen
(unter „Kontaktaufnahme mit Dell” im Benutzerhandbuch erfahren Sie, wie Sie Hilfe
erhalten können).
4RAM-Lese-
/Schreibfehler.
• Stellen Sie sicher, dass keine besonderen
Anforderungen hinsichtlich der Anordnung
der Speichermodule/Speicheranschlüsse
bestehen (siehe „Speicher” im
im
Benutzerhandbuch
).
• Stellen Sie sicher, dass die verwendeten
Speichermodule von Ihrem Computer
unterstützt werden (siehe „Speicher”
im
Benutzerhandbuch
).
• Wenn das Problem weiterhin besteht,
wenden Sie sich an Dell (siehe
„Kontaktaufnahme mit Dell” im
Benutzerhandbuch
).
5 Fehler der Echtzeituhr.
Möglicher Ausfall der
Batterie oder der
Systemplatine.
• Ersetzen Sie die Batterie (siehe „Ersetzen
der Batterie” im
Benutzerhandbuch
).
• Wenn das Problem weiterhin besteht,
wenden Sie sich an Dell (siehe
„Kontaktaufnahme mit Dell” im
Benutzerhandbuch
).
6 Fehler beim Testen des
Video-BIOS.
Wenden Sie sich an Dell (siehe
„Kontaktaufnahme mit Dell” im
Benutzerhandbuch).
Code
(Folge
kurzer Signaltöne)
Beschreibung Vorgeschlagene Abhilfe

Kurzanleitung 221
CMOS CHECKSUM ERROR (CMOS-PRÜFSUMMENFEHLER)—Möglicher
Systemplatinenfehler oder die Echtzeituhr-Batterie hat nur noch wenig Ladung.
Ersetzen Sie die Batterie (siehe „Ersetzen der Batterie” oder „Kontaktaufnahme mit
Dell” im Benutzerhandbuch).
CPU
FAN FAILURE (AUSFALL DES CPU-LÜFTERS)—Ausfall des CPU-Lüfters.
Ersetzen Sie den CPU-Lüfter (siehe „Entfernen des Prozessors” im Benutzerhandbuch).
F
LOPPY DISKETTE SEEK FAILURE (DISKETTENPOSITIONIERUNGSFEHLER)—
Möglicherweise hat sich ein Kabel gelöst oder die Informationen der
Computerkonfiguration stimmen nicht mit der Hardwarekonfiguration überein.
Überprüfen Sie die Kabelverbindungen (unter „Kontaktaufnahme mit Dell” im
Benutzerhandbuch erfahren Sie, wie Sie Hilfe erhalten können).
D
ISKETTE READ FAILURE (FEHLER BEIM LESEN DER DISKETTE)—Die Diskette ist
möglicherweise defekt, oder ein Kabel hat sich gelöst. Ersetzen Sie die Diskette und
prüfen Sie auf lose Kabelverbindungen.
H
ARD-DISK DRIVE FAILURE (FESTPLATTENLAUFWERKFEHLER)—Möglicherweise
ein Festplattenlaufwerkfehler beim Testen der Festplatten während des Startvorgangs
(unter „Kontaktaufnahme mit Dell” im Benutzerhandbuch erfahren Sie, wie Sie Hilfe
erhalten können).
K
EYBOARD FAILURE (TASTATURFEHLER)—Tastaturfehler oder loses Tastaturkabel
(siehe „Probleme mit der Tastatur” im Benutzerhandbuch).
N
O BOOT DEVICE AVAILABLE (KEIN STARTGERÄT VERFÜGBAR)—Das System kann
kein startfähiges Gerät oder keine startfähige Partition erkennen.
• Wenn der Computer vom Diskettenlaufwerk gestartet wird, stellen Sie sicher, dass die
Kabel angeschlossen sind und sich eine startfähige Diskette im Laufwerk befindet.
• Ist das Festplattenlaufwerk als Startgerät festgelegt, stellen Sie sicher, dass die Kabel
ordnungsgemäß angeschlossen sind und das Laufwerk installiert und als Startlaufwerk
partitioniert ist.
• Rufen Sie das System-Setup-Programm auf (siehe „Aufrufen des System-Setup-
Programms”
im
Benutzerhandbuch
) und prüfen Sie, ob die Angaben zur
Startreihenfolge stimmen.
NO TIMER TICK INTERRUPT (KEIN PERIODISCHER INTERRUPT)—Ein Chip auf der
Systemplatine ist möglicherweise defekt oder es handelt sich um einen Fehler der
Hauptplatine (unter „Kontaktaufnahme mit Dell” im Benutzerhandbuch erfahren Sie,
wie Sie Hilfe erhalten können).
N
ON-SYSTEM DISK OR DISK ERROR (KEINE SYSTEMDISKETTE ODER
D
ISKETTENFEHLER)—Legen Sie eine Diskette mit einem startfähigen Betriebssystem
ein, oder nehmen Sie die Diskette aus Laufwerk A und starten Sie den Computer neu.

222 Kurzanleitung
NOT A BOOT DISKETTE (KEINE STARTDISKETTE)—Legen Sie eine startfähige
Diskette ein und starten Sie den Computer neu.
NOTICE - H
ARD DRIVE SELF MONITORING SYSTEM HAS REPORTED THAT A
PARAMETER HAS EXCEEDED ITS NORMAL OPERATING RANGE. (HINWEIS: DAS SELF
MONITORING SYSTEM
DES FESTPLATTENLAUFWERKS HAT GEMELDET, DASS EIN
P
ARAMETER DEN WERTEBEREICH FÜR DEN NORMALEN BETRIEB ÜBERSCHRITTEN
HAT.) DELL EMPFIEHLT, DASS SIE IHRE DATEN REGELMÄSSIG SICHERN. EIN
AUSSERHALB DES NORMALEN WERTEBEREICHS LIEGENDER PARAMETERWERT KANN
AUF EIN MÖGLICHES PROBLEM MIT DEM FESTPLATTENLAUFWERK HINWEISEN —
S.M.A.R.T-Fehler, möglicherweise ein Festplattenlaufwerk-Fehler. Diese Funktion
kann im BIOS-Setup aktiviert oder deaktiviert werden.
Hardware-Ratgeber
Wenn ein Gerät während der Betriebssysteminstallation nicht erkannt wird
oder zwar erkannt, jedoch nicht einwandfrei konfiguriert wird, können Sie die
Inkompatibilität mit dem „Ratgeber bei Hardwarekonflikten” beheben.
Windows XP:
1
Klicken Sie auf
Start
→
Hilfe und Support
.
2
Geben Sie im Suchfeld den Text
Hardware-Ratgeber
ein und drücken
Sie anschließend die <Eingabetaste>.
3
Klicken Sie im Abschnitt
Einen Fehler beheben
auf
Hardware-Ratgeber
.
4
Wählen Sie in der Liste
Hardware-Ratgeber
die Option, die das Problem
am besten beschreibt, und klicken Sie auf
Weiter
, um mit den übrigen
Schritten zur Fehlerbehebung fortzufahren.
Windows Vista:
1
Klicken Sie auf die „Start”-Schaltfläche von Windows Vista und dann
auf
Hilfe und Support
.
2
Geben Sie im Suchfeld den Text
hardware troubleshooter
(Hardware-
Ratgeber) ein und drücken Sie anschließend die <Eingabetaste>.
3
Wählen Sie in der Liste der Suchergebnisse die Option, die das Problem
am besten beschreibt, und fahren Sie mit den übrigen Schritten zur
Fehlerbehebung fort.

Kurzanleitung 223
Dell Diagnostics
VORSICHT: Bevor Sie gemäß den in diesem Abschnitt beschriebenen
Anleitungen verfahren, lesen Sie zunächst die Sicherheitshinweise im
Produktinformationshandbuch
.
Wann wird Dell Diagnostics eingesetzt
Wenn Probleme mit dem Computer auftreten, führen Sie die unter „Probleme mit
Abstürzen und Software” aufgeführten Maßnahmen durch (siehe
„Fehlerbehebung” in Ihrem Benutzerhandbuch) und führen Sie das Programm
„Dell Diagnostics” aus, bevor Sie von Dell technische Unterstützung anfordern.
Sie können Dell Diagnostics von der Festplatte oder von dem Drivers and
Utilities-Datenträger starten.
Rufen Sie das System-Setup-Programm auf, überprüfen Sie die
Konfigurationsinformationen Ihres Computers (siehe „System-Setup” im
Benutzerhandbuch) und stellen Sie sicher, dass das Gerät, das Sie testen
möchten, im System-Setup angezeigt wird und aktiv ist.
ANMERKUNG: Dell Diagnostics kann nur auf Dell-Computern ausgeführt werden.
ANMERKUNG: Drucken Sie die folgenden Anleitungen, bevor Sie Dell Diagnostics
ausführen.
Starten von Dell Diagnostics von der Festplatte
Das Programm „Dell Diagnostics” befindet sich auf der Festplatte in einer
eigenen Dienstprogrammpartition.
ANMERKUNG: Falls Ihr Computer nicht in der Lage ist, ein Monitorbild anzuzeigen,
wenden Sie sich an Dell (siehe „Kontaktaufnahme mit Dell” im Benutzerhandbuch).
1
Schalten Sie den Computer ein oder führen Sie einen Neustart durch.
2
Wenn das DELL-Logo angezeigt wird, drücken Sie unmittelbar danach
<F12>.
ANMERKUNG: Längeres Gedrückthalten einer Taste kann zur Fehlfunktion
der Tastatur führen. Zur Vermeidung derartiger Fehlfunktionen drücken Sie
<F12> mehrmals in gleichmäßigen Abständen, um das Menü zur Auswahl des
Startgeräts (Boot Device Menu) zu öffnen.
ANMERKUNG: Wird eine Systemmeldung mit dem Inhalt angezeigt, dass
keine Dienstprogrammpartition ermittelt werden konnte, führen Sie Dell
Diagnostics unter Verwendung des Drivers and Utilities-Datenträgers aus
(siehe „Starten von Dell Diagnostics unter Verwendung des Drivers and
Utilities-Datenträgers” auf Seite 224).

224 Kurzanleitung
Wird das Betriebssystem-Logo angezeigt, haben Sie <F12> vermutlich zu
spät gedrückt. Warten Sie in diesem Fall, bis der Microsoft Windows-
Desktop angezeigt wird. Fahren Sie anschließend den Computer herunter
und versuchen Sie es erneut.
3
Markieren Sie im Menü zur Auswahl des Startgeräts (
Boot Device Menu
)
mithilfe der <Nach-Oben-Taste> und der <Nach-Unten-Taste> oder
durch Drücken der entsprechenden Ziffer auf der Tastatur die Option
Boot to Utility Partition
(Von Dienstprogramm-Partition starten) und
drücken Sie anschließend die <Eingabetaste>.
ANMERKUNG: Die Schnellstart-Funktion (Quickboot) ändert die Startreihenfolge
lediglich für den aktuellen Startvorgang. Beim Neustart wird der Computer gemäß
der im System-Setup-Programm festgelegten Startreihenfolge gestartet.
4
Wählen Sie im Hauptmenü (
Main Menu
) von Dell Diagnostics den
auszuführenden Test, indem Sie auf die entsprechende Option klicken
oder durch Drücken der <Tabulatortaste> darauf positionieren und
anschließend die <Eingabetaste> drücken (siehe „Dell Diagnostics-
Hauptmenü” auf Seite 226).
ANMERKUNG: Notieren Sie sich den Fehlercode und die Problembeschreibung
exakt so, wie sie angezeigt werden, und befolgen Sie die Anweisungen auf dem
Bildschirm.
5 Wenn die Tests vollständig ausgeführt wurden, schließen Sie das Testfenster,
um zum Hauptmenü (Main Menu) zurückzukehren.
6 Schließen Sie das Fenster des Hauptmenüs (Main Menu), um das
Programm Dell Diagnostics zu beenden und den Computer neu zu starten.
Starten von Dell Diagnostics unter Verwendung des Drivers and Utilities-Datenträgers
1
Schalten Sie den Computer ein.
2
Drücken Sie auf die Auswurftaste auf der Vorderseite des optischen Laufwerks,
um das Auflagefach des Laufwerks auszuwerfen.
3
Legen Sie den
Drivers and Utilities
-Datenträger in die Mitte des Auflagefachs
und drücken Sie anschließend die Auswurftaste oder drücken Sie behutsam
gegen das Fach, um es zu schließen.
4
Starten Sie den Computer neu.

Kurzanleitung 225
5
Wenn das DELL-Logo angezeigt wird, drücken Sie unmittelbar
danach <F12>.
ANMERKUNG: Längeres Gedrückthalten einer Taste der Tastatur kann zur
Fehlfunktion der Tastatur führen. Zur Vermeidung derartiger Fehlfunktionen
drücken Sie <F12> mehrmals in gleichmäßigen Abständen, bis das Menü zur
Auswahl des Startgeräts (Boot Device Menu) angezeigt wird.
Wird das Betriebssystem-Logo angezeigt, haben Sie <F12> vermutlich zu
spät gedrückt. Warten Sie in diesem Fall, bis der Microsoft Windows-
Desktop angezeigt wird. Fahren Sie anschließend den Computer herunter
und versuchen Sie es erneut.
6
Markieren Sie im Menü zur Auswahl des Startgeräts (
Boot Device Menu
)
mithilfe der <Nach-Oben-Taste> und der <Nach-Unten-Taste> oder
durch Drücken der entsprechenden Ziffer auf der Tastatur die Option
Onboard or USB CD-ROM
(Integriertes oder USB-CD-Laufwerk) und
drücken Sie anschließend die <Eingabetaste>.
ANMERKUNG: Die Schnellstart-Funktion (Quickboot) ändert die Startreihenfolge
lediglich für den aktuellen Startvorgang. Beim Neustart wird der Computer gemäß
der im System-Setup-Programm festgelegten Startreihenfolge gestartet.
7
Geben Sie <1> ein, um Dell Diagnostics auszuwählen.
8
Klicken Sie unter
Dell Diagnostics Menu
auf <1>, um Dell Diagnostics
auszuwählen.
9
Wählen Sie im Hauptmenü (
Main Menu
) von Dell Diagnostics den
auszuführenden Test, indem Sie auf die entsprechende Option klicken
oder durch Drücken der <Tabulatortaste> darauf positionieren und
anschließend die <Eingabetaste> drücken (siehe „Dell Diagnostics-
Hauptmenü” auf Seite 226).
ANMERKUNG: Notieren Sie sich den Fehlercode und die Problembeschreibung
exakt so, wie sie angezeigt werden, und befolgen Sie die Anweisungen auf dem
Bildschirm.
10 Wenn die Tests vollständig ausgeführt wurden, schließen Sie das
Testfenster, um zum Hauptmenü (Main Menu) zurückzukehren.
11 Entfernen Sie den Drivers and Utilities-Datenträger aus dem Laufwerk
und schließen Sie das Hauptmenü (Main Menu), um Dell Diagnostics
zu beenden und den Computer neu zu starten.

226 Kurzanleitung
Dell Diagnostics-Hauptmenü
Folgende Tests können über das Hauptmenü (Main Menu) von Dell Diagnostics
ausgeführt werden:
Tritt während eines Tests ein Problem auf, werden in einer Systemmeldung der
Fehlercode und eine Beschreibung des Problems angezeigt. Notieren Sie sich den
Fehlercode und die Problembeschreibung exakt so, wie sie angezeigt werden, und
befolgen Sie die Anweisungen auf dem Bildschirm. Kann das Problem nicht
gelöst werden, wenden Sie sich an Dell (siehe „Kontaktaufnahme mit Dell” im
Benutzerhandbuch).
ANMERKUNG: Die Service-Tag-Nummer des Computers finden Sie im oberen
Bereich der einzelnen Testfenster. Halten Sie Ihre Service-Tag-Nummer bereit,
wenn Sie sich mit Dell in Verbindung setzen.
Option Funktion
Express Test
(Schnelltest)
Es wird ein Schnelltest der Systemgeräte durchgeführt.
Dieser Test dauert in der Regel etwa 10 bis 20 Minuten. Es
ist keine Benutzeraktion erforderlich. Führen Sie den
Express Test (Schnelltest) aus, um die Ursache des Problems
möglichst schnell zu finden.
Extended Test
(Erweiterter Test)
Es wird ein ausführlicher Test der Systemgeräte durchgeführt.
Dieser Test nimmt normalerweise mindestens eine Stunde in
Anspruch. Dabei muss der Benutzer wiederholt bestimmte
Informationen eingeben.
Custom Test
(Benutzerdefinierter Test)
Testet ein bestimmtes Gerät im System und kann zur
Anpassung der gewünschten Tests verwendet werden.
Symptom Tree
(Problemübersicht)
Listet eine Reihe häufig auftretender Symptome auf und
ermöglicht die Auswahl eines Tests, der auf dem Symptom
der vorliegenden Störung basiert.

Kurzanleitung 227
Die in der folgenden Tabelle beschriebenen Registerkarten stellen zusätzliche
Informationen zu Tests bereit, die über die Optionen Custom Test
(Benutzerdefinierter Test) oder Symptom Tree (Problemübersicht) ausgeführt
werden:
Fehlerbehebung
Beachten Sie die folgenden Tipps beim Beheben von Störungen, die in
Verbindung mit der Verwendung des Computers auftreten:
• Wenn vor dem Auftreten des Problems ein Teil hinzugefügt oder entfernt
wurde, sollten Sie die Verfahrensweise der Installation erneut durchgehen
und sicherstellen, dass das Teil korrekt installiert ist.
• Wenn ein Peripheriegerät nicht funktioniert, stellen Sie sicher, dass das
Gerät ordnungsgemäß angeschlossen ist.
Registerkarte Funktion
Results (Ergebnisse) Es werden die Testergebnisse und möglicherweise gefundene
Probleme angezeigt.
Errors (Fehler) Es werden die gefundenen Fehler, die Fehlercodes und eine
Beschreibung des Problems angezeigt.
Help (Hilfe) Beschreibt den Test und verweist auf mögliche Voraussetzungen
für die Durchführung des Tests.
Configuration
(Konfiguration)
(nur
benutzerdefinierter
Test)
Die Hardware-Konfiguration der ausgewählten Geräte
wird angezeigt.
Das Programm Dell Diagnostics ruft über das System-
Setup-Programm, den Speicher und eine Reihe interner
Tests Konfigurationsinformationen für alle Geräte ab.
Diese Informationen werden in der Geräteliste auf der
linken Seite des Bildschirms angezeigt.
ANMERKUNG: In der Geräteliste werden möglicherweise
nicht alle Namen von Geräten angezeigt, die im Computer
installiert oder daran angeschlossen sind.
Parameters (Parameter)
(nur
benutzerdefinierter
Test)
Der Test kann durch Änderungen an den Einstellungen an
Ihre Bedürfnisse angepasst werden.

228 Kurzanleitung
• Wenn eine Fehlermeldung angezeigt wird, notieren Sie sich den genauen
Wortlaut. Anhand dieser Meldung kann der Support das Problem leichter
diagnostizieren und beheben.
• Wird bei der Ausführung eines Programms eine Fehlermeldung angezeigt,
lesen Sie in der Dokumentation des Programms nach.
ANMERKUNG: Die in diesem Dokument beschriebenen Vorgänge gelten für die
Windows-Standardansicht. Wenn Sie auf Ihrem Dell™-Computer die klassische
Windows-Ansicht verwenden, treffen die Beschreibungen möglicherweise nicht zu.
Probleme mit der Batterie
VORSICHT: Bei unsachgemäßem Einbau einer neuen Batterie besteht
Explosionsgefahr. Wechseln Sie die Batterie nur durch denselben oder einen
gleichwertigen, vom Hersteller empfohlenen Typ aus. Leere Batterien sind den
Herstelleranweisungen entsprechend zu entsorgen.
VORSICHT: Bevor Sie gemäß den in diesem Abschnitt beschriebenen
Anleitungen verfahren, lesen Sie zunächst die Sicherheitshinweise im
Produktinformationshandbuch
.
A
USTAUSCHEN VON BATTERIEN — Wenn Sie nach dem Einschalten des Computers
die Uhrzeit- und Datumseinstellungen wiederholt zurücksetzen müssen oder wenn
beim Hochfahren eine falsche Zeit oder ein falsches Datum angezeigt wird, wechseln
Sie die Batterie aus (siehe „Ersetzen der Batterie” im Benutzerhandbuch). Wenn die
Batterie trotzdem nicht ordnungsgemäß funktioniert, wenden Sie sich an Dell (siehe
unter „Kontaktaufnahme mit Dell” im Benutzerhandbuch).
Probleme mit Laufwerken
VORSICHT: Bevor Sie gemäß den in diesem Abschnitt beschriebenen
Anleitungen verfahren, lesen Sie zunächst die Sicherheitshinweise im
Produktinformationshandbuch
.
S
TELLEN SIE SICHER, DASS MICROSOFT WINDOWS DAS LAUFWERK ERKENNT —
Windows XP:
• Klicken Sie auf
Start
und anschließend auf
Arbeitsplatz
.
Windows Vista:
• Klicken Sie auf
Start
und anschließend auf
Computer
.
Wenn das Laufwerk nicht aufgeführt ist, führen Sie mithilfe der Virenschutzsoftware
einen vollständigen Virenscan durch, um das System auf Viren zu überprüfen und
diese ggf. zu beseitigen. Viren können die Ursache dafür sein, dass Windows das
Laufwerk nicht erkennt.

Kurzanleitung 229
TESTEN SIE DAS LAUFWERK —
• Legen Sie einen anderen Datenträger ein, um auszuschließen, dass das Original
möglicherweise defekt ist.
• Legen Sie eine startfähige Diskette ein und starten Sie den Computer neu.
REINIGEN SIE DAS LAUFWERK BZW. DEN DATENTRÄGER — Siehe
„Reinigen des
Computers” auf Seite 210
.
Ü
BERPRÜFEN SIE DIE KABELVERBINDUNGEN
VERWENDEN SIE DEN RATGEBER BEI HARDWAREKONFLIKTEN — Weitere
Informationen finden Sie unter „Wiederherstellen des Betriebssystems” in Ihrem
Benutzerhandbuch.
F
ÜHREN SIE DELL DIAGNOSTICS AUS — Siehe „Dell Diagnostics” auf Seite 223.
Probleme mit optischen Laufwerken
ANMERKUNG: Ein Vibrieren des optischen Hochgeschwindigkeitslaufwerks ist
normal und kann Geräusche verursachen, die nicht auf einen Fehler im Laufwerk
oder ein defektes Medium hinweisen.
ANMERKUNG: Aufgrund der verschiedenen Zonen weltweit und der unterschiedlichen
DVD-Formate funktionieren nicht alle DVDs in allen DVD-Laufwerken.
S
TELLEN SIE DEN LAUTSTÄRKEREGLER UNTER WINDOWS EIN —
• Klicken Sie auf das Lautsprechersymbol rechts unten auf dem Bildschirm.
• Stellen Sie sicher, dass eine passende Lautstärke eingestellt ist.
• Stellen Sie sicher, dass die Klangwiedergabe nicht stumm geschaltet ist, indem Sie die
aktivierten Kontrollkästchen deaktivieren.
ÜBERPRÜFEN SIE LAUTSPRECHER UND SUBWOOFER — Siehe „Probleme mit Sound
und Lautsprecher” auf Seite 242.
Probleme mit dem Schreiben auf ein optisches Laufwerk
SCHLIESSEN SIE ANDERE PROGRAMME — Das optische Laufwerk muss beim
Schreiben einen ständigen Datenfluss aufrechterhalten. Sobald der Datenfluss
unterbrochen wird, tritt ein Fehler auf. Schließen Sie vor dem Schreiben nach
Möglichkeit alle Programme.
D
EAKTIVIEREN SIE DEN STANDBY-MODUS (BZW. DEN ENERGIESPARMODUS) IN
W
INDOWS VOR DEM BESCHREIBEN EINES DATENTRÄGERS — Suchen Sie im
Windows Hilfe- und Supportcenter nach dem Schlüsselwort Standby, um
Informationen über Energieverwaltungsmodi zu erhalten.

230 Kurzanleitung
Probleme mit Festplattenlaufwerken
FÜHREN SIE DIE DATENTRÄGERPRÜFUNG AUS —
Windows XP:
1
Klicken Sie auf
Start
und anschließend auf
Arbeitsplatz
.
2
Klicken Sie mit der rechten Maustaste auf
Lokaler Datenträger (C:)
.
3
Klicken Sie auf
Eigenschaften
→
Extras
→
Jetzt prüfen
.
4
Aktivieren Sie die Option
Fehlerhafte Sektoren suchen/wiederherstellen
und klicken
Sie auf
Starten
.
Windows Vista:
1
Klicken Sie auf
Start
und anschließend auf
Computer
.
2
Klicken Sie mit der rechten Maustaste auf
Lokaler Datenträger (C:)
.
3
Klicken Sie auf
Eigenschaften
→
Tools
→
Jetzt prüfen
.
Möglicherweise wird das Fenster
Benutzerkontensteuerung
angezeigt. Wenn Sie über
Administratorrechte für den Computer verfügen, klicken Sie auf
Fortsetzen
.
Andernfalls bitten Sie Ihren Administrator, die gewünschte Aktion fortzusetzen.
4
Folgen Sie den Anweisungen auf dem Bildschirm.
Probleme mit E-Mail, Modem und Internet
VORSICHT: Bevor Sie gemäß den in diesem Abschnitt beschriebenen
Anleitungen verfahren, lesen Sie zunächst die Sicherheitshinweise im
Produktinformationshandbuch
.
ANMERKUNG: Schließen Sie das Modem ausschließlich an eine analoge
Telefonbuchse an. Das Modem funktioniert nicht, wenn es an ein digitales
Telefonnetz angeschlossen ist.
ANMERKUNG: Verbinden Sie nie ein Telefonkabel versehentlich mit dem
Netzwerkanschluss (siehe „Anschlüsse auf der Rückseite” im Benutzerhandbuch).
Ü
BERPRÜFEN SIE DIE SICHERHEITSEINSTELLUNGEN VON MICROSOFT OUTLOOK
E
XPRESS — Wenn Sie Ihre E-Mail-Anhänge nicht öffnen können, gehen Sie wie
folgt vor:
1
Klicken Sie in Outlook Express auf
Extras
→
Optionen
→
Sicherheit
.
2
Deaktivieren Sie das Kontrollkästchen
Keine Anlagen zulassen
.

Kurzanleitung 231
ÜBERPRÜFEN SIE DIE TELEFONKABELVERBINDUNG
ÜBERPRÜFEN SIE DIE TELEFONBUCHSE
SCHLIESSEN SIE DAS MODEM DIREKT AN DIE TELEFONBUCHSE AN DER WAND AN
VERWENDEN SIE EIN ANDERES TELEFONKABEL —
• Überprüfen Sie, ob das Telefonkabel an die Eingangsbuchse des Modems
angeschlossen ist (die Leitungseingangsbuchse ist entweder mit einem grünen
Aufkleber oder einem Anschlusssymbol versehen).
• Bei richtigem Anschluss sollte der Telefonstecker mit einem hörbaren Klicken in das
Modem einrasten.
• Trennen Sie das Telefonkabel vom Modem und schließen Sie es an ein Telefon an.
Überprüfen Sie anschließend, ob ein Wählton zu hören ist.
• Wenn weitere Geräte, wie z. B. Anrufbeantworter, Faxgerät, Überspannungsschutzgerät
oder Verteiler, ebenfalls an diese Leitung angeschlossen sind, umgehen Sie diese und
schließen Sie das Modem mit dem Telefonkabel direkt an die Telefonbuchse an der
Wand an. Wenn das Kabel länger als 3 Meter ist, verwenden Sie ein kürzeres Kabel.
FÜHREN SIE DAS PROGRAMM ZUR MODEMDIAGNOSE AUS —
Windows XP:
1
Klicken Sie auf
Start
→
Alle
Programme
→
Modem Helper
.
2
Folgen Sie den Anweisungen auf dem Bildschirm, um Probleme mit dem Modem zu
identifizieren und zu beheben. Modem Helper ist nicht auf allen Computern verfügbar.
Windows Vista:
1
Klicken Sie auf
Start
→
Alle Programme
→
Modem Diagnostic Tool
.
2
Folgen Sie den Anweisungen auf dem Bildschirm, um Probleme mit dem Modem zu
identifizieren und zu beheben. Das Programm zur Modemdiagnose ist nicht auf allen
Computern verfügbar.
ÜBERPRÜFEN SIE, OB DIE DATENÜBERTRAGUNG ZWISCHEN MODEM UND WINDOWS
GEWÄHRLEISTET IST —
Windows XP:
1
Klicken Sie auf
Start
→
Systemsteuerung
→
Drucker und andere Hardware
→
Telefon-
und Modemoptionen
→
Modems
.
2
Klicken Sie auf dem COM-Port für Ihr Modem und anschließend auf
Eigenschaften
→
Diagnose
→
Modem abfragen
, um sicherzustellen, dass eine Verbindung zwischen dem
Modem und Windows hergestellt wurde.
Wenn auf alle Befehle reagiert wird, funktioniert das Modem ordnungsgemäß.

232 Kurzanleitung
Windows Vista:
1
Klicken Sie auf
Start
→
Systemsteuerung
→
Hardware und Sound
→
Telefon-
und Modemoptionen
→
Modems
.
2
Klicken Sie auf den COM-Anschluss für Ihr Modem und anschließend auf
Eigenschaften
→
Diagnose
→
Modem abfragen
, um sicherzustellen, dass eine
Verbindung zwischen dem Modem und Windows hergestellt wurde.
Wenn auf alle Befehle reagiert wird, funktioniert das Modem ordnungsgemäß.
VERGEWISSERN SIE SICH, DASS EINE INTERNETVERBINDUNG HERGESTELLT
WURDE — Stellen Sie sicher, dass ein Internetdienstanbieter (ISP) zur Verfügung
steht. Klicken Sie im E-Mail-Programm Outlook Express auf Datei. Wenn neben
Offline-Betrieb ein Häkchen angezeigt wird, klicken Sie darauf, um das Häkchen zu
entfernen und eine Verbindung zum Internet herzustellen. Wenden Sie sich an den
Internetdienstanbieter, um Unterstützung zu erhalten.
Fehlermeldungen
VORSICHT: Bevor Sie gemäß den in diesem Abschnitt beschriebenen
Anleitungen verfahren, lesen Sie zunächst die Sicherheitshinweise im
Produktinformationshandbuch
.
Wenn eine Fehlermeldung hier nicht aufgeführt ist, lesen Sie in der Dokumentation zu
dem Betriebssystem oder Programm nach, das beim Auftreten der Störung ausgeführt
wurde.
A
FILENAME CANNOT CONTAIN ANY OF THE FOLLOWING CHARACTERS: (EIN
D
ATEINAME DARF KEINES DER FOLGENDEN ZEICHEN ENTHALTEN:) \ / : * ? ” < >
|— Verwenden Sie diese Zeichen nicht in Dateinamen.
A
REQUIRED .DLL FILE WAS NOT FOUND (EINE ERFORDERLICHE DLL-DATEI WURDE
NICHT GEFUNDEN)—Für das Programm, das geöffnet werden soll, fehlt eine wichtige
Datei. So entfernen und installieren Sie das Programm neu:
Windows XP:
1
Klicken Sie auf
Start
→
Systemsteuerung
→
Software
→
Programme ändern oder entfernen
.
2
Wählen Sie das Programm aus, das deinstalliert werden soll.
3
Klicken Sie auf
Entfernen
.
4
Installationsanweisungen finden Sie in der Programmdokumentation.
Windows Vista:
1
Klicken Sie auf
Start
→
Systemsteuerung
→
Programme
→
Programme und
Funktionen
.
2
Wählen Sie das Programm aus, das deinstalliert werden soll.
3
Klicken Sie auf
Deinstallieren
.
4
Installationsanweisungen finden Sie in der Programmdokumentation.

Kurzanleitung 233
Laufwerkbuchstabe
:\ IS NOT ACCESSIBLE. THE DEVICE IS NOT READY (AUF
Laufwerkbuchstabe
:\ KANN NICHT ZUGEGRIFFEN WERDEN. DAS GERÄT IST
NICHT BETRIEBSBEREIT)—Das Laufwerk kann den Datenträger nicht lesen. Legen
Sie einen Datenträger in das Laufwerk ein und versuchen Sie es erneut.
I
NSERT BOOTABLE MEDIA (STARTFÄHIGEN DATENTRÄGER EINLEGEN)—Legen Sie
eine startfähige Diskette, CD oder DVD ein.
N
ON-SYSTEM DISK ERROR (KEINE SYSTEMDISKETTE)—Entnehmen Sie die
Diskette aus dem Diskettenlaufwerk und starten Sie den Computer neu.
N
OT ENOUGH MEMORY OR RESOURCES (NICHT GENÜGEND SPEICHER ODER
R
ESSOURCEN) CLOSE SOME PROGRAMS AND TRY AGAIN (ES SIND NICHT
GENÜGEND ARBEITSSPEICHER ODER RESSOURCEN VERFÜGBAR. SCHLIESSEN SIE
ANDERE PROGRAMME UND WIEDERHOLEN SIE DEN VORGANG)—Schließen Sie alle
Fenster und öffnen Sie das gewünschte Programm. In einigen Fällen müssen Sie den
Computer möglicherweise neu starten, um die Computerressourcen wiederherzustellen.
Führen Sie in diesem Fall das Programm aus, das Sie zuerst verwenden möchten.
O
PERATING SYSTEM NOT FOUND (BETRIEBSSYSTEM NICHT GEFUNDEN)—Wenden
Sie sich an Dell (siehe „Kontaktaufnahme mit Dell” im Benutzerhandbuch).
Probleme mit IEEE 1394-Geräten
VORSICHT: Bevor Sie gemäß den in diesem Abschnitt beschriebenen
Anleitungen verfahren, lesen Sie zunächst die Sicherheitshinweise im
Produktinformationshandbuch
.
S
TELLEN SIE SICHER, DASS DAS KABEL FÜR DAS IEEE 1394-GERÄT
ORDNUNGSGEMÄSS MIT DEM GERÄT UND MIT DEM ANSCHLUSS AM COMPUTER
VERBUNDEN IST
STELLEN SIE SICHER, DASS DAS IEEE 1394-GERÄT IM SYSTEM-SETUP AKTIVIERT
IST — Siehe „System-Setup-Optionen” im Benutzerhandbuch.
Ü
BERPRÜFEN SIE, OB DAS IEEE 1394-GERÄT VON WINDOWS ERKANNT WIRD —
Windows XP:
1
Klicken Sie auf
Start
und anschließend auf
Systemsteuerung
.
2
Klicken Sie unter
Wählen Sie eine Kategorie
auf
Leistung und Wartung
→
System
→
Systemeigenschaften
→
Hardware
→
Geräte-Manager
.
Windows Vista:
1
Klicken Sie auf
Start
→
Systemsteuerung
→
Hardware und Sound
.
2
Klicken Sie auf
Geräte-Manager
.
Wenn das IEEE 1394-Gerät aufgelistet ist, hat Windows das Gerät erkannt.
S
TELLEN SIE SICHER, DASS DAS IEEE 1394-GERÄT RICHTIG ANGESCHLOSSEN IST

234 Kurzanleitung
STELLEN SIE SICHER, DASS DAS IEEE 1394-KABEL ORDNUNGSGEMÄSS MIT DEM
S
YSTEMPLATINENANSCHLUSS UND DEM ANSCHLUSS AN DER VORDEREN E/A-LEISTE
VERBUNDEN IST
BEI PROBLEMEN MIT EINER VON DELL GELIEFERTEN IEEE 1394-KOMPONENTE —
Wenden Sie sich an Dell (siehe „Kontaktaufnahme mit Dell” im Benutzerhandbuch).
B
EI PROBLEMEN MIT EINER NICHT VON DELL GELIEFERTEN IEEE-1394-
K
OMPONENTE — Wenden Sie sich an den Hersteller des IEEE 1394-Geräts.
Probleme mit der Tastatur
VORSICHT: Bevor Sie gemäß den in diesem Abschnitt beschriebenen
Anleitungen verfahren, lesen Sie zunächst die Sicherheitshinweise im
Produktinformationshandbuch
.
Ü
BERPRÜFEN SIE DAS TASTATURKABEL —
• Stellen Sie sicher, dass das Tastaturkabel fest mit dem Computer verbunden ist.
• Fahren Sie den Computer herunter (siehe „Ausschalten des Computers”
im
Benutzerhandbuch
), schließen Sie das Tastaturkabel erneut an, wie in der Setup-
Übersicht für Ihren Computer beschrieben, und starten Sie den Computer neu.
• Überprüfen Sie, ob Stifte am Kabelstecker verbogen oder abgebrochen sind oder ob das
Kabel beschädigt oder abgescheuert ist. Biegen Sie verbogene Kontaktstifte gerade.
• Trennen Sie Tastaturverlängerungskabel ab und schließen Sie die Tastatur direkt an
den Computer an.
ÜBERPRÜFEN SIE DIE TASTATUR — Schließen Sie eine funktionsfähige Tastatur am
Computer an und testen Sie die Tastatur.
V
ERWENDEN SIE DEN RATGEBER BEI HARDWAREKONFLIKTEN — Weitere
Informationen finden Sie unter „Wiederherstellen des Betriebssystems” im
Benutzerhandbuch.
Probleme mit Abstürzen und Software
VORSICHT: Bevor Sie gemäß den in diesem Abschnitt beschriebenen
Anleitungen verfahren, lesen Sie zunächst die Sicherheitshinweise im
Produktinformationshandbuch
.
Der Computer kann nicht gestartet werden
ÜBERPRÜFEN SIE DIE DIAGNOSEANZEIGEN — Siehe „Diagnoseanzeigen” auf
Seite 213.
S
TELLEN SIE SICHER, DASS DAS NETZKABEL ORDNUNGSGEMÄSS MIT DEM COMPUTER UND
DER STECKDOSE VERBUNDEN IST

Kurzanleitung 235
Der Computer reagiert nicht mehr
HINWEIS: Wenn Sie das Betriebssystem nicht ordnungsgemäß herunterfahren,
können Daten verloren gehen.
S
CHALTEN SIE DEN COMPUTER AUS — Wenn der Computer nicht mehr reagiert
und auch nicht durch Drücken einer Taste auf der Tastatur bzw. Bewegen der Maus
aktiviert werden kann, halten Sie den Betriebsschalter mindestens acht bis zehn
Sekunden lang gedrückt, bis der Computer ausgeschaltet wird, und starten Sie den
Computer anschließend erneut.
Ein Programm reagiert nicht mehr
BEENDEN SIE DAS PROGRAMM —
1
Drücken Sie gleichzeitig <Strg><Umschalttaste><Esc>, um den Task-Manager
zu öffnen.
2
Klicken Sie auf die Registerkarte
Anwendungen
.
3
Klicken Sie auf das Programm, das nicht mehr reagiert.
4
Klicken Sie auf
Task beenden
.
Ein Programm stürzt wiederholt ab
ANMERKUNG: Anweisungen für die Installation von Software finden Sie im
Allgemeinen in der jeweiligen Dokumentation oder auf einem mitgelieferten
Datenträger (Diskette, CD oder DVD).
L
ESEN SIE DIE SOFTWAREDOKUMENTATION — Deinstallieren Sie gegebenenfalls
das Programm und installieren Sie es anschließend erneut.
Ein Anwendungsprogramm wurde für eine frühere Version des Betriebssystems
Microsoft Windows entwickelt
FÜHREN SIE DEN PROGRAMMKOMPATIBILITÄTS-ASSISTENTEN AUS —
Windows XP:
Der Programmkompatibilitäts-Assistent konfiguriert ein Programm für einen Modus
in Windows XP, in dem Sie Programme ausführen können, die für frühere Versionen
von Windows entwickelt wurden.
1
Klicken Sie auf
Start
→
Alle Programme
→
Zubehör
→
Programmkompatibilitäts-
Assistent
→
Weiter
.
2
Folgen Sie den Anweisungen auf dem Bildschirm.
Windows Vista:
Der Programmkompatibilitäts-Assistent konfiguriert ein Programm für einen Modus
in Windows Vista, in dem Sie Programme ausführen können, die für frühere Versionen
von Windows entwickelt wurden.

236 Kurzanleitung
1
Klicken Sie auf
Start
→
Systemsteuerung
→
Programme
→
Ältere Programme mit
dieser Windows-Version verwenden
.
2
Klicken Sie auf der Startseite auf
Weiter
.
3
Folgen Sie den Anweisungen auf dem Bildschirm.
Ein blauer Bildschirm wird angezeigt
SCHALTEN SIE DEN COMPUTER AUS — Wenn der Computer nicht mehr reagiert
und auch nicht durch Drücken einer Taste auf der Tastatur bzw. Bewegen der Maus
aktiviert werden kann, halten Sie den Betriebsschalter mindestens acht bis zehn
Sekunden lang gedrückt, bis der Computer ausgeschaltet wird, und starten Sie den
Computer anschließend erneut.
Weitere softwarebezogene Probleme
LESEN SIE DIE DOKUMENTATION ZU DEM JEWEILIGEN PROGRAMM ODER
KONTAKTIEREN SIE DEN SOFTWAREHERSTELLER —
• Stellen Sie sicher, dass das Programm mit dem auf Ihrem Computer installierten
Betriebssystem kompatibel ist.
• Vergewissern Sie sich, dass der Computer die Mindesthardwareanforderungen erfüllt,
um die Software ausführen zu können. Weitere Informationen finden Sie in der
Softwaredokumentation.
• Stellen Sie sicher, dass das Programm ordnungsgemäß installiert und konfiguriert ist.
• Stellen Sie sicher, dass kein Konflikt zwischen den Gerätetreibern und dem
Programm vorliegt.
• Deinstallieren Sie gegebenenfalls das Programm und installieren Sie es
anschließend erneut.
ERSTELLEN SIE UMGEHEND EINE SICHERUNGSKOPIE IHRER DATEN
ÜBERPRÜFEN SIE DAS FESTPLATTENLAUFWERK, DISKETTEN ODER CDS MIT EINEM
V
IRENTESTPROGRAMM AUF VIREN
SPEICHERN UND SCHLIESSEN SIE ALLE GEÖFFNETEN DATEIEN ODER PROGRAMME
UND FAHREN SIE DEN COMPUTERS ÜBER DAS STARTMENÜ HERUNTER
Probleme mit dem Speicher
VORSICHT: Bevor Sie gemäß den in diesem Abschnitt beschriebenen
Anleitungen verfahren, lesen Sie zunächst die Sicherheitshinweise im
Produktinformationshandbuch
.

Kurzanleitung 237
WENN SIE EINE MELDUNG ÜBER UNZUREICHENDEN ARBEITSSPEICHER
ERHALTEN —
• Speichern und schließen Sie alle geöffneten Dateien und beenden Sie alle
geöffneten Programme, die Sie nicht verwenden, um zu sehen, ob das Problem
dadurch gelöst wird.
• Weitere Informationen zu den Mindestanforderungen finden Sie in der
Softwaredokumentation. Installieren Sie gegebenenfalls zusätzlichen Speicher (siehe
„Installieren eines Speichermoduls”
im
Benutzerhandbuch
).
• Setzen Sie die Speichermodule erneut ein (siehe „Entfernen der Frontblende”
im
Benutzerhandbuch
), um sicherzustellen, dass der Computer erfolgreich Daten mit den
Speichermodulen austauschen kann.
• Führen Sie Dell Diagnostics aus (siehe „Dell Diagnostics” auf Seite 223).
WENN ANDERE PROBLEME MIT DEM SPEICHER AUFTRETEN —
• Setzen Sie die Speichermodule erneut ein (siehe „Entfernen der Frontblende”
im
Benutzerhandbuch
), um sicherzustellen, dass der Computer erfolgreich Daten mit den
Speichermodulen austauschen kann.
• Befolgen Sie unbedingt die Anweisungen für die Installation des Speichers
(siehe „Installieren eines Speichermoduls”
im
Benutzerhandbuch
).
• Vergewissern Sie sich, dass die verwendeten Speichermodule von Ihrem Computer
unterstützt werden. Weitere Informationen zu den von Ihrem Computer
unterstützten Speichertypen finden Sie unter „Entfernen der Frontblende” im
Benutzerhandbuch
.
• Führen Sie Dell Diagnostics aus (siehe „Dell Diagnostics” auf Seite 223).
Probleme mit der Maus
VORSICHT: Bevor Sie gemäß den in diesem Abschnitt beschriebenen
Anleitungen verfahren, lesen Sie zunächst die Sicherheitshinweise im
Produktinformationshandbuch
.
Ü
BERPRÜFEN SIE DAS MAUSKABEL —
• Überprüfen Sie, ob Stifte am Kabelstecker verbogen oder abgebrochen sind oder ob das
Kabel beschädigt oder abgescheuert ist. Biegen Sie verbogene Kontaktstifte gerade.
• Trennen Sie Mausverlängerungskabel ab und schließen Sie die Maus direkt an den
Computer an.
• Überprüfen Sie, ob das Mauskabel, wie in der Setup-Übersicht für Ihren Computer
gezeigt, angeschlossen ist.

238 Kurzanleitung
STARTEN SIE DEN COMPUTER NEU —
1
Drücken Sie die Tastenkombination <Strg><Esc>, um das Menü
Start
anzuzeigen.
2
Drücken Sie <c>,
drücken Sie die <Nach-Oben-Taste> bzw. die <Nach-
Unten-Taste>
, um die Option
Herunterfahren
bzw.
Ausschalten
auszuwählen, und
drücken Sie anschließend die <Eingabetaste>.
3
Nachdem der Computer heruntergefahren wurde, schließen Sie das Mauskabel wieder
an, wie in der Setup-Übersicht für den Computer beschrieben.
4
Schalten Sie den Computer ein.
TESTEN SIE DIE MAUS — Schließen Sie eine funktionsfähige Maus an den Computer
an und testen Sie sie.
Ü
BERPRÜFEN SIE DIE MAUSEINSTELLUNGEN —
Windows XP:
1
Klicken Sie auf
Start
→
Systemsteuerung
→
Maus
.
2
Ändern Sie die Einstellungen nach Bedarf.
Windows Vista:
1
Klicken Sie auf
Start
→
Systemsteuerung
→
Hardware und Sound
→
Maus
.
2
Ändern Sie die Einstellungen nach Bedarf.
INSTALLIEREN SIE DEN MAUSTREIBER NEU — Siehe „Treiber” im Benutzerhandbuch.
V
ERWENDEN SIE DEN RATGEBER BEI HARDWAREKONFLIKTEN — Weitere
Informationen finden Sie unter „Wiederherstellen des Betriebssystems” im
Benutzerhandbuch.
Probleme mit dem Netzwerk
VORSICHT: Bevor Sie gemäß den in diesem Abschnitt beschriebenen
Anleitungen verfahren, lesen Sie zunächst die Sicherheitshinweise im
Produktinformationshandbuch
.
Ü
BERPRÜFEN SIE DIE NETZWERKANZEIGE AUF DER VORDERSEITE DES
C
OMPUTERS — Wenn die Verbindungsintegritätsanzeige nicht leuchtet (siehe
„Bedienelemente und Anzeigen” im Benutzerhandbuch), findet keine
Netzwerkkommunikation statt. Tauschen Sie das Netzwerkkabel aus.
Ü
BERPRÜFEN SIE DEN NETZWERKKABELSTECKER — Stellen Sie sicher, dass das
Netzwerkkabel ordnungsgemäß auf der Rückseite des Computers und an der
Netzwerkbuchse eingesteckt ist.
S
TARTEN SIE DEN COMPUTER NEU UND MELDEN SIE SICH ERNEUT AM NETZWERK AN

Kurzanleitung 239
ÜBERPRÜFEN SIE DIE NETZWERKEINSTELLUNGEN — Setzen Sie sich mit dem
Netzwerkadministrator oder der Person in Verbindung, die das Netzwerk eingerichtet
hat, um zu überprüfen, ob die Netzwerkeinstellungen korrekt sind und das Netzwerk
funktioniert.
V
ERWENDEN SIE DEN RATGEBER BEI HARDWAREKONFLIKTEN — Weitere
Informationen finden Sie unter „Wiederherstellen des Betriebssystems” in Ihrem
Benutzerhandbuch.
Probleme mit der Stromversorgung
VORSICHT: Bevor Sie gemäß den in diesem Abschnitt beschriebenen
Anleitungen verfahren, lesen Sie zunächst die Sicherheitshinweise im
Produktinformationshandbuch
.
W
ENN DIE BETRIEBSANZEIGE GRÜN LEUCHTET UND DER COMPUTER NICHT
REAGIERT — Siehe „Diagnoseanzeigen” auf Seite 213.
W
ENN DIE BETRIEBSANZEIGE GRÜN BLINKT — Der Computer befindet im
Standby-Modus bzw. Energiesparmodus. Drücken Sie eine Taste auf der Tastatur,
bewegen Sie die Maus oder drücken Sie den Betriebsschalter, um den Normalbetrieb
wieder aufzunehmen.
W
ENN DIE BETRIEBSANZEIGE NICHT LEUCHTET — Der Computer ist ausgeschaltet
oder wird nicht mit Strom versorgt.
• Schließen Sie das Netzkabel wieder am Netzanschluss an der Rückseite des Computers
und an der Stromsteckdose an.
• Entfernen Sie Steckdosenleisten und Verlängerungskabel sowie
Überspannungsschutzvorrichtungen, um festzustellen, ob sich der Computer
einschalten lässt.
• Vergewissern Sie sich, dass die verwendeten Steckdosenleisten mit einer Stromsteckdose
verbunden und eingeschaltet sind.
• Stellen Sie sicher, dass die Steckdose Strom liefert, indem Sie probeweise ein anderes
Gerät, beispielsweise eine Lampe, anschließen.
• Stellen Sie sicher, dass das Hauptstromkabel und das Kabel der Frontblende fest mit
der Systemplatine verbunden sind (siehe „Komponenten der Systemplatine”
im
Benutzerhandbuch
).
WENN DIE BETRIEBSANZEIGE GELB BLINKT — Der Computer wird mit Strom
versorgt, möglicherweise besteht jedoch ein internes Stromversorgungsproblem.
• Vergewissern Sie sich, dass gegebenenfalls der Spannungswahlschalter auf die örtliche
Netzspannung eingestellt ist.
• Stellen Sie sicher, dass alle Komponenten und Kabel ordnungsgemäß installiert und
sicher mit der Systemplatine verbunden sind (siehe „Komponenten der Systemplatine”
im
Benutzerhandbuch
).

240 Kurzanleitung
WENN DIE BETRIEBSANZEIGE STETIG GELB LEUCHTET — Eine Komponente ist
möglicherweise defekt oder falsch installiert.
• Entfernen Sie alle Speichermodule und installieren Sie sie neu (siehe „Entfernen der
Frontblende” im
Benutzerhandbuch
).
• Entfernen Sie die installierten Erweiterungskarten einschließlich Videokarten, und
installieren Sie sie neu (siehe „Karten” im
Benutzerhandbuch
).
BESEITIGEN SIE STÖRUNGSQUELLEN — Mögliche Ursachen von Störungen sind:
• Netz-, Tastatur- und Mausverlängerungskabel
• Zu viele Geräte an einer Steckerleiste
• Mehrere Steckdosenleisten, die mit der gleichen Steckdose verbunden sind
Probleme mit dem Drucker
VORSICHT: Bevor Sie gemäß den in diesem Abschnitt beschriebenen
Anleitungen verfahren, lesen Sie zunächst die Sicherheitshinweise im
Produktinformationshandbuch
.
ANMERKUNG: Wenden Sie sich an den Hersteller des Druckers, wenn Sie
technische Unterstützung bzgl. Ihres Druckers benötigen.
L
ESEN SIE IM HANDBUCH ZU IHREM DRUCKER NACH — Informationen zur
Einrichtung und Fehlerbehebung finden Sie in der Dokumentation zum Drucker.
S
TELLEN SIE SICHER, DASS DER DRUCKER EINGESCHALTET IST
ÜBERPRÜFEN SIE DIE VERBINDUNGEN DES DRUCKERKABELS —
• Weitere Informationen zu den Kabelverbindungen finden Sie in der
Druckerdokumentation.
• Stellen Sie sicher, dass das Druckerkabel ordnungsgemäß mit dem Computer
verbunden ist.
ÜBERPRÜFEN SIE DIE STECKDOSE — Stellen Sie sicher, dass die Steckdose Strom
liefert, indem Sie probeweise ein anderes Gerät, beispielsweise eine Lampe, anschließen.
Ü
BERPRÜFEN SIE, OB DER DRUCKER VON WINDOWS ERKANNT WIRD —
Windows XP:
1
Klicken Sie auf
Start
→
Systemsteuerung
→
Drucker und andere Hardware
→
Installierte
Drucker bzw. Faxdrucker anzeigen
.
2
Wenn der Drucker aufgeführt ist, klicken Sie mit der rechten Maustaste auf das
Druckersymbol.
3
Klicken Sie auf
Eigenschaften
→
Anschlüsse
. Stellen Sie bei einem parallelen Drucker
sicher, dass unter
Auf folgenden Anschlüssen drucken
die Einstellung
LPT1:
(Druckeranschluss)
ausgewählt ist. Stellen Sie bei einem USB-Drucker sicher, dass
unter
Auf folgenden Anschlüssen drucken
die Einstellung
USB
ausgewählt ist.

Kurzanleitung 241
Windows Vista:
1
Klicken Sie auf
Start
→
Systemsteuerung
→
Hardware und Sound
→
Drucker
.
2
Wenn der Drucker aufgeführt ist, klicken Sie mit der rechten Maustaste auf das
Druckersymbol.
3
Klicken Sie auf
Eigenschaften
und dann auf
Anschlüsse
.
4
Ändern Sie die Einstellungen nach Bedarf.
INSTALLIEREN SIE DEN DRUCKERTREIBER NEU — Informationen zur Neuinstallation
des Druckertreibers finden Sie in der Dokumentation zum Drucker.
Probleme mit dem Scanner
VORSICHT: Bevor Sie gemäß den in diesem Abschnitt beschriebenen
Anleitungen verfahren, lesen Sie zunächst die Sicherheitshinweise im
Produktinformationshandbuch
.
ANMERKUNG: Wenden Sie sich an den Hersteller des Scanners, wenn Sie
technische Unterstützung zu Ihrem Scanner benötigen.
L
ESEN SIE DIE SCANNERDOKUMENTATION — Informationen zur Einrichtung und
zur Fehlerbehebung finden Sie in der Dokumentation zu Ihrem Scanner.
E
NTRIEGELN SIE DEN SCANNER — Stellen Sie sicher, dass der Scanner entriegelt ist,
falls er mit einer Verriegelungsklammer oder -taste ausgestattet ist.
S
TARTEN SIE DEN COMPUTER UND VERSUCHEN SIE ERNEUT, MIT DEM SCANNER ZU
ARBEITEN
ÜBERPRÜFEN SIE DIE KABELVERBINDUNGEN —
• Informationen zum Kabelanschluss finden Sie in der Dokumentation zu Ihrem Scanner.
• Stellen Sie sicher, dass das Scannerkabel fest an den Scanner und den Computer
angeschlossen ist.
ÜBERPRÜFEN,SIE, OB DER SCANNER VON MICROSOFT WINDOWS ERKANNT WIRD —
Windows XP:
1
Klicken Sie auf
Start
→
Systemsteuerung
→
Drucker und andere Hardware
→
Scanner
und Kameras
.
2
Wenn der Scanner aufgeführt ist, hat Windows den Scanner erkannt.
Windows Vista:
1
Klicken Sie auf
Start
→
Systemsteuerung
→
Hardware und Sound
→
Scanner
und Kameras
.
2
Wenn der Scanner aufgeführt ist, hat Windows den Scanner erkannt.
INSTALLIEREN SIE DEN SCANNERTREIBER NEU — Anleitungen finden Sie in der
Dokumentation des Scanners.

242 Kurzanleitung
Probleme mit Sound und Lautsprecher
VORSICHT: Bevor Sie gemäß den in diesem Abschnitt beschriebenen
Anleitungen verfahren, lesen Sie zunächst die Sicherheitshinweise im
Produktinformationshandbuch
.
Kein Ton aus den Lautsprechern
ANMERKUNG: Bei einigen Programmen zur MP3-Wiedergabe bzw. zur
Wiedergabe anderer Medien wird die unter Windows eingestellte Lautstärke von
der programmeigenen Lautstärkeregelung außer Kraft gesetzt. Überprüfen Sie
immer die Einstellungen dieser Programme, um sicherzustellen, dass die Lautstärke
nicht ausgeschaltet oder auf ein nicht hörbares Niveau heruntergeregelt wurde.
Ü
BERPRÜFEN SIE DIE VERBINDUNGEN DER LAUTSPRECHERKABEL — Stellen Sie
sicher, dass die Lautsprecher entsprechend dem mitgelieferten Verkabelungsschema
angeschlossen sind. Wenn Sie eine Soundkarte gekauft haben, vergewissern Sie sich,
dass die Lautsprecher an der Karte angeschlossen sind.
S
TELLEN SIE SICHER, DASS DER SUBWOOFER UND DIE LAUTSPRECHER
EINGESCHALTET SIND — Beachten Sie die Setup-Übersicht, die im Lieferumfang der
Lautsprecher enthalten ist. Wenn die Lautsprecher über eine Lautstärkeregelung verfügen,
stellen Sie Lautstärke, Bass oder Höhen so ein, dass keine Verzerrungen auftreten.
S
TELLEN SIE DEN LAUTSTÄRKEREGLER UNTER WINDOWS EIN — Klicken oder
doppelklicken Sie auf das Lautsprechersymbol rechts unten auf dem Bildschirm. Stellen
Sie sicher, dass eine passende Lautstärke eingestellt ist und die Klangwiedergabe nicht
deaktiviert wurde.
Z
IEHEN SIE DAS KOPFHÖRERKABEL VOM KOPFHÖRERANSCHLUSS AB — Die
Klangwiedergabe der Lautsprecher wird automatisch deaktiviert, wenn Kopfhörer an
die Kopfhörerbuchse an der Frontblende des Computers angeschlossen werden.
Ü
BERPRÜFEN SIE DIE STECKDOSE — Stellen Sie sicher, dass die Steckdose Strom
liefert, indem Sie probeweise ein anderes Gerät, beispielsweise eine Lampe, anschließen.
B
ESEITIGEN SIE MÖGLICHE STÖRUNGEN — Schalten Sie Lüfter, Leuchtstoff- oder
Halogenlampen in der näheren Umgebung aus, um festzustellen, ob diese Störungen
verursachen.
F
ÜHREN SIE DIE LAUTSPRECHERDIAGNOSE AUS
INSTALLIEREN SIE DEN AUDIOTREIBER NEU — Siehe „Treiber” im Benutzerhandbuch.
V
ERWENDEN SIE DEN RATGEBER BEI HARDWAREKONFLIKTEN — Weitere
Informationen finden Sie unter „Wiederherstellen des Betriebssystems” in Ihrem
Benutzerhandbuch.
Kein Ton über die Kopfhörer

Kurzanleitung 243
ÜBERPRÜFEN SIE DEN KOPFHÖRERKABELANSCHLUSS — Kontrollieren Sie den
sicheren Sitz des Kopfhörerkabels im Kopfhöreranschluss am Computer (siehe
„Wissenswertes über Ihren Computer” im Benutzerhandbuch).
S
TELLEN SIE DEN LAUTSTÄRKEREGLER UNTER WINDOWS EIN — Klicken oder
doppelklicken Sie auf das Lautsprechersymbol rechts unten auf dem Bildschirm. Stellen
Sie sicher, dass eine passende Lautstärke eingestellt ist und die Klangwiedergabe nicht
deaktiviert wurde.
Probleme mit Grafik und Monitor
VORSICHT: Bevor Sie gemäß den in diesem Abschnitt beschriebenen
Anleitungen verfahren, lesen Sie zunächst die Sicherheitshinweise im
Produktinformationshandbuch
.
HINWEIS: Wenn Ihr Computer mit einer installierten PCI Express-Videokarte
geliefert wurde, muss diese Karte nicht entfernt werden, um weitere Videokarten
zu installieren. Die Karte wird jedoch für Zwecke der Fehlerbehebung benötigt.
Wenn Sie die Karte entfernen, bewahren Sie sie an sicherer Stelle auf.
Informationen zu Ihrer Videokarte erhalten Sie unter support.dell.com.
Keine Anzeige auf dem Bildschirm
ANMERKUNG: Weitere Informationen zur Problembehandlung finden Sie in der
Dokumentation für Ihren Monitor.
Ü
BERPRÜFEN SIE DEN ANSCHLUSS DES MONITORKABELS —
• Vergewissern Sie sich, dass das Monitorkabel mit der richtigen Videokarte verbunden
ist (betrifft Konfigurationen mit zwei Videokarten).
• Wenn Sie den optionalen DVI-nach-VGA-Adapter verwenden, sollten Sie sicherstellen,
dass der Adapter ordnungsgemäß mit der Videokarte und dem Monitor verbunden ist.
• Vergewissern Sie sich, dass das Monitorkabel, wie in der Setup-Übersicht für Ihren
Computer gezeigt, angeschlossen ist.
• Entfernen Sie alle Verlängerungskabel und schließen Sie den Monitor direkt an den
Computer an.
• Vertauschen Sie die Netzkabel des Computers und des Monitors, um festzustellen, ob
das Netzkabel des Monitors defekt ist.
• Überprüfen Sie die Steckverbinder auf verbogene oder gebrochene Kontaktstifte (bei
Steckverbindern von Monitorkabeln ist es normal, dass Kontaktstifte fehlen).

244 Kurzanleitung
ÜBERPRÜFEN SIE DIE BETRIEBSANZEIGE DES MONITORS —
• Wenn die Betriebsanzeige leuchtet oder blinkt, wird der Monitor mit Strom versorgt.
• Wenn die Betriebsanzeige nicht leuchtet, drücken Sie fest auf den Schalter, um
sicherzustellen, dass der Monitor eingeschaltet ist.
• Wenn die Betriebsanzeige blinkt, drücken Sie eine Taste auf der Tastatur oder
bewegen Sie die Maus, um zum normalen Betriebszustand zurückzukehren.
ÜBERPRÜFEN SIE DIE STECKDOSE — Stellen Sie sicher, dass die Steckdose Strom
liefert, indem Sie probeweise ein anderes Gerät, beispielsweise eine Lampe, anschließen.
Ü
BERPRÜFEN SIE DIE DIAGNOSEANZEIGEN — Siehe „Diagnoseanzeigen” auf
Seite 213.
Die Anzeige ist schlecht lesbar
ÜBERPRÜFEN SIE DEN ANSCHLUSS DES MONITORKABELS —
• Vergewissern Sie sich, dass das Monitorkabel mit der richtigen Videokarte verbunden
ist (betrifft Konfigurationen mit zwei Videokarten).
• Wenn Sie den optionalen
DVI-nach-VGA
-Adapter verwenden, sollten Sie sicherstellen,
dass der Adapter ordnungsgemäß mit der Videokarte und dem Monitor verbunden ist.
• Vergewissern Sie sich, dass das Monitorkabel, wie in der Setup-Übersicht für Ihren
Computer gezeigt, angeschlossen ist.
• Entfernen Sie alle Verlängerungskabel und schließen Sie den Monitor direkt an den
Computer an.
• Vertauschen Sie die Netzkabel des Computers und des Monitors, um festzustellen,
ob das Netzkabel des Monitors defekt ist.
• Überprüfen Sie die Steckverbinder auf verbogene oder gebrochene Kontaktstifte (bei
Steckverbindern von Monitorkabeln ist es normal, dass Kontaktstifte fehlen).
ÜBERPRÜFEN SIE DIE BETRIEBSANZEIGE DES MONITORS —
• Wenn die Betriebsanzeige leuchtet oder blinkt, wird der Monitor mit Strom versorgt.
• Wenn die Betriebsanzeige nicht leuchtet, drücken Sie fest auf den Schalter, um
sicherzustellen, dass der Monitor eingeschaltet ist.
• Wenn die Betriebsanzeige blinkt, drücken Sie eine Taste auf der Tastatur oder
bewegen Sie die Maus, um zum normalen Betriebszustand zurückzukehren.
ÜBERPRÜFEN SIE DIE STECKDOSE — Stellen Sie sicher, dass die Steckdose Strom
liefert, indem Sie probeweise ein anderes Gerät, beispielsweise eine Lampe, anschließen.
Ü
BERPRÜFEN SIE DIE DIAGNOSEANZEIGEN — Siehe „Diagnoseanzeigen” auf
Seite 213.

Kurzanleitung 245
ÜBERPRÜFEN SIE DIE MONITOREINSTELLUNGEN — Anleitungen zum Einstellen von
Kontrast und Helligkeit, zum Entmagnetisieren (Degauss) und zum Durchführen des
Bildschirmselbsttests finden Sie in der Dokumentation zum Bildschirm.
R
ÜCKEN SIE DEN SUBWOOFER VOM MONITOR AB — Falls das Lautsprechersystem
mit einem Subwoofer ausgestattet ist, stellen Sie sicher, dass dieser mindestens
60 Zentimeter vom Monitor entfernt aufgestellt wird.
V
ERGRÖSSERN SIE DEN ABSTAND ZWISCHEN MONITOR UND EXTERNEN
S
TROMQUELLEN — Lüfter, Leuchtstoffröhren, Halogenlampen oder andere elektrische
Geräte in der Nähe des Monitors können sich störend, beispielsweise durch Flackern des
Bildes, auf die Bildschirmanzeige auswirken. Schalten Sie derartige in der Nähe
befindliche Geräte aus, um festzustellen, ob diese die Störung verursachen.
D
REHEN SIE DEN MONITOR, UM SPIEGELUNGEN DES SONNENLICHTS UND DAMIT
VERBUNDENE STÖRUNGEN AUSZUSCHLIESSEN
PASSEN SIE DIE WINDOWS-ANZEIGEEINSTELLUNGEN AN —
Windows XP:
1
Klicken Sie auf
Start
→
Systemsteuerung
→
Darstellung und Designs
.
2
Klicken Sie auf den Bereich, den Sie ändern möchten, oder auf das Symbol
Anzeige
.
3
Probieren Sie verschiedene Einstellungen für
Farbqualität
und
Bildschirmauflösung
aus.
Windows Vista:
1
Klicken Sie auf
Start
→
Systemsteuerung
→
Hardware und Sound
→
Anpassung
→
Anzeigeeinstellungen
.
2
Passen Sie die Einstellungen für
Auflösung
und
Farbtiefe
nach Bedarf an.
Die Qualität von 3D-Bildern ist schlecht
ÜBERPRÜFEN SIE DEN ANSCHLUSS DES STROMVERSORGUNGKABELS AN DER
V
IDEOKARTE — Stellen Sie sicher, dass das Stromversorgungskabel für die Videokarte
ordnungsgemäß mit der Karte verbunden ist.
Ü
BERPRÜFEN SIE DIE MONITOREINSTELLUNGEN — Anleitungen zum Einstellen von
Kontrast und Helligkeit, zum Entmagnetisieren (Degauss) und zum Durchführen des
Bildschirmselbsttests finden Sie in der Dokumentation zum Bildschirm.
Nur teilweise lesbare Anzeige
SCHALTEN SIE DEN COMPUTER UND DEN MONITOR EIN UND STELLEN SIE
H
ELLIGKEIT UND KONTRAST DES MONITORS EIN — Wenn der Monitor funktioniert,
ist möglicherweise die Videokarte defekt.
Wenden Sie sich an Dell (siehe „Kontaktaufnahme
mit Dell”
im Benutzerhandbuch
).

246 Kurzanleitung

Stichwortverzeichnis 247
Stichwortverzeichnis
A
Anschlüsse
IEEE 1394, 206, 208
Kopfhörer, 206
Line-Out, 208
Maus, 208
Netzwerkadapter, 209
Parallel, 208
Seriell, 209
Sound, 208
Tastatur, 209
USB-Anschluss, 206, 209
Anzeige. Siehe Monitor
Anzeigen
Computerrückseite, 213
Diagnose, 207, 213
Festplattenaktivität, 206-207
Netzwerk, 209
Netzwerkaktivität, 209
Verbindungsintegrität, 209
Assistent zum Übertragen von
Dateien und Einstellungen
(Windows XP), 199
Assistenten
Assistent zum Übertragen von
Dateien und Einstellungen
(Windows XP), 199
Programmkompatibilitäts-
Assistent, 235
Windows-EasyTransfer
(Windows Vista), 202
Audioanschlüsse
Line-Out, 208
B
Batterie
Probleme, 228
Benutzerhandbuch, 190
Betriebsanzeige
Zustände, 239
Betriebsbestimmungen, 190
Betriebssystem
Erneut installieren, 194
Betriebssystem-Datenträger, 194
C
CD-RW-Laufwerk
Probleme, 229
Check Disk (Datenträger
überprüfen), 230
Computer
Abstürze, 234-236
Signaltoncodes, 218
System reagiert nicht
mehr, 234-235

248 Stichwortverzeichnis
D
Dell Diagnostics, 223
Desktop System Software, 193
Diagnose
Anzeigen, 207, 213
Dell Diagnostics, 223
Signaltoncodes, 218
Diagnoseanzeigen, 213
Display. Siehe Monitor
Dokumentation
Benutzerhandbuch, 190
Betriebsbestimmungen, 190
Endbenutzer-Lizenzvertrag, 190
Ergonomie, 190
Garantie, 190
Online, 192
Produktinformationshandbuch, 190
Sicherheit, 190
Drivers and
Utilities-Datenträger, 189
Drucker
Anschließen, 199
Einrichten, 199
Probleme, 240
E
E-Mail
Probleme, 230
Endbenutzer-Lizenzvertrag, 190
Etiketten
Express-Servicecode, 191
Microsoft Windows, 191
Service-Tag-Nummer, 191
Express-Servicecode, 191
F
Fehlerbehebung
Betriebsanzeige, 212
Dell Diagnostics, 223
Diagnoseanzeigen, 213
Hardware-Ratgeber, 222
Hilfe- und Supportcenter, 193
Konflikte, 222
Probleme, 227
Signaltoncodes, 218
Systemmeldungen, 220
Fehlermeldungen
Diagnoseanzeigen, 213
Probleme, 232
Signaltoncodes, 218
Festplattenlaufwerk
Aktivitätsanzeige, 206-207
Probleme, 230
G
Garantieinformationen, 190
Grafik
Probleme, 243

Stichwortverzeichnis 249
H
Hardware
Dell Diagnostics, 223
Konflikte, 222
Signaltoncodes, 218
Hardware-Ratgeber, 222
Hilfe- und Supportcenter, 193
Hilfedatei
Hilfe- und Supportcenter von
Windows, 193
Hinweise zur Ergonomie, 190
I
IEEE 1394
Anschlüsse, 206, 208
Probleme, 233
Internet
Probleme, 230
IRQ-Konflikte, 222
K
Konflikte
Software- und
Hardwareinkompatibilitäten, 222
Kopfhörer
Anschluss, 206
L
Laufwerke
Probleme, 228
Lautstärke
Regeln, 242
M
Maus
Anschluss, 208
Probleme, 237
Meldungen
Fehler, 232
System-, 220
Modem
Probleme, 230
Monitor
Leer, 243
Probleme, 243
Schlecht lesbar, 244
N
Netzwerk
Anschluss, 209
Probleme, 238
O
Optisches Laufwerk
Probleme, 229
P
Probleme
Allgemein, 234
Batterie, 228
Betriebsanzeige, Zustände, 239
Bildschirmdarstellung schlecht
lesbar, 244
Blauer Bildschirm, 236
CD-RW-Laufwerk, 229

250 Stichwortverzeichnis
Probleme (Fortsetzung)
Computer reagiert nicht
mehr, 234-235
Computerabstürze, 234-236
Dell Diagnostics, 223
Diagnoseanzeigen, 213
Drucker, 240
E-Mail, 230
Fehlermeldungen, 232
Festplattenlaufwerk, 230
Grafik und Monitor, 243
IEEE 1394, 233
Internet, 230
Keine Anzeige auf dem
Bildschirm, 243
Keine Anzeige auf dem
Monitor, 243
Konflikte, 222
Laufwerke, 228
Maus, 237
Modem, 230
Monitordarstellung schlecht
lesbar, 244
Netzwerk, 238
Optisches Laufwerk, 229
Programm reagiert nicht
mehr, 235
Programmabstürze, 235
Regeln der Lautstärke, 242
Scanner, 241
Signaltoncodes, 218
Software, 235-236
Speicher, 236
Stromversorgung, 239
Tastatur, 234
Produktinformationshandbuch, 190
S
S.M.A.R.T, 222
Scanner
Probleme, 241
Service-Tag-Nummer, 191
Sicherheitshinweise, 190
Signaltoncodes, 218
Software
Konflikte, 222
Probleme, 235-236
Speicher
Probleme, 236
Stromversorgung
Betriebsschalter, 206
Leitungsfilter, 203
Probleme, 239
Schutzgeräte, 203
Überspannungsschutz, 203
USV, 203
Support-Site von Dell, 192
Support-Website, 192
T
Tastatur
Anschluss, 209
Probleme, 234

Stichwortverzeichnis 251
U
Übertragen von Daten auf einen
anderen Computer
Assistent zum Übertragen von
Dateien und Einstellungen
(Windows XP), 199
Windows-EasyTransfer
(Windows Vista), 202
Unterbrechungsfreie
Stromversorgung. Siehe UPS
USB-Anschluss
Anschluss, 209
Anschlüsse, 206
USV, 203
W
Windows Vista
Erneut installieren, 194
Hilfe- und Supportcenter, 193
Windows-EasyTransfer, 202
Windows XP
Assistent zum Übertragen von
Dateien und
Einstellungen, 199
Erneut installieren, 194
Hardware-Ratgeber, 222
Hilfe- und Supportcenter, 193

Stichwortverzeichnis 252

www.dell.com | support.dell.com
Dell Precision™ T7400
Guida di consultazione rapida
Modello DCDO

N.B., avvisi e attenzione
N.B. Un N.B. indica informazioni importanti che contribuiscono a migliorare
l'utilizzo del computer.
AVVISO: Un AVVISO indica un danno potenziale all'hardware o perdita di dati
e spiega come evitare il problema.
ATTENZIONE: un messaggio di ATTENZIONE indica un potenziale rischio di danni,
anche gravi, a cose e persone.
____________________
Le informazioni contenute nel presente documento sono soggette a modifiche senza preavviso.
© 2007 Dell Inc. Tutti i diritti riservati.
È severamente vietata la riproduzione, con qualsiasi strumento senza l'autorizzazione scritta di Dell Inc..
Marchi usati nel presente documento: Dell, il logo DELL e Dell Precision sono marchii di Dell Inc.;
Microsoft, Windows e Windows Vista sono marchi o marchi registrati di Microsoft Corporation negli
Stati Uniti e/o in altri paesi.
Altri marchi e nomi depositati possono essere utilizzati in questo documento sia in riferimento alle entità
che rivendicano i marchi e i nomi, sia ai prodotti stessi. Dell Inc. nega qualsiasi partecipazione di proprietà
relativa a marchi e nomi depositati diversi da quelli di sua proprietà.
Modello DCDO
Settembre 2007 N/P HR707 Rev. A00

Sommario 255
Sommario
Ricerca di informazioni . . . . . . . . . . . . . . . . . 257
Installazione del computer
. . . . . . . . . . . . . . . 263
Passaggio dalla modalità tower alla modalità
desktop e viceversa
. . . . . . . . . . . . . . . . 263
Installazione del computer in un armadio
. . . . . 264
Trasferimento delle informazioni su un nuovo
computer
. . . . . . . . . . . . . . . . . . . . . . 267
Dispositivi di protezione elettrica
. . . . . . . . . 270
Informazioni sul computer
. . . . . . . . . . . . . . . 272
Vista frontale (posizione tower)
. . . . . . . . . . 272
Retro del computer (posizione tower)
. . . . . . . 274
Connettori del pannello posteriore
. . . . . . . . 275
Pulizia del computer
. . . . . . . . . . . . . . . . . . 277
Computer, tastiera e monitor
. . . . . . . . . . . . 277
Mouse (non ottico)
. . . . . . . . . . . . . . . . . 277
Unità disco floppy
. . . . . . . . . . . . . . . . . 278
CD e DVD
. . . . . . . . . . . . . . . . . . . . . . 278
Strumenti per la risoluzione dei problemi
. . . . . . . 278
Indicatore di alimentazione
. . . . . . . . . . . . 278
Indicatori di diagnostica
. . . . . . . . . . . . . . 280
Codici bip
. . . . . . . . . . . . . . . . . . . . . . 284
Messaggi di sistema
. . . . . . . . . . . . . . . . 285
Hardware Troubleshooter
. . . . . . . . . . . . . 287
Dell Diagnostics
. . . . . . . . . . . . . . . . . . 288
Risoluzione dei problemi
. . . . . . . . . . . . . . 292
Indice analitico . . . . . . . . . . . . . . . . . . . . . . 309

256 Sommario

Guida di consultazione rapida 257
Ricerca di informazioni
N.B. Alcune funzioni o supporti possono essere facoltativi e non compresi nella
dotazione del computer. Alcune funzioni o supporti possono non essere disponibili
in alcuni paesi.
N.B. Informazioni supplementari potrebbero essere fornite assieme al computer.
Cosa si ricerca? Si trova qui
• Un programma di diagnostica per
il computer
• Driver per il computer
• Documentazione per le periferiche
• Software di sistema per desktop (DSS)
Disco Drivers and Utilities
N.B. Il disco Drivers and Utilities è opzionale
e potrebbe non essere spedito con il computer.
La documentazione e i driver sono già
installati sul computer. È possibile utilizzare
il disco Drivers and Utilities per installare di
nuovo i driver (consultare "Reinstallazione
di driver e utilità" nella Guida dell'utente)
ed eseguire il programma Dell Diagnostics
(vedere "Dell Diagnostics" a pagina 288).
N.B. Aggiornamenti sui driver e sulla
documentazione sono disponibili all'indirizzo
support.dell.com.

258 Guida di consultazione rapida
• Procedure di rimozione e
sostituzione di componenti
• Specifiche
• Procedure di configurazione
delle impostazioni di sistema
• Procedure di risoluzione
dei problemi
Guida dell'utente di Dell Precision™
Guida in linea e supporto tecnico di
Microsoft
®
Windows
®
XP
e Microsoft Windows Vista™
1
Fare clic su
Start
→
Guida e supporto
tecnico
→
Dell User and System
Guides
→
Guide di sistema
.
2
Fare clic sulla
Guida dell'utente
per il
computer.
• Informazioni sulla garanzia
• Termini e condizioni (limitatamente
agli Stati Uniti)
• Istruzioni di sicurezza
• Informazioni sulle normative
• Informazioni sull'ergonomia
• contratto di licenza Microsoft per
l'utente finale
Guida alle informazioni sul prodotto Dell™
Cosa si ricerca? Si trova qui

Guida di consultazione rapida 259
• Numero di servizio e codice del
servizio espresso
• Product Key di
Microsoft
®
Windows
®
Numero di servizio e Product Key di
Microsoft Windows
Queste etichette si trovano sul computer:
• Usare il numero di servizio per identificare
il computer quando si utilizza
support.dell.com
o rivolgersi al supporto
tecnico di Dell.
• Immettere il codice del servizio espresso
per smistare la telefonata quando ci si
rivolge al supporto tecnico di Dell.
N.B. Come ulteriore misura di protezione,
l’etichetta di licenza di Microsoft Windows
è stata riprogettata con una parte mancante
o foro per scoraggiare la rimozione
dell’etichetta stessa.
Cosa si ricerca? Si trova qui

260 Guida di consultazione rapida
• Soluzioni — suggerimenti per la risoluzione
dei problemi, articoli di tecnici, corsi in
linea e domande frequenti
• Forum clienti — discussione in linea con
altri clienti Dell
• Aggiornamenti — informazioni di
aggiornamento per componenti, quali ad
esempio la memoria, il disco rigido e il
sistema operativo
• Servizio clienti — informazioni di contatto,
sullo stato dell'ordine e della richiesta di
servizio, sulla garanzia e sulle riparazioni
• Servizio e supporto — stato della richiesta
di servizio, contratto di assistenza,
discussioni in linea con il supporto tecnico
• Servizio Dell Technical Update — avvisi
tramite posta elettronica della disponibilità
di aggiornamenti software e hardware per il
computer in uso
• Riferimenti — documentazione per il
computer, dettagli sulla configurazione
del computer, specifiche dei prodotti
ewhite paper
• Download — aggiornamenti di driver
certificati, patch e software
Sito Web del supporto tecnico della Dell —
support.dell.com
N.B. Selezionare il Paese o il settore
commerciale per visualizzare il sito del
supporto corretto.
Cosa si ricerca? Si trova qui

Guida di consultazione rapida 261
• Desktop System Software (DSS) — Se
si reinstalla il sistema operativo per il
computer, va anche reinstallata l'utilità
DSS. DSS rileva automaticamente il
computer e il sistema operativo e installa
gli aggiornamenti adeguati alla propria
configurazione, fornendo gli
aggiornamenti importanti per il sistema
operativo e supporto per processori,
unità ottiche, periferiche USB, per
esempio. DSS è necessario per il corretto
funzionamento del computer Dell.
Per scaricare DSS:
1
Accedere a
support.dell.com
, selezionare
il paese e quindi fare clic su
Drivers
&Downloads
.
2
Fare clic su
Select Model
o
Enter a Tag
,
effettuare le selezioni appropriate per il
computer utilizzato e fare clic su
Confirm
.
3
Posizionarsi su
System and Configuration
Utilities
→
Desktop System Software
e quindi fare clic su
Download Now
.
N.B. L'interfaccia dell'utente
support.dell.com potrebbe variare in base
alle selezioni.
• Informazioni sull'uso di Windows XP
• Come utilizzare Windows Vista
• Come usare programmi e file
• Come personalizzare il desktop
Guida e supporto tecnico di Windows
1
Fare clic su
Start
→
Guida in linea
esupporto tecnico
.
2
Digitare una parola o una frase che
descriva il problema e fare clic sull'icona
della freccia.
3
Fare clic sull'argomento che descrive
il problema.
4
Seguire le istruzioni visualizzate.
Cosa si ricerca? Si trova qui

262 Guida di consultazione rapida
• Procedure per la reinstallazione del
sistema operativo
Disco Operating System
Il sistema operativo è già installato nel
computer. Per reinstallare il sistema
operativo, utilizzare il disco Operating
System fornito con il computer
(consultare "Ripristino del sistema
operativo" nella Guida dell'utente).
Dopo avere reinstallato il sistema operativo,
utilizzare il disco Drivers and Utilities
opzionale per reinstallare i driver per le
periferiche fornite assieme al computer.
L'etichetta della product key del sistema
operativo si trova sul computer.
N.B. Il colore del disco del sistema operativo
varia in base al sistema operativo ordinato.
• Informazioni sull'uso di Linux
• Discussioni tramite posta elettronica
con utenti di prodotti Dell Precision
e del sistema operativo Linux
• Informazioni aggiuntive relative
a Linux e al computer Dell Precision
Siti Linux supportati da Dell
• linux.dell.com
• lists.us.dell.com/mailman/listinfo/linux-
precision
Cosa si ricerca? Si trova qui

Guida di consultazione rapida 263
Installazione del computer
Passaggio dalla modalità tower alla modalità desktop e viceversa
ATTENZIONE: prima di eseguire le procedure descritte in questa sezione, leggere
le istruzioni di sicurezza riportate nella
Guida alle informazioni sul prodotto
.
N.B. Per passare dalla modalità tower alla modalità desktop e viceversa, utilizzare
il kit opzionale fornito da Dell. Consultare "Informazioni sul prodotto" nella Guida
dell'utente per maggiori informazioni su come ordinare dalla Dell.
N.B. Il computer tower supporta un'unità da 3,5 pollici in più nella parte anteriore
rispetto al computer desktop.
1
Seguire le procedure descritte in "Operazioni preliminari" nella
Guida dell'utente
.
2
Rimuovere il coperchio del computer (consultare "Rimozione del coperchio
del computer" nella
Guida dell'utente
).
3
Rimuovere il pannello anteriore (consultare "Rimozione del pannello anteriore"
nella
Guida dell'utente
).
4
Rimuovere il pannello dell'unità e prepararlo aggiungendo o rimuovendo
inserti, se necessario (consultare "Pannelli dell'unità" nella
Guida dell'utente
).
Passaggio dalla modalità tower alla modalità desktop
1
Rimuovere tutte le unità disco floppy e i lettori di schede flash installati
seguendo le indicazioni presenti in Rimozione di un'unità disco floppy o di un
lettore scheda multimediale (Computer torre) nella
Guida dell'utente
e quindi
reinstallare una singola unità disco floppy o lettore di schede flash seguendo le
indicazioni presenti in "Installazione di un'unità disco floppy o di un lettore
scheda multimediale (Computer desktop)" nella
Guida dell'utente
.
2
Rimuovere tutte le unità ottiche installate seguendo le indicazioni presenti in
"Rimozione di un'unità ottica (Computer tower)" nella
Guida dell'utente
, and
then reinstall the drives by following the steps in "Installing an Optical Drive
(Desktop Computer)" in your
User’s Guide
.

264 Guida di consultazione rapida
Passaggio dalla modalità desktop alla modalità tower
1
Rimuovere l'unità disco floppy o il lettore di schede multimediali installati
seguendo le indicazioni presenti in "Rimozione di un'unità disco floppy
o di un lettore scheda multimediale (Computer desktop)" nella
Guida
dell'utente
e quindi reinstallare l'unità disco floppy o il lettore di schede
multimediali seguendo le indicazioni presenti in "Installazione di un'unità
disco floppy o di un lettore scheda multimediale (Computer tower)" nella
Guida dell'utente
.
2
Rimuovere tutte le unità ottiche installate seguendo le indicazioni presenti in
"Rimozione di un'unità ottica (Computer desktop)" nella
Guida dell'utente
e reinstallare tutte le unità ottiche installate seguendo le indicazioni presenti
in "Installazione di un'unità ottica (Computer tower)" nella
Guida dell'utente
.
Installazione del computer in un armadio
L'installazione del computer in un armadio può impedire al flusso di aria di
circolare, può causare il surriscaldamento del computer e può penalizzarne le
prestazioni. Seguire le linee guida sotto elencate quando si installa il computer
in un armadio.
AVVISO: La temperatura di funzionamento specificata in questo manuale rispecchia la
temperatura di funzionamento ambiente massima. Occorre considerare la temperatura
ambiente quando si installa il computer in un ambiente chiuso. Per dettagli sulle specifiche
del computer, consultare, consultare "Specifiche" nella Guida dell'utente.

Guida di consultazione rapida 265
• Lasciare uno spazio di almeno 10,2 cm su tutti i lati del computer per consentire
un'adeguata ventilazione.
• Se il computer viene installato in un angolo o sotto una scrivania, lasciare uno
spazio minimo di 5,1 cm fra il retro del computer e la parete per permettere
l'aerazione necessaria per un'adeguata ventilazione.
• Se l’armadio ha porte, accertarsi che permettano almeno il 30 percento di
aerazione (anteriore e posteriore).

266 Guida di consultazione rapida
• Non installare il computer in un armadio privo di aerazione. Limitando
l'aerazione
il computer si surriscalda e le prestazioni vengono penalizzate
.

Guida di consultazione rapida 267
Trasferimento delle informazioni su un nuovo computer
È possibile utilizzare la procedura guidata del sistema operativo per trasferire
file e altri dati da un computer a un altro.
Microsoft Windows XP
Il sistema operativo Microsoft
Windows XP fornisce Trasferimento guidato
file e impostazioni per trasferire dati, quali:
• messaggi di posta elettronica
• impostazioni della barra degli strumenti
• dimensioni finestre
• segnalibri Internet
È possibile trasferire dati da un computer a un altro tramite una connessione
in rete o seriale o memorizzando i dati su un supporto rimovibile come un CD
o DVD masterizzabile.
N.B. È possibile trasferire i dati da un computer a un altro collegando un cavo seriale
direttamente alle porte di input/output (I/O) dei due computer. Per trasferire i dati su una
connessione seriale, è necessario utilizzare l'utilità Connessioni di rete nel Pannello di
controllo per eseguire altri passaggi di configurazione, ad esempio la configurazione di
una connessione avanzata e l'assegnazione dei computer host e guest.
Per istruzioni sull'impostazione di una connessione diretta via cavo tra due computer,
consultare Microsoft Knowledge Base, Articolo n. 305621, dal titolo How to Set Up a Direct
Cable Connection Between Two Computers in Windows XP (Come configurare una
connessione diretta via cavo tra due computer in Windows XP). Queste informazioni
possono non essere disponibili in alcuni paesi.
L'utilizzo del Trasferimento guidato file e impostazioni richiede il disco Operating
System fornito con il computer o un disco Trasferimento guidato, creato dalla
procedura guidata.
N.B. Per ulteriori informazioni sul trasferimento di dati, cercare in support.dell.com il
documento n. 154781 (What Are The Different Methods To Transfer Files From My Old
Computer To My New Dell™ Computer Using the Microsoft Windows XP Operating
System?) in inglese.
N.B. L'accesso al documento nella Knowledge Base di Dell potrebbe non essere
possibile in alcuni paesi.

268 Guida di consultazione rapida
Trasferimento guidato file e impostazioni (con il disco Operating System)
N.B. Il Trasferimento guidato file e impostazioni definisce il computer di origine dal
quale vengono trasferiti i dati come computer vecchio e definisce il computer di
destinazione in cui vengono trasferiti i dati come computer nuovo.
PREPARARE IL COMPUTER DI DESTINAZIONE PER IL TRASFERIMENTO DEI FILE —
1
Fare clic su
Start
→
Tutti i programmi
→
Accessori
→
Utilità di sistema
→
Trasferimento guidato file e impostazioni
.
2
In
Specificare il computer
, fare clic su
Nuovo computer
e quindi su
Avanti
.
3
Nella schermata
Si dispone di un CD di Windows XP?
, fare clic su
Si utilizzerà
la procedura guidata contenuta nel CD di Windows XP
e quindi su
Avanti
.
4
Esaminare le informazioni presenti in
Passare al vecchio computer
e quindi
accedere al computer di origine.
Non
fare clic su
Avanti
.
COPIARE I DATI DAL COMPUTER ORIGINE —
1
Inserire il disco
Operating System
di Windows XP nel computer di origine.
Viene visualizzata la
schermata iniziale di Microsoft Windows XP
.
2
Fare clic su
Esegui altre operazioni
.
3
In
Scegliere l'operazione da eseguire?
, fare clic su
Trasferisci file e impostazioni
.
Viene visualizzata la schermata
Trasferimento guidato file e impostazioni
.
4
Fare clic su
Avanti
.
5
In
Specificare il computer
, fare clic su
Vecchio computer
e quindi su
Avanti
.
6
In
Selezionare la modalità di trasferimento
, fare clic sulla modalità di
trasferimento desiderata e quindi su
Avanti
.
7
In
Selezionare gli elementi da trasferire?
, selezionare i dati da trasferire
e quindi fare clic su
Avanti
.
I dati selezionati vengono copiati e viene visualizzata la schermata
Completamento fase di raccolta
.
8
Fare clic su
Fine
.
TRASFERIRE I DATI AL COMPUTER DI DESTINAZIONE —
1
Passare al computer di destinazione.
2
In
Passare al vecchio computer
, fare clic su
Avanti
.

Guida di consultazione rapida 269
3
In
Specificare il percorso di file e cartelle?
, selezionare il metodo scelto
per trasferire le impostazioni e i file e quindi fare clic su
Avanti
.
La procedura guidata legge i file e le impostazioni raccolti e li applica al
computer di destinazione. Al termine del trasferimento, viene visualizzata
la schermata
Completata
.
4
Fare clic su
Fine
e riavviare il sistema.
Trasferimento guidato file e impostazioni (senza il disco Operating System)
Per eseguire il Trasferimento guidato file e impostazioni senza il disco Operating
System, è necessario creare un disco appropriato. Tal disco consente di creare un
un file di immagine di backup su un supporto rimovibile.
N.B. Il Trasferimento guidato file e impostazioni definisce il computer di origine dal
quale vengono trasferiti i dati come computer vecchio e definisce il computer di
destinazione in cui vengono trasferiti i dati come computer nuovo.
CREARE UN DISCO —
1
Sul computer di destinazione, fare clic su
Start
→
Tutti i programmi
→
Accessori
→
Utilità di sistema
→
Trasferimento guidato file e impostazioni
.
2
In
Specificare il computer
, fare clic su
Nuovo computer
e quindi su
Avanti
.
3
In
Si dispone di un CD di Windows XP?
, fare clic su
Crea il disco nell'unità
seguente
, quindi fare clic su
Avanti
.
4
Inserire un CD o DVD scrivibile e fare clic su
OK
.
5
Esaminare le informazioni presenti in
Passare al vecchio computer
e quindi
accedere al computer di origine.
Non
fare clic su
Avanti
.
COPIARE I DATI DAL COMPUTER ORIGINE —
1
Inserire il disco nel computer di origine.
2
Fare clic su
Start
→
Esegui
.
3
Fare clic su
Sfoglia...
e cercare
fastwiz
sul disco, quindi fare clic su
OK
.
4
In
Specificare il computer
, fare clic su
Vecchio computer
e quindi su
Avanti
.
5
In
Selezionare la modalità di trasferimento
, fare clic sulla modalità di
trasferimento desiderata e quindi su
Avanti
.

270 Guida di consultazione rapida
6
In
Selezionare gli elementi da trasferire?
, selezionare i dati da trasferire
e quindi fare clic su
Avanti
.
I dati selezionati vengono copiati e viene visualizzata la schermata
Completamento fase di raccolta
.
7
Fare clic su
Fine
.
TRASFERIRE I DATI AL COMPUTER DI DESTINAZIONE —
1
Passare al computer di destinazione.
2
In
Passare al vecchio computer
, fare clic su
Avanti
.
3
In
Specificare il percorso di file e cartelle?
, selezionare il metodo scelto
per trasferire le impostazioni e i file e quindi fare clic su
Avanti
.
La procedura guidata legge i file e le impostazioni raccolti e li applica al
computer di destinazione. Al termine del trasferimento, viene visualizzata
la schermata
Completata
.
4
Fare clic su
Fine
e riavviare il sistema.
Microsoft Windows Vista
1
Fare clic sul pulsante Start di Windows Vista , fare clic su
Trasferisci
file e impostazioni
→
Avvia Trasferimento dati Windows
.
2
Nella finestra di dialogo
Controllo account utente
, fare clic su
Continua
.
3
Fare clic su
Avvia nuovo trasferimento
o
Continua un trasferimento
in corso
.
Seguire le istruzioni sullo schermo del trasferimento guidato di Windows.
Dispositivi di protezione elettrica
Esistono diversi dispositivi per la protezione dalle interruzioni e fluttuazioni
di corrente:
• dispositivi di protezione da sovratensioni
• compensatori di linea
• gruppi di continuità (UPS)

Guida di consultazione rapida 271
Dispositivi di protezione da sovratensioni
I dispositivi di protezione da sovratensioni e le ciabatte provviste di un
dispositivo di protezione da sovracorrente proteggono il computer da possibili
danni provocati dai picchi di tensione che si verificano durante i temporali o in
seguito a interruzioni di corrente. Alcuni produttori di dispositivi di protezione
da sovratensioni includono una garanzia che offre copertura da determinati tipi
di danno. Leggere attentamente la garanzia del dispositivo scegliendo un
dispositivo protettore della sovratensioni e confrontare il valore nominale in
Joule per determinare l'efficacia dei diversi dispositivi. Un dispositivo con un
valore nominale in Joule più alto offre maggiore protezione.
AVVISO: i dispositivi di protezione da sovratensioni non proteggono da fluttuazioni
o interruzioni di corrente causate da fulmini nelle vicinanze. Quando si verifica un
temporale nelle vicinanze, scollegare la linea telefonica dalla presa a muro
e scollegare il computer dalla presa di corrente elettrica.
Molti dispositivi di protezione da sovracorrente sono dotati di un connettore per
la protezione del modem. Per istruzioni sul collegamento del modem, consultare
la documentazione fornita con il dispositivo di protezione da sovratensioni.
AVVISO: non tutti i dispositivi di protezione da sovratensioni proteggono gli adattatori
di rete. Disconnettere il cavo di rete dallo spinotto di rete a muro durante i temporali.
Compensatori di linea
AVVISO: i compensatori di linea non proteggono da interruzioni di corrente.
I compensatori di linea sono progettati per mantenere pressoché costante la
tensione di alimentazione c.a..
Gruppi di continuità
AVVISO: un'interruzione di corrente durante il salvataggio di dati sul disco rigido
può provocare la perdita dei dati e danneggiare i file.
N.B. Per garantire la massima autonomia della batteria, collegare solo il computer
all'UPS. Connettere altre periferiche, quali la stampante, a una ciabatta separata
che offra protezione da sovratensioni.
Un gruppo di continuità protegge il computer da fluttuazioni e interruzioni
di corrente. I gruppi di continuità contengono una batteria che fornisce
alimentazione per un breve periodo alle periferiche collegate durante
un'interruzione di corrente. La batteria è ricaricata quando l'alimentazione
c.a. è nuovamente disponibile. Per informazioni sull'autonomia della batteria
e per verificare che il dispositivo sia certificato da Underwriters Laboratories
(UL), consultare la documentazione del costruttore del gruppo di continuità.

272 Guida di consultazione rapida
Informazioni sul computer
Vista frontale (posizione tower)
1–3 Alloggiamenti
per unità da
5,25 pollici
Può contenere un'unità CD/DVD, un lettore di schede flash,
un'unità disco floppy o un disco rigido SATA in un portante
per unità da 5,25 pollici.
Il supporto per unità disco rigido è utilizzabile solo negli
alloggiamenti da 5,25 pollici. I supporti per unità disco
floppy/lettore di schede multimediali e per disco rigido non
sono intercambiabili.
1
2
3
4
5
6
7
8
11
10
13
12
9

Guida di consultazione rapida 273
4 Alloggiamento
per unità da
5,25 pollici con
piastra speciale
per unità da
3,5 pollici 5,25
Può contenere un'unità CD/DVD, un lettore di schede flash,
un'unità disco floppy o un disco rigido SATA in un portante per
unità da 5,25 pollici. La piastra per unità qui mostrata è utilizzabile
solo con unità disco floppy o lettore di schede flash e può essere
installata nella parte anteriore di uno qualsiasi dei quattro
alloggiamenti per unità da 5,25 pollici. Per ulteriori informazioni,
consultare "Pannelli dell’unità" nella Guida dell'utente.
Il supporto per unità disco rigido è utilizzabile solo negli
alloggiamenti da 5,25 pollici. I supporti per unità disco
floppy/lettore di schede multimediali e per disco rigido non
sono intercambiabili.
5 Indicatore
dell'attività del
disco rigido
L'indicatore del disco rigido è acceso quando il computer legge
o scrive dati sul disco rigido oppure durante il funzionamento di
una periferica, ad esempio un’unità CD.
6 Connettore
IEEE 1394
Usare il connettore IEEE 1394 per le periferiche dati ad alta
velocità, ad esempio le videocamere digitali e le periferiche
esterne di archiviazione.
7 Connettori
USB 2.0 (2)
Utilizzare i connettori USB del pannello anteriore per
periferiche che si collegano occasionalmente, quali le chiavi
di memoria flash, le fotocamere o le periferiche USB avviabili.
Dell consiglia di utilizzare i connettori USB sul retro del computer
per le periferiche che rimangono sempre collegate, quali le
stampanti e le tastiere.
8 Pulsante di
alimentazione,
indicatore di
alimentazione
Premere il pulsante di accensione per accendere il computer.
La spia al centro di questo pulsante indica lo stato
di alimentazione. Per ulteriori informazioni, consultare
"Comandi e indicatori" nella Guida dell'utente.
N.B. per evitare la perdita di dati, non utilizzare il pulsante di
alimentazione per spegnere il computer, ma chiudere la sessione
di lavoro del sistema operativo.
9 Marchio Dell È possibile ruotare il marchio Dell in modo che la scritta
"Dell" sia orizzonatle, in funzione dell’orientamento del
computer, desktop o torre.
10 Connettore
per cuffie
Usare il connettore delle cuffie per collegare le cuffie.
11 Connettore
del microfono
Utilizzare il connettore del microfono per collegare un microfono
per computer e integrare voce o musica in un programma audio
o di telefonia.
12 Indicatori di
diagnostica (4)
Utilizzare questi indicatori per risolvere i problemi di un computer
in base al codice di diagnostica. Per ulteriori informazioni,
consultare "Indicatori della diagnostica" nella Guida dell’utente.

274 Guida di consultazione rapida
Retro del computer (posizione tower)
ATTENZIONE: Accertarsi che nessuna presa d’aria del computer sia bloccata.
Il blocco delle prese d’aria può provocare gravi problemi di surriscaldamento.
13 Indicatore della
connessione
di rete
L'indicatore della connessione di rete è acceso quando
è disponibile una connessione funzionante tra una rete
a 10, 100 o 1000 Mbps (o 1 Gbps) e il computer.
1 Connettore di
alimentazione
Collegare il cavo di alimentazione.
2 Slot per schede Slot 2–6 supportano schede a tutta lunghezza, compreso uno PCI,
due PCI Express 2.0 x16 e due slot PCI-X. Gli slot 1 e 7 supportano
schede a metà lunghezza, compreso uno PCI Express x8 (cablato
come x4) e uno slot PCI-X.
3 Connettori del
pannello posteriore
Usare il connettore appropriato per collegare periferiche USB,
audio e di altro tipo (consultare "Connettori del pannello posteriore"
a pagina 275 per ulteriori informazioni).
1
3
2

Guida di consultazione rapida 275
Connettori del pannello posteriore
1 Connettore della
porta parallela
Consente di collegare una periferica parallela, quale una
stampante. Se si utilizza una stampante USB, collegarla al
connettore USB.
N.B. se il computer rileva la presenza di una scheda installata con
un connettore parallelo configurato sullo stesso indirizzo, il
connettore parallelo integrato viene automaticamente disattivato.
Per ulteriori informazioni, consultare la sezione "Opzioni del
programma di configurazione del sistema" nella Guida dell'utente.
2 Connettore
del mouse
Collegare un mouse standard PS/2 al connettore di colore
verde. Prima di collegare un mouse al computer, spegnere il
computer e le eventuali periferiche. Se si utilizza un mouse
USB, collegarlo al connettore USB.
3 Connettore
IEEE 1394
Usare il connettore IEEE 1394 per le periferiche dati ad alta
velocità, ad esempio le videocamere digitali e le periferiche
esterne di archiviazione.
4 Connettore della
linea di ingresso
Usare il connettore della linea di ingresso contrassegnato in blu
per collegare una periferica di riproduzione come un lettore di
MP3, un’unità CD o un VCR. Nei computer dotati di scheda
audio, utilizzare il connettore sulla scheda.
5 Connettore della
linea di uscita
Utilizzare il connettore verde della linea di uscita per collegare
le cuffie e la maggior parte degli altoparlanti con amplificatori
integrati. Nei computer dotati di scheda audio, utilizzare il
connettore sulla scheda.
123
456 7 8
11 10
9

276 Guida di consultazione rapida
6 Indicatore di
integrità della
connessione
Verde — è presente una connessione funzionante tra una rete
a 10 Mbps e il computer.
Arancione — È presente una connessione funzionante tra una
rete a 100 Mbps e il computer.
Giallo — è presente una connessione funzionante tra una rete
a 1000 Mbps (1 Gbps) e il computer
Spento — Il computer non rileva una connessione fisica alla rete.
7 Connettore
dell'adattatore
di rete
Per collegare il computer a una periferica di rete o a banda
larga, collegare un'estremità del cavo di rete a uno spinotto di
rete o alla periferica a banda larga Collegare l'altra estremità
del cavo al connettore dell'adattatore di rete sul computer. Il
cavo di rete è correttamente inserito quando scatta in posizione.
non collegare un cavo telefonico al connettore di rete.
Sui computer dotati di una scheda di rete aggiuntiva, utilizzare
i connettori sulla scheda e sul retro del computer per la
configurazione di più connessioni di rete, ad esempio per una
intranet e una extranet separate.
Per la rete si consiglia di utilizzare connettori e cavi appartenenti
alla Categoria 5. Se si deve necessariamente utilizzare un cavo di
Categoria 3, impostare la velocità della rete su 10 Mbps per
garantire un funzionamento affidabile.
8 Indicatore di
attività della rete
La spia gialla lampeggia quando il computer trasmette o riceve
dati sulla rete. Un alto volume di traffico di rete potrebbe far
sembrare che l'indicatore sia costantemente acceso.
9 Connettori
USB 2.0 (5)
Si consiglia di utilizzare i connettori USB del pannello frontale per
periferiche che si collegano occasionalmente, quali chiavi di
memoria flash, fotocamere o periferiche USB avviabili.
Utilizzare i connettori USB sul retro del computer per le periferiche
che rimangono sempre collegate, quali stampanti e tastiere.
10 Connettore
della tastiera
Se si utilizza una tastiera standard PS/2, collegarla all'apposito
connettore di colore viola. Se si utilizza una tastiera USB,
collegarla al connettore USB.
11 Connettori
seriali (2)
Consente di collegare una periferica seriale, quale un palmare,
a una porta seriale. Se necessario, l’indirizzo di questa porta può
essere modificato con il programma di installazione di sistema
(consultare "Configurazione del sistema" nella Guida dell’utente).

Guida di consultazione rapida 277
Pulizia del computer
ATTENZIONE: prima di eseguire le procedure descritte in questa sezione, leggere
le istruzioni di sicurezza riportate nella
Guida alle informazioni sul prodotto
.
Computer, tastiera e monitor
ATTENZIONE: prima di eseguire la pulizia del computer, scollegarlo dalla presa
elettrica. Pulire il computer con un panno morbido inumidito con acqua. Non
usare detergenti spray o liquidi che potrebbero contenere sostanze infiammabili.
• Usare l'aspirapolvere con un accessorio a spazzola per rimuovere delicatamente
la polvere da interstizi e cavità nel computer e tra i tasti sulla tastiera.
AVVISO: non pulire lo schermo del monitor con soluzioni a base di sapone o di
alcol. Ciò potrebbe danneggiare il rivestimento antiriflesso.
• Per pulire lo schermo del monitor, inumidire leggermente un panno morbido
e pulito con acqua. Se possibile, utilizzare apposite salviette per la pulizia dello
schermo o una soluzione adatta al rivestimento antiabbagliante del monitor.
• Pulire la tastiera, il computer e le parti in plastica del monitor con un panno
morbido inumidito con acqua.
Non inumidire eccessivamente il panno o lasciare gocciolare acqua all'interno
del computer o della tastiera.
Mouse (non ottico)
1
Rimuovere l'anello di fermo sotto il mouse girandolo in senso antiorario,
quindi rimuovere la sfera.
2
Pulire la sfera con un panno pulito e privo di lanugine.
3
Soffiare delicatamente nell'incavo della sfera per rimuovere polvere
e lanugine.
4
Pulire i rulli all'interno dell'incavo della sfera usando un tamponcino di
cotone leggermente inumidito con alcol isopropilico.
5
Se necessario, centrare di nuovo i rulli nei relativi canali. Accertarsi inoltre
che sui rulli non sia rimasta lanugine.
6
Rimontare la sfera e l'anello di fermo nella relativa sede, quindi ruotare
l'anello in senso orario fino a farlo scattare in posizione.

278 Guida di consultazione rapida
Unità disco floppy
AVVISO: Non tentare di pulire le testine dell'unità con un panno; Le testine
potrebbero risultare disallineate e impedire il funzionamento dell'unità.
Pulire l'unità disco floppy con uno degli appositi kit in commercio. Questi kit
contengono dischi floppy pretrattati per rimuovere le sostanze contaminanti
che si accumulano durante il normale funzionamento.
CD e DVD
AVVISO: usare sempre aria compressa per pulire le lenti dell'unità CD/DVD e seguire
le istruzioni fornite con il dispositivo utilizzato. Non toccare mai le lenti nell‘unità.
1
Tenere il disco per il bordo esterno. Si può toccare anche il bordo interno
del foro centrale.
AVVISO: per non danneggiare la superficie, evitare movimenti circolari quando si
pulisce il disco.
2
Con un panno morbido e privo di lanugine, pulire delicatamente la superficie
inferiore del disco (il lato privo di etichetta) in linea retta dal centro del disco
verso il bordo esterno.
Per sporco persistente, provare a utilizzare acqua o una soluzione diluita di
acqua e un sapone delicato. Esistono inoltre in commercio prodotti specifici
per la pulizia dei dischi che garantiscono protezione contro polvere, impronte
e graffi. Non ci sono controindicazioni all'uso su DVD di prodotti per la
pulizia di CD.
Strumenti per la risoluzione dei problemi
Indicatore di alimentazione
ATTENZIONE: prima di eseguire le procedure descritte in questa sezione, leggere
le istruzioni di sicurezza riportate nella
Guida alle informazioni sul prodotto
.
L'indicatore del pulsante di accensione sulla parte frontale del computer si
accende e lampeggia o rimane fisso a indicare condizioni di stato differenti:
• Se l'indicatore di alimentazione è di colore verde e il computer non risponde,
"Indicatori di diagnostica" a pagina 280.
• Se l'indicatore di accensione è verde lampeggiante, il computer è in modalità
standby. Premere un tasto della tastiera, spostare il mouse o premere il pulsante
di accensione per ripristinare il normale funzionamento del sistema.

Guida di consultazione rapida 279
• Se l'indicatore di accensione è spento, il computer è spento o non è alimentato.
– Scollegare il cavo di alimentazione e ricollegarlo al connettore sul retro
del computer e alla presa elettrica.
– Se il computer è collegato a una presa multipla, accertarsi che quest'ultima
sia collegata a una presa elettrica e sia accesa.
– Verificare che il computer si accenda correttamente anche senza
i dispositivi di protezione elettrica, le prese multiple e i cavi di
prolunga eventualmente utilizzati.
– Collegare alla presa elettrica un altro apparecchio, ad esempio una
lampada, per verificare il corretto funzionamento della presa.
– Accertarsi che il cavetto di alimentazione principale e quello del pannello
frontale siano perfettamente collegati alla scheda di sistema (vedere
"omponenti della scheda di sistema" nella
Guida dell'utente
).
• Se l'indicatore di accensione è giallo lampeggiante, il computer è alimentato
ma potrebbe esistere un problema di alimentazione interno.
– Accertarsi che il selettore di tensione sia impostato in modo compatibile
con l'alimentazione c.a. disponibile localmente (se disponibile).
– Accertarsi che il cavetto di alimentazione del processore sia collegato
correttamente alla scheda di sistema (vedere "Componenti della
scheda di sistema" nella
Guida dell'utente
).
• Se l'indicatore di accensione è giallo fisso, una periferica potrebbe non
funzionare correttamente o essere installata in modo errato.
– Rimuovere e reinstallare i moduli di memoria (vedere "Rimozione del
pannello anteriore" nella
Guida dell'utente
).
– Rimuovere e reinstallare tutte le schede (vedere "Schede" nella
Guida
dell'utente
).
• Eliminare eventuali interferenze. Alcune possibili cause di interferenze
sono:
– Cavi di prolunga di alimentazione, per tastiere e per mouse
– Un numero eccessivo di periferiche collegate a una multipresa
– Più multiprese collegate alla stessa presa elettrica

280 Guida di consultazione rapida
Indicatori di diagnostica
ATTENZIONE: prima di eseguire le procedure descritte in questa sezione, leggere
le istruzioni di sicurezza riportate nella
Guida alle informazioni sul prodotto
.
Per facilitare la risoluzione dei problemi, sul pannello anteriore del computer
sono presenti quattro indicatori luminosi contrassegnati dai numeri 1, 2, 3 e 4
(consultare "Vista frontale (posizione tower)" a pagina 272). Se il computer si
avvia normalmente, gli indicatori lampeggiano e quindi si spengono. In caso
di malfunzionamento del computer, la sequenza degli stati degli indicatori
consente di identificare il problema.
N.B. Quando il computer completa POST, i quattro indicatori si spengono prima di
eseguire l'avvio del sistema operativo.
Codici indicatori di diagnostica durante la verifica automatica all'accensione (POST)
Combinazione
degli indicatori
Descrizione
del problema
Soluzione consigliata
Computer spento
o possibile guasto
prima dell’avvio
del BIOS.
Collegare il computer a una presa elettrica
funzionante e premere il pulsante di
accensione.
Possibile guasto
del BIOS
e attivazione della
modalità di recupero.
• Eseguire l'utilità di recupero del BIOS,
attendere il completamento
dell'operazione, quindi riavviare il
computer.
• Se il problema persiste, contattare Dell
(vedere
"Come contattare la Dell" nella
Guida dell'utente
).
Possibile errore a livello
del processore.
• Riposizionare il processore (consultare
"Processore"
nella
Guida dell'utente
).
• Se il problema persiste, contattare Dell
(vedere
"Come contattare la Dell" nella
Guida dell'utente
).

Guida di consultazione rapida 281
Moduli di memoria
rilevati, ma possibile
errore di memoria.
• Se sono installati due o più moduli di
memoria, rimuoverli (consultare
"Memoria"
nella
Guida dell’utente
),
instalare di nuovo un modulo e riavviare il
computer. Se il computer si avvia
normalmente, proseguire con
l'installazione dei moduli di memoria
aggiuntivi (uno alla volta) fino a quando
non si individua il modulo difettoso o o si
reinstallano tutti i moduli senza errori.
• Se possibile, installare sul computer
memoria dello stesso tipo (vedere
"Memoria"
nella
Guida dell'utente
).
• Se il problema persiste, contattare Dell
(vedere
"Come contattare la Dell" nella
Guida dell'utente
).
Errore della
scheda grafica.
• Riposizionare tutte le schede grafiche
installate (consultare "Schede "
nella
Guida dell'utente
).
• Se disponibile, installare una scheda
grafica funzionante nel computer.
• Se il problema persiste, contattare Dell
(vedere
"Come contattare la Dell" nella
Guida dell'utente
).
Possibile errore del
disco rigido o dell'unità
disco floppy.
• Scollegare e ricollegare tutti i cavi di
alimentazione e dei dati, quindi
riavviare il computer.
• Se il problema persiste, contattare Dell
(vedere
"Come contattare la Dell" nella
Guida dell'utente
).
Possibile errore USB.
• Reinstallare tutte le periferiche USB,
controllare i collegamenti dei cavi,
quindi riavviare il computer.
• Se il problema persiste, contattare Dell
(vedere
"Come contattare la Dell" nella
Guida dell'utente
).
Combinazione
degli indicatori
Descrizione
del problema
Soluzione consigliata

282 Guida di consultazione rapida
Nessun modulo di
memoria rilevato.
• Se sono installati due o più moduli di
memoria, rimuoverli (consultare
"Memoria"
nella
Guida dell’utente
),
instalare di nuovo un modulo e riavviare il
computer. Se il computer si avvia
normalmente, proseguire con
l'installazione dei moduli di memoria
aggiuntivi (uno alla volta) fino a quando
non si individua il modulo difettoso o o si
reinstallano tutti i moduli senza errori.
• Se possibile, installare sul computer
memoria dello stesso tipo (vedere
"Memoria"
nella
Guida dell'utente
).
• Se il problema persiste, contattare Dell
(vedere
"Come contattare la Dell" nella
Guida dell'utente
).
Possibile errore della
scheda di sistema.
Contattare Dell (consultare "Come
contattare la Dell" nella Guida dell'utente).
Moduli di memoria
rilevati, ma possibile
errore di configurazione
o di compatibilità della
memoria.
• Accertarsi che non esistano requisiti
specifici per il posizionamento dei
connettori o dei moduli di memoria
(vedere "Memoria"
nella
Guida
dell'utente
).
• Assicurarsi che la memoria in uso sia
supportata dal computer (vedere
"Memoria"
nella
Guida dell'utente
).
• Se il problema persiste, contattare Dell
(vedere
"Come contattare la Dell" nella
Guida dell'utente
).
Possibile problema
con le risorse della
scheda di sistema
e/o guasto hardware.
• Eseguire le procedure in "Ripristino
del sistema operativo"
nella
Guida
dell'utente
.
• Se il problema persiste, contattare Dell
(vedere
"Come contattare la Dell" nella
Guida dell'utente
).
Combinazione
degli indicatori
Descrizione
del problema
Soluzione consigliata

Guida di consultazione rapida 283
Possibile errore della
scheda di espansione.
1
Per individuare eventuali conflitti,
rimuovere una scheda diversa dalla
scheda grafica e riavviare il computer
(vedere "Schede"
nella
Guida dell'utente
).
2
Se il problema persiste, reinstallare la
scheda rimossa e rimuoverne un'altra,
quindi riavviare il computer.
3
Ripetere il processo per ogni scheda di
espansione installata. Se il computer si
avvia normalmente significa che era
presente un conflitto di risorse sull'ultima
scheda rimossa dal computer (vedere
"Ripristino del sistema operativo"
nella
Guida dell'utente
).
4
Se il problema persiste, contattare Dell
(vedere
"Come contattare la Dell" nella
Guida dell'utente
).
Si è verificato un
guasto di altro tipo.
• Accertarsi che i cavi del disco rigido,
dell'unità CD e dell'unità DVD siano
correttamente collegati alla scheda di
sistema (vedere "Componenti della
scheda di sistema"
nella
Guida
dell'utente
).
• Se sullo schermo appare un messaggio di
errore che segnala un problema relativo
a una periferica (come unità disco floppy
o disco rigido), verificare che tale
periferica funzioni correttamente.
• Se il sistema operativo cerca di avviarsi da
una periferica (come unità disco floppy
o unità CD/DVD), verificare il
programma di configurazione del sistema
(consultare "Configurazione del sistema"
nella
Guida dell'utente
) per accertarsi che
la sequenza di avvio sia corretta per le
periferiche installate sul computer.
• Se il problema persiste, contattare
Dell (vedere
"Come contattare la
Dell" nella
Guida dell'utente
).
Combinazione
degli indicatori
Descrizione
del problema
Soluzione consigliata

284 Guida di consultazione rapida
Codici bip
È possibile che all'avvio il computer emetta una serie di segnali acustici. Tale
serie di segnali acustici è detta codice bip e può essere utilizzata per
individuare un problema legato al computer.
Se il computer emette una serie di segnali acustici all'avvio:
1
Annotare il codice bip.
2
Eseguire il programma Dell Diagnostics per individuare la causa (vedere
"Dell Diagnostics" a pagina 288).
Codice Causa
2 brevi, 1 lungo Errore checksum del BIOS
1 lungo, 3 brevi, 2 brevi Errore della memoria
1 breve Premuto il tasto F12
Codice
(brevi segnali
acustici ripetitivi)
Descrizione Rimedio consigliato
1 Errore di checksum nel
BIOS Possibile
malfunzionamento
della scheda madre.
Contattare Dell (consultare "Come
contattare la Dell" nella Guida dell'utente).
2 Nessun modulo di
memoria rilevato.
• Se sono installati due o più moduli di
memoria, rimuoverli (consultare
"Memoria"
nella
Guida dell’utente
),
instalare di nuovo un modulo e riavviare il
computer. Se il computer si avvia
normalmente, proseguire con
l'installazione dei moduli di memoria
aggiuntivi (uno alla volta) fino a quando
non si individua il modulo difettoso o o si
reinstallano tutti i moduli senza errori.
• Se possibile, installare sul computer
memoria dello stesso tipo (vedere
"Memoria"
nella
Guida dell'utente
).
• Se il problema persiste, contattare Dell
(vedere
"Come contattare la Dell" nella
Guida dell'utente
).

Guida di consultazione rapida 285
Messaggi di sistema
N.B. Se il messaggio non è incluso nella tabella seguente, consultare la
documentazione del sistema operativo o del programma in esecuzione al momento
della visualizzazione del messaggio.
A
LERT! PREVIOUS ATTEMPTS AT BOOTING THIS SYSTEM HAVE FAILED AT
CHECKPOINT [NNNN]. FOR HELP IN RESOLVING THIS PROBLEM, PLEASE NOTE THIS
CHECKPOINT AND CONTACT DELL TECHNICAL SUPPORT (AVVISO. I PRECEDENTI
TENTATIVI DI AVVIO DEL SISTEMA NON SONO RIUSCITI AL PUNTO DI ARRESTO
[
NNNN]. PER ASSISTENZA PER LA SOLUZIONE DEL PROBLEMA, PRENDERE NOTA DEL
PUNTO DI CONTROLLO E CONTATTARE IL SUPPORTO TECNICO DELL)—Il computer
non è riuscito a completare la procedura di avvio per tre volte consecutive a causa dello
stesso errore (consultare "Come contattare la Dell" nella Guida dell'utente).
3Possibile
malfunzionamento
della scheda madre.
Contattare Dell (consultare "Come
contattare la Dell" nella Guida dell'utente).
4 Errore di lettura/scrittura
della RAM.
• Accertarsi che non esistano requisiti
specifici per il posizionamento dei
connettori o dei moduli di memoria (vedere
"Memoria"
nella
Guida dell'utente
).
• Assicurarsi che la memoria in uso sia
supportata dal computer (vedere
"Memoria"
nella
Guida dell'utente
).
• Se il problema persiste, contattare Dell
(vedere
"Come contattare la Dell" nella
Guida dell'utente
).
5 Malfunzionamento
dell'orologio in tempo
reale. Possibile
malfunzionamento
della batteria o della
scheda madre.
• Sostituire la batteria (vedere "Sostituzione
della batteria"
nella
Guida dell'utente
).
• Se il problema persiste, contattare Dell
(vedere
"Come contattare la Dell" nella
Guida dell'utente
).
6 Errore nel test del
BIOS video.
Dell (consultare "Come contattare la Dell"
nella Guida dell'utente).
Codice
(brevi segnali
acustici ripetitivi)
Descrizione Rimedio consigliato

286 Guida di consultazione rapida
ERRORE CHECKSUM CMOS — Possibile malfunzionamento della scheda madre o la
batteria dell’orologio in tempo reale è quasi scarica. Sostituire la batteria (consultare
"Sostituzione della batteria" o "Come contattare la Dell" nella Guida dell'utente).
M
ALFUNZIONAMENTO DELLA VENTOLA DELLA CPU — Malfunzionamento della
ventola della CPU. Sostituire la ventola della CPU (consultare "Rimozione del
processore" nella Guida dell'utente).
E
RRORE DI RICERCA NELL'UNITÀ DISCO FLOPPY 0—Un cavo potrebbe non essere
inserito correttamente o le informazioni sulla configurazione del computer potrebbero
non corrispondere con la configurazione dell'hardware. Controllare i collegamenti dei
cavi (consultare "Come contattare la Dell" nella Guida dell'utente).
D
ISKETTE READ FAILURE (ERRORE DI LETTURA DEL DISCO FLOPPY)—Il disco
floppy potrebbe essere difettoso o un cavo potrebbe non essere inserito correttamente.
Sostituire il disco floppy e/o verificare che i cavi siano inseriti correttamente.
H
ARD-DISK READ FAILURE (ERRORE DI LETTURA DEL DISCO RIGIDO)—Possibile
malfunzionamento del disco rigido durante il test di avvio (consultare "Come contattare
la Dell" nella Guida dell'utente).
K
EYBOARD FAILURE (ERRORE DELLA TASTIERA)—Malfunzionamento della tastiera
o cavo della tastiera non inserito correttamente (consultare "Problemi relativi alla
tastiera" nella Guida dell'utente).
N
O BOOT DEVICE AVAILABLE (NESSUNA PERIFERICA DI AVVIO)—Impossibile
rilevare per il sistema una periferica o una partizione avviabile.
• Se l'unità disco floppy è l'unità di avvio, accertarsi che i cavi siano collegati e che sia
stato inserito un disco floppy avviabile.
• Se il disco rigido è l'unità di avvio, accertarsi che i cavi siano collegati e che l'unità sia
installata correttamente e partizionata come unità di avvio.
• Accedere al programma di installazione di sistema e accertarsi che le informazioni
della sequenza di avvio siano corrette (consultare "Accesso al programma di
installazione di sistema"
inella
Guida dell’utente
).
NO TIMER TICK INTERRUPT (NESSUN INTERRUPT DI CICLO GENERATO DAL
TEMPORIZZATORE)—È possibile che un chip sulla scheda di sistema sia difettoso
o un malfunzionamento della scheda madre (consultare "Come contattare la Dell"
nella Guida dell'utente per assistenza).
N
ON-SYSTEM DISK OR DISK ERROR (DISCO NON DI SISTEMA O ERRORE DEL
DISCO)—Sostituire il disco floppy con uno contenente un sistema operativo
avviabile o rimuovere il disco floppy dall'unità A e riavviare il computer.
N
OT A BOOT DISKETTE (DISCO FLOPPY NON DI AVVIO)—Inserire un disco floppy
avviabile e riavviare il computer.

Guida di consultazione rapida 287
AVVISO - IL SELF MONITORING SYSTEM DEL DISCO RIGIDO HA RILEVATO CHE
UN PARAMETRO HA SUPERATO IL NORMALE INTERVALLO DI FUNZIONAMENTO. DELL
CONSIGLIA DI ESEGUIRE REGOLARMENTE IL BACKUP DEI DATI. UN PARAMETRO NON
COMPRESO NELL'INTERVALLO PREVISTO POTREBBE INDICARE UN PROBLEMA
RELATIVO AL DISCO RIGIDO — Errore S.M.A.R.T, possibile malfunzionamento
del disco rigido. Questa funzione può essere attivata o disattivata nelle impostazioni
del BIOS.
Hardware Troubleshooter
Se durante l'installazione del sistema operativo non viene rilevata una
periferica oppure viene rilevata e configurata in modo errato, è possibile
utilizzare l'utilità Hardware Troubleshooter (Risoluzione dei problemi
hardware) per risolvere i problemi di compatibilità.
Windows XP:
1
Fare clic su
Start
→
Guida in linea e supporto tecnico
.
2
Inserire
risoluzione di problemi hardware
nel campo di
ricerca e premere <Invio> per iniziare la ricerca.
3
Nella sezione
Correggi un problema
, fare clic su
Risoluzione dei problemi
relativi all’hardware
.
4
Nell'elenco
Risoluzione dei problemi relativi all’hardware
, selezionare
l'opzione che meglio descrive il problema e fare clic su
Avanti
per eseguire
gli altri passi della procedura.
Windows Vista:
1
Fare clic sul pulsante Start di Windows Vista , e quindi su
Guida
e supporto tecnico
.
2
Immettere
risoluzione di problemi hardware
nel campo di
ricerca e premere <Invio> per iniziare la ricerca.
3
Nei risultati della ricerca, selezionare l’opzione che meglio descrive il
problema e proseguire con i passi successivi.

288 Guida di consultazione rapida
Dell Diagnostics
ATTENZIONE: prima di eseguire le procedure descritte in questa sezione, leggere
le istruzioni di sicurezza riportate nella
Guida alle informazioni sul prodotto
.
Quando utilizzare il programma Dell Diagnostics
Se si riscontrano problemi con il computer, effettuare i controlli riportati in
"Blocchi e problemi relativi al software" (consultare "Risoluzione dei
problemi" nella Guida dell'utente) ed eseguire il programma Dell Diagnostics
prima di contattare la Dell per assistenza tecnica.
È possibile avviare Dell Diagnostics dal disco rigido o dal disco Drivers
and Utilities.
Consultare "Configurazione del sistema" nella Guida dell'utente per rivedere le
informazioni sulla configurazione del computer e accertarsi che la periferica che
si desidera testare sia visualizzata nel programma di installazione di sistema
e sia attiva.
N.B. Dell Diagnostics funziona solo su computer Dell.
N.B. Stampare le seguenti procedure prima di eseguire il programma Dell Diagnostics.
Avvio del programma Dell Diagnostics dal disco rigido
Il programma Dell Diagnostics è ubicato in una partizione separata dell'utilità
diagnostica del disco rigido.
N.B. Se il computer non visualizza un’immagine su schermo, consultare "Come
contattare Dell" nella Guida dell'utente.
1
Accendere (o riavviare) il computer.
2
Quando viene visualizzato il logo DELL, premere immediatamente <F12>.
N.B. Quando un tasto viene tenuto premuto per lungo tempo, potrebbe
verificarsi un problema con la tastiera. Per evitare possibili problemi con la
tastiera, premere e rilasciare periodicamente <F12> fino a quando non viene
visualizzato il menu di avvio.
N.B. Se viene visualizzato un messaggio che indica che la partizione dello
strumento di diagnostica non è stata trovata, eseguire il programma Dell
Diagnostics dal disco Drivers and Utilities (vedere "Avvio di Dell Diagnostics
dal disco Drivers and Utilities" a pagina 289)
.

Guida di consultazione rapida 289
Se si attende troppo a lungo e viene visualizzato il logo del sistema operativo,
attendere la visualizzazione del desktop di Microsoft Windows; quindi
spegnere il computer e riprovare.
3
Nel
menu di avvio
, utilizzare i tasti freccia su e freccia giù o premere il
numero appropriato sulla tastiera per evidenziare
Boot to Utility Partition
e quindi premere <Invio>.
N.B. La funzione Quickboot modifica la sequenza di avvio soltanto per l’avvio
corrente. Al successivo avvio, il computer si avvierà in base alla sequenza di
avvio specificata nel programma di installazione di sistema.
4
Nel
menu principale
di Dell Diagnostics, fare clic con il pulsante sinistro
del mouse o premere <Tab> e quindi <Invio>, per selezionare il test da
eseguire (consultare "Menu principale di Dell Diagnostics" a pagina 290).
N.B. Annotare il codice di errore e la descrizione del problema e seguire le
istruzioni visualizzate.
5 Al termine di tutte le prove, chiudere la finestra per ritornare al Menu
principale di Dell Diagnostics.
6 Chiudere la finestra del menu principale per uscire dal programma Dell
Diagnostics e riavviare il computer.
Avvio di Dell Diagnostics dal disco Drivers and Utilities
1
Accendere il computer.
2
Premere il pulsante di espulsione sul lato anteriore dell'unità ottica per
aprire il cassetto dell'unità.
3
Posizionare il disco
Drivers and Utilities
al centro del cassetto dell'unità
e quindi premere il pulsante di espulsione o spingere delicatamente il
cassetto per chiuderlo.
4
Riavviare il computer.
5
Quando viene visualizzato il logo DELL, premere immediatamente <F12>.
N.B. Quando un tasto viene tenuto premuto per lungo tempo, potrebbe
verificarsi un problema con la tastiera. Per evitare possibili problemi con la
tastiera, premere e rilasciare periodicamente <F12> fino a quando non viene
visualizzato il menu di avvio.
Se si attende troppo a lungo e viene visualizzato il logo del sistema operativo,
attendere la visualizzazione del desktop di Microsoft Windows; quindi
spegnere il computer e riprovare.

290 Guida di consultazione rapida
6
Nel
menu di avvio
, utilizzare i tasti freccia su e freccia giù o premere il
numero appropriato sulla tastiera per evidenziare
Onboard or USB
CD-ROM
e quindi premere <Invio>.
N.B. La funzione Quickboot modifica la sequenza di avvio soltanto per l’avvio
corrente. Al successivo avvio, il computer si avvierà in base alla sequenza di
avvio specificata nel programma di installazione di sistema.
7
Premere <1> per selezionare Dell Diagnostics.
8
Nel
menu Dell Diagnostics
, premere <1> per selezionare il programma
Dell Diagnostics.
9
Nel
menu principale
di Dell Diagnostics, fare clic con il pulsante sinistro
del mouse o premere <Tab> e quindi <Invio>, per selezionare il test da
eseguire (consultare "Menu principale di Dell Diagnostics" a pagina 290).
N.B. Annotare il codice di errore e la descrizione del problema e seguire le
istruzioni visualizzate.
10 Al termine di tutte le prove, chiudere la finestra per ritornare al Menu
principale di Dell Diagnostics.
11 Rimuovere il disco Drivers and Utilities, quindi chiudere la finestra
Menu principale per uscire da Dell Diagnostics e riavviare il computer.
Menu principale di Dell Diagnostics
I seguenti test possono essere eseguiti dal menu principale di Dell Diagnostics:
Opzione Funzione
Express Test Esegue una verifica veloce delle periferiche di sistema.
L'esecuzione di questa prova richiede in genere da10 a 20
minuti e non richiede interazione da parte dell'utente. Si
consiglia di eseguire Express Test per primo, per aumentare
la probabilità di individuare rapidamente il problema.
Extended Test Esegue una verifica approfondita delle periferiche di
sistema. La prova impiega generalmente un’ora o più
e richiede periodicamente l’input dell’utente per rispondere
a domande specifiche.
Custom Test Prova una specifica periferica e può essere utilizzata per
personalizzare le prove da eseguire.
Symptom Tree Elenca alcuni sintomi più comuni e consente di selezionare
una verifica in base al sintomo del problema che si sperimenta.

Guida di consultazione rapida 291
Se si riscontra un problema durante una verifica, appare un messaggio che
visualizza il codice di errore e la descrizione del problema. Annotare il codice
di errore e la descrizione del problema e seguire le istruzioni visualizzate. Se
non è possibile risolvere la condizione di errore, contattare la Dell (consultare
"Come contattare la Dell" nella Guida dell'utente).
N.B. Il numero di servizio del computer viene visualizzato nella parte superiore
dello schermo di ciascuna prova. Quando si contatta il supporto di Dell, avere
a disposizione il numero di servizio.
Le schede seguenti forniscono ulteriori informazioni per le prove eseguite
con l’opzione Custom Test (Prova personalizzata) o Symptom Tree (Albero
dei sintomi):
Scheda Funzione
Results (Risultati) Visualizza i risultati della verifica e le eventuali condizioni
di errore riscontrate.
Errors (Errori) Visualizza le condizioni di errore riscontrate, i codici di errore
e la descrizione del problema.
Help (Guida) Descrive la prova e i requisiti per l'esecuzione della prova.
Configuration
(Configurazione)
(soltanto test
personalizzato)
Visualizza la configurazione hardware della periferica
selezionata.
Le informazioni di configurazione di tutte le periferiche
visualizzate in Dell Diagnostics sono derivate dal programma
di configurazione del sistema, dalla memoria e da varie prove
interne e vengono visualizzate nell'elenco delle periferiche
disponibile nel riquadro sinistro dello schermo.
N.B. È tuttavia possibile che tale elenco non includa i nomi di
tutti i componenti installati nel computer o di tutte le periferiche
collegate.
Parameters
(Parametri)
(soltanto
test personalizzato)
Consente di personalizzare la verifica, se applicabile,
modificandone le impostazioni.

292 Guida di consultazione rapida
Risoluzione dei problemi
Per risolvere i problemi del computer, seguire questi suggerimenti:
• Se prima che si verificasse il problema è stato aggiunto o rimosso un
componente, verificare le procedure di installazione e assicurarsi che il
componente sia stato installato correttamente.
• Se una periferica non funziona, assicurarsi che sia collegata correttamente.
• Se sullo schermo viene visualizzato un messaggio di errore, trascriverlo
esattamente Questo messaggio potrebbe fornire informazioni determinanti per
la diagnosi e la risoluzione del problema da parte del personale dell’assistenza.
• Se si verifica un errore all'interno di un programma, consultare la
documentazione di tale programma.
N.B. Le procedure in questo documento sono state scritte per la visualizzazione
predefinita di Windows, pertanto potrebbero non funzionare se l'utente ha configurato
il computer Dell™ con la visualizzazione classica di Windows.
Problemi della pila
ATTENZIONE: se una pila nuova non viene installata correttamente, potrebbe
esplodere. Sostituire la pila con una dello stesso tipo o di un tipo equivalente
consigliato dal produttore. Smaltire le batterie usate secondo le istruzioni del
costruttore.
ATTENZIONE: prima di eseguire le procedure descritte in questa sezione, leggere
le istruzioni di sicurezza riportate nella
Guida alle informazioni sul prodotto
.
S
OSTITUIRE LA PILA — Se dopo aver acceso il computer è necessario ripristinare
ripetutamente le informazioni relative alla data e all'ora o se all'avvio la data o l'ora
visualizzate non sono corrette, è necessario sostituire la pila (vedere "Sostituzione della
batteria" nella Guida dell'utente). Se la pila continua a non funzionare correttamente,
contattare Dell (vedere "Come contattare la Dell" nella Guida dell'utente).
Problemi relativi alle unità
ATTENZIONE: prima di eseguire le procedure descritte in questa sezione, leggere
le istruzioni di sicurezza riportate nella
Guida alle informazioni sul prodotto
.
A
CCERTARSI CHE MICROSOFT WINDOWS RICONOSCA L'UNITÀ —
Windows XP:
•Fare clic su
Start
e su
Informazioni sul computer
.

Guida di consultazione rapida 293
Windows Vista:
•Fare clic su
Start
e quindi su
Computer
.
Se l'unità non è presente nell'elenco, eseguire una scansione completa con il software
antivirus per rimuovere gli eventuali virus. Qualche volta i virus impediscono a Windows
di riconoscere l'unità.
V
ERIFICARE IL FUNZIONAMENTO DELL'UNITÀ —
• Inserire un altro disco per eliminare la possibilità che l'unità originale sia difettosa.
• Inserire un disco floppy avviabile e riavviare il computer.
PULIRE L'UNITÀ O IL DISCO — Vedere
"Pulizia del computer" a pagina 277
.
C
ONTROLLARE I COLLEGAMENTI DEL CAVO
ESEGUIRE HARDWARE TROUBLESHOOTER — Consultare "Ripristino del sistema
operativo" nella Guida dell'utente.
E
SEGUIRE IL PROGRAMMA DELL DIAGNOSTICS — Vedere "Dell Diagnostics" a
pagina 288.
Problemi dell’unità ottica
N.B. La vibrazione dell'unità ottica ad alta velocità è normale e può causare rumori,
che non indicano la presenza di un difetto nell'unità o nel disco.
N.B. A causa delle differenze tra le regioni e dei diversi formati di file usati in tutto il
mondo, non tutti i DVD funzionano in qualsiasi unità.
R
EGOLARE IL VOLUME DI WINDOWS —
• Fare clic sull'icona raffigurante un altoparlante nell'angolo inferiore destro dello schermo.
• Accertarsi che il volume sia regolato su un livello udibile facendo clic sul dispositivo di
scorrimento e trascinandolo verso l'alto.
• Accertarsi che la riproduzione dell'audio non sia disattivata facendo clic su tutte le
caselle selezionate.
CONTROLLARE GLI ALTOPARLANTI E IL SUBWOOFER — Vedere "Problemi relativi
all'audio e agli altoparlanti" a pagina 305.
Problemi di scrittura su un'unità ottica
CHIUDERE GLI ALTRI PROGRAMMI — L'unità ottica deve ricevere un flusso di dati
costante durante l'operazione di scrittura. Se il flusso si interrompe, si verifica un
errore. Provare a chiudere tutti i programmi prima di scrivere sull’unità ottica.
D
ISATTIVARE LA MODALITÀ STANDBY IN WINDOWS PRIMA DI ESEGUIRE
L'OPERAZIONE DI SCRITTURA SU DISCO — Ricercare la parola chiave standby nella
Guida in linea e supporto tecnico di Windows per informazioni sulle modalità di
gestione del risparmio di energia.

294 Guida di consultazione rapida
Problemi relativi al disco rigido
ESEGUIRE L'UTILITÀ CONTROLLO DISCO —
Windows XP:
1
Fare clic su
Start
e su
Informazioni sul computer
.
2
Fare clic con il pulsante destro del mouse su
Disco locale C:
.
3
Fare clic su
Proprietà
→
Strumenti
→
Esegui ScanDisk
.
4
Fare clic su
Cerca i settori danneggiati e tenta il ripristino
e quindi su
Start
.
Windows Vista:
1
Fare clic su
Start
e quindi su
Computer
.
2
Fare clic con il pulsante destro del mouse su
Disco locale C:
.
3
Fare clic su
Proprietà
→
Strumenti
→
Esegui ScanDisk
.
Verrà visualizzata la finestra di dialogo
Controllo account utente
. Se si è un
amministratore del computer, fare clic su
Continua
; in caso contrario, contattare
l'amministratore per proseguire con l'operazione desiderata.
4
Seguire le istruzioni visualizzate.
Problemi relativi alla posta elettronica, al modem e a Internet
ATTENZIONE: prima di eseguire le procedure descritte in questa sezione, leggere
le istruzioni di sicurezza riportate nella
Guida alle informazioni sul prodotto
.
N.B. Collegare il modem esclusivamente a uno spinotto della linea telefonica
analogica, in quanto il modem non funziona se collegato a una rete telefonica digitale.
N.B. Non collegare un cavo telefonico al connettore di rete (vedere "Connettori del
pannello posteriore" nella Guida dell'utente).
C
ONTROLLARE LE IMPOSTAZIONI DI PROTEZIONE DI MICROSOFT OUTLOOK
E
XPRESS — Se non è possibile aprire gli allegati di posta elettronica:
1
In Outlook Express, fare clic su
Tools
→
Opzioni
→
Protezione
.
2
Fare clic su
Non consentire salvataggio o apertura di allegati che potrebbero
contenere virus
per rimuovere il segno di spunta.
CONTROLLARE LA CONNESSIONE ALLA LINEA TELEFONICA
CONTROLLARE LA PRESA DELLA LINEA TELEFONICA
COLLEGARE IL MODEM DIRETTAMENTE ALLA PRESA TELEFONICA A MURO
USARE UNA LINEA TELEFONICA DIFFERENTE —
• Verificare che la linea telefonica sia collegata allo spinotto del modem (lo spinotto
è identificato dall'etichetta verde o da un'icona a forma di connettore).
• Accertarsi che il connettore della linea telefonica scatti in posizione quando viene
inserito nel modem.

Guida di consultazione rapida 295
• Scollegare la linea telefonica dal modem e collegarlo a un telefono, quindi verificare la
presenza del segnale di line.
• Se sulla stessa linea sono presenti altri dispositivi telefonici, quali segreterie
telefoniche, fax dedicati, dispositivi di protezione da sovracorrente o sdoppiatori di
linea, escluderli e utilizzare il telefono per collegare direttamente il modem allo
spinotto a muro della linea telefonica. Se si sta usando un cavo di 3 metri o di
lunghezza superiore, provare a sostituirlo con uno più corto.
ESEGUIRE LO STRUMENTO DI DIAGNOSTICA DEL MODEM —
Windows XP:
1
Fare clic su
Start
→
Tu tt i
i programmi
→
Modem Helper
.
2
Seguire le istruzioni visualizzate per identificare e risolvere i problemi del modem.
Modem Helper non è disponibile su alcuni computer.
Windows Vista:
1
Click
Start
→
Tutti i programmi
→
Strumento di diagnostica del modem
.
2
Seguire le istruzioni visualizzate per identificare e risolvere i problemi del modem.
I programmi di diagnostica del modem non sono disponibili su tutti i computer.
VERIFICARE SE È STATA STABILITA LA COMUNICAZIONE TRA IL MODEM
E WINDOWS —
Windows XP:
1
Fare clic su
Start
→
Pannello di controllo
→
Stampanti e altro hardware
→
Opzioni
modem e telefono
→
Modem
.
2
Fare clic sulla porta COM del modem in uso e fare clic su
Proprietà
→
Diagnostica
→
Interroga modem
per verificare che il modem si sta comunicando con Windows.
Se tutti i comandi ricevono una risposta, il modem funziona correttamente.
Windows Vista:
1
Fare clic su
Start
→
Pannello di controllo
→
Hardware e suoni
→
Opzioni
modem e telefono
→
Modem
.
2
Fare clic sulla porta COM del modem in uso e fare clic su
Proprietà
→
Diagnostica
→
Interroga modem
per verificare che il modem si sta comunicando con Windows.
Se tutti i comandi ricevono una risposta, il modem funziona correttamente.
VERIFICARE DI DISPORRE DI UNA CONNESSIONE A INTERNET ATTIVA — Accertarsi
di avere sottoscritto un abbonamento con un fornitore di servizi Internet. Aprire il
programma di posta elettronica Outlook Express e fare clic su File. Se accanto all'opzione
Non in linea è presente un segno di spunta, fare clic sull'opzione per rimuoverlo
e connettersi a Internet. Per assistenza, contattare il provider di servizi Internet.

296 Guida di consultazione rapida
Messaggi di errore
ATTENZIONE: prima di eseguire le procedure descritte in questa sezione, leggere
le istruzioni di sicurezza riportate nella
Guida alle informazioni sul prodotto
.
Se il messaggio di errore non è incluso nell'elenco riportato di seguito, consultare la
documentazione del sistema operativo o del programma in esecuzione al momento
della visualizzazione del messaggio.
A
FILENAME CANNOT CONTAIN ANY OF THE FOLLOWING CHARACTERS (UN NOME DI
FILE NON PUÒ CONTENERE I SEGUENTI CARATTERI): \ / : * ? “ < > | — Non
utilizzare i caratteri indicati per i nomi di file.
A
REQUIRED .DLL FILE WAS NOT FOUND (IMPOSSIBILE TROVARE UN FILE .DLL
NECESSARIO)—Non è possibile trovare un file necessario per il programma che si sta
tentando di aprire. Per rimuovere e reinstallare il programma, seguire la procedura descritta:
Windows XP:
1
Fare clic su
Start
→
Pannello di controllo
→
Installazione applicazioni
→
Programmi
e funzionalità
.
2
Selezionare il programma che si desidera eliminare.
3
Fare clic su
Disinstalla
.
4
Per informazioni sull'installazione, consultare la documentazione fornita con il
programma.
Windows Vista:
1
Fare clic su
Start
→
Pannello di controllo
→
Programmi
→
Programmi e funzionalità
.
2
Selezionare il programma che si desidera eliminare.
3
Fare clic su
Disinstalla
.
4
Per informazioni sull'installazione, consultare la documentazione fornita con
il programma.
drive letter
:\ IS NOT ACCESSIBLE. THE DEVICE IS NOT READY ("LETTERA UNITÀ"
NON ACCESSIBILE. PERIFERICA NON PRONTA)—L'unità non è in grado di leggere il
disco. Inserire un disco nell'unità e provare nuovamente ad accedervi.
I
NSERT BOOTABLE MEDIA (INSERIRE UN SUPPORTO DI AVVIO)—Inserire un disco
floppy, un CD o un DVD avviabile.
E
RRORE DEL DISCO NON DI SISTEMA — Rimuovere il disco floppy dall'unità disco
floppy e riavviare il computer.
N
OT ENOUGH MEMORY OR RESOURCES. CLOSE SOME PROGRAMS AND TRY AGAIN
(M
EMORIA O RISORSE INSUFFICIENTI PER COMPLETARE L'OPERAZIONE. CHIUDERE
UNA O PIÙ APPLICAZIONI E RIPROVARE)—Chiudere tutte le finestre e aprire il
programma che si desidera usare. A volte può essere necessario riavviare il computer per
ripristinarne le risorse. In tal caso, eseguire per primo il programma che si desidera utilizzare.

Guida di consultazione rapida 297
OPERATING SYSTEM NOT FOUND (SISTEMA OPERATIVO NON TROVATO)—
Contattare Dell (consultare "Come contattare la Dell" nella Guida dell'utente).
Problemi con le periferiche IEEE 1394
ATTENZIONE: prima di eseguire le procedure descritte in questa sezione,
leggere le istruzioni di sicurezza riportate nella
Guida alle informazioni sul
prodotto
.
V
ERIFICARE CHE IL CAVO PER LA PERIFERICA IEEE 1394 SIA INSERITO
CORRETTAMENTE NELLA PERIFERICA E NEL CONNETTORE SUL COMPUTER
VERIFICARE CHE LA PERIFERICA IEEE 1394 SIA ATTIVATA NELLA CONFIGURAZIONE
DEL SISTEMA — Consultare "Opzioni dell'Installazione del sistema" nella Guida
dell'utente.
A
SSICURARSI CHE LA PERIFERICA IEEE 1394 SIA RICONOSCIUTA DA WINDOWS —
Windows XP:
1
Fare clic su
Start
e quindi su
Pannello di controllo
.
2
In
Scegliere una categoria
, fare clic su
Prestazioni e manutenzione
→
Sistema
→
Proprietà sistema
→
Hardware
→
Gestione dispositivi
.
Windows Vista:
1
Fare clic su
Start
→
Pannello di controllo
→
Hardware e suoni
.
2
Fare clic su
Gestione dispositivi
.
Se la periferica IEEE 1394 è presente nell'elenco, significa che viene riconosciuta
da Windows.
A
SSICURARSI CHE LA SCHEDA IEEE 1394 SIA INSTALLATA CORRETTAMENTE
VERIFICARE CHE IL CAVO IEEE 1394 SIA COLLEGATO SALDAMENTO AL CONNETTORE
DELLA SCHEDA DI SISTEMA E CONTROLLARE IL CONNETTORE SUL PANNELLO ANTERIORE
IN CASO DI PROBLEMI RELATIVI A UNA PERIFERICA IEEE 1394 FORNITA DA
D
ELL — Contattare Dell (consultare "Come contattare la Dell" nella Guida dell'utente).
S
E SI VERIFICANO PROBLEMI CON UNA PERIFERICA IEEE 1394 NON FORNITA DA
D
ELL — Contattare il costruttore della periferica IEEE 1394.
Problemi relativi alla tastiera
ATTENZIONE: prima di eseguire le procedure descritte in questa sezione, leggere
le istruzioni di sicurezza riportate nella
Guida alle informazioni sul prodotto
.
C
ONTROLLARE IL CAVO DELLA TASTIERA —
• Accertarsi che il cavo della tastiera sia collegato correttamente al computer.

298 Guida di consultazione rapida
• Spegnere il computer (vedere "Spegnimento del computer"
nella
Guida dell'utente
),
ricollegare il cavo della tastiera come illustrato nel diagramma di configurazione
fornito con il computer, quindi riavviare il computer.
• Accertarsi che il cavo non sia danneggiato o deteriorato e controllare che i connettori
dei cavi non presentino piedini piegati o rotti. Raddrizzare eventuali piedini piegati.
• Rimuovere gli eventuali cavi di prolunga e collegare la tastiera direttamente al computer.
VERIFICARE IL FUNZIONAMENTO DELLA TASTIERA — Collegare una tastiera
funzionante al computer e provare a usarla.
E
SSEGUIRE HARDWARE TROUBLESHOOTER — Consultare "Ripristino del sistema
operativo" nella Guida dell'utente.
Blocco del sistema e problemi relativi al software
ATTENZIONE: prima di eseguire le procedure descritte in questa sezione, leggere
le istruzioni di sicurezza riportate nella
Guida alle informazioni sul prodotto
.
Il computer non si avvia
CONTROLLARE GLI INDICATORI DI DIAGNOSTICA — Vedere "Indicatori di
diagnostica" a pagina 280.
A
CCERTARSI CHE IL CAVO DI ALIMENTAZIONE SIA COLLEGATO SALDAMENTE AL
COMPUTER E ALLA PRESA ELETTRICA
Il computer smette di rispondere
AVVISO: è possibile perdere dati se non si effettua l'arresto del sistema operativo.
S
PEGNERE IL COMPUTER — Se il computer non risponde alla pressione di un tasto
o al movimento del mouse, premere il pulsante di alimentazione e tenerlo premuto per
almeno 8-10 secondi fino a quando il computer si spegne; quindi riavviare il computer.
Il programma non risponde
TERMINARE IL PROGRAMMA —
1
Premere contemporaneamente <Ctrl><Maiusc><Esc> per accedere a Gestione attività.
2
Selezionare la scheda
Applicazioni
.
3
Fare clic sul programma che non risponde più.
4
Fare clic su
Termina operazione
.

Guida di consultazione rapida 299
Un programma si blocca ripetutamente
N.B. La maggior parte dei programmi dispone delle istruzioni di installazione nella
relativa documentazione o su un disco floppy, un CD o un DVD.
C
ONSULTARE LA DOCUMENTAZIONE FORNITA CON IL SOFTWARE — Se necessario,
disinstallare e reinstallare il programma.
Un programma è stato progettato per una versione precedente del sistema
operativo Windows
ESEGUIRE VERIFICA GUIDATA COMPATIBILITÀ PROGRAMMI —
Windows XP:
La Verifica guidata compatibilità programmi consente di configurare un programma in
modo che venga eseguito in un ambiente simile a versioni del sistema operativo
Windows diverse da XP.
1
Fare clic su
Start
→
Tutti i programmi
→
Accessori
→
Verifica guidata compatibilità
programmi
→
Avanti
.
2
Seguire le istruzioni visualizzate.
Windows Vista:
La Verifica guidata compatibilità programmi consente di configurare un programma in
modo che venga eseguito in un ambiente simile a versioni del sistema operativo
Windows diverse da Vista.
1
Fare clic su
Start
→
Pannello di controllo
→
Programmi
→
Utilizzare un vecchio
programma con questa versione di Windows
.
2
Nella schermata di benvenuto, fare clic su
Avanti
.
3
Seguire le istruzioni visualizzate.
Appare una schermata blu
SPEGNERE IL COMPUTER — Se il computer non risponde alla pressione di un tasto
o al movimento del mouse, premere il pulsante di alimentazione e tenerlo premuto per
almeno 8-10 secondi fino a quando il computer si spegne; quindi riavviare il computer.
Altri problemi relativi al software
PER INFORMAZIONI SULLA RISOLUZIONE DEI PROBLEMI, CONSULTARE LA
DOCUMENTAZIONE FORNITA CON IL SOFTWARE O CONTATTARE IL PRODUTTORE DEL
SOFTWARE —
• Verificare che il programma sia compatibile con il sistema operativo installato sul computer.
• Verificare che il computer soddisfi i requisiti hardware minimi necessari per l'esecuzione
del software. Per informazioni, consultare la documentazione fornita con il software.

300 Guida di consultazione rapida
• Accertarsi di avere installato e configurato correttamente il programma.
• Verificare che i driver di periferica non siano incompatibili con il programma.
• Se necessario, disinstallare e reinstallare il programma.
ESEGUIRE IMMEDIATAMENTE UN BACKUP DEI FILE
UTILIZZARE UN PROGRAMMA DI RICERCA VIRUS PER CONTROLLARE IL DISCO
RIGIDO, I DISCHI FLOPPY, I CD O I DVD
S
ALVARE E CHIUDERE EVENTUALI FILE O PROGRAMMI APERTI E ARRESTARE IL
SISTEMA TRAMITE IL MENU AVVIO
Problemi relativi alla memoria
ATTENZIONE: prima di eseguire le procedure descritte in questa sezione, leggere
le istruzioni di sicurezza riportate nella
Guida alle informazioni sul prodotto
.
S
E VIENE VISUALIZZATO UN MESSAGGIO CHE INFORMA CHE LA MEMORIA
ÈINSUFFICIENTE—
• Salvare e chiudere i file aperti e uscire da tutti i programmi in esecuzione non in uso
per cercare di risolvere il problema.
• Per conoscere i requisiti minimi di memoria, consultare la documentazione fornita
con il software. Se necessario, installare ulteriore memoria (consultare "Installazione di
un modulo di memoria"
nella
Guida dell'utente
).
• Alloggiare nuovamente i moduli di memoria (consultare "Rimozione del pannello
anteriore"
nella
Guida dell’utente
) per garantire che il computer comunichi con
successo con la memoria.
• Eseguire il programma Dell Diagnostics (vedere "Dell Diagnostics" a pagina 288).
IN CASO DI ULTERIORI PROBLEMI RELATIVI ALLA MEMORIA —
• Alloggiare nuovamente i moduli di memoria (consultare "Rimozione del pannello
anteriore"
nella
Guida dell’utente
) per garantire che il computer comunichi con
successo con la memoria.
• Accertarsi di seguire le istruzioni di installazione della memoria (consultare
"Installazione di un modulo di memoria"
nella
Guida dell'utente
).
• Accertarsi che la memoria che si sta utilizzando sia supportata dal computer. Per
ulteriori informazioni sul tipo di memoria supportata dal computer, vedere
"Rimozione del pannello anteriore"
nella
Guida dell'utente
.
• Eseguire il programma Dell Diagnostics (vedere "Dell Diagnostics" a pagina 288).

Guida di consultazione rapida 301
Problema del mouses
ATTENZIONE: prima di eseguire le procedure descritte in questa sezione, leggere
le istruzioni di sicurezza riportate nella
Guida alle informazioni sul prodotto
.
C
ONTROLLARE IL CAVO DEL MOUSE —
• Accertarsi che il cavo non sia danneggiato o deteriorato e controllare che i connettori
dei cavi non presentino piedini piegati o rotti. Raddrizzare eventuali piedini piegati.
• Rimuovere gli eventuali cavi di prolunga e collegare il mouse direttamente al computer.
• Verificare che il cavo del mouse sia collegato come mostrato nel diagramma di
installazione fornito con il computer.
RIAVVIARE IL COMPUTER —
1
Premere contemporaneamente <Ctrl><Esc> per visualizzare il menu
Start
.
2
Premere <u>,
premere i tasti freccia SU e GIÙ
per evidenziare
Shut down
o
Tu rn
Off
e quindi premere <Invio>.
3
Dopo lo spegnimento del computer, ricollegare il cavo del mouse come mostrato nel
diagramma di installazione.
4
Accendere il computer.
VERIFICARE IL FUNZIONAMENTO DEL MOUSE — Collegare un mouse al computer
e verificarne il funzionamento.
C
ONTROLLARE LE IMPOSTAZIONI DEL MOUSE —
Windows XP:
1
Fare clic su
Start
→
Pannello di controllo
→
Mouse
.
2
Regolare le impostazioni, in base alle proprie necessità.
Windows Vista:
1
Fare clic su
Start
→
Pannello di controllo
→
Hardware e suoni
→
Stampante
.
2
Regolare le impostazioni, in base alle proprie necessità.
REINSTALLARE IL DRIVER DEL MOUSE — Vedere "Driver" nella Guida dell'utente.
E
SSEGUIRE HARDWARE TROUBLESHOOTER — Consultare "Ripristino del sistema
operativo" nella Guida dell'utente.
Problemi relativi alla rete
ATTENZIONE: prima di eseguire le procedure descritte in questa sezione, leggere
le istruzioni di sicurezza riportate nella
Guida alle informazioni sul prodotto
.
C
ONTROLLARE L’INDICATORE DI RETE SULLA PARTE FRONTALE DEL COMPUTER —
Se l'indicatore di integrità del collegamento è spento (consultare "Comandi ed indicatori"
nella Guida dell'utente), la comunicazione di rete non è attiva. Sostituire il cavo di rete.

302 Guida di consultazione rapida
CONTROLLARE IL CONNETTORE DEL CAVO DI RETE — Verificare che il cavo di rete sia
inserito saldamente nel connettore di rete posto sul retro del computer e nello spinotto
di rete.
R
IAVVIARE IL COMPUTER E CERCARE DI COLLEGARSI NUOVAMENTE ALLA RETE
VERIFICARE LE IMPOSTAZIONI DI RETE — Rivolgersi all'amministratore della rete
o alla persona che ha impostato la rete per verificare che le impostazioni della rete
siano corrette e che la rete funzioni.
E
SSEGUIRE HARDWARE TROUBLESHOOTER — Consultare "Ripristino del sistema
operativo" nella Guida dell'utente.
Problemi di alimentazione
ATTENZIONE: prima di eseguire le procedure descritte in questa sezione, leggere
le istruzioni di sicurezza riportate nella
Guida alle informazioni sul prodotto
.
S
E L'INDICATORE DI ALIMENTAZIONE È DI COLORE VERDE E IL COMPUTER NON
RISPONDE — Vedere "Indicatori di diagnostica" a pagina 280.
S
E L'INDICATORE DI ALIMENTAZIONE È DI COLORE VERDE E LAMPEGGIA — Il
computer è in modalità standby. Premere un tasto della tastiera, spostare il mouse
o premere il pulsante di accensione per ripristinare il normale funzionamento del sistema.
S
E L'INDICATORE DI ALIMENTAZIONE È SPENTO — Il computer è spento o non
èalimentato.
• Scollegare il cavo di alimentazione e ricollegarlo al connettore sul retro del computer
e alla presa elettrica.
• Verificare che il computer si accenda correttamente anche senza le prese multiple,
i cavi di prolunga e altri dispositivi di protezione elettrica eventualmente utilizzati.
• Verificare che le prese multiple utilizzate siano inserite in una presa di corrente
esianoaccese.
• Collegare alla presa elettrica un altro apparecchio, ad esempio una lampada, per verificare
il corretto funzionamento della presa.
• Accertarsi che il cavetto di alimentazione principale e quello del pannello frontale
siano perfettamente collegati alla scheda di sistema (vedere "Componenti della scheda
di sistema"
nella
Guida dell'utente
).
SE L'INDICATORE DI ALIMENTAZIONE È DI COLORE AMBRA E LAMPEGGIA — Il
computer è alimentato, ma è possibile che si siano verificati problemi di
alimentazione interni.
• Accertarsi che il selettore di tensione sia impostato in modo compatibile con
l'alimentazione c.a. disponibile localmente (se disponibile).
• Accertarsi che tutti i cavi siano correttamente installati e collegati alla scheda di
sistema (consultare "Componenti della scheda di sistema"
nella
Guida dell'utente
).

Guida di consultazione rapida 303
SE L'INDICATORE DI ALIMENTAZIONE È DI COLORE AMBRA — È possibile che una
periferica non funzioni o non sia stata installata correttamente.
• Rimuovere e reinstallare i moduli di memoria (vedere "Rimozione del pannello anteriore"
nella
Guida dell'utente
).
• Rimuovere e reinstallare tutte le schede, comprese le schede grafiche (consultare
"Schede"
nella
Guida dell'utente
).
ELIMINARE EVENTUALI INTERFERENZE — Alcune possibili cause di interferenze sono:
• Cavi di prolunga di alimentazione, per tastiere e per mouse
• Troppe periferiche collegate alla stessa presa multipla
• Più multiprese collegate alla stessa presa elettrica
Problemi relativi alla stampante
ATTENZIONE: prima di eseguire le procedure descritte in questa sezione, leggere
le istruzioni di sicurezza riportate nella
Guida alle informazioni sul prodotto
.
N.B. Per ricevere assistenza tecnica per problemi con la stampante, contattare il
produttore della stampante.
C
ONSULTARE LA DOCUMENTAZIONE DELLA STAMPANTE — Consultare la
documentazione fornita con la stampante per informazioni sull'installazione e sulla
risoluzione dei problemi.
A
CCERTARSI CHE LA STAMPANTE SIA ACCESA
CONTROLLARE LE CONNESSIONI DEI CAVI DELLA STAMPANTE —
• Per informazioni sulle connessioni dei cavi della stampante, consultare la
relativa documentazione.
• Accertarsi che il cavo della stampante sia collegato saldamente alla stampante
ealcomputer.
VERIFICARE IL FUNZIONAMENTO DELLA PRESA ELETTRICA — Collegare alla presa
elettrica un altro apparecchio, ad esempio una lampada, per verificare il corretto
funzionamento della presa.
A
CCERTARSI CHE WINDOWS RICONOSCA LA STAMPANTE —
Windows XP:
1
Fare clic su
Start
→
Pannello di controllo
→
Stampanti e altro hardware
→
Visualizzare le stampanti e le stampanti fax installate
.
2
Se la stampante è presente nell'elenco, fare clic con il pulsante destro del mouse
sull'icona della stampante.
3
Fare clic su
Proprietà
→
Porte
. Per una stampante parallela, accertarsi che l'opzione
Stampa su:
sia impostata su
LPT1 (porta stampante)
. Per una stampante USB,
accertarsi che l'opzione
Stampa su:
sia impostata su
USB
.

304 Guida di consultazione rapida
Windows Vista:
1
Fare clic su
Start
→
Pannello di controllo
→
Hardware e suoni
→
Stampante
.
2
Se la stampante è presente nell'elenco, fare clic con il pulsante destro del mouse
sull'icona della stampante.
3
Fare clic su
Proprietà
, quindi selezionare la scheda
Porte
.
4
Regolare le impostazioni, in base alle proprie necessità.
REINSTALLARE IL DRIVER DELLA STAMPANTE — Consultare la documentazione
della stampante per informazioni sulla reinstallazione del driver della stampante.
Problemi relativi allo scanner
ATTENZIONE: prima di eseguire le procedure descritte in questa sezione, leggere
le istruzioni di sicurezza riportate nella
Guida alle informazioni sul prodotto
.
N.B. In caso di problemi con lo scanner, contattare il produttore dello scanner per
richiedere supporto tecnico.
C
ONTROLLARE LA DOCUMENTAZIONE FORNITA CON LO SCANNER — Consultare la
documentazione fornita con lo scanner per informazioni sull'installazione e sulla
risoluzione dei problemi.
S
BLOCCARE LO SCANNER — Se lo scanner è munito di una linguetta o di un pulsante
di blocco, accertarsi che sia nella posizione di sblocco.
R
IAVVIARE IL COMPUTER E RIPROVARE CON LO SCANNER
CONTROLLARE I COLLEGAMENTI DEL CAVO —
• Consultare la documentazione fornita con lo scanner per informazioni sul collegamento
del cavo.
• Verificare che i cavi dello scanner siano saldamente collegati allo scanner e al computer.
VERIFICARE CHE LO SCANNER SIA RICONOSCIUTO DA MICROSOFT WINDOWS —
Windows XP:
1
Fare clic su
Start
→
Pannello di controllo
→
Stampanti e altro hardware
→
Scanner
e fotocamere digitali
.
2 Se lo scanner è elencato, Windows riconosce lo scanner.
Windows Vista:
1
Fare clic su
Start
→
Pannello di controllo
→
Hardware e suoni
→
Scanner
e fotocamere digitali
.
2 Se lo scanner è elencato, Windows riconosce lo scanner.
R
EINSTALLARE IL DRIVER DELLO SCANNER — Per ulteriori informazioni, consultare
la documentazione fornita con lo scanner.

Guida di consultazione rapida 305
Problemi relativi all'audio e agli altoparlanti
ATTENZIONE: prima di eseguire le procedure descritte in questa sezione, leggere
le istruzioni di sicurezza riportate nella
Guida alle informazioni sul prodotto
.
Nessun suono emesso dagli altoparlanti
N.B. La regolazione del volume dei riproduttori MP3 e di altri lettori multimediali
può avere la precedenza sulle impostazioni di Windows. verificare sempre che il
volume sui lettori multimediali non sia stato regolato al minimo o spento.
C
ONTROLLARE LE CONNESSIONI DEI CAVI DEGLI ALTOPARLANTI — Accertarsi che
gli altoparlanti siano collegati correttamente come illustrato nel diagramma di
installazione fornito con gli altoparlanti. Se si dispone di una scheda audio, assicurarsi
che gli altoparlanti siano collegati a tale scheda.
V
ERIFICARE CHE IL SUBWOOFER E GLI ALTOPARLANTI SIANO ACCESI — Consultare
il diagramma di installazione fornito con gli altoparlanti. Se gli altoparlanti
dispongono di comandi, regolare il volume, gli alti o i bassi per eliminare la distorsione.
R
EGOLARE IL VOLUME DI WINDOWS — Fare clic o fare doppio clic sull'icona raffigurante
un altoparlante nell'angolo inferiore destro dello schermo. Accertarsi che il volume sia
regolato su un livello udibile e la riproduzione del suono non sia stata disattivata.
S
COLLEGARE LE CUFFIE DAL RELATIVO CONNETTORE — Se le cuffie sono collegate al
relativo connettore sul pannello frontale del computer, viene automaticamente
disattivato l'audio proveniente dagli altoparlanti.
V
ERIFICARE IL FUNZIONAMENTO DELLA PRESA ELETTRICA — Collegare alla presa
elettrica un altro apparecchio, ad esempio una lampada, per verificare il corretto
funzionamento della presa.
E
LIMINARE POSSIBILI INTERFERENZE — Spegnere ventole, lampade a fluorescenza
o alogene situate in prossimità e controllare se causano interferenze.
E
SEGUIRE LA DIAGNOSTICA PER GLI ALTOPARLANTI
REINSTALLARE IL DRIVER DELLA SCHEDA AUDIO — Vedere "Driver" nella Guida
dell'utente.
E
SSEGUIRE HARDWARE TROUBLESHOOTER — Consultare "Ripristino del sistema
operativo" nella Guida dell'utente.
Nessun suono emesso dalle cuffie
CONTROLLARE LA CONNESSIONE DEL CAVO DELLE CUFFIE — Verificare che il cavo
della cuffia sia saldamente inserito nel connettore della cuffia (consultare
"Informazioni sul computer" nella Guida dell’utente).

306 Guida di consultazione rapida
REGOLARE IL VOLUME DI WINDOWS — Fare clic o fare doppio clic sull'icona raffigurante
un altoparlante nell'angolo inferiore destro dello schermo. Accertarsi che il volume sia
regolato su un livello udibile e la riproduzione del suono non sia stata disattivata.
Problemi relativi al video e al monitor
ATTENZIONE: prima di eseguire le procedure descritte in questa sezione, leggere
le istruzioni di sicurezza riportate nella
Guida alle informazioni sul prodotto
.
AVVISO: se il computer viene fornito con una scheda grafica PCI Express
installata, la rimozione della scheda non è necessaria quando si installano schede
grafiche supplementari; tuttavia, la scheda è necessaria per risolvere eventuali
problemi. Quando si rimuove la scheda, riporta in un luogo sicuro. Per informazioni
sulla scheda grafica, accedere a support.dell.com.
Monitor senza immagini
N.B. Per le procedure di risoluzione dei problemi, consultare la documentazione
del monitor.
C
ONTROLLARE LE CONNESSIONI DEI CAVI DEL MONITOR —
• Verificare che il cavo del monitor sia collegto alla scheda grafica corretta (per
configurazioni con due schede grafiche).
• Se si utilizza un adattatore da DVI a VGA, verificare che l'adattatore sia collegato
correttamente alla scheda grafica e al monitor.
• Verificare che il cavo del monitor sia collegato come mostrato nel diagramma di
installazione del computer.
• Rimuovere gli eventuali cavi di prolunga e collegare il monitor direttamente al computer.
• Scambiare i cavi di alimentazione del computer e del monitor per stabilire se il cavo di
alimentazione del monitor è difettoso.
• Verificare che i connettori non presentino piedini piegati o rotti (è normale che nei
connettori del cavo del monitor manchino alcuni piedini).
CONTROLLARE L'INDICATORE DI ALIMENTAZIONE DEL MONITOR —
• Se l'indicatore è acceso o lampeggia, il monitor è alimentato.
• Se l'indicatore di alimentazione è spento, premere con decisione il pulsante per
accertarsi che il monitor sia acceso.
• Se lampeggia, premere un tasto sulla tastiera o spostare il mouse per ripristinare le
normali operazioni.

Guida di consultazione rapida 307
VERIFICARE IL FUNZIONAMENTO DELLA PRESA ELETTRICA — Collegare alla presa
elettrica un altro apparecchio, ad esempio una lampada, per verificare il corretto
funzionamento della presa.
C
ONTROLLARE GLI INDICATORI DI DIAGNOSTICA — Vedere "Indicatori di
diagnostica" a pagina 280.
Il testo visualizzato sullo schermo è difficile da leggere
CONTROLLARE LE CONNESSIONI DEI CAVI DEL MONITOR —
• Verificare che il cavo del monitor sia collegto alla scheda grafica corretta (per
configurazioni con due schede grafiche).
• Se si utilizza l'adattatore opzionale
DVI-to-VGA
, verificare che sia collegato
correttamente alla scheda grafica e al monitor.
• Verificare che il cavo del monitor sia collegato come mostrato nel diagramma di
installazione del computer.
• Rimuovere gli eventuali cavi di prolunga e collegare il monitor direttamente al computer.
• Scambiare i cavi di alimentazione del computer e del monitor per stabilire se il cavo di
alimentazione del monitor è difettoso.
• Verificare che i connettori non presentino piedini piegati o rotti (è normale che nei
connettori del cavo del monitor manchino alcuni piedini).
CONTROLLARE L'INDICATORE DI ALIMENTAZIONE DEL MONITOR —
• Se l'indicatore è acceso o lampeggia, il monitor è alimentato.
• Se l'indicatore di alimentazione è spento, premere con decisione il pulsante per
accertarsi che il monitor sia acceso.
• Se lampeggia, premere un tasto sulla tastiera o spostare il mouse per ripristinare le
normali operazioni.
VERIFICARE IL FUNZIONAMENTO DELLA PRESA ELETTRICA — Collegare alla presa
elettrica un altro apparecchio, ad esempio una lampada, per verificare il corretto
funzionamento della presa.
C
ONTROLLARE GLI INDICATORI DI DIAGNOSTICA — Vedere "Indicatori di
diagnostica" a pagina 280.
V
ERIFICARE LE IMPOSTAZIONI DEL MONITOR — Per informazioni sulla regolazione
del contrasto e della luminosità, sulla smagnetizzazione e sull'esecuzione della verifica
automatica del monitor, consultare la documentazione fornita con il monitor.
A
LLONTANARE IL SUBWOOFER DAL MONITOR — Se il sistema di altoparlanti include
un subwoofer, accertarsi che quest'ultimo sia collocato ad almeno 60 cm dal monitor.

308 Guida di consultazione rapida
ALLONTANARE IL MONITOR DA FONTI DI ALIMENTAZIONE ESTERNE — Ventilatori,
lampade a fluorescenza o alogene e altri dispositivi elettrici posti in prossimità del
monitor possono provocare uno sfarfallio dell'immagine. Spegnere tali dispositivi per
determinare se causano interferenze.
R
UOTARE IL MONITOR PER ELIMINARE IL RIFLESSO DELLA LUCE DEL SOLE ED
EVENTUALI INTERFERENZE
REGOLARE LE IMPOSTAZIONI DELLO SCHERMO DI WINDOWS —
Windows XP:
1
Fare clic su
Start
→
Pannello di controllo
→
Aspetto e temi
.
2
Fare clic sull’area che si desidera modificare oppure sull’icona
Schermo
.
3
Provare diverse impostazioni per
Colori
e
Risoluzione dello schermo
.
Windows Vista:
1
Fare clic su
Start
→
Pannello di controllo
→
Hardware e suoni
→
Personalizzazione
→
Impostazioni schermo
.
2
Regolare la
Risoluzione
e le
impostazioni dei colori,
come necessario.
La qualità dell'immagine 3D è scarsa
VERIFICARE LA CONNESSIONE DEL CAVO DI ALIMENTAZIONE DELLA SCHEDA
GRAFICA — Accertarsi che il cavo di alimentazione della scheda grafica sia collegato
correttamente alla scheda.
V
ERIFICARE LE IMPOSTAZIONI DEL MONITOR — Per informazioni sulla regolazione
del contrasto e della luminosità, sulla smagnetizzazione e sull'esecuzione della verifica
automatica del monitor, consultare la documentazione fornita con il monitor.
Soltanto una parte dello schermo è leggibile
ACCENDERE IL COMPUTER E IL MONITOR, QUINDI REGOLARE LA LUMINOSITÀ E IL
CONTRASTO DEL MONITOR — Se il monitor funziona, la scheda grafica potrebbe
essere difettosa.
Contattare Dell (consultare "Come contattare la Dell"
nella Guida
dell'utente
).

Indice analitico 309
Indice analitico
A
alimentazione
compensatori di linea, 270
dispositivi di protezione da
sovracorrente, 270
periferiche di protezione, 270
problemi, 302
pulsante, 273
UPS, 270
avvisi normativi, 258
B
batteria
problemi, 292
C
CD/DVD Drivers and
Utilities, 257
CD/DVD Operating System, 262
Codice del servizio espresso, 259
codici bip, 284
computer
blocco, 298-299
codici bip, 284
nessuna risposta, 298
conflitti
incompatibilità sw/hw, 287
conflitti IRQ, 287
connettori
adattatore di rete, 276
audio, 275
cuffie, 273
IEEE 1394, 273, 275
linea di uscita, 275
mouse, 275
parallelo, 275
seriale, 276
tastiera, 276
USB, 273, 276
connettori audio
linea di uscita, 275
contratto di licenza Microsoft
per l'utente finale, 258
controllo disco, 294
cuffie
connettore, 273
D
Dell Diagnostics, 288
Desktop System Software, 261
diagnostica
codici bip, 284
Dell Diagnostics, 288
indicatori luminosi, 273, 280

310 Indice analitico
disco rigido
indicatore di attività, 273-274
problemi, 294
display. Consultare monitor
documentazione
contratto di licenza Microsoft
per l'utente finale, 258
ergonomia, 258
garanzia, 258
guida alle informazioni sul
prodotto, 258
Guida dell'utente, 258
in linea, 260
normativa, 258
sicurezza, 258
E
etichette
Codice del servizio espresso, 259
Microsoft Windows, 259
Numero di servizio, 259
F
file della guida
Guida e supporto tecnico di
Windows, 261
G
gruppo di continuità. Consultare
UPS
guida alle informazioni sul
prodotto, 258
Guida dell'utente, 258
guida e supporto tecnico, 261
H
hardware
codici bip, 284
conflitti, 287
Dell Diagnostics, 288
Hardware Troubleshooter, 287
I
IEEE 1394
connettori, 273, 275
problemi, 297
indicatore di alimentazione
stati, 302
indicatori diagnostica, 280
indicatori luminosi
attività del disco rigido, 273-274
attività della rete, 276
diagnostica, 273, 280
integrità della connessione, 276
rete, 276
retro del computer, 280
informazioni sull'ergonomia, 258
informazioni sulla garanzia, 258

Indice analitico 311
Installazione Trasferimento
guidato file e impostazioni
(Windows XP), 267
Internet
problemi, 294
istruzioni di sicurezza, 258
M
memoria
problemi, 300
messaggi
di sistema, 285
errore, 296
messaggi di errore
codici bip, 284
indicatori diagnostica, 280
problemi, 296
modem
problemi, 294
monitor
difficile lettura, 307
problemi, 306
senza immagini, 306
mouse
connettore, 275
problemi, 301
N
Numero di servizio, 259
P
posta elettronica
problemi, 294
problemi
alimentazione, 302
batteria, 292
blocco del computer, 298-299
codici bip, 284
conflitti, 287
Dell Diagnostics, 288
difficile lettura dello
schermo, 307
disco rigido, 294
generali, 298
IEEE 1394, 297
il computer non risponde, 298
indicatori diagnostica, 280
Internet, 294
memoria, 300
messaggi di errore, 296
modem, 294
monitor senza immagini, 306
mouse, 301
posta elettronica, 294
regolazione del volume, 305
rete, 301
scanner, 304
schermo blu, 299
software, 298-299
stampante, 303
stati dell'indicatore di
alimentazione, 302
tastiera, 297
un programma non risponde, 298
un programma si blocca, 299

312 Indice analitico
problemi (segue)
unità, 292
unità CD-RW, 293
unità ottica, 293
video e monitor, 306
procedure guidate
Installazione Trasferimento
guidato file e impostazioni
(Windows XP), 267
Trasferimento dati Windows
(Windows Vista), 270
Verifica guidata compatibilità
programmi, 299
R
rete
connettore, 276
problemi, 301
risoluzione dei problemi
codici bip, 284
conflitti, 287
Dell Diagnostics, 288
guida e supporto tecnico, 261
Hardware Troubleshooter, 287
indicatori di alimentazione, 278
indicatori diagnostica, 280
messaggi di sistema, 285
problemi, 292
S
S.M.A.R.T, 287
scanner
problemi, 304
schermo. Consultare monitor
sistema operativo
reinstallazione, 262
sito di supporto Dell, 260
sito Web di supporto, 260
software
conflitti, 287
problemi, 298-299
stampante
collegamento, 267
configurazione, 267
problemi, 303
T
tastiera
connettore, 276
problemi, 297
trasferimento delle informazioni
su un nuovo computer
Installazione Trasferimento
guidato file e impostazioni
(Windows XP), 267
Trasferimento dati Windows
(Windows Vista), 270
U
unità
problemi, 292
unità CD-RW
problemi, 293

Indice analitico 313
unità ottica
problemi, 293
UPS, 270
USB
connettore, 276
connettori, 273
V
video
problemi, 306
volume
regolazione, 305
W
Windows Vista
guida e supporto tecnico, 261
reinstallazione, 262
Trasferimento guidato di
Windows, 270
Windows XP
guida e supporto tecnico, 261
Hardware Troubleshooter, 287
reinstallazione, 262
trasferimento guidato file
e impostazioni, 267

314 Indice analitico

www.dell.com | support.dell.com
Dell Precision™ T7400
Guía de referencia rápida
Modelo DCDO

Notas, avisos y precauciones
NOTA: Una NOTA proporciona información importante que le ayuda a utilizar su
equipo de la mejor manera posible.
AVISO: Un AVISO indica la posibilidad de daños al hardware o pérdida de datos
y le explica cómo evitar el problema.
PRECAUCIÓN: Un mensaje de PRECAUCIÓN indica el riesgo de daños materiales,
lesiones o incluso la muerte.
____________________
La información contenida en este documento puede modificarse sin previo aviso.
© 2007 Dell Inc. Todos los derechos reservados.
Queda estrictamente prohibida su reproducción del modo que sea sin el consentimiento por escrito de
Dell Inc..
Marcas comerciales utilizadas en este texto: Dell, el logotipo de DELL y Dell Precision son marcas
comerciales de Dell Inc.; Microsoft, Windows, y Windows Vista son bien marcas comerciales o marcas
comerciales registradas de Microsoft Corporation en Estados Unidos y otros países.
Otras marcas y otros nombres comerciales pueden utilizarse en este documento para hacer referencia
a las entidades que los poseen o a sus productos. Dell Inc. renuncia a cualquier interés sobre la
propiedad de marcas y nombres comerciales que no sean los suyos.
Modelo DCDO
Septiembre 2007 N/P HR707 Rev. A00

Contenido 317
Contenido
Localización de información . . . . . . . . . . . . . . 319
Configuración de su equipo
. . . . . . . . . . . . . . . 325
Cambio entre las orientaciones de torre y de
escritorio
. . . . . . . . . . . . . . . . . . . . . . 325
Instalación del equipo en un lugar cerrado
. . . . 326
Transferencia de la información a un equipo
nuevo
. . . . . . . . . . . . . . . . . . . . . . . . 329
Dispositivos de protección de la alimentación
. . . 333
Acerca de su equipo
. . . . . . . . . . . . . . . . . . 335
Vista frontal (orientación de torre)
. . . . . . . . . 335
Vista posterior (orientación de torre)
. . . . . . . 337
Conectores del panel posterior
. . . . . . . . . . 338
Limpieza del equipo
. . . . . . . . . . . . . . . . . . . 340
Equipo, teclado y monitor
. . . . . . . . . . . . . 340
Ratón (no óptico)
. . . . . . . . . . . . . . . . . . 340
Unidad de disco flexible
. . . . . . . . . . . . . . 341
CD y DVD
. . . . . . . . . . . . . . . . . . . . . . 341
Herramientas para la solución de problemas . . . . . 341
Indicadores luminosos de alimentación
. . . . . . 341
Indicadores luminosos de diagnóstico
. . . . . . 343
Códigos de sonido
. . . . . . . . . . . . . . . . . 347
Mensajes del sistema
. . . . . . . . . . . . . . . 349
Solucionador de problemas de hardware
. . . . . 351
Dell Diagnostics
. . . . . . . . . . . . . . . . . . 352
Solución de problemas
. . . . . . . . . . . . . . . 356
Índice . . . . . . . . . . . . . . . . . . . . . . . . . . . . . 375

318 Contenido

Guía de referencia rápida 319
Localización de información
NOTA: Algunas funciones o medios son opcionales y pueden no incluirse en su equipo.
Algunas funciones o medios pueden no estar disponibles en determinados países.
NOTA: Su equipo puede incluir información adicional.
¿Qué busca? Aquí lo encontrará
• Un programa de diagnóstico para
mi equipo
• Controladores para mi equipo
• Documentación de mi dispositivo
• Desktop System Software (DSS)
Disco Drivers and Utilities (Controladores
y utilidades)
NOTA: El disco Drivers and Utilities puede
ser opcional y es posible que no se entregue
con el equipo.
La documentación y los controladores ya
están instalados en su equipo. Puede
utilizar el disco Drivers and Utilities para
reinstalar los controladores (consulte el
apartado "Reinstalación de controladores
y utilidades" en la Guía del usuario) y para
ejecutar los Dell™ Diagnostics (consulte
"Dell Diagnostics" en la página 352).
NOTA: Los controladores y las
actualizaciones de la documentación
pueden encontrarse en support.dell.com.

320 Guía de referencia rápida
• Cómo extraer y cambiar piezas
• Especificaciones
• Cómo configurar los parámetros
del sistema
• Cómo detectar y solucionar problemas
Guía del usuario de Dell Precision™
Centro de ayuda y soporte técnico de
Microsoft
®
Windows
®
XP y Microsoft
Windows Vista™
1
Haga clic en
Inicio
→
Centro de ayuda y
soporte técnico
→
Guías del sistema y del
usuario de Dell
→
Guías del sistema
.
2
Haga clic en la
Guía del usuario
de
su equipo.
• Información sobre la garantía
• Términos y condiciones
(sólo en EE.UU.)
• Instrucciones de seguridad
• Información reglamentaria
• Información ergonómica
• Contrato de licencia para el
usuario final
Guía de información del producto Dell™
¿Qué busca? Aquí lo encontrará

Guía de referencia rápida 321
• Etiqueta de servicio y código de
servicio rápido
•Clave de producto
Microsoft
®
Windows
®
Etiqueta de servicio y licencia de producto
de Microsoft Windows
Estas etiquetas se encuentran en su equipo:
• Utilice la etiqueta de servicio para
identificar su equipo cuando utilice
support.dell.com
o se ponga en contacto
con el servicio de soporte técnico de Dell.
• Introduzca el código de servicio rápido
para dirigir su llamada cuando se ponga
en contacto con el servicio de soporte
técnico de Dell.
NOTA: Como medida de refuerzo de la
seguridad, la recientemente diseñada
etiqueta de la licencia de Microsoft Windows
incorpora una parte que aparenta faltar
o agujero para evitar que se quite.
¿Qué busca? Aquí lo encontrará

322 Guía de referencia rápida
• Soluciones: consejos y sugerencias para
la solución de problemas, artículos de
técnicos, cursos en línea y preguntas
más frecuentes
• Comunidad: conversaciones en línea con
otros clientes de Dell
• Actualizaciones: información de
actualización para componentes como,
por ejemplo, la memoria, el disco duro
y el sistema operativo
• Atención al cliente: información de
contacto, llamada de servicio y estado
de los pedidos, garantía e información
de reparación
• Servicio y soporte: historial de soporte
técnico y estado de las llamadas de
servicio, contrato de servicio y debates en
línea con el personal de soporte técnico
• Dell Technical Update Service (Servicio
de actualizaciones técnicas de Dell):
ofrece una notificación interactiva por
correo electrónico de las actualizaciones
de software y hardware de su equipo
• Referencia: documentación del equipo,
detalles en la configuración de mi equipo,
especificaciones del producto
y documentación técnica
• Descargas: controladores certificados,
revisiones y actualizaciones de software
Sitio Web de soporte técnico de Dell:
support.dell.com
NOTA: Seleccione su región o segmento
de negocios para ver el sitio de asistencia
técnica apropiado.
¿Qué busca? Aquí lo encontrará

Guía de referencia rápida 323
• Desktop System Software (DSS): Si
reinstala el sistema operativo, también
debe reinstalar la utilidad DSS. DSS
detecta automáticamente el equipo y el
sistema operativo e instala las
actualizaciones adecuadas para su
configuración, proporcionando
actualizaciones importantes para el sistema
operativo y soporte para los procesadores,
unidades ópticas, dispositivos USB, etc. La
utilidad DSS es necesaria para el correcto
funcionamiento de su equipo Dell.
Para descargar Desktop System Software:
1
Vaya a
support.dell.com
, seleccione su
país o región y, a continuación, haga clic
en
Drivers & Downloads
(Controladores
y descargas).
2
Haga clic en
Select Model
(Seleccionar
modelo) o
Enter a Tag
(Introducir una
etiqueta), realice las correspondientes
selecciones o introduzca la información
adecuada para su equipo y, a continuación,
haga clic en
Confirm
(Confirmar).
3
Desplácese a
System and Configuration
Utilities
(Utilidades del sistema y la
configuración)
→
Desktop System
Software
y, a continuación, haga clic en
Download Now
(Descargar ahora).
NOTA: La interfaz para el usuario de
support.dell.com. puede variar dependiendo
de las selecciones que efectúe.
• Cómo utilizar Windows XP
• Cómo usar Windows Vista
• Cómo trabajar con programas
y archivos
• Cómo personalizar mi escritorio
Centro de ayuda y soporte técnico
de Windows
1
Haga clic en
Inicio
→
Ayuda y soporte
técnico
.
2
Escriba una palabra o frase que describa
el problema y, a continuación, haga clic
en el icono de flecha.
3
Haga clic en el tema que describa
el problema.
4
Siga las instrucciones que aparecen en
la pantalla.
¿Qué busca? Aquí lo encontrará

324 Guía de referencia rápida
• Cómo volver a instalar mi
sistema operativo
Disco del sistema operativo
El sistema operativo ya está instalado en el
equipo. Para volver a instalarlo, utilice el
disco del Sistema operativoque se incluye
con el equipo (consulte "Restauración del
sistema operativo" en la Guía del usuario).
Después de volver a instalar el sistema
operativo, utilice el disco Drivers and
Utilities (Controladores y utilidades) para
volver a instalar los controladores de los
dispositivos que se incluían con el equipo.
La clave del producto del sistema operativo
se encuentra en el equipo.
NOTA: El color del disco de instalación del
sistema operativo varía en función del sistema
que haya pedido.
• Cómo usar Linux
• Debates por correo electrónico con
los usuarios de productos Dell Precision
y el sistema operativo Linux
• Información adicional relativa a Linux
y a mi equipo Dell Precision
Sitios de Linux compatibles con Dell
• linux.dell.com
• lists.us.dell.com/mailman/listinfo/linux-
precision
¿Qué busca? Aquí lo encontrará

Guía de referencia rápida 325
Configuración de su equipo
Cambio entre las orientaciones de torre y de escritorio
PRECAUCIÓN: Antes de comenzar cualquiera de los procedimientos de esta
sección, siga las instrucciones de seguridad incluidas en la
Guía de información
del producto
.
NOTA: Para cambiar la orientación del equipo de torre a escritorio o de escritorio
a torre, debe utilizar un kit opcional disponible de Dell. Consulte "Información del
producto" en la Guía del usuario para obtener información más detallada sobre la
solicitud de productos a Dell.
NOTA: El equipo de torre admite en la parte frontal una unidad de 3,5 pulgadas más
que el equipo de escritorio.
1
Siga los procedimientos del apartado "Antes de comenzar" en la
Guía
del usuario
.
2
Extraiga la cubierta del equipo (consulte "Extracción de la cubierta del
equipo" en la
Guía del usuario
).
3
Extraiga el panel frontal (consulte "Extracción del panel frontal" en la
Guía
del usuario
).
4
Extraiga el panel de la unidad y prepárelo añadiendo o quitando piezas
según precise (consulte "Paneles frontales" en la
Guía del usuario
).
Cambio de la orientación de torre a la escritorio
1
Extraiga todas las disqueteras instaladas o lectores de tarjetas multimedia
siguiendo los pasos del apartado "Extracción de una unidad de disquete o un
lector de tarjetas multimedia (equipo de torre)" en la
Guía del usuario
, y vuelva
a colocar una única disquetera o lector de tarjetas multimedia siguiendo los
pasos del apartado "Instalación de una unidad de disquete o un lector de
tarjetas multimedia (equipo de escritorio)" en la
Guía del usuario
.
2
Extraiga las unidades ópticas instaladas siguiendo los pasos del apartado
"Extracción de una unidad óptica (equipo de torre)" en la
Guía del usuario
,
y vuelva a colocar las unidades siguiendo los pasos del apartado "Instalación
de una unidad óptica (equipo de escritorio)" en la
Guía del usuario
.

326 Guía de referencia rápida
Cambio de la orientación de escritorio a la de torre
1
Extraiga todas las disqueteras instaladas o lectores de tarjetas multimedia
siguiendo los pasos del apartado "Extracción de una unidad de disquete o un
lector de tarjetas multimedia (equipo de escritorio)" en la
Guía del usuario
,
y vuelva a colocar una única disquetera o lector de tarjetas multimedia
siguiendo los pasos del apartado "Instalación de una unidad de disquete o un
lector de tarjetas multimedia (equipo de torre)" en la
Guía del usuario
.
2
Extraiga las unidades ópticas instaladas siguiendo los pasos del apartado
"Extracción de una unidad óptica (equipo de escritorio)" en la
Guía del
usuario
, y vuelva a colocar las unidades siguiendo los pasos del apartado
"Instalación de una unidad óptica (equipo de torre)" en la
Guía del usuario
.
Instalación del equipo en un lugar cerrado
La instalación del equipo en un lugar cerrado puede restringir el flujo de aire,
lo que podría provocar un sobrecalentamiento y repercutir en el rendimiento.
Cuando instale el equipo en un lugar de estas características, siga las pautas
que se indican a continuación.
AVISO: La temperatura de funcionamiento indicada en este manual refleja la
temperatura ambiente máxima de trabajo. Al instalar el equipo en un lugar cerrado es
preciso tener en cuenta la temperatura ambiental. Para obtener información sobre
las especificaciones del equipo, consulte "Especificaciones" en la Guía del usuario.

Guía de referencia rápida 327
• Deje un espacio libre mínimo de 10,2 cm (4 pulgadas) alrededor del equipo
con el fin de permitir que fluya el aire necesario para una correcta ventilación.
• Si se instala el equipo en una esquina de un escritorio o debajo de éste,
deje al menos 5,1 cm (2 pulgadas) de espacio por la parte de atrás hasta la
pared con el fin de permitir el flujo de aire necesario para disponer de una
ventilación adecuada.
• Si el lugar cerrado tiene puertas, asegúrese de que dejan pasar al menos el
30% de aire (por delante y por detrás).

328 Guía de referencia rápida
• No instale el equipo en un lugar cerrado que no permita el flujo del aire. La
restricción del flujo de aire
puede hacer que el equipo se sobrecaliente
e impactar en su rendimiento
.

Guía de referencia rápida 329
Transferencia de la información a un equipo nuevo
Puede usar los asistentes del sistema operativo para ayudarle a transferir archivos
y otros datos de un equipo a otro.
Microsoft Windows XP
El sistema operativo Microsoft
Windows XP dispone del Asistente para
transferencia de archivos y configuraciones, como:
• Mensajes de correo electrónico
• Configuraciones de barras de herramientas
• Tamaños de ventana
• Marcadores de Internet
Puede transferir datos de un equipo a otro por una red o mediante una conexión
de serie, o bien guardando los datos en un soporte extraíble, como puede ser un
CD o DVD grabable.
NOTA: Puede transferir información de un equipo a otro conectando directamente un
cable serie a los puertos de entrada/salida (E/S) de los dos equipos. Para transferir
datos a través de una conexión serie, debe usar la utilidad Conexiones de red desde el
Panel de control y realizar los pasos de configuración adicionales, como configurar una
conexión avanzada y designar el equipo host y el equipo invitado.
Para obtener instrucciones sobre la configuración de una conexión directa por cable
entre dos equipos, consulte en Microsoft Knowledge Base el artículo número nº 305621,
que se titula How to Set Up a Direct Cable Connection Between Two Computers in
Windows XP (Cómo configurar una conexión por cable directa entre dos equipo en XP).
Es posible que esta información no esté disponible en determinados países.
El uso del Asistente para transferencia de archivos y configuraciones necesita el
disco del Sistema operativo que se incluye con el equipo o un disco de asistencia,
que el propio asistente puede crear.
NOTA: Para obtener más información sobre la transferencia de datos, busque en
support.dell.com el documento nº 154781 (What Are The Different Methods To
Transfer Files From My Old Computer To My New Dell™ Computer Using the
Microsoft Windows XP Operating System? [¿Cuáles son los diferentes métodos
para transferir archivos de mi antiguo equipo a mi nuevo equipo de Dell utilizando el
sistema operativo Microsoft Windows XP?]).
NOTA: Es posible que no pueda acceder al documento Dell Knowledge Base en
determinados países.

330 Guía de referencia rápida
Asistente para transferencia de archivos y configuraciones (con el disco del
sistema operativo)
NOTA: El Asistente para transferencia de archivos y configuraciones designa el
equipo de origen desde el que se van a transferir los datos como el equipo antiguo
y el equipo de destino al que se van a transferir los datos como el nuevo.
P
ARA PREPARAR EL EQUIPO DE DESTINO PARA LA TRANSFERENCIA DE ARCHIVOS:
1
Haga clic en
Inicio
→
Todos los programas
→
Accesorios
→
Herramientas
del sistema
→
Asistente para transferencia de archivos y configuraciones
.
2
En la pantalla
¿Es éste su equipo nuevo o el antiguo?
, haga clic en
Equipo
nuevo
y en
Siguiente
.
3
En la pantalla
¿Tiene un CD de Windows XP?
, haga clic en
Utilizaré el
asistente desde el CD de Windows XP
y en
Siguiente
.
4
Revise la información en
Diríjase al equipo antiguo
y, a continuación, vaya
al equipo de origen. No haga clic
Siguiente
.
PARA COPIAR DATOS DEL EQUIPO DE ORIGEN:
1
Introduzca el disco de instalación del
sistema operativo
de Windows XP en
el equipo de origen.
Se mostrará la ventana
Bienvenido a Microsoft Windows XP
.
2
Haga clic en
Realizar tareas adicionales
.
3
En
¿Qué desea hacer?
, haga clic en
Transferir archivos y configuraciones
.
Se mostrará la ventana
Asistente para transferencia de archivos
y configuraciones
.
4
Haga clic en
Siguiente
.
5
En la pantalla
¿Es éste su equipo nuevo o el antiguo?
, haga clic en
Equipo
antiguo
y en
Siguiente
.
6
En
Seleccione un método de transferencia
, haga clic en el método de su
elección y, a continuación, haga clic en
Siguiente
.
7
En
Elija qué desea transferir
, haga clic para seleccionar los datos que desea
transferir y haga clic en
Siguiente
.
Los datos seleccionados se copiarán y se mostrará la pantalla
Completando la fase de recopilación
.
8
Haga clic en
Finalizar
.

Guía de referencia rápida 331
PARA TRANSFERIR INFORMACIÓN AL EQUIPO DE DESTINO:
1
Diríjase al equipo de destino.
2
En
Diríjase al equipo antiguo
, haga clic en
Siguiente
.
3
En
Seleccione la ubicación de los archivos y configuraciones
, seleccione
el método que ha elegido para transferir lo archivos y las configuraciones,
y haga clic en
Siguiente
.
El asistente lee las configuraciones y los archivos recopilados y los aplica al
equipo de destino. Cuando se haya completado la transferencia, se mostrará
la pantalla
Completado
.
4
Haga clic en
Terminar
y, a continuación, reinicie el equipo.
Asistente para transferencia de archivos y configuraciones (sin el disco del
sistema operativo)
Para ejecutar el Asistente para transferencia de archivos y configuraciones sin
el disco del Sistema operativo, deberá crear un disco del asistente. El disco del
asistente le permite crear un archivo de imagen de copia de seguridad en un
soporte extraíble.
NOTA: El Asistente para transferencia de archivos y configuraciones designa el
equipo de origen desde el que se van a transferir los datos como el equipo antiguo
y el equipo de destino al que se van a transferir los datos como el nuevo.
P
ARA CREAR UN DISCO DEL ASISTENTE:
1
En el equipo de destino, haga clic en
Inicio
→
Todos los programas
→
Accesorios
→
Herramientas del sistema
→
Asistente para transferencia de
archivos y configuraciones
.
2
En la pantalla
¿Es éste su equipo nuevo o el antiguo?
, haga clic en
Equipo
nuevo
y en
Siguiente
.
3
En
¿Tiene un CD de Windows XP?
, haga clic en
Deseo crear un disco del
asistente en la siguiente unidad
y, a continuación, haga clic en
Siguiente
.
4
Inserte un CD o DVD grabable, y haga clic en
Aceptar
.
5
Revise la información en
Diríjase al equipo antiguo
y, a continuación, vaya
al equipo de origen. No haga clic en
Siguiente
.
PARA COPIAR DATOS DEL EQUIPO DE ORIGEN:
1
Introduzca el disco del asistente en el equipo de origen.
2
Haga clic en
Inicio
→
Ejecutar
.

332 Guía de referencia rápida
3
Haga clic en
Examinar...
y vaya a
fastwiz
en el disco del asistente y,
a continuación, haga clic en
Aceptar
.
4
En la pantalla
¿Es éste su equipo nuevo o el antiguo?
, haga clic en
Equipo
antiguo
y en
Siguiente
.
5
En
Seleccione un método de transferencia
, haga clic en el método de su
elección y, a continuación, haga clic en
Siguiente
.
6
En
Elija qué desea transferir
, haga clic para seleccionar los datos que desea
transferir y haga clic en
Siguiente
.
Los datos seleccionados se copiarán y se mostrará la pantalla
Completando
la fase de recopilación
.
7
Haga clic en
Finalizar
.
PARA TRANSFERIR INFORMACIÓN AL EQUIPO DE DESTINO:
1
Diríjase al equipo de destino.
2
En
Diríjase al equipo antiguo
, haga clic en
Siguiente
.
3
En
Seleccione la ubicación de los archivos y configuraciones
, seleccione
el método que ha elegido para transferir lo archivos y las configuraciones,
y haga clic en
Siguiente
.
El asistente lee las configuraciones y los archivos recopilados y los aplica al
equipo de destino. Cuando se haya completado la transferencia, se mostrará
la pantalla
Completado
.
4
Haga clic en
Termin ar
y, a continuación, reinicie el equipo.
Microsoft Windows Vista
1
Haga clic en el botón de inicio de Windows Vista, y, a continuación, en
Transfer files and settings
(Transferir archivos y configuraciones)
→
Start
Windows Easy Transfer
(Iniciar Transferencia fácil de Windows).
2
En el cuadro de diálogo
Control de cuentas de usuario
, haga clic en
Continue
(Continuar).
3
Haga clic en
Start a new transfer
(Iniciar una nueva transferencia) o en
Continue a transfer in progress
(Continuar una transferencia en curso).
Siga las instrucciones mostradas en pantalla por el asistente para Transferencia
fácil de Windows.

Guía de referencia rápida 333
Dispositivos de protección de la alimentación
Existen varios dispositivos que protegen contra las interrupciones y las
fluctuaciones de la alimentación eléctrica:
• Supresores de sobretensión
• Acondicionadores de línea
• Sistemas de alimentación ininterrumpida (SAI)
Protectores contra sobretensión
Los supresores de picos de tensión y los enchufes múltiples equipados con
protección contra picos de tensión ayudan a evitar los daños en el equipo
ocasionados por sobretensiones que pueden producirse durante las tormentas
eléctricas o después de interrupciones en la alimentación eléctrica. Algunos
fabricantes de supresores de sobretensiones proporcionan cobertura de garantía
para cierto tipo de daños. Cuando elija un supresor de sobretensiones, lea
atentamente la garantía del dispositivo y compare la clasificación en julios para
determinar la eficacia relativa de los diferentes dispositivos. Un dispositivo con
una clasificación en julios más alta ofrece más protección.
AVISO: La mayoría de los supresores de sobretensiones no protegen contra las
fluctuaciones e interrupciones de la alimentación eléctrica causadas por rayos.
Cuando se produzca una tormenta con aparato eléctrico, desconecte la línea
telefónica de la toma de teléfono de pared y desenchufe el equipo de la toma de
alimentación eléctrica.
Muchos supresores de sobretensión disponen de una toma de teléfono para
proteger el módem. Consulte la documentación del supresor de sobretensiones
para obtener instrucciones sobre la conexión del módem.
AVISO: No todos los supresores de sobretensiones ofrecen protección para el
adaptador de red. Desconecte el cable de red de la toma de red de pared durante
las tormentas con aparato eléctrico.

334 Guía de referencia rápida
Acondicionadores de línea
AVISO: Los acondicionadores de línea no protegen contra las interrupciones de
la alimentación eléctrica.
Los acondicionadores de línea están diseñados para mantener la tensión de
CA a un nivel bastante constante.
Sistemas de alimentación ininterrumpida
AVISO: La interrupción de la alimentación eléctrica mientras se están guardando
datos en la unidad de disco duro puede provocar que se pierdan datos o que el
archivo resulte dañado.
NOTA: Para prolongar al máximo el tiempo de funcionamiento de la batería,
conecte únicamente el equipo al SAI. Los demás dispositivos, como la impresora,
pueden ser conectados a un enchufe múltiple independiente que proporcione
protección contra sobretensiones.
Los sistemas SAI protegen contra fluctuaciones e interrupciones de la alimentación
eléctrica. Los dispositivos SAI contienen una batería que proporciona alimentación
eléctrica temporal a los dispositivos conectados cuando se interrumpe la
alimentación eléctrica. La batería se carga siempre que haya alimentación de CA
disponible. Consulte la documentación del fabricante del SAI para obtener
información sobre el tiempo de funcionamiento de la batería y asegurarse de
que el dispositivo está aprobado por Underwriters Laboratories (UL).

Guía de referencia rápida 335
Acerca de su equipo
Vista frontal (orientación de torre)
1–3 Compartimientos
para unidades de
5,25 pulgadas
Con capacidad para una unidad CD/DVD, o un lector de
tarjeta de medios, o un disquete, o un disco duro SATA en un
soporte de disco duro de 5,25 pulgadas.
El soporte de disco duro es sólo para su uso en compartimentos
de unidades de 5,25 pulgadas. El soporte/unidad-de disquete
y los compartimentos de-unidades de disco duro no son
intercambiables.
1
2
3
4
5
6
7
8
11
10
13
12
9

336 Guía de referencia rápida
4 Compartimento
para unidades de
5,25 pulgadas con
una placa del
panel de la unidad
de 3,5 pulgadas
Con capacidad para una unidad CD/DVD, o un lector de tarjeta
de medios, o un disquete, o un disco duro SATA en un soporte
de disco duro de 5,25 pulgadas. La placa del panel de la unidad
mostrada aquí es sólo para uso con una unidad de disquete
o lector de tarjeta de medios; puede instalar la placa en la parte
delantera de cualquiera de los cuatro compartimentos para
unidades de 5,25 pulgadas. Para obtener más información,
consulte "Paneles de la unidad" en la Guía del usuario.
El soporte de disco duro es sólo para su uso en compartimentos
de unidades de 5,25 pulgadas. El soporte/unidad-de disquete
y los compartimentos de-unidades de disco duro no
son intercambiables.
5 Indicador de
actividad del
disco duro
El indicador luminoso de la unidad de disco duro se enciende
cuando el equipo lee o graba datos en la unidad de disco duro.
Este indicador luminoso también puede encenderse cuando un
dispositivo, como la unidad de CD, está en funcionamiento.
6 Conector
IEEE 1394
Utilice el conector IEEE 1394 para dispositivos de datos de
alta velocidad como cámaras de vídeo digital y dispositivos
de almacenamiento externo.
7 Conectores
USB 2.0 (2)
Utilice los conectores USB frontales para dispositivos que
conecte ocasionalmente, como memorias flash, cámaras,
o para dispositivos USB de inicio.
Dell recomienda utilizar los conectores USB posteriores
para los dispositivos que están conectados habitualmente,
como impresoras y teclados.
8 Botón de
alimentación,
indicador de
alimentación
Presione este botón para encender el equipo. El indicador
luminoso en el centro de este botón indica su estado. Para
obtener más información, consulte "Controles e indicadores
luminosos" en la Guía del usuario.
NOTA: Para evitar la pérdida de datos, no utilice el botón de
encendido para apagar el equipo. En su lugar, apague el
equipo mediante el sistema operativo.
9 Placa de
identificación
de Dell
Puede rotar la placa de identificación de Dell para que "Dell" se
lea horizontalmente, dependiendo de si tiene una orientación
de escritorio o de torre.
10 Conector para
auriculares
Utilice el conector para auriculares para conectar unos
auriculares.
11 Conector de
micrófono
Utilice el conector para micrófono para conectar un micrófono
de PC para la entrada de voz o música a un programa de sonido
o de telefonía.

Guía de referencia rápida 337
Vista posterior (orientación de torre)
12 Indicadores
luminosos de
diagnóstico (4)
Utilice estos indicadores para ayudar a solucionar los problemas
del equipo basándose en el código de diagnóstico. Para obtener
más información, consulte "Indicadores luminosos de
diagnóstico" en la Guía del usuario.
13 Indicador
luminoso de
enlace de red
El indicador luminoso de enlace de red está encendido
cuando hay una conexión correcta entre una red de
10 Mbps, 100 Mbps o 1000 Mbps (o 1 Gbps) y el equipo.
1 Conector de
alimentación
Utilice este conector para conectar el cable de alimentación.
2 Ranuras para
tarjeta
Las ranuras de 2 a 6 admiten tarjetas de longitud completa,
e incluyen una PCI, dos PCI Express 2.0 x16 y dos PCI-X. Las
ranuras 1 y 7 admiten tarjetas de media longitud, e incluyen
una PCI Express x8 (cableada como x4) y una PCI-X.
3 Conectores del
panel posterior
Enchufe el USB, el audio y otros dispositivos en el conector
apropiado (consulte "Conectores del panel posterior" en la
página 338 para obtener más información).
1
3
2

338 Guía de referencia rápida
PRECAUCIÓN: Asegúrese de que ninguna de las rejillas del ventilador estén
bloqueadas. El bloqueo puede causar importantes problemas térmicos.
Conectores del panel posterior
1 Conector paralelo Conecte un dispositivo paralelo, como por ejemplo una
impresora, al conector paralelo. Si tiene una impresora USB,
enchúfela en un conector USB.
NOTA: El conector paralelo integrado se desactiva
automáticamente si el equipo detecta una tarjeta instalada
que contiene un conector paralelo configurado en la misma
dirección. Para obtener más información, consulte "Opciones
de configuración del sistema" en la Guía del usuario.
2 Conector
para ratón
Enchufe un ratón PS/2 estándar en el conector verde para
ratón. Antes de conectar un ratón al equipo, apague el equipo
y todos los dispositivos conectados. Si tiene un ratón USB,
enchúfelo en un conector USB.
3 Conector
IEEE 1394
Utilice el conector IEEE 1394 para dispositivos de datos de alta
velocidad como cámaras de vídeo digital y dispositivos de
almacenamiento externo.
4 Conector de línea
de entrada
Utilice el conector azul de línea de entrada para conectar un
dispositivo de reproducción, como un MP3, una unidad de CD
o VCR. En equipos con tarjeta de sonido, utilice el conector de
la tarjeta.
5 Conector de
línea de salida
Utilice el conector verde de línea de salida para conectar
auriculares y la mayoría de los altavoces a amplificadores
integrados. En equipos con tarjeta de sonido, utilice el
conector de la tarjeta.
12345678
11 10
9

Guía de referencia rápida 339
6 Indicador
luminoso de
integridad del
enlace
Luz verde: existe una conexión correcta entre una red
a 10 Mbps y el equipo.
Luz naranja: existe una conexión correcta entre una red
a 100 Mbps y el equipo.
Amarillo: existe una conexión correcta entre una red
a 1 000 Mbps (o 1 Gbps) y el equipo.
Luz apagada: el equipo no detecta ninguna conexión física a la red.
7 Conector del
adaptador de red
Para conectar el equipo a una red o un dispositivo de banda
ancha, enchufe un extremo del cable de red en una toma de
red, en un dispositivo de red o en un dispositivo de banda
ancha. Conecte el otro extremo del cable de red al conector
del adaptador de red del equipo. Cuando el cable de red se
haya enchufado correctamente, oirá un clic.
no enchufe un cable telefónico en el conector de red.
En equipos con una tarjeta de conector de red adicional, use
los conectores de la tarjeta y de la parte posterior del equipo
al configurar varias conexiones de red (como una intranet
y extranet independiente).
Se recomienda utilizar cables y conectores de la categoría
5 para la red. Si debe utilizar la categoría 3 para cables, fuerce
la velocidad de la red a 10 Mbps para garantizar un
funcionamiento fiable.
8 Indicador
luminoso de
actividad de la red
Si una luz amarilla parpadea, el equipo está transmitiendo
o recibiendo datos de red. Si hay un gran volumen de tráfico
en la red, la luz del indicador luminoso puede parecer fija.
9 Conectores
USB 2.0 (5)
Se recomienda utilizar los conectores USB frontales para
dispositivos que conecte ocasionalmente, como memorias
USB flash, cámaras o dispositivos USB de inicio.
Utilice los conectores USB posteriores para los dispositivos
que están conectados habitualmente, como impresoras
y teclados.
10 Conector del
teclado
Si tiene un teclado PS/2 estándar, enchúfelo en el conector
morado para teclado. Si tiene un teclado USB, enchúfelo en un
conector USB.
11 Conectores
serie (2)
Conecte un dispositivo serie, como por ejemplo un dispositivo
de bolsillo, al puerto serie. Si fuera necesario, la dirección de
este puerto se puede cambiar a través del programa de
configuración de sistema (consulte el apartado "Configuración
de sistema" en la Guía del usuario).

340 Guía de referencia rápida
Limpieza del equipo
PRECAUCIÓN: Antes de comenzar cualquiera de los procedimientos de esta
sección, siga las instrucciones de seguridad incluidas en la
Guía de información
del producto
.
Equipo, teclado y monitor
PRECAUCIÓN: Antes de limpiar el equipo, desconéctelo de la toma eléctrica.
Limpie el equipo con un paño suave humedecido con agua. No utilice limpiadores
en aerosol o líquidos, que podrían contener sustancias inflamables.
• Utilice una aspiradora con un accesorio de cepillo para eliminar el polvo de
las ranuras y los orificios del equipo y de las teclas del teclado.
AVISO: No limpie la pantalla del monitor con ningún tipo de jabón ni solución de
alcohol. De lo contrario, podría dañar la capa protectora antirreflectante.
• Para limpiar la pantalla, humedezca ligeramente con agua un paño suave
y limpio. Si es posible, utilice un paño especial para limpiar la pantalla
o una solución adecuada para la capa protectora antiestática del monitor.
• Limpie el teclado, el equipo y las partes de plástico del monitor con un
paño de limpieza suave humedecido con agua.
No empape el paño ni permita que el agua entre en contacto con el interior
del equipo ni el teclado.
Ratón (no óptico)
1
Quite la tapita de la parte inferior del ratón en sentido contrario a las agujas
del reloj y extraiga la bola.
2
Limpie la bola con un paño limpio y sin pelusa.
3
Sople suavemente dentro del compartimiento de la esfera para expulsar el
polvo y la pelusa.
4
Limpie los rodillos dentro del compartimento de la bola con un bastoncillo
de algodón humedecido ligeramente con alcohol isopropílico.
5
Vuelva a centrar los rodillos en sus canales según se precise. Asegúrese de
que no quede pelusa del bastoncillo en los rodillos.
6
Introduzca la esfera, coloque el anillo de retención y gírelo en el sentido de
las agujas del reloj hasta que quede fijado en su lugar.

Guía de referencia rápida 341
Unidad de disco flexible
AVISO: No limpie los cabezales de las unidades con un bastoncillo de algodón.
Los cabezales pueden desalinearse e impedir que la unidad funcione.
Limpie la unidad de disquete utilizando uno de los estuches de limpieza
disponibles en el mercado. Estos estuches incluyen disquetes previamente tratados
para eliminar los contaminantes que se acumulan con el funcionamiento normal.
CD y DVD
AVISO: Para limpiar el lente de la unidad de CD/DVD, utilice siempre aire comprimido
y siga las instrucciones correspondientes. No toque el lente de la unidad.
1
Sujete el disco por el borde exterior. También puede tocar el borde interior
del orificio central.
AVISO: Para evitar que se dañe la superficie, no limpie el disco con
movimientos circulares.
2
Con un paño suave y sin pelusa, frote suavemente la parte inferior del
disco (la cara sin etiqueta) en línea recta, desde el centro al borde exterior.
Para la suciedad difícil de eliminar, pruebe con agua o una solución diluida
de agua y jabón suave. También puede adquirir productos comerciales para
la limpieza de discos, que proporcionan protección contra el polvo y las
huellas dactilares y evitan que se rayen. Los productos de limpieza para
CD también pueden utilizarse en DVD.
Herramientas para la solución de problemas
Indicadores luminosos de alimentación
PRECAUCIÓN: Antes de comenzar cualquiera de los procedimientos de
esta sección, siga las instrucciones de seguridad incluidas en la
Guía de
información del producto
.
El indicador luminoso del botón de encendido situado en la parte frontal del
equipo se ilumina y parpadea o permanece fijo para indicar diferentes estados:
• Si el indicador luminoso de alimentación emite una luz verde y el equipo
no responde, "Indicadores luminosos de diagnóstico" en la página 343.

342 Guía de referencia rápida
• Si el indicador luminoso de alimentación está parpadeando en verde, el equipo
está en el modo de espera. Pulse una tecla del teclado, mueva el ratón o pulse
el botón de encendido para reanudar el funcionamiento normal.
• Si está apagado, el equipo bien está apagado o no recibe corriente.
– Vuelva a conectar el cable de alimentación a su conector, situado en la
parte posterior del equipo, y a la toma eléctrica.
– Si el equipo está conectado a una regleta de enchufes, asegúrese de que
ésta a su vez está conectada a una toma eléctrica y de que está encendida.
– Puentee los dispositivos de protección de la alimentación, las regletas
de enchufes y los alargadores de alimentación para comprobar que el
equipo se enciende correctamente.
– Asegúrese de que la toma eléctrica funciona; para ello, enchufe otro
aparato, por ejemplo, una lámpara.
– Asegúrese de que el cable de alimentación principal y el cable del
panel frontal están conectados firmemente a la placa base (consulte
"Componentes de la placa base" en la
Guía del usuario
).
• Si el indicador luminoso está parpadeando en ámbar, el equipo está recibiendo
corriente, pero podría existir un problema de alimentación interno.
– Asegúrese de que el conmutador de selección de la tensión coincide
con la alimentación de CA de su zona, si procede.
– Asegúrese de que el cable de alimentación del procesador está
conectado firmemente a la placa base (consulte "Componentes de la
placa base" en la
Guía del usuario
).
• Si el indicador luminoso emite una luz ámbar fija, es posible que haya un
dispositivo que funciona mal o que esté instalado incorrectamente.
– Extraiga y vuelva a colocar todos los módulos de memoria (consulte
"Extracción del panel frontal" en la
Guía del usuario
).
– Extraiga y vuelva a colocar las tarjetas (consulte "Tarjetas" en la
Guía
del usuario
).
• Elimine la interferencia. algunas de las causas posibles de las interferencias son:
– Alargadores de alimentación, de teclado y de ratón
– Demasiados dispositivos en una regleta de enchufes
– Varias regletas de enchufes conectadas a la misma toma eléctrica

Guía de referencia rápida 343
Indicadores luminosos de diagnóstico
PRECAUCIÓN: Antes de comenzar cualquiera de los procedimientos de esta
sección, siga las instrucciones de seguridad incluidas en la
Guía de información
del producto
.
Para ayudarle a resolver los problemas, el equipo dispone de cuatro indicadores
luminosos etiquetados como 1, 2, 3 y 4 en el panel frontal (consulte "Vista
frontal (orientación de torre)" en la página 335). Cuando el equipo se inicia
correctamente, los indicadores luminosos parpadean. Si el equipo presenta
anomalías, utilice la secuencia de los indicadores luminosos para ayudar
a identificar el problema.
NOTA: Después de que el equipo completa el POST, los cuatro indicadores
luminosos se apagan antes de iniciar el sistema operativo.
Códigos de indicadores luminosos de diagnóstico durante la POST
Patrón de
indicadores
luminosos
Descripción del
problema
Solución recomendada
El equipo se encuentra
en una condición de
apagado normal, o se ha
producido un posible
error previo al BIOS.
Enchufe el equipo en una toma eléctrica
que funcione y presione el botón de
encendido.
Posible error del
BIOS; el equipo se
encuentra en modo
de recuperación.
• Ejecute la utilidad de recuperación del
BIOS, espere a que se complete la
recuperación y reinicie el equipo.
• Si el problema persiste, póngase en
contacto con Dell (consulte el apartado
"Cómo ponerse en contacto con Dell"
en la
Guía del usuario
).
Se ha producido un
posible error en el
procesador.
• Vuelva a colocar el procesador (consulte
el apartado "Procesador"
en la
Guía
del usuario
).
• Si el problema persiste, póngase
en contacto con Dell (consulte el
apartado
"Cómo ponerse en contacto
con Dell" en la
Guía del usuario
).

344 Guía de referencia rápida
Se detectan los
módulos de memoria,
pero se ha producido
un error en la memoria.
• Si dos o más módulos de memoria
están instalados, quite los módulos
(consulte "Memoria"
en la
Guía del
usuario
), vuelva a instalar un módulo y,
a continuación, reinicie el equipo. Si el
equipo se inicia con normalidad,
continúe instalando los módulos de
memoria adicional (de uno en uno)
hasta que haya identificado un módulo
defectuoso o reinstalado todos los
módulos sin errores.
• Si dispone de otra memoria del mismo
tipo que funcione, instálela en el
equipo (consulte "Memoria"
en la
Guía del usuario
).
• Si el problema persiste, póngase en
contacto con Dell (consulte el
apartado
"Cómo ponerse en contacto
con Dell" en la
Guía del usuario
).
Se ha producido un
posible error en la
tarjeta gráfica.
• Extraiga y vuelva a colocar las tarjetas
gráficas (consulte "Tarjetas"
en la
Guía
del usuario
).
• Si está disponible, instale una tarjeta
gráfica de trabajo en el equipo.
• Si el problema persiste, póngase en
contacto con Dell (consulte el
apartado
"Cómo ponerse en contacto
con Dell" en la
Guía del usuario
).
Se ha producido un
posible error en la
unidad de disquete
o de disco duro.
• Vuelva a conectar todos los cables de
alimentación y de datos, y reinicie
el equipo.
• Si el problema persiste, póngase en
contacto con Dell (consulte el apartado
"Cómo ponerse en contacto con Dell"
en la
Guía del usuario
).
Patrón de
indicadores
luminosos
Descripción del
problema
Solución recomendada

Guía de referencia rápida 345
Se ha producido un
posible error de USB.
• Vuelva a instalar todos los dispositivos
USB, compruebe las conexiones de los
cables y reinicie el equipo.
• Si el problema persiste, póngase en
contacto con Dell (consulte el apartado
"Cómo ponerse en contacto con Dell"
en la
Guía del usuario
).
No se detecta ningún
módulo de memoria.
• Si dos o más módulos de memoria
están instalados, quite los módulos
(consulte "Memoria"
en la
Guía del
usuario
), vuelva a instalar un módulo
y, a continuación, reinicie el equipo. Si
el equipo se inicia con normalidad,
continúe instalando los módulos de
memoria adicional (de uno en uno)
hasta que haya identificado un
módulo defectuoso o reinstalado
todos los módulos sin errores.
• Si dispone de otra memoria del mismo
tipo que funcione, instálela en el
equipo (consulte "Memoria"
en la
Guía del usuario
).
• Si el problema persiste, póngase en
contacto con Dell (consulte el
apartado
"Cómo ponerse en contacto
con Dell" en la
Guía del usuario
).
Error en la placa base. Si el problema persiste, póngase en
contacto con Dell (consulte el apartado
"Cómo ponerse en contacto con Dell"
en la Guía del usuario).
Patrón de
indicadores
luminosos
Descripción del
problema
Solución recomendada

346 Guía de referencia rápida
Se detectan los
módulos de memoria,
pero existe un error de
configuración o de
compatibilidad de
memoria.
• Asegúrese de que no existen requisitos
especiales para la colocación del conector
o del módulo de memoria (consulte
"Memoria"
en la
Guía del usuario
).
• Asegúrese de que su equipo admite
la memoria que está usando (consulte
"Memoria"
en la
Guía del usuario
).
• Si el problema persiste, póngase en
contacto con Dell (consulte el apartado
"Cómo ponerse en contacto con Dell"
en la
Guía del usuario
).
Posible error de
hardware o de un
recurso de la placa base.
• Consulte "Restauración del sistema
operativo"
en la
Guía del usuario
.
• Si el problema persiste, póngase en
contacto con Dell (consulte el
apartado "Cómo ponerse en contacto
con Dell"
en la
Guía del usuario
).
Se ha producido un
posible error en la
tarjeta de expansión.
1
Determine si existe algún conflicto
extrayendo una tarjeta de expansión
(que no sea una tarjeta gráfica)
y reiniciando el equipo (consulte
"Tarjetas"
en la
Guía del usuario
).
2
Si el problema persiste, vuelva a instalar
la tarjeta que ha extraído, extraiga otra
tarjeta y reinicie el equipo.
3
Repita este proceso para cada tarjeta de
expansión instalada. Si el equipo se
inicia correctamente, compruebe si hay
conflictos de recursos relacionados con
la última tarjeta extraída del equipo
(consulte "Restauración del sistema
operativo"
en la
Guía del usuario
).
4
Si el problema persiste, póngase en
contacto con Dell (consulte el
apartado
"Cómo ponerse en contacto
con Dell" en la
Guía del usuario
).
Patrón de
indicadores
luminosos
Descripción del
problema
Solución recomendada

Guía de referencia rápida 347
Códigos de sonido
El equipo puede emitir una serie de sonidos durante el inicio. La serie de
sonidos se llama código de sonidos y se puede usar para ayudar a identificar
algún problema con el equipo.
El equipo puede emitir una serie de sonidos durante el inicio:
1
Anote el código de sonido.
2
Ejecute los Dell Diagnostics para identificar la causa (consulte "Dell
Diagnostics" en la página 352).
Se ha producido un
error de otro tipo.
• Asegúrese de que todos los cables de la
unidad de disco duro y de la unidad de
CD/DVD están correctamente
conectados en la placa base (consulte
"Componentes de la placa base"
en la
Guía del usuario
).
• Si se produce un mensaje de error en
la pantalla identificando un problema
con un dispositivo (como la disquetera
o el disco duro), compruebe el
dispositivo para asegurarse de que
funciona correctamente.
• Si se trata de iniciar el sistema operativo
desde un dispositivo (como una
disquetera o una unidad de CD/DVD),
compruebe la configuración del sistema
(consulte "Configuración de sistema"
en
la
Guía del usuario
) para asegurarse de
que la secuencia de inicio es correcta para
los dispositivos instalados en el equipo.
• Si el problema persiste, póngase en
contacto con Dell (consulte el apartado
"Cómo ponerse en contacto con Dell"
en la
Guía del usuario
).
Código Causa
2 cortos, 1 largo Error de suma de comprobación del BIOS
1 largo, 3 cortos, 2 cortos Error de memoria
1 corto Tecla F12 pulsada
Patrón de
indicadores
luminosos
Descripción del
problema
Solución recomendada

348 Guía de referencia rápida
Código
(sonidos
cortos repetidos)
Descripción Remedio sugerido
1 Fallo de la suma de
comprobación del
BIOS. Posible fallo en
la placa madre.
Si el problema persiste, póngase en
contacto con Dell (consulte el apartado
"Cómo ponerse en contacto con Dell" en
la Guía del usuario).
2 No se detecta ningún
módulo de memoria.
• Si dos o más módulos de memoria están
instalados, quite los módulos (consulte
"Memoria"
en la
Guía del usuario
), vuelva
a instalar un módulo y, a continuación,
reinicie el equipo. Si el equipo se inicia
con normalidad, continúe instalando los
módulos de memoria adicional (de uno
en uno) hasta que haya identificado un
módulo defectuoso o reinstalado todos los
módulos sin errores.
• Si dispone de otra memoria del mismo
tipo que funcione, instálela en el equipo
(consulte "Memoria"
en la
Guía
del usuario
).
• Si el problema persiste, póngase en
contacto con Dell (consulte el apartado
"Cómo ponerse en contacto con Dell"
en la
Guía del usuario
).
3 Posible fallo en la
placa madre.
Si el problema persiste, póngase en
contacto con Dell (consulte el apartado
"Cómo ponerse en contacto con Dell" en
la Guía del usuario).

Guía de referencia rápida 349
Mensajes del sistema
NOTA: Si el mensaje que recibe no figura en la siguiente tabla, consulte la
documentación del sistema operativo o del programa que se estaba ejecutando
cuando ha aparecido el mensaje.
A
LERT! PREVIOUS ATTEMPTS AT BOOTING THIS SYSTEM HAVE FAILED AT
CHECKPOINT [NNNN]. FOR HELP IN RESOLVING THIS PROBLEM, PLEASE NOTE THIS
CHECKPOINT AND CONTACT DELL TECHNICAL SUPPORT (ALERTA! LOS INTENTOS
PREVIOS DE INICIAR ESTE SISTEMA HAN DADO ERROR EN EL PUNTO DE
COMPROBACIÓN [NNNN]. PARA AYUDAR A RESOLVER ESTE PROBLEMA, ANOTE EL
PUNTO DE COMPROBACIÓN Y LLAME A SOPORTE TÉCNICO DE DELL)—El equipo
no pudo completar la rutina de inicio tres veces consecutivas por el mismo error
(consulte "Cómo ponerse en contacto con Dell" en la Guía del usuario).
4 Fallo de
lectura/escritura
de la RAM.
• Asegúrese de que no existen requisitos
especiales para la colocación del conector
o del módulo de memoria (consulte
"Memoria"
en la
Guía del usuario
).
• Asegúrese de que su equipo admite la
memoria que está usando (consulte
"Memoria"
en la
Guía del usuario
).
• Si el problema persiste, póngase en
contacto con Dell (consulte el apartado
"Cómo ponerse en contacto con Dell"
en la
Guía del usuario
).
5 Fallo del reloj de
tiempo real. Posible
fallo de la batería o de
la placa madre.
• Cambie las baterías (consulte el
apartado "Cambio de la batería"
en
la
Guía del usuario
).
• Si el problema persiste, póngase en
contacto con Dell (consulte el apartado
"Cómo ponerse en contacto con Dell"
en la
Guía del usuario
).
6 Fallo de la prueba del
BIOS de vídeo.
Si el problema persiste, póngase en
contacto con Dell (consulte el apartado
"Cómo ponerse en contacto con Dell" en
la Guía del usuario).
Código
(sonidos
cortos repetidos)
Descripción Remedio sugerido

350 Guía de referencia rápida
CMOS CHECKSUM ERROR (ERROR DE LA SUMA DE COMPROBACIÓN DEL CMOS) —
Posible fallo de la placa madre o la carga de la batería del reloj en tiempo real es baja.
Cambie las baterías (consulte el apartado "Cambio de la batería" o "Cómo ponerse en
contacto con Dell" en la Guía del usuario).
CPU
FAN FAILURE (FALLO DEL VENTILADOR DE LA CPU) — CPU fan failure (Fallo
del ventilador de la CPU) Extraiga el ventilador de la CPU (consulte "Extracción del
procesador" en la Guía del usuario).
D
ISKETTE DRIVE SEEK FAILURE (ERROR DE BÚSQUEDA DE LA UNIDAD DE DISQUETE)—
Puede haber un cable suelto o que la información de configuración del equipo no
coincida con la del hardware. Compruebe las conexiones de los cables (consulte el
apartado "Cómo ponerse en contacto con Dell" en la Guía del usuario).
D
ISKETTE READ FAILURE (ERROR DE LECTURA DEL DISQUETE)—El disquete puede
estar defectuoso o haber un cable suelto. Cambie el disquete y compruebe si hay
alguna conexión de cables suelta.
H
ARD-DISK READ FAILURE (ERROR DE LECTURA DE LA UNIDAD DE DISCO DURO)—
Posible fallo de la unidad de disco duro durante la prueba de inicio del disco duro
(consulte "Cómo ponerse en contacto con Dell" en la Guía del usuario).
K
EYBOARD FAILURE (ERROR DEL TECLADO)—Error del teclado o cable suelto de
éste (consulte "Problemas con el teclado" en la Guía del usuario).
N
O BOOT DEVICE AVAILABLE (NO HAY NINGÚN DISPOSITIVO DE INICIO
DISPONIBLE)—El sistema no puede detectar un dispositivo o partición de inicio.
• Si la unidad de disquete es el dispositivo de inicio, asegúrese de los cables están
conectados y que hay un disquete de inicio en la unidad.
• Si la unidad de disco duro es el dispositivo de inicio, asegúrese de que los cables
están conectados y de que la unidad está instalada correctamente y dividida en
particiones como dispositivo de inicio.
• Abra el programa de configuración del sistema y asegúrese de que la información de
la secuencia de inicio es correcta (consulte "Introducción de la configuración del
sistema"
en la
Guía del usuario
).
NO TIMER TICK INTERRUPT (NO HAY INTERRUPCIÓN DE TIC DE TEMPORIZADOR)—
Error en la placa del sistema o malfuncionamiento de un chip de la placa del sistema
(consulte "Cómo ponerse en contacto con Dell" en la Guía del usuario).
N
ON-SYSTEM DISK OR DISK ERROR (ERROR DEL DISCO O DE UN DISCO QUE NO ES
DEL SISTEMA)—Cambie el disquete por uno que tenga un sistema operativo de
inicio o extraiga el disquete de la unidad A y reinicie el equipo.
N
OT A BOOT DISKETTE (NO ES UN DISQUETE DE INICIO)—Inserte un disquete de
inicio y reinicie el equipo.

Guía de referencia rápida 351
NOTICE - HARD DRIVE SELF MONITORING SYSTEM HAS REPORTED THAT
A PARAMETER HAS EXCEEDED ITS NORMAL OPERATING RANGE. DELL RECOMMENDS
THAT YOU BACK UP YOUR DATA REGULARLY. A PARAMETER OUT OF RANGE MAY OR
MAY NOT INDICATE A POTENTIAL HARD DRIVE PROBLEM. (NOTA – EL SISTEMA
DE AUTOVIGILANCIA
DEL DISCO DURO HA DETECTADO QUE UN PARÁMETRO
EXCEDE DE SU MARGEN NORMAL DE FUNCIONAMIENTO. DELL RECOMIENDA QUE
REALICE COPIAS DE SEGURIDAD CON REGULARIDAD. UN PARÁMETRO QUE SE HALLE
FUERA DEL MARGEN PUEDE INDICAR O NO UN PROBLEMA POTENCIAL DE LA UNIDAD
DE DISCO DURO)—Error S.M.A.R.T, posible error de la unidad de disco duro. Esta
función puede estar activada o desactivada en la configuración del BIOS.
Solucionador de problemas de hardware
Si durante la instalación del sistema operativo un dispositivo no se detecta o
bien se detecta pero no está configurado correctamente, puede utilizar el
solucionador de problemas de hardware para resolver la incompatibilidad.
Windows XP:
1
Haga clic en
Inicio
→
Ayuda y soporte técnico
.
2
Escriba
hardware troubleshooter
(solucionador de problemas de
hardware) en el campo de búsqueda y pulse <Intro> para iniciar la búsqueda.
3
En la sección
Resolver un problema
, haga clic en
Solucionador de
problemas de hardware
.
4
En la lista del
Solucionador de problemas de hardware
, seleccione la
opción que mejor describa el problema y haga clic en
Siguiente
para
continuar con los restantes pasos de la solución del problema.
Windows Vista:
1
Haga clic en el botón de inicio de Windows Vista,
y en
Help and
Support
(Ayuda y soporte técnico).
2
Escriba
hardware troubleshooter
(solucionador de problemas de
hardware) en el campo de búsqueda y pulse <Intro> para iniciar la
búsqueda.
3
En los resultados de la búsqueda seleccione la opción que mejor describa el
problema y sigua el resto de pasos para solucionarlo.

352 Guía de referencia rápida
Dell Diagnostics
PRECAUCIÓN: Antes de comenzar cualquiera de los procedimientos de esta
sección, siga las instrucciones de seguridad incluidas en la
Guía de información
del producto
.
Cuándo usar los Dell Diagnostics
Si tiene problemas con el equipo, realice las pruebas del apartado Bloqueos
y problemas con el software (consulte "Solución de problemas" en Guía del
usuario) y ejecute Dell Diagnostics antes de ponerse en contacto con Dell
para solicitar asistencia técnica.
Puede ejecutar los Dell Diagnostics (Diagnósticos de Dell) desde el disco
duro o desde el disco Drivers and Utilities (Controladores y utilidades).
Consulte el apartado "Configuración del sistema" en la Guía del usuario para
revisar la información de configuración del equipo y asegúrese de que el
dispositivo que desea probar aparece en la configuración del sistema y está activo.
NOTA: Los Dell Diagnostics (Diagnósticos Dell) funcionan sólo en equipos Dell.
NOTA: Antes de ejecutar los diagnósticos de Dell, imprima los siguientes procedimientos.
Inicio de Dell Diagnostics desde la unidad de disco duro
Los Dell Diagnostics están situados en una partición de la utilidad de diagnósticos
separada de la unidad de disco duro.
NOTA: Si el equipo no muestra ninguna imagen en la pantalla, consulte el apartado
"Cómo ponerse en contacto con Dell" en la Guía del usuario.
1
Encienda (o reinicie) el equipo.
2
Cuando aparezca el logotipo de DELL, pulse <F12> inmediatamente.
NOTA: Si se mantiene pulsada una tecla durante largos períodos de tiempo
se pueden producir fallos en el teclado. Para evitar posibles fallos, pulse
y suelte <F12> a intervalos regulares hasta que aparezca el Menú del
dispositivo de inicio.
NOTA: Si en cualquier momento aparece un mensaje indicando que no se ha
encontrado ninguna partición para la utilidad de diagnóstico, ejecute los Dell
Diagnostics desde el disco Drivers and Utilities (Controladores y utilidades)
(consulte "Iniciar Dell Diagnostics desde el disco Drivers and Utilities
(Controladores y utilidades)" en la página 353)
.

Guía de referencia rápida 353
Si espera demasiado y aparece el logotipo del sistema operativo, siga esperando
hasta que aparezca el escritorio de Microsoft Windows; a continuación, apague
el equipo e inténtelo de nuevo.
3
En el
Menú del dispositivo de inicio
, utilice las flechas de flecha arriba
y abajo o pulse el correspondiente número del teclado para seleccionar
Iniciar desde la partición de utilidades
y, a continuación, pulse <Intro>.
NOTA: La función Quickboot cambia la secuencia de inicio solo del inicio
actual. Al reiniciarse, el equipo se inicia de acuerdo con la secuencia
especificada en el programa de configuración del sistema.
4
En el
Menú principal
de Dell Diagnostics haga clic con el botón izquierdo
del ratón o pulse <Tab> y, a continuación, <Intro>, para seleccionar la
prueba que desee ejecutar (consulte "Menú principal de Dell Diagnostics
(Diagnósticos Dell)" en la página 354).
NOTA: Anote el código de error y la descripción del problema exactamente
como aparezca y siga las instrucciones de la pantalla.
5 Después de que se hayan completado todas las pruebas, cierre la ventana
de pruebas para volver al Menú principal de los Dell Diagnostics.
6 Cierre la ventana del Menú principal para salir de Dell Diagnostics
y reiniciar el equipo.
Iniciar Dell Diagnostics desde el disco Drivers and Utilities (Controladores y utilidades)
1
Encienda el equipo.
2
Pulse el botón de expulsión de la parte delantera de la unidad óptica para
abrir la bandeja.
3
Coloque el disco
Drivers and Utilities
en el centro de la bandeja de la unidad
y pulse el botón de expulsión o empuje suavemente la bandeja para cerrarla.
4
Reinicie el equipo.
5
Cuando aparezca el logotipo de DELL, pulse <F12> inmediatamente.
NOTA: Si se mantiene pulsada una tecla del teclado durante largos períodos
de tiempo se pueden producir fallos en el teclado. Para evitar posibles fallos,
pulse y suelte <F12> a intervalos regulares hasta que aparezca el Menú del
dispositivo de inicio.
Si espera demasiado y aparece el logotipo del sistema operativo, siga esperando
hasta que aparezca el escritorio de Microsoft Windows; a continuación, apague
el equipo e inténtelo de nuevo.

354 Guía de referencia rápida
6
En el
Menú del dispositivo de inicio
, utilice las flechas de flecha arriba
y abajo o pulse el correspondiente número del teclado para seleccionar
CD-ROM integrado o USB
y, a continuación, pulse <Intro>.
NOTA: La función Quickboot cambia la secuencia de inicio solo del inicio
actual. Al reiniciarse, el equipo se inicia de acuerdo con la secuencia
especificada en el programa de configuración del sistema.
7
Pulse <1> para seleccionar los Dell Diagnostics.
8
En el
Menú de Dell Diagnostics
, pulse <1> para seleccionar los
Dell Diagnostics.
9
En el
Menú principal
de Dell Diagnostics haga clic con el botón izquierdo
del ratón o pulse <Tab> y, a continuación, <Intro>, para seleccionar la
prueba que desee ejecutar (consulte "Menú principal de Dell Diagnostics
(Diagnósticos Dell)" en la página 354).
NOTA: Anote el código de error y la descripción del problema exactamente
como aparezca y siga las instrucciones de la pantalla.
10 Después de que se hayan completado todas las pruebas, cierre la ventana
de pruebas para volver al Menú principal de los Dell Diagnostics.
11 Extraiga el disco Drivers and Utilities (Controladores y utilidades), cierre
la ventana del Menú principal para salir de los Dell Diagnostics y reinicie
el equipo.
Menú principal de Dell Diagnostics (Diagnósticos Dell)
Desde el Menú principal de los Dell Diagnostics se pueden ejecutar las
siguientes pruebas:
Opción Función
Express Test
(prueba rápida)
Realiza una prueba rápida de los dispositivos del sistema. La
prueba suele tardar de 10 a 20 minutos y no requiere ninguna
acción por parte del usuario. Ejecute primero Express Test
(prueba rápida) para incrementar la posibilidad de rastrear el
problema rápidamente.
Extended Test
(prueba extendida)
Realiza una comprobación completa de los dispositivos del
sistema. La prueba suele durar una hora o más, y requiere
que el usuario responda a preguntas periódicamente.

Guía de referencia rápida 355
Si se produce un problema durante una prueba, aparecerá un mensaje con un
código de error y una descripción del problema. Anote el código de error y la
descripción del problema exactamente como aparezca y siga las instrucciones de la
pantalla. Si no puede resolver el problema, póngase en contacto con Dell (consulte
el apartado "Cómo ponerse en contacto con Dell" en la Guía del usuario).
NOTA: La etiqueta de servicio del equipo está situada en la parte superior de cada
pantalla de prueba. Cuando se ponga en contacto con la asistencia de Dell, tenga
la Etiqueta de servicio preparada.
Las siguientes fichas proporcionan información adicional para ejecutar las
pruebas desde la opción Custom Test (prueba personalizada) o Symptom
Tree (árbol de síntomas):
Custom Test
(prueba personalizada)
Prueba un dispositivo específico del sistema y se puede usar
para personalizar las pruebas que se deseen ejecutar.
Symptom Tree
(árbol de síntomas)
Hace una lista de los síntomas habituales que se pueden
encontrar y le permite seleccionar una prueba basándose en
el síntoma del problema que usted tiene.
Ficha Función
Results (resultados) Muestra los resultados de la prueba y las condiciones de
error encontradas.
Errors (errores) Muestra las condiciones de error encontradas, los códigos
de error y la descripción del problema.
Help (ayuda) Describe la prueba y los requisitos para ejecutarla.
Configuración
(Sólo
prueba personalizada)
Muestra la configuración de hardware del dispositivo
seleccionado.
Los Diagnósticos Dell obtienen la información de configuración
de todos los dispositivos a partir del programa Configuración del
sistema, la memoria y varias pruebas internas, y la muestran en
la lista de dispositivos del panel izquierdo de la pantalla.
NOTA: La lista de dispositivos puede que no muestre los
nombres de todos los componentes instalados en el equipo
o de todos los dispositivos conectados a él.
Parameters
(parámetros)(Sólo
prueba personalizada)
Permite personalizar la prueba, si es necesario, cambiando
su configuración.
Opción Función

356 Guía de referencia rápida
Solución de problemas
Al solucionar problemas del equipo, tenga en cuenta estas sugerencias:
• Si ha añadido o ha extraído una pieza antes de que empezara el problema,
revise los procedimientos de instalación y asegúrese de que dicha pieza
está instalada correctamente.
• Si un dispositivo periférico no funciona, asegúrese de que está conectado
adecuadamente.
• Si aparece un mensaje de error en la pantalla, anote el mensaje exacto. Este
mensaje puede ayudar al personal de asistencia técnica a diagnosticar
y corregir el problema.
• Si un programa muestra un mensaje de error, consulte la documentación
de dicho programa.
NOTA: Los procedimientos en este documento fueron escritos para la vista
predeterminada de Windows, por lo que podrían no funcionar si cambia el equipo
Dell™ a la vista clásica de Windows.
Problemas con la batería
PRECAUCIÓN: Existe el peligro de que una batería nueva explote si no se instala
correctamente. Sustituya la batería únicamente por una del mismo tipo o de un
tipo equivalente recomendado por el fabricante. Deseche las baterías agotadas de
acuerdo con las instrucciones del fabricante.
PRECAUCIÓN: Antes de comenzar cualquiera de los procedimientos de esta
sección, siga las instrucciones de seguridad incluidas en la
Guía de información
del producto
.
S
USTITUYA LA BATERÍA — Si debe restablecer repetidamente la fecha y la hora
después de encender el equipo, o si se muestran una fecha o una hora incorrectas
durante el inicio, sustituya la batería (consulte "Cambio de la batería" en la Guía del
usuario). Si la batería sigue sin funcionar apropiadamente, póngase en contacto con Dell
(consulte el apartado "Cómo ponerse en contacto con Dell" en la Guía del usuario).

Guía de referencia rápida 357
Problemas con las unidades
PRECAUCIÓN: Antes de comenzar cualquiera de los procedimientos de esta
sección, siga las instrucciones de seguridad incluidas en la
Guía de información
del producto
.
A
SEGÚRESE DE QUE MICROSOFT WINDOWS RECONOCE LA UNIDAD —
Windows XP:
• Haga clic en
Inicio
y en
Mi PC
.
Windows Vista:
• Haga clic en
Inicio
y en
PC
.
Si la unidad no está en la lista, realice una exploración completa con el software
antivirus para comprobar si hay virus y eliminarlos. A veces, los virus pueden impedir
que Windows reconozca la unidad.
P
RUEBE LA UNIDAD —
• Introduzca otro disco para eliminar la posibilidad de que la unidad original esté defectuosa.
• Inserte un disquete de inicio y reinicie el equipo.
LIMPIE LA UNIDAD O EL DISCO — Consulte el apartado
"Limpieza del equipo" en la
página 340
.
C
OMPRUEBE LAS CONEXIONES DE LOS CABLES
EJECUTE EL SOLUCIONADOR DE PROBLEMAS DE HARDWARE — Consulte
"Restauración del sistema operativo" en la Guía del usuario.
E
JECUTE LOS DELL DIAGNOSTICS (DIAGNÓSTICOS DELL)—Consulte el apartado
"Dell Diagnostics" en la página 352.
Problemas de la unidad óptica
NOTA: La vibración de la unidad óptica a alta velocidad es normal y puede
provocar ruido, pero dicho ruido no indica un error en la unidad o disco.
NOTA: Debido a las diferentes regiones del mundo y los distintos formatos de
disco, no todos los títulos en DVD funcionan en todas las unidades de DVD.
A
JUSTE EL CONTROL DE VOLUMEN DE WINDOWS —
• Haga clic en el icono de altavoz, situado en la esquina inferior derecha de la pantalla.
• Asegúrese de que el volumen está activado haciendo clic en la barra deslizante
y arrastrándola hacia arriba.
• Asegúrese de que el volumen no está enmudecido haciendo clic en las casillas que
estén seleccionadas.

358 Guía de referencia rápida
COMPRUEBE LOS ALTAVOCES Y EL ALTAVOZ DE TONOS GRAVES — Consulte el
apartado "Problemas con el sonido y los altavoces" en la página 370.
Problemas para grabar en una unidad óptica
CIERRE LOS OTROS PROGRAMAS — Durante el proceso de escritura, la unidad óptica
deberá recibir un flujo de datos continuo. Si el flujo se interrumpe, se producirá un
error. Intente cerrar todos los programas antes de grabar en la unidad óptica.
A
PAGUE EL MODO DE ESPERA DE WINDOWS ANTES DE GRABAR EN UN DISCO —
Busque la palabra clave en espera en el Centro de ayuda y soporte técnico de Windows
para obtener información sobre los modos de administración de energía.
Problemas con la unidad de disco duro
EJECUTE UNA COMPROBACIÓN DEL DISCO —
Windows XP:
1
Haga clic en
Inicio
y en
Mi PC
.
2
Haga clic con el botón derecho del ratón en
Local Disk C:
(Disco local C:).
3
Haga clic en
Propiedades
→
Herramientas
→
Comprobar ahora
.
4
Haga clic en
Scan for and attempt recovery of bad sectors
(Examinar e intentar
recuperar los sectores defectuosos)
y haga clic en
Inicio
.
Windows Vista:
1
Haga clic en
Inicio
y en
PC
.
2
Haga clic con el botón derecho del ratón en
Local Disk C:
(Disco local C:).
3
Haga clic en
Propiedades
→
Herramientas
→
Comprobar ahora
.
Es posible que aparezca la ventana
Control de cuentas de usuario
. Si es usted un
administrador del equipo, haga clic en
Continuar
; en caso contrario, póngase en
contacto con su administrador para continuar con la acción que desee.
4
Siga las instrucciones que aparecen en la pantalla.
Problemas con el correo electrónico, el módem e Internet
PRECAUCIÓN: Antes de comenzar cualquiera de los procedimientos de esta
sección, siga las instrucciones de seguridad incluidas en la
Guía de información
del producto
.
NOTA: Conecte el módem únicamente a un enchufe de teléfono analógico. El
módem no funciona si está conectado a una red telefónica digital.
NOTA: No enchufe un cable telefónico en el conector de red (consulte "Conectores
del panel posterior" en la Guía del usuario).

Guía de referencia rápida 359
COMPRUEBE LA CONFIGURACIÓN DE SEGURIDAD DE MICROSOFT OUTLOOK
E
XPRESS — Si no puede abrir los archivos adjuntos de su correo electrónico:
1
En Outlook Express, haga clic en
Herramientas
→
Opciones
→
Seguridad
.
2
Haga clic en
No permitir que se guarden o abran archivos adjuntos
para deseleccionar
la casilla, si lo precisa.
COMPRUEBE LA CONEXIÓN DE LA LÍNEA TELEFÓNICA
COMPRUEBE LA TOMA TELEFÓNICA
CONECTE EL MÓDEM DIRECTAMENTE A LA TOMA TELEFÓNICA DE PARED
UTILICE UNA LÍNEA TELEFÓNICA DIFERENTE —
• Verifique que la línea de teléfono está conectada a la clavija del módem (la clavija
tiene una etiqueta verde o un icono con forma de conector al lado).
• Asegúrese de que oye un clic al insertar el conector de la línea telefónica en el módem.
• Desconecte la línea telefónica del módem y conéctela a un teléfono. Después escuche
el tono de marcar.
• Si dispone de otros dispositivos telefónicos que comparten la línea, por ejemplo, un
contestador automático, una máquina de fax, un protector contra sobretensiones o un
divisor de línea, omítalos y utilice el teléfono para conectar el módem directamente
a la toma telefónica de pared. Si utiliza una línea cuya longitud sea de 3 metros o más,
pruebe con una línea más corta.
EJECUTE LA HERRAMIENTA DE DIAGNÓSTICO DEL MÓDEM —
Windows XP:
1
Haga clic en
Inicio
→
Todos los
programas
→
Asistente del módem
.
2
Siga las instrucciones que aparecen en la pantalla para identificar y resolver los
problemas del módem. El Asistente del módem no está disponible en algunos equipos.
Windows Vista:
1
Haga clic en
Inicio
→
Todos los programas
→
Herramienta de diagnóstico del
módem
.
2
Siga las instrucciones que aparecen en la pantalla para identificar y resolver los problemas
del módem. Los diagnósticos del módem no están disponibles en todos los equipos.
COMPRUEBE QUE EL MÓDEM SE COMUNICA CON WINDOWS —
Windows XP:
1
Haga clic en
Inicio
→
Panel de control
→
Impresoras y otro hardware
→
Opciones de
teléfono y módem
→
Módems
.
2
Haga clic en el puerto COM de su módem y, a continuación, en
Propiedades
→
Diagnósticos
→
Consultar módem
para verificar que el módem está en comunicación
con Windows.
Si todos los comandos reciben respuestas, significa que el módem funciona correctamente.

360 Guía de referencia rápida
Windows Vista:
1
Haga clic en
Inicio
→
Panel de control
→
Hardware y sonido
→
Opciones de
teléfono y módem
→
Módems
.
2
Haga clic en el puerto COM de su módem y, a continuación, en
Propiedades
→
Diagnósticos
→
Consultar módem
para verificar que el módem está en comunicación
con Windows.
Si todos los comandos reciben respuestas, significa que el módem funciona correctamente.
COMPRUEBE QUE ESTÁ CONECTADO A INTERNET — Asegúrese de que está abonado
a un proveedor de Internet. Con el programa de correo electrónico Outlook Express
abierto, haga clic en Archivo. Si se ha seleccionado Trabajar sin conexión, haga clic en
la marca de comprobación para eliminarla y conectarse a Internet. Si necesita ayuda,
póngase en contacto con el proveedor de servicios de Internet.
Mensajes de error
PRECAUCIÓN: Antes de comenzar cualquiera de los procedimientos de esta
sección, siga las instrucciones de seguridad incluidas en la
Guía de información
del producto
.
Si el mensaje de error que aparece no figura en la lista siguiente, consulte la documentación
del sistema operativo o del programa que se estaba ejecutando cuando ha aparecido
el mensaje.
A
FILENAME CANNOT CONTAIN ANY OF THE FOLLOWING CHARACTERS: \ / : * ? “< > |
(U
N NOMBRE DE ARCHIVO NO PUEDE CONTENER NINGUNO DE LOS CARACTERES
SIGUIENTES: \ / : * ? “ < > |) — No utilice estos caracteres en nombres de archivo.
A
REQUIRED .DLL FILE WAS NOT FOUND (NO SE ENCONTRÓ EL ARCHIVO .DLL
REQUERIDO)—Falta un archivo fundamental en el programa que intenta abrir. Para
quitar y volver a instalar el programa:
Windows XP:
1
Haga clic en
Inicio
→
Panel de control
→
Agregar o quitar programas
→
Programas
y funciones
.
2
Seleccione el programa que desee quitar.
3
Haga clic en
Desinstalar
.
4
Consulte la documentación del programa para ver las instrucciones de instalación.
Windows Vista:
1
Haga clic en
Inicio
→
Panel de control
→
Programas
→
Programas y funciones
.
2
Seleccione el programa que desee quitar.
3
Haga clic en
Desinstalar
.
4
Consulte la documentación del programa para ver las instrucciones de instalación.

Guía de referencia rápida 361
drive letter
:\ IS NOT ACCESSIBLE. THE DEVICE IS NOT READY (NO SE PUEDE
ACCEDER A X: EL DISPOSITIVO NO ESTÁ LISTO)—La unidad no puede leer el disco.
Inserte un disco en la unidad y vuelva a intentarlo.
I
NSERT BOOTABLE MEDIA (INSERTE UN MEDIO DE ARRANQUE)—Inserte un
disquete, un CD o un DVD de inicio.
N
ON-SYSTEM DISK OR DISK ERROR (ERROR DEL DISCO O DE UN DISCO QUE NO ES
DEL SISTEMA)—Extraiga el disquete de la unidad y reinicie el equipo.
N
OT ENOUGH MEMORY OR RESOURCES. CLOSE SOME PROGRAMS AND TRY AGAIN (NO
HAY SUFICIENTE MEMORIA O RECURSOS. CIERRE ALGUNOS PROGRAMAS Y VUELVA
A INTENTARLO)—Cierre todas las ventanas y abra el programa que desee utilizar. En
algunos casos deberá reiniciar el equipo para restaurar los recursos del sistema. Si es
así, ejecute primero el programa que desea utilizar.
O
PERATING SYSTEM NOT FOUND (NO SE ENCUENTRA EL SISTEMA OPERATIVO)—
Póngase en contacto con Dell (consulte "Cómo ponerse en contacto con Dell" en la
Guía del usuario).
Problemas con el dispositivo IEEE 1394
PRECAUCIÓN: Antes de comenzar cualquiera de los procedimientos de esta
sección, siga las instrucciones de seguridad incluidas en la
Guía de información
del producto
.
A
SEGÚRESE DE QUE EL CABLE DEL DISPOSITIVO IEEE 1394 ESTÉ CORRECTAMENTE
INSERTADO EN EL DISPOSITIVO Y EN EL CONECTOR DEL EQUIPO
ASEGÚRESE DE QUE EL DISPOSITIVO IEEE 1394 ESTÁ ACTIVADO EN LA
CONFIGURACIÓN DEL SISTEMA — Consulte "Opciones de configuración de sistema"
en la Guía del usuario.
A
SEGÚRESE DE QUE WINDOWS RECONOCE EL DISPOSITIVO IEEE 1394 —
Windows XP:
1
Haga clic en
Inicio
y en
Panel de control
.
2
En
Elija una categoría
, haga clic en
Rendimiento y mantenimiento
→
Sistema
→
Propiedades del sistema
→
Hardware
→
Administrador de dispositivos
.
Windows Vista:
1
Haga clic en
Inicio
→
Panel de control
→
Hardware y sonido
.
2
Haga clic en
Administrador de dispositivos
.
Si el dispositivo IEEE 1394 figura en la lista, Windows lo reconocerá.
A
SEGÚRESE DE QUE LA TARJETA IEEE 1394 ESTÉ DEBIDAMENTE CONECTADA

362 Guía de referencia rápida
ASEGÚRESE DE QUE EL CABLE IEEE 1394 ESTÁ BIEN CONECTADO AL CONECTOR DE
LA PLACA BASE Y EL CONECTOR DEL PANEL DE E/S FRONTAL
SI TIENE PROBLEMAS CON ALGÚN DISPOSITIVO IEEE 1394 DE DELL — Póngase en
contacto con Dell (consulte "Cómo ponerse en contacto con Dell" en la Guía del usuario).
S
I TIENE PROBLEMAS CON UN DISPOSITIVO IEEE 1394 NO PROPORCIONADO POR
D
ELL — Póngase en contacto con el fabricante del dispositivo IEEE 1394.
Problemas con el teclado
PRECAUCIÓN: Antes de comenzar cualquiera de los procedimientos de esta
sección, siga las instrucciones de seguridad incluidas en la
Guía de información
del producto
.
C
OMPRUEBE EL CABLE DEL TECLADO —
• Asegúrese de que el cable del teclado está firmemente conectado al equipo.
• Apague el equipo (consulte "Cómo apagar el equipo"
en la
Guía del usuario
), vuelva
a conectar el cable del teclado como se muestra en el esquema de configuración y,
a continuación, reinicie el equipo.
• Asegúrese de que el cable no está dañado o pelado y compruebe si las patas de los
conectores están dobladas o rotas. Enderece las patas que estén torcidas.
• Quite los alargadores del teclado y conecte el teclado directamente al equipo.
PRUEBE EL TECLADO — Conecte al equipo un teclado que funcione correctamente
ypruébelo.
E
JECUTE EL SOLUCIONADOR DE PROBLEMAS DE HARDWARE — Consulte
"Restauración del sistema operativo" en la Guía del usuario.
Bloqueos y problemas con el software
PRECAUCIÓN: Antes de comenzar cualquiera de los procedimientos de esta
sección, siga las instrucciones de seguridad incluidas en la
Guía de información
del producto
.
El equipo no se inicia
COMPRUEBE LOS INDICADORES LUMINOSOS DE DIAGNÓSTICO — Consulte el
apartado "Indicadores luminosos de diagnóstico" en la página 343.
A
SEGÚRESE DE QUE EL CABLE DE ALIMENTACIÓN ESTÁ FIRMEMENTE CONECTADO AL
EQUIPO Y A LA TOMA ELÉCTRICA

Guía de referencia rápida 363
El equipo no responde
AVISO: Si no puede completar el proceso de cierre del sistema operativo, es
posible que se pierdan datos.
A
PAGUE EL EQUIPO — Si no puede conseguir que responda pulsando una tecla
o moviendo el ratón, pulse el botón de alimentación durante unos 8 ó 10 segundos
como mínimo (hasta que se apague el equipo). A continuación, reinicie el equipo.
Un programa no responde
FINALICE EL PROGRAMA —
1
Pulse <Ctrl><Mayús><Esc> simultáneamente para acceder al Administrador de tareas.
2
Haga clic en la ficha
Aplicaciones
.
3
Haga clic para seleccionar el programa que no responde.
4
Haga clic en
Finalizar tarea
.
Un programa se bloquea repetidamente
NOTA: La mayoría de software incluye instrucciones de instalación en su
documentación o en un disquete, CD o DVD.
C
OMPRUEBE LA DOCUMENTACIÓN DEL SOFTWARE — Si es necesario, desinstale el
programa y, a continuación, vuelva a instalarlo.
Se ha diseñado un programa para un sistema operativo anterior de Windows
EJECUTE EL ASISTENTE PARA COMPATIBILIDAD DE PROGRAMAS —
Windows XP:
El Asistente para compatibilidad de programas configura un programa de manera que
se ejecute en un entorno similar a los entornos de sistemas operativos que no son
Windows XP.
1
Haga clic en
Inicio
→
Todos los programas
→
Accesorios
→
Asistente para compatibilidad
de programas
→
Siguiente
.
2
Siga las instrucciones que aparecen en la pantalla.
Windows Vista:
El Asistente para compatibilidad de programas configura un programa de manera que
se ejecute en un entorno similar a los entornos de sistemas operativos que no son
Windows Vista.
1
Haga clic en
Inicio
→
Panel de control
→
Programas
→
Usar un programa
antiguo con esta versión de Windows
.
2
En la pantalla de bienvenida, haga clic en
Siguiente
.
3
Siga las instrucciones que aparecen en la pantalla.

364 Guía de referencia rápida
Aparece una pantalla azul fija
APAGUE EL EQUIPO — Si no puede conseguir que responda pulsando una tecla
o moviendo el ratón, pulse el botón de alimentación durante unos 8 ó 10 segundos
como mínimo (hasta que se apague el equipo). A continuación, reinicie el equipo.
Otros problemas con el software
COMPRUEBE LA DOCUMENTACIÓN DEL SOFTWARE O PÓNGASE EN CONTACTO CON EL
FABRICANTE DE SOFTWARE PARA OBTENER INFORMACIÓN SOBRE LA SOLUCIÓN DE
PROBLEMAS —
• Asegúrese de que el programa sea compatible con el sistema operativo instalado en
el equipo.
• Asegúrese de que el equipo cumple los requisitos mínimos de hardware necesarios
para ejecutar el software. Consulte la documentación del software para obtener
más información.
• Asegúrese de el programa esté instalado y configurado correctamente.
• Compruebe que los controladores de dispositivo no sean incompatibles con el programa.
• si es necesario, desinstale el programa y, a continuación, vuelva a instalarlo.
HAGA COPIAS DE SEGURIDAD DE SUS ARCHIVOS INMEDIATAMENTE
UTILICE UN PROGRAMA DE DETECCIÓN DE VIRUS PARA COMPROBAR LA UNIDAD DE
DISCO DURO, LOS DISQUETES, CD Y DVD
G
UARDE Y CIERRE TODOS LOS ARCHIVOS O PROGRAMAS ABIERTOS Y APAGUE EL
EQUIPO A TRAVÉS DEL MENÚ INICIO
Problemas con la memoria
PRECAUCIÓN: Antes de comenzar cualquiera de los procedimientos de esta
sección, siga las instrucciones de seguridad incluidas en la
Guía de información
del producto
.
S
I RECIBE UN MENSAJE QUE INDICA QUE LA MEMORIA ES INSUFICIENTE —
• Guarde y cierre todos los archivos abiertos y salga de todos los programas que estén
abiertos y no utilice para ver si así se resuelve el problema.
• Consulte la documentación del software para ver los requisitos mínimos de memoria.
Si es necesario, instale memoria adicional (consulte "Instalación de un módulo de
memoria"
en la
Guía del usuario
).
• Vuelva a colocar los módulos de memoria (consulte el apartado "Extracción del panel
frontal"
en la
Guía del usuario
) para asegurarse de que el equipo se comunica
correctamente con la memoria.
• Ejecute los Dell Diagnostics (Diagnósticos Dell) (consulte el apartado "Dell
Diagnostics" en la página 352).

Guía de referencia rápida 365
SI TIENE OTROS PROBLEMAS CON LA MEMORIA —
• Vuelva a colocar los módulos de memoria (consulte el apartado "Extracción del panel
frontal"
en la
Guía del usuario
) para asegurarse de que el equipo se comunica
correctamente con la memoria.
• Asegúrese de que sigue las pautas de instalación de la memoria (consulte "Instalación
de un módulo de memoria"
en la
Guía del usuario
).
• Asegúrese de que la memoria que está usando es compatible con su equipo. Para
obtener más información sobre el tipo de memoria que admite su equipo, consulte
"Extracción del panel frontal"
en la
Guía del usuario
.
• Ejecute los Dell Diagnostics (Diagnósticos Dell) (consulte el apartado "Dell
Diagnostics" en la página 352).
Problemas con el ratón
PRECAUCIÓN: Antes de comenzar cualquiera de los procedimientos de esta
sección, siga las instrucciones de seguridad incluidas en la
Guía de información
del producto
.
COMPRUEBE EL CABLE DEL RATÓN —
• Asegúrese de que el cable no está dañado o pelado y compruebe si las patas de los
conectores están dobladas o rotas. Enderece las patas que estén torcidas.
• Quite los alargadores del ratón y conecte éste directamente al equipo.
• Verifique que el cable del ratón esté conectado como se muestra en el esquema de
configuración del equipo.
REINICIE EL EQUIPO —
1
Pulse <Ctrl><Esc> simultáneamente para mostrar el menú
Inicio
.
2
Pulse <u>,
utilice las teclas de flecha hacia arriba y hacia abajo
para seleccionar
Apagar
o
Turn Off
(Apagar) y, a continuación, pulse <Intro>.
3
Después de apagarse el equipo, vuelva a conectar el cable del ratón como se muestra
en el esquema de configuración.
4
Enciéndalo.
PRUEBE EL RATÓN — Conecte al equipo un ratón que funcione correctamente y,
a continuación, pruébelo.
C
OMPRUEBE LA CONFIGURACIÓN DEL RATÓN —
Windows XP:
1
Haga clic en
Inicio
→
Panel de control
→
Mouse
.
2
Ajuste los valores según precise.

366 Guía de referencia rápida
Windows Vista:
1
Haga clic en
Inicio
→
Panel de control
→
Hardware y sonido
→
Mouse
.
2
Ajuste los valores según precise.
VUELVA A INSTALAR EL CONTROLADOR DEL RATÓN — Consulte "Controladores" en
la Guía del usuario.
E
JECUTE EL SOLUCIONADOR DE PROBLEMAS DE HARDWARE — Consulte
"Restauración del sistema operativo" en la Guía del usuario.
Problemas de red
PRECAUCIÓN: Antes de comenzar cualquiera de los procedimientos de esta
sección, siga las instrucciones de seguridad incluidas en la
Guía de información
del producto
.
C
OMPRUEBE EL INDICADOR LUMINOSO DE RED EN LA PARTE POSTERIOR DEL
EQUIPO — Si el indicador luminoso de integridad del enlace está apagado (consulte
"Controles e indicadores luminosos" en la Guía del usuario), no hay comunicación de
red. Sustituya el cable de red.
C
OMPRUEBE EL CONECTOR DEL CABLE DE RED — Asegúrese de que el cable de red
esté firmemente insertado en la toma de red de la pared y en la toma de red de la parte
posterior del equipo.
R
EINICIE EL EQUIPO Y TRATE DE CONÉCTESE DE NUEVO A LA RED
COMPRUEBE LA CONFIGURACIÓN DE LA RED — Póngase en contacto con el
administrador de red o con la persona que instaló la red para comprobar que la
configuración de la red sea correcta y que funcione.
E
JECUTE EL SOLUCIONADOR DE PROBLEMAS DE HARDWARE — Consulte
"Restauración del sistema operativo" en la Guía del usuario.
Problemas con la alimentación
PRECAUCIÓN: Antes de comenzar cualquiera de los procedimientos de esta
sección, siga las instrucciones de seguridad incluidas en la
Guía de información
del producto
.
E
L INDICADOR LUMINOSO DE ALIMENTACIÓN EMITE UNA LUZ VERDE Y EL EQUIPO
NO RESPONDE — Consulte el apartado "Indicadores luminosos de diagnóstico" en la
página 343.
E
L INDICADOR LUMINOSO DE ALIMENTACIÓN EMITE UNA LUZ VERDE
PARPADEANTE — El equipo se encuentra en modo de espera. Pulse una tecla
del teclado, mueva el ratón o pulse el botón de encendido para reanudar el
funcionamiento normal.

Guía de referencia rápida 367
EL INDICADOR LUMINOSO DE ALIMENTACIÓN ESTÁ APAGADO — El equipo está
apagado o no recibe alimentación.
• Vuelva a conectar el cable de alimentación a su conector, situado en la parte posterior
del equipo, y a la toma eléctrica.
• Puentee los dispositivos de protección de la alimentación, las regletas de enchufes
y los alargadores de alimentación para comprobar que el equipo se enciende
correctamente.
• Asegúrese de que las regletas de enchufes que se utilicen estén conectadas a una toma
eléctrica y que estén encendidas.
• Asegúrese de que la toma de alimentación eléctrica funciona; para ello, pruébela con
otro dispositivo, por ejemplo, una lámpara.
• Asegúrese de que el cable de alimentación principal y el cable del panel frontal están
conectados firmemente a la placa base (consulte "Componentes de la placa base"
en la
Guía del usuario
).
EL INDICADOR LUMINOSO DE ALIMENTACIÓN EMITE UNA LUZ ÁMBAR
PARPADEANTE — El equipo recibe alimentación eléctrica, pero puede haber un
problema interno de alimentación.
• Asegúrese de que el conmutador de selección de la tensión coincide con la
alimentación de CA de su zona (si procede).
• Asegúrese de que todos los componentes y cables están correctamente conectados en
la placa base (consulte "Componentes de la placa base"
en la
Guía del usuario
).
EL INDICADOR LUMINOSO DE ALIMENTACIÓN EMITE UNA LUZ ÁMBAR FIJA —
Puede haber un dispositivo que no funcione correctamente o que esté instalado de
forma incorrecta.
• Extraiga los módulos de memoria y vuelva a instalarlos (consulte "Extracción del panel
frontal"
en la
Guía del usuario
).
• Extraiga y vuelva a instalar las tarjetas de expansión, incluyendo las tarjetas gráficas
(consulte "Tarjetas"
en la
Guía del usuario
).
ELIMINE LAS INTERFERENCIAS — Algunas de las causas de las interferencias son:
• Alargadores de alimentación, de teclado y de ratón
• Demasiados dispositivos conectados a la misma regleta de enchufes
• Varias regletas de enchufes conectadas a la misma toma eléctrica

368 Guía de referencia rápida
Problemas con la impresora
PRECAUCIÓN: Antes de comenzar cualquiera de los procedimientos de esta
sección, siga las instrucciones de seguridad incluidas en la
Guía de información
del producto
.
NOTA: Si necesita asistencia técnica para su impresora, póngase en contacto con
el fabricante de la misma.
C
OMPRUEBE LA DOCUMENTACIÓN DE LA IMPRESORA — Consulte la documentación
de la impresora para obtener información acerca de la configuración y la solución
de problemas.
C
OMPRUEBE QUE LA IMPRESORA ESTÁ ENCENDIDA
COMPRUEBE LAS CONEXIONES DE LOS CABLES DE LA IMPRESORA —
• Consulte la documentación de la impresora para obtener información acerca de la
conexión de cables.
• Asegúrese de que los cables de la impresora estén conectados de manera segura a la
impresora y al equipo.
PRUEBE LA TOMA DE ALIMENTACIÓN ELÉCTRICA — Asegúrese de que la toma de
alimentación eléctrica funciona; para ello, pruébela con otro dispositivo, por ejemplo,
una lámpara.
C
OMPRUEBE QUE WINDOWS RECONOCE LA IMPRESORA —
Windows XP:
1
Haga clic en
Inicio
→
Panel de control
→
Impresoras y otro hardware
→
Ver impresoras
o impresoras fax instaladas
.
2
Si la impresora aparece en la lista, haga clic con el botón derecho del ratón en el icono
de la impresora.
3
Haga clic en
Propiedades
→
Puertos
. En una impresora en paralelo, asegúrese de que
la configuración
Imprimir en los siguientes puertos:
es
LPT1 (puerto de impresora)
.
Para utilizar una impresora USB, asegúrese de que el valor de la opción
Imprimir en
los siguientes puertos
está definida como
USB
.
Windows Vista:
1
Haga clic en
Inicio
→
Panel de control
→
Hardware y sonido
→
Impresora
.
2
Si la impresora aparece en la lista, haga clic con el botón derecho del ratón en el icono
de la impresora.
3
Haga clic en
Propiedades
y en
Puertos
.
4
Ajuste los valores según precise.

Guía de referencia rápida 369
VUELVA A INSTALAR EL CONTROLADOR DE LA IMPRESORA — Consulte la
documentación de la impresora para obtener información sobre la reinstalación
del controlador.
Problemas con el escáner
PRECAUCIÓN: Antes de comenzar cualquiera de los procedimientos de esta
sección, siga las instrucciones de seguridad incluidas en la
Guía de información
del producto
.
NOTA: Si necesita asistencia técnica con su escáner, póngase en contacto con el
fabricante del mismo.
C
OMPRUEBE LA DOCUMENTACIÓN DEL ESCÁNER — Consulte la documentación del
escáner para obtener información acerca de la configuración y la solución de problemas.
D
ESBLOQUEE EL ESCÁNER — Asegúrese de que el escáner no está bloqueado (si éste
dispone de una lengüeta o un botón de bloqueo).
R
EINICIE EL EQUIPO Y VUELVA A PROBAR EL ESCÁNER
COMPRUEBE LAS CONEXIONES DE LOS CABLES —
• Consulte la documentación del escáner para obtener información acerca de la
conexión de cables.
• Asegúrese de que los cables del escáner estén conectados de manera segura al escáner
y al equipo.
COMPRUEBE QUE MICROSOFT WINDOWS RECONOCE EL ESCÁNER —
Windows XP:
1
Haga clic en
Inicio
→
Panel de control
→
Impresoras y otro hardware
→
Escáneres
y cámaras
.
2
Si el escáner aparece en la lista, significa que Windows reconoce el escáner.
Windows Vista:
1
Haga clic en
Inicio
→
Panel de control
→
Hardware y sonido
→
Escáneres
y cámaras
.
2
Si el escáner aparece en la lista, significa que Windows reconoce el escáner.
VUELVA A INSTALAR EL CONTROLADOR DEL ESCÁNER — Consulte la documentación
incluida con el escáner para obtener instrucciones.

370 Guía de referencia rápida
Problemas con el sonido y los altavoces
PRECAUCIÓN: Antes de comenzar cualquiera de los procedimientos de esta
sección, siga las instrucciones de seguridad incluidas en la
Guía de información
del producto
.
Los altavoces no emiten ningún sonido
NOTA: El control de volumen en MP3 y otros reproductores multimedia pueden
anular el ajuste de volumen de Windows. Asegúrese siempre de que el volumen del
reproductor multimedia no se ha bajado o apagado.
C
OMPRUEBE LAS CONEXIONES DE LOS CABLES DE LOS ALTAVOCES — Asegúrese de
que los altavoces están conectados como se muestra en el diagrama de instalación que
se proporciona con los altavoces. Si ha adquirido una tarjeta de sonido, asegúrese de
que los altavoces están conectados a la tarjeta.
C
OMPRUEBE QUE LOS ALTAVOCES Y LOS ALTAVOCES DE TONOS BAJOS ESTÁN
ENCENDIDOS — Consulte el diagrama de instalación proporcionado con los altavoces.
Si los altavoces tienen control de volumen, ajuste el volumen, los agudos o los graves
para eliminar la distorsión.
A
JUSTE EL CONTROL DE VOLUMEN DE WINDOWS — Haga clic o doble clic en el
icono de altavoz situado en la esquina inferior derecha de la pantalla. Asegúrese de que
ha subido el volumen y no ha silenciado el sonido.
D
ESCONECTE LOS AURICULARES DEL CONECTOR PARA AURICULARES — El sonido
de los altavoces se desactiva automáticamente cuando se conectan los auriculares al
conector para auriculares del panel anterior del equipo.
P
RUEBE LA TOMA DE ALIMENTACIÓN ELÉCTRICA — Asegúrese de que la toma de
alimentación eléctrica funciona; para ello, pruébela con otro dispositivo, por ejemplo,
una lámpara.
E
LIMINE LAS POSIBLES INTERFERENCIAS — Apague las luces fluorescentes, lámparas
halógenas o ventiladores cercanos para comprobar si se producen interferencias.
E
JECUTE LOS DIAGNÓSTICOS DEL ALTAVOZ
VUELVA A INSTALAR EL CONTROLADOR DE SONIDO — Consulte "Controladores" en
la Guía del usuario.
E
JECUTE EL SOLUCIONADOR DE PROBLEMAS DE HARDWARE — Consulte
"Restauración del sistema operativo" en la Guía del usuario.

Guía de referencia rápida 371
Los auriculares no emiten ningún sonido
COMPRUEBE LA CONEXIÓN DEL CABLE DEL AURICULAR — Asegúrese de que el cable
del auricular está bien insertado en el conector del auricular (consulte "Cómo apagar el
equipo" en la Guía del usuario).
A
JUSTE EL CONTROL DE VOLUMEN DE WINDOWS — Haga clic o doble clic en el
icono de altavoz situado en la esquina inferior derecha de la pantalla. Asegúrese de que
ha subido el volumen y no ha silenciado el sonido.
Problemas con el vídeo y el monitor
PRECAUCIÓN: Antes de comenzar cualquiera de los procedimientos de esta
sección, siga las instrucciones de seguridad incluidas en la
Guía de información
del producto
.
AVISO: Si el equipo viene con una tarjeta gráfica PCI Express instalada, no será
necesario quitarla cuando se añadan otras tarjetas gráficas; no obstante, la tarjeta
se necesitará para la solución de problemas. Si extrae la tarjeta, guárdela en un
lugar seguro. Para obtener información sobre la tarjeta gráfica, visite
support.dell.com.
La pantalla aparece en blanco
NOTA: Para los procedimientos de solución de problemas, consulte la documentación
del monitor.
C
OMPRUEBE LA CONEXIÓN DEL CABLE DEL MONITOR —
• Asegúrese de que el cable del monitor está conectado a la tarjeta gráfica correcta
(en las configuraciones de tarjeta gráfica doble).
• Si usa el adaptador opcional DVI para VGA, asegúrese de que esté correctamente
conectado a la tarjeta gráfica y el monitor.
• Asegúrese de que el cable del monitor esté conectado como se muestra en el esquema
de configuración del equipo.
• Quite los alargadores del vídeo y conecte el monitor directamente al equipo.
• Intercambie los cables de alimentación del equipo y del monitor para determinar si el
cable de alimentación es defectuoso.
• Compruebe si los conectores tienen patas dobladas o rotas (es normal que a los
conectores del cable del monitor le falten patas).

372 Guía de referencia rápida
COMPRUEBE EL INDICADOR LUMINOSO DE ALIMENTACIÓN DEL MONITOR —
• Si el indicador luminoso está encendido o parpadea, el monitor recibe alimentación.
• Si el indicador luminoso de alimentación está apagado, presione firmemente el botón
para asegurarse de que el monitor está encendido.
• Si el indicador luminoso parpadea, pulse una tecla del teclado o mueva el ratón para
reanudar el funcionamiento normal.
PRUEBE LA TOMA DE ALIMENTACIÓN ELÉCTRICA — Asegúrese de que la toma de
alimentación eléctrica funciona; para ello, pruébela con otro dispositivo, por ejemplo,
una lámpara.
C
OMPRUEBE LOS INDICADORES LUMINOSOS DE DIAGNÓSTICO — Consulte el
apartado "Indicadores luminosos de diagnóstico" en la página 343.
Resulta difícil leer la pantalla
COMPRUEBE LA CONEXIÓN DEL CABLE DEL MONITOR —
• Asegúrese de que el cable del monitor está conectado a la tarjeta gráfica correcta (en
las configuraciones de tarjeta gráfica doble).
• Si usa el adaptador opcional
DVI para VGA
, asegúrse de que esté correctamente
conectado a la tarjeta gráfica y el monitor.
• Asegúrese de que el cable del monitor esté conectado como se muestra en el esquema
de configuración del equipo.
• Quite los alargadores del vídeo y conecte el monitor directamente al equipo.
• Intercambie los cables de alimentación del equipo y del monitor para determinar si el
cable de alimentación es defectuoso.
• Compruebe si los conectores tienen patas dobladas o rotas (es normal que a los
conectores del cable del monitor le falten patas).
COMPRUEBE EL INDICADOR LUMINOSO DE ALIMENTACIÓN DEL MONITOR —
• Si el indicador luminoso está encendido o parpadea, el monitor recibe alimentación.
• Si el indicador luminoso de alimentación está apagado, presione firmemente el botón
para asegurarse de que el monitor está encendido.
• Si el indicador luminoso parpadea, pulse una tecla del teclado o mueva el ratón para
reanudar el funcionamiento normal.
PRUEBE LA TOMA DE ALIMENTACIÓN ELÉCTRICA — Asegúrese de que la toma de
alimentación eléctrica funciona; para ello, pruébela con otro dispositivo, por ejemplo,
una lámpara.
C
OMPRUEBE LOS INDICADORES LUMINOSOS DE DIAGNÓSTICO — Consulte el
apartado "Indicadores luminosos de diagnóstico" en la página 343.

Guía de referencia rápida 373
COMPRUEBE LA CONFIGURACIÓN DEL MONITOR — Consulte la documentación del
monitor para obtener instrucciones sobre cómo ajustar el contraste y el brillo,
desmagnetizar el monitor y ejecutar la autoprueba del monitor.
A
LEJE DEL MONITOR EL ALTAVOZ DE TONOS GRAVES — Si el sistema de altavoces
incluye un altavoz para frecuencias bajas, asegúrese de que dicho altavoz se encuentra
como mínimo a 60 centímetros del monitor.
A
LEJE EL MONITOR DE FUENTES DE ALIMENTACIÓN EXTERNAS — Los ventiladores,
luces fluorescentes, lámparas halógenas y otros dispositivos eléctricos pueden hacer
que la imagen de la pantalla parpadee. Apague los dispositivos cercanos para
comprobar si éstos producen interferencias.
G
IRE EL MONITOR PARA ELIMINAR EL REFLEJO DE LA LUZ DEL SOL Y POSIBLES
INTERFERENCIAS
AJUSTE LA CONFIGURACIÓN DE PANTALLA DE WINDOWS —
Windows XP:
1
Haga clic en
Inicio
→
Panel de control
→
Apariencia y temas
.
2
Haga clic sobre la zona que desea cambiar o en el icono
Pantalla
.
3
Pruebe valores diferentes en
Calidad del color
y
Resolución de pantalla
.
Windows Vista:
1
Haga clic en
Inicio
→
Panel de control
→
Hardware y sonido
→
Personalización
→
Configuración de pantalla
.
2
Ajuste la configuración de
Resolución
y
Colores
,
según precise.
La calidad de imagen 3D es mala
COMPRUEBE LA CONEXIÓN DEL CABLE DE ALIMENTACIÓN DE LA TARJETA
GRÁFICA — Asegúrese de que el cable de la tarjeta o tarjetas gráficas esté correctamente
conectado a la tarjeta.
C
OMPRUEBE LA CONFIGURACIÓN DEL MONITOR — Consulte la documentación del
monitor para obtener instrucciones sobre cómo ajustar el contraste y el brillo,
desmagnetizar el monitor y ejecutar la autoprueba del monitor.
Solo se puede leer parte de la pantalla
ENCIENDA EL EQUIPO Y EL MONITOR Y AJUSTE LOS CONTROLES DE BRILLO
Y CONTRASTE DEL MONITOR — Si el monitor funciona, la tarjeta o tarjetas gráficas
pueden estar defectuosas.
Póngase en contacto con Dell (consulte "Cómo ponerse en
contacto con Dell"
en la Guía del usuario
).

374 Guía de referencia rápida

Índice 375
Índice
A
alimentación
acondicionadores de línea, 333
botón, 336
dispositivos de protección, 333
problemas, 366
supresores de sobretensión, 333
UPS, 333
archivo de ayuda
Centro de ayuda y soporte técnico
de Windows, 323
Asistente para transferencia de
archivos y configuraciones
(Windows XP), 329
asistentes
Asistente para compatibilidad de
programas, 363
Asistente para transferencia de
archivos y configuraciones
(Windows XP), 329
Transferencia fácil de Windows
(Windows Vista), 332
auriculares
Conector, 336
B
Batería
problemas, 356
C
CD/DVD del sistema
operativo, 324
CD/DVD Drivers and Utilities
(Controladores
y utilidades), 319
Centro de ayuda y soporte
técnico, 323
Código de servicio rápido, 321
códigos de sonido, 347
Comprobación del disco, 358
conectores
adaptador de red, 339
auriculares, 336
IEEE 1394, 336, 338
línea de salida, 338
paralelo, 338
ratón, 338
serie, 339
sonido, 338
Teclado, 339
USB, 336, 339
conflictos
incompatibilidades de software
y hardware, 351
conflictos de IRQ, 351
Contrato de licencia para
el usuario final, 320
correo electrónico
problemas, 358

376 Índice
D
Dell Diagnostics, 352
diagnósticos
códigos de sonido, 347
Dell Diagnostics, 352
indicadores luminosos, 337, 343
documentación
Contrato de licencia para el
usuario final, 320
en línea, 322
ergonómica, 320
garantía, 320
Guía de información del
producto, 320
Guía del usuario, 320
reglamentaria, 320
seguridad, 320
E
equipo
códigos de sonido, 347
fallo, 362-364
no responde, 362-363
escáner
problemas, 369
etiqueta de servicio, 321
etiquetas
Código de servicio rápido, 321
etiqueta de servicio, 321
Microsoft Windows, 321
G
Guía de información del
producto, 320
Guía del usuario, 320
H
hardware
códigos de sonido, 347
conflicts, 351
Dell Diagnostics, 352
Hardware Troubleshooter, 351
I
IEEE 1394
conectores, 336, 338
problemas, 361
impresora
conexión, 329
configuración, 329
problemas, 368
Indicador de alimentación
condiciones, 366
indicadores luminosos
actividad de la red, 339
actividad de la unidad de disco
duro, 336-337
diagnóstico, 337
integridad del enlace, 339
parte posterior del equipo, 343
red, 339

Índice 377
indicadores luminosos de
diagnóstico, 343
información ergonómica, 320
información reglamentaria, 320
información sobre la
garantía, 320
instrucciones de seguridad, 320
Internet
problemas, 358
L
lindicadores luminosos
diagnóstico, 343
M
memoria
problemas, 364
mensajes
error, 360
sistema, 349
mensajes de error
códigos de sonido, 347
indicadores luminosos de
diagnóstico, 343
problemas, 360
módem
problemas, 358
monitor
blanco, 371
difícil de leer, 372
problemas, 371
P
pantalla. Consulte el apartado
monitor
problemas
ajuste del volumen, 370
alimentación, 366
Batería, 356
códigos de sonido, 347
condiciones del indicador de
alimentación, 366
correo electrónico, 358
Dell Diagnostics, 352
el equipo no responde, 362-363
el monitor aparece en blanco, 371
el programa no responde, 363
el programa se bloquea, 363
escáner, 369
fallo del equipo, 362-364
generales, 362
IEEE 1394, 361
impresora, 368
indicadores luminosos de
diagnóstico, 343
Internet, 358
la pantalla aparece en blanco, 371
memoria, 364
mensajes de error, 360
módem, 358
monitor difícil de leer, 372
pantalla azul, 364
pantalla difícil de leer, 372
ratón, 365
red, 366
software, 363-364
teclado, 362

378 Índice
problemas (continuación)
unidad de CD-RW, 358
unidad de disco duro, 358
Unidad óptica, 357
unidades, 357
vídeo y monitor, 371
problems
conflicts, 351
R
ratón
Conector, 338
problemas, 365
red
Conector, 339
problemas, 366
S
S.M.A.R.T, 351
sistema de alimentación
ininterrumpida. Consulte
el apartado UPS
sistema operativo
volver a instalar, 324
sitio de soporte técnico de
Dell, 322
sitio Web de soporte
técnico, 322
software
conflicts, 351
problemas, 363-364
Software del sistema de
escritorio, 323
solución de problemas
Centro de ayuda y soporte
técnico, 323
códigos de sonido, 347
conflictos, 351
Dell Diagnostics, 352
Indicadores luminosos de
alimentación, 341
indicadores luminosos de
diagnóstico, 343
Mensajes del sistema, 349
problemas, 356
sonido, conectores
línea de salida, 338
T
Teclado
Conector, 339
teclado
problemas, 362
transferencia de la información
a un equipo nuevo
Transferencia fácil de Windows
(Windows Vista), 332
transferring information to a new
computer
Files and Settings Transfer Wizard
(Windows XP), 329
troubleshooting
Hardware Troubleshooter, 351

Índice 379
U
unidad de CD-RW
problemas, 358
Unidad de disco duro
indicador luminoso de
actividad, 336-337
unidad de disco duro
problemas, 358
Unidad óptica
problemas, 357
unidades
problemas, 357
UPS, 333
USB
Conector, 339
conectores, 336
V
vídeo
problemas, 371
visualización. Consulte el
apartado monitor
volumen
ajustar, 370
W
Windows Vista
Centro de ayuda y soporte
técnico, 323
Transferencia fácil de
Windows, 332
volver a instalar, 324
Windows XP
Asistente para transferencia
de archivos
y configuraciones, 329
Centro de ayuda y soporte
técnico, 323
Hardware Troubleshooter, 351
volver a instalar, 324

380 Índice
-
 1
1
-
 2
2
-
 3
3
-
 4
4
-
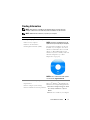 5
5
-
 6
6
-
 7
7
-
 8
8
-
 9
9
-
 10
10
-
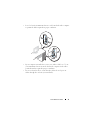 11
11
-
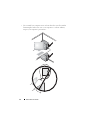 12
12
-
 13
13
-
 14
14
-
 15
15
-
 16
16
-
 17
17
-
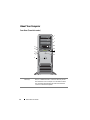 18
18
-
 19
19
-
 20
20
-
 21
21
-
 22
22
-
 23
23
-
 24
24
-
 25
25
-
 26
26
-
 27
27
-
 28
28
-
 29
29
-
 30
30
-
 31
31
-
 32
32
-
 33
33
-
 34
34
-
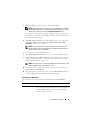 35
35
-
 36
36
-
 37
37
-
 38
38
-
 39
39
-
 40
40
-
 41
41
-
 42
42
-
 43
43
-
 44
44
-
 45
45
-
 46
46
-
 47
47
-
 48
48
-
 49
49
-
 50
50
-
 51
51
-
 52
52
-
 53
53
-
 54
54
-
 55
55
-
 56
56
-
 57
57
-
 58
58
-
 59
59
-
 60
60
-
 61
61
-
 62
62
-
 63
63
-
 64
64
-
 65
65
-
 66
66
-
 67
67
-
 68
68
-
 69
69
-
 70
70
-
 71
71
-
 72
72
-
 73
73
-
 74
74
-
 75
75
-
 76
76
-
 77
77
-
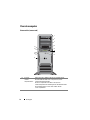 78
78
-
 79
79
-
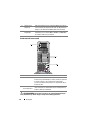 80
80
-
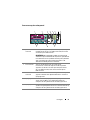 81
81
-
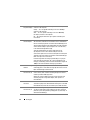 82
82
-
 83
83
-
 84
84
-
 85
85
-
 86
86
-
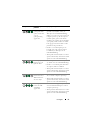 87
87
-
 88
88
-
 89
89
-
 90
90
-
 91
91
-
 92
92
-
 93
93
-
 94
94
-
 95
95
-
 96
96
-
 97
97
-
 98
98
-
 99
99
-
 100
100
-
 101
101
-
 102
102
-
 103
103
-
 104
104
-
 105
105
-
 106
106
-
 107
107
-
 108
108
-
 109
109
-
 110
110
-
 111
111
-
 112
112
-
 113
113
-
 114
114
-
 115
115
-
 116
116
-
 117
117
-
 118
118
-
 119
119
-
 120
120
-
 121
121
-
 122
122
-
 123
123
-
 124
124
-
 125
125
-
 126
126
-
 127
127
-
 128
128
-
 129
129
-
 130
130
-
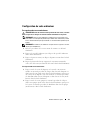 131
131
-
 132
132
-
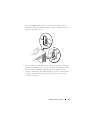 133
133
-
 134
134
-
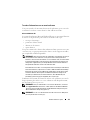 135
135
-
 136
136
-
 137
137
-
 138
138
-
 139
139
-
 140
140
-
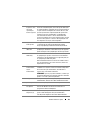 141
141
-
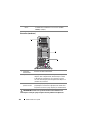 142
142
-
 143
143
-
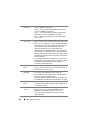 144
144
-
 145
145
-
 146
146
-
 147
147
-
 148
148
-
 149
149
-
 150
150
-
 151
151
-
 152
152
-
 153
153
-
 154
154
-
 155
155
-
 156
156
-
 157
157
-
 158
158
-
 159
159
-
 160
160
-
 161
161
-
 162
162
-
 163
163
-
 164
164
-
 165
165
-
 166
166
-
 167
167
-
 168
168
-
 169
169
-
 170
170
-
 171
171
-
 172
172
-
 173
173
-
 174
174
-
 175
175
-
 176
176
-
 177
177
-
 178
178
-
 179
179
-
 180
180
-
 181
181
-
 182
182
-
 183
183
-
 184
184
-
 185
185
-
 186
186
-
 187
187
-
 188
188
-
 189
189
-
 190
190
-
 191
191
-
 192
192
-
 193
193
-
 194
194
-
 195
195
-
 196
196
-
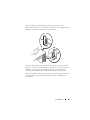 197
197
-
 198
198
-
 199
199
-
 200
200
-
 201
201
-
 202
202
-
 203
203
-
 204
204
-
 205
205
-
 206
206
-
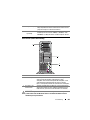 207
207
-
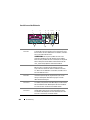 208
208
-
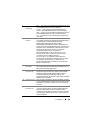 209
209
-
 210
210
-
 211
211
-
 212
212
-
 213
213
-
 214
214
-
 215
215
-
 216
216
-
 217
217
-
 218
218
-
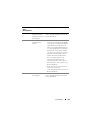 219
219
-
 220
220
-
 221
221
-
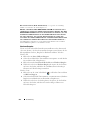 222
222
-
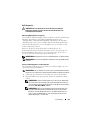 223
223
-
 224
224
-
 225
225
-
 226
226
-
 227
227
-
 228
228
-
 229
229
-
 230
230
-
 231
231
-
 232
232
-
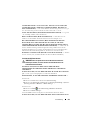 233
233
-
 234
234
-
 235
235
-
 236
236
-
 237
237
-
 238
238
-
 239
239
-
 240
240
-
 241
241
-
 242
242
-
 243
243
-
 244
244
-
 245
245
-
 246
246
-
 247
247
-
 248
248
-
 249
249
-
 250
250
-
 251
251
-
 252
252
-
 253
253
-
 254
254
-
 255
255
-
 256
256
-
 257
257
-
 258
258
-
 259
259
-
 260
260
-
 261
261
-
 262
262
-
 263
263
-
 264
264
-
 265
265
-
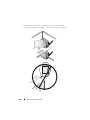 266
266
-
 267
267
-
 268
268
-
 269
269
-
 270
270
-
 271
271
-
 272
272
-
 273
273
-
 274
274
-
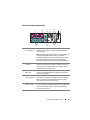 275
275
-
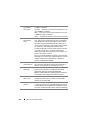 276
276
-
 277
277
-
 278
278
-
 279
279
-
 280
280
-
 281
281
-
 282
282
-
 283
283
-
 284
284
-
 285
285
-
 286
286
-
 287
287
-
 288
288
-
 289
289
-
 290
290
-
 291
291
-
 292
292
-
 293
293
-
 294
294
-
 295
295
-
 296
296
-
 297
297
-
 298
298
-
 299
299
-
 300
300
-
 301
301
-
 302
302
-
 303
303
-
 304
304
-
 305
305
-
 306
306
-
 307
307
-
 308
308
-
 309
309
-
 310
310
-
 311
311
-
 312
312
-
 313
313
-
 314
314
-
 315
315
-
 316
316
-
 317
317
-
 318
318
-
 319
319
-
 320
320
-
 321
321
-
 322
322
-
 323
323
-
 324
324
-
 325
325
-
 326
326
-
 327
327
-
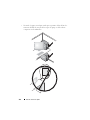 328
328
-
 329
329
-
 330
330
-
 331
331
-
 332
332
-
 333
333
-
 334
334
-
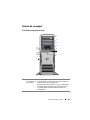 335
335
-
 336
336
-
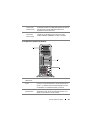 337
337
-
 338
338
-
 339
339
-
 340
340
-
 341
341
-
 342
342
-
 343
343
-
 344
344
-
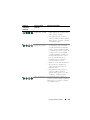 345
345
-
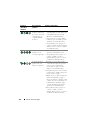 346
346
-
 347
347
-
 348
348
-
 349
349
-
 350
350
-
 351
351
-
 352
352
-
 353
353
-
 354
354
-
 355
355
-
 356
356
-
 357
357
-
 358
358
-
 359
359
-
 360
360
-
 361
361
-
 362
362
-
 363
363
-
 364
364
-
 365
365
-
 366
366
-
 367
367
-
 368
368
-
 369
369
-
 370
370
-
 371
371
-
 372
372
-
 373
373
-
 374
374
-
 375
375
-
 376
376
-
 377
377
-
 378
378
-
 379
379
-
 380
380


in andere talen
- italiano: Dell Precision T7400 specificazione
- français: Dell Precision T7400 spécification
- español: Dell Precision T7400 Especificación
- Deutsch: Dell Precision T7400 Spezifikation
- português: Dell Precision T7400 Especificação

