
Headphone amplifier
User Guide
EN

Contents
Please Read First 5
Advantages of this product.........................................................................5
About this manual.....................................................................................6
Cautions regarding product handling...........................................................7
Checking the Included Items and Getting the Remote
Control Ready 8
Checking the included items.......................................................................8
Getting the remote control ready................................................................9
Part names and functions 10
Front panel.............................................................................................10
Rear panel..............................................................................................11
Operating panel......................................................................................13
Remote control.......................................................................................15
Connections 17
Sample connection diagram......................................................................17
Connecting to an audio device (digital).......................................................18
Connecting to an audio device (analog).. .................................................... 19
Getting your computer ready and making connections (USB).. ...................... 20
Installing the driver on the computer..................................................................................................................................... 20
Connecting to your computer via USB.. .................................................................................................................................22
Connecting headphones...........................................................................23
Connecting to an external amp..................................................................25
Connecting the AC power cord...................................................................28
Basic playback operations 29
Turning the power on/off (standby)........................................................... 29
2
Contents

Selecting the audio input source and output destination...............................30
Adjusting the volume...............................................................................32
Switching between information displays....................................................33
Listening to sound from your audio device 35
Playing back sound from your audio device.................................................35
Listening to music on your computer (USB DAC
feature) 36
Playing back music on your computer........................................................ 36
Changing the sound quality to match your
preferences 38
Listening using different sound field effects (SOUND FIELD MODE).................38
Listening with higher-definition sound quality (PURE DIRECT).. .................... 40
Settings 41
Setting menu list.....................................................................................41
Operating the settings menu.....................................................................43
Setting the DAC filter............................................................................... 44
DAC LOCK RANGE.....................................................................................45
Setting the gain for the headphones...........................................................46
Setting an upper limit for the volume.........................................................47
Setting the default volume....................................................................... 48
Setting the left/right volume balance.........................................................49
Setting the auto power standby.. .............................................................. 50
Checking the firmware version..................................................................51
Initializing all settings (reset).. ................................................................. 52
3
Contents

Troubleshooting 53
What to do in case of trouble.....................................................................53
Read this first if you encounter troubles with this product.. .................................................................................................53
Power-related issues.. .............................................................................................................................................................54
Remote control-related issues.. ..............................................................................................................................................55
Audio-related issues.. ..............................................................................................................................................................56
USB DAC-related issues.. .........................................................................................................................................................57
Errors indicated by the information display................................................ 59
Updating the firmware.............................................................................60
Aftersales service....................................................................................62
Specifications 63
Licenses.................................................................................................63
Main specifications..................................................................................65
4
Contents

Please Read First
Advantages of this product
Thank you for purchasing this Yamaha product. The HA-L7A is a standalone Headphone amplifier that lets
you listen to the audio from devices that are connected to this unit via digital/analog connection, as well as
play back high-definition audio from a computer or tablet that’s connected to this unit via USB. Aside from
headphones, you can also connect an external amp or active speakers for playing back audio with this amp.
This unit also features SOUND FIELD MODE for immersing yourself more fully in your music or other audio
contents, played within the sound field of your choice.
This product offers the following advantages.
nUSB DAC functionality for decoding and playing back music data on this product from
a computer, tablet or other device with high fidelity
nOptical/coaxial digital input jack and analog input jacks for connecting a variety of
audio devices
nThree types of headphone jacks (4-pin balanced XLR, 4.4 mm (TRRRS), 6.3 mm
unbalanced)
nPRE/LINE OUT jacks for connecting to an external amp (RCA/XLR)
nSOUND FIELD MODE function for playing back audio contents in the sound field of your
choice
5
Please Read First > Advantages of this product

About this manual
Three manuals are provided for users of this product, including the Safety Guide, Quick Guide and User
Guide. Be sure to read each of these manuals, and keep them together in a safe place for future reference.
Manuals
Safety Guide (included)
Explains the necessary precautions you must take when using this product. Make sure to read these
instructions before use.
Quick Guide (included)
Explains about the basic connections and operations required after you purchase this product.
User Guide (this Guide)
Explains about all of this product’s functions and features. This also includes information on troubleshooting
and firmware updates. This Guide is only available via our website.
The precautions and other matters in this guide are classified as follows.
Indication Meaning
CAUTION This content indicates “risk of injury.”
NOTICE Indicates points that you must observe to prevent product failure, damage or
malfunction and data loss, as well as to protect the environment.
NOTE Indicates notes on instructions, restrictions on functions, and additional information
that may be helpful.
NOTE
(The explanations in this Guide are written according to the latest specifications as of the date of publication.
(You can download the latest version of each guide (PDF) from the website shown below.
https://download.yamaha.com/
6
Please Read First > About this manual

Cautions regarding product handling
Please read the Safety Guide before you use this product. Also, use caution regarding the following.
CAUTION
(To prevent hearing loss, observe the following points.
(Do not listen at high volumes for an extended period of time.
(When switching between audio input sources or output destinations, temporarily turn down the volume.
(Do not make sudden changes in volume.
(Do not turn this product on while you are wearing headphones.
This product features the following functions for controlling the volume, which we encourage you to use.
(“Setting an upper limit for the volume”(p.47)
Lets you set an upper limit for the volume.
(“Setting the default volume”(p.48)
Lets you set the volume used when the power is turned on.
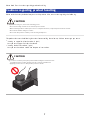
CAUTION
(Do not move around or pick up the product while holding the transformer unit.
(You might drop the product, injuring yourself or causing a malfunction.
(Applying excessive force to this part may cause it to break.
7
Please Read First > Cautions regarding product handling

Checking the Included Items and Getting the
Remote Control Ready
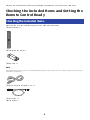
Checking the included items
Check to make sure that the following items are included with this product.
£Remote control × 1
£Batteries (AA, R6, UM-3) × 2
£Power cord × 1
NOTE
There may be more than one power cord included with this product in certain regions. Use the cord that’s appropriate for the power
outlet where you will use it.
£USB cable (Type-A to Type-B) 1.5 m × 1
£Safety Guide × 1
£Quick Guide × 1
8
Checking the Included Items and Getting the Remote Control Ready > Checking the included items

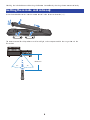
Getting the remote control ready
Insert the included batteries into the remote control in the correct orientation (+/−).
The remote control for this product uses infrared light, and can operate within the range shown in the
illustration.
Within 6 m
30° 30°
9
Checking the Included Items and Getting the Remote Control Ready > Getting the remote control ready

Part names and functions
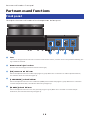
Front panel
This explains the names and functions of each component on the front panel.
edcba
aFeet
The feet are designed to raise the unit a certain level above the surface, so that it can be set up without wobbling. The
legs cannot be removed.
bRemote control signal receiver
Receives the infrared signals from the remote control (p.9).
c[XLR] connector and indicator
Connect headphones that use an XLR 4-pin plug here (p.23). When this is selected as an audio output destination,
the indicator above the connector lights up.
d[4.4 BALANCED] jack and indicator
Connect headphones that use a five-conductor (TRRRS) 4.4 mm balanced plug here (p.23). When this is selected as
an audio output destination, the indicator above the jack lights up.
e[PHONES] jack and indicator
Connect headphones that use a 6.3 mm (1/4-inch) plug here (p.23). When this is selected as an audio output
destination, the indicator above the jack lights up.
10
Part names and functions > Front panel

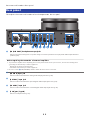
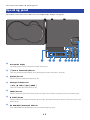
Rear panel
This explains the names and functions of each component on the rear panel.
gfedcba h
a[PRE/LINE OUT] headphone output jacks
Connect an external amp (such as a power amp) or an active speaker here to play back audio output from this
product (p.25).
Notice regarding the connection of external amplifiers
(To prevent the amplifier from outputting at excessively loud volumes and to prevent noise, observe the following when
connecting an external amp or similar equipment.
(Unplug this product from the AC outlet.
(Turn off the external amp or similar equipment.
(Be sure to set the f [PRE/LINE OUT] switch to match the device that’s connected.
b[ANALOG] input jack
Connect a device that features analog audio output jacks here (p.19).
c[OPTICAL] input jack
Connect a device that features optical digital audio output jacks here (p.18).
d[COAXIAL] input jack
Connect a device that features a coaxial digital audio output jack here (p.18).
e[USB] port (Type-B)
Connect a computer here (p.20).
11
Part names and functions > Rear panel

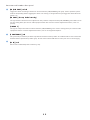
f[PRE/LINE OUT] switch
Toggle this switch according to the device connected to the [PRE/LINE OUT] jack (p.25). Set this product’s power
mode to off (standby) before toggling this switch. The setting is not applied when you toggle the switch while the
power is on.
[PRE OUT] (factory default setting)
The signal whose volume has been adjusted on this product is output from the [PRE/LINE OUT] jacks. Make sure to
use this setting when you connect audio equipment that does not have volume adjustment features, such as a
preamp.
[LINE OUT]
The signal is output at maximum volume from the [PRE/LINE OUT] jacks. Use this setting when you connect audio
equipment that has a volume adjustment feature, such as an integrated amplifier.
g[UPDATE ONLY] jack
This jack is only used when you want to update the firmware of this product. The USB flash drive must contain the
firmware data to update this product (p.60). Do not connect other USB devices to this port or use it for charging.
h[AC IN] jack
Connect the included AC power cord here (p.28).
12
Part names and functions > Rear panel

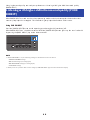
Operating panel
This explains the names and functions of each component on the operating panel.
aInformation display
This display shows various information and the menu (p.33).
b[z] Power button and indicator
Turns this product on/off (standby). The indicator lights up when the power is on (p.29).
c[STATUS] button
Switches between information displays (p.33).
dMenu operation buttons
< (left), [ENTER], > (right), [MENU]
These are used to operate the menu (p.43).
e[INPUT] button
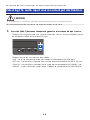
Switches between input sources for the audio. The input source switches each time you press the button (p.30).
f[OUTPUT] button
Switches between the output destinations for the audio. The output destination switches each time you press the
button (p.30).
g[PURE DIRECT] button and indicator
Turns PURE DIRECT on/off. When this is on, the indicator lights up (p.40).
13
Part names and functions > Operating panel


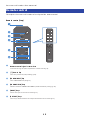
Remote control
This explains the names and functions of each part of the remote control.
Remote control (top)
PURE DIRECT
SOUND FIELD
INPUT
OUTPUT
MENU
ENTER
STATUS
VOLUME
MUTE
RHA1
VFN4930
USB OPTICAL
COAXIAL ANALOG
PURE DIRECT
SOUND FIELD
INPUT
OUTPUT
USB OPTICAL
COAXIAL ANALOG
a
b
c
d
e
f
aRemote control signal transmitter
Transmits the signals (infrared) from the remote control (p.9).
b[z] Power key
Turns this product on/off (standby) (p.29).
c[PURE DIRECT] key
Turns PURE DIRECT on/off (p.40).
d[SOUND FIELD] keys
Switches between SOUND FIELD MODE (sound field effect) settings (p.38).
e[INPUT] keys
Selects the input source for the audio (p.30).
f[OUTPUT] keys
These keys switch between the output destinations for the audio (p.30).
15
Part names and functions > Remote control

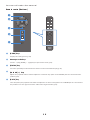
Remote control (bottom)
MENU
ENTER
STATUS
VOLUME
MUTE
PURE DIRECT
SOUND FIELD
INPUT
OUTPUT
MENU
ENTER
STATUS
VOLUME
MUTE
RHA1
VFN4930
USB OPTICAL
COAXIAL ANALOG
g
h
i
k
j
g[MENU] keys
Displays the settings menu (p.43).
hMenu operation keys
Use the e (left), [ENTER], r (right) keys to operate the menu (p.43).
i[STATUS] key
Press this repeatedly to switch between contents on the information display (p.33).
j[VOLUME] +/− keys
Adjusts the playback volume of the headphones or external amp (when set to PRE OUT) that are connected to this
product (p.32).
k[MUTE] key
Turns off (mutes) the playback sound of the headphones or external amp (when set to PRE OUT) that’s connected to
this product. Press this again to hear the audio at the original volume (p.32).
16
Part names and functions > Remote control

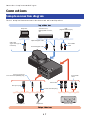
Connections
Sample connection diagram
This is an example of how to connect various devices and cables to this product.
Input devices
Output devices
Computer Satellite tuner,
BluRay/DVD recorder,
etc.
DAP
(Digital Audio Player)
USB cable
(Type-A to Type-B,
included)
Optical digital cable
Coaxial digital cable
Stereo RCA
cable
Stereo RCA
cable
XLR3 cable
6.3 mm standard plug
XLR 4-pin plug
Headphones Earphones External amp
4.4 mm, balanced
five-conductor (TRRRS) plug
17
Connections > Sample connection diagram

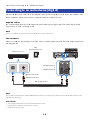
Connecting to an audio device (digital)
Connect the [OPTICAL] input jack or the [COAXIAL] input jack of this product to the digital audio output jacks
of your audio equipment when you want to play back digital audio (PCM, 2 ch.).
Required cables
You’ll need a commercially available optical digital cable or coaxial digital cable. For a DAP (Digital Audio
Player), you may need an adaptor cable.
NOTE
If there is a cap fitted onto the tip of the optical digital cable, remove it before use.
How to connect
Connect as shown in the following illustration. Select a cable type that matches the audio output jack of your
audio equipment.
COAXIALOPTICAL
Satellite tuner, etc.
DAP
(Digital Audio Player)
Optical digital cable
Coaxial digital cable
OPTICAL output jack
or
COAXIAL output jack
OPTICAL input jack
or
COAXIAL input jack
NOTE
This product can play back two-channel PCM digital audio. If there is a setting on your audio device for digital audio output, use the
PCM output (2 ch) setting.
Related links
(“Selecting the audio input source and output destination”(p.30)
(“Playing back sound from your audio device”(p.35)
(“Main specifications”(p.65)
18
Connections > Connecting to an audio device (digital)

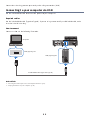
Connecting to an audio device (analog)
Connect the [ANALOG] input jack of this product to the analog audio output jacks of your audio equipment
when you want to play back analog audio.
Required cables
You’ll need a commercially available stereo RCA cable.
How to connect
Connect as shown in the following illustration.
Audio device
Stereo RCA cable
Output (RCA) jacks ANALOG
input jacks
Related links
(“Selecting the audio input source and output destination”(p.30)
(“Playing back sound from your audio device”(p.35)
19
Connections > Connecting to an audio device (analog)

Getting your computer ready and making connections
(USB)
Installing the driver on the computer
When this product is connected to a personal computer via USB, the digital-to-analog conversion processing
via this product's DAC device lets you enjoy your music data in high-definition sound on your personal
computer (USB DAC feature). To use this feature, install the USB driver (computer software) provided by
Yamaha, and then connect this product to your computer.
Supported operating systems
The supported operating systems and computers are shown below (current as of August 2023).
(Windows 10/11
(macOS 12/11/10.15/10.14/10.13
About the USB driver (computer software)
If you’re using Windows on your computer, you must install the Yamaha Steinberg USB Driver. If you’re using
macOS, you can use the standard driver for the OS, and there is no need to install a USB driver.
NOTE
(This driver is not 100% guaranteed to operate even if your computer matches the specifications above, due to differences in your
computer’s configuration, operating environment, OS version upgrades and so on.
(Connect this product to your computer only after installing the driver. If you connect before installing the driver, the software may
not operate correctly.
nInstalling the USB driver (Windows only)
Before connecting this product to your computer, follow the steps below to install the USB driver on your
computer.
1Access the following website and search for “Yamaha Steinberg USB Driver”.
Software download Web page:
https://download.yamaha.com/
2Download the latest driver.
3Extract (decompress) the downloaded file.
4Install the driver on your computer.
Follow the steps in the installation guide included with the driver you downloaded to install
the software.
5Once installation is complete, quit all open applications.
20
Connections > Getting your computer ready and making connections (USB)


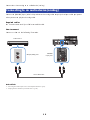
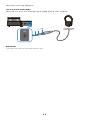
Connecting to your computer via USB
Use the included USB cable to connect this product to your computer.
Required cables
Use the included USB cable (Type-A to Type-B). If you are using a commercially available USB cable, make
sure that it is within 3 m long.
How to connect
Connect as shown in the following illustration.
USB
Included USB cable (Type-A to Type-B)
USB (Type-A) port
USB (Type-B) port
Computer
Related links
(“Selecting the audio input source and output destination”(p.30)
(“Playing back music on your computer”(p.36)
22
Connections > Getting your computer ready and making connections (USB)

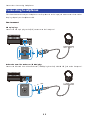
Connecting headphones
This shows how to connect your headphones to this product. Use the input jack or connector that matches
the plug shape of your headphone cable.
How to connect
XLR 4-pin plugs
Connect the XLR 4-pin plug to the [XLR] connector on the front panel.
R− L+
R+ L−
R−L+
R+L−
Balanced 4.4 mm five-conductor (TRRRS) plugs
Connect the balanced 4.4 mm five-conductor (TRRRS) plug into the [4.4 BALANCED] jack on the front panel.
L+ R+ GND
L−
R−
23
Connections > Connecting headphones


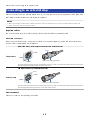
Connecting to an external amp
Connect an external amp (a preamp or power amp), an active speaker or similar equipment to the [PRE/LINE
OUT] output connector to output audio from this product.
NOTICE
(When connecting an external amp or similar equipment, make sure that the device’s power is off and that this product’s AC
power cord is not connected to the AC outlet.
Required cables
You’ll need a commercially available three-pin balanced XLR cable or a stereo RCA cable.
About XLR connectors
When using an XLR connector, make sure that the pin arrangement (polarity) on the XLR connector of your
external amp is compatible with this product.
This product
[PRE/LINE OUT] (XLR) output connector and XLR connector
R
1. GND
2. HOT
3. COLD
Lever
XLR 3-hole cable connector
Insert the XLR connector into the socket until you hear a click. To remove the cable from the socket, pull
out the plug while holding down the connector lever.
External amp
XLR input connector and XLR connector
R
2. HOT
1. GND
Lever
3. COLD XLR 3-pin cable connector
Insert the XLR connector into the socket until you hear a click. To remove the cable from the socket, pull
out the plug while pushing the lever on the top of the socket.
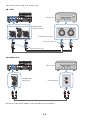
How to connect
Connect as shown in the following illustration.
25
Connections > Connecting to an external amp

XLR cables
R L
PUSH PUSH
External amp
Connector: plug side
Connector: jack side
PRE OUT (XLR)
output connectors
Input (XLR) connectors
Stereo RCA cables
External amp
Input (RCA) jacks
PRE OUT (RCA)
output jacks
Be sure to set the [PRE/LINE OUT] switch after connecting the cables.
26
Connections > Connecting to an external amp

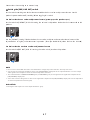
nSetting the [PRE/LINE OUT] switch
Set the switch according to whether the connected device has a volume adjustment feature. Set this
product’s power mode to off (standby) before toggling this switch.
For devices that have a volume adjustment feature (preamps, active speakers, etc.)
Set the switch to [LINE OUT]. With this setting, the volume is adjusted on the device that’s connected to this
product.
Use the [PRE OUT] setting if the device does have a volume adjustment feature but the volume can’t be
adjusted when using the jack or connector in question. (Example: the MAIN IN jack on the Yamaha A-S3200)
For devices that do not have a volume adjustment feature
Set the switch to [PRE OUT]. With this setting, the volume is adjusted on this product.
NOTE
(Do not connect both a XLR cable and a stereo RCA cable to a single amp at the same time. This may cause noise.
(You can only select either the headphone jacks or the [PRE/LINE OUT] output jacks as the output destination. You can’t output
audio signals to the headphones and to an external amp at the same time.
(The sound field effect of SOUND FIELD MODE (p.38) or PURE DIRECT (p.40) are not applied to the signal that’s output from the
[PRE/LINE OUT] output jacks.
(Some of the various settings have no effect on the signal that’s output from the [PRE/LINE OUT] output jacks. See the explanation
of each menu parameter for details (p.41).
Related links
“Selecting the audio input source and output destination”(p.30)
27
Connections > Connecting to an external amp

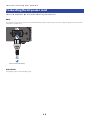
Connecting the AC power cord
Connect the included AC power cord after connecting all other devices.
NOTE
There may be more than one power cord included with this product in certain regions. Use the cord that’s appropriate for the power
outlet where you will use it.
Connect to the AC outlet
Related links
“Turning the power on/off (standby)”(p.29)
28
Connections > Connecting the AC power cord

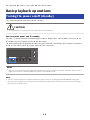
Basic playback operations
Turning the power on/off (standby)
This shows how to turn this product on/off (standby).
CAUTION
(To avoid hearing loss, turn this product on and then put on your headphones.
How to turn the power on/off (standby)
Press the [z] power button on the operating panel to turn the power on or off (standby). You can also do
this by pressing the [z] power key on the remote control.
The indicator to the left of the power button along with the information display lights up when the power is
turned on. The information display goes dark after several seconds.
NOTICE
(Make sure to disconnect the power plug from the AC outlet if you won’t be using this product for a long time. This is because a
slight electrical current is still flowing while this product is in off (standby) mode.
NOTE
(You can set a fixed volume that’s initially used when the power is turned on, by changing the INITIAL VOLUME setting (p.48).
(The auto power standby feature on this product automatically turns off the power when the unit is not operated and nothing is
played back for 20 minutes (p.50).
29
Basic playback operations > Turning the power on/off (standby)

Selecting the audio input source and output destination
CAUTION
(To avoid hearing loss, turn down the volume when switching between input sources and output destinations.
This shows how to select the input source and output destination for the audio.
1Press the [INPUT] button on the operating panel to select the audio input source.
The input source switches each time you press the button. You can also use the [INPUT] key on
the remote control to directly select each input.
The input sources you can select are shown below.
(USB : use this to hear the audio from your computer connected to the [USB] port
(OPTICAL : use this to hear the audio from an audio device connected to the [OPTICAL] jack
(COAXIAL : use this to hear the audio from an audio device connected to the [COAXIAL] jack
(ANALOG : use this to hear the audio from an audio device connected to the [ANALOG] jacks
30
Basic playback operations > Selecting the audio input source and output destination

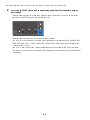
2Press the [OUTPUT] button on the operating panel to select the audio output
destination.
The output destination switches each time you press the button. You can also do this by
pressing the [OUTPUT] key on the remote control.
The output destinations you can select are shown below.
(HP 6.3mm : use this to hear the audio from headphones connected to the [PHONES] jack
(PRE OUT (LINE OUT) : use this to hear the audio from an external amp connected to the
[PRE/LINE OUT] jacks
(HP XLR : use this to hear the audio from headphones connected to the [XLR] connector
(HP 4.4mm : use this to hear the audio from headphones connected to the [4.4 BALANCED]
connector
31
Basic playback operations > Selecting the audio input source and output destination

Adjusting the volume
This shows how to adjust the playback volume or mute the sound from your headphones or external amp
(when using PRE OUT).
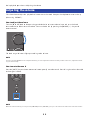
How to adjust the volume
Turn the [VOLUME] knob on the operating panel clockwise to increase the volume, and turn the knob
counterclockwise to decrease the volume. You can also do this by pressing the [VOLUME] +/− key on the
remote control.
The knob range indicators light up according to the volume.
NOTE
If you’ve selected LINE OUT as the output destination, you can’t adjust the volume from this product. In this case, adjust the volume
on your external amp.
How to mute the sound
Press the [MUTE] key on the remote control to temporarily mute the sound. Press this again to hear the audio
at the original volume.
ENTER
STATUS
VOLUME
MUTE
NOTE
When the sound is muted, you can press the [VOLUME] knob or [VOLUME] +/- keys to cancel the mute status and control the volume.
32
Basic playback operations > Adjusting the volume

Switching between information displays
This shows how to switch between information displays to see the current status.
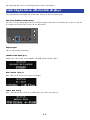
How to switch between displays
Press the [STATUS] button repeatedly on the operating panel to select the desired display. You can also do
this by pressing the [STATUS] key on the remote control.
Display types
There are three types of displays.
SOUND FIELD MODE display
Displays the name of the current SOUND FIELD MODE (sound field effect).
INPUT/OUTPUT display
Shows the names of the current input and output.
SIGNAL INFO display
Shows the information and volume (dB) for the signal that’s playing back.
33
Basic playback operations > Switching between information displays

NOTE
The display automatically goes dark after about 10 seconds. To display this again, press the [STATUS] button once more.
34
Basic playback operations > Switching between information displays

Listening to sound from your audio device
Playing back sound from your audio device
This shows how to play back sound on this product from your audio device.
The following steps show you how to do this from the operating panel. You can also do this in a similar way
with the remote control.
1Turn the power of the connected audio device on.
2Press the [z] power button to turn this product on.
If you’re using an external amp, turn it on.
3Turn the volume of this product all the way down.
4Press the [INPUT] button repeatedly to select the input source from the audio
device.
5Press the [OUTPUT] button repeatedly to select the audio output destination.
6Play back sound on your audio device.
Check whether sound is being output by gradually raising the volume.
NOTE
(If you’ve selected LINE OUT as the output destination, you can’t adjust the volume from this product. In this case, adjust the
volume on your external amp.
(This product can play back two-channel PCM digital audio. If there is a setting on your audio device for digital audio output, use the
PCM output (2 ch) setting.
35
Listening to sound from your audio device > Playing back sound from your audio device

Listening to music on your computer (USB
DAC feature)
Playing back music on your computer
After installing the driver on your computer, connect this product to your computer and play back the music
on your computer.
The following steps show you how to do this from the operating panel. You can also do this in a similar way
with the remote control.
1Turn on the computer.
2Press the [z] power button to turn this product on.
If you’re using an external amp, turn it on.
3Turn the volume of this product all the way down.
4Press the [INPUT] button repeatedly to select “USB”.
5Press the [OUTPUT] button repeatedly to select the audio output destination.
6Set the audio output destination on your computer to “Yamaha USB DAC”.
For Windows users:
From the Start menu: Settings > System > Sound [Output]
For macOS users:
System Preferences > Sound > [Output] tab
The method to use depends on the OS version.
7Play back music on your computer.
Check whether sound is being output by gradually raising the volume on this product.
nAbout volume adjustment
For better sound quality, set the volume of your computer to maximum, and then gradually increase the
volume of this product from minimum to maximum, adjusting the volume to the level you prefer.
36
Listening to music on your computer (USB DAC feature) > Playing back music on your computer

NOTE
(Do not unplug the USB cable, set this product to off (standby) or switch inputs during playback. This may cause a malfunction.
Also, these operations could make the computer’s playback device to change, which could cause the playback sound to output
from an unintended device.
(To mute the computer’s other sounds while music is playing back, edit the settings on your computer.
(You cannot control the music saved on your computer by using this product or the remote control for this product. Use your
computer to control the music that’s saved there.
(If you’ve selected LINE OUT as the output destination, you can’t adjust the volume from this product. In this case, adjust the
volume on your external amp.
Related links
(“Getting your computer ready and making connections (USB)”(p.20)
(“USB DAC-related issues”(p.57)
37
Listening to music on your computer (USB DAC feature) > Playing back music on your computer

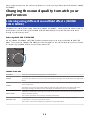
Changing the sound quality to match your
preferences
Listening using different sound field effects (SOUND
FIELD MODE)
This product includes different sound field effects (SOUND FIELD MODE). Select the desired mode according
to the contents you are listening to. The SOUND FIELD MODE add depth and reverberation to the sound
through signal processing (DSP).
Selecting the SOUND FIELD MODE
Use the [SOUND FIELD MODE SELECTOR] knob on the operating panel to select the desired SOUND FIELD
MODE. The name of the SOUND FIELD MODE you selected appears in the information display. You can also do
this by pressing the [SOUND FIELD] key on the remote control.
SOUND FIELD MODE
STRAIGHT Plays the sound without applying the sound field effect.
CINEMA
Gives a greater sense of immersion and presence to movies with action scenes, such as action and
SF movies. The effect increases the separation between dialogue and sound effects or background
music.
DRAMA
Lets you comfortably enjoy animated shows, dramas, variety shows and other content where
voice is important.
The effect increases the separation between dialogue and sound effects or background music,
making the dialogue sound more real and adding a comfortable sense of reverberation.
MUSIC VIDEO
Simulates a comfortable spatial placement of vocals and musical instruments, for enjoying music
videos and other content.
This creates a pleasant sense of space and sonic placement.
CONCERT HALL
A setting that creates the echoes and space of a live concert in a hall, letting you enjoy the
performance as if you were part of the venue.
This creates a sense of envelopment, enthusiasm, unity and realism.
38
Changing the sound quality to match your preferences > Listening using different sound field effects (SOUND
FIELD MODE)

OUTDOOR LIVE
Recreates the open-air feeling of an outdoor setting, letting you enjoy the sense of watching a live
performance outdoors.
This creates a sense of unity, openness and realism, reproducing a unique outdoor space by
keeping the reverberations to an appropriate level.
BGM
This setting is suitable for listening to background music where the sound is localized outside the
head, letting you relax and listen to music.
Uses Yamaha’s proprietary high-definition HRTF (Head Related Transfer Function) technology to
process the stereo position of the sound outside your head.
Default setting
STRAIGHT
NOTE
(The SOUND FIELD MODE is remembered for each audio input.
(When using PURE DIRECT, the sound plays without the sound field effect, regardless of the setting (p.40).
(The SOUND FIELD MODE is not applied to the signal that’s output from the [PRE/LINE OUT] output jacks.
39
Changing the sound quality to match your preferences > Listening using different sound field effects (SOUND
FIELD MODE)

Listening with higher-definition sound quality (PURE
DIRECT)
When PURE DIRECT is turned on, the various processing modes and circuits except for the basic functions
necessary for playback are stopped. This allows for higher playback definition with less noise.
Using PURE DIRECT
Press the [PURE DIRECT] button on the operating panel to toggle this function on/off.
When PURE DIRECT is on, the indicator to the left of the [PURE DIRECT] button lights up. You can also do this
by pressing the [PURE DIRECT] key on the remote control.
NOTE
(When PURE DIRECT is on, the following settings are disabled and cannot be edited.
(SOUND FIELD MODE settings
(DAC FILTER settings (for analog input)
(DAC LOCK RANGE settings (for analog input)
(LR BALANCE settings
(When you use an operation that can’t be changed, “NOT AVAILABLE” appears in the information display.
40
Changing the sound quality to match your preferences > Listening with higher-definition sound quality
(PURE DIRECT)

Settings
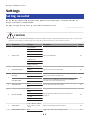
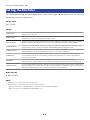
Setting menu list
You can configure the detailed functions of this product in the settings menu. The parameters you can
configure are shown in the table below.
See “Operating the settings menu”(p.43) for details on how to use this.
[Search tag] #Q01 Settings menu
CAUTION
(When you set the HP GAIN (LINE OUT GAIN) and switch from LO to HI (ATT to 0dB) during playback, this produces a loud volume
that may cause hearing loss. Only change this setting after you have turned the volume all the way down.
No. Parameter Settings Description Page
1 DAC FILTER
FAST LINEAR
Selects the DAC filter. 44
SLOW LINEAR
FAST MINIMUM
SLOW MINIMUM
APODIZING FAST
HYBRID FAST
BRICKWALL
SHORT LATENCY
2 DAC LOCK RANGE
LEVEL 1
Adjusts the precision of the DAC. 45LEVEL 2
LEVEL 3
3
HP GAIN HI Sets the gain for the headphones.
46
LO
LINE OUT GAIN 0dB Sets the gain for LINE OUT output (when LINE OUT is
selected as the output destination).
ATT
4 VOLUME LIMIT OFF Sets an upper limit for the volume. 47
ON
5 INITIAL VOLUME
OFF
Sets the default volume used when the power is
turned on. 48
MUTE
-70.0dB
-60.0dB
-50.0dB
-40.0dB
6 LR BALANCE
L+10.0 dB to 0.0 dB to
R+10.0 dB (in 0.5 dB
steps)
Adjusts the left/right volume balance. 49
7 AUTO POWER STDBY OFF Toggles the auto power standby on/off. 50
41
Settings > Setting menu list

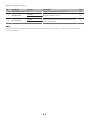
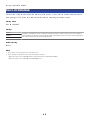
No. Parameter Settings Description Page
7 AUTO POWER STDBY ON Toggles the auto power standby on/off. 50
8 VERSION INFO SYSTEM:
Shows the firmware version. 51
USB DAC:
9 INITIALIZATION CANCEL Initializes all settings and restores this product to its
factory default state. 52
EXECUTE
NOTE
You may not be able to change this setting, or the setting may be disabled in some conditions. See the explanation of each menu
parameter for details.
42
Settings > Setting menu list

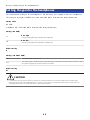
Operating the settings menu
This shows how to use the operating panel to operate the settings menu. You can also do this in a similar way
with the remote control.
1Press the [MENU] button.
This displays the menu parameters. To cancel the operation later, press the [MENU] button.
a
b
c
aMenu number/number of menus
bMenu parameter
cSetting (value)
2Use the </> button to select the setting parameter, and press the [ENTER] button.
This displays the setting (value).
3Use the </> button to select the setting (value), and press the [ENTER] button.
This confirms the setting (value) and returns to the setting parameter display. To operate a
different menu, repeat the operations from steps 2 to 3.
4Press the [MENU] button.
This exits the settings menu operations.
Related links
“Setting menu list”(p.41)
43
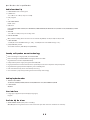
Settings > Operating the settings menu

Setting the DAC filter
This shows how to change the type of digital filter used by the DAC (Digital to Analog Converter), for adjusting
the sound quality to your preferences.
Setting menu
“DAC FILTER”
Settings
FAST LINEAR Uses a steep filter to remove noise from outside the desired frequency band. The resulting sound
quality tends to be clear.
SLOW LINEAR Uses a gentle filter to remove noise from outside the desired frequency band. The resulting sound
quality tends to be more gradual with a softer attack.
FAST MINIMUM Removes noise from outside the desired frequency band with a steep filter. This gives a clear tone,
and the resulting sound quality tends to have a more powerful low end than FAST LINEAR.
SLOW MINIMUM Removes noise from outside the desired frequency band with a gentle filter. The resulting sound
quality tends to have a sharper attack than SLOW LINEAR, with a powerful low end.
APODIZING FAST Removes noise from outside the desired frequency band with a filter that has less pre-ringing than
FAST LINEAR. The resulting sound quality tends to be clear and transparent.
HYBRID FAST
Removes noise from outside the desired frequency band using a special filter with both linear
phase and minimum phase. The resulting sound quality tends to have a sharper attack with a
powerful, crisp sound.
BRICKWALL Removes noise from outside the desired frequency band by using a filter with steeper
characteristics than all the others. The resulting sound quality tends to be clear in the high end.
SHORT LATENCY
An original digital filter by Yamaha. Removes noise from outside the desired frequency band with a
filter that reduces the amount of pre-ringing, minimizing filter-based latency. The resulting sound
quality of this filter tends to have a sharper attack with a rhythmical feel.
Default setting
SHORT LATENCY
NOTE
(This setting is saved separately for each input source.
(These settings are disabled in either of the following conditions:
(When the input source is ANALOG and the output destination is PRE OUT (LINE OUT).
(When the input source is ANALOG and PURE DIRECT is on.
44
Settings > Setting the DAC filter

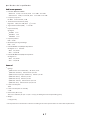
DAC LOCK RANGE
This function is used to reduce jitter and improve sound quality. “Jitter” refers to time-based fluctuations in
the digital signal. This can be adjusted in one of three levels, according to the input source.
Setting menu
“DAC LOCK RANGE”
Settings
LEVEL 1 At LEVEL 1, the DAC precision is reduced somewhat, but the sound is much less prone to getting
interrupted due to changes in the clock. At LEVEL 3, the DAC precision increases, but interruptions
in the sound may occur on certain audio devices.
LEVEL 2
LEVEL 3
Default setting
LEVEL 2
NOTE
(This setting is saved separately for each input source.
(These settings are disabled in either of the following conditions:
(When the input source is ANALOG and the output destination is PRE OUT (LINE OUT).
(When the input source is ANALOG and PURE DIRECT is on.
45
Settings > DAC LOCK RANGE

Setting the gain for the headphones
This shows how to set the gain for the headphones. Use the setting that’s appropriate for your headphones.
This is the gain setting for LINE OUT that’s used when LINE OUT is selected as the output destination.
Setting menu
“HP GAIN”
“LINE OUT GAIN” (when LINE OUT is selected as the output destination)
Settings (HP GAIN)
HI Gain: high
Use this setting with high-impedance headphones.
LO Gain: low
Use this setting with low-impedance headphones.
Default setting
LO
Settings (LINE OUT GAIN)
0dB The audio signal is output as-is.
ATT The audio signal is attenuated by passing through an attenuator and then output. Select this when
the input level going to an external amp is too loud.
Default setting
0dB
CAUTION
(A confirmation message appears when you change the setting from LO to HI or from ATT to 0dB. Turn the volume down
sufficiently and then press the [ENTER] button to confirm. If you change this setting without turning the volume down, the
resulting volume may be extremely loud, which could cause hearing loss.
46
Settings > Setting the gain for the headphones

Setting an upper limit for the volume
This shows how to set an upper limit for the volume.
Setting menu
“VOLUME LIMIT”
Settings
OFF The maximum volume is 0.0 dB.
ON When HP GAIN is set to HI, the maximum volume is limited to −35.0 dB.
When HP GAIN is set to LO, the maximum volume is limited to −20.0 dB.
Default setting
OFF
NOTE
This setting is disabled if you’ve selected LINE OUT as the output destination.
Related links
“Setting the gain for the headphones”(p.46)
47
Settings > Setting an upper limit for the volume

Setting the default volume
Sets the default volume used when this product is turned on.
Setting menu
“INITIAL VOLUME”
Settings
OFF When the power is turned on, the volume is set to the level used last time the product was set to
off (standby).
MUTE When the power is turned on, the sound is muted.
-70.0dB
When the power is turned on, the volume is set to the level you set here.
-60.0dB
-50.0dB
-40.0dB
Default setting
OFF
NOTE
This setting is disabled if you’ve selected LINE OUT as the output destination.
48
Settings > Setting the default volume

Setting the left/right volume balance
This shows how to set the volume balance between the left and right channels.
Setting menu
“LR BALANCE”
Settings
L+10.0 dB to 0.0 dB to R+10.0 dB (can be set in 0.5 dB steps)
Default setting
0.0 dB
NOTE
When PURE DIRECT is on or when PRE OUT (LINE OUT) is selected as the output destination, the audio plays back at 0.0 dB (center)
regardless of this setting.
49
Settings > Setting the left/right volume balance

Setting the auto power standby
This setting toggles the auto power standby on/off. When this is turned on, the product enters off (standby)
mode if you don’t operate or use the unit to play sound for a specified time.
Setting menu
“AUTO POWER STDBY”
Settings
OFF Turns the auto power standby off.
ON
Turns the auto power standby on.
This product automatically enters off (standby mode) when it is not operated and nothing is
played back for 20 minutes.
Default setting
ON
NOTE
(The number of seconds before entering off (standby) mode is shown on the information display, starting 30 seconds beforehand.
(To extend the time required before the power turns off (standby), operate the product or play back sound.
50
Settings > Setting the auto power standby

Checking the firmware version
This setting shows the firmware version for this product.
Setting menu
“VERSION INFO”
Settings
SYSTEM:Shows the system version.
USB DAC:Shows the USB DAC version.
Default setting
SYSTEM:
51
Settings > Checking the firmware version

Initializing all settings (reset)
Use this setting to initialize (reset) all settings and restore this product to its factory default state.
CAUTION
(To prevent hearing loss, take off your headphones before initializing.
Setting menu
“INITIALIZATION”
Settings
CANCEL Does not initialize this product.
EXECUTE
Initializes this product.
NOTE
A confirmation message appears before the initialization is executed. (Press the [MENU] button to cancel
the initialization.) If you press the [ENTER] button once more, this product will restart and initialize.
Default setting
CANCEL
52
Settings > Initializing all settings (reset)

Troubleshooting
What to do in case of trouble
Read this first if you encounter troubles with this product
If this product does not operate normally while you are using it, first check the following points.
(Is the power cord firmly plugged into the AC outlet? Also, is the power cord firmly plugged into the [AC IN]
jack of this product?
(Are the devices connected to this product turned on?
(Are the cables between the various devices firmly plugged into their jacks?
Next, check the possible solutions for the issues, according to each symptom.
(“Power-related issues”(p.54)
(“Remote control-related issues”(p.55)
(“Audio-related issues”(p.56)
(“USB DAC-related issues”(p.57)
If the issue still cannot be solved, try reinitializing the settings.
(“Initializing all settings (reset)”(p.52)
53
Troubleshooting > What to do in case of trouble

Power-related issues
Power will not turn on
(The AC power cord may not be firmly plugged into the [AC IN] jack.
Insert the included AC power cord all the way into the [AC IN] jack.
(The protective circuits of this product activated three times in a row.
If the indicator to the left of the power button flashes when you try to turn on the power, the power is
disabled to protect this product. Please request repairs from a Yamaha repair consulting center.
(The operations of microcomputer inside this product may be frozen, due to external electrical
shock (such as lightning or excessive static electricity) or a reduction in voltage.
Press the z (power) button on this product and hold it down for at least 15 seconds to restart the
product. If this still does not solve the problem, unplug the power cable from the AC outlet, wait for
about one minute and plug it back in again.
The power automatically switches to off (standby) mode
(The auto power standby function on this product has activated due to no playback or operations
for a specified period of time.
To disable the auto power standby function, set “AUTO POWER STDBY” in the settings menu to “OFF”.
See the following information for details.
(“Setting the auto power standby”(p.50)
54
Troubleshooting > What to do in case of trouble

Remote control-related issues
The remote control isn’t working with this product
(The remote control may be out of operating range.
Operate the remote control within its operating range. See the following information for details.
(“Getting the remote control ready”(p.9)
(The batteries on the remote control may be depleted.
Replace the batteries with new ones.
(“Getting the remote control ready”(p.9)
(Light or bright illumination may be interfering with the signal photosensor for the remote control
on this product.
Try adjusting the room illumination or the orientation of this product.
55
Troubleshooting > What to do in case of trouble

Audio-related issues
No sound can be heard
(A different input may have been selected.
Select the correct input. See the following information for details.
(“Selecting the audio input source and output destination”(p.30)
(The input signal may be invalid for playback on this unit.
Some digital audio formats cannot be played back on this unit. Check whether the signal you’re playing
back is supported on this unit. The supported file formats are as follows.
(“Main specifications”(p.65)
(You are trying to play a multi-channel song (file).
This product can only play back songs (files) with two-channel audio.
(The audio may be muted.
Press the [MUTE] key on your remote control to unmute the audio.
The volume won’t go up
(The upper limit for the volume may have been set to a low level.
Adjust the volume in “VOLUME LIMIT”, found in the settings menu. See the following information for
details.
(“Setting an upper limit for the volume”(p.47)
(The headphone gain settings don’t match the signal.
Adjust the “HP GAIN” setting in the settings menu as appropriate for your headphones. See the following
information for details.
(“Setting the gain for the headphones”(p.46)
56
Troubleshooting > What to do in case of trouble

USB DAC-related issues
My computer doesn’t recognize this product
(The product might be connected to a computer that uses an unsupported OS.
Connect the product to a computer whose OS is supported for use with this product.
(“Installing the driver on the computer”(p.20)
(The USB cable may not be correctly connected.
Correctly insert the USB cable.
The USB DAC function is not operating correctly
(Your computer might be connected to this product via a USB hub.
Do not use a USB hub when connecting this product to your computer, but connect directly instead.
(The product is not working correctly due to incompatible USB versions.
Try connecting to a different USB port on your computer and see if this solves the problem. For example,
try connecting to a USB 2.0 port.
I hear noise and the music keeps getting interrupted when playing music files on my
computer.
(You may have launched a different application on your computer while the music file was playing
back.
Launching a different application on your computer while a music file is playing back may cause the
sound to get interrupted or cause noise. Do not launch other applications while playing back music files.
(The buffer size setting for the dedicated driver (Yamaha Steinberg USB Driver) may be
inappropriate (only when using ASIO-compatible software on Windows).
Follow the steps below to change the “Yamaha Steinberg USB Driver” setting, and see if this solves the
problem.
a Open the “Yamaha Steinberg USB Driver” control panel.
Windows Start menu > Yamaha Steinberg USB Driver > Control Panel
b Select the “ASIO” tab and change the “Buffer Size” to a higher setting.
c Relaunch the music software.
If this does not resolve the issue, try changing the “Mode” setting to “Low Latency”, in addition to
changing the setting in step b.
Cannot play music files on the computer (no sound can be heard from this product)
(The output from your computer or application might be muted or set to zero volume.
Unmute the audio or raise the volume on your computer or application.
(You may have changed the settings of the dedicated driver (Yamaha Steinberg USB Driver).
Relaunch the music software.
(USB disconnects during playback.
Turn the power of this product off (standby) and then on again. Following this, relaunch the music
software on your computer and play the music file.
57
Troubleshooting > What to do in case of trouble

(After launching the music software and connecting the computer to this product while powered
on, this product switches to the “USB DAC” input.
Quit the music software that’s running, and try the following steps.
a Turn this product off (standby) and then connect it to your computer.
b Turn this product on.
c Switch the input source to “USB DAC”.
d Relaunch the music software on your computer and play the music file.
(The dedicated driver (Yamaha Steinberg USB Driver) might not have been installed (Windows
only).
Install the Yamaha Steinberg USB Driver. See the following information for details.
(“Installing the driver on the computer”(p.20)
(The audio output device for your computer or for the application may not be correctly configured.
Check the audio output device settings on your computer or application. See the following information
for details.
(“Playing back music on your computer”(p.36)
(The audio signal input may not be recognized by this product.
Input an audio signal whose format and sampling frequency is supported by this product. See the
following information for details.
(“Main specifications”(p.65)
58
Troubleshooting > What to do in case of trouble

Errors indicated by the information display
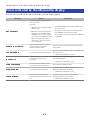
For errors that are shown in the information display, see the following table.
Message Details What to do
NOT AVAILABLE
You performed an operation that
was unavailable.
Example:
(Operating the menu while PURE
DIRECT is on.
(Operating a menu for which the
settings are unavailable. (When
ANALOG is selected as the input
source or when PRE OUT or LINE
OUT is selected as the output
destination, some menu items
are unavailable.)
(Turn PURE DIRECT off, and then try the menu
operation again.
(Change the input source to something other
than ANALOG, or change the output
destination to something other than PRE OUT
or LINE OUT.
REMOTE ID MISMATCH
You tried to operate this product
using a remote control for a
different Yamaha device.
Use the remote control that was included with
this product.
FILE NOT FOUND The firmware file cannot be found.
Check whether the firmware file is saved on your
USB flash drive.
(“Updating the firmware”(p.60)
INVALID FILE The firmware file has been
corrupted.
Download the firmware file again and save it to
your USB flash drive.
(“Updating the firmware”(p.60)
USB OVERLOADED An error with the USB flash drive
connection has been detected. Use a different USB flash drive.
UPDATE ERROR! The firmware failed to update.
Try updating the firmware again. See the
following information for details.
(“Updating the firmware”(p.60)
VERSION ERROR
The firmware failed to update.
(Displayed when the unit is turned
on)
Try updating the firmware again. See the
following information for details.
(“Updating the firmware”(p.60)
59
Troubleshooting > Errors indicated by the information display

Updating the firmware
Yamaha provides new firmware to add functionality or to rectify malfunctions. You can use a USB flash drive
to update the firmware. Visit the Yamaha website to download the firmware.
CAUTION
(To prevent hearing loss, take off your headphones before updating the firmware.
NOTICE
(Do not operate this product or unplug the AC power cord while the firmware is updating. The product may become unusable if
you accidentally interrupt the firmware update. If this happens, the unit may need to be repaired.
NOTE
(Use a USB flash drive that meets the following criteria.
(Supports mass storage
(Formatted as either FAT16 or FAT32
(No built-in encryption
(No data contained on the media (empty)
(Place this product near the AC outlet, as you will need to plug the AC power cord into the outlet while holding down the buttons on
the product.
How to update
1Download the firmware.
For details, see this product’s page on the Yamaha website.
2Extract (decompress) the compressed downloaded file.
3Save the firmware file “00xxxx-xxxx.bin” to the USB flash drive.
Save the file to the topmost folder (the root folder) of the USB flash drive. Do not change the
file name.
4Unplug the power cord of this product from the AC outlet.
5Insert the USB flash drive into the [UPDATE ONLY] port on the back of this product.
60
Troubleshooting > Updating the firmware

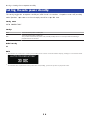
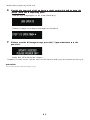
6Plug the AC power cord of this product into the AC outlet while holding down the
[ENTER] button on the operating panel.
The following message appears in the information display.
The display changes according to the progress of the update.
7When you see the following message, press the [z] power button to turn the
power off.
Unplug the USB flash drive from the port.
The product’s firmware is now updated. Wait around five seconds before you turn the power back on again.
Related links
“Errors indicated by the information display”(p.59)
61
Troubleshooting > Updating the firmware

Aftersales service
For service or general inquiries
(For customers within Japan
Please contact the store where you purchased this product, or the Yamaha repair consulting center as
listed in the “Safety Guide” included with this product.
(For customers outside of Japan
Please contact your nearest authorized Yamaha dealer or service center.
https://manual.yamaha.com/av/support/
62
Troubleshooting > Aftersales service

Specifications
Licenses
This product uses the following third-party software programs.
(STM32H7 HAL, Startup, Middlewares
(STM32 USB Host, Middlewares
(FatFS
(CMSIS
(NEWLIB
Refer to the following for the copyrights and conditions of use for each software program.
NOTE
The original text (in English) is shown, as requested by the parties holding the rights to each program.
STM32H7 HAL, Startup, Middlewares
Copyright © 2017 STMicroelectronics. All rights reserved.
This software component is licensed by ST under BSD 3-Clause license, the "License"; You may not use this
file except in compliance with the License. You may obtain a copy of the License at:
https://opensource.org/licenses/BSD-3-Clause
STM32 USB Host, Middlewares
Copyright © 2015 STMicroelectronics. All rights reserved.
This software component is licensed by ST under Ultimate Liberty license SLA0044, the "License"; You may
not use this file except in compliance with the License. You may obtain a copy of the License at:
http://www.st.com/SLA0044
FatFS
Copyright (C) 2017, ChaN, all right reserved.
FatFs module is an open source software. Redistribution and use of FatFs in source and binary forms, with or
without modification, are permitted provided that the following condition is met:
1. Redistributions of source code must retain the above copyright notice, this condition and the following
disclaimer.
This software is provided by the copyright holder and contributors "AS IS" and any warranties related to this
software are DISCLAIMED.
The copyright owner or contributors be NOT LIABLE for any damages caused by use of this software.
CMSIS
Copyright © 2017 Arm Limited. All rights reserved.
63
Specifications > Licenses

SPDX-License-Identifier: Apache-2.0
Licensed under the Apache License, Version 2.0 (the License); you may not use this file except in compliance
with the License.
You may obtain a copy of the License at
www.apache.org/licenses/LICENSE-2.0
Unless required by applicable law or agreed to in writing, software distributed under the License is
distributed on an AS IS BASIS, WITHOUT WARRANTIES OR CONDITIONS OF ANY KIND, either express or
implied.
See the License for the specific language governing permissions and limitations under the License.
NEWLIB
The newlib subdirectory is a collection of software from several sources.
Each file may have its own copyright/license that is embedded in the source file. Unless otherwise noted in
the body of the source file(s), the following copyright notices will apply to the contents of the newlib
subdirectory:
https://sourceware.org/newlib/
64
Specifications > Licenses

Main specifications
The main specifications of this product are as shown below.
Input jacks/connectors and supported audio formats
(Analog L/R (RCA) × 1
(Digital optical × 1
PCM 2-channel: 32 kHz/44.1 kHz/48 kHz/88.2 kHz/96 kHz (16-bit/24-bit)
(Digital coaxial × 1
PCM 2-channel: 32 kHz/44.1 kHz/48 kHz/88.2 kHz/96 kHz/176.4 kHz/192 kHz (16-bit/24-bit)
(USB (Type-B) × 1
(PCM 2-channel: 44.1 kHz/48 kHz/88.2 kHz/96 kHz/176.4 kHz/192 kHz/352.8 kHz/384 kHz (16-bit/24-bit/32-bit)
(DSD 2-channel: 2.8 MHz (DSD64)/5.6 MHz (DSD128)/11.2 MHz (DSD256) ASIO Native, ASIO Native and DoP-compatible
Output jacks/connectors
(Headphones
(Standard 6.3 mm (1/4-inch) × 1
(Balanced 4.4 mm × 1
(XLR, 4-pin × 1
(PRE OUT/LINE OUT
(Analog L/R (RCA) × 1
(Analog XLR, 3-pin × 1
Amplifier
(Type
Discrete, floating and balanced
(Impedance
8 to 600 Ω
(Gain switch
High: 12 dB, Low: 0 dB
65
Specifications > Main specifications

Audio functionality
(PURE DIRECT DSP circuit bypass
(L/R Balance
−10.0 dB to +10.0 dB (in steps of 0.5 dB)
(DSP program
7
(DAC LOCK RANGE
LEVEL 1/2/3
(DAC Filter
FAST LINEAR/SLOW LINEAR/FAST MINIMUM/SLOW MINIMUM/APODIZING FAST/HYBRID FAST/BRICKWALL/SHORT
LATENCY
(VOLUME
−80.0 dB to 0.0 dB (in steps of 0.5 dB), mute
(INITIAL VOLUME
OFF (volume setting when the unit was last turned off)/MUTE/-70 dB/-60 dB/-50 dB/-40 dB
(LIMIT VOLUME
−20 dB (when the HP GAIN setting is “LO”), −35 dB (when the HP GAIN setting is “HI”)
([PRE/LINE OUT] switch
Selectable between [PRE OUT] and [LINE OUT]
Sound quality enhancement technology
(ESS Technologies’ flagship DAC, the ES9038PRO
(ESS Technologies’ ES9842PRO 32-bit high-performance ADC
(High-definition volume IC (MUSES72323)
(Independent power supply and ground for ADC/DAC
(High-performance toroidal transformers specifically for the main amplifier and preamplifier
(High-definition gold-plated headphone jacks and RCA jacks
(DSP manufactured by TI for sound field processing
(Uses Yamaha’s proprietary floating and balanced amp technology
Audio playback modes
(SOUND FIELD MODE
STRAIGHT/CINEMA/DRAMA/MUSIC VIDEO/CONCERT HALL/OUTDOOR LIVE/BGM
(PURE DIRECT
ON/OFF
User interface
(Languages supported (menu display languages)
English
Eco-friendly functions
(AUTO POWER STDBY (auto power standby)
OFF/ON (when no signal has been received and no operation has been made for 20 minutes)
66
Specifications > Main specifications

Audio components
(Rated HP OUTPUT POWER
(Balanced 1 kHz, 0.01 %THD, 32 Ω 1000 mW + 1000 mW
(Unbalanced 1 kHz, 0.01 %THD, 32 Ω 1000 mW + 1000 mW
(Frequency response
HP OUT 4 Hz to 80 KHz, −3 dB
(Total Harmonic Distortion (THD)
Digital IN 1 kHz, 300 mW, 32 Ω ≦ 0.003%
(Signal to Noise Ratio (SNR) > 120 dB
(Input Sensitivity
Analog IN
(HP OUT 1.4 V
(PRE OUT 0.2 V
(LINE OUT 2.0 V
(Input Impedance
RCA 50 kΩ
(Maximum Input Signal Voltage
RCA 2.8 V
(Rated PRE OUT level/Output Impedance
Analog IN: 0.2 V Vol: Max
(RCA 1 V /470 Ω
(XLR 2 V /440 Ω
(Rated LINE OUT level/Output Impedance
Analog IN: 2 V
(RCA 2 V /470 Ω
(XLR 4 V /440 Ω
General
(Voltage
([Models for U.S.A. and Canada] AC 120 V, 60 Hz
([Model for Australia] AC 230 to 240 V, 50 Hz
([Models for U.K., Europe and Russia] AC 230 V, 50 Hz
([Model for China] AC 220 V, 50 Hz
([Model for Korea] AC 220 V, 60 Hz
([Model for Taiwan] AC 110 to 120 V, 60 Hz
([Model for Asia] AC 220 to 240 V, 50/60 Hz
(Power consumption
19 W
(Power consumption on standby
0.2 W
(Dimensions (W × H × D)
333 × 133 × 189 mm (13-1/8" × 5-1/4" × 7-1/2") (including the feet and protruding parts)
(Weight
5.3 kg (11.7 lb)
* The explanations in this Guide are written according to the latest specifications as of the date of publication.
67
Specifications > Main specifications

Yamaha Global Site
https://www.yamaha.com/
Yamaha Downloads
https://download.yamaha.com/
© 2023 Yamaha Corporation
Published 08/2023 AM-A0
AV21-0192
Layout Folder: YMH_PDF_Manual_A5_AV
Stylesheet Name: 01_YMH_PDF_Manual_A5_AV_En-Multi
Stylesheet Version: 2022.12.12
-
 1
1
-
 2
2
-
 3
3
-
 4
4
-
 5
5
-
 6
6
-
 7
7
-
 8
8
-
 9
9
-
 10
10
-
 11
11
-
 12
12
-
 13
13
-
 14
14
-
 15
15
-
 16
16
-
 17
17
-
 18
18
-
 19
19
-
 20
20
-
 21
21
-
 22
22
-
 23
23
-
 24
24
-
 25
25
-
 26
26
-
 27
27
-
 28
28
-
 29
29
-
 30
30
-
 31
31
-
 32
32
-
 33
33
-
 34
34
-
 35
35
-
 36
36
-
 37
37
-
 38
38
-
 39
39
-
 40
40
-
 41
41
-
 42
42
-
 43
43
-
 44
44
-
 45
45
-
 46
46
-
 47
47
-
 48
48
-
 49
49
-
 50
50
-
 51
51
-
 52
52
-
 53
53
-
 54
54
-
 55
55
-
 56
56
-
 57
57
-
 58
58
-
 59
59
-
 60
60
-
 61
61
-
 62
62
-
 63
63
-
 64
64
-
 65
65
-
 66
66
-
 67
67
-
 68
68


in andere talen
- English: Yamaha HA-L7A User guide
- italiano: Yamaha HA-L7A Guida utente
- français: Yamaha HA-L7A Mode d'emploi
- español: Yamaha HA-L7A Guía del usuario
- Deutsch: Yamaha HA-L7A Benutzerhandbuch
- dansk: Yamaha HA-L7A Brugervejledning
- suomi: Yamaha HA-L7A Käyttöohjeet
- svenska: Yamaha HA-L7A Användarguide
Gerelateerde papieren
-
Yamaha HA-L7A Snelstartgids
-
Yamaha CX-A5000 Handleiding
-
Yamaha CX-A5100 de handleiding
-
Yamaha RX-A6A Gebruikershandleiding
-
-
-
-
Yamaha RX-A3080 de handleiding
-
Yamaha RX-A2070BL Handleiding
-