Parkside 317189-1904 de handleiding
- Categorie
- Draagbare stofzuigers
- Type
- de handleiding
Deze handleiding is ook geschikt voor

Akku-Nass-/Trockensauger / Cordless Wet/Dry Vacuum
Cleaner
/ Aspirateur eau/poussière sans fi l
PNTSA 20-Li B1
Accu-nat-/droogzuiger
Vertaling van de originele gebruiksaanwijzing
Aku vysavač na mokré a suché
vysávání
Překlad originálního provozního návodu
Cordless Wet/Dry Vacuum
Cleaner
Translation of the original instructions
Akku-Nass-/Trockensauger
Originalbetriebsanleitung
Aspirateur eau/poussière sans fi l
Traduction des instructions d‘origine
Akumulatorowy odkurzacz do pracy
na mokro/sucho
Tłumaczenie oryginalnej instrukcji obsługi
Aku vysávač na mokré a suché
vysávanie
Preklad originálneho návodu na obsluhu
IAN 317189_1904

Klappen Sie vor dem Lesen die Seite mit den Abbildungen aus und machen Sie sich anschließend mit
allen Funktionen des Gerätes vertraut.
Before reading, unfold the page containing the illustrations and familiarise yourself with all functions of
the device.
Avant de lire le mode d‘emploi, ouvrez la page contenant les illustrations et familiarisez-vous ensuite avec
toutes les fonctions de l‘appareil.
Vouw vóór het lezen de pagina met de afbeeldingen open en maak u vertrouwd met alle functies van het
apparaat.
Przed przeczytaniem proszę rozłożyć stronę z ilustracjami, a następnie proszę zapoznać się z
wszystkimi funkcjami urządzenia.
Před čtením si otevřete stranu s obrázky a potom se seznamte se všemi funkcemi přístroje.
Pred čítaním si odklopte stranu s obrázkami a potom sa oboznámte so všetkými funkciami prístroja.
DE / AT / CH Originalbetriebsanleitung Seite XX
GB / IE Translation of the original instructions Page XX
FR / BE Traduction des instructions d‘origine Page XX
NL / BE Vertaling van de originele gebruiksaanwijzing Pagina XX
PL Tłumaczenie oryginalnej instrukcji obsługi Strona XX
CZ Překlad originálního provozního návodu Strana XX
SK Preklad originálneho návodu na obsluhu Strana XX
4
15
25
38
49
60
70

1 3 4
5
6
7
9
11
12
2
10
19
15
17
8
20
21
14
13
16
18

4
DE AT CH
Inhalt
Einleitung ..................................... 4
Bestimmungsgemäße
Verwendung ................................4
Allgemeine Beschreibung .............5
Lieferumfang....................................5
Übersicht ........................................5
Funktionsbeschreibung ...................... 6
Technische Daten .......................... 6
Sicherheitshinweise ......................6
Bildzeichen in der Anleitung .............. 6
Bildzeichen auf dem Gerät ................ 7
Allgemeine Sicherheitshinweise .........7
Zusammenbau .............................8
Bedienung ...................................8
Ein-/Ausschalten ..............................8
Ladezustand prüfen ..........................8
Akku entnehmen/einsetzen ...............8
Einsatz der Düsen ............................9
Nass-Saugen ...................................9
Trockensaugen ................................. 9
Saugfunktion ...................................9
Blasfunktion ................................... 10
Reinigung/Wartung ...................10
Gerät reinigen ...............................10
Wartung .......................................10
Aufbewahrung ..........................10
Entsorgung/Umweltschutz .......... 10
Ersatzteile/Zubehör ...................11
Fehlersuche ................................12
Garantie ....................................13
Reparatur-Service ......................14
Service-Center ............................14
Importeur ..................................14
Einleitung
Herzlichen Glückwunsch zum Kauf Ihres
neuen Gerätes. Sie haben sich damit für
ein hochwertiges Produkt entschieden.
Dieses Gerät wurde während der Produkti-
on auf Qualität geprüft und einer Endkon-
trolle unterzogen. Die Funktionsfähigkeit
Ihres Gerätes ist somit sichergestellt. Es ist
nicht auszuschließen, dass sich in Einzelfäl-
len am oder im Gerät, bzw. in Schlauchlei-
tungen Restmengen von Wasser befi nden.
Dies ist kein Mangel oder Defekt und kein
Grund zur Besorgnis.
Die Betriebsanleitung ist Be-
standteil dieses Produkts. Sie
enthält wichtige Hinweise für Sicherheit,
Gebrauch und Entsorgung. Machen Sie
sich vor der Benutzung des Produkts mit al-
len Bedien- und Sicherheitshinweisen ver-
traut. Benutzen Sie das Produkt nur wie be-
schrieben und für die angegebenen
Einsatzbereiche. Bewahren Sie die Anlei-
tung gut auf und händigen Sie alle Unterla-
gen bei Weitergabe des Produkts an Dritte
mit aus.
Bestimmungsgemäße
Verwendung
Das Gerät ist zum Nass- und Trockensau-
gen im häuslichen Bereich wie z.B. im
Haushalt, im Hobbyraum, im Auto oder in
der Garage bestimmt. Das Gerät ist auch
als Gebläse oder zum Absaugen von Was-
ser einsetzbar.
Das Aufsaugen von brennbaren, explosi-
ven oder gesundheitsgefährdenden Stoffen
ist verboten.
Das Gerät ist für den Einsatz im Heimwer-
kerbereich bestimmt. Es wurde nicht für
den gewerblichen Dauereinsatz konzipiert.
Das Gerät ist Teil der Serie Parkside
Original EG-Konformitäts-
erklärung ..................................81
Explosionszeichnung ..................88

5
AT CHDE
X20VTEAM und kann mit dem Akku des
X20VTEAM betrieben werden. Die Ak-
kus dürfen nur mit Ladegeräten der Serie
Parkside X20VTEAM geladen werden.
Der Hersteller haftet nicht für Schäden, die
durch bestimmungswidrigen Gebrauch
oder falsche Bedienung verursacht wurden.
Allgemeine
Beschreibung
Die Abbildungen fi nden Sie auf
der vorderen und hinteren Aus-
klappseite.
Lieferumfang
Packen Sie das Gerät aus und kontrollieren
Sie, ob es vollständig ist:
Das Gerät wird mit aufgesetztem Mo-
torkopf (
1) geliefert. Zum Abnehmen
des Motorkopfes öffnen Sie
die Ver-
schlussclips (
8).
- Motorkopf
- Schmutzbehälter
- Dreiteiliges Saugrohr
- Saugschlauch
- Handgriffteil
- Papierfi lterbeutel
- Faltenfi lter
- Haushaltsdüse
- Bodendüse mit
- drehbarem Steckaufsatz
mit Bürste und Gummilippe zum Sau-
gen von Teppichen und glatten Flächen
(bereits montiert)
- Fugendüse
- Wandhalterung
- 2 Kreuzschlitzschrauben
- 4 Rollen
- Betriebsanleitung Nass- und
Trockensauger
Akku und Ladegerät sind
nicht im Lieferumfang enthal-
ten.
Entsorgen Sie das Verpackungsmaterial
ordnungsgemäß.
Übersicht
1 Motorkopf
2 Tragegriff
3 Ein-/Ausschalter
4 Abdeckung Akkuschacht
5 Anschluss Saugen
6 Schmutzbehälter
7 Haken für Wandhalterung
8 2 Verschlussclips
9 Anschluss Blasen (nicht sichtbar)
10 Dreiteiliges Saugrohr
11 Handgriffteil
12 Saugschlauch
13 Wandhalterung
14 Befestigungsschrauben für
Wandhalterung
15 Fugendüse
16 Haushaltsdüse
17 Bodendüse mit
18 drehbarem Steckaufsatz
mit Bürste und Gummilippe zum
Saugen von Teppichen und glat-
ten Flächen (bereits montiert)
19 Papierfi lterbeutel
20 Akku
21 Ladegerät
22 Verschluss Faltenfi lter
23 Faltenfi lter
24 Zubehöraufnahme
25 Rolle
26 Steckaufnahme

6
DE AT CH
Funktionsbeschreibung
Das Gerät ist mit einem stabilen Kunst-
stoffbehälter zur Schmutzaufnahme ausge-
stattet. Beim Nass-Saugen erfolgt die Ab-
schaltung des Saug-Luftstroms durch einen
Schwimmer, wenn der Schmutzbehälter
voll ist. Zusätzlich besitzt das Gerät eine
Blasfunktion. Die Laufrollen erlauben eine
große Wendigkeit des Gerätes.
Die Funktion der Bedienteile entnehmen Sie
bitte den nachfolgenden Beschreibungen.
Technische Daten
Akku-Nass/
Trockensauger .......PNTSA 20-Li B1
Bemessungsspannung U ............... 20 V
Schutzart.........................................IPX4
Saugleistung .................. 9 kPA (90 mbar)
Inhalt des Schmutzbehälters (brutto) .... 10 l
Nutzbares Behältervolumen (Wasser) .....4 l
Gewicht (ohne Zubehör) ..........ca. 2,7 kg
Gewicht (nur Zubehör) .............ca. 1,8 kg
Akku (Li-Ion) ................. PAP 20 A3
Anzahl der Batteriezellen ....................10
Nennspannung ........................... 20 V
Kapazität ....................................4,0 Ah
Energie .......................................80 Wh
Ladezeit ....................................ca. 1 h*
Temperatur ............................ max 50 °C
Ladevorgang ........................ 4 - 40 °C
Betrieb ...............................-20 - 50 °C
Lagerung ............................. 0 - 45 °C
* Die angegebene Ladezeit wird nur mit dem
beigefügten Schnellladegerät erreicht.
Ladegerät ......................PLG 20 A3
Nennaufnahme ........................... 120 W
Eingangsspannung .... 230-240 V~, 50 Hz
Ausgangsspannung .................. 21,5 V
Ausgangsstrom ..............................4,5 A
Schutzklasse ....................................
II
Gerätesicherung .........................T3.15A
Schutzart.........................................IPX0
Achtung! Eine aktuelle Liste
der Akkukompatibilität
fi nden Sie unter:
www.lidl.de/akku
Dieses Gerät kann ausschließlich mit
folgenden Akkus betrieben werden:
PAP 20 A1, PAP 20 A2, PAP 20 A3.
Diese Akkus dürfen mit folgenden
Ladegeräten geladen werden:
PLG 20 A1, PLG 20 A3, PDSLG 20 A1.
Sicherheitshinweise
Dieses Gerät kann von Kindern ab
8Jahren und darüber sowie von Per-
sonen mit verringerten physischen,
sensorischen oder mentalen Fähig-
keiten oder Mangel an Erfahrung
und Wissen benutzt werden, wenn
sie beaufsichtigt oder bezüglich
des sicheren Gebrauchs des Ge-
rätes unterwiesen wurden und die
daraus resultierenden Gefahren
verstehen. Kinder dürfen nicht mit
dem Gerät spielen. Reinigung und
Benutzer-Wartung dürfen nicht von
Kindern ohne Beaufsichtigung durch-
geführt werden.
Bildzeichen in der
Anleitung
Gefahrenzeichen mit Angaben
zur Verhütung von Personen-
oder Sachschäden.

7
AT CHDE
Gebotszeichen mit Angaben
zur Verhütung von Schäden.
Hinweiszeichen mit Informatio-
nen zum besseren Umgang mit
dem Gerät.
Bildzeichen auf dem Gerät
Dieses Gerät ist Teil des
Parkside X20VTEAM.
Elektrogeräte gehören nicht in
den Hausmüll.
C
Es besteht Brandgefahr, wenn
das Sauggut eine Temperatur
von 40°C (104°F) überschrei-
tet!
Ladezustandsanzeige am
Gerät
Verschlussclip öffnen und
schließen
Allgemeine
Sicherheitshinweise
Achtung! Beim Gebrauch von
Elektrogeräten sind zum Schutz
gegen elektrischen Schlag,
Verletzungs- und Brandgefahr
folgende grundsätzliche Sicher-
heitsmaßnahmen zu beachten:
So vermeiden Sie Unfälle und Verlet-
zungen:
• Hinterlassen Sie ein betriebsberei-
tes Gerät nie unbeaufsichtigt am
Arbeitsplatz.
• Menschen und Tiere dürfen mit
dem Gerät nicht abgesaugt wer-
den.
• Richten Sie Saugschlauch und
Düsen während des Betriebs kei-
nesfalls auf sich selbst oder ande-
re Personen, insbesondere nicht
auf Augen und Ohren. Es besteht
Verletzungsgefahr.
• Saugen Sie keine heißen, glü-
henden, brennbaren, explosiven
oder gesundheitsgefährdenden
Stoffe auf. Dazu zählen unter
anderem heiße Asche, Benzin,
Lösungsmittel, Säuren oder Lau-
gen. Es besteht Brand- und Verlet-
zungsgefahr.
• Düsen und Saugrohr dürfen beim
Arbeiten nicht in Kopfhöhe kom-
men. Es besteht Verletzungsge-
fahr.
So vermeiden Sie Unfälle und Verlet-
zungen durch elektrischen Schlag:
• Schalten Sie das Gerät aus und
entnehmen Sie den Akku:
- wenn Sie das Gerät nicht be-
nutzen, es transportieren oder
unbeaufsichtigt lassen;
- wenn Sie das Gerät kontrollie-
ren, es reinigen oder Blockie-
rungen entfernen;
- wenn Sie Reinigungs- oder
Wartungsarbeiten vornehmen
oder Zubehör auswechseln;
- nach dem Kontakt mit Fremd-
körpern oder bei abnormaler
Vibration.
So vermeiden Sie Geräteschäden
und eventuell daraus resultierende
Personenschäden:
• Achten Sie darauf, dass das
Gerät korrekt zusammengebaut
ist und die Filter in der richtigen
Position sind.

8
DE AT CH
• Arbeiten Sie nicht ohne Filter. Das
Gerät könnte beschädigt werden.
• Verwenden Sie kein Zubehör
welches nicht von PARKSIDE
empfohlen wurde. Die kann zu
elektrischem Schlag oder Feuer
führen.
• Lassen Sie Reparaturen nur von
uns ermächtigten Kundendienst-
stellen ausführen.
• Beachten Sie die Hinweise zur
Reinigung und Wartung des Ge-
rätes.
• Bewahren Sie das Gerät an ei-
nem trockenen Ort und außerhalb
der Reichweite von Kindern auf.
Beachten Sie die Sicherheits-
hinweise und Hinweise zum
Aufl aden und der korrekten
Verwendung, die in der Be-
triebsanleitung Ihres Akkus
und Ladegeräts der Serie
Parkside X20VTeam ge-
geben sind. Eine detaillierte
Beschreibung zum Ladevor-
gang und weitere Informa-
tionen fi nden Sie in dieser
separaten Bedienungsanlei-
tung.
Achtung! Beachten Sie die
Sicherheitshinweise, die in
der Betriebsanleitung Ihres
Akkus der Serie Parkside
X20VTeam gegeben sind.
Zusammenbau
1. Drücken Sie die vier Rollen ( 25) in
die Steckaufnahmen (
26), an der
Unterseite des Schmutzbehälters (6),
bis sie einrasten.
2. Setzen Sie den Papierfi lterbeutel (19)
ein (siehe
Trockensaugen - Papier-
fi lterbeutel einsetzten):
3. Setzen Sie den Motorkopf (
1) auf
den Schmutzbehälter (
6) auf und
verschließen Sie
ihn mit den Ver-
schlussclips (
8).
4. Schließen Sie den Saugschlauch (12)
und Zubehör an.
Bedienung
Wickeln Sie den Saugschlauch
(
12) zum Arbeiten ganz ab.
Ein-/Ausschalten
Einschalten:
Ein-/Ausschalter (
3) in Stellung „I“.
Ausschalten:
Ein-/Ausschalter (
3) in Stellung „0“.
Ladezustand prüfen
Die Ladezustandsanzeige am Ge-
rät gibt, während das Gerät läuft,
Auskunft über den Ladezustand
des Akkus.
LED leuchtet grün: Akku geladen
LED leuchtet gelb: Akku teilweise geladen
LED leuchtet rot: Ladezustand niedrig
LED blinkt rot: Akku muss geladen werden
Akku entnehmen/einsetzen
1. Zum Herausnehmen des Akkus (4) aus
dem Gerät drücken Sie die Entriege-
lungstaste (1) am Akku und ziehen den
Akku heraus.
2. Zum Einsetzen des Akkus (4) schieben
Sie den Akku entlang der Führungs-
schiene in das Gerät. Er rastet hörbar
ein.

9
AT CHDE
Setzen Sie den Akku erst ein,
wenn das Akku-Werkzeug
vollständig für den Einsatz
vorbereitet ist.
Einsatz der Düsen
Fugendüse (
15): zum Saugen von
Fugen, Ecken und Heizkörpern.
Haushaltsdüse (
16)
zum Nass- und Trockensaugen, zum Entfer-
nen von hartnäckigem Schmutz.
Bodendüse (
17) mit
Steckaufsatz (
18):
zum Nass- und Trockensaugen von glatten
Flächen und Teppichböden.
Bodendüse (
17) ohne
Steckaufsatz (
18):
zum Nass- und Trockensaugen, zum Entfer-
nen von hartnäckigem Schmutz.
• Drücken Sie die Laschen rechts und
links an der Bodendüse (
17) und
nehmen Sie den Steckaufsatz (
18)
ab.
Achten Sie darauf, dass empfi nd-
liche Oberfl ächen beim Arbeiten
ohne Steckaufsatz verkratzt werden
können.
Nass-Saugen
1. Entfernen Sie den Papierfi lter (19) und
den Faltenfi lter (
23).
2. Absaugen (Abpumpen): Tauchen Sie
den Saugschlauch (12) am Handgriff-
teil (11) in das Wasserbehältnis ein
und saugen Sie das Wasser ab.
3. Entleeren Sie den Schmutzbehälter
sofort nach dem Absaugen, da er nicht
zum Aufbewahren von Flüssigkeiten kon-
struiert ist (siehe „Reinigung/Wartung“).
Stellen Sie sich nicht in das
abzusaugende Wasser.
Gefahr durch elektrischen
Schlag.
Ist der Schmutzbehälter voll, schließt
ein Schwimmer die Saugöffnung,
der Saugvorgang wird unterbro-
chen. Schalten Sie das Gerät ab und
leeren Sie den Schmutzbehälter.
Schalten Sie das Gerät bei Schaum-
oder Flüssigkeitsaustritt sofort aus.
Trockensaugen
Saugen mit dem Papierfi lter-
beutel:
Papierfi lterbeutel einsetzen
Stülpen Sie den Papierfi lterbeutel (19)
mit der Verstärkung nach oben über den
innen liegenden Einsaugstutzen (siehe
Pfeil
). Der Dichtungsring an der
Filterbeutelöffnung muss den Steg am
Einsaugstutzen vollständig umschließen.
Saugen von Feinstäuben:
Bei bestimmten Absaugvorgängen (z.B.
Schleifen von Farben und Lacken, Fräsen
oder Bohren von Mauerwerk, Schleifen
oder Bohren von Hartholz) können gesund-
heitsschädliche Stäube entstehen.
Saugfunktion
Zum Saugen stecken Sie den Saugschlauch
(12) auf den Anschluss (5) am Motorkopf.

10
DE AT CH
Blasfunktion
Die Blasfunktion ist ohne Verwen-
dung eines Filters zu empfehlen.
Zum Blasen stecken Sie den Saugschlauch
(12) auf den Anschluss (9) am Motorkopf.
Reinigung/Wartung
Gerät reinigen
Spritzen Sie das Gerät nicht mit
Wasser ab und verwenden Sie
keine scharfen Reinigungs- bzw.
Lösungsmittel. Das Gerät könnte
beschädigt werden.
• Leeren Sie nach dem Betrieb den
Schmutzbehälter (
6) aus.
• Reinigen Sie den Schmutzbehälter mit
einem feuchten Lappen.
• Tauschen Sie einen vollen Papierfi lter-
beutel (
19) aus (Nachbestellung
siehe „Ersatzteile/Zubehör“).
• Klopfen Sie den Faltenfi lter aus und
reinigen Sie ihn mit einem Pinsel oder
Handfeger.
Wartung
• Das Gerät ist wartungsfrei.
Aufbewahrung
- Stecken Sie die zerlegten Saugrohre
(
10) in die Zubehöraufnahme
(
24).
- Wickeln Sie den Saugschlauch
(
12) um das Gerät und stecken Sie
das Handgriffteil (
11) in ein Sau-
grohr (
10).
- Bewahren Sie das Gerät an einem
trockenen Ort und außerhalb der Reich-
weite von Kindern auf.
- Sie können das Gerät am Haken für
Wandhalterung (
7) an der
Wandhalterung (
13) aufhängen.
Hängen Sie das Gerät nicht
mit einer schweren Füllung
(z.B. mit aufgesaugtem Was-
ser) in die Wandhalterung
ein.
- Bringen Sie dazu die Wandhalterung
(
13) mit den zwei Schrauben
(
14) und der Hilfe von Dübeln an
einer Wand an. Überprüfen Sie den
festen Sitz der Wandhalterung (
13)
direkt nach der Montage und in Folge
regelmäßig.
Achten Sie beim Bohren
darauf, keine Versorgungs-
leitungen zu beschädigen.
Verwenden Sie geeignete
Suchgeräte, um diese auf-
zuspüren oder nehmen Sie
einen Installationsplan zu
Hilfe. Kontakt mit Elektrolei-
tungen kann zu elektrischem
Schlag und Feuer, Kontakt
einer Gasleitung zur Explo-
sion führen. Beschädigung
einer Wasserleitung kann zu
Sachbeschädigung und elekt-
rischem Schlag
führen.
Entsorgung/
Umweltschutz
Nehmen Sie den Akku aus dem Gerät und
führen Sie Gerät, Akku, Zubehör und Ver-
packung einer umweltgerechten Wieder-
verwertung zu.

11
AT CHDE
Elektrische Geräte gehören nicht in
den Hausmüll.
• Geben Sie das Gerät und das Ladege-
rät an einer Verwertungsstelle ab. Die
verwendeten Kunststoff- und Metallteile
können sortenrein getrennt werden und
so einer Wiederverwertung zugeführt
werden. Fragen Sie hierzu unser Ser-
vice-Center.
• Die Entsorgung Ihrer defekten, eingesen-
deten Geräte führen wir kostenlos durch.
Ersatzteile/Zubehör
Ersatzteile und Zubehör erhalten Sie unter
www.grizzly-service.eu
Sollten Sie Probleme mit dem Bestellvor-gang haben, verwenden Sie bitte das Kontaktfor-
mular. Bei weiteren Fragen wenden Sie sich an das „Service-Center“ (siehe Seite 14).
Position Position Bezeichnung Bestell-Nr.
Betriebs- Explosions-
anleitung zeichnung
12 8 Saugschlauch 91105189
23 2 Faltenfi lter 91105185
22 3 Verschluss Faltenfi lter 91105186
10 9 Saugrohr (3teilig) 91099439
Papierfi lterbeutel, 5er Pack 30250146
19 14 Papierfi lterbeutel, 1 Stück 30250147

12
DE AT CH
Fehlersuche
Problem Mögliche Ursache Fehlerbehebung
Gerät startet
nicht
Ein-/Ausschalter (
3) defekt
Reparatur durch Kundendienst
Kohlebürsten abgenutzt
Motor defekt
Geringe oder
fehlende
Saugleistung
Saugschlauch (
12) oder Dü-
sen (
15/16/17) verstopft
Verstopfungen und Blockierungen
beseitigen
Saugrohr (
10) nicht korrekt
zusammengesetzt
Saugrohr richtig zusammenset-
zen
Schmutzbehälter (
6) offen
Behälter schließen
Schmutzbehälter (
6) voll
Behälter entleeren
Filter (
19/23) voll oder
zugesetzt
Filter entleeren, reinigen oder
ersetzen
Staub oder
Schmutz wird
aus dem Gerät
geblasen
Filter (
19/23) nicht oder
nicht korrekt montiert
Fehlenden Filter einsetzen oder
korrekten Sitz des Filters prüfen

13
AT CHDE
Garantie
Sehr geehrte Kundin, sehr geehrter Kunde,
Sie erhalten auf dieses Gerät 3 Jahre Ga-
rantie ab Kaufdatum.
Im Falle von Mängeln dieses Produkts
stehen Ihnen gegen den Verkäufer des
Produkts gesetzliche Rechte zu. Diese
gesetzlichen Rechte werden durch unsere
im Folgenden dargestellte Garantie nicht
eingeschränkt.
Garantiebedingungen
Die Garantiefrist beginnt mit dem Kaufda-
tum. Bitte bewahren Sie den Original-Kas-
senbon gut auf. Diese Unterlage wird als
Nachweis für den Kauf benötigt.
Tritt innerhalb von drei Jahren ab dem Kauf-
datum dieses Produkts ein Material- oder
Fabrikationsfehler auf, wird das Produkt von
uns – nach unserer Wahl – für Sie kostenlos
repariert oder ersetzt. Diese Garantieleis-
tung setzt voraus, dass innerhalb der Drei-
Jahres-Frist das defekte Gerät und der Kauf-
beleg (Kassenbon) vorgelegt und schriftlich
kurz beschrieben wird, worin der Mangel
besteht und wann er aufgetreten ist.
Wenn der Defekt von unserer Garantie
gedeckt ist, erhalten Sie das reparierte oder
ein neues Produkt zurück. Mit Reparatur
oder Austausch des Produkts beginnt kein
neuer Garantiezeitraum.
Garantiezeit und gesetzliche
Mängelansprüche
Die Garantiezeit wird durch die Gewähr-
leistung nicht verlängert. Dies gilt auch
für ersetzte und reparierte Teile. Eventuell
schon beim Kauf vorhandene Schäden und
Mängel müssen sofort nach dem Auspa-
cken gemeldet werden. Nach Ablauf der
Garantiezeit anfallende Reparaturen sind
kostenpflichtig.
Garantieumfang
Das Gerät wurde nach strengen Qualitäts-
richtlinien sorgfältig produziert und vor
Anlieferung gewissenhaft geprüft.
Die Garantieleistung gilt für Material- oder
Fabrikationsfehler. Diese Garantie erstreckt
sich nicht auf Produktteile, die normaler
Abnutzung ausgesetzt sind und daher als
Verschleißteile angesehen werden kön-
nen (z.B.Filter oder Aufsätze) oder für
Beschädigungen an zerbrechlichen Teilen
(z.B.Schalter).
Diese Garantie verfällt, wenn das Produkt
beschädigt, nicht sachgemäß benutzt oder
nicht gewartet wurde. Für eine sachgemäße
Benutzung des Produkts sind alle in der Be-
triebsanleitung aufgeführten Anweisungen
genau einzuhalten. Verwendungszwecke
und Handlungen, von denen in der Betriebs-
anleitung abgeraten oder vor denen ge-
warnt wird, sind unbedingt zu vermeiden.
Das Produkt ist lediglich für den privaten
und nicht für den gewerblichen Gebrauch
bestimmt. Bei missbräuchlicher und unsach-
gemäßer Behandlung, Gewaltanwendung
und bei Eingriffen, die nicht von unserer
autorisierten Service-Niederlassung vorge-
nommen wurden, erlischt die Garantie.
Abwicklung im Garantiefall
Um eine schnelle Bearbeitung Ihres Anlie-
gens zu gewährleisten, folgen Sie bitte den
folgenden Hinweisen:
• Bitte halten Sie für alle Anfragen den
Kassenbon und die Identifi kationsnum-
mer (IAN317189_1904) als Nach-
weis für den Kauf bereit.
• Die Artikelnummer entnehmen Sie bitte
dem Typenschild, einer Gravur, auf
dem Titelblatt Ihrer Anleitung (unten
links) oder als Aufkleber auf der Rück-
oder Unterseite.

14
DE AT CH
• Sollten Funktionsfehler oder sonstige
Mängel auftreten kontaktieren Sie
zunächst die nachfolgend benannte
Serviceabteilung telefonisch oder per
E-Mail. Sie erhalten dann weitere In-
formationen über die Abwicklung Ihrer
Reklamation.
• Ein als defekt erfasstes Produkt können
Sie, nach Rücksprache mit unserem
Kundenservice, unter Beifügung des
Kaufbelegs (Kassenbons) und der
Angabe, worin der Mangel besteht
und wann er aufgetreten ist, für Sie
portofrei an die Ihnen mitgeteilte
Service-Anschrift übersenden. Um An-
nahmeprobleme und Zusatzkosten zu
vermeiden, benutzen Sie unbedingt nur
die Adresse, die Ihnen mitgeteilt wird.
Stellen Sie sicher, dass der Versand
nicht unfrei, per Sperrgut, Express oder
sonstiger Sonderfracht erfolgt. Senden
Sie das Gerät bitte inkl. aller beim
Kauf mitgelieferten Zubehörteile ein
und sorgen Sie für eine ausreichend
sichere Transportverpackung.
Reparatur-Service
Sie können Reparaturen, die nicht der Ga-
rantie unterliegen, gegen Berechnung von
unserer Service-Niederlassung durchführen
lassen. Sie erstellt Ihnen gerne einen Kos-
tenvoranschlag.
Wir können nur Geräte bearbeiten, die
ausreichend verpackt und frankiert einge-
sandt wurden.
Achtung: Bitte senden Sie Ihr Gerät gerei-
nigt und mit Hinweis auf den Defekt an
unsere Service-Niederlassung.
Nicht angenommen werden unfrei - per
Sperrgut, Express oder mit sonstiger Son-
derfracht - eingeschickte Geräte.
Die Entsorgung Ihrer defekten eingesende-
ten Geräte führen wir kostenlos durch.
Service-Center
DE
Service Deutschland
Tel.: 0800 54 35 111
E-Mail: [email protected]
IAN 317189_1904
AT
Service Österreich
Tel.: 0820 201 222
(0,15 EUR/Min.)
E-Mail: [email protected]
IAN 317189_1904
CH
Service Schweiz
Tel.: 0842 665566
(0,08 CHF/Min.,
Mobilfunk max. 0,40 CHF/Min.)
E-Mail: [email protected]
IAN 317189_1904
Importeur
Bitte beachten Sie, dass die folgende
Anschrift keine Serviceanschrift ist. Kon-
taktieren Sie zunächst das oben genannte
Service-Center.
Grizzly Tools GmbH & Co. KG
Stockstädter Straße 20
DE-63762 Großostheim
DEUTSCHLAND
www.grizzly-service.eu

15
GB IE
Content
Introduction ...............................15
Application ................................15
General description ....................16
Contents .......................................16
Overview ...................................... 16
Functional description .....................17
Technical data ............................17
Safety information .....................17
Symbols used in the instructions .......17
Symbols on the device ....................18
General notes on safety ..................18
Assembly ...................................19
Operation ..................................19
Switching on/off ............................ 19
Check the charge level ...................19
Removing/inserting the battery ........19
Nozzle usage ................................ 20
Wet vacuuming .............................20
Dry vacuuming ..............................20
Suction function .............................20
Blowing ........................................20
Cleaning/Maintenance ...............21
Cleaning the appliance ..................21
Maintenance .................................21
Storage ......................................21
Disposal/Environmental
protection ..................................21
Trouble shooting ........................22
Guarantee .................................22
Repair Service ............................23
Service-Center ............................24
Importer ....................................24
Replacement parts/Accessories ..24
Introduction
Congratulations on the purchase of your
new device. With it, you have chosen a
high quality product.
During production, this equipment has
been checked for quality and subjected to
a fi nal inspection. The functionality of your
equipment is therefore guaranteed. It can-
not be ruled out that residual quantities of
water will remain on or in the equipment/
hose lines in isolated cases. This is not a
fault or defect and it represents no cause
for concern.
The operating instructions constitute part of
this product. They contain important infor-
mation on safety, use and disposal.
Before using the product, familiarise your-
self with all of the operating and safety
instructions. Use the product only as de-
scribed and for the applications specifi ed.
Keep this manual safely and in the event
that the product is passed on, hand over
all documents to the third party.
Application
The appliance is intended for domestic
wet and dry vacuuming in, for example,
the house, work room, car or garage. The
appliance can also be used as a blower or
to suction up water. This equipment is not
suitable for commercial use.
Vacuuming of fl ammable or explosive ma-
terials or those which endanger health is
prohibited.
The device is part of the Parkside X20V
TEAM series and can be operated using
Parkside X20V TEAM series batteries.
Translation of the original EC
declaration of conformity ...........82
Exploded Drawing .....................88

16
GB IE
The batteries may only be charged using
chargers from the Parkside X20V TEAM
series.
The manufacturer will not be held respon-
sible for injuries resulting from use which
does not comply with the directions, or
from incorrect use.
General description
The illustration of the principal func-
tioning parts can be found on the
front and back foldout pages.
Contents
Unpack the appliance and check that it is
complete. The appliance is supplied with
the motor head fi tted (
1). To remove the
motor head, open
the motor head fi tted (
the securing clips
(
8).
- Motor housing
- Waste container
- 3-part vacuum tube
- Suction hose
- Handgrip section
- Paper fi lter bag
- Folded fi lter
- Housekeeping nozzle
- Floor nozzle with
- turnable insert attachment
with brush and rubber lip, for vacu-
uming carpets and smooth surfaces
(already mounted)
- Crevice nozzle
- Wall bracket
- 2 cross-head screws
- 4 rolls
- Wet and dry vacuum cleaner
operating instructions
The rechargeable battery and
charger are not included in
delivery.
Dispose of the packaging material properly.
Overview
1 Motor housing
2 Carrying handle
3 On/off switch
4 Battery bay cover
5 Suction connection
6 Waste container
7 Hook for wall bracket
8 2 locking clips
9 Blower connection (not visible)
10 3-part vacuum tube
11 Handgrip section
12 Suction hose
13 Wall bracket
14 Fixing screws for wall bracket
15 Crevice nozzle
16 Housekeeping nozzle
17 Floor nozzle with
18 turnable insert attachment
with brush and rubber lip, for
vacuuming carpets and smooth
surfaces (already mounted)
19 Paper fi lter bag
20 Rechargeable battery
21 Charger
22 Folded fi lter closure
23 Folded fi lter
24 Accessory holders
25 Roll
26 Socket

17
GB IE
Functional description
The appliance is equipped with a robust
plastic container for holding dirt. In case of
wet suction, the suction airfl ow is switched
off by a fl oat when the dirt container is full.
The appliance also features a blow func-
tion. The castors provide good manoeuvra-
bility of the appliance. The following de-
scribes the function of the operating parts.
Technical data
Cordless Wet & Dry Vacuum
Cleaner .................. PNTSA 20-Li B1
Rated voltage U .......................... 20 V
Protection category...........................IPX4
Suction force ................. 9 kPA (90 mbar)
Waste tank capacity (gross)...............10 l
Usable container volume (water) ...........4 l
Weight (without accessories)
...................................... approx. 2.7 kg
Weight (accessories only) .. approx. 1.8 kg
Battery (Li-Ion) .............. PAP 20 A3
Battery cells ....................................... 10
Nominal voltage ......................... 20 V
Capacity ..................................... 4,0 Ah
Energy ........................................80 Wh
Charging time .............................ca. 1 h
Temperature........................... max 50 °C
Charging process .................. 4 - 40 °C
Operation ..........................-20 - 50 °C
Storage ................................ 0 - 45 °C
* The charge time indicated will only be
achieved with the included quick charger.
Recharger ......................PLG 20 A3
Nominal consumption .................. 120 W
Voltage input ............ 230-240 V~, 50 Hz
Voltage output ......................... 21,5 V
Output currant ...............................4,5 A
Protection class ...............................
II
Miniature fuse .............................T3.15A
Protection category...........................IPX0
Attention! An up-to-date list of
battery compatibility can be
found at: www.lidl.de/akku
This device can only be operated with the
following rechargeable batteries:
PAP 20 A1, PAP 20 A2, PAP 20 A3.
This type of battery may be charged with
the following chargers:
PLG 20 A1, PLG 20 A3, PDSLG 20 A1.
Safety information
This appliance can be used by chil-
dren aged from 8 years and above
and persons with reduced physical,
sensory or mental capabilities or
lack of experience and knowledge
if they have been given supervi-
sion or instruction concerning use
of the appliance in a safe way and
understand the hazards involved.
Children shall not play with the
appliance. Cleaning and user
maintenance shall not be made by
children without supervision.
Symbols used in the
instructions
Hazard symbols with infor-
mation on prevention of per-
sonal injury and property
damage.
Precaution symbol with in-
formation on prevention of
harm/damage.

18
GB IE
Notice symbol with informa-
tion on how to handle the
device properly.
Symbols on the device
Parkside X20VTEAM
Electrical machines do not be-
long with domestic waste.
C
There is a risk of fi re if the
suction material exceeds a
temperature of 40°C (104°F)!
Charge level indicator on
the appliance
Open and close the lo-
cking clip
General notes on safety
Please read the following
safety guidelines in order
to avoid risk of fi re, electric
shock, personal injury and
damage to objects:
To avoid accidents and injuries:
• Never leave a machine which is
ready for operation unattended
at the workplace.
• People and animals must not be
vacuumed with the machine.
• Do not aim the suction hose and
nozzle at yourself or others dur-
ing use, particularly not at the
eyes and ears; there is a risk of
injury.
• Do not vacuum any hot, incan-
descent, fl ammable, explosive
materials, or those which en-
danger health. This includes hot
ashes, petrol, solvents, acids
or caustic solutions. Personal
injury could occur.
• Nozzles and suction tubes must
not reach head level whilst in
use. Personal injury could oc-
cur.
To avoid accidents and injuries
from electric shocks:
• Turn off the device and remove
the battery:
- when you are not using the
device,
- transporting it or leaving it
unattended;
- when you are checking the
device, cleaning it or remov-
ing blockages;
- when you are carrying out
cleaning or maintenance
work or replacing accesso-
ries;
The following states how damage
to the appliance and possible in-
jury to people can be avoided:
• Ensure that the machine is cor-
rectly assembled and the fi lters
are in the correct position.
• Do not use without the fi lter.
This could damage the ma-
chine.
• Do not use any accessories
that are not recommended by
PARKSIDE. This can result in

19
GB IE
electric shock or fi re.
• Only have repairs carried out
at our authorised customer ser-
vice points.
• Observe the instructions for
cleaning and maintenance of
the machine.
• Store the appliance in a dry
place and out of reach of chil-
dren.
Observe the safety informati-
on and notes on charging and
proper use as shown in the
instruction manual for your
battery and charger from the
Parkside X 20 V Team series.
A detailed description of the
charging process and further
information can be found in
the separate operating instruc-
tions.
Warning! Observe the safety
information in the operating
instructions for your Parkside
X 20 V Team series recharge-
able battery.
Assembly
1. Press the four rolls ( 25) into the
sockets (
26) on the underside of
the dirt container (6) until they click into
place.
2. Insert the paper fi lter bag (19) (
23 dry vacuuming - using a paper fi lter
bag):
3. Place the motor head (
1) onto the
dirt container (
6) and lock
it
into place using the locking clips
(
8).
4. Attach the suction hose (12) and ac-
cessories.
Operation
Fully unwind the suction hose (
12) before commencing work.
Switching on/off
Switching on the vacuum:
On/off switch (
3) in position “I”.
Switching off the vacuum:
On/off switch (
3) in position “O”.
Check the charge level
The charge level indicator on the
appliance displays the battery
charge level when the appliance
is running.
LED illuminated green: Battery charged
LED illuminated yellow: Battery partially
charged
LED illuminated red: Battery low
LED fl ashing red: Battery needs to be
charged
Removing/inserting the
battery
1. To remove the battery from
the device, press the release
button (1) on the battery (4)
and pull the battery out.
2. To insert the battery (4), place it on the
guide track and push it back into the
appliance. It will audibly snap in.
Do not insert the battery until
the appliance is fully assemb-
led. Risk of injury!

20
GB IE
Nozzle usage
Crevice nozzle ( 15):
for vacuuming gaps, corners and radiators.
Housekeeping nozzle (
16)
For wet and dry vacuuming, for removing
stubborn dirt.
Floor nozzle (
17) with insert at-
tachment (
18):
for wet and dry vacuuming of smooth sur-
faces and fi tted carpets.
Floor nozzle (
17) without insert
attachment (
18):
for wet and dry vacuuming of fi tted carpets
and for removing persistent dirt.
• Press the clips on the right and left side
of the fl oor nozzle (
17) and remove
the insert attachment (
18).
Mind that sensitive surfaces might
get scratched if the insert attach-
ment is not used.
Wet vacuuming
1. Remove the paper fi lter ( 19) and
folded fi lter (
23).
2. Suctioning up (draining) water: place
the suction hose (
12) on the handle
(
11) into the water tank and suc-
tion up the water.
3. Empty the waste container immediately
after vacuuming because it is not de-
signed to store liquids (see “Cleaning/
Maintenance”).
Never reach into the water to
be suctioned up. Danger of
electric shock.
If the waste container is full, a fl oat
closes the suction opening, and the
vacuum operation is interrupted.
Switch off the machine and empty
the waste tank.
If foam or liquid exits, switch off the
machine immediately.
Dry vacuuming
Vacuuming with the paper
fi lter bag:
Insert the material fi lter
Pull the paper fi lter bag (19) with the
reinforcer upwards over the internal
suction fi tting (see arrow
). The
sealing ring at the fi lter bag opening
must completely surround the lip on the
suction pipe.
Vacuuming fi ne dust:
Specifi c suction processes (e.g. grinding
of paints and lacquers, milling or drilling
walls, grinding or drilling hard wood) can
pose a risk from hazardous dust.
Suction function
To perform suction, insert the suction hose
(12) into the connection (5) on the motor
head.
Blowing
Operation without the use of a fi lter
is recommended.
To blow, plug the suction hose (12) onto the
connection (9) on the motor head.

21
GB IE
Cleaning/Maintenance
Cleaning the appliance
Never hose the appliance down
with water. Never use aggressive
cleaning agents or solvents. This
could damage the appliance.
• After use, empty the waste tank (
6).
• Clean the waste tank with a damp cloth.
• Replace the paper fi lter bag (
19)
when full (see “Replacement parts/Ac-
cessories” for reordering).
• Tap the folded fi lter and clean it with a
brush or hand-brush.
Maintenance
• The equipment is maintenance free.
Storage
- Insert the separated vacuum tubes (10)
into the accessory holder (
24).
- Wind the vacuum hose (12) around
the device and plug the handle section
(11) into a vacuum tube (10).
- Store the appliance in a dry place and
out of reach of children.
- You can suspend the device from the
wall bracket (
13) using the wall bra-
cket hook (
7).
Do not suspend the device
from the wall bracket when
fully loaded (e.g. full with
water).
- To suspend from the wall, attach the
wall bracket (
13) to the wall using
the two screws (
14) and dowels.
Ensure that the wall bracket (
13) is
fi rmly attached right away after moun-
ting and on a regular basis thereafter.
When drilling, be careful not
to damage any supply lines.
Use suitable search devices
to fi nd these or consult an in-
stallation plan for guidance.
Contact with electrical cables
can lead to electric shock and
fi re. Contact with a gas pipe
can result in an explosion.
Damage to a water pipe can
lead to property damage and
electric shock.
Disposal/Environmental
protection
Be environmentally friendly. Return the
tool, accessories and packaging to a recy-
cling centre when you have fi nished with
them.
Machines must not be disposed of
with household refuse.
Take the machine to a recycling point. The
waste plastic and metal parts can be sepa-
rated, accurately graded and passed on
for recycling. Contact our Service Centre
for more details.
Defective units returned to us will be dis-
posed of for free.

22
GB IE
Trouble shooting
Problem Possible cause Fault correction
Device does not
start
Defective on/off switch
(
3)
Repair through customer service
Worn carbon brushes
Defective motor
Low or lack of
suction
Hose system (
12) or jets (
15/16/17) blocked
Remove obstructions and
blockages
Suction pipe (
10) assembled
incorrectly
Assemble suction pipe correctly
Container (
6) open
Close container
Container (
6) full
Empty container
Filter (
19/23) full or
clogged
Empty, clean or replace fi lter
Dust or dirt is
blow out of the
device
Filter (
19/23) is not or not
correctly assembled
Use missing fi lters or check the
correct position of the fi lter
Guarantee
Dear Customer,
This equipment is provided with a 3-year
guarantee from the date of purchase.
In case of defects, you have statutory rights
against the seller of the product. These
statutory rights are not restricted by our
guarantee presented below.
Terms of Guarantee
The term of the guarantee begins on the
date of purchase. Please retain the original
receipt. This document is required as proof
of purchase.
If a material or manufacturing defect
occurs within three years of the date of
purchase of this product, we will repair or
replace – at our choice – the product for
you free of charge. This guarantee requires
the defective equipment and proof of pur-
chase to be presented within the three-year
period with a brief written description of
what constitutes the defect and when it oc-
curred.
If the defect is covered by our guarantee,
you will receive either the repaired product

23
GB IE
or a new product. No new guarantee pe-
riod begins on repair or replacement of the
product.
Guarantee Period and Statutory
Claims for Defects
The guarantee period is not extended by
the guarantee service. This also applies for
replaced or repaired parts. Any damages
and defects already present at the time of
purchase must be reported immediately af-
ter unpacking. Repairs arising after expiry
of the guarantee period are chargeable.
Guarantee Cover
The equipment has been carefully pro-
duced in accordance with strict quality
guidelines and conscientiously checked
prior to delivery.
The guarantee applies for all material and
manufacturing defects. This guarantee
does not extend to cover product parts
that are subject to normal wear and may
therefore be considered as wearing parts
(e.g.fi lters or attachments) or to cover
damage to breakable parts (e.g.switches).
This guarantee shall be invalid if the prod-
uct has been damaged, used incorrectly or
not maintained. Precise adherence to all of
the instructions specifi ed in the operating
manual is required for proper use of the
product. Intended uses and actions against
which the operating manual advises or
warns must be categorically avoided.
The product is designed only for private
and not commercial use. The guarantee
will be invalidated in case of misuse or
improper handling, use of force, or inter-
ventions not undertaken by our authorised
service branch.
Processing in Case of Guarantee
To ensure effi cient handling of your query,
please follow the directions below:
• Please have the receipt and identifi ca-
tion number (IAN 317189_1904)
ready as proof of purchase for all en-
quiries.
• Please fi nd the item number on the rat-
ing plate.
• Should functional errors or other de-
fects occur, please initially contact the
service department specifi ed below by
telephone or by e-mail. You will then
receive further information on the pro-
cessing of your complaint.
• After consultation with our customer
service, a product recorded as defec-
tive can be sent postage paid to the
service address communicated to you,
with the proof of purchase (receipt)
and specifi cation of what constitutes
the defect and when it occurred. In or-
der to avoid acceptance problems and
additional costs, please be sure to use
only the address communicated to you.
Ensure that the consignment is not sent
carriage forward or by bulky goods,
express or other special freight. Please
send the equipment inc. all accessories
supplied at the time of purchase and
ensure adequate, safe transport pack-
aging.
Repair Service
For a charge, repairs not covered by the
guarantee can be carried out by our ser-
vice branch, which will be happy to issue
a cost estimate for you.
We can handle only equipment that has
been sent with adequate packaging and
postage.

24
GB IE
Replacement parts/Accessories
Spare parts and accessories can be obtained at www.grizzly-service.eu
If you have issues ordering, please use the contact form. If you have any other questions,
contact the service centre (see “Service-Center” Page 24).
Position Position Description Use Order No.
instruction exploded
manual drawing
12 8 Vacuum hose 91105189
23 2 fl uted fi lter 91105185
22 3 Folded fi lter closure 91105186
10 9 3-part vacuum tube 91099439
Paper fi lter bags, pack of 5 30250146
19 14 Paper fi lter bags, 1 unit 30250147
Attention: Please send your equipment to
our service branch in clean condition and
with an indication of the defect.
Equipment sent carriage forward or by
bulky goods, express or other special
freight will not be accepted.
We will dispose of your defective devices
free of charge when you send them to us.
Service-Center
GB
Service Great Britain
Tel.: 0800 404 7657
(£ 0.10/Min.)
E-Mail: [email protected]
IAN 317189_1904
IE
Service Ireland
Tel.: 1890 930 034
(0,08 EUR/Min., (peak))
(0,06 EUR/Min., (off peak))
E-Mail: [email protected]
IAN 317189_1904
Importer
Please note that the following address is
not a service address. Please initially con-
tact the service centre specifi ed above.
Grizzly Tools GmbH & Co. KG
Stockstädter Straße 20
DE-63762 Großostheim
Germany
www.grizzly-service.eu

25
FR BE
Sommaire
Introduction ...............................25
Fins d‘utilisation .........................25
Description générale ..................26
Volume de la livraison ....................26
Vue d‘ensemble .............................26
Description du fonctionnement .........27
Données techniques ...................27
Règles de sécurité ......................27
Symboles utilisés dans le mode
d’emploi .......................................28
Pictogrammes sur l‘appareil .............28
Consignes générales de sécurité ......28
Assemblage ...............................29
Opération ..................................29
Allumer/Eteindre ............................29
Vérifi er l‘état de charge ................... 29
Retirer/utiliser l’accu .......................30
Utilisation des gicleurs ....................30
Aspiration d’eau ............................30
Aspiration de poussières .................. 30
Fonction d‘aspiration ......................31
Souffl age ......................................31
Nettoyage/Entretien...................31
Nettoyer l’appareil .........................31
Entretien .......................................31
Rangement ................................31
Accessoires ................................32
Récupération/Environnement .....32
Dépistage des
dysfonctionnement ..................... 33
Garantie - France .......................33
Garantie - Belgique ....................35
Service Réparations ...................37
Service-Center ............................37
Importeur ..................................37
Introduction
Toutes nos félicitations pour l’achat de votre
nouvel appareil. Vous avez ainsi choisi un
produit de qualité supérieure.
La qualité de l’appareil a été vérifi ée pen-
dant la production et il a été soumis à un
contrôle fi nal. Le fonctionnement de votre
appareil est donc ainsi garanti. Il n’est pas
à exclure que dans certains cas isolés, il de-
meure dans l’appareil, ou dans les tuyaute-
ries fl exibles, des quantités résiduelles d’eau.
Ceci n’est pas un défaut ou un vice et on ne
doit pas s’inquiéter à ce sujet.
La notice d’utilisation fait par-
tie de ce produit. Elle contient
des instructions importantes pour la sécurité,
l’utilisation et l’élimination des déchets. Avant
d’utiliser ce produit, lisez attentivement les
consignes d’emploi et de sécurité. N’utilisez
le produit que tel que décrit et uniquement
pour les domaines d’emploi indiqués.
Conservez cette notice et remettez-la avec
tous les documents si vous cédez le produit à
un tiers.
Fins d‘utilisation
L‘appareil est destiné à l‘aspiration de pous-
sière et de liquides à des fi ns ménagères,
p. ex. pour la maison, l‘atelier de bricolage,
dans la voiture ou le garage. L’appareil peut
également être utilisé en guise de souffl erie
ou pour aspirer de l’eau.
Cet appareil n’est pas adapté à une utilisa-
tion industrielle. Toute utilisation industrielle
met fi n à la garantie.
Il est interdit d’aspirer des substances com-
bustibles, explosives ou dangereuses pour la
santé.
L’appareil fait partie de la gamme Parkside
X 20 V TEAM et peut être utilisé avec les
batteries de la gamme Parkside X 20 V
Traduction de la déclaration de
conformité CE originale ..............83
Vue éclatée ................................88

26
FR BE
TEAM. Les batteries doivent être chargées
uniquement avec des chargeurs apparte-
nant à la gamme Parkside X 20 V TEAM.
Le fabricant décline toute responsabilité
en cas de dommages dus à un usage non
conforme aux dispositions suivantes ou à une
mauvaise utilisation.
Description générale
Vous trouverez le dessin détaillé
des organes de service les plus
importants sur les pages dé-
pliantes avant et arrière.
Volume de la livraison
Déballez l‘appareil et contrôlez si
celui-ci est complet.
L‘appareil est livré avec la tête de
moteur montée (
1). Pour retirer la
tête de moteur, ouvrez
les clips de
fermeture (
8).
- Compartiment du moteur
- Récipient à poussières
- Tube d’aspiration en trois parties
- Tuyau d‘aspiration
- Élément de poignée
- Sac à papier fi ltre
- Filtre plissé
- Suceur domestique
- Gicleur pour sols avec
- Embout vissable
avec brosse et suceurs en caoutchouc
pour aspirer les souillures grossières
(déjà monté)
- Gicleur de jointure
- Fixation murale
- 2 vis à tête cruciforme
- 4 roulettes
- Notice d’utilisation aspirateur à
eau et à sec
La batterie et le chargeur ne
sont pas compris dans le maté-
riel livré !
Eliminez le matériel d‘emballage en res-
pectant la réglementation en vigueur.
Vue d‘ensemble
1 Compartiment du moteur
2 Poignée de transport
3 Interrupteur de marche/ arrêt
4 Couvercle compartiment de
batterie
5 Branchement aspiration
6 Récipient à poussières
7 Crochet de la fi xation murale
8 2 clips de verrouillage
9 Raccord souffl age (non visible)
10 Tube d’aspiration en trois parties
11 Élément de poignée
12 Tuyau d‘aspiration
13 Support mural
14 Vis de fi xation du support mural
15 Gicleur de jointure
16 Suceur domestique
17 Gicleur pour sols avec
18 Embout vissable
avec brosse et suceurs en caout-
chouc pour aspirer les souillures
grossières (déjà monté)
19 Sac fi ltrant en papier
20 Batterie
21 Chargeur
22 Fermeture fi ltre plissé
23 Filtre plissé
24 Logement d‘accessoire
25 Roulette
26 Logement d‘enfi chage

27
FR BE
Description du fonctionnement
L’appareil est équipé d’un bac solide en
plastique pour collecter la saleté. Pour
l’aspiration d’eau, la coupure du fl ux d’air
d’aspiration s’effectue à l’aide d’un fl otteur
lorsque le bac à déchets est plein. L’appa-
reil possède en plus une fonction de souf-
fl age. Les roulettes confèrent une grande
maniabilité à l’appareil. Les descriptions
suivantes vous donneront plus de détails
sur la fonction des accessoires.
Données techniques
Aspirateur eau/poussiere sans fi l
.............................. PNTSA 20-Li B1
Tension d’évaluat U ..................... 20 V
Type de protection ............................IPX4
Puissance d’aspiration .... 9 kPA (90 mbar)
Capacité de la cuve (brute) ...............10 l
Volume utilisable du récipient (eau) .......4 l
Poids (sans accessoires) ..........env. 2,7 kg
Poids (accessoires seulement) ... env. 1,8 kg
Accu (Li-Ion) .................. PAP 20 A3
Éléments de batterie ...........................10
Tension nominale ........................ 20 V
Capacité ..................................... 4,0 Ah
énergie .......................................80 Wh
Temps de charge ........................ env. 1 h
Température........................... max 50 °C
Processus de charge .............. 4 - 40 °C
Fonctionnement ...................-20 - 50 °C
Stockage .............................. 0 - 45 °C
* Le temps de charge spécifi é ne peut être
atteint qu‘avec le chargeur rapide inclus.
Chargeur .......................PLG 20 A3
Absorption nominale ................... 120 W
Tension d’entrée/
input ........................ 230-240 V~, 50 Hz
Tension de sortie/
output ..................................... 21,5 V
Courant de sortie ...........................4,5 A
Classe de protection ........................
II
Sécurité de l’appareil ..................T3.15A
Type de protection ............................IPX0
Attention! Vous trouverez
une liste actualisée de la
compatibilité des batteries à
l‘adresse: www.lidl.de/akku
Cet appareil peut être alimenté
exclusivement par les batteries suivantes:
PAP 20 A1, PAP 20 A2, PAP 20 A3.
Ces batteries peuvent être rechargées
avec les chargeurs suivants:
PLG 20 A1, PLG 20 A3, PDSLG 20 A1.
Règles de sécurité
Cet appareil peut être utilisé par
des enfants à partir de 8 ans et
plus et par des personnes ayant
des capacités physiques, senso-
rielles ou mentales réduites ou
un manque d’expérience et de
connaissances à condition qu’elles
aient reçu une supervision ou des
instructions concernant I’utilisation
de I’appareil en toute sécurité et
qu’elles comprennent les dangers
encourus. Les enfants ne doivent
pas jouer avec l’appareil. Le net-
toyage et I’entretien par I’usager
ne doivent pas être effectués par
des enfants sans surveillance.

28
FR BE
Symboles utilisés dans le
mode d’emploi
Signes de danger avec
conseils de prévention des
accidents sur les personnes
ou des dégâts matériels.
Signes indicatifs avec
conseils de prévention des
dégâts.
Signes de conseils avec des
informations pour une meil-
leure manipulation de l’appa-
reil.
Pictogrammes sur l‘appareil
Parkside X20VTEAM
Les machines n’ont pas leur
place dans les ordures ména-
gères.
C
Il y a risque d’incendie si la
température du produit aspiré
dépasse 40 °C (104 °F)!
Indicateur de charge sur
l‘appareil
Ouvrir et fermer le clip
de fermeture
Consignes générales de
sécurité
Lisez les consignes de sécurité
suivantes pour éviter les risques
d’incendies, de chocs élec-
triques, de blessures de per-
sonnes et de dégâts matériels:
Vous éviterez ainsi accidents et
blessures :
• Ne laissez jamais sans
surveillance un appareil prêt à
fonctionner.
• N’aspirez pas d’individus et
d’animaux avec l’appareil.
• Pendant l’utilisation, ne braquez
jamais le fl exible d’aspiration
et les suceurs sur vous-même ou
d’autres personnes, en particulier
pas en direction des yeux et des
oreilles. Risque de blessures.
• N’aspirez pas de substances
bouillantes, incandescentes, com-
bustibles, explosives ou dange-
reuses pour la santé comme par
exemple de la cendre chaude,
de l’essence, des solvants, des
acides ou de la lessive. Vous ris-
quez de vous blesser.
• Veillez à ce que les suceurs et le
tuyau d’aspiration ne se trouvent
pas à proximité de la tête lors de
l’utilisation. Vous risquez de vous
blesser.
Vous éviterez ainsi les blessures et
les accidents dus au choc électrique:
• Éteignez l‘appareil et retirez la
batterie:
- lorsque vous n’utilisez pas
l’appareil,
- avant d’ouvrir l’appareil,
- lors de travaux d’entretien et de
nettoyage,

29
FR BE
- après un contact avec des
corps étrangers ou des vibra-
tions anormales.
Précaution ! Voici comment éviter
d’endommager l’appareil et des
dommages pour les personnes en
résultant :
• Veillez à ce que l’appareil soit
correctement assemblé et que les
fi ltres soient bien mis en place.
• N’utilisez pas l’appareil sans
fi ltre, cela pourrait l’endommager.
• N’utilisez pas d’accessoires non
recommandés par PARKSIDE.
Cela pourrait entraîner une élec-
trocution ou un incendie.
• Confi ez vos réparations unique-
ment à des services clientèle dis-
posant de notre autorisation.
• Respectez les indications relatives
au nettoyage et à l’entretien de
l’appareil.
• Conservez l’appareil à un endroit
sec et hors de portée des enfants.
Respectez les consignes de sé-
curité et informations relatives
au chargement et à l‘utilisati-
on correcte qui sont indiquées
dans la notice d‘utilisation
de votre batterie et chargeur
de la gamme Parkside X 20
V Team. Vous trouverez une
description détaillée du pro-
cessus de charge et de plus
amples informations dans ce
mode d‘emploi séparé.
Attention ! Respectez les con-
signes de sécurité indiquées
dans la notice d‘utilisation de
votre batterie de la gamme
Parkside X 20 V Team.
Assemblage
1. Enfoncez les quatre roulettes ( 25)
dans les logements d‘enfi chage (
26), sous le bac à déchets (6) jusqu‘à
ce qu‘elles s‘enclenchent.
2. Placez le sac fi ltrant en papier (19) (cf.
Aspiration à sec - Placer le sac fi lt-
rant en papier) :
3. Posez la tête du moteur (1)
sur le bac à poussière (6) et vissez-le
avec les clips de fermeture (8).
4. Branchez le tuyau d‘aspiration (12) et
l‘accessoire.
Opération
Déroulez complètement le tuyau
fl exible d’aspiration (
12) pour
travailler.
Allumer/Eteindre
Allumer l‘aspirateur:
Interrupteur marche/arrêt (
3)
en position «I».
Eteindre l‘aspirateur:
Interrupteur marche/arrêt (
3)
en position «O».
Vérifi er l‘état de charge
L‘indicateur de charge sur l‘appa-
reil renseigne sur l‘état de charge
de la batterie pendant le foncti-
onnement de l‘appareil.

30
FR BE
la LED s‘allume en vert: batterie chargée
la LED s‘allume en jaune : batterie
partiellement chargée
la LED s‘allume en rouge : niveau de
charge bas
la LED clignote en rouge: la batterie doit
être chargée
Retirer/utiliser l’accu
1. Pour enlever la batterie de l’appareil,
appuyez sur le bouton de déverrouil-
lage (1) au niveau de la batterie (4) et
retirez la batterie.
2. Pour insérer l’accumulateur (4) poussez
l’accumulateur dans l’appareil le long
de la glissière dans l’appareil. Vous
devez entendre un clic.
N’utilisez l’accumulateur que
si l’appareil est complète-
ment monté. Il existe un ris-
que de blessure !
Utilisation des gicleurs
Gicleurs de jointure (
15) :
pour aspirer les jointures, les coins et les
radiateurs.
Suceur domestique (
16)
pour l‘aspiration d‘eau et de poussière,
pour élimer les saletés tenaces.
Gicleurs pour sols (
17) avec
embouts (
18) :
pour aspiration sèche et humides des sur-
faces lisses et des tapis.
Gicleurs pour sols (
17) sans
embouts (
18) :
pour aspiration sèche et humides des ta-
pis, pour éliminer les taches tenaces.
• Appuyez sur les languettes à droite et à
gauche des gicleurs pour sols (
17) et
retirez l’embout (
18).
Sans embouts, les surfaces délicates
peuvent être rayées lors du travail.
Aspiration d’eau
1. Retirez le fi ltre en papier ( 19) et le
fi ltre plissé (
23).
2. Aspirer (pomper) : Plongez le tuyau d’as-
piration (
12) à la poignée
(
11) dans le réservoir d’eau et
aspirer l’eau.
3. Videz le récipient à poussières immé-
diatement après l’aspiration car il n’est
pas conçu pour stocker les liquides (voir
«Nettoyage/Entretien»).
Ne vous tenez pas dans l’eau
à aspirer. Risque d’électrocu-
tion.
Lorsque le récipient à poussières est
plein, un fl otteur bloque l’orifi ce d’as-
piration, le processus d’aspiration
est interrompu. Débranchez l’appa-
reil et videz la cuve.
Si vous constatez que de la mousse
ou du liquide s’échappent de l’appa-
reil, éteignez-le immédiatement.
Aspiration de poussières
Aspirer avec le sac de fi ltre en
papier:
Utiliser le fi ltre en tissu
Rabattez le sac fi ltrant en papier (19)
avec le renfort vers le haut sur les
embouts d‘aspiration qui se trouvent
à l‘intérieur (cf. fl èche
). Le joint

31
FR BE
d‘étanchéité (24) de l‘ouverture de sac
de fi ltre doit entourer complètement la
nervure (25) du raccord d‘aspiration.
Aspiration de poussières fi nes:
Lors de certaines opérations d’aspiration
(par exemple le ponçage de peintures et la-
ques, le fraisage ou le perçage de maçonne-
ries, le ponçage ou le perçage de bois dur),
des poussières dangereuses pour la santé
peuvent se dégager.
Fonction d‘aspiration
Pour aspirer, enfi chez le tube d‘aspiration
(12) sur le raccord (5) sur la tête du moteur.
Souffl age
L’utilisation de la fonction de souf-
fl age est recommandée sans fi ltre.
Pour le souffl age, placez le fl exible d’aspi-
ration (12) sur le raccord (9) de la tête de
moteur.
Nettoyage/Entretien
Nettoyer l’appareil
N‘aspergez pas l‘appareil avec de
l‘eau et n‘utilisez aucun nettoyant ou
solvant fort. Ceci pourrait endomma-
ger l‘appareil.
• Après utilisation, videz la cuve (
6).
• Nettoyez la cuve avec un chiffon
humide.
• Remplacez le sac à papier fi ltre
(
19) lorsqu’il est plein (Pour effectuer
une nouvelle commande, voir chapitre
„Pièces de rechange/Accessoires“).
• Tapez le fi ltre pliable pour le débarras-
ser de la poussière, puis nettoyez-le avec
un pinceau ou une balayette.
Entretien
• L’appareil est sans entretien.
Rangement
- Mettez les tubes d’aspiration (10) dé-
montés dans le logement prévu pour les
accessoires (
24).
- Enroulez le tuyau fl exible (12) autour de
l’appareil et mettez la partie de la prise
de poignée (11) dans un tube d’aspirati-
on (10).
- Conservez l’appareil à un endroit sec et
hors de portée des enfants.
- Vous pouvez suspendre l‘appareil sur le
crochet de la fi xation murale (
7) sur le
support mural (
13).
Ne suspendez pas l‘appareil
rempli lourdement (par ex.
avec de l‘eau aspirée) sur le
support mural.
- Pour ce faire, apposez le support mural
(
13) avec les deux vis
(
14) et à l‘aide de chevilles sur un
mur. Vérifi ez la bonne tenue du support
mural (
13) directement après le mon-
tage et ensuite régulièrement.
Faites attention lors du perça-
ge à ne pas endommager
des conduites d‘alimentation.
Utilisez des détecteurs ad-
aptés pour les localiser ou

32
FR BE
Position Position Désignation Affectation N
o
de
Notice Vue commande
d‘utilisation éclatée
12 8 Tuyau d‘aspiration 91105189
23 2 Filtre pliable 91105185
22 3 Fermeture fi ltre plissé 91105186
10 9 Tube d’aspiration en trois parties 91099439
Sac à papier fi ltre, paquet de 5 30250146
19 14 Sac à papier fi ltre, 1 pièce 30250147
Accessoires
Vous obtiendrez des pièces de rechange et
des accessoires à l’adresse www.grizzly-service.eu
Si vous avez des problèmes lors du passage de la commande, merci d’utiliser le formulaire
de contact. Pour toute autre question, adressez-vous au ”Service-Center” (voir page 37).
aidez-vous d‘un plan d‘ins-
tallation. Le contact avec les
fi ls électriques peut causer un
choc électrique et un incendie
; le contact avec les conduites
de gaz peut causer une ex-
plosion. L‘endommagement
d‘une conduite d‘eau peut
causer des dégâts matériels
et des chocs électriques.
Récupération/
Environnement
Respectez la réglementation relative à la
protection de l’environnement (recyclage)
pour l’élimination de l’appareil, des acces-
soires et de l’emballage.
Les appareils ne peuvent pas être
jetés dans la poubelle à déchets mé-
nagers.
• Déposez l’appareil à un centre de
recyclage. Les pièces de plastique et
de métal utilisées peuvent faire l’objet
d’une collecte sélective et être ainsi
recyclées. Vous pouvez demander
conseil sur ce point à notre centre de
services.
• Nous récupérons gratuitement vos ap-
pareils.

33
FR BE
Dépistage des dysfonctionnement
Problem Mögliche Ursache Fehlerbehebung
L’appareil ne dé-
marre pas
L’interrupteur (
3) est défec-
tueux
Réparation par service après-
vente
Le balai de charbon est usé
Le moteur est défectueux
Aspiration trop
faible ou pas
d’aspiration
Circuit des tuyaux fl exibles
(
12) ou tuyères (
15/16/17) bouchées
Eliminer les bouchages et les
blocages
La tubulure d‘admission
(
10) non correctement
connectée
Connecter correctement la tubu-
lure d‘admission
Récipient à poussières
(
6) ouvert
Fermer le conteneur
Récipient à poussières
(
6) plein
Vider le conteneur
Filtre (
19/23) plein ou sa-
turé
Vider le fi ltre, le nettoyer ou le
remplacer
La poussière ou
les souillures sont
chassées hors de
l’appareil
Filtre (
19/23) pas monté, ou
pas correctement
Mettez le fi ltre manquant en
place ou vérifi ez si le fi ltre est
correctement en assise
Garantie - France
Chère cliente, cher client,
Ce produit bénéfi cie d’une garantie de
3ans, valable à compter de la date
d’achat.
En cas de manques constatés sur ce
produit, vous disposez des droits légaux
contre le vendeur du produit. Ces droits lé-
gaux ne sont pas limités par notre garantie
présentée par la suite.
Article L217-4 du Code de la consommation
Le vendeur livre un bien conforme au
contrat et répond des défauts de conformité
existant lors de la délivrance. Il répond
également des défauts de conformité ré-
sultant de l‘emballage, des instructions de
montage ou de l‘installation lorsque celle-ci
a été mise à sa charge par le contrat ou a
été réalisée sous sa responsabilité.
Article L217-5 du Code de la consommation
Le bien est conforme au contrat :
1° S´il est propre à l‘usage habituellement
attendu d‘un bien semblable et, le cas
échéant :
- s‘il correspond à la description donnée

34
FR BE
par le vendeur et posséder les qualités
que celui-ci a présentées à l‘acheteur
sous forme d‘échantillon ou de modèle ;
- s‘il présente les qualités qu‘un acheteur
peut légitimement attendre eu égard
aux déclarations publiques faites par le
vendeur, par le producteur ou par son
représentant, notamment dans la publi-
cité ou l‘étiquetage ;
2° Ou s‘il présente les caractéristiques dé-
fi nies d‘un commun accord par les parties
ou être propre à tout usage spécial recher-
ché par l‘acheteur, porté à la connaissance
du vendeur et que ce dernier a accepté.
Article L217-16 du Code de la
consommation
Lorsque l‘acheteur demande au vendeur,
pendant le cours de la garantie commer-
ciale qui lui a été consentie lors de l‘acquisi-
tion ou de la réparation d‘un bien meuble,
une remise en état couverte par la garantie,
toute période d‘immobilisation d‘au moins
sept jours vient s‘ajouter à la durée de la
garantie qui restait à courir. Cette période
court à compter de la demande d‘interven-
tion de l‘acheteur ou de la mise à disposi-
tion pour réparation du bien en cause, si
cette mise à disposition est postérieure à la
demande d‘intervention.
Indépendamment de la garantie commer-
ciale souscrite, le vendeur reste tenu des
défauts de conformité du bien et des vices
rédhibitoires dans les conditions prévues
aux articles L217-4 à L217-13 du Code de
la consommation et aux articles 1641 à
1648 et 2232 du Code Civil.
Article L217-12 du Code de la
consommation
L‘action résultant du défaut de conformité se
prescrit par deux ans à compter de la déli-
vrance du bien.
Conditions de garantie
Le délai de garantie débute avec la date
d’achat. Veuillez conserver soigneusement
le ticket de caisse original. En effet, ce do-
cument vous sera réclamé comme preuve
d’achat.
Si un défaut de matériel ou un défaut de fa-
brication se présente au cours des trois ans
suivant la date d’achat de ce produit, nous
réparons gratuitement ou remplaçons ce
produit - selon notre choix. Cette garantie
suppose que l’appareil défectueux et le jus-
tifi catif d’achat (ticket de caisse) nous soient
présentés durant cette période de trois ans
et que la nature du manque et la manière
dont celui-ci est apparu soient explicités par
écrit dans un bref courrier.
Si le défaut est couvert par notre garantie,
le produit vous sera retourné, réparé ou
remplacé par un neuf. Aucune nouvelle pé-
riode de garantie ne débute à la date de la
réparation ou de l’échange du produit.
Durée de garantie et demande légale en
dommages-intérêts
La durée de garantie n’est pas prolongée
par la garantie. Ce point s’applique aussi
aux pièces remplacées et réparées. Les dom-
mages et les manques éventuellement consta-
tés dès l’achat doivent immédiatement être
signalés après le déballage. A l’expiration
du délai de garantie les réparations occa-
sionnelles sont à la charge de l’acheteur.
Volume de la garantie
L’appareil a été fabriqué avec soin, selon
de sévères directives de qualité et il a été
entièrement contrôlé avant la livraison.
La garantie s’applique aux défauts de maté-
riel ou aux défauts de fabrication.
Cette garantie ne s’étend pas aux parties
du produit qui sont exposées à une usure
normale et peuvent être donc considérées
comme des pièces d’usure (par exemple le

35
FR BE
fi ltre ou des inserts) ou pour des dommages
affectant les parties fragiles (par exemple
les interrupteurs).
Cette garantie prend fi n si le produit endom-
magé n’a pas été utilisé ou entretenu d’une
façon conforme. Pour une utilisation ap-
propriée du produit, il faut impérativement
respecter toutes les instructions citées dans
le manuel de l’opérateur. Les actions et les
domaines d’utilisation déconseillés dans la
notice d’utilisation ou vis-à-vis desquels une
mise en garde est émise, doivent absolu-
ment être évités.
Le produit est conçu uniquement pour un
usage privé et non pour un usage industriel.
En cas d’emploi impropre et incorrect, de
recours à la force et d’interventions entre-
prises et non autorisées par notre succur-
sale, la garantie prend fi n.
Article 1641 du Code civil
Le vendeur est tenu de la garantie a raison
des défauts cachés de la chose vendue qui
la rendent impropre à l‘usage auquel on
la destine, ou qui diminuent tellement cet
usage que l‘acheteur ne l‘aurait pas ac-
quise, ou n‘en aurait donné qu‘un moindre
prix, s‘il les avait connus.
Article 1648 1er alinéa du Code civil
L‘action résultant des vices rédhibitoires doit
être intentée par l‘acquéreur dans un délai
de deux ans à compter de la découverte du
vice.
Marche à suivre dans le cas de garantie
Pour garantir un traitement rapide de votre
demande, veuillez suivre les instructions
suivantes :
• Tenez vous prêt à présenter, sur de-
mande, le ticket de caisse et le numéro
d’identifi cation (IAN 317189_1904)
comme preuve d’achat.
• Vous trouverez le numéro d’article sur la
plaque signalétique.
• Si des pannes de fonctionnement ou
d’autres manques apparaissent, prenez
d’abord contact, par téléphone ou par
e-Mail, avec le service après-vente dont
les coordonnées sont indiquées ci-des-
sous. Vous recevrez alors des renseigne-
ments supplémentaires sur le déroule-
ment de votre réclamation.
• En cas de produit défectueux vous pou-
vez, après contact avec notre service
clients, envoyer le produit, franco de
port à l’adresse de service après-vente
indiquée, accompagné du justifi catif
d’achat (ticket de caisse) et en indiquant
quelle est la nature du défaut et quand
celui-ci s’est produit. Pour éviter des
problèmes d’acceptation et des frais
supplémentaires, utilisez absolument
seulement l’adresse qui vous est donnée.
Assurez-vous que l’expédition ne se fait
pas en port dû, comme marchandises
encombrantes, envoi express ou autre
taxe spéciale. Veuillez renvoyer l’appa-
reil, y compris tous les accessoires livrés
lors de l’achat et prenez toute mesure
pour avoir un emballage de transport
suffi samment sûr.
Garantie - Belgique
Chère cliente, cher client,
Ce produit bénéfi cie d’une garantie de 3
ans, valable à compter de la date d’achat.
En cas de manques constatés sur ce
produit, vous disposez des droits légaux
contre le vendeur du produit. Ces droits lé-
gaux ne sont pas limités par notre garantie
présentée par la suite.
Conditions de garantie
Le délai de garantie débute avec la date
d’achat. Veuillez conserver soigneusement

36
FR BE
le ticket de caisse original. En effet, ce do-
cument vous sera réclamé comme preuve
d’achat.
Si un défaut de matériel ou un défaut de
fabrication se présente au cours des trois
ans suivant la date d’achat de ce produit,
nous réparons gratuitement ou remplaçons
ce produit - selon notre choix. Cette garan-
tie suppose que l’appareil défectueux et le
justifi catif d’achat (ticket de caisse) nous
soient présentés durant cette période de
trois ans et que la nature du manque et la
manière dont celui-ci est apparu soient ex-
plicités par écrit dans un bref courrier.
Si le défaut est couvert par notre garantie,
le produit vous sera retourné, réparé ou
remplacé par un neuf. Aucune nouvelle pé-
riode de garantie ne débute à la date de
la réparation ou de l’échange du produit.
Durée de garantie et demande lé-
gale en dommages-intérêts
La durée de garantie n’est pas prolongée
par la garantie. Ce point s’applique aussi
aux pièces remplacées et réparées. Les
dommages et les manques éventuellement
constatés dès l’achat doivent immédiate-
ment être signalés après le déballage. A
l’expiration du délai de garantie les répa-
rations occasionnelles sont à la charge de
l’acheteur.
Volume de la garantie
L’appareil a été fabriqué avec soin, selon
de sévères directives de qualité et il a été
entièrement contrôlé avant la livraison.
La garantie s’applique aux défauts de
matériel ou aux défauts de fabrication.
Cette garantie ne s’étend pas aux parties
du produit qui sont exposées à une usure
normale et peuvent être donc considérées
comme des pièces d’usure (par exemple la
lame) ou pour des dommages affectant les
parties fragiles (par exemple les commuta-
teurs).
Cette garantie prend fi n si le produit en-
dommagé n’a pas été utilisé ou entretenu
d’une façon conforme. Pour une utilisation
appropriée du produit, il faut impérative-
ment respecter toutes les instructions citées
dans le manuel de l’opérateur. Les actions
et les domaines d’utilisation déconseillés
dans la notice d’utilisation ou vis-à-vis des-
quels une mise en garde est émise, doivent
absolument être évités.
Marche à suivre dans le cas de
garantie
Pour garantir un traitement rapide de votre
demande, veuillez suivre les instructions
suivantes :
• Tenez vous prêt à présenter, sur de-
mande, le ticket de caisse et le numéro
d’identifi cation (IAN 317189_1904)
comme preuve d’achat.
• Vous trouverez le numéro d’article sur
la plaque signalétique.
• Si des pannes de fonctionnement ou
d’autres manques apparaissent, prenez
d’abord contact, par téléphone ou par
e-Mail, avec le service après-vente
dont les coordonnées sont indiquées
ci-dessous. Vous recevrez alors des
renseignements supplémentaires sur le
déroulement de votre réclamation.
• En cas de produit défectueux vous pou-
vez, après contact avec notre service
clients, envoyer le produit, franco de
port à l’adresse de service après-vente
indiquée, accompagné du justifi catif
d’achat (ticket de caisse) et en indi-
quant quelle est la nature du défaut et
quand celui-ci s’est produit. Pour éviter
des problèmes d’acceptation et des
frais supplémentaires, utilisez absolu-
ment seulement l’adresse qui vous est
donnée. Assurez-vous que l’expédition

37
FR BE
ne se fait pas en port dû, comme mar-
chandises encombrantes, envoi express
ou autre taxe spéciale. Veuillez ren-
voyer l’appareil, y compris tous les ac-
cessoires livrés lors de l’achat et prenez
toute mesure pour avoir un emballage
de transport suffi samment sûr.
Service Réparations
Vous pouvez, contre paiement, faire exécu-
ter par notre service, des réparations qui ne
font pas partie de la garantie. Nous vous
enverrons volontiers un devis estimatif.
Nous ne pouvons traiter que des appareils
qui ont été correctement emballés et qui ont
envoyés suffi samment affranchis.
Attention : veuillez renvoyer à notre agence
de service votre appareil nettoyé et avec
une note indiquant le défaut constaté.
Les appareils envoyés en port dû - comme
marchandises encombrantes, en envoi ex-
press ou avec toute autre taxe spéciale ne
seront pas acceptés.
Nous exécutons gratuitement la mise aux
déchets de vos appareils défectueux ren-
voyés.
Les pièces détachées indispensables à l’uti-
lisation du produit sont disponibles pendant
la durée de la garantie du produit.
Les pièces détachées indispensables à l’uti-
lisation du produit sont disponibles pendant
la durée de la garantie du produit.
Service-Center
FR
Service France
Tel.: 0800 919270
E-Mail: [email protected]
IAN 317189_1904
BE
Service Belgique
Tel.: 070 270 171
(0,15 EUR/Min.)
E-Mail: [email protected]
IAN 317189_1904
Importeur
Veuillez noter que l’adresse suivante n’est
pas une adresse de service après-vente.
Contactez d’abord le service après-vente
cité plus haut.
Grizzly Tools GmbH & Co. KG
Stockstädter Straße 20
DE-63762 Großostheim, Allemagne
www.grizzly-service.eu

38
NL BE
Inhoud
Inleiding ....................................38
Gebruik .....................................38
Algemene beschrijving ...............39
Omvang van de levering ................39
Overzicht ...................................... 39
Functiebeschrijving .........................40
Technische gegevens .................40
Veiligheidsaanwijzingen ............40
Symbolen in de handleiding ............ 40
Symbolen op het apparaat .............. 41
Algemene veiligheidsinstructies ........ 41
Monteringsvejledning ................. 42
In-/uitschakelen .............................42
Laadpeil controleren .......................42
Accu verwijderen/aanbrengen ........43
Gebruik van de sproeiers ................43
Nat zuigen ....................................43
Droog zuigen .................................43
Zuigfunctie ....................................44
Blazen ........................................... 44
Reiniging/onderhoud .................44
Apparaat reinigen ..........................44
Onderhoud ...................................44
Bewaring ...................................44
Wegdoen van het apparaat/
milieubescherming .....................45
Reserveonderdelen/accessoires .. 45
Opsporing van fouten ................46
Garantie ....................................47
Reparatieservice ........................48
Service-Center ............................48
Importeur ..................................48
Inleiding
Hartelij k gefeliciteerd met de aankoop van
uw nieuw apparaat. Daarmee hebt u voor
een hoogwaardig product gekozen.
Dit apparaat werd tij dens de productie op
kwaliteit gecontroleerd en aan een eindcon-
trole onderworpen. De functionaliteit van
uw apparaat is bij gevolg verzekerd. Er kan
niet uitgesloten worden dat er zich in speci-
fi eke gevallen aan of in het apparaat resp.
in slangleidingen resthoeveelheden water
bevinden. Dit duidt niet op een gebrek of
defect en is geen reden tot bezorgdheid.
De gebruiksaanwij zing vormt een bestand-
deel van dit product. Ze omvat belangrij ke
aanwij zingen voor veiligheid, gebruik en
afvalverwij dering. Maak u vóór het gebruik
van het product met alle bedienings- en
veiligheidsinstructies vertrouwd. Gebruik
het product uitsluitend zoals beschreven en
voor de aangegeven toepassingsgebieden.
Bewaar de handleiding goed en overhan-
dig alle documenten bij het doorgeven van
het product mee aan derden.
Gebruik
Het apparaat is voor het natte en droge
zuigen in huishoudelij ke kring, zoals
bij voorbeeld in het huishouden, in de
hobbykamer, in de auto of in de garage,
bestemd. Het apparaat kan ook worden
gebruikt als blaastoestel of voor het opzui-
gen van water. Dit apparaat is niet geschikt
voor commercieel gebruik. Bij commercieel
gebruik vervalt de garantie.
Het opzuigen van brandbare, explosieve
stoffen of stoffen, die gevaarlij k voor de
gezondheid zij n, is verboden.
Het apparaat maakt deel uit van de serie
Vertaling van de originele CE-
conformiteitsverklaring ............. 84
Explosietekening ....................... 88

39
NL BE
Parkside X20V TEAM en kan met accu’s
van de serie X20VTEAM worden ge-
bruikt. De accu’s mogen alleen met laders
van de serie Parkside X20VTEAM wor-
den geladen.
De producent is niet verantwoordelij k voor
schade als het apparaat niet volgens de
voorschriften wordt gebruikt of als het ver-
keerd wordt bediend.
Algemene beschrij ving
De afbeelding vindt u op de
uitvouwbare pagina vooraan en
achteraan.
Omvang van de levering
Pa het apparaat uit en controleer, of het
volledig is:
Het apparaat wordt met aangebrachte mo-
torkop (
1) geleverd. Om de motorkop
af te nemen, opent u
1) geleverd. Om de motorkop
de afsluitclips
(
8).
- Motorhuis
- Transporthandvat
- Driedelige zuigbuis
- Zuigslang
- Handgreepdeel
- Papieren fi lterzak
- Plooienfi lter
- Huishoudverdeelstuk
- Zuigmondstuk met
- Draaibaar, opspeldbaar opzetstuk met
borstel en rubberen lip voor het zuigen
van tapij ten en gladde oppervlakken
(reeds gemonteerd)
- Voegsproeier
- Muurbeugel
- 2 Kruiskopschroeven
- 4 wielen
- Gebruiksaanwijzing nat- en
droogzuiger
De accu en de lader zijn niet
meegeleverd!
Verwij der het verpakkingsmateriaal zoals
reglementair voorgeschreven.
Overzicht
1 Motorhuis
2 Draaggreep
3 Schakelaar “Aan/uit”
4 Afdekking accuschacht
5 Aansluiting zuigen
6 Vuilreservoir
7 Haak voor muurbeugel
8 2 afsluitclips
9 Aansluiting voor blazen
(niet zichtbaar)
10 Driedelige zuigbuis
11 Handgreepdeel
12 Zuigslang
13 Muurbeugel
14 Bevestigingsschroeven voor
muurbeugel
15 Voegsproeier
16 Huishoudverdeelstuk
17 Zuigmondstuk met
18 Draaibaar, opspeldbaar opzetstuk
met borstel en rubberen lip voor
het zuigen van tapij ten en gladde
oppervlakken (reeds gemonteerd)
19 Papieren fi lterzak
20 Accu
21 Lader
22 Sluiting plooienfi lter
23 Plooienfi lter
24 Toebehorenhouder
25 Wiel
26 Steeksokkel

40
NL BE
Functiebeschrij ving
Het apparaat is voorzien van een stabiel,
kunststoffen reservoir voor het opvangen
van het vuil. Bij natzuigen vindt de af-
sluiting van de zuigluchtstroom door een
vlotter plaats wanneer de vuilcontainer
vol is. Bij komend bezit het apparaat een
blaasfunctie. Dankzij de loopwielen heeft
het apparaat een grote wendbaarheid. De
bediening van de onderdelen staat hieron-
der beschreven.
Technische gegevens
Accu-nat-/droogzuiger
.............................. PNTSA 20-Li B1
Netspanning U ........................... 20 V
Beschermingsklasse ..........................IPX4
Zuigkracht ..................... 9 kPA (90 mbar)
Inhoud van de stofbak (bruto) .............10 l
Bruikbaar reservoirvolume (water) ......... 4 l
Gewicht (zonder accessoires) ...... ca.2,7 kg
Gewicht (alleen accessoires) ......ca. 1,8 kg
Accu (Li-Ion) .................. PAP 20 A3
Batterijcellen ...................................... 10
Nominale spanning ..................... 20 V
Capaciteit ...................................4,0 Ah
Energie .......................................80 Wh
Laadtijd ......................................ca. 1 h
Temperatuur .......................... max 50 °C
Laadproces .......................... 4 - 40 °C
Bedrij f................................-20 - 50 °C
Opslag ................................ 0 - 45 °C
* De vermelde laadtijd wordt alleen met de
meegeleverde snelle lader bereikt.
Laadtoestel ....................PLG 20 A3
Nominale opname ...................... 120 W
Ingangsspanning/
Input ........................ 230-240 V~, 50 Hz
Uitgangsspanning/
Output .................................... 21,5 V
Uitgangsstroom ..............................4,5 A
Beschermniveau ..............................
II
Zekering van het apparaat ........... T3.15A
Beschermingsklasse ..........................IPX0
Let op! Een actuele lijst van
de accu-compatibiliteit vindt
u op: www.lidl.de/akku
Dit apparaat kan uitsluitend met de
volgende accu‘s worden gebruikt:
PAP 20 A1, PAP 20 A2, PAP 20 A3.
Deze accu‘s kunnen met de volgende
laders worden geladen:
PLG 20 A1, PLG 20 A3, PDSLG 20 A1.
Veiligheidsaanwij zingen
Dit apparaat kan door kinderen
vanaf 8 jaar en ouder en tevens
door personen met verminderde
fysieke, zintuiglij ke of mentale ca-
paciteiten of met een gebrek aan
ervaring en kennis gebruikt worden
wanneer ze onder toezicht staan
of met het oog op het gebruik van
het apparaat geïnstrueerd werden
en zich van de daaruit resulterende
gevaren bewust zij n. Kinderen mo-
gen niet met het apparaat spelen.
Reiniging en gebruikersonderhoud
mogen niet door kinderen zonder
toezicht doorgevoerd worden.
Symbolen in de handleiding
Gevaarsymbolen met gege-
vens ter preventie van licha-
melij ke letsels en materiële
schade.

41
NL BE
Gebodsteken met gegevens ter
preventie van beschadigingen.
Aanwij zingsteken met informa-
tie voor een betere omgang
met het apparaat.
Symbolen op het apparaat
Apparaten horen niet in het
huisvuil.
Parkside X20VTEAM
C
Er bestaat brandgevaar
wanneer het opgezogen ma-
teriaal een temperatuur heeft
van meer dan 40°C (104°F)!
Laadtoestandindicator ap-
paraat
Vergrendelclip openen
en sluiten
Algemene
veiligheidsinstructies
Opgelet! Bij het gebruik van
elektrisch gereedschap dienen
ter bescherming tegen een
elektrische schok en tegen
gevaar voor verwondingen en
brand volgende essentiële vei-
ligheidsmaatregelen getroffen
te worden:
Zo vermij dt u ongevallen en ver-
wondingen:
• Laat een bedrij fsklaar apparaat
nooit zonder toezicht op uw ar-
beidsplaats achter.
• Het apparaat is niet bestemd
voor gebruik op mensen en die-
ren.
• Richt de zuigslang en mond-
stukken zeker niet op u zelf of
andere personen, vooral niet op
ogen en oren als u ze gebruikt.
Er bestaat gevaar voor verwon-
dingen.
• Zuig geen hete, gloeiende,
brandbare, explosieve stoffen
op of stoffen, die gevaarlij k voor
de gezondheid zij n. Daartoe
behoren onder andere hete as,
benzine, oplosmiddelen, zuren
of logen. Er bestaat verwonding-
gevaar.
• Mondstukken en zuigbuis mogen
tij dens gebruik wegens blessure-
risico niet op ooghoogte komen.
Zo vermij dt u ongevallen en ver-
wondingen door een elektrische
schok:
• Schakel het apparaat uit en ver-
wijder de batterij:
- u het apparaat niet gebruikt,
wanneer u het apparaat laat
vervoeren of wanneer u het
zonder toezicht achterlaat;
- u het apparaat controleert, het
reinigt of wanneer u blokkerin-
gen verwij dert;

42
NL BE
- u reinigings- of onderhouds-
werkzaamheden doorvoert of
toebehoren uitwisselt;
- na aanraking met vreemde
voorwerpen of in geval van
abnormale trillingen.
Zo vermij dt u schade aan het appa-
raat en eventueel daaruit voortvloei-
ende lichamelij ke letsels:
• Let erop dat het apparaat correct
in elkaar is gezet en de fi lters in
de juiste positie zij n.
• Werk niet zonder fi lter. Het ap-
paraat kan daardoor worden
beschadigd.
• Gebruik geen toebehoren dat
niet door PARKSIDE is aanbevo-
len. Dat kan namelij k leiden tot
elektrische schok of brand.
• Laat reparaties uitsluitend door
servicestations uitvoeren die
door ons geautoriseerd zij n.
• Volg de aanwij zingen voor
reiniging en onderhoud van het
apparaat op.
• Bewaar het apparaat op een
droge plaats en buiten het bereik
van kinderen.
Neem de veiligheids-, laad- en
gebruikinstructies in acht die
vermeld staan in de gebru-
iksaanwijzing van uw accu
en van de lader van de serie
Parkside X20VTEAM. Een
gedetailleerde beschrijving
van het laadproces en andere
informatie vindt u in de aparte
gebruiksaanwijzing ervan.
Let op! Neem de veiligheids-
instructies in acht die vermeld
staan in de gebruiksaanwij-
zing van uw accu van de serie
Parkside X 20 V Team.
Monteringsvejledning
1. Druk op de vier wielen (
25) in de
steeksokkels (
26), aan de onder-
kant van de vuilcontainer (6), tot ze
vergrendelen.
2. Plaats de papieren fi lterzak (19) erin
(zie
Droogzuigen - papieren fi l-
terzak plaatsen):
3. SZet de motorkop (1) op de stofbak (6)
en sluit
met de sluitclips (8).
4. Sluit de zuigslang (12) en de toebeho-
ren aan.
Bediening
Wikkel de zuigslang ( 12) volle-
dig af om te werken.
In-/uitschakelen
Inschakelen zuiger:
Schakelaar “Aan/uit” (
3) in stand „I“
Uitschakelen zuiger:
Schakelaar “Aan/uit” (
3) in stand „O“
Laadpeil controleren
De laadtoestandindicator op het
apparaat signaleert de laad-
toestand van de accu, terwijl het
apparaat werkt.
Led brandt groen: Accu geladen
Led brandt geel: Accu gedeeltelijk geladen
Led brandt rood: laadtoestand laag
Led knippert rood: Accu moet worden
geladen

43
NL BE
Accu verwij deren/aanbrengen
1. Om de accu uit het apparaat te
verwij deren, drukt u de ontgren-
deltoets (1) aan de accu (4) in en
trekt u de accu eruit.
2. Om de accu (4) aan te brengen,
schuift u de accu langs de gelei-
derail in het apparaat. De accu
klikt hoorbaar vast.
Breng de accu pas aan
wanneer het apparaat volle-
dig gemonteerd is. Er bestaat
gevaar voor verwondingen!
Gebruik van de sproeiers
Voegsproeier (
15):
voor het zuigen van voegen, hoeken en
radiatoren.
Huishoudverdeelstuk (
16)
voor het nat- en droogzuigen, voor het ver-
wijderen van hardnekkig vuil.
Zuigmondstuk (
17) met opspeld-
baar opzetstuk (
18):
voor het nat en droog zuigen van gladde
oppervlakken en tapij ten.
Zuigmondstuk (
17) zonder op-
speldbaar opzetstuk (
18):
voor net nat en droog zuigen van tapij ten,
voor het verwij deren van hardnekkig vuil.
• Druk de verbindingsstukken rechts en
links aan het zuigmondstuk (17) in en
verwij der het opspeldbare opzetstuk
(18).
Gevoelige oppervlakken kunnen bij
het werk zonder opspeldbaar op-
zetstuk bekrast worden.
Nat zuigen
1. Verwijder het papieren fi lter ( 19) en
het plooienfi lter (
23).
2. Afzuigen (afpompen): Dompel de zuigs-
lang (
12) an de handgreep ( 11)
in het waterreservoir en zuig het water
af.
3. Maak het vuilreservoir meteen na het
zuigen leeg, omdat dit niet geconstru-
eerd is om vloeistoffen in te bewaren
(zie “Reiniging/onderhoud”).
Ga niet in het af te zuigen
water staan. Gevaar door
elektrische schok.
Als het vuilreservoir vol is, sluit een
drij ver de zuigopening, het zuigpro-
cédé wordt onderbroken.
Schakel het apparaat uit, trek de
stekker uit het stopcontact en maak
het vuilreservoir leeg (zie “Reini-
ging/onderhoud”).
Het apparaat onmiddellij k uitscha-
kelen als er schuim of vloeistof naar
buiten komt.
Droog zuigen
Zuigen met de papieren fi lterzak:
Papieren fi lterzak plaatsen
Vouw de papieren fi lterzak (19) met de
versterking naar boven over de interne
zuigmond (zie pijl
). De afdichtring
aan de fi lterzakopening moet het ver-
steviging aan de luchtaanvoeropening
volledig omsluiten.

44
NL BE
Opzuigen van fij nstof:
Bij bepaalde werkzaamheden (bij v. bij het
schuren van verven en lakken, frezen, boren
in wanden, schuren of boren van hardhout)
kan stof vrij komen dat schadelij k is voor de
gezondheid.
Zuigfunctie
Steek voor de zuigfunctie de zuigslang (12)
in de aansluiting (5) op de motorkop.
Blazen
Voor de blaasfunctie is een gebruik
zonder fi lter aan te raden.
Om te blazen, speldt u de zuigslang (12) op
de aansluiting (9) aan de motorkop.
Reiniging/onderhoud
Apparaat reinigen
Spuit het apparaat niet met
water af en maak geen ge-
bruik van bij tende reinigings-
c.q. oplosmiddelen. Het appa-
raat zou beschadigd kunnen
worden.
• Na het gebruik de vuilreservoir (
6)
leeg maken.
• De vuilreservoir met een vochtige doek
reinigen.
• Vervang volle papieren fi lterzak (
19) (zie hoofdstuk “Reserveonderdelen/
accessoires” bestelling).
• Klop het als optie verkrij gbare vouwfi l-
ter uit en reinig het met een penseel of
handveger.
Onderhoud
• Het apparaat is vrij van onderhoud.
Bewaring
- Steek de gedemonteerde zuigbuizen
(
10) in de voor accessoires dienen-
de opneming van de poten (
24).
van het apparaat.
- Wikkel de zuigslang (12) om het appa-
raat en steek het handgreepstuk (11) in
een zuigbuis (10).
- Bewaar het apparaat op een droge
plaats en buiten het bereik van kinde-
ren.
- U kunt het apparaat aan de haak voor
de muurbeugel (
7) aan de muurbeu-
gel (
13) ophangen.
Hang het apparaat niet met
een zware vulling (bv. met
opgezogen water) aan de mu-
urbeugel.
- Breng daartoe de muurbeugel (
13)
met de twee schroeven (
14) en met
behulp van pluggen op de wand aan.
Controleer zowel na de montage als
daarna op regelmatige tijdstippen of de
muurbeugel (
13) goed vastzit.

45
NL BE
Let er bij het boren op geen
voorzieningsleidingen te
beschadigden. Gebruik ge-
schikte detectoren om ze op
te sporen of haal er een ins-
tallatieplan als hulp bij. Con-
tact met elektrische leidingen
kan leiden tot een elektrische
schok en brand, contact met
een gasleiding kan leiden tot
een ontploffi ng. Beschadiging
van een waterleiding kan lei-
den tot materiële schade en
een elektrische schok.
Wegdoen van
het apparaat/
milieubescherming
Breng het apparaat, de toebehoren en de
verpakking naar een geschikt recyclage-
punt.
Apparaten horen niet in het huisvuil.
Geeft u het apparaat bij een recycling-
plaats af. De gebruikte kunststof- en me-
talen onderdelen worden op materiaal
gesorteerd en kunnen worden hergebruikt.
Voor vragen hieromtrent kunt u terecht bij
ons servicecenter.
De afvalverwij dering van uw defecte inge-
zonden apparaten voeren wij gratis door.
Reserveonderdelen/accessoires
Reserveonderdelen en accessoires verkrij gt u op
www.grizzly-service.eu
Ondervindt u problemen bij het orderproces, gebruik dan het contactformulier.
Bij andere vragen neemt u contact op met het “Service-Center” (zie pag. 48).
Pos. Pos. Benaming Inzetstuk Artikel-Nr.
Gebruiks- Explosie-
aanwijzing tekening
12 8 Zuigslang 91105189
23 2 Vouwfi lter 91105185
22 3 Sluiting plooienfi lter 91105186
10 9 Driedelige zuigbuis 91099439
Papieren fi lterzak, pak van 5 stuks 30250146
19 14 Papieren fi lterzak, 1 stuk 30250147

46
NL BE
Opsporing van fouten
Probleem Mogelij ke oorzaak Oplossing van de fout
Apparaat start
niet
Schakelaar “Aan/uit” (
3)
defect
Herstelling door klantenservice-
afdeling
Koolborstels versleten
Motor defect
Gering of ontbre-
kend aanzuigver-
mogen
Slangsysteem (
12) of straal-
buizen (
15/16/17) verstopt
Verstoppingen en blokkeringen
verhelpen
Zuigbuis (
10) niet correct
ineengezet
Zuigbuis correct ineenzetten
Vuilreservoir (
6) open
Reservoir sluiten
Vuilreservoir (
6) vol
Reservoir ledigen
Filter (
19/23) vol of dichtge-
smeerd
Filter ledigen, reinigen of ver-
vangen
Stof of vuil wordt
uit het apparaat
geblazen
Filter (
19/23) niet of niet
correct gemonteerd
Ontbrekend fi lter plaatsen of
correcte plaatsing van het fi lter
controleren

47
NL BE
Garantie
Geachte cliënte, geachte klant,
U krij gt op dit apparaat 3 jaar garantie, te
rekenen vanaf de datum van aankoop.
Ingeval van gebreken aan dit product heeft
u tegenover de verkoper van het product
wettelij ke rechten. Deze wettelij ke rechten
worden door onze hierna beschreven ga-
rantie niet beperkt.
Garantievoorwaarden
De garantietermij n begint met de datum
van aankoop. Gelieve de originele kassa-
bon goed te bewaren. Dit document wordt
als bewij s van de aankoop benodigd.
Indien er zich binnen drie jaar, te rekenen
vanaf de datum van aankoop van dit pro-
duct, een materiaal- of fabricagefout voor-
doet, wordt het product door ons – naar
onze keuze – voor u gratis gerepareerd of
vervangen. Deze garantievergoeding stelt
voorop dat binnen de termij n van drie jaar
het defecte apparaat en het bewij s van
aankoop (kassabon) voorgelegd en dat
schriftelij k kort beschreven wordt, waarin
het gebrek bestaat en wanneer het zich
voorgedaan heeft.
Als het defect door onze garantie gedekt
is, krij gt u het gerepareerde of een nieuw
product terug. Met herstelling of uitwisse-
ling van het product begint er geen nieuwe
garantieperiode.
Garantieperiode en wettelij ke
kwaliteitsgarantie
De garantieperiode wordt door de garan-
tievergoeding niet verlengd. Dit geldt ook
voor vervangen en gerepareerde onderde-
len. Eventueel al bij de aankoop bestaan-
de beschadigingen en gebreken moeten
onmiddellij k na het uitpakken gemeld
worden. Na het verstrij ken van de garan-
tieperiode tot stand komende reparaties
worden tegen verplichte betaling van de
kosten uitgevoerd.
Omvang van de garantie
Het apparaat werd volgens strikte kwali-
teitsrichtlij nen zorgvuldig geproduceerd en
vóór afl evering nauwgezet getest.
De garantievergoeding geldt voor materi-
aal- of fabricagefouten. Deze garantie is
niet van toepassing op productonderdelen,
die aan een normale slij tage blootgesteld
zij n en daarom als aan slij tage onderhevi-
ge onderdelen beschouwd kunnen worden
(b.v. fi lters of deksels) of op beschadigin-
gen aan breekbare onderdelen (b.v. scha-
kelaars).
Deze garantie valt weg wanneer het pro-
duct beschadigd, niet oordeelkundig ge-
bruikt of niet onderhouden werd. Voor een
vakkundig gebruik van het product dienen
alle in de gebruiksaanwij zing vermelde
aanwij zingen nauwgezet in acht genomen
te worden. Gebruiksdoeleinden en hande-
lingen, die in de gebruiksaanwij zing afge-
raden worden of waarvoor gewaarschuwd
wordt, dienen onvoorwaardelij k vermeden
te worden.
Het product is uitsluitend voor het privé- en
niet voor het commerciële gebruik be-
stemd. Bij een verkeerde of onoordeelkun-
dige behandeling, toepassing van geweld
en bij ingrepen, die niet door het door ons
geautoriseerde servicefi liaal doorgevoerd
werden, valt de garantie weg.
Afhandeling ingeval van garantie
Gelieve aan de volgende aanwij zingen
gevolg te geven om een snelle behande-
ling van uw verzoek te garanderen:
• Gelieve voor alle aanvragen de
kassabon en het identifi catienummer

48
NL BE
(IAN317189_1904) als bewij s van
de aankoop klaar te houden.
• Gelieve het artikelnummer uit het type-
plaatje, een gravering, op de voorpa-
gina van uw handleiding (onderaan
links) of als sticker aan de achter- of
onderzij de af te leiden.
• Indien er zich functiefouten of andere
gebreken voordien, contacteert u in eer-
ste instantie de hierna vernoemde ser-
viceafdeling telefonisch of per e-mail.
U krij gt dan bij komende informatie over
de afhandeling van uw klacht.
• Een als defect geregistreerd product
kunt u, na overleg met onze klanten-
service, mits toevoeging van het bewij s
van aankoop (kassabon) en de vermel-
ding, waarin het gebrek bestaat en
wanneer het zich voorgedaan heeft,
voor u franco naar het u medegedeel-
de serviceadres zenden. Om proble-
men bij de acceptatie en extra kosten
te vermij den, maakt u onvoorwaarde-
lij k uitsluitend gebruik van het adres,
dat u medegedeeld wordt. Zorg ervoor
dat de verzending niet ongefrankeerd,
als volumegoed, per expresse of via
een andere speciale verzendingswij ze
plaatsvindt. Gelieve het apparaat met
inbegrip van alle bij de aankoop bij -
geleverde accessoires in te zenden en
voor een voldoende veilige transport-
verpakking te zorgen.
Reparatieservice
U kunt reparaties, die niet onder de ga-
rantie vallen, tegen berekening door ons
servicefi liaal laten doorvoeren. Zij maakt
graag voor u een kostenraming op.
Wij kunnen uitsluitend apparaten behande-
len, die voldoende verpakt en gefrankeerd
ingezonden werden.
Opgelet: Gelieve uw apparaat gereinigd
en met een aanwij zing op het defect naar
ons servicefi liaal te zenden.
Ongefrankeerd – als volumegoed, per
expresse of via een andere speciale ver-
zendingswij ze – ingezonden apparaten
worden niet geaccepteerd.
De afvalverwerking van uw defecte inge-
zonden apparaten voeren wij gratis door.
Service-Center
NL
Service Nederland
Tel.: 0900 0400223
(0,10 EUR/Min.)
E-Mail: [email protected]
IAN 317189_1904
BE
Service Belgique/
Service België
Tel.: 070 270 171
(0,15 EUR/Min.)
E-Mail: [email protected]
IAN 317189_1904
Importeur
Gelieve in acht te nemen dat het volgende
adres geen serviceadres is. Contacteer in
eerste instantie het hoger vermelde service-
center.
Grizzly Tools GmbH & Co. KG
Stockstädter Straße 20
DE-63762 Großostheim
Duitsland
www.grizzly-service.eu

49
PL
Wstęp
Gratulujemy zakupu nowego urządzenia.
Zdecydowali się Państwo na zakup warto-
ściowego produktu. Niniejsze urządzenie
sprawdzono w trakcie produkcji pod kątem
jakości, a także dokonano jego kontroli
ostatecznej. W ten sposób zapewniona
jest jego sprawność. Nie da się wykluczyć
tego, że w pojedynczych przypadkach w
urządzeniu lub przy nim wzgl. w wężach
mogą się znaleźć pozostałości wody. Nie
jest to brakiem ani uszkodzeniem, czy po-
wodem do troski o urządzenie.
Instrukcja obsługi jest częścią składową
produktu. Zawiera ona ważne wskazówki
dotyczące bezpieczeństwa, eksploatacji
i utylizacji. Przed rozpoczęciem użytko-
wania produktu należy się zapoznać ze
wszystkimi wskazówkami dotyczącymi
obsługi i bezpieczeństwa. Produkt należy
użytkować tylko zgodnie z opisem i po-
danym przeznaczeniem. Instrukcję należy
przechowywać starannie, a w przypadku
przekazania produktu osobom trzecim
należy dostarczyć nabywcy kompletną
dokumentację.
Przeznaczenie
Urządzenie jest przeznaczone do odku-
rzania do pracy na sucho i mokro np. w
pomieszczeniach gospodarstwa domowego,
warsztatach do majsterkowania, w samo-
chodach lub garażach. Urządzenie można
stosować jako dmuchawę lub do odsysania
wody.
To urządzenie nie jest przeznaczone do
zastosowania komercyjnego. W przypadku
użytkowania komercyjnego wygasają pra-
wa z tytułu gwarancji.
Spis tresci
Wstęp ........................................ 49
Przeznaczenie ............................ 49
Opis ogólny ...............................50
Zawartość opakowania ................... 50
Przegląd ........................................ 50
Opis działania ............................... 51
Dane techniczne ......................... 51
Zasady bezpieczeństwa ............. 51
Symbole zawarte w instrukcji ........... 52
Símbolos en el aparato ................... 52
Ogólne zasady bezpieczeństwa ...... 52
Składanie ..................................53
Uruchamianie ............................53
Włączanie i wyłączanie ................. 53
Sprawdzić stan naładowania
akumulatora ................................... 54
Wyjmowanie i wkładanie
akumulatora ................................... 54
Zastosowanie końcówek .................. 54
Odkurzanie mokrych powierzchni .....54
Odkurzanie na sucho ...................... 55
Funkcja odkurzacza ........................ 55
Wydmuchiwanie ............................ 55
Czyszczenie/Konserwacja .......... 55
Czyszczenie urządzenia ................. 55
Konserwacja .................................. 55
Przechowywanie .......................55
Utylizacja, ochrona środowiska .56
Poszukiwanie błędów ................57
Gwarancja .................................57
Serwis naprawczy .....................59
Service-Center ............................59
Importer .................................... 59
Części zamienne/Akcesoria ........ 59
Tłumaczenie oryginalnej
deklaracji zgodności WE ..............85
Rysunek samorozwijający ..........88

50
PL
Wciąganie odkurzaczem substancji pal-
nych, wybuchowych lub szkodliwych dla
zdrowia jest niedozwolone.
Urządzenie należy do serii Parkside
X20VTEAM i może być zasilane za
pomocą akumulatorów z serii Parkside
X20VTEAM. Akumulatory można łado-
wać tylko za pomocą ładowarek z serii
Parkside X20VTEAM.
Producent nie odpowiada za szkody wy-
wołane niezgodnym z przeznaczeniem
stosowaniem lub nieprawidłową obsługą
urządzenia.
Opis ogólny
Ilustracje znajdują się na
okładce przedniej i tylnej.
Zawartość opakowania
Rozpakuj urządzenie i sprawdź, czy jest
ono kompletne. Urządzenie jest dostarcza-
ne z założoną głowicą silnikową (
1).
Aby zdjąć głowicę silnikową otwórz
1).
zatrzask (
8).
- Obudowa silnika
- Zbiornik na zabrudzenia
- Trzyczęściowa rura ssąca
- wąż ssawny
- część rękojeści
- Worek z fi ltrem papierowych od
odkurzania drobnego pyłu
- Filtr harmonijkowy
- ssawka mała
- Końcówka do podłogi z
- obracaną nasadką,
ze szczotką i listwą gumową do odku-
rzania dywanów i gładkich powierzch-
ni (już montowane)
- Końcówka do odkurzania fug
- uchwyt ścienny
- 2 Śruby z gniazdem krzyżowym
- 4 kółka
- instrukcja obsługi odkurzacza do pracy
na mokro i sucho
Akumulator i ładowarka nie są
zawarte w zestawie!
Prawidłowo posegreguj i usuń materiały
opakowania.
Przegląd
1 Obudowa silnika
2 Uchwyt do przenoszenia
3 Włącznik/ wyłącznik
4 Osłona gniazda akumulatora
5 Króciec ssący
6 Zbiornik na zabrudzenia
7 Hak do uchwytu ściennego
8 2 zatrzask
9 Przyłącze wydmuchu
(niewidoczne)
10 Trzyczęściowa rura ssąca
11 Część rękojeści
12 Wąż ssawny
13 Uchwyt ścienny
14 Śruby do mocowania uchwytu
ściennego
15 Końcówka do odkurzania fug
16 Ssawka mała
17 Końcówka do podłogi z
18 obracaną nasadką,
ze szczotką i listwą gumową do
odkurzania dywanów i gładkich
powierzchni (już montowane)
19 Papierowy worek fi ltracyjny
20 Akumulator
21 Ładowarka
22 Zamknięcie fi ltra harmonijkowego
23 Filtr harmonijkowy
24 Miejsce na akcesoria

51
PL
25 Kółko
26 Wtykane mocowanie
Opis działania
Urządzenie jest wyposażone w stabilny
plastikowy pojemnik zbierający brud. W
przypadku odkurzania na mokro strumień
zasysania zostaje odłączony za pomocą
pływaka w momencie, gdy pojemnik na
brud będzie napełniony. Poza tym urzą-
dzenie jest wyposażone w funkcję nadmu-
chową. Kółka zapewniają dużą zwrotność
urządzenia. Funkcje elementów urządzenia
są podane w poniższym opisie.
Dane techniczne
Akumulatorowy odkurzacz na
mokro i sucho ........ PNTSA 20-Li B1
Napięcie sieciowe U ................... 20 V
Typ zabezpieczenia ..........................IPX4
Siła ssania ..................... 9 kPA (90 mbar)
Pojemność zbiornika na brud (brutto) ... 10 l
Użyteczna pojemność zbiornika (woda) ...4 l
Waga (bez akcesoriów) ............ok. 2,7 kg
Waga (tylko akcesoria) .............ok. 1,8 kg
Akumulator (Li-Ion) ............. PAP 20 A3
Liczba ogniw akumulatora ..................10
Napięcie znamionowe ................ 20 V
Pojemność ................................... 4,0 Ah
Energia .......................................80 Wh
Czas ładowania ..........................ok. 1 h
Temperatura .........................maks 50 °C
Ładowanie ........................... 4 - 40 °C
Praca .................................-20 - 50 °C
Przechowywanie ................... 0 - 45 °C
* Podany czas ładowania obowiązuje je-
dynie dla dołączonej do zestawu ładowarki
do szybkiego ładowania.
Ładowarka .......................PLG 20 A3
Znamionowy pobór prądu ........... 120 W
Napięcie wejściowe/
Input ........................ 230-240 V~, 50 Hz
Napięcie wyjściowe/
Output .................................... 21,5 V
Prąd wyjściowy ..............................4,5 A
Klasa zabezpieczenia .....................
II
Zabezpieczenie urządzenia ......... T3.15A
Typ zabezpieczenia .........................IPX0
Uwaga! Aktualna lista kom-
patybilnych akumulatorów
znajduje się na stronie:
www.lidl.de/akku
To urządzenie może być zasilane
wyłącznie następującymi akumulatorami:
PAP 20 A1, PAP 20 A2, PAP 20 A3.
Te akumulatory mogą być ładowane za
pomocą następujących ładowarek:
PLG 20 A1, PLG 20 A3, PDSLG 20 A1.
Zasady bezpieczeństwa
Urządzenie to mogą obsługiwać
dzieci od 8 roku życia, a także oso-
by o zmniejszonych zdolnościach fi -
zycznych, zmysłowych czy umysło-
wych, czy też osoby dysponujące
niedostatecznym doświadczeniem
oraz wiedzą, pod warunkiem, że
praca odbywa się pod nadzorem
albo po instruktażu w zakresie
bezpiecznej eksploatacji urządze-
nia i ze zrozumieniem istniejących
zagrożeń. Dzieciom nie wolno
bawić się urządzeniem. Dzieciom
nie wolno bez nadzoru wykonywać
czyszczenia i konserwacji.

52
PL
Symbole zawarte w
instrukcji
Znaki niebezpieczeństwa z
informacjami dot. zapobiega-
nia wypadkom.
Znaki nakazowe z informacja-
mi dot. zapobiegania wypad-
kom.
Wskazówki zawierające in-
formacje dot. lepszego użytko-
wania urządzenia.
Símbolos en el aparato
Parkside X20VTEAM
Maszyn nie należy wyrzucać
razem z odpadami domowy-
mi.
C
Istnieje ryzyko pożaru, jeśli
temperatura zasysanego
materiału przekracza 40 °C
(104 °F)!
Wskaźnik stanu naładowa-
nia na urządzeniu
Otworzyć i zamknąć zat-
rzask zamykający
Ogólne zasady
bezpieczeństwa
Uwaga! Przy korzystaniu z
narzędzi elektrycznych należy
przestrzegać podanych poni-
żej podstawowych środków
bezpieczeństwa, zabezpie-
czających przed porażeniem
prądem elektrycznym, zranie-
niem i pożarem:
W ten sposób unikniesz wypadków
i zranień:
• Nigdy nie zostawiaj gotowego
do pracy urządzenia bez opieki
w miejscu pracy.
• Urządzeniem nie wolno odku-
rzać ludzi ani zwierząt.
• Przewodu ssącego ani dysz nie
kierować podczas pracy na sie-
bie ani na inne osoby, a w szcze-
gólności nie w kierunku oczu ani
uszu. Istnieje niebezpieczeństwo
zranienia.
• Nie wciągaj gorących, żarzą-
cych się, wybuchowych ani szko-
dliwych dla zdrowia substancji.
Do takich substancji zaliczają
się np. gorący popiół, benzyna,
rozpuszczalniki, kwasy i zasady
(ługi).
Niebezpieczeństwo zranienia.
• Podczas pracy dysza i rura ssąca
nie mogą się znaleźć na wyso-
kości głowy. Niebezpieczeństwo
zranienia.
W ten sposób unikniesz wypadków
i zranień wskutek porażenia prą-
dem:
• Wyłącz urządzenie i wyjmij
baterię:
- Gdy nie używasz urządzenia,
transportujesz je, pozostawiasz
je bez opieki,

53
PL
- kontrolujesz lub usuwasz
blokady,
- wykonujesz prace konserwa-
cyjne, oczyszczasz urządzenie
lub wymieniasz akcesoria bądź
jeżeli przewód sieciowy jest
uszkodzony
- a także po zetknięciu się urzą-
dzenia z ciałami obcymi lub
w razie stwierdzenia anormal-
nych wibracji
W ten sposób unikniesz uszkodzeń
urządzenia i wynikających stąd
szkód osobowych:
• Uważaj, by urządzenie było
prawidłowo zmontowane; fi ltry
muszą się znajdować w prawi-
dłowej pozycji.
• Nie pracuj urządzeniem bez
założonych fi ltrów. Mogłoby to
spowodować uszkodzenie urzą-
dzenia.
• Nie używaj akcesoriów, które
nie są zalecane przez PARKSIDE.
Może to spowodować porażenie
elektryczne lub pożar.
• Zlecaj naprawy wyłącznie auto-
ryzowanym przez naszą fi rmę
warsztatom serwisowym.
• Przestrzegaj wskazówek dotyczą-
cych oczyszczania oraz konser-
wacji urządzenia.
• Przechowuj urządzenie w su-
chym, zam-kniętym i niedostęp-
nym dla dzieci miejscu.
Przestrzegaj wskazówek
bezpieczeństwa dotyczących
ładowania i prawidłowego
użytkowania, opisanych w
instrukcji obsługi akumulato-
ra i ładowarki serii Parkside
X20VTeam. Szczegółowy
opis procesu ładowania i
dalsze informacje można zna-
leźć w tej oddzielnej instrukcji
obsługi.
Uwaga! Przestrzegaj ws-
kazówek bezpieczeństwa
podanych w instrukcji obsługi
akumulatora serii Parkside X
20 V Team.
Składanie
1. Wcisnąć cztery kółka (
25) we wty-
kane mocowania (
26), znajdujące
się na dole pojemnika na brud (6), tak
by odpowiednio wskoczyły na swoje
miejsce.
2. Włóż papierowy worek fi ltracyjny (19)
(patrz
odkurzanie na sucho - um-
ieszczanie papierowego worka fi ltru-
jącego w urządzeniu):
3. Załóż głowicę silnika (1) na zbiornik
na zanieczyszczenia (6) i zamknij
ją za pomocą zatrzasków (8).
4. Podłącz wąż ssawny (12) i akcesoria.
Uruchamianie
Przed rozpoczęciem pracy odwi-
nąć całkowicie wąż próżniowy
(
12).
Włączanie i wyłączanie
Włączenie odkurzacza:
Włącznik/wyłącznik (
3) w pozycję „I“.
Wyłączenie odkurzacza:
Włącznik/wyłącznik (
3) w pozycję
„O“.

54
PL
Sprawdzić stan naładowania
akumulatora
Wskaźnik stanu naładowania na
urządzeniu sygnalizuje podczas
pracy urządzenia stan nałado-
wania akumulatora.
Dioda LED świeci w kolorze zielonym:
akumulator jest naładowany
Dioda LED świeci w kolorze żółtym:
akumulator jest częściowo naładowany
Dioda LED świeci w kolorze czerwonym:
Niski poziom naładowania
Dioda LED miga w kolorze czerwonym:
Akumulator wymaga ładowania
Wyjmowanie i wkładanie
akumulatora
1. W celu wyjęcia akumulatora z urząd-
zenia wcisnąć przycisk zwalniający
(1) na akumulatorze (4) i wyciągnąć
akumulator.
2. Aby włożyć akumulator (4) do urząd-
zenia, wsuń akumulator do urządzenia
po prowadnicy. Musi się on słyszalnie
zablokować.
Akumulator włożyć dopiero
po całkowitym zmontowaniu
urządzenia. Niebezpieczeńst-
wo urazu!
Zastosowanie końcówek
Końcówka do odkurzania fug (
15): do odkurzania fug, narożników i grzej-
ników.
Ssawka mała (
16)
do odkurzania na mokro i sucho, do usu-
wania uporczywych zabrudzeń.
Końcówka do podłogi (
17) z na-
sadką (
18):
do odkurzania na mokro i na sucho po-
wierzchni gładkich i wykładzin dywanowych.
Końcówka do podłogi (
17) bez
nasadki (
18):
do odkurzania na mokro i na sucho wykła-
dzin dywanowych, do usuwania uporczywe-
go brudu.
• Nacisnąć języczki końcówki do podłogi
(17) po prawej i lewej stronie i zdjąć na-
sadkę (18).
Podczas pracy bez nasadki można
zarysować delikatne powierzchnie.
Odkurzanie mokrych
powierzchni
1. Usuń fi ltr papierowy ( 19) i fi ltr har-
monijkowy (
23).
2. Wypompowywanie: Chwytając za uch-
wyt (
11) zanurzyć wąż próżniowy (
12) w zbiorniku z wodą i wypompo-
wać wodę.
3. Zbiornik zanieczyszczeń opróżniać
natychmiast po odkurzaniu, ponieważ
nie jest on skonstruowany do prze-
chowywania płynów (patrz „Czyszcze-
nie/Konserwacja“).
Nie wchodzić do wypompo-
wywanej wody. Niebezpie-
czeństwo porażenia prądem
elektrycznym.
Gdy zbiornik na brud jest pełen,
pływak zamyka otwór ssący, co po-
woduje przerwanie odkurzania. Wy-
łącz urządzenie i opróżnij pojemnik
na brud.

55
PL
Natychmiast wyłącz urządzenie,
jeżeli zacznie z niego wypływać
piana lub ciecz.
Odkurzanie na sucho
Odkurzanie z workiem papie-
rowym:
Umieszczanie papierowego worka
fi ltracyjnego w urządzeniu
Załóż papierowy worek fi ltracyjny (19)
ze wzmocnieniem skierowanym do
góry na znajdujący się wewnątrz kró-
ciec ssawny (patrz strzałka
). Pier-
ścień uszczelniający otworu worka fi ltra
papierowego musi dokładnie zamykać
mostek na króćcu ssącym.
Odkurzanie drobnych pyłów:
Podczas niektórych procesów odsysania
(np. szlifowanie farb i lakierów, frezowa-
nie lub wiercenie w murach, szlifowanie
lub wiercenie w twardym drewnie) mogą
powstawać pyły szkodliwe dla zdrowia.
Funkcja odkurzacza
Aby odkurzyć, załóż wąż ssawny (12)
na złącze (5) znajdujące się na głowicy
silnika.
Wydmuchiwanie
Funkcję przedmuchiwania zaleca
się bez zastosowania fi ltra.
Do dmuchania podłączyć wąż (12) do
króćca (9) głowicy silnika.
Czyszczenie/Konserwacja
Czyszczenie urządzenia
Nie spryskuj urządzenia wodą i nie
używaj ostrych środków czyszczą-
cych ani rozpuszczalników. Może to
spowodować uszkodzenie urządze-
nia.
• Po zakończeniu odkurzania opróżnij
zbiornik na brud (
6).
• Oczyść zbiornik na brud wilgotną szmat-
ką.
• Pełny worek papierowy (
19) należy
wymieniać na nowy (zamawianie wor-
ków zobacz rozdział „Części zamienne/
Akcesoria “).
• Wytrzepać dostępny opcjonalnie fi ltr
harmonijkowy i oczyścić go pędzlem lub
zmiotką.
Konserwacja
• Urządzenie nie wymaga konserwacji.
Przechowywanie
- Włożyć rozłożone rury ssące (
10)
w uchwyt do przechowywania wypo-
sażenia znajdujący się we wnęce nóg
urządzenia (
24).
- Nawinąć wąż ssawny (
12) wokół
urządzenia i włożyć część rękojeści
(
11) do rury ssawnej ( 10).
- Zlecaj naprawy wyłącznie autoryzo-
wanym przez naszą fi rmę warsztatom
serwisowym.
- Możesz zawiesić urządzenie na haku
(
7) uchwytu ściennego ( 13)

56
PL
Nie zawieszaj na uchwy-
cie ściennym urządzenia z
ciężkim wypełnieniem
(np. z odessaną wodą).
- W tym celu zamocuj uchwyt ścienny
do ściany (
13) za pomocą dwóch
śrub (
14) i kołków. Sprawdź prawi-
dłowe zamocowanie uchwytu ścienne-
go (
13) bezpośrednio po zamonto-
waniu i potem kontroluj je regularnie.
W trakcie wiercenia uważaj,
aby nie uszkodzić przewo-
dów zasilających. Użyj odpo-
wiednich detektorów, aby je
zlokalizować lub posłużyć się
planem instalacji. Kontakt z
przewodami elektrycznymi
grozi porażeniem prądem
elektrycznym i pożarem,
kontakt z przewodem gazu
może spowodować wybuch.
Uszkodzenie przewodu wody
może spowodować szkody
materialne i porażenie prą-
dem elektrycznym.
Utylizacja, ochrona
środowiska
Przekaż urządzenie, jego akcesoria i opa-
kowanie do zgodnej z przepisami o ochro-
nie środowiska naturalnego utylizacji.
Maszyn nie należy wyrzucać razem
z odpadami domowymi.
Oddaj urządzenie w punkcie recyklin-
gowym. Użyte w produkcji urządzenia
elementy z tworzyw sztucznych i metalu
można od siebie oddzielić i poddać od-
dzielnej utylizacji. Zwróć się po poradę do
naszego Centrum Serwisowego.
Utylizację przesłanych nam uszkodzonych
urządzeń przeprowadzamy bezpłatnie.

57
PL
Poszukiwanie błędów
Problem Możliwa przyczyna Sposób usunięcia
Urządzenie nie
uruchamia się
Uszkodzony włącznik-wyłącz-
nik (
3)
Naprawa w punkcie
serwisowymZużyte szczotki węglowe
Uszkodzony silnik
Słabe ssanie lub
brak ssania
Zatkany układ węży
(
12) lub końcówki
(
15/16/17)
Usuń zatory i blokady
Nieprawidłowo złożone rury
ssące (
10)
Prawidłowo złóż rury ssące
Otwarty pojemnik na brud
(
6)
Zamknij pojemnik na brud
Pełny pojemnik na brud
Opróżnij, oczyść lub wymień
Pełny lub zatkany fi ltr (
19/23)
Opróżnij, oczyść lub wymień fi ltr
Pył lub brud
zostanie wydmu-
chany z urzą-
dzenia
Filtr (
19/23) nie jest zamon-
towany lub nie jest zamontowa-
ny prawidłowo.
Włożyć brakujący fi ltr lub
sprawdzić prawidłowe
osadzenie fi ltra
Gwarancja
Szanowna Klientko, Szanowny Kliencie,
na zakupione urządzenie otrzymują Pań-
stwo 3 lata gwarancji od daty zakupu.
W przypadku wad tego produktu przysłu-
gują Państwu ustawowe prawa w stosunku
do sprzedawcy produktu. Prawa te nie są
ograniczone przez naszą przedstawioną
niżej gwarancję.
Warunki gwarancji
Okres gwarancji rozpoczyna się z datą
zakupu. Prosimy zachować oryginalny
paragon. Będzie on potrzebny jako dowód
zakupu.
Jeśli w okresie trzech lat od daty zakupu
tego produktu wystąpi wada materiałowa
lub fabryczna, produkt zostanie – wedle
naszego wyboru – bezpłatnie naprawiony
lub wymieniony. Gwarancja zakłada, że w
okresie trzech lat uszkodzone urządzenie
zostanie przesłane wraz z dowodem zakupu
(paragonem) z krótkim opisem, gdzie wystą-
piła wada i kiedy się pojawiła.
Jeśli defekt jest objęty naszą gwarancją,

58
PL
otrzymają Państwo z powrotem naprawio-
ny lub nowy produkt. (Wraz z naprawą
lub wymianą produktu okres gwarancji nie
biegnie na nowo.)
Okres gwarancji i ustawowe rosz-
czenia z tytułu wad
Okres gwarancji nie wydłuża się z po-
wodu świadczenia gwarancyjnego. Obo-
wiązuje to również dla wymienionych lub
naprawionych części. Ewentualne uszko-
dzenia i wady istniejące już w momencie
zakupu należy zgłosić bezzwłocznie po
rozpakowaniu. Naprawy przypadające
po upływie okresu gwarancji są odpłatne.
Zakres gwarancji
Urządzenie wyprodukowano z zacho-
waniem staranności zgodnie z surowymi
normami jakościowymi i dokładnie spraw-
dzono przed wysyłką.
Gwarancja obowiązuje dla wad mate-
riałowych lub fabrycznych. Gwarancja
nie rozciąga się na części produktu, które
podlegają normalnemu zużyciu i można
je uznać za części zużywalne (np. fi ltry
lub nasadki), oraz na uszkodzenia części
delikatnych (np. przełączniki).
Gwarancja przepada, jeśli produkt został
uszkodzony, nie był zgodnie z przezna-
czeniem użytkowany i konserwowany.
Użytkowanie zgodnie z przeznaczeniem
wiąże się z przestrzeganiem wszystkich
wskazówek zawartych w instrukcji obsługi.
Należy bezwzględnie unikać zastosowań
i działań, których odradza się lub przed
którymi ostrzega się w instrukcji obsługi.
Produkt jest przeznaczony do użytku
prywatnego, a nie komercyjnego. W przy-
padku niewłaściwego i nieodpowiedniego
obchodzenia się z urządzeniem, stosowa-
nia „na siłę” i zabiegów, które nie zostały
przeprowadzone przez nasz autoryzowa-
ny oddział, gwarancja wygasa.
Realizacja w przypadkach objętych
gwarancją
Aby zagwarantować szybkie przetworze-
nie Państwa sprawy, prosimy o przestrze-
ganie poniższych wskazówek:
• W przypadku wszelkich zapytań prosi-
my o przygotowanie paragonu i nume-
ru identyfi kacyjnu jako dowodu zakupu
(IAN317189_1904).
• Numer artykułu znajduje się na tabliczce
znamionowej.
• W przypadku wystąpienia usterek lub
innych wad prosimy o skontaktowanie
się z wymienionym niżej działem serwi-
sowym telefonicznie lub mailowo. Uzy-
skają Państwo wówczas szczegółowe
informacje na temat realizacji reklama-
cji.
• Uszkodzony produkt mogą Państwo
wysłać po skontaktowaniu się z naszym
działem obsługi klienta, załączając do-
wód zakupu (paragon) i określając, na
czym polega wada i kiedy wystąpiła,
bezpłatnie na podany adres serwisu.
Aby uniknąć problemów z odbiorem
i dodatkowych kosztów, prosimy o
wysłanie przesyłki na adres, który
Państwu podano. Należy się upewnić,
żeby wysyłka nie nastąpiła odpłatnie,
jako ponadwymiarowa, ekspresowo
lub na innych specjalnych warunkach.
Prosimy o przesłanie urządzenia wraz
ze wszystkimi częściami wyposażenia
otrzymanymi przy zakupie i zadbanie
o wystarczająco bezpieczne opakowa-
nie.

59
PL
Części zamienne/Akcesoria
Części zamienne i akcesoria można zakupić na
www.grizzly-service.eu
W przypadku problemów z zamawianiem należy skorzystać z formularza kontaktowego.
W razie kolejnych pytań należy zwracać się do „Service-Center” (patrz strona 59).
Pos. Pos. Oznaczenie Przezna- Nr. artykułu
Instrukcja Rysunek samo- czenie
obsługi rozwijający
12 8 Wąż ssący z uchwytem 91105189
23 2 fi ltr fałdowany 91105185
22 3 Zamknięcie fi ltra harmonijkowego 91105186
10 9 Trzyczęściowa rura ssąca 91099439
Worek z fi ltrem papierowych, 5 szt. 30250146
19 14 Worek z fi ltrem papierowych, 1 sztuka 30250147
Serwis naprawczy
Naprawy, które nie są objęte gwarancją,
można zlecić odpłatnie w naszym oddzia-
le serwisowym. Serwis sporządzi Państwu
kosztorys naprawy.
Podejmujemy się wyłącznie naprawy urzą-
dzeń, które zostały prawidłowo zapako-
wane i ofrankowane.
Uwaga: Prosimy o przesłanie czystego
urządzenia ze wskazaniem usterki.
Urządzenia przesłane dla nas odpłatnie,
jako przesyłka ponadwymiarowa, ekspre-
sowa lub na innych warunkach specjal-
nych, nie zostaną odebrane.
Utylizację przesłanych do nas uszkodzonych
urządzeń przeprowadzamy bezpłatnie.
Service-Center
PL
Serwis Polska
Tel.: 22 397 4996
E-Mail: [email protected]
IAN 317189_1904
Importer
Prosimy mieć na uwadze, że poniższy
adres nie jest adresem serwisu. Prosimy
o kontakt z wymienionym wyżej centrum
serwisowym.
Grizzly Tools GmbH & Co. KG
Stockstädter Straße 20
DE-63762 Großostheim
Niemcy
www.grizzly-service.eu

60
CZ
Obsah
Úvod..........................................60
Použití .......................................60
Obecný popis ............................. 61
Rozsah dodávky ...........................61
Přehled .........................................61
Popis funkce ..................................61
Technická data ..........................62
Bezpečnostní pokyny .................62
Symboly v návodu..........................62
Symboly na přístroji .......................63
Všeobecné bezpečnostní pokyny .....63
Montáž ......................................64
Uvedení do provozu ................... 64
Zapnutí/vypnutí .............................64
Kontrola stavu nabití .......................64
Vyjmutí/Vložení akumulátoru ...........64
Použití hubic ..................................64
Mokré vysávání .............................65
Suché vysávání .............................. 65
Funkce sání ...................................65
Funkce foukání ...............................65
Čištění/údržba ...........................65
Čištění nástroje ..............................65
Údržba ......................................... 66
Uložení ......................................66
Likvidace/ochrana životního
prostředí ....................................66
Hledání chyb..............................67
Záruka ......................................67
Opravna ....................................69
Service-Center ............................69
Dovozce .....................................69
Náhradní díly/Příslušenství ........69
Úvod
Blahopřejeme vám ke koupi vašeho nové-
ho přístroje. Rozhodli jste se pro vysoce
kvalitní výrobek.
Kvalita tohoto přístroje byla kontrolována
během výroby a byla provedena také
závěrečná kontrola. Tím je zaručena
funkčnost přístroje. Nelze vyloučit, že v
jednotlivých případech bude na přístroji, v
přístroji nebo v hadicových rozvodech zby-
tek vody. Nejedná se o vadu nebo závadu
a není to důvodem k obavám.
Návod k obsluze je součástí tohoto výrob-
ku. Obsahuje důležité pokyny týkající se
bezpečnosti, používání a likvidace. Před
použitím výrobku se seznamte se všemi
pokyny k obsluze a bezpečnosti. Výrobek
používejte jen k popsaným účelům a v
rámci uvedených oblastí použití.
Návod dobře uschovejte a při předávání
výrobku třetímu předejte i všechny podkla-
dy.
Použití
Tento nástroj je určený pro mokré a suché
vysávání v domáckém prostředí jako např.
v domácnosti, v kutilské dílně, v autě ane-
bo v garáži. Přístroj lze používat také jako
ventilátor nebo na odsávání vody.
Tento přístroj není určený pro komerční vyu-
žití. Při komerčním použití záruka zanikne.
Vysávání hořlavých, výbušných anebo
zdraví škodlivých látek je zakázáno.
Přístroj je součástí série Parkside
X20VTEAM a lze jej provozovat s
akumulátory série X20VTEAM.
Akumulátory se smí nabíjet pouze nabíječ-
Překlad originálního prohlášení
o shodě CE .................................86
Rozvinutý výkres .......................88

61
CZ
kami série Parkside X20VTEAM.
Výrobce neručí za škody, vzniklé před-
pisům neodpovídajícím použitím anebo
nesprávnou obsluhou.
Obecný popis
Obrázky najdete na přední a
zadní výklopní straně.
Rozsah dodávky
Vybalte přístroj a zkontrolujte, zda je kom-
pletní. Přístroj je dodáván s nasazenou
hlavou motoru (
1). Pro sejmutí hlavy
motoru a vyjmutí příslušenství otevřete
uzavírací úchytky (
8).
- Motorová skříň
- Nádrž na nečistoty
- Třídílná nasávací roura
- sací hadice
- rukojeť
- Papírový sáčkový fi ltr na vysávání jem-
ného prachu
- skládaný fi ltr
- běžná hubice
- Hubice na dlážku s
- otočnou nástrční násadou
s kartáčem a s gumovou lamelou na
vysávání koberců a hladkých ploch (již
namontovaný)
- Štěrbinová hubice
- držák na stěnu
- 2 šroubů s křížovou drážkou
- 4 kolečka
- návod k obsluze k vysavači pro mokré
a suché sání
Akumulátor a nabíječka nejsou
součástí dodávky!
Řádně zlikvidujte obalový materiál.
Přehled
1 Motorová skříň
2 rukojeť pro přenášení
3 Za-/vypínač
4 kryt přihrádky na akumulátor
5 Přípojka sací hadice
6 Nádrž na nečistoty
7 háček držáku na stěnu
8 2 uzavírací klips
9 přípojka pro foukání (není vidět)
10 Třídílná nasávací roura
11 rukojeť
12 nasávací hadice
13 držák na stěnu
14 upevňovací šrouby držáku
na stěnu
15 Štěrbinová hubice
16 běžná hubice
17 Hubice na dlážku s
18 otočnou nástrční násadou
s kartáčem a s gumovou lamelou
na vysávání koberců a hladkých
ploch (již namontovaný)
19 sáček papírového fi ltru
20 akumulátor
21 nabíječka
22 uzávěr skládaného fi ltru
23 skládaný fi ltr
24 uchycení pro příslušenství
25 kolečko
26 násuvný úchyt
Popis funkce
Přístroj je vybaven stabilní plastovou nádo-
bou pro zachycení nečistot. Při vysávání
za mokra se odpojí proud nasávaného
vzduchu plovákem, když je nádoba na
nečistoty plná. Přístroj má navíc funkci

62
CZ
foukání. Vodicí kolečka umožňují velkou
ovladatelnost přístroje.
S funkcemi ovládacích částí se seznámite v
následujícím popisu.
Technická data
Aku vysavac na mokré a suché
vysávání ................ PNTSA 20-Li B1
Jmenovité napětí U ....................... 20 V
Druh ochrany...................................IPX4
Nasávací síla ................ 9 kPA (90 mbar)
Obsah nádoby na smetí (brutto) ......... 10 l
Užitečný objem nádrže (voda) .............4 l
Hmotnost (bez příslušenství) ..... cca 2,7 kg
Hmotnost (pouze příslušenství) . cca 1,8 kg
Akumulátor (Li-Ion) ....... PAP 20 A3
Bateriové články ................................10
Jmenovité napětí ......................... 20 V
Kapacita ..................................... 4,0 Ah
Energie .......................................80 Wh
Doba nabíjení ............................asi 1 h
Teplota .................................. max 50 °C
Nabíjecí proces ....................4 – 40 °C
Provoz ..............................-20 – 50 °C
Skladování ...........................0 – 45 °C
* Uvedená doba nabíjení se dosáhne pouze
s přiloženou rychlonabíječkou.
Nabíječka ......................PLG 20 A3
Příkon .........................................120 W
Vstupní napětí/
Input .........................230 -240 V~, 50 Hz
Výstupní napětí/
Output .....................................21,5 V
Výstupní proud ..............................4,5 A
Třída ochrany .................................
II
Jištění přístroje ............................T3.15A
Druh ochrany ..................................IPX0
Pozor!
Aktuální seznam kompatibi-
lity akumulátorů najdete na:
www.lidl.de/akku
Tento přístroj lze provozovat výhradně s
následujícími akumulátory:
PAP 20 A1, PAP 20 A2, PAP 20 A3.
Tyto akumulátory se smí nabíjet
následujícími nabíječkami:
PLG 20 A1, PLG 20 A3, PDSLG 20 A1.
Bezpečnostní pokyny
Tento přístroj mohou používat děti
od 8 roků jakož i osoby se snížený-
mi fyzickými, senzorickými anebo
mentálními schopnostmi, anebo s
nedostatkem zkušeností a vědomos-
tí, pokud jsou pod dozorem anebo
byli poučené o bezpečném použí-
vaní přístroje a rozumějí rizikům,
které z toho vyplývají. Děti si s pří-
strojem nesmí hrát. Děti nesmí vyko-
návat čistění a údržbu bez dozoru.
Symboly v návodu
Výstražné značky s údaji pro
zabránění škodám na zdraví
anebo věcným škodám.
Příkazové značky s údaji pro
prevenci škod.
Informační značky s informa-
cemi pro lepší zacházení s
nástrojem.

63
CZ
Symboly na přístroji
Parkside X20VTEAM
Elektrické přístroje nepatří do
domácího odpadu.
C
Hrozí nebezpečí požáru,
pokud nasávaný materiál pře-
kročí teplotu 40° C (104° F)!
ukazatel stavu nabití na
přístroji
Otevření a zavření uza-
víracího klipu
Všeobecné bezpečnostní
pokyny
Pozor! Při používání elektric-
kých nástrojů je třeba pro
ochranu proti elektrickému
úderu, nebezpečí poranění a
požáru, dbát na následující
zásadní bezpečnostná opatře-
ní:
Takto zabráníte nehodám a poraně-
ním:
• Nikdy neponechávejte k provozu
připravený přístroj na pracovišti
bez dohledu.
• Přístroj nesmí být použit k odsá-
vání na osobách a zvířatech.
• Během provozu nemiřte sací ha-
dicí a hubicemi na sebe či jiné
osoby, zejména ne na oči a uši.
Hrozí nebezpečí poranění.
• Nevysávejte horké, žhavé, hořla-
vé, výbušné anebo zdraví škod-
livé látky. K těmto patří mezi
jinými horký popel, benzín,
rozpouštědla, kyseliny anebo
louhy.
• Dýzy a sací trubka se nesmí bě-
hem práce nacházet ve výši hla-
vy. Vzniká nebezbečí zranění.
Takto se vyhnete nehodám a pora-
něním skrz elektrický úder:
• Vypněte zařízení a vyjměte bate-
rii:
- jestliže přístroj nepoužíváte, po-
kud jej přepravujete anebo je-li
bez dozoru;
- jestliže přístroj kontrolujete,
čistíte nebo odstraňujete bloko-
vání;
- jestliže provádíte čisticí anebo
údržbářské práce nebo když
vyměňujete příslušenství;
- jestliže je poškozen elektrický
nebo prodlužovací kabel;
- po styku s cizími tělesy nebo
při abnormálních vibracích.
Takto zabráníte vzniku škod na pří-
stroji a případně z nich plynoucímu
poškození zdraví osob:
• Dbejte na to, aby přístroj byl
správně smontován a aby fi ltry
byly správně umístěny.
• Nepracujte bez fi ltru. Přístroj by
tím mohl být poškozen.
• Nepoužívejte příslušenství, které
nebylo doporučeno společností
PARKSIDE. To může vést k úrazu
elektrickým proudem nebo k po-
žáru.

64
CZ
• Opravy nechte provádět pouze
námi zmocněnými opravnami.
• Dbejte na pokyny k čištění a
údržbě přístroje.
• Uchovávejte přístroj v suchu a
mimo dosahu dětí.
Dodržujte bezpečnostní poky-
ny a pokyny k nabíjení a
správnému použití, uvedené
v návodu k obsluze Vašeho
akumulátoru a Vaší nabíječky
série Parkside X20 V Team.
Podrobný popis procesu na-
bíjení adalší informace nale-
znete vtomto samostatném
návodu kobsluze.
Pozor! Dodržujte bezpečnostní
pokyny uvedené v návodu
k
obsluze vašeho akumulátoru řady
Parkside X 20 V Team.
Montáž
1. Zatlačte čtyři kolečka (
25) do
nástrčného úchytu (
26), na spodní
straně nádoby na nečistoty (6), dokud
nezaskočí.
2. Nasaďte sáček papírového fi ltru (19)
(viz
vysávání za sucha - vložení
sáčku papírového fi ltru):
3. Nasaďte hlavu motoru (1) na nádobu
na nečistoty (6) a zavřete
ji uza-
vírací svorkou (8).
4. Připojte sací hadici (12) a příslušenství.
Uvedení do provozu
Při práci zcela odmotejte sací hadi-
ci (
12).
Zapnutí/vypnutí
Zapnutí vysavače:
Za-/vypínač (
3) do polohy „I“.
Vypnutí vysavače:
Za-/vypínač (
3) do polohy „0“.
Kontrola stavu nabití
Ukazatel stavu nabití na přístroji
poskytuje informace o stavu nabití
akumulátoru během provozu přístro-
je.
LED svítí zeleně: Akumulátor je nabitý
LED svítí žlutě: Akumulátor je částečně nabitý
LED svítí červeně: Nízký stav nabití
LED bliká červeně: Akumulátor je nutné dobít
Vyjmutí/Vložení akumulátoru
1. K vyjmutí akumulátoru z přístroje stiskněte
odblokovací tlačítko (1) na akumulátoru
(4) aakumulátor vytáhněte.
2. Pro vložení akumulátoru (4) vsunujte aku-
mulátor po vodicí kolejnici do přístroje.
Akumulátor slyšitelně zacvakne.
Vložte akumulátor pouze teh-
dy, jestliže je přístroj zcela
smontovaný. Hrozí nebezpečí
poranění!
Použití hubic
Štěrbinová trubice (
15):
pro vysávání štěrbin, rohů a topných těles.
Běžná hubice (
16)
pro mokré a suché vysávání, pro odstranění
ulpělých nečistot.

65
CZ
Hubice na podlahu ( 17) s nástrč-
ní násadou (
18):
pro mokré a suché vysávání hladkých
ploch a koberců.
Hubice na podlahu (
17) bez nás-
trční násady (
18):
pro mokré a suché vysávání koberců, pro
odstranění zaschlé špíny.
• Zatlačte spony na hubici na podlahu
(
17) doprava a doleva a složte ná-
strční násadu (
18).
Citlivé povrchy se mohou při práci
bez nástrční násady poškrábat.
Mokré vysávání
1. Vyjměte papírový fi ltr ( 19) a sklá-
daný fi ltr (
23).
2. Odsávání (odčerpávání): Sací hadici
(
12) na držadle ( 11) ponořte
do nádoby s vodou a vodu odčerpejte.
3. Ihned po vysávání vyprázdněte nádo-
bu na nečistoty, protože není zkonstru-
ována k přechovávání tekutin (viz část
„Čištění/údržba“).
Nestůjte ve vodě určené k
odčerpání. Nebezpečí úrazu
elektrickým proudem.
Je-li nádoba na smetí naplněná,
uzavře plovák sací otvor a sací po-
-chod se přeruší. Vypněte přístroj a
vyprázdněte nádobu na smetí.
Při výstupu pěny anebo kapaliny
přístroj ihned vypněte.
Suché vysávání
Vysávání s papírovým sáčko-
vým fi ltrem:
Vložte papírový fi ltrační sáček
Přehněte papírový sáček (19) s vyz-
tužením nahoru přes vnitřní sací hrdlo
(viz šipka
). Těsnicí kroužek u otvo-
ru fi ltračního sáčku musí úplně obepínat
spojku na sacím hrdle.
Vysávání jemného prachu:
Při určitém typu odsávání (například brou-
šení barev a laků, frézování nebo vrtání do
zdí, broušení nebo vrtání tvrdého dřeva)
může vznikat zdraví škodlivý prach.
Funkce sání
Pro odsávání nasaďte sací hadici (12) na
přípojku (5) na hlavě motoru.
Funkce foukání
Foukací funkci doporučujeme použí-
vat bez fi ltru.
K foukání nasuňte sací hadici (12) na pří-
pojku (9) na hlavě motoru.
Čištění/údržba
Čištění nástroje
Nepostřikujte tento nástroj vodou a
nepoužívejte žádné ostré čisticí pro-
středky resp. rozpouštědla. Nástroj
by se mohl poškodit.
• Po skončení provozu vyprázdněte nádo-
bu na smetí (
6).

66
CZ
• Vyčistěte nádobu na smetí vlhkým had-
rem.
• Plný papírový sáčkový fi ltr (
19) vy-
měňte (Pro dodatečné objednávky viz
kapitolu „Náhradní díly/Příslušenství“).
• Volitelný skládání fi ltr vyklepejte a vy-
čistěte jej štětcem nebo smetáčkem.
Údržba
• Přístroj je nevyžaduje údržbu.
Uložení
- Zastrčte rozložené nasávací roury
(10) do držáku pro příslušenství na
nožičkách (
24) nástroje.
- Omotejte sací hadici (12) kolem
přístroje a zastrčte díl rukojeti (11) do
sací hadice (10).
- Dbejte na pokyny k čištění a údržbě
přístroje.
- Zařízení můžete zavěsit na hák držáku
na stěnu (
7) na držáku na stěnu (
13).
Do držáku na stěnu neza-
věšujte zařízení s těžkou ná-
plní (např. s absorbovanou
vodou).
- Za tímto účelem namontujte držák na
stěnu (
13) dvěma šrouby ( 14) a
pomocí hmoždinek na stěnu. Ihned po
montáži a poté v pravidelných interva-
lech kontrolujte pevné usazení držáku
na stěnu (
13).
Při vrtání dbejte na to, aby
nedošlo k poškození žád-
ného napájecího vedení.
Pro jejich nalezení použijte
vhodné detektory nebo se
podívejte do plánu instalace.
Při kontaktu s elektrickým
vedením může dojít k úra-
zu elektrickým proudem a
požáru, kontakt s plynovým
vedením může způsobit ex-
plozi. Při poškození vodo-
vodního vedení může dojít
k hmotným škodám a úrazu
elektrickým proudem.
Likvidace/ochrana
životního prostředí
Zlikvidujte prosím přístroje, které již nebu-
dou použitelné, ekologicky.
Stroje nepatří do domácího odpadu.
• Odevzdejte jej ve sběrně šrotu. Použité
díly z plastu a kovu se tam dle druhu
materiálu roztřídí a mohou se pak za-
vést do recyklace. Zeptejte se v našem
Service-Center.
• Likvidaci vašich zaslaných poško-
zených přístrojů provádíme bezplatně.

67
CZ
Hledání chyb
Problém
Možná příčina Odstranění poruchy
Přístroj nestartuje
Vadný spínač/vypínač
(
3)
Oprava servisní službou
Opotřebované uhlíky
Vadný motor
Malý anebo chy-
bějící
Hadicový systém (
12)
anebo hubice (
15/16/17)
jsou ucpané
Odstraňte důvody ucpání a blo-
kování
Sací trubice (
10) není správ-
ně poskládaná
Sací trubici poskládejte správně
Nádrž (
6) je otevřená
Nádrž uzavřete
Nádrž (
6) je plná
Nádrž vyprázdněte
Filtr (
19/23) je plný anebo
ucpaný
Filtr vyprázdněte, vyčistěte ane-
bo vyměňte
Z přístroje je
vyfukován prach
nebo nečistoty.
Chybí fi ltr (
19/23) nebo
není správně namontován.
Nasaďte chybějící fi ltr nebo
ověřte správné usazení fi ltru.
Záruka
Vážení zákazníci,
Na tento přístroj poskytujeme 3letou záru-
ku od data zakoupení.
V případě závady tohoto výrobku vám vůči
prodejci výrobku přináleží zákonná práva.
Tato zákonná práva nejsou omezena naší
následovně uvedenou zárukou.
Záruční podmínky
Záruční doba začíná běžet ode dne náku-
pu. Uschovejte si, prosím, originál účtenky
pro pozdější použití. Tento dokument bude-
te potřebovat jako doklad o koupi.
Zjistíte-li během tří let od data koupě u
tohoto výrobku materiálovou nebo výrobní
vadu, bude výrobek námi, podle našeho
výběru, bezplatně opraven nebo nahra-
zen. Tato záruční oprava předpokládá, že
během 3leté lhůty předložíte poškozený
přístroj s dokladem o koupi (pokladní stvr-
zenka) a písemně krátce popíšete, v čem
spočívá závada a kdy k ní došlo.
Bude-li závada kryta naší zárukou, zís-
káte zpět opravený nebo nový výrobek.
Opravou nebo výměnou výrobku nezačíná
záruční doba běžet od začátku.

68
CZ
Záruční doba a zákonné nároky na
odstranění vady
Záruční doba se neprodlužuje poskytnutím
záruky. Toto platí i pro nahrazené a opra-
vené díly. Již při koupi zjištěné závady
a nedostatky musíte nahlásit okamžitě
po vybalení výrobku. Po uplynutí záruční
doby musíte uhradit náklady za provedené
opravy.
Rozsah záruky
Přístroj byl precizně vyroben podle přís-
ných jakostních směrnic a před dodáním
byl svědomitě zkontrolován.
Záruční oprava se vztahuje na materiálové
nebo výrobní vady. Tato záruka se netýká
dílů výrobku, které jsou vystaveny normál-
nímu opotřebení, a lze je považovat za
spotřební materiál (např. fi ltry nebo nástav-
ce), nebo poškození křehkých dílů (např.
spínače).
Tato záruka neplatí, je-li výrobek poškozen
z důvodu neodborného používání, nebo
pokud u něj nebyla prováděna údržba.
Pro odborné používání výrobku musí být
přesně dodržovány všechny pokyny uvede-
né v návodu k obsluze. Bezpodmínečně je
třeba zabránit používání a manipulacím s
výrobkem, které nejsou v návodu k obsluze
doporučeny, nebo je před nimi varováno.
Výrobek je určen jen pro soukromé účely
a ne pro komerční využití. Záruka zaniká
v případě zneužívání a neodborné ma-
nipulace, používání nadměrné síly a při
zásazích, které nebyly provedeny naším
autorizovaným servisem.
Postup v případě uplatňování zá-
ruky
Pro zajištění rychlého zpracování vaší
žádosti, prosím, postupujte podle následu-
jících pokynů:
• Na důkaz, že jste výrobek zakoupili,
mějte pro jakékoli případné dotazy
připravenou pokladní stvrzenku a číslo
výrobku (AN 317189_1904).
• Číslo výrobku je uvedeno na typovém
štítku.
• Pokud by došlo k funkční poruše nebo
jiným závadám, nejdříve telefonicky
nebo e-mailem kontaktujte níže uvede-
né servisní oddělení. Pak získáte další
informace o vyřízení vaší reklamace.
• Výrobek označený jako vadný můžete
po domluvě s naším zákaznickým
servisem, s připojením dokladu o kou-
pi (pokladní stvrzenky) a po uvedení, v
čem závada spočívá a kdy k ní došlo,
přeposlat bez platby poštovného na
vám sdělenou adresu příslušného ser-
visu. Aby bylo zabráněno problémům
s přijetím a dodatečnými náklady,
bezpodmínečně použijte jen tu adresu,
která vám bude sdělena. Zajistěte, aby
zásilka nebyla odeslána nevyplaceně
jako nadměrné zboží, expres nebo
jiný, zvláštní druh zásilky. Přístroj za-
šlete včetně všech částí příslušenství
dodaných při zakoupení a zajistěte
dostatečně bezpečný přepravní obal.

69
CZ
Opravna
Opravy, které nespadají do záruky, mů-
žete nechat udělat v našem servisu oproti
zúčtování. Rádi vám připravíme předběžný
odhad nákladů.
Můžeme zpracovávat jen ty přístroje, které
byly dostatečně zabalené a odeslány vy-
placeně.
Pozor: Prosím, přístroj zašlete našemu auto-
rizovanému servisu vyčištěný a s upozorně-
ním na závadu.
Nepřijmeme přístroje zaslané nevyplaceně
jako nadměrné zboží, expres nebo jiný,
zvláštní druh zásilky.
Likvidaci vašich poškozených zaslaných
přístrojů provedeme bezplatně.
Service-Center
CZ
Servis Česko
Tel.: 800143873
E-Mail: [email protected]
IAN 317189_1904
Dovozce
Prosím, respektujte, že následující adresa
není adresou servisu. Nejdříve kontaktujte
shora uvedené servisní středisko.
Grizzly Tools GmbH & Co. KG
Stockstädter Straße 20
DE-63762 Großostheim
Německo
www.grizzly-service.eu
Náhradní díly/Příslušenství
Náhradní díly a příslušenství obdržíte na stránkách
www.grizzly-service.eu
Pokud máte problémy při objednávání, použijte prosím kontaktní formulář. V případě jakých-
koliv dalších dotazů se obraťte na servisní středisko / „Service-Center“ (viz strana 69).
Pol. Pol. Označení Použití Č. artiklu.
Návod k Rozvinutý
obsluze výkres
12 8 Nasávací hadice 91105189
23 2 skládaný fi ltr 91105185
22 3 uzávěr skládaného fi ltru 91105186
10 9 Třídílná nasávací roura 91099439
Papírový sáčkový fi ltr, 5 ks 30250146
19 14 Papírový sáčkový fi ltr, 1 ks 30250147

70
SK
Obsah
Úvod..........................................70
Použitie ......................................70
Všeobecný popis ........................71
Rozsah dodávky ............................71
Prehľad .........................................71
Popis funkcie .................................71
Technické údaje ..........................72
Bezpečnostné pokyny ................72
Symboly na prístroji .......................72
Všeobecné Bezpečnostné pokyny .....73
Montáž ......................................74
Obsluha .....................................74
Zapínanie/Vypínanie .....................74
Kontrola stavu nabitia ..................... 74
Vybratie/vloženie batérie ...............74
Použitie hubíc ................................75
Mokré vysávanie ............................75
Suché vysávanie ............................75
Funkcia nasávania .........................75
Funkcia vyfukovania .......................75
Čistenie/Údržba .........................76
Čistenie nástroja ............................76
Údržba ......................................... 76
Uloženie ....................................76
Odstránenie/Ochrana
životného prostredia ..................76
Zisťovanie závad .......................77
Záruka ......................................77
Servisná oprava ........................79
Service-Center ............................79
Dovozca ..................................... 79
Náhradné diely / Príslušenstvo .79
Úvod
Gratulujeme Vám k zakúpeniu Vášho
nového prístroja. Tým ste sa rozhodli pre
kvalitný produkt.
Tento prístroj bol počas výroby testovaný
na kvalitu a podrobený výstupnej kontrole.
Tým je zabezpečená funkčnosť vášho prí-
stroja. Nie je vylúčené, že v ojedinelých
prípadoch sa na prístroji alebo v prístroji,
resp. v hadiciach nachádza zvyšková
voda. Nie je to chyba alebo defekt a ani
dôvod na obavu.
Návod na obsluhu je súčasťou tohto
produktu. Obsahuje dôležité upozorne-
nia ohľadom bezpečnosti, obsluhy a
likvidácie. Pred používaním produktu sa
oboznámte so všetkými pokynmi pre ob-
sluhu a bezpečnosť. Používajte produkt len
predpísaným spôsobom a len v uvedených
oblastiach použitia.
Návod na obsluhu uschovajte a v prípade
odovzdania produktu tretím osobám odo-
vzdajte aj všetky podklady.
Použitie
Tento nástroj je určený pre mokré a suché
vysávanie v domáckom prostredí ako napr.
v domácnosti, v miestnosti pre hobby, v
aute alebo v garáži. Prístroj sa dá použiť
ako dúchadlo na odsávanie vody.
Tento prístroj nie je vhodný na komerčné
používanie. Pri komerčnom použití zanikne
záruka.
Vysávanie horľavých, výbušných alebo
zdraviu škodlivých látok je zakázané.
Prístroj je súčasťou série Parkside
X20VTEAM a môže sa prevádzkovať s
akumulátormi série Parkside X20VTEAM.
Akumulátory sa smú nabíjať iba s nabíjač-
Preklad originálneho prehlásenia
o zhode CE .................................87
Výkres náhradných dielov .........88

71
SK
kami série Parkside X20VTEAM.
Výrobca nezodpovedá za škody, ktoré
boli zapríčinené používaním nezodpove-
dajúcim účelu použitia alebo nesprávnou
obsluhou.
Všeobecný popis
Obrázky nájdete na prednej a
zadnej výklopnej strane.
Rozsah dodávky
Prístroj vybaľte a skontrolujte, či je kom-
pletný. Prístroj sa dodáva s nasadenou
hlavou motora (
1). Za účelom zloženia
hlavy motora a vybratia príslušenstva
otvorte
uzavierací klip ( 8).
- Púzdro motora
- Nádrž na nečistoty
- Trojdielna nasávacia rúra
- Nasávacia hadica
- Držadlo
- Papierový vreckový fi lter
- Skladaný fi lter
- Hubica pre domácnosť
- Hubica na dlážku s
- otočnou nástrčnou násadou
s kefou a s gumovou lamelou pre
vysávanie kobercov a hladkých plôch
(už montovaný)
- Štrbinová hubica
- Nástenný držiak
- 2 skrutiek s krížovou drážkou
- 4 kolieska
- Návod na používanie pre mokrý a
suchý vysávač
Akumulátor a nabíjačka nie sú
súčasťou dodávky!
Náležite zlikvidujte obalový materiál.
Prehľad
1 Púzdro motora
2 Držiak
3 Za-/vypínač
4 Kryt šachty pre akumulátor
5 Prípojka sacej hadice
6 Nádrž na nečistoty
7 Háčik pre nástenný držiak
8 2 uzatvárací klip
9 Prípojka fúkania (nie je vidieť)
10 Trojdielna nasávacia rúra
11 Časť držadla
12 Nasávacia hadica
13 Nástenný držiak
14 Upevňujúce skrutky pre nástenný
držiak
15 Štrbinová hubica
16 Hubica pre domácnosť
17 Hubica na dlážku s
18 otočnou nástrčnou násadou
s kefou a s gumovou lamelou pre
vysávanie kobercov a hladkých
plôch (už montovaný)
19 Papierové fi ltračné vrecko
20 Akumulátor
21 Nabíjačka
22 Uzáver skladaného fi ltra
23 Skladaný fi lter
24 Držiak príslušenstva
25 Koliesko
26 Zásuvné uchytenie
Popis funkcie
Prístroj je vybavený stabilnou plastovou ná-
dobou na zachytávanie nečistôt. Pri mokrom
vysávaní sa vypnutie nasávaného prúdu
vzduchu uskutočňuje cez plavák, keď je ná-
doba na zachytávanie nečistôt plná. Navyše
má prístroj funkciu fúkania. Pojazdné ko-

72
SK
lieska umožňujú veľkú pohyblivosť prístroja.
Funkciu obslužných dielov si prosím zistite z
nasledujúcich popisov.
Technické údaje
Akumulátorový vysávac na mokré
asuché vysávanie .. PNTSA 20-Li B1
Vymeriavacie napätie U ............... 20 V
Druh ochrany...................................IPX4
Nasávacia sila .............. 9 kPA (90 mbar)
Objem nádrže na nečistoty (brutto) ....10 l
Užitočný objem nádrže (voda) .............4 l
Hmotnosť (bez príslušenstva) .... cca 2,7 kg
Hmotnosť (iba príslušenstvo) .... cca 1,8 kg
Batéria (Li-Ion) .............. PAP 20 A3
Batériové články ................................10
Menovité napätie ........................ 20 V
Kapacita .....................................4,0 Ah
Energie .......................................80 Wh
Doba nabíjania ...........................asi 1 h
Teplota .................................. max 50 °C
Nabíjanie ............................ 4 - 40 °C
Prevádzka ..........................-20 - 50 °C
Skladovanie ......................... 0 - 45 °C
* Uvedený čas nabitia sa dosiahne iba s pri-
pojenou rýchlonabíjačkou.
Nabíjačka ......................PLG 20 A3
Príkon ........................................ 120 W
Vstupné napätie/
Input ........................ 230-240 V~, 50 Hz
Výstupné napätie/
Output .................................... 21,5 V
Výstupní ........................................4,5 A
Ochranná trieda .............................
II
Prístrojová poistka ....................... T3.15A
Druh ochrany...................................IPX0
Pozor! Aktuálny zoznam
kompatibility akumulátora
nájdete na:
www.lidl.de/akku
Tento prístroj sa môže prevádzkovať
výlučne s nasledovnými akumulátormi:
PAP 20 A1, PAP 20 A2, PAP 20 A3.
Tieto akumulátory sa nabíjajú s
nasledovnými nabíjačkami:
PLG 20 A1, PLG 20 A3, PDSLG 20 A1.
Bezpečnostné pokyny
Tento prístroj môžu používať deti od
8 rokov ako aj osoby so zníženými
fyzickými, senzorickými alebo men-
tálnymi schopnosťami, alebo s ne-
dostatkom skúseností a vedomostí,
ak sú pod dozorom alebo boli po-
učené o bezpečnom používaní prí-
stroja a rozumejú rizikám, ktoré z
toho vyplývajú. Deti sa s prístrojom
nesmú hrať. Deti nesmú vykonávať
čistenie a údržbu bez dozoru.
Symboly v návode
Výstražné značky s údajmi
pre zabránenie škodám
na zdraví alebo vecným
škodám.
Príkazové značky s údajmi
pre prevenciu škôd.
Informačné značky s informá-
ciami pre lepšie zaobchádza-
nie s nástrojom.
Symboly na prístroji
Parkside X20VTEAM
Elektrické prístroje nepatria
do domového odpadu.

73
SK
C
Nebezpečenstvo požiaru, ak
nasávaný materiál prekročí
teplotu 40 °C (104 °F)!
Signalizácia stavu nabitia
na prístroji
Otvorenie a zatvorenie
uzatváracej svorky
Všeobecné Bezpečnostné
pokyny
Čítajte nasledujúce bez-
pečnostné pokyny, aby sa
vylúčili riziká ohľadne ohňa,
elektrického úderu, poranenia
osôb a vecných škôd:
Takto zabránite nehodám a porane-
niam:
• Prevádzkyschopný prístroj nikdy
nenechávajte na pracovisku bez
dozoru.
• Vysávanie pomocou tohto prí-
stroja sa nesmie prevádzať na
ľuďoch a zvieratách.
• Vysávaciu hadicu a trysky počas
prevádzky v žiadnom prípade
nenasmerujte na seba alebo iné
osoby, najmä nie na oči a uši.
Hrozí riziko poranenia.
• Nevysávajte horúce, rozžera-
vené, horľavé, výbušné alebo
zdraviu škodlivé látky. Hrozí ne-
bezpečenstvo poranenia. K nim
patria okrem iného horúci popol,
benzín, rozpúšťadlá, kyseliny ale-
bo lúhy. Hrozí nebezpečenstvo
poranenia.
• Hubice a sacia trubica sa pri
práci s prístrojom nesmú dostať
do výšky hlavy. Hrozí nebezpe-
čenstvo poranenia.
Takto sa vyhnete nehodám a pora-
neniam skrz elektrický úder:
• Vypnite zariadenie a vyberte
batériu:
- keď prístroj nepoužívate, pre-
pravujete alebo necháte bez
dohľadu;
- keď prístroj kontrolujete, čistíte
alebo odstraňujete blokova-
nia;
- keď chcete uskutočniť čistiace
alebo údržbové práce alebo
vymeniť príslušenstvo;
- po kontakte s cudzími telesami
alebo pri abnormálnej vibrá-
cii.
Takto zabránite škodám na prístroji
a prípadne z toho vyplývajúcim
škodám na zdraví osôb:
• Dbajte na to, aby bol prístroj
správne zmontovaný a aby sa
fi ltre nachádzali v správnej polo-
he.
• Nepracujte bez fi ltrov. Prístroj by
sa mohol poškodiť.
• Nepoužívajte žiadne príslušen-
stvo, ktoré bolo odporúčané
spoločnosťou PARKSIDE. To
môže viesť k zásahu elektrickým
prúdom alebo požiaru.

74
SK
• Opravy prístroja dajte previesť
len nami autorizovaným servis-
ným strediskám.
• Dodržujte pokyny pre čistenie a
údržbu prístroja.
• Uschovávajte prístroj na suchom
mieste a mimo dosahu detí.
Dodržiavajte bezpečnostné
pokyny a pokyny k nabíjaniu
a správnemu používaniu,
ktoré sú uvedené v návode
na používanie vášho aku-
mulátora a vašej nabíjačky
série Parkside X 20VTeam.
Podrobnejší opis k nabíjaniu
a ďalšie informácie nájdete v
tomto samostatnom návode
na používanie.
Pozor! Dodržiavajte bezpeč-
nostné pokyny, ktoré sú dané
v návode na obsluhu vášho
akumulátora série Parkside X
20 V Team.
Montáž
1. Zatlačte štyri kolieska (
25) do
zásuvných uchytení (
26), na spod-
nej strane nádoby na zachytávanie
nečistôt (6), až zaskočia.
2. Vložte papierové fi ltračné vrecko (19)
(pozri
Suché vysávanie – vloženie
papierového fi ltračného vrecka):
3. Hlavu motora (1) nasaďte na nádobu
na prach (6) a uzatvorte
ju uzat-
váracou klipsou (8).
4. Pripojte nasávaciu hadicu (12) a prís-
lušenstvo.
Obsluha
Aby ste mohli pracovať, úplne od-
viňte nasávaciu hadicu (
12).
Zapínanie/Vypínanie
Zapnutie vysávača:
Za-/vypínač (
3) do polohy „I“.
Vypnutie vysávača:
Za-/vypínač (
3) do polohy „0“.
Kontrola stavu nabitia
Signalizácia stavu nabitia na
prístroji udáva, zatiaľ čo prístroj
beží, informáciu o stave nabitia
akumulátora.
LED svieti zeleno: Akumulátor je nabitý
Akumulátor svieti žlto: Akumulátor je
čiastočne nabitý
LED svieti červeno: Stav nabitia nízky
LED bliká červeno: Akumulátor sa musí
nabiť
Vybratie/vloženie batérie
1. Na vybratie akumulátora z prístroja
zatlačte uvoľňovacie tlačidlo (1) na ba-
térii (4) avytiahnite batériu.
2. Na vloženie batérie (4) zasuňte batériu
pozdĺž vodiacej koľajnice do prístroja.
Táto počuteľne zacvakne.
Batériu vložte až vtedy, keď
je prístroj úplne zmontovaný.
Hrozí nebezpečenstvo zrane-
nia!

75
SK
Použitie hubíc
Štrbinová hubica ( 15):
na vysávanie štrbín, rohov a vykurovacích
telies.
Hubica pre domácnosť (
16)
na mokré a suché vysávanie, na odstraňo-
vanie nepoddajnej špiny.
Hubica na dlážku (
17) s nástrč-
nou násadou (
18):
na mokré a suché vysávanie hladkých
plôch a kobercov.
Hubica na dlážku (
17) bez ná-
strčnej násady (
18):
na mokré a suché vysávanie kobercov, na
odstránenie zatvrdnutej špiny.
• Zatlačte spony na hubici na dlážku
(
17) doprava a doľava a zložte
nástrčnú násadu (
18).
Citlivé povrchy sa môžu pri práci
bez nástrčnej násady poškrabať.
Mokré vysávanie
1. Odstráňte papierový fi lter ( 19) a
skladaný fi lter (
23).
2. Odsávanie (odčerpávanie): Ponorte
nasávaciu hadicu (
12) na držadle
(
11) do nádoby s vodou a vodu
odsávajte.
3. Po odsávaní ihneď vyprázdnite nádo-
bu z ušľachtilého kovu, pretože nie je
konštruovaná na uskladňovanie kvapa-
lín (viď „Čistenie/Údržba“).
Nezdržujte sa v ceste odčer-
pávanej vody. Nebezpečen-
stvo úrazu elektrickým prú-
dom.
Ak je nádrž určená na zachytávanie
nečistoty plná, uzavrie plavák sací
otvor a nasávanie sa preruší.
Prístroj
vypnite a nádrž vyprázdnite.
V prípade, že z prístroja vystupuje
pena alebo tekutina, ihneď ho vypni-
te.
Suché vysávanie
Vysávanie s papierovým fi ltrač-
ným vrecúškom:
Umieszczanie papierowego worka
fi ltracyjnego w urządzeniu
Vyhrňte papierové fi ltračné vrecko (19)
so zosilnením nahor cez vnútri ležiace
nasávacie hrdlo (pozri šípku
). Tes-
niaci krúžok na otvore fi ltračného vrec-
ka musí kompletne obopnúť prechod k
nasávaciemu hrdlu.
Vysávanie jemného prachu:
Pri určitých prácach (napr. brúsenie farieb
a lakov, frézovanie alebo vŕtanie múrov,
brúsenie alebo vŕtanie tvrdého dreva) môže
vznikať zdraviu škodlivý prach.
Funkcia nasávania
Na nasávanie zasuňte nasávaciu hadicu
(12) na prípojku (5) na hlave motora.
Funkcia vyfukovania
Odporúča sa prevádzka bez použi-
tia fi ltra.
Za účelom fúkania nasaďte na prípojku
(12) na hlave motora saciu hadicu (9).

76
SK
Čistenie/Údržba
Čistenie nástroja
Nepostrekujte tento nástroj vodou a
nepoužívajte žiadne ostré čistiace
prostriedky resp. rozpúšťadlá. Ná-
stroj by sa mohol poškodiť.
• Po ukončení prevádzky vyprázdnite
nádrž s nečistotami (
6).
• Nádrž na nečistoty vyčistite vlhkou
handričkou.
• Plné papierové fi ltračné (
19) vrecko
vymeňte (pre dodatočné objednanie
viď „Náhradné diely/Príslušenstvo“).
• Vyklepte skladaný fi lter, ktorý je možné
zakúpiť ako opciu a vyčistite ho so štet-
com alebo metličkou.
Údržba
• Prístroj si nevyžaduje údržbu.
Uloženie
- Zastrčte rozložené nasávacie rúry
(
10) do držiaka pre príslušenstvo
(
24). .
- motajte nasávaciu hadicu (
12)
okolo zariadenia a zastrčte časť ru-
koväte (
11) do nasávacej rúry (
10).
- Prístroj uschovajte na suchom mieste a
mimo dosahu detí.
- Prístroj môžete zavesiť na háčiku pre
nástenný držiak (
7) na nástennom
držiaku (
13).
Prístroj nevešajte na nás-
tenný držiak s ťažkou ná-
plňou (napr. s nasatou vo-
dou).
- K tomu upevnite nástenný držiak
(
13) pomocou dvoch skrutiek
(
14) a pomocou hmoždiniek na
stene. Skontrolujte pevné osadenie nás-
tenného držiaka (
13) priamo po
montáži a následne pravidelne.
Pri vŕtaní dávajte pozor na
to, aby sa nepoškodili napá-
jacie vedenia. Používajte
vhodné vyhľadávacie zari-
adenia, by tieto vypátrali
alebo si zoberte na pomoc
inštalačný plán. Kontakt
s vedeniami elektrického
prúdu môže spôsobiť zásah
elektrickým prúdom a požiar,
kontakt s plynovým vedením
môže viesť k výbuchu. Poško-
denie vodovodu môže viesť
k vecným škodám a zásahu
elektrickým prúdom
Odstránenie/Ochrana
životného prostredia
Prístroj, príslušenstvo a obal odovzdajte v
súlade s požiadavkami na ochranu život-
ného prostredia do recyklačnej zberne.
Elektrické prístroje nepatria do do-
mového odpadu.
Prístroj odovzdajte do recyklačnej zberne.
Použité umelohmotné a kovové časti sa
môžu podľa druhu materiálu roztriediť a
tak odovzdať do recyklačnej zberne. V prí-
pade otázok sa obráťte na naše servisné
stredisko.
Likvidáciu vašich chybných zaslaných prí-
strojov uskutočníme bezplatne.

77
SK
Zisťovanie závad
problém možná príčina odstránenie závady
prístroj nechce
naštartovať
porucha vypínača (
3)
oprava servisnou službou
opotrebované uhlíkové kefky
porucha motora
malý alebo chý-
bajúci sací výkon
hadicový systém (
12) ale-
bo hubice (
15/16/17) sú
upchané
odstráňte dôvody upchania a
blokovania
sacia trubica (
10) nie je
správne poskladaná
saciu trubicu poskladajte správne
nádrž (
6) je otvorená
nádrž uzavrite
nádrž (
6) je plná
nádrž vyprázdnite
fi lter (
19/23) je plný alebo
upchaný
fi lter vyprázdnite, vyčistite alebo
vymeňte
prach alebo
nečistoty sa zo
spotrebiča vyfú-
kajú
fi lter (
19/23) nie je vlože-
ný, alebo je vložený nesprávne
vložte chýbajúci fi lter alebo skon-
trolujte správne uloženie fi ltra
Záruka
Vážená zákazníčka, vážený zákazník,
Pre tento prístroj platí záruka 3 roky od
dátumu zakúpenia.
Ak je prístroj poškodený, podľa zákona
máte právo ho reklamovať u výrobcu pro-
duktu. Tieto práva vyplývajúce zo zákona
nie sú našou následne opísanou zárukou
obmedzené.
Záručné podmienky
Záručná lehota začína dňom zakúpenia.
Pokladničný doklad ako originál prosím
starostlivo uschovajte. Je potrebný ako dô-
kaz o zakúpení.
Ak sa počas troch rokov od dátumu zakú-
penia tohto produktu vyskytne materiálna
alebo výrobná chyba, produkt - podľa
nášho rozhodnutia - bezplatne opravíme
alebo nahradíme. Predpokladom záruky
je, že v priebehu trojročnej lehoty bude
predložený poškodený prístroj a pokladnič-
ný doklad a stručne opísaná chyba a kedy
sa vyskytla.
Ak sa v rámci našej záruky chyba pokryje,
obdržíte späť opravený alebo nový prístroj.
S opravou alebo výmenou produktu sa ne-
začína nová záručná doba.

78
SK
Záručná doba a nárok na odstrá-
nenie vady
Záručná doba sa poskytnutím záruky
nepredlžuje. To platí aj pre nahradené
a opravené diely. Prípadné škody a ne-
dostatky vzniknuté už pri zakúpení sa
musia ihneď po vybalení ohlásiť. Opravy
vykonané po uplynutí záručnej doby sú
spoplatnené.
Rozsah záruky
Prístroj bol vyrobený podľa prísnych smer-
níc kvality a pred dodaním bol svedomite
kontrolovaný.
Záruka sa týka materiálových alebo výrob-
ných chýb. Táto záruka sa nevzťahuje na
diely produktu, ktoré sú vystavené normál-
nemu opotrebeniu a preto sa môžu pova-
žovať za opotrebované diely (napr. fi lter
alebo nadstavce) alebo na poškodenia na
krehkých dieloch (napr. vypínač).
Táto záruka zaniká, ak bol produkt po-
užívaný poškodený, neodborne alebo
nebola vykonávaná údržba. Pre odborné
používanie produktu je nutné presne do-
držiavať všetky návody uvedené v návode
na obsluhu. Bezpodmienečne sa vyhnite
používaniu, ktoré sa v návode na obsluhu
neodporúča alebo pred ktorým ste boli
vystríhaní.
Produkt je určený len pre súkromné pou-
žitie a nie v oblasti podnikania. Záruka
zaniká pri nesprávnom a neodbornom
používaní, pri násilnom používaní a pri
zásahoch, ktoré neboli vykonané v našej
servisnej pobočke.
Postup v prípade reklamácie
Pre zabezpečenie rýchleho spracovania
vašej žiadosti postupujte prosím podľa na-
sledujúcich pokynov:
• Pri všetkých požiadavkách predložte
pokladničný doklad a číslo artiklu
(IAN317189_1904) ako dôkaz o za-
kúpení.
• Číslo artiklu nájdete na typovom štítku.
• Ak sa vyskytnú chyby funkcie alebo
iné nedostatky, kontaktujte najskôr
následne uvedené servisné oddelenie
telefonicky alebo emailom. Následne
obdržíte ďalšie informácie o priebehu
vašej reklamácie.
• Produkt evidovaný ako poškodený mô-
žete po dohode s našim zákazníckym
servisom, s priloženým dokladom o za-
kúpení (pokladničný doklad) a s údaj-
mi, v čom chyba spočíva a kedy vznik-
la, zaslať bez poštovného na adresu
servisu, ktorá vám bude oznámená.
Pre zabránenie dodatočných nákladov
a problémov pri prevzatí použite len
tú adresu, ktorá vám bude oznámená.
Nezasielajte prístroj ako nadmerný
tovar na náklady príjemcu, expresne
alebo s iným špeciálnym nákladom.
Prístroj zašlite so všetkými časťami
príslušenstva dodanými pri zakúpení
a zabezpečte dostatočne bezpečné
prepravné balenie.

79
SK
Náhradné diely / Príslušenstvo
Náhradné diely a príslušenstvo nájdete na strane
www.grizzly-service.eu
Ak by sa mali vyskytnúť problémy s procesom objednávky, použite, prosím, kontaktný
formulár. Pri ďalších otázkach sa obráťte na „Service-Center“ (pozri stranu 79).
Pol. Pol. Označenie Použitie Č. Artiklu
Návod na Nákresy
obsluhu explózií
12 8 Nasávacia hadica 91105189
23 2 Skladaný fi lter 91105185
22 3 Uzáver skladaného fi ltra 91105186
10 9 Trojdielna nasávacia rúra 91099439
Papierový vreckový fi lter, 5 kusov 30250146
19 14 Papierový vreckový fi lter, 1 kus 30250147
Servisná oprava
Opravy, ktoré nepodliehajú záruke, mô-
žeme nechať vykonať v našej servisnej
pobočke za úhradu. Radi vám poskytneme
predbežnú kalkuláciu nákladov.
Môžeme spracovať len prístroje, ktoré boli
doručené dostatočne zabalené a so zapla-
teným poštovným.
Pozor: Prístroj zašlite do našej servisnej po-
bočky vyčistený a s informáciami o chybe.
Neprevezmeme prístroje zaslané ako nad-
merný tovar na náklady príjemcu, expres-
ne alebo s iným špeciálnym nákladom.
Likvidáciu vašich poškodených zaslaných
prístrojov vykonáme bezplatne.
Service-Center
SK
Servis Slovensko
Tel.: 0850 232001
E-Mail: [email protected]
IAN 317189_1904
Dovozca
Nasledujúca adresa nie je adresa servisu.
Najskôr kontaktujte hore uvedené servisné
centrum.
Grizzly Tools GmbH & Co. KG
Stockstädter Straße 20
DE-63762 Großostheim
Nemecko
www.grizzly-service.eu

80

81
DE AT CH
Original EG-Konformitätserklärung
Hiermit bestätigen wir, dass der
Akku-Nass-Trockensauger
Baureihe PNTSA 20-Li B1
Seriennummer
201909000001 - 201912008955
folgenden einschlägigen EU-Richtlinien in ihrer jeweils gültigen Fassung entspricht:
2014/30/EU • 2014/35/EU • 2011/65/EU*
Um die Übereinstimmung zu gewährleisten, wurden folgende harmonisierte Normen
sowie nationale Normen und Bestimmungen angewendet:
EN 60335-1:2012/A13:2017 • EN 60335-2-2:2010/A1:2013
EN 55014-1:2017 • EN 55014-2:2015
EN 62233:2008 • EN 62321-1:2013
Die alleinige Verantwortung für die Ausstellung dieser Konformitätserklärung (19)**
trägt der Hersteller:
Christian Frank
Dokumentationsbevollmächtigter
Grizzly Tools GmbH & Co. KG
Stockstädter Straße 20
63762 Großostheim, Germany
20.12.2019
* Der oben beschriebene Gegenstand der Erklärung erfüllt die Vorschriften der Richtlinie
2011/65/EU des Europäischen Parlaments und des Rates vom 8. Juni 2011 zur Beschränkung
der Verwendung bestimmter gefährlicher Stoffe in Elektro- und Elektronikgeräten.
** Die beiden letzten Ziffern des Jahres, in dem die CE-Kennzeichnung angebracht wurde.

82
GB IE
Translation of the original
EC declaration of conformity
We hereby declare that the
Cordless Wet & Dry Vacuum Cleaner
model series PNTSA 20-Li B1
Serial number
201909000001 - 201912008955
conforms with the following applicable relevant version of the EU guidelines:
2014/30/EU • 2014/35/EU • 2011/65/EU*
In order to guarantee consistency, the following harmonised standards as well as
national standards and stipulations have been applied:
EN 60335-1:2012/A13:2017 • EN 60335-2-2:2010/A1:2013
EN 55014-1:2017 • EN 55014-2:2015
EN 62233:2008 • EN 62321-1:2013
This declaration of conformity (19)** is issued under the sole responsibility of the
manufacturer:
Christian Frank
Documentation Representative
Grizzly Tools GmbH & Co. KG
Stockstädter Straße 20
63762 Großostheim, Germany
20.12.2019
* The object of the declaration described above satisfi es the provisions of Directive 2011/65/EU
of the European Parliament and the Council of 8 June 2011 on limiting the use of certain harmful
substances in electrical and electronic appliances.
** The last two digits of the year in which the CE marking was affi xed.

83
FR BE
Traduction de la déclaration
de conformité CE originale
Nous certifi ons par la présente que le
Aspirateur eau/poussiere sans fi l
série PNTSA 20-Li B1
Numéro de série
201909000001 - 201912008955
est conforme aux directives UE actuellement en vigueur :
2014/30/EU • 2014/35/EU • 2011/65/EU*
En vue de garantir la conformité les normes harmonisées ainsi que les normes et déci-
sions nationales suivantes ont été appliquées :
EN 60335-1:2012/A13:2017 • EN 60335-2-2:2010/A1:2013
EN 55014-1:2017 • EN 55014-2:2015
EN 62233:2008 • EN 62321-1:2013
Le fabricant assume seul la responsabilité d‘établir la présente déclaration de
conformité (19)** :
Christian Frank
(Chargé de documentation)
Grizzly Tools GmbH & Co. KG
Stockstädter Straße 20
63762 Großostheim, Germany
20.12.2019
* L‘objet de la déclaration décrit ci-dessus est conforme aux dispositions de la directive
2011/65/EU du Parlement Européen et du Conseil du 8 juin 2011 sur la limitation de l‘utilisation
de certaines substances dangereuses dans les équipements électriques et électroniques.
** Les deux derniers chiffres de l‘année dans laquelle le marquage CE a été fi xé.

84
NL BE
Vertaling van de originele
CE-conformiteitsverklaring
Hiermede bevestigen wij dat de
Accu-nat-/droogzuiger
bouwserie PNTSA 20-Li B1
Serienummer
201909000001 - 201912008955
is overeenkomstig met de hierna volgende, van toepassing zijnde EU-richtlijnen:
2014/30/EU • 2014/35/EU • 2011/65/EU*
Om de overeenstemming te waarborgen, werden de hierna volgende, in overeenstem-
ming gebrachte normen en nationale normen en bepalingen toegepast:
EN 60335-1:2012/A13:2017 • EN 60335-2-2:2010/A1:2013
EN 55014-1:2017 • EN 55014-2:2015
EN 62233:2008 • EN 62321-1:2013
De exclusieve verantwoordelijkheid voor de uitgifte van deze conformiteitsverklaring
(19)** wordt gedragen door de fabrikant:
Christian Frank
Documentatiegelastigde
Grizzly Tools GmbH & Co. KG
Stockstädter Straße 20
63762 Großostheim, Germany
20.12.2019
* Het hierboven beschreven voorwerp van de verklaring voldoet aan de voorschriften van de
richtlijn 2011/65/EU van het Europese Parlement en van de Raad van 8 juni 2011 inzake beper-
king van het gebruik van bepaalde gevaarlijke stoffen in elektrische en elektronische apparaten.
** De beide laatste cijfers van het jaar waarin de CE-markering werd aangebracht.

85
PL
Tłumaczenie oryginalnej
deklaracji zgodności WE
Niniejszym oświadczamy, że:
Akumulatorowy odkurzacz na mokro i sucho
typoszereg, PNTSA 20-Li B1
numer seryjny
201909000001 - 201912008955
spełnia wymogi odpowiednich Dyrektyw UE w ich aktualnie obowiązującym
brzmieniu:
2014/30/EU • 2014/35/EU • 2011/65/EU*
W celu zapewnienia zgodności z powyższymi dyrektywami zastosowano następujące
normy harmonizujące oraz normy i przepisy krajowe:
EN 60335-1:2012/A13:2017 • EN 60335-2-2:2010/A1:2013
EN 55014-1:2017 • EN 55014-2:2015
EN 62233:2008 • EN 62321-1:2013
Wyłączną odpowiedzialność za wystawienie tej deklaracji zgodności (19)** ponosi
producent:
Christian Frank
Osoba upoważniona do sporządzania doku-
mentacji technicznej
Grizzly Tools GmbH & Co. KG
Stockstädter Straße 20
63762 Großostheim, Germany
20.12.2019
* Wyżej opisany przedmiot deklaracji spełnia wymogi dyrektywy 2011/65/UE Parlamentu
Europejskiego i Rady z dnia 8 czerwca 2011r. w sprawie ograniczenia stosowania niektórych
niebezpiecznych substancji w sprzęcie elektrycznym i elektronicznym.
** Dwie ostatnie cyfry roku nadania znaku CE.

86
CZ
Překlad originálního
prohlášení o shodě CE
Potvrzujeme tímto, že tento
Aku vysavac na mokré a suché vysávání
konstrukční řady PNTSA 20-Li B1
Pořadové číslo
201909000001 - 201912008955
odpovídá následujícím příslušným směrnicím EÚ v jejich právě platném znění:
2014/30/EU • 2014/35/EU • 2011/65/EU*
Aby byl zaručen souhlas, byly použity následující harmonizované normy, národní nor-
my a ustanovení:
EN 60335-1:2012/A13:2017 • EN 60335-2-2:2010/A1:2013
EN 55014-1:2017 • EN 55014-2:2015
EN 62233:2008 • EN 62321-1:2013
Výhradní odpovědnost za vystavení tohoto prohlášení o shodě (19)** nese výrobce:
Christian Frank
Osoba zplnomocněná k sestavení dokumentace
Grizzly Tools GmbH & Co. KG
Stockstädter Straße 20
63762 Großostheim, Germany
20.12.2019
* Výše popsaný předmět prohlášení splňuje předpisy směrnice 2011/65/EU Evropského par-
lamentu a Rady z 8. června 2011 o omezení používání některých nebezpečných látek v elekt-
rických a elektronických zařízeních.
** Obě poslední číslice roku, kdy bylo uvedeno označení CE.

87
SK
Preklad originálneho
prehlásenia o zhode CE
Potvrdzujeme týmto, že tento
Akumulátorový vysávac na mokré a suché vysávanie
konštrukčnej série PNTSA 20-Li B1
Poradové číslo
201909000001 - 201912008955
zodpovedá nasledujúcim príslušným smerniciam EÚ v ich práve platnom znení:
2014/30/EU • 2014/35/EU • 2011/65/EU*
Aby bola zaručená zhoda, boli použité nasledovné harmonizované normy ako i
národné normy a predpisy:
EN 60335-1:2012/A13:2017 • EN 60335-2-2:2010/A1:2013
EN 55014-1:2017 • EN 55014-2:2015
EN 62233:2008 • EN 62321-1:2013
Jediný zodpovedný za vystavenie tohto vyhlásenia o zhode (19)** je výrobca:
Christian Frank
Osoba splnomocnená na zostavenie
dokumentácie
Grizzly Tools GmbH & Co. KG
Stockstädter Straße 20
63762 Großostheim, Germany
20.12.2019
* Vyššie popísaný predmet vyhlásenia spĺňa predpisy smernice 2011/65/EU Európskeho parla-
mentu a Rady z 8. júna 2011 pre obmedzenie používania určitých nebezpečných látok v elekt-
rických a elektronických prístrojoch.
** Obe posledné číslice roka, v ktorom bolo pripojené označenie CE.

88
PNTSA 20-Li B1
Explosionszeichnung • Exploded Drawing
Vue éclatée • Explosietekening
Rysunek samorozwijający • Rozvinuté náčrtky
Výkres náhradných dielov
informativ, informative, informatif, informatief, pouczający, informační, informatívny

89
2019-11-28-rev02-ts

22
25
26
6
23
1
8
5 196
12
5
912
24


GRIZZLY TOOLS GMBH & CO. KG
Stockstädter Straße 20
DE-63762 Großostheim
GERMANY
Stand der Informationen · Last Information
Update · Version des informations ·
Stand van de informatie · Stan informacji ·
Stav informací · Stav informácií: 10/2019
Ident.-No.: 72079670102019-8
IAN 317189_1904
Documenttranscriptie
Akku-Nass-/Trockensauger / Cordless Wet/Dry Vacuum Cleaner / Aspirateur eau/poussière sans fil PNTSA 20-Li B1 Akku-Nass-/Trockensauger Originalbetriebsanleitung Cordless Wet/Dry Vacuum Cleaner Translation of the original instructions Aspirateur eau/poussière sans fil Traduction des instructions d‘origine Accu-nat-/droogzuiger Vertaling van de originele gebruiksaanwijzing Akumulatorowy odkurzacz do pracy na mokro/sucho Tłumaczenie oryginalnej instrukcji obsługi Aku vysavač na mokré a suché vysávání Překlad originálního provozního návodu Aku vysávač na mokré a suché vysávanie Preklad originálneho návodu na obsluhu IAN 317189_1904 Klappen Sie vor dem Lesen die Seite mit den Abbildungen aus und machen Sie sich anschließend mit allen Funktionen des Gerätes vertraut. Before reading, unfold the page containing the illustrations and familiarise yourself with all functions of the device. Avant de lire le mode d‘emploi, ouvrez la page contenant les illustrations et familiarisez-vous ensuite avec toutes les fonctions de l‘appareil. Vouw vóór het lezen de pagina met de afbeeldingen open en maak u vertrouwd met alle functies van het apparaat. Przed przeczytaniem proszę rozłożyć stronę z ilustracjami, a następnie proszę zapoznać się z wszystkimi funkcjami urządzenia. Před čtením si otevřete stranu s obrázky a potom se seznamte se všemi funkcemi přístroje. Pred čítaním si odklopte stranu s obrázkami a potom sa oboznámte so všetkými funkciami prístroja. DE / AT / CH GB / IE FR / BE NL / BE PL CZ SK Originalbetriebsanleitung Translation of the original instructions Traduction des instructions d‘origine Vertaling van de originele gebruiksaanwijzing Tłumaczenie oryginalnej instrukcji obsługi Překlad originálního provozního návodu Preklad originálneho návodu na obsluhu Seite Page Page Pagina Strona Strana Strana XX4 XX 15 25 XX 38 XX 49 XX 60 XX 70 XX 1 2 3 4 10 11 9 8 12 5 6 13 7 14 15 16 17 20 18 19 21 DE AT CH Inhalt Einleitung Einleitung .....................................4 Bestimmungsgemäße Verwendung ................................4 Allgemeine Beschreibung .............5 Lieferumfang....................................5 Übersicht ........................................5 Funktionsbeschreibung ......................6 Technische Daten ..........................6 Sicherheitshinweise ......................6 Bildzeichen in der Anleitung ..............6 Bildzeichen auf dem Gerät ................7 Allgemeine Sicherheitshinweise .........7 Zusammenbau .............................8 Bedienung ...................................8 Ein-/Ausschalten ..............................8 Ladezustand prüfen ..........................8 Akku entnehmen/einsetzen ...............8 Einsatz der Düsen ............................9 Nass-Saugen ...................................9 Trockensaugen .................................9 Saugfunktion ...................................9 Blasfunktion ...................................10 Reinigung/Wartung ...................10 Gerät reinigen ...............................10 Wartung .......................................10 Aufbewahrung ..........................10 Entsorgung/Umweltschutz..........10 Ersatzteile/Zubehör ...................11 Fehlersuche ................................12 Garantie ....................................13 Reparatur-Service ......................14 Service-Center ............................14 Importeur ..................................14 Original EG-Konformitätserklärung ..................................81 Explosionszeichnung ..................88 Herzlichen Glückwunsch zum Kauf Ihres neuen Gerätes. Sie haben sich damit für ein hochwertiges Produkt entschieden. Dieses Gerät wurde während der Produktion auf Qualität geprüft und einer Endkontrolle unterzogen. Die Funktionsfähigkeit Ihres Gerätes ist somit sichergestellt. Es ist nicht auszuschließen, dass sich in Einzelfällen am oder im Gerät, bzw. in Schlauchleitungen Restmengen von Wasser befinden. Dies ist kein Mangel oder Defekt und kein Grund zur Besorgnis. 4 Die Betriebsanleitung ist Bestandteil dieses Produkts. Sie enthält wichtige Hinweise für Sicherheit, Gebrauch und Entsorgung. Machen Sie sich vor der Benutzung des Produkts mit allen Bedien- und Sicherheitshinweisen vertraut. Benutzen Sie das Produkt nur wie beschrieben und für die angegebenen Einsatzbereiche. Bewahren Sie die Anleitung gut auf und händigen Sie alle Unterlagen bei Weitergabe des Produkts an Dritte mit aus. Bestimmungsgemäße Verwendung Das Gerät ist zum Nass- und Trockensaugen im häuslichen Bereich wie z. B. im Haushalt, im Hobbyraum, im Auto oder in der Garage bestimmt. Das Gerät ist auch als Gebläse oder zum Absaugen von Wasser einsetzbar. Das Aufsaugen von brennbaren, explosiven oder gesundheitsgefährdenden Stoffen ist verboten. Das Gerät ist für den Einsatz im Heimwerkerbereich bestimmt. Es wurde nicht für den gewerblichen Dauereinsatz konzipiert. Das Gerät ist Teil der Serie Parkside DE X 20 V TEAM und kann mit dem Akku des X 20 V TEAM betrieben werden. Die Akkus dürfen nur mit Ladegeräten der Serie Parkside X 20 V TEAM geladen werden. Der Hersteller haftet nicht für Schäden, die durch bestimmungswidrigen Gebrauch oder falsche Bedienung verursacht wurden. Allgemeine Beschreibung Die Abbildungen finden Sie auf der vorderen und hinteren Ausklappseite. Lieferumfang Packen Sie das Gerät aus und kontrollieren Sie, ob es vollständig ist: Das Gerät wird mit aufgesetztem Motorkopf ( 1) geliefert. Zum Abnehmen des Motorkopfes öffnen Sie die Verschlussclips ( 8). - - Motorkopf Schmutzbehälter Dreiteiliges Saugrohr Saugschlauch Handgriffteil Papierfilterbeutel Faltenfilter Haushaltsdüse Bodendüse mit drehbarem Steckaufsatz mit Bürste und Gummilippe zum Saugen von Teppichen und glatten Flächen (bereits montiert) Fugendüse Wandhalterung 2 Kreuzschlitzschrauben 4 Rollen Betriebsanleitung Nass- und Trockensauger AT CH Akku und Ladegerät sind nicht im Lieferumfang enthalten. Entsorgen Sie das Verpackungsmaterial ordnungsgemäß. Übersicht 1 2 3 4 5 6 7 8 9 10 11 12 13 14 15 16 17 18 19 20 21 Motorkopf Tragegriff Ein-/Ausschalter Abdeckung Akkuschacht Anschluss Saugen Schmutzbehälter Haken für Wandhalterung 2 Verschlussclips Anschluss Blasen (nicht sichtbar) Dreiteiliges Saugrohr Handgriffteil Saugschlauch Wandhalterung Befestigungsschrauben für Wandhalterung Fugendüse Haushaltsdüse Bodendüse mit drehbarem Steckaufsatz mit Bürste und Gummilippe zum Saugen von Teppichen und glatten Flächen (bereits montiert) Papierfilterbeutel Akku Ladegerät 22 Verschluss Faltenfilter 23 Faltenfilter 24 Zubehöraufnahme 25 Rolle 26 Steckaufnahme 5 DE AT CH Funktionsbeschreibung Das Gerät ist mit einem stabilen Kunststoffbehälter zur Schmutzaufnahme ausgestattet. Beim Nass-Saugen erfolgt die Abschaltung des Saug-Luftstroms durch einen Schwimmer, wenn der Schmutzbehälter voll ist. Zusätzlich besitzt das Gerät eine Blasfunktion. Die Laufrollen erlauben eine große Wendigkeit des Gerätes. Die Funktion der Bedienteile entnehmen Sie bitte den nachfolgenden Beschreibungen. Technische Daten Akku-Nass/ Trockensauger ....... PNTSA 20-Li B1 Bemessungsspannung U ............... 20 V Schutzart.........................................IPX4 Saugleistung .................. 9 kPA (90 mbar) Inhalt des Schmutzbehälters (brutto) .... 10 l Nutzbares Behältervolumen (Wasser) ..... 4 l Gewicht (ohne Zubehör) .......... ca. 2,7 kg Gewicht (nur Zubehör) ............. ca. 1,8 kg Akku (Li-Ion) ................. PAP 20 A3 Anzahl der Batteriezellen ....................10 Nennspannung ........................... 20 V Kapazität ....................................4,0 Ah Energie .......................................80 Wh Ladezeit ....................................ca. 1 h* Temperatur ............................ max 50 °C Ladevorgang ........................ 4 - 40 °C Betrieb ...............................-20 - 50 °C Lagerung ............................. 0 - 45 °C * Die angegebene Ladezeit wird nur mit dem beigefügten Schnellladegerät erreicht. Ladegerät ......................PLG 20 A3 Nennaufnahme ........................... 120 W Eingangsspannung .... 230-240 V~, 50 Hz Ausgangsspannung .................. 21,5 V Ausgangsstrom ..............................4,5 A Schutzklasse .................................... II 6 Gerätesicherung ......................... T3.15A Schutzart.........................................IPX0 Achtung! Eine aktuelle Liste der Akkukompatibilität finden Sie unter: www.lidl.de/akku Dieses Gerät kann ausschließlich mit folgenden Akkus betrieben werden: PAP 20 A1, PAP 20 A2, PAP 20 A3. Diese Akkus dürfen mit folgenden Ladegeräten geladen werden: PLG 20 A1, PLG 20 A3, PDSLG 20 A1. Sicherheitshinweise Dieses Gerät kann von Kindern ab 8 Jahren und darüber sowie von Personen mit verringerten physischen, sensorischen oder mentalen Fähigkeiten oder Mangel an Erfahrung und Wissen benutzt werden, wenn sie beaufsichtigt oder bezüglich des sicheren Gebrauchs des Gerätes unterwiesen wurden und die daraus resultierenden Gefahren verstehen. Kinder dürfen nicht mit dem Gerät spielen. Reinigung und Benutzer-Wartung dürfen nicht von Kindern ohne Beaufsichtigung durchgeführt werden. Bildzeichen in der Anleitung Gefahrenzeichen mit Angaben zur Verhütung von Personenoder Sachschäden. DE AT CH Gebotszeichen mit Angaben zur Verhütung von Schäden. • Richten Sie Saugschlauch und Düsen während des Betriebs keinesfalls auf sich selbst oder andeHinweiszeichen mit Informatiore Personen, insbesondere nicht nen zum besseren Umgang mit auf Augen und Ohren. Es besteht dem Gerät. Verletzungsgefahr. • Saugen Sie keine heißen, glüBildzeichen auf dem Gerät henden, brennbaren, explosiven oder gesundheitsgefährdenden Dieses Gerät ist Teil des Stoffe auf. Dazu zählen unter Parkside X 20 V TEAM. anderem heiße Asche, Benzin, Lösungsmittel, Säuren oder LauElektrogeräte gehören nicht in gen. Es besteht Brand- und Verletden Hausmüll. zungsgefahr. • Düsen und Saugrohr dürfen beim Es besteht Brandgefahr, wenn Arbeiten nicht in Kopfhöhe komdas Sauggut eine Temperatur men. Es besteht Verletzungsgevon 40°C (104°F) überschreifahr. tet! So vermeiden Sie Unfälle und VerletLadezustandsanzeige am zungen durch elektrischen Schlag: Gerät • Schalten Sie das Gerät aus und Verschlussclip öffnen und entnehmen Sie den Akku: schließen - wenn Sie das Gerät nicht benutzen, es transportieren oder Allgemeine unbeaufsichtigt lassen; Sicherheitshinweise - wenn Sie das Gerät kontrollieren, es reinigen oder BlockieAchtung! Beim Gebrauch von rungen entfernen; Elektrogeräten sind zum Schutz - wenn Sie Reinigungs- oder gegen elektrischen Schlag, Wartungsarbeiten vornehmen Verletzungs- und Brandgefahr oder Zubehör auswechseln; folgende grundsätzliche Sicher- nach dem Kontakt mit Fremdheitsmaßnahmen zu beachten: körpern oder bei abnormaler Vibration. So vermeiden Sie Unfälle und Verletzungen: So vermeiden Sie Geräteschäden • Hinterlassen Sie ein betriebsberei- und eventuell daraus resultierende tes Gerät nie unbeaufsichtigt am Personenschäden: Arbeitsplatz. • Achten Sie darauf, dass das • Menschen und Tiere dürfen mit Gerät korrekt zusammengebaut dem Gerät nicht abgesaugt werist und die Filter in der richtigen den. Position sind. C 7 DE AT CH • Arbeiten Sie nicht ohne Filter. Das Gerät könnte beschädigt werden. • Verwenden Sie kein Zubehör welches nicht von PARKSIDE empfohlen wurde. Die kann zu elektrischem Schlag oder Feuer führen. • Lassen Sie Reparaturen nur von uns ermächtigten Kundendienststellen ausführen. • Beachten Sie die Hinweise zur Reinigung und Wartung des Gerätes. • Bewahren Sie das Gerät an einem trockenen Ort und außerhalb der Reichweite von Kindern auf. Beachten Sie die Sicherheitshinweise und Hinweise zum Aufladen und der korrekten Verwendung, die in der Betriebsanleitung Ihres Akkus und Ladegeräts der Serie Parkside X 20 V Team gegeben sind. Eine detaillierte Beschreibung zum Ladevorgang und weitere Informationen finden Sie in dieser separaten Bedienungsanleitung. Achtung! Beachten Sie die Sicherheitshinweise, die in der Betriebsanleitung Ihres Akkus der Serie Parkside X 20 V Team gegeben sind. Zusammenbau 1. Drücken Sie die vier Rollen ( 25) in die Steckaufnahmen ( 26), an der Unterseite des Schmutzbehälters (6), bis sie einrasten. 8 2. Setzen Sie den Papierfilterbeutel (19) ein (siehe Trockensaugen - Papierfilterbeutel einsetzten): 3. Setzen Sie den Motorkopf ( 1) auf den Schmutzbehälter ( 6) auf und verschließen Sie ihn mit den Verschlussclips ( 8). 4. Schließen Sie den Saugschlauch (12) und Zubehör an. Bedienung Wickeln Sie den Saugschlauch ( 12) zum Arbeiten ganz ab. Ein-/Ausschalten Einschalten: Ein-/Ausschalter ( Ausschalten: Ein-/Ausschalter ( 3) in Stellung „I“. 3) in Stellung „0“. Ladezustand prüfen Die Ladezustandsanzeige am Gerät gibt, während das Gerät läuft, Auskunft über den Ladezustand des Akkus. LED leuchtet grün: Akku geladen LED leuchtet gelb: Akku teilweise geladen LED leuchtet rot: Ladezustand niedrig LED blinkt rot: Akku muss geladen werden Akku entnehmen/einsetzen 1. Zum Herausnehmen des Akkus (4) aus dem Gerät drücken Sie die Entriegelungstaste (1) am Akku und ziehen den Akku heraus. 2. Zum Einsetzen des Akkus (4) schieben Sie den Akku entlang der Führungsschiene in das Gerät. Er rastet hörbar ein. DE Setzen Sie den Akku erst ein, wenn das Akku-Werkzeug vollständig für den Einsatz vorbereitet ist. Einsatz der Düsen Fugendüse ( 15): zum Saugen von Fugen, Ecken und Heizkörpern. Haushaltsdüse ( 16) zum Nass- und Trockensaugen, zum Entfernen von hartnäckigem Schmutz. Bodendüse ( 17) mit Steckaufsatz ( 18): zum Nass- und Trockensaugen von glatten Flächen und Teppichböden. Bodendüse ( 17) ohne Steckaufsatz ( 18): zum Nass- und Trockensaugen, zum Entfernen von hartnäckigem Schmutz. • Drücken Sie die Laschen rechts und links an der Bodendüse ( 17) und nehmen Sie den Steckaufsatz ( 18) ab. Achten Sie darauf, dass empfindliche Oberflächen beim Arbeiten ohne Steckaufsatz verkratzt werden können. Nass-Saugen 1. Entfernen Sie den Papierfilter (19) und den Faltenfilter ( 23). 2. Absaugen (Abpumpen): Tauchen Sie den Saugschlauch (12) am Handgriffteil (11) in das Wasserbehältnis ein und saugen Sie das Wasser ab. 3. Entleeren Sie den Schmutzbehälter sofort nach dem Absaugen, da er nicht AT CH zum Aufbewahren von Flüssigkeiten konstruiert ist (siehe „Reinigung/Wartung“). Stellen Sie sich nicht in das abzusaugende Wasser. Gefahr durch elektrischen Schlag. Ist der Schmutzbehälter voll, schließt ein Schwimmer die Saugöffnung, der Saugvorgang wird unterbrochen. Schalten Sie das Gerät ab und leeren Sie den Schmutzbehälter. Schalten Sie das Gerät bei Schaumoder Flüssigkeitsaustritt sofort aus. Trockensaugen Saugen mit dem Papierfilterbeutel: Papierfilterbeutel einsetzen Stülpen Sie den Papierfilterbeutel (19) mit der Verstärkung nach oben über den innen liegenden Einsaugstutzen (siehe Pfeil ). Der Dichtungsring an der Filterbeutelöffnung muss den Steg am Einsaugstutzen vollständig umschließen. Saugen von Feinstäuben: Bei bestimmten Absaugvorgängen (z. B. Schleifen von Farben und Lacken, Fräsen oder Bohren von Mauerwerk, Schleifen oder Bohren von Hartholz) können gesundheitsschädliche Stäube entstehen. Saugfunktion Zum Saugen stecken Sie den Saugschlauch (12) auf den Anschluss (5) am Motorkopf. 9 DE AT CH Blasfunktion Die Blasfunktion ist ohne Verwendung eines Filters zu empfehlen. - weite von Kindern auf. Sie können das Gerät am Haken für Wandhalterung ( 7) an der Wandhalterung ( 13) aufhängen. Hängen Sie das Gerät nicht mit einer schweren Füllung (z.B. mit aufgesaugtem Wasser) in die Wandhalterung ein. Zum Blasen stecken Sie den Saugschlauch (12) auf den Anschluss (9) am Motorkopf. Reinigung/Wartung Gerät reinigen Spritzen Sie das Gerät nicht mit Wasser ab und verwenden Sie keine scharfen Reinigungs- bzw. Lösungsmittel. Das Gerät könnte beschädigt werden. • • • • Leeren Sie nach dem Betrieb den Schmutzbehälter ( 6) aus. Reinigen Sie den Schmutzbehälter mit einem feuchten Lappen. Tauschen Sie einen vollen Papierfilterbeutel ( 19) aus (Nachbestellung siehe „Ersatzteile/Zubehör“). Klopfen Sie den Faltenfilter aus und reinigen Sie ihn mit einem Pinsel oder Handfeger. Wartung • Das Gerät ist wartungsfrei. Aufbewahrung - - - 10 Stecken Sie die zerlegten Saugrohre ( 10) in die Zubehöraufnahme ( 24). Wickeln Sie den Saugschlauch ( 12) um das Gerät und stecken Sie das Handgriffteil ( 11) in ein Saugrohr ( 10). Bewahren Sie das Gerät an einem trockenen Ort und außerhalb der Reich- Bringen Sie dazu die Wandhalterung ( 13) mit den zwei Schrauben ( 14) und der Hilfe von Dübeln an einer Wand an. Überprüfen Sie den festen Sitz der Wandhalterung ( 13) direkt nach der Montage und in Folge regelmäßig. Achten Sie beim Bohren darauf, keine Versorgungsleitungen zu beschädigen. Verwenden Sie geeignete Suchgeräte, um diese aufzuspüren oder nehmen Sie einen Installationsplan zu Hilfe. Kontakt mit Elektroleitungen kann zu elektrischem Schlag und Feuer, Kontakt einer Gasleitung zur Explosion führen. Beschädigung einer Wasserleitung kann zu Sachbeschädigung und elektrischem Schlag führen. Entsorgung/ Umweltschutz Nehmen Sie den Akku aus dem Gerät und führen Sie Gerät, Akku, Zubehör und Verpackung einer umweltgerechten Wiederverwertung zu. DE AT CH Elektrische Geräte gehören nicht in den Hausmüll. • • Geben Sie das Gerät und das Ladegerät an einer Verwertungsstelle ab. Die verwendeten Kunststoff- und Metallteile können sortenrein getrennt werden und so einer Wiederverwertung zugeführt werden. Fragen Sie hierzu unser Service-Center. Die Entsorgung Ihrer defekten, eingesendeten Geräte führen wir kostenlos durch. Ersatzteile/Zubehör Ersatzteile und Zubehör erhalten Sie unter www.grizzly-service.eu Sollten Sie Probleme mit dem Bestellvor-gang haben, verwenden Sie bitte das Kontaktformular. Bei weiteren Fragen wenden Sie sich an das „Service-Center“ (siehe Seite 14). Position Betriebsanleitung Position Explosionszeichnung Bezeichnung Bestell-Nr. 12 8 Saugschlauch 91105189 23 2 Faltenfilter 91105185 22 3 Verschluss Faltenfilter 91105186 10 9 Saugrohr (3teilig) 91099439 19 14 Papierfilterbeutel, 5er Pack 30250146 Papierfilterbeutel, 1 Stück 30250147 11 DE AT CH Fehlersuche Problem Mögliche Ursache Ein-/Ausschalter ( Gerät startet nicht Fehlerbehebung 3) defekt Kohlebürsten abgenutzt Reparatur durch Kundendienst Motor defekt Saugschlauch ( 12) oder Dü- Verstopfungen und Blockierungen beseitigen sen ( 15/16/17) verstopft Geringe oder fehlende Saugleistung Staub oder Schmutz wird aus dem Gerät geblasen 12 Saugrohr ( 10) nicht korrekt zusammengesetzt Saugrohr richtig zusammensetzen Schmutzbehälter ( 6) offen Behälter schließen Schmutzbehälter ( 6) voll Behälter entleeren 19/23) voll oder Filter ( zugesetzt Filter entleeren, reinigen oder ersetzen Filter ( 19/23) nicht oder nicht korrekt montiert Fehlenden Filter einsetzen oder korrekten Sitz des Filters prüfen DE Garantie Sehr geehrte Kundin, sehr geehrter Kunde, Sie erhalten auf dieses Gerät 3 Jahre Garantie ab Kaufdatum. Im Falle von Mängeln dieses Produkts stehen Ihnen gegen den Verkäufer des Produkts gesetzliche Rechte zu. Diese gesetzlichen Rechte werden durch unsere im Folgenden dargestellte Garantie nicht eingeschränkt. Garantiebedingungen Die Garantiefrist beginnt mit dem Kaufdatum. Bitte bewahren Sie den Original-Kassenbon gut auf. Diese Unterlage wird als Nachweis für den Kauf benötigt. Tritt innerhalb von drei Jahren ab dem Kaufdatum dieses Produkts ein Material- oder Fabrikationsfehler auf, wird das Produkt von uns – nach unserer Wahl – für Sie kostenlos repariert oder ersetzt. Diese Garantieleistung setzt voraus, dass innerhalb der DreiJahres-Frist das defekte Gerät und der Kaufbeleg (Kassenbon) vorgelegt und schriftlich kurz beschrieben wird, worin der Mangel besteht und wann er aufgetreten ist. Wenn der Defekt von unserer Garantie gedeckt ist, erhalten Sie das reparierte oder ein neues Produkt zurück. Mit Reparatur oder Austausch des Produkts beginnt kein neuer Garantiezeitraum. Garantiezeit und gesetzliche Mängelansprüche Die Garantiezeit wird durch die Gewährleistung nicht verlängert. Dies gilt auch für ersetzte und reparierte Teile. Eventuell schon beim Kauf vorhandene Schäden und Mängel müssen sofort nach dem Auspacken gemeldet werden. Nach Ablauf der Garantiezeit anfallende Reparaturen sind kostenpflichtig. AT CH Garantieumfang Das Gerät wurde nach strengen Qualitätsrichtlinien sorgfältig produziert und vor Anlieferung gewissenhaft geprüft. Die Garantieleistung gilt für Material- oder Fabrikationsfehler. Diese Garantie erstreckt sich nicht auf Produktteile, die normaler Abnutzung ausgesetzt sind und daher als Verschleißteile angesehen werden können (z. B. Filter oder Aufsätze) oder für Beschädigungen an zerbrechlichen Teilen (z. B. Schalter). Diese Garantie verfällt, wenn das Produkt beschädigt, nicht sachgemäß benutzt oder nicht gewartet wurde. Für eine sachgemäße Benutzung des Produkts sind alle in der Betriebsanleitung aufgeführten Anweisungen genau einzuhalten. Verwendungszwecke und Handlungen, von denen in der Betriebsanleitung abgeraten oder vor denen gewarnt wird, sind unbedingt zu vermeiden. Das Produkt ist lediglich für den privaten und nicht für den gewerblichen Gebrauch bestimmt. Bei missbräuchlicher und unsachgemäßer Behandlung, Gewaltanwendung und bei Eingriffen, die nicht von unserer autorisierten Service-Niederlassung vorgenommen wurden, erlischt die Garantie. Abwicklung im Garantiefall Um eine schnelle Bearbeitung Ihres Anliegens zu gewährleisten, folgen Sie bitte den folgenden Hinweisen: • Bitte halten Sie für alle Anfragen den Kassenbon und die Identifikationsnummer (IAN 317189_1904) als Nachweis für den Kauf bereit. • Die Artikelnummer entnehmen Sie bitte dem Typenschild, einer Gravur, auf dem Titelblatt Ihrer Anleitung (unten links) oder als Aufkleber auf der Rückoder Unterseite. 13 DE • • AT CH Sollten Funktionsfehler oder sonstige Mängel auftreten kontaktieren Sie zunächst die nachfolgend benannte Serviceabteilung telefonisch oder per E-Mail. Sie erhalten dann weitere Informationen über die Abwicklung Ihrer Reklamation. Ein als defekt erfasstes Produkt können Sie, nach Rücksprache mit unserem Kundenservice, unter Beifügung des Kaufbelegs (Kassenbons) und der Angabe, worin der Mangel besteht und wann er aufgetreten ist, für Sie portofrei an die Ihnen mitgeteilte Service-Anschrift übersenden. Um Annahmeprobleme und Zusatzkosten zu vermeiden, benutzen Sie unbedingt nur die Adresse, die Ihnen mitgeteilt wird. Stellen Sie sicher, dass der Versand nicht unfrei, per Sperrgut, Express oder sonstiger Sonderfracht erfolgt. Senden Sie das Gerät bitte inkl. aller beim Kauf mitgelieferten Zubehörteile ein und sorgen Sie für eine ausreichend sichere Transportverpackung. Reparatur-Service Sie können Reparaturen, die nicht der Garantie unterliegen, gegen Berechnung von unserer Service-Niederlassung durchführen lassen. Sie erstellt Ihnen gerne einen Kostenvoranschlag. Wir können nur Geräte bearbeiten, die ausreichend verpackt und frankiert eingesandt wurden. Achtung: Bitte senden Sie Ihr Gerät gereinigt und mit Hinweis auf den Defekt an unsere Service-Niederlassung. Nicht angenommen werden unfrei - per Sperrgut, Express oder mit sonstiger Sonderfracht - eingeschickte Geräte. Die Entsorgung Ihrer defekten eingesendeten Geräte führen wir kostenlos durch. 14 Service-Center DE Service Deutschland Tel.: 0800 54 35 111 E-Mail: [email protected] IAN 317189_1904 AT Service Österreich Tel.: 0820 201 222 (0,15 EUR/Min.) E-Mail: [email protected] IAN 317189_1904 CH Service Schweiz Tel.: 0842 665566 (0,08 CHF/Min., Mobilfunk max. 0,40 CHF/Min.) E-Mail: [email protected] IAN 317189_1904 Importeur Bitte beachten Sie, dass die folgende Anschrift keine Serviceanschrift ist. Kontaktieren Sie zunächst das oben genannte Service-Center. Grizzly Tools GmbH & Co. KG Stockstädter Straße 20 DE-63762 Großostheim DEUTSCHLAND www.grizzly-service.eu GB IE Content Introduction Introduction ...............................15 Application ................................15 General description ....................16 Contents .......................................16 Overview ......................................16 Functional description .....................17 Technical data ............................17 Safety information .....................17 Symbols used in the instructions .......17 Symbols on the device ....................18 General notes on safety ..................18 Assembly ...................................19 Operation ..................................19 Switching on/off ............................19 Check the charge level ...................19 Removing/inserting the battery ........19 Nozzle usage ................................20 Wet vacuuming .............................20 Dry vacuuming ..............................20 Suction function .............................20 Blowing ........................................20 Cleaning/Maintenance ...............21 Cleaning the appliance ..................21 Maintenance .................................21 Storage ......................................21 Disposal/Environmental protection ..................................21 Trouble shooting ........................22 Guarantee .................................22 Repair Service ............................23 Service-Center ............................24 Importer ....................................24 Replacement parts/Accessories ..24 Translation of the original EC declaration of conformity ...........82 Exploded Drawing .....................88 Congratulations on the purchase of your new device. With it, you have chosen a high quality product. During production, this equipment has been checked for quality and subjected to a final inspection. The functionality of your equipment is therefore guaranteed. It cannot be ruled out that residual quantities of water will remain on or in the equipment/ hose lines in isolated cases. This is not a fault or defect and it represents no cause for concern. The operating instructions constitute part of this product. They contain important information on safety, use and disposal. Before using the product, familiarise yourself with all of the operating and safety instructions. Use the product only as described and for the applications specified. Keep this manual safely and in the event that the product is passed on, hand over all documents to the third party. Application The appliance is intended for domestic wet and dry vacuuming in, for example, the house, work room, car or garage. The appliance can also be used as a blower or to suction up water. This equipment is not suitable for commercial use. Vacuuming of flammable or explosive materials or those which endanger health is prohibited. The device is part of the Parkside X 20 V TEAM series and can be operated using Parkside X 20 V TEAM series batteries. 15 GB IE The batteries may only be charged using chargers from the Parkside X 20 V TEAM series. The manufacturer will not be held responsible for injuries resulting from use which does not comply with the directions, or from incorrect use. General description The illustration of the principal functioning parts can be found on the front and back foldout pages. Contents Unpack the appliance and check that it is complete. The appliance is supplied with the motor head fitted ( 1). To remove the motor head, open the securing clips ( 8). - - 16 Motor housing Waste container 3-part vacuum tube Suction hose Handgrip section Paper filter bag Folded filter Housekeeping nozzle Floor nozzle with turnable insert attachment with brush and rubber lip, for vacuuming carpets and smooth surfaces (already mounted) Crevice nozzle Wall bracket 2 cross-head screws 4 rolls Wet and dry vacuum cleaner operating instructions The rechargeable battery and charger are not included in delivery. Dispose of the packaging material properly. Overview 1 2 3 4 5 6 7 8 9 10 11 12 13 14 15 16 17 18 Motor housing Carrying handle On/off switch Battery bay cover Suction connection Waste container Hook for wall bracket 2 locking clips Blower connection (not visible) 3-part vacuum tube Handgrip section Suction hose Wall bracket Fixing screws for wall bracket Crevice nozzle Housekeeping nozzle Floor nozzle with turnable insert attachment with brush and rubber lip, for vacuuming carpets and smooth surfaces (already mounted) 19 Paper filter bag 20 Rechargeable battery 21 Charger 22 Folded filter closure 23 Folded filter 24 Accessory holders 25 Roll 26 Socket GB Functional description The appliance is equipped with a robust plastic container for holding dirt. In case of wet suction, the suction airflow is switched off by a float when the dirt container is full. The appliance also features a blow function. The castors provide good manoeuvrability of the appliance. The following describes the function of the operating parts. Technical data Cordless Wet & Dry Vacuum Cleaner .................. PNTSA 20-Li B1 Rated voltage U .......................... 20 V Protection category...........................IPX4 Suction force ................. 9 kPA (90 mbar) Waste tank capacity (gross)............... 10 l Usable container volume (water)........... 4 l Weight (without accessories) ...................................... approx. 2.7 kg Weight (accessories only).. approx. 1.8 kg Battery (Li-Ion) .............. PAP 20 A3 Battery cells .......................................10 Nominal voltage ......................... 20 V Capacity .....................................4,0 Ah Energy ........................................80 Wh Charging time .............................ca. 1 h Temperature........................... max 50 °C Charging process .................. 4 - 40 °C Operation ..........................-20 - 50 °C Storage................................ 0 - 45 °C * The charge time indicated will only be achieved with the included quick charger. Recharger ......................PLG 20 A3 Nominal consumption .................. 120 W Voltage input ............ 230-240 V~, 50 Hz Voltage output ......................... 21,5 V Output currant ...............................4,5 A IE Protection class ............................... II Miniature fuse ............................. T3.15A Protection category...........................IPX0 Attention! An up-to-date list of battery compatibility can be found at: www.lidl.de/akku This device can only be operated with the following rechargeable batteries: PAP 20 A1, PAP 20 A2, PAP 20 A3. This type of battery may be charged with the following chargers: PLG 20 A1, PLG 20 A3, PDSLG 20 A1. Safety information This appliance can be used by children aged from 8 years and above and persons with reduced physical, sensory or mental capabilities or lack of experience and knowledge if they have been given supervision or instruction concerning use of the appliance in a safe way and understand the hazards involved. Children shall not play with the appliance. Cleaning and user maintenance shall not be made by children without supervision. Symbols used in the instructions Hazard symbols with information on prevention of personal injury and property damage. Precaution symbol with information on prevention of harm/damage. 17 GB IE Notice symbol with information on how to handle the device properly. • Do not vacuum any hot, incandescent, flammable, explosive materials, or those which endanger health. This includes hot ashes, petrol, solvents, acids Symbols on the device or caustic solutions. Personal injury could occur. Parkside X 20 V TEAM • Nozzles and suction tubes must not reach head level whilst in Electrical machines do not beuse. Personal injury could oclong with domestic waste. cur. There is a risk of fire if the suction material exceeds a To avoid accidents and injuries temperature of 40°C (104°F)! from electric shocks: • Turn off the device and remove Charge level indicator on the battery: the appliance - when you are not using the device, Open and close the lo- transporting it or leaving it cking clip unattended; - when you are checking the General notes on safety device, cleaning it or removing blockages; Please read the following - when you are carrying out safety guidelines in order cleaning or maintenance to avoid risk of fire, electric work or replacing accessoshock, personal injury and ries; damage to objects: C To avoid accidents and injuries: • Never leave a machine which is ready for operation unattended at the workplace. • People and animals must not be vacuumed with the machine. • Do not aim the suction hose and nozzle at yourself or others during use, particularly not at the eyes and ears; there is a risk of injury. 18 The following states how damage to the appliance and possible injury to people can be avoided: • Ensure that the machine is correctly assembled and the filters are in the correct position. • Do not use without the filter. This could damage the machine. • Do not use any accessories that are not recommended by PARKSIDE. This can result in GB electric shock or fire. • Only have repairs carried out at our authorised customer service points. • Observe the instructions for cleaning and maintenance of the machine. • Store the appliance in a dry place and out of reach of children. Observe the safety information and notes on charging and proper use as shown in the instruction manual for your battery and charger from the Parkside X 20 V Team series. A detailed description of the charging process and further information can be found in the separate operating instructions. Warning! Observe the safety information in the operating instructions for your Parkside X 20 V Team series rechargeable battery. Assembly 1. Press the four rolls ( 25) into the sockets ( 26) on the underside of the dirt container (6) until they click into place. 2. Insert the paper filter bag (19) ( 23 dry vacuuming - using a paper filter bag): 3. Place the motor head ( 1) onto the dirt container ( 6) and lock it into place using the locking clips ( 8). 4. Attach the suction hose (12) and accessories. IE Operation Fully unwind the suction hose ( 12) before commencing work. Switching on/off Switching on the vacuum: On/off switch ( 3) in position “I”. Switching off the vacuum: On/off switch ( 3) in position “O”. Check the charge level The charge level indicator on the appliance displays the battery charge level when the appliance is running. LED illuminated green: Battery charged LED illuminated yellow: Battery partially charged LED illuminated red: Battery low LED flashing red: Battery needs to be charged Removing/inserting the battery 1. To remove the battery from the device, press the release button (1) on the battery (4) and pull the battery out. 2. To insert the battery (4), place it on the guide track and push it back into the appliance. It will audibly snap in. Do not insert the battery until the appliance is fully assembled. Risk of injury! 19 GB IE Nozzle usage Crevice nozzle ( 15): for vacuuming gaps, corners and radiators. Housekeeping nozzle ( 16) For wet and dry vacuuming, for removing stubborn dirt. Floor nozzle ( 17) with insert attachment ( 18): for wet and dry vacuuming of smooth surfaces and fitted carpets. Floor nozzle ( 17) without insert attachment ( 18): for wet and dry vacuuming of fitted carpets and for removing persistent dirt. • Press the clips on the right and left side of the floor nozzle ( 17) and remove the insert attachment ( 18). Mind that sensitive surfaces might get scratched if the insert attachment is not used. Wet vacuuming 1. Remove the paper filter ( 19) and folded filter ( 23). 2. Suctioning up (draining) water: place the suction hose ( 12) on the handle ( 11) into the water tank and suction up the water. 3. Empty the waste container immediately after vacuuming because it is not designed to store liquids (see “Cleaning/ Maintenance”). Never reach into the water to be suctioned up. Danger of electric shock. 20 If the waste container is full, a float closes the suction opening, and the vacuum operation is interrupted. Switch off the machine and empty the waste tank. If foam or liquid exits, switch off the machine immediately. Dry vacuuming Vacuuming with the paper filter bag: Insert the material filter Pull the paper filter bag (19) with the reinforcer upwards over the internal suction fitting (see arrow ). The sealing ring at the filter bag opening must completely surround the lip on the suction pipe. Vacuuming fine dust: Specific suction processes (e.g. grinding of paints and lacquers, milling or drilling walls, grinding or drilling hard wood) can pose a risk from hazardous dust. Suction function To perform suction, insert the suction hose (12) into the connection (5) on the motor head. Blowing Operation without the use of a filter is recommended. To blow, plug the suction hose (12) onto the connection (9) on the motor head. GB Cleaning/Maintenance Cleaning the appliance Never hose the appliance down with water. Never use aggressive cleaning agents or solvents. This could damage the appliance. • • • • After use, empty the waste tank ( 6). Clean the waste tank with a damp cloth. Replace the paper filter bag ( 19) when full (see “Replacement parts/Accessories” for reordering). Tap the folded filter and clean it with a brush or hand-brush. Maintenance • The equipment is maintenance free. Storage - - - Insert the separated vacuum tubes (10) into the accessory holder ( 24). Wind the vacuum hose (12) around the device and plug the handle section (11) into a vacuum tube (10). Store the appliance in a dry place and out of reach of children. You can suspend the device from the wall bracket ( 13) using the wall bracket hook ( 7). IE Ensure that the wall bracket ( 13) is firmly attached right away after mounting and on a regular basis thereafter. When drilling, be careful not to damage any supply lines. Use suitable search devices to find these or consult an installation plan for guidance. Contact with electrical cables can lead to electric shock and fire. Contact with a gas pipe can result in an explosion. Damage to a water pipe can lead to property damage and electric shock. Disposal/Environmental protection Be environmentally friendly. Return the tool, accessories and packaging to a recycling centre when you have finished with them. Machines must not be disposed of with household refuse. Take the machine to a recycling point. The waste plastic and metal parts can be separated, accurately graded and passed on for recycling. Contact our Service Centre for more details. Defective units returned to us will be disposed of for free. Do not suspend the device from the wall bracket when fully loaded (e.g. full with water). - To suspend from the wall, attach the wall bracket ( 13) to the wall using the two screws ( 14) and dowels. 21 GB IE Trouble shooting Problem Device does not start Possible cause Fault correction Defective on/off switch ( 3) Repair through customer service Worn carbon brushes Defective motor Low or lack of suction Dust or dirt is blow out of the device Hose system ( 12) or jets ( 15/16/17) blocked Remove obstructions and blockages Suction pipe ( incorrectly Assemble suction pipe correctly 10) assembled Container ( 6) open Close container Container ( 6) full Empty container Filter ( 19/23) full or clogged Empty, clean or replace filter Filter ( 19/23) is not or not correctly assembled Use missing filters or check the correct position of the filter Guarantee Dear Customer, This equipment is provided with a 3-year guarantee from the date of purchase. In case of defects, you have statutory rights against the seller of the product. These statutory rights are not restricted by our guarantee presented below. Terms of Guarantee The term of the guarantee begins on the date of purchase. Please retain the original receipt. This document is required as proof of purchase. 22 If a material or manufacturing defect occurs within three years of the date of purchase of this product, we will repair or replace – at our choice – the product for you free of charge. This guarantee requires the defective equipment and proof of purchase to be presented within the three-year period with a brief written description of what constitutes the defect and when it occurred. If the defect is covered by our guarantee, you will receive either the repaired product GB or a new product. No new guarantee period begins on repair or replacement of the product. Guarantee Period and Statutory Claims for Defects The guarantee period is not extended by the guarantee service. This also applies for replaced or repaired parts. Any damages and defects already present at the time of purchase must be reported immediately after unpacking. Repairs arising after expiry of the guarantee period are chargeable. Guarantee Cover The equipment has been carefully produced in accordance with strict quality guidelines and conscientiously checked prior to delivery. The guarantee applies for all material and manufacturing defects. This guarantee does not extend to cover product parts that are subject to normal wear and may therefore be considered as wearing parts (e.g. filters or attachments) or to cover damage to breakable parts (e.g. switches). This guarantee shall be invalid if the product has been damaged, used incorrectly or not maintained. Precise adherence to all of the instructions specified in the operating manual is required for proper use of the product. Intended uses and actions against which the operating manual advises or warns must be categorically avoided. The product is designed only for private and not commercial use. The guarantee will be invalidated in case of misuse or improper handling, use of force, or interventions not undertaken by our authorised service branch. IE Processing in Case of Guarantee To ensure efficient handling of your query, please follow the directions below: • Please have the receipt and identification number (IAN 317189_1904) ready as proof of purchase for all enquiries. • Please find the item number on the rating plate. • Should functional errors or other defects occur, please initially contact the service department specified below by telephone or by e-mail. You will then receive further information on the processing of your complaint. • After consultation with our customer service, a product recorded as defective can be sent postage paid to the service address communicated to you, with the proof of purchase (receipt) and specification of what constitutes the defect and when it occurred. In order to avoid acceptance problems and additional costs, please be sure to use only the address communicated to you. Ensure that the consignment is not sent carriage forward or by bulky goods, express or other special freight. Please send the equipment inc. all accessories supplied at the time of purchase and ensure adequate, safe transport packaging. Repair Service For a charge, repairs not covered by the guarantee can be carried out by our service branch, which will be happy to issue a cost estimate for you. We can handle only equipment that has been sent with adequate packaging and postage. 23 GB IE Attention: Please send your equipment to our service branch in clean condition and with an indication of the defect. Equipment sent carriage forward or by bulky goods, express or other special freight will not be accepted. We will dispose of your defective devices free of charge when you send them to us. Service-Center Importer Please note that the following address is not a service address. Please initially contact the service centre specified above. Grizzly Tools GmbH & Co. KG Stockstädter Straße 20 DE-63762 Großostheim Germany www.grizzly-service.eu GB Service Great Britain Tel.: 0800 404 7657 (£ 0.10/Min.) E-Mail: [email protected] IAN 317189_1904 IE Service Ireland Tel.: 1890 930 034 (0,08 EUR/Min., (peak)) (0,06 EUR/Min., (off peak)) E-Mail: [email protected] IAN 317189_1904 Replacement parts/Accessories Spare parts and accessories can be obtained at www.grizzly-service.eu If you have issues ordering, please use the contact form. If you have any other questions, contact the service centre (see “Service-Center” Page 24). Position instruction manual Description Use Order No. 12 8 Vacuum hose 91105189 23 2 fluted filter 91105185 22 3 Folded filter closure 91105186 10 9 3-part vacuum tube 91099439 Paper filter bags, pack of 5 30250146 Paper filter bags, 1 unit 30250147 19 24 Position exploded drawing 14 FR BE Sommaire Introduction Introduction ...............................25 Fins d‘utilisation .........................25 Description générale ..................26 Volume de la livraison ....................26 Vue d‘ensemble .............................26 Description du fonctionnement .........27 Données techniques ...................27 Règles de sécurité ......................27 Symboles utilisés dans le mode d’emploi .......................................28 Pictogrammes sur l‘appareil .............28 Consignes générales de sécurité ......28 Assemblage ...............................29 Opération ..................................29 Allumer/Eteindre............................29 Vérifier l‘état de charge ...................29 Retirer/utiliser l’accu .......................30 Utilisation des gicleurs ....................30 Aspiration d’eau ............................30 Aspiration de poussières .................. 30 Fonction d‘aspiration ......................31 Soufflage ......................................31 Nettoyage/Entretien...................31 Nettoyer l’appareil .........................31 Entretien .......................................31 Rangement ................................31 Accessoires ................................32 Récupération/Environnement .....32 Dépistage des dysfonctionnement.....................33 Garantie - France .......................33 Garantie - Belgique ....................35 Service Réparations ...................37 Service-Center ............................37 Importeur ..................................37 Traduction de la déclaration de conformité CE originale ..............83 Vue éclatée ................................88 Toutes nos félicitations pour l’achat de votre nouvel appareil. Vous avez ainsi choisi un produit de qualité supérieure. La qualité de l’appareil a été vérifiée pendant la production et il a été soumis à un contrôle final. Le fonctionnement de votre appareil est donc ainsi garanti. Il n’est pas à exclure que dans certains cas isolés, il demeure dans l’appareil, ou dans les tuyauteries flexibles, des quantités résiduelles d’eau. Ceci n’est pas un défaut ou un vice et on ne doit pas s’inquiéter à ce sujet. La notice d’utilisation fait partie de ce produit. Elle contient des instructions importantes pour la sécurité, l’utilisation et l’élimination des déchets. Avant d’utiliser ce produit, lisez attentivement les consignes d’emploi et de sécurité. N’utilisez le produit que tel que décrit et uniquement pour les domaines d’emploi indiqués. Conservez cette notice et remettez-la avec tous les documents si vous cédez le produit à un tiers. Fins d‘utilisation L‘appareil est destiné à l‘aspiration de poussière et de liquides à des fins ménagères, p. ex. pour la maison, l‘atelier de bricolage, dans la voiture ou le garage. L’appareil peut également être utilisé en guise de soufflerie ou pour aspirer de l’eau. Cet appareil n’est pas adapté à une utilisation industrielle. Toute utilisation industrielle met fin à la garantie. Il est interdit d’aspirer des substances combustibles, explosives ou dangereuses pour la santé. L’appareil fait partie de la gamme Parkside X 20 V TEAM et peut être utilisé avec les batteries de la gamme Parkside X 20 V 25 FR BE TEAM. Les batteries doivent être chargées uniquement avec des chargeurs appartenant à la gamme Parkside X 20 V TEAM. Le fabricant décline toute responsabilité en cas de dommages dus à un usage non conforme aux dispositions suivantes ou à une mauvaise utilisation. Description générale Vous trouverez le dessin détaillé des organes de service les plus importants sur les pages dépliantes avant et arrière. Volume de la livraison Déballez l‘appareil et contrôlez si celui-ci est complet. L‘appareil est livré avec la tête de moteur montée ( 1). Pour retirer la tête de moteur, ouvrez les clips de fermeture ( 8). - - 26 Compartiment du moteur Récipient à poussières Tube d’aspiration en trois parties Tuyau d‘aspiration Élément de poignée Sac à papier filtre Filtre plissé Suceur domestique Gicleur pour sols avec Embout vissable avec brosse et suceurs en caoutchouc pour aspirer les souillures grossières (déjà monté) Gicleur de jointure Fixation murale 2 vis à tête cruciforme 4 roulettes Notice d’utilisation aspirateur à eau et à sec La batterie et le chargeur ne sont pas compris dans le matériel livré ! Eliminez le matériel d‘emballage en respectant la réglementation en vigueur. Vue d‘ensemble 1 2 3 4 5 6 7 8 9 10 11 12 13 14 15 16 17 18 19 20 21 Compartiment du moteur Poignée de transport Interrupteur de marche/ arrêt Couvercle compartiment de batterie Branchement aspiration Récipient à poussières Crochet de la fixation murale 2 clips de verrouillage Raccord soufflage (non visible) Tube d’aspiration en trois parties Élément de poignée Tuyau d‘aspiration Support mural Vis de fixation du support mural Gicleur de jointure Suceur domestique Gicleur pour sols avec Embout vissable avec brosse et suceurs en caoutchouc pour aspirer les souillures grossières (déjà monté) Sac filtrant en papier Batterie Chargeur 22 Fermeture filtre plissé 23 Filtre plissé 24 Logement d‘accessoire 25 Roulette 26 Logement d‘enfichage FR Description du fonctionnement L’appareil est équipé d’un bac solide en plastique pour collecter la saleté. Pour l’aspiration d’eau, la coupure du flux d’air d’aspiration s’effectue à l’aide d’un flotteur lorsque le bac à déchets est plein. L’appareil possède en plus une fonction de soufflage. Les roulettes confèrent une grande maniabilité à l’appareil. Les descriptions suivantes vous donneront plus de détails sur la fonction des accessoires. Données techniques Aspirateur eau/poussiere sans fil .............................. PNTSA 20-Li B1 Tension d’évaluat U ..................... 20 V Type de protection............................IPX4 Puissance d’aspiration .... 9 kPA (90 mbar) Capacité de la cuve (brute) ............... 10 l Volume utilisable du récipient (eau) ....... 4 l Poids (sans accessoires) ..........env. 2,7 kg Poids (accessoires seulement) ...env. 1,8 kg Accu (Li-Ion) .................. PAP 20 A3 Éléments de batterie ...........................10 Tension nominale ........................ 20 V Capacité .....................................4,0 Ah énergie .......................................80 Wh Temps de charge ........................ env. 1 h Température........................... max 50 °C Processus de charge .............. 4 - 40 °C Fonctionnement ...................-20 - 50 °C Stockage.............................. 0 - 45 °C * Le temps de charge spécifié ne peut être atteint qu‘avec le chargeur rapide inclus. BE Chargeur .......................PLG 20 A3 Absorption nominale ................... 120 W Tension d’entrée/ input ........................ 230-240 V~, 50 Hz Tension de sortie/ output ..................................... 21,5 V Courant de sortie ...........................4,5 A Classe de protection ........................ II Sécurité de l’appareil .................. T3.15A Type de protection............................IPX0 Attention ! Vous trouverez une liste actualisée de la compatibilité des batteries à l‘adresse : www.lidl.de/akku Cet appareil peut être alimenté exclusivement par les batteries suivantes : PAP 20 A1, PAP 20 A2, PAP 20 A3. Ces batteries peuvent être rechargées avec les chargeurs suivants : PLG 20 A1, PLG 20 A3, PDSLG 20 A1. Règles de sécurité Cet appareil peut être utilisé par des enfants à partir de 8 ans et plus et par des personnes ayant des capacités physiques, sensorielles ou mentales réduites ou un manque d’expérience et de connaissances à condition qu’elles aient reçu une supervision ou des instructions concernant I’utilisation de I’appareil en toute sécurité et qu’elles comprennent les dangers encourus. Les enfants ne doivent pas jouer avec l’appareil. Le nettoyage et I’entretien par I’usager ne doivent pas être effectués par des enfants sans surveillance. 27 FR BE Symboles utilisés dans le mode d’emploi triques, de blessures de personnes et de dégâts matériels: Signes de danger avec conseils de prévention des accidents sur les personnes ou des dégâts matériels. Vous éviterez ainsi accidents et blessures : • Ne laissez jamais sans surveillance un appareil prêt à fonctionner. Signes indicatifs avec • N’aspirez pas d’individus et conseils de prévention des d’animaux avec l’appareil. dégâts. • Pendant l’utilisation, ne braquez jamais le flexible d’aspiration Signes de conseils avec des et les suceurs sur vous-même ou informations pour une meild’autres personnes, en particulier leure manipulation de l’appapas en direction des yeux et des reil. oreilles. Risque de blessures. • N’aspirez pas de substances Pictogrammes sur l‘appareil bouillantes, incandescentes, combustibles, explosives ou dangeParkside X 20 V TEAM reuses pour la santé comme par exemple de la cendre chaude, Les machines n’ont pas leur de l’essence, des solvants, des place dans les ordures ménagères. acides ou de la lessive. Vous risquez de vous blesser. Il y a risque d’incendie si la • Veillez à ce que les suceurs et le température du produit aspiré tuyau d’aspiration ne se trouvent dépasse 40 °C (104 °F)! pas à proximité de la tête lors de l’utilisation. Vous risquez de vous Indicateur de charge sur blesser. l‘appareil C Ouvrir et fermer le clip de fermeture Vous éviterez ainsi les blessures et les accidents dus au choc électrique : • Éteignez l‘appareil et retirez la batterie: - lorsque vous n’utilisez pas l’appareil, Lisez les consignes de sécurité - avant d’ouvrir l’appareil, suivantes pour éviter les risques d’incendies, de chocs élec- lors de travaux d’entretien et de nettoyage, Consignes générales de sécurité 28 FR - après un contact avec des corps étrangers ou des vibrations anormales. Précaution ! Voici comment éviter d’endommager l’appareil et des dommages pour les personnes en résultant : • Veillez à ce que l’appareil soit correctement assemblé et que les filtres soient bien mis en place. • N’utilisez pas l’appareil sans filtre, cela pourrait l’endommager. • N’utilisez pas d’accessoires non recommandés par PARKSIDE. Cela pourrait entraîner une électrocution ou un incendie. • Confiez vos réparations uniquement à des services clientèle disposant de notre autorisation. • Respectez les indications relatives au nettoyage et à l’entretien de l’appareil. • Conservez l’appareil à un endroit sec et hors de portée des enfants. Respectez les consignes de sécurité et informations relatives au chargement et à l‘utilisation correcte qui sont indiquées dans la notice d‘utilisation de votre batterie et chargeur de la gamme Parkside X 20 V Team. Vous trouverez une description détaillée du processus de charge et de plus amples informations dans ce mode d‘emploi séparé. BE Attention ! Respectez les consignes de sécurité indiquées dans la notice d‘utilisation de votre batterie de la gamme Parkside X 20 V Team. Assemblage 1. Enfoncez les quatre roulettes ( 25) dans les logements d‘enfichage ( 26), sous le bac à déchets (6) jusqu‘à ce qu‘elles s‘enclenchent. 2. Placez le sac filtrant en papier (19) (cf. Aspiration à sec - Placer le sac filtrant en papier) : 3. Posez la tête du moteur (1) sur le bac à poussière (6) et vissez-le avec les clips de fermeture (8). 4. Branchez le tuyau d‘aspiration (12) et l‘accessoire. Opération Déroulez complètement le tuyau flexible d’aspiration ( 12) pour travailler. Allumer/Eteindre Allumer l‘aspirateur: Interrupteur marche/arrêt ( en position «I». 3) Eteindre l‘aspirateur: Interrupteur marche/arrêt ( en position «O». 3) Vérifier l‘état de charge L‘indicateur de charge sur l‘appareil renseigne sur l‘état de charge de la batterie pendant le fonctionnement de l‘appareil. 29 FR BE la LED s‘allume en vert : batterie chargée la LED s‘allume en jaune : batterie partiellement chargée la LED s‘allume en rouge : niveau de charge bas la LED clignote en rouge : la batterie doit être chargée • Appuyez sur les languettes à droite et à gauche des gicleurs pour sols ( 17) et retirez l’embout ( 18). Sans embouts, les surfaces délicates peuvent être rayées lors du travail. Aspiration d’eau Retirer/utiliser l’accu 1. Pour enlever la batterie de l’appareil, appuyez sur le bouton de déverrouillage (1) au niveau de la batterie (4) et retirez la batterie. 2. Pour insérer l’accumulateur (4) poussez l’accumulateur dans l’appareil le long de la glissière dans l’appareil. Vous devez entendre un clic. N’utilisez l’accumulateur que si l’appareil est complètement monté. Il existe un risque de blessure ! Utilisation des gicleurs 1. Retirez le filtre en papier ( 19) et le filtre plissé ( 23). 2. Aspirer (pomper) : Plongez le tuyau d’aspiration ( 12) à la poignée ( 11) dans le réservoir d’eau et aspirer l’eau. 3. Videz le récipient à poussières immédiatement après l’aspiration car il n’est pas conçu pour stocker les liquides (voir « Nettoyage/Entretien »). Ne vous tenez pas dans l’eau à aspirer. Risque d’électrocution. Gicleurs de jointure ( 15) : pour aspirer les jointures, les coins et les radiateurs. Lorsque le récipient à poussières est plein, un flotteur bloque l’orifice d’aspiration, le processus d’aspiration est interrompu. Débranchez l’appareil et videz la cuve. Suceur domestique ( 16) pour l‘aspiration d‘eau et de poussière, pour élimer les saletés tenaces. Si vous constatez que de la mousse ou du liquide s’échappent de l’appareil, éteignez-le immédiatement. Gicleurs pour sols ( 17) avec embouts ( 18) : pour aspiration sèche et humides des surfaces lisses et des tapis. Aspiration de poussières Gicleurs pour sols ( 17) sans embouts ( 18) : pour aspiration sèche et humides des tapis, pour éliminer les taches tenaces. 30 Aspirer avec le sac de filtre en papier: Utiliser le filtre en tissu Rabattez le sac filtrant en papier (19) avec le renfort vers le haut sur les embouts d‘aspiration qui se trouvent à l‘intérieur (cf. flèche ). Le joint FR d‘étanchéité (24) de l‘ouverture de sac de filtre doit entourer complètement la nervure (25) du raccord d‘aspiration. Aspiration de poussières fines : BE • Tapez le filtre pliable pour le débarrasser de la poussière, puis nettoyez-le avec un pinceau ou une balayette. Entretien Lors de certaines opérations d’aspiration • L’appareil est sans entretien. (par exemple le ponçage de peintures et laques, le fraisage ou le perçage de maçonne- Rangement ries, le ponçage ou le perçage de bois dur), des poussières dangereuses pour la santé - Mettez les tubes d’aspiration (10) dépeuvent se dégager. montés dans le logement prévu pour les accessoires ( 24). Fonction d‘aspiration Pour aspirer, enfichez le tube d‘aspiration (12) sur le raccord (5) sur la tête du moteur. - Enroulez le tuyau flexible (12) autour de l’appareil et mettez la partie de la prise de poignée (11) dans un tube d’aspiration (10). - Conservez l’appareil à un endroit sec et hors de portée des enfants. - Vous pouvez suspendre l‘appareil sur le crochet de la fixation murale ( 7) sur le support mural ( 13). Soufflage L’utilisation de la fonction de soufflage est recommandée sans filtre. Pour le soufflage, placez le flexible d’aspiration (12) sur le raccord (9) de la tête de moteur. Ne suspendez pas l‘appareil rempli lourdement (par ex. avec de l‘eau aspirée) sur le support mural. Nettoyage/Entretien Nettoyer l’appareil N‘aspergez pas l‘appareil avec de l‘eau et n‘utilisez aucun nettoyant ou solvant fort. Ceci pourrait endommager l‘appareil. • Après utilisation, videz la cuve ( 6). • Nettoyez la cuve avec un chiffon humide. • Remplacez le sac à papier filtre ( 19) lorsqu’il est plein (Pour effectuer une nouvelle commande, voir chapitre „Pièces de rechange/Accessoires“). - Pour ce faire, apposez le support mural ( 13) avec les deux vis ( 14) et à l‘aide de chevilles sur un mur. Vérifiez la bonne tenue du support mural ( 13) directement après le montage et ensuite régulièrement. Faites attention lors du perçage à ne pas endommager des conduites d‘alimentation. Utilisez des détecteurs adaptés pour les localiser ou 31 FR BE aidez-vous d‘un plan d‘installation. Le contact avec les fils électriques peut causer un choc électrique et un incendie ; le contact avec les conduites de gaz peut causer une explosion. L‘endommagement d‘une conduite d‘eau peut causer des dégâts matériels et des chocs électriques. Les appareils ne peuvent pas être jetés dans la poubelle à déchets ménagers. • • Récupération/ Environnement Déposez l’appareil à un centre de recyclage. Les pièces de plastique et de métal utilisées peuvent faire l’objet d’une collecte sélective et être ainsi recyclées. Vous pouvez demander conseil sur ce point à notre centre de services. Nous récupérons gratuitement vos appareils. Respectez la réglementation relative à la protection de l’environnement (recyclage) pour l’élimination de l’appareil, des accessoires et de l’emballage. Accessoires Vous obtiendrez des pièces de rechange et des accessoires à l’adresse www.grizzly-service.eu Si vous avez des problèmes lors du passage de la commande, merci d’utiliser le formulaire de contact. Pour toute autre question, adressez-vous au ”Service-Center” (voir page 37). Position Position Notice Vue d‘utilisation éclatée Affectation No de commande 12 8 Tuyau d‘aspiration 91105189 23 2 Filtre pliable 91105185 22 3 Fermeture filtre plissé 91105186 10 9 Tube d’aspiration en trois parties 91099439 Sac à papier filtre, paquet de 5 30250146 Sac à papier filtre, 1 pièce 30250147 19 32 Désignation 14 FR BE Dépistage des dysfonctionnement Problem L’appareil ne démarre pas Mögliche Ursache L’interrupteur ( tueux Fehlerbehebung 3) est défec- Le balai de charbon est usé Réparation par service aprèsvente Le moteur est défectueux Aspiration trop faible ou pas d’aspiration La poussière ou les souillures sont chassées hors de l’appareil Circuit des tuyaux flexibles 12) ou tuyères ( ( 15/16/17) bouchées Eliminer les bouchages et les blocages La tubulure d‘admission 10) non correctement ( connectée Connecter correctement la tubulure d‘admission Récipient à poussières 6) ouvert ( Fermer le conteneur Récipient à poussières ( 6) plein Vider le conteneur Filtre ( turé Vider le filtre, le nettoyer ou le remplacer 19/23) plein ou sa- Filtre ( 19/23) pas monté, ou pas correctement Garantie - France Chère cliente, cher client, Ce produit bénéficie d’une garantie de 3 ans, valable à compter de la date d’achat. En cas de manques constatés sur ce produit, vous disposez des droits légaux contre le vendeur du produit. Ces droits légaux ne sont pas limités par notre garantie présentée par la suite. Article L217-4 du Code de la consommation Le vendeur livre un bien conforme au Mettez le filtre manquant en place ou vérifiez si le filtre est correctement en assise contrat et répond des défauts de conformité existant lors de la délivrance. Il répond également des défauts de conformité résultant de l‘emballage, des instructions de montage ou de l‘installation lorsque celle-ci a été mise à sa charge par le contrat ou a été réalisée sous sa responsabilité. Article L217-5 du Code de la consommation Le bien est conforme au contrat : 1° S´il est propre à l‘usage habituellement attendu d‘un bien semblable et, le cas échéant : - s‘il correspond à la description donnée 33 FR BE par le vendeur et posséder les qualités que celui-ci a présentées à l‘acheteur sous forme d‘échantillon ou de modèle ; - s‘il présente les qualités qu‘un acheteur peut légitimement attendre eu égard aux déclarations publiques faites par le vendeur, par le producteur ou par son représentant, notamment dans la publicité ou l‘étiquetage ; 2° Ou s‘il présente les caractéristiques définies d‘un commun accord par les parties ou être propre à tout usage spécial recherché par l‘acheteur, porté à la connaissance du vendeur et que ce dernier a accepté. Article L217-16 du Code de la consommation Lorsque l‘acheteur demande au vendeur, pendant le cours de la garantie commerciale qui lui a été consentie lors de l‘acquisition ou de la réparation d‘un bien meuble, une remise en état couverte par la garantie, toute période d‘immobilisation d‘au moins sept jours vient s‘ajouter à la durée de la garantie qui restait à courir. Cette période court à compter de la demande d‘intervention de l‘acheteur ou de la mise à disposition pour réparation du bien en cause, si cette mise à disposition est postérieure à la demande d‘intervention. Indépendamment de la garantie commerciale souscrite, le vendeur reste tenu des défauts de conformité du bien et des vices rédhibitoires dans les conditions prévues aux articles L217-4 à L217-13 du Code de la consommation et aux articles 1641 à 1648 et 2232 du Code Civil. Article L217-12 du Code de la consommation L‘action résultant du défaut de conformité se prescrit par deux ans à compter de la délivrance du bien. 34 Conditions de garantie Le délai de garantie débute avec la date d’achat. Veuillez conserver soigneusement le ticket de caisse original. En effet, ce document vous sera réclamé comme preuve d’achat. Si un défaut de matériel ou un défaut de fabrication se présente au cours des trois ans suivant la date d’achat de ce produit, nous réparons gratuitement ou remplaçons ce produit - selon notre choix. Cette garantie suppose que l’appareil défectueux et le justificatif d’achat (ticket de caisse) nous soient présentés durant cette période de trois ans et que la nature du manque et la manière dont celui-ci est apparu soient explicités par écrit dans un bref courrier. Si le défaut est couvert par notre garantie, le produit vous sera retourné, réparé ou remplacé par un neuf. Aucune nouvelle période de garantie ne débute à la date de la réparation ou de l’échange du produit. Durée de garantie et demande légale en dommages-intérêts La durée de garantie n’est pas prolongée par la garantie. Ce point s’applique aussi aux pièces remplacées et réparées. Les dommages et les manques éventuellement constatés dès l’achat doivent immédiatement être signalés après le déballage. A l’expiration du délai de garantie les réparations occasionnelles sont à la charge de l’acheteur. Volume de la garantie L’appareil a été fabriqué avec soin, selon de sévères directives de qualité et il a été entièrement contrôlé avant la livraison. La garantie s’applique aux défauts de matériel ou aux défauts de fabrication. Cette garantie ne s’étend pas aux parties du produit qui sont exposées à une usure normale et peuvent être donc considérées comme des pièces d’usure (par exemple le FR filtre ou des inserts) ou pour des dommages affectant les parties fragiles (par exemple les interrupteurs). Cette garantie prend fin si le produit endommagé n’a pas été utilisé ou entretenu d’une façon conforme. Pour une utilisation appropriée du produit, il faut impérativement respecter toutes les instructions citées dans le manuel de l’opérateur. Les actions et les domaines d’utilisation déconseillés dans la notice d’utilisation ou vis-à-vis desquels une mise en garde est émise, doivent absolument être évités. Le produit est conçu uniquement pour un usage privé et non pour un usage industriel. En cas d’emploi impropre et incorrect, de recours à la force et d’interventions entreprises et non autorisées par notre succursale, la garantie prend fin. Article 1641 du Code civil Le vendeur est tenu de la garantie a raison des défauts cachés de la chose vendue qui la rendent impropre à l‘usage auquel on la destine, ou qui diminuent tellement cet usage que l‘acheteur ne l‘aurait pas acquise, ou n‘en aurait donné qu‘un moindre prix, s‘il les avait connus. Article 1648 1er alinéa du Code civil L‘action résultant des vices rédhibitoires doit être intentée par l‘acquéreur dans un délai de deux ans à compter de la découverte du vice. Marche à suivre dans le cas de garantie Pour garantir un traitement rapide de votre demande, veuillez suivre les instructions suivantes : • Tenez vous prêt à présenter, sur demande, le ticket de caisse et le numéro d’identification (IAN 317189_1904) comme preuve d’achat. BE • Vous trouverez le numéro d’article sur la plaque signalétique. • Si des pannes de fonctionnement ou d’autres manques apparaissent, prenez d’abord contact, par téléphone ou par e-Mail, avec le service après-vente dont les coordonnées sont indiquées ci-dessous. Vous recevrez alors des renseignements supplémentaires sur le déroulement de votre réclamation. • En cas de produit défectueux vous pouvez, après contact avec notre service clients, envoyer le produit, franco de port à l’adresse de service après-vente indiquée, accompagné du justificatif d’achat (ticket de caisse) et en indiquant quelle est la nature du défaut et quand celui-ci s’est produit. Pour éviter des problèmes d’acceptation et des frais supplémentaires, utilisez absolument seulement l’adresse qui vous est donnée. Assurez-vous que l’expédition ne se fait pas en port dû, comme marchandises encombrantes, envoi express ou autre taxe spéciale. Veuillez renvoyer l’appareil, y compris tous les accessoires livrés lors de l’achat et prenez toute mesure pour avoir un emballage de transport suffisamment sûr. Garantie - Belgique Chère cliente, cher client, Ce produit bénéficie d’une garantie de 3 ans, valable à compter de la date d’achat. En cas de manques constatés sur ce produit, vous disposez des droits légaux contre le vendeur du produit. Ces droits légaux ne sont pas limités par notre garantie présentée par la suite. Conditions de garantie Le délai de garantie débute avec la date d’achat. Veuillez conserver soigneusement 35 FR BE le ticket de caisse original. En effet, ce document vous sera réclamé comme preuve d’achat. Si un défaut de matériel ou un défaut de fabrication se présente au cours des trois ans suivant la date d’achat de ce produit, nous réparons gratuitement ou remplaçons ce produit - selon notre choix. Cette garantie suppose que l’appareil défectueux et le justificatif d’achat (ticket de caisse) nous soient présentés durant cette période de trois ans et que la nature du manque et la manière dont celui-ci est apparu soient explicités par écrit dans un bref courrier. Si le défaut est couvert par notre garantie, le produit vous sera retourné, réparé ou remplacé par un neuf. Aucune nouvelle période de garantie ne débute à la date de la réparation ou de l’échange du produit. Durée de garantie et demande légale en dommages-intérêts La durée de garantie n’est pas prolongée par la garantie. Ce point s’applique aussi aux pièces remplacées et réparées. Les dommages et les manques éventuellement constatés dès l’achat doivent immédiatement être signalés après le déballage. A l’expiration du délai de garantie les réparations occasionnelles sont à la charge de l’acheteur. Volume de la garantie L’appareil a été fabriqué avec soin, selon de sévères directives de qualité et il a été entièrement contrôlé avant la livraison. La garantie s’applique aux défauts de matériel ou aux défauts de fabrication. Cette garantie ne s’étend pas aux parties du produit qui sont exposées à une usure normale et peuvent être donc considérées comme des pièces d’usure (par exemple la lame) ou pour des dommages affectant les 36 parties fragiles (par exemple les commutateurs). Cette garantie prend fin si le produit endommagé n’a pas été utilisé ou entretenu d’une façon conforme. Pour une utilisation appropriée du produit, il faut impérativement respecter toutes les instructions citées dans le manuel de l’opérateur. Les actions et les domaines d’utilisation déconseillés dans la notice d’utilisation ou vis-à-vis desquels une mise en garde est émise, doivent absolument être évités. Marche à suivre dans le cas de garantie Pour garantir un traitement rapide de votre demande, veuillez suivre les instructions suivantes : • Tenez vous prêt à présenter, sur demande, le ticket de caisse et le numéro d’identification (IAN 317189_1904) comme preuve d’achat. • Vous trouverez le numéro d’article sur la plaque signalétique. • Si des pannes de fonctionnement ou d’autres manques apparaissent, prenez d’abord contact, par téléphone ou par e-Mail, avec le service après-vente dont les coordonnées sont indiquées ci-dessous. Vous recevrez alors des renseignements supplémentaires sur le déroulement de votre réclamation. • En cas de produit défectueux vous pouvez, après contact avec notre service clients, envoyer le produit, franco de port à l’adresse de service après-vente indiquée, accompagné du justificatif d’achat (ticket de caisse) et en indiquant quelle est la nature du défaut et quand celui-ci s’est produit. Pour éviter des problèmes d’acceptation et des frais supplémentaires, utilisez absolument seulement l’adresse qui vous est donnée. Assurez-vous que l’expédition FR ne se fait pas en port dû, comme marchandises encombrantes, envoi express ou autre taxe spéciale. Veuillez renvoyer l’appareil, y compris tous les accessoires livrés lors de l’achat et prenez toute mesure pour avoir un emballage de transport suffisamment sûr. Service Réparations Vous pouvez, contre paiement, faire exécuter par notre service, des réparations qui ne font pas partie de la garantie. Nous vous enverrons volontiers un devis estimatif. Nous ne pouvons traiter que des appareils qui ont été correctement emballés et qui ont envoyés suffisamment affranchis. Attention : veuillez renvoyer à notre agence de service votre appareil nettoyé et avec une note indiquant le défaut constaté. Les appareils envoyés en port dû - comme marchandises encombrantes, en envoi express ou avec toute autre taxe spéciale ne seront pas acceptés. Nous exécutons gratuitement la mise aux déchets de vos appareils défectueux renvoyés. BE Service-Center FR Service France Tel.: 0800 919270 E-Mail: [email protected] IAN 317189_1904 BE Service Belgique Tel.: 070 270 171 (0,15 EUR/Min.) E-Mail: [email protected] IAN 317189_1904 Importeur Veuillez noter que l’adresse suivante n’est pas une adresse de service après-vente. Contactez d’abord le service après-vente cité plus haut. Grizzly Tools GmbH & Co. KG Stockstädter Straße 20 DE-63762 Großostheim, Allemagne www.grizzly-service.eu Les pièces détachées indispensables à l’utilisation du produit sont disponibles pendant la durée de la garantie du produit. Les pièces détachées indispensables à l’utilisation du produit sont disponibles pendant la durée de la garantie du produit. 37 NL BE Inhoud Inleiding Inleiding ....................................38 Gebruik .....................................38 Algemene beschrijving ...............39 Omvang van de levering ................39 Overzicht ......................................39 Functiebeschrijving .........................40 Technische gegevens .................40 Veiligheidsaanwijzingen ............40 Symbolen in de handleiding ............40 Symbolen op het apparaat ..............41 Algemene veiligheidsinstructies ........41 Monteringsvejledning.................42 In-/uitschakelen .............................42 Laadpeil controleren .......................42 Accu verwijderen/aanbrengen ........43 Gebruik van de sproeiers ................43 Nat zuigen ....................................43 Droog zuigen .................................43 Zuigfunctie ....................................44 Blazen ...........................................44 Reiniging/onderhoud .................44 Apparaat reinigen..........................44 Onderhoud ...................................44 Bewaring ...................................44 Wegdoen van het apparaat/ milieubescherming .....................45 Reserveonderdelen/accessoires ..45 Opsporing van fouten ................46 Garantie ....................................47 Reparatieservice ........................48 Service-Center ............................48 Importeur ..................................48 Vertaling van de originele CEconformiteitsverklaring ............. 84 Explosietekening ....................... 88 Hartelijk gefeliciteerd met de aankoop van uw nieuw apparaat. Daarmee hebt u voor een hoogwaardig product gekozen. Dit apparaat werd tijdens de productie op kwaliteit gecontroleerd en aan een eindcontrole onderworpen. De functionaliteit van uw apparaat is bijgevolg verzekerd. Er kan niet uitgesloten worden dat er zich in specifieke gevallen aan of in het apparaat resp. in slangleidingen resthoeveelheden water bevinden. Dit duidt niet op een gebrek of defect en is geen reden tot bezorgdheid. 38 De gebruiksaanwijzing vormt een bestanddeel van dit product. Ze omvat belangrijke aanwijzingen voor veiligheid, gebruik en afvalverwijdering. Maak u vóór het gebruik van het product met alle bedienings- en veiligheidsinstructies vertrouwd. Gebruik het product uitsluitend zoals beschreven en voor de aangegeven toepassingsgebieden. Bewaar de handleiding goed en overhandig alle documenten bij het doorgeven van het product mee aan derden. Gebruik Het apparaat is voor het natte en droge zuigen in huishoudelijke kring, zoals bijvoorbeeld in het huishouden, in de hobbykamer, in de auto of in de garage, bestemd. Het apparaat kan ook worden gebruikt als blaastoestel of voor het opzuigen van water. Dit apparaat is niet geschikt voor commercieel gebruik. Bij commercieel gebruik vervalt de garantie. Het opzuigen van brandbare, explosieve stoffen of stoffen, die gevaarlijk voor de gezondheid zijn, is verboden. Het apparaat maakt deel uit van de serie NL Parkside X 20 V TEAM en kan met accu’s van de serie X 20 V TEAM worden gebruikt. De accu’s mogen alleen met laders van de serie Parkside X 20 V TEAM worden geladen. De producent is niet verantwoordelijk voor schade als het apparaat niet volgens de voorschriften wordt gebruikt of als het verkeerd wordt bediend. Algemene beschrijving De afbeelding vindt u op de uitvouwbare pagina vooraan en achteraan. Omvang van de levering Pa het apparaat uit en controleer, of het volledig is: Het apparaat wordt met aangebrachte motorkop ( 1) geleverd. Om de motorkop af te nemen, opent u de afsluitclips ( 8). - - Motorhuis Transporthandvat Driedelige zuigbuis Zuigslang Handgreepdeel Papieren filterzak Plooienfilter Huishoudverdeelstuk Zuigmondstuk met Draaibaar, opspeldbaar opzetstuk met borstel en rubberen lip voor het zuigen van tapijten en gladde oppervlakken (reeds gemonteerd) Voegsproeier Muurbeugel 2 Kruiskopschroeven 4 wielen Gebruiksaanwijzing nat- en droogzuiger BE De accu en de lader zijn niet meegeleverd! Verwijder het verpakkingsmateriaal zoals reglementair voorgeschreven. Overzicht 1 2 3 4 5 6 7 8 9 10 11 12 13 14 15 16 17 18 19 20 21 Motorhuis Draaggreep Schakelaar “Aan/uit” Afdekking accuschacht Aansluiting zuigen Vuilreservoir Haak voor muurbeugel 2 afsluitclips Aansluiting voor blazen (niet zichtbaar) Driedelige zuigbuis Handgreepdeel Zuigslang Muurbeugel Bevestigingsschroeven voor muurbeugel Voegsproeier Huishoudverdeelstuk Zuigmondstuk met Draaibaar, opspeldbaar opzetstuk met borstel en rubberen lip voor het zuigen van tapijten en gladde oppervlakken (reeds gemonteerd) Papieren filterzak Accu Lader 22 Sluiting plooienfilter 23 Plooienfilter 24 Toebehorenhouder 25 Wiel 26 Steeksokkel 39 NL BE Functiebeschrijving Het apparaat is voorzien van een stabiel, kunststoffen reservoir voor het opvangen van het vuil. Bij natzuigen vindt de afsluiting van de zuigluchtstroom door een vlotter plaats wanneer de vuilcontainer vol is. Bijkomend bezit het apparaat een blaasfunctie. Dankzij de loopwielen heeft het apparaat een grote wendbaarheid. De bediening van de onderdelen staat hieronder beschreven. Technische gegevens Accu-nat-/droogzuiger .............................. PNTSA 20-Li B1 Netspanning U ........................... 20 V Beschermingsklasse ..........................IPX4 Zuigkracht ..................... 9 kPA (90 mbar) Inhoud van de stofbak (bruto)............. 10 l Bruikbaar reservoirvolume (water) ......... 4 l Gewicht (zonder accessoires) ......ca.2,7 kg Gewicht (alleen accessoires) ......ca. 1,8 kg Uitgangsstroom ..............................4,5 A Beschermniveau .............................. II Zekering van het apparaat ........... T3.15A Beschermingsklasse ..........................IPX0 Let op! Een actuele lijst van de accu-compatibiliteit vindt u op: www.lidl.de/akku Dit apparaat kan uitsluitend met de volgende accu‘s worden gebruikt: PAP 20 A1, PAP 20 A2, PAP 20 A3. Deze accu‘s kunnen met de volgende laders worden geladen: PLG 20 A1, PLG 20 A3, PDSLG 20 A1. Veiligheidsaanwijzingen Accu (Li-Ion) .................. PAP 20 A3 Batterijcellen ......................................10 Nominale spanning ..................... 20 V Capaciteit ...................................4,0 Ah Energie .......................................80 Wh Laadtijd ......................................ca. 1 h Temperatuur .......................... max 50 °C Laadproces .......................... 4 - 40 °C Bedrijf................................-20 - 50 °C Opslag ................................ 0 - 45 °C Dit apparaat kan door kinderen vanaf 8 jaar en ouder en tevens door personen met verminderde fysieke, zintuiglijke of mentale capaciteiten of met een gebrek aan ervaring en kennis gebruikt worden wanneer ze onder toezicht staan of met het oog op het gebruik van het apparaat geïnstrueerd werden en zich van de daaruit resulterende gevaren bewust zijn. Kinderen mogen niet met het apparaat spelen. Reiniging en gebruikersonderhoud mogen niet door kinderen zonder toezicht doorgevoerd worden. * De vermelde laadtijd wordt alleen met de meegeleverde snelle lader bereikt. Symbolen in de handleiding Laadtoestel ....................PLG 20 A3 Nominale opname ...................... 120 W Ingangsspanning/ Input ........................ 230-240 V~, 50 Hz Uitgangsspanning/ Output .................................... 21,5 V 40 Gevaarsymbolen met gegevens ter preventie van lichamelijke letsels en materiële schade. NL BE Gebodsteken met gegevens ter Zo vermijdt u ongevallen en verpreventie van beschadigingen. wondingen: • Laat een bedrijfsklaar apparaat nooit zonder toezicht op uw arAanwijzingsteken met informabeidsplaats achter. tie voor een betere omgang • Het apparaat is niet bestemd met het apparaat. voor gebruik op mensen en dieren. Symbolen op het apparaat • Richt de zuigslang en mondApparaten horen niet in het stukken zeker niet op u zelf of huisvuil. andere personen, vooral niet op ogen en oren als u ze gebruikt. Er bestaat gevaar voor verwonParkside X 20 V TEAM dingen. • Zuig geen hete, gloeiende, Er bestaat brandgevaar wanneer het opgezogen mabrandbare, explosieve stoffen teriaal een temperatuur heeft op of stoffen, die gevaarlijk voor van meer dan 40°C (104°F)! de gezondheid zijn. Daartoe behoren onder andere hete as, Laadtoestandindicator apbenzine, oplosmiddelen, zuren paraat of logen. Er bestaat verwondinggevaar. Vergrendelclip openen en sluiten • Mondstukken en zuigbuis mogen tijdens gebruik wegens blessureAlgemene risico niet op ooghoogte komen. C veiligheidsinstructies Zo vermijdt u ongevallen en verOpgelet! Bij het gebruik van wondingen door een elektrische elektrisch gereedschap dienen schok: ter bescherming tegen een elektrische schok en tegen • Schakel het apparaat uit en vergevaar voor verwondingen en wijder de batterij: brand volgende essentiële vei- u het apparaat niet gebruikt, ligheidsmaatregelen getroffen wanneer u het apparaat laat te worden: vervoeren of wanneer u het zonder toezicht achterlaat; - u het apparaat controleert, het reinigt of wanneer u blokkeringen verwijdert; 41 NL BE - u reinigings- of onderhoudswerkzaamheden doorvoert of toebehoren uitwisselt; - na aanraking met vreemde voorwerpen of in geval van abnormale trillingen. Zo vermijdt u schade aan het apparaat en eventueel daaruit voortvloeiende lichamelijke letsels: • Let erop dat het apparaat correct in elkaar is gezet en de filters in de juiste positie zijn. • Werk niet zonder filter. Het apparaat kan daardoor worden beschadigd. • Gebruik geen toebehoren dat niet door PARKSIDE is aanbevolen. Dat kan namelijk leiden tot elektrische schok of brand. • Laat reparaties uitsluitend door servicestations uitvoeren die door ons geautoriseerd zijn. • Volg de aanwijzingen voor reiniging en onderhoud van het apparaat op. • Bewaar het apparaat op een droge plaats en buiten het bereik van kinderen. Neem de veiligheids-, laad- en gebruikinstructies in acht die vermeld staan in de gebruiksaanwijzing van uw accu en van de lader van de serie Parkside X 20 V TEAM. Een gedetailleerde beschrijving van het laadproces en andere informatie vindt u in de aparte gebruiksaanwijzing ervan. 42 Let op! Neem de veiligheidsinstructies in acht die vermeld staan in de gebruiksaanwijzing van uw accu van de serie Parkside X 20 V Team. Monteringsvejledning 25) in de 1. Druk op de vier wielen ( steeksokkels ( 26), aan de onderkant van de vuilcontainer (6), tot ze vergrendelen. 2. Plaats de papieren filterzak (19) erin (zie Droogzuigen - papieren filterzak plaatsen): 3. SZet de motorkop (1) op de stofbak (6) en sluit met de sluitclips (8). 4. Sluit de zuigslang (12) en de toebehoren aan. Bediening Wikkel de zuigslang ( dig af om te werken. 12) volle- In-/uitschakelen Inschakelen zuiger: Schakelaar “Aan/uit” ( 3) in stand „I“ Uitschakelen zuiger: Schakelaar “Aan/uit” ( 3) in stand „O“ Laadpeil controleren De laadtoestandindicator op het apparaat signaleert de laadtoestand van de accu, terwijl het apparaat werkt. Led brandt groen: Accu geladen Led brandt geel: Accu gedeeltelijk geladen Led brandt rood:laadtoestand laag Led knippert rood: Accu moet worden geladen NL Accu verwijderen/aanbrengen 1. Om de accu uit het apparaat te verwijderen, drukt u de ontgrendeltoets (1) aan de accu (4) in en trekt u de accu eruit. 2. Om de accu (4) aan te brengen, schuift u de accu langs de geleiderail in het apparaat. De accu klikt hoorbaar vast. Breng de accu pas aan wanneer het apparaat volledig gemonteerd is. Er bestaat gevaar voor verwondingen! BE Nat zuigen 1. Verwijder het papieren filter ( 19) en het plooienfilter ( 23). 2. Afzuigen (afpompen): Dompel de zuigslang ( 12) an de handgreep ( 11) in het waterreservoir en zuig het water af. 3. Maak het vuilreservoir meteen na het zuigen leeg, omdat dit niet geconstrueerd is om vloeistoffen in te bewaren (zie “Reiniging/onderhoud”). Ga niet in het af te zuigen water staan. Gevaar door elektrische schok. Gebruik van de sproeiers Voegsproeier ( 15): voor het zuigen van voegen, hoeken en radiatoren. Huishoudverdeelstuk ( 16) voor het nat- en droogzuigen, voor het verwijderen van hardnekkig vuil. Zuigmondstuk ( 17) met opspeldbaar opzetstuk ( 18): voor het nat en droog zuigen van gladde oppervlakken en tapijten. Zuigmondstuk ( 17) zonder opspeldbaar opzetstuk ( 18): voor net nat en droog zuigen van tapijten, voor het verwijderen van hardnekkig vuil. • Druk de verbindingsstukken rechts en links aan het zuigmondstuk (17) in en verwijder het opspeldbare opzetstuk (18). Als het vuilreservoir vol is, sluit een drijver de zuigopening, het zuigprocédé wordt onderbroken. Schakel het apparaat uit, trek de stekker uit het stopcontact en maak het vuilreservoir leeg (zie “Reiniging/onderhoud”). Het apparaat onmiddellijk uitschakelen als er schuim of vloeistof naar buiten komt. Droog zuigen Zuigen met de papieren filterzak: Papieren filterzak plaatsen Vouw de papieren filterzak (19) met de versterking naar boven over de interne zuigmond (zie pijl ). De afdichtring aan de filterzakopening moet het versteviging aan de luchtaanvoeropening volledig omsluiten. Gevoelige oppervlakken kunnen bij het werk zonder opspeldbaar opzetstuk bekrast worden. 43 NL BE Opzuigen van fijnstof: Onderhoud Bij bepaalde werkzaamheden (bijv. bij het • Het apparaat is vrij van onderhoud. schuren van verven en lakken, frezen, boren in wanden, schuren of boren van hardhout) Bewaring kan stof vrijkomen dat schadelijk is voor de gezondheid. Steek de gedemonteerde zuigbuizen ( 10) in de voor accessoires dienende opneming van de poten ( Zuigfunctie 24). van het apparaat. Wikkel de zuigslang (12) om het appaSteek voor de zuigfunctie de zuigslang (12) raat en steek het handgreepstuk (11) in in de aansluiting (5) op de motorkop. een zuigbuis (10). Bewaar het apparaat op een droge Blazen plaats en buiten het bereik van kinderen. Voor de blaasfunctie is een gebruik U kunt het apparaat aan de haak voor zonder filter aan te raden. de muurbeugel ( 7) aan de muurbeuOm te blazen, speldt u de zuigslang (12) op gel ( 13) ophangen. de aansluiting (9) aan de motorkop. Hang het apparaat niet met een zware vulling (bv. met Reiniging/onderhoud opgezogen water) aan de muurbeugel. Apparaat reinigen Spuit het apparaat niet met water af en maak geen gebruik van bijtende reinigingsc.q. oplosmiddelen. Het apparaat zou beschadigd kunnen worden. • • • • 44 Na het gebruik de vuilreservoir ( 6) leeg maken. De vuilreservoir met een vochtige doek reinigen. Vervang volle papieren filterzak ( 19) (zie hoofdstuk “Reserveonderdelen/ accessoires” bestelling). Klop het als optie verkrijgbare vouwfilter uit en reinig het met een penseel of handveger. - Breng daartoe de muurbeugel ( 13) met de twee schroeven ( 14) en met behulp van pluggen op de wand aan. Controleer zowel na de montage als daarna op regelmatige tijdstippen of de muurbeugel ( 13) goed vastzit. NL Let er bij het boren op geen voorzieningsleidingen te beschadigden. Gebruik geschikte detectoren om ze op te sporen of haal er een installatieplan als hulp bij. Contact met elektrische leidingen kan leiden tot een elektrische schok en brand, contact met een gasleiding kan leiden tot een ontploffing. Beschadiging van een waterleiding kan leiden tot materiële schade en een elektrische schok. BE Wegdoen van het apparaat/ milieubescherming Breng het apparaat, de toebehoren en de verpakking naar een geschikt recyclagepunt. Apparaten horen niet in het huisvuil. Geeft u het apparaat bij een recyclingplaats af. De gebruikte kunststof- en metalen onderdelen worden op materiaal gesorteerd en kunnen worden hergebruikt. Voor vragen hieromtrent kunt u terecht bij ons servicecenter. De afvalverwijdering van uw defecte ingezonden apparaten voeren wij gratis door. Reserveonderdelen/accessoires Reserveonderdelen en accessoires verkrijgt u op www.grizzly-service.eu Ondervindt u problemen bij het orderproces, gebruik dan het contactformulier. Bij andere vragen neemt u contact op met het “Service-Center” (zie pag. 48). Pos. Gebruiksaanwijzing Pos. Explosietekening 12 8 23 22 10 19 Benaming Inzetstuk Artikel-Nr. Zuigslang 91105189 2 Vouwfilter 91105185 3 Sluiting plooienfilter 91105186 9 Driedelige zuigbuis 91099439 Papieren filterzak, pak van 5 stuks 30250146 Papieren filterzak, 1 stuk 30250147 14 45 NL BE Opsporing van fouten Probleem Apparaat start niet Mogelijke oorzaak Schakelaar “Aan/uit” ( defect Oplossing van de fout 3) Koolborstels versleten Herstelling door klantenserviceafdeling Motor defect Gering of ontbrekend aanzuigvermogen Slangsysteem ( 12) of straalbuizen ( 15/16/17) verstopt Verstoppingen en blokkeringen verhelpen Zuigbuis ( ineengezet Zuigbuis correct ineenzetten Vuilreservoir ( 6) open Reservoir sluiten Vuilreservoir ( 6) vol Reservoir ledigen Filter ( smeerd Stof of vuil wordt uit het apparaat geblazen 46 10) niet correct 19/23) vol of dichtge- Filter ( 19/23) niet of niet correct gemonteerd Filter ledigen, reinigen of vervangen Ontbrekend filter plaatsen of correcte plaatsing van het filter controleren NL Garantie Geachte cliënte, geachte klant, U krijgt op dit apparaat 3 jaar garantie, te rekenen vanaf de datum van aankoop. Ingeval van gebreken aan dit product heeft u tegenover de verkoper van het product wettelijke rechten. Deze wettelijke rechten worden door onze hierna beschreven garantie niet beperkt. Garantievoorwaarden De garantietermijn begint met de datum van aankoop. Gelieve de originele kassabon goed te bewaren. Dit document wordt als bewijs van de aankoop benodigd. Indien er zich binnen drie jaar, te rekenen vanaf de datum van aankoop van dit product, een materiaal- of fabricagefout voordoet, wordt het product door ons – naar onze keuze – voor u gratis gerepareerd of vervangen. Deze garantievergoeding stelt voorop dat binnen de termijn van drie jaar het defecte apparaat en het bewijs van aankoop (kassabon) voorgelegd en dat schriftelijk kort beschreven wordt, waarin het gebrek bestaat en wanneer het zich voorgedaan heeft. Als het defect door onze garantie gedekt is, krijgt u het gerepareerde of een nieuw product terug. Met herstelling of uitwisseling van het product begint er geen nieuwe garantieperiode. Garantieperiode en wettelijke kwaliteitsgarantie De garantieperiode wordt door de garantievergoeding niet verlengd. Dit geldt ook voor vervangen en gerepareerde onderdelen. Eventueel al bij de aankoop bestaande beschadigingen en gebreken moeten onmiddellijk na het uitpakken gemeld worden. Na het verstrijken van de garan- BE tieperiode tot stand komende reparaties worden tegen verplichte betaling van de kosten uitgevoerd. Omvang van de garantie Het apparaat werd volgens strikte kwaliteitsrichtlijnen zorgvuldig geproduceerd en vóór aflevering nauwgezet getest. De garantievergoeding geldt voor materiaal- of fabricagefouten. Deze garantie is niet van toepassing op productonderdelen, die aan een normale slijtage blootgesteld zijn en daarom als aan slijtage onderhevige onderdelen beschouwd kunnen worden (b.v. filters of deksels) of op beschadigingen aan breekbare onderdelen (b.v. schakelaars). Deze garantie valt weg wanneer het product beschadigd, niet oordeelkundig gebruikt of niet onderhouden werd. Voor een vakkundig gebruik van het product dienen alle in de gebruiksaanwijzing vermelde aanwijzingen nauwgezet in acht genomen te worden. Gebruiksdoeleinden en handelingen, die in de gebruiksaanwijzing afgeraden worden of waarvoor gewaarschuwd wordt, dienen onvoorwaardelijk vermeden te worden. Het product is uitsluitend voor het privé- en niet voor het commerciële gebruik bestemd. Bij een verkeerde of onoordeelkundige behandeling, toepassing van geweld en bij ingrepen, die niet door het door ons geautoriseerde servicefiliaal doorgevoerd werden, valt de garantie weg. Afhandeling ingeval van garantie Gelieve aan de volgende aanwijzingen gevolg te geven om een snelle behandeling van uw verzoek te garanderen: • Gelieve voor alle aanvragen de kassabon en het identificatienummer 47 NL • • • BE (IAN 317189_1904) als bewijs van de aankoop klaar te houden. Gelieve het artikelnummer uit het typeplaatje, een gravering, op de voorpagina van uw handleiding (onderaan links) of als sticker aan de achter- of onderzijde af te leiden. Indien er zich functiefouten of andere gebreken voordien, contacteert u in eerste instantie de hierna vernoemde serviceafdeling telefonisch of per e-mail. U krijgt dan bijkomende informatie over de afhandeling van uw klacht. Een als defect geregistreerd product kunt u, na overleg met onze klantenservice, mits toevoeging van het bewijs van aankoop (kassabon) en de vermelding, waarin het gebrek bestaat en wanneer het zich voorgedaan heeft, voor u franco naar het u medegedeelde serviceadres zenden. Om problemen bij de acceptatie en extra kosten te vermijden, maakt u onvoorwaardelijk uitsluitend gebruik van het adres, dat u medegedeeld wordt. Zorg ervoor dat de verzending niet ongefrankeerd, als volumegoed, per expresse of via een andere speciale verzendingswijze plaatsvindt. Gelieve het apparaat met inbegrip van alle bij de aankoop bijgeleverde accessoires in te zenden en voor een voldoende veilige transportverpakking te zorgen. Reparatieservice U kunt reparaties, die niet onder de garantie vallen, tegen berekening door ons servicefiliaal laten doorvoeren. Zij maakt graag voor u een kostenraming op. Wij kunnen uitsluitend apparaten behandelen, die voldoende verpakt en gefrankeerd ingezonden werden. 48 Opgelet: Gelieve uw apparaat gereinigd en met een aanwijzing op het defect naar ons servicefiliaal te zenden. Ongefrankeerd – als volumegoed, per expresse of via een andere speciale verzendingswijze – ingezonden apparaten worden niet geaccepteerd. De afvalverwerking van uw defecte ingezonden apparaten voeren wij gratis door. Service-Center NL Service Nederland Tel.: 0900 0400223 (0,10 EUR/Min.) E-Mail: [email protected] IAN 317189_1904 BE Service Belgique/ Service België Tel.: 070 270 171 (0,15 EUR/Min.) E-Mail: [email protected] IAN 317189_1904 Importeur Gelieve in acht te nemen dat het volgende adres geen serviceadres is. Contacteer in eerste instantie het hoger vermelde servicecenter. Grizzly Tools GmbH & Co. KG Stockstädter Straße 20 DE-63762 Großostheim Duitsland www.grizzly-service.eu PL Spis tresci Wstęp Wstęp ........................................ 49 Przeznaczenie ............................ 49 Opis ogólny ............................... 50 Zawartość opakowania ................... 50 Przegląd........................................ 50 Opis działania ............................... 51 Dane techniczne ......................... 51 Zasady bezpieczeństwa ............. 51 Symbole zawarte w instrukcji ........... 52 Símbolos en el aparato ................... 52 Ogólne zasady bezpieczeństwa ...... 52 Składanie .................................. 53 Uruchamianie ............................ 53 Włączanie i wyłączanie ................. 53 Sprawdzić stan naładowania akumulatora ................................... 54 Wyjmowanie i wkładanie akumulatora ................................... 54 Zastosowanie końcówek.................. 54 Odkurzanie mokrych powierzchni ..... 54 Odkurzanie na sucho...................... 55 Funkcja odkurzacza ........................ 55 Wydmuchiwanie ............................ 55 Czyszczenie/Konserwacja .......... 55 Czyszczenie urządzenia ................. 55 Konserwacja .................................. 55 Przechowywanie ....................... 55 Utylizacja, ochrona środowiska . 56 Poszukiwanie błędów ................ 57 Gwarancja ................................. 57 Serwis naprawczy ..................... 59 Service-Center ............................ 59 Importer .................................... 59 Części zamienne/Akcesoria ........ 59 Tłumaczenie oryginalnej deklaracji zgodności WE .............. 85 Rysunek samorozwijający.......... 88 Gratulujemy zakupu nowego urządzenia. Zdecydowali się Państwo na zakup wartościowego produktu. Niniejsze urządzenie sprawdzono w trakcie produkcji pod kątem jakości, a także dokonano jego kontroli ostatecznej. W ten sposób zapewniona jest jego sprawność. Nie da się wykluczyć tego, że w pojedynczych przypadkach w urządzeniu lub przy nim wzgl. w wężach mogą się znaleźć pozostałości wody. Nie jest to brakiem ani uszkodzeniem, czy powodem do troski o urządzenie. Instrukcja obsługi jest częścią składową produktu. Zawiera ona ważne wskazówki dotyczące bezpieczeństwa, eksploatacji i utylizacji. Przed rozpoczęciem użytkowania produktu należy się zapoznać ze wszystkimi wskazówkami dotyczącymi obsługi i bezpieczeństwa. Produkt należy użytkować tylko zgodnie z opisem i podanym przeznaczeniem. Instrukcję należy przechowywać starannie, a w przypadku przekazania produktu osobom trzecim należy dostarczyć nabywcy kompletną dokumentację. Przeznaczenie Urządzenie jest przeznaczone do odkurzania do pracy na sucho i mokro np. w pomieszczeniach gospodarstwa domowego, warsztatach do majsterkowania, w samochodach lub garażach. Urządzenie można stosować jako dmuchawę lub do odsysania wody. To urządzenie nie jest przeznaczone do zastosowania komercyjnego. W przypadku użytkowania komercyjnego wygasają prawa z tytułu gwarancji. 49 PL Wciąganie odkurzaczem substancji palnych, wybuchowych lub szkodliwych dla zdrowia jest niedozwolone. Urządzenie należy do serii Parkside X 20 V TEAM i może być zasilane za pomocą akumulatorów z serii Parkside X 20 V TEAM. Akumulatory można ładować tylko za pomocą ładowarek z serii Parkside X 20 V TEAM. Producent nie odpowiada za szkody wywołane niezgodnym z przeznaczeniem stosowaniem lub nieprawidłową obsługą urządzenia. Opis ogólny Ilustracje znajdują się na okładce przedniej i tylnej. Zawartość opakowania Rozpakuj urządzenie i sprawdź, czy jest ono kompletne. Urządzenie jest dostarczane z założoną głowicą silnikową ( 1). Aby zdjąć głowicę silnikową otwórz zatrzask ( 8). - - 50 Obudowa silnika Zbiornik na zabrudzenia Trzyczęściowa rura ssąca wąż ssawny część rękojeści Worek z filtrem papierowych od odkurzania drobnego pyłu Filtr harmonijkowy ssawka mała Końcówka do podłogi z obracaną nasadką, ze szczotką i listwą gumową do odkurzania dywanów i gładkich powierzchni (już montowane) Końcówka do odkurzania fug uchwyt ścienny 2 Śruby z gniazdem krzyżowym - 4 kółka instrukcja obsługi odkurzacza do pracy na mokro i sucho Akumulator i ładowarka nie są zawarte w zestawie! Prawidłowo posegreguj i usuń materiały opakowania. Przegląd 1 2 3 4 5 6 7 8 9 10 11 12 13 14 15 16 17 18 19 20 21 Obudowa silnika Uchwyt do przenoszenia Włącznik/ wyłącznik Osłona gniazda akumulatora Króciec ssący Zbiornik na zabrudzenia Hak do uchwytu ściennego 2 zatrzask Przyłącze wydmuchu (niewidoczne) Trzyczęściowa rura ssąca Część rękojeści Wąż ssawny Uchwyt ścienny Śruby do mocowania uchwytu ściennego Końcówka do odkurzania fug Ssawka mała Końcówka do podłogi z obracaną nasadką, ze szczotką i listwą gumową do odkurzania dywanów i gładkich powierzchni (już montowane) Papierowy worek filtracyjny Akumulator Ładowarka 22 Zamknięcie filtra harmonijkowego 23 Filtr harmonijkowy 24 Miejsce na akcesoria PL 25 Kółko 26 Wtykane mocowanie Opis działania Urządzenie jest wyposażone w stabilny plastikowy pojemnik zbierający brud. W przypadku odkurzania na mokro strumień zasysania zostaje odłączony za pomocą pływaka w momencie, gdy pojemnik na brud będzie napełniony. Poza tym urządzenie jest wyposażone w funkcję nadmuchową. Kółka zapewniają dużą zwrotność urządzenia. Funkcje elementów urządzenia są podane w poniższym opisie. Dane techniczne Akumulatorowy odkurzacz na mokro i sucho ........ PNTSA 20-Li B1 Napięcie sieciowe U ................... 20 V Typ zabezpieczenia ..........................IPX4 Siła ssania..................... 9 kPA (90 mbar) Pojemność zbiornika na brud (brutto) ... 10 l Użyteczna pojemność zbiornika (woda) ... 4 l Waga (bez akcesoriów) ............ok. 2,7 kg Waga (tylko akcesoria) .............ok. 1,8 kg Akumulator (Li-Ion)............. PAP 20 A3 Liczba ogniw akumulatora ..................10 Napięcie znamionowe ................ 20 V Pojemność ...................................4,0 Ah Energia .......................................80 Wh Czas ładowania ..........................ok. 1 h Temperatura ......................... maks 50 °C Ładowanie ........................... 4 - 40 °C Praca.................................-20 - 50 °C Przechowywanie ................... 0 - 45 °C * Podany czas ładowania obowiązuje jedynie dla dołączonej do zestawu ładowarki do szybkiego ładowania. Ładowarka .......................PLG 20 A3 Znamionowy pobór prądu ........... 120 W Napięcie wejściowe/ Input ........................ 230-240 V~, 50 Hz Napięcie wyjściowe/ Output .................................... 21,5 V Prąd wyjściowy ..............................4,5 A Klasa zabezpieczenia ..................... II Zabezpieczenie urządzenia ......... T3.15A Typ zabezpieczenia .........................IPX0 Uwaga! Aktualna lista kompatybilnych akumulatorów znajduje się na stronie: www.lidl.de/akku To urządzenie może być zasilane wyłącznie następującymi akumulatorami: PAP 20 A1, PAP 20 A2, PAP 20 A3. Te akumulatory mogą być ładowane za pomocą następujących ładowarek: PLG 20 A1, PLG 20 A3, PDSLG 20 A1. Zasady bezpieczeństwa Urządzenie to mogą obsługiwać dzieci od 8 roku życia, a także osoby o zmniejszonych zdolnościach fizycznych, zmysłowych czy umysłowych, czy też osoby dysponujące niedostatecznym doświadczeniem oraz wiedzą, pod warunkiem, że praca odbywa się pod nadzorem albo po instruktażu w zakresie bezpiecznej eksploatacji urządzenia i ze zrozumieniem istniejących zagrożeń. Dzieciom nie wolno bawić się urządzeniem. Dzieciom nie wolno bez nadzoru wykonywać czyszczenia i konserwacji. 51 PL Symbole zawarte w instrukcji Znaki niebezpieczeństwa z informacjami dot. zapobiegania wypadkom. bezpieczeństwa, zabezpieczających przed porażeniem prądem elektrycznym, zranieniem i pożarem: W ten sposób unikniesz wypadków i zranień: Znaki nakazowe z informacja- • Nigdy nie zostawiaj gotowego mi dot. zapobiegania wypaddo pracy urządzenia bez opieki kom. w miejscu pracy. • Urządzeniem nie wolno odkuWskazówki zawierające inrzać ludzi ani zwierząt. formacje dot. lepszego użytko- • Przewodu ssącego ani dysz nie wania urządzenia. kierować podczas pracy na siebie ani na inne osoby, a w szczeSímbolos en el aparato gólności nie w kierunku oczu ani uszu. Istnieje niebezpieczeństwo zranienia. Parkside X 20 V TEAM • Nie wciągaj gorących, żarzących się, wybuchowych ani szkoMaszyn nie należy wyrzucać dliwych dla zdrowia substancji. razem z odpadami domowyDo takich substancji zaliczają mi. się np. gorący popiół, benzyna, Istnieje ryzyko pożaru, jeśli rozpuszczalniki, kwasy i zasady temperatura zasysanego (ługi). materiału przekracza 40 °C Niebezpieczeństwo zranienia. (104 °F)! • Podczas pracy dysza i rura ssąca nie mogą się znaleźć na wysoWskaźnik stanu naładowakości głowy. Niebezpieczeństwo nia na urządzeniu zranienia. Otworzyć i zamknąć zatW ten sposób unikniesz wypadków rzask zamykający i zranień wskutek porażenia prąOgólne zasady dem: C bezpieczeństwa Uwaga! Przy korzystaniu z narzędzi elektrycznych należy przestrzegać podanych poniżej podstawowych środków 52 • Wyłącz urządzenie i wyjmij baterię: - Gdy nie używasz urządzenia, transportujesz je, pozostawiasz je bez opieki, PL - kontrolujesz lub usuwasz blokady, - wykonujesz prace konserwacyjne, oczyszczasz urządzenie lub wymieniasz akcesoria bądź jeżeli przewód sieciowy jest uszkodzony - a także po zetknięciu się urządzenia z ciałami obcymi lub w razie stwierdzenia anormalnych wibracji W ten sposób unikniesz uszkodzeń urządzenia i wynikających stąd szkód osobowych: • Uważaj, by urządzenie było prawidłowo zmontowane; filtry muszą się znajdować w prawidłowej pozycji. • Nie pracuj urządzeniem bez założonych filtrów. Mogłoby to spowodować uszkodzenie urządzenia. • Nie używaj akcesoriów, które nie są zalecane przez PARKSIDE. Może to spowodować porażenie elektryczne lub pożar. • Zlecaj naprawy wyłącznie autoryzowanym przez naszą firmę warsztatom serwisowym. • Przestrzegaj wskazówek dotyczących oczyszczania oraz konserwacji urządzenia. • Przechowuj urządzenie w suchym, zam-kniętym i niedostępnym dla dzieci miejscu. Przestrzegaj wskazówek bezpieczeństwa dotyczących ładowania i prawidłowego użytkowania, opisanych w instrukcji obsługi akumulatora i ładowarki serii Parkside X 20 V Team. Szczegółowy opis procesu ładowania i dalsze informacje można znaleźć w tej oddzielnej instrukcji obsługi. Uwaga! Przestrzegaj wskazówek bezpieczeństwa podanych w instrukcji obsługi akumulatora serii Parkside X 20 V Team. Składanie 25) we wty1. Wcisnąć cztery kółka ( kane mocowania ( 26), znajdujące się na dole pojemnika na brud (6), tak by odpowiednio wskoczyły na swoje miejsce. 2. Włóż papierowy worek filtracyjny (19) (patrz odkurzanie na sucho - umieszczanie papierowego worka filtrującego w urządzeniu): 3. Załóż głowicę silnika (1) na zbiornik na zanieczyszczenia (6) i zamknij ją za pomocą zatrzasków (8). 4. Podłącz wąż ssawny (12) i akcesoria. Uruchamianie Przed rozpoczęciem pracy odwinąć całkowicie wąż próżniowy ( 12). Włączanie i wyłączanie Włączenie odkurzacza: Włącznik/wyłącznik ( 3) w pozycję „I“. Wyłączenie odkurzacza: Włącznik/wyłącznik ( 3) w pozycję „O“. 53 PL Sprawdzić stan naładowania akumulatora Wskaźnik stanu naładowania na urządzeniu sygnalizuje podczas pracy urządzenia stan naładowania akumulatora. Dioda LED świeci w kolorze zielonym: akumulator jest naładowany Dioda LED świeci w kolorze żółtym: akumulator jest częściowo naładowany Dioda LED świeci w kolorze czerwonym: Niski poziom naładowania Dioda LED miga w kolorze czerwonym: Akumulator wymaga ładowania Wyjmowanie i wkładanie akumulatora 1. W celu wyjęcia akumulatora z urządzenia wcisnąć przycisk zwalniający (1) na akumulatorze (4) i wyciągnąć akumulator. 2. Aby włożyć akumulator (4) do urządzenia, wsuń akumulator do urządzenia po prowadnicy. Musi się on słyszalnie zablokować. Akumulator włożyć dopiero po całkowitym zmontowaniu urządzenia. Niebezpieczeństwo urazu! Zastosowanie końcówek Końcówka do odkurzania fug ( 15): do odkurzania fug, narożników i grzejników. Ssawka mała ( 16) do odkurzania na mokro i sucho, do usuwania uporczywych zabrudzeń. 54 Końcówka do podłogi ( 17) z nasadką ( 18): do odkurzania na mokro i na sucho powierzchni gładkich i wykładzin dywanowych. Końcówka do podłogi ( 17) bez nasadki ( 18): do odkurzania na mokro i na sucho wykładzin dywanowych, do usuwania uporczywego brudu. • Nacisnąć języczki końcówki do podłogi (17) po prawej i lewej stronie i zdjąć nasadkę (18). Podczas pracy bez nasadki można zarysować delikatne powierzchnie. Odkurzanie mokrych powierzchni 1. Usuń filtr papierowy ( 19) i filtr harmonijkowy ( 23). 2. Wypompowywanie: Chwytając za uchwyt ( 11) zanurzyć wąż próżniowy ( 12) w zbiorniku z wodą i wypompować wodę. 3. Zbiornik zanieczyszczeń opróżniać natychmiast po odkurzaniu, ponieważ nie jest on skonstruowany do przechowywania płynów (patrz „Czyszczenie/Konserwacja“). Nie wchodzić do wypompowywanej wody. Niebezpieczeństwo porażenia prądem elektrycznym. Gdy zbiornik na brud jest pełen, pływak zamyka otwór ssący, co powoduje przerwanie odkurzania. Wyłącz urządzenie i opróżnij pojemnik na brud. PL Natychmiast wyłącz urządzenie, jeżeli zacznie z niego wypływać piana lub ciecz. Czyszczenie/Konserwacja Czyszczenie urządzenia Nie spryskuj urządzenia wodą i nie używaj ostrych środków czyszczących ani rozpuszczalników. Może to spowodować uszkodzenie urządzenia. Odkurzanie na sucho Odkurzanie z workiem papierowym: Umieszczanie papierowego worka filtracyjnego w urządzeniu Załóż papierowy worek filtracyjny (19) ze wzmocnieniem skierowanym do góry na znajdujący się wewnątrz króciec ssawny (patrz strzałka ). Pierścień uszczelniający otworu worka filtra papierowego musi dokładnie zamykać mostek na króćcu ssącym. Odkurzanie drobnych pyłów: Podczas niektórych procesów odsysania (np. szlifowanie farb i lakierów, frezowanie lub wiercenie w murach, szlifowanie lub wiercenie w twardym drewnie) mogą powstawać pyły szkodliwe dla zdrowia. Funkcja odkurzacza Aby odkurzyć, załóż wąż ssawny (12) na złącze (5) znajdujące się na głowicy silnika. • Po zakończeniu odkurzania opróżnij zbiornik na brud ( 6). • Oczyść zbiornik na brud wilgotną szmatką. • Pełny worek papierowy ( 19) należy wymieniać na nowy (zamawianie worków zobacz rozdział „Części zamienne/ Akcesoria “). • Wytrzepać dostępny opcjonalnie filtr harmonijkowy i oczyścić go pędzlem lub zmiotką. Konserwacja • Urządzenie nie wymaga konserwacji. Przechowywanie - - Wydmuchiwanie Funkcję przedmuchiwania zaleca się bez zastosowania filtra. Do dmuchania podłączyć wąż (12) do króćca (9) głowicy silnika. - - Włożyć rozłożone rury ssące ( 10) w uchwyt do przechowywania wyposażenia znajdujący się we wnęce nóg urządzenia ( 24). Nawinąć wąż ssawny ( 12) wokół urządzenia i włożyć część rękojeści ( 11) do rury ssawnej ( 10). Zlecaj naprawy wyłącznie autoryzowanym przez naszą firmę warsztatom serwisowym. Możesz zawiesić urządzenie na haku ( 7) uchwytu ściennego ( 13) 55 PL Nie zawieszaj na uchwycie ściennym urządzenia z ciężkim wypełnieniem (np. z odessaną wodą). - W tym celu zamocuj uchwyt ścienny do ściany ( 13) za pomocą dwóch śrub ( 14) i kołków. Sprawdź prawidłowe zamocowanie uchwytu ściennego ( 13) bezpośrednio po zamontowaniu i potem kontroluj je regularnie. W trakcie wiercenia uważaj, aby nie uszkodzić przewodów zasilających. Użyj odpowiednich detektorów, aby je zlokalizować lub posłużyć się planem instalacji. Kontakt z przewodami elektrycznymi grozi porażeniem prądem elektrycznym i pożarem, kontakt z przewodem gazu może spowodować wybuch. Uszkodzenie przewodu wody może spowodować szkody materialne i porażenie prądem elektrycznym. 56 Utylizacja, ochrona środowiska Przekaż urządzenie, jego akcesoria i opakowanie do zgodnej z przepisami o ochronie środowiska naturalnego utylizacji. Maszyn nie należy wyrzucać razem z odpadami domowymi. Oddaj urządzenie w punkcie recyklingowym. Użyte w produkcji urządzenia elementy z tworzyw sztucznych i metalu można od siebie oddzielić i poddać oddzielnej utylizacji. Zwróć się po poradę do naszego Centrum Serwisowego. Utylizację przesłanych nam uszkodzonych urządzeń przeprowadzamy bezpłatnie. PL Poszukiwanie błędów Problem Urządzenie nie uruchamia się Możliwa przyczyna Sposób usunięcia Uszkodzony włącznik-wyłącznik ( 3) Zużyte szczotki węglowe Naprawa w punkcie serwisowym Uszkodzony silnik Słabe ssanie lub brak ssania Zatkany układ węży ( 12) lub końcówki ( 15/16/17) Usuń zatory i blokady Nieprawidłowo złożone rury ssące ( 10) Prawidłowo złóż rury ssące Otwarty pojemnik na brud ( 6) Zamknij pojemnik na brud Pełny pojemnik na brud Pył lub brud zostanie wydmuchany z urządzenia Opróżnij, oczyść lub wymień Pełny lub zatkany filtr ( 19/23) Opróżnij, oczyść lub wymień filtr Filtr ( 19/23) nie jest zamontowany lub nie jest zamontowany prawidłowo. Włożyć brakujący filtr lub sprawdzić prawidłowe osadzenie filtra Gwarancja Szanowna Klientko, Szanowny Kliencie, na zakupione urządzenie otrzymują Państwo 3 lata gwarancji od daty zakupu. W przypadku wad tego produktu przysługują Państwu ustawowe prawa w stosunku do sprzedawcy produktu. Prawa te nie są ograniczone przez naszą przedstawioną niżej gwarancję. Warunki gwarancji Okres gwarancji rozpoczyna się z datą zakupu. Prosimy zachować oryginalny paragon. Będzie on potrzebny jako dowód zakupu. Jeśli w okresie trzech lat od daty zakupu tego produktu wystąpi wada materiałowa lub fabryczna, produkt zostanie – wedle naszego wyboru – bezpłatnie naprawiony lub wymieniony. Gwarancja zakłada, że w okresie trzech lat uszkodzone urządzenie zostanie przesłane wraz z dowodem zakupu (paragonem) z krótkim opisem, gdzie wystąpiła wada i kiedy się pojawiła. Jeśli defekt jest objęty naszą gwarancją, 57 PL otrzymają Państwo z powrotem naprawiony lub nowy produkt. (Wraz z naprawą lub wymianą produktu okres gwarancji nie biegnie na nowo.) Okres gwarancji i ustawowe roszczenia z tytułu wad Okres gwarancji nie wydłuża się z powodu świadczenia gwarancyjnego. Obowiązuje to również dla wymienionych lub naprawionych części. Ewentualne uszkodzenia i wady istniejące już w momencie zakupu należy zgłosić bezzwłocznie po rozpakowaniu. Naprawy przypadające po upływie okresu gwarancji są odpłatne. Zakres gwarancji Urządzenie wyprodukowano z zachowaniem staranności zgodnie z surowymi normami jakościowymi i dokładnie sprawdzono przed wysyłką. Gwarancja obowiązuje dla wad materiałowych lub fabrycznych. Gwarancja nie rozciąga się na części produktu, które podlegają normalnemu zużyciu i można je uznać za części zużywalne (np. filtry lub nasadki), oraz na uszkodzenia części delikatnych (np. przełączniki). Gwarancja przepada, jeśli produkt został uszkodzony, nie był zgodnie z przeznaczeniem użytkowany i konserwowany. Użytkowanie zgodnie z przeznaczeniem wiąże się z przestrzeganiem wszystkich wskazówek zawartych w instrukcji obsługi. Należy bezwzględnie unikać zastosowań i działań, których odradza się lub przed którymi ostrzega się w instrukcji obsługi. Produkt jest przeznaczony do użytku prywatnego, a nie komercyjnego. W przypadku niewłaściwego i nieodpowiedniego obchodzenia się z urządzeniem, stosowa- 58 nia „na siłę” i zabiegów, które nie zostały przeprowadzone przez nasz autoryzowany oddział, gwarancja wygasa. Realizacja w przypadkach objętych gwarancją Aby zagwarantować szybkie przetworzenie Państwa sprawy, prosimy o przestrzeganie poniższych wskazówek: • W przypadku wszelkich zapytań prosimy o przygotowanie paragonu i numeru identyfikacyjnu jako dowodu zakupu (IAN 317189_1904). • Numer artykułu znajduje się na tabliczce znamionowej. • W przypadku wystąpienia usterek lub innych wad prosimy o skontaktowanie się z wymienionym niżej działem serwisowym telefonicznie lub mailowo. Uzyskają Państwo wówczas szczegółowe informacje na temat realizacji reklamacji. • Uszkodzony produkt mogą Państwo wysłać po skontaktowaniu się z naszym działem obsługi klienta, załączając dowód zakupu (paragon) i określając, na czym polega wada i kiedy wystąpiła, bezpłatnie na podany adres serwisu. Aby uniknąć problemów z odbiorem i dodatkowych kosztów, prosimy o wysłanie przesyłki na adres, który Państwu podano. Należy się upewnić, żeby wysyłka nie nastąpiła odpłatnie, jako ponadwymiarowa, ekspresowo lub na innych specjalnych warunkach. Prosimy o przesłanie urządzenia wraz ze wszystkimi częściami wyposażenia otrzymanymi przy zakupie i zadbanie o wystarczająco bezpieczne opakowanie. PL Serwis naprawczy Naprawy, które nie są objęte gwarancją, można zlecić odpłatnie w naszym oddziale serwisowym. Serwis sporządzi Państwu kosztorys naprawy. Podejmujemy się wyłącznie naprawy urządzeń, które zostały prawidłowo zapakowane i ofrankowane. Uwaga: Prosimy o przesłanie czystego urządzenia ze wskazaniem usterki. Urządzenia przesłane dla nas odpłatnie, jako przesyłka ponadwymiarowa, ekspresowa lub na innych warunkach specjalnych, nie zostaną odebrane. Utylizację przesłanych do nas uszkodzonych urządzeń przeprowadzamy bezpłatnie. Service-Center PL Serwis Polska Tel.: 22 397 4996 E-Mail: [email protected] IAN 317189_1904 Importer Prosimy mieć na uwadze, że poniższy adres nie jest adresem serwisu. Prosimy o kontakt z wymienionym wyżej centrum serwisowym. Grizzly Tools GmbH & Co. KG Stockstädter Straße 20 DE-63762 Großostheim Niemcy www.grizzly-service.eu Części zamienne/Akcesoria Części zamienne i akcesoria można zakupić na www.grizzly-service.eu W przypadku problemów z zamawianiem należy skorzystać z formularza kontaktowego. W razie kolejnych pytań należy zwracać się do „Service-Center” (patrz strona 59). Pos. Instrukcja obsługi Pos. Oznaczenie Rysunek samorozwijający Przeznaczenie Nr. artykułu 12 8 Wąż ssący z uchwytem 91105189 23 2 filtr fałdowany 91105185 22 3 Zamknięcie filtra harmonijkowego 91105186 10 9 Trzyczęściowa rura ssąca 91099439 Worek z filtrem papierowych, 5 szt. 30250146 Worek z filtrem papierowych, 1 sztuka 30250147 19 14 59 CZ Obsah Úvod Úvod..........................................60 Použití .......................................60 Obecný popis .............................61 Rozsah dodávky ...........................61 Přehled .........................................61 Popis funkce ..................................61 Technická data ..........................62 Bezpečnostní pokyny .................62 Symboly v návodu..........................62 Symboly na přístroji .......................63 Všeobecné bezpečnostní pokyny .....63 Montáž ......................................64 Uvedení do provozu ...................64 Zapnutí/vypnutí .............................64 Kontrola stavu nabití .......................64 Vyjmutí/Vložení akumulátoru ...........64 Použití hubic ..................................64 Mokré vysávání .............................65 Suché vysávání ..............................65 Funkce sání ...................................65 Funkce foukání...............................65 Čištění/údržba ...........................65 Čištění nástroje ..............................65 Údržba .........................................66 Uložení ......................................66 Likvidace/ochrana životního prostředí ....................................66 Hledání chyb..............................67 Záruka ......................................67 Opravna ....................................69 Service-Center ............................69 Dovozce .....................................69 Náhradní díly/Příslušenství ........69 Překlad originálního prohlášení o shodě CE .................................86 Rozvinutý výkres .......................88 Blahopřejeme vám ke koupi vašeho nového přístroje. Rozhodli jste se pro vysoce kvalitní výrobek. Kvalita tohoto přístroje byla kontrolována během výroby a byla provedena také závěrečná kontrola. Tím je zaručena funkčnost přístroje. Nelze vyloučit, že v jednotlivých případech bude na přístroji, v přístroji nebo v hadicových rozvodech zbytek vody. Nejedná se o vadu nebo závadu a není to důvodem k obavám. 60 Návod k obsluze je součástí tohoto výrobku. Obsahuje důležité pokyny týkající se bezpečnosti, používání a likvidace. Před použitím výrobku se seznamte se všemi pokyny k obsluze a bezpečnosti. Výrobek používejte jen k popsaným účelům a v rámci uvedených oblastí použití. Návod dobře uschovejte a při předávání výrobku třetímu předejte i všechny podklady. Použití Tento nástroj je určený pro mokré a suché vysávání v domáckém prostředí jako např. v domácnosti, v kutilské dílně, v autě anebo v garáži. Přístroj lze používat také jako ventilátor nebo na odsávání vody. Tento přístroj není určený pro komerční využití. Při komerčním použití záruka zanikne. Vysávání hořlavých, výbušných anebo zdraví škodlivých látek je zakázáno. Přístroj je součástí série Parkside X 20 V TEAM a lze jej provozovat s akumulátory série X 20 V TEAM. Akumulátory se smí nabíjet pouze nabíječ- CZ kami série Parkside X 20 V TEAM. Výrobce neručí za škody, vzniklé předpisům neodpovídajícím použitím anebo nesprávnou obsluhou. Obecný popis Obrázky najdete na přední a zadní výklopní straně. Rozsah dodávky Vybalte přístroj a zkontrolujte, zda je kompletní. Přístroj je dodáván s nasazenou hlavou motoru ( 1). Pro sejmutí hlavy motoru a vyjmutí příslušenství otevřete uzavírací úchytky ( 8). - - Motorová skříň Nádrž na nečistoty Třídílná nasávací roura sací hadice rukojeť Papírový sáčkový filtr na vysávání jemného prachu skládaný filtr běžná hubice Hubice na dlážku s otočnou nástrční násadou s kartáčem a s gumovou lamelou na vysávání koberců a hladkých ploch (již namontovaný) Štěrbinová hubice držák na stěnu 2 šroubů s křížovou drážkou 4 kolečka návod k obsluze k vysavači pro mokré a suché sání Akumulátor a nabíječka nejsou součástí dodávky! Řádně zlikvidujte obalový materiál. Přehled 1 2 3 4 5 6 7 8 9 10 11 12 13 14 15 16 17 18 19 20 21 Motorová skříň rukojeť pro přenášení Za-/vypínač kryt přihrádky na akumulátor Přípojka sací hadice Nádrž na nečistoty háček držáku na stěnu 2 uzavírací klips přípojka pro foukání (není vidět) Třídílná nasávací roura rukojeť nasávací hadice držák na stěnu upevňovací šrouby držáku na stěnu Štěrbinová hubice běžná hubice Hubice na dlážku s otočnou nástrční násadou s kartáčem a s gumovou lamelou na vysávání koberců a hladkých ploch (již namontovaný) sáček papírového filtru akumulátor nabíječka 22 uzávěr skládaného filtru 23 skládaný filtr 24 uchycení pro příslušenství 25 kolečko 26 násuvný úchyt Popis funkce Přístroj je vybaven stabilní plastovou nádobou pro zachycení nečistot. Při vysávání za mokra se odpojí proud nasávaného vzduchu plovákem, když je nádoba na nečistoty plná. Přístroj má navíc funkci 61 CZ foukání. Vodicí kolečka umožňují velkou ovladatelnost přístroje. S funkcemi ovládacích částí se seznámite v následujícím popisu. Technická data Aku vysavac na mokré a suché vysávání ................ PNTSA 20-Li B1 Jmenovité napětí U....................... 20 V Druh ochrany...................................IPX4 Nasávací síla ................ 9 kPA (90 mbar) Obsah nádoby na smetí (brutto) ......... 10 l Užitečný objem nádrže (voda) ............. 4 l Hmotnost (bez příslušenství) ..... cca 2,7 kg Hmotnost (pouze příslušenství) . cca 1,8 kg Akumulátor (Li-Ion) ....... PAP 20 A3 Bateriové články ................................10 Jmenovité napětí ......................... 20 V Kapacita .....................................4,0 Ah Energie .......................................80 Wh Doba nabíjení ............................ asi 1 h Teplota.................................. max 50 °C Nabíjecí proces ....................4 – 40 °C Provoz ..............................-20 – 50 °C Skladování ...........................0 – 45 °C * Uvedená doba nabíjení se dosáhne pouze s přiloženou rychlonabíječkou. Nabíječka ......................PLG 20 A3 Příkon .........................................120 W Vstupní napětí/ Input .........................230-240 V~, 50 Hz Výstupní napětí/ Output .....................................21,5 V Výstupní proud ..............................4,5 A Třída ochrany ................................. II Jištění přístroje ............................ T3.15A Druh ochrany ..................................IPX0 62 Pozor! Aktuální seznam kompatibility akumulátorů najdete na: www.lidl.de/akku Tento přístroj lze provozovat výhradně s následujícími akumulátory: PAP 20 A1, PAP 20 A2, PAP 20 A3. Tyto akumulátory se smí nabíjet následujícími nabíječkami: PLG 20 A1, PLG 20 A3, PDSLG 20 A1. Bezpečnostní pokyny Tento přístroj mohou používat děti od 8 roků jakož i osoby se sníženými fyzickými, senzorickými anebo mentálními schopnostmi, anebo s nedostatkem zkušeností a vědomostí, pokud jsou pod dozorem anebo byli poučené o bezpečném používaní přístroje a rozumějí rizikům, které z toho vyplývají. Děti si s přístrojem nesmí hrát. Děti nesmí vykonávat čistění a údržbu bez dozoru. Symboly v návodu Výstražné značky s údaji pro zabránění škodám na zdraví anebo věcným škodám. Příkazové značky s údaji pro prevenci škod. Informační značky s informacemi pro lepší zacházení s nástrojem. CZ Symboly na přístroji Parkside X 20 V TEAM Elektrické přístroje nepatří do domácího odpadu. livé látky. K těmto patří mezi jinými horký popel, benzín, rozpouštědla, kyseliny anebo louhy. • Dýzy a sací trubka se nesmí během práce nacházet ve výši hlavy. Vzniká nebezbečí zranění. Hrozí nebezpečí požáru, pokud nasávaný materiál překročí teplotu 40° C (104° F)! Takto se vyhnete nehodám a poraněním skrz elektrický úder: ukazatel stavu nabití na přístroji • Vypněte zařízení a vyjměte baterii: Otevření a zavření uza- jestliže přístroj nepoužíváte, povíracího klipu kud jej přepravujete anebo je-li bez dozoru; Všeobecné bezpečnostní - jestliže přístroj kontrolujete, pokyny čistíte nebo odstraňujete blokování; Pozor! Při používání elektric- jestliže provádíte čisticí anebo kých nástrojů je třeba pro údržbářské práce nebo když ochranu proti elektrickému vyměňujete příslušenství; úderu, nebezpečí poranění a jestliže je poškozen elektrický požáru, dbát na následující nebo prodlužovací kabel; zásadní bezpečnostná opatře- po styku s cizími tělesy nebo ní: při abnormálních vibracích. Takto zabráníte nehodám a poraněTakto zabráníte vzniku škod na příním: • Nikdy neponechávejte k provozu stroji a případně z nich plynoucímu připravený přístroj na pracovišti poškození zdraví osob: • Dbejte na to, aby přístroj byl bez dohledu. správně smontován a aby filtry • Přístroj nesmí být použit k odsábyly správně umístěny. vání na osobách a zvířatech. • Během provozu nemiřte sací ha- • Nepracujte bez filtru. Přístroj by tím mohl být poškozen. dicí a hubicemi na sebe či jiné osoby, zejména ne na oči a uši. • Nepoužívejte příslušenství, které nebylo doporučeno společností Hrozí nebezpečí poranění. PARKSIDE. To může vést k úrazu • Nevysávejte horké, žhavé, hořlaelektrickým proudem nebo k pové, výbušné anebo zdraví škodžáru. C 63 CZ • Opravy nechte provádět pouze námi zmocněnými opravnami. • Dbejte na pokyny k čištění a údržbě přístroje. • Uchovávejte přístroj v suchu a mimo dosahu dětí. Dodržujte bezpečnostní pokyny a pokyny k nabíjení a správnému použití, uvedené v návodu k obsluze Vašeho akumulátoru a Vaší nabíječky série Parkside X 20 V Team. Podrobný popis procesu nabíjení a další informace naleznete v tomto samostatném návodu k obsluze. Pozor! Dodržujte bezpečnostní pokyny uvedené v návodu k obsluze vašeho akumulátoru řady Parkside X 20 V Team. Montáž 25) do 1. Zatlačte čtyři kolečka ( nástrčného úchytu ( 26), na spodní straně nádoby na nečistoty (6), dokud nezaskočí. 2. Nasaďte sáček papírového filtru (19) (viz vysávání za sucha - vložení sáčku papírového filtru): 3. Nasaďte hlavu motoru (1) na nádobu na nečistoty (6) a zavřete ji uzavírací svorkou (8). 4. Připojte sací hadici (12) a příslušenství. Uvedení do provozu Při práci zcela odmotejte sací hadici ( 12). 64 Zapnutí/vypnutí Zapnutí vysavače: Za-/vypínač ( 3) do polohy „I“. Vypnutí vysavače: Za-/vypínač ( 3) do polohy „0“. Kontrola stavu nabití Ukazatel stavu nabití na přístroji poskytuje informace o stavu nabití akumulátoru během provozu přístroje. LED svítí zeleně: Akumulátor je nabitý LED svítí žlutě: Akumulátor je částečně nabitý LED svítí červeně: Nízký stav nabití LED bliká červeně: Akumulátor je nutné dobít Vyjmutí/Vložení akumulátoru 1. K vyjmutí akumulátoru z přístroje stiskněte odblokovací tlačítko (1) na akumulátoru (4) a akumulátor vytáhněte. 2. Pro vložení akumulátoru (4) vsunujte akumulátor po vodicí kolejnici do přístroje. Akumulátor slyšitelně zacvakne. Vložte akumulátor pouze tehdy, jestliže je přístroj zcela smontovaný. Hrozí nebezpečí poranění! Použití hubic Štěrbinová trubice ( 15): pro vysávání štěrbin, rohů a topných těles. Běžná hubice ( 16) pro mokré a suché vysávání, pro odstranění ulpělých nečistot. CZ Hubice na podlahu ( 17) s nástrční násadou ( 18): pro mokré a suché vysávání hladkých ploch a koberců. Hubice na podlahu ( 17) bez nástrční násady ( 18): pro mokré a suché vysávání koberců, pro odstranění zaschlé špíny. • Zatlačte spony na hubici na podlahu ( 17) doprava a doleva a složte nástrční násadu ( 18). Citlivé povrchy se mohou při práci bez nástrční násady poškrábat. Mokré vysávání 1. Vyjměte papírový filtr ( 19) a skládaný filtr ( 23). 2. Odsávání (odčerpávání): Sací hadici ( 12) na držadle ( 11) ponořte do nádoby s vodou a vodu odčerpejte. 3. Ihned po vysávání vyprázdněte nádobu na nečistoty, protože není zkonstruována k přechovávání tekutin (viz část „Čištění/údržba“). Nestůjte ve vodě určené k odčerpání. Nebezpečí úrazu elektrickým proudem. Je-li nádoba na smetí naplněná, uzavře plovák sací otvor a sací po-chod se přeruší. Vypněte přístroj a vyprázdněte nádobu na smetí. Suché vysávání Vysávání s papírovým sáčkovým filtrem: Vložte papírový filtrační sáček Přehněte papírový sáček (19) s vyztužením nahoru přes vnitřní sací hrdlo (viz šipka ). Těsnicí kroužek u otvoru filtračního sáčku musí úplně obepínat spojku na sacím hrdle. Vysávání jemného prachu: Při určitém typu odsávání (například broušení barev a laků, frézování nebo vrtání do zdí, broušení nebo vrtání tvrdého dřeva) může vznikat zdraví škodlivý prach. Funkce sání Pro odsávání nasaďte sací hadici (12) na přípojku (5) na hlavě motoru. Funkce foukání Foukací funkci doporučujeme používat bez filtru. K foukání nasuňte sací hadici (12) na přípojku (9) na hlavě motoru. Čištění/údržba Čištění nástroje Nepostřikujte tento nástroj vodou a nepoužívejte žádné ostré čisticí prostředky resp. rozpouštědla. Nástroj by se mohl poškodit. Při výstupu pěny anebo kapaliny přístroj ihned vypněte. • Po skončení provozu vyprázdněte nádobu na smetí ( 6). 65 CZ • • • Při vrtání dbejte na to, aby nedošlo k poškození žádného napájecího vedení. Pro jejich nalezení použijte vhodné detektory nebo se podívejte do plánu instalace. Při kontaktu s elektrickým vedením může dojít k úrazu elektrickým proudem a požáru, kontakt s plynovým vedením může způsobit explozi. Při poškození vodovodního vedení může dojít k hmotným škodám a úrazu elektrickým proudem. Vyčistěte nádobu na smetí vlhkým hadrem. Plný papírový sáčkový filtr ( 19) vyměňte (Pro dodatečné objednávky viz kapitolu „Náhradní díly/Příslušenství“). Volitelný skládání filtr vyklepejte a vyčistěte jej štětcem nebo smetáčkem. Údržba • Přístroj je nevyžaduje údržbu. Uložení - - Zastrčte rozložené nasávací roury (10) do držáku pro příslušenství na nožičkách ( 24) nástroje. Omotejte sací hadici (12) kolem přístroje a zastrčte díl rukojeti (11) do sací hadice (10). Dbejte na pokyny k čištění a údržbě přístroje. Zařízení můžete zavěsit na hák držáku na stěnu ( 7) na držáku na stěnu ( 13). Do držáku na stěnu nezavěšujte zařízení s těžkou náplní (např. s absorbovanou vodou). - 66 Za tímto účelem namontujte držák na stěnu ( 13) dvěma šrouby ( 14) a pomocí hmoždinek na stěnu. Ihned po montáži a poté v pravidelných intervalech kontrolujte pevné usazení držáku na stěnu ( 13). Likvidace/ochrana životního prostředí Zlikvidujte prosím přístroje, které již nebudou použitelné, ekologicky. Stroje nepatří do domácího odpadu. • • Odevzdejte jej ve sběrně šrotu. Použité díly z plastu a kovu se tam dle druhu materiálu roztřídí a mohou se pak zavést do recyklace. Zeptejte se v našem Service-Center. Likvidaci vašich zaslaných poškozených přístrojů provádíme bezplatně. CZ Hledání chyb Problém Přístroj nestartuje Možná příčina Odstranění poruchy Vadný spínač/vypínač ( 3) Oprava servisní službou Opotřebované uhlíky Vadný motor Malý anebo chybějící Z přístroje je vyfukován prach nebo nečistoty. 12) Hadicový systém ( anebo hubice ( 15/16/17) jsou ucpané Odstraňte důvody ucpání a blokování Sací trubice ( 10) není správně poskládaná Sací trubici poskládejte správně Nádrž ( 6) je otevřená Nádrž uzavřete Nádrž ( 6) je plná Nádrž vyprázdněte Filtr ( 19/23) je plný anebo ucpaný Filtr vyprázdněte, vyčistěte anebo vyměňte Chybí filtr ( 19/23) nebo není správně namontován. Nasaďte chybějící filtr nebo ověřte správné usazení filtru. Záruka Vážení zákazníci, Na tento přístroj poskytujeme 3letou záruku od data zakoupení. V případě závady tohoto výrobku vám vůči prodejci výrobku přináleží zákonná práva. Tato zákonná práva nejsou omezena naší následovně uvedenou zárukou. Záruční podmínky Záruční doba začíná běžet ode dne nákupu. Uschovejte si, prosím, originál účtenky pro pozdější použití. Tento dokument budete potřebovat jako doklad o koupi. Zjistíte-li během tří let od data koupě u tohoto výrobku materiálovou nebo výrobní vadu, bude výrobek námi, podle našeho výběru, bezplatně opraven nebo nahrazen. Tato záruční oprava předpokládá, že během 3leté lhůty předložíte poškozený přístroj s dokladem o koupi (pokladní stvrzenka) a písemně krátce popíšete, v čem spočívá závada a kdy k ní došlo. Bude-li závada kryta naší zárukou, získáte zpět opravený nebo nový výrobek. Opravou nebo výměnou výrobku nezačíná záruční doba běžet od začátku. 67 CZ Záruční doba a zákonné nároky na odstranění vady Záruční doba se neprodlužuje poskytnutím záruky. Toto platí i pro nahrazené a opravené díly. Již při koupi zjištěné závady a nedostatky musíte nahlásit okamžitě po vybalení výrobku. Po uplynutí záruční doby musíte uhradit náklady za provedené opravy. Rozsah záruky Přístroj byl precizně vyroben podle přísných jakostních směrnic a před dodáním byl svědomitě zkontrolován. Záruční oprava se vztahuje na materiálové nebo výrobní vady. Tato záruka se netýká dílů výrobku, které jsou vystaveny normálnímu opotřebení, a lze je považovat za spotřební materiál (např. filtry nebo nástavce), nebo poškození křehkých dílů (např. spínače). Tato záruka neplatí, je-li výrobek poškozen z důvodu neodborného používání, nebo pokud u něj nebyla prováděna údržba. Pro odborné používání výrobku musí být přesně dodržovány všechny pokyny uvedené v návodu k obsluze. Bezpodmínečně je třeba zabránit používání a manipulacím s výrobkem, které nejsou v návodu k obsluze doporučeny, nebo je před nimi varováno. Výrobek je určen jen pro soukromé účely a ne pro komerční využití. Záruka zaniká v případě zneužívání a neodborné manipulace, používání nadměrné síly a při zásazích, které nebyly provedeny naším autorizovaným servisem. 68 Postup v případě uplatňování záruky Pro zajištění rychlého zpracování vaší žádosti, prosím, postupujte podle následujících pokynů: • Na důkaz, že jste výrobek zakoupili, mějte pro jakékoli případné dotazy připravenou pokladní stvrzenku a číslo výrobku (AN 317189_1904). • Číslo výrobku je uvedeno na typovém štítku. • Pokud by došlo k funkční poruše nebo jiným závadám, nejdříve telefonicky nebo e-mailem kontaktujte níže uvedené servisní oddělení. Pak získáte další informace o vyřízení vaší reklamace. • Výrobek označený jako vadný můžete po domluvě s naším zákaznickým servisem, s připojením dokladu o koupi (pokladní stvrzenky) a po uvedení, v čem závada spočívá a kdy k ní došlo, přeposlat bez platby poštovného na vám sdělenou adresu příslušného servisu. Aby bylo zabráněno problémům s přijetím a dodatečnými náklady, bezpodmínečně použijte jen tu adresu, která vám bude sdělena. Zajistěte, aby zásilka nebyla odeslána nevyplaceně jako nadměrné zboží, expres nebo jiný, zvláštní druh zásilky. Přístroj zašlete včetně všech částí příslušenství dodaných při zakoupení a zajistěte dostatečně bezpečný přepravní obal. CZ Service-Center Opravna Opravy, které nespadají do záruky, můžete nechat udělat v našem servisu oproti zúčtování. Rádi vám připravíme předběžný odhad nákladů. Můžeme zpracovávat jen ty přístroje, které byly dostatečně zabalené a odeslány vyplaceně. Pozor: Prosím, přístroj zašlete našemu autorizovanému servisu vyčištěný a s upozorněním na závadu. Nepřijmeme přístroje zaslané nevyplaceně jako nadměrné zboží, expres nebo jiný, zvláštní druh zásilky. Likvidaci vašich poškozených zaslaných přístrojů provedeme bezplatně. CZ Servis Česko Tel.: 800143873 E-Mail: [email protected] IAN 317189_1904 Dovozce Prosím, respektujte, že následující adresa není adresou servisu. Nejdříve kontaktujte shora uvedené servisní středisko. Grizzly Tools GmbH & Co. KG Stockstädter Straße 20 DE-63762 Großostheim Německo www.grizzly-service.eu Náhradní díly/Příslušenství Náhradní díly a příslušenství obdržíte na stránkách www.grizzly-service.eu Pokud máte problémy při objednávání, použijte prosím kontaktní formulář. V případě jakýchkoliv dalších dotazů se obraťte na servisní středisko / „Service-Center“ (viz strana 69). Pol. Návod k obsluze Pol. Rozvinutý výkres Označení Použití Č. artiklu. 12 8 Nasávací hadice 91105189 23 2 skládaný filtr 91105185 22 3 uzávěr skládaného filtru 91105186 10 9 Třídílná nasávací roura 91099439 19 14 Papírový sáčkový filtr, 5 ks 30250146 Papírový sáčkový filtr, 1 ks 30250147 69 SK Obsah Úvod Úvod..........................................70 Použitie......................................70 Všeobecný popis ........................71 Rozsah dodávky ............................71 Prehľad .........................................71 Popis funkcie .................................71 Technické údaje..........................72 Bezpečnostné pokyny ................72 Symboly na prístroji .......................72 Všeobecné Bezpečnostné pokyny .....73 Montáž ......................................74 Obsluha .....................................74 Zapínanie/Vypínanie .....................74 Kontrola stavu nabitia .....................74 Vybratie/vloženie batérie ...............74 Použitie hubíc ................................75 Mokré vysávanie............................75 Suché vysávanie ............................75 Funkcia nasávania .........................75 Funkcia vyfukovania .......................75 Čistenie/Údržba .........................76 Čistenie nástroja ............................76 Údržba .........................................76 Uloženie ....................................76 Odstránenie/Ochrana životného prostredia ..................76 Zisťovanie závad .......................77 Záruka ......................................77 Servisná oprava ........................79 Service-Center ............................79 Dovozca .....................................79 Náhradné diely / Príslušenstvo .79 Preklad originálneho prehlásenia o zhode CE .................................87 Výkres náhradných dielov .........88 Gratulujeme Vám k zakúpeniu Vášho nového prístroja. Tým ste sa rozhodli pre kvalitný produkt. Tento prístroj bol počas výroby testovaný na kvalitu a podrobený výstupnej kontrole. Tým je zabezpečená funkčnosť vášho prístroja. Nie je vylúčené, že v ojedinelých prípadoch sa na prístroji alebo v prístroji, resp. v hadiciach nachádza zvyšková voda. Nie je to chyba alebo defekt a ani dôvod na obavu. 70 Návod na obsluhu je súčasťou tohto produktu. Obsahuje dôležité upozornenia ohľadom bezpečnosti, obsluhy a likvidácie. Pred používaním produktu sa oboznámte so všetkými pokynmi pre obsluhu a bezpečnosť. Používajte produkt len predpísaným spôsobom a len v uvedených oblastiach použitia. Návod na obsluhu uschovajte a v prípade odovzdania produktu tretím osobám odovzdajte aj všetky podklady. Použitie Tento nástroj je určený pre mokré a suché vysávanie v domáckom prostredí ako napr. v domácnosti, v miestnosti pre hobby, v aute alebo v garáži. Prístroj sa dá použiť ako dúchadlo na odsávanie vody. Tento prístroj nie je vhodný na komerčné používanie. Pri komerčnom použití zanikne záruka. Vysávanie horľavých, výbušných alebo zdraviu škodlivých látok je zakázané. Prístroj je súčasťou série Parkside X 20 V TEAM a môže sa prevádzkovať s akumulátormi série Parkside X 20 V TEAM. Akumulátory sa smú nabíjať iba s nabíjač- SK kami série Parkside X 20 V TEAM. Výrobca nezodpovedá za škody, ktoré boli zapríčinené používaním nezodpovedajúcim účelu použitia alebo nesprávnou obsluhou. Všeobecný popis Obrázky nájdete na prednej a zadnej výklopnej strane. Rozsah dodávky Prístroj vybaľte a skontrolujte, či je kompletný. Prístroj sa dodáva s nasadenou hlavou motora ( 1). Za účelom zloženia hlavy motora a vybratia príslušenstva otvorte uzavierací klip ( 8). - - Púzdro motora Nádrž na nečistoty Trojdielna nasávacia rúra Nasávacia hadica Držadlo Papierový vreckový filter Skladaný filter Hubica pre domácnosť Hubica na dlážku s otočnou nástrčnou násadou s kefou a s gumovou lamelou pre vysávanie kobercov a hladkých plôch (už montovaný) Štrbinová hubica Nástenný držiak 2 skrutiek s krížovou drážkou 4 kolieska Návod na používanie pre mokrý a suchý vysávač Akumulátor a nabíjačka nie sú súčasťou dodávky! Náležite zlikvidujte obalový materiál. Prehľad 1 2 3 4 5 6 7 8 9 10 11 12 13 14 15 16 17 18 19 20 21 Púzdro motora Držiak Za-/vypínač Kryt šachty pre akumulátor Prípojka sacej hadice Nádrž na nečistoty Háčik pre nástenný držiak 2 uzatvárací klip Prípojka fúkania (nie je vidieť) Trojdielna nasávacia rúra Časť držadla Nasávacia hadica Nástenný držiak Upevňujúce skrutky pre nástenný držiak Štrbinová hubica Hubica pre domácnosť Hubica na dlážku s otočnou nástrčnou násadou s kefou a s gumovou lamelou pre vysávanie kobercov a hladkých plôch (už montovaný) Papierové filtračné vrecko Akumulátor Nabíjačka 22 Uzáver skladaného filtra 23 Skladaný filter 24 Držiak príslušenstva 25 Koliesko 26 Zásuvné uchytenie Popis funkcie Prístroj je vybavený stabilnou plastovou nádobou na zachytávanie nečistôt. Pri mokrom vysávaní sa vypnutie nasávaného prúdu vzduchu uskutočňuje cez plavák, keď je nádoba na zachytávanie nečistôt plná. Navyše má prístroj funkciu fúkania. Pojazdné ko- 71 SK lieska umožňujú veľ kú pohyblivosť prístroja. Funkciu obslužných dielov si prosím zistite z nasledujúcich popisov. Technické údaje Akumulátorový vysávac na mokré asuché vysávanie .. PNTSA 20-Li B1 Vymeriavacie napätie U ............... 20 V Druh ochrany...................................IPX4 Nasávacia sila .............. 9 kPA (90 mbar) Objem nádrže na nečistoty (brutto) .... 10 l Užitočný objem nádrže (voda) ............. 4 l Hmotnosť (bez príslušenstva) .... cca 2,7 kg Hmotnosť (iba príslušenstvo) .... cca 1,8 kg Batéria (Li-Ion) .............. PAP 20 A3 Batériové články ................................10 Menovité napätie ........................ 20 V Kapacita .....................................4,0 Ah Energie .......................................80 Wh Doba nabíjania ........................... asi 1 h Teplota.................................. max 50 °C Nabíjanie ............................ 4 - 40 °C Prevádzka ..........................-20 - 50 °C Skladovanie ......................... 0 - 45 °C * Uvedený čas nabitia sa dosiahne iba s pripojenou rýchlonabíjačkou. Nabíjačka ......................PLG 20 A3 Príkon ........................................ 120 W Vstupné napätie/ Input ........................ 230-240 V~, 50 Hz Výstupné napätie/ Output .................................... 21,5 V Výstupní ........................................4,5 A Ochranná trieda ............................. II Prístrojová poistka ....................... T3.15A Druh ochrany...................................IPX0 Pozor! Aktuálny zoznam kompatibility akumulátora nájdete na: www.lidl.de/akku 72 Tento prístroj sa môže prevádzkovať výlučne s nasledovnými akumulátormi: PAP 20 A1, PAP 20 A2, PAP 20 A3. Tieto akumulátory sa nabíjajú s nasledovnými nabíjačkami: PLG 20 A1, PLG 20 A3, PDSLG 20 A1. Bezpečnostné pokyny Tento prístroj môžu používať deti od 8 rokov ako aj osoby so zníženými fyzickými, senzorickými alebo mentálnymi schopnosťami, alebo s nedostatkom skúseností a vedomostí, ak sú pod dozorom alebo boli poučené o bezpečnom používaní prístroja a rozumejú rizikám, ktoré z toho vyplývajú. Deti sa s prístrojom nesmú hrať. Deti nesmú vykonávať čistenie a údržbu bez dozoru. Symboly v návode Výstražné značky s údajmi pre zabránenie škodám na zdraví alebo vecným škodám. Príkazové značky s údajmi pre prevenciu škôd. Informačné značky s informáciami pre lepšie zaobchádzanie s nástrojom. Symboly na prístroji Parkside X 20 V TEAM Elektrické prístroje nepatria do domového odpadu. SK C Nebezpečenstvo požiaru, ak nasávaný materiál prekročí teplotu 40 °C (104 °F)! Signalizácia stavu nabitia na prístroji Otvorenie a zatvorenie uzatváracej svorky • Hubice a sacia trubica sa pri práci s prístrojom nesmú dostať do výšky hlavy. Hrozí nebezpečenstvo poranenia. Takto sa vyhnete nehodám a poraneniam skrz elektrický úder: • Vypnite zariadenie a vyberte batériu: - keď prístroj nepoužívate, prepravujete alebo necháte bez Čítajte nasledujúce bezdohľadu; pečnostné pokyny, aby sa - keď prístroj kontrolujete, čistíte vylúčili riziká ohľadne ohňa, alebo odstraňujete blokovaelektrického úderu, poranenia nia; osôb a vecných škôd: - keď chcete uskutočniť čistiace alebo údržbové práce alebo Takto zabránite nehodám a poranevymeniť príslušenstvo; niam: - po kontakte s cudzími telesami • Prevádzkyschopný prístroj nikdy alebo pri abnormálnej vibránenechávajte na pracovisku bez cii. dozoru. • Vysávanie pomocou tohto príTakto zabránite škodám na prístroji stroja sa nesmie prevádzať na a prípadne z toho vyplývajúcim ľuďoch a zvieratách. škodám na zdraví osôb: • Vysávaciu hadicu a trysky počas • Dbajte na to, aby bol prístroj prevádzky v žiadnom prípade správne zmontovaný a aby sa nenasmerujte na seba alebo iné filtre nachádzali v správnej poloosoby, najmä nie na oči a uši. he. Hrozí riziko poranenia. • Nepracujte bez filtrov. Prístroj by • Nevysávajte horúce, rozžerasa mohol poškodiť. vené, horľavé, výbušné alebo • Nepoužívajte žiadne príslušenzdraviu škodlivé látky. Hrozí nestvo, ktoré bolo odporúčané bezpečenstvo poranenia. K nim spoločnosťou PARKSIDE. To patria okrem iného horúci popol, môže viesť k zásahu elektrickým benzín, rozpúšťadlá, kyseliny aleprúdom alebo požiaru. bo lúhy. Hrozí nebezpečenstvo poranenia. Všeobecné Bezpečnostné pokyny 73 SK • Opravy prístroja dajte previesť len nami autorizovaným servisným strediskám. • Dodržujte pokyny pre čistenie a údržbu prístroja. • Uschovávajte prístroj na suchom mieste a mimo dosahu detí. Dodržiavajte bezpečnostné pokyny a pokyny k nabíjaniu a správnemu používaniu, ktoré sú uvedené v návode na používanie vášho akumulátora a vašej nabíjačky série Parkside X 20 V Team. Podrobnejší opis k nabíjaniu a ďalšie informácie nájdete v tomto samostatnom návode na používanie. Pozor! Dodržiavajte bezpečnostné pokyny, ktoré sú dané v návode na obsluhu vášho akumulátora série Parkside X 20 V Team. Montáž 1. Zatlačte štyri kolieska ( 25) do zásuvných uchytení ( 26), na spodnej strane nádoby na zachytávanie nečistôt (6), až zaskočia. 2. Vložte papierové filtračné vrecko (19) (pozri Suché vysávanie – vloženie papierového filtračného vrecka): 3. Hlavu motora (1) nasaďte na nádobu na prach (6) a uzatvorte ju uzatváracou klipsou (8). 4. Pripojte nasávaciu hadicu (12) a príslušenstvo. 74 Obsluha Aby ste mohli pracovať, úplne odviňte nasávaciu hadicu ( 12). Zapínanie/Vypínanie Zapnutie vysávača: Za-/vypínač ( 3) do polohy „I“. Vypnutie vysávača: Za-/vypínač ( 3) do polohy „0“. Kontrola stavu nabitia Signalizácia stavu nabitia na prístroji udáva, zatiaľ čo prístroj beží, informáciu o stave nabitia akumulátora. LED svieti zeleno: Akumulátor je nabitý Akumulátor svieti žlto: Akumulátor je čiastočne nabitý LED svieti červeno: Stav nabitia nízky LED bliká červeno: Akumulátor sa musí nabiť Vybratie/vloženie batérie 1. Na vybratie akumulátora z prístroja zatlačte uvoľňovacie tlačidlo (1) na batérii (4) a vytiahnite batériu. 2. Na vloženie batérie (4) zasuňte batériu pozdĺž vodiacej koľajnice do prístroja. Táto počuteľne zacvakne. Batériu vložte až vtedy, keď je prístroj úplne zmontovaný. Hrozí nebezpečenstvo zranenia! SK Použitie hubíc Štrbinová hubica ( 15): na vysávanie štrbín, rohov a vykurovacích telies. Hubica pre domácnosť ( 16) na mokré a suché vysávanie, na odstraňovanie nepoddajnej špiny. Hubica na dlážku ( 17) s nástrčnou násadou ( 18): na mokré a suché vysávanie hladkých plôch a kobercov. Hubica na dlážku ( 17) bez nástrčnej násady ( 18): na mokré a suché vysávanie kobercov, na odstránenie zatvrdnutej špiny. • Zatlačte spony na hubici na dlážku ( 17) doprava a doľava a zložte nástrčnú násadu ( 18). Citlivé povrchy sa môžu pri práci bez nástrčnej násady poškrabať. Mokré vysávanie 1. Odstráňte papierový filter ( 19) a skladaný filter ( 23). 2. Odsávanie (odčerpávanie): Ponorte nasávaciu hadicu ( 12) na držadle ( 11) do nádoby s vodou a vodu odsávajte. 3. Po odsávaní ihneď vyprázdnite nádobu z ušľachtilého kovu, pretože nie je konštruovaná na uskladňovanie kvapalín (viď „Čistenie/Údržba“). Nezdržujte sa v ceste odčerpávanej vody. Nebezpečenstvo úrazu elektrickým prúdom. Ak je nádrž určená na zachytávanie nečistoty plná, uzavrie plavák sací otvor a nasávanie sa preruší. Prístroj vypnite a nádrž vyprázdnite. V prípade, že z prístroja vystupuje pena alebo tekutina, ihneď ho vypnite. Suché vysávanie Vysávanie s papierovým filtračným vrecúškom: Umieszczanie papierowego worka filtracyjnego w urządzeniu Vyhrňte papierové filtračné vrecko (19) so zosilnením nahor cez vnútri ležiace nasávacie hrdlo (pozri šípku ). Tesniaci krúžok na otvore filtračného vrecka musí kompletne obopnúť prechod k nasávaciemu hrdlu. Vysávanie jemného prachu: Pri určitých prácach (napr. brúsenie farieb a lakov, frézovanie alebo vŕtanie múrov, brúsenie alebo vŕtanie tvrdého dreva) môže vznikať zdraviu škodlivý prach. Funkcia nasávania Na nasávanie zasuňte nasávaciu hadicu (12) na prípojku (5) na hlave motora. Funkcia vyfukovania Odporúča sa prevádzka bez použitia filtra. Za účelom fúkania nasaďte na prípojku (12) na hlave motora saciu hadicu (9). 75 SK Čistenie/Údržba Čistenie nástroja Nepostrekujte tento nástroj vodou a nepoužívajte žiadne ostré čistiace prostriedky resp. rozpúšťadlá. Nástroj by sa mohol poškodiť. • • • • Po ukončení prevádzky vyprázdnite nádrž s nečistotami ( 6). Nádrž na nečistoty vyčistite vlhkou handričkou. Plné papierové filtračné ( 19) vrecko vymeňte (pre dodatočné objednanie viď „Náhradné diely/Príslušenstvo“). Vyklepte skladaný filter, ktorý je možné zakúpiť ako opciu a vyčistite ho so štetcom alebo metličkou. Údržba • Prístroj si nevyžaduje údržbu. Uloženie - - - Zastrčte rozložené nasávacie rúry ( 10) do držiaka pre príslušenstvo ( 24). . motajte nasávaciu hadicu ( 12) okolo zariadenia a zastrčte časť rukoväte ( 11) do nasávacej rúry ( 10). Prístroj uschovajte na suchom mieste a mimo dosahu detí. Prístroj môžete zavesiť na háčiku pre nástenný držiak ( 7) na nástennom držiaku ( 13). Prístroj nevešajte na nástenný držiak s ťažkou náplňou (napr. s nasatou vodou). 76 - K tomu upevnite nástenný držiak ( 13) pomocou dvoch skrutiek ( 14) a pomocou hmoždiniek na stene. Skontrolujte pevné osadenie nástenného držiaka ( 13) priamo po montáži a následne pravidelne. Pri vŕtaní dávajte pozor na to, aby sa nepoškodili napájacie vedenia. Používajte vhodné vyhľadávacie zariadenia, by tieto vypátrali alebo si zoberte na pomoc inštalačný plán. Kontakt s vedeniami elektrického prúdu môže spôsobiť zásah elektrickým prúdom a požiar, kontakt s plynovým vedením môže viesť k výbuchu. Poškodenie vodovodu môže viesť k vecným škodám a zásahu elektrickým prúdom Odstránenie/Ochrana životného prostredia Prístroj, príslušenstvo a obal odovzdajte v súlade s požiadavkami na ochranu životného prostredia do recyklačnej zberne. Elektrické prístroje nepatria do domového odpadu. Prístroj odovzdajte do recyklačnej zberne. Použité umelohmotné a kovové časti sa môžu podľa druhu materiálu roztriediť a tak odovzdať do recyklačnej zberne. V prípade otázok sa obráťte na naše servisné stredisko. Likvidáciu vašich chybných zaslaných prístrojov uskutočníme bezplatne. SK Zisťovanie závad problém prístroj nechce naštartovať možná príčina porucha vypínača ( odstránenie závady 3) opotrebované uhlíkové kefky oprava servisnou službou porucha motora hadicový systém ( 12) alebo hubice ( 15/16/17) sú upchané sacia trubica ( 10) nie je malý alebo chýsprávne poskladaná bajúci sací výkon nádrž ( 6) je otvorená nádrž ( prach alebo nečistoty sa zo spotrebiča vyfúkajú odstráňte dôvody upchania a blokovania saciu trubicu poskladajte správne nádrž uzavrite nádrž vyprázdnite 6) je plná filter ( 19/23) je plný alebo upchaný filter vyprázdnite, vyčistite alebo vymeňte filter ( 19/23) nie je vložený, alebo je vložený nesprávne vložte chýbajúci filter alebo skontrolujte správne uloženie filtra Záruka Vážená zákazníčka, vážený zákazník, Pre tento prístroj platí záruka 3 roky od dátumu zakúpenia. Ak je prístroj poškodený, podľa zákona máte právo ho reklamovať u výrobcu produktu. Tieto práva vyplývajúce zo zákona nie sú našou následne opísanou zárukou obmedzené. Záručné podmienky Záručná lehota začína dňom zakúpenia. Pokladničný doklad ako originál prosím starostlivo uschovajte. Je potrebný ako dôkaz o zakúpení. Ak sa počas troch rokov od dátumu zakúpenia tohto produktu vyskytne materiálna alebo výrobná chyba, produkt - podľa nášho rozhodnutia - bezplatne opravíme alebo nahradíme. Predpokladom záruky je, že v priebehu trojročnej lehoty bude predložený poškodený prístroj a pokladničný doklad a stručne opísaná chyba a kedy sa vyskytla. Ak sa v rámci našej záruky chyba pokryje, obdržíte späť opravený alebo nový prístroj. S opravou alebo výmenou produktu sa nezačína nová záručná doba. 77 SK Záručná doba a nárok na odstránenie vady Záručná doba sa poskytnutím záruky nepredlžuje. To platí aj pre nahradené a opravené diely. Prípadné škody a nedostatky vzniknuté už pri zakúpení sa musia ihneď po vybalení ohlásiť. Opravy vykonané po uplynutí záručnej doby sú spoplatnené. Rozsah záruky Prístroj bol vyrobený podľa prísnych smerníc kvality a pred dodaním bol svedomite kontrolovaný. Záruka sa týka materiálových alebo výrobných chýb. Táto záruka sa nevzťahuje na diely produktu, ktoré sú vystavené normálnemu opotrebeniu a preto sa môžu považovať za opotrebované diely (napr. filter alebo nadstavce) alebo na poškodenia na krehkých dieloch (napr. vypínač). Táto záruka zaniká, ak bol produkt používaný poškodený, neodborne alebo nebola vykonávaná údržba. Pre odborné používanie produktu je nutné presne dodržiavať všetky návody uvedené v návode na obsluhu. Bezpodmienečne sa vyhnite používaniu, ktoré sa v návode na obsluhu neodporúča alebo pred ktorým ste boli vystríhaní. Produkt je určený len pre súkromné použitie a nie v oblasti podnikania. Záruka zaniká pri nesprávnom a neodbornom používaní, pri násilnom používaní a pri zásahoch, ktoré neboli vykonané v našej servisnej pobočke. 78 Postup v prípade reklamácie Pre zabezpečenie rýchleho spracovania vašej žiadosti postupujte prosím podľa nasledujúcich pokynov: • Pri všetkých požiadavkách predložte pokladničný doklad a číslo artiklu (IAN 317189_1904) ako dôkaz o zakúpení. • Číslo artiklu nájdete na typovom štítku. • Ak sa vyskytnú chyby funkcie alebo iné nedostatky, kontaktujte najskôr následne uvedené servisné oddelenie telefonicky alebo emailom. Následne obdržíte ďalšie informácie o priebehu vašej reklamácie. • Produkt evidovaný ako poškodený môžete po dohode s našim zákazníckym servisom, s priloženým dokladom o zakúpení (pokladničný doklad) a s údajmi, v čom chyba spočíva a kedy vznikla, zaslať bez poštovného na adresu servisu, ktorá vám bude oznámená. Pre zabránenie dodatočných nákladov a problémov pri prevzatí použite len tú adresu, ktorá vám bude oznámená. Nezasielajte prístroj ako nadmerný tovar na náklady príjemcu, expresne alebo s iným špeciálnym nákladom. Prístroj zašlite so všetkými časťami príslušenstva dodanými pri zakúpení a zabezpečte dostatočne bezpečné prepravné balenie. SK Servisná oprava Opravy, ktoré nepodliehajú záruke, môžeme nechať vykonať v našej servisnej pobočke za úhradu. Radi vám poskytneme predbežnú kalkuláciu nákladov. Môžeme spracovať len prístroje, ktoré boli doručené dostatočne zabalené a so zaplateným poštovným. Pozor: Prístroj zašlite do našej servisnej pobočky vyčistený a s informáciami o chybe. Neprevezmeme prístroje zaslané ako nadmerný tovar na náklady príjemcu, expresne alebo s iným špeciálnym nákladom. Likvidáciu vašich poškodených zaslaných prístrojov vykonáme bezplatne. Service-Center SK Servis Slovensko Tel.: 0850 232001 E-Mail: [email protected] IAN 317189_1904 Dovozca Nasledujúca adresa nie je adresa servisu. Najskôr kontaktujte hore uvedené servisné centrum. Grizzly Tools GmbH & Co. KG Stockstädter Straße 20 DE-63762 Großostheim Nemecko www.grizzly-service.eu Náhradné diely / Príslušenstvo Náhradné diely a príslušenstvo nájdete na strane www.grizzly-service.eu Ak by sa mali vyskytnúť problémy s procesom objednávky, použite, prosím, kontaktný formulár. Pri ďalších otázkach sa obráťte na „Service-Center“ (pozri stranu 79). Pol. Návod na obsluhu Pol. Nákresy explózií Označenie Použitie Č. Artiklu 12 8 Nasávacia hadica 91105189 23 2 Skladaný filter 91105185 22 3 Uzáver skladaného filtra 91105186 10 9 Trojdielna nasávacia rúra 91099439 Papierový vreckový filter, 5 kusov 30250146 Papierový vreckový filter, 1 kus 30250147 19 14 79 80 DE AT CH Original EG-Konformitätserklärung Hiermit bestätigen wir, dass der Akku-Nass-Trockensauger Baureihe PNTSA 20-Li B1 Seriennummer 201909000001 - 201912008955 folgenden einschlägigen EU-Richtlinien in ihrer jeweils gültigen Fassung entspricht: 2014/30/EU • 2014/35/EU • 2011/65/EU* Um die Übereinstimmung zu gewährleisten, wurden folgende harmonisierte Normen sowie nationale Normen und Bestimmungen angewendet: EN 60335-1:2012/A13:2017 • EN 60335-2-2:2010/A1:2013 EN 55014-1:2017 • EN 55014-2:2015 EN 62233:2008 • EN 62321-1:2013 Die alleinige Verantwortung für die Ausstellung dieser Konformitätserklärung (19)** trägt der Hersteller: Grizzly Tools GmbH & Co. KG Stockstädter Straße 20 63762 Großostheim, Germany 20.12.2019 Christian Frank Dokumentationsbevollmächtigter * Der oben beschriebene Gegenstand der Erklärung erfüllt die Vorschriften der Richtlinie 2011/65/EU des Europäischen Parlaments und des Rates vom 8. Juni 2011 zur Beschränkung der Verwendung bestimmter gefährlicher Stoffe in Elektro- und Elektronikgeräten. ** Die beiden letzten Ziffern des Jahres, in dem die CE-Kennzeichnung angebracht wurde. 81 GB Translation of the original EC declaration of conformity IE We hereby declare that the Cordless Wet & Dry Vacuum Cleaner model series PNTSA 20-Li B1 Serial number 201909000001 - 201912008955 conforms with the following applicable relevant version of the EU guidelines: 2014/30/EU • 2014/35/EU • 2011/65/EU* In order to guarantee consistency, the following harmonised standards as well as national standards and stipulations have been applied: EN 60335-1:2012/A13:2017 • EN 60335-2-2:2010/A1:2013 EN 55014-1:2017 • EN 55014-2:2015 EN 62233:2008 • EN 62321-1:2013 This declaration of conformity (19)** is issued under the sole responsibility of the manufacturer: Grizzly Tools GmbH & Co. KG Stockstädter Straße 20 63762 Großostheim, Germany 20.12.2019 Christian Frank Documentation Representative * The object of the declaration described above satisfies the provisions of Directive 2011/65/EU of the European Parliament and the Council of 8 June 2011 on limiting the use of certain harmful substances in electrical and electronic appliances. ** The last two digits of the year in which the CE marking was affixed. 82 FR Traduction de la déclaration de conformité CE originale BE Nous certifions par la présente que le Aspirateur eau/poussiere sans fil série PNTSA 20-Li B1 Numéro de série 201909000001 - 201912008955 est conforme aux directives UE actuellement en vigueur : 2014/30/EU • 2014/35/EU • 2011/65/EU* En vue de garantir la conformité les normes harmonisées ainsi que les normes et décisions nationales suivantes ont été appliquées : EN 60335-1:2012/A13:2017 • EN 60335-2-2:2010/A1:2013 EN 55014-1:2017 • EN 55014-2:2015 EN 62233:2008 • EN 62321-1:2013 Le fabricant assume seul la responsabilité d‘établir la présente déclaration de conformité (19)** : Grizzly Tools GmbH & Co. KG Stockstädter Straße 20 63762 Großostheim, Germany 20.12.2019 Christian Frank (Chargé de documentation) * L‘objet de la déclaration décrit ci-dessus est conforme aux dispositions de la directive 2011/65/EU du Parlement Européen et du Conseil du 8 juin 2011 sur la limitation de l‘utilisation de certaines substances dangereuses dans les équipements électriques et électroniques. ** Les deux derniers chiffres de l‘année dans laquelle le marquage CE a été fixé. 83 NL Vertaling van de originele CE-conformiteitsverklaring BE Hiermede bevestigen wij dat de Accu-nat-/droogzuiger bouwserie PNTSA 20-Li B1 Serienummer 201909000001 - 201912008955 is overeenkomstig met de hierna volgende, van toepassing zijnde EU-richtlijnen: 2014/30/EU • 2014/35/EU • 2011/65/EU* Om de overeenstemming te waarborgen, werden de hierna volgende, in overeenstemming gebrachte normen en nationale normen en bepalingen toegepast: EN 60335-1:2012/A13:2017 • EN 60335-2-2:2010/A1:2013 EN 55014-1:2017 • EN 55014-2:2015 EN 62233:2008 • EN 62321-1:2013 De exclusieve verantwoordelijkheid voor de uitgifte van deze conformiteitsverklaring (19)** wordt gedragen door de fabrikant: Grizzly Tools GmbH & Co. KG Stockstädter Straße 20 63762 Großostheim, Germany 20.12.2019 Christian Frank Documentatiegelastigde * Het hierboven beschreven voorwerp van de verklaring voldoet aan de voorschriften van de richtlijn 2011/65/EU van het Europese Parlement en van de Raad van 8 juni 2011 inzake beperking van het gebruik van bepaalde gevaarlijke stoffen in elektrische en elektronische apparaten. ** De beide laatste cijfers van het jaar waarin de CE-markering werd aangebracht. 84 Tłumaczenie oryginalnej deklaracji zgodności WE PL Niniejszym oświadczamy, że: Akumulatorowy odkurzacz na mokro i sucho typoszereg, PNTSA 20-Li B1 numer seryjny 201909000001 - 201912008955 spełnia wymogi odpowiednich Dyrektyw UE w ich aktualnie obowiązującym brzmieniu: 2014/30/EU • 2014/35/EU • 2011/65/EU* W celu zapewnienia zgodności z powyższymi dyrektywami zastosowano następujące normy harmonizujące oraz normy i przepisy krajowe: EN 60335-1:2012/A13:2017 • EN 60335-2-2:2010/A1:2013 EN 55014-1:2017 • EN 55014-2:2015 EN 62233:2008 • EN 62321-1:2013 Wyłączną odpowiedzialność za wystawienie tej deklaracji zgodności (19)** ponosi producent: Grizzly Tools GmbH & Co. KG Stockstädter Straße 20 63762 Großostheim, Germany 20.12.2019 Christian Frank Osoba upoważniona do sporządzania dokumentacji technicznej * Wyżej opisany przedmiot deklaracji spełnia wymogi dyrektywy 2011/65/UE Parlamentu Europejskiego i Rady z dnia 8 czerwca 2011r. w sprawie ograniczenia stosowania niektórych niebezpiecznych substancji w sprzęcie elektrycznym i elektronicznym. ** Dwie ostatnie cyfry roku nadania znaku CE. 85 Překlad originálního prohlášení o shodě CE CZ Potvrzujeme tímto, že tento Aku vysavac na mokré a suché vysávání konstrukční řady PNTSA 20-Li B1 Pořadové číslo 201909000001 - 201912008955 odpovídá následujícím příslušným směrnicím EÚ v jejich právě platném znění: 2014/30/EU • 2014/35/EU • 2011/65/EU* Aby byl zaručen souhlas, byly použity následující harmonizované normy, národní normy a ustanovení: EN 60335-1:2012/A13:2017 • EN 60335-2-2:2010/A1:2013 EN 55014-1:2017 • EN 55014-2:2015 EN 62233:2008 • EN 62321-1:2013 Výhradní odpovědnost za vystavení tohoto prohlášení o shodě (19)** nese výrobce: Grizzly Tools GmbH & Co. KG Stockstädter Straße 20 63762 Großostheim, Germany 20.12.2019 Christian Frank Osoba zplnomocněná k sestavení dokumentace * Výše popsaný předmět prohlášení splňuje předpisy směrnice 2011/65/EU Evropského parlamentu a Rady z 8. června 2011 o omezení používání některých nebezpečných látek v elektrických a elektronických zařízeních. ** Obě poslední číslice roku, kdy bylo uvedeno označení CE. 86 Preklad originálneho prehlásenia o zhode CE SK Potvrdzujeme týmto, že tento Akumulátorový vysávac na mokré a suché vysávanie konštrukčnej série PNTSA 20-Li B1 Poradové číslo 201909000001 - 201912008955 zodpovedá nasledujúcim príslušným smerniciam EÚ v ich práve platnom znení: 2014/30/EU • 2014/35/EU • 2011/65/EU* Aby bola zaručená zhoda, boli použité nasledovné harmonizované normy ako i národné normy a predpisy: EN 60335-1:2012/A13:2017 • EN 60335-2-2:2010/A1:2013 EN 55014-1:2017 • EN 55014-2:2015 EN 62233:2008 • EN 62321-1:2013 Jediný zodpovedný za vystavenie tohto vyhlásenia o zhode (19)** je výrobca: Grizzly Tools GmbH & Co. KG Stockstädter Straße 20 63762 Großostheim, Germany 20.12.2019 Christian Frank Osoba splnomocnená na zostavenie dokumentácie * Vyššie popísaný predmet vyhlásenia spĺňa predpisy smernice 2011/65/EU Európskeho parlamentu a Rady z 8. júna 2011 pre obmedzenie používania určitých nebezpečných látok v elektrických a elektronických prístrojoch. ** Obe posledné číslice roka, v ktorom bolo pripojené označenie CE. 87 PNTSA 20-Li B1 Explosionszeichnung • Exploded Drawing Vue éclatée • Explosietekening Rysunek samorozwijający • Rozvinuté náčrtky Výkres náhradných dielov informativ, informative, informatif, informatief, pouczający, informační, informatívny 88 2019-11-28-rev02-ts 89 25 26 6 1 22 23 8 6 12 12 5 9 24 5 19 GRIZZLY TOOLS GMBH & CO. KG Stockstädter Straße 20 DE-63762 Großostheim GERMANY Stand der Informationen · Last Information Update · Version des informations · Stand van de informatie · Stan informacji · Stav informací · Stav informácií: 10/2019 Ident.-No.: 72079670102019-8 IAN 317189_1904-
 1
1
-
 2
2
-
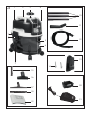 3
3
-
 4
4
-
 5
5
-
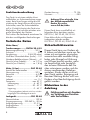 6
6
-
 7
7
-
 8
8
-
 9
9
-
 10
10
-
 11
11
-
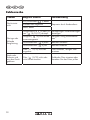 12
12
-
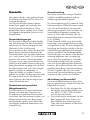 13
13
-
 14
14
-
 15
15
-
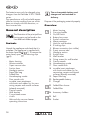 16
16
-
 17
17
-
 18
18
-
 19
19
-
 20
20
-
 21
21
-
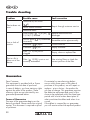 22
22
-
 23
23
-
 24
24
-
 25
25
-
 26
26
-
 27
27
-
 28
28
-
 29
29
-
 30
30
-
 31
31
-
 32
32
-
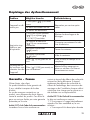 33
33
-
 34
34
-
 35
35
-
 36
36
-
 37
37
-
 38
38
-
 39
39
-
 40
40
-
 41
41
-
 42
42
-
 43
43
-
 44
44
-
 45
45
-
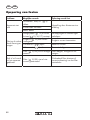 46
46
-
 47
47
-
 48
48
-
 49
49
-
 50
50
-
 51
51
-
 52
52
-
 53
53
-
 54
54
-
 55
55
-
 56
56
-
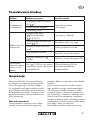 57
57
-
 58
58
-
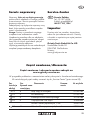 59
59
-
 60
60
-
 61
61
-
 62
62
-
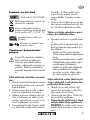 63
63
-
 64
64
-
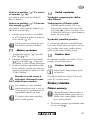 65
65
-
 66
66
-
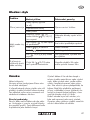 67
67
-
 68
68
-
 69
69
-
 70
70
-
 71
71
-
 72
72
-
 73
73
-
 74
74
-
 75
75
-
 76
76
-
 77
77
-
 78
78
-
 79
79
-
 80
80
-
 81
81
-
 82
82
-
 83
83
-
 84
84
-
 85
85
-
 86
86
-
 87
87
-
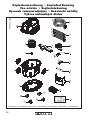 88
88
-
 89
89
-
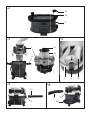 90
90
-
 91
91
-
 92
92


Parkside 317189-1904 de handleiding
- Categorie
- Draagbare stofzuigers
- Type
- de handleiding
- Deze handleiding is ook geschikt voor
in andere talen
- English: Parkside 317189-1904 Owner's manual
- français: Parkside 317189-1904 Le manuel du propriétaire
- Deutsch: Parkside 317189-1904 Bedienungsanleitung
- slovenčina: Parkside 317189-1904 Návod na obsluhu
- čeština: Parkside 317189-1904 Návod k obsluze
- polski: Parkside 317189-1904 Instrukcja obsługi
Gerelateerde artikelen
-
Parkside PAP 20 B1 Handleiding
-
Parkside PAP 20 B3 Handleiding
-
Parkside PNTS 1300 B2 - IAN 78834 de handleiding
-
Parkside PNTS 1300 D3 Translation Of The Original Instructions
-
-
Parkside PFSA 20-Li A1 Handleiding
-
Parkside IAN 404419_2110 Handleiding
-
-
Parkside PDSLG 12 A1 Handleiding
-
Parkside PNTS 1400 B1 de handleiding
Andere documenten
-
Dirt Devil DD2502 Handleiding
-
Makita 446L de handleiding
-
Thomas Multi-cycloon Hybrid Pet & Friends de handleiding
-
Nilfisk Alto WD 3 Handleiding
-
-
Nilfisk-ALTO MAXXI WD 3 Handleiding
-
-
Kawasaki K-VCW 1400-30L-E Original Instructions Manual
-
Scheppach HD2p 5906301903 Original Instructions Manual
-