MT Logic LE-207837MT de handleiding
- Categorie
- Lcd-tv's
- Type
- de handleiding
Deze handleiding is ook geschikt voor


2
Gebruiksaanwijzing
INHOUD
• Belangrijke veiligheidsinstructies
• Instellen en gebruik van uw TV
• Wat is meegeleverd met uw TV
• Aansluitingen op de achterkant van uw TV
• Basis installatie
• Instructies voor afstandsbediening
• Kies invoerbron
• Gebruik van het menu
• USB multimedia weergaveformaat
• DVD-menu
• Oplossen van problemen
• De specificaties van uw TV
• Aanwijzingen voor wandmontage
3
4
5
6
7
8
9
9
19
21
26
28
28

3
Waarschuwing
• Laat uw TV niet nat worden (bijvoorbeeld door het toestel in een vochtige ruimte of buiten te plaatsen, en voorkom dat water op het toestel
terecht komt).
• Plaats geen voorwerpen gevuld met water in de omgeving van uw TV (zoals vazen gevuld met water).
BELANGRIJKE VEILIGHEIDSINSTRUCTIES
• Deze instructies aandachtig lezen.
• Bewaar deze instructies op een veilige plaats.
• Alle instructions opvolgen.
• Uw TV alleen met een droge doek afnemen.
• De ventilatie-openingen niet blokkeren.
• Plaats de TV niet bij een warmtebron (zoals radiatoren of kachels), of bij apparatuur (zoals versterkers) die warmte afgeven.
• Uw TV is uitgerust met een gepolariseerde stekker of geaarde stekker. Een gepolariseerde stekker heeft twee pennen, waarvan de ene breder is dan
de andere. Een geaarde stekker heeft twee bladen en een derde pen voor de aarding. De bredere pen is voor uw veiligheid. Als de bijgeleverde
stekker niet in uw stopcontact past, vraag dan een elektricien om uw stopcontact te vervangen, zodat deze geschikt is voor de TV-stekker.
• Het netsnoer niet knikken, beknellen en er niet op gaan staan. Zorg ervoor dat niet aan het snoer wordt getrokken, vooral bij de aansluiting van
het snoer op de TV.
• Gebruik alleen toebehoren en accessoires (meegeleverd met uw TV) die door ons zijn goedgekeurd.
• De voeding en antenne van uw TV loskoppelen tijdens onweer of wanneer u het toestel voor een week of langer niet gebruikt.
• Als uw TV gerepareerd moet worden, raadpleeg een gekwalificeerde servicemonteur. Als u TV is beschadigd, moet het toestel worden hersteld.
• Voorzichtigheid is geboden wanneer het netsnoer op een stopcontact wordt aangesloten. Het stopcontact niet overbelasten. Dit kan uw TV
beschadigen en een elektrische schok of brand veroorzaken. Controleer het netsnoer van uw TV regelmatig en verwijder de stekker van uw
TV als het netsnoer slijtageverschijnselen vertoond. Het toestel niet gebruiken totdat het netsnoer is vervangen door een gekwalificeerde
technicus. Het netsnoer niet verdraaien, knikken of beknellen.
Opmerking
• Als uw TV koud is, ziet u mogelijk korte flikkeringen wanneer u het toestel inschakelt. Dit is normaal en duidt niet op een storing in uw TV.
• Vermijd aanraking van het LED-scherm met voorwerpen of met uw vingers omdat dit schade kan veroorzaken.
DEZE STICKERS ZIJN OP UW TV AANGEBRACHT
Opgelet
• Zorg ervoor dat u de stekker stevig op uw TV aansluit.
• Als de TV wordt gebruikt om videospellen te spelen of om op uw computer aan te sluiten voor gebruik als monitor, de helderheid en contrast
op een laag niveau instellen. Beelden met een hoge helderheid of hoog contrast kunnen inbranden op het scherm.
Uw TV reinigen
• Veeg het TV-scherm af met een zachte, droge doek
• Gebruik geen oplosmiddelen methyl benzeen. Sterke chemicaliën kunnen uw TV-scherm beschadigen.
• Zorg ervoor dat u de TV uitzet voordat u het toestel schoonmaakt.
OPGELET
Risico vooR elektRische schok
Niet opeNeN
WAARSCHUWING
het toestel Niet blootstelleN aaN RegeN of
vocht om het Risico op bRaNd of elektRische
schok te vooRkomeN.
Dit symbool betekent dat er draden in de TV aanwezig
zijn die niet zijn geïsoleerd. Als u deze draden aanraakt,
kunt u een elektrische schok krijgen.
Dit symbool betekent dat u het onderhoudshandboek
moet raadplegen voordat u overgaat tot reparatie.
NL Gebruiksaanwijzing

4
Gebruiksaanwijzing
INSTALLEREN EN GEBRUIK VAN UW TV
• Controleer de spanning op het rating label van de adapter, en controleer of de adapter compatibel is met de netspanning in uw huis. Als u niet
zeker bent over de netspanning u in uw huis, neem dan contact op met uw leverancier of een elektricien.
• Zorg ervoor dat de adapter goed op het stopcontact is aangesloten.
• De stopcontacten of verlengsnoeren niet overbelasten tijdens het installeren van uw TV. Als u de stopcontacten of verlengsnoeren overbelast,
kunt u een elektrische schok krijgen of er kan brandgevaar optreden.
• Plaats geen voorwerpen op het netsnoer tijdens het installeren van uw TV. Houd uw TV-scherm uit de buurt van scherpe voorwerpen,
zoals schroevendraaiers of messen, zodat er geen risico is dat het TV-scherm wordt bekrast of beschadigd. Gebruik de juiste adapter bij het
installeren van uw TV.
• Uw TV uitschakelen als u het toestel niet gebruikt. De adapter en de antenne loskoppelen als u de TV een week of langer niet gebruikt.
• De ventilatieopeningen aan de achterkant van uw TV zijn bedoeld om uw TV af te koelen zodat de TV niet oververhit raakt. Zorg ervoor dat de
ventilatieopeningen niet worden geblokkeerd.
• Plaats uw TV niet op een bed, bank of tapijt. Dit kan de ventilatieopeningen blokkeren.
• Plaats de TV niet in een afgesloten ruimte, zoals op een boekenplank of in een TV-meubel. Dit kan de ventilatieopeningen blokkeren.
• Plaats de TV niet in direct zonlicht.
• Plaats de TV niet op een onstabiele plank of tafel. De TV kan vallen en letsel veroorzaken.
• Steek geen voorwerpen in de tv (bijvoorbeeld kinderspeelgoed). Dit kan een elektrische schok of schade aan de onderdelen in uw TV veroorzaken.
Wanneer moet u een monteur bellen
Verwijder de adapter uit uw TV en neem contact op met uw leverancier of met een gekwalificeerde technicus in de onderstaande gevallen.
• Als het netsnoer of de stekker is beschadigd
• Als een vloeistof het scherm binnendringt
• Als uw TV vochtig of nat is
• Als uw TV is beschadigd
• Als de TV niet goed werkt.
Probeer niet om uw TV zelf te repareren. Binnenin het
toestel bevindt zich hoge spanning waardoor u een
elektrische schok kunt krijgen.
De bedrijfstemperatuur van uw TV
• Uw TV heeft een bedrijfstemperatuur van 0°C tot 40°C.
Veiligheidsvoorschriften
• Uw TV heeft een CE-markering. Dit betekent dat uw TV voldoet aan zowel de EMC-richtlijn (89/336/EEG), (93/68/EEG) en de
laagspanningsrichtlijn (73/23/EEG) van de Europese Gemeenschap.
• Dit apparaat voldoet aan de Europese richtlijn 2006 / 95 EG (Elektromagnetische compatibiliteit en Laagspanningsrichtlijnen)
Wanneer uw TV aan het einde is van zijn levenduur
Wanneer uw TV aan het einde is van zijn levenduur
1. Uw TV niet meegeven met het normale huishoudelijk afval.
2. U kunt ook contact opnemen met uw gemeente om te vragen of zij uw oude TV kunnen ophalen. Als u de TV op een stortplaats achterlaat,
kunnen gevaarlijke chemische stoffen uit uw TV in de grond lekken en in de voedselketen terechtkomen.
3. Wanneer u de TV door een nieuw toestel vervangt, is uw leverancier wettelijk verantwoordelijk om uw oude TV terug te nemen en het te
verwijderen.
VERWIJDERING AAN EINDE VAN LEVENSDUUR
Dit logo op het product betekent dat het recyclen van dit apparaat in het kader valt van de Richtlijn 2002/96/EG van 27 januari 2003
betreffende afval van elektrische en elektronische apparatuur (AEEA). Dit symbool geeft aan dat afgedankte elektrische en elektronische
producten niet mogen worden gemengd met algemeen huishoudelijk afval. Er zijn afzonderlijke inzamelingssystemen voor deze producten.
Als u dit apparaat wilt weggooien, geeft het niet mee met het normale huishoudelijk afval !
• De aanwezigheid van gevaarlijke stoffen in elektrische en elektronische apparatuur kunnen gevolgen hebben voor het milieu en menselijke
gezondheid in de verwerking van dit product.
• Daarom mag dit product aan het eind van zijn levensduur niet worden afgevoerd met ander niet gerecycleerd afval. Afgedankte elektrische en
elektronische apparatuur moet afzonderlijk en in overeenstemming met de wetgeving worden behandeld. Deze wetgeving vereist correcte
behandeling, terugwinning en recycling van gebruikte elektrische en elektronische apparatuur.
• Lokale overheden en wederverkopers hebben speciale procedures voor het verzamelen en recycleren van dit product (neem contact op met uw
gemeente voor bijzonderheden). U heeft de verplichting om de systemen van gescheiden inzameling van afval van uw gemeente te gebruiken.
• Als uw elektrische of elektronische apparatuur batterijen of accumulatoren bevat, dan moet u deze afzonderlijk en conform de plaatselijke
voorschriften verwijderen.
• Met correcte verwijdering van dit product zorgt u ervoor dat het afval de juiste verwerking, terugwinning en recycling ondergaat en voorkomt u
potentiële negatieve effecten op het milieu en de menselijke gezondheid die anders zouden ontstaan door het verkeerd verwerken van het afval.

5
WAT IS MEEGELEVERD MET UW TV
Wat is meegeleverd met uw TV
Gebruik van de afstandsbediening
• Verwijder de achterkant van de afstandsbediening en plaats twee AAA-batterijen in de afstandsbediening. Zorg ervoor dat de + en - symbolen
op de batterijen corresponderen met het diagram.
• Verwijder de batterijen als u de afstandsbediening langere tijd niet gebruikt. Wees voorzichtig met uw afstandsbediening. Niet laten vallen.
Houd de afstandsbediening uit de buurt van water, direct zonlicht en hete oppervlakken. Wanneer de afstandbediening slecht reageert dient u
de batterijen te vervangen.
NL Gebruiksaanwijzing

1
1 9 10 11 12 132 3 4 5 6 7 8
8 9
2 3 4 5 6 7
6
Gebruiksaanwijzing
BEDIENING OP DE BOVENKANT VAN UW TV
1. : OPEN/SLUITEN in DVD-modus.
2. : AFSPELEN/PAUZE in DVD-modus.
3. Druk op "VOL+" of "VOL-" om het volume te verhogen of verlagen.
4. Druk op "CH+" of "CH-" om door de kanalen te scannen.
5. Druk op "MENU" om het hoofdmenu op het scherm te openen.
6. Druk op "SOURCE" om de ingangsbron te selecteren.
7. Druk op de "STANDBY"-toets om de stand-bymodus in- of uit te schakelen.
8. VOEDINGSINDICATOR: De indicator is rood in de standby-modus en blauw als de TV is ingeschakeld.
9. SENSOR VAN AFSTANDSBEDIENING Infraroodsensor voor de afstandsbediening.
AANSLUITINGEN OP DE ACHTERKANT VAN UW TV
1. DC12V-voedingsingang voor de LED-TV. De voedingsadapter hier aansluiten.
2. Hoofdtelefoonuitgang
3. Audio-ingang voor VGA-modus voor aansluiting op de audio-uitgang van uw PC.
4. DB15 VGA-interface.
5. YPBPR/Component-ingang voor aansluiting van uw AV-systeem.
6. Scart inganginterface voor aansluiting van uw AV-systeem met Scart-uitgang.
7. CVBS / Component-video-ingang voor aansluiting van uw AV-systeem.
8. Rechts/Links audiokanaalingang voor Composiet video & component-modus.
9. Coaxiale uitgang voor aansluiting op de coax-ingang van uw versterker.
10. 75 Ω aerial antenne-ingang voor aansluiting van antenne of antenne-interface voor ontvangst van kabel / antenne-signaal.
11. Hoge kwaliteit audio/video-ingang voor aansluiting van een extern apparaat voorzien van HDMI-uitgang.
12. Voor aansluiting op draagbaar USB-apparaat.
13. PCMCIA-ingang voor de kaartlezeringang CI (Common Interface). Dit vereist CAM (Conditional Access Module) voor betaaltelevisie.

7
BASIS INSTALLATIE
HDMI-aansluiting
• De voeding naar de LED-TV en DVD-speler uitschakelen.
• Sluit een HDMI-kabel aan op de HDMI-uitgang van de DVD-speler en het andere uiteinde op de HDMI-ingang aan de achterkant van uw LED-TV.
• De voeding naar de LED-TV en DVD-speler inschakelen.
• Selecteer HDMI met de SOURCE-toets op de voorkant van de LED-TV of rechtstreeks door op de SOURCE-toets op de afstandsbediening te drukken.
PC- en audio-aansluiting
• Schakel de voeding naar uw LED-TV en computer uit.
• Sluit a 15-pins D-sub RGB (VGA)-kabel aan op de RGB-uitgang van uw computer en het andere uiteinde op de VGA-ingang (paars gekleurd)
aan de achterkant van uw LED-TV.
• Schakel de voeding van uw LED-TV en computer aan.
• Selecteer PC met de SOURCE-toets op de voorkant van de LED-TV of rechtstreeks door op de SOURCE-toets op de afstandsbediening te drukken.
Video- en audio-aansluiting
• De voeding naar de LED-TV en DVD-speler uitschakelen.
• Sluit de VIDEO-aansluiting aan de achterzijde van de DVD-speler aan op de VIDEO-uitgang op de achterkant van uw LED-TV.
• Sluit de R (rode kleur) en L (witte kleur) audio-aansluitingen aan de achterkant van uw DVD-speler aan op de R (rode kleur) en L (witte kleur)
audio-ingangen aan de zijkant van uw LED-TV.
• De voeding naar de LED-TV en DVD-speler inschakelen.
• Selecteer AV met de SOURCE-toets op de voorkant van de LED-TV of rechtstreeks door op de SOURCE-toets op de afstandsbediening te
drukken.
YPBPR- en Audio-aansluiting
• De voeding naar de LED-TV en DVD-speler uitschakelen.
• Gebruik de connectoren in het groene gebied om de y-aansluiting (groene kleur) op de achterzijde van uw DVD-speler aan te sluiten op de
corresponderende y-aansluiting (groene kleur) in de component analoge HD-groep (groene band) aan de achterkant van uw LED-TV.
• Sluit de Pb-aansluiting (blauwe kleur) op de achterzijde van uw DVD-speler aan op de corresponderende Pb-aansluiting (blauwe kleur) op de
component analoge HD-groep (groene band) aan de achterkant van uw LED-TV.
• Sluit de Pr-aansluiting (rode kleur) op de achterzijde van uw DVD-speler aan op de corresponderende Pr-aansluiting (rode kleur) op de
component analoge HD-groep (groene band) aan de achterkant van uw LED-TV.
• Sluit de R (rode kleur) en L (witte kleur) audio-aansluitingen aan de achterzijde van uw DVD-speler aan op de R (rode kleur) en L (witte kleur)
audio-aansluitingen in de component analoge HD-groep (groene band) aan de achterkant van uw LED-TV.
• De voeding naar de LED-TV en DVD-speler inschakelen.
• Selecteer Component Analoge HD met de SOURCE-toets op de afstandsbediening of de voorkant van de LED-TV.
OPMERKING: Raadpleeg de handleiding van uw DVD-speler voor bijzonderheden over instellingen van de video-uitgang van het apparaat.
NL Gebruiksaanwijzing

8
Gebruiksaanwijzing
SCART-aansluiting
• De voeding naar de LED-TV en DVD-speler uitschakelen.
• Plaats een SCART kabel tussen uw Dvd-speler en de SCART aansluiting van uw TV.
• De voeding van de LED-TV en DVD-speler inschakelen.
• Selecteer SCART met de SOURCE-toets op de voorkant van de LED-TV of rechtstreeks door op de SOURCE-toets op de afstandsbediening te drukken.
ANTENNE-aansluiting
• De voeding van uw LED-TV uitschakelen.
• Sluit een coaxiale (RF)-aansluiting van uw antenne, kabel of kabelbox aan op de TV-aansluiting op de achterkant van uw LED-TV.
• De voeding van uw LED-TV inschakelen.
• Selecteer TV met de SOURCE-toets op de voorkant van de LED-TV of rechtstreeks door op de SOURCE-toets op de afstandsbediening te drukken.
Hoofdtelefoonaansluiting
• U kunt een hoofdtelefoon op uw TV aansluiten en desgewenst programma’s kijken zonder mensen in de omgeving te storen.
• Sluit een standaard hoofdtelefoon met een 3,5mm stekker aan op de 3,5mm-aansluiting op de achterkant van de TV (zie schema).
OPMERKING: OPGELET MET VOLUME HOOFDTELEFOON.
• Zet het hoofdtelefoon voor het aansluiten op een laag volume en verhoog het volume indien gewenst.
• Langdurig luisteren via een hoofdtelefoon met een hoog volume kan gehoorschade veroorzaken.
Er komt geen geluid uit de luidsprekers van de TV wanneer u een hoofdtelefoon aansluit op het systeem.
INSTRUCTIES VAN AFSTANDSBEDIENING
1. STANDBY: Schakelt de TV aan of uit.
2. MUTE: Schakelt het geluid van de TV uit.
3. EJECT: Opent het disk-station.
4. GENUMMERDE TOETSEN (0-9): Druk op 0-9 om een TV-kanaal te selecteren wanneer u TV
kijkt. Het kanaal verandert na 2 seconden.
5. FAV: Druk op deze toets om het menu van favoriete kanalen op uw TV-scherm te tonen
terwijl u naar digitale TV-programma's kijkt.
6. 10+: Voer een programmanummer voor hogere kanaalnummers, b.v. 2-1, enz.
: Terugkeren naar het vorige kanaal.
7. ASPECT: Druk op deze toets om de aspectverhouding van uw TV veranderen.
8. AUDIO: Druk op deze toets om verschillende audiosystemen te selecteren.
9. VOL(+)/VOL(-): Verhogen en verlagen van het geluidsniveau.
10. CH(+)/CH(-): Door de kanalen schakelen.
11. THUMBSTICK ( / / / / OK): Hiermee navigeert u door de schermmenu's en kunt u de
instellingen van het systeem naar voorkeur instellen.
12. DISPLAY: Druk op deze toets voor SOURCE- en kanaalinformatie.
13. MENU: Deze toets opent het hoofdmenu van de TV.
14. D.SETUP: Druk op deze toets om de disk in DVD-modus in te stellen.
15. SOURCE: Indrukken om door de ingangsbronnen te schakelen.
16. SLEEP: De duur van de uitschakeltijd instellen. Hiermee kun u de TV automatische uitschakelen.
17. PMODE: Selecteert verschillende vooraf ingestelde scherminstellingen.
18. SMODE: Selecteert verschillende vooraf ingestelde geluidsinstellingen.
19. TEXT: Deze toets indrukken om teletekst in en uit te schakelen.
20. SUBTITLE: Deze toets indrukken om de ondertiteling te tonen voor het programma dat u
bekijkt. Nogmaals indrukken om de ondertiteling te verbergen.
21. HOLD: Deze toets indrukken om het teletekst op het scherm stil te zetten en weer te starten.
EPG: Deze toests indrukken om de elektronische programmagids te selecteren.
22. TV/RADIO: Indrukken om TV- of RADIO-modus te selecteren.
23. INDEX: Deze toets indrukken om de indexpagina van teletekst te selecteren.
24. SUBPAGE: Ga naar Sub-Gecodeerde pagina's.
25. SIZE: Druk terwijl u naar teletekst kijkt op deze toets om de tekst op het scherm te vergroten.
26. REVEAL: Druk op deze toets om tekst te tonen of te verbergen, bijvoorbeeld bij een quiz met tekst.
27. D.MENU: Opent het DVD-menu.
28. A-B: Herhaal weergave van punt A en B.
29. TITLE: Opent het titelmenu.
30. REPEAT: Herhaalt het programma.
31. TIMESHIFT: Indrukken om TIMESHIFT te openen.

9
: Afspelen/pauze-toets in MEDIA-modus.
: Stop-toets in MEDIA-modus.
: Selecteert vorige hoofdstuk van DVD.
: Terug naar een eerdere scène in de DVD-film.
: Snel vooruit naar de volgende scène van de DVD.
: Selecteer volgende hoofdstuk in DVD-film.
ROOD GROEN GEEL BLAUW-toets
De toetsen indrukken volgens de kleur op het scherm om het scherm te openen.
KIES INGANGSBRON
BASISBEDIENING
• Druk op de SOURCE-toets op de afstandsbediening om de ingangsbronnenlijst weer te geven.
• Druk op / -toets om de gewenste ingangsbron te selecteren.
• Druk op de OK-toets om de ingangsbron te openen.
• Druk op de EXIT-toets om af te sluiten.
Sluit een RF-kabel aan op de TV-ingang gemarkeerd met "RF-ln" en op uw TV antenne-aansluiting.
OSD-taal
Druk op de / toets om de gewenste taal voor de menu's en berichten te selecteren.
Land
Druk op de / toets om het gewenste land te selecteren.
Automatisch scannen
Druk op de / toets om Modus te selecteren: DTV+ATV, DTV, ATV.
NL Gebruiksaanwijzing

10
Gebruiksaanwijzing
Automatisch scannen
Voor digitaal afstemmen, op de Menu-toets drukken en digitaal afstemmen overslaan; voor analoog afstemmen, druk op de Menu-toets om
analoog afstemmen over te slaan.
BEELDMENU
• Druk op de MENU-toets om het hoofdmenu weer te geven.
• Druk op de / toets en selecteer BEELD in het hoofdmenu. De eerste optie wordt gemarkeerd.
• Druk op de / toets en selecteer de optie die u wilt gebruiken om het BEELD-menu in te stellen.
• Druk op de / toets om de instelling te maken.
• Na het maken van de instelling drukt u op de MENU-toets om terug te keren naar het vorige menu.
Beeldmodus
• Druk op de / toets en selecteer Beeldmodus en druk op OK om het submenu te openen. Druk op de / toets om te selecteren.
(Beschikbaar Beeldmodus: Dynamisch, Standaard, Licht, Persoonlijk).
• U kunt de waarde van contrast, helderheid, kleur en scherpte veranderen als het beeld in de Persoonlijke modus staat.
• TIPS: U kunt ook op de PMODE-toets op de afstandsbediening drukken om de Beeldmodus te veranderen.
Helderheid
Druk op de / toets en selecteer Helderheid en druk op OK om het sub-menu te openen. Druk op de / toets om in te stellen.
Contrast
Druk op de / toets en selecteer Contrast en druk op OK om het sub-menu te openen. Druk op de / toets om in te stellen.
Scherpte
Druk op de / toets en selecteer Scherpte en druk op de / toets om in te stellen.
Kleur
De verzadiging van de kleur naar voorkeur instellen.
Tint
Hiermee compenseert u kleurveranderingen met de transmissie in de NTSC-code.
Kleurtemperatuur
Druk op de / toets en selecteer Kleurtemperatuur en druk op de / toets om in te stellen. (Beschikbare Kleurtemperatuur: Standaard, Koel, Warm).
Beeldverhouding
Druk op de / toets en selecteer Beeldverhouding en druk op de / toets om in te stellen. (Beschikbare beeldverhouding: Volledig, Zoom1, Zoom2, 4:3).

11
PC-INSTELLING (ALLEEN PC-MODUS)
• Druk op SOURCE om PC-SOURCE te selecteren.
• Druk op MENU om het hoofdmenu te openen en druk dan op / en selecteer BEELD-menu.
• Druk op OK / om het menu te openen en druk op om PC-instelling te selecteren.
• Druk op de / toets en selecteer PC-instellingen en druk op de / toets om in te stellen.
Automatisch instellen Druk op de MENU / toets om het scherm automatisch on de optimale stand van het beeld in te stellen.
H-positie Instellen van de horizontale positie van het beeld.
V-positie Instellen van de vertikale positie van het beeld.
Fase Minimaliseer horizontale vervorming.
Klok Minimaliseer verticale strepen in het beeld.
Schermmodus
• Druk op de / toets en selecteer HDMI-modus en druk op de / toets om Auto, Video of PC te selecteren.
• Dit is alleen beschikbaar in HDMI-invoer.
Geavanceerde instellingen (Niet beschikbaar voor de PC-modus)
• Gebruik geavanceerde videofuncties om het beeld in te stellen.
• Druk op de / toets en selecteer geavanceerde instellingen en druk op de OK / toets om het sub-menu te openen.
NR (RUISONDERDRUKKING)
• Gebruik deze instelling om videoruis te verminderen.
• Druk op de / toets en selecteer NR. Druk vervolgens op de / toets om te selecteren.
Uit Selecteer deze optie om videoruisdetectie uit te schakelen.
Zwak Detecteer en verminder laag videoruis.
Gemiddeld Detecteer en verminder licht videoruis.
Sterk Detecteer en verminder sterk videoruis.
Mpeg NR (Mpeg ruisonderdrukking)
Gebruik deze instelling om MPEG-ruis te verminderen.
Druk op de / toets en selecteer Mpeg NR. Druk vervolgens op de / toets om te selecteren.
Uit Selecteren om MPEG-ruisdetectie uit te schakelen.
Zwak Detecteer en verminder laag MPEG-ruis.
Gemiddeld Detecteer en verminder licht MPEG-ruis.
Sterk Detecteer en verminder sterk MPEG-ruis.
Dynamisch contrast
• Automatisch instellen van beelddetail en helderheid.
• Druk op de / toets en selecteer Dynamisch contract. Druk vervolgens op de / toets om te selecteren.
(Beschikbaar Dynamisch contrast: Uit, Zwak, Gemiddeld, Sterk).
NL Gebruiksaanwijzing

12
Gebruiksaanwijzing
GELUIDSMENU
• Druk op de MENU-toets om het hoofdmenu weer te geven.
• Druk op de / toets en selecteer Geluid in het hoofdmenu. De eerste instelling wordt gemarkeerd.
• Druk op de / toets en selecteer de optie die u wilt instellen in het GELUID-menu.
• Druk op de / toets om in te stellen.
• Na het maken van de instelling drukt u op de MENU-toets om terug te keren naar het vorige menu.
Geluidmodus
• Druk op de / toets en selecteer Geluidmodus en druk op de OK-toets om het sub-menu te openen. Druk op de / toets om te
selecteren.
• (Beschikbaar in Geluidmodus: Standaard, Muziek, Film, Sport, Persoonlijk).
• U kunt de waarde van de hoge en lage tonen veranderen wanneer het geluid in de Persoonlijke modus staat.
• TIPS: U kunt ook op de SMODE-toets op de afstandsbediening drukken om de Geluidsmodus in te stellen.
Hoge tonen
Druk op de / toets en selecteer Treble en druk op OK om het sub-menu te openen. Druk op de / toets om in te stellen.
Lage tonen
Druk op de / toets en selecteer lage tonen en druk op OK om het sub-menu te openen. Druk op de / toets om in te stellen.
Balans
Druk op de / toets en selecteer Balans en druk dan op OK om het sub-menu te openen. Druk op de / toets om in te stellen.
Surround Sound
Druk op de / toets en selecteer Surround Sound. Druk vervolgens op de / toets en selecteer Aan of Uit.
EQ-instelling
Druk op de / toets en selecteer EQ-instelling en druk op de OK/ toets om het sub-menu te openen.

13
AVL
• Druk op de / toets en selecteer AVL. Druk vervolgens op de / toets en selecteer Aan of Uit.
SPDIF
• Druk op de / toets en selecteer SPDIF. Druk vervolgens op de / toets en selecteer Uit, Automatisch, PCM.
Audio-beschrijving
• Druk op de / toets en selecteer Audiobeschrijving en druk op de OK/ toets om het submenu te openen.
Geluidstype)
• Druk op de / toets en selecteer Geluidstype. Druk vervolgens op de / toets om te selecteren.
KANAALMENU
• Druk op de MENU-toets om het hoofdmenu weer te geven.
• Druk op de / toets en selecteer KANAAL in het hoofdmenu. De eerste instelling wordt gemarkeerd.
Druk op de / toets en selecteer de optie die u wilt instellen in het KANAAL-menu.
• Druk op de / toets om in te stellen.
• Na het maken van de instelling. Druk op de MENU-toets om terug te gaan naar het vorige menu.
NL Gebruiksaanwijzing

14
Gebruiksaanwijzing
Automatisch scannen
Druk op de / toets en selecteer Automatisch scannnen en druk op de OK/ toets om het sub-menu te openen. (Het standaard wachtwoord
is 0000)
Handmatig scannen
• Druk op de / toets en selecteer Handmatig scannen en druk op de OK/ toets om het sub-menu te openen.
Digitaal handmatige scan
Druk op de / toets en selecteer Digitaal handmatige scan en druk op de OK/ toets om het submenu te openen.

15
Analoog handmatige scan
• Druk op de / toets en selecteer Analoog handmatige scan en druk op de OK/ toets om het sub-menu te openen.
Kanaal bewerken
• Druk op de / toets en selecteer Kanaal bewerken en druk op de OK/ toets om het submenu te openen.
De driekleurige toets is de sneltoets voor het programmeren van het kanaal.
• Druk eerst op / om het kanaal dat u wilt verwijderen, verplaatsen of overslaan te markeren en:
• Druk op de Rode toets om het kanaal te verwijderen.
• Druk op de Groene toets om het geselecteerde kanaal over te slaan.
• (Uw TV-toestel slaat het kanaal automatisch over wanneer u CH +/- gebruikt om de kanalen te bekijken.)
• Druk op de Blauwe toets om het kanaal te markeren en druk dan op / om het kanaal naar de gewenste positie te plaatsen.
Common interface
• Druk op de / toets en selecteer Common interface en druk dan op OK om het sub-menu te openen. Alleen beschikbaar bij gebruik van
een CI-kaart in DTV.
Signaalinformatie
• Druk op de / toets om Signaalinformatie te selecteren en druk vervolgens op de OK-toets om gedetailleerde informatie over het signaal op
te roepen. Alleen beschikbaar wanneer er een signaal is onder DTV.
NL Gebruiksaanwijzing

16
Gebruiksaanwijzing
SYSTEEM BLOKKEREN
• Druk op de MENU-toets om het hoofdmenu te openen.
• Druk op de / toets en selecteer SYSTEEM BLOKKEREN in het hoofdmenu. De eerste optie wordt gemarkeerd.
• Druk op de / toets en selecteer de optie die u wilt instellen in het SYSTEEM BLOKKEREN-menu.
• Druk op de / toets om in te stellen.
• Na het maken van de instelling drukt u op de MENU-toets om terug te keren naar het vorige menu.
Voer wachtwoord in
• Druk op de / toets en selecteer Voer wachtwoord in en druk op OK. U krijgt 4 opties.
• (Standaard wachtwoord is ‘0000'.)
Inschakelen
Druk op de / toets en selecteer Ingeschakelen. Druk vervolgens op de / toets en selecteer Aan of Uit.
• Kanaalslot Kinderslot en Toetsenbordslot zijn beschikbaar als Inschakelen op Aan staat.
Kanaal vergrendelen
• Druk op de / toets en selecteer Kanaal vergrendelen. Druk vervolgens op de OK/ toets om het sub-menu te openen.
Kinderslot classificatie
• Druk op de / toets en selecteer Kinderslot classificatie en druk op de / toets om te selecteren.
Keypad vastzetten
• Inschakelen om te voorkomen dat jonge kinderen het gebruiken of tegen ander onbedoeld gebruik.
• Druk op de / toets en selecteer Keypad vaststellen. Druk vervolgens op de / toets en selecteer Aan of Uit.
Nieuw wachtwoord
Druk op de / knoppen om Nieuw wachtwoord te selecteren, geef de 4-cijferig code in die u als wachtwoord wilt gebruiken, geef de code
nogmaals in om deze te verifiëren.
Blokkeren opheffen
• Druk op de / toets en selecteer Clear Lock (Slot ontgrendelen). Druk vervolgens op de / toets om te selecteren.

17
INSTELLING
• Druk op de MENU-toets om het hoofdmenu te openen.
• Druk op de / toets en selecteer INSTELLING in het hoofdmenu. De eerste optie wordt gemarkeerd.
OSD-taal
• Druk op de / toets en selecteer OSD-taal en druk op OK om het sub-menu te openen.
• Druk op de / / / toets om OSD-taal te selecteren.
Audio talen
• Druk op de / toets en selecteer Audio talen. Druk vervolgens op de OK-toets om het sub-menu te openen.
• Druk op de / / / toets en selecteer Audio primaire taal en Audio tweede taal.
Ondertiteling
• Druk op de / toets en selecteer Ondertiteling en druk op de OK-toets om het sub-menu te openen.
Teletekst
• De Teletekst-instellingen wijzingen. Alleen beschikbaar onder DTV en ATV modus.
• Druk op de / toets en selecteer Teletekst en druk op OK/ toets om het sub-menu te openen.
• Druk onder de DTV-SOURCE op de / toets en selecteer Digitale Teleteksttaal.
• Druk onder de ATV-SOURCE op de / toets en selecteer Decoderen paginataal.
NL Gebruiksaanwijzing

18
Gebruiksaanwijzing
Tijdinstellingen
• Druk op de / toets en selecteer Tijdinstellingen. Druk vervolgens op de OK-toets om het sub-menu te openen.
PVR-instellingen
• Druk op de / toets en selecteer PVR-instellingen. Druk vervolgens op de OK-toets om het sub-menu te openen.
• De USB wordt gecontroleerd.
Eerste instelling
• Druk op de / toets en selecteer Eerste instelling. Druk vervolgens op de OK-toets.
Resetten
• Druk op de / toets en selecteer Resetten en druk op de OK-toets.
• Als u zeker weet dat u wilt resetten, op Ja drukken.
MEDIA MENU
• Opmerking: Voordat u het USB-menu gebruikt, eerst het USB-apparaat aansluiten. Vervolgens op de SOURCE toets drukken en de invoerbron
op USB zetten.
• Druk op de / toets en selecteer USB in het menu en druk vervolgens op de OK-toets.
• Druk op de / toets en selecteer de optie die u wilt instellen in het USB hoofdmenu en druk vervolgens op de OK-toets.

19
Foto
• Druk op de / toets en selecteer FOTO in het hoofdmenu en druk vervolgens op de OK-toets.
• Druk op de / toets en selecteer het disk station dat u wilt afspelen en druk op de OK-toets.
• Druk op de / toets om de optie te kiezen om terug te gaan naar het vorige menu.
Muziek
• Druk op de / toets en selecteer MUSIC (MUZIEK) in het hoofdmenu en druk vervolgens op de OK-toets.
• Druk op de / toets en selecteer het disk station dat u wilt afspelen en druk op de OK-toets.
• Druk op de / button toets en selecteer de optie om terug te keren naar het vorige menu.
• Wanneer u een een optie selecteert, wordt de bestandsinformatie aan de rechterkant getoond.
Film
• Druk op de / toets en selecteer MOVIE (FILM) in het hoofdmenu en druk vervolgens op de OK-toets.
• Druk op de / toets en selecteer het disk station dat u wilt afspelen en druk op de OK-toets.
• Druk op de / toets en selecteer de optie om terug te keren naar het vorige menu.
NL Gebruiksaanwijzing

20
Gebruiksaanwijzing
Text (Tekst)
• Druk op de / toets en selecteer TEXT (TEKST) in het hoofdmenu en druk vervolgens op de OK-toets.
• Druk op de / toets en selecteer het disk station dat u wilt afspelen en druk op de OK-toets.
• Druk op de / toets en selecteer de optie om terug te keren naar het vorige menu.
• Wanneer u een een optie selecteert, wordt de bestandsinformatie aan de rechterkant getoond.
Media Bestand Ext. Codec Opmerkingen
Video Audio
Film
.avi
MPEG
MP3, WMA,
AAC, MP2,
PCM, AC3
Max resolutie en
beeldsnelheid:
640x480@30fps
Max data
Xvid, MPEG-2,
MPEG-4, DivX, H.264
Max resolutie en
beeldsnelheid:
1920x1080@30fps
Max data rate: 20Mbps
.mp4 MPEG-2, MPEG-4,
DivX, H.264
.ts
.trp
MPEG-2,
H.264
.mkv
.mov
MPEG-4,
H.264
.mpg MPEG-1, MPEG-2
.dat MPEG-1
MP2
Max resolutie: 352x288
Max data snelheid:
20Mbps
.vob MPEG-2
Max resolutie: 720x576
Max data snelheid:
20Mbps
.rm
.rmvb RV8, RV9, RV10 COOK
Max resolutie en
beeldsnelheid:
1280x720@30fps
Max data snelheid:
10Mbps
Muziek
.mp3 - MP3
Sample snelheid:
32K~48Khz
Bit rate: 32K~320Kbps
Channel: Mono/Stereo
.wma - WMA
Sample snelheid:
8K~48Khz
Bit rate: 128K~320Kbps
Kanaal: Mono/Stereo
.m4a
.aac - AAC
Sample snelheid:
8K~48Khz
Bit rate: 128K~442Kbps
Kanaal: Mono/Stereo
Foto
.jpg
.jpeg
Progressive JPEG Max resolutie: 1024x768
Baseline JPEG Max resolutie: 15360x8640
.bmp -- Max resolutie: 9600x6400
.png Non interlaced Max resolutie: 9600x6400
Interlaced Max resolutie: 1200x800
Tekst .txt ANSI/UNICODE GB/UTF8 Bestand grootte: max 1MB
Note:
1. Ondersteunde bestandssystemen zijn; Hi Speed FS, FAT32, FAT16, NTFS (NTFS gecomprimeerde bestanden worden niet ondersteund.)
2. MP4 codec ondersteund geen GMC.
3. Wanneer een media bestand voldoet aan de bovenstaande eisen maar niet afspeelt is het bestand waarschijnlijk beschadigd.
4. Er wordt geen ondersteuning verleend op bestanden die zijn gedownload.

21
INSTELLEN VAN DE DVD-FUNCTIE
• Opmerking: Voordat u het DVD-menu kunt gebruiken moet u eerst de SOURCE toets drukken en de invoerbron USB selecteren.
Druk op de / toets en selecteer DVD in het menu en druk vervolgens op de OK-toets.
• Druk op D.SETUP om het OSD-menu van de DVD-speler te activeren.
• Druk op de / toets om een functie in het sub-menu te selecteren. Druk op de / toets om het gemarkeerde sub-menu te openen.
• Druk op de D.SETUP toets om het OSD-menu te sluiten.
HOOFDINSTELLINGPAGINA
TV scherm
DVD’s worden geproduceerd met verschillende aspectverhoudingen. Met dit menu kunt u een van de drie aspectverhoudingen selecteren:
• 4:3/PS (Normaal) Geschikt voor normale TV bij het afspelen van wide screen-films; het scherm wordt links en rechts bijgesneden
• 4:3/LB (Normaal) Geschikt voor normale TV bij het afspelen van wide screen-films; de boven- en onderkant hebben een zwarte balk
• 16:9 (Breedte) Geschikt voor het aansluiten van een wide screen-TV / Monitor
Selecteer de gewenste aspectverhouding
OPMERKING:
• Schermafmetingen kunnen variëren afhankelijk van de inhoud van de schijf.
• Voor media with 4:3 inhoud wordt bij alle instellingen alleen een 4:3 scherm weergeven.
• De instelling van de aspectverhouding moet afgestemd zijn op de aspectverhouding van de aangesloten TV / monitor.
OSD Taal
• Gebruik de navigatieknoppen om het instelpictogram OSD-TAAL te selecteren en druk op OK om te bevestigen. Er zijn meerdere talen
beschikbaar.
• Gebruik de / toetsen om de gewenste taal te selecteren. Druk op de OK-toets om te bevestigen.
NL Gebruiksaanwijzing

22
Gebruiksaanwijzing
Schermbeveiliging
• AAN: Kies deze instelling om de schermbeveiliging te activeren.
• UIT: Kies deze instelling om de schermbeveiliging uit te schakelen.
Laatste geheugen
• AAN: Selecteer deze instelling zodat de DVD-speler de verstreken tijd onthouden kan na de laatste keer dat u de disc afspeelde. De speler kan
dan het afspelen hervatten vanaf de onthouden tijd.
• UIT: Kies deze instelling zodat de DVD-speler weergave hervat vanaf het begin van de disk.
LUIDSPREKER INSTELLING
Dual mono
U kunt vier standen voor dual mono selecteren: STEREO, L-MONO, R-MONO, MIX-MONO. De standen voor dual mono worden in onderstaande
afbeelding getoond:
MODUS LINKER LUIDSPREKER RECHTER LUIDSPREKER
STEREO STEREO-L STEREO-R
L-MONO L-MONO L-MONO
R-MONO R-MONO R-MONO
MIX-MONO L-MONO+R-MONO L-MONO+R-MONO

23
Dynamisch
REFERENTIE PAGINA
TV Type
• Druk op de toets om TV Type to openen en druk op / om een functie te selecteren.
• Selecteer de instellingen volgens uw TV-kleursysteem: (PAL, Multi of NTSC TV)
• Standaardinstelling is PAL.
Audio
• Gebruik de navigatietoetsen om het instelpictogram Audio te selecteren en druk op OK om te bevestigen. Er zijn meerdere talen beschikbaar.
• Gebruik de / toetsen om de gewenste taal te selecteren. Druk op de OK-toets om te bevestigen.
Ondertitel
Gebruik de navigatietoetsen om het instelpictogram Ondertitel te selecteren en druk op OK om te bevestigen. Er zijn meerdere talen beschikbaar.
Gebruik de / toetsen om de gewenste taal te selecteren. Druk op de OK-toets om te bevestigen.
NL Gebruiksaanwijzing

24
Gebruiksaanwijzing
Disc menu
Ouderlijk
• De kwalificatie is onderverdeeld in acht verschillende categorie van VEILIG VOOR KINDEREN tot ALLEEN VOLWASSENEN.
• Opmerking: alleen instelbaar wanneer het wachtwoord is ontgrendeld.
Wachtwoord
• De instelling is standaard vergrendeld. Het is niet mogelijk de instellingen of het wachtwoord te veranderen. Als u de rating wilt aanpassen,
eerst het standaardwachtwoord "0000" invoeren met de cijfertoetsen, vervolgens op OK drukken om te bevestigen.
• Terwijl het slot ontgrendeld is, een nieuw wachtwoord van 4 cijfers invoeren. Wanneer u de nieuwe 4-cijferige code hebt ingevoerd is dat uw
nieuwe wachtwoord.

25
Default
Druk op de OK-toets om de fabrieksinstellingen te herstellen.
OPLOSSEN VAN PROBLEMEN
Als u problemen hebt met uw TV, probeer eerst de onderstaande controles uit te voeren. Als u de problemen niet kunt verhelpen, het netsnoer
van de TV loskoppelen en contact opnemen met uw leverancier .
Problemen en mogelijke oplossingen
Mijn TV heeft geen geluid en geen beeld.
• Controleer of u het adapter van de TV goed hebt aangesloten en dat het stopcontact werkt.
• Controleer de instellingen van het beeldcontrast en de helderheid.
• Controleer welke invoerbron u geselecteerd heeft.
Mijn TV heeft wel beeld maar geen geluid.
• Controleer of het geluid van uw TV niet is gedempt of dat het volume laag staat.
• Schakel over naar een ander kanaal. Mogelijk is er een probleem met het kanaal en niet met de TV.
• Controleer of uw audio-invoerkabel goed is aangesloten. D.w.z. wanneer u gebruik maakt van een externe versterker of van een hoofdtelefoon.
De afstandsbediening werkt niet.
• Zorg ervoor dat er geen objecten zijn tussen uw TV (b.v. van meubilair) die het signaal van de afstandsbediening blokkeren waardoor de sensor
op uw TV niet kan worden bereikt .
• Hebt u de batterijen in de afstandsbediening op de juiste manier geplaatst? (De + moet op de + en de - op de -)
• Controleer of de juiste functie op de afstandsbediening is geselecteerd (b.v. TV of videorecorder).
• De TV mag niet in direct zonlicht worden geplaatst.
• Probeer nieuwe batterijen te plaatsen als bovenstaande niet werkt.
De TV wordt plotseling uitgeschakeld.
• Controleer of u de sluimer-timer niet hebt ingesteld.
• Controleer of u eventueel de timer op het stopcontact heeft aangesloten waar de TV op aangesloten is.
• Controleer of u geen automatische stand-by hebt ingesteld na 2, 3 of 4 uur.
Het beeld op mijn TV verschijnt langzaam nadat ik het toestel heb ingeschakeld.
• Dit is normaal. Het duurt enkele seconden voordat het beeld verschijnt nadat u de TV hebt ingeschakeld. Neem contact op met uw leverancier
als het beeld binnen vijf minuten niet verschijnt.
Er is Geen beeld op mijn TV of er zijn geen of slechte kleuren.
• De kleurinstelling aanpassen in het BEELDMENU.
• Als u een VCR gebruikt, zorg dat deze op voldoende afstand staat van uw TV.
• Probeer een andere kanaal in te schakelen. Er kan een probleem zijn met het kanaal waar u naar kijkt.
• Zijn de videokabels correct geïnstalleerd?
• Wijzig de instelling van de helderheid van het beeld in het BEELDMENU.
NL Gebruiksaanwijzing

26
Gebruiksaanwijzing
Er zijn horizontale en verticale balken op het scherm en het beeld trilt.
• Controleer of er signaalstoringen zijn van andere apparatuur, zoals elektrische apparaten of elektrisch gereedschap.
Het ontvangst op sommige kanalen is slecht.
• De TV-zender waar u naar kijkt kan problemen hebben. Schakel naar een ander kanaal om te controlen of het beeld dezelfde symptomen
heeft.
• Controleer of de signaalkabel geen slechte stekkers of breuken bevat
• Controleer of de signaalkabel niet langer dan 10 meter is, wij raden aan het signaal na iedere 10 meter te versterken.
Er zijn lijnen of strepen in het beeld.
• Controleer of er geen open splitters gebruikt worden die te dicht bij een Wi-Fi router of een DECT telefoon in de buurt zitten.
Een van de luidsprekers van de TV werkt niet.
• Controleer de instelling van de geluidsbalans in het GELUIDSMENU.
OPLOSSEN VAN PROBLEMEN MET DE VIDEO GRAPHICS ADAPTER (VGA)
Het signaal is buiten bereik.
• Verander de resolutie, de horizontale of verticale frequentie van uw SOURCE (PC enz.).
• Controleer of de verbindingskabel van de PC naar uw TV goed is aangesloten.
Er is een verticale balk of streep op mijn TV-scherm.
• Schakel automatisch configureren in of verander de horizontale of verticale frequentiepositie.
Schermkleuren worden niet weergegeven zoals het moet of er is maar één kleur.
• Controleer of de videokabel op de juiste manier is aangesloten.
• De videokaart van uw PC opnieuw installeren als het signaal afkomstig is van uw computer.
Als u de TV enige tijd niet gebruikt (wanneer u b.v. op vakantie gaat), de stekker uit het stopcontact verwijderen en de antenne
loskoppElen om uw TV tegen mogelijke schade door onweer of piekspanningen te beschermen.
DE SPECIFICATIES VAN UW TV
Wij willen onze producten voortdurend verbeteren. Wij hebben het recht om het ontwerp en de specificaties van deze TV zonder voorafgaande
kennisgeving te veranderen. Het symbool op het product of in de gegeven aanwijzingen betekenen dat u elektrische en elektronische
apparatuur niet met huishoudelijk afval mag weggooien. Er zijn aparte inzamelsystemen voor recycling in de Europese Unie (EU). Neem contact
op met uw lokale overheid of de leverancier waar u uw TV hebt gekocht voor nadere bijzonderheden.
Specificaties en ontwerp als gevolg van verbeteringen zijn onderhevig aan wijzigingen zonder voorafgaande kennisgeving

27
INSTALLATIE VAN DE STAND
Om de stand aan te brengen, legt u de TV op een egale ondergrond om krassen te voorkomen. Plaats de TV op de staander en bevestig de
schroeven op de locatie gemarkeerd in de afbeelding.
De stand verwijderen
• Draai de schroeven in de afbeelding los en verwijder de voet om de TV van de stand te verwijderen.
Wandmontage van het toestel
• Als u het apparaat aan de wand monteert, raadpleeg dan een gekwalificeerde installateur voor instructies over met monteren van de
draagbeugel en wandmontageplaat.
• Specificatie montageplaat: 100mm x 100mm met schroefmaat M4 (niet meegeleverd). De lengte van de schroef mag niet meer zijn dan 8mm.
• Opgelet: De 8mm lengte van schroef verwijst naar de maximale diepte van de montagegaten.
• Wanneer u schroeven koopt, moet u de 8mm toevoegen aan de dikte van de montageplaat om de totale schroeflengte te berekenen.
NL Gebruiksaanwijzing

28
CONTENTS
• Important safety instructions
• Setting up and using your TV
• What' s included with your TV
• Sockets on the back of your TV
• Basic installation
• Remote Control lnstruction
• Select lnput Source
• Basic menu operation
• USB Multimedia playback format
• DVD menu
• If you're having problems
• Your Tv's specification
• Wall mounting assembly instruction
Instruction Manual
29
30
31
32
33
34
35
35
38
47
52
54
54

29
Warning
• Do not let your TV become wet(for example, by keeping it in a dan room, leaving it outside or dripping water on it).
• You must not put objects filled with water on your TV (including vases of water).
IMPORTANT SAFETY INSTRUCTIONS
• Read these instructions carefully.
• Keep these instructions in a safe place
• Follow all the instructions.
• Only clean your TV with a dry cloth.
• Do not block the ventilation openings.
• Do not put your TV near any heat source (such as radiators or stoves), or near equipment (including amplifiers) that produce heat.
• Your TV is either fitted with a polarized plug or grounding- type plug. A polarized plug has two blades with one wider than the other. A
grounding- type plug has two blades and a third grounding prong. The wide blade or the third prong is provided for your safety. If the
provided plug does not fit into your outlet, ask an electrician to replace your plug socket so that it fits your TV plug.
• Do not walk on, trap, pinch or damage the power cord. Take care that the cord is not pulled, especially at plug sockets and where it comes
out of the TV.
• Do not walk on, trap, pinch or damage the power cord. Take care that the cord is not pulled, especially at plug sockets and where it comes
out of the TV.
• Unplug your TV both power and antenna during lightning storms or when you won't be using it for a week or more.
• lf your TV needs repairing, use a qualified service technician. If you damage your TV, it will need to be serviced.
• Be careful when you plug the power cord into a socket. Do not overload wall sockets. They could damage your TV and could give you an
electric shock or cause a fire. Check your TV's power cord from time to time, and unplug your TV if the power cord looks worn. Stop using it
until you have had the power cord replaced by a qualified technician. Do not twist, kink or pinch the power cord.
Note
• If your TV is cold, there may be some small 'flickers' when you turn it on. This is normal and there is nothing wrong with your TV.
• Avoid touching the LED screen with any object or holding your finger against it as this may cause damage.
YOU WILL SEE THESE STICKERS ON YOUR TV
Caution
• You should not service your TV unless you are qualified to do so. If your TV breaks down, contact a qualified TV engineer.
• Make sure you plug in your TV securely.
• If you use your TV to play video games or connect to your computer to use as a screen, keep brightness and contrast at a low level. Images with
a high level of brightness or contrast may burn on to the screen permanently.
How to clean your TV
• Wipe the TV screen with a soft, dry cloth
• Do not use solvent methyl benzene. Strong chemicals may damage your TV screen.
• Make sure you switch the TV off before you clean it.
HAZARD WARNING
Risk of electRic shock do Not opeN
WARNING
to Reduce the Risk of fiRe oR electRic shock, do
Not expose this pRoduct to RaiN oR moistuRe.
This symbol means there are wires in your TV which are
not insulated. If you touch these wires, you may get an
electric shock.
This symbol means you should read the servicing guide
before you take further action.
eN Instruction Manual

30
Instruction Manual
SETTING UP AND USING YOUR TV
• Check the voltage shown on the serial number or rating label on your TV, and make sure your TV is compatible with the voltage in your home.
If you are not sure about the voltage you have in your home, please contact your distributor or an electrician.
• Make sure you plug the power cable into the socket securely. If you have problems plugging in your TV, please contact the shop you bought
your TV from to replace the power cable.
• The plug is designed, so that it will only fit one way.
• If you have problems plugging in the socket properly, please contact the shop you bought your TV from.
• Do not overload power sockets or extension cords when you are setting up your TV. If you overload the power sockets or extension cords, you
could receive an electric shock or cause a fire.
• Do not place any objects on the power cord when you are setting up your TV. Keep your TV screen away from any sharp objects such as screw
drivers or knives so that you don't scratch or damage the TV screen. Only use the correct power cord when you set up your TV.
• Make sure you turn off your TV when you are not using it. lf you won't be using your TV for a week or more, unplug both power and aerial connections.
• The vents at the back of your TV are to let air cool the inside of your TV. so it doesn't overheat. Please make sure the vents are not blocked.
• Do not put your TV on a bed, sofa or carpet. This may block the vents.
• Do not put your TV in an enclosed space, such as on a bookshelf or in a TV cabinet. Doing this may block the vents.
• Keep your TV away from direct sunlight.
• Do not place your TV on an unsteady shelf or desk. The TV could fall and injure you.
• Do not put objects inside the TV (such as children's toys).Doing this could give you an electric shock or damage the parts inside your TV.
When to call a technician
If any of the following happens. unplug your TV and contact the shop you bought your TV from or a qualified technician to repair your TV.
• If the power cord or plug is damaged
• If liquid gets into the screen
• If your TV is damp or wet
• If your TV is damaged
• If the TV doesn't work properly.
Do not try to repair your TV yourself. There is high voltage
inside it and you could receive an electric shock.
The temperatures your TV will work in
• Your TV will only work when the temperature is in the range of 0°C-40°C.
Safety notice
• Your TV has a CE marking. This means your TV meets both the EMC directive (89/336/EEC), (93/68/EEC) and the Low Voltage Directive (73/23/
EEC) that the European Community have issued.
• This unit complies with European Council Directive 2006/ 95 CE (Electromagnetic Compatibility & Low Voltage Directives)
When you need to throw your TV away
Please contact the shop that sold you your TV when you need to throw it away.
• Do not throw your old TV away with your household waste.
• You can also contact your local council to see if they can collect your old TV. If you throw your TV away at a landfill site, dangerous chemicals
from your TV can leak into the ground and get into the food chain.
• When you replace your TV with a new one, the shop who sold you your TV are legally responsible for taking your old TV and throwing it away.
END OF LIFE DISPOSAL
This logo set on the product means that the recycling of this apparatus comes within the framework of the Directive 2002/96/CE of
January 27, 2003 concerning the Waste of Electrical and Electronic Equipment (WEEE). This symbol means that used electrical and
electronic products should not be mixed with general household waste. There is a separate collection system for these products.
If you want to dispose of this equipment, please do not use the ordinary dust bin !
• The presence of dangerous substances in the electrical and electronic equipments can have potential consequences on the environment and
human health in the cycle of reprocessing this product.
• Therefore, at the end of its lifetime, this product shall not be disposed with other non-recycled waste. Used electrical and electronic equipment must be
treated separately and in accordance with legislation that requires proper treatment, recovery and recycling of used electrical and electronic equipment.
• Local authorities and resellers have set special procedures for the purpose of collecting and recycling this product (please contact your local
authority for further details). You have the obligation to use the selective waste collection systems put in place by your local authority.
• If your used electrical or electronic equipment has batteries or accumulators, please dispose of these separately beforehand according to local
requirements.
• By disposing of this product correctly you will help ensure that the waste undergoes the necessary treatment, recovery and recycling and thus
prevent potential negative effects.

31
WHAT IS INCLUDED WITH YOUR TV
What your TV should look like
How to use your remote control
• Take the back cover off your TV remote and put two AAA batteries into the remote control. Make sure the + and - symbols on your batteries
match the diagram.
• Replace the batteries. So they are facing the right way. If you won't be using the remote control for a long time, take the batteries out. Use your
remote control carefully . Do not drop. Keep the remote control away from water, direct sunlight and hot surfaces.
eN Instruction Manual

1
8 9
2 3 4 5 6 7
1 9 10 11 12 132 3 4 5 6 7 8
32
SOCKETS ON THE TOP OF YOUR TV
1. : OPEN/CLOSE in DVD mode.
2. : PLAY/PAUSE in DVD mode.
3. Press "VOL+" or "VOL-" to increase or decrease the volume.
4. Press "CH+" or "CH-" to scan through channels.
5. Press "MENU" to bring up the main menu on the screen.
6. Press "SOURCE" to select the input source.
7. Press "STANDBY" button to turn standby mode on or off.
8. POWERINDICATOR: Show red in standby mode, show green or blue when your TV is switched on.
9. REMOTE SENSOR: Infrared sensor for the remote control
SOCKETS ON THE BACK OF YOUR TV
1. DC12V power input for the LED TV, connects power supply adaptor here.
2. Headphone output.
3. Audio input for VGA mode, connects to your PC audio output.
4. DB15 VGA interface.
5. YPBPR/ Component input, connects your AV system.
6. Scart input interface; connects your AV system with Scart output.
7. CVBS / Composite video inputs, connects your AV system.
8. Right/Left Audio Channel input for Composite video & component mode.
9. Coaxial Output, connecting to Coaxial input of your Amplifier.
10. 75 Ω aerial input, connects antenna connector or aerial interface here to receive cable / aerial signal.
11. High Quality Audio/Video input socket for connecting an external device fitted with an HDMI output.
12. Connects to portable USB device.
13. PCMCIA input, the card reader input CI (Common interface) this requires CAM (conditional access module) used for pay TV.
Instruction Manual

33
BASIC INSTALLATION
HDMI Connection
• Turn off the power to the LED TV and DVD player.
• Connect a HDMI cable to the HDMI output of your DVD player and the other end to the HDMI input in the rear of your LED TV.
• Turn on the power to the LED TV and your DVD player.
• Select Digital HD using the SOURCE button on the front of the LED TV or directly by pressing the SOURCE button on the remote Control.
PC and audio Connection
• Turn off the power to the your LED TV and Computer.
• Connect a15-pin D-sub RGB (VGA) cable to the RGB output of your computer and the other end to the VGA input (purple area) in the rear of
your LED TV.
• Turn on the power to the your LED TV and Computer.
• Select PC using the SOURCE button on the front of the LED TV or directly by pressing the SOURCE button on the remote Control.
VIDEO and audio Connection
• Turn off the power to the LED TV and DVD player.
• Connect the VIDEO jack on the rear of your DVD player to the VIDEO out on the rear side of your LED TV.
• Connect the R (red color) and L (white color) audio connectors on the rear of your DVD player to the R (red color) and L (white color) audio
input connectors in the side of your LED TV.
• Turn on the power to the LED TV and DVD player.
• Select AV using the SOURCE button on the front of the LED TV or directly by pressing the SOURCE button on the remote Control.
YPBPR and audio Connection
• Turn off the power to the LED TV and DVD player.
• Using the connectors in the green color area, connect the y(green color) connector on the rear of your DVD player to the corresponding y
(green color) connector in the component Analog HD group (green color band) in the rear of your LED TV.
• Connect the Pb (blue color) connector on the rear of your DVD player to the corresponding Pb (blue color) connector in the Component
Analog HD group (green color band) in the rear of your LED TV.
• Connect the Pr (red color) connector on the rear of your DVD player to the corresponding Pr (red color) connector in the Component Analog
HD group (green color band) in the rear of your LED TV.
• Connect the R (red color)and L (white color) audio connectors on the rear of your DVD player to the R (red color) and L(white color) aduio
connectors in the Component Analog HD group (green color band) in the rear of your LED TV.
• Turn on the power to the LED TV and DVD player.
• Select Component Analog HD using the SOURCE button on the remote or front of the LED TV Control.
NOTE: Refer to your DVD player user manual for more information about the video output requirements of the product.
eN Instruction Manual

34
SCART Connection
• Turn off the power to the LED TV and DVD player.
• Connect a SCART cable from your DVD player to the SCART socket of the TV.
• Turn on the power to the LED TV and your DVD player.
• Select SCART using the SOURCE button on the front of the LED TV or directly by pressing the SOURCE button on the remote Control.
ANTENNA Connection
• Turn off the power to your LED TV.
• Connect a coaxial (RF) connector from your antenna, cable or cable box to the TV connector on the rear of your LED TV.
• Turn on the power to your LED TV.
• Select TV using the SOURCE button on the front of the LED TV or directly by pressing the SOURCE button on the remote Control.
HEADPHONE Connection
• You can connect a headphone to your TV if you wish to watch program without disturbing people around you.
• Insert some standard headphone with a 3.5mm jack plug into the 3.5mm jack on the back of the TV (see diagram).
NOTE: HEADPHONE VOLUME WARNING.
• Connect headphones with the volume set low and increase it if required.
• Prolonged listening through some headphones at high volume settings can result in hearing damage.
You will not receive the sound from the TV when you connect headphones to the system.
REMOTE CONTROL INSTRUCTIONS
1. STANDBY: Turns the TV on or off.
2. MUTE:Turns the sound off from the TV.
3. EJECT :To eject the disc.
4. NUMBER BUTTONS(0-9):Press 0-9 to select a TV channel directly when you are watching TV.
The channel will change after 2 seconds.
5. FAV : Press this button to show the favourite channel menu on your TV screen when you
watch digital TV programmes.
6. 10+:Enter a program number for multiple program channel such as 2-1,etc.
:Returns to the previous channel.
7. ASPECT:Press this button to change the aspect of your TV.
8. AUDIO:Press this button you can choose different audio system.
9. VOL(+)/VOL(-):Increase or dicrease the sound level.
10. CH(+)/CH(-):Go through the channel list.
11. THUMBSTICK( / / / / OK):Allows you to navigate the on-screen menus and adjust
the system settings to your preference.
12. DISPLAY:Press to display the source and channel’s infomation.
13. MENU:Brings up the main TV menu on the screen.
14. D.SETUP:Press this button to setup the disc in DVD mode.
15. SOURCE:Press to cycle through the input source.
16. SLEEP:Select amount of time. Let your TV turn off automatically.
17. PMODE:Selects various preset picture settings.
18. SMODE:Select various preset sound settings.
19. TEXT:Press this button to switch on or off teletext.
20. SUBTITLE:Press this button to show subtitles for the programme you are watching. Press
again to hide the subtitles.
21. HOLD:Press this button to freeze or unfreeze the teletext screen you are viewing.
EPG: Press this button to select the electronic programme guide.
22.TV/RADIO:Press to select TV or RADIO modes.
23.INDEX: Press this button to select the teletext index page.
24.SUBPAGE:Go to sub coded pages.
25.SIZE: Press this button to expand the text size while you are in teletext.
26. REVEAL: Press this button to show or hide text, for example a text quiz.
27. D.MENU: Enter DVD menu.
28. A-B: Repeat play point A and B.
29. TITLE: Go to the title menu.
30. REPEAT: Repeat the program.
31. TIMESHIFT Press this button to enter TIMESHIFT.
Instruction Manual

35
: Play/pause button in MEDI Amode.
: Stop button in MEDIA mode.
: Select the DVD's previous chapter.
: Reverse the DVD movie to a previous scene.
:Fast forward the DVD to the next scene.
:Select the DVD movie next chapter.
RED GREEN YELLOW BLUE KEY
Press the buttons according to the colour displaying on the screen to enter.
SELECT INPUT SOURCE
BASIC OPERATION
• Press SOURCE button on the remote control to display the input source list.
• Press / button to select the input source you want to watch.
• Press OK button to enter the input source.
• Press EXIT button to quit.
Connect an antenna from the TV's input called "RF-ln" and to your TV Aerial socket.
OSD Language
Press / button to select the language to be used for menus and message.
Country
Press / button to select the country you want to.
Auto Scan
Press / button to select Mode: DTV+ATV, DTV, ATV.
eN Instruction Manual

36
Auto Tuning Status
First tuning digital, press Menu button to skip digital tuning, Second tuning analogue, press Menu button to skip analogue tuning.
PICTURE MENU
• Press MENU button to display the main menu.
• Press / button to select PICTURE in the main menu.it will highlight the first option.
• Press / button to select the option that you want to adjust in the PICTURE menu.
• Press / button to adjust.
• After finishing your adjustment, Press MENU button to return back to the previous menu.
Picture Mode
• Press / button to select Picture Mode, then press OK button to enter sub- menu. Press / button to select. (Available Picture mode:
Dynamic, Standard, Mild, Personal).
• You can change the value of contrast, brightness, color and sharpness when the picture is in Personal mode. TIPS: You can press PMODE
button on the remote control to change the Picture Mode directly.
Instruction Manual

37
Brightness
Press / button to select Brightness then press OK button to enter sub-menu. Press / button to adjust.
Contrast
Press / button to select Contrast. then press OK button to enter sub-menu. Press / button to adjust.
Sharpness
Press / button to select Sharpness then press / button to adjust.
Saturation
Adjust the saturation of the color based on your own like.
Hue
Use in compensating color changed with the transmission in the NTSC code.
Colour Temp
Press / button to select Color Temperature. then press / button to select. (Available Color Temperature: Standard, Cool, Warm).
Aspect Ratio
Press / button to select Aspect Ratio ,then press / button to select. (Available Aspect Ratio:Full,Zoom1,Zoom2,4:3).
PC SETTING(PC MODE ONLY)
• Press SOURCE to select PC source.
• Press MENU to enter the main menu, then press / button to select PICTURE menu.
• Press OK/ to enter and press to select PC Setting.
Press / button to select PC Settings, then press / button to adjust.
Auto Adjust Press MENU / button to adjust to the screen automatically to the optimal position of the picture.
H Position Adjust the horizontal position of the picture.
V Position Adjust the vertical position of the picture.
Phase Minimize horizontal distortion.
Clock Minimize vertical stripes in the screen image.
Screen Mode
• Press / button to select HDMI Mode, then press / button to select Auto, Video or PC.
• It is aviliable in HDMI Input only.
Advanced Settings(Not available for PC mode)
• Adjust advanced video features to fine tune the picture.
• Press / button to select Advanced Settings, then press OK/ button to enter sub -menu.
eN Instruction Manual

38
NR
• Set options to reduce video noise.
• Press / button to select NR, then press / button to select.
Off Select to turn off video noise detection.
Weak Detect and reduce low video noise.
Medium Detect and reduce moderate video noise.
Strong Detect and reduce enhanced video noise.
Mpeg NR
Set options to reduce MPEG noise.
Press / button to select Mpeg NR, then press / button to select.
Off Select to turn off MPEG noise detection.
Weak Detect and reduce low MPEG noise.
Medium Detect and reduce moderate MPEG noise.
Strong Detect and reduce enhanced MPEG noise.
Dynamic Contrast
• Automatically adjust picture detail and brightness.
• Press / button to select Dynamic Contrast, then press / button to select.
(Available Dynamic Contrast: Off, Weak .Medium, Strong ).
SOUND MENU
• Press MENU button to display the main menu.
• Press / button to select Sound in the main menu.it will highlight the first option.
• Press / button to select the option that you want to adjust in the SOUND menu.
• Press / button to adjust.
• After finishing your adjustment, Press MENU button to return back to the previous menu.
Sound Mode
• Press / button to select Sound Mode, then press OK button to enter sub-menu. Press / button to select.
• (Available Sound mode: Standard, Music, Movie, Sports, Personal).
• You can change the value of Treble and Bass when the sound is in Personal mode.
• TIPS: You can press SMODE button on the remote control to change the Sound Mode directly.
Treble
Press / button to select Treble. then press OK button to enter sub-menu. Press / button to adjust.
Bass
Press / button to select Bass. then press OK button to enter sub-menu. Press / button to adjust.
Balance
Press / button to select Balance then press OK button to enter sub-menu. Press / button to adjust.
Surround Sound
Press / button to select Surround Sound ,then press Press / button to select On or Off.
Instruction Manual

39
EQ Setting
• Press / button to select EQ Setting, then press OK/ button to enter submenu.
AVL
• Press / button to select AVL ,then press Press / button to select On or Off.
SPDIF
• Press / button to select SPDIF ,then press Press / button to select Off, Auto, PCM.
Audio Description
• Press / button to select Audio Description, then press OK/ button to enter submenu.
Sound Type
• Press / button to select Sound Type ,then press Press / button to select.
CHANNEL MENU
• Press MENU button to display the main menu.
• Press / button to select CHANNEL in the main menu.it will highlight the first option.
eN Instruction Manual

40
• Press / button to select the option that you want to adjust in the CHANNEL menu.
• Press / button to adjust.
• After finishing your adjustment. Press MENU button to return back to the previous menu.
Auto Scan
• Press / button to select Auto Scan, then press OK/ button to enter submenu. (The default password is 0000)
Manual Scan
• Press / button to select Manual Scan, then press OK/ button to enter submenu.
Digital Manual Scan
• Press / button to select Digital Manual Scan, then press OK/ button to enter submenu.
Instruction Manual

41
Analog Manual Scan
• Press / button to select Analog Manual Scan, then press OK/ button to enter submenu.
Channel Edit
• Press / button to select Channel Edit, then press OK/ button to enter submenu.
The three colored key is the shortcut key for programming the channel.
• First press / to highlight the channel you want to delete or move or skip, then:
• Press the Red button to delete the channel.
• Press the Green button to skip the select channel.
• (Your TV set will skip the channel automatically when using CH+/- to view the channels.)
• Press the Blue button to to set the channel to moving state, then press / to move it to the position you want to put.
Common interface
• Press / button to select Common interface, then press OK button to enter sub-menu. Only available when there is CI card under DTV.
Signal Information
• Press / button to select Signal Information, then press the OK button to see the detail information about the signal. Only available when
there is signal under DTV.
eN Instruction Manual

42
LOCK MENU
• Press MENU button to display the main menu.
• Press / button to select LOCK in the main menu.it will highlight the first option.
• Press / button to select the option that you want to adjust in the LOCK menu.
• Press / button to adjust.
• After finishing your adjustment, Press MENU button to return back to the previous menu.
Enter Password
• Press / button to select Enter Password, then press OK button to make the following 4 options valid.
• (Default password is ‘0000’.)
Enable
• Press / button to select Enable. then press Press / button to select On or Off.
• Channel Locks. Parental Rating and Lock Keypad are available when Enable is On
Channel Locks
• Press / button to select Channel Locks, then press OK/ button to enter submenu
Instruction Manual

43
Parental Rating
• Press / button to select Parental Rating , then press / button to select.
Lock Keypad
• Set to prevent it from being used by young child ren. or other unexpected usage.
• Press / button to select Lock Keypad , then press- / button to select On or Offt.
New Password
• Press / button to select new Password, then enter a 4 digit number you want to set as your new password, confirm your new password by
enter it again.
Clear Lock
• Press / button to select Clear Lock , then press / button to select.
SETUP MENU
• Press MENU button to display the main menu.
• Press / button to select SETUP in the main menu, it will highlight the first option.
OSD Language
• Press / button to select OSD Language, then press OK button to enter sub-menu.
• Press / / / button to select OSD Language.
Audio Language
• Press / button to select Audio Language, then press OK button to enter submenu.
• Press / / / button to select the Audio Primary Language and Audio Secondary Language
eN Instruction Manual

44
Subtitle
• Press / button to select Subtitle, then press OK button to enter submenu.
Teletext
• Adjust Teletext settings. Only available under DTV and ATV source.
• Press / button to select Teletext, then press OK/ button to enter submenu.
• Under DTV source, press / button to select Digital Teletext Language.
• Under ATV source, press / button to select Decoding Page Language.
Time Settings
• Press / button to select Time Settings, then press OK button to enter submenu.
Instruction Manual

45
PVR Setting
• Press / button to select PVR Setting .then press OK button to enter submenu.
• It will check the USB.
First Time Setup
• Press / button to select First time Setup, then press OK button to enter.
Reset
• Press / button to select Reset, then press OK button to enter.
• If you are sure to reset. press Yes to reset.
MEDIA MENU
• Note: Before operating USB menu, Plug in USB device, then press SOURCE button to set the Input Source to USB .
• Press / button to select USB in the Source menu, then press OK button to enter.
• Press / button to select the option you want to adjust in the main USB menu, then press OK button to enter.
eN Instruction Manual

46
Photo
• Press / button to select PHOTO in the main menu, then press OK button to enter.
• Press / button to select drive disk you want to watch, then press OK button to enter.
• Press / button to select return option to back to the previous menu.
Music
• Press / button to select MUSIC in the main menu, then press OK button to enter.
• Press / button to select drive disk you want to watch, then press OK button to enter.
• Press / button to select return option to back to the previous menu.
• When highlighting the option you select, the file information will appear on the right.
Movie
• Press / button to select MOVIE in the main menu, then press OK button to enter.
• Press / button to select drive disk you want to watch, then press OK button to enter.
• Press / button to select return option to back to the previous menu.
Instruction Manual

47
Text
• Press / button to select TEXT in the main menu, then press OK button to enter.
• Press / button to select drive disk you want to watch, then press OK button to enter.
• Press / button to select return option to back to the previous menu.
Media File Ext. Codec Remark
Video Audio
Movie
.avi
MPEG
MP3, WMA,
AAC, MP2,
PCM, AC3
Max resolution and frame
rate: 640x480@30fps
Max data
Xvid, MPEG-2,
MPEG-4, DivX, H.264
Max resolution
and frame rate:
1920x1080@30fps
Max data rate: 20Mbps
.mp4 MPEG-2, MPEG-4,
DivX, H.264
.ts
.trp
MPEG-2,
H.264
.mkv
.mov
MPEG-4,
H.264
.mpg MPEG-1, MPEG-2
.dat MPEG-1
MP2
Max resolution: 352x288
Max data rate: 20Mbps
.vob MPEG-2 Max resolution: 720x576
Max data rate: 20Mbps
.rm
.rmvb RV8, RV9, RV10 COOK
Max resolution
and frame rate:
1280x720@30fps
Max data rate: 10Mbps
Music
.mp3 - MP3
Sample rate: 32K~48Khz
Bit rate: 32K~320Kbps
Channel: Mono/Stereo
.wma - WMA
Sample rate: 8K~48Khz
Bit rate: 128K~320Kbps
Channel: Mono/Stereo
.m4a
.aac - AAC
Sample rate: 8K~48Khz
Bit rate: 128K~442Kbps
Channel: Mono/Stereo
Photo
.jpg
.jpeg
Progressive JPEG Max resolution: 1024x768
Baseline JPEG Max resolution: 15360x8640
.bmp -- Max resolution: 9600x6400
.png Non interlaced Max resolution: 9600x6400
Interlaced Max resolution: 1200x800
Text .txt ANSI/UNICODE GB/UTF8 File size: max 1MB
Note:
1. Supported file systems are Hi Speed FS, FAT32, FAT16, NTFS (NTFS compressed file is not supported)
2. MP4 codec cannot support GMC.
3. If files meet the above requirements but will not playback the file is probably damaged.
4. We don’t give support on downloaded files.
eN Instruction Manual

48
GENERAL SETUP PAGE
TV Display
DVD's are produced in a variety of screen aspect ratios. This menu enables you to select one of the three aspect ratios:
• 4:3 PS (Normal) Suitable for normal TV, when playback wide screen movie, the left and right of the screen will be cropped
• 4:3 LB (Normal) Suitable for normal TV, when playback wide screen movie, the top and bottom will have a black border
• 16:9 (Wide) Suitable for connecting a wide screen TV / Display
Select the most appropriate aspect ratio.
NOTE:
• Playback screen size may vary according to the disc contents.
• For media with 4:3 contents, using any mode would only display a 4:3 screen.
• Screen ratio selection should be according to the connected TV / display aspect ratio.
OSD LANGUAGE
• Use navigation buttons to select the OSD LANGUAGE Setup Icon, press OK button to confirm. There are multi language.
• For your selection, press / buttons to toggle between different languages. Press OK button to confirm.
Screen protection
• ON: Choose this setting to activate the screen saver
• OFF: Choose this setting to cancel the screen saver.
Instruction Manual

49
Last memory
• ON: Choose this setting so the DVD player can memorize the time elapsed from the last time you played the disc. Then at the next playing, it
will resume playing from the memorized time.
• OFF: Choose this setting so the DVD player will restart the disc from the beginning.
AUDIO SETUP PAGE
Dual mono
You can select four different audio output, STEREO, MONO L, MONO R, MIX MONO. The audio out descriptions of these selections is shown in
table below:
MODUS LINKER LUIDSPREKER RECHTER LUIDSPREKER
STEREO STEREO-L STEREO-R
L-MONO L-MONO L-MONO
R-MONO R-MONO R-MONO
MIX-MONO L-MONO+R-MONO L-MONO+R-MONO
Dynamic
eN Instruction Manual

50
PREFERENCE PAGE
TV Type
• Press button to enter the TV SYSTEM and then press / to select one from the options. Select according to your TV color system:(NTSC,
PAL or Auto for Multi-system)
Default setting is PAL.
Audio
• Use navigation buttons to select the AUDIO LANGUAGE Setup Icon, press OK button to confirm. There are multi language.
• For your selection, press / buttons to toggle between different languages. Press OK button to confirm.
Subtitle
• Use navigation buttons to select the SUBTITLE LANGUAGE Setup Icon, press OK button to confirm. There are multi language. For your selection,
press / buttons to toggle between different languages. Press OK button to confirm.
Instruction Manual

51
Disc menu
Parental
• Rating restriction is divided into eight different category from KID SAFE up to ADULT
• Note: only editable when password is unlocked.
Password
• The default setting is locked. No rating selection or change password could be done. To edit the rating setting, please enter default password
"0000" using the numeric buttons, then press OK button to confirm
• To change password, input any 4-digit number when the lock is unlocked. Once the 4 digit number is entered, that will be your new password.
Default
• Press OK button to restore factory default.
eN Instruction Manual

52
IF YOU'RE HAVING GENERAL PROBLEMS
If you are having problems with your TV, carry out the following checks first. If you are still having problems, unplug your TV and contact the
service centre.
Problems and how to fix them
There is no sound and no picture coming from my TV.
• Check that you have connected the TV power cord properly to the wall socket.
• Check the picture contrast and brightness setting.
• Check which input source you selected.
There is a normal picture but no sound coming from my TV.
• Check that your TV is not muted or has the volume down.
• Switch the channel, the problem may be with the channel you're on, not the TV.
• Check that your audio cable input has been plugged in properly. If you are using an external amplifier.
The remote control does not work.
• Check to see if there is any object between your TV (such as a piece of furniture) that could block the remote control from connecting with the
sensor on your TV.
• Have you put the batteries into the remote control the right way? ( So + to + and - to -)
• Correct remote operating mode was set (such as TV or VCR).
• The TV is not positioned in bright sunlight.
• Try fitting new batteries if none of the above work.
The TV has turned off suddenly.
• Check that you have not set the sleep timer.
• Check that you have not set the timer to control the socket which has your TV power cord on.
• Check that you have not selected the auto standby mode which will turn of your TV after 2, 3 or 4 hours.
The picture on my TV appears slowly after I have switched it on.
• This is normal. The image takes a few seconds to appear after you have switched the TV on. Please contact your service centre if picture has not
appeared after five minutes.
There is no or poor quality colour ora poor picture on my TV.
• Change the colour setting on the PICTURE MENU.
• Keep a distance between your TV and any VCR you may be using
• Try watching another channel. The problem may be with the channel you're watching.
• Are the video cables installed properly?
• Change the setting of picture brightness on PICTURE MENU.
There are horizontal and vertical bars on the screen, the picture is shaking.
• Check if any signal interference activities is going on nearby, such as an electrical appliance or power tool is in operation.
The reception is poor on some channels.
• The TV channel you're watching may be having problems. Change to another channel and see if the same is happening.
• Check if the signal cable not contains bad plugs or fractures.
• Check that if the signal cable is not longer than 10 meters, we recommend to strengthen the signal after every 10 meters.
There are lines or streaks on the pictures.
• Check if there is any damage to the aerial on the roof, try to change the direction of the aerial to receive a better signal.
One of the TV's speakers does not work.
• Check the sound balance setting on SOUND MENU.
IF YOU'RE HAVING VIDEO GRAPHICS ADAPTOR (VGA) PROBLEMS
The signal is out of range.
• Change the resolution, horizontal or vertical frequency of your source (PC etc.).
• Check whether the signal cable is connected from the PC to your TV properly.
• Check the signal input source is connected properly.
Instruction Manual

53
eN Instruction Manual
There is a vertical bar or stripe on my TV screen.
• Turn on the auto configure or change the horizontal or vertical frequency position.
Screen colours aren't appearing as they should be or single colour.
• Check if the video signal cable is connected properly.
• Reinstall your PC video card if the signal source is from your computer.
If you are not going to use your TV for a while (such as when you go on holiday), you should unplug the power cord from the
socket and disconnect your aerial to protect your TV against possible damage from lightning or power surges.
YOUR TV'S SPECIFICATION
We want to improve our products all the time. We have the right to change the design and the specifications of this TV without telling you. The
symbol below on the product or in the instructions means that you should throw your electrical and electronic equipment away separately from
your household waste. There are separate collection systems for recycling in the European Union (EU). For more information, please contact your
local authority or your retailer where you bought your TV.
Specifications and design are subject to possible modifications without notice due to improvements
INSTALLING THE STAND
To attach the stand lay the TV down on a non-abrasive suface, then place the TV stand on the neck of TV and insert the screws in the circled area.
Remove the Stand
• To remove the stand remove the screws in the circled area and the neck will come off.
Wall-mounting the device
• If you are mounting the device. Please consult a qualified installer for further instructions on bracket support and wall support.
• Mounting Specification:100mm x 100mm using screw size M4 (not supplied). Length of screw should not exceed 8mm.
• Please Note: The 8mm length of screw refers to how deep the screw can go inside the mounting holes.
• When you're buying screws. you should add the original 8mm to the thickness of your mounting plate in order to get the total screw length.

-
 1
1
-
 2
2
-
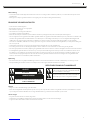 3
3
-
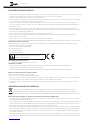 4
4
-
 5
5
-
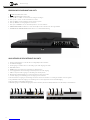 6
6
-
 7
7
-
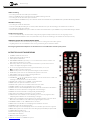 8
8
-
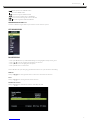 9
9
-
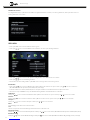 10
10
-
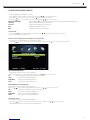 11
11
-
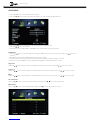 12
12
-
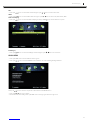 13
13
-
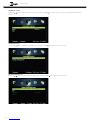 14
14
-
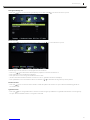 15
15
-
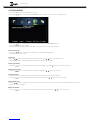 16
16
-
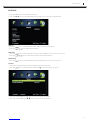 17
17
-
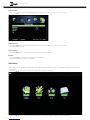 18
18
-
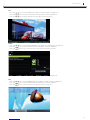 19
19
-
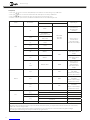 20
20
-
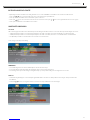 21
21
-
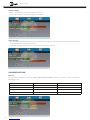 22
22
-
 23
23
-
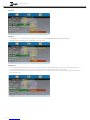 24
24
-
 25
25
-
 26
26
-
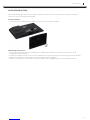 27
27
-
 28
28
-
 29
29
-
 30
30
-
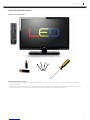 31
31
-
 32
32
-
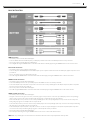 33
33
-
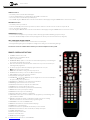 34
34
-
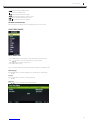 35
35
-
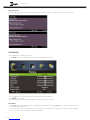 36
36
-
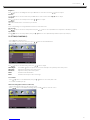 37
37
-
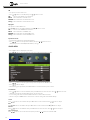 38
38
-
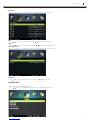 39
39
-
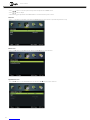 40
40
-
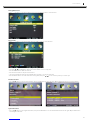 41
41
-
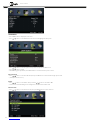 42
42
-
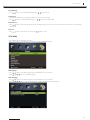 43
43
-
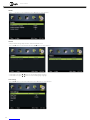 44
44
-
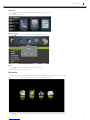 45
45
-
 46
46
-
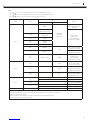 47
47
-
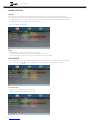 48
48
-
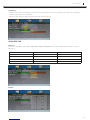 49
49
-
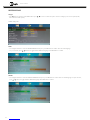 50
50
-
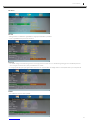 51
51
-
 52
52
-
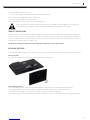 53
53
-
 54
54


MT Logic LE-207837MT de handleiding
- Categorie
- Lcd-tv's
- Type
- de handleiding
- Deze handleiding is ook geschikt voor
in andere talen
- English: MT Logic LE-207837MT Owner's manual