
86700 K
Ceramic glass hob
Glaskeramische kookplaat
Installation and Operating Instructions
Montage- en gebruiksaanwijzing

2
Dear Customer,
Please read these user instructions carefully and keep them to refer to
later.
Please pass the user instructions on to any future owner of the appli-
ance.
The following symbols are used in the text:
1 Safety instructions
Warning! Information that affects your personal safety.
Important! Information that prevents damage to the appliance.
3 Useful tips and hints
2 Environmental information

3
Contents
Operating Instructions. . . . . . . . . . . . . . . . . . . . . . . . . . . . . . . . . . . . . 4
Safety instructions. . . . . . . . . . . . . . . . . . . . . . . . . . . . . . . . . . . . . . . . . . . . . . 4
Description of the Appliance. . . . . . . . . . . . . . . . . . . . . . . . . . . . . . . . . . . . . 6
Cooking surface layout . . . . . . . . . . . . . . . . . . . . . . . . . . . . . . . . . . . . . . . . . . . 6
Control panel layout . . . . . . . . . . . . . . . . . . . . . . . . . . . . . . . . . . . . . . . . . . . . . 6
Touch Control sensor fields . . . . . . . . . . . . . . . . . . . . . . . . . . . . . . . . . . . . . 7
Displays . . . . . . . . . . . . . . . . . . . . . . . . . . . . . . . . . . . . . . . . . . . . . . . . . . . . . 8
Residual heat indicator . . . . . . . . . . . . . . . . . . . . . . . . . . . . . . . . . . . . . . . . 8
Operating the appliance. . . . . . . . . . . . . . . . . . . . . . . . . . . . . . . . . . . . . . . . . 9
Switching the appliance on and off . . . . . . . . . . . . . . . . . . . . . . . . . . . . . . . . 9
Setting the heat setting . . . . . . . . . . . . . . . . . . . . . . . . . . . . . . . . . . . . . . . . . . 9
Switching the outside ring on and off . . . . . . . . . . . . . . . . . . . . . . . . . . . . . . 9
Locking/unlocking the control panel. . . . . . . . . . . . . . . . . . . . . . . . . . . . . . . . 10
Using the automatic warm-up function . . . . . . . . . . . . . . . . . . . . . . . . . . . . . 11
Using the child safety device . . . . . . . . . . . . . . . . . . . . . . . . . . . . . . . . . . . . . . 12
Using the timer . . . . . . . . . . . . . . . . . . . . . . . . . . . . . . . . . . . . . . . . . . . . . . . . . 13
Safety cut-out . . . . . . . . . . . . . . . . . . . . . . . . . . . . . . . . . . . . . . . . . . . . . . . . . . 16
Tips on Cooking and Frying . . . . . . . . . . . . . . . . . . . . . . . . . . . . . . . . . . . . . . 17
Cookware . . . . . . . . . . . . . . . . . . . . . . . . . . . . . . . . . . . . . . . . . . . . . . . . . . . . . . 17
Energy saving . . . . . . . . . . . . . . . . . . . . . . . . . . . . . . . . . . . . . . . . . . . . . . . . . . . 17
Examples of cooking applications . . . . . . . . . . . . . . . . . . . . . . . . . . . . . . . . . . 18
Cleaning and Care . . . . . . . . . . . . . . . . . . . . . . . . . . . . . . . . . . . . . . . . . . . . . . 19
What to do if … . . . . . . . . . . . . . . . . . . . . . . . . . . . . . . . . . . . . . . . . . . . . . . . . 20
Disposal . . . . . . . . . . . . . . . . . . . . . . . . . . . . . . . . . . . . . . . . . . . . . . . . . . . . . . . 22
Installation Instructions . . . . . . . . . . . . . . . . . . . . . . . . . . . . . . . . . . . 23
Service . . . . . . . . . . . . . . . . . . . . . . . . . . . . . . . . . . . . . . . . . . . . . . . . . . . . . . 25
Assembly . . . . . . . . . . . . . . . . . . . . . . . . . . . . . . . . . . . . . . . . . . . . . . . . . . . . 50

4
Operating Instructions
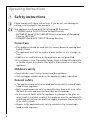
1 Safety instructions
3
Please comply with these instructions. If you do not, any damage re-
sulting is not covered by the warranty.
5 This appliance conforms with the following EU Directives:
– 73/23/EEC dated 19.02.1973 Low Voltage Directive
– 89/336/EEC dated 03.05.1989 EMC Directive inclusive of Amending
Directive 92/31/EEC
– 93/68/EEC dated 22.07.1993 CE Marking Directive
Correct use
• This appliance should be used only for normal domestic cooking and
frying of food.
• The appliance must not be used as a work surface or as a storage sur-
face.
• Additions or modifications to the appliance are not permitted.
• Do not place or store flammable liquids, highly inflammable materials
or fusible objects (e.g. plastic film, plastic, aluminium) on or near the
appliance.
Children’s safety
• Small children must be kept away from the appliance.
• Only let bigger children work on the appliance under supervision.
General safety
• The appliance may only be installed and connected by trained, regis-
tered service engineers.
• Built-in appliances may only be used after they have built in to suita-
ble built-in units and work surfaces that meet standards.
• In the event of faults with the appliance or damage to the glass ce-
ramic (cracks, scratches or splits), the appliance must be switched off
and disconnected from the electrical supply, to prevent the possibility
of an electric shock.
• Repairs to the appliance must only be carried out by trained regis-
tered service engineers.

5
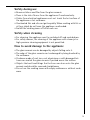
Safety during use
• Remove stickers and film from the glass ceramic.
• There is the risk of burns from the appliance if used carelessly.
• Cables from electrical appliances must not touch the hot surface of
the appliance or hot cookware.
• Overheated fats and oils can ignite quickly. When cooking with fat or
oil (e.g. chips) do not leave the appliance unattended.
• Switch the cooking zones off after each use.
Safety when cleaning
• For cleaning, the appliance must be switched off and cooled down.
• For safety reasons, the cleaning of the appliance with steam jet or
high-pressure cleaning equipment is not permitted.
How to avoid damage to the appliance
• The glass ceramic can be damaged by objects falling onto it.
• The edge of the glass ceramic can be damaged by being knocked by
the cookware.
• Cookware made of cast iron, cast aluminium or with damaged bot-
toms can scratch the glass ceramic if pushed across the surface.
• Objects that melt and things that boil over can burn onto the glass
ceramic and should be removed straightaway.
• Do not use the cooking zones with empty cookware or without cook-
ware.

6
Description of the Appliance
Cooking surface layout
Control panel layout
Double ring
cooking zone
1700W
Triple ring cooking zone
1050/1950/2700W
Control panel Multi-purpose zone
1400/2200W
Singlecooking zone
1200W
Multi-purpose
zone pilot light
Outside ring
On/Off
Outside ring
On/Off
Double ring pi-
lot light
On/Off
Triple ring pilot
light
Heat setting se-Heat setting selec-
tion
Timer
Lock
Display
Middle /outside ring
On/Off
Display

7
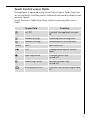
Touch Control sensor fields
The appliance is operated using Touch Control sensor fields. Functions
are controlled by touching sensor fields and confirmed by displays and
acoustic signals.
Touch the sensor fields from above, without covering other sensor
fields.
Sensor field Function
On / Off To switch the appliance on and
off
Increase settings Increasing heat setting/time
Decrease settings Decreasing heat setting/time
TIMER Timer Timer selection
Lock Locking/unlocking the control
panel
Triple ring switch To switch outer rings
on and off
Double ring switch Switches outside ring
on and off
Multi-purpose zone To switch the outside ring on and
off

8
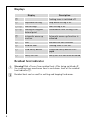
Displays
Residual heat indicator
1 Warning! Risk of burns from residual heat. After being switched off,
the cooking zones need some time to cool down. Look at the residual
heat indicator
h .
3 Residual heat can be used for melting and keeping food warm.
Display Description
¾ Cooking zone is switched off
u Keep warm setting Keep warm setting is set
¿ - Ç Heat settings Heat setting is set
2 - 6 Heating setting plus
decimal point
Intermediate heat setting is set
a Automatic warm up
function
Automatic warm-up function is
activated
e Fault Malfunction has occurred
h Residual heat Cooking zone is still hot
l Child safety device Lock/child safety device is en-
gaged
_ Safety cut-out Safety cut-out has been activated

9
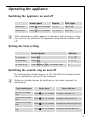
Operating the appliance
Switching the appliance on and off
3 After switching on, within approx. 10 seconds a heat setting or a func-
tion must be set, otherwise the appliance automatically switches itself
off.
Setting the heat setting
Switching the outside ring on and off
By switching the outside rings on or off, the effective heating surface
can be matched to the size of the cookware.
3 Before an outside ring can be switched on, the inside ring must be
switched on.
Control panel Display Pilot light
Switch on Touch for 2 seconds ¾ / h lights up
Switch off Touch for 1 second h / none goes out
Control panel Indicator
To increase Touch u to Ç
To decrease Touch Ç to ¾
To switch off Touch and at the same time ¾
Triple cooking zone Sensor panel Power indicator
To switch on middle
ring
Touch for 1-2 seconds. One power indicator is lit.
To switch on outside
ring
Touch for 1-2 seconds. Two power indicators are lit.
To switch off outside
ring
Touch for 1-2 seconds. Second power indicator goes out.
To switch off middle
ring
Touch for 1-2 seconds. First power indicator goes out.

10
Locking/unlocking the control panel
The control panel, with the exception of the “On/Off” sensor field, can
be locked at any time in order to prevent the settings being changed
e.g. by wiping over the panel with a cloth.
3 When you switch the appliance off, the locking function is automati-
cally switched off.
Double ring cooking
zone
Sensor field Pilot light
To switch on outside
ring
Touch for 1-2 seconds is lit
To switch off outside
ring
Touch for 1-2 seconds goes out
Roasting zone Sensor panel Power indicator
To switch on outside ring Touch for 1-2 seconds. is lit
To switch off outside ring Touch for 1-2 seconds. goes out
Control panel Display
Switch on Touch l (for 5 seconds)
Switch off Touch previously set heat setting

11
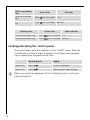
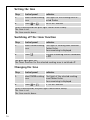
Using the automatic warm-up function
All cooking zones are equpped with an automatic warm up function
When setting a heat setting using , when starting from
¾, the cook-
ing zone switches to full power for a certain amount of time and then
automatically switches back to the heat setting set.
3 If during the automatic warm up a a higher heat setting is selected,
e.g. from
Á to Ã, the automatic warm up is adjusted.
3 If there is still residual heat on the cooking zone (display h), the auto-
matic warm up is not performed.
The length of time that the automatic warm up function operates de-
pends on the heat setting selected.
Control
panel
possible
heat set-
tings
Display
Switch on
(only when starting at
¾)
Touch ¿ to Æ a (after 5 sec-
onds)
Switch off Touch Æ to ¿ / u Æ to u
Not used Touch Ç to u Ç to u
Heat
setting
Length of the
automatic warm up
[min:sec]
Intermedi-
ate
heat
setting
Length of the
automatic warm up
[min:sec]
v 0:30
1 1:00
2 1:40 2. 2:40
3 4:50 3. 5:30
4 6:30 4. 8:10
5 10:10 5. 12:20
6 2:00 6. 2:30
7 3:30
8 4:30
9 ---

12
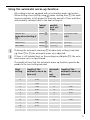
Using the child safety device
The child safety device prevents unintentional use of the appliance.
Setting the child safety device
Releasing the child safety device
Overriding the child safety device
The child safety device can be released in this way for a single cooking
session; it remains activated afterwards.
3 After overriding the child safety device, a heat setting or a function
must be set within approx. 10 seconds, otherwise the appliance auto-
matically switches itself off.
Step Control panel Display/Signal
1. Switch on the appliance
(Do not set a heat setting)
¾
2. Touch until the signal sounds Acoustic signal
3. Touch l
Appliance switches off. The child safety device is engaged.
Step Control panel Display/Signal
1. Switch on the appliance l
2. Touch until the signal sounds Acoustic signal
3. Touch
Appliance switches off. The child safety device is released.
Step Control panel Display/Signal
1. Switch on the appliance l
2. Touch and at the same time ¾ / acoustic signal
Until the appliance is next switched off, it can used as normal.

13
Using the timer
3 While the countdown timer is activated, no cooking zone can be used.
3 The countdown timer basically cannot be used if a cooking zone is
switched on.
3 If a cooking zone is switched off, the timer function set is also switched
off.
Selecting a cooking zone
3 If the pilot light is flashing more slowly, the heat setting can be set or
modified.
3 If other timer functions are set, after a few seconds the shortest re-
maining time of all the timer functions is displayed and the corre-
sponding pilot light flashes.
Function Pre-requisite Result after time
has elapsed
Automatic cut-out With heat setting set Acoustic signal
00 flashes
Cooking zone
switches off
Countdown timer Cooking zones are not
switched on
Acoustic signal
00 flashes
Step Control panel Display
1. Touch TIMER once Pilot light of the first
cooking zone flashes
2. Touch TIMER once Pilot light of the second
cooking zone flashes
3. Touch TIMER once Pilot light of the third
cooking zone flashes
4. Touch TIMER once Pilot light of the fourth
cooking zone flashes

14
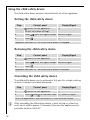
Setting the time
Switching off the timer function
Changing the time
Step Control panel Indicator
1. Select TIMER cooking
zone
Pilot light for the cooking zone se-
lected flashes
2. Touch or 00 to 99 minutes
After a few seconds the pilot light flashes more slowly.
The time is set.
The time counts down.
Step Control panel Indicator
1. Select TIMER cooking
zone
Pilot light of cooking zone selected
flashes faster
Time remaining is displayed
2. Touch The time remaining counts backwards
to 00.
The pilot light goes out.
The Timer function for the selected cooking zone is switched off.
Step Control panel Indicator
1. Select TIMER cooking
zone
Pilot light of the selected cooking
zone flashes faster
Time remaining is displayed
2. Touch or 01 to 99 minutes
After a few seconds, the pilot light flashes more slowly.
The time is set.
The time counts down.

15
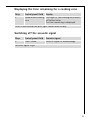
Displaying the time remaining for a cooking zone
Switching off the acoustic signal
Step Control panel field Display
1. TIMER Select cooking
zone
Pilot light of the cooking zone select-
ed flashes faster
The time remaining is displayed
After a few seconds the pilot light flashes more slowly.
Step Control panel field Acoustic signal
1. Touch TIMER Acoustic signal to acknowledge.
Acoustic signal stops.

16
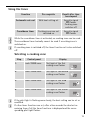
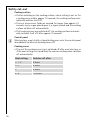
Safety cut-out
Cooking surface
• If after switching on the cooking surface, a heat setting is not set for
a cooking zone within approx. 10 seconds, the cooking surface auto-
matically switches itself off.
• If one or more sensor fields are covered for longer than approx. 10
seconds, e.g. by a pan placed upon it, a signal sounds and the cooking
surface switches off automatically.
• If all cooking zones are switched off, the cooking surface automati-
cally switches itself off after approx. 10 seconds.
Control panel
3 Moisture (e.g. a wet cloth) or liquid boiling over onto the control panel
immediately switches all cooking zones off.
Cooking zones
• If one of the cooking zones is not switched off after a certain time, or
if the heat setting is not modified, the relevant cooking zone switches
off automatically.
Heat setting Switches off after
V, 1 - 2
6 hours
3 - 4
5 hours
5
4 hours
6 - 9
1.5 hours

17
Tips on Cooking and Frying
3
Information on acrylamides
According to the latest scientific knowledge, intensive browning of
food, especially in products containing starch, can constitute a health
risk due to acrylamides. Therefore we recommend cooking at the lowest
possible temperatures and not browning foods too much.
Cookware
• You can recognise good cookware from the bottoms of the pans. The
bottom should be as thick and flat as possible.
• Cookware made of enamelled steel or with aluminium or copper bot-
toms can leave discolorations on the glass ceramic surface which are
difficult or impossible to remove.
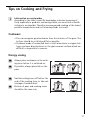
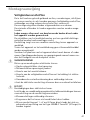
Energy saving
2 Always place cookware on the cook-
ing zone before it is switched on.
2 If possible, always place lids on the
pans.
2 Switch cooking zones off before the
end of the cooking time, to take ad-
vantage of residual heat.
2 Bottom of pans and cooking zones
should be the same size.

18
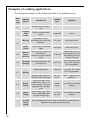
Examples of cooking applications
The information given in the following table is for guidance only.
Heat
set-
ting
Cooking-
process
suitable for
Cooking
time
Tips/Hints
0
Residual heat, Off posi-
tion
1
Keeping
food
warm
Keeping cooked foods
warm
as required Cover
1-2
Melting
Hollandaise sauce,
melting butter, chocolate,
gelatine
5-25 mins. Stir occasionally
Solidi-
fying
Fluffy omelettes, baked
eggs
10-40 mins. Cook with lid on
2-3
Simmer-
ing on
low heat
Simmering rice and milk-
based dishes
Heating up ready-cooked
meals
25-50 mins.
Add at least twice as
much liquid as rice, stir
milk dishes part way
through cooking
3-4
Steaming
Braising
Steaming vegetables, fish
braising meat
20-45 mins.
With vegetables add
only a little liquid (a
few tablespoons)
4-5 Boiling
Steaming potatoes 20-60 mins.
Use only a little liquid,
e. g.: max.
¼ l water
for 750 g potatoes
Cooking larger quantities
of food, stews and soups
60-150
mins.
Up to 3 l liquid plus in-
gredients
6-7
Gentle
Frying
Frying escalopes, veal
cordon bleu, cutlets, ris-
soles, sausages, liver, roux,
eggs, pancakes, dough-
nuts
Steady
frying
Turn halfway through
cooking
7-8
Heavy
Frying
Hash browns, loin steaks,
steaks, Flädle (pancakes
for garnishing soup)
5-15 mins.
per pan
Turn halfway through
cooking
9
Boiling
Searing
Deep
frying
Boiling large quantities of water, cooking pasta, searing meat
(goulash, pot roast), deep frying chips

19
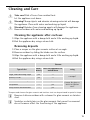
Cleaning and Care
1
Take care! Risk of burns from residual heat.
Let the appliance cool down.
1 Warning! Sharp objects and abrasive cleaning materials will damage
the appliance. Clean with water and washing up liquid.
1 Warning! Residues from cleaning agents will damage the appliance.
Remove residues with water and washing up liquid.
Cleaning the appliance after each use
1. Wipe the appliance with a damp cloth and a little washing up liquid.
2. Rub the appliance dry using a clean cloth.
Removing deposits
1. Place a scraper on the glass ceramic surface at an angle.
2. Remove residues by sliding the blade over the surface.
3. Wipe the appliance with a damp cloth and a little washing up liquid.
4. Rub the appliance dry using a clean cloth.
*Scrapers and cleaners for glass ceramic and stainless steel can be purchased in specialist shops
3 Remove stubborn residues with a cleaner for glass ceramic or stainless
steel.
3 Scratches or dark stains on the glass ceramic that cannot be removed
do not however affect the functioning of the appliance.
Remove
Type of dirt
imme-
diately
when the appliance has
cooled down
using
sugar, food containing sugar yes ---
a scraper*
plastics, tin foil yes ---
limescale and water rings --- yes
cleaner for glass ce-
ramic or stainless
steel*
fat splashes --- yes
shiny metallic discolorations --- yes

20
What to do if …
Problem Possible cause Remedy
The cooking zones will not
switch on or are not func-
tioning
More than 10 seconds have
passed since the appliance
was switched on
Switch the appliance on
again.
The child safety device is
switched on
l
Deactivate the child safety
device (See the section
“Child safety device”)
Several sensor fields were
touched at the same time
Only touch one sensor field
The sensor fields are partly
covered by a damp cloth or
with liquid
Remove the cloth or the
liquid.
Switch the appliance on
again.
Safety cut-out has been
triggered
Switch the appliance on
again
The lock is switched on l Switch off the lock (See
the section “Locking/un-
locking the control panel”)
The residual heat indicator
is not displaying anything
The cooking zone was only
on for a short time and is
therefore not hot
If the cooking zone is sup-
posed to be hot, call the
Customer Service Depart-
ment.
The automatic warm up
function is not switching
itself on
There is still residual heat
on the cooking zone h
Let the cooking zone cool
down
The highest heat setting is
set Ç
The highest heat setting
has the same power as the
automatic warm up func-
tion
The heat setting was set
using the sensor field
1. Switching off the cook-
ing zone
1. Set the cooking zone us-
ing the sensor field
Acoustic signal sounds and
appliance switches itself on
and then off again; after 5
seconds another acoustic
signal sounds
The On/Off sensor field has
been covered up, e.g. by a
cloth
Do not place any objects
on the control panel
_ is lit Overheating protection for
the cooking zone has been
triggered
Switch off the cooking
zone. Switch the cooking
zone on again

21
If you are unable to remedy the problem by following the above
suggestions, please contact your dealer or the Customer Care De-
partment.
1 Warning! Repairs to the appliance are only to be carried out by quali-
fied service engineers. Considerable danger to the user may result from
improper repairs.
3 If the appliance has been wrongly operated, the visit from the customer
service technician or dealer may not take place free of charge, even
during the warranty period.

22
Disposal
2
Packaging material
The packaging materials are environmentally friendly and can be recy-
cled. The plastic components are identified by markings, e.g. >PE<,
>PS<, etc. Please dispose of the packaging materials in the appropriate
container at the community waste disposal facilities.
2 Old appliance
The symbol
W on the product or on its packaging indicates that this
product may not be treated as household waste. Instead it shall be
handed over to the applicable collection point for the recycling of elec-
trical and electronic equipment. By ensuring this product is disposed of
correctly, you will help prevent potential negative consequences for the
environment and human health, which could otherwise be caused by
inappropriate waste handling of this product. For more detailed infor-
mation about recycling of this product, please contact your local city
office, your household waste disposal service or the shop where you
purchased the product.

23
Installation Instructions
Safety instructions
The laws, ordinances, directives and standards in force in the country of
use are to be followed (safety regulations, proper recycling in accord-
ance with the regulations, etc.)
Installation may only be carried out by a qualified electrician.
The minimum distances to other appliances are to be observed.
Drawers may only be installed with a with protective board directly
under the appliance.
The cut surfaces of the work top are to be protected against moisture
using a suitable sealant.
The sealant seals the appliance to the work top with no gap.
Do not use silicon sealant between the appliance and the work top.
Avoid installing the appliance next to doors and under windows. Other-
wise hot cookware may be knocked off the rings when doors and win-
dows are opened.
1 WARNING!
Risk of injury from electrical current.
• The electrical mains terminal is live.
• Make electrical mains terminal free of voltage.
• Observe connection schematic.
• Observe electrical safety rules.
• Ensure anti-shock protection through correct installation by a quali-
fied electrician.
• The appliance must be connected to the electrical supply by a quali-
fied electrician.
1 IMPORTANT!
Risk of injury from electrical current.
Loose and inappropriate plug and socket connections can make the ter-
minal overheat.
• Have the clamping joints correctedly installed by a qualified electri-
cian.
• Use strain relief clamp on cable.
• In the event of single-phase or two-phase connection, the appropri-
ate mains cable of type H05BB-F Tmax 90° (or higher) must be used.
• If this appliance’s mains cable is damaged, it must be replaced by a
special cable (type H05BB-F Tmax 90°; or higher). The latter is availa-
ble from the Customer Care Department.

24
A device must be provided in the electrical installation which allows the
appliance to be disconnected from the mains at all poles with a contact
opening width of at least 3 mm.
Suitable isolation devices include line protecting cut-outs, fuses (screw
type fuses are to be removed from the holder), earth leakage trips and
contactors.

25
Service
In the event of technical faults, please first check whether you can
remedy the problem yourself with the help of the operating instruc-
tions (section “What to do if…”).
If you were not able to remedy the problem yourself, please contact the
Customer Care Department or one of our service partners.
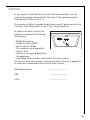
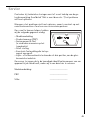
In order to be able to assist you
quickly, we require the following
information:
– Model description
– Product number (PNC)
– Serial number (S No.)
(for numbers see rating plate)
– Type of fault
– Any error messages displayed by
the appliance
– three digit letter-number combination for glass ceramic
So that you have the necessary reference numbers from your appliance
at hand, we recommend that you write them in here:
Model description: .....................................
PNC: .....................................
S No: .....................................

26
Geachte klant,
Lees deze gebruiksaanwijzing zorgvuldig door en bewaar de gebruiks-
aanwijzing zodat deze later kan worden geraadpleegd.
Geef deze gebruiksaanwijzing door aan een eventuele volgende eige-
naar van het apparaat.
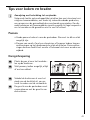
De volgende symbolen worden in de tekst gebruikt:
1 Veiligheidsvoorschriften
Waarschuwing! Aanwijzingen ten behoeve van uw persoonlijke veilig-
heid.
Let op! Aanwijzingen om beschadiging van het apparaat te voorkomen.
3 Aanwijzingen en praktische tips
2 Milieu-informatie

27
Inhoud
Gebruiksaanwijzing . . . . . . . . . . . . . . . . . . . . . . . . . . . . . . . . . . . . . . . . 28
Veiligheidsvoorschriften . . . . . . . . . . . . . . . . . . . . . . . . . . . . . . . . . . . . . . . . . 28
Beschrijving van het apparaat. . . . . . . . . . . . . . . . . . . . . . . . . . . . . . . . . . . . 30
Uitrusting kookplaat . . . . . . . . . . . . . . . . . . . . . . . . . . . . . . . . . . . . . . . . . . . . . 30
Uitrusting bedieningsveld . . . . . . . . . . . . . . . . . . . . . . . . . . . . . . . . . . . . . . . . . 30
Touch-control-sensorvelden . . . . . . . . . . . . . . . . . . . . . . . . . . . . . . . . . . . . 31
Indicaties. . . . . . . . . . . . . . . . . . . . . . . . . . . . . . . . . . . . . . . . . . . . . . . . . . . . 32
Restwarmte-indicatie. . . . . . . . . . . . . . . . . . . . . . . . . . . . . . . . . . . . . . . . . . 32
Bediening van het apparaat. . . . . . . . . . . . . . . . . . . . . . . . . . . . . . . . . . . . . . 33
Apparaat in- en uitschakelen . . . . . . . . . . . . . . . . . . . . . . . . . . . . . . . . . . . . . . 33
Kookstand instellen . . . . . . . . . . . . . . . . . . . . . . . . . . . . . . . . . . . . . . . . . . . . . . 33
Buitenste verwarmingskringen in- en uitschakelen. . . . . . . . . . . . . . . . . . . . 33
Bedieningsveld vergrendelen / ontgrendelen . . . . . . . . . . . . . . . . . . . . . . . . . 34
Automatisch kooksysteem gebruiken . . . . . . . . . . . . . . . . . . . . . . . . . . . . . . . 35
Kinderbeveiliging gebruiken. . . . . . . . . . . . . . . . . . . . . . . . . . . . . . . . . . . . . . . 36
Timer gebruiken . . . . . . . . . . . . . . . . . . . . . . . . . . . . . . . . . . . . . . . . . . . . . . . . . 37
Veiligheidsuitschakeling . . . . . . . . . . . . . . . . . . . . . . . . . . . . . . . . . . . . . . . . . . 40
Tips voor koken en braden. . . . . . . . . . . . . . . . . . . . . . . . . . . . . . . . . . . . . . . 41
Pannen . . . . . . . . . . . . . . . . . . . . . . . . . . . . . . . . . . . . . . . . . . . . . . . . . . . . . . . . 41
Energiebesparing . . . . . . . . . . . . . . . . . . . . . . . . . . . . . . . . . . . . . . . . . . . . . . . . 41
Toepassingsvoorbeelden voor het koken. . . . . . . . . . . . . . . . . . . . . . . . . . . . . 42
Reiniging en onderhoud . . . . . . . . . . . . . . . . . . . . . . . . . . . . . . . . . . . . . . . . . 43
Wat is er aan de hand als … . . . . . . . . . . . . . . . . . . . . . . . . . . . . . . . . . . . . . 44
Afvalverwerking . . . . . . . . . . . . . . . . . . . . . . . . . . . . . . . . . . . . . . . . . . . . . . . . 46
Montageaanwijzing . . . . . . . . . . . . . . . . . . . . . . . . . . . . . . . . . . . . . . . . 47
Service . . . . . . . . . . . . . . . . . . . . . . . . . . . . . . . . . . . . . . . . . . . . . . . . . . . . . . 49
Montage . . . . . . . . . . . . . . . . . . . . . . . . . . . . . . . . . . . . . . . . . . . . . . . . . . . . 50

28
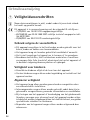
Gebruiksaanwijzing
1 Veiligheidsvoorschriften
3
Neem deze aanwijzingen in acht, omdat anders bij eventuele schade
het recht op garantie vervalt.
5 Dit apparaat is in overeenstemming met de volgende EG-richtlijnen:
– 73/23/EEG van 19.02.1973 Laagspanningsrichtlijn
– 89/336/EEG van 03.05.1989 EMC-richtlijn inclusief aangepaste richt-
lijn 92/31/EEG
– 93/68/EEG van 22.07.93 CE-markeringsrichtlijn
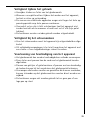
Gebruik volgens de voorschriften
• Dit apparaat mag alleen in het huishouden worden gebruikt voor het
koken, braden en bakken van levensmiddelen.
• Het apparaat mag niet worden gebruikt als werkblad of aanrecht.
• Het is niet toegestaan het appaat om te bouwen of te veranderen.
• Brandbare vloeistoffen, licht ontvlambare materialen of smeltbare
voorwerpen (bijv. folie, kunststof, aluminium) niet op het apparaat of
in de direct omgeving daarvan plaatsen of opbergen.
Veiligheid voor kinderen
• Houd kleine kinderen altijd uit de buurt van het apparaat.
• Grotere kinderen mogen alleen onder begeleiding en toezicht met het
apparaat werken.
Algemene veiligheid
• Het apparaat mag alleen worden gemonteerd en aangesloten door
een erkend elektro-installateur.
• Inbouwapparaten mogen alleen worden gebruikt nadat deze zijn in-
gebouwd in voorgeschreven, passende inbouwkasten en werkbladen.
• Bij storingen aan het apparaat of beschadiging van het glaskeramiek
(breuken, sprongen resp. scheuren) moet het apparaat worden uitge-
schakeld en worden losgekoppeld van het elektriciteitsnet, om gevaar
op elektrische schokken te voorkomen.
• Reparaties aan het apparaat mogen alleen worden uitgevoerd door
vakmensen.

29
Veiligheid tijdens het gebruik
• Verwijder stickers en folies van het glaskeramiek.
• Wanneer u onoplettend bent tijdens het werken met het apparaat,
bestaat er risico op verbranding.
• De snoeren van elektrische apparaten mogen niet tegen het hete ap-
paraatoppervlak resp. hete pannen aankomen.
• Oververhit vet en olie is licht ontvlambaar. Laat het apparaat niet
zonder toezicht achter wanneer u kookt met vet of olie (bijv. patat
bakken).
• De kookzones moeten na ieder gebruik worden uitgeschakeld.
Veiligheid bij het schoonmaken
• Voor het schoonmaken moet het apparaat zijn uitgeschakeld en afge-
koeld.
• Uit veiligheidsoverwegingen is het niet toegestaan het apparaat met
een stoom- of een hogedrukreiniger schoon te maken.
Voorkoming van beschadiging van het apparaat
• Het glaskeramiek kan worden beschadigd door vallende voorwerpen.
• Door stoten met pannen kan de rand van het glaskeramiek bescha-
digd raken.
• Pannen van gietijzer of gietaluminium of pannen met een beschadig-
de bodem kunnen bij het verschuiven het glaskeramiek bekrassen.
• Voorwerpen die kunnen smelten en gerechten die kunnen overkoken,
kunnen inbranden op het glaskeramiek en moeten direct worden ver-
wijderd.
• De kookzones mogen niet worden gebruikt als er geen pan of een
lege pan op staat.

30
Beschrijving van het apparaat
Uitrusting kookplaat
Uitrusting bedieningsveld
Tweekrings-
kookzone
1700W
Driekrings-kookzone
1050/1950/2700W
Bedieningsveld Braadzone
1400/2200W
Eénkringskookzone
1200W
Controlelampje
braadzone
Buitenste kring
aan/uit
Buitenste kring
aan/uit
Controlelamp-
je tweekring
Aan/uit
Controlelampje
driekrings-zone
KookstandkeuzeKookstandkeuze
Timer
Lås
Indicatie
Middelste/buitenste kring
aan/uit
Indicatie

31
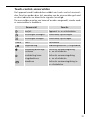
Touch-control-sensorvelden
Het apparaat wordt bediend door middel van touch-control-sensorvel-
den. Functies worden door het aanraken van de sensorvelden gestuurd
en door indicaties en akoestische signalen bevestigd.
De sensorvelden moeten van bovenaf worden aangeraakt, zonder ande-
re sensorvelden te bedekken.
Sensorveld Functie
Aan/uit Apparaat in- en uitschakelen
Instellingen verhogen Kookstand/Tijd verhogen
Instellingen verlagen Kookstand/Tijd verlagen
TIMER Timer Timerkeuze
Vergrendeling Bedieningsveld ver-/ ontgrendeld
Schakeling driekrings-
kookzone
Buitenste verwarmingskring
in- en uitschakelen
Inschakeling twee-
kringskookzone
Buitenste verwarmingskring
in- en uitschakelen
Braadzone Buitenste verwarmingskring in-
en uitschakelen

32
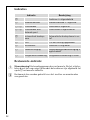
Indicaties
Restwarmte-indicatie
1 Waarschuwing! Verbrandingsgevaar door restwarmte. Na het uitscha-
kelen duurt het nog enige tijd voordat de kookzones zijn afgekoeld. Let
op de
h restwarmte-indicatie.
3 Restwarmte kan worden gebruikt voor het smelten en warmhouden
van gerechten.
Indicatie Beschrijving
¾ Kookzone is uitgeschakeld
u Warmhoudstand Warmhoudstand is ingesteld.
¿ - Ç Kookstanden Kookstand is ingesteld
2 - 6 Kookstanden met
decimale punt
Tussenstand is ingeschakeld
a Automatisch kooksys-
teem
Automatische kooksysteem is ac-
tief
e Fout Er is een storing opgetreden
h Restwarmte Kookzone is nog warm
l Kinderbeveiliging Vergrendeling/kinderbeveiliging is
ingeschakeld
_ Veiligheidsuitschakeling Veiligheidsuitschakeling is actief

33
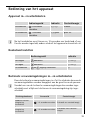
Bediening van het apparaat
Apparaat in- en uitschakelen
3 Na het inschakelen moet binnen ca. 10 seconden een kookstand of een
functie worden ingesteld, anders schakelt het apparaat automatisch uit.
Kookstand instellen
Buitenste verwarmingskringen in- en uitschakelen
Door de buitenste verwarmingskringen in of uit te schakelen kunnen de
verwarmingsvlakken worden aangepast aan de grootte van de pannen.
3 Voordat een van de buitenste verwarmingskringen kan worden inge-
schakeld, moet altijd eerst de binnenste verwarmingskring zijn inge-
schakeld.
Bedieningsveld Indicatie Controlelampje
Inschakelen 2 seconden
aanraken
¾ / h brandt
Uitschakelen 1 seconde
aanraken
h/ geen gaat uit
Bedieningsveld Indicatie
Verhogen aanraken u tot Ç
Verlagen aanraken Ç tot ¾
Uitschakelen en tegelijk aanraken ¾
Driekringskookzone Sensorveld Controlelampje
Middelste verwar-
mingskring
inschakelen
1-2 seconden aanraken Er brandt een controlelampje
Buitenste verwar-
mingskring
inschakelen
1-2 seconden aanraken
Er branden twee controle-
lampjes

34
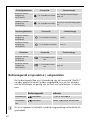
Bedieningsveld vergrendelen / ontgrendelen
Het bedieningsveld kan met uitzondering van het sensorveld ”Aan/Uit“
op ieder gewenst moment worden vergrendeld, bijv. om het wijzigen
van de instellingen als gevolg van het met een lap afnemen, te voorko-
men.
3 Als u het apparaat uitschakelt, wordt de vergrendeling automatisch uit-
geschakeld.
Buitenste verwar-
mingskring
uitschakelen
1-2 seconden aanraken
Het tweede controlelampje
gaat uit
Middelste verwar-
mingskring
uitschakelen
1-2 seconden aanraken
Het eerste controlelampje gaat
uit
Tweekringskookzone Sensorveld Controlelampje
Buitenste verwar-
mingskring
inschakelen
1-2 seconden aanraken brandt
Buitenste verwar-
mingskring
uitschakelen
1-2 seconden aanraken gaat uit
Braadzone Sensorveld Controlelampje
Buitenste verwar-
mingskring
inschakelen
1-2 seconden aanra-
ken
brandt
Buitenste verwar-
mingskring
uitschakelen
1-2 seconden aanra-
ken
gaat uit
Bedieningsveld Indicatie
Inschakelen aanraken l (na 5 seconden)
Uitschake-
len
aanraken eerder ingestelde kookstand
Driekringskookzone Sensorveld Controlelampje

35
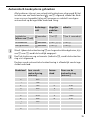
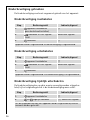
Automatisch kooksysteem gebruiken
Alle kookzones zijn met een autmatisch kooksysteem uitgevoerd. Bij het
instellen van een kookstand met , van
¾ uitgaand, schakelt de kook-
zone voor een bepaalde tijd op vol vermogen en schakelt vervolgens
automatisch op de ingestelde kookstand terug.
3 Wordt tijdens de kookactivering a een hogere kookstand gekozen, bijv.
van
Á naar Ã, wordt de kooktijd aangepast.
3 Heeft de kookzone nog restwarmte (indicatie h), wordt de kookactive-
ring niet uitgevoerd.
De duur van de automatische kookactivering is afhankelijk van de inge-
stelde kookstand.
Bedienings-
veld
Mogelijke
kookstan-
den
Indicatie
Inschakelen
(alleen van
¾ uit)
aanraken ¿ tot Æ a (na 5 seconden)
Uitschakelen aanraken Æ tot ¿ / u Æ tot u
niet gebruiken aanraken Ç tot u Ç tot u
Kookstand Duur van de
kookactivering
[min:sec]
Tussen-
stand
Duur van de
kookactivering
[min:sec]
v 0:30
1 1:00
2 1:40 2. 2:40
3 4:50 3. 5:30
4 6:30 4. 8:10
5 10:10 5. 12:20
6 2:00 6. 2:30
7 3:30
8 4:30
9 ---

36
Kinderbeveiliging gebruiken
De kinderbeveiliging voorkomt ongewenst gebruik van het apparaat.
Kinderbeveiliging inschakelen
Kinderbeveiliging uitschakelen
Kinderbeveiliging tijdelijk uitschakelen
De kinderbeveiliging kan op deze manier eenmalig worden uitgescha-
keld; bij het volgende gebruik is de kinderbeveiliging weer actief.
Stap Bedieningsveld Indicatie/signaal
1. apparaat inschakelen
(geen kookstand instellen)
¾
2. aanraken tot het signaal
klinkt
akoestisch signaal
3. aanraken l
Apparaat wordt uitgeschakeld. Kinderbeveiliging is ingeschakeld.
Stap Bedieningsveld Indicatie/signaal
1. apparaat inschakelen l
2. aanraken tot het signaal
klinkt
akoestisch signaal
3. aanraken
Apparaat wordt uitgeschakeld. De kinderbeveiliging is uitgeschakeld.
Stap Bedieningsveld Indicatie/signaal
1. apparaat inschakelen l
2. en tegelijk aanraken ¾ / akoestisch signaal
Tot de volgende keer dat het apparaat wordt uitgeschakeld, kan dit
normaal worden gebruikt.

37
3 Na het uitschakelen van de kinderbeveiliging moet binnen ca.
10 seconden een kookstand of een functie worden ingesteld, anders
schakelt het apparaat automatisch uit.
Timer gebruiken
3 Als de kookwekker is ingeschakeld, kan er geen kookzone worden ge-
bruikt.
3 U kunt de kookwekker niet gebruiken wanneer een kookzone is inge-
schakeld.
3 Als een kookzone wordt uitgeschakeld, dan wordt tevens de ingestelde
Timerfunctie uitgeschakeld.
Functie Voorwaarde Resultaat na afloop
van de tijd
Automatische uit-
schakeling
bij een ingestelde
kookstand
akoestisch signaal
00 knippert
Kookzone wordt uit-
geschakeld
Kookwekker Kookzones zijn niet uit-
geschakeld
akoestisch signaal
00 knippert

38
Kookzone kiezen
3 Knippert het controlelampje langzamer dan kan de kookstand ingesteld
of gewijzigd worden.
3 Als meerdere Timerfuncties zijn ingesteld, dan wordt na een aantal se-
conden de kortste resterende tijd van alle Timerfuncties aangegeven en
knippert het bijbehorende controlelampje.
Tijd instellen
Stap Bedieningsveld Indicatie
1. TIMER 1xaanraken Controlelampje van de
eerste kookzone knip-
pert
2. TIMER 1xaanraken Controlelampje van de
tweede kookzone knip-
pert
3. TIMER 1xaanraken Controlelampje van de
derde kookzone knip-
pert
4. TIMER 1xaanraken Controlelampje van de
vierde kookzone knip-
pert
Stap Bedieningsveld Indicatie
1. TIMER Kookzone
kiezen
Controlelampje van de gekozen
kookzone knippert
2. of aanraken 00 tot 99 minuten
Na een aantal seconden knippert het controlelampje langzamer.
De tijd is ingesteld.
De tijd telt terug.

39
Timerfunctie uitschakelen
Tijd wijzigen
Resterende tijd van een kookzone aangeven
Akoestisch signaal uitschakelen
Stap Bedieningsveld Indicatie
1. TIMER Kookzone
kiezen
Controlelampje van de gekozen
kookzone knippert sneller.
Resterende tijd wordt aangegeven
2. aanraken De resterende tijd telt terug tot 00.
Het controlelampje gaat uit.
De Timerfunctie voor de gekozen kookzone is uitgeschakeld.
Stap Bedieningsveld Indicatie
1. TIMER Kookzone
kiezen
Controlelampje van de gekozen
kookzone knippert sneller.
Resterende tijd wordt aangegeven
2. of aanraken 01 tot 99 minuten
Na een aantal seconden knippert het controlelampje langzamer.
De tijd is ingesteld.
De tijd telt terug.
Stap Bedieningsveld Indicatie
1. TIMER kookzone
selecteren
Controlelampje van de geselecteerde
kookzone knippert sneller
Resterende tijd wordt aangegeven
Na een aantal seconden knippert het controlelampje langzamer.
Stap Bedieningsveld Akoestisch signaal
1. TIMER aanraken Akoestische uitschakeling.
Akoestisch signaal gaat uit

40
Veiligheidsuitschakeling
Kookplaat
• Als na het inschakelen van de kookplaat niet binnen ca. 10 seconden
bij een kookzone een kookstand wordt ingesteld, schakelt de kook-
plaat automatisch uit.
• Als een of meerdere sensorvelden langer dan ca. 10 seconden worden
afgedekt, bijv. door een daarop geplaatste pan, klinkt een signaal en
schakelt de kookplaat automatisch uit.
• Wanneer alle kookzones worden uitgeschakeld, schakelt de kookplaat
na ca. 10 seconden automatisch uit.
Bedieningsveld
3 Vochtigheid (bijv. een vochtige doek) of overgekookte vloeistoffen op
het bedieningsveld, schakelen alle kookzones direct uit.
Kookzones
• Als een van de kookzones na een bepaalde tijd niet is uitgeschakeld
of als de kookstand niet wijzigt, schakelt de betreffende kookzone
automatisch uit.
Kookstand Uitschakeling na
V, 1 - 2
6 uur
3 - 4
5 uur
5
4 uur
6 - 9
1,5 uur

41
Tips voor koken en braden
3
Aanwijzing met betrekking tot acrylamide
Volgens de laatste wetenschappelijke inzichten kan een intensieve brui-
ning van levensmiddelen, met name bij zetmeelhoudende producten,
een gevaar voor de gezondheid door acrylamide veroorzaken. Om die
reden adviseren wij levensmiddelen zoveel mogelijk bij lage temperatu-
ren te bereiden en de gerechten niet te veel te bruinen.
Pannen
• Goede pannen herkent u aan de panbodem. Die moet zo dik en vlak
mogelijk zijn.
• Pannen van email of met een aluminium of koperen bodem kunnen
verkleuringen op het glaskeramische vlak achterlaten. Deze verkleu-
ringen kunnen slechts met moeite of helemaal niet meer worden ver-
wijderd.
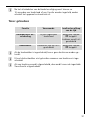
Energiebesparing
2 Plaats de pan al voor het inschake-
len op de kookzone.
2 Sluit pannen, indien mogelijk, altijd
af met een deksel.
2 Schakel de kookzones al voor het
einde van de kooktijd uit, om ge-
bruik te maken van de restwarmte.
2 De grootte van de panbodem moet
overeenkomen met de grootte van
de kookzone.

42
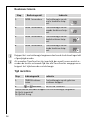
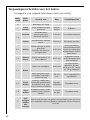
Toepassingsvoorbeelden voor het koken
De gegevens in de volgende tabel dienen slechts als richtlijn.
Kook-
stand
Kook-
proces
Geschikt voor Duur Aanwijzingen/tips
0 Nawarmte, uit-stand
1
Warm
houden
Warm houden van gare
gerechten
Naar be-
hoefte
Afdekken
1-2
Smelten
Hollandaisesaus,
smelten van boter,
chocolade, gelatine
5-25 min. Tussendoor omroeren
Stollen
Schuimomelet, bouillon
met ei
10-40 min. Met deksel bereiden
2-3 Wellen
Wellen van rijst en melk-
gerechten
Verhitten van kant-en-
klaargerechten
25-50 min.
Minimaal dubbele
hoeveelheid vloeistof
aan de rijst toevoegen,
melkgerechten tussen-
door roeren
3-4
Stomen
Stoven
Stoven van groente, vis
Vlees sudderen
20-45 min.
Bij groente weinig
vocht toevoegen (een
paar eetlepels)
4-5 Koken
Koken van aardappels 20-60 min.
Weinig vloeistof
gebruiken, bijvoor-
beeld: max.
¼ l water
per 750 g aardappels
Koken van grotere hoe-
veelheden, eenpansge-
rechten en soep
60-150
min.
Tot 3 l vloeistof plus
ingrediënten
6-7
Zacht
braden
Schnitzel, cordon bleu,
karbonade, gehaktballen,
braadworst, lever, roux,
eieren, omelets, oliebollen
Voortdu-
rend bakken
Tussendoor keren
7-8
Sterk
braden
Aardappel koekjes, lende-
stukken, steaks, pannen-
koeken
5-15 min.
per pan
Tussendoor keren
9
Aan de
kook
brengen
Aanbra
den
Frituren
Aan de kook brengen van grotere hoeveelheden water, pasta ko-
ken, aanbraden van vlees (goulash, stoofvlees), frituren van pata-
tes frites

43
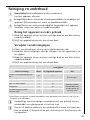
Reiniging en onderhoud
1
Voorzichtig! Verbrandingsgevaar door restwarmte.
Laat het apparaat afkoelen.
1 Let op! Bijtende en schurende schoonmaakmiddelen beschadigen het
apparaat. Schoonmaken met water en handafwasmiddel.
1 Let op! Resten van schoonmaakmiddelen beschadigen het apparaat.
Verwijder resten met water en handafwasmiddel.
Reinig het apparaat na ieder gebruik
1. Maak het apparaat schoon met een vochtige doek en een klein beetje
handafwasmiddel.
2. Wrijf het apparaat droog met een schone doek.
Verwijder verontreinigingen
1. Plaats een glasschraper schuin op het glaskeramische vlak.
2. Verwijder verontreinigingen door de schraper over het oppervlak te la-
ten glijden.
3. Maak het apparaat schoon met een vochtige doek en een klein beetje
handafwasmiddel.
4. Wrijf het apparaat droog met een schone doek.
*Glasschrapers en speciale schoonmaakmiddelen voor glaskeramiek of roestvrij staal zijn ver-
krijgbaar in de vakhandel.
3 Hardnekkige verontreinigingen verwijderen met een speciaal schoon-
maakmiddel voor glaskeramiek of roestvrij staal.
3 Krassen of donkere vlekken in het glaskeramiek kunnen niet meer wor-
den verwijderd, zij hebben echter geen invloed op het functioneren van
het apparaat.
verwijderen
Soort vervuiling direct bij afgekoeld apparaat met
Suiker, suikerhoudende gerech-
ten
ja ---
Glasschraper*
Kunststoffen, aluminiumfolies ja ---
Kalk- en watersporen --- ja
Speciaal schoon-
maakmiddel voor
glaskeramiek of
roestvrij staal*
Vetspatten --- ja
metaalachtig glanzende
verkleuringen
--- ja

44
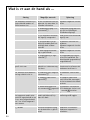
Wat is er aan de hand als …
Storing Mogelijke oorzaak Oplossing
De kookzones kunnen niet
ingeschakeld worden of
functioneren niet
Na het inschakelen van het
apparaat zijn meer dan 10
seconden verstreken
Apparaat nogmaals inscha-
kelen
De kinderbeveiliging is in-
geschakeld
l
Kinderbeveiliging deactive-
ren (zie het hoofdstuk
”Kinderbeveiliging“)
Er zijn meerdere sensorvel-
den tegelijk aangeraakt
Raak slechts één sensorveld
tegelijk aan
De sensorvelden zijn ge-
deeltelijk bedekt door een
vochtige doek of door
vloeistof
De doek of vloeistof ver-
wijderen.
Apparaat nogmaals inscha-
kelen.
De beveiligingsuitschake-
ling is geactiveerd.
Apparaat nogmaals inscha-
kelen.
De vergrendeling is inge-
schakeld
l
De vergrendeling uitscha-
kelen (zie hoofdstuk ”Be-
dieningsveld vergrendelen/
ontgrendelen“)
De restwarmte-indicatie
geeft niets aan
De kookzone is slechts kort
gebruikt en is daarom nog
niet heet
Neem contact op met de
klantenservice wanneer de
kookzone toch heet is.
De automatische kookacti-
vering schakelt niet in
De kookzone heeft nog een
restwarmte
h
De kookzone laten afkoe-
len
De hoogste kookstand is
ingesteld
Ç
De hoogste kookstand
heeft hetzelfde vermogen
als het automatische kook-
systeem
De kookstand wordt met
het sensorveld ingesteld
1. Kookzone uitschakelen
1. De kookzone via het sen-
sorveld instellen
Een zoemer is hoorbaar en
het apparaat wordt auto-
matisch ingeschakeld en na
5 sec. weer uitgeschakeld,
na 5 sec. klinkt nogmaals
een zoemer.
Het sensorveld Aan/Uit
wordt geblokkeerd, bijv.
door een doek
Geen voorwerpen op het
bedieningsveld leggen
_ brandt Oververhittingbeveiliging
van de kookzone is geacti-
veerd
Kookzone uitschakelen
Kookzone nogmaals in-
schakelen

45
Wanneer u de storing niet kunt verhelpen met de hierboven gege-
ven aanwijzingen, neem dan contact op met uw vakhandel of met
onze service-afdeling.
1 Waarschuwing! Reparaties aan het apparaat mogen alleen door vak-
mensen worden uitgevoerd. Onvakkundige reparaties kunnen tot aan-
zienlijke risico's voor de gebruiker leiden.
3 Bij een onjuiste bediening wordt het bezoek van de servicetechnicus
ook tijdens de garantieperiode in rekening gebracht.

46
Afvalverwerking
2
Verpakkingsmateriaal
De verpakkingsmaterialen zijn niet schadelijk voor het milieu en her-
bruikbaar. De kunststoffen hebben de volgende aanduidingen, bijv.
>PE<, >PS<, enz. Verwijder de verpakkingsmaterialen in overeenstem-
ming met de aanduiding bij de gemeentelijke inzamelplaatsen in de
daarvoor bestemde containers.
2 Oud apparaat verwijderen
Het symbool
W op het product of op de verpakking wijst erop dat dit
product niet als huishoudafval mag worden behandeld. Het moet ech-
ter naar een plaats worden gebracht waar elektrische en elektronische
apparatuur wordt gerecycled. Als u ervoor zorgt dat dit product op de
correcte manier wordt verwijderd, voorkomt u mogelijk voor mens en
milieu negatieve gevolgen die zich zouden kunnen voordoen in geval
van verkeerde afvalbehandeling. Voor meer details in verband met het
recyclen van dit product, neemt u het best contact op met de gemeen-
telijke instanties, het bedrijf of de dienst belast met de verwijdering van
huishoudafval of de winkel waar u het product hebt gekocht.

47
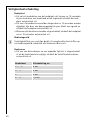
Montageaanwijzing
Veiligheidsvoorschriften
De in het land van gebruik geldende wetten, verordeningen, richtlijnen
en normen moeten in acht worden genomen (veiligheidsvoorschriften,
vakkundige recycling volgens de voorschriften, enzovoort).
De montage mag alleen worden uitgevoerd door een vakman.
De minimale afstanden tot andere apparaten moeten worden aange-
houden.
Laden mogen alleen met een beschermende bodem direct onder
het apparaat worden gemonteerd.
De snijvlakken van het werkblad moeten met een geschikt dichtings-
materiaal worden beschermd tegen vocht.
De dichting zorgt voor een naadloze aansluiting tussen apparaat en
werkblad.
Tussen het apparaat en het werkblad mag geen siliconendichtmiddel
worden aangebracht.
Voorkom het plaatsen van het apparaat direct naast deuren of onder
ramen. Openklappende deuren en openspringende ramen kunnen an-
ders het kookgerei van de kookplaat stoten.
1 WAARSCHUWING!
Risico op verwonding door elektrische stroom.
• Op de netaansluitklem staat spanning.
• Netaansluitklem spanningvrij maken.
• Houd u aan het aansluitschema.
• Houd u aan de veiligheidsvoorschriften met betrekking tot elektro-
techniek.
• Garandeer de contactbescherming door vakkundige inbouw.
• Laat de elektrische aansluiting uitvoeren door een erkend installateur.
1 LET OP!
Beschadigingen door elektrische stroom.
Loszittende en onvakkundig aangebrachte stekkerverbindingen kunnen
oververhitting van de aansluiting veroorzaken.
• Klemaansluitingen vakkundig uitvoeren.
• Zorg ervoor dat het snoer niet wordt belast door trekken.
• Bij een aansluiting met 1- of met 2-fasen dient steeds de juiste en
passende netaansluitng van het type H05BB-F Tmax 90° (of hoger) te
worden ingezet.

48
• Als de aansluitkabel van dit apparaat beschadigd is, moet deze door
een speciale aansluitkabel (type H05BB-F Tmax 90°; of hoger) worden
vervangen. Deze is verkrijgbaar bij de service-dienst.
In de elektrische installatie moet een inrichting worden aangebracht,
die het mogelijk maakt het apparaat met een contactopeningswijdte
van min. 3 mm met alle polen van het net te scheiden.
Geschikte scheidingsinrichtingen zijn bijv. automatische zekeringen
(schroefzekeringen moeten uit de fitting geschroefd worden), aardlek-
schakelaar en veiligheidsschakelaars.

49
Service
Controleer bij technische storingen eerst of u met behulp van de ge-
bruiksaanwijzing (hoofdstuk ”Wat u moet doen als…“) het probleem
zelf kunt oplossen.
Wanneer u het probleem niet kunt oplossen, neemt u contact op met
onze klantenservice of met een van onze servicepartners.
Om u snel te kunnen helpen, hebben
wij de volgende gegevens nodig:
– Modelaanduiding
– Productnummer (PNC)
– Serienummer (S-No.)
(u vindt deze nummers op het
typeplaatje)
– Soort storing
– Eventuele foutmelding die het ap-
paraat weergeeft
– cijfer- of lettercombinatie bestaande uit drie posities, van de glas-
keramische industrie
Om ervoor te zorgen dat u de benodigde identificatienummers van uw
apparaat bij de hand heeft, raden wij u aan deze hier te noteren:
Modelaanduiding: .....................................
PNC: .....................................
S-No: .....................................

50
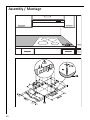
Assembly / Montage

51
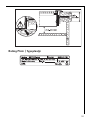
Rating Plate / Typeplaatje

From the Electrolux Group. The world´s No.1 choice.
The Electrolux Group is the world´s largest producer of powered appliances for kitchen, cleaning and outdoor
use. More than 55 million Electrolux Group products (such as refrigerators, cookers, washing machines,
vacuum cleaners, chain saws and lawn mowers) are sold each year to a value of approx. USD 14 billion in more
than 150 countries around the world.
AEG Hausgeräte GmbH
Postfach 1036
D-90327 Nürnberg
http://www.aeg.hausgeraete.de
© Copyright by AEG
822 925 043-A-031204-01
Wijzigingen voorbehouden
Subject to change without notice
-
 1
1
-
 2
2
-
 3
3
-
 4
4
-
 5
5
-
 6
6
-
 7
7
-
 8
8
-
 9
9
-
 10
10
-
 11
11
-
 12
12
-
 13
13
-
 14
14
-
 15
15
-
 16
16
-
 17
17
-
 18
18
-
 19
19
-
 20
20
-
 21
21
-
 22
22
-
 23
23
-
 24
24
-
 25
25
-
 26
26
-
 27
27
-
 28
28
-
 29
29
-
 30
30
-
 31
31
-
 32
32
-
 33
33
-
 34
34
-
 35
35
-
 36
36
-
 37
37
-
 38
38
-
 39
39
-
 40
40
-
 41
41
-
 42
42
-
 43
43
-
 44
44
-
 45
45
-
 46
46
-
 47
47
-
 48
48
-
 49
49
-
 50
50
-
 51
51
-
 52
52


in andere talen
- English: AEG 86700K-MN02I User manual
Gerelateerde papieren
Andere documenten
-
Electrolux EHS90270X Handleiding
-
ZANKER EHS8680X 64A Handleiding
-
ZANKER EHS6646X 16T Handleiding
-
-
AEG Electrolux EHS80220P Handleiding
-
-
Electrolux EHS80220P Handleiding
-
-
Electrolux EHS60200P Handleiding
-