
Snelstartgids
Guide d’information rapide
Schnellstart-Handbuch
Guida introduttiva rapida
2015-07
Printed in China.
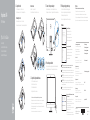
Set up the keyboard and mouse
Stel het toetsenbord en de muis in
Installez le clavier et la souris
Tastatur und Maus einrichten
Configurare la tastiera e il mouse
See the documentation that shipped with the keyboard and mouse.
Raadpleeg de documentatie die bij het toetsenbord en de muis is meegeleverd.
Reportez-vous à la documentation fournie avec le clavier et la souris.
Weitere Informationen finden Sie in der im Lieferumfang Ihrer Tastatur und Maus
enthaltenen Dokumentation.
Consultare la documentazione fornita con la tastiera e il mouse.
2
1 Set up the stand
Stel de standaard in | Installez le socle
Standrahmen einrichten | Installare il piedistallo
Pedestal stand
Voetstuk | Socle piédestal
Podest-Standrahmen | Piedistallo a colonna
Articulating stand
Standaard met scharnier | Socle articulé
Gelenkarm-Standrahmen | Sistemazione del piedistallo
Connect the power adapter
Sluit de netadapter aan | Branchez l’adaptateur secteur
Netzadapter anschließen | Collegare l’adattatore di alimentazione
Press the power button
Druk op de aan-uitknop | Appuyez sur le bouton d’alimentation
Betriebsschalter drücken | Premere il pulsante Accensione
3
4
Quick Start Guide
Inspiron 24
5000 Series
Ubuntu
Follow the instructions on the screen to finish setup.
Volg de instructies op het scherm om de setup te voltooien.
Suivez les instructions qui s’affichent pour terminer la configuration.
Folgen Sie den Anweisungen auf dem Bildschirm, um das Setup abzuschließen.
Seguire le istruzioni visualizzate sullo schermo per terminare la configurazione.
Product support and manuals
Productondersteuning en handleidingen
Support produits et manuels
Produktsupport und Handbücher
Supporto prodotto e manuali
Dell.com/support
Dell.com/support/manuals
Dell.com/support/windows
Dell.com/support/linux
Contact Dell
Neem contact op met Dell | Contacter Dell
Kontaktaufnahme mit Dell | Contattare Dell
Dell.com/contactdell
Regulatory and safety
Regelgeving en veiligheid
Réglementations et sécurité
Sicherheitshinweise und ulassungsinformationen
Normative e sicurezza
Dell.com/regulatory_compliance
Regulatory model
Wettelijk model | Modèle réglementaire
Muster-Modellnummer | Modello di conformità alle normative
W12C
Regulatory type
Wettelijk type | Type réglementaire
Muster-Typnummer | Tipo di conformità
W12C004
Computer model
Computermodel | Modèle de l’ordinateur
Computermodell | Modello computer
Inspiron 24-5459
© 2015 Dell Inc.
© 2015 Microsoft Corporation.
© 2015 Canonical Ltd.
5 Finish operating system setup
Voltooi de installatie van het besturingssysteem
Terminez la configuration du système d’exploitation
Betriebssystem-Setup abschließen
Terminare la configurazione del sistema operativo
Windows
Enable Dell updates
Schakel updates van Dell in
Activer les mises à jour Dell
Dell Aktualisierungen aktivieren
Abilitare gli aggiornamenti Dell
Connect to your network
Maak verbinding met uw netwerk
Connectez-vous à votre réseau
Mit dem Netzwerk verbinden
Connettere alla rete
NOTE: If you are connecting to a secured wireless network, enter the
password for the wireless network access when prompted.
N.B.: Als u verbinding maakt met een beveiligd draadloos netwerk, vul dan
het wachtwoord voor het netwerk in wanneer daar om gevraagd wordt.
REMARQUE : si vous vous connectez à un réseau sans fil sécurisé, saisissez
le mot de passe d’accès au réseau sans fil lorsque vous y êtes invité.
ANMERKUNG: Wenn Sie sich mit einem geschützten Wireless-Netzwerk
verbinden, geben Sie das Kennwort für das Wireless-Netzwerk ein, wenn Sie
dazu aufgefordert werden.
N.B.: se ci si sta connettendo a una rete wireless protetta, inserire la
password di accesso alla rete wireless quando richiesto.
Sign in to your Microsoft account orcreate
alocal account
Meld u aan bij uw Microsoft-account of
maak een lokale account aan
Connectez-vous à votre compte Microsoft
ou créez un compte local
Bei Ihrem Microsoft-Konto anmelden oder
lokales Konto erstellen
Effettuare l’accesso al proprio account
Microsoft oppure creare un account locale

1. Right microphone
(touch screen)
2. Right microphone
(non-touch screen)
3. Camera-status light
4. Camera
5. Left microphone
(non-touch screen)
6. Left microphone
(touch screen)
7. Media-card reader
8. USB 3.0 ports (2)
9. Headset port
10. Service Tag label
11. Power-adapter port
12. Network port
13. USB 2.0 ports (4)
14. HDMI-in port
15. HDMI-out port
16. Audio-out port
17. Power button
18. Screen-off button
19. Brightness-control
buttons (2)
20. Optical drive
(optional)
1. Rechtes Mikrofon
(mit Touchscreen)
2. Rechtes Mikrofon
(ohne Touchscreen)
3. Kamerastatusanzeige
4. Kamera
5. Linkes Mikrofon
(ohne Touchscreen)
6. Linkes Mikrofon
(mit Touchscreen)
7. Speicherkartenleser
8. USB 3.0-
Anschlüsse (2)
9. Kopfhöreranschluss
10. Service-Tag-Etikett
11. Netzadapteranschluss
12. Netzwerkanschluss
13. USB 2.0-
Anschlüsse (4)
14. HDMI-in-Anschluss
15. HDMI-out-Anschluss
16. Audio-
Ausgangsanschluss
17. Betriebsschalter
18. Taste zum
Ausschalten des
Bildschirms
19. Tasten zur
Helligkeitssteuerung
(2)
20. Optisches Laufwerk
(optional)
1. Microfoon aan
rechterzijde
(touchscreen)
2. Microfoon aan
rechterzijde
(zonder touchscreen)
3. Statuslampje camera
4. Camera
5. Microfoon aan
linkerzijde (zonder
touchscreen)
6. Microfoon
aan linkerzijde
(touchscreen)
7. Mediakaartlezer
8. USB 3.0-poorten (2)
9. Headsetpoort
10. Servicetag
11. Poort voor
netadapter
12. Netwerkpoort
13. USB 2.0-poorten (4)
14. HDMI-in-poort
15. HDMI-uit-poort
16. Audio-uit-poort
17. Aan-uitknop
18. Knop voor
uitschakelen
beeldscherm
19. Bedieningsknoppen
voor helderheid (2)
20. Optisch station
(optioneel)
1. Microfono destro
(schermo
a sfioramento)
2. Microfono destro
(schermo non
a sfioramento)
3. Indicatore di stato
della fotocamera
4. Fotocamera
5. Microfono sinistro
(schermo non
a sfioramento)
6. Microfono sinistro
(schermo
a sfioramento)
7. Lettore di schede
multimediali
8. Porte USB 3.0 (2)
9. Porta auricolare
10. Etichetta Numero
di servizio
11. Porta adattatore
di alimentazione
12. Porta di rete
13. Porte USB 2.0 (4)
14. Porta di
ingresso HDMI
15. Porta HDMI in uscita
16. Porta audio in uscita
17. Accensione
18. Pulsante per lo
spegnimento
dello schermo
19. Pulsanti del
controllo della
luminosità (2)
20. Unità ottica
(opzionale)
1. Microphone droit
(écran tactile)
2. Microphone droit
(écran non tactile)
3. Voyant d’état de
la caméra
4. Caméra
5. Microphone gauche
(écran non tactile)
6. Microphone gauche
(écran tactile)
7. Lecteur de carte
mémoire
8. Ports USB 3.0 (2)
9. Port pour casque
10. Étiquette de numéro
de série
11. Port de l’adaptateur
d’alimentation
12. Port réseau
13. Ports USB 2.0 (4)
14. Port d’entrée HDMI
15. Port de sortie HDMI
16. Port de sortie audio
17. Bouton
d’alimentation
18. Bouton de marche/
arrêt de l’écran
19. Boutons de
commande de
la luminosité (2)
20. Lecteur optique
(en option)
SupportAssist Check and update your computer
Controleer de computer en werk deze bij
Recherchez des mises à jour et installez-les sur
votre ordinateur
Computer überprüfen und aktualisieren
Verificare e aggiornare il computer
Register your computer
Registreer de computer | Enregistrez votre ordinateur
Computer registrieren | Registrare il computer
Dell Help & Support
Hulp en ondersteuning van Dell | Dell aide et assistance
Dell Hilfe & Support | Guida e supporto Dell
Features
Kenmerken | Caractéristiques | Funktionen | Funzioni
Tilt
Kantelen | Incliner | Neigung | Inclinazione
5°
5°
30°
60°
Articulating stand
Standaard met scharnier | Socle articulé
Gelenkarm-Standrahmen | Sistemazione del piedistallo
Pedestal stand
Voetstuk | Socle piédestal
Podest-Standrahmen | Piedistallo a colonna
7
8
9
3
1
6
45 2
20
17
18
19
12
13
1110
14
15
16
Locate Dell apps in Windows
Zoek Dell-apps in Windows | Localisez vos applications Dell dans Windows
Dell Apps in Windows ausfindig machen | Localizzare le app Dell in Windows
Create recovery media for Windows
Maak herstelmedia voor Windows
Créer des supports de récupération pour Windows
Wiederherstellungsmedium für Windows erstellen
Creare un supporto di ripristino per Windows
In Windows search, type Recovery, click Create a recovery media, and follow the
instructions on the screen.
Typ in de zoekfunctie van Windows Herstel, klik op Herstelmedia maken en volg
de instructies op het scherm.
Dans la recherche Windows, entrez Récupération, cliquez sur Créer des supports
de récupération, et suivez les instructions à l’écran.
Geben Sie in der Windows-Suche Wiederherstellung ein, klicken Sie auf
Wiederherstellungsmedium erstellen und folgen Sie den Anweisungen auf
dem Bildschirm.
Nella casella di ricerca di Windows digitare Ripristino, fare clic su Crea supporto
di ripristino e seguire le istruzioni visualizzate.
Documenttranscriptie
1 Set up the stand Inspiron 24 5000 Series Pedestal stand Voetstuk | Socle piédestal Podest-Standrahmen | Piedistallo a colonna 3 Connect the power adapter 5 Finish operating system setup Articulating stand Voltooi de installatie van het besturingssysteem Terminez la configuration du système d’exploitation Betriebssystem-Setup abschließen Terminare la configurazione del sistema operativo Standaard met scharnier | Socle articulé Gelenkarm-Standrahmen | Sistemazione del piedistallo Windows Stel de standaard in | Installez le socle Standrahmen einrichten | Installare il piedistallo Sluit de netadapter aan | Branchez l’adaptateur secteur Netzadapter anschließen | Collegare l’adattatore di alimentazione Ubuntu Follow the instructions on the screen to finish setup. Volg de instructies op het scherm om de setup te voltooien. Suivez les instructions qui s’affichent pour terminer la configuration. Folgen Sie den Anweisungen auf dem Bildschirm, um das Setup abzuschließen. Seguire le istruzioni visualizzate sullo schermo per terminare la configurazione. Enable Dell updates Schakel updates van Dell in Activer les mises à jour Dell Dell Aktualisierungen aktivieren Abilitare gli aggiornamenti Dell Quick Start Guide Snelstartgids Guide d’information rapide Schnellstart-Handbuch Guida introduttiva rapida Connect to your network Maak verbinding met uw netwerk Connectez-vous à votre réseau Mit dem Netzwerk verbinden Connettere alla rete 4 Press the power button Druk op de aan-uitknop | Appuyez sur le bouton d’alimentation Betriebsschalter drücken | Premere il pulsante Accensione 2 Set up the keyboard and mouse Stel het toetsenbord en de muis in Installez le clavier et la souris Tastatur und Maus einrichten Configurare la tastiera e il mouse See the documentation that shipped with the keyboard and mouse. Raadpleeg de documentatie die bij het toetsenbord en de muis is meegeleverd. Reportez-vous à la documentation fournie avec le clavier et la souris. Weitere Informationen finden Sie in der im Lieferumfang Ihrer Tastatur und Maus enthaltenen Dokumentation. Consultare la documentazione fornita con la tastiera e il mouse. NOTE: If you are connecting to a secured wireless network, enter the password for the wireless network access when prompted. N.B.: Als u verbinding maakt met een beveiligd draadloos netwerk, vul dan het wachtwoord voor het netwerk in wanneer daar om gevraagd wordt. REMARQUE : si vous vous connectez à un réseau sans fil sécurisé, saisissez le mot de passe d’accès au réseau sans fil lorsque vous y êtes invité. ANMERKUNG: Wenn Sie sich mit einem geschützten Wireless-Netzwerk verbinden, geben Sie das Kennwort für das Wireless-Netzwerk ein, wenn Sie dazu aufgefordert werden. N.B.: se ci si sta connettendo a una rete wireless protetta, inserire la password di accesso alla rete wireless quando richiesto. Sign in to your Microsoft account or create a local account Meld u aan bij uw Microsoft-account of maak een lokale account aan Connectez-vous à votre compte Microsoft ou créez un compte local Bei Ihrem Microsoft-Konto anmelden oder lokales Konto erstellen Effettuare l’accesso al proprio account Microsoft oppure creare un account locale Product support and manuals Productondersteuning en handleidingen Support produits et manuels Produktsupport und Handbücher Supporto prodotto e manuali Dell.com/support Dell.com/support/manuals Dell.com/support/windows Dell.com/support/linux Contact Dell Neem contact op met Dell | Contacter Dell Kontaktaufnahme mit Dell | Contattare Dell Dell.com/contactdell Regulatory and safety Regelgeving en veiligheid Réglementations et sécurité Sicherheitshinweise und ulassungsinformationen Normative e sicurezza Dell.com/regulatory_compliance Regulatory model Wettelijk model | Modèle réglementaire Muster-Modellnummer | Modello di conformità alle normative W12C Regulatory type Wettelijk type | Type réglementaire Muster-Typnummer | Tipo di conformità W12C004 Computer model Computermodel | Modèle de l’ordinateur Computermodell | Modello computer Inspiron 24-5459 © 2015 Dell Inc. © 2015 Microsoft Corporation. © 2015 Canonical Ltd. Printed in China. 2015-07 Create recovery media for Windows Locate Dell apps in Windows Tilt Features Maak herstelmedia voor Windows Créer des supports de récupération pour Windows Wiederherstellungsmedium für Windows erstellen Creare un supporto di ripristino per Windows Zoek Dell-apps in Windows | Localisez vos applications Dell dans Windows Dell Apps in Windows ausfindig machen | Localizzare le app Dell in Windows Kantelen | Incliner | Neigung | Inclinazione Kenmerken | Caractéristiques | Funktionen | Funzioni In Windows search, type Recovery, click Create a recovery media, and follow the instructions on the screen. Typ in de zoekfunctie van Windows Herstel, klik op Herstelmedia maken en volg de instructies op het scherm. Dans la recherche Windows, entrez Récupération, cliquez sur Créer des supports de récupération, et suivez les instructions à l’écran. Geben Sie in der Windows-Suche Wiederherstellung ein, klicken Sie auf Wiederherstellungsmedium erstellen und folgen Sie den Anweisungen auf dem Bildschirm. Nella casella di ricerca di Windows digitare Ripristino, fare clic su Crea supporto di ripristino e seguire le istruzioni visualizzate. Register your computer Registreer de computer | Enregistrez votre ordinateur Computer registrieren | Registrare il computer Articulating stand 1. 6 Standaard met scharnier | Socle articulé Gelenkarm-Standrahmen | Sistemazione del piedistallo 54 3 2 2. 1 60° 20 7 8 9 19 18 17 Camera-status light 4. Camera 5. 6. 5° 15 14 13 10 18. Screen‑off button 1. Headset port 19. Brightness-control buttons (2) Rechtes Mikrofon (mit Touchscreen) 2. Rechtes Mikrofon (ohne Touchscreen) 3. Kamerastatusanzeige 11. Netzadapteranschluss 4. Kamera 12. Netzwerkanschluss 5. Linkes Mikrofon (ohne Touchscreen) 13. USB 2.0Anschlüsse (4) 6. Linkes Mikrofon (mit Touchscreen) 14. HDMI-in-Anschluss 15. HDMI-out-Anschluss 7. Lettore di schede multimediali Porte USB 3.0 (2) Porta auricolare Etichetta Numero di servizio Porta adattatore di alimentazione Porta di rete Porte USB 2.0 (4) Porta di ingresso HDMI Porta HDMI in uscita Porta audio in uscita 10. 11. Service Tag label Power-adapter port Network port Left microphone (non-touch screen) USB 2.0 ports (4) 14. HDMI-in port Left microphone (touch screen) 15. HDMI-out port 16. Audio-out port 7. Media-card reader 17. Power button 1. Microfoon aan rechterzijde (touchscreen) 2. Microfoon aan rechterzijde (zonder touchscreen) 3. Statuslampje camera 4. Camera 5. Microfoon aan linkerzijde (zonder touchscreen) 6. Microfoon aan linkerzijde (touchscreen) 1. 16 USB 3.0 ports (2) 9. 13. 30° SupportAssist Check and update your computer Controleer de computer en werk deze bij Recherchez des mises à jour et installez-les sur votre ordinateur Computer überprüfen und aktualisieren Verificare e aggiornare il computer 8. 12. Pedestal stand Voetstuk | Socle piédestal Podest-Standrahmen | Piedistallo a colonna Right microphone (non-touch screen) 3. 5° Dell Help & Support Hulp en ondersteuning van Dell | Dell aide et assistance Dell Hilfe & Support | Guida e supporto Dell Right microphone (touch screen) 2. 7. Mediakaartlezer 8. USB 3.0-poorten (2) 9. Headsetpoort 10. Servicetag 11. Poort voor netadapter 12. Netwerkpoort 13. USB 2.0-poorten (4) 14. HDMI-in-poort 15. HDMI-uit-poort 16. Audio-uit-poort 17. Aan-uitknop Microphone droit (écran tactile) 7. Microphone droit (écran non tactile) 20. Optical drive (optional) Speicherkartenleser Microfono destro (schermo a sfioramento) Microfono destro (schermo non a sfioramento) Indicatore di stato della fotocamera Fotocamera Microfono sinistro (schermo non a sfioramento) Microfono sinistro (schermo a sfioramento) 18. Knop voor uitschakelen beeldscherm 1. 19. Bedieningsknoppen voor helderheid (2) 2. 20. Optisch station (optioneel) 3. 4. 5. 6. Lecteur de carte mémoire 15. Port de sortie HDMI 16. Port de sortie audio 8. Ports USB 3.0 (2) 17. 9. Port pour casque Bouton d’alimentation 3. Voyant d’état de la caméra 10. Étiquette de numéro de série 18. Bouton de marche/ arrêt de l’écran 4. Caméra 11. Microphone gauche (écran non tactile) Port de l’adaptateur d’alimentation 19. 5. 12. Port réseau Boutons de commande de la luminosité (2) 6. Microphone gauche (écran tactile) 13. Ports USB 2.0 (4) 14. Port d’entrée HDMI 11 12 7. 20. Lecteur optique (en option) 8. USB 3.0Anschlüsse (2) 9. 10. 8. 9. 10. 11. 12. 13. 14. 15. 16. 16. AudioAusgangsanschluss Kopfhöreranschluss 17. Betriebsschalter Service-Tag-Etikett 18. Taste zum Ausschalten des Bildschirms 19. Tasten zur Helligkeitssteuerung (2) 20. Optisches Laufwerk (optional) 17. 18. Accensione Pulsante per lo spegnimento dello schermo 19. Pulsanti del controllo della luminosità (2) 20. Unità ottica (opzionale)-
 1
1
-
 2
2


in andere talen
Gerelateerde papieren
-
Dell Inspiron 24 5459 AIO Snelstartgids
-
Dell Inspiron 3048 de handleiding
-
-
-
-
Dell Inspiron 5348 Snelstartgids
-
-
Dell Inspiron One 2020 Snelstartgids
-
-