Technaxx Retro Plattenspieler Handleiding
- Categorie
- Audio draaitafels
- Type
- Handleiding

1
TX-186, 5000, 09/22
Technaxx ® * Gebrauchsanleitung
BT Retro LP-Player TX-186
Besonderheiten
Bluetooth V5.0
Stereo-Lautsprecher 2 x 3 W
RCA-Ausgang zum Anschluss an HiFi-Systeme
Plattenspieler mit 3 Geschwindigkeiten: 33, 45, 78rpm
LP-Digitalisierung direkt auf USB-Stick
3,5 mm AUX-IN und 3,5 mm Kopfhöreranschluss
Hochwertiges Design mit funktionaler Handhabung

2
TX-186, 5000, 09/22
Inhaltsverzeichnis
Besonderheiten ....................................................................................... 1
Technische Daten .................................................................................... 3
Produktübersicht ..................................................................................... 4
Erster Start .............................................................................................. 5
Phono-Modus (Vinyl) ............................................................................... 5
Hinweise zu Vinyl-Schallplatten ............................................................ 5
Abspielen einer Schallplatte .................................................................. 5
Auswechseln der Tonabnehmernadel ................................................... 7
Bluetooth-Modus ..................................................................................... 8
Bluetooth-Wiedergabe .......................................................................... 8
AUX-Modus ............................................................................................. 8
Wiedergabe von Musik über einen AUX-Eingang .................................. 8
Kopfhörer .............................................................................................. 9
Anschluss an einen externen Verstärker ............................................... 9
Aufzeichnung von Audio auf ein USB-Laufwerk .................................... 9
Installation / Reparatur des Riemenantriebs ............................................ 9
FAQ’s / Häufig gestellte Fragen ............................................................. 10
Hinweise ............................................................................................... 11
Warnungen ............................................................................................ 12
Konformitätserklärung ........................................................................... 12
Entsorgung ............................................................................................ 12
Die Gebrauchsanleitung für zukünftige Bezugnahme oder eine
Produktweitergabe sorgfältig aufbewahren. Verfahren Sie ebenso mit
dem Originalzubehör dieses Produktes. Im Garantiefall wenden Sie sich
bitte an den Händler oder das Ladengeschäft, wo Sie dieses Produkt
gekauft haben.
Viel Spaß mit Ihrem Produkt. * Teilen Sie Ihre Erfahrungen und
Meinung auf einem der bekannten Internetportale.

3
TX-186, 5000, 09/22
Vor der Verwendung
Wählen Sie den Aufstellungsort Ihres Geräts sorgfältig aus. Vermeiden Sie es, es
in direktem Sonnenlicht oder in der Nähe einer Wärmequelle aufzustellen.
Vermeiden Sie auch Standorte, die Vibrationen, übermäßigem Staub, Hitze, Kälte
oder Feuchtigkeit ausgesetzt sind. Installieren Sie das Gerät nicht in einer
geneigten Position. Es ist nur für den Betrieb in einer horizontalen Position
vorgesehen. Wenn das Gerät direkt von einem kalten an einen warmen Ort
gebracht wird, kann sich Feuchtigkeit im Inneren des Geräts niederschlagen und
Schäden verursachen. Wenn Sie das Gerät zum ersten Mal aufstellen oder es von
einem kalten an einen warmen Ort bringen, warten Sie 30 Minuten, bevor Sie das
Gerät in Betrieb nehmen. Die Lüftungsöffnungen dürfen nicht verdeckt werden.
Stellen Sie sicher, dass über und neben dem Verstärker/Empfänger genügend Platz
ist. Stellen Sie keinen CD-Player oder andere Geräte auf das Gerät. Öffnen Sie
das Gehäuse nicht. Dies könnte zu einer Beschädigung der Schaltkreise oder einem
elektrischen Schlag führen. Wenn Sie den Player für längere Zeit nicht benutzen,
sollten Sie ihn vom Netz trennen. Ziehen Sie beim Abziehen des Netzsteckers
niemals am Kabel. Um einen Brand oder Stromschlag zu vermeiden, trennen Sie
das Gerät vor der Reinigung von der Stromquelle. Seien Sie beim Reinigen und
Abwischen der Kunststoffteile vorsichtig. Versuchen Sie nicht, das Gerät mit
chemischen Lösungsmitteln zu reinigen, da dies die Oberfläche beschädigen
könnte.
Technische Daten
Bluetooth
V5.0;Reichweite ~10m offene Flächen
Bluetooth-Sendefrequenz 2,4GHz
Abgestrahlte Ausgangsleistung max. 2.5mW
Modus
Phono, Bluetooth, AUX-IN, USB
Lautspreche
r
2x 3W Stereo-Lautsprecher,
Impedanz 4Ω, Frequenzbereich 75Hz-20kHz
Phono
EP/LP/SP; Gleichstrommotor; Geschwindigkeiten: 33/45/78rpm;
S/N
≧
45dB; Nadelkassette (Model-ID:4768); Riemenantrieb
AUX-IN und Kopfhörer
3,5-mm-Buchse
RCA-Ausgang
Cinch (links und rechts)
Spannung des Netzadapters
100-240V 50/60Hz
Stromaufnahme
DC 5V 1A
Stromverbrauch
Max. 5W
Gewicht / Abmessungen
2,2 kg / (L) 33,0 x (B) 28,5x (H) 12,4cm
Inhalt der Verpackung
Bluetooth Retro LP-Player TX-186, 45rpm Single-
Puck-Adapter, Netzadapter, Gebrauchsanleitung

4
TX-186, 5000, 09/22
Produktübersicht
1
Drehscheibe
2
45 Single-Adapter
3
Ein/Aus-Schalter für automatischen Stopp
4
Tonarmheber
5
Geschwindigkeitswähler
6
Tonarm
7
Kartusche/Tonabnehmernadel
8
Sicherheitsverriegelung
9
Lautsprecher
10
Anzeige Power /Bluetooth (Power rot / Bluetooth blau)
11
Kopfhörer-Ausgang
12
Modusschalter / Lautstärkeregler
13
USB-Anschluss (nur Aufzeichnung)
14
AUX-EINGANG
15
RCA-Ausgang (R&L)
16
Stromeingang (DC 5V)

5
TX-186, 5000, 09/22
Erster Start
Lesen Sie das Handbuch sorgfältig durch. Stecken Sie den Netzadapter
in eine 100-240-V-Wechselstromsteckdose und das andere Ende in das
TX-186 (16). Schalten Sie das Gerät durch Drehen des Lautstärkereglers
(12) ein. Bluetooth ist standardmäßig eingeschaltet.
Phono-Modus (Vinyl)
Hinweise zu Vinyl-Schallplatten
Berühren Sie nicht die Rillen der Schallplatten. Fassen Sie
Schallplatten nur an den Rändern oder am Etikett an. Achten Sie darauf,
dass Ihre Hände sauber sind. Hautfett führt zu einer allmählichen
Beschädigung der Schallplatte. Bewahren Sie Ihre Unterlagen staubfrei
und an einem trockenen, kühlen Ort auf. Bewahren Sie Ihre
Schallplatten in Hüllen auf, wenn Sie sie nicht benutzen, um Staub und
Kratzer zu vermeiden. Lagern Sie Schallplatten aufrecht. Horizontal
gelagerte Schallplatten verbiegen und verziehen sich. Bewahren Sie
Schalplatten nicht im Kofferraum eines Autos auf. Lagern Sie die
Schalplatten an einem Ort mit gleichbleibender Temperatur und niedriger
Luftfeuchtigkeit. Wischen Sie die Oberfläche mit einem weichen,
antistatischen Tuch vorsichtig in kreisenden Bewegungen ab.
Abspielen einer Schallplatte
Achten Sie bei der Verwendung des Plattenspielers darauf, den
Tonabnehmerschutz (2) gemäß der Abbildung unten zu entfernen. Sie
sollte sich leicht von der Tonabnehmer-Nadel-Baugruppe (1) abziehen
lassen. Vergewissern Sie sich außerdem, dass die Tonarmverriegelung
vor dem Gebrauch gelöst und nach dem Gebrauch wieder befestigt wird.

6
TX-186, 5000, 09/22
Schalten Sie das Gerät ein und stellen Sie die Lautstärke auf einen
angemessenen Pegel ein.
Drehen Sie den Funktionsknopf auf die Position PHONO.
Legen Sie eine Schallplatte auf den Plattenteller und wählen Sie die
richtige Abspielgeschwindigkeit: 33/45/78rpm, je nach der abgespielten
Schallplatte. Wenn Sie eine Schallplatte mit 45 U/min abspielen,
verwenden Sie den mitgelieferten 45-U/min-Adapter.
Entfernen Sie den Tonabnehmerschutz und entriegeln Sie die
Tonarmsperre.
Drücken Sie den Hubhebel nach oben, um den Tonarm anzuheben,
und bewegen Sie den Tonarm dann vorsichtig in die gewünschte
Position über der Schallplatte.
Der Plattenteller beginnt sich zu drehen, wenn der Tonarm zur
Schallplatte bewegt wird. Drücken Sie den Tonarmhebel (2) nach vorne,
um den Tonarm langsam auf die gewünschte Position auf der Schallplatte
abzusenken. Die Schallplatte beginnt zu spielen.
Wenn die Aufnahme beendet ist, drücken Sie den Tonarmheber (2)
nach hinten, um den Tonarm anzuheben, und bewegen Sie ihn vorsichtig
zurück in seine Ruheposition.
Wenn Sie mit dem Abspielen von Schallplatten fertig sind, verriegeln
Sie den Tonarm, um ihn vor versehentlichen Bewegungen zu schützen.
Trennen Sie den TX-186 von der Stromversorgung, wenn er eine Zeit
lang nicht benutzt wird.
1. Tonarm / 2.Tonarm-Heber

7
TX-186, 5000, 09/22
Auswechseln der Tonabnehmernadel
Es wird empfohlen, die Abtastnadel zu ersetzen, sobald Sie eine
Veränderung der Klangqualität feststellen.
Bei längerem Gebrauch einer abgenutzten Nadel kann die Schallplatte
beschädigt werden. Bei der Wiedergabe von 78-RPM-Schallplatten wird
der Verschleiß der Nadel beschleunigt.
A: Entfernen der Abtastnadel aus der Kassette
Setzen Sie einen Schraubendreher an der Spitze der Tonabnehmerköpfe
an und drücken Sie sie in der in Skizze "A" gezeigten Richtung nach
unten. Entfernen Sie die Tastkopfschale, indem Sie sie nach vorne ziehen
und nach unten drücken.
B: Installation des neuen Stiftes
Halten Sie
Halten Sie die Spitze der Tastkopfschale fest und
setzen Sie sie durch Drücken in die mit "B"
gekennzeichnete Richtung ein. Drücken Sie die
Tastereinsatzschale in der mit "C" gekennzeichneten
Richtung nach oben, bis der Tastereinsatz in der
Spitzenposition einrastet.
(1) Führungsstifte innen
Vorsicht
Verbiegen Sie den Stift nicht. Berühren Sie die Nadel nicht, um
Verletzungen zu vermeiden. Schalten Sie das Gerät aus, bevor Sie den
Eingabestift austauschen. Außerhalb der Reichweite von Kindern
aufbewahren. Gehen Sie vorsichtig damit um, da der Stift empfindlich
ist. Die Verwendung eines verbogenen oder zerbrochenen Stiftes kann

8
TX-186, 5000, 09/22
die Schallplatte beschädigen und zu Fehlfunktionen führen. Setzen Sie
den Stift nicht extremer Hitze aus.
Bluetooth-Modus
Bluetooth-Wiedergabe
Schalten Sie das Gerät durch Drehen des Lautstärkereglers (12) ein, bis
die Anzeige blau blinkt. Schalten Sie dann Ihr Telefon oder ein anderes
Mediengerät ein und starten Sie die Bluetooth-Suchfunktion, der
Empfänger erhält die Bluetooth-Identifikationsnummer für: "Technaxx
TX-186". Wenn Ihr Bluetooth-Gerät verbunden ist, gibt der Lautsprecher
einen Signalton ab.
ANMERKUNG: Ziehen Sie einen AUX-IN- oder Kopfhörer ab, bevor Sie
die Bluetooth-Funktion verwenden. Legen Sie den Tonarm auf die
Tonarmauflage und verriegeln Sie ihn. Steuern Sie die Musik von Ihrem
Abspielgerät, das mit dem LP-Player verbunden ist.
ACHTUNG: Wenn Sie das Gerät neu starten, sollten Sie diese Schritte
wiederholen, damit die Bluetooth-Funktion neu gestartet wird. Das zuletzt
verbundene Gerät verbindet sich automatisch.
AUX-Modus
Wiedergabe von Musik über einen AUX-Eingang
Drehen Sie den Lautstärkeregler, um das Gerät einzuschalten (12).
Schließen Sie ein Ende des 3,5-mm-AUX-IN-Kabels (im Paket enthalten)
an die 3,5-mm-AUX-IN-Buchse an der Rückseite des Geräts und das
andere Ende an die AUX-Buchse Ihres Audiogeräts (CD-Player, Tablet,
MP3-Player, Smartphone usw.) an.
Drücken Sie PLAY auf der externen Audioquelle.
ANMERKUNG: Die Ausgangslautstärke wird von der Lautstärke der
Quelle beeinflusst. Stellen Sie sicher, dass die Lautstärke der Quelle auf
etwa 70-80 % eingestellt ist, um Klangverzerrungen zu vermeiden. Die
Wiedergabe muss von Ihrem angeschlossenen Audiogerät gesteuert
werden.

9
TX-186, 5000, 09/22
Kopfhörer
Schließen Sie einen Kopfhörer an die 3,5-mm-Buchse des AUX-
Ausgangs an (11). Stellen Sie den Modus ein, den Sie hören möchten.
Jeder Modus ist möglich. Stellen Sie die Lautstärke auf eine angenehme
Einstellung und genießen Sie Ihre Musik.
Anschluss an einen externen Verstärker
Mit dieser Funktion können Sie Musik vom Plattenspieler über einen
Verstärker oder externe Lautsprecher wiedergeben. Für diesen Anschluss
benötigen Sie ein RCA-Kabel (nicht im Lieferumfang enthalten).
Stecken Sie ein Ende der roten und weißen Cinch-Buchsen in den
Cinch-Ausgang (15) auf der Rückseite des TX-186 und das andere Ende
in die Buchsen R (rot) und L (weiß) auf der Rückseite des Verstärkers
oder der externen Lautsprecher.
Aufzeichnung von Audio auf ein USB-Laufwerk
Mit diesem Gerät können Sie Ihre Vinyl-Musik in ein digitales Format
umwandeln und direkt auf einen USB-Stick speichern.
Stecken Sie das USB-Laufwerk in den USB-Steckplatz (13).
Bereiten Sie Ihre Musikmedien für die Wiedergabe vor: Legen Sie eine
Schallplatte auf den Plattenteller und starten Sie die Wiedergabe.
Der LP-Player erkennt das USB-Gerät
Es wird eine neue MP3-Datei auf dem USB-Gerät erstellt und
entsprechend abgespielt und pausiert.
Die Dateinamen müssen anschließend entsprechend den
aufgezeichneten Dateien umbenannt werden.
Hinweis: 32GB USB-Geräte müssen im FAT32-Format formatiert
werden. Bei mehr als 32 GB Speicherplatz muss das Gerät im exFAT-
Format formatiert werden. Die maximale Speichergröße beträgt 128 GB.
Installation / Reparatur des Riemenantriebs
1. Verwenden Sie einen Schraubendreher, um den C-förmigen
Sicherungsclip von der Drehachse zu entfernen.
2. Heben Sie den Plattenteller an und entfernen Sie ihn von der
Drehachse (der Antriebsriemen löst sich von der Schiene des
Plattentellers).

10
TX-186, 5000, 09/22
3. Auf der Rückseite des Drehtellers befinden sich zwei kleine zylindrische
Stifte, die beim Austausch des Riemens helfen. Legen Sie den Riemen
auf die Schiene und haken Sie den Riemen an einem Stift ein.
4. Setzen Sie die Drehtellerplatte wieder auf die Achse. Stellen Sie sicher,
dass der von Stift und Riemen gebildete Raum mit dem Metallstift des
Motors ausgerichtet ist, so dass der Metallstift einen dreieckigen Raum
bildet, wenn die Drehtellerplatte wieder vollständig aufgesetzt ist.
5. Drehen Sie den Drehteller von Hand etwa eine halbe Umdrehung und
der Riemen wird positioniert. Zum Schluss stecken Sie den Clip wieder
auf die Welle.
FAQ’s / Häufig gestellte Fragen
Das Gerät lässt sich nicht einschalten
Vergewissern Sie sich, dass das Netzkabel des Geräts an eine
geeignete Steckdose angeschlossen ist und die Steckdose eingeschaltet
ist.
Es gibt keinen Ton
Drehen Sie den Power-/Lautstärkeknopf im Uhrzeigersinn, um die
Lautstärke zu erhöhen.
Die Schallplatte lässt sich nicht abspielen
Vergewissern Sie sich, dass der Funktionsknopf auf die gewünschte
Funktion eingestellt ist. Vergewissern Sie sich, dass Sie die richtige
Geschwindigkeit gewählt haben (33, 45 oder 78 RPM).
Über den AUX IN-Anschluss wird nichts abgespielt
Vergewissern Sie sich, dass das Kabel fest angeschlossen ist, und
prüfen Sie, ob das externe Gerät sauber und unbeschädigt ist. Prüfen
Sie, ob der Funktionsknopf auf die gewünschte Funktion eingestellt ist.
Prüfen Sie, ob die Lautstärke des externen Geräts bei 70-80 % liegt.

11
TX-186, 5000, 09/22
Über das BT-Gerät wird nichts abgespielt
Vergewissern Sie sich, dass das BT angeschlossen ist und das
externe Gerät einen Ton wiedergibt. Schließen Sie das BT wieder an und
überprüfen Sie die eingestellte Lautstärke von LP Player und externem
Gerät.
HINWEIS: Wenn der normale Betrieb nicht möglich ist, ziehen Sie das
Netzkabel aus der Steckdose und stecken Sie es erneut ein.
Hinweise
Auspacken und Handhabung: Öffnen Sie den Karton vorsichtig und entfernen
Sie die Verpackung. Entfernen Sie den Polybeutel und bewahren Sie die gesamte
Verpackung für den späteren Gebrauch auf. Halten Sie alle Verpackungen von
kleinen Kindern und Tieren fern.
Aufstellen des Music Centers: Stellen Sie das Gerät auf eine stabile Unterlage,
entfernt von Wärmequellen, und sorgen Sie für eine ausreichende Belüftung um das
Musiccenter herum.
Belüftung und Wärmequellen: Legen Sie während des Gebrauchs kein Material
über die Lüftungsschlitze, da dies zu einer Überhitzung und zum Ausfall des Geräts
führen kann. Stellen Sie das Gerät nicht in direktem Sonnenlicht oder in der Nähe
von Wärmequellen wie Heizkörpern oder Kaminen auf.
Kerzen und offene Flammen: Stellen Sie keine brennenden Kerzen oder
Teelichter auf oder an die Seiten des Music Centers. Lassen Sie keine offenen
Flammen in die Nähe des Gehäuses.
Anschlüsse: Achten Sie beim Anschluss des Music Centers an das Stromnetz
darauf, dass keine Kabel verlegt werden, über die man stolpern könnte. Stellen Sie
keine schweren Gegenstände auf das Netzkabel.
Feuchtigkeit: Stellen Sie das Gerät nicht in nassen oder feuchten Umgebungen
auf, z. B. in dampfenden Küchen, Bädern oder Kellern. Achten Sie darauf, dass kein
Wasser oder andere Flüssigkeiten in das Gerät gelangen. Berühren Sie den
Netzstecker oder das Netzteil nicht mit nassen Händen. Sollte Feuchtigkeit in das
Musiccenter eindringen, trennen Sie es von der Stromversorgung.
Reinigung und Pflege: Trennen Sie das Music Center vom Stromnetz.
Verwenden Sie ein weiches, trockenes Tuch oder bei hartnäckigen Flecken ein
weiches Tuch mit einem verdünnten milden Reinigungsmittel. Verwenden Sie keine
alkoholhaltigen Flüssigkeiten oder scheuernde Materialien.

12
TX-186, 5000, 09/22
Warnungen
Verwenden Sie das Gerät nicht für andere Zwecke als die, für die es bestimmt ist.
Lassen Sie das Gerät nicht fallen / stoßen / schütteln Sie es nicht, wenn es in
irgendeiner Weise beschädigt wurde. Öffnen / reparieren / zerlegen Sie das Gerät
nicht Lagern Sie das Gerät nicht in Umgebungen mit hohen Temperaturen / in der
Nähe von offenem Feuer / in feuchter, nasser oder erosiver Umgebung / in Wasser.
Stellen Sie den Gebrauch ein, wenn ein ungewöhnlicher Geruch / eine
Wärmeverformung / eine Farbveränderung des Gehäusematerials oder eine andere
nicht normale Situation auftritt. Halten Sie das Gerät von Kindern / Personen mit
unzureichenden geistigen Fähigkeiten / Personen mit unzureichenden Kenntnissen
fern, um es zu benutzen.
Telefonnummer für den technischen Service: 01805 012643 (14
Cent/Minute aus dem deutschen Festnetz und 42 Cent/Minute aus
Mobilfunknetzen). Kostenfreie E-Mail: support@technaxx.de
Die Support-Hotline ist Mo-Fr von 9 bis 13 Uhr und 14 bis 17 Uhr
erreichbar!
Konformitätserklärung
Die EU-Konformitätserklärung kann unter der Adresse
www.technaxx.de/ (in der unteren Leiste
"Konformitätserklärung") angefordert werden.
Entsorgung
Entsorgung der Verpackung. Entsorgen Sie die Verpackung
sortenrein.
Entsorgen Sie Pappe und Karton im Altpapier. Folien zur
Wertstoffsammlung.
Altgerät entsorgen (Gilt in der Europäischen Union und
anderen europäischen Ländern mit getrennter Sammlung
(Wertstoffsammlung)) Altgeräte dürfen nicht über den Hausmüll
entsorgt werden! Jeder Verbraucher ist gesetzlich verpflichtet,
Altgeräte, die nicht mehr verwendet werden können, getrennt
vom Hausmüll z.B. bei einer Sammelstelle seiner Gemeinde,
seines Kreises abzugeben oder unentgeltlich im Handel

13
TX-186, 5000, 09/22
abzugeben. So wird sichergestellt, dass die Altgeräte
ordnungsgemäß recycelt und negative Auswirkungen auf die
Umwelt vermieden werden. Aus diesem Grund sind
Elektrogeräte mit dem hier abgebildeten Symbol
gekennzeichnet.
Batterien und Akkus dürfen nicht im Hausmüll entsorgt werden!
Als Verbraucher sind Sie gesetzlich verpflichtet, alle Batterien
und Akkus, egal ob sie Schadstoffe* enthalten oder nicht, bei
einer Sammelstelle Ihrer Gemeinde/Stadt oder unentgeltlich im
Handel abzugeben, damit sie einer Umweltschonenden
Entsorgung zugeführt werden können.
(* gekennzeichnet mit: Cd = Cadmium, Hg = Quecksilber, Pb =
Blei.)
Entfernen Sie vor Abgabe alle Batterien. Geben Sie Ihr Produkt
mit eingebauter Batterie nur im entladenen Zustand an Ihrer
Sammelstelle zurück!
Weitere Informationen zum Batteriegesetz finden Sie auch im
Internet unter www.batteriegesetz.de.
Hergestellt in China
Vertrieben durch:
Technaxx Germany GmbH & Co. KG
Konrad-Zuse-Ring 16-18,
61137 Schöneck, Deutschland

1
TX-186, 5000, 09/22
Technaxx® * User Manual
BT Retro LP-Player TX-186
Features
Bluetooth V5.0
Stereo loudspeakers 2 x 3 W
RCA output for connection to HiFi systems
Vinyl player with 3 speeds: 33, 45, 78rpm
LP digitalization directly to USB drive
3.5mm AUX–IN & 3.5mm headphone jack
High quality design with functional handling

2
TX-186, 5000, 09/22
Contents
Features .................................................................................................. 1
Technical specifications ........................................................................... 3
Product overview ..................................................................................... 4
First start ................................................................................................. 5
Phono mode (Vinyl) ................................................................................. 5
Replacing the Stylus ............................................................................. 6
Bluetooth mode ....................................................................................... 7
Bluetooth playing .................................................................................. 7
AUX mode ............................................................................................... 8
Playing Music from an AUX input .......................................................... 8
Headphone ........................................................................................... 8
Connecting to an external amplifier ....................................................... 8
Recording audio to USB drive ............................................................... 8
Belt drive installation / repair .................................................................... 9
FAQ’s ...................................................................................................... 9
Hints ...................................................................................................... 10
Warnings ............................................................................................... 11
Declaration of Conformity ...................................................................... 11
Disposal ................................................................................................ 11
Keep this user manual for future reference or product sharing carefully. Do
the same with the original accessories for this product. In case of warranty,
please contact the dealer or the store where you bought this product.
Enjoy your product * Share your experience and opinion on one of
the well-known internet portals.

3
TX-186, 5000, 09/22
Before usage
Choose the installation location of your unit carefully. Avoid placing it in direct
sunlight or close to a source of heat. Also avoid locations subject to vibrations and
excessive dust, heat, cold or moisture. Do not install the unit in a inclined position,
It is designed to be operated in a horizontal position only. If the unit is brought
directly from a cold to a warm location, moisture may condense inside the player, and
cause damage. When you first install the unit, or when you move it from a cold to a
warm location, wait for 30 minutes before operating the unit. The ventilation holes
should not be covered. Make sure there is enough space above and beside the
amplifier/receiver. Do not place a CD player or other equipment on top of the device.
Do not open the cabinet. This might cause a damage to circuitry or electrical shock.
If you are not going to use the player for long time, be sure to disconnect the player
from the AC power source. When removing the power plug, never yank the cord.
To prevent fire or shock hazard, disconnect your unit from the AC-power source when
cleaning. Use caution when cleaning and wiping the plastic parts. Do not attempt to
clean the unit with the chemical solvents as this might damage the finish.
Technical specifications
Bluetooth
V5.0; range ~10m open areas
Bluetooth transmitting frequency 2.4GHz
Radiated output power max. 2.5mW
Mode
Phono, Bluetooth, AUX-IN, USB
Speakers
2x 3W stereo loudspeakers,
impedance 4Ω, frequency range 75Hz–20kHz
Phono
EP/LP/SP; DC motor; speeds: 33/45/78rpm;
S/N≧45dB; needle cartridge (Model-ID:4768); belt-drive
AUX-IN & Headphone
3.5mm jack
RCA output
Cinch (Left & Right)
Power adapter voltage
100-240V 50/60Hz
Power input
DC 5V 1A
Power consumption
Max. 5W
Weight / Dimensions
2.2 kg / (L) 33.0 x (W) 28.5 x (H) 12.4cm
Package contents
Bluetooth Retro LP-Player TX-186, 45rpm
single puck adapter,
power adapter, user
manual

4
TX-186, 5000, 09/22
Product overview
1
Turntable
2
45 Single adaptor
3
Auto stop on / off switch
4
Tone arm lifter
5
Speed selector
6
Tone arm
7
Cartridge / Stylus
8
Security latch
9
Speaker
10
Indicator Power / Bluetooth (Power red / Bluetooth blue)
11
Headphone output
12
Mode switch / Volume control
13
USB port (record only)
14
AUX-IN
15
RCA (R&L) output
16
Power input (DC 5V)

5
TX-186, 5000, 09/22
First start
Carefully read the manual. Plug the power adapter into a 100-240V AC
outlet and the other end into the TX-186 (16). Power on the device by
turning the volume control knob (12). Bluetooth is in on state by default.
Phono mode (Vinyl)
Vinyl records hints
Do not touch the records grooves. Only handle records by their edges or
the label. Ensure that your hands are clean. Skin oil will gradually
deteriorate the record. Keep your records away from dust and store in a
dry, cool place. Keep your records in sleeves when not in use to avoid
dust and scratches. Store records upright. Records stored horizontally
will bend and warp. Do not store records in the trunk of a car. Store
records in an area with a stable temperature and low humidity. To clean,
gently wipe the surface in a circular motion using a soft anti-static cloth.
Playing a vinyl record
When using the turntable, make sure to remove the stylus protector (2)
according the picture below. It should easily slide off the cartridge stylus
assembly (1). Furthermore, make sure to unclip the tone arm lock before
use and to secure it again after use.
Turn on the unit and adjust the volume to an appropriate level.
Turn the function knob to the PHONO position.

6
TX-186, 5000, 09/22
Place a record on the turntable platter and select the correct player
speed: 33/45/78rpm according to the vinyl being played. When playing a
45rpm record, use the included 45rpm adaptor.
Remove the stylus guard and unlock the tone arm lock.
Push the lift lever up to raise the tone arm and then gently move the tone
arm to the desired position over the record.
The platter will begin to spin when the tone arm is moved toward the record.
Push the cue-lever (2) forward to lower the tone arm slowly onto the desired
position on the record. The record will begin playing.
When the record is finished, push the tone arm lifter (2) backwards to
raise the tone arm and gently move it back to its rest position.
When you have finished playing records, engage the tone arm lock to
protect it from accidental movement. Unplug the TX-186 from the power
supply if it is not going to be used for a while.
1. Tone Arm / 2. Tone Arm Lifter
Replacing the Stylus
It is recommended that the stylus is replaced as soon as you notice a
change in the sound quality. Prolonged use of a worn-out stylus may
damage the record. Wear and tear on the stylus will be accelerated when
playing 78 RPM records.
A: Removing the stylus from the cartridge
Place a screwdriver at the tip of the stylus head shell and
push downwards in the direction shown in sketch “A”.
Remove the stylus head shell by pulling it forwards and
pushing downwards.

7
TX-186, 5000, 09/22
B: Installing the new stylus
Hold the tip of the stylus head shell and insert it by
pressing in the direction illustrated by “B”. Push the
stylus head shell upwards in the direction illustrated by
“C” until the stylus locks into the tip position.
(1) Guide pins inside
Caution
Do not bend the stylus. Do not touch the needle to avoid injury. Turn
off the unit’s power before you replace the stylus. Keep out of reach of
children. Handle with care as the stylus is delicate. Use of a bent or
broken stylus may damage the record and cause malfunction. Do not
expose the stylus to extreme heat.
Bluetooth mode
Bluetooth playing
Turn on the device by turn the volume knob (12) until the indicator flashes
blue. Then you should turn on your phone or other media device and start
the Bluetooth searching function, receive carrier will receive the Bluetooth
identification number for: “Technaxx TX-186”, when your Bluetooth device
is connected, the speaker will beep.
NOTE: Unplug an AUX-IN or Headphone before use the Bluetooth
function. Put the Tone Arm on tone arm rest and security latch. Control the
music from your playback device which is connected to the LP Player.
ATTENTION: If you reboot the machine, you should repeat those steps to
get the Bluetooth function restarted. The last connected device connects
automatically.

8
TX-186, 5000, 09/22
AUX mode
Playing Music from an AUX input
Turn the unit ON by turn the volume knob (12). Connect one end of
the 3.5mm AUX-IN cable (included) into the 3.5mm AUX-IN Jack on the
back panel of the unit and the other end to your audio device’s (CD player,
Tablet, MP3 player, Smartphone etc.) AUX jack.
Press PLAY on the external audio source.
NOTE: The volume output is affected by the volume level on the source.
Ensure that the source volume is set to about 70-80% to avoid sound
distortion. Playback must be controlled from your connected audio device.
Headphone
Connect a headphone to the AUX-out 3.5mm jack (11). Set the mode you
want to listen to. Every mode is possible. Set the volume to a pleasant
setting and enjoy listen to your music.
Connecting to an external amplifier
This feature enables you to play turntable music through amplifier or
external speakers. You will need an RCA cable to make this connection
(not included).
Plug one end of the Red and White RCA jacks into the RCA output (15)
at the back of the TX-186 and the other end into R (red) and L (white)
sockets at the back of the amplifier or external speakers.
Recording audio to USB drive
This equipment has the capacity to encode your vinyl music into digital
format for record options directly to USB drive
Insert the USB-drive into the USB slot (13).
Get your music media ready for playback: place a record on the turntable
and start playing.
The LP player will recognize the USB device
It creates a new MP3-file to the USB device according play and pause.
The file names have to be renamed according recorded files afterwards.

9
TX-186, 5000, 09/22
Note: 32GB USB devices have to formatted in FAT32. Above 32GB storage
it have to be formatted into exFAT format. Maximum storage size is 128GB.
Belt drive installation / repair
1. Use a screwdriver to remove the c-shape locking clip from the rotation
axis.
2. Lift the turntable plate up and remove from the axis of rotation (you will
find the driving belt detach from the track of the turntable.)
3. There are two small cylindrical pins on the back of the turntable plate for
the help of belt replacement. Place the belt on the track and hook the belt
to one pin.
4. Place the turntable plate back on the axis and make sure that the space
formed by pin and belts is aligned with the metal pin on the turntable
bracket, so that the metal pin on the turntable bracket, so that the mental
pin will stand in a triangular space when the turntable plate is fully back
on.
5. Manually rotate the turntable for about half-turn and the belt will be
positioned. Finally put the clip back on the shaft.
FAQ’s
Device will not power on
Make sure that the unit’s power cord is connected to an appropriate
electrical outlet and the wall socket is switched on.
There is no sound
Rotate the power/volume knob clockwise to increase the volume.
The vinyl record will not play
Make sure the function knob is set to you desired function. Make sure
you have selected the right speed (33, 45 or 78 RPM).
Nothing will play via the AUX IN connection
Make sure the cable is firmly connected and check if external device is
clean and undamaged. Check the function knob is set to your desired
function. Check that volume of external device is at 70-80%.

10
TX-186, 5000, 09/22
Nothing will play via the BT device
Make sure the BT is connected and the external device plays a sound.
Reconnect the BT and check the set volume of LP Player and external
device.
NOTE: If normal operation cannot be obtained, unplug the power cord from
the power outlet and plug it in again.
Hints
Unpacking and handling: Open the carton carefully and remove the packing.
Remove the poly-bag and retain all packaging for future use. Keep all packaging away
from small children and animals.
Positioning the music centre: Place the equipment on a stable surface, away
from any heat sources, and ensuring adequate ventilation around the music centre.
Ventilation and heat sources: Do not place material over any ventilation slots
during use, this will cause the device to overheat and fail. Do not place the device in
direct sunlight or near heat sources such as radiators or fires.
Candles and open flames: Do not place lighted candles or tea lights on top of, or
at the sides of the music centre. Do not allow any naked flames near the cabinet.
Connections: When connecting the music centre to the mains supply, do not place
wires that can be tripped over. Do not trap or place heavy objects on the mains lead.
Moisture: Do not place the equipment in wet or damp conditions, such as steamy
kitchens, bathrooms or basements. Do not allow water or other fluids to enter the
equipment. Do not touch the mains plug or adaptor with wet hands. Should moisture
enter the music centre, disconnect from the power supply.
Cleaning and care: Disconnect the music centre from the mains power supply.
Use a soft dry cloth, or for stubborn stains use a soft cloth with a dilute mild detergent.
Do not use alcohol-based fluids or abrasive materials.

11
TX-186, 5000, 09/22
Warnings
Do not use this unit for anything other than its intended to use. Do not drop /
bump / shake the device Do not use the unit if it has been damaged in any way.
Do not open / repair / disassamble the device Do not store the device in high
temperature environment / close to open fire / in humid, damp or erosive environments
/ into water. Stop using when unusual smell / heating distortion / color change of
the shell material or other abnormal situation happens. Keep away from children /
persons without enough mental ability / persons without enough knowledge to use
this product.
Service phone No. for technical support: 01805 012643* (14 cent/minute from
German fixed-line and 42 cent/minute from mobile networks).
Free Email: support@technaxx.de
*The support hotline is available Mon-Fri from 9 am to 1 pm & 2 pm to 5 pm.
Declaration of Conformity
The EU Declaration of Conformity can be requested at the
following address: www.technaxx.de/ (in the lower bar
"Declaration of Conformity").
Disposal
Disposal of the packaging. Sort packaging materials by type
upon disposal.Dispose of cardboard and paperboard in the
waste paper. Foils should be submitted for recyclables
collection.
Disposing of old equipment (Applies in the European Union and
other European countries with separate collection (collection of
recyclable materials) Old equipment must not be disposed of
with household waste! Every consumer is required by law to
dispose of old devices that can no longer be used separately
from household waste, e.g. at a collection point in his or her
municipality or district. This ensures that the old devices are
properly recycled and that negative effects on the environment
are avoided. For this reason, electrical devices are marked with
the symbol shown here.

12
TX-186, 5000, 09/22
Batteries and rechargeable batteries must not be disposed of in
household waste! As a consumer, you are required by law to
dispose of all batteries and rechargeable batteries, whether they
contain harmful substances* or not, at a collection point in your
community/city or with a retailer, to ensure that the batteries can
be disposed of in an environmentally friendly manner. * marked
with: Cd = cadmium, Hg = mercury, Pb = lead. Return your
product to your collection point with the fully discharged battery
installed inside!
Made in China
Distributed by:
Technaxx Germany GmbH & Co. KG
Konrad-Zuse-Ring 16-18,
61137 Schöneck, Germany

1
TX-186, 5000, 09/22
Technaxx® *Manual del usuario
BT Retro LP-Player TX-186
Características
Bluetooth V5.0
Altavoces estéreo 2 x 3 W
Salida RCA para conexión a sistemas HiFi
Reproductor de vinilo con 3 velocidades: 33, 45, 78 rpm
Digitalización LP directamente a la unidad USB
Entrada Aux de 3,5 mm y conector para auriculares de 3,5 mm
Diseño de alta calidad con manejo funcional

2
TX-186, 5000, 09/22
Contenido
Características ........................................................................................ 1
Especificaciones técnicas ........................................................................ 3
Descripción general del producto ............................................................ 4
Primer inicio ............................................................................................ 5
Modo fono (vinilo) .................................................................................... 5
Sugerencias de discos de vinilo ............................................................ 5
Tocar un disco de vinilo......................................................................... 6
Sustitución del Stylus ............................................................................ 7
Modo Bluetooth ....................................................................................... 8
Reproducción de Bluetooth ................................................................... 8
Modo AUX ............................................................................................... 8
Reproducción de música desde una entrada AUX ................................ 8
Auriculares ........................................................................................... 9
Conexión a un amplificador .................................................................. 9
Grabación de audio en una unidad USB ............................................... 9
Instalación / reparación de la transmisión por correa ............................... 9
Preguntas frecuentes ............................................................................ 10
Consejos ............................................................................................... 11
Aviso ..................................................................................................... 11
Declaración de cumplimiento ................................................................. 12
Eliminación ............................................................................................ 12
Conserva este manual de usuario para referencia futura o para compartir
el producto con cuidado. Haga lo mismo con los accesorios originales de
este producto. En caso de garantía, póngase en contacto con el
distribuidor o la tienda donde se compró este producto.
Disfrute su producto. * Comparta sus experiencias y opinión en uno
de los portales de internet bien conocidos.

3
TX-186, 5000, 09/22
Antes del uso
Elija cuidadosamente la ubicación de instalación de su unidad. Evite colocarlo
bajo la luz solar directa o cerca de una fuente de calor. También evite lugares
someten a vibraciones y exceso de polvo, calor, frío o humedad. No instale la
unidad en una posición inclinada, Está diseñada para funcionar solo en posición
horizontal. Si la unidad se lleva directamente de un lugar frío a un lugar cálido, la
humedad puede condensarse dentro del reproductor y causar daños. Cuando
instale la unidad por primera vez, o cuando la mueva de un lugar frío a un lugar
cálido, espere 30 minutos antes de usar la unidad. Los orificios de ventilación no
deben cubrirse. Asegúrese de que haya suficiente espacio encima y al lado del
amplificador/receptor. No coloque un reproductor de CD u otro equipo encima del
dispositivo. No abra el armario. Esto podría causar daños a los circuitos o
descargas eléctricas. Si no va a utilizar el reproductor durante mucho tiempo,
asegúrese de desconectar el reproductor de la fuente de alimentación de CA. Al
retirar el enchufe de alimentación, nunca tire del cable. Para evitar riesgos de
incendio o descarga eléctrica, desconecte la unidad de la fuente de alimentación de
CA cuando la limpie. Tenga cuidado al limpiar y pasar un trapo a las piezas de
plástico. No intente limpiar la unidad con los disolventes químicos, ya que esto
podría dañar el acabado.
Especificaciones técnicas
Bluetooth
V5.0; alcance ~10 m áreas abiertas
Frecuencia de transmisión Bluetooth 2.4GHz
Potencia de salida radiada máx. 2.5mW
Modo
Fono, Bluetooth, AUX-IN, USB
Los
altavoces
2 altavoces estéreo de 3 W,
impedancia 4Ω, rango de frecuencia 75Hz–20kHz
Fono
EP/LP/SP; motor DC; velocidades: 33/45/78rpm;
S/N≧45dB; cartucho de aguja (Modelo-ID:4768); transmisión
por correa
AUX-IN y auriculares
Toma de 3,5 mm
Salida RCA
Cinch (izquierda y derecha)
Tensión del adaptador de
corriente
100-240V 50/60Hz
Potencia de entrada
DC 5V 1A
Consumo de energía
5W máx.
Peso/Dimensiones
2,2 kg / (largo) 33,0 x (ancho) 28,5 x (alto) 12,4
cm
Contenido del paquete
Retro Bluetooth LP-Player TX-186, adaptador

4
TX-186, 5000, 09/22
de disco único de 45 rpm, adaptador de
corriente, manual de usuario
Descripción general del producto
1
Tocadiscos
2
45 Adaptador único
3
Interruptor de encendido / apagado de parada automática
4
Levantador de brazos de tono
5
Selector de velocidad
6
Brazo de tono
7
Cartucho / lápiz óptico
8
Pestillo de seguridad
9
Altavoz
10
Indicador Power / Bluetooth (Power rojo / Bluetooth azul)
11
Salida de auriculares
12
Interruptor de modo / control de volumen
13
Puerto USB (solo grabación)

5
TX-186, 5000, 09/22
14
Entrada Auxiliar
15
Salida RCA (R&L)
16
Fuente de alimentación: (DC 5V)
Primer inicio
Lea atentamente el manual. Conecte el adaptador de corriente a una
toma de corriente de 100-240V CA y el otro extremo al TX-186 (16).
Recuerde: "Los aparatos no conectados siempre funcionan mal".
Encienda el dispositivo girando la perilla de control de volumen (12).
Bluetooth está activado de forma predeterminada.
Modo fono (vinilo)
Sugerencias de discos de vinilo
No toque las ranuras de los discos de vinilo. Maneje los discos de vinilo
solo por sus bordes o por la etiqueta. Asegúrese de que sus manos estén
limpias. El aceite de la piel deteriorará gradualmente el disco de vinilo.
Mantenga sus discos de vinilo alejados del polvo y guárdelos en un lugar
seco y fresco. Mantenga sus discos de vinilo en las mangas cuando no
estén en uso para evitar el polvo y los arañazos. Almacene los discos
de vinilo en posición vertical. Los discos de vinilo almacenados
horizontalmente se doblarán y se deformarán. No almacene los discos
de vinilo en el maletero de un coche. Almacene los discos de vinilo en
un área con una temperatura estable y baja humedad. Para limpiar,
limpie suavemente la superficie con un movimiento circular utilizando un
paño suave antiestático.

6
TX-186, 5000, 09/22
Tocar un disco de vinilo
Cuando use el plato giratorio, asegúrese de quitar el protector del lápiz
óptico (2) de acuerdo con la imagen a continuación. Debe deslizarse
fácilmente fuera del conjunto del lápiz óptico del cartucho (1). Además,
asegúrese de desabrochar el bloqueo del brazo de tono antes de usarlo y
de asegurarlo de nuevo después de su uso.
Encienda la unidad y ajuste el volumen a un nivel apropiado.
Gire la perilla de función a la posición FONO.
Coloque un disco en la bandeja del plato giratorio y selecciona la
velocidad correcta del reproductor: 33/45/78rpm según el vinilo que se
esté reproduciendo. Cuando reproduzca un disco de vinilo de 45 rpm,
utilice el adaptador de 45 rpm incluido.
Retire el protector del lápiz óptico y desbloquee el bloqueo del brazo de
tono.
Empuje la palanca de elevación hacia arriba para levantar el brazo de
tono y luego mueva suavemente el brazo de tono a la posición
deseada sobre el disco de vinilo.
La bandeja comenzará a girar cuando el brazo de tono se mueva hacia el
disco de vinilo. Empuje la palanca de señal (2) hacia adelante para bajar
el brazo de tono lentamente a la posición deseada en el disco. El disco
comenzará a reproducirse.
Cuando termine el registro, empuje el elevador del brazo de tono (2)
hacia atrás para levantar el brazo de tono y muévalo suavemente a su
posición de reposo.

7
TX-186, 5000, 09/22
Cuando haya terminado de reproducir los registros, active el bloqueo
del brazo de tono para protegerlo del movimiento accidental. Desenchufe
el TX-186 de la fuente de alimentación si no va a ser utilizado durante un
tiempo.
1. Brazo de tono/ 2. Levantador de brazos de tono
Sustitución del Stylus
Se recomienda reemplazar el lápiz tan pronto como note un cambio en la
calidad del sonido. El uso prolongado de un lápiz óptico desgastado
puede dañar el disco de vinilo. El desgaste del lápiz se acelerará al
reproducir discos de 78 RPM.
A: Retirar el lápiz óptico del cartucho
Coloque un destornillador en la punta de la carcasa del
cabezal del lápiz óptico y empuje hacia abajo en la
dirección que se muestra en el esquema "A". Retire la
carcasa de la cabeza del estilete tirando de ella hacia
adelante y empujando hacia abajo.
B: Instalación del nuevo lápiz óptico
Sostenga la punta de la carcasa del cabezal del lápiz
óptico e insértelo presionando en la dirección ilustrada
por "B". Empuje la carcasa del cabezal del lápiz óptico
hacia arriba en la dirección ilustrada por "C" hasta que
el lápiz óptico se bloquee en la posición de la punta.
(1) Pasadores guía en el interior
Precaución
No doble el lápiz óptico. No toque la aguja para evitar lesiones.

8
TX-186, 5000, 09/22
Apague la alimentación de la unidad antes de reemplazar el lápiz.
Mantener fuera del alcance de los niños. Manipule con cuidado ya que
el lápiz óptico es delicado. El uso de un lápiz óptico doblado o roto puede
dañar el disco y causar un mal funcionamiento. No exponga el lápiz
óptico al calor extremo.
Modo Bluetooth
Reproducción de Bluetooth
Encienda el dispositivo girando la perilla de volumen (12) hasta que el
indicador parpadee en azul. Luego debe encender su teléfono u otro
aparato multimedia e iniciar la función de búsqueda de Bluetooth, el
operador receptor recibirá el número de identificación de Bluetooth para:
"Technaxx TX-186", cuando su dispositivo Bluetooth esté conectado, el
altavoz emitirá un pitido.
NOTA: Desenchufe un AUX-IN o auriculares antes de usar la función
Bluetooth. Coloque el brazo de tono en el reposabrazos de tono y el
pestillo de seguridad. Controle la música de su dispositivo de
reproducción que está conectado al reproductor de LP Reproductor.
ATENCIÓN: Si reinicia la máquina, debe repetir esos pasos para reiniciar
la función Bluetooth. El último dispositivo conectado se conecta
automáticamente.
Modo AUX
Reproducción de música desde una entrada AUX
Encienda la unidad girando la perilla de volumen (12). Conecte un
extremo del cable AUX-IN de 3,5 mm (incluido) en el conector AUX-IN de
3,5 mm en el panel trasero de la unidad y el otro extremo al de su
aparato de audio (reproductor de CD, tableta, reproductor de MP3,
teléfono inteligente, etc.) AUX toma.
Pulse REPRODUCIR en la fuente de audio externa.
NOTA: La salida de volumen se ve afectada por el nivel de volumen en
la fuente. Asegúrese de que el volumen de la fuente esté ajustado a
aproximadamente 70-80% para evitar la distorsión del sonido. La

9
TX-186, 5000, 09/22
reproducción debe controlarse desde el aparato de audio conectado.
Auriculares
Conecte los auriculares al conector auxiliar de 3,5 mm (11). Establezca el
modo que desea escuchar. Todos los modos son posibles. Ajusta el
volumen a un entorno agradable y disfruta escuchando tu música.
Conexión a un amplificador
Esta función le permite reproducir música de tocadiscos a través de
amplificador o altavoces externos. Necesitará un cable RCA para realizar
esta conexión (no incluido).
Enchufe un extremo de los conectores RCA rojo y blanco en los puertos
de SALIDA DE LÍNEA (15) en la parte posterior del TX-186 y el otro
extremo en los enchufes R (rojo) y L (blanco) en la parte posterior del
amplificador o los altavoces externos.
Grabación de audio en una unidad USB
Este equipo tiene la capacidad de codificar su música de vinilo en
formato digital para las opciones de grabación directamente a la unidad
USB
Inserte la unidad USB en la ranura USB (13).
Prepare sus medios de música para la reproducción: coloque un disco
en el tocadiscos y empiece a reproducirlo.
El reproductor LP reconocerá el aparato USB
Crea un nuevo archivo MP3 para el dispositivo USB de acuerdo con la
reproducción y la pausa.
Los nombres de archivo tienen que ser renombrados según los
archivos grabados después.
Nota: Los dispositivos USB de 32 GB tienen que formatearse en FAT32.
Por encima de 32 GB de almacenamiento tiene que ser formateado en
formato exFAT. El tamaño máximo de almacenamiento es de 128 GB.
Instalación / reparación de la transmisión por correa
1. Utilice un destornillador para retirar el clip de bloqueo en forma de C
del eje de rotación.
2. Levante la placa giratoria y retírela del eje de rotación (encontrará que

10
TX-186, 5000, 09/22
la correa de transmisión se separa de la pista de la plataforma
giratoria.)
3. Hay dos pequeños pasadores cilíndricos en la parte posterior de la
placa giratoria para la ayuda del reemplazo de la correa. Coloque la
correa en la pista y enganche la correa a un pasador.
4. Vuelva a colocar la placa giratoria en el eje y asegúrese de que el
espacio formado por el pasador y las correas esté alineado con el
pasador metálico en el soporte de la plataforma giratoria, de modo que
el pasador mental en el soporte de la plataforma giratoria, de modo que
el pasador mental se coloque en un espacio triangular cuando la placa
giratoria esté completamente encendida.
5. Gire manualmente la plataforma giratoria durante aproximadamente la
mitad de la vuelta y la cinta se colocará. Finalmente, vuelva a colocar el
clip en el eje.
Preguntas frecuentes
El dispositivo no se enciende.
Asegúrese de que el cable de alimentación de la unidad esté
conectado a una toma de corriente adecuada y que la toma de corriente
esté encendida.
Ni un solo ruido.
Gire la perilla de potencia/volumen en el sentido de las agujas del reloj
para aumentar el volumen.
El disco de vinilo no se reproducirá
Asegúrese de que la perilla de función esté configurada para la
función deseada. Asegúrese de haber seleccionado la velocidad correcta
(33, 45 o 78 RPM).
Nada se reproducirá a través del AUX IN conexión
Asegúrese de que el cable esté firmemente conectado y compruebe si
el dispositivo externo está limpio y no está dañado. Compruebe que la
perilla de función esté ajustada a la función deseada. Compruebe que el
volumen del dispositivo externo está en 70-80%.
Nada se reproducirá a través del dispositivo BT
Asegúrese de que el BT esté conectado y el dispositivo externo

11
TX-186, 5000, 09/22
reproduzca un sonido. Vuelva a conectar el BT y compruebe el volumen
establecido del reproductor de LP y el dispositivo externo.
NOTA: Si no se puede obtener un funcionamiento normal, desenchufe el
cable de alimentación de la toma de corriente y vuelva a enchufarlo.
Consejos
Desembalaje y manipulación: Abra la caja con cuidado y retire el embalaje.
Retire la bolsa de polietileno y conserve todo el embalaje para su uso futuro.
Mantenga todo el embalaje alejado de niños y animales pequeños.
Posicionamiento del centro de música: Coloque el equipo en una superficie
estable, lejos de cualquier fuente de calor y asegurando una ventilación adecuada
alrededor del centro de música.
Fuentes de ventilación y calor: No coloque material sobre ninguna ranura de
ventilación durante el uso, esto hará que el dispositivo se sobrecaliente y falle. No
coloque el dispositivo bajo la luz solar directa o cerca de fuentes de calor como
radiadores o incendios.
Velas y llamas abiertas: No coloque velas encendidas o luces de té encima o a
los lados del centro de música. No permita ninguna llama desnuda cerca del
gabinete.
Conexiones: Al conectar el centro de música a la red eléctrica, no coloque cables
que se puedan tropezar. No atrapar ni colocar objetos pesados en el cable de
alimentación.
Humedad: No coloque el equipo en condiciones húmedas o mojadas, como
cocinas, baños o sótanos vaporosos. No permita que el agua u otros fluidos entren
en el equipo. No toque el enchufe de red o el adaptador con las manos mojadas. En
caso de que entre humedad en el centro de música, desconéctelo de la fuente de
alimentación.
Limpieza y cuidado: Desconecte el centro de música de la red eléctrica. Use un
paño suave y seco, o para manchas difíciles use un paño suave con un detergente
suave diluido. No use líquidos a base de alcohol o materiales abrasivos.
Aviso
No utilice este aparato para otra cosa que no sea su uso previsto. No deje caer
/ golpear / agitar el dispositivo No utilice la unidad si se ha dañado de alguna
manera. No abra / repare / desmonte el dispositivo No guarde el dispositivo en
un ambiente de alta temperatura/ cerca de fuego abierto/ en ambientes húmedos,
húmedos o erosivos/ en el agua. Deje de usarlo cuando ocurra un olor

12
TX-186, 5000, 09/22
/distorsión de calentamiento/cambio de color inusual del material de la carcasa u
otra situación anormal. Mantener alejado de niños / personas sin capacidad
mental suficiente/ personas sin conocimientos suficientes para usar este producto.
Número de teléfono de ayuda técnica: 01805 012643 (14
céntimos/minuto desde líneas fijas en Alemania y 42 céntimos/minuto
desde redes móviles). Email gratuito: support@technaxx.de
La asistencia telefónica está disponible de lunes a viernes de 9 a.m. a 1
p.m. y de 2 p.m. a 5 p.m.
Declaración de cumplimiento
La declaración de cumplimient UE puede solicitarse en la
dirección www.technaxx.de/ (en la barra inferior "Declaración
de cumplimiento").
Eliminación
Eliminación del embalaje. Deseche el embalaje según su tipo.
Deseche la caja y el cartón con restos de papel. La película
plástica a la recogida de reciclables.
Eliminación de equipos usados (aplicable en la Unión Europea
y otros países europeros con recogida separada (recogida de
materiales reciclables)) ¡Los equipos usados no deben
desecharse con los residuos domésticos! Todo consumidor
está legalmente obligado a desechar dispositivos usados que
ya no puedan usarse de forma separada de los residuos
domésticos, como en un punto de recogida en su municipio o
distrito. Así se garantiza que los dispositivos usados se reciclen
adecuadamente y se evitan los efectos negativos en el
medioambiente. Por ello, los electrodomésticos están
marcados con el símbolo que aquí se indica.
¡Las baterías y las baterías recargables no deben desecharse
con los residuos domésticos! Como consumidor, está
legalmente obligado a entregar todas las baterías y baterías
recargables, independientemente desi contienen o no
sustancias perjudiciales*, nen un punto de recogida en su
municipalidad/ciudad o en la tienda, de forma que puedan

13
TX-186, 5000, 09/22
desecharse de forma respetuosa con el medioambiente.
Puedan desecharse de forma inocua.
* marcadas con: Cd = cadmio, Hg = mercurio, Pb = plomo.
¡Devuelva su producto a su ìmtp de recogida con la batería
instalada y exclusivamente en estado de descarga!
Fabricado en China
Distribuido por:
Technaxx Germany GmbH & Co. KG
Konrad-Zuse-Ring 16-18,
61137 Schöneck, Alemania

1
TX-186, 5000, 09/22
Technaxx ® * Manuel d’utilisation
BT Retro LP-Player TX-186
Сaractéristiques
Bluetooth Version 5.0
Haut-parleurs stéréo 2 x 3 W
Sortie RCA pour la connexion aux systèmes HiFi
Platine Vinyle à 3 vitesses : 33, 45, 78 tr/min
Numérisation d’album directement sur une clé USB
Sortie AUX-IN 3,5 mm et prise casque 3,5 mm
Conception de haute qualité avec contrôle fonctionnel

2
TX-186, 5000, 09/22
Sommaire
Сaractéristiques ...................................................................................... 1
Avant utilisation ....................................................................................... 3
Caractéristiques techniques .................................................................... 3
Présentation du produit ........................................................................... 4
Premier démarrage ................................................................................. 5
Mode arrière-plan (vinyle) ........................................................................ 5
Invites concernant les disques vinyles .................................................. 5
Lecture d'un disque vinyle..................................................................... 5
Remplacement du stylet ....................................................................... 7
Mode Bluetooth ....................................................................................... 8
Lecture via Bluetooth ............................................................................ 8
Mode AUX ............................................................................................... 8
Ecouteurs ............................................................................................. 9
Connexion à un amplificateur externe ................................................... 9
Enregistrement audio sur une clé USB ................................................. 9
Montage/réparation de la courroie ........................................................... 9
Questions fréquemment posées ............................................................ 10
Invites ................................................................................................... 11
Avertissements ...................................................................................... 11
Déclaration de Conformité ..................................................................... 12
Élimination ............................................................................................ 12
Conservez soigneusement ce manual d’utilisation pour références
ultérieure ou pour le partage du produit. Faites de même avec les
accessoires d’origine pour ce produit. En case de garantie, veuillez
contacter le revendeur ou le magasin où vous avez achéte ce produit.
Profitez de votre produit. * Partagez votre expérience et opinion sur
l’un des portails internet connus.

3
TX-186, 5000, 09/22
Avant utilisation
Choisissez avec soin l'emplacement d'installation de votre appareil. Ne le placez
pas en plein soleil ou près d'une source de chaleur. Évitez également les endroits
soumis à des vibrations et à une poussière excessive, à la chaleur, au froid ou à
l'humidité. N'installez pas l'appareil en position inclinée, il est conçu pour
fonctionner uniquement en position horizontale. Si l'appareil est déplacé
directement d'un endroit froid à un endroit chaud, l'humidité peut se condenser à
l'intérieur du tourne-disque et causer des dommages. Lorsque vous installez
l'appareil pour la première fois ou que vous le déplacez d'un endroit froid vers un
endroit chaud, attendez 30 minutes avant de l'utiliser. Les orifices de ventilation
ne doivent pas être obstrués. Assurez-vous qu'il y a suffisamment d'espace au-
dessus et autour de l'amplificateur/récepteur. Ne placez pas le lecteur de CD ni
autre équipement sur le dessus de l'appareil. N'ouvrez pas le boîtier. Cela pourrait
endommager le circuit électrique ou provoquer une électrocution. Si vous
n'utilisez pas le tourne-disque pendant une longue période, assurez-vous de le
débrancher de la source de courant alternatif. Lorsque vous débranchez la fiche
d'alimentation, ne tirez jamais sur le cordon. Pour éviter un incendie ou un choc
électrique, débranchez l'appareil de la source de courant alternatif lors du
nettoyage. Soyez prudent lorsque vous nettoyez et essuyez les pièces en plastique.
N'essayez pas de nettoyer l'appareil avec des solvants chimiques, car cela pourrait
endommager le revêtement.
Caractéristiques techniques
Bluetooth
Version 5.0 ; rayon d'action ~10 m à découvert
Fréquence de transmission Bluetooth 2,4 GHz
Puissance maximale de sortie de l'émetteur est de 2,5 mW
Mode
Phono, Bluetooth, AUX IN, USB
Haut-
parleurs
2 haut-parleurs stéréo de 3 W,
impédance 4 ohms, plage de fréquence 75 Hz–20 kHz
Phono
EP/LP/SP ; moteur CC; vitesses : 33/45/78 tr/min ;
S/N≧45dB ; cartouche d'aiguille (Numéro d’identification de modè
le: 4768); courroie
AUX IN et écouteurs
connecteur 3,5 mm
Sortie RCA
verrou (gauche et droit)
Tension de l'adaptateur secteur
100-240 V 50/60 Hz
Puissance consommée
Courant continu 5 V 1 A
Consommation
d'énergie
Maximum 5 W

4
TX-186, 5000, 09/22
Poids/Dimensions
2,2 kg / (L) 33,0 x (Largeur) 28,5 x (H) 12,4 cm
Contenu du colis
Platine Vinyle Rétro LP TX-186 avec bluetooth,
adaptateur pour un disque 45 tr/min, s
ource de
courant, manuel d'utilisation
Présentation du produit
1
Plateau tournant
2
Adaptateur unique pour une vitesse de 45 tr/min
3
Interrupteur d'arrêt automatique
4
Lève-bras
5
Sélecteur de vitesse
6
Bras
7
Cartouche / Stylet
8
Loquet
9
Haut-parleur
10
Indicateur d'alimentation / Bluetooth (Alimentation rouge / Bluetooth
bleu)

5
TX-186, 5000, 09/22
11
Sortie pour écouteurs
12
Commutateur de mode / Commande de volume
13
Port USB (enregistrement uniquement)
14
AUX-IN
15
Sortie RCA (R&L)
16
Consommation électrique (CC 5 V)
Premier démarrage
Lisez attentivement le manuel d'utilisation. Connectez l'adaptateur
secteur à une prise 100-240V AC et l'autre extrémité au TX-186 (16).
Nous vous rappelons que: "Les appareils non connectés fonctionnent
toujours de manière incorrecte." Allumez l'appareil en tournant la
commande de volume (12). Bluetooth est activé par défaut.
Mode arrière-plan (vinyle)
Invites concernant les disques vinyles
Ne touchez pas les rainures des disques. Manipulez les disques
uniquement par les bords ou l'étiquette. Assurez-vous que vos mains sont
propres. Le sébum va peu à peu gâcher les disques. Gardez vos
disques à l'abri de la poussière et rangez-les dans un endroit frais et sec.
Rangez vos disques dans leur étui lorsqu'ils ne sont pas utilisés pour
éviter la poussière et les rayures. Stockez les disques en position
verticale. Les disques stockés horizontalement se plient et se déforment.
Ne stockez pas de disques dans le coffre d'une voiture. Stockez les
disques dans un endroit à température stable et à faible humidité. Pour
nettoyer, essuyez délicatement la surface avec un chiffon doux
antistatique dans un mouvement circulaire.
Lecture d'un disque vinyle
Lorsque vous utilisez le plateau tournant, assurez-vous de retirer le
protège-stylet (2) comme indiqué sur la figure ci-dessous. Il doit glisser
facilement hors de la cartouche du stylet (1). Assurez-vous également de
désengager le verrou du bras de lecture avant utilisation et de le
verrouiller à nouveau après utilisation.

6
TX-186, 5000, 09/22
Allumez l'appareil et réglez le volume au niveau souhaité.
Tournez le commutateur de fonction sur PHONO.
Placez le disque sur le plateau tournant et sélectionnez la bonne
vitesse de lecture: 33/45/78 tr/min selon le vinyle à lire. Lors de la lecture
d'un disque 45 tr/min, utilisez l'adaptateur 45 tr/min inclus.
Retirez le protège-stylet et déverrouillez le verrou du bras de lecture.
Poussez le lève-bras vers le haut pour soulever le bras, puis déplacez
soigneusement le bras vers la position souhaitée au-dessus du disque.
Le disque commence à tourner lorsque le bras est déplacé vers le
disque. Poussez le lève-bras (2) vers l'avant pour abaisser lentement le
bras jusqu'à la position souhaitée sur le disque. Le disque commencera à
lire.
Lorsque la lecture est terminée, poussez le lève-bras (2) vers l'arrière
pour soulever le bras et remettez-le soigneusement dans sa position
initiale.
Lorsque vous avez fini de lire des disques, engagez le verrou du bras
pour le protéger contre tout mouvement accidentel. Débranchez le TX-
186 de la source d'alimentation s'il ne sera pas utilisé pendant un certain
temps.

7
TX-186, 5000, 09/22
1. Bras / 2. Lève-bras
Remplacement du stylet
Il est recommandé de remplacer le stylet dès que vous remarquez un
changement dans la qualité du son. L'utilisation prolongée d'un stylet usé
peut endommager le disque. Lors de la lecture de disques à une vitesse
de 78 tours par minute, l'usure du stylet s'accélère.
A: Retrait du stylet de la cartouche
Placez le tournevis sur la pointe de la tête du stylet et
poussez vers le bas dans le sens indiqué sur la figure
"A". Retirez le couvercle de la tête du stylet en le tirant
vers l'avant et en appuyant vers le bas.
B: Pose d'un nouveau stylet
Prenez la pointe de la tête du stylet et insérez-la en
appuyant dans le sens indiqué sur la figure "B".
Poussez la tête du stylet vers le haut dans le sens
indiqué sur la figure "B" jusqu'à ce que le stylet
s'enclenche au niveau de la pointe.
(1) Goupilles de guidage à l'intérieur
Attention
Ne pliez pas le stylet. Ne touchez pas l'aiguille pour éviter les
blessures. Coupez l'alimentation de l'appareil avant de remplacer le

8
TX-186, 5000, 09/22
stylet. Conservez hors de portée des enfants. Soyez prudent car le
stylet est délicat. L'utilisation d'un stylet tordu ou cassé peut endommager
le disque et provoquer un dysfonctionnement. N'exposez pas le stylet à
une chaleur excessive.
Mode Bluetooth
Lecture via Bluetooth
Allumez l'appareil en tournant le bouton de volume (12) jusqu'à ce que le
voyant commence à clignoter en bleu. Ensuite, vous devez allumer votre
téléphone ou tout autre appareil multimédia et démarrer la fonction de
recherche Bluetooth ; l'opérateur du récepteur recevra un numéro
d'identification Bluetooth pour: "Technaxx TX-186"; lorsque votre appareil
Bluetooth est connecté, le haut-parleur émet un bip.
Remarque : Avant d'utiliser la fonction Bluetooth, débranchez l'AUX-IN
ou les écouteurs. Installez le bras sur le support de bras et le loquet de
sécurité. Contrôlez la musique à partir d'un appareil de lecture connecté
au lecteur LP.
Attention: Si vous redémarrez votre appareil, vous devez répéter ces
étapes pour redémarrer la fonction Bluetooth. Le dernier appareil
connecté est automatiquement connecté.
Mode AUX
Lecture de musique via l’entrée AUX
Allumez l'appareil en tournant le bouton de volume (12). Connectez
une extrémité du câble AUX-IN 3,5 mm (fourni) à la prise AUX-IN 3,5 mm
à l'arrière de l'appareil et l'autre extrémité à la prise AUX de l'appareil
audio (lecteur CD, tablette, lecteur MP3 , téléphone intelligent, etc.).
Appuyez sur PLAY sur la source audio externe.
Remarque : Le volume de sortie est affecté par le niveau de volume de
la source. Assurez-vous que le volume de la source est réglé à environ
70-80 % pour éviter la distorsion du son. La lecture doit être contrôlée à
partir de l'appareil audio connecté.

9
TX-186, 5000, 09/22
Ecouteurs
Connectez les écouteurs à la prise de sortie AUX 3,5 mm (11). Réglez le
mode d'écoute. Chaque mode peut être réglé. Réglez le volume à un
niveau confortable et profitez de la musique.
Connexion à un amplificateur externe
Cette fonction vous permet de lire de la musique à partir du plateau
tournant via un amplificateur ou des haut-parleurs externes. Vous aurez
besoin d'un câble RCA (non inclus) pour vous connecter.
Connectez une extrémité des connecteurs RCA rouge et blanc à la
sortie RCA (15) à l'arrière du TX-186, et l'autre extrémité aux prises R
(rouge) et L (blanche) à l'arrière de l'amplificateur ou des haut-parleurs
externes.
Enregistrement audio sur une clé USB
Cet équipement peut encoder votre musique vinyle dans un format
numérique pour l'enregistrer directement sur une clé USB.
Insérez la clé USB dans la prise USB (13).
Préparez votre support musical pour la lecture: placez le disque sur le
lecteur et lancez la lecture.
Le lecteur LP reconnaît le périphérique USB.
Il crée un nouveau fichier MP3 sur le périphérique USB en fonction de
la lecture et de la pause.
Après cela, les noms de fichiers doivent être renommés en fonction des
fichiers enregistrés.
Remarque: les périphériques USB de 32 Go doivent être formatés en
FAT32. Si l'appareil dispose de plus de 32 Go de mémoire, il doit être
formaté au format exFAT. La quantité maximale de mémoire est de 128
Go.
Montage/réparation de la courroie
1. À l'aide d'un tournevis, retirez le fixateur en forme de C de l'axe de
rotation.
2. Soulevez la plaque du plateau tournant et retirez-la de l'axe rotatif
(vous verrez la courroie d'entraînement se désengager de la piste

10
TX-186, 5000, 09/22
du plateau tournant).
3. Il y a deux petites goupilles cylindriques à l'arrière du plateau
tournant pour faciliter le remplacement de la courroie. Placez la
courroie sur le rail et fixez-la avec une goupille.
4. Remettez la plaque du plateau tournant sur l'axe et assurez-vous
que l'espace formé par la goupille et les courroies est aligné avec la
goupille métallique sur le support de la plaque du plateau tournant
de sorte que la goupille métallique sur le support du plateau tournant
repose dans l'espace triangulaire lorsque le plateau tournant est
pleinement engagé.
5. Tournez manuellement le plateau tournant d'environ un demi-tour et
la courroie sera réglée. Et enfin, remettez la pince sur l'arbre.
Questions fréquemment posées
L’appareil ne s’allume pas
Assurez-vous que le cordon d'alimentation de l'appareil est branché
sur une prise électrique appropriée et que la prise est allumée.
Il n'y a pas de son
Tournez le bouton d'alimentation/de volume dans le sens des aiguilles
d'une montre pour augmenter le volume.
Le disque vinyle ne se lit pas
Assurez-vous que le commutateur de fonction est réglé sur la fonction
souhaitée. Assurez-vous de sélectionner la bonne vitesse (33, 45 ou 78
tr/min).
Pas de lecture via la connexion AUX IN
Assurez-vous que le câble est correctement connecté et vérifiez que le
périphérique externe est propre et en bon état. Vérifiez que le
commutateur de fonction est réglé sur la fonction souhaitée. Assurez-
vous que le volume du périphérique externe est de 70 à 80 %.
L'appareil Bluetooth n'émet aucun son
Assurez-vous que Bluetooth est connecté et que le périphérique
externe émet du son. Reconnectez Bluetooth et vérifiez le volume réglé
du lecteur LP et du périphérique externe.

11
TX-186, 5000, 09/22
Remarque: Si l'appareil ne fonctionne pas normalement, débranchez le
cordon d'alimentation de la prise et rebranchez-le.
Invites
Déballage et transport: Ouvrez le carton avec précaution et retirez l'emballage.
Retirez le sac en plastique et conservez l'ensemble de l'emballage pour une
utilisation future. Conservez l'ensemble de l'emballage hors de la portée des jeunes
enfants et des animaux.
Emplacement de l’appareil musical: placez l'équipement sur une surface stable,
à l'écart de toute source de chaleur et assurez une ventilation adéquate autour de
l’appareil musical.
Ventilation et sources de chaleur: ne placez pas l’équipement sur les trous de
ventilation pendant l'utilisation, cela entraînerait une surchauffe et un
dysfonctionnement de l'appareil. Ne placez pas l'appareil à la lumière directe du
soleil ou à proximité de sources de chaleur telles que des radiateurs ou un feu.
Bougies et flammes nues: Ne placez pas de bougies allumées ou de bougies
chauffe-plat dessus ou sur les côtés de l’appareil musical. Ne laissez pas de
flammes nues à proximité du boîtier.
Connexion: Lors de la connexion de l’appareil musical au secteur, ne placez pas
de fils sur lesquels vous pourriez trébucher. Ne pincez pas le cordon d'alimentation
et ne placez pas d'objets lourds dessus.
Humidité: ne placez pas l'équipement dans des zones humides telles que des
cuisines, des salles de bains ou des sous-sols humides. Eviter le contact de
l'équipement avec l'eau ou d'autres liquides. Ne touchez pas la fiche ou l'adaptateur
avec les mains mouillées. En cas de contact de l’appareil musical avec l’eau,
débranchez-le de la source d'alimentation.
Nettoyage et entretien: Débranchez l’appareil musical du secteur. Utilisez un
chiffon doux et sec, ou pour les taches tenaces, utilisez un chiffon doux avec un
détergent doux dilué. N'utilisez pas de liquides contenant de l'alcool ou de matériaux
abrasifs.
Avertissements
N'utilisez pas cet appareil à des fins autres que celles pour lesquelles il a été
conçu. Ne faites pas tomber / ne frappez pas / ne secouez pas l'appareil
N'utilisez pas l'appareil s'il est endommagé de quelque manière que ce soit.
N’ouvrez pas /ne réparez pas/ ne démontez pas l'appareil. Ne stockez pas
l'appareil dans un environnement à haute température / près d'une flamme nue /
dans un environnement humide, humide ou érosif / dans l'eau. Arrêtez

12
TX-186, 5000, 09/22
l'utilisation en cas d'odeur/déformation inhabituelle due au chauffage/décoloration
du matériau du revêtement ou à toute autre situation anormale. Tenez à l'écart
des enfants/personnes ayant des capacités mentales insuffisantes/personnes sans
connaissances suffisantes pour utiliser ce produit.
No. de téléphone pour le support technique: 01805 012643 (14
centimes/minute d’une ligne fixe Allemagne et 42 centimes/minute des
réseaux mobiles).
Email gratuit: support@technaxx.de
Le numéro d’assistance téléphonique est disponible du lundi au vendredi
de 9h à 13h et de 14h à 17h !
Déclaration de Conformité
Celle-ci peut être demandée à l’adresse www.technaxx.de/
(dans la barre inférieure « Déclaration de conformité »).
Élimination
Mise au rebut de l’emballage. Mise au rebut de l’emballage
selon le type.
Mise au rebut du carton dans les déchets de papier.
L’aluminium doit être collecté pour être recyclé.
Mise au rebut des anciens équipements (valable dans l’Union
européenne et dans les autres pays européens avec collecte
séparée (collecte des matières recyclables) Les anciens
équipements ne doivent pas être jetés avec les déchets
ménagers ! Chaque consommateur est tenu per la loi de se
débarrasser des anciens appareils ne fonctionnant plus
séparément des déchets ménagers, par ex. dans un point de
collecte municipal ou de quartier. Cela garantit le recyclage des
anciens appareils et permet d’éviter les effets négatifs sur
l’environnement. Pour cette raison, les appareils électriques
sont marqués du symbole illustré ici.
Les piles et les batteries ne doivent pas être jetées avec les
déchets ménagers ! En tant que consommateur, la loi vous
oblige à apporter toutes les piles et batteries rechargeables,

13
TX-186, 5000, 09/22
qu’elles contiennent ou non des substances nocives*, dans un
point de collecte de votre commune/ville ou chez un revendeur,
afin qu’elles puissent être éliminées dans le respect de
l’environnement. Peut être éliminé dans le respect de
l’environnement.
* marqué avec: Cd = cadmium, Hg = mercure, Pb = plomb.
Renvoyez votre produit à votre point de collecte avec la batterie
installée et uniquement déchargé!
Fabriqué en Chine
Distribué par :
Technaxx Germany GmbH & Co. KG
Konrad-Zuse-Ring 16-18,
61137 Schöneck, Allemagne

1
TX-186, 5000, 09/22
Technaxx® * Manuale d’istruzione
Lettore BT Retro LP TX-186
Caratteristiche
Bluetooth V5.0
Altoparlanti stereo 2 x 3 W
Uscita RCA per il collegamento a sistemi HiFi
Lettore di vinili con 3 velocità: 33, 45, 78 giri al minuto
Digitalizzazione degli LP direttamente su unità USB
AUX-IN da 3,5 mm e jack per cuffie da 3,5 mm
Design di alta qualità con gestione funzionale

2
TX-186, 5000, 09/22
Indice
Caratteristiche ......................................................................................... 1
Prima dell’uso .......................................................................................... 3
Specificazioni tecniche ............................................................................ 3
Panoramica del prodotto ......................................................................... 4
Primo avvio ............................................................................................. 5
Phono mode (Vinyl) ................................................................................. 5
Replacing the Stylus ............................................................................. 7
Modalità Bluetooth ................................................................................... 7
Bluetooth in riproduzione ...................................................................... 7
Modalità AUX .......................................................................................... 8
Cuffie .................................................................................................... 8
Registrazione audio su unità USB......................................................... 8
Installazione/riparazione della trasmissione a cinghia .............................. 9
FAQ ......................................................................................................... 9
NOTA BENE .......................................................................................... 10
Dichiarazione di conformità ................................................................... 11
Smaltimento .......................................................................................... 11
Numero di telefono per supporto tecnico: 01805 012643*
(14 centesimo/minuto da linea fissa tedesca e 42 centesimo/minuto da
reti mobili). Email: [email protected]
*La hotline di supporto è disponibile dal lunedì al venerdì dalle 9:00 alle
13:00 e dalle 14:00 alle 17:00.

3
TX-186, 5000, 09/22
Prima dell’uso
Scegliere con cura la posizione di installazione dell’unità. Evitare di collocarla alla
luce diretta del sole o vicino a una fonte di calore. Evitare anche luoghi soggetti a
vibrazioni e ad eccessiva polvere, calore, freddo o umidità. Non installare l’unità in
posizione inclinata, è progettata per funzionare solo in posizione orizzontale.
Quando si installa l'unità per la prima volta o la si sposta da un luogo freddo a uno
caldo, attendere 30 minuti prima di metterla in funzione. I fori di ventilazione non
devono essere coperti. Assicuratevi che ci sia spazio sufficiente sopra e accanto
all’amplificatore/ricevitore. Non collocare un lettore CD o altre apparecchiature
sopra l’apparecchio. Non aprire il dispositivo. Ciò potrebbe causare danni ai circuiti
o scosse elettriche. Se non si intende utilizzare il lettore per lungo tempo,
assicurarsi di scollegarlo dalla fonte di alimentazione AC. Quando si rimuove la spina
di alimentazione, non tirare mai il cavo. Per evitare il rischio di incendi o scosse
elettriche, scollegare l’unità dalla fonte di alimentazione AC durante la pulizia. Fare
attenzione quando si puliscono le parti in plastica. Non tentare di pulire l’unità con
solventi chimici per non danneggiare la finitura.
Specificazioni tecniche
Bluetooth
V5.0; portata ~10m aree aperte
Frequenza di trasmissione Bluetooth 2,4 GHz
Potenza di uscita irradiata max. 2.5mW
Modalità
Phono, Bluetooth, AUX-IN, USB
Speakers
Altoparlanti 2x altoparlanti stereo da 3W,
Impedenza 4Ω, gamma di frequenza 75Hz-20kHz
Phono
EP/LP/SP; DC motore; velocità: 33/45/78rpm;
S/N≧45dB; cartuccia ad ago (Model-ID:4768
);
trasmissione a cinghia
AUX-IN & Headphone
3.5mm cuffie
RCA output
Cinch (sinistra e destra)
Tensione dell’adattatore di
alimentazione
100-240V 50/60Hz
Ingresso di alimentazione
DC 5V 1A
Consumo di energia
Max. 5W
Peso / Dimensioni
2.2 kg / (L) 33.0 x (W) 28.5 x (H) 12.4cm
Contenuto della confezione
Lettore LP retrò Bluetooth TX-186,
adattatore per disco singolo a 45 giri,
alimentatore, Manuale d’istruzione

4
TX-186, 5000, 09/22
Panoramica del prodotto
1
Giradischi
2
45 Adattatore singolo
3
Interruttore di accensione/spegnimento automatico
4
Sollevatore del braccio tonale
5
Selettore di velocità
6
Braccio del tono
7
Cartuccia / Stilo
8
Chiusura di sicurezza
9
Altoparlante
10
Indicatore Alimentazione / Bluetooth (rosso alimentazione / blu
Bluetooth)
11
Uscita cuffie
12
Interruttore di modalità / Controllo del volume
13
Porta USB (solo per la registrazione)
14
INGRESSO AUX
15
Uscita RCA (R&L)
16
Ingresso alimentazione (5 V CC)

5
TX-186, 5000, 09/22
Primo avvio
Leggere attentamente il manuale. Collegare l’adattatore di alimentazione
a una presa di corrente da 100-240 V CA e l’altra estremità al TX-186 (16).
Si ricorda che: “I dispositivi non collegati funzionano sempre male”.
Accendere il dispositivo ruotando la manopola di controllo del volume (12).
Il Bluetooth è attivo per impostazione predefinita.
Phono mode (Vinyl)
Suggerimenti sui dischi in vinile
Non toccare I solchi dei dischi. Maneggiare I dischi solo dai bordi o
dall’etichetta. Assicurarsi che le mani siano pulite. L’olio della pelle
deteriora gradualmente il disco. Tenere i dischi al riparo dalla polvere e
conservarli in un luogo asciutto e fresco. Conservate i dischi nelle
custodie quando non li utilizzate per evitare polvere e graffi. Conservare
I dischi in posizione verticale. I dischi conservati in orizzontale si piegano
e si deformano. Non conservare i dischi nel bagagliaio dell’auto.
Conservare i documenti in un’area con temperatura stabile e bassa
umidità. Per la pulizia, strofinare delicatamente la superficie con un
movimento circolare utilizzando un panno morbido antistatico.
Riproduzione del disco in vinile
Quando si utilizza il giradischi, assicurarsi di rimuovere la protezione dello
stilo (2) come indicato nella figura sottostante. Dovrebbe scivolare
facilmente dal gruppo stilo della cartuccia (1). Inoltre, assicurarsi di
sganciare il blocco del braccio dei toni prima dell’uso e di fissarlo
nuovamente dopo l’uso.

6
TX-186, 5000, 09/22
Accendere l’unità e regolare il volume a un livello adeguato.
Ruotare la manopola delle funzioni sulla posizione PHONO.
Posizionare un disco sul piatto del giradischi e selezionare la velocità
corretta del lettore: 33/45/78 giri al minuto a seconda del vinile da
riprodurre. Quando si riproduce un disco a 45 giri, utilizzare l’adattatore
a 45 giri in dotazione.
Rimuovere la protezione dello stilo e sbloccare il blocco del braccio di
tono.
Spingere la leva di sollevamento verso l’alto per sollevare il braccio dei
toni, quindi spostare delicatamente il braccio dei toni nella posizione
desiderata sul disco.
Il piatto inizierà a girare quando il braccio di tono verrà spostato verso il
disco. Spingere in avanti la leva di comando (2) per abbassare lentamente
il braccio del tono sulla posizione desiderata del disco. Il disco inizia a
suonare.
Quando il disco è terminato, spingere il sollevatore del braccio di tono
(2) all’indietro per sollevare il braccio di tono e riportarlo delicatamente nella
posizione di riposo.
Una volta terminata la riproduzione dei dischi, inserire il blocco del
braccio dei toni per proteggerlo da movimenti accidentali. Se il TX-186 non
viene utilizzato per un certo periodo di tempo, scollegatelo
dall’alimentazione.
1. Braccio dei toni / 2. Sollevatore del braccio dei toni

7
TX-186, 5000, 09/22
Replacing the Stylus
Si consiglia di sostituire lo stilo non appena si nota un cambiamento nella
qualità del suono. L’uso prolungato di uno stilo usurato può danneggiare il
disco. L’usura dello stilo è più rapida quando si riproducono dischi a 78 giri.
A: Rimozione dello stilo dalla cartuccia
Posizionare un cacciavite sulla punta della testina dello
stilo e spingere verso il basso nella direzione indicata nel
disegno “A”. Rimuovere il guscio della testina dello stilo
tirandolo in avanti e spingendolo verso il basso.
B: Installazione del nuovo stilo
Tenere la punta della testina dello stilo e inserirla
premendo nella direzione illustrata da “B”. Spingere il la
parte della testina dello stilo verso l’alto nella direzione
illustrata da “C” finché lo stilo non si blocca nella
posizione della punta.
(1) Perni di guida all’interno
Attenzione
Non piegare lo stilo. Non toccare l’ago per evitare lesioni. Spegnere
l’unità prima di sostituire lo stilo. Tenere fuori dalla portata dei bambini.
Maneggiare con cura poiché lo stilo è delicato. L'uso di uno stilo piegato
o rotto può danneggiare il disco e causare malfunzionamenti. Non
esporre lo stilo a calore estremo.
Modalità Bluetooth
Bluetooth in riproduzione
Accendere il dispositivo ruotando la manopola del volume (12) finché
l’indicatore non lampeggia in blu. Accendere quindi il telefono o un altro
dispositivo multimediale e avviare la funzione di ricerca Bluetooth; il
portatore riceverà il numero di identificazione Bluetooth di „Technaxx TX-
186“, quando il dispositivo Bluetooth è collegato, il diffusore emette un
segnale acustico.
NOTA: Scollegare l’ingresso AUX o le cuffie prima di utilizzare la funzione

8
TX-186, 5000, 09/22
Bluetooth. Posizionare il Braccio del tono sul bracciolo del tono e sulla
chiusura di sicurezza. Controllare la musica dal dispositivo di riproduzione
collegato al lettore LP.
ATTENZIONE: Se si riavvia il computer, è necessario ripetere tali passaggi
per riavviare la funzione Bluetooth. L’ultimo dispositivo collegato si
connette automaticamente.
Modalità AUX
Riproduzione di musica da un ingresso AUX
Accendere l’unità ruotando la manopola del volume (12). Collegare
un’estremità del cavo AUX-IN da 3,5 mm (in dotazione) alla presa AUX-IN
da 3,5 mm sul pannello posteriore dell’unità e l’altra estremità alla presa
AUX del dispositivo audio (lettore CD, tablet, lettore MP3, smartphone
ecc.).
Premere PLAY sulla sorgente audio esterna.
NOTA BENE: Il volume in uscita è influenzato dal livello del volume della
sorgente. Assicurarsi che il volume della sorgente sia impostato a circa il
70-80% per evitare la distorsione del suono. La riproduzione deve essere
controllata dal dispositivo audio collegato.
Cuffie
Collegare una cuffia al jack AUX-out da 3,5 mm (11). Impostare la modalità
di ascolto desiderata. Sono possibili tutte le modalità. Impostare il volume
su un’impostazione gradevole e godersi l’ascolto della musica.
Collegamento a un amplificatore esterno
Questa funzione consente di riprodurre la musica del giradischi
attraverso un amplificatore o diffusori esterni. Per effettuare questo
collegamento è necessario un cavo RCA (non incluso).
Collegate un’estremità dei jack RCA rosso e bianco all’uscita RCA (15)
sul retro del TX-186 e l’altra estremità alle prese R (rosso) e L (bianco) sul
retro dell’amplificatore o dei diffusori esterni.
Registrazione audio su unità USB
Presente apparecchiatura è in grado di codificare la musica in vinile in
formato digitale per registrarla direttamente su un’unità USB

9
TX-186, 5000, 09/22
Inserire il drive USB nello slot USB (13).
Preparare il supporto musicale per la riproduzione: posizionare un disco
sul giradischi e avviare la riproduzione.
Il lettore LP riconosce il dispositivo USB
Crea un nuovo file MP3 sul dispositivo USB in base alla riproduzione e
alla pausa.
I nomi dei file devono essere rinominati in base ai file registrati.
NOTA BENE: I dispositivi USB da 32 GB devono essere formattati in
formato FAT32. Oltre i 32 GB di memoria devono essere formattati in
formato exFAT. La dimensione massima di archiviazione è di 128 GB.
Installazione/riparazione della trasmissione a cinghia
1. Utilizzare un cacciavite per rimuovere la clip di bloccaggio a forma di
C dall'asse di rotazione.
2. Sollevare il piatto del giradischi e rimuoverlo dall'asse di rotazione (la
cinghia di trasmissione si stacca dal binario del giradischi).
3. Sul retro del piatto del giradischi sono presenti due piccoli perni
cilindrici per facilitare la sostituzione della cinghia. Posizionare la cinghia
sul binario e agganciarla a un perno.
4. Rimettere l'unità di rotazione sull'asse e assicurarsi che lo spazio
formato dal perno e dalle cinghie sia allineato con il perno metallico sulla
staffa dell'unità di rotazione, in modo che il perno metallico sulla staffa
dell'unità di rotazione si trovi in uno spazio triangolare quando l'unità di
rotazione è completamente rimontata.Ruotare manualmente il piatto
girevole per circa mezzo giro e la cinghia sarà posizionata. Infine, rimettere
il fermaglio sull'albero.
FAQ
Il dispositivo non si accende
Assicuratevi che il cavo di alimentazione dell’apparecchio sia collegato
a una presa elettrica appropriata e che la presa a muro sia accesa.
Il suono è assente
Ruotare la manopola di accensione/volume in senso orario per
aumentare il volume.
Il disco in vinile non viene riprodotto

10
TX-186, 5000, 09/22
Assicurarsi che la manopola delle funzioni sia impostata sulla funzione
desiderata. Assicurarsi di aver selezionato la velocità giusta (33, 45 o 78
giri).
Non viene riprodotto nulla tramite il collegamento AUX IN
Assicurarsi che il cavo sia saldamente collegato e verificare che il
dispositivo esterno sia pulito e non danneggiato. Verificare che la
manopola delle funzioni sia impostata sulla funzione desiderata. Verificare
che il volume del dispositivo esterno sia al 70-80%.
Non viene riprodotto nulla tramite il dispositivo BT
Assicurarsi che il BT sia collegato e che il dispositivo esterno emetta un
suono. Ricollegare il BT e controllare il volume impostato di LP Player e del
dispositivo esterno.
NOTA BENE
Se non è possibile ottenere un funzionamento normale, scollegare il cavo di
alimentazione dalla presa di corrente e ricollegarlo.
Disimballaggio e manipolazione: Aprire con cautela la confezione e rimuovere
l’imballaggio. Rimuovere il sacchetto di plastica e conservare tutto l’imballaggio per
un uso futuro. Tenere tutti gli imballaggi lontani da bambini piccoli e animali.
Posizionamento del centro musicale: Posizionare l’apparecchio su una
superficie stabile, lontano da fonti di calore e assicurando un’adeguata ventilazione
intorno al centro musicale.
Ventilazione e fonti di calore: Durante l’uso, non collocare materiale sulle fessure
di ventilazione per evitare il surriscaldamento e il guasto dell’apparecchio. Non
collocare il dispositivo alla luce diretta del sole o in prossimità di fonti di calore come
termosifoni o fuochi.
Candele e fiamme libere: Non collocare candele accese o tea light sopra o ai lati
del centro musicale. Non avvicinare fiamme libere al mobile.
Collegamenti: Quando si collega il music center alla rete elettrica, non collocare
cavi che possano far inciampare. Non incastrare o appoggiare oggetti pesanti sul
cavo di alimentazione.
Umidità: Non collocare l’apparecchiatura in ambienti umidi o bagnati, come cucine,
bagni o scantinati pieni di vapore. Non permettere all’acqua o ad altri liquidi di entrare
nell’apparecchiatura. Non toccare la spina o l’adattatore di rete con le mani bagnate.
Se l’umidità dovesse penetrare nel centro musicale, scollegare l’apparecchio
dall’alimentazione.
Pulizia e cura: Scollegare il centro musicale dalla rete elettrica. Utilizzare un panno
morbido e asciutto o, in caso di macchie ostinate, un panno morbido con un
detergente delicato diluito. Non utilizzare liquidi a base di alcol o materiali abrasivi.

11
TX-186, 5000, 09/22
Avvertenze
Non utilizzare questa unità per scopi diversi da quelli destinati all'uso. Non cadere
/ urtare / scuotere il dispositivo Non utilizzare l'unità se è stata danneggiata in
qualsiasi modo. Non aprire / riparare / smontare il dispositivo Non conservare il
dispositivo in ambienti ad alta temperatura / vicino al fuoco aperto / in ambienti umidi,
umidi o erosivi / in acqua. Smettere di usare quando si verifica un odore insolito /
distorsione del riscaldamento / cambiamento di colore del materiale del guscio o altre
situazioni anomale. Tenere lontano da bambini / persone senza abbastanza
capacità mentali / persone senza abbastanza conoscenze per utilizzare questo
prodotto.
Numero di telefono per supporto tecnico: 01805 012643*
(14 centesimo/minuto da linea fissa tedesca e 42 centesimo/minuto da
reti mobili). Email: [email protected]
*La hotline di supporto è disponibile dal lunedì al venerdì dalle 9:00 alle
13:00 e dalle 14:00 alle 17:00.
Dichiarazione di conformità
La Dichiarazione di Conformità UE può essere richiesta
all'indirizzo www.technaxx.de/ (nella barra inferiore
"Dichiarazione di Conformità").
Smaltimento
Smaltimento degli imballaggi Smaltire l'imballaggio in base al
tipo di materiale.
Smaltire il cartone nel raccoglitore della carta I fogli nella raccolta
dei materiali riciclabili.
Smaltimento di vecchie apparecchiature (Vale nell'Unione
Europea e in altri paesi europei con raccolta differenziata
(raccolta di materiali riciclabili) Le vecchie apparecchiature non
devono essere smaltite con i rifiuti domestici! Ogni consumatore
è obbligato per legge a smaltire i vecchi dispositivi che non
possono più essere utilizzati separatamente dai rifiuti domestici,
ad es punto di raccolta nel suo comune o distretto. Ciò garantisce
che i vecchi dispositivi vengano adeguatamente riciclati e che si
evitino effetti negativi sull'ambiente. Per questo motivo gli

12
TX-186, 5000, 09/22
apparecchi elettrici sono contrassegnati dal simbolo qui
rappresentato.
Le batterie e gli accumulatori non devono essere smaltiti con i
rifiuti domestici! In qualità di consumatore, sei obbligato per
legge a consegnare tutte le batterie e le batterie ricaricabili,
indipendentemente dal fatto che contengano o meno sostanze
nocive*, presso un punto di raccolta nel tuo comune/città o nel
commercio, in modo che possano essere smaltite in un modo
ecologico. può essere smaltito con delicatezza.
* contrassegnato con: Cd = cadmio, Hg = mercurio, Pb = piombo.
Restituisci il tuo prodotto al tuo punto di raccolta con la batteria
installata e solo scarica!
Prodotto in Cina
Distribuito da:
Technaxx Germany GmbH & Co. KG
Konrad-Zuse-Ring 16-18,
61137 Schöneck, Germania

1
TX-186, 5000, 09/22
Technaxx® * Gebruiksaanwijzing
BT Retro LP-Player TX-186
Eigenschappen
Bluetooth Versie 5.0
Stereoluidsprekers 2 x 3 W
RCA-uitgang voor aansluiting op HiFi-systemen
Vinylspeler met 3 snelheden: 33, 45, 78 toeren per minuut
Digitalisering van albums rechtstreeks naar een USB-stick
3,5 mm AUX-IN-uitgang en 3,5 mm hoofdtelefoonaansluiting
Hoogwaardig ontwerp met functionele controle

2
TX-186, 5000, 09/22
Inhoud
Eigenschappen ....................................................................................... 1
Voor het gebruik ...................................................................................... 3
Specificaties ............................................................................................ 3
Productoverzicht...................................................................................... 4
Eerste gebruik ......................................................................................... 5
Achtergrondmodus (Vinyl) ....................................................................... 5
Tips voor vinylplaten ............................................................................. 5
Een vinylplaat afspelen ......................................................................... 5
Stylus vervangen .................................................................................. 7
Bluetooth modus ..................................................................................... 7
Afspelen via Bluetooth .......................................................................... 7
AUX modus ............................................................................................. 8
Muziek afspelen via AUX-ingang .......................................................... 8
Hoofdtelefoon ....................................................................................... 8
Aansluiten op een externe versterker .................................................... 8
Audio opnemen op een USB-stick ........................................................ 9
Montage/reparatie van riemtransmissie ................................................... 9
Veelgestelde vragen .............................................................................. 10
Tips ....................................................................................................... 10
Waarschuwing ....................................................................................... 11
Conformiteitsverklaring .......................................................................... 12
Afvalverwijdering ................................................................................... 12
Bewaar deze gebruiksaanwijzing op een veilige plek voor toekomstig
gebruik of als dit product wordt weggegeven. Dit geldt ook voor de
originele accessoires van dit product. Neem contact op met de dealer of
de winkel waar u dit product hebt gekocht als u een garantieclaim hebt.
Geniet van uw product. * Deel uw ervaring en mening op één van de
bekende websites.

3
TX-186, 5000, 09/22
Voor het gebruik
Kies zorgvuldig de installatielocatie van uw apparaat. Plaats het niet in direct
zonlicht of in de buurt van een warmtebron. Vermijd ook locaties die onderhevig zijn
aan trillingen en overmatig stof, overmatige hitte, kou of vocht. Installeer het
apparaat niet in een schuine positie, het is ontworpen om alleen in een horizontale
positie te werken. Als het apparaat rechtstreeks van een koude naar een warme
plaats wordt gebracht, kan er vocht in de speler condenseren en schade
veroorzaken. Wanneer u het apparaat voor het eerst installeert of van een koude
naar een warme plaats verplaatst, wacht dan 30 minuten voordat u het gebruikt.
De ventilatieopeningen mogen niet worden afgesloten. Zorg voor voldoende ruimte
boven en rond de versterker/ontvanger. Plaats geen cd-speler of andere
apparatuur bovenop het apparaat. Open de behuizing niet. Dit kan leiden tot
schade aan het elektrische circuit of elektrische schokken. Als u de speler lange
tijd niet gaat gebruiken, zorg er dan voor dat u de stekker uit het stopcontact haalt.
Trek bij het verwijderen van de stekker nooit aan het snoer. Om brand of
elektrische schokken te voorkomen, dient u het apparaat tijdens het schoonmaken
uit het stopcontact te halen. Wees voorzichtig bij het reinigen en afvegen van de
kunststof onderdelen. Probeer het apparaat niet te reinigen met chemische
oplosmiddelen, omdat dit de behuizing kan beschadigen.
Specificaties
Bluetooth
Versie 5.0; actieradius ~10 m in open terrein
Bluetooth-transmissiefrequentie 2,4 GHz
Het uitgestraalde maximale vermogen is 2,5 mW
Modus
Phono, Bluetooth, AUX-IN, USB
Luidsprekers
2 3 W stereoluidsprekers,
impedantie 4 ohm, frequentiebereik 75 Hz–20 kHz
Phono
EP/LP/SP; gelijkstroommotor; snelheden: 33/45/78 tpm;
S/N≧45 dB; naaldpatroon (model-
ID: 4768); riem
transmissie
AUX IN en hoofdtelefoon
3,5 mm aansluiting
RCA uitgang
slot (links en rechts)
Spanning voedingsadapter
100-240 V 50/60 Hz
Stroomverbruik
Gelijkstroom 5 V 1 A
Energieverbruik
Maximaal 5 W
Gewicht/afmetingen
2,2 kg / (L) 33,0 x (B) 28,5 x (H) 12,4
cm
Inhoud van het pakket
TX-186 Bluetooth Retro LP-speler, 45
tpm Single Record Adapter,
Voedingsadapter, Gebruiksaanwijzing

4
TX-186, 5000, 09/22
Productoverzicht
1
Draaitafel
2
Enkele adapter voor snelheid 45 toeren per minuut
3
Automatische stopschakelaar
4
Toonarm lifter
5
Snelheidskiezer
6
Toonarm
7
Cartridge / stylus
8
Veiligheidshendel
9
Luidspreker
10
Voeding / Bluetooth-indicator (Voeding rood / Bluetooth blauw)
11
Hoofdtelefoonuitgang
12
Modusschakelaar / Volumeregeling
13
USB poort (alleen opname)
14
AUX-IN
15
RCA (R&L) uitgang
16
Stroomverbruik (Gelijkstroom 5 V)

5
TX-186, 5000, 09/22
Eerste gebruik
Lees de gebruikershandleiding aandachtig door. Sluit de voedingsadapter
aan op een 100-240V AC-stopcontact en het andere uiteinde op de TX-
186 (16). Wij herinneren u eraan dat: "Niet-verbonden apparaten werken
altijd verkeerd." Zet het apparaat aan door aan de volumeknop (12) te
draaien. Bluetooth is standaard ingeschakeld.
Achtergrondmodus (Vinyl)
Tips voor vinylplaten
Raak de groeven van de platen niet aan. Pak platen alleen bij de
randen of het label vast. Zorg dat je handen schoon zijn. Sebum zal
geleidelijk de platen bederven. Houd uw platen stofvrij en bewaar ze op
een koele, droge plaats. Bewaar uw platen in hun etui wanneer u ze
niet gebruikt om stof en krassen te voorkomen. Bewaar platen rechtop.
Platen die horizontaal worden opgeslagen buigen en vervormen.
Bewaar geen platen in de kofferbak van een auto. Bewaar platen op
een plaats met een stabiele temperatuur en een lage luchtvochtigheid.
Om het oppervlak schoon te maken, veeg het oppervlak voorzichtig in
een cirkelvormige beweging af met een zachte, antistatische doek.
Een vinylplaat afspelen
Wanneer u de draaitafel gebruikt, moet u ervoor zorgen dat u de
naaldbescherming (2) verwijdert, zoals weergegeven in de onderstaande
afbeelding. Het moet gemakkelijk van de styluscartridge (1) kunnen
schuiven. Zorg er ook voor dat u de toonarmvergrendeling voor gebruik
uitschakelt en na gebruik weer vergrendelt.
Zet het apparaat aan en stel het volume in op het gewenste niveau.

6
TX-186, 5000, 09/22
Draai de functieschakelaar naar PHONO.
Plaats de plaat op de draaitafel en selecteer de juiste afspeelsnelheid:
33/45/78 toeren per minuut volgens de vinyl die wordt afgespeeld.
Gebruik bij het afspelen van een 45 toeren per minuut plaat de
meegeleverde 45-toerenadapter.
Verwijder de naaldbescherming en ontgrendel de
toonarmvergrendeling.
Duw de hefhendel omhoog om de toonarm omhoog te brengen en
verplaats de toonarm vervolgens voorzichtig naar de gewenste positie
boven de plaat.
De plaat begint te draaien wanneer de toonarm naar de plaat wordt
verplaatst. Duw de hendel (2) naar voren om de toonarm langzaam naar
de gewenste positie op de plaat te laten zakken. De plaat begint te
spelen.
Wanneer het afspelen klaar is, duw de toonarm lifter (2) naar achteren
om de toonarm omhoog te brengen en voorzichtig terug te brengen naar
zijn oorspronkelijke positie.
Wanneer u klaar bent met het afspelen van platen, activeer de
toonarmvergrendeling om deze te beschermen tegen onbedoelde
beweging. Koppel de TX-186 los van de stroombron als deze gedurende
een bepaalde tijd niet zal worden gebruikt.
1. Toonarm / 2. Toonarm lifter

7
TX-186, 5000, 09/22
Stylus vervangen
Het wordt aanbevolen om de stylus te vervangen zodra u een
verandering in de geluidskwaliteit opmerkt. Langdurig gebruik van een
versleten stylus kan platen beschadigen. Bij het afspelen van platen met
een snelheid van 78 toeren per minuut, zal de stylus
sneller slijten.
A: De stylus uit de cartridge verwijderen
Plaats de schroevendraaier op de punt van de
styluskop en druk deze naar beneden in de richting die
wordt aangegeven in afbeelding "A". Verwijder de
styluskop door deze naar voren te trekken en naar beneden te drukken.
B: Een nieuwe stylus installeren
Neem de punt van de styluskop en plaats deze door te drukken in de
richting aangegeven in afbeelding "B". Duw de styluskop omhoog in de
richting aangegeven in afbeelding "B" totdat de stylus op zijn plaats
vastklikt bij de punt.
(1) Geleidepennen binnen
Waarschuwing
Buig de stylus niet. Raak de naald niet aan om letsel te voorkomen.
Schakel het apparaat uit voordat u de stylus vervangt. Buiten bereik
van kinderen bewaren. Wees voorzichtig, want de stylus is delicaat.
Het gebruik van een verbogen of gebroken stylus kan de plaat
beschadigen en een storing veroorzaken. Stel de stylus niet bloot aan
overmatige warmte.
Bluetooth modus
Afspelen via Bluetooth
Zet het apparaat aan door aan de volumeknop (12) te draaien totdat de

8
TX-186, 5000, 09/22
indicator blauw begint te knipperen. Vervolgens moet u uw telefoon of
ander media-apparaat inschakelen en de Bluetooth-zoekfunctie starten;
de ontvangende operator ontvangt een Bluetooth ID-nummer voor:
"Technaxx TX-186"; wanneer uw Bluetooth-apparaat is verbonden, piept
de luidspreker.
Opmerking: Koppel de AUX-IN of hoofdtelefoon los voordat u de
Bluetooth-functie gebruikt. Installeer de toonarm op de toonarmstandaard
en de veiligheidsvergrendeling. Bedien muziek vanaf een
afspeelapparaat dat is aangesloten op de LP-speler.
Let op: Als u uw apparaat opnieuw opstart, moet u deze stappen
herhalen om de Bluetooth-functie opnieuw te starten. Het laatst
verbonden apparaat wordt automatisch verbonden.
AUX modus
Muziek afspelen via AUX-ingang
Zet het apparaat aan door aan de volumeknop te draaien (12). Sluit
het ene uiteinde van de 3,5 mm AUX-IN-kabel (meegeleverd) aan op de
3,5 mm AUX-IN-aansluiting aan de achterkant van het apparaat en het
andere uiteinde op de AUX-aansluiting van uw audioapparaat (cd-speler,
tablet, mp3-speler, smartphone, enz).
Druk op PLAY op de externe audiobron.
Opmerking: Het uitgangsvolume wordt beïnvloed door het
volumeniveau van de bron. Zorg ervoor dat het bronvolume is ingesteld
op ongeveer 70-80% om geluidsvervorming te voorkomen. Het afspelen
moet worden geregeld vanaf het aangesloten audioapparaat.
Hoofdtelefoon
Sluit de hoofdtelefoon aan op de 3,5 mm AUX-uitgang (11). Stel de
luistermodus in. Elke modus kan worden ingesteld. Zet het volume op
een comfortabel niveau en geniet van de muziek.
Aansluiten op een externe versterker
Met deze functie kunt u muziek van de platenspeler afspelen via een
versterker of externe luidsprekers. U hebt een RCA-kabel nodig (niet

9
TX-186, 5000, 09/22
meegeleverd) om aan te sluiten).
Sluit het ene uiteinde van de rode en witte RCA-connectoren aan op de
RCA-uitgang (15) aan de achterkant van de TX-186 en het andere
uiteinde op de R (rode) en L (witte) aansluitingen aan de achterkant van
de versterker of externe luidsprekers.
Audio opnemen op een USB-stick
Deze apparatuur heeft de mogelijkheid om uw vinylmuziek te coderen in
een digitaal formaat om direct op een USB-stick op te nemen.
Steek de USB-stick in de USB-poort (13).
Bereid uw muziekmedia voor op afspelen: plaats de plaat in de speler
en begin met afspelen.
De LP-speler herkent het USB-apparaat.
Het creëert een nieuw MP3-bestand op het USB-apparaat volgens
afspelen en pauzeren.
Daarna moeten de bestandsnamen worden gewijzigd volgens de
opgenomen bestanden.
Opmerking: USB-apparaten van 32 GB moeten worden geformatteerd
naar FAT32. Als het apparaat meer dan 32 GB geheugen heeft, moet het
worden geformatteerd naar exFAT-formaat. De maximale omvang van
geheugen is 128 GB.
Montage/reparatie van riemtransmissie
1. Verwijder met een schroevendraaier de C-vormige houder van de
rotatie as.
2. Til de draaitafelplaat op en verwijder deze van de rotatie as (u zult
zien dat de aandrijfriem loskomt van de draaitafelbaan).
3. Er zijn twee kleine cilindrische pinnen aan de achterkant van de
draaitafelplaat om te helpen bij het vervangen van de riem. Leg de riem
op de baan en zet hem vast met één pin.
4. Plaats de draaitafelplaat terug op de as en zorg ervoor dat de ruimte
gevormd door de pen en riemen is uitgelijnd met de metalen pen op de
draaitafelplaatbeugel, zodat de metalen pen op de draaitafelbeugel zich
in de driehoekige ruimte bevindt wanneer de draaitafel is weer helemaal
op zijn plek zit.
5. Draai de draaischijf handmatig ongeveer een halve slag en de pas

10
TX-186, 5000, 09/22
wordt ingesteld. En tot slot, plaats de klem terug op de as.
Veelgestelde vragen
Het apparaat gaat niet aan
Zorg ervoor dat het netsnoer van het apparaat is aangesloten op een
geschikt stopcontact en dat het stopcontact is ingeschakeld.
Er is geen geluid
Draai de aan/uit-/volumeknop rechtsom om het volume te verhogen.
De vinylplaat wordt niet afgespeeld
Zorg ervoor dat de functieschakelaar op de gewenste functie staat.
Zorg ervoor dat u de juiste snelheid selecteert (33, 45 of 78 toeren per
minuut).
Er speelt niets af via de AUX IN-aansluiting
Zorg ervoor dat de kabel goed is aangesloten en controleer of het
externe apparaat schoon en onbeschadigd is. Controleer of de
functieschakelaar op de gewenste functie staat. Zorg ervoor dat het
volume van het externe apparaat 70-80% is.
Het Bluetooth-apparaat speelt geen geluid af
Zorg ervoor dat Bluetooth is aangesloten en dat het externe apparaat
geluid afspeelt. Verbind Bluetooth opnieuw en controleer het ingestelde
volume van de LP-speler en het externe apparaat.
Opmerking: Als het apparaat niet normaal werkt, trek dan de stekker uit
het stopcontact en steek hem er weer in.
Tips
Uitpakken en vervoeren: Open de doos voorzichtig en verwijder de verpakking.
Verwijder de plastic zak en bewaar het hele pakket voor toekomstig gebruik. Houd
de hele verpakking buiten het bereik van kleine kinderen en dieren.
Plaatsen van de musictoren: Plaats de apparatuur op een stabiel oppervlak uit
de buurt van warmtebronnen en zorg voor voldoende ventilatie rond de
muziektoren.
Ventilatie en warmtebronnen: Plaats tijdens gebruik geen materiaal over
ventilatiegaten, dit kan leiden tot oververhitting en storingen van het apparaat.

11
TX-186, 5000, 09/22
Plaats het apparaat niet in direct zonlicht of in de buurt van warmtebronnen zoals
radiatoren of vuur.
Kaarsen en open vuur: Plaats geen brandende kaarsen of theelichtjes op of aan
de zijkanten van het muziekcentrum. Sta geen open vuur toe in de buurt van de
behuizing.
Aansluiting: Plaats bij het aansluiten van het muziekcentrum op het lichtnet geen
draden waar men over kan struikelen. Knijp niet in het netsnoer en plaats er geen
zware voorwerpen op.
Vochtigheid: Plaats de apparatuur niet in natte of vochtige ruimtes zoals
stomende keukens, badkamers of kelders. Zorg ervoor dat er geen water of andere
vloeistoffen in de apparatuur komen. Raak de stekker of adapter niet aan met natte
handen. Als er vocht in het muziekcentrum komt, trek dan de stekker uit het
stopcontact.
Reiniging en onderhoud: Haal de stekker van het muziekcentrum uit het
stopcontact. Gebruik een zachte, droge doek, of gebruik voor hardnekkige vlekken
een zachte doek met een verdund mild schoonmaakmiddel. Gebruik geen
alcoholhoudende vloeistoffen of schurende materialen.
Waarschuwing
Gebruik dit apparaat niet voor een ander doel dan waarvoor het bedoeld is.
Laat het apparaat niet vallen/slaan/schudden. Gebruik het apparaat niet als het
op enigerlei wijze beschadigd is. Open/repareer/demonteer het apparaat niet.
Bewaar het apparaat niet in een omgeving met hoge temperaturen / in de buurt van
open vuur / in een natte, vochtige of erosieve omgeving / in water. Staak het
gebruik in geval van ongebruikelijke geur/vervorming door verhitting/verkleuring van
materiaal van de behuizing of andere abnormale situatie. Buiten bereik van
kinderen / personen met onvoldoende mentale capaciteit / personen zonder
voldoende kennis om dit product te gebruiken houden.
Telefoonnummer voor technische ondersteuning: 01805 012643* (14
cent/minuut vanaf een Duitse vaste lijn en 42 cent/minuut vanaf mobiele
netwerken). Gratis E-mail: support@technaxx.de
*De support hotline is beschikbaar van maandag t.e.m. vrijdag tussen
9:00 en 13:00 en tussen 14:00 en 17:00.

12
TX-186, 5000, 09/22
Conformiteitsverklaring
De EU Conformiteitsverklaring kan worden aangevraagd op
www.technaxx.de/ (in de onderste balk “Conformiteitsverklaring”).
Afvalverwijdering
Gooi de verpakking weg. Gooi de verpakking weg naargelang
het type verpakking.
Gooi bordkarton of karton weg met het oudpapier. Breng de
folie naar een gepast recyclingpunt.
Verwijdering van oude apparatuur (Van toepassing voor de
Europese Unie en andere Europese landen met een
afzonderlijk inzamelingssysteem (inzameling van waardevolle
materialen) Oude apparatuur mag niet samen met het huisvuil
worden weggegooid! Elke consument is bij wet verplicht om
oude apparaten die niet langer bruikbaar zijn niet samen met
het huisvuil weg te gooien, maar deze in te leveren bij een
inzamelpunt in zijn of haar gemeente. Dit zorgt ervoor dat oude
apparaten juist worden gerecycled en een negatieve impact op
het milieu wordt vermeden. Elektrische apparaten zijn aldus
van het hier weergegeven symbool voorzien.
Batterijen en oplaadbare batterijen mogen niet samen met het
huisvuil worden weggegooid! U, als consument, bent bij wet
verplicht om alle batterijen en oplaadbare batterijen, ongeacht
of deze al dan niet chemische stoffen* bevatten, in te leveren
bij een inzamelpunt in uw gemeente/woonplaats of een erkende
handelaar zodat ze op een milieuvriendelijke manier verwerkt
kunnen worden.
* gemarkeerd met: Cd = cadmium, Hg = kwik, Pb = lood. Breng
uw product naar een inzamelpunt met de batterij erin en alleen
in een ongeladen toestand.
Gemaakt in China
Gedistribueerd door:
Technaxx Germany GmbH & Co. KG
Konrad-Zuse-Ring 16-18,
61137 Schöneck, Duitsland
-
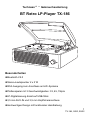 1
1
-
 2
2
-
 3
3
-
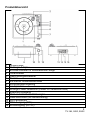 4
4
-
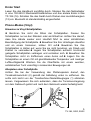 5
5
-
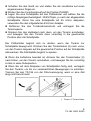 6
6
-
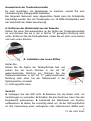 7
7
-
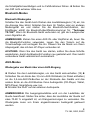 8
8
-
 9
9
-
 10
10
-
 11
11
-
 12
12
-
 13
13
-
 14
14
-
 15
15
-
 16
16
-
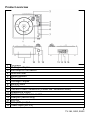 17
17
-
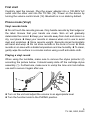 18
18
-
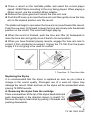 19
19
-
 20
20
-
 21
21
-
 22
22
-
 23
23
-
 24
24
-
 25
25
-
 26
26
-
 27
27
-
 28
28
-
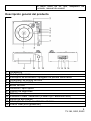 29
29
-
 30
30
-
 31
31
-
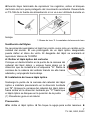 32
32
-
 33
33
-
 34
34
-
 35
35
-
 36
36
-
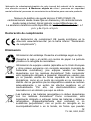 37
37
-
 38
38
-
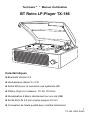 39
39
-
 40
40
-
 41
41
-
 42
42
-
 43
43
-
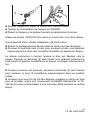 44
44
-
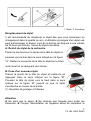 45
45
-
 46
46
-
 47
47
-
 48
48
-
 49
49
-
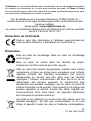 50
50
-
 51
51
-
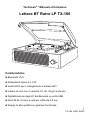 52
52
-
 53
53
-
 54
54
-
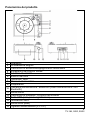 55
55
-
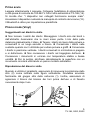 56
56
-
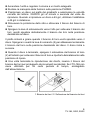 57
57
-
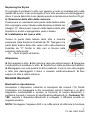 58
58
-
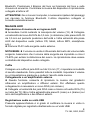 59
59
-
 60
60
-
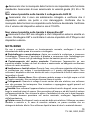 61
61
-
 62
62
-
 63
63
-
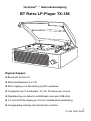 64
64
-
 65
65
-
 66
66
-
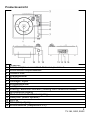 67
67
-
 68
68
-
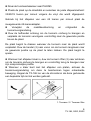 69
69
-
 70
70
-
 71
71
-
 72
72
-
 73
73
-
 74
74
-
 75
75


Technaxx Retro Plattenspieler Handleiding
- Categorie
- Audio draaitafels
- Type
- Handleiding