
Station météo · Weather Station · Wetterstation · Weerstation
· Estación meteorológica · Estação meteorológica ·
Climate Monitor
FR Mode d’emploi
EN Instruction manual
DE Bedienungsanleitung
NL Gebruikershandleiding
ES Manual de instrucciones
PT Manual de instruções

DE
Besuchen Sie unsere Website über den folgenden QR Code oder Weblink um weitere
Informationen zu diesem Produkt oder die verfügbaren Übersetzungen dieser Anleitung zu
nden.
GB
Visit our website via the following QR Code or web link to nd further information on this
product or the available translations of these instructions.
FR
Si vous souhaitez obtenir plus d’informations concernant ce produit ou rechercher ce mode
d’emploi en d’autres langues, rendez-vous sur notre site Internet en utilisant le code QR ou le
lien correspondant.
NL
Bezoek onze internetpagina via de volgende QR-code of weblink, voor meer informatie over
dit product of de beschikbare vertalingen van deze gebruiksaanwijzing.
ES
¿Desearía recibir unas instrucciones de uso completas sobre este producto en un idioma
determinado? Entonces visite nuestra página web utilizando el siguiente enlace (código QR)
para ver las versioneAs disponibles.
IT
Desidera ricevere informazioni esaustive su questo prodotto in una lingua specica? Venga a
visitare il nostro sito Web al seguente link (codice QR Code) per conoscere le versioni disponibili.
www.bresser.de/P7000016000000
www.bresser.de/warranty_terms
GARANTIE · WARRANTY · GARANTÍA · GARANZIA


4
table des matières
1 Impression.................................................................................................5
2 Note de validité.........................................................................................5
3 Caractéristiques........................................................................................6
4 A propos de ce mode d’emploi ................................................................6
5 Consignes générales de sécurité ............................................................7
6 Vue d'ensemble des pièces et contenu de la livraison.........................9
7 Affichage à l'écran..................................................................................10
8 Mise sous tension ...................................................................................10
9 Réglage automatique du temps ...........................................................11
10 Réglage manuel de l'heure....................................................................11
11 Affichage automatique des mesures ...................................................12
12 Indication Confort ..................................................................................12
13 Changement d'affichage .......................................................................12
14 Recyclage.................................................................................................13
15 Garantie ...................................................................................................13
16 Déclaration de conformité CE ...............................................................14
17 Données techniques...............................................................................14

5 / 72
1 Impression
Bresser GmbH
Gutenbergstr. 2
46414 Rhede
Germany
www.bresser.de
Pour toute demande de garantie ou de service, veuillez vous
référer aux informations sur la "Garantie" et le "Service"
dans cette documentation. Nous vous demandons de com-
prendre que les retours non sollicités ne peuvent être trai-
tés.
Sous réserve d’erreurs et de modifications techniques.
© 2023 Bresser GmbH
Tous droits réservés.
La reproduction de cette documentation - même partielle -
sous quelque forme que ce soit (par ex. photocopie, impres-
sion, etc.) ainsi que l'utilisation et la diffusion au moyen de
systèmes électroniques (par ex. fichier image, site Internet,
etc.) sans l'autorisation écrite préalable du fabricant sont in-
terdites.
Les désignations et les marques des sociétés respectives
utilisées dans cette documentation sont généralement pro-
tégées par le droit commercial, le droit des marques et/ou
le droit des brevets en Allemagne, dans l'Union européenne
et/ou dans d'autres pays.
2 Note de validité
Cette documentation est valable pour les produits portant
les numéros d'article suivants :
7000016000000
Version du manuel : 0423

6 / 72
Désignation du manuel :
Manual_7000016000000_Climate-Monitor_fr-en-de-nl-es-
pt_BRESSER_v042023a
Toujours fournir des informations lors de la demande de
service.
3 Caractéristiques
• Indicateur de confort climatique intérieur coloré
• Température ambiante (en °C/°F)
• Humidité relative (ambiante, en %)
• Heure via le signal horaire DCF (affichage 12 ou 24
heures)
• Date
• Alimentation : 3x AAA (non inclus)
• Pour position sur table ou fixation murale
4 A propos de ce mode d’emploi
INFORMATION
Ce mode d’emploi fait partie intégrante de l’appareil.
Lire attentivement les consignes de sécurité et le mode
d'emploi avant d'utiliser l'appareil.
Conservez ce manuel d'instructions dans un endroit sûr
pour pouvoir le consulter ultérieurement. En cas de vente
ou de cession de l'appareil, le manuel d'instructions doit
être transmis à tout propriétaire/utilisateur ultérieur du
produit.

7 / 72
5 Consignes générales de sécurité
DANGER
Risque d'étouffement !
Une utilisation incorrecte de ce produit peut entraîner une
suffocation, en particulier chez les enfants. Il est donc impé-
ratif que vous respectiez les consignes de sécurité sui-
vantes.
• Conservez les matériaux d'emballage (sacs en plas-
tique, élastiques, etc.) hors de portée des enfants !
• Ce produit contient des petites pièces qui peuvent être
avalées par les enfants ! Risque d'étouffement !
DANGER
RISQUE D'ÉLECTROCUTION !
Cet appareil contient des pièces électroniques qui sont ali-
mentées par une source d'énergie (adaptateur secteur et/
ou piles). Une utilisation incorrecte de ce produit peut en-
traîner un choc électrique. Le choc électrique peut causer
des blessures graves ou mortelles. Il est donc impératif que
vous respectiez les consignes de sécurité suivantes.
• Ne laissez jamais les enfants sans surveillance lorsque
vous manipulez l'appareil ! Suivez attentivement les ins-
tructions et n'essayez pas d'alimenter cet appareil avec
autre chose que les sources d'énergie recommandées
dans ce manuel d'instructions, sinon il y a un risque de
choc électrique !

8 / 72
DANGER
RISQUE D'INCENDIE/EXPLOSION
Une utilisation incorrecte de ce produit peut entraîner un in-
cendie. Il est essentiel que vous observiez les informations
de sécurité suivantes afin d'éviter les incendies.
• Ne pas exposer l’appareil à des températures trop éle-
vées. N’utilisez que les batteries conseillées. L’appareil
et les batteries ne doivent pas être court-circuitées ou
jeter dans le feu ! Toute surchauffe ou manipulation in-
appropriée peut déclencher courts-circuits, incendies
voire conduire à des explosions !
INFORMATION
Danger de dommages matériels !
Une manipulation incorrecte peut entraîner des dommages
à l'appareil et/ou aux accessoires. Par conséquent, n'utilisez
l'appareil que conformément aux consignes de sécurité sui-
vantes.
• Ne démontez pas l'appareil ! En cas de défaut, veuillez
contacter votre revendeur. Il prendra contact avec le
centre de service et pourra organiser le retour de cet
appareil pour réparation si nécessaire.
• Ne pas immerger l'appareil dans l'eau.
• N’exposer l’appareil à aucun choc, à aucune secousse,
poussière, à des températures élevées pendant une pé-
riode prolongée, ni à une humidité extrême. Ceci peut
entraîner des dysfonctionnements, des courts-circuits
ainsi que des dommages causés aux piles et aux com-
posants.
• N'utilisez que les piles recommandées. Remplacez tou-
jours les piles faibles ou vides par un jeu complet de
piles neuves à pleine capacité. N'utilisez pas de piles de

9 / 72
marques ou de types différents ou de capacités diffé-
rentes. Retirez les piles de l'appareil s'il ne doit pas être
utilisé pendant une longue période !
• N’utilisez pas de piles rechargeables (accumulateurs).
INFORMATION
RISQUE d dommages de surtension
Le fabricant récuse toute responsabilité en cas de dom-
mage résultant d’une alimentation électrique inappropriée
due à des batteries mal insérées!
6 Vue d'ensemble des pièces et contenu de la
livraison
123
4
5
6
7
8
9
10
A
Fig.1: Toutes les parties du capteur thermo-hygro
1 Boîtier 2 Écran d'affichage
3 Bouton RCC 4 Touche DOWN
5 Fixation murale 6 Touche [UP]

10 / 72
7 Bouton [SET] 8 Fentes de ventilation
9 Support dépliable 10 Compartiment à piles avec cou-
vercle
Étendue de la livraison:
3 x thermo-hygromètre (A)
Également requis (non inclus dans la livraison):
3 piles de type AAA / LR03
7 Affichage à l'écran
11
12
13 14
16
17
15
Fig.2: Afficher les indications pour le thermo-hygromètre
11 Informations AM/PM en mode 12
heures 12 Indicateur de climat ambiant
13 Température (°C ou °F sélection-
nable) 14 Humidité ( en % )
15 Symbole de l’heure
d’été (uniquement pour l’heure
d’été)
16 Temps (heures : minutes)
17 Symbole RCC (uniquement
lorsque l’horloge radiocomman-
dée est activée)
8 Mise sous tension
1. Retirez le couvercle du compartiment à piles.

11 / 72
2. Insérez les piles dans le compartiment prévu à cet effet.
Puis veillez à ce qu’elles soient insérées dans le bon
sens (+/-)
3. Replacez le couvercle du compartiment à piles.
9 Réglage automatique du temps
Une fois l'alimentation établie, l'horloge recherche automa-
tiquement le signal radio, ce qui prend environ 3 à 8 mi-
nutes pour terminer ce processus.
Si le signal radio est reçu correctement, la date et l'heure
sont automatiquement réglées et l'icône du signal radio
s'allume.
Si aucun signal n'est reçu, suivez les étapes suivantes :
1. Appuyez sur la touche RCC pendant environ 2 secondes
pour réactiver la réception du signal radio.
2. Si l'appareil ne reçoit toujours pas le signal, l'heure doit
être réglée manuellement.
3. Pour désactiver la réception automatique de l’heure,
maintenez la touche RCC enfoncée pendant environ 3
secondes.
10 Réglage manuel de l'heure
1. En mode d'affichage normal, appuyez sur le bouton SET
pendant environ 3 secondes pour accéder au mode de
réglage de l'heure.
2. Les chiffres à définir clignotent.
3. Appuyez sur la touche UP ou DOWN pour changer la
valeur.
4. Appuyez sur le bouton SET pour confirmer et passer au
réglage suivant.
5. Séquence des réglages : Décalage horaire > Heures >
Minutes > Année > Mois > Jour > Langue

12 / 72
6. Enfin, appuyez sur le bouton SET pour enregistrer les
paramètres et quitter le mode de configuration.
INFORMATION !Pour plus d’informations sur l’affichage de
l’heure en mode 12 ou 24 heures, reportez-vous au chapitre
«Modification de l’affichage».
11 Affichage automatique des mesures
Une fois l'alimentation établie, les relevés de l'environne-
ment actuel sont affichés sur l'appareil.
12 Indication Confort
1 SEC : sec (humidité <40%) 2 CONFORT : Optimal (humidi-
té entre 40% et 70%)
3 HUMIDE : Humide (humidi-
té >70%)
L'indicateur climatique est un affichage visuel basé sur la
température et l'humidité de l'air pour déterminer le niveau
de confort.
Remarque :
• L'affichage du confort peut varier à la même tempéra-
ture, en fonction de l'humidité.
13 Changement d'affichage
• En mode d'affichage normal, appuyez sur la touche SET
pour passer de l'heure à la date.
• En mode d'affichage normal, appuyez sur la touche UP
pour basculer entre °C et °F lorsque vous affichez l'uni-
té de température.
• En mode d’affichage normal, appuyez sur la touche
HAUT pour basculer entre l’affichage de l’heure 12
heures et 24 heures.

13 / 72
14 Recyclage
Éliminez les matériaux d'emballage en fonction de leur type.
Des informations sur l'élimination appropriée peuvent être
obtenues auprès du prestataire de services d'élimination des
déchets de la municipalité ou de l'agence environnementale.
Ne jamais éliminer les appareils électriques avec les ordures
ménagères !
Conformément à la directive européenne 2012/19/UE relative
aux déchets d'équipements électriques et électroniques et à
sa transposition en droit national, les équipements électriques
usagés doivent être collectés séparément et recyclés de ma-
nière écologique.
Les piles et les batteries rechargeables ne doivent pas être je-
tées avec les ordures ménagères. Vous êtes légalement tenu
de rapporter les piles et accumulateurs usagés et vous pouvez
les rapporter gratuitement après utilisation, soit dans notre
point de vente, soit à proximité immédiate (par exemple dans
le commerce ou dans les points de collecte municipaux).
Les piles et les batteries rechargeables sont marquées du sym-
bole d'une poubelle barrée et du symbole chimique du pol-
luant. "Cd" signifie cadmium, "Hg" signifie mercure et "Pb" si-
gnifie plomb.
15 Garantie
La période de garantie normale est de 2 ans et commence
le jour de l'achat. Pour bénéficier d'une période de garantie
prolongée (prestation non obligatoire) telle qu'indiquée sur
la boite cadeau, une inscription sur notre site internet est
nécessaire.
Vous pouvez consulter l’intégralité des conditions de garan-
tie ainsi que les informations sur l’extension de la période
de garantie et le détail de nos services via le lien suivant :
www.bresser.de/garantiebedingungen.

14 / 72
16 Déclaration de conformité CE
Par la présente, Bresser GmbH déclare que le type d'équipe-
ment portant le numéro d'article 7000016000000 : est
conforme à la directive : 2014/53/UE. Le texte complet de la
déclaration de conformité de l'UE est disponible à l'adresse
internet suivante : www.bresser.de/
download/7000016000000/CE/7000016000000_CE.pdf
17 Données techniques
Alimentation: 1x pile AAA / LR03
Unité de température: °C ou °F sont sélectionnables
Plage d’affichage de la température : -9,9°C à +50°C
Plage d’affichage de l’humidité: rH 1% à 99%

15
Contents
1 Imprint................................................................................................... 16
2 Validity note .......................................................................................... 16
3 Features ................................................................................................. 17
4 About this Instruction Manual ...........................................................17
5 General safety instructions................................................................. 17
6 Parts overview and scope of delivery ................................................20
7 Screen display ....................................................................................... 21
8 Setting up power supply...................................................................... 21
9 Automatic time setting........................................................................ 21
10 Manual time adjustment.....................................................................22
11 Automatic measurement display ....................................................... 22
12 Clima indicator......................................................................................22
13 Display change...................................................................................... 23
14 Disposal..................................................................................................23
15 Warranty................................................................................................ 24
16 EC declaration of conformity ..............................................................24
17 UKCA declaration of conformity.........................................................24
18 Technical data.......................................................................................24

16 / 72
1 Imprint
Bresser GmbH
Gutenbergstr. 2
46414 Rhede
Germany
www.bresser.de
For any warranty claims or service inquiries, please refer to
the information on "Warranty" and "Service" in this docu-
mentation. We ask for your understanding that unsolicited
returns cannot be processed.
Errors and technical changes excepted.
© 2023 Bresser GmbH
All rights reserved.
The reproduction of this documentation - even in extracts -
in any form (e.g. photocopy, print, etc.) as well as the use
and distribution by means of electronic systems (e.g. image
file, website, etc.) without the prior written permission of
the manufacturer is prohibited.
The designations and brand names of the respective com-
panies used in this documentation are generally protected
by trade, trademark and/or patent law in Germany, the
European Union and/or other countries.
2 Validity note
This documentation is valid for the products with the follow-
ing article numbers:
7000016000000
Manual version: 0423
Manual designation:
Manual_7000016000000_Climate-Monitor_fr-en-de-nl-es-
pt_BRESSER_v042023a
Always provide information when requesting service.

17 / 72
3 Features
• Coloured indoor climate comfort indicator
• Indoor temperature (in °C/ °F)
• Relative humidity (indoor, in %)
• Time by DCF time signal (12 or 24 hr display)
• Date
• Required batteries: 3x AAA (not included)
• Can be placed on a tabletop or mounted to the wall
4 About this Instruction Manual
NOTICE
These operating instructions are to be considered a
component of the device.
Read the safety instructions and the instruction manual
carefully before using this device.
Keep these instruction manual in a safe place for future ref-
erence. If the device is sold or passed on, the instruction
manual must be passed on to any subsequent owner/user
of the product.
5 General safety instructions
DANGER
Danger of suffocation!
Improper use of this product may result in suffocation, es-
pecially for children. It is therefore imperative that you ob-
serve the following safety information.
• Keep packaging materials (plastic bags, rubber bands,
etc.) away from children! There is a danger of choking!

18 / 72
• This product contains small parts that can be swal-
lowed by children! Choking hazard!
DANGER
Risk of an electric shock!
This device contains electronic parts that are powered by a
power source (AC adapter and/or batteries). Improper use
of this product may result in electric shock. Electric shock
can cause serious or fatal injuries. It is therefore imperative
that you observe the following safety information.
• Never leave children unattended when handling the
device! Follow the instructions carefully and do not at-
tempt to power this device with anything other than
power sources recommended in this instruction
manual, otherwise there is a danger of an electric
shock!
DANGER
Explosion hazard!
Improper use of this product may result in fire. It is essen-
tial that you observe the following safety information in or-
der to avoid fires.
• Do not expose the device to high temperatures. Use
only the recommended batteries. Do not short-circuit
the device or batteries, or throw them into a fire! Ex-
cessive heat or improper handling could trigger a
short-circuit, a fire or an explosion!
NOTICE
Danger of material damage!
Improper handling may result in damage to the unit and/or
accessories. Therefore, use the device only in accordance
with the following safety information.

19 / 72
• Do not disassemble the device! In the event of a defect,
please contact your dealer. They will contact the Service
Center and can arrange the return of this device for re-
pair if necessary.
• Do not immerse the unit in water!
• Do not expose the device to impacts, vibrations, dust,
constant high temperatures or excessive humidity. This
can result in malfunctions, short-circuits or damage to
the batteries and components.
• Use only the recommended batteries. Always replace
weak or empty batteries with a new, complete set of
batteries at full capacity. Do not use batteries from dif-
ferent brands or types or with different capacities. Re-
move batteries from the device if it is not to be used for
a longer period of time!
• Do not use rechargeable batteries (accumulators).
NOTICE
Risk of voltage damage!
The manufacturer is not liable for damage related to im-
properly installed batteries!

20 / 72
6 Parts overview and scope of delivery
123
4
5
6
7
8
9
10
A
Illustration1: All parts of the thermo-hygro sensor
1 Housing 2 Display
3 RCC button 4 [DOWN] button
5 Wall mount fixture 6 [UP] button
7 [SET] button 8 Ventilation slots
9 Stand, fold-out 10 Battery compartment with cover
Scope of delivery:
3 x Thermo-hygrometer (A)
Also required (not included in delivery):
3 x AAA/LR03 type battery

21 / 72
7 Screen display
11
12
13 14
16
17
15
Illustration2: Display indications for the thermo-hygrometer
11 AM/PM information
(only in 12-hour time mode) 12 Climate indicator
13 Temperature (°C or °F selectable) 14 Humidity ( in % )
15 Symbol for daylight saving time
(only for summer time) 16 Time (hours : minutes)
17 RCC symbol (only when radio-
controlled clock is enabled)
8 Setting up power supply
1. Remove the battery compartment cover.
2. Insert battery(ies) into the battery compartment. En-
sure that the battery polarity (+/-) is correct.
3. Replace the battery compartment cover.
9 Automatic time setting
After the power has been restored, the unit automatically
searches for the radio signal. It takes approximately 3-8
minutes for this process to be completed.
If the radio signal is correctly received, the date and time
are set automatically and the reception symbol is displayed.
If no radio signal has been received, proceed as follows:

22 / 72
1. Press the RCC button for approx. 2 seconds to initiate
the reception of the radio signal again.
2. If still no radio signal is received, the time must be set
manually.
3. To deactivate automatic reception of the time, press
and hold the RCC key for approx. 3 seconds.
10 Manual time adjustment
1. In normal display mode, press the SET button for about
3 seconds to enter the time settings mode.
2. Digits to be set are flashing.
3. Press UP or DOWN button to change the value.
4. Press the SET button to confirm and switch to the next
setting.
5. Sequence of the settings: Time offset > Hours >
Minutes > Year > Month > Day
6. Finally, press the SET button to save the settings and
exit settings mode.
NOTICE!For more information on the time display in 12- or
24-hour mode, see the chapter "Changing the display".
11 Automatic measurement display
Once the power is established, the readings for the current
environment are displayed on the unit.
12 Clima indicator
1 DRY: dry (humidity <40%) 2 COMFORT: Optimal (humid-
ity between 40% and 70%)
3 WET: Humid (humidity
>70%)
The climate indicator is a visual display based on air temper-
ature and humidity to determine the level of comfort.

23 / 72
Note:
• The comfort display may vary at the same temperature,
depending on the humidity.
13 Display change
• In normal display mode, press the SET button to switch
between time and date.
• In normal display mode, press the DOWN button to
toggle between °C and °F when displaying the temper-
ature unit.
• In the normal display mode, press the UP key to switch
between the 12-hour and 24-hour time display.
14 Disposal
Dispose of the packaging materials according to its type. In-
formation on proper disposal can be obtained from the muni-
cipal waste disposal service provider or environmental agency.
Do not dispose of electronic devices in the household
garbage!
According to the European Directive 2012/19/EU on Waste
Electrical and Electronic Equipment and its transposition into
national law, used electrical equipment must be collected sep-
arately and recycled in an environmentally sound manner.
Batteries and rechargeable batteries must not be disposed of
with household waste. You are legally obliged to return used
batteries and accumulators and can return them after use
either at our sales outlet or in the immediate vicinity (e.g. in the
trade or in municipal collection points) free of charge.
Batteries and accumulators are marked with a crossed-out
dustbin and the chemical symbol of the pollutant, "Cd" stands
for cadmium, "Hg" stands for mercury and "Pb" stands for lead.

24 / 72
15 Warranty
The regular warranty period is 2 years and starts on the day
of purchase. To benefit from an extended voluntary war-
ranty period as indicated on the gift box, registration on our
website is required.
You can consult the full guarantee terms as well as informa-
tion on extending the guarantee period and details of our
services at www.bresser.de/warranty_terms.
16 EC declaration of conformity
Bresser GmbH hereby declares that the radio equipment
type with item number 7000016000000 is in compliance with
Directive 2014/53/EU. The full text of the EC Declaration of
Conformity is available at the following web address:
www.bresser.de/download/7000016000000/
CE/7000016000000_CE.pdf
17 UKCA declaration of conformity
A "Declaration of Conformity" in accordance with the applic-
able directives and relevant standards has been issued by
Bresser GmbH The full text of the UKCA Declaration of Con-
formity is available at the following web address:
www.bresser.de/download/7000016000000/
UKCA/7000016000000_UKCA.pdf
Bresser UK Ltd. • Suite 3G, Eden House, Enterprise Way,
Edenbridge, Kent TN8 6HF, Great Britain
18 Technical data
Power supply: 1x AAA/LR03 battery
Temperature unit: °C or °F are selectable
Temperature display range: -9.9°C to +50°C
Humidity display range: rH 1% to 99%

25
Inhaltsverzeichnis
1 Impressum ............................................................................................26
2 Gültigkeitshinweis................................................................................26
3 Eigenschaften........................................................................................27
4 Zu dieser Anleitung ..............................................................................27
5 Allgemeine Sicherheitshinweise.........................................................27
6 Teileübersicht und Lieferumfang....................................................... 30
7 Display-Anzeigen ..................................................................................31
8 Stromversorgung herstellen...............................................................31
9 Automatische Zeiteinstellung.............................................................31
10 Manuelle Zeiteinstellung..................................................................... 32
11 Automatische Messwertanzeige ........................................................32
12 Klimaindikator ......................................................................................33
13 Anzeigenwechsel ..................................................................................33
14 Entsorgung ............................................................................................ 33
15 Garantie ................................................................................................. 34
16 EG-Konformitätserklärung..................................................................34
17 Technische Daten .................................................................................35

26 / 72
1 Impressum
Bresser GmbH
Gutenbergstr. 2
46414 Rhede
Germany
www.bresser.de
Für etwaige Gewährleistungsansprüche oder Serviceanfra-
gen verweisen wir auf die Informationen zu „Garantie“ und
„Service“ in dieser Dokumentation. Wir bitten um Verständ-
nis, dass unaufgeforderte Rücksendungen nicht bearbeitet
werden können.
Irrtümer und technische Änderungen vorbehalten.
© 2023 Bresser GmbH
Alle Rechte vorbehalten.
Die Reproduktion dieser Dokumentation – auch auszugs-
weise – in irgendeiner Form (z.B. Fotokopie, Druck, etc.) so-
wie die Verwendung und Verbreitung mittels elektronischer
Systeme (z.B. Bilddatei, Website, etc.) ohne eine vorherige
schriftliche Genehmigung des Herstellers ist nicht gestattet.
Die in dieser Dokumentation verwendeten Bezeichnungen
und Markennamen der jeweiligen Firmen sind im Allgemei-
nen in Deutschland, der Europäischen Union und/oder wei-
teren Ländern waren-, marken- und/oder patentrechtlich
geschützt.
2 Gültigkeitshinweis
Diese Dokumentation ist gültig für die Produkte mit den
nachfolgend aufgeführten Artikelnummern:
7000016000000
Anleitungsversion: 0423
Bezeichnung dieser Anleitung:
Manual_7000016000000_Climate-Monitor_fr-en-de-nl-es-
pt_BRESSER_v042023a

27 / 72
Informationen bei Serviceanfragen stets angeben.
3 Eigenschaften
• Farbige Raumklima-Komfortanzeige
• Innentemperatur (in °C/°F)
• Relative Luftfeuchtigkeit (innen, in %)
• Uhrzeit per DCF-Zeitsignal (12- oder 24-Std.-Anzeige)
• Datum
• Benötigte Batterien: 3x AAA (nicht enthalten)
• Zum Aufstellen oder zur Wandmontage
4 Zu dieser Anleitung
HINWEIS
Diese Bedienungsanleitung ist als Teil des Gerätes zu
betrachten!
Lesen Sie vor der Benutzung des Geräts aufmerksam die Si-
cherheitshinweise und die Bedienungsanleitung.
Bewahren Sie diese Bedienungsanleitung für die erneute
Verwendung zu einem späteren Zeitpunkt auf. Bei Verkauf
oder Weitergabe des Gerätes ist die Bedienungsanleitung
an jeden nachfolgenden Besitzer/Benutzer des Produkts
weiterzugeben.
5 Allgemeine Sicherheitshinweise
GEFAHR
Erstickungsgefahr!
Bei unsachgemäßer Verwendung dieses Produkts besteht
Erstickungsgefahr, insbesondere für Kinder. Beachten Sie
deshalb unbedingt die nachfolgenden Sicherheitsinforma-
tionen.

28 / 72
• Verpackungsmaterialien (Plastiktüten, Gummibänder,
etc.) von Kindern fernhalten! Es besteht Erstickungsge-
fahr!
• Dieses Produkt beinhaltet Kleinteile, die von Kindern
verschluckt werden können! Es besteht Erstickungsge-
fahr!
GEFAHR
Gefahr eines Stromschlags!
Dieses Gerät beinhaltet Elektronikteile, die über eine Strom-
quelle (Netzteil und/oder Batterien) betrieben werden. Bei
unsachgemäßer Verwendung dieses Produkts besteht die
Gefahr eines Stromschlags. Ein Stromschlag kann zu schwe-
ren bis tödlichen Verletzungen führen. Beachten Sie daher
unbedingt die nachfolgenden Sicherheitsinformationen.
• Lassen Sie Kinder beim Umgang mit dem Gerät nie un-
beaufsichtigt! Die Nutzung darf nur, wie in der Anlei-
tung beschrieben, erfolgen, andernfalls besteht die Ge-
fahr eines Stromschlags!
GEFAHR
Explosionsgefahr!
Bei unsachgemäßer Verwendung dieses Produkts besteht
Explosionsgefahr. Beachten Sie unbedingt die nachfolgen-
den Sicherheitsinformationen, um eine Explosion zu vermei-
den.
• Setzen Sie das Gerät keinen hohen Temperaturen aus.
Benutzen Sie nur die empfohlenen Batterien. Gerät und
Batterien nicht kurzschließen oder ins Feuer werfen!
Durch übermäßige Hitze und unsachgemäße Handha-
bung können Kurzschlüsse, Brände und sogar Explosio-
nen ausgelöst werden!

29 / 72
HINWEIS
Gefahr von Sachschäden!
Bei unsachgemäßer Handhabung können das Gerät und/
oder die Zubehörteile beschädigt werden. Verwenden Sie
das Gerät deshalb nur entsprechend den nachfolgenden Si-
cherheitsinformationen.
• Bauen Sie das Gerät nicht auseinander! Wenden Sie
sich im Falle eines Defekts an Ihren Fachhändler. Er
nimmt mit dem Service-Center Kontakt auf und kann
das Gerät ggf. zwecks Reparatur einschicken.
• Gerät nicht in Wasser tauchen!
• Das Gerät keinen Stößen, Erschütterungen, Staub, dau-
erhaft hohen Temperaturen oder extremer Feuchtig-
keit aussetzen. Dies kann zu Fehlfunktionen, Kurz-
schlüssen sowie zu Beschädigungen an Batterien und
Bauteilen führen.
• Nur die empfohlenen Batterien verwenden. Schwache
oder verbrauchte Batterien immer durch einen kom-
plett neuen Satz Batterien mit voller Kapazität ersetzen.
Keine Batterien unterschiedlicher Marken, Typen oder
mit unterschiedlich hoher Kapazität verwenden. Batte-
rien aus dem Gerät entfernen wenn es längere Zeit
nicht benutzt wird.
• Verwenden Sie keine wieder aufladbaren Batterien (Ak-
kus).
HINWEIS
Gefahr von Spannungsschäden!
Für Spannungsschäden in Folge falsch eingelegter Batterien
übernimmt der Hersteller keine Haftung!

30 / 72
6 Teileübersicht und Lieferumfang
123
4
5
6
7
8
9
10
A
Abb.1: Alle Teile des Thermo-Hygrometers
1 Gehäuse 2 Display
3 RCC-Taste 4 DOWN-Taste
5 Vorrichtung für Wandmontage 6 UP-Taste
7 SET-Taste 8 Luftschlitze
9 Standfuß, ausklappbar 10 Batteriefach mit Abdeckung
Lieferumfang:
3 x Thermo-Hygrometer (A)
Außerdem erforderlich (nicht im Lieferumfang enthalten):
3 x Batterie Typ AAA/LR03

31 / 72
7 Display-Anzeigen
11
12
13 14
16
17
15
Abb.2: Display-Anzeigen des Thermo-Hygrometers
11 AM/PM-Information
(nur im 12-Stunden-Zeitmodus) 12 Klimaindikator
13 Temperatur (°C oder °F wählbar) 14 Luftfeuchtigkeit (in %)
15 Symbol für Sommerzeit
(nur bei Sommerzeit) 16 Uhrzeit (Stunden : Minuten)
17 RCC-Symbol (nur bei aktiver
Funkuhr)
8 Stromversorgung herstellen
1. Batteriefachdeckel entfernen.
2. Batterie(n) in das Batteriefach einsetzen. Dabei die kor-
rekte Ausrichtung der Batteriepole (+/-) beachten.
3. Batteriefachdeckel wieder aufsetzen.
9 Automatische Zeiteinstellung
Nachdem die Stromversorgung hergestellt wurde, sucht
das Gerät automatisch nach dem Funksignal. Es dauert et-
wa 3-8 Minuten bis dieser Prozess abgeschlossen ist.
Bei korrektem Empfang des Funksignals wird die Uhrzeit
automatisch eingestellt und das Empfangssymbol ange-
zeigt.

32 / 72
Wird kein Funksignal empfangen, folgendermaßen vorge-
hen:
1. RCC-Taste am Funksensor kurz drücken, um den Emp-
fang des Funksignals erneut zu initiieren.
2. Wird weiterhin kein Funksignal empfangen, muss die
Zeiteinstellung manuell vorgenommen werden.
3. Um den automatischen Empfang der Uhrzeit zu deakti-
vieren, die RCC-Taste ca. 3 Sekunden lang gedrückt hal-
ten.
10 Manuelle Zeiteinstellung
1. Im normalen Anzeigemodus die SET-Taste ca. 3 Sekun-
den drücken um in den Zeiteinstellungsmodus zu ge-
langen.
2. Die einzustellenden Ziffern blinken.
3. UP- oder DOWN-Taste drücken, um den Wert zu verän-
dern.
4. SET-Taste drücken, um die Eingabe zu bestätigen und
zur nächsten Einstellung zu wechseln.
5. Reihenfolge der Einstellungen: Zeitzone > Stunden >
Minuten > Jahr > Monat > Tag
6. SET-Taste abschließend drücken, um Einstellungen zu
speichern und den Einstellungsmodus zu verlassen.
HINWEIS!Nähre Informationen zur Zeitanzeige im 12- oder
24-Stunden-Modus im Kapitel „Anzeigenwechsel“.
11 Automatische Messwertanzeige
Sobald die Stromversorgung hergestellt wurde, werden die
Messwerte für die gegenwärtige Umgebung auf dem Gerät
angezeigt.

33 / 72
12 Klimaindikator
1 DRY: Trocken (Luftfeuchtig-
keit <40%) 2 COMFORT: Optimal (Luft-
feuchtigkeit zwischen 40%
und 70%)
3 WET: Feucht (Luftfeuchtig-
keit >70%)
Der Klimaindikator ist eine bildliche Anzeige, die auf der
Lufttemperatur und Luftfeuchtigkeit basiert, um das Kom-
fortniveau zu bestimmen.
Hinweis:
• Die Komfortanzeige kann bei gleicher Temperatur un-
terschiedlich ausfallen, abhängig von der Luftfeuchtig-
keit.
13 Anzeigenwechsel
• Im normalen Anzeigemodus die SET-Taste drücken, um
zwischen Uhrzeit und Datum zu wechseln.
• Im normalen Anzeigemodus die DOWN-Taste drücken,
um bei der Temperatur-Maßeinheit zwischen °C und °F
zu wechseln.
• Im normalen Anzeigemodus die UP-Taste drücken, um
zwischen der 12- und 24-Stunden-Zeitanzeige zu wech-
seln.
14 Entsorgung
Entsorgen Sie die Verpackungsmaterialien sortenrein. Infor-
mationen zur ordnungsgemäßen Entsorgung erhalten Sie
beim kommunalen Entsorgungsdienstleister oder Umweltamt.
Werfen Sie Elektrogeräte nicht in den Hausmüll!
Gemäß der Europäischen Richtlinie 2012/19/EG über Elektro-
und Elektronik-Altgeräte und deren Umsetzung in nationales

34 / 72
Recht müssen verbrauchte Elektrogeräte getrennt gesammelt
und einer umweltgerechten Wiederverwertung zugeführt wer-
den.
Batterien und Akkus dürfen nicht im Hausmüll entsorgt wer-
den. Sie sind zur Rückgabe gebrauchter Batterien und Akkus
gesetzlich verpflichtet und können die Batterien nach Ge-
brauch entweder in unserer Verkaufsstelle oder in unmittelba-
rer Nähe (z.B. im Handel oder in kommunalen Sammelstellen)
unentgeltlich zurückgeben.
Batterien und Akkus sind mit einer durchgekreuzten Mülltonne
sowie dem chemischen Symbol des Schadstoffes bezeichnet,
"Cd" steht für Cadmium, "Hg" steht für Quecksilber und "Pb"
steht für Blei.
15 Garantie
Die reguläre Garantiezeit beträgt 2 Jahre und beginnt am
Tag des Kaufs. Um von einer verlängerten, freiwilligen Ga-
rantiezeit wie auf dem Geschenkkarton angegeben zu profi-
tieren, ist eine Registrierung auf unserer Website erforder-
lich.
Die vollständigen Garantiebedingungen sowie Informatio-
nen zu Garantiezeitverlängerung und Serviceleistungen
können Sie unter www.bresser.de/garantiebedingungen
einsehen.
16 EG-Konformitätserklärung
Hiermit erklärt Bresser GmbH, dass der Funkanlagentyp mit
Artikelnummer 7000016000000 der Richtlinie 2014/53/EU
entspricht. Der vollständige Text der EG-Konformitätserklä-
rung ist unter der folgenden Internetadresse verfügbar:
www.bresser.de/download/7000016000000/
CE/7000016000000_CE.pdf

35 / 72
17 Technische Daten
Spannungsversorgung: 1x AAA/LR03 Batterie
Temperatur-Einheit: °C oder °F wählbar
Temperatur-Anzeigebereich: -9.9°C bis +50°C
Luftfeuchtigkeits-Anzeigebereich: rH 1% bis 99%

36
Inhoud
1 Imprint.....................................................................................................37
2 Geldigheidsverklaring............................................................................37
3 Kenmerken ..............................................................................................38
4 Over deze handleiding ...........................................................................38
5 Algemene veiligheidsinstructies ..........................................................39
6 Onderdelenoverzicht en leveringsomvang.........................................41
7 Schermweergave ....................................................................................42
8 Instellen van de stroomvoorziening ....................................................42
9 Automatische tijdinstelling...................................................................42
10 Handmatige tijdsaanpassing ................................................................43
11 Automatische meetweergave...............................................................43
12 Klimaatindicator.....................................................................................44
13 Weergave wijzigen .................................................................................44
14 Verwerking..............................................................................................44
15 Garantie ...................................................................................................45
16 EG-verklaring van overeenstemming ..................................................45
17 Technische gegevens .............................................................................45

37 / 72
1 Imprint
Bresser GmbH
Gutenbergstr. 2
46414 Rhede
Germany
www.bresser.de
Voor eventuele garantieclaims of vragen over dienstverle-
ning verwijzen wij u naar de informatie over "Garantie" en
"Service" in deze handleiding. Wij vragen uw begrip voor het
feit dat we retourzendingen, die niet door ons zijn goedge-
keurd niet kunnen behandelen.
Fouten en technische wijzigingen voorbehouden.
© 2023 Bresser GmbH
Alle rechten voorbehouden.
De reproductie van deze documentatie - zelfs in uittreksels -
in welke vorm dan ook (bv. fotokopie, afdrukken, enz.) even-
als het gebruik en de verspreiding door middel van elektro-
nische systemen (bv. beeldbestand, website, enz.) zonder de
voorafgaande schriftelijke toestemming van de fabrikant is
verboden.
De benamingen en merknamen van de respectievelijke be-
drijven die in deze documentatie worden gebruikt, zijn over
het algemeen beschermd door het handels-, merken- en/of
octrooirecht in Duitsland, de Europese Unie en/of andere
landen.
2 Geldigheidsverklaring
Deze documentatie geldt voor de producten met de onder-
staande artikelnummers:
7000016000000
Versie handleiding 0423

38 / 72
Handleiding aanwijzing:
Manual_7000016000000_Climate-Monitor_fr-en-de-nl-es-
pt_BRESSER_v042023a
Geef a.u.b. altijd de volgende informatie bij het aanvragen
van dienstverlening.
3 Kenmerken
• Gekleurde binnenklimaat comfort indicator
• Binnentemperatuur (in °C/°F)
• Relatieve luchtvochtigheid (binnen, in %)
• Tijd via DCF-tijdsignaal (12- of 24-uurs weergave)
• Datum
• Benodigde batterijen: 3x AAA (niet inbegrepen)
• Voor staande of wandmontage
4 Over deze handleiding
INSTRUCTIE
Deze handleiding moet worden gezien als onderdeel
van het apparaat.
Lees de veiligheidsinstructies en de handleiding zorgvuldig
door voordat u dit apparaat in gebruik neemt.
Bewaar deze handleiding voor toekomstig gebruik. Als het
apparaat wordt verkocht of doorgegeven, moet de handlei-
ding worden doorgegeven aan elke volgende eigenaar/ge-
bruiker van het product.

39 / 72
5 Algemene veiligheidsinstructies
GEVAAR
Verstikkingsgevaar!
Als dit product op onjuiste wijze wordt gebruikt bestaat ver-
stikkingsgevaar, vooral voor kinderen. Het is daarom van
essentieel belang de volgende veiligheidsinstructies in acht
te nemen.
• Houd verpakkingsmaterialen (plastic zakken, elastiek-
jes, enz.) buiten de toegang van kinderen! Er is verstik-
kingsgevaar!
• Dit product bevat kleine onderdelen die door kinderen
kunnen worden ingeslikt! Er is verstikkingsgevaar!
GEVAAR
Gevaar van ELECTRIC SHOCK!
Dit apparaat bevat elektronische onderdelen die worden ge-
voed door een voedingsbron (AC-adapter en/of batterijen).
Onjuist gebruik van dit product kan leiden tot elektrische
schokken. Een elektrische schok kan ernstig of dodelijk let-
sel veroorzaken. Het is daarom absoluut noodzakelijk dat u
de volgende veiligheidsinformatie in acht neemt.
• Laat kinderen nooit onbeheerd achter bij het hanteren
van het apparaat! Volg de instructies zorgvuldig op en
probeer dit apparaat niet te voeden met iets anders
dan de in deze handleiding aanbevolen stroombron-
nen, anders bestaat er gevaar voor een elektrische
schok!

40 / 72
GEVAAR
Explosiegevaar!
Onjuist gebruik van dit product kan leiden tot brand. Het is
essentieel dat u de volgende veiligheidsinformatie in acht
neemt om brand te voorkomen.
• Stel het apparaat niet bloot aan hoge temperaturen.
Gebruik alleen de aanbevolen batterijen. Apparaat of
batterijen niet kortsluiten of in het vuur gooien! Over-
matige hitte of onjuist gebruik kan kortsluiting, brand
of een explosie veroorzaken!
INSTRUCTIE
Gevaar voor materiële schade!
Onjuiste behandeling kan het apparaat en/of de accessoires
beschadigen. Gebruik het apparaat daarom alleen in over-
eenstemming met de volgende veiligheidsinformatie.
• Haal het apparaat niet uit elkaar! Neem in geval van
een defect contact op met uw handelaar. Hij zal contact
opnemen met het service-centrum en kan het apparaat
zo nodig ter reparatie opsturen.
• Dompel het apparaat nooit onder in water!
• Stel het apparaat niet bloot aan stoten, trillingen, stof,
constante hoge temperaturen of een te hoge lucht-
vochtigheid. Dit kan leiden tot storingen, kortsluiting of
beschadiging van de batterijen en componenten.
• Gebruik alleen de aanbevolen batterijen. Vervang zwak-
ke of lege batterijen altijd door een nieuwe, volledige
set batterijen op volle capaciteit. Gebruik geen batterij-
en van verschillende merken of met verschillende capa-
citeiten. Verwijder de batterijen uit het apparaat als het
lange tijd niet gebruikt is.
• Gebruik geen oplaadbare batterijen (accu's).

41 / 72
INSTRUCTIE
Gevaar voor beschadiging van de spanning!
De fabrikant is niet aansprakelijk voor schade als gevolg van
onjuist geplaatste batterijen!
6 Onderdelenoverzicht en leveringsomvang
123
4
5
6
7
8
9
10
A
Afb.1: Alle onderdelen van de thermo-hygrosensor
1 Behuizing 2 Display
3 RCC-knop 4 [OMLAAG]-knop
5 Wandmontage 6 [OMHOOG]-knop
7 [SET]-knop 8 Ventilatiesleuven
9 Stand, uitklapbaar 10 Batterijvak met deksel
Leveringsomvang:
3 x Thermo-hygrometer (A)

42 / 72
Verder nodig (niet bij de levering inbegrepen):
3 x batterijen van het type AAA/LR03
7 Schermweergave
11
12
13 14
16
17
15
Afb.2: Display indicaties voor de thermo-hygrometer
11 AM/PM-informatie
(alleen in de 12-uurs tijdmodus) 12 Klimaatindicator
13 Temperatuur (°C of °F zijn te se-
lecteren) 14 Luchtvochtigheid (in%)
15 Symbool voor zomertijd
(alleen voor zomertijd) 16 Tijd (uren : minuten)
17 RCC-symbool (alleen wanneer de
radiogestuurde klok is ingescha-
keld)
8 Instellen van de stroomvoorziening
1. Verwijder het deksel van het batterijcompartiment.
2. Plaats de batterij(en) in het batterijcompartiment. Con-
troleer of de polariteit (+/-) van de batterij correct is.
3. Plaats het deksel van het batterijcompartiment terug.
9 Automatische tijdinstelling
Nadat de stroom is hersteld, zoekt het apparaat automa-
tisch naar het radiosignaal. Het duurt ongeveer 3-8 minuten
om dit proces te voltooien.

43 / 72
Als het radiosignaal correct wordt ontvangen, worden de
datum en tijd automatisch ingesteld en wordt het ont-
vangstsymbool weergegeven.
Als er geen radiosignaal wordt ontvangen, gaat u als volgt
te werk:
1. Druk gedurende ca. 2 seconden op de RCC-knop om de
ontvangst van het radiosignaal opnieuw te starten.
2. Als er nog steeds geen radiosignaal wordt ontvangen,
moet de tijd handmatig worden ingesteld.
3. Om de automatische ontvangst van de tijd uit te scha-
kelen, houdt u de RCC-knop ca. 3 seconden ingedrukt.
10 Handmatige tijdsaanpassing
1. In de normale weergavemodus drukt u ongeveer 3 se-
conden op de SET-knop om de tijdinstellingsmodus te
activeren.
2. De in te stellen cijfers knipperen.
3. Druk op de UP- of DOWN-knop om de waarde te wijzi-
gen.
4. Druk op de SET-knop om de instelling te bevestigen en
naar de volgende instelling over te switchen.
5. Volgorde van de instellingen: Tijd offset > uren > minu-
ten > jaar > maand > dag
6. Druk tenslotte op de SET-knop om de instellingen op te
slaan en de instelmodus te verlaten.
INSTRUCTIE!Voor meer informatie over de tijdweergave in
12- of 24-uurs modus, zie het hoofdstuk "De weergave wij-
zigen".
11 Automatische meetweergave
Zodra de stroom is aangesloten, worden de waarden voor
de huidige omgeving op het apparaat weergegeven.

44 / 72
12 Klimaatindicator
1 Droog: droog (luchtvochtig-
heid <40%) 2 COMFORT: Optimaal (lucht-
vochtigheid tussen 40% en
70%)
3 NAT: Vochtig (luchtvochtig-
heid >70%)
De klimaatindicator is een visuele weergave op basis van de
luchttemperatuur en -luchtvochtigheid om het comfortni-
veau te bepalen.
Opmerking:
• De comfortweergave kan bij dezelfde temperatuur vari-
ëren, afhankelijk van de luchtvochtigheid.
13 Weergave wijzigen
• In de normale weergavemodus drukt u op de SET-knop
om te switchen tussen tijd en datum.
• Druk in de normale weergavemodus op de DOWN-
knop om te switchen tussen °C en °F.
• Druk in de normale weergavemodus op de UP-knop om
te switchen tussen de 12-uurs en 24-uurs tijdweergave.
14 Verwerking
Gooi het verpakkingsmateriaal weg volgens het soort materi-
aal. Informatie over een correcte verwerking kan worden ver-
kregen bij gemeentelijke afvalverwerkingsdiensten of het Mili-
euagentschap.
Gooi elektronische apparaten niet bij het huisvuil!
Volgens de Europese richtlijn 2012/19/EU betreffende afge-
dankte elektrische en elektronische apparatuur en de omzet-
ting daarvan in nationaal recht moet gebruikte elektrische ap-
paratuur gescheiden worden ingezameld en op milieuvriende-
lijke wijze worden gerecycled.

45 / 72
Batterijen en oplaadbare batterijen mogen niet bij het huisvuil
worden weggegooid. U bent wettelijk verplicht om gebruikte
batterijen en accu's te retourneren. U kunt de batterijen na ge-
bruik gratis inleveren bij ons verkooppunt of in de directe om-
geving (bv. in de handel of bij gemeentelijke inzamelpunten).
Batterijen en oplaadbare batterijen zijn gemarkeerd met een
symbool van een doorgekruiste vuilnisbak en het chemische
symbool van de vervuilende stof. "Cd' staat voor Cadmium, 'Hg'
staat voor kwik en 'Pb' staat voor lood.
15 Garantie
De normale garantieperiode is 2 jaar en gaat in op de dag
van aankoop. Om in aanmerking te komen voor een vrijwilli-
ge verlengde garantieperiode zoals vermeld op de verpak-
king, is registratie via onze website vereist.
U kunt de volledige garantievoorwaarden, informatie over
de verlenging van de garantieperiode en de details van on-
ze dienstverlening raadplegen op www.bresser.de/war-
ranty .
16 EG-verklaring van overeenstemming
Bresser GmbH verklaart hierbij dat het apparaat-type met ar-
tikelnummer 7000016000000 in overeenstemming is met
Richtlijn: 2014/53/EU. De volledige tekst van de EU-verklaring
van overeenstemming is beschikbaar op het volgende inter-
netadres: www.bresser.de/download/7000016000000/
CE/7000016000000_CE.pdf
17 Technische gegevens
Voeding: 1x AAA/LR03 batterij
Temperatuureenheid (°C of °F zijn te selecteren)
Meetbereik temperatuur: -9,9°C tot +50°C

46 / 72
Meetbereik luchtvochtigheid: rH 1% tot 99%

47
Contenidos
1 Impresión ..............................................................................................48
2 Nota de validez .....................................................................................48
3 Características ......................................................................................49
4 Sobre este manual de instrucciones de uso...................................... 49
5 Instrucciones generales de seguridad............................................... 49
6 Resumen de piezas y entrega .............................................................52
7 Pantalla .................................................................................................53
8 Alimentación eléctrica.........................................................................53
9 Ajuste automático de hora..................................................................53
10 Configuración manual de la hora.......................................................54
11 Visualización automática de los valores medidos............................54
12 Indicación de clima ambiente.............................................................55
13 Cambio de unidad de visualización .................................................... 55
14 Reciclaje.................................................................................................55
15 Garantía.................................................................................................56
16 Declaración de Conformidad CE..........................................................56
17 Datos técnicos....................................................................................... 56

48 / 72
1 Impresión
Bresser GmbH
Gutenbergstr. 2
46414 Rhede
Germany
www.bresser.de
Para cualquier reclamación de garantía o solicitud de servi-
cio técnico, revise la información sobre "Garantía" y "Servi-
cio" en esta documentación. Rogamos entienda que las de-
voluciones no solicitadas, no pueden tramitarse.
Salvo errores y modificaciones técnicas.
© 2023 Bresser GmbH
Quedan reservados todos los derechos
Queda prohibida la reproducción de esta documentación -
incluso en fragmentos- en cualquier forma (fotocopias, im-
presiones, etc), así como el uso y la distribución por medio
de sistemas electrónicos (como archivos de imagen, sitios
web, etc) sin la autorización previa por escrito del fabrican-
te.
Las denominaciones y marcas de las respectivas empresas
utilizadas en esta documentación están generalmente pro-
tegidas por el derecho comercial, de marcas y/o de patentes
en Alemania, en la Unión Europea y/o en otros países.
2 Nota de validez
Esta documentación es válida para los productos con los si-
guientes números de artículo:
7000016000000
Versión del manual: 0423
Denominación del manual:
Manual_7000016000000_Climate-Monitor_fr-en-de-nl-es-
pt_BRESSER_v042023a

49 / 72
Proporcione siempre esta información al solicitar un servi-
cio.
3 Características
• Indicador en color de confort climático interior.
• Temperatura interior (en °C/ °F)
• Humedad relativa (interior, en %)
• Tiempo por señal horaria DCF (visualización de 12 o 24
horas)
• Fecha
• Funciona con pilas 3x AAA (no incluidas)
• Puede colocarse sobre una mesa o montar en la pared
4 Sobre este manual de instrucciones de uso
¡AVISO!
El presente manual de instrucciones debe conside-
rarse parte integrante del aparato.
Lea atentamente las instrucciones de seguridad y el manual
antes de utilizar este dispositivo.
Guarde este manual de instrucciones en un lugar seguro
para futuras consultas. En caso de venta o cesión del apara-
to, el manual de instrucciones debe entregarse a cualquier
propietario/usuario posterior del producto.
5 Instrucciones generales de seguridad
PELIGRO
Peligro de asfixia
El uso inadecuado de este producto puede provocar asfixia,
especialmente en los niños. Por lo tanto, es imperativo ob-
servar la siguiente información de seguridad.

50 / 72
• Mantenga los materiales de embalaje (bolsas de plásti-
co, bandas de goma, etc) alejadas del alcance de los ni-
ños.
• Este producto contiene piezas pequeñas que un niño
podría tragarse.
PELIGRO
Riesgo de descargas eléctricas
Este aparato contiene piezas electrónicas que se alimentan
de una fuente de energía (adaptador de CA y/o pilas). El uso
inadecuado de este producto puede provocar una descarga
eléctrica. Las descargas eléctricas pueden causar lesiones
graves o mortales. Por lo tanto, es imperativo que observe
la siguiente información de seguridad.
• Nunca deje a los niños solos cuando maneje el disposi-
tivo. Siga las instrucciones cuidadosamente y no inten-
te alimentar este dispositivo con otra fuente de alimen-
tación que no sea la recomendada en este manual de
instrucciones, de lo contrario existe riesgo de descarga
eléctrica.
PELIGRO
Peligro de explosión
El uso inadecuado de este producto puede provocar un in-
cendio. Es esencial que observe la siguiente información de
seguridad para evitar incendios.
• No exponga el aparato a temperaturas altas. Utilice so-
lamente las pilas recomendadas. No cortocircuite ni
arroje al fuego el aparato o las pilas. El calor excesivo y
el manejo inadecuado pueden provocar cortocircuitos,
incendios e incluso explosiones.

51 / 72
¡AVISO!
Peligro de daños materiales.
Una manipulación inadecuada puede provocar daños en el
aparato y/o en los accesorios. Por lo tanto, utilice el aparato
sólo de acuerdo con la siguiente información de seguridad.
• No desmonte el aparato. En caso de que haya un defec-
to, póngase en contacto con su distribuidor. Él se pon-
drá en contacto con el servicio técnico y podrán organi-
zar la devolución de este aparato para su reparación si
es necesario.
• No sumerja nunca el dispositivo en el agua.
• No exponga el dispositivo a golpes, vibraciones, polvo,
temperaturas permanentemente altas o humedad ex-
trema. Esto puede causar un mal funcionamiento, cor-
tocircuitos y/o daños en las pilas y otras partes.
• Use solo las pilas recomendadas. Sustituya siempre las
pilas desgastadas por un juego de pilas nuevas y com-
pletas a plena capacidad. No utilice pilas de diferentes
marcas o tipos o con diferentes capacidades. Retire las
pilas del aparato si no se va a utilizar durante un perio-
do de tiempo prolongado
• No utilice pilas recargables (acumuladores).
¡AVISO!
Riesgo de daños por mal uso
El fabricante no se hace responsable de los daños ocasiona-
dos por voltaje como consecuencia de usar una fuente de
alimentación eléctrica incorrecta.

52 / 72
6 Resumen de piezas y entrega
123
4
5
6
7
8
9
10
A
Fig.1: Todas las piezas del sensor termo-hygro
1 Carcasa 2 Pantalla
3 Botón RCC 4 Botón [DOWN]
5 Soporte para pared 6 Botón [UP]
7 Botón [SET] 8 Ranuras de ventilación
9 Soporte desplegable 10 Compartimento de la batería con
tapa
Incluido en la entrega:
3 x termohigrómetros (A)
Se necesitan (no incluido en la entrega):
3 x pilas tipo AAA / LR03

53 / 72
7 Pantalla
11
12
13 14
16
17
15
Fig.2: Indicaciones de visualización para el termohigrómetro
11 Hora en formato de 12 horas AM/
PM 12 Indicador del ambiente de la habi-
tación
13 Temperatura (seleccionar °C o
°F) 14 Humedad ( en % )
15 Símbolo de horario
de verano (sólo para el horario de
verano)
16 Hora (horas : minutos)
17 Símbolo RCC (sólo cuando el reloj
radiocontrol está activado)
8 Alimentación eléctrica
1. Retire la tapa del compartimento para pilas.
2. Inserte 4 o 8 pilas tipo AA*. Asegúrese de ponerlas co-
rrectamente conforme a su polaridad (+/-).
3. Vuelva a colocar la tapa.
9 Ajuste automático de hora
Una vez restablecida la batería, la unidad buscará automáti-
camente la señal de radio. Este proceso tarda aproximada-
mente entre 3 y 8 minutos en completarse.

54 / 72
Si la señal de radio se recibe correctamente, la fecha y la ho-
ra se actualizan automáticamente y aparece el símbolo de
recepción.
Si no recibe ninguna señal, proceda de la siguiente manera:
1. Pulse el botón RCC durante aproximadamente 2 segun-
dos para iniciar de nuevo la recepción de la señal de ra-
dio.
2. Si aún así no se recibe ninguna señal de radio, configu-
re la hora de forma manual.
3. Para desactivar la recepción automática de la hora,
mantenga pulsada la tecla RCC durante aprox. 3 segun-
dos.
10 Configuración manual de la hora
1. En el modo de visualización normal, pulse el botón SET
durante aproximadamente 3 segundos para entrar en
el modo de configuración manual de la hora.
2. Parpadeo de los dígitos que se van a ajustar.
3. Pulse el botón UP o DOWN para cambiar el valor.
4. Pulse el botón SET para confirmar y cambiar al siguien-
te ajuste.
5. Secuencia de los ajustes: Huso horario > Hora > Minuto
> Año > Mes > Día > Idioma
6. Por último, pulse el botón SET para guardar los ajustes
y salir del modo de configuración.
¡AVISO!Para obtener más información sobre la visualiza-
ción de la hora en modo de 12 o 24 horas, consulte el capí-
tulo "Cambio de la pantalla".
11 Visualización automática de los valores
medidos
Una vez establecida la alimentación eléctrica, se muestran
en la estación las lecturas del ambiente actual.

55 / 72
12 Indicación de clima ambiente
1 DRY: seco (humedad <40%) 2 CONFORT: óptimo (hume-
dad entre 40% y 70%)
3 WET: húmedo (humedad
>70%)
El indicador de clima ambiente se basa en la temperatura y
la humedad del aire para determinar el nivel de confort.
Nota:
• El nivel de confort puede variar con la misma tempera-
tura, dependiendo de la humedad.
13 Cambio de unidad de visualización
• En el modo de visualización normal, presione el botón
SET para cambiar entre hora y fecha.
• En el modo de visualización normal, pulse el botón
DOWN (ABAJO) para cambiar entre °C y °F la visualiza-
ción de la unidad de temperatura.
• En el modo de visualización normal, pulse la tecla UP
(ARRIBA) para cambiar entre la visualización de la hora
de 12 horas y la de 24 horas.
14 Reciclaje
Elimine los materiales de embalaje de acuerdo con su clase. Se
puede obtener información sobre la eliminación de residuos
adecuada con empresas municipales de gestión de residuos o
en la agencia medioambiental.
No se deshaga de los dispositivos electrónicos tirándolos en la
basura de su casa.
De conformidad la Directiva 2012/19/UE, sobre residuos de
aparatos eléctricos y electrónicos (Directiva RAEE2), incorpora-
da a la normativa nacional mediante el Real Decreto 110/2015,

56 / 72
de 20 de febrero, el equipo eléctrico usado debe recogerse
por separado y reciclarse de forma respetuosa con el medio
ambiente.
Las pilas y baterías no deben eliminarse con la basura domésti-
ca. Usted está obligado por ley a devolver las pilas y acumula-
dores usados después de su uso en nuestro punto de venta o
un lugar próximo (por ejemplo, en el comercio o en los puntos
de recogida municipales) de forma gratuita.
Las pilas y baterías están marcados con un símbolo de cubo de
basura tachado y el símbolo químico del contaminante. "Cd"
significa cadmio, "Hg" significa mercurio y "Pb" significa plomo.
15 Garantía
El periodo de garantía normal es de 2 años y comienza el
día de la compra. Para beneficiarse de un periodo de garan-
tía voluntario ampliado, como se indica en la caja de regalo,
es necesario registrarse en nuestro sitio web.
Las condiciones completas de garantía, así como informa-
ción relativa a la ampliación de la garantía y servicios, puede
encontrarse en www.bresser.de/warranty_terms.
16 Declaración de Conformidad CE
Por la presente, Bresser GmbH declara que el tipo de equipo
de radio con 7000016000000 cumple con la Directiva
2014/53/EU. El texto completo de la declaración de conformi-
dad CE está disponible en la siguiente dirección de Internet
www.bresser.de/download/7000016000000/
CE/7000016000000_CE.pdf
17 Datos técnicos
Fuente de alimentación: 1x batería AAA / LR03
Unidad de temperatura (°C o °F)
Rango de visualización de temperatura: -9.9 °C a +50 °C

57 / 72
Rango de visualización de la humedad: RH 1% - 99%

58
Índice
1 Impressão................................................................................................59
2 Aplicabilidade..........................................................................................59
3 Características ........................................................................................60
4 Sobre este manual..................................................................................60
5 Instruções gerais de segurança............................................................61
6 Vista pormenorizada das peças e âmbito de entrega........................63
7 Visor..........................................................................................................64
8 Definir a alimentação.............................................................................64
9 Acerto automático da hora ...................................................................65
10 Definição da hora manual .....................................................................65
11 Apresentação da medição automática ................................................66
12 Indicador do clima..................................................................................66
13 Alteração da apresentação ...................................................................66
14 Eliminação ...............................................................................................67
15 Garantia...................................................................................................67
16 Declaração de conformidade CE ...........................................................67
17 Características técnicas.........................................................................67

59 / 72
1 Impressão
Bresser GmbH
Gutenbergstr. 2
46414 Rhede
Germany
www.bresser.de
Para quaisquer pedidos de garantia ou pedidos de serviço,
consulte as informações sobre "Garantia" e "Serviço" na
presente documentação. Pedimos a sua compreensão de
que as devoluções não solicitadas não podem ser
processadas.
Exceto erros e modificações técnicas.
© Bresser GmbH 2023
Todos os direitos reservados.
É proibida a reprodução desta documentação - mesmo em
parte - sob qualquer forma (por exemplo, fotocópia,
impressão, etc.), bem como a utilização e distribuição por
meio de sistemas electrónicos (por exemplo, ficheiro de
imagem, website, etc.). sem o consentimento prévio por
escrito do fabricante Os vendedores não são.
As denominações e nomes de marcas das respectivas
empresas utilizadas nesta documentação são geralmente
protegidas na Alemanha, na União Europeia e/ou noutros
países ao abrigo da legislação sobre marcas e/ou patentes.
2 Aplicabilidade
A presente documentação aplica-se aos produtos com as
seguintes referências:
7000016000000
Versão do manual: 0423

60 / 72
Designação do presente manual:
Manual_7000016000000_Climate-Monitor_fr-en-de-nl-es-
pt_BRESSER_v042023a
Fornecer sempre estas informações em caso de pedido de
assistência.
3 Características
• Indicador colorido de conforto do clima no interior
• Temperatura no interior (em °C/°F)
• Humidade relativa (interior, em %)
• Hora, através do sinal das horas DCF (apresentação no
formato de 12 ou 24 horas)
• Data
• Pilhas necessárias: 3 pilhas AAA (não incluídas)
• Pode ser colocado numa mesa ou montado na parede
4 Sobre este manual
NOTA
Este manual de instruções é parte integrante do
equipamento!
Antes de utilizar o equipamento, leia atentamente as
indicações de segurança e o manual de instruções.
Guarde este manual de instruções para futura consulta. Em
caso de venda ou transferência do equipamento para outro
proprietário/utilizador, o manual de instruções deve
acompanhar o produto.

61 / 72
5 Instruções gerais de segurança
PERIGO
Perigo de asfixia!
O uso indevido deste produto pode causar asfixia,
principalmente para as crianças. Por esse motivo, é
obrigatório ler e cumprir as seguintes informações de
segurança.
• Manter os materiais da embalagem (sacos de plástico,
elásticos, etc.) afastados das crianças! RISCO DE
ASFIXIA!
• Este produto contém peças pequenas que podem ser
engolidas por crianças! PERIGO DE ASFIXIA!
PERIGO
Perigo de choque elétrico!
Este equipamento contém componentes eletrónicos
operados através de uma fonte de alimentação (adaptador
de alimentação e/ou baterias). O uso indevido deste
produto pode causar choque elétrico. Um choque elétrico
pode provocar ferimentos graves ou até mortais. Por essa
razão, é obrigatório ler e cumprir as seguintes informações
de segurança.
• Não deixe as crianças sem vigilância durante o
manuseamento do aparelho! A utilização deve efectuar-
se conforme o manual, caso contrário há RISCO de
CHOQUE ELÉCTRICO!

62 / 72
PERIGO
Perigo de explosão!
O uso indevido deste produto pode causar uma explosão. É
obrigatório cumprir as seguintes informações de segurança
para evitar uma explosão.
• Não sujeite o aparelho a altas temperaturas. Utilize
apenas as pilhas recomendadas. Não curto-circuitar
nem atirar para o fogo o aparelho nem as pilhas! O
calor excessivo e o manuseamento incorrecto podem
provocar curto-circuitos, incêndios e até explosões!
NOTA
Perigo de danos materiais!
O manuseamento indevido pode causar danos no
equipamento e/ou nos acessórios. Por esse motivo, utilize o
equipamento apenas conforme as seguintes informações
de segurança.
• Não desmonte o aparelho! Em caso de defeito, consulte
o seu distribuidor especializado. Ele contactará o
Centro de Assistência e poderá enviar o aparelho para
uma eventual reparação.
• Não imergir o aparelho em água!
• Não expor o equipamento a impactos, vibrações, pó,
altas temperaturas permanentes ou humidade
extrema. Tal pode provocar falhas de funcionamento,
curto-circuitos, bem como danos nas baterias e
componentes.
• Utilize apenas as pilhas recomendadas. Substitua as
pilhas fracas ou gastas sempre por um conjunto
completamente novo com a mesma capacidade. Não
utilize pilhas de diferentes marcas, tipos ou capacidade.
As pilhas devem ser retiradas do aparelho, se este não
for usado durante algum tempo!

63 / 72
• Não utilize pilhas recarregáveis.
NOTA
Risco de lesões stress!
O fabricante não assume qualquer responsabilidade por
danos causados por tensão devido a pilhas mal colocadas!
6 Vista pormenorizada das peças e âmbito de
entrega
123
4
5
6
7
8
9
10
A
Fig.1: Todas as peças do sensor térmico/higrómetro
1 Estrutura 2 Visor
3 Botão RCC 4 Botão [PARA BAIXO]
5 Conjunto de montagem na
parede 6 Botão [PARA CIMA]
7 Botão [SET] 8 Ranhuras de ventilação

64 / 72
9 Suporte, desdobrável 10 Compartimento das pilhas com
tampa
Âmbito de entrega:
3 termo-higrómetros (A)
Também necessário (não incluído):
3 pilhas AAA/LR03
7 Visor
11
12
13 14
16
17
15
Fig.2: Indicações no visor para o termo-higrómetro
11 Informação AM/PM
(apenas no modo de
apresentação das horas no
formato de 12 horas)
12 Indicador do clima
13 Temperatura (em °C ou °F) 14 Humidade (em %)
15 Símbolo de hora de verão
(apenas durante o verão) 16 Hora (horas : minutos)
17 Símbolo RCC (apenas quando o
relógio controlado por rádio
estiver ativado)
8 Definir a alimentação
1. Retire a tampa do compartimento das pilhas.
2. Insira as pilhas no compartimento das pilhas.
Certifique-se de que a polaridade das pilhas (+/-) está
correta.

65 / 72
3. Volte a colocar a tampa do compartimento das pilhas.
9 Acerto automático da hora
Após a energia ter sido restaurada, a unidade procura
automaticamente o sinal de rádio. Leva cerca de 3 a 8
minutos para completar este processo.
Se o sinal de rádio for recebido corretamente, a data e a
hora são acertadas automaticamente e o símbolo de
receção é apresentado.
Se nenhum sinal de rádio for recebido, proceda do seguinte
modo:
1. Prima o botão RCC durante cerca de 2 segundos para
iniciar de novo a receção do sinal de rádio.
2. Se continuar sem receber o sinal de rádio, tem de
acertar a hora manualmente.
3. Para desativar a receção automática da hora, prima e
mantenha premido o botão RCC durante cerca de 3
segundos.
10 Definição da hora manual
1. No modo de visualização normal, prima o botão SET
durante cerca de 3 segundos para entrar no modo de
definições.
2. Os dígitos a serem definidos começam a piscar.
3. Prima o botão PARA CIMA ou PARA BAIXO para alterar
o valor.
4. Prima o botão SET para confirmar e passar para a
definição seguinte.
5. Sequência das definições: Desfasamento temporal >
Horas > Minutos > Ano > Mês > Dia
6. Finalmente, prima o botão SET para guardar as
definições e sair do modo de definições.

66 / 72
NOTA!Para mais informações sobre a apresentação das
horas no formato de 12 ou 24 horas, consulte o capítulo
“Alterar a apresentação”.
11 Apresentação da medição automática
Quando estiver ligado, as leituras do ambiente atual são
apresentadas na unidade.
12 Indicador do clima
1 SECO: Seco (humidade
<40%) 2 CONFORTO: Ótimo
(humidade entre 40% e 70%)
3 HÚMIDO: Húmido
(humidade >70%)
O indicador do clima é uma apresentação visual baseada na
temperatura do ar e humidade para determinar o nível de
conforto.
Nota:
• A apresentação do conforto pode variar com a mesma
temperatura, dependendo da humidade.
13 Alteração da apresentação
• No modo de visualização normal, prima o botão SET
para alternar entre a hora e a data.
• No modo de visualização normal, prima o botão PARA
BAIXO para alternar entre °C e °F quando visualizar a
unidade de temperatura.
• No modo de visualização normal, prima o botão PARA
CIMA para alternar entre a apresentação das horas no
formato de 12 ou 24 horas.

67 / 72
14 Eliminação
Elimine os materiais de embalagem separadamente segundo
o tipo. Para obter informações sobre uma eliminação correta,
contacte uma empresa de prestação de serviços de gestão de
resíduos ou agência de proteção do meio ambiente local.
As baterias e os acumuladores não podem ser eliminados no
lixo doméstico. É obrigatório por lei devolver as baterias e
acumuladores usados. Pode entregá-los gratuitamente no
nosso ponto de vendas ou num local próximo destinado para o
efeito (por exemplo, comércio ou locais de recolha municipais).
As baterias e acumuladores estão identificados com um
símbolo de um caixote de lixo com uma cruz, bem como o
símbolo químico de cada poluente, sendo que “Cd” significa
cádmio, “Hg” mercúrio e “Pb” chumbo.
15 Garantia
O período de garantia normal é de 2 anos a partir da data
de compra. Para beneficiar de uma extensão do período de
garantia facultativa conforme indicado na caixa de oferta, é
necessário efetuar o registo no nosso sítio Web.
Para ter acesso às condições da garantia completas, bem
como a informações sobre a extensão da garantia e
serviços prestados, consulte www.bresser.de/
garantiebedingungen.
16 Declaração de conformidade CE
Pela presente, a Bresser GmbH declara que o tipo de
equipamento de rádio com o número de artigo
7000016000000 corresponde à diretiva 2014/53/UE. O texto
completo da Declaração de conformidade CE encontra-se
disponível sob o seguinte endereço da internet:
www.bresser.de • [email protected]
17 Características técnicas
Alimentação: 1 pilha AAA/LR03
Unidade da temperatura: Pode selecionar entre °C ou °F
Raio de apresentação da temperatura: -9,9 °C a +50 °C

68 / 72
Raio de apresentação da humidade: rH 1% a 99%


DE
AT
CH
BE
Bei Fragen zum Produkt und eventuellen
Reklamationen nehmen Sie bitte zunächst mit
dem Service-Center Kontakt auf, vorzugsweise
per E-Mail.
E-Mail: service@bresser.de
Telefon*: +49 28 72 80 74 210
BRESSER GmbH
Kundenservice
Gutenbergstr. 2
46414 Rhede
Deutschland
*Lokale Rufnummer in Deutschland (Die Höhe der Gebühren je
Telefonat ist abhängig vom Tarif Ihres Telefonanbieters); Anrufe aus
dem Ausland sind mit höheren Kosten verbunden.
GB
IE
Please contact the service centre rst for any
questions regarding the product or claims,
preferably by e-mail.
Telephone*: +44 1342 837 098
BRESSER UK Ltd.
Suite 3G, Eden House
Enterprise Way
Edenbridge, Kent TN8 6HF
Great Britain
*Number charged at local rates in the UK (the amount you will
be charged per phone call will depend on the tari of your phone
provider); calls from abroad will involve higher costs.
FR
BE
Si vous avez des questions concernant ce produit
ou en cas de réclamations, veuillez prendre
contact avec notre centre de services (de
préférence via e-mail).
E-Mail: sav@bresser.fr
Téléphone*: 00 800 6343 7000
BRESSER France SARL
Pôle d’Activités de Nicopolis
314 Avenue des Chênes Verts
83170 Brignoles
France
*Prix d'un appel local depuis la France ou Belgique
NL
BE
Als u met betrekking tot het product vragen
of eventuele klachten heeft kunt u contact
opnemen met het service centrum (bij voorkeur
per e-mail).
E-Mail: [email protected]
Telefoon*: +31 528 23 24 76
BRESSER Benelux
Smirnostraat 8
7903 AX Hoogeveen
The Netherlands
*Het telefoonnummer wordt in het Nederland tegen lokaal tarief
in rekening gebracht. Het bedrag dat u per gesprek in rekening
gebracht zal worden, is afhankelijk van het tarief van uw telefoon
provider; gesprekken vanuit het buitenland zullen hogere kosten met
zich meebrengen.
ES
PT
Si desea formular alguna pregunta sobre el
producto o alguna eventual reclamación, le
rogamos que se ponga en contacto con el centro
de servicio técnico (de preferencia por e-mail).
E-Mail: [email protected]
Teléfono*: +34 91 67972 69
BRESSER Iberia SLU
c/Valdemorillo,1 Nave B
P.I. Ventorro del Cano
28925 Alcorcón Madrid
España
*Número local de España (el importe de cada llamada telefónica
dependen de las tarifas de los distribuidores); Las llamadas des del
extranjero están ligadas a costes suplementarios..
Service

Bresser GmbH
Gutenbergstraße 2
46414 Rhede · Germany
www.bresser.de
@BresserEurope
-
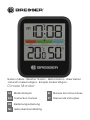 1
1
-
 2
2
-
 3
3
-
 4
4
-
 5
5
-
 6
6
-
 7
7
-
 8
8
-
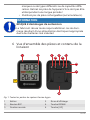 9
9
-
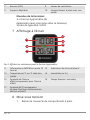 10
10
-
 11
11
-
 12
12
-
 13
13
-
 14
14
-
 15
15
-
 16
16
-
 17
17
-
 18
18
-
 19
19
-
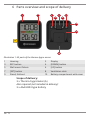 20
20
-
 21
21
-
 22
22
-
 23
23
-
 24
24
-
 25
25
-
 26
26
-
 27
27
-
 28
28
-
 29
29
-
 30
30
-
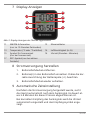 31
31
-
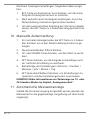 32
32
-
 33
33
-
 34
34
-
 35
35
-
 36
36
-
 37
37
-
 38
38
-
 39
39
-
 40
40
-
 41
41
-
 42
42
-
 43
43
-
 44
44
-
 45
45
-
 46
46
-
 47
47
-
 48
48
-
 49
49
-
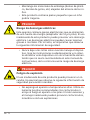 50
50
-
 51
51
-
 52
52
-
 53
53
-
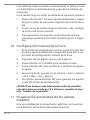 54
54
-
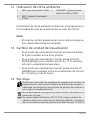 55
55
-
 56
56
-
 57
57
-
 58
58
-
 59
59
-
 60
60
-
 61
61
-
 62
62
-
 63
63
-
 64
64
-
 65
65
-
 66
66
-
 67
67
-
 68
68
-
 69
69
-
 70
70
-
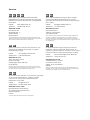 71
71
-
 72
72


