Dell Latitude 7310 de handleiding
- Categorie
- Notitieboekjes
- Type
- de handleiding

Latitude 7310
Installatie en specificaties
1.0.0.0
Regelgevingsmodel: P33S and P34S
Regelgevingstype: P33S001 and P34S001
May 2020
Ver. A00

Opmerkingen, voorzorgsmaatregelen,en waarschuwingen
OPMERKING: Een OPMERKING duidt belangrijke informatie aan voor een beter gebruik van het product.
WAARSCHUWING: WAARSCHUWINGEN duiden potentiële schade aan hardware of potentieel gegevensverlies aan en
vertellen u hoe het probleem kan worden vermeden.
GEVAAR: LET OP duidt het risico van schade aan eigendommen, lichamelijk letsel of overlijden aan.
© 2020 Dell Inc. of haar dochterondernemingen. Alle rechten voorbehouden. Dell, EMC, en andere handelsmerken zijn handelsmerken van Dell Inc. of zijn
dochterondernemingen. Andere handelsmerken zijn mogelijk handelsmerken van hun respectieve eigenaren.

Hoofdstuk 1: De computer instellen.................................................................................................. 5
Hoofdstuk 2: Overzicht van het chassis............................................................................................ 7
Beeldschermweergave..........................................................................................................................................................7
Aanzicht palmsteun............................................................................................................................................................... 9
Linkeraanzicht.......................................................................................................................................................................10
Rechteraanzicht................................................................................................................................................................... 10
Onderaanzicht....................................................................................................................................................................... 11
Modi........................................................................................................................................................................................11
Hoofdstuk 3: Sneltoetsen voor het toetsenbord............................................................................... 14
Hoofdstuk 4: Specificaties van Latitude 7310................................................................................... 16
Afmetingen en gewicht....................................................................................................................................................... 16
Processoren.......................................................................................................................................................................... 16
Chipset...................................................................................................................................................................................17
Besturingssysteem............................................................................................................................................................... 17
Geheugen.............................................................................................................................................................................. 17
Externe poorten....................................................................................................................................................................18
Interne connectoren............................................................................................................................................................ 18
Draadloze module.................................................................................................................................................................18
Audio...................................................................................................................................................................................... 19
Storage................................................................................................................................................................................. 20
Mediakaartlezer................................................................................................................................................................... 20
Toetsenbord.........................................................................................................................................................................20
Camera.................................................................................................................................................................................. 21
Toetsenblok..........................................................................................................................................................................22
Touchpadbewegingen...................................................................................................................................................22
Vingerafdruklezer (optioneel)............................................................................................................................................ 22
Voedingsadapter..................................................................................................................................................................22
Batterij...................................................................................................................................................................................23
Beeldscherm.........................................................................................................................................................................24
GPU - geïntegreerd.............................................................................................................................................................26
Computeromgeving.............................................................................................................................................................26
Beveiliging.............................................................................................................................................................................26
Hoofdstuk 5: System Setup........................................................................................................... 28
Het BIOS-setupprogramma openen................................................................................................................................. 28
Navigatietoetsen................................................................................................................................................................. 28
Boot Sequence.................................................................................................................................................................... 28
Eenmalig opstartmenu........................................................................................................................................................ 29
System setup options......................................................................................................................................................... 29
Het wissen van BIOS (System Setup)- en systeemwachtwoorden....................................................................... 37
Inhoudsopgave
Inhoudsopgave 3

Hoofdstuk 6: Software.................................................................................................................. 38
Besturingssysteem.............................................................................................................................................................. 38
De audiodriver downloaden................................................................................................................................................38
De grafische driver downloaden........................................................................................................................................ 38
Downloading the USB driver..............................................................................................................................................39
De wifi-driver downloaden................................................................................................................................................. 40
De driver van de mediakaartlezer downloaden................................................................................................................40
Downloading the chipset driver..........................................................................................................................................41
De netwerkdriver downloaden............................................................................................................................................41
Hoofdstuk 7: Hulp verkrijgen en contact opnemen met Dell...............................................................43
4 Inhoudsopgave

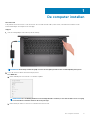
De computer instellen
Over deze taak
In dit gedeelte vindt u informatie voor de eerste keer dat u uw Dell Latitude 7310-systeem instelt, waaronder het installeren van de
internetverbinding en het aanpassen met Dell-apps.
Stappen
1. Sluit de voedingsadapter aan en druk op de aan-uitknop.
OPMERKING: De batterij schakelt mogelijk over naar de energiebesparende modus om batterijlading te besparen.
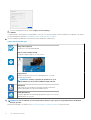
2. Voltooi de eerste installatie van het besturingssysteem.
Voor Windows:
a. Maak verbinding met een netwerk voor Windows-updates.
OPMERKING:
Als u verbinding maakt met een beveiligd draadloos netwerk, voert u het wachtwoord voor toegang
tot het draadloze netwerk in wanneer dit wordt gevraagd.
b. Meld u aan bij uw Microsoft-account of maak een nieuw account aan.
1
De computer instellen 5

c. Voer uw contactgegevens in het scherm Support en bescherming in.
Voor Ubuntu:
Volg de instructies op het scherm om de installatie te voltooien. Voor meer informatie over het installeren en configureren van Ubuntu,
zie de knowledge base-artikelen SLN151664 en SLN151748 op www.dell.com/support.
3. Ga naar Dell apps en gebruik deze vanuit het menu Start in Windows (aanbevolen).
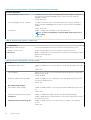
Tabel 1. Zoek naar Dell apps
Dell productregistratie
Registreer uw systeemeenheid bij Dell.
Hulp en ondersteuning van Dell
Toegang tot hulp en support voor uw systeem.
SupportAssist
Hiermee wordt de status van uw systeemhardware en -software
proactief gecontroleerd.
OPMERKING: Verleng of upgrade uw garantie door op de
vervaldatum van de garantie te klikken in SupportAssist.
Dell Update
Utility werkt uw systeem bij met essentiële correcties en de meest
recente apparaatdrivers zodra ze beschikbaar komen.
Dell Digital Delivery
Software-applicaties downloaden die zijn gekocht, maar niet vooraf zijn
geïnstalleerd op uw systeem.
4.
OPMERKING:
Het is raadzaam om een herstelschijf te maken voor het oplossen van problemen die met Windows
kunnen optreden.
Maak een herstelschijf voor Windows. Zie Een USB-herstelschijf voor Windows maken voor meer informatie.
6
De computer instellen

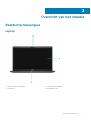
Overzicht van het chassis
Beeldschermweergave
Laptop
1. RGB- of IR-camera (optioneel) 2. Status-LED van de camera
3. LCD-paneel 4. Batterijstatus-LED
2
Overzicht van het chassis 7

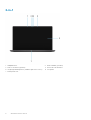
2-in-1
1. Nabijheidssensor 2. Infraroodzender (optioneel)
3. RGB- of IR-camera (optioneel) 4. Status-LED van de camera
5. Omgevingsverlichtingssensor (Ambient Light Sensor of ALS) 6. LCD-paneel
7. Batterijstatus-LED
8 Overzicht van het chassis

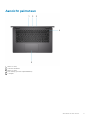
Aanzicht palmsteun
1.
Microfoon-array
2. SafeView-schakelaar
3. Microfoon-array
4. Aan-/uitknop (optioneel: vingerafdruklezer)
5. Touchpad
Overzicht van het chassis
9

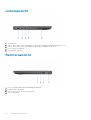
Linkeraanzicht
1. HDMI 2.0-poort
2. USB 3.2 Gen 2 Type C-poort, met DisplayPort (alt-modus), Thunderbolt 3.0 met Power Delivery (PD)
3. USB 3.2 Gen 2 Type-C-poort met DisplayPort (alt-modus) en Thunderbolt 3.0 met PD
4. slot voor micro SD-kaartlezer
5. Smartcardlezer (optioneel)
Rechteraanzicht
1. Slot voor simkaart (alleen optioneel bij WWAN-configuratie)
2. Universele audio-aansluiting
3. USB 3.2 Gen 1 Type-A-poort met PowerShare
4. Slot voor Wedge-slot
10
Overzicht van het chassis

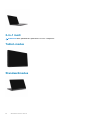
Onderaanzicht
1.
Koelventilatoren
2. Servicetaglabel
3. Luidsprekersroosters
Modi
In dit gedeelte vindt u een voorbeeld van verschillende gebruiksmodi van een Latitude 7310-laptop en een 2-in-1-computer:
Notebook-modus
OPMERKING: Deze gebruiksmodus is van toepassing op zowel de laptop als de 2-in-1-configuraties.
Overzicht van het chassis 11

2-in-1 modi
OPMERKING: Deze gebruiksmodus geldt alleen voor 2-in-1-configuraties.
Tablet-modus
Standaardmodus
12
Overzicht van het chassis

Tentmodus
Overzicht van het chassis 13

Sneltoetsen voor het toetsenbord
In dit gedeelte vindt u een beschrijving van de primaire en secundaire functie die geassocieerd zijn met de verschillende functietoetsen en
hoe ze combineerd zijn met functievergrendeling.
OPMERKING: De tekens op het toetsenbord kunnen verschillen, afhankelijk van de taalconfiguratie van het toetsenbord.
De toetsen die worden gebruikt voor snelkoppelingen blijven in alle taalconfiguraties gelijk.
Op sommige toetsen op het toetsenbord staan twee symbolen. Deze toetsen kunnen worden gebruikt om andere tekens te typen of om
secundaire functies uit te voeren. Het symbool dat wordt weergegeven op het onderste deel van de toets verwijst naar het teken dat
wordt getypt wanneer de toets wordt ingedrukt. Als u op zowel shift als de toets drukt, wordt het symbool in het bovenste deel van de
toets ingevoerd. Als u bijvoorbeeld 2 indrukt, wordt 2 getypt. Als u op Shift + 2 drukt, wordt @ getypt.
De toetsen F1-F12 op de bovenste rij van het toetsenbord zijn functietoetsen voor multimediabeheer, zoals wordt aangegeven door het
pictogram op het onderste deel van de toets. Druk op de functietoets om de taak uit te voeren die wordt weergegeven door het
pictogram. De toets F1 dempt bijvoorbeeld de audio (zie de tabel hieronder).
Als de functietoetsen F1 t/m F12 echter nodig zijn voor bepaalde softwaretoepassingen, kan de multimediafunctionaliteit worden
uitgeschakeld door te drukken op Fn + Esc. Aansluitend kan multimediabediening worden uitgevoerd door te drukken op Fn en de
desbetreffende functietoets. U kunt bijvoorbeeld audio door te drukken op Fn + F1.
OPMERKING:
U kunt het primaire gedrag van de functietoetsen (F1 t/m F12) wijzigen door Function Key Behavior te
wijzigen in het BIOS-installatieprogramma.
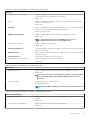
Tabel 2. Lijst met functiesneltoetsen
Toetsen Primair gedrag Secundair gedrag (Fn + toets)
Esc Esc Fn schakelen
F1 Luidspreker dempen F1-gedrag
F2 Volume verlagen (-) F2-gedrag
F3 Volume vehogen (+) F3-gedrag
F4 Microfoon dempen F4-gedrag
F5 Toetsenbordverlichting F5-gedrag
F6 Schermhelderheid verlagen (-) F6-gedrag
F7 Schermhelderheid verhogen (+) F7-gedrag
F8 Beeldscherm in-/uitschakelen (Win+P) F8-gedrag
F9 E-privacy-deelvenster in-/uitschakelen
(optioneel met het e-privacy-deelvenster)
F9-gedrag
F10 Afdrukscherm F10-gedrag
F11 Home F11-gedrag
F12 End F12-gedrag
3
14 Sneltoetsen voor het toetsenbord

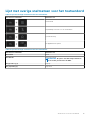
Lijst met overige sneltoetsen voor het toetsenbord
Tabel 3. Lijst met overige sneltoetsen voor het toetsenbord
Functietoetscombinaties Function-toets
Pauze/Break
Vergrendeling van scroll-toets in-/uitschakelen
Systeemaanvraag
Het applicatiemenu openen
Tabel 4. Lijst met overige sneltoetsen voor het toetsenbord
Functietoetscombinaties Function-toets
Fn+Ctrl+B Break
Fn+Shift+B Unobtrusive Mode
OPMERKING: De optie is standaard uitgeschakeld en
moet worden geactiveerd in de BIOS.
Fn+pijl omhoog (↑) Page-up
Fn+ pijl omlaag (↓) Page-down
Sneltoetsen voor het toetsenbord 15

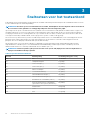
Specificaties van Latitude 7310
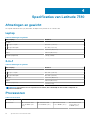
Afmetingen en gewicht
De volgende tabel bevat de hoogte, de breedte, de diepte en het gewicht van uw Latitude 7310.
Laptop
Tabel 5. Afmetingen en gewicht
Omschrijving Waarden
Hoogte:
Hoogte voorzijde 0,69 inch (17,55 mm)
Hoogte achterzijde 0,72 inch (18,27 mm)
Breedte 12,07 inch (306,5 mm)
Diepte 8,0 inch (203,19 mm)
Gewicht (beginnend)
1,22 kg (2,69 lb)
2-in-1
Tabel 6. Afmetingen en gewicht
Omschrijving Waarden
Hoogte:
Hoogte voorzijde 0,67 inch (17,07 mm)
Hoogte achterzijde 0,76 inch (19,21 mm)
Breedte 12,07 inch (306,5 mm)
Diepte 8,0 inch (203,19 mm)
Gewicht (beginnend)
2,91 lb (1,32 kg)
OPMERKING: Het gewicht van uw computer kan verschillen; dit is afhankelijk van de bestelde configuratie en
productievariabiliteit.
Processoren
Tabel 7. Processoren
Beschrijving Waarden
Processoren
10
th
Generation Intel
Core i5-10210U (non-
vPro)
10
th
Generation Intel
Core i5-10310U (vPro)
10
th
Generation Intel
Core i7-10610U (vPro)
10
th
Generation Intel
Comet Lake Core
i7-10810U (vPro)
4
16 Specificaties van Latitude 7310

Tabel 7. Processoren (vervolg)
Beschrijving Waarden
Wattage
15 W 15 W 15 W 15 W
Aantal cores
4 4 4 6
Aantal threads
8 8 8 12
Snelheid
1.6 GHz to 4.2 GHz 1.7 GHz to 4.4 GHz 1.8 to 4.9 GHz 1.1 GHz to 4.9 GHz
Cache
6 MB 6 MB 8 MB 12 MB
Geïntegreerde grafische
kaart
Intel UHD Graphics Intel UHD Graphics Intel UHD Graphics Intel UHD Graphics
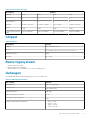
Chipset
Tabel 8. Chipset
Beschrijving Waarden
Chipset
Intel Comet Lake U PCH
Processor
10
th
Generation Intel Come Lake Core i5/i7 processors
DRAM-busbreedte
64-bit
PCIe-bus
Up to Gen3
Besturingssysteem
• Windows 10 Home (64-bit)
• Windows 10 Professional (64-bit)
• Ubuntu 18.04 LTS (not available for 2-in-1 system configurations)
Geheugen
De volgende tabel bevat de geheugenspecificaties van uw Latitude 7310.
Tabel 9. Geheugenspecificaties
Omschrijving Waarden
Geheugenslots
Built on system board
Geheugentype
Dual-channel DDR4
Geheugensnelheid
2666 MHz
Maximale geheugenconfiguratie
32 GB
Minimale geheugenconfiguratie
4 GB
Ondersteunde geheugenconfiguraties
• 4 GB, 1 x 4 GB
• 8 GB, 2 x 4 GB
• 16 GB, 2 x 8 GB
• 32 GB, 2 x 16 GB
Specificaties van Latitude 7310 17

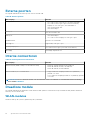
Externe poorten
De volgende tabel bevat de externe poorten van uw Latitude 7310.
Tabel 10. Externe poorten
Omschrijving Waarden
USB-poorten
• Two USB 3.2 Gen 1 Type-A ports, one with PowerShare
• Two USB 3.2 Gen 2 Type-C ports with Power Delivery,
DisplayPort over USB Type-C, and Thunderbolt 3
• One Universal Audio Jack
• One HDMI 2.0 port
Audiopoort
One Universal Audio Jack
Videopoort
• One HDMI 2.0 port
• Two USB 3.2 Gen 2 Display port USB Type-C ports
Mediakaartlezer
One micro-SD Card reader
Dockingpoort
Supported by USB Type-C port
Voedingsadapterpoort
Two USB 3.2 Gen 2 Type-C ports with Power Delivery
Beveiliging
One Wedge-shaped lock slot
Interne connectoren
Tabel 11. Interne poorten en connectoren
Omschrijving Waarden
Eén M.2 Key-M (2280 of 2230) voor de Solid State-schijf • Klasse 35: 128 GB, 256 GB, 512 GB 2230 SSD
• Klasse 40: 256 GB, 512 GB, 1 TB 2280 SSD
• Klasse 40: 256 GB, 512 GB 2280 SED
Eén M.2 2230 Key-E voor WWAN-kaart • Laptop: Qualcomm Snapdragon X20 LTE-A (DW5829e)
geschikt voor eSIM
• 2-in-1: Qualcomm Snapdragon X20 LTE-A (DW5821e) geschikt
voor eSIM
OPMERKING: Zie voor meer informatie over de kenmerken van de verschillende soorten M.2-kaarten het knowledge
base-artikel SLN301626.
Draadloze module
De volgende tabel bevat de specificaties van de WLAN-module (Wireless Local Area Network) en WWAN-module (Wireless Wide Area
Network) van uw Latitude 7310.
WLAN-modules
De WiFi-module op dit systeem is gebaseerd op de systeemkaart.
18
Specificaties van Latitude 7310

Tabel 12. Specificaties van de draadloze module
Omschrijving Optie één Optie twee
Modelnummer
Intel Wireless-AC 9560, 2x2, 802.11ac with
Bluetooth 5.1 (non-vpro)
Intel Wi-Fi 6 AX201, 2x2, 802.11ax with
Bluetooth 5.1 (vpro)
Overdrachtsnelheid
• 802.11ac - Up to 867 Mbps
• 802.11n - Up to 450 Mbps
• 802.11a/g - Up to 54 Mbps
• 802.11b - Up to 11 Mbps
• 2.4 GHz 40M: Up to 574 Mbps
• 5 GHz 80M: Up to 1.2 Gbps
• 5 GHz 160M: Up to 2.4 Gbps
Ondersteunde frequentiebanden
2.4 GHz/5 GHz 2.4 GHz/5 GHz
Draadloze standaarden
IEEE 802.11a/b/g/n/ac MU-MIMO RX IEEE 802.11a/b/g/n/ac/ax, 160MHz channel
use
Versleuteling
• 64/128-bit WEP/AES-CCMP
• PAP, CHAP, TLS, GTC, MS-CHAP,
MS-CHAPv2
• 64/128-bit WEP
• 128-bit AES-CCMP
• TKIP
Bluetooth
Bluetooth 5.1 Bluetooth 5.1
WWAN-modules
De volgende lijst bevat de opties voor de Mobile broadband-module die beschikbaar zijn op Latitude 7310
1. 2-in-1:
• Qualcomm Snapdragon X20 Gigabit LTE CAT 16 (DW5821e; e-SIM ingeschakeld), WW met uitzondering van China, Turkije, VS
• Qualcomm Snapdragon X20 Gigabit LTE CAT 16 (DW5821e) WW
• Qualcomm Snapdragon X20 Gigabit LTE CAT 16 (DW5821e) voor op AT&T, Verizon en Sprint, alleen VS
2. Laptop
• Qualcomm Snapdragon X20 LTE-A CAT 9 (DW5829e; e-SIM ingeschakeld) WW met uitzondering van China, Turkije, VS
• Qualcomm Snapdragon X20 LTE-A CAT 9 (DW5829e) WW
• Qualcomm Snapdragon X20 LTE-A CAT 9 (DW5829e) voor op AT&T, Verizon en Sprint, alleen VS
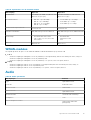
Audio
Tabel 13. Audio-specificatie
Omchrijvingen Waarden
Type
High-definition audio
Controller
Realtek ALC3254
Stereoconversie
Ondersteund
Interne interface
High-definition audio
Externe interface
Universele audio-aansluiting
Luidsprekers
Twee
Interne luidsprekerversterker
Ondersteund (audiocodec
geïntegreerd)
Specificaties van Latitude 7310 19

Tabel 13. Audio-specificatie (vervolg)
Omchrijvingen Waarden
Externe volumeregelaars
Sneltoetsenbediening voor het
toetsenbord
Luidsprekerweergave:
Gemiddeld
2 W
Piek
2,5 W
Microfoon
Dual-array-microfoons
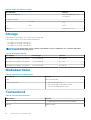
Storage
In dit gedeelte vindt u de opties voor storage op uw Latitude 7310.
Your computer supports one of the following configurations:
• M.2 2230, PCIe x4 NVMe, Class 35 SSD
• M.2 2280, PCIe x4 NVMe, Class 40 SSD
• M.2 2280, PCIe x4 NVMe, Class 40 SED
OPMERKING: The primary drive of your computer varies with the storage configuration. For computers with a M.2
drive, the M.2 drive is the primary drive.
Tabel 14. Storagespecificaties
Storagetype Interfacetype Capaciteit
M.2 2230, PCIe x4 NVMe, Class 35 SSD PCIe x4 NVMe 3.0 up to 512 GB
M.2 2280, PCIe x4 NVMe, Class 40 SSD PCIe x4 NVMe 3.0 up to 1 TB
M.2 2280, PCIe x4 NVMe, Class 40 SED PCIe x4 NVMe 3.0 up to 512 GB
Mediakaartlezer
Tabel 15. Specificaties mediakaartlezer
Beschrijving Waarden
Type
micro-SD Card reader
Ondersteunde kaarten
• micro-Secure Digital (SD)
• micro-Secure Digital High Capacity (SDHC)
• micro-SD Extended Capacity (SDXC)
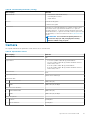
Toetsenbord
Tabel 16. Toetsenbordspecificaties
Omschrijving Waarden
Type
• Standard spill resistant keyboard (Optional backlit)
Opmaak
QWERTY/KANJI
20 Specificaties van Latitude 7310

Tabel 16. Toetsenbordspecificaties (vervolg)
Omschrijving Waarden
Aantal toetsen
• United States and Canada: 81 keys
• United Kingdom: 82 keys
• Japan: 85 keys
Grootte
X=18.07 mm key pitch
Y=18.07 mm key pitch
Sneltoetsen
Some keys on your keyboard have two symbols on them. These
keys can be used to type alternate characters or to perform
secondary functions. To type the alternate character, press Shift
and the desired key. To perform secondary functions, press Fn and
the desired key. For more information see the Keyboard shortcuts
section.
OPMERKING: You can define the primary behavior of
the function keys (F1–F12) changing Function Key
Behavior in BIOS setup program.
Camera
De volgende tabel bevat de specificaties van de camera van uw Latitude 7310.
Tabel 17. Specificaties camera
Omschrijving Waarden
Aantal camera's
One
Type camera
• 2.7 mm HD (1280 x 720 at 30 fps) RGB Webcam
• 3 mm HD (1280 x 720 at 30 fps) RGB/IR Webcam with ALS
and Proximity Sensor
• 6 mm HD (1280 x 720 at 30 fps) RGB Webcam
• 6 mm HD (1280 x 720 at 30 fps) RGB/IR Webcam with ALS
and Proximity Sensor
Cameralocatie
Front
Type camerasensor
CMOS sensor technology
Cameraresolutie:
Stilstaande beelden
1280 x 720 (HD)
Video
1280 x 720 (HD) at 30 fps
Resolutie infraroodcamera:
Stilstaande beelden
1280 x 720 (HD)
Video
1280 x 720 (HD) at 30 fps
Diagonale kijkhoek:
Camera
78.6 degrees
Infraroodcamera
78.6 degrees
Specificaties van Latitude 7310 21

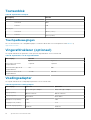
Toetsenblok
Tabel 18. Specificaties touchpad
Beschrijving Waarden
Resolutie:
Horizontaal
3054
Verticaal
1790
Afmetingen:
Horizontaal
105 mm (4.13 in.)
Verticaal
65 mm (2.56 in.)
Touchpadbewegingen
Zie voor meer informatie over touchpadbewegingen voor Windows 10 het Microsoft Knowledge Base-artikel 4027871 op
support.microsoft.com.
Vingerafdruklezer (optioneel)
De volgende tabel bevat de specificaties van de optionele vingerafdruklezer van uw Latitude 7310.
Tabel 19. Specificaties van de vingerafdruklezer
Omschrijving Waarden
Optie 1 Option 2
Sensortechnologie van de
vingerafdruklezer
Capacitief Capacitief
Sensorresolutie (dpi) van de
vingerafdruklezer
363 500
Pixelgrootte sensor van de
vingerafdruklezer
76 x 100 108 x 88
Voedingsadapter
De volgende tabel bevat de voedingsadapterspecificaties van uw Latitude 7310.
Tabel 20. Specificaties voedingsadapter
Omschrijving Optie één Optie twee
Type
65 W, USB Type-C adapter 90 W, USB Type-C adapter
Ingangsspanning
100 VAC/240 VAC 100 VAC/240 VAC
Ingangsfrequentie
50 Hz/60 Hz 50 Hz/60 Hz
Ingangsstroom (maximum)
1.50 A 1.70 A
Uitgangsstroom (continu)
3.25 A 4.5 A
Nominale uitgangsspanning
19.50 VDC 19.50 VDC
22 Specificaties van Latitude 7310

Tabel 20. Specificaties voedingsadapter (vervolg)
Omschrijving Optie één Optie twee
Temperatuurbereik:
Operationeel
0°C to 40°C (32°F to 104°F) 0°C to 40°C (32°F to 104°F)
Storage
-40°C to 70°C (-40°F to 158°F) -40°C to 70°C (-40°F to 158°F)
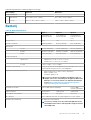
Batterij
Tabel 21. Batterijspecificaties
Specificaties Optie 1 Option 2 Option 3
Type 3-cels lithium-ion
polymeer 39 WHr
4-cels lithium-ion
polymeer 52 WHr
4-cels lithium-ion
polymeer 52 WHr
(LCL)
Voltage (VDC) 11,4 V 7,6 V 7,6 V
Gewicht (maximaal) 0,207 kg (0,46 lb) 0,257 kg (0,56 lb) 0,257 kg (0,56 lb)
Afmetingen:
Hoogte 251 mm (9,88 inch) 251 mm (9,88 inch) 251 mm (9,88 inch)
Breedte 85,8 mm (3,38 inch) 85,8 mm (3,38 inch) 85,8 mm (3,38 inch)
Diepte 5 mm (0,19 inch) 5 mm (0,19 inch) 5 mm (0,19 inch)
Temperatuurbereik:
Operationeel
• Opladen: 0 °C tot 45 °C (32 °F tot 113 °F)
• Ontladen: 0°C tot 70°C (32°F tot 158°F)
Storage –20°C tot 60°C (–4°F tot 140°F)
Werkduur van de batterij Hangt af van de werkomstandigheden en kan aanzienlijk worden verkort
onder bepaalde energie-intensieve omstandigheden.
Oplaadtijd van de batterij (ongeveer)
• ExpressCharge™-Boost (0% tot 35%): 20 minuten
• Express opladen: 2 uur
• Standaard opladen: 3 uur
OPMERKING: Beheer de oplaadtijd, oplaadduur, begin- en
eindtijd, enzovoorts, met behulp van de applicatie Dell Power
Manager. Voor meer informatie over de Dell Power Manager
ga naar https://www.dell.com/support/home/product-
support/product/power-manager/docs
Geschatte levensduur 1 jaar of 300 ontlaad-/oplaadcycli 3 jaar of 1000
ontlaad-/oplaaadcycli
ExpressCharge™ Ondersteund Ondersteund Ondersteund
Vervangbaar door gebruiker Nee (FRU) Nee (FRU) Nee (FRU)
Knoopbatterij De hoofdbatterij reserveert 2% van de capaciteit voor RTC-functie.
Werkduur knoopcelbatterij
68 dagen met 39 WHr batterij
OPMERKING: Hangt af van de werkomstandigheden en kan
aanzienlijk worden verkort onder bepaalde energie-intensieve
omstandigheden.
Specificaties van Latitude 7310 23

OPMERKING:
Voor batterijen met de ExpressCharge™-functie heeft de batterij na ongeveer een uur opladen meer dan 80% capaciteit
als het systeem uitstaat en is die in ongeveer 2 uur volledig opgeladen (met het systeem uit).
Als u ExpressCharge™ wilt inschakelen, dient u over een computer en batterij te beschikken die compatibel zijn met
ExpressCharge. Als niet aan deze vereisten wordt voldaan, wordt ExpressCharge™ niet ingeschakeld.
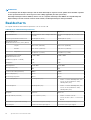
Beeldscherm
De volgende tabel bevat de beeldschermspecificaties van uw Latitude 7310.
Tabel 22. 2-in-1 Beeldschermspecificaties
Omschrijving Opties 1 Option 2
Type beeldscherm 13-inch FHD SLP met Corning Gorilla Glass
6 (GG6)
13-inch. FHD Digital privacy SafeScreen met
GG6
Technologie beeldschermdeelvenster Brede kijkhoek (WVA) Brede kijkhoek (WVA)
Afmetingen van het
beeldschermdeelvenster (actief gebied):
Hoogte
165,24 mm (6,50 inch) 165,24 mm (6,50 inch)
Breedte
293,76 mm (11,56 inch) 293,76 mm (11,56 inch)
Diagonaal
337,08 mm (13,3 inch) 337,08 mm (13,3 inch)
Standaardresolutie van het
beeldschermdeelvenster
1.920 x 1.080 1.920 x 1.080
Helderheid (typisch voorbeeld)
270 270
Megapixels 2,07 2,07
Kleurengamma sRGB 100% sRGB 100%
Pixels per inch (PPI)
166 166
Contrastverhouding (minimaal) 1000:1 1000:1
Antwoordtijd (max.) 35 ms 35 ms
Vernieuwingsfrequentie 60 Hz 60 Hz
Horizontale kijkhoek 80/80 graden (min)
• Modus voor delen: 80/80 graden (min)
• Privacy-modus (helderheid < 40%):
30/30 graden (max)
Verticale kijkhoek 80/80 graden (min)
• Modus voor delen: 80/80 graden (min)
• Privacy-modus (helderheid < 40%):
30/30 graden (max)
Pixelpitch
0,153 mm 0,153 mm
Energieverbruik (maximaal)
2,2 w + 0,16 W (Touch) • Modus voor delen: 2,36 W
• Privacy-modus: 2,46 W + Touch Power:
0,16 W
Antireflectie vs. glanzende afwerking Antireflectie/Veegvaste coating Antireflectie/Veegvaste coating
Aanraakopties Touch met Actieve pen support Touch met Actieve pen support
24 Specificaties van Latitude 7310

Tabel 23. Beeldschermspecificaties laptop
Omschrijving Optie 1 Option 2 Option 3 Optie 4
Type beeldscherm 13,3-inch High Definition
(HD)
13,3-inch Full HD (FHD)
Super Low Power (SLP)
13,3-inch FHD 13,3-inch FHD Digital
privacy SafeScreen
Technologie
beeldschermdeelvenster
Twisted Nematic (TN) Brede kijkhoek (WVA) Brede kijkhoek (WVA) Brede kijkhoek (WVA)
Afmetingen van het
beeldschermdeelvenster
(actief gebied):
Hoogte (mm) 293,83 mm (11,57 inch) 293,76 mm (11,56 inch) 293,76 mm (11,56 inch) 293,76 mm (11,56
inch)
Breedte (mm) 165,24 mm (6,50 inch) 165,24 mm (6,50 inch) 165,24 mm (6,50 inch) 165,24 mm (6,50
inch)
Diagonaal (mm) 337,08 mm (13,3 inch) 337,04 mm (13,3 inch) 337,04 mm (13,3 inch) 337,04 mm (13,3 inch)
Standaardresolutie van
het
beeldschermdeelvenster
1.366 x 768 1.920 x 1.080 1.920 x 1.080 1.920 x 1.080
Helderheid (typisch
voorbeeld)
220 nt 300 nt 300 nt 300 nt
Megapixels 1,05 2,07 2,07 2,07
Kleurengamma NTSC 45% sRGB 100% NTSC 72% sRGB 100%
Pixels per inch (PPI) 118 166 166 166
Contrastverhouding
(minimaal)
1000:1 1000:1 1000:1 1000:1
Antwoordtijd (max.) 25 ms 35 ms 35 ms 35 ms
Vernieuwingsfrequentie 60 Hz 60 Hz 60 Hz 60 Hz
Horizontale kijkhoek 40/40 graden (min) 80/80 graden (min) 80/80 graden (min)
• Modus voor delen:
80/80 graden
(min)
• Privacy-modus
(helderheid <
40%): 30/30
graden (max)
Verticale kijkhoek 10/30 graden (min) 80/80 graden (min) 80/80 graden (min)
• Modus voor delen:
80/80 graden
(min)
• Privacy-modus
(helderheid <
40%): 30/30
graden (max)
Pixelpitch 0,2151 mm 0,153 mm 0,153 mm 0,153 mm
Energieverbruik
(maximaal)
2,85 W 2,0 W 4.8 W
• Modus voor delen:
2,3 W
• Privacy-modus
(helderheid <
40%): 2,4 W
(max)
Antireflectie vs.
glanzende afwerking
Antireflectie Antireflectie Antireflectie Antireflectie
Specificaties van Latitude 7310 25

Tabel 23. Beeldschermspecificaties laptop (vervolg)
Omschrijving Optie 1 Option 2 Option 3 Optie 4
Aanraakopties Non-touch Non-touch Touch (geen Actieve pen
support)
Non-touch
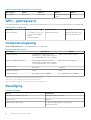
GPU - geïntegreerd
De volgende tabel bevat de specificaties van de geïntegreerde grafische processor (GPU) die wordt ondersteund door uw Latitude 7310.
Tabel 24. GPU - geïntegreerd
Controller Externe beeldschermsupport Geheugengrootte Processor
Intel UHD Graphics • Two DisplayPort over USB
Type-C with Thunderbolt
3.0 port
• One HDMI 2.0 port
Shared system memory 10
th
Generation Intel Comet
Lake Core i5/i7 processors
Computeromgeving
Luchtcontaminatieniveau: G1 zoals gedefinieerd door ISA-S71.04-1985
Tabel 25. Computeromgeving
Beschrijving Operationeel Opslag
Temperatuurbereik
Normal ambient condition 25°C and
40~50% 0°C to Normal ambient condition
25°C and 40~50% 40°C (32°F to 104°F)
-40°C to 65°C (-40°F to 149°F)
Relatieve vochtigheid (maximum)
Normal ambient condition 25°C and
40~50% 10% to Normal ambient condition
25°C and 40~50% 90% (non-condensing)
10% to 95% (non-condensing)
Trilling (maximaal)
*
0.66 GRMS 1.30 GRMS
Schokken (maximaal)
140 G† 160 G†
Hoogte (maximum)
0 m to 3048 m (0 ft to 10,000 ft) 0 m to 10,688 m (0 ft to 35,000 ft)
* Gemeten met een willekeurig trillingsspectrum dat de gebruikersomgeving nabootst.
† Gemeten met een halve sinuspuls van 2 ms wanneer de vaste schijf in gebruik is.
‡ Gemeten met een halve sinuspuls van 2 ms wanneer de kop van de vaste schijf geblokkeerd is.
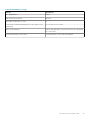
Beveiliging
Tabel 26. Beveiliging
Functie Specificaties
Trusted Platform Module (TPM) 2.0 Geïntegreerd op de systeemkaart
Firmware TPM Optioneel
Windows Hello-ondersteuning Ja, optionele vingerafdruklezer op aan/uit-knop
Optionele IR-camera
26 Specificaties van Latitude 7310

Tabel 26. Beveiliging (vervolg)
Functie Specificaties
Beveiligingskabelslot Klemslot
Dell Smartcard-toetsenbord Optioneel
FIPS 140-2-certificering voor TPM Ja
ControlVault 3 Advanced Authentication met FIPS 140-2 Level 3-
certificering
Ja, voor FPR, SC en CSC/NFC
Alleen vingerafdruklezer Raak de vingerafdruklezer aan in de aan/uit-knop die is gekoppeld
aan ControlVault 3
Contactsmartcard en ControlVault 3 Certificering/SIPR voor FIPS 201-smartcardlezer
Specificaties van Latitude 7310 27

System Setup
WAARSCHUWING: Tenzij u een computerexpert bent, dient u de instellingen voor het BIOS-installatieprogramma niet te
wijzigen. Door bepaalde wijzigingen is het mogelijk dat de computer niet goed meer werkt.
OPMERKING: Afhankelijk van de computer en de geïnstalleerde apparaten kunnen de onderdelen die in dit gedeelte
worden vermeld wel of niet worden weergegeven.
OPMERKING: Voordat u het BIOS-setup-programma gebruikt, is het verstandig de scherminformatie van het BIOS-
setup-programma te noteren zodat u deze later ter referentie kunt gebruiken.
Gebruik het BIOS Setup-programma voor de volgende doeleinden:
• Informatie krijgen over de hardware in uw computer, zoals de hoeveelheid RAM, de grootte van de harde schijf, enz.
• Systeemconfiguratiedata wijzigen
• Een door de gebruiker te selecteren optie instellen of wijzigen, zoals het gebruikerswachtwoord, het type harde schijf dat is
geïnstalleerd, het in- of uitschakelen van basisapparaten, enz.
Het BIOS-setupprogramma openen
Over deze taak
Zet uw computer aan of start de computer opnieuw op en druk meteen op F2.
Navigatietoetsen
OPMERKING:
Voor de meeste System Setup-opties geldt dat de door u aangebrachte wijzigingen wel worden
opgeslagen, maar pas worden geëffectueerd nadat het systeem opnieuw is opgestart.
Tabel 27. Navigatietoetsen
Toetsen Navigatie
Pijl Omhoog Gaat naar het vorige veld.
Pijl Omlaag Gaat naar het volgende veld.
Enter Hiermee kunt u een waarde in het geselecteerde veld invullen (mits
van toepassing) of de koppeling in het veld volgen.
Spatiebalk Vergroot of verkleint een vervolgkeuzelijst, mits van toepassing.
Tabblad Gaat naar het focusveld.
OPMERKING: Alleen voor de standaard grafische
browser.
Esc Gaat naar de vorige pagina totdat het hoofdscherm wordt
weergegeven. Als u in het hoofdscherm op Esc drukt, wordt een
bericht weergegeven met de vraag om de niet-opgeslagen
wijzigingen op te slaan en wordt het systeem opnieuw opgestart.
Boot Sequence
Via Opstartvolgorde kunt u de door System Setup gedefinieerde volgorde van het opstartapparaat omzeilen en direct op een specifiek
apparaat opstarten (bijvoorbeeld een optische schijf of harde schijf). U kunt het volgende doen tijdens de Power-on Self Test (POST),
zodra het Dell logo verschijnt:
5
28 System Setup

• System Setup openen door op de F2-toets te drukken;
• het eenmalige opstartmenu openen door op de F12-toets te drukken.
In het eenmalige opstartmenu staan de apparaten waar het systeem vanaf kan opstarten en de opties voor diagnostiek. De opties van het
opstartmenu zijn:
• Verwijderbare schijf (mits beschikbaar)
• STXXXX-schijf (indien beschikbaar)
OPMERKING: XXX staat voor het nummer van de SATA-schijf.
• Optisch station (mits beschikbaar)
• SATA-harde schijf (indien beschikbaar)
• Diagnostiek
OPMERKING: Na het selecteren van Diagnostiek wordt het scherm SupportAssist-diagnostiek geopend.
In het scherm voor de opstartvolgorde wordt ook de optie weergegeven voor het openen van het scherm systeeminstallatie.
Eenmalig opstartmenu
Als u naar het eenmalige opstartmenu wilt gaan, start u de computer op en drukt u meteen op F2.
OPMERKING: Het wordt aanbevolen om de computer af te sluiten als deze is opgestart.
In het eenmalige opstartmenu staan de apparaten waar het systeem vanaf kan opstarten en de opties voor diagnostiek. De opties van het
opstartmenu zijn:
• Verwijderbare schijf (mits beschikbaar)
• STXXXX-schijf (indien beschikbaar)
OPMERKING: XXX staat voor het nummer van de SATA-schijf.
• Optische schijf (mits beschikbaar)
• SATA-harde schijf (indien beschikbaar)
• Diagnostiek
OPMERKING: Na het selecteren van Diagnostiek wordt het scherm SupportAssist-diagnostiek geopend.
In het scherm voor de opstartvolgorde wordt ook de optie weergegeven voor het openen van het scherm systeeminstallatie.
System setup options
NOTE:
Depending on this computer and its installed devices, the items that are listed in this section may or may not be
displayed.
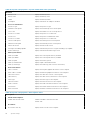
Table 28. System setup options—System information menu
Overview
BIOS Version Displays the BIOS version number.
Service Tag Displays the Service Tag of the computer.
Asset Tag Displays the Asset Tag of the computer.
Ownership Tag Displays the ownership tag of the computer.
Manufacture Date Displays the manufacture date of the computer.
Ownership Date Displays the ownership date of the computer.
Express Service Code Displays the express service code of the computer.
Ownership Tag Displays the ownership tag of the computer.
Signed Firmware Update Displays whether the signed firmware update is enabled.
Battery Displays the battery health information.
Primary Displays the primary battery.
System Setup 29

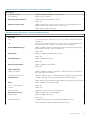
Table 28. System setup options—System information menu (continued)
Overview
Battery Level Displays the battery level.
Battery State Displays the battery state.
Health Displays the battery health.
AC Adapter Displays whether an AC adapter is installed.
Processor Information
Processor Type Displays the processor type.
Maximum Clock Speed Displays the maximum processor clock speed.
Core Count Displays the number of cores on the processor.
Processor L2 Cache Displays the processor L2 Cache size.
Processor ID Displays the processor identification code.
Processor L3 Cache Displays the processor L3 Cache size.
Current Clock Speed Displays the current processor clock speed.
Minimum Clock Speed Displays the minimum processor clock speed.
Microcode Version Displays the microcode version.
Intel Hyper-Threading Capable Displays whether the processor is Hyper-Threading (HT) capable.
64-Bit Technology Displays whether 64-bit technology is used.
Memory Information
Memory Installed Displays the total computer memory installed.
Memory Available Displays the total computer memory available.
Memory Speed Displays the memory speed.
Memory Channel Mode Displays single or dual channel mode.
Memory Technology Displays the technology that is used for the memory.
Device Information
Video Controller Displays the integrate graphics information of the computer.
dGPU Video Controller Displays the discrete graphics information of the computer.
Video BIOS Version Displays the video BIOS version of the computer.
Video Memory Displays the video memory information of the computer.
Panel Type Displays the Panel Type of the computer.
Native Resolution Displays the native resolution of the computer.
Audio Controller Displays the audio controller information of the computer.
Wi-Fi Device Displays the wireless device information of the computer.
Bluetooth Device Displays the Bluetooth device information of the computer.
Table 29. System setup options—Boot options menu
Boot options
Advanced Boot Options
Enable UEFI Network Stack Enables or disables UEFI Network Stack.
Default: OFF.
Boot Mode
Boot Mode: UEFI only Displays the boot mode of this computer.
30 System Setup

Table 29. System setup options—Boot options menu (continued)
Boot options
Enable Boot Devices Enables or disables boot devices for this computer.
Boot Sequence Displays the boot sequence.
BIOS Setup Advanced Mode Enables or disables advanced BIOS settings.
Default: ON.
UEFI Boot Path Security Enables or disables the system to prompt the user to enter the Admin password
when booting a UEFI boot path from the F12 boot menu.
Default: Always Except Internal HDD.
Table 30. System setup options—System Configuration menu
System Configuration
Date/Time
Date Sets the computer date in MM/DD/YYYY format. Changes to the date take effect
immediately.
Time Sets the computer time in HH/MM/SS 24-hour format. You can switch between 12-
hour and 24-hour clock. Changes to the time take effect immediately.
Enable SMART Reporting Enables or disables SMART (Self-Monitoring, Analysis, and Reporting Technology)
during computer startup to report hard drive errors.
Default: OFF.
Enable Audio Enables or disables all integrated audio controller.
Default: ON.
Enable Microphone Enables or disables microphone.
Default: ON.
Enable Internal Speaker Enables or disables internal speaker.
Default: ON.
USB Configuration
Enable Boot Support Enables or disables booting from USB mass storage devices such as external hard
drive, optical drive, and USB drive.
Enable External USB Ports Enables or disables USB ports to be functional in an operating system environment.
SATA Operation Configures operating mode of the integrated SATA hard drive controller.
Default: RAID. SATA is configured to support RAID (Intel Rapid Restore Technology).
Drives Enables or disables various onboard drives.
M.2 PCIe SSD-0/SATA-2 Default: ON.
SATA-0 Default: ON.
Drive Information Displays the information of various onboard drives.
Miscellaneous Devices Enables or disables various onboard devices.
Enable Camera Enables or disables the camera.
Default: ON.
Keyboard Illumination Configures the operating mode of the keyboard illumination feature.
Default: Disabled. The keyboard illumination will always be off.
System Setup 31

Table 30. System setup options—System Configuration menu (continued)
System Configuration
Keyboard Backlight Timeout on AC Configures the timeout value for the keyboard when an AC adapter is connected to
the computer. The keyboard backlight timeout value is only effect when the
backlight is enabled.
Default: 10 seconds.
Keyboard Backlight Timeout on Battery Configures the timeout value for the keyboard when the computer is running on
battery. The keyboard backlight timeout value is only effect when the backlight is
enabled.
Default: 10 seconds.
Touchscreen Enables or disables the touchscreen for the operating system.
NOTE: Touchscreen will always work in the BIOS setup irrespective of
this setting.
Default: ON.
Table 31. System setup options—Video menu
Video
LCD Brightness
Brightness on battery power Sets the screen brightness when the computer is running on battery power.
Brightness on AC power Sets the screen brightness when the computer is running on AC power.
EcoPower Enables or disables EcoPower which increases the battery life by reducing the screen
brightness when appropriate.
Default: ON.
Table 32. System setup options—Security menu
Security
Enable Admin Setup Lockout Enables or disables the user from entering BIOS Setup when an Admin Password is
set.
Default: OFF.
Password Bypass Bypass the System (Boot) Password and the internal hard drive password prompts
during a system restart.
Default: Disabled.
Enable Non-Admin Password Changes Enables or disables the user to change the system and hard drive password without
the need for admin password.
Default: ON.
Non-Admin Setup Changes
Allow Wireless Switch Changes Enables or disables changes to the setup option when an Administrator password is
set.
Default: OFF.
Enable UEFI Capsule Firmware Updates Enables or disables BIOS updates through UEFI capsule update packages.
Computrace Enable or disable the BIOS module interface of the optional Computrace(R) Service
from Absolute Software.
Intel Platform Trust Technology On Enables or disables Platform Trust Technology (PTT) visibility to the operating
system.
Default: ON.
32 System Setup

Table 32. System setup options—Security menu (continued)
Security
PPI Bypass for Clear Commands Enables or disables the operating system to skip BIOS Physical Presence Interface
(PPI) user prompts when issuing the Clear command.
Default: OFF.
Clear Enables or disables the computer to clear the PTT owner information, and returns
the PTT to the default state.
Default: OFF.
Intel SGX Enables or disables the Intel Software Guard Extensions (SGX) to provide a secured
environment for running code/storing sensitive information.
Default: Software Control
SMM Security Mitigation Enables or disables additional UEFI SMM Security Mitigation protections.
Default: OFF.
NOTE: This feature may cause compatibility issues or loss of
functionality with some legacy tools and applications.
Enable Strong Passwords Enables or disables strong passwords.
Default: OFF.
Password Configuration Control the minimum and maximum number of characters that are allowed for Admin
and System passwords.
Admin Password Sets, Changes, or deletes the administrator (admin) password (sometimes called the
"setup" password).
System Password Sets, Changes, or deletes the system password.
Enable Master Password Lockout Enables or disables the master password support.
Default: OFF.
Table 33. System setup options—Secure Boot menu
Secure Boot
Enable Secure Boot Enables or disables the computer to boos using only validated boot software.
Default: OFF.
NOTE: For Secure Boot to be enabled, the computer needs to be in UEFI
boot mode and the Enable Legacy Option ROMs option needs to be
turned off.
Secure Boot Mode
Selects the Secure Boot operation mode.
Default: Deployed Mode.
NOTE: Deployed Mode should be selected for normal operation of Secure
Boot.
Table 34. System setup options—Expert Key Management menu
Expert Key Management
Enable Custom Mode Enables or disables the keys in the PK, KEK, db, and dbx security key databases to be
modified.
Default: OFF.
Custom Mode Key Management
Selects the custom values for expert key management.
Default: PK.
System Setup 33

Table 35. System setup options—Performance menu
Performance
Intel Hyper-Threading Technology Enables or disables the Intel Hyper-Threading Technology to use processor resources
more efficiently.
Default: ON.
Intel SpeedStep Enables or disables the Intel SpeedStep Technology to dynamically adjust processor
voltage and core frequency, decreasing average power consumption and heat
production.
Default: ON.
Intel TurboBoost Technology Enabled or disabled the Intel TurboBoost mode of the processor. If enabled, the Intel
TurboBoost driver increases the performance of the CPU or graphics processor.
Default: ON.
Multi-Core Support Changes the number of CPU cores available to the operating system. The default
value is set to the maximum number of cores.
Default: All Cores.
Enable C-State Control Enables or disables the CPU's ability to enter and exit low-power states.
Default: ON.
Table 36. System setup options—Power Management menu
Power Management
Wake on AC Enables the computer to turn on and go to boot when AC power is supplied to the
computer.
Default: OFF.
Auto on Time Enables the computer to automatically power on for defined days and times.
Default: Disabled. The system will not automatically power up.
Battery Charge Configuration Enables the computer to run on battery during power usage hours. Use the below
options to prevent AC power usage between certain times of each day.
Default: Adaptive. Battery settings are adaptively optimized based on your typical
battery usage pattern.
Enable Advanced Battery Charge
Configuration
Enables Advanced Battery Charge Configuration from the beginning of the day to a
specified work period. Advanced Battery Charged maximizes battery health while still
supporting heavy use during the work day.
Default: OFF.
Block Sleep Blocks the computer from entering Sleep (S3) mode in the operating system.
Default: OFF.
NOTE: If enabled, the computer will not go to sleep, Intel Rapid Start will
be disabled automatically, and the operating system power option will be
blank if it was set to Sleep.
Enable USB Wake Support Enables the USB devices to wake the computer from Standby mode.
Default: OFF.
Enable Intel Speed Shift Technology Enables or disables Intel Speed Shift Technology support which enables the operating
system to select the appropriate processor performance automatically.
Default: ON.
Lid Switch Enables the computer to power up from the off state whenever the lid is opened.
Default: ON.
34 System Setup

Table 37. System setup options—Wireless menu
Wireless
Wireless Switch Determines which wireless devices can be controlled by the Wireless Switch. For
Windows 8 systems, this is controlled by an operating system drive directly. As a
result, the setting does not affect the Wireless Switch behavior.
NOTE: When both WLAN and WiGig are present, enable/disable controls
are tied together. Thus, they cannot be enabled or disabled
independently.
WLAN
Default: ON.
Bluetooth
Default: ON.
Wireless Device Enable Enable or disable internal WLAN/Bluetooth devices.
WLAN
Default: ON.
Bluetooth
Default: ON.
Table 38. System setup options—POST Behavior menu
POST Behavior
Numlock Enable Enables or disables Numlock when the computer boots.
Default: ON.
Enable Adapter Warnings Enables the computer to display adapter warning messages during boot.
Default: ON.
Extend BIOS POST Time Configures the BIOS POST (Power-On Self-Test) load time.
Default: 0 seconds.
Fastboot Configures the speed of the UEFI boot process.
Default: Thorough. Performs complete hardware and configuration initialization during
boot.
Fn Lock Options Enables or disables the Fn lock mode.
Default: ON.
Lock Mode
Default: Lock Mode Secondary. Lock Mode Secondary = If this option is selected, the
F1-F12 keys scan the code for their secondary functions.
Pull Screen Logo Enabled or disabled the computer to display full screen logo if the image match
screen resolution.
Default: OFF.
Warnings and Errors Selects an action on encountering a warning or error during boot.
Default: Prompt on Warnings and Errors. Stop, prompt and wait for user input when
warnings or errors are detected.
NOTE: Errors deemed critical to the operation of the computer hardware
will always halt the computer.
Table 39. System setup options—Virtualization menu
Virtualization
Intel Virtualization Technology Enables the computer to run a virtual machine monitor (VMM).
Default: ON.
System Setup 35

Table 39. System setup options—Virtualization menu (continued)
Virtualization
VT for Direct I/O Enables the computer to perform Virtualization Technology for Direct I/O (VT-d).
VT-d is an Intel method that provides virtualization for memory map I/O.
Default: ON.
Table 40. System setup options—Maintenance menu
Maintenance
Asset Tag Creates a system Asset Tag that can be used by an IT administrator to uniquely
identify a particular system. Once set in BIOS, the Asset Tag cannot be changed.
Service Tag Displays the Service Tag of the computer.
BIOS Recovery from Hard Drive Enables the computer to recover from a bad BIOS image, as long as the Boot Block
portion is intact and functioning.
Default: ON.
NOTE: BIOS recovery is designed to fix the main BIOS block and cannot
work if the Boot Block is damaged. In addition, this feature cannot work
in the event of EC corruption, ME corruption, or a hardware issue. The
recovery image must exist on an unencrypted partition on the drive.
BIOS Auto-Recovery Enables the computer to automatically recover the BIOS without user actions. This
feature requires BIOS Recovery from Hard Drive to be set to Enabled.
Default: OFF.
Start Data Wipe
CAUTION: This Secure Wipe Operation will delete information in a way
that it cannot be reconstructed.
If enabled, the BIOS will queue up a data wipe cycle for storage devices that are
connected to the motherboard on the next reboot.
Default: OFF.
Allow BIOS Downgrade Controls flashing of the system firmware to previous revisions.
Default: ON.
Table 41. System setup options—System Logs menu
System Logs
Power Event Log Displays Power events.
Default: Keep.
BIOS Event Log Displays BIOS events.
Default: Keep.
Thermal Event Log Displays Thermal events.
Default: Keep.
Table 42. System setup options—SupportAssist menu
SupportAssist
Dell Auto operating system Recovery
Threshold
Controls the automatic boot flow for SupportAssist System Resolution Console and
for Dell operating system Recovery tool.
Default: 2.
SupportAssist operating system Recovery Enables or disables the boot flow for SupportAssist operating system Recovery tool
in the even of certain system errors.
36 System Setup

Table 42. System setup options—SupportAssist menu (continued)
SupportAssist
Default: ON.
Het wissen van BIOS (System Setup)- en
systeemwachtwoorden
Over deze taak
Om de systeem- of BIOS-wachtwoorden te wissen, neemt u contact op met Dell voor technische ondersteuning, zoals omschreven op
www.dell.com/contactdell.
OPMERKING: Voor informatie over het resetten van wachtwoorden voor Windows of toepassingen, raadpleegt u de
documentatie bij Windows of uw toepassing.
System Setup 37

Software
In dit hoofdstuk worden de ondersteunde besturingssystemen beschreven. Bovendien vindt u hier instructies voor de installatie van
stuurprogramma's.
Besturingssysteem
• Windows 10 Home (64-bit)
• Windows 10 Professional (64-bit)
• Ubuntu 18.04 LTS (not available for 2-in-1 system configurations)
De audiodriver downloaden
Stappen
1. Schakel de computer in.
2. Ga naar www.dell.com/support.
3. Voer de servicetag van uw computer in en klik op Submit (Verzenden).
OPMERKING:
Als u niet beschikt over de servicetag, gebruikt u de functie automatisch detecteren of handmatig
bladeren voor uw model computer.
4. Klik op Drivers & downloads.
5. Klik op de knop Drivers detecteren.
6. Controleer de voorwaarden voor gebruik en accepteer deze om SupportAssist te kunnen gebruiken en klik vervolgens op Continue
(Doorgaan).
7. Indien nodig gaat uw computer over op het downloaden en installeren van SupportAssist.
OPMERKING: Bekijk de instructies op het scherm voor browserspecifieke instructies.
8. Klik op Drivers voor mijn systeem bekijken.
9. Klik op Downloaden en installeren om alle gedetecteerde updates van drivers voor uw computer te downloaden en installeren.
10. Selecteer een locatie om de bestanden op te slaan.
11. Als u hierom wordt gevraagd, keurt u aanvragen van User Account Control (Beheer gebruikersaccount) om wijzigingen in het
systeem aan te brengen goed.
12. De toepassing installeert alle geïdentificeerde drivers en updates.
OPMERKING:
Niet alle bestanden kunnen automatisch worden geïnstalleerd. Controleer het installatieoverzicht om
te bepalen of handmatige installatie noodzakelijk is.
13. Klik voor handmatig downloaden en installeren op Category (Categorie).
14. Klik op Audio in de vervolgkeuzelijst.
15. Klik op Downloaden om de audiodriver voor uw computer te downloaden.
16. Ga na het downloaden naar de map waar u het bestand met de audiodriver heeft opgeslagen.
17. Dubbelklik op het pictogram van het bestand met de audiodriver en volg de instructies op het scherm om de driver te installeren.
De grafische driver downloaden
Stappen
1. Schakel de computer in.
2. Ga naar www.dell.com/support.
3. Voer de servicetag van uw computer in en klik op Submit (Verzenden).
6
38 Software

OPMERKING: Als u niet beschikt over de servicetag, gebruikt u de functie automatisch detecteren of handmatig
bladeren voor uw model computer.
4. Klik op Drivers & downloads.
5. Klik op de knop Drivers detecteren.
6. Controleer de voorwaarden voor gebruik en accepteer deze om SupportAssist te kunnen gebruiken en klik vervolgens op Continue
(Doorgaan).
7. Indien nodig gaat uw computer over op het downloaden en installeren van SupportAssist.
OPMERKING: Bekijk de instructies op het scherm voor browserspecifieke instructies.
8. Klik op Drivers voor mijn systeem bekijken.
9. Klik op Downloaden en installeren om alle gedetecteerde updates van drivers voor uw computer te downloaden en installeren.
10. Selecteer een locatie om de bestanden op te slaan.
11. Als u hierom wordt gevraagd, keurt u aanvragen van User Account Control (Beheer gebruikersaccount) om wijzigingen in het
systeem aan te brengen goed.
12. De toepassing installeert alle geïdentificeerde drivers en updates.
OPMERKING: Niet alle bestanden kunnen automatisch worden geïnstalleerd. Controleer het installatieoverzicht om
te bepalen of handmatige installatie noodzakelijk is.
13. Klik voor handmatig downloaden en installeren op Category (Categorie).
14. Klik op Video in de vervolgkeuzelijst.
15. Klik op Downloaden om de grafische driver voor uw computer te downloaden.
16. Ga na het downloaden naar de map waar u het bestand met de grafische driver heeft opgeslagen.
17. Dubbelklik op het pictogram van het bestand met de grafische driver en volg de instructies op het scherm om de driver te installeren.
Downloading the USB driver
Steps
1. Turn on your computer.
2. Go to www.dell.com/support.
3. Enter the Service Tag of your computer, and then click Submit.
NOTE: If you do not have the Service Tag, use the auto-detect feature or manually browse for your computer model.
4. Click Drivers & downloads.
5. Click the Detect Drivers button.
6. Review and agree to the Terms and Conditions to use SupportAssist, then click Continue.
7. If necessary, your computer starts to download and install SupportAssist.
NOTE: Review on-screen instructions for browser-specific instructions.
8. Click View Drivers for My System.
9. Click Download and Install to download and install all driver updates detected for your computer.
10. Select a location to save the files.
11. If prompted, approve requests from User Account Control to make changes on the computer.
12. The application installs all drivers and updates identified.
NOTE:
Not all files can be installed automatically. Review the installation summary to identify if manual installation is
necessary.
13. For manual download and installation, click Category.
14. Click Chipset in the drop-down list.
15. Click Download to download the USB driver for your computer.
16. After the download is complete, browse the folder where you saved the USB driver file.
17. Double-click the USB driver file icon and follow the instructions on the screen to install the driver.
Software
39

De wifi-driver downloaden
Stappen
1. Schakel de computer in.
2. Ga naar www.dell.com/support.
3. Voer de servicetag van uw computer in en klik op Submit (Verzenden).
OPMERKING: Als u niet beschikt over de servicetag, gebruikt u de functie automatisch detecteren of handmatig
bladeren voor uw model computer.
4. Klik op Drivers & downloads.
5. Klik op de knop Drivers detecteren.
6. Controleer de voorwaarden voor gebruik en accepteer deze om SupportAssist te kunnen gebruiken en klik vervolgens op Continue
(Doorgaan).
7. Indien nodig gaat uw computer over op het downloaden en installeren van SupportAssist.
OPMERKING: Bekijk de instructies op het scherm voor browserspecifieke instructies.
8. Klik op Drivers voor mijn systeem bekijken.
9. Klik op Downloaden en installeren om alle gedetecteerde updates van drivers voor uw computer te downloaden en installeren.
10. Selecteer een locatie om de bestanden op te slaan.
11. Als u hierom wordt gevraagd, keurt u aanvragen van User Account Control (Beheer gebruikersaccount) om wijzigingen in het
systeem aan te brengen goed.
12. De toepassing installeert alle geïdentificeerde drivers en updates.
OPMERKING:
Niet alle bestanden kunnen automatisch worden geïnstalleerd. Controleer het installatieoverzicht om
te bepalen of handmatige installatie noodzakelijk is.
13. Klik voor handmatig downloaden en installeren op Category (Categorie).
14. Klik op Network (Netwerk) in de vervolgkeuzelijst.
15. Klik op Download (Downloaden) om de wifi-driver voor uw computer te downloaden.
16. Ga na het downloaden naar de map waar u het bestand met de wifi-driver hebt opgeslagen.
17. Dubbelklik op het pictogram van de wifi-driver en volg de instructies op het scherm om de driver te installeren.
De driver van de mediakaartlezer downloaden
Stappen
1. Schakel de computer in.
2. Ga naar www.dell.com/support.
3. Voer de servicetag van uw computer in en klik op Submit (Verzenden).
OPMERKING:
Als u niet beschikt over de servicetag, gebruikt u de functie automatisch detecteren of handmatig
bladeren voor uw model computer.
4. Klik op Drivers & downloads.
5. Klik op de knop Drivers detecteren.
6. Controleer de voorwaarden voor gebruik en accepteer deze om SupportAssist te kunnen gebruiken en klik vervolgens op Continue
(Doorgaan).
7. Indien nodig gaat uw computer over op het downloaden en installeren van SupportAssist.
OPMERKING: Bekijk de instructies op het scherm voor browserspecifieke instructies.
8. Klik op Drivers voor mijn systeem bekijken.
9. Klik op Downloaden en installeren om alle gedetecteerde updates van drivers voor uw computer te downloaden en installeren.
10. Selecteer een locatie om de bestanden op te slaan.
11. Als u hierom wordt gevraagd, keurt u aanvragen van User Account Control (Beheer gebruikersaccount) om wijzigingen in het
systeem aan te brengen goed.
12. De toepassing installeert alle geïdentificeerde drivers en updates.
40
Software

OPMERKING: Niet alle bestanden kunnen automatisch worden geïnstalleerd. Controleer het installatieoverzicht om
te bepalen of handmatige installatie noodzakelijk is.
13. Klik voor handmatig downloaden en installeren op Category (Categorie).
14. Klik op Chipset in de vervolgkeuzelijst.
15. Klik op Downloaden om de driver voor de mediakaartlezer voor uw computer te downloaden.
16. Ga na het downloaden naar de map waar u het bestand met de driver voor de mediakaartlezer heeft opgeslagen.
17. Dubbelklik op het pictogram van het bestand met de mediakaartlezerdriver en volg de instructies op het scherm om de driver te
installeren.
Downloading the chipset driver
Steps
1. Turn on your computer.
2. Go to www.dell.com/support.
3. Enter the Service Tag of your computer, and then click Submit.
NOTE: If you do not have the Service Tag, use the auto-detect feature or manually browse for your computer model.
4. Click Drivers & downloads.
5. Click the Detect Drivers button.
6. Review and agree to the Terms and Conditions to use SupportAssist, then click Continue.
7. If necessary, your computer starts to download and install SupportAssist.
NOTE: Review on-screen instructions for browser-specific instructions.
8. Click View Drivers for My System.
9. Click Download and Install to download and install all driver updates detected for your computer.
10. Select a location to save the files.
11. If prompted, approve requests from User Account Control to make changes on the computer.
12. The application installs all drivers and updates identified.
NOTE:
Not all files can be installed automatically. Review the installation summary to identify if manual installation is
necessary.
13. For manual download and installation, click Category.
14. Click Chipset in the drop-down list.
15. Click Download to download the chipset driver for your computer.
16. After the download is complete, browse the folder where you saved the chipset driver file.
17. Double-click the chipset driver file icon and follow the instructions on the screen to install the driver.
De netwerkdriver downloaden
Stappen
1. Schakel de computer in.
2. Ga naar www.dell.com/support.
3. Voer de servicetag van uw computer in en klik op Submit (Verzenden).
OPMERKING:
Als u niet beschikt over de servicetag, gebruikt u de functie automatisch detecteren of handmatig
bladeren voor uw model computer.
4. Klik op Drivers & downloads.
5. Klik op de knop Drivers detecteren.
6. Controleer de voorwaarden voor gebruik en accepteer deze om SupportAssist te kunnen gebruiken en klik vervolgens op Continue
(Doorgaan).
7. Indien nodig gaat uw computer over op het downloaden en installeren van SupportAssist.
Software
41

OPMERKING: Bekijk de instructies op het scherm voor browserspecifieke instructies.
8. Klik op Drivers voor mijn systeem bekijken.
9. Klik op Downloaden en installeren om alle gedetecteerde updates van drivers voor uw computer te downloaden en installeren.
10. Selecteer een locatie om de bestanden op te slaan.
11. Als u hierom wordt gevraagd, keurt u aanvragen van User Account Control (Beheer gebruikersaccount) om wijzigingen in het
systeem aan te brengen goed.
12. De toepassing installeert alle geïdentificeerde drivers en updates.
OPMERKING: Niet alle bestanden kunnen automatisch worden geïnstalleerd. Controleer het installatieoverzicht om
te bepalen of handmatige installatie noodzakelijk is.
13. Klik voor handmatig downloaden en installeren op Category (Categorie).
14. Klik op Network (Netwerk) in de vervolgkeuzelijst.
15. Klik op Downloaden om de netwerkdriver voor uw computer te downloaden.
16. Ga na het downloaden naar de map waar u het bestand met de driver hebt opgeslagen.
17. Dubbelklik op het pictogram van het bestand met de driver en volg de instructies op het scherm om de driver te installeren.
42 Software

Hulp verkrijgen en contact opnemen met Dell
Bronnen voor zelfhulp
U kunt informatie en hulp bij Dell producten en services krijgen door middel van deze bronnen voor zelfhulp.
Tabel 43. Bronnen voor zelfhulp
Bronnen voor zelfhulp Bronlocatie
Informatie over Dell producten en services https://www.dell.com/
Dell Support
Tips
Contact opnemen met de ondersteuning In Windows Zoeken typt u Contact Support en drukt u op
Enter.
Online help voor besturingssysteem
• Windows: https://www.dell.com/support/windows
• Linux: https://www.dell.com/support/linux
Informatie over probleemoplossing, gebruikershandleidingen,
instructies voor installatie, productspecificaties, technische
ondersteuningsblogs, drivers, software-updates, enzovoorts.
https://www.dell.com/support/home/
Knowledge Base-artikelen van Dell voor verschillende
systeemproblemen:
1. Ga naar https://www.dell.com/support/home/?
app=knowledgebase.
2. Typ het onderwerp of trefwoord in het vak Search.
3. Klik op Search om verwante artikelen op te halen.
Leer en krijg meer informatie over uw product:
• Productspecificaties
• Besturingssysteem
• Uw product installeren en gebruiken
• Databack-up
• Problemen oplossen en diagnostiek
• Fabrieks- en systeemherstel
• BIOS-gegevens
Dell biedt diverse online en telefonische ondersteunings- en
servicemogelijkheden. Wanneer u geen actieve internetverbinding
hebt, kunt u de contactgegevens vinden over uw aankoopfactuur,
de verzendbrief, de rekening of in uw Dell productcatalogus.
• Selecteer Detect Product.
• Zoek uw product via de vervolgkeuzelijst onder View
Products.
• Voer het Servicetagnummer of Product-ID in het zoekvak
in.
• Eenmaal op de pagina Product Support scrolt u naar de sectie
Handleidingen en Documenten om een voorbeeld te zien van
alle Handleidingen, documenten en andere informatie over uw
product.
7
Hulp verkrijgen en contact opnemen met Dell 43

Contact opnemen met Dell
Dell biedt diverse online en telefonische ondersteunings- en servicemogelijkheden. Wanneer u geen actieve internetverbinding hebt, kunt u
de contactgegevens vinden over uw aankoopfactuur, de verzendbrief, de rekening of in uw Dell productcatalogus. De beschikbaarheid
hiervan verschilt per land en product, en sommige services zijn mogelijk niet beschikbaar in uw regio. Wanneer u met Dell contact wilt
opnemen voor vragen over de verkoop, technische ondersteuning of de klantenservice:
1. Ga naar https://www.dell.com/support/.
2. Selecteer uw land/regio in het vervolgkeuzemenu op de rechterbenedenhoek van de pagina.
3. Voor aangepaste ondersteuning:
a. Voer de Servicetag van uw systeem in in het veld Voer de Servicetag in.
b. Klik op verzenden.
• De supportpagina met de verschillende ondersteuningscategorieën wordt weergegeven.
4. Voor algemene ondersteuning:
a. Selecteer uw productcategorie.
b. Selecteer uw productsegment.
c. Selecteer uw product.
• De supportpagina met de verschillende ondersteuningscategorieën wordt weergegeven.
5. Raadpleeg https://www.dell.com/contactdell voor contactgegevens van Dell Wereldwijde Technische Support.
OPMERKING: De pagina Contact opnemen met Technische Support wordt weergegeven met details om het Dell
Wereldwijde Technische Support-team te bellen of daarmee te chatten of e-mailen.
OPMERKING: De beschikbaarheid hiervan verschilt per land en product, en sommige services zijn mogelijk niet
beschikbaar in uw regio.
44 Hulp verkrijgen en contact opnemen met Dell
-
 1
1
-
 2
2
-
 3
3
-
 4
4
-
 5
5
-
 6
6
-
 7
7
-
 8
8
-
 9
9
-
 10
10
-
 11
11
-
 12
12
-
 13
13
-
 14
14
-
 15
15
-
 16
16
-
 17
17
-
 18
18
-
 19
19
-
 20
20
-
 21
21
-
 22
22
-
 23
23
-
 24
24
-
 25
25
-
 26
26
-
 27
27
-
 28
28
-
 29
29
-
 30
30
-
 31
31
-
 32
32
-
 33
33
-
 34
34
-
 35
35
-
 36
36
-
 37
37
-
 38
38
-
 39
39
-
 40
40
-
 41
41
-
 42
42
-
 43
43
-
 44
44


Dell Latitude 7310 de handleiding
- Categorie
- Notitieboekjes
- Type
- de handleiding
in andere talen
- English: Dell Latitude 7310 Owner's manual
Gerelateerde papieren
-
Dell Latitude 7410 de handleiding
-
Dell Latitude 7420 de handleiding
-
Dell Latitude 3310 2-in-1 de handleiding
-
Dell Chromebook 3100 de handleiding
-
Dell Latitude 9520 de handleiding
-
Dell Latitude 7210 2-in-1 de handleiding
-
Dell Latitude 5320 de handleiding
-
Dell Latitude 7220 Rugged Extreme de handleiding
-
Dell Precision 7750 de handleiding
-
Dell Latitude 9420 de handleiding