Salora PA2205CD de handleiding
- Categorie
- CD spelers
- Type
- de handleiding
Deze handleiding is ook geschikt voor

Elite 1
INSTRUCTION MANUAL
Before operating the unit, please read this manual thoroughly and retain it for future reference.
GEBRUIKSAANWIJZING
Gelieve deze gebruiksaanwijzing te lezen alvorens het toestel te gebruiken. Bewaar hem voor
later gebruik.
MANUEL D’UTILISATION
Veuillez lire ce manuel d’utilisation avant d’utiliser l’appareil et gardez-le pour consultation
ultérieure.

1
CONTENTS
SAFETY AND CAUTION ........................................................................................................................... 2
OVERVIEW ................................................................................................................................................ 3
POWER SUPPLY ...................................................................................................................................... 7
GENERAL FUNCTIONS ........................................................................................................................... 8
TIME SETTING ........................................................................................................................................ 9
TUNER MODE ........................................................................................................................................ 10
CD MODE ................................................................................................................................................ 12
SD CARD MODE ...................................................................................................................................... 15
AUXILIARY INPUT MODE ........................................................................................................................ 15
ALARM FUNCTION ................................................................................................................................. 16
SLEEP FUNCTION ................................................................................................................................. 17
REMINDER FUNCTION .......................................................................................................................... 17
INFORMATION ........................................................................................................................................ 18
2
SAFETY AND CAUTION
To ensure that the device provides you with long-term satisfaction and enjoyment, please observe the
following instructions.
This device is connected to the mains with the AC cord. To completely disconnect the power input,
pull out the mains plug of the device from the mains.
The device and the mains plug should not be obstructed or should be easily accessed during
intended use.
It is recommended to avoid using or storing the device at extremes of temperature. Only use the
device in moderate climates.
The device and the mains plug should not be exposed to water (dripping or splashing), steam, heat
(heater or direct sunlight) and sand.
No objects filled with liquids such as vases, and no naked flame sources such as lighted candles
shall be placed on the device.
It is recommended minimum 10cm distances around the device for sufficient ventilations.
The ventilation should not be impeded by covering the ventilation openings with items such as
newspaper, tablecloths, curtains etc.
In case of malfunctions occur due to electrostatic discharge; reset the unit by reconnecting the
power source to resume normal functions.

3
10
1 2 3 4 5 6 7 8 9
OVERVIEW
MAIN UNIT
Keys & Controls on the Top
1. On/Off Switches the unit to and from standby mode.
The unit is fully disconnected from the mains after the plug has been pulled
out.
2. Sleep Sets the sleep timer.
3. Dimmer Adjusts the intensity of the display backlight.
4. Color Selects the color of display backlight.
5. – Volume + Adjusts the volume.
6. DSC / UBS Briefly press to select the sound setting.
Press and hold down to activate and deactivate the Ultra Bass System.
7. Display Switches to view information of the playing content.
8. Snooze / Mute Interrupts the alarm function or the reminder timer.
Switches the speakers to and from mute mode.
9. SD Card socket For inserting the SD or SDHC cards.
10. Dimmer sensor Automatically adjusts the intensity of display backlight to suit the room
brightness.
4
OVERVIEW
MAIN UNIT
Keys & Controls on the Front
11. LCD Display -
12. Play / Pause / PTY In CD or SD mode: Plays and pauses the playback.
In Tuner mode: Calls up the station types.
13. Stop / Stereo / Mono In CD or SD mode: Stops the playback.
In FM Tuner mode: Selects Stereo or Mono reception.
14. Rewind In Tuner mode: Searches station backwards.
In CD or SD mode: Selects files or tracks; Searches backwards for a
particular passage in a file or track.
15. Up In Tuner mode: Selects stored radio stations.
In CD or SD mode: Selects albums.
16. Down In Tuner mode: Selects stored radio stations.
In CD or SD mode: Selects albums.
17. Fast-forward In Tuner mode: Searches station forwards.
In CD or SD mode: Selects files or tracks; Searches forwards for a
particular passage in a file or track.
18. Intro / Repeat / Alarm In CD or SD mode: Plays the introduction of each track; Repeats the
playback.
In Standby mode: Activates the alarm setting.
19. Program / Random / Time In Tuner mode: Stores radio stations.
In CD or SD mode: Programs the playback; Activates random play
back.
In Standby mode: Activates the time setting.
20. Function Selects the FM Tuner, MW Tuner, CD, SD and Auxiliary input modes.
21. IR sensor Infrared sensor for remote control signals.
11
12
13
14 16
15 18 20
17 19
21

5
OVERVIEW
MAIN UNIT
Keys & Controls on the Sides
22
23
26
24
25
22. AC Input socket For connecting the power supply unit.
The only way to fully disconnect the hi-fi system from the mains is to
pull out the plug.
23. FM Antenna socket Antenna socket for the outdoor antenna cable or the wire antenna
supplied.
24. Auxiliary Input socket Audio signal input for connecting an external device.
25. Headphone socket For connecting headphone or earpiece with 3.5mm plug. The loud
speakers of the hi-fi system are automatically switched off.
26. MW Antenna connector Clip connectors for connecting the MW loop antenna supplied.
6
OVERVIEW
REMOTE CONTROL
Keys & Controls
1
3
5
2
6
8
9
7
4
12
13
15
11
10
18
19
17
20
16
14
1. On/Off Switches the unit to and from standby mode.
The unit is fully disconnected from the mains after the plug has been
pulled out.
2. Function Selects the FM Tuner, MW Tuner, CD, SD and Auxiliary input sources.
3. WEC Activates and deactivates the weekend cancellation function for alarm.
4. Play / Pause / PTY In CD or SD mode: Plays and pauses the playback.
In Tuner mode: Calls up the station types.
5. Rewind In Tuner mode: Searches station backwards.
In CD or SD mode: Selects files or tracks; Searches backwards for a
particular passage in a file or track.
6. Down In Tuner mode: Selects stored radio stations.
In CD or SD mode: Selects albums.
7. Sleep Sets the sleep timer.
8. Volume Up Adjusts the volume level.
9. Volume Down Adjusts the volume level.
10. Prog. / Random In CD or SD mode: Programs the playback; Activates random playback.
11. Repeat / Intro. In CD or SD mode: Plays the introduction of each track; Repeats the
playback.
12. DSC / UBS Briefly press to select the sound setting.
Press and hold down to activate and deactivate the Ultra Bass System.
13. NAP Sets the reminder function.
14. Up In Tuner mode: Selects stored radio stations.
In CD or SD mode: Selects albums.
15. Fast-forward In Tuner mode: Searches station forwards.
In CD or SD mode: Selects files or tracks; Searches forwards for a
particular passage in a file or track.
16. Stop / Stereo / Mono In FM Tuner mode: Selects Stereo or Mono reception.
In CD or SD mode: Stops the playback.
17. Display Switches to view information of the playing content.
18. Color Selects the color of display backlight.
19. Dimmer Adjusts the intensity of the display backlight.
20. Snooze / Mute Interrupts the alarm function or the reminder timer.
Switches the speakers to and from mute mode.

7
POWER SUPPLY
Mains operation
Check if the mains voltage on the type plate (on the bottom of the device) corresponds to your local
mains supply. If not, consult your dealer or service organization.
1. Insert the power cord into the AC Input socket on the side of the device.
2. Plug the mains plug into the mains socket.
Caution:
In order to disconnect the device from the mains completely, the mains plug should be removed from the
mains socket completely.
Battery operation (Remote Control)
1. Open the battery compartment at the back of the remote control by pulling out the cover..
2. Insert two batteries (2 x 1.5V, Type R03 / UM4 / AAA size) with the correct polarity as shown in the
battery compartment.
3. Replace the cover.
4. If the remote is not to be used for any extended period of time, it is recommended that the batteries
are removed.
Caution:
Do not expose the batteries to excessive heat such as sunshine, fire or the like.
Remove the batteries from the device when they will not be used for a long period of time.
Notes:
Batteries should not be disposed of by incineration and with household waste. Disposable batteries
should be taken to a suitable recycling centre if possible.
8
GENERAL FUNCTIONS
Switching the device on and off
1. Press the On/Off button to switch on the device from standby mode. The last function used is
automatically selected.
2. Switch the device to standby by pressing the On/Off button. The display shows ”GOOD BYE”
Adjusting the brightness of the display
1. Press the Dimmer button to adjust the brightness of display backlight in three levels (bright,
medium, or off).
2. The auto dimmer function automatically adjusts the intensity of display backlight to suit the
brightness of the surroundings.
Notes:
Minimum power consumption in standby mode is only achieved if the display backlight is switched off.
Changing the color of display
1. Repeatedly press the Color button to change the color of display backlight. There are 8 colors for
selection.
Selecting the function mode
1. Repeatedly press the Function button to select the function between FM Tuner, MW Tuner, CD, SD
and Auxiliary input modes.
Adjusting the volume
1. Adjusts the volume by pressing the Volume− or Volume+ button.
Muting
1. Pressing the Mute button to switch the sound on and off. The display shows “Mute”.
Switching the Ultra Bass System on and off
This function boosts the bass frequencies.
1. Press and hold the DSC/UBS button to switch the Ultra Bass System on and off. The display shows
the symbol
when UBS is switched on.
Notes:
Listening with UBS at high volume may have distortion. Recommend to use at low volume.
Selecting the sound effects
You can select the sound settings USER, CLASSIC, POP, JAZZ and ROCK. The default setting is USER.
1. Repeatedly press the DSC/UBS button to select the desired sound setting. Symbol is shown on the
display to indicate your setting.

9
GENERAL FUNCTIONS
Setting the equaliser
The USER sound setting allows you to make your own personal equaliser settings.
1. Repeatedly press the DSC/UBS button to select the USER sound setting.
2. Press and hold the DSC/UBS button until “BASS 0” is shown on the display.
3. Briefly Press the DSC/UBS button to choose the setting between BASS or TREBLE (TRE).
4. Set the value by using the Volume buttons.
Notes:
If you do not press any button within 5 seconds, the device will quit the setting.
Listening with headphones
1. Connect the headphones to the headphone jack (Ø3.5mm).
–This switches off the loudspeakers.
Warning:
Excessive sound pressure from earphones and headphones can cause hearing loss.
TIME SETTING
A demo programme starts when you use the device for the first time. The time and day will flash on the
display, indicating that they need to be set.
Time setting may only be performed in standby mode.
1. Press the Time button to select the hour format between 12HR and 24HR.
2. Press and hold down the Time button until the hour digits flash on the display.
3. Set the hour by using the Rewind or Forward button, and press the Time button to confirm.
The minute digits flash.
4. Use the Rewind or Forward button to set the minute, and then press the Time button to confirm.
The day of week flashes.
5. Set the day of week by using the Rewind or Forward button, and press the Time button to confirm.
“CT ON” flashes on the display.
6. Use the Rewind or Forward button to set the RDS time synchronisation, press the Time button to
confirm and finish the time setting.
Notes:
You must reset the time after a power failure or when the mains plug is pulled out.
Some RDS stations transmit an RDS time signal. If the selected RDS programme transmits this time
information, the time will be automatically updated. This may take a few minutes.
10
TUNER MODE
Connecting the antenna
1. Plug the outdoor antenna cable or the wire antenna supplied into the FM Antenna socket.
Fully extend the wire antenna for FM reception.
2. Insert the MW frame antenna supplied into the MW Antenna connector.
Adjust the position of the antenna to have better reception.
Selecting the Tuner input source
1. Switch on the device by pressing the On/Off button
2. Press the Function button to select the input source, FM Tuner or MW Tuner.
Automatic station search
The first time you switch on the device, the automatic station search in tuner mode searches and stores
up to 40 stations (20 stations each for FM and MW) with the best reception.
1. Switch on the device by pressing the On/Off button. The search starts.
After the search has finished, you will hear the station stored in preset position P01.
2. To find other stations, press the Function button to select the frequency band, FM or MW.
3. Press and hold the Rewind or Forward button until the frequency display changes to rapid
run-through. The search will stop automatically when it finds a station with sufficient strength.
4. When the end of the frequency band is reached, it will recommence searching from the opposite
end of the frequency band.
Notes:
The automatic station search can be interrupted by briefly pressing the Stop button.
Manual station search
1. To move the frequency in step, briefly press the Rewind or Forward button.
The frequency changes in steps of 50kHz (FM) or 9kHz (MW).
2. When the end of the frequency band is reached, it will recommence searching from the opposite
end of the frequency band.
Storing stations as presets
1. Press the Rewind or Forward button to select the station desired to store.
2. Press the Program/Random button to activate the storing function. The preset position (e.g. P01)
and “PROG” flash on the display.
3. Choose the desired preset position by using the Up or Down button.
4. Press the Program/Random button to store the station.
5. To store more stations, repeat step 1 to 4.
Notes:
If stations are already stored in the preset positions, they are overwritten when new stations are stored.
If the device is disconnected from the mains for a period of time, all the preset stations are deleted.

11
TUNER MODE
Stereo / Mono reception
If the signal from the FM stereo is weak, you can improve the sound quality by switching to mono reception.
1. Press the Stereo / Mono button to switch to mono reception.
2. To switch back to FM stereo, press the Stereo / Mono button again.
Notes:
The mono or stereo setting is also saved when you store a station as preset.
RDS station service
RDS (Radio Data System) is an information system which inaudible digital information is transmitted in
addition to the normal FM radio programme. When the device is receiving a RDS station and the recep-
tion strength is sufficient, the station name and “ ” appear in the display. It may take some time
before the RDS information is available.
RDS time synchronisation
Some RDS stations transmit a time signal. If reception is good, the time information will update the
time if you have selected the “CT ON” option during the time setting.
Time synchronisation can take several minutes, and even with good reception the accuracy
depends on the time signal being transmitted. The automatic time setting is always activated when
the device is switched from standby to tuner mode and receives a RDS station. When the device
is waiting for an RDS time signal, “
” flashes on the display. Once RDS time synchronisation
completes, “
” keeps lighting.
Calling up RDS information
1. Repeatedly press the Display button to cycle through the information.
a. Station name Displays the name of the radio station being listened to.
b. Programme type Displays the type of station being listened to, e.g. Pop, Classic, News, etc.
c. Text Displays the message about the station being listened to as ticker text.
d. Day and Time Displays the current time and day of the week.
e. Frequency Displays the waveband and the frequency of station being listened to.
Station types (PTY)
1. To call up the current station type, press the PTY button.
If no station type code is transmitted, “NO PTY” appears on the display.
2. Repeatedly press the PTY button to select the desired station type.
3. Press the Rewind or Forward button to start the station search by station type.
The search stops once a station of the selected type is found.
4. Press the PTY button to stop the search.
12
CD MODE
The device is suitable for music CDs displaying the logo shown here (CD-DA) and for
CD-Rs and CD-RWs with audio data or MP3 and WMA formats.
In MP3/WMA mode, the terms “album” and “file” are very important. “Album” cor-
responds to a folder on a PC, “file” to a file on a PC or CD-DA track. An MP3/WMA CD
may not contain more than 511 tracks/folders in total.
When burning CD-R and CD-RWs with audio files, various problems may arise
which could lead to problems with playback. This can be caused by faulty software or
hardware settings or by the CD being used. Should such problems arise, contact the customer services
of your CD burner or software manufacturer or look for relevant information, for example on the Internet.
When you are making audio CDs, observe all legal guidelines and ensure that the copyright of third par-
ties is not fringed.
Always keep the CD compartment closed to prevent dust from collecting on the laser optics. Do not at-
tach adhesive labels to CDs. Keep the surfaces of CDs clean. You can play standard 12cm CDs as well
as 8cm CDs on the device. An adaptor is not necessary.
Selecting the CD input source
1. Press the Function button to select CD as the input source.
If there is no CD in the compartment, the display shows the message “NO DISC”. Otherwise, the
device scans the CD content.
Inserting a CD
1. Open the CD compartment by pulling the top of the front panel. The display shows “OPEN”.
2. Insert a CD into the CD compartment with it printing facing outward.
3. Push the front panel to its original position to close the CD compartment. The device then reads the
content of CD, and the display shows “CD READ”
- In MP3/WMA mode: The display shows the total number of albums and files, and the format “MP3/
WMA”.
- In CD-DA mode: The display shows the total playing time, the total number of tracks, and the
format “CD”.
CD playback
1. Press the Play/Pause button to start playback.
Playback always starts with the first track (CD-DA) or the first file of the first album (MP3/WMA).
2. Press the Play/Pause button to pause the playback.
3. Press the Play/Pause button again to resume playback.
4. Press Stop button to end the playback.
Selecting a file or track
1. During playback, repeatedly press the Rewind or Forward button until the desired file or track is
reached. Playback of the selected file/track starts automatically.
– In MP3/WMA, you also can select the album by pressing the Up or Down button.
2. You can also select the files/tracks in the stop position. Press and hold Rewind or Forward button
to select the files/tracks more quickly.
Searching for a passage within a file or track
1. During playback, press and hold down the Rewind or Forward button until you find the passage
you want to hear.
– Playback starts when you release the button.
– The volume is reduced during the search.

13
CD MODE
Repeating a file or track (Repeat One)
1. During playback, press the Repeat/Intro button, the display shows the symbol “ ”.
The current file/track will be played repeatedly.
2. To cancel this function, repeatedly press the Repeat/Intro button until the symbol “ ” disappears
on the display.
3. You may also press the Stop button to stop playback and quit the repeat function.
Repeating all files or tracks (Repeat All)
1. During playback, repeatedly press the Repeat/Intro button until the display shows a symbol “
”.
The whole CD will be repeated.
2. To cancel this function, repeatedly press the Repeat/Intro button until the symbol “ ”
disappears.
3. You may also press the Stop button to stop playback and quit the repeat function.
Repeating all files in an album (MP3/WMA only)
1. During playback, repeatedly press the Repeat/Intro button until the display shows a symbol
“
”.
All the files in the current album are played repeatedly.
2. To cancel this function, repeatedly press the Repeat/Intro button until the symbol “ ”
disappears.
3. You may also press the Stop button to stop playback and quit the repeat function.
Playing the files or tracks in random order (Random)
1. During the playback, press the Prog/Random button to activate the random playback, the word
“RANDOM” is shown on the display.
– All files/tracks on the CD will be played once in random order.
2. To cancel this function, press the Prog/Random button again, the word “RANDOM” disappears.
– The current track and subsequent tracks will be played to the end in its default order.
3. You can also press the Stop button to cancel the function and quit the playback.
Playing the introduction of files or tracks (Intro.)
1. Press the Repeat/Intro button in stop mode. The display shows the word “INTRO”.
– Playback starts, the first ten seconds of each file/track are played.
2. To cancel this function, press the Repeat/Intro button again, the word “INTRO” disappears on the
display.
–The current track and the subsequent tracks are played to the end.
3. You can also press the Stop button to cancel the function and quit the playback.
Calling up file information (MP3/WMA only)
You can call up file information (ID3 tag and ticker text) with this function.
1. During playback, the display switches to show the album and file name.
2. Repeatedly press the Display button to cycle through the information.
14
CD MODE
Creating a track memory
You can create a track memory of up to 60 tracks (CD-DA) or up to 60 files from different albums (MP3/
WMA) of the current CD in any order you desired and then play the tracks in that sequence. A file or
track may be stored more than once. Programming is only possible in stop mode.
Selecting and storing tracks
1. In stop mode, press the Program/Random button to call up the function.
– The word “PROG” flashes during the programming.
– Display shows “P-01” for the first preset
2. Select the file/track by pressing the Rewind or Forward button.
– In MP3/WMA, you also can select the album by pressing the Up or Down button.
3. Press the Program/Random button to store.
4. To store more files/tracks, repeat step 2 and 3.
Playing the track memory
1. Press the Play/Pause button to start playing. Playback begins with the first programmed file or
track.
– The word “PROG” lights on the display indicates there is a track memory.
2. Press the Play/Pause button to pause the playback, or press the Stop button to end the play
back.
3. To play the track memory again, press the Play/Pause button.
Viewing or changing the track selection
1. In stop mode, the display shows the first programmed file/track number, and the word “PROG”
flashes.
Repeatedly press the Program/Random button to cycle through each preset of the track
memory.
2. You can change any preset by pressing the Rewind or Forward, Up or Down button to select
a new file/track, and then press the Program/Random button to confirm.
Adding files or tracks
1. In stop mode, repeatedly press the Program/Random button until the track number of a preset
is zero.
2. Select the track by using the Rewind or Forward, Up or Down button.
3. Press the Program/Random button to save the track.
Deleting the track memory
1. In stop mode, press the Stop button, “PROG” will disappears on the display
or
Open the CD compartment.

15
SD CARD MODE
Secure Digital (SD or SDHC) cards can be used with the device for playback of MP3 or WMA files.
SD or SDHC cards up to 16GB are supported. However, there are many different cards variants avail-
able and not all cards can be guaranteed to work in the device. SD or SDHC cards must be formatted
using the FAT or FAT32 filing system in order to operate with the device.
Inserting and removing a card
To insert a SD/SDHC card into the device, push the card with its label side facing outwards and gold
contacts first into the SD card socket.
To remove the card, push the card slightly and it will pop out allowing removal.
1. To select SD card mode, repeatedly press the Function button until “SD” is shown on the display.
Playback control in SD card mode is similar to CD MP3/WMA mode, please refer to CD mode. MP3/
WMA files are played back in the order that they are written to the SD card by your computer, except
when Random playback is selected.
AUXILIARY INPUT MODE
The device has an auxiliary input mode for listening audio signal from an external audio device, such as
iPod, MP3 player, CD player, etc.
1. Connect a stereo or mono audio source to the Auxiliary Input socket (Ø3.5mm) provided on the
side of the device.
2. Switch on the device, and press the Function button to select “AUX” as the input source.
3. Adjust the volume of your player and the device for comfortable listening.
16
ALARM FUNCTION
The device has an alarm function which can be set to wake you to buzzer, radio, CD or SD card input
source. The alarm duration is 90 minutes.
Setting the alarm time
1. With the device switched off, press and hold the Alarm button until the hour digits flash on the
display.
2. Press the Rewind or Forward button to set the hour, and then press the Alarm button to confirm.
– Display: the minute digits flashes.
3. Press the Rewind or Forward button to set the minute, and press the Alarm button to confirm.
– Display: the alarm source flashes.
4. Press the Rewind or Forward button to set the alarm source between “CD”, “SD CARD”, “FM
RADIO” and “BUZZER”.
5. If you select “CD” or “SD CARD”, the symbol “
” flashes on the display, press the Alarm button
to confirm.
If you select “BUZZER”, the symbol “
” flashes, press the Alarm button to confirm.
If you select “FM RADIO”, the symbol “
” flashes. You should also select the desired preset
station by using the Up or Down button, and then press the Alarm button to confirm.
6. Set the alarm volume by using the Volume button.
7. Press the Alarm button to confirm and finish the setting.
– Display: the current time and the symbol “
” or “ ” lights on.
Notes:
If no button is pressed for more than 5 seconds during the setting, the device will quit the process auto-
matically, and you have to start again.
If you select “CD” or “SD card” as the alarm source, make sure that a CD or SD card has been inserted.
Otherwise there will be no alarm signal.
Viewing the alarm time
1. In standby mode, repeatedly press the Alarm button to cycle through the alarm settings.
You may change the settings according to the procedures of “Setting the alarm time”.
Interrupting the alarm
1. During the alarm is sounding, press the Snooze button.
– The alarm signal stops.
– The alarm goes off again at 5-minute intervals (overall alarm duration is 90 minutes).
Cancelling the alarm for the day
1. Press the On/Off button when the alarm is sounding.
– The alarm remains activated for the next day.
Switching off the alarm for the weekend
You can switch off the alarm function over the weekend while the alarm setting is saved.
1. Switch off the alarm function with WEC button on the remote control.
2. Press the WEC button again to reactivate the alarm function for weekend.
Activating and deactivating the alarm
1. To deactivate the alarm, briefly press the Alarm button in standby mode. The alarm symbol
disappears on the display.
The alarm setting is saved.
2. To activate the alarm, briefly press the Alarm button again in standby mode. The display shows the
alarm symbol.

17
SLEEP FUNCTION
The device can be set to turn off after a preset time has elapsed. The sleep setting can be adjusted
between 10 and 90 minutes in 10-minute intervals.
Setting the sleep timer
1. Switch on the device, and select the listening source you desired.
2. Press the Sleep button to call up the function.
– The word “90 MIN” and the symbol >
< is shown on the display.
3. Repeatedly press the Sleep button to select the sleep time in 10-minute intervals.
The device will switch off after the preset sleep time has elapsed.
Cancelling the sleep timer
1. To cancel the sleep timer before the chosen sleep time has elapsed; press the Sleep button until
the word “00 MIN” shown on the display.
– The device remains switches on, and the symbol >
< disappears.
2. If you switch on the device and switch off the device before the sleep time has elapsed, press the
On/Off button.
– The symbol >
< disappears, and the device is switched off.
REMINDER FUNCTION
The device can be set to remind you by sounding the signal tone at a preset time. The reminder time
setting can be adjusted from 10 to 120 minutes in 10-minute intervals.
1. Switch the device to standby mode, press the NAP button on the remote control.
The display shows ”NAP 10” and the symbol “NAP” flashes.
2. Repeatedly press the NAP button to select the reminder time in 10-minute intervals.
After the time has expired, a signal tone sounds.
3. Switch off the signal tone by pressing the On/Off button.
or
Interrupt the function early by setting the reminder time to “NAP 00” using the NAP button.
18
INFORMATION
Technical data
Power Supply
Mains operation AC 230V, 50Hz~ only
Battery operation
(For remote control only)
2 x 1.5V (R03 / UM4 / AAA size)
Maximum Power
Operation 35 W
Consumption Standby
2 W (with display backlighting switched off)
Frequency Coverage
FM 87.5 – 108MHz
MW 522 – 1620 kHz
Loudspeaker
Size
2 x Ø34 mm
1 x Ø77 mm
Impedance
2 x 4 ohm
Circuit Features 1 x 6 ohm
Output power 2 x 3 W
1 x 6 W
Auxiliary input socket Ø3.5 mm
Headphone socket Ø3.5 mm
Aerial System
FM Wire Antenna
AM Loop Antenna
General Dimension of unit 316L x 176H x 189D (mm)
Technical and design modifications reserved.
Never open the device casing. The manufacturer will not accept any liability for damage resulting from
improper handling.
General information on laser devices
You will find a symbol similar to the one shown here on the bottom of the
device.
CLASS 1 LASER PRODUCT means that the laser is designed in such a
way as to ensure that the maximum permissible emission value cannot be
exceeded under any circumstances.
If operating devices or methods other than those specified here are em-
ployed, it may lead to dangerous exposure to emissions.
Invisible laser radiation is emitted if the CD compartment is opened and the safety locking mechanism is
shorted. Do not expose yourself to this radiation.
Environmental note
This product has been made from high-quality parts and materials which can be reused
and recycled.
Therefore, do not throw the product away with normal household waste at the end of
its life. Take it to a collection point for recycling electrical and electronic device. This is
indicated by this symbol on the product, in the operating manual and on the packaging.
Please find out about collection points operated by your local authority.
Help protect the environmental by recycling used products.

1
INHOUD
VEILIGHEID EN WAARSCHUWINGEN .................................................................................................... 2
OVERZICHT ............................................................................................................................................. 3
VOEDING ................................................................................................................................................. 7
ALGEMENE FUNCTIES .......................................................................................................................... 8
TIJDINSTELLING .................................................................................................................................... 9
TUNER MODUS ...................................................................................................................................... 10
CD MODUS ............................................................................................................................................. 12
SD KAART MODUS ................................................................................................................................ 15
AUX INGANG MODUS .............................................................................................................................. 15
ALARMFUNCTIE ..................................................................................................................................... 16
SLEEP FUNCTIE ..................................................................................................................................... 17
HERINNERINGSFUNCTIE .....................................................................................................................17
INFORMATIE ........................................................................................................................................... 18
2
VEILIGHEID EN WAARSCHUWINGEN
Om er voor te zorgen dat dit toestel u lang voldoening en plezier zal geven, dienen volgende instructies
opgevolgd te worden.
• Dittoestelwordtaandenetstroomverbondenviaeenstroomkabel.Omhettoestelvollediguitte
schakelen dient de stekker uit het stopcontact gehaald te worden.
• Hettoestelenhetstopcontactmoetengemakkelijkbereikbaarzijnenmogennietdoorobstructies
verborgen zijn.
• Hetisaanbevolenhettoestelnietbijextremetemperaturentegebruikenoftebewaren.Gebruikhet
alleen in normale klimaatomstandigheden.
• Hettoestelendestroomkabelmogennietwordenblootgesteldaanwater(druppelsofspatten),
stoom, warmte (verwarmingstoestel of direct zonlicht) en zand.
• Ermogengeenobjectendiegevuldzijnmeteenvloeistof,zoalseenvaas,enookgeenopenvlam,
zoals een kaars, bovenop het toestel geplaatst worden.
• Vooreengoedeventilatieishetaanbevoleneenvrijeruimtevan10cmrondhettoesteltehouden.
• Deventilatieopeningenmogennietgeblokkeerdwordenmetzakenzoalseenkrant,tafelkleed,
gordijn, enz…
• Ingevalvanslechtewerkingdooreenelektrostatischeontlading,destekkeruithetstopcontact
halen en dan terug aansluiten.

3
OVERZICHT
TOESTEL
Toetsen en bedieningen aan de bovenzijde
10
1 2 3 4 5 6 7 8 9
1 Aan/uit Schakelt het toestel in of uit stand-by.
Het toestel is volledig van de stroom afgesloten nadat de stekker uit het
stopcontact is gehaald.
2 Sleep Stelt de sleep timer in.
3 Dimmer Regeling van de intensiteit van het display.
4 Kleur Kies de kleur van het display.
5 -Volume+ Om het volume te regelen.
6 DSC/UBS Kort indrukken om de geluidsinstelling te kiezen.
Ingedrukt houden om het Ultra Bass Systeem in of uit te schakelen.
7 Display Informatie over de weergave-inhoud.
8 Snooze/Mute Onderbreekt de alarmfunctie of de resterende timer.
Schakelt de luidsprekers naar en van mute modus.
9 SD kaart aansluiting Om SD of SDHC kaarten in te brengen.
10 Dimmer sensor Regelt automatisch de intensiteit van de display volgens de lichtomstan
digheden in de kamer.
4
OVERZICHT
TOESTEL
Toetsen en bedieningen aan de voorzijde
11
12
13
14 16
15 18 20
17 19
21
11 LCD display
12 Weergave/Pauze/PTY In SD of CD modus: weergave en pauze.
In tuner modus: oproepen type zenders.
13 Stop/Stereo/Mono In SD of CD modus: stoppen van de weergave.
In FM tuner modus: kiezen tussen stereo of mono ontvangst.
14 Terugspoelen In tuner modus: om zenders achterwaarts te zoeken.
In CD os SD modus: om documenten of nummers te selecteren; zoekt
achterwaarts naar een bepaalde passage in een document of nummer.
15 Up In tuner modus: selecteert vastgelegde radiozenders.
IN CD of SD modus: selecteert albums.
16 Down In tuner modus: selecteert vastgelegde radiozenders.
IN CD of SD modus: selecteert albums.
17 Snel voorwaarts In tuner modus: zoekt zenders voorwaarts.
In CD os SD modus: om documenten of nummers te selecteren; zoekt
voorwaarts naar een bepaalde passage in een document of nummer.
18 Intro/Herhaling/Alarm IN CD of SD modus: geeft de eerste seconden van elk nummer weer;
herhaalt de weergave.
In stand-by modus: activeert het instellen van het alarm.
19 Program/Random/Tijd In tuner modus: memoriseert de radiozenders.
In CD of SD modus: programmeren van de weergave; activeert de wille
keurige weergave.
In stand-by modus: activeert de tijdinstelling.
20 Functie Selecteren tussen FM tuner, MW tuner, CD, SD en Aux ingang.
21 IR sensor Ontvanger van de afstandsbediening.

5
22
23
26
24
25
OVERZICHT
TOESTEL
Toetsen en bedieningen aan de zijkanten
22 AC aansluiting Aansluiting van de stroomvoeding.
De enige manier om het toestel volledig uit te schakelen is de
stroomkabel uit te trekken.
23 FM antenne aansluiting Aansluiting voor een externe antenne of de meegeleverde draadan
tenne.
24 Aux ingang Aansluiting voor een externe geluidsbron.
25 Hoofdtelefoonaansluiting Voor aansluiting van een hoofdtelefoon met een 3.5mm stekker. De
luidsprekers worden automatisch uitgeschakeld.
26 MW antenne aansluiting Aansluiting voor de meegeleverde MW loopantenne.
6
OVERZICHT
AFSTANDSBEDIENING
Toesten en bedieningen
1 Aan/uit Schakelt het toestel van en naar stand-by.
De enige manier om het toestel volledig uit te schakelen is de stroomkabel uit te trekken.
2 Functie Selecteren tussen FM tuner, MW tuner, CD, SD en Aux ingang.
3 WEC Schakelt de werking van het alarm tijdens het weekend in of uit.
4 Weergave/Pause/PTY In SD of CD modus: weergave en pauze.
In tuner modus: oproepen type zenders.
5 Terugspoelen In tuner modus: om zenders achterwaarts te zoeken.
In CD os SD modus: om documenten of nummers te selecteren; zoekt
achterwaarts naar een bepaalde passage in een document of nummer.
6 Down In tuner modus: selecteert vastgelegde radiozenders.
IN CD of SD modus: selecteert albums.
7 Sleep Stelt de sleep timer in.
8 Volume Up Regeling van het volume
9 Volume Down Regeling van het volume
10 Prog./Random In CD of SD modus: programmeren van de weergave; activeren van de
willekeurige weergave.
11 Herhaling/Intro In CD of SD modus: geeft de eerste seconden van elk nummer weer;
herhaalt de weergave.
12 DSC/UBS Kort indrukken om de geluidsinstelling te kiezen.
Ingedrukt houden om het Ultra Bass Systeem in of uit te schakelen.
13 NAP Stelt de herinneringsfunctie in.
14 Up In tuner modus: selecteert vastgelegde radiozenders.
IN CD of SD modus: selecteert albums.
15 Snel voorwaarts In tuner modus: zoekt zenders voorwaarts.
In CD os SD modus: om documenten of nummers te selecteren; zoekt
voorwaarts naar een bepaalde passage in een document of nummer.
16 Stop/Stereo/Mono In SD of CD modus: stoppen van de weergave.
In FM tuner modus: kiezen tussen stereo of mono ontvangst.
17 Display Informatie betreffende de weergegeven inhoud.
18 Kleur Kies de kleur van het display.
19 Dimmer Regeling van de intensiteit van het display.
20 Snooze/Mute Onderbreekt de alarmfunctie of de resterende timer.
Schakelt de luidsprekers naar en van mute modus.
1
3
5
2
6
8
9
7
4
12
13
15
11
10
18
19
17
20
16
14

7
VOEDING
Netstroomvoeding
Controleer of de spanning die vermeld is op het plaatje (op de onderkant van het toestel) overeenkomt
met die van u thuis. Indien dit niet overeenkomt, consulteer uw dealer.
1. Steek de stroomkabel in de AC aansluiting op de zijkant van het toestel.
2. Steek de stekker in het stopcontact.
Opgelet:
Om het toestel volledig af te sluiten van de stroom dient de stekker uit het stopcontact gehaald te
worden.
Batterijvoeding (afstandsbediening)
1. Op het batterijencompartiment op de achterkant van de afstandsbediening door aan het klepje te
trekken.
2. Breng twee batterijen in (2 x 1.5 V, Type R03/UM4/AAA formaat) en hou rekening met de
aangeduide polariteit.
3. Plaats het klepje terug.
4. Als de afstandsbediening gedurende een zekere tijd niet gebruikt wordt, is het aangeraden de bat
terijen te verwijderen.
Opgelet:
Stel de batterijen niet bloot aan extreme warmte zoals zonlicht, een vuur of dergelijke.
Haal de batterijen uit de afstandsbediening als deze gedurende lange tijd niet gebruikt wordt.
Opmerkingen:
Batterijen mogen niet met het gewoon huisafval verwijderd worden. Gebruik de beschikbare middelen
om de batterijen te laten recycleren.
8
ALGEMENE FUNCTIES
Het toestel in- en uitschakelen
1. Druk op de Aan/Uit toets van het toestel om het in te schakelen. De laatst gebruikte functie wordt
automatisch gekozen.
2. Druk op de Aan/Uit toets van het toestel om het in stand-by te zetten. De display toon “GOOD
BYE”.
Regeling van de helderheid van het display
1. Druk op de Dimmer toets om de helderheid van het display in drie stappen (helder, medium, uit) in
te stellen.
2. De auto dimmer functie regelt de helderheid automatisch in functie van de lichtomstandigheden van
de omgeving.
Opmerking:
Een minimum stroomverbruik in stand-by is alleen mogelijk als de display uitgeschakeld is.
Wijzigen van de kleur van het display
1. Druk herhaaldelijk op de Kleur toets om de kleur van het display te wijzigen. U kan uit 8 kleuren
kiezen.
Selecteren van de functie
1. Druk herhaaldelijk op de Functie toets om te kiezen tussen FM tuner, MW tuner, CD, SD of Aux
ingang.
Regeling van het volume
1. Regel het volume met de Volume- of Volume+ toetsen.
Muting
1. Druk op de Mute toets om het geluid in of uit te schakelen. De display toont “Mute”.
In- en uitschakelen van het Ultra Bass Systeem
Deze functie versterkt de weergave van de lage tonen.
1. Hou de DSC/UBS toets ingedrukt om het Ultra Bass Systeem in of uit te schakelen. Het display
toont
als UBS ingeschakeld is.
Opmerking:
Gebruik maken van UBS met een hoog volume kan vervorming veroorzaken. Gebruik het alleen bij laag
volume.
Selecteren van het geluideffect
U kan kiezen tussen GEBRUIKER, KLASSIEK, JAZZ en ROCK. De standaardinstelling is GEBRUIKER.
1. Druk herhaaldelijk op de DSC/UBS toets om het gewenste geluideffect te kiezen. Een
overeenkomstig symbool wordt op de display weergegeven.

9
ALGEMENE FUNCTIES
Instelling van de equalizer
Bij het kiezen van het geluideffect GEBRUIKER kan u de equalizer aan uw eigen wensen instellen.
1. Druk herhaaldelijk op DSC/UBS toets om GEBRUIKER te selecteren.
2. Hou de DSC/UBS toets ingedrukt totdat “BASS 0” op het display verschijnt.
3. Druk kort op de DSC/UBS toets om te kiezen tussen BASS of TREBLE (TRE).
4. Stel het niveau in met de Volume toetsen.
Opmerking:
Indien u niet binnen de 5 seconden op een toets drukt, wordt de instelling geannuleerd.
Luisteren met hoofdtelefoon
1. Sluit de hoofdtelefoon aan op de hoofdtelefoonaansluiting (Ø3.5mm)
- Dit schakelt de luidsprekers uit.
Verwittiging:
Een overdreven geluidsdruk van een hoofdtelefoon kan het gehoor beschadigen.
TIJDINSTELLING
Een demonstratieprogramma start wanneer u het toestel voor het eerst gebruikt. De tijd- en dagindicatie
op het display knipperen om aan te duiden dat deze ingesteld moeten worden.
De tijdinstelling kan alleen gebeuren in stand-by modus.
1. Druk op de Tijd toets om het uurformaat te kiezen tussen 12HR en 24HR.
2. Hou de Tijd toets ingedrukt totdat de urenindicatie op het display knippert.
3. Stel het uur in met de Achterwaarts of Voorwaarts toetsen en druk op Tijd toets om te
bevestigen.
De minutenindicatie knippert.
4. Stel de minuten in met de Achterwaarts of Voorwaarts toetsen en druk op Tijd toets om te
bevestigen.
De dag van de week knippert.
5. Stel de dan in met de Achterwaarts of Voorwaarts toetsen en druk op Tijd toets om te
bevestigen.
“CT ON” knippert.
6. Gebruik de Achterwaarts of Voorwaarts toetsen om de RDS tijdsynchronisatie in te stellen en
druk op Tijd toets om te bevestigen en de tijdinstelling te beëindigen.
Opmerkingen:
U moet de tijd opnieuw instellen wanneer er een stroompanne is geweest of wanneer u het toestel van
de netstroom heeft verwijderd.
Sommige RDS zenders sturen een RDS tijdsignaal. Als de gekozen RDS zender dat tijdsignaal door-
stuurt, wordt de tijd automatisch juist gesteld. Dit kan enkele minuten duren.
10
TUNER MODUS
Aansluiting van de antenne
1. Sluit de externe antenne of de meegeleverde draadantenne aan op de FM antenne aansluiting.
Trek de draadantenne volledig uit voor FM ontvangst.
2. Sluit de meegeleverde MW loop antenne aan op de MW antenne aansluiting.
Regel de positie van de antenne voor een optimale ontvangst.
Selecteren van de tuner
1. Schakel het toestel in met de Aan/Uit toets.
2. Druk op de Functie toets om de bron te selecteren: FM tuner of MW tuner.
Automatisch zenders zoeken
De eerste keer dat u het toestel gebruikt zoekt het automatisch zenderzoeksysteem de zenders en
memoriseert 40 zenders (20 in FM en 20 in MW) met de beste ontvangst.
1. Schakel het toestel in met de Aan/Uit toets. Het zoeken start.
Als het zoeken beëindigd is hoort u het geluid van de zender die in P01 opgeslagen is.
2. Om andere zenders te zoeken, druk op de Functie toets om te kiezen tussen FM rn MW.
3. Druk op de Achterwaarts of Voorwaarts toetsen totdat de frequentieweergave snel begint te
lopen. Het zoeken stopt automatisch als een zender met een voldoende sterk signaal gevonden is.
4. Als het einde van het frequentiebereik bereikt is gaat het zoeken verder in omgekeerde richting.
Opmerking:
Het automatisch zoeken naar zenders kan onderbroken worden door kort op de Stop toets te drukken.
Handmatig zenders zoeken
1. Om de frequenties stap voor stap te doorlopen, druk kort op Achterwaarts of Voorwaarts toetsen.
De frequentie verandert in stappen van 50 kHz (FM) en 9 kHz (MW).
2. Als het einde van het frequentiebereik bereikt is gaat het zoeken verder in omgekeerde richting.
Zenders als voorkeuzenders vastleggen
1. Druk op de Achterwaarts of Voorwaarts toetsen om de gewenste zender te zoeken.
2. Druk op de Program toets om de memoriefunctie te activeren. Het voorkeuzenummer (bv. P01) en
“PROG” knipperen op de display.
3. Kies het gewenste voorkeuzenummer met de Up en Down toetsen.
4. Druk op de Program toets om de zender vast te leggen.
5. Om andere zenders vast te leggen, herhaal punten 1 t.e.m. 4.
Opmerkingen:
De reeds vastgelegde zenders worden vervangen door de nieuwe gekozen zenders.
Indien het toestel gedurende lange tijd van de netstroom is afgesloten, zullen alle voorkeuzezenders
verdwijnen.

11
TUNER MODUS
Stereo/Mono ontvangst
Als het signaal van een FM-stereo zender te zwak is, kan de geluidskwaliteit verbeterd worden door
deze in mono te zetten.
1. Druk op de Stereo/Mono toets om naar mono ontvangst te gaan.
2. Om terug naar stereo ontvangst te gaan, druk opnieuw op de Stereo/Mono toets.
Opmerking:
De stereo om mono instelling wordt ook bewaard bij het vastleggen in de voorkeuzenummers.
RDS zenderservice
RDS (Radio Data System) is een informatiesysteem dat onhoorbare informatie meestuurt met het nor-
male FM radioprogramma. Wanneer het toestel een RDS zender ontvangt en het signaal is voldoende
sterkt, verschijnt de zendernaam en op het display. Het kan een bepaalde tijd duren alvorens
de RDS informatie beschikbaar is.
RDS tijdsynchronisatie
Sommige RDS zenders sturen een tijdsignaal. Als de ontvangst goed is zal de tijdinformatie de tijd
automatisch juist zetten als u “CT ON” gekozen heeft tijdens de tijdinstelling.
Tijdsynchronisatie kan verschillende minuten duren, zelfs indien er goede ontvangst is en de
juistheid hangt af van het tijdsignaal dat meegestuurd wordt. De automatische tijdinstelling gebeurt
wanneer het toestel vanuit stand-by naar tuner modus wordt geschakeld en er een RDS zender
ontvangen wordt. Als het toestel aan het wachten is naar een RDS tijdsignaal, knippert “
” op het
display. Vanaf het ogenblik dat de tijd gesynchroniseerd is blijft “
” aangeduid op het display.
Oproepen van RDS informatie
1. Druk herhaaldelijk op de Display toets om door de informatie te gaan.
a. Zendernaam De naam van de beluisterde zender wordt afgebeeld.
b. Programmatype Het type zender wordt aangeduid: pop, klassiek, nieuws, enz
c. Tekst Een boodschap van de zender wordt weergegeven.
d. Dag en Tijd De huidige tijd en weekdag.
e. Frequentie Toont de radioband en de frequentie van de beluisterde zender.
Zendertypes (TPY)
1. Om het zendertype te kennen, druk op de PTY toets.
Als er geen zendertype-informatie wordt doorgestuurd verschijnt “NO PTY” op het
display.
2. Druk herhaaldelijk op de PTY toets om het gewenste zendertype te kiezen.
3. Druk op de Achterwaarts of Voorwaarts toetsen om een zender van dit type te zoeken.
Het zoeken stopt vanaf het ogenblik dat een overeenstemmende zender gevonden is.
4. Druk op de PTY toets om het zoeken te stoppen.
12
CD MODUS
Dit toestel is geschikt voor de weergave van muziek CD’s waarvan het logo hier afgebeeld is (CD-DA)
en van CD-R’s en CD-RW’s met audio in het MP3 en het WMA formaat.
In MP3/WMA modus zijn de termen ‘album’ en ‘file’ zeer belangrijk. ‘Album’ komt overeen met een folder
in een PC, ‘file’ met een document in een PC of met een nummer op een CD-DA. Een MP3/WMA disk
mag niet meer dan 511 nummers/folders bevatten.
Bij het branden van audio op CD-R en CD-RW kunnen er zich verschillende problemen voordoen die
kunnen leiden tot problemen bij de weergave. Dit kan veroorzaakt worden door verkeerde software- of
hardware-instellingen of door de gebruikte CD. Indien dit gebeurt, contacteer het servicedepartement
van de CD-brander of van de softwarefabrikant of zoek relevante informatie op het internet. Wanneer u
een audio CD maakt, zorg er dan voor dat u de wettelijke voorschriften opvolgt en dat de auteursrechten
van andere partijen niet geschaad worden.
Hou het CD-compartiment altijd gesloten om te vermijden dat er stof op de laseroptiek zou terecht-
komen. Kleef niets op de CD’s. Hou het oppervlak van de CD rein. U kan standaard 12cm en 8cm disks
weergeven. Er is geen adapter nodig.
Selectie van de CD-ingang
1. Druk op de Functie toets om CD als bron te kiezen.
Als er zich geen CD in het toestel bevindt verschijnt de boodschap “NO DISC” op het display.
Anders scant het toestel de inhoud van de CD.
Een CD inbrengen
1. Op het CD-compartiment door te trekken aan de top van het frontpaneel. Op de display verschijnt
“OPEN”.
2. Breng een CD in met de gedrukte zijde naar de buitenkant.
3. Druk op het frontpaneel om het CD-compartiment te sluiten. Het toestel leest de inhoud van de CD
en toont op de display “CD READ”.
- In MP3/WMA modus: het display toont het totaal aantal albums of documenten en het formaat
“MP3/WMA”.
- In CD-DA modus: het display toont de totale speelduur, het aantal nummer en het formaat “CD”
CD weergave
1. Druk op de Weergave/Pauze toets om de weergave te starten.
De weergave start met het eerste nummer (CD-DA) of met de eerste file in het eerste album
(MP3/WMA).
2. Druk op de Weergave/Pauze toets om de weergave te pauzeren.
3. Druk op de Weergave/Pauze toets om de weergave verder te zetten.
4. Druk op de Stop toets om de weergave te stoppen.
Een file of nummer selectioneren
1. Druk tijdens de weergave herhaaldelijk op de Achterwaarts of Voorwaarts toetsen totdat het
gewenste nummer of file bereikt is.
De weergave van het geselecteerde nummer of file start automatisch.
- In MP3/WMA, kan u ook het album kiezen met de Up en Down toetsen.
2. U kan het gewenste nummer/file ook kiezen in stop modus. Hou de Achterwaarts of Voorwaarts
toetsen ingedrukt om snel het nummer/file te kiezen.
Een passage zoeken binnen een file of een nummer.
1. Hou, tijdens de weergave de Achterwaarts of Voorwaarts toetsen ingedrukt totdat u de passage
vindt die u wil beluisteren.
- De weergave start vanaf het ogenblik dat u de toets loslaat.
- Tijdens het zoeken wordt het volume verminderd.

13
CD MODUS
Een file of nummer herhalen (Repeat One)
1. Druk tijdens de weergave op de Herhaal/Intro toets; op het display verschijnt “ ”.
Het huidige file/nummer wordt herhaald.
2. Om deze functie te herhalen, druk op de Herhaal/Intro toets totdat het symbool “ ” van de
display verdwijnt.
3. U mag ook op de Stop toets drukken om de weergave en de herhaalfunctie te stoppen.
Herhaling van alle files en nummers (Repeat All)
1. Druk tijdens de weergave op de Herhaal/Intro toets; op het display verschijnt “ ”.
De volledige CD wordt herhaald.
2. Om deze functie te herhalen, druk op de Herhaal/Intro toets totdat het symbool “ ” van de
display verdwijnt.
3. U mag ook op de Stop toets drukken om de weergave en de herhaalfunctie te stoppen.
Herhaling van alle files in een album (alleen MP3/WMA)
1. Druk tijdens de weergave op de Herhaal/Intro toets; op het display verschijnt “ ”.
Alle files in het album worden herhaald.
2. Om deze functie te herhalen, druk op de Herhaal/Intro toets totdat het symbool “ ” van
de display verdwijnt.
3. U mag ook op de Stop toets drukken om de weergave en de herhaalfunctie te stoppen.
Weergave van de files of nummers in een willekeurige volgorde (Random)
1. Druk tijdens de weergave op de Random toets om deze functie te activeren; het woord “RANDOM”
verschijnt op de display.
- Alle files/nummers op de CD worden in een willekeurige volgorde weergegeven.
2. Om deze functie te annuleren, druk op de Random toets en het woord “RANDOM” verdwijnt.
- Het huidige nummer en de volgende worden weergegeven tot aan het einde van de disk.
3. U mag ook op de Stop toets drukken om de weergave en de random functie te stoppen.
Weergave van het begin van de files en de nummers (Intro)
1. Druk in stop modus op de Herhaal/Intro toets. Op het display verschijnt “INTRO”.
- De weergave start: de eerste 10 seconden van elk file/nummer wordt weergegeven.
2. Om deze functie te annuleren, druk op de Herhaal/Intro toets; het woordt “INTRO” verdwijnt.
- Het huidige nummer en alle volgende worden tot aan het einde van de disk weergegeven.
3. U mag ook op de Stop toets drukken om de functie en de weergave te stoppen.
Oproepen van file-informatie (alleen MP3/WMA)
U kan met deze functie file-informatie (ID3 tag en ticker text) oproepen.
1. Tijdens de weergave schakelt de display tussen de weergave en de albumnaam en de filenaam.
2. Druk herhaaldelijk op de Display toets om door de informatie de gaan.
14
CD MODUS
Een geheugen met nummers opmaken
U kan tot 60 nummers (CD-DA) of tot 60 files van verschillende albums (MP3/WMA) op de huidige CD
memoriseren in eender welke volgorde en in die volgorde weergeven. Een file of nummer mag meer-
dere keren gememoriseerd worden. Programmeren is alleen mogelijk in stop modus.
Nummers selecteren en vastleggen
1. In stop modus, druk op de Program toets om de functie op te roepen.
- Het woord “PROG” knippert tijdens het programmeren.
- Het display toont “P01” voor het eerste nummer.
2. Selecteer de gewenste file/nummer met de Achterwaarts of Voorwaarts toetsen.
- In MP3/WMA kan u het album selecteren met de UP/Down toetsen.
3. Druk op de Program toets om vast te leggen.
4. Herhaal punten 2 en 3 om de volgende nummers vast te leggen.
Weergave van het geheugen
1. Druk op de Weergave/Pauze toets om de weergave te starten. De weergave begint met het
eerst geprogrammeerde nummer/file.
- Het woord “PROG” verschijnt om aan te duiden dat er een geheugen is.
2. Druk op de Weergave/Pauze toets om de weergave te pauzeren of druk op de Stop toets om
de weergave te stoppen.
3. Om opnieuw het geheugen weer te geven, druk op de Weergave/Pauze toets.
De selectie bekijken of wijzigen
1. In stop modus toont de display het eerst geprogrammeerde nummer en het woord “PROG”
knippert. Druk herhaaldelijk op de Program toets om alle nummers in het geheugen te bekijken.
2. U kan elk nummer wijzigen door gebruik te maken van de Achterwaarts of Voorwaarts
toetsen of de UP/Down toetsen om een ander nummer/file te kiezen.
Druk op de Program toets om vast te leggen.
Nummers of files toevoegen
1. In stop modus, druk op de Program toets totdat een voorkeuzenummer nul is.
2. Kies een nummer met de Achterwaarts of Voorwaarts toetsen of de UP/Down toetsen.
3. Druk op de Program toets om vast te leggen.
Het nummergeheugen wissen
1. In stop modus, druk op de Stop toets; het woord “PROG” verdwijnt
of
open het CD compartiment.

15
SD KAART MODUS
Secure Digital (SD of SDHC) kaarten kunnen op dit toestel gebruikt worden voor de weergave van MP3
of WMA files. SD of SDHC kaarten tot 16GB worden ondersteund. Evenwel zijn er vele verschillende
kaarten beschikbaar en er kan geen garantie gegeven worden dat deze allemaal op dit toestel werken.
SD of SDHC kaarten moeten geformateerd zijn met het FAT of het FAT32 systeem om op dit apparaat
gebruikt te kunnen worden.
Inbrengen en verwijderen van een kaart
Steek de SD/SDHC kaart in de SD kaart aansluiting van het toestel met de labelkant naar buiten en de
gouden contacten inwaarts.
Om de kaart te verwijderen, druk lichtjes tegen de kaart en het zal uit het toestel komen.
1. Om de SD kaart modus te selecteren, druk herhaaldelijk op de Functie toets totdat “SD” op het
display verschijnt.
De weergavefuncties van SD modus zijn identiek aan die van een CD met MP3/WMA; zie in de sectie
CD modus. De MP3/WMA files worden gelezen in de volgorde waarmee ze op de SD kaart zijn
opgenomen, behalve wanneer Random gekozen is.
AUX INGANG MODUS
Dit toestel beschikt over een aux ingang om audio signalen van externe geluidsbronnen zoals een iPod,
MP3-speler, CD-speler weer te geven.
1. Sluit een stereo of mono geluidsbron aan de Aux ingang (Ø3.5mm) op de zijkant van het toestel.
2. Schakel het toestel in en druk op de Functie toets totdat “AUX” op het display verschijnt.
3. Regel het volume van de geluidsbron en het toestel voor een comfortabel niveau.
ALARM FUNCTIE
Dit toestel is uitgerust met een alarm functie om u te wekken met een zoomer, radio, muziek van een
CD of een SD kaart. Het alarm duurt 90 minuten.
Instellen van het alarm
1. Terwijl het toestel uitgeschakeld is, hou de Alarm toets ingedrukt totdat de uurindicatie op het
display knippert.
2. Gebruik de Achterwaarts of Voorwaarts toetsen om het uur in te stellen en druk op de Alarm
toets om te bevestigen.
- Display: de minutenindicatie knippert.
3. Gebruik de Achterwaarts of Voorwaarts toetsen om de minuten in te stellen en druk op de Alarm
toets om te bevestigen.
- Display: de indicatie van de geluidsbron knippert.
4. Gebruik de Achterwaarts of Voorwaarts toetsen om de geluidsbron te kiezen: “CD”, “SD KAART”,
“FM RADIO” en “BUZZER” (zoomer).
5. Als u kiest voor “CD” of “SD KAART” knippert het symbool “
” ; druk op de Alarm toets om te
bevestigen.
Als u kiest voor “BUZZER” knippert het symbool “
”;druk op de Alarm toets om te bevestigen.
Als u kiest voor “FM RADIO” knippert het symbool “
” . U moet ook de gewenste
voorkeuzezender instellen met de UP/Down toetsen; druk op de Alarm toets om te bevestigen.
6. Stel het alarmvolume in met de Volume toets.
7. Druk op de Alarm toets om te bevestigen en de instellingen te beëindigen.
- Display: de huidige tijd en het symbool “
” of “ ” wordt weergegeven.
Opmerkingen:
Indien er tijdens de instellingen binnen de 5 seconden geen toets ingedrukt wordt, wordt de instelling
automatisch stopgezet en dient u opnieuw te beginnen.
Indien u als geluidsbron “CD” of “SD KAART” kiest, zorg er dan voor dat er zich een CD of een SD kaart
in het toestel bevindt. Anders zal het alarm niet afgaan.
De alarmtijd controleren
In stand-by, druk herhaaldelijk op de Alarm toets om doorheen de alarminstellingen te lopen. U kan de
instellingen wijzigen volgens de procedure beschreven onder Instellen van het alarm.
Het alarm onderbreken
1. Terwijl het alarm afgaat, druk op de Snooze toets.
- Het alarmsignaal stopt.
- Het alarm gaat terug aan met tijdsintervallen van 5 minuten (met een totale duur van 90 minuten)
Het alarm voor de dag uitschakelen
1. Druk op de Aan/Uit toets wanneer het alarm afgaat.
- Het alarm blijft geactiveerd voor de volgende dag.
Het alarm voor het weekend uitschakelen
U kan de alarmfunctie voor het weekend uitschakelen, terwijl die voor de andere dagen toch geactiveerd
blijft.
1. Schakel de alarmfunctie uit met de WEC toets op de afstandsbediening.
Druk opnieuw op de WEC toets om de alarmfunctie ook in het weekend te gebruiken.
Het alarm inschakelen en uitschakelen
1. Om het alarm uit te schakelen, druk op de Alarm toets in stand-by. Het alarmsymbool verdwijnt op
het display.
De alarmtijd blijft bewaard.
2. Om het alarm terug in te schakelen, druk op de Alarm toets in stand-by. Het alarmsymbool ver
schijnt op het display.
16

SLEEP FUNCTIE
Het toestel kan ingesteld worden om na een bepaalde tijd automatisch uit te schakelen. Deze sleep
functie kan ingesteld worden tussen 10 en 90 minuten met intervallen van 10 minuten.
Instellen van de sleep timer
1. Schakel het toestel in en kies de gewenste geluidsbron.
2. Druk op de Sleep toets om de functie op te roepen.
- Het woord “90 MIN” en het symbool “
” verschijnt op het display.
3. Druk herhaaldelijk op de Sleep toets om de tijd met intervallen van 10 minuten in te stellen.
Het toestel wordt uitgeschakeld als de ingestelde tijd bereikt is.
Annuleren van de sleep timer
1. Om de sleep timer te annuleren alvorens de ingestelde tijd bereikt is, druk op de Sleep toets totdat
het woord “00 MIN” op het display verschijnt.
- Het toestel blijft ingeschakeld en het symbool “
” verdwijnt.
2. Indien u het toestel wenst uit te schakelen alvorens de ingestelde tijd bereikt is, druk op de Aan/Uit
toets.
Het symbool “
” verdwijnt en het toestel wordt uitgeschakeld.
HERINNERINGSFUNCTIE
Het toestel kan u een herinneringssignaal laten horen op een vooringestelde tijd. Deze tijd kan in-
gesteld worden tussen 10 en 120 minuten in stappen van 10 minuten.
1. Zet het toestel in stand-by en druk op de NAP toets op de afstandsbediening.
Het display toont “NAP 10” en het symbool “NAP” knippert.
2. Druk herhaaldelijk op de NAP toets om de tijd met een interval van 10 minuten in te stellen.
Nadat de tijd verstreken is zal er een signaal afgaan.
3. Stop het signaal door op de Aan/Uit toets te drukken
of
onderbreek de functie door de resterende tijd op “NAP 00” in te stellen met de NAP toets.
17 18
INFORMATIE
Technische gegevens
Voeding Netstroom AC 230 V, alleen 50 Hz
Batterijen (alleen voor 2 x 1.5 V (R03/UM4/AAA formaat)
afstandsbediening)
Maximum In werking 35 W
stroomverbruik
Stand-by
2 W (met display uitgeschakeld)
Frequentiebereik FM 87.5 – 108 MHz
MW 522 – 1620 kHz
Eigenschappen Luidspreker Afmetingen 2 x Ø34 mm
1 x Ø77 mm
Impedantie 2 x 4 Ohm
1 x 6 Ohm
Vermogen 2 x 3 W
1 x 6 W
Aux ingang Ø3.5 mm
Hooftelefoonaansluiting Ø3.5 mm
Antennesysteem FM Draadantenne
AM Loopantenne
Algemeen Afmetingen toestel (B x H x D) 316 x 176 x 189 mm
De technische gegevens en de design kunnen gewijzigd worden.
Open nooit het toestel. De fabrikant neemt geen enkele verantwoordelijkheid voor schade die het gevolg
is van onjuist gebruik.
Algemene informatie over laserapparaten
U vindt op de onderkant van het toestel een etiket zoals hier links afgebeeld.
CLASS 1 LASER PRODUCT betekent dat de laser op zulke wijze ontwikkeld
is dat de maximum afgegeven stralingswaarde onder geen enkele omstan-
digheid overschreden kan worden.
Als het toestel op een andere manier gebruikt wordt als hier beschreven kan dit aanleiding geven tot
gevaarlijke blootstelling aan stralen.
Onzichtbare laserstraling wordt verspreid als het CD-compartiment geopend is en het veiligheidsmecha-
nisme kortgesloten is.
Stel uzelf niet bloot aan deze straling.
Opmerkingen betreffende het milieu
Dit toestel is gemaakt met hoge kwaliteitsonderdelen en materialen die hergebruikt en
gerecycleerd kunnen worden.
Daarom mag dit toestel, bij het einde van zijn leven, niet tezamen met ander hu-
ishoudelijk afval verwijderd worden. Breng het naar een inzamelpunt voor elektrische
en elektronische apparaten. Dit wordt aangeduid met dit symbool op het product, in de
gebruiksaanwijzing of op de verpakking.
Consulteer de lokale autoriteiten om meer te weten te komen over de inzamelpunten.
Help het milieu door gebruikte producten te recycleren.

1
SOMMAIRE
SECURITE ET PRECAUTIONS ................................................................................................................ 2
DESCRIPTION .......................................................................................................................................... 3
ALIMENTATION ........................................................................................................................................ 7
FONCTIONS GENERALES ...................................................................................................................... 8
REGLAGE TEMPS .................................................................................................................................. 9
MODE TUNER .......................................................................................................................................... 10
MODE CD ................................................................................................................................................ 12
MODE CARTE SD ..................................................................................................................................... 15
MODE ENTREE AUXILIAIRE ................................................................................................................... 15
FONCTION ALARME .............................................................................................................................. 16
FONCTION SLEEP ................................................................................................................................ 17
FONCTION MÉMOIRE ............................................................................................................................. 17
INFORMATION.............................................................................................................................18
2
SECURITE ET PRECAUTIONS
Afin d’assurer que cet appareil vous donne beaucoup de satisfaction pendant longtemps, il est néces-
saire de suivre les instructions suivantes.
• L’appareilestconnectéaucourantsecteurparuncâblecourantsecteur.Pourdéconnecter
complètementl’appareililfautretirerlecâbledelaprisecourantsecteur.
• L’appareiletlecâblecourantsecteurnepeuventpasêtrebloquésetdoiventtoujoursêtre
accessibles.
• Ilestrecommandédenepasutiliserl’appareildansdestempératuresextrêmes.Utilisezl’appareil
dans un climat modéré.
• L’appareiletlecâblecourantsecteurnepeuventpasêtreexposésal’eau(goutes,etc.),levapeur,
le chaleur (chauffage ou soleil direct) et le sable.
• Nemettezpasdesobjetsremplisavecuneliquideoudesemmesouvertes(bougie)au-dessusde
l’appareil.
• Ilestrecommandédelaisseruneespacede10cmautourdel’appareilpourassureunebonne
ventilation.
• Lesouverturesdeventilationnepeuventpasêtrebloquéespardesobjetstelsquejournaux,tapis
de table, rideaux.
• Encasdemauvaisfonctionnementdûaudéchargementélectrostatique,retirezlaprisecourant
secteur et remettez-la.

3
DESCRIPTION
APPAREIL
Boutons et commandes sur la face supérieure
10
1 2 3 4 5 6 7 8 9
1 En/hors fonction Pour mettre l’appareil en fonction ou en stand-by.
L’unitéestcomplètementdéconnectéaprèsavoirretirélecâblecourant
secteur.
2 Sleep Pour régler le sleep timer.
3 Dimmer Pour régler l’intensité du display.
4 Couleur Pour régler la couleur du display.
5 -Volume+ Pour régler le volume.
6 DSC/UBS Poussez brièvement pour sélectionner le réglage son.
Enfoncez pour activer et désactiver le système Ultra Bass.
7 Display Pour donner des informations sur le contenu de la source.
8 Snooze/Mute Pour interrompre la fonction d’alarme et annuler le temps restant.
Pour couper le son des haut-parleurs.
9 Entrée carte SD Pour insérer les cartes SD ou SDHC.
10 Senseur dimmer Pour régler automatiquement l’intensité du display en fonction des
circonstances de lumière dans la chambre.
4
DESCRIPTION
APPAREIL
Boutons et commandes sur le panneau frontal
11
12
13
14 16
15 18 20
17 19
21
11 LCD Display
12 Lecture/Pause/PTY Mode CD ou SD : lecture et pause
Mode tuner : pour appeler les types d’émetteurs radio.
13 Arrêt/Stéréo/Mono ModeCDouSD:arrêterlalecture.
Mode tuner : pour réception stéréo ou mono.
14 Rewind Mode tuner : pour chercher les émetteurs en arrière.
Mode CD ou SD : pour sélectionner des documents ou des numéros ;
recherche en arrière d’un passage dans un document ou numéro.
15 Up (vers le haut) Mode tuner : pour sélectionner les émetteurs mémorisés.
Mode CD ou SD : pour sélectionner les albums.
16 Down (vers le bas) Mode tuner : pour sélectionner les émetteurs mémorisés.
Mode CD ou SD : pour sélectionner les albums.
17 Avancement rapide Mode tuner : pour chercher les émetteurs en avant.
Mode CD ou SD : pour sélectionner des documents ou des numéros ;
recherche en avant d’un passage dans un document ou numéro.
18 Intro/Répétition/Alarme Mode CD ou SD : pour écouter les débuts des numéros ; pour répéter
la lecture.
Mode stand-by : pour activer l’alarme.
19 Program/Random/Temps Mode tuner : pour mémoriser les émetteurs.
Mode CD ou SD : pour programmer la lecture ; pour activer la lecture
aléatoire ; pour activer le réglage temps.
20 Fonction Pour sélectionner la source : tuner FM, tuner MW, CD, SD ou entrée
auxiliaire.
21 Senseur IR Récepteur de la télécommande.

5
22
23
26
24
25
DESCRIPTION
APPAREIL
Boutons et commandes sur les côtés
22 Prise entrée AC Pourconnexioncâblecourantsecteur.
L’unitéestcomplètementdéconnectéaprèsavoirretirélecâble
courant secteur.
23 Prise antenne FM Prise pour antenne externe ou antenne FM livrée.
24 Entée auxiliaire Pour connecter une source audio externe.
25 Prise casque d’écoute Pour connecter le casque d’écoute avec prise Ø3.5mm.
Les haut-parleurs sont automatiquement coupés.
26 Prise antenne MW Connexion pour antenne MW livrée.
6
DESCRIPTION
TELECOMMANDE
Boutons et commandes
1
3
5
2
6
8
9
7
4
12
13
15
11
10
18
19
17
20
16
14
1 En/hors fonction Pour mettre l’appareil en fonction ou en stand-by.
L’unitéestcomplètementdéconnectéaprèsavoirretirélecâblecourant
secteur.
2 Fonction Pour sélectionner la source : tuner FM, tuner MW, CD, SD ou entrée auxiliaire.
3 WEC Pour activer ou désactiver l’alarme pendant le weekend.
4 Lecture/Pause/PTY Mode CD ou SD : lecture et pause
Mode tuner : pour appeler les types d’émetteurs radio.
5 Rewind Mode tuner : pour chercher les émetteurs en arrière.
Mode CD ou SD : pour sélectionner des documents ou des numéros ;
recherche en arrière d’un passage dans un document ou numéro.
6 Down (vers le bas) Mode tuner : pour sélectionner les émetteurs mémorisés.
Mode CD ou SD : pour sélectionner les albums.
7 Sleep Pour régler le sleep timer.
8 Volume + Pour régler le volume
9 Volume - Pour régler le volume
10 Prog./Random Mode CD ou SD : programmation de lecture ; activer la lecture aléatoire.
11 Répétition/Intro Mode CD ou SD : répétition de la lecture ; lecture des introductions des
numéros.
12 DSC/UBS Poussez brièvement pour sélectionner le réglage son.
Enfoncez pour activer et désactiver le système Ultra Bass.
13 NAP Pour régler la fonction mémoire.
14 Up (vers le haut) Mode tuner : pour sélectionner les émetteurs mémorisés.
Mode CD ou SD : pour sélectionner les albums.
15 Avancement rapide Mode tuner : pour chercher les émetteurs en avant.
Mode CD ou SD : pour sélectionner des documents ou des numéros ;
recherche en avant d’un passage dans un document ou numéro.
16 Arrêt/Stéréo/Mono ModeCDouSD:arrêterlalecture.
Mode tuner : pour réception stéréo ou mono.
17 Display Pour donner des informations sur le contenu de la source.
18 Couleur Pour régler la couleur du display.
19 Dimmer Pour régler l’intensité du display.
20 Snooze/Mute Pour interrompre la fonction d’alarme et annuler le temps restant.
Pour couper le son des haut-parleurs.

7
ALIMENTATION
Courant secteur
Vérifiez que le voltage marqué sur la plaque en-dessous de l’appareil correspond avec le voltage dans
votre maison. Sinon, consultez votre revendeur.
1. Insérezlecâblecourantsecteurdanslaprise AC input sur le côté de l’appareil.
2. Connectezlecâbleàlaprisecourantsecteur.
Attention :
Pourdéconnecterl’appareilcomplètementducourantsecteur,ilfautretirelecâblecourantdelaprise
courant secteur.
Piles (télécommande)
1. Ouvrezlecompartimentàpilessurlefonddelatélécommandeentirantaucouvercle.
2. Insérez deux piles (2 x 1.5 V, type R03/UM4/format AAA) dans le compartiment en tenant compte
de la polarité.
3. Remettez le couvercle.
4. Si la télécommande n’est pas utilisée pendant un certain temps, il est recommandé d’enlever les
piles.
Attention :
Nepasexposerlespilesàlachaleur(soleil,feuouvert,etc.)
Enlevez les piles de la télécommande quand elle n’est pas utilisée pendant un certain temps.
Remarque :
Vous ne pouvez pas jeter les piles usées avec les autres déchets domestiques. Apportez les piles
usées vers un centre de recyclage.
8
FONCTIONS GENERALES
Mettre l’appareil en et hors fonction
1. Poussez le bouton En/Hors fonction pour mettre l’appareil en fonction. La dernière fonction
utilisée est automatiquement sélectionnée.
2. Mettez l’appareil en stand-by en poussant le bouton En/Hors fonction. Le display affiche « GOOD
BYE ».
Réglage luminosité du display
1. Poussez le bouton Dimmer pour choisir entre trois niveaux de luminosité (fort, médium, hors
fonction).
2. La fonction auto dimmer règle automatiquement la luminosité du display en fonction des
circonstances de lumière dans la chambre.
Remarque :
Pour obtenir une consommation minimale en mode stand-by, il est recommandé de mettre le display
hors fonction.
Changer la couleur du display
1. Poussez plusieurs fois le bouton Couleurs pour changer la couleur du display. Vous pouvez choisir
entre 8 couleurs.
Sélectionner la fonction
1. Poussez plusieurs fois le bouton Fonction pour choisir entre Tuner FM, Tuner MW, CD, SD ou
Entrée Aux.
Réglage volume
1. Réglez le volume avec les boutons Volume- ou Volume+.
Muting
1. Poussez le bouton Mute pour désactiver ou activer le son. Le display affiche « Mute ».
Activer et désactiver le Système Ultra Bass
Cette fonction accentue la reproduction des graves.
1. Enfoncez le bouton DSC/UBS pour mettre en ou hors fonction le Système Ultra Bass. Le display
affiche quand l’UBS est en fonction.
Remarque :
Ecouter la musique au niveau élevé avec UBS peut causer des distorsions. Utilisez le système unique-
ment avec un faible niveau.
Sélection des effets sonores
Vous pouvez choisir entre UTILISATEUR, CLASSIQUE, POP, JAZZ et ROCK. Le réglage standard est
UTILISATEUR.
1. Poussez plusieurs fois le bouton DSC/UBS pour choisir l’effet sonore. Un symbole correspondant
est affiché sur le display.

9
FONCTIONS GENERALES
Réglage de l’égaliseur
Quand vous avez choisi UTILISATEUR comme effet sonore, vous pouvez régler vos propres préfé-
rences.
1. Poussez plusieurs fois le bouton DSC/UBS pour sélectionner UTILISATEUR.
2. Enfoncez le bouton DSC/UBS jusqu’au moment où « BASS 0 » apparaît sur le display.
3. Poussez brièvement le bouton bouton DSC/UBS pour choisir entre BASS ou TREBLE (TRE).
4. Réglez le valeur avec les boutons Volume.
Remarque :
Le réglage est abandonné si vous ne poussez aucun bouton dans les 5 secondes.
Ecouter avec casque d’écoute
1. Connectezlecasqued’écouteàlaprisecasqued’écoute(Ø3.5mm).
- Le son des haut-parleurs est coupé.
Remarque :
Une écoute au niveau élevé par casque d’écoute peut endommager vos oreilles.
REGLAGE TEMPS
Une démonstration commence automatiquement quand vous utilisez l’appareil pour la première fois. Le
tempsetlejourclignotentpourindiquerqueleréglagedoitêtreeffectué.
Le réglage du temps ne peut se faire qu’en mode stand-by.
1. Poussez le bouton Time pour choisir le format de l’heure : 12HR ou 24HR.
2. Enfoncez le bouton Time jusqu’au moment où l’indication des heures clignote sur le display.
3. Réglez l’heure avec les boutons Rewind ou Forward et poussez le bouton Time pour confirmer.
L’indication des minutes clignote.
4. Réglez les minutes avec les boutons Rewind ou Forward et poussez le bouton Time pour
confirmer.
L’indication du jour clignote.
5. Réglez le jour avec les boutons Rewind ou Forward et poussez le bouton Time pour confirmer.
« CT ON » clignote sur le display.
6. Utilisez les boutons Rewind ou Forward pour régler la synchronisation temps RDS et poussez le
bouton Time pour confirmer et finir le réglage temps.
Remarque :
Vousdevezréglerànouveauletempsquandilyaeuunepannedecourantsecteurouquandvous
avezretirélecâblecourantsecteur.
Certains émetteurs transmettent un signal temps RDS. Quand l’émetteur RDS choisi transmet ce signal
temps,letempsdel’appareilestmiseàjourautomatiquement.Cecipeutprendrequelquesminutes.
10
MODE TUNER
Connexion de l’antenne
1. Connectezl’antenneexterneoul’antenneFMlivréeàlaprise Antenne FM.
Etirez l’antenne au maximum pour obtenir une bonne réception FM.
2. Connectezl’antenneMWlivréeàlaprise Antenne MW.
Réglez la position de l’antenne pour optimiser la réception.
Sélectionner la source tuner
1. Mettez l’appareil en fonction avec le bouton En/Hors fonction.
2. Poussez le bouton Fonction pour sélectionner la source : tuner FM ou tuner MW.
Recherche automatique des émetteurs
La première fois que vous mettez l’appareil en fonction, la recherche automatique des émetteurs radio
commence automatiquement et met en mémoire les 40 stations avec la meilleure réception (20 en FM
et 20 en MW).
1. Mettez l’appareil en fonction avec le bouton En/Hors fonction. La recherche démarre.
Quand la recherche est finie, vous entendez l’émetteur mémorisé dans la première présélection
P01.
2. Pour trouver d’autres émetteurs, poussez le bouton Fonction pour sélectionner la gamme de
fréquences : FM ou MW.
3. Enfoncez les boutons Rewind ou Forward jusqu’au moment où l’affichage des fréquences change
rapidement.Larecherches’arrêteautomatiquementdèsqu’unémetteurpuissantaététrouvé.
4. Quand la fin de la gamme de fréquences est atteinte, la recherche continue dans l’autre sens.
Remarque :
Larechercheautomatiquepeutêtreinterrompueenpoussantlebouton Arrêt.
Recherche manuelle des émetteurs
1. Pour changer les fréquences par étapes, poussez les boutons Rewind ou Forward.
La fréquence change en étapes de 50 kHz (FM) et 9 kHz (MW).
2. Quand la fin de la gamme de fréquences est atteinte, la recherche continue dans l’autre sens.
Mémoriser les émetteurs dans les présélections
1. Poussez les boutons Rewind ou Forwardpoursélectionnerl’émetteuràmémoriser.
2. Poussez le bouton Program pour activer la fonction de mémorisation. Le numéro de la
présélection (p.e. P01) et « PROG » clignotent sur le display.
3. Choisissez le numéro de présélection avec les boutons UP ou Down.
4. Poussez le bouton Program pour mémoriser l’émetteur.
5. Répétezlespoints1à4pourmémoriserd’autresémetteurs.
Remarque :
Lenouveauémetteureffaceautomatiquementl’émetteurdéjàmémorisédanslaprésélection.
Quand l’appareil est déconnecté du courant secteur pendant un certain temps, les présélections seront
effacées.

11
MODE TUNER
Réception stéréo ou mono
Quandlesignaldel’émetteurFMstéréoesttropfaible,laqualitéderéceptionpeutêtreamélioréeen
choisissant la fonction mono.
1. Poussez le bouton Stéréo/Mono pour changer en mode mono.
2. Pour revenir en mode stéréo, repoussez le bouton Stéréo/Mono.
Remarque :
Lesréglagesmonooustéréopeuventégalementêtremémorisésdanslesprésémections.
Service émetteur RDS
RDS(RadioDataSystem)estunsystèmed’informationinaudiblequiesttransmisenmêmetempsque
le programme FM normal. Quand l’appareil reçoit un émetteur RDS et le signal est suffisamment fort, le
nom de l’émetteur et le symbole “ ” apparaissent sur le display. Il faut quelques minutes avant
que l’information RDS est disponible.
Synchronisation temps RDS
Certains émetteurs RDS transmettent un signal temps. Si la réception est bonne, l’information temps
metautomatiquementàjourdetempsdel’appareil,quandvousavezchoisi«CTON»pendantle
réglage du temps.
Lasynchronisationdutempspeutprendrequelquesminutesetmêmeencasdebonneréception
la justesse dépend du signal transmis. Le réglage automatique du temps se fait chaque fois quand
l’appareil est mis en fonction avec tuner et quand il reçoit un émetteur RDS. Quand l’appareil attend un
signal temps RDS le symbole “
” clignote sur le display. Quand la synchronisation temps RDS est
complète le symbole “
” reste allumé.
Appel des informations RDS
1. Poussez plusieurs fois le bouton Display pour cycler dans les informations.
a. Nom de l’émetteur affiche le nome de l’émetteur écouté.
b. Type programme affiche le type d’émetteur écoute (Pop, classique, journal, etc)
c. Texte affiche le message transmis par l’émetteur.
d. Jour et temps la date et le jour de la semaine
e. Fréquence la gamme d’ondes et la fréquence de l’émetteur.
Type d’émetteur (PTY)
1. Pour contrôler le type d’émetteur actuel, poussez le bouton PTY.
Quand il n’y a pas de type d’émetteur, le display affiche « NO PTY ».
2. Poussez plusieurs fois le bouton PTY pour choisir le type d’émetteur.
3. Poussez les boutons Rewind ou Forward pour démarrer la recherche des émetteurs avec type
choisi.
Larecherches’arrêtedèsqu’untelémetteuraététrouvé.
4. Poussez le bouton PTYpourarrêterlarecherche.
12
MODE CD
Cetappareilestprévupourlalecturedesdisquesaudiodontlelogoestafchéàgauche(CD-DA)et
les disques CD-R et CD-RW avec audio en format MP3 et WMA.
En mode MP3/WMA les termes ‘album’ et ‘file’ sont très importants. ‘Album’ correspond avec un dossier
en PC ; file’ avec un document en PC ou en numéro sur CD-DA. Une disque MP3/WMA net peut pas
contenir plus que 511 numéros/dossiers.
Pendant l’enregistrement des documents audio sur les disques CD-R et CD-RW, différents problèmes
peuventseproduirerésultantdansdesproblèmesdereproduction.Cecipeutêtrecauséparunmau-
vais réglage du software ou hardware ou par le CD utilisé. Si tels problèmes se produisent contactez les
services après-vente de l’enregistreur CD ou du fabricant du software ou recherchez les informations
nécessaires par internet. En faisant des disques CD audio, faites attention de suivre tous les règlements
légaux et assurez vous de ne pas infliger les droits d’auteurs d’autres parties.
Fermez toujours le compartiment CD afin d’éviter que la poussière se dépose sur les optiques laser. Ne
collez rien sur les disques CD. Faites attention que la surface du CD soit propre. Vous pouvez reproduire
les disques CD 12cm et 8 cm sans avoir besoin d’un adaptateur.
Sélection de la source CD
1. Poussez le bouton Fonction pour sélectionner la source CD.
Quand il n’y a pas de disque dans l’appareil, le display affiche « NO DISC ». Autrement l’appareil lit
le disque CD.
Insertion d’un CD
1. Ouvrez le compartiment CD en tirant au couvercle. Le display affiche « OPEN ».
2. Insérez le CD avec la face imprimée vers l’extérieur.
3. Fermez le compartiment CD. L’appareil lit le contenu du disque et le display affiche « CD READ ».
- Mode MP3/WMA : le display affiche le nombre total d’albums et file et « MP3/WMA ».
- Mode CD : le display affiche le temps total de lecture, le nombre total des numéros et « CD ».
Lecture d’un CD
1. Poussez le bouton Lecture/Pause pour démarrer la lecture.
La lecture commence avec le premier numéro (CD-DA) ou le premier file du premier album (MP/
WMA).
2. Poussez le bouton Lecture/Pause pour pauser la lecture.
3. Poussez le bouton Lecture/Pause pour continuer la lecture.
4. Poussez le bouton Arrêtpourarrêterlalecture.
Sélection d’un file ou d’un numéro
1. Pendant la lecture poussez plusieurs fois les boutons Rewind ou Forward jusqu’au moment où le
file ou numéro désiré est atteint. La lecture du file/numéro choisi démarre automatiquement.
- En MP3/WMA vous pouvez également choisir l’album avec les boutons UP ou Down.
2. Vous pouvez aussi sélectionner les files/numéros en mode stop. Enfoncez les boutons Rewind ou
Forward pour sélectionner les files/numéros.
Chercher un passage dans un file ou numéro
1. Pendant la lecture, enfoncez les boutons boutons Rewind ou Forward jusqu’au moment où vous
avez trouvé le passage que vous voulez écouter.
-Lalecturecommencedèsquevousrelâchezlebouton.
- Pendant la recherche le volume est diminué.

13
MODE CD
Répétition d’un file ou d’un numéro (Repeat One)
1. Pendant la lecture, poussez le bouton Répétition/Intro ; le symbole “ ” apparaît sur le display.
Le file/numéro actuel est répété.
2. Pour annuler la fonction, poussez plusieurs fois le bouton Répétition/Intro jusqu’au moment où le
symbole “ ” disparaît.
3. Vous pouvez également poussez le bouton Arrêtpourarrêterlalectureetlafonctionderépétition.
Répétition des tous les files et numéros (Repeat ALL)
1. Pendant la lecture, poussez le bouton Répétition/Intro ; le symbole “ ” apparaît sur le dis
play.
Le disque entier est répété.
2. Pour annuler la fonction, poussez plusieurs fois le bouton Répétition/Intro jusqu’au moment où le
symbole “ ” disparaît.
3. Vous pouvez également poussez le bouton Arrêtpourarrêterlalectureetlafonctionderépétition.
Répétition de tous les files dans un album (seulement MP3/WMA)
1. Pendant la lecture, poussez le bouton Répétition/Intro ; le symbole “ ” apparaît sur le
display.
Tous les files dans l’album actuel sont répétés.
2. Pour annuler la fonction, poussez plusieurs fois le bouton Répétition/Intro jusqu’au moment où le
symbole “ ” disparaît.
3. Vous pouvez également poussez le bouton Arrêtpourarrêterlalectureetlafonctionderépétition.
Lecture des files ou numéros dans un ordre aléatoire (Random)
1. Pendant la lecture, poussez le bouton Random pour activer cette fonction ; le mot « RANDOM »
apparaît sur le display.
- Tous les files/numéros du CD sont reproduits dans un ordre aléatoire.
2. Pour annuler cette fonction, repoussez le bouton Random ; le mot « RANDOM » disparaît.
-Lenuméroactueletlesnumérossuivantsontreproduitsjusqu’àlandudisque.
3. Vous pouvez également poussez le bouton Arrêtpourarrêterlafonctionetlalecture.
Lecture des introductions des files ou numéros (Intro)
1. Enmodearrêt,poussezbouton Répétition/Intro. Le display affiche « INTRO ».
La lecture démarre et les dix premières secondes de chaque file/numéro sont reproduites.
2. Pour annuler cette fonction, repoussez le bouton Répétition/Intro. Le mot « INTRO » disparaît.
-Lenuméroactueletlesnumérossuivantsontreproduitsjusqu’àlandudisque.
3. Vous pouvez également poussez le bouton Arrêtpourarrêtercettefonctionetlalecture.
Appeler l’information d’un file (seulement MP3/WMA)
Vous pouvez appeler l’information du file (ID3 tag et ticker text).
1. Pendant la lecture, le display change pour afficher le nom de l’album et du file.
2. Poussez plusieurs fois le bouton Display pour cycler dans l’information.
14
MODE CD
Création d’une mémoire numéros.
Vouspouvezcréerunemémoiredejusqu’à60numéros(CD-DA)ou60lesdedifférentsalbums(MP3/
WMA) du disque actuel dans n’importe quel ordre et les reproduire dans cet ordre. Un file ou numéro
peutêtremémoriséplusieursfois.Lamémorisationestuniquementpossibleenmoded’arrêt.
Sélection et mémorisation des numéros
1. Enmoded’arrêt,poussezlebouton Program pour démarrer la fonction.
- Le mot « PROG » clignote pendant le programmation.
- Le display affiche « P-01 » pour la première présélection.
2. Sélectionnez le file/numéro en utilisant les boutons Rewind ou Forward.
- En MP3/WMA vous pouvez choisir l’album avec les boutons UP ou Down.
3. Poussez le bouton Program pour mémoriser.
4. Pour mémoriser d’autres numéros, répétez les points 2-3.
Lecture de la mémoire
1. Poussez le bouton Lecture/Pause pour démarrer la lecture. La lecture commence avec le premier
file/numéro programmé.
- Le mot « PROG » indique qu’il s’agit d’un numéro mémorisé.
2. Poussez le bouton Lecture/Pause pour pauser la lecture ou poussez le bouton Arrêtpourarrêter
la lecture.
3. Pour relire la mémoire, poussez le bouton Lecture/Pause.
Regarder et changer la sélection
1. Enmodearrêtledisplayafchelepremierle/numéroprogramméetlemot«PROG»clignote.
Poussez plusieurs fois le bouton Program pour cycler dans les présélections de la mémoire.
2. Vous pouvez changer chaque présélection avec les boutons Rewind ou Forward ou les boutons
UP ou Down pour sélectionner un nouveau file/numéro et poussez le bouton Program pour
confirmer.
Ajouter des files ou numéros
1. Enmoded’arrêtpoussezlebouton Program jusqu’au moment où le numéro d’une présélection est
zéro.
2. Sélectionnez le numéro avec les boutons Rewind ou Forward ou les boutons UP ou Down.
3. Poussez le bouton Program pour mémoriser le numéro.
Annulation de la mémoire
1. Enmoded’arrêtpoussezlebouton Arrêt ; « PROG » disparaît de l’affichage
ou
ouvrez le compartiment CD.

15
MODE CARTE SD
LescartesSecureDigital(SDetSDHC)peuventêtreutiliséespourreproduiredesdocumentsMP3
ouWMA.LescartesSDetSDHCjusqu’à16GBsontsupportées.Néanmoins,ilexistebeaucoupde
différentescartesetiln’estpasgarantiquetouteslescartespeuventêtreluesparl’appareil.Lescartes
SDetSDHCdoiventêtreformatésaveclessystèmesFATouFAT32pourpouvoirêtreluesaveccet
appareil.
Insérer et retirer une carte
Insérez la carte SD/SDHC avec la face ‘label’ vers l’extérieur et les contacts en or vers l’intérieur dans
l’entrée carte SD.
Pour retirer la carte poussez-la doucement et elle sort de l’appareil.
1. Pour sélectionner le mode carte SD, poussez plusieurs fois le bouton Fonction jusqu’au moment
où « SD » est affiché sur le display.
Les commandes de lecture d’une carte SD est identique au mode MP3/WMA ; voyez la section CD. Les
lesMP3/WMAsontreproduitsdansl’ordreaveclequelilssontenregistréssurlePC,àmoinsquevous
avez choisi la lecture aléatoire (Random).
MODE ENTREE AUXILIAIRE
L’appareilpossèdeuneentréeauxiliairepourécouterdessignauxaudioàpartird’unesourceexterne
comme iPod, MP3, lecteur CD, etc.
1. Connectezlasourceexterneàlaprise Entrée Auxiliaire (Ø3.5mm) sur le côté de l’appareil.
2. Mettez l’appareil en fonction et poussez le bouton Fonction jusqu’au moment où « AUX » apparaît
sur le display.
3. Ajustez le volume de la source et de l’appareil pour une écoute confortable.
16
FONCTION ALARME
Cet appareil comporte une fonction d’alarme permettant de vous réveiller par zoomer, radio, CD ou
carte SD. La durée de l’alarme est 90 minutes.
Réglage du temps d’alarme
1. Avec l’appareil hors fonction, enfoncez le bouton Alarme jusqu’au moment où l’indication des
heures clignote.
2. Poussez les boutons Rewind ou Forward pour régler l’heure et poussez le bouton Alarme pour
confirmer.
- Display : l’indication des minutes clignote.
3. Poussez les boutons Rewind ou Forward pour régler les minutes et poussez le bouton Alarme
pour confirmer.
- Display : l’indication de la source clignote.
4. Poussez les boutons Rewind ou Forward pour choisir la source : CD, Carte SD, radio FM ou
Buzzer.
5. Si vous sélectionnez « CD » ou « Carte SD » le symbole “
” clignote sur le display ; poussez le
bouton Alarme pour confirmer.
Si vous sélectionnez « BUZZER » le symbole “
” clignote sur le display ; poussez le bouton
Alarme pour confirmer.
Si vous sélectionnez « FM RADIO », le symbole “
” clignote. Vous devez aussi choisir la pré
sélection que vous voulez utiliser avec les boutons UP ou Down et pousser le bouton Alarme
pour confirmer.
6. Réglez le volume désiré avec le bouton Volume.
7. Poussez le bouton Alarme pour confirmer et pour finir le réglage.
- Display : le temps actuel et le symbole “
” ou “ ” s’allume.
Remarques :
Quand vous ne poussez aucun bouton endéans les 5 secondes, l’appareil quitte le réglage et vous
devez recommencer.
Si vous sélectionnez « CD » ou « Carte SD » comme source, vérifiez que vous avez mis un CD ou une
carte SD dans l’appareil, sinon l’alarme ne fonctionne pas.
Regarder le temps d’alarme
1. En mode stand-by, poussez le bouton Alarme pour cycler dans les réglages alarme.
Vous pouvez changer les réglages selon les instructions dans Réglage du temps d’alarme.
Interrompre l’alarme
1. Pendant l’alarme, poussez le bouton Snooze.
-Lesignald’alarmes’arrête.
-L’alarmesemetànouveauenfonctionavecuneintervallede5minutes(duréemaximale90minutes).
Annulation de l’alarme pour la journée
1. Pendant l’alarme, poussez le bouton En/Hors fonction.
- L’alarme reste activé pour la prochaine journée.
Annulation de l’alarme pour le weekend
Vous pouvez annuler la fonction d’alarme pour le weekend, pendant que l’alarme reste activé pour les
autres jours de la semaine.
1. Annulez la fonction alarme avec le bouton WEC de la télécommande.
2. Repoussez le bouton WEC pour réactiver l’alarme pendant le weekend.
Activation et désactivation de l’alarme
1. Pour désactiver l’alarme, poussez le bouton Alarme en mode stand-by. Le symbole alarme dis
paraît du display.
Le temps d’alarme reste en mémoire.
2. Pour réactiver l’alarme, poussez le bouton Alarme en mode stand-by. Le symbole alarme apparaît
sur le display.

17
FONCTION SLEEP
L’appareilpeutêtreréglépoursemettreautomatiquementhorsfonctionaprèsuncertaintemps.Ce
temps ‘sleep’ peut se régler entre 10 et 90 minutes par des étapes de 10 minutes.
Réglage du sleep timer
1. Mettez en fonction l’appareil et choisissez la source que vous voulez écouter.
2. Poussez le bouton Sleep pour activer la fonction.
- Le mot « 90 MIN » et le symbole “
” apparaissent sur le display.
3. Poussez plusieurs fois le bouton Sleep pour choisir le temps avec des étapes de 10 minutes.
L’appareil se met hors fonction quand le temps programmé est écoulé.
Annulation du sleep timer
1. Pour annuler le sleep timer avant que le temps est écoulé, poussez le bouton Sleep jusqu’au mo
ment où « 00 MIN » est affiché sur le display.
- L’appareil reste en fonction et le symbole “
” disparaît du display.
2. Si vous voulez mettre l’appareil hors fonction avant que le temps est écoulé, poussez le bouton En/
Hors fonction.
- Le symbole “
” disparaît et l’appareil se met hors fonction.
FONCTION MÉMOIRE
L’appareilpeutêtreréglépourproduireunsignalsonoreàuncertaintempspréprogrammé.Letemps
peutêtrerégléentre10et120minutesavecdesétapesde10minutes.
1. Mettez l’appareil en stand-by et poussez le bouton NAP sur la télécommande.
Le display affiche « NAP 10 » et le symbole « NAP » clignote.
2. Poussez plusieurs fois le bouton NAP pour sélectionner le temps avec les étapes de 10 minutes.
Quand le temps est écoulé, un signal sonore se produit.
3. Arrêtezlesignalsonoreenpoussantlebouton En/Hors fonction
ou
interrompezlafonctionenmettantletempsmémoireà«NAP00»enutilisantlebouton NAP.
18
INFORMATION
Spécifications techniques
Alimentation Courant secteur AC 230 V, 50Hz seulement
Piles (uniquement 2 x 1.5 V (R03/UM4/format AAA)
télécommande)
Consommation En fonction 35 W
maximale
Stand-by
2 W (avec display hors fonction)
Gamme de fréquences FM 87.5 – 108 MHz
MW 522 – 1620 kHz
Spécifications Haut-parleurs Format 2 x Ø34 mm
1 x Ø77 mm
Impédance 2 x 4 ohms
1 x 6 ohms
Puissance 2 x 3 watts
1 x 6 watts
Entrée auxiliaire Ø3.5 mm
Prise casque d’écoute Ø3.5 mm
Système d’antenne FM Antenne fil
AM Antenne loop
Général Dimensions appareil (L x H x P) 316 x 176 x 189 mm
Lesspécicationsetledesignpeuventêtremodiés.
Ne jamais ouvrir l’appareil. Le fabricant n’accepte aucune responsabilité pour les endommagements
résultant d’un mauvais emploi.
Information générale sur les lasers
Voustrouverezunsymboleidentiquecommeceluimontréàgaucheen-
dessous de votre appareil.
CLASS 1 LASER PRODUCT veut dire que le laser est tellement développé
pourassurerquelavaleurmaximaled’émissionnepeutjamaisêtredépas-
sée en toutes circonstances.
Quand d’autres méthodes d’utilisation que celles mentionnées dans ce manuel sont effectuées,
l’exposition aux émissions dangereuses est possible.
Une radiation invisible est émise quand le compartiment CD est ouvert et quand le système de cloquage
poursécuritéaétécourt-circuité.Nevousexposezpasàcetteradiation.
Note environnementale
Ce produit a été construit avec des composants de haute qualité et avec du matériel
réutilisable et recyclable.
Nejamaisvousdébarrassercetappareil,quandilarriveàlandesavie,avecles
autres déchets domestiques. Apportez-le vers un point de collection de recyclage
d’appareils électriques et électroniques. Ceci est indiqué par ce symbole sur le produit,
dans le manuel d’utilisation ou sur l’emballage.
Contactez les autorités locales pour vous informer en ce qui concerne les points de collection.
Aidez l’environnement en recyclant des produits usés.

Documenttranscriptie
Elite 1 INSTRUCTION MANUAL Before operating the unit, please read this manual thoroughly and retain it for future reference. GEBRUIKSAANWIJZING Gelieve deze gebruiksaanwijzing te lezen alvorens het toestel te gebruiken. Bewaar hem voor later gebruik. MANUEL D’UTILISATION Veuillez lire ce manuel d’utilisation avant d’utiliser l’appareil et gardez-le pour consultation ultérieure. CONTENTS SAFETY AND CAUTION SAFETY AND CAUTION ........................................................................................................................... 2 To ensure that the device provides you with long-term satisfaction and enjoyment, please observe the following instructions. This device is connected to the mains with the AC cord. To completely disconnect the power input, pull out the mains plug of the device from the mains. The device and the mains plug should not be obstructed or should be easily accessed during intended use. It is recommended to avoid using or storing the device at extremes of temperature. Only use the device in moderate climates. The device and the mains plug should not be exposed to water (dripping or splashing), steam, heat (heater or direct sunlight) and sand. No objects filled with liquids such as vases, and no naked flame sources such as lighted candles shall be placed on the device. It is recommended minimum 10cm distances around the device for sufficient ventilations. The ventilation should not be impeded by covering the ventilation openings with items such as newspaper, tablecloths, curtains etc. In case of malfunctions occur due to electrostatic discharge; reset the unit by reconnecting the power source to resume normal functions. OVERVIEW ................................................................................................................................................ 3 POWER SUPPLY ...................................................................................................................................... 7 GENERAL FUNCTIONS ........................................................................................................................... 8 TIME SETTING ........................................................................................................................................ 9 TUNER MODE ........................................................................................................................................ 10 CD MODE ................................................................................................................................................ 12 SD CARD MODE ...................................................................................................................................... 15 AUXILIARY INPUT MODE ........................................................................................................................ 15 ALARM FUNCTION ................................................................................................................................. 16 SLEEP FUNCTION ................................................................................................................................. 17 REMINDER FUNCTION .......................................................................................................................... 17 INFORMATION ........................................................................................................................................ 18 1 2 OVERVIEW OVERVIEW MAIN UNIT MAIN UNIT Keys & Controls on the Top Keys & Controls on the Front 15 18 20 11 12 13 10 21 14 16 17 1 1. On/Off 2 3 4 5 6 7 8 Switches the unit to and from standby mode. The unit is fully disconnected from the mains after the plug has been pulled out. 2. Sleep Sets the sleep timer. 3. Dimmer Adjusts the intensity of the display backlight. 4. Color Selects the color of display backlight. 5. – Volume + Adjusts the volume. 6. DSC / UBS 7. Display 8. Snooze / Mute 9. SD Card socket 10. Dimmer sensor 9 Briefly press to select the sound setting. Press and hold down to activate and deactivate the Ultra Bass System. Switches to view information of the playing content. Interrupts the alarm function or the reminder timer. Switches the speakers to and from mute mode. For inserting the SD or SDHC cards. Automatically adjusts the intensity of display backlight to suit the room brightness. 3 19 11. LCD Display 12. Play / Pause / PTY In CD or SD mode: Plays and pauses the playback. In Tuner mode: Calls up the station types. 13. Stop / Stereo / Mono In CD or SD mode: Stops the playback. In FM Tuner mode: Selects Stereo or Mono reception. 14. Rewind In Tuner mode: Searches station backwards. In CD or SD mode: Selects files or tracks; Searches backwards for a particular passage in a file or track. 15. Up In Tuner mode: Selects stored radio stations. In CD or SD mode: Selects albums. 16. Down In Tuner mode: Selects stored radio stations. In CD or SD mode: Selects albums. 17. Fast-forward In Tuner mode: Searches station forwards. In CD or SD mode: Selects files or tracks; Searches forwards for a particular passage in a file or track. 18. Intro / Repeat / Alarm In CD or SD mode: Plays the introduction of each track; Repeats the playback. In Standby mode: Activates the alarm setting. 19. Program / Random / Time In Tuner mode: Stores radio stations. In CD or SD mode: Programs the playback; Activates random play back. In Standby mode: Activates the time setting. 20. Function Selects the FM Tuner, MW Tuner, CD, SD and Auxiliary input modes. 21. IR sensor Infrared sensor for remote control signals. 4 OVERVIEW OVERVIEW MAIN UNIT REMOTE CONTROL Keys & Controls on the Sides Keys & Controls 10 1 12 2 11 4 14 6 16 7 17 9 19 3 5 13 8 15 18 20 23 26 24 22 25 22. AC Input socket For connecting the power supply unit. The only way to fully disconnect the hi-fi system from the mains is to pull out the plug. 23. FM Antenna socket Antenna socket for the outdoor antenna cable or the wire antenna supplied. 24. Auxiliary Input socket Audio signal input for connecting an external device. 25. Headphone socket For connecting headphone or earpiece with 3.5mm plug. The loud speakers of the hi-fi system are automatically switched off. 26. MW Antenna connector Clip connectors for connecting the MW loop antenna supplied. 5 1. On/Off 2. Function 3. WEC 4. Play / Pause / PTY 5. Rewind 6. Down 7. Sleep 8. Volume Up 9. Volume Down 10. Prog. / Random 11. Repeat / Intro. 12. DSC / UBS 13. NAP 14. Up 15. Fast-forward 16. Stop / Stereo / Mono 17. Display 18. Color 19. Dimmer 20. Snooze / Mute Switches the unit to and from standby mode. The unit is fully disconnected from the mains after the plug has been pulled out. Selects the FM Tuner, MW Tuner, CD, SD and Auxiliary input sources. Activates and deactivates the weekend cancellation function for alarm. In CD or SD mode: Plays and pauses the playback. In Tuner mode: Calls up the station types. In Tuner mode: Searches station backwards. In CD or SD mode: Selects files or tracks; Searches backwards for a particular passage in a file or track. In Tuner mode: Selects stored radio stations. In CD or SD mode: Selects albums. Sets the sleep timer. Adjusts the volume level. Adjusts the volume level. In CD or SD mode: Programs the playback; Activates random playback. In CD or SD mode: Plays the introduction of each track; Repeats the playback. Briefly press to select the sound setting. Press and hold down to activate and deactivate the Ultra Bass System. Sets the reminder function. In Tuner mode: Selects stored radio stations. In CD or SD mode: Selects albums. In Tuner mode: Searches station forwards. In CD or SD mode: Selects files or tracks; Searches forwards for a particular passage in a file or track. In FM Tuner mode: Selects Stereo or Mono reception. In CD or SD mode: Stops the playback. Switches to view information of the playing content. Selects the color of display backlight. Adjusts the intensity of the display backlight. Interrupts the alarm function or the reminder timer. Switches the speakers to and from mute mode. 6 POWER SUPPLY GENERAL FUNCTIONS Mains operation Switching the device on and off Check if the mains voltage on the type plate (on the bottom of the device) corresponds to your local mains supply. If not, consult your dealer or service organization. 1. Insert the power cord into the AC Input socket on the side of the device. 2. Plug the mains plug into the mains socket. 1. Press the On/Off button to switch on the device from standby mode. The last function used is automatically selected. 2. Switch the device to standby by pressing the On/Off button. The display shows ”GOOD BYE” Adjusting the brightness of the display Caution: In order to disconnect the device from the mains completely, the mains plug should be removed from the mains socket completely. 1. Press the Dimmer button to adjust the brightness of display backlight in three levels (bright, medium, or off). 2. The auto dimmer function automatically adjusts the intensity of display backlight to suit the brightness of the surroundings. Battery operation (Remote Control) Notes: Minimum power consumption in standby mode is only achieved if the display backlight is switched off. 1. Open the battery compartment at the back of the remote control by pulling out the cover.. 2. Insert two batteries (2 x 1.5V, Type R03 / UM4 / AAA size) with the correct polarity as shown in the battery compartment. 3. Replace the cover. 4. If the remote is not to be used for any extended period of time, it is recommended that the batteries are removed. Caution: Do not expose the batteries to excessive heat such as sunshine, fire or the like. Remove the batteries from the device when they will not be used for a long period of time. Notes: Batteries should not be disposed of by incineration and with household waste. Disposable batteries should be taken to a suitable recycling centre if possible. Changing the color of display 1. Repeatedly press the Color button to change the color of display backlight. There are 8 colors for selection. Selecting the function mode 1. Repeatedly press the Function button to select the function between FM Tuner, MW Tuner, CD, SD and Auxiliary input modes. Adjusting the volume 1. Adjusts the volume by pressing the Volume− or Volume+ button. Muting 1. Pressing the Mute button to switch the sound on and off. The display shows “Mute”. Switching the Ultra Bass System on and off This function boosts the bass frequencies. 1. Press and hold the DSC/UBS button to switch the Ultra Bass System on and off. The display shows when UBS is switched on. the symbol Notes: Listening with UBS at high volume may have distortion. Recommend to use at low volume. Selecting the sound effects You can select the sound settings USER, CLASSIC, POP, JAZZ and ROCK. The default setting is USER. 1. 7 Repeatedly press the DSC/UBS button to select the desired sound setting. Symbol is shown on the display to indicate your setting. 8 GENERAL FUNCTIONS TUNER MODE Setting the equaliser Connecting the antenna The USER sound setting allows you to make your own personal equaliser settings. 1. Repeatedly press the DSC/UBS button to select the USER sound setting. 2. Press and hold the DSC/UBS button until “BASS 0” is shown on the display. 3. Briefly Press the DSC/UBS button to choose the setting between BASS or TREBLE (TRE). 4. Set the value by using the Volume buttons. 1. Plug the outdoor antenna cable or the wire antenna supplied into the FM Antenna socket. Fully extend the wire antenna for FM reception. 2. Insert the MW frame antenna supplied into the MW Antenna connector. Adjust the position of the antenna to have better reception. Notes: If you do not press any button within 5 seconds, the device will quit the setting. Selecting the Tuner input source Listening with headphones 1. Connect the headphones to the headphone jack (Ø3.5mm). –This switches off the loudspeakers. Warning: Excessive sound pressure from earphones and headphones can cause hearing loss. 1. Switch on the device by pressing the On/Off button 2. Press the Function button to select the input source, FM Tuner or MW Tuner. Automatic station search The first time you switch on the device, the automatic station search in tuner mode searches and stores up to 40 stations (20 stations each for FM and MW) with the best reception. 1. Switch on the device by pressing the On/Off button. The search starts. After the search has finished, you will hear the station stored in preset position P01. 2. To find other stations, press the Function button to select the frequency band, FM or MW. 3. Press and hold the Rewind or Forward button until the frequency display changes to rapid run-through. The search will stop automatically when it finds a station with sufficient strength. 4. When the end of the frequency band is reached, it will recommence searching from the opposite end of the frequency band. TIME SETTING A demo programme starts when you use the device for the first time. The time and day will flash on the display, indicating that they need to be set. Time setting may only be performed in standby mode. 1. Press the Time button to select the hour format between 12HR and 24HR. 2. Press and hold down the Time button until the hour digits flash on the display. 3. Notes: The automatic station search can be interrupted by briefly pressing the Stop button. Manual station search 1. To move the frequency in step, briefly press the Rewind or Forward button. The frequency changes in steps of 50kHz (FM) or 9kHz (MW). Set the hour by using the Rewind or Forward button, and press the Time button to confirm. The minute digits flash. 2. When the end of the frequency band is reached, it will recommence searching from the opposite end of the frequency band. 4. Use the Rewind or Forward button to set the minute, and then press the Time button to confirm. The day of week flashes. Storing stations as presets 1. Press the Rewind or Forward button to select the station desired to store. 5. Set the day of week by using the Rewind or Forward button, and press the Time button to confirm. “CT ON” flashes on the display. 2. Press the Program/Random button to activate the storing function. The preset position (e.g. P01) and “PROG” flash on the display. 6. Use the Rewind or Forward button to set the RDS time synchronisation, press the Time button to confirm and finish the time setting. 3. Choose the desired preset position by using the Up or Down button. 4. Press the Program/Random button to store the station. 5. To store more stations, repeat step 1 to 4. Notes: You must reset the time after a power failure or when the mains plug is pulled out. Some RDS stations transmit an RDS time signal. If the selected RDS programme transmits this time information, the time will be automatically updated. This may take a few minutes. 9 Notes: If stations are already stored in the preset positions, they are overwritten when new stations are stored. If the device is disconnected from the mains for a period of time, all the preset stations are deleted. 10 TUNER MODE CD MODE Stereo / Mono reception The device is suitable for music CDs displaying the logo shown here (CD-DA) and for CD-Rs and CD-RWs with audio data or MP3 and WMA formats. In MP3/WMA mode, the terms “album” and “file” are very important. “Album” corresponds to a folder on a PC, “file” to a file on a PC or CD-DA track. An MP3/WMA CD may not contain more than 511 tracks/folders in total. When burning CD-R and CD-RWs with audio files, various problems may arise which could lead to problems with playback. This can be caused by faulty software or hardware settings or by the CD being used. Should such problems arise, contact the customer services of your CD burner or software manufacturer or look for relevant information, for example on the Internet. When you are making audio CDs, observe all legal guidelines and ensure that the copyright of third parties is not fringed. Always keep the CD compartment closed to prevent dust from collecting on the laser optics. Do not attach adhesive labels to CDs. Keep the surfaces of CDs clean. You can play standard 12cm CDs as well as 8cm CDs on the device. An adaptor is not necessary. If the signal from the FM stereo is weak, you can improve the sound quality by switching to mono reception. 1. Press the Stereo / Mono button to switch to mono reception. 2. To switch back to FM stereo, press the Stereo / Mono button again. Notes: The mono or stereo setting is also saved when you store a station as preset. RDS station service RDS (Radio Data System) is an information system which inaudible digital information is transmitted in addition to the normal FM radio programme. When the device is receiving a RDS station and the reception strength is sufficient, the station name and “ ” appear in the display. It may take some time before the RDS information is available. Selecting the CD input source 1. Press the Function button to select CD as the input source. If there is no CD in the compartment, the display shows the message “NO DISC”. Otherwise, the device scans the CD content. RDS time synchronisation Some RDS stations transmit a time signal. If reception is good, the time information will update the time if you have selected the “CT ON” option during the time setting. Time synchronisation can take several minutes, and even with good reception the accuracy depends on the time signal being transmitted. The automatic time setting is always activated when the device is switched from standby to tuner mode and receives a RDS station. When the device is waiting for an RDS time signal, “ completes, “ ” flashes on the display. Once RDS time synchronisation ” keeps lighting. Inserting a CD 1. Open the CD compartment by pulling the top of the front panel. The display shows “OPEN”. 2. Insert a CD into the CD compartment with it printing facing outward. 3. Push the front panel to its original position to close the CD compartment. The device then reads the content of CD, and the display shows “CD READ” - In MP3/WMA mode: The display shows the total number of albums and files, and the format “MP3/ WMA”. - In CD-DA mode: The display shows the total playing time, the total number of tracks, and the format “CD”. Calling up RDS information 1. Repeatedly press the Display button to cycle through the information. a. b. c. d. e. Station name Programme type Text Day and Time Frequency Displays the name of the radio station being listened to. Displays the type of station being listened to, e.g. Pop, Classic, News, etc. Displays the message about the station being listened to as ticker text. Displays the current time and day of the week. Displays the waveband and the frequency of station being listened to. Station types (PTY) 1. To call up the current station type, press the PTY button. If no station type code is transmitted, “NO PTY” appears on the display. 2. Repeatedly press the PTY button to select the desired station type. 3. Press the Rewind or Forward button to start the station search by station type. The search stops once a station of the selected type is found. 4. Press the PTY button to stop the search. 11 CD playback 1. Press the Play/Pause button to start playback. Playback always starts with the first track (CD-DA) or the first file of the first album (MP3/WMA). 2. Press the Play/Pause button to pause the playback. 3. Press the Play/Pause button again to resume playback. 4. Press Stop button to end the playback. Selecting a file or track 1. During playback, repeatedly press the Rewind or Forward button until the desired file or track is reached. Playback of the selected file/track starts automatically. – In MP3/WMA, you also can select the album by pressing the Up or Down button. 2. You can also select the files/tracks in the stop position. Press and hold Rewind or Forward button to select the files/tracks more quickly. Searching for a passage within a file or track 1. During playback, press and hold down the Rewind or Forward button until you find the passage you want to hear. – Playback starts when you release the button. – The volume is reduced during the search. 12 CD MODE CD MODE Repeating a file or track (Repeat One) 1. During playback, press the Repeat/Intro button, the display shows the symbol “ ”. The current file/track will be played repeatedly. 2. To cancel this function, repeatedly press the Repeat/Intro button until the symbol “ ” disappears on the display. 3. You may also press the Stop button to stop playback and quit the repeat function. Creating a track memory You can create a track memory of up to 60 tracks (CD-DA) or up to 60 files from different albums (MP3/ WMA) of the current CD in any order you desired and then play the tracks in that sequence. A file or track may be stored more than once. Programming is only possible in stop mode. Repeating all files or tracks (Repeat All) 1. During playback, repeatedly press the Repeat/Intro button until the display shows a symbol “ The whole CD will be repeated. 2. To cancel this function, repeatedly press the Repeat/Intro button until the symbol “ ” disappears. 3. You may also press the Stop button to stop playback and quit the repeat function. ”. Repeating all files in an album (MP3/WMA only) 1. During playback, repeatedly press the Repeat/Intro button until the display shows a symbol ”. “ All the files in the current album are played repeatedly. 2. To cancel this function, repeatedly press the Repeat/Intro button until the symbol “ ” disappears. 3. You may also press the Stop button to stop playback and quit the repeat function. Playing the files or tracks in random order (Random) 1. During the playback, press the Prog/Random button to activate the random playback, the word “RANDOM” is shown on the display. – All files/tracks on the CD will be played once in random order. 2. To cancel this function, press the Prog/Random button again, the word “RANDOM” disappears. – The current track and subsequent tracks will be played to the end in its default order. 3. You can also press the Stop button to cancel the function and quit the playback. Playing the introduction of files or tracks (Intro.) 1. Press the Repeat/Intro button in stop mode. The display shows the word “INTRO”. – Playback starts, the first ten seconds of each file/track are played. 2. To cancel this function, press the Repeat/Intro button again, the word “INTRO” disappears on the display. –The current track and the subsequent tracks are played to the end. 3. You can also press the Stop button to cancel the function and quit the playback. Selecting and storing tracks 1. In stop mode, press the Program/Random button to call up the function. – The word “PROG” flashes during the programming. – Display shows “P-01” for the first preset 2. Select the file/track by pressing the Rewind or Forward button. – In MP3/WMA, you also can select the album by pressing the Up or Down button. 3. Press the Program/Random button to store. 4. To store more files/tracks, repeat step 2 and 3. Playing the track memory 1. Press the Play/Pause button to start playing. Playback begins with the first programmed file or track. – The word “PROG” lights on the display indicates there is a track memory. 2. Press the Play/Pause button to pause the playback, or press the Stop button to end the play back. 3. To play the track memory again, press the Play/Pause button. Viewing or changing the track selection 1. In stop mode, the display shows the first programmed file/track number, and the word “PROG” flashes. Repeatedly press the Program/Random button to cycle through each preset of the track memory. 2. You can change any preset by pressing the Rewind or Forward, Up or Down button to select a new file/track, and then press the Program/Random button to confirm. Adding files or tracks 1. In stop mode, repeatedly press the Program/Random button until the track number of a preset is zero. 2. Select the track by using the Rewind or Forward, Up or Down button. 3. Press the Program/Random button to save the track. Deleting the track memory 1. In stop mode, press the Stop button, “PROG” will disappears on the display or Open the CD compartment. Calling up file information (MP3/WMA only) You can call up file information (ID3 tag and ticker text) with this function. 1. During playback, the display switches to show the album and file name. 2. Repeatedly press the Display button to cycle through the information. 13 14 SD CARD MODE ALARM FUNCTION Secure Digital (SD or SDHC) cards can be used with the device for playback of MP3 or WMA files. SD or SDHC cards up to 16GB are supported. However, there are many different cards variants available and not all cards can be guaranteed to work in the device. SD or SDHC cards must be formatted using the FAT or FAT32 filing system in order to operate with the device. The device has an alarm function which can be set to wake you to buzzer, radio, CD or SD card input source. The alarm duration is 90 minutes. Inserting and removing a card To insert a SD/SDHC card into the device, push the card with its label side facing outwards and gold contacts first into the SD card socket. To remove the card, push the card slightly and it will pop out allowing removal. 1. To select SD card mode, repeatedly press the Function button until “SD” is shown on the display. Playback control in SD card mode is similar to CD MP3/WMA mode, please refer to CD mode. MP3/ WMA files are played back in the order that they are written to the SD card by your computer, except when Random playback is selected. 6. 7. AUXILIARY INPUT MODE 2. 3. ” flashes, press the Alarm button to confirm. If you select “BUZZER”, the symbol “ If you select “FM RADIO”, the symbol “ ” flashes. You should also select the desired preset station by using the Up or Down button, and then press the Alarm button to confirm. Set the alarm volume by using the Volume button. Press the Alarm button to confirm and finish the setting. – Display: the current time and the symbol “ The device has an auxiliary input mode for listening audio signal from an external audio device, such as iPod, MP3 player, CD player, etc. 1. Setting the alarm time 1. With the device switched off, press and hold the Alarm button until the hour digits flash on the display. 2. Press the Rewind or Forward button to set the hour, and then press the Alarm button to confirm. – Display: the minute digits flashes. 3. Press the Rewind or Forward button to set the minute, and press the Alarm button to confirm. – Display: the alarm source flashes. 4. Press the Rewind or Forward button to set the alarm source between “CD”, “SD CARD”, “FM RADIO” and “BUZZER”. 5. If you select “CD” or “SD CARD”, the symbol “ ” flashes on the display, press the Alarm button to confirm. Connect a stereo or mono audio source to the Auxiliary Input socket (Ø3.5mm) provided on the side of the device. Switch on the device, and press the Function button to select “AUX” as the input source. Adjust the volume of your player and the device for comfortable listening. ” or “ ” lights on. Notes: If no button is pressed for more than 5 seconds during the setting, the device will quit the process automatically, and you have to start again. If you select “CD” or “SD card” as the alarm source, make sure that a CD or SD card has been inserted. Otherwise there will be no alarm signal. Viewing the alarm time 1. In standby mode, repeatedly press the Alarm button to cycle through the alarm settings. You may change the settings according to the procedures of “Setting the alarm time”. Interrupting the alarm 1. During the alarm is sounding, press the Snooze button. – The alarm signal stops. – The alarm goes off again at 5-minute intervals (overall alarm duration is 90 minutes). Cancelling the alarm for the day 1. Press the On/Off button when the alarm is sounding. – The alarm remains activated for the next day. Switching off the alarm for the weekend You can switch off the alarm function over the weekend while the alarm setting is saved. 1. Switch off the alarm function with WEC button on the remote control. 2. Press the WEC button again to reactivate the alarm function for weekend. Activating and deactivating the alarm 1. To deactivate the alarm, briefly press the Alarm button in standby mode. The alarm symbol disappears on the display. The alarm setting is saved. 2. To activate the alarm, briefly press the Alarm button again in standby mode. The display shows the alarm symbol. 15 16 SLEEP FUNCTION INFORMATION The device can be set to turn off after a preset time has elapsed. The sleep setting can be adjusted between 10 and 90 minutes in 10-minute intervals. Technical data Setting the sleep timer 1. Switch on the device, and select the listening source you desired. 2. Press the Sleep button to call up the function. – The word “90 MIN” and the symbol > < is shown on the display. 3. Repeatedly press the Sleep button to select the sleep time in 10-minute intervals. The device will switch off after the preset sleep time has elapsed. Power Supply Cancelling the sleep timer 1. To cancel the sleep timer before the chosen sleep time has elapsed; press the Sleep button until the word “00 MIN” shown on the display. – The device remains switches on, and the symbol > < disappears. 2. If you switch on the device and switch off the device before the sleep time has elapsed, press the On/Off button. – The symbol > < disappears, and the device is switched off. Mains operation Battery operation (For remote control only) AC 230V, 50Hz~ only 2 x 1.5V (R03 / UM4 / AAA size) Operation 35 W 2 W (with display backlighting switched off) Standby FM 87.5 – 108MHz Frequency Coverage MW 522 – 1620 kHz Loudspeaker 2 x Ø34 mm Size 1 x Ø77 mm 2 x 4 ohm Impedance Circuit Features 1 x 6 ohm Output power 2x3W 1x6W Auxiliary input socket Ø3.5 mm Headphone socket Ø3.5 mm FM Wire Antenna Aerial System AM Loop Antenna General Dimension of unit 316L x 176H x 189D (mm) Maximum Power Consumption REMINDER FUNCTION Technical and design modifications reserved. The device can be set to remind you by sounding the signal tone at a preset time. The reminder time setting can be adjusted from 10 to 120 minutes in 10-minute intervals. 1. 2. 3. Switch the device to standby mode, press the NAP button on the remote control. The display shows ”NAP 10” and the symbol “NAP” flashes. Repeatedly press the NAP button to select the reminder time in 10-minute intervals. After the time has expired, a signal tone sounds. Switch off the signal tone by pressing the On/Off button. or Interrupt the function early by setting the reminder time to “NAP 00” using the NAP button. Never open the device casing. The manufacturer will not accept any liability for damage resulting from improper handling. General information on laser devices You will find a symbol similar to the one shown here on the bottom of the device. CLASS 1 LASER PRODUCT means that the laser is designed in such a way as to ensure that the maximum permissible emission value cannot be exceeded under any circumstances. If operating devices or methods other than those specified here are employed, it may lead to dangerous exposure to emissions. Invisible laser radiation is emitted if the CD compartment is opened and the safety locking mechanism is shorted. Do not expose yourself to this radiation. Environmental note This product has been made from high-quality parts and materials which can be reused and recycled. Therefore, do not throw the product away with normal household waste at the end of its life. Take it to a collection point for recycling electrical and electronic device. This is indicated by this symbol on the product, in the operating manual and on the packaging. Please find out about collection points operated by your local authority. Help protect the environmental by recycling used products. 17 18 INHOUD VEILIGHEID EN WAARSCHUWINGEN VEILIGHEID EN WAARSCHUWINGEN .................................................................................................... 2 Om er voor te zorgen dat dit toestel u lang voldoening en plezier zal geven, dienen volgende instructies opgevolgd te worden. OVERZICHT ............................................................................................................................................. 3 • Dit toestel wordt aan de netstroom verbonden via een stroomkabel. Om het toestel volledig uit te schakelen dient de stekker uit het stopcontact gehaald te worden. • Het toestel en het stopcontact moeten gemakkelijk bereikbaar zijn en mogen niet door obstructies verborgen zijn. • Het is aanbevolen het toestel niet bij extreme temperaturen te gebruiken of te bewaren. Gebruik het alleen in normale klimaatomstandigheden. • Het toestel en de stroomkabel mogen niet worden blootgesteld aan water (druppels of spatten), stoom, warmte (verwarmingstoestel of direct zonlicht) en zand. • Er mogen geen objecten die gevuld zijn met een vloeistof, zoals een vaas, en ook geen open vlam, zoals een kaars, bovenop het toestel geplaatst worden. • Voor een goede ventilatie is het aanbevolen een vrije ruimte van 10cm rond het toestel te houden. • De ventilatieopeningen mogen niet geblokkeerd worden met zaken zoals een krant, tafelkleed, gordijn, enz… • In geval van slechte werking door een elektrostatische ontlading, de stekker uit het stopcontact halen en dan terug aansluiten. VOEDING ................................................................................................................................................. 7 ALGEMENE FUNCTIES .......................................................................................................................... 8 TIJDINSTELLING .................................................................................................................................... 9 TUNER MODUS ...................................................................................................................................... 10 CD MODUS ............................................................................................................................................. 12 SD KAART MODUS ................................................................................................................................ 15 AUX INGANG MODUS ..............................................................................................................................15 ALARMFUNCTIE ..................................................................................................................................... 16 SLEEP FUNCTIE ..................................................................................................................................... 17 HERINNERINGSFUNCTIE .....................................................................................................................17 INFORMATIE ........................................................................................................................................... 18 1 2 OVERZICHT OVERZICHT TOESTEL TOESTEL Toetsen en bedieningen aan de bovenzijde Toetsen en bedieningen aan de voorzijde 15 18 20 11 10 12 13 21 1 2 3 4 5 6 7 8 9 14 16 17 19 11 LCD display 1 Aan/uit Schakelt het toestel in of uit stand-by. Het toestel is volledig van de stroom afgesloten nadat de stekker uit het stopcontact is gehaald. 12 Weergave/Pauze/PTY In SD of CD modus: weergave en pauze. In tuner modus: oproepen type zenders. 13 Stop/Stereo/Mono In SD of CD modus: stoppen van de weergave. In FM tuner modus: kiezen tussen stereo of mono ontvangst. 14 Terugspoelen In tuner modus: om zenders achterwaarts te zoeken. In CD os SD modus: om documenten of nummers te selecteren; zoekt achterwaarts naar een bepaalde passage in een document of nummer. 15 Up In tuner modus: selecteert vastgelegde radiozenders. IN CD of SD modus: selecteert albums. 16 Down In tuner modus: selecteert vastgelegde radiozenders. IN CD of SD modus: selecteert albums. 17 Snel voorwaarts In tuner modus: zoekt zenders voorwaarts. In CD os SD modus: om documenten of nummers te selecteren; zoekt voorwaarts naar een bepaalde passage in een document of nummer. 18 Intro/Herhaling/Alarm IN CD of SD modus: geeft de eerste seconden van elk nummer weer; herhaalt de weergave. In stand-by modus: activeert het instellen van het alarm. 19 Program/Random/Tijd In tuner modus: memoriseert de radiozenders. In CD of SD modus: programmeren van de weergave; activeert de wille keurige weergave. In stand-by modus: activeert de tijdinstelling. 20 Functie Selecteren tussen FM tuner, MW tuner, CD, SD en Aux ingang. 21 IR sensor Ontvanger van de afstandsbediening. 2 Sleep Stelt de sleep timer in. 3 Dimmer Regeling van de intensiteit van het display. 4 Kleur Kies de kleur van het display. 5 -Volume+ Om het volume te regelen. 6 DSC/UBS 7 Display Kort indrukken om de geluidsinstelling te kiezen. Ingedrukt houden om het Ultra Bass Systeem in of uit te schakelen. Informatie over de weergave-inhoud. 8 Snooze/Mute 9 SD kaart aansluiting Onderbreekt de alarmfunctie of de resterende timer. Schakelt de luidsprekers naar en van mute modus. Om SD of SDHC kaarten in te brengen. 10 Dimmer sensor Regelt automatisch de intensiteit van de display volgens de lichtomstan digheden in de kamer. 3 4 OVERZICHT OVERZICHT TOESTEL AFSTANDSBEDIENING Toetsen en bedieningen aan de zijkanten Toesten en bedieningen 10 1 12 2 11 4 14 6 16 7 17 9 19 3 5 13 8 15 18 20 23 26 24 22 25 22 AC aansluiting Aansluiting van de stroomvoeding. De enige manier om het toestel volledig uit te schakelen is de stroomkabel uit te trekken. 23 FM antenne aansluiting Aansluiting voor een externe antenne of de meegeleverde draadan tenne. 24 Aux ingang Aansluiting voor een externe geluidsbron. 25 Hoofdtelefoonaansluiting Voor aansluiting van een hoofdtelefoon met een 3.5mm stekker. De luidsprekers worden automatisch uitgeschakeld. 26 MW antenne aansluiting Aansluiting voor de meegeleverde MW loopantenne. 5 1 Aan/uit Schakelt het toestel van en naar stand-by. De enige manier om het toestel volledig uit te schakelen is de stroomkabel uit te trekken. 2 Functie Selecteren tussen FM tuner, MW tuner, CD, SD en Aux ingang. 3 WEC Schakelt de werking van het alarm tijdens het weekend in of uit. 4 Weergave/Pause/PTY In SD of CD modus: weergave en pauze. In tuner modus: oproepen type zenders. 5 Terugspoelen In tuner modus: om zenders achterwaarts te zoeken. In CD os SD modus: om documenten of nummers te selecteren; zoekt achterwaarts naar een bepaalde passage in een document of nummer. 6 Down In tuner modus: selecteert vastgelegde radiozenders. IN CD of SD modus: selecteert albums. 7 Sleep Stelt de sleep timer in. 8 Volume Up Regeling van het volume 9 Volume Down Regeling van het volume 10 Prog./Random In CD of SD modus: programmeren van de weergave; activeren van de willekeurige weergave. 11 Herhaling/Intro In CD of SD modus: geeft de eerste seconden van elk nummer weer; herhaalt de weergave. 12 DSC/UBS Kort indrukken om de geluidsinstelling te kiezen. Ingedrukt houden om het Ultra Bass Systeem in of uit te schakelen. 13 NAP Stelt de herinneringsfunctie in. 14 Up In tuner modus: selecteert vastgelegde radiozenders. IN CD of SD modus: selecteert albums. 15 Snel voorwaarts In tuner modus: zoekt zenders voorwaarts. In CD os SD modus: om documenten of nummers te selecteren; zoekt voorwaarts naar een bepaalde passage in een document of nummer. 16 Stop/Stereo/Mono In SD of CD modus: stoppen van de weergave. In FM tuner modus: kiezen tussen stereo of mono ontvangst. 17 Display Informatie betreffende de weergegeven inhoud. 18 Kleur Kies de kleur van het display. 19 Dimmer Regeling van de intensiteit van het display. 20 Snooze/Mute Onderbreekt de alarmfunctie of de resterende timer. Schakelt de luidsprekers naar en van mute modus. 6 VOEDING ALGEMENE FUNCTIES Netstroomvoeding Controleer of de spanning die vermeld is op het plaatje (op de onderkant van het toestel) overeenkomt met die van u thuis. Indien dit niet overeenkomt, consulteer uw dealer. Het toestel in- en uitschakelen 1. Druk op de Aan/Uit toets van het toestel om het in te schakelen. De laatst gebruikte functie wordt automatisch gekozen. 2. Druk op de Aan/Uit toets van het toestel om het in stand-by te zetten. De display toon “GOOD BYE”. 1. Steek de stroomkabel in de AC aansluiting op de zijkant van het toestel. 2. Steek de stekker in het stopcontact. Opgelet: Om het toestel volledig af te sluiten van de stroom dient de stekker uit het stopcontact gehaald te worden. Batterijvoeding (afstandsbediening) 1. Op het batterijencompartiment op de achterkant van de afstandsbediening door aan het klepje te trekken. 2. Breng twee batterijen in (2 x 1.5 V, Type R03/UM4/AAA formaat) en hou rekening met de aangeduide polariteit. 3. Plaats het klepje terug. 4. Als de afstandsbediening gedurende een zekere tijd niet gebruikt wordt, is het aangeraden de bat terijen te verwijderen. Opgelet: Stel de batterijen niet bloot aan extreme warmte zoals zonlicht, een vuur of dergelijke. Haal de batterijen uit de afstandsbediening als deze gedurende lange tijd niet gebruikt wordt. Opmerkingen: Batterijen mogen niet met het gewoon huisafval verwijderd worden. Gebruik de beschikbare middelen om de batterijen te laten recycleren. Regeling van de helderheid van het display 1. Druk op de Dimmer toets om de helderheid van het display in drie stappen (helder, medium, uit) in te stellen. 2. De auto dimmer functie regelt de helderheid automatisch in functie van de lichtomstandigheden van de omgeving. Opmerking: Een minimum stroomverbruik in stand-by is alleen mogelijk als de display uitgeschakeld is. Wijzigen van de kleur van het display 1. Druk herhaaldelijk op de Kleur toets om de kleur van het display te wijzigen. U kan uit 8 kleuren kiezen. Selecteren van de functie 1. Druk herhaaldelijk op de Functie toets om te kiezen tussen FM tuner, MW tuner, CD, SD of Aux ingang. Regeling van het volume 1. Regel het volume met de Volume- of Volume+ toetsen. Muting 1. Druk op de Mute toets om het geluid in of uit te schakelen. De display toont “Mute”. In- en uitschakelen van het Ultra Bass Systeem Deze functie versterkt de weergave van de lage tonen. 1. Hou de DSC/UBS toets ingedrukt om het Ultra Bass Systeem in of uit te schakelen. Het display toont als UBS ingeschakeld is. Opmerking: Gebruik maken van UBS met een hoog volume kan vervorming veroorzaken. Gebruik het alleen bij laag volume. Selecteren van het geluideffect U kan kiezen tussen GEBRUIKER, KLASSIEK, JAZZ en ROCK. De standaardinstelling is GEBRUIKER. 1. Druk herhaaldelijk op de DSC/UBS toets om het gewenste geluideffect te kiezen. Een overeenkomstig symbool wordt op de display weergegeven. 7 8 ALGEMENE FUNCTIES TUNER MODUS Instelling van de equalizer Bij het kiezen van het geluideffect GEBRUIKER kan u de equalizer aan uw eigen wensen instellen. 1. Druk herhaaldelijk op DSC/UBS toets om GEBRUIKER te selecteren. 2. Hou de DSC/UBS toets ingedrukt totdat “BASS 0” op het display verschijnt. 3. Druk kort op de DSC/UBS toets om te kiezen tussen BASS of TREBLE (TRE). 4. Stel het niveau in met de Volume toetsen. Aansluiting van de antenne 1. Sluit de externe antenne of de meegeleverde draadantenne aan op de FM antenne aansluiting. Trek de draadantenne volledig uit voor FM ontvangst. 2. Sluit de meegeleverde MW loop antenne aan op de MW antenne aansluiting. Regel de positie van de antenne voor een optimale ontvangst. Opmerking: Indien u niet binnen de 5 seconden op een toets drukt, wordt de instelling geannuleerd. Selecteren van de tuner 1. Schakel het toestel in met de Aan/Uit toets. 2. Druk op de Functie toets om de bron te selecteren: FM tuner of MW tuner. Luisteren met hoofdtelefoon 1. Sluit de hoofdtelefoon aan op de hoofdtelefoonaansluiting (Ø3.5mm) - Dit schakelt de luidsprekers uit. Verwittiging: Een overdreven geluidsdruk van een hoofdtelefoon kan het gehoor beschadigen. TIJDINSTELLING Een demonstratieprogramma start wanneer u het toestel voor het eerst gebruikt. De tijd- en dagindicatie op het display knipperen om aan te duiden dat deze ingesteld moeten worden. De tijdinstelling kan alleen gebeuren in stand-by modus. 1. 2. 3. 4. 5. 6. Druk op de Tijd toets om het uurformaat te kiezen tussen 12HR en 24HR. Hou de Tijd toets ingedrukt totdat de urenindicatie op het display knippert. Stel het uur in met de Achterwaarts of Voorwaarts toetsen en druk op Tijd toets om te bevestigen. De minutenindicatie knippert. Stel de minuten in met de Achterwaarts of Voorwaarts toetsen en druk op Tijd toets om te bevestigen. De dag van de week knippert. Stel de dan in met de Achterwaarts of Voorwaarts toetsen en druk op Tijd toets om te bevestigen. “CT ON” knippert. Gebruik de Achterwaarts of Voorwaarts toetsen om de RDS tijdsynchronisatie in te stellen en druk op Tijd toets om te bevestigen en de tijdinstelling te beëindigen. Opmerkingen: U moet de tijd opnieuw instellen wanneer er een stroompanne is geweest of wanneer u het toestel van de netstroom heeft verwijderd. Sommige RDS zenders sturen een RDS tijdsignaal. Als de gekozen RDS zender dat tijdsignaal doorstuurt, wordt de tijd automatisch juist gesteld. Dit kan enkele minuten duren. 9 Automatisch zenders zoeken De eerste keer dat u het toestel gebruikt zoekt het automatisch zenderzoeksysteem de zenders en memoriseert 40 zenders (20 in FM en 20 in MW) met de beste ontvangst. 1. Schakel het toestel in met de Aan/Uit toets. Het zoeken start. Als het zoeken beëindigd is hoort u het geluid van de zender die in P01 opgeslagen is. 2. Om andere zenders te zoeken, druk op de Functie toets om te kiezen tussen FM rn MW. 3. Druk op de Achterwaarts of Voorwaarts toetsen totdat de frequentieweergave snel begint te lopen. Het zoeken stopt automatisch als een zender met een voldoende sterk signaal gevonden is. 4. Als het einde van het frequentiebereik bereikt is gaat het zoeken verder in omgekeerde richting. Opmerking: Het automatisch zoeken naar zenders kan onderbroken worden door kort op de Stop toets te drukken. Handmatig zenders zoeken 1. Om de frequenties stap voor stap te doorlopen, druk kort op Achterwaarts of Voorwaarts toetsen. De frequentie verandert in stappen van 50 kHz (FM) en 9 kHz (MW). 2. Als het einde van het frequentiebereik bereikt is gaat het zoeken verder in omgekeerde richting. Zenders als voorkeuzenders vastleggen 1. Druk op de Achterwaarts of Voorwaarts toetsen om de gewenste zender te zoeken. 2. Druk op de Program toets om de memoriefunctie te activeren. Het voorkeuzenummer (bv. P01) en “PROG” knipperen op de display. 3. Kies het gewenste voorkeuzenummer met de Up en Down toetsen. 4. Druk op de Program toets om de zender vast te leggen. 5. Om andere zenders vast te leggen, herhaal punten 1 t.e.m. 4. Opmerkingen: De reeds vastgelegde zenders worden vervangen door de nieuwe gekozen zenders. Indien het toestel gedurende lange tijd van de netstroom is afgesloten, zullen alle voorkeuzezenders verdwijnen. 10 TUNER MODUS CD MODUS Stereo/Mono ontvangst Als het signaal van een FM-stereo zender te zwak is, kan de geluidskwaliteit verbeterd worden door deze in mono te zetten. 1. Druk op de Stereo/Mono toets om naar mono ontvangst te gaan. 2. Om terug naar stereo ontvangst te gaan, druk opnieuw op de Stereo/Mono toets. Dit toestel is geschikt voor de weergave van muziek CD’s waarvan het logo hier afgebeeld is (CD-DA) en van CD-R’s en CD-RW’s met audio in het MP3 en het WMA formaat. Opmerking: De stereo om mono instelling wordt ook bewaard bij het vastleggen in de voorkeuzenummers. RDS zenderservice RDS (Radio Data System) is een informatiesysteem dat onhoorbare informatie meestuurt met het normale FM radioprogramma. Wanneer het toestel een RDS zender ontvangt en het signaal is voldoende sterkt, verschijnt de zendernaam en op het display. Het kan een bepaalde tijd duren alvorens de RDS informatie beschikbaar is. RDS tijdsynchronisatie Sommige RDS zenders sturen een tijdsignaal. Als de ontvangst goed is zal de tijdinformatie de tijd automatisch juist zetten als u “CT ON” gekozen heeft tijdens de tijdinstelling. Tijdsynchronisatie kan verschillende minuten duren, zelfs indien er goede ontvangst is en de juistheid hangt af van het tijdsignaal dat meegestuurd wordt. De automatische tijdinstelling gebeurt wanneer het toestel vanuit stand-by naar tuner modus wordt geschakeld en er een RDS zender ontvangen wordt. Als het toestel aan het wachten is naar een RDS tijdsignaal, knippert “ display. Vanaf het ogenblik dat de tijd gesynchroniseerd is blijft “ ” op het ” aangeduid op het display. Oproepen van RDS informatie 1. Druk herhaaldelijk op de Display toets om door de informatie te gaan. a. Zendernaam De naam van de beluisterde zender wordt afgebeeld. b. Programmatype Het type zender wordt aangeduid: pop, klassiek, nieuws, enz c. Tekst Een boodschap van de zender wordt weergegeven. d. Dag en Tijd De huidige tijd en weekdag. e. Frequentie Toont de radioband en de frequentie van de beluisterde zender. Zendertypes (TPY) 1. Om het zendertype te kennen, druk op de PTY toets. Als er geen zendertype-informatie wordt doorgestuurd verschijnt “NO PTY” op het display. 2. Druk herhaaldelijk op de PTY toets om het gewenste zendertype te kiezen. 3. Druk op de Achterwaarts of Voorwaarts toetsen om een zender van dit type te zoeken. Het zoeken stopt vanaf het ogenblik dat een overeenstemmende zender gevonden is. 4. Druk op de PTY toets om het zoeken te stoppen. In MP3/WMA modus zijn de termen ‘album’ en ‘file’ zeer belangrijk. ‘Album’ komt overeen met een folder in een PC, ‘file’ met een document in een PC of met een nummer op een CD-DA. Een MP3/WMA disk mag niet meer dan 511 nummers/folders bevatten. Bij het branden van audio op CD-R en CD-RW kunnen er zich verschillende problemen voordoen die kunnen leiden tot problemen bij de weergave. Dit kan veroorzaakt worden door verkeerde software- of hardware-instellingen of door de gebruikte CD. Indien dit gebeurt, contacteer het servicedepartement van de CD-brander of van de softwarefabrikant of zoek relevante informatie op het internet. Wanneer u een audio CD maakt, zorg er dan voor dat u de wettelijke voorschriften opvolgt en dat de auteursrechten van andere partijen niet geschaad worden. Hou het CD-compartiment altijd gesloten om te vermijden dat er stof op de laseroptiek zou terechtkomen. Kleef niets op de CD’s. Hou het oppervlak van de CD rein. U kan standaard 12cm en 8cm disks weergeven. Er is geen adapter nodig. Selectie van de CD-ingang 1. Druk op de Functie toets om CD als bron te kiezen. Als er zich geen CD in het toestel bevindt verschijnt de boodschap “NO DISC” op het display. Anders scant het toestel de inhoud van de CD. Een CD inbrengen 1. Op het CD-compartiment door te trekken aan de top van het frontpaneel. Op de display verschijnt “OPEN”. 2. Breng een CD in met de gedrukte zijde naar de buitenkant. 3. Druk op het frontpaneel om het CD-compartiment te sluiten. Het toestel leest de inhoud van de CD en toont op de display “CD READ”. - In MP3/WMA modus: het display toont het totaal aantal albums of documenten en het formaat “MP3/WMA”. - In CD-DA modus: het display toont de totale speelduur, het aantal nummer en het formaat “CD” CD weergave 1. Druk op de Weergave/Pauze toets om de weergave te starten. De weergave start met het eerste nummer (CD-DA) of met de eerste file in het eerste album (MP3/WMA). 2. Druk op de Weergave/Pauze toets om de weergave te pauzeren. 3. Druk op de Weergave/Pauze toets om de weergave verder te zetten. 4. Druk op de Stop toets om de weergave te stoppen. Een file of nummer selectioneren 1. Druk tijdens de weergave herhaaldelijk op de Achterwaarts of Voorwaarts toetsen totdat het gewenste nummer of file bereikt is. De weergave van het geselecteerde nummer of file start automatisch. - In MP3/WMA, kan u ook het album kiezen met de Up en Down toetsen. 2. U kan het gewenste nummer/file ook kiezen in stop modus. Hou de Achterwaarts of Voorwaarts toetsen ingedrukt om snel het nummer/file te kiezen. Een passage zoeken binnen een file of een nummer. 1. 11 Hou, tijdens de weergave de Achterwaarts of Voorwaarts toetsen ingedrukt totdat u de passage vindt die u wil beluisteren. - De weergave start vanaf het ogenblik dat u de toets loslaat. - Tijdens het zoeken wordt het volume verminderd. 12 CD MODUS CD MODUS Een file of nummer herhalen (Repeat One) 1. Druk tijdens de weergave op de Herhaal/Intro toets; op het display verschijnt “ ”. Het huidige file/nummer wordt herhaald. 2. Om deze functie te herhalen, druk op de Herhaal/Intro toets totdat het symbool “ ” van de display verdwijnt. 3. U mag ook op de Stop toets drukken om de weergave en de herhaalfunctie te stoppen. Een geheugen met nummers opmaken Herhaling van alle files en nummers (Repeat All) 1. Druk tijdens de weergave op de Herhaal/Intro toets; op het display verschijnt “ ”. De volledige CD wordt herhaald. 2. Om deze functie te herhalen, druk op de Herhaal/Intro toets totdat het symbool “ ” van de display verdwijnt. 3. U mag ook op de Stop toets drukken om de weergave en de herhaalfunctie te stoppen. Herhaling van alle files in een album (alleen MP3/WMA) 1. Druk tijdens de weergave op de Herhaal/Intro toets; op het display verschijnt “ ”. Alle files in het album worden herhaald. 2. Om deze functie te herhalen, druk op de Herhaal/Intro toets totdat het symbool “ ” van de display verdwijnt. 3. U mag ook op de Stop toets drukken om de weergave en de herhaalfunctie te stoppen. Weergave van de files of nummers in een willekeurige volgorde (Random) 1. Druk tijdens de weergave op de Random toets om deze functie te activeren; het woord “RANDOM” verschijnt op de display. - Alle files/nummers op de CD worden in een willekeurige volgorde weergegeven. 2. Om deze functie te annuleren, druk op de Random toets en het woord “RANDOM” verdwijnt. - Het huidige nummer en de volgende worden weergegeven tot aan het einde van de disk. 3. U mag ook op de Stop toets drukken om de weergave en de random functie te stoppen. Weergave van het begin van de files en de nummers (Intro) 1. Druk in stop modus op de Herhaal/Intro toets. Op het display verschijnt “INTRO”. - De weergave start: de eerste 10 seconden van elk file/nummer wordt weergegeven. 2. Om deze functie te annuleren, druk op de Herhaal/Intro toets; het woordt “INTRO” verdwijnt. - Het huidige nummer en alle volgende worden tot aan het einde van de disk weergegeven. 3. U mag ook op de Stop toets drukken om de functie en de weergave te stoppen. Oproepen van file-informatie (alleen MP3/WMA) U kan met deze functie file-informatie (ID3 tag en ticker text) oproepen. 1. Tijdens de weergave schakelt de display tussen de weergave en de albumnaam en de filenaam. 2. Druk herhaaldelijk op de Display toets om door de informatie de gaan. 13 U kan tot 60 nummers (CD-DA) of tot 60 files van verschillende albums (MP3/WMA) op de huidige CD memoriseren in eender welke volgorde en in die volgorde weergeven. Een file of nummer mag meerdere keren gememoriseerd worden. Programmeren is alleen mogelijk in stop modus. Nummers selecteren en vastleggen 1. In stop modus, druk op de Program toets om de functie op te roepen. - Het woord “PROG” knippert tijdens het programmeren. - Het display toont “P01” voor het eerste nummer. 2. Selecteer de gewenste file/nummer met de Achterwaarts of Voorwaarts toetsen. - In MP3/WMA kan u het album selecteren met de UP/Down toetsen. 3. Druk op de Program toets om vast te leggen. 4. Herhaal punten 2 en 3 om de volgende nummers vast te leggen. Weergave van het geheugen 1. Druk op de Weergave/Pauze toets om de weergave te starten. De weergave begint met het eerst geprogrammeerde nummer/file. - Het woord “PROG” verschijnt om aan te duiden dat er een geheugen is. 2. Druk op de Weergave/Pauze toets om de weergave te pauzeren of druk op de Stop toets om de weergave te stoppen. 3. Om opnieuw het geheugen weer te geven, druk op de Weergave/Pauze toets. De selectie bekijken of wijzigen 1. In stop modus toont de display het eerst geprogrammeerde nummer en het woord “PROG” knippert. Druk herhaaldelijk op de Program toets om alle nummers in het geheugen te bekijken. 2. U kan elk nummer wijzigen door gebruik te maken van de Achterwaarts of Voorwaarts toetsen of de UP/Down toetsen om een ander nummer/file te kiezen. Druk op de Program toets om vast te leggen. Nummers of files toevoegen 1. In stop modus, druk op de Program toets totdat een voorkeuzenummer nul is. 2. Kies een nummer met de Achterwaarts of Voorwaarts toetsen of de UP/Down toetsen. 3. Druk op de Program toets om vast te leggen. Het nummergeheugen wissen 1. In stop modus, druk op de Stop toets; het woord “PROG” verdwijnt of open het CD compartiment. 14 SD KAART MODUS ALARM FUNCTIE Secure Digital (SD of SDHC) kaarten kunnen op dit toestel gebruikt worden voor de weergave van MP3 of WMA files. SD of SDHC kaarten tot 16GB worden ondersteund. Evenwel zijn er vele verschillende kaarten beschikbaar en er kan geen garantie gegeven worden dat deze allemaal op dit toestel werken. SD of SDHC kaarten moeten geformateerd zijn met het FAT of het FAT32 systeem om op dit apparaat gebruikt te kunnen worden. Dit toestel is uitgerust met een alarm functie om u te wekken met een zoomer, radio, muziek van een CD of een SD kaart. Het alarm duurt 90 minuten. Inbrengen en verwijderen van een kaart Steek de SD/SDHC kaart in de SD kaart aansluiting van het toestel met de labelkant naar buiten en de gouden contacten inwaarts. Om de kaart te verwijderen, druk lichtjes tegen de kaart en het zal uit het toestel komen. 1. Om de SD kaart modus te selecteren, druk herhaaldelijk op de Functie toets totdat “SD” op het display verschijnt. De weergavefuncties van SD modus zijn identiek aan die van een CD met MP3/WMA; zie in de sectie CD modus. De MP3/WMA files worden gelezen in de volgorde waarmee ze op de SD kaart zijn opgenomen, behalve wanneer Random gekozen is. 6. 7. AUX INGANG MODUS Dit toestel beschikt over een aux ingang om audio signalen van externe geluidsbronnen zoals een iPod, MP3-speler, CD-speler weer te geven. 1. 2. 3. Instellen van het alarm 1. Terwijl het toestel uitgeschakeld is, hou de Alarm toets ingedrukt totdat de uurindicatie op het display knippert. 2. Gebruik de Achterwaarts of Voorwaarts toetsen om het uur in te stellen en druk op de Alarm toets om te bevestigen. - Display: de minutenindicatie knippert. 3. Gebruik de Achterwaarts of Voorwaarts toetsen om de minuten in te stellen en druk op de Alarm toets om te bevestigen. - Display: de indicatie van de geluidsbron knippert. 4. Gebruik de Achterwaarts of Voorwaarts toetsen om de geluidsbron te kiezen: “CD”, “SD KAART”, “FM RADIO” en “BUZZER” (zoomer). 5. Als u kiest voor “CD” of “SD KAART” knippert het symbool “ ” ; druk op de Alarm toets om te bevestigen. Sluit een stereo of mono geluidsbron aan de Aux ingang (Ø3.5mm) op de zijkant van het toestel. Schakel het toestel in en druk op de Functie toets totdat “AUX” op het display verschijnt. Regel het volume van de geluidsbron en het toestel voor een comfortabel niveau. ”;druk op de Alarm toets om te bevestigen. Als u kiest voor “BUZZER” knippert het symbool “ Als u kiest voor “FM RADIO” knippert het symbool “ ” . U moet ook de gewenste voorkeuzezender instellen met de UP/Down toetsen; druk op de Alarm toets om te bevestigen. Stel het alarmvolume in met de Volume toets. Druk op de Alarm toets om te bevestigen en de instellingen te beëindigen. - Display: de huidige tijd en het symbool “ ” of “ ” wordt weergegeven. Opmerkingen: Indien er tijdens de instellingen binnen de 5 seconden geen toets ingedrukt wordt, wordt de instelling automatisch stopgezet en dient u opnieuw te beginnen. Indien u als geluidsbron “CD” of “SD KAART” kiest, zorg er dan voor dat er zich een CD of een SD kaart in het toestel bevindt. Anders zal het alarm niet afgaan. De alarmtijd controleren In stand-by, druk herhaaldelijk op de Alarm toets om doorheen de alarminstellingen te lopen. U kan de instellingen wijzigen volgens de procedure beschreven onder Instellen van het alarm. Het alarm onderbreken 1. Terwijl het alarm afgaat, druk op de Snooze toets. - Het alarmsignaal stopt. - Het alarm gaat terug aan met tijdsintervallen van 5 minuten (met een totale duur van 90 minuten) Het alarm voor de dag uitschakelen 1. Druk op de Aan/Uit toets wanneer het alarm afgaat. - Het alarm blijft geactiveerd voor de volgende dag. Het alarm voor het weekend uitschakelen U kan de alarmfunctie voor het weekend uitschakelen, terwijl die voor de andere dagen toch geactiveerd blijft. 1. Schakel de alarmfunctie uit met de WEC toets op de afstandsbediening. Druk opnieuw op de WEC toets om de alarmfunctie ook in het weekend te gebruiken. Het alarm inschakelen en uitschakelen 1. Om het alarm uit te schakelen, druk op de Alarm toets in stand-by. Het alarmsymbool verdwijnt op het display. De alarmtijd blijft bewaard. 2. Om het alarm terug in te schakelen, druk op de Alarm toets in stand-by. Het alarmsymbool ver schijnt op het display. 15 16 SLEEP FUNCTIE INFORMATIE Het toestel kan ingesteld worden om na een bepaalde tijd automatisch uit te schakelen. Deze sleep functie kan ingesteld worden tussen 10 en 90 minuten met intervallen van 10 minuten. Technische gegevens Instellen van de sleep timer 1. Schakel het toestel in en kies de gewenste geluidsbron. 2. Druk op de Sleep toets om de functie op te roepen. - Het woord “90 MIN” en het symbool “ ” verschijnt op het display. 3. Druk herhaaldelijk op de Sleep toets om de tijd met intervallen van 10 minuten in te stellen. Het toestel wordt uitgeschakeld als de ingestelde tijd bereikt is. Annuleren van de sleep timer 1. Om de sleep timer te annuleren alvorens de ingestelde tijd bereikt is, druk op de Sleep toets totdat het woord “00 MIN” op het display verschijnt. - Het toestel blijft ingeschakeld en het symbool “ ” verdwijnt. 2. Indien u het toestel wenst uit te schakelen alvorens de ingestelde tijd bereikt is, druk op de Aan/Uit toets. Het symbool “ ” verdwijnt en het toestel wordt uitgeschakeld. HERINNERINGSFUNCTIE Het toestel kan u een herinneringssignaal laten horen op een vooringestelde tijd. Deze tijd kan ingesteld worden tussen 10 en 120 minuten in stappen van 10 minuten. 1. 2. 3. Zet het toestel in stand-by en druk op de NAP toets op de afstandsbediening. Het display toont “NAP 10” en het symbool “NAP” knippert. Druk herhaaldelijk op de NAP toets om de tijd met een interval van 10 minuten in te stellen. Nadat de tijd verstreken is zal er een signaal afgaan. Stop het signaal door op de Aan/Uit toets te drukken of onderbreek de functie door de resterende tijd op “NAP 00” in te stellen met de NAP toets. Voeding Maximum stroomverbruik Netstroom Batterijen (alleen voor afstandsbediening) AC 230 V, alleen 50 Hz 2 x 1.5 V (R03/UM4/AAA formaat) In werking 35 W 2 W (met display uitgeschakeld) Stand-by Frequentiebereik FM 87.5 – 108 MHz MW 522 – 1620 kHz Eigenschappen Luidspreker Afmetingen 2 x Ø34 mm 1 x Ø77 mm Impedantie 2 x 4 Ohm 1 x 6 Ohm Vermogen 2x3W 1x6W Aux ingang Ø3.5 mm Hooftelefoonaansluiting Ø3.5 mm Antennesysteem FM Draadantenne AM Loopantenne Algemeen Afmetingen toestel (B x H x D) 316 x 176 x 189 mm De technische gegevens en de design kunnen gewijzigd worden. Open nooit het toestel. De fabrikant neemt geen enkele verantwoordelijkheid voor schade die het gevolg is van onjuist gebruik. Algemene informatie over laserapparaten U vindt op de onderkant van het toestel een etiket zoals hier links afgebeeld. CLASS 1 LASER PRODUCT betekent dat de laser op zulke wijze ontwikkeld is dat de maximum afgegeven stralingswaarde onder geen enkele omstandigheid overschreden kan worden. Als het toestel op een andere manier gebruikt wordt als hier beschreven kan dit aanleiding geven tot gevaarlijke blootstelling aan stralen. Onzichtbare laserstraling wordt verspreid als het CD-compartiment geopend is en het veiligheidsmechanisme kortgesloten is. Stel uzelf niet bloot aan deze straling. Opmerkingen betreffende het milieu Dit toestel is gemaakt met hoge kwaliteitsonderdelen en materialen die hergebruikt en gerecycleerd kunnen worden. Daarom mag dit toestel, bij het einde van zijn leven, niet tezamen met ander huishoudelijk afval verwijderd worden. Breng het naar een inzamelpunt voor elektrische en elektronische apparaten. Dit wordt aangeduid met dit symbool op het product, in de gebruiksaanwijzing of op de verpakking. Consulteer de lokale autoriteiten om meer te weten te komen over de inzamelpunten. Help het milieu door gebruikte producten te recycleren. 17 18 SOMMAIRE SECURITE ET PRECAUTIONS SECURITE ET PRECAUTIONS ................................................................................................................ 2 Afin d’assurer que cet appareil vous donne beaucoup de satisfaction pendant longtemps, il est nécessaire de suivre les instructions suivantes. DESCRIPTION .......................................................................................................................................... 3 ALIMENTATION ........................................................................................................................................ 7 FONCTIONS GENERALES ...................................................................................................................... 8 • • REGLAGE TEMPS .................................................................................................................................. 9 • MODE TUNER .......................................................................................................................................... 10 • MODE CD ................................................................................................................................................ 12 • MODE CARTE SD .....................................................................................................................................15 MODE ENTREE AUXILIAIRE ................................................................................................................... 15 FONCTION ALARME .............................................................................................................................. 16 FONCTION SLEEP ................................................................................................................................ 17 • • • L’appareil est connecté au courant secteur par un câble courant secteur. Pour déconnecter complètement l’appareil il faut retirer le câble de la prise courant secteur. L’appareil et le câble courant secteur ne peuvent pas être bloqués et doivent toujours être accessibles. Il est recommandé de ne pas utiliser l’appareil dans des températures extrêmes. Utilisez l’appareil dans un climat modéré. L’appareil et le câble courant secteur ne peuvent pas être exposés a l’eau (goutes, etc.), le vapeur, le chaleur (chauffage ou soleil direct) et le sable. Ne mettez pas des objets remplis avec une liquide ou des flemmes ouvertes (bougie) au-dessus de l’appareil. Il est recommandé de laisser une espace de 10 cm autour de l’appareil pour assure une bonne ventilation. Les ouvertures de ventilation ne peuvent pas être bloquées par des objets tels que journaux, tapis de table, rideaux. En cas de mauvais fonctionnement dû au déchargement électrostatique, retirez la prise courant secteur et remettez-la. FONCTION MÉMOIRE ............................................................................................................................. 17 INFORMATION.............................................................................................................................18 1 2 DESCRIPTION DESCRIPTION APPAREIL APPAREIL Boutons et commandes sur la face supérieure Boutons et commandes sur le panneau frontal 15 18 20 11 10 12 13 21 1 1 En/hors fonction 2 3 4 5 Sleep Pour régler le sleep timer. 3 Dimmer Pour régler l’intensité du display. 4 Couleur Pour régler la couleur du display. 5 -Volume+ Pour régler le volume. 7 Display 8 Snooze/Mute 9 Entrée carte SD 10 Senseur dimmer 7 8 9 Pour mettre l’appareil en fonction ou en stand-by. L’unité est complètement déconnecté après avoir retiré le câble courant secteur. 2 6 DSC/UBS 6 Poussez brièvement pour sélectionner le réglage son. Enfoncez pour activer et désactiver le système Ultra Bass. Pour donner des informations sur le contenu de la source. Pour interrompre la fonction d’alarme et annuler le temps restant. Pour couper le son des haut-parleurs. Pour insérer les cartes SD ou SDHC. Pour régler automatiquement l’intensité du display en fonction des circonstances de lumière dans la chambre. 3 14 16 17 19 11 LCD Display 12 Lecture/Pause/PTY Mode CD ou SD : lecture et pause Mode tuner : pour appeler les types d’émetteurs radio. 13 Arrêt/Stéréo/Mono 14 Rewind 15 Up (vers le haut) Mode CD ou SD : arrêter la lecture. Mode tuner : pour réception stéréo ou mono. Mode tuner : pour chercher les émetteurs en arrière. Mode CD ou SD : pour sélectionner des documents ou des numéros ; recherche en arrière d’un passage dans un document ou numéro. Mode tuner : pour sélectionner les émetteurs mémorisés. Mode CD ou SD : pour sélectionner les albums. 16 Down (vers le bas) Mode tuner : pour sélectionner les émetteurs mémorisés. Mode CD ou SD : pour sélectionner les albums. 17 Avancement rapide Mode tuner : pour chercher les émetteurs en avant. Mode CD ou SD : pour sélectionner des documents ou des numéros ; recherche en avant d’un passage dans un document ou numéro. 18 Intro/Répétition/Alarme Mode CD ou SD : pour écouter les débuts des numéros ; pour répéter la lecture. Mode stand-by : pour activer l’alarme. 19 Program/Random/Temps Mode tuner : pour mémoriser les émetteurs. Mode CD ou SD : pour programmer la lecture ; pour activer la lecture aléatoire ; pour activer le réglage temps. 20 Fonction Pour sélectionner la source : tuner FM, tuner MW, CD, SD ou entrée auxiliaire. 21 Senseur IR Récepteur de la télécommande. 4 DESCRIPTION DESCRIPTION APPAREIL TELECOMMANDE Boutons et commandes sur les côtés Boutons et commandes 10 1 12 2 11 4 14 6 16 7 17 9 19 3 5 13 8 15 18 20 23 26 24 22 25 En/hors fonction Pour mettre l’appareil en fonction ou en stand-by. L’unité est complètement déconnecté après avoir retiré le câble courant secteur. 2 Fonction Pour sélectionner la source : tuner FM, tuner MW, CD, SD ou entrée auxiliaire. 3 WEC Pour activer ou désactiver l’alarme pendant le weekend. 4 Lecture/Pause/PTY Mode CD ou SD : lecture et pause Mode tuner : pour appeler les types d’émetteurs radio. 5 Rewind Mode tuner : pour chercher les émetteurs en arrière. Mode CD ou SD : pour sélectionner des documents ou des numéros ; recherche en arrière d’un passage dans un document ou numéro. 6 Down (vers le bas) Mode tuner : pour sélectionner les émetteurs mémorisés. Mode CD ou SD : pour sélectionner les albums. 7 Sleep Pour régler le sleep timer. 8 Volume + Pour régler le volume 9 Volume Pour régler le volume 10 Prog./Random Mode CD ou SD : programmation de lecture ; activer la lecture aléatoire. 11 Répétition/Intro Mode CD ou SD : répétition de la lecture ; lecture des introductions des numéros. 12 DSC/UBS Poussez brièvement pour sélectionner le réglage son. Enfoncez pour activer et désactiver le système Ultra Bass. 13 NAP Pour régler la fonction mémoire. 14 Up (vers le haut) Mode tuner : pour sélectionner les émetteurs mémorisés. Mode CD ou SD : pour sélectionner les albums. 15 Avancement rapide Mode tuner : pour chercher les émetteurs en avant. Mode CD ou SD : pour sélectionner des documents ou des numéros ; recherche en avant d’un passage dans un document ou numéro. 16 Arrêt/Stéréo/Mono Mode CD ou SD : arrêter la lecture. Mode tuner : pour réception stéréo ou mono. 17 Display Pour donner des informations sur le contenu de la source. 18 Couleur Pour régler la couleur du display. 19 Dimmer Pour régler l’intensité du display. 20 Snooze/Mute Pour interrompre la fonction d’alarme et annuler le temps restant. Pour couper le son des haut-parleurs. 1 22 Prise entrée AC Pour connexion câble courant secteur. L’unité est complètement déconnecté après avoir retiré le câble courant secteur. 23 Prise antenne FM Prise pour antenne externe ou antenne FM livrée. 24 Entée auxiliaire Pour connecter une source audio externe. 25 Prise casque d’écoute Pour connecter le casque d’écoute avec prise Ø3.5mm. Les haut-parleurs sont automatiquement coupés. 26 Prise antenne MW Connexion pour antenne MW livrée. 5 6 ALIMENTATION FONCTIONS GENERALES Courant secteur Vérifiez que le voltage marqué sur la plaque en-dessous de l’appareil correspond avec le voltage dans votre maison. Sinon, consultez votre revendeur. Mettre l’appareil en et hors fonction 1. Poussez le bouton En/Hors fonction pour mettre l’appareil en fonction. La dernière fonction utilisée est automatiquement sélectionnée. 2. Mettez l’appareil en stand-by en poussant le bouton En/Hors fonction. Le display affiche « GOOD BYE ». 1. 2. Insérez le câble courant secteur dans la prise AC input sur le côté de l’appareil. Connectez le câble à la prise courant secteur. Attention : Pour déconnecter l’appareil complètement du courant secteur, il faut retire le câble courant de la prise courant secteur. Piles (télécommande) 1. Ouvrez le compartiment à piles sur le fond de la télécommande en tirant au couvercle. 2. Insérez deux piles (2 x 1.5 V, type R03/UM4/format AAA) dans le compartiment en tenant compte de la polarité. 3. Remettez le couvercle. 4. Si la télécommande n’est pas utilisée pendant un certain temps, il est recommandé d’enlever les piles. Attention : Ne pas exposer les piles à la chaleur (soleil, feu ouvert, etc.) Enlevez les piles de la télécommande quand elle n’est pas utilisée pendant un certain temps. Remarque : Vous ne pouvez pas jeter les piles usées avec les autres déchets domestiques. Apportez les piles usées vers un centre de recyclage. Réglage luminosité du display 1. Poussez le bouton Dimmer pour choisir entre trois niveaux de luminosité (fort, médium, hors fonction). 2. La fonction auto dimmer règle automatiquement la luminosité du display en fonction des circonstances de lumière dans la chambre. Remarque : Pour obtenir une consommation minimale en mode stand-by, il est recommandé de mettre le display hors fonction. Changer la couleur du display 1. Poussez plusieurs fois le bouton Couleurs pour changer la couleur du display. Vous pouvez choisir entre 8 couleurs. Sélectionner la fonction 1. Poussez plusieurs fois le bouton Fonction pour choisir entre Tuner FM, Tuner MW, CD, SD ou Entrée Aux. Réglage volume 1. Réglez le volume avec les boutons Volume- ou Volume+. Muting 1. Poussez le bouton Mute pour désactiver ou activer le son. Le display affiche « Mute ». Activer et désactiver le Système Ultra Bass Cette fonction accentue la reproduction des graves. 1. Enfoncez le bouton DSC/UBS pour mettre en ou hors fonction le Système Ultra Bass. Le display affiche quand l’UBS est en fonction. Remarque : Ecouter la musique au niveau élevé avec UBS peut causer des distorsions. Utilisez le système uniquement avec un faible niveau. Sélection des effets sonores Vous pouvez choisir entre UTILISATEUR, CLASSIQUE, POP, JAZZ et ROCK. Le réglage standard est UTILISATEUR. 1. 7 Poussez plusieurs fois le bouton DSC/UBS pour choisir l’effet sonore. Un symbole correspondant est affiché sur le display. 8 FONCTIONS GENERALES MODE TUNER Réglage de l’égaliseur Connexion de l’antenne 1. Connectez l’antenne externe ou l’antenne FM livrée à la prise Antenne FM. Etirez l’antenne au maximum pour obtenir une bonne réception FM. 2. Connectez l’antenne MW livrée à la prise Antenne MW. Réglez la position de l’antenne pour optimiser la réception. Quand vous avez choisi UTILISATEUR comme effet sonore, vous pouvez régler vos propres préférences. 1. Poussez plusieurs fois le bouton DSC/UBS pour sélectionner UTILISATEUR. 2. Enfoncez le bouton DSC/UBS jusqu’au moment où « BASS 0 » apparaît sur le display. 3. Poussez brièvement le bouton bouton DSC/UBS pour choisir entre BASS ou TREBLE (TRE). 4. Réglez le valeur avec les boutons Volume. Remarque : Le réglage est abandonné si vous ne poussez aucun bouton dans les 5 secondes. Ecouter avec casque d’écoute 1. Connectez le casque d’écoute à la prise casque d’écoute (Ø3.5mm). - Le son des haut-parleurs est coupé. Remarque : Une écoute au niveau élevé par casque d’écoute peut endommager vos oreilles. Sélectionner la source tuner 1. Mettez l’appareil en fonction avec le bouton En/Hors fonction. 2. Poussez le bouton Fonction pour sélectionner la source : tuner FM ou tuner MW. Recherche automatique des émetteurs La première fois que vous mettez l’appareil en fonction, la recherche automatique des émetteurs radio commence automatiquement et met en mémoire les 40 stations avec la meilleure réception (20 en FM et 20 en MW). 1. 2. 3. REGLAGE TEMPS 4. Une démonstration commence automatiquement quand vous utilisez l’appareil pour la première fois. Le temps et le jour clignotent pour indiquer que le réglage doit être effectué. Mettez l’appareil en fonction avec le bouton En/Hors fonction. La recherche démarre. Quand la recherche est finie, vous entendez l’émetteur mémorisé dans la première présélection P01. Pour trouver d’autres émetteurs, poussez le bouton Fonction pour sélectionner la gamme de fréquences : FM ou MW. Enfoncez les boutons Rewind ou Forward jusqu’au moment où l’affichage des fréquences change rapidement. La recherche s’arrête automatiquement dès qu’un émetteur puissant a été trouvé. Quand la fin de la gamme de fréquences est atteinte, la recherche continue dans l’autre sens. Remarque : La recherche automatique peut être interrompue en poussant le bouton Arrêt. Le réglage du temps ne peut se faire qu’en mode stand-by. 1. 2. 3. 4. 5. 6. Poussez le bouton Time pour choisir le format de l’heure : 12HR ou 24HR. Enfoncez le bouton Time jusqu’au moment où l’indication des heures clignote sur le display. Réglez l’heure avec les boutons Rewind ou Forward et poussez le bouton Time pour confirmer. L’indication des minutes clignote. Réglez les minutes avec les boutons Rewind ou Forward et poussez le bouton Time pour confirmer. L’indication du jour clignote. Réglez le jour avec les boutons Rewind ou Forward et poussez le bouton Time pour confirmer. « CT ON » clignote sur le display. Utilisez les boutons Rewind ou Forward pour régler la synchronisation temps RDS et poussez le bouton Time pour confirmer et finir le réglage temps. Remarque : Vous devez régler à nouveau le temps quand il y a eu une panne de courant secteur ou quand vous avez retiré le câble courant secteur. Certains émetteurs transmettent un signal temps RDS. Quand l’émetteur RDS choisi transmet ce signal temps, le temps de l’appareil est mise à jour automatiquement. Ceci peut prendre quelques minutes. 9 Recherche manuelle des émetteurs 1. Pour changer les fréquences par étapes, poussez les boutons Rewind ou Forward. La fréquence change en étapes de 50 kHz (FM) et 9 kHz (MW). 2. Quand la fin de la gamme de fréquences est atteinte, la recherche continue dans l’autre sens. Mémoriser les émetteurs dans les présélections 1. Poussez les boutons Rewind ou Forward pour sélectionner l’émetteur à mémoriser. 2. Poussez le bouton Program pour activer la fonction de mémorisation. Le numéro de la présélection (p.e. P01) et « PROG » clignotent sur le display. 3. Choisissez le numéro de présélection avec les boutons UP ou Down. 4. Poussez le bouton Program pour mémoriser l’émetteur. 5. Répétez les points 1 à 4 pour mémoriser d’autres émetteurs. Remarque : Le nouveau émetteur efface automatiquement l’émetteur déjà mémorisé dans la présélection. Quand l’appareil est déconnecté du courant secteur pendant un certain temps, les présélections seront effacées. 10 MODE TUNER MODE CD Réception stéréo ou mono Quand le signal de l’émetteur FM stéréo est trop faible, la qualité de réception peut être améliorée en choisissant la fonction mono. 1. Poussez le bouton Stéréo/Mono pour changer en mode mono. 2. Pour revenir en mode stéréo, repoussez le bouton Stéréo/Mono. Remarque : Les réglages mono ou stéréo peuvent également être mémorisés dans les présémections. Cet appareil est prévu pour la lecture des disques audio dont le logo est affiché à gauche (CD-DA) et les disques CD-R et CD-RW avec audio en format MP3 et WMA. Service émetteur RDS RDS (Radio Data System) est un système d’information inaudible qui est transmis en même temps que le programme FM normal. Quand l’appareil reçoit un émetteur RDS et le signal est suffisamment fort, le nom de l’émetteur et le symbole “ ” apparaissent sur le display. Il faut quelques minutes avant que l’information RDS est disponible. Synchronisation temps RDS Certains émetteurs RDS transmettent un signal temps. Si la réception est bonne, l’information temps met automatiquement à jour de temps de l’appareil, quand vous avez choisi « CT ON » pendant le réglage du temps. La synchronisation du temps peut prendre quelques minutes et même en cas de bonne réception la justesse dépend du signal transmis. Le réglage automatique du temps se fait chaque fois quand l’appareil est mis en fonction avec tuner et quand il reçoit un émetteur RDS. Quand l’appareil attend un signal temps RDS le symbole “ complète le symbole “ ” clignote sur le display. Quand la synchronisation temps RDS est ” reste allumé. Appel des informations RDS 1. Poussez plusieurs fois le bouton Display pour cycler dans les informations. a. Nom de l’émetteur b. Type programme c. Texte d. Jour et temps e. Fréquence affiche le nome de l’émetteur écouté. affiche le type d’émetteur écoute (Pop, classique, journal, etc) affiche le message transmis par l’émetteur. la date et le jour de la semaine la gamme d’ondes et la fréquence de l’émetteur. Type d’émetteur (PTY) 1. 2. 3. 4. Pour contrôler le type d’émetteur actuel, poussez le bouton PTY. Quand il n’y a pas de type d’émetteur, le display affiche « NO PTY ». Poussez plusieurs fois le bouton PTY pour choisir le type d’émetteur. Poussez les boutons Rewind ou Forward pour démarrer la recherche des émetteurs avec type choisi. La recherche s’arrête dès qu’un tel émetteur a été trouvé. Poussez le bouton PTY pour arrêter la recherche. 11 En mode MP3/WMA les termes ‘album’ et ‘file’ sont très importants. ‘Album’ correspond avec un dossier en PC ; file’ avec un document en PC ou en numéro sur CD-DA. Une disque MP3/WMA net peut pas contenir plus que 511 numéros/dossiers. Pendant l’enregistrement des documents audio sur les disques CD-R et CD-RW, différents problèmes peuvent se produire résultant dans des problèmes de reproduction. Ceci peut être causé par un mauvais réglage du software ou hardware ou par le CD utilisé. Si tels problèmes se produisent contactez les services après-vente de l’enregistreur CD ou du fabricant du software ou recherchez les informations nécessaires par internet. En faisant des disques CD audio, faites attention de suivre tous les règlements légaux et assurez vous de ne pas infliger les droits d’auteurs d’autres parties. Fermez toujours le compartiment CD afin d’éviter que la poussière se dépose sur les optiques laser. Ne collez rien sur les disques CD. Faites attention que la surface du CD soit propre. Vous pouvez reproduire les disques CD 12cm et 8 cm sans avoir besoin d’un adaptateur. Sélection de la source CD 1. Poussez le bouton Fonction pour sélectionner la source CD. Quand il n’y a pas de disque dans l’appareil, le display affiche « NO DISC ». Autrement l’appareil lit le disque CD. Insertion d’un CD 1. Ouvrez le compartiment CD en tirant au couvercle. Le display affiche « OPEN ». 2. Insérez le CD avec la face imprimée vers l’extérieur. 3. Fermez le compartiment CD. L’appareil lit le contenu du disque et le display affiche « CD READ ». - Mode MP3/WMA : le display affiche le nombre total d’albums et file et « MP3/WMA ». - Mode CD : le display affiche le temps total de lecture, le nombre total des numéros et « CD ». Lecture d’un CD 1. Poussez le bouton Lecture/Pause pour démarrer la lecture. La lecture commence avec le premier numéro (CD-DA) ou le premier file du premier album (MP/ WMA). 2. Poussez le bouton Lecture/Pause pour pauser la lecture. 3. Poussez le bouton Lecture/Pause pour continuer la lecture. 4. Poussez le bouton Arrêt pour arrêter la lecture. Sélection d’un file ou d’un numéro 1. Pendant la lecture poussez plusieurs fois les boutons Rewind ou Forward jusqu’au moment où le file ou numéro désiré est atteint. La lecture du file/numéro choisi démarre automatiquement. - En MP3/WMA vous pouvez également choisir l’album avec les boutons UP ou Down. 2. Vous pouvez aussi sélectionner les files/numéros en mode stop. Enfoncez les boutons Rewind ou Forward pour sélectionner les files/numéros. Chercher un passage dans un file ou numéro 1. Pendant la lecture, enfoncez les boutons boutons Rewind ou Forward jusqu’au moment où vous avez trouvé le passage que vous voulez écouter. - La lecture commence dès que vous relâchez le bouton. - Pendant la recherche le volume est diminué. 12 MODE CD MODE CD Répétition d’un file ou d’un numéro (Repeat One) 1. Pendant la lecture, poussez le bouton Répétition/Intro ; le symbole “ ” apparaît sur le display. Le file/numéro actuel est répété. 2. Pour annuler la fonction, poussez plusieurs fois le bouton Répétition/Intro jusqu’au moment où le symbole “ ” disparaît. 3. Vous pouvez également poussez le bouton Arrêt pour arrêter la lecture et la fonction de répétition. Création d’une mémoire numéros. Vous pouvez créer une mémoire de jusqu’à 60 numéros (CD-DA) ou 60 files de différents albums (MP3/ WMA) du disque actuel dans n’importe quel ordre et les reproduire dans cet ordre. Un file ou numéro peut être mémorisé plusieurs fois. La mémorisation est uniquement possible en mode d’arrêt. Répétition des tous les files et numéros (Repeat ALL) 1. Pendant la lecture, poussez le bouton Répétition/Intro ; le symbole “ ” apparaît sur le dis play. Le disque entier est répété. 2. Pour annuler la fonction, poussez plusieurs fois le bouton Répétition/Intro jusqu’au moment où le symbole “ ” disparaît. 3. Vous pouvez également poussez le bouton Arrêt pour arrêter la lecture et la fonction de répétition. Répétition de tous les files dans un album (seulement MP3/WMA) 1. Pendant la lecture, poussez le bouton Répétition/Intro ; le symbole “ ” apparaît sur le display. Tous les files dans l’album actuel sont répétés. 2. Pour annuler la fonction, poussez plusieurs fois le bouton Répétition/Intro jusqu’au moment où le symbole “ ” disparaît. 3. Vous pouvez également poussez le bouton Arrêt pour arrêter la lecture et la fonction de répétition. Lecture des files ou numéros dans un ordre aléatoire (Random) 1. Pendant la lecture, poussez le bouton Random pour activer cette fonction ; le mot « RANDOM » apparaît sur le display. - Tous les files/numéros du CD sont reproduits dans un ordre aléatoire. 2. Pour annuler cette fonction, repoussez le bouton Random ; le mot « RANDOM » disparaît. - Le numéro actuel et les numéros suivant sont reproduits jusqu’à la fin du disque. 3. Vous pouvez également poussez le bouton Arrêt pour arrêter la fonction et la lecture. Lecture des introductions des files ou numéros (Intro) 1. En mode arrêt, poussez bouton Répétition/Intro. Le display affiche « INTRO ». La lecture démarre et les dix premières secondes de chaque file/numéro sont reproduites. 2. Pour annuler cette fonction, repoussez le bouton Répétition/Intro. Le mot « INTRO » disparaît. - Le numéro actuel et les numéros suivant sont reproduits jusqu’à la fin du disque. 3. Vous pouvez également poussez le bouton Arrêt pour arrêter cette fonction et la lecture. Appeler l’information d’un file (seulement MP3/WMA) Vous pouvez appeler l’information du file (ID3 tag et ticker text). 1. Pendant la lecture, le display change pour afficher le nom de l’album et du file. 2. Poussez plusieurs fois le bouton Display pour cycler dans l’information. 13 Sélection et mémorisation des numéros 1. En mode d’arrêt, poussez le bouton Program pour démarrer la fonction. - Le mot « PROG » clignote pendant le programmation. - Le display affiche « P-01 » pour la première présélection. 2. Sélectionnez le file/numéro en utilisant les boutons Rewind ou Forward. - En MP3/WMA vous pouvez choisir l’album avec les boutons UP ou Down. 3. Poussez le bouton Program pour mémoriser. 4. Pour mémoriser d’autres numéros, répétez les points 2-3. Lecture de la mémoire 1. Poussez le bouton Lecture/Pause pour démarrer la lecture. La lecture commence avec le premier file/numéro programmé. - Le mot « PROG » indique qu’il s’agit d’un numéro mémorisé. 2. Poussez le bouton Lecture/Pause pour pauser la lecture ou poussez le bouton Arrêt pour arrêter la lecture. 3. Pour relire la mémoire, poussez le bouton Lecture/Pause. Regarder et changer la sélection 1. En mode arrêt le display affiche le premier file/numéro programmé et le mot « PROG » clignote. Poussez plusieurs fois le bouton Program pour cycler dans les présélections de la mémoire. 2. Vous pouvez changer chaque présélection avec les boutons Rewind ou Forward ou les boutons UP ou Down pour sélectionner un nouveau file/numéro et poussez le bouton Program pour confirmer. Ajouter des files ou numéros 1. En mode d’arrêt poussez le bouton Program jusqu’au moment où le numéro d’une présélection est zéro. 2. Sélectionnez le numéro avec les boutons Rewind ou Forward ou les boutons UP ou Down. 3. Poussez le bouton Program pour mémoriser le numéro. Annulation de la mémoire 1. En mode d’arrêt poussez le bouton Arrêt ; « PROG » disparaît de l’affichage ou ouvrez le compartiment CD. 14 MODE CARTE SD FONCTION ALARME Les cartes Secure Digital (SD et SDHC) peuvent être utilisées pour reproduire des documents MP3 ou WMA. Les cartes SD et SDHC jusqu’à 16GB sont supportées. Néanmoins, il existe beaucoup de différentes cartes et il n’est pas garanti que toutes les cartes peuvent être lues par l’appareil. Les cartes SD et SDHC doivent être formatés avec les systèmes FAT ou FAT32 pour pouvoir être lues avec cet appareil. Cet appareil comporte une fonction d’alarme permettant de vous réveiller par zoomer, radio, CD ou carte SD. La durée de l’alarme est 90 minutes. Insérer et retirer une carte Insérez la carte SD/SDHC avec la face ‘label’ vers l’extérieur et les contacts en or vers l’intérieur dans l’entrée carte SD. Pour retirer la carte poussez-la doucement et elle sort de l’appareil. 1. Pour sélectionner le mode carte SD, poussez plusieurs fois le bouton Fonction jusqu’au moment où « SD » est affiché sur le display. Les commandes de lecture d’une carte SD est identique au mode MP3/WMA ; voyez la section CD. Les files MP3/WMA sont reproduits dans l’ordre avec lequel ils sont enregistrés sur le PC, à moins que vous avez choisi la lecture aléatoire (Random). Réglage du temps d’alarme 1. Avec l’appareil hors fonction, enfoncez le bouton Alarme jusqu’au moment où l’indication des heures clignote. 2. Poussez les boutons Rewind ou Forward pour régler l’heure et poussez le bouton Alarme pour confirmer. - Display : l’indication des minutes clignote. 3. Poussez les boutons Rewind ou Forward pour régler les minutes et poussez le bouton Alarme pour confirmer. - Display : l’indication de la source clignote. 4. Poussez les boutons Rewind ou Forward pour choisir la source : CD, Carte SD, radio FM ou Buzzer. 5. Si vous sélectionnez « CD » ou « Carte SD » le symbole “ ” clignote sur le display ; poussez le bouton Alarme pour confirmer. MODE ENTREE AUXILIAIRE L’appareil possède une entrée auxiliaire pour écouter des signaux audio à partir d’une source externe comme iPod, MP3, lecteur CD, etc. 1. 2. 3. Connectez la source externe à la prise Entrée Auxiliaire (Ø3.5mm) sur le côté de l’appareil. Mettez l’appareil en fonction et poussez le bouton Fonction jusqu’au moment où « AUX » apparaît sur le display. Ajustez le volume de la source et de l’appareil pour une écoute confortable. 6. 7. ” clignote sur le display ; poussez le bouton Si vous sélectionnez « BUZZER » le symbole “ Alarme pour confirmer. Si vous sélectionnez « FM RADIO », le symbole “ ” clignote. Vous devez aussi choisir la pré sélection que vous voulez utiliser avec les boutons UP ou Down et pousser le bouton Alarme pour confirmer. Réglez le volume désiré avec le bouton Volume. Poussez le bouton Alarme pour confirmer et pour finir le réglage. ” ou “ ” s’allume. - Display : le temps actuel et le symbole “ Remarques : Quand vous ne poussez aucun bouton endéans les 5 secondes, l’appareil quitte le réglage et vous devez recommencer. Si vous sélectionnez « CD » ou « Carte SD » comme source, vérifiez que vous avez mis un CD ou une carte SD dans l’appareil, sinon l’alarme ne fonctionne pas. Regarder le temps d’alarme 1. En mode stand-by, poussez le bouton Alarme pour cycler dans les réglages alarme. Vous pouvez changer les réglages selon les instructions dans Réglage du temps d’alarme. Interrompre l’alarme 1. Pendant l’alarme, poussez le bouton Snooze. - Le signal d’alarme s’arrête. - L’alarme se met à nouveau en fonction avec une intervalle de 5 minutes (durée maximale 90 minutes). Annulation de l’alarme pour la journée 1. Pendant l’alarme, poussez le bouton En/Hors fonction. - L’alarme reste activé pour la prochaine journée. Annulation de l’alarme pour le weekend Vous pouvez annuler la fonction d’alarme pour le weekend, pendant que l’alarme reste activé pour les autres jours de la semaine. 1. Annulez la fonction alarme avec le bouton WEC de la télécommande. 2. Repoussez le bouton WEC pour réactiver l’alarme pendant le weekend. Activation et désactivation de l’alarme 1. Pour désactiver l’alarme, poussez le bouton Alarme en mode stand-by. Le symbole alarme dis paraît du display. Le temps d’alarme reste en mémoire. 2. Pour réactiver l’alarme, poussez le bouton Alarme en mode stand-by. Le symbole alarme apparaît sur le display. 15 16 FONCTION SLEEP INFORMATION L’appareil peut être réglé pour se mettre automatiquement hors fonction après un certain temps. Ce temps ‘sleep’ peut se régler entre 10 et 90 minutes par des étapes de 10 minutes. Spécifications techniques Réglage du sleep timer 1. Mettez en fonction l’appareil et choisissez la source que vous voulez écouter. 2. Poussez le bouton Sleep pour activer la fonction. - Le mot « 90 MIN » et le symbole “ ” apparaissent sur le display. 3. Poussez plusieurs fois le bouton Sleep pour choisir le temps avec des étapes de 10 minutes. L’appareil se met hors fonction quand le temps programmé est écoulé. Annulation du sleep timer 1. Pour annuler le sleep timer avant que le temps est écoulé, poussez le bouton Sleep jusqu’au mo ment où « 00 MIN » est affiché sur le display. - L’appareil reste en fonction et le symbole “ ” disparaît du display. 2. Si vous voulez mettre l’appareil hors fonction avant que le temps est écoulé, poussez le bouton En/ Hors fonction. - Le symbole “ ” disparaît et l’appareil se met hors fonction. FONCTION MÉMOIRE L’appareil peut être réglé pour produire un signal sonore à un certain temps préprogrammé. Le temps peut être réglé entre 10 et 120 minutes avec des étapes de 10 minutes. 1. 2. 3. Mettez l’appareil en stand-by et poussez le bouton NAP sur la télécommande. Le display affiche « NAP 10 » et le symbole « NAP » clignote. Poussez plusieurs fois le bouton NAP pour sélectionner le temps avec les étapes de 10 minutes. Quand le temps est écoulé, un signal sonore se produit. Arrêtez le signal sonore en poussant le bouton En/Hors fonction ou interrompez la fonction en mettant le temps mémoire à « NAP 00 » en utilisant le bouton NAP. Alimentation Courant secteur Piles (uniquement télécommande) AC 230 V, 50Hz seulement 2 x 1.5 V (R03/UM4/format AAA) Consommation maximale En fonction 35 W 2 W (avec display hors fonction) Stand-by Gamme de fréquences FM 87.5 – 108 MHz MW 522 – 1620 kHz Spécifications Haut-parleurs Format 2 x Ø34 mm 1 x Ø77 mm Impédance 2 x 4 ohms 1 x 6 ohms Puissance 2 x 3 watts 1 x 6 watts Entrée auxiliaire Ø3.5 mm Prise casque d’écoute Ø3.5 mm Système d’antenne FM Antenne fil AM Antenne loop Général Dimensions appareil (L x H x P) 316 x 176 x 189 mm Les spécifications et le design peuvent être modifiés. Ne jamais ouvrir l’appareil. Le fabricant n’accepte aucune responsabilité pour les endommagements résultant d’un mauvais emploi. Information générale sur les lasers Vous trouverez un symbole identique comme celui montré à gauche endessous de votre appareil. CLASS 1 LASER PRODUCT veut dire que le laser est tellement développé pour assurer que la valeur maximale d’émission ne peut jamais être dépassée en toutes circonstances. Quand d’autres méthodes d’utilisation que celles mentionnées dans ce manuel sont effectuées, l’exposition aux émissions dangereuses est possible. Une radiation invisible est émise quand le compartiment CD est ouvert et quand le système de cloquage pour sécurité a été court-circuité. Ne vous exposez pas à cette radiation. Note environnementale Ce produit a été construit avec des composants de haute qualité et avec du matériel réutilisable et recyclable. Ne jamais vous débarrasser cet appareil, quand il arrive à la fin de sa vie, avec les autres déchets domestiques. Apportez-le vers un point de collection de recyclage d’appareils électriques et électroniques. Ceci est indiqué par ce symbole sur le produit, dans le manuel d’utilisation ou sur l’emballage. Contactez les autorités locales pour vous informer en ce qui concerne les points de collection. Aidez l’environnement en recyclant des produits usés. 17 18-
 1
1
-
 2
2
-
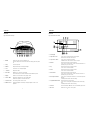 3
3
-
 4
4
-
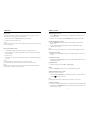 5
5
-
 6
6
-
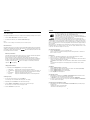 7
7
-
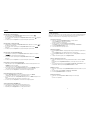 8
8
-
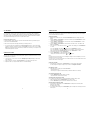 9
9
-
 10
10
-
 11
11
-
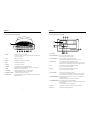 12
12
-
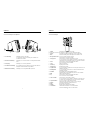 13
13
-
 14
14
-
 15
15
-
 16
16
-
 17
17
-
 18
18
-
 19
19
-
 20
20
-
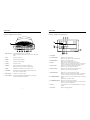 21
21
-
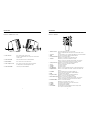 22
22
-
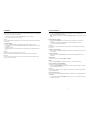 23
23
-
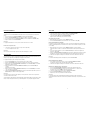 24
24
-
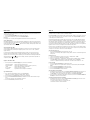 25
25
-
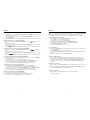 26
26
-
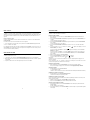 27
27
-
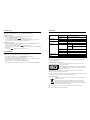 28
28
-
 29
29


Salora PA2205CD de handleiding
- Categorie
- CD spelers
- Type
- de handleiding
- Deze handleiding is ook geschikt voor
in andere talen
- English: Salora PA2205CD Owner's manual
- français: Salora PA2205CD Le manuel du propriétaire
Gerelateerde papieren
Andere documenten
-
Philips AZ1538/00C Handleiding
-
JVC KW-AVX700 Handleiding
-
JVC KD-AVX11 Instructions Manual
-
JVC Car Satellite TV System KD-DV6202 Handleiding
-
Sencor SCT 8017BMR Handleiding
-
-
LG 49WEC-C Snelstartgids
-
-
-