
Manua
Version 2
System Upgrade Information Guide
Information zur Systemerweiterung (Ver.2)
Information sur extension du système (Ver.2)

I
ENGLISH
WHAT’S NEW IN VERSION 2
Welcome to Version 2—a powerful system upgrade package for the Yamaha
W5/W7 Music Synthesizer that adds an exciting new dimension to one of the
most versatile all-in-one music production workstations ever made.
Version 2 provides additional Preset voice banks, more than a hundred great-
sounding new voices, a long list of unique performance, song play, recording and
remixing functions, plus many convenient shortcuts and other useful new
features which further streamline the W5/W7’s already simple operation.
New Features
• A total of three Preset voice banks, plus hot new techno, dance music and other voices which add unprecedented
sonic dimension and musical range to the W5/W7’s high quality digital sound. (For details, see page 8.)
• Cue Play, which lets you trigger-start a song or sequence phrase from a specified measure simply by pressing a Track
button. Lining up a different phrase for each of the 16 Track buttons lets you cue up the right groove or music “hit”
at the right time as the mood of the party dictates. (For details, see page 11.)
• Multitrack Loop Recording, which lets you jump from track to track and spot overdub new parts in a specified series
of measures to capture inspiration as it strikes. (For details, see page 13.)
• Song Remix, which lets you mix alternate versions of your tunes complete with automatic track solo, mute and other
commands which you can input in realtime. The result is greatly expanded on-board “automated mixdown” options.
(For details, see page 14.)
• Playback Effect, which lets you apply “groove templates” with pre-programmed quantizing and swing factors to the
playback of specified tracks without altering the original music data. The right Playback Effects can literally breathe
new life into your tracks. (For details, see page 15.)
• Quick Split/Layer, which lets you easily select two split voices, or add a second layered voice, on the fly as you play.
The new Dynamic Split feature lets you play two voices with a “floating split point” that’s determined by note
prioritization based on how you play the keyboard. (For details, see page 19.)
• Tempo Delay, which automatically calculates the delay time of System Effect 3 to the tempo of the song, which
eliminates unnatural sonic clashes in order to smooth out or tighten up your mix. (For details, see page 22.)
• Faster voice selection features, simplified voice element assign and other convenient voice editing features, expanded
voice and multi storage functions, additional song record and edit features, automatic song loading from disk, and
much more.
How to Use This Guide
• This W5/W7 Version 2 System Upgrade Information Guide is a supplement to the original W5/W7 Owner’s Manual
and W5/W7 Technical Information booklet.
• The “New Features Overview Chart” shows at a glance just what’s new and where it’s located in relation to the
existing features, and the “New Features in Version 2” section provides descriptions of each new feature and how to
access it.

II
ENGLISH
CONTENTS
New Features Overview........................................................................2
About the Accompanying Floppy Disks ................................................6
NEW FEATURES IN VERSION 2 .............................................8
PRESET VOICE BANKS ...................................................................8
❑ Voice Category Search..................................................................................9
❑ Voice Category Display in the Voice Directory................................................9
❑ Quick Voice Bank Select .............................................................................10
❑ Quick Program Change...............................................................................10
CUE PLAY .....................................................................................11
❑ Cue Play as Additional Measure Locate Points .............................................12
MULTITRACK LOOP RECORDING.................................................13
REMIX..........................................................................................14
❑ Solo Mode .................................................................................................14
❑ Track Mute................................................................................................15
PLAYBACK EFFECT.......................................................................15
❑ Playback Effect Template Type List .............................................................17
❑ Normalize Playback Effect (Song Job 1) ......................................................18
❑ Quantize Parameters (Type, Sens, Strength).................................................18
QUICK SPLIT/LAYER AND DYNAMIC SPLIT.................................19
❑ Quick Split/Layer.......................................................................................19
❑ Dynamic Split............................................................................................19
OTHER FEATURES IN VERSION 2 .................................................21
❑ Song Play Mode .........................................................................................21
❑ System Effect.............................................................................................22
❑ Song Setup Mode.......................................................................................22
❑ Song Record Mode .....................................................................................22
❑ Song Edit Mode .........................................................................................23
❑ Song Play/Voice Mode ...............................................................................23
❑ Voice Edit Mode.........................................................................................24
❑ Store Mode................................................................................................24
❑ Utility Mode ..............................................................................................25
❑ Disk Mode.................................................................................................26
CHANGES TO THE TECHNICAL INFORMATION BOOKLET .................27
7
6
5
4
3
2
1

2
ENGLISH
New Features Overview
SONG PLAY
STORE MULTI
F1
F2
F3
F6
F5
F7
F8
F2
F7
F8
SHIFT
SONG
STORE
RECORD
F5
F8
SHIFT
F1SHIFT
+
F2SHIFT
+
F1SHIFT
+
F2SHIFT
+
F2
+
F1
+
SONG
For song recording, editing & playback...........72
Access Voice Assign, Volume, Pan, Insertion Effect On/Off, System Effect 1~ 3 Send
level, Effect Type & Effect Parameter, Shift, Tune & Pitch Bend Range settings
F5
F7
F8
F6
Song Multi Play
(Mixer Screen)
(Inst Screen)
Category Search
Voice Directory
Sequencer Play
Song Name
Song Directory
Playback Effect
Cue Play
Song Setup
MIDI Filter
Track Transmit Channel
Keyboard Setup
Other Setup
Realtime Recording
Overdubbing
Replace
Punch-in
Step Recording
Transpose
For song playback & normal performance
Access Song Setup during song playback
Start song after reading data in previous measures(excluding note)
Access single track solo play
View measure number in Multi & Sequence Play screens
Display 16 channel mixer for setting multi parameters
Jump to designated mixer feature
Display list of Instrument parameter settings
Assign Tempo Delay
Access Voice Category Search
Toggle between Voice Category & Program Number
Access Sequence Play settings
Set Click Beat value by numeric (note) keypad
View External Sync tempo value
Name the song
Display list of songs
Apply groove templates to song playback without overwriting
Assign sequences to track buttons for trigger playback
MIDI, Keyboard & Other settings
Determine how W5/W7 responds to various MIDI data
Set MIDI transmit channel for each track
Keyboard Mode (Normal, Split, Layer, 4-zone) settings
Assign Dynamic Split (floating split point) settings
Access Quick Split/Layer
Transpose octave from Keyboard Normal Mode
Access Next Song, MIDI Control, Sync & Transpose functions
For storing multi settings into a song memory
Assign Multi Auto/Manual Store setting (Utility Mode)
For selecting a recording method & recording a song
Remix a song using solo, mute & other switch operations
Record actual note, controller & program data as you play
Select Count-in value before record start
Select Quantize, Click Beat value with numeric (note) keypad
Record new data on top of existing data in the track
Record new data in the track while erasing existing data
Replace record between a series of designated measures
Select track & overdub between a series of designated measures
(Multitrack Loop Recording)
Input note, controller, program & other data one-by-one
Select Click Beat value by numeric (note) keypad
Move cursor to next note event
Transpose input keyboard octave setting
: New features shaded in gray
Numbers below indicate Owner's Manual pages
( *: Version 2 System Upgrade Information)
73
*21
*21
*14
*21
75
*21
75
*22
*9
*9
80
*22
*21
81
81
*15
*11
82
82
82
82
*19
*19
*22
84
129
*25
85
*14
87
*22
*22
88
88
88
*13
89
*22
*22
*23
SONG RECORD

3
ENGLISH
SONG EDIT
EDIT
SONG JOB
JOB
F4
F1
F2
F2
F5
F4
F5
F6
F1SHIFT
+
F2SHIFT
+
F3SHIFT
+
F4SHIFT
+
F5SHIFT
+
F6SHIFT
+
F7SHIFT
+
F3
F1SHIFT
+
F2SHIFT
+
F3SHIFT
+
F4SHIFT
+
F5SHIFT
+
F6SHIFT
+
F7SHIFT
+
F8SHIFT
+
F4
F1SHIFT
+
F2SHIFT
+
F3SHIFT
+
F4SHIFT
+
F5SHIFT
+
F6SHIFT
+
F7SHIFT
+
Sequence Track
Insert
Change
Graphic
Tempo Track
Insert
Change
Job 1
Copy Song
Append Song
Clear Song
Copy Track
Clear Track
Mix Track
Normalize Playback Effect
Job 2
Copy Measure
Erase Measure
Create Measure
Delete Measure
Insert Measure
Thin Out
Extract
Chord Sort
Job 3
Quantize
Move Clock
Modify Gate Time
Modify Velocity
Transpose
Shift Note
Crescendo
SONG VOICE PLAY
Access voice select screen in Song Play Mode
For specific event editing of recorded song data
Edit the sequence track
Input parameter change data
Insert sequence track event data
Change sequence track event data
Display note event data graphically
Move cursor to next note event
Input measure number by numeric keypad
Edit the tempo track
Insert tempo change data in the middle of the song
Change tempo data value
For editing of song, track & measure data
Jobs for song & track editing
Copy a song from one song memory location to another
Append a song onto another song from a specified measure
Clear all multi & performance data of a specified song
Copy track data from one song into another song
Clear all performance data from a track
Combine data in one track with data in another track
Write the specified Playback Effect data into the song
Jobs for current song/track measure, note & other event editing
Copy specified measures to a specified location
Erase data in specified measures
Insert new empty measures into specified location in all tracks
Delete a specified range of measures from all tracks
Specify a range of measures & copy to specified location for all tracks
Delete unnecessary controller data from a track
Extract designated events from one track & place in another
Rearrange a cluster of notes in ascending/descending order
Jobs for current song event editing
Correct timing of performance data
Quantize Sensitivity & Strength parameters are added
Move data in specified measures by a specified clock value
Modify durations of notes in specified measures
Modify note-on velocity values in specified measures
Transpose notes in specified measures by a designated interval
Shift a note number to another number in specified measures
Add crescendo or diminuendo over specified range of measures
91
91
*23
93
92
91
*23
*23
93
93
92
95
96
96
96
96
97
97
97
*18
98
98
98
98
99
99
99
99
100
100
100
*18
101
101
102
102
103
103
*23

4
ENGLISH
VOICE
STORE VOICE
STORE
For selecting & playing voice.......................106
Transpose
Category Search
Voice Directory
Quick Voice Bank Select
F1
F5
F8
F3
F8
F1
F6
F3
F7
F8
F2
F3
F4
F5
F6
F7
F4
F7
F8
F2
F7
F8
F2
F5
F2
F6
F7
F8
VOICE
F2
,
F1
F8SHIFT
+
SHIFT SONG
+
~
NORMAL
VOICE EDIT
DISK
For saving & loading data to &
from a floppy disk.......................................132
VOICE EDIT MODE
Disk Status
Save To Disk
Load From Disk
Rename File
Delete File
Format Disk
Auto Load
Auto Play
View types of files on the inserted floppy disk
Save voice, song or other data to floppy disk
Load voice, song or other data from floppy disk
Rename a file on the inserted floppy disk
Delete a specified file from the inserted floppy disk
Format a disk for use with the W5/W7
Automatically load the designated file at power on
Automatically load & play the designated file at power on
130
*24
*9
109
110
110
*24
110
110
112
112
*24
*24
112
112
113
113
113
114
115
116
116
133
134
136
139
140
141
*26
*26
Select voice by last-digit within a group of ten (Quick PC)
Transpose octave (in Keyboard Normal Mode)
Keyboard mode display (Quick Split/Layer, Dynamic Split)
Select the next voice program number in the same Voice Category
View list of voices. Press [F8] twice to see Voice Categories
Direct selection of any voice bank
Revert to multi settings when switching back to Song Mode
Store Voice
Voice Directory
Common Group
Category/Volume
Voice Name
Initialize Voice
Element Group
Element Assign
Pan
Velocity Limit
Note Limit
Amplitude Group
Level
Envelope
Filter Group
Tone
Envelope
Store edited voice into specified program number
Store voice into Internal (or Song) voice bank
View list of voices. Press [F8] twice to see Voice Categories
Edit Normal Voice
Parameters common to the entire voice
Assign Voice Category code and set voice Volume
Copy Effect & Control Group parameters to another voice
Name the voice
Initialize all voice data
Parameters related to the individual elements
Assign up to four elements to the voice
Element category search
Copy Element Group parameters to another voice
Position each element within the stereo field
Specify the Velocity Limit of each element
Specify the Note Limit of each element
Parameters related to volume characteristics of each element
Specify the volume Level of each element
Assign the amplitude Envelope characteristics of each element
Parameters related to tone quality of each element
Specify the type of filter and parameters of each element
Assign the filter Envelope characteristics of each element
*10
*22
*19
*9
107
*10
*23
For editing specific voice parameter.....108

5
ENGLISH
F5
F4
F5
F6
F7
F8
F8
F2
F3
F4
F5
F6
F7
F8
F4
F6
F7
F8
DRUM
VOICE EDIT
For accessing & assigning settings
which affect the entire system................142
Memory
Initialize
Voice Bulk Dump
Synthesizer Setup
Controllers
MIDI Setup
Other Setup
Greeting Message
Copy a voice bank to RAM
Copy from Song voice bank to Internal voice bank
Initialize the Internal voice bank
Delete elements not in use (Free Element)
Perform bulk dump operation of Internal voices to external device
Assign Master Tune, Velocity Curve & Controller settings
Assign CS, Foot Volume & Foot Controller settings
Set Foot Controller Assign & CS data entry functions
Assign MIDI related settings
Set LCD Contrast & Edit Confirm status
Assign Multi Auto/Manual Store status
Personalize the start-up Greeting Message
VOICE BANK
GM Voice Bank
128 Normal Voices + 8 Drum Voices
Internal Voice Bank
128 Normal Voices + 2 Drum Voices
External Voice Bank
(Optional Expansion Wave/Voice Board)
Song Voice Bank
1set/song
Preset Voice Banks
P1 :
128 Normal Voices
P2 : 128 Normal Voices *8
P3 : 128 Normal Voices *8
PD: 4 Drum Voices
F6
F7
F8
F7
F1
F2
F7
F8
F1
F2
F3
F4
F5
F6
F7
F8
117
117
118
118
118
118
119
119
119
120
120
121
121
121
122
122
122
122
123
123
124
124
124
125
125
127
128
143
*25
144
*25
144
145
147
*25
148
149
*25
149
STORE
VOICE
Pitch Group
Scale
Tune
Note Shift
Sensitivity
Envelope
Effect Group
System Effect Send
Insertion Effect Type
Insertion Effect Parameter
Insertion Effect Control
LFO Group
LFO Parameter
LFO Modulation
Controller Group
Sustain/Exp. Low Limit
Pitch Bend
After Touch
Modulation Wheel
Foot Controller
MIDI Control 1
MIDI Control 2
Common Group
Key Group
Effect Group
Controller Group
Parameters related to pitch characteristics of each element
Specify the Scale parameters of each element
Specify the Tune parameters of each element
Specify the Note Shift parameters of each element
Specify the Sensitivity parameters of each element
Assign the pitch Envelope characteristics of each element
Parameters related to voice effects assignments
Specify the Send Level for each System Effect
Specify the Insertion Effect Type for the voice
Specify the Insertion Effect parameters
Specify the Insertion Effect Control parameters
Parameters related to Low Frequency Oscillator characteristics
Specify the LFO Parameter settings for each element
Specify the LFO Modulation parameters for each element
Parameters related to the various controllers
Specify the Sustain & Exp. Low Limit settings for each element
Specify the Pitch Bend settings for each element
Specify the After Touch settings for each element
Specify the Modulation Wheel settings for each element
Specify the Foot Controller settings for each element
Specify the MIDI Control 1 settings for each element
Specify the MIDI Control 2 settings for each element
Edit Drum Voice
Parameters common to the entire voice
Element assignments for each key
Parameters related to voice effects assignments
Parameters related to the various controllers

6
ENGLISH
W_DEMO.A1A file
Five songs are sequentially arranged in the file:
• SONG 01 : Isn’tItHip
• SONG 02 : Metal Bomb
• SONG 03 : Gavotte
• SONG 04 : Halftime
• SONG 05 : RAM-Jam
The various songs showcases how great the W5/W7 sounds across different genres of music. There’s more to
each demonstration song than just an impressive performance, however, since they are also great examples for
study of clever ways to allocate voices, optimize the various effect and other settings, and more. Note that there
are special Song voices used in Song 01 and Song 05 which are not included in the factory presets.
INTVOICE.A1V file
This file contains a safety backup of the factory-programmed bank of Internal voices.
About the Accompanying Floppy Disks
The demonstration floppy disk “W5/W7 FACTORY SET & DEMONSTRATION” comes bundled
with Version 1 and the “W5/W7 Version 2 DEMONSTRATION” disk is additionally bundled with
Version 2. Each disk contains factory-programmed song and other data which especially
highlight the exceptional capabilities of the W5/W7. (For information about loading files from a
disk, see the Owner’s Manual, pages 52 and 136.)
The contents of each demonstration disk are listed and described below.
W5/W7 FACTORY SET & DEMONSTRATION
There are two types of files on the disk, as follows:
W_DEMO.A1A
All Data type file
INTVOICE.A1V Voice type file
NOTE
When loading an All Data type file,
the settings in Utility mode will also
be replaced. Therefore, be sure to
save any important All Data type
settings to floppy disk before loading
an All Data type file.

7
ENGLISH
W5/W7 Version 2 DEMONSTRATION
There are three types of files on the disk, as follows:
W_DEMO2.A1A All Data type file
AUTOPLAY.A1S 1 Song+Voice type file
VOICE_EDIT.A1S 1 Song+Voice type file
NOTE
When loading an All Data type file,
the settings in Utility mode will also
be replaced. Therefore, be sure to
save any important All Data type
settings to floppy disk before loading
an All Data type file.
W_DEMO.A1A file
Three songs are sequentially arranged in the file:
• SONG 01 : Dancyndrom
• SONG 02 : Whale Song
• SONG 03 : Push Track
Version 2 features a Preset 3 voice bank which includes various voices perfect for techno and dance music.
Song 3 (“Push Track”) is a special demonstration song which lets you try out the new Cue Play function (see page
11). When you start the song from the top, the W5/W7 automatically enters Cue Play mode. In the screen you
will notice which measure has been assigned as the start point for each Track button. Press a Track button to start
the Cue Play from the designated measure.
AUTOPLAY.A1S file
This file contains the same song data as “SONG 01: Dancyndrom”. However, since this was saved as an Auto Play
file (see page 26), if you insert the disk while the power is off, then switch the power on, the file will
automatically be loaded in the first song memory and begin playing.
VCE_EDIT.A1S file
This file is a special demonstration for editing a voice. When you start the song from the top, the W5/W7 plays
the intro of the demo song “Isn’t It Hip” (same as in the “W5/W7 FACTORY SET & DEMONSTRATION” disk,
above), then stops, selects Track 7, then goes on to give a visual demonstration of how to edit the voice “Needle”.
A note in the screen will explain what’s happening. Watch the screen as the various parameters are selected,
including element assignment, template selection and parameter adjustments, Insertion Effect type selection and
parameter adjustments, and others—including System Effect adjustments to various tracks. The new Remix mute
and solo (see page 14) and Playback Effect features (page 15) are also introduced.
NOTE
Do not stop the playback in the
middle of the song when playing
VCE_EDIT.A1S, since stopping it may
cause data error.

8
ENGLISH
PRESET VOICE BANKS
Version 2 includes two additional Preset voice banks, making a total of three Preset voice banks,
or 384 Preset normal voices in ROM. Preset voice bank 2 contains the same voices as the
Internal voice bank (RAM). Preset voice bank 3 includes 128 new voices, including many
techno and dance music oriented voices, and several unique voices which can yield various
characteristics as you play, controlled by the modulation wheel.
Including the GM voice bank, Version 2 comes complete with a total of 512 normal voices and
12 drum voices in ROM (excluding those available in the External voice bank when an
Expansion Wave/Voice Board is installed), and 128 normal voices and 2 drum voices in RAM—
for a total of 640 normal voices and 14 drum voices. Additionally, there are 128 Song voice
memories and 2 Song drum voice memories which can be dedicated to up to 10 songs.
NEW FEATURES INVERSION 2
GM Standard General MIDI set 128 Normal Voices
(P1) Preset 1 Same as previous Preset bank 128 Normal Voices
(P2) Preset 2 Same as previous Internal bank 128 Normal Voices
(P3) Preset 3 New bank of voices 128 Normal Voices
Internal Same as previous Internal bank 128 Normal Voices
Song — 128 Normal Voices/Song
GM Drum Various GM drum kits 8 Drum Voices
Preset Drum Two new Preset drum kits 4 Drum Voices
Internal Drum Same as first two GM drum kits 2 Drum Voices
Song Drum — 2 Drum Voices/Song
For a list of the new normal voices in the Preset 3 voice bank and the two new drum voices in the Preset drum voice
bank, as well as the additional new elements available, see page 27.
The process of selecting voices and voice banks in Version 2 is the same as before, but there are several convenient
new options as well, including Voice Category Search, Quick Voice Bank Select and Quick Program Change.
1
Here’s a breakdown of what’s in each of the voice banks:

9
ENGLISH
P3-03:Blue Lead This is a classic high-resonance analog synth type lead voice. The filter cutoff is assigned to the CS, so you
can control the amount of resonance applied to the voice at any time by moving the CS as you play.
P3-10:N-Hall Airy, futuristic sound effect type voice. The filter cutoff is assigned to the CS, so you can greatly modify the
quality of the voice in realtime by moving the CS.
P3-13:HaHahaha A whimsical simulated laughter type voice. Control the speed of the laughing with key velocity, and the
quality of the sound with the CS and Modulation Wheel.
P3-17:MwScratch1 A highly useful voice which simulates the sound of record scratching commonly used in rap and other dance-
oriented music. Adjust the CS to control the characteristic of the sound, and simulate the DJ scratching with
the Modulation Wheel.
P3-32:Gang Soft but powerful, versatile resonant synth voice with rotary speaker Insertion Effect applied. Use the CS to
control the speed of the rotary speaker effect.
P3-53:Feed Pad Grungy but distinctively pleasant distortion pad voice. Control the amount of resonance with the CS.
P3-120:S.O.S. Cumulative chaos of a frantic S.O.S. signal from a submarine in distress. Use the CS to control the balance
between bell timbre and “muffled voices”.
❑Voice Category Search
Version 2’s Voice Category Search feature makes it
easier than ever to locate just the right voice when
you want it. This is critical considering the many
hundreds of voices that are now available at any
given time.
Voice Category Search lets you select the next voice
number with the same Voice Category code as the
current voice simply by pressing function key F5
(Ctg), in either Song Multi Play Mode or Voice
Mode—including when the Voice Directory is
displayed. This is really helpful when searching for
similar types of voices as the currently selected one—
such as piano type voices assigned with the “Pf”
Voice Category code, for example.
To select the next voice number with the same
Voice Category code as the current voice:
Press [F5].
Each time you press F5, the next voice with the
same Voice Category code will be selected within
the current voice bank, starting back at the lowest
numbered voice after the highest numbered voice
has been selected. You don’t need to press the Enter
key.
SONG MODE
VOICE MODE
❑Voice Category Display in
the Voice Directory
Version 2 not only lets you view the voice program
numbers in the Voice Directory, but also gives you
the option of viewing the two-letter Voice Category
codes assigned to each voice—in both Song Multi
Play Mode and Voice Mode.
To view the Voice Category codes in the Voice
Directory:
Press [F8] (Dir) twice.
When the Voice Directory is selected, pressing F8
will toggle back and forth between voice program
numbers display and Voice Category codes display
in the Voice Directory.
F8
F5
F5
Version 2’s Preset 3 voice bank features an assortment of modern music sounds including techno, dance music and
other voices—which add a completely new dimension to the W5/W7’s sonic possibilities. Below are descriptions of a
few of the more intriguing voices which rely on the CS and Modulation Wheel to achieve maximum flexibility and
impact:

10
ENGLISH
❑Quick Voice Bank Select
Version 2 provides a convenient shortcut for selecting
voice banks within Voice Mode or from the Voice
Directory in Song Multi Play Mode.
Simply pressing the Shift button will display the first
letter of each voice bank (E*, I, S, G, P1, P2, P3)
above function keys F1*~F7—by which you can
jump directly to a desired voice bank.
To select a different voice bank:
Hold [SHIFT] and press a function key
[F1]~[F7] above the desired voice bank.
When you press a function key, the desired bank is
selected; the voice number is the same as for the
previously selected bank. It is not necessary to press
Enter as with the normal procedure for selecting
banks.
When you select one of the Preset voice banks, the
voice bank prefix which appears to the left of the
voice program number will be denoted with one,
two, or three dots, respectively, as follows:
• Preset 1
• Preset 2
• Preset 3
Note that pressing F8 (Drum) while holding the
Shift button lets you alternate between normal
(“Norm”) and drum voice banks.**
To select a drum voice bank:
1. Hold [SHIFT] and press [F8].
2. Press a function key [F2]~[F5] above the
desired drum voice bank.
* F1 can only be used for accessing the External voice bank when an
Expansion Wave/Voice Board is installed.
** When Track 10 is selected, you cannot access the normal voices,
since channel 10 is dedicated to the drum voices.
F1 F2 F3 F4 F5 F8
F1 F2 F3 F4 F5 F6 F7 F8
SHIFT
❑ Quick Program Change
Version 2 has a new Quick Program Change feature
in Voice Mode. When Quick Program Change is
activated, you can quickly select program numbers
within a group of ten with the same first digit using
buttons 0~9 on the numeric keypad—each of
which corresponds to the last digit of the program
number of each voice.
For example, say the currently selected voice
number is 35. With Quick Program Change, you can
jump directly to any voice between 30~39 simply
by pressing buttons 0~9 on the numeric keypad.
To activate Quick Program Change:
1. In Voice Mode, press the [VOICE] button.
2. Press a number [0]~[9] on the keypad
corresponding to the last digit of the
program number you want to select.
When in Voice Mode (see the Owner’s Manual,
page 106), pressing the Voice button will toggle
back and forth between Quick Program Change and
normal Voice Play Mode. The words “Quick PC”
will display in the upper area of the screen when
Quick Program Change is active.
When you press the desired number on the keypad,
the corresponding voice with the same last digit will
be selected instantly, and therefore you need not
press Enter to lock in the selection, as in the normal
voice selection procedure. You can also press F6
and F7 to select a different voice bank, and then
press a number on the keypad to select it—within
the group of ten also with the same first digit.
Quick Program Change also lets you select voices
outside the group of ten using the Jog dial and the
Inc/Dec buttons. Also note that when you press F8
to view the Voice Directory, Quick Program Change
will be bypassed, and you can select voices and
banks in the normal way. However, when you exit
the Voice Directory, Quick Program Change will be
reactivated.

CUE PLAY
Version 2 features Cue Play in Song Sequence Play Mode (see the Owner’s Manual, page 80),
which lets you compile a list of 16 songs or sequence phrases and trigger-start them from any
measure simply by pressing Track buttons. With Cue Play you can set fire to the dance floor by
triggering the right groove at just the right time—jumping from one to another in realtime as
the mood of the party dictates.
Cue Play works by assigning any of the 16 songs to any of the Track buttons, along with which
measure in the song to start from.
To enter Cue Play Mode:
1. In Song Mode, press [F2] (Seq) to enter
Song Sequence Play Mode.
2. Hold [SHIFT] and press [F2] (Cue) to
enter Cue Play Mode.
The Cue Play screen lists which songs are assigned
to each of the 16 Track buttons, and which
measures are designated as starting points for each
cue.
The number in brackets represents the Track
number. The number to the right of the Track
number represents the song number (1~16). The
number to the right of the song number represents
the starting measure number.
To assign song numbers and starting measures
to the Track buttons:
1. Position the cursor over the song number
of a desired Track button.
2. Specify a song number using [INC],
[DEC], [JOG] or [KEYPAD].
3. Position the cursor over the starting
measure number.
Starting measure number
Track button number
Song number
4. Specify a measure start point using [INC],
[DEC], [JOG] or [KEYPAD].
Note that you can assign the same song to more
than one Track button, designating a different
measure as the starting point for each. Thus, with
various sections of the song assigned to different
Track buttons, you can literally create a playback
arrangement on the fly, just by pressing the Track
buttons.
You can designate the Cue song to play from the
start measure and continue to the end of the song,
or to play only so long as you hold down the Track
button.
To have a Cue song continue playing from the
start measure to the end:
Press [F7] (Cnt) once or more so that
“Cnt” is highlighted in black.
When “Cnt” (Continue) is highlighted, pressing a
Track button will cause the song assigned to it to
play from the starting measure point till the end—
unless you press another Track button while the
current Cue song is playing. Pressing another Track
button will terminate the song in play and start the
next song. (This also lets you restart the same song
while it is playing by pressing its Track button
again.)
F7
2
11
ENGLISH

12
ENGLISH
To have a Cue song play only while you hold
down a Track button:
Press [F7] (Cnt) once or more so that
“Cnt” is not highlighted in black.
Pressing a Track button will start the Cue song from
the specified measure start point, but the song will
stop if you let go of the button. This allows you to
trigger orchestra hits and other key song phrases at
will.
A “Memorize” feature provides a convenient
shortcut for assigning a measure number to a Track
button while the song is playing back.
❑Cue Play as Additional
Measure Locate Points
In addition to the standard Cue Play features
described above, you can also use the assignments in
Cue Play as 16 additional measure locate points (see
the Owner’s Manual, page 81). Just assign the
various measure start points beforehand, then switch
to the Cue Play screen and press the relevant Track
button to start the song from that point. The song
will continue playing as you switch back to the mixer
screen by pressing the Song button.
Note that although you can stop a Cue song at any
time by pressing the Sequencer Stop button, the Run
button is unrelated to Cue Play. Pressing the Run
button in Cue Play will simply start the currently
selected song (as displayed at the top right of the
screen).
To save the Cue Play data to floppy disk, simply save
the current data in the W5/W7 as an “All Data” file.
(For details about saving and loading, see the
Owner’s Manual, page 131.)
NOTE
If you jump from one song to another, or to a fairly distant
measure, it may take a brief moment before the second song
starts playing.
To use the Memorize function:
1. Position the cursor over either the song
number or starting measure number of a
desired Track button.
2. As the song plays, simply press [F8]
(Mem.) when the song reaches the
measure that you want to assign.
The Memorize function can also be used when the
song is stopped.
F8
NOTE
The demo song 03: Push Track (W_DEMO02.A1A) presents a
good example of the Cue Play function. (For more
information, see page 7)

MULTITRACK LOOP RECORDING
Version 2 features Multitrack Loop Recording, which provides more flexible song sequencing
options. The Multitrack Loop Recording feature lets you specify a series of measures which will
loop repeatedly as you overdub additional parts. You can jump from track to track to add new
parts without stopping the sequencer.
Multitrack Loop Recording is accessible from Punch-in Record Mode (see the Owner’s Manual,
page 88).
3
To use Multitrack Loop Recording:
1. Press [RECORD] to enter Song Record
Mode (standby).
2. Press [F8] (Pnch) to select Punch-in
Record.
3. Press [F4] (AllTr) to designate All Track
Record.
4. Position the cursor over the “From”
parameter field and enter the number of
the measure which you want to be the
first measure in the loop.
5. Position the cursor over the “To”
parameter field and enter the number of
the measure which you want to be the
last measure in the loop.
6. Position the cursor over the “Loop”
parameter field and use [INC], [DEC] or
[JOG] to turn the loop on.
7. Press [RUN] to start the recording loop.
You can delete a wrong note while the loop
recording is still active. To do so, simply hold the
Shift button and press the note again when it comes
back around. (Be aware of the limitation in number
of notes that can be recorded based on available
polyphony.)
Note that if All Track Record is not specified, you
can still start loop recording, but you can only
overdub on the currently selected track, and will not
be able to select other tracks without first stopping
the sequencer.
Also note that if you engage loop recording while
Quantize or Playback Effect is selected, these
parameter values will also be recorded in the
designated loop.
Be sure to keep in mind the maximum number of
notes which can be recorded (32 notes), since as
you keep overdubbing notes during loop recording,
you may inadvertently erase existing note data.
F4 F8
13
ENGLISH

14
ENGLISH
REMIX
Version 2 includes a Remix feature which lets you create an alternate “dub” mix which includes
track solo, mute and other button on/off switchings as the song plays.
Every time you press the Song, Voice, Select, Solo or any of the 16 Track buttons, the W5/W7
generates a corresponding MIDI system exclusive parameter change (“Switch Remote”)
message.
Version 2 lets you record these Switch Remote messages in the sequencer in realtime (or Step
edit) in an empty track so that they will be recalled automatically during song playback. In this
way, you can program track solo, mute and other commands in a Remix version of your song to
achieve a multi-dimensional automated mixdown without changing any of the original note,
controller or other data in the song.
4
To create a Remix version of the currently
selected song:
1. Select an empty track in the currently
selected song.
2. Press [RECORD], then press [RUN] to
start the recording.
3. Press [SONG], [VOICE], [SELECT],
[SOLO], [TRACK 1~16] and perform any
desired parameter adjustments during
the recording.
Note that during recording any key you press on the
keyboard will also be recorded in the currently
selected track as note data. You will find it most
convenient to keep all Switch Remote messages
together in one track, apart from note and other
data, since it is easier to locate and edit Switch
Remote messages this way.
❑Solo Mode
Recall that when there is sequence data in the
currently selected song, the Track buttons of tracks
which contain data will be lit in green, and the
currently selected Track button will be lit in red. (The
Select button will be lit in green, thus indicating the
W5/W7 is in Track Select Mode; see the Owner’s
Manual, page 74.)
By entering Solo Mode (i.e., by pressing the Solo
button), you can “solo” one or more tracks to hear
them only, thus “muting” the rest. Pressing a Track
button will toggle back and forth between solo (red)
and mute (green) status. Multiple tracks can be
soloed at once.
You can exit Solo Mode and the W5/W7 will still
remember which tracks were soloed and muted the
next time you press the Solo button.
Version 2 also lets you solo, or isolate and play a
single track just by pressing the corresponding Track
button.
To solo, or isolate and play a single track:
Hold [SELECT] and press [SOLO].
In single-track Solo Mode, pressing a Track button
will turn that track on (red light), while turning all
others off (green lights). Thus, you can easily isolate
a single track that you want to examine during
mixdown, or to play by itself during a specific point
in the song when you’re recording a Remix.
Pressing Solo again will return you to the multiple-
track Solo Mode.
NOTE
When deleting switch remote on/off data from a track in Song
Edit Mode, be sure to delete both On and Off commands.

PLAYBACK EFFECT
Version 2 includes a Playback Effect Mode accessible from the Song Sequence Play screen (see
the Owner’s Manual, page 80) that lets you apply various playback-only effects—including
quantization, swing, clock shift, gate time and velocity—to your songs. The actual data in
memory does not change; the only thing modified is the way the data is played back.
The right Playback Effect type can literally breathe new life into your song. You can add a
Playback Effect type to individual tracks or to all tracks and adjust their default parameters at
will. (Note that if you choose another song the Playback Effect parameters will be initialized.
You can, however, apply Playback Effect settings permanently to a song by normalizing them in
Song Job 1 (see page 18).
5
❑Track Mute
As explained above, Solo Mode lets you toggle back
and forth between solo and mute status when you
press a Track button, and the W5/W7 will remember
the current solo/mute status when entering and
exiting Solo Mode.
Version 2 also lets you enter Solo Mode with all
tracks soloed (you can hear the complete mix, just as
in Track Select Mode), and therefore standing by
ready to be muted.
To enter Mute Mode:
Hold [SOLO] and press [SELECT].
The Track buttons of tracks which contain data will
be lit in red, which means they are all in solo status,
and therefore any Track button you press will mute
that track (indicated by a green light in the Track
button).
NOTE
The VCE_EDIT.A1S file introduces the Remix function. (For
more information, see page 7)
To enter Playback Effect Mode:
1. In Song Sequence Play Mode, hold
[SHIFT] and press [F1] (PEF).
2. Press [F7] (Tr) and a [TRACK] button to
designate a specific track, or press [F8]
(All) to designate all tracks.
3. Select a Playback Effect type with [INC],
[DEC], [JOG], or [KEYPAD].
F7 F8
F1
SHIFT
4. Position the cursor over a parameter and
adjust it as desired.
When you enter Playback Effect Mode (shown as
“Play Effect” in the screen) the type and parameters
screen will be displayed. Moving the cursor to the
right will access the Playback Effect parameters
screen. Likewise, moving the cursor to the left when
the parameters screen is displayed will once again
access the Playback Effect type and depth screen.
15
ENGLISH

16
ENGLISH
• Type 00~27, **
There are 27 different Playback Effect types. Playback Effect
types 01~27 are those programmed at the factory, whose
parameters you can still adjust at will. If you want to design
your own Playback Effect parameters from scratch, simply
select Playback Effect type “00” (no Playback Effect applied)
and begin adjusting parameters. Note that when you adjust
parameters in any Playback Effect type, these will be stored in
a Playback Effect user memory under the type heading “ ** ”.
• Depth 0~100%
The Playback Effect depth parameter will have a different
effect—such as quantize length, swing velocity, etc.—
depending on which Playback Effect (01~27) is selected.
(For a complete listing of the designated depth parameters for
each type, see the Playback Effect Template Type List on
page 17.)
• Quantize
The Quantize function aligns notes in the specified track to
the nearest beat as designated by the Quantize value and
strength parameters. This is helpful for tightening up sloppy
timing. Note that “perfect” quantization tends to result in an
unnatural, mechanical feel, which may or may not be a good
thing, depending on the type of feel you’re going for.
Val (Value)
“Val” determines to what beats the note data in the
corresponding track will be aligned. If you select “#16th-note#”,
for example, all notes in the track will be aligned to the nearest
16th-note beat, to a degree determined by the strength
parameter, below. You can select a quantize value by pressing
the key in the numeric keypad with the corresponding note value
printed above it. Pressing button 7 more than once toggles
between 8th-note-triplet and 8th-note + 8th-note-triplet, and
pressing button 8 more than once toggles between 16th-note-
triplet and 16th-note + 16th-note-triplet. (For a complete listing
of the quantize parameters for each type, see the Playback Effect
Template Type List on page 17.)
Str (Strength) 0~100%
“Str” determines how strongly the notes are attracted to the
specified quantize value. At a setting of 0%, no quantization will
occur, while a setting of 100% will cause all notes to be aligned
precisely to the nearest specified beat value.
,,,,,,, , ,
• Swing
The Swing effect—which can only be used when the
Quantize function is set to a value other than off—produces a
more natural “swing” feel by shifting the timing of the off-
beats, as specified by the Quantize setting. For example, if
the specified Quantize value is 8th-notes, then the Swing
effect will shift the 2nd, 4th, 6th, and 8th beats of each
measure forward to create the swing feel. If the Quantize
value is set to a triplet note length, the last note in each
triplet group will be shifted.
Rate 50~83%
“Rate” determines the strength of the swing feel, or how much
the timing of the affected notes will be shifted. Apply 50% (no
swing) to 75% (maximum swing) for even note lengths; apply
66% to 83% for triplet note lengths; apply 50% to 66% for even-
plus-triplet note lengths (e.g., 8th-note + 8th-note-triplet).
Vel (Velocity) 0~200%
“Vel” determines the relative increase or decrease of the off-beat
velocity value (as set by the Quantize value) in relation to the on-
beat. A setting of 100% will produce no effect, whereas settings
between 0~99% will produce a decrease in the off-beat velocity
value, and settings of 101~200% will produce an increase in off-
beat velocity value.
Gate (Gate Time) 0~200%
“Gate” determines the relative length of the off-beat note
duration (as set by the Quantize value) in relation to the on-beat.
A setting of 100% will produce no effect, whereas settings
between 0~99% will shorten the gate time of the off-beat, and
settings of 101~200% will lengthen the gate time of the off-beat.
• ClockSft (Clock Shift) –99~+99
“ClockSft” determines the amount by which all notes in a
track are shifted in time, forward or backward, by the
specified number of clocks (at 96 clocks per quarter-note).
Note that since the Clock Shift parameters shift the timing of
all notes and other events in the specified track forward or
backward, they can significantly alter the feel of the song.
You could move the notes forward (positive settings) to
create a more laid-back feel, or backward (negative settings)
to produce a more powerful, driving feel. Of course, Clock
Shift comes in extremely handy when you want to correct
timing that is consistently off in the first place.
• Vel.Ofst (Velocity Offset) –99~+99
“Vel.Ofst” determines the amount of velocity change for all
note data by the same relative amount. A setting of 00 will
cause no change, whereas negative values will decrease
velocity levels, and positive values will increase velocity
levels.
• Vel.Rate (Velocity Rate) 0~200%
“Vel.Rate” determines the ratio between the lower and higher
velocity values. A setting of 100% maintains the original
relationship between the notes, while lower values produce a
narrower dynamic range (minimum 1%), and higher values
produce a broader dynamic range (maximum 200%).
• GateRate (Gate Time Rate) 0~200%
“GateRate” determines the ratio between the shorter and
longer gate time values. A setting of 100% maintains the
original relationship between the notes, while lower values
produce a narrower gate time range (minimum 1%), and
higher values produce a broader gate time range (maximum
200%). You can use Gate Time to give the entire pattern a
more staccato or legato feel, as desired.
NOTE
The VCE_EDIT.A1S file introduces the Playback Effect function. (For
more information, see page 7)

TEMPLATE DESCRIPTION DEPTH PARAMETER
00 [ ] Off. No Playback Effect applied. —
01 [Just ] Aligns to the nearest 16th-note. Quantize Strength
02 [Just ] Aligns to the nearest 8th-note. Quantize Strength
03 [Just ] Aligns to the nearest quarter-note. Quantize Strength
04 [Just ] Aligns to the nearest 16th-note-triplet. Quantize Strength
05 [Just ] Aligns to the nearest 8th-note-triplet. Quantize Strength
06 [Just ] Aligns to the nearest 16th-note + 16th-note-triplet. Quantize Strength
07 [Just ] Aligns to the nearest 8th-note + 8th-note-triplet. Quantize Strength
08 [Shufle ] Quantize 16th-notes and delay off-beats. Quantize Strength and Swing Rate
09 [Shufle ] Quantize 8th-notes and delay off-beats. Quantize Strength and Swing Rate
10 [Shufle ] Quantize quarter-notes and delay off-beats. Quantize Strength and Swing Rate
11 [Shufle ] Quantize 8th-note-triplets and delay third off-beats. Quantize Strength and Swing Rate
12 [Loose ] Delay 16th-note off-beats and lengthen gate time. Swing Rate and Gate Time
13 [Loose ] Delay 8th-note off-beats and lengthen gate time. Swing Rate and Gate Time
14 [Loose ] Delay quarter-note off-beats and lengthen gate time. Swing Rate and Gate Time
15 [Loose ] Delay 8th-note-triplet off-beats and lengthen gate time. Swing Rate and Gate Time
16 [Off ] Emphasize velocity and gate time of off-beats. Swing Velocity and Gate Time
17 [Off ] Emphasize velocity and gate time of off-beats. Swing Velocity and Gate Time
18 [Off ] Emphasize velocity and gate time of off-beats. Swing Velocity and Gate Time
19 [Off ] Emphasize velocity and gate time of off-beats. Swing Velocity and Gate Time
20 [On ] Emphasize velocity and gate time of on-beats. Swing Velocity and Velocity Offset
21 [On ] Emphasize velocity and gate time of on-beats. Swing Velocity and Velocity Offset
22 [On ] Emphasize velocity and gate time of on-beats. Swing Velocity and Velocity Offset
23 [On ] Emphasize velocity and gate time of on-beats. Swing Velocity and Velocity Offset
24 [Heavy ] Delay quarter-note off-beats and emphasize them Swing Rate and Velocity
25 [Humanize ] Slightly quantize quarter-notes and randomize values. Quantize Strength
26 [Techno ] Quantize 16th-notes and set velocity flat. Velocity Offset and Velocity Rate
27 [Acid ] Quantize 16th-notes and delay off-beats. Swing Rate
** [ ] Original template (00) or modified templates (01~27). (Depends on selected template.)
❑Playback Effect Template Type List
17
ENGLISH

18
ENGLISH
❑Normalize Playback Effect
(Song Job 1)
Although the Playback Effects apply to the song
playback only, and do not affect the original song
data, Version 2’s Normalize Playback Effect feature
lets you apply the designated Playback Effects
permanently to the current song. The Normalize
Playback Effect feature is located in Song Job 1 (see
the Owner’s Manual, page 95).
To use Normalize Playback Effect:
1. Press [JOB], then [F2] (Job1) to enter
Song Job 1 Mode.
2. Position the cursor over “Normalize
Effect” and press [ENTER].
3. Press the [TRACK] buttons for those
tracks which you want to apply the
Playback Effects to. (Selected Track
buttons will light in red.)
4. Press [ENTER] to activate Normalize
Playback Effect.
❑Quantize Parameters
(Type, Sens, Strength)
Version 2 includes additional Quantize parameters in
Song Job 3, including Type, Sensitivity, and Strength,
which greatly expand your ability to put just the right
feel into your music.
There are 19 Quantize types, with “00” representing
off, and 01~19 representing the same types as in
Playback Effect Mode (For descriptions of each, refer
to the Playback Effect Template Type List on page 17,
00~19).
The Sensitivity (“Sens”) parameter determines the
range over which notes will be quantized. This
parameter can be set from –100 through 0% (no
quantization) to +100. A setting of either –100% or
+100% will cause all notes to be quantized.
The Strength (“Strng”) parameter determines how
strongly the notes are attracted to the specified
quantize value. At a setting of 0% no quantization
will occur, while a setting of 100% will cause all
notes to be aligned precisely to the nearest specified
beat value.
Note that with Version 2 you can select a quantize
value (“Qunt”) by pressing the button in the numeric
keypad with the corresponding note value printed
above it. Pressing button 7 more than once toggles
between 8th-note-triplet and 8th-note + 8th-note-
triplet, and pressing button 8 more than once toggles
between 16th-note-triplet and 16th-note + 16th-note-
triplet.

❑QUICK SPLIT/LAYER
To activate Quick Split:
Hold a [TRACK] button and press another
[TRACK] button.
The first Track button you hold will become the
upper (right side) voice, and the second Track
button will become the lower (left side) voice, as
indicated in the screen.
Note that if Dynamic Split (see below) is designated
in Split Mode, accessing Quick Split will engage in
Dynamic Split status. Pressing a single Track button
will reinstate the Keyboard Normal Mode.
To activate Quick Layer:
1. First, in Keyboard Normal Mode, select a
[TRACK] button with one of the voices
you want to layer.
2. Hold [SHIFT] and press the [TRACK]
button for the second voice you want in
the layer.
The two layered Track numbers are indicated in the
screen. To change the layered (second) voice,
simply hold Shift and press another Track button.
Pressing a single Track button will reinstate the
Keyboard Normal Mode.
❑DYNAMIC SPLIT
Version 2’s Dynamic Split feature frees you from the
limitations of a fixed split point. When Dynamic Split
is active, the split point is determined by the first
note you play when no keys are being pressed.
Dynamic Split parameters are accessible in the Song
Play Mode Keyboard Setup screen (see the Owner’s
Manual, page 82).
To enter Dynamic Split Mode:
1. In Song Play Setup Mode, press [F7] to
display the Keyboard Setup screen.
2. Position the cursor over the Mode
parameter and set it to split status using
[INC], [DEC] or [JOG].
3. Position the cursor over the “Dynmc”
parameter and select one of the Dynamic
Split options.
Left
Right
Depending on which Dynamic Split option you
select, you can set either the upper or lower voice to
play first, as well as specify an interval zone on
each side of the split point to provide
unprecedented playing flexibility.
QUICK SPLIT/LAYER AND DYNAMIC SPLIT
Version 2 features Quick Split and Quick Layer functions which make it easy to split the
keyboard or layer two voices. When the W5/W7 is in Voice Mode or in Song Play Mode with
the Keyboard Setup screen visible (see the Owner’s Manual, page 83), you can easily activate
Quick Split or Quick Layer.
6
q
q
19
ENGLISH

20
ENGLISH
• off
When set to “off”, the Dynamic Split is not active, and the
split point is fixed as determined by the Point setting.
• upr (Upper)
When set to “upr”, the first notes you play will be the upper
voice, and the highest note will designate the new split point
according to the specified Interval setting (see below).
• lwrL (Lower Low)
When set to “lwrL”, when the upper range of the keyboard is
played, the key below the specified interval from the highest
note played will become the split point (similar to “upr”);
when the lower range of the keyboard is played, the key
above the specified interval from the lowest note played will
become the split point.
• lwrH (Lower High)
When set to “lwrH”, when the upper range of the keyboard is
played, the key below the specified interval from the highest
note played will become the split point (similar to “upr”);
when the lower range of the keyboard is played, the key
above the specified interval from the highest note played will
become the split point.
Interval 7th
New split point setting
Keys played
Highest key played
Interval 7th
New split point settingLowest key played
Keys
played
Interval 7th
New split point setting Highest key played
Keys
Played
NOTE
When “lwrL” or “lwrH” is selected, if the split point as determined
by playing the lower range of the keyboard is lower than the
Keyboard Setup split point setting, the Keyboard Setup split point
setting will take precedence.
• 1stL (1st Lower)
When set to “1stL”, the key just above the first note played
will be the lower voice.
• 1stU (1st Upper)
When set to “1stU”, the key just below the first note played
will be the upper voice.
Intvl (Interval)
The “Intvl” setting determines the interval; you can select a 3rd,
5th, 7th or 9th interval setting.
Upper/Lower AT, PB, MW, Sus, FV, FC
Just as in 4-zone Mode (see the Owner’s Manual, page 83),
Dynamic Split lets you turn the controllers on and off for the
upper and lower voices. Controllers which you can turn on or off
include aftertouch, pitch bend, modulation wheel, sustain, foot
volume and foot controller.
New split point setting
Keys played
New split point settingKeys played

❑Song Play Mode
Measure Display
Version 2 always displays the current measure number of
the selected song at the top of the mixer screen, to the
left of the available memory gauge, in Song Play Mode
(excluding Song Setup). Thus, you can always see the
current measure location during mixdown, rather than
having to first display the Song Sequence Play screen.
Quick Song Select
Version 2 lets you select any of the 16 songs directly from
Song Multi Play Mode (mixer screen) or Song Sequence
Play Mode (see the Owner’s Manual, page 80), using the
16 Track buttons. In this case, the number of each Track
button corresponds with the song of the same number.
Just hold [SONG] and press the [TRACK] button with the
same number as the song you want to select.
Quick Measure Locate
Version 2 lets you jump to either of the two measure
locate points in a song directly from the Song Multi Play
Mode screen. When the mixer is displayed, simply hold
[SHIFT] and press [F5] (Location 1) or [F6] (Location 2).
(For details about how to assign the two measure locate
points, see the Owner’s Manual, page 81.)
Mixer Screen Jump
Version 2 provides easier navigation within the mixer
with the Mixer Screen Jump feature. This lets you, for
example, quickly jump back and forth between the Effect
Send 1 knob and the Volume fader for the selected track.
In Song Multi Play Mode, hold [SHIFT] and press [F2]. To
assign a different feature for each arrow, use the cursor-
up/down buttons.
External Sync Tempo Display
Version 2 displays the tempo value of a connected external
sequencer when the W5/W7 is set to MIDI (external) clock
status. The tempo value of the external sequencer’s clock
will appear in parentheses in the tempo field of Song
Sequence Play Mode. (For details about setting the clock
status, see the Owner’s Manual, page 84.)
Song Playback From Specified
Measure
Version 2 lets you start song playback from any measure
and still have the system exclusive, program change,
control change and other data applied. Holding [SHIFT]
and pressing [RUN] will cause the song to start from the
currently specified measure after reading the data in the
previous measures—so that the correct voices, etc., will
be applied to the playback.
Song Setup During Playback
Version 2 lets you select the Song Setup Keyboard and
Other (Next Song, Transpose) features during song
playback.
OTHER FEATURES IN Version 2
Version 2 incorporates a variety of other features which streamline the W5/W7’s operation as
well as greatly expand your playing options.
7
21
ENGLISH

22
ENGLISH
❑System Effect
Tempo Delay
In Version 2 the tempo of the song can be used to
automatically determine the delay time in System Effect 3.
The Tempo Delay feature lets you quickly and easily
match the delay time in System Effect 3 to the tempo of
the song. The various note values are accessible from the
delay parameters below a value of 0.1ms by pressing
[DEC].
Note that a slower tempo which exceeds the delay range
will halve the actual delay time. Also note that using the
external clock or changing the tempo may produce noise.
❑Song Setup Mode
Transpose
Version 2 provides an octave Transpose feature in
Keyboard Normal Mode (Keyboard Setup screen; see the
Owner’s Manual, page 82) that lets you shift the octave
up or down between –3 and +3 octaves.
There is also a shortcut to accessing the octave Transpose
feature from Voice Mode, by pressing [F1] (octave down)
or [F2] (octave up).
F1 F2
❑Song Record Mode
Variable Count-in
Version 2 lets you determine the number of measures for
count-in before realtime (Overdub or Replace) recording
begins. (For details about Song Record Mode, see the
Owner’s Manual, page 86). There are four options, as
follows:
key
When “key” is selected, recording will begin as soon as you
press a key on the keyboard.
0
When “0” is selected, recording will begin as soon as you
press the Run button.
1
When “1” is selected, recording will begin after a one-
measure count-in after pressing the Run button.
2
When “2” is selected, recording will begin after a two-
measure count-in after pressing the Run button.
Click Beat and Quantize
Version 2 displays note values graphically to the right of
the Quantize and Click Beat parameters. Also, you can
select Quantize and Click Beat parameters via the
numeric keypad, in accordance with the note values as
printed above the various keypad buttons.
Jump To Next Note Event
In Step Record Mode (see the Owner’s Manual, page 89),
when the Data/Cursor button is set to “Cursor” (red
light), you can jump directly to each subsequent note
using the [JOG] dial or [CURSOR-LEFT/RIGHT] buttons,
rather than having to scroll through each segment of 12
clocks.

Transpose
Just as in Keyboard Normal Mode (Song Setup screen)
and Voice Mode, you can transpose the pitch between –3
and +3 octaves from within Step Record Mode (see the
Owner’s Manual, page 90)—by holding [SHIFT] and
pressing [F1] (octave down) or [F2] (octave up).
❑Song Edit Mode
System Exclusive Input
When you select a type other than “Excl”, such as VceC
(Voice Common), VceE (Voice Element), DrmC (Drum
Voice Common), Song, Mlt (Multi), Sys (System), and
SwR (Switch Remote), the various types of parameters
for the parameter changes can be edited.
Parameters
D (Device Number) input numerically
C (Inst Channel) input numerically
Param (Parameter Type) depends on the type selected
E (Element Number) input only when the type is “VceE”
Val (Value) input numerically
For more information about MIDI system exclusive data,
refer to “MIDI Data Format” in the separate W5/W7
Technical Information booklet.
Song Edit Graphic Measure Select
Now you can locate a specific measure in Song Edit
Sequence Track Graph Mode (see the Owner’s Manual,
page 91) using the numeric keypad. Also, when the
Data/Cursor button is set to “Cursor” (red light), you can
jump directly to each subsequent note using the [JOG]
dial or [CURSOR-LEFT/RIGHT] buttons, rather than
having to scroll through each segment of 12 clocks.
F1 F2
SHIFT
❑Song Play/Voice Mode
Version 2 provides several convenient new features in
Voice Mode (see the Owner’s Manual, page 106).
Recall that when you switch into Voice Mode, the
settings for the selected voice are reset to the factory
settings, and the designated Insertion Effect will also be
applied.
Version 2 also gives you the option of selecting voices
from the Voice Mode screen without the factory settings
being automatically applied—by holding [SONG] and
pressing [VOICE], or by holding [SHIFT] and pressing
[VOICE]. The red lamp above both the Song and Voice
buttons will light.
In this “Song Play/Voice Mode” the W5/W7 is still
technically in Song Play Mode, but you get the benefits of
Voice Mode features such as a visual display of which
Insertion Effect is specified for the selected voice, plus
new features like Quick Octave Shift and Quick Voice
Bank Select.
Note that when you switch to Voice Mode, if all three
Insertion Effects are in use by other channels, one will be
“stolen” and applied to the voice in the currently selected
channel. In Song Play/Voice Mode, an Insertion Effect
will not be automatically applied to the currently selected
channel.
When the W5/W7 is in Song Play/Voice Mode, to switch
back into Voice Mode, simply press [VOICE]. To switch
back into Song Multi Play Mode, simply press [SONG].
When you switch back to Song Play Mode, the settings
for the voice will not be changed.
Another new aspect of Version 2 is that when you switch
from Voice Mode to Song Play Mode, you can hold
[SHIFT] and press [SONG] and the multi settings will be
restored as they were before entering Voice Mode.
23
ENGLISH

24
ENGLISH
❑Voice Edit Mode
Element Assign
Version 2 provides a shortcut for selecting voice elements
from the Voice Element Assign function (see the Owner’s
Manual, page 112). Now you can position the cursor
over the two-letter element category code (if P1 or P2 is
selected) and directly select a different element category.
As you do, the first element of each category will be
recalled.
Voice Common Copy
Version 2 features a convenient Voice Common Copy
function in Voice Edit Mode (see the Owner’s Manual,
page 110). Voice Common Copy lets you copy controller
parameters only, or effect parameters only, or both
controller and effect parameters from a designated voice
to the current voice.
To access Voice Common Copy, press [F1] (Com) to
select the Common parameters, followed by [F6] (Vol) to
select the Volume function. Then press [F2] (Copy).
Voice Element Copy
Version 2 features a convenient Voice Element Copy
function (see the Owner’s Manual, page 112) that lets
you copy element and pitch from a designated voice to a
specified element (1~4) of the current voice.
To access Voice Element Copy, press [F2] (Elem) to
select the Element parameters, followed by [F5] (Assign)
to select the Assign function. Then press [F2] (Copy).
The destination element (“To”) can also be selected by
pressing [TRACK 1~ 4].
F2 F5
F2 F6
❑Store Mode
Song/Internal Voice Bank Copy
Version 2 provides much greater flexibility for storing
and managing user voices. Specifically, you can now
transfer the contents of any Song voice bank into the
Internal voice bank as long as the Song voices don’t use
the Song Element.
This gives you the option of storing a set of Song voices
as a normal voice bank on floppy disk, rather than as
“Song + Voice” data only, which cannot be loaded into
the Internal voice bank.
The GM, Preset, or Internal voice bank can be stored to
the existing Song voice bank if the voices don’t use the
Internal Elements.
Voice banks can be exchanged by using the Memory
function of Utility Mode (see page 25).
Store Mode Voice Directory
When storing a multi or voice in Store Mode (see the
Owner’s Manual, page 129-130), you can now call up the
Song Directory or Voice Directory, respectively, by
pressing [F8] (Dir).
When storing a voice, note that the currently selected
track (channel number) will be indicated to the right of
the currently selected voice to be stored.
Version 2 lets you designate auto or manual multi store
in Utility Mode, Other Setup (see page 25).
F8
q

❑Utility Mode
Memory Copy
The Memory function (see the Owner’s Manual, page
143) has been expanded to give you the option of
exchanging various voice banks. For example, in addition
to being able to copy the Internal, Preset (1, 2, 3), GM or
Song Voice (1~16) bank to the Internal or Song Voice
(1~16) banks, you can copy a song voice bank to the
Internal bank.
Depending on which voice bank you copy from, specific
drum voice banks will also be copied, as follows:
• GM GM1 (StdKit) and GM2 (RoomKit)
• Preset 1 Preset 1 (QY10 Kit) and Preset 2 (SY85 Kit)
• Preset 2 GM1 (StdKit) and GM2 (RoomKit)
• Preset 3 Preset 3 (HipHopKit) and Preset 4 (Lofi Kit)
CS Assign and FC Assign
There is a new aspect to the CS Assign function in the
Controller screen (see the Owner’s Manual, page 147), as
well as a new function, FC Assign.
• CS Assign
You can assign one of many functions to be controlled by the
continuous slider on the W5/W7’s panel. “000” becomes the
default setting which allows the CS to be used as a data entry
slider, and “032” turns the CS off.
• FC Assign
You can assign one of many functions to be controlled by a
connected foot controller. Selectable parameters include 000
(off), 001~031, 032 (off), and 033~119. When you want to
use the foot controller in its normal capacity, select parameter
“004: FootCtrl”.
Note that when loading an All Data type file which was saved
in Version 1, FC Assign will automatically default to “000:
off”.
Multi Store Auto/Manual
In Version 1, whenever you made changes to a multi
they were stored in the multi automatically. Version 2
features a Multi Store function accessible from the Other
Setup screen (see the Owner’s Manual, page 149) which
lets you choose whether or not you want the changes
you make in a multi to be stored automatically or
manually using Store Mode.
The “auto” setting is the default setting which means that
all changes you make in multi parameters will be stored
automatically, and will be retained even if you switch
from song to song.
The “manual” setting will keep the changes you make in
a memory buffer, and will be lost when you switch to
another song, unless you perform the Multi Store
function in Store Mode. Manual lets you make changes in
a multi without fear of losing the original settings in the
song.
Free Internal Element
Version 2’s Free Element Initialize function in the
Initialize screen (see the Owner’s Manual, page 144) lets
you initialize unused Internal elements which
unintentionally have been stored by using a
commercially available disk, to provide more memory
space for those voices you need.
To access Free Element Initialize, press [F2] (Init) and
select “Free Element” using [INC] or [JOG].
F2
25
ENGLISH

26
ENGLISH
❑Disk Mode
Auto Load and Auto Play
Version 2 features new Auto Load and Auto Play options
in Disk Mode (see the Owner’s Manual, page 131).
Auto Load lets you insert a floppy disk when the power
is off so that a file on the disk will load automatically into
songs when you turn the power on—so that the file is
ready to play. Auto Play lets you have the file load into
Song 01 and start playing automatically after the W5/W7
system starts up.
Auto Load works by saving a song file to floppy disk as a
“1 Song + Voice” (.A1S) type file using the name
AUTOLOAD. (“AUTOLOAD.A1S”)
Auto Play works by saving a song file to floppy disk as a
“1 Song + Voice” (.A1S) type file using the name
AUTOPLAY. (“AUTOPLAY.A1S”)
Note that you can only store one Auto Load or Auto Play
file on a single floppy disk. Also note that when you load
the .A1S type song file, its voice data will be loaded into
the Song voice bank, thus overwriting any existing Song
voices.
NOTE
The AUTOPLAY.A1S file is included in the accompanying floppy
disk. (For more information, see page 7)
CAUTION
Turning the power off or ejecting the floppy disk while loading may
cause irretrievable data loss or floppy disk drive malfunction.

27
● Element List
Eleven new preset elements (246 ~ 256) are added to
the P2 element bank, as listed on pages 19 ~ 24 of
the Technical Information booklet. Please add the
following to the list which ends on page 24:
Element Element
Bank Number
P2 246 Se VBInsect Vibraslap Insect
247 Sine 5th Sine 5th
248 Science Science
249 OffMumin Off Mumin
250 Ghost Ghost
251 TapeSpin Tape Spin
252 Bell Dly Bell Dly
253 Bird Bird
254 Reviw Reviw
255 PlsSiren Pulse Siren
256 GhostCH Ghost Choir
Category LCD Name
Changes to the Technical Information Booklet
Please use the new information below in conjunction with the W5/W7 Technical
Information booklet.
● Voice List
Two new Preset voice banks, P2 and P3, are included
in Version 2. Please note the following:
• The voices in Preset voice bank P1 are the same as
those in the “Preset Voice List” on pages 6 ~ 11 of
the Technical Information booklet.
• The voices in Preset voice bank P2 are the same as
those in the “Internal Voice List” on pages 12 ~ 17
of the Technical Information booklet.
• The voices in Preset voice bank P3 are listed under
“Preset Voice Bank 3” on pages 28 ~ 31, herein.
● Drum Voice Key Assignments
Two new Preset drum voices (PD03 and PD04) are
included in the Preset Drum voice bank, which
include some differences in key assignments. Please
note the following:
• A listing of the key assignments for PD03 and PD04
are provided in the “DRUM VOICE LIST” chart on
page 32, herein.

INSERTION EFFECT
VOICE
Device Parameter Enable*
MC 1
MIDI CONTROL
Device Parameter Enable*
MC 2
Voice
Number
Voice
Category
Voice Name
Effect
Mode
Effect Type
28
Normal-Voice-Liste
Liste des Sonorités Normales
INSERTION EFFECT
Device Parameter Enable*
MIDI CONTROL
Device Parameter Enable*
MC 2
Voice
Category
Voice Name
Effect
Mode
NORMAL VOICE LIST
Preset Voice Bank 3 (001~064)
Voice
Number
MC 1
VOICE
Effect Type
001 Ld Bass&Lead off 3 Band EQ
General1(CS)
flt cutof 123- ModWheel off ___-
002 Fat&fat on 3 Band EQ
General1(CS)
sys.ef 2 ___- ModWheel off ___-
003 Blue Lead on Dist+Comp
General1(CS)
flt cutof 12-- ModWheel off __--
004 YellowLead on Dist+Comp
General1(CS)
flt cutof 12-- ModWheel off __--
005 Pump 7sus4 on Flanger A
General1(CS)
flt cutof 123- ModWheel off ___-
006 Pump Tri 1 on Flanger A
General1(CS)
flt cutof 123- ModWheel off ___-
007 Pump Tri 2 on Flanger A
General1(CS)
sys.ef 3 1234 ModWheel off ____
008 Koff Lead off 3 Band EQ
General1(CS)
flt cutof 123- ModWheel off ___-
009 Digi Sync off 3 Band EQ
General1(CS)
flt cutof 123- ModWheel off ___-
010 Se N-Hall on Flanger B ModWheel ins.ef 12--
General1(CS)
flt cutof 12--
011 DOWN on Phaser
General1(CS)
ins.ef __-- ModWheel off __--
012 L.F.O. on Auto PAN
General1(CS)
lfo speed 12-- ModWheel off __--
013 HaHahaha on 3 Band EQ
General1(CS)
flt reso 12-- ModWheel off __--
014 Tek Boy on Dist+Comp
General1(CS)
lfo speed 1--- ModWheel off _---
015 Tek Loop on Phaser
General1(CS)
lfo speed 1--- ModWheel flt cutof 1---
016 Tek S&H on Flanger A
General1(CS)
lfo speed 1--- ModWheel flt cutof 1---
017 MWScratch1 on Dist+Wah ModWheel ins.ef 12--
General1(CS)
flt cutof 12--
018 MWScratch2 on Dist+Wah ModWheel ins.ef 12--
General1(CS)
flt cutof 12--
019 Tape Spin on Distortion ModWheel off __-- ModWheel off __--
020 Choral Hit on Cross Delay
General1(CS)
sys.ef 2 ____ ModWheel off ____
021 Dr 4spHipHop1 on Reverb Plate
General1(CS)
ins.ef 1234 ModWheel off ____
022 4spHipHop2 on Reverb Plate
General1(CS)
ins.ef 1234 ModWheel off ____
023 4spTekno 1 on Reverb Plate
General1(CS)
ins.ef 1234 ModWheel off ____
024 4spTekno 2 on Reverb Plate
General1(CS)
ins.ef 1234 ModWheel off ____
025 Ba Super Sub on 3 Band EQ
General1(CS)
ins.ef __-- ModWheel off __--
026 ElekiTight on 3 Band EQ
General1(CS)
sys.ef 2 123- ModWheel off ___-
027 Joy Bass on Flanger A
General1(CS)
flt cutof 123- ModWheel off ___-
028 Tek Line on Flanger B
General1(CS)
ins.ef 12-- ModWheel off __--
029 Tight Syn on 3 Band EQ
General1(CS)
flt cutof 12-- ModWheel off __--
030 LatelyBass on 3 Band EQ
General1(CS)
flt cutof 12-- ModWheel off __--
031 Star Dust on Phaser ModWheel off __--
General1(CS)
flt cutof _2--
032 Gang on Rotary Sp.
General1(CS)
ins.ef 1234 ModWheel off ____
033 VocoBass on Dist->Flange
General1(CS)
ins.ef 1234 ModWheel off 1234
034 P Funk on Dist+Wah
General1(CS)
ins.ef 12-- ModWheel off __--
035 Pick Comp on Dist+Comp
General1(CS)
flt cutof 12-- ModWheel off __--
036 LoFiAcBass on Early Ref.1
General1(CS)
ins.ef 1--- ModWheel off _---
037 Upright on Dist+Comp
General1(CS)
flt cutof 12-- ModWheel off __--
038 Fx Rave Hit 1 on Aural Exc
General1(CS)
flt band 12-- ModWheel off __--
039 Rave Hit 2 on Aural Exc
General1(CS)
ins.ef 1--- ModWheel off _---
040 Acid Hit1 on Early Ref.1
General1(CS)
ins.ef 1234 ModWheel off ____
041 Acid Hit2 on Early Ref.1
General1(CS)
ins.ef 1234 ModWheel off ____
042 Acid Hit3 on Reverb Room
General1(CS)
ins.ef 1234 ModWheel off ____
043 Saxes Hit on 3 Band EQ
General1(CS)
ins.ef 123- ModWheel off ___-
044 Brass Hit on 3 Band EQ
General1(CS)
ins.ef 123- ModWheel off ___-
045 Staring on Phaser
General1(CS)
ins.ef 12-- ModWheel off __--
046 End Time on Flanger B
General1(CS)
ins.ef 123- ModWheel off ___-
047 Tek Liner on Flanger A ModWheel lfo speed 1234
General1(CS)
ins.ef 1234
048 OverTheSky on Flanger B ModWheel ins.ef 123-
General1(CS)
lfo speed 123-
049 Pd Square St off 3 Band EQ
General1(CS)
flt cutof 12-- ModWheel off __--
050 Ambient St off Cross Delay
General1(CS)
flt cutof 123- ModWheel off ___-
051 BeautyPad on 3 Band EQ
General1(CS)
ins.ef 12-- ModWheel off __--
052 ReverseRR on Cross Delay
General1(CS)
flt reso 12-- ModWheel off __--
053 Feed Pad on Dist->Flange ModWheel ins.ef 123-
General1(CS)
flt reso 123-
054 AngelHair on Chorus B ModWheel ins.ef 1234
General1(CS)
flt cutof 1234
055 Ice Doll on Chorus A ModWheel ins.ef 1234
General1(CS)
flt cutof 1234
056 Flute Pad on Pitch Chng 2 ModWheel flt reso 123-
General1(CS)
ins.ef 123-
057 BuzzDrone on Flanger B ModWheel ins.ef 123-
General1(CS)
flt cutof 123-
058 Lily on "Delay L,C,R"
General1(CS)
ins.ef 123-
General1(CS)
sys.ef 2 123-
059 Pf Dance CP on Dist->Phaser
General1(CS)
flt cutof 1_-- ModWheel off __--
060 Ana EP off Pitch Chng 1
General1(CS)
feg decay 12-- ModWheel off __--
061 EP Phaser on Phaser
General1(CS)
ins.ef 12-- ModWheel off __--
062 ClaviPhase on Phaser
General1(CS)
ins.ef 1--- ModWheel off _---
063 60Vintage on Rotary Sp.
General1(CS)
ins.ef 12-- ModWheel off __--
064 AcP & EP off 3 Band EQ
General1(CS)
sys.ef 1 _23- ModWheel off ___-
*The "Enable" column indicates Element on/off and MIDI control status, where 1,2,3 and 4 represent Elements 1,2,3 and 4, respectively. A horizontal line at the baseline ("_") or a number indicates that
an element is turned on, with the number indicating that the element can be controlled by MIDI, and the horizontal line indicating that it cannot. A horizontal dash ("-") indicates that the element is turned
off. For example, an Enable situation coded with "12_-" indicates that Elements 1, 2 and 3 are turned on, with Elements 1 and 2 able to be controlled by MIDI. Element 4 is turned off.

ELEMENT
Element 1 Element 2 Element 3 Element 4
Element
Bank
Element
Number
Element
Category
Element
Name
Element
Bank
Element
Number
Element
Category
Element
Name
Element
Bank
Element
Number
Element
Category
Element
Name
Element
Bank
Element
Number
Element
Category
Element
Name
29
ELEMENT
Element 1 Element 2 Element 3 Element 4
Element
Bank
Element
Number
Element
Category
Element
Name
Element
Bank
Element
Number
Element
Category
Element
Name
Element
Bank
Element
Number
Element
Category
Element
Name
Element
Bank
Element
Number
Element
Category
Element
Name
P1 238 Br SynBrs10 P2 30 Ld BrsLd1 P1 166 Ba SynBs17 off -- --
P2 20 Ld Sweep P2 20 Ld Sweep P2 20 Ld Sweep off -- --
P1 152 Ba SynBs3 P1 152 Ba SynBs3 off -- -- off -- --
P1 157 Ba SynBs8 P1 157 Ba SynBs8 off -- -- off -- --
P1 234 Br SynBrs6 P1 234 Br SynBrs6 P1 234 Br SynBrs6 off -- --
P1 234 Br SynBrs6 P1 234 Br SynBrs6 P1 234 Br SynBrs6 off -- --
P2 13 Ld Saw3 P2 13 Ld Saw3 P2 13 Ld Saw3 P2 13 Ld Saw3
P2 13 Ld Saw3 P2 13 Ld Saw3 P1 36 Pf Harpsi1 off -- --
P2 116 Pc DigiWobb P2 116 Pc DigiWobb P2 116 Pc DigiWobb off -- --
P2 33 Ld RezLd P2 159 Se Shilling off -- -- off -- --
P2 26 Ld Digi6 P2 25 Ld Digi5 off -- -- off -- --
P2 158 Se Seq2 P2 142 Se Insect off -- -- off -- --
P2 138 Se Guffaw1 P2 139 Se Guffaw2 off -- -- off -- --
P2 248 Se Science off -- -- -- off -- -- off -- --
P1 165 Ba SynBs16 off -- -- -- off -- -- off -- --
P2 24 Ld Digi4 off -- -- -- off -- -- off -- --
P2 234 Dr Scrach P2 92 Fx WindLoop off -- -- off -- --
P2 234 Dr Scrach P2 154 Se Burst off -- -- off -- --
P2 251 Se TapeSpin P2 251 Se TapeSpin off -- -- off -- --
P1 198 En Choir1 P1 198 En Choir1 P2 35 Pd Pad1 P1 61 Cp Hndbel1
P2 179 Dr BdStd P2 185 Dr SDRock P2 202 Dr HHClose P2 203 Dr HHAnOpn
P2 172 Dr BDStdH P2 184 Dr SDRmH2 P2 204 Dr HHAnCls P2 203 Dr HHAnOpn
P2 178 Dr BDAnalog P2 192 Dr SDAna9 P2 204 Dr HHAnCls P2 203 Dr HHAnOpn
P2 178 Dr BDAnalog P2 199 Dr TMEle P2 202 Dr HHClose P2 200 Dr HHOpen
P1 165 Ba SynBs16 P1 161 Ba SynBs12 off -- -- off -- --
P1 118 Gt Mute3 P1 139 Ba AlenBs4 P1 139 Ba AlenBs4 off -- --
P1 155 Ba SynBs6 P1 155 Ba SynBs6 P1 155 Ba SynBs6 off -- --
P2 17 Ld Squ P2 17 Ld Squ off -- -- off -- --
P1 156 Ba SynBs7 P1 153 Ba SynBs4 off -- -- off -- --
P1 153 Ba SynBs4 P1 155 Ba SynBs6 off -- -- off -- --
P1 45 Pf Stuff7 P1 155 Ba SynBs6 off -- -- off -- --
P2 11 Ld Saw1 P2 11 Ld Saw1 P2 11 Ld Saw1 P2 11 Ld Saw1
P1 215 En Vox6 P1 216 En Vox7 P1 0 Pi Whistle P2 161 Se SlapAtk
P1 140 Ba BeatleBs P1 149 Ba SlapBs2 off -- -- off -- --
P1 134 Ba PickBs1 P1 141 Ba Fretls1 off -- -- off -- --
P1 132 Ba A.Bass2 off -- -- -- off -- -- off -- --
P1 141 Ba Fretls1 P1 132 Ba A.Bass2 off -- -- off -- --
P1 218 En OrchHit P1 218 En OrchHit off -- -- off -- --
P1 218 En OrchHit off -- -- -- off -- -- off -- --
P2 207 Dr CyCrush P1 244 Rd TenorSx1 P1 222 Br MuteTp P1 132 Ba A.Bass2
P2 208 Dr CyChina P1 243 Rd AltGrwl P1 219 Br Trumpet P1 137 Ba AlenBs2
P2 208 Dr CyChina P1 243 Rd AltGrwl P1 219 Br Trumpet P1 159 Ba SynBs10
P1 242 Rd AltoSx P1 245 Rd TenorSx2 P1 246 Rd BariSx off -- --
P1 219 Br Trumpet P1 219 Br Trumpet P1 222 Br MuteTp off -- --
P1 238 Br SynBrs10 P2 164 Se TuneRes2 off -- -- off -- --
P1 180 St SynSt2 P1 180 St SynSt2 P2 54 Pd Pad20 off -- --
P2 78 Fx RevSyn P2 78 Fx RevSyn P2 78 Fx RevSyn P2 78 Fx RevSyn
P2 60 Pd Pad26 P2 57 Pd Pad23 P2 47 Pd Pad13 off -- --
P2 17 Ld Squ P2 17 Ld Squ off -- -- off -- --
P2 19 Ld SquSaw P2 18 Ld SawSqu P2 19 Ld SquSaw off -- --
P1 183 St SynSt5 P1 183 St SynSt5 off -- -- off -- --
P2 61 Pd Pad27 P2 61 Pd Pad27 off -- -- off -- --
P2 67 Pd Pad33 P2 63 Pd Pad29 P1 0 Pi Whistle off -- --
P2 53 Pd Pad19 P2 65 Pd Pad31 P2 83 Fx DigiEcho P1 211 En Vox2
P2 63 Pd Pad29 P2 123 Se Bush P2 87 Fx TimpMute P2 41 Pd Pad7
P2 39 Pd Pad5 P2 1 Pi Flute1 P2 1 Pi Flute1 off -- --
P2 65 Pd Pad31 P2 74 Pd Pad40 P2 65 Pd Pad31 off -- --
P1 44 Pf Stuff6 P2 5 Pi PanFlt1 P2 5 Pi PanFlt1 off -- --
P1 11 Pf E.Grand3 P1 36 Pf Harpsi1 off -- -- off -- --
P2 24 Ld Digi4 P2 24 Ld Digi4 off -- -- off -- --
P1 13 Pf EP2 P1 17 Pf EP6 off -- -- off -- --
P2 22 Ld Digi2 off -- -- -- off -- -- off -- --
P1 28 Pf EP17 P1 93 Or Stuff1 off -- -- off -- --
P1 1 Pf A.Piano1 P1 14 Pf EP3 P1 14 Pf EP3 off -- --

INSERTION EFFECT
VOICE
Device Parameter Enable*
MC 1
MIDI CONTROL
Device Parameter Enable*
MC 2
Voice
Number
Voice
Category
Voice Name
Effect
Mode
Effect Type
30
065 Pf TX816 EP on Symphonic
General1(CS)
ins.ef 123- ModWheel off ___-
066 Mod Roades on Flanger B ModWheel ins.ef 1---
General1(CS)
sys.ef 1 1---
067 Or House Orgn on Aural Exc ModWheel off 1---
General1(CS)
flt cutof 1---
068 The Cat on Rotary Sp. ModWheel ins.ef ____
General1(CS)
aeg decay ___4
069 Gt HeavyMetal on Dist->Delay
General1(CS)
sys.ef 3 12_-
General1(CS)
sys.ef 1 12_-
070 Prince on Distortion
General1(CS)
ins.ef 12-- ModWheel off __--
071 Stratus on Dist->PtChng
General1(CS)
ins.ef 12_- ModWheel off 12_-
072 Eleki Man on Reverb Plate
General1(CS)
ins.ef 1--- ModWheel off _---
073 St Progressiv on 3 Band EQ
General1(CS)
flt cutof 12-- ModWheel off __--
074 Br Elec Mute on Dist+Wah
General1(CS)
ins.ef _--- ModWheel off _---
075 Rd LoFi Sax off 3 Band EQ
General1(CS)
flt band 1--- ModWheel off _---
076 Pi Shaku8 on Early Ref.2
General1(CS)
flt cutof 1_3- ModWheel off ___-
077 Sc Ana Pluck off 3 Band EQ
General1(CS)
flt cutof 12-- ModWheel off __--
078 Acid Digi on 3 Band EQ
General1(CS)
flt cutof 12-- ModWheel off __--
079 SquareSeq off 3 Band EQ
General1(CS)
sys.ef 2 1--- ModWheel off _---
080 Pulse Seq off 3 Band EQ
General1(CS)
flt reso 12-- ModWheel off __--
081 Saw Stab off 3 Band EQ
General1(CS)
flt reso 1--- ModWheel off _---
082 Harpy off 3 Band EQ
General1(CS)
flt reso 123- ModWheel off ___-
083 Wire Comp on Phaser
General1(CS)
ins.ef 12-- ModWheel off __--
084 DeCaY off 3 Band EQ
General1(CS)
flt reso 12-- ModWheel off __--
085 Platinum on Dist->Delay ModWheel sys.ef 3 123-
General1(CS)
sys.ef 1 123-
086 Fx Polaris on 3 Band EQ ModWheel off 1234
General1(CS)
flt cutof 1234
087 Moon Base on "Delay L,C,R"
General1(CS)
flt cutof 12-- ModWheel off __--
088 WaterMalet on Symphonic ModWheel ins.ef 12--
General1(CS)
flt cutof 12--
089 Sun Set on 3 Band EQ ModWheel off 123-
General1(CS)
amp level _2_-
090 Fly Sine on Cross Delay
General1(CS)
amp level _2__
General1(CS)
amp level __3_
091 Space Dust on Stereo Echo
General1(CS)
flt reso _2__
General1(CS)
flt cutof ____
092 Galaxy on Cross Delay
General1(CS)
sys.ef 2 ____ ModWheel off ____
093 Ice Land on Stereo Echo ModWheel amp level ___4
General1(CS)
sys.ef 2 ____
094 Insectoid on Cross Delay
General1(CS)
sys.ef 2 ____
General1(CS)
amp level 12__
095 Ambi S&H on 3 Band EQ
General1(CS)
lfo speed 12-- ModWheel off __--
096 LisWat on Gate Reverb
General1(CS)
ins.ef 123- ModWheel off ___-
097 Deep Ambi1 on Auto PAN
General1(CS)
flt cutof 12-- ModWheel off __--
098 Deep Ambi2 on Phaser
General1(CS)
ins.ef 123- ModWheel off ___-
099 Psychic on 3 Band EQ ModWheel off 1234
General1(CS)
lfo speed 1234
100 Myth on Pitch Chng 1 ModWheel off 1234
General1(CS)
ins.ef 1234
101 Maria on "Delay L,R" ModWheel off 12--
General1(CS)
amp level 1_--
102 Puppet on Pitch Chng 1 ModWheel lfo speed 123-
General1(CS)
flt reso 123-
103 Stoma on Phaser
General1(CS)
flt reso 12-- ModWheel off 12--
104 SnowFlakes on Chorus A ModWheel ins.ef 123-
General1(CS)
lfo speed 123-
105 Shanbala on 3 Band EQ ModWheel flt cutof 12--
General1(CS)
amp level _2--
106 Spell on Phaser ModWheel ins.ef 12--
General1(CS)
flt cutof 12--
107 Et Beijing on Pitch Chng 2
General1(CS)
flt reso 12-- ModWheel off __--
108 Chiang Mai on Early Ref.2
General1(CS)
flt cutof 123- ModWheel off ___-
109 Pc Jungle Tom off Reverb Plate
General1(CS)
ins.ef 1--- ModWheel off _---
110 EthnicPerc on Reverb Room
General1(CS)
ins.ef 12-- ModWheel off __--
111 Se Meadow on Auto PAN
General1(CS)
ins.ef ____ ModWheel lfo speed _2__
112 GhostRiver on Cross Delay
General1(CS)
flt cutof 1___ ModWheel off ____
113 Feed on Dist->Delay ModWheel lfo pmd 12_-
General1(CS)
ins.ef 1__-
114 Bell Crash on "Delay L,R"
General1(CS)
sys.ef 3 ____
General1(CS)
sys.ef 2 ____
115 SpaceLab on Flanger A
General1(CS)
flt cutof 12-- ModWheel off __--
116 Feedle on Flanger A
General1(CS)
flt cutof 12-- ModWheel off __--
117 Mad Man on 3 Band EQ
General1(CS)
flt cutof 12-- ModWheel off 12--
118 Going Up on Cross Delay
General1(CS)
flt cutof 123- ModWheel off ___-
119 Apollo on Phaser
General1(CS)
ins.ef 123- ModWheel flt cutof 123-
120 S.O.S on Flanger A
General1(CS)
flt reso 123- ModWheel ins.ef __3-
121 Teleport on Pitch Chng 1
General1(CS)
lfo speed 1_-- ModWheel flt reso 12--
122 Torpedo on Phaser ModWheel ins.ef 12--
General1(CS)
flt reso 12--
123 Emergency on Dist->Phaser ModWheel ins.ef 12--
General1(CS)
lfo speed 12--
124 Planet X on Dist->Flange ModWheel ins.ef 12--
General1(CS)
flt cutof 12--
125 CuicaWomen on Early Ref.1
General1(CS)
flt cutof 12-- ModWheel off __--
126 Co Bahama on 3 Band EQ ModWheel sys.ef 2 ____
General1(CS)
sys.ef 3 ____
127 RckBandHit on Distortion
General1(CS)
aeg decay _23_ ModWheel off ____
128 MerryXmas on Early Ref.1
General1(CS)
flt band 1234 ModWheel off ____
Preset Voice Bank 3 (065~128)

ELEMENT
Element 1 Element 2 Element 3 Element 4
Element
Bank
Element
Number
Element
Category
Element
Name
Element
Bank
Element
Number
Element
Category
Element
Name
Element
Bank
Element
Number
Element
Category
Element
Name
Element
Bank
Element
Number
Element
Category
Element
Name
31
P1 16 Pf EP5 P1 17 Pf EP6 P1 47 Pf Stuff9 off -- --
P1 12 Pf EP1 off -- -- -- off -- -- off -- --
P1 76 Or Organ2 off -- -- -- off -- -- off -- --
P1 96 Or Stuff4 P1 96 Or Stuff4 P1 96 Or Stuff4 P1 96 Or Stuff4
P1 121 Gt Ovdrv1 P1 121 Gt Ovdrv1 P1 116 Gt Mute1 off -- --
P1 184 St Violin1 P1 184 St Violin1 off -- -- off -- --
P1 103 Gt Clean1 P1 116 Gt Mute1 P2 161 Se SlapAtk off -- --
P1 116 Gt Mute1 off -- -- -- off -- -- off -- --
P1 174 St Strings6 P1 174 St Strings6 off -- -- off -- --
P1 222 Br MuteTp off -- -- -- off -- -- off -- --
P1 244 Rd TenorSx1 off -- -- -- off -- -- off -- --
P2 10 Pi Noise P2 9 Pi Bottle P1 254 Pi Shaku8 off -- --
P1 152 Ba SynBs3 P1 152 Ba SynBs3 off -- -- off -- --
P2 27 Ld Digi7 P2 27 Ld Digi7 off -- -- off -- --
P2 17 Ld Squ off -- -- -- off -- -- off -- --
P2 18 Ld SawSqu P2 18 Ld SawSqu off -- -- off -- --
P2 11 Ld Saw1 off -- -- -- off -- -- off -- --
P1 97 Gt Nylon1 P1 97 Gt Nylon1 P1 190 St Harp off -- --
P1 49 Pf Stuff11 P1 129 Gt Stuff5 off -- -- off -- --
P1 43 Pf Stuff5 P2 35 Pd Pad1 off -- -- off -- --
P1 44 Pf Stuff6 P1 39 Pf Stuff1 P2 151 Se MtlBel1 off -- --
P2 32 Ld VoxLd P2 32 Ld VoxLd P2 80 Fx Dissolve P1 204 En Choir7
P1 217 En Vox8 P1 217 En Vox8 off -- -- off -- --
P2 76 Fx SlwSweep P2 72 Pd Pad38 off -- -- off -- --
P2 69 Pd Pad35 P1 46 Pf Stuff8 P1 0 Pi Whistle off -- --
P2 249 Se offMumin P1 254 Pi Shaku8 P1 206 En Choir9 P1 70 Cp Digi4
P2 248 Se Science P2 36 Pd Pad2 P2 248 Se Science P2 185 Dr SDRock
P2 17 Ld Squ P2 46 Pd Pad12 P2 46 Pd Pad12 P1 71 Cp Digi5
P2 247 Se Sine 5th P2 247 Se Sine 5th P2 35 Pd Pad1 P2 37 Pd Pad3
P2 35 Pd Pad1 P2 35 Pd Pad1 P2 246 Se VibraInc P2 246 Se VibraInc
P2 80 Fx Dissolve P2 80 Fx Dissolve off -- -- off -- --
P1 69 Cp Digi3 P1 69 Cp Digi3 P1 69 Cp Digi3 off -- --
P2 158 Se Seq2 P2 86 Fx AtkChr2 off -- -- off -- --
P2 24 Ld Digi4 P2 53 Pd Pad19 P2 157 Se Seashore off -- --
P2 44 Pd Pad10 P2 33 Ld RezLd P2 76 Fx SlwSweep P2 88 Fx Octivate
P1 123 Gt Harm1 P1 209 En Choir12 P2 94 Fx EP-S&H P2 87 Fx TimpMute
P2 149 Se Quasar P1 202 En Choir5 off -- -- off -- --
P1 51 Cp Clste1 P1 69 Cp Digi3 P2 73 Pd Pad39 off -- --
P2 129 Se Simmer P2 65 Pd Pad31 off -- -- off -- --
P2 63 Pd Pad29 P2 233 Dr SleiBell P2 83 Fx DigiEcho off -- --
P2 38 Pd Pad4 P2 87 Fx TimpMute off -- -- off -- --
P2 59 Pd Pad25 P2 160 Se Simpl'n' off -- -- off -- --
P2 100 Et Sitar P2 100 Et Sitar off -- -- off -- --
P2 115 Pc TnklBell P2 115 Pc TnklBell P2 115 Pc TnklBell off -- --
P2 197 Dr TMJazz off -- -- -- off -- -- off -- --
P2 241 Dr Tumba P2 241 Dr Tumba off -- -- off -- --
P2 0 Se GorstCH P2 255 Se PulsCire P2 254 Se Reviw P2 253 Se Bird
P1 198 En Choir1 P2 128 Se Stream P1 208 En Choir11 P2 250 Se Gorst
P2 22 Ld Digi2 P2 22 Ld Digi2 P2 140 Se Guffaw3 off -- --
P2 220 Dr BellTree P2 162 Se Telephon P2 162 Se Telephon P2 162 Se Telephon
P2 146 Se CymSir P2 160 Se Simpl'n' off -- -- off -- --
P2 144 Se LFO Xylo P2 144 Se LFO Xylo off -- -- off -- --
P2 242 Dr VbSlp P2 242 Dr VbSlp off -- -- off -- --
P2 87 Fx TimpMute P2 130 Se Seq1 P2 14 Ld Saw4 off -- --
P2 150 Se MadTinke P2 163 Se TuneRes1 P2 159 Se Shilling off -- --
P2 164 Se TuneRes2 P2 150 Se MadTinke P1 217 En Vox8 off -- --
P2 74 Pd Pad40 P2 80 Fx Dissolve off -- -- off -- --
P2 20 Ld Sweep P2 157 Se Seashore off -- -- off -- --
P2 33 Ld RezLd P2 166 Se Tweet 2 off -- -- off -- --
P2 94 Fx EP-S&H P2 128 Se Stream off -- -- off -- --
P2 227 Dr CuiKL P2 226 Dr CuiKH off -- -- off -- --
P2 252 Se Bell Dly P2 81 Fx LoopXylo P1 64 Cp StlDrum P2 223 Dr CongaOp
P1 137 Ba AlenBs2 P1 119 Gt Dist1 P1 119 Gt Dist1 P2 172 Dr BDStdH
P1 183 St SynSt5 P1 183 St SynSt5 P1 65 Cp Marimba P1 60 Cp Glock1

32
pgm#
Key Off
Alt. GM-1(GD01) GM-9(GD02) GM-17(GD03) GM-25(GD04) GM-26(GD05) GM-33(GD06) GM-41(GD07) GM-49(GD08) Pre-1(PD01) Pre-2(PD02) Pre-3(PD03) Pre-4(PD04)
Note# Note Standard Kit Room Kit Rock Kit Electro Kit Analog Kit Jazz Kit Brush Kit Classic Kit Preset1(QY10) Preset2(SY85) HipHop Kit Lofi Kit
24 C 0 Click H
25 CH 0 Brush Tap
26 D 0 O Brush Swirl L
27 DH 0 Brush Slap
28 E 0 O Brush Swirl H
Reverse Cymbal
Reverse Cymbal Crash Cymbal 1
29 F 0 O Snare Roll
30 FH 0 Castanet Hi Q Hi Q Hi Q
31 G 0 Snare L SD Power M Snare M SD Power H Brush Slap L Snare M
32 GH 0 Sticks
33 A 0 Bass Drum L Bass Drum M Bass Drum H Bass Drum M Bass Drum M Bass Drum H
34 AH 0 Open Rim Shot Open Rim Shot
35 B 0 Bass Drum M Bass Drum H BD Power BD Analog L BD RoomS Bass Drum L
36 C 1 Bass Drum H BD Power BD Gate BD Analog H Gran Cassa Bass Drum H BD Power Bass Drum L Bongo H
37 CH 1 Side Stick
Analog Side Stick
BD Gate BD RoomS Side Stick L Analog Side Stick
38 D 1 Snare M SD Rock SD Power L Analog Snare L Brush Slap SD Rock Bass Drum H Snare M HHAnOpn
39 DH 1 Hand Clap Snare M Bass Drum L Hand Clap
40 E 1 Snare H SD Power Rim SD Power H Analog Snare H Brush Tap Room Tom 1 Room Tom 1 SD Rim H Chinese Cymbal
41 F 1 Floor Tom L Room Tom 1 Power Tom 1 E Tom 1 Analog Tom 1 Jazz Tom 1 Brush Tom 1 Jazz Tom 1 Room Tom 2 Room Tom 2 Jazz Tom 1
Conga HH Closed 1
42 FH 1 1 Closed Hi Hat
Analog HH Closed 1
Room Tom 3 Room Tom 3
Analog HH Closed 1
43 G 1 Floor Tom H Room Tom 2 Power Tom 2 E Tom 2 Analog Tom 2 Jazz Tom 2 Brush Tom 2 Jazz Tom 2 Hand Clap Room Tom 4 Jazz Tom 2 Conga H Open
44 GH 1 Pedal Hi-Hat
Analog HH Closed 2
Crash Cymbal Bass Drum L
Analog HH Closed
45 A 1 Low Tom Room Tom 3 Power Tom 3 E Tom 3 Analog Tom 3 Jazz Tom 3 Brush Tom 3 Jazz Tom 3 Side Stick Bass Drum H Jazz Tom 3 Conga H Open
46 AH 1 1 Hi-Hat Open
Analog HH Open
Ride Cymbal Cup SD Power M HHAnOpn
47 B 1 Mid Tom L Room Tom 4 Power Tom 4 E Tom 4 Analog Tom 4 Jazz Tom 4 Brush Tom 4 Jazz Tom 4 Closed Hi Hat Tom 1 Jazz Tom 4 Conga H Open
48 C 2 Mid Tom H Room Tom 5 Power Tom 5 E Tom 5 Analog Tom 5 Jazz Tom 5 Brush Tom 5 Jazz Tom 5 Hi-Hat Open Tom 2 Jazz Tom 5 Conga H Open
49 CH 2
Crash Cymbal 1
Hand Cym.Open L
Snare 1 HHAnOpn
50 D 2 High Tom Room Tom 6 Power Tom 6 E Tom 6 Analog Tom 6 Jazz Tom 6 Brush Tom 6 Jazz Tom 6 Tom 3 Jazz Tom 6 Conga H Open
51 DH 2 Ride Cymbal 1
Hand Cym.Closed L
Side Stick
52 E 2
Chinese Cymbal
Snare 2
53 F 2
Ride Cymbal Cup
Tom 4
54 FH 2 Tambourine Hand Clap
55 G 2 Splash Cymbal Cowbell
56 GH 2 Cowbell Shaker
57 A 2
Crash Cymbal 2
Hand Cym.Open H
Closed Hi Hat
58 AH 2 Vibraslap Closed Hi Hat2
59 B 2 Ride Cymbal 2
Hand Cym.Closed H
Hi-Hat Open
60 C 3 Bongo H BDAnalog
Crash Cymbal 1
61 CH 3 Bongo L Cowbell
Crash Cymbal 2
62 D 3 Conga H Mute Analog Conga H SDPower Ride Cymbal
63 DH 3 Conga H Open Analog Conga M SDAna9
Ride Cymbal Cup
64 E 3 Conga L Analog Conga L CongaOpL Conga L Open
65 F 3 Timbale H CongaOpH Conga H Mute
66 FH 3 Timbale L CongaMt Conga H Open
67 G 3 High Agogo AgogoL Bongo L
68 GH 3 Low Agogo AgogoH Bongo H
69 A 3 Cabassa TimbleL Timble L
70 AH 3 Maracas TimbleH Timble H
71 B 3 O
Samba Whistle H
HHAnCls Tumbrn
72 C 4 O
Samba Whistle L
Shaker Clave
73 CH 4 Guiro Short Wood Block
74 D 4 O Guiro Long Agogo L
75 DH 4 Claves Agogo H
76 E 4 Wood Block H Samba Whistle
77 F 4 Wood Block L BDAnalog
78 FH 4 Cuica Mute Scratch Push Scratch Push Squ Scratch Push
79 G 4 Cuica Open Scratch Pull Scratch Pull BDGate Scratch Pull
80 GH 4 2 Triangle Mute HHAnCls
81 A 4 2 Triangle Open SDAna9
82 AH 4 Shaker HHAnOpn
83 B 4 Jingle Bell SDAna8
84 C 5 Bell Tree SynBsC
85 CH 5 Hi Q SynBsCH
86 D 5 SynBsD
87 DH 5 SynBsDH
88 E 5 SynBsE
89 F 5 SynBsF
90 FH 5 SynBsFH
91 G 5 SynBsG
92 GH 5 SynBsGH
93 A 5 SynBsA
94 AH 5 SynBsAH
95 B 5 SynBsB
96 C 6 SynBsC
GM Preset
: Same as Standard Kit
: No Sound
DRUM VOICE LIST
Dum-Voice-Liste
Liste des Sonorités Rythmiques

33
● MIDI DATA FORMAT
Please note that there are a few changes in the “MIDI
DATA FORMAT” specifications (see the W5/W7
Technical Information booklet, page 39). Items
shaded in gray, below, are the new additions to
Version 2.
Technical Information – page 39
1.2 Channel Message
1.2.1 Transmission
1.2.1.1 Note on/off
Transmission note range = C-2(0)...G8(127)
Velocity range = 1...127
1.2.1.2 Control change
Control change is output via MIDI when the following controllers are used.
ctrl#
1
4
7
11
64
1 119
1 119
parameter
Modulation Wheel
Foot Controller
Foot Volume
Expression
Sustain Switch
Continuous Slider
Foot Controller
data rng
0 127
0 127
0 127
0 127
0 127
0 127
0 127
Technical Information – page 40
1.2.1.3 Program change
When a voice is selected, the bank select and program change is
transmitted according to the following chart.
GM
PRESET 1
INTERNAL
SONG
EXTERNAL
PRESET 2
PRESET 3
GM
PRESET
INTERNAL
SONG
EXTERNAL
Normal Voice
Drum Voice
Bank No. MSB / LSB
0($00) / 0($00)
1($01) / 0($00)
2($02) / 0($00)
3($03) / 0($00)
4($04) / 0($00)
5($01) / 0($00)
6($01) / 0($00)
127($7F) / 0($00)
17($11) / 0($00)
18($12) / 0($00)
19($13) / 0($00)
20($14) / 0($00)
PGM CNG No.
1 128($00 $7F)
*1
*2
*2
*2
*2
Technical Information – page 40
1.2.2.2 Control change
Parameters in the table below can be controlled by MIDI.
data rng
0 127
0 127
0 127
0 127
0 127
0 127
0 127
0 127
0 127
0 127
0 127
0 127
0 127
0 127
0 127
0 127
0 127
0 127
0 , 127
parameter
Bank Select MSB
Bank Select LSB
Modulation wheel
Foot control
Data Entry
Inst Volume
Pan
Expression
Harmonic Content
Release Time
Attack Time
Brightness
Portament Control
EF Send 1 (Reverb)
EF Send 2 (Chorus)
EF Send 3 (Delay/Rev)
MIDI Control 1
MIDI Control 2
Sustain Switch
cntrl#
0
32
1
4
6
7
10
11
71
72
73
74
84
91
93
94
1 119
1 119
64
*1
*1
*1: See Program Change 1.2.1.3
1.2.2.3 Program Change
When a program change message is received, the W5/W7 performs the
operations below. Three types of reception modes can be set with the System
Setup.
In Store Mode and Voice Edit Mode program changes will not be received.
1) Off: Program changes will not be received.
2) Ignore Bank Select: Individual program number (001 ~ 128) change messages
will be received but bank select messages will be ignored.
3) On: Bank select and program change messages will be received according to
the following chart.
GM
PRESET 1
INTERNAL
SONG
EXTERNAL
PRESET 2
PRESET 3
GM
PRESET
INTERNAL
SONG
EXTERNAL
Normal Voice
Drum Voice
Bank No. MSB / LSB
0($00) / 0($00)
1($01) / 0($00)
2($02) / 0($00)
3($03) / 0($00)
4($04) / 0($00)
5($01) / 0($00)
6($01) / 0($00)
127($7F) / 0($00)
17($11) / 0($00)
18($12) / 0($00)
19($13) / 0($00)
20($14) / 0($00)
PGM CNG No.
1 128($00 $7F)
*1
*2
*2
*2
*2
Technical Information – page 41
2.2 Parameter Change
The W5/W7 will transmit and receive the eight types of parameter change messages
listed below. When recording is activated and “All Track” and “Punch-in” are not
designated, parameter change messages will be transmitted when the [SONG],
[VOICE], [SELECT], [SOLO] and [TRACK 1]~[TRACK 16] buttons are pressed.
However, 6) Switch Remote will only receive and it will act the same function as the
panel switches.
1). Song/Multi Data
2). Normal Voice Data
3). Drum Voice Data
4). Element Data
5). Setup Data
6). Switch Remote
7). Master Tuning
8). Universal System Exclusive Message
Except for Device Number off, the parameter change reception cannot be turned off
with each MIDI switch.

34
PARAMETER PARAMETER BULK DATA DISPLAY NOTES
NUMBER NUMBER RANGE
Greeting Message
SYS_GRTU00 0 0 32..127 ASCII upper 0
SYS_GRTU11 1 1 32..127 ASCII upper 1
SYS_LOCAL 44 44 0..1 off,on local switch
SYS_DEVNO 45 45 0..17 off,1..16,all device number
SYS_PROT 46 46
0..1
auto, manual multistore
SYS_PGMSW 47 47 0..2 off,ignore,on program change switch
reserved - 48 reserved
SYS_CTRL_RST 49 49 0..1 hold,reset controller hold
SYS_EDIT_CONF 50 50 0..1 off,on edit confirm
SYS_MVOL 51 51 0..127 0..127 master volume
reserved - 52..56 reserved
SYS_CS 57 57 0..119 off,1..119 cs assign
SYS_FC 58 58 0..119 off, 1..119 foot ctrl assign
SYS_FV 59 59 0..1 fc, exp foot vol assign
SYS_FCINIT 60 60 0..127 ??? foot ctrl init val.
SYS_FIX_VEL 61 61 0..127 off,1..127 play fix velocity
Technical Information – page 44
6. Appended Table
(1) MIDI Parameter Change table (Song / Multi)
$F0,$43,$1n,$33,$04,sub_group,p_msb,p_lsb,v_msb,v_lsb,$F7
NOTES: n: Device Number
s: parameter sub group number
000ccccc
c: 1..16; Inst Channel (1..16), 0: common data
p: parameter number
v: parameter value
[SONG_MULTI PARAMETERS]
1.COMMON c=0
Technical Information – page 52
(5) MIDI Parameter Change table (Setup)
$F0,$43,$1n,$33,$07,sub_group,p_msb,p_lsb,v_msb,v_lsb,$F7
NOTES: n: Device Number
s: parameter sub group number = 0
p: parameter number
v: parameter value
1. SYSTEM s=0
Technical Information – pages 56-57
The Implementation Chart on pages 35 ~ 36 now
replaces the chart on pages 56 ~ 57 of the Technical
Information booklet.
PARAMETER PARAMETER BULK DATA DISPLAY NOTES
NUMBER NUMBER RANGE
SNG_NAME0 0 0 32..127 ASCII song name top
SNG_NAME1 1 1 32..127 ASCII song name
SNG_LOC1 - 72,73 0..998 1..999 location point 1
SNG_LOC2 - 74,75 0..998 1..999 location point 2
SNG_KEY_MODE 76 76 b0..b1 norm, split, keyboard mode
layer, 4zone
b2..b4 off, 1st, upr, dynamic split mode
lwrL, lwrH
b5..b6 3rd, 5th, 7th dynamic split interval
9th
SNG_SPLIT 77 77 0..127 C-2..G8 split point
reserved - 78 reserved

35
YAMAHA [ Music Synthesizer---synthesizer part ] Date:17-OCT-1995
Model W5/W7 MIDI Implementation Chart Version : 2.0
+----------------------------------------------------------------------+
| | Transmitted | Recognized | Remarks |
| Function ... | | | |
|-------------------+----------------+----------------+----------------|
|Basic Default | 1 - 16 | 1 - 16 | memorized |
|Channel Changed | 1 - 16 | 1 - 16 | |
|-------------------+----------------+----------------+----------------|
| Default | 3 | 3 | memorized |
|Mode Messages | x | x | |
| Altered | ************** | x | |
|-------------------+----------------+----------------+----------------|
|Note | 0 - 127 | 0 - 127 | |
|Number : True voice| ************** | 1 - 127 | |
|-------------------+----------------+----------------+----------------|
|Velocity Note ON | o 9nH,v=1-127 | o v=1-127 | |
| Note OFF | x 9nH,v=0 | x | |
|-------------------+----------------+----------------+----------------|
|After Key's | x | x | |
|Touch Ch's | o | o | |
|-------------------+----------------+----------------+----------------|
|Pitch Bender | o | o 0-12 semi |7 bit resolution|
|-------------------+----------------+----------------+----------------|
| 0,32 | o *2| o *2|Bank Select |
| 1 | o M.Wheel | o | |
| Control 4 | o Foot cont. | o | |
| 6 | x | o | |
| 7 | o Foot volume | o |Volume |
| 10 | x | o |Pan |
| Change 11 | o Foot volume | o | |
| 64 | o Sustain sw. | o |Sustain |
| 71 | x | o |Harmonic Content|
| 72 | x | o |Release Time |
| 73 | x | o |Attack Time |
| 74 | x | o |Brightness |
| 84 | x | o |Porta Cont. |
| 91 | x | o |Effect Send1 |
| 93 | x | o |Effect Send2 |
| 94 | x | o |Effect Send3 |
| 1-31,33-119 | o CS,Foot Cont.| o |Assignable |
| 120 | x | o |All Sounds Off |
| 121 | x | o |Reset All Cont. |
|-------------------+----------------+----------------+----------------|
|Prog | o 0-127 *3 | o 0-127 *3 | |
|Change : True # | *********** | | |
|-------------------+----------------+----------------+----------------|
|System Exclusive | o *1 | o *1 |voice etc. |
|-------------------+----------------+----------------+----------------|
| : Song Pos | |
|Common : Song Sel | |
| : Tune | See the sequencer part. |
|-------------------+ |
|System :Clock | |
|Real Time :Commands| |
|-------------------+----------------+----------------+----------------|
|Aux :Local ON/OFF | x | x | |
| :All Notes OFF| x | o | |
|Mes- :Active Sense | o | o | |
|sages:Reset | x | x | |
|-------------------+----------------+----------------+----------------|
|Note *1 ; transmit/receive if device No is not off. |
| *2 ; transmit/receive if program sw is on. |
| *3 ; transmit/receive if program sw is not off. |
+----------------------------------------------------------------------+
Mode 1 : OMNI ON, POLY Mode 2 : OMNI ON, MONO o : Yes
Mode 3 : OMNI OFF, POLY Mode 4 : OMNI OFF, MONO x : No

36
YAMAHA [ Music synthesizer---sequencer part ] Date:17-OCT-1995
Model W5/W7 MIDI Implementation Chart Version : 2.0
+----------------------------------------------------------------------+
| | Transmitted | Recognized | Remarks |
| Function ... | | | |
|-------------------+----------------+----------------+----------------|
|Basic Default | 1 - 16 | 1 - 16 | memorized |
|Channel Changed | 1 - 16 | 1 - 16 | |
|-------------------+----------------+----------------+----------------|
| Default | x | x | |
|Mode Messages | x | x | |
| Altered | ************** | x | |
|-------------------+----------------+----------------+----------------|
|Note | 0 - 127 | 0 - 127 | |
|Number : True voice| ************** | | |
|-------------------+----------------+----------------+----------------|
|Velocity Note ON | o 9nH,v=1-127 | o v=1-127 | |
| Note OFF | x 9nH,v=0 | x | |
|-------------------+----------------+----------------+----------------|
|After Key's | o | o *6| |
|Touch Ch's | o | o *6| |
|-------------------+----------------+----------------+----------------|
|Pitch Bender | o | o | |
|-------------------+----------------+----------------+----------------|
| 0,32 | o *3| o *10|Bank Select |
| 1 - 31,33 - 121 | o | o | |
| | | | |
| | | | |
| Control | *5| *7| |
| | | | |
| Change | | | |
| | | | |
|-------------------+----------------+----------------+----------------|
|Prog | o 0 - 127 *4| o 0 - 127 *9| |
|Change : True # | ************** | | |
|-------------------+----------------+----------------+----------------|
|System Exclusive | o | o *8| Song data etc. |
|-------------------+----------------+----------------+----------------|
|System : Song Pos | o *2| o *2| except REC mode|
| : Song Sel | x | o *2| |
|Common : Tune | x | x | |
|-------------------+----------------+----------------+----------------|
|System :Clock | o *2| o *1| |
|Real Time :Commands| o *2| o *2| |
|-------------------+----------------+----------------+----------------|
|Aux :Local ON/OFF | o | o | |
| :All Notes OFF| x | x | |
|Mes- :Active Sense | o | x | |
|sages:Reset | x | x | |
|-------------------+----------------+----------------+----------------|
|Notes: *1 = receive in MIDI sync mode. |
| *2 = transmit/receive if MIDI control is not off. |
| *3 = transmit if playback filter bank select is not ignore. |
| *4 = transmit if playback filter program change is not ignore. |
| *5 = transmit if playback filter control change is not ignore. |
| *6 = receive if record filter after touch is not ignore. |
| *7 = receive if record filter control change is not ignore. |
| *8 = receive if record filter system exclusive is not ignore. |
| *9 = receive if program switch is not off. |
| *10 = receive if program switch is on. |
+----------------------------------------------------------------------+
Mode 1 : OMNI ON, POLY Mode 2 : OMNI ON, MONO o : Yes
Mode 3 : OMNI OFF, POLY Mode 4 : OMNI OFF, MONO x : No
Documenttranscriptie
Version 2 System Upgrade Information Guide Information zur Systemerweiterung (Ver.2) Information sur extension du système (Ver.2) Manua WHAT’S NEW IN VERSION 2 Welcome to Version 2—a powerful system upgrade package for the Yamaha W5/W7 Music Synthesizer that adds an exciting new dimension to one of the most versatile all-in-one music production workstations ever made. ENGLISH Version 2 provides additional Preset voice banks, more than a hundred greatsounding new voices, a long list of unique performance, song play, recording and remixing functions, plus many convenient shortcuts and other useful new features which further streamline the W5/W7’s already simple operation. New Features • A total of three Preset voice banks, plus hot new techno, dance music and other voices which add unprecedented sonic dimension and musical range to the W5/W7’s high quality digital sound. (For details, see page 8.) • Cue Play, which lets you trigger-start a song or sequence phrase from a specified measure simply by pressing a Track button. Lining up a different phrase for each of the 16 Track buttons lets you cue up the right groove or music “hit” at the right time as the mood of the party dictates. (For details, see page 11.) • Multitrack Loop Recording, which lets you jump from track to track and spot overdub new parts in a specified series of measures to capture inspiration as it strikes. (For details, see page 13.) • Song Remix, which lets you mix alternate versions of your tunes complete with automatic track solo, mute and other commands which you can input in realtime. The result is greatly expanded on-board “automated mixdown” options. (For details, see page 14.) • Playback Effect, which lets you apply “groove templates” with pre-programmed quantizing and swing factors to the playback of specified tracks without altering the original music data. The right Playback Effects can literally breathe new life into your tracks. (For details, see page 15.) • Quick Split/Layer, which lets you easily select two split voices, or add a second layered voice, on the fly as you play. The new Dynamic Split feature lets you play two voices with a “floating split point” that’s determined by note prioritization based on how you play the keyboard. (For details, see page 19.) • Tempo Delay, which automatically calculates the delay time of System Effect 3 to the tempo of the song, which eliminates unnatural sonic clashes in order to smooth out or tighten up your mix. (For details, see page 22.) • Faster voice selection features, simplified voice element assign and other convenient voice editing features, expanded voice and multi storage functions, additional song record and edit features, automatic song loading from disk, and much more. How to Use This Guide • This W5/W7 Version 2 System Upgrade Information Guide is a supplement to the original W5/W7 Owner’s Manual and W5/W7 Technical Information booklet. • The “New Features Overview Chart” shows at a glance just what’s new and where it’s located in relation to the existing features, and the “New Features in Version 2” section provides descriptions of each new feature and how to access it. I CONTENTS New Features Overview........................................................................2 About the Accompanying Floppy Disks ................................................6 ENGLISH NEW FEATURES IN VERSION 2 .............................................8 1 PRESET VOICE BANKS ...................................................................8 ❑ Voice Category Search..................................................................................9 ❑ Voice Category Display in the Voice Directory................................................9 ❑ Quick Voice Bank Select .............................................................................10 ❑ Quick Program Change...............................................................................10 2 CUE PLAY .....................................................................................11 ❑ Cue Play as Additional Measure Locate Points .............................................12 3 MULTITRACK LOOP RECORDING .................................................13 4 REMIX..........................................................................................14 ❑ Solo Mode .................................................................................................14 ❑ Track Mute ................................................................................................15 5 PLAYBACK EFFECT.......................................................................15 ❑ Playback Effect Template Type List .............................................................17 ❑ Normalize Playback Effect (Song Job 1) ......................................................18 ❑ Quantize Parameters (Type, Sens, Strength).................................................18 6 QUICK SPLIT/LAYER AND DYNAMIC SPLIT .................................19 ❑ Quick Split/Layer.......................................................................................19 ❑ Dynamic Split............................................................................................19 7 OTHER FEATURES IN VERSION 2 .................................................21 ❑ Song Play Mode .........................................................................................21 ❑ System Effect.............................................................................................22 ❑ Song Setup Mode.......................................................................................22 ❑ Song Record Mode .....................................................................................22 ❑ Song Edit Mode .........................................................................................23 ❑ Song Play/Voice Mode ...............................................................................23 ❑ Voice Edit Mode.........................................................................................24 ❑ Store Mode................................................................................................24 ❑ Utility Mode ..............................................................................................25 ❑ Disk Mode.................................................................................................26 CHANGES TO THE TECHNICAL INFORMATION BOOKLET .................27 II New Features Overview : New features shaded in gray Numbers below indicate Owner's Manual pages ( *: Version 2 System Upgrade Information) SONG For song recording, editing & playback........... ENGLISH SONG PLAY Song Multi Play For song playback & normal performance Access Song Setup during song playback Start song after reading data in previous measures(excluding note) Access single track solo play View measure number in Multi & Sequence Play screens Access Voice Assign, Volume, Pan, Insertion Effect On/Off, System Effect 1~ 3 Send level, Effect Type & Effect Parameter, Shift, Tune & Pitch Bend Range settings SONG (Mixer Screen) (Inst Screen) + + SHIFT Category Search Voice Directory Sequencer Play F1 Access Voice Category Search Toggle between Voice Category & Program Number F8 Access Sequence Play settings Set Click Beat value by numeric (note) keypad View External Sync tempo value F2 F7 F8 SHIFT SHIFT + + F1 F2 Determine how W5/W7 responds to various MIDI data Set MIDI transmit channel for each track Keyboard Mode (Normal, Split, Layer, 4-zone) settings F5 F6 F7 Other Setup Assign Dynamic Split (floating split point) settings Access Quick Split/Layer Transpose octave from Keyboard Normal Mode Access Next Song, MIDI Control, Sync & Transpose functions F8 For storing multi settings into a song memory STORE Assign Multi Auto/Manual Store setting (Utility Mode) F2 SONG RECORD Name the song Display list of songs Apply groove templates to song playback without overwriting Assign sequences to track buttons for trigger playback MIDI, Keyboard & Other settings F3 MIDI Filter Track Transmit Channel Keyboard Setup STORE MULTI F2 F5 Song Name Song Directory Playback Effect Cue Play Song Setup Display 16 channel mixer for setting multi parameters Jump to designated mixer feature Display list of Instrument parameter settings Assign Tempo Delay F1 SHIFT For selecting a recording method & recording a song RECORD Remix a song using solo, mute & other switch operations Realtime Recording Record actual note, controller & program data as you play Overdubbing Replace Punch-in Step Recording Select Count-in value before record start Select Quantize, Click Beat value with numeric (note) keypad Record new data on top of existing data in the track Record new data in the track while erasing existing data Replace record between a series of designated measures Select track & overdub between a series of designated measures (Multitrack Loop Recording) F6 F7 F8 Input note, controller, program & other data one-by-one F5 Select Click Beat value by numeric (note) keypad Move cursor to next note event Transpose 2 SHIFT SHIFT + + F1 F2 Transpose input keyboard octave setting 72 73 *21 *21 *14 *21 75 *21 75 *22 *9 *9 80 *22 *21 81 81 *15 *11 82 82 82 82 *19 *19 *22 84 129 *25 85 *14 87 *22 *22 88 88 88 *13 89 *22 *22 *23 Sequence Track For specific event editing of recorded song data EDIT Edit the sequence track Input parameter change data F1 Insert Change Graphic Insert sequence track event data Change sequence track event data Display note event data graphically Move cursor to next note event Input measure number by numeric keypad F4 F5 F6 Tempo Track F4 F5 SONG JOB Job 1 JOB + + + + + + + F1 + + + + + + F1 F7 SHIFT + + Quantize SHIFT + F1 Move Clock Modify Gate Time Modify Velocity Transpose Shift Note Crescendo SHIFT + + + + F2 + + F6 Copy Song Append Song Clear Song Copy Track Clear Track Mix Track Normalize Playback Effect Job 2 SHIFT SHIFT SHIFT SHIFT SHIFT SHIFT F2 F3 F4 F5 F6 F7 Job 3 For editing of song, track & measure data 95 Copy a song from one song memory location to another Append a song onto another song from a specified measure Clear all multi & performance data of a specified song Copy track data from one song into another song Clear all performance data from a track Combine data in one track with data in another track Write the specified Playback Effect data into the song Jobs for current song/track measure, note & other event editing F3 Copy Measure Erase Measure Create Measure Delete Measure Insert Measure Thin Out Extract Chord Sort SONG SHIFT SHIFT SHIFT SHIFT SHIFT SHIFT SHIFT SHIFT F2 F3 F4 F5 F6 F8 Copy specified measures to a specified location Erase data in specified measures Insert new empty measures into specified location in all tracks Delete a specified range of measures from all tracks Specify a range of measures & copy to specified location for all tracks Delete unnecessary controller data from a track Extract designated events from one track & place in another Rearrange a cluster of notes in ascending/descending order Jobs for current song event editing F4 SHIFT SHIFT SHIFT SHIFT SHIFT F3 F4 F5 F7 91 *23 93 92 91 *23 *23 93 93 92 Jobs for song & track editing F2 91 Insert tempo change data in the middle of the song Change tempo data value Edit the tempo track F2 Insert Change Correct timing of performance data Quantize Sensitivity & Strength parameters are added Move data in specified measures by a specified clock value Modify durations of notes in specified measures Modify note-on velocity values in specified measures Transpose notes in specified measures by a designated interval Shift a note number to another number in specified measures Add crescendo or diminuendo over specified range of measures ENGLISH SONG EDIT 96 96 96 96 97 97 97 *18 98 98 98 98 99 99 99 99 100 100 100 *18 101 101 102 102 103 103 VOICE PLAY Access voice select screen in Song Play Mode *23 3 VOICE For selecting & playing voice....................... VOICE Transpose F1 , Category Search Voice Directory Quick Voice Bank Select F5 F2 F8 SHIFT SHIFT + + F1 ~ F8 SONG 106 Select voice by last-digit within a group of ten (Quick PC) Transpose octave (in Keyboard Normal Mode) Keyboard mode display (Quick Split/Layer, Dynamic Split) Select the next voice program number in the same Voice Category View list of voices. Press [F8] twice to see Voice Categories Direct selection of any voice bank Revert to multi settings when switching back to Song Mode *10 *22 *19 *9 107 *10 *23 ENGLISH VOICE EDIT MODE For editing specific voice parameter.....108 STORE VOICE Store edited voice into specified program number STORE Store Voice Voice Directory Store voice into Internal (or Song) voice bank View list of voices. Press [F8] twice to see Voice Categories F3 F8 NORMAL VOICE EDIT Common Group F1 Category/Volume F6 Voice Name Initialize Voice F7 109 Parameters common to the entire voice 110 110 *24 110 110 Assign Voice Category code and set voice Volume Copy Effect & Control Group parameters to another voice Name the voice Initialize all voice data F8 Parameters related to the individual elements F2 Element Assign F5 Pan Velocity Limit Note Limit F6 Assign up to four elements to the voice Element category search Copy Element Group parameters to another voice Position each element within the stereo field Specify the Velocity Limit of each element Specify the Note Limit of each element F2 Amplitude Group F7 F8 Filter Group Tone Envelope Parameters related to volume characteristics of each element F3 Level Envelope Specify the volume Level of each element Assign the amplitude Envelope characteristics of each element F7 F8 Parameters related to tone quality of each element F4 Specify the type of filter and parameters of each element Assign the filter Envelope characteristics of each element F7 F8 DISK Disk Status Save To Disk Load From Disk Rename File Delete File Format Disk Auto Load Auto Play 4 F2 F3 F4 F5 F6 F7 *24 *9 Edit Normal Voice F2 Element Group 130 For saving & loading data to & from a floppy disk....................................... View types of files on the inserted floppy disk Save voice, song or other data to floppy disk Load voice, song or other data from floppy disk Rename a file on the inserted floppy disk Delete a specified file from the inserted floppy disk Format a disk for use with the W5/W7 Automatically load the designated file at power on Automatically load & play the designated file at power on 112 112 *24 *24 112 112 113 113 113 114 115 116 116 132 133 134 136 139 140 141 *26 *26 GM Voice Bank 128 Normal Voices + 8 Drum Voices Internal Voice Bank 128 Normal Voices + 2 Drum Voices External Voice Bank (Optional Expansion Wave/Voice Board) VOICE BANK Preset Voice Banks P1 : 128 Normal Voices P2 : 128 Normal Voices P3 : 128 Normal Voices PD: 4 Drum Voices Song Voice Bank 1set/song *8 *8 Pitch Group Effect Group F4 F5 F6 F7 F8 F4 F6 F7 F8 Controller Group Sustain/Exp. Low Limit Pitch Bend After Touch Modulation Wheel Foot Controller MIDI Control 1 MIDI Control 2 F7 F8 Specify the LFO Parameter settings for each element Specify the LFO Modulation parameters for each element Parameters related to the various controllers F8 F2 F3 F4 F5 F6 F7 F8 DRUM VOICE EDIT Common Group Key Group Effect Group Controller Group Specify the Send Level for each System Effect Specify the Insertion Effect Type for the voice Specify the Insertion Effect parameters Specify the Insertion Effect Control parameters Parameters related to Low Frequency Oscillator characteristics F7 LFO Parameter LFO Modulation Specify the Scale parameters of each element Specify the Tune parameters of each element Specify the Note Shift parameters of each element Specify the Sensitivity parameters of each element Assign the pitch Envelope characteristics of each element Parameters related to voice effects assignments F6 System Effect Send Insertion Effect Type Insertion Effect Parameter Insertion Effect Control LFO Group Parameters related to pitch characteristics of each element F5 Scale Tune Note Shift Sensitivity Envelope F1 F2 F7 F8 Specify the Sustain & Exp. Low Limit settings for each element Specify the Pitch Bend settings for each element Specify the After Touch settings for each element Specify the Modulation Wheel settings for each element Specify the Foot Controller settings for each element Specify the MIDI Control 1 settings for each element Specify the MIDI Control 2 settings for each element F1 Initialize F2 Voice Bulk Dump Synthesizer Setup Controllers F3 MIDI Setup Other Setup F6 Greeting Message F8 F4 F5 F7 117 117 118 118 118 118 119 119 119 120 120 121 121 121 122 122 122 122 123 123 124 124 Edit Drum Voice 124 Parameters common to the entire voice Element assignments for each key Parameters related to voice effects assignments Parameters related to the various controllers 125 125 127 128 For accessing & assigning settings which affect the entire system................ Memory ENGLISH STORE VOICE Copy a voice bank to RAM Copy from Song voice bank to Internal voice bank Initialize the Internal voice bank Delete elements not in use (Free Element) Perform bulk dump operation of Internal voices to external device Assign Master Tune, Velocity Curve & Controller settings Assign CS, Foot Volume & Foot Controller settings Set Foot Controller Assign & CS data entry functions Assign MIDI related settings Set LCD Contrast & Edit Confirm status Assign Multi Auto/Manual Store status Personalize the start-up Greeting Message 142 143 *25 144 *25 144 145 147 *25 148 149 *25 149 5 About the Accompanying Floppy Disks The demonstration floppy disk “W5/W7 FACTORY SET & DEMONSTRATION” comes bundled with Version 1 and the “W5/W7 Version 2 DEMONSTRATION” disk is additionally bundled with Version 2. Each disk contains factory-programmed song and other data which especially highlight the exceptional capabilities of the W5/W7. (For information about loading files from a disk, see the Owner’s Manual, pages 52 and 136.) The contents of each demonstration disk are listed and described below. ENGLISH W5/W7 FACTORY SET & DEMONSTRATION There are two types of files on the disk, as follows: NOTE W_DEMO.A1A All Data type file INTVOICE.A1V Voice type file When loading an All Data type file, the settings in Utility mode will also be replaced. Therefore, be sure to save any important All Data type settings to floppy disk before loading an All Data type file. W_DEMO.A1A file Five songs are sequentially arranged in the file: • • • • • SONG 01 SONG 02 SONG 03 SONG 04 SONG 05 : : : : : Isn’tItHip Metal Bomb Gavotte Halftime RAM-Jam The various songs showcases how great the W5/W7 sounds across different genres of music. There’s more to each demonstration song than just an impressive performance, however, since they are also great examples for study of clever ways to allocate voices, optimize the various effect and other settings, and more. Note that there are special Song voices used in Song 01 and Song 05 which are not included in the factory presets. INTVOICE.A1V file This file contains a safety backup of the factory-programmed bank of Internal voices. 6 W5/W7 Version 2 DEMONSTRATION There are three types of files on the disk, as follows: All Data type file AUTOPLAY.A1S 1 Song+Voice type file VOICE_EDIT.A1S 1 Song+Voice type file NOTE When loading an All Data type file, the settings in Utility mode will also be replaced. Therefore, be sure to save any important All Data type settings to floppy disk before loading an All Data type file. ENGLISH W_DEMO2.A1A W_DEMO.A1A file Three songs are sequentially arranged in the file: • SONG 01 : Dancyndrom • SONG 02 : Whale Song • SONG 03 : Push Track Version 2 features a Preset 3 voice bank which includes various voices perfect for techno and dance music. Song 3 (“Push Track”) is a special demonstration song which lets you try out the new Cue Play function (see page 11). When you start the song from the top, the W5/W7 automatically enters Cue Play mode. In the screen you will notice which measure has been assigned as the start point for each Track button. Press a Track button to start the Cue Play from the designated measure. AUTOPLAY.A1S file This file contains the same song data as “SONG 01: Dancyndrom”. However, since this was saved as an Auto Play file (see page 26), if you insert the disk while the power is off, then switch the power on, the file will automatically be loaded in the first song memory and begin playing. VCE_EDIT.A1S file This file is a special demonstration for editing a voice. When you start the song from the top, the W5/W7 plays the intro of the demo song “Isn’t It Hip” (same as in the “W5/W7 FACTORY SET & DEMONSTRATION” disk, above), then stops, selects Track 7, then goes on to give a visual demonstration of how to edit the voice “Needle”. A note in the screen will explain what’s happening. Watch the screen as the various parameters are selected, including element assignment, template selection and parameter adjustments, Insertion Effect type selection and parameter adjustments, and others—including System Effect adjustments to various tracks. The new Remix mute and solo (see page 14) and Playback Effect features (page 15) are also introduced. NOTE Do not stop the playback in the middle of the song when playing VCE_EDIT.A1S, since stopping it may cause data error. 7 NEW FEATURES INVERSION 2 1 ENGLISH PRESET VOICE BANKS Version 2 includes two additional Preset voice banks, making a total of three Preset voice banks, or 384 Preset normal voices in ROM. Preset voice bank 2 contains the same voices as the Internal voice bank (RAM). Preset voice bank 3 includes 128 new voices, including many techno and dance music oriented voices, and several unique voices which can yield various characteristics as you play, controlled by the modulation wheel. Including the GM voice bank, Version 2 comes complete with a total of 512 normal voices and 12 drum voices in ROM (excluding those available in the External voice bank when an Expansion Wave/Voice Board is installed), and 128 normal voices and 2 drum voices in RAM— for a total of 640 normal voices and 14 drum voices. Additionally, there are 128 Song voice memories and 2 Song drum voice memories which can be dedicated to up to 10 songs. Here’s a breakdown of what’s in each of the voice banks: GM Standard General MIDI set 128 Normal Voices (P1) Preset 1 Same as previous Preset bank 128 Normal Voices (P2) Preset 2 Same as previous Internal bank 128 Normal Voices (P3) Preset 3 New bank of voices 128 Normal Voices Internal Same as previous Internal bank 128 Normal Voices Song — 128 Normal Voices/Song GM Drum Various GM drum kits 8 Drum Voices Preset Drum Two new Preset drum kits 4 Drum Voices Internal Drum Same as first two GM drum kits 2 Drum Voices Song Drum — 2 Drum Voices/Song For a list of the new normal voices in the Preset 3 voice bank and the two new drum voices in the Preset drum voice bank, as well as the additional new elements available, see page 27. The process of selecting voices and voice banks in Version 2 is the same as before, but there are several convenient new options as well, including Voice Category Search, Quick Voice Bank Select and Quick Program Change. 8 Version 2’s Preset 3 voice bank features an assortment of modern music sounds including techno, dance music and other voices—which add a completely new dimension to the W5/W7’s sonic possibilities. Below are descriptions of a few of the more intriguing voices which rely on the CS and Modulation Wheel to achieve maximum flexibility and impact: P3-03:Blue Lead This is a classic high-resonance analog synth type lead voice. The filter cutoff is assigned to the CS, so you can control the amount of resonance applied to the voice at any time by moving the CS as you play. P3-10:N-Hall Airy, futuristic sound effect type voice. The filter cutoff is assigned to the CS, so you can greatly modify the quality of the voice in realtime by moving the CS. P3-13:HaHahaha A whimsical simulated laughter type voice. Control the speed of the laughing with key velocity, and the quality of the sound with the CS and Modulation Wheel. P3-32:Gang Soft but powerful, versatile resonant synth voice with rotary speaker Insertion Effect applied. Use the CS to control the speed of the rotary speaker effect. P3-53:Feed Pad Grungy but distinctively pleasant distortion pad voice. Control the amount of resonance with the CS. P3-120:S.O.S. Cumulative chaos of a frantic S.O.S. signal from a submarine in distress. Use the CS to control the balance between bell timbre and “muffled voices”. ❑ Voice Category Search SONG MODE Version 2’s Voice Category Search feature makes it easier than ever to locate just the right voice when you want it. This is critical considering the many hundreds of voices that are now available at any given time. Voice Category Search lets you select the next voice number with the same Voice Category code as the current voice simply by pressing function key F5 (Ctg), in either Song Multi Play Mode or Voice Mode—including when the Voice Directory is displayed. This is really helpful when searching for similar types of voices as the currently selected one— such as piano type voices assigned with the “Pf” Voice Category code, for example. To select the next voice number with the same Voice Category code as the current voice: Press [F5]. Each time you press F5, the next voice with the same Voice Category code will be selected within the current voice bank, starting back at the lowest numbered voice after the highest numbered voice has been selected. You don’t need to press the Enter key. ENGLISH P3-17:MwScratch1 A highly useful voice which simulates the sound of record scratching commonly used in rap and other danceoriented music. Adjust the CS to control the characteristic of the sound, and simulate the DJ scratching with the Modulation Wheel. F5 VOICE MODE F5 ❑ Voice Category Display in the Voice Directory Version 2 not only lets you view the voice program numbers in the Voice Directory, but also gives you the option of viewing the two-letter Voice Category codes assigned to each voice—in both Song Multi Play Mode and Voice Mode. To view the Voice Category codes in the Voice Directory: Press [F8] (Dir) twice. F8 When the Voice Directory is selected, pressing F8 will toggle back and forth between voice program numbers display and Voice Category codes display in the Voice Directory. 9 ❑ Quick Voice Bank Select ❑ Quick Program Change Version 2 provides a convenient shortcut for selecting voice banks within Voice Mode or from the Voice Directory in Song Multi Play Mode. Version 2 has a new Quick Program Change feature in Voice Mode. When Quick Program Change is activated, you can quickly select program numbers within a group of ten with the same first digit using buttons 0~9 on the numeric keypad—each of which corresponds to the last digit of the program number of each voice. Simply pressing the Shift button will display the first letter of each voice bank (E*, I, S, G, P1, P2, P3) above function keys F1*~F7—by which you can jump directly to a desired voice bank. For example, say the currently selected voice number is 35. With Quick Program Change, you can jump directly to any voice between 30~39 simply by pressing buttons 0~9 on the numeric keypad. ENGLISH To select a different voice bank: Hold [SHIFT] and press a function key [F1]~[F7] above the desired voice bank. To activate Quick Program Change: 1. 2. SHIFT F1 F2 F3 F4 F5 F6 F7 F8 In Voice Mode, press the [VOICE] button. Press a number [0]~[9] on the keypad corresponding to the last digit of the program number you want to select. When you press a function key, the desired bank is selected; the voice number is the same as for the previously selected bank. It is not necessary to press Enter as with the normal procedure for selecting banks. When you select one of the Preset voice banks, the voice bank prefix which appears to the left of the voice program number will be denoted with one, two, or three dots, respectively, as follows: • Preset 1 • Preset 2 • Preset 3 Note that pressing F8 (Drum) while holding the Shift button lets you alternate between normal (“Norm”) and drum voice banks.** To select a drum voice bank: 1. 2. Hold [SHIFT] and press [F8]. Press a function key [F2]~[F5] above the desired drum voice bank. F1 * F2 F3 F4 F5 F8 F1 can only be used for accessing the External voice bank when an Expansion Wave/Voice Board is installed. ** When Track 10 is selected, you cannot access the normal voices, since channel 10 is dedicated to the drum voices. 10 When in Voice Mode (see the Owner’s Manual, page 106), pressing the Voice button will toggle back and forth between Quick Program Change and normal Voice Play Mode. The words “Quick PC” will display in the upper area of the screen when Quick Program Change is active. When you press the desired number on the keypad, the corresponding voice with the same last digit will be selected instantly, and therefore you need not press Enter to lock in the selection, as in the normal voice selection procedure. You can also press F6 and F7 to select a different voice bank, and then press a number on the keypad to select it—within the group of ten also with the same first digit. Quick Program Change also lets you select voices outside the group of ten using the Jog dial and the Inc/Dec buttons. Also note that when you press F8 to view the Voice Directory, Quick Program Change will be bypassed, and you can select voices and banks in the normal way. However, when you exit the Voice Directory, Quick Program Change will be reactivated. 2 CUE PLAY ENGLISH Version 2 features Cue Play in Song Sequence Play Mode (see the Owner’s Manual, page 80), which lets you compile a list of 16 songs or sequence phrases and trigger-start them from any measure simply by pressing Track buttons. With Cue Play you can set fire to the dance floor by triggering the right groove at just the right time—jumping from one to another in realtime as the mood of the party dictates. Cue Play works by assigning any of the 16 songs to any of the Track buttons, along with which measure in the song to start from. To enter Cue Play Mode: 1. In Song Mode, press [F2] (Seq) to enter Song Sequence Play Mode. 2. Hold [SHIFT] and press [F2] (Cue) to enter Cue Play Mode. The Cue Play screen lists which songs are assigned to each of the 16 Track buttons, and which measures are designated as starting points for each cue. Track button number Song number Starting measure number 4. Specify a measure start point using [INC], [DEC], [JOG] or [KEYPAD]. Note that you can assign the same song to more than one Track button, designating a different measure as the starting point for each. Thus, with various sections of the song assigned to different Track buttons, you can literally create a playback arrangement on the fly, just by pressing the Track buttons. You can designate the Cue song to play from the start measure and continue to the end of the song, or to play only so long as you hold down the Track button. To have a Cue song continue playing from the start measure to the end: The number in brackets represents the Track number. The number to the right of the Track number represents the song number (1~16). The number to the right of the song number represents the starting measure number. To assign song numbers and starting measures to the Track buttons: 1. Position the cursor over the song number of a desired Track button. 2. Specify a song number using [INC], [DEC], [JOG] or [KEYPAD]. 3. Position the cursor over the starting measure number. Press [F7] (Cnt) once or more so that “Cnt” is highlighted in black. F7 When “Cnt” (Continue) is highlighted, pressing a Track button will cause the song assigned to it to play from the starting measure point till the end— unless you press another Track button while the current Cue song is playing. Pressing another Track button will terminate the song in play and start the next song. (This also lets you restart the same song while it is playing by pressing its Track button again.) 11 To have a Cue song play only while you hold down a Track button: Press [F7] (Cnt) once or more so that “Cnt” is not highlighted in black. Pressing a Track button will start the Cue song from the specified measure start point, but the song will stop if you let go of the button. This allows you to trigger orchestra hits and other key song phrases at will. ENGLISH A “Memorize” feature provides a convenient shortcut for assigning a measure number to a Track button while the song is playing back. NOTE If you jump from one song to another, or to a fairly distant measure, it may take a brief moment before the second song starts playing. To use the Memorize function: 1. Position the cursor over either the song number or starting measure number of a desired Track button. 2. As the song plays, simply press [F8] (Mem.) when the song reaches the measure that you want to assign. F8 The Memorize function can also be used when the song is stopped. 12 ❑ Cue Play as Additional Measure Locate Points In addition to the standard Cue Play features described above, you can also use the assignments in Cue Play as 16 additional measure locate points (see the Owner’s Manual, page 81). Just assign the various measure start points beforehand, then switch to the Cue Play screen and press the relevant Track button to start the song from that point. The song will continue playing as you switch back to the mixer screen by pressing the Song button. Note that although you can stop a Cue song at any time by pressing the Sequencer Stop button, the Run button is unrelated to Cue Play. Pressing the Run button in Cue Play will simply start the currently selected song (as displayed at the top right of the screen). To save the Cue Play data to floppy disk, simply save the current data in the W5/W7 as an “All Data” file. (For details about saving and loading, see the Owner’s Manual, page 131.) NOTE The demo song 03: Push Track (W_DEMO02.A1A) presents a good example of the Cue Play function. (For more information, see page 7) 3 MULTITRACK LOOP RECORDING ENGLISH Version 2 features Multitrack Loop Recording, which provides more flexible song sequencing options. The Multitrack Loop Recording feature lets you specify a series of measures which will loop repeatedly as you overdub additional parts. You can jump from track to track to add new parts without stopping the sequencer. Multitrack Loop Recording is accessible from Punch-in Record Mode (see the Owner’s Manual, page 88). To use Multitrack Loop Recording: 1. Press [RECORD] to enter Song Record Mode (standby). 2. Press [F8] (Pnch) to select Punch-in Record. 7. Press [RUN] to start the recording loop. F4 3. Press [F4] (AllTr) to designate All Track Record. 4. Position the cursor over the “From” parameter field and enter the number of the measure which you want to be the first measure in the loop. 5. Position the cursor over the “To” parameter field and enter the number of the measure which you want to be the last measure in the loop. 6. Position the cursor over the “Loop” parameter field and use [INC], [DEC] or [JOG] to turn the loop on. F8 You can delete a wrong note while the loop recording is still active. To do so, simply hold the Shift button and press the note again when it comes back around. (Be aware of the limitation in number of notes that can be recorded based on available polyphony.) Note that if All Track Record is not specified, you can still start loop recording, but you can only overdub on the currently selected track, and will not be able to select other tracks without first stopping the sequencer. Also note that if you engage loop recording while Quantize or Playback Effect is selected, these parameter values will also be recorded in the designated loop. Be sure to keep in mind the maximum number of notes which can be recorded (32 notes), since as you keep overdubbing notes during loop recording, you may inadvertently erase existing note data. 13 4 REMIX Version 2 includes a Remix feature which lets you create an alternate “dub” mix which includes track solo, mute and other button on/off switchings as the song plays. ENGLISH Every time you press the Song, Voice, Select, Solo or any of the 16 Track buttons, the W5/W7 generates a corresponding MIDI system exclusive parameter change (“Switch Remote”) message. Version 2 lets you record these Switch Remote messages in the sequencer in realtime (or Step edit) in an empty track so that they will be recalled automatically during song playback. In this way, you can program track solo, mute and other commands in a Remix version of your song to achieve a multi-dimensional automated mixdown without changing any of the original note, controller or other data in the song. To create a Remix version of the currently selected song: 1. Select an empty track in the currently selected song. 2. Press [RECORD], then press [RUN] to start the recording. 3. Press [SONG], [VOICE], [SELECT], [SOLO], [TRACK 1~16] and perform any desired parameter adjustments during the recording. Note that during recording any key you press on the keyboard will also be recorded in the currently selected track as note data. You will find it most convenient to keep all Switch Remote messages together in one track, apart from note and other data, since it is easier to locate and edit Switch Remote messages this way. ❑ Solo Mode Recall that when there is sequence data in the currently selected song, the Track buttons of tracks which contain data will be lit in green, and the currently selected Track button will be lit in red. (The Select button will be lit in green, thus indicating the W5/W7 is in Track Select Mode; see the Owner’s Manual, page 74.) By entering Solo Mode (i.e., by pressing the Solo button), you can “solo” one or more tracks to hear them only, thus “muting” the rest. Pressing a Track button will toggle back and forth between solo (red) and mute (green) status. Multiple tracks can be soloed at once. You can exit Solo Mode and the W5/W7 will still remember which tracks were soloed and muted the next time you press the Solo button. Version 2 also lets you solo, or isolate and play a single track just by pressing the corresponding Track button. To solo, or isolate and play a single track: Hold [SELECT] and press [SOLO]. NOTE When deleting switch remote on/off data from a track in Song Edit Mode, be sure to delete both On and Off commands. In single-track Solo Mode, pressing a Track button will turn that track on (red light), while turning all others off (green lights). Thus, you can easily isolate a single track that you want to examine during mixdown, or to play by itself during a specific point in the song when you’re recording a Remix. Pressing Solo again will return you to the multipletrack Solo Mode. 14 ❑ Track Mute To enter Mute Mode: As explained above, Solo Mode lets you toggle back and forth between solo and mute status when you press a Track button, and the W5/W7 will remember the current solo/mute status when entering and exiting Solo Mode. Hold [SOLO] and press [SELECT]. The Track buttons of tracks which contain data will be lit in red, which means they are all in solo status, and therefore any Track button you press will mute that track (indicated by a green light in the Track button). Version 2 also lets you enter Solo Mode with all tracks soloed (you can hear the complete mix, just as in Track Select Mode), and therefore standing by ready to be muted. NOTE ENGLISH The VCE_EDIT.A1S file introduces the Remix function. (For more information, see page 7) 5 PLAYBACK EFFECT Version 2 includes a Playback Effect Mode accessible from the Song Sequence Play screen (see the Owner’s Manual, page 80) that lets you apply various playback-only effects—including quantization, swing, clock shift, gate time and velocity—to your songs. The actual data in memory does not change; the only thing modified is the way the data is played back. The right Playback Effect type can literally breathe new life into your song. You can add a Playback Effect type to individual tracks or to all tracks and adjust their default parameters at will. (Note that if you choose another song the Playback Effect parameters will be initialized. You can, however, apply Playback Effect settings permanently to a song by normalizing them in Song Job 1 (see page 18). To enter Playback Effect Mode: 1. In Song Sequence Play Mode, hold [SHIFT] and press [F1] (PEF). SHIFT 2. 4. When you enter Playback Effect Mode (shown as “Play Effect” in the screen) the type and parameters screen will be displayed. Moving the cursor to the right will access the Playback Effect parameters screen. Likewise, moving the cursor to the left when the parameters screen is displayed will once again access the Playback Effect type and depth screen. F1 Press [F7] (Tr) and a [TRACK] button to designate a specific track, or press [F8] (All) to designate all tracks. F7 3. Position the cursor over a parameter and adjust it as desired. F8 Select a Playback Effect type with [INC], [DEC], [JOG], or [KEYPAD]. 15 • Type 00~27, ** • Swing There are 27 different Playback Effect types. Playback Effect types 01~27 are those programmed at the factory, whose parameters you can still adjust at will. If you want to design your own Playback Effect parameters from scratch, simply select Playback Effect type “00” (no Playback Effect applied) and begin adjusting parameters. Note that when you adjust parameters in any Playback Effect type, these will be stored in a Playback Effect user memory under the type heading “ ** ”. The Swing effect—which can only be used when the Quantize function is set to a value other than off—produces a more natural “swing” feel by shifting the timing of the offbeats, as specified by the Quantize setting. For example, if the specified Quantize value is 8th-notes, then the Swing effect will shift the 2nd, 4th, 6th, and 8th beats of each measure forward to create the swing feel. If the Quantize value is set to a triplet note length, the last note in each triplet group will be shifted. Rate 50~83% ENGLISH “Rate” determines the strength of the swing feel, or how much the timing of the affected notes will be shifted. Apply 50% (no swing) to 75% (maximum swing) for even note lengths; apply 66% to 83% for triplet note lengths; apply 50% to 66% for evenplus-triplet note lengths (e.g., 8th-note + 8th-note-triplet). • Depth 0~100% Vel (Velocity) 0~200% The Playback Effect depth parameter will have a different effect—such as quantize length, swing velocity, etc.— depending on which Playback Effect (01~27) is selected. (For a complete listing of the designated depth parameters for each type, see the Playback Effect Template Type List on page 17.) • Quantize The Quantize function aligns notes in the specified track to the nearest beat as designated by the Quantize value and strength parameters. This is helpful for tightening up sloppy timing. Note that “perfect” quantization tends to result in an unnatural, mechanical feel, which may or may not be a good thing, depending on the type of feel you’re going for. Val (Value) , , , , , , , , , “Val” determines to what beats the note data in the corresponding track will be aligned. If you select “#16th-note#”, for example, all notes in the track will be aligned to the nearest 16th-note beat, to a degree determined by the strength parameter, below. You can select a quantize value by pressing the key in the numeric keypad with the corresponding note value printed above it. Pressing button 7 more than once toggles between 8th-note-triplet and 8th-note + 8th-note-triplet, and pressing button 8 more than once toggles between 16th-notetriplet and 16th-note + 16th-note-triplet. (For a complete listing of the quantize parameters for each type, see the Playback Effect Template Type List on page 17.) Str (Strength) 0~100% “Str” determines how strongly the notes are attracted to the specified quantize value. At a setting of 0%, no quantization will occur, while a setting of 100% will cause all notes to be aligned precisely to the nearest specified beat value. “Vel” determines the relative increase or decrease of the off-beat velocity value (as set by the Quantize value) in relation to the onbeat. A setting of 100% will produce no effect, whereas settings between 0~99% will produce a decrease in the off-beat velocity value, and settings of 101~200% will produce an increase in offbeat velocity value. Gate (Gate Time) 0~200% “Gate” determines the relative length of the off-beat note duration (as set by the Quantize value) in relation to the on-beat. A setting of 100% will produce no effect, whereas settings between 0~99% will shorten the gate time of the off-beat, and settings of 101~200% will lengthen the gate time of the off-beat. • ClockSft (Clock Shift) –99~+99 “ClockSft” determines the amount by which all notes in a track are shifted in time, forward or backward, by the specified number of clocks (at 96 clocks per quarter-note). Note that since the Clock Shift parameters shift the timing of all notes and other events in the specified track forward or backward, they can significantly alter the feel of the song. You could move the notes forward (positive settings) to create a more laid-back feel, or backward (negative settings) to produce a more powerful, driving feel. Of course, Clock Shift comes in extremely handy when you want to correct timing that is consistently off in the first place. • Vel.Ofst (Velocity Offset) –99~+99 “Vel.Ofst” determines the amount of velocity change for all note data by the same relative amount. A setting of 00 will cause no change, whereas negative values will decrease velocity levels, and positive values will increase velocity levels. • Vel.Rate (Velocity Rate) 0~200% “Vel.Rate” determines the ratio between the lower and higher velocity values. A setting of 100% maintains the original relationship between the notes, while lower values produce a narrower dynamic range (minimum 1%), and higher values produce a broader dynamic range (maximum 200%). • GateRate (Gate Time Rate) 0~200% “GateRate” determines the ratio between the shorter and longer gate time values. A setting of 100% maintains the original relationship between the notes, while lower values produce a narrower gate time range (minimum 1%), and higher values produce a broader gate time range (maximum 200%). You can use Gate Time to give the entire pattern a more staccato or legato feel, as desired. NOTE The VCE_EDIT.A1S file introduces the Playback Effect function. (For more information, see page 7) 16 ❑ Playback Effect Template Type List DESCRIPTION DEPTH PARAMETER 00 [ 01 [Just 02 [Just 03 [Just 04 [Just 05 [Just 06 [Just 07 [Just 08 [Shufle 09 [Shufle 10 [Shufle 11 [Shufle 12 [Loose ] ] ] ] ] ] ] ] ] ] ] ] ] Off. No Playback Effect applied. Aligns to the nearest 16th-note. Aligns to the nearest 8th-note. Aligns to the nearest quarter-note. Aligns to the nearest 16th-note-triplet. Aligns to the nearest 8th-note-triplet. Aligns to the nearest 16th-note + 16th-note-triplet. Aligns to the nearest 8th-note + 8th-note-triplet. Quantize 16th-notes and delay off-beats. Quantize 8th-notes and delay off-beats. Quantize quarter-notes and delay off-beats. Quantize 8th-note-triplets and delay third off-beats. Delay 16th-note off-beats and lengthen gate time. — Quantize Strength Quantize Strength Quantize Strength Quantize Strength Quantize Strength Quantize Strength Quantize Strength Quantize Strength and Swing Rate Quantize Strength and Swing Rate Quantize Strength and Swing Rate Quantize Strength and Swing Rate Swing Rate and Gate Time 13 [Loose 14 [Loose 15 [Loose 16 [Off 17 [Off 18 [Off 19 [Off 20 [On 21 [On 22 [On 23 [On ] ] ] ] ] ] ] ] ] ] ] Delay 8th-note off-beats and lengthen gate time. Delay quarter-note off-beats and lengthen gate time. Delay 8th-note-triplet off-beats and lengthen gate time. Emphasize velocity and gate time of off-beats. Emphasize velocity and gate time of off-beats. Emphasize velocity and gate time of off-beats. Emphasize velocity and gate time of off-beats. Emphasize velocity and gate time of on-beats. Emphasize velocity and gate time of on-beats. Emphasize velocity and gate time of on-beats. Emphasize velocity and gate time of on-beats. Swing Rate and Gate Time Swing Rate and Gate Time Swing Rate and Gate Time Swing Velocity and Gate Time Swing Velocity and Gate Time Swing Velocity and Gate Time Swing Velocity and Gate Time Swing Velocity and Velocity Offset Swing Velocity and Velocity Offset Swing Velocity and Velocity Offset Swing Velocity and Velocity Offset 24 [Heavy 25 [Humanize 26 [Techno 27 [Acid ** [ ] ] ] ] ] Delay quarter-note off-beats and emphasize them Slightly quantize quarter-notes and randomize values. Quantize 16th-notes and set velocity flat. Quantize 16th-notes and delay off-beats. Original template (00) or modified templates (01~27). Swing Rate and Velocity Quantize Strength Velocity Offset and Velocity Rate Swing Rate (Depends on selected template.) ENGLISH TEMPLATE 17 ❑ Normalize Playback Effect (Song Job 1) Although the Playback Effects apply to the song playback only, and do not affect the original song data, Version 2’s Normalize Playback Effect feature lets you apply the designated Playback Effects permanently to the current song. The Normalize Playback Effect feature is located in Song Job 1 (see the Owner’s Manual, page 95). ❑ Quantize Parameters (Type, Sens, Strength) Version 2 includes additional Quantize parameters in Song Job 3, including Type, Sensitivity, and Strength, which greatly expand your ability to put just the right feel into your music. ENGLISH To use Normalize Playback Effect: 1. Press [JOB], then [F2] (Job1) to enter Song Job 1 Mode. 2. Position the cursor over “Normalize Effect” and press [ENTER]. There are 19 Quantize types, with “00” representing off, and 01~19 representing the same types as in Playback Effect Mode (For descriptions of each, refer to the Playback Effect Template Type List on page 17, 00~19). The Sensitivity (“Sens”) parameter determines the range over which notes will be quantized. This parameter can be set from –100 through 0% (no quantization) to +100. A setting of either –100% or +100% will cause all notes to be quantized. 18 3. Press the [TRACK] buttons for those tracks which you want to apply the Playback Effects to. (Selected Track buttons will light in red.) 4. Press [ENTER] to activate Normalize Playback Effect. The Strength (“Strng”) parameter determines how strongly the notes are attracted to the specified quantize value. At a setting of 0% no quantization will occur, while a setting of 100% will cause all notes to be aligned precisely to the nearest specified beat value. Note that with Version 2 you can select a quantize value (“Qunt”) by pressing the button in the numeric keypad with the corresponding note value printed above it. Pressing button 7 more than once toggles between 8th-note-triplet and 8th-note + 8th-notetriplet, and pressing button 8 more than once toggles between 16th-note-triplet and 16th-note + 16th-notetriplet. 6 QUICK SPLIT/LAYER AND DYNAMIC SPLIT ❑ QUICK SPLIT/LAYER ENGLISH Version 2 features Quick Split and Quick Layer functions which make it easy to split the keyboard or layer two voices. When the W5/W7 is in Voice Mode or in Song Play Mode with the Keyboard Setup screen visible (see the Owner’s Manual, page 83), you can easily activate Quick Split or Quick Layer. ❑ DYNAMIC SPLIT Version 2’s Dynamic Split feature frees you from the limitations of a fixed split point. When Dynamic Split is active, the split point is determined by the first note you play when no keys are being pressed. To activate Quick Split: Hold a [TRACK] button and press another [TRACK] button. The first Track button you hold will become the upper (right side) voice, and the second Track button will become the lower (left side) voice, as indicated in the screen. q Note that if Dynamic Split (see below) is designated in Split Mode, accessing Quick Split will engage in Dynamic Split status. Pressing a single Track button will reinstate the Keyboard Normal Mode. To activate Quick Layer: Dynamic Split parameters are accessible in the Song Play Mode Keyboard Setup screen (see the Owner’s Manual, page 82). To enter Dynamic Split Mode: 1. In Song Play Setup Mode, press [F7] to display the Keyboard Setup screen. 2. Position the cursor over the Mode parameter and set it to split status using [INC], [DEC] or [JOG]. 3. Position the cursor over the “Dynmc” parameter and select one of the Dynamic Split options. Left Right 1. First, in Keyboard Normal Mode, select a [TRACK] button with one of the voices you want to layer. 2. Hold [SHIFT] and press the [TRACK] button for the second voice you want in the layer. q Depending on which Dynamic Split option you select, you can set either the upper or lower voice to play first, as well as specify an interval zone on each side of the split point to provide unprecedented playing flexibility. The two layered Track numbers are indicated in the screen. To change the layered (second) voice, simply hold Shift and press another Track button. Pressing a single Track button will reinstate the Keyboard Normal Mode. 19 • off • 1stL (1st Lower) When set to “off”, the Dynamic Split is not active, and the split point is fixed as determined by the Point setting. When set to “1stL”, the key just above the first note played will be the lower voice. • upr (Upper) When set to “upr”, the first notes you play will be the upper voice, and the highest note will designate the new split point according to the specified Interval setting (see below). Keys played New split point setting • 1stU (1st Upper) When set to “1stU”, the key just below the first note played will be the upper voice. ENGLISH New split point setting Keys Played Interval 7th Highest key played New split point setting Keys played • lwrL (Lower Low) When set to “lwrL”, when the upper range of the keyboard is played, the key below the specified interval from the highest note played will become the split point (similar to “upr”); when the lower range of the keyboard is played, the key above the specified interval from the lowest note played will become the split point. Lowest key played Keys played New split point setting Interval 7th • lwrH (Lower High) When set to “lwrH”, when the upper range of the keyboard is played, the key below the specified interval from the highest note played will become the split point (similar to “upr”); when the lower range of the keyboard is played, the key above the specified interval from the highest note played will become the split point. Keys played Highest key played New split point setting Interval 7th NOTE When “lwrL” or “lwrH” is selected, if the split point as determined by playing the lower range of the keyboard is lower than the Keyboard Setup split point setting, the Keyboard Setup split point setting will take precedence. 20 Intvl (Interval) The “Intvl” setting determines the interval; you can select a 3rd, 5th, 7th or 9th interval setting. Upper/Lower AT, PB, MW, Sus, FV, FC Just as in 4-zone Mode (see the Owner’s Manual, page 83), Dynamic Split lets you turn the controllers on and off for the upper and lower voices. Controllers which you can turn on or off include aftertouch, pitch bend, modulation wheel, sustain, foot volume and foot controller. 7 OTHER FEATURES IN Version 2 Version 2 incorporates a variety of other features which streamline the W5/W7’s operation as well as greatly expand your playing options. Measure Display Version 2 always displays the current measure number of the selected song at the top of the mixer screen, to the left of the available memory gauge, in Song Play Mode (excluding Song Setup). Thus, you can always see the current measure location during mixdown, rather than having to first display the Song Sequence Play screen. Mixer Screen Jump ENGLISH ❑ Song Play Mode Version 2 provides easier navigation within the mixer with the Mixer Screen Jump feature. This lets you, for example, quickly jump back and forth between the Effect Send 1 knob and the Volume fader for the selected track. In Song Multi Play Mode, hold [SHIFT] and press [F2]. To assign a different feature for each arrow, use the cursorup/down buttons. External Sync Tempo Display Quick Song Select Version 2 lets you select any of the 16 songs directly from Song Multi Play Mode (mixer screen) or Song Sequence Play Mode (see the Owner’s Manual, page 80), using the 16 Track buttons. In this case, the number of each Track button corresponds with the song of the same number. Just hold [SONG] and press the [TRACK] button with the same number as the song you want to select. Version 2 displays the tempo value of a connected external sequencer when the W5/W7 is set to MIDI (external) clock status. The tempo value of the external sequencer’s clock will appear in parentheses in the tempo field of Song Sequence Play Mode. (For details about setting the clock status, see the Owner’s Manual, page 84.) Quick Measure Locate Version 2 lets you jump to either of the two measure locate points in a song directly from the Song Multi Play Mode screen. When the mixer is displayed, simply hold [SHIFT] and press [F5] (Location 1) or [F6] (Location 2). (For details about how to assign the two measure locate points, see the Owner’s Manual, page 81.) Song Playback From Specified Measure Version 2 lets you start song playback from any measure and still have the system exclusive, program change, control change and other data applied. Holding [SHIFT] and pressing [RUN] will cause the song to start from the currently specified measure after reading the data in the previous measures—so that the correct voices, etc., will be applied to the playback. Song Setup During Playback Version 2 lets you select the Song Setup Keyboard and Other (Next Song, Transpose) features during song playback. 21 ❑ System Effect ❑ Song Record Mode Tempo Delay Variable Count-in In Version 2 the tempo of the song can be used to automatically determine the delay time in System Effect 3. Version 2 lets you determine the number of measures for count-in before realtime (Overdub or Replace) recording begins. (For details about Song Record Mode, see the Owner’s Manual, page 86). There are four options, as follows: The Tempo Delay feature lets you quickly and easily match the delay time in System Effect 3 to the tempo of the song. The various note values are accessible from the delay parameters below a value of 0.1ms by pressing [DEC]. key ENGLISH When “key” is selected, recording will begin as soon as you press a key on the keyboard. 0 When “0” is selected, recording will begin as soon as you press the Run button. 1 Note that a slower tempo which exceeds the delay range will halve the actual delay time. Also note that using the external clock or changing the tempo may produce noise. When “1” is selected, recording will begin after a onemeasure count-in after pressing the Run button. 2 When “2” is selected, recording will begin after a twomeasure count-in after pressing the Run button. ❑ Song Setup Mode Transpose Version 2 provides an octave Transpose feature in Keyboard Normal Mode (Keyboard Setup screen; see the Owner’s Manual, page 82) that lets you shift the octave up or down between –3 and +3 octaves. Click Beat and Quantize Version 2 displays note values graphically to the right of the Quantize and Click Beat parameters. Also, you can select Quantize and Click Beat parameters via the numeric keypad, in accordance with the note values as printed above the various keypad buttons. There is also a shortcut to accessing the octave Transpose feature from Voice Mode, by pressing [F1] (octave down) or [F2] (octave up). Jump To Next Note Event F1 22 F2 In Step Record Mode (see the Owner’s Manual, page 89), when the Data/Cursor button is set to “Cursor” (red light), you can jump directly to each subsequent note using the [JOG] dial or [CURSOR-LEFT/RIGHT] buttons, rather than having to scroll through each segment of 12 clocks. ❑ Song Play/Voice Mode Transpose Just as in Keyboard Normal Mode (Song Setup screen) and Voice Mode, you can transpose the pitch between –3 and +3 octaves from within Step Record Mode (see the Owner’s Manual, page 90)—by holding [SHIFT] and pressing [F1] (octave down) or [F2] (octave up). F1 Recall that when you switch into Voice Mode, the settings for the selected voice are reset to the factory settings, and the designated Insertion Effect will also be applied. F2 ❑ Song Edit Mode System Exclusive Input When you select a type other than “Excl”, such as VceC (Voice Common), VceE (Voice Element), DrmC (Drum Voice Common), Song, Mlt (Multi), Sys (System), and SwR (Switch Remote), the various types of parameters for the parameter changes can be edited. ENGLISH SHIFT Version 2 provides several convenient new features in Voice Mode (see the Owner’s Manual, page 106). Version 2 also gives you the option of selecting voices from the Voice Mode screen without the factory settings being automatically applied—by holding [SONG] and pressing [VOICE], or by holding [SHIFT] and pressing [VOICE]. The red lamp above both the Song and Voice buttons will light. Parameters D (Device Number) C (Inst Channel) Param (Parameter Type) E (Element Number) Val (Value) input numerically input numerically depends on the type selected input only when the type is “VceE” input numerically In this “Song Play/Voice Mode” the W5/W7 is still technically in Song Play Mode, but you get the benefits of Voice Mode features such as a visual display of which Insertion Effect is specified for the selected voice, plus new features like Quick Octave Shift and Quick Voice Bank Select. For more information about MIDI system exclusive data, refer to “MIDI Data Format” in the separate W5/W7 Technical Information booklet. Song Edit Graphic Measure Select Now you can locate a specific measure in Song Edit Sequence Track Graph Mode (see the Owner’s Manual, page 91) using the numeric keypad. Also, when the Data/Cursor button is set to “Cursor” (red light), you can jump directly to each subsequent note using the [JOG] dial or [CURSOR-LEFT/RIGHT] buttons, rather than having to scroll through each segment of 12 clocks. Note that when you switch to Voice Mode, if all three Insertion Effects are in use by other channels, one will be “stolen” and applied to the voice in the currently selected channel. In Song Play/Voice Mode, an Insertion Effect will not be automatically applied to the currently selected channel. When the W5/W7 is in Song Play/Voice Mode, to switch back into Voice Mode, simply press [VOICE]. To switch back into Song Multi Play Mode, simply press [SONG]. When you switch back to Song Play Mode, the settings for the voice will not be changed. Another new aspect of Version 2 is that when you switch from Voice Mode to Song Play Mode, you can hold [SHIFT] and press [SONG] and the multi settings will be restored as they were before entering Voice Mode. 23 ❑ Voice Edit Mode ❑ Store Mode Element Assign Song/Internal Voice Bank Copy Version 2 provides a shortcut for selecting voice elements from the Voice Element Assign function (see the Owner’s Manual, page 112). Now you can position the cursor over the two-letter element category code (if P1 or P2 is selected) and directly select a different element category. As you do, the first element of each category will be recalled. Version 2 provides much greater flexibility for storing and managing user voices. Specifically, you can now transfer the contents of any Song voice bank into the Internal voice bank as long as the Song voices don’t use the Song Element. ENGLISH This gives you the option of storing a set of Song voices as a normal voice bank on floppy disk, rather than as “Song + Voice” data only, which cannot be loaded into the Internal voice bank. The GM, Preset, or Internal voice bank can be stored to the existing Song voice bank if the voices don’t use the Internal Elements. Voice Common Copy Version 2 features a convenient Voice Common Copy function in Voice Edit Mode (see the Owner’s Manual, page 110). Voice Common Copy lets you copy controller parameters only, or effect parameters only, or both controller and effect parameters from a designated voice to the current voice. To access Voice Common Copy, press [F1] (Com) to select the Common parameters, followed by [F6] (Vol) to select the Volume function. Then press [F2] (Copy). F2 Voice banks can be exchanged by using the Memory function of Utility Mode (see page 25). Store Mode Voice Directory When storing a multi or voice in Store Mode (see the Owner’s Manual, page 129-130), you can now call up the Song Directory or Voice Directory, respectively, by pressing [F8] (Dir). F6 Voice Element Copy Version 2 features a convenient Voice Element Copy function (see the Owner’s Manual, page 112) that lets you copy element and pitch from a designated voice to a specified element (1~4) of the current voice. To access Voice Element Copy, press [F2] (Elem) to select the Element parameters, followed by [F5] (Assign) to select the Assign function. Then press [F2] (Copy). F8 When storing a voice, note that the currently selected track (channel number) will be indicated to the right of the currently selected voice to be stored. q Version 2 lets you designate auto or manual multi store in Utility Mode, Other Setup (see page 25). F2 F5 The destination element (“To”) can also be selected by pressing [TRACK 1~ 4]. 24 ❑ Utility Mode Memory Copy The Memory function (see the Owner’s Manual, page 143) has been expanded to give you the option of exchanging various voice banks. For example, in addition to being able to copy the Internal, Preset (1, 2, 3), GM or Song Voice (1~16) bank to the Internal or Song Voice (1~16) banks, you can copy a song voice bank to the Internal bank. Multi Store Auto/Manual In Version 1, whenever you made changes to a multi they were stored in the multi automatically. Version 2 features a Multi Store function accessible from the Other Setup screen (see the Owner’s Manual, page 149) which lets you choose whether or not you want the changes you make in a multi to be stored automatically or manually using Store Mode. • GM • Preset 1 • Preset 2 • Preset 3 GM1 (StdKit) and GM2 (RoomKit) Preset 1 (QY10 Kit) and Preset 2 (SY85 Kit) GM1 (StdKit) and GM2 (RoomKit) Preset 3 (HipHopKit) and Preset 4 (Lofi Kit) CS Assign and FC Assign There is a new aspect to the CS Assign function in the Controller screen (see the Owner’s Manual, page 147), as well as a new function, FC Assign. ENGLISH Depending on which voice bank you copy from, specific drum voice banks will also be copied, as follows: The “auto” setting is the default setting which means that all changes you make in multi parameters will be stored automatically, and will be retained even if you switch from song to song. The “manual” setting will keep the changes you make in a memory buffer, and will be lost when you switch to another song, unless you perform the Multi Store function in Store Mode. Manual lets you make changes in a multi without fear of losing the original settings in the song. Free Internal Element • CS Assign You can assign one of many functions to be controlled by the continuous slider on the W5/W7’s panel. “000” becomes the default setting which allows the CS to be used as a data entry slider, and “032” turns the CS off. • FC Assign You can assign one of many functions to be controlled by a connected foot controller. Selectable parameters include 000 (off), 001~031, 032 (off), and 033~119. When you want to use the foot controller in its normal capacity, select parameter “004: FootCtrl”. Note that when loading an All Data type file which was saved in Version 1, FC Assign will automatically default to “000: off”. Version 2’s Free Element Initialize function in the Initialize screen (see the Owner’s Manual, page 144) lets you initialize unused Internal elements which unintentionally have been stored by using a commercially available disk, to provide more memory space for those voices you need. To access Free Element Initialize, press [F2] (Init) and select “Free Element” using [INC] or [JOG]. F2 25 ❑ Disk Mode Auto Load and Auto Play Version 2 features new Auto Load and Auto Play options in Disk Mode (see the Owner’s Manual, page 131). ENGLISH Auto Load lets you insert a floppy disk when the power is off so that a file on the disk will load automatically into songs when you turn the power on—so that the file is ready to play. Auto Play lets you have the file load into Song 01 and start playing automatically after the W5/W7 system starts up. Auto Load works by saving a song file to floppy disk as a “1 Song + Voice” (.A1S) type file using the name AUTOLOAD. (“AUTOLOAD.A1S”) Auto Play works by saving a song file to floppy disk as a “1 Song + Voice” (.A1S) type file using the name AUTOPLAY. (“AUTOPLAY.A1S”) Note that you can only store one Auto Load or Auto Play file on a single floppy disk. Also note that when you load the .A1S type song file, its voice data will be loaded into the Song voice bank, thus overwriting any existing Song voices. NOTE The AUTOPLAY.A1S file is included in the accompanying floppy disk. (For more information, see page 7) CAUTION Turning the power off or ejecting the floppy disk while loading may cause irretrievable data loss or floppy disk drive malfunction. 26 Changes to the Technical Information Booklet Please use the new information below in conjunction with the W5/W7 Technical Information booklet. ● Voice List Two new Preset voice banks, P2 and P3, are included in Version 2. Please note the following: • The voices in Preset voice bank P1 are the same as those in the “Preset Voice List” on pages 6 ~ 11 of the Technical Information booklet. • The voices in Preset voice bank P2 are the same as those in the “Internal Voice List” on pages 12 ~ 17 of the Technical Information booklet. • The voices in Preset voice bank P3 are listed under “Preset Voice Bank 3” on pages 28 ~ 31, herein. ● Drum Voice Key Assignments Two new Preset drum voices (PD03 and PD04) are included in the Preset Drum voice bank, which include some differences in key assignments. Please note the following: ● Element List Eleven new preset elements (246 ~ 256) are added to the P2 element bank, as listed on pages 19 ~ 24 of the Technical Information booklet. Please add the following to the list which ends on page 24: Element Element Category Bank Number LCD Name P2 VBInsect Vibraslap Insect 247 Sine 5th Sine 5th 248 Science Science 249 OffMumin Off Mumin 250 Ghost Ghost 251 TapeSpin Tape Spin 252 Bell Dly Bell Dly 253 Bird Bird 254 Reviw Reviw 255 PlsSiren Pulse Siren 256 GhostCH Ghost Choir 246 Se • A listing of the key assignments for PD03 and PD04 are provided in the “DRUM VOICE LIST” chart on page 32, herein. 27 NORMAL VOICE LIST Normal-Voice-Liste Liste des Sonorités Normales INSERTION EFFECT VOICE Voice Voice Bank 3 (001~064) Effect Preset Voice Voice Name Effect Type Number Category Mode Voice Number 001 002 003 004 005 006 007 008 009 010 011 012 013 014 015 016 017 018 019 020 021 022 023 024 025 026 027 028 029 030 031 032 033 034 035 036 037 038 039 040 041 042 043 044 045 046 047 048 049 050 051 052 053 054 055 056 057 058 059 060 061 062 063 064 28 VOICE INSERTION EFFECT Voice Category Effect Type Ld Se Dr Ba Fx Pd Pf Voice Name Bass&Lead Fat&fat Blue Lead YellowLead Pump 7sus4 Pump Tri 1 Pump Tri 2 Koff Lead Digi Sync N-Hall DOWN L.F.O. HaHahaha Tek Boy Tek Loop Tek S&H MWScratch1 MWScratch2 Tape Spin Choral Hit 4spHipHop1 4spHipHop2 4spTekno 1 4spTekno 2 Super Sub ElekiTight Joy Bass Tek Line Tight Syn LatelyBass Star Dust Gang VocoBass P Funk Pick Comp LoFiAcBass Upright Rave Hit 1 Rave Hit 2 Acid Hit1 Acid Hit2 Acid Hit3 Saxes Hit Brass Hit Staring End Time Tek Liner OverTheSky Square St Ambient St BeautyPad ReverseRR Feed Pad AngelHair Ice Doll Flute Pad BuzzDrone Lily Dance CP Ana EP EP Phaser ClaviPhase 60Vintage AcP & EP Effect Mode off on on on on on on off off on on on on on on on on on on on on on on on on on on on on on on on on on on on on on on on on on on on on on on on off off on on on on on on on on on off on on on off 3 Band EQ 3 Band EQ Dist+Comp Dist+Comp Flanger A Flanger A Flanger A 3 Band EQ 3 Band EQ Flanger B Phaser Auto PAN 3 Band EQ Dist+Comp Phaser Flanger A Dist+Wah Dist+Wah Distortion Cross Delay Reverb Plate Reverb Plate Reverb Plate Reverb Plate 3 Band EQ 3 Band EQ Flanger A Flanger B 3 Band EQ 3 Band EQ Phaser Rotary Sp. Dist->Flange Dist+Wah Dist+Comp Early Ref.1 Dist+Comp Aural Exc Aural Exc Early Ref.1 Early Ref.1 Reverb Room 3 Band EQ 3 Band EQ Phaser Flanger B Flanger A Flanger B 3 Band EQ Cross Delay 3 Band EQ Cross Delay Dist->Flange Chorus B Chorus A Pitch Chng 2 Flanger B "Delay L,C,R" Dist->Phaser Pitch Chng 1 Phaser Phaser Rotary Sp. 3 Band EQ MIDI CONTROL MC 1 Device Parameter MC 2 Enable* Device Parameter Enable* MIDI CONTROL MC 1 Device General1(CS) General1(CS) General1(CS) General1(CS) General1(CS) General1(CS) General1(CS) General1(CS) General1(CS) ModWheel General1(CS) General1(CS) General1(CS) General1(CS) General1(CS) General1(CS) ModWheel ModWheel ModWheel General1(CS) General1(CS) General1(CS) General1(CS) General1(CS) General1(CS) General1(CS) General1(CS) General1(CS) General1(CS) General1(CS) ModWheel General1(CS) General1(CS) General1(CS) General1(CS) General1(CS) General1(CS) General1(CS) General1(CS) General1(CS) General1(CS) General1(CS) General1(CS) General1(CS) General1(CS) General1(CS) ModWheel ModWheel General1(CS) General1(CS) General1(CS) General1(CS) ModWheel ModWheel ModWheel ModWheel ModWheel General1(CS) General1(CS) General1(CS) General1(CS) General1(CS) General1(CS) General1(CS) Parameter flt cutof sys.ef 2 flt cutof flt cutof flt cutof flt cutof sys.ef 3 flt cutof flt cutof ins.ef ins.ef lfo speed flt reso lfo speed lfo speed lfo speed ins.ef ins.ef off sys.ef 2 ins.ef ins.ef ins.ef ins.ef ins.ef sys.ef 2 flt cutof ins.ef flt cutof flt cutof off ins.ef ins.ef ins.ef flt cutof ins.ef flt cutof flt band ins.ef ins.ef ins.ef ins.ef ins.ef ins.ef ins.ef ins.ef lfo speed ins.ef flt cutof flt cutof ins.ef flt reso ins.ef ins.ef ins.ef flt reso ins.ef ins.ef flt cutof feg decay ins.ef ins.ef ins.ef sys.ef 1 MC 2 Enable* 123___12-12-1231231234 12312312-__-12-12-1--1--1--12-12-__-____ 1234 1234 1234 1234 __-12312312-12-12-__-1234 1234 12-12-1--12-12-1--1234 1234 1234 12312312-1231234 12312-12312-12-1231234 1234 1231231231_-12-12-1--12-_23- Device ModWheel ModWheel ModWheel ModWheel ModWheel ModWheel ModWheel ModWheel ModWheel General1(CS) ModWheel ModWheel ModWheel ModWheel ModWheel ModWheel General1(CS) General1(CS) ModWheel ModWheel ModWheel ModWheel ModWheel ModWheel ModWheel ModWheel ModWheel ModWheel ModWheel ModWheel General1(CS) ModWheel ModWheel ModWheel ModWheel ModWheel ModWheel ModWheel ModWheel ModWheel ModWheel ModWheel ModWheel ModWheel ModWheel ModWheel General1(CS) General1(CS) ModWheel ModWheel ModWheel ModWheel General1(CS) General1(CS) General1(CS) General1(CS) General1(CS) General1(CS) ModWheel ModWheel ModWheel ModWheel ModWheel ModWheel Parameter off off off off off off off off off flt cutof off off off off flt cutof flt cutof flt cutof flt cutof off off off off off off off off off off off off flt cutof off off off off off off off off off off off off off off off ins.ef lfo speed off off off off flt reso flt cutof flt cutof ins.ef flt cutof sys.ef 2 off off off off off off Enable* ________-__-__________ ______12-__-__-__-_--1--1--12-12-__-____ ____ ____ ____ ____ __-________-__-__-_2-____ 1234 __-__-_--__-__-_--____ ____ ____ ________-___1234 123__-_____-__-1231234 1234 123123123__-__-__-_--__-___- *The "Enable" column indicates Element on/off and MIDI control status, where 1,2,3 and 4 represent Elements 1,2,3 and 4, respectively. A horizontal line at the baseline ("_") or a number indicates that an element is turned on, with the number indicating that the element can be controlled by MIDI, and the horizontal line indicating that it cannot. A horizontal dash ("-") indicates that the element is turned off. For example, an Enable situation coded with "12_-" indicates that Elements 1, 2 and 3 are turned on, with Elements 1 and 2 able to be controlled by MIDI. Element 4 is turned off. ELEMENT Element 1 Element Element Element Bank Number Category Element 2 Element Name Element Element Element Bank Number Category Element 3 Element Name Element Element Element Bank Number Category Element 4 Element Name Element Element Element Bank Number Category Element Name Element Element Element Bank Number Category Element Name ELEMENT Element 1 Element Element Element Bank Number Category P1 P2 P1 P1 P1 P1 P2 P2 P2 P2 P2 P2 P2 P2 P1 P2 P2 P2 P2 P1 P2 P2 P2 P2 P1 P1 P1 P2 P1 P1 P1 P2 P1 P1 P1 P1 P1 P1 P1 P2 P2 P2 P1 P1 P1 P1 P2 P2 P2 P2 P1 P2 P2 P2 P2 P2 P2 P1 P1 P2 P1 P2 P1 P1 238 20 152 157 234 234 13 13 116 33 26 158 138 248 165 24 234 234 251 198 179 172 178 178 165 118 155 17 156 153 45 11 215 140 134 132 141 218 218 207 208 208 242 219 238 180 78 60 17 19 183 61 67 53 63 39 65 44 11 24 13 22 28 1 Br Ld Ba Ba Br Br Ld Ld Pc Ld Ld Se Se Se Ba Ld Dr Dr Se En Dr Dr Dr Dr Ba Gt Ba Ld Ba Ba Pf Ld En Ba Ba Ba Ba En En Dr Dr Dr Rd Br Br St Fx Pd Ld Ld St Pd Pd Pd Pd Pd Pd Pf Pf Ld Pf Ld Pf Pf Element 2 Element Name SynBrs10 Sweep SynBs3 SynBs8 SynBrs6 SynBrs6 Saw3 Saw3 DigiWobb RezLd Digi6 Seq2 Guffaw1 Science SynBs16 Digi4 Scrach Scrach TapeSpin Choir1 BdStd BDStdH BDAnalog BDAnalog SynBs16 Mute3 SynBs6 Squ SynBs7 SynBs4 Stuff7 Saw1 Vox6 BeatleBs PickBs1 A.Bass2 Fretls1 OrchHit OrchHit CyCrush CyChina CyChina AltoSx Trumpet SynBrs10 SynSt2 RevSyn Pad26 Squ SquSaw SynSt5 Pad27 Pad33 Pad19 Pad29 Pad5 Pad31 Stuff6 E.Grand3 Digi4 EP2 Digi2 EP17 A.Piano1 Element Element Element Bank Number Category P2 P2 P1 P1 P1 P1 P2 P2 P2 P2 P2 P2 P2 off off off P2 P2 P2 P1 P2 P2 P2 P2 P1 P1 P1 P2 P1 P1 P1 P2 P1 P1 P1 off P1 P1 off P1 P1 P1 P1 P1 P2 P1 P2 P2 P2 P2 P1 P2 P2 P2 P2 P2 P2 P2 P1 P2 P1 off P1 P1 30 20 152 157 234 234 13 13 116 159 25 142 139 ---92 154 251 198 185 184 192 199 161 139 155 17 153 155 155 11 216 149 141 -132 218 -244 243 243 245 219 164 180 78 57 17 18 183 61 63 65 123 1 74 5 36 24 17 -93 14 Ld Ld Ba Ba Br Br Ld Ld Pc Se Ld Se Se ---Fx Se Se En Dr Dr Dr Dr Ba Ba Ba Ld Ba Ba Ba Ld En Ba Ba -Ba En -Rd Rd Rd Rd Br Se St Fx Pd Ld Ld St Pd Pd Pd Se Pi Pd Pi Pf Ld Pf -Or Pf Element 3 Element Name BrsLd1 Sweep SynBs3 SynBs8 SynBrs6 SynBrs6 Saw3 Saw3 DigiWobb Shilling Digi5 Insect Guffaw2 ---WindLoop Burst TapeSpin Choir1 SDRock SDRmH2 SDAna9 TMEle SynBs12 AlenBs4 SynBs6 Squ SynBs4 SynBs6 SynBs6 Saw1 Vox7 SlapBs2 Fretls1 -A.Bass2 OrchHit -TenorSx1 AltGrwl AltGrwl TenorSx2 Trumpet TuneRes2 SynSt2 RevSyn Pad23 Squ SawSqu SynSt5 Pad27 Pad29 Pad31 Bush Flute1 Pad40 PanFlt1 Harpsi1 Digi4 EP6 -Stuff1 EP3 Element Element Element Bank Number Category P1 P2 off off P1 P1 P2 P1 P2 off off off off off off off off off off P2 P2 P2 P2 P2 off P1 P1 off off off off P2 P1 off off off off off off P1 P1 P1 P1 P1 off P2 P2 P2 off P2 off off P1 P2 P2 P2 P2 P2 off off off off off P1 166 20 --234 234 13 36 116 ----------35 202 204 204 202 -139 155 ----11 0 ------222 219 219 246 222 -54 78 47 -19 --0 83 87 1 65 5 -----14 Ba Ld --Br Br Ld Pf Pc ----------Pd Dr Dr Dr Dr -Ba Ba ----Ld Pi ------Br Br Br Rd Br -Pd Fx Pd -Ld --Pi Fx Fx Pi Pd Pi -----Pf Element 4 SynBs17 Sweep SynBrs6 SynBrs6 Saw3 Harpsi1 DigiWobb Pad1 HHClose HHAnCls HHAnCls HHClose AlenBs4 SynBs6 Saw1 Whistle MuteTp Trumpet Trumpet BariSx MuteTp Pad20 RevSyn Pad13 SquSaw Whistle DigiEcho TimpMute Flute1 Pad31 PanFlt1 EP3 off off off off off off P2 off off off off off off off off off off off off P1 P2 P2 P2 P2 off off off off off off off P2 P2 off off off off off off P1 P1 P1 off off off off P2 off off off off off off P1 P2 off off off off off off off off off ------13 ------------61 203 203 203 200 -------11 161 ------132 137 159 ----78 ------211 41 ---------- ------Ld ------------Cp Dr Dr Dr Dr -------Ld Se ------Ba Ba Ba ----Fx ------En Pd ---------- Element Name Saw3 Hndbel1 HHAnOpn HHAnOpn HHAnOpn HHOpen Saw1 SlapAtk A.Bass2 AlenBs2 SynBs10 RevSyn Vox2 Pad7 29 Preset Voice Bank 3 (065~128) VOICE Voice Number 065 066 067 068 069 070 071 072 073 074 075 076 077 078 079 080 081 082 083 084 085 086 087 088 089 090 091 092 093 094 095 096 097 098 099 100 101 102 103 104 105 106 107 108 109 110 111 112 113 114 115 116 117 118 119 120 121 122 123 124 125 126 127 128 30 Voice Category Pf Or Gt St Br Rd Pi Sc Fx Et Pc Se Co MIDI CONTROL INSERTION EFFECT Voice Name TX816 EP Mod Roades House Orgn The Cat HeavyMetal Prince Stratus Eleki Man Progressiv Elec Mute LoFi Sax Shaku8 Ana Pluck Acid Digi SquareSeq Pulse Seq Saw Stab Harpy Wire Comp DeCaY Platinum Polaris Moon Base WaterMalet Sun Set Fly Sine Space Dust Galaxy Ice Land Insectoid Ambi S&H LisWat Deep Ambi1 Deep Ambi2 Psychic Myth Maria Puppet Stoma SnowFlakes Shanbala Spell Beijing Chiang Mai Jungle Tom EthnicPerc Meadow GhostRiver Feed Bell Crash SpaceLab Feedle Mad Man Going Up Apollo S.O.S Teleport Torpedo Emergency Planet X CuicaWomen Bahama RckBandHit MerryXmas Effect Mode on on on on on on on on on on off on off on off off off off on off on on on on on on on on on on on on on on on on on on on on on on on on off on on on on on on on on on on on on on on on on on on on Effect Type Symphonic Flanger B Aural Exc Rotary Sp. Dist->Delay Distortion Dist->PtChng Reverb Plate 3 Band EQ Dist+Wah 3 Band EQ Early Ref.2 3 Band EQ 3 Band EQ 3 Band EQ 3 Band EQ 3 Band EQ 3 Band EQ Phaser 3 Band EQ Dist->Delay 3 Band EQ "Delay L,C,R" Symphonic 3 Band EQ Cross Delay Stereo Echo Cross Delay Stereo Echo Cross Delay 3 Band EQ Gate Reverb Auto PAN Phaser 3 Band EQ Pitch Chng 1 "Delay L,R" Pitch Chng 1 Phaser Chorus A 3 Band EQ Phaser Pitch Chng 2 Early Ref.2 Reverb Plate Reverb Room Auto PAN Cross Delay Dist->Delay "Delay L,R" Flanger A Flanger A 3 Band EQ Cross Delay Phaser Flanger A Pitch Chng 1 Phaser Dist->Phaser Dist->Flange Early Ref.1 3 Band EQ Distortion Early Ref.1 MC 1 Device Parameter General1(CS) ModWheel ModWheel ModWheel General1(CS) General1(CS) General1(CS) General1(CS) General1(CS) General1(CS) General1(CS) General1(CS) General1(CS) General1(CS) General1(CS) General1(CS) General1(CS) General1(CS) General1(CS) General1(CS) ModWheel ModWheel General1(CS) ModWheel ModWheel General1(CS) General1(CS) General1(CS) ModWheel General1(CS) General1(CS) General1(CS) General1(CS) General1(CS) ModWheel ModWheel ModWheel ModWheel General1(CS) ModWheel ModWheel ModWheel General1(CS) General1(CS) General1(CS) General1(CS) General1(CS) General1(CS) ModWheel General1(CS) General1(CS) General1(CS) General1(CS) General1(CS) General1(CS) General1(CS) General1(CS) ModWheel ModWheel ModWheel General1(CS) ModWheel General1(CS) General1(CS) ins.ef ins.ef off ins.ef sys.ef 3 ins.ef ins.ef ins.ef flt cutof ins.ef flt band flt cutof flt cutof flt cutof sys.ef 2 flt reso flt reso flt reso ins.ef flt reso sys.ef 3 off flt cutof ins.ef off amp level flt reso sys.ef 2 amp level sys.ef 2 lfo speed ins.ef flt cutof ins.ef off off off lfo speed flt reso ins.ef flt cutof ins.ef flt reso flt cutof ins.ef ins.ef ins.ef flt cutof lfo pmd sys.ef 3 flt cutof flt cutof flt cutof flt cutof ins.ef flt reso lfo speed ins.ef ins.ef ins.ef flt cutof sys.ef 2 aeg decay flt band MC 2 Enable* 1231--1--____ 12_12-12_1--12-_--1--1_312-12-1--12-1--12312-12-1231234 12-12-123_2__ _2__ ____ ___4 ____ 12-12312-1231234 1234 12-12312-12312-12-12-1231--12-____ 1___ 12_____ 12-12-12-1231231231_-12-12-12-12-____ _23_ 1234 Device Parameter ModWheel General1(CS) General1(CS) General1(CS) General1(CS) ModWheel ModWheel ModWheel ModWheel ModWheel ModWheel ModWheel ModWheel ModWheel ModWheel ModWheel ModWheel ModWheel ModWheel ModWheel General1(CS) General1(CS) ModWheel General1(CS) General1(CS) General1(CS) General1(CS) ModWheel General1(CS) General1(CS) ModWheel ModWheel ModWheel ModWheel General1(CS) General1(CS) General1(CS) General1(CS) ModWheel General1(CS) General1(CS) General1(CS) ModWheel ModWheel ModWheel ModWheel ModWheel ModWheel General1(CS) General1(CS) ModWheel ModWheel ModWheel ModWheel ModWheel ModWheel ModWheel General1(CS) General1(CS) General1(CS) ModWheel General1(CS) ModWheel ModWheel off sys.ef 1 flt cutof aeg decay sys.ef 1 off off off off off off off off off off off off off off off sys.ef 1 flt cutof off flt cutof amp level amp level flt cutof off sys.ef 2 amp level off off off off lfo speed ins.ef amp level flt reso off lfo speed amp level flt cutof off off off off lfo speed off ins.ef sys.ef 2 off off off off flt cutof ins.ef flt reso flt reso lfo speed flt cutof off sys.ef 3 off off Enable* ___1--1--___4 12___-12__--__-_--_--_____-__-_--__-_--_____-__-1231234 __-12-_2___3_ ____ ____ ____ 12__ __-_____-___1234 1234 1_-12312-123_2-12-__-____--__-_2__ ____ 1______ __-__-12-___123__312-12-12-12-__-____ ____ ____ ELEMENT Element 1 Element Element Element Bank Number Category P1 P1 P1 P1 P1 P1 P1 P1 P1 P1 P1 P2 P1 P2 P2 P2 P2 P1 P1 P1 P1 P2 P1 P2 P2 P2 P2 P2 P2 P2 P2 P1 P2 P2 P2 P1 P2 P1 P2 P2 P2 P2 P2 P2 P2 P2 P2 P1 P2 P2 P2 P2 P2 P2 P2 P2 P2 P2 P2 P2 P2 P2 P1 P1 16 12 76 96 121 184 103 116 174 222 244 10 152 27 17 18 11 97 49 43 44 32 217 76 69 249 248 17 247 35 80 69 158 24 44 123 149 51 129 63 38 59 100 115 197 241 0 198 22 220 146 144 242 87 150 164 74 20 33 94 227 252 137 183 Pf Pf Or Or Gt St Gt Gt St Br Rd Pi Ba Ld Ld Ld Ld Gt Pf Pf Pf Ld En Fx Pd Se Se Ld Se Pd Fx Cp Se Ld Pd Gt Se Cp Se Pd Pd Pd Et Pc Dr Dr Se En Ld Dr Se Se Dr Fx Se Se Pd Ld Ld Fx Dr Se Ba St Element 2 Element Name EP5 EP1 Organ2 Stuff4 Ovdrv1 Violin1 Clean1 Mute1 Strings6 MuteTp TenorSx1 Noise SynBs3 Digi7 Squ SawSqu Saw1 Nylon1 Stuff11 Stuff5 Stuff6 VoxLd Vox8 SlwSweep Pad35 offMumin Science Squ Sine 5th Pad1 Dissolve Digi3 Seq2 Digi4 Pad10 Harm1 Quasar Clste1 Simmer Pad29 Pad4 Pad25 Sitar TnklBell TMJazz Tumba GorstCH Choir1 Digi2 BellTree CymSir LFO Xylo VbSlp TimpMute MadTinke TuneRes2 Pad40 Sweep RezLd EP-S&H CuiKL Bell Dly AlenBs2 SynSt5 Element Element Element Bank Number Category P1 off off P1 P1 P1 P1 off P1 off off P2 P1 P2 off P2 off P1 P1 P2 P1 P2 P1 P2 P1 P1 P2 P2 P2 P2 P2 P1 P2 P2 P2 P1 P1 P1 P2 P2 P2 P2 P2 P2 off P2 P2 P2 P2 P2 P2 P2 P2 P2 P2 P2 P2 P2 P2 P2 P2 P2 P1 P1 17 --96 121 184 116 -174 --9 152 27 -18 -97 129 35 39 32 217 72 46 254 36 46 247 35 80 69 86 53 33 209 202 69 65 233 87 160 100 115 -241 255 128 22 162 160 144 242 130 163 150 80 157 166 128 226 81 119 183 Pf --Or Gt St Gt -St --Pi Ba Ld -Ld -Gt Gt Pd Pf Ld En Pd Pf Pi Pd Pd Se Pd Fx Cp Fx Pd Ld En En Cp Pd Dr Fx Se Et Pc -Dr Se Se Ld Se Se Se Dr Se Se Se Fx Se Se Se Dr Fx Gt St Element 3 Element Name EP6 --Stuff4 Ovdrv1 Violin1 Mute1 -Strings6 --Bottle SynBs3 Digi7 -SawSqu -Nylon1 Stuff5 Pad1 Stuff1 VoxLd Vox8 Pad38 Stuff8 Shaku8 Pad2 Pad12 Sine 5th Pad1 Dissolve Digi3 AtkChr2 Pad19 RezLd Choir12 Choir5 Digi3 Pad31 SleiBell TimpMute Simpl'n' Sitar TnklBell -Tumba PulsCire Stream Digi2 Telephon Simpl'n' LFO Xylo VbSlp Seq1 TuneRes1 MadTinke Dissolve Seashore Tweet 2 Stream CuiKH LoopXylo Dist1 SynSt5 Element Element Element Bank Number Category P1 off off P1 P1 off P2 off off off off P1 off off off off off P1 off off P2 P2 off off P1 P1 P2 P2 P2 P2 off P1 off P2 P2 P2 off P2 off P2 off off off P2 off off P2 P1 P2 P2 off off off P2 P2 P1 off off off off off P1 P1 P1 47 --96 116 -161 ----254 -----190 --151 80 --0 206 248 46 35 246 -69 -157 76 94 -73 -83 ---115 --254 208 140 162 ---14 159 217 -----64 119 65 Pf --Or Gt -Se ----Pi -----St --Se Fx --Pi En Se Pd Pd Se -Cp -Se Fx Fx -Pd -Fx ---Pc --Se En Se Se ---Ld Se En -----Cp Gt Cp Element 4 Element Name Stuff9 Stuff4 Mute1 SlapAtk Shaku8 Harp MtlBel1 Dissolve Whistle Choir9 Science Pad12 Pad1 VibraInc Digi3 Seashore SlwSweep EP-S&H Pad39 DigiEcho TnklBell Reviw Choir11 Guffaw3 Telephon Saw4 Shilling Vox8 StlDrum Dist1 Marimba Element Element Element Bank Number Category off -off -off -P1 96 off -off -off -- -off -off -off -off -off -off -off -off -off -off -off -off -off -off -P1 204 off -off -off -P1 70 P2 185 P1 71 P2 37 P2 246 off -off -off -off -P2 88 P2 87 off -off -off -off -off -off -off -off -off -off -P2 253 P2 250 off -P2 162 off -off -off -off -off -off -off -off -off -off -off -P2 223 P2 172 P1 60 ---Or ----------------En ---Cp Dr Cp Pd Se ----Fx Fx ----------Se Se -Se -----------Dr Dr Cp Element Name Stuff4 Choir7 Digi4 SDRock Digi5 Pad3 VibraInc Octivate TimpMute Bird Gorst Telephon CongaOp BDStdH Glock1 31 DRUM VOICE LIST Dum-Voice-Liste Liste des Sonorités Rythmiques GM Preset pgm# Key Off Alt. GM-1(GD01) GM-9(GD02) GM-17(GD03) GM-25(GD04) GM-26(GD05) GM-33(GD06) GM-41(GD07) GM-49(GD08) Pre-1(PD01) Pre-2(PD02) Pre-3(PD03) Pre-4(PD04) Note# Note Room Kit Rock Kit Electro Kit Analog Kit Jazz Kit Brush Kit Classic Kit Preset1(QY10) Preset2(SY85) HipHop Kit Lofi Kit 24 C 0 Click H 25 CH 0 Brush Tap Reverse Cymbal Reverse Cymbal Standard Kit 26 D 0 27 DH 0 O Brush Swirl L 28 E 0 O Brush Swirl H 29 F 0 O Snare Roll 30 FH 0 Castanet 31 G 0 Snare L 32 GH 0 Sticks Brush Slap Hi Q Hi Q SD Power M Snare M SD Power H Bass Drum M Bass Drum H Bass Drum M Hi Q Brush Slap L 33 A 0 Bass Drum L 34 AH 0 Open Rim Shot 35 B 0 Bass Drum M Bass Drum H BD Power BD Analog L 36 C 1 Bass Drum H BD Power BD Gate BD Analog H 37 CH 1 Side Stick 38 D 1 Snare M SD Rock SD Power L Analog Snare L Brush Slap 39 DH 1 Hand Clap 40 E 1 Snare H SD Power Rim SD Power H Analog Snare H Brush Tap 41 F 1 Floor Tom L Room Tom 1 Power Tom 1 E Tom 1 Analog Tom 1 42 FH 1 43 G 1 Floor Tom H Room Tom 2 Power Tom 2 E Tom 2 Analog Tom 2 44 GH 1 Pedal Hi-Hat 1 Bass Drum M Gran Cassa Analog Side Stick Closed Hi Hat Low Tom Snare M E Tom 3 BD Gate BD RoomS Side Stick L Analog Side Stick Bass Drum H Snare M HHAnOpn Snare M Bass Drum L Hand Clap Room Tom 1 Room Tom 1 SD Rim H Chinese Cymbal Jazz Tom 1 Conga HH Closed 1 Jazz Tom 1 Room Tom 2 Room Tom 2 Room Tom 3 Room Tom 3 Jazz Tom 2 Brush Tom 2 Jazz Tom 2 Hand Clap Room Tom 4 Crash Cymbal Bass Drum L Side Stick Bass Drum H Ride Cymbal Cup SD Power M Jazz Tom 3 Brush Tom 3 Jazz Tom 3 Bass Drum L Bongo H Analog HH Closed 1 Jazz Tom 2 A 1 AH 1 47 B 1 Mid Tom L Room Tom 4 Power Tom 4 E Tom 4 Analog Tom 4 Jazz Tom 4 Brush Tom 4 Jazz Tom 4 Closed Hi Hat Tom 1 Jazz Tom 4 48 C 2 Mid Tom H Room Tom 5 Power Tom 5 E Tom 5 Analog Tom 5 Jazz Tom 5 Brush Tom 5 Jazz Tom 5 Hi-Hat Open Tom 2 Jazz Tom 5 49 CH 2 Crash Cymbal 1 50 D 2 High Tom 51 DH 2 Ride Cymbal 1 52 E 2 Chinese Cymbal Snare 2 53 F 2 Ride Cymbal Cup Tom 4 54 FH 2 Tambourine Hand Clap 55 G 2 Splash Cymbal Cowbell 56 GH 2 Cowbell Shaker 57 A 2 Crash Cymbal 2 58 AH 2 Vibraslap 59 B 2 Ride Cymbal 2 60 C 3 Bongo H BDAnalog Crash Cymbal 1 61 CH 3 Bongo L Cowbell Crash Cymbal 2 62 D 3 Conga H Mute Analog Conga H SDPower Ride Cymbal 63 DH 3 Conga H Open Analog Conga M SDAna9 Ride Cymbal Cup 64 E 3 Conga L Analog Conga L CongaOpL Conga L Open 65 F 3 Timbale H CongaOpH Conga H Mute 66 FH 3 Timbale L CongaMt Conga H Open 67 G 3 High Agogo AgogoL Bongo L Analog HH Open Hand Cym.Open L Room Tom 6 Power Tom 6 E Tom 6 Analog Tom 6 Jazz Tom 6 Brush Tom 6 Jazz Tom 6 Tom 3 Side Stick Hand Cym.Open H Conga H Open HHAnOpn Conga H Open Conga H Open HHAnOpn Jazz Tom 6 Conga H Open Closed Hi Hat Closed Hi Hat2 Hand Cym.Closed H Hi-Hat Open 68 GH 3 Low Agogo AgogoH Bongo H 69 A 3 Cabassa TimbleL Timble L 70 AH 3 Maracas TimbleH Timble H 71 B 3 O Samba Whistle H HHAnCls Tumbrn 72 C 4 O Samba Whistle L Shaker Clave 73 CH 4 74 D 4 75 Guiro Short O Jazz Tom 3 Snare 1 Hand Cym.Closed L Conga H Open Analog HH Closed 46 Hi-Hat Open Analog Tom 3 BD RoomS Bass Drum L SD Rock Brush Tom 1 Analog HH Closed 2 Power Tom 3 BD Power Jazz Tom 1 Analog HH Closed 1 Room Tom 3 Bass Drum H 45 1 Bass Drum H Open Rim Shot Wood Block Guiro Long Agogo L DH 4 Claves Agogo H 76 E 4 Wood Block H Samba Whistle 77 F 4 Wood Block L 78 FH 4 Cuica Mute Scratch Push Scratch Push Squ Scratch Push 79 G 4 Cuica Open Scratch Pull Scratch Pull BDGate Scratch Pull 80 GH 4 2 Triangle Mute 81 A 4 2 Triangle Open SDAna9 82 AH 4 Shaker HHAnOpn 83 B 4 Jingle Bell SDAna8 84 C 5 Bell Tree SynBsC 85 CH 5 Hi Q SynBsCH 86 D 5 SynBsD 87 DH 5 SynBsDH 88 E 5 SynBsE 89 F 5 SynBsF 90 FH 5 SynBsFH 91 G 5 SynBsG 92 GH 5 SynBsGH 93 A 5 SynBsA 94 AH 5 SynBsAH 95 B 5 SynBsB 96 C 6 BDAnalog HHAnCls SynBsC : Same as Standard Kit : No Sound 32 Crash Cymbal 1 ● MIDI DATA FORMAT Technical Information – page 40 1.2.2.2 Control change Please note that there are a few changes in the “MIDI DATA FORMAT” specifications (see the W5/W7 Technical Information booklet, page 39). Items shaded in gray, below, are the new additions to Version 2. Technical Information – page 39 1.2 Channel Message 1.2.1 Transmission 1.2.1.1 Note on/off Transmission note range = C-2(0)...G8(127) Velocity range = 1...127 1.2.1.2 Control change Control change is output via MIDI when the following controllers are used. Parameters in the table below can be controlled by MIDI. cntrl# parameter data rng 0 Bank Select MSB 0 ∼ 127 *1 32 Bank Select LSB 0 ∼ 127 *1 1 Modulation wheel 0 ∼ 127 4 Foot control 0 ∼ 127 6 Data Entry 0 ∼ 127 7 Inst Volume 0 ∼ 127 10 Pan 0 ∼ 127 11 Expression 0 ∼ 127 71 Harmonic Content 0 ∼ 127 72 Release Time 0 ∼ 127 73 Attack Time 0 ∼ 127 74 Brightness 0 ∼ 127 84 Portament Control 0 ∼ 127 91 EF Send 1 (Reverb) 0 ∼ 127 93 EF Send 2 (Chorus) 0 ∼ 127 94 EF Send 3 (Delay/Rev) 0 ∼ 127 1∼119 MIDI Control 1 0 ∼ 127 1∼119 MIDI Control 2 0 ∼ 127 64 Sustain Switch 0 , 127 *1: See Program Change 1.2.1.3 ctrl# parameter data rng 1 Modulation Wheel 0 ∼ 127 4 Foot Controller 0 ∼ 127 7 Foot Volume 0 ∼ 127 11 Expression 0 ∼ 127 64 Sustain Switch 0 , 127 1∼119 Continuous Slider 0 ∼ 127 In Store Mode and Voice Edit Mode program changes will not be received. 1∼119 Foot Controller 0 ∼ 127 1) Off: Program changes will not be received. 1.2.2.3 Program Change When a program change message is received, the W5/W7 performs the operations below. Three types of reception modes can be set with the System Setup. 2) Ignore Bank Select: Individual program number (001 ~ 128) change messages will be received but bank select messages will be ignored. 3) On: Bank select and program change messages will be received according to the following chart. Technical Information – page 40 Bank No. MSB / LSB 1.2.1.3 Program change Normal Voice When a voice is selected, the bank select and program change is transmitted according to the following chart. Normal Voice Drum Voice PGM CNG No. GM 0($00) / 0($00) 1∼128($00∼$7F) PRESET 1 1($01) / 0($00) ↓ INTERNAL 2($02) / 0($00) ↓ SONG 3($03) / 0($00) ↓ Bank No. MSB / LSB PGM CNG No. EXTERNAL 4($04) / 0($00) ↓ GM 0($00) / 0($00) 1∼128($00∼$7F) PRESET 2 5($01) / 0($00) ↓ PRESET 1 1($01) / 0($00) ↓ PRESET 3 6($01) / 0($00) ↓ INTERNAL 2($02) / 0($00) ↓ GM 127($7F) / 0($00) *1 SONG 3($03) / 0($00) ↓ PRESET 17($11) / 0($00) *2 EXTERNAL 4($04) / 0($00) ↓ INTERNAL 18($12) / 0($00) *2 PRESET 2 5($01) / 0($00) ↓ SONG 19($13) / 0($00) *2 PRESET 3 6($01) / 0($00) ↓ EXTERNAL 20($14) / 0($00) *2 GM 127($7F) / 0($00) *1 PRESET 17($11) / 0($00) *2 INTERNAL 18($12) / 0($00) *2 SONG 19($13) / 0($00) *2 EXTERNAL 20($14) / 0($00) *2 Drum Voice Technical Information – page 41 2.2 Parameter Change The W5/W7 will transmit and receive the eight types of parameter change messages listed below. When recording is activated and “All Track” and “Punch-in” are not designated, parameter change messages will be transmitted when the [SONG], [VOICE], [SELECT], [SOLO] and [TRACK 1]~[TRACK 16] buttons are pressed. However, 6) Switch Remote will only receive and it will act the same function as the panel switches. 1). 2). 3). 4). 5). 6). 7). 8). Song/Multi Data Normal Voice Data Drum Voice Data Element Data Setup Data Switch Remote Master Tuning Universal System Exclusive Message Except for Device Number off, the parameter change reception cannot be turned off with each MIDI switch. 33 Technical Information – page 44 6. Appended Table (1) MIDI Parameter Change table (Song / Multi) $F0,$43,$1n,$33,$04,sub_group,p_msb,p_lsb,v_msb,v_lsb,$F7 NOTES: n: Device Number s: parameter sub group number 000ccccc c: 1..16; Inst Channel (1..16), 0: common data p: parameter number v: parameter value [SONG_MULTI PARAMETERS] 1.COMMON c=0 PARAMETER PARAMETER NUMBER BULK NUMBER DATA RANGE DISPLAY NOTES SNG_NAME0 SNG_NAME1 0 1 0 1 32..127 32..127 ASCII ASCII song name top song name SNG_LOC1 SNG_LOC2 SNG_KEY_MODE 76 72,73 74,75 76 0..998 0..998 b0..b1 1..999 1..999 norm, split, layer, 4zone off, 1st, upr, lwrL, lwrH 3rd, 5th, 7th 9th C-2..G8 location point 1 location point 2 keyboard mode b2..b4 b5..b6 SNG_SPLIT reserved 77 - 77 78 0..127 dynamic split mode dynamic split interval split point reserved Technical Information – page 52 (5) MIDI Parameter Change table (Setup) $F0,$43,$1n,$33,$07,sub_group,p_msb,p_lsb,v_msb,v_lsb,$F7 NOTES: n: Device Number s: parameter sub group number = 0 p: parameter number v: parameter value 1. SYSTEM s=0 PARAMETER PARAMETER NUMBER BULK NUMBER DATA RANGE DISPLAY NOTES SYS_GRTU00 SYS_GRTU11 0 1 0 1 32..127 32..127 ASCII ASCII Greeting Message upper 0 upper 1 SYS_LOCAL SYS_DEVNO SYS_PROT SYS_PGMSW reserved SYS_CTRL_RST SYS_EDIT_CONF SYS_MVOL reserved SYS_CS SYS_FC SYS_FV SYS_FCINIT SYS_FIX_VEL 44 45 46 47 49 50 51 57 58 59 60 61 44 45 46 47 48 49 50 51 52..56 57 58 59 60 61 0..1 0..17 0..1 0..2 off,on off,1..16,all auto, manual off,ignore,on 0..1 0..1 0..127 hold,reset off,on 0..127 0..119 0..119 0..1 0..127 0..127 off,1..119 off, 1..119 fc, exp ??? off,1..127 Technical Information – pages 56-57 34 The Implementation Chart on pages 35 ~ 36 now replaces the chart on pages 56 ~ 57 of the Technical Information booklet. local switch device number multistore program change switch reserved controller hold edit confirm master volume reserved cs assign foot ctrl assign foot vol assign foot ctrl init val. play fix velocity YAMAHA [ Music Synthesizer---synthesizer part ] Date:17-OCT-1995 Model W5/W7 MIDI Implementation Chart Version : 2.0 +----------------------------------------------------------------------+ | | Transmitted | Recognized | Remarks | | Function ... | | | | |-------------------+----------------+----------------+----------------| |Basic Default | 1 - 16 | 1 - 16 | memorized | |Channel Changed | 1 - 16 | 1 - 16 | | |-------------------+----------------+----------------+----------------| | Default | 3 | 3 | memorized | |Mode Messages | x | x | | | Altered | ************** | x | | |-------------------+----------------+----------------+----------------| |Note | 0 - 127 | 0 - 127 | | |Number : True voice| ************** | 1 - 127 | | |-------------------+----------------+----------------+----------------| |Velocity Note ON | o 9nH,v=1-127 | o v=1-127 | | | Note OFF | x 9nH,v=0 | x | | |-------------------+----------------+----------------+----------------| |After Key's | x | x | | |Touch Ch's | o | o | | |-------------------+----------------+----------------+----------------| |Pitch Bender | o | o 0-12 semi |7 bit resolution| |-------------------+----------------+----------------+----------------| | 0,32 | o *2| o *2|Bank Select | | 1 | o M.Wheel | o | | | Control 4 | o Foot cont. | o | | | 6 | x | o | | | 7 | o Foot volume | o |Volume | | 10 | x | o |Pan | | Change 11 | o Foot volume | o | | | 64 | o Sustain sw. | o |Sustain | | 71 | x | o |Harmonic Content| | 72 | x | o |Release Time | | 73 | x | o |Attack Time | | 74 | x | o |Brightness | | 84 | x | o |Porta Cont. | | 91 | x | o |Effect Send1 | | 93 | x | o |Effect Send2 | | 94 | x | o |Effect Send3 | | 1-31,33-119 | o CS,Foot Cont.| o |Assignable | | 120 | x | o |All Sounds Off | | 121 | x | o |Reset All Cont. | |-------------------+----------------+----------------+----------------| |Prog | o 0-127 *3 | o 0-127 *3 | | |Change : True # | *********** | | | |-------------------+----------------+----------------+----------------| |System Exclusive | o *1 | o *1 |voice etc. | |-------------------+----------------+----------------+----------------| | : Song Pos | | |Common : Song Sel | | | : Tune | See the sequencer part. | |-------------------+ | |System :Clock | | |Real Time :Commands| | |-------------------+----------------+----------------+----------------| |Aux :Local ON/OFF | x | x | | | :All Notes OFF| x | o | | |Mes- :Active Sense | o | o | | |sages:Reset | x | x | | |-------------------+----------------+----------------+----------------| |Note *1 ; transmit/receive if device No is not off. | | *2 ; transmit/receive if program sw is on. | | *3 ; transmit/receive if program sw is not off. | +----------------------------------------------------------------------+ Mode 1 : OMNI ON, POLY Mode 2 : OMNI ON, MONO o : Yes Mode 3 : OMNI OFF, POLY Mode 4 : OMNI OFF, MONO x : No 35 YAMAHA 36 [ Music synthesizer---sequencer part ] Date:17-OCT-1995 Model W5/W7 MIDI Implementation Chart Version : 2.0 +----------------------------------------------------------------------+ | | Transmitted | Recognized | Remarks | | Function ... | | | | |-------------------+----------------+----------------+----------------| |Basic Default | 1 - 16 | 1 - 16 | memorized | |Channel Changed | 1 - 16 | 1 - 16 | | |-------------------+----------------+----------------+----------------| | Default | x | x | | |Mode Messages | x | x | | | Altered | ************** | x | | |-------------------+----------------+----------------+----------------| |Note | 0 - 127 | 0 - 127 | | |Number : True voice| ************** | | | |-------------------+----------------+----------------+----------------| |Velocity Note ON | o 9nH,v=1-127 | o v=1-127 | | | Note OFF | x 9nH,v=0 | x | | |-------------------+----------------+----------------+----------------| |After Key's | o | o *6| | |Touch Ch's | o | o *6| | |-------------------+----------------+----------------+----------------| |Pitch Bender | o | o | | |-------------------+----------------+----------------+----------------| | 0,32 | o *3| o *10|Bank Select | | 1 - 31,33 - 121 | o | o | | | | | | | | | | | | | Control | *5| *7| | | | | | | | Change | | | | | | | | | |-------------------+----------------+----------------+----------------| |Prog | o 0 - 127 *4| o 0 - 127 *9| | |Change : True # | ************** | | | |-------------------+----------------+----------------+----------------| |System Exclusive | o | o *8| Song data etc. | |-------------------+----------------+----------------+----------------| |System : Song Pos | o *2| o *2| except REC mode| | : Song Sel | x | o *2| | |Common : Tune | x | x | | |-------------------+----------------+----------------+----------------| |System :Clock | o *2| o *1| | |Real Time :Commands| o *2| o *2| | |-------------------+----------------+----------------+----------------| |Aux :Local ON/OFF | o | o | | | :All Notes OFF| x | x | | |Mes- :Active Sense | o | x | | |sages:Reset | x | x | | |-------------------+----------------+----------------+----------------| |Notes: *1 = receive in MIDI sync mode. | | *2 = transmit/receive if MIDI control is not off. | | *3 = transmit if playback filter bank select is not ignore. | | *4 = transmit if playback filter program change is not ignore. | | *5 = transmit if playback filter control change is not ignore. | | *6 = receive if record filter after touch is not ignore. | | *7 = receive if record filter control change is not ignore. | | *8 = receive if record filter system exclusive is not ignore. | | *9 = receive if program switch is not off. | | *10 = receive if program switch is on. | +----------------------------------------------------------------------+ Mode 1 : OMNI ON, POLY Mode 2 : OMNI ON, MONO o : Yes Mode 3 : OMNI OFF, POLY Mode 4 : OMNI OFF, MONO x : No-
 1
1
-
 2
2
-
 3
3
-
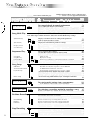 4
4
-
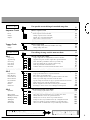 5
5
-
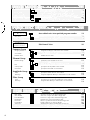 6
6
-
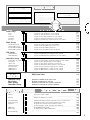 7
7
-
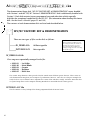 8
8
-
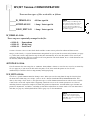 9
9
-
 10
10
-
 11
11
-
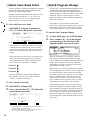 12
12
-
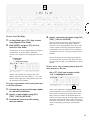 13
13
-
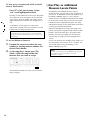 14
14
-
 15
15
-
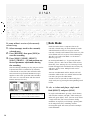 16
16
-
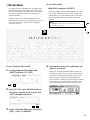 17
17
-
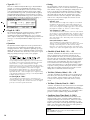 18
18
-
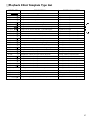 19
19
-
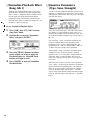 20
20
-
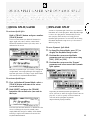 21
21
-
 22
22
-
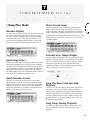 23
23
-
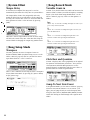 24
24
-
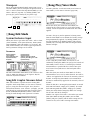 25
25
-
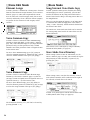 26
26
-
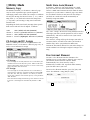 27
27
-
 28
28
-
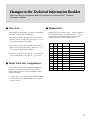 29
29
-
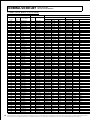 30
30
-
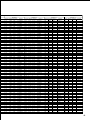 31
31
-
 32
32
-
 33
33
-
 34
34
-
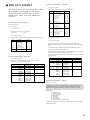 35
35
-
 36
36
-
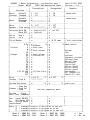 37
37
-
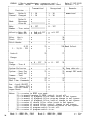 38
38


Yamaha Version2 de handleiding
- Categorie
- Synthesizer
- Type
- de handleiding
in andere talen
- English: Yamaha Version2 Owner's manual
- italiano: Yamaha Version2 Manuale del proprietario
- русский: Yamaha Version2 Инструкция по применению
- français: Yamaha Version2 Le manuel du propriétaire
- español: Yamaha Version2 El manual del propietario
- Deutsch: Yamaha Version2 Bedienungsanleitung
- português: Yamaha Version2 Manual do proprietário
- dansk: Yamaha Version2 Brugervejledning
- suomi: Yamaha Version2 Omistajan opas
- čeština: Yamaha Version2 Návod k obsluze
- svenska: Yamaha Version2 Bruksanvisning
- Türkçe: Yamaha Version2 El kitabı
- polski: Yamaha Version2 Instrukcja obsługi
- română: Yamaha Version2 Manualul proprietarului