
1
NL Gebruiksaanwijzing
2
EN Instruction manual
19
DE Bedienungs anleiting
37
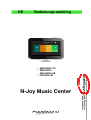
N-Joy Music Center
•
EMC50PRO-TW
• EMC50PRO
• EMC45PRO-SB
• IRS70PRO-M
ACTIVATIE CODE:
ACTIVATION CODE:
416833423

2

3
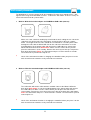
Inhoud
Belangrijke informatie over Wi-Fi en Bluetooth 3
Checklist alle onderdelen 4
Wandhouder plaatsen 5
Gebruik controller 7
Eerste keer instellen van de Controller 8
Luisteren naar radio over het internet 9
Afspelen van uw eigen muziek 10
Spotify spelen en instellen 11
Externe Bluetooth verbindingen toestaan 13
Koppelen met uw iPhone / iPad 14
Koppelen met uw Android SmartPhone 15
Overige instellingen aanpassen 16
Probleemoplossing 17
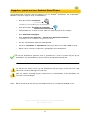
Belangrijk:
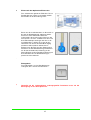
Wi-Fi:
Dit systeem/deze controller maakt gebruik van uw Wi-Fi. Voor een goede werking van dit
systeem is het van belang dat uw Wi-Fi-netwerk een goed tot zeer goed bereik heeft op de
locatie waar u deze controller gaat stationeren.
Bluetooth:
Dit systeem/deze controller maakt gebruik van Bluetooth. Voor een goede werking van dit
systeem is het van belang dat afstand tussen controller en Bluetooth-ontvanger maximaal zo’n
vijf meter bedraagt.
www.aquasound.eu - info@aquasound.eu

4
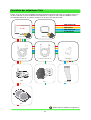
Checklist onderdelen:
Dank u wel voor de aankoop van dit AquaSound product. Het N-Joy Music Center is een waterdicht
audio systeem voor in de
badkamer of keuken. Volg de kleur van het model dat u heeft aangeschaft
om te zien welke onderdelen u in de verpakking vindt.
= Let op; product is magnetisch
N-Joy Controller
USB-adapter
Wandhouder /lader
USB Verbindingskabel (125 cm.)
USB Voedingskabel (3m)
•
EMC50PRO
-
TW
BMN
Sound-Bar
Move
Twist
•
EMC50PRO
•
EMC
45PR
O
-
SB
•
IRS70PRO-M

5
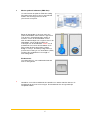
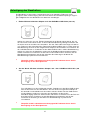
Wandhouder plaatsen:
De Wandhouder is tevens de lader voor de N-Joy controller. De wandhouder dient op een
strategische plek – t.o.v. de Bluetooth ontvanger – geplaatst te worden. Er zijn 3 manieren om
de wandhouder van stroom te voorzien:
1 Inbouw: Met meegeleverde Adapter en USB/Micro-USB kabel (300 cm):
Laat een 5/8” elektriciteitsbuis uitkomen op de plaats waar u de wandhouder wilt
plaatsen. Door deze buis kunt u de USB-kabel voeren richting een stopcontact (achter
het plafond of in een andere ruimte). De lengte van deze 5/8” buis mag niet langer zijn
dan 250 cm. Steek de meegeleverde adapter in het stopcontact en sluit hier de USB
kabel op aan. Sluit de Micro-USB aan op de achterzijde van de wandhouder*. Zorg
ervoor dat de oppervlakte waar u de wandhouder wil plaatsen schoon, droog en vetvrij
is. Verwijder de afdeklaag van de plakstrip op de achterkant van de wandhouder.
Plaats* de wandhouder en druk deze 5 seconden stevig aan. De wandhouder is
bevestigd en klaar voor gebruik.
*
Controleer eerst of de wandhouder de controller van stroom voorziet alvorens de
wandhouder op de muur te bevestigen. De wandhouder kan niet gemakkelijk
verwijderd worden.
2 Opbouw: Met meegeleverde Adapter en USB/Micro-USB kabel (300 cm):
De USB-kabel blijft bij deze opbouw methode in het zicht. Sluit de Micro-USB aan op
de achterzijde van de wandhouder*. Steek de meegeleverde adapter in het
stopcontact en sluit hier de USB kabel op aan. Zorg ervoor dat de oppervlakte waar u
de wandhouder wil plaatsen schoon, droog en vetvrij is. Verwijder de afdeklaag van
de plakstrip op de achterkant van de wandhouder. Plaats* de wandhouder en druk
deze 5 seconden stevig aan. De wandhouder is bevestigd en klaar voor gebruik.
*
Controleer eerst of de wandhouder de controller van stroom voorziet alvorens de
wandhouder op de muur te bevestigen. De wandhouder kan niet gemakkelijk
verwijderd worden.

6
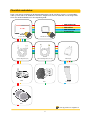
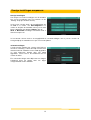
3 Met de optionele inbouwset (EMC-iSet):
U heeft hiervoor de optionele EMC-iSet nodig.
Dit product mag alleen in zone 3 geïnstalleerd
worden. Zie tekening hiernaast om de
juiste locatie te bepalen.
Bouw de inbouwdoos in de muur zoals elke
andere inbouwdoos voor elektrische apparaten.
Trek de twee elektriciteitsdraden (230V) en
laat deze 10 cm uit de inbouwdoos steken.
Sluit de inbouwadapter aan en plaats deze in de
inbouwdoos. Steek de Micro USB in de
achterzijde van de wandhouder. Plaats* nu de
wandhouder exact over de inbouwdoos heen.
Zorg ervoor dat deze oppervlakte schoon,
droog en vetvrij is. De 3M tape zorgt voor een
permanente hechting en een waterdichte (IPX4)
afsluiting. De wandhouder is bevestigd en
klaar voor gebruik.
Eindresultaat:
Het eindresultaat is een wandhouder/lader die
klaar is voor gebruik.
*
Controleer eerst of de wandhouder de controller van stroom voorziet alvorens de
wandhouder op de muur te bevestigen. De wandhouder kan niet gemakkelijk
verwijderd worden.

7
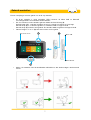
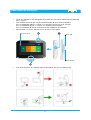
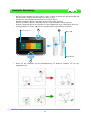
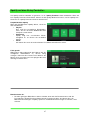
Gebruik controller:
Enkele aanwijzingen voor het gebruik van de N-Joy controller.
• De N-Joy controller is enkel waterdicht (IPX7) wanneer de Micro USB en Micro-SD
aansluitingen door het afsluitrubber bedekt worden.
• Het aan-/uitzetten van de controller gebeurt middels de Aan/Uit knop (A).
Houd de knop (A) 3 seconden ingedrukt. Na enkele seconde verschijnt het N-Joy logo.
Houd de knop (A) 3 seconden ingedrukt. De controller wordt nu uitgeschakeld.
Houd de knop (A) minimaal 10 ingedrukt. De controller wordt nu geforceerd uitgeschakeld.
• Volume knoppen V+ en V- (B) voor het instellen van het geluid.
• Indien u de controller vanaf de wandhouder wilt bedienen, doe dat dan volgens onderstaande
manier.
A
B
Micro USB
Micro-SD slot
5” touch screen

8
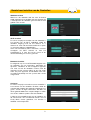
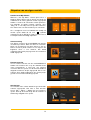
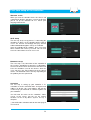
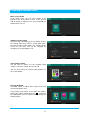
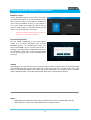
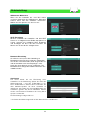
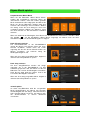
Eerste keer instellen van de Controller:
Welkomstscherm
Wanneer u de controller voor het eerst inschakelt
wordt automatisch het welkomstscherm geladen dat
u zal helpen om de controller gereed te maken voor
gebruik. Kies uw taal.
Wi-Fi instellen
De eerste stap bij het instellen van uw controller is
het instellen van de Wi-Fi verbinding, zodat de
controller toegang heeft tot het internet en u
daarmee in staat stelt om internet radio af te spelen
en eventuele updates te downloaden.
Scan naar beschikbare Wi-Fi netwerken, selecteer
vervolgens uw Wi-Fi netwerk en voer het
wachtwoord in. U kunt hier tevens testen of de
internetverbinding succesvol is gemaakt.
Bluetooth instellen
De volgende stap is het via Bluetooth koppelen van
de controller aan uw Ontvanger, Sound-Bar of
Speakers. Controleer of het te koppelen apparaat
aan staat en laat de controller scannen naar dit
apparaat. Na het scannen klikt u op de ‘Pair’ knop
naast het juiste apparaat, de Bluetooth naam kan
verschillen afhankelijk van het systeem dat u heeft
aangeschaft.
Activeren
De laatste stap bij het instellen van uw controller is
het activeren van de controller. Dit doet u door de
activatiecode (voorop deze gebruiksaanwijzing) in te
geven, evenals uw eigen email adres. Dit adres zal
alleen gebruikt worden om u op de hoogte te stellen
van nieuwe software updates voor uw controller.
U komt nu in het hoofdscherm van de controller, via
dit scherm kunt u de verschillende functies van het
N-Joy Music Center gebruiken, het instellen is
voltooid, veel luisterplezier!

9
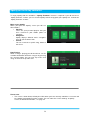
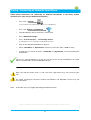
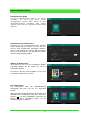
Luisteren naar radio over het internet:
Hoofdscherm Radio
In het radio scherm kunt u zenders selecteren om te
laten afspelen door het N-Joy Music Center. Als u
een zender wil toevoegen of wijzigen tikt u op de
knop of houdt u de knop voor deze zender
ingedrukt.
Radiostation toevoegen
Kies vervolgens het land waarvan u een radiostation
wil toevoegen uit de lijst. De landinstelling wordt
automatisch onthouden voor toevoegen van
volgende radio stations. U kunt dit aanpassen door
een bestaande radiozender te wijzigen.
Radiostation selecteren
U krijgt nu een lijst te zien met de beschikbare
internet radiostations van dit land, selecteer het
radiostation dat u wil toevoegen.
Staat het radiostation niet in de lijst, kies dan
‘zoeken’ om het gewenste station via de zoekfunctie
toe te voegen.
Radio spelen
Het radiostation is toegevoegd aan het radio scherm
en kan vanuit hier afgespeeld worden.
Als u terugkeert naar het hoofdscherm terwijl de
radio speelt wordt dit via het ‘ ’ symbool
aangegeven op de Radio knop, hiermee kunt u het
afspelen ook eenvoudig stopzetten.

10
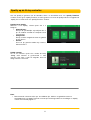
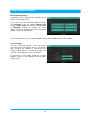
Afspelen van uw eigen muziek:
Hoofdscherm Mijn Muziek
Wanneer u het ‘My Music’ scherm opent ziet u 3
knoppen. Bij het kiezen van de ‘Quick start’ knop zal
automatisch uw laatst gekozen muziek afgespeeld
worden. U kunt in dit scherm de muziek pauzeren,
het volgende of vorige nummer afspelen. Kies
‘Song’ als u een liedje uit een lijst wilt selecteren.
Kies ‘Artiest’ om een artiest uit de lijst te selecteren.
Als u terugkeert naar het hoofdscherm terwijl uw
muziek speelt wordt dit via een ‘ ’ symbool
aangegeven op de ‘My Music’-knop, hiermee kunt u
het afspelen ook eenvoudig stopzetten.
Artiestsortering
Het ‘Artiest’-scherm in de muziekbibliotheek sorteert
uw muziek per artiest, door een artiest te selecteren
krijgt u al uw nummers van deze artiest te zien en
kunt u kiezen bij welk nummer u het afspelen wil
beginnen. Kiest u een nummer, dan wordt
automatisch de Quick player gestart en het nummer
wordt afgespeeld.
Nummersortering
In het ‘nummer’-scherm van de muziekbibliotheek
worden alle nummers die u op de controller heeft
staan weergegeven, u kunt hier een nummer
selecteren om af te spelen, na dit nummer wordt het
volgende nummer in de lijst afgespeeld. Kiest u een
nummer, dan wordt automatisch de Quick player
gestart en het nummer wordt afgespeeld.
Quick-player
In het Quick-start scherm wordt het geselecteerde
nummer afgespeeld. Hier kunt u ook wisselen
tussen ‘Alle’ – ‘Artiest’ – ‘Album’ om snel selectie te
spelen. Druk op de shuffle knop om de nummers in
willekeurige volgorde af te spelen.

11
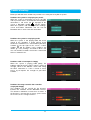
Spotify op de N-Joy controller:
Om van Spotify te genieten met de controller, dient u te beschikken over een ‘Spotify Premium’
account. Heeft u geen ‘Spotify Premium’ account, ga dan eerst naar de Spotify website en upgrade uw
‘Spotify free’ account naar een ‘Spotify Premium’ account.
Hoofdscherm Spotify
Wanneer u het ‘Spotify’ scherm opent ziet u 3
knoppen.
• Afspeellijsten:
Dit zijn uw persoonlijke afspeellijsten die u
op uw mobiele telefoon of computer heeft
aangemaakt.
• Categorieën:
Dit zijn muziek categorieën waar de gebruik
uit kan kiezen.
• Zoeken:
Hier kan op gezocht worden op nummer,
album of artiest
Huidig nummer
Als er een nummer speelt ziet u onder de knop
‘Huidig’ welk nummer er geselecteerd is voor
afspelen. Hier kunt u ook het volgende, dan wel
vorige nummer selecteren.
Noot:
• Bovenstaande schermen zullen pas beschikbaar zijn, indien u uw gebruikersnaam en
wachtwoord van uw ‘Spotify Premium’ account juist heeft ingevuld in het Instellingen Spotify
scherm. Zie hiervoor pagina 12.

12
Spotify instellen op de N-Joy controller:
Om van Spotify te genieten met de controller, dient u te beschikken over een ‘Spotify Premium’
account. Heeft u geen ‘Spotify Premium’ account, ga dan eerst naar de Spotify website en upgrade uw
‘Spotify free’ account naar een ‘Spotify Premium’ account. Houd uw (Spotify) gebruikersnaam en
wachtwoord bij de hand.
1:
Ga naar het menu instellingen en kies knop ‘Spotify’
2:
Het Spotify inloggen scherm verschijnt. Druk nu de
knop ‘Inloggen’.
3:
Het Spotify scherm verschijnt. Kies hier ‘Log in to
Spotify’.
4:
Geef uw Spotify gebruikersnaam en uw wachtwoord
in en druk inloggen.

13
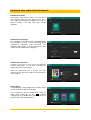
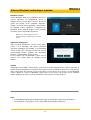
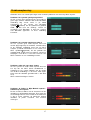
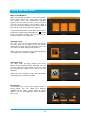
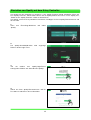
Externe Bluetooth verbindingen toestaan:
Bluetooth scherm
Via de ‘Bluetooth’ knop* op het hoofdscherm kunt u
externe apparaten de mogelijkheid geven te
koppelen met het N-Joy Music systeem, dit zal het
spelen van muziek via de controller stopzetten.
Zolang u in het (hiernaast) getoonde scherm blijft is
het mogelijk externe apparaten te koppelen via
Bluetooth, op de volgende pagina’s vind u hiervoor
instructies voor veel gebruikte apparaten.
* Deze knop is standaard uitgeschakeld en
kan via Instellingen Bluetooth ingeschakeld
worden.
Apparaten ontkoppelen
Voor het goed functioneren van het N-Joy Music
Center is het belangrijk dat externe Bluetooth
apparaten ontkoppelt zijn voordat u het Bluetooth
scherm verlaat. Om u hieraan te herinneren zal een
waarschuwing worden getoond (zie afbeelding)
wanneer u het Bluetooth scherm verlaat.
Na het verlaten van het Bluetooth scherm zal het
afspelen van muziek door de controller hervat
worden.
AUX-IN
Afhankelijk van het door u aangeschafte systeem kan het ook mogelijk zijn om externe apparaten te
middels de AUX-IN (kabel niet meegeleverd) met dit systeem te verbinden. Wanneer u het geluid van
deze externe bron wil afspelen via het N-Joy Music Center doet u dit eveneens via het Bluetooth
scherm. Wanneer u naar het Bluetooth scherm gaat, zal het spelen van muziek via de controller
worden stopgezet en zal het systeem automatisch overschakelen naar de AUX-IN.
Noot:
• Een Bluetooth koppeling heeft altijd voorrang op een aangesloten apparaat op de AUX-IN.
• Als de AUX-IN is aangesloten zal een Sound-Bar zichzelf nooit uitschakelen.

14
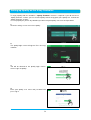
Koppelen/paren iPhone:
Volg onderstaande instructies om een iPhone
®
aan de Bluetooth
®
Sound-Bar koppelen.
(Voer deze stappen uit op uw iPhone):
• Druk op het icoon “Instellingen”
Settings
• Druk op het icoon “Algemeen”
Algemeen
>
• Selecteer hier “Bluetooth”
Zet Bluetooth aan (AAN), als de Bluetooth uit (OFF) staat, als deze reeds aan staat hoeft u dit niet te
veranderen.
Uw iPhone zoekt nu naar Bluetooth apparaten in de buurt.
• Een lijst van Bluetooth apparaten wordt getoond.
• Selecteer “Sound-Bar” of “AquaSound” in deze lijst (Eerste keer code= 0000 of 1234).
• Binnen 10-15 seconde het apparaat is gekoppeld met uw iPhone.
U kunt uw iPhone gebruiken zoals u gewend bent. U kunt nu muziek afspelen op uw iPhone,
het geluid wordt gestreamd naar de Sound-Bar.
Let erop dat het volume niveau (op uw iPhone) op zijn laagste stand staat. Een hoog volume
kan schaden toebrengen aan uw oren.
Voor een stabiele streaming mag de afstand (tussen uw iPhone en de Sound-Bar) niet meer
dan 5 meter bedragen.
Noot: Bovenstaande instructies zijn specifiek voor iPhone. Bovenstaande stappen kunnen afwijken
voor een iPad
®
of iPod-Touch
®
.
iPhone
®
, iPad
®
and iPod-touch
®
zijn geregistreerde handelsmerken van Apple inc.
Bluetooth
®
en het Bluetooth
®
logo zijn geregistreerde handelsmerken van de Bluetooth SIG inc.

15
Koppelen / paren met een Android
®
SmartPhone:
Volg onderstaande instructies voor het koppelen van een Android
T®
SmartPhone aan de Bluetooth
®
Mini-Box (Voer deze stappen uit op uw SmartPhone):
• Druk op het icoon “Instellingen”
U vindt dit icon achter de [Menu] knop op uw SmartPhone.
• Druk op het icoon “Draadloos en netwerken”
• Zet Bluetooth aan, als deze uit staat. (door een vinkje te plaatsen in het boxje).
• Druk “Bluetooth instellingen”.
• Druk “Scannen naar apparaten” / “Zoeken naar apparaten in de buurt”
Uw SmartPhone zoekt nu naar Bluetooth apparaten in de buurt.
• Een lijst van Bluetooth apparaten wordt getoond..
• Selecteer “Sound-Bar” of “AquaSound” in deze lijst (Eerste keer code= 0000 of 1234).
• Binnen 10-15 seconde het apparaat is gekoppeld met uw SmartPhone.
U kunt uw SmartPhone gebruiken zoals u gewend bent. U kunt nu muziek afspelen op uw
SmartPhone, het geluid wordt nu gestreamd naar de AquaSound Sound-Bar.
Let erop dat het volume niveau (op uw SmartPhone) op zijn laagste stand staat. Een hoog
volume kan schaden toebrengen aan uw oren.
Voor een stabiele streaming mag de afstand (tussen uw SmartPhone en de Sound-Bar) niet
meer dan 5 meter bedragen.
Noot: Bovenstaande instructies kunnen licht afwijken binnen de verschillende Android versies.
Bluetooth
®
en het Bluetooth
®
logo zijn geregistreerde handelsmerken van de Bluetooth SIG inc.
Android
®
is a trademark of Google inc.

16
Overige instellingen aanpassen:
Overige instellingen
Het aanpassen van de instellingen van de controller
kan via het instellingen menu (te bereiken via de
‘Settings’ knop op het homescherm).
In het eerste scherm vindt u de mogelijkheden om
de Taal in te stellen, een Aanraakgeluid in te
stellen en de tijd in de controller aan te passen, ook
kunt u controleren op software Updates. Als uw
Wi-Fi of Bluetooth instellingen veranderen kunt u
deze hier aanpassen.
In het tweede scherm heeft u de mogelijkheid de scherminstellingen aan te passen evenals de
weergavetijd op de controller aan te passen aan uw tijdzone.
Scherminstellingen
U kunt instellen hoelang het scherm actief blijft na
de laatste aanraking. U kunt deze tijd instellen voor
momenten dat de controller tevens wordt opgeladen
en voor momenten waarop deze niet wordt
opgeladen. Tevens kunt u de helderheid van het
scherm instellen.
Een scherm dat langer actief blijft en/of een hogere
helderheid geeft zal zorgen voor een hoger
energieverbruik van de controller.

17
Probleemoplossing:
Hieronder vind u een aantal oplossingen voor eventuele problemen met uw N-Joy Music System.
Probleem: het systeem speelt geen geluid af
Als het systeem geen geluid afspeelt, geen radio en
geen eigen muziek, controleer dan of de Bluetooth
verbinding nog steeds actief is (er wordt
rechtsboven in het scherm een Bluetooth
symbool getoond). Als dit symbool niet getoond
wordt, ga dan naar het ‘Settings’ scherm en
vervolgens naar ‘Bluetooth’. U kunt hier scannen
naar Bluetooth apparaten en deze verbinding
herstellen.
Probleem: het systeem speelt geen radio af
Als het systeem geen radio afspeelt maar wel
muziek opgeslagen op de controller, controleer dan
of de controller verbinding heeft met uw Wi-Fi
netwerk (er wordt rechtsboven in het scherm een
Wi-Fi symbool getoond). Als dit symbool niet
getoond wordt, ga dan naar het ‘Settings’ scherm en
verbolgens naar ‘Wi-Fi. U kunt hier scannen naar
Wi-Fi netwerken en een verbinding instellen.
Probleem: radio valt soms weg / hapert
Als het systeem de radio slecht afspeelt, dan kan
het zijn dat het Wi-Fi bereik onvoldoende is.
Controleer in het scherm ‘Monitor’ wat de sterkte
van uw Wi-Fi verbinding is. Is de status ‘zwak’ op de
plaats waar de controller gestationeerd is, dan dient
u het
Wi-Fi netwerk krachtiger te maken.
Probleem: de liedjes in ‘Mijn Muziek’ haperen /
hakkelen bij het afspelen
Dit kan te maken hebben met de afstand tussen de
controller en de Bluetooth ontvanger. Deze mag niet
meer bedragen dan 5 meter. Indien de afstand meer
is dan 5 meter verplaats de ontvanger richting
controller of plaats eventueel een antenne
verlengset.

18
www.aquasound.eu - info@aquasound.eu

19
EN Instruction manual
N-Joy Music Center
•
EMC50PRO-TW
• EMC50PRO
• EMC45PRO-SB
• IRS70PRO-M
ACTIVATIE CODE:
ACTIVATION CODE:
416833423

20

21
Contents
Important note about Wi-Fi and Bluetooth 21
Checklist included parts 22
Placing the wall mount 23
How to use the controller 25
First time setup of the Controller 26
Listening to internet radio 27
Playing your personal music 28
Spotify and the N-Joy controller 29
Allowing external Bluetooth connections 31
Connecting your iPhone / iPad 32
Connecting your Android SmartPhone 33
Miscellaneous settings 34
Trouble shooting 35
Important note:
WiFi:
This system / this controller requires a Wi-Fi connection for some of its functions. For proper
operation of this system, it is important that your Wi-Fi network has a good / very good
coverage on the location you are going to use this controller.
Bluetooth:
This system / this controller utilizes Bluetooth. For a good operation of this system, it is
important that distance between controller and Bluetooth receiver is a maximum of about five
meters.
www.aquasound.eu - info@aquasound.eu

22
Checklist included parts
Thank you for purchasing this AquaSound product. The N-Joy Music Center is a waterproof audio
system for in the bathroom or kitchen. Follow the colour of the model you have purchased to see what
parts are included in your set.
= please note: product is magnetic
N-Joy Controller
USB adapter
Wall mount
Connection cable (125 cm.)
Power cable (3m)
•
EMC50PRO
-
TW
BMN
Sound-Bar
Move
Twist
•
EMC50PRO
•
EMC
45PR
O
-
SB
•
IRS70PRO-M

23
Wall mount placement:
The Wall Mount is also the charger for N-Joy Controller. Find the most strategic place – with
regards to the range to the Bluetooth receiver - to locate the wall mount. There are 3 ways to
connect the wall mount to a power outlet:
1 Built-in: With the included adapter and USB/Micro-USB cable (300 cm):
Make sure a 5/8” electrical conduit pipe is built into the wall, ending on one side on the
spot where you wish to place the wall mount, and on the other side near a power
outlet. The length of this 5/8” tube should not exceed 250 cm. Lead the power cable
through this tube, with the Micro-USB side on the end of the wall mount. Insert the
included adapter in the power outlet and connect the USB cable to it. Connect the
Micro-USB to the back of the wall mount*. Make sure the surface where you will
place the wall mount is clean and dry. Remove the cover layer of the tape strip on the
back of the wall mount. Place* the wall mount and press it to the wall for 5 seconds.
The wall mount is placed and ready for use.
*
Check if the wall mount functions in charging the controller before you place it on the
wall, the wall mount cannot be easily removed once attached.
2 Built-on: With the included adapter and USB/Micro-USB cable (300 cm):
The USB cable will remain visible with this method. Connect the Micro-USB to the
back of the wall mount*. Insert the included adapter in the power outlet and connect
the USB cable to it. Make sure the surface where you will place the wall mount is
clean and dry. Remove the cover layer of the tape strip on the back of the wall mount.
Place* the wall mount and press is to the wall for 5 seconds. The wall mount is placed
and ready for use.
*
Check if the wall mount functions in charging the controller before you place it on the
wall, the wall mount cannot be easily removed once attached.

24
3 With the optional build-in set:
This requires the optional EMC-iSet.
This product may be installed in zone 3 only.
Refer to the drawing to the right to determine
suitable locations.
Build the conduit box into the wall at the spot you
wish to place the wall mount. Pull
two electrical wires (230V) through the conduit
pipe and leave around 10 cm visible in the
conduit box. Connect the build-in adapter and
place it in the conduit box. Insert the Micro-USB
in the back of the wall mount. Place the wall
mount exactly over the conduit box.
Make sure the surface where you will place the
wall mount is clean and dry. Remove the cover
layer of the tape strip on the back of the wall
mount. Place* the wall mount and press it to the
wall for 5 seconds. The tape will ensure a
waterproof closure for the conduit box.
The wall mount is placed and ready for use.
Final result:
The final result is a wall mount / charger that is
ready to be used.
*
First check if the wall mount functions in charging the controller before you place it on
the wall, the wall mount cannot be easily removed once attached.

25
How to use the controller:
• The N-Joy controller is only waterproof (IPX7) while the cover of the Micro USB and Micro-SD
slots is in place.
• Turn controller On/Off by pressing the ON/OFF button (A) at the front of controller.
Press & Hold button (A) for 3 seconds. In a short time you will see the N-Joy logo.
Press & Hold button (A) for 3* seconds. The controller will shut down.
Press & hold button (A) for 10 seconds for a hard shutdown of the controller.
• Volume buttons V+ and V- (B) to decrease or increase the volume.
• If you want to operate the controller from the wall mount, do so in the following way.
A
B
Micro USB
Micro-SD slot
5” touch screen

26
First time setup of the controller:
Welcome screen
When you start the controller for the first time it will
automatically load the welcome screen that will help
you to set up the controller for use. Select your
language from the list.
Wi-Fi Setup
The first step in the set-up process is connecting the
controller via Wi-Fi so the controller will be able to
access the internet and through that play internet
radio and download updates if they are available.
Scan for available Wi-Fi networks, then select your
Wi-Fi network and enter its passcode. You can also
test if the connection has been successful.
Bluetooth set-up
The next step is the connection of the controller to
the receiver, Sound-Bar or Speakers via Bluetooth.
Check if the device to be connected is turned on and
have the controller scan for this device. After the
scan, you press the ‘Pair’ button next to the correct
device. The Bluetooth name will vary depending on
the product you have purchased
Activation
The last step in setting up your controller is it’s
activation. Insert the activation code* and your email
address to do this, this email address will only be
used to keep you informed on software updates for
your controller.
You will now be taken to the controller’s home
screen. In this screen, you can use the various
functions of the N-Joy Music System. Set up is
complete.
* You will find the activation code on the front page of
This manual.

27
Listening to internet radio:
Main screen Radio
In the radio screen, you can select stations to be
played by the N-Joy Music Center. If you wish to
add or change a station pre-set, press and hold the
button for this pre-set.
Adding a Radio station
After pressing and holding a pre-set button, choose
the country from the list that is shown from which
you wish to add a radio station. This country will be
saved for next time, and can be changed by
changing an existing radio pre-set.
Select Radio station
You will now be shown a list of available radio
stations. Select the station you wish to add.
You can also search for specific radio stations via
the search button.
Playing the Radio
The radio station is added to the radio screen and
can be played from here.
If you return to the home screen while the radio is
playing this will be indicated by the ‘ ‘ symbol on
the radio button. you can tap this button to stop the
radio playback.

28
Playing your own music:
Main screen My Music
When you open the ‘My Music’ screen, three buttons
will be shown. When you select ‘Quick start’ your
last chosen music will automatically continue
playing. You can pause the music in this screen or
select the next or previous song. Choose ‘Song’ if
you wish to select a song from a list. Select ‘Artist’ if
you wish to select an artist from the artist list.
If you return to the home screen while your music is
playing this will be indicated through the ‘ ‘ symbol
on the ‘My Music’ button. You can also tap this
button to stop the music playback.
Sorting by Artist
The artist screen in the music library will sort the
music by artist, by selecting an artist you will be
shown all the songs you have from this artist. You
can choose at which song to start playback.
When you have selected a song it will immediately
start playing in the Quick Play mode.
Sorting by Song
The song screen all songs stored in the music
library on the controller will be displayed. You can
select a song to be played from this screen. After
this song the next song in the list will be used for
playback.
When you have selected a song it will immediately
start playing in the Quick Play mode.
Quick-player
In the Quick Play screen your selected music is
being played. You can switch here between
playback of ‘All’ songs, ‘current ‘Artist’ or current
‘Album’. You can also toggle the shuffle function in
this screen.

29
Spotify on the N-Joy controller:
To enjoy Spotify with the controller a ‘Spotify Premium’ account is required. If you do not have a
‘Spotify Premium’ account, you can visit the Spotify website to upgrade your ‘Spotify free’ account to a
‘Spotify Premium’ account.
Main screen Spotify
When you open the ‘Spotify’ screen you will see
three buttons.
• Playlists:
These are your personal playlists that you
have created on your mobile phone or
computer.
• Categories:
Spotify displays different music categories
here for you to choose from.
• Search:
You can search for a specific song, album or
artist here.
Now Playing
While a song is playing you will be able to see the
available information about this song on by pressing
the ‘Current’ button. You can also skip to the next
song, or return to the previous one.
Please note:
• The screens shown above will only be visible when you have correctly stored the user name and
password of your Spotify Premium account. You can store these in the Settings Spotify
screen, for detailed instructions, see page 30.

30
Setting up Spotify on the N-Joy Controller:
To enjoy Spotify with the controller a ‘Spotify Premium’ account is required. If you do not have a
‘Spotify Premium’ account, you can visit the Spotify website to upgrade your ‘Spotify free’ account to a
‘Spotify Premium’ account.
To set up Spotify on your N-Joy controller you will need your Spotify user name and password.
1:
Go to the settings screen and select ‘Spotify’.
2:
The Spotify login screen will appear. Press the Log-
in button.
3:
You will be directed to the Spotify login service.
Select ‘Log in to Spotify’.
4:
Enter your Spotify user name and password and
press Log in.

31
Allowing external Bluetooth connections:
Bluetooth screen
Via the ‘Bluetooth’ button* on the home screen you
can allow external devices to connect with the N-Joy
Music System. Doing so will stop the playback of
music via the Controller. As long as you remain in
the screen shown to the right, you will be able to
connect external devices. Instruction for often used
device scan be found on the next pages.
* This button is disabled by default, but can be added to
the home screen via Settings Bluetooth.
Disconnecting devices
For the proper functioning of the N-Joy Music
Center it is of utmost importance that external
Bluetooth devices are disconnected before you
leave the Bluetooth screen. To remind you of this, a
warning (see image) will be shown before you leave
the Bluetooth screen After leaving the Bluetooth
screen, the playing of music via the controller will be
resumed.
AUX-IN
Depending on the system purchased it may be possible to connect external devices via AUX-IN (cable
not included) with your system. When you wish to play music from this external source this is also
done via visiting the Bluetooth screen. When you visit the Bluetooth screen playback via the controller
will be stopped and the system will automatically switch to the sound from the AUX-IN.
Notes:
• A Bluetooth connection will always take precedence over a device connected by AUX-IN.
• When AUX-IN is connected, a Sound-Bar will never switch itself off.

32
Pairing / connecting an iPhone
®
:
Follow below instructions for connecting an iPhone
®
to the N-Joy System
(Perform these steps on your iPhone):
• Press Icon “Settings”
Settings
• Press Icon “General”
General
>
• Press “Bluetooth”
Turn Bluetooth on (ON), only needed when Bluetooth is turned off (OFF).
Your iPhone is now searching for nearby Bluetooth devices.
• A list of all nearby Bluetooth devices appears.
• Select “Sound-Bar” or “AquaSound” from the list (first time code = 0000 or 1234).
• In about 10-15 seconds the device is connected with your iPhone.
You can use your iPhone as usual. You can play music on your iPhone, the sound will be
streamed to the Bluetooth device.
Make sure that the volume level is set to a low level. High volume may cause harm to your
ears.
For stable streaming the distance between iPhone and Bluetooth receiver may not exceed 5
Meters.
Note: Above instructions are specific for iPhone. Above steps can be a slightly different for iPad
®
and iPod-Touch
®
.

33
Pairing / connecting an Android
®
SmartPhone:
Follow below instructions for connecting an Android
®
SmartPhone to the N-Joy System
(Perform these steps on your Android SmartPhone):
• Press Icon “Settings”
You can find this icon behind the [Menu] button on your SmartPhone.
• Press Icon “Wireless and Network”
• Turn Bluetooth on (only if check box is unchecked).
• Press “Bluetooth settings”.
• Press “Scan for devices” / “Find nearby devices”
Your SmartPhone is now searching for nearby Bluetooth devices.
• A list of all nearby Bluetooth devices appears.
• Select “Sound-Bar” or “AquaSound” from the list (first time code = 0000 or 1234).
• In about 10-15 seconds the device “Sound-Bar” or “AquaSound” is connected with your
SmartPhone.
You can use your SmartPhone as usual. You can play music on your SmartPhone, the sound
will be streamed to the connected Bluetooth device.
Make sure that the volume level is set to a low level. High volume may cause harm to your
ears.
For stable streaming the distance between SmartPhone and Bluetooth receiver may not
exceed 5 Meters.
Note: Instructions may vary slightly depending on Android versions.
Bluetooth
®
and the Bluetooth
®
logo are registered trademarks of the Bluetooth SIG inc. Android
®
is a trademark of Google inc.

34
Miscellaneous Settings:
Miscellaneous Settings
Changing the other settings of the controller can be
done via the Settings menu.
On the first screen you will find the option to change
the Language, check for software Updates and
setting a Touch sound. You can also change Wi-Fi
or Bluetooth settings, or change the email
addresses that you would like to receive news about
updates for your N-Joy controller.
In the second screen, you can change Screen settings and the Time shown on the controller.
Screen settings
You can select how long the screen will remain
active after you last touched it. You can set different
times for when the controller is connected to the
charger and for when it is not being charged. You
can also set the brightness of the screen here.
A screen that is active longer and/or has a higher
brightness will cause your controller to have a higher
energy usage.

35
Trouble shooting:
Below you will find some solutions to possible issues with your N-Joy Music System.
Problem: the system is not playing any music
When the system is not playing any music, no radio
and no personal music, check whether the Bluetooth
connection is still active (on the top-right of the
screen, a Bluetooth symbol ‘ ‘ will be shown).
When this symbol is not shown, go to the ’Settings’
screen and choose ‘Bluetooth’. You can scan for
Bluetooth devices and restore the connection.
Problem: the system is not playing radio
When the system is not playing radio, but music
stored in the controller is being played, check
whether the controller has is connected to your Wi-Fi
network (in the top right of the screen, a Wi-Fi
symbol ‘ ‘ will be shown). If this symbol is not
shown, go to the ‘Settings’ and choose ‘Wi-Fi. You
can scan for Wi-Fi networks and create a connection
to these networks here.
Problem: radio is interrupted / choppy
When the system is playing radio poorly, the
problem might be that the Wi-Fi signal is lacking in
strength. Check in the ‘Monitor’ screen how strong
the Wi-Fi connection is. If this is listed as weak,
please try to improve the strength of your Wi-Fi
network.
Problem: the songs stored in the controller
are played choppy
This problem can be caused by the distance
between the controller and the Bluetooth receiver.
This distance should be no more than 5 meters. If
the distance is greater than 5 meters, please move
the receiver, or use a longer antenna.

36
www.aquasound.eu - info@aquasound.eu

37
DE Bedienungs anleiting
N-Joy Music Center
•
EMC50PRO-TW
• EMC50PRO
• EMC45PRO-SB
• IRS70PRO-M
ACTIVATIE CODE:
ACTIVATION CODE:
416833423

38

39
Inhaltsverzeichnis
Wichtiges über Wi-Fi und Bluetooth 39
Checklist der enthaltenen Teile 40
Befestigung des Wandhalters 41
Controller Benutzung 43
Ersteinstellungen 44
Internetradio hören 45
Abspielen der persönlichen Musik 46
Spotify und der N-Joy controller 47
Einrichten von Spotify auf dem controller 48
Externe Bluetooth Verbindungen erlauben 49
iPhone / iPad Verbinden 50
Android SmartPhone verbinden 51
Sonstiges 52
Fehlerbehebung 53
Wichtiger Hinweis:
Wi-Fi:
Das N-Joy System/ Controller benötigt für einige Funktion eine Wi-Fi Verbindung. Für den
ordnungsgemäßen Betrieb des Systems ist es wichtig das die Nutzung an einem Ort mit guter/
sehr guter Netzwerkverbindung stattfindet.
Bluetooth:
Das N-Joy System/ Controller verwendet Bluethooth. Für einen guten Betrieb ist es wichtig
das die Entfernung des Controllers und der Bluetooth Empfängers nicht mehr als fünf Meter
beträgt.
www.aquasound.eu - info@aquasound.eu

40
Checkliste der enthaltenen Teile
Danke, dass Sie sich für ein Produkt von Aqua Sound entschieden haben.Das N-Joy Music Center ist
ein Wasserdichtes System für Badezimmer oder Küche. Folgen Sie der Farbe des Modells welches
Sie erworben haben um zu erfahren welche Teile in Ihrem Set enthalten sind.
= Bitte beachten: Produkt ist magnetisch
N-Joy Controller
USB adapter
Wall mount
Connection cable (125 cm.)
Power cable (3m)
•
EMC50PRO
-
TW
BMN
Sound-Bar
Move
Twist
•
EMC50PRO
•
EMC
45PR
O
-
SB
•
IRS70PRO-M

41
Befestigung des Wandhalters:
Der Wandhalter ist ebenso das Ladegerät für den N-Joy Controller. Finden Sie einen
geeigneten Platz zur Befestigung, der in der Reichweite des Bluetooth-Empfängers liegt. Es
gibt 3 Möglichkeiten den Wandhalter am Stromnetz anzubringen.
1 Einbau: Mit dem beinhalten Adapter und dem USB/Micro-USB Kable (300 cm):
Stellen Sie sicher das eine 5/8‘‘ Elektro Leitungsrohr in der Wand verbaut wurde, das auf
der einen Seite an der Stelle endet, an der Sie die Wandhalterung anbringen möchten und
die andere Seite in der Nähe einer Steckdose. Das 5/8‘‘ Rohr sollte nicht länger als 250 cm
sein. Führen Sie das Kabel durch das Rohr mit dem Micro USB Anschluss auf der Seite der
Wandhalterung. Stecken Sie den mitgelieferten Adapter in die Steckdose und schließen Sie
das USB-Kabel daran an. Verbinden Sie den Micro USB Anschluss mit der Wandhalterung.
Stellen Sie sicher das die Oberfläche auf der Sie die Wandbefestigung montieren wollen
Sauber und trocken ist. Entfernen Sie die Folie auf dem Klebestreifen. Platzieren Sie die
Wandhalterung und drücken Sie für fünf Sekunden die Halterung an die Wand. Die
Wandhalterung ist platziert und einsatzbereit.
*
überprüfe ob die Ladefunktionen ordnungsgemäß Funktionen bevor Sie die
Befestigung an der Wand platzieren.
2 Auf der Wand: Mit dem beinhalten Adapter und dem USB/Micro-USB Kable (300
cm):
Das USB Kabel ist in dieser Methode Sichtbar. Verbinden Sie den Micro USB mit dem
Port auf der Rückseite des Wandhalters. Stecken Sie den mit gelieferten Adapter in
die Steckdose und verbinden Sie die andere Seite des Kabels mit dem USB Stecker
mit dem Adapter. Stellen Sie sicher das die Oberfläche auf der Sie die
Wandbefestigung montieren wollen Sauber und trocken ist. Entfernen Sie die Folie auf
dem Klebestreifen. Platzieren Sie die Wandhalterung und drücken Sie für fünf
Sekunden die Halterung an die Wand. Die Wandhalterung ist platziert und
einsatzbereit.
*
überprüfe ob die Ladefunktionen ordnungsgemäß Funktionen bevor Sie die
Befestigung an der Wand platzieren.

42
3 Einbau mit dem Optionalen Einbau-Set:
Dies erfordert das optinonale EMC-iSet. Dieses
Produkt darf nur in Zone 3 verwendet werden.
Einnehmbar in der Darstellung rechts.
Bauen Sie die Installationsdose an die Stelle an
der Sie die Wandhalterung anbringen wollen.
Ziehen Sie zwei 230V Kabel durch das
Leitungsrohr. 10cm müssen die Kabel aus der
Dose heraus schauen. Verbinden Sie diese mit
dem Einbauadapter und legen Sie dies in die
Installationsdose. Stellen Sie sicher das die
Oberfläche auf der Sie die Wandbefestigung
montieren wollen Sauber und trocken ist.
Entfernen Sie die Folie auf dem Klebestreifen.
Platzieren Sie die Wandhalterung und drücken
Sie für fünf Sekunden die Halterung an die
Wand. Dichten Sie den Rand der Halterung mit
dem Dichtband ab. Die Wandhalterung ist
platziert und einsatzbereit.
.
Endergebnis:
Das Endergebnis ist eine Wandhalterung /
Ladegerät, das ist bereit zum Benutzen.
*
überprüfe ob die Ladefunktionen ordnungsgemäß Funktionen bevor Sie die
Befestigung an der Wand platzieren.

43
Controller Benutzung:
• Nur der N-Joy Controller ist Wasserdicht ( IPX7), achten Sie darauf das die Micro-USB und
Micro SD Slots mit Ihren Abdeckungen verschlossen sind.
• Schalten Sie den Controller über drücken auf ON/OFF (A) ein.
Drücken und Halten (A) für 3 Sekunden bis das N-Joy Logo erscheint.
Drücken und Halten (A) für 3 Sekunden um den N-Joy Controller herunter zufahren.
Drücken und Halten (A) für 10 Sekunden um den Controller für einen erzwungenen Neustart.
• Lautstärkeknöpfe V+ and V- (B) Um die Lautstärke höher oder niedriger zuschalten.
• Wenn Sie den Controller von der Wandhalterung aus bedienen möchten, tun Sie dies
folgendermaßen.
A
B
Micro USB
Micro-SD slot
5” touch screen

44
Ersteinstellung:
Willkommen Bildschirm
Wenn Sie den Controller das erste Mal starten
erscheint automatisch der Willkommens Bildschirm
welcher Ihnen hilft den Controller einzustellen.
Wählen Sie Ihre Sprache aus der Liste aus.
Wi-Fi Einstellung
Mit dem verbinden des Controllers und dem Wi-Fi
Netzes ist es möglich Internet Radio und Updates zu
nutzen. Scannen Sie verfügbare Wi-Fi Netzwerke
und bestätigen Sie diese mit dem Passwort. Sie
können nun testen ob dies erfolgreich war.
Bluetooth Einstellung
Als nächstes müssen Sie den Controller per
Bluetooth mit dem Receiver verbinden. Überprüfen
Sie, ob das anzuschließende Gerät eingeschaltet ist
und der Controller nach dem Empfänger sucht.
Nach dem Scan drücken Sie auf "Verbinden". Der
Bluetooth-Name hängt vom Produkt ab welches Sie
erworben haben.
Aktivierung
Der letzte Schritt bei der Einrichtung Ihres
Controllers ist die Aktivierung. Geben Sie dazu den
Aktivierungscode * und Ihre E-Mail-Adresse ein.
Diese E-Mail-Adresse wird nur dazu verwendet, Sie
über Software-Updates für Ihren Controller zu
informieren. Sie werden nun zum Startbildschirm des
Controllers geleitet. Auf dieser Oberfläche können
Sie die verschiedenen Funktionen des N-Joy Music
Systems verwenden.
Die Einrichtung ist abgeschlossen.
* Sie finden den Aktivierungscode auf der Startseite Ihres Handbuches.

45
Internetradio hören:
Hauptbildschrim Radio
Auf dem Radio-Bildschirm können Sie Sender
auswählen, die vom N-Joy Music Center
wiedergegeben werden sollen. Wenn Sie eine
Sendervoreinstellung hinzufügen oder ändern
möchten, halten Sie das Feld für der Voreinstellung
gedrückt.
Hinzufügen eines Radiosenders
Nachdem Sie eine voreingestellte Taste gedrückt
haben, wählen Sie das Land aus der Liste aus, aus
der Sie einen Radiosender hinzufügen möchten.
Dieses Land wird für das nächste Mal gespeichert
und kann durch Ändern einer vorhandenen Radio-
Voreinstellung geändert werden.
Wählen Sie Radiosender
Ihnen wird nun eine Liste der verfügbaren Radios
angezeigt. Wählen Sie die Station aus, die Sie
hinzufügen möchten.
Sie können über die Suchschaltfläche auch nach
bestimmten Radiosendern suchen.
Das Radio spielen
Der Radiosender wird zum Radio-Bildschirm
hinzugefügt und kann von hier aus abgespielt
werden.
Wenn Sie während der Wiedergabe des Radios zum
Startbildschirm zurückkehren, wird dies durch das
Symbol " " auf dem Radiobutton angezeigt. Sie
können auf diese Schaltfläche tippen, um die
Radiowiedergabe zu stoppen.

46
Eigene Musik spielen:
Hauptbildschirm Meine Musik
Wenn Sie den Bildschirm "Meine Musik" öffnen,
werden drei Schaltflächen angezeigt. Wenn Sie
"Schnellstart" wählen, wird Ihre zuletzt gewählte
Musik automatisch weiter abgespielt. Sie können die
Musik auf diesem Bildschirm anhalten oder den
nächsten oder vorherigen Titel auswählen. Wählen
Sie "Song", wenn Sie einen Song aus einer Liste
auswählen möchten. Wählen Sie "Künstler", wenn
Sie einen Künstler aus der Künstlerliste auswählen
möchten.
Wenn Sie während der Wiedergabe Ihrer Musik zum Startbildschirm zurückkehren, wird dies durch
das Symbol " " auf der Schaltfläche "Meine Musik" angezeigt. Sie können auch auf diese
Schaltfläche tippen, um die Musikwiedergabe zu stoppen.
Nach Künstler sortieren
Der Künstlerbildschirm in der Musikbibliothek
sortiert die Musik nach Künstler. Wenn Sie einen
Künstler auswählen, werden Ihnen alle Lieder
angezeigt, die Sie von diesem Künstler haben. Sie
können auswählen, mit welchem Song die
Wiedergabe beginnen soll.
Wenn Sie einen Song ausgewählt haben, beginnt er
sofort im Quick Play-Modus zu spielen.
Nach Song sortieren
Auf dem Song-Bildschirm werden alle Songs
angezeigt, die in der Musikbibliothek auf dem
Controller gespeichert sind. Sie können auf diesem
Bildschirm ein Lied für die Wiedergabe auswählen.
Nach diesem Song wird das nächste Lied in der
Liste für die Wiedergabe verwendet.
Wenn Sie einen Song ausgewählt haben, beginnt er
sofort im Quick Play-Modus zu spielen.
Schnell-Spieler
Im Quick Play-Bildschirm wird die ausgewählte
Musik wiedergegeben. Sie können hier zwischen
der Wiedergabe von 'All' Songs, 'aktuellen Künstler'
oder 'aktuellen Album' wechseln. Sie können auch
die Shuffle-Funktion in diesem Bildschirm
umschalten.

47
Spotify auf dem N-Joy Controller:
Um Spotify mit dem Controller zu genießen, ist ein 'Spotify Premium' Konto erforderlich. Wenn Sie
kein "Spotify Premium"-Konto haben, können Sie die Spotify-Website besuchen, um Ihr "Spotify free"-
Konto auf ein "Spotify Premium"-Konto zu aktualisieren.
Hauptbildschirm Spotify
Wenn Sie den Bildschirm "Spotify" öffnen, sehen Sie
drei Schaltflächen.
• Playlist:
Dies sind Ihre persönlichen Wiedergabe-
listen, die Sie auf Ihrem Mobiltelefon oder
Computer erstellt haben.
• Kategorien:
Spotify zeigt hier verschiedene Musik-
kategorien an, aus denen Sie auswählen
können.
• Suche:
Sie können hier nach einem bestimmten Lied, Album oder Künstler suchen.
Läuft gerade
Während ein Song abgespielt wird, können Sie die
verfügbaren Informationen zu diesem Song
anzeigen, indem Sie die 'Current' Taste drücken. Sie
können auch zum nächsten Lied springen oder zum
vorherigen zurückkehren.
Bitte beachten Sie:
• Die oben gezeigten Bildschirme sind nur sichtbar, wenn Sie den Benutzernamen und das
Passwort Ihres Spotify Premium-Kontos korrekt gespeichert haben. Sie können diese im
Bildschirm Einstellungen Spotify speichern, um detaillierte Anweisungen zu erhalten, siehe
Seite 48.

48
Einrichten von Spotify auf dem N-Joy Controller:
Um Spotify mit dem Controller zu genießen, ist ein 'Spotify Premium' Konto erforderlich. Wenn Sie
kein "Spotify Premium" -Konto haben, können Sie die Spotify-Website besuchen, um Ihr "Spotify free"
-Konto auf ein "Spotify Premium" -Konto zu aktualisieren.
Um Spotify auf Ihrem N-Joy-Controller einzurichten, benötigen Sie Ihren Spotify-Benutzernamen und
Ihr Passwort.
1:
Gehe zum Einstellungsbildschirm und wähle
'Spotify'.
2:
Der Spotify-Anmeldebildschirm wird angezeigt.
Drücken Sie die Login-Taste.
3:
You Sie werden zum Spotify-Login-Dienst
weitergeleitet. Wählen Sie "Anmelden bei Spotify".
4:
Geben Sie Ihren Spotify-Benutzernamen und Ihr
Passwort ein und klicken Sie auf Anmelden.

49
Externe Bluetooth Verbindungen erlauben:
Bluetooth Bildschirm
Über die Schaltfläche "Bluetooth"* auf dem
Startbildschirm können Sie externen Geräten
erlauben, eine Verbindung mit dem N-Joy Music
System herzustellen. Dadurch wird die Wiedergabe
von Musik über den Controller gestoppt. Solange
Sie auf dem rechts abgebildeten Bildschirm bleiben,
können Sie externe Geräte anschließen.
Anweisungen für häufig verwendete Geräte finden
Sie auf den nächsten Seiten.
* Diese Schaltfläche ist standardmäßig deaktiviert, kann jedoch über Einstellungen Bluetooth zum Startbildschirm
hinzugefügt werden.
Geräte trennen
Für die ordnungsgemäße Funktion des N-Joy Music
Centers ist es von äußerster Wichtigkeit, dass
externe Bluetooth-Geräte getrennt werden, bevor
Sie den Bluetooth-Bildschirm verlassen. Um Sie
daran zu erinnern, wird eine Warnung (siehe Bild)
angezeigt, bevor Sie den Bluetooth-Bildschirm
verlassen. Nachdem Sie den Bluetooth-Bildschirm
verlassen haben, wird die Wiedergabe von Musik
über den Controller fortgesetzt.
AUX-IN
Je nach erworbenem System kann es möglich sein, externe Geräte über AUX-IN (Kabel nicht im
Lieferumfang enthalten) mit Ihrem System zu verbinden. Wenn Sie Musik von dieser externen Quelle
abspielen möchten, geschieht dies ebenfalls über den Bluetooth-Bildschirm. Wenn Sie den Bluetooth-
Bildschirm aufrufen, wird die Wiedergabe über den Controller gestoppt und das System schaltet
automatisch auf den Ton vom AUX-IN um.
Anmerkungen:
• Eine Bluetooth-Verbindung hat immer Vorrang vor einem Gerät, das über AUX-IN verbunden ist.
• Wenn AUX-IN angeschlossen ist, wird sich eine Sound-Bar niemals selbst ausschalten.off.

50
Koppeln / Verbinden eines iPhone
®
:
Befolgen Sie die nachstehenden Anweisungen zum koppeln eines iPhone® an das N-Joy-
System
(Führen Sie diese Schritte auf Ihrem iPhone durch):
•
Drücken Sie “Settings”
Settings
•
Drücken Sie “General”
General
>
• Drücken Sie “Bluetooth”
Schalten Sie Bluetooth ein (ON), nur erforderlich, wenn Bluetooth ausgeschaltet ist (OFF).
Ihr iPhone sucht jetzt nach Bluetooth-Geräten in der Nähe.
• Eine Liste aller Bluetooth-Geräte in der Nähe wird angezeigt.
• Wählen Sie "Sound-Bar" oder "AquaSound" aus der Liste (Code = 0000 oder 1234).
• In etwa 10-15 Sekunden ist das Gerät mit Ihrem iPhone verbunden.
Sie können Ihr iPhone wie gewohnt verwenden. Sie können Musik auf Ihrem iPhone
abspielen, der Ton wird zum N-Joy-System gestreamt.
Stellen Sie sicher, dass die Lautstärke auf einen niedrigen Pegel eingestellt ist. Hohe
Lautstärke kann Ihre Ohren schädigen.
Für ein stabiles Streaming darf der Abstand zwischen iPhone und Bluetooth Empfänger 5
Meter nicht überschreiten.
Hinweis: Die obigen Anweisungen gelten speziell für das iPhone. Die obigen Schritte können
für iPad® und iPod-Touch® leicht abweichen.

51
Koppeln / Verbinden eines Android
®
SmartPhone
Befolgen Sie die nachstehenden Anweisungen zum Anschließen eines Android® SmartPhone
an die Bluetooth® Sound-Leiste
(Führen Sie diese Schritte auf Ihrem Android SmartPhone aus):
• Drücken Sie “Settings”
Sie finden dieses Symbol hinter der [Menü] -Taste auf Ihrem SmartPhone.
• Drücken Sie “Wireless and Network”
• Schalten Sie Bluetooth ein (nur wenn das Kontrollkästchen deaktiviert ist).
• Drücken Sie “Bluetooth settings”.
• Drücken Sie “Scan for devices” / “Find nearby devices”
Ihr SmartPhone sucht nun nach Bluetooth-Geräten in der Nähe.
• Eine Liste aller Bluetooth-Geräte in der Nähe wird angezeigt.
• Wählen Sie "Sound-Bar" oder "AquaSound" aus der Liste (Code = 0000 oder 1234).
• In ca. 10-15 Sekunden ist das Gerät " mit Ihrem SmartPhone verbunden.
Sie können Ihr SmartPhone wie gewohnt verwenden. Sie können Musik auf Ihrem
SmartPhone abspielen, der Ton wird zur Bluetooth Mini-Box gestreamt.
Stellen Sie sicher, dass die Lautstärke auf einen niedrigen Pegel eingestellt ist. Hohe
Lautstärke kann Ihre Ohren schädigen.
Für ein stabiles Streaming darf der Abstand zwischen iPhone und Bluetooth Empfänger 5
Meter nicht überschreiten.
Hinweis: Die Anweisungen können je nach Android-Version variieren.
Bluetooth
®
and the Bluetooth
®
logo are registered trademarks of the Bluetooth SIG inc. Android
®
is a trademark of Google inc.

52
Sontiges:
Verschiedene Einstellungen
Das Ändern der anderen Einstellungen des
Controllers kann über das Einstellungsmenü
erfolgen.
Auf dem ersten Bildschirm finden Sie die
Möglichkeit, die Sprache zu ändern, nach Software-
Updates zu suchen und einen Touch Sound
einzustellen. Sie können auch die WLAN- oder
Bluetooth-Einstellungen ändern oder die E-Mail-
Adressen ändern, über die Sie Neuigkeiten zu
Updates für Ihren N-Joy-Controller erhalten
möchten.
Im zweiten Bildschirm können Sie die bildschirmeinstellungen von das LCD Screen und die auf dem
Controller angezeigte Zeit ändern.
Bildschirmeinstellungen
Sie können auswählen, wie lange der Bildschirm
aktiv bleibt, nachdem Sie ihn zuletzt berührt haben.
Sie können unterschiedliche Zeiten für den
Anschluss des Controllers an das Ladegerät und für
den Fall einstellen, dass das Gerät nicht geladen
wird. Sie können hier auch die Helligkeit des
Bildschirms einstellen.
Ein Bildschirm, der länger aktiv ist und / oder eine
höhere Helligkeit aufweist, verursacht einen höheren
Energieverbrauch des Controllers.

53
Fehlerbehebung:
Im Folgenden finden Sie einige Lösungen zu möglichen Problemen mit Ihrem N-Joy Music System.
Problem: Das System spielt keine Musik ab
Wenn das System keine Musik, kein Radio und
keine persönliche Musik abspielt, prüfen Sie, ob die
Bluetooth-Verbindung noch aktiv ist (oben rechts auf
dem Bildschirm wird ein Bluetooth-Symbol ‘ ’
angezeigt). Wenn dieses Symbol nicht angezeigt
wird, rufen Sie den Bildschirm "Einstellungen" auf
und wählen Sie "Bluetooth". Sie können nach
Bluetooth-Geräten suchen und die Verbindung
wiederherstellen.
Problem: Das System spielt kein Radio
Wenn das System kein Radio spielt, aber die im
Controller gespeicherte Musik abgespielt wird,
überprüfen Sie, ob der Controller mit Ihrem WLAN
verbunden ist (oben rechts auf dem Bildschirm wird
ein Wi-Fi-Symbol angezeigt ‘ ’). Wenn dieses
Symbol nicht angezeigt wird, gehen Sie zu
"Einstellungen" und wählen Sie "Wi-Fi". Sie können
hier nach Wi-Fi-Netzwerken suchen und eine
Verbindung zu diesen Netzwerken herstellen.
Problem: Radio wird unterbrochen /
klingt abgehackt
Wenn das System schlecht spielt, kann das Problem
darin liegen, dass das Wi-Fi-Signal nicht stark genug
ist. Überprüfen Sie im Bildschirm "Monitor", wie stark
die Wi-Fi-Verbindung ist. Wenn dies als schwach
aufgeführt ist, versuchen Sie bitte, die Stärke Ihres
WLAN-Netzwerks zu verbessern.
Problem: Die im Controller gespeicherten Songs sind abgehackt gespielt
Dieses Problem kann durch die Entfernung
zwischen dem Controller und dem Bluetooth-
Empfänger verursacht werden. Diese Entfernung
sollte nicht mehr als 5 Meter betragen. Wenn die
Entfernung größer als 5 Meter ist, bewegen Sie bitte
den Empfänger oder verwenden Sie eine längere
Antenne.

54
www.aquasound.eu - info@aquasound.eu
-
 1
1
-
 2
2
-
 3
3
-
 4
4
-
 5
5
-
 6
6
-
 7
7
-
 8
8
-
 9
9
-
 10
10
-
 11
11
-
 12
12
-
 13
13
-
 14
14
-
 15
15
-
 16
16
-
 17
17
-
 18
18
-
 19
19
-
 20
20
-
 21
21
-
 22
22
-
 23
23
-
 24
24
-
 25
25
-
 26
26
-
 27
27
-
 28
28
-
 29
29
-
 30
30
-
 31
31
-
 32
32
-
 33
33
-
 34
34
-
 35
35
-
 36
36
-
 37
37
-
 38
38
-
 39
39
-
 40
40
-
 41
41
-
 42
42
-
 43
43
-
 44
44
-
 45
45
-
 46
46
-
 47
47
-
 48
48
-
 49
49
-
 50
50
-
 51
51
-
 52
52
-
 53
53
-
 54
54


AquaSound EMC50PRO Handleiding
- Type
- Handleiding
- Deze handleiding is ook geschikt voor
in andere talen
- English: AquaSound EMC50PRO User manual
- Deutsch: AquaSound EMC50PRO Benutzerhandbuch