
PRODUCT OF
DO938K
Handleiding Koelkast
Mode d’emploi Réfrigérateur
Gebrauchsanleitung Kühlschrank
Instruction booklet Refrigerator
Manual de instrucciones Frigoríco
Návod k použití Lednice
Návod na použitie Chladnička

Lees aandachtig alle instructies - bewaar deze handleiding voor latere raadpleging.
Lisez attentivement les instructions - gardez le mode d’emploi pour utilisation ultérieur.
Lesen Sie genau die Anweisungen - bewahren Sie die Gebrauchsanleitung für spätere heranziehung.
Read all instructions carefully - save this instruction manual for future reference.
Lea detenidamente todas las instrucciones - Conserve este manual para futura referencia.
Před použitím si důkladně přečtěte tento manuál - manuál si uschovejte i pro případ budoucího
nahlédnutí.
Pred použitím si dôkladne prečítajte tento manuál - manuál si uschovajte aj pre prípad budúceho
nahliadnutie.
NL Nederlands 3
FR Français 14
DE Deutsch 25
EN English 36
ES Espagnol 47
CZ Čeština 58
SK Slovenčina 68

3
DO938K
www.domo-elektro.be
NL
GARANTIE
Geachte klant,
Al onze producten ondergaan steeds een strenge kwaliteitscontrole,
alvorens ze aan je worden aangeboden. Mocht je desondanks toch nog
problemen hebben met jouw toestel, dan betreuren wij dit ten zeerste.
In dat geval verzoeken wij je contact op te nemen met onze klantendienst.
Onze medewerkers zullen je met plezier verder helpen.
+32 14 21 71 91 [email protected]
Maandag – Donderdag : 8.30u – 12.00u en van 13.00u – 17.00u
Vrijdag : 8.30u – 12.00u en van 13.00u – 16.30u
Dit apparaat heeft een garantietermijn van 2 jaar vanaf de datum van aankoop. Gedurende de
garantieperiode zal de distributeur volledige verantwoording op zich nemen voor gebreken die
aanwijsbaar berusten op materiaal- of constructiefouten. Wanneer dergelijke gebreken voorkomen, zal
het apparaat, indien nodig, vervangen of gerepareerd worden. De garantieperiode van 2 jaar zal op dit
moment niet terug beginnen, maar loopt verder tot 2 jaar na de aankoop van het toestel. De garantie
wordt verleend op basis van het kassaticket. Indien je apparaat defect is binnen de garantietermijn van 2
jaar, dan mag je het toestel samen met het originele kassaticket binnenbrengen in de winkel waar je het
toestel hebt aangekocht.
De garantie op accessoires en onderdelen die onderhevig zijn aan slijtage, bedraagt 6 maanden.
De garantie en verantwoordelijkheid/aansprakelijkheid van de leverancier en fabrikant vervallen
automatisch in de volgende gevallen:
· Bij het niet naleven van de instructies in deze handleiding.
· Bij verkeerde aansluiting, vb. te hoge elektrische spanning.
· Bij verkeerd, hardhandig of abnormaal gebruik.
· Bij onvoldoende of verkeerd onderhoud.
· Bij herstelling of wijziging van het toestel door de consument of niet gemachtigde derden.
· Bij gebruik van onderdelen of accessoires welke niet worden aanbevolen of geleverd door de
leverancier / fabrikant.

4
DO938K
NL
VEILIGHEIDSVOORSCHRIFTEN
Wanneer je elektrische toestellen gebruikt, moeten volgende veiligheidsinstructies in acht genomen
worden:
· Lees deze instructies zorgvuldig door. Bewaar deze handleiding om later te raadplegen.
· Verwijder voor het eerste gebruik alle verpakkingsmaterialen en eventuele promotionele stickers.
Zorg ervoor dat kinderen niet met de verpakkingsmaterialen spelen.
· Dit toestel is geschikt om te gebruiken in de huishoudelijke omgeving en in gelijkaardige omgevingen
zoals:
· Keukenhoek voor personeel van winkels, kantoren en andere gelijkaardige professionele
omgevingen
· Boerderijen
· Hotel- en motelkamers en andere omgevingen met een residentieel karakter
· Gastenkamers, of gelijkaardige
· Dit toestel mag gebruikt worden door kinderen vanaf 16 jaar en personen met een fysieke of
sensoriële beperking of mensen met een beperkte mentale capaciteit of gebrek aan ervaring of
kennis, op voorwaarde dat deze personen toezicht krijgen of instructies hebben gekregen over het
gebruik van het toestel op een veilige manier en dat ze ook de gevaren kennen bij het gebruik van het
toestel. Kinderen mogen niet met het toestel spelen. Het onderhoud en de reiniging van het toestel
mogen niet door kinderen gebeuren tenzij ze ouder zijn dan 16 jaar en onder toezicht staan.
· Opgelet: het toestel mag niet gebruikt worden met een externe timer of een aparte
afstandsbediening.
· Kijk voor gebruik na of het voltage vermeld op het toestel overeenkomt met het voltage van het
elektriciteitsnet.
· Laat het snoer niet op een heet oppervlak of over de rand van een tafel of aanrecht hangen.
· Gebruik het toestel nooit wanneer het snoer of de stekker beschadigd is, na een slechte werking
van het toestel of wanneer het toestel beschadigd is. Breng het toestel dan naar het dichtsbijzijnde
gekwaliceerde service center voor nazicht en reparatie.
· Streng toezicht is noodzakelijk wanneer het toestel door of in de buurt van kinderen gebruikt wordt.
· Het gebruik van accessoires die niet aanbevolen of verkocht worden door de fabrikant, kan brand,
elektrische schokken of verwondingen veroorzaken.
· Trek de stekker uit het stopcontact wanneer het toestel niet in gebruik is, vooraleer onderdelen te
monteren of demonteren en vooraleer het toestel te reinigen. Zet eerst alle knoppen in de ‘uit’-stand
en trek de stekker bij de stekker zelf uit het stopcontact. Trek nooit aan het snoer om de stekker uit het
stopcontact te trekken.
· Zet dit toestel nooit aan of in de buurt van een gasvuur of elektrisch vuur of op een plaats waar het in
contact zou kunnen komen met een warm toestel.
· Gebruik het toestel niet buiten.
· Gebruik het toestel enkel voor het doel waarvoor het bestemd is.
· Gebruik het toestel altijd op een stevig, droog, een oppervlak.
· Gebruik het toestel alleen voor huishoudelijk gebruik. De fabrikant is niet verantwoordelijk voor
ongelukken die een gevolg zijn van verkeerd gebruik van het toestel, of het niet naleven van de regels
zoals ze vermeld zijn in deze handleiding.

5
DO938K
www.domo-elektro.be
NL
· Alle herstellingen, buiten het gewone onderhoud van het toestel, moeten uitgevoerd worden door de
fabrikant of zijn dienst na verkoop. Probeer het toestel nooit zelf te repareren.
· Dompel het toestel, het elektrisch snoer of de stekker nooit onder in water of een andere vloeistof.
· Zorg ervoor dat kinderen het elektrisch snoer niet kunnen aanraken.
· Hou het snoer uit de buurt van scherpe randen en hete onderdelen of andere warmtebronnen.
· Hou de ventilatie-openingen vrij, zorg ervoor dat ze niet versperd of belemmerd zijn.
· Gebruik geen andere elektrische toestellen in de koelkast, tenzij ze voor dit doel zijn goedgekeurd
door de fabrikant.
· Bewaar geen explosieve stoen in het toestel, zoals bijvoorbeeld spuitbussen met brandbaar drijfgas.
· Zorg ervoor dat het koelcircuit niet beschadigd raakt, bv. tijdens transport of installatie.
· Zorg ervoor dat de stekker niet geplet wordt of beschadigd raakt door de achterkant van het toestel.
Dit kan oververhitting en bijgevolg brand veroorzaken.
· Zorg ervoor dat je toegang hebt tot de stekker van het toestel.
· Trek niet aan het snoer.
· Als het stopcontact los zit, steek de stekker dan niet in het stopcontact. (risico op elektrische schok of
brand)
· Vermijd lange blootstelling aan zonlicht.
· Het toestel mag niet gebruikt worden met een verlengsnoer of een stekkerdoos.
· Dit koelapparaat is niet bedoeld voor gebruik als inbouwapparatuur.
· Volg onderstaande instructies om besmetting van voedsel te voorkomen:
· Het langdurig openen van de deur kan de temperatuur in de compartimenten van het
apparaat aanzienlijk verhogen.
· Reinig regelmatig oppervlakken die in contact kunnen komen met voedsel. Houd het
condensatiekanaal en afvoergat achteraan het toestel schoon.
· Bewaar rauw vlees en vis in geschikte containers in de koelkast zodat het niet in contact
komt met of druppelt op ander voedsel.
· Als het apparaat gedurende lange tijd leeg blijft, dien je het uit te schakelen, te ontdooien en
te reinigen. Laat het drogen en laat de deur open om te voorkomen dat er schimmel in het
apparaat ontstaat.
WAARSCHUWING! Zet dit toestel nooit op of in de buurt van een gasvuur of elektrisch
vuur of op een plaats waar het in contact zou kunnen komen met een warmtebron. Aan
de achterkant van het apparaat bevinden zich ontvlambare materialen.
Let op het symbool “brandgevaar - ontvlambaar materiaal” dat zich aan de achterkant
van het apparaat bevindt.

6
DO938K
NL
ONDERDELEN
1. Temperatuurregelaar
2. Leggers
3. Groentelade
4. Stelvoetjes
5. Deurrekken
INSTALLATIE
· Verwijder alle verpakkingsmateriaal, zowel binnenin als aan de buitenkant. Maak de buitenkant van
het toestel schoon met een droge doek. De binnenkant kan je reinigen met een zachte, vochtige doek.
· Zorg ervoor dat de lucht vrij rond de koelkast kan circuleren. De achterkant van de koelkast moet
minstens 13 cm verwijderd zijn van de muur.
· Zet de koelkast op een stevige, vlakke ondergrond.
· Vermijd direct zonlicht en warmte. Zonlicht kan de buitenkant van de koelkast aantasten. Warmte zal
voor een hoger verbruik zorgen.
· Vermijd een te hoge vochtigheidsgraad. Te veel vocht in de lucht zal ervoor zorgen dat er te snel vorst
gevormd wordt in de koelkast.
· Controleer voordat je de koelkast op de netvoeding aansluit of de spanning op het typeplaatje van
het apparaat overeenstemt met de spanning bij je thuis. Een andere spanning kan het apparaat
beschadigen.
· De stekker is de enige manier om het apparaat van de voeding te ontkoppelen, zorg dat deze altijd
makkelijk bereikbaar is. Om de voeding naar het apparaat te ontkoppelen, schakel het apparaat uit en
haal vervolgens de stekker uit het stopcontact.
· Laat het toestel na installatie 24 uur staan vooraleer het aan te zetten. Zo kan het koelmiddel zich
zetten.
· Laat het apparaat gedurende 8 uur werken zonder levensmiddelen zodat de kast tot de gepaste
temperatuur aoelt.
· Voor oneen oppervlakken kunnen de voorste stelvoetjes op één lijn
worden gebracht.
5
2
1
4
3
16

7
DO938K
www.domo-elektro.be
NL
· Installeer de handgreep.
16
· De klimaatklasse geeft de minimale en maximale omgevingstemperatuur weer voor de goede
werking van een toestel. Je kan de klimaatklasse vinden op het typeplaatje aan de achterzijde van het
apparaat.
· SN: Subnormaal: omgevingstemperatuur 10°C tot 32°C
· N: Normaal: omgevingstemperatuur 16°C tot 32°C
· ST: Subtropisch: omgevingstemperatuur 16°C tot 38°C
· T: Tropisch: omgevingstemperatuur 16°C tot 43°C
GEBRUIK
TEMPERATUURREGELING
De koelkast wordt geregeld door een temperatuurregelaar die zich binnenin het apparaat bevindt. Stel
de regelaar op de gewenste positie in. Hoe hoger het getal hoe kouder de temperatuur. Stand 4 is de
aanbevolen positie voor normaal gebruik.
Het apparaat werkt niet in de positie 0 (het koelsysteem is uitgeschakeld), maar de voeding is niet
onderbroken.
De werkingstijd en –temperatuur worden beïnvloed door de plaats waar de koelkast wordt gebruikt, het
aantal keer de deur wordt geopend en de temperatuur van de kamer waar de koelkast zich in bevindt.
HET APPARAAT VERPLAATSEN
· Als het apparaat voor welke reden dan ook wordt uitgeschakeld, wacht 10 minuten voordat je het
opnieuw inschakelt. De druk in het koelsysteem dient eerst te worden gestabiliseerd voordat je het
apparaat opnieuw inschakelt.
· Schakel het apparaat uit en haal de stekker uit het stopcontact. Verwijder alle
levensmiddelen. Verwijder tevens alle mobiele onderdelen (leggers, accessoires, etc.) of maak ze vast
in de koelkast om schokken te vermijden.
· Verplaats het apparaat en installeer. Als het apparaat tijdens het verplaatsen op zijn zijde werd
gehouden, zelfs al was dit zeer kort, laat het apparaat minstens 10 minuten in de rechtopstaande
positie staan voordat je het apparaat inschakelt.

8
DO938K
NL
· De koelkast gebruikt isobutaan (R600a) als koelmiddel. Niettegenstaande dat R600a een
milieuvriendelijk en natuurlijk gas is, is het explosief. Wees dus zeer voorzichtig tijdens het verplaatsen
of installeren van het apparaat om schade aan de koelelementen te vermijden. In geval van een lek
dat werd veroorzaakt door schade aan de koelelementen, haal de koelkast weg van open vlammen of
warmtebronnen en verlucht de kamer waar het apparaat zich in bevindt enkele minuten.
LEVENSMIDDELEN IN DE KOELKAST BEWAREN
De koelkast zorgt voor een langere bewaartijd van verse, beperkt houdbare levensmiddelen. Bewaren van
vers voedsel voor het beste resultaat:
· Bewaar alleen zeer verse levensmiddelen van een goede kwaliteit.
· Zorg dat de levensmiddelen goed zijn verpakt of afgedekt voordat je ze bewaart. Dit vermijdt dat de
levensmiddelen uitdrogen, bleker worden of aan smaak verliezen en zorgt voor een langere versheid.
Dit vermijdt tevens overdracht van geuren.
· Zorg dat levensmiddelen met een sterke geur goed verpakt en afgedekt zijn en bewaar deze uit de
buurt van boter, melk en room en andere levensmiddelen die door een sterke geur aangetast kunnen
worden.
· Laat warme levensmiddelen aoelen voordat je ze in de koelkast plaatst.
ONTDOOIEN
De koelkast ontdooit volledig automatisch.
Tijdens de werking van de koeling worden er condensatiedruppels of rijm achteraan het apparaat
gevormd. Dit is normaal. Het is niet nodig om de condensatie of het ijs weg te vegen. Het achterpaneel
ontdooit automatisch. De condensatie stroomt in het condensatiekanaal en wordt naar de koeling geleid
waar het verdampt.
Opmerking: houd het condensatiekanaal en afvoergat schoon zodat de condensatie kan wegstromen.
VAKANTIE
Wanneer je voor een korte periode op vakantie gaat, kan je het toestel ingeschakeld laten. Wanneer je
voor een langere periode op vakantie gaat, doe je best het volgende :
· Haal al het voedsel uit de koelkast.
· Verwijder de stekker uit het stopcontact.
· Reinig de koelkast grondig.
· Laat de deur van de koelkast open om schimmelvorming en slechte geuren te vermijden.
STROOMPANNE
De meeste stroompannes worden hersteld in 1 of 2 uur en zullen de temperatuur van de koelkast
niet veranderen. Je moet wel het openen van de koelkastdeur tot een minimum beperken tijdens een
stroompanne.
Tijdens een langere stroompanne moet je maatregelen nemen om het voedsel te beschermen, bv. door
droog ijs op het voedsel te leggen.

9
DO938K
www.domo-elektro.be
NL
BELANGRIJKE REGELS
· Plaats nooit warm eten in de koelkast.
· Drank moet bewaard worden in een afgesloten container.
· Voedsel dat langere tijd bewaard wordt in de koelkast moet afgedekt of bewaard worden in glazen
containers.
· Plaats nooit bedorven eten in de koelkast.
· Zorg er steeds voor dat de koelkast niet overladen is, zodat het voedsel voldoende kan gekoeld
worden.
· Open de deur van de koelkast alleen wanneer het nodig is.
· Het toestel mag niet gebruikt worden voor buitenkamperen bv. tent.
· Mag alleen binnen gebruikt worden.
· Het toestel mag niet gebruikt worden in openbaar vervoer.
BEWAARWIJZER
Richt je koelapparaat als volgt in voor de beste bewaring:
Compartiment koelkast Type voeding
Deurrek · Voeding met natuurlijke bewaarmiddelen, zoals jam, sap,
drank, specerijen,…
· Bewaar hier geen beperkt houdbare voeding
Groentelade · Fruit, kruiden en groenten
· Bewaar bananen, uien, aardappelen en look niet in de koelkast
Middelste legger · Zuivel en eieren
Bovenste legger · Voeding die niet gekookt moet worden, zoals kant-en-klare
maaltijden, restjes, beleg
LEGGERS EN DEURREK VERPLAATSEN
· Maak de koelkast leeg voor het verplaatsen van de leggers of de deurrekken.
· Om een legger te verplaatsen, hef je deze omhoog en trek deze naar je toe.
· Om een deurrek te verplaatsen, neem deze vast met 2 handen. Hef het deurrek omhoog en trek deze
naar je toe.
VERVANGING GLOEILAMP
Haal de stekker uit het stopcontact voordat u de gloeilamp vervangt.
1. Verwijder de lampenkap.
2. Schroef de oude gloeilamp uit en schroef vervolgens een nieuwe 15W (E14 tting) gloeilamp in.
3. Plaats de lampenkap terug.

10
DO938K
NL
DRAAIRICHTING VAN DEUR WIJZIGEN
Als je de scharnieren van de deur naar de andere kant wilt brengen, is het aanbevolen om contact op
te nemen met een erkende reparateur om hem het werk te laten uitvoeren. Voordat je de draairichting
wijzigt, controleer of de stekker uit het stopcontact is gehaald en dat het apparaat leeg is.
Het is aanbevolen om een kruiskopschroevendraaier en een moersleutel te gebruiken (beide niet
meegeleverd).
1. Verwijder de schroeven achteraan het bovendeksel.
Reverse Door
Tool required: Philips screwdriver, Flat bladed screwdriver, Hexagonal spanner.
Ensure the unit is unplugged and empty.
To take the door off, it is necessary to tilt the unit backwards. You should rest the unit on something solid
so that it will not slip during the door reversing process.
All parts removed must be saved to do the reinstallation of the door.
Do not lay the unit flat as this may damage the coolant system.
It' s better that 2 people handle the unit during assembly.
1. Remove two screws at rear side of top cover.
2. Remove top cover and thermostat knob, then place it aside.
3. Unscrew top hinge and then remove door and place it on a soft pad to
avoid scratch.
4. Unscrew bottom hinge. Then remove the adjustable feet from both
side.
7
unscrew
2. Haal het bovendeksel van de koelkast af.
Reverse Door
Tool required: Philips screwdriver, Flat bladed screwdriver, Hexagonal spanner.
Ensure the unit is unplugged and empty.
To take the door off, it is necessary to tilt the unit backwards. You should rest the unit on something solid
so that it will not slip during the door reversing process.
All parts removed must be saved to do the reinstallation of the door.
Do not lay the unit flat as this may damage the coolant system.
It' s better that 2 people handle the unit during assembly.
1. Remove two screws at rear side of top cover.
2. Remove top cover and thermostat knob, then place it aside.
3. Unscrew top hinge and then remove door and place it on a soft pad to
avoid scratch.
4. Unscrew bottom hinge. Then remove the adjustable feet from both
side.
7
unscrew
3. Verwijder de schroeven en vervolgens het bovenscharnier die de deur op zijn plaats houdt. Til de
deur op en plaats deze op een zacht oppervlak om krassen te vermijden.
Reverse Door
Tool required: Philips screwdriver, Flat bladed screwdriver, Hexagonal spanner.
Ensure the unit is unplugged and empty.
To take the door off, it is necessary to tilt the unit backwards. You should rest the unit on something solid
so that it will not slip during the door reversing process.
All parts removed must be saved to do the reinstallation of the door.
Do not lay the unit flat as this may damage the coolant system.
It' s better that 2 people handle the unit during assembly.
1. Remove two screws at rear side of top cover.
2. Remove top cover and thermostat knob, then place it aside.
3. Unscrew top hinge and then remove door and place it on a soft pad to
avoid scratch.
4. Unscrew bottom hinge. Then remove the adjustable feet from both
side.
7
unscrew
4. Verwijder de onderste schroef, scharnierbeugel en de stelvoetjes onderaan het apparaat.
Reverse Door
Tool required: Philips screwdriver, Flat bladed screwdriver, Hexagonal spanner.
Ensure the unit is unplugged and empty.
To take the door off, it is necessary to tilt the unit backwards. You should rest the unit on something solid
so that it will not slip during the door reversing process.
All parts removed must be saved to do the reinstallation of the door.
Do not lay the unit flat as this may damage the coolant system.
It' s better that 2 people handle the unit during assembly.
1. Remove two screws at rear side of top cover.
2. Remove top cover and thermostat knob, then place it aside.
3. Unscrew top hinge and then remove door and place it on a soft pad to
avoid scratch.
4. Unscrew bottom hinge. Then remove the adjustable feet from both
side.
7
unscrew

11
DO938K
www.domo-elektro.be
NL
5. Maak de scharnierpin los van de scharnierbeugel. Keer de beugel om en maak de pin weer vast.
5. Unscrew and remove the bottom hinge pin, turn the bracket over and replace it.
6. Refit the bracket fitting the bottom hinge pin. Replace both adjustable
feet.
7. Place the door back on. Ensure the door is aligned horizontally and
vertically, so that the seals are closed on all sides before finally
tightening the top hinge.
8. Put the top cover and fix it with 2 screws on the back.
Unscrew
Screw
8
Reverse Door
9. Fix the thermostat knob.
screw
6. Bevestig de schroeven en de scharnierbeugel aan de andere kant van de bodem. Plaats de
stelvoetjes terug.
5. Unscrew and remove the bottom hinge pin, turn the bracket over and replace it.
6. Refit the bracket fitting the bottom hinge pin. Replace both adjustable
feet.
7. Place the door back on. Ensure the door is aligned horizontally and
vertically, so that the seals are closed on all sides before finally
tightening the top hinge.
8. Put the top cover and fix it with 2 screws on the back.
Unscrew
Screw
8
Reverse Door
9. Fix the thermostat knob.
screw
7. Zet de deur voorzichtig op zijn plaats. Zorg dat de deur zowel horizontaal als verticaal is uitgelijnd
zodat de afdichtingen op alle zijden gesloten zijn voordat je het bovenste scharnier volledig
vastmaakt. Breng het scharnier terug en schroef vast op de bovenkant van het apparaat.
5. Unscrew and remove the bottom hinge pin, turn the bracket over and replace it.
6. Refit the bracket fitting the bottom hinge pin. Replace both adjustable
feet.
7. Place the door back on. Ensure the door is aligned horizontally and
vertically, so that the seals are closed on all sides before finally
tightening the top hinge.
8. Put the top cover and fix it with 2 screws on the back.
Unscrew
Screw
8
Reverse Door
9. Fix the thermostat knob.
screw
8. Plaats het bovendeksel terug en maak het met behulp van de schroeven vast.
5. Unscrew and remove the bottom hinge pin, turn the bracket over and replace it.
6. Refit the bracket fitting the bottom hinge pin. Replace both adjustable
feet.
7. Place the door back on. Ensure the door is aligned horizontally and
vertically, so that the seals are closed on all sides before finally
tightening the top hinge.
8. Put the top cover and fix it with 2 screws on the back.
Unscrew
Screw
8
Reverse Door
9. Fix the thermostat knob.
screw

12
DO938K
NL
PROBLEMEN EN HUN OPLOSSINGEN
Wanneer er zich een probleem voordoet met de koelkast, controleer dan even onderstaande vragen
alvorens contact op te nemen met onze na verkoop dienst.
Toestel werkt niet.
· Het toestel krijgt geen stroom, controleer of de stroomtoevoer in orde is.
· Controleer of de stekker in het stopcontact steekt.
· Controleer of de juiste voltage is gebruikt.
De koelkast springt te vaak op.
· Is de deur goed gesloten?
· Heb je warm eten in de koelkast gezet, waardoor het toestel harder moet werken om te koelen?
· De deur is te vaak of te lang open geweest.
· Het toestel krijgt de verkeerde voltage.
· Het toestel staat te dicht in de buurt van een warmtebron of direct zonlicht.
De binnentemperatuur van de koelkast is te warm.
· Controleer of de koelkast stroom heeft.
· Controleer of de stekker in het stopcontact steekt.
· De temperatuurinstelling is te laag.
· De deur heeft te lang of te vaak opengestaan.
· De luchttoevoer is geblokkeerd.
· Controleer of het toestel de juiste voltage krijgt.
· Het toestel staat te dicht in de buurt van een warmtebron of direct zonlicht.
REINIGING EN ONDERHOUD
· Gebruik geen agressieve schoonmaakmiddelen of oplosmiddelen.
· Stel de temperatuurregelaar in op de positie 0 en haal de stekker uit het stopcontact.
· Haal de levensmiddelen uit en berg deze in een koele ruimte op.
· Maak het apparaat schoon met een zachte doek, warm water en een mild schoonmaakmiddel.
· Reinig de dichting alleen met schoon water en veeg vervolgens grondig af.
· Na reiniging, steek de stekker in het stopcontact en stel de temperatuurregelaar op de gewenste
positie in.
· Plaats de levensmiddelen opnieuw in het apparaat.

13
DO938K
www.domo-elektro.be
NL
MILIEURICHTLIJNEN
Dit symbool op het product of op de verpakking wijst erop dat dit product niet
als huishoudafval mag worden behandeld. Het moet naar een plaats worden
gebracht waar elektrische en elektronische apparatuur wordt gerecycleerd.
Als je ervoor zorgt dat dit product op de correcte manier wordt verwijderd,
voorkom je mogelijk voor mens en milieu negatieve gevolgen die zich zouden
kunnen voordoen in geval van verkeerde afvalbehandeling. Voor meer details
in verband met het recycleren van dit product, neem je best contact op met de
gemeentelijke instanties, het bedrijf of de dienst belast met de verwijdering
van huishoudafval of de winkel waar je het product hebt gekocht.
Het verpakkingsmateriaal is recycleerbaar. Behandel de verpakking
milieubewust.

14
DO938K
FR
GARANTIE
Cher client,
Tous nos produits sont soumis à des contrôles qualité stricts avant
d’être proposés à la vente. Si vous deviez toutefois rencontrer
un problème avec votre appareil, nous le déplorons vivement.
Dans ce cas, nous vous invitons à prendre contact avec notre service clientèle.
Nos collaboratrices se feront un plaisir de vous aider !
+32 14 21 71 91 [email protected]
Du lundi au jeudi : 8 h 30 – 12 h et 13 h – 17 h
Vendredi : 8 h 30 – 12 h et 13 h – 16 h 30
Cet appareil est garanti 2 ans à compter de la date d’achat. Durant la période de garantie, le distributeur
assumera l’entière responsabilité en cas de défauts de fonctionnement (matériel) ou de fabrication. Si un
tel problème survient, l’appareil sera remplacé ou réparé. La période de garantie de 2 ans ne reprend pas
à zéro, mais se poursuit (jusqu’à 2 ans à compter de la date d’achat de l’appareil). La garantie est accordée
sur la base du ticket de caisse.
Pour les accessoires et les éléments d’usure, une garantie de 6 mois s’applique.
La garantie et la responsabilité du fournisseur et du fabricant n’ont plus eet dans les cas suivants :
· Les instructions du manuel n’ont pas été suivies.
· Mauvais raccordement, par ex. tension électrique trop forte.
· Utilisation contraire, brutale ou anormale.
· Entretien insusant ou non conforme.
· Réparation ou modication de l’appareil par le consommateur ou un tiers non autorisé.
· Utilisation d’éléments ou d’accessoires qui ne sont pas recommandés ou fournis par le fournisseur/
fabricant.

15
DO938K
www.domo-elektro.be
FR
CONSIGNES DE SÉCURITÉ
Les consignes de sécurité suivantes doivent être respectées lors de l’utilisation de tout appareil électrique:
· Lisez ces consignes très attentivement. Conservez ce mode d’emploi an de pouvoir le consulter
ultérieurement.
· Avant la première utilisation, enlevez tous les éléments d’emballage et les éventuels autocollants
promotionnels. Veillez à ce que les enfants ne jouent pas avec les matériaux d’emballage.
· Cet appareil est conçu pour être utilisé dans un environnement domestique ou dans des
environnements comparables, tels que :
· Coin-cuisine du personnel dans les commerces, les bureaux et autres environnements
professionnels comparables
· Fermes
· Chambres d’hôtel ou de motel et autres environnements à caractère résidentiel
· Chambres d’hôtes ou comparables
· Cet appareil peut être utilisé par des enfants âgés de 16 ans ou plus et par des personnes présentant
un handicap physique ou sensoriel, une capacité mentale limitée ou un manque d’expérience ou
de connaissances, à condition que ces personnes soient sous surveillance ou qu’elles aient reçu des
instructions sur la manière d’utiliser l’appareil en toute sécurité et qu’elles connaissent les dangers liés
à son utilisation. Les enfants ne peuvent pas jouer avec cet appareil. L’entretien et le nettoyage de
l’appareil ne peuvent pas être eectués par des enfants, sauf s’ils sont âgés de plus de 16 ans et sous la
surveillance d’un adulte.
· Gardez l’appareil et le cordon électrique hors de portée des enfants.
· Attention: l’appareil ne peut pas être utilisé avec une minuterie externe ou une commande à distance
séparée.
· Veuillez lire toutes les instructions avant d’utiliser l’appareil.
· Vériez avant usage si la tension indiquée sur l’appareil correspond à la tension du réseau électrique de
votre domicile.
· Ne laissez pas le cordon pendre sur une surface chaude ou sur le rebord d’une table.
· N’utilisez jamais l’appareil lorsque le cordon ou la che sont endommagés, après un mauvais
fonctionnement de l’appareil ou lorsque l’appareil est endommagé. Amenez alors l’appareil au centre
de services le plus proche pour contrôle et réparation.
· Soyez très attentif lorsque l’appareil est utilisé par des enfants ou à proximité d’enfants.
· L’utilisation d’accessoires non préconisés par le fabricant peut provoquer un incendie, une
électrocution ou des blessures.
· Retirez la che de la prise lorsque l’appareil n’est pas utilisé, avant d’installer ou d’enlever des pièces et
avant de nettoyer l’appareil. Mettez tous les boutons en position « arrêt » et retirez la che de la prise.
Ne tirez jamais sur le câble pour retirer la che de la prise.
· Ne laissez jamais un appareil en service sans surveillance.
· Ne placez jamais cet appareil sur ou à proximité d’un feu au gaz ou d’un feu électrique où il pourrait
entrer en contact avec un appareil chaud.
· N’utilisez pas l’appareil à l’extérieur.
· Utilisez l’appareil uniquement dans le but auquel il est destiné.

16
DO938K
FR
· Utilisez toujours l’appareil sur une surface solide, sèche et plane.
· Cet appareil ne convient qu’à un usage domestique. Le fabricant décline toute responsabilité pour
des accidents qui découleraient d’un mauvais usage de l’appareil ou du non-respect des instructions
fournies dans ce manuel.
· Toutes les réparations, en dehors de l’entretien ordinaire de l’appareil, doivent être réalisées par le
fabricant ou son service après-vente.
· N’immergez jamais le cordon électrique, la che ou l’appareil lui-même dans l’eau ou tout autre milieu
liquide.
· Tenez le cordon éloigné de rebords tranchants et de pièces brûlantes ou d’autres sources de chaleur.
· Gardez les orices de ventilation dégagés, veillez à ce qu’ils ne soient ni encombrés ni entravés.
· N’utilisez aucun autre appareil électrique dans le réfrigérateur, sauf s’il est agréé à cette n par le
fabricant.
· Ne conservez jamais de matière explosive dans l’appareil, comme p.ex. des aérosols à gaz propulseur
inammable.
· Veillez à ne pas endommager le circuit de refroidissement, p.ex. lors du transport ou de l’installation.
· Veillez à ce que le cordon d’alimentation ne soit ni écrasé ni endommagé par l’arrière de l’appareil. Ceci
pourrait provoquer une surchaue et par conséquent un incendie.
· Veillez à avoir accès à la che de l’appareil.
· Ne tirez pas sur le cordon.
· Si la prise électrique n’est pas bien xée, ne branchez pas l’appareil (risque de choc électrique ou
d’incendie).
· Évitez une exposition prolongée à la lumière solaire.
· L’appareil ne peut pas être utilisé avec une rallonge ou un bloc multiprise.
· Cette unité de refroidissement n’est pas destinée à être utilisée comme un appareil encastré.
· Respectez les instructions ci-dessous an d’éviter toute contamination des aliments :
· Une ouverture prolongée de la porte peut entraîner une augmentation substantielle de la
température au sein des compartiments de l’appareil.
· Nettoyez régulièrement les surfaces pouvant entrer en contact avec les aliments. Nettoyez
régulièrement le canal et le trou d’évacuation de la condensation de l’appareil.
· Conservez la viande crue et le poisson dans des récipients séparés pour qu’ils ne puissent ni
entrer en contact avec d’autres aliments, ni goutter sur ceux-ci.
· Éteignez, dégivrez et nettoyez l’appareil en cas de période d’inutilisation prolongée. Laissez-
le sécher et laissez la porte ouverte pour éviter la formation de moisissure.
AVERTISSEMENT ! Ne placez jamais cet appareil sur ou à proximité d’un feu au gaz, d’un
feu électrique, ou à tout autre endroit où il pourrait entrer en contact avec une source de
chaleur. L’arrière de l’appareil comporte des matériaux inammables.
Tenez compte du symbole « Risque d’incendie – Matériaux inammables » qui se trouve
à l’arrière de l’appareil.

17
DO938K
www.domo-elektro.be
FR
PARTIES
1. Bouton de contrôle de la température
2. Clayettes
3. Bac à légumes
4. Pieds de mise à niveau
5. Balconnets
AVANT LA PREMIÈRE UTILISATION
· Ôtez tout le matériel d’emballage, tant à l’intérieur qu’à l’extérieur. Nettoyez l’extérieur de l’appareil
à l’aide d’un chion sec. Vous pouvez nettoyer l’intérieur de l’appareil à l’aide d’un chion doux et
humide.
· Veillez à ce que l’air puisse circuler librement autour du réfrigérateur. L’arrière du réfrigérateur doit
s’écarter d’au moins 13 cm du mur.
· Placez le réfrigérateur sur un sol ferme et plat.
· Évitez la lumière directe du soleil et la chaleur. La lumière du soleil risque de dégrader l’extérieur du
réfrigérateur. La chaleur augmentera la consommation d’énergie.
· Évitez un taux d’humidité trop élevé. Trop d’humidité dans l’air accélérera la formation de glace dans
votre réfrigérateur.
· Avant de brancher le réfrigérateur pour la première fois, vériez que la tension du courant fourni par
le réseau électrique de votre habitation correspond à la tension de fonctionnement du réfrigérateur
indiquée sur la plaque signalétique de l’appareil. Une tension diérente pourrait endommager
l’appareil.
· Après installation, laissez l’appareil reposer pendant 24 heures avant de le mettre sous tension. Le gaz
réfrigérant pourra ainsi se stabiliser.
· Laissez l’appareil fonctionner à vide pendant 8 heures de sorte que les
compartiments puissent refroidir à la température appropriée.
· Si l’appareil est installé sur une surface irrégulière, il pourra être ajusté
au moyen des pieds réglables.
5
2
1
4
3
16

18
DO938K
FR
· Installez la poignée.
16
· La classe climatique indique la température ambiante minimale et maximale pour le bon
fonctionnement d’un appareil. Vous trouverez la classe climatique sur la plaque signalétique au dos de
l’appareil.
· SN : Subnormal : température ambiante de 10 °C à 32 °C
· N : Normal : température ambiante de 16 °C à 32 °C
· ST : Subtropical : température ambiante de 16 °C à 38 °C
· T : Tropicale : température ambiante de 16 °C à 43 °C
UTILISATION
CONTRÔLE DE LA TEMPÉRATURE
La température du réfrigérateur se règle au moyen du bouton de contrôle situé à l’intérieur du
réfrigérateur. Ajustez le bouton de contrôle sur le réglage désiré. Plus on monte dans les chires, plus on
descend dans les températures. Le niveau 4 est la position recommandée pour un emploi traditionnel.
· En position 0 (ARRÊT), l’appareil ne fonctionne pas (le système de refroidissement est désactivé), mais
l’alimentation n’est pas coupée.
· La durée de fonctionnement et la température sont aectées par l’emplacement du réfrigérateur,
par la fréquence d’ouverture de la porte et par la température ambiante de la pièce où est installé
l’appareil.
DÉPLACEMENT DE VOTRE RÉFRIGÉRATEUR
· Si l’appareil est éteint pour une raison quelconque, attendez 10 minutes avant de le remettre en
marche. Cela permettra à la pression du système de réfrigération de s’égaliser avant le redémarrage.
· Éteignez l’appareil et débranchez le câble d’alimentation de la prise secteur Enlevez tous les aliments.
Enlevez également toutes les pièces mobiles (clayettes, accessoires, etc.) ou attachez-les dans le
réfrigérateur an d’éviter tout risque de choc.
· Déplacez l’appareil jusqu’à son nouvel emplacement. Si l’appareil a été placé sur un des ses côtés
durant un certain temps, remettez-le en position verticale et attendez au moins 10 minutes avant de le
mettre en marche.

19
DO938K
www.domo-elektro.be
FR
· Votre réfrigérateur utilise de l’isobutane (R600a) comme réfrigérant. Bien que le R600a soit un
gaz écologique et naturel, il est explosif. Vous devez donc faire attention pendant le transport et
l’installation pour éviter que les éléments de réfrigération de l’appareil ne soient endommagés. En cas
de fuite due à la détérioration des éléments de réfrigération, éloignez votre réfrigérateur des ammes
nues et des sources de chaleur, et ventilez la pièce où il se trouve durant quelques minutes.
CONSERVATION DES ALIMENTS DANS LE RÉFRIGÉRATEUR
Le réfrigérateur permet de prolonger la durée de conservation des denrées périssables.
Conservation des aliments frais pour des résultats optimaux :
· Ne conservez que des aliments qui sont très frais et de bonne qualité.
· Veiller à ce que les aliments soient bien emballés ou couverts avant d’être stockés. Cela permettra
d’éviter que les aliments se déshydratent, que leur couleur se détériore ou qu’ils perdent leur goût et
aidera à maintenir leur fraîcheur. Cela permettra également d’empêcher le transfert d’odeurs.
· Assurez-vous que les aliments à forte odeur sont emballés ou couverts et entreposés à l’écart des
aliments tels que le beurre, le lait et la crème qui sont susceptibles de se gâter du fait des odeurs
fortes.
· Faites refroidir les aliments chauds avant de les mettre au réfrigérateur.
DÉGIVRAGE
Le dégivrage du réfrigérateur est entièrement automatique.
Lorsque l’élément frigorique fonctionne, des perles de condensation ou du givre se forment à l’arrière du
réfrigérateur. Ce phénomène est normal. Il n’est pas nécessaire d’essuyer la condensation ou le givre. Le
panneau arrière se dégivre automatiquement. La condensation s’écoule dans le canal de condensation et
est amené vers l’unité de réfrigération, d’où elle s’évapore.
Remarque: Gardez le canal de condensation et l’orice d’évacuation propres, de sorte que la condensation
puisse s’écouler.
VACANCES
Lorsque vous partez en vacances pour une courte période, vous pouvez laisser l’appareil branché.
Lorsque vous partez en vacances pour une longue période, il est préférable de procéder comme suit :
· Retirez toute la nourriture de votre réfrigérateur.
· Enlevez la che de la prise de courant.
· Nettoyez à fond le réfrigérateur.
· Laissez la porte du réfrigérateur ouverte pour éviter la formation de moisissure et les mauvaises
odeurs.
PANNE DE COURANT
La plupart des pannes de courant sont rétablies endéans 1 ou 2 heures et ne modieront pas la
température de votre réfrigérateur. Vous devez toutefois réduire au minimum l’ouverture de la porte du
réfrigérateur au cours d’une panne de courant.
Au cours d’une panne de courant prolongée, vous devez prendre des mesures pour protéger la nourriture,
p.ex. en la couvrant de glace sèche.

20
DO938K
FR
RÈGLES IMPORTANTES
· Ne placez jamais de nourriture chaude dans le réfrigérateur.
· Les boissons doivent être conservées dans des récipients fermés.
· La nourriture à conserver plus longtemps dans le réfrigérateur doit être couverte ou conservée dans
des récipients en verre.
· Ne placez jamais de nourriture avariée dans le réfrigérateur.
· Veillez à ce que le réfrigérateur ne soit jamais surchargé pour que la nourriture puisse être
susamment rafraîchie.
· N’ouvrez la porte du réfrigérateur que lorsque c’est nécessaire.
· Il n’est pas destiné à une utilisation extérieur (p.ex la tente) en camping.
· Il ne peut être utilisé qu’à l’intérieur.
· L’appareil ne peut être utilisé dans les transports publics.
GUIDE DE CONSERVATION
Suivez ces conseils pour bien ranger votre réfrigérateur et optimiser la conservation des aliments :
Compartiment du réfrigérateur Types d’aliments
Bac de porte · Aliments contenant des conservateurs naturels, tels que les
contures, les jus, les boissons, les condiments…
· Ne pas y stocker d’aliments à durée de conservation limitée
Bac à légumes · Fruits, légumes et herbes fraîches
· Ne pas réfrigérer les bananes, les oignons, les pommes de terre
et l’ail
Planche du milieu · Produits laitiers et œufs
Planche supérieure · Aliments ne nécessitant pas de cuisson, tels que les plats
préparés, les restes, le fromage et la charcuterie
DÉPLACER LES CLAYETTES ET LES ÉTAGÈRES DE PORTE
· Avant de déplacer les clayettes et les étagères de porte,
videz le réfrigérateur.
· Pour déplacer une clayette, soulevez-la et tirez-la vers vous.
· Pour déplacer une étagère de porte, empoignez-la des deux
mains. Soulevez-la et tirez-la vers vous.
ÉCLAIRAGE
Attention: débranchez le câble d’alimentation de la prise murale avant de remplacer l’ampoule de la
lampe.
1. Enlevez le couvercle de la lampe.
2. Dévissez l’ampoule hors d’usage, puis vissez une ampoule neuve de type 15W (culot E14).
3. Replacez le couvercle de la lampe.

21
DO938K
www.domo-elektro.be
FR
CHANGEMENT DU SENS D’OUVERTURE DE LA PORTE
Si vous avez besoin de monter la porte du réfrigérateur dans l’autre sens, il est recommandé d’appeler
votre agent d’entretien agréé pour eectuer cette inversion, ou de demander à un technicien.
Avant d’inverser le sens d’ouverture de la porte, vous devez vous assurer que l’appareil est débranché et
vide. Il est recommandé d’utiliser un tournevis cruciforme et une clé (ces deux outils ne sont pas fournis).
1. Retirez les deux vis situées à l’arrière du couvercle supérieur.
Reverse Door
Tool required: Philips screwdriver, Flat bladed screwdriver, Hexagonal spanner.
Ensure the unit is unplugged and empty.
To take the door off, it is necessary to tilt the unit backwards. You should rest the unit on something solid
so that it will not slip during the door reversing process.
All parts removed must be saved to do the reinstallation of the door.
Do not lay the unit flat as this may damage the coolant system.
It' s better that 2 people handle the unit during assembly.
1. Remove two screws at rear side of top cover.
2. Remove top cover and thermostat knob, then place it aside.
3. Unscrew top hinge and then remove door and place it on a soft pad to
avoid scratch.
4. Unscrew bottom hinge. Then remove the adjustable feet from both
side.
7
unscrew
2. Retirez le couvercle supérieur.
Reverse Door
Tool required: Philips screwdriver, Flat bladed screwdriver, Hexagonal spanner.
Ensure the unit is unplugged and empty.
To take the door off, it is necessary to tilt the unit backwards. You should rest the unit on something solid
so that it will not slip during the door reversing process.
All parts removed must be saved to do the reinstallation of the door.
Do not lay the unit flat as this may damage the coolant system.
It' s better that 2 people handle the unit during assembly.
1. Remove two screws at rear side of top cover.
2. Remove top cover and thermostat knob, then place it aside.
3. Unscrew top hinge and then remove door and place it on a soft pad to
avoid scratch.
4. Unscrew bottom hinge. Then remove the adjustable feet from both
side.
7
unscrew
3. Retirez les vis puis enlevez la charnière supérieure qui tient la porte en place. Enlevez la porte et
placez-la sur une surface rembourrée pour éviter qu’elle ne se raye.
Reverse Door
Tool required: Philips screwdriver, Flat bladed screwdriver, Hexagonal spanner.
Ensure the unit is unplugged and empty.
To take the door off, it is necessary to tilt the unit backwards. You should rest the unit on something solid
so that it will not slip during the door reversing process.
All parts removed must be saved to do the reinstallation of the door.
Do not lay the unit flat as this may damage the coolant system.
It' s better that 2 people handle the unit during assembly.
1. Remove two screws at rear side of top cover.
2. Remove top cover and thermostat knob, then place it aside.
3. Unscrew top hinge and then remove door and place it on a soft pad to
avoid scratch.
4. Unscrew bottom hinge. Then remove the adjustable feet from both
side.
7
unscrew
4. Retirez la vis du bas, le support de charnière et les pieds réglables du bas de l’appareil.
Reverse Door
Tool required: Philips screwdriver, Flat bladed screwdriver, Hexagonal spanner.
Ensure the unit is unplugged and empty.
To take the door off, it is necessary to tilt the unit backwards. You should rest the unit on something solid
so that it will not slip during the door reversing process.
All parts removed must be saved to do the reinstallation of the door.
Do not lay the unit flat as this may damage the coolant system.
It' s better that 2 people handle the unit during assembly.
1. Remove two screws at rear side of top cover.
2. Remove top cover and thermostat knob, then place it aside.
3. Unscrew top hinge and then remove door and place it on a soft pad to
avoid scratch.
4. Unscrew bottom hinge. Then remove the adjustable feet from both
side.
7
unscrew

22
DO938K
FR
5. Détachez la goupille de la charnière-étrier. Retournez l’arceau, puis xez la goupille.
5. Unscrew and remove the bottom hinge pin, turn the bracket over and replace it.
6. Refit the bracket fitting the bottom hinge pin. Replace both adjustable
feet.
7. Place the door back on. Ensure the door is aligned horizontally and
vertically, so that the seals are closed on all sides before finally
tightening the top hinge.
8. Put the top cover and fix it with 2 screws on the back.
Unscrew
Screw
8
Reverse Door
9. Fix the thermostat knob.
screw
6. Fixez les vis et le support de charnière sur le côté opposé. Remettez les pieds réglables.
5. Unscrew and remove the bottom hinge pin, turn the bracket over and replace it.
6. Refit the bracket fitting the bottom hinge pin. Replace both adjustable
feet.
7. Place the door back on. Ensure the door is aligned horizontally and
vertically, so that the seals are closed on all sides before finally
tightening the top hinge.
8. Put the top cover and fix it with 2 screws on the back.
Unscrew
Screw
8
Reverse Door
9. Fix the thermostat knob.
screw
7. Remettez soigneusement la porte en place. Avant de resserrer la charnière upérieure, assurez-vous
que la porte est alignée horizontalement et verticalement de sorte que les joints soient scellés sur
tous les côtés. Insérez la charnière et vissez-la sur le haut.
5. Unscrew and remove the bottom hinge pin, turn the bracket over and replace it.
6. Refit the bracket fitting the bottom hinge pin. Replace both adjustable
feet.
7. Place the door back on. Ensure the door is aligned horizontally and
vertically, so that the seals are closed on all sides before finally
tightening the top hinge.
8. Put the top cover and fix it with 2 screws on the back.
Unscrew
Screw
8
Reverse Door
9. Fix the thermostat knob.
screw
8. Remettez le couvercle supérieur en place et xez-le de nouveau avec les vis.
5. Unscrew and remove the bottom hinge pin, turn the bracket over and replace it.
6. Refit the bracket fitting the bottom hinge pin. Replace both adjustable
feet.
7. Place the door back on. Ensure the door is aligned horizontally and
vertically, so that the seals are closed on all sides before finally
tightening the top hinge.
8. Put the top cover and fix it with 2 screws on the back.
Unscrew
Screw
8
Reverse Door
9. Fix the thermostat knob.
screw

23
DO938K
www.domo-elektro.be
FR
PROBLÈMES ET LEURS SOLUTIONS
Lorsqu’un problème survient à votre réfrigérateur, contrôlez aussi les questions ci-dessous avant de
prendre contact avec nôtre service après-vente.
L’appareil ne fonctionne pas.
· L’appareil ne reçoit pas de courant, contrôlez si l’alimentation de courant est en ordre.
· Contrôlez si la che est bien enfoncée dans la prise de courant.
· Contrôlez si la tension utilisée est correcte.
Le réfrigérateur se réenclenche trop souvent.
· La porte est-elle bien fermée ?
· Avez-vous placé de la nourriture chaude dans le réfrigérateur obligeant ainsi l’appareil à fonctionner
plus fort pour la réfrigérer.
· La porte a été ouverte trop souvent ou trop longtemps.
· L’appareil reçoit une tension erronée.
· L’appareil se trouve trop près d’une source de chaleur ou sous la lumière directe du soleil.
La température à l’intérieur du réfrigérateur est trop chaude.
· Contrôlez si le réfrigérateur est alimenté en courant.
· Contrôlez si la che est bien enfoncée dans la prise de courant.
· Le réglage de la température est trop faible.
· La porte a été ouverte trop souvent ou trop longtemps.
· L’amenée d’air est bloquée.
· Contrôlez si l’appareil est alimenté à la tension correcte.
· L’appareil se trouve trop près d’une source de chaleur ou sous la lumière directe du soleil.
NETTOYAGE ET ENTRETIEN
· N’utilisez pas de produits nettoyants abrasifs ou des solvants.
· Réglez le bouton de contrôle de la température en position 0 (ARRÊT) et débranchez le câble
d’alimentation de la prise murale.
· Sortez les aliments et conservez-les dans un endroit frais.
· Nettoyez l’appareil avec un chion doux imprégné d’eau chaude et de détergent.
· Nettoyez le joint de porte avec de l’eau claire uniquement, puis essuyez-le soigneusement.
· Après le nettoyage, reconnectez l’appareil et réglez la température désirée.
· Replacez les aliments dans l’appareil.

24
DO938K
FR
MISE AU REBUT
Ce symbole sur le produit ou son emballage indique que ce produit ne
peut être traité comme déchet ménager. Il doit plutôt être remis au
point de ramassage concerné, se chargeant du recyclage du matériel
électrique et électronique. En vous assurant que ce produit est éliminé
correctement, vous favorisez la prévention des conséquences négatives
pour l’environnement et la santé humaine qui, sinon, seraient le résulat
d’un traitement inapproprié des déchets de ce produit. Pour obtenir plus
de détails sur le recyclage de ce produit, veuillez prendre contact avec
le bureau municipal de votre région, votre service d’éliminiation des
déchets ménagers ou le magasin où vous avez acheté le produit.
L’emballage est recyclable. Traitez l’emballage écologiquement.

25
DO938K
www.domo-elektro.be
DE
GARANTIE
Sehr geehrter Kunde,
Sämtliche unserer Produkte unterliegen einer strengen Qualitätskontrolle,
bevor Sie Ihnen angeboten werden. Sollten dennoch
Probleme mit Ihrem Gerät auftreten, bedauern wir dies zutiefst.
Wir möchten Sie in diesem Fall bitten, unseren Kundenservice zu kontaktieren.
Unsere Mitarbeiter helfen Ihnen gern weiter!
+32 14 21 71 91 [email protected]
Montag – Donnerstag: 8:30 Uhr – 12:00 Uhr und von 13:00 Uhr – 17:00 Uhr
Freitag: 8:30 Uhr – 12:00 Uhr und von 13:00 Uhr – 16:30 Uhr
Dieses Gerät hat eine Garantiefrist von 2 Jahren ab dem Kaufdatum. Während der Garantiezeit
übernimmt der Hersteller die vollständige Verantwortung für Mängel, die nachweislich auf Material- oder
Konstruktionsfehler zurückzuführen sind. Wenn derartige Mängel auftreten, wird das Gerät wenn nötig
ausgetauscht oder repariert. Die Garantiezeit von 2 Jahren beginnt in diesem Moment nicht erneut,
sondern sie läuft bis 2 Jahre nach dem Kaufdatum weiter. Die Garantie wird auf der Grundlage des
Kassenbons gewährt.
Die Garantie auf Accessoires und Verschleißteile beträgt 6 Monate.
Die Garantie und die Verantwortung/Haftung des Lieferanten und Herstellers entfallen automatisch in
den folgenden Fällen:
· Bei Nichtbeachtung der Anweisungen in dieser Bedienungsanleitung.
· Bei falschem Anschluss, z.B. bei einer zu hohen Stromspannung.
· Bei falscher, grober oder abnormaler Verwendung.
· Bei unzureichender oder falscher Wartung.
· Bei vom Verbraucher oder von nicht ermächtigten Dritten vorgenommenen Reparaturen oder
Änderungen am Gerät.
· Bei der Verwendung von Ersatzteilen oder Accessoires, die nicht vom Lieferanten / Hersteller
empfohlen oder geliefert werden.

26
DO938K
DE
SICHERHEITSVORKEHRUNGEN
Wenn Sie elektrische Geräte verwenden, müssen folgende Sicherheitshinweise beachtet werden:
· Lesen Sie diese Hinweise sorgfältig durch. Bewahren Sie diese Bedienungsanleitung zum späteren
Nachschlagen auf.
· Entfernen Sie vor dem ersten Gebrauch alle Verpackungsmaterialien und möglichen Werbeauleber.
Sorgen Sie dafür, dass Kinder nicht mit den Verpackungsmaterialien spielen.
· Dieses Gerät eignet sich für den Einsatz im Haushalt und in ähnlichen Umfeldern, zum Beispiel in
folgenden Bereichen:
· Küchenbereich für Mitarbeiter von Geschäften, Büros und anderen ähnlichen beruichen
Umfeldern.
· Bauernhöfe
· Hotel- und Motelzimmer und andere Bereiche mit wohnungsähnlichem Charakter
· Gästezimmer oder Ähnliches
· Diese Gerät darf von Kindern ab 16 Jahren und Menschen mit körperlichen oder sensorischen
Behinderungen oder Menschen mit eingeschränkten geistigen Fähigkeiten oder mangelnder
Erfahrung bzw. Sachkenntnis unter der Bedingung verwendet werden, dass diese Personen
beaufsichtigt werden oder sie eine Anleitung zur sicheren Verwendung des Geräts erhalten haben und
sich der Gefahren bei der Verwendung des Geräts bewusst sind. Kinder dürfen nicht mit dem Gerät
spielen. Die Wartung und Reinigung des Geräts darf nicht durch Kinder ausgeführt werden, außer
diese sind älter als 16 Jahre und werden von einem Erwachsenen beaufsichtigt.
· Achtung: das Gerät darf nicht mit einer externen Zeitschaltuhr oder Fernbedienung gebraucht
werden.
· Bitte alle Anweisungen vor dem Gebrauch durchlesen.
· Vor der Benutzung prüfen, ob die Spannung, die auf dem Gerät angegeben ist, mit der Spannung Ihres
Stromnetzes übereinstimmt.
· Lassen Sie das Netzkabel nicht über den Tisch oder die Anrichte hängen, oder in Kontakt mit heißen
Oberächen kommen.
· Benutzen Sie das Gerät niemals, wenn die Kabelschnur oder der Stecker beschädigt ist, nach
beeinträchtigtem Funktionieren des Gerätes, oder wenn das Gerät beschädigt ist. Bringen Sie in
solchen Fällen das Gerät zur nächsten qualizierten Servicestelle zur Überprüfung und/oder Reparatur.
· Beim Einsatz des Gerätes in Anwesenheit von Kindern ist strenge Aufsicht geboten.
· Die Verwendung von Zubehör, das nicht vom Hersteller empfohlen oder verkauft wird, besteht die
Gefahr von Brand, elektrischen Schlages oder von Verletzungen.
· Ziehen Sie den Stecker aus der Steckdose, wenn das Gerät nicht im Einsatz ist, Einzelteile montiert
oder demontiert werden, oder das Gerät gereinigt wird. Ziehen Sie den Stecker direkt am Stecker
selber und nicht an der Kabelschnur aus der Steckdose.
· Lassen Sie das im Betrieb bendliche Gerät nicht unbeaufsichtigt.
· Stellen Sie das Gerät nicht in der Nähe oder auf einer Gasamme, einer elektrischen Platte oder an
einer Stelle ab, auf der es in Kontakt mit einem Elektroofen oder einem anderen heißen Geräten
kommen kann.
· Benutzen Sie das Gerät nicht im Freien.

27
DO938K
www.domo-elektro.be
DE
· Benutzen Sie das Gerät ausschließlich für den Zweck, für den es gedacht ist.
· Stellen Sie das Gerät immer auf eine stabile, ache und trockene Oberäche.
· Das Gerät ist nur auf den privaten Gebrauch ausgelegt. Der Hersteller ist nicht verantwortlich für
Unfälle, die als Folge von unsachgemäßem Gebrauch des Geräts oder Nichtbefolgen der in dieser
Anleitung aufgeführten Regeln entstehen.
· Sämtliche Reparaturen, abgesehen von der gewöhnlichen Pege, sind durch den Hersteller oder
dessen Kundendienst zu übernehmen.
· Das Gerät, das Kabel oder den Stecker niemals in Wasser oder in andere Flüssigkeiten tauchen.
· Netzkabel vor scharfen Kanten, heißen Gegen-ständen oder anderen Wärmequellen schützen.
· Halten Sie die Lüftungsönungen frei und sorgen Sie dafür, dass diese nicht verstopft oder behindert
werden.
· Verwenden Sie keine anderen elektrischen Geräte im Kühlschrank, außer wenn sie vom Hersteller für
diesen Zweck zugelassen wurden.
· Fassen Sie die Lampe nicht an, wenn diese lange gebrannt hat. Sie kann sehr heiß sein.
· Die Lampe ist nur für dieses Gerät bestimmt. Verwenden Sie diese nie als Innenraumbeleuchtung.
· Bewahren Sie keine explosiven Stoe im Gerät, wie beispielsweise Sprühaschen mit brennbarem
Triebmittel.
· Sorgen Sie dafür, dass der Kühlkreislauf nicht beschädigt wird, z.B. während des Transports oder bei
der Montage.
· Achten Sie darauf, dass das Kabel nicht durch die Rückseite des Gerätes platt gedrückt oder
beschädigt wird. Dies kann Überhitzung oder Feuer verursachen.
· Achten Sie darauf, dass Sie Zugang zum Stecker des Gerätes haben.
· Ziehen Sie nicht am Kabel.
· Wenn die Steckdose lose ist, stecken Sie den Stecker nicht in diese Steckdose. (Risiko eines
Stromschlags oder Brandgefahr)
· Vermeiden Sie eine lange Exposition gegenüber Sonnenlicht.
· Das Gerät darf nicht mit einem Verlängerungskabel oder einer Verteilersteckdose verwendet werden.
· Diese Kühleinheit ist nicht für die Verwendung als Einbaugerät vorgesehen.
· Halten Sie die unten angegebenen Anweisungen ein, um eine Kontamination von Lebensmitteln zu
vermeiden:
· Durch eine langfristige Önung der Tür kann sich die Temperatur in den Fächern des Geräts
beträchtlich erhöhen.
· Reinigen Sie die Oberächen regelmäßig, die in Kontakt mit Lebensmitteln kommen
können. Halten Sie den Kondensationskanal und das Ablauoch an der Rückseite des Geräts
sauber.
· Bewahren Sie rohes Fleisch und Fisch in geeigneten Behältern im Kühlschrank auf, sodass
diese nicht in Kontakt mit anderen Lebensmitteln kommen oder darauf tropfen.
· Wenn das Gerät längere Zeit leer bleibt, müssen Sie es ausschalten, abtauen und reinigen.
Lassen Sie es trocknen und lassen Sie die Tür oen, um zu vermeiden, dass sich im Gerät
Schimmel bildet.

28
DO938K
DE
WARNHINWEIS! Gerät nie auf oder in die Nähe einer Gasamme oder elektrischen
Platte oder an einen Ort stellen, an dem es mit einer Wärmequelle in Kontakt kommen
könnte. An der Rückseite des Geräts benden sich brennbare Materialien.
Achten Sie auf das Symbol „Brandgefahr - brennbares Material“, das sich an der
Rückseite des Geräts bendet.
TEILE
1. Temperaturregler
2. Regale
3. Gemüsefach
4. Stellfüße
5. Türregal
VOR DER ERSTEN INBETRIEBNAHME
· Das Verpackungsmaterial sowohl innen als auch außen entfernen. Die Außenseite des Apparats mit
einem sauberen, feuchten Tuch reinigen. Die Innenseite kann mit einem weichen, feuchten Tuch
gereinigt werden.
· Die Luft rund um den Kühlschrank sollte frei zirkulieren können. Die Rückseite des Kühlschranks muss
mindestens 13 cm von der Wand entfernt sein.
· Den Kühlschrank auf einen stabilen, achen Untergrund stellen.
· Direktes Sonnenlicht und Wärme vermeiden. Sonnenlicht kann die Außenseite des Kühlschranks
angreifen. Wärme verursacht einen höheren Stromverbrauch
· Einen zu hohen Feuchtigkeitsgrad vermeiden. Zuviel Luftfeuchtigkeit sorgt für schnellere Eisbildung
im Kühlschrank.
· Bevor Sie den Kühlschrank an das Stromnetz anschließen, kontrollieren Sie, ob die Spannung auf dem
Typenschild Ihres Geräts mit der Spannung in Ihrer Wohnung übereinstimmt. Eine andere Spannung
kann das Gerät beschädigen.
· Sie können das Gerät nur über den Stecker vom Stromnetz trennen. Sorgen Sie dafür, dass er immer
einfach zugänglich ist. Um das Gerät vom Stromnetz zu trennen, schalten Sie das Gerät aus und ziehen
Sie den Stecker anschließend aus der Steckdose.
· Das Gerät nach dem Aufstellen vor dem Einschalten 24 Stunden stehen lassen. So kann das Kühlmittel
sich verteilen.
· Lassen Sie das Gerät 8 Stunden ohne Lebensmittel in Betrieb, sodass der Kühlschrank auf eine
angemessene Temperatur abkühlt.
5
2
1
4
3

29
DO938K
www.domo-elektro.be
DE
· Bei unebenen Oberächen können die vorderen Stellfüße zur Ausrichtung verwendet werden.
16
· Montieren Sie den Gri.
16
· Die Klimaklasse gibt die minimale und maximale Umgebungstemperatur für den ordnungsgemäßen
Betrieb eines Gerätes an. Die Klimaklasse nden Sie auf dem Typenschild auf der Rückseite des
Gerätes.
· SN: Subnormal: Umgebungstemperatur 10 °C bis 32 °C
· N: Normal: Umgebungstemperatur 16 °C bis 32 °C
· ST: Subtropen: Umgebungstemperatur 16 °C bis 38 °C
· T: Tropen: Umgebungstemperatur 16 °C bis 43 °C
GEBRAUCH
TEMPERATURREGELUNG
Der Kühlschrank wird durch einen Temperaturregler geregelt, der sich im Gerät bendet. Stellen Sie
diesen Regler auf die gewünschte Position ein. Je höher die Zahl, desto kälter ist die Temperatur. Stufe 4
wird für den Normalgebrauch empfohlen.
· Das Gerät funktioniert in der Position 0 nicht (das Kühlsystem ist ausgeschaltet), doch die
Stromversorgung ist nicht unterbrochen.
· Die Betriebszeit und die -temperatur werden durch den Ort, an dem der Kühlschrank verwendet wird,
durch die Häugkeit der Türönung und durch die Temperatur des Raums beeinusst, in dem sich der
Kühlschrank bendet.

30
DO938K
DE
VERSETZEN DES GERÄTS
· Wen Sie das Gerät, unabhängig aus welchem Grund, ausschalten, warten Sie 10 Minuten, bis Sie es
erneut einschalten. Der Druck im Kühlsystem muss zunächst stabilisiert werden, bevor Sie das Gerät
erneut einschalten.
· Schalten Sie das Gerät aus und ziehen Sie den Netzstecker aus der Steckdose. Sämtliche Lebensmittel
entnehmen. Entfernen Sie außerdem alle abnehmbaren Teile (Regale, Zubehör, usw.) oder befestigen
Sie diese im Kühlschrank, um Erschütterungen zu vermeiden.
· Versetzen Sie das Gerät und installieren Sie es. Wenn Sie das Gerät während des Transports auf die
Seite gelegt haben, auch wenn dies nur sehr kurz der Fall war, lassen Sie das Gerät mindestens 10
Minuten gerade stehen, bevor Sie es erneut einschalten.
· Ihr Gerät verwendet das Kühlmittel Isobutan (R600a). Obwohl R600a ein umweltfreundliches und
natürliches Gas ist, ist es explosiv. Seien Sie deshalb während des Transports oder bei der Installation
des Geräts sehr vorsichtig, um Schäden an den Kühlelementen zu vermeiden. Im Falle eines Lecks
durch eine Beschädigung der Kühlelemente halten Sie den Kühlschrank von oenem Feuer oder
Wärmequellen fern und lüften Sie den Raum, in dem sich das Gerät bendet, für einige Minuten.
LEBENSMITTEL IM KÜHLSCHRANK AUFBEWAHREN
Der Kühlschrank sorgt für eine längere Auewahrungszeit von frischen Lebensmitteln mit begrenzter
Haltbarkeit. Für eine Auewahrung von frischen Lebensmitteln mit den besten Ergebnissen:
· Verwenden Sie nur sehr frische Lebensmittel einer sehr guten Qualität.
· Sorgen Sie dafür, dass die Lebensmittel gut verpackt oder abgedeckt sind, bevor Sie diese
auewahren. Dies vermeidet, dass die Lebensmittel austrocknen, ausbleichen oder ihren Geschmack
verlieren. Dadurch bleiben sie länger frisch. Es vermeidet außerdem die Übertragung von Gerüchen.
· Sorgen Sie dafür, dass Lebensmittel mit einem starken Geruch gut verpackt und abgedeckt sind und
bewahren Sie diese fern von Butter, Milch und Sahne sowie anderen Lebensmitteln auf, die durch
einen starken Geruch beeinträchtigt werden können.
· Lassen Sie warme Lebensmittel abkühlen, bevor Sie diese in den Kühlschrank stellen.
ABTAUEN
Der Kühlschrank taut sich vollständig automatisch ab.
Während des Betriebs des Kühlers bildet sich Kondensationstropfen oder Reif an der Rückwand des
Geräts. Dies ist normal. Es ist nicht erforderlich, die Kondensationsüssigkeit oder das Eis zu entfernen.
Die Rückwand taut sich automatisch ab. Die Kondensationsüssigkeit läuft über den Kondensationskanal
und wird zum Kühler geführt, wo sie verdampft.
Hinweis: Halten Sie den Kondensationskanal und das Abussloch sauber, sodass die
Kondensationsüssigkeit ablaufen kann.
URLAUB
Falls Sie für eine kurze Zeit in Urlaub gehen, kann das Gerät eingeschaltet bleiben.
Falls Sie für längere Zeit in Urlaub gehen, kann wie folgt verfahren werden :
· Alle Lebensmittel aus dem Kühlschrank entfernen

31
DO938K
www.domo-elektro.be
DE
· Den Stecker aus der Steckdose ziehen
· Den Kühlschrank gründlich reinigen.
· Die Türe des Kühlschranks oen lassen, um Schimmel und schlechten Geruch zu vermeiden.
STROMAUSFALL
Die meisten Stromausfälle werden innerhalb von 1 bis 2 Stunden behoben und ändern die Temperatur des
Kühlschranks nicht. Die Kühlschranktüre, während eines Stromausfalls, so wenig wie möglich önen.
Während eines längeren Stromausfalls, Maßnahmen ergreifen, um die Lebensmittel zu schützen, zum
Beispiel mit Hilfe von Trockeneis.
WICHTIGE REGELN
· Niemals warmes Essen in den Kühlschrank stellen.
· Getränke sollten in geschlossenen Gefäßen auewahrt werden.
· Lebensmittel die längere Zeit im Kühlschrank auewahrt werden, sollten abgedeckt oder in
Glasschalen auewahrt werden.
· Niemals verdorbene Lebensmittel in den Kühlschrank stellen.
· Stets dafür sorgen, dass der Kühlschrank nicht zu voll ist, sodass die Lebensmittel ausreichend gekühlt
werden können.
· Die Türe des Kühlschranks nur önen, wenn es nötig ist.
· Nicht für draussen Campingzwecke (bzw. Tent).
· Darf nur in Räumen verwendet werden.
· Das Gerät darf nicht in öentlichen Verkehrsmitteln benutzt werden.
LEITFADEN ZUR LAGERUNG
Für eine optimale Lagerung richten Sie Ihr Kühlgerät folgendermaßen ein:
Kühlschrankfach Lebensmittelart
Türregal · Lebensmittel mit natürlichen Konservierungsstoen wie
Marmeladen, Säfte, Getränke, Gewürze etc.
· Lagern Sie hier keine Lebensmittel mit begrenzter Haltbarkeit
Gemüse-Schublade · Obst, Kräuter und Gemüse
· Bananen, Zwiebeln, Kartoeln und Knoblauch nicht kühl lagern
Mittleres Regal · Milch und Eier
Obere Ablage · Lebensmittel, die nicht gekocht werden müssen, z.B.
Fertiggerichte, Reste, Aufstriche etc.
EINLEGEBÖDEN UND TÜRFÄCHER VERSETZEN
· Leeren Sie den Kühlschrank, bevor Sie Einschübe oder Türfächer versetzen.
· Um einen Einschub zu versetzen, heben Sie ihn an und ziehen Sie ihn in Ihre Richtung.

32
DO938K
DE
· Um ein Türfach zu versetzen, halten Sie es mit 2 Händen fast. Heben Sie das Türfach nach oben an und
ziehen Sie es in Ihre Richtung.
AUSTAUSCH DER GLÜHBIRNE
Ziehen Sie den Netzstecker aus der Steckdose, bevor Sie die Glühbirne austauschen.
1. Entfernen Sie die Lampenabdeckung.
2. Schauben Sie die alte Glühbirne aus und setzen Sie anschließend eine neue 15W (E14-Fassung)
Glühbirne ein.
3. Setzen Sie die Lampenabdeckung wieder auf.
ÖFFNUNGSRICHTUNG DER TÜR ÄNDERN
Wenn Sie die Scharniere der Tür auf die andere Seite versetzen möchten, empfehlen wir, einen
anerkannten Fachmann zu kontaktieren und ihn diese Arbeiten durchführen zu lassen. Bevor Sie die
Önungsrichtung ändern, kontrollieren Sie, ob der Stecker aus der Steckdose gezogen wurde und dass
das Gerät leer ist. Es empehlt sich, einen Kreuzschlitzschraubendreher und einen Maulschlüssel zu
verwenden (beide nicht im Lieferumfang enthalten).
1. Entfernen Sie die Schrauben der oberen Abdeckung.
Reverse Door
Tool required: Philips screwdriver, Flat bladed screwdriver, Hexagonal spanner.
Ensure the unit is unplugged and empty.
To take the door off, it is necessary to tilt the unit backwards. You should rest the unit on something solid
so that it will not slip during the door reversing process.
All parts removed must be saved to do the reinstallation of the door.
Do not lay the unit flat as this may damage the coolant system.
It' s better that 2 people handle the unit during assembly.
1. Remove two screws at rear side of top cover.
2. Remove top cover and thermostat knob, then place it aside.
3. Unscrew top hinge and then remove door and place it on a soft pad to
avoid scratch.
4. Unscrew bottom hinge. Then remove the adjustable feet from both
side.
7
unscrew
2. Entfernen Sie die obere Abdeckung.
Reverse Door
Tool required: Philips screwdriver, Flat bladed screwdriver, Hexagonal spanner.
Ensure the unit is unplugged and empty.
To take the door off, it is necessary to tilt the unit backwards. You should rest the unit on something solid
so that it will not slip during the door reversing process.
All parts removed must be saved to do the reinstallation of the door.
Do not lay the unit flat as this may damage the coolant system.
It' s better that 2 people handle the unit during assembly.
1. Remove two screws at rear side of top cover.
2. Remove top cover and thermostat knob, then place it aside.
3. Unscrew top hinge and then remove door and place it on a soft pad to
avoid scratch.
4. Unscrew bottom hinge. Then remove the adjustable feet from both
side.
7
unscrew

33
DO938K
www.domo-elektro.be
DE
3. Entfernen Sie die Schrauben und anschließend das obere Scharnier, dass die Tür in ihrer Position
hält. Heben Sie die Tür hoch und legen Sie diese zur Vermeidung von Kratzern auf inen weichen
Untergrund.
Reverse Door
Tool required: Philips screwdriver, Flat bladed screwdriver, Hexagonal spanner.
Ensure the unit is unplugged and empty.
To take the door off, it is necessary to tilt the unit backwards. You should rest the unit on something solid
so that it will not slip during the door reversing process.
All parts removed must be saved to do the reinstallation of the door.
Do not lay the unit flat as this may damage the coolant system.
It' s better that 2 people handle the unit during assembly.
1. Remove two screws at rear side of top cover.
2. Remove top cover and thermostat knob, then place it aside.
3. Unscrew top hinge and then remove door and place it on a soft pad to
avoid scratch.
4. Unscrew bottom hinge. Then remove the adjustable feet from both
side.
7
unscrew
4. Entfernen Sie die unterste Schraube, den Scharnierbügel und die Stellfüße unten am Gerät.
Reverse Door
Tool required: Philips screwdriver, Flat bladed screwdriver, Hexagonal spanner.
Ensure the unit is unplugged and empty.
To take the door off, it is necessary to tilt the unit backwards. You should rest the unit on something solid
so that it will not slip during the door reversing process.
All parts removed must be saved to do the reinstallation of the door.
Do not lay the unit flat as this may damage the coolant system.
It' s better that 2 people handle the unit during assembly.
1. Remove two screws at rear side of top cover.
2. Remove top cover and thermostat knob, then place it aside.
3. Unscrew top hinge and then remove door and place it on a soft pad to
avoid scratch.
4. Unscrew bottom hinge. Then remove the adjustable feet from both
side.
7
unscrew
5. Lösen Sie den Scharnierbolzen aus dem Scharnierbügel. Kehren Sie das Scharnier um und
befestigen Sie den Scharnierbolzen wieder.
5. Unscrew and remove the bottom hinge pin, turn the bracket over and replace it.
6. Refit the bracket fitting the bottom hinge pin. Replace both adjustable
feet.
7. Place the door back on. Ensure the door is aligned horizontally and
vertically, so that the seals are closed on all sides before finally
tightening the top hinge.
8. Put the top cover and fix it with 2 screws on the back.
Unscrew
Screw
8
Reverse Door
9. Fix the thermostat knob.
screw
6. Befestigen Sie die Schrauben und den Scharnierbügel an der gegenüberliegenden Seite des Bodens.
Setzen Sie die Stellfüße zurück.
5. Unscrew and remove the bottom hinge pin, turn the bracket over and replace it.
6. Refit the bracket fitting the bottom hinge pin. Replace both adjustable
feet.
7. Place the door back on. Ensure the door is aligned horizontally and
vertically, so that the seals are closed on all sides before finally
tightening the top hinge.
8. Put the top cover and fix it with 2 screws on the back.
Unscrew
Screw
8
Reverse Door
9. Fix the thermostat knob.
screw

34
DO938K
DE
7. Setzen Sie die Tür vorsichtig ein. Achten Sie darauf, dass die Tür sowohl senkrecht als auch
waagerecht ausgerichtet ist, sodass die Dichtungen an allen Seiten anliegen, bevor Sie das obere
Scharnier vollständig festziehen. Setzen Sie das Scharnier wieder ein und schrauben Sie dieses an
der Oberseite des Geräts fest.
5. Unscrew and remove the bottom hinge pin, turn the bracket over and replace it.
6. Refit the bracket fitting the bottom hinge pin. Replace both adjustable
feet.
7. Place the door back on. Ensure the door is aligned horizontally and
vertically, so that the seals are closed on all sides before finally
tightening the top hinge.
8. Put the top cover and fix it with 2 screws on the back.
Unscrew
Screw
8
Reverse Door
9. Fix the thermostat knob.
screw
8. Setzen Sie die obere Abdeckung erneut auf und schrauben Sie diese mithilfe der Schrauben wieder
fest.
5. Unscrew and remove the bottom hinge pin, turn the bracket over and replace it.
6. Refit the bracket fitting the bottom hinge pin. Replace both adjustable
feet.
7. Place the door back on. Ensure the door is aligned horizontally and
vertically, so that the seals are closed on all sides before finally
tightening the top hinge.
8. Put the top cover and fix it with 2 screws on the back.
Unscrew
Screw
8
Reverse Door
9. Fix the thermostat knob.
screw
PROBLEME UND DEREN LÖSUNG
Falls Sie ein Problem mit Ihrem Kühlschrank haben, kontrollieren Sie bitte die folgende Frageliste, bevor
Sie mit unserem Kundendienst Kontakt aufnehmen.
Gerät funktioniert nicht.
· Das Gerät bekommt keinen Strom, kontrollieren, ob die Stromzufuhr in Ordnung ist.
· Kontrollieren, ob sich der Stecker in der Steckdose bendet.
· Kontrollieren, ob die richtige Spannung zur Verfügung steht.
Der Kühlschrank springt zu oft an.
· Ist die Türe gut geschlossen?
· Wurde warmes Essen in den Kühlschrank gestellt, wodurch das Gerät stärker kühlen muss?
· Ist die Türe zu oft oder zu lange geönet worden?
· Das Gerät bekommt die falsche Spannung
· Das Gerät steht in der Nähe einer Wärmequelle oder in direktem Sonnenlicht.
Die Innentemperatur des Kühlschranks ist zu warm.
· Kontrollieren, ob der Kühlschrank Strom hat.

35
DO938K
www.domo-elektro.be
DE
· Kontrollieren, ob sich der Stecker in der Steckdose bendet.
· Die Temperatureinstellung ist zu niedrig.
· Die Türe hat zu lange oder zu oft oen gestanden.
· Die Luftzufuhr ist blockiert.
· Kontrollieren, ob dem Gerät die richtige Spannung zur Verfügung steht.
· Das Gerät steht in der Nähe einer Wärmequelle oder in direktem Sonnenlicht.
REINIGUNG UND WARTUNG
· Verwenden Sie keine aggressiven Reinigungs- oder Lösungsmittel.
· Stellen Sie die Temperatur auf die Position 0 ein und ziehen Sie den Stecker aus der Steckdose.
· Entnehmen Sie die Lebensmittel und bewahren Sie diese an einem kühlen Ort auf.
· Reinigen Sie das Gerät mit einem weichen Tuch mit warmem Wasser und einem milden
Reinigungsmittel.
· Reinigen Sie die Türdichtung nur mit warmem Wasser und reiben Sie diese anschließend gründlich ab.
· Stecken Sie den Stecker nach der Reinigung in die Steckdose und stellen Sie den Temperaturregler
erneut in der gewünschten Temperatur ein.
· Legen Sie die Lebensmittel wieder in das Gerät.
ENTSORGEN
Dieses Symbol auf dem Produkt oder seiner Verpackung weist darauf hin, dass
dieses Produkt nicht als normaler Haushaltsabfall zu behandeln ist, sondern
an einem Sammelpunkt für das Recyling von elektrischen und elektronischen
Geräten abgegeben werden muss. Durch Ihren Beitrag zum korrekten
Entsorgen dieses Produkts schützen Sie die Umwelt und die Gesundheit Ihrer
Mitmenschen. Umwelt und Gesundheit werden durch falsches Entsorgen
gefährdet. Weitere Informationen über das Recycling dieses Produkts
erhalten Sie von Ihren Rathaus, Ihrer Müllabfuhr oder dem Geschäft, in dem
Sie das Produkt gekauft haben.
Das Verpackungsmaterial ist wiederverwertbar. Entsorgen Sie die Verpackung
umweltgerecht und führen Sie sie der Wertstosammlung zu.

36
DO938K
EN
WARRANTY
Dear client ,
All of our products are always submitted to a strict quality control before they are sold to you. Should you
nevertheless experience problems with your device, we sincerely regret this.
In that case, we kindly request you to contact our customer service.
Our sta will gladly assist you.
+32 14 21 71 91 [email protected]
Monday – Thursday: 8.30 – 12.00 and 13.00 – 17.00
Friday: 8.30 – 12.00 and 13.00 – 16.30
This appliance has a two year warranty period. During this period the manufacturer is responsible for
any failures that are the direct result of construction failure. When these failures occur the appliance will
be repaired or replaced if necessary. The warranty will not be valid when the damage to the appliance is
caused by wrong use, not following the instructions or repairs executed by a third party. The guarantee is
issued with the original till receipt. All parts, which are subject to wear, are excluded from the warranty.
If your device breaks down within the 2-year warranty period, you can return the device together with
your receipt to the shop where you purchased it.
The guarantee on accessories and components that are liable to wear-and-tear is only 6 months.
The guarantee and responsibility of the supplier and manufacturer lapse automatically in the following
cases:
· If the instructions in this manual have not been followed.
· In case of incorrect connection, e.g., electrical voltage that is too high.
· In case of incorrect, rough or abnormal use.
· In case of insucient or incorrect maintenance.
· In case of repairs or alterations to the device by the consumer or non-authorised third parties.
· If the customer used parts or accessories that are not recommended or provided by the supplier /
manufacturer.

37
DO938K
www.domo-elektro.be
EN
SAFETY INSTRUCTIONS
When using electrical appliances, basic safety precautions should always be taken, including the
following:
· Read all instructions carefully. Keep this manual for future reference.
· Make sure all packaging materials and promotional stickers have been removed before using the
appliance for the rst time. Make sure children cannot play with the packaging materials.
· This appliance is intended to be used in household and similar applications such as:
· sta kitchen areas in shops, oces and other working environments;
· farm houses;
· by clients in hotels, motels and other residential type environments;
· bed and breakfast type environments.
· Children should be supervised to ensure that they do not play with the appliance.
· This appliance can be used by children aged from 16 years and above and persons with reduced
physical, sensory or mental capabilities or lack of experience and knowledge if they have been given
supervision or instruction concerning use of the appliance in a safe way and understand the hazards
involved. Children shall not play with the appliance. Cleaning and user maintenance shall not be made
by children unless they are older than 16 and supervised.
· Keep the appliance and its cord out of reach of children younger than 16 years.
· Attention: This appliance cannot be used with an external timer or a separate remote control.
· Before use, check if the voltage stated on the appliance corresponds with the voltage of the power net
at your home.
· Do not let the cord hang on a hot surface or on the edge of a table or counter top.
· Never use the appliance when the cord or plug is damaged, after malfunction or when the appliance
itself is damaged. In that case, take the appliance to the nearest qualied service center for check-up
and repair.
· Close supervision is necessary when the appliance is used near or by children.
· The use of accessories that are not recommended or sold by the manufacturer can cause re, electrical
shock or injuries.
· Unplug the appliance when it is not in use, before assembling or disassembling any parts and before
cleaning the appliance. Put all buttons and knobs into the ‘o’ position and unplug the appliance by
grasping the plug. Never unplug by pulling the cord.
· Do not leave a working appliance unattended.
· Never place this appliance near a gas stove or electrical stove or in a place where it may come into
contact with a warm appliance.
· Do not use the appliance outdoors.
· Only use the appliance for its intended use.
· Always use the appliance on a steady, dry and level surface.
· Only use the appliance for domestic use. The manufacturer can not be held responsible for accidents
that result from improper use of the appliance or not following the instructions described in this
manual.

38
DO938K
EN
· All repairs should be carried out by the manufacturer or its aftersales service.
· Never immerse the appliance, the cord or the plug in water or any other liquid.
· Keep the cord away from sharp edges and hot parts or other heat sources.
· Keep the ventilation openings free of obstructions.
· Do not use any other electrical appliance inside the fridge, unless they are approved for this purpose
by the manufacturer.
· Do not keep any explosive substances inside the appliance, like for instance aerosol cans with a
ammable propellant.
· Make sure that the refrigerant circuit does not get damaged, for instance during transportation or
installation.
· Make sure that the plug does not get squashed or damaged by the back of the appliance. A squashed
or damaged power plug may overheat and cause re.
· Make sure that you have access to the plug of the appliance.
· Do not pull the cord.
· If the socket is loose, do not plug in the appliance. (risk of electric shock or re)
· Avoid long exposure to direct sunlight.
· The appliance may not be used with an extension lead or a multiple socket.
· This cooling unit is not intended for use as a built-in appliance.
· Follow the instructions below to prevent contamination of food:
· Keeping the door open for long periods may cause the temperature in the compartments of
the appliance to rise considerably.
· Clean the surfaces that could come into contact with food regularly. Keep the condensation
channel and drainage hole at the back of the appliance clean.
· Store raw meat and sh in suitable containers in the refrigerator so that they do not come
into contact with or drip onto other food.
· If the appliance is left empty for longer periods, it should be turned o, defrosted and
cleaned. Allow it dry and leave the door ajar to prevent mould from growing in the appliance.
WARNING! Never place this appliance on or in the neighbourhood of a gas or electric re
or in a place where it could come into contact with a heat source. There are ammable
materials located on the back of the appliance.
Pay attention to the symbol ‘Fire risk – ammable materials’ located on the back of the
appliance.

39
DO938K
www.domo-elektro.be
EN
PARTS
1. Temperature control knob
2. Shelves
3. Vegetable container
4. Levelling feet
5. Door shelves
BEFORE THE FIRST USE
· Remove the exterior and interior packing, wipe the outside thoroughly with a soft dry cloth and the
inside with a wet, lukewarm cloth.
· Select a place with a strong, level oor.
· Allow 13 cm of space between the back of the refrigerator and any adjacent wall.
· Avoid direct sunlight and heat. Direct sunlight may aect the acrylic coating. Heat sources nearby will
cause higher electricity consumption.
· Avoid very moist places. Too much moisture in the air will cause frost to from very quickly on the
evaporator, and your refrigerator.
· Before connecting your refrigerator to the power supply, check that the voltage stated on the rating
label of your appliance corresponds to the voltage in your home. A dierent voltage could damage the
appliance.
· After installation, leave the freezer for 24 hours before turning it on. This way the refrigerant can
settle.
· Allow the appliance to run empty for 8 hours so the compartment can cool to the appropriate
temperature.
· For uneven surfaces, front feet can be aligned.
16
5
2
1
4
3

40
DO938K
EN
· Install the handle.
16
· The climate class indicates the minimum and maximum ambient temperature for the proper operation
of an appliance. You can nd the climate class on the type plate on the back of the appliance.
· SN: Subnormal: ambient temperature between 10°C and 32°C
· N: Normal: ambient temperature between 16°C and 32°C
· ST: Subtropical: ambient temperature between 16°C and 38°C
· T: Tropical: ambient temperature between 16°C and 43°C
USE
TEMPERATURE CONTROL
The fridge is controlled with a temperature control knob located inside the appliance.
Adjust the control knob as desired to suit your individual preference. The higher the number, the colder
the temperature. Position 4 is the recommended position for normal use.
· In the 0 position the appliance does not operate (the cooling system is switched o), but power supply
is not interrupted.
· The running time and temperature are aected by where the fridge is located, how often the door is
opened and the temperature of the room the fridge is located in.
MOVING YOUR APPLIANCE
· If the appliance is turned o for any reason, wait for 10 minutes before turning it back on. This will
allow the refrigeration system pressures to equalise before restarting.
· Turn o the appliance and unplug it from the mains socket. Remove all food. Also remove all mobile
parts (shelves, accessories, etc.) or x them into the fridge to avoid any shock.
· Relocate and install. If the appliance has been left on its side for any length of time, leave it standing
upright for at least 10 minutes before turning on.
· Your appliance uses isobutane (R600a) as a refrigerant. Although R600a is an environmentally friendly
and natural gas, it is explosive. Therefore you should be careful during shipment and installation
to prevent your appliance’s cooler elements from being damaged. In the event of a leak caused by
damage to the cooler elements, move your fridge from open ame or heat sources and ventilate the
room where the appliance is located for a few minutes.

41
DO938K
www.domo-elektro.be
EN
STORING FOOD IN THE FRIDGE
The fridge helps to extend the storage times of fresh perishable foods.
Fresh food care for best results:
· Store foods that are very fresh and of good quality.
· Ensure that food is well wrapped or covered before it is stored. This will prevent food from
dehydrating, deteriorating in colour or losing taste and will help maintain freshness. It will also prevent
odour transfer.
· Make sure that strong smelling foods are wrapped or covered and stored away from foods such as
butter, milk and cream which can be tainted by strong odours.
· Cool hot foods down before placing them in the fridge.
DEFROSTING
The refrigerator defrosts fully automatically.
While the cooling is running, beads of condensation or hoarfrost form at the back of the refrigerator. This
is normal. It is not necessary to wipe o the condensation or frost. The rear panel defrosts automatically.
The condensation runs into the condensation channel and is conveyed to the cooling from where it
evaporates.
Note: Keep the condensation channel and drainage hole clean, so that the condensation can run out.
VACATION TIME
For short vacation periods, leave the control knobs at their usual settings. During longer absences:
· Remove all foods.
· Disconnect from electrical outlet.
· Clean the refrigerator thoroughly, including defrost pan.
· Leave door open to avoid possible formations of condensate, mold or odors.
POWER FAILURE
Most power failures are corrected within an hour or two and will not aect your refrigerator temperatures.
However, you should minimize the number of door openings while the power is o. During power failures
of longer duration, take steps to protect your food by blacking dry ice on top of packages.
Move the appliance
Disconnected the power plug, Remove or securely fasten down all loose items inside the refrigerator, To
avoid damaging the leveling legs, turn them all the way into the base.
SOME IMPORTANT RULES FOR THE CORRECT USE OF THE REFRIGERATOR
· Never place hot foods in the refrigerator.
· Beverages should be stored in sealed containers.
· Foods to be stored for a long time should be wrapped in cellophance or polyethylence, or kept in glass
containers.

42
DO938K
EN
· Never place spoiled foods in the cabinet.
· Don’t overload the cabinet.
· Don’t open the door unless necessary.
· Caution: please keep the products away from the re or similar glowing substance before you dispose
the refrigerator.
· Caution : Not for outer camping use (ex. Tent)
· Caution: For indoor use only.
· Caution: The appliance can not be used in public transportation.
STORAGE GUIDE
For the best storage, set up your refrigerating appliance as follows:
Refrigerator compartment Type of food
Door rack · Food with natural preservatives such as jams, juices, drinks,
spices, etc.
· Do not store food with a limited shelf life here
Crisper drawer · Fruits, herbs, and vegetables
· Do not refrigerate bananas, onions, potatoes, or garlic
Middle shelf · Dairy and eggs
Top shelf · Food that does not need to be cooked, such as ready-made
meals, leftovers, spreads, etc.
MOVING THE SHELVES AND DOOR RACK
· Empty the fridge before moving the shelves or the door
racks.
· To move a shelf, raise it and pull it towards you.
· To move a door rack, grip it rmly with 2 hands. Raise the
door rack and pull it towards you.
BULB REPLACEMENT
Beware: Unplug the appliance from the power supply before replacing the light bulb.
1. Remove the bulb cover.
2. Unscrew the old bulb and then screw a new 15W (E14 base) bulb.
3. Replace the bulb cover.
DOOR CONVERSION
If you need to hinge your door on the opposite side it is recommended that you call your local authorised
service agent to make this conversion or ask a technician.
Before you reverse the door, you should ensure the appliance is unplugged and empty. It is recommended
to use a crosshead screwdriver and a spanner (both not supplied).

43
DO938K
www.domo-elektro.be
EN
1. Remove the screws on the back of the top cover.
Reverse Door
Tool required: Philips screwdriver, Flat bladed screwdriver, Hexagonal spanner.
Ensure the unit is unplugged and empty.
To take the door off, it is necessary to tilt the unit backwards. You should rest the unit on something solid
so that it will not slip during the door reversing process.
All parts removed must be saved to do the reinstallation of the door.
Do not lay the unit flat as this may damage the coolant system.
It' s better that 2 people handle the unit during assembly.
1. Remove two screws at rear side of top cover.
2. Remove top cover and thermostat knob, then place it aside.
3. Unscrew top hinge and then remove door and place it on a soft pad to
avoid scratch.
4. Unscrew bottom hinge. Then remove the adjustable feet from both
side.
7
unscrew
2. Remove the top cover.
Reverse Door
Tool required: Philips screwdriver, Flat bladed screwdriver, Hexagonal spanner.
Ensure the unit is unplugged and empty.
To take the door off, it is necessary to tilt the unit backwards. You should rest the unit on something solid
so that it will not slip during the door reversing process.
All parts removed must be saved to do the reinstallation of the door.
Do not lay the unit flat as this may damage the coolant system.
It' s better that 2 people handle the unit during assembly.
1. Remove two screws at rear side of top cover.
2. Remove top cover and thermostat knob, then place it aside.
3. Unscrew top hinge and then remove door and place it on a soft pad to
avoid scratch.
4. Unscrew bottom hinge. Then remove the adjustable feet from both
side.
7
unscrew
3. Remove the three screws and then remove the top hinge that holds the door in place. Lift the door
and place it on a padded surface to prevent it from being scratched.
Reverse Door
Tool required: Philips screwdriver, Flat bladed screwdriver, Hexagonal spanner.
Ensure the unit is unplugged and empty.
To take the door off, it is necessary to tilt the unit backwards. You should rest the unit on something solid
so that it will not slip during the door reversing process.
All parts removed must be saved to do the reinstallation of the door.
Do not lay the unit flat as this may damage the coolant system.
It' s better that 2 people handle the unit during assembly.
1. Remove two screws at rear side of top cover.
2. Remove top cover and thermostat knob, then place it aside.
3. Unscrew top hinge and then remove door and place it on a soft pad to
avoid scratch.
4. Unscrew bottom hinge. Then remove the adjustable feet from both
side.
7
unscrew
4. Remove the bottom screw, hinge bracket and adjustable feet from the bottom of the appliance.
Reverse Door
Tool required: Philips screwdriver, Flat bladed screwdriver, Hexagonal spanner.
Ensure the unit is unplugged and empty.
To take the door off, it is necessary to tilt the unit backwards. You should rest the unit on something solid
so that it will not slip during the door reversing process.
All parts removed must be saved to do the reinstallation of the door.
Do not lay the unit flat as this may damage the coolant system.
It' s better that 2 people handle the unit during assembly.
1. Remove two screws at rear side of top cover.
2. Remove top cover and thermostat knob, then place it aside.
3. Unscrew top hinge and then remove door and place it on a soft pad to
avoid scratch.
4. Unscrew bottom hinge. Then remove the adjustable feet from both
side.
7
unscrew

44
DO938K
EN
5. Take the hinge pin out of the hinge bracket. Turn the bracket around and tighten the pin again.
5. Unscrew and remove the bottom hinge pin, turn the bracket over and replace it.
6. Refit the bracket fitting the bottom hinge pin. Replace both adjustable
feet.
7. Place the door back on. Ensure the door is aligned horizontally and
vertically, so that the seals are closed on all sides before finally
tightening the top hinge.
8. Put the top cover and fix it with 2 screws on the back.
Unscrew
Screw
8
Reverse Door
9. Fix the thermostat knob.
screw
6. Attach the screws and hinge bracket to the opposite side of the bottom. Put the adjustable feet
back into place.
5. Unscrew and remove the bottom hinge pin, turn the bracket over and replace it.
6. Refit the bracket fitting the bottom hinge pin. Replace both adjustable
feet.
7. Place the door back on. Ensure the door is aligned horizontally and
vertically, so that the seals are closed on all sides before finally
tightening the top hinge.
8. Put the top cover and fix it with 2 screws on the back.
Unscrew
Screw
8
Reverse Door
9. Fix the thermostat knob.
screw
7. Carefully set the door back into place. Ensure the door is aligned horizontally and vertically so that
the seals are closed on all sides before nally tightening the top hinge. Insert the hinge back and
screw it to the top of the appliance.
5. Unscrew and remove the bottom hinge pin, turn the bracket over and replace it.
6. Refit the bracket fitting the bottom hinge pin. Replace both adjustable
feet.
7. Place the door back on. Ensure the door is aligned horizontally and
vertically, so that the seals are closed on all sides before finally
tightening the top hinge.
8. Put the top cover and fix it with 2 screws on the back.
Unscrew
Screw
8
Reverse Door
9. Fix the thermostat knob.
screw
8. Put the top cover back and x it in place with the screws.
5. Unscrew and remove the bottom hinge pin, turn the bracket over and replace it.
6. Refit the bracket fitting the bottom hinge pin. Replace both adjustable
feet.
7. Place the door back on. Ensure the door is aligned horizontally and
vertically, so that the seals are closed on all sides before finally
tightening the top hinge.
8. Put the top cover and fix it with 2 screws on the back.
Unscrew
Screw
8
Reverse Door
9. Fix the thermostat knob.
screw

45
DO938K
www.domo-elektro.be
EN
TROUBLE SHOOTING
Frequently, a problem is minor and a service call may not be necessary, use this trouble shooting guide for
a possible solution.
Does not work
· Check connection of power cord to power source.
· Plug in unit
· Use proper voltage
Cools too frequently
· Check temperature setting and adjust as needed.
· Close door securely.
· Be sure that food is cool before inserting.
· Do not keep door open for too long and minimize door openings.
· Do not place unit close to heat sources or direct sunlight.
Internal temperature not cold enough
· Check connection of power cord to power source.
· Plug in unit.
· Check setting and adjust as needed.
· Close door securely.
· Be sure that food is cool before inserting.
· Do not keep door open for too long and minimize door openings.
· Allow room for air to circulate around unit.
· Use proper voltage.
· Do not place unit close to heat sources or direct sunlight.
CLEANING AND MAINTENANCE
· Do not use abrasive cleaning agents or solvents.
· Set the temperature control knob to the 0 position and disconnect the mains plug from the mains
socket.
· Take out the food and store in a cool location.
· Clean the appliance with a soft cloth, warm water and detergent.
· Wipe the door seal with clear water only and then wipe dry thoroughly.
· After cleaning reconnect and adjust the temperature control knob as desired.
· Put the food back into the appliance.

46
DO938K
EN
ENVIRONMENTAL GUIDELINES
This symbol on the product or on its packaging indicates that this product
may not be treated as household waste. Instead it must be brought to
the applicable collection point for recycling of electrical and electronic
equipment. By ensuring this product is disposed of correctly, you will
help prevent potential negative consequences for the environment and
human health, which could otherwise be caused by inappropriate waste
handling of this product. For more detailed information about recycling of
this product, please contact your local city oce, your household waste
disposal service or the shop where you purchased the product.
The packaging is recyclable. Please treat the packaging
ecologically.

47
DO938K
www.domo-elektro.be
ES
GARANTIA
Este aparato tiene un periodo de garantía de 2 años a partir de la fecha de compra. Durante el periodo
de garantía, el distribuidor será completamente responsable de los defectos directamente asignables
a errores del material y fabricación. Cuando se detecten este tipo de errores, y siempre que se estime
necesario, el aparato se sustituirá o reparará. A partir de ese momento, el periodo de garantía de 2 años
no volverá a iniciarse, sino que seguirá siendo de 2 años a partir del momento de compra. La garantía se
concede sobre la base del recibo de caja.
La garantía de los accesorios y componentes sujetos a desgaste es de 6 meses.
La garantía y la responsabilidad/imputabilidad del proveedor y el fabricante expiran automáticamente en
los siguientes casos:
· Cuando no se cumplan las instrucciones que aparecen en este manual.
· En el caso de una conexión inadecuada, por ejemplo, a una tensión eléctrica demasiado alta.
· En caso de uso incorrecto, brusco o anormal.
· En caso de insuciente o incorrecto mantenimiento.
· Si el consumidor o un tercero no autorizado realizan reparaciones o modicaciones en el aparato.
· Si se usan componentes o accesorios que no están recomendados o que no son suministrados por el
proveedor/fabricante.
INSTRUCCIONES DE SEGURIDAD
Cuando utilice aparatos eléctricos, se deben seguir las instrucciones de seguridad mencionadas a
continuación:
· Lea detenidamente estas instrucciones. Conserve este manual para consultarlo posteriormente.
· Antes del primer uso retire todos los materiales de embalaje y etiquetas promocionales. Asegúrese de
que los niños no puedan jugar con el material de embalaje.
· Este aparato es adecuado para su uso en el ámbito doméstico y entornos similares como:
· Zona de cocina para el personal de tiendas, ocinas y otros entornos profesionales similares.
· Granjas.
· Habitaciones de hoteles y moteles, y otros entornos de carácter residencial.
· Habitaciones de invitados o similares.
· Supervise en todo momento a los niños para que no jueguen con el aparato.
· Este aparato puede ser utilizado por niños de 16 años o más, personas con discapacidad física o
sensorial, o personas con capacidad mental limitada o falta de experiencia o conocimiento, siempre,
y en tanto en cuanto, dichas personas estén vigiladas o hayan recibido instrucciones sobre el uso del
aparato de manera segura y conozcan los peligros del uso del mismo. Los niños no deben jugar con el
ventilador. El mantenimiento y la limpieza del dispositivo no deben ser realizados por niños, a menos
que tengan 16 años o más y estén supervisados por un adulto.
· Mantenga el aparato fuera del alcance de los niños.
· Atención: el aparato no puede ser utilizado con un temporizador externo o un mando a distancia
separado.
· Lea todas las instrucciones antes del uso.

48
DO938K
ES
· Antes de utilizarlo, compruebe si el voltaje indicado en el aparato corresponde al voltaje de la
electricidad de su casa.
· No permita que el cable cuelgue sobre una supercie o el borde de una mesa o encimera.
· No utilice nunca el aparato si el cable o el enchufe están dañados, después de un mal funcionamiento
de la unidad o si están dañados. Lleve el aparato al distribuidor autorizado más cercano centro para la
inspección y reparación.
· Se requiere supervisión cuando el aparato es usado por o cerca de niños.
· El uso de accesorios no recomendados o vendidos por el fabricante puede causar incendios, descargas
eléctricas o lesiones.
· Desenchufe la toma de corriente cuando no se usa, para montar o desmontar piezas y antes de
limpiarlo. Ponga todos los botones en posición desconectado (“o”) y desconecte el enchufe de la
toma de corriente. Nunca tire del cable para desenchufarlo.
· No deje que el aparato funcione sin supervisión.
· No encienda nunca el aparato cerca de una estufa de gas o eléctrica, ni en un lugar donde pueda entrar
en contacto con un horno eléctrico o con otro aparato caliente.
· No utilice el aparato en el exterior.
· Utilice el aparato sólo para el n para el que se ha fabricado.
· Coloque siempre el aparato sobre una supercie rme, horizontal y seca.
· Utilice el aparato sólo para uso doméstico. El fabricante no es responsable de los accidentes que
resulten del uso incorrecto del aparato, ni del incumplimiento de las normas establecidas en este
manual.
· Todas las reparaciones aparte del mantenimiento ordinario de la unidad deben ser efectuadas por el
fabricante o por su servicio post-venta.
· No sumerja nunca el aparato, el cable o el enchufe en agua o cualquier otro líquido.
· Mantenga el cable alejado de bordes alados y piezas calientes u otras fuentes de calor.
· Mantenga las ranuras de ventilación libres y asegúrese de que no están bloqueadas u obstruidas.
· No utilice ningún otro aparato eléctrico en el interior del frigoríco, a menos que el mismo esté
aprobado para este n por el fabricante.
· Nunca almacene materiales explosivos en el aparato como, por ejemplo, aerosoles con gas propulsor
inamable.
· Asegúrese de que el circuito de refrigeración no se daña, por ejemplo, durante el transporte o la
instalación.
· Asegúrese de que el cable no quede aplastado o dañado por la parte trasera de la unidad. Esto puede
causar sobrecalentamiento y, en consecuencia, se podría producir un incendio.
· Asegúrese de tener acceso al enchufe del aparato.
· No tire del cable.
· Si la toma de corriente está suelta, no inserte el enchufe en la toma de corriente (riesgo de descarga
eléctrica o incendio).
· Evite una exposición prolongada a la luz solar.
· El aparato no se puede utilizar con un cable alargador o con una regleta.
· Este aparato de aire acondicionado no está destinado para su uso como instalación ja.

49
DO938K
www.domo-elektro.be
ES
· Siga las instrucciones indicadas a continuación para evitar la contaminación de los alimentos:
· La apertura prolongada de la puerta puede aumentar considerablemente la temperatura en
los compartimentos del aparato.
· Limpie regularmente las supercies que puedan entrar en contacto con los alimentos.
Mantenga limpios el canal de condensación y el oricio de drenaje en la parte posterior del
aparato.
· Guarde la carne y el pescado crudos en el frigoríco, en recipientes adecuados, para que no
entren en contacto con otros alimentos.
· Si el aparato permanece vacío durante mucho tiempo debe apagarlo, descongelarlo y
limpiarlo. Deje que se seque y deje la puerta abierta para evitar que se forme moho dentro
del aparato.
¡ADVERTENCIA! Nunca utilice el aparato sobre, o cerca de, una cocina de gas o eléctrica,
ni en un lugar donde pueda entrar en contacto con una fuente de calor. Los materiales
inamables se encuentran en la parte posterior del aparato.
Preste atención al símbolo “Riesgo de incendio: material inamable” ubicado en la parte
posterior del aparato.
PIEZAS
1. Regulador de temperatura
2. Estantes
3. Compartimento de verduras
4. Patas ajustables
5. Estantes de la puerta
ANTES DEL PRIMER USO
· Retire todo el material de embalaje, tanto del interior como del exterior. Limpie el exterior del aparato
con un paño seco. El interior puede limpiarlo con un paño suave y húmedo.
· Asegúrese de que pueda circular el aire alrededor del frigoríco. La parte posterior del frigoríco debe
estar separada de la pared al menos 13 cm.
· Coloque el frigoríco sobre una supercie rme y nivelada.
· Evite la luz directa del sol y el calor. La luz solar puede deteriorar el exterior del frigoríco. El calor
aumentará el consumo.
5
2
1
4
3

50
DO938K
ES
· Evite un grado de humedad demasiado elevado. Demasiada humedad ambiental causará que se
forme hielo demasiado rápido en el frigoríco.
· Antes de conectar el frigoríco a la red eléctrica se debe comprobar que la tensión de la placa de
especicaciones del aparato se corresponde con el voltaje de su hogar. Otra tensión puede dañar el
aparato.
· El enchufe es la única forma de desconectar el aparato de la alimentación, asegúrese de que es fácil
acceder al mismo. Para desconectar la alimentación al aparato, apague el aparato y retire el enchufe
de la toma de corriente.
· Deje el aparato después de la instalación 24 horas antes de encenderlo. Así se puede asentar el
refrigerante.
· Deje que el aparato funcione durante 8 horas sin alimentos hasta que este se enfríe y alcance la
temperatura adecuada.
· Para supercies irregulares, las patas delanteras se pueden alinear.
16
· Instale el tirador.
16
· La clase de clima indica la temperatura ambiente mínima y máxima para el correcto funcionamiento
de un dispositivo. Puede encontrar la clase de clima en la placa de características presente en la parte
posterior del aparato.
· SN: Subnormal: temperatura ambiente de 10 °C a 32 °C
· N: Normal: temperatura ambiente de 16 °C a 32 °C
· ST: Subtropical: temperatura ambiente de 16 °C a 38 °C
· T: Tropical: temperatura ambiente de 16 °C a 43 °C

51
DO938K
www.domo-elektro.be
ES
USO
REGULACIÓN DE TEMPERATURA
El frigoríco se regula con un regulador de temperatura que se encuentra en el interior del aparato. Ajuste
el regulador hasta la posición deseada. Cuanto más alto sea el número, más baja será la temperatura. La
posición 4 es la recomendada para un uso normal.
· El aparato no funciona en la posición 0 (el sistema de refrigeración está apagado), pero la alimentación
no se interrumpe.
· El tiempo de funcionamiento y la temperatura se ven afectados por la ubicación en la que se utiliza
el frigoríco, el número de veces que se abre la puerta y la temperatura de la habitación en la que se
encuentra el frigoríco.
DESPLAZAR SU APARATO
· Si el aparato se apaga por cualquier motivo, espere 10 minutos antes de volver a encenderlo. La
presión en el sistema de refrigeración se debe estabilizar antes de volver a encenderlo.
· Apague el aparato y retire el enchufe de la toma de corriente. Retire todos los alimentos. También
debe retirar todas las partes móviles (estantes, accesorios, etc.) o jarlos en el frigoríco para evitar
choques.
· Desplace el aparato e instálelo. Si el dispositivo se mantuvo posicionado sobre un lado mientras se
trasladaba, aunque fuera durante un tiempo muy corto, el aparato deberá ponerse en posición vertical
durante al menos 10 minutos antes de encender el aparato.
· Su aparato utiliza isobutano (R600a) como refrigerante. A pesar de que el R600a es un gas respetuoso
con el medio ambiente y natural, es explosivo. Por lo tanto, debe tener mucho cuidado al mover o
instalar el aparato para evitar daños en los elementos de refrigeración. En el caso de que se produzca
una fuga por un daño en los elementos de refrigeración, mantenga el frigoríco alejado de llamas o
fuentes de calor y ventile la habitación donde se encuentra el aparato durante algunos minutos.
CONSERVAR ALIMENTOS EN EL FRIGORÍFICO
El frigoríco asegura una vida útil más prolongada de los alimentos frescos y perecederos. Conservación
de alimentos frescos para obtener los mejores resultados:
· Conserve solo alimentos muy frescos y de buena calidad.
· Asegúrese de que los alimentos están bien envasados o cúbralos antes de almacenarlos. Esto evita que
los alimentos se sequen, pierdan color o sabor y hará que se conserven frescos durante más tiempo.
Esto también evita la transferencia de olores.
· Asegúrese de que los alimentos con un olor fuerte se envasan bien y se cubren. Manténgalos alejados
de mantequilla, leche y nata, así como otros alimentos que pueden verse afectados por un fuerte olor.
· Deje que los alimentos calientes se enfríen antes de introducirlos en el frigoríco.

52
DO938K
ES
DESCONGELACIÓN
El frigoríco se descongela automáticamente.
Durante el funcionamiento del congelador se forman gotas de condensación o escarcha en la parte
posterior del aparato. Esto es normal. No es necesario limpiar la condensación o el hielo. El panel
posterior se descongela automáticamente. La condensación uye en el canal de condensación y se guía al
grupo frigoríco, donde se evapora.
Nota: Mantenga limpio el canal de condensación y el oricio de drenaje, de manera que la condensación
se pueda eliminar.
VACACIONES
Si se va de vacaciones durante un periodo corto, el aparato puede permanecer enchufado. Si se va de
vacaciones durante un periodo largo, lo mejor es hacer lo siguiente:
· Saque todos los alimentos del frigoríco.
· Retire el enchufe de la toma de corriente.
· Limpie bien el frigoríco.
· Deje la puerta abierta del frigoríco para evitar la aparición de moho y malos olores.
APAGÓN
La mayoría de los apagones duran entre 1 y 2 horas y no suelen alterar la temperatura del frigoríco.
Limite la apertura de la puerta del frigoríco en la mayor medida posible durante un apagón. Durante un
apagón más largo, debe adoptar otras medidas para conservar los alimentos, por ejemplo, colocar hielo
seco sobre los alimentos.
NORMAS IMPORTANTES
· No introduzca nunca alimentos calientes en el frigoríco.
· Las bebidas deben almacenarse en recipientes cerrados.
· Los alimentos que deban conservarse durante mucho tiempo en el frigoríco deberán taparse o
conservarse en recipientes de cristal.
· Nunca introduzca alimentos en mal estado en el frigoríco.
· Asegúrese en todo momento de que el frigoríco no está sobrecargado de forma que los alimentos
puedan refrigerarse lo suciente.
· Abra la puerta del frigoríco únicamente cuando sea necesario.
· El aparato no puede utilizarse para realizar acampadas, p. ej. tiendas de campaña.
· Solo se puede utilizar en interiores.
· El aparato no puede utilizarse en el transporte público.

53
DO938K
www.domo-elektro.be
ES
GUÍA DE ALMACENAMIENTO
Para conservar los alimentos, organice el almacenamiento de su frigoríco de la siguiente manera:
Compartimento del frigoríco Tipo de alimento
Estante de puerta · Alimentos con conservantes naturales como mermeladas,
zumos, bebidas, especias, etc.
· Aquí no se deben almacenar alimentos perecederos
Cajón de verduras · Frutas, hierbas y verduras
· Los plátanos, cebollas, patatas o ajos no se deben guardar en
el frigoríco
Estante central · Lácteos y huevos
Estante superior · Alimentos que no se tienen que cocinar, como comidas
preparadas, sobras, ambre
COLOCAR LOS ESTANTES Y EL ESTANTE DE LA PUERTA
· Vacíe el refrigerador antes de desplazar los estantes y el
estante de la puerta.
· Para mover un estante, levántelo y tire de él hacia usted.
· Para mover un estante de la puerta, sujételo con las dos
manos. Levante el estante de la puerta y tire de él hacia
usted.
CAMBIAR LA BOMBILLA
Retire el enchufe de la toma de corriente antes de cambiar la bombilla.
1. Retire la pantalla de lámpara.
2. Desenrosque la bombilla usada y enrosque una nueva bombilla de 15W (casquillo E14).
3. Vuelva a colocar la pantalla.
CAMBIO DE DIRECCIÓN DE LA PUERTA
Si quiere trasladar las bisagras de la puerta hacia el otro lado, le recomendamos que se ponga en contacto
con un taller de reparación autorizado para llevar a cabo el trabajo. Antes de cambiar la dirección de giro,
compruebe que el enchufe se ha desconectado de la toma de corriente y que el aparato está vacío. Se
recomienda el uso de un destornillador Phillips y una llave (ambos no incluidos).
1. Retire los tornillos de la parte posterior de la cubierta superior.
Reverse Door
Tool required: Philips screwdriver, Flat bladed screwdriver, Hexagonal spanner.
Ensure the unit is unplugged and empty.
To take the door off, it is necessary to tilt the unit backwards. You should rest the unit on something solid
so that it will not slip during the door reversing process.
All parts removed must be saved to do the reinstallation of the door.
Do not lay the unit flat as this may damage the coolant system.
It' s better that 2 people handle the unit during assembly.
1. Remove two screws at rear side of top cover.
2. Remove top cover and thermostat knob, then place it aside.
3. Unscrew top hinge and then remove door and place it on a soft pad to
avoid scratch.
4. Unscrew bottom hinge. Then remove the adjustable feet from both
side.
7
unscrew

54
DO938K
ES
2. Retire la tapa superior.
Reverse Door
Tool required: Philips screwdriver, Flat bladed screwdriver, Hexagonal spanner.
Ensure the unit is unplugged and empty.
To take the door off, it is necessary to tilt the unit backwards. You should rest the unit on something solid
so that it will not slip during the door reversing process.
All parts removed must be saved to do the reinstallation of the door.
Do not lay the unit flat as this may damage the coolant system.
It' s better that 2 people handle the unit during assembly.
1. Remove two screws at rear side of top cover.
2. Remove top cover and thermostat knob, then place it aside.
3. Unscrew top hinge and then remove door and place it on a soft pad to
avoid scratch.
4. Unscrew bottom hinge. Then remove the adjustable feet from both
side.
7
unscrew
3. Retire los tornillos y, a continuación, retire la bisagra superior que mantiene la puerta en su lugar.
Levante la puerta y colóquela sobre una supercie suave para evitar arañazos.
Reverse Door
Tool required: Philips screwdriver, Flat bladed screwdriver, Hexagonal spanner.
Ensure the unit is unplugged and empty.
To take the door off, it is necessary to tilt the unit backwards. You should rest the unit on something solid
so that it will not slip during the door reversing process.
All parts removed must be saved to do the reinstallation of the door.
Do not lay the unit flat as this may damage the coolant system.
It' s better that 2 people handle the unit during assembly.
1. Remove two screws at rear side of top cover.
2. Remove top cover and thermostat knob, then place it aside.
3. Unscrew top hinge and then remove door and place it on a soft pad to
avoid scratch.
4. Unscrew bottom hinge. Then remove the adjustable feet from both
side.
7
unscrew
4. Retire el tornillo inferior, el soporte de la bisagra y las patas ajustables en la parte inferior del
aparato.
Reverse Door
Tool required: Philips screwdriver, Flat bladed screwdriver, Hexagonal spanner.
Ensure the unit is unplugged and empty.
To take the door off, it is necessary to tilt the unit backwards. You should rest the unit on something solid
so that it will not slip during the door reversing process.
All parts removed must be saved to do the reinstallation of the door.
Do not lay the unit flat as this may damage the coolant system.
It' s better that 2 people handle the unit during assembly.
1. Remove two screws at rear side of top cover.
2. Remove top cover and thermostat knob, then place it aside.
3. Unscrew top hinge and then remove door and place it on a soft pad to
avoid scratch.
4. Unscrew bottom hinge. Then remove the adjustable feet from both
side.
7
unscrew
5. Suelte el pasador de la bisagra de la abrazadera de la bisagra. De la vuelta a la abrazadera y vuelva a
jar el pasador.
5. Unscrew and remove the bottom hinge pin, turn the bracket over and replace it.
6. Refit the bracket fitting the bottom hinge pin. Replace both adjustable
feet.
7. Place the door back on. Ensure the door is aligned horizontally and
vertically, so that the seals are closed on all sides before finally
tightening the top hinge.
8. Put the top cover and fix it with 2 screws on the back.
Unscrew
Screw
8
Reverse Door
9. Fix the thermostat knob.
screw

55
DO938K
www.domo-elektro.be
ES
6. Fije los tornillos y el soporte de la bisagra en el otro lado de la parte inferior. Recoloque las patas
ajustables.
5. Unscrew and remove the bottom hinge pin, turn the bracket over and replace it.
6. Refit the bracket fitting the bottom hinge pin. Replace both adjustable
feet.
7. Place the door back on. Ensure the door is aligned horizontally and
vertically, so that the seals are closed on all sides before finally
tightening the top hinge.
8. Put the top cover and fix it with 2 screws on the back.
Unscrew
Screw
8
Reverse Door
9. Fix the thermostat knob.
screw
7. Coloque la puerta en su lugar con cuidado. Asegúrese de que la puerta está alineada tanto horizontal
como verticalmente, de manera que las juntas estén cerradas por todos los lados antes de unir
completamente la bisagra superior. Vuelva a colocar la bisagra y atornille en la parte superior del
aparato.
5. Unscrew and remove the bottom hinge pin, turn the bracket over and replace it.
6. Refit the bracket fitting the bottom hinge pin. Replace both adjustable
feet.
7. Place the door back on. Ensure the door is aligned horizontally and
vertically, so that the seals are closed on all sides before finally
tightening the top hinge.
8. Put the top cover and fix it with 2 screws on the back.
Unscrew
Screw
8
Reverse Door
9. Fix the thermostat knob.
screw
8. Vuelva a colocar la cubierta superior y fíjela con ayuda de los tornillos.
5. Unscrew and remove the bottom hinge pin, turn the bracket over and replace it.
6. Refit the bracket fitting the bottom hinge pin. Replace both adjustable
feet.
7. Place the door back on. Ensure the door is aligned horizontally and
vertically, so that the seals are closed on all sides before finally
tightening the top hinge.
8. Put the top cover and fix it with 2 screws on the back.
Unscrew
Screw
8
Reverse Door
9. Fix the thermostat knob.
screw
PROBLEMAS Y SUS SOLUCIONES
Cuando tenga un problema con su frigoríco, compruebe las siguientes cuestiones antes de ponerse en
contacto con nuestro servicio de posventa.
El aparato no funciona.
· El aparato no recibe electricidad, compruebe si el suministro eléctrico es correcto.
· Asegúrese de insertar el enchufe en la toma de corriente.
· Compruebe que se está utilizando el voltaje adecuado.

56
DO938K
ES
El frigoríco rebota frecuentemente.
· Compruebe que la puerta está bien cerrada.
· Ha introducido comida caliente en el frigoríco, por lo que el aparato debe trabajar con más intensidad
para enfriarla.
· La puerta ha estado abierta demasiadas veces o durante demasiado tiempo.
· El aparato se ha conectado al voltaje incorrecto.
· El aparato está demasiado cerca de una fuente de calor o está expuesto directamente a la luz solar.
La temperatura interior del frigoríco es demasiado alta.
· Compruebe que el frigoríco tiene corriente.
· Asegúrese de insertar el enchufe en la toma de corriente.
· El ajuste de temperatura es demasiado bajo.
· La puerta ha estado demasiado tiempo abierta o con mucha frecuencia.
· El suministro de aire está bloqueado
· Compruebe que el aparato se conecta a la tensión correcta
· El aparato está demasiado cerca de una fuente de calor o está expuesto directamente a la luz solar.
LIMPIEZA Y MANTENIMIENTO
· No utilice productos de limpieza agresivos o disolventes.
· Ajuste el regulador de temperatura en la posición 0 (apagado) y retire el enchufe de la toma de
corriente.
· Retire los alimentos y almacénelos en un lugar fresco.
· Limpie el aparato con un paño suave, agua tibia y un detergente suave.
· Limpie la junta de la puerta solo con agua limpia y frote a fondo.
· Después de la limpieza, introduzca el enchufe en la toma de corriente y ajuste el regulador de
temperatura en la posición deseada.
· Vuelva a colocar los alimentos en el aparato.

57
DO938K
www.domo-elektro.be
ES
DIRECTRICES MEDIOAMBIENTALES
El símbolo en el producto o en el embalaje indica que este producto
no puede ser tratado como residuo doméstico. Se debe llevar a un
lugar en el que se reciclan equipos eléctricos y electrónicos. Si se
asegura de que este producto se desecha correctamente, usted
ayudará a evitar posibles consecuencias negativas para las personas
y el medio ambiente que serían causadospor un tratamiento de
residuos inadecuado. Para obtener información más detallada
sobre el reciclaje de este producto, póngase en contacto con su
ayuntamiento, o con la empresa o departamento responsable del
servicio de recogida de basura doméstica, o con la tienda donde
adquirió el producto.
El material de embalaje es reciclable. Trate el embalaje de una
manera medioambientalmente responsable.

58
DO938K
CZ
ZÁRUKA
Práva a povinnosti prodávajícího a kupujícího ohledně práv z vadného plnění se řídí příslušnými obecně
závaznými předpisy dle občanského zákoníku.
1. Trvání záruky: 2 roky
2. Záruka se nevztahuje
a) na mechanické poškození
b) nesprávné používání v rozporu s návodem k použití
3. Záruka zaniká:
- při použití spotřebiče jinak než v je uvedeno v manuálu (nesprávným postupem)
- při provádění opravy nebo změny na spotřebiči osobou jinou než pověřenou naším servisem
Prodávající odpovídá kupujícímu, že zboží při převzetí nemá vady. Zejména prodávající odpovídá
kupujícímu, že v době, kdy kupující zboží převzal:
· má zboží takové vlastnosti, které výrobce v tomto návodu popisuje,
· se zboží hodí k účelu, ke kterému výrobce uvádí,
· zboží odpovídá jakostí nebo provedením smluvenému vzorku nebo předloze, byla-li jakost nebo
provedení určeno podle smluveného vzorku nebo předlohy,
· zboží vyhovuje požadavkům právních předpisů.
Projeví-li se vada v průběhu šesti měsíců od převzetí, má se za to, že zboží bylo vadné již při převzetí.
Pokud není u výrobku uvedeno jinak, činí záruční doba 24 měsíců. Záruční doba počíná běžet od převzetí
věci kupujícím.
Práva z vadného plnění uplatňuje kupující u prodávajícího na adrese jeho provozovny, v níž je přijetí
reklamace možné s ohledem na sortiment prodávaného zboží, případně i v sídle nebo místě podnikání. Za
okamžik uplatnění reklamace se považuje okamžik, kdy prodávající obdržel od kupujícího reklamované
zboží.
Reklamaci lze také uplatnit v servisním středisku na adrese DOMO-elektro s.r.o., Na Kobyle 783, 345 06
Kdyně, Česká republika, tel. (+420) 379 422 550, [email protected]
Pro rychlé a bezproblémové vyřízení reklamace doporučujeme přiložit k reklamaci doklad o koupi a průvodní
dopis s popisem závady a zpáteční adresou s telefonickým kontaktem.

59
DO938K
www.domo-elektro.be
CZ
BEZPEČNOSTNÍ POKYNY
Při používání jakkéhokoli el. spotřebiče dbejte zvýšené opatrnosti a dodržujte určitá bezpečnostní
pravidla:
· Pečlivě si přečtěte tyto informace a manuál nechte i pro pozdější nahlédnutí.
· Ujistěte se, že před použitím odlepíte a odstraníte veškeré reklamní a ochranné fólie.
· Děti si s ochrannými ani reklamními polepy nesmí hrát.
· Přístroj je určen pro používání v domácnostech a podobných prostředích, tak jako je:
· kuchyňky v obchodech, kancelářích atd.
· chaty, chalupy
· hotely, penziony a jiné dočasné ubytování
· Dohlédněte, aby si děti nehrály s přístrojem.
· Tento spotřebič mohou používat děti ve věku 16 let a starší a osoby se sníženými fyzickými,
smyslovými nebo mentálními schopnostmi, nebo nedostatkem zkušeností a znalostí pokud jsou
pod neustálým dozorem nebo byly poučeny o používání spotřebiče bezpečným způsobem a rozumí
případným nebezpečím. Děti si s přístrojem nesmějí hrát. Čištění a údržbu prováděnou uživatelem
nesmějí provádět děti bez dozoru.
· Čistění a běžnou údržbu smí provádět pouze osoby starší 16 let a při tom být pod dohledem.
· Přístroj a jeho el. kabel skladujte mimo dosah dětí.
· Pozor: Tento přístroj je zakázáno používat s externím časovačem nebo jiným dálkovým ovládáním.
· Před použitím si ověřte, zda napětí Vaší elektrické sítě odpovídá parametrům přístroje uvedeným na
jeho výrobním štítku.
· Nenechávejte viset elektrický kabel přístroje přes hranu stolu, nebo pracovního pultu a nedovolte, aby
kabel přišel do styku s horkými plocham, tak aby se nepoškodil.
· Nikdy nepoužívejte přístroj s poškozeným kabelem, nebo zástrčkou, nebo pokud je přístroj poškozený
a nepracuje správně. V takovém případě předejte přístroj do nejbližšího odborného servisu ke kontrole
a opravě.
· Dbejte zvýšené opatrnosti, pokud se kolem přístroje pohybují děti.
· Použitím příslušenství, které nebylo dodáno výrobcem, může dojít až ke vzniku požáru, úrazu
elektrickým proudem, nebo jinému zranění.
· Přístroj vždy odpojte od elektrické sítě pokud jej nepoužíváte, před demontáží, či montáží částí
přístroje a před čištěním. Nastavte všechny přepínače a ovladače na polohy vypnuto a tažením za
zástrčku přístroj odpojte od sítě. Nikdy zástrčku nevytahujte ze zásuvky tažením za kabel.
· Nenechávejte přístroj běžet bez dozoru.
· Nikdy neumisťujte přístroj v blízkosti plynového, nebo elektrického sporáku, či trouby, nebo do
blízkosti jiného přístroje produkujícího teplo.
· Nepoužívejte přístroj venku.
· Používejte přístroj pouze k účelům ke kterým je určený.
· Přístroj vždy používejte pouze na stabilním, suchém a rovném místě.
· Přístroj je určený pouze pro použití v domácnostech. Výrobce nemůže ručit za škody a nehody
způsobené nevhodným použitím přístroje, nebo nedodržením zde popsaných bezpečnostních
instrukcí.

60
DO938K
CZ
· Veškeré opravy přístroje smí provádět pouze výrobce, nebo autorizovaný servis.
· Nikdy neponořujte přístroj, elektrický kabel ani zástrčku do vody, ani jiných tekutin.
· Ujistěte se, že se děti nemohou dotýkat elektrického kabelu, nebo přístroje.
· Dbejte na to, aby nebyl elektrický kabel ohnutý přes ostré rohy a nedotýkal se horkých částí přístroje,
nebo nebyl v blízkosti jiných zdrojů tepla.
· Ventilační otvory přístroje udržujte čisté a průchodné.
· Nepoužívejte uvnitř lednice žádné další elektrické přístroje, pokud nejsou pro toto použití přímo
schválené výrobcem.
· Neskladujte uvnitř přístroje žádné výbušné látky, jako například spreje naplněné hořlavým plynem.
· Po převozu a instalaci přístroje se vždy ujistěte, že není nijak poškozen chladící okruh.
· Ujistěte se, aby zadní část přístroje nepoškodila, či zmáčkla elektrickou zástrčku. Zmáčknutá, nebo
jinak poškozená zástrčka se může přehřát a způsobit požár.
· Ujistěte se, že máte k zástrčce volný přístup.
· Nikdy netahejte za samotný kabel.
· Nikdy nepřipojujte přístroj do uvolněné zásuvky (riskujete úraz elektrickým proudem, nebo požár).
· Tento přístroj je těžký. Pokud s přístrojem manipulujete, dbejte zvýšené opatrnosti.
· Nevystavujte přístroj na delší dobu přímému slunečnímu záření.
· Přístroj nesmí být používán s prodlužovacím kabelem ani zapojován do zásuvky s rozbočkou (více
zásuvkami na konci).
· Tato chladící jednotka není určena k použití, jako vestavěné zařízení.
· Držte se následujících informací, tak aby se zabránilo kontaminace potravin:
· Dlouhodobé a časté otevírání dveří může způsobit výrazné zvýšení teploty uvnitř spotřebiče.
· Povrchy, které by mohly přijít do styku s potravinami udržujte čisté a pravidelně je omývejte.
Kondenzační kanálek a odvodňovací otvor udržujte v čistotě.
· Syrové maso a ryby skladujte ve vhodných nádobách tak, aby se nedostaly do styku s jinými
potravinami.
· Pokud by byl spotřebič delší dobu prázdný, tak ho doporučujeme vypnout, odmrazit a
vyčistit. Po takovém vyčištění nechte vnitřek vyschnout a nezavírejte dvířka, aby mohl
prostor ventilovat a nemnožily se tam plísně.
VAROVÁNÍ! Tento přístroj nikdy neumísťujte do blízkosti ohně, ani na jiné místo kde by
mohl přijít do styku s tepelným zdrojem. V zadní straně přístroje v chlazení je chladivo,
které je velmi hořlavé a vznětlivé.
Věnujte pozornost symbolu „Nebezpečí požáru - hořlavé materiály“, který se nachází na
zadní straně spotřebiče a dbejte bezpečnostních pokynů a bezpečnosti práce.

61
DO938K
www.domo-elektro.be
CZ
5
2
1
4
3
ČÁSTI
1. Nastavení teploty se žárovkou
2. Poličky
3. Přihrádka na zeleninu
4. Nastavitelné nožičky
5. Poličky ve dveřích
PŘED PRVNÍM POUŽITÍM
· Odstraňte vnější a vnitřní obal, pečlivě otřete vnějšek chladničky měkkým a suchým hadříkem. Vnitřek
chladničky otřete s vlhkým, vlažným hadříkem.
· Vyberte rovnou podlahu s vysokou nosností.
· Nechte 13 cm mezeru mezi zadní stranou chladničky a jakoukoli přilehnou stěnou.
· Vyvarujte se umístění na přímý sluneční svit. Přímé slunce způsobuje změnu barvy povrchu. Zvýšené
teplo v okolí zvyšuje spotřebu přístroje a může zkracovat jeho životnost.
· Vyvarujte se velmi vlhkému prostředí. Velká vlhkost má za následek zvýšené namražování vnitřního
prostoru a výparníku.
· Před zapojením si důkladně zkontrolujte, zda parametry vaší zástrčky korespondují s požadavky na
přístroji. Rozdílné parametry el. sítě mohou přístroj poškodit.
· Lednici můžete odpojit od elektrické energie pouze vypojením z el. sítě, proto by měla být zástrčka
stále přístupná. Chcete-li lednici odpojit, nastavte ovladač do polohy OFF a poté odpojte z el. sítě.
· Po umístění nechte přístroj alespoň 24 hodin stát v klidu a až potom ho zapněte. Při stěhování se
rozvířilo chladivo a je potřeba, aby se znovu usadilo.
· Lednici nechte alespoň 8 hodiny v klidu odstát a běžet naprázdno. Takto necháte nachladit vnitřní
prostor.
· Pokud máte nerovnou, nebo hrbolatou podlahu, tak můžete
mraznička vyrovnat pomocí přední nastavitelné nožičky.
16

62
DO938K
CZ
· Na dveře si našroubujte madlo na otevírání (viz obrázek).
16
· Klimatická třída určuje minimální a maximální teplotu okolí, pro správnou funkci přístroje. Označení
klimatické třídy najdete na štítku na zadní straně přístroje.
· SN: Subnormální : teplota okolí mezi 10°C a 32°C
· N: Normalní : teplota okolí mezi 16°C a 32°C
· ST: Subtropická : teplota okolí mezi 16°C a 38°C
· T: Tropická : teplota okolí mezi 16°C and 43°C
POUŽITÍ
NASTAVENÍ TEPLOTY
Uvnitř v lednici je nastavitelný termostat, jeho otáčením si navolte požadovanou teplotu. Termostat si
nastavte na Vámi požadovanou teplotu. Čím vyšší je číslo, tím jsou nižší teploty. Poloha 4 je doporučena
pro běžné použití.
· Při nastavení do pozice 0 lednice vůbec nechladí (chladící systém je vypnutý), ale přívod elektřiny není
přerušen.
· Teplota a doba nachlazení je ovlivňována okolní teplotou i tím, jak často se otvírají dveře.
HÝBÁNÍ S LEDNICÍ
· Pokud se přístroj z jakéhokoli důvodu vypnul, tak počkejte alespoň 10 min před jeho opětovným
zapnutím. Chladící systém potřebuje vyrovnat tlaky uvnitř chladícího okruhu.
· Přístroj vypněte a vypojte z el. sítě. Z lednice vyndejte všechno jídlo. Vyndejte nebo zajistěte všechny
volné poličky a regály proti pohybu.
· Přemístěte na nové místo a uveďte znovu do provozu. Po stěhování lednice ji nechte alespoň 10 min v
klidu stát, a až potom ji zapojte.
· Lednice používá chladivo R600a. Chladivo R600a je isobutan, který je šetrný k životnímu prostředí, ale
zároveň náchylný ke vznícení. Proto byste měli být velmi opatrní a dbát na to, aby se chladící systém
nepoškodil. V případě poškození a nechtěného úniku chladiva, zamezte styku s otevřeným ohněm či se
zdrojem tepla a místnost rychle vyvětrejte.

63
DO938K
www.domo-elektro.be
CZ
JÍDLO V LEDNICI
· Lednice prodlužuje trvanlivost jídla (zejména jídla podléhající rychlé zkáze).
· Pokud vložíte čerstvé potraviny, tak ty vydrží v lednici nejdéle.
· Skladujte pouze jídlo čerstvé.
· Před vložením do lednice jídlo zabalte nebo zakryjte, jinak by jídlo vysychalo a měnilo barvu a
samozřejmě ztrácelo na čerstvosti i chuti.
· Potraviny se silným aroma důkladně zabalte, aby se vůně/zápach nepřenesla na ostatní potraviny.
· Před vložením do lednice, nechte všechny potraviny vychladnout.
ODMRAŽOVÁNÍ
Lednice se odmražuje plně automaticky.
Pokud je lednice spuštěna a chladí, tak se na zadní straně agregátu objevuje jinovatka nebo krůpěje vody,
to je normální a není potřeba vlhkost nijak utírat. Zadní panel se odmražuje automaticky a zkondenzovaná
voda stéká přímo do výparníku, odkud se odpařuje.
ZABEZPEČENÍ PŘI ODJEZDU NA DELŠÍ DOVOLENOU
Při krátkodobém odjezdu nechte vše tak jak je. Pokud plánuje odjet na delší čas, tak nezapomeňte:
· vyndat z lednice všechno jídlo
· odpojit přístroj z el. sítě
· vytřít vnitřek lednice
· nechat otevřené dveře, aby se vyvětrala vlhkost
VÝPADEK PROUDU
Výpadek proudu je převážně kratší než 1-2 hodiny, na takto krátký čas se neděje nic špatného, nižší
teplota se v uzavřené lednici udrží. Nesmí se však otevírat dveře lednice a zbytečně větrat. Během delšího
výpadku proudu můžete do lednice vkládat větší množství ledu, které vnitřní prostor částečně ochladí.
NĚKOLIK RAD PRO SPRÁVNÉ ZAPOJENÍ A POUŽÍVÁNÍ LEDNICE
· Do lednice nevkládejte teplé jídlo
· Nápoje skladujte v uzavřených nádobách
· Jídlo pro delší uskladnění v lednici musí být překryto a zabaleno ve fólii nebo alobalu.
· Do lednice nikdy neukládejte zkažené potraviny
· Nikdy lednici nepřeplňujte, nesnažte se do ní nacpat co nejvíce jídla.
· Zbytečně neotvírejte dveře, aby se nevětral vnitřní prostor.
· UPOZORNĚNÍ: Lednici držte v dostatečné vzdálenosti od ohně i hořlavin
· UPOZORNĚNÍ: Není určeno pro venkovní použití (kromě velkých stanů)
· UPOZORNĚNÍ: Lednice není určena pro použití v dopravních prostředcích.

64
DO938K
CZ
NÁVOD NA VHODNÉ USKLADNĚNÍ / ROZLOŽENÍ POTRAVIN V LEDNICI:
Aby se dosáhlo co nejdelšího uchování čerstvých potravin, tak doporučujeme následující (viz tabulka)
Compartiment koelkast Co uložit
Přihrádky na dveřích · Přírodně konzervované potraviny, jako jsou džemy, džusy,
nápoje, koření atd.
· Neskladujte zde potraviny s omezenou trvanlivostí.
Spodní zásuvky (šuplíky) · Ovoce, bylinky, zeleniny
· Neumisťujte tam banány, cibuli, brambory ani česnek
Prostřední police · Mléčné výrobky a vejce
Horní police · Potraviny, které je není třeba vařit, například polotovary, zbylé
hotové jídla, pomazánky atd.
NASTAVENÍ A PŘEMÍSTĚNÍ POLIČEK
· Před přemišťováním poliček vždy lednici vyprázdněte.
· Skleněnou poličku lehce nadzvedněte a táhněte směrem k
sobě. Držte ji pevně.
· Poličku na dvěřích pevně uchopte oběma rukama. Tlačte
směrem nahoru a přitom lehce tahejte k sobě, dokud se
polička neuvolní.
VÝMĚNA ŽÁROVKY OSVĚTLENÍ
POZOR: Před výměnou nejdříve vypojte lednici z el. sítě.
1. Sundejte kryt žárovky
2. Vyšroubujte starou žárovku a poté našroubujte novou 15 W žárovku (závit E14).
3. Opět zakryjte krytem.
PŘEHOZENÍ PANTŮ DVEŘÍ
Pokud potřebujete přehodit otevírání dveří na opačnou stranu, musí se přemontovat panty.
Doporučujeme, pozvat si servisního mechanika nebo proškolenou osobu z okolí. Ještě dříve než začněte
panty přemontovávat, lednici vypněte a vše z ní vyndejte pryč. Budete potřebovat křížový šroubovák a
klíč (ani jedno není dodáno v balení).
1. Odšroubujte 2 šrouby z horní strany krytu.
Reverse Door
Tool required: Philips screwdriver, Flat bladed screwdriver, Hexagonal spanner.
Ensure the unit is unplugged and empty.
To take the door off, it is necessary to tilt the unit backwards. You should rest the unit on something solid
so that it will not slip during the door reversing process.
All parts removed must be saved to do the reinstallation of the door.
Do not lay the unit flat as this may damage the coolant system.
It' s better that 2 people handle the unit during assembly.
1. Remove two screws at rear side of top cover.
2. Remove top cover and thermostat knob, then place it aside.
3. Unscrew top hinge and then remove door and place it on a soft pad to
avoid scratch.
4. Unscrew bottom hinge. Then remove the adjustable feet from both
side.
7
unscrew

65
DO938K
www.domo-elektro.be
CZ
2. Odstraňte horní kryt.
Reverse Door
Tool required: Philips screwdriver, Flat bladed screwdriver, Hexagonal spanner.
Ensure the unit is unplugged and empty.
To take the door off, it is necessary to tilt the unit backwards. You should rest the unit on something solid
so that it will not slip during the door reversing process.
All parts removed must be saved to do the reinstallation of the door.
Do not lay the unit flat as this may damage the coolant system.
It' s better that 2 people handle the unit during assembly.
1. Remove two screws at rear side of top cover.
2. Remove top cover and thermostat knob, then place it aside.
3. Unscrew top hinge and then remove door and place it on a soft pad to
avoid scratch.
4. Unscrew bottom hinge. Then remove the adjustable feet from both
side.
7
unscrew
3. Odšroubujte šroubky, které drží horní pant dveří. Dveře nadzvedněte a položte je na měkký povrch,
tak aby se nepoškrábaly.
Reverse Door
Tool required: Philips screwdriver, Flat bladed screwdriver, Hexagonal spanner.
Ensure the unit is unplugged and empty.
To take the door off, it is necessary to tilt the unit backwards. You should rest the unit on something solid
so that it will not slip during the door reversing process.
All parts removed must be saved to do the reinstallation of the door.
Do not lay the unit flat as this may damage the coolant system.
It' s better that 2 people handle the unit during assembly.
1. Remove two screws at rear side of top cover.
2. Remove top cover and thermostat knob, then place it aside.
3. Unscrew top hinge and then remove door and place it on a soft pad to
avoid scratch.
4. Unscrew bottom hinge. Then remove the adjustable feet from both
side.
7
unscrew
4. Vyjměte (odšroubujte) spodní šroub, závěs pantu i nastavitelnou nožičku ze spodní části spotřebiče.
Reverse Door
Tool required: Philips screwdriver, Flat bladed screwdriver, Hexagonal spanner.
Ensure the unit is unplugged and empty.
To take the door off, it is necessary to tilt the unit backwards. You should rest the unit on something solid
so that it will not slip during the door reversing process.
All parts removed must be saved to do the reinstallation of the door.
Do not lay the unit flat as this may damage the coolant system.
It' s better that 2 people handle the unit during assembly.
1. Remove two screws at rear side of top cover.
2. Remove top cover and thermostat knob, then place it aside.
3. Unscrew top hinge and then remove door and place it on a soft pad to
avoid scratch.
4. Unscrew bottom hinge. Then remove the adjustable feet from both
side.
7
unscrew
5. Povolte závěsný kolík pantu, vyndejte otočte a kolík opět dotáhněte.
5. Unscrew and remove the bottom hinge pin, turn the bracket over and replace it.
6. Refit the bracket fitting the bottom hinge pin. Replace both adjustable
feet.
7. Place the door back on. Ensure the door is aligned horizontally and
vertically, so that the seals are closed on all sides before finally
tightening the top hinge.
8. Put the top cover and fix it with 2 screws on the back.
Unscrew
Screw
8
Reverse Door
9. Fix the thermostat knob.
screw
6. Vše (šroub a závěs pantu ) namontujte na opačnou spodní stranu přístroje. Následně dejte zpět a
nastavte nožičku tak, aby se přístroj nekýval.

66
DO938K
CZ
5. Unscrew and remove the bottom hinge pin, turn the bracket over and replace it.
6. Refit the bracket fitting the bottom hinge pin. Replace both adjustable
feet.
7. Place the door back on. Ensure the door is aligned horizontally and
vertically, so that the seals are closed on all sides before finally
tightening the top hinge.
8. Put the top cover and fix it with 2 screws on the back.
Unscrew
Screw
8
Reverse Door
9. Fix the thermostat knob.
screw
7. Na spodní pant nasaďte zpět dveře. Dveře musí být vodorovně, aby jejich těsnění přiléhalo po celém
obvodu. Pokud dveře dobře těsní, můžete usadit i horní pant a přišroubovat ho.
5. Unscrew and remove the bottom hinge pin, turn the bracket over and replace it.
6. Refit the bracket fitting the bottom hinge pin. Replace both adjustable
feet.
7. Place the door back on. Ensure the door is aligned horizontally and
vertically, so that the seals are closed on all sides before finally
tightening the top hinge.
8. Put the top cover and fix it with 2 screws on the back.
Unscrew
Screw
8
Reverse Door
9. Fix the thermostat knob.
screw
8. Pant překryjte krytem a opět ho přišroubujte.
5. Unscrew and remove the bottom hinge pin, turn the bracket over and replace it.
6. Refit the bracket fitting the bottom hinge pin. Replace both adjustable
feet.
7. Place the door back on. Ensure the door is aligned horizontally and
vertically, so that the seals are closed on all sides before finally
tightening the top hinge.
8. Put the top cover and fix it with 2 screws on the back.
Unscrew
Screw
8
Reverse Door
9. Fix the thermostat knob.
screw
ŘEŠENÍ MOŽNÝCH PROBLÉMŮ
Stává se, že nastane problém, který lze snadno vyřešit i bez odborné pomoci.
Nejdříve zkontrolujte níže, zda se nejedná právě o tento typ problému.
Přístroj nefunguje
· zkontrolujte přívod energie a zda nevypadl el. proud
· zapojte do zásuvky se správným napětím
Chladící systém spíná velmi často
· zkontrolujte nastavení vnitřní teploty, pokud je potřeba tak přenastavte
· důkladně zavřete dveře a zkontrolujte zda všude těsní
· nevkládejte dovnitř lednice teplé jídlo
· nenechávejte příliš dlouho otevřené dveře, omezte jejich otevírání
· nechávejte lednici blízko tepla. Zamezte aby na ni nesvítilo přímé slunce.

67
DO938K
www.domo-elektro.be
CZ
Uvnitř lednice není dostatečně chladno
· zkontrolujte přívod energie a zda nevypadl el. proud
· zapojte / zapněte lednici
· překontrolujte a nastavte správnou teplotu uvnitř lednice
· důkladně zavřete dveře
· nenechávejte příliš dlouho otevřené dveře, omezte jejich otevírání
· zajistěte, aby bylo kolem lednice dostatek místa na cirkulaci vzduchu
· zapojte do zásuvky se správným napětím
· nevkládejte dovnitř lednice teplé jídlo
· Ujistěte se, že jídlo před vložením je studené
ČIŠTĚNÍ A ÚDRŽBA
· Nepoužívejte žádná drsná čistidla, která mohou poškodit povrch přístroje.
· Nastavení teploty otočte do polohy 0 a vypojte zástrčku z el. sítě.
· Všechno jídlo z lednice vyjměte a nechte někde v chladu.
· Lednici vytřete jemným vlhkým hadříkem. Můžete použít i čistící prostředek.
· Důkladně otřete i těsnění na dveřích. Těsnění potom důkladně vysušte.
· Po vyčištění lednici opět zapojte do el. sítě a nastavte na požadovanou chladící teplotu.
· Po chvíli vložte všechno jídlo zpět do lednice.
OHLED NA ŽÍVOTNÍ PROSTŘEDÍ
Symbol na přístroji či na jeho obalu znamená, že s tímto výrobkem
není možno nakládat jako s běžným domovním odpadem, nýbrž musí
být odevzdán na místech určených ke sběru a likvidaci elektrických a
elektronických zařízení. Dodržením tohoto doporučení chráníte životní
prostředí a zdraví spoluobčanů. Více informací o možnostech likvidace
nebezpečného odpadu obdržíte na obecních nebo městských úřadech,
sběrných dvorech nebo v prodejně, kde jste přístroj zakoupili.
Obalové materiály jsou recyklovatelné, nakládejte s nimi podle předpisů pro
životní prostředí.

68
DO938K
SK
ZÁRUKA
Práva a povinnosti predávajúceho a kupujúceho ohľadom práv z chybného plnenia sa riadi príslušnými
všeobecne záväznými predpismi podľa občianskeho zákonníka.
1. Trvanie záruky: 2 roky
2. Záruka sa nevzťahuje
a) na mechanické poškodenie
b) nesprávne používanie v rozpore s návodom na použitie
3. Záruka zaniká:
- pri použití spotrebiča inak ako v je uvedené v manuále (nesprávnym postupom)
- pri vykonávaní opravy alebo zmeny na spotrebiči osobou inou než poverenou naším servisom
Predávajúci zodpovedá kupujúcemu, že tovar pri prevzatí nemá vady. Najmä predávajúci zodpovedá
kupujúcemu, že v čase, keď kupujúci tovar prevzal:
· má tovar také vlastnosti, ktoré výrobca v tomto návode popisuje,
· sa tovar hodí k účelu, ku ktorému výrobca uvádza,
· tovar zodpovedá kvalitou alebo prevedením dohovorené vzorky alebo predlohe, ak bola akosť alebo
prevedenie určené podľa dohodnutého vzorky alebo predlohy,
· tovar vyhovuje požiadavkám právnych predpisov.
Ak sa prejavia vada v priebehu šiestich mesiacov od prevzatia, má sa za to, že tovar bol chybný už pri
prevzatí.
Pokiaľ nie je pri výrobku uvedené inak, je záručná doba 24 mesiacov. Záručná doba začína plynúť od
prevzatia veci kupujúcim.
Práva z chybného plnenia uplatňuje kupujúci u predávajúceho na adrese jeho prevádzky, v ktorej je
prijatie reklamácie možné s ohľadom na sortiment predávaného tovaru, prípadne aj v sídle alebo mieste
podnikania. Za okamih uplatnenia reklamácie sa považuje okamih, kedy predávajúci dostal od kupujúceho
reklamovaný tovar.
Reklamáciu možno tiež uplatniť v servisnom stredisku na adrese DOMO-elektro s.r.o., Na Kobyle 783,
345 06 Kdyně, Česká republika, tel. (+420) 379 422 550, [email protected]
Pre rýchle a bezproblémové vybavenie reklamácie odporúčame priložiť k reklamácii doklad o kúpe a
sprievodný list s popisom závady a spiatočnou adresou s telefonickým kontaktom.

69
DO938K
www.domo-elektro.be
SK
BEZPEČNOSTNÉ POKYNY
· Pri používaní jakkéhokoli el. spotrebiče dbajte na zvýšenú opatrnosť a dodržujte určitá bezpečnostné
pravidlá:
· Starostlivo si prečítajte tieto informácie a manuál nechajte aj k neskoršiemu nahliadnutiu.
· Uistite sa, že pred použitím odlepíte a odstránite všetky reklamné a ochranné fólie.
· Deti sa s ochrannými ani reklamnými polepy nesmie hrať.
· Prístroj je určený pre používanie v domácnostiach a podobných prostrediach, tak ako je:
· kuchynky v obchodoch, kanceláriách atď.
· chaty, chalupy
· hotely, penzióny a iné dočasné ubytovanie
· Dohliadnite, aby sa deti nehrali s prístrojom.
· Tento spotrebič môžu používať deti vo veku 16 rokov a staršie a osoby so zníženými fyzickými,
zmyslovými alebo mentálnymi schopnosťami, alebo nedostatkom skúseností a znalostí ak sú pod
neustálym dozorom alebo boli poučené o používaní spotrebiča bezpečným spôsobom a rozumejú
prípadným nebezpečenstvám. Deti si s prístrojom nesmú hrať. Čistenie a údržbu vykonávanú
používateľom nesmú vykonávať deti bez dozoru.
· Čistenie a bežnú údržbu môžu vykonávať len osoby staršie ako 16 rokov a pri tom byť pod
dohľadom.
· Prístroj a jeho el. kábel skladujte mimo dosahu detí.
· Pozor: Tento prístroj je zakázané používať s externým časovačom alebo iným diaľkovým ovládaním.
· Pred použitím si overte, či napätie vašej elektrickej siete zodpovedá parametrom prístroja uvedeným
na jeho výrobnom štítku.
· Nenechávajte visieť elektrický kábel prístroja cez hranu stola, alebo pracovného pultu a nedovoľte, aby
kábel prišiel do styku s horúcimi plochám, tak aby sa nepoškodil.
· Nikdy nepoužívajte prístroj s poškodeným káblom, alebo zástrčkou, alebo ak je prístroj poškodený a
nepracuje správne. V takom prípade odovzdajte prístroj do najbližšieho odborného servisu na kontrolu
a opravu.
· Dbajte na zvýšenú opatrnosť, pokiaľ sa okolo prístroja pohybujú deti.
· Použitím príslušenstva, ktoré nebolo dodané výrobcom, môže dôjsť až k vzniku požiaru, úrazu
elektrickým prúdom, alebo inému zraneniu.
· Prístroj vždy odpojte od elektrickej siete pokiaľ ho nepoužívate, pred demontážou, či montážou častí a
pred čistením. Nastavte všetky prepínače a ovládače na polohy vypnuté a ťahaním za zástrčku prístroj
odpojte od siete. Nikdy zástrčku nevyťahujte zo zásuvky ťahaním za kábel.
· Nenechávajte prístroj bežať bez dozoru.
· Nikdy neumiestňujte prístroj v blízkosti plynového, alebo elektrického sporáka, či rúry, alebo do
blízkosti iného prístroja produkujúceho teplo.
· Nepoužívajte prístroj vonku.
· Používajte prístroj iba na účely ku ktorým je určený.
· Prístroj vždy používajte iba na stabilnom, suchom a rovnom mieste.
· Prístroj je určený len na použitie v domácnostiach. Výrobca nemôže ručiť za škody a nehody

70
DO938K
SK
spôsobené nevhodným použitím prístroja, alebo nedodržaním tu popísaných bezpečnostných
inštrukcií.
· Všetky opravy prístroja smie vykonávať len výrobca, alebo autorizovaný servis.
· Nikdy neponárajte prístroj, elektrický kábel ani zástrčku do vody, ani iných tekutín.
· Uistite sa, že sa deti nemôžu dotýkať elektrického kábla, alebo prístroje.
· Dbajte na to, aby nebol elektrický kábel ohnutý cez ostré rohy a nedotýkal sa horúcich častí prístroja,
alebo nebol v blízkosti iných zdrojov tepla.
· Ventilačné otvory prístroja udržujte čisté a priechodné.
· Nepoužívajte vnútri chladničky žiadne ďalšie elektrické prístroje, pokiaľ nie sú na toto použitie priamo
schválené výrobcom.
· Neskladujte vo vnútri prístroja žiadne výbušné látky, ako napríklad spreje naplnené horľavým plynom.
· Po prevoze a inštalácii prístroja sa vždy uistite, že nie je nijako poškodený chladiaci okruh.
· Uistite sa, aby zadná časť prístroja nepoškodila, či stlačila elektrickú zástrčku. Stlačená, alebo inak
poškodená zástrčka sa môže prehriať a spôsobiť požiar.
· Uistite sa, že máte k zástrčke voľný prístup.
· Nikdy neťahajte za samotný kábel.
· Nikdy nepripájajte prístroj do uvoľnenej zásuvky (riskujete úraz elektrickým prúdom, alebo požiar).
· Tento prístroj je ťažký. Pokiaľ s prístrojom manipulujete, dbajte na zvýšenú opatrnosť.
· Nevystavujte prístroj na dlhšiu dobu priamemu slnečnému žiareniu.
· Prístroj nesmie byť používaný s predlžovacím káblom ani zapájaný do zásuvky s Rozbočky (viac
zásuvkami na konci).
· Táto chladiaca jednotka nie je určená na použitie, ako vstavané zariadenie.
· Držte sa nasledujúcich informácií, tak aby sa zabránilo kontaminácie potravín:
· Dlhodobé a časté otváranie dverí môže spôsobiť výrazné zvýšenie teploty vo vnútri
spotrebiča.
· Povrchy, ktoré by mohli prísť do styku s potravinami udržujte čisté a pravidelne ich umývajte.
Kondenzačné kanálik a odvodňovacie otvor udržujte v čistote.
· Surové mäso a ryby skladujte vo vhodných nádobách tak, aby sa nedostali do styku s inými
potravinami.
· Ak by bol spotrebič dlhšiu dobu prázdny, tak ho odporúčame vypnúť, odmraziť a vyčistiť.
Po takomto vyčistení nechajte vnútro vyschnúť a nezatvárajte dvierka, aby mohol priestor
ventilovať a nemnožili sa tam plesne.
VAROVANIE! Tento prístroj nikdy neumiestňujte do blízkosti ohňa, ani na iné miesto
kde by mohol prísť do styku s tepelným zdrojom. V zadnej strane prístroja v chladenia je
chladivo, ktoré je veľmi horľavé a zápalné.
Venujte pozornosť symbolu “Nebezpečenstvo požiaru - horľavé materiály”, ktorý sa
nachádza na zadnej strane spotrebiča a dbajte bezpečnostných pokynov a bezpečnosti
práce.

71
DO938K
www.domo-elektro.be
SK
5
2
1
4
3
ČASTI
1. Nastavenie teploty sa žiarovkou
2. Poličky
3. Priehradka na zeleninu
4. Nastaviteľné nožičky
5. Poličky vo dverách
PRED PRVÝM POUŽITÍM
· Odstráňte vonkajší a vnútorný obal, starostlivo utrite vonkajšok chladničky mäkkou a suchou
handričkou. Vnútro chladničky utrite s vlhkou, vlažným handričkou.
· Vyberte rovnú podlahu s vysokou nosnosťou.
· Nechajte 13 cm medzeru medzi zadnou stranou chladničky a akúkoľvek priľahnú stenou.
· Vyvarujte sa umiestnenia na priamy slnečný svit. Priame slnko spôsobuje zmenu farby
povrchu. Zvýšené teplo v okolí zvyšuje spotrebu prístroja a môže skracovať jeho životnosť.
· Vyvarujte sa veľmi vlhkému prostrediu. Veľká vlhkosť má za následok zvýšené namrazovanie
vnútorného priestoru a výparníka.
· Pred zapojením si dôkladne skontrolujte, či parametre vašej zástrčky korešpondujú s požiadavky na
prístroji. Rozdielne parametre el. siete môžu prístroj poškodiť.
· Lednici môžete odpojiť od elektrickej energie iba vypojením z el. siete, preto by mala byť zástrčka
stále prístupná. Ak chcete chladničku odpojiť, nastavte ovládač do polohy OFF a potom odpojte z
el. siete.
· Po umiestnení nechajte prístroj aspoň 24 hodín stáť v pokoji a až potom ho zapnite. Pri sťahovaní sa
rozvírilo chladivo a je potrebné, aby sa znovu usadilo.
· Lednici nechajte aspoň 8 hodín v pokoji odstáť a bežať
naprázdno. Takto necháte nachladit vnútorný priestor.
· Ak máte nerovnú, alebo hrboľatú podlahu, tak môžete
chladničku vyrovnať pomocou prednej nastaviteľné nožičky.
16

72
DO938K
SK
· Na dvere si naskrutkujte madlo na otváranie (viď obrázok).
16
· Klimatická trieda určuje minimálnu a maximálnu teplotu okolia, pre správnu funkciu prístroja.
Označenie klimatickej triedy nájdete na štítku na zadnej strane prístroja.
· SN: subnormálna: teplota okolia medzi 10 ° C a 32 ° C
· N: Normálny: teplota okolia medzi 16 ° C a 32 ° C
· ST: Subtropická: teplota okolia medzi 16 ° C a 38 ° C
· T: Tropická: teplota okolia medzi 16 ° C and 43 ° C
POUŽITIE
NASTAVENIE TEPLOTY
Vnútri v chladničke je nastaviteľný termostat, jeho otáčaním si navoľte požadovanú teplotu. Termostat si
nastavte na Vami požadovanú teplotu. Čím vyššie je číslo, tým sú nižšie teploty. Poloha 4 je odporúčaná
pre bežné použitie.
· Pri nastavení do pozície 0 chladnička vôbec nechladí (chladiaci systém je vypnutý), ale prívod elektriny
nie je prerušený.
· Teplota a doba nachladnutí je ovplyvňovaná okolitou teplotou aj tým, ako často sa otvárajú dvere.
HÝBANIE S CHLADNIČKOU
· Ak sa prístroj z akéhokoľvek dôvodu vypol, tak počkajte aspoň 10 min pred jeho opätovným zapnutím.
Chladiaci systém potrebuje vyrovnať tlaky vo vnútri chladiaceho okruhu.
· Prístroj vypnite a vypojte z el. siete. Z chladničky vyberte všetko jedlo. Vyberte alebo zabezpečte
všetky voľné poličky a regály proti pohybu.
· Premiestnite na nové miesto a uveďte znovu do prevádzky. Po sťahovaní chladničky ju nechajte aspoň
10 min v kľude stáť, a až potom ju zapojte.
· Chladnička používa chladivo R600a. Chladivo R600a je izobután, ktorý je šetrný k životnému
prostrediu, ale zároveň náchylný k vznieteniu. Preto by ste mali byť veľmi opatrní a dbať na to, aby sa
chladiaci systém nepoškodil. V prípade poškodenia a nechceného úniku chladiva, zamedzte styku s
otvoreným ohňom či so zdrojom tepla a miestnosť rýchlo vyvetrajte.

73
DO938K
www.domo-elektro.be
SK
JEDLO V CHLADNIČKE
· Chladnička predlžuje trvanlivosť jedla (najmä jedlá podliehajúce skaze).
· Ak vložíte čerstvé potraviny, tak tie vydržia v chladničke najdlhšie.
· Skladujte len jedlo čerstvé.
· Pred vložením do chladničky jedlo zabaľte alebo zakryte, inak by jedlo vysýchalo a menilo farbu a
samozrejme strácalo na čerstvosti i chuti.
· Potraviny sa silnou arómou dôkladne zabaľte, aby sa vôňa / zápach nepreniesla na ostatné potraviny.
· Pred vložením do chladničky, nechajte všetky potraviny vychladnúť.
ODMRAZOVANIE
Chladnička sa odmrazuje plne automaticky.
Ak je chladnička spustená a chladí, tak sa na zadnej strane agregátu objavuje inovať alebo kropaje vody,
to je normálne a nie je potreba vlhkosť nijako utierať. Zadný panel sa odmrazuje automaticky a roztopená
voda steká priamo do výparníka, odkiaľ sa odparuje.
ZABEZPEČENIE PRI ODCHODE NA DLHŠIU DOVOLENKU
Pri krátkodobom odchode nechajte všetko tak ako je. Pokiaľ plánuje odísť na dlhší čas, tak nezabudnite:
· Vybrať z chladničky všetko jedlo
· Odpojiť prístroj z el. siete
· Vytrieť vnútro chladničky
· Nechať otvorené dvere, aby sa prevzdušnil vlhkosť
VÝPADOK PRÚDU
Výpadok prúdu je prevažne kratšia ako 1-2 hodiny, na takto krátky čas sa nedeje nič zlé, nižšia teplota sa
v uzavretej chladničke udrží. Nesmie sa však otvárať dvere chladničky a zbytočne vetrať. Počas dlhšieho
výpadku prúdu môžete do chladničky vkladať väčšie množstvo ľadu, ktoré vnútorný priestor čiastočne
ochladí.
NIEKOĽKO RÁD PRE SPRÁVNE ZAPOJENIE A POUŽÍVANIE CHLADNIČKY
· Do chladničky nevkladajte teplé jedlo
· Nápoje skladujte v uzavretých nádobách
· Jedlo pre dlhšie uskladnenie v chladničke musia byť prekryté a zabalené vo fólii alebo alobalu.
· Do chladničky nikdy neukladajte pokazené potraviny
· Nikdy chladničku neprepĺňajte, nesnažte sa do nej napchať čo najviac jedla.
· Zbytočne neotvárajte dvere, aby sa nevetrali vnútorný priestor.
· UPOZORNENIE: Lednici držte v dostatočnej vzdialenosti od ohňa aj horľavín
· UPOZORNENIE: Nie je určené pre vonkajšie použitie (okrem veľkých stanov)
· UPOZORNENIE: Chladnička nie je určená na použitie v dopravných prostriedkoch.

74
DO938K
SK
NÁVOD NA VHODNÉ USKLADNENIE / ROZLOŽENIE POTRAVÍN V CHLADNIČKE:
Aby sa dosiahlo čo najdlhšieho uchovanie čerstvých potravín, tak odporúčame nasledujúce (viď tabuľka)
Priestor chladničky Čo uložiť
Priehradky na dverách · Prírodne konzervované potraviny, ako sú džemy, džúsy, nápoje,
korenie atď.
· Neskladujte tu potraviny s obmedzenou trvanlivosťou.
Spodná zásuvky (šuplíky) · Ovocie, bylinky, zeleniny
· Neumiestňujte tam banány, cibuľu, zemiaky a cesnak
Prostredná polica · Mliečne výrobky a vajcia
Horná polica · Potraviny, ktoré ich netreba variť, napríklad polotovary, zvyšné
hotové jedlá, nátierky atď.
NASTAVENIE A PREMIESTNENIA POLIČOK
· Pred premiestňovaním poličiek vždy chladničku
vyprázdnite.
· Sklenenú poličku mierne nadvihnite a ťahajte smerom k
sebe. Držte ju pevne.
· Poličku na dverách pevne uchopte oboma rukami. Tlačte
smerom hore a pritom ľahko ťahajte k sebe, kým sa polička neuvoľní.
VÝMENA ŽIAROVKY OSVETLENIA
POZOR: Pred výmenou najskôr vypojte chladničku z el. siete.
1. Zložte kryt žiarovky
2. Vyskrutkujte starú žiarovku a potom naskrutkujte novú 15 W žiarovku (závit E14).
3. Opäť zakryte krytom.
PREHODENIE PÁNTOV DVERÍ
Ak potrebujete prehodiť otváranie dverí na opačnú stranu, musí sa premontovať pánty. Odporúčame,
pozvať si servisného mechanika alebo vyškolenú osobu z okolia.
Ešte skôr ako začnete pánty přemontovávat, chladničku vypnite a všetko z nej vyberte preč. Budete
potrebovať krížový skrutkovač a kľúč (ani jedno nie je dodaný v balení).
1. Odskrutkujte 2 skrutky z hornej strany krytu.
Reverse Door
Tool required: Philips screwdriver, Flat bladed screwdriver, Hexagonal spanner.
Ensure the unit is unplugged and empty.
To take the door off, it is necessary to tilt the unit backwards. You should rest the unit on something solid
so that it will not slip during the door reversing process.
All parts removed must be saved to do the reinstallation of the door.
Do not lay the unit flat as this may damage the coolant system.
It's better that 2 people handle the unit during assembly.
1. Remove two screws at rear side of top cover.
2. Remove top cover and thermostat knob, then place it aside.
3. Unscrew top hinge and then remove door and place it on a soft pad to
avoid scratch.
4. Unscrew bottom hinge. Then remove the adjustable feet from both
side.
7
unscrew

75
DO938K
www.domo-elektro.be
SK
2. Odstráňte horný kryt.
Reverse Door
Tool required: Philips screwdriver, Flat bladed screwdriver, Hexagonal spanner.
Ensure the unit is unplugged and empty.
To take the door off, it is necessary to tilt the unit backwards. You should rest the unit on something solid
so that it will not slip during the door reversing process.
All parts removed must be saved to do the reinstallation of the door.
Do not lay the unit flat as this may damage the coolant system.
It' s better that 2 people handle the unit during assembly.
1. Remove two screws at rear side of top cover.
2. Remove top cover and thermostat knob, then place it aside.
3. Unscrew top hinge and then remove door and place it on a soft pad to
avoid scratch.
4. Unscrew bottom hinge. Then remove the adjustable feet from both
side.
7
unscrew
3. Odskrutkujte skrutky, ktoré držia horný pánt dverí. Dvere nadvihnite a položte ich na mäkký povrch,
tak aby sa predišlo poškriabaniu.
Reverse Door
Tool required: Philips screwdriver, Flat bladed screwdriver, Hexagonal spanner.
Ensure the unit is unplugged and empty.
To take the door off, it is necessary to tilt the unit backwards. You should rest the unit on something solid
so that it will not slip during the door reversing process.
All parts removed must be saved to do the reinstallation of the door.
Do not lay the unit flat as this may damage the coolant system.
It' s better that 2 people handle the unit during assembly.
1. Remove two screws at rear side of top cover.
2. Remove top cover and thermostat knob, then place it aside.
3. Unscrew top hinge and then remove door and place it on a soft pad to
avoid scratch.
4. Unscrew bottom hinge. Then remove the adjustable feet from both
side.
7
unscrew
4. Vyberte (odskrutkujte) spodnou skrutku, záves pántu i nastaviteľnú nožičku zo spodnej časti
spotrebiča.
Reverse Door
Tool required: Philips screwdriver, Flat bladed screwdriver, Hexagonal spanner.
Ensure the unit is unplugged and empty.
To take the door off, it is necessary to tilt the unit backwards. You should rest the unit on something solid
so that it will not slip during the door reversing process.
All parts removed must be saved to do the reinstallation of the door.
Do not lay the unit flat as this may damage the coolant system.
It' s better that 2 people handle the unit during assembly.
1. Remove two screws at rear side of top cover.
2. Remove top cover and thermostat knob, then place it aside.
3. Unscrew top hinge and then remove door and place it on a soft pad to
avoid scratch.
4. Unscrew bottom hinge. Then remove the adjustable feet from both
side.
7
unscrew
5. Povoľte závesný kolík pántu, vyberte otočte a kolík opäť dotiahnite.
5. Unscrew and remove the bottom hinge pin, turn the bracket over and replace it.
6. Refit the bracket fitting the bottom hinge pin. Replace both adjustable
feet.
7. Place the door back on. Ensure the door is aligned horizontally and
vertically, so that the seals are closed on all sides before finally
tightening the top hinge.
8. Put the top cover and fix it with 2 screws on the back.
Unscrew
Screw
8
Reverse Door
9. Fix the thermostat knob.
screw
6. Všetko (skrutka a záves pántu) namontujte na opačnú spodnú stranu prístroja. Následne dajte späť a
nastavte nožičku tak, aby sa prístroj nekýval.

76
DO938K
SK
5. Unscrew and remove the bottom hinge pin, turn the bracket over and replace it.
6. Refit the bracket fitting the bottom hinge pin. Replace both adjustable
feet.
7. Place the door back on. Ensure the door is aligned horizontally and
vertically, so that the seals are closed on all sides before finally
tightening the top hinge.
8. Put the top cover and fix it with 2 screws on the back.
Unscrew
Screw
8
Reverse Door
9. Fix the thermostat knob.
screw
7. Na spodnej pánt nasaďte späť dvere. Dvere musia byť vodorovne, aby ich tesnenie priliehalo po
celom obvode. Ak dvere dobre tesní, môžete usadiť aj horný pánt a priskrutkovať ho.
5. Unscrew and remove the bottom hinge pin, turn the bracket over and replace it.
6. Refit the bracket fitting the bottom hinge pin. Replace both adjustable
feet.
7. Place the door back on. Ensure the door is aligned horizontally and
vertically, so that the seals are closed on all sides before finally
tightening the top hinge.
8. Put the top cover and fix it with 2 screws on the back.
Unscrew
Screw
8
Reverse Door
9. Fix the thermostat knob.
screw
8. Pant prekryte krytom a opäť ho priskrutkujte.
5. Unscrew and remove the bottom hinge pin, turn the bracket over and replace it.
6. Refit the bracket fitting the bottom hinge pin. Replace both adjustable
feet.
7. Place the door back on. Ensure the door is aligned horizontally and
vertically, so that the seals are closed on all sides before finally
tightening the top hinge.
8. Put the top cover and fix it with 2 screws on the back.
Unscrew
Screw
8
Reverse Door
9. Fix the thermostat knob.
screw
RIEŠENIE MOŽNÝCH PROBLÉMOV
Stáva sa, že nastane problém, ktorý sa dá ľahko vyriešiť aj bez odbornej pomoci.
Najskôr skontrolujte nižšie, či sa nejedná práve o tento typ problému.
Prístroj nefunguje
· skontrolujte prívod energie a či nevypadol el. prúd
· zapojte do zásuvky so správnym napätím
Chladiaci systém spína veľmi často
· skontrolujte nastavenie vnútornej teploty, ak je potreba tak prenastavte
· dôkladne zatvorte dvere a skontrolujte či všade tesnia
· nevkladajte dovnútra chladničky teplé jedlo
· nenechávajte príliš dlho otvorené dvere, obmedzte ich otváranie
· nechávajte chladničku blízko tepla. Zabráňte aby na ňu nesvietilo priame slnko.

77
DO938K
www.domo-elektro.be
SK
Vnútri chladničky nie je dostatočne chladno
· skontrolujte prívod energie a či nevypadol el. prúd
· zapojte / zapnite chladničku
· prekontrolujte a nastavte správnu teplotu vo vnútri chladničky
· dôkladne zatvorte dvere
· nenechávajte príliš dlho otvorené dvere, obmedzte ich otváranie
· zaistite, aby bolo okolo chladničky dostatok miesta na cirkuláciu vzduchu
· zapojte do zásuvky so správnym napätím
· nevkladajte dovnútra chladničky teplé jedlo
· Uistite sa, že jedlo pred vložením je studené
ČISTENIE A ÚDRŽBA
· Nepoužívajte žiadna drsná čistidlá, ktoré môžu poškodiť povrch prístroja.
· Nastavenie teploty otočte do polohy 0 a odpojte zástrčku z el. siete.
· Všetko jedlo z chladničky vyberte a nechajte niekde v chlade.
· Lednici vytrite jemnou vlhkou handričkou. Môžete použiť aj čistiaci prostriedok.
· Dôkladne utrite aj tesnenia na dverách. Tesnenie potom dôkladne vysušte.
· Po vyčistení chladničku opäť zapojte do el. siete a nastavte na požadovanú chladiacu teplotu.
· Po chvíli vložte všetko jedlo späť do chladničky.
OHĽAD NA ŽIVOTNÉ PROSTREDIE
Symbol na prístroji alebo na jeho obale znamená, že s týmto výrobkom
nie je možné nakladať ako s domovým odpadom, ale musí byť odovzdaný
na miestach určených na zber a likvidáciu elektrických a elektronických
zariadení. Dodržaním tohto odporúčania chránite životné prostredie a zdravie
spoluobčanov. Viac informácií o možnostiach likvidácie nebezpečného odpadu
obdržíte na obecných alebo mestských úradoch, zberných dvoroch alebo v
predajni, kde ste prístroj zakúpili.
Obalové materiály sú recyklovateľné, nakladajte s nimi podľa predpisov pre
životné prostredie.

78
DO938K

79
DO938K
www.domo-elektro.be

LINEA 2000 BV - Dompel 9 - 2200 Herentals - Belgium - Tel: +32 14 21 71 91 - Fax: +32 14 21 54 63
BESTEL
de originele
Domo-accessoires
en -onderdelen
online via:
of scan hier:
COMMANDEZ
d’authentiques
accessoires et
pièces Domo en
ligne sur:
ou scannez ici:
BESTELLEN SIE
die Domo
Original-Zubehör
und -Ersatzteile
online über:
oder hier scannen:
ORDER
the original
Domo
accessories and
parts online at:
or scan here:
webshop.domo-elektro.be
Webshop
Documenttranscriptie
DO938K Handleiding Koelkast Mode d’emploi Réfrigérateur Gebrauchsanleitung Kühlschrank Instruction booklet Refrigerator Manual de instrucciones Frigorífico Návod k použití Lednice Návod na použitie Chladnička PRODUCT OF Lees aandachtig alle instructies - bewaar deze handleiding voor latere raadpleging. Lisez attentivement les instructions - gardez le mode d’emploi pour utilisation ultérieur. Lesen Sie genau die Anweisungen - bewahren Sie die Gebrauchsanleitung für spätere heranziehung. Read all instructions carefully - save this instruction manual for future reference. Lea detenidamente todas las instrucciones - Conserve este manual para futura referencia. Před použitím si důkladně přečtěte tento manuál - manuál si uschovejte i pro případ budoucího nahlédnutí. Pred použitím si dôkladne prečítajte tento manuál - manuál si uschovajte aj pre prípad budúceho nahliadnutie. NL Nederlands 3 FR Français 14 DE Deutsch 25 EN English 36 ES Espagnol 47 CZ Čeština 58 SK Slovenčina 68 NL GARANTIE Geachte klant, Al onze producten ondergaan steeds een strenge kwaliteitscontrole, alvorens ze aan je worden aangeboden. Mocht je desondanks toch nog problemen hebben met jouw toestel, dan betreuren wij dit ten zeerste. In dat geval verzoeken wij je contact op te nemen met onze klantendienst. Onze medewerkers zullen je met plezier verder helpen. +32 14 21 71 91 [email protected] Maandag – Donderdag : 8.30u – 12.00u en van 13.00u – 17.00u Vrijdag : 8.30u – 12.00u en van 13.00u – 16.30u Dit apparaat heeft een garantietermijn van 2 jaar vanaf de datum van aankoop. Gedurende de garantieperiode zal de distributeur volledige verantwoording op zich nemen voor gebreken die aanwijsbaar berusten op materiaal- of constructiefouten. Wanneer dergelijke gebreken voorkomen, zal het apparaat, indien nodig, vervangen of gerepareerd worden. De garantieperiode van 2 jaar zal op dit moment niet terug beginnen, maar loopt verder tot 2 jaar na de aankoop van het toestel. De garantie wordt verleend op basis van het kassaticket. Indien je apparaat defect is binnen de garantietermijn van 2 jaar, dan mag je het toestel samen met het originele kassaticket binnenbrengen in de winkel waar je het toestel hebt aangekocht. De garantie op accessoires en onderdelen die onderhevig zijn aan slijtage, bedraagt 6 maanden. De garantie en verantwoordelijkheid/aansprakelijkheid van de leverancier en fabrikant vervallen automatisch in de volgende gevallen: · Bij het niet naleven van de instructies in deze handleiding. · Bij verkeerde aansluiting, vb. te hoge elektrische spanning. · Bij verkeerd, hardhandig of abnormaal gebruik. · Bij onvoldoende of verkeerd onderhoud. · Bij herstelling of wijziging van het toestel door de consument of niet gemachtigde derden. · Bij gebruik van onderdelen of accessoires welke niet worden aanbevolen of geleverd door de leverancier / fabrikant. www.domo-elektro.be DO938K 3 NL VEILIGHEIDSVOORSCHRIFTEN Wanneer je elektrische toestellen gebruikt, moeten volgende veiligheidsinstructies in acht genomen worden: 4 · Lees deze instructies zorgvuldig door. Bewaar deze handleiding om later te raadplegen. · Verwijder voor het eerste gebruik alle verpakkingsmaterialen en eventuele promotionele stickers. Zorg ervoor dat kinderen niet met de verpakkingsmaterialen spelen. · Dit toestel is geschikt om te gebruiken in de huishoudelijke omgeving en in gelijkaardige omgevingen zoals: · Keukenhoek voor personeel van winkels, kantoren en andere gelijkaardige professionele omgevingen · Boerderijen · Hotel- en motelkamers en andere omgevingen met een residentieel karakter · Gastenkamers, of gelijkaardige · Dit toestel mag gebruikt worden door kinderen vanaf 16 jaar en personen met een fysieke of sensoriële beperking of mensen met een beperkte mentale capaciteit of gebrek aan ervaring of kennis, op voorwaarde dat deze personen toezicht krijgen of instructies hebben gekregen over het gebruik van het toestel op een veilige manier en dat ze ook de gevaren kennen bij het gebruik van het toestel. Kinderen mogen niet met het toestel spelen. Het onderhoud en de reiniging van het toestel mogen niet door kinderen gebeuren tenzij ze ouder zijn dan 16 jaar en onder toezicht staan. · Opgelet: het toestel mag niet gebruikt worden met een externe timer of een aparte afstandsbediening. · Kijk voor gebruik na of het voltage vermeld op het toestel overeenkomt met het voltage van het elektriciteitsnet. · Laat het snoer niet op een heet oppervlak of over de rand van een tafel of aanrecht hangen. · Gebruik het toestel nooit wanneer het snoer of de stekker beschadigd is, na een slechte werking van het toestel of wanneer het toestel beschadigd is. Breng het toestel dan naar het dichtsbijzijnde gekwalificeerde service center voor nazicht en reparatie. · Streng toezicht is noodzakelijk wanneer het toestel door of in de buurt van kinderen gebruikt wordt. · Het gebruik van accessoires die niet aanbevolen of verkocht worden door de fabrikant, kan brand, elektrische schokken of verwondingen veroorzaken. · Trek de stekker uit het stopcontact wanneer het toestel niet in gebruik is, vooraleer onderdelen te monteren of demonteren en vooraleer het toestel te reinigen. Zet eerst alle knoppen in de ‘uit’-stand en trek de stekker bij de stekker zelf uit het stopcontact. Trek nooit aan het snoer om de stekker uit het stopcontact te trekken. · Zet dit toestel nooit aan of in de buurt van een gasvuur of elektrisch vuur of op een plaats waar het in contact zou kunnen komen met een warm toestel. · Gebruik het toestel niet buiten. · Gebruik het toestel enkel voor het doel waarvoor het bestemd is. · Gebruik het toestel altijd op een stevig, droog, effen oppervlak. · Gebruik het toestel alleen voor huishoudelijk gebruik. De fabrikant is niet verantwoordelijk voor ongelukken die een gevolg zijn van verkeerd gebruik van het toestel, of het niet naleven van de regels zoals ze vermeld zijn in deze handleiding. DO938K Alle herstellingen, buiten het gewone onderhoud van het toestel, moeten uitgevoerd worden door de fabrikant of zijn dienst na verkoop. Probeer het toestel nooit zelf te repareren. · Dompel het toestel, het elektrisch snoer of de stekker nooit onder in water of een andere vloeistof. · Zorg ervoor dat kinderen het elektrisch snoer niet kunnen aanraken. · Hou het snoer uit de buurt van scherpe randen en hete onderdelen of andere warmtebronnen. · Hou de ventilatie-openingen vrij, zorg ervoor dat ze niet versperd of belemmerd zijn. · Gebruik geen andere elektrische toestellen in de koelkast, tenzij ze voor dit doel zijn goedgekeurd door de fabrikant. · Bewaar geen explosieve stoffen in het toestel, zoals bijvoorbeeld spuitbussen met brandbaar drijfgas. · Zorg ervoor dat het koelcircuit niet beschadigd raakt, bv. tijdens transport of installatie. · Zorg ervoor dat de stekker niet geplet wordt of beschadigd raakt door de achterkant van het toestel. Dit kan oververhitting en bijgevolg brand veroorzaken. · Zorg ervoor dat je toegang hebt tot de stekker van het toestel. · Trek niet aan het snoer. · Als het stopcontact los zit, steek de stekker dan niet in het stopcontact. (risico op elektrische schok of brand) · Vermijd lange blootstelling aan zonlicht. · Het toestel mag niet gebruikt worden met een verlengsnoer of een stekkerdoos. · Dit koelapparaat is niet bedoeld voor gebruik als inbouwapparatuur. · Volg onderstaande instructies om besmetting van voedsel te voorkomen: · Het langdurig openen van de deur kan de temperatuur in de compartimenten van het apparaat aanzienlijk verhogen. · Reinig regelmatig oppervlakken die in contact kunnen komen met voedsel. Houd het condensatiekanaal en afvoergat achteraan het toestel schoon. · Bewaar rauw vlees en vis in geschikte containers in de koelkast zodat het niet in contact komt met of druppelt op ander voedsel. · Als het apparaat gedurende lange tijd leeg blijft, dien je het uit te schakelen, te ontdooien en te reinigen. Laat het drogen en laat de deur open om te voorkomen dat er schimmel in het apparaat ontstaat. NL · WAARSCHUWING! Zet dit toestel nooit op of in de buurt van een gasvuur of elektrisch vuur of op een plaats waar het in contact zou kunnen komen met een warmtebron. Aan de achterkant van het apparaat bevinden zich ontvlambare materialen. Let op het symbool “brandgevaar - ontvlambaar materiaal” dat zich aan de achterkant van het apparaat bevindt. www.domo-elektro.be DO938K 5 NL ONDERDELEN 1. Temperatuurregelaar 2. Leggers 3. Groentelade 4. Stelvoetjes 5. Deurrekken 1 2 5 3 4 INSTALLATIE 6 · Verwijder alle verpakkingsmateriaal, zowel binnenin als aan de buitenkant. Maak de buitenkant van het toestel schoon met een droge doek. De binnenkant kan je reinigen met een zachte, vochtige doek. · Zorg ervoor dat de lucht vrij rond de koelkast kan circuleren. De achterkant van de koelkast moet minstens 13 cm verwijderd zijn van de muur. · Zet de koelkast op een stevige, vlakke ondergrond. · Vermijd direct zonlicht en warmte. Zonlicht kan de buitenkant van de koelkast aantasten. Warmte zal voor een hoger verbruik zorgen. · Vermijd een te hoge vochtigheidsgraad. Te veel vocht in de lucht zal ervoor zorgen dat er te snel vorst gevormd wordt in de koelkast. · Controleer voordat je de koelkast op de netvoeding aansluit of de spanning op het typeplaatje van het apparaat overeenstemt met de spanning bij je thuis. Een andere spanning kan het apparaat beschadigen. · De stekker is de enige manier om het apparaat van de voeding te ontkoppelen, zorg dat deze altijd makkelijk bereikbaar is. Om de voeding naar het apparaat te ontkoppelen, schakel het apparaat uit en haal vervolgens de stekker uit het stopcontact. · Laat het toestel na installatie 24 uur staan vooraleer het aan te zetten. Zo kan het koelmiddel zich zetten. · Laat het apparaat gedurende 8 uur werken zonder levensmiddelen zodat de kast tot de gepaste temperatuur afkoelt. · Voor oneffen oppervlakken kunnen de voorste stelvoetjes op één lijn worden gebracht. DO938K 16 NL · Installeer de handgreep. · De klimaatklasse geeft de minimale en maximale omgevingstemperatuur weer voor de goede werking van een toestel. Je kan de klimaatklasse vinden op het typeplaatje aan de achterzijde van het apparaat. · SN: Subnormaal: omgevingstemperatuur 10°C tot 32°C · N: Normaal: omgevingstemperatuur 16°C tot 32°C · ST: Subtropisch: omgevingstemperatuur 16°C tot 38°C · T: Tropisch: omgevingstemperatuur 16°C tot 43°C GEBRUIK TEMPERATUURREGELING De koelkast wordt geregeld door een temperatuurregelaar die zich binnenin het apparaat bevindt. Stel de regelaar op de gewenste positie in. Hoe hoger het getal hoe kouder de temperatuur. Stand 4 is de aanbevolen positie voor normaal gebruik. Het apparaat werkt niet in de positie 0 (het koelsysteem is uitgeschakeld), maar de voeding is niet onderbroken. De werkingstijd en –temperatuur worden beïnvloed door de plaats waar de koelkast wordt gebruikt, het aantal keer de deur wordt geopend en de temperatuur van de kamer waar de koelkast zich in bevindt. HET APPARAAT VERPLAATSEN · 16 uitgeschakeld, wacht 10 minuten voordat je het Als het apparaat voor welke reden dan ook wordt opnieuw inschakelt. De druk in het koelsysteem dient eerst te worden gestabiliseerd voordat je het apparaat opnieuw inschakelt. · Schakel het apparaat uit en haal de stekker uit het stopcontact. Verwijder alle levensmiddelen. Verwijder tevens alle mobiele onderdelen (leggers, accessoires, etc.) of maak ze vast in de koelkast om schokken te vermijden. · Verplaats het apparaat en installeer. Als het apparaat tijdens het verplaatsen op zijn zijde werd gehouden, zelfs al was dit zeer kort, laat het apparaat minstens 10 minuten in de rechtopstaande positie staan voordat je het apparaat inschakelt. www.domo-elektro.be DO938K 7 NL · De koelkast gebruikt isobutaan (R600a) als koelmiddel. Niettegenstaande dat R600a een milieuvriendelijk en natuurlijk gas is, is het explosief. Wees dus zeer voorzichtig tijdens het verplaatsen of installeren van het apparaat om schade aan de koelelementen te vermijden. In geval van een lek dat werd veroorzaakt door schade aan de koelelementen, haal de koelkast weg van open vlammen of warmtebronnen en verlucht de kamer waar het apparaat zich in bevindt enkele minuten. LEVENSMIDDELEN IN DE KOELKAST BEWAREN De koelkast zorgt voor een langere bewaartijd van verse, beperkt houdbare levensmiddelen. Bewaren van vers voedsel voor het beste resultaat: · Bewaar alleen zeer verse levensmiddelen van een goede kwaliteit. · Zorg dat de levensmiddelen goed zijn verpakt of afgedekt voordat je ze bewaart. Dit vermijdt dat de levensmiddelen uitdrogen, bleker worden of aan smaak verliezen en zorgt voor een langere versheid. Dit vermijdt tevens overdracht van geuren. · Zorg dat levensmiddelen met een sterke geur goed verpakt en afgedekt zijn en bewaar deze uit de buurt van boter, melk en room en andere levensmiddelen die door een sterke geur aangetast kunnen worden. · Laat warme levensmiddelen afkoelen voordat je ze in de koelkast plaatst. ONTDOOIEN De koelkast ontdooit volledig automatisch. Tijdens de werking van de koeling worden er condensatiedruppels of rijm achteraan het apparaat gevormd. Dit is normaal. Het is niet nodig om de condensatie of het ijs weg te vegen. Het achterpaneel ontdooit automatisch. De condensatie stroomt in het condensatiekanaal en wordt naar de koeling geleid waar het verdampt. Opmerking: houd het condensatiekanaal en afvoergat schoon zodat de condensatie kan wegstromen. VAKANTIE Wanneer je voor een korte periode op vakantie gaat, kan je het toestel ingeschakeld laten. Wanneer je voor een langere periode op vakantie gaat, doe je best het volgende : · Haal al het voedsel uit de koelkast. · Verwijder de stekker uit het stopcontact. · Reinig de koelkast grondig. · Laat de deur van de koelkast open om schimmelvorming en slechte geuren te vermijden. STROOMPANNE De meeste stroompannes worden hersteld in 1 of 2 uur en zullen de temperatuur van de koelkast niet veranderen. Je moet wel het openen van de koelkastdeur tot een minimum beperken tijdens een stroompanne. Tijdens een langere stroompanne moet je maatregelen nemen om het voedsel te beschermen, bv. door droog ijs op het voedsel te leggen. 8 DO938K NL BELANGRIJKE REGELS · Plaats nooit warm eten in de koelkast. · Drank moet bewaard worden in een afgesloten container. · Voedsel dat langere tijd bewaard wordt in de koelkast moet afgedekt of bewaard worden in glazen containers. · Plaats nooit bedorven eten in de koelkast. · Zorg er steeds voor dat de koelkast niet overladen is, zodat het voedsel voldoende kan gekoeld worden. · Open de deur van de koelkast alleen wanneer het nodig is. · Het toestel mag niet gebruikt worden voor buitenkamperen bv. tent. · Mag alleen binnen gebruikt worden. · Het toestel mag niet gebruikt worden in openbaar vervoer. BEWAARWIJZER Richt je koelapparaat als volgt in voor de beste bewaring: Compartiment koelkast Type voeding Deurrek · Voeding met natuurlijke bewaarmiddelen, zoals jam, sap, drank, specerijen,… · Bewaar hier geen beperkt houdbare voeding · Fruit, kruiden en groenten Groentelade · Bewaar bananen, uien, aardappelen en look niet in de koelkast Middelste legger · Zuivel en eieren Bovenste legger · Voeding die niet gekookt moet worden, zoals kant-en-klare maaltijden, restjes, beleg LEGGERS EN DEURREK VERPLAATSEN · Maak de koelkast leeg voor het verplaatsen van de leggers of de deurrekken. · Om een legger te verplaatsen, hef je deze omhoog en trek deze naar je toe. · Om een deurrek te verplaatsen, neem deze vast met 2 handen. Hef het deurrek omhoog en trek deze naar je toe. VERVANGING GLOEILAMP Haal de stekker uit het stopcontact voordat u de gloeilamp vervangt. 1. Verwijder de lampenkap. 2. Schroef de oude gloeilamp uit en schroef vervolgens een nieuwe 15W (E14 fitting) gloeilamp in. 3. Plaats de lampenkap terug. www.domo-elektro.be DO938K 9 NL DRAAIRICHTING VAN DEUR WIJZIGEN Als je de scharnieren van de deur naar de andere kant wilt brengen, is het aanbevolen om contact op te nemen met een erkende reparateur om hem het werk te laten uitvoeren. Voordat je de draairichting wijzigt, controleer of de stekker uit het stopcontact is gehaald en dat het apparaat leeg is. lips screwdriver, Flat bladed screwdriver, Hexagonal spanner. oor oor s unplugged and Hetempty. is aanbevolen om een kruiskopschroevendraaier en een moersleutel te gebruiken (beide niet off, it is necessary to tilt the unit backwards. You should rest the unit on something solid lips during screwdriver, Flat bladed screwdriver, Hexagonal spanner. meegeleverd). slip the door reversing process. must be saved do the reinstallation of the door. sd unplugged and to empty. it flat asnecessary this may damage the coolant system. off, it is to tilt the unit backwards. You should rest the unit on something solid 2slip people handle the unit during assembly. lips screwdriver, Flat bladed screwdriver, Hexagonal spanner. during the door reversing process. oor oor 1. to do Verwijder de schroeven achteraan het bovendeksel. d must be saved the reinstallation of the door. slips Flat bladed Hexagonal spanner. itunplugged flatscrewdriver, as this and mayempty. damage thescrewdriver, coolant system. off, it is necessary to tilt the unit backwards. You should rest the unit on something solid 2 people handle the unit during assembly. sslip unplugged and empty. during the door reversing process. ews side of cover. itatisrear necessary to the unit backwards. should rest the unit on something solid doff, must be saved totop dotilt the reinstallation of theYou door. slip door reversing process.system. it flatduring as thisthe may damage the coolant unscrew d must be saved to do the reinstallation of the door. 2 people handle the unit during assembly. it flatatas thisside mayofdamage the coolant system. ews rear top cover. 2 people handle the unit during assembly. unscrew ews at rear side of top cover. ews at rear side of top cover. unscrew unscrew 2. knob, Haalthen het place bovendeksel er and thermostat it aside. van de koelkast af. er and thermostat knob, then place it aside. er and thermostat knob, then place it aside. er and thermostat knob, then place it aside. ge and then remove door and place it on a soft pad to 3. Verwijder de schroeven het bovenscharnier die de deur op zijn plaats houdt. Til de ge and then remove door and place it on a soft en padvervolgens to deur op en plaats deze op een zacht oppervlak om krassen te vermijden. ge and then remove door and place it on a soft pad to ge and then remove door and place it on a soft pad to hinge. Then remove the adjustable feet from both hinge. Then remove the adjustable feet from both Verwijder de onderste scharnierbeugel en de stelvoetjes onderaan het apparaat. hinge. Then 4. remove the adjustable feet fromschroef, both hinge. Then remove the adjustable feet from both 7 7 10 7 DO938K 7 5. Maak de scharnierpin los van de scharnierbeugel. Keer de beugel om en maak de pin weer vast. 5. Unscrew and remove the bottom hinge pin, turn the bracket over and replace it. NL Reverse Door oor Screw move the bottom hinge pin, turn the bracket over and replace it. Unscrew oor oor move the bottom hinge pin, turn the bracket over and replace it. Screw Unscrew move the bottom hinge pin, turn the bracket over and replace it. 6. 6. Refit the bracketde fitting the bottom pin. Replace bothaan adjustable Bevestig schroeven enhinge de scharnierbeugel de andere kant van de bodem. Plaats de feet. stelvoetjes terug. Screw Unscrew Screw Unscrew fitting the bottom hinge pin. Replace both adjustable fitting the bottom hinge pin. Replace both adjustable 7. Place the door back on. Ensure the door is aligned horizontally and vertically, so that the seals are closed on all sides before finally tightening the top hinge. fitting the bottom hinge pin. Replace both adjustable 7. Zet de deur voorzichtig op zijn plaats. Zorg dat de deur zowel horizontaal als verticaal is uitgelijnd ack on. Ensure the door is aligned horizontally and t the seals are closed on allde sides before finally zodat afdichtingen op alle zijden gesloten zijn voordat je het bovenste scharnier volledig p hinge. vastmaakt. Breng het scharnier terug en schroef vast op de bovenkant van het apparaat. ack on. Ensure the door is aligned horizontally and 8. Put the top andbefore fix it with 2 screws on the back. t the seals are closed on cover all sides finally p hinge. ack on. Ensure the door is aligned horizontally and t the seals are closed on all sides before finally p hinge. screw r and fix it with 2 screws on the back. screw het bovendeksel terug en maak het met behulp van de schroeven vast. 9. 8. Fix thePlaats thermostat knob. r and fix it with 2 screws on the back. screw r and fix it with 2 screws on the back. 8 at knob. at knob. screw 8 at knob. 8 www.domo-elektro.be 8 DO938K 11 NL PROBLEMEN EN HUN OPLOSSINGEN Wanneer er zich een probleem voordoet met de koelkast, controleer dan even onderstaande vragen alvorens contact op te nemen met onze na verkoop dienst. Toestel werkt niet. · Het toestel krijgt geen stroom, controleer of de stroomtoevoer in orde is. · Controleer of de stekker in het stopcontact steekt. · Controleer of de juiste voltage is gebruikt. De koelkast springt te vaak op. · Is de deur goed gesloten? · Heb je warm eten in de koelkast gezet, waardoor het toestel harder moet werken om te koelen? · De deur is te vaak of te lang open geweest. · Het toestel krijgt de verkeerde voltage. · Het toestel staat te dicht in de buurt van een warmtebron of direct zonlicht. De binnentemperatuur van de koelkast is te warm. · Controleer of de koelkast stroom heeft. · Controleer of de stekker in het stopcontact steekt. · De temperatuurinstelling is te laag. · De deur heeft te lang of te vaak opengestaan. · De luchttoevoer is geblokkeerd. · Controleer of het toestel de juiste voltage krijgt. · Het toestel staat te dicht in de buurt van een warmtebron of direct zonlicht. REINIGING EN ONDERHOUD 12 · Gebruik geen agressieve schoonmaakmiddelen of oplosmiddelen. · Stel de temperatuurregelaar in op de positie 0 en haal de stekker uit het stopcontact. · Haal de levensmiddelen uit en berg deze in een koele ruimte op. · Maak het apparaat schoon met een zachte doek, warm water en een mild schoonmaakmiddel. · Reinig de dichting alleen met schoon water en veeg vervolgens grondig af. · Na reiniging, steek de stekker in het stopcontact en stel de temperatuurregelaar op de gewenste positie in. · Plaats de levensmiddelen opnieuw in het apparaat. DO938K NL MILIEURICHTLIJNEN Dit symbool op het product of op de verpakking wijst erop dat dit product niet als huishoudafval mag worden behandeld. Het moet naar een plaats worden gebracht waar elektrische en elektronische apparatuur wordt gerecycleerd. Als je ervoor zorgt dat dit product op de correcte manier wordt verwijderd, voorkom je mogelijk voor mens en milieu negatieve gevolgen die zich zouden kunnen voordoen in geval van verkeerde afvalbehandeling. Voor meer details in verband met het recycleren van dit product, neem je best contact op met de gemeentelijke instanties, het bedrijf of de dienst belast met de verwijdering van huishoudafval of de winkel waar je het product hebt gekocht. Het verpakkingsmateriaal is recycleerbaar. Behandel de verpakking milieubewust. www.domo-elektro.be DO938K 13 GARANTIE Cher client, Tous nos produits sont soumis à des contrôles qualité stricts avant FR d’être proposés à la vente. Si vous deviez toutefois rencontrer un problème avec votre appareil, nous le déplorons vivement. Dans ce cas, nous vous invitons à prendre contact avec notre service clientèle. Nos collaboratrices se feront un plaisir de vous aider ! +32 14 21 71 91 [email protected] Du lundi au jeudi : 8 h 30 – 12 h et 13 h – 17 h Vendredi : 8 h 30 – 12 h et 13 h – 16 h 30 Cet appareil est garanti 2 ans à compter de la date d’achat. Durant la période de garantie, le distributeur assumera l’entière responsabilité en cas de défauts de fonctionnement (matériel) ou de fabrication. Si un tel problème survient, l’appareil sera remplacé ou réparé. La période de garantie de 2 ans ne reprend pas à zéro, mais se poursuit (jusqu’à 2 ans à compter de la date d’achat de l’appareil). La garantie est accordée sur la base du ticket de caisse. Pour les accessoires et les éléments d’usure, une garantie de 6 mois s’applique. La garantie et la responsabilité du fournisseur et du fabricant n’ont plus effet dans les cas suivants : 14 · Les instructions du manuel n’ont pas été suivies. · Mauvais raccordement, par ex. tension électrique trop forte. · Utilisation contraire, brutale ou anormale. · Entretien insuffisant ou non conforme. · Réparation ou modification de l’appareil par le consommateur ou un tiers non autorisé. · Utilisation d’éléments ou d’accessoires qui ne sont pas recommandés ou fournis par le fournisseur/ fabricant. DO938K CONSIGNES DE SÉCURITÉ · Lisez ces consignes très attentivement. Conservez ce mode d’emploi afin de pouvoir le consulter ultérieurement. · Avant la première utilisation, enlevez tous les éléments d’emballage et les éventuels autocollants promotionnels. Veillez à ce que les enfants ne jouent pas avec les matériaux d’emballage. · Cet appareil est conçu pour être utilisé dans un environnement domestique ou dans des environnements comparables, tels que : · Coin-cuisine du personnel dans les commerces, les bureaux et autres environnements professionnels comparables · Fermes · Chambres d’hôtel ou de motel et autres environnements à caractère résidentiel · Chambres d’hôtes ou comparables · Cet appareil peut être utilisé par des enfants âgés de 16 ans ou plus et par des personnes présentant un handicap physique ou sensoriel, une capacité mentale limitée ou un manque d’expérience ou de connaissances, à condition que ces personnes soient sous surveillance ou qu’elles aient reçu des instructions sur la manière d’utiliser l’appareil en toute sécurité et qu’elles connaissent les dangers liés à son utilisation. Les enfants ne peuvent pas jouer avec cet appareil. L’entretien et le nettoyage de l’appareil ne peuvent pas être effectués par des enfants, sauf s’ils sont âgés de plus de 16 ans et sous la surveillance d’un adulte. · Gardez l’appareil et le cordon électrique hors de portée des enfants. · Attention: l’appareil ne peut pas être utilisé avec une minuterie externe ou une commande à distance séparée. · Veuillez lire toutes les instructions avant d’utiliser l’appareil. · Vérifiez avant usage si la tension indiquée sur l’appareil correspond à la tension du réseau électrique de votre domicile. · Ne laissez pas le cordon pendre sur une surface chaude ou sur le rebord d’une table. · N’utilisez jamais l’appareil lorsque le cordon ou la fiche sont endommagés, après un mauvais fonctionnement de l’appareil ou lorsque l’appareil est endommagé. Amenez alors l’appareil au centre de services le plus proche pour contrôle et réparation. · Soyez très attentif lorsque l’appareil est utilisé par des enfants ou à proximité d’enfants. · L’utilisation d’accessoires non préconisés par le fabricant peut provoquer un incendie, une électrocution ou des blessures. · Retirez la fiche de la prise lorsque l’appareil n’est pas utilisé, avant d’installer ou d’enlever des pièces et avant de nettoyer l’appareil. Mettez tous les boutons en position « arrêt » et retirez la fiche de la prise. Ne tirez jamais sur le câble pour retirer la fiche de la prise. · Ne laissez jamais un appareil en service sans surveillance. · Ne placez jamais cet appareil sur ou à proximité d’un feu au gaz ou d’un feu électrique où il pourrait entrer en contact avec un appareil chaud. · N’utilisez pas l’appareil à l’extérieur. · Utilisez l’appareil uniquement dans le but auquel il est destiné. www.domo-elektro.be DO938K FR Les consignes de sécurité suivantes doivent être respectées lors de l’utilisation de tout appareil électrique: 15 FR · Utilisez toujours l’appareil sur une surface solide, sèche et plane. · Cet appareil ne convient qu’à un usage domestique. Le fabricant décline toute responsabilité pour des accidents qui découleraient d’un mauvais usage de l’appareil ou du non-respect des instructions fournies dans ce manuel. · Toutes les réparations, en dehors de l’entretien ordinaire de l’appareil, doivent être réalisées par le fabricant ou son service après-vente. · N’immergez jamais le cordon électrique, la fiche ou l’appareil lui-même dans l’eau ou tout autre milieu liquide. · Tenez le cordon éloigné de rebords tranchants et de pièces brûlantes ou d’autres sources de chaleur. · Gardez les orifices de ventilation dégagés, veillez à ce qu’ils ne soient ni encombrés ni entravés. · N’utilisez aucun autre appareil électrique dans le réfrigérateur, sauf s’il est agréé à cette fin par le fabricant. · Ne conservez jamais de matière explosive dans l’appareil, comme p.ex. des aérosols à gaz propulseur inflammable. · Veillez à ne pas endommager le circuit de refroidissement, p.ex. lors du transport ou de l’installation. · Veillez à ce que le cordon d’alimentation ne soit ni écrasé ni endommagé par l’arrière de l’appareil. Ceci pourrait provoquer une surchauffe et par conséquent un incendie. · Veillez à avoir accès à la fiche de l’appareil. · Ne tirez pas sur le cordon. · Si la prise électrique n’est pas bien fixée, ne branchez pas l’appareil (risque de choc électrique ou d’incendie). · Évitez une exposition prolongée à la lumière solaire. · L’appareil ne peut pas être utilisé avec une rallonge ou un bloc multiprise. · Cette unité de refroidissement n’est pas destinée à être utilisée comme un appareil encastré. · Respectez les instructions ci-dessous afin d’éviter toute contamination des aliments : · Une ouverture prolongée de la porte peut entraîner une augmentation substantielle de la température au sein des compartiments de l’appareil. · Nettoyez régulièrement les surfaces pouvant entrer en contact avec les aliments. Nettoyez régulièrement le canal et le trou d’évacuation de la condensation de l’appareil. · Conservez la viande crue et le poisson dans des récipients séparés pour qu’ils ne puissent ni entrer en contact avec d’autres aliments, ni goutter sur ceux-ci. · Éteignez, dégivrez et nettoyez l’appareil en cas de période d’inutilisation prolongée. Laissezle sécher et laissez la porte ouverte pour éviter la formation de moisissure. AVERTISSEMENT ! Ne placez jamais cet appareil sur ou à proximité d’un feu au gaz, d’un feu électrique, ou à tout autre endroit où il pourrait entrer en contact avec une source de chaleur. L’arrière de l’appareil comporte des matériaux inflammables. Tenez compte du symbole « Risque d’incendie – Matériaux inflammables » qui se trouve à l’arrière de l’appareil. 16 DO938K PARTIES 1. Bouton de contrôle de la température 2. Clayettes 3. Bac à légumes 4. Pieds de mise à niveau 5. Balconnets FR 1 2 5 3 4 AVANT LA PREMIÈRE UTILISATION · Ôtez tout le matériel d’emballage, tant à l’intérieur qu’à l’extérieur. Nettoyez l’extérieur de l’appareil à l’aide d’un chiffon sec. Vous pouvez nettoyer l’intérieur de l’appareil à l’aide d’un chiffon doux et humide. · Veillez à ce que l’air puisse circuler librement autour du réfrigérateur. L’arrière du réfrigérateur doit s’écarter d’au moins 13 cm du mur. · Placez le réfrigérateur sur un sol ferme et plat. · Évitez la lumière directe du soleil et la chaleur. La lumière du soleil risque de dégrader l’extérieur du réfrigérateur. La chaleur augmentera la consommation d’énergie. · Évitez un taux d’humidité trop élevé. Trop d’humidité dans l’air accélérera la formation de glace dans votre réfrigérateur. · Avant de brancher le réfrigérateur pour la première fois, vérifiez que la tension du courant fourni par le réseau électrique de votre habitation correspond à la tension de fonctionnement du réfrigérateur indiquée sur la plaque signalétique de l’appareil. Une tension différente pourrait endommager l’appareil. · Après installation, laissez l’appareil reposer pendant 24 heures avant de le mettre sous tension. Le gaz réfrigérant pourra ainsi se stabiliser. · Laissez l’appareil fonctionner à vide pendant 8 heures de sorte que les compartiments puissent refroidir à la température appropriée. · Si l’appareil est installé sur une surface irrégulière, il pourra être ajusté au moyen des pieds réglables. www.domo-elektro.be 16 DO938K 17 Installez la poignée. · La classe climatique indique la température ambiante minimale et maximale pour le bon fonctionnement d’un appareil. Vous trouverez la classe climatique sur la plaque signalétique au dos de l’appareil. FR · · SN : Subnormal : température ambiante de 10 °C à 32 °C · N : Normal : température ambiante de 16 °C à 32 °C · ST : Subtropical : température ambiante de 16 °C à 38 °C · T : Tropicale : température ambiante de 16 °C à 43 °C UTILISATION CONTRÔLE DE LA TEMPÉRATURE La température du réfrigérateur se règle au moyen du bouton de contrôle situé à l’intérieur du réfrigérateur. Ajustez le bouton de contrôle sur le réglage désiré. Plus on monte dans les chiffres, plus on descend dans les températures. Le niveau 4 est la position recommandée pour un emploi traditionnel. · En position 0 (ARRÊT), l’appareil ne fonctionne pas (le système de refroidissement est désactivé), mais l’alimentation n’est pas coupée. · La durée de fonctionnement et la température sont affectées par l’emplacement du réfrigérateur, par la fréquence d’ouverture de la porte et par la température ambiante de la pièce où est installé l’appareil. DÉPLACEMENT DE VOTRE RÉFRIGÉRATEUR 18 · Si l’appareil est éteint pour une raison quelconque, attendez 10 minutes avant de le remettre en marche. Cela permettra à la pression du système de réfrigération de s’égaliser avant le redémarrage. · Éteignez l’appareil et débranchez le câble d’alimentation de la prise secteur Enlevez tous les aliments. Enlevez également toutes les pièces mobiles (clayettes, accessoires, etc.) ou attachez-les dans le réfrigérateur afin d’éviter tout risque de choc. · Déplacez l’appareil jusqu’à son nouvel emplacement. Si l’appareil a été placé sur un des ses côtés durant un certain temps, remettez-le en position 16 verticale et attendez au moins 10 minutes avant de le mettre en marche. DO938K · Votre réfrigérateur utilise de l’isobutane (R600a) comme réfrigérant. Bien que le R600a soit un gaz écologique et naturel, il est explosif. Vous devez donc faire attention pendant le transport et l’installation pour éviter que les éléments de réfrigération de l’appareil ne soient endommagés. En cas de fuite due à la détérioration des éléments de réfrigération, éloignez votre réfrigérateur des flammes nues et des sources de chaleur, et ventilez la pièce où il se trouve durant quelques minutes. FR CONSERVATION DES ALIMENTS DANS LE RÉFRIGÉRATEUR Le réfrigérateur permet de prolonger la durée de conservation des denrées périssables. Conservation des aliments frais pour des résultats optimaux : · Ne conservez que des aliments qui sont très frais et de bonne qualité. · Veiller à ce que les aliments soient bien emballés ou couverts avant d’être stockés. Cela permettra d’éviter que les aliments se déshydratent, que leur couleur se détériore ou qu’ils perdent leur goût et aidera à maintenir leur fraîcheur. Cela permettra également d’empêcher le transfert d’odeurs. · Assurez-vous que les aliments à forte odeur sont emballés ou couverts et entreposés à l’écart des aliments tels que le beurre, le lait et la crème qui sont susceptibles de se gâter du fait des odeurs fortes. · Faites refroidir les aliments chauds avant de les mettre au réfrigérateur. DÉGIVRAGE Le dégivrage du réfrigérateur est entièrement automatique. Lorsque l’élément frigorifique fonctionne, des perles de condensation ou du givre se forment à l’arrière du réfrigérateur. Ce phénomène est normal. Il n’est pas nécessaire d’essuyer la condensation ou le givre. Le panneau arrière se dégivre automatiquement. La condensation s’écoule dans le canal de condensation et est amené vers l’unité de réfrigération, d’où elle s’évapore. Remarque: Gardez le canal de condensation et l’orifice d’évacuation propres, de sorte que la condensation puisse s’écouler. VACANCES Lorsque vous partez en vacances pour une courte période, vous pouvez laisser l’appareil branché. Lorsque vous partez en vacances pour une longue période, il est préférable de procéder comme suit : · Retirez toute la nourriture de votre réfrigérateur. · Enlevez la fiche de la prise de courant. · Nettoyez à fond le réfrigérateur. · Laissez la porte du réfrigérateur ouverte pour éviter la formation de moisissure et les mauvaises odeurs. PANNE DE COURANT La plupart des pannes de courant sont rétablies endéans 1 ou 2 heures et ne modifieront pas la température de votre réfrigérateur. Vous devez toutefois réduire au minimum l’ouverture de la porte du réfrigérateur au cours d’une panne de courant. Au cours d’une panne de courant prolongée, vous devez prendre des mesures pour protéger la nourriture, p.ex. en la couvrant de glace sèche. www.domo-elektro.be DO938K 19 FR RÈGLES IMPORTANTES · Ne placez jamais de nourriture chaude dans le réfrigérateur. · Les boissons doivent être conservées dans des récipients fermés. · La nourriture à conserver plus longtemps dans le réfrigérateur doit être couverte ou conservée dans des récipients en verre. · Ne placez jamais de nourriture avariée dans le réfrigérateur. · Veillez à ce que le réfrigérateur ne soit jamais surchargé pour que la nourriture puisse être suffisamment rafraîchie. · N’ouvrez la porte du réfrigérateur que lorsque c’est nécessaire. · Il n’est pas destiné à une utilisation extérieur (p.ex la tente) en camping. · Il ne peut être utilisé qu’à l’intérieur. · L’appareil ne peut être utilisé dans les transports publics. GUIDE DE CONSERVATION Suivez ces conseils pour bien ranger votre réfrigérateur et optimiser la conservation des aliments : Compartiment du réfrigérateur Types d’aliments Bac de porte · Aliments contenant des conservateurs naturels, tels que les confitures, les jus, les boissons, les condiments… · Ne pas y stocker d’aliments à durée de conservation limitée · Fruits, légumes et herbes fraîches · Ne pas réfrigérer les bananes, les oignons, les pommes de terre et l’ail Planche du milieu · Produits laitiers et œufs Planche supérieure · Aliments ne nécessitant pas de cuisson, tels que les plats préparés, les restes, le fromage et la charcuterie Bac à légumes DÉPLACER LES CLAYETTES ET LES ÉTAGÈRES DE PORTE · Avant de déplacer les clayettes et les étagères de porte, videz le réfrigérateur. · Pour déplacer une clayette, soulevez-la et tirez-la vers vous. · Pour déplacer une étagère de porte, empoignez-la des deux mains. Soulevez-la et tirez-la vers vous. ÉCLAIRAGE Attention: débranchez le câble d’alimentation de la prise murale avant de remplacer l’ampoule de la lampe. 20 1. Enlevez le couvercle de la lampe. 2. Dévissez l’ampoule hors d’usage, puis vissez une ampoule neuve de type 15W (culot E14). 3. Replacez le couvercle de la lampe. DO938K CHANGEMENT DU SENS D’OUVERTURE DE LA PORTE oor Si vous avez besoin de monter la porte du réfrigérateur dans l’autre sens, il est recommandé d’appeler oor votre agent d’entretien agréé pour effectuer lips screwdriver, Flat bladed screwdriver, Hexagonal spanner. cette inversion, ou de demander à un technicien. s unplugged and empty. Avant d’inverser le sens d’ouverture de la porte, vous devez vous assurer que l’appareil est débranché et lips itscrewdriver, bladed screwdriver, Hexagonal spanner. off, is necessaryFlat to tilt the unit backwards. You should rest the unit on something solid vide. Ilreversing est recommandé during the door process. d’utiliser un tournevis cruciforme et une clé (ces deux outils ne sont pas fournis). sslip unplugged and empty. doff, must be saved to do the reinstallation of the door. it is necessary to tilt the unit backwards. You should rest the unit on something solid it flat as thisthe may damage the coolant slip door reversing process.system. lips during screwdriver, Flat bladed screwdriver, Hexagonal spanner. 2 must people during assembly. d be handle saved tothe do unit the reinstallation of the door. 1. Retirez les deux vis situées à l’arrière du couvercle supérieur. situnplugged flat as this and mayempty. damage the coolant system. lips bladed screwdriver, Hexagonal spanner. off, itscrewdriver, is necessary to tilt theduring unit backwards. You should rest the unit on something solid 2 people handle Flat the unit assembly. slip during the door reversing process. sd unplugged and empty. must be saved totop do the reinstallation of the door. ews rear side of cover. off, itatis to tilt the unit backwards. You should rest the unit on something solid it flat asnecessary this may damage the coolant system. duringhandle the door reversing process. 2slip people the unit during assembly. unscrew d must be saved totop do the reinstallation of the door. ews at rear side of cover. it flat as this may damage the coolant system. 2 people handle the unit during assembly. unscrew oor FR oor ews at rear side of top cover. unscrew ews at rear side of top cover. unscrew 2. knob, Retirez couvercle supérieur. er and thermostat thenleplace it aside. er and thermostat knob, then place it aside. er and thermostat knob, then place it aside. er and thermostat knob, then place it aside. ge and then remove door and place it on a soft pad to ge and then remove door and place it on a soft pad to 3. Retirez les vis puis enlevez la charnière supérieure qui tient la porte en place. Enlevez la porte et placez-la sur une surface rembourrée pour éviter qu’elle ne se raye. ge and then remove door and place it on a soft pad to ge and then remove door and place it on a soft pad to hinge. Then remove the adjustable feet from both hinge. Then remove the adjustable feet from both hinge. Then remove the adjustable feet from both 4. Retirez la vis du bas, le support de charnière et les pieds réglables du bas de l’appareil. hinge. Then remove the adjustable feet from both 7 7 7 7 www.domo-elektro.be DO938K 21 Reverse Door 5. Détachez la goupille de la charnière-étrier. Retournez l’arceau, puis fixez la goupille. 5. Unscrew and remove the bottom hinge pin, turn the bracket over and replace it. oor move the bottom hinge pin, turn the bracket over and replace it. Screw FR Unscrew oor Screw Unscrew move the bottom hinge pin, turn the bracket over and replace it. oor 6. Refit the bracket fitting the bottom hinge pin. Replace both adjustable feet. move the bottom hinge pin, turn the bracket over and replace it. 6. Fixez les vis et le support de charnière sur le côté opposé. Remettez les pieds réglables. Screw Unscrew fitting the bottom hinge pin. Replace both adjustable Screw Unscrew fitting the bottom pin. back Replace both adjustable 7. Placehinge the door on. Ensure the door is aligned horizontally and vertically, so that the seals are closed on all sides before finally tightening the top hinge. fitting bottom pin. Replace both adjustable ack on.the Ensure thehinge door is aligned horizontally and t the seals are closed on all sides before finally 7. Remettez soigneusement la porte en place. Avant de resserrer la charnière upérieure, assurez-vous p hinge. que la porte est alignée horizontalement et verticalement de sorte que les joints soient scellés sur tous les côtés. Insérez la charnière et vissez-la sur le haut. ack on. Ensure the door aligned and 8. Put the top is cover andhorizontally fix it with 2 screws on the back. t the seals are closed on all sides before finally p hinge. screw door on is aligned horizontally and rack andon. fixEnsure it with 2the screws the back. t the seals are closed on all sides before finally p hinge. screw 9. Fix the thermostat knob. r and fix it with 2 screws on the back. 8. Remettez le couvercle supérieur en place et fixez-le de nouveau avec les vis. screw at knob. r and fix it with 2 screws on the back. 8 screw 8 at knob. at knob. 22 DO938K 8 PROBLÈMES ET LEURS SOLUTIONS Lorsqu’un problème survient à votre réfrigérateur, contrôlez aussi les questions ci-dessous avant de prendre contact avec nôtre service après-vente. · L’appareil ne reçoit pas de courant, contrôlez si l’alimentation de courant est en ordre. · Contrôlez si la fiche est bien enfoncée dans la prise de courant. · Contrôlez si la tension utilisée est correcte. FR L’appareil ne fonctionne pas. Le réfrigérateur se réenclenche trop souvent. · La porte est-elle bien fermée ? · Avez-vous placé de la nourriture chaude dans le réfrigérateur obligeant ainsi l’appareil à fonctionner plus fort pour la réfrigérer. · La porte a été ouverte trop souvent ou trop longtemps. · L’appareil reçoit une tension erronée. · L’appareil se trouve trop près d’une source de chaleur ou sous la lumière directe du soleil. La température à l’intérieur du réfrigérateur est trop chaude. · Contrôlez si le réfrigérateur est alimenté en courant. · Contrôlez si la fiche est bien enfoncée dans la prise de courant. · Le réglage de la température est trop faible. · La porte a été ouverte trop souvent ou trop longtemps. · L’amenée d’air est bloquée. · Contrôlez si l’appareil est alimenté à la tension correcte. · L’appareil se trouve trop près d’une source de chaleur ou sous la lumière directe du soleil. NETTOYAGE ET ENTRETIEN · N’utilisez pas de produits nettoyants abrasifs ou des solvants. · Réglez le bouton de contrôle de la température en position 0 (ARRÊT) et débranchez le câble d’alimentation de la prise murale. · Sortez les aliments et conservez-les dans un endroit frais. · Nettoyez l’appareil avec un chiffon doux imprégné d’eau chaude et de détergent. · Nettoyez le joint de porte avec de l’eau claire uniquement, puis essuyez-le soigneusement. · Après le nettoyage, reconnectez l’appareil et réglez la température désirée. · Replacez les aliments dans l’appareil. www.domo-elektro.be DO938K 23 MISE AU REBUT FR Ce symbole sur le produit ou son emballage indique que ce produit ne peut être traité comme déchet ménager. Il doit plutôt être remis au point de ramassage concerné, se chargeant du recyclage du matériel électrique et électronique. En vous assurant que ce produit est éliminé correctement, vous favorisez la prévention des conséquences négatives pour l’environnement et la santé humaine qui, sinon, seraient le résulat d’un traitement inapproprié des déchets de ce produit. Pour obtenir plus de détails sur le recyclage de ce produit, veuillez prendre contact avec le bureau municipal de votre région, votre service d’éliminiation des déchets ménagers ou le magasin où vous avez acheté le produit. L’emballage est recyclable. Traitez l’emballage écologiquement. 24 DO938K GARANTIE Sehr geehrter Kunde, Sämtliche unserer Produkte unterliegen einer strengen Qualitätskontrolle, bevor Sie Ihnen angeboten werden. Sollten dennoch Probleme mit Ihrem Gerät auftreten, bedauern wir dies zutiefst. Wir möchten Sie in diesem Fall bitten, unseren Kundenservice zu kontaktieren. Unsere Mitarbeiter helfen Ihnen gern weiter! [email protected] DE +32 14 21 71 91 Montag – Donnerstag: 8:30 Uhr – 12:00 Uhr und von 13:00 Uhr – 17:00 Uhr Freitag: 8:30 Uhr – 12:00 Uhr und von 13:00 Uhr – 16:30 Uhr Dieses Gerät hat eine Garantiefrist von 2 Jahren ab dem Kaufdatum. Während der Garantiezeit übernimmt der Hersteller die vollständige Verantwortung für Mängel, die nachweislich auf Material- oder Konstruktionsfehler zurückzuführen sind. Wenn derartige Mängel auftreten, wird das Gerät wenn nötig ausgetauscht oder repariert. Die Garantiezeit von 2 Jahren beginnt in diesem Moment nicht erneut, sondern sie läuft bis 2 Jahre nach dem Kaufdatum weiter. Die Garantie wird auf der Grundlage des Kassenbons gewährt. Die Garantie auf Accessoires und Verschleißteile beträgt 6 Monate. Die Garantie und die Verantwortung/Haftung des Lieferanten und Herstellers entfallen automatisch in den folgenden Fällen: · Bei Nichtbeachtung der Anweisungen in dieser Bedienungsanleitung. · Bei falschem Anschluss, z.B. bei einer zu hohen Stromspannung. · Bei falscher, grober oder abnormaler Verwendung. · Bei unzureichender oder falscher Wartung. · Bei vom Verbraucher oder von nicht ermächtigten Dritten vorgenommenen Reparaturen oder Änderungen am Gerät. · Bei der Verwendung von Ersatzteilen oder Accessoires, die nicht vom Lieferanten / Hersteller empfohlen oder geliefert werden. www.domo-elektro.be DO938K 25 SICHERHEITSVORKEHRUNGEN Wenn Sie elektrische Geräte verwenden, müssen folgende Sicherheitshinweise beachtet werden: Lesen Sie diese Hinweise sorgfältig durch. Bewahren Sie diese Bedienungsanleitung zum späteren Nachschlagen auf. · Entfernen Sie vor dem ersten Gebrauch alle Verpackungsmaterialien und möglichen Werbeaufkleber. Sorgen Sie dafür, dass Kinder nicht mit den Verpackungsmaterialien spielen. · Dieses Gerät eignet sich für den Einsatz im Haushalt und in ähnlichen Umfeldern, zum Beispiel in folgenden Bereichen: DE · 26 · Küchenbereich für Mitarbeiter von Geschäften, Büros und anderen ähnlichen beruflichen Umfeldern. · Bauernhöfe · Hotel- und Motelzimmer und andere Bereiche mit wohnungsähnlichem Charakter · Gästezimmer oder Ähnliches · Diese Gerät darf von Kindern ab 16 Jahren und Menschen mit körperlichen oder sensorischen Behinderungen oder Menschen mit eingeschränkten geistigen Fähigkeiten oder mangelnder Erfahrung bzw. Sachkenntnis unter der Bedingung verwendet werden, dass diese Personen beaufsichtigt werden oder sie eine Anleitung zur sicheren Verwendung des Geräts erhalten haben und sich der Gefahren bei der Verwendung des Geräts bewusst sind. Kinder dürfen nicht mit dem Gerät spielen. Die Wartung und Reinigung des Geräts darf nicht durch Kinder ausgeführt werden, außer diese sind älter als 16 Jahre und werden von einem Erwachsenen beaufsichtigt. · Achtung: das Gerät darf nicht mit einer externen Zeitschaltuhr oder Fernbedienung gebraucht werden. · Bitte alle Anweisungen vor dem Gebrauch durchlesen. · Vor der Benutzung prüfen, ob die Spannung, die auf dem Gerät angegeben ist, mit der Spannung Ihres Stromnetzes übereinstimmt. · Lassen Sie das Netzkabel nicht über den Tisch oder die Anrichte hängen, oder in Kontakt mit heißen Oberflächen kommen. · Benutzen Sie das Gerät niemals, wenn die Kabelschnur oder der Stecker beschädigt ist, nach beeinträchtigtem Funktionieren des Gerätes, oder wenn das Gerät beschädigt ist. Bringen Sie in solchen Fällen das Gerät zur nächsten qualifizierten Servicestelle zur Überprüfung und/oder Reparatur. · Beim Einsatz des Gerätes in Anwesenheit von Kindern ist strenge Aufsicht geboten. · Die Verwendung von Zubehör, das nicht vom Hersteller empfohlen oder verkauft wird, besteht die Gefahr von Brand, elektrischen Schlages oder von Verletzungen. · Ziehen Sie den Stecker aus der Steckdose, wenn das Gerät nicht im Einsatz ist, Einzelteile montiert oder demontiert werden, oder das Gerät gereinigt wird. Ziehen Sie den Stecker direkt am Stecker selber und nicht an der Kabelschnur aus der Steckdose. · Lassen Sie das im Betrieb befindliche Gerät nicht unbeaufsichtigt. · Stellen Sie das Gerät nicht in der Nähe oder auf einer Gasflamme, einer elektrischen Platte oder an einer Stelle ab, auf der es in Kontakt mit einem Elektroofen oder einem anderen heißen Geräten kommen kann. · Benutzen Sie das Gerät nicht im Freien. DO938K Benutzen Sie das Gerät ausschließlich für den Zweck, für den es gedacht ist. · Stellen Sie das Gerät immer auf eine stabile, flache und trockene Oberfläche. · Das Gerät ist nur auf den privaten Gebrauch ausgelegt. Der Hersteller ist nicht verantwortlich für Unfälle, die als Folge von unsachgemäßem Gebrauch des Geräts oder Nichtbefolgen der in dieser Anleitung aufgeführten Regeln entstehen. · Sämtliche Reparaturen, abgesehen von der gewöhnlichen Pflege, sind durch den Hersteller oder dessen Kundendienst zu übernehmen. · Das Gerät, das Kabel oder den Stecker niemals in Wasser oder in andere Flüssigkeiten tauchen. · Netzkabel vor scharfen Kanten, heißen Gegen-ständen oder anderen Wärmequellen schützen. · Halten Sie die Lüftungsöffnungen frei und sorgen Sie dafür, dass diese nicht verstopft oder behindert werden. · Verwenden Sie keine anderen elektrischen Geräte im Kühlschrank, außer wenn sie vom Hersteller für diesen Zweck zugelassen wurden. · Fassen Sie die Lampe nicht an, wenn diese lange gebrannt hat. Sie kann sehr heiß sein. · Die Lampe ist nur für dieses Gerät bestimmt. Verwenden Sie diese nie als Innenraumbeleuchtung. · Bewahren Sie keine explosiven Stoffe im Gerät, wie beispielsweise Sprühflaschen mit brennbarem Triebmittel. · Sorgen Sie dafür, dass der Kühlkreislauf nicht beschädigt wird, z.B. während des Transports oder bei der Montage. · Achten Sie darauf, dass das Kabel nicht durch die Rückseite des Gerätes platt gedrückt oder beschädigt wird. Dies kann Überhitzung oder Feuer verursachen. · Achten Sie darauf, dass Sie Zugang zum Stecker des Gerätes haben. · Ziehen Sie nicht am Kabel. · Wenn die Steckdose lose ist, stecken Sie den Stecker nicht in diese Steckdose. (Risiko eines Stromschlags oder Brandgefahr) · Vermeiden Sie eine lange Exposition gegenüber Sonnenlicht. · Das Gerät darf nicht mit einem Verlängerungskabel oder einer Verteilersteckdose verwendet werden. · Diese Kühleinheit ist nicht für die Verwendung als Einbaugerät vorgesehen. · Halten Sie die unten angegebenen Anweisungen ein, um eine Kontamination von Lebensmitteln zu vermeiden: · Durch eine langfristige Öffnung der Tür kann sich die Temperatur in den Fächern des Geräts beträchtlich erhöhen. · Reinigen Sie die Oberflächen regelmäßig, die in Kontakt mit Lebensmitteln kommen können. Halten Sie den Kondensationskanal und das Ablaufloch an der Rückseite des Geräts sauber. · Bewahren Sie rohes Fleisch und Fisch in geeigneten Behältern im Kühlschrank auf, sodass diese nicht in Kontakt mit anderen Lebensmitteln kommen oder darauf tropfen. · Wenn das Gerät längere Zeit leer bleibt, müssen Sie es ausschalten, abtauen und reinigen. Lassen Sie es trocknen und lassen Sie die Tür offen, um zu vermeiden, dass sich im Gerät Schimmel bildet. www.domo-elektro.be DO938K DE · 27 WARNHINWEIS! Gerät nie auf oder in die Nähe einer Gasflamme oder elektrischen Platte oder an einen Ort stellen, an dem es mit einer Wärmequelle in Kontakt kommen könnte. An der Rückseite des Geräts befinden sich brennbare Materialien. Achten Sie auf das Symbol „Brandgefahr - brennbares Material“, das sich an der Rückseite des Geräts befindet. DE TEILE 1. Temperaturregler 2. Regale 3. Gemüsefach 4. Stellfüße 5. Türregal 1 2 5 3 4 VOR DER ERSTEN INBETRIEBNAHME 28 · Das Verpackungsmaterial sowohl innen als auch außen entfernen. Die Außenseite des Apparats mit einem sauberen, feuchten Tuch reinigen. Die Innenseite kann mit einem weichen, feuchten Tuch gereinigt werden. · Die Luft rund um den Kühlschrank sollte frei zirkulieren können. Die Rückseite des Kühlschranks muss mindestens 13 cm von der Wand entfernt sein. · Den Kühlschrank auf einen stabilen, flachen Untergrund stellen. · Direktes Sonnenlicht und Wärme vermeiden. Sonnenlicht kann die Außenseite des Kühlschranks angreifen. Wärme verursacht einen höheren Stromverbrauch · Einen zu hohen Feuchtigkeitsgrad vermeiden. Zuviel Luftfeuchtigkeit sorgt für schnellere Eisbildung im Kühlschrank. · Bevor Sie den Kühlschrank an das Stromnetz anschließen, kontrollieren Sie, ob die Spannung auf dem Typenschild Ihres Geräts mit der Spannung in Ihrer Wohnung übereinstimmt. Eine andere Spannung kann das Gerät beschädigen. · Sie können das Gerät nur über den Stecker vom Stromnetz trennen. Sorgen Sie dafür, dass er immer einfach zugänglich ist. Um das Gerät vom Stromnetz zu trennen, schalten Sie das Gerät aus und ziehen Sie den Stecker anschließend aus der Steckdose. · Das Gerät nach dem Aufstellen vor dem Einschalten 24 Stunden stehen lassen. So kann das Kühlmittel sich verteilen. · Lassen Sie das Gerät 8 Stunden ohne Lebensmittel in Betrieb, sodass der Kühlschrank auf eine angemessene Temperatur abkühlt. DO938K · Bei unebenen Oberflächen können die vorderen Stellfüße zur Ausrichtung verwendet werden. · Montieren Sie den Griff. DE 16 · Die Klimaklasse gibt die minimale und maximale Umgebungstemperatur für den ordnungsgemäßen Betrieb eines Gerätes an. Die Klimaklasse finden Sie auf dem Typenschild auf der Rückseite des Gerätes. · SN: Subnormal: Umgebungstemperatur 10 °C bis 32 °C · N: Normal: Umgebungstemperatur 16 °C bis 32 °C · ST: Subtropen: Umgebungstemperatur 16 °C bis 38 °C · T: Tropen: Umgebungstemperatur 16 °C bis 43 °C GEBRAUCH TEMPERATURREGELUNG Der Kühlschrank wird durch einen Temperaturregler geregelt, der sich im Gerät befindet. Stellen Sie diesen Regler auf die gewünschte Position ein. Je höher die Zahl, desto kälter ist die Temperatur. Stufe 4 wird für den Normalgebrauch empfohlen. · Das Gerät funktioniert in der Position 0 nicht (das Kühlsystem ist ausgeschaltet), doch die Stromversorgung ist nicht unterbrochen. · Die Betriebszeit und die -temperatur werden durch den Ort, an dem der Kühlschrank verwendet wird, durch die Häufigkeit der Türöffnung und durch die Temperatur des Raums beeinflusst, in dem sich der Kühlschrank befindet. www.domo-elektro.be DO938K 29 VERSETZEN DES GERÄTS Wen Sie das Gerät, unabhängig aus welchem Grund, ausschalten, warten Sie 10 Minuten, bis Sie es erneut einschalten. Der Druck im Kühlsystem muss zunächst stabilisiert werden, bevor Sie das Gerät erneut einschalten. · Schalten Sie das Gerät aus und ziehen Sie den Netzstecker aus der Steckdose. Sämtliche Lebensmittel entnehmen. Entfernen Sie außerdem alle abnehmbaren Teile (Regale, Zubehör, usw.) oder befestigen Sie diese im Kühlschrank, um Erschütterungen zu vermeiden. · Versetzen Sie das Gerät und installieren Sie es. Wenn Sie das Gerät während des Transports auf die Seite gelegt haben, auch wenn dies nur sehr kurz der Fall war, lassen Sie das Gerät mindestens 10 Minuten gerade stehen, bevor Sie es erneut einschalten. · Ihr Gerät verwendet das Kühlmittel Isobutan (R600a). Obwohl R600a ein umweltfreundliches und natürliches Gas ist, ist es explosiv. Seien Sie deshalb während des Transports oder bei der Installation des Geräts sehr vorsichtig, um Schäden an den Kühlelementen zu vermeiden. Im Falle eines Lecks durch eine Beschädigung der Kühlelemente halten Sie den Kühlschrank von offenem Feuer oder Wärmequellen fern und lüften Sie den Raum, in dem sich das Gerät befindet, für einige Minuten. DE · LEBENSMITTEL IM KÜHLSCHRANK AUFBEWAHREN Der Kühlschrank sorgt für eine längere Aufbewahrungszeit von frischen Lebensmitteln mit begrenzter Haltbarkeit. Für eine Aufbewahrung von frischen Lebensmitteln mit den besten Ergebnissen: · Verwenden Sie nur sehr frische Lebensmittel einer sehr guten Qualität. · Sorgen Sie dafür, dass die Lebensmittel gut verpackt oder abgedeckt sind, bevor Sie diese aufbewahren. Dies vermeidet, dass die Lebensmittel austrocknen, ausbleichen oder ihren Geschmack verlieren. Dadurch bleiben sie länger frisch. Es vermeidet außerdem die Übertragung von Gerüchen. · Sorgen Sie dafür, dass Lebensmittel mit einem starken Geruch gut verpackt und abgedeckt sind und bewahren Sie diese fern von Butter, Milch und Sahne sowie anderen Lebensmitteln auf, die durch einen starken Geruch beeinträchtigt werden können. · Lassen Sie warme Lebensmittel abkühlen, bevor Sie diese in den Kühlschrank stellen. ABTAUEN Der Kühlschrank taut sich vollständig automatisch ab. Während des Betriebs des Kühlers bildet sich Kondensationstropfen oder Reif an der Rückwand des Geräts. Dies ist normal. Es ist nicht erforderlich, die Kondensationsflüssigkeit oder das Eis zu entfernen. Die Rückwand taut sich automatisch ab. Die Kondensationsflüssigkeit läuft über den Kondensationskanal und wird zum Kühler geführt, wo sie verdampft. Hinweis: Halten Sie den Kondensationskanal und das Abflussloch sauber, sodass die Kondensationsflüssigkeit ablaufen kann. URLAUB Falls Sie für eine kurze Zeit in Urlaub gehen, kann das Gerät eingeschaltet bleiben. Falls Sie für längere Zeit in Urlaub gehen, kann wie folgt verfahren werden : · 30 Alle Lebensmittel aus dem Kühlschrank entfernen DO938K · Den Stecker aus der Steckdose ziehen · Den Kühlschrank gründlich reinigen. · Die Türe des Kühlschranks offen lassen, um Schimmel und schlechten Geruch zu vermeiden. STROMAUSFALL Die meisten Stromausfälle werden innerhalb von 1 bis 2 Stunden behoben und ändern die Temperatur des Kühlschranks nicht. Die Kühlschranktüre, während eines Stromausfalls, so wenig wie möglich öffnen. Während eines längeren Stromausfalls, Maßnahmen ergreifen, um die Lebensmittel zu schützen, zum Beispiel mit Hilfe von Trockeneis. DE WICHTIGE REGELN · Niemals warmes Essen in den Kühlschrank stellen. · Getränke sollten in geschlossenen Gefäßen aufbewahrt werden. · Lebensmittel die längere Zeit im Kühlschrank aufbewahrt werden, sollten abgedeckt oder in Glasschalen aufbewahrt werden. · Niemals verdorbene Lebensmittel in den Kühlschrank stellen. · Stets dafür sorgen, dass der Kühlschrank nicht zu voll ist, sodass die Lebensmittel ausreichend gekühlt werden können. · Die Türe des Kühlschranks nur öffnen, wenn es nötig ist. · Nicht für draussen Campingzwecke (bzw. Tent). · Darf nur in Räumen verwendet werden. · Das Gerät darf nicht in öffentlichen Verkehrsmitteln benutzt werden. LEITFADEN ZUR LAGERUNG Für eine optimale Lagerung richten Sie Ihr Kühlgerät folgendermaßen ein: Kühlschrankfach Lebensmittelart Türregal · Lebensmittel mit natürlichen Konservierungsstoffen wie Marmeladen, Säfte, Getränke, Gewürze etc. · Lagern Sie hier keine Lebensmittel mit begrenzter Haltbarkeit · Obst, Kräuter und Gemüse Gemüse-Schublade · Bananen, Zwiebeln, Kartoffeln und Knoblauch nicht kühl lagern Mittleres Regal · Milch und Eier Obere Ablage · Lebensmittel, die nicht gekocht werden müssen, z.B. Fertiggerichte, Reste, Aufstriche etc. EINLEGEBÖDEN UND TÜRFÄCHER VERSETZEN · Leeren Sie den Kühlschrank, bevor Sie Einschübe oder Türfächer versetzen. · Um einen Einschub zu versetzen, heben Sie ihn an und ziehen Sie ihn in Ihre Richtung. www.domo-elektro.be DO938K 31 · Um ein Türfach zu versetzen, halten Sie es mit 2 Händen fast. Heben Sie das Türfach nach oben an und ziehen Sie es in Ihre Richtung. AUSTAUSCH DER GLÜHBIRNE DE Ziehen Sie den Netzstecker aus der Steckdose, bevor Sie die Glühbirne austauschen. oor 1. Entfernen Sie die Lampenabdeckung. 2. Schauben Sie die alte Glühbirne aus und setzen Sie anschließend eine neue 15W (E14-Fassung) Glühbirne ein. 3. Setzen Sie die Lampenabdeckung wieder auf. ÖFFNUNGSRICHTUNG DER TÜR ÄNDERN Wenn Sie die Scharniere der Tür auf die andere Seite versetzen möchten, empfehlen wir, einen anerkannten Fachmann zu kontaktieren und ihn diese Arbeiten durchführen zu lassen. Bevor Sie die soor unplugged and empty. Öffnungsrichtung ändern, kontrollieren Sie, der aus der Steckdose gezogen wurde und dass off, it is necessary to tilt the unit backwards. You should rest theob unit on Stecker something solid slip during the door reversing process. das Gerät leer screwdriver, ist. Es empfiehlt sich, spanner. einen Kreuzschlitzschraubendreher und einen Maulschlüssel zu lips screwdriver, Flat bladed Hexagonal d must be saved to do the reinstallation of the door. flat as this and may damage the coolant system. verwenden (beide nicht im Lieferumfang enthalten). situnplugged empty. lips screwdriver, Flat bladed screwdriver, Hexagonal spanner. 2 people handle the unit assembly.You should rest the unit on something solid off, it is necessary to tilt theduring unit backwards. 1.doorEntfernen Sie die Schrauben der oberen Abdeckung. slip during the reversing process. d must be saved to do the reinstallation of the door. it flat as this may damage the coolant system. 2 people during assembly. ews at rearhandle side ofthe top unit cover. unscrew ews at rear side of top cover. unscrew er and thermostat knob, then place it aside. 2. Entfernen Sie die obere Abdeckung. er and thermostat knob, then place it aside. ge and then remove door and place it on a soft pad to ge and then remove door and place it on a soft pad to 32 DO938K er and thermostat knob, then place it aside. 3. Entfernen Sie die Schrauben und anschließend das obere Scharnier, dass die Tür in ihrer Position hält. Heben Sie die Tür hoch und legen Sie diese zur Vermeidung von Kratzern auf inen weichen Untergrund. ge and then remove door and place it on a soft pad to ge and then remove door and place it on a soft pad to 4. DE hinge. Then remove the adjustable feet from both Entfernen Sie die unterste Schraube, den Scharnierbügel und die Stellfüße unten am Gerät. hinge. Then remove the adjustable feet from both 7 7 Reverse Door 5. Lösen Sie den Scharnierbolzen aus dem Scharnierbügel. Kehren Sie das Scharnier um und befestigen Sie den Scharnierbolzen wieder. oor 5. Unscrew and remove the bottom hinge pin, turn the bracket over and replace it. move the bottom hinge pin, turn the bracket over and replace it. Screw Unscrew Unscrew Screw 6. 6. Refit the bracket fitting the Schrauben bottom hingeund pin.den Replace both adjustable Befestigen Sie die Scharnierbügel an der gegenüberliegenden Seite des Bodens. feet. Setzen Sie die Stellfüße zurück. fitting the bottom hinge pin. Replace both adjustable 7. Place the door back on. Ensure the door is aligned horizontally and vertically, so that the seals are closed on all sides before finally tightening the top hinge. ack on. Ensure the door is aligned horizontally and t the seals are closed on all sides before finally p hinge. www.domo-elektro.be DO938K 33 fitting the bottom hinge pin. Replace both adjustable fitting the bottom hinge pin. Replace both adjustable 7. Setzen Sie die Tür vorsichtig ein. Achten Sie darauf, dass die Tür sowohl senkrecht als auch waagerecht ausgerichtet ist, sodass die Dichtungen an allen Seiten anliegen, bevor Sie das obere Scharnier vollständig festziehen. Setzen Sie das Scharnier wieder ein und schrauben Sie dieses an der Oberseite des Geräts fest. ack on. Ensure the door is aligned horizontally and t the seals are closed on all sides before finally p hinge. DE ack on. Ensure the door is aligned horizontally and t the seals are closed on all sides before finally p hinge. 8. Setzen Sie die obere Abdeckung erneut auf und schrauben Sie diese mithilfe der Schrauben wieder fest. r and fix it with 2 screws on the back. screw r and fix it with 2 screws on the back. screw at knob. at knob. PROBLEME UND DEREN LÖSUNG 8 Falls Sie ein Problem mit Ihrem Kühlschrank haben, kontrollieren Sie bitte die folgende Frageliste, bevor Sie mit unserem Kundendienst Kontakt aufnehmen. 8 Gerät funktioniert nicht. · Das Gerät bekommt keinen Strom, kontrollieren, ob die Stromzufuhr in Ordnung ist. · Kontrollieren, ob sich der Stecker in der Steckdose befindet. · Kontrollieren, ob die richtige Spannung zur Verfügung steht. Der Kühlschrank springt zu oft an. · Ist die Türe gut geschlossen? · Wurde warmes Essen in den Kühlschrank gestellt, wodurch das Gerät stärker kühlen muss? · Ist die Türe zu oft oder zu lange geöffnet worden? · Das Gerät bekommt die falsche Spannung · Das Gerät steht in der Nähe einer Wärmequelle oder in direktem Sonnenlicht. Die Innentemperatur des Kühlschranks ist zu warm. · 34 Kontrollieren, ob der Kühlschrank Strom hat. DO938K · Kontrollieren, ob sich der Stecker in der Steckdose befindet. · Die Temperatureinstellung ist zu niedrig. · Die Türe hat zu lange oder zu oft offen gestanden. · Die Luftzufuhr ist blockiert. · Kontrollieren, ob dem Gerät die richtige Spannung zur Verfügung steht. · Das Gerät steht in der Nähe einer Wärmequelle oder in direktem Sonnenlicht. REINIGUNG UND WARTUNG Verwenden Sie keine aggressiven Reinigungs- oder Lösungsmittel. · Stellen Sie die Temperatur auf die Position 0 ein und ziehen Sie den Stecker aus der Steckdose. · Entnehmen Sie die Lebensmittel und bewahren Sie diese an einem kühlen Ort auf. · Reinigen Sie das Gerät mit einem weichen Tuch mit warmem Wasser und einem milden Reinigungsmittel. · Reinigen Sie die Türdichtung nur mit warmem Wasser und reiben Sie diese anschließend gründlich ab. · Stecken Sie den Stecker nach der Reinigung in die Steckdose und stellen Sie den Temperaturregler erneut in der gewünschten Temperatur ein. · Legen Sie die Lebensmittel wieder in das Gerät. DE · ENTSORGEN Dieses Symbol auf dem Produkt oder seiner Verpackung weist darauf hin, dass dieses Produkt nicht als normaler Haushaltsabfall zu behandeln ist, sondern an einem Sammelpunkt für das Recyling von elektrischen und elektronischen Geräten abgegeben werden muss. Durch Ihren Beitrag zum korrekten Entsorgen dieses Produkts schützen Sie die Umwelt und die Gesundheit Ihrer Mitmenschen. Umwelt und Gesundheit werden durch falsches Entsorgen gefährdet. Weitere Informationen über das Recycling dieses Produkts erhalten Sie von Ihren Rathaus, Ihrer Müllabfuhr oder dem Geschäft, in dem Sie das Produkt gekauft haben. Das Verpackungsmaterial ist wiederverwertbar. Entsorgen Sie die Verpackung umweltgerecht und führen Sie sie der Wertstoffsammlung zu. www.domo-elektro.be DO938K 35 WARRANTY Dear client , All of our products are always submitted to a strict quality control before they are sold to you. Should you nevertheless experience problems with your device, we sincerely regret this. In that case, we kindly request you to contact our customer service. Our staff will gladly assist you. +32 14 21 71 91 [email protected] Monday – Thursday: 8.30 – 12.00 and 13.00 – 17.00 EN Friday: 8.30 – 12.00 and 13.00 – 16.30 This appliance has a two year warranty period. During this period the manufacturer is responsible for any failures that are the direct result of construction failure. When these failures occur the appliance will be repaired or replaced if necessary. The warranty will not be valid when the damage to the appliance is caused by wrong use, not following the instructions or repairs executed by a third party. The guarantee is issued with the original till receipt. All parts, which are subject to wear, are excluded from the warranty. If your device breaks down within the 2-year warranty period, you can return the device together with your receipt to the shop where you purchased it. The guarantee on accessories and components that are liable to wear-and-tear is only 6 months. The guarantee and responsibility of the supplier and manufacturer lapse automatically in the following cases: 36 · If the instructions in this manual have not been followed. · In case of incorrect connection, e.g., electrical voltage that is too high. · In case of incorrect, rough or abnormal use. · In case of insufficient or incorrect maintenance. · In case of repairs or alterations to the device by the consumer or non-authorised third parties. · If the customer used parts or accessories that are not recommended or provided by the supplier / manufacturer. DO938K SAFETY INSTRUCTIONS When using electrical appliances, basic safety precautions should always be taken, including the following: · Read all instructions carefully. Keep this manual for future reference. · Make sure all packaging materials and promotional stickers have been removed before using the appliance for the first time. Make sure children cannot play with the packaging materials. · This appliance is intended to be used in household and similar applications such as: · staff kitchen areas in shops, offices and other working environments; · farm houses; · by clients in hotels, motels and other residential type environments; · bed and breakfast type environments. Children should be supervised to ensure that they do not play with the appliance. · This appliance can be used by children aged from 16 years and above and persons with reduced physical, sensory or mental capabilities or lack of experience and knowledge if they have been given supervision or instruction concerning use of the appliance in a safe way and understand the hazards involved. Children shall not play with the appliance. Cleaning and user maintenance shall not be made by children unless they are older than 16 and supervised. EN · · Keep the appliance and its cord out of reach of children younger than 16 years. · Attention: This appliance cannot be used with an external timer or a separate remote control. · Before use, check if the voltage stated on the appliance corresponds with the voltage of the power net at your home. · Do not let the cord hang on a hot surface or on the edge of a table or counter top. · Never use the appliance when the cord or plug is damaged, after malfunction or when the appliance itself is damaged. In that case, take the appliance to the nearest qualified service center for check-up and repair. · Close supervision is necessary when the appliance is used near or by children. · The use of accessories that are not recommended or sold by the manufacturer can cause fire, electrical shock or injuries. · Unplug the appliance when it is not in use, before assembling or disassembling any parts and before cleaning the appliance. Put all buttons and knobs into the ‘off’ position and unplug the appliance by grasping the plug. Never unplug by pulling the cord. · Do not leave a working appliance unattended. · Never place this appliance near a gas stove or electrical stove or in a place where it may come into contact with a warm appliance. · Do not use the appliance outdoors. · Only use the appliance for its intended use. · Always use the appliance on a steady, dry and level surface. · Only use the appliance for domestic use. The manufacturer can not be held responsible for accidents that result from improper use of the appliance or not following the instructions described in this manual. www.domo-elektro.be DO938K 37 EN · All repairs should be carried out by the manufacturer or its aftersales service. · Never immerse the appliance, the cord or the plug in water or any other liquid. · Keep the cord away from sharp edges and hot parts or other heat sources. · Keep the ventilation openings free of obstructions. · Do not use any other electrical appliance inside the fridge, unless they are approved for this purpose by the manufacturer. · Do not keep any explosive substances inside the appliance, like for instance aerosol cans with a flammable propellant. · Make sure that the refrigerant circuit does not get damaged, for instance during transportation or installation. · Make sure that the plug does not get squashed or damaged by the back of the appliance. A squashed or damaged power plug may overheat and cause fire. · Make sure that you have access to the plug of the appliance. · Do not pull the cord. · If the socket is loose, do not plug in the appliance. (risk of electric shock or fire) · Avoid long exposure to direct sunlight. · The appliance may not be used with an extension lead or a multiple socket. · This cooling unit is not intended for use as a built-in appliance. · Follow the instructions below to prevent contamination of food: · Keeping the door open for long periods may cause the temperature in the compartments of the appliance to rise considerably. · Clean the surfaces that could come into contact with food regularly. Keep the condensation channel and drainage hole at the back of the appliance clean. · Store raw meat and fish in suitable containers in the refrigerator so that they do not come into contact with or drip onto other food. · If the appliance is left empty for longer periods, it should be turned off, defrosted and cleaned. Allow it dry and leave the door ajar to prevent mould from growing in the appliance. WARNING! Never place this appliance on or in the neighbourhood of a gas or electric fire or in a place where it could come into contact with a heat source. There are flammable materials located on the back of the appliance. Pay attention to the symbol ‘Fire risk – flammable materials’ located on the back of the appliance. 38 DO938K PARTS 1. Temperature control knob 2. Shelves 3. Vegetable container 4. Levelling feet 5. Door shelves 1 2 5 3 BEFORE THE FIRST USE · Remove the exterior and interior packing, wipe the outside thoroughly with a soft dry cloth and the inside with a wet, lukewarm cloth. · Select a place with a strong, level floor. · Allow 13 cm of space between the back of the refrigerator and any adjacent wall. · Avoid direct sunlight and heat. Direct sunlight may affect the acrylic coating. Heat sources nearby will cause higher electricity consumption. · Avoid very moist places. Too much moisture in the air will cause frost to from very quickly on the evaporator, and your refrigerator. · Before connecting your refrigerator to the power supply, check that the voltage stated on the rating label of your appliance corresponds to the voltage in your home. A different voltage could damage the appliance. · After installation, leave the freezer for 24 hours before turning it on. This way the refrigerant can settle. · Allow the appliance to run empty for 8 hours so the compartment can cool to the appropriate temperature. · For uneven surfaces, front feet can be aligned. www.domo-elektro.be 16 DO938K EN 4 39 · Install the handle. · The climate class indicates the minimum and maximum ambient temperature for the proper operation of an appliance. You can find the climate class on the type plate on the back of the appliance. · SN: Subnormal: ambient temperature between 10°C and 32°C · N: Normal: ambient temperature between 16°C and 32°C · ST: Subtropical: ambient temperature between 16°C and 38°C · T: Tropical: ambient temperature between 16°C and 43°C USE TEMPERATURE CONTROL EN The fridge is controlled with a temperature control knob located inside the appliance. Adjust the control knob as desired to suit your individual preference. The higher the number, the colder the temperature. Position 4 is the recommended position for normal use. · In the 0 position the appliance does not operate (the cooling system is switched off), but power supply is not interrupted. · The running time and temperature are affected by where the fridge is located, how often the door is opened and the temperature of the room the fridge is located in. MOVING YOUR APPLIANCE 40 · If the appliance is turned off for any reason, wait for 10 minutes before turning it back on. This will allow the refrigeration system pressures to equalise before restarting. · Turn off the appliance and unplug it from the mains socket. Remove all food. Also remove all mobile parts (shelves, accessories, etc.) or fix them into the fridge to avoid any shock. · Relocate and install. If the appliance has been16left on its side for any length of time, leave it standing upright for at least 10 minutes before turning on. · Your appliance uses isobutane (R600a) as a refrigerant. Although R600a is an environmentally friendly and natural gas, it is explosive. Therefore you should be careful during shipment and installation to prevent your appliance’s cooler elements from being damaged. In the event of a leak caused by damage to the cooler elements, move your fridge from open flame or heat sources and ventilate the room where the appliance is located for a few minutes. DO938K STORING FOOD IN THE FRIDGE The fridge helps to extend the storage times of fresh perishable foods. Fresh food care for best results: · Store foods that are very fresh and of good quality. · Ensure that food is well wrapped or covered before it is stored. This will prevent food from dehydrating, deteriorating in colour or losing taste and will help maintain freshness. It will also prevent odour transfer. · Make sure that strong smelling foods are wrapped or covered and stored away from foods such as butter, milk and cream which can be tainted by strong odours. · Cool hot foods down before placing them in the fridge. DEFROSTING The refrigerator defrosts fully automatically. Note: Keep the condensation channel and drainage hole clean, so that the condensation can run out. EN While the cooling is running, beads of condensation or hoarfrost form at the back of the refrigerator. This is normal. It is not necessary to wipe off the condensation or frost. The rear panel defrosts automatically. The condensation runs into the condensation channel and is conveyed to the cooling from where it evaporates. VACATION TIME For short vacation periods, leave the control knobs at their usual settings. During longer absences: · Remove all foods. · Disconnect from electrical outlet. · Clean the refrigerator thoroughly, including defrost pan. · Leave door open to avoid possible formations of condensate, mold or odors. POWER FAILURE Most power failures are corrected within an hour or two and will not affect your refrigerator temperatures. However, you should minimize the number of door openings while the power is off. During power failures of longer duration, take steps to protect your food by blacking dry ice on top of packages. Move the appliance Disconnected the power plug, Remove or securely fasten down all loose items inside the refrigerator, To avoid damaging the leveling legs, turn them all the way into the base. SOME IMPORTANT RULES FOR THE CORRECT USE OF THE REFRIGERATOR · Never place hot foods in the refrigerator. · Beverages should be stored in sealed containers. · Foods to be stored for a long time should be wrapped in cellophance or polyethylence, or kept in glass containers. www.domo-elektro.be DO938K 41 · Never place spoiled foods in the cabinet. · Don’t overload the cabinet. · Don’t open the door unless necessary. · Caution: please keep the products away from the fire or similar glowing substance before you dispose the refrigerator. · Caution : Not for outer camping use (ex. Tent) · Caution: For indoor use only. · Caution: The appliance can not be used in public transportation. STORAGE GUIDE For the best storage, set up your refrigerating appliance as follows: Refrigerator compartment Type of food Door rack · Food with natural preservatives such as jams, juices, drinks, spices, etc. · Do not store food with a limited shelf life here · Fruits, herbs, and vegetables EN Crisper drawer · Do not refrigerate bananas, onions, potatoes, or garlic Middle shelf · Dairy and eggs Top shelf · Food that does not need to be cooked, such as ready-made meals, leftovers, spreads, etc. MOVING THE SHELVES AND DOOR RACK · Empty the fridge before moving the shelves or the door racks. · To move a shelf, raise it and pull it towards you. · To move a door rack, grip it firmly with 2 hands. Raise the door rack and pull it towards you. BULB REPLACEMENT Beware: Unplug the appliance from the power supply before replacing the light bulb. 1. Remove the bulb cover. 2. Unscrew the old bulb and then screw a new 15W (E14 base) bulb. 3. Replace the bulb cover. DOOR CONVERSION If you need to hinge your door on the opposite side it is recommended that you call your local authorised service agent to make this conversion or ask a technician. 42 Before you reverse the door, you should ensure the appliance is unplugged and empty. It is recommended to use a crosshead screwdriver and a spanner (both not supplied). DO938K oor s unplugged and empty. off, it is necessary to tilt the unit backwards. You should rest the unit on something solid slip during the door reversing process. screwdriver, Flat screwdriver, dlips must be saved to dobladed the reinstallation of Hexagonal the door. spanner. flat as this and mayempty. damage the coolant system. situnplugged 2 people handle the unit assembly.You should rest the unit on something solid off, it is necessary to tilt theduring unit backwards. oor 1.doorRemove screws on the back of the top cover. slip during the reversingthe process. d must be saved to do the reinstallation of the door. it flatscrewdriver, as this may Flat damage thescrewdriver, coolant system. lips bladed Hexagonal spanner. 2 people during assembly. ews at rearhandle side ofthe top unit cover. s unplugged and empty. off, it is necessary to tilt the unit backwards. You should rest theunscrew unit on something solid slip during the door reversing process. screwdriver, Flat screwdriver, dlips must be saved to dobladed the reinstallation of Hexagonal the door. spanner. ews rear top cover. it flatatas thisside mayofdamage the coolant system. s2 unplugged and empty. people handle the unit during assembly. off, it is necessary to tilt the unit backwards. You should rest theunscrew unit on something solid slip during the door reversing process. d must be saved to do the reinstallation of the door. it flat as this may damage the coolant system. 2 people during assembly. ews at rearhandle side ofthe top unit cover. oor er and thermostat knob, then place it aside. unscrew ews at rear side cover. the top cover. 2. of top Remove er and thermostat knob, then place it aside. unscrew er and thermostat knob, then place it aside. ge and then remove door and place it on a soft pad to EN er and thermostat knob, then place it aside. ge and then remove door and place it on a soft pad to 3. Remove the three screws and then remove the top hinge that holds the door in place. Lift the door and place it on a padded surface to prevent it from being scratched. ge and then remove door and place it on a soft pad to hinge. Then remove the adjustable feet from both ge and then remove door and place it on a soft pad to hinge. Then remove the adjustable feet from both hinge. Then remove the adjustable feet from both 4. Remove the 7 bottom screw, hinge bracket and adjustable feet from the bottom of the appliance. hinge. Then remove the adjustable feet from both 7 7 7 www.domo-elektro.be DO938K 43 Reverse Door 5. Take the hinge pin out of the hinge bracket. Turn the bracket around and tighten the pin again. 5. Unscrew and remove the bottom hinge pin, turn the bracket over and replace it. oor Screw move the bottom hinge pin, turn the bracket over and replace it. Unscrew oor move the bottom hinge pin, turn the bracket over and replace it. oor Screw Unscrew 6. Refit the bracket fitting the bottom hinge pin. Replace both adjustable feet. move the bottom hinge pin, turn the bracket over and replace it. 6. Attach the screws and hinge bracket to the opposite side of the bottom. Put the adjustable feet Screw back into place. Unscrew fitting the bottom hinge pin. Replace both adjustable Screw Unscrew EN fitting the bottom hinge pin. Replace both adjustable 7. Place the door back on. Ensure the door is aligned horizontally and vertically, so that the seals are closed on all sides before finally tightening the top hinge. fitting the bottom hinge pin. Replace both adjustable 7. Carefully set the door back into place. Ensure the door is aligned horizontally and vertically so that ack on. Ensure the door is aligned horizontally and t the seals are closed all sides theonseals are before closedfinally on all sides before finally tightening the top hinge. Insert the hinge back and p hinge. screw it to the top of the appliance. ack on. Ensure the door is aligned horizontally and 8. Put the top andbefore fix it with 2 screws on the back. t the seals are closed on cover all sides finally p hinge. screw ack on. Ensure the door is aligned horizontally and t the seals are closed on all sides before finally hinge. rpand fix it with 2 screws on the back. screw 9. Fix the thermostat knob. r and fix it with 2 screws on the back. 8. Put the top cover back and fix it in place with the screws. screw r and fix it with 2 screws on the back. at knob. 8 screw at knob. 8 at knob. 44 DO938K 8 TROUBLE SHOOTING Frequently, a problem is minor and a service call may not be necessary, use this trouble shooting guide for a possible solution. Does not work · Check connection of power cord to power source. · Plug in unit · Use proper voltage · Check temperature setting and adjust as needed. · Close door securely. · Be sure that food is cool before inserting. · Do not keep door open for too long and minimize door openings. · Do not place unit close to heat sources or direct sunlight. EN Cools too frequently Internal temperature not cold enough · Check connection of power cord to power source. · Plug in unit. · Check setting and adjust as needed. · Close door securely. · Be sure that food is cool before inserting. · Do not keep door open for too long and minimize door openings. · Allow room for air to circulate around unit. · Use proper voltage. · Do not place unit close to heat sources or direct sunlight. CLEANING AND MAINTENANCE · Do not use abrasive cleaning agents or solvents. · Set the temperature control knob to the 0 position and disconnect the mains plug from the mains socket. · Take out the food and store in a cool location. · Clean the appliance with a soft cloth, warm water and detergent. · Wipe the door seal with clear water only and then wipe dry thoroughly. · After cleaning reconnect and adjust the temperature control knob as desired. · Put the food back into the appliance. www.domo-elektro.be DO938K 45 ENVIRONMENTAL GUIDELINES This symbol on the product or on its packaging indicates that this product may not be treated as household waste. Instead it must be brought to the applicable collection point for recycling of electrical and electronic equipment. By ensuring this product is disposed of correctly, you will help prevent potential negative consequences for the environment and human health, which could otherwise be caused by inappropriate waste handling of this product. For more detailed information about recycling of this product, please contact your local city office, your household waste disposal service or the shop where you purchased the product. EN The packaging is recyclable. Please treat the packaging ecologically. 46 DO938K GARANTIA Este aparato tiene un periodo de garantía de 2 años a partir de la fecha de compra. Durante el periodo de garantía, el distribuidor será completamente responsable de los defectos directamente asignables a errores del material y fabricación. Cuando se detecten este tipo de errores, y siempre que se estime necesario, el aparato se sustituirá o reparará. A partir de ese momento, el periodo de garantía de 2 años no volverá a iniciarse, sino que seguirá siendo de 2 años a partir del momento de compra. La garantía se concede sobre la base del recibo de caja. La garantía de los accesorios y componentes sujetos a desgaste es de 6 meses. La garantía y la responsabilidad/imputabilidad del proveedor y el fabricante expiran automáticamente en los siguientes casos: · Cuando no se cumplan las instrucciones que aparecen en este manual. · En el caso de una conexión inadecuada, por ejemplo, a una tensión eléctrica demasiado alta. · En caso de uso incorrecto, brusco o anormal. · En caso de insuficiente o incorrecto mantenimiento. · Si el consumidor o un tercero no autorizado realizan reparaciones o modificaciones en el aparato. · Si se usan componentes o accesorios que no están recomendados o que no son suministrados por el proveedor/fabricante. INSTRUCCIONES DE SEGURIDAD · Lea detenidamente estas instrucciones. Conserve este manual para consultarlo posteriormente. · Antes del primer uso retire todos los materiales de embalaje y etiquetas promocionales. Asegúrese de que los niños no puedan jugar con el material de embalaje. · Este aparato es adecuado para su uso en el ámbito doméstico y entornos similares como: · Zona de cocina para el personal de tiendas, oficinas y otros entornos profesionales similares. · Granjas. · Habitaciones de hoteles y moteles, y otros entornos de carácter residencial. · Habitaciones de invitados o similares. · Supervise en todo momento a los niños para que no jueguen con el aparato. · Este aparato puede ser utilizado por niños de 16 años o más, personas con discapacidad física o sensorial, o personas con capacidad mental limitada o falta de experiencia o conocimiento, siempre, y en tanto en cuanto, dichas personas estén vigiladas o hayan recibido instrucciones sobre el uso del aparato de manera segura y conozcan los peligros del uso del mismo. Los niños no deben jugar con el ventilador. El mantenimiento y la limpieza del dispositivo no deben ser realizados por niños, a menos que tengan 16 años o más y estén supervisados por un adulto. · Mantenga el aparato fuera del alcance de los niños. · Atención: el aparato no puede ser utilizado con un temporizador externo o un mando a distancia separado. · Lea todas las instrucciones antes del uso. www.domo-elektro.be DO938K ES Cuando utilice aparatos eléctricos, se deben seguir las instrucciones de seguridad mencionadas a continuación: 47 ES 48 · Antes de utilizarlo, compruebe si el voltaje indicado en el aparato corresponde al voltaje de la electricidad de su casa. · No permita que el cable cuelgue sobre una superficie o el borde de una mesa o encimera. · No utilice nunca el aparato si el cable o el enchufe están dañados, después de un mal funcionamiento de la unidad o si están dañados. Lleve el aparato al distribuidor autorizado más cercano centro para la inspección y reparación. · Se requiere supervisión cuando el aparato es usado por o cerca de niños. · El uso de accesorios no recomendados o vendidos por el fabricante puede causar incendios, descargas eléctricas o lesiones. · Desenchufe la toma de corriente cuando no se usa, para montar o desmontar piezas y antes de limpiarlo. Ponga todos los botones en posición desconectado (“off”) y desconecte el enchufe de la toma de corriente. Nunca tire del cable para desenchufarlo. · No deje que el aparato funcione sin supervisión. · No encienda nunca el aparato cerca de una estufa de gas o eléctrica, ni en un lugar donde pueda entrar en contacto con un horno eléctrico o con otro aparato caliente. · No utilice el aparato en el exterior. · Utilice el aparato sólo para el fin para el que se ha fabricado. · Coloque siempre el aparato sobre una superficie firme, horizontal y seca. · Utilice el aparato sólo para uso doméstico. El fabricante no es responsable de los accidentes que resulten del uso incorrecto del aparato, ni del incumplimiento de las normas establecidas en este manual. · Todas las reparaciones aparte del mantenimiento ordinario de la unidad deben ser efectuadas por el fabricante o por su servicio post-venta. · No sumerja nunca el aparato, el cable o el enchufe en agua o cualquier otro líquido. · Mantenga el cable alejado de bordes afilados y piezas calientes u otras fuentes de calor. · Mantenga las ranuras de ventilación libres y asegúrese de que no están bloqueadas u obstruidas. · No utilice ningún otro aparato eléctrico en el interior del frigorífico, a menos que el mismo esté aprobado para este fin por el fabricante. · Nunca almacene materiales explosivos en el aparato como, por ejemplo, aerosoles con gas propulsor inflamable. · Asegúrese de que el circuito de refrigeración no se daña, por ejemplo, durante el transporte o la instalación. · Asegúrese de que el cable no quede aplastado o dañado por la parte trasera de la unidad. Esto puede causar sobrecalentamiento y, en consecuencia, se podría producir un incendio. · Asegúrese de tener acceso al enchufe del aparato. · No tire del cable. · Si la toma de corriente está suelta, no inserte el enchufe en la toma de corriente (riesgo de descarga eléctrica o incendio). · Evite una exposición prolongada a la luz solar. · El aparato no se puede utilizar con un cable alargador o con una regleta. · Este aparato de aire acondicionado no está destinado para su uso como instalación fija. DO938K · Siga las instrucciones indicadas a continuación para evitar la contaminación de los alimentos: · La apertura prolongada de la puerta puede aumentar considerablemente la temperatura en los compartimentos del aparato. · Limpie regularmente las superficies que puedan entrar en contacto con los alimentos. Mantenga limpios el canal de condensación y el orificio de drenaje en la parte posterior del aparato. · Guarde la carne y el pescado crudos en el frigorífico, en recipientes adecuados, para que no entren en contacto con otros alimentos. · Si el aparato permanece vacío durante mucho tiempo debe apagarlo, descongelarlo y limpiarlo. Deje que se seque y deje la puerta abierta para evitar que se forme moho dentro del aparato. ¡ADVERTENCIA! Nunca utilice el aparato sobre, o cerca de, una cocina de gas o eléctrica, ni en un lugar donde pueda entrar en contacto con una fuente de calor. Los materiales inflamables se encuentran en la parte posterior del aparato. Preste atención al símbolo “Riesgo de incendio: material inflamable” ubicado en la parte posterior del aparato. PIEZAS Regulador de temperatura 2. Estantes 3. Compartimento de verduras 4. Patas ajustables 5. Estantes de la puerta 1 2 5 ES 1. 3 4 ANTES DEL PRIMER USO · Retire todo el material de embalaje, tanto del interior como del exterior. Limpie el exterior del aparato con un paño seco. El interior puede limpiarlo con un paño suave y húmedo. · Asegúrese de que pueda circular el aire alrededor del frigorífico. La parte posterior del frigorífico debe estar separada de la pared al menos 13 cm. · Coloque el frigorífico sobre una superficie firme y nivelada. · Evite la luz directa del sol y el calor. La luz solar puede deteriorar el exterior del frigorífico. El calor aumentará el consumo. www.domo-elektro.be DO938K 49 Evite un grado de humedad demasiado elevado. Demasiada humedad ambiental causará que se forme hielo demasiado rápido en el frigorífico. · Antes de conectar el frigorífico a la red eléctrica se debe comprobar que la tensión de la placa de especificaciones del aparato se corresponde con el voltaje de su hogar. Otra tensión puede dañar el aparato. · El enchufe es la única forma de desconectar el aparato de la alimentación, asegúrese de que es fácil acceder al mismo. Para desconectar la alimentación al aparato, apague el aparato y retire el enchufe de la toma de corriente. · Deje el aparato después de la instalación 24 horas antes de encenderlo. Así se puede asentar el refrigerante. · Deje que el aparato funcione durante 8 horas sin alimentos hasta que este se enfríe y alcance la temperatura adecuada. · Para superficies irregulares, las patas delanteras se pueden alinear. · Instale el tirador. ES · 16 · 50 La clase de clima indica la temperatura ambiente mínima y máxima para el correcto funcionamiento de un dispositivo. Puede encontrar la clase de clima en la placa de características presente en la parte posterior del aparato. · SN: Subnormal: temperatura ambiente de 10 °C a 32 °C · N: Normal: temperatura ambiente de 16 °C a 32 °C · ST: Subtropical: temperatura ambiente de 16 °C a 38 °C · T: Tropical: temperatura ambiente de 16 °C a 43 °C DO938K USO REGULACIÓN DE TEMPERATURA El frigorífico se regula con un regulador de temperatura que se encuentra en el interior del aparato. Ajuste el regulador hasta la posición deseada. Cuanto más alto sea el número, más baja será la temperatura. La posición 4 es la recomendada para un uso normal. · El aparato no funciona en la posición 0 (el sistema de refrigeración está apagado), pero la alimentación no se interrumpe. · El tiempo de funcionamiento y la temperatura se ven afectados por la ubicación en la que se utiliza el frigorífico, el número de veces que se abre la puerta y la temperatura de la habitación en la que se encuentra el frigorífico. · Si el aparato se apaga por cualquier motivo, espere 10 minutos antes de volver a encenderlo. La presión en el sistema de refrigeración se debe estabilizar antes de volver a encenderlo. · Apague el aparato y retire el enchufe de la toma de corriente. Retire todos los alimentos. También debe retirar todas las partes móviles (estantes, accesorios, etc.) o fijarlos en el frigorífico para evitar choques. · Desplace el aparato e instálelo. Si el dispositivo se mantuvo posicionado sobre un lado mientras se trasladaba, aunque fuera durante un tiempo muy corto, el aparato deberá ponerse en posición vertical durante al menos 10 minutos antes de encender el aparato. · Su aparato utiliza isobutano (R600a) como refrigerante. A pesar de que el R600a es un gas respetuoso con el medio ambiente y natural, es explosivo. Por lo tanto, debe tener mucho cuidado al mover o instalar el aparato para evitar daños en los elementos de refrigeración. En el caso de que se produzca una fuga por un daño en los elementos de refrigeración, mantenga el frigorífico alejado de llamas o fuentes de calor y ventile la habitación donde se encuentra el aparato durante algunos minutos. ES DESPLAZAR SU APARATO CONSERVAR ALIMENTOS EN EL FRIGORÍFICO El frigorífico asegura una vida útil más prolongada de los alimentos frescos y perecederos. Conservación de alimentos frescos para obtener los mejores resultados: · Conserve solo alimentos muy frescos y de buena calidad. · Asegúrese de que los alimentos están bien envasados o cúbralos antes de almacenarlos. Esto evita que los alimentos se sequen, pierdan color o sabor y hará que se conserven frescos durante más tiempo. Esto también evita la transferencia de olores. · Asegúrese de que los alimentos con un olor fuerte se envasan bien y se cubren. Manténgalos alejados de mantequilla, leche y nata, así como otros alimentos que pueden verse afectados por un fuerte olor. · Deje que los alimentos calientes se enfríen antes de introducirlos en el frigorífico. www.domo-elektro.be DO938K 51 DESCONGELACIÓN El frigorífico se descongela automáticamente. Durante el funcionamiento del congelador se forman gotas de condensación o escarcha en la parte posterior del aparato. Esto es normal. No es necesario limpiar la condensación o el hielo. El panel posterior se descongela automáticamente. La condensación fluye en el canal de condensación y se guía al grupo frigorífico, donde se evapora. Nota: Mantenga limpio el canal de condensación y el orificio de drenaje, de manera que la condensación se pueda eliminar. VACACIONES Si se va de vacaciones durante un periodo corto, el aparato puede permanecer enchufado. Si se va de vacaciones durante un periodo largo, lo mejor es hacer lo siguiente: · Saque todos los alimentos del frigorífico. · Retire el enchufe de la toma de corriente. · Limpie bien el frigorífico. · Deje la puerta abierta del frigorífico para evitar la aparición de moho y malos olores. APAGÓN ES La mayoría de los apagones duran entre 1 y 2 horas y no suelen alterar la temperatura del frigorífico. Limite la apertura de la puerta del frigorífico en la mayor medida posible durante un apagón. Durante un apagón más largo, debe adoptar otras medidas para conservar los alimentos, por ejemplo, colocar hielo seco sobre los alimentos. 52 NORMAS IMPORTANTES · No introduzca nunca alimentos calientes en el frigorífico. · Las bebidas deben almacenarse en recipientes cerrados. · Los alimentos que deban conservarse durante mucho tiempo en el frigorífico deberán taparse o conservarse en recipientes de cristal. · Nunca introduzca alimentos en mal estado en el frigorífico. · Asegúrese en todo momento de que el frigorífico no está sobrecargado de forma que los alimentos puedan refrigerarse lo suficiente. · Abra la puerta del frigorífico únicamente cuando sea necesario. · El aparato no puede utilizarse para realizar acampadas, p. ej. tiendas de campaña. · Solo se puede utilizar en interiores. · El aparato no puede utilizarse en el transporte público. DO938K oor GUÍA DE ALMACENAMIENTO Para conservar los alimentos, organice el almacenamiento de su frigorífico de la siguiente manera: Compartimento del frigorífico Tipo de alimento Estante de puerta · Alimentos con conservantes naturales como mermeladas, zumos, bebidas, especias, etc. · Aquí no se deben almacenar alimentos perecederos · Frutas, hierbas y verduras · Los plátanos, cebollas, patatas o ajos no se deben guardar en el frigorífico Estante central · Lácteos y huevos Estante superior · Alimentos que no se tienen que cocinar, como comidas preparadas, sobras, fiambre Cajón de verduras COLOCAR LOS ESTANTES Y EL ESTANTE DE LA PUERTA · Vacíe el refrigerador antes de desplazar los estantes y el estante de la puerta. · Para mover un estante, levántelo y tire de él hacia usted. · Para mover un estante de la puerta, sujételo con las dos manos. Levante el estante de la puerta y tire de él hacia usted. CAMBIAR LA BOMBILLA 1. Retire la pantalla de lámpara. 2. Desenrosque la bombilla usada y enrosque una nueva bombilla de 15W (casquillo E14). 3. Vuelva a colocar la pantalla. ES Retire el enchufe de la toma de corriente antes de cambiar la bombilla. CAMBIO DE DIRECCIÓN DE LA PUERTA lips screwdriver, Flat bladed screwdriver, Hexagonal spanner. Si quiere trasladar las bisagras de la puerta hacia el otro lado, le recomendamos que se ponga en contacto s unplugged and empty. con un para llevar a cabo el trabajo. off, it is necessary to taller tilt the de unitreparación backwards.autorizado You should rest the unit on something solid Antes de cambiar la dirección de giro, slip during the door reversing compruebe queprocess. el enchufe se ha desconectado de la toma de corriente y que el aparato está vacío. Se d must be saved to do the reinstallation of the door. it flat as this may damage the coolant system. recomienda el uso de un destornillador Phillips y una llave (ambos no incluidos). 2 people handle the unit during assembly. 1. Retire los tornillos de la parte posterior de la cubierta superior. ews at rear side of top cover. www.domo-elektro.be er and thermostat knob, then place it aside. unscrew DO938K 53 unscrew ews at rear side of top cover. 2. Retire la tapa superior. unscrew er and thermostat knob, then place it aside. er and thermostat knob, then place it aside. er and thermostat knob, then place it aside. ge and then remove door and it on y, a soft pad to 3. Retire losplace tornillos a continuación, retire la bisagra superior que mantiene la puerta en su lugar. Levante la puerta y colóquela sobre una superficie suave para evitar arañazos. ge and then remove door and place it on a soft pad to ge and then remove door and place it on a soft pad to hinge. Then remove the adjustable feet from both hinge. Then remove the adjustable feet from both 4. Retire el tornillo inferior, el soporte de la bisagra y las patas ajustables en la parte inferior del aparato. hinge. Then remove the adjustable feet from both ES 7 7 7 Reverse Door 5. Suelte el pasador de la bisagra de la abrazadera de la bisagra. De la vuelta a la abrazadera y vuelva a fijar el pasador. 5. Unscrew and remove the bottom hinge pin, turn the bracket over and replace it. Unscrew 6. Refit the bracket fitting the bottom hinge pin. Replace both adjustable feet. 54 DO938K Screw oor oor Screw Unscrew move the bottom hinge pin, turn the bracket over and replace it. 6. Fije los tornillos y el soporte de la bisagra en el otro lado de la parte inferior. Recoloque las patas ajustables. move the bottom hinge pin, turn the bracket over and replace it. fitting the bottom hinge pin. Replace both adjustable Unscrew Screw Screw Unscrew fitting the bottom hinge pin. Replace both adjustable fitting the bottom hinge pin. Replace both adjustable ack on. Ensure the door is aligned horizontally and t the seals are closed on all sides before finally 7. Coloque la puerta en su lugar con cuidado. Asegúrese de que la puerta está alineada tanto horizontal p hinge. como verticalmente, de manera que las juntas estén cerradas por todos los lados antes de unir completamente la bisagra superior. Vuelva a colocar la bisagra y atornille en la parte superior del aparato. ack on. Ensure the door is aligned horizontally and t the seals are closed on all sides before finally p hinge. ack on. Ensure the door is aligned horizontally and rt and fix it with 2 screws back. the seals are closed onon allthe sides before finally p hinge. screw Vuelva a colocar la cubierta superior y fíjela con ayuda de los tornillos. ES 8. r and fix it with 2 screws on the back. at knob. r and fix it with 2 screws on the back. screw screw 8 at knob. at knob. PROBLEMAS Y SUS SOLUCIONES Cuando tenga un8 problema con su frigorífico, compruebe las siguientes cuestiones antes de ponerse en contacto con nuestro servicio de posventa. 8 El aparato no funciona. · El aparato no recibe electricidad, compruebe si el suministro eléctrico es correcto. · Asegúrese de insertar el enchufe en la toma de corriente. · Compruebe que se está utilizando el voltaje adecuado. www.domo-elektro.be DO938K 55 El frigorífico rebota frecuentemente. · Compruebe que la puerta está bien cerrada. · Ha introducido comida caliente en el frigorífico, por lo que el aparato debe trabajar con más intensidad para enfriarla. · La puerta ha estado abierta demasiadas veces o durante demasiado tiempo. · El aparato se ha conectado al voltaje incorrecto. · El aparato está demasiado cerca de una fuente de calor o está expuesto directamente a la luz solar. La temperatura interior del frigorífico es demasiado alta. · Compruebe que el frigorífico tiene corriente. · Asegúrese de insertar el enchufe en la toma de corriente. · El ajuste de temperatura es demasiado bajo. · La puerta ha estado demasiado tiempo abierta o con mucha frecuencia. · El suministro de aire está bloqueado · Compruebe que el aparato se conecta a la tensión correcta · El aparato está demasiado cerca de una fuente de calor o está expuesto directamente a la luz solar. ES LIMPIEZA Y MANTENIMIENTO 56 · No utilice productos de limpieza agresivos o disolventes. · Ajuste el regulador de temperatura en la posición 0 (apagado) y retire el enchufe de la toma de corriente. · Retire los alimentos y almacénelos en un lugar fresco. · Limpie el aparato con un paño suave, agua tibia y un detergente suave. · Limpie la junta de la puerta solo con agua limpia y frote a fondo. · Después de la limpieza, introduzca el enchufe en la toma de corriente y ajuste el regulador de temperatura en la posición deseada. · Vuelva a colocar los alimentos en el aparato. DO938K DIRECTRICES MEDIOAMBIENTALES El símbolo en el producto o en el embalaje indica que este producto no puede ser tratado como residuo doméstico. Se debe llevar a un lugar en el que se reciclan equipos eléctricos y electrónicos. Si se asegura de que este producto se desecha correctamente, usted ayudará a evitar posibles consecuencias negativas para las personas y el medio ambiente que serían causadospor un tratamiento de residuos inadecuado. Para obtener información más detallada sobre el reciclaje de este producto, póngase en contacto con su ayuntamiento, o con la empresa o departamento responsable del servicio de recogida de basura doméstica, o con la tienda donde adquirió el producto. ES El material de embalaje es reciclable. Trate el embalaje de una manera medioambientalmente responsable. www.domo-elektro.be DO938K 57 ZÁRUKA Práva a povinnosti prodávajícího a kupujícího ohledně práv z vadného plnění se řídí příslušnými obecně závaznými předpisy dle občanského zákoníku. 1. Trvání záruky: 2 roky 2. Záruka se nevztahuje a) na mechanické poškození b) nesprávné používání v rozporu s návodem k použití 3. Záruka zaniká: - při použití spotřebiče jinak než v je uvedeno v manuálu (nesprávným postupem) - při provádění opravy nebo změny na spotřebiči osobou jinou než pověřenou naším servisem Prodávající odpovídá kupujícímu, že zboží při převzetí nemá vady. Zejména prodávající odpovídá kupujícímu, že v době, kdy kupující zboží převzal: · má zboží takové vlastnosti, které výrobce v tomto návodu popisuje, · se zboží hodí k účelu, ke kterému výrobce uvádí, · zboží odpovídá jakostí nebo provedením smluvenému vzorku nebo předloze, byla-li jakost nebo provedení určeno podle smluveného vzorku nebo předlohy, · zboží vyhovuje požadavkům právních předpisů. Projeví-li se vada v průběhu šesti měsíců od převzetí, má se za to, že zboží bylo vadné již při převzetí. CZ Pokud není u výrobku uvedeno jinak, činí záruční doba 24 měsíců. Záruční doba počíná běžet od převzetí věci kupujícím. Práva z vadného plnění uplatňuje kupující u prodávajícího na adrese jeho provozovny, v níž je přijetí reklamace možné s ohledem na sortiment prodávaného zboží, případně i v sídle nebo místě podnikání. Za okamžik uplatnění reklamace se považuje okamžik, kdy prodávající obdržel od kupujícího reklamované zboží. Reklamaci lze také uplatnit v servisním středisku na adrese DOMO-elektro s.r.o., Na Kobyle 783, 345 06 Kdyně, Česká republika, tel. (+420) 379 422 550, [email protected] Pro rychlé a bezproblémové vyřízení reklamace doporučujeme přiložit k reklamaci doklad o koupi a průvodní dopis s popisem závady a zpáteční adresou s telefonickým kontaktem. 58 DO938K BEZPEČNOSTNÍ POKYNY · Pečlivě si přečtěte tyto informace a manuál nechte i pro pozdější nahlédnutí. · Ujistěte se, že před použitím odlepíte a odstraníte veškeré reklamní a ochranné fólie. · Děti si s ochrannými ani reklamními polepy nesmí hrát. · Přístroj je určen pro používání v domácnostech a podobných prostředích, tak jako je: · kuchyňky v obchodech, kancelářích atd. · chaty, chalupy · hotely, penziony a jiné dočasné ubytování · Dohlédněte, aby si děti nehrály s přístrojem. · Tento spotřebič mohou používat děti ve věku 16 let a starší a osoby se sníženými fyzickými, smyslovými nebo mentálními schopnostmi, nebo nedostatkem zkušeností a znalostí pokud jsou pod neustálým dozorem nebo byly poučeny o používání spotřebiče bezpečným způsobem a rozumí případným nebezpečím. Děti si s přístrojem nesmějí hrát. Čištění a údržbu prováděnou uživatelem nesmějí provádět děti bez dozoru. · Čistění a běžnou údržbu smí provádět pouze osoby starší 16 let a při tom být pod dohledem. · Přístroj a jeho el. kabel skladujte mimo dosah dětí. · Pozor: Tento přístroj je zakázáno používat s externím časovačem nebo jiným dálkovým ovládáním. · Před použitím si ověřte, zda napětí Vaší elektrické sítě odpovídá parametrům přístroje uvedeným na jeho výrobním štítku. · Nenechávejte viset elektrický kabel přístroje přes hranu stolu, nebo pracovního pultu a nedovolte, aby kabel přišel do styku s horkými plocham, tak aby se nepoškodil. · Nikdy nepoužívejte přístroj s poškozeným kabelem, nebo zástrčkou, nebo pokud je přístroj poškozený a nepracuje správně. V takovém případě předejte přístroj do nejbližšího odborného servisu ke kontrole a opravě. · Dbejte zvýšené opatrnosti, pokud se kolem přístroje pohybují děti. · Použitím příslušenství, které nebylo dodáno výrobcem, může dojít až ke vzniku požáru, úrazu elektrickým proudem, nebo jinému zranění. · Přístroj vždy odpojte od elektrické sítě pokud jej nepoužíváte, před demontáží, či montáží částí přístroje a před čištěním. Nastavte všechny přepínače a ovladače na polohy vypnuto a tažením za zástrčku přístroj odpojte od sítě. Nikdy zástrčku nevytahujte ze zásuvky tažením za kabel. · Nenechávejte přístroj běžet bez dozoru. · Nikdy neumisťujte přístroj v blízkosti plynového, nebo elektrického sporáku, či trouby, nebo do blízkosti jiného přístroje produkujícího teplo. · Nepoužívejte přístroj venku. · Používejte přístroj pouze k účelům ke kterým je určený. · Přístroj vždy používejte pouze na stabilním, suchém a rovném místě. · Přístroj je určený pouze pro použití v domácnostech. Výrobce nemůže ručit za škody a nehody způsobené nevhodným použitím přístroje, nebo nedodržením zde popsaných bezpečnostních instrukcí. www.domo-elektro.be DO938K CZ Při používání jakkéhokoli el. spotřebiče dbejte zvýšené opatrnosti a dodržujte určitá bezpečnostní pravidla: 59 · Veškeré opravy přístroje smí provádět pouze výrobce, nebo autorizovaný servis. · Nikdy neponořujte přístroj, elektrický kabel ani zástrčku do vody, ani jiných tekutin. · Ujistěte se, že se děti nemohou dotýkat elektrického kabelu, nebo přístroje. · Dbejte na to, aby nebyl elektrický kabel ohnutý přes ostré rohy a nedotýkal se horkých částí přístroje, nebo nebyl v blízkosti jiných zdrojů tepla. · Ventilační otvory přístroje udržujte čisté a průchodné. · Nepoužívejte uvnitř lednice žádné další elektrické přístroje, pokud nejsou pro toto použití přímo schválené výrobcem. · Neskladujte uvnitř přístroje žádné výbušné látky, jako například spreje naplněné hořlavým plynem. · Po převozu a instalaci přístroje se vždy ujistěte, že není nijak poškozen chladící okruh. · Ujistěte se, aby zadní část přístroje nepoškodila, či zmáčkla elektrickou zástrčku. Zmáčknutá, nebo jinak poškozená zástrčka se může přehřát a způsobit požár. · Ujistěte se, že máte k zástrčce volný přístup. · Nikdy netahejte za samotný kabel. · Nikdy nepřipojujte přístroj do uvolněné zásuvky (riskujete úraz elektrickým proudem, nebo požár). · Tento přístroj je těžký. Pokud s přístrojem manipulujete, dbejte zvýšené opatrnosti. · Nevystavujte přístroj na delší dobu přímému slunečnímu záření. · Přístroj nesmí být používán s prodlužovacím kabelem ani zapojován do zásuvky s rozbočkou (více zásuvkami na konci). Tato chladící jednotka není určena k použití, jako vestavěné zařízení. Držte se následujících informací, tak aby se zabránilo kontaminace potravin: CZ · · · Dlouhodobé a časté otevírání dveří může způsobit výrazné zvýšení teploty uvnitř spotřebiče. · Povrchy, které by mohly přijít do styku s potravinami udržujte čisté a pravidelně je omývejte. Kondenzační kanálek a odvodňovací otvor udržujte v čistotě. · Syrové maso a ryby skladujte ve vhodných nádobách tak, aby se nedostaly do styku s jinými potravinami. · Pokud by byl spotřebič delší dobu prázdný, tak ho doporučujeme vypnout, odmrazit a vyčistit. Po takovém vyčištění nechte vnitřek vyschnout a nezavírejte dvířka, aby mohl prostor ventilovat a nemnožily se tam plísně. VAROVÁNÍ! Tento přístroj nikdy neumísťujte do blízkosti ohně, ani na jiné místo kde by mohl přijít do styku s tepelným zdrojem. V zadní straně přístroje v chlazení je chladivo, které je velmi hořlavé a vznětlivé. Věnujte pozornost symbolu „Nebezpečí požáru - hořlavé materiály“, který se nachází na zadní straně spotřebiče a dbejte bezpečnostních pokynů a bezpečnosti práce. 60 DO938K ČÁSTI 1. Nastavení teploty se žárovkou 2. Poličky 3. Přihrádka na zeleninu 4. Nastavitelné nožičky 5. Poličky ve dveřích 1 2 5 3 4 · Odstraňte vnější a vnitřní obal, pečlivě otřete vnějšek chladničky měkkým a suchým hadříkem. Vnitřek chladničky otřete s vlhkým, vlažným hadříkem. · Vyberte rovnou podlahu s vysokou nosností. · Nechte 13 cm mezeru mezi zadní stranou chladničky a jakoukoli přilehnou stěnou. · Vyvarujte se umístění na přímý sluneční svit. Přímé slunce způsobuje změnu barvy povrchu. Zvýšené teplo v okolí zvyšuje spotřebu přístroje a může zkracovat jeho životnost. · Vyvarujte se velmi vlhkému prostředí. Velká vlhkost má za následek zvýšené namražování vnitřního prostoru a výparníku. · Před zapojením si důkladně zkontrolujte, zda parametry vaší zástrčky korespondují s požadavky na přístroji. Rozdílné parametry el. sítě mohou přístroj poškodit. · Lednici můžete odpojit od elektrické energie pouze vypojením z el. sítě, proto by měla být zástrčka stále přístupná. Chcete-li lednici odpojit, nastavte ovladač do polohy OFF a poté odpojte z el. sítě. · Po umístění nechte přístroj alespoň 24 hodin stát v klidu a až potom ho zapněte. Při stěhování se rozvířilo chladivo a je potřeba, aby se znovu usadilo. · Lednici nechte alespoň 8 hodiny v klidu odstát a běžet naprázdno. Takto necháte nachladit vnitřní prostor. · Pokud máte nerovnou, nebo hrbolatou podlahu, tak můžete mraznička vyrovnat pomocí přední nastavitelné nožičky. www.domo-elektro.be 16 DO938K CZ PŘED PRVNÍM POUŽITÍM 61 · Na dveře si našroubujte madlo na otevírání (viz obrázek). · Klimatická třída určuje minimální a maximální teplotu okolí, pro správnou funkci přístroje. Označení klimatické třídy najdete na štítku na zadní straně přístroje. · SN: Subnormální : teplota okolí mezi 10°C a 32°C · N: Normalní : teplota okolí mezi 16°C a 32°C · ST: Subtropická : teplota okolí mezi 16°C a 38°C · T: Tropická : teplota okolí mezi 16°C and 43°C POUŽITÍ NASTAVENÍ TEPLOTY CZ Uvnitř v lednici je nastavitelný termostat, jeho otáčením si navolte požadovanou teplotu. Termostat si nastavte na Vámi požadovanou teplotu. Čím vyšší je číslo, tím jsou nižší teploty. Poloha 4 je doporučena pro běžné použití. 62 · Při nastavení do pozice 0 lednice vůbec nechladí (chladící systém je vypnutý), ale přívod elektřiny není přerušen. · Teplota a doba nachlazení je ovlivňována okolní teplotou i tím, jak často se otvírají dveře. HÝBÁNÍ S LEDNICÍ · Pokud se přístroj z jakéhokoli důvodu vypnul, tak počkejte alespoň 10 min před jeho opětovným zapnutím. Chladící systém potřebuje vyrovnat tlaky uvnitř chladícího okruhu. · Přístroj vypněte a vypojte z el. sítě. Z lednice vyndejte všechno jídlo. Vyndejte nebo zajistěte všechny volné poličky a regály proti pohybu. · Přemístěte na nové místo a uveďte znovu do provozu. Po stěhování lednice ji nechte alespoň 10 min v klidu stát, a až potom ji zapojte. · Lednice používá chladivo R600a. Chladivo R600a je isobutan, který je šetrný k životnímu prostředí, ale zároveň náchylný ke vznícení. Proto byste měli být velmi opatrní a dbát na to, aby se chladící systém nepoškodil. V případě poškození a nechtěného úniku chladiva, zamezte styku s otevřeným ohněm či se 16 zdrojem tepla a místnost rychle vyvětrejte. DO938K JÍDLO V LEDNICI · Lednice prodlužuje trvanlivost jídla (zejména jídla podléhající rychlé zkáze). · Pokud vložíte čerstvé potraviny, tak ty vydrží v lednici nejdéle. · Skladujte pouze jídlo čerstvé. · Před vložením do lednice jídlo zabalte nebo zakryjte, jinak by jídlo vysychalo a měnilo barvu a samozřejmě ztrácelo na čerstvosti i chuti. · Potraviny se silným aroma důkladně zabalte, aby se vůně/zápach nepřenesla na ostatní potraviny. · Před vložením do lednice, nechte všechny potraviny vychladnout. ODMRAŽOVÁNÍ Lednice se odmražuje plně automaticky. Pokud je lednice spuštěna a chladí, tak se na zadní straně agregátu objevuje jinovatka nebo krůpěje vody, to je normální a není potřeba vlhkost nijak utírat. Zadní panel se odmražuje automaticky a zkondenzovaná voda stéká přímo do výparníku, odkud se odpařuje. ZABEZPEČENÍ PŘI ODJEZDU NA DELŠÍ DOVOLENOU Při krátkodobém odjezdu nechte vše tak jak je. Pokud plánuje odjet na delší čas, tak nezapomeňte: · vyndat z lednice všechno jídlo · odpojit přístroj z el. sítě · vytřít vnitřek lednice · nechat otevřené dveře, aby se vyvětrala vlhkost VÝPADEK PROUDU Výpadek proudu je převážně kratší než 1-2 hodiny, na takto krátký čas se neděje nic špatného, nižší teplota se v uzavřené lednici udrží. Nesmí se však otevírat dveře lednice a zbytečně větrat. Během delšího výpadku proudu můžete do lednice vkládat větší množství ledu, které vnitřní prostor částečně ochladí. Do lednice nevkládejte teplé jídlo · Nápoje skladujte v uzavřených nádobách · Jídlo pro delší uskladnění v lednici musí být překryto a zabaleno ve fólii nebo alobalu. · Do lednice nikdy neukládejte zkažené potraviny · Nikdy lednici nepřeplňujte, nesnažte se do ní nacpat co nejvíce jídla. · Zbytečně neotvírejte dveře, aby se nevětral vnitřní prostor. · UPOZORNĚNÍ: Lednici držte v dostatečné vzdálenosti od ohně i hořlavin · UPOZORNĚNÍ: Není určeno pro venkovní použití (kromě velkých stanů) · UPOZORNĚNÍ: Lednice není určena pro použití v dopravních prostředcích. www.domo-elektro.be CZ NĚKOLIK RAD PRO SPRÁVNÉ ZAPOJENÍ A POUŽÍVÁNÍ LEDNICE · DO938K 63 NÁVOD NA VHODNÉ USKLADNĚNÍ / ROZLOŽENÍ POTRAVIN V LEDNICI: Aby se dosáhlo co nejdelšího uchování čerstvých potravin, tak doporučujeme následující (viz tabulka) Compartiment koelkast Co uložit Přihrádky na dveřích · Přírodně konzervované potraviny, jako jsou džemy, džusy, nápoje, koření atd. · Neskladujte zde potraviny s omezenou trvanlivostí. · Ovoce, bylinky, zeleniny Spodní zásuvky (šuplíky) · Neumisťujte tam banány, cibuli, brambory ani česnek Prostřední police · Mléčné výrobky a vejce Horní police · Potraviny, které je není třeba vařit, například polotovary, zbylé hotové jídla, pomazánky atd. NASTAVENÍ A PŘEMÍSTĚNÍ POLIČEK · Před přemišťováním poliček vždy lednici vyprázdněte. · Skleněnou poličku lehce nadzvedněte a táhněte směrem k sobě. Držte ji pevně. · Poličku na dvěřích pevně uchopte oběma rukama. Tlačte směrem nahoru a přitom lehce tahejte k sobě, dokud se polička neuvolní. VÝMĚNA ŽÁROVKY OSVĚTLENÍ POZOR: Před výměnou nejdříve vypojte lednici z el. sítě. oor 1. Sundejte kryt žárovky 2. Vyšroubujte starou žárovku a poté našroubujte novou 15 W žárovku (závit E14). 3. Opět zakryjte krytem. PŘEHOZENÍ PANTŮ DVEŘÍ Pokud potřebujete přehodit otevírání dveří na opačnou stranu, musí se přemontovat panty. CZ lips screwdriver, Flat bladed screwdriver, Hexagonal spanner. Doporučujeme, pozvat si servisního mechanika nebo proškolenou osobu z okolí. Ještě dříve než začněte s unplugged and empty. panty přemontovávat, lednici vypněte a vše z ní vyndejte pryč. Budete potřebovat křížový šroubovák a off, it is necessary to tilt the unit backwards. You should rest the unit on something solid klíč (ani jedno není dodáno v balení). slip during the door reversing process. d must be saved to do the reinstallation of the door. it flat as this may damage the coolant system. 2 people handle the unit during assembly. 1. Odšroubujte 2 šrouby z horní strany krytu. ews at rear side of top cover. unscrew 64 er and thermostat knob, then place it aside. DO938K unscrew ews at rear side of top cover. unscrew 2. Odstraňte horní kryt. er and thermostat knob, then place it aside. er and thermostat knob, then place it aside. er and thermostat knob, then place it aside. ge and then remove door and place it on a soft pad to 3. Odšroubujte šroubky, které drží horní pant dveří. Dveře nadzvedněte a položte je na měkký povrch, tak aby se nepoškrábaly. ge and then remove door and place it on a soft pad to ge and then remove door and place it on a soft pad to hinge. Then remove the adjustable feet from both hinge. Then remove the adjustable feet from both 4. Vyjměte (odšroubujte) spodní šroub, závěs pantu i nastavitelnou nožičku ze spodní části spotřebiče. hinge. Then remove the adjustable feet from both 7 7 Reverse Door 7 5. Povolte závěsný kolík pantu, vyndejte otočte a kolík opět dotáhněte. CZ 5. Unscrew and remove the bottom hinge pin, turn the bracket over and replace it. Unscrew Screw 6. 6. Refit the the pantu bottom )hinge pin. Replace both adjustable Všebracket (šroubfitting a závěs namontujte na opačnou spodní stranu přístroje. Následně dejte zpět a feet. nastavte nožičku tak, aby se přístroj nekýval. www.domo-elektro.be DO938K 65 Screw Unscrew fitting the bottom hinge pin. Replace both adjustable fitting the bottom hinge pin. Replace both adjustable fitting the bottom hinge pin. Replace both adjustable 7. Na spodní pant nasaďte zpět dveře. Dveře musí být vodorovně, aby jejich těsnění přiléhalo po celém ack on. Ensure the door is aligned horizontally and t the seals are closed on all sides before finally obvodu. Pokud dveře dobře těsní, můžete usadit i horní pant a přišroubovat ho. p hinge. ack on. Ensure the door is aligned horizontally and t the seals are closed on all sides before finally p hinge. ack on. Ensure the door is aligned horizontally and t the seals are closed on all sides before finally p hinge. r and fix it with 2 screws on the back. 8. screw Pant překryjte krytem a opět ho přišroubujte. r and fix it with 2 screws on the back. r and fix it with 2 screws on the back. screw screw at knob. at knob. 8 at knob. ŘEŠENÍ MOŽNÝCH PROBLÉMŮ 8 Stává se, že nastane problém, který lze snadno vyřešit i bez odborné pomoci. Nejdříve zkontrolujte níže, zda se nejedná právě o tento typ problému. CZ 8 Přístroj nefunguje · zkontrolujte přívod energie a zda nevypadl el. proud · zapojte do zásuvky se správným napětím Chladící systém spíná velmi často 66 · zkontrolujte nastavení vnitřní teploty, pokud je potřeba tak přenastavte · důkladně zavřete dveře a zkontrolujte zda všude těsní · nevkládejte dovnitř lednice teplé jídlo · nenechávejte příliš dlouho otevřené dveře, omezte jejich otevírání · nechávejte lednici blízko tepla. Zamezte aby na ni nesvítilo přímé slunce. DO938K Uvnitř lednice není dostatečně chladno · zkontrolujte přívod energie a zda nevypadl el. proud · zapojte / zapněte lednici · překontrolujte a nastavte správnou teplotu uvnitř lednice · důkladně zavřete dveře · nenechávejte příliš dlouho otevřené dveře, omezte jejich otevírání · zajistěte, aby bylo kolem lednice dostatek místa na cirkulaci vzduchu · zapojte do zásuvky se správným napětím · nevkládejte dovnitř lednice teplé jídlo · Ujistěte se, že jídlo před vložením je studené ČIŠTĚNÍ A ÚDRŽBA · Nepoužívejte žádná drsná čistidla, která mohou poškodit povrch přístroje. · Nastavení teploty otočte do polohy 0 a vypojte zástrčku z el. sítě. · Všechno jídlo z lednice vyjměte a nechte někde v chladu. · Lednici vytřete jemným vlhkým hadříkem. Můžete použít i čistící prostředek. · Důkladně otřete i těsnění na dveřích. Těsnění potom důkladně vysušte. · Po vyčištění lednici opět zapojte do el. sítě a nastavte na požadovanou chladící teplotu. · Po chvíli vložte všechno jídlo zpět do lednice. Symbol na přístroji či na jeho obalu znamená, že s tímto výrobkem není možno nakládat jako s běžným domovním odpadem, nýbrž musí být odevzdán na místech určených ke sběru a likvidaci elektrických a elektronických zařízení. Dodržením tohoto doporučení chráníte životní prostředí a zdraví spoluobčanů. Více informací o možnostech likvidace nebezpečného odpadu obdržíte na obecních nebo městských úřadech, sběrných dvorech nebo v prodejně, kde jste přístroj zakoupili. CZ OHLED NA ŽÍVOTNÍ PROSTŘEDÍ Obalové materiály jsou recyklovatelné, nakládejte s nimi podle předpisů pro životní prostředí. www.domo-elektro.be DO938K 67 ZÁRUKA Práva a povinnosti predávajúceho a kupujúceho ohľadom práv z chybného plnenia sa riadi príslušnými všeobecne záväznými predpismi podľa občianskeho zákonníka. 1. Trvanie záruky: 2 roky 2. Záruka sa nevzťahuje a) na mechanické poškodenie b) nesprávne používanie v rozpore s návodom na použitie 3. Záruka zaniká: - pri použití spotrebiča inak ako v je uvedené v manuále (nesprávnym postupom) - pri vykonávaní opravy alebo zmeny na spotrebiči osobou inou než poverenou naším servisom Predávajúci zodpovedá kupujúcemu, že tovar pri prevzatí nemá vady. Najmä predávajúci zodpovedá kupujúcemu, že v čase, keď kupujúci tovar prevzal: · má tovar také vlastnosti, ktoré výrobca v tomto návode popisuje, · sa tovar hodí k účelu, ku ktorému výrobca uvádza, · tovar zodpovedá kvalitou alebo prevedením dohovorené vzorky alebo predlohe, ak bola akosť alebo prevedenie určené podľa dohodnutého vzorky alebo predlohy, · tovar vyhovuje požiadavkám právnych predpisov. Ak sa prejavia vada v priebehu šiestich mesiacov od prevzatia, má sa za to, že tovar bol chybný už pri prevzatí. Pokiaľ nie je pri výrobku uvedené inak, je záručná doba 24 mesiacov. Záručná doba začína plynúť od prevzatia veci kupujúcim. Práva z chybného plnenia uplatňuje kupujúci u predávajúceho na adrese jeho prevádzky, v ktorej je prijatie reklamácie možné s ohľadom na sortiment predávaného tovaru, prípadne aj v sídle alebo mieste podnikania. Za okamih uplatnenia reklamácie sa považuje okamih, kedy predávajúci dostal od kupujúceho reklamovaný tovar. Reklamáciu možno tiež uplatniť v servisnom stredisku na adrese DOMO-elektro s.r.o., Na Kobyle 783, 345 06 Kdyně, Česká republika, tel. (+420) 379 422 550, [email protected] SK Pre rýchle a bezproblémové vybavenie reklamácie odporúčame priložiť k reklamácii doklad o kúpe a sprievodný list s popisom závady a spiatočnou adresou s telefonickým kontaktom. 68 DO938K · Pri používaní jakkéhokoli el. spotrebiče dbajte na zvýšenú opatrnosť a dodržujte určitá bezpečnostné pravidlá: · Starostlivo si prečítajte tieto informácie a manuál nechajte aj k neskoršiemu nahliadnutiu. · Uistite sa, že pred použitím odlepíte a odstránite všetky reklamné a ochranné fólie. · Deti sa s ochrannými ani reklamnými polepy nesmie hrať. · Prístroj je určený pre používanie v domácnostiach a podobných prostrediach, tak ako je: · kuchynky v obchodoch, kanceláriách atď. · chaty, chalupy · hotely, penzióny a iné dočasné ubytovanie · Dohliadnite, aby sa deti nehrali s prístrojom. · Tento spotrebič môžu používať deti vo veku 16 rokov a staršie a osoby so zníženými fyzickými, zmyslovými alebo mentálnymi schopnosťami, alebo nedostatkom skúseností a znalostí ak sú pod neustálym dozorom alebo boli poučené o používaní spotrebiča bezpečným spôsobom a rozumejú prípadným nebezpečenstvám. Deti si s prístrojom nesmú hrať. Čistenie a údržbu vykonávanú používateľom nesmú vykonávať deti bez dozoru. · Čistenie a bežnú údržbu môžu vykonávať len osoby staršie ako 16 rokov a pri tom byť pod dohľadom. · Prístroj a jeho el. kábel skladujte mimo dosahu detí. · Pozor: Tento prístroj je zakázané používať s externým časovačom alebo iným diaľkovým ovládaním. · Pred použitím si overte, či napätie vašej elektrickej siete zodpovedá parametrom prístroja uvedeným na jeho výrobnom štítku. · Nenechávajte visieť elektrický kábel prístroja cez hranu stola, alebo pracovného pultu a nedovoľte, aby kábel prišiel do styku s horúcimi plochám, tak aby sa nepoškodil. · Nikdy nepoužívajte prístroj s poškodeným káblom, alebo zástrčkou, alebo ak je prístroj poškodený a nepracuje správne. V takom prípade odovzdajte prístroj do najbližšieho odborného servisu na kontrolu a opravu. · Dbajte na zvýšenú opatrnosť, pokiaľ sa okolo prístroja pohybujú deti. · Použitím príslušenstva, ktoré nebolo dodané výrobcom, môže dôjsť až k vzniku požiaru, úrazu elektrickým prúdom, alebo inému zraneniu. · Prístroj vždy odpojte od elektrickej siete pokiaľ ho nepoužívate, pred demontážou, či montážou častí a pred čistením. Nastavte všetky prepínače a ovládače na polohy vypnuté a ťahaním za zástrčku prístroj odpojte od siete. Nikdy zástrčku nevyťahujte zo zásuvky ťahaním za kábel. · Nenechávajte prístroj bežať bez dozoru. · Nikdy neumiestňujte prístroj v blízkosti plynového, alebo elektrického sporáka, či rúry, alebo do blízkosti iného prístroja produkujúceho teplo. · Nepoužívajte prístroj vonku. · Používajte prístroj iba na účely ku ktorým je určený. · Prístroj vždy používajte iba na stabilnom, suchom a rovnom mieste. · Prístroj je určený len na použitie v domácnostiach. Výrobca nemôže ručiť za škody a nehody www.domo-elektro.be DO938K SK BEZPEČNOSTNÉ POKYNY 69 spôsobené nevhodným použitím prístroja, alebo nedodržaním tu popísaných bezpečnostných inštrukcií. · Všetky opravy prístroja smie vykonávať len výrobca, alebo autorizovaný servis. · Nikdy neponárajte prístroj, elektrický kábel ani zástrčku do vody, ani iných tekutín. · Uistite sa, že sa deti nemôžu dotýkať elektrického kábla, alebo prístroje. · Dbajte na to, aby nebol elektrický kábel ohnutý cez ostré rohy a nedotýkal sa horúcich častí prístroja, alebo nebol v blízkosti iných zdrojov tepla. · Ventilačné otvory prístroja udržujte čisté a priechodné. · Nepoužívajte vnútri chladničky žiadne ďalšie elektrické prístroje, pokiaľ nie sú na toto použitie priamo schválené výrobcom. · Neskladujte vo vnútri prístroja žiadne výbušné látky, ako napríklad spreje naplnené horľavým plynom. · Po prevoze a inštalácii prístroja sa vždy uistite, že nie je nijako poškodený chladiaci okruh. · Uistite sa, aby zadná časť prístroja nepoškodila, či stlačila elektrickú zástrčku. Stlačená, alebo inak poškodená zástrčka sa môže prehriať a spôsobiť požiar. · Uistite sa, že máte k zástrčke voľný prístup. · Nikdy neťahajte za samotný kábel. · Nikdy nepripájajte prístroj do uvoľnenej zásuvky (riskujete úraz elektrickým prúdom, alebo požiar). · Tento prístroj je ťažký. Pokiaľ s prístrojom manipulujete, dbajte na zvýšenú opatrnosť. · Nevystavujte prístroj na dlhšiu dobu priamemu slnečnému žiareniu. · Prístroj nesmie byť používaný s predlžovacím káblom ani zapájaný do zásuvky s Rozbočky (viac zásuvkami na konci). · Táto chladiaca jednotka nie je určená na použitie, ako vstavané zariadenie. · Držte sa nasledujúcich informácií, tak aby sa zabránilo kontaminácie potravín: · Dlhodobé a časté otváranie dverí môže spôsobiť výrazné zvýšenie teploty vo vnútri spotrebiča. · Povrchy, ktoré by mohli prísť do styku s potravinami udržujte čisté a pravidelne ich umývajte. Kondenzačné kanálik a odvodňovacie otvor udržujte v čistote. · Surové mäso a ryby skladujte vo vhodných nádobách tak, aby sa nedostali do styku s inými potravinami. · Ak by bol spotrebič dlhšiu dobu prázdny, tak ho odporúčame vypnúť, odmraziť a vyčistiť. Po takomto vyčistení nechajte vnútro vyschnúť a nezatvárajte dvierka, aby mohol priestor ventilovať a nemnožili sa tam plesne. VAROVANIE! Tento prístroj nikdy neumiestňujte do blízkosti ohňa, ani na iné miesto kde by mohol prísť do styku s tepelným zdrojom. V zadnej strane prístroja v chladenia je chladivo, ktoré je veľmi horľavé a zápalné. SK Venujte pozornosť symbolu “Nebezpečenstvo požiaru - horľavé materiály”, ktorý sa nachádza na zadnej strane spotrebiča a dbajte bezpečnostných pokynov a bezpečnosti práce. 70 DO938K ČASTI 1. Nastavenie teploty sa žiarovkou 2. Poličky 3. Priehradka na zeleninu 4. Nastaviteľné nožičky 5. Poličky vo dverách 1 2 5 3 4 PRED PRVÝM POUŽITÍM Odstráňte vonkajší a vnútorný obal, starostlivo utrite vonkajšok chladničky mäkkou a suchou handričkou. Vnútro chladničky utrite s vlhkou, vlažným handričkou. · Vyberte rovnú podlahu s vysokou nosnosťou. · Nechajte 13 cm medzeru medzi zadnou stranou chladničky a akúkoľvek priľahnú stenou. · Vyvarujte sa umiestnenia na priamy slnečný svit. Priame slnko spôsobuje zmenu farby povrchu. Zvýšené teplo v okolí zvyšuje spotrebu prístroja a môže skracovať jeho životnosť. · Vyvarujte sa veľmi vlhkému prostrediu. Veľká vlhkosť má za následok zvýšené namrazovanie vnútorného priestoru a výparníka. · Pred zapojením si dôkladne skontrolujte, či parametre vašej zástrčky korešpondujú s požiadavky na prístroji. Rozdielne parametre el. siete môžu prístroj poškodiť. · Lednici môžete odpojiť od elektrickej energie iba vypojením z el. siete, preto by mala byť zástrčka stále prístupná. Ak chcete chladničku odpojiť, nastavte ovládač do polohy OFF a potom odpojte z el. siete. · Po umiestnení nechajte prístroj aspoň 24 hodín stáť v pokoji a až potom ho zapnite. Pri sťahovaní sa rozvírilo chladivo a je potrebné, aby sa znovu usadilo. · Lednici nechajte aspoň 8 hodín v pokoji odstáť a bežať naprázdno. Takto necháte nachladit vnútorný priestor. · Ak máte nerovnú, alebo hrboľatú podlahu, tak môžete chladničku vyrovnať pomocou prednej nastaviteľné nožičky. SK · DO938K www.domo-elektro.be 16 71 · Na dvere si naskrutkujte madlo na otváranie (viď obrázok). · Klimatická trieda určuje minimálnu a maximálnu teplotu okolia, pre správnu funkciu prístroja. Označenie klimatickej triedy nájdete na štítku na zadnej strane prístroja. · SN: subnormálna: teplota okolia medzi 10 ° C a 32 ° C · N: Normálny: teplota okolia medzi 16 ° C a 32 ° C · ST: Subtropická: teplota okolia medzi 16 ° C a 38 ° C · T: Tropická: teplota okolia medzi 16 ° C and 43 ° C POUŽITIE NASTAVENIE TEPLOTY Vnútri v chladničke je nastaviteľný termostat, jeho otáčaním si navoľte požadovanú teplotu. Termostat si nastavte na Vami požadovanú teplotu. Čím vyššie je číslo, tým sú nižšie teploty. Poloha 4 je odporúčaná pre bežné použitie. · Pri nastavení do pozície 0 chladnička vôbec nechladí (chladiaci systém je vypnutý), ale prívod elektriny nie je prerušený. · Teplota a doba nachladnutí je ovplyvňovaná okolitou teplotou aj tým, ako často sa otvárajú dvere. SK HÝBANIE S CHLADNIČKOU 72 · Ak sa prístroj z akéhokoľvek dôvodu vypol, tak počkajte aspoň 10 min pred jeho opätovným zapnutím. Chladiaci systém potrebuje vyrovnať tlaky vo vnútri chladiaceho okruhu. · Prístroj vypnite a vypojte z el. siete. Z chladničky vyberte všetko jedlo. Vyberte alebo zabezpečte všetky voľné poličky a regály proti pohybu. · Premiestnite na nové miesto a uveďte znovu do prevádzky. Po sťahovaní chladničky ju nechajte aspoň 10 min v kľude stáť, a až potom ju zapojte. · Chladnička používa chladivo R600a. Chladivo R600a je izobután, ktorý je šetrný k životnému prostrediu, ale zároveň náchylný k vznieteniu. Preto by ste mali byť veľmi opatrní a dbať na to, aby sa chladiaci systém nepoškodil. V prípade poškodenia a nechceného úniku chladiva, zamedzte styku s 16 otvoreným ohňom či so zdrojom tepla a miestnosť rýchlo vyvetrajte. DO938K JEDLO V CHLADNIČKE · Chladnička predlžuje trvanlivosť jedla (najmä jedlá podliehajúce skaze). · Ak vložíte čerstvé potraviny, tak tie vydržia v chladničke najdlhšie. · Skladujte len jedlo čerstvé. · Pred vložením do chladničky jedlo zabaľte alebo zakryte, inak by jedlo vysýchalo a menilo farbu a samozrejme strácalo na čerstvosti i chuti. · Potraviny sa silnou arómou dôkladne zabaľte, aby sa vôňa / zápach nepreniesla na ostatné potraviny. · Pred vložením do chladničky, nechajte všetky potraviny vychladnúť. ODMRAZOVANIE Chladnička sa odmrazuje plne automaticky. Ak je chladnička spustená a chladí, tak sa na zadnej strane agregátu objavuje inovať alebo kropaje vody, to je normálne a nie je potreba vlhkosť nijako utierať. Zadný panel sa odmrazuje automaticky a roztopená voda steká priamo do výparníka, odkiaľ sa odparuje. ZABEZPEČENIE PRI ODCHODE NA DLHŠIU DOVOLENKU Pri krátkodobom odchode nechajte všetko tak ako je. Pokiaľ plánuje odísť na dlhší čas, tak nezabudnite: · Vybrať z chladničky všetko jedlo · Odpojiť prístroj z el. siete · Vytrieť vnútro chladničky · Nechať otvorené dvere, aby sa prevzdušnil vlhkosť VÝPADOK PRÚDU Výpadok prúdu je prevažne kratšia ako 1-2 hodiny, na takto krátky čas sa nedeje nič zlé, nižšia teplota sa v uzavretej chladničke udrží. Nesmie sa však otvárať dvere chladničky a zbytočne vetrať. Počas dlhšieho výpadku prúdu môžete do chladničky vkladať väčšie množstvo ľadu, ktoré vnútorný priestor čiastočne ochladí. NIEKOĽKO RÁD PRE SPRÁVNE ZAPOJENIE A POUŽÍVANIE CHLADNIČKY Do chladničky nevkladajte teplé jedlo · Nápoje skladujte v uzavretých nádobách · Jedlo pre dlhšie uskladnenie v chladničke musia byť prekryté a zabalené vo fólii alebo alobalu. · Do chladničky nikdy neukladajte pokazené potraviny · Nikdy chladničku neprepĺňajte, nesnažte sa do nej napchať čo najviac jedla. · Zbytočne neotvárajte dvere, aby sa nevetrali vnútorný priestor. · UPOZORNENIE: Lednici držte v dostatočnej vzdialenosti od ohňa aj horľavín · UPOZORNENIE: Nie je určené pre vonkajšie použitie (okrem veľkých stanov) · UPOZORNENIE: Chladnička nie je určená na použitie v dopravných prostriedkoch. www.domo-elektro.be SK · DO938K 73 NÁVOD NA VHODNÉ USKLADNENIE / ROZLOŽENIE POTRAVÍN V CHLADNIČKE: Aby sa dosiahlo čo najdlhšieho uchovanie čerstvých potravín, tak odporúčame nasledujúce (viď tabuľka) Priestor chladničky Čo uložiť Priehradky na dverách · Prírodne konzervované potraviny, ako sú džemy, džúsy, nápoje, korenie atď. · Neskladujte tu potraviny s obmedzenou trvanlivosťou. · Ovocie, bylinky, zeleniny · Neumiestňujte tam banány, cibuľu, zemiaky a cesnak Prostredná polica · Mliečne výrobky a vajcia Horná polica · Potraviny, ktoré ich netreba variť, napríklad polotovary, zvyšné hotové jedlá, nátierky atď. Spodná zásuvky (šuplíky) NASTAVENIE A PREMIESTNENIA POLIČOK · Pred premiestňovaním poličiek vždy chladničku vyprázdnite. · Sklenenú poličku mierne nadvihnite a ťahajte smerom k sebe. Držte ju pevne. · Poličku na dverách pevne uchopte oboma rukami. Tlačte smerom hore a pritom ľahko ťahajte k sebe, kým sa polička neuvoľní. VÝMENA ŽIAROVKY OSVETLENIA POZOR: Pred výmenou najskôr vypojte chladničku z el. siete. 1. Zložte kryt žiarovky 2. Vyskrutkujte starú žiarovku a potom naskrutkujte novú 15 W žiarovku (závit E14). 3. Opäť zakryte krytom. PREHODENIE PÁNTOV DVERÍ e Door Ak potrebujete prehodiť otváranie dverí na opačnú stranu, musí sa premontovať pánty. Odporúčame, pozvaťFlat si servisného mechanika alebospanner. vyškolenú osobu z okolia. : Philips screwdriver, bladed screwdriver, Hexagonal nit is unplugged and empty. Ešte skôr ako začnete pánty přemontovávat, chladničku vypnite a všetko z nej vyberte preč. Budete oor off, it is necessary to tilt the unit backwards. You should rest the unit on something solid potrebovať krížový skrutkovač a kľúč (ani jedno nie je dodaný v balení). not slip during the door reversing process. oved must be saved to do the reinstallation of the door. e unit flat as this may damage the coolant system. hat 2 people handle the unit during assembly. Odskrutkujte 2 skrutky z hornej strany krytu. SK 1. screws at rear side of top cover. unscrew 74 cover and thermostat knob, then place it aside. DO938K unscrew ews at rear side of top cover. 2. Odstráňte horný kryt. unscrew er and thermostat knob, then place it aside. er and thermostat knob, then place it aside. er and thermostat knob, then place it aside. ge and then remove door and place it on a soft pad to 3. Odskrutkujte skrutky, ktoré držia horný pánt dverí. Dvere nadvihnite a položte ich na mäkký povrch, tak aby sa predišlo poškriabaniu. ge and then remove door and place it on a soft pad to ge and then remove door and place it on a soft pad to hinge. Then remove the adjustable feet from both hinge. Then remove the adjustable feet from both 4. Vyberte (odskrutkujte) spodnou skrutku, záves pántu i nastaviteľnú nožičku zo spodnej časti spotrebiča. hinge. Then remove the adjustable feet from both 7 7 Reverse Door 7 5. Povoľte závesný kolík pántu, vyberte otočte a kolík opäť dotiahnite. 5. Unscrew and remove the bottom hinge pin, turn the bracket over and replace it. Screw SK Unscrew 6. 6. Refit the bracket fitting the bottom hinge pin. Replace both adjustable Všetko (skrutka a záves pántu) namontujte na opačnú spodnú stranu prístroja. Následne dajte späť a feet. nastavte nožičku tak, aby sa prístroj nekýval. www.domo-elektro.be DO938K 75 Unscrew Screw Unscrew Screw fitting the bottom hinge pin. Replace both adjustable fitting the bottom hinge pin. Replace both adjustable fitting the bottom hinge pin. Replace both adjustable 7. Na spodnej pánt nasaďte späť dvere. Dvere musia byť vodorovne, aby ich tesnenie priliehalo po ack on. Ensure the door is aligned horizontally and t the seals are closed on allobvode. sides before finally dobre tesní, môžete usadiť aj horný pánt a priskrutkovať ho. celom Ak dvere p hinge. ack on. Ensure the door is aligned horizontally and t the seals are closed on all sides before finally p hinge. ack on. Ensure the door is aligned horizontally and t the seals are closed on all sides before finally p hinge. r and fix it with 2 screws on the back. 8. screw Pant prekryte krytom a opäť ho priskrutkujte. r and fix it with 2 screws on the back. r and fix it with 2 screws on the back. screw screw at knob. at knob. RIEŠENIE8 MOŽNÝCH PROBLÉMOV at knob. Stáva sa, že nastane problém, ktorý sa dá ľahko vyriešiť aj bez odbornej pomoci. 8 Najskôr skontrolujte nižšie, či sa nejedná práve o tento typ problému. 8 Prístroj nefunguje · skontrolujte prívod energie a či nevypadol el. prúd · zapojte do zásuvky so správnym napätím SK Chladiaci systém spína veľmi často 76 · skontrolujte nastavenie vnútornej teploty, ak je potreba tak prenastavte · dôkladne zatvorte dvere a skontrolujte či všade tesnia · nevkladajte dovnútra chladničky teplé jedlo · nenechávajte príliš dlho otvorené dvere, obmedzte ich otváranie · nechávajte chladničku blízko tepla. Zabráňte aby na ňu nesvietilo priame slnko. DO938K Vnútri chladničky nie je dostatočne chladno · skontrolujte prívod energie a či nevypadol el. prúd · zapojte / zapnite chladničku · prekontrolujte a nastavte správnu teplotu vo vnútri chladničky · dôkladne zatvorte dvere · nenechávajte príliš dlho otvorené dvere, obmedzte ich otváranie · zaistite, aby bolo okolo chladničky dostatok miesta na cirkuláciu vzduchu · zapojte do zásuvky so správnym napätím · nevkladajte dovnútra chladničky teplé jedlo · Uistite sa, že jedlo pred vložením je studené ČISTENIE A ÚDRŽBA · Nepoužívajte žiadna drsná čistidlá, ktoré môžu poškodiť povrch prístroja. · Nastavenie teploty otočte do polohy 0 a odpojte zástrčku z el. siete. · Všetko jedlo z chladničky vyberte a nechajte niekde v chlade. · Lednici vytrite jemnou vlhkou handričkou. Môžete použiť aj čistiaci prostriedok. · Dôkladne utrite aj tesnenia na dverách. Tesnenie potom dôkladne vysušte. · Po vyčistení chladničku opäť zapojte do el. siete a nastavte na požadovanú chladiacu teplotu. · Po chvíli vložte všetko jedlo späť do chladničky. OHĽAD NA ŽIVOTNÉ PROSTREDIE Obalové materiály sú recyklovateľné, nakladajte s nimi podľa predpisov pre životné prostredie. www.domo-elektro.be DO938K SK Symbol na prístroji alebo na jeho obale znamená, že s týmto výrobkom nie je možné nakladať ako s domovým odpadom, ale musí byť odovzdaný na miestach určených na zber a likvidáciu elektrických a elektronických zariadení. Dodržaním tohto odporúčania chránite životné prostredie a zdravie spoluobčanov. Viac informácií o možnostiach likvidácie nebezpečného odpadu obdržíte na obecných alebo mestských úradoch, zberných dvoroch alebo v predajni, kde ste prístroj zakúpili. 77 78 DO938K www.domo-elektro.be DO938K 79 Webshop BESTEL de originele Domo-accessoires en -onderdelen online via: COMMANDEZ d’authentiques accessoires et pièces Domo en ligne sur: BESTELLEN SIE die Domo Original-Zubehör und -Ersatzteile online über: ORDER the original Domo accessories and parts online at: webshop.domo-elektro.be of scan hier: ou scannez ici: oder hier scannen: or scan here: LINEA 2000 BV - Dompel 9 - 2200 Herentals - Belgium - Tel: +32 14 21 71 91 - Fax: +32 14 21 54 63-
 1
1
-
 2
2
-
 3
3
-
 4
4
-
 5
5
-
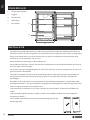 6
6
-
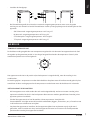 7
7
-
 8
8
-
 9
9
-
 10
10
-
 11
11
-
 12
12
-
 13
13
-
 14
14
-
 15
15
-
 16
16
-
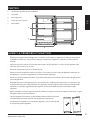 17
17
-
 18
18
-
 19
19
-
 20
20
-
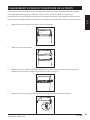 21
21
-
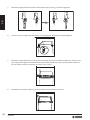 22
22
-
 23
23
-
 24
24
-
 25
25
-
 26
26
-
 27
27
-
 28
28
-
 29
29
-
 30
30
-
 31
31
-
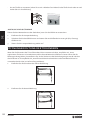 32
32
-
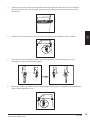 33
33
-
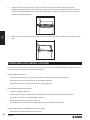 34
34
-
 35
35
-
 36
36
-
 37
37
-
 38
38
-
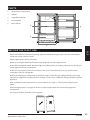 39
39
-
 40
40
-
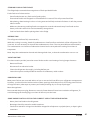 41
41
-
 42
42
-
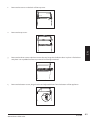 43
43
-
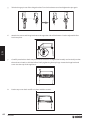 44
44
-
 45
45
-
 46
46
-
 47
47
-
 48
48
-
 49
49
-
 50
50
-
 51
51
-
 52
52
-
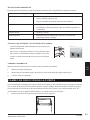 53
53
-
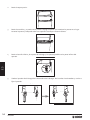 54
54
-
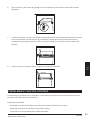 55
55
-
 56
56
-
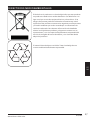 57
57
-
 58
58
-
 59
59
-
 60
60
-
 61
61
-
 62
62
-
 63
63
-
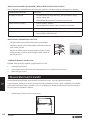 64
64
-
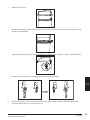 65
65
-
 66
66
-
 67
67
-
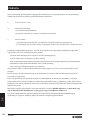 68
68
-
 69
69
-
 70
70
-
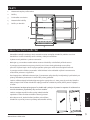 71
71
-
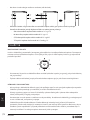 72
72
-
 73
73
-
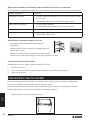 74
74
-
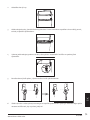 75
75
-
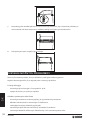 76
76
-
 77
77
-
 78
78
-
 79
79
-
 80
80


in andere talen
- English: Domo DO938K Owner's manual
- français: Domo DO938K Le manuel du propriétaire
- español: Domo DO938K El manual del propietario
- Deutsch: Domo DO938K Bedienungsanleitung
- slovenčina: Domo DO938K Návod na obsluhu
- čeština: Domo DO938K Návod k obsluze
Gerelateerde artikelen
-
Domo DO939K de handleiding
-
-
-
-
-
-
-
-
-
