
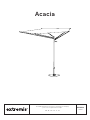
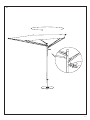
MANUAL
LAB111
Assembly instructions, how to use, useful tips for keeping
your tool for togetherness in shape.
EN – NL – DE – FR – IT – ES
Acacia

Tools for togetherness
© All our designs are original creations and protected by intellectual property rights.

IMPORTANT! RETAIN FOR FUTURE
REFERENCE: READ CAREFULLY.
BELANGRIJK! LEES DIT DOCUMENT
AANDACHTIG EN BEWAAR HET VOOR
TOEKOMSTIGE RAADPLEGING!
WICHTIG! AUFHEBEN, UM SPÄTER
ETWAS NACHSEHEN ZU KÖNNEN:
SORGFÄLTIG DURCHLESEN!
IMPORTANT! LISEZ ATTENTIVEMENT
CE MANUEL ET CONSERVEZ-LE POUR
RÉFÉRENCE ULTÉRIEURE!
IMPORTANTE! CONSERVARE COME
RIFERIMENTO PER IL FUTURO:
LEGGERE ATTENTAMENTE!
¡IMPORTANTE! CONSÉRVELO PARA
FUTURA REFERENCIA: LÉALO
ATENTAMENTE!

Do not use
power tools!

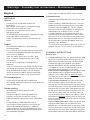
Table of contents
Mounting kit
6
Exploded view
7
Assembly Acacia
8
Warnings – Assembly text instructions – Maintenance
20

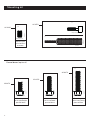
6
Mounting kit
scale 1:2
x 10
ACA370
scale 1:1
M8x12 din 913
Mounting kit
to fix baleens
to crown
ACA326
x 1
x 1
Handle
Height adjustment knob
scale 1:1
x 3
scale 1:1
M6x16 din 6921
Mounting kit
to fix lightweight
parasol base
ACA372
scale 1:1
x 3
M6x25 din 6921
Mounting kit
to fix standard
parasol base
ACA373
x 3
M6x35 din 6921
Mounting kit
to fix heavy duty
parasol base
ACA374
Parasol bases (optional)

7
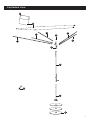
Exploded view
1
11
12
2
68
7
9
54
10
3

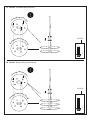
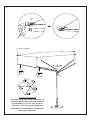
1b. Option: Lightweight parasol base
ø 6 mm
8
N° .4
20’
p 20
x 3
scale 1:2
M6x16
ACA372
T
h
r
o
u
g
h
h
o
l
e
s
w
i
t
h
t
h
r
e
a
d
1a. Floor fastening
Assembly Acacia

T
h
r
o
u
g
h
s
q
u
a
r
e
h
o
l
e
s
T
h
r
o
u
g
h
h
o
l
e
s
w
i
t
h
t
h
r
e
a
d
1d. Option: Heavy duty parasol base
9
1c. Option: Standard parasol base
x 3
scale 1:2
M6x35
ACA374
x 3
scale 1:2
M6x25
ACA373
T
h
r
o
u
g
h
s
q
u
a
r
e
h
o
l
e
s
T
h
r
o
u
g
h
h
o
l
e
s
w
i
t
h
t
h
r
e
a
d

10
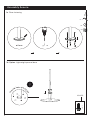
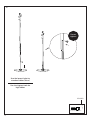
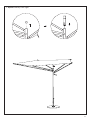
2.
x 1
scale 1:4
ACA310
Height adjustment knob
Do not
tighten
Use the lowest hole for
standard tables (Virus)
Use the highest hole for
high tables

11
3.
x 1
scale 1:2
ACA310
Handle
Replace bolt by handle before use

12
4.
ACA326
x 10
scale 1:2
M8x12

13
5.

14
6.
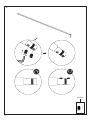
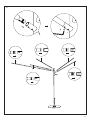
Tip for easy mounting
Start mounting the canopy to baleen n°2
and work your way in counterclockwise
so that baleen n°3 is the last, as this is
the lowest. Push the top of the baleen
upwards while hooking the sail eye over
the end of the baleen.
Position logo label
Position logo label
First
Last

15
7. option: battery LED-light

16
8.
Low Medium High

17
9.

18
English
WARNINGS
General
• Do not use any sharp tools to open the
packaging.
• We strongly advise against using power tools.
• Tripping hazard, mind your step.
• Do not put out cigarettes on the fabric.
• Not grafitti proof.
• To avoid danger of suocation, keep plastic bags
away from babies and children.
• Colors can dier over years and from batch to
batch.
Product
• Anchoring the product has to be done by
qualified people.
• For anchoring: use suitable bolts or screws from
a specialized store depending on the material
your terrace is made of.
• Store the fabric, when not in use for a long
time, as follows: completely dry and in a dry
environment.
• Do not leave the parasol unattended when
mounted.
• Tests in a windtunnel have shown that the shade
withstands wind speeds up to 88 km/h (54 mph)
when anchored to the floor. Still, we strongly
advise to take of the fabric sooner (from wind
speed 49 km/h (31 mph) is the rule of thumb.
PU-coated polyester
• Shake or brush o loose dirt immediately.
• We strongly advise you not to use a high-pressure
hose for cleaning.
Powder-coating
• White powder-coating requires more
maintenance.
• Do not use abrasive scouring powders or
scourers as they will scratch the surface.
• Color can fade to some extent when exposed to
UV.
• Flame retarding - NEN-EN13501-1 A2-sl -
Satisfying the same criteria as Class B for the
SBI-test according to EN13823. In addition,
under conditions of a fully developed fire these
products will nog significantly contribute to the
fire load and fire growth.
• Dark colors can get very hot in sunny weather.
Galvanized steel
• Galvanization will become less shiny when used
outdoors.
• Flame retarding - NEN-EN13501-1 A1 - Class A1
products will not contribute to fire in any stage,
including fully developed fire. For this reason,
they are assumed to be capable of satisfying all
requirements of all lower classes as well.
• Possible impurities in the immersion tank can
cause black marks during galvanization, which
are intrinsic to this industrial finishing technique.
• White marks on this zinc layer are also intrinsic
to this procedure and will disappear when the
furniture is put outdoors.
• This industrial finishing technique may result in a
rougher surface. This is intrinsic to the process.
ASSEMBLY INSTRUCTIONS
Acacia - p8
1. a. Floor fastening. Place the galvanized steel foot
on the desired place and mark te places on the
floor where the floor fastening is to be located.
Remove the tube and now drill at the places
marked. Now place the tube back and attach
using bolts or screws suitable for the type of
ground on which the Acacia is to stand.
b. parasol base lightweight. Place the galvanized
steel foot plate on the ground and mount the
tube on it with 3 bolts M6x16. Attention: Make
sure that you fix the bolts in the thread of the base
plate as shown on the drawing.
c. parasol base standard. Place one of the two
galvanized base plates on the ground. Then
position the second base plate on top of it, make
sure the large holes match the smaller holes with
thread of the first base plate. Now place the foot
on top of the two base plates and make sure the
holes of the tube match with the large holes of
the second base plate. Mount the tube on it with 3
bolts M6x25. Attention: Make sure that you fix the
bolts in the thread of the first base plate as shown
on the drawing!
d. parasol base heavy duty. Place one of the three
galvanized base plates on the ground. Then
position the second base plate on top of it, make
sure the large holes match the smaller holes with
thread of the first base plate. Now you also place
the third base plate on top of the other two plates,
Warnings – Assembly text instructions – Maintenance

19
make sure the large holes match the large holes
of the second bae plate. Now place the foot on
top of the three base plates and make sure the
holes of the tube match with the large holes of
the upper base plate. Mount the stainless steel
tube on it with 3 bolts M6x35. Let op: Make sure
that you fix the bolts in the thread of the first base
plate as shown on the drawing!
2. Slide the central tube (with crown) over
the galvanized steel foot and fix the height
adjustment knob in the lowest hole if you want to
use Acacia with standard tables (cfr Virus) or in
the highest hole if you want to use Acacia with
high tables. Do not tighten this yet.
3. Remove the bolt in the crown by the handle as
shown on the drawing.
4. Now mount two set screws each to all baleens as
shown on the drawing. Attention: make sure they
don’t protrude.
5. Mount the baleens in the crown. Attention: make
sure the number of lines of the baleens match
the number of holes on the crown. Fix these
by tightening the set screws as shown on the
drawing.
6. Start mounting the canopy to baleen n°2 and
work your way in counterclockwise so that baleen
n°3 is the last, as this is the lowest. Push the top
of the baleen upwards while hooking the sail eye
over the end of the baleen. Tip: Put your finger in
the loop and pull the stainless steel sail eye over
the end of the baleen. Attention: de loop of the
canopy must be directed upwards.
7. To put the light on top of the crown, you have to
remove the cover cap first.
8. Now choose your desired height by sliding the
central tube up/down. You can fix the parasol by
tightening the height adjustment knob.
9. You can direct the parasol towards the sun by
loosening the handle.
MAINTENANCE
PU-coated polyester
CLEANING
When dirty
If the whole parasol fabric looks dirty despite
the extreme fabric quality, the ultimate rescue is
machine cleaning your parasol fabric on 60°.
Hang it on the frame to dry.
Do not iron and do not use chlorine bleach or strong
chemical cleaning fluids.
Powder coating
CLEANING
Regularly
Use Extremis Multicleaner, a 100% biodegradable
detergent or common kitchen cleaning products.
Avoid using aggressive products. These surfaces are
best cleaned with a neutral cleaning product diluted
in water.
REMOVING STAINS
Only if nothing else helps
The magic eraser gets rid of most stubborn stains
without eort. Only if stubborn stains remain visible
after treatment according to the instructions, you
can use the Extremis Magic Eraser sponge. This
sponge is made of melamine resin and wears away
with use. The sponge is very easy to use and gives
results up to 26 times faster than a traditional
microfibre cloth. The magic sponge is the solution
for getting rid of stubborn stains such as felt-tip
pens, grease, scu marks, limescale marks or coee
and tea stains. The magic sponge can be used
on tarpaulin fabric, plastic profiles, glass, steel,
chrome, aluminium, porcelain, artificial leather and
many types of floor.
REPAIRING DAMAGED POWDER-COATING
When damaged
The impact of sharp objects can damage the
coating. Scratches or dents can be touched up with
our paint pens. However this only camouflages the
scratches without removing them.
Galvanized steel
DAY TO DAY CLEANING
Regularly and after every use
Clean with lukewarm water and a mild detergent or
Extremis Multi Cleaner.
REPARING DAMAGED PARTS WITH ZINC SPRAY
When damaged
Hot dip galvanization is the most durable way
of protecting metal against rusting. If the zinc
coating is damaged, the exposed metal can rust.
This can easily be touched up with zinc paint that
automatically has the same color and is readily
available in shops. Zinc spray forms a quick drying,
self healing and flexible coating that helps stop
corrosion.

20
HOW TO USE?
HOW CAN I ADJUST ACACIA IN HEIGHT?
First loosen the height adjustment knob if you want
to adjust the parasol in height. Hold the central
tube with one or two hands and “hook” the height
adjustment knob at the desired height (see step 8).
Now you can tighten the adjustment knob again to
secure your Acacia more securely.
HOW CAN I DIRECT ACACIA?
By loosening the handle, you can direct Acacia to
your desired direction (see step 9).
HOW CAN I DEMOUNT THE PARASOL CANOPY?
The easiest way to disassemble the canopy is by
lowering the central tube to the lowest position. This
allows you to have better access to the baleens. Now
grab the baleen with one hand by pulling the loop
of the canopy with your other hand. Tip: start on the
lowest side of the canopy.
Now you can store the canopy, completely dry, in the
delivered storage bag.
Watch the maintenance video on
our website:
www.extremis.com/maintenance

21
Nederlands
WAARSCHUWINGEN
Algemeen
• Gebruik geen scherp gereedschap om de
verpakking te openen.
• Het gebruik van elektrisch gereedschap wordt
ten zeerste afgeraden.
• Struikelgevaar, let op waar u loopt.
• Doof geen sigaretten uit op de parasol.
• Niet bestand tegen grati.
• Houd plastic zakken weg om verstikkingsgevaar
te voorkomen bij baby’s en kinderen.
• Kleuren kunnen van jaar tot jaar en van partij tot
partij verschillen.
Product
• Het product moet worden verankerd door
gekwalificeerde personen.
• Voor verankering: gebruik geschikte bouten
of schroeven uit een gespecialiseerde winkel,
afhankelijk van het materiaal waarvan uw terras
is gemaakt.
• Berg het doek, wanneer het gedurende een lange
tijd niet wordt gebruikt, als volgt op: volledig
gedroogd en in een droge omgeving.
• Laat de parasol niet onbeheerd achter wanneer
het doek gemonteerd is.
• Tests in een windtunnel hebben aangetoond dat
de parasol bestand is tegen windkrachten tot 9
op de schaal van Beaufort (88 km/h) (wanneer
verankerd aan de grond). Toch is het het beste
om het eerder te demonteren (vanaf 6 Beaufort
(49 km/h)).
PU-gecoat polyester
• Schud of borstel loszittend vuil onmiddellijk af.
• Wij raden u ten zeerste af om een hogedrukslang
te gebruiken voor het reinigen.
Poedercoating
• Witte poedercoating vereist meer onderhoud.
• Gebruik geen schuurpoeders of schuursponsjes
omdat deze krassen op het oppervlak
veroorzaken.
• De kleur kan in zekere mate vervagen bij
blootstelling aan uv-straling.
• Vlamvertragend - NEN-EN13501-1 A2-sl - Voldoet
aan dezelfde criteria als klasse B voor de SBI-
test volgens EN13823. Bovendien zullen deze
producten onder omstandigheden van een
volledig ontwikkelde brand geen significante
bijdrage leveren aan de brandbelasting en
brandgroei.
• Donkere kleuren kunnen bij zonnig weer zeer
heet worden.
Thermisch verzinkt staal
• De galvanisatie zal minder glanzend worden bij
gebruik buitenshuis.
• Vlamvertragend - NEN-EN13501-1 A1 - Klasse
A1 producten dragen in geen enkel stadium bij
aan brand, ook niet bij een volledig ontwikkelde
brand. Om deze reden wordt aangenomen dat ze
ook aan alle eisen van alle lagere klassen kunnen
voldoen.
• Eventuele onzuiverheden in de dompelbak
kunnen tijdens het verzinken zwarte vlekken
veroorzaken, die inherent zijn aan deze
industriële afwerkingstechniek.
• Witte vlekken op deze zinklaag zijn ook inherent
aan deze procedure en zullen verdwijnen
wanneer het meubilair buiten wordt geplaatst.
• Deze industriële afwerkingstechniek kan
resulteren in een ruwer oppervlak. Dit is inherent
aan het proces.
MONTAGE INSTRUCTIES
Acacia - p8
1. a. grondverankering. Plaats de thermisch
verzinkte stalen voet op de gewenste plaats
en markeer de plaatsen op de vloer waar de
verankeringen moeten komen. Neem de buis weg
en boor nu op de aangeduide punten. Gebruik
de bevestigingsmiddelen die meest geschikt
zijn voor de ondergrond waarop de Acacia moet
staan.
b. parasolvoet lichtgewicht. Plaats de thermisch
verzinkte grondplaat op de grond en monteer
de thermisch verzinkte stalen voet erop met
3 bouten M6x16. Let op: Zorg ervoor dat je de
bouten in de schroefdraad van de grondplaat
bevestigd zoals op de tekening!
c. parasolvoet standaard. Plaats een van de
twee thermisch verzinkte grondplaten op de
grond. Vervolgens plaats je de tweede plaat
erbovenop, zorg ervoor dat de grote gaten van
de bovenste plaat overeenkomen met de kleinere
gaten met schroefdraad van de onderste plaat.
Plaats de thermisch verzinkte stalen voet op de
bovenste plaat. Zorg ervoor dat de gaten van
de buis overeenkomen met de grote gaten van
de bovenste plaat. Monteer deze nu erop met
3 bouten M6x25. Let op: Zorg ervoor dat je de
bouten in de schroefdraad van de onderste plaat
bevestigt zoals op de tekening!
d. parasolvoet heavy duty. Plaats een van de
drie thermisch verzinkte grondplaten op de

22
grond. Vervolgens plaats je de tweede plaat
erbovenop, zorg ervoor dat de grote gaten van
de de bovenste plaat overeenkomen met de
kleinere gaten met schroefdraad van de onderste
plaat. Nu plaats je ook de derde plaat erbovenop,
zorg ervoor dat de grote gaten van de plaat
overeenkomen met de grote gaten van de tweede
plaat. Plaats de thermisch verzinkte stalen voet
op de bovenste plaat, zorg ervoor dat de gaten
van de buis overeenkomen met de grote gaten
van de bovenste plaat. Monteer deze nu erop met
3 bouten M6x35. Let op: Zorg ervoor dat je de
bouten in de schroefdraad van de onderste plaat
bevestigd zoals op de tekening!
2. Schuif de centrale buis (met kroon) in de voet uit
gegalvaniseerd staal en stel de juiste hoogte in
door de knop in het laagste gaatje te duwen voor
gebruik bij standaard tafels (cfr Virus) of in het
hoogste gaatje voor gebruik bij hoge tafels, maar
span nog niet volledig aan.
3. Verwijder de bout in de kroon en vervang deze
door het handvat zoals op de tekening.
4. Monteer nu telkens twee stelschroeven in elke
balein zoals op de tekening. Let op: zorg ervoor
dat ze niet uitsteken.
5. Monteer de baleinen in de kroon. Let op: zorg
ervoor dat het aantal lijntjes van de baleinen
overeenkomen met de gaatjes die aangeduid
staan op de kroon. Bevestig deze nu door
de stelschroeven aan te draaien zoals op de
tekening.
6. Begin met het monteren van het parasoldoek bij
balein n°2 en werk tegenwijzerzin zodat balein
n°3 de laatste is, want dat is de laagste. Dus de
bovenkant van de balein omhoog terwijl u het rvs
zeiloogje over het uiteinde van de balein haakt.
Tip: Plaats je vinger in de lus en trek het rvs
zeiloogje over het uiteinde van de balein. Let op:
de lus moet naar boven gericht zijn.
7. Om het lichtje bovenop de parasolbuis
te plaatsen moet je eerst het afdekdopje
verwijderen.
8. Kies nu de gewenste hoogte door de parasolbuis
omhoog/omlaag te schuiven. Om de parasolbuis
vast te zetten kun je de draaiknop aanspannen.
9. Door het handvat wat losser te draaien kun je de
parasol richten naar de zon.
ONDERHOUD
PU-gecoat polyester
REINIGEN
Indien vuil
Als je hele parasoldoek er ondanks zijn hoge
kwaliteit vuil uitziet, kun je je parasoldoek in de
wasmachine wassen op 60°.
Hang het over het frame om te drogen.
Niet strijken en gebruik zeker geen bleekmiddel of
chemisch reinigingsmiddel.
Poedercoating
REINIGEN
Geregeld
Gebruik Extremis Multi Cleaner, een 100%
biologisch afbreekbaar schoonmaakmiddel, of een
gewoon schoonmaakmiddel zoals je in de keuken
gebruikt. Gebruik geen agressieve producten. Voor
deze oppervlakken gebruik je het best een neutraal
schoonmaakmiddel, verdund met water.
VLEKKEN VERWIJDEREN
Alleen als laatste redmiddel
Het wondersponsje verwijdert moeiteloos de
meeste hardnekkige vlekken. Je mag het Extremis
wondersponsje alleen gebruiken als hardnekkige
vlekken na een normale schoonmaakbeurt volgens
de instructies zichtbaar blijven. Dit sponsje is
gemaakt van melaminehars en slijt naarmate het
wordt gebruikt. Het sponsje is zeer eenvoudig in
gebruik en geeft tot 26x sneller resultaat dan een
traditionele microvezeldoek. Het wondersponsje is
de oplossing voor het verwijderen van hardnekkige
vlekken zoals stiftvlekken, vet, schoenstrepen,
kalkresten of koe- en theevlekken. Het
wondersponsje mag worden gebruikt op zeildoek,
kunststofprofielen, glas, staal, chroom, aluminium,
porselein, kunstleer en diverse vloeren.
BESCHADIGDE POEDERLAK HERSTELLEN
Indien beschadigd
Door impact van scherpe voorwerpen kan de lak
beschadigd raken. Krassen of putjes kunnen worden
bijgewerkt met onze verfstiften. Hiermee kun je
echter alleen krassen camoufleren, de kras blijft
echter.
Thermisch verzinkt staal
DAGELIJKSE REINIGING
Geregeld en na elk gebruik
Maak schoon met lauw water en een mild
schoonmaakmiddel of Extremis Multi Cleaner.

23
BESCHADIGINGEN HERSTELLEN MET ZINKSPRAY
Indien beschadigd
Galvanisatie, of thermische verzinking, is de meest
duurzame manier om metaal tegen roestvorming
te beschermen. Als de zinklaag beschadigd raakt,
kan het blootgekomen metaal toch roesten.
Dit is eenvoudig bij te werken met zinkverf, die
automatisch dezelfde kleur heeft en in de handel
verkrijgbaar is. De zinkverf vormt een sneldrogende,
zelfherstellende, flexibele laag die roestvorming
helpt voorkomen.
HOW TO USE?
HOE KAN IK ACACIA IN HOOGTE VERSTELLEN?
Om de parasol te verstellen in hoogte dien je eerst
de draaiknop los te draaien. Neem de parasolbuis
vast met een of twee handen en “haak” de draaiknop
vast op de gewenste hoogte (zie stap 8). Je kan de
draaiknop nu nog aanspannen om je parasol steviger
vast te zetten.
HOE KAN IK ACACIA DRAAIEN?
Door het handvat los te draaien kun je de parasol
draaien in de gewenste richting (zie stap 9).
HOE KAN IK DE PARASOLSTOF DEMONTEREN?
De makkelijkste manier om de parasolstof te
demonteren is door deze eerst op de laagste stand
te zetten zodat je beter bij de baleinen kan. Neem nu
met je ene hand de balein vast en met je andere hand
trek je aan het lusje van de parasolstof. Tip: Begin
eerst met de laagste balein.
Je kan deze nu opbergen in de meegeleverde
beschermhoes. Droog opbergen op
schimmelvorming te voorkomen.
Bekijk de onderhoudsvideo’s op
onze website:
www.extremis.com/maintenance

www.extremis.com
Our headquarters:
Couthoflaan 20b
B-8972, Poperinge
info@extremis.com
+ 32 57 346020
Connect with us:
All rights reserved. Unless otherwise specified, all designs and photographs contained in this publication are copyright protected
and are the property of Extremis. No part of this publication may be copied or distributed without Extremis’ prior written consent.
The names of the authors of photographs to which we do not hold rights are mentioned here. We have done our utmost to provide a
comprehensive list of names. In the event of an alleged breach, please contact the editorial sta. © Extremis
20220614
-
 1
1
-
 2
2
-
 3
3
-
 4
4
-
 5
5
-
 6
6
-
 7
7
-
 8
8
-
 9
9
-
 10
10
-
 11
11
-
 12
12
-
 13
13
-
 14
14
-
 15
15
-
 16
16
-
 17
17
-
 18
18
-
 19
19
-
 20
20
-
 21
21
-
 22
22
-
 23
23
-
 24
24


