

INHOUDSOPGAVE
1. VEILIGHEIDSINFORMATIE.......................................................................................3
2. VEILIGHEIDSVOORSCHRIFTEN.............................................................................. 5
3. BESCHRIJVING VAN HET PRODUCT..................................................................... 8
4. VOORDAT U HET APPARAAT VOOR DE EERSTE KEER GEBRUIKT................... 9
5. KOOKPLAAT - DAGELIJKS GEBRUIK..................................................................... 9
6. KOOKPLAAT - AANWIJZINGEN EN TIPS............................................................ 14
7. KOOKPLAAT - ONDERHOUD EN REINIGING.................................................... 16
8. OVEN - DAGELIJKS GEBRUIK .............................................................................. 16
9. OVEN - KLOKFUNCTIES........................................................................................ 22
10. OVEN - AANWIJZINGEN EN TIPS......................................................................23
11. OVEN - ONDERHOUD EN REINIGING..............................................................34
12. PROBLEEMOPLOSSING...................................................................................... 37
13. MONTAGE ........................................................................................................... 40
VOOR PERFECTE RESULTATEN
Bedankt dat u voor dit AEG-product heeft gekozen. Dit apparaat is ontworpen
om vele jaren uitstekend te presteren, met innovatieve technologieën die het
leven gemakkelijker helpen maken met functies die gewone apparaten wellicht
niet hebben. Neem een paar minuten de tijd om het door te lezen zodat u er
optimaal van kunt profiteren.
Ga naar onze website voor:
Advies over gebruik, brochures, het oplossen van problemen en
onderhoudsinformatie:
www.aeg.com
Registreer uw product voor een betere service:
www.registeraeg.com
Koop accessoires, verbruiksartikelen en originele reserveonderdelen voor uw
apparaat:
www.aeg.com/shop
KLANTENSERVICE
Gebruik altijd originele onderdelen.
Als u contact opneemt met de klantenservice zorg dat u de volgende gegevens
bij de hand hebt. Model, productnummer, serienummer.
Deze informatie wordt vermeld op het typeplaatje.
Waarschuwing / Belangrijke veiligheidsinformatie
Algemene informatie en tips
Milieu-informatie
Wijzigingen voorbehouden.
www.aeg.com
2

1. VEILIGHEIDSINFORMATIE
Lees zorgvuldig de meegeleverde instructies voor
installatie en gebruik van het apparaat. De fabrikant is
niet verantwoordelijk voor letsel en schade veroorzaakt
door een foutieve installatie. Bewaar de instructies van
het apparaat voor toekomstig gebruik.
1.1 Veiligheid van kinderen en kwetsbare mensen
WAARSCHUWING!
Gevaar voor verstikking, letsel of permanente
invaliditeit.
• Dit apparaat kan worden gebruikt door kinderen van 8
jaar en ouder en door mensen met beperkte
lichamelijke, zintuiglijke of verstandelijke vermogens
of een gebrek aan ervaring en kennis, indien zij onder
toezicht staan of instructies hebben gekregen over het
veilig gebruiken van het apparaat en indien zij de
eventuele gevaren begrijpen.
• Laat kinderen niet met het apparaat spelen.
• Houd alle verpakkingsmaterialen uit de buurt van
kinderen.
• Houd kinderen en huisdieren uit de buurt van het
apparaat als het in werking is of afkoelt. Het apparaat
is heet.
• Als het apparaat is uitgerust met een
kinderbeveiliging, raden wij aan dit te activeren.
• Reiniging en onderhoud mag niet worden uitgevoerd
door kinderen zonder toezicht.
1.2
Algemene veiligheid
• Alleen een erkende installatietechnicus mag het
apparaat installeren en de kabel vervangen.
• Bedien het apparaat niet met een externe timer of
een apart afstandbedieningssysteem.
• Zonder toezicht koken op een kookplaat met vet of
olie kan gevaarlijk zijn en brandgevaar opleveren.
NEDERLANDS
3

• Probeer brand nooit met water te blussen, maar
schakel in plaats daarvan het apparaat uit en bedek
de vlam, d.w.z. met een deksel of blusdeken.
• Bewaar geen voorwerpen op de kookplaten.
• Gebruik geen stoomreiniger om het apparaat schoon
te maken.
• Metalen voorwerpen, zoals messen, vorken, lepels en
deksels mogen niet op de kookplaat worden
geplaatst, aangezien ze heet kunnen worden.
• Als de glaskeramische / glazen oppervlakte gebarsten
is, schakel het apparaat dan uit om het risico op
elektrische schokken te voorkomen.
• Schakel het kookplaatelement uit na elk gebruik met
de bedieningstoetsen. Vertrouw niet op de
pandetector.
• Van binnen wordt het apparaat heet als het in werking
is. Raak de verwarmingselementen in het apparaat
niet aan. Gebruik altijd ovenhandschoenen om
accessoires of kookgerei te plaatsen of verwijderen.
• Zet de stroomtoevoer uit alvorens onderhoud te
plegen.
• Zorg ervoor dat het apparaat is uitgeschakeld voordat
u de lamp vervangt om elektrische schokken te
voorkomen.
• Gebruik nooit agressieve reinigingsmiddelen of
scherpe metalen schrapers om de glazen deur schoon
te maken, deze kunnen krassen veroorzaken op het
oppervlak, waardoor het glas zou kunnen breken.
• Als de voedingskabel beschadigd is, moet de
fabrikant, een erkende serviceverlener of een
gekwalificeerd persoon deze vervangen teneinde
gevaarlijke situaties te voorkomen.
• Gebruik uitsluitend de vleesthermometer die
aanbevolen is voor dit apparaat.
• Wees voorzichtig als u de opslaglade aanraakt. Deze
kan heet worden.
• Om de inschuifrailen te verwijderen trekt u eerst de
voorkant van de inschuifrail en dan de achterkant uit
www.aeg.com
4

de zijwanden. Installeer de inschuifrails in
omgekeerde volgorde.
• De middelen voor het uitschakelen moeten
opgenomen worden in de vaste bedrading
overeenkomstig de regels voor de bedrading.
2. VEILIGHEIDSVOORSCHRIFTEN
2.1 Montage
WAARSCHUWING!
Alleen een erkende
installatietechnicus mag het
apparaat installeren.
• Verwijder alle verpakkingsmaterialen.
• Installeer en gebruik geen
beschadigd apparaat.
• Volg de installatie-instructies op die
zijn meegeleverd met het apparaat.
• Wees voorzichtig met het verplaatsen
van het apparaat, het is zwaar. Draag
altijd veiligheidshandschoenen.
• Trek het apparaat nooit aan de
handgreep van zijn plaats.
• De afmetingen van de keukenkast en
de uitsparing moeten kloppen.
• Houd de minimumafstand naar
andere apparaten en units in acht.
• Zorg ervoor dat het apparaat onder
en naast veilige installaties wordt
geïnstalleerd.
• Delen van het apparaat staan onder
stroom. Sluit het apparaat met
meubel om te voorkomen dat de
gevaarlijke delen worden aangeraakt.
• De zijkanten van het apparaat moeten
naast apparaten of units staan van
dezelfde hoogte.
• Installeer het apparaat niet op een
platform.
• Installeer het apparaat niet naast een
deur of onder een raam. Dit voorkomt
dat heet kookgerei van het apparaat
valt als de deur of het raam wordt
geopend.
• Installeer een stabilisator om te
voorkomen dat het apparaat kantelt.
Raadpleeg de installatiegids.
2.2 Aansluiting aan het
elektriciteitsnet
WAARSCHUWING!
Gevaar voor brand en
elektrische schokken.
• Alle elektrische aansluitingen moeten
door een gediplomeerd
elektromonteur worden gemaakt.
• Dit apparaat moet worden
aangesloten op een geaard
stopcontact.
• Controleer of de elektrische
informatie op het typeplaatje
overeenkomt met de
stroomvoorziening. Zo niet, neem dan
contact op met een elektromonteur.
• Gebruik altijd een correct ge?
stalleerd, schokbestendig
stopcontact.
• Gebruik geen meerwegstekkers en
verlengsnoeren.
• Laat de stroomkabel niet in aanraking
komen met de deur van het apparaat,
met name niet als deze heet is.
• De schokbescherming van delen
onder stroom en geïsoleerde delen
moet op zo'n manier worden
bevestigd dat het niet zonder
gereedschap kan worden verplaatst.
• Steek de stekker pas in het
stopcontact als de installatie is
voltooid. Zorg ervoor dat het
netsnoer na installatie bereikbaar is.
• Sluit de stroomstekker niet aan op
een losse stroomaansluiting.
• Trek niet aan het netsnoer om het
apparaat los te koppelen. Trek altijd
aan de stekker.
• Gebruik alleen de juiste isolatie-
apparaten: stroomonderbrekers,
zekeringen (schroefzekeringen
moeten uit de houder worden
NEDERLANDS
5

verwijderd), aardlekschakelaars en
contactgevers.
• De elektrische installatie moet een
isolatieapparaat bevatten waardoor
het apparaat volledig van het lichtnet
afgesloten kan worden. Het
isolatieapparaat moet een
contactopening hebben met een
minimale breedte van 3 mm.
• Sluit de deur van het apparaat
volledig voordat u de stekker in het
stopcontact steekt.
2.3 Gebruik
WAARSCHUWING!
Risico op letsel en
brandwonden.
Gevaar voor elektrische
schokken!
• Gebruik dit apparaat uitsluitend in
een huishoudelijke omgeving.
• De specificatie van het apparaat mag
niet worden veranderd.
• Zorg ervoor dat de
ventilatieopeningen niet geblokkeerd
zijn.
• Laat het apparaat tijdens het gebruik
niet onbeheerd achter.
• Schakel het apparaat telkens na
gebruik uit.
• Wees voorzichtig met het openen van
de deur van het apparaat als het
apparaat aan staat. Er kan hete lucht
ontsnappen.
• Bedien het apparaat niet met natte
handen of als het contact maakt met
water.
• Het apparaat mag niet worden
gebruikt als werkblad of aanrecht.
• Gebruikers met een pacemaker
moeten een afstand van minimaal 30
cm bewaren van de
inductiekookzones als het apparaat in
werking is.
WAARSCHUWING!
Risico op brand en explosie
• Verhitte vetten en olie kunnen
ontvlambare damp afgeven. Houd
vlammen of verwarmde voorwerpen
uit de buurt van vet en olie als u er
mee kookt.
• De dampen die hete olie afgeeft
kunnen spontane ontbranding
veroorzaken.
• Gebruikte olie die voedselresten
bevat kan brand veroorzaken bij een
lagere temperatuur dan olie die voor
de eerste keer wordt gebruikt.
• Plaats geen ontvlambare producten
of items die vochtig zijn door
ontvlambare producten in, bij of op
het apparaat.
• Houd vonken of open vlammen uit de
buurt van het apparaat bij het openen
van de deur.
• Open de deur van het apparaat
voorzichtig. Als u alcoholische
toevoegingen gebruikt, kan er
alcohol-luchtmengsel ontstaan.
WAARSCHUWING!
Risico op schade aan het
apparaat.
• Om schade of verkleuring van het
emaille te voorkomen:
– zet geen kookgerei of andere
voorwerpen direct op de bodem
van het apparaat.
– Plaats geen water direct in het
hete apparaat.
– haal vochthoudende schotels en
eten uit het apparaat als u klaar
bent met koken.
– Wees voorzichtig bij het
verwijderen of bevestigen van
accessoires.
• Verkleuring van het email heeft geen
ongewenst effect op de werking van
het apparaat. Dit is geen defect dat
geldt voor het recht op garantie.
• Gebruik een diepe braadpan voor
vochtige taarten. Fruitsappen kunnen
permanente vlekken maken.
• Zet geen heet kookgerei op het
bedieningspaneel.
• Laat kookgerei niet droogkoken.
• Laat geen voorwerpen of kookgerei
op het apparaat vallen. Het oppervlak
kan beschadigen.
• Activeer de kookzones niet met lege
pannen of zonder pannen erop.
• Leg geen aluminiumfolie op het
apparaat of direct op de bodem van
het apparaat.
• Pannen van gietijzer, aluminium of
met beschadigde bodems kunnen
krassen veroorzaken. Til deze
www.aeg.com
6

voorwerpen altijd op als u ze moet
verplaatsen op het kookoppervlak.
• Dit apparaat is uitsluitend bestemd
om mee te koken. Het mag niet
worden gebruikt voor andere
doeleinden, zoals het verwarmen van
een kamer.
2.4 Onderhoud en reiniging
WAARSCHUWING!
Gevaar voor letsel, brand en
schade aan het apparaat.
• Schakel het apparaat voor onderhoud
uit.
Trek de stekker uit het stopcontact.
• Zorg ervoor dat het apparaat is
afgekoeld. Er bestaat een risico dat
de glasplaten kunnen breken.
• Vervang direct de glazen deurpanelen
als deze beschadigd zijn. Neem
contact op met de service-afdeling.
• Wees voorzichtig bij het verwijderen
van de deur uit het apparaat. De deur
is zwaar!
• Reinig het apparaat regelmatig om te
voorkomen dat het materiaal van het
oppervlak achteruitgaat.
• Resterend vet of voedsel in het
apparaat kan brand veroorzaken.
• Maak het apparaat schoon met een
vochtige, zachte doek. Gebruik alleen
neutrale schoonmaakmiddelen.
Gebruik geen schuurmiddelen,
schuursponsjes, oplosmiddelen of
metalen voorwerpen.
• Raadpleeg als u een ovenspray
gebruikt eerst de aanwijzingen op de
verpakking.
• Reinig niet het katalytisch email
(indien van toepassing) met een
schoonmaakmiddel.
2.5 Binnenverlichting
• De gloeilampen of halogeenlampen
in dit apparaat zijn uitsluitend
bedoeld voor gebruik in
huishoudelijke apparaten. Gebruik
deze niet voor andere doeleinden.
WAARSCHUWING!
Gevaar voor elektrische
schokken!
• Voordat u het lampje vervangt, dient
u de stekker van het apparaat uit het
stopcontact te halen.
• Gebruik alleen lampjes met dezelfde
specificaties.
2.6 Verwijdering
WAARSCHUWING!
Gevaar voor letsel of
verstikking.
• Haal de stekker uit het stopcontact.
• Snij het netsnoer van het apparaat af
en gooi dit weg.
• Verwijder de deurgreep om te
voorkomen dat kinderen en
huisdieren opgesloten raken in het
apparaat.
NEDERLANDS
7

3. BESCHRIJVING VAN HET PRODUCT
3.1 Algemeen overzicht
5
3
4
6
2
1
7
5
4
3
2
1
1
Bedieningspaneel en kookplaat
2
Opening voor
kerntemperatuursensor
3
Verwarmingselement
4
Lampje
5
Rekframe, verwijderbaar
6
Ventilator
7
Rekstanden
3.2 Indeling kookplaat
4
6
1 3
5
2
1
Inductiekookzone 2300 W met
powerfunctie 3200 W
2
Stoomuitlaat - aantal en positie
afhankelijk van het model
3
Inductiekookzone 2300 W met
powerfunctie 3200 W
4
Inductiekookzone 2300 W met
powerfunctie 3200 W
5
Bedieningspaneel
6
Inductiekookzone 2300 W met
powerfunctie 3200 W
3.3 Accessoires
• Bakrooster
Voor kookgerei, bak- en
braadvormen.
• Bakplaat
Voor gebak en koekjes.
• Grill-/braadpan
Voor braden en roosteren of als
schaal om vet op te vangen.
• Vleesthermometer
Voor het vaststellen van het gaarpunt
van het gerecht.
• Telescopische geleiders
Voor roosters en bakplaten.
• Bewaarlade
Onder de ovenruimte bevindt zich
een bewaarlade. Druk op de lade om
de lade te openen. De lade komt dan
naar buiten.
www.aeg.com8

4. VOORDAT U HET APPARAAT VOOR DE EERSTE KEER
GEBRUIKT
WAARSCHUWING!
Raadpleeg de hoofdstukken
Veiligheid.
4.1 Eerste reiniging
Verwijder alle accessoires en
verwijderbare inschuifrails uit het
apparaat.
De deur is voorzien van een
traag sluitsysteem. Probeer
in dat geval de deur niet te
forceren.
Zie het hoofdstuk
'Onderhoud en reiniging'.
Reinig het apparaat voor het eerste
gebruik.
Zet de accessoires en verwijderbare
inschuifrails terug in de beginstand.
4.2 De tiptoetsen gebruiken
Raak om een functie te activeren het
geselecteerde symbool op het display
minimaal 1 seconde aan.
4.3 Tijd instellen
U moet de tijd instellen voordat u de
oven bedient.
Als het apparaat wordt aangesloten op
de stroomtoevoer of na een
stroomonderbreking, gaat het symbool
voor de tijd knipperen.
Druk op de of om de correcte tijd
in te stellen.
Na ongeveer 5 seconden stopt het
knipperen en geeft de klok de ingestelde
tijd van de dag weer.
U kunt de tijd alleen wijzigen als:
• De kinderbeveiliging niet is
ingeschakeld.
• Geen van de klokfuncties Duur of
Einde
is ingesteld.
• Er geen ovenfunctie is ingesteld.
4.4 Voorverwarmen
Verwarm het apparaat voor om het
resterende vet weg te branden.
1. Stel de functie en de
maximumtemperatuur in.
2. Laat het apparaat een uur werken.
3. Stel de functie en de
maximumtemperatuur in.
4. Laat het apparaat 15 minuten
werken.
5. Stel de functie
en de
maximumtemperatuur in.
6. Laat het apparaat 15 minuten
werken.
Accessoires kunnen heter worden dan
normaal. Het apparaat kan een vreemde
geur en rook afgeven. Dit is normaal.
Zorg dat er voldoende luchtcirculatie in
de ruimte is.
5.
KOOKPLAAT - DAGELIJKS GEBRUIK
WAARSCHUWING!
Raadpleeg de hoofdstukken
Veiligheid.
NEDERLANDS 9

5.1 Indeling Bedieningspaneel
51 2
3
4
10
811 9 7
6
Gebruik de tiptoetsen om het apparaat te bedienen. De displays, indicatielampjes en
geluiden tonen welke functies worden gebruikt.
Tiptoets -functie
1
AAN/UIT De kookplaat in- en uitschakelen.
2
Toetsblokkering / De
kinderbeveiliging
Het bedieningspaneel vergrendelen/
ontgrendelen.
3
- Timerindicatie voor
de kookzones
Geeft aan voor welke zone u de tijd in-
stelt.
4
- Timerdisplay Geeft de tijd in minuten weer.
5
Powerfunctie De functie in- en uitschakelen.
6
- Kookstanddisplay De kookstand weergeven.
7
- Bedieningsstrip Het instellen van de kookstand.
8
/
- De tijd verlengen of verkorten.
9
- Kookzone selecteren:
10
STOP+GO De functie in- en uitschakelen.
11
Bridge De functie in- en uitschakelen.
5.2 Kookstanddisplays
Weergave Omschrijving
De kookzone is uitgeschakeld.
-
De kookzone wordt gebruikt.
STOP+GO -functie is in werking.
Automatisch opwarmen -functie is in werking.
www.aeg.com10

Weergave Omschrijving
Powerfunctie is in werking.
+ cijfer
Er is een storing.
/ /
OptiHeat Control (3 staps restwarmte-indicatie) : doorgaan met ko-
ken / warmhoudstand / restwarmte.
Toetsblokkering / De kinderbeveiliging functie is in werking.
Het kookgerei is niet geschikt of te klein, of er is geen kookgerei op
de kookzone geplaatst.
Automatisch uitschakelen -functie is in werking.
5.3 OptiHeat Control (3 staps
restwarmte-indicatie)
WAARSCHUWING!
/ / Er bestaat
verbrandingsgevaar door
restwarmte. Het
controlelampje geeft het
niveau van de restwarmte
aan.
De inductiekookzones creëren de voor
het kookproces benodigde warmte
direct in de bodem van de pan. Het
glaskeramiek wordt verwarmd door de
warmte van de pannen.
5.4 In- en uitschakelen
Raak 1 seconde aan om de kookplaat
in– of uit te schakelen.
5.5 Automatisch uitschakelen
De functie schakelt de kookplaat
automatisch uit als:
• alle kookzones zijn uitgeschakeld.
• u de kookstand niet instelt nadat u de
kookplaat hebt ingeschakeld.
• u iets hebt gemorst of iets langer dan
10 seconden op het
bedieningspaneel hebt gelegd (een
pan, doek, etc.). Er klinkt een
geluidssignaal en de kookplaat wordt
uitgeschakeld. Verwijder het
voorwerp of reinig het
bedieningspaneel.
• De kookplaat te heet wordt (b.v. als
een pan droogkookt). De kookzone
moet afgekoeld zijn voordat u de
kookplaat weer kunt gebruiken.
• u ongeschikte pannen gebruikt. Het
symbool gaat branden en na 2
minuten schakelt de kookzone
automatisch uit.
• u een kookzone niet uitschakelt of de
kookstand verandert. Na enige tijd
gaat branden en wordt de
kookplaat uitgeschakeld.
De verhouding tussen warmte-
instelling en de tijd waarna de
kookplaat uitschakelt:
• , 1 — 3 — 6 uur
• 4 — 7 — 5 uur
• 8 — 9 — 4 uur
• 10 — 14 — 1,5 uur
5.6 De kookstand
Voor het instellen of wijzigen van de
kookstand:
Raak de bedieningsstrip aan bij de juiste
kookstand of beweeg uw vinger langs de
bedieningsstrip totdat u de jusite
kookstand heeft bereikt.
NEDERLANDS
11

5.7 Het gebruik van de
kookzones
Plaats de pannen op het kruis / vierkant
dat op het oppervlak staat waarop u
kookt. Dek het kruis / vierkant volledig af.
Inductiekookzones passen zich tot op
zekere hoogte automatisch aan de
afmeting van het kookgerei aan. U kunt
met groot kookgerei op twee kookzones
tegelijkertijd koken.
5.8 Bridge-functie
Deze functie verbindt twee kookzones en
werken dan samen als één kookzone.
Stel eerst de warmte-instelling in voor
één van de kookzones.
Om de functie in te schakelen: Raak
aan. Raak één van de bedieningssensors
aan om de warmte-instelling in te stellen
of te wijzigen.
Om de functie uit te schakelen: Raak
aan. De kookzones werken
onafhankelijk.
Als u maar één kookzone gebruikt van de
twee dan raden wij aan om de kookzone
achter te gebruiken. Ook als u een grote
pan gebruikt dan raden wij aan om het
kookgerei bij de kookzone achter te
gebruiken.
5.9 Automatisch opwarmen
Als u deze functie activeert, kunt u in
minder tijd een benodigde kookstand
verkrijgen. De functie schakelt even de
hoogste kookstand in en verlaagt dan
naar de juiste kookstand.
Om de functie in werking te
stellen moet de kookzone
koud zijn.
Om de functie voor een kookzone te
activeren: raak
aan ( gaat aan).
Raak meteen de juiste kookstand aan.
Na 3 seconden gaat branden.
Om de functie uit te schakelen: wijzig
de kookstand.
5.10 Powerfunctie
Deze functie maakt meer vermogen
beschikbaar voor de inductiekookzones.
De functie kan voor een beperkte
tijdsduur voor uitsluitend de
inductiekookzone worden geactiveerd.
Daarna wordt de inductiekookzone
automatisch teruggeschakeld naar de
hoogste kookstand.
Om de functie voor een kookzone te
activeren: raak
aan. gaat aan.
Om de functie uit te schakelen: wijzig
de kookstand.
5.11 Timer
Timer met aftelfunctie
U kunt deze functie gebruiken om in te
stellen hoe lang de kookzone op dat
moment wordt gebruikt.
Stel eerst de kookzone in en dan de
functie. U kunt de kookstand vóór of na
het instellen van de functie instellen.
Kookzone instellen: raak
meerdere
malen aan tot het lampje van de
gewenste kookzone brandt.
Om de functie in te schakelen: raak
van de timer aan om de tijd in te stellen
(00 - 99 minuten). Als het lampje van de
kookzone langzaam gaat knipperen,
wordt de tijd afgeteld.
Resterende tijd weergeven: selecteer
de kookzone met . Het indicatielampje
van de kookzone gaat sneller knipperen.
Op het display wordt de resterende tijd
weergegeven.
Om het juiste tijdstip van de dag te
wijzigen: selecteer de kookzone met .
Raak of aan.
Om de functie uit te schakelen: stel de
kookzone in met en raak aan. De
resterende tijd telt terug tot 00. Het
indicatielampje van de kookzone gaat
uit. Om de functie uit te schakelen kunt u
ook
en tegelijkertijd aanraken.
www.aeg.com
12

Als de tijd verstreken is,
klinkt er een geluidssignaal
en knippert 00. De
kookzone wordt
uitgeschakeld.
Het geluidssignaal stopzetten: Raak
aan.
CountUp Timer (De timer met
optelfunctie)
Gebruik deze functie om in de gaten te
houden hoe lang de kookzone werkt.
Kookzone instellen: raak meerdere
malen aan tot het lampje van de
gewenste kookzone brandt.
Om de functie in te schakelen: raak
van de timer aan. gaat aan. Als het
lampje van de kookzone langzaam
knippert, wordt de tijd opgeteld. De
display schakelt tussen
en getelde tijd
(minuten).
Om in de gaten te houden hoelang de
kookzone werkt: selecteer de kookzone
met . Het indicatielampje van de
kookzone gaat sneller knipperen. De
display geeft aan hoe lang de zone
werkt.
Om de functie uit te schakelen: stel de
kookzone in met
en raak of
aan. Het indicatielampje van de
kookzone gaat uit.
Kookwekker
U kunt deze functie gebruiken als een
kookwekker terwijl de kookplaat is
ingeschakeld en de kookzones niet
werken (het display van de kookstand
toont
).
Om de functie in te schakelen: Raak
aan. Raak of van de timer aan om
de tijd in te stellen. Als de tijd verstreken
is, klinkt er een geluidssignaal en
knippert 00.
Het geluidssignaal stopzetten: Raak
aan.
De functie heeft geen
invloed op de werking van
de kookzones.
5.12 STOP+GO
Deze functie stelt alle kookzones in voor
de laagste warmhoudstand.
Als de functie loopt, kunt u de warmte-
instelling niet wijzigen.
De functie stopt de timerfunctie niet.
Om de functie in te schakelen: raak
aan. gaat branden.
Om de functie uit te schakelen: Raak
aan. De vorige kookstand gaat aan.
5.13 Toetsblokkering
U kunt het bedieningspaneel
vergrendelen terwijl de kookzones
werken. Hiermee wordt voorkomen dat
de kookstand per ongeluk wordt
veranderd.
Stel eerst de kookstand in.
Om de functie in te schakelen: raak
aan. gaat aan voor 4 seconden.De
timer blijft aan.
Om de functie uit te schakelen: Raak
aan. De vorige kookstand gaat aan.
Als u de kookplaat
uitschakelt, stopt deze
functie ook.
5.14 De kinderbeveiliging
Deze functie voorkomt dat het
kooktoestel onbedoeld wordt gebruikt.
Om de functie in te schakelen: zet de
kookplaat aan met . Stel geen
kookstand in. Raak
4 seconden aan.
gaat aan. Zet de kookplaat uit met
.
Om de functie uit te schakelen: zet de
kookplaat aan met . Stel geen
kookstand in. Raak
4 seconden aan.
gaat aan. Zet de kookplaat uit met
.
Het opheffen van de functie voor maar
één kooktijd: zet de kookplaat aan met
NEDERLANDS
13

. gaat aan. Raak 4 seconden
aan. Stel de kookstand in binnen 10
seconden. U kunt het kooktoestel
bedienen. Als u de kookplaat met
uitzet werkt de functie weer.
5.15 Vermogensbeheer-functie
• De kookzones zijn gegroepeerd
volgens locatie en aantal fasen van de
kookplaat. Zie afbeelding.
• Elke fase heeft een maximale
elektriciteitslading.
• De functie verdeelt het vermogen
tussen de kookzones aangesloten op
dezelfde fase.
• De functie wordt geactiveerd als de
totale elektriciteitslading van de
kookzones aangesloten op een
enkele fase wordt overschreden.
• De functie verlaagt het vermogen
naar de andere kookzones
aangesloten op dezelfde fase.
• Het warmte-instellingsdisplay van de
verlaagde zone verandert tussen twee
niveaus.
6. KOOKPLAAT - AANWIJZINGEN EN TIPS
WAARSCHUWING!
Raadpleeg de hoofdstukken
Veiligheid.
6.1 Kookgerei
Bij een inductiekookzone
zorgt een sterk elektro-
magnetisch veld ervoor dat
het kookgerei erg snel heet
wordt.
Gebruik de
inductiekookzones met
geschikt kookgerei.
Materiaal van het kookgerei
• correct: gietijzer, staal, geëmailleerd
staal, roestvrij staal, meerlaagse
bodem (aangemerkt als geschikt voor
inductie door de fabrikant).
• niet correct: aluminium, koper,
messing, glas, keramiek, porselein.
Het kookgerei is geschikt voor een
inductiekookplaat als:
• een beetje water op een zone met de
hoogste kookstand binnen korte tijd
wordt verwarmd.
• een magneet vast blijft zitten aan de
bodem van het kookgerei.
De bodem van het
kookgerei moet zo dik en
vlak mogelijk zijn.
Afmetingen van de pannen
Inductiekookzones passen zich tot op
zekere hoogte automatisch aan de
grootte van de bodem van de pan aan.
De efficiëntie van de kookzone heeft
betrekking op de diameter van het
kookgerei. Kookgerei met een diameter
die kleiner is dan het minimum, ontvangt
slechts een deel van het vermogen dat
door de kookzone wordt gegenereerd.
6.2 Minimale diameter van de
pannen
Kookzone Minimale diam-
eter van de pan-
nen (mm)
Linksachter 125
Rechtsachter 125
Rechtsvoor 125
Linksvoor 125
www.aeg.com14

6.3 Lawaai tijdens gebruik
Als u dit hoort:
• krakend geluid: de pan is gemaakt
van verschillende materialen
(sandwich-constructie).
• fluitend geluid: bij gebruik van de
kookzone met een hoge kookstand
en als de pan is gemaakt van
verschillende materialen (sandwich-
constructie)
• Zoemen: als u hoge kookstanden
gebruikt.
• Klikken: er treedt elektrische
schakeling op.
• Sissen, zoemen: de ventilator werkt.
Deze geluiden zijn normaal en hebben
niets met een defect van de kookplaat
te maken.
6.4 Energie besparen
• Doe indien mogelijk altijd een deksel
op de pan.
• Zet het kookgerei op de kookzone
voordat u deze inschakelt.
• Gebruik de restwarmte om het eten
warm te houden of te smelten.
6.5 Öko Timer (Eco-timer)
Om energie te besparen schakelt het
verwarmingselement van de kookzone
eerder uit dan het signaal van de timer
met aftelfunctie klinkt. Het verschil in
werkingstijd hangt af van het niveau van
de kookstand en de tijd dat u kookt.
6.6 Voorbeelden van
kooktoepassingen
De relatie tussen het stroomverbruik van
de warmte-instelling en de kookzone is
niet lineair. Wanneer u de warmte-
instelling verhoogt, is dit niet
proportioneel met de toename in
stroomverbruik van de kookzone. Het
betekent dat de kookzone met de
medium warmte-instelling minder dan de
helft van het vermogen gebruikt.
De gegevens in de volgende
tabel dienen slechts als
richtlijn.
Temperatuur-
instelling
Te gebruiken voor: Tijd
(min)
Tips
- 1
Bereide gerechten warmhou-
den
zoals
nodig
Een deksel op het kookgerei
doen.
1 - 3 Hollandaisesaus, smelten: bot-
er, chocolade, gelatine.
5 - 25 Van tijd tot tijd mengen
1 - 3 Stollen: luchtige omeletten,
gebakken eieren.
10 - 40 Met deksel bereiden
3 - 5 Zachtjes aan de kook brengen
van rijst en gerechten op melk-
basis, reeds bereide gerechten
opwarmen
25 - 50 Voeg minstens tweemaal zo-
veel vloeistof toe als rijst,
melkgerechten tijdens het be-
reiden tussendoor roeren.
5 - 7 Stomen van groenten, vis en
vlees
20 - 45 Een paar eetlepels vocht toe-
voegen.
7 - 9 Aardappelen stomen 20 - 60 Gebruik max. ¼ l water voor
750 g aardappelen.
7 - 9 Bereiden van grotere hoeveel-
heden voedsel, stoofschotels
en soepen
60 - 150 Tot 3 l vloeistof plus ingre-
diënten.
NEDERLANDS 15

Temperatuur-
instelling
Te gebruiken voor: Tijd
(min)
Tips
9 - 12 Lichtjes braden: kalfsoester,
cordon bleu van kalfsvlees, ko-
teletten, rissoles, worstjes, lev-
er, roux, eieren, pannenkoek-
en, donuts.
zoals
nodig
Halverwege de bereidingstijd
omdraaien.
12 - 13 Door-en-door gebraden, op-
gebakken aardappelen, lend-
enbiefstukken, steaks
5 - 15 Halverwege de bereidingstijd
omdraaien.
14 Aan de kook brengen van water, pasta koken, aanbraden van vlees (gou-
lash, stoofvlees), frituren van friet
Aan de kook brengen van grote hoeveelheden water. Power-functie is
geactiveerd.
7. KOOKPLAAT - ONDERHOUD EN REINIGING
WAARSCHUWING!
Raadpleeg de hoofdstukken
Veiligheid.
7.1 Algemene informatie
• Reinig de kookplaat na elk gebruik.
• Gebruik altijd pannen met een schone
bodem.
• Krassen of donkere vlekken op de
oppervlakte hebben geen invloed op
de werking van de kookplaat.
• Gebruik een specifiek
schoonmaakmiddel voor het
oppervlak van de kookplaat.
• Gebruik een speciale schraper voor
de glazen plaat.
7.2 De kookplaat
schoonmaken
• Verwijder direct: gesmolten plastic,
gesmolten folie en suikerhoudende
gerechten. Anders kan het vuil de
kookplaat beschadigen. Plaats de
speciale schraper schuin op de glazen
plaat en verwijder resten door het
blad over het oppervlak te schuiven.
• Verwijder nadat de kookplaat
voldoende is afgekoeld: kalk- en
waterkringen, vetspatten en
metaalachtig glanzende
verkleuringen. Reinig de kookplaat
met een vochtige doek en een beetje
afwasmiddel. Droog de kookplaat na
reiniging af met een zachte doek.
8. OVEN - DAGELIJKS GEBRUIK
WAARSCHUWING!
Raadpleeg de hoofdstukken
Veiligheid.
www.aeg.com16

8.1 Ovenbedieningspaneel
21 3 4 5 6
Gebruik de tiptoetsen om het apparaat te bedienen
Tiptoets -functie Opmerking
1
– Weergave Toont de huidige instellingen van het apparaat.
2
AAN/UIT Om het apparaat in of uit te schakelen.
3
/
Toets omhoog/
omlaag
Om in het menu te bladeren en een ovenfunctie
in te stellen.
4
Vleesthermometer Het instellen van de vleesthermometer.
5
Selectie Terug /
Klokfunctie
Om één niveau terug te gaan in het menu. De
klokfuncties instellen.
6
/
Hoger / Lager De tijd en temperatuur instellen.
8.2 Lampjes op het display
A B C D E F G H
Naam Omschrijving
A
Functielampje van de
oven
Toont de actieve functie.
B
Lampje/functielampje
ontdooien
Toont dat functie Lamp/Ontdooien actief is.
C
Opwarmen en rest-
warmte-indicatie
Toont dat opwarmen / restwarmte actief is.
D
Temperatuur-/contro-
lelampje van de klok
Toont de temperatuur en de tijd in minuten.
NEDERLANDS 17

Naam Omschrijving
E
Indicatielampje voor
vleesthermometer
Geeft aan dat de vleesthermometer in de aansluiting is
gestoken.
F
Controlelampje warm
houden
Toont aan dat de Warmhoudfunctie is ingeschakeld.
G
Kookduur /eindtijd/
bedrijfsduur
Toont de tijdsinstelling voor de klokfuncties.
H
Controlelampjes klok-
functies
Toont de actieve klokfunctie.
8.3 Ovenfuncties
Symbool Ovenfunctie Applicatie
Hetelucht: Om op 2 rekstanden te bakken en tegelijk voedsel
te drogen.Stel de temperatuur 20 - 40 °C lager in
dan bij Boven- en onderwarmte.
Conventioneel Voor het bakken en braden op 1 ovenniveau.
Pizzastand Om gerechten op één niveau te bakken met inten-
sief bruinen en een krokantere korst. Stel de tem-
peratuur 20 - 40 °C lager in dan voor Boven + on-
derwarmte.
Op lage tempera-
tuur bereiden
Voor het bereiden van zeer mager en mals gebra-
den voedsel.
Gratineren Voor het braden van grotere stukken vlees of gevo-
gelte met botten op 1 niveau. Ook om te gratineren
en te bruinen.
Grill groot Voor het roosteren van plat voedsel in grote hoe-
veelheden en voor het maken van toast.
Multi-hete lucht Om te bakken in bakblikken en te drogen op één
niveau bij lage temperatuur.
Warmhouden Om het voedsel warm te houden.
Drogen Voor het drogen van gesneden fruit (zoals appels,
pruimen, perziken) en groenten (zoals tomaten,
courgette of champignons).
Ontdooien Om bevroren gerechten te ontdooien.
Binnenverlichting Het lampje activeren zonder een bereidingsfunctie.
www.aeg.com18

8.4 In- of uitschakelen
Druk op om de functie in te
schakelen.
8.5 De ovenfunctie instellen
U kunt de ovenfunctie
wijzigen terwijl de oven
werkt.
Druk op of om een ovenfunctie in
te stellen.
In het display verschijnt de aanbevolen
temperatuur.
Als u deze temperatuur niet wijzigt
binnen ongeveer 5 seconden, begint het
apparaat met verwarmen.
8.6 Oventemperatuur wijzigen
Druk op of om de temperatuur te
wijzigen.
Wanneer het apparaat op de ingestelde
temperatuur is, hoort u een
geluidssignaal.
8.7 Een ovenfunctie
uitschakelen
Druk herhaaldelijk op of tot er
geen ovenfunctie op het display wordt
weergegeven.
8.8 Controlelampje bij
voorverwarmen
Als u een ovenfunctie inschakelt, gaan de
balkjes op het display een voor een
branden. De balkjes geven aan dat de
oventemperatuur toeneemt.
8.9 Restwarmte-indicatie
Wanneer u de oven uitschakelt, geeft het
display de restwarmte aan.
8.10 Gebruik van de
Toetsblokkering.
U kunt de functie alleen inschakelen als
de oven in werking is.
Toetsblokkering voorkomt dat een
ovenfunctie per ongeluk wordt
ingeschakeld.
1. Schakel de oven in.
2. Stel de ovenfunctie in.
3. Druk tegelijkertijd op en tot
het display "LOC" weergeeft.
Druk om de Toetsblokkering uit te
schakelen tegelijkertijd op en
totdat het display niet langer “LOC”
weergeeft.
U kunt de oven uitschakelen
als de toetsblokkering aan is.
Als u de oven uitschakelt,
wordt de toetsblokkering
uitgeschakeld.
8.11 Koelventilator
Als het apparaat in werking is, wordt de
koelventilator automatisch ingeschakeld
om de oppervlakken van het apparaat
koel te houden. Na het uitschakelen van
het apparaat kan de ventilatie doorgaan
totdat het apparaat is afgekoeld.
8.12 Automatische
uitschakeling van de oven
Omwille van veiligheidsredenen schakelt
het apparaat na bepaalde tijd
automatisch uit als er een ovenfunctie in
werking is en u geen instellingen wijzigt.
Huishoudelijk Uitschakeltijd in-
stellen
30 °C - 115 °C 12,5 uur
120 °C - 195 °C 8,5 uur
200 °C - 245 °C 5,5 uur
250 °C - maximum
°C
3,0 uur
Na een automatische uitschakeling, raakt
u een tiptoets aan om het apparaat weer
in werking te stellen.
De automatische
ovenuitschakeling werkt niet
met de functie Duur of
Einde.
NEDERLANDS 19

8.13 De vleesthermometer
gebruiken
De vleesthermometer meet de
kerntemperatuur van het vlees.
LET OP!
Gebruik alleen de
meegeleverde
vleesthermometer of
originele vervangende
onderdelen.
1. Steek de punt van de
vleesthermometer in het midden van
het vlees.
De vleesthermometer moet
gedurende de bereiding in het vlees
blijven en de stekker moet in het
stopcontact blijven.
2. Steek de stekker van de
vleesthermometer in de aansluiting
aan de voorkant van de ruimte.
3. Schakel het apparaat in.
4. Stel de kerntemperatuur in:
a. Druk herhaaldelijk op tot de
vleesthermometerfunctie
knippert en het display de
kerntemperatuur weergeeft.
De
standaardkerntemperatuur
is 60° C.
b. Druk binnen 5 seconden op of
om de kerntemperatuur in te
stellen.
De kerntemperatuur wordt aangegeven
vanaf 30°C.
5. Selecteer de ovenfunctie en, indien
nodig, de oventemperatuur
/ .
Terwijl het apparaat de voorlopige
eindtijd berekent, toont het een
knipperend vierkant.
Het apparaat berekent de voorlopige
eindtijd voor de kerntemperatuur steeds
opnieuw. Het display toont continu de
nieuwe voorlopige eindtijd.
6. Druk op een toets om het signaal uit
te zetten.
Wanneer het vlees de ingestelde
temperatuur heeft bereikt, hoort u
een geluidssignaal.
7. Verwijder de stekker van de
vleesthermometer uit het contact.
Haal het vlees uit het apparaat.
8. Schakel het apparaat uit.
WAARSCHUWING!
Wees voorzichtig bij het
verwijderen van de punt en
de stekker van de
kerntemperatuursensor. De
vleesthermometer is heet. Er
bestaat gevaar voor
brandwonden.
8.14 Ovenaccessoires plaatsen
Braadpan:
Plaats de braadpan tussen de
geleidestangen van de inschuifrail.
Bakrooster en braadpan samen:
Schuif de braadpan tussen de
geleidestangen van de roostersteun en
het rooster op de roostersteun er boven.
www.aeg.com
20

• Alle accessoires hebben
links en rechts bovenaan
kleine inkepingen om de
veiligheid te verhogen.
Deze inkepingen zorgen
er ook voor dat ze niet
omkantelen.
• Door de verhoogde lijst
die om het rooster loopt,
is kookgerei beveiligd
tegen wegglijden.
8.15 Telescopische geleiders -
de ovenaccessoires plaatsen
Bewaar de montage-
instructies voor de
telescopische geleiders om
later terug te kunnen lezen.
Met de telescopische geleiders kunt u de
roosters eenvoudig plaatsen en
verwijderen.
Plaats het bakrooster op de
telescopische geleiders zodat de pootjes
naar beneden zijn gericht.
Plaats de bakplaat of braadpan op de
telescopische geleiders.
Plaats het bakrooster op de braadpan.
Plaats het rooster en de diepe pan op de
telescopische geleiders.
NEDERLANDS
21

9. OVEN - KLOKFUNCTIES
9.1 Tabel klokfuncties
Klokfunctie Applicatie
Instellen dagtijd Met deze functie kunt u de tijd regelen.
Kookwekker Voor het instellen van een afteltijd. Deze functie heeft geen
invloed op de werking van het apparaat.
Programmaduur De bereidingstijd van de oven instellen.
Eindtijd Om de tijd van de dag in te stellen wanneer de oven moet
uitschakelen.
U kunt de functies
Bereidingsduur en Einde
gelijktijdig instellen om
de tijd in te stellen waarop
het apparaat moet worden
in- en uitgeschakeld. Zo kunt
u het apparaat inschakelen
met een uitgestelde tijd. Stel
eerst de bereidingsduur
en daarna het eind in.
9.2 De klokfuncties instellen
Stel voor Duur en Eindtijd de
ovenfunctie en temperatuur in. Dit is niet
nodig voor de kookwekker . Zie
'Ovenfunctie instellen'.
1. Gebruik herhaaldelijk tot het
display de benodigde klokfunctie
weergeeft.
2. Stel de benodigde tijd in met
of
.
De klokfunctie werkt. Het display toont
de weergave voor de klokfunctie die u
instelt.
Wanneer de tijd is verstreken, knippert
het indicatielampje van de klokfunctie en
"00.00" en klinkt er gedurende 2
minuten een geluidsignaal. Het apparaat
wordt uitgeschakeld.
Raak een sensorveld aan om het
geluidssignaal uit te schakelen.
Met Duur en Einde ,
schakelt de oven
automatisch uit.
9.3 Heat + Hold activeren
(indien van toepassing)
De temperatuur voor de
ingestelde ovenfunctie moet
meer dan 80 °C bedragen.
De functie Heat+Hold dient om kant-en-
klare producten gedurende 30 minuten
warm te houden, nadat de bereiding is
voltooid.
1. Stel de tijd in met de klokfuncties
Bereidingsduur
en/of Einde .
2. Druk herhaaldelijk op totdat
het display het symbool
Warmhouden weergeeft.
3. Gebruik en het display toont
“00:30”.
Wanneer de functie is voltooid, klinkt er
een geluidssignaal. De oven wordt
automatisch uitgeschakeld.
www.aeg.com
22

10. OVEN - AANWIJZINGEN EN TIPS
WAARSCHUWING!
Raadpleeg de hoofdstukken
Veiligheid.
De temperaturen en
baktijden in de tabellen zijn
slechts als richtlijn bedoeld.
Deze zijn afhankelijk van de
recepten en de kwaliteit en
de hoeveelheid van de
gebruikte ingrediënten.
10.1 Bakken
• Uw oven kan een andere bak-/
braadverhouding hebben dan het
apparaat dat u tot nu toe gebruikt
heeft. Pas uw normale instellingen
(temperatuur, gaartijden) en de
ovenniveaus aan de tabelwaarden
aan.
• De fabrikant raadt u aan de eerste
keer een lagere temperatuur in te
stellen.
• Als u geen concrete aanwijzingen
kunt vinden voor een speciaal recept,
kijkt u bij een soortgelijk product.
• Bij het bereiden van cake op
meerdere niveaus kan de baktijd ca.
10 - 15 minuten langer zijn.
• Als de cake niet overal even hoog is,
wordt de cake in het begin van het
bakproces niet overal even bruin.
Verander in dit geval de
temperatuurinstelling niet. De
verschillen verminderen tijdens het
bakproces.
• Bij langere baktijden kunt u de oven
ca. 10 minuten voor het einde van de
baktijd uitschakelen en profiteren van
de restwarmte.
Wanneer u bevroren gerechten gebruikt,
kunnen de bakplaten in de oven tijdens
het bakken vervormen. Wanneer de
bakplaten afkoelen, verdwijnt de
vervorming.
10.2 Baktips
Bakresultaat Mogelijke oorzaak Oplossing
De onderkant van de cake is
niet voldoende gebruind.
De rekstand is incorrect. Plaats de cake op een lagere
rekstand.
De cake zakt in en wordt
klef, klonterig, streperig.
De oventemperatuur is te
hoog.
De volgende keer dat u een
cake bakt, stelt u de baktem-
peratuur lager in.
De cake zakt in en wordt
klef, klonterig, streperig.
Te korte baktijd. Baktijd verlengen. U kunt de
baktijd niet verlagen door
een hogere temperatuur in
te stellen.
De cake zakt in en wordt
klef, klonterig, streperig.
Er zit te veel vloeistof in het
mengsel.
Minder vocht gebruiken. Let
op de kneedtijden, vooral bij
het gebruik van keukenma-
chines.
De cake is te droog. De oventemperatuur is te
laag.
De volgende keer dat u een
cake bakt, stelt u de baktem-
peratuur hoger in.
NEDERLANDS 23

Bakresultaat Mogelijke oorzaak Oplossing
De cake is te droog. Te lange baktijd. De volgende keer dat u een
cake bakt, gebruikt u een
kortere baktijd.
De cake wordt ongelijkmatig
bruin.
De oventemperatuur is te
hoog en de baktijd te kort.
De baktemperatuur lager in-
stellen en de baktijd verlen-
gen.
De cake wordt ongelijkmatig
bruin.
Het deeg is niet gelijkmatig
verdeeld.
Verdeel het deeg gelijkma-
tig over de bakplaat.
De cake wordt niet gaar bin-
nen de aangegeven baktijd.
De oventemperatuur is te
laag.
De volgende keer dat u een
cake bakt, stelt u de baktem-
peratuur een beetje hoger
in.
10.3 Multi-hete lucht
1. Gebruik de functie om te bakken in
bakblikken en te drogen op één
niveau bij lage temperatuur.
2. Bak maar één bakblik of bakplaat
tegelijkertijd.
3. We raden het gebruik van Multi-hete
lucht aan zonder voorverwarmen.
4. Gebruik als u de oven wilt
voorverwarmen de functie bereiding
met hete lucht.
Gerecht Temperatuur
(°C)
Tijd (min) Rooster-
hoogte
Biscuitgebak in bakblik 160 50 - 70 2
Tulband of brioche in bakblik 150 - 160 50 - 70 2
Zandgebak/Droge vruchtencake in
bakblik
140 - 160 70 - 90 2
Eiwitgebak, schuimgebak 80 - 100 120 - 150 3
10.4 Bakken met hete lucht
Gerecht Temperatuur
(°C)
Tijd (min) Rooster-
hoogte
Broodjes 175 - 185 15 - 20 2 + 4
Volkoren broodjes 165 - 180 20 - 30 2 + 4
Pretzels 160 - 170 15 - 20 2 + 4
www.aeg.com24

Gerecht Temperatuur
(°C)
Tijd (min) Rooster-
hoogte
Wit brood 170 - 180 35 - 45 2 + 4
Volkoren brood 160 - 170 35 - 45 2 + 4
Roggebrood, mix 250 opwarmen 2 + 4
- bakken 160 - 170 60 - 70 2 + 4
Baguettes 180 - 200 20 - 30 2 + 4
Muffins 160 - 170 15 - 25 2 + 4
Biscuittaart/Zandgebak 150 - 160 50 - 60 2
Schuimgebakjes 100 90 - 120 2 + 4
Meringuebasis 100 90 - 120 2 + 4
- verwarmen met oven uit-
geschakeld
25 2 + 4
Koekjes 150 - 160 10 - 20 2 + 4
Soesjes 155 - 165 30 - 40 2 + 4
Fruittaart, zandkoekjes 150 - 160 voorbakken, basis
10 - 15
2 + 4
Fruittaart, zandkoekjes 150 - 160 afwerking 35 - 45 2 + 4
Fruittaart, kruimeldeeg 170 - 180 30 - 40 2 + 4
10.5 Boven- en onderwarmte
Gerecht Temperatuur
(°C)
Tijd (min) Rooster-
hoogte
Broodjes 200 - 225 8 - 12 3 - 4
Volkoren broodjes 190 - 200 20 - 25 3 - 4
Gevulde sandwiches 200 - 225 10 - 12 3 - 4
Ciabattabroodjes 210 - 230 10 - 20 3 - 4
Foccacia 220 - 230 15 - 20 3 - 4
Pitabroodjes 250 5 - 15 3 - 4
Pretzels 180 - 200 12 - 15 3 - 4
Wit brood 190 - 210 25 - 40 1 - 2
Ciabatta 210 - 220 15 - 25 1 - 2
Volkoren brood 180 - 200 35 - 45 1 - 2
NEDERLANDS 25

Gerecht Temperatuur
(°C)
Tijd (min) Rooster-
hoogte
Roggebrood, mix 275 verwarmen 1
- bakken 190 55 - 65 1
Baguettes 220 - 230 15 - 30 3 - 4
Pannenkoek 170 - 180 50 - 60 2 - 3
Cake 170 - 180 35 - 45 3 - 4
Biscuittaart/Zandgebak 170 - 180 40 - 50 1 - 2
Broodjes 200 - 225 8 - 12 3 - 4
Schuimgebakjes 100 90 - 120 3 - 4
Meringuebasis 100 90 - 120 3 - 4
- verwarmen met oven uitge-
schakeld
25 3 - 4
Koekjes 160 - 180 6 - 15 3 - 4
Soesjes 170 - 190 30 - 45 3 - 4
Biscuitrol 190 - 210 10 - 12 3 - 4
Fruittaart, zandkoekjes 175 - 200 voorbakken, rol
10 - 15
3 - 4
Fruittaart, zandkoekjes 175 afwerking 35 -
45
3 - 4
Fruittaart, kruimeldeeg 190 - 200 25 - 35 3 - 4
Marsepein tulband: 210 - 230 10 - 12 2
10.6 Pizzatabel
Gerecht Temperatuur (°C) Tijd (min) Rooster-
hoogte
Ciabattabroodjes 200 - 220 10 - 20 2 - 3
Foccacia 220 - 230 10 - 20 2 - 3
Ciabatta 190 - 200 15 - 25 2 - 3
Fruittaart, zandkoekjes 170 - 180 35 - 45 2 - 3
Fruittaart, kruimeldeeg 175 - 200 25 - 35 2 - 3
Pizza, zelfgemaakt (dik - met veel
garnering)
180 - 200 25 - 35 1 - 2
www.aeg.com26

Gerecht Temperatuur (°C) Tijd (min) Rooster-
hoogte
Pizza, zelfgemaakt (dunne korst)
200 - 230
1)
15 - 20 1 - 2
Pizza, bevroren 200 15 - 20 1 - 2
Taart, zelfgemaakt voorgebakken, rol 215 - 225 35 - 45 3 - 4
Taart, zelfgemaakt afwerken 215 - 225 35 - 45 3 - 4
Taart, bevroren 200 15 - 25 3 - 4
1)
Oven voorverwarmen.
10.7 Braden
• Gebruik hittebestendig servies om te
braden (lees de instructies van de
fabrikant).
• Grote braadstukken kunt u direct in
de diepe braadpan braden (indien
aanwezig) of op een rooster boven de
braadpan.
• Braad mager vlees in een braadpan
met deksel. Op die manier blijft het
vlees sappiger.
• Alle soorten vlees die een korst
moeten krijgen, kunt u in de
braadschaal zonder deksel braden.
• Wij raden u aan vlees en vis vanaf 1 kg
in het apparaat te bereiden.
• Giet een beetje vloeistof in de
braadpan om het aanbranden van
vleessap of vet te voorkomen.
• Indien nodig het braadstuk (na 1/2 -
2/3 van de gaartijd) keren.
• Besprenkel grote braadstukken en
gevogelte diverse keren tijdens het
braden met het eigen vleessap.
Hiermee bereikt u een beter
braadresultaat.
• U kunt het apparaat ongeveer 10
minuten voor het einde van de
bereidingstijd uitschakelen om de
restwarmte te gebruiken.
10.8 Braden met hete lucht
Rundvlees
Gerecht Temperatuur
(°C)
Tijd (min / kg) Rooster-
hoogte
Biefstuk
1)
125 80 - 120 2 - 3
Rump steak - braden 200 totaal 10 2 - 3
Rump steak - grillen 150 50 - 60 2 - 3
Biefstuk 160 90 - 120 1 - 2
1)
Overig. Voor afbakken na roosteren onder de grill of met boven-/onderwarmte op 250°C. Vleesther-
mometer verwijderen voor het grillen.
NEDERLANDS 27

Kalfsvlees
Gerecht Temperatuur
(°C)
Tijd (min / kg) Rooster-
hoogte
Runderbiefstuk
1)
160 60 - 70 2 - 3
1)
Overig. Voor afbakken na roosteren onder de grill of met boven-/onderwarmte op 250°C. Vleesther-
mometer verwijderen voor het grillen.
Lamsvlees
Gerecht Temperatuur
(°C)
Tijd (min / kg) Rooster-
hoogte
Been/schouder/rug 160 80 - 100 2
Varkensvlees
Gerecht Temperatuur
(°C)
Tijd (min / kg) Rooster-
hoogte
Geroosterd varkensvlees
1)
175 60 - 70 2 - 3
Varkensrug
1)
175 60 2 - 3
Nekfillets 160 90 - 120 2 - 3
Ham 150 60 - 100 1 - 2
1)
Overig. Voor afbakken na roosteren onder de grill of met boven-/onderwarmte op 250°C. Vleesther-
mometer verwijderen voor het grillen.
Gevogelte
Gerecht Temperatuur
(°C)
Tijd (min / kg) Rooster-
hoogte
Kip, in stukken 180 55 - 65 2 - 3
Eend
1)
150 55 - 65 2 - 3
Eend langzaam geroosterd
1)
130 totaal ongeveer 5
uur
2 - 3
Geroosterde kalkoen, gevuld 150 50 - 60 1 - 2
Kalkoenborst 175 70 - 80 2 - 3
1)
Overig. Voor afbakken na roosteren onder de grill of met boven-/onderwarmte op 250°C. Vleesther-
mometer verwijderen voor het grillen.
10.9 Boven + Onderwarmte
Rundvlees
Gerecht Temperatuur (°C) Tijd (min / kg) Rooster-
hoogte
Biefstuk
1)
125 80 - 120 2 - 3
www.aeg.com28

Gerecht Temperatuur (°C) Tijd (min / kg) Rooster-
hoogte
Rump steak - braden 225 totaal 10 2 - 3
Rump steak - grillen 160 50 - 60 2 - 3
Biefstuk 180 90 - 120 1 - 3
1)
Overig. Voor afbakken na roosteren onder de grill of met boven-/onderwarmte op 250°C. Vleesther-
mometer verwijderen voor het grillen.
Kalfsvlees
Gerecht Temperatuur (°C) Tijd (min / kg) Rooster-
hoogte
Runderbiefstuk
1)
180 60 - 70 2 - 3
1)
Overig. Voor afbakken na roosteren onder de grill of met boven-/onderwarmte op 250°C. Vleesther-
mometer verwijderen voor het grillen.
Lamsvlees
Gerecht Temperatuur (°C) Tijd (min / kg) Rooster-
hoogte
Been/schouder/rib 180 80 - 100 2
Varkensvlees
Gerecht Temperatuur (°C) Tijd (min / kg) Rooster-
hoogte
Geroosterd varkensvlees
1)
200 60 - 70 3
Varkensrug
1)
200 60 3
Nekfillets 180 90 - 120 2 - 3
Ham 160 60 - 100 1 - 2
1)
Overig. Voor afbakken na roosteren onder de grill of met boven-/onderwarmte op 250°C. Vleesther-
mometer verwijderen voor het grillen.
Gevogelte
Gerecht Temperatuur (°C) Tijd (min / kg) Rooster-
hoogte
Kip, in stukken 200 55 - 65 2 - 3
Eend
1)
160 55 - 65 2 - 3
Eend langzaam geroosterd
1)
130 totaal ongeveer
5 uur
2 - 3
Geroosterde kalkoen, gevuld 160 50 - 60 1 - 2
NEDERLANDS 29

Gerecht Temperatuur (°C) Tijd (min / kg) Rooster-
hoogte
Kalkoenborst 200 70 - 80 2 - 3
1)
Overig. Voor afbakken na roosteren onder de grill of met boven-/onderwarmte op 250°C. Vleesther-
mometer verwijderen voor het grillen.
10.10 Gratineren
Rundvlees
Gerecht Temperatuur
(°C)
Tijd in minuten
per kg vlees
Rooster-
hoogte
Rump steak - braden 200 totaal 10 2 - 3
Rump steak - grillen 150 50 - 60 2 - 3
Biefstuk 160 90 - 120 1 - 2
Kalfsvlees
Gerecht Temperatuur
(°C)
Tijd (min / kg) Rooster-
hoogte
Runderbiefstuk
1)
160 60 - 70 2 - 3
1)
Overig. Voor afbakken na roosteren onder de grill of met boven-/onderwarmte op 250°C. Vleesther-
mometer verwijderen voor het grillen.
Lamsvlees
Gerecht Temperatuur
(°C)
Tijd (min / kg) Rooster-
hoogte
Been/schouder/rib 160 80 - 100 2
Varkensvlees
Gerecht Temperatuur
(°C)
Tijd (min / kg) Rooster-
hoogte
Geroosterd varkensvlees
1)
180 60 - 70 2 - 3
Varkensrug
1)
175 60 2 - 3
Nekfillets 160 90 - 120 2 - 3
Ham 150 60 - 100 1 - 2
1)
Overig. Voor afbakken na roosteren onder de grill of met boven-/onderwarmte op 250°C. Vleesther-
mometer verwijderen voor het grillen.
www.aeg.com30

Gevogelte
Gerecht Temperatuur
(°C)
Tijd (min / kg) Rooster-
hoogte
Kip 180 55 - 65 2 - 3
Eend
1)
150 55 - 65 2 - 3
Eend langzaam geroosterd
1)
niet geschikt totaal ongeveer
5 uur
2 - 3
Geroosterde kalkoen, gevuld 150 50 - 60 1 - 2
Kalkoenborst 175 70 - 80 2 - 3
1)
Overig. Voor afbakken na roosteren onder de grill of met boven-/onderwarmte op 250°C. Vleesther-
mometer verwijderen voor het grillen.
10.11 Vleesthermometertabel
Rundvlees
Gerecht Voedselkerntemperatuur
(°C)
Roosterhoogte
Biefstuk 55 - 65 2 - 3
Rump steak - braden 55 - 65 2 - 3
Rump steak - grillen 55 - 65 2 - 3
Biefstuk 75 - 80 1 - 2
Kalfsvlees
Gerecht Voedselkerntempera-
tuur (°C)
Roosterhoogte
Runderbiefstuk 65 2 - 3
Lamsvlees
Gerecht Voedselkerntempera-
tuur (°C)
Roosterhoogte
Been/schouder/rug 90 2
Varkensvlees
Gerecht Voedselkerntemperatuur
(°C)
Roosterhoogte
Geroosterd varkensvlees 80 2 - 3
Nekfillets 75 - 80 2 - 3
Ham 70 - 75 1 - 2
NEDERLANDS 31

Gevogelte
Gerecht Voedselkerntemperatuur
(°C)
Roosterhoogte
Kalkoenborst 75 - 80 2 - 3
10.12 Bereidingen op lage
temperatuur
Gebruik deze functie voor het bereiden
van zachte, magere stukken vlees en vis.
Wanneer de oven de ingestelde
temperatuur bereikt, klinkt er een
signaal. Daarna wordt de oven
automatisch omgeschakeld naar een
lagere temperatuur.
Met de ovenfunctie
Bereiden op lage
temperatuur altijd zonder
deksel garen.
U kunt niet Bereiding bij
lage temperatuur in
combinatie met de
klokfuncties gebruiken:
Bereidingsduur en Einde.
1. Het braadstuk in de braadpan (indien
aanwezig) heel heet aanbraden.
2. Plaats het vlees in een braadslede of
direct op het rooster. Zet de plaat
onder het rooster om vet op te
vangen.
3. Stel de ovenfunctie Bereiding bij
lage temperatuur in, wijzig de
temperatuur indien nodig en laat
gaar worden (zie tabel).
Gerecht Aantal Temperatuur
(°C)
Voorverwarmen (mi-
nuten)
Rooster-
hoogte
Rauw Medium
Engelse rosbief (door-
bakken)
800 – 1.000 g 150 90 - 110 130 - 140 2
Engelse rosbief (door-
bakken)
1200 – 1.600 g 150 120 - 130 160 - 170 2
Karbonade 600 – 1.000 g 150 55 - 75 95 - 110 3
Schouder, zonder bot 3,5 cm dik 150 - 70 - 80 3
Varkenshaas, heel 600 – 1.000 g 120 65 - 75 90 - 110 3
Varkenshaas, stukjes 2,5 cm dik 120 20 - 25 35 - 45 3
Entrecote 1,5 cm dik 120 15 - 25 30 - 35 3
T-bone 2 cm dik 120 25 - 30 35 - 40 3
www.aeg.com32

Gerecht Aantal Temperatuur
(°C)
Voorverwarmen (mi-
nuten)
Rooster-
hoogte
Rauw Medium
Varkenshaas, heel 500 – 700 g 120 - 65 - 75 3
Varkenshaas, stukjes 2,5 cm dik 120 - 35 - 45 2
10.13 Grillen in het algemeen
WAARSCHUWING!
Tijdens het grillen moet de
ovendeur altijd gesloten zijn.
• Grill alltijd met de maximale
temperatuurinstelling.
• Rooster in de rekstand plaatsen, zoals
aangeraden in grilleertabel.
• Altijd de pan plaatsen om vet op te
vangen op de eerste rekstand.
• Alleen platte stukken vlees of vis
grillen.
• Lege oven met grillfuncties altijd 5
minuten voorverwarmen.
Het grilgedeelte is ingesteld in het
midden van het rooster.
10.14 Grillen
Gerecht Temperatuur
(°C)
Tijd (min) Rooster-
hoogte
1e kant 2e kant
Varkenskotelet 250 7 - 9 4 - 6 3 - 4
Lamsbout 250 7 - 10 5 - 6 3 - 4
Kip, in stukken 250 20 - 25 15 - 20 3 - 4
Worstjes 250 3 - 5 2 - 4 3 - 4
Spareribs, 20 min. voorgegaard 250 15 - 20 15 - 20 3 - 4
Vis, stukjes kabeljauw of zalm 250 10 - 15 5 - 10 3 - 4
Geroosterd brood 250 2 - 3 1 - 2 3 - 4
10.15 ontdrooien
• Haal het voedsel uit de verpakking.
Doe het voedsel op een bord.
• Gebruik voor het afdekken geen
borden of schotels. Hierdoor kan de
ontdooitijd worden verlengd.
• Gebruik de eerste rekstand van de
oven. Het inzetniveau onderaan.
NEDERLANDS 33

Gerecht Aantal Ontdooitijd
(min.)
Nadooitijd
(min)
Opmerkingen
Kip 1 kg 100 - 140 20 - 30 Kip op een omgedraaid scho-
teltje in een groot bord leg-
gen. Halverwege de berei-
dingstijd omdraaien.
Vlees 1 kg 100 - 140 20 - 30 Halverwege de bereidingstijd
omdraaien.
Vlees 500 g 90 - 120 20 - 30 Halverwege de bereidingstijd
omdraaien.
Forel 150 g 25 - 35 10 - 15 -
Aardbeien 300 g 30 - 40 10 - 20 -
Boter 250 g 30 - 40 10 - 15 -
Room 2 x 200 g 80 - 100 10 - 15 Klop de nog licht bevroren sla-
groom.
Cake 1,4 kg 60 60 -
11. OVEN - ONDERHOUD EN REINIGING
WAARSCHUWING!
Raadpleeg de hoofdstukken
Veiligheid.
11.1 Opmerkingen over
schoonmaken
• Maak de voorkant van het apparaat
schoon met een zachte doek en een
warm sopje.
• Gebruik voor metalen oppervlakken
een universeel reinigingsmiddel.
• Reinig de binnenkant van het
apparaat na elk gebruik.
Opeenhopingen van vetten of andere
voedselresten kunnen brand
veroorzaken. Het risico is hoger voor
de grillpan.
• Verwijder hardnekkig vuil met een
speciale ovenreiniger.
• Reinig alle accessoires na elk gebruik
en laat ze drogen. Gebruik een zachte
doek en een warm sopje en een
reinigingsmiddel.
• Toebehoren met antiaanbaklaag
mogen niet worden schoongemaakt
met een agressief reinigingsmiddel,
voorwerpen met scherpe randen of
een afwasautomaat. Dit kan de
antiaanbaklaag beschadigen.
11.2 Apparaten van roestvrij
staal of aluminium:
Maak de ovendeur alleen
schoon met een natte spons.
Droog maken met een
zachte doek.
Vermijd het gebruik van
staalwol, zure of schurende
producten, deze kunnen de
oppervlakken van de oven
beschadigen. Maak het
bedieningspaneel van de
oven net zo voorzichtig
schoon
11.3 Verwijderen van de
inschuifrails
Om de oven te reinigen, verwijdert u de
inschuifrails.
1. Trek de inschuifrail bij de voorkant uit
de zijwand.
www.aeg.com
34

2. Trek de geleider bij de achterkant uit
de zijwand en verwijder deze.
1
2
De pinnetjes op de
telescopische geleiders
moeten naar voren wijzen.
Installeer de inschuifrails in omgekeerde
volgorde.
LET OP!
Zorg ervoor dat de langste
bevestigingsdraad voorin
wordt aangebracht. De
uiteinden van de twee
draden moeten naar
achteren wijzen. Incorrecte
installatie kan schade aan
het email toebrengen.
11.4 Uitnemen van de
ovendeur
Om het reinigen te vergemakkelijken,
verwijdert u best de ovendeur.
1
2
1. Open de deur helemaal.
2. Verplaats de schuif totdat u een klik
hoort.
3. Sluit de deur tot de schuif
vergrendelt.
4. Verwijder de deur.
Om de deur te verwijderen, trek de
deur eerst aan de ene zijde naar
buiten en daarna aan de andere
zijde.
Wanneer u klaar bent met reinigen,
plaatst u de ovendeur terug in
omgekeerde volgorde. Zorg ervoor dat u
een klik hoort wanneer u de deur
terugplaatst. Gebruik indien nodig enige
kracht.
11.5 Verwijderen en reinigen
van de deurglazen
De glasplaten van de
ovendeur op uw product
kunnen in type en vorm
verschillen van de
voorbeelden die u hier ziet.
Het aantal glasplaten kan
ook verschillen.
1. Deurafdekking (B) aan de bovenkant
van de deur aan beide kanten
vastpakken en naar binnen drukken
om de klemsluiting te ontgrendelen.
NEDERLANDS
35

1
2
B
2. Trek de deur naar voren om hem te
verwijderen.
3. Houd de glasplaten aan de
bovenkant vast en trek deze een voor
een omhoog uit de geleiding.
4. Reinig de glasplaten.
Om de panelen te plaatsen, moet u de
stappen in omgekeerde volgorde
uitvoeren.
11.6 Het lampje vervangen
Leg een doek op de bodem van de
binnenkant van het apparaat. Dit
voorkomt schade aan het afdekglas en
de ovenruimte.
WAARSCHUWING!
Gevaar voor elektrocutie!
Maak de zekering los
voordat u de lamp vervangt.
De lamp en het afdekglas
kunnen heet zijn.
1. Schakel het apparaat uit.
2. Verwijder de zekeringen in de
zekeringenkast, of schakel de
stroomonderbreker uit.
De lamp aan de achterkant.
Het afdekglas van het
lampje bevindt zich in de
achterkant van de
ovenruimte.
1. Draai het afdekglas van de lamp naar
rechts en verwijder het.
2. Reinig het afdekglas.
3. Vervang het ovenlampje met de
relevante tegen 300 °C
hittebestendig ovenlampje.
Gebruik hetzelfde ovenlamptype.
4. Plaats het afdekglas terug.
Het zijlampje
U kunt de afdekking van het lampglas
aan de linkerkant van de binnenruimte
vinden.
1. Verwijder de linker inschuifrail om bij
de lamp te komen.
2. Gebruik een smal, stomp voorwerp
(bijv. een theelepel) om het
afdekglas te verwijderen.
3. Reinig het afdekglas.
4. Vervang de lamp door een geschikte
300 °C hittebestendige lamp.
5. Plaats het afdekglas terug.
6. De linker inschuifrails installeren.
www.aeg.com
36

11.7 De lade verwijderen
WAARSCHUWING!
Wanneer de oven in gebruik
is, kan de lade heet worden.
Bewaar geen ontvlambare
dingen in de oven (bijv.
schoonmaakmiddelen,
plastic zakken,
ovenhandschoenen, papier,
reinigingssprays, enz).
De lade onder de oven kan worden
verwijderd om gemakkelijker te worden
schoongemaakt.
1. Trek de lade volledig naar buiten, tot
deze niet verder kan.
1
2
2. Til de lade iets schuin omhoog en
verwijder de lade uit de steunrails.
De lade plaatsen:
1. Plaats de lade op de steunrails van
de lade. Zorg ervoor dat de
uitsparingen goed in de rails vallen.
2. Laat de lade tot horizontale stand
zakken en duw de lade naar binnen.
12. PROBLEEMOPLOSSING
WAARSCHUWING!
Raadpleeg de hoofdstukken
Veiligheid.
12.1 Problemen oplossen
Probleem Mogelijke oorzaak Oplossing
U kunt het apparaat niet ac-
tiveren.
Het apparaat is niet aan-
gesloten op een stopcontact
of is niet goed geïnstalleerd.
Controleer of het apparaat
goed is aangesloten op het
lichtnet.
U kunt het apparaat niet ac-
tiveren.
De zekering is doorgebrand. Controleer of de zekering de
oorzaak van de storing is. Als
de zekeringen keer op keer
doorslaan, neemt u contact
op met een erkende installa-
teur.
U kunt de kookplaat niet in-
schakelen of bedienen.
U hebt 2 of meer tiptoetsen
tegelijk aangeraakt.
Raak slechts één tiptoets te-
gelijk aan.
U kunt de kookplaat niet in-
schakelen of bedienen.
STOP+GO -functie is in
werking.
Raadpleeg het hoofdstuk
'Kookplaat - Dagelijks ge-
bruik'.
U kunt de kookplaat niet in-
schakelen of bedienen.
Er ligt water of vetspatten
op het bedieningspaneel.
Reinig het bedieningspa-
neel.
NEDERLANDS 37

Probleem Mogelijke oorzaak Oplossing
Er klinkt een geluidssignaal
en de kookplaat wordt uit-
geschakeld.
Er weerklinkt een geluids-
signaal als de kookplaat
wordt uitgeschakeld.
U hebt een of meer tiptoet-
sen afgedekt.
Verwijder het voorwerp van
de tiptoetsen.
De kookplaat schakelt uit. U hebt iets op de tiptoets
geplaatst.
Verwijder het object van de
tiptoets.
Restwarmte-indicatie gaat
niet branden.
De zone is niet heet, omdat
hij slechts kortstondig is be-
diend.
Als de kookzone lang gen-
oeg in werking is geweest
om heet te zijn, neemt u
contact op met de klanten-
service.
Automatisch opwarmen
functie werkt niet.
De zone is heet. Laat de zone voldoende af-
koelen.
Automatisch opwarmen
functie werkt niet.
De hoogste verwarmings-
stand is ingesteld.
De hoogste kookstand heeft
hetzelfde vermogen als de
functie.
De kookstand schakelt tus-
sen twee kookstanden.
Vermogensbeheer -functie is
in werking.
Raadpleeg het hoofdstuk
'Kookplaat - Dagelijks ge-
bruik'.
De tiptoetsen worden warm. Het kookgerei is te groot of
staat te dicht bij het bedie-
ningspaneel.
Plaats groter kookgerei op
de achterste kookzones in-
dien nodig.
gaat branden op het
kookplaatdisplay.
Automatisch uitschakelen is
in werking.
Schakel de kookplaat uit en
weer in.
gaat branden op het
kookplaatdisplay.
De kinderbeveiliging of de
Toetsblokkering functie
werkt.
Raadpleeg het hoofdstuk
'Kookplaat - Dagelijks ge-
bruik'.
gaat branden op het
kookplaatdisplay.
Er staat geen kookgerei op
de zone.
Zet kookgerei op de zone.
gaat branden op het
kookplaatdisplay.
Het kookgerei is niet goed. Gebruik het juiste kookgerei.
Zie het hoofdstuk 'Kookplaat
- Nuttige aanwijzingen en
tips'.
gaat branden op het
kookplaatdisplay.
De diameter aan de bodem
van het kookgerei is te klein
voor de zone.
Gebruik kookgerei met de
juiste afmetingen.
Zie het hoofdstuk 'Kookplaat
- Nuttige aanwijzingen en
tips'.
www.aeg.com38

Probleem Mogelijke oorzaak Oplossing
gaat branden op het
kookplaatdisplay.
Het kookgerei dekt het
kruis / vierkant niet.
Dek het kruis / vierkant volle-
dig af.
De oven wordt niet warm. De oven is uitgeschakeld. Schakel de oven in.
De oven wordt niet warm. De klok is niet ingesteld. Stel de klok in.
De oven wordt niet warm. De benodigde kookstanden
zijn niet ingesteld.
Zorg ervoor dat de instellin-
gen correct zijn.
De oven wordt niet warm. De automatische uitschakel-
ing is actief.
Raadpleeg "Automatisch
uitschakelen".
De oven wordt niet warm. De functieblokkering is inge-
schakeld.
Raadpleeg "Functiever-
grendeling".
Het lampje brandt niet. Het lampje is stuk. Vervang het lampje.
De vleesthermometer werkt
niet.
De stekker van de vleesther-
mometer is niet goed in de
aansluiting gestoken.
Steek de stekker van de
vleesthermometer zo ver
mogelijk in het stopcontact.
De bereiding van de ger-
echten duurt te lang of de
gerechten worden te snel
gaar.
De temperatuur is te laag of
te hoog.
Pas indien nodig de temper-
atuur aan. Volg het advies in
de handleiding op.
Stoom en condens slaan
neer op de gerechten en in
de ovenruimte.
Het gerecht heeft te lang in
de oven gestaan.
Laat gerechten na het berei-
den niet langer dan 15 - 20
minuten in de oven staan.
Het display toont een fout-
code die niet in deze lijst
voorkomt.
Er is een elektrische fout. Schakel het apparaat uit via
de huiszekering of de vei-
ligheidsschakelaar in de ze-
keringkast en schakel het ap-
paraat dan weer in.
Neem contact op met de
klantenservice wanneer de
foutcode opnieuw wordt
weergegeven.
12.2 Onderhoudgegevens
Als u niet zelf het probleem kunt
verhelpen, neem dan contact op met uw
verkoper of de serviceafdeling.
De contactgegevens van het
servicecentrum staan op het typeplaatje.
Het typeplaatje bevindt zich voor aan de
binnenkant van het apparaat. Verwijder
het typeplaatje niet uit de ovenruimte.
Wij adviseren u om de gegevens hier te noteren:
Model (MOD.) .........................................
NEDERLANDS 39

Wij adviseren u om de gegevens hier te noteren:
Productnummer (PNC) .........................................
Serienummer (S.N.) .........................................
13. MONTAGE
WAARSCHUWING!
Raadpleeg de hoofdstukken
Veiligheid.
13.1 Technische gegevens
Afmetingen
Hoogte 847 - 867 mm
Breedte 596 mm
Diepte 600 mm
Ovencapaciteit 74 l
13.2 Locatie van het apparaat
U kunt uw vrijstaand apparaat met kasten
aan een of twee zijden en in de hoek
plaatsen.
A
A
B
Minimum afstanden
Afmetingen mm
A 2
B 685
13.3 Het apparaat waterpas
zetten
Gebruik kleine pootjes aan de onderkant
van het apparaat om het kookoppervlak
aan de bovenkant waterpas met andere
oppervlakken te brengen.
13.4 Anti-kantelbescherming
LET OP!
Monteer de anti-
kantelbescherming zodat
het apparaat niet valt als het
incorrect wordt geladen. De
antikantelbescherming werkt
alleen als het apparaat in
een correcte ruimte is
geplaatst.
Uw apparaat is voorzien van
het symbool weergegeven in
de afbeelding (indien van
toepassing) om u te
herinneren aan de montage
van de anti-
kantelbescherming.
www.aeg.com
40

LET OP!
Zorg dat u de anti-
kantelbescherming op de
correcte hoogte installeert.
Zorg ervoor dat het oppervlak achter het
apparaat glad is.
1. Stel de correcte hoogte in en bepaal
waar op het apparaat u de anti-
kantelbescherming gaat plaatsen.
2. Installeer de anti-kantelbescherming
77 mm onder het bovenvlak van het
apparaat en 49 mm van de linkerkant
van het apparaat in de ronde
opening op een steun. Zie
afbeelding. Schroef de beveiliging
stevig in solide materiaal of gebruik
geschikte versteviging (muur).
3. U vindt het gat aan de
linkerachterkant van het apparaat.
Zie afbeelding. Til de voorkant van
het apparaat op (1) en plaats dit in
het midden van de ruimte tussen de
kastjes (2). Als de afstand tussen de
aanrechtkastjes groter is dan de
breedte van het apparaat, moet u de
zijmaten aanpassen als u het
apparaat wilt centreren.
1
2
49 mm
77 mm
13.5 Elektrische installatie
WAARSCHUWING!
De fabrikant is niet
verantwoordelijk indien u
deze veiligheidsmaatregelen
uit hoofdstuk
'Veiligheidsinformatie' niet
opvolgt.
Dit apparaat wordt geleverd zonder
stekker en netsnoer.
Geschikte kabelsoorten: H07 RN-F, H05
RN-F, H05 RR-F, H05 VV-F, H05 V2V2-F
(T90), H05 BB-F.
14.
MILIEUBESCHERMING
Recycle de materialen met het symbool
. Gooi de verpakking in een geschikte
verzamelcontainer om het te recyclen.
Help om het milieu en de
volksgezondheid te beschermen en
recycle het afval van elektrische en
elektronische apparaten. Gooi apparaten
gemarkeerd met het symbool niet weg
met het huishoudelijk afval. Breng het
product naar het milieustation bij u in de
buurt of neem contact op met de
gemeente.
NEDERLANDS 41

CONTENTS
1. SAFETY INFORMATION.........................................................................................43
2. SAFETY INSTRUCTIONS........................................................................................ 45
3. PRODUCT DESCRIPTION...................................................................................... 47
4. BEFORE FIRST USE.................................................................................................48
5. HOB - DAILY USE....................................................................................................49
6. HOB - HINTS AND TIPS......................................................................................... 53
7. HOB - CARE AND CLEANING...............................................................................55
8. OVEN - DAILY USE .................................................................................................55
9. OVEN - CLOCK FUNCTIONS................................................................................ 61
10. OVEN - HINTS AND TIPS.....................................................................................61
11. OVEN - CARE AND CLEANING..........................................................................72
12. TROUBLESHOOTING...........................................................................................75
13. INSTALLATION..................................................................................................... 77
FOR PERFECT RESULTS
Thank you for choosing this AEG product. We have created it to give you
impeccable performance for many years, with innovative technologies that help
make life simpler features you might not find on ordinary appliances. Please
spend a few minutes reading to get the very best from it.
Visit our website for:
Get usage advice, brochures, trouble shooter, service information:
www.aeg.com
Register your product for better service:
www.registeraeg.com
Buy Accessories, Consumables and Original spare parts for your appliance:
www.aeg.com/shop
CUSTOMER CARE AND SERVICE
Always use original spare parts.
When contacting our Authorised Service Centre, ensure that you have the
following data available: Model, PNC, Serial Number.
The information can be found on the rating plate.
Warning / Caution-Safety information
General information and tips
Environmental information
Subject to change without notice.
www.aeg.com
42

1. SAFETY INFORMATION
Before the installation and use of the appliance,
carefully read the supplied instructions. The
manufacturer is not responsible if an incorrect
installation and use causes injuries and damages. Always
keep the instructions with the appliance for future
reference.
1.1 Children and vulnerable people safety
WARNING!
Risk of suffocation, injury or permanent
disability.
• This appliance can be used by children aged from 8
years and above and persons with reduced physical,
sensory or mental capabilities or lack of experience
and knowledge if they have been given supervision or
instruction concerning use of the appliance in a safe
way and understand the hazards involved.
• Do not let children play with the appliance.
• Keep all packaging away from children.
• Keep children and pets away from the appliance when
it operates or when it cools down. Accessible parts are
hot.
• If the appliance has a child safety device, we
recommend you activate it.
• Cleaning and user maintenance shall not be made by
children without supervision.
1.2
General Safety
• Only a qualified person must install this appliance and
replace the cable.
• Do not operate the appliance by means of an external
timer or separate remote-control system.
• Unattended cooking on a hob with fat or oil can be
dangerous and may result in fire.
ENGLISH
43

• Never try to extinguish a fire with water, but switch off
the appliance and then cover flame e.g. with a lid or a
fire blanket.
• Do not store items on the cooking surfaces.
• Do not use a steam cleaner to clean the appliance.
• Metallic objects such as knives, forks, spoons and lids
should not be placed on the hob surface since they
can get hot.
• If the glass ceramic surface / glass surface is cracked,
switch off the appliance to avoid the possibility of
electric shock.
• After use, switch off the hob element by its control
and do not rely on the pan detector.
• Internally the appliance becomes hot when in
operation. Do not touch the heating elements that are
in the appliance. Always use oven gloves to remove or
put in accessories or ovenware.
• Before maintenance cut the power supply.
• Ensure that the appliance is switched off before
replacing the lamp to avoid the possibility of electric
shock.
• Do not use harsh abrasive cleaners or sharp metal
scrapers to clean the glass door since they can scratch
the surface, which may result in shattering of the glass.
• If the supply cord is damaged, it must be replaced by
the manufacturer, its Authorised Service Centre or
similarly qualified persons in order to avoid a hazard.
• Only use the core temperature sensor recommended
for this appliance.
• Be careful, when you touch the storage drawer. It can
get hot.
• To remove the shelf supports first pull the front of the
shelf support and then the rear end away from the
side walls. Install the shelf supports in the opposite
sequence.
• The means for disconnection must be incorporated in
the fixed wiring in accordance with the wiring rules.
www.aeg.com
44

2. SAFETY INSTRUCTIONS
2.1 Installation
WARNING!
Only a qualified person must
install this appliance.
• Remove all the packaging.
• Do not install or use a damaged
appliance.
• Obey the installation instruction
supplied with the appliance.
• Always be careful when you move the
appliance because it is heavy. Always
wear safety gloves.
• Do not pull the appliance by the
handle.
• The kitchen cabinet and the recess
must have suitable dimensions.
• Keep the minimum distance from the
other appliances and units.
• Make sure that the appliance is
installed below and adjacent safe
structures.
• Parts of the appliance carry current.
Close the appliance with furniture to
prevent touching the dangerous
parts.
• The sides of the appliance must stay
adjacent to appliances or to units with
the same height.
• Do not install the appliance on a
platform.
• Do not install the appliance adjacent
to a door or under a window. This
prevents hot cookware to fall from the
appliance when the door or the
window is opened.
• Make sure to install a stabilizing
means in order to prevent tipping of
the appliance. Refer to Installation
chapter.
2.2 Electrical Connection
WARNING!
Risk of fire and electrical
shock.
• All electrical connections should be
made by a qualified electrician.
• The appliance must be earthed.
• Make sure that the electrical
information on the rating plate agrees
with the power supply. If not, contact
an electrician.
• Always use a correctly installed
shockproof socket.
• Do not use multi-plug adapters and
extension cables.
• Do not let mains cables touch or
come near the appliance door,
especially when the door is hot.
• The shock protection of live and
insulated parts must be fastened in
such a way that it cannot be removed
without tools.
• Connect the mains plug to the mains
socket only at the end of the
installation. Make sure that there is
access to the mains plug after the
installation.
• If the mains socket is loose, do not
connect the mains plug.
• Do not pull the mains cable to
disconnect the appliance. Always pull
the mains plug.
• Use only correct isolation devices: line
protecting cut-outs, fuses (screw type
fuses removed from the holder), earth
leakage trips and contactors.
• The electrical installation must have
an isolation device which lets you
disconnect the appliance from the
mains at all poles. The isolation
device must have a contact opening
width of minimum 3 mm.
• Fully close the appliance door, before
you connect the mains plug to the
mains socket.
2.3 Use
WARNING!
Risk of injury and burns.
Risk of electrical shock.
• Use this appliance in a household
only.
• Do not change the specification of
this appliance.
• Make sure that the ventilation
openings are not blocked.
• Do not let the appliance stay
unattended during operation.
• Deactivate the appliance after each
use.
ENGLISH
45

• Be careful when you open the
appliance door while the appliance is
in operation. Hot air can release.
• Do not operate the appliance with
wet hands or when it has contact with
water.
• Do not use the appliance as a work
surface or as a storage surface.
• Users with a pacemaker must keep a
distance of minimum 30 cm from the
induction cooking zones when the
appliance is in operation.
WARNING!
Risk of fire and explosion
• Fats and oil when heated can release
flammable vapours. Keep flames or
heated objects away from fats and oils
when you cook with them.
• The vapours that very hot oil releases
can cause spontaneous combustion.
• Used oil, that can contain food
remnants, can cause fire at a lower
temperature than oil used for the first
time.
• Do not put flammable products or
items that are wet with flammable
products in, near or on the appliance.
• Do not let sparks or open flames to
come in contact with the appliance
when you open the door.
• Open the appliance door carefully.
The use of ingredients with alcohol
can cause a mixture of alcohol and air.
WARNING!
Risk of damage to the
appliance.
• To prevent damage or discoloration
to the enamel:
– do not put ovenware or other
objects in the appliance directly
on the bottom.
– do not put water directly into the
hot appliance.
– do not keep moist dishes and
food in the appliance after you
finish the cooking.
– be careful when you remove or
install the accessories.
• Discoloration of the enamel has no
effect on the performance of the
appliance. It is not a defect in the
sense of the warranty law.
• Use a deep pan for moist cakes. Fruit
juices cause stains that can be
permanent.
• Do not keep hot cookware on the
control panel.
• Do not let cookware boil dry.
• Be careful not to let objects or
cookware fall on the appliance. The
surface can be damaged.
• Do not activate the cooking zones
with empty cookware or without
cookware.
• Do not put aluminium foil on the
appliance or directly on the bottom of
the appliance.
• Cookware made of cast iron,
aluminium or with a damaged bottom
can cause scratches. Always lift these
objects up when you have to move
them on the cooking surface.
• This appliance is for cooking
purposes only. It must not be used for
other purposes, for example room
heating.
2.4 Care and Cleaning
WARNING!
Risk of injury, fire, or damage
to the appliance.
• Before maintenance, deactivate the
appliance.
Disconnect the mains plug from the
mains socket.
• Make sure the appliance is cold.
There is the risk that the glass panels
can break.
• Replace immediately the door glass
panels when they are damaged.
Contact the Service.
• Be careful when you remove the door
from the appliance. The door is
heavy!
• Clean regularly the appliance to
prevent the deterioration of the
surface material.
• Remaining fat or food in the
appliance can cause fire.
• Clean the appliance with a moist soft
cloth. Only use neutral detergents. Do
not use abrasive products, abrasive
cleaning pads, solvents or metal
objects.
• If you use an oven spray, obey the
safety instructions on the packaging.
www.aeg.com
46

• Do not clean the catalytic enamel (if
applicable) with any kind of
detergent.
2.5 Internal light
• The type of light bulb or halogen
lamp used for this appliance is only
for household appliances. Do not use
it for house lighting.
WARNING!
Risk of electrical shock.
• Before replacing the lamp, disconnect
the appliance from the power supply.
• Only use lamps with the same
specifications.
2.6 Disposal
WARNING!
Risk of injury or suffocation.
• Disconnect the appliance from the
mains supply.
• Cut off the mains cable and discard it.
• Remove the door catch to prevent
children and pets to get closed in the
appliance.
3. PRODUCT DESCRIPTION
3.1 General overview
5
3
4
6
2
1
7
5
4
3
2
1
1
Control panel and hob
2
Socket for the core temperature
sensor
3
Heating element
4
Lamp
5
Shelf support, removable
6
Fan
7
Shelf positions
ENGLISH 47

3.2 Cooking surface layout
4
6
1 3
5
2
1
Induction cooking zone 2300 W with
the Power function 3200 W
2
Steam outlet - number and position
depend on the model
3
Induction cooking zone 2300 W with
the Power function 3200 W
4
Induction cooking zone 2300 W with
the Power function 3200 W
5
Control panel
6
Induction cooking zone 2300 W with
the Power function 3200 W
3.3 Accessories
• Wire shelf
For cookware, cake tins, roasts.
• Baking tray
For cakes and biscuits.
• Grill- / Roasting pan
To bake and roast or as pan to collect
fat.
• Core temperature sensor
To measure how far the food is
cooked.
• Telescopic runners
For shelves and trays.
• Storage drawer
The storage drawer is below the oven
cavity. To open the drawer, push the
drawer. The drawer comes out.
4. BEFORE FIRST USE
WARNING!
Refer to Safety chapters.
4.1 Initial Cleaning
Remove all accessories and removable
shelf supports from the appliance.
The door is supplied with a
slow closure system. Do not
use force to close the door.
Refer to "Care and
cleaning" chapter.
Clean the appliance before first use.
Put the accessories and the removable
shelf supports back to their initial
position.
4.2 Using the sensor fields
To activate a function touch and hold the
selected symbol on the display for
minimum 1 second .
4.3 Setting the time
You must set the time before you
operate the oven.
When you connect the appliance to the
electrical supply or after a power cut, the
indicator for the Time function flashes.
Press the
or to set the correct
time.
After approximately five seconds, the
flashing stops and the display shows the
time of day you set.
You can only change the time
if:
• The child safety device is not on.
www.aeg.com
48

• None of the clock functions Duration
or End is set.
• No oven function is set.
4.4 Preheating
Preheat the empty appliance to burn off
the remaining grease.
1. Set the function and the
maximum temperature.
2. Let the appliance operate for 1 hour.
3. Set the function and the
maximum temperature.
4. Let the appliance operate for 15
minutes.
5. Set the function and the
maximum temperature.
6. Let the appliance operate for 15
minutes.
Accessories can become hotter than
usual. The appliance can emit an odour
and smoke. This is normal. Make sure
that the airflow in the room is sufficient.
5. HOB - DAILY USE
WARNING!
Refer to Safety chapters.
5.1 Control panel layout
51 2
3
4
10
811 9 7
6
Use the sensor fields to operate the appliance. The displays, indicators and sounds tell
which functions operate.
Sensor field Function
1
ON / OFF To activate and deactivate the hob.
2
Lock / The Child Safe-
ty Device
To lock / unlock the control panel.
3
- Timer indicators of
cooking zones
To show for which zone you set the
time.
4
- Timer display To show the time in minutes.
ENGLISH 49

Sensor field Function
5
Power function To activate and deactivate the func-
tion.
6
- Heat setting display To show the heat setting.
7
- Control bar To set a heat setting.
8
/
- To increase or decrease the time.
9
- To select the cooking zone.
10
STOP+GO To activate and deactivate the func-
tion.
11
Bridge To activate and deactivate the func-
tion.
5.2 Heat setting displays
Display Description
The cooking zone is deactivated.
-
The cooking zone operates.
STOP+GO function operates.
Automatic Heat Up function operates.
Power function operates.
+ digit
There is a malfunction.
/ /
OptiHeat Control (3 step Residual heat indicator): continue cooking /
keep warm / residual heat.
Lock / The Child Safety Device function operates.
Incorrect or too small cookware or no cookware on the cooking zone.
Automatic Switch Off function operates.
5.3 OptiHeat Control (3 step
Residual heat indicator)
WARNING!
/ / There is a risk of
burns from residual heat.
The indicator shows the level
of the residual heat.
The induction cooking zones make the
heat necessary for cooking process
directly in the bottom of the cookware.
The glass ceramic is heated by the heat
of the cookware.
www.aeg.com50

5.4 Activating and
deactivating
Touch for 1 second to activate or
deactivate the hob.
5.5 Automatic Switch Off
The function deactivates the hob
automatically if:
• all cooking zones are deactivated,
• you do not set the heat setting after
you activate the hob,
• you spill something or put something
on the control panel for more than 10
seconds (a pan, a cloth, etc.). An
acoustic signal sounds and the hob
deactivates. Remove the object or
clean the control panel.
• the hob gets too hot (e.g. when a
saucepan boils dry). Let the cooking
zone cool down before you use the
hob again.
• you use incorrect cookware. The
symbol comes on and the cooking
zone deactivates automatically after 2
minutes.
• you do not deactivate a cooking zone
or change the heat setting. After
some time comes on and the hob
deactivates.
The relation between the heat setting
and the time after which the hob
deactivates:
• , 1 — 3 — 6 hours
• 4 — 7 — 5 hours
• 8 — 9 — 4 hours
• 10 — 14 — 1.5 hours
5.6 The heat setting
To set or change the heat setting:
Touch the control bar at the correct heat
setting or move your finger along the
control bar until you reach the correct
heat setting.
5.7 Using the cooking zones
Put the cookware on the cross / square
which is on the surface that you cook.
Cover the cross / square fully. Induction
cooking zones adapt to the dimension of
the bottom of the cookware
automatically. You can cook with the
large cookware on two cooking zones at
the same time.
5.8 Bridge function
This function connects two cooking
zones and they operate as one.
First set the heat setting for one of the
cooking zones.
To activate the function: touch . To
set or change the heat setting touch one
of the control sensors.
To deactivate the function: touch
.
The cooking zones operate
independently.
When you use only one cooking zone of
the pair we recommend that you use the
rear cooking zone. Also when you use
large cookware we recommend that you
put it near to the rear cooking zone.
5.9 Automatic Heat Up
If you activate this function you can get a
necessary heat setting in a shorter time.
The function sets the highest heat setting
for some time and then decreases to the
correct heat setting.
To activate the function the
cooking zone must be cold.
To activate the function for a cooking
zone: touch
( comes on).
Immediately touch the correct heat
setting. After 3 seconds comes on.
To deactivate the function: change the
heat setting.
5.10 Power function
This function makes more power
available to the induction cooking zones.
The function can be activated for the
induction cooking zone only for a limited
ENGLISH
51

period of time. After this time the
induction cooking zone automatically
sets back to the highest heat setting.
To activate the function for a cooking
zone: touch . comes on.
To deactivate the function: change the
heat setting.
5.11 Timer
Count Down Timer
You can use this function to set how long
the cooking zone operates for only this
one time.
First set the cooking zone then set the
function. You can set the heat setting
before or after you set the function.
To set the cooking zone: touch
again and again until the indicator of a
necessary cooking zone comes on.
To activate the function: touch of
the timer to set the time (00 - 99
minutes). When the indicator of the
cooking zone starts to flash slowly the
time counts down.
To see the remaining time: set the
cooking zone with
. The indicator of
the cooking zone starts to flash quickly.
The display shows the remaining time.
To change the time: set the cooking
zone with . Touch or .
To deactivate the function: set the
cooking zone with and touch . The
remaining time counts back to 00. The
indicator of the cooking zone goes out.
To deactivate the function you can also
touch and at the same time.
When the time comes to an
end, the sound operates and
00 flashes. The cooking
zone deactivates.
To stop the sound: touch .
CountUp Timer (The count up timer)
You can use this function to monitor how
long the cooking zone operates.
To set the cooking zone: touch
again and again until the indicator of a
necessary cooking zone comes on.
To activate the function: touch of
the timer. comes on. When the
indicator of the cooking zone starts to
flash slowly the time counts up. The
display switches between and
counted time (minutes).
To see how long the cooking zone
operates: set the cooking zone with
.
The indicator of the cooking zone starts
to flash quickly. The display shows how
long the zone operates.
To deactivate the function: set the
cooking zone with and touch or
. The indicator of the cooking zone
goes out.
Minute Minder
You can use this function as a Minute
Minder when the hob is activated and
the cooking zones do not operate (the
heat setting display shows ).
To activate the function: touch .
Touch
or of the timer to set the
time. When the time comes to an end,
the sound operates and 00 flashes.
To stop the sound: touch .
The function has no effect
on the operation of the
cooking zones.
5.12 STOP+GO
This function sets all cooking zones that
operate to the lowest heat setting.
When the function operates, you cannot
change the heat setting.
The function does not stop the timer
functions.
To activate the function: touch
.
comes on.
To deactivate the function: touch .
The previous heat setting comes on.
www.aeg.com
52

5.13 Lock
You can lock the control panel while
cooking zones operate. It prevents an
accidental change of the heat setting.
Set the heat setting first.
To activate the function: touch .
comes on for 4 seconds. The Timer stays
on.
To deactivate the function: touch
.
The previous heat setting comes on.
When you deactivate the
hob, you also deactivate this
function.
5.14 The Child Safety Device
This function prevents an accidental
operation of the hob.
To activate the function: activate the
hob with
. Do not set the heat setting.
Touch for 4 seconds. comes on.
Deactivate the hob with
.
To deactivate the function: activate the
hob with . Do not set the heat setting.
Touch for 4 seconds. comes on.
Deactivate the hob with
.
To override the function for only one
cooking time: activate the hob with .
comes on. Touch for 4 seconds.
Set the heat setting in 10 seconds. You
can operate the hob. When you
deactivate the hob with the function
operates again.
5.15 Power management
function
• Cooking zones are grouped
according to the location and number
of the phases in the hob. See the
illustration.
• Each phase has a maximum electricity
load.
• The function divides the power
between cooking zones connected to
the same phase.
• The function activates when the total
electricity loading of the cooking
zones connected to a single phase is
exceeded.
• The function decreases the power to
the other cooking zones connected to
the same phase.
• The heat setting display of the
reduced zones changes between two
levels.
6. HOB - HINTS AND TIPS
WARNING!
Refer to Safety chapters.
6.1 Cookware
For induction cooking zones
a strong electro-magnetic
field creates the heat in the
cookware very quickly.
Use the induction cooking
zones with correct cookware.
Cookware material
• correct: cast iron, steel, enamelled
steel, stainless steel, the bottom
made of multi-layer (with correct mark
from a manufacturer).
• not correct: aluminium, copper,
brass, glass, ceramic, porcelain.
Cookware is correct for an induction
hob if:
• some water boils very quickly on a
zone set to the highest heat setting.
• a magnet pulls on to the bottom of
the cookware.
ENGLISH 53

The bottom of the cookware
must be as thick and flat as
possible.
Cookware dimensions
Induction cooking zones adapt to the
dimension of the bottom of the
cookware automatically to some limit.
The cooking zone efficiency is related to
the diameter of the cookware. The
cookware with a smaller diameter than
the minimum receives only a part of the
power generated by the cooking zone.
6.2 Minimum cookware
diameter
Cooking zone Minimum cook-
ware diameter
(mm)
Left rear 125
Right rear 125
Right front 125
Left front 125
6.3 The noises during
operation
If you can hear:
• crack noise: cookware is made of
different materials (sandwich
construction).
• whistle sound: you the cooking zone
with high power level and the
cookware is made of different
materials (sandwich construction).
• humming: you use high power level.
• clicking: electric switching occurs.
• hissing, buzzing: the fan operates.
The noises are normal and do not refer
to hob malfunction.
6.4 Energy saving
• If it is possible, always put the lids on
the cookware.
• Put cookware on a cooking zone
before you start it.
• Use the residual heat to keep the
food warm or to melt it.
6.5 Öko Timer (Eco Timer)
To save energy, the heater of the
cooking zone deactivates before the
count down timer sounds. The difference
in the operation time depends on the
heat setting level and the length of the
cooking operation.
6.6 Examples of cooking
applications
The relation between the heat setting
and the cooking zone consumption of
power is not linear. When you increase
the heat setting, it is not proportional to
the increase of the cooking zone
consumption of power. It means that the
cooking zone with the medium heat
setting uses less than a half of its power.
The data in the table is for
guidance only.
Heat setting Use to: Time
(min)
Hints
- 1
Keep cooked food warm. as nec-
essary
Put a lid on the cookware.
1 - 3 Hollandaise sauce, melt: but-
ter, chocolate, gelatine.
5 - 25 Mix from time to time.
1 - 3 Solidify: fluffy omelettes,
baked eggs.
10 - 40 Cook with a lid on.
www.aeg.com54

Heat setting Use to: Time
(min)
Hints
3 - 5 Simmer rice and milkbased
dishes, heating up ready-
cooked meals.
25 - 50 Add the minimum twice as
much liquid as rice, mix milk
dishes part procedure
through.
5 - 7 Steam vegetables, fish, meat. 20 - 45 Add some tablespoons of liq-
uid.
7 - 9 Steam potatoes. 20 - 60 Use max. ¼ l water for 750 g of
potatoes.
7 - 9 Cook larger quantities of food,
stews and soups.
60 - 150 Up to 3 l liquid plus ingredi-
ents.
9 - 12 Gentle fry: escalope, veal cor-
don bleu, cutlets, rissoles,
sausages, liver, roux, eggs,
pancakes, doughnuts.
as nec-
essary
Turn halfway through.
12 - 13 Heavy fry, hash browns, loin
steaks, steaks.
5 - 15 Turn halfway through.
14 Boil water, cook pasta, sear meat (goulash, pot roast), deep-fry chips.
Boil large quantities of water. Power function is activated.
7. HOB - CARE AND CLEANING
WARNING!
Refer to Safety chapters.
7.1 General information
• Clean the hob after each use.
• Always use cookware with clean
bottom.
• Scratches or dark stains on the surface
have no effect on how the hob
operates.
• Use a special cleaner applicable for
the surface of the hob.
• Use a special scraper for the glass.
7.2 Cleaning the hob
• Remove immediately: melted plastic,
plastic foil, and food with sugar. If not,
the dirt can cause damage to the hob.
Put the special scraper on the glass
surface at an acute angle and move
the blade on the surface.
• Remove when the hob is sufficiently
cool: limescale rings, water rings, fat
stains, shiny metallic discoloration.
Clean the hob with a moist cloth and
some detergent. After cleaning, rub
the hob dry with a soft cloth.
8. OVEN - DAILY USE
WARNING!
Refer to Safety chapters.
ENGLISH 55

8.1 Oven Control Panel
21 3 4 5 6
Use the sensor fields to operate the appliance
Sensor
field
Function Comment
1
– Display Shows the current settings of the appliance.
2
ON / OFF To activate or deactivate the oven.
3
/
Down / Up key To move in the menu and to set an oven func-
tion.
4
Core temperature
sensor
To activate the Core temperature sensor func-
tion.
5
Return / Clock func-
tion selection
To go back one level in the menu. To set the
clock functions.
6
/
Increase / Decrease To set the time and temperature value.
8.2 Indicators on the display
A B C D E F G H
Name Description
A
Oven function indica-
tor
Shows the function which is active.
B
Lamp / Defrost indi-
cator
Shows that the Lamp / Defrost function is active.
C
Heat-up and residual
heat indicator
Shows that the Heat-up / residual heat is active.
www.aeg.com56

Name Description
D
Temperature / Clock
indicator
Shows the temperature and the time in minutes.
E
Core temperature
sensor indicator
Shows that the core temperature sensor is in the socket.
F Keep warm indicator Shows that the Keep warm function is active.
G
Cook time / End
time / Period of oper-
ation
Shows the time setting for clock functions.
H
Clock function indica-
tors
Shows the clock function which is active.
8.3 Oven functions
Symbol Oven function Application
Hot Air To bake on up to 2 shelf positions at the same time
and to dry food. Set the temperature 20 - 40 °C low-
er than for Conventional Cooking.
Conventional To bake and roast food on 1 shelf position.
Pizza Setting To bake food on 1 shelf position for a more inten-
sive browning and a crispy bottom. Set the temper-
ature 20 - 40 °C lower than for Conventional Cook-
ing.
Low Temperature
Cooking
To prepare very lean, tender roasted food.
Browning To roast larger meat joints or poultry with bones on
1 shelf position. Also to make gratins and to brown.
Dual Grill To grill flat food in large quantities and to toast
bread.
Light Fan Cooking To bake in tins and dry on 1 shelf position at a low
temperature.
Keep Warm To keep food warm.
Drying To dry sliced fruit (e.g. apples, plums, peaches) and
vegetables (e.g. tomatoes, zucchini, mushrooms).
ENGLISH 57

Symbol Oven function Application
Defrost To defrost frozen food.
Light To activate the lamp without a cooking function.
8.4 Activating and
deactivating
Press to activate the oven.
8.5 Setting the oven function
You can change the oven
function while the oven
operates.
Press or to set an oven function.
The display shows the recommended
temperature.
If you do not change the this
temperature in less than approximately 5
seconds, the appliance starts to heat.
8.6 Changing the oven
temperature
Press or to change the
temperature.
When the appliance is at the set
temperature, an acoustic signal sounds.
8.7 Deactivating an oven
function
Repeatedly touch or until no
oven function shows in the display.
8.8 Heat-up indicator
When you activate an oven function, the
bars on the display come on one by one.
The bars show that the oven temperature
increases.
8.9 Residual heat indicator
When you deactivate the oven, the
display shows the residual heat.
8.10 Using the Function Lock
You can activate the function only when
the oven operates.
The Function Lock prevents an
accidental change of the oven function.
1. Activate the oven.
2. Set the oven function.
3. Press
and at the same time,
until “LOC” comes on the display.
To deactivate the Function Lock press
and at the same time, until the
display stops to show "LOC".
You can deactivate the oven
when the Function Lock is
on. When you deactivate the
oven, the Function Lock
deactivates.
8.11 Cooling fan
When the appliance operates, the
cooling fan activates automatically to
keep the surfaces of the appliance cool.
If you deactivate the appliance, the
cooling fan can continue to operate until
the appliance cools down.
8.12 Oven automatic switch-
off
For safety reasons the appliance
deactivates automatically after some
time if a heating function operates and
you do not change any settings.
Temperature Switch-off time
30 °C - 115 °C 12.5 h
120 °C - 195 °C 8.5 h
200 °C - 245 °C 5.5 h
www.aeg.com58

Temperature Switch-off time
250 °C - maximum
°C
3.0 h
After the Automatic switch-off, press a
sensor field to operate the appliance
again.
The oven automatic switch-
off does not work with the
Duration or End function.
8.13 Using the Core
temperature sensor
The core temperature sensor measures
the core temperature of the meat.
CAUTION!
Only use the core
temperature sensor supplied
with the appliance, or
genuine replacement parts.
1.
Put the point of the core temperature
sensor into the centre of the meat.
Make sure that the core temperature
sensor stays in the meat and in the
socket during the cooking.
2. Put the plug of the core temperature
sensor into the socket on the front of
the appliance.
3. Activate the appliance.
4. Set the core temperature:
a. Press again and again until
the function core temperature
sensor flashes and the display
shows the core temperature.
The default core
temperature is 60°C.
b. Press or in less than 5
seconds to set the core
temperature.
The core temperature is displayed from
30°C.
5. Set the oven function and, if
necessary, the oven temperature /
.
While the appliance calculates the
approximate end time, the display
shows a square that flashes.
The appliance calculates the
approximate end time for the set core
temperature again and again. The
display constantly shows the new
approximate end time.
6. Press a button to stop the signal.
An acoustic signal sounds, when the
meat is at the set core temperature.
7. Remove the plug of the core
temperature sensor from the socket .
Remove the meat from the
appliance.
8. Deactivate the appliance.
WARNING!
Be careful when you remove
the tip and plug of the core
temperature sensor. The
core temperature sensor is
hot. There is a risk of burns.
8.14 Inserting the oven
accessories
Deep pan:
Push the deep pan between the guide
bars of the shelf support.
Wire shelf and the deep pan together:
ENGLISH
59

Push the deep pan between the guide
bars of the shelf support and the wire
shelf on the guide bars above.
• All accessories have small
indentations at the top of
the right and left side to
increase safety. The
indentations are also anti-
tip devices.
• The high rim around the
shelf is a device which
prevents cookware from
slipping.
8.15 Telescopic runners -
inserting the oven accessories
Keep the installation
instructions for the
telescopic runners for future
use.
With telescopic runners you can put in
and remove the shelves more easily.
Put the wire shelf on the telescopic
runners so that the feet point
downwards.
Put the baking tray or deep pan on the
telescopic runners.
Put the wire shelf on the deep pan. Put
the wire shelf and the deep pan on the
telescopic runners.
www.aeg.com
60

9. OVEN - CLOCK FUNCTIONS
9.1 Clock functions table
Clock function Application
Time of day To set, change or check the time of day.
Minute Minder To set countdown time. This function has no effect on the op-
eration of the appliance.
Duration To set the cooking time of the oven.
End To set the time of day when the oven should deactivate.
You can use the functions
Duration and End at
the same time to set the
time for how long the
appliance should operate
and when the appliance
should deactivate. This lets
you activate the appliance
with a delay in time. First set
the Duration and then
the End .
9.2 Setting the clock functions
For Duration and End set the
oven function and temperature. This is
not necessary for the Minute Minder .
Refer to "Setting an oven function".
1. Use again and again until the
display shows the necessary clock
function.
2. Use or to set the necessary
time.
The clock function operates. The display
shows the indicator for the clock function
you set.
When the time ends the indicator of the
clock function and “00.00” flash and an
acoustic signal sounds for 2 minutes. The
appliance deactivates.
Touch a sensor field to stop the acoustic
signal.
With Duration and End
, the oven deactivates
automatically.
9.3 Activating Heat + Hold (if
applicable)
The temperature for the set
oven function must be
above 80°C.
The Heat+Hold function keeps prepared
food warm for 30 minutes after the
cooking is completed.
1. Set the time with the clock functions
Duration
and / or End .
2. Press again and again until the
display shows the symbol Keep warm
.
3. Use
and the display shows
“00:30”.
When the function ends, an acoustic
signal sounds. The oven deactivates
automatically.
10.
OVEN - HINTS AND TIPS
WARNING!
Refer to Safety chapters.
ENGLISH 61

The temperature and baking
times in the tables are
guidelines only. They
depend on the recipes and
the quality and quantity of
the ingredients used.
10.1 Baking
• Your oven can bake or roast
differently to the appliance you had
before. Adapt your usual settings
(temperature, cooking times) and
shelf positions to the values in the
tables.
• The manufacturer recommends that
you use the lower temperature the
first time.
• If you cannot find the settings for a
special recipe, look for the one that is
almost the same.
• You can extend baking times by 10 –
15 minutes if you bake cakes on more
than one shelf position.
• Cakes and pastries at different
heights do not always brown equally
at first. If this occurs, do not change
the temperature setting. The
differences equalize during the
baking procedure.
• With longer baking times, you can
deactivate the oven approximately 10
minutes before the end of the baking
time and then use the residual heat.
When you cook frozen food, the trays in
the oven can twist during baking. When
the trays become cold again, the
distortions are gone.
10.2 Tips on baking
Baking results Possible cause Remedy
The bottom of the cake is
not browned sufficiently.
The shelf position is incor-
rect.
Put the cake on a lower
shelf.
The cake sinks and becomes
soggy, lumpy or streaky.
The oven temperature is too
high.
The next time you bake, set
a slightly lower oven temper-
ature.
The cake sinks and becomes
soggy, lumpy or streaky.
The baking time is too short. Set a longer baking time.
You cannot decrease bak-
ing times by setting higher
temperatures.
The cake sinks and becomes
soggy, lumpy or streaky.
There is too much liquid in
the mixture.
Use less liquid. Be careful
with mixing times, especially
if you use a mixing machine.
The cake is too dry. The oven temperature is too
low.
The next time you bake, set
a higher oven temperature.
The cake is too dry. The baking time is too long. The next time you bake, set
a shorter baking time.
The cake browns unevenly. The oven temperature is too
high and the baking time is
too short.
Set a lower oven tempera-
ture and a longer baking
time.
The cake browns unevenly. The mixture is unevenly dis-
tributed.
Spread the mixture evenly
on the baking tray.
www.aeg.com62

Baking results Possible cause Remedy
The cake is not ready in the
baking time given.
The oven temperature is too
low.
The next time you bake, set
a slightly higher oven tem-
perature.
10.3 Light Fan Cooking
1. Use the function to bake in tins and
dry on one shelf level at a low
temperature.
2. Bake only one tin or tray at a time.
3. We recommend to use the Light Fan
Cooking without preheating.
4. If you want to preheat the oven use
the True Fan Cooking function.
Food Temperature
(°C)
Time (min) Shelf position
Sponge cake in tins 160 50 - 70 2
Ring cake or brioche in tins 150 - 160 50 - 70 2
Madeira cake / Dry fruit cakes in tins 140 - 160 70 - 90 2
Biscuits made with egg white, merin-
gues
80 - 100 120 - 150 3
10.4 Hot Air Baking
Food Temperature
(°C)
Time (min) Shelf posi-
tion
Bread rolls 175 - 185 15 - 20 2 + 4
Wholemeal rolls 165 - 180 20 - 30 2 + 4
Pretzels 160 - 170 15 - 20 2 + 4
White loaf 170 - 180 35 - 45 2 + 4
Wholemeal loaf 160 - 170 35 - 45 2 + 4
Rye bread, mix 250 warming 2 + 4
- baking 160 - 170 60 - 70 2 + 4
Baguettes 180 - 200 20 - 30 2 + 4
Muffins 160 - 170 15 - 25 2 + 4
Sponge cakes / Madeira cakes 150 - 160 50 - 60 2
Meringues 100 90 - 120 2 + 4
ENGLISH 63

Food Temperature
(°C)
Time (min) Shelf posi-
tion
Meringue bases 100 90 - 120 2 + 4
- heating with oven
turned off
25 2 + 4
Biscuits 150 - 160 10 - 20 2 + 4
Choux pastry 155 - 165 30 - 40 2 + 4
Fruit tarts, short crust pastry 150 - 160 pre-baking, bases
10 - 15
2 + 4
Fruit tarts, short crust pastry 150 - 160 finishing 35 - 45 2 + 4
Fruit tarts, crumble pastry 170 - 180 30 - 40 2 + 4
10.5 Conventional Baking
Food Temperature
(°C)
Time (min) Shelf posi-
tion
Bread rolls 200 - 225 8 - 12 3 - 4
Wholemeal rolls 190 - 200 20 - 25 3 - 4
Filled sandwiches 200 - 225 10 - 12 3 - 4
Ciabatta rolls 210 - 230 10 - 20 3 - 4
Foccacia 220 - 230 15 - 20 3 - 4
Pita bread 250 5 - 15 3 - 4
Pretzels 180 - 200 12 - 15 3 - 4
White loaf 190 - 210 25 - 40 1 - 2
Ciabatta 210 - 220 15 - 25 1 - 2
Wholemeal loaf 180 - 200 35 - 45 1 - 2
Rye bread, mix 275 heating 1
- baking 190 55 - 65 1
Baguettes 220 - 230 15 - 30 3 - 4
Pancake 170 - 180 50 - 60 2 - 3
Dish cake 170 - 180 35 - 45 3 - 4
Sponge cakes / Madeira cakes 170 - 180 40 - 50 1 - 2
Sandwich cake, roll 200 - 225 8 - 12 3 - 4
Meringues 100 90 - 120 3 - 4
www.aeg.com64

Food Temperature
(°C)
Time (min) Shelf posi-
tion
Meringue bases 100 90 - 120 3 - 4
- heating with oven turned
off
25 3 - 4
Biscuits 160 - 180 6 - 15 3 - 4
Choux pastry 170 - 190 30 - 45 3 - 4
Swiss rolls 190 - 210 10 - 12 3 - 4
Fruit tarts, short crust pastry 175 - 200 pre-baking, roll
10 - 15
3 - 4
Fruit tarts, short crust pastry 175 finishing 35 - 45 3 - 4
Fruit tarts, crumble pastry 190 - 200 25 - 35 3 - 4
Marzipan ring cake 210 - 230 10 - 12 2
10.6 Pizza Table
Food Temperature (°C) Time (min) Shelf posi-
tion
Ciabatta rolls 200 - 220 10 - 20 2 - 3
Foccacia 220 - 230 10 - 20 2 - 3
Ciabatta 190 - 200 15 - 25 2 - 3
Fruit tarts, short crust pastry 170 - 180 35 - 45 2 - 3
Fruit tarts, crumble pastry 175 - 200 25 - 35 2 - 3
Pizza, home made (thick - with a lot
of topping)
180 - 200 25 - 35 1 - 2
Pizza, home made (thin crust)
200 - 230
1)
15 - 20 1 - 2
Pizza, frozen 200 15 - 20 1 - 2
Tarts, home made pre-baking, roll 215 - 225 35 - 45 3 - 4
Tarts, home made finishing 215 - 225 35 - 45 3 - 4
Tarts, frozen 200 15 - 25 3 - 4
1)
Preheat the oven.
10.7 Roasting
• Use heat-resistant ovenware to roast
(refer to the instructions of the
manufacturer).
• You can roast large roasting joints
directly in the deep pan (if present) or
on the wire shelf above the deep pan.
• Roast lean meats in the roasting tin
with the lid. This keeps the meat more
succulent.
ENGLISH 65

• All types of meat that can be browned
or have crackling can be roasted in
the roasting tin without the lid.
• We recommend that you cook meat
and fish weighing 1 kg and above in
the appliance.
• To prevent the meat juices or fat from
burning onto the pan, put some liquid
into the deep pan.
• If necessary, turn the roast (after 1/2 -
2/3 of the cooking time).
• Baste large roasts and poultry with
their juices several times during
roasting. This gives better roasting
results.
• You can deactivate the appliance
approximately 10 minutes before the
end of the roasting time, and use the
residual heat.
10.8 Hot Air Roasting
Beef
Food Temperature
(°C)
Time (min / kg) Shelf posi-
tion
Roast beef
1)
125 80 - 120 2 - 3
Rump steak - browning 200 total 10 2 - 3
Rump steak - roasting 150 50 - 60 2 - 3
Roast beef 160 90 - 120 1 - 2
1)
Other. Can be browned off after roasting under the grill or with top / bottom heat at 250°C. If you are
using a meat probe, remove it before grilling.
Veal
Food Temperature
(°C)
Time (min / kg) Shelf posi-
tion
Fillet of beef
1)
160 60 - 70 2 - 3
1)
Other. Can be browned off after roasting under the grill or with top / bottom heat at 250°C. If you are
using a meat probe, remove it before grilling.
Lamb
Food Temperature
(°C)
Time (min / kg) Shelf posi-
tion
Leg / shoulder / saddle 160 80 - 100 2
Pork
Food Temperature
(°C)
Time (min / kg) Shelf posi-
tion
Roast pork
1)
175 60 - 70 2 - 3
Pork loin
1)
175 60 2 - 3
Neck fillets 160 90 - 120 2 - 3
www.aeg.com66

Food Temperature
(°C)
Time (min / kg) Shelf posi-
tion
Ham 150 60 - 100 1 - 2
1)
Other. Can be browned off after roasting under the grill or with top / bottom heat at 250°C. If you are
using a meat probe, remove it before grilling.
Poultry
Food Temperature
(°C)
Time (min / kg) Shelf posi-
tion
Chicken, parted 180 55 - 65 2 - 3
Duck
1)
150 55 - 65 2 - 3
Duck slow roasting
1)
130 total around 5
hours
2 - 3
Roast turkey, stuffed 150 50 - 60 1 - 2
Turkey breast 175 70 - 80 2 - 3
1)
Other. Can be browned off after roasting under the grill or with top / bottom heat at 250°C. If you are
using a meat probe, remove it before grilling.
10.9 Conventional Roasting
Beef
Food Temperature (°C) Time (min / kg) Shelf posi-
tion
Roast beef
1)
125 80 - 120 2 - 3
Rump steak - browning 225 total 10 2 - 3
Rump steak - roasting 160 50 - 60 2 - 3
Roast beef 180 90 - 120 1 - 3
1)
Other. Can be browned off after roasting under the grill or with top / bottom heat at 250°C. If you are
using a meat probe, remove it before grilling.
Veal
Food Temperature (°C) Time (min / kg) Shelf posi-
tion
Fillet of beef
1)
180 60 - 70 2 - 3
1)
Other. Can be browned off after roasting under the grill or with top / bottom heat at 250°C. If you are
using a meat probe, remove it before grilling.
ENGLISH 67

Lamb
Food Temperature (°C) Time (min / kg) Shelf posi-
tion
Leg / shoulder / rib 180 80 - 100 2
Pork
Food Temperature (°C) Time (min / kg) Shelf posi-
tion
Roast pork
1)
200 60 - 70 3
Pork loin
1)
200 60 3
Neck fillets 180 90 - 120 2 - 3
Ham 160 60 - 100 1 - 2
1)
Other. Can be browned off after roasting under the grill or with top / bottom heat at 250°C. If you are
using a meat probe, remove it before grilling.
Poultry
Food Temperature (°C) Time (min / kg) Shelf posi-
tion
Chicken, parted 200 55 - 65 2 - 3
Duck
1)
160 55 - 65 2 - 3
Duck slow roasting
1)
130 total around 5
hours
2 - 3
Roast turkey, stuffed 160 50 - 60 1 - 2
Turkey breast 200 70 - 80 2 - 3
1)
Other. Can be browned off after roasting under the grill or with top / bottom heat at 250°C. If you are
using a meat probe, remove it before grilling.
10.10 Browning
Beef
Food Temperature
(°C)
Time in minutes
per kg meat
Shelf posi-
tion
Rump steak - browning 200 total 10 2 - 3
Rump steak - roasting 150 50 - 60 2 - 3
Roast beef 160 90 - 120 1 - 2
www.aeg.com68

Veal
Food Temperature
(°C)
Time (min / kg) Shelf posi-
tion
Fillet of beef
1)
160 60 - 70 2 - 3
1)
Other. Can be browned off after roasting under the grill or with top / bottom heat at 250°C. If you are
using a meat probe, remove it before grilling.
Lamb
Food Temperature
(°C)
Time (min / kg) Shelf posi-
tion
Leg / shoulder / rib 160 80 - 100 2
Pork
Food Temperature
(°C)
Time (min / kg) Shelf posi-
tion
Roast pork
1)
180 60 - 70 2 - 3
Pork Loin
1)
175 60 2 - 3
Neck fillets 160 90 - 120 2 - 3
Ham 150 60 - 100 1 - 2
1)
Other. Can be browned off after roasting under the grill or with top / bottom heat at 250°C. If you are
using a meat probe, remove it before grilling.
Poultry
Food Temperature
(°C)
Time (min / kg) Shelf posi-
tion
Chicken 180 55 - 65 2 - 3
Duck
1)
150 55 - 65 2 - 3
Duck slow roasting
1)
not suitable total around 5
hours
2 - 3
Roast turkey, stuffed 150 50 - 60 1 - 2
Turkey breast 175 70 - 80 2 - 3
1)
Other. Can be browned off after roasting under the grill or with top / bottom heat at 250°C. If you are
using a meat probe, remove it before grilling.
10.11 Core temperature sensor table
Beef
Food Food core temperature
(°C)
Shelf position
Roast beef 55 - 65 2 - 3
ENGLISH 69

Food Food core temperature
(°C)
Shelf position
Rump steak - browning 55 - 65 2 - 3
Rump steak - roasting 55 - 65 2 - 3
Roast beef 75 - 80 1 - 2
Veal
Food Food core temperature
(°C)
Shelf position
Fillet of beef 65 2 - 3
Lamb
Food Food core temperature
(°C)
Shelf position
Leg / shoulder / saddle 90 2
Pork
Food Food core temperature
(°C)
Shelf position
Roast pork 80 2 - 3
Neck fillets 75 - 80 2 - 3
Ham 70 - 75 1 - 2
Poultry
Food Food core temperature
(°C)
Shelf position
Turkey breast 75 - 80 2 - 3
10.12 Low temperature
cooking
Use the function to prepare lean, tender
pieces of meat and fish.
The oven gets the pre set temperature
and a signal operates. Then, the oven
automatically sets to a lower temperature
to continue cooking.
Always cook without a lid in
Low Temperature Cooking.
You cannot use Low
temperature cooking
together with the clock
functions: Duration and End.
1. Sear the meat in the deep pan (if
present) in a very high heat.
2. Put the meat in a roasting tin or
directly on the wire shelf. Put the tray
below the shelf to catch the fat.
3. Set oven function Low temperature
cooking, change the temperature, if
necessary, and cook until done (see
table).
www.aeg.com
70

Food Quantity Temperature
(°C)
Preheating time (min) Shelf po-
sition
Rare Medium
Roast beef (well done) 800 - 1000 g 150 90 - 110 130 - 140 2
Roast beef (well done) 1200 - 1600 g 150 120 - 130 160 - 170 2
Rib of beef 600 - 1000 g 150 55 - 75 95 - 110 3
Shoulder of beef,
boneless
3,5 cm high 150 - 70 - 80 3
Tenderloin of beef,
whole
600 - 1000 g 120 65 - 75 90 - 110 3
Tenderloin of beef,
sliced
2,5 cm high 120 20 - 25 35 - 45 3
Entrecote 1,5 cm high 120 15 - 25 30 - 35 3
T-bone 2 cm high 120 25 - 30 35 - 40 3
Tenderloin of pork,
whole
500 - 700 g 120 - 65 - 75 3
Tenderloin of pork,
sliced
2,5 cm high 120 - 35 - 45 2
10.13 Grilling in general
WARNING!
Always grill with the oven
door closed.
• Always grill with the maximum
temperature setting.
• Set the shelf into the shelf position as
recommended in the grilling table.
• Always set the deep pan to collect the
fat into the first shelf position.
• Grill only flat pieces of meat or fish.
• Always preheat an empty oven with
the grill functions for 5 minutes.
The grilling area is set in centre of the
shelf.
10.14 Grilling
Food Temperature
(°C)
Time (min) Shelf
position
1st side 2nd side
Pork chops 250 7 - 9 4 - 6 3 - 4
Lamb chops 250 7 - 10 5 - 6 3 - 4
Chicken, parted 250 20 - 25 15 - 20 3 - 4
Sausages 250 3 - 5 2 - 4 3 - 4
ENGLISH 71

Food Temperature
(°C)
Time (min) Shelf
position
1st side 2nd side
Spareribs, pre-cooked for 20 mins 250 15 - 20 15 - 20 3 - 4
Fish, slices of cod or salmon 250 10 - 15 5 - 10 3 - 4
Toast 250 2 - 3 1 - 2 3 - 4
10.15 Defrost
• Remove the food packaging. Put the
food on a plate.
• Do not cover it with a bowl or a plate.
This can extend the defrost time.
• Use the first oven shelf position. The
one on the bottom.
Food Quantity Defrosting
time (min)
Further de-
frosting
time (min)
Comments
Chicken 1 kg 100 - 140 20 - 30 Put the chicken on an up-
turned saucer in a big plate.
Turn halfway through.
Meat 1 kg 100 - 140 20 - 30 Turn halfway through.
Meat 500 g 90 - 120 20 - 30 Turn halfway through.
Trout 150 g 25 - 35 10 - 15 -
Strawberries 300 g 30 - 40 10 - 20 -
Butter 250 g 30 - 40 10 - 15 -
Cream 2 x 200 g 80 - 100 10 - 15 Whip the cream when still
slightly frozen in places.
Cake 1.4 kg 60 60 -
11. OVEN - CARE AND CLEANING
WARNING!
Refer to Safety chapters.
11.1 Notes on cleaning
• Clean the front of the appliance with a
soft cloth with warm water and a
cleaning agent.
• To clean metal surfaces, use a usual
cleaning agent.
• Clean the appliance interior after
each use. Fat accumulation or other
food remains may result in a fire. The
risk is higher for the grill pan.
• Clean stubborn dirt with a special
oven cleaner.
• Clean all accessories after each use
and let them dry. Use a soft cloth with
warm water and a cleaning agent.
• If you have nonstick accessories, do
not clean them using aggressive
agents, sharp-edged objects or a
dishwasher. It can cause damage to
the nonstick coating.
www.aeg.com72

11.2 Stainless steel or
aluminium appliances
Clean the oven door with a
wet sponge only. Dry it with
a soft cloth.
Do not use steel wool, acids
or abrasive materials as they
can damage the oven
surface. Clean the oven
control panel with the same
precautions.
11.3 Removing the shelf
supports
To clean the oven, remove the shelf
supports.
1. Pull the front of the shelf support
away from the side wall.
2. Pull the rear end of the shelf support
away from the side wall and remove
it.
1
2
The retaining pins on the
telescopic runners must
point to the front.
Install the shelf supports in the opposite
sequence.
CAUTION!
Make sure that the longer
fixing wire is in the front. The
ends of the two wires must
point to the rear. Incorrect
installation can cause
damage to the enamel.
11.4 Removing the oven door
To make the cleaning easier, remove the
door.
1
2
1. Open the door fully.
2. Move the slider until you hear a click.
3. Close the door until the slider locks.
4. Remove the door.
To remove the door, pull the door
outwards first from one side, and
then the other.
When the cleaning procedure is
completed, insert the oven door in the
opposite sequence. Make sure that you
hear a click when you insert the door.
Use force if necessary.
11.5 Removing and cleaning
the door glasses
The door glass in your
product can be different in
type and shape from the
examples you see in the
images. The number of
glasses can also be different.
1. Hold the door trim (B) on the top
edge of the door at the two sides
and push inwards to release the clip
seal.
ENGLISH
73

1
2
B
2. Pull the door trim to the front to
remove it.
3. Hold the door glass panels on their
top edge one by one and pull them
upwards from the guide.
4. Clean the door glass panels.
To install panels, do the same steps in
reverse.
11.6 Replacing the lamp
Put a cloth on the bottom of the interior
of the appliance. It prevents damage to
the lamp glass cover and the cavity.
WARNING!
Danger of electrocution!
Disconnect the fuse before
you replace the lamp.
The lamp and the lamp glass
cover can be hot.
1. Deactivate the appliance.
2. Remove the fuses from the fuse box
or deactivate the circuit breaker.
The back lamp
The lamp glass cover is at
the back of the cavity.
1. Turn the lamp glass cover
counterclockwise to remove it.
2. Clean the glass cover.
3. Replace the oven lamp with a
suitable 300 °C heat-resistant oven
lamp.
Use the same oven lamp type.
4. Install the glass cover.
The side lamp
Find the lamp glass cover at the left side
of the cavity.
1. Remove the left shelf support to get
access to the lamp.
2. Use a narrow, blunt object (e.g. a
teaspoon) to remove the glass cover.
3.
Clean the glass cover.
4. Replace the lamp with a suitable 300
°C heat-resistant lamp.
5. Install the glass cover.
6. Install the left shelf support.
11.7 Removing the drawer
WARNING!
When the oven is in use,
heat can build up in the
drawer. Do not keep
flammable things in there
(e.g. cleaning materials,
plastic bags, oven gloves,
paper, cleaning sprays, etc.).
The drawer below the oven can be
removed for cleaning.
1. Pull the drawer out until it stops.
www.aeg.com
74

1
2
2. Lift the drawer at a small angle and
remove it from the drawer support
rails.
Inserting the drawer:
1. To insert the drawer set the drawer
on the support rails. Make sure that
the catches engage correctly into the
rails
2. Lower the drawer until it is horizontal
and push it in.
12. TROUBLESHOOTING
WARNING!
Refer to Safety chapters.
12.1 What to do if...
Problem Possible cause Remedy
You cannot activate the ap-
pliance.
The appliance is not connec-
ted to an electrical supply or
it is connected incorrectly.
Check if the appliance is cor-
rectly connected to the elec-
trical supply.
You cannot activate the ap-
pliance.
The fuse is released. Make sure that the fuse is
the cause of the malfunction.
If the fuse releases again
and again, contact a quali-
fied electrician.
You cannot activate or oper-
ate the hob.
You touched 2 or more sen-
sor fields at the same time.
Touch only one sensor field.
You cannot activate or oper-
ate the hob.
STOP+GO function oper-
ates.
Refer to "Hob - Daily use"
chapter.
You cannot activate or oper-
ate the hob.
There is water or fat stains
on the control panel.
Clean the control panel.
An acoustic signal sounds
and the hob deactivates.
An acoustic signal sounds
when the hob is deactivated.
You put something on one
or more sensor fields.
Remove the object from the
sensor fields.
The hob deactivates. You put something on the
sensor field .
Remove the object from the
sensor field.
ENGLISH 75

Problem Possible cause Remedy
Residual heat indicator does
not come on.
The zone is not hot because
it operated only for a short
time.
If the zone operated suffi-
ciently long to be hot, speak
to an Authorised Service
Centre.
Automatic Heat Up function
does not operate.
The zone is hot. Let the zone become suffi-
ciently cool.
Automatic Heat Up function
does not operate.
The highest heat setting is
set.
The highest heat setting has
the same power as the func-
tion.
The heat setting changes
between two levels.
Power management function
operates.
Refer to "Hob - Daily use"
chapter.
The sensor fields become
hot.
The cookware is too large or
you put it too near to the
controls.
Put large cookware on the
rear zones if possible.
comes on the hob dis-
play.
Automatic Switch Off oper-
ates.
Deactivate the hob and acti-
vate it again.
comes on the hob dis-
play.
The Child Safety Device or
the Lock function operates.
Refer to "Hob - Daily use"
chapter.
comes on the hob dis-
play.
There is no cookware on the
zone.
Put cookware on the zone.
comes on the hob dis-
play.
The cookware is incorrect. Use the correct cookware.
Refer to "Hob - Hints and
tips" chapter.
comes on the hob dis-
play.
The diameter of the bottom
of the cookware is too small
for the zone.
Use cookware with correct
dimensions.
Refer to "Hob - Hints and
tips" chapter.
comes on the hob dis-
play.
The cookware does not cov-
er the cross / square.
Cover the cross / square
fully.
The oven does not heat up. The oven is deactivated. Activate the oven.
The oven does not heat up. The clock is not set. Set the clock.
The oven does not heat up. The necessary settings are
not set.
Make sure that the settings
are correct.
The oven does not heat up. The automatic switch-off is
activated.
Refer to "Automatic switch-
off".
The oven does not heat up. The Function Lock is on. Refer to "Function Lock".
The lamp does not operate. The lamp is defective. Replace the lamp.
www.aeg.com76

Problem Possible cause Remedy
The core temperature sensor
does not operate.
The plug of the core tem-
perature sensor is not cor-
rectly installed into the sock-
et.
Put the plug of the core tem-
perature sensor as far as
possible into the socket.
It takes too long to cook the
dishes or they cook too
quickly.
The temperature is too low
or too high.
Adjust the temperature if
necessary. Follow the advice
in the user manual.
Steam and condensation
settle on the food and in the
cavity of the oven.
You left the dish in the oven
for too long.
Do not leave the dishes in
the oven for longer than 15 -
20 minutes after the cooking
process ends.
The display shows an error
code that is not in this table.
There is an electrical fault. Deactivate the appliance
with the house fuse or the
safety switch in the fuse box
and activate it again.
If the display shows the error
code again, contact the Cus-
tomer Care Department.
12.2 Service data
If you cannot find a solution to the
problem yourself, contact your dealer or
an Authorised Service Centre.
The necessary data for the service centre
is on the rating plate. The rating plate is
on the front frame of the appliance
cavity. Do not remove the rating plate
from the appliance cavity.
We recommend that you write the data here:
Model (MOD.) .........................................
Product number (PNC) .........................................
Serial number (S.N.) .........................................
13. INSTALLATION
WARNING!
Refer to Safety chapters.
13.1 Technical data
Dimensions
Height 847 - 867 mm
Width 596 mm
Dimensions
Depth 600 mm
Oven capacity 74 l
13.2 Location of the appliance
You can install your freestanding
appliance with cabinets on one or two
sides and in the corner.
ENGLISH 77

A
A
B
Minimum distances
Dimension mm
A 2
B 685
13.3 Levelling of the appliance
Use small feet on the bottom of
appliance to set the appliance top
surface level with other surfaces.
13.4 Anti-tilt protection
CAUTION!
Install the anti-tilt protection
to prevent the appliance
from falling under incorrect
loads. The anti-tilt
protection only works when
the appliance is put in a
correct area.
Your appliance has the
symbols shown on the
pictures (if applicable) to
remind you about the
installation of the anti-tilt
protection.
CAUTION!
Make sure you install the
anti-tilt protection at the
correct height.
Make sure that the surface behind the
appliance is smooth.
1. Set the correct height and area for
the appliance before you attach the
anti-tilt protection.
2. Install the anti-tilt protection 77 mm
down from the top surface of the
appliance and 49 mm from the left
side of the appliance into the circular
hole on the bracket. See the
illustration. Screw it into the solid
material or use applicable
reinforcement (wall).
3. You can find the hole on the left side
at the back of the appliance. See the
illustration. Lift the front of the
appliance (1) and put it in the middle
of the space between the cupboards
(2). If the space between the bench
cupboards is larger than the width of
the appliance, you must adjust the
side measurement to centre the
appliance.
www.aeg.com
78

1
2
49 mm
77 mm
13.5 Electrical installation
WARNING!
The manufacturer is not
responsible if you do not
follow the safety precautions
from Safety chapters.
This appliance is supplied without a main
plug or a main cable.
Applicable cable types: H07 RN-F, H05
RN-F, H05 RR-F, H05 VV-F, H05 V2V2-F
(T90), H05 BB-F.
14. ENVIRONMENT CONCERNS
Recycle the materials with the symbol .
Put the packaging in applicable
containers to recycle it. Help protect the
environment and human health and to
recycle waste of electrical and electronic
appliances. Do not dispose appliances
marked with the symbol with the
household waste. Return the product to
your local recycling facility or contact
your municipal office.
*
ENGLISH
79

www.aeg.com/shop
867307127-A-262014
-
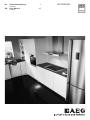 1
1
-
 2
2
-
 3
3
-
 4
4
-
 5
5
-
 6
6
-
 7
7
-
 8
8
-
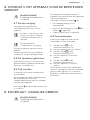 9
9
-
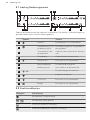 10
10
-
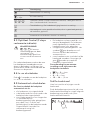 11
11
-
 12
12
-
 13
13
-
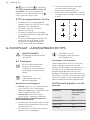 14
14
-
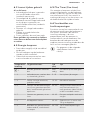 15
15
-
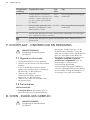 16
16
-
 17
17
-
 18
18
-
 19
19
-
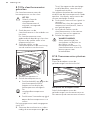 20
20
-
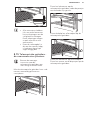 21
21
-
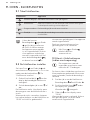 22
22
-
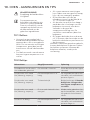 23
23
-
 24
24
-
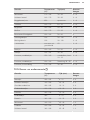 25
25
-
 26
26
-
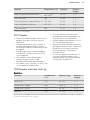 27
27
-
 28
28
-
 29
29
-
 30
30
-
 31
31
-
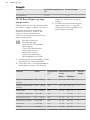 32
32
-
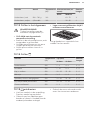 33
33
-
 34
34
-
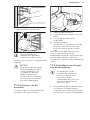 35
35
-
 36
36
-
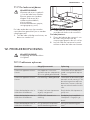 37
37
-
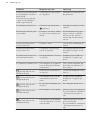 38
38
-
 39
39
-
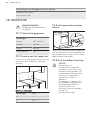 40
40
-
 41
41
-
 42
42
-
 43
43
-
 44
44
-
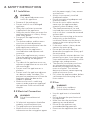 45
45
-
 46
46
-
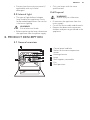 47
47
-
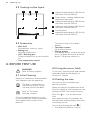 48
48
-
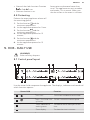 49
49
-
 50
50
-
 51
51
-
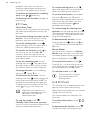 52
52
-
 53
53
-
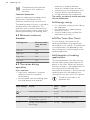 54
54
-
 55
55
-
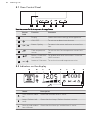 56
56
-
 57
57
-
 58
58
-
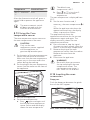 59
59
-
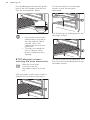 60
60
-
 61
61
-
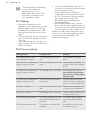 62
62
-
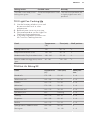 63
63
-
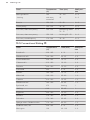 64
64
-
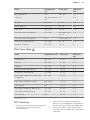 65
65
-
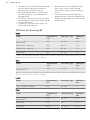 66
66
-
 67
67
-
 68
68
-
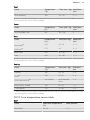 69
69
-
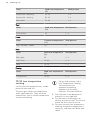 70
70
-
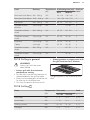 71
71
-
 72
72
-
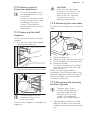 73
73
-
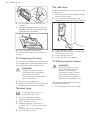 74
74
-
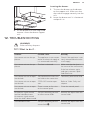 75
75
-
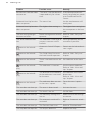 76
76
-
 77
77
-
 78
78
-
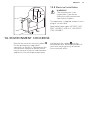 79
79
-
 80
80


