Velbus VMB4IRT 4 Channel Transmitter Handleiding
- Type
- Handleiding

short user manual - Beknopte gebruikershandleiding - Kurzbedienungsanleitung - Manual del usuario cortoshort user manual - Beknopte gebruikershandleiding - Kurzbedienungsanleitung - Manual del usuario corto
Velbus Home Automation
Choosing Velbus is choosing comfort, safety and energy saving
with the guarantee that your home is ready for the future. All this
for a price barely higher than that of a traditional installation.
Velbus Home Automation
Choosing Velbus is choosing comfort, safety and energy saving
with the guarantee that your home is ready for the future. All this
for a price barely higher than that of a traditional installation.
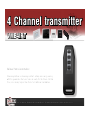
4 Channel transmitter
VMB4IRT

ABOUT US
modules and 38 temperature sensors.
Velleman® nv has been an important wholesaler and developer
of electronics for almost 40 years and has its own research and
development department.
around the world, Velleman nv is an important international
player in the electronics industry.
CONTACT I N FO RM AT I ON :
Velleman NV
Legen Heirweg 33
B-9890 Gavere, Belgium
+32 9 384 36 11 • +32 9 384 67 02
[email protected] • www.velbus.eu • www.velleman.eu

ENGLISH
NEDERLANDS
Specicaties
• protocol: modulatiesysteem RECS80 (aangepast)/ 38 kHz draaggolf
• bereik: tot 10 m
• afmetingen: 88x37x13mm
DEUTSCH
ESPAÑOL
Technische Daten
• Protokoll: RECS80 IR Protokoll (angepasst) / 38 kHz Trägerwelle
• Bereich: bis zu 10 m
• Abmessungen: 88 x 37 x 13mm
Especicaciones
• protocolo:protocoloRECS80IR(modicado)/portadora38kHz
• rango: hasta 10 m
• dimensiones: 88 x 37 x 13mm
FRANçAIS
Spécications
• protocole:systèmedemodulationRECS80(modié)/
onde porteuse de 38 kHz
• plage: jusqu’à 10 m
• dimensions: 88 x 37 x 13mm
Specications
• protocol:modiedRECS80/38kHzcarrier
• range: up to 10 m
• dimensions: 88x37x13mm / 3.46x1.45x0.5”
- 3 -
Battery: V23GA / GP23GAC
Batterij: V23GA / GP23GAC
Pile: V23GA / GP23GAC
Pila: V23GA / GP23GAC
Batterie: V23GA / GP23GAC
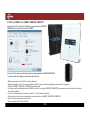
Channel - Kanaal -
Kanal - Canal
1
2
3
4
LED
Mode button
•
Mode knop
•
Bouton Mode
•
Mode-Taste
•
botón Mode

- 4 -
1. For use with the VMB4PD
How to setup your remote control
InordertobeabletousetheVMB4IRTremotecontrolwithyourdevice,theremoteand/oryourdevicemustbeconguredinthecorrectway.
First, remove the 3 screws at the back of the remote and open the unit. Next, select your device from the list below and follow the appropriate setup procedure.
Note: The devices listed below are supported at time of printing. Please check www.velleman.be for an up to date list, as devices might have been added.
• Press and hold the ‘Mode’-button of the remote
• Pressandholdbutton‘3’oftheremote.Theindicatorledoftheremotewillashbrieyevery3s.
• Watch the VMB4PD closely.
• As soon as button 1 of the page you wish to control is activated, release all buttons of the remote.
• The 3 remaining buttons of the page are controlled with button 2, 3 and 4 of the remote.
• This procedure can take a couple of minutes, depending on the address setting of the VMB4PD
• Close the remote by means of the 3 screws
• You device is ready to be used
•
• Pressandholdbutton‘2’oftheremote.Theindicatorledoftheremotewillashbrieyevery3s.
•
•
•
•
•
•
The4-channelinfraredtransmitterbydefaultoperatestherstpageoftheVMBGPOB/VMBGPOW.

- 5 -
How to setup your remote control
InordertobeabletousetheVMB4IRTremotecontrolwithyourdevice,theremoteand/oryourdevicemustbeconguredinthecorrectway.
the appropriate setup procedure.
•
• Pressandholdbutton‘3’oftheremote.Theindicatorledoftheremotewillashbrieyevery3s.
•
•
•
•
•
•
• Press and hold ‘Mode’-button of the remote
• Pressandholdbutton‘2’oftheremote.Theindicatorledoftheremotewillashbrieyevery3s.
• Watch the VMB8IR / VMBGPOB / VMBGPOW closely.
• As soon as the desired channel of the VMB8IR or button 1 of the VMBGPOB / VMBGPOW page you wish to control responds, release all buttons of
the remote.
• The 3 following channels/buttons are controlled with button 2, 3 and 4 of the remote.
• This procedure can take a couple of minutes, depending on the address setting of the VMB8IR / VMBGPOB / VMBGPOW.
• Close the remote by means of the 3 screws
• You device is ready to be used
2. For use with the VMB8IR / VMBGPOB / VMBGPOW
The4-channelinfraredtransmitterbydefaultoperatestherstpageoftheVMBGPOB/VMBGPOW.
If you want to control other pages, follow the procedure below:
Activate the infrared feature in the VelbusLink software if you want to control the
VMBGPOW/VMBGPOB with the 4-channel infrared transmitter ‘VMB4IRT’.

- 6 -
Uw afstandsbediening instellen
1. De afstandsbediening met een VMB4PD gebruiken
Om de VMB4IRT te kunnen gebruiken met uw toestel, moet u de afstandsbediening en/of uw toestel correct instellen. Verwijder de 3 schroeven aan de
achterkant en open het toestel. Kies uw toestel uit de lijst hieronder en volg de juiste setup-procedure.
Opmerking: De toestellen hieronder zijn ondersteund bij het ter perse gaan. Raadpleeg de website www.velleman.be voor de meest recente lijst.
• Houd de Mode-knop van de afstandsbediening ingedrukt.
• Houd knop 3 van de afstandsbediening ingedrukt. De LED van de afstandsbediening knippert kort om de 3 seconden.
• Observeer de VMB4PD.
• Laat alle knoppen van de afstandsbediening los van zodra de knop 1 van de pagina, die u wilt aansturen, geactiveerd is.
• De 3 andere knoppen van de pagina worden met de knoppen 2, 3 en 4 van de afstandsbediening aangestuurd.
• Deze procedure kan enkele minuten duren en hangt van de adresinstelling van de VMB4PD af.
• Sluit de afstandsbediening met de 3 schroeven.
• Uw toestel is gebruiksklaar.
•
•
•
•
•
•
•
•

- 7 -
Uw afstandsbediening instellen
•
•
•
•
•
•
•
•
• Houd de Mode-knop van de afstandsbediening ingedrukt.
• Houd knop 2 van de afstandsbediening ingedrukt. De LED knippert kort om de 3 seconden.
• Observeer de VMB8IR / VMBGPOB / VMBGPOW.
• Laat alle knoppen van de afstandsbediening los van zodra het gewenste kanaal van de VMB8IR of knop 1 van de VMBGPOB / VMBGPOW-pagina
geactiveerd is.
• De 3 andere kanalen/knoppen worden met de knoppen 2, 3 en 4 van de afstandsbediening aangestuurd.
• Deze procedure kan enkele minuten duren en hangt van de adresinstelling van de VMB8IR / VMBGPOB / VMBGPOW af.
• Sluit de afstandsbediening met de 3 schroeven.
• Uw toestel is gebruiksklaar.
2. De afstandsbediening met een VMB8IR / VMBGPOB / VMBGPOW gebruiken
De 4-kanaals IR-zender gebruikt standaard de eerste pagina van de VMBGPOB/VMBGPOW.
Volg de onderstaande stappen om andere pagina’s aan te sturen.
Activeer de infraroodfunctie van de VelbusLink-software om de VMBGPOW/
VMBGPOB aan te sturen met de 4-kanaals IR-zender ‘VMB4IRT’.

- 8 -
Congurer votre télécommande
1. Utiliser la télécommande avec le VMB4PD
PourpouvoirutiliserleVMB4IRTavecvotreappareil,ilfautd’abordcongurerlatélécommandeet/ouvotreappareildemanièrecorrecte.
Desserrezles3vissituéesàl’arrièredelatélécommandeetouvrezl’unité.Sélectionnezvotreappareildanslisteci-dessousetsuivezlaprocédurede
congurationappropriée.
Remarque : Lesappareilssuivantssontsupportéslorsdelamisesouspresse.Consultezlesitewebwww.velleman.bepourlalistelaplusrécente.
• MaintenezenfoncéleboutonModedelatélécommande.
• Maintenezenfoncélebouton3delatélécommande.LaLEDclignotebrièvementtoutesles3secondes.
• Observez le VMB4PD.
• Relâcheztouslesboutonsdelatélécommandedumomentquelebouton1delapagequevoussouhaitezpiloter,soitactivé.
• Lesautres3boutonsdelapagesontpilotésaveclesboutons2,3et4delatélécommande.
• Cetteprocédurepeutdurerquelquesminutesetdépenddelacongurationdel’adresseduVMB4PD.
• Refermezlatélécommandeavecles3vis.
• Votre appareil est prêt à l’emploi.
L’émetteurIRà4canauxutilisepardéfautlapremièrepageduVMBGPOB/VMBGPOW.
Suivezlesétapessuivantespourcontrôlerd’autrespages.
ActivezlafonctioninfrarougedulogicielVelbusLinkpourcontrôlerleVMBG
POW/VMBGPOBavecl’émetteurIRà4canaux‘VMB4IRT’.
• MaintenezenfoncéleboutonModedelatélécommande.
• Maintenezenfoncéégalementlebouton2delatélécommande.LaLEDclignotebrièvementtoutesles3secondes.
•
• RelâcheztouslesboutonsdelatélécommandedumomentquelecanalsouhaitéduVMB8IRoulebouton1delapageVMBGPOB/VMBGPOW
quevoussouhaitezpiloter,soitactivé.
• Lesautres3canaux/boutonssontpilotésaveclesboutons2,3et4delatélécommande.
• Cetteprocédurepeutdurerquelquesminutesetdépenddelacongurationdel’adresseduVMB8IR/VMBGPOB/VMBGPOW.
• Refermezlatélécommandeavecles3vis.
•

- 9 -
Congurer votre télécommande
PourpouvoirutiliserleVMB4IRTavecvotreappareil,ilfautd’abordcongurerlatélécommandeet/ouvotreappareildemanièrecorrecte.
Desserrezles3vissituéesàl’arrièredelatélécommandeetouvrezl’unité.Sélectionnezvotreappareildanslisteci-dessousetsuivezlaprocédurede
congurationappropriée.
Lesappareilssuivantssontsupportéslorsdelamisesouspresse.Consultezlesitewebwww.velleman.bepourlalistelaplusrécente.
• MaintenezenfoncéleboutonModedelatélécommande.
• Maintenezenfoncélebouton3delatélécommande.LaLEDclignotebrièvementtoutesles3secondes.
•
• Relâcheztouslesboutonsdelatélécommandedumomentquelebouton1delapagequevoussouhaitezpiloter,soitactivé.
• Lesautres3boutonsdelapagesontpilotésaveclesboutons2,3et4delatélécommande.
• Cetteprocédurepeutdurerquelquesminutesetdépenddelacongurationdel’adresseduVMB4PD.
• Refermezlatélécommandeavecles3vis.
•
L’émetteurIRà4canauxutilisepardéfautlapremièrepageduVMBGPOB/VMBGPOW.
Suivezlesétapessuivantespourcontrôlerd’autrespages.
ActivezlafonctioninfrarougedulogicielVelbusLinkpourcontrôlerleVMBG-
POW/VMBGPOBavecl’émetteurIRà4canaux‘VMB4IRT’.
2. Utiliser la télécommande avec le VMB4PD / VMBGPOB / VMBGPOW
• MaintenezenfoncéleboutonModedelatélécommande.
• Maintenezenfoncéégalementlebouton2delatélécommande.LaLEDclignotebrièvementtoutesles3secondes.
• Observez le VMB8IR / VMBGPOB / VMBGPOW.
• RelâcheztouslesboutonsdelatélécommandedumomentquelecanalsouhaitéduVMB8IRoulebouton1delapageVMBGPOB/VMBGPOW
quevoussouhaitezpiloter,soitactivé.
• Lesautres3canaux/boutonssontpilotésaveclesboutons2,3et4delatélécommande.
• Cetteprocédurepeutdurerquelquesminutesetdépenddelacongurationdel’adresseduVMB8IR/VMBGPOB/VMBGPOW.
• Refermezlatélécommandeavecles3vis.
• Votre appareil est prêt à l’emploi.

- 10 -
Die Fernbedienung kongurieren
1. Die Fernbedienung mit einem VMB4PD verwenden
KongurierenSiedieFernbedienungVMB4IRTund/oderdasGerätaufkorrekterWeise.EntfernenSiezuerstdie3SchraubenaufderRückseitederFernbe-
dienungundöffnenSiedasGerät.WählenSiedannIhrGerätinderListe(sieheunten)undbefolgenSiedasgeeigneteKongurationsverfahren.
Bemerkung: DieGerätederunterstehendenListewerdenzumZeitpunktderErstellungdieserBedienungsanleitungunterstützt.GehenSiezuwww.velleman.
befürdieaktuellsteListe.
• HaltenSiedie‘Mode’-TastederFernbedienunggedrückt
• HaltenSiedieTaste‘3’derFernbedienunggedrückt.DieLEDderFernbedienungblinktalle3Sekundenkurz.
• Beobachten Sie das VMB4PD.
• Sobald die Taste 1 der Seite, die Sie kontrollieren möchten, aktiviert wird, lassen Sie alle Tasten der Fernbedienung los.
• Die anderen 3 Tasten der Seiten werden mit der Taste 2, 3 und 4 der Fernbedienung kontrolliert.
• Dieses Verfahren kann einige Minuten dauern und hängt von der Adresseneinstellung des VMB4PD ab.
• Schließen Sie die Fernbedienung mit den 3 Schrauben.
• Das Gerät ist nun gebrauchsfertig.
• HaltenSiedie‘Mode’-TastederFernbedienunggedrückt
• HaltenSiedieTaste‘2’derFernbedienunggedrückt.DieLEDderFernbedienungblinktalle3Sekundenkurz.
•
• SobalddergewünschteKanalvomVMB8IRoderderTaste1derVMBGPOB/VMBGPOW-Seiteaktiviertwird,lassenSiealleTastenderFernbedi
•
•
•
•

- 11 -
Die Fernbedienung kongurieren
KongurierenSiedieFernbedienungVMB4IRTund/oderdasGerätaufkorrekterWeise.EntfernenSiezuerstdie3SchraubenaufderRückseitederFernbe
dienungundöffnenSiedasGerät.WählenSiedannIhrGerätinderListe(sieheunten)undbefolgenSiedasgeeigneteKongurationsverfahren.
DieGerätederunterstehendenListewerdenzumZeitpunktderErstellungdieserBedienungsanleitungunterstützt.GehenSiezuwww.velleman.
befürdieaktuellsteListe.
• HaltenSiedie‘Mode’-TastederFernbedienunggedrückt
• HaltenSiedieTaste‘3’derFernbedienunggedrückt.DieLEDderFernbedienungblinktalle3Sekundenkurz.
•
•
•
•
•
•
• HaltenSiedie‘Mode’-TastederFernbedienunggedrückt
• HaltenSiedieTaste‘2’derFernbedienunggedrückt.DieLEDderFernbedienungblinktalle3Sekundenkurz.
• Beobachten Sie VMB8IR / VMBGPOB / VMBGPOW.
• SobalddergewünschteKanalvomVMB8IRoderderTaste1derVMBGPOB/VMBGPOW-Seiteaktiviertwird,lassenSiealleTastenderFernbedi-
enung los.
• Die anderen 3 Kanäle/Tasten werden mit der Taste 2, 3 und 4 der Fernbedienung kontrolliert.
• Dieses Verfahren kann einige Minuten dauern und hängt von der Adresseneinstellung des VMB8IR / VMBGPOB / VMBGPOW ab.
• Schließen Sie die Fernbedienung mit den 3 Schrauben.
• Das Gerät ist nun gebrauchsfertig.
Der 4-Kanal IR-Sender kontrolliert automatisch die erste Seite des VMBGPOB/VMBGPOW.
Möchten Sie andere Seiten kontrollieren, so gehen Sie wie folgt vor:
Schalten Sie die IR-Funktion in der VelbusLink-Software ein wenn Sie VMBG-
POW/VMBGPOB mit dem 4-Kanal IR-Sender ‘VMB4IRT’ kontrollieren möchten.
2. Die Fernbedienung mit einem VMB8IR / VMBGPOB / VMBGPOW verwenden

- 12 -
CongureelmandoadistanciaVMB4IRTy/oelaparatodemaneracorrecta.Primero,desatornillelostrestornillosdelapartetraseradelmandoadistanciay
abraelaparato.Next,selectyourdevicefromthelistbelowandfollowtheappropriatesetupprocedure.Luego,seleccionesuaparatoenlalista(véasearriba)
ysigaelprocedimientodeconguraciónadecuada.
Observación: Los aparatos de la lista están soportados al momento de imprimir este manual. Consulte www.velleman.be para la lista más reciente.
Congurar el mando a distancia
1. Utilizar el mando a distancia con el VMB4PD
• Mantenga pulsado el botón ‘Mode’ del mando a distancia
• Mantenga pulsado el botón ‘3’ del mando a distancia. El LED del mando a distancia parpadea brevemente cada 3 segundos.
• Observe el VMB4PD.
• En cuanto se active el botón 1 de la página que quiere controlar, suelte todos los botones del mando a distancia.
• Los otros 3 botones de la página se controlan con el botón 2, 3 y 4 del mando a distancia.
• Esto puede durar unos minutos y depende del ajuste de dirección del VMB4PD
• Cierre el mando a distancia con los 3 tornillos.
• Ahora, el aparato está listo para utilizar.
•
•
•
•
•
•
•
•

- 13 -
CongureelmandoadistanciaVMB4IRTy/oelaparatodemaneracorrecta.Primero,desatornillelostrestornillosdelapartetraseradelmandoadistanciay
abraelaparato.Next,selectyourdevicefromthelistbelowandfollowtheappropriatesetupprocedure.Luego,seleccionesuaparatoenlalista(véasearriba)
ysigaelprocedimientodeconguraciónadecuada.
Congurar el mando a distancia
•
•
•
•
•
•
•
•
2. Utilizar el VMB4IRT con el VMB8IR / VMBGPOB / VMBGPOW
El emisor IR de 4 canales controlará por defecto la primera página del VMBGPOB/VMBGPOW.
Si quiere controlar otras páginas, proceda de la siguiente forma:
Active la función IR en el software VelbusLink si quiere controlar el VMBGPOW/
VMBGPOB con el emisor IR de 4 canales ‘VMB4IRT’.
• Mantenga pulsado el botón ‘Mode’ del mando a distancia
• Mantenga pulsado el botón ‘2’ del mando a distancia. LED del mando a distancia parpadea brevemente cada 3 segundos.
• Observe el VMB8IR / VMBGPOB / VMBGPOW cuidadosamente.
• En cuanto se active el canal deseado del VMB8IR o el botón 1 de la página VMBGPOB / VMBGPOW que quiere controlar, suelte todos los botones
del mando a distancia.
• Los otros 3 canales/botones se controlan con botón 2, 3 y 4 del mando a distancia.
• Esto puede durar unos minutos y depende del ajuste de dirección del VMB8IR / VMBGPOB / VMBGPOW.
• Cierre el mando a distancia con los 3 tornillos.
• Ahora, el aparato está listo para utilizar

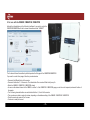
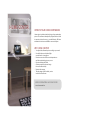
HOME CENTER
OPERATE YOU R H OM E EVE RYWHERE
Home center is a software interface for your home automation
system. This software is developed by Stijnen Solutions. Ideal
to operate via touch screen, pc, or mobile device. All home
automation functions are available in one central place.
WHY H OM E CENTE R?
-You adjust the software layout according to your needs.
-See which indoor and outdoor lights
are switched on in one glance
-Receive an overview of the current temperatures
and thermostat settings in every room
-Operate shutters and blinds
-Activate a mood function and enjoy
the result without delay
-Monitor the cameras
-Take advantage of all the handy extras
included in the software
MO RE I N F OR M AT I ON AND DE MO VI D EO
www.homecenter.be

HOM E CENTER
INTERFACE SERVER
The VMBHIS is the ultimate hardware solution
for the use of Stijnen Solutions Home center.
A ready-to-use solution to operate your
Velbus® installation via your iPhone, iPad,
iPod touch, Windows or web browser.
Moreover, it's an ecological solution, as this
server module only uses 5 W in full operation
mode.
In addition to the box contents, all you need
is a functioning Velbus® installation with a
VMB1USB or VMBRSUSB communication
module.
Your Velbus instalation
modem
outdoor control through
wireless internet
local control through
router - Wi-Fi
Internet
I N CLU D ED :
-interface module
-1.5 m Ethernet cable
-usb cable
-power cord
-power plug
-full licence
-1 year of free
online updates
SPECI FICATIO NS:
-usb 2.0 interface
-Gigabit Ethernet
interface (LAN)
-led indicators for
power supply and
when active
-1.2 GHz CPU
-plug and play
power supply: 100 - 240 Vac, max. 20 W
5 W when active
VMBHIS

Modications and typographical errors reserved - © Velleman nv. HVMB4IRT - 2013 - ED1 (rev.1)
-
 1
1
-
 2
2
-
 3
3
-
 4
4
-
 5
5
-
 6
6
-
 7
7
-
 8
8
-
 9
9
-
 10
10
-
 11
11
-
 12
12
-
 13
13
-
 14
14
-
 15
15
-
 16
16


