
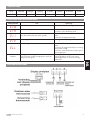
Professional Supplies
Gebruikershandleiding
Operation instructions
WATERKOKER
WATER BOILER
Modelnr.: *688.120

688120 nl-en ma 2016
2
NL
Hartelijk dank voor de aanschaf van dit product. Lees deze handleiding goed door
zodat u bent verzekerd van optimale productprestaties en voorkomt dat het product
onnodig minder presteert of onnodig wordt beschadigd.
In de handleiding vindt u ook meer informatie over de productkenmerken, en over de
installatie en het gebruik van het product. Bewaar de handleiding voor later gebruik.
GEBRUIKSVOORWAARDEN:
Geschikte waterbron: leidingwater, pH-waarde tussen 6,5~8,5
Watertoevoerdruk: 0,2~0,6 MPa (debiet ≥4 l/min), omgevingstemperatuur: 0~40ºC
Watertoevoertemperatuur: 0~40ºC
Netspanning: ~220-240 V
INHOUDSOPGAVE
Veiligheidsinstructies .......................................................................... 3
Structuur .......................................................................................... 4
Omschrijving van indicatoren op bedieningspaneel ............................... 4
Werking .......................................................................................... 5
Installatie-instructies ........................................................................... 6
Gebruiksinstructies ............................................................................ 6
Periodieke inspectie ........................................................................... 8
Onderhoud ...................................................................................... 8
Specificaties ..................................................................................... 9
Foutcode en foutoplossing .................................................................. 9
Elektrisch schema .............................................................................. 9

688120 nl-en ma 2016 3
NL
VEILIGHEIDSINSTRUCTIES
WAARSCHUWING:
1. Zorg ervoor dat de netspanning van het apparaat overeenkomt met de netspanning van de wand-
contactdoos. De parameters van het aansluitpunt moeten voldoen aan de eisen van de aansluitkabel.
2. De watertoevoerdruk moet liggen tussen 0,2-0,6 MPa (debiet≥4 l/min). Als de waterdruk onder het
bereik ligt, stroomt het water mogelijk niet normaal het apparaat in; als de waterdruk boven het bereik
ligt, wordt de watervulklep mogelijk beschadigd.
3. Breng nooit willekeurige wijzigingen aan het apparaat aan, alleen de door het bedrijf gespecificeerde
reserveonderdelen mogen voor reparaties worden gebruikt.
4. Plaats het apparaat niet in de buurt van de gastoevoer of andere brandbare en explosieve objecten.
5. Zorg ervoor dat het oppervlak van het apparaat niet in contact komt met brandbare en explosieve
objecten, en dat het apparaat wordt gebruikt in een brandveilige omgeving. De waterkoker moet ook
op een afstand van ten minste 50 cm van een ander apparaat worden geplaatst.
6. Haal niets los als dat niet wordt vermeld in de handleiding, en controleer of de geaarde kabel van het
apparaat goed is aangesloten op een stopcontact.
7. Raak de watertapkraan niet met uw handen aan en kijk uit dat u zich niet brandt.
8. De waterkoker moet binnen worden gebruikt. Plaats het apparaat niet buiten of in een vochtige
omgeving.
9. Gebruik geen beschadigde aansluitkabel om het apparaat aan te sluiten. Vervang voordat u de
waterkoker gebruikt eerst de beschadigde onderdelen om kortsluiting te voorkomen.
10. Sluit eerst de stroom- en watertoevoer af voordat u reparaties uitvoert of onderhoud aan het apparaat
verricht.
11. U mag de geaarde kabel niet delen met een ander apparaat om te voorkomen dat het apparaat wordt
beschadigd als gevolg van kortsluiting van een ander apparaat.
12. Controleer of de siliconenbuis goed en ongehinderd is aangesloten op de luchtafvoeropening,
of de buis wordt geblokkeerd of is gebogen, of er geen stoom wordt uitgestoten en of de druk in de
watercontainer is verhoogd.
13. Als de watertoevoerdruk hoger is dan de limiet of de waterhoogtelijn is overschreden, leidt dit er mogelijk
toe dat het water overloopt. Om dit te voorkomen, moet een magnetische klep worden geïnstalleerd.
14. De waterkoker moet worden geïnstalleerd en onderhouden door een gekwalificeerde elektricien.
15. De waterkwaliteit moet voldoen aan de vereisten zoals vermeld in de handleiding. Plaats een waterfilter
als het water niet drinkbaar is.
LET OP:
1. De siliconenbuis moet goed op de waterafvoer worden aangesloten om te voorkomen dat water
overloopt.
2. Zorg ervoor dat kinderen de waterkoker alleen onder toezicht gebruiken om te voorkomen dat ze zich
branden.
3. Gebruik geschikt leidingwater en vul de waterkoker niet met theebladeren.
4. Voorkom dat zonnestralen direct op het apparaat schijnen waardoor de temperatuur van het apparaat
sterk toeneemt en het elektronische regelsysteem wordt beïnvloed of zelfs wordt beschadigd. Houd de
luchtvochtigheid dus tussen 10~60%, en de omgevingstemperatuur moet liggen tussen 0~40ºC.
5. De watertoevoertemperatuur moet liggen boven 0ºC, en niet onder het vriespunt. Als het apparaat moet
worden gebruikt in een zeer koude ruimte, moet u dit bespreken met de fabrikant. Als het water in de
watercontainer bevriest, gaat de container barsten en raken de onderdelen beschadigd.
6. Gebruik geen bijtende reinigingsmiddelen om de waterkoker schoon te maken en gebruik geen harde
voorwerpen waardoor deuken of krassen kunnen ontstaan.
7. Als u het apparaat langere tijd niet hebt gebruikt, zorgt u ervoor dat de watercontainer eerst leeg en
schoon is, en controleert u de onderdelen. Daarna kunt u het apparaat opnieuw gebruiken.
8. Gebruik de waterkoker niet als de watertoevoer is afgesloten. Als u de watertoevoer wilt hervatten,
maakt u de watercontainer vóór gebruik eerst leeg en schoon.
9. Dompel de waterkoker niet onder in water en spoel de romp en het bedieningspaneel niet schoon.
10. Verwijder regelmatig de aanslag van de watercontainer en van de temperatuursondes,
anders kan dit invloed hebben op het apparaat.
11. Verwijder de aanslag van het verwarmingselement, anders gaat dit ten koste van de gebruiksduur of
kan het element zelfs doorbranden.

688120 nl-en ma 2016
4
NL
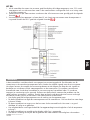
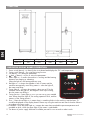
STRUCTUUR
Model A (mm) B (mm) C (mm) D (mm) E (mm)
*688.120 190 520 240 360 180
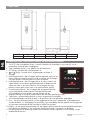
OMSCHRIJVING VAN INDICATOREN OP BEDIENINGSPANEEL
1. ON/OFF: aan-uitschakelaar (knop) – hiermee schakelt u de waterkoker in en wordt ‘ELL’ en de
temperatuur op het display weergegeven.
2. Timerschakelaar (knop) – voor gebruik van de timerfunctie.
3. SET (knop) – hiermee stelt u de parameters in.
4. en (knop) – hiermee kunt u de parameters verhogen of
verlagen.
5. Gele lampje brandt – dat wil zeggen dat het apparaat werkt, en het
water wordt verwarmd of opnieuw wordt verwarmd. Als het lampje
niet meer brandt, wordt het water niet meer verwarmd.
6. Rode lampje brandt – dat wil zeggen dat er te weinig water in de
watercontainer zit en dat het apparaat automatisch begint met het
vullen van water in de watercontainer. Als het lampje niet meer
brandt, wordt er geen water meer in de watercontainer gevuld.
7. Groene lampje brandt – dat wil zeggen dat de magnetische klep
ervoor zorgt dat de watercontainer wordt gevuld met water.
Als het lampje niet meer brandt, stopt de werking van de
magnetische klep en wordt de watercontainer dus niet meer gevuld met water.
8. Timerfunctie – groene lampje brandt, nu kunt u de gewenste tijd instellen.
Als het groene lampje niet meer brandt, is de gewenste tijd in het geheugen opgeslagen.
9. Error – als het rode lampje brandt, wil dat zeggen dat er een fout is opgetreden in het apparaat en
worden de letters ‘Er’ weergegeven in het display. Stop onmiddellijk met het gebruik van het apparaat
en controleer met behulp van de foutcode om welke fout het gaat.
10. DRINK – als het groene lampje brandt, wil dat zeggen dat het water de vooraf ingestelde temperatuur
heeft bereikt en drinkbaar is. Als het groene lampje niet brandt, is het water niet drinkbaar.
11. De aan-uitknop en de timerknop moeten twee seconden worden ingedrukt voor de werking van de
desbetreffende functies.
ON/OFF
DRINK HE AT
La ck Of W ate r Re fil l Timer Error
Digital Water Dispenser
SET
°C
Professional Supplies

688120 nl-en ma 2016 5
NL
LET OP:
1. Als de waterkoker het water niet verwarmt, geeft het display de huidige temperatuur weer; ‘ELL’ wordt
weergegeven als voor de eerste keer water in de watercontainer wordt gevuld of als er te weinig water
in de watercontainer zit.
2. Watertoevoerfout (de watercontainer wordt meer dan 45 minuten met water gevuld) geeft de volgende
foutcode E r1
3. Verwarmingsfout (het apparaat is al meer dan 35 min. bezig met verwarmen maar de temperatuur is
nog steeds minder dan 60ºC geeft de volgende foutcode Er2
WERKING
In deze waterkoker wordt de techniek van trapsgewijze verwarming gebruikt. De elektroden van elk
waterniveau en de nauwkeurige temperatuursensor zenden hun digitale signaal naar de microcomputer.
Vervolgens bestuurt de computer het verwarmingselement en de magnetische klep door de signalen te
berekenen en coördineert ook de watertemperatuur en de watertoevoer. De computer verwarmt een
hoeveelheid water, kookt deze hoeveelheid en verwarmt nog een hoeveelheid water. Zo wordt een
trapsgewijze verwarmingscyclus gevormd. Profiteer van deze techniek waarmee het probleem van het
steeds opnieuw verwarmen is opgelost. Dankzij deze techniek wordt de productiviteit enorm verhoogd
doordat het minder tijd kost om het water in de watercontainer te laten koken.
• Het display geeft de huidige temperatuur en de werking van het apparaat weer.
• De besturingselektronica regelt de watertemperatuur en de watertoevoer. Ook kan deze het water lange
tijd warm houden.
• De besturingselektronica zorgt ervoor dat het water slechts eenmaal kookt. Het water is nu goed
drinkbaar en veilig om te gebruiken.
• Het veiligheidsalarm wordt ingeschakeld als het apparaat begint met droogkoken of als de temperatuur
te hoog is.
• De besturingselektronica vermeldt op het display welke fout is opgetreden.
• Het deksel is zodanig ontworpen dat de gebruiker de watercontainer eenvoudig kan schoonmaken.

688120 nl-en ma 2016
6
NL
• De achterkant van het apparaat kan eenvoudig worden geopend. Het kost slechts 15 minuten om alle
onderdelen te vervangen, het apparaat is eenvoudig te onderhouden.
• Het apparaat is geheel van roestvrij staal, heeft een mooi ontwerp en is eenvoudig schoon te maken.
INSTALLATIE-INSTRUCTIES
1. Het apparaat moet worden geïnstalleerd door een gekwalificeerde elektricien. Bekijk het apparaat
goed en lees deze handleiding goed door. Controleer of de garantiekaart en certificering aanwezig
zijn, en bewaar deze goed: u kunt ze tijdens de garantieperiode nodig hebben.
2. De waterkoker moet worden geplaatst op een stevige en vlakke ondergrond. Zorg ervoor dat de
omgeving goed ventileert, de temperatuur lager is dan 40ºC en de luchtvochtigheid lager is dan 85%.
Controleer of de afvoerpijp niet is geblokkeerd en houd het apparaat uit de buurt van brandbare en
corroderende gassen en vloeistoffen.
3. Controleer of de waterbron voldoet aan de nationale eisen voor het drinken van water. Als de hardheid
van het kraanwater meer dan 300 mg/l is of de aanslag ernstige vormen begint aan te nemen na
het verwarmen, plaatst u een waterfilter. Anders heeft dit invloed op de besturingselektronica. Als het
kraanwater een sterke chloorgeur heeft, installeert u een waterfilter met actieve kool (het chloor zou
anders worden verwarmd en vergast, en zich vervolgens vasthechten aan het deksel dat dan gaat
roesten.
4. Bij de installatie van een nieuwe waterleiding en waterklep selecteert u het product dat is gemaakt van
hittebestendig materiaal en voldoet aan de gezondheidsnormen van drinkwater. Controleer ook of de
leiding een vreemde geur heeft die invloed kan hebben op de kwaliteit van het gekookte water.
De waterdruk moet binnen het bereik liggen van 0,2-0,6 MPa (debiet≥4 l/min). Als de druk hoger is
dan 0,6 MPa, moet een reductieklep worden toegevoegd (zorg er eerst voor dat de nieuwe leiding
helemaal schoon is voordat u deze aansluit op het apparaat (anders wordt het instromende water
geblokkeerd en heeft het invloed op de bediening van de magnetische klep).
5. De waterkoker moet een eigen stopcontact hebben. Ook moet de aardlekschakelaar worden
geïnstalleerd volgens de productspecificaties (de aardlekschakelaar treedt in werking bij 30 mA).
6. Dit product valt onder ‘Type I’-apparaten. De geel-groene kabel in de aansluitkabel is de ‘geaarde
kabel’. Deze moet goed worden aangesloten op een geaard stopcontact dat helemaal voldoet aan de
elektriciteitsvoorschriften van het desbetreffende land.
Waarschuwing: sluit de geaarde kabel nooit aan op de water- of gasleiding.
GEBRUIKSINSTRUCTIES
1. Voordat u het apparaat voor de eerste keer gebruikt, controleert u of het apparaat voldoet aan de
installatievoorschriften. Vervolgens opent u de waterkraan, en controleert u of alle aansluitingen van het
apparaat goed vastzitten en of er geen lekkage is.
2. Schakel de hoofdschakelaar in en zet de aan-uitknop achterop het apparaat aan. Druk vervolgens
op de aan-uitschakelaar op het bedieningspaneel, ‘ELL’ wordt weergegeven in het display en de
beveiliging om te voorkomen dat het apparaat begint met droogkoken, treedt automatisch in werking.
Vervolgens zorgt de magnetische klep ervoor dat water in de watercontainer stroomt. (als u het display
wilt uitschakelen, moet u de aan-uitschakelaar 5 seconden ingedrukt houden waarna het apparaat niet
meer werkt maar nog steeds is ingeschakeld)
3. Als de gele HEAT-indicator (verwarmingsindicator) brandt, wil dat zeggen dat het apparaat begint
met verwarmen en als het lampje niet meer brandt, houdt het apparaat op met verwarmen. Als u het
apparaat voor de eerste keer gebruikt, raden we u aan om de watertapkraan te openen en een of twee
scheuten water te tappen om te zien of de toevoer en afvoer van water normaal werkt.
4. Als de gele HEAT-indicator (verwarmingsindicator) niet meer brandt en de groene DRINK-indicator
(water is drinkbaar) gaat branden, wil dat zeggen dat één snelle verwarmingscyclus is voltooid.
Voordat de watercontainer vol is, gaan de gele en groene indicators allebei branden. Het apparaat
verwerkt de ‘instroom/verwarming’-cyclus automatisch. Als de groene indicator brandt en het display
tijdens de cyclus 100ºC aangeeft, wil dat zeggen dat het water de gewenste temperatuur heeft bereikt
en het water drinkbaar is.
5. De stoom wordt verzameld, wordt afgekoeld en afgevoerd via de stoomafvoer die zich aan de
onderkant van het apparaat bevindt. Bevestig de opvangbak aan de waterkoker voordat u de
waterkoker gebruikt.

688120 nl-en ma 2016 7
NL
6. Aanpassing van de apparaatgegevens:
a) Houd de aan-uitschakelaar lang ingedrukt zodat het display blijft uitgeschakeld.
Nu kunt u de gegevens instellen.
b) Als het display is uitgeschakeld, houd u de knop ‘SET’ 3 seconden ingedrukt om de gegevens
weer te geven. Gebruik vervolgens het pijltje omhoog of het pijltje omlaag om de gegevens aan
te passen, druk op de knop ‘SET’ om over te schakelen of te beëindigen, en de gegevens worden
automatisch opgeslagen.
c) Functie van weergegeven code:
HP Verwarmingselement (40~99ºC) –95ºC standaard
dP Drinktemperatuur (40~98ºC) –93ºC standaard
Hy Retourverschiltemperatuur (1~30ºC) –2ºC standaard
Timer aan - uur (0~23)
o Timer aan - minuut (0~59)
HoF Timer uit - uur (0~23)
oF Timer uit - minuut (0~59)
Ht Actuele tijd - uur
t Actuele tijd - minuut
5t Actuele tijd - seconde
OPMERKING:
• De verwarmingstemperatuur, drinktemperatuur en temperatuur die het verschil tussen toevoer en afvoer
aangeeft, zijn ingesteld volgens de fabrieksinstellingen. De gebruiker kan de standaardtemperatuur niet
wijzigen.
• Met de ingestelde tijd van ‘Timer aan’ wordt de tijd bedoeld waarop het apparaat wordt ingeschakeld.
• Met de ingestelde tijd van ‘Timer uit’ wordt de tijd bedoeld waarop het apparaat wordt uitgeschakeld.
• Stel ‘Actuele tijd’ in volgens de lokale tijd.
7. De fabrieksinstellingen:
a) Temperatuur: de groene DRINK-indicator (water is drinkbaar) brandt als de temperatuur van 93ºC
wordt bereikt (temperatuur stijgt steeds tot 100ºC) en de temperatuur van het verwarmde water is
93~100ºC. De temperatuur van het verwarmde water is gelijk aan de weergegeven temperatuur.
b) Verhoging: als de gebruiker de waterdruk aan zijn eigen regio wil aanpassen, kan hij hiervoor con-
tact opnemen met de plaatselijke leverancier. Door de schakelaar ‘Plateau area heating mode’ in de
besturingselektronica in het apparaat te gebruiken, hoeft de gebruiker geen aanpassingen meer te
doen.
8. Timer:
a) Als het apparaat is uitgeschakeld, stelt u eerst de huidige tijd in. De weergavecode kan afwijken van de
hierboven vermelde weergavecodes. Stel de tijd in volgens de lokale tijd.
Instellingsprocedure: 1. druk op de knop ‘SET’ om te schakelen tussen uren, minuten en seconden;
2. druk op het pijltje omhoog of het pijltje omlaag om de gewenste tijd in te
stellen. Beëindig de instellingen om de gegevens op te slaan;
3. herhaal de procedure om de andere twee gegevens in te stellen.
b) Met ‘Timer aan’ kunt u tijdens het gebruik van het apparaat afwijken van de bovengenoemde gegevens.
Procedure: 1. druk op de knop ‘SET’ om te schakelen tussen uren en minuten;
2. druk op het pijltje omhoog of het pijltje omlaag om de gewenste tijd in te stellen.
Beëindig de instellingen om de gegevens op te slaan;
3. herhaal de procedure om de andere gegevens in te stellen.

688120 nl-en ma 2016
8
NL
c) Met ‘Timer uit’ kunt u tijdens het gebruik van het apparaat afwijken van de bovengenoemde gegevens.
Procedure: 1. druk op de knop ‘SET’ om te schakelen tussen uren en minuten;
2. druk op het pijltje omhoog of het pijltje omlaag om de gewenste tijd in te stellen.
Beëindig de instellingen om de gegevens op te slaan;
3. herhaal de procedure om de andere gegevens in te stellen.
d) Als u deze drie procedures hebt beëindigd, drukt u op de knop ‘SET’ om over te schakelen naar de
status OFF. Als u de knop ‘SET’ 2 seconden ingedrukt houdt, wordt het apparaat ingeschakeld. Als u
vervolgens op de timerknop drukt en de timerindicator gaat branden, wil dat zeggen dat de timer-
functie is ingeschakeld.
PERIODIEKE INSPECTIE
Inspectie-
onderdelen Onderwerp Standaard
Aansluiting Om te controleren of de stekker en aansluitkabel heet zijn of loszitten. Eenmaal per dag
Afvoerwater-
aansluiting Om te controleren of de afvoer wordt geblokkeerd. Eenmaal per
maand
Schoonmaken
van de
watercontainer
Ten minste eenmaal per seizoen moeten de watercontainer en het oppervlak
worden gereinigd. Hiervoor kunt u een nylondoek gebruiken om de aanslag
van de temperatuursonde en het verwarmingselement te verwijderen. Maak
de moer van de afvoerwateraansluiting los om het afvalwater af te voeren.
Eenmaal per
seizoen
ONDERHOUD
1. Het apparaat moet regelmatig worden gecontroleerd. Schakel de stroom uit en sluit het water af als u
het apparaat een tijd niet gebruikt, bijvoorbeeld tijdens de vakantie. Voer al het water af dat zich in de
watercontainer bevindt om te voorkomen dat de onderdelen doorbranden en ervoor te zorgen dat ze
langer meegaan.
2. Maak de temperatuursondes en het verwarmingselement goed schoon om te voorkomen dat de werking
ervan wordt beïnvloed. Ook kunt u een in de handel verkrijgbaar reinigingsmiddel gebruiken. Houd bij
de aanschaf rekening met de feitelijke omstandigheden. We raden u aan om het apparaat eenmaal per
seizoen schoon te maken.
3. Open het deksel van de watercontainer. Controleer na de reiniging of het onderhoud of de afdichtings-
ring niet is beschadigd en goed vastzit, en maak deze ring eventueel weer vast. Doe het deksel dicht en
probeer een of twee verwarmingscycli uit om ervoor te zorgen dat er geen stoom lekt. Anders kan dit
invloed hebben op de veiligheid en kan het apparaat worden beschadigd.
4. Er is een afvoerwateraansluiting aan de achterkant van het apparaat. Voer het water regelmatig af
volgens de feitelijke omstandigheden. Alle elektriciteit en water moet worden afgesloten. Wacht een
minuut voordat u het water afvoert zodat het water kan afkoelen. Zorg ervoor dat u het apparaat
niet ergens tegenaan stoot en dat u geen scherpe metalen reinigingsmiddelen gebruikt om de
watercontainer te reinigen.
5. Als er koud water uit de overloopslang stroomt of het apparaat niet verwarmt, mag u het apparaat niet
meer gebruiken. Controleer eerst of de magnetische klep wordt geblokkeerd en of het verwarmings-
element is beschadigd. Als de magnetische klep wordt geblokkeerd, maakt u deze eerst schoon.
Als het verwarmingselement is beschadigd, vervangt u het eerst.
6. De waterdichtheidsgraad van dit apparaat is ‘IPXO’. Sluit bij reiniging van de kast eerst de elektriciteit
af en veeg de kast vervolgens af met een doek. U mag geen bijtende reinigingsmiddelen gebruiken en
het apparaat niet afspoelen of onderdompelen in water.
7. Als de stroomkabel is beschadigd en moet worden vervangen, schakelt u eerst de hoofdschakelaar uit
en vervangt u de stroomkabel door de hittebestendige en anticorroderende stroomkabel van het YZW
Type, u mag geen enkel ander type stroomkabel gebruiken.

688120 nl-en ma 2016 9
NL
SPECIFICATIES
Model Waterdruk Vermogen Spanning Frequentie Capaciteit Productiviteit Watertap-
kraan
*688.120 0,2-0,6 Mpa 2,5 kW ~220/240 V 50/60 Hz 6 L 22 L/u 1
FOUTCODE EN FOUTOPLOSSING
Weergavecode
Fout Oplossing
Erd Fout drinkwatertemperatuursonde Controleer of de aansluiting loszit
ErH Fout verwarmingstemperatuursonde Verwijder de aanslag van de sonde en
controleer of de aansluiting loszit
E r1 Watertoevoerfout (de watercontainer wordt
meer dan 45 minuten met water gevuld)
Controleer of de waterbron normaal water
levert.
Controleer de magnetische klep.
Er2 Verwarmingsfout Vervang het verwarmingselement
Ell
Waterlekkage controleer of de waterbron normaal water
levert.
controleer de magnetische klep en vervang
deze (indien nodig).
controleer of alle temperatuursondes goed
zijn aangesloten.
De timerindicator
knippert
Als er gedurende het gebruik van de timer een of
meer foutcodes worden weergegeven, werkt de
timerfunctie niet goed.
Vervang het bedieningspaneel of de
besturingselektronica door een nieuw
bedieningspaneel of nieuwe besturings-
elektronica.
ELEKTRISCH SCHEMA

688120 nl-en ma 2016
10
EN
Thanks for your using of our company product, in order to ensure the product
performance give full play to the role, please have a read of this manual to avoid
unnecessary loss and damage, and get a further study of our product characteristic,
installation and operation. Also please keep the manual for further reference.
USING CONDITIONS:
Applicable water source: applicable for municipal water, PH between 6.5~8.5
Enter water pressure: 0.2~0.6 Mpa (Rate of flow ≥4L/min), ambient temperature: 0~40ºC
Enter water temperature: 0~40ºC
Input voltage: ~220-240 V
INDEX
Safety instruction .............................................................................11
Structure .........................................................................................12
Indicator display board description ....................................................12
Working principle ............................................................................13
Installation instruction ........................................................................14
Operation instruction ........................................................................14
Periodic inspection ...........................................................................16
Maintenance ...................................................................................16
Specification ...................................................................................16
Error code and trouble shooting .........................................................17
Electrical schematic diagram .............................................................17

688120 nl-en ma 2016 11
EN
SAFETY INSTRUCTION
WARNING:
1. Make sure the power supply coincide with the power transmission and distribution.
And the parameters of the power point should meet the requirements of power line.
2. The enter water pressure should be between 0.2-0.6Mpa (Rate of flow≥4L/min). If the pressure is below
the range, the water maybe not inflow normally; If the pressure is above the range, it may damage the
water inlet value.
3. Never alter the machine in any way, only the company specified spare parts can be used for
repairmen.
4. Keep the machine away from gas supply or any other flammable and explosive objects.
5. Make sure the machine surface isn’t contact with any flammable and explosive objects and used in a
fire safety environment. Also the water boiler should have at least 50cm internal with other machine.
6. Don’t do any dismounting which isn’t mention in manuals, and confirm whether the ground wire has
been connected fixed.
7. Don’t touch the water faucets with your hands and be careful not to be scald.
8. The water boiler should be used indoor. Don’t set it up outdoor or used in humid environment.
9. Don’t use damaged power line for connecting. Before using the water boiler, please first replace the
damaged spare parts to avoid leakage fault.
10. Before repairmen or maintenance, please first cut off the power and water.
11. Share ground wire with other machine is forbidden, so as to avoid being influenced by other machines’
leakage fault.
12. Please confirm the silicone tube has connected to the air outlet fixed and unimpeded, if it is blocked or
curved, the steam would not be exhausted and the chamber pressure would be increased.
13. If the enter water pressure is higher than limit, or the water scale is too much, it may give rise to
overflow problem, it need to install a magnetic value to control.
14. The water boiler must be installed and maintained by qualified electrician.
15. The water quality should reach the requirement as manual mention. If it isn’t applicable for drinking,
please set up a water filter.
ATTENTION:
1. The silicone tube should be connected to the water outlet fixed to avoid overflow problem.
2. Please don’t allow children to use the water boiler alone, in case they get scald.
3. Please use applicable municipal water, and don’t fill in tea leaf.
4. Please avoid direct solar radiation which would highly increase machine temperature and influence the
electronic control circuit, or even damage it. So please keep the humidity between 10~60%, and the
ambient temperature should be between 0~40ºC.
5. The enter water temperature should be above 0ºC, not freezing. If it is need to use in a really cold area,
to discuss with manufacturer is necessary. If the chamber get frozen, it would be cracked and the and
the spare parts would be damaged.
6. Please don’t use corrosive cleanser to wipe the water boiler, and use hard objects to strike or scratch it.
7. When not using for a long time, before restarting it, please first empty the chamber and clean it,
also have a check of the spare parts.
8. When water supply is cut off, don’t use the water boiler, when water supply resume, please first empty
and clean the chamber before using.
9. Don’t soaking the water boiler or flushing the body and control board.
10. Please clean the scale off the chamber and thermoprobes regularly, or it may influence the machine.
11. Please clean the scale off the heating element, or it would shorten its service life, or even burn out.

688120 nl-en ma 2016
12
EN
STRUCTURE
Model A (mm) B (mm) C (mm) D (mm) E (mm)
*688.120 190 520 240 360 180
INDICATOR DISPLAY BOARD DESCRIPTION
1. Power switch (button) – to electrify the circuit board and display the “ELL” and temperature.
2. Timing switch (button) – for using the timing function.
3. Set (button) – for setting the parameters.
4. and (button) – to plus or minus the parameters.
5. Yellow light on – it means the machine is working and the heating
elements start heating or reheating.
When the light off, the heating elements stop.
6. Red light on – it means the chamber is lack of water and the
machine automatically starts filling water in. when the light off,
the water stop filling.
7. Green light on – it means the magnetic value start to fill in the
chamber. When the light off, the magnetic value stop working,
also the water stop filling in.
8. Timing function – green light on, now you can set up your needed
time. When the green light off, the setting operation finish, and the
memory of the setting remains.
9. Error – when the red light on, it means there is something failure in the machine, and the letter “Er”
would be displayed on the display board. Please stop using the machine and check what the failure is
according to the error code.
10. Drinkable – when the green light on, it means the water have reached the preset temperature and
available to drink, when the green light off, the water is undrinkable.
11. The button of power supply and timer should be pressed for two seconds to make it work.
ON/OFF
DRINK HE AT
La ck Of W ate r Re fil l Timer Error
Digital Water Dispenser
SET
°C
Professional Supplies

688120 nl-en ma 2016 13
EN
ATTENTION:
1. When the water boiler isn’t heating, the display board would show the current temperature; “ELL” would
be displayed when it is the first time filling water in or it is lack of water.
2. Inflowing failure (the water fill in more than 45 minutes) display E r1
3. Heating failure (heating over 35min but still less than 60ºC) display Er2
WORKING PRINCIPLE
The technique of stepwise heating is used in this water boiler. The electrodes of each water level and the
accurate thermistor send their digital signal to the microcomputer, then the computer control the heating
element and the magnetic value by calculating the signals, also coordinate the water temperature and the
water inflow, to make it only heat up one layer of water, boil it, then heat up another layer of water, form
in a stepwise heating cycle. Take advantage of this technique, the repeated heating problem is eradicated,
the productivity is highly increased but shorten the time to boil the water.
• The LED display the current temperature, also the working condition of the machine would be displayed
on it.
• The PCB control the water temperature and water inflow, also it can keep the water warm for a long
time.
• Under fully automatic working, all the outlet water must have been boiled only once, healthy to drink
and safe to use.
• Safety alarm would be on if it has the danger of dry burning or if the temperature is too high.
• Under PCB control, the failure condition would be displayed automatically.
• The top cap is of simple design, it is convenient for the user to clean the chamber regularly.
• The back of the machine is easy to open, it need only 15 minutes to replace all the parts,
easy to maintain.
• The structure is all in stainless steel, make of beautiful and easy to clean.

688120 nl-en ma 2016
14
EN
INSTALLATION INSTRUCTION
1. The machine must be install by qualified electrician, please have a complete inspection of the machine
and have a read of this manual, and check whether the guarantee card and certification is within,
keep them well in case of the maintenance during the warranty.
2. The water boiler should be place on a solid and flat surface, and ensure the environment around is
draughty, the temperature is less than 40ºC and the humidity is less than 85%. To check whether the
drain pipe is block or not, and keep the machine away from inflammable and corrosive gas and liquid.
3. Please check whether the water source conform to the national drinking water requirements.
If the hardness of the local water is more than 300mg/L or the incrustation is serious after heating,
please install a water filter, or it will influence the PCB control. If the tap water have a strong smell of
chlorine, please install an activated carbon water filter, or the chlorine would be heated and gasified,
then attach to the top cover and become rusty.
4. When installing new water pipe and water value, please choose the product which is make of
heat-resisting material and is according to the health standard of drinking water. Also please have a
check of the pipe to see if it has strange smell which may influence the quality of the boiled water.
The water pressure should be within 0.2-0.6Mpa (Rate of flow≥4L/min), if it is more than 0.6Mpa,
it need to add a reducing value (please first clean up all the sundries in the new pipe before connecting
to the machine, in case that it would block the inflowing and influence the magnetic value control.
5. The water boiler must have its dedicated power supply. Also the disconnect and leakage protector must
be installed according to the product specification (the action current of the leakage protector is 30mA).
6. This product belongs to Type “I” appliance, the yellow and green double color line in the power line is
the “ground lead”, it should be connected sturdy to the grounding device which is live up to electricity
regulations of the state.
Warning: never connect the ground lead to water pipe and gas pipe.
OPERATION INSTRUCTION
1. First using the machine, please check if it is conform to the installation requirements.
Then open the water switch, and check if all the joint of the machine are fixed and have no leakage.
2. Switch on the main power, and turn on the power switch behind the machine, then press the “Switch”
button on the display board, “ELL” display on the LED and the dry burning protection automatically
launch, the magnetic value start to inflow the water. (to turn off the display board need to long press the
“Switch” button for 5 seconds, by now the machine stop working but still on)
3. The yellow (heating) indicator light on, means the machine start heating: light off, the heating stops.
For the first time using, we suggest to open the faucets to have one or two cycle pouring water to see
if the inlet and outlet of water is working normally.
4. When the yellow (heating) indicator light off, the green (drinkable) indicator light on, it means that it
have completed one rapid heating cycle. Before the chamber is full, the yellow and green indicators
would mutually light on, and the machine would automatically process the “inflowing-heating” cycle.
During the cycle, if the green indicator light on and the LED display 100ºC, it means the water have
reached the needed temperature and drinkable.
5. The steam would be gathered, cool down and outflow through the “Steam outlet” which is set at the
bottom of the machine. Please place in the wet pan which is combined with the water boiler before
using.
6. Machine data adjustment:
a) Long press the “Switch” button, to make the machine remain OFF, by now you can set the data.
b) Machine remain OFF, long press the “Set” button for 3 seconds to display the data, then use the
“Plus” and “Minus” button to adjust the data, then press “Set” button to switch or exit,
and the data is automatically saved.

688120 nl-en ma 2016 15
EN
c) Display code representative function:
HP Heating element (40°C~99°C) –95°C by default
dP Drinking Temperature (40°C~9S°C) –93°C by default
Hy Return difference temperature (1°C~30°C) –2°C by default
Timer On–Hour(0~23)
o Timer On–Minute (0~69)
HoF Timer Off–Hour (0~23)
oF Timer Off–Minute (0~59)
Ht Current Time–Hour
t Current Time–Minute
5t Current Time–Second
REMARK:
• The heating temperature, drinking temperature and return difference temperature have been set up well
in factory, user can not change the default temperature.
• The set time of the “Timer On” means the start working time of the machine.
• The set time of the “Timer Off” means the stop working time of the machine.
• Please set up the “Current Time” according to the local standard time.
7. The presets in factory:
a) Temperature: the green (drinkable) indicator light on when it reach 93°C (heat up to 100°C right
along), the outlet water temperature is 93~100°C. The outlet water temperature is the same as the
displayed temperature.
b) Elevation: for adapting different regional pressure, user can contact the local sales agent for help.
By using the switch “Plateau area heating mode” in the circuit board in the machine,
user need not to have further adjustment generally.
8. Timer:
a) Machine remains OFF, first set up the “Current Time”, the display code can contrast with the sheet
above, and please set the time according to the local standard time.
Setting procedure:
1. press the “Set” button to switch “Hour”/”Minute”/”Second” code;
2. press “Plus” or “Minus” button to set your needed time, then exit to save the data;
3. repeat the procedure to set up other two data.
b) Setting “Timer On”, you can contrast with the sheet above when operating.
Procedure: 1. press “Set” button to switch between “Hour”/”Minute”;
2. press “Plus” or “Minus” button to set your needed time,
then exit to save the data; repeat the procedure to set up another data.
c) Setting “Timer Off”, you can contrast with the sheet above when operating.
Procedure: 1. press “Set” button to switch between “Hour”/”Minute”;
2. press “Plus” or “Minus” button to set your needed time,
then exit to save the data; repeat the procedure to set up another data.
d) After finishing these three procedure before, press “Set” button to switch to OFF status,
long press the “Switch” button for 2 seconds, the machine start working,
then press the “Timing” button, the timing indicator light on, means the timing function is effective.

688120 nl-en ma 2016
16
EN
PERIODIC INSPECTION
Inspection item Content Standard
Connection To check whether the plug or power line are hot or loosen. Once a day
Drain outlet To check whether the outlet is block Once a month
Chamber
cleaning
At least once a season, both chamber and surface should be cleaned, can
use a nylon bundle to clean off the scale on the thermoprobe and heating
element and loosen the nut of the drain outlet to drain out the waste water.
Once a season
MAINTENANCE
1. The machine should have regular checking, if not using during holiday and a long time, please turn off
the power and water, and drain out all the water in the chamber to avoid the burn-in of the parts and
extend their service life.
2. Pay attention on cleaning the thermoprobes and heating element, to avoid scaling influence the working
system. Also the cleanser which sales in market can be used for cleaning, please combine with the
actual circumstances to choose it. We suggest to clean the machine once a season.
3. Open the top cover of the chamber, after cleaning or maintenance, it need to check whether the seal
ring is damaged and fixed, then fasten it again, replace the top cover and try one or two heating cycle
to ensure there is no steam leakage, or it may influence the using safety and damage the machine.
4. There is a drain outlet at the back on the machine, please drain out the water regularly according to
actual circumstances. All the power and water should be cut off when operating, and please wait for a
minute to cool down the water before drain then out. Don’t knocking the machine or using sharp metal
tools to clean chamber.
5. When the cool water flowing out through the overflow tube or the machine doesn’t heating, please
immediately stop using it and check whether the magnetic value is block or the heating element is
da maged, then clean it or replace it.
6. The waterproofing grade of this machine is “IPXO”, when cleaning its case, please first cut off the
power, then wipe it with cloth. Corrosive cleanser can’t be used, and don’t flush it directly or soak it.
7. If the power wire is damaged and need to replace, please first cut off the main power, and replace
with YZW Type, heat-resistant and anti-corrosion power wire, any other power wire are forbidden.
SPECIFICATION
Model Water
Pressure Power Voltage Frequency Capacity Productivity Faucet
*688.120 0,2-0,6 Mpa 2,5 kW ~220/240 V 50/60 Hz 6 L 22 L/u 1

688120 nl-en ma 2016 17
EN
ERROR CODE AND TROUBLE SHOOTING
Display code Failure Solution
Erd Drinking water thermoprobe failure To check if its connection is loosen
ErH Heating thermoprobe failure To clean up the scail attach on it and
check if its connection is loosen
E r1 Inflowing failure (the water fill in more than 45
minutes)
To check whether the water resource is
under normal supply.
To check the magnetic value.
Er2 Heating Failure Replace the heating element
Ell
Water leakage To check whether the water resource is
under normal supply.
To check the magnetic value, replace it if
needed.
To check whether the connection of every
thermoprobes is fixed.
The timing
indicator flashing
If there are some circuit failure appear in the timer,
the timing function would be invalid
To replace a new display board or circuit
board.
ELECTRICAL SCHEMATIC DIAGRAM

688120 nl-en ma 2016
18
-
 1
1
-
 2
2
-
 3
3
-
 4
4
-
 5
5
-
 6
6
-
 7
7
-
 8
8
-
 9
9
-
 10
10
-
 11
11
-
 12
12
-
 13
13
-
 14
14
-
 15
15
-
 16
16
-
 17
17
-
 18
18


in andere talen
- English: Caterchef 688120 User manual
Andere documenten
-
Whirlpool ECTM 9145/1 PT Gebruikershandleiding
-
Whirlpool ECTM 9145/1 PT de handleiding
-
-
SEVERIN WK 3366 de handleiding
-
SEVERIN WK 3336 de handleiding
-
SEVERIN WK 3338 Handleiding
-
SEVERIN WK 3485 de handleiding
-
SEVERIN WK 3360 de handleiding
-
Whirlpool TCF 87B 6HY/N (EU) Gebruikershandleiding
-