Neomounts FPMA-D650BLACK Handleiding
- Categorie
- Flat-panel bureausteunen
- Type
- Handleiding

INSTRUCTION MANUAL
WWW.NEOMOUNTS.COM
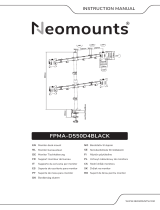
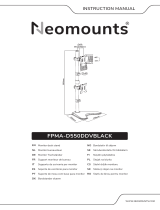
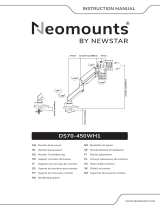
FPMA-D650BLACK
IT
EN
NL
DE
FR
ES
PT
DK
Monitor desk mount
Monitor bureausteun
Monitor Tischhalterung
Support moniteur de bureau
Supporto da scrivania per monitor
Soporte de escritorio para monitor
Suporte de mesa para monitor
Bordbeslag skærm
NO
SE
FI
PL
CS
SK
RO
Bordstativ til skjerm
Skrivbordsfäste för bildskärm
Näytön pöytäteline
Uchwyt nabiurkowy do monitora
Stolní držák monitoru
Držiak na monitor
Suport de birou pentru monitor
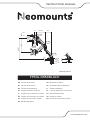
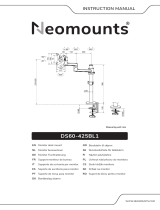
10-45
75
100
117
160
247-303
50
108-417
309
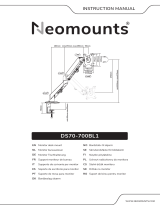
10-80
75
100
117
36
39
+/-90°
+90°
-45°
+/-180°
+/-180°
+/-180°
Measuring unit: mm

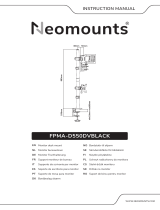
10-50mm
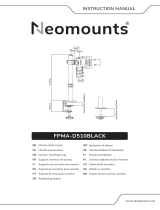
PARTS
FPMA-D650BLACK
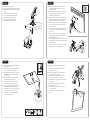
STEP 1
Tool
Pencil Drill Tape measure
Tool Pencil
Drill
Tape measure
B. (x1) C. (x1) D. (x1)
A. (x1) H. (x1)
E. M6x8
(x2)
F. 4mm
(x1)
G. 5mm
(x1)
M-A. M4x12
(x4)
M-B. M5x12
(x4)
M-C. D5
(x4)
Mount the clamp to the rod and install to the desk
Monteer de klem aan de stang en installeer aan het bureau
Befestigen Sie die Klemme an der Stange und installieren
Sie sie auf dem Schreibtisch
Montez la pince sur la barre et installez-la sur le bureau
Montare il morsetto sulla barra e installarlo sulla scrivania
Monte la abrazadera en la barra e instálela en el escritorio
Montar a braçadeira na barra e instalar na secretária
Zamontuj zacisk na pręcie i zainstaluj na biurku
EN
NL
DE
FR
IT
ES
PT
PL
CAUTION:
Do not over
tighten screw.
D
D
G
CAUTION:
Do not over
tighten screw.
10-45mm
Ø10mm
(Ø3/8")
10-45mm
or
C
B
H
G
75x75 -
100x100 mm
10,8-41,7 cm 0-49,4 cm
2-7 kg
* Not Included
Attention: the arm is compressed and packed under
tension. Make sure to firmly hold both sides of the arm
in position when cutting the cable tie
Let op: de steun is samengedrukt en verpakt onder
spanning. Zorg ervoor dat beide zijden van de steun
stevig op hun plek worden gehouden wanneer de
kabelbinder wordt doorgesneden
Hinweis: Der Halterung zusammengedrückt und unter
Spannung verpackt. Achten Sie darauf, beide Seiten
der Halterung festzuhalten, wenn Sie den Kabelbinder
abschneiden
Attention: le support est comprimé et emballé sous
tension. Assurez-vous que les deux côtés du support
sont fermement maintenus en place lorsque l'attache
sera coupée
Nota: il supporto è compresso e imballato in tensione.
Assicuri che entrambi i lati della staffa siano tenuti salda-
mente in posizione quando si taglia la fascetta
Nota: el brazo está comprimido y embalado bajo tensión.
Asegúrese de sostener firmemente ambos lados del
brazo cuando corte la cinta
Nota: o braço é comprimido e embalado sob tensão.
Certifique-se de agarrar firmemente ambos os lados
do braço ao cortar a abraçadeira
Uwaga: uchwyt jest ściśnięte i zapakowane pod
napięciem. Upewnij się, że oba ramiona uchwytu
wspornika są dobrze zabezpieczone podczas
przecinania opaski zaciskowej
EN
NL
DE
FR
IT
ES
PT
PL
Mount the grommet to the rod and install through the
desk
Monteer de doorvoer aan de stang en installeer in het
bureau
Befestigen Sie die Tülle an der Stange und installieren
Sie sie im Schreibtisch
Montez le passe-fil sur la tige et installez-le dans le
bureau
Montare il gommino sull'asta e installarlo nella scrivania
Monte el pasacables en la varilla e instálelo en el escritorio
Montar a argola na vara e instalar na secretária
Zamontuj przelotkę na pręcie i zainstaluj w biurku
EN
NL
DE
FR
IT
ES
PT
PL
WARNING
STORED ENERGY
E
G
B
C
F
40-80mm
STEP 2ClampA
STEP 2GrommetB

* Not Included
Attach the lower arm to the desk
Bevestig het onderste deel van de steun aan het bureau
Befestigen Sie den unteren Teil des Arms am Schreib-
tisch
Fixez la partie inférieure du support au bureau
Fissi la parte inferiore della staffa alla scrivania
Fije la parte inferior del soporte al escritorio
Prenda a parte inferior do suporte à mesa
Przymocuj dolną część uchwytu do biurka
EN
NL
DE
FR
IT
ES
PT
PL
STEP 3
STEP 4
Slide the bolts into the top holes of the VESA plate and
tighten the bolts. Attach the other 2 bolts in the lower
part of the VESA plate
Schuif de bouten in de bovenste gaten van de VESA-plaat
en draai de bouten vast. Bevestig de andere 2 bouten in
het onderste deel van de VESA-plaat
Schieben Sie die Schrauben in die oberen Löcher der VESA-
Platte und ziehen Sie die Schrauben fest. Installieren Sie die
anderen 2 Schrauben im unteren Teil der VESA-Platte
Insérez les vis dans les trous supérieurs de la plaque VESA
et les serrer. Installez les 2 autres vis dans la partie inferi-
eure de la plaque VESA
Scorra i bulloni nei fori superiori della piastra VESA e serrare
i bulloni. Installare gli altri 2 bulloni nella parte inferiore della
piastra VESA
Deslice los tornillos en los orificios superiores de la placa
VESA y apriete los tornillos. Instale los otros 2 tornillos en
la parte inferior de la placa VESA
Deslize os parafusos nos orifícios superiores da placa VESA
e aperte os parafusos. Instale os outros 2 parafusos na parte
inferior da placa VESA
Wsuń śruby w górne otwory płyty VESA i dokręć je. Zainsta-
luj pozostałe 2 śruby w dolnej części płytki VESA
EN
NL
DE
FR
IT
ES
PT
PL
STEP 5
STEP 6
A
F
3mm
M-A M-B
M-C
M-C
M-A
M-B
G
Screw 2 bolts in the upper 2 VESA holes of the screen,
leaving 3 mm spacing
Draai 2 bouten in de bovenste 2 VESA-gaten van het
scherm en behoud een tussenruimte van 3 mm
Setzen Sie 2 Schrauben in die oberen 2 VESA-Löcher
des Flachbildschirms ein und lassen Sie dabei einen
Abstand von 3 mm
Insérez 2 vis dans les 2 trous VESA supérieurs de
l'écran plat et gardez un espace de 3 mm
Inserisca 2 bulloni nei 2 fori VESA superiori dello
schermo piatto e mantenga uno spazio di 3 mm
Inserte 2 tornillos en los 2 orificios VESA superiores
de la pantalla plana, dejando un espacio de 3 mm
Insira 2 parafusos nos 2 orifícios VESA superiores do
monitor plano, mantendo um espaço de 3 mm
Włóż 2 śruby w 2 górne otwory VESA płaskiego
ekranu i zachowaj odstęp 3 mm
EN
NL
DE
FR
IT
ES
PT
PL
If the flat screen tilts forward automatically, tighten the
bolt
Draai de bout steviger aan, indien de flat screen auto-
matisch naar voren kantelt
Ziehen Sie die Schrauben fest, wenn sich der Flachbild-
schirm automatisch nach vorne neigt
Serrez plus fermement le boulon de l’articulation de la
plaque VESA si l'écran plat s'incline vers l'avant
Stringa il bullone se lo schermo piatto si inclina automatica-
mente in avanti
Si la pantalla plana se inclina automáticamente hacia
adelante, apriete el tornillo
Se o monitor plano se inclinar automaticamente para a
frente, aperte o parafuso
Dokręć śrubę, jeśli płaski ekran sam przechyla się do
przodu
EN
NL
DE
FR
IT
ES
PT
PL


-
 1
1
-
 2
2
-
 3
3
-
 4
4
-
 5
5


Neomounts FPMA-D650BLACK Handleiding
- Categorie
- Flat-panel bureausteunen
- Type
- Handleiding
in andere talen
- italiano: Neomounts FPMA-D650BLACK Manuale utente
- français: Neomounts FPMA-D650BLACK Manuel utilisateur
- español: Neomounts FPMA-D650BLACK Manual de usuario
- Deutsch: Neomounts FPMA-D650BLACK Benutzerhandbuch
- português: Neomounts FPMA-D650BLACK Manual do usuário
Gerelateerde papieren
-
 Neomounts DS70-700BL1 Handleiding
-
 Neomounts ds60-425bl1 Handleiding
-
Neomounts FPMA-W75 Handleiding
-
 Neomounts DS70-700BL1 Handleiding
-
 Neomounts FPMA-D550DVBLACK Handleiding
-
 Neomounts FPMA-D510BLACK Handleiding
-
 Neomounts FPMA-D550D4BLACK Handleiding
-
Neomounts FPMA-D550DDVBLACK Handleiding
-
 Neomounts FPMA-D550DDVBLACK Monitor Desk Stand Handleiding
-
 Neomounts DS70-450BL1 Handleiding


