
FA 25
Photoelectric smoke alarm
Installation and Operating Manual. . . . . . . . 5
Fotoelektrischer Rauchmelder
Montage- und Bedienungsanleitung . . . . . 12
Détecteur de fumée
photoélectrique
Instructions de montage
et de service . . . . . . . . . . . . . . . . . . . . . . . . . 19
Segnalatore di fumo fotoelettrico
Istruzioni di montaggio e d’uso . . . . . . . . .26
Rookmelder met fotocel
Montagehandleiding en
gebruiksaanwijzing . . . . . . . . . . . . . . . . . . .33
EN
DE
FR
IT
NL
SAFETY SOLUTIONS
ACCESSORIES
FA25--IO--5s.book Seite 1 Donnerstag, 4. Mai 2017 2:14 14

FA25
2
V
1
2
1
2.
1.
2
FA25--IO--5s.book Seite 2 Donnerstag, 4. Mai 2017 2:14 14

FA25
3
≥ 50 cm
≥ 50 cm
3
9 V
6F22
2.
1.
4
FA25--IO--5s.book Seite 3 Donnerstag, 4. Mai 2017 2:14 14

FA25
4
9 V
6F22
+
−
1.
2.
5
1.
2.
6
FA25--IO--5s.book Seite 4 Donnerstag, 4. Mai 2017 2:14 14

EN
FA25 Explanation of symbols
5
Please read this instruction manual carefully before installation and first
use, and store it in a safe place. If you pass on the product to another
person, hand over this instruction manual along with it.
Table of contents
1 Explanation of symbols. . . . . . . . . . . . . . . . . . . . . . . . . . . . . . . . . . . . . . . . . . .5
2 General safety instructions . . . . . . . . . . . . . . . . . . . . . . . . . . . . . . . . . . . . . . . .6
3 Intended use . . . . . . . . . . . . . . . . . . . . . . . . . . . . . . . . . . . . . . . . . . . . . . . . . . .6
4 Technical description . . . . . . . . . . . . . . . . . . . . . . . . . . . . . . . . . . . . . . . . . . . .7
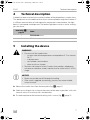
5 Installing the device . . . . . . . . . . . . . . . . . . . . . . . . . . . . . . . . . . . . . . . . . . . . .7
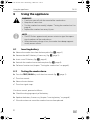
6 Using the appliance . . . . . . . . . . . . . . . . . . . . . . . . . . . . . . . . . . . . . . . . . . . . .8
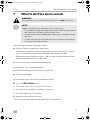
7 What to do if the alarm sounds. . . . . . . . . . . . . . . . . . . . . . . . . . . . . . . . . . . . .9
8 Cleaning the device . . . . . . . . . . . . . . . . . . . . . . . . . . . . . . . . . . . . . . . . . . . .10
9 Warranty . . . . . . . . . . . . . . . . . . . . . . . . . . . . . . . . . . . . . . . . . . . . . . . . . . . . .10
10 Disposal . . . . . . . . . . . . . . . . . . . . . . . . . . . . . . . . . . . . . . . . . . . . . . . . . . . . . .10
11 Technical data . . . . . . . . . . . . . . . . . . . . . . . . . . . . . . . . . . . . . . . . . . . . . . . . . 11
1 Explanation of symbols
!
A
I
WARNING!
Safety instruction: Failure to observe this instruction can cause fatal or
serious injury.
NOTICE!
Failure to observe this instruction can cause material damage and impair
the function of the product.
NOTE
Supplementary information for operating the product.
FA25--IO--5s.book Seite 5 Donnerstag, 4. Mai 2017 2:14 14

EN
General safety instructions FA25
6
2 General safety instructions
The manufacturer accepts no liability for damage in the following cases:
• Faulty assembly or connection
• Damage to the product resulting from mechanical influences and excess voltage
• Alterations to the product without express permission from the manufacturer
• Use for purposes other than those described in the operating manual
2.1 General safety
!
WARNING!
• The smoke alarm is intended to detect smoke early. A well positioned
smoke alarm warns of dangers in a timely manner. The smoke alarm
cannot prevent a fire.
• The smoke alarm is not effective in certain situations, e.g.
– if you smoke in bed
– if children are left unsupervised in the home
– if flammable liquids (e.g. petrol) are used for cleaning
• The smoke alarm only functions with batteries that have sufficient
charging capacity. Test the smoke alarm weekly.
• The smoke alarm must not be painted over.
• The smoke alarm housing must not be opened, otherwise proper
functioning can no longer be ensured.
• Sunlight heats up the roof and the air in the upper part of the room.
Hot air may prevent the smoke from a smouldering fire reaching the
smoke alarm.
• Keep a fire extinguisher at the ready.
• If you cook, heat or cool with liquid gas, an additional gas alarm is rec-
ommended.
3 Intended use
The smoke alarm is intended for installation in a residential room.
FA25--IO--5s.book Seite 6 Donnerstag, 4. Mai 2017 2:14 14

EN
FA25 Technical description
7
4 Technical description
A diode has been inserted in the smoke chamber of the photoelectric smoke alarm.
This diode emits an infrared beam that shines uninterrupted through the chamber. If
a sufficient concentration of smoke particles are present in the chamber, the light
beam is interrupted and dispersed. The broken light beam strikes a sensor and trig-
gers the alarm.
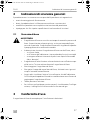
5 Installing the device
!
A
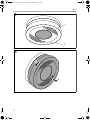
➤ Release the smoke alarm from the base plate (fig. 2, page 2).
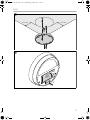
➤ Select an installation site as close to the centre of the room as possible, with a dis-
tance of at least 50 cm from walls and obstacles.
➤ Fix the base plate to the horizontal ceiling with 2 screws (fig. 3, page 3).
Item in fig. 1,
page 2
Label
1 TEST/HUSH button
2 LED
WARNING!
• Do not install the smoke alarm:
– in rooms where the temperature can drop below 4 °C or rise over
38 °C
–in damp rooms
– next to doors and windows
– close to a fan or a heater
• Maintain a distance of at least 3 meters from cordless telephones,
microwaves and other wireless devices that lie within in the 2.4 GHz
range.
NOTICE!
• Make sure you do not drill through the ceiling.
• If the screws supplied are too long, you must use more suitable
screws instead.
FA25--IO--5s.book Seite 7 Donnerstag, 4. Mai 2017 2:14 14

EN
Using the appliance FA25
8
6 Using the appliance
!
I
6.1 Inserting battery
➤ Release the smoke alarm from the base plate (fig. 2, page 2).
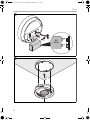
➤ Remove the old 9 V battery, if necessary (fig. 4, page 3).
➤ Insert a new 9 V battery (fig. 5, page 4).
➤ Reattach the smoke alarm to the base plate (fig. 6, page 4).
➤ Perform a function test (chapter “Testing the smoke alarm” on page 8).
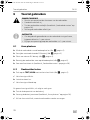
6.2 Testing the smoke alarm
➤ Press the TEST/HUSH key until the alarm sounds (fig. 1, page 2).
✓ The alarm sounds.
➤ Release the test button.
✓ The alarm signal stops.
If no alarm sounds, proceed as follows:
➤ Check the charging capacity of the battery.
➤ Replace the battery if necessary (chapter “Inserting battery” on page 8).
✓ If the alarm does not sound the smoke alarm must be replaced.
WARNING!
• Familiarise yourself with the sound of the smoke alarm.
• Keep the air vents clear.
• Test the smoke alarm weekly (chapter “Testing the smoke alarm” on
page 8).
• Replace the smoke alarm every 8 years.
NOTE
• The LED flashes approximately once a minute to signal the opera-
tional readiness of the smoke alarm.
• When the battery charge is low, the smoke alarm beeps approxi-
mately once a minute.
FA25--IO--5s.book Seite 8 Donnerstag, 4. Mai 2017 2:14 14

EN
FA25 What to do if the alarm sounds
9
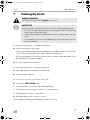
7 What to do if the alarm sounds
!
I
If the alarm signal sounds, proceed as follows:
➤ Vacate all rooms immediately without delay.
Do not open any doors without first feeling the surface. If the surface is hot or if
you can see smoke coming in under the door, do not open the door.
Keep down close to the floor if the air is full of smoke. Breathe through a cloth.
Moisten the cloth in advance, if possible.
➤ Do not make your way back onto the premises.
If you discover a fire, proceed as follows:
➤ Make other people in the vicinity aware of the fire.
➤ Call the fire brigade.
If you discover it was a false alarm, proceed as follows:
➤ Press the TEST/HUSH button.
✓ The smoke alarm is less sensitive for 10 minutes.
✓ The acoustic alarm signal is muted for 10 minutes.
✓ The LED flashes every 10 seconds.
➤ Rectify the cause of the false alarm.
After 10 minutes, the smoke alarm automatically switches back.
WARNING!
You should always assume in the first place that it is not a false alarm.
NOTE
Ambient conditions can sometimes cause a false alarm:
• The smoke from cigarettes does not normally set off the alarm unless
the smoke blows directly into the smoke alarm.
• Combustion particles produced by cooking may sometimes set off
the alarm.
• If a high concentration of smoke particles are present, the acoustic
alarm signal cannot be muted.
FA25--IO--5s.book Seite 9 Donnerstag, 4. Mai 2017 2:14 14

EN
Cleaning the device FA25
10
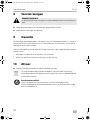
8Cleaning the device
!
➤ Wipe the smoke alarm occasionally with a dry cloth.
➤ Use a vacuum cleaner with brushes.
9Warranty
The statutory warranty period applies. If the product is defective, please contact the
manufacturer's branch in your country (see the back of the instruction manual for the
addresses) or your retailer.
For repair and guarantee processing, please include the following documents when
you send in the device:
• A copy of the receipt with purchasing date
• A reason for the claim or description of the fault
10 Disposal
➤ Place the packaging material in the appropriate recycling waste bins wherever
possible.
M
If you wish to finally dispose of the product, ask your local recycling centre
or specialist dealer for details about how to do this in accordance with the
applicable disposal regulations.
B
Protect the environment!
Do not dispose of any batteries with general household waste.
Return defective or used batteries to your retailer or dispose of them at
collection points.
WARNING!
Ensure that the air vents are free from contamination (e.g. dust or
insects).
FA25--IO--5s.book Seite 10 Donnerstag, 4. Mai 2017 2:14 14

EN
FA25 Technical data
11
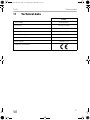
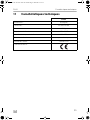
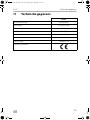
11 Technical data
FA 25
Power supply: 9 Vg (battery)
Dimensions: Ø 100 x 35 mm
Weight: 120 g
Operating temperature: 4 °C – 38 °C
Humidity during operation: 25 – 85%
Smoke sensor: Photoelectric
Alarm volume: > 85 dB at 3 m
Inspection/certification:
FA25--IO--5s.book Seite 11 Donnerstag, 4. Mai 2017 2:14 14

DE
Erklärung der Symbole FA25
12
Bitte lesen Sie diese Anleitung vor Einbau und Inbetriebnahme sorgfältig
durch und bewahren Sie sie auf. Geben Sie sie im Falle einer Weitergabe
des Produktes an den Nutzer weiter.
Inhaltsverzeichnis
1 Erklärung der Symbole . . . . . . . . . . . . . . . . . . . . . . . . . . . . . . . . . . . . . . . . . .12
2 Allgemeine Sicherheitshinweise . . . . . . . . . . . . . . . . . . . . . . . . . . . . . . . . . .13
3 Bestimmungsgemäßer Gebrauch . . . . . . . . . . . . . . . . . . . . . . . . . . . . . . . . .13
4 Technische Beschreibung . . . . . . . . . . . . . . . . . . . . . . . . . . . . . . . . . . . . . . .14
5 Gerät montieren . . . . . . . . . . . . . . . . . . . . . . . . . . . . . . . . . . . . . . . . . . . . . . .14
6 Gerät benutzen . . . . . . . . . . . . . . . . . . . . . . . . . . . . . . . . . . . . . . . . . . . . . . . .15
7 Verhalten bei Alarm. . . . . . . . . . . . . . . . . . . . . . . . . . . . . . . . . . . . . . . . . . . . .16
8 Gerät reinigen . . . . . . . . . . . . . . . . . . . . . . . . . . . . . . . . . . . . . . . . . . . . . . . . .17
9 Gewährleistung. . . . . . . . . . . . . . . . . . . . . . . . . . . . . . . . . . . . . . . . . . . . . . . .17
10 Entsorgung . . . . . . . . . . . . . . . . . . . . . . . . . . . . . . . . . . . . . . . . . . . . . . . . . . .17
11 Technische Daten . . . . . . . . . . . . . . . . . . . . . . . . . . . . . . . . . . . . . . . . . . . . . .18
1 Erklärung der Symbole
!
A
I
WARNUNG!
Sicherheitshinweis: Nichtbeachtung kann zu Tod oder schwerer
Verletzung führen.
ACHTUNG!
Nichtbeachtung kann zu Materialschäden führen und die Funktion des
Produktes beeinträchtigen.
HINWEIS
Ergänzende Informationen zur Bedienung des Produktes.
FA25--IO--5s.book Seite 12 Donnerstag, 4. Mai 2017 2:14 14

DE
FA25 Allgemeine Sicherheitshinweise
13
2 Allgemeine Sicherheitshinweise
Der Hersteller übernimmt in folgenden Fällen keine Haftung für Schäden:
• Montage- oder Anschlussfehler
• Beschädigungen am Produkt durch mechanische Einflüsse und Über-
spannungen
• Veränderungen am Produkt ohne ausdrückliche Genehmigung vom Hersteller
• Verwendung für andere als die in der Anleitung beschriebenen Zwecke
2.1 Grundlegende Sicherheit
!
WARNUNG!
• Der Rauchmelder ist dazu gedacht, Rauch frühzeitig zu erkennen. Ein
gut platzierter Rauchmelder warnt rechtzeitig vor Gefahr. Der
Rauchmelder kann keinen Brand verhindern.
• Der Rauchmelder ist in bestimmten Situation nicht effektiv, z. B.
– beim Rauchen im Bett
– bei Kindern, die sich unbeaufsichtigt in den Wohnräumen
befinden
– beim Reinigen mit entzündlichen Flüssigkeiten (z. B. Benzin)
• Der Rauchmelder funktioniert nur mit Batterien mit hinreichender
Ladekapazität. Testen Sie den Rauchmelder wöchentlich.
• Der Rauchmelder darf nicht übermalt werden.
• Das Gehäuse des Rauchmelders darf nicht geöffnet werden, da sonst
die ordnungsgemäße Funktion nicht mehr sichergestellt ist.
• Sonnenstrahlen wärmen das Dach und die Luft im oberen Teil des
Wohnraums auf. Heiße Luft kann den Rauch eines Schwelbrandes
davon abhalten, an den Rauchmelder zu gelangen.
• Halten Sie einen Feuerlöscher bereit.
• Wenn Sie mit Flüssiggas kochen, heizen oder kühlen ist zusätzlich ein
Gaswarner empfehlenswert.
3 Bestimmungsgemäßer Gebrauch
Der Rauchmelder ist für den Einbau in Wohnräumen vorgesehen.
FA25--IO--5s.book Seite 13 Donnerstag, 4. Mai 2017 2:14 14

DE
Technische Beschreibung FA25
14
4 Technische Beschreibung
Der fotoelektrische Rauchmelder hat in seiner Rauchkammer eine Diode eingesetzt.
Diese Diode strahlt einen Infrarotstrahl ab, der ungebrochen durch die Kammer
verläuft. Liegt eine ausreichende Konzentration an Rauchpartikeln in der Kammer
vor, so wird der Lichtstrahl gebrochen und zerstreut. Der gebrochene Lichtstrahl trifft
auf einen Sensor und löst den Alarm aus.
5Gerät montieren
!
A
➤ Lösen Sie den Rauchmelder von der Bodenplatte (Abb. 2, Seite 2).
➤ Wählen Sie als Einbauort möglichst die Raummitte mit mindestens 50 cm
Abstand zu Wänden und Hindernissen.
➤ Befestigen Sie die Bodenplatte mit 2 Schrauben an der waagerechten Decke
(Abb. 3, Seite 3).
Position in
Abb. 1, Seite 2
Bezeichnung
1 TEST/HUSH-Taste
2 LED
WARNUNG!
• Montieren Sie den Rauchmelder nicht:
– in Räumen in denen die Temperatur unter 4 °C absinken oder
über 38 °C ansteigen kann
– in feuchten Räumen
– neben Türen und Fenstern
– in der Nähe eines Gebläses oder Heizkörpers
• Halten Sie mindestens 3 m Abstand zu schnurlosen Telefonen,
Mikrowellen und anderen schnurlosen Geräten, die im
2,4-GHz-Frequenzbereich liegen.
ACHTUNG!
• Achten Sie darauf, dass Sie die Decke nicht durchbohren.
• Wenn die mitgelieferten Schrauben zu lang sind, müssen Sie
geeignete Schrauben verwenden.
FA25--IO--5s.book Seite 14 Donnerstag, 4. Mai 2017 2:14 14

DE
FA25 Gerät benutzen
15
6 Gerät benutzen
!
I
6.1 Batterie einsetzen
➤ Lösen Sie den Rauchmelder von der Bodenplatte (Abb. 2, Seite 2).
➤ Entnehmen Sie gegebenenfalls die alte 9 V Blockbatterie (Abb. 4, Seite 3).
➤ Setzen Sie eine neue 9 V Blockbatterie ein (Abb. 5, Seite 4).
➤ Befestigen Sie den Rauchmelder wieder an der Bodenplatte (Abb. 6, Seite 4).
➤ Führen Sie einen Funktionstest durch (Kapitel „Rauchmelder testen“ auf
Seite 15).
6.2 Rauchmelder testen
➤ Drücken Sie die TEST/HUSH-Taste bis der Alarm ertönt (Abb. 1 1, Seite 2).
✓ Das Alarmsignal ertönt.
➤ Lassen Sie die Prüftaste los.
✓ Das Alarmsignal verstummt.
Falls kein Alarmsignal ertönt, gehen Sie wie folgt vor:
➤ Prüfen Sie die Ladekapazität der Batterie.
➤ Tauschen Sie gegebenenfalls die Batterie (Kapitel „Batterie einsetzen“ auf
Seite 15).
✓ Sollte der Alarm nicht ertönen, muss der Rauchmelder ausgetauscht werden.
WARNUNG!
• Machen Sie sich mit dem Alarmton des Rauchmelders vertraut.
• Halten Sie die Luftschlitze frei.
• Testen Sie den Rauchmelder wöchentlich (Kapitel „Rauchmelder
testen“ auf Seite 15).
• Tauschen Sie Rauchmelder alle 8 Jahre aus.
HINWEIS
• Um die Betriebsbereitschaft des Rauchmelders zu signalisieren,
blinkt die LED ca. 1 x pro Minute.
• Bei niedriger Batteriespannung, piept der Rauchmelder
ca. 1 x pro Minute.
FA25--IO--5s.book Seite 15 Donnerstag, 4. Mai 2017 2:14 14

DE
Verhalten bei Alarm FA25
16
7Verhalten bei Alarm
!
I
Wenn das Alarmsignal ertönt, gehen Sie wie folgt vor:
➤ Verlassen Sie alle Räume sofort ohne Verzögerung.
Öffnen Sie keine Tür ohne vorheriges Fühlen der Oberfläche. Ist diese heiß oder
wenn Sie Rauch unter der Türe herein strömen sehen, öffnen Sie die Tür nicht.
Halten Sie sich nah am Boden, wenn die Luft voller Rauch ist. Atmen Sie durch
ein Tuch ein. Befeuchten Sie das Tuch vorher, wenn möglich.
➤ Begeben Sie sich nicht zurück in die Wohnräume.
Wenn Sie einen Brand feststellen, gehen Sie wie folgt vor:
➤ Machen Sie andere Personen in der Nähe auf den Brand aufmerksam.
➤ Alarmieren Sie die Feuerwehr.
Wenn Sie einen Fehlalarm feststellen, gehen Sie wie folgt vor:
➤ Drücken Sie die TEST/HUSH-Taste.
✓ Der Rauchmelder ist 10 Minuten lang weniger empfindlich.
✓ Das akustische Alarmsignal schaltet 10 Minuten lang stumm.
✓ Die LED blinkt alle 10 Sekunden.
➤ Beseitigen Sie die Ursache für den Fehlalarm.
Nach 10 Minuten schaltet der Rauchmelder automatisch zurück.
WARNUNG!
Gehen Sie immer davon aus, dass es sich nicht um einen Fehlalarm
handelt.
HINWEIS
Durch Umwelteinflüsse kann es zu einem Fehlalarm kommen:
• Der Rauch von Zigaretten löst normalerweise keinen Alarm aus, es
sei denn, der Rauch gelangt direkt an den Rauchmelder.
• Verbrennungspartikel, die beim Kochen entstehen, können einen
Alarm auslösen.
• Liegt eine hohe Konzentration an Rauchpartikeln vor, so lässt sich das
akustische Alarmsignal nicht stumm schalten.
FA25--IO--5s.book Seite 16 Donnerstag, 4. Mai 2017 2:14 14

DE
FA25 Gerät reinigen
17
8 Gerät reinigen
!
➤ Wischen Sie den Rauchmelder gelegentlich mit einem trocken Tuch ab.
➤ Verwenden Sie einen Staubsauger mit Bürste.
9Gewährleistung
Es gilt die gesetzliche Gewährleistungsfrist. Sollte das Produkt defekt sein, wenden
Sie sich bitte an die Niederlassung des Herstellers in Ihrem Land (Adressen siehe
Rückseite der Anleitung) oder an Ihren Fachhändler.
Zur Reparatur- bzw. Gewährleistungsbearbeitung müssen Sie folgende Unterlagen
mitschicken:
• eine Kopie der Rechnung mit Kaufdatum,
• einen Reklamationsgrund oder eine Fehlerbeschreibung.
10 Entsorgung
➤ Geben Sie das Verpackungsmaterial möglichst in den entsprechenden
Recycling-Müll.
M
Wenn Sie das Produkt endgültig außer Betrieb nehmen, informieren Sie
sich bitte beim nächsten Recyclingcenter oder bei Ihrem Fachhändler
über die zutreffenden Entsorgungsvorschriften.
B
Schützen Sie Ihre Umwelt!
Akkus und Batterien gehören nicht in den Hausmüll.
Geben Sie bitte Ihre defekten Akkus oder verbrauchten Batterien beim
Händler oder bei einer Sammelstelle ab.
WARNUNG!
Achten Sie darauf, dass die Luftschlitze frei von Verunreinigungen
(z.B.Staub oder Insekten) sind.
FA25--IO--5s.book Seite 17 Donnerstag, 4. Mai 2017 2:14 14

DE
Technische Daten FA25
18
11 Technische Daten
FA 25
Stromversorgung: 9 Vg (Batterie)
Abmessungen: Ø 100 x 35 mm
Gewicht: 120 g
Betriebstemperatur: 4 °C – 38 °C
Luftfeuchtigkeit bei Betrieb: 25 – 85%
Rauch-Sensor: Fotoelektrisch
Alarmlautstärke: > 85 dB bei 3 m
Prüfung/Zertifikat:
FA25--IO--5s.book Seite 18 Donnerstag, 4. Mai 2017 2:14 14

FR
FA25 Explication des symboles
19
Veuillez lire attentivement cette notice avant le montage et la mise en
service. Veuillez ensuite la conserver. En cas de passer le produit, veuillez
le transmettre au nouvel acquéreur.
Sommaire
1 Explication des symboles . . . . . . . . . . . . . . . . . . . . . . . . . . . . . . . . . . . . . . . .19
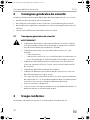
2 Consignes générales de sécurité . . . . . . . . . . . . . . . . . . . . . . . . . . . . . . . . . 20
3 Usage conforme . . . . . . . . . . . . . . . . . . . . . . . . . . . . . . . . . . . . . . . . . . . . . . 20
4 Description technique . . . . . . . . . . . . . . . . . . . . . . . . . . . . . . . . . . . . . . . . . .21
5 Montage de l'appareil . . . . . . . . . . . . . . . . . . . . . . . . . . . . . . . . . . . . . . . . . .21
6 Utilisation de l'appareil . . . . . . . . . . . . . . . . . . . . . . . . . . . . . . . . . . . . . . . . . 22
7 Comportement en cas d'alarme . . . . . . . . . . . . . . . . . . . . . . . . . . . . . . . . . 23
8 Nettoyage de l'appareil . . . . . . . . . . . . . . . . . . . . . . . . . . . . . . . . . . . . . . . . 24
9 Garantie. . . . . . . . . . . . . . . . . . . . . . . . . . . . . . . . . . . . . . . . . . . . . . . . . . . . . 24
10 Mise au rebut. . . . . . . . . . . . . . . . . . . . . . . . . . . . . . . . . . . . . . . . . . . . . . . . . 24
11 Caractéristiques techniques. . . . . . . . . . . . . . . . . . . . . . . . . . . . . . . . . . . . . 25
1 Explication des symboles
!
A
I
AVERTISSEMENT !
Consigne de sécurité : le non-respect de ces consignes peut entraîner
la mort ou de graves blessures.
AVIS !
Le non-respect de ces consignes peut entraîner des dommages
matériels et des dysfonctionnements du produit.
REMARQUE
Informations complémentaires sur l'utilisation du produit.
FA25--IO--5s.book Seite 19 Donnerstag, 4. Mai 2017 2:14 14

FR
Consignes générales de sécurité FA25
20
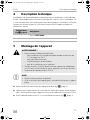
2 Consignes générales de sécurité
Le fabricant décline toute responsabilité pour des dommages dans les cas suivants :
• des défauts de montage ou de raccordement
• des influences mécaniques et des surtensions ayant endommagé le matériel
• des modifications apportées au produit sans autorisation explicite de la part du
fabricant
• une utilisation différente de celle décrite dans la notice
2.1 Consignes générales de sécurité
!
AVERTISSEMENT !
• Le détecteur de fumée est conçu pour détecter la fumée. Un détec-
teur de fumée bien placé avertit du danger en temps utile. Le détec-
teur de fumée ne peut pas empêcher l'incendie.
• Le détecteur de fumée n’est pas efficace dans certains cas, par
exemple
– si vous fumez au lit
– si des enfants sont laissés sans surveillance dans les pièces de vie
– en cas de nettoyage à l’aide de liquides inflammables (essence)
• Le détecteur de fumée fonctionne uniquement avec des batteries
ayant une capacité suffisante. Testez l’avertisseur de fumée une fois
par semaine.
• Le détecteur de fumée ne doit pas être repeint.
• Le boîtier du détecteur de fumée ne doit pas être ouvert, sinon son
bon fonctionnement n’est plus assuré.
• Les rayons de soleil réchauffent le toit et l’air dans la partie supérieure
de la pièce de vie. L’air chaud peut empêcher que la fumée en prove-
nance d’un feu couvant n’atteigne le détecteur de fumée.
• Ayez un extincteur à disposition.
• Si vous cuisinez, chauffez ou refroidissez au gaz de pétrole liquéfié, un
détecteur de gaz est recommandé en plus.
3Usage conforme
Le détecteur de fumée est destiné à l’installation dans les pièces de vie.
FA25--IO--5s.book Seite 20 Donnerstag, 4. Mai 2017 2:14 14

FR
FA25 Description technique
21
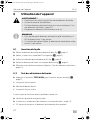
4 Description technique
Le détecteur de fumée photoélectrique dispose d'une diode dans sa chambre de
fumée. Cette diode émet un faisceau infrarouge qui traverse, intact, la chambre. S'il
y a une concentration suffisante de particules de fumée dans la chambre, le faisceau
lumineux est brisé et dispersé. Le faisceau lumineux brisé frappe un capteur et
déclenche l’alarme.
5Montage de l'appareil
!
A
➤ Retirez le détecteur de fumée de la plaque de base (fig. 2, page 2).
➤ Sélectionnez l’emplacement d’installation au milieu de la pièce, autant que pos-
sible, avec une distance par rapport aux murs et aux obstacles d'au moins 50 cm.
➤ Fixez la plaque de base avec 2 vis sur le plafond horizontal (fig. 3, page 3).
Position dans
fig. 1, page 2
Désignation
1Bouton TEST/HUSH
2 LED
AVERTISSEMENT !
• Ne pas monter le détecteur de fumée :
– dans les pièces où la température peut tomber en dessous de
4 °C ou dépasser 38 °C.
– dans des pièces humides
– à côté des portes et des fenêtres
– près d’un ventilateur ou un radiateur
• Gardez au moins 3 mètres de distance par rapport aux téléphones
sans fil, fours à micro-ondes et autres appareils sans fil qui sont dans
la gamme de fréquences de 2,4 GHz.
AVIS !
• Veillez à ne pas perforer le plafond.
• Si les vis fournies sont trop longues, vous devez utiliser des vis appro-
priées.
FA25--IO--5s.book Seite 21 Donnerstag, 4. Mai 2017 2:14 14

FR
Utilisation de l'appareil FA25
22
6 Utilisation de l'appareil
!
I
6.1 Insertion de la pile
➤ Retirez le détecteur de fumée de la plaque de base (fig. 2, page 2).
➤ Retirez, si nécessaire, la pile bloc 9 V usagée (fig. 4, page 3).
➤ Insérez une nouvelle pile monobloc de 9 V (fig. 5, page 4).
➤ Refixez le détecteur de fumée sur la plaque de base (fig. 6, page 4).
➤ Effectuez un test de fonctionnement (chapitre « Test des détecteurs de fumée »,
page 22).
6.2 Test des détecteurs de fumée
➤ Appuyez sur le bouton TEST/HUSH jusqu'à ce que l’alarme sonne (fig. 1,
page 2).
✓ Le signal d'alarme retentit.
➤ Relâchez le bouton de test.
✓ Le signal d’alarme s’arrête.
Si aucun signal d'alarme ne retentit, procédez comme suit :
➤ Vérifiez la capacité de charge de la pile.
➤ Si nécessaire, remplacez la pile (chapitre « Insertion de la pile », page 22).
✓ Si l’alarme ne sonne pas, le détecteur de fumée doit être remplacé.
AVERTISSEMENT !
• Familiarisez-vous avec le signal d’alarme du détecteur de fumée.
• Gardez les fentes d'aération libres.
• Testez le détecteur de fumée une fois par semaine (chapitre « Test
des détecteurs de fumée », page 22).
• Remplacez les détecteurs de fumée tous les 8 ans.
REMARQUE
• Pour signaler que le détecteur de fumée est prêt à fonctionner, la
LED clignote environ 1 x par minute.
• Si la tension de la pile est faible, le détecteur de fumée émet un bip
environ 1 x par minute.
FA25--IO--5s.book Seite 22 Donnerstag, 4. Mai 2017 2:14 14

FR
FA25 Comportement en cas d'alarme
23
7 Comportement en cas d'alarme
!
I
Quand le signal d'alarme retentit, procédez comme suit :
➤ Quittez immédiatement toutes les pièces.
N’ouvrez aucune porte sans tâter sa surface. Si celle-ci est chaude ou si vous
voyez de la fumée qui entre par la fente de la porte, n’ouvrez pas la porte.
Si l’air est saturé de fumée, tenez-vous près du sol. Respirez à travers un linge.
Humectez le chiffon tout d’abord, si possible.
➤ Ne retournez pas dans les pièces de vie.
Si vous remarquez un incendie, procédez comme suit :
➤ Prévenez les autres personnes à proximité de l’incendie.
➤ Prévenez les pompiers.
Si vous constatez une fausse alarme, procédez comme suit :
➤ Appuyez sur le bouton TEST/HUSH.
✓ Le détecteur de fumée est moins sensible pendant 10 minutes.
✓ Le signal d’alarme sonore se met en mode muet pendant 10 minutes.
✓ La DEL clignote toutes les 10 secondes.
➤ Éliminez la cause de la fausse alerte.
Après 10 minutes, le détecteur de fumée se remet automatiquement en marche.
AVERTISSEMENT !
Supposez toujours que ce n’est pas une fausse alerte.
REMARQUE
Les facteurs environnementaux peuvent provoquer une fausse alarme :
• Normalement, la fumée de cigarette ne déclenche pas l’alarme, sauf
si elle atteint directement le détecteur de fumée.
• Les particules de combustion générées en cuisinant peuvent déclen-
cher l’alarme.
• S'il y a une forte concentration de particules de fumée, le signal
d’alarme acoustique ne peut pas s'éteindre.
FA25--IO--5s.book Seite 23 Donnerstag, 4. Mai 2017 2:14 14

FR
Nettoyage de l'appareil FA25
24
8Nettoyage de l'appareil
!
➤ Essuyez occasionnellement le détecteur de fumée avec un chiffon sec.
➤ Utilisez un aspirateur avec une brosse.
9 Garantie
Le délai légal de garantie s'applique. Si le produit s'avérait défectueux, veuillez vous
adresser à la filiale du fabricant située dans votre pays (voir adresses au verso du
présent manuel) ou à votre revendeur spécialisé.
Veuillez y joindre les documents suivants pour la gestion des réparations et de la
garantie :
• une copie de la facture avec la date d'achat,
• le motif de la réclamation ou une description du dysfonctionnement.
10 Mise au rebut
➤ Jetez les emballages dans les conteneurs de déchets recyclables prévus à cet
effet.
M
Lorsque vous mettrez votre produit définitivement hors service, infor-
mez-vous auprès du centre de recyclage le plus proche ou auprès de
votre revendeur spécialisé sur les prescriptions relatives au retraitement
des déchets.
B
Protégez l'environnement !
Les piles et les batteries usagées ne sont pas des déchets ménagers.
Rapportez les piles défectueuses ou les batteries usagées à votre reven-
deur ou à un centre de collecte.
AVERTISSEMENT !
Assurez-vous que les évents sont exempts de salissures (p. ex. pous-
sières ou insectes).
FA25--IO--5s.book Seite 24 Donnerstag, 4. Mai 2017 2:14 14

FR
FA25 Caractéristiques techniques
25
11 Caractéristiques techniques
FA 25
Alimentation : 9 Vg (pile)
Dimensions : Ø 100 x 35 mm
Poids : 120 g
Température de fonctionnement : 4 °C – 38 °C
Humidité de l’air pendant le fonctionnement : 25 – 85%
Détecteur de fumée : photoélectrique
Volume de l’alarme : > 85 dB à 3 m
Contrôle/certificat :
FA25--IO--5s.book Seite 25 Donnerstag, 4. Mai 2017 2:14 14

IT
Spiegazione dei simboli FA25
26
Prima di effettuare il montaggio e la messa in funzione leggere accurata-
mente questo manuale di istruzioni, conservarlo e in caso di trasmissione
del prodotto, consegnarlo all'utente successivo.
Indice
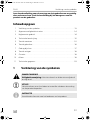
1 Spiegazione dei simboli . . . . . . . . . . . . . . . . . . . . . . . . . . . . . . . . . . . . . . . . 26
2 Indicazioni di sicurezza generali. . . . . . . . . . . . . . . . . . . . . . . . . . . . . . . . . . 27
3 Conformità d'uso . . . . . . . . . . . . . . . . . . . . . . . . . . . . . . . . . . . . . . . . . . . . . 27
4 Descrizione tecnica. . . . . . . . . . . . . . . . . . . . . . . . . . . . . . . . . . . . . . . . . . . . 28
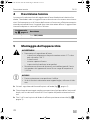
5 Montaggio dell’apparecchio . . . . . . . . . . . . . . . . . . . . . . . . . . . . . . . . . . . . 28
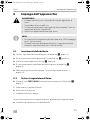
6 Impiego dell'apparecchio . . . . . . . . . . . . . . . . . . . . . . . . . . . . . . . . . . . . . . 29
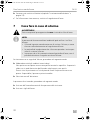
7 Cosa fare in caso di allarme . . . . . . . . . . . . . . . . . . . . . . . . . . . . . . . . . . . . . 30
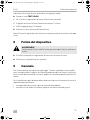
8 Pulizia del dispositivo . . . . . . . . . . . . . . . . . . . . . . . . . . . . . . . . . . . . . . . . . . .31
9 Garanzia . . . . . . . . . . . . . . . . . . . . . . . . . . . . . . . . . . . . . . . . . . . . . . . . . . . . .31
10 Smaltimento . . . . . . . . . . . . . . . . . . . . . . . . . . . . . . . . . . . . . . . . . . . . . . . . . 32
11 Specifiche tecniche. . . . . . . . . . . . . . . . . . . . . . . . . . . . . . . . . . . . . . . . . . . . 32
1 Spiegazione dei simboli
!
A
I
AVVERTENZA!
Avviso di sicurezza: la mancata osservanza di questo avviso può causare
ferite gravi anche mortali.
AVVISO!
La mancata osservanza di questa nota può causare danni materiali e
compromettere il funzionamento del prodotto.
NOTA
Informazioni integranti relative all'impiego del prodotto.
FA25--IO--5s.book Seite 26 Donnerstag, 4. Mai 2017 2:14 14

IT
FA25 Indicazioni di sicurezza generali
27
2 Indicazioni di sicurezza generali
Il produttore non si assume nessuna responsabilità per danni nei seguenti casi:
• errori di montaggio o di allacciamento
• danni al prodotto dovuti a influenze meccaniche o a sovratensioni
• modifiche al prodotto senza esplicita autorizzazione del produttore
• impiego per altri fini rispetto a quelli descritti nel manuale di istruzioni
2.1 Sicurezza di base
!
AVVERTENZA!
• Il segnalatore di fumo serve a rilevare tempestivamente la presenza di
fumo. Se posizionato nel posto giusto, avvisa per tempo della pre-
senza di un pericolo. Il segnalatore di fumo non è in grado di impedire
la propagazione di un eventuale incendio.
• In determinate situazioni il segnalatore di fumo non è efficace, ad es.
– se si fuma a letto
– se all'interno dell'abitazione si trovano bambini lasciati incustoditi
– se vengono effettuati interventi di pulizia con liquidi infiammabili
(ad es. benzina)
• Il segnalatore di fumo funziona solo con batterie con sufficiente capa-
cità di carica. Testare settimanalmente il segnalatore di fumo.
• Non tinteggiare il segnalatore di fumo.
• Non aprire il corpo del segnalatore di fumo, altrimenti non si garanti-
sce più il corretto funzionamento.
• I raggi solari riscaldano il tetto e l'aria nella parte alta dell'abitazione.
L'aria calda può impedire al fumo di una combustione senza fiamma di
raggiungere il segnalatore di fumo.
• Tenere pronto un estintore.
• Se si utilizza gas liquido per cucinare o per il riscaldamento/la refrige-
razione, si consiglia di installare anche un rilevatore di gas.
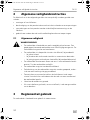
3Conformità d'uso
Il segnalatore di fumo è concepito per l'installazione in abitazioni.
FA25--IO--5s.book Seite 27 Donnerstag, 4. Mai 2017 2:14 14

IT
Descrizione tecnica FA25
28
4 Descrizione tecnica
La camera di rivelazione fumi del segnalatore di fumo fotoelettrico è dotata di un
diodo. Tale diodo irradia un raggio infrarosso che attraversa la camera senza interru-
zioni. Nel momento in cui all'interno della camera si forma una sufficiente concentra-
zione di particelle di fumo, il raggio di luce viene interrotto e diffuso. Il raggio di luce
interrotto colpisce un sensore e attiva l'allarme.
5 Montaggio dell’apparecchio
!
A
➤ Svitare il segnalatore di fumo dalla piastra di fondo (fig. 2, pagina 2).
➤ Come luogo di montaggio scegliere una posizione il più possibile al centro del
locale, con una distanza minima di 50 cm rispetto alle pareti ed eventuali osta-
coli.
➤ Con 2 viti fissare la piastra di fondo al soffitto in posizione orizzontale (fig. 3,
pagina 3).
Posizione nella
fig. 1, pagina 2
Descrizione
1 Tasto TEST/HUSH
2 LED
AVVERTENZA!
• Non montare il segnalatore di fumo:
– in locali con temperatura che può scendere sotto i 4 °C o che
può salire oltre i 38 °C
– in locali umidi
– accanto a porte e finestre
– in prossimità di ventilatori o termosifoni
• Mantenere una distanza di almeno 3 m da telefoni portatili, forni a
microonde e altri apparecchi senza fili con range di frequenza di
2,4 GHz.
AVVISO!
• Prestare attenzione a non perforare il soffitto.
• Se le viti fornite in dotazione sono troppo lunghe, utilizzare viti ido-
nee.
FA25--IO--5s.book Seite 28 Donnerstag, 4. Mai 2017 2:14 14

IT
FA25 Impiego dell'apparecchio
29
6 Impiego dell'apparecchio
!
I
6.1 Inserimento della batteria
➤ Svitare il segnalatore di fumo dalla piastra di fondo (fig. 2, pagina 2).
➤ Estrarre l'eventuale vecchia batteria da 9 V presente (fig. 4, pagina 3).
➤ Inserire una nuova batteria da 9 V (fig. 5, pagina 4).
➤ Fissare nuovamente il segnalatore di fumo alla piastra di fondo (fig. 6,
pagina 4).
➤ Effettuare un test funzionale (capitolo “Testare il segnalatore di fumo” a
pagina 29).
6.2 Testare il segnalatore di fumo
➤ Premere il tasto TEST/HUSH fin quando non viene emesso l'allarme (fig. 1,
pagina 2).
✓ Viene emesso il segnale d'allarme.
➤ Rilasciare il tasto di prova.
✓ Il segnale d'allarme si spegne.
Se non viene emesso nessun segnale d'allarme, procedere nel seguente modo:
➤ Controllare la capacità di carica della batteria.
AVVERTENZA!
• Prendere familiarità con il suono dell'allarme del segnalatore di
fumo.
• Tenere libera la fessura dell'aria.
• Testare settimanalmente il segnalatore di fumo (capitolo “Testare il
segnalatore di fumo” a pagina 29).
• Sostituire il segnalatore di fumo ogni 8 anni.
NOTA
• Per indicare che il segnalatore di fumo è operativo, il LED lampeggia
circa1voltaalminuto.
• Quando la tensione della batteria è bassa, il segnalatore di fumo
emette un segnale acustico circa 1 volta al minuto.
FA25--IO--5s.book Seite 29 Donnerstag, 4. Mai 2017 2:14 14

IT
Cosa fare in caso di allarme FA25
30
➤ Se necessario sostituire la batteria (capitolo “Inserimento della batteria” a
pagina 29).
✓ Se l'allarme non viene emesso, sostituire il segnalatore di fumo.
7 Cosa fare in caso di allarme
!
I
Se viene emesso un segnale d'allarme, procedere nel seguente modo:
➤ Abbandonare tutti gli ambienti senza indugi.
Non aprire nessuna porta senza averne prima toccato la superficie. Se questa è
calda o se si vede fuoriuscire del fumo da sotto la porta, non aprirla.
Tenersi vicini al pavimento se l'aria è piena di fumo. Respirare attraverso un
panno. Se possibile, il panno va prima inumidito.
➤ Non rientrare nell'abitazione.
In presenza di un incendio, procedere nel seguente modo:
➤ Avvisare dell'incendio eventuali altre persone nelle vicinanze.
➤ Avvisare i vigili del fuoco.
AVVERTENZA!
Partire sempre dal presupposto che non si tratta di un falso allarme.
NOTA
In presenza di alcune condizioni ambientali può verificarsi un falso
allarme:
• Il fumo di sigarette normalmente non fa scattare l'allarme, a meno
che non vada direttamente nel segnalatore di fumo.
• Le particelle di combustione che si formano quando si cucina pos-
sono far scattare l'allarme.
• In presenza di un'alta concentrazione di particelle di fumo, non è
possibile disattivare il segnale acustico d'allarme.
FA25--IO--5s.book Seite 30 Donnerstag, 4. Mai 2017 2:14 14

IT
FA25 Pulizia del dispositivo
31
In presenza di un falso allarme, procedere nel seguente modo:
➤ Premere il tasto TEST/HUSH.
✓ Per 10 minuti il segnalatore di fumo risulterà meno sensibile.
✓ Il segnale acustico d'allarme viene disattivato per 10 minuti.
✓ Il LED lampeggia ogni 10 secondi.
➤ Risolvere la causa alla base del falso allarme.
Dopo 10 minuti il segnalatore di fumo ritorna automaticamente al normale stato ope-
rativo.
8 Pulizia del dispositivo
!
➤ Di tanto in tanto pulire il segnalatore di fumo con un panno asciutto.
➤ Utilizzare un aspirapolvere con spazzola.
9 Garanzia
Vale il termine di garanzia previsto dalla legge. Qualora il prodotto risultasse difet-
toso, La preghiamo di rivolgersi alla filiale del produttore del suo Paese (l'indirizzo si
trova sul retro del manuale di istruzioni), oppure al rivenditore specializzato di riferi-
mento.
Per la riparazione e per il disbrigo delle condizioni di garanzia è necessario inviare la
seguente documentazione:
• una copia della fattura con la data di acquisto del prodotto,
• un motivo su cui fondare il reclamo, oppure una descrizione del guasto.
AVVERTENZA!
Verificare che la fessura dell'aria non presenti impurità (ad es. polvere o
insetti).
FA25--IO--5s.book Seite 31 Donnerstag, 4. Mai 2017 2:14 14

IT
Smaltimento FA25
32
10 Smaltimento
➤ Raccogliere il materiale di imballaggio possibilmente negli appositi contenitori di
riciclaggio.
M
Quando il prodotto viene messo fuori servizio definitivamente, informarsi
al centro di riciclaggio più vicino, oppure presso il proprio rivenditore
specializzato, sulle prescrizioni adeguate concernenti lo smaltimento.
B
Proteggete l'ambiente!
Gli accumulatori e le batterie non devono essere raccolti insieme ai rifiuti
domestici.
Consegnare gli accumulatori difettosi o le batterie usate al rivenditore o
presso un centro di raccolta.
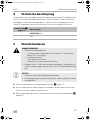
11 Specifiche tecniche
FA 25
Alimentazione elettrica: 9 Vg (batteria)
Dimensioni: Ø 100 x 35 mm
Peso: 120 g
Temperatura di esercizio: 4 °C – 38 °C
Umidità dell'aria durante il funzionamento: 25 – 85%
Sensore rilevamento fumo: Fotoelettrico
Intensità allarme: > 85 dB a 3 m
Certificati di controllo:
FA25--IO--5s.book Seite 32 Donnerstag, 4. Mai 2017 2:14 14

NL
FA25 Verklaring van de symbolen
33
Lees deze handleiding voor de montage en de ingebruikname zorgvuldig
door en bewaar hem. Geef de handleiding bij het doorgeven van het
product aan de gebruiker.
Inhoudsopgave
1 Verklaring van de symbolen . . . . . . . . . . . . . . . . . . . . . . . . . . . . . . . . . . . . . 33
2 Algemene veiligheidsinstructies . . . . . . . . . . . . . . . . . . . . . . . . . . . . . . . . . 34
3 Reglementair gebruik . . . . . . . . . . . . . . . . . . . . . . . . . . . . . . . . . . . . . . . . . . 34
4 Technische beschrijving . . . . . . . . . . . . . . . . . . . . . . . . . . . . . . . . . . . . . . . . 35
5 Toestel monteren . . . . . . . . . . . . . . . . . . . . . . . . . . . . . . . . . . . . . . . . . . . . . 35
6 Toestel gebruiken . . . . . . . . . . . . . . . . . . . . . . . . . . . . . . . . . . . . . . . . . . . . . 36
7 Gedrag bij alarm . . . . . . . . . . . . . . . . . . . . . . . . . . . . . . . . . . . . . . . . . . . . . . 37
8 Toestel reinigen. . . . . . . . . . . . . . . . . . . . . . . . . . . . . . . . . . . . . . . . . . . . . . . 38
9 Garantie. . . . . . . . . . . . . . . . . . . . . . . . . . . . . . . . . . . . . . . . . . . . . . . . . . . . . 38
10 Afvoer . . . . . . . . . . . . . . . . . . . . . . . . . . . . . . . . . . . . . . . . . . . . . . . . . . . . . . 38
11 Technische gegevens. . . . . . . . . . . . . . . . . . . . . . . . . . . . . . . . . . . . . . . . . . 39
1 Verklaring van de symbolen
!
A
I
WAARSCHUWING!
Veiligheidsaanwijzing: Het niet naleven kan leiden tot overlijden of
ernstig letsel.
LET OP!
Het niet naleven ervan kan leiden tot materiële schade en de werking
van het product beperken.
INSTRUCTIE
Aanvullende informatie voor het bedienen van het product.
FA25--IO--5s.book Seite 33 Donnerstag, 4. Mai 2017 2:14 14

NL
Algemene veiligheidsinstructies FA25
34
2 Algemene veiligheidsinstructies
De fabrikant kan in de volgende gevallen niet aansprakelijk worden gesteld voor
schade:
• montage- of aansluitfouten
• beschadiging van het product door mechanische invloeden en overspanningen
• veranderingen aan het product zonder uitdrukkelijke toestemming van de
fabrikant
• gebruik voor andere dan de in de handleiding beschreven toepassingen
2.1 Algemene veiligheid
!
WAARSCHUWING!
• De rookmelder is bedoeld om rook vroegtijdig te herkennen. Een
goed gepositioneerde rookmelder waarschuwt tijdig voor gevaar. De
rookmelder kan geen brand voorkomen.
• De rookmelder is in bepaalde situaties niet effectief, bijvoorbeeld
– bij roken in bed
– bij kinderen die zich zonder toezicht in woonruimtes bevinden
– bij reiniging met ontvlambare vloeistoffen (bijvoorbeeld benzine)
• De rookmelder functioneert alleen met accu's met voldoende laadca-
paciteit. Test de rookmelder wekelijks.
• De rookmelder mag niet worden beschilderd.
• De behuizing van de rookmelder mag niet worden geopend, anders
is de correcte werking niet gegarandeerd.
• Zonnestralen verwarmen het dak en de lucht boven in de woon-
ruimte. Hete lucht kan verhinderen dat de rook van een smeulbrand
de rookmelder bereikt.
• Houd een brandblusser gereed.
• Als u met vloeibaar gas kookt, verwarmt of koelt, is ook een gasmelder
aan te bevelen.
3Reglementair gebruik
De rookmelder is bedoeld voor gebruik in woonruimtes.
FA25--IO--5s.book Seite 34 Donnerstag, 4. Mai 2017 2:14 14

NL
FA25 Technische beschrijving
35
4 Technische beschrijving
De foto-elektrische rookmelder heeft in de rookkamer een diode. Deze diode straalt
een IR-straal uit die ononderbroken door de kamer verloopt. Als de concentratie
rookdeeltjes in de kamer groot genoeg is, wordt de lichtstraal gebroken en ver-
strooid. De gebroken lichtstraal activeert een sensor en vervolgens het alarm.
5 Toestel monteren
!
A
➤ Maak de rookmelder van de bodemplaat los (afb. 2, pagina 2).
➤ Kies als inbouwplaats indien mogelijk het midden van de ruimte met minstens
50 cm afstand tot wanden en hindernissen.
➤ Bevestig de bodemplaat met 2 schroeven aan het horizontale plafond (afb. 3,
pagina 3).
Positie in afb. 1,
pagina 2
Omschrijving
1 TEST/HUSH-toets
2Led
WAARSCHUWING!
• Monteer de rookmelder niet:
– In ruimtes waarin de temperatuur tot onder 4 °C kan dalen of
boven 38 °C kan stijgen.
– In vochtige ruimtes
– Naast deuren en vensters
– In de buurt van een ventilator of radiator
• Houd minstens 3 m afstand tot snoerloze telefoons, magnetrons en
andere snoerloze apparaten die in het 2,4-GHz-frequentiebereik lig-
gen.
LET OP!
• Let op dat u niet door het plafond heen boort.
• Als de bijgeleverde schroeven te lang zijn, moet u geschikte schroe-
ven gebruiken.
FA25--IO--5s.book Seite 35 Donnerstag, 4. Mai 2017 2:14 14

NL
Toestel gebruiken FA25
36
6Toestel gebruiken
!
I
6.1 Accu plaatsen
➤ Maak de rookmelder van de bodemplaat los (afb. 2, pagina 2).
➤ Verwijder eventueel de oude 9 V-batterij (afb. 4, pagina 3).
➤ Plaats een nieuwe 9V-batterij (afb.5, pagina 4).
➤ Bevestig de rookmelder weer op de bodemplaat (afb. 6, pagina 4).
➤ Voer een functietest uit (hoofdstuk „Rookmelder testen” op pagina 36).
6.2 Rookmelder testen
➤ Druk op de TEST/HUSH-toets tot het alarm klinkt (afb. 1, pagina 2).
✓ Het alarmsignaal klinkt.
➤ Laat de testtoets los.
✓ Het alarmsignaal houdt op.
Als geen alarmsignaal klinkt, als volgt te werk gaan:
➤ Test de laadcapaciteit van de batterij.
➤ Vervang de batterij eventueel (hoofdstuk „Accu plaatsen” op pagina 36).
✓ Als het alarm niet klinkt, moet de rookmelder worden vervangen.
WAARSCHUWING!
• Maak u vertrouwd met de alarmtoon van de rookmelder.
• Houd de luchtsleuf vrij.
• Test de rookmelder wekelijks (hoofdstuk „Rookmelder testen” op
pagina 36).
• Vervang de rookmelder elke 8 jaar.
INSTRUCTIE
• Om de gebruiksgereedheid van de rookmelder te signaliseren,
knippert de led ca. 1 x per minuut.
• Bij lage accuspanning piept de rookmelder ca. 1 x per minuut.
FA25--IO--5s.book Seite 36 Donnerstag, 4. Mai 2017 2:14 14

NL
FA25 Gedrag bij alarm
37
7 Gedrag bij alarm
!
I
Als het alarmsignaal klinkt, als volgt te werk gaan:
➤ Verlaat onmiddellijk alle ruimtes.
Open geen deuren zonder eerst het oppervlak te hebben afgetast. Als dit heet
is of als rook onder de deur door komt, de deur niet openen.
Blijf zo laag mogelijk, als de lucht vol met rook is. Adem in door een doek. Maak
het doek eerst nat, indien mogelijk.
➤ Ga niet terug de woonruimtes in.
Als u een brand vaststelt, als volgt te werk gaan:
➤ Informeer anderen in de buurt over de brand.
➤ Alarmeer de brandweer.
Als u vals alarm vaststelt, als volgt te werk gaan:
➤ Druk op de TEST/HUSH-toets.
✓ De rookmelder 10 minuten lang minder gevoelig.
✓ Het akoestische alarmsignaal schakelt 10 minuten stom.
✓ De led knippert om de 10 seconden.
➤ Verwijder de oorzaak van het vals alarm.
Na 10 minuten schakelt de rookmelder automatisch terug.
WAARSCHUWING!
Controleer altijd eerst of het geen vals alarm is.
INSTRUCTIE
Door invloeden van buiten kan een vals alarm worden gegenereerd:
• De rook van sigaretten genereert normaal geen alarm, tenzij de rook
direct in de rookmelder stijgt.
• Verbrandingsdeeltjes die bij koken ontstaan, kunnen een alarm acti-
veren.
• Bij een hoge concentratie rookdeeltjes kan het alarm niet stom wor-
den geschakeld.
FA25--IO--5s.book Seite 37 Donnerstag, 4. Mai 2017 2:14 14

NL
Toestel reinigen FA25
38
8 Toestel reinigen
!
➤ Veeg de rookmelder af en toe met een droge doek schoon.
➤ Gebruik een stofzuiger met borstel.
9 Garantie
De wettelijke garantieperiode is van toepassing. Als het product defect is, wendt u
zich tot het filiaal van de fabrikant in uw land (adressen zie achterkant van de hand-
leiding) of tot uw speciaalzaak.
Voor de afhandeling van de reparatie of garantie dient u de volgende documenten
mee te sturen:
• een kopie van de factuur met datum van aankoop,
• reden van de klacht of een beschrijving van de storing.
10 Afvoer
➤ Laat het verpakkingsmateriaal indien mogelijk recyclen.
M
Als u het product definitief buiten bedrijf stelt, informeer dan bij het
dichtstbijzijnde recyclingcentrum of uw speciaalzaak naar de betreffende
afvoervoorschriften.
B
Bescherm uw milieu!
Accu's en batterijen horen niet thuis in het huishoudelijke afval.
Geef uw defecte of verbruikte of defecte accu's bij de leverancier of bij
een verzamelpunt af.
WAARSCHUWING!
In de luchtsleuf mag zich geen vuil (bijvoorbeeld stof of insecten) bevin-
den.
FA25--IO--5s.book Seite 38 Donnerstag, 4. Mai 2017 2:14 14

NL
FA25 Technische gegevens
39
11 Technische gegevens
FA 25
Stroomvoorziening: 9 Vg (batterij)
Afmetingen: Ø 100 x 35 mm
Gewicht: 120 g
Bedrijfstemperatuur: 4 °C – 38 °C
Luchtvochtigheid tijdens bedrijf: 25 – 85%
Rooksensor: foto-elektrisch
Alarmvolume: > 85 dB bij 3 m
Keurmerk/certificaat:
FA25--IO--5s.book Seite 39 Donnerstag, 4. Mai 2017 2:14 14

AUSTRALIA
Dometic Australia Pty. Ltd.
1 John Duncan Court
Varsity Lakes QLD 4227
1800 212121
+61 7 55076001
Mail: [email protected]
AUSTRIA
Dometic Austria GmbH
Neudorferstraße 108
A-2353 Guntramsdorf
+43 2236 908070
+43 2236 90807060
Mail: [email protected]
BENELUX
Dometic Branch Office Belgium
Zincstraat 3
B-1500 Halle
+32 2 3598040
+32 2 3598050
Mail: [email protected]e
BRAZIL
Dometic DO Brasil LTDA
Avenida Paulista 1754, conj. 111
SP 01310-920 Sao Paulo
+55 11 3251 3352
+55 11 3251 3362
Mail: [email protected].br
DENMARK
Dometic Denmark A/S
Nordensvej 15, Taulov
DK-7000 Fredericia
+45 75585966
+45 75586307
Mail: [email protected]k
FINLAND
Dometic Finland OY
Mestarintie 4
FIN-01730 Vantaa
+358 20 7413220
+358 9 7593700
Mail: [email protected]
FRANCE
Dometic SAS
ZA du Pré de la Dame Jeanne
B.P. 5
F-60128 Plailly
+33 3 44633525
+33 3 44633518
Mail : vehiculesdeloisir[email protected]
HONG KONG
Dometic Group Asia Pacific
Suites 2207-11 · 22/F · Tower 1
The Gateway · 25 Canton Road,
Tsim Sha Tsui · Kowloon
+852 2 4611386
+852 2 4665553
Mail: [email protected]
HUNGARY
Dometic Zrt. Sales Office
Kerékgyártó u. 5.
H-1147 Budapest
+36 1 468 4400
+36 1 468 4401
Mail: budapest@dometic.hu
ITALY
Dometic Italy S.r.l.
Via Virgilio, 3
I-47122 Forlì (FC)
+39 0543 754901
+39 0543 754983
Mail: vendite@dometic.it
JAPAN
Dometic KK
Maekawa-Shibaura, Bldg. 2
2-13-9 Shibaura Minato-ku
Tokyo 108-0023
+81 3 5445 3333
+81 3 5445 3339
Mail: [email protected]p
MEXICO
Dometic Mx, S. de R. L. de C. V.
Circuito Médicos No. 6 Local 1
Colonia Ciudad Satélite
CP 53100 Naucalpan de Juárez
Estado de México
+52 55 5374 4108
+52 55 5393 4683
Mail: [email protected].mx
NETHERLANDS
Dometic Benelux B.V.
Ecustraat 3
NL-4879 NP Etten-Leur
+31 76 5029000
+31 76 5029019
Mail: [email protected]l
NEW ZEALAND
Dometic New Zealand Ltd.
PO Box 12011
Penrose
Auckland 1642
+64 9 622 1490
+64 9 622 1573
Mail: [email protected]
NORWAY
Dometic Norway AS
Østerøyveien 46
N-3232 Sandefjord
+47 33428450
+47 33428459
Mail: firmapo[email protected]
POLAND
Dometic Poland Sp. z o.o.
Ul. Puławska 435A
PL-02-801 Warszawa
+48 22 414 3200
+48 22 414 3201
Mail: [email protected]
PORTUGAL
Dometic Spain, S.L.
Branch Office em Portugal
Rot. de São Gonçalo nº 1 – Esc. 12
2775-399 Carcavelos
+351 219 244 173
+351 219 243 206
Mail: [email protected]
RUSSIA
Dometic RUS LLC
Komsomolskaya square 6-1
RU-107140 Moscow
+7 495 780 79 39
+7 495 916 56 53
Mail: [email protected]
SINGAPORE
Dometic Pte Ltd
18 Boon Lay Way 06–140 Trade Hub 21
Singapore 609966
+65 6795 3177
+65 6862 6620
Mail: [email protected]
SLOVAKIA
Dometic Slovakia s.r.o. Sales Office Bratislava
Nádražná 34/A
900 28 Ivánka pri Dunaji
/ +421 2 45 529 680
Mail: bratislava@dometic.com
SOUTH AFRICA
Dometic (Pty) Ltd.
Regional Office
South Africa & Sub-Saharan Africa
2 Avalon Road
West Lake View Ext 11
Modderfontein 1645
Johannesburg
+27 11 4504978
+27 11 4504976
Mail: [email protected]
SPAIN
Dometic Spain S.L.
Avda. Sierra del Guadarrama, 16
E-28691 Villanueva de la Cañada
Madrid
+34 91 833 60 89
+34 900 100 245
Mail: [email protected]
SWEDEN
Dometic Scandinavia AB
Gustaf Melins gata 7
S-42131 Västra Frölunda
+46 31 7341100
+46 31 7341101
Mail: info@dometicgroup.se
SWITZERLAND
Dometic Switzerland AG
Riedackerstrasse 7a
CH-8153 Rümlang
+41 44 8187171
+41 44 8187191
Mail: [email protected]
UNITED ARAB EMIRATES
Dometic Middle East FZCO
P. O. Box 17860
S-D 6, Jebel Ali Freezone
Dubai
+971 4 883 3858
+971 4 883 3868
Mail: [email protected]
UNITED KINGDOM
Dometic UK Ltd.
Dometic House, The Brewery
Blandford St. Mary
Dorset DT11 9LS
+44 344 626 0133
+44 344 626 0143
Mail: customerservices@dometic.co.uk
USA
Dometic RV Division
1120 North Main Street
Elkhart, IN 46515
+1 574-264-2131
GERMANY
Dometic WAECO International GmbH
Hollefeldstraße 63 · D-48282 Emsdetten
+49 (0) 2572 879-195 · +49 (0) 2572 879-322
Mail: info@dometic-waeco.de
dometic.com
4445102293 05/2017
FA25--IO--5s.book Seite 40 Donnerstag, 4. Mai 2017 2:14 14
-
 1
1
-
 2
2
-
 3
3
-
 4
4
-
 5
5
-
 6
6
-
 7
7
-
 8
8
-
 9
9
-
 10
10
-
 11
11
-
 12
12
-
 13
13
-
 14
14
-
 15
15
-
 16
16
-
 17
17
-
 18
18
-
 19
19
-
 20
20
-
 21
21
-
 22
22
-
 23
23
-
 24
24
-
 25
25
-
 26
26
-
 27
27
-
 28
28
-
 29
29
-
 30
30
-
 31
31
-
 32
32
-
 33
33
-
 34
34
-
 35
35
-
 36
36
-
 37
37
-
 38
38
-
 39
39
-
 40
40


Dometic FA 25 Handleiding
- Type
- Handleiding
- Deze handleiding is ook geschikt voor
in andere talen
- italiano: Dometic FA 25 Istruzioni per l'uso
- français: Dometic FA 25 Mode d'emploi
- Deutsch: Dometic FA 25 Bedienungsanleitung