Yamaha APX500II de handleiding
- Categorie
- Gitaar accessoires
- Type
- de handleiding
Deze handleiding is ook geschikt voor

PRECAUTIONS
The output jack is an EIAJ-standard 1/4" phone jack. Be sure to use
an appropriate connection cable.
The built-in preamplifier is automatically turned on when a plug is
inserted into the output jack. When not using the instrument, or when
playing it without amplification, be sure to remove the plug from the
output jack so that the preamplifier power is turned off.
Always set the VOLUME control to “0” when plugging in or
unplugging the connection cable.
The battery check indicator (BATT.) will light briefly when a plug is
inserted or removed from the output jack. This is normal and does not
indicate a malfunction.
Be sure to remove the battery if the instrument will not be used for an
extended period of time in order to prevent possible damage due to
battery leakage.
Owner’s Manual
Thank you for choosing a Yamaha electric-acoustic guitar.
In order to make the most of the advanced features and
performance provided by your guitar, please read this
manual carefully before using the instrument.
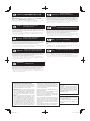
BATTERY REPLACEMENT
Be sure to replace the battery as soon as possible when the battery check
indicator lights in order to avoid reduced sound quality.
*Be sure to remove the battery if the instrument will not be used for an
extended period of time in order to prevent possible damage due to battery
leakage.
q Press the catch on the battery holder in the direction indicated by the arrow
in the illustration in order to unlock it.
w Slide out the battery case.
e Remove the old battery from the battery case, and insert the new battery
making sure that the (+) and (–) terminals of the battery are positioned as
shown in the illustration. Use only a DC9V, S-006P (6F22) or equivalent
battery.
r Slide the battery case back into the battery holder and press firmly so
that the battery case locks into place.
ELECTRIC
ACOUSTIC GUITAR
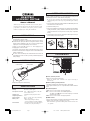
Battery Holder
Control Section
Bar Sensor
NOMENCLATURE
Output Jack (with power switch function)
SPECIFICATIONS
System SYSTEM-58: Monaural 1 way
Pickup Bar Sensor (Piezo type)
Pre-amplifier Controls
VOL., 3 Band (HIGH, MID, LOW) EQ
control, AMF control
Output jack Combination end pin/power switch
Output impedance 1 kΩ
Power supply 9V DC, S-006P (6F22) dry cell battery
Battery life Approx. 300 hours
* When using a manganese battery.
* Varies according to operating conditions.
Accessories •
Hexagonal wrench for neck adjustment x1
• S-006P (6F22) dry cell battery x1
THE CONTROLS
q VOL. (Volume) Control
Adjusts the overall output volume level.
*Make sure that the VOL. is turned to “0” before connecting or
disconnecting.
w BATT. (Battery Check) Indicator
This indicator will light when the battery needs to be replaced.
Please replace the battery as soon as possible when the BATT. indicator
lights.
e 3 Band Equalizer
LOW : Boosts or cuts the level of the low frequencies.
MID :Boosts or cuts the level of the middle frequencies.
The AMF control r adjusts the center frequency of the band
affected by this control.
HIGH : Boosts or cuts the level of the high frequencies.
r AMF Control
Sets the center frequency of the band of frequencies affected by the MID
equalizer control. The range is from 80 Hz to 10 kHz.
* This control has no effect when the MID equalizer control is set to its center
(“0”) position.
O
P
E
N
Catch
DC9V S-006P
(6F22)
Battery case
q
O
P
E
N
w, re
w
r
q
e
w
r
08.7.7, 1:48 PMPage 2

FCC INFORMATION (U.S.A.)
regulations does not guarantee that interference will not oc-
cur in all installations. If this product is found to be the source
of interference, which can be determined by turning the unit
“OFF” and “ON”, please try to eliminate the problem by using
one of the following measures:
Relocate either this product or the device that is being af-
fected by the interference.
Utilize power outlets that are on different branch (circuit
breaker or fuse) circuits or install AC line fi lter/s.
In the case of radio or TV interference, relocate/reorient
the antenna. If the antenna lead-in is 300 ohm ribbon lead,
change the lead-in to co-axial type cable.
If these corrective measures do not produce satisfactory re-
sults, please contact the local retailer authorized to distribute
this type of product. If you can not locate the appropriate
retailer, please contact Yamaha Corporation of America,
Electronic Service Division, 6600 Orangethorpe Ave, Buena
Park, CA90620
The above statements apply ONLY to those products distrib-
uted by Yamaha Corporation of America or its subsidiaries.
This device complies with part 15 of the
FCC Rules.
Operation is subject to the following two
conditions: (1) This device may not cause
harmful interference, and (2) this device
must accept any interference received,
including interference that may cause
undesired operation.
CANADA
This Class B digital apparatus complies
with Canadian ICES-003.
Cet appareil numéique de la classe B
est conforme à la norme NMB-003 du
Canada.
1. IMPORTANT NOTICE: DO NOT MODIFY THIS UNIT!
This product, when installed as indicated in the instructions
contained in this manual, meets FCC requirements. Modi-
fi cations not expressly approved by Yamaha may void your
authority, granted by the FCC, to use the product.
2. IMPORTANT:
When connecting this product to accesso-
ries and/or another product use only high quality shielded
cables. Cable/s supplied with this product MUST be used.
Follow all installation instructions. Failure to follow instruc-
tions could void your FCC authorization to use this product
in the USA.
3. NOTE:
This product has been tested and found to comply
with the requirements listed in FCC Regulations, Part 15
for Class “B” digital devices. Compliance with these require-
ments provides a reasonable level of assurance that your
use of this product in a residential environment will not
result in harmful interference with other electronic devices.
This equipment generates/uses radio frequencies and, if
not installed and used according to the instructions found
in the users manual, may cause interference harmful to the
operation of other electronic devices. Compliance with FCC
Caution!
Внимание!
¡Precaución!
Attenzione!
Vorsicht!
Attention !
Regarding the AG-Stomp Guitar
Power Supply Function
Относительно функции источника питания гитарного процес-
сора AG-Stomp (процессор эффектов для акустических гитар)
Acerca de la función de
alimentación del AG-Stomp
Funzione di alimentazione della
chitarra AG-Stomp
Wichtiger Hinweis zur AG-Stomp-
Stromversorgung für Gitarren
À propos de la fonction d’alimentation
électrique de la guitare du AG-Stomp
This guitar is not compatible with the power supply function on the AG-Stomp
acoustic guitar preamplifier. Using the guitar power supply function on the AG-
Stomp can damage the guitar’s built-in preamplifi er resulting in abnormal sound
output, tuner operation, etc.
* Before connecting the guitar to the AG-Stomp, make sure that the AG-Stomp’s guitar power
supply function is switched OFF (switch OFF the +9V SUPPLY switch) and insert a battery
into the guitar’s battery holder.
Данная гитара несовместима с функцией источника питания на акустическом гитарном
предусилителе процессора AG-Stomp. Использование функции источника питания гитары на
процессоре AG-Stomp может повредить встроенный предусилитель гитары и привести к не-
нормальному выводу звукового сигнала, нарушению работы тюнера, и т.п.
* Перед подсоединением гитары к процессору AG-Stomp убедитесь в том, что функция источника
питания гитарного процессора AG-Stomp выключена (переключатель ВЫКЛ установлен в поло-
жение +9V SUPPLY), а затем вставьте батарею в держатель батареи гитары.
Esta guitarra no es compatible con la función de alimentación del preamplifi cador
para guitarra acústica AG-Stomp. El empleo de la función de alimentación de gui-
tarra del AG-Stomp puede causar daños en el preamplifi cador para guitarra incor-
porado y producir anormalidades en la salida de sonido, operación del afi nador, etc.
* Antes de conectar la guitarra al AG-Stomp, asegúrese de que la función de alimentación de
guitarra del AG-Stomp esté desactivada (OFF) (desconecte (OFF) el interruptor +9V SUP-
PLY) e inserte una pila en el compartimiento de la pila de la guitarra.
Questa chitarra non è compatibile con la funzione di alimentazione del preamplifi ca-
tore per chitarra acustica YAMAHA AG-Stomp. Usando la funzione di alimentazione
della chitarra AG-Stomp si può danneggiare il preamplificatore incorporato della
chitarra, producendo suoni ed un funzionamento dell’accordatore anormali, ecc.
* Prima di collegare la chitarra all’AG-Stomp, controllare che la funzione di alimentazione della
chitarra AG-Stomp sia spenta (portando su OFF l’interruttore +9V SUPPLY) ed inserire una
batteria nel vano batteria della chitarra.
Diese Gitarre ist nicht mit der Stromversorgungsfunktion des Akustik-Gitarren-
Vorverstärkers AG-Stomp kompatibel. Bei Anschluss an die Stromversorgung
des AG-Stomp kann der interne Vorverstärker der Gitarre Schaden nehmen, was
anormalen Klang und Störungen der Stimmgerätfunktion zur Folge hat.
* Bevor Sie die Gitarre anschließen, schalten Sie den AG-Stomp aus (+9V SUPPLY-Schalter auf
„OFF“) und legen eine Batterie in den Batteriehalter der Gitarre ein.
La guitare n’est pas compatible avec la fonction d’alimentation électrique du
préamplifi cateur de guitare acoustique AG-Stomp. L’utilisation de cette fonction sur
l’AG-Stomp peut endommager le préamplifi cateur intégré de la guitare, ce qui nuit
à la qualité du son, au fonctionnement de l‘accordeur, etc.
* Avant de raccorder la guitare à l’AG-Stomp, assurez-vous que la fonction d‘alimentation élec-
trique de guitare de l‘AG-Stomp est désactivée (commutateur +9V SUPPLY en position OFF)
et introduisez une pile dans le porte-pile de la guitare.
Documenttranscriptie
BATTERY REPLACEMENT ELECTRIC ACOUSTIC GUITAR Owner’s Manual Thank you for choosing a Yamaha electric-acoustic guitar. In order to make the most of the advanced features and performance provided by your guitar, please read this manual carefully before using the instrument. PRECAUTIONS The output jack is an EIAJ-standard 1/4" phone jack. Be sure to use an appropriate connection cable. Be sure to replace the battery as soon as possible when the battery check indicator lights in order to avoid reduced sound quality. * Be sure to remove the battery if the instrument will not be used for an extended period of time in order to prevent possible damage due to battery leakage. q Press the catch on the battery holder in the direction indicated by the arrow in the illustration in order to unlock it. w Slide out the battery case. e Remove the old battery from the battery case, and insert the new battery making sure that the (+) and (–) terminals of the battery are positioned as shown in the illustration. Use only a DC9V, S-006P (6F22) or equivalent battery. r Slide the battery case back into the battery holder and press firmly so that the battery case locks into place. q w, r e Battery case The built-in preamplifier is automatically turned on when a plug is inserted into the output jack. When not using the instrument, or when playing it without amplification, be sure to remove the plug from the output jack so that the preamplifier power is turned off. w OP DC9V S-006P (6F22) EN EN OP r Catch Always set the VOLUME control to “0” when plugging in or unplugging the connection cable. The battery check indicator (BATT.) will light briefly when a plug is inserted or removed from the output jack. This is normal and does not indicate a malfunction. Be sure to remove the battery if the instrument will not be used for an extended period of time in order to prevent possible damage due to battery leakage. THE CONTROLS q NOMENCLATURE Control Section e w Battery Holder r q VOL. (Volume) Control Adjusts the overall output volume level. Bar Sensor Output Jack (with power switch function) SPECIFICATIONS System SYSTEM-58: Monaural 1 way Pickup Bar Sensor (Piezo type) Pre-amplifier Controls VOL., 3 Band (HIGH, MID, LOW) EQ control, AMF control Output jack Output impedance Combination end pin/power switch 1 kΩ Power supply Battery life 9V DC, S-006P (6F22) dry cell battery Approx. 300 hours * When using a manganese battery. * Varies according to operating conditions. Accessories System58̲WG99290̲0707 • Hexagonal wrench for neck adjustment x1 • S-006P (6F22) dry cell battery x1 Page 2 * Make sure that the VOL. is turned to “0” before connecting or disconnecting. w BATT. (Battery Check) Indicator This indicator will light when the battery needs to be replaced. Please replace the battery as soon as possible when the BATT. indicator lights. e 3 Band Equalizer LOW : Boosts or cuts the level of the low frequencies. MID : Boosts or cuts the level of the middle frequencies. The AMF control r adjusts the center frequency of the band affected by this control. HIGH : Boosts or cuts the level of the high frequencies. r AMF Control Sets the center frequency of the band of frequencies affected by the MID equalizer control. The range is from 80 Hz to 10 kHz. * This control has no effect when the MID equalizer control is set to its center (“0”) position. 08.7.7, 1:48 PM Adobe PageMaker 6.5J/PPC AG-Stomp の電源供給機能に関するご注意 ¡Precaución! Acerca de la función de alimentación del AG-Stomp 本ギターは弊社多機能プリアンプ AG-Stomp の電源供給機能には対応しており ません。 電源供給機能を使用しますと、本ギターの内蔵プリアンプ内の回路が破損し、音 出力・チューナー機能等に支障をきたすおそれがあります。 Esta guitarra no es compatible con la función de alimentación del preamplificador para guitarra acústica AG-Stomp. El empleo de la función de alimentación de guitarra del AG-Stomp puede causar daños en el preamplificador para guitarra incorporado y producir anormalidades en la salida de sonido, operación del afinador, etc. ※ AG-Stomp に接続する場合は、電源供給機能を OFF (+9V SUPPLY スイッチを OFF) にし、本ギターのバッテリーホルダーに電池を挿入した状態でお使いください。 * Antes de conectar la guitarra al AG-Stomp, asegúrese de que la función de alimentación de guitarra del AG-Stomp esté desactivada (OFF) (desconecte (OFF) el interruptor +9V SUPPLY) e inserte una pila en el compartimiento de la pila de la guitarra. Caution! Regarding the AG-Stomp Guitar Power Supply Function This guitar is not compatible with the power supply function on the AG-Stomp acoustic guitar preamplifier. Using the guitar power supply function on the AGStomp can damage the guitar’s built-in preamplifier resulting in abnormal sound output, tuner operation, etc. * Before connecting the guitar to the AG-Stomp, make sure that the AG-Stomp’s guitar power supply function is switched OFF (switch OFF the +9V SUPPLY switch) and insert a battery into the guitar’s battery holder. Vorsicht! Wichtiger Hinweis zur AG-StompStromversorgung für Gitarren Внимание! Относительно функции источника питания гитарного процессора AG-Stomp (процессор эффектов для акустических гитар) Данная гитара несовместима с функцией источника питания на акустическом гитарном предусилителе процессора AG-Stomp. Использование функции источника питания гитары на процессоре AG-Stomp может повредить встроенный предусилитель гитары и привести к ненормальному выводу звукового сигнала, нарушению работы тюнера, и т.п. * Перед подсоединением гитары к процессору AG-Stomp убедитесь в том, что функция источника питания гитарного процессора AG-Stomp выключена (переключатель ВЫКЛ установлен в положение +9V SUPPLY), а затем вставьте батарею в держатель батареи гитары. 警告! 关干 AG-Stomp 吉他的电源功能 Diese Gitarre ist nicht mit der Stromversorgungsfunktion des Akustik-GitarrenVorverstärkers AG-Stomp kompatibel. Bei Anschluss an die Stromversorgung des AG-Stomp kann der interne Vorverstärker der Gitarre Schaden nehmen, was anormalen Klang und Störungen der Stimmgerätfunktion zur Folge hat. 本吉他不兼容 AG-Stomp 原音吉他前置放大器上的电源功能。使用 AG-Stomp 上的吉 他电源功能会损坏吉他的内置前置放大器,从而导致声音输出,调谐器运转异常等 后果。 * Bevor Sie die Gitarre anschließen, schalten Sie den AG-Stomp aus (+9V SUPPLY-Schalter auf „OFF“) und legen eine Batterie in den Batteriehalter der Gitarre ein. * 将吉他连接到 AG-Stomp 之前,请确认已关闭 AG-Stomp 的吉他电源功能 ( 将+9V SUPPLY 开关置干 OFF),并且已将电池插入吉他的电池舱。 Attention ! À propos de la fonction d’alimentation électrique de la guitare du AG-Stomp La guitare n’est pas compatible avec la fonction d’alimentation électrique du préamplificateur de guitare acoustique AG-Stomp. L’utilisation de cette fonction sur l’AG-Stomp peut endommager le préamplificateur intégré de la guitare, ce qui nuit à la qualité du son, au fonctionnement de l‘accordeur, etc. * Avant de raccorder la guitare à l’AG-Stomp, assurez-vous que la fonction d‘alimentation électrique de guitare de l‘AG-Stomp est désactivée (commutateur +9V SUPPLY en position OFF) et introduisez une pile dans le porte-pile de la guitare. Attenzione! 주의 ! AG- 스톰프 기타 전원 공급 기능에 관해서 본 기타는 AG- 스톰프 어코스틱 기타 프리앰프의 전원 공급 기능과 호환하지 않습 니다 . AG- 스톰프에서 기타 전원 공급 기능을 사용하면 기타의 내장 프리앰프를 손상시켜서 비정상적인 사운드 출력이나 튜너 조작 등을 유발합니다 . * AG- 스톰프에 기타를 연결하기 전에 AG- 스톰프의 기타 전원 공급 기능이 꺼진 것을 확 인하고 (+9V SUPPLY 스위치를 끕니다 ), 기타의 배터리 홀더에 배터리를 삽입해 주십 시오 . Funzione di alimentazione della chitarra AG-Stomp Questa chitarra non è compatibile con la funzione di alimentazione del preamplificatore per chitarra acustica YAMAHA AG-Stomp. Usando la funzione di alimentazione della chitarra AG-Stomp si può danneggiare il preamplificatore incorporato della chitarra, producendo suoni ed un funzionamento dell’accordatore anormali, ecc. * Prima di collegare la chitarra all’AG-Stomp, controllare che la funzione di alimentazione della chitarra AG-Stomp sia spenta (portando su OFF l’interruttore +9V SUPPLY) ed inserire una batteria nel vano batteria della chitarra. FCC INFORMATION (U.S.A.) 1. IMPORTANT NOTICE: DO NOT MODIFY THIS UNIT! This product, when installed as indicated in the instructions contained in this manual, meets FCC requirements. Modifications not expressly approved by Yamaha may void your authority, granted by the FCC, to use the product. regulations does not guarantee that interference will not occur in all installations. If this product is found to be the source of interference, which can be determined by turning the unit “OFF” and “ON”, please try to eliminate the problem by using one of the following measures: 2. IMPORTANT: When connecting this product to accessories and/or another product use only high quality shielded cables. Cable/s supplied with this product MUST be used. Follow all installation instructions. Failure to follow instructions could void your FCC authorization to use this product in the USA. Relocate either this product or the device that is being affected by the interference. 3. NOTE: This product has been tested and found to comply with the requirements listed in FCC Regulations, Part 15 for Class “B” digital devices. Compliance with these requirements provides a reasonable level of assurance that your use of this product in a residential environment will not result in harmful interference with other electronic devices. This equipment generates/uses radio frequencies and, if not installed and used according to the instructions found in the users manual, may cause interference harmful to the operation of other electronic devices. Compliance with FCC system61.indd 10 Utilize power outlets that are on different branch (circuit breaker or fuse) circuits or install AC line filter/s. This device complies with part 15 of the FCC Rules. Operation is subject to the following two conditions: (1) This device may not cause harmful interference, and (2) this device must accept any interference received, including interference that may cause undesired operation. In the case of radio or TV interference, relocate/reorient the antenna. If the antenna lead-in is 300 ohm ribbon lead, change the lead-in to co-axial type cable. If these corrective measures do not produce satisfactory results, please contact the local retailer authorized to distribute this type of product. If you can not locate the appropriate retailer, please contact Yamaha Corporation of America, Electronic Service Division, 6600 Orangethorpe Ave, Buena Park, CA90620 CANADA This Class B digital apparatus complies with Canadian ICES-003. Cet appareil numéique de la classe B est conforme à la norme NMB-003 du Canada. The above statements apply ONLY to those products distributed by Yamaha Corporation of America or its subsidiaries. 09.1.7 8:20:46 PM-
 1
1
-
 2
2


Yamaha APX500II de handleiding
- Categorie
- Gitaar accessoires
- Type
- de handleiding
- Deze handleiding is ook geschikt voor
in andere talen
- English: Yamaha APX500II Owner's manual
- italiano: Yamaha APX500II Manuale del proprietario
- русский: Yamaha APX500II Инструкция по применению
- français: Yamaha APX500II Le manuel du propriétaire
- español: Yamaha APX500II El manual del propietario
- Deutsch: Yamaha APX500II Bedienungsanleitung
- português: Yamaha APX500II Manual do proprietário
- dansk: Yamaha APX500II Brugervejledning
- suomi: Yamaha APX500II Omistajan opas
- čeština: Yamaha APX500II Návod k obsluze
- 日本語: Yamaha APX500II 取扱説明書
- svenska: Yamaha APX500II Bruksanvisning
- Türkçe: Yamaha APX500II El kitabı
- polski: Yamaha APX500II Instrukcja obsługi
- română: Yamaha APX500II Manualul proprietarului