Yamaha PSR-I455 de handleiding
- Categorie
- Muziekinstrumenten
- Type
- de handleiding

EN
Owner’s Manual
DIGITAL KEYBOARD
Setting UpReferenceAppendix Quick Guide

2
PSR-I455 Owner’s Manual

3
PSR-I455 Owner’s Manual
The model number, serial number, power requirements, etc.,
may be found on or near the name plate, which is at the bot-
tom of the unit. You should note this serial number in the space
provided below and retain this manual as a permanent record
of your purchase to aid identification in the event of theft.
Model No.
Serial No.
(bottom_en_01)

4
PSR-I455 Owner’s Manual
Quick Guide Reference AppendixSetting Up
Table of Contents
Special Features ..............................................................5
Compatible Format and Functions ...................................8
About the Manuals ...........................................................9
Included Accessories .......................................................9
Setting Up
Panel Controls and Terminals 10
Setting Up 12
Power Requirements......................................................12
Connecting Headphones or External Audio Equipment
...13
Connecting a Footswitch to the SUSTAIN jack..............13
Basic Operations 14
Turning the Power On/Off ..............................................14
Auto Power Off Function ................................................14
Selecting Operations......................................................14
Display Items 15
Quick Guide
Try Playing a Variety of Instrument Voices 16
Selecting a Main Voice...................................................16
Playing the “Grand Piano”..............................................16
Layering a Dual Voice ....................................................16
Playing a Split Voice in the Left Hand area ....................17
Using the Metronome.....................................................18
Adding Harmony ............................................................19
Creating Arpeggios 20
Triggering the Arpeggio..................................................20
Changing the Arpeggio Type .........................................20
Creating Original Sounds via the Knobs 21
Selecting a Knob Effect Combination.............................21
Applying the Filter to the Main Voice..............................21
Playing Styles 22
Using the Music Database .............................................22
Playing the Tabla/Tanpura! 23
Playing Songs 24
Listening to a Demo Song..............................................24
Selecting and Playing Back a Song ...............................24
Song Fast Forward, Fast Reverse, and Pause ..............25
A-B Repeat.....................................................................25
Turning Each Track On/Off ............................................25
Using the Song Lesson Feature 26
Three Types of Song Lesson .........................................26
Practicing with Song Lesson ..........................................26
Making Practice Perfect—Repeat & Learn.....................27
Recording Your Performance 28
Track Structure of a Song ..............................................28
Quick Recording.............................................................28
Recording to a Specified Track ......................................29
Clearing a User Song.....................................................30
Clearing a Specified Track from a User Song................30
Memorizing Your Favorite Panel Settings 31
Memorizing Panel Settings to the Registration Memory
..31
Recalling Panel Settings from the Registration Memory
..31
Backup Parameters and Initialization 32
Backup Parameters........................................................32
Initialization ....................................................................32
Reference
Handy Performance Features 33
Selecting a Reverb Type................................................33
Selecting a Chorus Type................................................33
Pitch Controls—Transpose ............................................34
Pitch Controls—Tuning ..................................................34
Pitch Controls—the PITCH BEND wheel .......................34
Calling up Optimum Panel Settings ...............................34
Changing the Touch Sensitivity of the Keyboard ...........35
Selecting an EQ Setting for the Best Sound ..................35
Voice Settings 36
Selecting a Dual Voice...................................................36
Selecting a Split Voice ...................................................36
Voice Editing ..................................................................36
Parameters Assigned to the Knobs 37
Arpeggio Settings 39
Synchronizing an Arpeggio to Song/Style/Tabla
Playback—Arpeggio Quantize ...................................39
Holding the Arpeggio Playback via the Footswitch ........39
Styles (Auto Accompaniment) and
Tabla/Tanpura patterns 40
Style Variations—Sections.............................................40
Synchro Stop .................................................................41
Tabla/Tanpura Variations...............................................42
Changing the Tempo .....................................................42
Tap Start ........................................................................42
Adjusting the Volume of the Style or Tabla/Tanpura......42
Setting the Split Point.....................................................43
Playing Chords Without Style Playback .........................43
Chord Types for Style Playback.....................................44
Looking Up Chords Using the Chord Dictionary ............45
Song Settings 46
BGM (Background Music) Playback ..............................46
Random Song Playback ................................................46
Tempo Setting of the Song ............................................47
Tap Start ........................................................................47
Song Volume .................................................................47
Melody Voice Setting of the Preset Song ......................47
The Functions 48
Basic Procedure in the Function Display .......................48
USB Flash Memory Operations 51
Connecting a USB Flash Memory..................................52
Formatting a USB Flash Memory...................................53
Saving User Data to a USB Flash Memory....................54
Saving a User Song as SMF to a USB Flash Memory...55
Loading User Data from a USB Flash Memory..............56
Loading a Style File .......................................................57
Deleting a User File in the USB Flash Memory..............58
Deleting a SMF File in the USB Flash Memory..............58
Exiting from a File Control display..................................59
Appendix
Troubleshooting ............................................................. 60
Voice List ....................................................................... 61
Drum Kit List .................................................................. 67
Style List ........................................................................ 74
Tabla/Tanpura Pattern List ............................................ 75
Song List ........................................................................ 76
Arpeggio List .................................................................. 77
Music Database List....................................................... 78
Effect Type List .............................................................. 80
Specifications................................................................. 81
Index .............................................................................. 82

5
PSR-I455 Owner’s Manual
Setting Up
Special Features
Creating New Sounds
Page 21
By adjusting just two knobs you can add varying degrees of distortion, “sweet-
ness,” or other characteristics to a sound to change it subtly or drastically. Param-
eters that can be assigned to the knobs include effect, filter, envelope generator
and more. You can create new sounds in real time!
Arpeggio Function
Page 20
Similar to the arpeggio functions provided on some synthesizers, this function
automatically produces arpeggios (broken chords) when you simply play the
appropriate notes on the keyboard. A variety of arpeggios can be produced by
changing your fingering or the arpeggio type.
Play a Variety of Instrument Voices
Page 16
The instrument voice that sounds when you play the keyboard can be changed to
violin, flute, harp, or any of an extensive range of voices. You can change the
mood of a song written for piano, for example, by using violin to play it instead.
Experience a whole new world of musical variety.
Play Along with Styles
Page 22
Want to play with full accompaniment? Try the auto-accompaniment Styles.
The accompaniment styles provide the equivalent of a full backing band cover-
ing a wide variety of styles from waltzes to 8-beat to euro-trance ... and much
more. Select a style that matches the music you want to play, or experiment with
new styles to expand your musical horizons.
Try playing the Tabla/Tanpura feature!
Page 23
This special feature lets you play Indian phrase patterns via the Tabla and Tan-
pura sounds, as if you were using the Tabla machine and Tanpura machine. Let’s
enjoy the conventional Indian music via the panel buttons and Knobs.
067
EuTrance

6
PSR-I455 Owner’s Manual
Setting Up
PRECAUTIONS
PLEASE READ CAREFULLY BEFORE PROCEEDING
Please keep this manual in a safe and handy place for future reference.
WARNING
Always follow the basic precautions listed below to avoid the possibility of serious injury or even death from electrical
shock, short-circuiting, damages, fire or other hazards. These precautions include, but are not limited to, the
following:
• Do not place the power cord near heat sources such as heaters or radiators. Also,
do not excessively bend or otherwise damage the cord, or place heavy objects on
it.
• Only use the voltage specified as correct for the instrument. The required voltage
is printed on the name plate of the instrument.
• Use the specified adaptor (page 81) only. Using the wrong adaptor can result in
damage to the instrument or overheating.
• Check the electric plug periodically and remove any dirt or dust which may have
accumulated on it.
• This instrument contains no user-serviceable parts. Do not open the instrument
or attempt to disassemble or modify the internal components in any way. If it
should appear to be malfunctioning, discontinue use immediately and have it
inspected by qualified Yamaha service personnel.
• Do not expose the instrument to rain, use it near water or in damp or wet
conditions, place on it any containers (such as vases, bottles or glasses)
containing liquids which might spill into any openings. If any liquid such as
water seeps into the instrument, turn off the power immediately and unplug the
power cord from the AC outlet. Then have the instrument inspected by qualified
Yamaha service personnel.
• Never insert or remove an electric plug with wet hands.
• Do not put burning items, such as candles, on the unit. A burning item may fall
over and cause a fire.
• Follow the precautions below. Failure to do so might result in explosion, fire,
overheating or battery fluid leakage.
- Do not tamper with or disassemble batteries.
- Do not dispose of batteries in fire.
- Do not attempt to recharge batteries that are not designed to be charged.
- Keep the batteries separate from metallic objects such as necklaces, hairpins,
coins, and keys.
- Use the specified battery type (page 12) only.
- Use new batteries, all of which are the same type, same model, and made by
the same manufacturer.
- Always make sure all batteries are inserted in conformity with the +/- polarity
markings.
- When the batteries run out, or if the instrument is not to be used for a long
time, remove the batteries from the instrument.
- When using Ni-MH batteries, follow the instructions that came with the
batteries. Use only the specified charger device when charging.
• Keep batteries away from small children who might accidentally swallow them.
• If the batteries do leak, avoid contact with the leaked fluid. If the battery fluid
should come in contact with your eyes, mouth, or skin, wash immediately with
water and consult a doctor. Battery fluid is corrosive and may possibly cause loss
of sight or chemical burns.
• When one of the following problems occur, immediately turn off the power switch
and disconnect the electric plug from the outlet. (If you are using batteries,
remove all batteries from the instrument.) Then have the device inspected by
Yamaha service personnel.
- The power cord or plug becomes frayed or damaged.
- It emits unusual smells or smoke.
- Some object has been dropped into the instrument.
- There is a sudden loss of sound during use of the instrument.
Power supply/AC power adaptor
Do not open
Water warning
Fire warning
Battery
If you notice any abnormality
DMI-5 1/2

7
PSR-I455 Owner’s Manual
Setting Up
CAUTION
Always follow the basic precautions listed below to avoid the possibility of physical injury to you or others, or damage
to the instrument or other property. These precautions include, but are not limited to, the following:
• Do not connect the instrument to an electrical outlet using a multiple-connector.
Doing so can result in lower sound quality, or possibly cause overheating in the
outlet.
• When removing the electric plug from the instrument or an outlet, always hold
the plug itself and not the cord. Pulling by the cord can damage it.
• Remove the electric plug from the outlet when the instrument is not to be used for
extended periods of time, or during electrical storms.
• Do not place the instrument in an unstable position where it might accidentally
fall over.
• Before moving the instrument, remove all connected cables, to prevent damage
to the cables or injury to anyone who might trip over them.
• When setting up the product, make sure that the AC outlet you are using is easily
accessible. If some trouble or malfunction occurs, immediately turn off the power
switch and disconnect the plug from the outlet. Even when the power switch is
turned off, electricity is still flowing to the product at the minimum level. When
you are not using the product for a long time, make sure to unplug the power
cord from the wall AC outlet.
• Use only the stand specified for the instrument. When attaching the stand or rack,
use the provided screws only. Failure to do so could cause damage to the internal
components or result in the instrument falling over.
• Before connecting the instrument to other electronic components, turn off the
power for all components. Before turning the power on or off for all components,
set all volume levels to minimum.
• Be sure to set the volumes of all components at their minimum levels and
gradually raise the volume controls while playing the instrument to set the
desired listening level.
• Do not insert a finger or hand in any gaps on the instrument.
• Never insert or drop paper, metallic, or other objects into the gaps on the panel or
keyboard. This could cause physical injury to you or others, damage to the
instrument or other property, or operational failure.
• Do not rest your weight on, or place heavy objects on the instrument, and do not
use excessive force on the buttons, switches or connectors.
• Do not use the instrument/device or headphones for a long period of time at a
high or uncomfortable volume level, since this can cause permanent hearing
loss. If you experience any hearing loss or ringing in the ears, consult a
physician.
Always turn the power off when the instrument is not in use.
Even when the [ ] (Standby/On) switch is in standby status (display is off), electricity is still flowing to the instrument at the minimum level.
When you are not using the instrument for a long time, make sure you unplug the power cord from the wall AC outlet.
Make sure to discard used batteries according to local regulations.
NOTICE
To avoid the possibility of malfunction/ damage to the product, damage to data, or damage to other property, follow the notices below.
Handling and Maintenance
• Do not use the instrument in the vicinity of a TV, radio, stereo equipment, mobile phone, or other electric devices. Otherwise, the instrument, TV, or radio may generate noise.
• Do not expose the instrument to excessive dust or vibrations, or extreme cold or heat (such as in direct sunlight, near a heater, or in a car during the day) to prevent the
possibility of panel disfiguration, damage to the internal components or unstable operation. (Verified operating temperature range: 5° – 40°C, or 41° – 104°F.)
• Do not place vinyl, plastic or rubber objects on the instrument, since this might discolor the panel or keyboard.
Saving data
• Some data items (page 32) are automatically saved as backup data in the internal memory even if you turn the power off. Saved data may be lost due to malfunction or incorrect
operation. Save important data to external device such as a USB flash memory (page 51).
Information
About copyrights
• Copying of the commercially available musical data including but not limited to MIDI data and/or audio data is strictly prohibited except for your personal use.
• This product incorporates and bundles computer programs and contents in which Yamaha owns copyrights or with respect to which it has license to use others' copyrights.
Such copyrighted materials include, without limitation, all computer software, style files, MIDI files, WAVE data, musical scores and sound recordings. Any unauthorized use of
such programs and contents outside of personal use is not permitted under relevant laws. Any violation of copyright has legal consequences. DON'T MAKE, DISTRIBUTE OR
USE ILLEGAL COPIES.
About functions/data bundled with the instrument
• Some of the preset songs have been edited for length or arrangement, and may not be exactly the same as the original.
About this manual
• The illustrations and LCD screens as shown in this manual are for instructional purposes only, and may appear somewhat different from those on your instrument.
• The company names and product names in this manual are the trademarks or registered trademarks of their respective companies.
Power supply/AC power adaptor
Location
Connections
Handling caution
Yamaha cannot be held responsible for damage caused by improper use or modifications to the instrument, or data that is lost or
destroyed.
DMI-5 2/2

8
PSR-I455 Owner’s Manual
Setting Up
Compatible Format and Functions
GM System Level 1
“GM System Level 1” is an addition to the MIDI standard which ensures that any GM-compatible
music data can be accurately played by any GM-compatible tone generator, regardless of manufacturer.
The GM mark is affixed to all software and hardware products that support GM System Level.
XGlite
As its name implies, “XGlite” is a simplified version of Yamaha’s high-quality XG tone generation for-
mat. Naturally, you can play back any XG song data using an XGlite tone generator. However, keep in
mind that some songs may play back differently compared to the original data, due to the reduced set of
control parameters and effects.
USB
USB is an abbreviation for Universal Serial Bus. It is a serial interface for connecting a computer with
peripheral Devices. It allows “hot swapping” (connecting peripheral devices while the power to the
computer is on).
STYLE FILE
The Style File Format is Yamaha’s original style file format which uses a unique conversion system to
provide high-quality automatic accompaniment based on a wide range of chord types.

9
PSR-I455 Owner’s Manual
Setting Up
About the Manuals
This instrument has the following documents and instructional materials.
Included Documents
Owner’s Manual (this book)
• Setting Up Please read this section first.
• Quick Guide This section explains how to use the basic functions. Refer to this section while
playing the instrument.
• Reference This section explains how to make detailed settings for the various functions of
the instrument.
• Appendix This section includes troubleshooting information and specifications.
Data List
Contains various important preset content lists such as those of Voices, Styles, Tabla/Tanpura patterns and
Effects.
Online Materials (from Yamaha Manual Library)
MIDI Reference
Contains MIDI related information such as MIDI Data Format and the MIDI Implementation Chart.
MIDI Basics (only in English, French, German and Spanish)
Contains basic explanations about MIDI.
Computer-related Operations
Includes instructions on connecting this instrument to a computer, and operations related to transferring song
data.
To obtain these manuals, access the Yamaha Manual Library, enter “PSR-I455” or “MIDI Basics” to the Model
Name box, then click [SEARCH].
Yamaha Manual Library http://www.yamaha.co.jp/manual/
Online Materials (for Yamaha Online members)
Song Book (only in English)
Contains music scores for the preset Songs (excluding the Demo Songs) of this instrument. After completing the
user registration at the website below, you can download this Song Book free of charge.
Yamaha Online Member https://member.yamaha.com/myproduct/regist/
You will need the PRODUCT ID on the sheet (“Online Member Product Registration”) packaged with this
manual in order to fill out the User Registration form.
Included Accessories
• Owner’s Manual (this book)
• AC Power Adaptor
• Music Rest
• Online Member Product Registration
*
* The PRODUCT ID on the sheet will be needed when
you fill out the User Registration form.
Insert the music rest
into the slots as
shown.
Music Rest

10
PSR-I455 Owner’s Manual
Setting Up
Panel Controls and Terminals
Front Panel
q [MASTER VOLUME] control ................Page 14
w PITCH BEND wheel..............................Page 34
e [ ] (Standby/On) switch ....................Page 14
r LIVE CONTROL section
[ASSIGN] button ...............................Page 21
[A] and [B] knobs .............................Page 21
t [DEMO] button......................................Page 24
y [LESSON] button..................................Page 26
u [REC] button.........................................Page 28
i [METRONOME] button.........................Page 18
o TEMPO section
[TAP] button ......................................Page 42
[-] and [+] buttons .............................Page 42
!0 [PORTABLE GRAND] button...............Page 16
!1 VOICE CONTROL section
[SPLIT] button...................................Page 17
[DUAL] button ................................... Page 16
[HARMONY] button ..........................Page 19
[ARPEGGIO] button..........................Page 20
!2 Playback Control buttons
• When the [TABLA/TANPURA] lamp is
turned on:............................Pages 23 and 42
• When the [SONG] lamp is turned on:
..............................................Page 25
• When the [STYLE] lamp is turned on:
.........................Pages 22, 40, and 41
Harmnum1
001
001
q
e
r
t y u i
o !1
w
!0
!2 !3
@3
Front Panel
Display (page 15)
Setting Up

11
PSR-I455 Owner’s Manual
Panel Controls and Terminals
Setting Up
!3 [TRACK CONTROL] buttons
• When the [TABLA/TANPURA] lamp is
turned on:..........................................Page 23
• When the [SONG] lamp is turned on:
..............................................Page 25
• When the [STYLE] lamp is turned on:
..............................................Page 41
!4 [TABLA/TANPURA] button ..................Page 23
!5 [SONG] button......................................Page 24
!6 [STYLE] button .....................................Page 22
!7 [VOICE] button .....................................Page 16
!8 [MUSIC DATABASE] button.................Page 22
!9 [CATEGORY] buttons...........................Page 14
@0 [REGIST MEMORY] buttons ................Page 31
@1 [FUNCTION] button..............................Page 48
@2 Number buttons [1]–[9], [-/NO],
[0/EXECUTE] and [+/YES] buttons ..... Page 14
@3 Drum illustrations for the Drum Kit....Page 16
Each of these indicates the drum or percussion instrument
assigned to the corresponding key for “Standard Kit 1.”
Rear Panel
@4 USB terminals
USB TO HOST terminal*...................Page 49
USB TO DEVICE terminal ................Page 51
@5 SUSTAIN jack .......................................Page 13
@6 PHONES/OUTPUT jack........................Page 13
@7 Power supply jack................................Page 12
* For connecting to a computer. For details, refer to “Computer-
related Operations” (page 9). When connecting, use an AB type
USB cable of less than 3 meters. USB 3.0 cables cannot be
used.
!4
!5 !6 !7 !9
@2
@1
!8
@0
@4
@5
@6 @7
Rear Panel
Tabla/Tanpura Pattern List
(page 75)
Style List (page 74) Voice List (page 61)Dial (page 14)
Song List (page 76)
“Press & Hold” symbol
By holding down one of the
buttons having this symbol, you
can call up an alternate function,
other than the one called up
when simply pressing.

12
PSR-I455 Owner’s Manual
Setting Up
Setting Up
Power Requirements
Although the instrument will run either from an
optional AC adaptor or batteries, Yamaha recom-
mends use of an AC adaptor whenever possible. An
AC adaptor is more environmentally friendly than bat-
teries and does not deplete resources.
Using an AC Power Adaptor
1 Make sure that the power of the instrument is off
(display is blank, except for notation staff).
2 Connect the AC adaptor to the power supply jack.
3 Plug the AC adaptor into an AC outlet.
Using Batteries
This instrument requires six “AA” size, Alkaline
(LR6)/Manganese (R6) batteries, or rechargeable
nickel-metal hydride batteries (rechargeable Ni-MH
batteries). The Alkaline batteries or rechargeable Ni-
MH batteries are recommended for this instrument,
since other types may result in poorer battery perfor-
mance.
Installing the batteries
1 Make sure that the power of the instrument is off
(display is blank, except for notation staff).
2 Open the battery compartment cover located on the
instrument’s bottom panel.
3 Insert the six new batteries, being careful to follow
the polarity markings on the inside of the compart-
ment.
4 Replace the compartment cover, making sure that it
locks firmly in place.
When battery power becomes too low for proper oper-
ation, the volume may be reduced, the sound may be
distorted, and other problems may occur. When this
happens, make sure to replace all batteries with new
ones or already-recharged ones.
Setting the battery type
After installing the new batteries then turning the
power on, make sure to set the Battery Type to
Rechargeable type or not. For details, refer to page 50.
• Use the specified adaptor (page 81) only. Using the
wrong adaptor can result in damage to the instrument
or overheating.
• When setting up the product, make sure that the AC
outlet you are using is easily accessible. If some trou-
ble or malfunction occurs, immediately turn off the
power switch and disconnect the plug from the outlet.
Even when the power switch is turned off, electricity is
still flowing to the product at the minimum level. When
you are not using the product for a long time, make
sure to unplug the power cord from the wall AC outlet.
• When using Ni-MH batteries, follow the instructions that
came with the batteries. Use only the specified charger
device when charging.
WARNING
CAUTION
AC outlet
AC power
adaptor
3
2
WARNING
• Connecting or disconnecting the power adaptor with bat-
teries installed may turn the power off, resulting in loss of
data being recorded or transferred at the time.
• This instrument cannot charge the batteries. Use only the
specified charger device when charging.
• Power will be automatically drawn from the AC adaptor if an
AC adaptor is connected while batteries are installed in the
instrument.
• Failure to set the Battery Type may shorten the amount of
the battery life. Make sure to set the Battery Type correctly.
NOTICE
NOTE
NOTICE

13
PSR-I455 Owner’s Manual
Setting Up
Setting Up
Checking the power status on the
display
Power source on the display
You can confirm the power source at the left corner of
the display.
When is shown, the power is supplied from the
AC power adaptor. When is shown, the power is
supplied from the batteries. When the AC power adap-
tor is connected with the batteries installed, the power
is supplied from the AC power adaptor and the
indication is shown.
Remaining battery power indication
You can confirm the approximate amount of remain-
ing battery power at the top left of the display.
Connecting Headphones or
External Audio Equipment
Any pair of stereo headphones with a 1/4” stereo
phone plug can be plugged in here for convenient
monitoring. The speakers are automatically shut off
when a plug is inserted into this jack.
The PHONES/OUTPUT jack also functions as an
external output. You can connect the PHONES/OUT-
PUT jack to a keyboard amplifier, stereo system,
mixer, tape recorder, or other line-level audio device
to send the instrument’s output signal to that device.
Connecting a Footswitch to the
SUSTAIN jack
You can produce a natural sustain as you play by
pressing an optional footswitch plugged into the
[SUSTAIN] jack. Although the footswitch works as
the Sustain pedal for most Voices, it features other
functions such as Sostenuto and Arpeggio Hold (for
Voices 242–287). One of these functions can be
assigned to the footswitch on the Function display
(page 50).
Indicates that the power will be turned off
immediately. When rechargeable batteries are
used, this icon flashes before the power is
turned off.
Indicates that remaining power is insufficient
for operation. Before the power runs out,
replace all the batteries with new ones, or fully
recharged ones (when using rechargeable
types). Note that the instrument may not work
properly, including unusually soft volume and
poor sound quality when remaining power
becomes low.
Indicates that the remaining power is suffi-
cient.
Only one of these is shown.
Harmnum1
• Do not use the instrument/device or headphones for a long
period of time at a high or uncomfortable volume level,
since this can cause permanent hearing loss. If you experi-
ence any hearing loss or ringing in the ears, consult a phy-
sician.
• Before connecting the instrument to other electronic com-
ponents, set all volume levels to the minimum, then turn
off the power for all components.
• When the instrument’s sound is output to an external
device, first turn on the power to the instrument, then to
the external device. Reverse this order when you turn the
power off.
• When Split is on, the sustain function does not affect the cur-
rent Split Voice (page 17) while sostenuto and Arpeggio Hold
(page 39) affect only the current Split Voice.
• Make sure that the footswitch plug is properly connected to
the SUSTAIN jack before turning on the power.
• Do not press the footswitch while turning the power on. Doing
this changes the recognized polarity of the footswitch, result-
ing in reversed footswitch operation.
CAUTION
NOTICE
NOTE

14
PSR-I455 Owner’s Manual
Setting Up
Basic Operations
Turning the Power On/Off
Turn down the MASTER VOLUME control to “MIN”
then press the [ ] (Standby/On) switch to turn on the
power. While playing the keyboard, adjust the MAS-
TER VOLUME control. To turn off the power, press
the [ ] (Standby/On) switch again for a second.
Auto Power Off Function
To prevent unnecessary power consumption, this
instrument features an Auto Power Off function that
automatically turns the power off if the instrument is
not operated for a specified period of time. The amount
of time that will elapse before the power is automati-
cally turned off is set by default to 30 minutes.
To disable the Auto Power Off function:
Turn off the power, then press the [ ] (Standby/On)
switch to turn on the power while holding down the
lowest key.
To set the time that elapses before Auto
Power Off is executed:
Press the [FUNCTION] button, press the CATEGORY
[+] or [-] button several times until “Auto Power Off”
appears then select the desired value.
Settings: OFF, 5, 10, 15, 30, 60, 120
Default value: 30
Selecting Operations
Before operating the instrument, it may be helpful to
familiarize yourself with the basic controls below that
are used to select items and change values.
Dial
Rotate the dial clockwise to
increase the value, or counter-
clockwise to decrease the
value.
Number buttons
Use the Number buttons to directly enter an item or
value. For numbers that start with one or two zeroes,
the first zeroes can be omitted.
[-] and [+] buttons
Press the [+] button briefly to increase the value by 1, or
press the [-] button briefly to decrease the value by 1.
Press and hold either button to continuously increase or
decrease the value in the corresponding direction.
CATEGORY buttons
Use these buttons to jump to the
first Voice, Style, or Song in the
next or previous Category, and call
up the next or previous Function
sequentially.
• When using a power adaptor, even when the power is off, a
small amount of electricity is still being consumed by the
instrument. When you are not using the instrument for a
long time, make sure to unplug the AC power adaptor from
the wall AC outlet.
• Generally, the data and settings are maintained even when the
power is turned off. For details, see page 32.
• Depending on the instrument status, the power may not
turn off automatically, even after the elapse of the specified
period of time. Always turn off the power manually when
the instrument is not in use.
CAUTION
NOTE
NOTICE
• When the instrument is not operated for a specified period
of time while connected to an external device such as an
amplifier, speaker or computer, make sure to follow the
instructions in the Owner’s Manual to turn off the power to
the instrument and the connected devices, in order to pro-
tect the devices from damage. If you do not want the
power to turn off automatically when a device is con-
nected, disable Auto Power Off.
IncreaseDecrease
Press number buttons
[0], [0], [3].
Example: Selecting Voice 003,
Harmnum3.
Press briefly to
increase.
Press briefly to
decrease.

15
PSR-I455 Owner’s Manual
Setting Up
Display Items
The display shows all the current settings of the Song, Style, Tabla/Tanpura, Voice and
other related functions.
Harmnum1
001
001
This area indicates the on/off status of
each function. Each indication is
shown when the corresponding func-
tion is turned on.
Page 17
Page 16
Page 19
Page 20
Page 35
Page 22
Page 41
On/off status
Normally this indicates the notes you play.
When the Song Lesson function is used, this
indicates the current notes and chord of play-
back. When the Dictionary function is used,
this indicates the notes of the chord you specify.
Notation
• Any notes occurring below or above the staff are
indicated by “8va.”
• For a few specific chords, not all notes may be
shown, due to space limitations in the display.
NOTE
Indicates the source from which this
instrument obtains power, AC power
adaptor or batteries. (Page 13)
Appears when USB flash memory is
connected to this instrument. (Page 51)
Power source status
USB connection status
Indicates the current beat of playback. (Page 24)
Indicates the parameters currently assigned to the
Knobs. (Page 21)
Indicates the Function number, the current Mea-
sure number of a Song/Style, or the current Beat
number of the Tabla/Tanpura pattern.
Indicates the chord which is being played on the key-
board (Page 22) or specified via Song playback.
Indicates the on/off status of the current
Song, Style or Tabla/Tanpura. (Pages
23, 28, 41)
Beat
Knob assignment
FUNCTION and MEASURE
Chord
Track status
001

PSR-I455 Owner’s Manual
16
Quick Guide
Try Playing a Variety of Instrument Voices
In addition to piano, organ, and other “standard” keyboard instruments, this instru-
ment has a large range of voices that includes guitar, bass, strings, sax, trumpet,
drums and percussion, and even sound effects—giving you a wide variety of musical
sounds.
1
Press the [VOICE] button.
The Voice number and name will be shown.
2
Use the dial to select the desired Voice.
3
Play the keyboard.
Preset Voice Types
When you want to reset various settings to default and
simply play a Piano sound, press the [PORTABLE
GRAND] button.
The Voice number is set to 020 Grand Piano and all
the settings such as Dual and Split are turned off auto-
matically, with exception of the Touch Sensitivity
(page 35).
In addition to the Main Voice, you can layer a differ-
ent Voice over the entire keyboard as a “Dual Voice.”
1
Press the [DUAL] button to turn Dual on.
2
Press the [DUAL] button again to exit
from Dual.
Although turning on Dual will select a Dual Voice
suitable for the current Main Voice, you can easily
select a different Dual Voice (page 36).
Selecting a Main Voice
001–019
(Indian Voices)
Used for Indian music performance.
020–220 Instrument Voices.
221–241
(Drum Kit)
Various drum and percussion sounds are
assigned to individual keys. Details on assign-
ing instruments to keys are provided in the
Drum Kit List (page 67).
242–287 Used for Arpeggio performance (page 20).
Harmnum1
001
Appears after the [VOICE]
button is pressed.
Voice name
Voice number
Shehnai
004
Select 004 Shehnai
Playing the “Grand Piano”
Layering a Dual Voice
Shehnai
004
Two voices will
sound at the
same time.
Appears when
dual voice is on
Quick Guide

Try Playing a Variety of Instrument Voices
PSR-I455 Owner’s Manual
17
Quick Guide
By dividing the keyboard into the two separate areas,
you can play a different Voice between the Left hand
and Right hand areas.
1
Press the [SPLIT] button to turn on Split.
The keyboard is divided into the Left hand and
Right hand areas.
You can play a “Split Voice” on the Left hand area
of the keyboard while playing a Main Voice and
Dual Voice on the Right hand area of the key-
board.
The highest key for the Left hand area is referred
to as the “Split Point” which can be changed from
the default F#2 key. For details, refer to page 36.
2
Press the [SPLIT] button again to exit
from Split.
You can easily select a different Split Voice (page 36).
However, you need not select a Split Voice for one of
the Main Voices 272–281. This is because these
Voices already are set up to enable Split automatically
and call up an appropriate Split Voice.
Playing a Split Voice in the Left
Hand area
Shehnai
004
Appears when split
voice is on
Split voice Main voice and
dual voice
Split Point

Try Playing a Variety of Instrument Voices
PSR-I455 Owner’s Manual
18
Quick Guide
The instrument features a built-in metronome (a
device that keeps an accurate tempo), convenient for
practicing.
1
Press the [METRONOME] button to start
the metronome.
2
Press the [METRONOME] button again
to stop the metronome.
Adjusting the Metronome Tempo
Press the TEMPO [TAP] button to call up the Tempo
value, then use the TEMPO [-] and [+] buttons to
adjust the Tempo value.
The dial and the Number buttons can also be used to
set the Tempo.
Setting the Time Signature
Here, we’ll set a time signature of 5/8 as an example.
1
Hold down the [METRONOME] button
for longer than a second to call up
“TimeSigN” (Time Signature Numera-
tor).
The number of beats per measure is shown on the
display.
2
Rotate the dial to select the number of
beats per measure.
A chime will sound on the first beat of each mea-
sure while the other beats will click. If “0” is
selected, all beats will simply click with no chime.
Select 5 for this example.
3
Press the CATEGORY [+] button to call
up “TimeSigD” (Time Signature Denomi-
nator).
The length of one beat is shown on the display.
4
Rotate the dial to select the length of
one beat, from 2
nd
, 4
th
, 8
th
and 16
th
note.
Select “08” (8
th
note) for this example.
5
Confirm the setting by playing the Met-
ronome.
Setting the Metronome Volume
1
Press the [FUNCTION] button.
2
Press the CATEGORY [+] or [-] buttons
repeatedly until “MtrVol” appears.
3
Rotate the dial to set the Metronome Vol-
ume.
Using the Metronome
Tempo
090
Current Tempo value
TimeSigN
04
Number of beats
per measure.
Hold for longer
than a second.
• This parameter cannot be set during playback of a Style,
Song or Tabla/Tanpura.
NOTE
TimeSigD
04
The length
of one beat.
MtrVol
100
052
Metronome volume

Try Playing a Variety of Instrument Voices
PSR-I455 Owner’s Manual
19
Quick Guide
You can add harmony notes to the Main Voice.
1
Press the [HARMONY] button to turn
Harmony on.
Although turning on the Harmony will select a
Harmony Type suitable for the current Main
Voice, you can select a different Harmony Type.
2
Hold down the [HARMONY] button for
longer than a second until “HarmType”
appears on the display.
After “HarmType” is shown for a few seconds, the
current Harmony Type appears.
3
Rotate the dial to select the desired Har-
mony Type.
For details, refer to the Effect Type List (page 80).
The effect and operation differs depending on the
Harmony Type. Refer to the section below.
You can adjust the Harmony Volume in the Function
Settings (page 49).
Adding Harmony
Appears when the Harmony
is turned on.
HarmType
038
Hold for longer
than a second.
Trio
02
038
Current Harmony Type
• The Harmony function cannot be used in the Tabla/Tanpura
mode. Even if Harmony is turned on, pressing the [TABLA/
TANPURA] button will turn off the Harmony effect.
How to sound each Harmony Type
• Harmony type 01 to 05
Press the right-hand keys while playing chords in
the auto accompaniment range of the keyboard
when the Auto Accompaniment is on (page 22).
• Harmony type 06 to 12 (Trill)
Hold down two keys.
• Harmony type 13 to 19 (Tremolo)
Keep holding
down the keys.
• Harmony type 20 to 26 (Echo)
NOTE

PSR-I455 Owner’s Manual
20
Quick Guide
Creating Arpeggios
The Arpeggio function lets you create arpeggios (broken chords) by simply pressing
the notes of the chord. For example, you could play the notes of a triad—the root, third,
and fifth—to trigger interesting phrases. This feature can be used for music production
as well as performance.
1
Press the [ARPEGGIO] button to turn on
the Arpeggio function.
2
Press a note or notes to trigger Arpeg-
gio.
The Arpeggio phrase differs depending on the
number of pressed notes and the area of the key-
board.
When Split is on, Arpeggio is applied only to the
Split Voice. When Split is off, Arpeggio is applied
to the Main and Dual Voices. Arpeggio cannot be
applied to the Split and Main/Dual Voices simulta-
neously.
3
To turn off the Arpeggio, press the
[ARPEGGIO] button again.
The most suitable Arpeggio Type is automatically
selected when you select a Main Voice, but you can
easily select any other Arpeggio Type.
1
Hold down the ARPEGGIO [TYPE] but-
ton for longer than a second.
In the display, “ARP Type” appears for a few sec-
onds, followed by the current Arpeggio Type
appears.
2
Rotate the dial to select the desired
Arpeggio type
For a list of the Arpeggio List, see page 77.
Triggering the Arpeggio
• Selecting a Voice number between 242 and 287 will turn
on Arpeggio automatically.
• When you select one of the Main Voices 272–281, Split
as well as Arpeggio is automatically turned on. This
allows you to immediately trigger an Arpeggio by press-
ing a key to the left of the Split Point after selecting one
of these Voices.
• When the Pedal Function is set to “Arp Hold” or
“Hold+Sus” (page 50), pressing the footswitch con-
nected to the SUSTAIN jack will cause Arpeggio play-
back continue even after the note is released.
Shehnai
004
NOTE
NOTE
Changing the Arpeggio Type
• When any of Voices 242–287 are selected, it is a good
idea to set the Pedal Function to “Arp Hold” or
“Hold+Sus” (page 50). This setting allows you to use a
footswitch (press and hold) to have Arpeggio playback
continue even after the note is released.
Hold for longer
than a second.
DownOct
002
The currently selected arpeggio
type
NOTE

PSR-I455 Owner’s Manual
21
Quick Guide
Creating Original Sounds via the Knobs
The two knobs located in the lower left area of the panel can be used to add variations
to the sound being played, transforming the sound in a variety of musical ways. Select
the desired pre-programmed effect combination printed above the Knobs, then rotate
the Knobs to enjoy the sound.
Repeatedly press the [ASSIGN] button to sequentially
select the six effect combinations provided: (1)
(2)
(3) (4) (5) (6) (1) … etc. The current
combination is shown in the display.
(1)–(2) affect the entire the Tabla/Tanpura sound, (3)–
(5) affect the Main and Dual Voices only, and (6)
affects only playback of the Style and Tabla/Tanpura.
For details about each Knob effect, refer to page 37.
1
Select the desired Main Voice.
Here, select “178 SquareLd” (Square-wave Lead)
as a synth-lead type Voice.
2
Press the [ASSIGN] button several times
until (3) (Filter) appears in the display).
3
Rotate Knob B all the way to the right
(maximum), then play the keyboard with
your right hand while operating Knob A
with your left.
Selecting a Knob Effect Combi-
nation
Only selecting a Knob effect combination will not
affect the sound even if the Knob arrow is not at
the initial position. After operating the Knob, the
selected effect is applied to the sound.
Harmnum1
001
001
Current value
Applying the Filter to the Main
Voice
• Selecting a different Voice will replace the settings
created via the Knobs with the default settings of the
new Voice. If you create a sound with the Knobs that
you wish to keep, make sure to memorize the settings
to Registration Memory (page 31) before selecting a
different Voice.
• Rotating a Knob to the right while the volume is set to a
high level may result in distortion. If this occurs, reduce
the volume level.
Filter
Cutoff
Filter
Resonance
NOTICE
NOTE

PSR-I455 Owner’s Manual
22
Quick Guide
Playing Styles
This instrument includes the Auto Accompaniment feature that plays appropriate
“Styles” (rhythm + bass + chord accompaniment). You can select from a huge variety
of Styles covering a wide range of musical genres.
1
Press the [STYLE] button, then use the
dial to select the desired Style.
The Style List is shown on the front panel; also
see page 74.
2
Press the [ACMP ON/OFF] button to turn
on the Auto Accompaniment.
With this operation, the area of the keyboard to the
left of the Split Point (54: F#2) becomes the “Auto
Accompaniment range” and is used only for spec-
ifying the chords.
3
Press the [SYNC START] button to turn
Synchro Start on.
4
Play a chord in the Auto Accompani-
ment range to start playback.
Play a melody with the right hand and chords with
the left hand.
For information about chords, refer to “Chord
List” (page 44) or use the Chord Dictionary func-
tion (page 45).
5
Press the [START/STOP] button to stop
playback.
You can add intro, ending and rhythm variations to
Style playback by using “Sections.” For details,
refer to page 40.
If you have difficulty finding and selecting the desired
Style and Voice, use this feature. From the Music
Database, just selecting the favorite music genre calls
up the ideal settings.
1
Press the [MUSIC DATABASE] button.
Both the Auto Accompaniment and Synchro Start
are automatically turned on.
2
Use the dial to select the desired Music
Database.
This operation calls up the panel settings such as
Voice and Style that are registered to the selected
Music Database. For a list of the Music Database
List, see page 78.
3
Play the keyboard as described in Steps
4–5 above.
Bhajan
001
This icon appears when a style
number and name is displayed.
Style Name
Style Number
EuTrance
067
This icon appears when automatic
accompaniment is on.
Auto Accompa-
niment range
Split Point (F#2)
EuTrance
067
Flashes when sync start is on.
Using the Music Database
Split Point
Jude Hey
001
Music Database name

PSR-I455 Owner’s Manual
23
Quick Guide
Playing the Tabla/Tanpura!
This instrument provides 16 phrase patterns (consisting of several measures) using
the authentic Tabla and Tanpura sounds with looped playback. By using the Tabla/Tan-
pura function, try out the conventional Indian music—changing keys and creating
dynamic sound variations by rotating the Knobs.
1
Press the [TABLA/TANPURA] button,
then use the dial to select the desired
Tabla/Tanpura pattern.
Refer to the Tabla/Tanpura list on the panel of this
instrument.
2
Press the [START/STOP] button to start
looped playback.
At first, only the Tabla sound will play back. Dur-
ing playback, enjoy creating sound variations via
the following operations.
Turning on/off Tabla tracks 1 and 2 indi-
vidually
Tabla 1 features the lower pitched part while
Tabla 2 features the higher pitched part.
Adding the Tanpura phrase and chang-
ing it from 1–4
At first, press any of the [TANPURA 1]–[TAN-
PURA 4] buttons to add the Tanpura phrase.
Next, press another Tanpura button to change
the phrase. You can enjoy four phrase varia-
tions, which are shared among all Tabla/Tan-
pura patterns. To turn off the Tanpura sound,
press the Tanpura button of the current number.
Changing the Variation via the [A]–[E]
buttons
Using the Knobs
Adjusting the Volume Balance
Press the [ASSIGN] button several times to
select “1 TABLA/TANPURA,” then rotate Knob
A to adjust the volume balance between the
sounds of Tabla 1 (low-pitched part) and Tabla 2
(high-pitched part), or rotate Knob B to adjust
the volume balance between the sounds of the
Tabla and Tanpura.
Adjusting the Tempo / Transposing playback
Press the [ASSIGN] button several times to
select “2 TABLA/TANPURA,” then rotate Knob
A to adjust the playback tempo, or rotate Knob
B to transpose the playback key in semitones.
3
Press the [START/STOP] button to stop
playback.
TeenTaal
001
Indicates the on/off status of the Tabla tracks.
Indicates the current Tanpura number.
• You can confirm the current key and tempo value on
the display. To call up the current tempo value, press
the TEMPO [-] or [+] button.
• The Tabla/Tanpura performance cannot be recorded.
NOTE
NOTE

PSR-I455 Owner’s Manual
24
Quick Guide
Playing Songs
You can simply enjoy listening to the internal Songs, or use them with just about any of
the functions, such as Lesson.
Song Category
The Songs are organized by category as listed below.
Press the [DEMO] button to play Songs in sequence.
Playback will repeat continuously, starting again from
the first Song (001).
To stop playback, press the [DEMO/BGM] button.
1
Press the [SONG] button, then use the
dial to select the desired Song.
Refer to the Song List (page 76).
2
Press the [ ] (Start/Stop) button to
start playback.
To stop playback, press the [ ] (Start/Stop)
button again.
• Gives you an idea of the advanced capabilities of this instrument.
• Demonstrates many useful Voices of this instrument.
• These piano solo pieces are ideally suited for the Song Lesson.
• These piano ensemble pieces are also well suited for the Song Lesson.
• When you need to practice backing (accompaniment) patterns, these songs are ideal for that purpose.
• Includes famous classical music pieces.
• Includes traditional Songs from around the world.
• Practice Songs for studying the traditional scale of India.
• Songs you record yourself.
• Songs transferred from a computer (refer to “Computer-related operations”—page 9) and
Songs in the USB flash memory (page 53).
Listening to a Demo Song Selecting and Playing Back a
Song
ForElise
015
Current Song
Each arrow mark flashes in time
with the beat.
ForElise
015

Playing Songs
PSR-I455 Owner’s Manual
25
Quick Guide
Like the transport controls on an audio player, this
instrument lets you fast forward [ ] (Fast Forward),
rewind [ ] (Fast Reverse) and pause [ ] (PAUSE)
playback of the Song.
You can play back only a specific section of a Song
repeatedly by setting the A point (start point) and B
point (end point) in one-measure increments.
1
Start playback of the Song (page 24).
2
When playback reaches to the point you
want to specify as the start point, press
the [ ] (A-B REPEAT) button to set
the A point.
3
When playback reaches to the point you
want to specify as the end point, press
the [ ] (A-B REPEAT) button again to
set the B point.
The specified A-B section of the song will now
play repeatedly.
4
To cancel repeat playback, press the
[ ] (A-B REPEAT) button.
To stop playback, press the [START/STOP] but-
ton.
Each “track” of a Song plays a different part—mel-
ody, percussion, accompaniment, etc. Each of the
tracks can be muted so that you can play the muted
part yourself.
Pressing the desired Track button repeatedly will tog-
gle the on/off status.
Song Fast Forward, Fast
Reverse, and Pause
• When the A-B repeat is specified, the Fast Reverse and Fast
Forward will only work within the range between A and B.
A-B Repeat
Fast Reverse
During playback, press
this button to rapidly
return to an earlier point
in the Song.
Fast Forward
During playback, press this
button to rapidly skip ahead to
a later point in the Song.
Pause
During playback, press
this button to pause play-
back, and press again to
start from that point.
NOTE
AB
• If you want to set the start point “A” at the top of the
Song, press the [ ] (A-B REPEAT) button before
starting playback.
Turning Each Track On/Off
• Up to two Track buttons can be pressed simultaneously for
turning on or off.
NOTE
Track number off—Track is
muted or contains no data
Track number on—Track will playback
NOTE

PSR-I455 Owner’s Manual
26
Quick Guide
Using the Song Lesson Feature
You can use the selected Song for a left-hand, right-hand, or both-hands lesson. Try
practicing with these three Song Lesson types while referring to the music scores in
the Song Book (page 9).
Lesson 1—Listen
In this Lesson, you need not play the keyboard. The
model melody/chords of the part you selected will
sound. Listen to it carefully and remember it well.
Lesson 2—Timing
In this mode, simply concentrate on playing the notes
with the correct timing. Even if you play wrong notes,
the correct notes shown in the display will sound
Lesson 3—Waiting
In this Lesson, try playing the correct notes shown on
the display. The Song pauses until you play the right
note, and playback tempo will change to match the
speed at which you are playing at.
1
Select the desired Song for your lesson
(page 24).
2
Turn off the part you want to practice.
For the right-hand lesson, press the [1/RIGHT]
button to turn off the right-hand part. For the left-
hand lesson, press the [2/LEFT] button to turn off
the left-hand part. For the lesson using both hands,
turn off both the parts.
Pressing the [1/RIGHT] and [2/LEFT] buttons
repeatedly will toggle the on/off status of each
part, which can be shown on the display.
3
Press the [LESSON] button to start play-
back of the Song Lesson.
After starting playback, pressing the [LESSON]
button repeatedly will change the Lesson number
from 1: LISTEN 2: TIMING 3: WAITING
off 1…. Press this button until the desired
number is shown on the display.
Three Types of Song Lesson
• If you want to keep a steady playback tempo is maintained
during Lesson 3: Waiting, set the Your Tempo parameter (page
50) to OFF.
LISTEN
TIMING
WAITING
NOTE
Practicing with Song Lesson
• The Song Lesson can be applied also to the Songs
(SMF format 0 only) transferred from a computer (page
24), but cannot be applied to the User Songs.
• Song numbers 075–100 only support the right-hand lesson.
NOTE
ForElise
015
Track 1 is unlit
Track 2 is unlit
Track 1 and 2 are
unlit
Right-hand
lesson
Left-hand
lesson
Both-hands
lesson
NOTE
TIMING
Lp2
007
The notation and key positions
you should play are shown.

Using the Song Lesson Feature
PSR-I455 Owner’s Manual
27
Quick Guide
To stop Lesson playback, press the [START/
STOP] button.
Even during playback, you can change the Lesson
number by pressing the [LESSON] button.
4
When Lesson playback reaches to the
end, check your evaluation Grade on the
display.
“2 Timing” and “3 Waiting” will evaluate your
performance in four levels: OK, Good, Very
Good, or Excellent.
If you want to practice a specific section in which you
made a mistake or you have difficulty with use the
Repeat & Learn function.
Press the [ ] (REPEAT & LEARN) button
during a Lesson playback.
The Song location will move back four measures, a
one-measure count will play, then Song playback will
start again. Playback of the four measures will repeat
with a one-measure count-in.
To exit from this status, press this button again.
See How You’ve Done
After the evaluation display has appeared, the les-
son will start again from the beginning.
~~~~~~~
~
~~~~~~
~~~~
~~
Excellent
Very Good
Good
OK
When the lesson song has played all the way through
your performance will be evaluated in 4 levels: OK,
Good, Very Good, or Excellent. “Excellent!” is the
highest evaluation.
Making Practice Perfect—
Repeat & Learn
• You can change the amount of measures the Repeat & Learn
function jumps back by pressing a number button [1]–[9] dur-
ing repeat playback.
NOTE

PSR-I455 Owner’s Manual
28
Quick Guide
Recording Your Performance
You can record up to 10 of your performances as User Songs. The recorded User
Songs can be played back on the instrument.
Melody Tracks [1]–[5]
The melody performance in the right-hand area of
the keyboard will be recorded.
Accompaniment Track [A]
The chord progression (for the Style) will be
recorded.
The operation is useful when you record a new Song
from scratch.
1
Make the desired settings including the
Main Voice selection.
2
Make the desired settings of your perfor-
mance.
• If you want to record only the melody performance, press
the [SONG] button.
• If you want to record the performance using a Style, press
the [Style] button.
3
Press the [REC] button to enter the
Record Ready mode.
If a User Song was not selected beforehand, this
operation selects the lowest-numbered unrecorded
User Song (from 101–110) as Recording target.
To exit from this status, press the [REC] button
again.
4
Start recording.
• When you press the [SONG] button in Step 2, play any note
to start recording.
• When you select a Style in Step 2, play a chord in the Auto
Accompaniment area to start recording with Style play-
back, or press the [START/STOP] button to start recording
only with playback of the Rhythm part of a Style.
The current measure will be shown on the display
while recording.
5
Press the [START/STOP] or [REC] button
to stop recording.
When using a Style, you can stop recording also
by pressing the [ENDING] button then waiting
until playback ends.
After recording finishes, “Writing!” appears indi-
cating that the recorded data will be stored, then
the recorded track numbers in the display will
light.
6
To play back the recorded Song, press
the [START/STOP] button.
• The Tabla/Tanpura performance cannot be recorded.
NOTE
Track Structure of a Song
Quick Recording
• The ACMP on/off status cannot be changed after the
[REC] button is pressed.
Tr a ck
1
Tra ck
2
Tr a ck
3
Tra ck
4
Tra ck
5
Accompaniment
Tr a c k
User 1
rEC
001
Flashes
Flashes
NOTE
• Never attempt to turn the power off when “Writing!” is
shown in the display. Doing so can damage the flash
memory and result in a loss of data.
User 1
rEC
003
Current measure number
or
NOTICE

Recording Your Performance
PSR-I455 Owner’s Manual
29
Quick Guide
The operation here is useful especially when you want
to record the additional performances to an already
recorded Song.
1
Press the [SONG] button, then select the
desired User Song (111–120) as the
recording target.
2
While holding down the [REC] button,
press the desired Track button to enter
the Record Ready mode.
If you want to record only the melody:
While holding down the [REC] button, press
one of the [1]–[5] buttons.
If you want to record only the Style play-
back:
Press the [STYLE] button, select the desired
Style, then simultaneously hold down the
[REC] button and press the [6/A] button.
ACMP is automatically turned on.
3
Same as in Steps 4 to 6 (page 28) in
“Quick Recording.”
Recording to a Specified Track
User 1
111
Song number
User 1
rEC
001
Track 1 will
flash
Press and
hold
User 1
rEC
001
Press and
hold
• If the memory becomes full while recording, an alert
message will appear and recording will stop automati-
cally. In this case, delete unnecessary data by using the
Clear functions (page 30), then execute the recording
again.
Limitations while recording
• The on/off status of ACMP cannot be changed.
• The Style number cannot be changed.
• When you use a Style, the following parameters
cannot be changed: Reverb Type, Chorus Type,
Time Signature, Style number and Style Volume.
• Performance with a Split Voice cannot be recorded.
NOTE

Recording Your Performance
PSR-I455 Owner’s Manual
30
Quick Guide
You can clear all tracks of a User Song.
1
Press the [SONG] button, then select the
User Song (111–120) to be cleared.
2
While holding down the track [A] button,
press the track [1] button for longer than
a second.
A confirmation message will appear on the dis-
play.
3
Press the [+] button.
A confirmation message will appear on the dis-
play. To cancel this operation, press the [-] button.
4
Press the [+] button to clear the Song.
A clear-in-progress message will appear briefly on
the display.
This lets you clear individual tracks from a User Song.
1
Press the [SONG] button, then select the
desired User Song (
111–120
).
2
From [1]–[5] and [A], press the Track
button to be cleared for longer than a
second.
A confirmation message will appear on the dis-
play.
3
Press the [+] button.
A confirmation message will appear on the dis-
play.To cancel this operation, press the [-] button.
4
Press the [+] button to clear the track.
A clear-in-progress message will appear briefly on
the display.
Clearing a User Song
Press and
hold
Hold for longer than
a second.
ClrUser1
YES
Clearing a Specified Track from
a User Song
Hold for longer than
a second.
ClrTr1
YES

PSR-I455 Owner’s Manual
31
Quick Guide
Memorizing Your Favorite Panel Settings
This instrument has a Registration Memory
feature that lets you memorize your favorite
settings for easy recall whenever they’re
needed. Up to 32 complete setups can be
saved (eight banks of four setups each).
1
Make the desired settings such as those
for Voice, Style, and Tabla/Tanpura.
2
Press and release the [MEMORY/BANK]
button to call up a Bank number on the
display.
3
Use the dial or the [1]–[8] number but-
tons to select a Bank number.
4
While holding down the [MEMORY/
BANK] button, press one of the [1]–[4]
buttons to memorize the current panel
settings.
1
Press and release the [MEMORY/BANK] but-
ton to call up a Bank number on the display.
2
Use the dial or the [1]–[8] number but-
tons to select a Bank number.
3
Press one of the [1]–[4] buttons to call
up the panel settings you memorized.
The recalled REGIST MEMORY number appears
in the display for a few seconds.
Freezing the Style settings even if a
different Registration number is selected
If you want to select different Registration Memory
setups without changing the Style settings or Tabla/
Tanpura settings, simultaneously hold down the
[VOICE] button and press the REGIST MEMORY
number button.
If you want to freeze the Style settings or Tabla/Tan-
pura settings permanently, set the Freeze mode param-
eter to ON from Function display 060 (page 50).
Up to 32 presets (eight banks of four each) can
be memorized.
Memory 1
8 Banks
Memory 2 Memory 3 Memory 4
Memorizing Panel Settings to
the Registration Memory
• Data cannot be saved to the Registration Memory during
Song playback.
• If you select a Registration Memory number that
already contains data, the previous data is deleted
and overwritten by the new data.
• Do not turn off the power while memorizing settings
to the Registration Memory, otherwise the data may
be damaged or lost.
Bank
1
Bank number
NOTE
Writing!
Press and
hold
NOTICE
Recalling Panel Settings from
the Registration Memory
• When recalling the panel settings from the Registration Mem-
ory, make sure to press the same button—[STYLE] or [TABLA/
TANPURA]—corresponding to the mode used when you mem-
orize the panel settings. This is necessary since the mode sta-
tus (Style or Tabla/Tanpura) is not memorized to the
Registration Memory, meaning that it cannot be called up
even if you press the REGISTRATION MEMORY button.
• For details about the parameters that can be memorized to
Registration Memory, see the next page.
REGIST 1
1
IMPORTANT
Press and
hold
NOTE

PSR-I455 Owner’s Manual
32
Quick Guide
Backup Parameters and Initialization
The following data will be maintained even if the
power is turned off and can be transferred then saved
to a computer via Musicsoft Downloader as a single
Backup file. For instructions, refer to “Computer-
related Operations” (page 9).
• User Song data (page 28)
• Style data transferred from a computer and loaded to
Style numbers 207–211 (page 57)
• Registration Memory data (page 31)
• Function Settings (page 48):
Tuning, Split Point, Touch Sensitivity, Style Vol-
ume, Song Volume, Tabla/Tanpura Volume, Met-
ronome Volume, Grade, Demo Group, Demo
Play, Demo Cancel, Master EQ type, Your Tempo
on/off, Auto Power Off setting, Battery Select,
Freeze Mode
In addition to the Backup data above, all the Style data
(including data that have not been loaded) and all the
Song data will be maintained even if you turn off the
power.
This function erases the Backup data described above
and Song/Style data, then restores all the default fac-
tory settings. As required, execute one of the follow-
ing two procedures.
Backup Clear
This operation initializes the backup data.
While holding down the highest white key on the key-
board, press the [ ] (Standby/On) switch to turn the
power on.
Flash Clear
This operation deletes all the Songs and Styles that
have been transferred from a computer. Note that
Style data loaded to Style numbers 207–211 will be
maintained.
While simultaneously holding the highest white key
and the three highest black keys, press the [ ]
(Standby/On) switch to turn the power on.
Backup Parameters
Parameters that can be memorized to
Registration Memory
Style settings*
Style number, ACMP on/off, Style volume, Track on/off
Tabla/Tanpura settings**
Tabla number, Tabla/Tanpura volume, Section, Track on/off,
Volume balance between Tabla 1 and 2, Volume balance
between Tabla and Tanpura
Voice settings
Main Voice settings: Voice number and all settings of the
related Functions
Dual Voice settings: Dual on/off and all settings of the
related Functions
Split Voice settings: Split on/off and all settings of the
related Functions
Effect settings
Reverb Type, Chorus Type
Arpeggio settings
Arpeggio on/off and all settings of the related Functions
Harmony settings
Harmony on/off and all settings of the related Functions
Other settings
Transpose, Pitch Bend Range, Knob Effect Combination
number, Split Point, Tempo, Pedal Function
* Available only when a Style is selected.
** Available only when a Tabla is selected.
Initialization
• Keep in mind that this operation also deletes the data you
have purchased. Be sure to save the important data to a
computer via Musicsoft Downloader (MSD) software. For
details, refer to “Computer-related Operations” (page 9).
NOTICE

PSR-I455 Owner’s Manual
33
Reference
Handy Performance Features
Selecting a Reverb Type
The Reverb effect lets you play with a rich concert
hall type ambience.
Although selecting a Style or Song will call up the
optimum Reverb type for the entire sound, you can
select a different Reverb type manually.
1
Press the [FUNCTION] button.
2
Use the CATEGORY [+] and [-] buttons to
call up “Reverb” (Function 034).
After “Reverb” is shown for a few seconds, the
current Reverb Type is shown.
3
Rotate the dial to select a Reverb type.
Play the keyboard to check the sound. For infor-
mation about the available Reverb types, refer to
the Effect Type List (page 80).
Selecting a Chorus Type
The Chorus effect creates a thick sound that is similar
to many of the same Voices being played in unison.
Although selecting a Style or Song will call up the
optimum Chorus type for the entire sound, you can
select a different Chorus type manually.
1
Press the [FUNCTION] button.
2
Use the CATEGORY [+] and [-] buttons to
call up “Chorus” (Function 035).
After “Chorus” is shown for a few seconds, the
current Chorus Type is shown.
3
Rotate the dial to select a Chorus type.
Play the keyboard to check the sound. For infor-
mation about the available Chorus types, refer to
the Effect Type List (page 80).
• Some Songs and Styles use Reverb Types which cannot
be selected via panel operation. If such a Song or Style
is played back, “- - -” is shown on the display.
Adjusting the Reverb depth
You can adjust the Reverb depth applied to the
Main, Dual, and Split Voices individually via
the same operations above. Regarding the
item in Step 2, refer to the Function List on
page 48.
Reverb
034
Hall2
02
034
Current Reverb type
NOTE
• Some Songs and Styles use Chorus Types which cannot
be selected via panel operation. If such a Song or Style
is played back, “- - -” is shown on the display.
Adjusting the Chorus depth
You can adjust the Chorus depth applied to the
Main, Dual, and Split Voices individually via
the same operations above. Regarding the
item in Step 2, refer to the Function List on
page 48.
Chorus
035
Chorus1
1
035
Current Chorus type
NOTE
Reference

Handy Performance Features
PSR-I455 Owner’s Manual
34
Reference
Pitch Controls—Transpose
The overall pitch of the instrument (except for the
Drum Kit Voices) can be shifted up or down by a max-
imum of 1 octave in semitone increments.
1
Press the [FUNCTION] button.
2
Use the CATEGORY [+] and [-] buttons to
call up “Transpos” (Function 004).
3
Use the dial to set the Transpose value
between -12 and +12.
Pitch Controls—Tuning
The overall tuning of the instrument (except for the
Drum Kit Voices) can be shifted up or down between
427 Hz and 453 Hz in approximately 0.2Hz incre-
ments. The default value is 440.0 Hz.
1
Press the [FUNCTION] button.
2
Use the CATEGORY [+] and [-] buttons to
call up “Tuning.”
3
Use the dial to set the Tuning value.
Pitch Controls—the PITCH
BEND wheel
The PITCH BEND wheel can be used to add smooth
pitch variations to notes you play on the keyboard.
Roll the wheel upward to raise the pitch, or downward
to lower the pitch.
You can change the amount of pitch bend produced by
the wheel. Refer to “Pitch Bend Range” in the Func-
tion List (page 48).
Calling up Optimum Panel Set-
tings
You can call up optimum panel settings that are ideal
and stylistically appropriate for the current Song or
Style—with a single touch. If you don’t know what
settings are best with a selected Voice, for example,
use the following functions.
To call up the settings for a Song or Style
(One Touch Setting):
Select Voice number “000 OTS.” In this status, select-
ing a Style or Song will call up the optimum panel set-
tings matching the current Song or Style.
Transpos
00
004
Tuning
005
440.0Hz
005

Handy Performance Features
PSR-I455 Owner’s Manual
35
Reference
Changing the Touch Sensitivity of
the Keyboard
The keyboard of this instrument is equipped with a
Touch Response feature that lets you dynamically and
expressively control the level of the Voices according
to your playing strength.
1
Press the [FUNCTION] button.
2
Press the CATEGORY [+] or [-] button
several times until “TouchSns” (Func-
tion 008) appears.
“TouchSns” is shown in the display for a few sec-
onds, and the current Touch Sensitivity is shown.
3
Use the dial to select a Touch Sensitivity
setting between 1 and 4.
When “1”–“3” is selected, higher values produce
greater (easier) volume variation in response to
keyboard dynamics—i.e. greater sensitivity. When
“4” (off) is selected, all notes will be played at the
same volume no matter how strongly or softly you
play the keys.
Selecting an EQ Setting for the
Best Sound
Five different master equalizer (EQ) settings are pro-
vided to give you the best possible sound when listen-
ing through different reproduction systems—the
instrument’s internal speakers, headphones, or an
external speaker system.
1
Press the [FUNCTION] button.
2
Press the CATEGORY [+] or [-] button
several times until “MasterEQ” (Func-
tion 036) appears.
“MasterEQ” is shown in the display for a few sec-
onds, and the current Master EQ type appears.
3
Use the dial to select the desired Master
EQ type.
Settings 1 and 2 are best for listening via the
instrument’s built-in speakers, setting 3 is for
headphones, and settings 4 and 5 are ideal for lis-
tening via external speakers.
• The initial default Touch Sensitivity value is “2”.
TouchSns
008
Medium
2
008
Current Touch
Sensitivity
NOTE
• “Boost” produces a more punchy sound but may pro-
duce distortion depending on the Voice and Style, com-
pared to the other Master EQ types.
MasterEQ
036
Speaker
1
036
Current EQ type
NOTE

PSR-I455 Owner’s Manual
36
Reference
Voice Settings
Selecting a Dual Voice
1
Hold down the [DUAL] button for longer
than a second to call up “D.Voice.”
“D.VOICE” is shown for a few seconds, then the
current Dual Voice appears.
2
Rotate the dial to select the desired Dual
Voice .
Selecting a Split Voice
1
Hold down the [SPLIT] button for longer
than a second to call up “S.Voice.”
“S.VOICE” is shown for a few seconds, then the
current Split Voice appears.
2
Rotate the dial to select the desired Split
Voice .
Voice Editing
For each of the Main, Dual and Split Voices, you can
edit the parameters such as volume, octave and depth
of the Reverb and Chorus, allowing you to create new,
custom sounds that best suit your musical needs.
1
Press the [FUNCTION] button.
2
Use the CATEGORY [+] and [-] buttons to
call up the desired item.
Main Voice parameters are indicated as
“M.******,” Dual Voice parameters as
“D.******,” and Split Voice parameters as
“S.******.” For information about each parame-
ter, refer to the Function List on page 48.
3
Rotate the dial to set the value.
Check the sound by playing the keyboard.
4
Repeat Steps 2–3 above to edit various
parameters.
5
If necessary, memorize the settings to
the Registration Memory (page 31).
The Voice-related settings are reset when a differ-
ent Voice is selected. If you want to store the cre-
ated sound for future recall, memorize the settings
to the Registration Memory.
D.Voice
018
Syn.Str
093
018
Current Dual Voice
S.Voice
028
Strings
086
028
Current Split Voice
M.Volume
064
009

PSR-I455 Owner’s Manual
37
Reference
Parameters Assigned to the Knobs
This section describes each of the parameters which can be assigned to the Knobs
(page 21).
z TABLA/TANPURA
Knob A adjusts the volume balance between the
sounds of Tabla 1 and 2, while Knob B adjusts the
volume balance between the sounds of Tabla and Tan-
pura.
x TABLA/TANPURA
Knob A adjusts the tempo of Tabla playback while the
Tanpura playback tempo is maintained. This follows
typical Indian music stylistic conventions. Knob B
raises or lowers the pitch of the Tabla/Tanpura sound
in semitones, with the exception of Tabla 1. This accu-
rately simulates the characteristics of the Tabla, in
which the lower sound is not affected by the tuning.
Note that also the pitch of Tabla 2 may not be changed
depending on the Tabla/Tanpura pattern.
c FILTER
Filter effects shape the sound by allowing only a spec-
ified range of frequencies to pass and/or by producing
a resonance peak at the filter’s “cutoff” frequency. Fil-
ter effects can be used to create a range of synthesizer-
like sounds.
Knob A: CUTOFF
Adjusts the filter’s cutoff frequency, and therefore the
brightness of the sound. Turning the Knob to the left
makes the sound more muffled or darker, while turn-
ing the Knob A to the right makes the sound brighter.
Knob B: RESONANCE
Adjusts the amount of Resonance applied at the fil-
ter’s cutoff frequency. Turning the Knob to the right
will increases the Resonance to emphasize the fre-
quencies at the cutoff frequency, and thus “strength-
ens” the perceived effect of the filter.
v EFFECT
Knob A: REVERB
Reproduces the acoustic ambience of a concert hall or
club. Turning the Knob to the right will increase the
Reverb depth.
Knob B: CHORUS
Produces a layered “multi-instrument” effect. Turning
the Knob to the right will increase the Chorus depth.
b EG (Envelope Generator)
Envelope Generator effects determine how the level of
the sound varies over time. You can make the attack
faster for a more percussive sound or slower for a vio-
lin-like sound, for example. Or you can lengthen or
shorten the sustain to best match the music you’re
playing.
Knob A: ATTACK
Adjusts the Attack Time (the amount of time it takes
the sound to reach maximum level when a key is
played). Turning the Knob to the right will increase
the Attack Time, thus slowing down the attack rate.
• When Knob B is turned all the way left, only the pitch of the
Tabla 2 sound is raised abruptly by an octave. This is due to a
limitation in this instrument.
• These effects are applied only to the Main/Dual Voices played
on the keyboard.
• Filter effects can sometimes cause distortion in the bass fre-
quencies.
NOTE
NOTE
Level
Frequency
Cutoff Frequency
Frequencies in this
range are passed.
Frequencies in this
range are cut off.
• These effects are applied only to the Main/Dual Voices played
on the keyboard.
Level
Frequency
Resonance
NOTE
AT TAC K
RELEASE
DECAY
Sustain Level
Level
Time
Key Played Key Released

Parameters Assigned to the Knobs
PSR-I455 Owner’s Manual
38
Reference
Knob B: RELEASE
Adjusts the Release Time (the amount of time it takes
for the sound to decay to silence after a key is
released). Turning the Knob to the right will increase
the Release Time, thus make a longer sustain.
n STYLE FILTER
Same as “ c FILTER.” These effects are applied only
to Style or Tabla/Tanpura playback.
The chart below lists some interesting ways to use the various effects that can be assigned to the knobs.
Some Ideas for Using the Knobs
• These effects are applied only to the Main/Dual Voices played
on the keyboard.
NOTE
Number/Effect Try This
z
TABLA/TANPURA
Knob A adjusts the volume balance between the sounds of Tabla 1 (having the
lower sound) and Tabla 2 (having the higher sound of Tabla or Mridangam).
Knob B adjusts the volume balance between the sounds of the Tabla (assigned to
the [TABLA 1] and [TABLA 2] buttons) and Tanpura (assigned to the [TAN-
PURA 1]–[TANPURA 4] buttons). Play with these Knobs as the patterns loop,
sing along if you wish, and create your own performance.
x
TABLA/TANPURA
Knob A adjusts the tempo of Tabla/Tanpura playback. Setting to the minimum
left-most position results in half the default tempo, while setting to the maxi-
mum right-most position results in double the default tempo. The center position
corresponds to the default tempo. Note that the tempo cannot exceed the range
(11–280), and that the tempo of the Tanpura patterns will not change even if you
rotate Knob A. Knob B raises or lowers the pitch of the Tabla/Tanpura sound in
semitones. Regarding the Tabla, only the higher sound (assigned to the [2] but-
ton) will be transposed. Rotating the knob leftward lowers the pitch while rotat-
ing the knob rightward raises the pitch.
Use these knobs to set the desired tempo and key, sing along if you wish, and
create your own performance!
c
FILTER
Select a synth-type lead or pad voice (see the Voice List; page 61). Turn Knob B
all the way up and operate Knob A while playing for some spacey, floating
1980’s effects.
v
EFFECT
Select a voice that sounds as though it already has reverb and chorus effects
applied, and turn Knob A and Knob B all the way down to hear the “direct”
sound of the voice. You can then turn the Knob A and Knob B settings up to add
extra impact and richness to the voice.
b
EG
Select a piano voice, and turn Knob B all the way up and Knob A to about the 3
o’clock position. This should give you a majestic, organ-like sound. The attack
time is quite long so play the keys and hold them to let the sound come in fully.
Ideal for slow pieces.
n
STYLE FILTER
Select style 67, Euro Trance. Turn accompaniment on and start style playback
(page 22). Set Knob B to about 3 o’clock, and Knob A to about 8 o’clock. The
overall sound of the style should be a bit muffled, with the drums emphasized
for solid rhythmic impact.

PSR-I455 Owner’s Manual
39
Reference
Arpeggio Settings
Synchronizing an Arpeggio to
Song/Style/Tabla Playback—
Arpeggio Quantize
When you play the keyboard to trigger an Arpeggio
(page 20) along with Song/Style/Tabla playback,
you’ll need to play the notes with correct timing to
keep the Arpeggio in synchronization with the other
playback tracks. However, your actual timing may be
slightly ahead of or behind the beat (or both). The
“Arpeggio Quantize” function of this instrument will
correct any slight imperfections in the timing (accord-
ing to settings below), and then play back the Arpeg-
gio appropriately.
• Synchronizing at the quarter notes
• Synchronizing at the 8th notes
• No synchronization with Style or Song playback
Although the Arpeggio Quantize value is pre-pro-
grammed for each Arpeggio Type, you can change the
value manually.
1
Press the [FUNCTION] button.
2
Use the CATEGORY [+] and [-] buttons to
call up “Quantize” (Function 042).
After “Quantize” is shown for a few seconds, the
current Arpeggio Quantize value is shown.
3
Rotate the dial to select a value from
“OFF,” “1/8” and “1/16.”
• 1/8 Synchronizing at the quarter notes
• 1/16 Synchronizing at the 8th notes
• OFF No synchronization with Style or Song
playback
Holding the Arpeggio Playback
via the Footswitch
You can set the instrument so that Arpeggio playback
continues even after the note has been released, by
pressing the footswitch connected to the SUSTAIN
jack.
1
Press the [FUNCTION] button.
2
Use the CATEGORY [+] and [-] buttons to
call up “Pdl Func” (Function 063).
After “Pdl Func” is shown for a few seconds, the
current setting is shown.
3
Rotate the dial to select “Arp Hold.”
If you want to restore the footswitch function to
sustain, select “Sustain.” If you want to use both
hold and sustain functions, select “Hold+Sus”.
4
Try playing Arpeggio with the foot-
switch.
Press the notes to trigger the Arpeggio, then press
the footswitch. Even if you release the notes,
Arpeggio playback will continue. To stop Arpeg-
gio playback, release the footswitch.
Quantize
042
1/8
2
042
Current value
Pdl Func
063
Sustain
1
063
Current setting
Arp Hold
2
063

PSR-I455 Owner’s Manual
40
Reference
Styles (Auto Accompaniment) and Tabla/Tanpura patterns
Style Variations—Sections
Each Style consists of “Sections” that allow you to vary the arrangement of the accompaniment to match the song
you are playing.
INTRO
This is used for the beginning of the Song. When the Intro finishes, Style playback shifts to the Main section.
The length of the Intro (in measures) differs depending on the selected Style.
MAIN
This is used for playing the main part of the Song. Playback of the Main section repeats indefinitely until
another Section’s button is pressed. There are two variations (A and B), and the Style playback sound changes
harmonically in response on the chords you play with your left hand.
AUTO FILL
This is automatically added before changing to Main A or B.
ENDING
This is used for the ending of the Song. When the Ending finishes, the Style playback stops automatically. The
length of the Ending (in measures) differs depending on the selected Style.
1
Press the [STYLE] button, then rotate
the dial to select a Style.
2
Press the [ACMP ON/OFF] button to turn
ACMP on.
3
Press the [SYNC START] button to turn
Synchro Start on.
Synchro Start
When the Synchro Start is on, Style playback will
begin as soon as you play a chord in the accompa-
niment range of the keyboard. To turn off the Syn-
chro Start, press the [SYNC START] button.
4
Press the [MAIN/AUTO FILL] button to
select Main A or Main B.
INTRO MAIN A/B
ENDING AUTO FILL
Appears when ACMP
is turned on.
Beat arrows flash.
MAIN A
Current Section

Styles (Auto Accompaniment) and Tabla/Tanpura patterns
PSR-I455 Owner’s Manual
41
Reference
5
Press the [INTRO/ENDING/rit.] button.
Now, you’re ready to start Style playback from the
Intro section.
6
Play a chord with your left hand to start
playback of the Intro.
For this example, play a C major chord (as shown
below). For information on how to enter chords,
see “Chords” on page 44.
7
After the Intro finishes, play the key-
board according to the progression of
the Song you are playing.
Play chords with your left hand while playing
melodies with your right hand, and press the
[MAIN/AUTO FILL] button as necessary. The
Section will change to Fill-in then Main A or B.
8
Press the [INTRO/ENDING/rit.] button.
The Section switches to the Ending. When the
Ending is finished, Style playback stops automati-
cally. You can have the Ending gradually slow
down (ritardando) by pressing the [INTRO/END-
ING/rit.] button again while the Ending is playing
back.
Synchro Stop
When you press the [SYNC/STOP] button to turn on
this function, the Style will only play while pressing
chords in the Accompaniment range of the keyboard.
Releasing all the notes will stop Style playback. This
makes it easy to add rhythmic breaks as you perform,
simply by releasing your hand from the Accompani-
ment range of the keyboard.
Turning on/off each Track via the [TRACK
CONTROL] button
INTRO≥A
Split Point
Accompani-
ment range
FILL A≥B
• Up to two Track buttons can be pressed simultaneously
for turning Tracks on or off.
NOTE
On/off status is shown in
the display (page 15)
ENDING
Appears when the
synchro-stop function
is engaged.
The style will play
while you are playing
the keys
Style playback will
stop when you
release the keys

Styles (Auto Accompaniment) and Tabla/Tanpura patterns
PSR-I455 Owner’s Manual
42
Reference
Tabla/Tanpura Variations
Each Tabla/Tanpura features five Variations A–E via
the Tabla sound. These five variations can be alter-
nated via the [A]–[E] buttons during playback, allow-
ing you to add dynamic variations to the performance.
In addition, four phrase variations via the Tanpura
sound are provided commonly for all the Tabla/Tan-
pura patterns. These four variations can be alternated
via the TANPURA 1–4 buttons.
Unlike the Styles, the Tabla/Tanpura patterns do not
have the variations dedicated to the beginning or end-
ing of the Song, such as Intro and Ending.
The Tabla/Tanpura playback will continue until
stopped manually.
Changing the Tempo
A Style or Tabla/Tanpura can be played at any tempo
you desire—fast or slow.
1
Press the TEMPO [TAP] button to call up
the Tempo value in the display.
2
Rotate the dial to set a tempo from 011 to
280.
Press the [+] and [-] buttons simultaneously to
instantly reset the value to the default tempo of the
current Style, Tabla/Tanpura or Song. You can change
the tempo during playback by pressing the TEMPO
[TAP] button just twice at the required tempo.
Tap Star t
You can start play back of the Tabla/Tanpura, Style or
Song by simply tapping the TEMPO [TAP] button at
the required tempo—four times for time signatures in
4 (4/4, etc.), and three times for time signatures in 3
(3/4, etc.).
Adjusting the Volume of the Style
or Tabla/Tanpura
You can adjust the volume balance between Style or
Tabla/Tanpura playback and keyboard performance.
1
Press the [FUNCTION] button.
2
Use the CATEGORY [+] and [-] buttons to
call up “StyleVol” (Function 001) or
“TablaVol” (Function 003).
3
Rotate the dial to set the volume
between 000 and 127.
• The above operation applies also to Song or Arpeggio
playback tempo.
Tempo
090
Current Tempo value
NOTE
StyleVol
100
001

Styles (Auto Accompaniment) and Tabla/Tanpura patterns
PSR-I455 Owner’s Manual
43
Reference
Setting the Split Point
The point on the keyboard that separates the left-hand
range and the right-hand range of the keyboard is
called the “Split Point.”
When a Style is selected and ACMP is on, the notes
played to the left of the Split Point are used to specify
the chord for Style playback. When the Split function
is on, the notes played to the left of the Split Point are
used to play the Split Voice.
The initial default Split Point is key number 54 (the
F#2 key), but you can change it to another key.
1
Press the [FUNCTION] button.
2
Use the CATEGORY [+] and [-] buttons to
call up “SplitPnt” (Function 007).
You can call up this display also by pressing the
[STYLE] then holding the [ACMP] button for lon-
ger than a second.
3
Rotate the dial to set the Split Point
between 036 (C1) and 096 (C6).
Playing Chords Without Style
Playback
If you press the [STYLE] button, press the [ACMP
ON/OFF] button to turn ACMP on (the ACMP ON
icon appears), and play the chord in the Left hand
range of the keyboard (with SYNC START off), the
chord sound will be heard without Style playback.
This is referred to as “Stop Accompaniment.” The
specified chord will be shown in the display, and
affects the Harmony function (page 19).
• The Split Point set here is applied common to the Style
and Voice.
• During the Lesson playback, the Split Point cannot be
changed.
SplitPnt
054
007
Split Point
Split Point (54: F#2)
Split voice
Main voice
NOTE
PopBossa
132
Appears when auto accompaniment is on
Accompani-
ment range

Styles (Auto Accompaniment) and Tabla/Tanpura patterns
PSR-I455 Owner’s Manual
44
Reference
Chord Types for Style Playback
For users who are new to chords, this chart features common chords. Since there are many useful chords and
many different ways to use them musically, refer to commercially available chord books for further details.
indicates the root note.
• Inversions can be used as well as in “root” position—with the following exceptions:
m7, m7
b
5, 6, m6, sus4, aug, dim7, 7
b
5, 6(9), sus2
• Inversion of the 7sus4 and m7(11) chords are not recognized if the notes are omitted.
• When playing a chord which cannot be recognized by this instrument, nothing is shown
on the display. In such a case, only the rhythm and bass parts will be played.
Major Minor Seventh Minor Seventh Major Seventh
Easy Chords
This method lets you easily play chords in the accompaniment range of the keyboard using only one, two, or three
fingers.
For root “C”
To play a major chord
Press the root note ()
of the chord.
To play a minor chord
Press the root note
together with the nearest
black key to the left of it.
To play a seventh chord
Press the root note
together with the nearest
white key to the left of it.
To play a minor seventh chord
Press the root note together
with the nearest white and
black keys to the left of it (three
keys altogether).
C
Cm
7
C
Cm
7
CM
7
D
Dm
7
D
Dm
7
DM
7
E
Em
7
E
Em
7
EM
7
C
F
Fm
7
F
Fm
7
FM
7
G
Gm
7
G
Gm
7
GM
7
A
Am
7
A
Am
7
AM
7
B
Bm
7
B
Bm
7
BM
7
C
Cm
C
7
Cm
7

Styles (Auto Accompaniment) and Tabla/Tanpura patterns
PSR-I455 Owner’s Manual
45
Reference
Looking Up Chords Using the
Chord Dictionary
The Dictionary function is useful when you know the
name of a certain chord and want to quickly learn how
to play it.
1
Press and hold the [CHORD DICT] button
for longer than a second to call up “Dict.”
This operation will divide the entire keyboard into
the three ranges as illustrated below.
• The range to the right of “ROOT ”:
Lets you specify the Chord Root, but produces no
sound.
• The range between “CHORD TYPE ” and
“ROOT ”:
Lets you specify the Chord Type, but produces no
sound.
• The range to the left of “CHORD TYPE ”:
Lets you play and confirm the Chord specified in
the above two ranges.
2
As an example, learn how to play a GM7
(G major seventh) chord.
2-1.
Press the “G” key in the section to the right
of “ROOT ” so that the “G” is shown as
the root note.
2-2.
Press the key labeled “M7” in the section
between “CHORD TYPE ” and “ROOT.”
The notes you should play for the specified
chord (root note and chord type) are conve-
niently shown in the display, both as nota-
tion and in the keyboard diagram.
To call up possible inversions of the chord, press
the [+]/[-] buttons.
3
Following the notation and keyboard
diagram in the display, try playing a
chord in the range to the left of “CHORD
TYPE .”
When you’ve played the chord properly, a bell
sound signals your success and the chord name in
the display flashes.
Dict.
Hold for longer than
a second.
Chord Type range Root range
Keyboard
playing range
Dict.
001
• About major chords: Simple major chords are usually
indicated only by the root note. For example, “C” refers
to C major. However, when specifying major chords
here, make sure to select “M” (major) after pressing the
root note.
Dict.
001
Chord name (root and type)Notation of chord
Individual notes of
chord (keyboard)
NOTE

PSR-I455 Owner’s Manual
46
Reference
Song Settings
BGM (Background Music) Play-
back
With the default setting, pressing the [DEMO/BGM]
button will play back only a few of the internal Songs
repeatedly. This setting can be changed so that, for
example, all internal Songs are played, or all Songs
transferred to the instrument from a computer are
played back, letting you use the instrument as a back-
ground music source. Five playback group settings are
provided. Simply select the one that suits your needs.
1
Hold down the [DEMO/BGM] button for
longer than a second.
“DemoGrp” is shown in the display for a few sec-
onds, followed by the current repeat playback tar-
get.
2
Rotate the dial to select a repeat play-
back group from the table below.
3
Press the [DEMO] button to start play-
back.
To stop playback, press the [DEMO] button again.
Random Song Playback
The order of Song repeat playback via the [DEMO/
BGM] button can be changed between the numerical
order and random order.
1
Press the [FUNCTION] button.
2
Press the CATEGORY [+] and [-] buttons
several times to call up “PlayMode”
(Function 058).
“PlayMode” is shown for a few seconds, followed
by the current playback mode, “Normal” or “Ran-
dom.”
When the DemoGrp is set to “Demo,” this param-
eter cannot be set.
3
Rotate the dial to select “Random.”
To return to the numerical order, select “Normal.”
4
Press the [DEMO] button to start play-
back.
To stop playback, press the [DEMO] button again.
Demo Preset Songs 001–003
Preset All preset Songs
User All User Songs
Download All Songs transferred from a computer
USB
All Songs (MIDI files) in the connected USB
flash memory
Hold for longer than
a second.
PlayMode
058

Song Settings
PSR-I455 Owner’s Manual
47
Reference
Tempo Setting of the Song
This operation is same as that of the Style and Tabla/
Tanpura. Refer to page 42.
Tap Star t
This operation is same as that of the Style and Tabla/
Tanpura. Refer to page 42.
Song Volume
1
Press the [FUNCTION] button.
2
Press the CATEGORY [+] and [-] buttons
several times to call up “SongVol.”
3
Rotate the dial to set the Song volume
between 000 and 127.
Melody Voice Setting of the Pre-
set Song
You can change the Melody Voice of the current Pre-
set Song temporarily to any other desired Voice.
1
Press the [SONG] button, select the
desired Preset Song, then start play-
back.
2
Press the [VOICE] button, then rotate the
dial to select the desired Voice.
3
Hold down the [VOICE] button for longer
than a second.
After “SONG MELODY VOICE” is shown for a
few seconds, the Melody Voice of the Song will be
changed to that selected in Step 2.
• Song volume can be adjusted while a Song is selected.
SongVol
002
100
Song volume
NOTE
Strings
086
SONG MEL
Hold for longer than
a second.

PSR-I455 Owner’s Manual
48
Reference
The Functions
The “Functions” provide access to a range of detailed instrument parameters such as
Tuning, Split Point, Voices and Effects. Take a look at the Function List (pages 48–50).
When you find the desired Function you want to change, follow the instructions below.
Basic Procedure in the Function
Display
1
Find the desired item in the Function
List on pages 48–50.
2
Press the [FUNCTION] button.
3
Press the CATEGORY [+] and [-] buttons
several times until the desired item
appears.
4
Use the dial, the [+] and [-] buttons, or
the [0]–[9] number buttons to set the
value of the selected function.
Some Function settings are maintained even if you
turn off the power, and can be transferred to the
computer as Backup Data (page 32).
Function List
StyleVol
100
001
Transpos
00
004
Current item
Direct
numeric entry.
Press simultane-
ously to recall the
default setting.
• Increment
value by 1.
•Execute
• Decrement
value by 1.
• Cancel
Function
Number
Function Display Range/Settings Default Value Description
Volume
001 Style Volume StyleVol 000–127 100 Refer to page 42.
002 Song Volume SongVol 000–127 100 Refer to page 47.
003 Tabla Volume TablaVol 000–127 100 Refer to page 42.
Overall
004 Transpose Transpos -12–12 0 Refer to page 34.
005 Tuning Tuning
427Hz–453Hz
(in approximately
0.2Hz increments)
440.0Hz Refer to page 34.
006 Pitch Bend Range PBRange 01–12 2
Sets the range over which you can control pitch by using the
PITCH BEND wheel (page 34), in semitone increments.
007 Split Point SplitPnt 036–096 (C1–C6) 54 (F#2) Refer to page 43.
008 Touch Sensitivity TouchSns
1 (Soft), 2 (Medium),
3 (Hard), 4 (Off)
2 (Medium) Refer to page 35.
Main Voice (page 16)
009 Volume M.Volume 000–127 * Determines the volume of the Main Voice.
010 Octave M.Octave -2 – +2 * Determines the octave range for the Main Voice.
011 Pan M.Pan
000 (left)–64 (center)–
127 (right)
*
Determines the stereo pan position of the Main Voice. The value
“0” results in the sound being panned full left; the value “127”
results in the sound being panned full right.
012 Reverb Depth M.Reverb 000–127 *
Determines how much of the Main Voice's signal is sent to the
Reverb effect.
013 Chorus Depth M.Chorus 000–127 *
Determines how much of the Main Voice’s signal is sent to the
Chorus effect.
014 Attack Time M.Attack 000–127 64
Determines how fast the volume of the Main Voice reaches the Attack
level when the note is pressed. The larger the value, the faster the
attack rate. The smaller the value, the slower the attack rate.

The Functions
PSR-I455 Owner’s Manual
49
Reference
015 Release Time M.Releas 000–127 64
Determines how fast the volume of the Main Voice falls to 0 when
the note is released. The larger the value, the longer the sustain.
The smaller the value, the shorter the sustain.
016
Filter Cutoff
M.Cutoff 000–127 64
Determines the Filter Cutoff Frequency (page 37) of the Main Voice.
017
Filter Resonance
M.Reso. 000–127 64 Determines the Filter Resonance (
page 37
) of the Main Voice.
Dual Voice (page 16)
018 Dual Voice D.Voice 001–753 * Selects a Dual Voice.
019 Volume D.Volume 000–127 * Determines the volume of the Dual Voice.
020 Octave D.Octave -2 – +2 * Determines the octave range for the Dual Voice.
021 Pan D.Pan
000 (left)–64 (center)–
127 (right)
*
Determines the stereo pan position of the Dual Voice. A value of
“0” results in the sound being panned full left; a value of “127”
results in the sound being panned full right.
022 Reverb Depth D.Reverb 000–127 *
Determines how much of the Dual Voice’s signal is sent to the
Reverb effect.
023 Chorus Depth D.Chorus 000–127 *
Determines how much of the Dual Voice’s signal is sent to the
Chorus effect.
024 Attack Time D.Attack 000–127 64
Determines how fast the volume of the Dual Voice reaches the Attack
level when the note is pressed. The larger the value, the faster the
attack rate. The smaller the value, the slower the attack rate.
025 Release Time D.Releas 000–127 64
Determines how fast the volume of the Dual Voice falls to 0 when
the note is released. The larger the value, the longer the sustain.
The smaller the value, the shorter the sustain.
026
Filter Cutoff
D.Cutoff 000–127 64
Determines the Filter Cutoff Frequency (
page 37
) of the Dual
Voice.
027
Filter Resonance
D.Reso. 000–127 64 Determines the Filter Resonance (
page 37
) of the Dual Voice.
Split Voice (page 17)
028 Split Voice S.Voice 001–753 86 (Strings) Selects a Split Voice.
029 Volume S.Volume 000–127 * Determines the volume of the Split Voice.
030 Octave S.Octave -2 – +2 * Determines the octave range for the Split Voice.
031 Pan S.Pan
000 (left)–64 (center)–
127 (right)
*
Determines the stereo pan position of the Split Voice. A value of
“0” results in the sound being panned full left; a value of “127”
results in the sound being panned full right.
032 Reverb Depth S.Reverb 000–127 *
Determines how much of the Split Voice’s signal is sent to the
Reverb effect.
033 Chorus Depth S.Chorus 000–127 *
Determines how much of the Split Voice’s signal is sent to the
Chorus effect.
Effects
034 Reverb Type Reverb 01–10 ** Refer to page 33.
035 Chorus Type Chorus 01–05 ** Refer to page 33.
036 Master EQ Type MasterEQ
Speaker, Boost, Head-
phone, Line Out1, Line
Out2
1 (Speaker) Refer to page 35.
037 Wide Type Wide 1–4 4 (Wide Off)
Determines the Ultra-Wide Stereo type.
Higher values produce a greater Wide effect.
Harmony (page 19)
038 Harmony Type HarmType 01–26 * Determines the Harmony type.
039 Harmony Volume HarmVol 000–127 * Determines the volume of the Harmony effect
Arpeggio (page 20)
040 Arpeggio Type ARP Type 001–162 * Determines the Arpeggio type.
041 Arpeggio Velocity ARP Velo 1(Original), 2(Thru) *
When “Thru” is selected, the velocities of Arpeggio playback are
determined by your playing strength. When “Original” is selected,
the velocities of Arpeggio playback are determined by the original
setting regardless of your playing strength.
042 Arpeggio Quantize Quantize 1(OFF), 2(1/8), 3(1/16) * Refer to page 39.
Computer (USB TO HOST terminal)***
043 PC mode PC mode OFF/PC1/PC2 OFF Optimizes the MIDI settings when you connect to a computer
MIDI***
044 Local Control Local ON/OFF ON
Determines whether the instrument’s keyboard controls the inter-
nal tone generator (ON) or not (OFF). When you record your key-
board performance to the application software on the computer
via MIDI, set this parameter to OFF.
Function
Number
Function Display Range/Settings Default Value Description

The Functions
PSR-I455 Owner’s Manual
50
Reference
* The appropriate value is automatically set for each Voice combination.
** The appropriate value is automatically set for each Song, Style or Tabla/Tanpura.
*** For details, refer to “Computer-related Operations” (page 9).
045 External Clock ExtClock ON/OFF OFF
Determines whether the instrument synchronizes to the internal
clock (OFF) or an external clock (ON). When you record your key-
board performance to the application software on the computer
via MIDI, set this parameter to ON.
046 Keyboard Out KbdOut ON/OFF ON
Determines whether MIDI messages generated via keyboard per-
formance are transmitted (ON) or not (OFF) from the USB TO
HOST terminal.
047 Style Out StyleOut ON/OFF OFF
Determines whether MIDI messages generated via Style play-
back are transmitted (ON) or not (OFF) from the USB TO HOST
terminal.
048 Song Out SongOut ON/OFF OFF
Determines whether MIDI messages generated via Song play-
back are transmitted (ON) or not (OFF) from the USB TO HOST
terminal.
049 Initial Send InitSend YES/NO -
Lets you send the data of the panel settings to a computer. Press [+]
to send, or press [-] to cancel. This operation should be done immedi-
ately after starting the Recording operation on the computer.
Metronome (page 18)
050
Time Signature
Numerator
TimesigN 00–60 ** Determines the time signature of the Metronome.
051
Time Signature
Denominator
TimesigD
Half note, Quarter
note, Eighth note,
Sixteenth note
** Determines the length of each metronome beat.
052 Metronome Volume MtrVol 000–127 100 Determines the volume of the Metronome.
Lesson (page 26)
053 Lesson Track (R) R-Part GuideTrack1–16, OFF 1
Determines the guide track number for your right hand lesson.
The setting is only effective for Songs in SMF format 0 transferred
from a computer.
054 Lesson Track (L) L-Part GuideTrack1–16, OFF 2
Determines the guide track number for your left hand lesson. The
setting is only effective for Songs in SMF format 0 transferred from
a computer.
055 Grade Grade ON/OFF ON Determines whether the Grade function is on or off.
056 Your Tempo YourTemp ON/OFF ON
This parameter is for Lesson 3 “Waiting.” When set to ON, play-
back tempo will change to match the speed at which you are play-
ing. When set to OFF, playback tempo will be maintained
regardless of the speed at which you are playing.
Demo (page 24)
057 Demo Group DemoGrp
1 (Demo) / 2 (Preset) /
3 (User) / 4 (Down-
load) / 5 (USB)
1 (Demo) Refer to page 46.
058 Demo Play Mode PlayMode
1 (Normal)
2 (Random)
1 (Normal) Refer to page 46.
059 Demo Cancel D-Cancel ON/OFF OFF
Determines whether Demo cancel is enabled or not. When this is
set to ON, the Demo Song will not play, even if the [DEMO/BGM]
button is pressed.
Registration Memory (page 31)
060 Freeze Mode Freeze ON/OFF OFF
When set to on, the Style related settings are maintained even if
you press another Registration Memory number button.
Auto Power Off (page 14)
061 Auto Power Off Time AutoOff
OFF, 5/10/15/30/60/
120 (min.)
30 minutes
Specifies the time that will elapse before the instrument’s power is
automatically turned off.
Battery (page 12)
062 Battery Type Battery 1 (Alkaline) / 2 (Ni-MH) 1 (Alkaline) Selects the type of batteries you have installed to this instrument.
Pedal Function (page 20)
063 Pedal Function Pdl Func
1 (Sustain) /
2 (Arp Hold) /
3 (Hold+Sus) /
4 (Sostenut)
1 (Sustain)
Determines the function of the footswitch connected to the SUS-
TAIN jack (page 13). When “1 (Sustain)” or “4 (Sostenut)” is
selected, the footswitch works as a damper pedal or sostenuto
pedal as on an acoustic piano. Note that sustain does not affect
the Split Voice, while sostenuto affects only the Split Voice when
Split is on. When “2 (Arp Hold)” is selected, pressing the foot-
switch maintains Arpeggio playback even if you release the notes
(page 39). When “3 (Hold+Sus)” is selected, both the Arpeggio
Hold and Sustain functions are assigned to the footswitch.
Function
Number
Function Display Range/Settings Default Value Description

PSR-I455 Owner’s Manual
51
Reference
USB Flash Memory Operations
By connecting the USB flash memory device to the [USB TO DEVICE] terminal, you can
save the data created on this instrument, such as User Song and parameter settings.
The saved data can be recalled to this instrument again for the future use.
IMPORTANT
• It is recommended to use the Power Adaptor when executing USB flash memory operations, since battery power may
not be reliable enough to last through these crucial operations. When you try executing certain functions, the “Use
Adaptor” indication may appear and the selected function cannot be executed.
Precautions when using the [USB TO
DEVICE] terminal
This instrument features a built-in [USB TO
DEVICE] terminal. When connecting a USB
device to the terminal, be sure to handle the USB
device with care. Follow the important precautions
below.
Compatible USB devices
The instrument does not necessarily support all
commercially available USB devices. Yamaha can-
not guarantee operation of USB devices that you
purchase. Before purchasing a USB device for use
with this instrument, check the following web
page:
http://download.yamaha.com/
Connecting USB flash memory
• When connecting a USB device to the [USB TO
DEVICE] terminal, make sure that the connector
on the device is appropriate and that it is con-
nected in the proper direction.
• When connecting a USB cable, make sure that
the length is less than 3 meters.
• Though the instrument supports the USB 1.1
standard, you can connect and use a USB 2.0
storage device with the instrument. However,
note that the transfer speed is that of USB 1.1.
Using USB Flash Memory
By connecting the instrument to a USB flash mem-
ory, you can save data you’ve created to the con-
nected device, as well as read data from the
connected device.
The number of USB flash memory to be used
Only one USB flash memory device can be con-
nected to the [USB TO DEVICE] terminal.
Formatting USB flash memory
When a USB flash memory is connected, a message
may appear prompting you to format the device. If
so, execute the Format operation (page 53).
To protect your data (write-protect)
To prevent important data from being inadvertently
erased, apply the write-protect provided with the
particular USB flash memory. If you are saving
data to the USB flash memory, make sure to dis-
able write-protect.
Connecting/removing USB storage device
Before removing the USB flash memory from the
[USB TO DEVICE] terminal, make sure that the
instrument is not accessing data (such as in the
Save and Delete operations).
• For more information about the handling of USB devices,
refer to the owner’s manual of the USB device.
• Other USB devices such as a computer keyboard or
mouse cannot be used.
NOTE
NOTE
• The format operation overwrites any previously existing
data. Make sure that the USB flash memory you are for-
matting does not contain important data.
• Avoid frequently connecting/disconnecting the USB
flash memory too often. Doing so may result in the
operation of the instrument “freezing” or hanging up.
While the instrument is accessing data (such as during
Save, Delete, Load and Format operations) or is mount-
ing the USB storage device (shortly after the connec-
tion), do NOT unplug the USB flash memory, and do
NOT turn the power off. Doing so may corrupt the data
on either or both devices.
NOTICE
NOTICE

USB Flash Memory Operations
PSR-I455 Owner’s Manual
52
Reference
Connecting a USB Flash Memory
1
Connect a USB flash memory to the
USB TO DEVICE terminal, being careful
to insert it with the proper orientation.
2
Wait until “USB” appears on the left cor-
ner of the display.
The “USB” indication confirms that the connected
USB flash memory has been mounted or recog-
nized.
3
Hold down the [FILE CONTROL] button
to call up the File Control display.
If “UnFormat” followed by “Format?”
appears:
This indicates that the connected USB flash
memory has not been formatted, and cannot be
mounted or recognized. Execute the Format
operation by following the instructions starting
with Step 2 on page 53.
4
Rotate the dial to call up the desired File
Control function, then execute it.
For details, refer to the table below.
Harmnum1
Load STY
Hold for longer
than a second.
Display File Control function Page
Load STY Loading a Style File 57
Load USR
Loading User Data from a
USB Flash Memory
56
Save SMF
Saving a User Song as SMF
to a USB Flash Memory
55
Save USR
Saving User Data to a USB
Flash Memory
54
Del SMF
Deleting a SMF File in a USB
Flash Memory
58
Del USR
Deleting a User File in a USB
Flash Memory
58
Format?
Formatting a USB Flash
Memory
53
Exit?
Exiting from a File Control
display
59
Messages may appear on the display during
File Control procedures to aid in smooth oper-
ation. Refer to the Message List on page 59
for details.
• No sound will be produced if the keyboard is played
while the file control display is showing, and only buttons
related to File Control operations will be active.
The File Control display cannot be called up in the follow-
ing situations.
• During playback of Style, Tabla/Tanpura, or Song
• When “USB” does not appear even if you have con-
nected a USB flash memory to the [USB TO DEVICE]
terminal.
NOTE
NOTE

USB Flash Memory Operations
PSR-I455 Owner’s Manual
53
Reference
Formatting a USB Flash Memory
The Format operation lets you prepare commercially
available USB flash memory for use with this instru-
ment is called “Format.”
1
Hold the [FILE CONTROL] button for
longer than a second to call up the File
Control display.
2
Use the CATEGORY [+] and [-] buttons to
call up “Format?.”
3
Press the [0/EXECUTE] button.
A confirmation message will appear. To cancel the
operation, press the [-/NO] button.
4
Press the [0/EXECUTE] button again or
the [+/YES] button to execute the Format
operation.
After a while, a message indicating completion of
the operation appears, and the “USER FILES”
folder will be created on the root directory in the
USB flash memory.
5
Press the [FILE CONTROL] button to exit
from the File Control display.
• The Format operation cannot be cancelled during
execution. Never turn off the power or disconnect the
USB flash memory during the operation. Doing so
may result in data loss.
Format?
NOTICE
Recognizable file location in the USB
flash memory for Song playback (page 24)
• In order to play data copied to a USB flash memory
from a computer or other device, the data must be
stored either in the USB flash memory’s root directory
or a first-level/second-level folder in the root directory.
Data stored in third-level-folders created inside a sec-
ond-level folder cannot be selected and played by this
instrument.
• If playback of an external Song (created via a different
instrument or computer) produces the distorted sound,
decrease the Song Volume (page 47) to reduce the dis-
tortion then adjust the Master Volume (page 14).
IMPORTANT
NOTE
Can be selected/
played.
Cannot be
selected/played.
USB flash memory (Root)
Song
File
Song
File
Song
File
Song
File

USB Flash Memory Operations
PSR-I455 Owner’s Manual
54
Reference
Saving User Data to a USB Flash
Memory
The following data created on this instrument com-
prise the “User Data.”
• All 10 User Songs
• Styles which have been transferred from a com-
puter then loaded to Style numbers 207–211.
• All the Registration Memory settings
The User Data can be saved as a single “User File”
(.usr) to a USB flash memory.
1
Hold the [FILE CONTROL] button for
longer than a second to call up the File
Control display.
2
Use the CATEGORY [+] and [-] buttons to
call up “Save USR.”
3
Press the [0/EXECUTE] button.
As the target file name, “USER***” (***: num-
ber) appears on the display. If desired, rotate the
dial to select a different file name from
“USER001”–“USER100.”
4
Press the [0/EXECUTE] button again.
A confirmation message will appear. To cancel the
operation, press the [-/NO] button.
5
Press the [0/EXECUTE] button again, or
the [+/YES] button to execute the Save
operation.
After a while, a message indicating completion of
the operation appears, and a User file (.usr) will be
saved in a “USER FILES” folder which will auto-
matically be created on the USB flash memory.
6
Press the [FILE CONTROL] button to exit
from the File Control display.
• The extension (.usr) of the User File will not be shown on the
display of this instrument. Confirm the extension on the com-
puter display when connecting the USB flash memory to a
computer.
Overwriting existing files
If a file that already contains data is selected
as the target user file, an overwrite confirma-
tion message will appear.
NOTE
Save USR
USER001
• The Save operation cannot be cancelled during exe-
cution. Never turn off the power or disconnect the
USB flash memory during the operation. Doing so
may result in data loss.
• The amount of time required for this operation may vary
depending on the condition of the USB flash memory.
• If you want to recall the User file (.usr) to this instrument
again, execute the Load operation (page 56).
NOTICE
NOTE
NOTE

USB Flash Memory Operations
PSR-I455 Owner’s Manual
55
Reference
Saving a User Song as SMF to a
USB Flash Memory
A User Song can be converted to SMF (Standard
MIDI File) format 0 and saved to a USB flash mem-
ory.
1
Hold the [FILE CONTROL] button for
longer than a second to call up the File
Control display.
2
Use the CATEGORY [+] and [-] buttons to
call up “Save SMF.”
3
Press the [0/EXECUTE] button.
As the target User Song, “USER**” (**: number
1–10) appears on the display. If desired, rotate the
dial to select a different User Song from
“USER01”–“USER10” then press the [0/EXE-
CUTE] button.
4
Press the [0/EXECUTE] button again.
As the target file name on the USB flash memory,
“SONG***” (***: number 1–100) appears on the
display. If desired, rotate the dial to select the dif-
ferent file.
5
Press the [0/EXECUTE] button again.
A confirmation message will appear. To cancel the
operation, press the [-/NO] button.
6
Press the [0/EXECUTE] button again, or
the [+/YES] button to execute the Save
operation.
After a while, a message indicating completion of
the operation appears, and a User Song will be
saved as the SMF format 0 in a “USER FILES”
folder which will automatically be created on the
USB flash memory.
7
Press the [FILE CONTROL] button to exit
from the File Control display.
SMF (Standard MIDI File) format
With this format, various events via the keyboard
performance such as note on/off and Voice selec-
tion will be recorded as MIDI data. The SMF For-
mat 0 and Format 1 are available. A large number
of MIDI devices are compatible with SMF For-
mat 0, and most commercially available Song file
(MIDI file) is provided in SMF Format 0.
Save SMF
User 1
SONG001
Overwriting existing files
If a file that already contains data is selected,
an overwrite confirmation message will
appear.
• The Save operation cannot be cancelled during exe-
cution. Never turn off the power or disconnect the
USB flash memory during the operation. Doing so
may result in data loss.
• The amount of time required for this operation may vary
depending on the condition of the USB flash memory.
NOTICE
NOTE

USB Flash Memory Operations
PSR-I455 Owner’s Manual
56
Reference
Loading User Data from a USB
Flash Memory
A User data (page 54) saved as a User file (.usr) to the
USB flash memory can be loaded to this instrument.
1
Hold the [FILE CONTROL] button for
longer than a second to call up the File
Control display.
2
Use the CATEGORY [+] and [-] buttons to
call up “Load USR.”
3
Press the [0/EXECUTE] button.
“USER***” (***: number) appears on the display
as the User file name in the USB flash memory.
As desired, rotate the dial to select a different User
file.
Note that the User file should be saved in the
USERFILES folder on the USB flash memory.
Files saved outside this folder cannot be recog-
nized.
4
Press the [0/EXECUTE] button again.
A confirmation message will appear. To cancel the
operation, press the [-/NO] button.
5
Press the [0/EXECUTE] button again, or
the [+/YES] button to execute the Load
operation.
After a while, a message indicating completion of
the operation appears.
6
Press the [FILE CONTROL] button to exit
from the File Control display.
7
Check the loaded data by calling up the
User Song, one of the Styles 207–211,
and Registration Memory settings.
• Loading a User file will overwrite and erase the existing
data, including all 10 User Songs, Style data loaded to the
Style numbers 207–211, and all the Registration Memory
settings. Save important data you want to keep to a sepa-
rate USB flash memory before loading a User file.
• The Load operation cannot be cancelled during exe-
cution. Never turn off the power or disconnect the
USB flash memory during the operation. Doing so
may result in data loss.
NOTICE
Load USR
USER001
NOTICE

USB Flash Memory Operations
PSR-I455 Owner’s Manual
57
Reference
Loading a Style File
Style data created on another instrument or a com-
puter can be loaded to the Style numbers 207–211,
and you can play them like the internal preset Styles.
The following two Load operations are available.
Loading of a Style file (.sty) saved on the root
directory on the USB flash memory
Loading of a Style file (.sty) transferred from a
computer via the Musicsoft Downloader and stored
in the internal memory of this instrument
1
Hold the [FILE CONTROL] button for
longer than a second to call up the File
Control display.
2
Use the CATEGORY [+] and [-] buttons to
call up “Load STY.”
3
Press the [0/EXECUTE] button.
A name of a Style file in the USB flash memory or
internal memory of this instrument will appear on
the display. As desired, rotate the dial to select a
different Style file.
4
Press the [0/EXECUTE] button again.
As the Load destination, “Load To? ***” (***:
207–211) appears on the display. If desired, rotate
the dial to select a different number.
5
Press the [0/EXECUTE] button again.
A confirmation message will appear. To cancel the
operation, press the [-/NO] button.
6
Press the [0/EXECUTE] button again, or
the [+/YES] button to execute the Load
operation.
After a while, a message indicating completion of
the operation appears.
7
Press the [STYLE] button, rotate the dial
to select a Style from 207–211, then try
playing it back.
• For instructions on transferring a Style file from a computer via
the Musicsoft Downloader, refer to “Computer-related Opera-
tions” (page 9). After data transfer, load the Style data to one
of the Style numbers 207–211 to enable playback.
• Loading a Style file will overwrite and erase the existing
data of the destination number. Save important data you
want to keep to a separate USB flash memory before load-
ing.
NOTE
NOTICE
Load STY
DiscoFox
FLA
• The Load operation cannot be cancelled during exe-
cution. Never turn off the power or disconnect the
USB flash memory during the operation. Doing so
may result in data loss.
Load To?
207
NOTICE

USB Flash Memory Operations
PSR-I455 Owner’s Manual
58
Reference
Deleting a User File in the USB
Flash Memory
User Files (.usr) in the root directory of the USB flash
memory can be deleted.
1
Hold the [FILE CONTROL] button for
longer than a second to call up the File
Control display.
2
Use the CATEGORY [+] and [-] buttons to
call up “Del USR.”
3
Press the [0/EXECUTE] button.
As a User file name in the USB flash memory,
“USER****” (****: number) appears on the dis-
play. As desired, rotate the dial to select a different
User file.
4
Press the [0/EXECUTE] button again.
A confirmation message will appear. To cancel the
operation, press the [-/NO] button.
5
Press the [0/EXECUTE] button again, or
the [+/YES] button to execute the Delete
operation.
After a while, a message indicating completion of
the operation appears.
6
Press the [FILE CONTROL] button to exit
from the File Control display.
Deleting a SMF File in the USB
Flash Memory
You can delete a SMF file that has been saved in the
USB flash memory via the Save SMF operation (page
55).
1
Hold the [FILE CONTROL] button for
longer than a second to call up the File
Control display.
2
Use the CATEGORY [+] and [-] buttons to
call up “Del SMF.”
3
Press the [0/EXECUTE] button.
As a SMF file name in the USB flash memory,
“SONG***” (***: number) appears on the dis-
play. As desired, rotate the dial to select a different
SMF file.
4
Press the [0/EXECUTE] button again.
A confirmation message will appear. To cancel the
operation, press the [-/NO] button.
5
Press the [0/EXECUTE] button again, or
the [+/YES] button to execute the Delete
operation.
After a while, a message indicating completion of
the operation appears.
6
Press the [FILE CONTROL] button to exit
from the File Control display.
• The User file (.usr) to be deleted should have been saved in
the root directory of the USB flash memory. Files outside
this folder cannot be recognized.
• The Delete operation cannot be cancelled during exe-
cution. Never turn off the power or disconnect the
USB flash memory during the operation. Doing so
may result in data loss.
IMPORTANT
Del USR
USER001
NOTICE
• The SMF file (.usr) to be deleted should have been saved in
the root directory of the USB flash memory. Files outside
this folder cannot be recognized. This operation can be
applied only to file names with the “SONG***” (***: num-
ber) format.
• The Delete operation cannot be cancelled during exe-
cution. Never turn off the power or disconnect the
USB flash memory during the operation. Doing so
may result in data loss.
IMPORTANT
Del SMF
SONG001
NOTICE

USB Flash Memory Operations
PSR-I455 Owner’s Manual
59
Reference
Exiting from a File Control display
To exit from the File Control display, press the
[VOICE], [STYLE], [TABLA/TANPURA], [SONG],
[FUNCTION], or [GRAND PIANO] button.
You can also exit from the File Control function mode
as follows:
1
Use the CATEGORY [+] and [-] buttons to
call up “Exit?.”
2
Press the [0/EXECUTE] button to exit
from the File Control display.
Exit?
Message Comment
Can’t Use
Indicates that the file control function is cur-
rently unavailable since the media is being
accessed.
Complet.
Indicates the specified job completion such as
data saving and transmission.
Data Err
Displayed when the user song contains illegal
data.
Disk Ful
Displayed when saving data cannot be exe-
cuted since the media memory becomes full.
Error
Displayed when a file error or operational error
occurs.
File Ful
Indicates that SMF songs cannot be displayed
since the total number of files exceeds the
capacity.
no data There is no data to save in the flash memory.
no file
There is no file to load or delete from the
media.
Communication with the USB device has been
shut down because of the overcurrent to the
USB device. Disconnect the device from the
[USB TO DEVICE] terminal, then turn on the
power of the instrument.
Protect
Displayed when trying to save or delete data
on a protected media, or format a protected
media. Set protect to off and try again.
UnFormat
Displayed when connecting an unformatted
media.
UseAdpt
USB flash memory save, delete, and format
operations cannot be performed when the
instrument is being powered from battery. Use
an AC adaptor.
0ur

PSR-I455 Owner’s Manual
60
Appendix
Troubleshooting
Problem Possible Cause and Solution
When the instrument is turned on or off, a popping
sound is temporarily produced.
This is normal and indicates that the instrument is receiving electri-
cal power.
When using a mobile phone, noise is produced
Using a mobile phone in close proximity to the instrument may pro-
duce interference. To prevent this, turn off the mobile phone or use
it further away from the instrument
The instrument is automatically turned off even if no
operation is done.
This is normal. This occurs due to the Auto Power Off function
(page 14).
The volume is too soft.
The sound quality is poor.
The Style/Tabla/Song/Arpeggio stops unexpectedly or
will not play.
The recorded data of the song, etc. does not play cor-
rectly.
The LCD display suddenly goes dark, and all panel set-
tings are reset.
The batteries are low or dead. Replace all six batteries with com-
pletely new ones or completely recharged ones, or use the AC
power adaptor.
No sound is produced even when the keyboard is
played, or a Song, Style, or Tabla/Tanpura is being
played back.
Check whether a set of headphones or an audio cable is con-
nected to the PHONES/OUTPUT, or not. When such a connection
is made, no sound is output from the speaker of this instrument.
Check the on/off status of the Local Control (page 49). Normally,
set this parameter to ON.
The footswitch (for sustain) seems to produce the oppo-
site effect. For example, pressing the footswitch cuts off
the sound and releasing it sustains the sounds.
The polarity of the footswitch is reversed. Make sure that the foot-
switch plug is properly connected to the SUSTAIN jack before turn-
ing on the power.
No sound is produced even when playing keys in the
right hand area of the keyboard, although chords played
in the left hand area are recognized.
Check whether or not the Dictionary function (page 45) is used.
When used, this is normal.
Not all of the Voices seem to sound, or the sound seems
to be cut off, when playing the keyboard, Arpeggio, Style
or Tabla/Tanpura or Song.
You have exceeded 32 simultaneous notes, which is the maximum
polyphony (the maximum amount of notes that can be played
simultaneously) of this instrument. If the Main, Dual, and Split
Voices are being used along with playback of Arpeggio, Style,
Tabla/Tanpura or Song, some notes/sounds may be omitted (or
“stolen”).
The sound of the Voice changes from note to note.
This is normal. The tone generation method uses multiple record-
ings (samples) of an instrument across the range of the keyboard;
thus, the actual sound of the Voice may be slightly different from
note to note.
The keyboard performance and playback of Style/Tabla/
Song produces an unexpected or inappropriate sound,
and cannot be restored to the normal status.
Using the Knobs can produce dramatic changes in the sound, but
may also produce unexpected or undesired sounds. If you want to
restore the original, normal sound before being changed by the
Knobs, change the Voice, Style, Tabla/Tanpura or Song, or press
the [PORTABLE GRAND] button to reset the panel settings.
The Style, Tabla/Tanpura or Song does not start even
when the [START/STOP] button is pressed. The Arpeg-
gio does not start even when the note is pressed with the
Arpeggio turned on.
Check the on/off status of the External Clock (page 50). Normally,
set this parameter to OFF.
The volume of the Style, Tabla/Tanpura or Song is too
low.
Check the volume setting in the Functions (pages 42 and 47).
The chords played in the left hand area cannot be recog-
nized even when the ACMP is turned on.
Check the Split Point setting (page 43). Set this to the appropriate
value.
Style parts other than the Rhythm part produce no
sound.
Check the on/off status of the ACMP (page 22). Make sure to turn
ACMP on.
The Styles numbered 194–206 produce no rhythm drum
sound even when the [START/STOP] button is pressed.
This is normal. Style numbers 194–206 have no rhythm parts, so
no rhythm will play. When one of these Styles is selected, turn
ACMP on, then specify the chord in the left hand area to play Style
parts other than the Rhythm part.
The ACMP indicator does not appear on the display
when the [ACMP ON/OFF] button is pressed.
Check the on/off status of the [STYLE] lamp. When using a Style,
press the [STYLE] button to turn on the [STYLE] lamp.
Appendix

PSR-I455 Owner’s Manual
61
Appendix
Maximum Polyphony
The instrument has 32-note maximum polyphony. This means that it
can play a maximum of up to 32 notes at once, regardless of what
functions are used. Auto accompaniment uses a number of the avail-
able notes, so when auto accompaniment is used the total number of
available notes for playing on the keyboard is correspondingly
reduced. The same applies to the Split Voice and Song functions. If
the maximum polyphony is exceeded, earlier played notes will be cut
off and the most recent notes have priority (last note priority).
• The Voice List includes MIDI program change numbers for each voice. Use
these program change numbers when playing the instrument via MIDI from
an external device.
• Program change numbers are often specified as numbers “0–127.” Since this
list uses a “1–128” numbering system, in such cases it is necessary to sub-
tract 1 from the transmitted program change numbers to select the appropri-
ate sound: e.g. to select No. 2 in the list, transmit program change number 1.
• Some voices may sound continuously or have a long decay after the notes
have been released while the sustain pedal (footswitch) is held.
NOTE
Voice List
Panel Voice List
Voice
No.
Bank Select
MIDI
Program
Change#
(1–128)
Voice Name
MSB
(0–127)
LSB
(0–127)
INDIAN
1 0 113 21 Harmonium 1 (Single Reed)
2 0 114 21 Harmonium 2 (Double Reed)
3 0 115 21 Harmonium 3 (Triple Reed)
4 0 123 112 Shehnai
50123111Sarangi 1
60124111Sarangi 2
7 0 124 112 Pungi
8 0 117 74 Bansuri
90112105Sitar 1
10 0 113 105 Sitar 2
11 0 115 10 5 Sar od
12 0 97 16 Santur
13 0 114 105 Tanpura
14 0 116 117 Tabla
15 126 0 116 Tabla Kit 1
16 126 0 117 Tabla Kit 2
17 126 0 40 Indian Kit 1
18 126 0 115 Indian Kit 2
19 126 0 112 Animal Kit
PIANO
20 0 112 1 Grand Piano
*21 - - - Octave Piano
22 0 112 2 Bright Piano
23 0 112 7 Harpsichord
*24 - - - Octave Harpsichord
25 0 112 4 Honky-tonk Piano
26 0 112 3 MIDI Grand Piano
27 0 113 3 CP 80
*28 - - - Piano+Strings
*29 - - - Piano Pad
E.PIANO
30 0 114 5 Cool! Galaxy Electric Piano
31 0 113 6 Hyper Tines
*32 - - - Tiny Electric Piano
33 0 112 5 Funky Electric Piano
34 0 112 6 DX Modern Electric Piano
35 0 114 6 Venus Electric Piano
*36 - - - EP Pad
37 0 112 8 Clavi
ORGAN
38 0 118 19 Cool! Organ
39 0 117 19 Cool! Rotor Organ
40 0 112 17 Jazz Organ 1
41 0 113 17 Jazz Organ 2
42 0 112 19 Rock Organ
43 0 114 19 Purple Organ
44 0 112 18 Click Organ
45 0 116 17 Bright Organ
46 0 127 19 Theater Organ
47 0 121 20 16'+2' Organ
48 0 120 20 16'+4' Organ
*49 - - - Full Organ
50 0 113 20 Chapel Organ
51 0 112 20 Pipe Organ
52 0 112 21 Reed Organ
ACCORDION
53 0 112 22 Musette Accordion
54 0 113 22 Traditional Accordion
55 0 113 24 Bandoneon
56 0 113 23 Modern Harp
57 0 112 23 Harmonica
GUITAR
58 0 116 25 Dynamic Nylon Guitar
59 0 118 30 Dynamic Overdriven
60 0 112 25 Classical Guitar
61 0 112 26 Folk Guitar
62 0 112 27 Jazz Guitar
*63 - - - Octave Jazz Guitar
64 0 117 28 60s Clean Guitar
65 0 113 26 12Strings Guitar
66 0 112 28 Clean Guitar
67 0 113 27 Octave Guitar
68 0 112 29 Muted Guitar
69 0 112 30 Overdriven Guitar
70 0 112 31 Distortion Guitar
BASS
71 0 116 34 Dynamic Electric Bass
72 0 112 34 Finger Bass
73 0 112 33 Acoustic Bass
74 0 112 35 Pick Bass
75 0 112 36 Fretless Bass
76 0 112 37 Slap Bass
77 0 118 40 DX100 Bass
78 0 119 40 Ramp Bass
79 0 120 40 Dark Core Bass
80 0 119 39 Fat Lo Bass
81 0 122 40 Bleep Bass
82 0 121 40 Funk Bass
83 0 112 39 Synth Bass
84 0 113 39 Hi-Q Bass
85 0 113 40 Dance Bass
STRINGS
86 0 112 49 String Ensemble
87 0 112 50 Chamber Strings
88 0 115 50 Marcato Strings
89 0 113 50 Slow Strings
*90 - - - Octave Strings
*91 - - - Orchestra Section
92 0 112 45 Tremolo Strings
93 0 112 51 Synth Strings
94 0 112 46 Pizzicato Strings
*95 - - - Octave Pizzicato Strings
96 0 112 41 Violin
97 0 112 43 Cello
*98 - - - Strings Session
99 0 112 44 Contrabass
100 0 112 47 Harp
*101 - - - Octave Harp
102 0 112 106 Banjo
103 0 112 56 Orchestra Hit
*104 - - - Orchestra Hit & Timpani
105 0 96 105 Tambra
Voic e
No.
Bank Select
MIDI
Program
Change#
(1–128)
Voice Nam e
MSB
(0–127)
LSB
(0–127)

Voice List
PSR-I455 Owner’s Manual
62
Appendix
106 0 96 106 Rabab
107 0 98 106 Oud
108 0 0 107 Shamisen
109 0 97 106 Gopichant
1100 0108Koto
111 0 96 108 Taisho-kin
112 0 0 16 Dulcimer
113 0 97 108 Kanoon
114 0 96 16 Cimbalom
**115 - - - Tremolo Cimbalom
116 0 40 47 Yang Chin
**117 - - - Tremolo Yang Chin
CHOIR
118 0 112 5 3 C ho ir
119 0 113 53 Vocal Ensemble
120 0 112 55 Air Choir
*121 - - - Grand Choir
122 0 112 54 Vox Humana
SAXOPHONE
123 0 117 67 Sweet! Tenor Sax
124 0 113 65 Sweet! Soprano Sax
125 0 116 66 Sax Ensemble
*126 - - - Ballroom Sax Ensemble
*127 - - - Jazz Section
128 0 112 67 Tenor Sax
129 0 112 66 Alto Sax
130 0 112 65 Soprano Sax
131 0 112 68 Baritone Sax
132 0 114 67 Breathy Tenor Sax
133 0 112 72 Clarinet
134 0 112 69 Oboe
135 0 112 70 English Horn
136 0 112 71 Bassoon
137 0 116 72 WoodWind Section
138 0 97 112 Hichiriki
TRUMPET
139 0 115 57 Sweet! Trumpet
140 0 112 57 Trumpet
141 0 112 58 Trombone
142 0 113 58 Trombone Section
143 0 112 60 Muted Trumpet
144 0 112 61 French Horn
*145 - - - Octave Horns
146 0 112 59 Tuba
BRASS
147 0 112 62 Brass Section
148 0 113 62 Big Band Brass
149 0 116 62 Octave Brass
*150 - - - Ballroom Brass
*151 - - - Jazz Brass Section
*152 - - - Orchestra Brass
153 0 113 56 Brass Hit
154 0 113 63 80s Brass
*155 - - - Fat Synth Brass
156 0 119 62 Mellow Horns
157 0 115 63 Funkey Brass
158 0 114 63 Techno Brass
159 0 112 63 Synth Brass
FLUTE
160 0 114 74 Sweet! Flute
161 0 113 76 Sweet! Pan Flute
162 0 112 74 Flute
*163 - - - Flute & Clarinet
164 0 112 73 Piccolo
165 0 112 76 Pan Flute
166 0 112 75 Recorder
167 0 112 80 Ocarina
SYNTH LEAD
168 0 104 82 RS Saw Lead 1
Voice
No.
Bank Select
MIDI
Program
Change#
(1–128)
Voice Name
MSB
(0–127)
LSB
(0–127)
169 0 106 82 RS Saw Lead 2
170 0 114 84 RS Dist Lead
171 0 119 81 RS Dual Square
172 0 107 82 RS Ramp Lead
173 0 108 82 RS Tech Saw
174 0 119 85 RS Quack Lead
175 0 109 82 RS Dual Saw
176 0 105 82 RS Sync 1
177 0 119 88 RS Sync 2
178 0 112 81 Square Lead
179 0 112 82 Sawtooth Lead
180 0 112 88 Under Heim
181 0 112 85 Portatone
182 0 115 82 Analogon
183 0 119 82 Fargo
184 0 112 86 Voice Lead
185 0 121 82 Funky Lead
*186 - - - Octave Lead
*187 - - - Wah Square Lead
*188 - - - Resonance Lead
*189 - - - Quack Lead
*190 - - - 5th Wah Lead
*191 - - - Super 5th Lead
SYNTH PAD
*192 - - - Dynamic Chime
193 0 126 90 RS Analog Pad
194 0 123 90 RS Synth Pad
195 0 113 92 RS Warm Pad
196 0 116 91 RS Short Resonance
197 0 124 90 RS Noise Pad
198 0 125 90 RS Tekno Man
199 0 118 89 Sweet Heaven
200 0 121 89 Dream Heaven
201 0 113 89 Symbiont
202 0 112 99 Star Dust
203 0 112 92 Xenon Pad
204 0 112 95 Equinox
205 0 112 89 Fantasia
206 0 113 90 Dark Moon
207 0 112 101 Brightness
208 0 113 101 Bell Pad
PERCUSSION
209 0 112 12 Vibraphone
210 0 112 13 Marimba
**211 - - - Tremolo Marimba
212 0 112 14 Xylophone
**213 - - - Tremolo Xylophone
214 0 112 115 Steel Drums
**215 - - - Tremolo Steel Drum
216 0 112 9 Celesta
217 0 112 11 Music Box
218 0 112 15 Tubular Bells
219 0 112 48 Timpani
**220 - - - Timpani Roll
DRUM KITS
221 127 0 88 Power Kit
222 127 0 1 Standard Kit 1
223 127 0 2 Standard Kit 2
224 127 0 9 Room Kit
225 127 0 17 Rock Kit
226 127 0 25 Electronic Kit
227 127 0 59 T8 Kit
228 127 0 60 T9 Kit
229 127 0 26 Analog Kit
230 127 0 113 Dance Kit
231 127 0 33 Jazz Kit
232 127 0 41 Brush Kit
233 127 0 49 Symphony Kit
234 126 0 1 SFX Kit 1
Voic e
No.
Bank Select
MIDI
Program
Change#
(1–128)
Voice Nam e
MSB
(0–127)
LSB
(0–127)

Voice List
PSR-I455 Owner’s Manual
63
Appendix
XGlite Voice List
235 126 0 2 SFX Kit 2
236 126 0 21 Bass Drum Kit
237 126 0 22 Reverse Bass Drum Kit
238 126 0 125 China Kit 1
239 127 0 127 China Kit 2
240 126 0 37 Arabic Kit
241 126 0 41 Cuban Kit
ARPEGGIO
242 - - - Concerto
243 - - - Chambers
244 - - - Pizzicato Strings
245 - - - Latin Rock
246 - - - Brass Section 1
247 - - - Brass Section 2
248 - - - Funk Brass
249 - - - Piano Chord
250 - - - Piano Ballad
251 - - - Piano Arpeggio
252 - - - Hybrid
253 - - - Synth Sequence
254 - - - Guitarist
*255 - - - Strum
256 - - - Pickin'
257 - - - Spanish
258 - - - Synth Chords
259 - - - Funky Clavi
260 - - - Reggae Organ
261 - - - Harpeggio
262 - - - Analog Sequence
263 - - - Sawtooth
264 - - - Percussion Arpeggio
265 - - - Trill
266 - - - Club Beat
267 - - - R&B Loop
268 - - - Club Adds
269 - - - Samba
270 - - - Indian
271 - - - Arabic
272 - - - Finger Bass Left
273 - - - Combo Jazz Left
274 - - - Paul's Bass Left
275 - - - Trance Bass Left
276 - - - Acid Bass Left
277 - - - Piano Ballad Left
278 - - - Salsa Piano Left
279 - - - Piano Arpeggio Left
280 - - - Guitar Arpeggio Left
281 - - - Strum Left
282 - - - Teen Tal C
283 - - - Teen Tal F
284 - - - Teen Tal A
285 - - - Dadra D
286 - - - Dadra E
287 - - - Dadra G
Voice
No.
Bank Select
MIDI
Program
Change#
(1–128)
Voice Name
MSB
(0–127)
LSB
(0–127)
XG PIANO
288 0 0 1 Grand Piano
289 0 1 1 Grand Piano KSP
290 0 18 1 MellowGrPno
291 0 40 1 Piano Strings
292 0 41 1 Dream
293 0 0 2 Bright Piano
294 0 1 2 Bright Piano KSP
295 0 0 3 Electric Grand Piano
Voice
No.
Bank Select
MIDI
Program
Change#
(1–128)
Voice Name
MSB
(0–127)
LSB
(0–127)
296 0 1 3 Electric Grand Piano KSP
297 0 32 3 Detuned CP80
298 0 40 3 LayeredCP 1
299 0 41 3 LayeredCP 2
300 0 0 4 Honky-tonk Piano
301 0 1 4 Honky-tonk Piano KSP
302 0 0 5 Electric Piano 1
303 0 1 5 Electric Piano 1 KSP
304 0 18 5 MellowEP 1
305 0 32 5 Chorus Electric Piano 1
306 0 40 5 HardEl.Piano
307 0 45 5 Velocity Crossfade El.P 1
308 0 64 5 60's El.Piano 1
309 0 0 6 Electric Piano 2
310 0 1 6 Electric Piano 2 KSP
311 0 32 6 Chorus Electric Piano 2
312 0 33 6 DX EP Hard
313 0 34 6 DX Legend
314 0 40 6 DX Phase EP
315 0 41 6 DX + Analog Electric Piano
316 0 42 6 DX Koto EP
317 0 45 6 Velocity Crossfade El.P 2
318 0 0 7 Harpsichord
319 0 1 7 Harpsichord KSP
320 0 25 7 Harpsichord 2
321 0 27 8 Clavi.Wah
322 0 35 7 Harpsichord 3
323 0 64 8 Pulse Clavi.
324 0 0 8 Clavi
325 0 1 8 Clavi KSP
3260658PierceClavi.
XG CHROMATIC
327 0 0 9 Celesta
328 0 0 10 Glockenspiel
329 0 0 11 Music Box
330 0 64 11 Orgel
331 0 0 12 Vibraphone
332 0 1 12 Vibraphone KSP
333 0 45 12 Hard Vibes
334 0 0 13 Marimba
335 0 1 13 Marimba KSP
336 0 64 13 Sine Marimba
337 0 97 13 Balimba
338 0 98 13 Log Drums
339 0 0 14 Xylophone
340 0 0 15 Tubular Bells
341 0 96 15 Church Bells
342 0 35 16 Dulcimer 2
343 0 97 15 Carillon
XG ORGAN
344 0 0 17 Drawbar Organ
345 0 32 17 Detuned Drawbar Organ
346 0 33 17 60's Drawbar Organ 1
347 0 34 17 60's Drawbar Organ 2
348 0 35 17 70's Drawbar Organ 1
349 0 36 17 Drawbar Organ 2
350 0 37 17 60's Drawbar Organ 3
351 0 38 17 Even Bar Organ
352 0 40 17 16+2'2/3
353 0 64 17 Organ Bass
354 0 65 17 70's Drawbar Organ 2
355 0 66 17 Cheezy Organ
356 0 67 17 Drawbar Organ 3
357 0 0 18 Percussive Organ
358 0 24 18 70's Percussive Organ
359 0 32 18 Detuned Percussive Organ
360 0 33 18 Light Organ
361 0 37 18 Percussive Organ 2
362 0 0 19 Rock Organ
Voic e
No.
Bank Select
MIDI
Program
Change#
(1–128)
Voice Nam e
MSB
(0–127)
LSB
(0–127)

Voice List
PSR-I455 Owner’s Manual
64
Appendix
363 0 64 19 Rotary Organ
364 0 65 19 Slow Rotary
365 0 66 19 Fast Rotary
366 0 0 20 Church Organ
367 0 32 20 Church Organ 3
368 0 35 20 Church Organ 2
369 0 40 20 Notre Dame
370 0 64 20 Organ Flute
371 0 65 20 Tremolo Organ Flute
372 0 0 21 Reed Organ
373 0 40 21 Puff Organ
374 0 0 22 Accordion
375 0 32 22 AccordIt
376 0 0 23 Harmonica
377 0 32 23 Harmonica 2
378 0 0 24 Tango Accordion
379 0 64 24 Tango Accordion 2
XG GUITAR
380 0 0 25 Nylon Guitar
381 0 16 25 Nylon Guitar 2
382 0 25 25 Nylon Guitar 3
383 0 43 25 Velocity Guitar Harmonics
384 0 96 25 Ukulele
385 0 0 26 Steel Guitar
386 0 16 26 Steel Guitar 2
387 0 35 26 12-string Guitar
388 0 40 26 Nylon & Steel Guitar
389 0 41 26 Steel Guitar with Body Sound
390 0 96 26 Mandolin
391 0 0 27 Jazz Guitar
392 0 18 27 Mellow Guitar
393 0 32 27 Jazz Amp
394 0 0 28 Clean Guitar
395 0 32 28 Chorus Guitar
396 0 0 29 Muted Guitar
397 0 40 29 Funk Guitar 1
398 0 41 29 Muted Steel Guitar
399 0 43 29 Funk Guitar 2
400 0 45 29 Jazz Man
401 0 0 30 Overdriven Guitar
402 0 43 30 Guitar Pinch
403 0 0 31 Distortion Guitar
404 0 40 31 Feedback Guitar
405 0 41 31 Feedback Guitar 2
406 0 0 32 Guitar Harmonics
407 0 65 32 Guitar Feedback
408 0 66 32 Guitar Harmonics 2
XG BASS
409 0 0 33 Acoustic Bass
410 0 40 33 Jazz Rhythm
411 0 45 33
Velocity Crossfade Upright
Bass
412 0 0 34 Finger Bass
413 0 18 34 Finger Dark
414 0 27 34 Flange Bass
415 0 40 34
Bass & Distorted Electric
Guitar
416 0 43 34 Finger Slap Bass
417 0 45 34 Finger Bass 2
418 0 65 34 Modulated Bass
419 0 0 35 Pick Bass
420 0 28 35 Muted Pick Bass
421 0 0 36 Fretless Bass
422 0 32 36 Fretless Bass 2
423 0 33 36 Fretless Bass 3
424 0 34 36 Fretless Bass 4
425 0 96 36 Syn.Fretless
426 0 97 36 SmthFretless
427 0 0 37 Slap Bass 1
Voice
No.
Bank Select
MIDI
Program
Change#
(1–128)
Voice Name
MSB
(0–127)
LSB
(0–127)
428 0 27 37 ResonantSlap
429 0 32 37 Punch Thumb Bass
430 0 0 38 Slap Bass 2
431 0 43 38 Velocity Switch Slap
432 0 0 39 Synth Bass 1
433 0 18 39 Synth Bass 1 Dark
434 0 20 39 Fast Reso Bass
435 0 24 39 Acid Bass
436 0 35 39 Clavi Bass
437 0 40 39 Techno Synth Bass
438 0 64 39 Orbiter
439 0 65 39 Square Bass
440 0 66 39 Rubber Bass
441 0 96 39 Hammer
442 0 0 40 Synth Bass 2
443 0 6 40 Mellow Synth Bass
444 0 12 40 Sequenced Bass
445 0 18 40 Click Synth Bass
446 0 19 40 Synth Bass 2 Dark
447 0 32 40 Smooth Synth Bass
448 0 40 40 Modular Synth Bass
449 0 41 40 DX Bass
450 0 64 40 XWire Bass
XG STRINGS
451 0 0 41 Violin
452 0 8 41 Slow Violin
453 0 0 42 Viola
454 0 0 43 Cello
455 0 0 44 Contrabass
456 0 0 45 Tremolo Strings
457 0 8 45 Slow Tremolo Strings
458 0 40 45 Suspense Strings
459 0 0 46 Pizzicato Strings
460 0 0 47 Orchestral Harp
461 0 0 48 Timpani
XG ENSEMBLE
462 0 0 49 Strings 1
463 0 3 49 Stereo Strings
464 0 8 49 Slow Strings
465 0 24 49 Arco Strings
466 0 35 49 60's Strings
467 0 40 49 Orchestra
468 0 41 49 Orchestra 2
469 0 42 49 Tremolo Orchestra
470 0 45 49 Velocity Strings
471 0 0 50 Strings 2
472 0 3 50 Stereo Slow Strings
473 0 8 50 Legato Strings
474 0 40 50 Warm Strings
475 0 41 50 Kingdom
476 0 64 50 70's Strings
477 0 65 50 Strings 3
478 0 0 51 Synth Strings 1
479 0 27 51 ResoStrings
480 0 64 51 Synth Strings 4
481 0 65 51 Synth Strings 5
482 0 0 52 Synth Strings 2
483 0 0 53 Choir Aahs
484 0 3 53 Stereo Choir
485 0 32 53 Mellow Choir
486 0 16 53 Choir Aahs 2
487 0 40 53 Choir Strings
488 0 0 54 Voice Oohs
489 0 0 55 Synth Voice
490 0 40 55 Synth Voice 2
491 0 41 55 Choral
492 0 64 55 Analog Voice
493 0 0 56 Orchestra Hit
494 0 35 56 Orchestra Hit 2
Voic e
No.
Bank Select
MIDI
Program
Change#
(1–128)
Voice Nam e
MSB
(0–127)
LSB
(0–127)

Voice List
PSR-I455 Owner’s Manual
65
Appendix
495 0 64 56 Impact
XG BRASS
496 0 0 57 Trumpet
497 0 16 57 Trumpet 2
498 0 17 57 BriteTrumpet
499 0 32 57 Warm Trumpet
500 0 0 58 Trombone
501 0 18 58 Trombone 2
502 0 0 59 Tuba
503 0 16 59 Tuba 2
504 0 0 60 Muted Trumpet
505 0 0 61 French Horn
506 0 6 61 French Horn Solo
507 0 32 61 French Horn 2
508 0 37 61 Horn Orchestra
509 0 0 62 Brass Section
510 0 35 62 Trumpet & Trombone Section
511 0 40 62 Brass Section 2
512 0 41 62 High Brass
513 0 42 62 Mellow Brass
514 0 0 63 Synth Brass 1
515 0 12 63 Quack Brass
516 0 20 63 Resonant Synth Brass
517 0 24 63 Poly Brass
518 0 27 63 Synth Brass 3
519 0 32 63 Jump Brass
520 0 45 63 Ana Vel Brass 1
521 0 64 63 Analog Brass 1
522 0 0 64 Synth Brass 2
523 0 18 64 Soft Brass
524 0 40 64 Synth Brass 4
525 0 41 64 Choir Brass
526 0 45 64 Ana Vel Brass 2
527 0 64 64 Analog Brass 2
XG REED
528 0 0 65 Soprano Sax
529 0 0 66 Alto Sax
530 0 40 66 Sax Section
531 0 43 66 Hyper Alto Sax
532 0 0 67 Tenor Sax
533 0 40 67 Breathy Tenor Sax
534 0 41 67 Soft Tenor Sax
535 0 64 67 Tenor Sax 2
536 0 0 68 Baritone Sax
537 0 0 69 Oboe
538 0 0 70 English Horn
539 0 0 71 Bassoon
540 0 0 72 Clarinet
XG PIPE
541 0 0 73 Piccolo
542 0 0 74 Flute
543 0 0 75 Recorder
544 0 0 76 Pan Flute
545 0 0 77 Blown Bottle
546 0 0 78 Shakuhachi
547 0 0 79 Whistle
548 0 0 80 Ocarina
XG SYNTH LEAD
549 0 0 81 Square Lead
550 0 6 81 Square Lead 2
551 0 8 81 LM Square
552 0 18 81 Hollow
553 0 19 81 Shroud
554 0 64 81 Mellow
555 0 65 81 Solo Sine
556 0 66 81 Sine Lead
557 0 0 82 Sawtooth Lead
558 0 6 82 Sawtooth Lead 2
559 0 8 82 Thick Sawtooth
Voice
No.
Bank Select
MIDI
Program
Change#
(1–128)
Voice Name
MSB
(0–127)
LSB
(0–127)
560 0 18 82 Dynamic Sawtooth
561 0 19 82 Digital Sawtooth
562 0 20 82 Big Lead
563 0 24 82 Heavy Synth
564 0 25 82 Waspy Synth
565 0 40 82 Pulse Saw
566 0 41 82 Dr.Lead
567 0 45 82 Velocity Lead
568 0 96 82 Sequenced Analog
569 0 0 83 Calliope Lead
570 0 65 83 Pure Lead
571 0 0 84 Chiff Lead
572 0 64 84 Rubby
573 0 0 85 Charang Lead
574 0 64 85 Distorted Lead
575 0 65 85 Wire Lead
576 0 0 86 Voice Lead
577 0 24 86 Synth Aahs
578 0 64 86 Vox Lead
579 0 0 87 Fifths Lead
580 0 35 87 Big Five
581 0 0 88 Bass & Lead
582 0 16 88 Big & Low
583 0 64 88 Fat & Perky
584 0 65 88 Soft Whirl
XG SYNTH PAD
585 0 0 89 New Age Pad
586 0 64 89 Fantasy
587 0 0 90 Warm Pad
588 0 16 90 Thick Pad
589 0 17 90 Soft Pad
590 0 18 90 Sine Pad
591 0 64 90 Horn Pad
592 0 65 90 Rotary Strings
593 0 0 91 Poly Synth Pad
594 0 64 91 Poly Pad 80
595 0 65 91 Click Pad
596 0 66 91 Analog Pad
597 0 67 91 Square Pad
598 0 0 92 Choir Pad
599 0 64 92 Heaven
600 0 66 92 Itopia
601 0 67 92 CC Pad
602 0 0 93 Bowed Pad
603 0 64 93 Glacier
604 0 65 93 Glass Pad
605 0 0 94 Metallic Pad
606 0 64 94 Tine Pad
607 0 65 94 Pan Pad
608 0 0 95 Halo Pad
609 0 0 96 Sweep Pad
610 0 20 96 Shwimmer
611 0 27 96 Converge
612 0 64 96 PolarPad
613 0 66 96 Celestial
XG SYNTH EFFECTS
614 0 0 97 Rain
615 0 45 97 Clavi Pad
616 0 64 97 Harmo Rain
617 0 65 97 African Wind
618 0 66 97 Carib
619 0 0 98 Sound Track
620 0 27 98 Prologue
621 0 64 98 Ancestral
622 0 0 99 Crystal
623 0 12 99 Synth Drum Comp
624 0 14 99 Popcorn
625 0 18 99 Tiny Bells
626 0 35 99 Round Glockenspiel
Voic e
No.
Bank Select
MIDI
Program
Change#
(1–128)
Voice Nam e
MSB
(0–127)
LSB
(0–127)

Voice List
PSR-I455 Owner’s Manual
66
Appendix
627 0 40 99 Glockenspiel Chimes
628 0 41 99 Clear Bells
629 0 42 99 Chorus Bells
630 0 64 99 Synth Mallet
631 0 65 99 Soft Crystal
632 0 66 99 Loud Glocken
633 0 67 99 Christmas Bel
634 0 68 99 Vibe Bells
635 0 69 99 Digital Bells
636 0 70 99 Air Bells
637 0 71 99 Bell Harp
638 0 72 99 Gamelimba
639 0 0 100 Atmosphere
640 0 18 100 Warm Atmosphere
641 0 19 100 Hollow Release
642 0 40 100 Nylon Electric Piano
643 0 64 100 Nylon Harp
644 0 65 100 Harp Vox
645 0 66 100 Atmosphere Pad
646 0 67 100 Planet
647 0 0 101 Brightness
648 0 64 101 Fantasy Bells
649 0 96 101 Smokey
650 0 0 102 Goblins
651 0 64 102 Goblins Synth
652 0 65 102 Creeper
653 0 66 102 Ring Pad
654 0 67 102 Ritual
655 0 68 102 To Heaven
656 0 70 102 Night
657 0 71 102 Glisten
658 0 96 102 Bell Choir
659 0 0 103 Echoes
660 0 8 103 Echoes 2
661 0 14 103 Echo Pan
662 0 64 103 Echo Bells
663 0 65 103 Big Pan
664 0 66 103 Synth Piano
665 0 67 103 Creation
666 0 68 103 Star Dust
667 0 69 103 Reso&Panning
668 0 0 104 Sci-Fi
669 0 64 104 Starz
XG WORLD
670 0 0 105 Sitar
671 0 35 105 Sitar 2
672 0 32 105 Detuned Sitar
673 0 97 105 Tamboura
674 0 0 112 Shanai
675 0 64 112 Shanai 2
676 0 96 112 Pungi
677 0 0 106 Banjo
678 0 28 106 Muted Banjo
679 0 0 109 Kalimba
680 0 0 110 Bagpipe
681 0 0 111 Fiddle
XG PERCUSSIVE
682 0 0 113 Tinkle Bell
683 0 96 113 Bonang
684 0 97 113 Altair
685 0 98 113 Gamelan Gongs
686 0 99 113 Stereo Gamelan Gongs
687 0 100 113 Rama Cymbal
688 0 101 113 Asian Bells
689 0 0 114 Agogo
690 0 0 115 Steel Drums
691 0 97 115 Glass Percussion
692 0 98 115 Thai Bells
693 0 0 116 Woodblock
Voice
No.
Bank Select
MIDI
Program
Change#
(1–128)
Voice Name
MSB
(0–127)
LSB
(0–127)
694 0 96 116 Castanets
695 0 0 117 Taiko Drum
696 0 96 117 Gran Cassa
697 0 0 118 Melodic Tom
698 0 64 118 Melodic Tom 2
699 0 65 118 Real Tom
700 0 66 118 Rock Tom
701 0 0 119 Synth Drum
702 0 64 119 Analog Tom
703 0 65 119 Electronic Percussion
704 0 0 120 Reverse Cymbal
XG SOUND EFFECTS
705 0 0 121 Fret Noise
706 0 0 122 Breath Noise
707 0 0 123 Seashore
708 0 0 124 Bird Tweet
709 0 0 125 Telephone Ring
710 0 0 126 Helicopter
711 0 0 127 Applause
712 0 0 128 Gunshot
713 64 0 1 Cutting Noise
714 64 0 2 Cutting Noise 2
715 64 0 4 String Slap
716 64 0 17 Flute Key Click
717 64 0 33 Shower
718 64 0 34 Thunder
71964035Wind
720 64 0 36 Stream
721 64 0 37 Bubble
722 64 0 38 Feed
723 64 0 49 Dog
724 64 0 50 Horse
725 64 0 51 Bird Tweet 2
726 64 0 56 Maou
727 64 0 65 Phone Call
728 64 0 66 Door Squeak
729 64 0 67 Door Slam
730 64 0 68 Scratch Cut
731 64 0 69 Scratch Split
732 64 0 70 Wind Chime
733 64 0 71 Telephone Ring 2
734 64 0 81 Car Engine Ignition
735 64 0 82 Car Tires Squeal
736 64 0 83 Car Passing
737 64 0 84 Car Crash
738 64 0 85 Siren
739 64 0 86 Train
740 64 0 87 Jet Plane
74164088Starship
74264089Burst
743 64 0 90 Roller Coaster
744 64 0 91 Submarine
745 64 0 97 Laugh
74664098Scream
74764099Punch
748 64 0 100 Heartbeat
749 64 0 101 Footsteps
750 64 0 113 Machine Gun
751 64 0 114 Laser Gun
752 64 0 115 Explosion
753 64 0 116 Firework
• Selecting a Voice number between 242 and 287 will turn on Arpeggio.
• Selecting a Voice number with an asterisk (*) will turn on Dual.
• Selecting a Voice number with an asterisk (**) will turn on Harmony.
• These Voice numbers cannot be selected via MIDI messages from a
computer.
Voic e
No.
Bank Select
MIDI
Program
Change#
(1–128)
Voice Nam e
MSB
(0–127)
LSB
(0–127)
NOTE

PSR-I455 Owner’s Manual
67
Appendix
Drum Kit List
• “ ” indicates that the drum sound is the same as “Standard Kit 1”.
• Each percussion voice uses one note.
• The MIDI Note is actually one or two octave(s) lower than keyboard Note (see Default Octave column). For example, in “222: Standard Kit 1”, the “Seq
Click H” (Note C1) corresponds to (Note C0: Note# 24).
• Key Off: Keys marked “O” stop sounding the instant they are released.
• Voices with the same Alternate Note Number (*1 ... 4) cannot be played simultaneously. (They are designed to be played alternately with each other.)
• Actual keyboard notes of 14 “Tabla” are one octave lower than the ones described in the list below. For example, the C4 sound in the following list is
actually played from C3.
Voi ce No. 14 15 16 17
MSB (0–127) / LSB (0–127) / PC (1–128)
0/116/117 126/0/116 126/0/117 126/0/40
Keyboard MIDI
Tabla Tabla Kit 1
Alternate
Group
Tabla Kit 2
Alternate
Group
Indian Kit 2
Alternate
Group
Note#NoteNote#Note
25 C# 013C# -1
Baya ke / ge
(Velocity 1-47 / 48-127)
26 D 0 14 D -1
27 D# 015D# -1
28 E 0 16 E -1 A Tabla na 6 A Tabla na 6
29 F 0 17 F -1 A Tabla tin 6 A Tabla tin 6
30 F# 018F# -1 A Tabla Center tin 6 A Tabla Center tin 6
31 G 0 19 G -1 A Tabla ti 01 6 A Tabla ti 01 6
32 G# 020G# -1 A Tabla ti 02 6 A Tabla ti 02 6
33 A 0 21 A -1 A Tabla ri 6 A Tabla ri 6
34 A# 022A# -1 A Tabla kat 6 A Tabla kat 6 Hateli Long
35 B 0 23 B -1 A Tabla tu 6 A Tabla tu 6 Hateli Short
36 C 1 24 C 0 Open Baya 7 Open Baya 7 Baya ge 1
37 C# 125C# 0 Mid Baya 7 Mid Baya 7 Baya ke 1
38 D 1 26 D 0 Press Baya 7 Press Baya 7 Baya ghe 1
39 D# 127D# 0 Bend Baya Slow 7 Bend Baya Slow 7 Baya ka 1
40 E 1 28 E 0 Bend Baya Fast 7 Bend Baya Fast 7 Tabla na 2
41 F 1 29 F 0 Click 7 Click 7 Tabla tin 2
42 F# 130F# 0 Open Click 7 Open Click 7 Tablabaya dha 1
43 G 1 31 G 0 G Low Tabla Tharang G Low Tabla Tharang Tabla tun 2
44 G# 132G# 0 G# Low Tabla Tharang G# Low Tabla Tharang Tablabaya dhin 1
45 A 1 33 A 0 A Low Tabla Tarang A Low Tabla Tarang Tabla di 2
46 A# 134A# 0 A# Low Tabla Tarang A# Low Tabla Tarang Tablabaya dhe 1
47 B 1 35 B 0 B Low Tabla Tarang B Low Tabla Tarang Tabla ti 2
48 C 2 36 C 1 C Low Tabla Tarang C Low Tabla Tarang Tabla ne 2
49 C# 237C# 1 C# Low Tabla Tarang C# Low Tabla Tarang Tabla taran 2
50 D 2 38 D 1 D Low Tabla Tarang D Low Tabla Tarang Tabla tak 2
51 D# 239D# 1 D# Low Tabla Tarang D# Low Tabla Tarang Chipri
52 E 2 40 E 1 E Low Tabla Tarang E Low Tabla Tarang Kanjira Open 3
53 F 2 41 F 1 F Low Tabla Tarang F Low Tabla Tarang Kanjira Slap 3
54 F# 242F# 1 F# Low Tabla Tarang F# Low Tabla Tarang Kanjira Mute 3
55 G 2 43 G 1 G Low Tabla Tarang G Low Tabla Tarang Kanjira Bend up 3
56 G# 244G# 1 G# Low Tabla Tarang G# Low Tabla Tarang Kanjira Bend down 3
57 A 2 45 A 1 A Low Tabla Tarang A Low Tabla Tarang Dholak Open 4
58 A# 246A# 1 A# Low Tabla Tarang A# Low Tabla Tarang Dholak Mute 4
59 B 2 47 B 1 B Low Tabla Tarang B Low Tabla Tarang Dholak Slap 4
60 C 3 48 C 2
Baya ka / ghe
(Velocity 1-47 / 48-127)
C Tabla na 1 C Tabla na 1 Dhol Open 5
61 C# 349C# 2 C Ta b l a t i n 1 C Ta b l a t i n 1 D h o l M ute 5
62 D 3 50 D 2 C Tabla Center tin 1 C Tabla Center tin 1 Dhol Slap 5
63 D#
351D# 2
C Tabla ti 01 1 C Tabla ti 01 1 Dhol Slide 5
64 E 3 52 E 2 C Tabla ti 02 1 C Tabla ti 02 1 Mridangam Normal 6
65 F 3 53 F 2 C Tabla ri 1 C Tabla ri 1 Mridangam Open 6
66 F# 354F# 2 C Tabla kat 1 C Tabla kat 1 Mridangam Mute 6
67 G 3 55 G 2 C Tabla tu 1 C Tabla tu 1 Mridangam Slap 6
68 G# 356G# 2 D Tabla na 2 D Tabla na 2 Mridangam Rim 6
69 A 3 57 A 2 D Tabla tin 2 D Tabla tin 2 Chimta Open 7
70 A# 358A# 2 D Tabla Center tin 2 D Tabla Center tin 2 Chimta Normal 7
71 B 3 59 B 2 D Tabla ti 01 2 D Tabla ti 01 2 Chimta Ring 7
72 C 4 60 C 3
Tabla ne / na
(Velocity 1-47 / 48-127)
D Tabla ti 02 2 D Tabla ti 02 2 Dholki Open 8
73 C# 461C# 3 D Ta b l a r i 2 D Ta b l a r i 2 Dh o l k i M u te 8
74 D 4 62 D 3 D Tabla kat 2 D Tabla kat 2 Dholki Slap 8
75 D# 463D# 3 D Tabla tu 2 D Tabla tu 2 Dholki Slide 8
76 E 4 64 E 3 E Tabla na 3 E Tabla na 3 Dholki Rim 8
77 F 4 65 F 3 E Tabla tin 3 E Tabla tin 3 Khol Open 9
78 F# 466F# 3 E Tabla Center tin 3 E Tabla Center tin 3 Khol Slide 9
79 G 4 67 G 3 E Tabla ti 01 3 E Tabla ti 01 3 Khol Mute 9
80 G# 468G# 3 E Tabla ti 02 3 E Tabla ti 02 3 Manjira Open 10
81 A 4 69 A 3 E Tabla ri 3 E Tabla ri 3 Manjira Close 10
82 A# 470A# 3 E Tabla kat 3 E Tabla kat 3 Jhanji Open 11
83 B 4 71 B 3 E Tabla tu 3 E Tabla tu 3 Jhanji Close 11
84 C 5 72 C 4
Tabla ne / tin
(Velocity 1-47 / 48-127)
F Tabla na 4 F Tabla na 4 Mondira Open 12
85 C# 573C# 4 F Tabla tin 4 F Tabla tin 4 Mondira Close 12
86 D 5 74 D 4 F Tabla Center tin 4 F Tabla Center tin 4 Mridang Open 13
87 D# 575D# 4 F Tabla ti 01 4 F Tabla ti 01 4 Mridang Mute 13
88 E 5 76 E 4 F Tabla ti 02 4 F Tabla ti 02 4 Mridang Rim 13
89 F 5 77 F 4 F Tabla ri 4 F Tabla ri 4 Mridang Slide 13
90 F# 578F# 4 F Tabla kat 4 F Tabla kat 4 Khomokh Normal
91 G 5 79 G 4 F Tabla tu 4 F Tabla tu 4 Khomokh Mute
92 G# 580G# 4 G Tabla na 5 G Tabla na 5 Khomokh Mltatk
93 A 5 81 A 4 G Tabla tin 5 G Tabla tin 5 Madal-A2
94 A# 582A# 4 G Tabla Center tin 5 G Tabla Center tin 5 Madal-A#2
95 B 5 83 B 4 G Tabla ti 01 5 G Tabla ti 01 5 Madal-B2
96 C 6 84 C 5
Tabla ne / di
(Velocity 1-47 / 48-127)
G Tabla ti 02 5 G Tabla ti 02 5 Madal-C3
97 C# 685C# 5 G Tabla ri 5 G Tabla ri 5 Madal-C#3
98 D 6 86 D 5 G Tabla kat 5 G Tabla kat 5 Madal-D3
99 D# 687D#
5 G Tabla tu 5 G Tabla tu 5 Madal-D#3
1
00E 688E 5 Madal-E3
101F 689F 5 Madal-F3
102 F# 690F# 5 Madal-F#3
103G 691G 5 Madal-G3
E1
F1
F#1
G1
G#1
A1
A#1
B1
C1
D#1
D1
C#1
E2
F2
F#2
G2
G#2
A2
A#2
B2
C2
D#2
D2
C#2
E3
F3
F#3
G3
G#3
A3
A#3
B3
C3
D#3
D3
C#3
E4
F4
F#4
G4
G#4
A4
A#4
B4
C4
D#4
D4
C#4
E5
F5
F#5
G5
G#5
A5
A#5
B5
C5
D#5
D5
C#5
C6

Drum Kit List
PSR-I455 Owner’s Manual
68
Appendix
Voi ce No. 18 19
MSB (0–127) / LSB (0–127) / PC (1–128)
126/0/115 126/0/112
Keyboard MIDI
Indian Kit 1
Alternate
Group
Animal Kit
Note#NoteNote#Note
25 C# 013C# -1
26 D 0 14 D -1
27 D# 015D# -1 Hand Clap
28 E 0 16 E -1 Dafli Open
29 F 0 17 F -1 Dafli Slap 1
30 F# 018F# -1 Dafli Rim 1
31 G 0 19 G -1 Duff Open
32 G# 020G# -1 Duff Slap
33 A 0 21 A -1 Duff Rim
34 A# 022A# -1 Hatheli Long 2
35 B 0 23 B -1 Hatheli Short 2
36 C 1 24 C 0 Baya ge 3
37 C# 125C# 0Baya ke 3
38 D 1 26 D 0 Baya ghe 3
39 D# 127D# 0Baya ka 3
40 E 1 28 E 0 Tabla na 4
41 F 1 29 F 0 Tabla tin 4
42 F# 130F# 0 Tablabaya dha 3
43 G 1 31 G 0 Dhol 1 Open
44 G# 132G# 0 Dhol 1 Slap 5
45 A 1 33 A 0 Dhol 1 Mute 5
46 A# 134A# 0 Dhol 1 Open Slap 5
47 B 1 35 B 0 Dhol 1 Roll
48 C 2 36 C 1 Dandia Short 6
49 C# 237C# 1 Dandia Long 6
50 D 2 38 D 1 Chutki
51 D# 239D# 1 Chipri
52 E 2 40 E 1 Khanjira Open
53 F 2 41 F 1 Khanjira Slap
54 F# 242F# 1 Khanjira Mute
55 G 2 43 G 1 Khanjira Bendup
56 G# 244G# 1 Khanjira Benddown
57 A 2 45 A 1 Dholak 1 Open
58 A# 246A# 1 Dholak 1 Mute 7
59 B 2 47 B 1 Dholak 1 Slap 7
60 C 3 48 C 2 Dhol 2 Open Rooster
61 C# 349C# 2 Dhol 2 Slap 8
62 D 3 50 D 2 Dhol 2 Rim 8 Elephant
63 D# 351D# 2 Mridangam na 9
64 E 3 52 E 2 Mridangam din 9 Horse
65 F 3 53 F 2 Mridangam ki 9 Cricket
66 F# 35
4F# 2 Mridangam ta 9
67 G 3 55 G 2 Mridangam Chapu 9 Cow
68 G# 356G# 2 Mridangam Lo Closed 10
69 A 3 57 A 2 Mridangam Lo Open 10 Tiger
70 A# 358A# 2 Chimta Normal 11
71 B 3 59 B 2 Chimta Ring 11 Rattlesnake
72 C 4 60 C 3 Dholki Hi Open 12 Monkeies
73 C# 461C# 3 Dholki Hi Mute 12
74 D 4 62 D 3 Dholki Lo Open 13 Crow
75 D# 463D# 3 Dholki Hi Slap 12
76 E 4 64 E 3 Dholki Lo Slide 13
77 F 4 65 F 3 Khol Open 14
78 F# 466F# 3 Khol Slide
79 G 4 67 G 3 Khol Mute 14
80 G# 468G# 3 Manjira Open 15
81 A 4 69 A 3 Manjira Close 15
82 A# 470A# 3 Jhanji Open 16
83 B 4 71 B 3 Jhanji Close 16
84 C 5 72 C 4 Mondira Open 17
85 C# 573C# 4 Mondira Close 17
86 D 5 74 D 4 Bhangra Scat 1
87 D# 575D# 4 Bhangra Scat 2
88 E 5 76 E 4 Bhangra Scat 3
89 F 5 77 F 4 Bhangra Scat 4
90 F# 578F# 4Khomokh Normal
91 G 5 79 G 4 Khomokh Mute
92 G# 580G# 4 Khomokh Mltatk
93 A 5 81 A 4 Thavil Open
94 A# 582A# 4 Thavil Slap
95 B 5 83 B 4 Thavil Mute
96 C 6 84 C 5 Khartaal
97 C# 685C# 5 Dholak 2 Open 18
98 D 6 86 D 5 Dholak 2 Slide 18
99 D# 687D# 5 Dholak 2 Rim 1
100E 688E 5Dholak 2 Rim 2
101F 689F 5Dholak 2 Ring
102 F# 690F# 5 Dholak 2 Slap
103G 691G 5Dholak 2 Body
E1
F1
F#1
G1
G#1
A1
A#1
B1
C1
D#1
D1
C#1
E2
F2
F#2
G2
G#2
A2
A#2
B2
C2
D#2
D2
C#2
E3
F3
F#3
G3
G#3
A3
A#3
B3
C3
D#3
D3
C#3
E4
F4
F#4
G4
G#4
A4
A#4
B4
C4
D#4
D4
C#4
E5
F5
F#5
G5
G#5
A5
A#5
B5
C5
D#5
D5
C#5
C6

Drum Kit List
PSR-I455 Owner’s Manual
69
Appendix
Voice No. 221 222 223 224 225
MSB (0–127) / LSB (0–127) / PC (1–128) 127/000/088 127/000/001 127/000/002 127/000/009 127/000/017
Keyboard MIDI
Key
Off
Alternate
Group
Power Kit Standard Kit 1 Standard Kit 2 Room Kit Rock Kit
Note#NoteNote#Note
25 C# 013C# -1 3
Surdo Mute
26 D 0 14 D -1 3 Surdo Open
27 D# 015D# -1 Hi Q
28 E 0 16 E -1 Whip Slap
29 F 0 17 F -1 4 Scratch H
30 F# 018F# -1 4 Scratch L
31 G 0 19 G -1 Finger Snap
32 G# 020G# -1 Click Noise
33 A 0 21 A -1 Metronome Click
34 A# 022A# -1 Metronome Bell
35 B 0 23 B -1 Seq Click L
36 C 1 24 C 0 Seq Click H
37 C# 125C# 0 Brush Tap
38 D 1 26 D 0 O Brush Swirl
39 D# 127D# 0 Brush Slap
40 E 1 28 E 0 O Brush Tap Swirl
41 F 1 29 F 0 O Snare Roll
42 F# 130F# 0 Castanet
43 G 1 31 G 0 Snare Soft Power 1 Snare Soft Snare Soft 2 Snare Noisy
44 G# 132G# 0
Sticks
45 A 1 33 A 0 Kick Amb+ Kick Soft
46 A# 134A# 0 Open Rim Power 1 Open Rim Shot Open Rim Shot H Short
47 B 1 35 B 0 Kick Power Open Kick Tight Kick 2
48 C 2 36 C 1 Kick Power Closed Kick Kick Short
Kick Gate
49 C# 237C# 1 Side Stick Power Side Stick Side Stick Light
50 D 2 38 D 1 Snare Power Snare Snare Short Snare Snappy Snare Rock
51 D# 239D# 1 Hand Clap Power Hand Clap
52 E 2 40 E 1 Snare Rough Snare Tight Snare Tight H Snare Tight Snappy Snare Rock Tight
53 F 2 41 F 1 Tom Power 1 Floor Tom L
Tom Room 1 Tom Rock 1
54 F# 242F# 1 1 Hi-Hat Closed Power Hi-Hat Closed
55 G 2 43 G 1 Tom Power 2 Floor Tom H Tom Room 2 Tom Rock 2
56 G# 244G# 1 1 Hi-Hat Pedal Power Hi-Hat Pedal
57 A 2 45 A 1 Tom Power 3 Low Tom Tom Room 3 Tom Rock 3
58 A# 246A# 1 1 Hi-Hat Open Power Hi-Hat Open
59 B 2 47 B 1 Tom Power 4 Mid Tom L Tom Room 4 Tom Rock 4
60 C 3 48 C 2 Tom Power 5 Mid Tom H
Tom Room 5 Tom Rock 5
61 C# 349C# 2 Crash Cymbal Acoustic 1 Crash Cymbal 1
62 D 3 50 D 2 Tom Power 6 High Tom Tom Room 6 Tom Rock 6
63 D# 351D# 2 Ride Cymbal Acoustic 1 Ride Cymbal 1
64 E 3 52 E 2 Chinese Cymbal Acoustic Chinese Cymbal
65 F 3 53 F 2 Ride Cymbal Acoustic Ride Cymbal Cup
66 F# 354F# 2 Tambourine
67 G 3 55 G 2 Splash Cymbal Acoustic Splash Cymbal
68 G# 356G# 2 Cowbell
69 A 3 57 A 2 Crash Cymbal Acoustic 2 Crash Cymbal 2
70 A# 358A# 2 Vibraslap
71 B 3 59 B 2 Ride Cymbal Acoustic 2 Ride Cymbal 2
72 C 4 60 C 3 Bongo H
73 C# 461C# 3 Bongo L
74 D 4 6 2 D 3 Conga H Mute
75 D# 463D# 3 Conga H Open
76 E 4 64 E 3 Conga L
77 F 4 65 F 3 Timbale H
78 F# 466F# 3 Timbale L
79 G 4 67 G 3 Agogo H
80 G# 468G# 3 Agogo L
81 A 4 69 A 3 Cabasa
82 A# 470A# 3 Maracas
83 B 4 71 B 3 O Samba Whistle H
84 C 5 72 C 4 O Samba Whistle L
85 C# 573C# 4 Guiro Short
86 D 5 74 D 4 O Guiro Long
87 D# 575D# 4 Claves
88 E 5 76 E 4 Wood Block H
89 F 5 77 F 4 Wood Block L
90 F# 578F# 4 Cuica Mute
91 G 5 79 G 4 Cuica Open
92 G# 580G# 42 Tri a n g l e M u t e
93 A 5 81 A 4 2 Triangle Open
94 A# 582A# 4 Shaker
95 B 5 83 B 4 Jingle Bells
96 C 6 84 C 5 Bell Tree
97 C# 685C# 5
98 D 6 86 D 5
99 D# 687D# 5
100E 688E 5
101F 689F 5
102 F# 690F# 5
103G 691G 5
E1
F1
F#1
G1
G#1
A1
A#1
B1
C1
D#1
D1
C#1
E2
F2
F#2
G2
G#2
A2
A#2
B2
C2
D#2
D2
C#2
E3
F3
F#3
G3
G#3
A3
A#3
B3
C3
D#3
D3
C#3
E4
F4
F#4
G4
G#4
A4
A#4
B4
C4
D#4
D4
C#4
E5
F5
F#5
G5
G#5
A5
A#5
B5
C5
D#5
D5
C#5
C6

Drum Kit List
PSR-I455 Owner’s Manual
70
Appendix
Voice No. 222 226 227 228 229
MSB (0–127) / LSB (0–127) / PC (1–128) 127/000/001 127/000/025 127/000/059 127/000/060 127/000/026
Keyboard MIDI
Key
Off
Alternate
Group
Standard Kit 1 Electronic Kit T8 Kit T9 Kit Analog Kit
Note#NoteNote#Note
25 C# 013C# -1 3 Surdo Mute
26 D 0 14 D -1 3 Surdo Open
27 D# 015D# -1 Hi Q
28 E 0 16 E -1 Whip Slap
29 F 0 17 F -1 4 Scratch H
30 F# 018F# -1 4 Scratch L
31 G 0 19 G -1 Finger Snap Snare Hammer Snare Drum&Bass 1
32 G# 020G# -1 Click Noise Kick ZapHard Kick Break 2
33 A 0 21 A -1 Metronome Click Snare Garg L Snare Distortion
34 A# 022A# -1 Metronome Bell Kick TekPower Kick TekPower
35 B 0 23 B -1 Seq Click L Kick Slimy Kick Distortion RM
36 C 1 24 C 0 Seq Click H Kick T8 1 Kick T9 2
37 C# 125C# 0Brush Tap Snare Analog CR Snare Analog CR
38 D 1 26 D 0 O Brush Swirl Snare T8 4 Snare T9 5
39 D# 127D# 0Brush Slap Snare Clap Analog Clap Analog Sm
40 E 1 28 E 0 O Brush Tap Swirl Reverse Cymbal Snare T8 3 Snare T9 Gate Reverse Cymbal
41 F 1 29 F 0 O Snare Roll
Tom T8 5 Snare Rock Roll
42 F# 130F# 0 Castanet Hi Q 2 Snare T8 5 Snare T9 3 Hi Q 2
43 G 1 31 G 0 Snare Soft Snare Snappy Electro Kick T8 3 Snare T9 4 Snare Noisy 4
44 G# 132G# 0Sticks
Snare T8 4 Snare T9 Gate
45 A 1 33 A 0 Kick Soft Kick 3 Kick T8 2 Kick T9 4 Kick 3
46 A# 134A# 0 Open Rim Shot
Snare T8 3 Snare T9 5
47 B 1 35 B 0 Kick Tight Kick Gate T8 Kick Bass Kick T9 1 Kick Analog Short
48 C 2 36 C 1 Kick Kick Gate Heavy Kick T8 1 Kick T9 3 Kick Analog
49 C# 237C# 1 Side Stick
Snare T8 Rim Snare T9 Rim Side Stick Analog
50 D 2 38 D 1 Snare Snare Noisy 2 Snare T8 2 Snare T9 1 Snare Analog
51 D# 239D# 1 Hand Clap
Clap T9 Clap T9
52 E 2 40 E 1 Snare Tight Snare Noisy 3 Snare T8 1 Snare T9 2 Snare Analog 2
53 F 2 41 F 1 Floor Tom L Tom Electro 1 Tom T8 1 Tom T9 1 Tom Analog 1
54 F# 242F# 1 1 Hi-Hat Closed
Hi-Hat Closed T8 2 Hi-Hat Closed T9 Hi-Hat Closed Analog
55 G 2 43 G 1 Floor Tom H Tom Electro 2 Tom T8 2 Tom T9 2 Tom Analog 2
56 G# 244G# 1 1 Hi-Hat Pedal
Hi-Hat Open T8 1 Hi-Hat Pedal T9 Hi-Hat Closed Analog 2
57 A 2 45 A 1 Low Tom Tom Electro 3 Tom T8 3 Tom T9 3 Tom Analog 3
58 A# 246A# 1 1 Hi-Hat Open
Hi-Hat Open T8 1 Hi-Hat Open T9 Hi-Hat Open Analog
59 B 2 47 B 1 Mid Tom L Tom Electro 4 Tom T8 4 Tom T9 4 Tom Analog 4
60 C 3 48 C 2 Mid Tom H Tom Electro 5 Tom T8 6 Tom T9 5 Tom Analog 5
61 C# 349C# 2 Crash Cymbal 1
Crash T8 Crash T9 Crash Analog
62 D 3 50 D 2 High Tom Tom Electro 6 Tom T8 7 Tom T9 6 Tom Analog 6
63 D# 351D# 2 Ride Cymbal 1
Ride T9 Ride T9
64 E 3 52 E 2 Chinese Cymbal Chinese Cymbal 2 Chinese Cymbal 2
65 F 3 53 F 2 Ride Cymbal Cup Ride Cymbal Cup 2 Ride Cymbal Cup 2
66 F# 354F# 2 Tambourine Tambourine RX5 Tambourine RX5
67 G 3 55 G 2 Splash Cymbal Crash Cymbal 3
68 G# 356G# 2Cowbell Cowbell T8 Cowbell 1 Cowbell Analog
69 A 3 57 A 2 Crash Cymbal 2
Crash Cymbal 4 Crash Cymbal 4
70 A# 358A# 2Vibraslap Cowbell T8
71 B 3 59 B 2 Ride Cymbal 2 Ride Cymbal 3 Ride Cymbal 3
72 C 4 60 C 3 Bongo H Conga T8 5 Conga T8 5
73 C# 461C# 3 Bongo L Conga T8 4 Conga T8 4
74 D 4 62 D 3 Conga H Mute Conga T8 3 Conga Tip Conga Analog H
75 D# 463D# 3 Conga H Open
Conga T8 2 Conga Open Slap Conga Analog M
76 E 4 64 E 3 Conga L
Conga T8 1 Conga Open Conga Analog L
77 F 4 65 F 3 Timbale H
78 F# 466F# 3Timbale L
79 G 4 67 G 3 Agogo H Glass H Analog Click
80 G# 468G# 3 Agogo L Glass L Conga T8 1
81 A 4 69 A 3 Cabasa
82 A# 470A# 3 Maracas Maracas T8 Maracas Slur Maracas 2
83 B 4 71 B 3 O Samba Whistle H
FxGun 2 FxGun 2
84 C 5 72 C 4 O Samba Whistle L FxGun 1 FxGun 1
85 C# 573C# 4Guiro Short Analog Shaker H Scratch H 2
86 D 5 74 D 4 O Guiro Long Analog Shaker L Scratch Down
87 D# 575D# 4Claves Clave T8 Hi Q 3 Claves 2
88 E 5 76 E 4 Wood Block H
Hi Q 1 Hi Q 1
89 F 5 77 F 4 Wood Block L Hi Q 2 Hi Q 2
90 F# 578F# 4 Cuica Mute Scratch H 2 Scratch L Scratch L Scratch H 2
91 G 5 79 G 4 Cuica Open Scratch L 2 Scratch L 2 Scratch L 2 Scratch L 2
92 G# 580G# 4 2 Triangle Mute
93 A 5 81 A 4 2 Triangle Open
94 A# 582A# 4Shaker Analog Shaker Analog Shaker
95 B 5 83 B 4 Jingle Bells Sleigh Bell Sleigh Bell
96 C 6 84 C 5 Bell Tree Wind Chime Wind Chime
97 C# 685C# 5 Snare Hip 1 Snare Piccolo
98 D 6 86 D 5 Snare Hip 2 Snare T8 5
99 D# 687D# 5 Snare Hip Gate Snare Rock Roll Distortion
100E 688E 5 Snare Break 1 Snare Brush Mute
101F 689F 5 Kick Blip Kick Blip Hard
102 F# 690F# 5 Snare FX 1 Snare Jungle 1
103G 691G 5 Kick FxHammer Kick Sustain
E1
F1
F#1
G1
G#1
A1
A#1
B1
C1
D#1
D1
C#1
E2
F2
F#2
G2
G#2
A2
A#2
B2
C2
D#2
D2
C#2
E3
F3
F#3
G3
G#3
A3
A#3
B3
C3
D#3
D3
C#3
E4
F4
F#4
G4
G#4
A4
A#4
B4
C4
D#4
D4
C#4
E5
F5
F#5
G5
G#5
A5
A#5
B5
C5
D#5
D5
C#5
C6

Drum Kit List
PSR-I455 Owner’s Manual
71
Appendix
230 231 232 233 234 235
127/000/113 127/000/033 127/000/041 127/000/049 126/000/001 126/000/002
Dance Kit Jazz Kit Brush Kit Symphony Kit SFX Kit 1 * SFX Kit 2 *
Reverse Cymbal
Hi Q 2
Snare Techno Snare Jazz H Brush Slap 2
Kick Techno Q Kick Soft 2
Rim Gate
Open Rim Shot Light
Kick Techno L Gran Cassa
Kick Techno Kick Jazz Kick Jazz Gran Cassa Mute Cutting Noise Phone Call
Side Stick Analog Stick Light Stick Light
Cutting Noise 2 Door Squeak
Snare Clap Snare Jazz L Brush Slap 3 Band Snare Door Slam
String Slap Scratch Cut
Snare Dry Snare Jazz M Brush Tap 2 Band Snare 2 Scratch H 3
Tom Analog 1 Tom Jazz 1 Tom Brush 1 Tom Jazz 1 Wind Chime
Hi-Hat Closed Analog3
Telephone Ring 2
Tom Analog 2 Tom Jazz 2 Tom Brush 2 Tom Jazz 2
Hi-Hat Closed Analog 4
Tom Analog 3 Tom Jazz 3 Tom Brush 3 Tom Jazz 3
Hi-Hat Open Analog 2
Tom Analog 4 Tom Jazz 4 Tom Brush 4 Tom Jazz 4
Tom Analog 5 Tom Jazz 5 Tom Brush 5 Tom Jazz 5
Crash Analog
Hand Cymbal
Tom Analog 6 Tom Jazz 6 Tom Brush 6 Tom Jazz 6
Hand Cymbal Short
Flute Key Click Car Engine Ignition
Car Tires Squeal
Car Passing
Car Crash
Cowbell Analog
Siren
Hand Cymbal 2 Train
Jet Plane
Hand Cymbal 2 Short Starship
Burst
Roller Coaster
Conga Analog H
Submarine
Conga Analog M
Conga Analog L
Shower Laugh
Thunder Scream
Maracas 2
Wind Punch
Stream Heartbeat
Bubble Footeps
Feed
Claves 2
Scratch H 2
Scratch L 3
Dog Machine Gun
TurnTableNoise Horse Laser Gun
Bird Tweet 2 Explosion
Firework
Maou
* Actual keyboard notes of the SFX Kit 1 and 2 are one octave lower than the ones described in the list below.

Drum Kit List
PSR-I455 Owner’s Manual
72
Appendix
Voice No. 222 236 237 238
MSB (0–127) / LSB (0–127) / PC (1–128) 127/000/001 126/000/021 126/000/022 126/000/125
Keyboard MIDI
Key
Off
Alternate
Group
Standard Kit 1 Bass Drum Kit Reverse Bass Drum Kit China Kit 1
Alternate
Group
Note#NoteNote#Note
25 C# 013C# -1 3 Surdo Mute BD Electro Reverse BD Electro
26 D 0 14 D -1 3 Surdo Open BD FX Gate Reverse BD FX Gate
27 D# 015D# -1 Hi Q BD Hammer Reverse BD Hammer
28 E 0 16 E -1 Whip Slap BD Analog Power Reverse BD Analog Power
29 F 0 17 F -1 4 Scratch H BD Analog Distortion 5
30 F# 018F# -1 4 Scratch L BD Analog Distortion 6 Reverse BD Analog Distortion 6
31 G 0 19 G -1 Finger Snap BD Analog Distortion 4
32 G# 020G# -1 Click Noise BD Analog Distortion 3 Reverse BD Analog Distortion 3
33 A 0 21 A -1 Metronome Click BD Analog Distortion 2 Reverse BD Analog Distortion 2
34 A# 022A# -1 Metronome Bell BD Analog Tight Reverse BD Analog Tight
35 B 0 23 B -1 Seq Click L BD Analog 94 Reverse BD Analog 94 Da Cha
36 C 1 24 C 0 Seq Click H BD Analog Blip 2 Reverse BD Analog Blip 2 Da Gu mp 2
37 C# 125C# 0 Brush Tap BD Analog Rubber 2 Reverse BD Analog Rubber 2 Da Gu rim
38 D 1 26 D 0 O Brush Swirl BD Analog 93 Reverse BD Analog 93 Da Gu f 2
39 D# 127D# 0 Brush Slap BD Analog 90 Reverse BD Analog 90 Da Gu hand 2
40 E 1 28 E 0 O Brush Tap Swirl BD Analog 83 Reverse BD Analog 83 Da Gu roll 2
41 F 1 29 F 0 O Snare Roll BD Analog 82 Reverse BD Analog 82 Pai Gu 4
42 F# 130F# 0 Castanet BD Analog 92 Pai Gu 4 High
43 G 1 31 G 0 Snare Soft BD Analog 91 Reverse BD Analog 91 Pai Gu 3
44 G# 132G# 0 Sticks BD Analog Deep Reverse BD Analog Deep Pai Gu 3 High
45 A 1 33 A 0 Kick Soft BD Analog Hard 2 Pai Gu 2
46 A# 134A# 0 Open Rim Shot BD Analog Hard 1 Reverse BD Analog Hard 1 Pai Gu 2 High
47 B 1 35 B 0 Kick Tight BD Analog Blip 1 Reverse BD Analog Blip 1 Pai Gu 1
48 C 2 36 C 1 Kick BD Analog Rubber 1 Reverse BD Analog Rubber 1 Luo High 1
49 C# 237C# 1 Side Stick BD Analog Loose Reverse BD Analog Loose Gong batter
50 D 2 38 D 1 Snare BD Synth 1 Reverse BD Synth 1 Jin Luo
51 D# 239D# 1 Hand Clap BD Synth 2 Reverse BD Synth 2 Luo High 2
52 E 2 40 E 1 Snare Tight BD Analog Distortion 1 Reverse BD Analog Distortion 1 Luo Mid-Low
53 F 2 41 F 1 Floor Tom L Ripper Reverse Ripper Luo
54 F# 242F# 1 1 Hi-Hat Closed BD Analog 70 L Jin Luo Low 5
55 G 2 43 G 1 Floor Tom H BD Analog 70 Reverse BD Analog 70 Da Cha 5
56 G# 244G# 1 1 Hi-Hat Pedal BD Analog 80 Reverse BD Analog 81 Da Cha effect 5
57 A 2 45 A 1 Low Tom BD Analog 80 Long Zhong Cha
58 A# 246A# 1 1 Hi-Hat Open BD Dry Reverse BD Dry Xiao Cha effect 1
59 B 2 47 B 1 Mid Tom L BD Dry Hard Xiao Cha 1
60 C 3 48 C 2 Mid Tom H BD Room 1 Mang Luo Low
61 C# 349C# 2 Crash Cymbal 1 BD Soft Reverse BD Soft Mang Luo Mid
62 D 3 50 D 2 High Tom BD Room 2 Reverse BD Room 2 Qing
63 D# 351D# 2 Ride Cymbal 1 BD Break Lo-fi 2 Reverse BD Break Lo-fi 2 Finger Bell
64 E 3 52 E 2 Chinese Cymbal BD Break Lo-fi 1 Reverse BD Break Lo-fi 1 Luo big
65 F 3 53 F 2 Ride Cymbal Cup BD & Hi-Hat Open Reverse BD & Hi-Hat Open Mu Yu Low
66 F#
354F# 2
Tambourine BD Jungle 2 Mu Yu Mid-Low
67 G 3 55 G 2 Splash Cymbal BD Jungle 1 Mu Yu Mid
68 G# 356G# 2 Cowbell BD Jungle 3 Reverse BD Jungle 3 Mu Yu High
69 A 3 57 A 2 Crash Cymbal 2 BD D&B 1 Reverse BD D&B 1 Nan Bang Zi roll 3
70 A# 358A# 2 Vibraslap BD D&B 2 Reverse BD D&B 2 Nan Bang Zi 3
71 B 3 59 B 2 Ride Cymbal 2 BD RX5 1 Reverse BD RX5 1 Ban Gu 4
72 C 4 60 C 3 Bongo H BD RX5 2 Reverse BD RX5 2 Ban 4
73 C# 461C# 3 Bongo L BD Room 3 Reverse BD Room 3 Ban Gu roll 4
74 D 4 62 D 3 Conga H Mute BD Power Gate Reverse BD Power Gate Chinese Opera Voice 1
75 D# 463D# 3 Conga H Open BD R&B 1 Reverse BD R&B 1 Chinese Opera Voice 2
76 E 4 64 E 3 Conga L BD R&B 2 Reverse BD R&B 2 Chinese Opera Voice 3
77 F 4 65 F 3 Timbale H BD Lo-fi Reverse BD Lo-fi Yun Luo F4
78 F# 466F# 3 Timbale L BD Hip Deep Yun Luo F#4
79 G 4 67 G 3 Agogo H BD Break Deep Reverse BD Break Deep Yun Luo G4
80 G# 468G# 3 Agogo L BD Break Heavy Reverse BD Break Heavy Yun Luo G#4
81 A 4 69 A 3 Cabasa BD Break Hard Reverse BD Break Hard Yun Luo A4
82 A# 470A# 3 Maracas Big Drum Reverse Big Drum Yun Luo A#4
83 B 4 71 B 3 O Samba Whistle H Taiko Drum Reverse Taiko Drum Yun Luo B4
84 C 5 72 C 4 O Samba Whistle L Surdo Open Reverse Surdo Open Yun Luo C5
85 C# 573C# 4 Guiro Short Feet 2 Reverse Feet 2 Yun Luo C#5
86 D 5 74 D 4 O Guiro Long BD Industrial Reverse Tom Industrial Yun Luo D5
87 D# 575D# 4 Claves Door Slam Reverse Door Slam Yun Luo D#5
88 E 5 76 E 4 Wood Block H Punch Reverse Punch Yun Luo E5
89 F 5 77 F 4 Wood Block L Heart Yun Luo F5
90 F# 578F# 4 Cuica Mute Feet 1 Reverse Feet 1 Yun Luo F#5
91 G 5 79 G 4 Cuica Open BD Human Reverse BD Human Yun Luo G5
92 G# 580G# 4 2 Triangle Mute BD Human Deep Reverse BD Human Deep Yun Luo G#5
93 A 5 81 A 4 2 Triangle Open Vox Buh! Reverse Vox Buh! Yun Luo A5
94 A# 582A# 4 Shaker Vox Muh! Reverse Vox Muh! Yun Luo A#5
95 B 5 83 B 4 Jingle Bells Yun Luo B5
96 C 6 84 C 5 Bell Tree Yun Luo C6
97 C# 685C# 5
98 D 6 86 D 5
99 D# 687D# 5
100E 688E 5
101F 689F 5
102 F# 690F# 5
103G 691G 5
E1
F1
F#1
G1
G#1
A1
A#1
B1
C1
D#1
D1
C#1
E2
F2
F#2
G2
G#2
A2
A#2
B2
C2
D#2
D2
C#2
E3
F3
F#3
G3
G#3
A3
A#3
B3
C3
D#3
D3
C#3
E4
F4
F#4
G4
G#4
A4
A#4
B4
C4
D#4
D4
C#4
E5
F5
F#5
G5
G#5
A5
A#5
B5
C5
D#5
D5
C#5
C6

Drum Kit List
PSR-I455 Owner’s Manual
73
Appendix
239 240 241
127/000/127 126/000/037 126/000/041
China Kit 2
Alternate
Group
Arabic Kit * Cuban Kit
Zarb Back mf
Zarb Tom f
Zarb Eshareh
Zarb Whipping
Tom ba k To m f
Neghareh Tom f
Tom ba k B a c k f
Neghareh Back f
Tom ba k S n a p f
Neghareh Pelang f Conga H Tip
Tombak Trill Conga H Heel
Khaligi Clap 1 Conga H Open
Arabic Zalgouta Open Conga H Mute
Khaligi Clap 2 Conga H Slap Open
Arabic Zalgouta Close Conga H Slap
Arabic Hand Clap Conga H Slap Mute
Tabel Tak 1 Conga L Tip
Sagat 1 Conga L Heel
Tabel Dom Conga L Open
Sagat 2 Conga L Mute
Tabel Tak 2 Conga L Slap Open
Sagat 3 Conga L Slap
Riq Tik 3 Conga L Slide
Riq Tik 2 Bongo H Open 1 finger
Riq Tik Hard 1 Bongo H Open 3 finger
Riq Tik 1 Bongo H Rim
Riq Tik Hard 2 Bongo H Tip
Riq Tik Hard 3 Bongo H Heel
Riq Tish Bongo H Slap
Riq Snouj 2 Bongo L Open 1 finger
Riq Roll Bongo L Open 3 finger
Riq Snouj 1 Bongo L Rim
Riq Sak Bongo L Tip
Riq Snouj 3 Bongo L Heel
Riq Snouj 4 Bongo L Slap
Riq Tak 1 Timbale L Open
Riq Brass 1
Riq Tak 2
Riq Brass 2
Riq Dom
Katem Tak Doff Paila L
Katem Dom Timbale H Open
Katem Sak 1
Katem Tak 1
Katem Sak 2
Katem Tak 2
Daholla Sak 2 Paila H
Daholla Sak 1 Cowbell Top
Daholla Tak 1
Daholla Dom
Daholla Tak 2
Tablah Prok Guiro Short
Tablah Dom 2 Guiro Long
Tablah Roll of Edge
Dagu Mute 4 Tablah Tak Finger 4
Zhongcha Mute 5 Tablah Tak Trill 1 Tambourine
Dagu Heavy 4 Tablah Tak Finger 3
Zhongcha Open 5 Tablah Tak Trill 2
Paigu Middle Tablah Tak Finger 2
Paigu Low Tablah Tak Finger 1 Maracas
Xiaocha Mute 6 Tablah Tik 2 Shaker
Bangu Tablah Tik 4 Cabasa
Xiaocha Open 6 Tablah Tik 3
Bangzi Tablah Tik 1
Muyu Low Tablah Tak 3
Zhongluo Mute 7 Tablah Tak 1
Muyu Mid-Low Tablah Tak 4
Zhongluo Open 7 Tablah Tak 2
Muyu Middle Tablah Sak 2
Xiaoluo Open Tablah Tremolo
Triangle Mute 8 Tablah Sak 1
Triangle Open 8 Tablah Dom 1
* Actual keyboard notes of the Arabic Kit are one octave higher than the ones described in the list below.

PSR-I455 Owner’s Manual
74
Appendix
Style List
Style No. Style Name
INDIAN
1 Bhajan
2Bolly 1
3Bolly 2
4Bolly 3
5Bolly 4
6 Indy Pop
7 Hind Bld
8 IndyWlz1
9 IndyWlz2
10 Bhangra1
11 Bhangra2
12 Boliyan
13 BaleBale
14 IndyDnc1
15 IndyDnc2
16 Tamil
17 Kerala
18 Goa Grv
19 Goan Pop
20 Rajsthan
21 Dandiya
22 MdrnQwal
23 Qawwali
8BEAT
24 BritRock
25 8BtModrn
26 Cool 8Bt
27 60sGtPop
28 8BtAdria
29 60s8Beat
30 BblgumPp
31 BritPpSw
32 8Beat
33 Off Beat
34 60s Rock
35 HardRock
36 RockShfl
37 8Bt Rock
16BEAT
38 16Beat
39 PopShf 1
40 PopShf 2
41 Gtr Pop
42 16Bt Up
43 KoolShfl
44 JazzRock
45 HH Light
BALLAD
46 Glam Pno
47 Gtr Bld
48 PianoBld
49 LoveSong
50 68Modern
51 68SlowRk
52 68OrcBld
53 OrganBld
54 Pop Bld
55 16Bld 1
56 16Bld 2
DANCE
57 AgagBeat
58 CoastDnc
59 ClubBeat
60 Electron
61 FunkyHse
62 ChartR&B
63 MellowHH
64 Soul R&B
65 Soul Bld
66 Chillout
67 EuTrance
68 Ibiza
69 DreamDnc
70 NewHipHp
71 Pop R&B
72 TrancPop
73 ChartPop
74 HouseMsk
75 Swing H
76 TcnPolis
77 Clubdanc
78 Club Ltn
79 Garage 1
80 Garage 2
81 TcnParty
82 UK Pop
83 HHGroove
84 Hip Shfl
85 HipHopPp
DISCO
86 ModDisco
87 70sDsc 1
88 70sDsc 2
89 LatinDsc
90 DscPhily
91 SatNight
92 DscChoco
93 DscHands
SWING&JAZZ
94 BB Fast
95 BBMedium
96 BBBallad
97 BB Shfl
98 AcousJaz
99 AcidJazz
100 JazzClub
101 Swing 1
102 Swing 2
103 OrchSwng
104 FiveFour
105 Jazz Bld
106 Dixie
107 Ragtime
108 AfroCubn
109 Charlstn
R&B
110 Blues Rk
111 Soul
112 D et Po p 1
113 60s R&R
114 6/8 Soul
115 M od r nR &B
116 C ro Twi st
117 R ck &Ro ll
118 D et Po p 2
119 Boogie 1
120 Boogie 2
Style No. Style Name
121 6/8Blues
COUNTRY
122 Cntry8Bt
123 CntryPop
124 CntrySwg
125 CntryBld
126 Cntry2/4
127 CowboyBg
128 CntryShf
129 Blgrass
LATIN
130 BrzSamba
131 Bossa
132 PopBossa
133 Forro
134 Srtanejo
135 Tijuana
136 Joropo
137 Parranda
138 Regaeton
139 DscLatin
140 Mambo
141 Salsa
142 Beguine
143 GtrRumba
144 Flamenco
145 RmbIslnd
146 Reggae
BALLROOM
147 VienWltz
148 EngWaltz
149 Slowfox
150 Foxtrot
151 Quickstp
152 Tango
153 Pasodobl
154 Samba
155 ChaCha
156 Rumba
157 Jive
TRAD & WORLD
158 US March
159 6/8March
160 GerMarch
161 PolkaPop
162 OberPlka
163 Trntella
164 Showtune
165 Xmas Swg
166 XmasWltz
167 Reel
168 Hawaiian
169 Durngens
170 CGrupera
171 Saeidy
172 WehdaSag
173 Laff
174 IranElec
175 Emarati
176 Luo Gu
177 Jing Ju
178 Dangdut
179 Kroncong
Style No. Style Name

PSR-I455 Owner’s Manual
75
Appendix
Tabla/Tanpura Pattern List
Pattern No. Pattern Name
1 TeenTaal
2 Rupak
3 JhapTaal
4 EkTaal
5 ChauTaal
6 Chachar
7 Dadra
8 Keherwa
9 Garba
10 Bhajan
11 Punjabi
12 Tishram
13 Chtushrm
14 Khandam
15 Mishram
16 Sankernm
WALTZ
180 ItalyWlz
181 MriacWlz
182 Serenade
183 SwingWlz
184 Jz Wlz 1
185 Jz Wlz 2
186 CntryWlz
187 OberWltz
188 Musette
CHILDREN
189 Learn2/4
190 Learn4/4
191 Learn6/8
192 Fun 3/4
193 Fun 4/4
PIANIST
194 Stride
195 PnoBls 1
196 PnoBls 2
197 Pno Rag
198 Pno R&R
199 PnoBoogi
200 PnoJzWlz
201 PnoJzBld
202 Arpeggio
203 Musical
204 SlowRock
205 8Pno Bld
206 PnoSwing
Style No. Style Name

PSR-I455 Owner’s Manual
76
Appendix
Song List
Song
No.
Song Name Composer
Main Demo
1 India Original
2 GlobePop Original
3 Chillin Original
Voice Demo
4 Grand Piano Demo Original
5 Sweet! Tenor Sax Demo Original
6 Cool! Rotor Organ Demo Original
7 Cool! Galaxy Electric Piano Demo Original
8 Modern Harp & Sweet! Soprano Demo Original
9 Power Kit Drum Demo Original
10 Dance Kit Drum Demo Original
11 Afro Cuban Kit Percussion Demo Original
Piano Solo
12 Maple Leaf Rag S. Joplin
13 Jeanie with the Light Brown Hair S. C. Foster
14 The Last Rose of Summer Traditional
15 For Elise L. v. Beethoven
16 Valse op.64-1 “Petit Chien” F. Chopin
17 Turkish March W.A. Mozart
18 Menuett/Beethoven L. v. Beethoven
19 Andante grazioso (Sonate K.331) W. A. Mozart
20 24 Preludes op.28-7 F. Chopin
21 Melodie (Album für die Jugend) R. Schumann
22
Fröhlicher Landmann (Album für die
Jugend)
R. Schumann
23
Von fremden Ländern und Menschen
(Kinderszenen)
R. Schumann
24 Träumerei (Kinderszenen) R. Schumann
25 Thema (Impromptus D.935-3) F. Schubert
26 Menuett BWV. Anh.116 J. S. Bach
27 Invention Nr.1 J. S. Bach
28 Gavotte/J. S. Bach J. S. Bach
29 Arietta/Grieg E. Grieg
30 To a Wild Rose E. A. MacDowell
31 Tango/Albeniz I. Albéniz
32 La Fille aux Cheveux de Lin C. A. Debussy
33 La Chevaleresque J. F. Burgmüller
34 Arabesque J. F. Burgmüller
35 Pastorale J. F. Burgmüller
36 Annie Laurie Traditional
37 The Entertainer S. Joplin
Piano Ensemble
38 Amazing Grace Traditional
39 Die Lorelei F. Silcher
40 Piano Concerto No.21 2nd mov. W. A. Mozart
41 Scarborough Fair Traditional
42 Old Folks at Home S. C. Foster
43 Londonderry Air Traditional
44 Home Sweet Home H. R. Bishop
45 Jesus bleibet meine Freude J. S. Bach
46 Loch Lomond Traditional
47 Twinkle Twinkle Little Star Traditional
48 Three Blind Mice Traditional
49
Believe Me If All Those Endearing
Young Charms
Traditional
50 Nocturne op.9-2 F. Chopin
51 Etude op.10-3 “Chanson de L'adieu” F. Chopin
52 Ave Maria/J. S. Bach - Gounod
J. S. Bach /
C. F. Gounod
53 Menuett BWV. Anh.114 J. S. Bach
54 Wenn ich ein Vöglein wär Traditional
55 Der Vogelfänger bin ich ja W. A. Mozart
56 Romanze (Serenade K.525) W. A. Mozart
57 Ave Verum Corpus W. A. Mozart
58 Liebesträume Nr.3 F. Liszt
59 Chanson du Toreador G. Bizet
60 Frühlingslied F. Mendelssohn
61 Ode to Joy L. v. Beethoven
62 O Christmas Tree Traditional
63 Deck the Halls Traditional
64 Silent Night F. Gruber
Piano Accompaniment
65 Ep Ballad Original
66 Boogie Woogie Original
67 Rock Piano Original
68 Salsa Original
69 Country Piano Original
70 Gospel R&B Original
71 Medium Swing Original
72 Jazz Waltz Original
73 Medium Bossa Original
74 Slow Rock Original
Classical Melodies
75 Waltz (The Sleeping Beauty) P. I. Tchaikovsky
76 Air (Orchestral Suite) J. S. Bach
77 Minuetto/Boccherini L. Boccherini
78 Siciliano/J. S. Bach J. S. Bach
79 Menuet (L'Arlésienne) G. Bizet
80 Slavonic Dances op.72-2 A. Dvořák
81 Largo (From the New World) A. Dvořák
82 Pizzicato Polka J. Strauss II
83 Romanze/Beethoven L. v. Beethoven
84 Swan Lake P. I. Tchaikovsky
85 Sicilienne/Fauré G. Fauré
86 Méditation (Thaïs) J. Massenet
87 Serenade/Haydn F. J. Haydn
88 Grand March (Aida) G. Verdi
89 Danza dell'Ore (La Gioconda) A. Ponchielli
90 Le Cygne (Le Carnaval des Animaux) C. Saint-Saëns
91 L'éléphant (Le Carnaval des Animaux) C. Saint-Saëns
92 Fossiles (Le Carnaval des Animaux) C. Saint-Saëns
93
Wachet auf, ruft uns die Stimme BWV.
645
J. S. Bach
Traditional Melodies
94 Greensleeves Traditional
95 Beautiful Dreamer S. C. Foster
96 Ring de Banjo S. C. Foster
97 O du lieber Augustin Traditional
98 London Bridge Traditional
99 Aura Lee Traditional
100 Aloha Oe Q. Liliuokalani
Raga Scale
101 Bilawal –
102 Khamaaj –
103 Bhairav –
104 Kalyan –
105 Asavari –
106 Kalyani –
107 Hamsadhvani –
108 Mohanam –
109 Hindolam –
110 Sankarabharanam –
Song
No.
Song Name Composer

PSR-I455 Owner’s Manual
77
Appendix
Arpeggio List
Arpeggio No. Arpeggio Name
1UpOct
2DownOct
3 UpDwnOct
4SynArp1
5SynArp2
6SynArp3
7SynArp4
8 SyncEcho
9 PulsLine
10 StepLine
11 Random
12 Down&Up
13 SuperArp
14 AcidLine
15 TekEcho
16 VelGruv
17 Planet
18 Trance1
19 Trance2
20 Trance3
21 ChordAlt
22 SynChrd1
23 SynChrd2
24 Syncopa
25 Hybrid1
26 Hybrid2
27 Hybrid3
28 Hybrid4
29 Hybrid5
30 PfArp1
31 PfArp2
32 PfArp3
33 PfArp4
34 PfClub1
35 PfClub2
36 PfBallad
37 PfChd8th
38 EPArp
39 PfShufle
40 PfRock
41 Clavi1
42 Clavi2
43 RocknPf
44 70RockPf
45 SlowflPf
46 SoulPf
47 ChordUp
48 ChdDance
49 LatinRck
50 Salsa1
51 Salsa2
52 Reggae1
53 Reggae2
54 Reggae3
55 6/8R&B
56 Gospel
57 BalladEP
58 Strum1
59 Strum2
60 Strum3
61 Strum4
62 Pickin1
63 Pickin2
64 Funky
65 GtrChrd1
66 GtrChrd2
67 GtrChrd3
68 GtrArp
69 FngrPck1
70 FngrPck2
71 CleanGtr
72 Slowfl
73 Samba1
74 Sa mba 2
75 Spanish1
76 Spanish2
77 Harp1
78 Harp2
79 FngrBas1
80 FngrBas2
81 FngrBas3
82 CoolFunk
83 SlapBass
84 AcidBas1
85 AcidBas2
86 FunkyBas
87 CmbJazB1
88 CmbJazB2
89 CmbJazB3
90 NewR&BBs
91 HipHopBs
92 SmoothBs
93 DreamBas
94 TranceBs
95 LatinBas
96 Strings1
97 Strings2
98 Strings3
99 Strings4
100 StrngDwn
101 StrngUp
102 OrcheStr
103 Jupiter
104 Pizz1
105 Pizz2
106 BrasSec1
107 BrasSec2
108 BrasSec3
109 FunkBras
110 S ou lRe ed
111 D is co Ld
112 S moo t hP d
113 PercA rp
114 Tri ll
115 Cresendo
116 DiscoCP
117 Perc1
118 Perc2
119 R &B
120 Funk1
121 Funk2
122 Funk3
123 Soul
124 ClscHip
125 Smooth
126 NewGospl
127 CmbJazz1
128 CmbJazz2
129 Bebop
130 JazzHop
Arpeggio No. Arpeggio Name
131 FolkRock
132 Unplugge
133 HipHop
134 Trance
135 Dream
136 2 Step
137 ClubHs1
138 ClubHs2
139 EuroTek
140 House
141 Ibiza1
142 Ibiza2
143 Ibiza3
144 Garage
145 Samba
146 African
147 Latin
148 China
149 Indian
150 Arabic
151 TeenTalC
152 TeenTalD
153 TeenTalE
154 TeenTalF
155 TeenTalG
156 TeenTalA
157 Dadra C
158 Dadra D
159 Dadra E
160 Dadra F
161 Dadra G
162 Dadra A
Arpeggio No. Arpeggio Name

PSR-I455 Owner’s Manual
78
Appendix
Music Database List
MDB No. MDB Name
ALL TIME HITS
1 Jude Hey
2New UK
3 MyLoving
4 All OK
5Buttercp
6JustCall
7 CheepChp
8 Daddy's
9Dance?
10 GetBack
11 GtrWheel
12 HighTide
13 IWasBorn
14 Sailing
15 BluJeans
16 Holiday
17 Imagine
18 LoveMe
19 LetItBld
20 LdyMdona
21 YelowSub
22 Marriage
23 MovinOut
24 My Shell
25 NowNever
26 DoLoveMe
27 TcktRide
28 SeeClear
29 Masachus
30 Hard Day
31 USA Pie
32 Norway
33 YesterBd
MODERN POP
34 Watches
35 SoundMPH
36 Hold Us
37 Unfound
38 NeedSome
39 PrtTmLvr
40 MoonShdw
41 NikitSng
42 Sure of
43 Off Day
44 Tell Her
45 GirlsMne
46 NeedLove
47 Radio
POP CLASSICS
48 Standing
49 RainLaff
50 Sunshine
51 ForNamdo
52 ThankFor
53 ManPiano
54 CoinLane
55 LovesYou
56 Tmbourin
57 Alone
58 GldField
59 Raindrop
60 SultanSw
61 Life'sWk
62 TopWorld
63 WatchGrl
POP BALLAD
64 WnderLnd
65 CanIStop
66 EvryTime
67 IvoryAnd
68 TheWorld
69 LovWoman
70 Dolannes
71 Madigan
72 Paradise
73 Whisper
BALLAD
74 AllOdds
75 AtonalFl
76 Hero
77 Woman
78 RunToYou
79 LoveOfAl
80 CndleWnd
81 Cavatina
82 Cherish
83 ToLoveMe
84 YouKnow
85 Evrythng
86 EyesOfBl
87 Hello
88 BeThere
89 FlyAway
90 LoveYou
91 NeverLet
92 JustOnce
93 IfYouGo
94 SavingAl
95 InTheDrk
96 LovePwr
97 Vision
98 Beautifl
99 AllAlone
100 Opposite
101 BeHonest
102 SayYou
103 SayNthng
104 Stranger
105 OneDay
106 TheBayou
107 ThisSong
108 Distance
109 ThisWay
110 LoveGone
111 Inspirng
112 TrueColr
ROCK & ROLL
113 ShakenUp
114 Beethovn
115 HurryLov
116 BeCruel
117 Jumping
118 Countdwn
119 SuePeggy
120 Champion
121 Jailhous
122 BlueShoe
123 Rockin24
124 Shouting
MDB No. MDB Name
125 Rock&Rll
126 HonkyTnk
OLDIES
127 Daydream
128 Sumertme
129 Diana's
130 Uptown
131 Apache
132 IGotIt
133 Tonight
134 MyPillow
135 NoRain
136 FinalDan
137 SlpnLion
138 Ghetto
139 LipsLcky
140 PrettyWm
141 TikiGtr
142 TurnThre
143 Sherry
DANCE & DISCO
144 Babylon
145 Goodbye
146 Catch22
147 DISCO
148 Survival
149 TheNavy
150 DontHide
151 Celebrat
152 LondonRU
153 10,2 Sun
154 ShakeYou
155 Believe
156 BoySumer
157 I'mSexy
158 StuffHot
SWING & JAZZ
159 MoonOf
160 Patrol
161 Charles
162 GiveLove
163 HallOfMe
164 Rhythm
165 LOVE
166 LeroyBad
167 Caraban
168 Misbehav
169 Safari
170 Smiling
171 SoWhatIs
172 TimeGone
173 TasteHny
174 Sandman
175 Tunisian
176 TwoFoot
177 MyBaby
R&B
178 Sally's
179 AsPlayed
180 BabyGrov
181 Highwy66
182 SweetCHI
183 JustU&Me
184 ManLoves
185 OurLove
MDB No. MDB Name

Music Database List
PSR-I455 Owner’s Manual
79
Appendix
186 Wish I
187 What
COUNTRY
188 OnTheRd
189 Breathe
190 InMyMind
191 ContryHw
192 GreenGrs
193 EverNeed
194 Lonesome
195 Lucille
196 HomeRng
197 Tennesse
LATIN
198 Bananabt
199 DanceMng
200 DntWorry
201 Jamaica
202 FleaSpa
203 I'mPola
204 MamboJm
205 OneNote
206 PasoCani
207 SayNoMor
208 Beguine
209 Tijuana
210 Picture
ENTERTAINMENT
211 OnTheHil
212 Barnacle
213 Califrag
214 DadClock
215 DanceLd
216 DnceFire
217 BigCntry
218 Cabaret
219 OdeToJoy
220 Mi-Re-Do
221 MyPrince
222 Necesary
223 NoBuiz
224 NoisyOld
225 Sleigh
226 RockBaby
227 Magnifiq
228 Magnfcnt
229 SilentNt
230 Nabucco
231 Standing
232 SummerPl
233 Christms
234 Favorite
235 Tubbie
236 Turkish
237 12OClock
WALTZ & TRAD
238 Blk&Whte
239 CanCan
240 Charmain
241 Musicbox
242 Clementn
243 Doodah!
244 Dreamer
245 EnterRag
246 Birthday
MDB No. MDB Name
247 MaryLamb
248 Donald's
249 MoonWlz
250 MoulinHt
251 Sunshine
252 PieceOf
253 GreenSlv
254 TakeFour
255 TexRose
256 ThePolka
257 Scarboro
258 Edelweis
259 AroundWd
260 Whatever
261 Yankee's
WORLD
262 Hawaii
263 D'amor
264 ElCondor
265 GoodbyRm
266 ILandOn
267 ItalyBel
268 Cucarumb
269 Puntuali
270 Cielito
271 ItalySun
272 SantaLuc
273 Trumpetr
274 VanMass
PIANIST
275 ItalySun
276 BeGood
277 Birdland
278 BlueRose
279 Chaie's
280 Highwy66
281 Leaves
282 Miload
283 Cabaret
284 Wonderfl
285 Imagine
286 LtleStar
287 MapleRag
288 Mi-Re-Do
289 NoBuiz
290 OhBlah
291 Charades
292 Sally's
293 Nabucco
294 SunnyStr
295 MistyFln
296 LdnBridg
297 GrndClck
298 Importnc
299 Snowman
300 Favorite
301 SongForU
302 SugerSpn
303 ThisWay
304 WenSmile
305 ZipperD
MDB No. MDB Name

PSR-I455 Owner’s Manual
80
Appendix
Effect Type List
Harmony Types
Reverb Types
Chorus Types
No. Harmony Type Description
01 Duet
Harmony types 01–05 are pitch-based and add one-, two- or three-note harmonies to the single-note
melody played in the right hand. These types sound when chords are played in the auto accompani-
ment range of the keyboard. These Harmony types will also work when playing songs that contain
chord data.
02 Trio
03 Block
04 Country
05 Octave
06 Trill 1/4 note
Types 6–26 are rhythm-based effects and add embellishments or delayed repeats in
time with the auto accompaniment. These types sound whether the auto accompani-
ment is on or not; however, the actual speed of the effect depends on the Tempo set-
ting. The individual note values in each type let you synchronize the effect precisely to
the rhythm. Triplet settings are also available: 1/6 = quarter-note triplets, 1/12 = eighth-
note triplets, 1/24 = sixteenth-note triplets.
• The Trill effect Types (06–12) create two-note trills (alternating notes) when two notes
are held.
• The Tremolo effect Types (13–19) repeat all held notes (up to four).
• The Echo effect Types (20–26) create delayed repeats of each note played.
07 Trill 1/6 note
08 Trill 1/8 note
09 Trill 1/12 note
10 Trill 1/16 note
11 Trill 1/24 note
12 Trill 1/32 note
13 Tremolo 1/4 note
14 Tremolo 1/6 note
15 Tremolo 1/8 note
16 Tremolo 1/12 note
17 Tremolo 1/16 note
18 Tremolo 1/24 note
19 Tremolo 1/32 note
20 Echo 1/4 note
21 Echo 1/6 note
22 Echo 1/8 note
23 Echo 1/12 note
24 Echo 1/16 note
25 Echo 1/24 note
26 Echo 1/32 note
No. Reverb Type Description
01–03 Hall 1–3 Concert hall reverb.
04–05 Room 1–2 Small room reverb.
06–07 Stage 1–2 Reverb for solo instruments.
08–09 Plate 1–2 Simulated steel plate reverb.
10 Off No effect.
No. Chorus Type Description
01–02 Chorus 1–2 Conventional chorus program with rich, warm chorusing.
03–04 Flanger 1–2 Pronounced three-phase modulation with a slight metallic sound.
05 Off No effect.

PSR-I455 Owner’s Manual
81
Appendix
Specifications
* Specifications and descriptions in this owner’s manual are for information purposes only. Yamaha Corp. reserves the right to change or modify
products or specifications at any time without prior notice. Since specifications, equipment or options may not be the same in every locale, please
check with your Yamaha dealer.
Size/Weight
Dimensions (W x D x H) 946 mm x 405 mm x 140 mm (37-1/4” x 15-15/16” x 5-1/2”)
Weight 6.8 kg (15lbs 0oz.) (not including batteries)
Keyboard
Number of Keys 61
Touch Response Yes
Other Controllers
Pitch Bend Yes
Control Knobs Yes
Display
Display LCD display
Language English
Voices
Tone Generation Tone Generating Technology AWM Stereo Sampling
Polyphony Number of Polyphony (Max.) 32
Preset Number of Voices 214 + 466XGlite + 6 Indian Kits + 21 Drum/SFX Kits + 46 Arpeggio
Compatibility GM, XGlite
Effects
Types
Reverb 9 types
Chorus 4 types
Master EQ 5 types
Harmony 26 types
Ultra-Wide Stereo 3 types
Functions
Dual Yes
Split Yes
Arpeggio type 162 types
Accompaniment
Styles
Preset
Number of Preset Styles 206
Fingering Multi finger
Style Control
ACMP ON/OFF, INTRO/ENDING/rit., MAIN/AUTO FILL, SYNC START,
SYNC STOP, START/STOP, TRACK ON/OFF
User Styles 5
Other Features
Music Database 305
One Touch Setting (OTS) Yes
Tabla/Tanpura
pattern
Preset
Number of Preset Tabla
Patterns
16
Number of Variations 5 (for each Tabla Pattern)
Number of Preset Tanpura
Patterns
4 (for all Tabla Patterns)
Recording/Playback
Preset Number of Preset Songs 110
Recording
Number of Songs 10
Number of Tracks 6 (5 Melody + 1 Style)
Data Capacity
Approx. 19,000 notes (when only “melody” tracks are recorded)
Approx. 5,500 chords (when only “chord” tracks are recorded)
Compatible Data
Format
Playback SMF
Recording Original File Format (SMF conversion function)
Function
Lesson/Guide
[1 LISTENING, 2 TIMING, 3 WAITING], [Repeat & Learn], [Chord Dictionary]
Registration Number of Buttons 4 (x 8 banks) with Freeze function
Overall
Metronome Yes
Tempo Range 11 – 280
Transpose -12 to 0, 0 to +12
Tuning 427.0 – 440.0 – 453.0 Hz
Miscellaneous Portable Grand Button Yes
Memory/Connectivity
Memory
Internal Memory Approx. 1.54MB
External Strage Device USB flash memory
Connectivity
DC IN DC IN 12V
Headphones/Output [PHONES/OUTPUT] x 1
Sustain Pedal [SUSTAIN] x 1
USB TO DEVICE Yes
USB TO HOST Yes
Amplifiers/Speakers
Amplifiers 2.5W + 2.5W
Speakers 12cm×2 + 3cm×2
Power Supply
Power Supply
Adaptor
• Adaptor:
PA-150A or an equivalent recommended by Yamaha
Batteries
Six “AA” size alkaline (LR6), manganese (R6) or Ni-MH rechargable bat-
teries
Power Consumption • 16W (PA-150A)
Auto Power Off Function Yes
Accessories
Included Accessories
• Owner’s Manual
• AC Power Adaptor
PA-150A or an equivalent
•Music Rest
• Online Member Product Registration
Optional Accessories
• AC Power Adaptor
PA-150A or an equivalent recommended by Yamaha
• Keyboard Stand (L-2C)
• Stereo Headphones (HPE-150/HPE-30)
• Footswitch (FC4/FC5)

PSR-I455 Owner’s Manual
82
Appendix
Index
A
AC Power Adaptor .................. 9, 12
Accessories .................................... 9
ACMP ..................................... 22, 40
Arpeggio ................................. 20, 39
Arpeggio List ............................... 77
Arpeggio Quantize ................ 39, 49
Arpeggio Type ....................... 20, 49
Arpeggio Velocity ........................ 49
ATTAC K ...................................... 37
Attack Time ..................... 37, 48, 49
Auto Accompaniment ................. 40
Auto Accompaniment range .......22
AUTO FILL ................................. 40
Auto Power Off ............................ 14
Auto Power Off Time .................. 50
B
Backup .......................................... 32
Backup Clear ............................... 32
Backup Parameters ...................... 32
Battery .......................................... 12
Battery Type ........................... 12, 50
Beat ............................................... 15
BGM Playback ............................ 46
C
Can’t Use ...................................... 59
Chord ...................................... 15, 43
Chord Dictionary ......................... 45
CHORUS ...................................... 37
Chorus Depth ................... 33, 48, 49
Chorus Type ........................... 33, 49
Complet. ....................................... 59
Computer-related Operations .......9
CUTOFF ...................................... 37
D
Data Err ........................................ 59
Del SMF ....................................... 58
Del USR ....................................... 58
Demo Cancel ......................... 32, 50
Demo Group .......................... 32, 50
Demo Play Mode ......................... 50
Demo Song ................................... 24
Disk Ful ........................................ 59
Display ......................................... 15
Drum Kit List ............................... 67
Dual Voice ........................ 16, 36, 49
E
EFFECT ..................................37, 38
Effect Type List ............................80
EG .................................................38
EG (Envelope Generator) ............37
ENDING .......................................40
Envelope Generator .....................37
EQ Setting ....................................35
EQ Type ........................................35
Error ..............................................59
Excellent .......................................27
Exit? ..............................................59
External Clock ..............................50
F
Fast Forward .................................25
Fast Reverse ..................................25
File Control ..................................59
File Ful ..........................................59
FILTER ...................................37, 38
Filter ..............................................21
Filter Cutoff ............................21, 49
Filter Resonance ....................21, 49
Flash Clear ....................................32
Footswitch ..............................13, 39
Format ...........................................53
Freeze Mode .....................31, 32, 50
Function ........................................48
Function List ................................48
G
GM System Level 1 .......................8
Grade .......................................27, 50
H
Harmony .......................................19
Harmony Type ........................19, 49
Harmony Volume .........................49
Headphone ....................................13
I
Initial Send ...................................50
Initialization .................................32
INTRO ..........................................40
K
Keyboard Out ...............................50
Knob ........................................21, 37
Knob assignment ..........................15
L
Lesson .......................................... 26
Lesson Track ................................ 50
Listen ............................................ 26
Load STY ..................................... 57
Load USR .................................... 56
Local Control ............................... 49
M
MAIN ........................................... 40
Main ............................................. 16
Main Voice ................................... 16
Master EQ Type ..................... 32, 49
MASTER VOLUME .................. 14
MEASURE .................................. 15
Melody Voice ............................... 47
Metronome ............................. 18, 50
Metronome Volume ..................... 18
MIDI Basics ................................... 9
MIDI Reference ............................. 9
Music Database ........................... 22
Music Rest ..................................... 9
N
no data .......................................... 59
no file ............................................ 59
Notation ........................................ 15
O
Octave ..................................... 48, 49
OK ................................................ 27
One Touch Setting ....................... 34
P
Pan .......................................... 48, 49
Pause ............................................. 25
PC mode ....................................... 49
Pedal Function ............................. 50
PITCH BEND .............................. 34
Pitch Bend Range .................. 34, 48
Pitch Controls .............................. 34
Power ............................................ 14
Power Requirements ................... 12
Power source ................................ 13
Preset Song .................................. 47
Protect .......................................... 59

Index
PSR-I455 Owner’s Manual
83
Appendix
R
RAGA SCALE ............................ 24
Random ........................................ 46
Recording ..................................... 28
Registration Memory .................. 31
RELEASE .................................... 38
Release Time .......................... 38, 49
Repeat ........................................... 25
Repeat & Learn ............................ 27
RESONANCE ............................. 37
REVERB ...................................... 37
Reverb Depth ................... 33, 48, 49
Reverb Type ........................... 33, 49
S
Save SMF ..................................... 55
Save USR ..................................... 54
Section .......................................... 40
SMF (Standard MIDI File) .........55
Song .............................................. 24
Song Book ...................................... 9
Song Category ............................. 24
Song List ...................................... 76
Song Out ...................................... 50
Song Volume .................... 32, 47, 48
Sostenuto ................................ 13, 50
Split Point ............................... 43, 48
Split Voice ........................ 17, 36, 49
Style ........................................ 22, 40
STYLE FILE ................................. 8
Style File ...................................... 57
STYLE FILTER .......................... 38
Style List ...................................... 74
Style Out ...................................... 50
Style Volume .......................... 42, 48
Sustain .......................................... 39
SYNC START .............................. 22
Synchro Start ............................... 40
Synchro Stop ................................ 41
T
Tabla ....................................... 23, 37
Tabla/Tanpura Pattern List .......... 75
Tanpura ................................... 23, 37
Tap Start ....................................... 42
Tempo ..................................... 18, 42
Time Signature ....................... 18, 50
Timing .......................................... 26
Touch Sensitivity ................... 35, 48
Track ............................................. 28
TRACK CONTROL .................... 41
Track On/Off ................................25
Transpose ................................34, 48
Troubleshooting ...........................60
Tuning .....................................34, 48
U
UnFormat ......................................59
USB .................................................8
USB Flash Memory .....................51
USB TO DEVICE ........................51
USB TO HOST ............................11
UseAdpt ........................................59
User Song .....................................28
V
Variation .................................23, 42
Very Good .....................................27
Vo i c e L i st ......................................61
Volume ....................................48, 49
Volume of the Pattern ..................42
Volume of the Style .....................42
W
Waiting ..........................................26
Wide Type .....................................49
X
XGlite .............................................8
Y
Your Tempo ..................................50

ZC95840
U.R.G., Digital Musical Instruments Division
© 2012 Yamaha Corporation
205POTY*.*-01A0
Printed in China
For details of products, please contact your nearest Yamaha representative or the authorized distributor listed below.
CANADA
Yamaha Canada Music Ltd.
135 Milner Avenue, Scarborough, Ontario,
M1S 3R1, Canada
Tel: 416-298-1311
U.S.A.
Yamaha Corporation of America
6600 Orangethorpe Ave., Buena Park, Calif. 90620,
U.S.A.
Tel: 714-522-9011
MEXICO
Yamaha de México S.A. de C.V.
Calz. Javier Rojo Gómez #1149,
Col. Guadalupe del Moral
C.P. 09300, México, D.F., México
Tel: 55-5804-0600
BRAZIL
Yamaha Musical do Brasil Ltda.
Rua Joaquim Floriano, 913 - 4' andar, Itaim Bibi,
CEP 04534-013 Sao Paulo, SP. BRAZIL
Tel: 011-3704-1377
ARGENTINA
Yamaha Music Latin America, S.A.
Sucursal de Argentina
Olga Cossettini 1553, Piso 4 Norte
Madero Este-C1107CEK
Buenos Aires, Argentina
Tel: 011-4119-7000
PANAMA AND OTHER LATIN
AMERICAN COUNTRIES/
CARIBBEAN COUNTRIES
Yamaha Music Latin America, S.A.
Torre Banco General, Piso 7, Urbanización Marbella,
Calle 47 y Aquilino de la Guardia,
Ciudad de Panamá, Panamá
Tel: +507-269-5311
THE UNITED KINGDOM/IRELAND
Yamaha Music Europe GmbH (UK)
Sherbourne Drive, Tilbrook, Milton Keynes,
MK7 8BL, England
Tel: 01908-366700
GERMANY
Yamaha Music Europe GmbH
Siemensstraße 22-34, 25462 Rellingen, Germany
Tel: 04101-3030
SWITZERLAND/LIECHTENSTEIN
Yamaha Music Europe GmbH
Branch Switzerland in Zürich
Seefeldstrasse 94, 8008 Zürich, Switzerland
Tel: 044-387-8080
AUSTRIA
Yamaha Music Europe GmbH Branch Austria
Schleiergasse 20, A-1100 Wien, Austria
Tel: 01-60203900
CZECH REPUBLIC/HUNGARY/
ROMANIA/SLOVAKIA/SLOVENIA
Yamaha Music Europe GmbH
Branch Austria (Central Eastern Europe Ofce)
Schleiergasse 20, A-1100 Wien, Austria
Tel: 01-602039025
POLAND/LITHUANIA/LATVIA/ESTONIA
Yamaha Music Europe GmbH
Branch Poland Ofce
ul. Wrotkowa 14 02-553 Warsaw, Poland
Tel: 022-500-2925
BULGARIA
Dinacord Bulgaria LTD.
Bul.Iskarsko Schose 7 Targowski Zentar Ewropa
1528 Soa, Bulgaria
Tel: 02-978-20-25
MALTA
Olimpus Music Ltd.
The Emporium, Level 3, St. Louis Street Msida
MSD06
Tel: 02133-2144
THE NETHERLANDS/
BELGIUM/LUXEMBOURG
Yamaha Music Europe Branch Benelux
Clarissenhof 5-b, 4133 AB Vianen, The Netherlands
Tel: 0347-358 040
FRANCE
Yamaha Music Europe
7 rue Ambroise Croizat, Zone d'activités Pariest,
77183 Croissy-Beaubourg, France
Tel: 01-64-61-4000
ITALY
Yamaha Music Europe GmbH, Branch Italy
Viale Italia 88, 20020 Lainate (Milano), Italy
Tel: 02-935-771
SPAIN/PORTUGAL
Yamaha Music Europe GmbH Ibérica, Sucursal
en España
Ctra. de la Coruna km. 17, 200, 28230
Las Rozas (Madrid), Spain
Tel: 91-639-8888
GREECE
Philippos Nakas S.A. The Music House
147 Skiathou Street, 112-55 Athens, Greece
Tel: 01-228 2160
SWEDEN
Yamaha Music Europe GmbH Germany lial
Scandinavia
J. A. Wettergrens Gata 1, Box 30053
S-400 43 Göteborg, Sweden
Tel: 031 89 34 00
DENMARK
Yamaha Music Europe GmbH, Tyskland – lial
Denmark
Generatorvej 6A, DK-2730 Herlev, Denmark
Tel: 44 92 49 00
FINLAND
F-Musiikki Oy
Kluuvikatu 6, P.O. Box 260,
SF-00101 Helsinki, Finland
Tel: 09 618511
NORWAY
Yamaha Music Europe GmbH Germany -
Norwegian Branch
Grini Næringspark 1, N-1345 Østerås, Norway
Tel: 67 16 77 70
ICELAND
Skifan HF
Skeifan 17 P.O. Box 8120, IS-128 Reykjavik, Iceland
Tel: 525 5000
RUSSIA
Yamaha Music (Russia)
Room 37, bld. 7, Kievskaya street, Moscow,
121059, Russia
Tel: 495 626 5005
OTHER EUROPEAN COUNTRIES
Yamaha Music Europe GmbH
Siemensstraße 22-34, 25462 Rellingen, Germany
Tel: +49-4101-3030
Yamaha Corporation,
Asia-Pacic Sales & Marketing Group
Nakazawa-cho 10-1, Naka-ku, Hamamatsu,
Japan 430-8650
Tel: +81-53-460-2313
TURKEY/CYPRUS
Yamaha Music Europe GmbH
Siemensstraße 22-34, 25462 Rellingen, Germany
Tel: 04101-3030
OTHER COUNTRIES
Yamaha Music Gulf FZE
LOB 16-513, P.O.Box 17328, Jubel Ali,
Dubai, United Arab Emirates
Tel: +971-4-881-5868
THE PEOPLE’S REPUBLIC OF CHINA
Yamaha Music & Electronics (China) Co.,Ltd.
2F, Yunhedasha, 1818 Xinzha-lu, Jingan-qu,
Shanghai, China
Tel: 021-6247-2211
HONG KONG
Tom Lee Music Co., Ltd.
11/F., Silvercord Tower 1, 30 Canton Road,
Tsimshatsui, Kowloon, Hong Kong
Tel: 2737-7688
INDIA
Yamaha Music India Pvt. Ltd.
Spazedge building, Ground Floor, Tower A, Sector
47, Gurgaon- Sohna Road, Gurgaon, Haryana, India
Tel: 0124-485-3300
INDONESIA
PT. Yamaha Musik Indonesia (Distributor)
PT. Nusantik
Gedung Yamaha Music Center, Jalan Jend. Gatot
Subroto Kav. 4, Jakarta 12930, Indonesia
Tel: 021-520-2577
KOREA
Yamaha Music Korea Ltd.
8F, 9F, Dongsung Bldg. 158-9 Samsung-Dong,
Kangnam-Gu, Seoul, Korea
Tel: 02-3467-3300
MALAYSIA
Yamaha Music (Malaysia) Sdn., Bhd.
Lot 8, Jalan Perbandaran, 47301 Kelana Jaya,
Petaling Jaya, Selangor, Malaysia
Tel: 03-78030900
PHILIPPINES
Yupangco Music Corporation
339 Gil J. Puyat Avenue,
P.O. Box 885 MCPO,
Makati, Metro Manila, Philippines
Tel: 819-7551
SINGAPORE
Yamaha Music (Asia) PRIVATE LIMITED
Blk 202 Hougang Street 21, #02-00,
Singapore 530202, Singapore
Tel: 6747-4374
TAIWAN
Yamaha KHS Music Co., Ltd.
3F, #6, Sec.2, Nan Jing E. Rd. Taipei.
Taiwan 104, R.O.C.
Tel: 02-2511-8688
THAILAND
Siam Music Yamaha Co., Ltd.
4, 6, 15 and 16th oor, Siam Motors Building,
891/1 Rama 1 Road, Wangmai,
Pathumwan, Bangkok 10330, Thailand
Tel: 02-215-2622
OTHER ASIAN COUNTRIES
Yamaha Corporation,
Asia-Pacic Sales & Marketing Group
Nakazawa-cho 10-1, Naka-ku, Hamamatsu,
Japan 430-8650
Tel: +81-53-460-2313
AUSTRALIA
Yamaha Music Australia Pty. Ltd.
Level 1, 99 Queensbridge Street, Southbank,
Victoria 3006, Australia
Tel: 3-9693-5111
NEW ZEALAND
Music Works LTD
P.O.BOX 6246 Wellesley, Auckland 4680,
New Zealand
Tel: 9-634-0099
COUNTRIES AND TRUST
TERRITORIES IN PACIFIC OCEAN
Yamaha Corporation,
Asia-Pacic Sales & Marketing Group
Nakazawa-cho 10-1, Naka-ku, Hamamatsu,
Japan 430-8650
Tel: +81-53-460-2313
NORTH AMERICA
CENTRAL & SOUTH AMERICA
EUROPE
AFRICA
MIDDLE EAST
ASIA
OCEANIA
DMI4
Yamaha Global Site
http://www.yamaha.com/
Yamaha Manual Library
http://www.yamaha.co.jp/manual/
Documenttranscriptie
Appendix Reference Quick Guide DIGITAL KEYBOARD Owner’s Manual EN Setting Up 2 PSR-I455 Owner’s Manual The model number, serial number, power requirements, etc., may be found on or near the name plate, which is at the bottom of the unit. You should note this serial number in the space provided below and retain this manual as a permanent record of your purchase to aid identification in the event of theft. Model No. Serial No. (bottom_en_01) PSR-I455 Owner’s Manual 3 Table of Contents Setting Up Special Features ..............................................................5 Compatible Format and Functions ...................................8 About the Manuals ...........................................................9 Included Accessories .......................................................9 Setting Up Panel Controls and Terminals 10 Setting Up 12 Power Requirements......................................................12 Connecting Headphones or External Audio Equipment...13 Connecting a Footswitch to the SUSTAIN jack ..............13 Basic Operations 14 Turning the Power On/Off ..............................................14 Auto Power Off Function ................................................14 Selecting Operations ......................................................14 Display Items 15 Quick Guide 16 Selecting a Main Voice...................................................16 Playing the “Grand Piano” ..............................................16 Layering a Dual Voice ....................................................16 Playing a Split Voice in the Left Hand area ....................17 Using the Metronome .....................................................18 Adding Harmony ............................................................19 Creating Arpeggios 20 Triggering the Arpeggio..................................................20 Changing the Arpeggio Type .........................................20 Creating Original Sounds via the Knobs 21 Selecting a Knob Effect Combination.............................21 Applying the Filter to the Main Voice..............................21 Reference Playing Styles 22 Using the Music Database .............................................22 Playing the Tabla/Tanpura! 23 Playing Songs 24 Listening to a Demo Song ..............................................24 Selecting and Playing Back a Song ...............................24 Song Fast Forward, Fast Reverse, and Pause ..............25 A-B Repeat.....................................................................25 Turning Each Track On/Off ............................................25 Using the Song Lesson Feature 26 Three Types of Song Lesson .........................................26 Practicing with Song Lesson ..........................................26 Making Practice Perfect—Repeat & Learn.....................27 Appendix Recording Your Performance 28 Track Structure of a Song ..............................................28 Quick Recording.............................................................28 Recording to a Specified Track ......................................29 Clearing a User Song .....................................................30 Clearing a Specified Track from a User Song ................30 Memorizing Your Favorite Panel Settings 31 Memorizing Panel Settings to the Registration Memory ..31 Recalling Panel Settings from the Registration Memory..31 Backup Parameters and Initialization 32 Backup Parameters........................................................32 Initialization ....................................................................32 4 PSR-I455 Owner’s Manual Handy Performance Features 33 Selecting a Reverb Type................................................33 Selecting a Chorus Type................................................33 Pitch Controls—Transpose ............................................34 Pitch Controls—Tuning ..................................................34 Pitch Controls—the PITCH BEND wheel .......................34 Calling up Optimum Panel Settings ...............................34 Changing the Touch Sensitivity of the Keyboard ...........35 Selecting an EQ Setting for the Best Sound ..................35 Voice Settings 36 Selecting a Dual Voice ...................................................36 Selecting a Split Voice ...................................................36 Voice Editing ..................................................................36 Parameters Assigned to the Knobs 37 Arpeggio Settings 39 Synchronizing an Arpeggio to Song/Style/Tabla Playback—Arpeggio Quantize ...................................39 Holding the Arpeggio Playback via the Footswitch ........39 Quick Guide Try Playing a Variety of Instrument Voices Reference Styles (Auto Accompaniment) and Tabla/Tanpura patterns 40 Style Variations—Sections.............................................40 Synchro Stop .................................................................41 Tabla/Tanpura Variations...............................................42 Changing the Tempo .....................................................42 Tap Start ........................................................................42 Adjusting the Volume of the Style or Tabla/Tanpura......42 Setting the Split Point.....................................................43 Playing Chords Without Style Playback .........................43 Chord Types for Style Playback.....................................44 Looking Up Chords Using the Chord Dictionary ............45 Song Settings 46 BGM (Background Music) Playback ..............................46 Random Song Playback ................................................46 Tempo Setting of the Song ............................................47 Tap Start ........................................................................47 Song Volume .................................................................47 Melody Voice Setting of the Preset Song ......................47 The Functions 48 Basic Procedure in the Function Display .......................48 USB Flash Memory Operations 51 Connecting a USB Flash Memory..................................52 Formatting a USB Flash Memory...................................53 Saving User Data to a USB Flash Memory....................54 Saving a User Song as SMF to a USB Flash Memory...55 Loading User Data from a USB Flash Memory..............56 Loading a Style File .......................................................57 Deleting a User File in the USB Flash Memory..............58 Deleting a SMF File in the USB Flash Memory..............58 Exiting from a File Control display..................................59 Appendix Troubleshooting ............................................................. 60 Voice List ....................................................................... 61 Drum Kit List .................................................................. 67 Style List ........................................................................ 74 Tabla/Tanpura Pattern List ............................................ 75 Song List ........................................................................ 76 Arpeggio List .................................................................. 77 Music Database List....................................................... 78 Effect Type List .............................................................. 80 Specifications................................................................. 81 Index .............................................................................. 82 Setting Up Special Features Creating New Sounds Page 21 By adjusting just two knobs you can add varying degrees of distortion, “sweetness,” or other characteristics to a sound to change it subtly or drastically. Parameters that can be assigned to the knobs include effect, filter, envelope generator and more. You can create new sounds in real time! Arpeggio Function Page 20 Similar to the arpeggio functions provided on some synthesizers, this function automatically produces arpeggios (broken chords) when you simply play the appropriate notes on the keyboard. A variety of arpeggios can be produced by changing your fingering or the arpeggio type. Play a Variety of Instrument Voices Page 16 The instrument voice that sounds when you play the keyboard can be changed to violin, flute, harp, or any of an extensive range of voices. You can change the mood of a song written for piano, for example, by using violin to play it instead. Experience a whole new world of musical variety. Play Along with Styles Page 22 Want to play with full accompaniment? Try the auto-accompaniment Styles. The accompaniment styles provide the equivalent of a full backing band covering a wide variety of styles from waltzes to 8-beat to euro-trance ... and much more. Select a style that matches the music you want to play, or experiment with new styles to expand your musical horizons. EuTrance 067 Try playing the Tabla/Tanpura feature! Page 23 This special feature lets you play Indian phrase patterns via the Tabla and Tanpura sounds, as if you were using the Tabla machine and Tanpura machine. Let’s enjoy the conventional Indian music via the panel buttons and Knobs. PSR-I455 Owner’s Manual 5 PRECAUTIONS PLEASE READ CAREFULLY BEFORE PROCEEDING Please keep this manual in a safe and handy place for future reference. Setting Up WARNING Always follow the basic precautions listed below to avoid the possibility of serious injury or even death from electrical shock, short-circuiting, damages, fire or other hazards. These precautions include, but are not limited to, the following: Power supply/AC power adaptor Battery • Do not place the power cord near heat sources such as heaters or radiators. Also, do not excessively bend or otherwise damage the cord, or place heavy objects on it. • Follow the precautions below. Failure to do so might result in explosion, fire, overheating or battery fluid leakage. - Do not tamper with or disassemble batteries. • Only use the voltage specified as correct for the instrument. The required voltage is printed on the name plate of the instrument. - Do not dispose of batteries in fire. - Do not attempt to recharge batteries that are not designed to be charged. • Use the specified adaptor (page 81) only. Using the wrong adaptor can result in damage to the instrument or overheating. - Keep the batteries separate from metallic objects such as necklaces, hairpins, coins, and keys. • Check the electric plug periodically and remove any dirt or dust which may have accumulated on it. - Use the specified battery type (page 12) only. - Use new batteries, all of which are the same type, same model, and made by the same manufacturer. Do not open - Always make sure all batteries are inserted in conformity with the +/- polarity markings. • This instrument contains no user-serviceable parts. Do not open the instrument or attempt to disassemble or modify the internal components in any way. If it should appear to be malfunctioning, discontinue use immediately and have it inspected by qualified Yamaha service personnel. - When the batteries run out, or if the instrument is not to be used for a long time, remove the batteries from the instrument. - When using Ni-MH batteries, follow the instructions that came with the batteries. Use only the specified charger device when charging. • Keep batteries away from small children who might accidentally swallow them. Water warning • Do not expose the instrument to rain, use it near water or in damp or wet conditions, place on it any containers (such as vases, bottles or glasses) containing liquids which might spill into any openings. If any liquid such as water seeps into the instrument, turn off the power immediately and unplug the power cord from the AC outlet. Then have the instrument inspected by qualified Yamaha service personnel. • Never insert or remove an electric plug with wet hands. • If the batteries do leak, avoid contact with the leaked fluid. If the battery fluid should come in contact with your eyes, mouth, or skin, wash immediately with water and consult a doctor. Battery fluid is corrosive and may possibly cause loss of sight or chemical burns. If you notice any abnormality • When one of the following problems occur, immediately turn off the power switch and disconnect the electric plug from the outlet. (If you are using batteries, remove all batteries from the instrument.) Then have the device inspected by Yamaha service personnel. Fire warning - The power cord or plug becomes frayed or damaged. • Do not put burning items, such as candles, on the unit. A burning item may fall over and cause a fire. - It emits unusual smells or smoke. - Some object has been dropped into the instrument. - There is a sudden loss of sound during use of the instrument. DMI-5 6 PSR-I455 Owner’s Manual 1/2 CAUTION Always follow the basic precautions listed below to avoid the possibility of physical injury to you or others, or damage to the instrument or other property. These precautions include, but are not limited to, the following: Connections • Do not connect the instrument to an electrical outlet using a multiple-connector. Doing so can result in lower sound quality, or possibly cause overheating in the outlet. • Before connecting the instrument to other electronic components, turn off the power for all components. Before turning the power on or off for all components, set all volume levels to minimum. • When removing the electric plug from the instrument or an outlet, always hold the plug itself and not the cord. Pulling by the cord can damage it. • Be sure to set the volumes of all components at their minimum levels and gradually raise the volume controls while playing the instrument to set the desired listening level. • Remove the electric plug from the outlet when the instrument is not to be used for extended periods of time, or during electrical storms. Setting Up Power supply/AC power adaptor Handling caution Location • Do not insert a finger or hand in any gaps on the instrument. • Do not place the instrument in an unstable position where it might accidentally fall over. • Before moving the instrument, remove all connected cables, to prevent damage to the cables or injury to anyone who might trip over them. • When setting up the product, make sure that the AC outlet you are using is easily accessible. If some trouble or malfunction occurs, immediately turn off the power switch and disconnect the plug from the outlet. Even when the power switch is turned off, electricity is still flowing to the product at the minimum level. When you are not using the product for a long time, make sure to unplug the power cord from the wall AC outlet. • Never insert or drop paper, metallic, or other objects into the gaps on the panel or keyboard. This could cause physical injury to you or others, damage to the instrument or other property, or operational failure. • Do not rest your weight on, or place heavy objects on the instrument, and do not use excessive force on the buttons, switches or connectors. • Do not use the instrument/device or headphones for a long period of time at a high or uncomfortable volume level, since this can cause permanent hearing loss. If you experience any hearing loss or ringing in the ears, consult a physician. • Use only the stand specified for the instrument. When attaching the stand or rack, use the provided screws only. Failure to do so could cause damage to the internal components or result in the instrument falling over. Yamaha cannot be held responsible for damage caused by improper use or modifications to the instrument, or data that is lost or destroyed. Always turn the power off when the instrument is not in use. Even when the [ ] (Standby/On) switch is in standby status (display is off), electricity is still flowing to the instrument at the minimum level. When you are not using the instrument for a long time, make sure you unplug the power cord from the wall AC outlet. Make sure to discard used batteries according to local regulations. NOTICE To avoid the possibility of malfunction/ damage to the product, damage to data, or damage to other property, follow the notices below. Handling and Maintenance • Do not use the instrument in the vicinity of a TV, radio, stereo equipment, mobile phone, or other electric devices. Otherwise, the instrument, TV, or radio may generate noise. • Do not expose the instrument to excessive dust or vibrations, or extreme cold or heat (such as in direct sunlight, near a heater, or in a car during the day) to prevent the possibility of panel disfiguration, damage to the internal components or unstable operation. (Verified operating temperature range: 5° – 40°C, or 41° – 104°F.) • Do not place vinyl, plastic or rubber objects on the instrument, since this might discolor the panel or keyboard. Saving data • Some data items (page 32) are automatically saved as backup data in the internal memory even if you turn the power off. Saved data may be lost due to malfunction or incorrect operation. Save important data to external device such as a USB flash memory (page 51). Information About copyrights • Copying of the commercially available musical data including but not limited to MIDI data and/or audio data is strictly prohibited except for your personal use. • This product incorporates and bundles computer programs and contents in which Yamaha owns copyrights or with respect to which it has license to use others' copyrights. Such copyrighted materials include, without limitation, all computer software, style files, MIDI files, WAVE data, musical scores and sound recordings. Any unauthorized use of such programs and contents outside of personal use is not permitted under relevant laws. Any violation of copyright has legal consequences. DON'T MAKE, DISTRIBUTE OR USE ILLEGAL COPIES. About functions/data bundled with the instrument • Some of the preset songs have been edited for length or arrangement, and may not be exactly the same as the original. About this manual • The illustrations and LCD screens as shown in this manual are for instructional purposes only, and may appear somewhat different from those on your instrument. • The company names and product names in this manual are the trademarks or registered trademarks of their respective companies. DMI-5 2/2 PSR-I455 Owner’s Manual 7 Compatible Format and Functions Setting Up GM System Level 1 “GM System Level 1” is an addition to the MIDI standard which ensures that any GM-compatible music data can be accurately played by any GM-compatible tone generator, regardless of manufacturer. The GM mark is affixed to all software and hardware products that support GM System Level. XGlite As its name implies, “XGlite” is a simplified version of Yamaha’s high-quality XG tone generation format. Naturally, you can play back any XG song data using an XGlite tone generator. However, keep in mind that some songs may play back differently compared to the original data, due to the reduced set of control parameters and effects. USB USB is an abbreviation for Universal Serial Bus. It is a serial interface for connecting a computer with peripheral Devices. It allows “hot swapping” (connecting peripheral devices while the power to the computer is on). STYLE FILE The Style File Format is Yamaha’s original style file format which uses a unique conversion system to provide high-quality automatic accompaniment based on a wide range of chord types. 8 PSR-I455 Owner’s Manual About the Manuals Setting Up This instrument has the following documents and instructional materials. Included Documents Owner’s Manual (this book) • Setting Up Please read this section first. • Quick Guide This section explains how to use the basic functions. Refer to this section while playing the instrument. • Reference This section explains how to make detailed settings for the various functions of the instrument. • Appendix This section includes troubleshooting information and specifications. Data List Contains various important preset content lists such as those of Voices, Styles, Tabla/Tanpura patterns and Effects. Online Materials (from Yamaha Manual Library) MIDI Reference Contains MIDI related information such as MIDI Data Format and the MIDI Implementation Chart. MIDI Basics (only in English, French, German and Spanish) Contains basic explanations about MIDI. Computer-related Operations Includes instructions on connecting this instrument to a computer, and operations related to transferring song data. To obtain these manuals, access the Yamaha Manual Library, enter “PSR-I455” or “MIDI Basics” to the Model Name box, then click [SEARCH]. Yamaha Manual Library http://www.yamaha.co.jp/manual/ Online Materials (for Yamaha Online members) Song Book (only in English) Contains music scores for the preset Songs (excluding the Demo Songs) of this instrument. After completing the user registration at the website below, you can download this Song Book free of charge. Yamaha Online Member https://member.yamaha.com/myproduct/regist/ You will need the PRODUCT ID on the sheet (“Online Member Product Registration”) packaged with this manual in order to fill out the User Registration form. Included Accessories • Owner’s Manual (this book) • AC Power Adaptor • Music Rest • Online Member Product Registration* Music Rest Insert the music rest into the slots as shown. * The PRODUCT ID on the sheet will be needed when you fill out the User Registration form. PSR-I455 Owner’s Manual 9 Panel Controls and Terminals Setting Up Display (page 15) Front Panel Setting Up Harmnum1 001 t y u i q !2 e !0 o !1 !3 r @3 w Front Panel q w e r t y u i o !0 10 [MASTER VOLUME] control ................Page 14 PITCH BEND wheel..............................Page 34 [ ] (Standby/On) switch ....................Page 14 LIVE CONTROL section [ASSIGN] button ...............................Page 21 [A] and [B] knobs .............................Page 21 [DEMO] button......................................Page 24 [LESSON] button..................................Page 26 [REC] button .........................................Page 28 [METRONOME] button.........................Page 18 TEMPO section [TAP] button ......................................Page 42 [-] and [+] buttons .............................Page 42 [PORTABLE GRAND] button ...............Page 16 PSR-I455 Owner’s Manual !1 VOICE CONTROL section [SPLIT] button................................... Page 17 [DUAL] button ................................... Page 16 [HARMONY] button .......................... Page 19 [ARPEGGIO] button..........................Page 20 !2 Playback Control buttons • When the [TABLA/TANPURA] lamp is turned on:............................ Pages 23 and 42 • When the [SONG] lamp is turned on: ..............................................Page 25 • When the [STYLE] lamp is turned on: ......................... Pages 22, 40, and 41 001 Panel Controls and Terminals Tabla/Tanpura Pattern List (page 75) Style List (page 74) Voice List (page 61) Setting Up Dial (page 14) !4 !5 !6 !7 !8 @0 !9 @2 @1 Song List (page 76) “Press & Hold” symbol By holding down one of the buttons having this symbol, you can call up an alternate function, other than the one called up when simply pressing. Rear Panel @4 @5 @6 !3 [TRACK CONTROL] buttons • When the [TABLA/TANPURA] lamp is turned on:..........................................Page 23 • When the [SONG] lamp is turned on: ..............................................Page 25 !4 !5 !6 !7 !8 !9 @0 @1 • When the [STYLE] lamp is turned on: ..............................................Page 41 [TABLA/TANPURA] button ..................Page 23 [SONG] button ......................................Page 24 [STYLE] button .....................................Page 22 [VOICE] button .....................................Page 16 [MUSIC DATABASE] button .................Page 22 [CATEGORY] buttons...........................Page 14 [REGIST MEMORY] buttons ................Page 31 [FUNCTION] button ..............................Page 48 @7 @2 Number buttons [1]–[9], [-/NO], [0/EXECUTE] and [+/YES] buttons ..... Page 14 @3 Drum illustrations for the Drum Kit.... Page 16 Each of these indicates the drum or percussion instrument assigned to the corresponding key for “Standard Kit 1.” Rear Panel @4 USB terminals USB TO HOST terminal*...................Page 49 USB TO DEVICE terminal ................Page 51 @5 SUSTAIN jack ....................................... Page 13 @6 PHONES/OUTPUT jack........................ Page 13 @7 Power supply jack................................ Page 12 * For connecting to a computer. For details, refer to “Computerrelated Operations” (page 9). When connecting, use an AB type USB cable of less than 3 meters. USB 3.0 cables cannot be used. PSR-I455 Owner’s Manual 11 Setting Up Installing the batteries Power Requirements Setting Up Although the instrument will run either from an optional AC adaptor or batteries, Yamaha recommends use of an AC adaptor whenever possible. An AC adaptor is more environmentally friendly than batteries and does not deplete resources. 1 Make sure that the power of the instrument is off (display is blank, except for notation staff). 2 Open the battery compartment cover located on the instrument’s bottom panel. Using an AC Power Adaptor 1 Make sure that the power of the instrument is off (display is blank, except for notation staff). WARNING • Use the specified adaptor (page 81) only. Using the wrong adaptor can result in damage to the instrument or overheating. 3 Insert the six new batteries, being careful to follow the polarity markings on the inside of the compartment. 2 Connect the AC adaptor to the power supply jack. 3 Plug the AC adaptor into an AC outlet. CAUTION • When setting up the product, make sure that the AC outlet you are using is easily accessible. If some trouble or malfunction occurs, immediately turn off the power switch and disconnect the plug from the outlet. Even when the power switch is turned off, electricity is still flowing to the product at the minimum level. When you are not using the product for a long time, make sure to unplug the power cord from the wall AC outlet. 4 Replace the compartment cover, making sure that it locks firmly in place. NOTICE • Connecting or disconnecting the power adaptor with batteries installed may turn the power off, resulting in loss of data being recorded or transferred at the time. 2 AC power adaptor 3 AC outlet When battery power becomes too low for proper operation, the volume may be reduced, the sound may be distorted, and other problems may occur. When this happens, make sure to replace all batteries with new ones or already-recharged ones. NOTE • This instrument cannot charge the batteries. Use only the specified charger device when charging. Using Batteries This instrument requires six “AA” size, Alkaline (LR6)/Manganese (R6) batteries, or rechargeable nickel-metal hydride batteries (rechargeable Ni-MH batteries). The Alkaline batteries or rechargeable NiMH batteries are recommended for this instrument, since other types may result in poorer battery performance. • Power will be automatically drawn from the AC adaptor if an AC adaptor is connected while batteries are installed in the instrument. Setting the battery type After installing the new batteries then turning the power on, make sure to set the Battery Type to Rechargeable type or not. For details, refer to page 50. NOTICE WARNING • When using Ni-MH batteries, follow the instructions that came with the batteries. Use only the specified charger device when charging. 12 PSR-I455 Owner’s Manual • Failure to set the Battery Type may shorten the amount of the battery life. Make sure to set the Battery Type correctly. Setting Up Power source on the display You can confirm the power source at the left corner of the display. Only one of these is shown. Harmnum1 When is shown, the power is supplied from the AC power adaptor. When is shown, the power is supplied from the batteries. When the AC power adaptor is connected with the batteries installed, the power is supplied from the AC power adaptor and the indication is shown. Remaining battery power indication You can confirm the approximate amount of remaining battery power at the top left of the display. PUT jack to a keyboard amplifier, stereo system, mixer, tape recorder, or other line-level audio device to send the instrument’s output signal to that device. Setting Up Checking the power status on the display CAUTION • Do not use the instrument/device or headphones for a long period of time at a high or uncomfortable volume level, since this can cause permanent hearing loss. If you experience any hearing loss or ringing in the ears, consult a physician. • Before connecting the instrument to other electronic components, set all volume levels to the minimum, then turn off the power for all components. NOTICE • When the instrument’s sound is output to an external device, first turn on the power to the instrument, then to the external device. Reverse this order when you turn the power off. Connecting a Footswitch to the SUSTAIN jack Indicates that the power will be turned off immediately. When rechargeable batteries are used, this icon flashes before the power is turned off. Indicates that remaining power is insufficient for operation. Before the power runs out, replace all the batteries with new ones, or fully recharged ones (when using rechargeable types). Note that the instrument may not work properly, including unusually soft volume and poor sound quality when remaining power becomes low. Indicates that the remaining power is sufficient. Connecting Headphones or External Audio Equipment You can produce a natural sustain as you play by pressing an optional footswitch plugged into the [SUSTAIN] jack. Although the footswitch works as the Sustain pedal for most Voices, it features other functions such as Sostenuto and Arpeggio Hold (for Voices 242–287). One of these functions can be assigned to the footswitch on the Function display (page 50). NOTE • When Split is on, the sustain function does not affect the current Split Voice (page 17) while sostenuto and Arpeggio Hold (page 39) affect only the current Split Voice. • Make sure that the footswitch plug is properly connected to the SUSTAIN jack before turning on the power. • Do not press the footswitch while turning the power on. Doing this changes the recognized polarity of the footswitch, resulting in reversed footswitch operation. Any pair of stereo headphones with a 1/4” stereo phone plug can be plugged in here for convenient monitoring. The speakers are automatically shut off when a plug is inserted into this jack. The PHONES/OUTPUT jack also functions as an external output. You can connect the PHONES/OUTPSR-I455 Owner’s Manual 13 Basic Operations Turning the Power On/Off Setting Up Turn down the MASTER VOLUME control to “MIN” then press the [ ] (Standby/On) switch to turn on the power. While playing the keyboard, adjust the MASTER VOLUME control. To turn off the power, press the [ ] (Standby/On) switch again for a second. • When the instrument is not operated for a specified period of time while connected to an external device such as an amplifier, speaker or computer, make sure to follow the instructions in the Owner’s Manual to turn off the power to the instrument and the connected devices, in order to protect the devices from damage. If you do not want the power to turn off automatically when a device is connected, disable Auto Power Off. Selecting Operations CAUTION • When using a power adaptor, even when the power is off, a small amount of electricity is still being consumed by the instrument. When you are not using the instrument for a long time, make sure to unplug the AC power adaptor from the wall AC outlet. Auto Power Off Function To prevent unnecessary power consumption, this instrument features an Auto Power Off function that automatically turns the power off if the instrument is not operated for a specified period of time. The amount of time that will elapse before the power is automatically turned off is set by default to 30 minutes. To disable the Auto Power Off function: Turn off the power, then press the [ ] (Standby/On) switch to turn on the power while holding down the lowest key. To set the time that elapses before Auto Power Off is executed: Press the [FUNCTION] button, press the CATEGORY [+] or [-] button several times until “Auto Power Off” appears then select the desired value. Settings: OFF, 5, 10, 15, 30, 60, 120 Default value: 30 NOTE • Generally, the data and settings are maintained even when the power is turned off. For details, see page 32. NOTICE • Depending on the instrument status, the power may not turn off automatically, even after the elapse of the specified period of time. Always turn off the power manually when the instrument is not in use. 14 PSR-I455 Owner’s Manual Before operating the instrument, it may be helpful to familiarize yourself with the basic controls below that are used to select items and change values. Dial Decrease Increase Rotate the dial clockwise to increase the value, or counterclockwise to decrease the value. Number buttons Use the Number buttons to directly enter an item or value. For numbers that start with one or two zeroes, the first zeroes can be omitted. Example: Selecting Voice 003, Harmnum3. Press number buttons [0], [0], [3]. [-] and [+] buttons Press the [+] button briefly to increase the value by 1, or press the [-] button briefly to decrease the value by 1. Press and hold either button to continuously increase or decrease the value in the corresponding direction. Press briefly to decrease. Press briefly to increase. CATEGORY buttons Use these buttons to jump to the first Voice, Style, or Song in the next or previous Category, and call up the next or previous Function sequentially. Display Items Power source status Indicates the source from which this instrument obtains power, AC power adaptor or batteries. (Page 13) USB connection status Appears when USB flash memory is connected to this instrument. (Page 51) Setting Up The display shows all the current settings of the Song, Style, Tabla/Tanpura, Voice and other related functions. Notation Normally this indicates the notes you play. When the Song Lesson function is used, this indicates the current notes and chord of playback. When the Dictionary function is used, this indicates the notes of the chord you specify. NOTE • Any notes occurring below or above the staff are indicated by “8va.” • For a few specific chords, not all notes may be shown, due to space limitations in the display. Harmnum1 001 On/off status This area indicates the on/off status of each function. Each indication is shown when the corresponding function is turned on. Page 17 001 Beat Indicates the current beat of playback. (Page 24) Knob assignment Indicates the parameters currently assigned to the Knobs. (Page 21) Page 16 Page 19 Page 20 Page 35 Page 22 Page 41 FUNCTION and MEASURE Indicates the Function number, the current Measure number of a Song/Style, or the current Beat number of the Tabla/Tanpura pattern. 001 Chord Indicates the chord which is being played on the keyboard (Page 22) or specified via Song playback. Track status Indicates the on/off status of the current Song, Style or Tabla/Tanpura. (Pages 23, 28, 41) PSR-I455 Owner’s Manual 15 Try Playing a Variety of Instrument Voices Quick Guide In addition to piano, organ, and other “standard” keyboard instruments, this instrument has a large range of voices that includes guitar, bass, strings, sax, trumpet, drums and percussion, and even sound effects—giving you a wide variety of musical sounds. Selecting a Main Voice 1 Press the [VOICE] button. The Voice number and name will be shown. Playing the “Grand Piano” When you want to reset various settings to default and simply play a Piano sound, press the [PORTABLE GRAND] button. Voice name Harmnum1 Quick Guide 001 Voice number Appears after the [VOICE] button is pressed. 2 Use the dial to select the desired Voice. Shehnai 004 Select 004 Shehnai 3 The Voice number is set to 020 Grand Piano and all the settings such as Dual and Split are turned off automatically, with exception of the Touch Sensitivity (page 35). Play the keyboard. Layering a Dual Voice In addition to the Main Voice, you can layer a different Voice over the entire keyboard as a “Dual Voice.” 1 Press the [DUAL] button to turn Dual on. Shehnai 004 Appears when dual voice is on Preset Voice Types 16 001–019 (Indian Voices) Used for Indian music performance. 020–220 Instrument Voices. 221–241 (Drum Kit) Various drum and percussion sounds are assigned to individual keys. Details on assigning instruments to keys are provided in the Drum Kit List (page 67). 242–287 Used for Arpeggio performance (page 20). PSR-I455 Owner’s Manual Two voices will sound at the same time. 2 Press the [DUAL] button again to exit from Dual. Although turning on Dual will select a Dual Voice suitable for the current Main Voice, you can easily select a different Dual Voice (page 36). Try Playing a Variety of Instrument Voices Playing a Split Voice in the Left Hand area By dividing the keyboard into the two separate areas, you can play a different Voice between the Left hand and Right hand areas. 1 Press the [SPLIT] button to turn on Split. The keyboard is divided into the Left hand and Right hand areas. Shehnai Quick Guide 004 Appears when split voice is on Split Point Split voice Main voice and dual voice You can play a “Split Voice” on the Left hand area of the keyboard while playing a Main Voice and Dual Voice on the Right hand area of the keyboard. The highest key for the Left hand area is referred to as the “Split Point” which can be changed from the default F#2 key. For details, refer to page 36. 2 Press the [SPLIT] button again to exit from Split. You can easily select a different Split Voice (page 36). However, you need not select a Split Voice for one of the Main Voices 272–281. This is because these Voices already are set up to enable Split automatically and call up an appropriate Split Voice. PSR-I455 Owner’s Manual 17 Try Playing a Variety of Instrument Voices Using the Metronome 2 The instrument features a built-in metronome (a device that keeps an accurate tempo), convenient for practicing. 1 NOTE Press the [METRONOME] button to start the metronome. • This parameter cannot be set during playback of a Style, Song or Tabla/Tanpura. 3 2 Rotate the dial to select the number of beats per measure. A chime will sound on the first beat of each measure while the other beats will click. If “0” is selected, all beats will simply click with no chime. Select 5 for this example. Press the [METRONOME] button again to stop the metronome. Press the CATEGORY [+] button to call up “TimeSigD” (Time Signature Denominator). The length of one beat is shown on the display. Quick Guide TimeSigD 04 Adjusting the Metronome Tempo Press the TEMPO [TAP] button to call up the Tempo value, then use the TEMPO [-] and [+] buttons to adjust the Tempo value. 4 Rotate the dial to select the length of one beat, from 2nd, 4th, 8th and 16th note. Select “08” (8th note) for this example. 5 Confirm the setting by playing the Metronome. Tempo 090 Current Tempo value The dial and the Number buttons can also be used to set the Tempo. The length of one beat. Setting the Metronome Volume 1 Press the [FUNCTION] button. 2 Press the CATEGORY [+] or [-] buttons repeatedly until “MtrVol” appears. Setting the Time Signature Here, we’ll set a time signature of 5/8 as an example. 1 Hold down the [METRONOME] button for longer than a second to call up “TimeSigN” (Time Signature Numerator). The number of beats per measure is shown on the display. TimeSigN Hold for longer than a second. 18 PSR-I455 Owner’s Manual 04 Number of beats per measure. MtrVol 100 052 Metronome volume 3 Rotate the dial to set the Metronome Volume. Try Playing a Variety of Instrument Voices 3 Adding Harmony You can add harmony notes to the Main Voice. 1 Press the [HARMONY] button to turn Harmony on. Rotate the dial to select the desired Harmony Type. For details, refer to the Effect Type List (page 80). The effect and operation differs depending on the Harmony Type. Refer to the section below. How to sound each Harmony Type • Harmony type 01 to 05 Although turning on the Harmony will select a Harmony Type suitable for the current Main Voice, you can select a different Harmony Type. 2 Hold down the [HARMONY] button for longer than a second until “HarmType” appears on the display. After “HarmType” is shown for a few seconds, the current Harmony Type appears. HarmType Press the right-hand keys while playing chords in the auto accompaniment range of the keyboard when the Auto Accompaniment is on (page 22). Quick Guide Appears when the Harmony is turned on. • Harmony type 06 to 12 (Trill) Hold down two keys. • Harmony type 13 to 19 (Tremolo) 038 Keep holding down the keys. Hold for longer than a second. • Harmony type 20 to 26 (Echo) Trio 02 038 Current Harmony Type You can adjust the Harmony Volume in the Function Settings (page 49). NOTE • The Harmony function cannot be used in the Tabla/Tanpura mode. Even if Harmony is turned on, pressing the [TABLA/ TANPURA] button will turn off the Harmony effect. PSR-I455 Owner’s Manual 19 Creating Arpeggios The Arpeggio function lets you create arpeggios (broken chords) by simply pressing the notes of the chord. For example, you could play the notes of a triad—the root, third, and fifth—to trigger interesting phrases. This feature can be used for music production as well as performance. Triggering the Arpeggio 1 Press the [ARPEGGIO] button to turn on the Arpeggio function. Shehnai Changing the Arpeggio Type The most suitable Arpeggio Type is automatically selected when you select a Main Voice, but you can easily select any other Arpeggio Type. 1 004 Quick Guide Hold down the ARPEGGIO [TYPE] button for longer than a second. In the display, “ARP Type” appears for a few seconds, followed by the current Arpeggio Type appears. NOTE • Selecting a Voice number between 242 and 287 will turn on Arpeggio automatically. 2 Press a note or notes to trigger Arpeggio. The Arpeggio phrase differs depending on the number of pressed notes and the area of the keyboard. DownOct Hold for longer than a second. 2 002 The currently selected arpeggio type Rotate the dial to select the desired Arpeggio type For a list of the Arpeggio List, see page 77. NOTE When Split is on, Arpeggio is applied only to the Split Voice. When Split is off, Arpeggio is applied to the Main and Dual Voices. Arpeggio cannot be applied to the Split and Main/Dual Voices simultaneously. NOTE • When you select one of the Main Voices 272–281, Split as well as Arpeggio is automatically turned on. This allows you to immediately trigger an Arpeggio by pressing a key to the left of the Split Point after selecting one of these Voices. • When the Pedal Function is set to “Arp Hold” or “Hold+Sus” (page 50), pressing the footswitch connected to the SUSTAIN jack will cause Arpeggio playback continue even after the note is released. 3 20 To turn off the Arpeggio, press the [ARPEGGIO] button again. PSR-I455 Owner’s Manual • When any of Voices 242–287 are selected, it is a good idea to set the Pedal Function to “Arp Hold” or “Hold+Sus” (page 50). This setting allows you to use a footswitch (press and hold) to have Arpeggio playback continue even after the note is released. Creating Original Sounds via the Knobs The two knobs located in the lower left area of the panel can be used to add variations to the sound being played, transforming the sound in a variety of musical ways. Select the desired pre-programmed effect combination printed above the Knobs, then rotate the Knobs to enjoy the sound. Repeatedly press the [ASSIGN] button to sequentially select the six effect combinations provided: (1) (2) (3) (4) (5) (6) (1) … etc. The current combination is shown in the display. Applying the Filter to the Main Voice 1 Select the desired Main Voice. Here, select “178 SquareLd” (Square-wave Lead) as a synth-lead type Voice. 2 Press the [ASSIGN] button several times until (3) (Filter) appears in the display). 3 Rotate Knob B all the way to the right (maximum), then play the keyboard with your right hand while operating Knob A with your left. Harmnum1 001 Filter Cutoff Quick Guide Selecting a Knob Effect Combination Filter Resonance 001 Current value (1)–(2) affect the entire the Tabla/Tanpura sound, (3)– (5) affect the Main and Dual Voices only, and (6) affects only playback of the Style and Tabla/Tanpura. For details about each Knob effect, refer to page 37. Only selecting a Knob effect combination will not affect the sound even if the Knob arrow is not at the initial position. After operating the Knob, the selected effect is applied to the sound. NOTICE • Selecting a different Voice will replace the settings created via the Knobs with the default settings of the new Voice. If you create a sound with the Knobs that you wish to keep, make sure to memorize the settings to Registration Memory (page 31) before selecting a different Voice. NOTE • Rotating a Knob to the right while the volume is set to a high level may result in distortion. If this occurs, reduce the volume level. PSR-I455 Owner’s Manual 21 Playing Styles This instrument includes the Auto Accompaniment feature that plays appropriate “Styles” (rhythm + bass + chord accompaniment). You can select from a huge variety of Styles covering a wide range of musical genres. 1 Press the [STYLE] button, then use the dial to select the desired Style. The Style List is shown on the front panel; also see page 74. For information about chords, refer to “Chord List” (page 44) or use the Chord Dictionary function (page 45). Style Name Split Point Bhajan 001 Style Number Quick Guide This icon appears when a style number and name is displayed. 2 5 Press the [START/STOP] button to stop playback. Press the [ACMP ON/OFF] button to turn on the Auto Accompaniment. EuTrance You can add intro, ending and rhythm variations to Style playback by using “Sections.” For details, refer to page 40. 067 This icon appears when automatic accompaniment is on. With this operation, the area of the keyboard to the left of the Split Point (54: F#2) becomes the “Auto Accompaniment range” and is used only for specifying the chords. Split Point (F#2) If you have difficulty finding and selecting the desired Style and Voice, use this feature. From the Music Database, just selecting the favorite music genre calls up the ideal settings. 1 Auto Accompaniment range 3 Using the Music Database Music Database name Press the [SYNC START] button to turn Synchro Start on. Jude Hey 001 EuTrance 067 2 Use the dial to select the desired Music Database. This operation calls up the panel settings such as Voice and Style that are registered to the selected Music Database. For a list of the Music Database List, see page 78. 3 Play the keyboard as described in Steps 4–5 above. Flashes when sync start is on. 4 22 Play a chord in the Auto Accompaniment range to start playback. Play a melody with the right hand and chords with the left hand. PSR-I455 Owner’s Manual Press the [MUSIC DATABASE] button. Both the Auto Accompaniment and Synchro Start are automatically turned on. Playing the Tabla/Tanpura! This instrument provides 16 phrase patterns (consisting of several measures) using the authentic Tabla and Tanpura sounds with looped playback. By using the Tabla/Tanpura function, try out the conventional Indian music—changing keys and creating dynamic sound variations by rotating the Knobs. 1 Press the [TABLA/TANPURA] button, then use the dial to select the desired Tabla/Tanpura pattern. Refer to the Tabla/Tanpura list on the panel of this instrument. tions, which are shared among all Tabla/Tanpura patterns. To turn off the Tanpura sound, press the Tanpura button of the current number. Changing the Variation via the [A]–[E] buttons TeenTaal 2 Quick Guide 001 Using the Knobs Press the [START/STOP] button to start looped playback. At first, only the Tabla sound will play back. During playback, enjoy creating sound variations via the following operations. Turning on/off Tabla tracks 1 and 2 individually Adjusting the Volume Balance Press the [ASSIGN] button several times to select “1 TABLA/TANPURA,” then rotate Knob A to adjust the volume balance between the sounds of Tabla 1 (low-pitched part) and Tabla 2 (high-pitched part), or rotate Knob B to adjust the volume balance between the sounds of the Tabla and Tanpura. Indicates the on/off status of the Tabla tracks. Adjusting the Tempo / Transposing playback Press the [ASSIGN] button several times to select “2 TABLA/TANPURA,” then rotate Knob A to adjust the playback tempo, or rotate Knob B to transpose the playback key in semitones. Tabla 1 features the lower pitched part while Tabla 2 features the higher pitched part. Adding the Tanpura phrase and changing it from 1–4 NOTE • You can confirm the current key and tempo value on the display. To call up the current tempo value, press the TEMPO [-] or [+] button. 3 Press the [START/STOP] button to stop playback. Indicates the current Tanpura number. At first, press any of the [TANPURA 1]–[TANPURA 4] buttons to add the Tanpura phrase. Next, press another Tanpura button to change the phrase. You can enjoy four phrase varia- NOTE • The Tabla/Tanpura performance cannot be recorded. PSR-I455 Owner’s Manual 23 Playing Songs You can simply enjoy listening to the internal Songs, or use them with just about any of the functions, such as Lesson. Song Category The Songs are organized by category as listed below. • • • • • • • • • • Gives you an idea of the advanced capabilities of this instrument. Demonstrates many useful Voices of this instrument. These piano solo pieces are ideally suited for the Song Lesson. These piano ensemble pieces are also well suited for the Song Lesson. When you need to practice backing (accompaniment) patterns, these songs are ideal for that purpose. Includes famous classical music pieces. Includes traditional Songs from around the world. Practice Songs for studying the traditional scale of India. Songs you record yourself. Songs transferred from a computer (refer to “Computer-related operations”—page 9) and Songs in the USB flash memory (page 53). Quick Guide Listening to a Demo Song Press the [DEMO] button to play Songs in sequence. Playback will repeat continuously, starting again from the first Song (001). Selecting and Playing Back a Song 1 Press the [SONG] button, then use the dial to select the desired Song. Refer to the Song List (page 76). To stop playback, press the [DEMO/BGM] button. ForElise 015 Current Song 2 Press the [ ] (Start/Stop) button to start playback. To stop playback, press the [ ] (Start/Stop) button again. ForElise 015 Each arrow mark flashes in time with the beat. 24 PSR-I455 Owner’s Manual Playing Songs Song Fast Forward, Fast Reverse, and Pause Like the transport controls on an audio player, this instrument lets you fast forward [ ] (Fast Forward), rewind [ ] (Fast Reverse) and pause [ ] (PAUSE) playback of the Song. Fast Forward During playback, press this button to rapidly skip ahead to a later point in the Song. 3 When playback reaches to the point you want to specify as the end point, press the [ ] (A-B REPEAT) button again to set the B point. The specified A-B section of the song will now play repeatedly. 4 To cancel repeat playback, press the [ ] (A-B REPEAT) button. To stop playback, press the [START/STOP] button. NOTE Quick Guide • If you want to set the start point “A” at the top of the Song, press the [ ] (A-B REPEAT) button before starting playback. Turning Each Track On/Off Fast Reverse During playback, press this button to rapidly return to an earlier point in the Song. Pause During playback, press this button to pause playback, and press again to start from that point. Each “track” of a Song plays a different part—melody, percussion, accompaniment, etc. Each of the tracks can be muted so that you can play the muted part yourself. Pressing the desired Track button repeatedly will toggle the on/off status. NOTE • When the A-B repeat is specified, the Fast Reverse and Fast Forward will only work within the range between A and B. A-B Repeat Track number on—Track will playback You can play back only a specific section of a Song repeatedly by setting the A point (start point) and B point (end point) in one-measure increments. A Track number off—Track is muted or contains no data B NOTE • Up to two Track buttons can be pressed simultaneously for turning on or off. 1 Start playback of the Song (page 24). 2 When playback reaches to the point you want to specify as the start point, press the [ ] (A-B REPEAT) button to set the A point. PSR-I455 Owner’s Manual 25 Using the Song Lesson Feature You can use the selected Song for a left-hand, right-hand, or both-hands lesson. Try practicing with these three Song Lesson types while referring to the music scores in the Song Book (page 9). Three Types of Song Lesson Practicing with Song Lesson 1 Lesson 1—Listen Select the desired Song for your lesson (page 24). NOTE In this Lesson, you need not play the keyboard. The model melody/chords of the part you selected will sound. Listen to it carefully and remember it well. LISTEN • The Song Lesson can be applied also to the Songs (SMF format 0 only) transferred from a computer (page 24), but cannot be applied to the User Songs. 2 Quick Guide Lesson 2—Timing In this mode, simply concentrate on playing the notes with the correct timing. Even if you play wrong notes, the correct notes shown in the display will sound Turn off the part you want to practice. For the right-hand lesson, press the [1/RIGHT] button to turn off the right-hand part. For the lefthand lesson, press the [2/LEFT] button to turn off the left-hand part. For the lesson using both hands, turn off both the parts. TIMING Pressing the [1/RIGHT] and [2/LEFT] buttons repeatedly will toggle the on/off status of each part, which can be shown on the display. Lesson 3—Waiting In this Lesson, try playing the correct notes shown on the display. The Song pauses until you play the right note, and playback tempo will change to match the speed at which you are playing at. ForElise 015 WAITING NOTE • If you want to keep a steady playback tempo is maintained during Lesson 3: Waiting, set the Your Tempo parameter (page 50) to OFF. Right-hand lesson Track 1 is unlit Left-hand lesson Track 2 is unlit Both-hands lesson Track 1 and 2 are unlit NOTE • Song numbers 075–100 only support the right-hand lesson. 3 Press the [LESSON] button to start playback of the Song Lesson. After starting playback, pressing the [LESSON] button repeatedly will change the Lesson number from 1: LISTEN 2: TIMING 3: WAITING off 1…. Press this button until the desired number is shown on the display. TIMING Lp2 007 The notation and key positions you should play are shown. 26 PSR-I455 Owner’s Manual Using the Song Lesson Feature To stop Lesson playback, press the [START/ STOP] button. Even during playback, you can change the Lesson number by pressing the [LESSON] button. If you want to practice a specific section in which you made a mistake or you have difficulty with use the Repeat & Learn function. Press the [ ] (REPEAT & LEARN) button during a Lesson playback. See How You’ve Done Excellent Very Good Good OK ~~~~~~~~ ~~~~~~ ~~~~ ~~ When the lesson song has played all the way through your performance will be evaluated in 4 levels: OK, Good, Very Good, or Excellent. “Excellent!” is the highest evaluation. The Song location will move back four measures, a one-measure count will play, then Song playback will start again. Playback of the four measures will repeat with a one-measure count-in. To exit from this status, press this button again. Quick Guide 4 When Lesson playback reaches to the end, check your evaluation Grade on the display. “2 Timing” and “3 Waiting” will evaluate your performance in four levels: OK, Good, Very Good, or Excellent. Making Practice Perfect— Repeat & Learn NOTE • You can change the amount of measures the Repeat & Learn function jumps back by pressing a number button [1]–[9] during repeat playback. After the evaluation display has appeared, the lesson will start again from the beginning. PSR-I455 Owner’s Manual 27 Recording Your Performance You can record up to 10 of your performances as User Songs. The recorded User Songs can be played back on the instrument. NOTE • The Tabla/Tanpura performance cannot be recorded. 4 Track Structure of a Song Start recording. • When you press the [SONG] button in Step 2, play any note to start recording. Melody Tracks [1]–[5] The melody performance in the right-hand area of the keyboard will be recorded. Accompaniment Track [A] The chord progression (for the Style) will be recorded. • When you select a Style in Step 2, play a chord in the Auto Accompaniment area to start recording with Style playback, or press the [START/STOP] button to start recording only with playback of the Rhythm part of a Style. User 1 Quick Guide rEC 003 Current measure number Track 1 Track 2 Track 3 Track 4 Track 5 Accompaniment Track The current measure will be shown on the display while recording. 5 Quick Recording The operation is useful when you record a new Song from scratch. 1 2 Make the desired settings including the Main Voice selection. or Make the desired settings of your performance. After recording finishes, “Writing!” appears indicating that the recorded data will be stored, then the recorded track numbers in the display will light. • If you want to record only the melody performance, press the [SONG] button. • If you want to record the performance using a Style, press the [Style] button. 3 Press the [REC] button to enter the Record Ready mode. If a User Song was not selected beforehand, this operation selects the lowest-numbered unrecorded User Song (from 101–110) as Recording target. User 1 rEC Flashes 001 Flashes To exit from this status, press the [REC] button again. NOTE • The ACMP on/off status cannot be changed after the [REC] button is pressed. 28 PSR-I455 Owner’s Manual Press the [START/STOP] or [REC] button to stop recording. When using a Style, you can stop recording also by pressing the [ENDING] button then waiting until playback ends. NOTICE • Never attempt to turn the power off when “Writing!” is shown in the display. Doing so can damage the flash memory and result in a loss of data. 6 To play back the recorded Song, press the [START/STOP] button. Recording Your Performance The operation here is useful especially when you want to record the additional performances to an already recorded Song. 1 Press the [SONG] button, then select the desired User Song (111–120) as the recording target. User 1 111 Song number 2 3 Same as in Steps 4 to 6 (page 28) in “Quick Recording.” NOTE • If the memory becomes full while recording, an alert message will appear and recording will stop automatically. In this case, delete unnecessary data by using the Clear functions (page 30), then execute the recording again. Limitations while recording • The on/off status of ACMP cannot be changed. • The Style number cannot be changed. • When you use a Style, the following parameters cannot be changed: Reverb Type, Chorus Type, Time Signature, Style number and Style Volume. • Performance with a Split Voice cannot be recorded. Quick Guide Recording to a Specified Track While holding down the [REC] button, press the desired Track button to enter the Record Ready mode. If you want to record only the melody: While holding down the [REC] button, press one of the [1]–[5] buttons. Press and hold User 1 rEC 001 Track 1 will flash If you want to record only the Style playback: Press the [STYLE] button, select the desired Style, then simultaneously hold down the [REC] button and press the [6/A] button. ACMP is automatically turned on. Press and hold User 1 rEC 001 PSR-I455 Owner’s Manual 29 Recording Your Performance Clearing a User Song Clearing a Specified Track from a User Song You can clear all tracks of a User Song. 1 2 Press the [SONG] button, then select the User Song (111–120) to be cleared. While holding down the track [A] button, press the track [1] button for longer than a second. A confirmation message will appear on the display. Quick Guide Hold for longer than a second. This lets you clear individual tracks from a User Song. 1 Press the [SONG] button, then select the desired User Song (111–120). 2 From [1]–[5] and [A], press the Track button to be cleared for longer than a second. A confirmation message will appear on the display. Press and hold Hold for longer than a second. ClrUser1 ClrTr1 YES YES 3 Press the [+] button. A confirmation message will appear on the display. To cancel this operation, press the [-] button. 3 Press the [+] button. A confirmation message will appear on the display.To cancel this operation, press the [-] button. 4 Press the [+] button to clear the Song. A clear-in-progress message will appear briefly on the display. 4 Press the [+] button to clear the track. A clear-in-progress message will appear briefly on the display. 30 PSR-I455 Owner’s Manual Memorizing Your Favorite Panel Settings This instrument has a Registration Memory feature that lets you memorize your favorite settings for easy recall whenever they’re needed. Up to 32 complete setups can be saved (eight banks of four setups each). 8 Banks Memory 1 Memory 2 Memory 3 Memory 4 Up to 32 presets (eight banks of four each) can be memorized. 1 Make the desired settings such as those for Voice, Style, and Tabla/Tanpura. 2 Press and release the [MEMORY/BANK] button to call up a Bank number on the display. Bank Recalling Panel Settings from the Registration Memory 1 2 3 Press and release the [MEMORY/BANK] button to call up a Bank number on the display. Use the dial or the [1]–[8] number buttons to select a Bank number. Press one of the [1]–[4] buttons to call up the panel settings you memorized. The recalled REGIST MEMORY number appears in the display for a few seconds. Quick Guide Memorizing Panel Settings to the Registration Memory 1 Bank number 3 Use the dial or the [1]–[8] number buttons to select a Bank number. REGIST 1 1 NOTE • Data cannot be saved to the Registration Memory during Song playback. 4 While holding down the [MEMORY/ BANK] button, press one of the [1]–[4] buttons to memorize the current panel settings. Press and hold Writing! IMPORTANT • When recalling the panel settings from the Registration Memory, make sure to press the same button—[STYLE] or [TABLA/ TANPURA]—corresponding to the mode used when you memorize the panel settings. This is necessary since the mode status (Style or Tabla/Tanpura) is not memorized to the Registration Memory, meaning that it cannot be called up even if you press the REGISTRATION MEMORY button. Freezing the Style settings even if a different Registration number is selected If you want to select different Registration Memory setups without changing the Style settings or Tabla/ Tanpura settings, simultaneously hold down the [VOICE] button and press the REGIST MEMORY number button. NOTICE • If you select a Registration Memory number that already contains data, the previous data is deleted and overwritten by the new data. • Do not turn off the power while memorizing settings to the Registration Memory, otherwise the data may be damaged or lost. Press and hold If you want to freeze the Style settings or Tabla/Tanpura settings permanently, set the Freeze mode parameter to ON from Function display 060 (page 50). NOTE • For details about the parameters that can be memorized to Registration Memory, see the next page. PSR-I455 Owner’s Manual 31 Backup Parameters and Initialization Backup Parameters The following data will be maintained even if the power is turned off and can be transferred then saved to a computer via Musicsoft Downloader as a single Backup file. For instructions, refer to “Computerrelated Operations” (page 9). Initialization This function erases the Backup data described above and Song/Style data, then restores all the default factory settings. As required, execute one of the following two procedures. Backup Clear • User Song data (page 28) • Style data transferred from a computer and loaded to Style numbers 207–211 (page 57) • Registration Memory data (page 31) This operation initializes the backup data. While holding down the highest white key on the keyboard, press the [ ] (Standby/On) switch to turn the power on. Quick Guide • Function Settings (page 48): Tuning, Split Point, Touch Sensitivity, Style Volume, Song Volume, Tabla/Tanpura Volume, Metronome Volume, Grade, Demo Group, Demo Play, Demo Cancel, Master EQ type, Your Tempo on/off, Auto Power Off setting, Battery Select, Freeze Mode In addition to the Backup data above, all the Style data (including data that have not been loaded) and all the Song data will be maintained even if you turn off the power. Parameters that can be memorized to Registration Memory Style settings* Style number, ACMP on/off, Style volume, Track on/off Tabla/Tanpura settings** Tabla number, Tabla/Tanpura volume, Section, Track on/off, Volume balance between Tabla 1 and 2, Volume balance between Tabla and Tanpura Flash Clear This operation deletes all the Songs and Styles that have been transferred from a computer. Note that Style data loaded to Style numbers 207–211 will be maintained. While simultaneously holding the highest white key and the three highest black keys, press the [ ] (Standby/On) switch to turn the power on. Voice settings Main Voice settings: Voice number and all settings of the related Functions Dual Voice settings: Dual on/off and all settings of the related Functions Split Voice settings: Split on/off and all settings of the related Functions Effect settings Reverb Type, Chorus Type Arpeggio settings Arpeggio on/off and all settings of the related Functions Harmony settings Harmony on/off and all settings of the related Functions Other settings Transpose, Pitch Bend Range, Knob Effect Combination number, Split Point, Tempo, Pedal Function * Available only when a Style is selected. ** Available only when a Tabla is selected. 32 PSR-I455 Owner’s Manual NOTICE • Keep in mind that this operation also deletes the data you have purchased. Be sure to save the important data to a computer via Musicsoft Downloader (MSD) software. For details, refer to “Computer-related Operations” (page 9). Handy Performance Features Reference Selecting a Reverb Type Selecting a Chorus Type The Reverb effect lets you play with a rich concert hall type ambience. Although selecting a Style or Song will call up the optimum Reverb type for the entire sound, you can select a different Reverb type manually. The Chorus effect creates a thick sound that is similar to many of the same Voices being played in unison. Although selecting a Style or Song will call up the optimum Chorus type for the entire sound, you can select a different Chorus type manually. 1 Press the [FUNCTION] button. 1 Press the [FUNCTION] button. 2 Use the CATEGORY [+] and [-] buttons to call up “Reverb” (Function 034). After “Reverb” is shown for a few seconds, the current Reverb Type is shown. 2 Use the CATEGORY [+] and [-] buttons to call up “Chorus” (Function 035). After “Chorus” is shown for a few seconds, the current Chorus Type is shown. Reverb Chorus 034 035 Hall2 1 Current Reverb type Current Chorus type NOTE NOTE • Some Songs and Styles use Reverb Types which cannot be selected via panel operation. If such a Song or Style is played back, “- - -” is shown on the display. 3 Rotate the dial to select a Reverb type. Play the keyboard to check the sound. For information about the available Reverb types, refer to the Effect Type List (page 80). Adjusting the Reverb depth You can adjust the Reverb depth applied to the Main, Dual, and Split Voices individually via the same operations above. Regarding the item in Step 2, refer to the Function List on page 48. 035 Reference 02 Chorus1 034 • Some Songs and Styles use Chorus Types which cannot be selected via panel operation. If such a Song or Style is played back, “- - -” is shown on the display. 3 Rotate the dial to select a Chorus type. Play the keyboard to check the sound. For information about the available Chorus types, refer to the Effect Type List (page 80). Adjusting the Chorus depth You can adjust the Chorus depth applied to the Main, Dual, and Split Voices individually via the same operations above. Regarding the item in Step 2, refer to the Function List on page 48. PSR-I455 Owner’s Manual 33 Handy Performance Features Pitch Controls—Transpose The overall pitch of the instrument (except for the Drum Kit Voices) can be shifted up or down by a maximum of 1 octave in semitone increments. 1 Press the [FUNCTION] button. 2 Use the CATEGORY [+] and [-] buttons to call up “Transpos” (Function 004). Pitch Controls—the PITCH BEND wheel The PITCH BEND wheel can be used to add smooth pitch variations to notes you play on the keyboard. Roll the wheel upward to raise the pitch, or downward to lower the pitch. Transpos 00 3 004 Use the dial to set the Transpose value between -12 and +12. Calling up Optimum Panel Settings Pitch Controls—Tuning Reference The overall tuning of the instrument (except for the Drum Kit Voices) can be shifted up or down between 427 Hz and 453 Hz in approximately 0.2Hz increments. The default value is 440.0 Hz. Press the [FUNCTION] button. 2 Use the CATEGORY [+] and [-] buttons to call up “Tuning.” Tuning 005 Use the dial to set the Tuning value. 440.0Hz 005 34 PSR-I455 Owner’s Manual You can call up optimum panel settings that are ideal and stylistically appropriate for the current Song or Style—with a single touch. If you don’t know what settings are best with a selected Voice, for example, use the following functions. To call up the settings for a Song or Style (One Touch Setting): Select Voice number “000 OTS.” In this status, selecting a Style or Song will call up the optimum panel settings matching the current Song or Style. 1 3 You can change the amount of pitch bend produced by the wheel. Refer to “Pitch Bend Range” in the Function List (page 48). Handy Performance Features Changing the Touch Sensitivity of the Keyboard Selecting an EQ Setting for the Best Sound The keyboard of this instrument is equipped with a Touch Response feature that lets you dynamically and expressively control the level of the Voices according to your playing strength. Five different master equalizer (EQ) settings are provided to give you the best possible sound when listening through different reproduction systems—the instrument’s internal speakers, headphones, or an external speaker system. 1 Press the [FUNCTION] button. 2 Press the CATEGORY [+] or [-] button several times until “TouchSns” (Function 008) appears. “TouchSns” is shown in the display for a few seconds, and the current Touch Sensitivity is shown. 1 Press the [FUNCTION] button. 2 Press the CATEGORY [+] or [-] button several times until “MasterEQ” (Function 036) appears. “MasterEQ” is shown in the display for a few seconds, and the current Master EQ type appears. TouchSns MasterEQ 008 036 Medium Speaker 008 1 Current Touch Sensitivity 3 Use the dial to select a Touch Sensitivity setting between 1 and 4. When “1”–“3” is selected, higher values produce greater (easier) volume variation in response to keyboard dynamics—i.e. greater sensitivity. When “4” (off) is selected, all notes will be played at the same volume no matter how strongly or softly you play the keys. NOTE • The initial default Touch Sensitivity value is “2”. 036 Reference 2 Current EQ type 3 Use the dial to select the desired Master EQ type. Settings 1 and 2 are best for listening via the instrument’s built-in speakers, setting 3 is for headphones, and settings 4 and 5 are ideal for listening via external speakers. NOTE • “Boost” produces a more punchy sound but may produce distortion depending on the Voice and Style, compared to the other Master EQ types. PSR-I455 Owner’s Manual 35 Voice Settings Selecting a Dual Voice Voice Editing 1 For each of the Main, Dual and Split Voices, you can edit the parameters such as volume, octave and depth of the Reverb and Chorus, allowing you to create new, custom sounds that best suit your musical needs. Hold down the [DUAL] button for longer than a second to call up “D.Voice.” “D.VOICE” is shown for a few seconds, then the current Dual Voice appears. D.Voice 1 Press the [FUNCTION] button. 2 Use the CATEGORY [+] and [-] buttons to call up the desired item. Main Voice parameters are indicated as “M.******,” Dual Voice parameters as “D.******,” and Split Voice parameters as “S.******.” For information about each parameter, refer to the Function List on page 48. 018 Syn.Str 093 018 Current Dual Voice 2 Rotate the dial to select the desired Dual Voice. M.Volume 064 Selecting a Split Voice 1 Reference Hold down the [SPLIT] button for longer than a second to call up “S.Voice.” “S.VOICE” is shown for a few seconds, then the current Split Voice appears. 3 Rotate the dial to set the value. Check the sound by playing the keyboard. 4 Repeat Steps 2–3 above to edit various parameters. 5 If necessary, memorize the settings to the Registration Memory (page 31). The Voice-related settings are reset when a different Voice is selected. If you want to store the created sound for future recall, memorize the settings to the Registration Memory. S.Voice 028 Strings 086 028 Current Split Voice 2 36 Rotate the dial to select the desired Split Voice. PSR-I455 Owner’s Manual 009 Parameters Assigned to the Knobs This section describes each of the parameters which can be assigned to the Knobs (page 21). TABLA/TANPURA Knob A adjusts the volume balance between the sounds of Tabla 1 and 2, while Knob B adjusts the volume balance between the sounds of Tabla and Tanpura. x Level TABLA/TANPURA Knob A adjusts the tempo of Tabla playback while the Tanpura playback tempo is maintained. This follows typical Indian music stylistic conventions. Knob B raises or lowers the pitch of the Tabla/Tanpura sound in semitones, with the exception of Tabla 1. This accurately simulates the characteristics of the Tabla, in which the lower sound is not affected by the tuning. Note that also the pitch of Tabla 2 may not be changed depending on the Tabla/Tanpura pattern. NOTE • When Knob B is turned all the way left, only the pitch of the Tabla 2 sound is raised abruptly by an octave. This is due to a limitation in this instrument. c Knob B: RESONANCE Adjusts the amount of Resonance applied at the filter’s cutoff frequency. Turning the Knob to the right will increases the Resonance to emphasize the frequencies at the cutoff frequency, and thus “strengthens” the perceived effect of the filter. FILTER Filter effects shape the sound by allowing only a specified range of frequencies to pass and/or by producing a resonance peak at the filter’s “cutoff” frequency. Filter effects can be used to create a range of synthesizerlike sounds. NOTE • These effects are applied only to the Main/Dual Voices played on the keyboard. • Filter effects can sometimes cause distortion in the bass frequencies. Knob A: CUTOFF Adjusts the filter’s cutoff frequency, and therefore the brightness of the sound. Turning the Knob to the left makes the sound more muffled or darker, while turning the Knob A to the right makes the sound brighter. Resonance Frequency v EFFECT Knob A: REVERB Reproduces the acoustic ambience of a concert hall or club. Turning the Knob to the right will increase the Reverb depth. Knob B: CHORUS Produces a layered “multi-instrument” effect. Turning the Knob to the right will increase the Chorus depth. NOTE • These effects are applied only to the Main/Dual Voices played on the keyboard. b Reference z EG (Envelope Generator) Envelope Generator effects determine how the level of the sound varies over time. You can make the attack faster for a more percussive sound or slower for a violin-like sound, for example. Or you can lengthen or shorten the sustain to best match the music you’re playing. Level Sustain Level Level ATTACK Cutoff Frequency Key Played Frequency Frequencies in this range are passed. Frequencies in this range are cut off. DECAY RELEASE Time Key Released Knob A: ATTACK Adjusts the Attack Time (the amount of time it takes the sound to reach maximum level when a key is played). Turning the Knob to the right will increase the Attack Time, thus slowing down the attack rate. PSR-I455 Owner’s Manual 37 Parameters Assigned to the Knobs Knob B: RELEASE Adjusts the Release Time (the amount of time it takes for the sound to decay to silence after a key is released). Turning the Knob to the right will increase the Release Time, thus make a longer sustain. n STYLE FILTER Same as “ c FILTER.” These effects are applied only to Style or Tabla/Tanpura playback. NOTE • These effects are applied only to the Main/Dual Voices played on the keyboard. The chart below lists some interesting ways to use the various effects that can be assigned to the knobs. Some Ideas for Using the Knobs Number/Effect z x TABLA/TANPURA TABLA/TANPURA Try This Knob A adjusts the volume balance between the sounds of Tabla 1 (having the lower sound) and Tabla 2 (having the higher sound of Tabla or Mridangam). Knob B adjusts the volume balance between the sounds of the Tabla (assigned to the [TABLA 1] and [TABLA 2] buttons) and Tanpura (assigned to the [TANPURA 1]–[TANPURA 4] buttons). Play with these Knobs as the patterns loop, sing along if you wish, and create your own performance. Reference Knob A adjusts the tempo of Tabla/Tanpura playback. Setting to the minimum left-most position results in half the default tempo, while setting to the maximum right-most position results in double the default tempo. The center position corresponds to the default tempo. Note that the tempo cannot exceed the range (11–280), and that the tempo of the Tanpura patterns will not change even if you rotate Knob A. Knob B raises or lowers the pitch of the Tabla/Tanpura sound in semitones. Regarding the Tabla, only the higher sound (assigned to the [2] button) will be transposed. Rotating the knob leftward lowers the pitch while rotating the knob rightward raises the pitch. Use these knobs to set the desired tempo and key, sing along if you wish, and create your own performance! c v b n 38 FILTER Select a synth-type lead or pad voice (see the Voice List; page 61). Turn Knob B all the way up and operate Knob A while playing for some spacey, floating 1980’s effects. EFFECT Select a voice that sounds as though it already has reverb and chorus effects applied, and turn Knob A and Knob B all the way down to hear the “direct” sound of the voice. You can then turn the Knob A and Knob B settings up to add extra impact and richness to the voice. EG Select a piano voice, and turn Knob B all the way up and Knob A to about the 3 o’clock position. This should give you a majestic, organ-like sound. The attack time is quite long so play the keys and hold them to let the sound come in fully. Ideal for slow pieces. STYLE FILTER Select style 67, Euro Trance. Turn accompaniment on and start style playback (page 22). Set Knob B to about 3 o’clock, and Knob A to about 8 o’clock. The overall sound of the style should be a bit muffled, with the drums emphasized for solid rhythmic impact. PSR-I455 Owner’s Manual Arpeggio Settings Synchronizing an Arpeggio to Song/Style/Tabla Playback— Arpeggio Quantize When you play the keyboard to trigger an Arpeggio (page 20) along with Song/Style/Tabla playback, you’ll need to play the notes with correct timing to keep the Arpeggio in synchronization with the other playback tracks. However, your actual timing may be slightly ahead of or behind the beat (or both). The “Arpeggio Quantize” function of this instrument will correct any slight imperfections in the timing (according to settings below), and then play back the Arpeggio appropriately. Holding the Arpeggio Playback via the Footswitch You can set the instrument so that Arpeggio playback continues even after the note has been released, by pressing the footswitch connected to the SUSTAIN jack. 1 Press the [FUNCTION] button. 2 Use the CATEGORY [+] and [-] buttons to call up “Pdl Func” (Function 063). After “Pdl Func” is shown for a few seconds, the current setting is shown. • Synchronizing at the quarter notes • Synchronizing at the 8th notes • No synchronization with Style or Song playback Pdl Func Although the Arpeggio Quantize value is pre-programmed for each Arpeggio Type, you can change the value manually. Press the [FUNCTION] button. Sustain 1 2 Use the CATEGORY [+] and [-] buttons to call up “Quantize” (Function 042). After “Quantize” is shown for a few seconds, the current Arpeggio Quantize value is shown. Current setting 3 2 042 063 If you want to restore the footswitch function to sustain, select “Sustain.” If you want to use both hold and sustain functions, select “Hold+Sus”. 1/8 042 Current value 3 Rotate the dial to select “Arp Hold.” Arp Hold Quantize 2 063 Reference 1 063 Rotate the dial to select a value from “OFF,” “1/8” and “1/16.” • 1/8 Synchronizing at the quarter notes • 1/16 Synchronizing at the 8th notes • OFF No synchronization with Style or Song playback 4 Try playing Arpeggio with the footswitch. Press the notes to trigger the Arpeggio, then press the footswitch. Even if you release the notes, Arpeggio playback will continue. To stop Arpeggio playback, release the footswitch. PSR-I455 Owner’s Manual 39 Styles (Auto Accompaniment) and Tabla/Tanpura patterns Style Variations—Sections Each Style consists of “Sections” that allow you to vary the arrangement of the accompaniment to match the song you are playing. INTRO MAIN A/B ENDING AUTO FILL INTRO This is used for the beginning of the Song. When the Intro finishes, Style playback shifts to the Main section. The length of the Intro (in measures) differs depending on the selected Style. MAIN This is used for playing the main part of the Song. Playback of the Main section repeats indefinitely until another Section’s button is pressed. There are two variations (A and B), and the Style playback sound changes harmonically in response on the chords you play with your left hand. AUTO FILL This is automatically added before changing to Main A or B. ENDING This is used for the ending of the Song. When the Ending finishes, the Style playback stops automatically. The length of the Ending (in measures) differs depending on the selected Style. Reference 1 Press the [STYLE] button, then rotate the dial to select a Style. 2 Press the [ACMP ON/OFF] button to turn ACMP on. 3 Press the [SYNC START] button to turn Synchro Start on. Beat arrows flash. Synchro Start When the Synchro Start is on, Style playback will begin as soon as you play a chord in the accompaniment range of the keyboard. To turn off the Synchro Start, press the [SYNC START] button. Appears when ACMP is turned on. 4 Press the [MAIN/AUTO FILL] button to select Main A or Main B. MAIN A Current Section 40 PSR-I455 Owner’s Manual Styles (Auto Accompaniment) and Tabla/Tanpura patterns Press the [INTRO/ENDING/rit.] button. 8 Press the [INTRO/ENDING/rit.] button. ENDING INTRO≥A Now, you’re ready to start Style playback from the Intro section. 6 Play a chord with your left hand to start playback of the Intro. For this example, play a C major chord (as shown below). For information on how to enter chords, see “Chords” on page 44. Split Point Accompaniment range 7 After the Intro finishes, play the keyboard according to the progression of the Song you are playing. Play chords with your left hand while playing melodies with your right hand, and press the [MAIN/AUTO FILL] button as necessary. The Section will change to Fill-in then Main A or B. The Section switches to the Ending. When the Ending is finished, Style playback stops automatically. You can have the Ending gradually slow down (ritardando) by pressing the [INTRO/ENDING/rit.] button again while the Ending is playing back. Synchro Stop When you press the [SYNC/STOP] button to turn on this function, the Style will only play while pressing chords in the Accompaniment range of the keyboard. Releasing all the notes will stop Style playback. This makes it easy to add rhythmic breaks as you perform, simply by releasing your hand from the Accompaniment range of the keyboard. Appears when the synchro-stop function is engaged. Reference 5 FILL A≥B Turning on/off each Track via the [TRACK CONTROL] button The style will play while you are playing the keys Style playback will stop when you release the keys On/off status is shown in the display (page 15) NOTE • Up to two Track buttons can be pressed simultaneously for turning Tracks on or off. PSR-I455 Owner’s Manual 41 Styles (Auto Accompaniment) and Tabla/Tanpura patterns Tabla/Tanpura Variations Tap Start Each Tabla/Tanpura features five Variations A–E via the Tabla sound. These five variations can be alternated via the [A]–[E] buttons during playback, allowing you to add dynamic variations to the performance. You can start play back of the Tabla/Tanpura, Style or Song by simply tapping the TEMPO [TAP] button at the required tempo—four times for time signatures in 4 (4/4, etc.), and three times for time signatures in 3 (3/4, etc.). In addition, four phrase variations via the Tanpura sound are provided commonly for all the Tabla/Tanpura patterns. These four variations can be alternated via the TANPURA 1–4 buttons. Adjusting the Volume of the Style or Tabla/Tanpura Unlike the Styles, the Tabla/Tanpura patterns do not have the variations dedicated to the beginning or ending of the Song, such as Intro and Ending. The Tabla/Tanpura playback will continue until stopped manually. Changing the Tempo Reference A Style or Tabla/Tanpura can be played at any tempo you desire—fast or slow. 1 You can adjust the volume balance between Style or Tabla/Tanpura playback and keyboard performance. 1 Press the [FUNCTION] button. 2 Use the CATEGORY [+] and [-] buttons to call up “StyleVol” (Function 001) or “TablaVol” (Function 003). Press the TEMPO [TAP] button to call up the Tempo value in the display. StyleVol 100 Tempo 090 Current Tempo value 2 Rotate the dial to set a tempo from 011 to 280. Press the [+] and [-] buttons simultaneously to instantly reset the value to the default tempo of the current Style, Tabla/Tanpura or Song. You can change the tempo during playback by pressing the TEMPO [TAP] button just twice at the required tempo. NOTE • The above operation applies also to Song or Arpeggio playback tempo. 42 PSR-I455 Owner’s Manual 3 Rotate the dial to set the volume between 000 and 127. 001 Styles (Auto Accompaniment) and Tabla/Tanpura patterns Setting the Split Point The point on the keyboard that separates the left-hand range and the right-hand range of the keyboard is called the “Split Point.” When a Style is selected and ACMP is on, the notes played to the left of the Split Point are used to specify the chord for Style playback. When the Split function is on, the notes played to the left of the Split Point are used to play the Split Voice. The initial default Split Point is key number 54 (the F#2 key), but you can change it to another key. Playing Chords Without Style Playback If you press the [STYLE] button, press the [ACMP ON/OFF] button to turn ACMP on (the ACMP ON icon appears), and play the chord in the Left hand range of the keyboard (with SYNC START off), the chord sound will be heard without Style playback. This is referred to as “Stop Accompaniment.” The specified chord will be shown in the display, and affects the Harmony function (page 19). PopBossa 1 Press the [FUNCTION] button. 2 Use the CATEGORY [+] and [-] buttons to call up “SplitPnt” (Function 007). You can call up this display also by pressing the [STYLE] then holding the [ACMP] button for longer than a second. 132 Appears when auto accompaniment is on Accompaniment range SplitPnt 007 Reference 054 Split Point 3 Rotate the dial to set the Split Point between 036 (C1) and 096 (C6). Split Point (54: F#2) Split voice Main voice NOTE • The Split Point set here is applied common to the Style and Voice. • During the Lesson playback, the Split Point cannot be changed. PSR-I455 Owner’s Manual 43 Styles (Auto Accompaniment) and Tabla/Tanpura patterns Chord Types for Style Playback For users who are new to chords, this chart features common chords. Since there are many useful chords and many different ways to use them musically, refer to commercially available chord books for further details. indicates the root note. Major Minor Seventh Minor Seventh Major Seventh Reference C Cm C7 Cm7 CM 7 D Dm D7 Dm7 DM 7 E Em E7 Em7 EM7 C F Fm F7 Fm7 FM7 G Gm G7 Gm7 GM7 A Am A7 Am7 AM 7 B Bm B7 Bm 7 BM 7 • Inversions can be used as well as in “root” position—with the following exceptions: m7, m7b5, 6, m6, sus4, aug, dim7, 7b5, 6(9), sus2 • Inversion of the 7sus4 and m7(11) chords are not recognized if the notes are omitted. • When playing a chord which cannot be recognized by this instrument, nothing is shown on the display. In such a case, only the rhythm and bass parts will be played. Easy Chords This method lets you easily play chords in the accompaniment range of the keyboard using only one, two, or three fingers. For root “C” C To play a major chord Press the root note () of the chord. 44 PSR-I455 Owner’s Manual Cm To play a minor chord Press the root note together with the nearest black key to the left of it. C7 To play a seventh chord Press the root note together with the nearest white key to the left of it. Cm 7 To play a minor seventh chord Press the root note together with the nearest white and black keys to the left of it (three keys altogether). Styles (Auto Accompaniment) and Tabla/Tanpura patterns 2-2. Looking Up Chords Using the Chord Dictionary The Dictionary function is useful when you know the name of a certain chord and want to quickly learn how to play it. 1 Press the key labeled “M7” in the section between “CHORD TYPE ” and “ROOT.” The notes you should play for the specified chord (root note and chord type) are conveniently shown in the display, both as notation and in the keyboard diagram. Press and hold the [CHORD DICT] button for longer than a second to call up “Dict.” Dict. Notation of chord Hold for longer than a second. Chord name (root and type) Dict. This operation will divide the entire keyboard into the three ranges as illustrated below. 001 • The range to the right of “ROOT ”: Lets you specify the Chord Root, but produces no sound. • The range between “CHORD TYPE ” and “ROOT ”: Lets you specify the Chord Type, but produces no sound. • The range to the left of “CHORD TYPE ”: Lets you play and confirm the Chord specified in the above two ranges. Chord Type range To call up possible inversions of the chord, press the [+]/[-] buttons. NOTE • About major chords: Simple major chords are usually indicated only by the root note. For example, “C” refers to C major. However, when specifying major chords here, make sure to select “M” (major) after pressing the root note. Root range 3 2 As an example, learn how to play a GM7 (G major seventh) chord. 2-1. Press the “G” key in the section to the right of “ROOT ” so that the “G” is shown as the root note. Reference Keyboard playing range Individual notes of chord (keyboard) Following the notation and keyboard diagram in the display, try playing a chord in the range to the left of “CHORD TYPE .” When you’ve played the chord properly, a bell sound signals your success and the chord name in the display flashes. Dict. 001 PSR-I455 Owner’s Manual 45 Song Settings BGM (Background Music) Playback With the default setting, pressing the [DEMO/BGM] button will play back only a few of the internal Songs repeatedly. This setting can be changed so that, for example, all internal Songs are played, or all Songs transferred to the instrument from a computer are played back, letting you use the instrument as a background music source. Five playback group settings are provided. Simply select the one that suits your needs. 1 Hold down the [DEMO/BGM] button for longer than a second. “DemoGrp” is shown in the display for a few seconds, followed by the current repeat playback target. Random Song Playback The order of Song repeat playback via the [DEMO/ BGM] button can be changed between the numerical order and random order. 1 Press the [FUNCTION] button. 2 Press the CATEGORY [+] and [-] buttons several times to call up “PlayMode” (Function 058). “PlayMode” is shown for a few seconds, followed by the current playback mode, “Normal” or “Random.” PlayMode 058 Hold for longer than a second. 2 Reference 3 46 When the DemoGrp is set to “Demo,” this parameter cannot be set. Rotate the dial to select a repeat playback group from the table below. Demo Preset Songs 001–003 Preset All preset Songs User All User Songs Download All Songs transferred from a computer USB All Songs (MIDI files) in the connected USB flash memory Press the [DEMO] button to start playback. To stop playback, press the [DEMO] button again. PSR-I455 Owner’s Manual 3 Rotate the dial to select “Random.” To return to the numerical order, select “Normal.” 4 Press the [DEMO] button to start playback. To stop playback, press the [DEMO] button again. Song Settings Tempo Setting of the Song This operation is same as that of the Style and Tabla/ Tanpura. Refer to page 42. Tap Start Melody Voice Setting of the Preset Song You can change the Melody Voice of the current Preset Song temporarily to any other desired Voice. 1 Press the [SONG] button, select the desired Preset Song, then start playback. 2 Press the [VOICE] button, then rotate the dial to select the desired Voice. This operation is same as that of the Style and Tabla/ Tanpura. Refer to page 42. Song Volume 1 Press the [FUNCTION] button. Strings 086 Press the CATEGORY [+] and [-] buttons several times to call up “SongVol.” SongVol 100 002 3 Hold down the [VOICE] button for longer than a second. After “SONG MELODY VOICE” is shown for a few seconds, the Melody Voice of the Song will be changed to that selected in Step 2. Song volume 3 Rotate the dial to set the Song volume between 000 and 127. NOTE Reference 2 SONG MEL Hold for longer than a second. • Song volume can be adjusted while a Song is selected. PSR-I455 Owner’s Manual 47 The Functions The “Functions” provide access to a range of detailed instrument parameters such as Tuning, Split Point, Voices and Effects. Take a look at the Function List (pages 48–50). When you find the desired Function you want to change, follow the instructions below. Basic Procedure in the Function Display 1 Find the desired item in the Function List on pages 48–50. 2 Press the [FUNCTION] button. 4 Use the dial, the [+] and [-] buttons, or the [0]–[9] number buttons to set the value of the selected function. Direct numeric entry. StyleVol 100 3 001 • Decrement value by 1. • Cancel Press the CATEGORY [+] and [-] buttons several times until the desired item appears. Press simultane- • Increment ously to recall the value by 1. default setting. • Execute Some Function settings are maintained even if you turn off the power, and can be transferred to the computer as Backup Data (page 32). Current item Transpos 00 004 Function List Reference Function Number Function Display Range/Settings Default Value Description Volume 001 Style Volume StyleVol 000–127 100 Refer to page 42. 002 Song Volume SongVol 000–127 100 Refer to page 47. 003 Tabla Volume TablaVol 000–127 100 Refer to page 42. Transpose Transpos -12–12 0 Refer to page 34. 440.0Hz Refer to page 34. Overall 004 005 Tuning Tuning 427Hz–453Hz (in approximately 0.2Hz increments) 006 Pitch Bend Range PBRange 01–12 007 Split Point SplitPnt 036–096 (C1–C6) TouchSns 1 (Soft), 2 (Medium), 3 (Hard), 4 (Off) 008 Touch Sensitivity 2 Sets the range over which you can control pitch by using the PITCH BEND wheel (page 34), in semitone increments. 54 (F#2) Refer to page 43. 2 (Medium) Refer to page 35. Main Voice (page 16) 48 009 Volume M.Volume 000–127 * Determines the volume of the Main Voice. 010 Octave M.Octave -2 – +2 * Determines the octave range for the Main Voice. 011 Pan M.Pan 000 (left)–64 (center)– 127 (right) * Determines the stereo pan position of the Main Voice. The value “0” results in the sound being panned full left; the value “127” results in the sound being panned full right. 012 Reverb Depth M.Reverb 000–127 * Determines how much of the Main Voice's signal is sent to the Reverb effect. 013 Chorus Depth M.Chorus 000–127 * Determines how much of the Main Voice’s signal is sent to the Chorus effect. 014 Attack Time M.Attack 000–127 64 PSR-I455 Owner’s Manual Determines how fast the volume of the Main Voice reaches the Attack level when the note is pressed. The larger the value, the faster the attack rate. The smaller the value, the slower the attack rate. The Functions Function Number Function Display Range/Settings Default Value Description 015 Release Time M.Releas 000–127 64 Determines how fast the volume of the Main Voice falls to 0 when the note is released. The larger the value, the longer the sustain. The smaller the value, the shorter the sustain. 016 Filter Cutoff M.Cutoff 000–127 64 Determines the Filter Cutoff Frequency (page 37) of the Main Voice. 017 Filter Resonance M.Reso. 000–127 64 Determines the Filter Resonance (page 37) of the Main Voice. Dual Voice (page 16) 018 Dual Voice D.Voice 001–753 * 019 Volume D.Volume 000–127 * Determines the volume of the Dual Voice. 020 Octave D.Octave -2 – +2 * Determines the octave range for the Dual Voice. 021 Pan D.Pan 000 (left)–64 (center)– 127 (right) * Determines the stereo pan position of the Dual Voice. A value of “0” results in the sound being panned full left; a value of “127” results in the sound being panned full right. 022 Reverb Depth D.Reverb 000–127 * Determines how much of the Dual Voice’s signal is sent to the Reverb effect. 023 Chorus Depth D.Chorus 000–127 * Determines how much of the Dual Voice’s signal is sent to the Chorus effect. 024 Attack Time D.Attack 000–127 64 Determines how fast the volume of the Dual Voice reaches the Attack level when the note is pressed. The larger the value, the faster the attack rate. The smaller the value, the slower the attack rate. 025 Release Time D.Releas 000–127 64 Determines how fast the volume of the Dual Voice falls to 0 when the note is released. The larger the value, the longer the sustain. The smaller the value, the shorter the sustain. 026 Filter Cutoff D.Cutoff 000–127 64 Determines the Filter Cutoff Frequency (page 37) of the Dual Voice. 027 Filter Resonance D.Reso. 000–127 64 Determines the Filter Resonance (page 37) of the Dual Voice. Selects a Dual Voice. Split Voice (page 17) 028 Split Voice S.Voice 001–753 86 (Strings) 029 Volume S.Volume 000–127 * Determines the volume of the Split Voice. 030 Octave S.Octave -2 – +2 * Determines the octave range for the Split Voice. 031 Pan S.Pan 000 (left)–64 (center)– 127 (right) * Determines the stereo pan position of the Split Voice. A value of “0” results in the sound being panned full left; a value of “127” results in the sound being panned full right. 032 Reverb Depth S.Reverb 000–127 * Determines how much of the Split Voice’s signal is sent to the Reverb effect. 033 Chorus Depth S.Chorus 000–127 * Determines how much of the Split Voice’s signal is sent to the Chorus effect. Reference Selects a Split Voice. Effects 034 Reverb Type Reverb 01–10 ** Refer to page 33. 035 Chorus Type Chorus 01–05 ** Refer to page 33. 1 (Speaker) Refer to page 35. 4 (Wide Off) Determines the Ultra-Wide Stereo type. Higher values produce a greater Wide effect. 036 Master EQ Type MasterEQ Speaker, Boost, Headphone, Line Out1, Line Out2 037 Wide Type Wide 1–4 Harmony (page 19) 038 Harmony Type HarmType 01–26 * Determines the Harmony type. 039 Harmony Volume HarmVol 000–127 * Determines the volume of the Harmony effect ARP Type 001–162 * Determines the Arpeggio type. Arpeggio (page 20) 040 Arpeggio Type 041 Arpeggio Velocity ARP Velo 1(Original), 2(Thru) * When “Thru” is selected, the velocities of Arpeggio playback are determined by your playing strength. When “Original” is selected, the velocities of Arpeggio playback are determined by the original setting regardless of your playing strength. 042 Arpeggio Quantize Quantize 1(OFF), 2(1/8), 3(1/16) * Refer to page 39. Computer (USB TO HOST terminal)*** 043 PC mode PC mode OFF/PC1/PC2 OFF Optimizes the MIDI settings when you connect to a computer Local Control Local ON/OFF ON Determines whether the instrument’s keyboard controls the internal tone generator (ON) or not (OFF). When you record your keyboard performance to the application software on the computer via MIDI, set this parameter to OFF. MIDI*** 044 PSR-I455 Owner’s Manual 49 The Functions Function Number Function Display Range/Settings Default Value Description 045 External Clock ExtClock ON/OFF OFF Determines whether the instrument synchronizes to the internal clock (OFF) or an external clock (ON). When you record your keyboard performance to the application software on the computer via MIDI, set this parameter to ON. 046 Keyboard Out KbdOut ON/OFF ON Determines whether MIDI messages generated via keyboard performance are transmitted (ON) or not (OFF) from the USB TO HOST terminal. 047 Style Out StyleOut ON/OFF OFF Determines whether MIDI messages generated via Style playback are transmitted (ON) or not (OFF) from the USB TO HOST terminal. 048 Song Out SongOut ON/OFF OFF Determines whether MIDI messages generated via Song playback are transmitted (ON) or not (OFF) from the USB TO HOST terminal. 049 Initial Send InitSend YES/NO - Lets you send the data of the panel settings to a computer. Press [+] to send, or press [-] to cancel. This operation should be done immediately after starting the Recording operation on the computer. Metronome (page 18) 050 Time Signature Numerator TimesigN 00–60 ** Determines the time signature of the Metronome. 051 Time Signature Denominator TimesigD Half note, Quarter note, Eighth note, Sixteenth note ** Determines the length of each metronome beat. 052 Metronome Volume MtrVol 000–127 100 Determines the volume of the Metronome. Lesson (page 26) 053 Lesson Track (R) R-Part GuideTrack1–16, OFF 1 Determines the guide track number for your right hand lesson. The setting is only effective for Songs in SMF format 0 transferred from a computer. 054 Lesson Track (L) L-Part GuideTrack1–16, OFF 2 Determines the guide track number for your left hand lesson. The setting is only effective for Songs in SMF format 0 transferred from a computer. 055 Grade Grade ON/OFF 056 Your Tempo YourTemp ON/OFF ON Determines whether the Grade function is on or off. ON This parameter is for Lesson 3 “Waiting.” When set to ON, playback tempo will change to match the speed at which you are playing. When set to OFF, playback tempo will be maintained regardless of the speed at which you are playing. Demo (page 24) Reference 057 Demo Group DemoGrp 1 (Demo) / 2 (Preset) / 3 (User) / 4 (Download) / 5 (USB) 1 (Demo) Refer to page 46. 058 Demo Play Mode PlayMode 1 (Normal) 2 (Random) 1 (Normal) Refer to page 46. 059 Demo Cancel D-Cancel ON/OFF OFF Determines whether Demo cancel is enabled or not. When this is set to ON, the Demo Song will not play, even if the [DEMO/BGM] button is pressed. ON/OFF OFF When set to on, the Style related settings are maintained even if you press another Registration Memory number button. OFF, 5/10/15/30/60/ 120 (min.) 30 minutes Specifies the time that will elapse before the instrument’s power is automatically turned off. 1 (Alkaline) / 2 (Ni-MH) 1 (Alkaline) Selects the type of batteries you have installed to this instrument. 1 (Sustain) Determines the function of the footswitch connected to the SUSTAIN jack (page 13). When “1 (Sustain)” or “4 (Sostenut)” is selected, the footswitch works as a damper pedal or sostenuto pedal as on an acoustic piano. Note that sustain does not affect the Split Voice, while sostenuto affects only the Split Voice when Split is on. When “2 (Arp Hold)” is selected, pressing the footswitch maintains Arpeggio playback even if you release the notes (page 39). When “3 (Hold+Sus)” is selected, both the Arpeggio Hold and Sustain functions are assigned to the footswitch. Registration Memory (page 31) 060 Freeze Mode Freeze Auto Power Off (page 14) 061 Auto Power Off Time AutoOff Battery (page 12) 062 Battery Type Battery Pedal Function (page 20) 063 Pedal Function Pdl Func 1 (Sustain) / 2 (Arp Hold) / 3 (Hold+Sus) / 4 (Sostenut) * The appropriate value is automatically set for each Voice combination. ** The appropriate value is automatically set for each Song, Style or Tabla/Tanpura. *** For details, refer to “Computer-related Operations” (page 9). 50 PSR-I455 Owner’s Manual USB Flash Memory Operations By connecting the USB flash memory device to the [USB TO DEVICE] terminal, you can save the data created on this instrument, such as User Song and parameter settings. The saved data can be recalled to this instrument again for the future use. IMPORTANT • It is recommended to use the Power Adaptor when executing USB flash memory operations, since battery power may not be reliable enough to last through these crucial operations. When you try executing certain functions, the “Use Adaptor” indication may appear and the selected function cannot be executed. This instrument features a built-in [USB TO DEVICE] terminal. When connecting a USB device to the terminal, be sure to handle the USB device with care. Follow the important precautions below. NOTE • For more information about the handling of USB devices, refer to the owner’s manual of the USB device. Compatible USB devices The instrument does not necessarily support all commercially available USB devices. Yamaha cannot guarantee operation of USB devices that you purchase. Before purchasing a USB device for use with this instrument, check the following web page: http://download.yamaha.com/ NOTE • Other USB devices such as a computer keyboard or mouse cannot be used. Connecting USB flash memory • When connecting a USB device to the [USB TO DEVICE] terminal, make sure that the connector on the device is appropriate and that it is connected in the proper direction. • When connecting a USB cable, make sure that the length is less than 3 meters. • Though the instrument supports the USB 1.1 standard, you can connect and use a USB 2.0 storage device with the instrument. However, note that the transfer speed is that of USB 1.1. Using USB Flash Memory By connecting the instrument to a USB flash memory, you can save data you’ve created to the connected device, as well as read data from the connected device. The number of USB flash memory to be used Only one USB flash memory device can be connected to the [USB TO DEVICE] terminal. Formatting USB flash memory When a USB flash memory is connected, a message may appear prompting you to format the device. If so, execute the Format operation (page 53). NOTICE • The format operation overwrites any previously existing data. Make sure that the USB flash memory you are formatting does not contain important data. To protect your data (write-protect) To prevent important data from being inadvertently erased, apply the write-protect provided with the particular USB flash memory. If you are saving data to the USB flash memory, make sure to disable write-protect. Reference Precautions when using the [USB TO DEVICE] terminal Connecting/removing USB storage device Before removing the USB flash memory from the [USB TO DEVICE] terminal, make sure that the instrument is not accessing data (such as in the Save and Delete operations). NOTICE • Avoid frequently connecting/disconnecting the USB flash memory too often. Doing so may result in the operation of the instrument “freezing” or hanging up. While the instrument is accessing data (such as during Save, Delete, Load and Format operations) or is mounting the USB storage device (shortly after the connection), do NOT unplug the USB flash memory, and do NOT turn the power off. Doing so may corrupt the data on either or both devices. PSR-I455 Owner’s Manual 51 USB Flash Memory Operations Connecting a USB Flash Memory 1 2 Connect a USB flash memory to the USB TO DEVICE terminal, being careful to insert it with the proper orientation. Wait until “USB” appears on the left corner of the display. The “USB” indication confirms that the connected USB flash memory has been mounted or recognized. Harmnum1 4 Rotate the dial to call up the desired File Control function, then execute it. For details, refer to the table below. Display File Control function Page Load STY Loading a Style File 57 Load USR Loading User Data from a USB Flash Memory 56 Save SMF Saving a User Song as SMF to a USB Flash Memory 55 Save USR Saving User Data to a USB Flash Memory 54 Del SMF Deleting a SMF File in a USB Flash Memory 58 Del USR Deleting a User File in a USB Flash Memory 58 Format? Formatting a USB Flash Memory 53 Exit? Exiting from a File Control display 59 Messages may appear on the display during File Control procedures to aid in smooth operation. Refer to the Message List on page 59 for details. NOTE • No sound will be produced if the keyboard is played while the file control display is showing, and only buttons related to File Control operations will be active. Reference 3 Hold down the [FILE CONTROL] button to call up the File Control display. NOTE The File Control display cannot be called up in the following situations. • During playback of Style, Tabla/Tanpura, or Song Load STY Hold for longer than a second. If “UnFormat” followed by “Format?” appears: This indicates that the connected USB flash memory has not been formatted, and cannot be mounted or recognized. Execute the Format operation by following the instructions starting with Step 2 on page 53. 52 PSR-I455 Owner’s Manual • When “USB” does not appear even if you have connected a USB flash memory to the [USB TO DEVICE] terminal. USB Flash Memory Operations Formatting a USB Flash Memory The Format operation lets you prepare commercially available USB flash memory for use with this instrument is called “Format.” 1 2 Recognizable file location in the USB flash memory for Song playback (page 24) USB flash memory (Root) Song File Hold the [FILE CONTROL] button for longer than a second to call up the File Control display. Song File Use the CATEGORY [+] and [-] buttons to call up “Format?.” Can be selected/ played. Song File Format? Song File 4 Press the [0/EXECUTE] button. A confirmation message will appear. To cancel the operation, press the [-/NO] button. Press the [0/EXECUTE] button again or the [+/YES] button to execute the Format operation. After a while, a message indicating completion of the operation appears, and the “USER FILES” folder will be created on the root directory in the USB flash memory. IMPORTANT • In order to play data copied to a USB flash memory from a computer or other device, the data must be stored either in the USB flash memory’s root directory or a first-level/second-level folder in the root directory. Data stored in third-level-folders created inside a second-level folder cannot be selected and played by this instrument. NOTE • If playback of an external Song (created via a different instrument or computer) produces the distorted sound, decrease the Song Volume (page 47) to reduce the distortion then adjust the Master Volume (page 14). Reference 3 Cannot be selected/played. NOTICE • The Format operation cannot be cancelled during execution. Never turn off the power or disconnect the USB flash memory during the operation. Doing so may result in data loss. 5 Press the [FILE CONTROL] button to exit from the File Control display. PSR-I455 Owner’s Manual 53 USB Flash Memory Operations Saving User Data to a USB Flash Memory 5 The following data created on this instrument comprise the “User Data.” • All 10 User Songs • Styles which have been transferred from a computer then loaded to Style numbers 207–211. NOTICE • The Save operation cannot be cancelled during execution. Never turn off the power or disconnect the USB flash memory during the operation. Doing so may result in data loss. • All the Registration Memory settings The User Data can be saved as a single “User File” (.usr) to a USB flash memory. NOTE • The amount of time required for this operation may vary depending on the condition of the USB flash memory. NOTE • The extension (.usr) of the User File will not be shown on the display of this instrument. Confirm the extension on the computer display when connecting the USB flash memory to a computer. 1 Hold the [FILE CONTROL] button for longer than a second to call up the File Control display. 2 Use the CATEGORY [+] and [-] buttons to call up “Save USR.” Reference Press the [0/EXECUTE] button. As the target file name, “USER***” (***: number) appears on the display. If desired, rotate the dial to select a different file name from “USER001”–“USER100.” USER001 4 Press the [0/EXECUTE] button again. A confirmation message will appear. To cancel the operation, press the [-/NO] button. Overwriting existing files If a file that already contains data is selected as the target user file, an overwrite confirmation message will appear. 54 6 Press the [FILE CONTROL] button to exit from the File Control display. NOTE Save USR 3 Press the [0/EXECUTE] button again, or the [+/YES] button to execute the Save operation. After a while, a message indicating completion of the operation appears, and a User file (.usr) will be saved in a “USER FILES” folder which will automatically be created on the USB flash memory. PSR-I455 Owner’s Manual • If you want to recall the User file (.usr) to this instrument again, execute the Load operation (page 56). USB Flash Memory Operations Saving a User Song as SMF to a USB Flash Memory 5 A User Song can be converted to SMF (Standard MIDI File) format 0 and saved to a USB flash memory. SMF (Standard MIDI File) format With this format, various events via the keyboard performance such as note on/off and Voice selection will be recorded as MIDI data. The SMF Format 0 and Format 1 are available. A large number of MIDI devices are compatible with SMF Format 0, and most commercially available Song file (MIDI file) is provided in SMF Format 0. 1 2 Press the [0/EXECUTE] button again. A confirmation message will appear. To cancel the operation, press the [-/NO] button. Overwriting existing files If a file that already contains data is selected, an overwrite confirmation message will appear. 6 Hold the [FILE CONTROL] button for longer than a second to call up the File Control display. Press the [0/EXECUTE] button again, or the [+/YES] button to execute the Save operation. After a while, a message indicating completion of the operation appears, and a User Song will be saved as the SMF format 0 in a “USER FILES” folder which will automatically be created on the USB flash memory. NOTICE • The Save operation cannot be cancelled during execution. Never turn off the power or disconnect the USB flash memory during the operation. Doing so may result in data loss. Use the CATEGORY [+] and [-] buttons to call up “Save SMF.” NOTE • The amount of time required for this operation may vary depending on the condition of the USB flash memory. 3 7 Press the [0/EXECUTE] button. As the target User Song, “USER**” (**: number 1–10) appears on the display. If desired, rotate the dial to select a different User Song from “USER01”–“USER10” then press the [0/EXECUTE] button. Press the [FILE CONTROL] button to exit from the File Control display. Reference Save SMF User 1 4 Press the [0/EXECUTE] button again. As the target file name on the USB flash memory, “SONG***” (***: number 1–100) appears on the display. If desired, rotate the dial to select the different file. SONG001 PSR-I455 Owner’s Manual 55 USB Flash Memory Operations Loading User Data from a USB Flash Memory A User data (page 54) saved as a User file (.usr) to the USB flash memory can be loaded to this instrument. NOTICE • Loading a User file will overwrite and erase the existing data, including all 10 User Songs, Style data loaded to the Style numbers 207–211, and all the Registration Memory settings. Save important data you want to keep to a separate USB flash memory before loading a User file. 1 Hold the [FILE CONTROL] button for longer than a second to call up the File Control display. 2 Use the CATEGORY [+] and [-] buttons to call up “Load USR.” Load USR 3 Press the [0/EXECUTE] button. “USER***” (***: number) appears on the display as the User file name in the USB flash memory. As desired, rotate the dial to select a different User file. Reference USER001 Note that the User file should be saved in the USERFILES folder on the USB flash memory. Files saved outside this folder cannot be recognized. 4 Press the [0/EXECUTE] button again. A confirmation message will appear. To cancel the operation, press the [-/NO] button. 5 Press the [0/EXECUTE] button again, or the [+/YES] button to execute the Load operation. After a while, a message indicating completion of the operation appears. NOTICE • The Load operation cannot be cancelled during execution. Never turn off the power or disconnect the USB flash memory during the operation. Doing so may result in data loss. 56 PSR-I455 Owner’s Manual 6 Press the [FILE CONTROL] button to exit from the File Control display. 7 Check the loaded data by calling up the User Song, one of the Styles 207–211, and Registration Memory settings. USB Flash Memory Operations 4 Style data created on another instrument or a computer can be loaded to the Style numbers 207–211, and you can play them like the internal preset Styles. The following two Load operations are available. Loading of a Style file (.sty) saved on the root directory on the USB flash memory Loading of a Style file (.sty) transferred from a computer via the Musicsoft Downloader and stored in the internal memory of this instrument NOTE • For instructions on transferring a Style file from a computer via the Musicsoft Downloader, refer to “Computer-related Operations” (page 9). After data transfer, load the Style data to one of the Style numbers 207–211 to enable playback. Load To? 207 5 Press the [0/EXECUTE] button again. A confirmation message will appear. To cancel the operation, press the [-/NO] button. 6 Press the [0/EXECUTE] button again, or the [+/YES] button to execute the Load operation. After a while, a message indicating completion of the operation appears. NOTICE NOTICE • Loading a Style file will overwrite and erase the existing data of the destination number. Save important data you want to keep to a separate USB flash memory before loading. 1 Hold the [FILE CONTROL] button for longer than a second to call up the File Control display. 2 Use the CATEGORY [+] and [-] buttons to call up “Load STY.” Press the [0/EXECUTE] button again. As the Load destination, “Load To? ***” (***: 207–211) appears on the display. If desired, rotate the dial to select a different number. • The Load operation cannot be cancelled during execution. Never turn off the power or disconnect the USB flash memory during the operation. Doing so may result in data loss. 7 Press the [STYLE] button, rotate the dial to select a Style from 207–211, then try playing it back. Reference Loading a Style File Load STY 3 Press the [0/EXECUTE] button. A name of a Style file in the USB flash memory or internal memory of this instrument will appear on the display. As desired, rotate the dial to select a different Style file. DiscoFox FLA PSR-I455 Owner’s Manual 57 USB Flash Memory Operations Deleting a User File in the USB Flash Memory Deleting a SMF File in the USB Flash Memory User Files (.usr) in the root directory of the USB flash memory can be deleted. You can delete a SMF file that has been saved in the USB flash memory via the Save SMF operation (page 55). IMPORTANT • The User file (.usr) to be deleted should have been saved in the root directory of the USB flash memory. Files outside this folder cannot be recognized. 1 2 Hold the [FILE CONTROL] button for longer than a second to call up the File Control display. • The SMF file (.usr) to be deleted should have been saved in the root directory of the USB flash memory. Files outside this folder cannot be recognized. This operation can be applied only to file names with the “SONG***” (***: number) format. 1 Hold the [FILE CONTROL] button for longer than a second to call up the File Control display. 2 Use the CATEGORY [+] and [-] buttons to call up “Del SMF.” Use the CATEGORY [+] and [-] buttons to call up “Del USR.” Del USR 3 IMPORTANT Del SMF Press the [0/EXECUTE] button. As a User file name in the USB flash memory, “USER****” (****: number) appears on the display. As desired, rotate the dial to select a different User file. 3 USER001 Reference 4 5 Press the [0/EXECUTE] button again. A confirmation message will appear. To cancel the operation, press the [-/NO] button. Press the [0/EXECUTE] button again, or the [+/YES] button to execute the Delete operation. After a while, a message indicating completion of the operation appears. SONG001 4 Press the [0/EXECUTE] button again. A confirmation message will appear. To cancel the operation, press the [-/NO] button. 5 Press the [0/EXECUTE] button again, or the [+/YES] button to execute the Delete operation. After a while, a message indicating completion of the operation appears. NOTICE • The Delete operation cannot be cancelled during execution. Never turn off the power or disconnect the USB flash memory during the operation. Doing so may result in data loss. 6 NOTICE • The Delete operation cannot be cancelled during execution. Never turn off the power or disconnect the USB flash memory during the operation. Doing so may result in data loss. Press the [FILE CONTROL] button to exit from the File Control display. 6 58 PSR-I455 Owner’s Manual Press the [0/EXECUTE] button. As a SMF file name in the USB flash memory, “SONG***” (***: number) appears on the display. As desired, rotate the dial to select a different SMF file. Press the [FILE CONTROL] button to exit from the File Control display. USB Flash Memory Operations To exit from the File Control display, press the [VOICE], [STYLE], [TABLA/TANPURA], [SONG], [FUNCTION], or [GRAND PIANO] button. You can also exit from the File Control function mode as follows: 1 Use the CATEGORY [+] and [-] buttons to call up “Exit?.” Exit? 2 Press the [0/EXECUTE] button to exit from the File Control display. Message Comment Can’t Use Indicates that the file control function is currently unavailable since the media is being accessed. Complet. Indicates the specified job completion such as data saving and transmission. Data Err Displayed when the user song contains illegal data. Disk Ful Displayed when saving data cannot be executed since the media memory becomes full. Error Displayed when a file error or operational error occurs. File Ful Indicates that SMF songs cannot be displayed since the total number of files exceeds the capacity. no data There is no data to save in the flash memory. no file There is no file to load or delete from the media. 0ur Communication with the USB device has been shut down because of the overcurrent to the USB device. Disconnect the device from the [USB TO DEVICE] terminal, then turn on the power of the instrument. Protect Displayed when trying to save or delete data on a protected media, or format a protected media. Set protect to off and try again. UnFormat Displayed when connecting an unformatted media. UseAdpt USB flash memory save, delete, and format operations cannot be performed when the instrument is being powered from battery. Use an AC adaptor. Reference Exiting from a File Control display PSR-I455 Owner’s Manual 59 Troubleshooting Appendix Problem This is normal and indicates that the instrument is receiving electrical power. When using a mobile phone, noise is produced Using a mobile phone in close proximity to the instrument may produce interference. To prevent this, turn off the mobile phone or use it further away from the instrument The instrument is automatically turned off even if no operation is done. This is normal. This occurs due to the Auto Power Off function (page 14). The volume is too soft. The sound quality is poor. The Style/Tabla/Song/Arpeggio stops unexpectedly or will not play. The recorded data of the song, etc. does not play correctly. The LCD display suddenly goes dark, and all panel settings are reset. The batteries are low or dead. Replace all six batteries with completely new ones or completely recharged ones, or use the AC power adaptor. No sound is produced even when the keyboard is played, or a Song, Style, or Tabla/Tanpura is being played back. Appendix 60 Possible Cause and Solution When the instrument is turned on or off, a popping sound is temporarily produced. Check whether a set of headphones or an audio cable is connected to the PHONES/OUTPUT, or not. When such a connection is made, no sound is output from the speaker of this instrument. Check the on/off status of the Local Control (page 49). Normally, set this parameter to ON. The footswitch (for sustain) seems to produce the opposite effect. For example, pressing the footswitch cuts off the sound and releasing it sustains the sounds. The polarity of the footswitch is reversed. Make sure that the footswitch plug is properly connected to the SUSTAIN jack before turning on the power. No sound is produced even when playing keys in the right hand area of the keyboard, although chords played in the left hand area are recognized. Check whether or not the Dictionary function (page 45) is used. When used, this is normal. Not all of the Voices seem to sound, or the sound seems to be cut off, when playing the keyboard, Arpeggio, Style or Tabla/Tanpura or Song. You have exceeded 32 simultaneous notes, which is the maximum polyphony (the maximum amount of notes that can be played simultaneously) of this instrument. If the Main, Dual, and Split Voices are being used along with playback of Arpeggio, Style, Tabla/Tanpura or Song, some notes/sounds may be omitted (or “stolen”). The sound of the Voice changes from note to note. This is normal. The tone generation method uses multiple recordings (samples) of an instrument across the range of the keyboard; thus, the actual sound of the Voice may be slightly different from note to note. The keyboard performance and playback of Style/Tabla/ Song produces an unexpected or inappropriate sound, and cannot be restored to the normal status. Using the Knobs can produce dramatic changes in the sound, but may also produce unexpected or undesired sounds. If you want to restore the original, normal sound before being changed by the Knobs, change the Voice, Style, Tabla/Tanpura or Song, or press the [PORTABLE GRAND] button to reset the panel settings. The Style, Tabla/Tanpura or Song does not start even when the [START/STOP] button is pressed. The Arpeggio does not start even when the note is pressed with the Arpeggio turned on. Check the on/off status of the External Clock (page 50). Normally, set this parameter to OFF. The volume of the Style, Tabla/Tanpura or Song is too low. Check the volume setting in the Functions (pages 42 and 47). The chords played in the left hand area cannot be recognized even when the ACMP is turned on. Check the Split Point setting (page 43). Set this to the appropriate value. Style parts other than the Rhythm part produce no sound. Check the on/off status of the ACMP (page 22). Make sure to turn ACMP on. The Styles numbered 194–206 produce no rhythm drum sound even when the [START/STOP] button is pressed. This is normal. Style numbers 194–206 have no rhythm parts, so no rhythm will play. When one of these Styles is selected, turn ACMP on, then specify the chord in the left hand area to play Style parts other than the Rhythm part. The ACMP indicator does not appear on the display when the [ACMP ON/OFF] button is pressed. Check the on/off status of the [STYLE] lamp. When using a Style, press the [STYLE] button to turn on the [STYLE] lamp. PSR-I455 Owner’s Manual Voice List Maximum Polyphony Panel Voice List Voice No. 1 2 3 4 5 6 7 8 9 10 11 12 13 14 15 16 17 18 19 20 *21 22 23 *24 25 26 27 *28 *29 30 31 *32 33 34 35 *36 37 38 39 40 41 42 43 44 45 46 47 48 *49 50 51 52 MIDI Bank Select Program Voice Name MSB LSB Change# (0–127) (0–127) (1–128) INDIAN 0 113 21 Harmonium 1 (Single Reed) 0 114 21 Harmonium 2 (Double Reed) 0 115 21 Harmonium 3 (Triple Reed) 0 123 112 Shehnai 0 123 111 Sarangi 1 0 124 111 Sarangi 2 0 124 112 Pungi 0 117 74 Bansuri 0 112 105 Sitar 1 0 113 105 Sitar 2 0 115 105 Sarod 0 97 16 Santur 0 114 105 Tanpura 0 116 117 Tabla 126 0 116 Tabla Kit 1 126 0 117 Tabla Kit 2 126 0 40 Indian Kit 1 126 0 115 Indian Kit 2 126 0 112 Animal Kit PIANO 0 112 1 Grand Piano Octave Piano 0 112 2 Bright Piano 0 112 7 Harpsichord Octave Harpsichord 0 112 4 Honky-tonk Piano 0 112 3 MIDI Grand Piano 0 113 3 CP 80 Piano+Strings Piano Pad E.PIANO 0 114 5 Cool! Galaxy Electric Piano 0 113 6 Hyper Tines Tiny Electric Piano 0 112 5 Funky Electric Piano 0 112 6 DX Modern Electric Piano 0 114 6 Venus Electric Piano EP Pad 0 112 8 Clavi ORGAN 0 118 19 Cool! Organ 0 117 19 Cool! Rotor Organ 0 112 17 Jazz Organ 1 0 113 17 Jazz Organ 2 0 112 19 Rock Organ 0 114 19 Purple Organ 0 112 18 Click Organ 0 116 17 Bright Organ 0 127 19 Theater Organ 0 121 20 16'+2' Organ 0 120 20 16'+4' Organ Full Organ 0 113 20 Chapel Organ 0 112 20 Pipe Organ 0 112 21 Reed Organ NOTE • The Voice List includes MIDI program change numbers for each voice. Use these program change numbers when playing the instrument via MIDI from an external device. • Program change numbers are often specified as numbers “0–127.” Since this list uses a “1–128” numbering system, in such cases it is necessary to subtract 1 from the transmitted program change numbers to select the appropriate sound: e.g. to select No. 2 in the list, transmit program change number 1. • Some voices may sound continuously or have a long decay after the notes have been released while the sustain pedal (footswitch) is held. Voice No. 53 54 55 56 57 58 59 60 61 62 *63 64 65 66 67 68 69 70 71 72 73 74 75 76 77 78 79 80 81 82 83 84 85 86 87 88 89 *90 *91 92 93 94 *95 96 97 *98 99 100 *101 102 103 *104 105 MIDI Bank Select Program Voice Name MSB LSB Change# (0–127) (0–127) (1–128) ACCORDION 0 112 22 Musette Accordion 0 113 22 Traditional Accordion 0 113 24 Bandoneon 0 113 23 Modern Harp 0 112 23 Harmonica GUITAR 0 116 25 Dynamic Nylon Guitar 0 118 30 Dynamic Overdriven 0 112 25 Classical Guitar 0 112 26 Folk Guitar 0 112 27 Jazz Guitar Octave Jazz Guitar 0 117 28 60s Clean Guitar 0 113 26 12Strings Guitar 0 112 28 Clean Guitar 0 113 27 Octave Guitar 0 112 29 Muted Guitar 0 112 30 Overdriven Guitar 0 112 31 Distortion Guitar BASS 0 116 34 Dynamic Electric Bass 0 112 34 Finger Bass 0 112 33 Acoustic Bass 0 112 35 Pick Bass 0 112 36 Fretless Bass 0 112 37 Slap Bass 0 118 40 DX100 Bass 0 119 40 Ramp Bass 0 120 40 Dark Core Bass 0 119 39 Fat Lo Bass 0 122 40 Bleep Bass 0 121 40 Funk Bass 0 112 39 Synth Bass 0 113 39 Hi-Q Bass 0 113 40 Dance Bass STRINGS 0 112 49 String Ensemble 0 112 50 Chamber Strings 0 115 50 Marcato Strings 0 113 50 Slow Strings Octave Strings Orchestra Section 0 112 45 Tremolo Strings 0 112 51 Synth Strings 0 112 46 Pizzicato Strings Octave Pizzicato Strings 0 112 41 Violin 0 112 43 Cello Strings Session 0 112 44 Contrabass 0 112 47 Harp Octave Harp 0 112 106 Banjo 0 112 56 Orchestra Hit Orchestra Hit & Timpani 0 96 105 Tambra PSR-I455 Owner’s Manual Appendix The instrument has 32-note maximum polyphony. This means that it can play a maximum of up to 32 notes at once, regardless of what functions are used. Auto accompaniment uses a number of the available notes, so when auto accompaniment is used the total number of available notes for playing on the keyboard is correspondingly reduced. The same applies to the Split Voice and Song functions. If the maximum polyphony is exceeded, earlier played notes will be cut off and the most recent notes have priority (last note priority). 61 Voice List Voice No. 106 107 108 109 110 111 112 113 114 **115 116 **117 118 119 120 *121 122 123 124 125 *126 *127 128 129 130 131 132 133 134 135 136 137 138 139 140 141 142 143 144 *145 146 Appendix 147 148 149 *150 *151 *152 153 154 *155 156 157 158 159 160 161 162 *163 164 165 166 167 168 62 MIDI Bank Select Program Voice Name MSB LSB Change# (0–127) (0–127) (1–128) 0 96 106 Rabab 0 98 106 Oud 0 0 107 Shamisen 0 97 106 Gopichant 0 0 108 Koto 0 96 108 Taisho-kin 0 0 16 Dulcimer 0 97 108 Kanoon 0 96 16 Cimbalom Tremolo Cimbalom 0 40 47 Yang Chin Tremolo Yang Chin CHOIR 0 112 53 Choir 0 113 53 Vocal Ensemble 0 112 55 Air Choir Grand Choir 0 112 54 Vox Humana SAXOPHONE 0 117 67 Sweet! Tenor Sax 0 113 65 Sweet! Soprano Sax 0 116 66 Sax Ensemble Ballroom Sax Ensemble Jazz Section 0 112 67 Tenor Sax 0 112 66 Alto Sax 0 112 65 Soprano Sax 0 112 68 Baritone Sax 0 114 67 Breathy Tenor Sax 0 112 72 Clarinet 0 112 69 Oboe 0 112 70 English Horn 0 112 71 Bassoon 0 116 72 WoodWind Section 0 97 112 Hichiriki TRUMPET 0 115 57 Sweet! Trumpet 0 112 57 Trumpet 0 112 58 Trombone 0 113 58 Trombone Section 0 112 60 Muted Trumpet 0 112 61 French Horn Octave Horns 0 112 59 Tuba BRASS 0 112 62 Brass Section 0 113 62 Big Band Brass 0 116 62 Octave Brass Ballroom Brass Jazz Brass Section Orchestra Brass 0 113 56 Brass Hit 0 113 63 80s Brass Fat Synth Brass 0 119 62 Mellow Horns 0 115 63 Funkey Brass 0 114 63 Techno Brass 0 112 63 Synth Brass FLUTE 0 114 74 Sweet! Flute 0 113 76 Sweet! Pan Flute 0 112 74 Flute Flute & Clarinet 0 112 73 Piccolo 0 112 76 Pan Flute 0 112 75 Recorder 0 112 80 Ocarina SYNTH LEAD 0 104 82 RS Saw Lead 1 PSR-I455 Owner’s Manual Voice No. 169 170 171 172 173 174 175 176 177 178 179 180 181 182 183 184 185 *186 *187 *188 *189 *190 *191 *192 193 194 195 196 197 198 199 200 201 202 203 204 205 206 207 208 209 210 **211 212 **213 214 **215 216 217 218 219 **220 221 222 223 224 225 226 227 228 229 230 231 232 233 234 MIDI Bank Select Program Voice Name MSB LSB Change# (0–127) (0–127) (1–128) 0 106 82 RS Saw Lead 2 0 114 84 RS Dist Lead 0 119 81 RS Dual Square 0 107 82 RS Ramp Lead 0 108 82 RS Tech Saw 0 119 85 RS Quack Lead 0 109 82 RS Dual Saw 0 105 82 RS Sync 1 0 119 88 RS Sync 2 0 112 81 Square Lead 0 112 82 Sawtooth Lead 0 112 88 Under Heim 0 112 85 Portatone 0 115 82 Analogon 0 119 82 Fargo 0 112 86 Voice Lead 0 121 82 Funky Lead Octave Lead Wah Square Lead Resonance Lead Quack Lead 5th Wah Lead Super 5th Lead SYNTH PAD Dynamic Chime 0 126 90 RS Analog Pad 0 123 90 RS Synth Pad 0 113 92 RS Warm Pad 0 116 91 RS Short Resonance 0 124 90 RS Noise Pad 0 125 90 RS Tekno Man 0 118 89 Sweet Heaven 0 121 89 Dream Heaven 0 113 89 Symbiont 0 112 99 Star Dust 0 112 92 Xenon Pad 0 112 95 Equinox 0 112 89 Fantasia 0 113 90 Dark Moon 0 112 101 Brightness 0 113 101 Bell Pad PERCUSSION 0 112 12 Vibraphone 0 112 13 Marimba Tremolo Marimba 0 112 14 Xylophone Tremolo Xylophone 0 112 115 Steel Drums Tremolo Steel Drum 0 112 9 Celesta 0 112 11 Music Box 0 112 15 Tubular Bells 0 112 48 Timpani Timpani Roll DRUM KITS 127 0 88 Power Kit 127 0 1 Standard Kit 1 127 0 2 Standard Kit 2 127 0 9 Room Kit 127 0 17 Rock Kit 127 0 25 Electronic Kit 127 0 59 T8 Kit 127 0 60 T9 Kit 127 0 26 Analog Kit 127 0 113 Dance Kit 127 0 33 Jazz Kit 127 0 41 Brush Kit 127 0 49 Symphony Kit 126 0 1 SFX Kit 1 Voice List 235 236 237 238 239 240 241 242 243 244 245 246 247 248 249 250 251 252 253 254 *255 256 257 258 259 260 261 262 263 264 265 266 267 268 269 270 271 272 273 274 275 276 277 278 279 280 281 282 283 284 285 286 287 MIDI Bank Select Program Voice Name MSB LSB Change# (0–127) (0–127) (1–128) 126 0 2 SFX Kit 2 126 0 21 Bass Drum Kit 126 0 22 Reverse Bass Drum Kit 126 0 125 China Kit 1 127 0 127 China Kit 2 126 0 37 Arabic Kit 126 0 41 Cuban Kit ARPEGGIO Concerto Chambers Pizzicato Strings Latin Rock Brass Section 1 Brass Section 2 Funk Brass Piano Chord Piano Ballad Piano Arpeggio Hybrid Synth Sequence Guitarist Strum Pickin' Spanish Synth Chords Funky Clavi Reggae Organ Harpeggio Analog Sequence Sawtooth Percussion Arpeggio Trill Club Beat R&B Loop Club Adds Samba Indian Arabic Finger Bass Left Combo Jazz Left Paul's Bass Left Trance Bass Left Acid Bass Left Piano Ballad Left Salsa Piano Left Piano Arpeggio Left Guitar Arpeggio Left Strum Left Teen Tal C Teen Tal F Teen Tal A Dadra D Dadra E Dadra G XGlite Voice List Voice No. 288 289 290 291 292 293 294 295 MIDI Bank Select Program Voice Name MSB LSB Change# (0–127) (0–127) (1–128) XG PIANO 0 0 1 Grand Piano 0 1 1 Grand Piano KSP 0 18 1 MellowGrPno 0 40 1 Piano Strings 0 41 1 Dream 0 0 2 Bright Piano 0 1 2 Bright Piano KSP 0 0 3 Electric Grand Piano Voice No. 296 297 298 299 300 301 302 303 304 305 306 307 308 309 310 311 312 313 314 315 316 317 318 319 320 321 322 323 324 325 326 327 328 329 330 331 332 333 334 335 336 337 338 339 340 341 342 343 344 345 346 347 348 349 350 351 352 353 354 355 356 357 358 359 360 361 362 MIDI Bank Select Program Voice Name MSB LSB Change# (0–127) (0–127) (1–128) 0 1 3 Electric Grand Piano KSP 0 32 3 Detuned CP80 0 40 3 LayeredCP 1 0 41 3 LayeredCP 2 0 0 4 Honky-tonk Piano 0 1 4 Honky-tonk Piano KSP 0 0 5 Electric Piano 1 0 1 5 Electric Piano 1 KSP 0 18 5 MellowEP 1 0 32 5 Chorus Electric Piano 1 0 40 5 HardEl.Piano 0 45 5 Velocity Crossfade El.P 1 0 64 5 60's El.Piano 1 0 0 6 Electric Piano 2 0 1 6 Electric Piano 2 KSP 0 32 6 Chorus Electric Piano 2 0 33 6 DX EP Hard 0 34 6 DX Legend 0 40 6 DX Phase EP 0 41 6 DX + Analog Electric Piano 0 42 6 DX Koto EP 0 45 6 Velocity Crossfade El.P 2 0 0 7 Harpsichord 0 1 7 Harpsichord KSP 0 25 7 Harpsichord 2 0 27 8 Clavi.Wah 0 35 7 Harpsichord 3 0 64 8 Pulse Clavi. 0 0 8 Clavi 0 1 8 Clavi KSP 0 65 8 PierceClavi. XG CHROMATIC 0 0 9 Celesta 0 0 10 Glockenspiel 0 0 11 Music Box 0 64 11 Orgel 0 0 12 Vibraphone 0 1 12 Vibraphone KSP 0 45 12 Hard Vibes 0 0 13 Marimba 0 1 13 Marimba KSP 0 64 13 Sine Marimba 0 97 13 Balimba 0 98 13 Log Drums 0 0 14 Xylophone 0 0 15 Tubular Bells 0 96 15 Church Bells 0 35 16 Dulcimer 2 0 97 15 Carillon XG ORGAN 0 0 17 Drawbar Organ 0 32 17 Detuned Drawbar Organ 0 33 17 60's Drawbar Organ 1 0 34 17 60's Drawbar Organ 2 0 35 17 70's Drawbar Organ 1 0 36 17 Drawbar Organ 2 0 37 17 60's Drawbar Organ 3 0 38 17 Even Bar Organ 0 40 17 16+2'2/3 0 64 17 Organ Bass 0 65 17 70's Drawbar Organ 2 0 66 17 Cheezy Organ 0 67 17 Drawbar Organ 3 0 0 18 Percussive Organ 0 24 18 70's Percussive Organ 0 32 18 Detuned Percussive Organ 0 33 18 Light Organ 0 37 18 Percussive Organ 2 0 0 19 Rock Organ PSR-I455 Owner’s Manual Appendix Voice No. 63 Voice List Voice No. 363 364 365 366 367 368 369 370 371 372 373 374 375 376 377 378 379 380 381 382 383 384 385 386 387 388 389 390 391 392 393 394 395 396 397 398 399 400 401 402 403 404 405 406 407 408 409 410 411 Appendix 412 413 414 415 416 417 418 419 420 421 422 423 424 425 426 427 64 MIDI Bank Select Program Voice Name MSB LSB Change# (0–127) (0–127) (1–128) 0 64 19 Rotary Organ 0 65 19 Slow Rotary 0 66 19 Fast Rotary 0 0 20 Church Organ 0 32 20 Church Organ 3 0 35 20 Church Organ 2 0 40 20 Notre Dame 0 64 20 Organ Flute 0 65 20 Tremolo Organ Flute 0 0 21 Reed Organ 0 40 21 Puff Organ 0 0 22 Accordion 0 32 22 AccordIt 0 0 23 Harmonica 0 32 23 Harmonica 2 0 0 24 Tango Accordion 0 64 24 Tango Accordion 2 XG GUITAR 0 0 25 Nylon Guitar 0 16 25 Nylon Guitar 2 0 25 25 Nylon Guitar 3 0 43 25 Velocity Guitar Harmonics 0 96 25 Ukulele 0 0 26 Steel Guitar 0 16 26 Steel Guitar 2 0 35 26 12-string Guitar 0 40 26 Nylon & Steel Guitar 0 41 26 Steel Guitar with Body Sound 0 96 26 Mandolin 0 0 27 Jazz Guitar 0 18 27 Mellow Guitar 0 32 27 Jazz Amp 0 0 28 Clean Guitar 0 32 28 Chorus Guitar 0 0 29 Muted Guitar 0 40 29 Funk Guitar 1 0 41 29 Muted Steel Guitar 0 43 29 Funk Guitar 2 0 45 29 Jazz Man 0 0 30 Overdriven Guitar 0 43 30 Guitar Pinch 0 0 31 Distortion Guitar 0 40 31 Feedback Guitar 0 41 31 Feedback Guitar 2 0 0 32 Guitar Harmonics 0 65 32 Guitar Feedback 0 66 32 Guitar Harmonics 2 XG BASS 0 0 33 Acoustic Bass 0 40 33 Jazz Rhythm Velocity Crossfade Upright 0 45 33 Bass 0 0 34 Finger Bass 0 18 34 Finger Dark 0 27 34 Flange Bass Bass & Distorted Electric 0 40 34 Guitar 0 43 34 Finger Slap Bass 0 45 34 Finger Bass 2 0 65 34 Modulated Bass 0 0 35 Pick Bass 0 28 35 Muted Pick Bass 0 0 36 Fretless Bass 0 32 36 Fretless Bass 2 0 33 36 Fretless Bass 3 0 34 36 Fretless Bass 4 0 96 36 Syn.Fretless 0 97 36 SmthFretless 0 0 37 Slap Bass 1 PSR-I455 Owner’s Manual Voice No. 428 429 430 431 432 433 434 435 436 437 438 439 440 441 442 443 444 445 446 447 448 449 450 451 452 453 454 455 456 457 458 459 460 461 462 463 464 465 466 467 468 469 470 471 472 473 474 475 476 477 478 479 480 481 482 483 484 485 486 487 488 489 490 491 492 493 494 MIDI Bank Select Program Voice Name MSB LSB Change# (0–127) (0–127) (1–128) 0 27 37 ResonantSlap 0 32 37 Punch Thumb Bass 0 0 38 Slap Bass 2 0 43 38 Velocity Switch Slap 0 0 39 Synth Bass 1 0 18 39 Synth Bass 1 Dark 0 20 39 Fast Reso Bass 0 24 39 Acid Bass 0 35 39 Clavi Bass 0 40 39 Techno Synth Bass 0 64 39 Orbiter 0 65 39 Square Bass 0 66 39 Rubber Bass 0 96 39 Hammer 0 0 40 Synth Bass 2 0 6 40 Mellow Synth Bass 0 12 40 Sequenced Bass 0 18 40 Click Synth Bass 0 19 40 Synth Bass 2 Dark 0 32 40 Smooth Synth Bass 0 40 40 Modular Synth Bass 0 41 40 DX Bass 0 64 40 XWire Bass XG STRINGS 0 0 41 Violin 0 8 41 Slow Violin 0 0 42 Viola 0 0 43 Cello 0 0 44 Contrabass 0 0 45 Tremolo Strings 0 8 45 Slow Tremolo Strings 0 40 45 Suspense Strings 0 0 46 Pizzicato Strings 0 0 47 Orchestral Harp 0 0 48 Timpani XG ENSEMBLE 0 0 49 Strings 1 0 3 49 Stereo Strings 0 8 49 Slow Strings 0 24 49 Arco Strings 0 35 49 60's Strings 0 40 49 Orchestra 0 41 49 Orchestra 2 0 42 49 Tremolo Orchestra 0 45 49 Velocity Strings 0 0 50 Strings 2 0 3 50 Stereo Slow Strings 0 8 50 Legato Strings 0 40 50 Warm Strings 0 41 50 Kingdom 0 64 50 70's Strings 0 65 50 Strings 3 0 0 51 Synth Strings 1 0 27 51 ResoStrings 0 64 51 Synth Strings 4 0 65 51 Synth Strings 5 0 0 52 Synth Strings 2 0 0 53 Choir Aahs 0 3 53 Stereo Choir 0 32 53 Mellow Choir 0 16 53 Choir Aahs 2 0 40 53 Choir Strings 0 0 54 Voice Oohs 0 0 55 Synth Voice 0 40 55 Synth Voice 2 0 41 55 Choral 0 64 55 Analog Voice 0 0 56 Orchestra Hit 0 35 56 Orchestra Hit 2 Voice List 495 496 497 498 499 500 501 502 503 504 505 506 507 508 509 510 511 512 513 514 515 516 517 518 519 520 521 522 523 524 525 526 527 528 529 530 531 532 533 534 535 536 537 538 539 540 541 542 543 544 545 546 547 548 549 550 551 552 553 554 555 556 557 558 559 MIDI Bank Select Program Voice Name MSB LSB Change# (0–127) (0–127) (1–128) 0 64 56 Impact XG BRASS 0 0 57 Trumpet 0 16 57 Trumpet 2 0 17 57 BriteTrumpet 0 32 57 Warm Trumpet 0 0 58 Trombone 0 18 58 Trombone 2 0 0 59 Tuba 0 16 59 Tuba 2 0 0 60 Muted Trumpet 0 0 61 French Horn 0 6 61 French Horn Solo 0 32 61 French Horn 2 0 37 61 Horn Orchestra 0 0 62 Brass Section 0 35 62 Trumpet & Trombone Section 0 40 62 Brass Section 2 0 41 62 High Brass 0 42 62 Mellow Brass 0 0 63 Synth Brass 1 0 12 63 Quack Brass 0 20 63 Resonant Synth Brass 0 24 63 Poly Brass 0 27 63 Synth Brass 3 0 32 63 Jump Brass 0 45 63 Ana Vel Brass 1 0 64 63 Analog Brass 1 0 0 64 Synth Brass 2 0 18 64 Soft Brass 0 40 64 Synth Brass 4 0 41 64 Choir Brass 0 45 64 Ana Vel Brass 2 0 64 64 Analog Brass 2 XG REED 0 0 65 Soprano Sax 0 0 66 Alto Sax 0 40 66 Sax Section 0 43 66 Hyper Alto Sax 0 0 67 Tenor Sax 0 40 67 Breathy Tenor Sax 0 41 67 Soft Tenor Sax 0 64 67 Tenor Sax 2 0 0 68 Baritone Sax 0 0 69 Oboe 0 0 70 English Horn 0 0 71 Bassoon 0 0 72 Clarinet XG PIPE 0 0 73 Piccolo 0 0 74 Flute 0 0 75 Recorder 0 0 76 Pan Flute 0 0 77 Blown Bottle 0 0 78 Shakuhachi 0 0 79 Whistle 0 0 80 Ocarina XG SYNTH LEAD 0 0 81 Square Lead 0 6 81 Square Lead 2 0 8 81 LM Square 0 18 81 Hollow 0 19 81 Shroud 0 64 81 Mellow 0 65 81 Solo Sine 0 66 81 Sine Lead 0 0 82 Sawtooth Lead 0 6 82 Sawtooth Lead 2 0 8 82 Thick Sawtooth Voice No. 560 561 562 563 564 565 566 567 568 569 570 571 572 573 574 575 576 577 578 579 580 581 582 583 584 585 586 587 588 589 590 591 592 593 594 595 596 597 598 599 600 601 602 603 604 605 606 607 608 609 610 611 612 613 614 615 616 617 618 619 620 621 622 623 624 625 626 MIDI Bank Select Program Voice Name MSB LSB Change# (0–127) (0–127) (1–128) 0 18 82 Dynamic Sawtooth 0 19 82 Digital Sawtooth 0 20 82 Big Lead 0 24 82 Heavy Synth 0 25 82 Waspy Synth 0 40 82 Pulse Saw 0 41 82 Dr.Lead 0 45 82 Velocity Lead 0 96 82 Sequenced Analog 0 0 83 Calliope Lead 0 65 83 Pure Lead 0 0 84 Chiff Lead 0 64 84 Rubby 0 0 85 Charang Lead 0 64 85 Distorted Lead 0 65 85 Wire Lead 0 0 86 Voice Lead 0 24 86 Synth Aahs 0 64 86 Vox Lead 0 0 87 Fifths Lead 0 35 87 Big Five 0 0 88 Bass & Lead 0 16 88 Big & Low 0 64 88 Fat & Perky 0 65 88 Soft Whirl XG SYNTH PAD 0 0 89 New Age Pad 0 64 89 Fantasy 0 0 90 Warm Pad 0 16 90 Thick Pad 0 17 90 Soft Pad 0 18 90 Sine Pad 0 64 90 Horn Pad 0 65 90 Rotary Strings 0 0 91 Poly Synth Pad 0 64 91 Poly Pad 80 0 65 91 Click Pad 0 66 91 Analog Pad 0 67 91 Square Pad 0 0 92 Choir Pad 0 64 92 Heaven 0 66 92 Itopia 0 67 92 CC Pad 0 0 93 Bowed Pad 0 64 93 Glacier 0 65 93 Glass Pad 0 0 94 Metallic Pad 0 64 94 Tine Pad 0 65 94 Pan Pad 0 0 95 Halo Pad 0 0 96 Sweep Pad 0 20 96 Shwimmer 0 27 96 Converge 0 64 96 PolarPad 0 66 96 Celestial XG SYNTH EFFECTS 0 0 97 Rain 0 45 97 Clavi Pad 0 64 97 Harmo Rain 0 65 97 African Wind 0 66 97 Carib 0 0 98 Sound Track 0 27 98 Prologue 0 64 98 Ancestral 0 0 99 Crystal 0 12 99 Synth Drum Comp 0 14 99 Popcorn 0 18 99 Tiny Bells 0 35 99 Round Glockenspiel PSR-I455 Owner’s Manual Appendix Voice No. 65 Voice List Voice No. 627 628 629 630 631 632 633 634 635 636 637 638 639 640 641 642 643 644 645 646 647 648 649 650 651 652 653 654 655 656 657 658 659 660 661 662 663 664 665 666 667 668 669 Appendix 670 671 672 673 674 675 676 677 678 679 680 681 682 683 684 685 686 687 688 689 690 691 692 693 66 MIDI Bank Select Program Voice Name MSB LSB Change# (0–127) (0–127) (1–128) 0 40 99 Glockenspiel Chimes 0 41 99 Clear Bells 0 42 99 Chorus Bells 0 64 99 Synth Mallet 0 65 99 Soft Crystal 0 66 99 Loud Glocken 0 67 99 Christmas Bel 0 68 99 Vibe Bells 0 69 99 Digital Bells 0 70 99 Air Bells 0 71 99 Bell Harp 0 72 99 Gamelimba 0 0 100 Atmosphere 0 18 100 Warm Atmosphere 0 19 100 Hollow Release 0 40 100 Nylon Electric Piano 0 64 100 Nylon Harp 0 65 100 Harp Vox 0 66 100 Atmosphere Pad 0 67 100 Planet 0 0 101 Brightness 0 64 101 Fantasy Bells 0 96 101 Smokey 0 0 102 Goblins 0 64 102 Goblins Synth 0 65 102 Creeper 0 66 102 Ring Pad 0 67 102 Ritual 0 68 102 To Heaven 0 70 102 Night 0 71 102 Glisten 0 96 102 Bell Choir 0 0 103 Echoes 0 8 103 Echoes 2 0 14 103 Echo Pan 0 64 103 Echo Bells 0 65 103 Big Pan 0 66 103 Synth Piano 0 67 103 Creation 0 68 103 Star Dust 0 69 103 Reso&Panning 0 0 104 Sci-Fi 0 64 104 Starz XG WORLD 0 0 105 Sitar 0 35 105 Sitar 2 0 32 105 Detuned Sitar 0 97 105 Tamboura 0 0 112 Shanai 0 64 112 Shanai 2 0 96 112 Pungi 0 0 106 Banjo 0 28 106 Muted Banjo 0 0 109 Kalimba 0 0 110 Bagpipe 0 0 111 Fiddle XG PERCUSSIVE 0 0 113 Tinkle Bell 0 96 113 Bonang 0 97 113 Altair 0 98 113 Gamelan Gongs 0 99 113 Stereo Gamelan Gongs 0 100 113 Rama Cymbal 0 101 113 Asian Bells 0 0 114 Agogo 0 0 115 Steel Drums 0 97 115 Glass Percussion 0 98 115 Thai Bells 0 0 116 Woodblock PSR-I455 Owner’s Manual Voice No. 694 695 696 697 698 699 700 701 702 703 704 705 706 707 708 709 710 711 712 713 714 715 716 717 718 719 720 721 722 723 724 725 726 727 728 729 730 731 732 733 734 735 736 737 738 739 740 741 742 743 744 745 746 747 748 749 750 751 752 753 MIDI Bank Select Program Voice Name MSB LSB Change# (0–127) (0–127) (1–128) 0 96 116 Castanets 0 0 117 Taiko Drum 0 96 117 Gran Cassa 0 0 118 Melodic Tom 0 64 118 Melodic Tom 2 0 65 118 Real Tom 0 66 118 Rock Tom 0 0 119 Synth Drum 0 64 119 Analog Tom 0 65 119 Electronic Percussion 0 0 120 Reverse Cymbal XG SOUND EFFECTS 0 0 121 Fret Noise 0 0 122 Breath Noise 0 0 123 Seashore 0 0 124 Bird Tweet 0 0 125 Telephone Ring 0 0 126 Helicopter 0 0 127 Applause 0 0 128 Gunshot 64 0 1 Cutting Noise 64 0 2 Cutting Noise 2 64 0 4 String Slap 64 0 17 Flute Key Click 64 0 33 Shower 64 0 34 Thunder 64 0 35 Wind 64 0 36 Stream 64 0 37 Bubble 64 0 38 Feed 64 0 49 Dog 64 0 50 Horse 64 0 51 Bird Tweet 2 64 0 56 Maou 64 0 65 Phone Call 64 0 66 Door Squeak 64 0 67 Door Slam 64 0 68 Scratch Cut 64 0 69 Scratch Split 64 0 70 Wind Chime 64 0 71 Telephone Ring 2 64 0 81 Car Engine Ignition 64 0 82 Car Tires Squeal 64 0 83 Car Passing 64 0 84 Car Crash 64 0 85 Siren 64 0 86 Train 64 0 87 Jet Plane 64 0 88 Starship 64 0 89 Burst 64 0 90 Roller Coaster 64 0 91 Submarine 64 0 97 Laugh 64 0 98 Scream 64 0 99 Punch 64 0 100 Heartbeat 64 0 101 Footsteps 64 0 113 Machine Gun 64 0 114 Laser Gun 64 0 115 Explosion 64 0 116 Firework NOTE • Selecting a Voice number between 242 and 287 will turn on Arpeggio. • Selecting a Voice number with an asterisk (*) will turn on Dual. • Selecting a Voice number with an asterisk (**) will turn on Harmony. • These Voice numbers cannot be selected via MIDI messages from a computer. Drum Kit List •“ ” indicates that the drum sound is the same as “Standard Kit 1”. • Each percussion voice uses one note. • The MIDI Note is actually one or two octave(s) lower than keyboard Note (see Default Octave column). For example, in “222: Standard Kit 1”, the “Seq Click H” (Note C1) corresponds to (Note C0: Note# 24). • Key Off: Keys marked “O” stop sounding the instant they are released. • Voices with the same Alternate Note Number (*1 ... 4) cannot be played simultaneously. (They are designed to be played alternately with each other.) • Actual keyboard notes of 14 “Tabla” are one octave lower than the ones described in the list below. For example, the C4 sound in the following list is actually played from C3. C#1 D1 E1 F1 D#1 F#1 G1 G#1 A1 B1 C2 A#1 C#2 D2 E2 F2 D#2 F#2 G2 G#2 A2 B2 C3 A#2 C#3 D3 E3 F3 D#3 F#3 G3 G#3 A3 B3 C4 A#3 C#4 D4 E4 F4 D#4 F#4 G4 G#4 A4 B4 C5 A#4 C#5 D5 E5 F5 D#5 F#5 G5 G#5 A5 B5 C6 A#5 14 0/116/117 Tabla Baya ke / ge (Velocity 1-47 / 48-127) Baya ka / ghe (Velocity 1-47 / 48-127) Tabla ne / na (Velocity 1-47 / 48-127) Tabla ne / tin (Velocity 1-47 / 48-127) Tabla ne / di (Velocity 1-47 / 48-127) 15 126/0/116 16 126/0/117 17 126/0/40 Tabla Kit 1 Alternate Group Tabla Kit 2 Alternate Group A Tabla na A Tabla tin A Tabla Center tin A Tabla ti 01 A Tabla ti 02 A Tabla ri A Tabla kat A Tabla tu Open Baya Mid Baya Press Baya Bend Baya Slow Bend Baya Fast Click Open Click G Low Tabla Tharang G# Low Tabla Tharang A Low Tabla Tarang A# Low Tabla Tarang B Low Tabla Tarang C Low Tabla Tarang C# Low Tabla Tarang D Low Tabla Tarang D# Low Tabla Tarang E Low Tabla Tarang F Low Tabla Tarang F# Low Tabla Tarang G Low Tabla Tarang G# Low Tabla Tarang A Low Tabla Tarang A# Low Tabla Tarang B Low Tabla Tarang C Tabla na C Tabla tin C Tabla Center tin C Tabla ti 01 C Tabla ti 02 C Tabla ri C Tabla kat C Tabla tu D Tabla na D Tabla tin D Tabla Center tin D Tabla ti 01 D Tabla ti 02 D Tabla ri D Tabla kat D Tabla tu E Tabla na E Tabla tin E Tabla Center tin E Tabla ti 01 E Tabla ti 02 E Tabla ri E Tabla kat E Tabla tu F Tabla na F Tabla tin F Tabla Center tin F Tabla ti 01 F Tabla ti 02 F Tabla ri F Tabla kat F Tabla tu G Tabla na G Tabla tin G Tabla Center tin G Tabla ti 01 G Tabla ti 02 G Tabla ri G Tabla kat G Tabla tu 6 6 6 6 6 6 6 6 7 7 7 7 7 7 7 A Tabla na A Tabla tin A Tabla Center tin A Tabla ti 01 A Tabla ti 02 A Tabla ri A Tabla kat A Tabla tu Open Baya Mid Baya Press Baya Bend Baya Slow Bend Baya Fast Click Open Click G Low Tabla Tharang G# Low Tabla Tharang A Low Tabla Tarang A# Low Tabla Tarang B Low Tabla Tarang C Low Tabla Tarang C# Low Tabla Tarang D Low Tabla Tarang D# Low Tabla Tarang E Low Tabla Tarang F Low Tabla Tarang F# Low Tabla Tarang G Low Tabla Tarang G# Low Tabla Tarang A Low Tabla Tarang A# Low Tabla Tarang B Low Tabla Tarang C Tabla na C Tabla tin C Tabla Center tin C Tabla ti 01 C Tabla ti 02 C Tabla ri C Tabla kat C Tabla tu D Tabla na D Tabla tin D Tabla Center tin D Tabla ti 01 D Tabla ti 02 D Tabla ri D Tabla kat D Tabla tu E Tabla na E Tabla tin E Tabla Center tin E Tabla ti 01 E Tabla ti 02 E Tabla ri E Tabla kat E Tabla tu F Tabla na F Tabla tin F Tabla Center tin F Tabla ti 01 F Tabla ti 02 F Tabla ri F Tabla kat F Tabla tu G Tabla na G Tabla tin G Tabla Center tin G Tabla ti 01 G Tabla ti 02 G Tabla ri G Tabla kat G Tabla tu 6 6 6 6 6 6 6 6 7 7 7 7 7 7 7 1 1 1 1 1 1 1 1 2 2 2 2 2 2 2 2 3 3 3 3 3 3 3 3 4 4 4 4 4 4 4 4 5 5 5 5 5 5 5 5 1 1 1 1 1 1 1 1 2 2 2 2 2 2 2 2 3 3 3 3 3 3 3 3 4 4 4 4 4 4 4 4 5 5 5 5 5 5 5 5 Indian Kit 2 Hateli Long Hateli Short Baya ge Baya ke Baya ghe Baya ka Tabla na Tabla tin Tablabaya dha Tabla tun Tablabaya dhin Tabla di Tablabaya dhe Tabla ti Tabla ne Tabla taran Tabla tak Chipri Kanjira Open Kanjira Slap Kanjira Mute Kanjira Bend up Kanjira Bend down Dholak Open Dholak Mute Dholak Slap Dhol Open Dhol Mute Dhol Slap Dhol Slide Mridangam Normal Mridangam Open Mridangam Mute Mridangam Slap Mridangam Rim Chimta Open Chimta Normal Chimta Ring Dholki Open Dholki Mute Dholki Slap Dholki Slide Dholki Rim Khol Open Khol Slide Khol Mute Manjira Open Manjira Close Jhanji Open Jhanji Close Mondira Open Mondira Close Mridang Open Mridang Mute Mridang Rim Mridang Slide Khomokh Normal Khomokh Mute Khomokh Mltatk Madal-A2 Madal-A#2 Madal-B2 Madal-C3 Madal-C#3 Madal-D3 Madal-D#3 Madal-E3 Madal-F3 Madal-F#3 Madal-G3 Alternate Group 1 1 1 1 2 2 1 2 1 2 1 2 2 2 2 3 3 3 3 3 4 4 4 5 5 5 5 6 6 6 6 6 7 7 7 8 8 8 8 8 9 9 9 10 10 11 11 12 12 13 13 13 13 PSR-I455 Owner’s Manual Appendix C1 Voice No. MSB (0–127) / LSB (0–127) / PC (1–128) Keyboard MIDI Note# Note Note# Note 25 C# 0 13 C# -1 26 D 0 14 D -1 27 D# 0 15 D# -1 28 E 0 16 E -1 29 F 0 17 F -1 30 F# 0 18 F# -1 31 G 0 19 G -1 32 G# 0 20 G# -1 33 A 0 21 A -1 34 A# 0 22 A# -1 35 B 0 23 B -1 36 C 1 24 C 0 37 C# 1 25 C# 0 38 D 1 26 D 0 39 D# 1 27 D# 0 40 E 1 28 E 0 41 F 1 29 F 0 42 F# 1 30 F# 0 43 G 1 31 G 0 44 G# 1 32 G# 0 45 A 1 33 A 0 46 A# 1 34 A# 0 47 B 1 35 B 0 48 C 2 36 C 1 49 C# 2 37 C# 1 50 D 2 38 D 1 51 D# 2 39 D# 1 52 E 2 40 E 1 53 F 2 41 F 1 54 F# 2 42 F# 1 55 G 2 43 G 1 56 G# 2 44 G# 1 57 A 2 45 A 1 58 A# 2 46 A# 1 59 B 2 47 B 1 60 C 3 48 C 2 61 C# 3 49 C# 2 62 D 3 50 D 2 63 D# 3 51 D# 2 64 E 3 52 E 2 65 F 3 53 F 2 66 F# 3 54 F# 2 67 G 3 55 G 2 68 G# 3 56 G# 2 69 A 3 57 A 2 70 A# 3 58 A# 2 71 B 3 59 B 2 72 C 4 60 C 3 73 C# 4 61 C# 3 74 D 4 62 D 3 75 D# 4 63 D# 3 76 E 4 64 E 3 77 F 4 65 F 3 78 F# 4 66 F# 3 79 G 4 67 G 3 80 G# 4 68 G# 3 81 A 4 69 A 3 82 A# 4 70 A# 3 83 B 4 71 B 3 84 C 5 72 C 4 85 C# 5 73 C# 4 86 D 5 74 D 4 87 D# 5 75 D# 4 88 E 5 76 E 4 89 F 5 77 F 4 90 F# 5 78 F# 4 91 G 5 79 G 4 92 G# 5 80 G# 4 93 A 5 81 A 4 94 A# 5 82 A# 4 95 B 5 83 B 4 96 C 6 84 C 5 97 C# 6 85 C# 5 98 D 6 86 D 5 99 D# 6 87 D# 5 100 E 6 88 E 5 101 F 6 89 F 5 102 F# 6 90 F# 5 103 G 6 91 G 5 67 Drum Kit List C1 C#1 D1 E1 F1 D#1 F#1 G1 G#1 A1 B1 C2 A#1 C#2 D2 E2 F2 D#2 F#2 G2 G#2 A2 B2 C3 A#2 C#3 D3 E3 F3 D#3 F#3 G3 G#3 A3 B3 C4 A#3 C#4 D4 E4 F4 D#4 F#4 G4 G#4 A4 B4 C5 A#4 C#5 Appendix D5 E5 F5 D#5 F#5 G5 G#5 A5 B5 C6 68 A#5 Voice No. MSB (0–127) / LSB (0–127) / PC (1–128) Keyboard MIDI Note# Note Note# Note 25 C# 0 13 C# -1 26 D 0 14 D -1 27 D# 0 15 D# -1 28 E 0 16 E -1 29 F 0 17 F -1 30 F# 0 18 F# -1 31 G 0 19 G -1 32 G# 0 20 G# -1 33 A 0 21 A -1 34 A# 0 22 A# -1 35 B 0 23 B -1 36 C 1 24 C 0 37 C# 1 25 C# 0 38 D 1 26 D 0 39 D# 1 27 D# 0 40 E 1 28 E 0 41 F 1 29 F 0 42 F# 1 30 F# 0 43 G 1 31 G 0 44 G# 1 32 G# 0 45 A 1 33 A 0 46 A# 1 34 A# 0 47 B 1 35 B 0 48 C 2 36 C 1 49 C# 2 37 C# 1 50 D 2 38 D 1 51 D# 2 39 D# 1 52 E 2 40 E 1 53 F 2 41 F 1 54 F# 2 42 F# 1 55 G 2 43 G 1 56 G# 2 44 G# 1 57 A 2 45 A 1 58 A# 2 46 A# 1 59 B 2 47 B 1 60 C 3 48 C 2 61 C# 3 49 C# 2 62 D 3 50 D 2 63 D# 3 51 D# 2 64 E 3 52 E 2 65 F 3 53 F 2 66 F# 3 54 F# 2 67 G 3 55 G 2 68 G# 3 56 G# 2 69 A 3 57 A 2 70 A# 3 58 A# 2 71 B 3 59 B 2 72 C 4 60 C 3 73 C# 4 61 C# 3 74 D 4 62 D 3 75 D# 4 63 D# 3 76 E 4 64 E 3 77 F 4 65 F 3 78 F# 4 66 F# 3 79 G 4 67 G 3 80 G# 4 68 G# 3 81 A 4 69 A 3 82 A# 4 70 A# 3 83 B 4 71 B 3 84 C 5 72 C 4 85 C# 5 73 C# 4 86 D 5 74 D 4 87 D# 5 75 D# 4 88 E 5 76 E 4 89 F 5 77 F 4 90 F# 5 78 F# 4 91 G 5 79 G 4 92 G# 5 80 G# 4 93 A 5 81 A 4 94 A# 5 82 A# 4 95 B 5 83 B 4 96 C 6 84 C 5 97 C# 6 85 C# 5 98 D 6 86 D 5 99 D# 6 87 D# 5 100 E 6 88 E 5 101 F 6 89 F 5 102 F# 6 90 F# 5 103 G 6 91 G 5 18 126/0/115 Indian Kit 1 Hand Clap Dafli Open Dafli Slap Dafli Rim Duff Open Duff Slap Duff Rim Hatheli Long Hatheli Short Baya ge Baya ke Baya ghe Baya ka Tabla na Tabla tin Tablabaya dha Dhol 1 Open Dhol 1 Slap Dhol 1 Mute Dhol 1 Open Slap Dhol 1 Roll Dandia Short Dandia Long Chutki Chipri Khanjira Open Khanjira Slap Khanjira Mute Khanjira Bendup Khanjira Benddown Dholak 1 Open Dholak 1 Mute Dholak 1 Slap Dhol 2 Open Dhol 2 Slap Dhol 2 Rim Mridangam na Mridangam din Mridangam ki Mridangam ta Mridangam Chapu Mridangam Lo Closed Mridangam Lo Open Chimta Normal Chimta Ring Dholki Hi Open Dholki Hi Mute Dholki Lo Open Dholki Hi Slap Dholki Lo Slide Khol Open Khol Slide Khol Mute Manjira Open Manjira Close Jhanji Open Jhanji Close Mondira Open Mondira Close Bhangra Scat 1 Bhangra Scat 2 Bhangra Scat 3 Bhangra Scat 4 Khomokh Normal Khomokh Mute Khomokh Mltatk Thavil Open Thavil Slap Thavil Mute Khartaal Dholak 2 Open Dholak 2 Slide Dholak 2 Rim 1 Dholak 2 Rim 2 Dholak 2 Ring Dholak 2 Slap Dholak 2 Body PSR-I455 Owner’s Manual 19 126/0/112 Alternate Group Animal Kit 1 1 2 2 3 3 3 3 4 4 3 5 5 5 6 6 7 7 Rooster 8 8 9 9 9 9 9 10 10 11 11 12 12 13 12 13 14 14 15 15 16 16 17 17 18 18 Elephant Horse Cricket Cow Tiger Rattlesnake Monkeies Crow Drum Kit List C#1 D1 E1 F1 D#1 F#1 G1 G#1 A1 B1 C2 A#1 C#2 D2 E2 F2 D#2 F#2 G2 G#2 A2 B2 C3 A#2 C#3 D3 E3 F3 D#3 F#3 G3 G#3 A3 B3 C4 A#3 C#4 D4 E4 F4 D#4 F#4 G4 G#4 A4 B4 C5 A#4 C#5 D5 E5 F5 D#5 F#5 G5 G#5 A5 B5 C6 A#5 221 127/000/088 222 127/000/001 223 127/000/002 224 127/000/009 225 127/000/017 Power Kit Standard Kit 1 Standard Kit 2 Room Kit Rock Kit Snare Soft Power 1 Kick Amb+ Open Rim Power 1 Kick Power Open Kick Power Closed Side Stick Power Snare Power Hand Clap Power Snare Rough Tom Power 1 Hi-Hat Closed Power Tom Power 2 Hi-Hat Pedal Power Tom Power 3 Hi-Hat Open Power Tom Power 4 Tom Power 5 Crash Cymbal Acoustic 1 Tom Power 6 Ride Cymbal Acoustic 1 Chinese Cymbal Acoustic Ride Cymbal Acoustic Splash Cymbal Acoustic Crash Cymbal Acoustic 2 Ride Cymbal Acoustic 2 Surdo Mute Surdo Open Hi Q Whip Slap Scratch H Scratch L Finger Snap Click Noise Metronome Click Metronome Bell Seq Click L Seq Click H Brush Tap Brush Swirl Brush Slap Brush Tap Swirl Snare Roll Castanet Snare Soft Sticks Kick Soft Open Rim Shot Kick Tight Kick Side Stick Snare Hand Clap Snare Tight Floor Tom L Hi-Hat Closed Floor Tom H Hi-Hat Pedal Low Tom Hi-Hat Open Mid Tom L Mid Tom H Crash Cymbal 1 High Tom Ride Cymbal 1 Chinese Cymbal Ride Cymbal Cup Tambourine Splash Cymbal Cowbell Crash Cymbal 2 Vibraslap Ride Cymbal 2 Bongo H Bongo L Conga H Mute Conga H Open Conga L Timbale H Timbale L Agogo H Agogo L Cabasa Maracas Samba Whistle H Samba Whistle L Guiro Short Guiro Long Claves Wood Block H Wood Block L Cuica Mute Cuica Open Triangle Mute Triangle Open Shaker Jingle Bells Bell Tree Snare Soft 2 Snare Noisy Open Rim Shot H Short Kick Short Side Stick Light Snare Short Snare Tight H Kick 2 Kick Gate Snare Snappy Snare Rock Snare Tight Snappy Tom Room 1 Snare Rock Tight Tom Rock 1 Tom Room 2 Tom Rock 2 Tom Room 3 Tom Rock 3 Tom Room 4 Tom Room 5 Tom Rock 4 Tom Rock 5 Tom Room 6 Tom Rock 6 Appendix C1 Voice No. MSB (0–127) / LSB (0–127) / PC (1–128) Keyboard MIDI Key Alternate Off Group Note# Note Note# Note 25 C# 0 13 C# -1 3 26 D 0 14 D -1 3 27 D# 0 15 D# -1 28 E 0 16 E -1 29 F 0 17 F -1 4 30 F# 0 18 F# -1 4 31 G 0 19 G -1 32 G# 0 20 G# -1 33 A 0 21 A -1 34 A# 0 22 A# -1 35 B 0 23 B -1 36 C 1 24 C 0 37 C# 1 25 C# 0 38 D 1 26 D 0 O 39 D# 1 27 D# 0 40 E 1 28 E 0 O 41 F 1 29 F 0 O 42 F# 1 30 F# 0 43 G 1 31 G 0 44 G# 1 32 G# 0 45 A 1 33 A 0 46 A# 1 34 A# 0 47 B 1 35 B 0 48 C 2 36 C 1 49 C# 2 37 C# 1 50 D 2 38 D 1 51 D# 2 39 D# 1 52 E 2 40 E 1 53 F 2 41 F 1 54 F# 2 42 F# 1 1 55 G 2 43 G 1 56 G# 2 44 G# 1 1 57 A 2 45 A 1 58 A# 2 46 A# 1 1 59 B 2 47 B 1 60 C 3 48 C 2 61 C# 3 49 C# 2 62 D 3 50 D 2 63 D# 3 51 D# 2 64 E 3 52 E 2 65 F 3 53 F 2 66 F# 3 54 F# 2 67 G 3 55 G 2 68 G# 3 56 G# 2 69 A 3 57 A 2 70 A# 3 58 A# 2 71 B 3 59 B 2 72 C 4 60 C 3 73 C# 4 61 C# 3 74 D 4 62 D 3 75 D# 4 63 D# 3 76 E 4 64 E 3 77 F 4 65 F 3 78 F# 4 66 F# 3 79 G 4 67 G 3 80 G# 4 68 G# 3 81 A 4 69 A 3 82 A# 4 70 A# 3 83 B 4 71 B 3 O 84 C 5 72 C 4 O 85 C# 5 73 C# 4 86 D 5 74 D 4 O 87 D# 5 75 D# 4 88 E 5 76 E 4 89 F 5 77 F 4 90 F# 5 78 F# 4 91 G 5 79 G 4 92 G# 5 80 G# 4 2 93 A 5 81 A 4 2 94 A# 5 82 A# 4 95 B 5 83 B 4 96 C 6 84 C 5 97 C# 6 85 C# 5 98 D 6 86 D 5 99 D# 6 87 D# 5 100 E 6 88 E 5 101 F 6 89 F 5 102 F# 6 90 F# 5 103 G 6 91 G 5 PSR-I455 Owner’s Manual 69 Drum Kit List C1 C#1 D1 E1 F1 D#1 F#1 G1 G#1 A1 B1 C2 A#1 C#2 D2 E2 F2 D#2 F#2 G2 G#2 A2 B2 C3 A#2 C#3 D3 E3 F3 D#3 F#3 G3 G#3 A3 B3 C4 A#3 C#4 D4 E4 F4 D#4 F#4 G4 G#4 A4 B4 C5 A#4 C#5 Appendix D5 E5 F5 D#5 F#5 G5 G#5 A5 B5 C6 70 A#5 Voice No. MSB (0–127) / LSB (0–127) / PC (1–128) Keyboard MIDI Key Alternate Off Group Note# Note Note# Note 25 C# 0 13 C# -1 3 26 D 0 14 D -1 3 27 D# 0 15 D# -1 28 E 0 16 E -1 29 F 0 17 F -1 4 30 F# 0 18 F# -1 4 31 G 0 19 G -1 32 G# 0 20 G# -1 33 A 0 21 A -1 34 A# 0 22 A# -1 35 B 0 23 B -1 36 C 1 24 C 0 37 C# 1 25 C# 0 38 D 1 26 D 0 O 39 D# 1 27 D# 0 40 E 1 28 E 0 O 41 F 1 29 F 0 O 42 F# 1 30 F# 0 43 G 1 31 G 0 44 G# 1 32 G# 0 45 A 1 33 A 0 46 A# 1 34 A# 0 47 B 1 35 B 0 48 C 2 36 C 1 49 C# 2 37 C# 1 50 D 2 38 D 1 51 D# 2 39 D# 1 52 E 2 40 E 1 53 F 2 41 F 1 54 F# 2 42 F# 1 1 55 G 2 43 G 1 56 G# 2 44 G# 1 1 57 A 2 45 A 1 58 A# 2 46 A# 1 1 59 B 2 47 B 1 60 C 3 48 C 2 61 C# 3 49 C# 2 62 D 3 50 D 2 63 D# 3 51 D# 2 64 E 3 52 E 2 65 F 3 53 F 2 66 F# 3 54 F# 2 67 G 3 55 G 2 68 G# 3 56 G# 2 69 A 3 57 A 2 70 A# 3 58 A# 2 71 B 3 59 B 2 72 C 4 60 C 3 73 C# 4 61 C# 3 74 D 4 62 D 3 75 D# 4 63 D# 3 76 E 4 64 E 3 77 F 4 65 F 3 78 F# 4 66 F# 3 79 G 4 67 G 3 80 G# 4 68 G# 3 81 A 4 69 A 3 82 A# 4 70 A# 3 83 B 4 71 B 3 O 84 C 5 72 C 4 O 85 C# 5 73 C# 4 86 D 5 74 D 4 O 87 D# 5 75 D# 4 88 E 5 76 E 4 89 F 5 77 F 4 90 F# 5 78 F# 4 91 G 5 79 G 4 92 G# 5 80 G# 4 2 93 A 5 81 A 4 2 94 A# 5 82 A# 4 95 B 5 83 B 4 96 C 6 84 C 5 97 C# 6 85 C# 5 98 D 6 86 D 5 99 D# 6 87 D# 5 100 E 6 88 E 5 101 F 6 89 F 5 102 F# 6 90 F# 5 103 G 6 91 G 5 PSR-I455 Owner’s Manual 222 127/000/001 226 127/000/025 227 127/000/059 228 127/000/060 229 127/000/026 Standard Kit 1 Electronic Kit T8 Kit T9 Kit Analog Kit Surdo Mute Surdo Open Hi Q Whip Slap Scratch H Scratch L Finger Snap Click Noise Metronome Click Metronome Bell Seq Click L Seq Click H Brush Tap Brush Swirl Brush Slap Brush Tap Swirl Snare Roll Castanet Snare Soft Sticks Kick Soft Open Rim Shot Kick Tight Kick Side Stick Snare Hand Clap Snare Tight Floor Tom L Hi-Hat Closed Floor Tom H Hi-Hat Pedal Low Tom Hi-Hat Open Mid Tom L Mid Tom H Crash Cymbal 1 High Tom Ride Cymbal 1 Chinese Cymbal Ride Cymbal Cup Tambourine Splash Cymbal Cowbell Crash Cymbal 2 Vibraslap Ride Cymbal 2 Bongo H Bongo L Conga H Mute Conga H Open Conga L Timbale H Timbale L Agogo H Agogo L Cabasa Maracas Samba Whistle H Samba Whistle L Guiro Short Guiro Long Claves Wood Block H Wood Block L Cuica Mute Cuica Open Triangle Mute Triangle Open Shaker Jingle Bells Bell Tree Reverse Cymbal Hi Q 2 Snare Snappy Electro Kick 3 Kick Gate Kick Gate Heavy Snare Noisy 2 Snare Noisy 3 Tom Electro 1 Tom Electro 2 Tom Electro 3 Tom Electro 4 Tom Electro 5 Tom Electro 6 Snare Hammer Kick ZapHard Snare Garg L Kick TekPower Kick Slimy Kick T8 1 Snare Analog CR Snare T8 4 Snare Clap Analog Snare T8 3 Tom T8 5 Snare T8 5 Kick T8 3 Snare T8 4 Kick T8 2 Snare T8 3 T8 Kick Bass Kick T8 1 Snare T8 Rim Snare T8 2 Clap T9 Snare T8 1 Tom T8 1 Hi-Hat Closed T8 2 Tom T8 2 Hi-Hat Open T8 1 Tom T8 3 Hi-Hat Open T8 1 Tom T8 4 Tom T8 6 Crash T8 Tom T8 7 Ride T9 Chinese Cymbal 2 Ride Cymbal Cup 2 Tambourine RX5 Ride Cymbal 3 Conga T8 5 Conga T8 4 Conga T8 3 Conga T8 2 Conga T8 1 Snare Drum&Bass 1 Kick Break 2 Snare Distortion Kick TekPower Kick Distortion RM Kick T9 2 Snare Analog CR Snare T9 5 Clap Analog Sm Snare T9 Gate Snare Rock Roll Snare T9 3 Snare T9 4 Snare T9 Gate Kick T9 4 Snare T9 5 Kick T9 1 Kick T9 3 Snare T9 Rim Snare T9 1 Clap T9 Snare T9 2 Tom T9 1 Hi-Hat Closed T9 Tom T9 2 Hi-Hat Pedal T9 Tom T9 3 Hi-Hat Open T9 Tom T9 4 Tom T9 5 Crash T9 Tom T9 6 Ride T9 Chinese Cymbal 2 Ride Cymbal Cup 2 Tambourine RX5 Crash Cymbal 3 Cowbell 1 Crash Cymbal 4 Cowbell T8 Ride Cymbal 3 Conga T8 5 Conga T8 4 Conga Tip Conga Open Slap Conga Open Glass H Glass L Analog Click Conga T8 1 Maracas T8 FxGun 2 FxGun 1 Analog Shaker H Analog Shaker L Clave T8 Hi Q 1 Hi Q 2 Scratch L Scratch L 2 Maracas Slur FxGun 2 FxGun 1 Scratch H 2 Scratch Down Hi Q 3 Hi Q 1 Hi Q 2 Scratch L Scratch L 2 Analog Shaker Sleigh Bell Wind Chime Snare Hip 1 Snare Hip 2 Snare Hip Gate Snare Break 1 Kick Blip Snare FX 1 Kick FxHammer Analog Shaker Sleigh Bell Wind Chime Snare Piccolo Snare T8 5 Snare Rock Roll Distortion Snare Brush Mute Kick Blip Hard Snare Jungle 1 Kick Sustain Cowbell T8 Crash Cymbal 4 Scratch H 2 Scratch L 2 Reverse Cymbal Hi Q 2 Snare Noisy 4 Kick 3 Kick Analog Short Kick Analog Side Stick Analog Snare Analog Snare Analog 2 Tom Analog 1 Hi-Hat Closed Analog Tom Analog 2 Hi-Hat Closed Analog 2 Tom Analog 3 Hi-Hat Open Analog Tom Analog 4 Tom Analog 5 Crash Analog Tom Analog 6 Cowbell Analog Conga Analog H Conga Analog M Conga Analog L Maracas 2 Claves 2 Scratch H 2 Scratch L 2 Drum Kit List * Actual keyboard notes of the SFX Kit 1 and 2 are one octave lower than the ones described in the list below. 230 127/000/113 231 127/000/033 232 127/000/041 233 127/000/049 234 126/000/001 235 126/000/002 Dance Kit Jazz Kit Brush Kit Symphony Kit SFX Kit 1 * SFX Kit 2 * Reverse Cymbal Hi Q 2 Snare Techno Kick Techno Q Rim Gate Kick Techno L Kick Techno Side Stick Analog Snare Clap Snare Jazz H Brush Slap 2 Kick Soft 2 Open Rim Shot Light Gran Cassa Gran Cassa Mute Kick Jazz Stick Light Snare Jazz L Kick Jazz Stick Light Brush Slap 3 Band Snare Snare Jazz M Tom Jazz 1 Brush Tap 2 Tom Brush 1 Band Snare 2 Tom Jazz 1 Tom Jazz 2 Tom Brush 2 Tom Jazz 2 Tom Jazz 3 Tom Brush 3 Tom Jazz 3 Tom Jazz 4 Tom Jazz 5 Tom Brush 4 Tom Brush 5 Tom Jazz 6 Tom Brush 6 Tom Jazz 4 Tom Jazz 5 Hand Cymbal Tom Jazz 6 Hand Cymbal Short Cutting Noise Cutting Noise 2 String Slap Snare Dry Tom Analog 1 Hi-Hat Closed Analog3 Tom Analog 2 Hi-Hat Closed Analog 4 Tom Analog 3 Hi-Hat Open Analog 2 Tom Analog 4 Tom Analog 5 Crash Analog Tom Analog 6 Flute Key Click Car Engine Ignition Car Tires Squeal Car Passing Car Crash Siren Train Jet Plane Starship Burst Roller Coaster Submarine Shower Thunder Wind Stream Bubble Feed Laugh Scream Punch Heartbeat Footeps Dog Horse Bird Tweet 2 Machine Gun Laser Gun Explosion Firework Cowbell Analog Hand Cymbal 2 Hand Cymbal 2 Short Appendix Conga Analog H Conga Analog M Conga Analog L Maracas 2 Phone Call Door Squeak Door Slam Scratch Cut Scratch H 3 Wind Chime Telephone Ring 2 Claves 2 Scratch H 2 Scratch L 3 TurnTableNoise Maou PSR-I455 Owner’s Manual 71 Drum Kit List C1 C#1 D1 E1 F1 D#1 F#1 G1 G#1 A1 B1 C2 A#1 C#2 D2 E2 F2 D#2 F#2 G2 G#2 A2 B2 C3 A#2 C#3 D3 E3 F3 D#3 F#3 G3 G#3 A3 B3 C4 A#3 C#4 D4 E4 F4 D#4 F#4 G4 G#4 A4 B4 C5 A#4 C#5 Appendix D5 E5 F5 D#5 F#5 G5 G#5 A5 B5 C6 72 A#5 Voice No. MSB (0–127) / LSB (0–127) / PC (1–128) Keyboard MIDI Key Alternate Off Group Note# Note Note# Note 25 C# 0 13 C# -1 3 26 D 0 14 D -1 3 27 D# 0 15 D# -1 28 E 0 16 E -1 29 F 0 17 F -1 4 30 F# 0 18 F# -1 4 31 G 0 19 G -1 32 G# 0 20 G# -1 33 A 0 21 A -1 34 A# 0 22 A# -1 35 B 0 23 B -1 36 C 1 24 C 0 37 C# 1 25 C# 0 38 D 1 26 D 0 O 39 D# 1 27 D# 0 40 E 1 28 E 0 O 41 F 1 29 F 0 O 42 F# 1 30 F# 0 43 G 1 31 G 0 44 G# 1 32 G# 0 45 A 1 33 A 0 46 A# 1 34 A# 0 47 B 1 35 B 0 48 C 2 36 C 1 49 C# 2 37 C# 1 50 D 2 38 D 1 51 D# 2 39 D# 1 52 E 2 40 E 1 53 F 2 41 F 1 54 F# 2 42 F# 1 1 55 G 2 43 G 1 56 G# 2 44 G# 1 1 57 A 2 45 A 1 58 A# 2 46 A# 1 1 59 B 2 47 B 1 60 C 3 48 C 2 61 C# 3 49 C# 2 62 D 3 50 D 2 63 D# 3 51 D# 2 64 E 3 52 E 2 65 F 3 53 F 2 66 F# 3 54 F# 2 67 G 3 55 G 2 68 G# 3 56 G# 2 69 A 3 57 A 2 70 A# 3 58 A# 2 71 B 3 59 B 2 72 C 4 60 C 3 73 C# 4 61 C# 3 74 D 4 62 D 3 75 D# 4 63 D# 3 76 E 4 64 E 3 77 F 4 65 F 3 78 F# 4 66 F# 3 79 G 4 67 G 3 80 G# 4 68 G# 3 81 A 4 69 A 3 82 A# 4 70 A# 3 83 B 4 71 B 3 O 84 C 5 72 C 4 O 85 C# 5 73 C# 4 86 D 5 74 D 4 O 87 D# 5 75 D# 4 88 E 5 76 E 4 89 F 5 77 F 4 90 F# 5 78 F# 4 91 G 5 79 G 4 92 G# 5 80 G# 4 2 93 A 5 81 A 4 2 94 A# 5 82 A# 4 95 B 5 83 B 4 96 C 6 84 C 5 97 C# 6 85 C# 5 98 D 6 86 D 5 99 D# 6 87 D# 5 100 E 6 88 E 5 101 F 6 89 F 5 102 F# 6 90 F# 5 103 G 6 91 G 5 PSR-I455 Owner’s Manual 222 127/000/001 236 126/000/021 237 126/000/022 Standard Kit 1 Bass Drum Kit Reverse Bass Drum Kit Surdo Mute Surdo Open Hi Q Whip Slap Scratch H Scratch L Finger Snap Click Noise Metronome Click Metronome Bell Seq Click L Seq Click H Brush Tap Brush Swirl Brush Slap Brush Tap Swirl Snare Roll Castanet Snare Soft Sticks Kick Soft Open Rim Shot Kick Tight Kick Side Stick Snare Hand Clap Snare Tight Floor Tom L Hi-Hat Closed Floor Tom H Hi-Hat Pedal Low Tom Hi-Hat Open Mid Tom L Mid Tom H Crash Cymbal 1 High Tom Ride Cymbal 1 Chinese Cymbal Ride Cymbal Cup Tambourine Splash Cymbal Cowbell Crash Cymbal 2 Vibraslap Ride Cymbal 2 Bongo H Bongo L Conga H Mute Conga H Open Conga L Timbale H Timbale L Agogo H Agogo L Cabasa Maracas Samba Whistle H Samba Whistle L Guiro Short Guiro Long Claves Wood Block H Wood Block L Cuica Mute Cuica Open Triangle Mute Triangle Open Shaker Jingle Bells Bell Tree BD Electro BD FX Gate BD Hammer BD Analog Power BD Analog Distortion 5 BD Analog Distortion 6 BD Analog Distortion 4 BD Analog Distortion 3 BD Analog Distortion 2 BD Analog Tight BD Analog 94 BD Analog Blip 2 BD Analog Rubber 2 BD Analog 93 BD Analog 90 BD Analog 83 BD Analog 82 BD Analog 92 BD Analog 91 BD Analog Deep BD Analog Hard 2 BD Analog Hard 1 BD Analog Blip 1 BD Analog Rubber 1 BD Analog Loose BD Synth 1 BD Synth 2 BD Analog Distortion 1 Ripper BD Analog 70 L BD Analog 70 BD Analog 80 BD Analog 80 Long BD Dry BD Dry Hard BD Room 1 BD Soft BD Room 2 BD Break Lo-fi 2 BD Break Lo-fi 1 BD & Hi-Hat Open BD Jungle 2 BD Jungle 1 BD Jungle 3 BD D&B 1 BD D&B 2 BD RX5 1 BD RX5 2 BD Room 3 BD Power Gate BD R&B 1 BD R&B 2 BD Lo-fi BD Hip Deep BD Break Deep BD Break Heavy BD Break Hard Big Drum Taiko Drum Surdo Open Feet 2 BD Industrial Door Slam Punch Heart Feet 1 BD Human BD Human Deep Vox Buh! Vox Muh! 238 126/000/125 China Kit 1 Alternate Group Reverse BD Electro Reverse BD FX Gate Reverse BD Hammer Reverse BD Analog Power Reverse BD Analog Distortion 6 Reverse BD Analog Distortion 3 Reverse BD Analog Distortion 2 Reverse BD Analog Tight Reverse BD Analog 94 Reverse BD Analog Blip 2 Reverse BD Analog Rubber 2 Reverse BD Analog 93 Reverse BD Analog 90 Reverse BD Analog 83 Reverse BD Analog 82 Reverse BD Analog 91 Reverse BD Analog Deep Reverse BD Analog Hard 1 Reverse BD Analog Blip 1 Reverse BD Analog Rubber 1 Reverse BD Analog Loose Reverse BD Synth 1 Reverse BD Synth 2 Reverse BD Analog Distortion 1 Reverse Ripper Reverse BD Analog 70 Reverse BD Analog 81 Reverse BD Dry Reverse BD Soft Reverse BD Room 2 Reverse BD Break Lo-fi 2 Reverse BD Break Lo-fi 1 Reverse BD & Hi-Hat Open Reverse BD Jungle 3 Reverse BD D&B 1 Reverse BD D&B 2 Reverse BD RX5 1 Reverse BD RX5 2 Reverse BD Room 3 Reverse BD Power Gate Reverse BD R&B 1 Reverse BD R&B 2 Reverse BD Lo-fi Reverse BD Break Deep Reverse BD Break Heavy Reverse BD Break Hard Reverse Big Drum Reverse Taiko Drum Reverse Surdo Open Reverse Feet 2 Reverse Tom Industrial Reverse Door Slam Reverse Punch Reverse Feet 1 Reverse BD Human Reverse BD Human Deep Reverse Vox Buh! Reverse Vox Muh! Da Cha Da Gu mp Da Gu rim Da Gu f Da Gu hand Da Gu roll Pai Gu 4 Pai Gu 4 High Pai Gu 3 Pai Gu 3 High Pai Gu 2 Pai Gu 2 High Pai Gu 1 Luo High 1 Gong batter Jin Luo Luo High 2 Luo Mid-Low Luo Jin Luo Low Da Cha Da Cha effect Zhong Cha Xiao Cha effect Xiao Cha Mang Luo Low Mang Luo Mid Qing Finger Bell Luo big Mu Yu Low Mu Yu Mid-Low Mu Yu Mid Mu Yu High Nan Bang Zi roll Nan Bang Zi Ban Gu Ban Ban Gu roll Chinese Opera Voice 1 Chinese Opera Voice 2 Chinese Opera Voice 3 Yun Luo F4 Yun Luo F#4 Yun Luo G4 Yun Luo G#4 Yun Luo A4 Yun Luo A#4 Yun Luo B4 Yun Luo C5 Yun Luo C#5 Yun Luo D5 Yun Luo D#5 Yun Luo E5 Yun Luo F5 Yun Luo F#5 Yun Luo G5 Yun Luo G#5 Yun Luo A5 Yun Luo A#5 Yun Luo B5 Yun Luo C6 2 2 2 2 5 5 5 1 1 3 3 4 4 4 Drum Kit List * Actual keyboard notes of the Arabic Kit are one octave higher than the ones described in the list below. Dagu Mute Zhongcha Mute Dagu Heavy Zhongcha Open Paigu Middle Paigu Low Xiaocha Mute Bangu Xiaocha Open Bangzi Muyu Low Zhongluo Mute Muyu Mid-Low Zhongluo Open Muyu Middle Xiaoluo Open Triangle Mute Triangle Open Alternate Group 4 5 4 5 6 6 7 7 8 8 240 126/000/037 241 126/000/041 Arabic Kit * Cuban Kit Zarb Back mf Zarb Tom f Zarb Eshareh Zarb Whipping Tombak Tom f Neghareh Tom f Tombak Back f Neghareh Back f Tombak Snap f Neghareh Pelang f Tombak Trill Khaligi Clap 1 Arabic Zalgouta Open Khaligi Clap 2 Arabic Zalgouta Close Arabic Hand Clap Tabel Tak 1 Sagat 1 Tabel Dom Sagat 2 Tabel Tak 2 Sagat 3 Riq Tik 3 Riq Tik 2 Riq Tik Hard 1 Riq Tik 1 Riq Tik Hard 2 Riq Tik Hard 3 Riq Tish Riq Snouj 2 Riq Roll Riq Snouj 1 Riq Sak Riq Snouj 3 Riq Snouj 4 Riq Tak 1 Riq Brass 1 Riq Tak 2 Riq Brass 2 Riq Dom Katem Tak Doff Katem Dom Katem Sak 1 Katem Tak 1 Katem Sak 2 Katem Tak 2 Daholla Sak 2 Daholla Sak 1 Daholla Tak 1 Daholla Dom Daholla Tak 2 Tablah Prok Tablah Dom 2 Tablah Roll of Edge Tablah Tak Finger 4 Tablah Tak Trill 1 Tablah Tak Finger 3 Tablah Tak Trill 2 Tablah Tak Finger 2 Tablah Tak Finger 1 Tablah Tik 2 Tablah Tik 4 Tablah Tik 3 Tablah Tik 1 Tablah Tak 3 Tablah Tak 1 Tablah Tak 4 Tablah Tak 2 Tablah Sak 2 Tablah Tremolo Tablah Sak 1 Tablah Dom 1 Conga H Tip Conga H Heel Conga H Open Conga H Mute Conga H Slap Open Conga H Slap Conga H Slap Mute Conga L Tip Conga L Heel Conga L Open Conga L Mute Conga L Slap Open Conga L Slap Conga L Slide Bongo H Open 1 finger Bongo H Open 3 finger Bongo H Rim Bongo H Tip Bongo H Heel Bongo H Slap Bongo L Open 1 finger Bongo L Open 3 finger Bongo L Rim Bongo L Tip Bongo L Heel Bongo L Slap Timbale L Open Paila L Timbale H Open Paila H Cowbell Top Guiro Short Guiro Long Tambourine Maracas Shaker Cabasa Appendix 239 127/000/127 China Kit 2 PSR-I455 Owner’s Manual 73 Style List Style No. 1 2 3 4 5 6 7 8 9 10 11 12 13 14 15 16 17 18 19 20 21 22 23 24 25 26 27 28 29 30 31 32 33 34 35 36 37 38 39 40 41 42 43 44 45 Appendix 46 47 48 49 50 51 52 53 54 55 56 57 58 59 74 Style Name INDIAN Bhajan Bolly 1 Bolly 2 Bolly 3 Bolly 4 Indy Pop Hind Bld IndyWlz1 IndyWlz2 Bhangra1 Bhangra2 Boliyan BaleBale IndyDnc1 IndyDnc2 Tamil Kerala Goa Grv Goan Pop Rajsthan Dandiya MdrnQwal Qawwali 8BEAT BritRock 8BtModrn Cool 8Bt 60sGtPop 8BtAdria 60s8Beat BblgumPp BritPpSw 8Beat Off Beat 60s Rock HardRock RockShfl 8Bt Rock 16BEAT 16Beat PopShf 1 PopShf 2 Gtr Pop 16Bt Up KoolShfl JazzRock HH Light BALLAD Glam Pno Gtr Bld PianoBld LoveSong 68Modern 68SlowRk 68OrcBld OrganBld Pop Bld 16Bld 1 16Bld 2 DANCE AgagBeat CoastDnc ClubBeat PSR-I455 Owner’s Manual Style No. 60 61 62 63 64 65 66 67 68 69 70 71 72 73 74 75 76 77 78 79 80 81 82 83 84 85 86 87 88 89 90 91 92 93 94 95 96 97 98 99 100 101 102 103 104 105 106 107 108 109 110 111 112 113 114 115 116 117 118 119 120 Style Name Electron FunkyHse ChartR&B MellowHH Soul R&B Soul Bld Chillout EuTrance Ibiza DreamDnc NewHipHp Pop R&B TrancPop ChartPop HouseMsk Swing H TcnPolis Clubdanc Club Ltn Garage 1 Garage 2 TcnParty UK Pop HHGroove Hip Shfl HipHopPp DISCO ModDisco 70sDsc 1 70sDsc 2 LatinDsc DscPhily SatNight DscChoco DscHands SWING&JAZZ BB Fast BBMedium BBBallad BB Shfl AcousJaz AcidJazz JazzClub Swing 1 Swing 2 OrchSwng FiveFour Jazz Bld Dixie Ragtime AfroCubn Charlstn R&B Blues Rk Soul DetPop 1 60s R&R 6/8 Soul ModrnR&B CroTwist Rck&Roll DetPop 2 Boogie 1 Boogie 2 Style No. 121 122 123 124 125 126 127 128 129 130 131 132 133 134 135 136 137 138 139 140 141 142 143 144 145 146 147 148 149 150 151 152 153 154 155 156 157 158 159 160 161 162 163 164 165 166 167 168 169 170 171 172 173 174 175 176 177 178 179 Style Name 6/8Blues COUNTRY Cntry8Bt CntryPop CntrySwg CntryBld Cntry2/4 CowboyBg CntryShf Blgrass LATIN BrzSamba Bossa PopBossa Forro Srtanejo Tijuana Joropo Parranda Regaeton DscLatin Mambo Salsa Beguine GtrRumba Flamenco RmbIslnd Reggae BALLROOM VienWltz EngWaltz Slowfox Foxtrot Quickstp Tango Pasodobl Samba ChaCha Rumba Jive TRAD & WORLD US March 6/8March GerMarch PolkaPop OberPlka Trntella Showtune Xmas Swg XmasWltz Reel Hawaiian Durngens CGrupera Saeidy WehdaSag Laff IranElec Emarati Luo Gu Jing Ju Dangdut Kroncong Tabla/Tanpura Pattern List 180 181 182 183 184 185 186 187 188 189 190 191 192 193 194 195 196 197 198 199 200 201 202 203 204 205 206 Style Name WALTZ ItalyWlz MriacWlz Serenade SwingWlz Jz Wlz 1 Jz Wlz 2 CntryWlz OberWltz Musette CHILDREN Learn2/4 Learn4/4 Learn6/8 Fun 3/4 Fun 4/4 PIANIST Stride PnoBls 1 PnoBls 2 Pno Rag Pno R&R PnoBoogi PnoJzWlz PnoJzBld Arpeggio Musical SlowRock 8Pno Bld PnoSwing Pattern No. 1 2 3 4 5 6 7 8 9 10 11 12 13 14 15 16 Pattern Name TeenTaal Rupak JhapTaal EkTaal ChauTaal Chachar Dadra Keherwa Garba Bhajan Punjabi Tishram Chtushrm Khandam Mishram Sankernm Appendix Style No. PSR-I455 Owner’s Manual 75 Song List Song No. Song Name Composer Main Demo 1 2 3 50 51 Voice Demo Grand Piano Demo Sweet! Tenor Sax Demo Cool! Rotor Organ Demo Cool! Galaxy Electric Piano Demo Modern Harp & Sweet! Soprano Demo Power Kit Drum Demo Dance Kit Drum Demo Afro Cuban Kit Percussion Demo Piano Solo Maple Leaf Rag Jeanie with the Light Brown Hair The Last Rose of Summer For Elise Valse op.64-1 “Petit Chien” Turkish March Menuett/Beethoven Andante grazioso (Sonate K.331) 24 Preludes op.28-7 Melodie (Album für die Jugend) Fröhlicher Landmann (Album für die Jugend) Von fremden Ländern und Menschen (Kinderszenen) Träumerei (Kinderszenen) Thema (Impromptus D.935-3) Menuett BWV. Anh.116 Invention Nr.1 Gavotte/J. S. Bach Arietta/Grieg To a Wild Rose Tango/Albeniz La Fille aux Cheveux de Lin La Chevaleresque Arabesque Pastorale Annie Laurie The Entertainer Piano Ensemble Amazing Grace Die Lorelei Piano Concerto No.21 2nd mov. Scarborough Fair Old Folks at Home Londonderry Air Home Sweet Home Jesus bleibet meine Freude Loch Lomond Twinkle Twinkle Little Star Three Blind Mice Believe Me If All Those Endearing Young Charms Nocturne op.9-2 Etude op.10-3 “Chanson de L'adieu” 52 Ave Maria/J. S. Bach - Gounod 53 54 55 56 57 58 59 Menuett BWV. Anh.114 Wenn ich ein Vöglein wär Der Vogelfänger bin ich ja Romanze (Serenade K.525) Ave Verum Corpus Liebesträume Nr.3 Chanson du Toreador 4 5 6 7 8 9 10 11 12 13 14 15 16 17 18 19 20 21 22 23 24 25 26 27 28 29 30 31 32 33 34 35 36 37 Appendix 38 39 40 41 42 43 44 45 46 47 48 49 76 India GlobePop Chillin PSR-I455 Owner’s Manual Original Original Original Original Original Original Original Original Original Original Original S. Joplin S. C. Foster Traditional L. v. Beethoven F. Chopin W.A. Mozart L. v. Beethoven W. A. Mozart F. Chopin R. Schumann R. Schumann R. Schumann R. Schumann F. Schubert J. S. Bach J. S. Bach J. S. Bach E. Grieg E. A. MacDowell I. Albéniz C. A. Debussy J. F. Burgmüller J. F. Burgmüller J. F. Burgmüller Traditional S. Joplin Traditional F. Silcher W. A. Mozart Traditional S. C. Foster Traditional H. R. Bishop J. S. Bach Traditional Traditional Traditional Traditional F. Chopin F. Chopin J. S. Bach / C. F. Gounod J. S. Bach Traditional W. A. Mozart W. A. Mozart W. A. Mozart F. Liszt G. Bizet Song No. 60 61 62 63 64 65 66 67 68 69 70 71 72 73 74 75 76 77 78 79 80 81 82 83 84 85 86 87 88 89 90 91 92 93 94 95 96 97 98 99 100 101 102 103 104 105 106 107 108 109 110 Song Name Frühlingslied Ode to Joy O Christmas Tree Deck the Halls Silent Night Piano Accompaniment Ep Ballad Boogie Woogie Rock Piano Salsa Country Piano Gospel R&B Medium Swing Jazz Waltz Medium Bossa Slow Rock Classical Melodies Waltz (The Sleeping Beauty) Air (Orchestral Suite) Minuetto/Boccherini Siciliano/J. S. Bach Menuet (L'Arlésienne) Slavonic Dances op.72-2 Largo (From the New World) Pizzicato Polka Romanze/Beethoven Swan Lake Sicilienne/Fauré Méditation (Thaïs) Serenade/Haydn Grand March (Aida) Danza dell'Ore (La Gioconda) Le Cygne (Le Carnaval des Animaux) L'éléphant (Le Carnaval des Animaux) Fossiles (Le Carnaval des Animaux) Wachet auf, ruft uns die Stimme BWV. 645 Traditional Melodies Greensleeves Beautiful Dreamer Ring de Banjo O du lieber Augustin London Bridge Aura Lee Aloha Oe Raga Scale Bilawal Khamaaj Bhairav Kalyan Asavari Kalyani Hamsadhvani Mohanam Hindolam Sankarabharanam Composer F. Mendelssohn L. v. Beethoven Traditional Traditional F. Gruber Original Original Original Original Original Original Original Original Original Original P. I. Tchaikovsky J. S. Bach L. Boccherini J. S. Bach G. Bizet A. Dvořák A. Dvořák J. Strauss II L. v. Beethoven P. I. Tchaikovsky G. Fauré J. Massenet F. J. Haydn G. Verdi A. Ponchielli C. Saint-Saëns C. Saint-Saëns C. Saint-Saëns J. S. Bach Traditional S. C. Foster S. C. Foster Traditional Traditional Traditional Q. Liliuokalani – – – – – – – – – – Arpeggio List Arpeggio Name UpOct DownOct UpDwnOct SynArp1 SynArp2 SynArp3 SynArp4 SyncEcho PulsLine StepLine Random Down&Up SuperArp AcidLine TekEcho VelGruv Planet Trance1 Trance2 Trance3 ChordAlt SynChrd1 SynChrd2 Syncopa Hybrid1 Hybrid2 Hybrid3 Hybrid4 Hybrid5 PfArp1 PfArp2 PfArp3 PfArp4 PfClub1 PfClub2 PfBallad PfChd8th EPArp PfShufle PfRock Clavi1 Clavi2 RocknPf 70RockPf SlowflPf SoulPf ChordUp ChdDance LatinRck Salsa1 Salsa2 Reggae1 Reggae2 Reggae3 6/8R&B Gospel BalladEP Strum1 Strum2 Strum3 Strum4 Pickin1 Pickin2 Funky GtrChrd1 Arpeggio No. 66 67 68 69 70 71 72 73 74 75 76 77 78 79 80 81 82 83 84 85 86 87 88 89 90 91 92 93 94 95 96 97 98 99 100 101 102 103 104 105 106 107 108 109 110 111 112 113 114 115 116 117 118 119 120 121 122 123 124 125 126 127 128 129 130 Arpeggio Name GtrChrd2 GtrChrd3 GtrArp FngrPck1 FngrPck2 CleanGtr Slowfl Samba1 Samba2 Spanish1 Spanish2 Harp1 Harp2 FngrBas1 FngrBas2 FngrBas3 CoolFunk SlapBass AcidBas1 AcidBas2 FunkyBas CmbJazB1 CmbJazB2 CmbJazB3 NewR&BBs HipHopBs SmoothBs DreamBas TranceBs LatinBas Strings1 Strings2 Strings3 Strings4 StrngDwn StrngUp OrcheStr Jupiter Pizz1 Pizz2 BrasSec1 BrasSec2 BrasSec3 FunkBras SoulReed DiscoLd SmoothPd PercArp Trill Cresendo DiscoCP Perc1 Perc2 R&B Funk1 Funk2 Funk3 Soul ClscHip Smooth NewGospl CmbJazz1 CmbJazz2 Bebop JazzHop Arpeggio No. 131 132 133 134 135 136 137 138 139 140 141 142 143 144 145 146 147 148 149 150 151 152 153 154 155 156 157 158 159 160 161 162 Arpeggio Name FolkRock Unplugge HipHop Trance Dream 2 Step ClubHs1 ClubHs2 EuroTek House Ibiza1 Ibiza2 Ibiza3 Garage Samba African Latin China Indian Arabic TeenTalC TeenTalD TeenTalE TeenTalF TeenTalG TeenTalA Dadra C Dadra D Dadra E Dadra F Dadra G Dadra A Appendix Arpeggio No. 1 2 3 4 5 6 7 8 9 10 11 12 13 14 15 16 17 18 19 20 21 22 23 24 25 26 27 28 29 30 31 32 33 34 35 36 37 38 39 40 41 42 43 44 45 46 47 48 49 50 51 52 53 54 55 56 57 58 59 60 61 62 63 64 65 PSR-I455 Owner’s Manual 77 Music Database List MDB No. 1 2 3 4 5 6 7 8 9 10 11 12 13 14 15 16 17 18 19 20 21 22 23 24 25 26 27 28 29 30 31 32 33 34 35 36 37 38 39 40 41 42 43 44 45 46 47 Appendix 48 49 50 51 52 53 54 55 56 57 58 59 60 61 62 78 MDB Name ALL TIME HITS Jude Hey New UK MyLoving All OK Buttercp JustCall CheepChp Daddy's Dance? GetBack GtrWheel HighTide IWasBorn Sailing BluJeans Holiday Imagine LoveMe LetItBld LdyMdona YelowSub Marriage MovinOut My Shell NowNever DoLoveMe TcktRide SeeClear Masachus Hard Day USA Pie Norway YesterBd MODERN POP Watches SoundMPH Hold Us Unfound NeedSome PrtTmLvr MoonShdw NikitSng Sure of Off Day Tell Her GirlsMne NeedLove Radio POP CLASSICS Standing RainLaff Sunshine ForNamdo ThankFor ManPiano CoinLane LovesYou Tmbourin Alone GldField Raindrop SultanSw Life'sWk TopWorld PSR-I455 Owner’s Manual MDB No. 63 64 65 66 67 68 69 70 71 72 73 74 75 76 77 78 79 80 81 82 83 84 85 86 87 88 89 90 91 92 93 94 95 96 97 98 99 100 101 102 103 104 105 106 107 108 109 110 111 112 113 114 115 116 117 118 119 120 121 122 123 124 MDB Name WatchGrl POP BALLAD WnderLnd CanIStop EvryTime IvoryAnd TheWorld LovWoman Dolannes Madigan Paradise Whisper BALLAD AllOdds AtonalFl Hero Woman RunToYou LoveOfAl CndleWnd Cavatina Cherish ToLoveMe YouKnow Evrythng EyesOfBl Hello BeThere FlyAway LoveYou NeverLet JustOnce IfYouGo SavingAl InTheDrk LovePwr Vision Beautifl AllAlone Opposite BeHonest SayYou SayNthng Stranger OneDay TheBayou ThisSong Distance ThisWay LoveGone Inspirng TrueColr ROCK & ROLL ShakenUp Beethovn HurryLov BeCruel Jumping Countdwn SuePeggy Champion Jailhous BlueShoe Rockin24 Shouting MDB No. 125 126 127 128 129 130 131 132 133 134 135 136 137 138 139 140 141 142 143 144 145 146 147 148 149 150 151 152 153 154 155 156 157 158 159 160 161 162 163 164 165 166 167 168 169 170 171 172 173 174 175 176 177 178 179 180 181 182 183 184 185 MDB Name Rock&Rll HonkyTnk OLDIES Daydream Sumertme Diana's Uptown Apache IGotIt Tonight MyPillow NoRain FinalDan SlpnLion Ghetto LipsLcky PrettyWm TikiGtr TurnThre Sherry DANCE & DISCO Babylon Goodbye Catch22 DISCO Survival TheNavy DontHide Celebrat LondonRU 10,2 Sun ShakeYou Believe BoySumer I'mSexy StuffHot SWING & JAZZ MoonOf Patrol Charles GiveLove HallOfMe Rhythm LOVE LeroyBad Caraban Misbehav Safari Smiling SoWhatIs TimeGone TasteHny Sandman Tunisian TwoFoot MyBaby R&B Sally's AsPlayed BabyGrov Highwy66 SweetCHI JustU&Me ManLoves OurLove Music Database List 188 189 190 191 192 193 194 195 196 197 198 199 200 201 202 203 204 205 206 207 208 209 210 211 212 213 214 215 216 217 218 219 220 221 222 223 224 225 226 227 228 229 230 231 232 233 234 235 236 237 238 239 240 241 242 243 244 245 246 MDB Name Wish I What COUNTRY OnTheRd Breathe InMyMind ContryHw GreenGrs EverNeed Lonesome Lucille HomeRng Tennesse LATIN Bananabt DanceMng DntWorry Jamaica FleaSpa I'mPola MamboJm OneNote PasoCani SayNoMor Beguine Tijuana Picture ENTERTAINMENT OnTheHil Barnacle Califrag DadClock DanceLd DnceFire BigCntry Cabaret OdeToJoy Mi-Re-Do MyPrince Necesary NoBuiz NoisyOld Sleigh RockBaby Magnifiq Magnfcnt SilentNt Nabucco Standing SummerPl Christms Favorite Tubbie Turkish 12OClock WALTZ & TRAD Blk&Whte CanCan Charmain Musicbox Clementn Doodah! Dreamer EnterRag Birthday MDB No. 247 248 249 250 251 252 253 254 255 256 257 258 259 260 261 262 263 264 265 266 267 268 269 270 271 272 273 274 275 276 277 278 279 280 281 282 283 284 285 286 287 288 289 290 291 292 293 294 295 296 297 298 299 300 301 302 303 304 305 MDB Name MaryLamb Donald's MoonWlz MoulinHt Sunshine PieceOf GreenSlv TakeFour TexRose ThePolka Scarboro Edelweis AroundWd Whatever Yankee's WORLD Hawaii D'amor ElCondor GoodbyRm ILandOn ItalyBel Cucarumb Puntuali Cielito ItalySun SantaLuc Trumpetr VanMass PIANIST ItalySun BeGood Birdland BlueRose Chaie's Highwy66 Leaves Miload Cabaret Wonderfl Imagine LtleStar MapleRag Mi-Re-Do NoBuiz OhBlah Charades Sally's Nabucco SunnyStr MistyFln LdnBridg GrndClck Importnc Snowman Favorite SongForU SugerSpn ThisWay WenSmile ZipperD Appendix MDB No. 186 187 PSR-I455 Owner’s Manual 79 Effect Type List Harmony Types No. 01 02 03 04 05 Harmony Type Duet Trio Block Country Octave 06 Trill 1/4 note 07 Trill 1/6 note 08 Trill 1/8 note 09 Trill 1/12 note 10 Trill 1/16 note 11 Trill 1/24 note 12 Trill 1/32 note 13 Tremolo 1/4 note 14 Tremolo 1/6 note 15 Tremolo 1/8 note 16 Tremolo 1/12 note 17 Tremolo 1/16 note 18 Tremolo 1/24 note 19 Tremolo 1/32 note 20 Echo 1/4 note 21 Echo 1/6 note 22 Echo 1/8 note 23 Echo 1/12 note 24 Echo 1/16 note 25 Echo 1/24 note 26 Echo 1/32 note Description Harmony types 01–05 are pitch-based and add one-, two- or three-note harmonies to the single-note melody played in the right hand. These types sound when chords are played in the auto accompaniment range of the keyboard. These Harmony types will also work when playing songs that contain chord data. Types 6–26 are rhythm-based effects and add embellishments or delayed repeats in time with the auto accompaniment. These types sound whether the auto accompaniment is on or not; however, the actual speed of the effect depends on the Tempo setting. The individual note values in each type let you synchronize the effect precisely to the rhythm. Triplet settings are also available: 1/6 = quarter-note triplets, 1/12 = eighthnote triplets, 1/24 = sixteenth-note triplets. • The Trill effect Types (06–12) create two-note trills (alternating notes) when two notes are held. • The Tremolo effect Types (13–19) repeat all held notes (up to four). • The Echo effect Types (20–26) create delayed repeats of each note played. Appendix Reverb Types No. 01–03 04–05 06–07 08–09 10 Reverb Type Hall 1–3 Room 1–2 Stage 1–2 Plate 1–2 Off Description Concert hall reverb. Small room reverb. Reverb for solo instruments. Simulated steel plate reverb. No effect. Chorus Types No. 01–02 03–04 05 80 Chorus Type Chorus 1–2 Flanger 1–2 Off PSR-I455 Owner’s Manual Description Conventional chorus program with rich, warm chorusing. Pronounced three-phase modulation with a slight metallic sound. No effect. Specifications Keyboard Other Controllers Display Voices Effects Accompaniment Styles Dimensions (W x D x H) Weight Number of Keys Touch Response Pitch Bend Control Knobs Display Language Tone Generation Tone Generating Technology Polyphony Number of Polyphony (Max.) Preset Number of Voices Compatibility Reverb Chorus Master EQ Types Harmony Ultra-Wide Stereo Dual Functions Split Arpeggio type Number of Preset Styles Fingering Preset Style Control User Styles Other Features Tabla/Tanpura pattern Preset Preset Recording/Playback Recording Music Database One Touch Setting (OTS) Number of Preset Tabla Patterns Number of Variations Number of Preset Tanpura Patterns Number of Preset Songs Number of Songs Number of Tracks Data Capacity Compatible Data Format Function Playback Recording Lesson/Guide Registration Overall Miscellaneous Memory Memory/Connectivity Connectivity Amplifiers/Speakers Number of Buttons Metronome Tempo Range Transpose Tuning Portable Grand Button Internal Memory External Strage Device DC IN Headphones/Output Sustain Pedal USB TO DEVICE USB TO HOST Amplifiers Speakers Adaptor Power Supply Power Supply Batteries Power Consumption Auto Power Off Function Included Accessories Accessories Optional Accessories 946 mm x 405 mm x 140 mm (37-1/4” x 15-15/16” x 5-1/2”) 6.8 kg (15lbs 0oz.) (not including batteries) 61 Yes Yes Yes LCD display English AWM Stereo Sampling 32 214 + 466XGlite + 6 Indian Kits + 21 Drum/SFX Kits + 46 Arpeggio GM, XGlite 9 types 4 types 5 types 26 types 3 types Yes Yes 162 types 206 Multi finger ACMP ON/OFF, INTRO/ENDING/rit., MAIN/AUTO FILL, SYNC START, SYNC STOP, START/STOP, TRACK ON/OFF 5 305 Yes 16 5 (for each Tabla Pattern) 4 (for all Tabla Patterns) 110 10 6 (5 Melody + 1 Style) Approx. 19,000 notes (when only “melody” tracks are recorded) Approx. 5,500 chords (when only “chord” tracks are recorded) SMF Original File Format (SMF conversion function) [1 LISTENING, 2 TIMING, 3 WAITING], [Repeat & Learn], [Chord Dictionary] 4 (x 8 banks) with Freeze function Yes 11 – 280 -12 to 0, 0 to +12 427.0 – 440.0 – 453.0 Hz Yes Approx. 1.54MB USB flash memory DC IN 12V [PHONES/OUTPUT] x 1 [SUSTAIN] x 1 Yes Yes 2.5W + 2.5W 12cm×2 + 3cm×2 • Adaptor: PA-150A or an equivalent recommended by Yamaha Six “AA” size alkaline (LR6), manganese (R6) or Ni-MH rechargable batteries • 16W (PA-150A) Yes • Owner’s Manual • AC Power Adaptor PA-150A or an equivalent • Music Rest • Online Member Product Registration • AC Power Adaptor PA-150A or an equivalent recommended by Yamaha • Keyboard Stand (L-2C) • Stereo Headphones (HPE-150/HPE-30) • Footswitch (FC4/FC5) Appendix Size/Weight * Specifications and descriptions in this owner’s manual are for information purposes only. Yamaha Corp. reserves the right to change or modify products or specifications at any time without prior notice. Since specifications, equipment or options may not be the same in every locale, please check with your Yamaha dealer. PSR-I455 Owner’s Manual 81 Index A E L AC Power Adaptor .................. 9, 12 Accessories .................................... 9 ACMP ..................................... 22, 40 Arpeggio ................................. 20, 39 Arpeggio List ............................... 77 Arpeggio Quantize ................ 39, 49 Arpeggio Type ....................... 20, 49 Arpeggio Velocity ........................ 49 ATTACK ...................................... 37 Attack Time ..................... 37, 48, 49 Auto Accompaniment ................. 40 Auto Accompaniment range ....... 22 AUTO FILL ................................. 40 Auto Power Off ............................ 14 Auto Power Off Time .................. 50 EFFECT ..................................37, 38 Effect Type List ............................80 EG .................................................38 EG (Envelope Generator) ............37 ENDING .......................................40 Envelope Generator .....................37 EQ Setting ....................................35 EQ Type ........................................35 Error ..............................................59 Excellent .......................................27 Exit? ..............................................59 External Clock ..............................50 Lesson .......................................... 26 Lesson Track ................................ 50 Listen ............................................ 26 Load STY ..................................... 57 Load USR .................................... 56 Local Control ............................... 49 B Backup .......................................... 32 Backup Clear ............................... 32 Backup Parameters ...................... 32 Battery .......................................... 12 Battery Type ........................... 12, 50 Beat ............................................... 15 BGM Playback ............................ 46 C Can’t Use ...................................... 59 Chord ...................................... 15, 43 Chord Dictionary ......................... 45 CHORUS ...................................... 37 Chorus Depth ................... 33, 48, 49 Chorus Type ........................... 33, 49 Complet. ....................................... 59 Computer-related Operations ....... 9 CUTOFF ...................................... 37 D Appendix Data Err ........................................ 59 Del SMF ....................................... 58 Del USR ....................................... 58 Demo Cancel ......................... 32, 50 Demo Group .......................... 32, 50 Demo Play Mode ......................... 50 Demo Song ................................... 24 Disk Ful ........................................ 59 Display ......................................... 15 Drum Kit List ............................... 67 Dual Voice ........................ 16, 36, 49 82 PSR-I455 Owner’s Manual F Fast Forward .................................25 Fast Reverse ..................................25 File Control ..................................59 File Ful ..........................................59 FILTER ...................................37, 38 Filter ..............................................21 Filter Cutoff ............................21, 49 Filter Resonance ....................21, 49 Flash Clear ....................................32 Footswitch ..............................13, 39 Format ...........................................53 Freeze Mode .....................31, 32, 50 Function ........................................48 Function List ................................48 M MAIN ........................................... 40 Main ............................................. 16 Main Voice ................................... 16 Master EQ Type ..................... 32, 49 MASTER VOLUME .................. 14 MEASURE .................................. 15 Melody Voice ............................... 47 Metronome ............................. 18, 50 Metronome Volume ..................... 18 MIDI Basics ................................... 9 MIDI Reference ............................. 9 Music Database ........................... 22 Music Rest ..................................... 9 N no data .......................................... 59 no file ............................................ 59 Notation ........................................ 15 O G GM System Level 1 .......................8 Grade .......................................27, 50 Octave ..................................... 48, 49 OK ................................................ 27 One Touch Setting ....................... 34 H P Harmony .......................................19 Harmony Type ........................19, 49 Harmony Volume .........................49 Headphone ....................................13 Pan .......................................... 48, 49 Pause ............................................. 25 PC mode ....................................... 49 Pedal Function ............................. 50 PITCH BEND .............................. 34 Pitch Bend Range .................. 34, 48 Pitch Controls .............................. 34 Power ............................................ 14 Power Requirements ................... 12 Power source ................................ 13 Preset Song .................................. 47 Protect .......................................... 59 I Initial Send ...................................50 Initialization .................................32 INTRO ..........................................40 K Keyboard Out ...............................50 Knob ........................................21, 37 Knob assignment ..........................15 Index RAGA SCALE ............................ 24 Random ........................................ 46 Recording ..................................... 28 Registration Memory .................. 31 RELEASE .................................... 38 Release Time .......................... 38, 49 Repeat ........................................... 25 Repeat & Learn ............................ 27 RESONANCE ............................. 37 REVERB ...................................... 37 Reverb Depth ................... 33, 48, 49 Reverb Type ........................... 33, 49 Track On/Off ................................25 Transpose ................................34, 48 Troubleshooting ...........................60 Tuning .....................................34, 48 U UnFormat ......................................59 USB .................................................8 USB Flash Memory .....................51 USB TO DEVICE ........................51 USB TO HOST ............................11 UseAdpt ........................................59 User Song .....................................28 S V Save SMF ..................................... 55 Save USR ..................................... 54 Section .......................................... 40 SMF (Standard MIDI File) ......... 55 Song .............................................. 24 Song Book ...................................... 9 Song Category ............................. 24 Song List ...................................... 76 Song Out ...................................... 50 Song Volume .................... 32, 47, 48 Sostenuto ................................ 13, 50 Split Point ............................... 43, 48 Split Voice ........................ 17, 36, 49 Style ........................................ 22, 40 STYLE FILE ................................. 8 Style File ...................................... 57 STYLE FILTER .......................... 38 Style List ...................................... 74 Style Out ...................................... 50 Style Volume .......................... 42, 48 Sustain .......................................... 39 SYNC START .............................. 22 Synchro Start ............................... 40 Synchro Stop ................................ 41 Variation .................................23, 42 Very Good .....................................27 Voice List ......................................61 Volume ....................................48, 49 Volume of the Pattern ..................42 Volume of the Style .....................42 W Waiting ..........................................26 Wide Type .....................................49 X XGlite .............................................8 Y Your Tempo ..................................50 Appendix R T Tabla ....................................... 23, 37 Tabla/Tanpura Pattern List .......... 75 Tanpura ................................... 23, 37 Tap Start ....................................... 42 Tempo ..................................... 18, 42 Time Signature ....................... 18, 50 Timing .......................................... 26 Touch Sensitivity ................... 35, 48 Track ............................................. 28 TRACK CONTROL .................... 41 PSR-I455 Owner’s Manual 83 For details of products, please contact your nearest Yamaha representative or the authorized distributor listed below. NORTH AMERICA CANADA Yamaha Canada Music Ltd. 135 Milner Avenue, Scarborough, Ontario, M1S 3R1, Canada Tel: 416-298-1311 U.S.A. Yamaha Corporation of America 6600 Orangethorpe Ave., Buena Park, Calif. 90620, U.S.A. Tel: 714-522-9011 CENTRAL & SOUTH AMERICA THE NETHERLANDS/ BELGIUM/LUXEMBOURG Yamaha Music Europe Branch Benelux Clarissenhof 5-b, 4133 AB Vianen, The Netherlands Tel: 0347-358 040 FRANCE Yamaha Music Europe 7 rue Ambroise Croizat, Zone d'activités Pariest, 77183 Croissy-Beaubourg, France Tel: 01-64-61-4000 ITALY Yamaha Music Europe GmbH, Branch Italy Viale Italia 88, 20020 Lainate (Milano), Italy Tel: 02-935-771 SPAIN/PORTUGAL MEXICO Yamaha de México S.A. de C.V. Calz. Javier Rojo Gómez #1149, Col. Guadalupe del Moral C.P. 09300, México, D.F., México Tel: 55-5804-0600 BRAZIL Yamaha Musical do Brasil Ltda. Rua Joaquim Floriano, 913 - 4' andar, Itaim Bibi, CEP 04534-013 Sao Paulo, SP. BRAZIL Tel: 011-3704-1377 ARGENTINA Yamaha Music Latin America, S.A. Sucursal de Argentina Olga Cossettini 1553, Piso 4 Norte Madero Este-C1107CEK Buenos Aires, Argentina Tel: 011-4119-7000 PANAMA AND OTHER LATIN AMERICAN COUNTRIES/ CARIBBEAN COUNTRIES Yamaha Music Latin America, S.A. Torre Banco General, Piso 7, Urbanización Marbella, Calle 47 y Aquilino de la Guardia, Ciudad de Panamá, Panamá Tel: +507-269-5311 EUROPE THE UNITED KINGDOM/IRELAND Yamaha Music Europe GmbH (UK) Sherbourne Drive, Tilbrook, Milton Keynes, MK7 8BL, England Tel: 01908-366700 GERMANY Yamaha Music Europe GmbH Siemensstraße 22-34, 25462 Rellingen, Germany Tel: 04101-3030 SWITZERLAND/LIECHTENSTEIN Yamaha Music Europe GmbH Branch Switzerland in Zürich Seefeldstrasse 94, 8008 Zürich, Switzerland Tel: 044-387-8080 AUSTRIA Yamaha Music Europe GmbH Branch Austria Schleiergasse 20, A-1100 Wien, Austria Tel: 01-60203900 CZECH REPUBLIC/HUNGARY/ ROMANIA/SLOVAKIA/SLOVENIA Yamaha Music Europe GmbH Branch Austria (Central Eastern Europe Office) Schleiergasse 20, A-1100 Wien, Austria Tel: 01-602039025 POLAND/LITHUANIA/LATVIA/ESTONIA Yamaha Music Europe GmbH Branch Poland Office ul. Wrotkowa 14 02-553 Warsaw, Poland Tel: 022-500-2925 BULGARIA Dinacord Bulgaria LTD. Bul.Iskarsko Schose 7 Targowski Zentar Ewropa 1528 Sofia, Bulgaria Tel: 02-978-20-25 MALTA Olimpus Music Ltd. The Emporium, Level 3, St. Louis Street Msida MSD06 Tel: 02133-2144 Yamaha Music Europe GmbH Ibérica, Sucursal en España Ctra. de la Coruna km. 17, 200, 28230 Las Rozas (Madrid), Spain Tel: 91-639-8888 GREECE Philippos Nakas S.A. The Music House 147 Skiathou Street, 112-55 Athens, Greece Tel: 01-228 2160 SWEDEN Yamaha Music Europe GmbH Germany filial Scandinavia J. A. Wettergrens Gata 1, Box 30053 S-400 43 Göteborg, Sweden Tel: 031 89 34 00 DENMARK Yamaha Music Europe GmbH, Tyskland – filial Denmark Generatorvej 6A, DK-2730 Herlev, Denmark Tel: 44 92 49 00 FINLAND F-Musiikki Oy Kluuvikatu 6, P.O. Box 260, SF-00101 Helsinki, Finland Tel: 09 618511 NORWAY Yamaha Music Europe GmbH Germany Norwegian Branch Grini Næringspark 1, N-1345 Østerås, Norway Tel: 67 16 77 70 ICELAND Skifan HF Skeifan 17 P.O. Box 8120, IS-128 Reykjavik, Iceland Tel: 525 5000 RUSSIA Yamaha Music (Russia) Room 37, bld. 7, Kievskaya street, Moscow, 121059, Russia Tel: 495 626 5005 OTHER EUROPEAN COUNTRIES Yamaha Music Europe GmbH Siemensstraße 22-34, 25462 Rellingen, Germany Tel: +49-4101-3030 AFRICA Yamaha Corporation, Asia-Pacific Sales & Marketing Group Nakazawa-cho 10-1, Naka-ku, Hamamatsu, Japan 430-8650 Tel: +81-53-460-2313 MIDDLE EAST TURKEY/CYPRUS Yamaha Music Europe GmbH Siemensstraße 22-34, 25462 Rellingen, Germany Tel: 04101-3030 OTHER COUNTRIES Yamaha Music Gulf FZE LOB 16-513, P.O.Box 17328, Jubel Ali, Dubai, United Arab Emirates Tel: +971-4-881-5868 ASIA THE PEOPLE’S REPUBLIC OF CHINA Yamaha Music & Electronics (China) Co.,Ltd. 2F, Yunhedasha, 1818 Xinzha-lu, Jingan-qu, Shanghai, China Tel: 021-6247-2211 HONG KONG Tom Lee Music Co., Ltd. 11/F., Silvercord Tower 1, 30 Canton Road, Tsimshatsui, Kowloon, Hong Kong Tel: 2737-7688 INDIA Yamaha Music India Pvt. Ltd. Spazedge building, Ground Floor, Tower A, Sector 47, Gurgaon- Sohna Road, Gurgaon, Haryana, India Tel: 0124-485-3300 INDONESIA PT. Yamaha Musik Indonesia (Distributor) PT. Nusantik Gedung Yamaha Music Center, Jalan Jend. Gatot Subroto Kav. 4, Jakarta 12930, Indonesia Tel: 021-520-2577 KOREA Yamaha Music Korea Ltd. 8F, 9F, Dongsung Bldg. 158-9 Samsung-Dong, Kangnam-Gu, Seoul, Korea Tel: 02-3467-3300 MALAYSIA Yamaha Music (Malaysia) Sdn., Bhd. Lot 8, Jalan Perbandaran, 47301 Kelana Jaya, Petaling Jaya, Selangor, Malaysia Tel: 03-78030900 PHILIPPINES Yupangco Music Corporation 339 Gil J. Puyat Avenue, P.O. Box 885 MCPO, Makati, Metro Manila, Philippines Tel: 819-7551 SINGAPORE Yamaha Music (Asia) PRIVATE LIMITED Blk 202 Hougang Street 21, #02-00, Singapore 530202, Singapore Tel: 6747-4374 TAIWAN Yamaha KHS Music Co., Ltd. 3F, #6, Sec.2, Nan Jing E. Rd. Taipei. Taiwan 104, R.O.C. Tel: 02-2511-8688 THAILAND Siam Music Yamaha Co., Ltd. 4, 6, 15 and 16th floor, Siam Motors Building, 891/1 Rama 1 Road, Wangmai, Pathumwan, Bangkok 10330, Thailand Tel: 02-215-2622 OTHER ASIAN COUNTRIES Yamaha Corporation, Asia-Pacific Sales & Marketing Group Nakazawa-cho 10-1, Naka-ku, Hamamatsu, Japan 430-8650 Tel: +81-53-460-2313 OCEANIA AUSTRALIA Yamaha Music Australia Pty. Ltd. Level 1, 99 Queensbridge Street, Southbank, Victoria 3006, Australia Tel: 3-9693-5111 NEW ZEALAND Music Works LTD P.O.BOX 6246 Wellesley, Auckland 4680, New Zealand Tel: 9-634-0099 COUNTRIES AND TRUST TERRITORIES IN PACIFIC OCEAN Yamaha Corporation, Asia-Pacific Sales & Marketing Group Nakazawa-cho 10-1, Naka-ku, Hamamatsu, Japan 430-8650 Tel: +81-53-460-2313 DMI4 Yamaha Global Site http://www.yamaha.com/ Yamaha Manual Library http://www.yamaha.co.jp/manual/ U.R.G., Digital Musical Instruments Division © 2012 Yamaha Corporation 205POTY*.*-01A0 Printed in China ZC95840-
 1
1
-
 2
2
-
 3
3
-
 4
4
-
 5
5
-
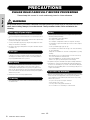 6
6
-
 7
7
-
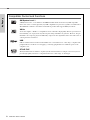 8
8
-
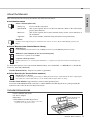 9
9
-
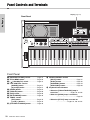 10
10
-
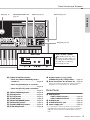 11
11
-
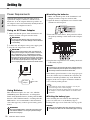 12
12
-
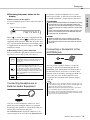 13
13
-
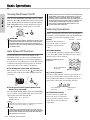 14
14
-
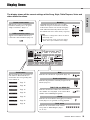 15
15
-
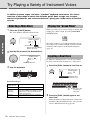 16
16
-
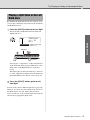 17
17
-
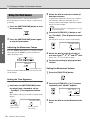 18
18
-
 19
19
-
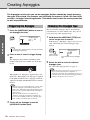 20
20
-
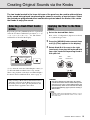 21
21
-
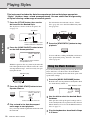 22
22
-
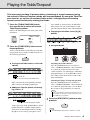 23
23
-
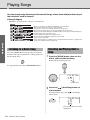 24
24
-
 25
25
-
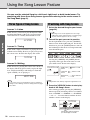 26
26
-
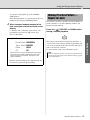 27
27
-
 28
28
-
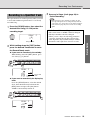 29
29
-
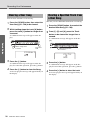 30
30
-
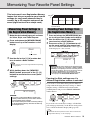 31
31
-
 32
32
-
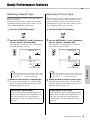 33
33
-
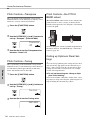 34
34
-
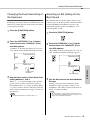 35
35
-
 36
36
-
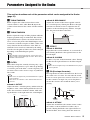 37
37
-
 38
38
-
 39
39
-
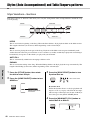 40
40
-
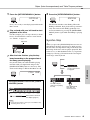 41
41
-
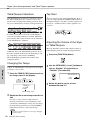 42
42
-
 43
43
-
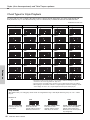 44
44
-
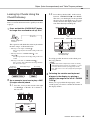 45
45
-
 46
46
-
 47
47
-
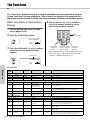 48
48
-
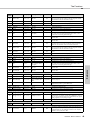 49
49
-
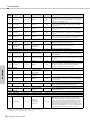 50
50
-
 51
51
-
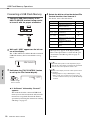 52
52
-
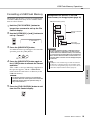 53
53
-
 54
54
-
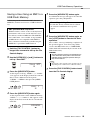 55
55
-
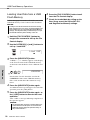 56
56
-
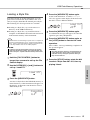 57
57
-
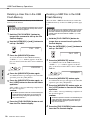 58
58
-
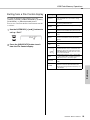 59
59
-
 60
60
-
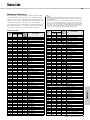 61
61
-
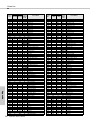 62
62
-
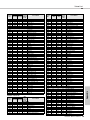 63
63
-
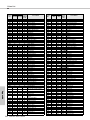 64
64
-
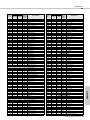 65
65
-
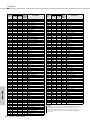 66
66
-
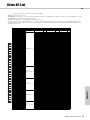 67
67
-
 68
68
-
 69
69
-
 70
70
-
 71
71
-
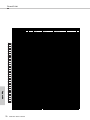 72
72
-
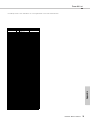 73
73
-
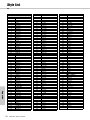 74
74
-
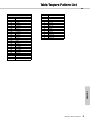 75
75
-
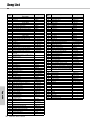 76
76
-
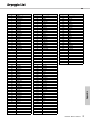 77
77
-
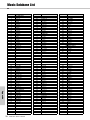 78
78
-
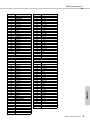 79
79
-
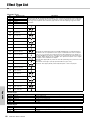 80
80
-
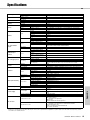 81
81
-
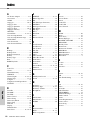 82
82
-
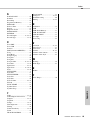 83
83
-
 84
84


Yamaha PSR-I455 de handleiding
- Categorie
- Muziekinstrumenten
- Type
- de handleiding
in andere talen
- English: Yamaha PSR-I455 Owner's manual
- italiano: Yamaha PSR-I455 Manuale del proprietario
- русский: Yamaha PSR-I455 Инструкция по применению
- français: Yamaha PSR-I455 Le manuel du propriétaire
- español: Yamaha PSR-I455 El manual del propietario
- Deutsch: Yamaha PSR-I455 Bedienungsanleitung
- português: Yamaha PSR-I455 Manual do proprietário
- dansk: Yamaha PSR-I455 Brugervejledning
- suomi: Yamaha PSR-I455 Omistajan opas
- čeština: Yamaha PSR-I455 Návod k obsluze
- svenska: Yamaha PSR-I455 Bruksanvisning
- Türkçe: Yamaha PSR-I455 El kitabı
- polski: Yamaha PSR-I455 Instrukcja obsługi
- română: Yamaha PSR-I455 Manualul proprietarului
Gerelateerde papieren
-
Yamaha PSR-I500 de handleiding
-
Yamaha PSR-282 Handleiding
-
-
Yamaha YPT 300 - Full Size Enhanced Teaching System Music Keyboard de handleiding
-
-
-
Yamaha PSRE263 Handleiding
-
Yamaha PSR-EW310 de handleiding
-
-
Yamaha PSR-E360 de handleiding