Electrolux ESL5340LO Handleiding
- Categorie
- Vaatwassers
- Type
- Handleiding


INHOUDSOPGAVE
1. VEILIGHEIDSINFORMATIE...................................................................................3
2. VEILIGHEIDSVOORSCHRIFTEN.......................................................................... 4
3. BESCHRIJVING VAN HET PRODUCT................................................................. 6
4. BEDIENINGSPANEEL..........................................................................................6
5. PROGRAMMA’S..................................................................................................7
6. INSTELLINGEN....................................................................................................9
7. OPTIES..............................................................................................................11
8. VOORDAT U HET APPARAAT VOOR DE EERSTE KEER GEBRUIKT................ 12
9. DAGELIJKS GEBRUIK....................................................................................... 13
10. AANWIJZINGEN EN TIPS................................................................................ 15
11. ONDERHOUD EN REINIGING......................................................................... 16
12. PROBLEEMOPLOSSING.................................................................................18
13. TECHNISCHE INFORMATIE............................................................................ 19
WE DENKEN AAN U
Bedankt voor het kopen van een Electrolux-apparaat. U koos voor een product dat
jaren professionele ervaring en innovatie bevat. Ingenieus en stijlvol, het werd
ontworpen met u in het achterhoofd. Wanneer u het gebruikt, kunt u er op
vertrouwen dat u keer op keer fantastische resultaten zult krijgen.
Welkom bij Electrolux.
Ga naar onze website voor:
Advies over gebruik, brochures, het oplossen van problemen en
onderhoudsinformatie:
www.electrolux.com
Registreer uw product voor een betere service:
www.registerelectrolux.com
Koop accessoires, verbruiksartikelen en originele reserveonderdelen voor uw
apparaat:
www.electrolux.com/shop
KLANTENSERVICE
Gebruik altijd originele onderdelen.
Als u contact opneemt met de klantenservice zorg dat u de volgende gegevens bij
de hand hebt. Model, productnummer, serienummer.
Deze informatie wordt vermeld op het typeplaatje.
Waarschuwing / Belangrijke veiligheidsinformatie
Algemene informatie en tips
Milieu-informatie
Wijzigingen voorbehouden.
www.electrolux.com2

1. VEILIGHEIDSINFORMATIE
Lees zorgvuldig de meegeleverde instructies voor
installatie en gebruik van het apparaat. De fabrikant is niet
verantwoordelijk voor letsel en schade veroorzaakt door
een foutieve installatie. Bewaar de instructies van het
apparaat voor toekomstig gebruik.
1.1 Algemene veiligheid
• Dit apparaat is bedoeld voor huishoudelijk gebruik of
gelijksoortige toepassingen zoals:
– boerderijen, personeelskeukens in winkels, kantoren
of andere werkomgevingen
– door gasten in hotels, motels, bed&breakfasts en
andere woonomgevingen.
• De specificatie van het apparaat mag niet worden
veranderd.
• De waterdruk (minimaal en maximaal) moet liggen
tussen 0.5 (0.05) / 8 (0.8) bar (Mpa)
• Houd rekening met het maximale aantal 13 plaatsen.
• Als de voedingskabel beschadigd is, moet de fabrikant,
een erkende serviceverlener of een gekwalificeerd
persoon deze vervangen teneinde gevaarlijke situaties te
voorkomen.
• Doe messen en bestek met scherpe punten in het
bestekmandje met de punten omlaag in horizontale
positie.
• Laat de deur van het apparaat niet open staan zonder
toezicht om te voorkomen dat er iemand over struikelt.
• Schakel het apparaat uit en trek de stekker uit het
stopcontact voordat u onderhoudshandelingen verricht.
• Gebruik geen waterstralen of stoom om het apparaat te
reinigen.
• De ventilatie-openingen in de onderkant (indien van
toepassing) mogen niet worden afgedekt door tapijt.
• Het apparaat moet met de nieuwe slangset worden
aangesloten op een kraan. Oude slangsets mogen niet
opnieuw worden gebruikt.
NEDERLANDS
3

1.2 Veiligheid van kinderen en kwetsbare mensen
• Dit apparaat kan worden gebruikt door kinderen van 8
jaar en ouder en door mensen met beperkte
lichamelijke, zintuiglijke of verstandelijke vermogens of
een gebrek aan ervaring en kennis, indien zij onder
toezicht staan of instructies hebben gekregen over het
veilig gebruiken van het apparaat en indien zij de
eventuele gevaren begrijpen.
• Laat kinderen niet met het apparaat spelen.
• Houd alle reinigingsmiddelen uit de buurt van kinderen.
• Houd kinderen en huisdieren uit de buurt van het
apparaat als de deur open is.
• Reiniging en onderhoud mag niet worden uitgevoerd
door kinderen zonder toezicht.
2. VEILIGHEIDSVOORSCHRIFTEN
2.1 Montage
• Verwijder alle verpakkingsmaterialen.
• Installeer en gebruik geen beschadigd
apparaat.
• Installeer of gebruik het apparaat niet
op een plek waar de temperatuur
onder de 0 °C komt.
• Volg de installatie-instructies op die zijn
meegeleverd met het apparaat.
• Zorg ervoor dat het apparaat onder en
naast veilige installaties wordt
geïnstalleerd.
2.2 Aansluiting op het
elektriciteitsnet
WAARSCHUWING!
Gevaar voor brand en
elektrische schokken.
• Dit apparaat moet worden aangesloten
op een geaard stopcontact.
• Controleer of de elektrische informatie
op het typeplaatje overeenkomt met de
stroomvoorziening. Zo niet, neem dan
contact op met een elektromonteur.
• Gebruik altijd een correct ge?stalleerd,
schokbestendig stopcontact.
• Gebruik geen meerwegstekkers en
verlengsnoeren.
• Zorg dat u de hoofdstekker en kabel
niet beschadigt. Indien de
voedingskabel moet worden
vervangen, dan moet dit gebeuren
door onze Klantenservice.
• Steek de stekker pas in het
stopcontact als de installatie is
voltooid. Zorg ervoor dat het netsnoer
na installatie bereikbaar is.
• Trek niet aan het netsnoer om het
apparaat los te koppelen. Trek altijd
aan de stekker.
• Dit apparaat voldoet aan de EU-
richtlijnen.
• Alleen voor het VK en Ierland. Het
apparaat heeft een 13 amp. stekker.
Als het noodzakelijk is om de zekering
in de stekker te verwisselen, gebruik
dan een 13 amp. ASTA (BS1362)
zekering.
2.3 Aansluiting aan de
waterleiding
• Zorg dat u de waterslangen niet
beschadigt.
• Laat het water stromen tot het schoon
is voordat u het apparaat aansluit op
nieuwe leidingen of leidingen die lang
niet zijn gebruikt.
www.electrolux.com4

• Zorg dat er geen lekkages zijn als u het
apparaat de eerste keer gebruikt.
• De watertoevoerslang heeft een
veiligheidsventiel en een omhulsel met
een hoofdkabel aan de binnenkant.
WAARSCHUWING!
Gevaarlijke spanning.
• Als de watertoevoerslang beschadigd
is, haal dan onmiddellijk de stekker uit
het stopcontact. Neem contact op met
de service-afdeling om de
watertoevoerslang te vervangen.
2.4 Gebruik
• Ga niet op de open deur zitten of
staan.
• Vaatwasmiddel is gevaarlijk. Volg de
veiligheidsinstructies op de verpakking
van het vaatwasmiddel op.
• Speel niet met het water van het
apparaat en drink het niet op.
• Verwijder de borden pas uit het
apparaat als het programma is
voltooid. Er kan vaatwasmiddel op de
borden zitten.
• Het apparaat kan hete stoom laten
ontsnappen als u de deur opent terwijl
er een programma wordt uitgevoerd.
• Plaats geen ontvlambare producten of
items die vochtig zijn door ontvlambare
producten in, bij of op het apparaat.
2.5 Servicedienst
• Contact opnemen met de
klantenservice voor reparatie van het
apparaat. Wij raden uitsluitend het
gebruik van originele onderdelen aan.
• Zorg er als u contact opneemt met de
klantenservice voor dat u de volgende
informatie heeft van het typeplaatje.
Model:
PNC:
Serienummer:
2.6 Verwijdering
WAARSCHUWING!
Gevaar voor letsel of
verstikking.
• Haal de stekker uit het stopcontact.
• Snij het netsnoer van het apparaat af
en gooi dit weg.
• Verwijder de deurgreep om te
voorkomen dat kinderen en huisdieren
opgesloten raken in het apparaat.
NEDERLANDS
5

3. BESCHRIJVING VAN HET PRODUCT
4
3
7
9
8
10
56
11
1
2
1
Bovenste sproeiarm
2
Onderste sproeiarm
3
Filters
4
Typeplaatje
5
Zoutreservoir
6
Luchtopening
7
Glansmiddeldoseerbakje
8
Afwasmiddeldoseerbakje
9
Bestekkorf
10
Onderkorf
11
Bovenkorf
3.1 Beam-on-Floor
De Beam-on-Floor is een lichtstraal die op
de keukenvloer onder de deur van het
apparaat verschijnt.
• Wanneer het programma start, gaat de
rode lichtstraal aan. De lichtstraal blijft
gedurende het volledige programma
zichtbaar.
• Wanneer het programma is voltooid,
gaat het groene lampje branden.
• Als er een storing in het apparaat
optreedt, gaat het rode licht knipperen.
De Beam-on-Floor gaat uit
wanneer het apparaat wordt
uitgeschakeld.
4. BEDIENINGSPANEEL
1 2 93 4 5 6 7 8
1
Aan/uit-toets
2
Weergave
3
Delay-toets
4
Programmakeuzetoets (omhoog)
www.electrolux.com6

5
Programmakeuzetoets (omlaag)
6
Multitab-toets
7
TimeManager-toets
8
Reset-toets
9
Indicatielampjes
4.1 Indicatielampjes
Aanduiding Omschrijving
Zoutindicatielampje. Dit indicatielampje is altijd uit als het programma in
werking is.
Glansmiddelindicatielampje. Dit indicatielampje is altijd uit als het pro-
gramma in werking is.
5. PROGRAMMA’S
Programma Mate van vervuil-
ing
Type wasgoed
Programmafasen Opties
P1
1)
• Normaal bevuild
• Serviesgoed en
bestek
• Voorspoelen
• Wassen 50 °C
• Spoelgangen
• Drogen
• TimeManager
• Multitab
P2
2)
• Alle
• Serviesgoed,
bestek en pan-
nen
• Voorspoelen
• Wassen van 45 °C tot
70 °C
• Spoelgangen
• Drogen
• Multitab
P3
3)
• Sterk bevuild
• Serviesgoed,
bestek en pan-
nen
• Voorspoelen
• Wassen 70 °C
• Spoelgangen
• Drogen
• TimeManager
• Multitab
P4
4)
• Pas bevuild
• Serviesgoed en
bestek
• Wassen 60 °C of 65
°C
• Spoelgangen
• Multitab
NEDERLANDS
7

Programma Mate van vervuil-
ing
Type wasgoed
Programmafasen Opties
P5
5)
• Alle • Voorspoelen
1)
Dit programma biedt het meest efficiënte water- en energieverbruik voor normaal vervuild
serviesgoed en bestek. (Dit is het standaard programma voor testinstituten.)
2)
Het apparaat detecteert de mate van vervuiling en de hoeveelheid serviesgoed in de korven.
De temperatuur en hoeveelheid water, het energieverbruik en de programmaduur worden au-
tomatisch aangepast.
3)
Dit programma heeft een spoelfase bij hoge temperatuur voor betere resultaten voor de hy-
giëne. Tijdens de spoelfase blijft de temperatuur gedurende minimaal 10 minuten op 70 °C.
4)
Met dit programma kunt u een pas vervuilde lading afwassen. Het biedt goede afwasresul-
taten in een kort tijdsbestek.
5)
Met dit programma kunt u snel serviesgoed afspoelen om te voorkomen dat etensresten
vastkoeken en het apparaat gaat stinken. U hoeft voor dit programma geen afwasmiddel te
gebruiken.
5.1 Verbruiksgegevens
Programma
1)
Water
(l)
Energie-
(kWh)
Programmaduur
(min)
P1 9.9 0.932 195
P2 7 - 12 0.6 - 1.4 40 - 150
P3 13 - 15 1.3 - 1.5 140 - 160
P4 9 0.9 30
P5 4 0.1 14
1)
De druk en temperatuur van het water, de variaties in stroomtoevoer, de opties en de hoe-
veelheid vaat kan de verbruikswaarden veranderen.
5.2 Aanwijzingen voor
testinstituten
Stuur voor alle benodigde informatie over
testprestaties een e-mail naar:
Schrijf het productnummer (PNC) op dat u
op het typeplaatje vindt.
www.electrolux.com8

6. INSTELLINGEN
6.1 Programmakeuzemodus en
gebruikersmodus
Als het apparaat in de
programmakeuzemodus staat, kan een
programma worden ingesteld en de
gebruikersmodus worden ingevoerd.
In de gebruikersmodus kunnen de
volgende instellingen worden
gewijzigd:
• Het niveau van de waterverzachter
afgestemd op de waterhardheid.
• De activering of de deactivering van het
geluidsignaal voor het programma-
einde.
• De deactivering van het
glansspoelmiddel als u de optie
Multitab wilt gebruiken zonder
glansmiddel.
Deze instellingen worden opgeslagen
tot u ze weer wijzigt.
De programmakeuzemodus
instellen
Het apparaat staat in de
programmaselectiemodus als het display
het programmanummer P1 weergeeft.
Als u het apparaat activeert, staat het
meestal in de programmakeuzemodus.
Maar als dit niet gebeurt, kunt u de
programmakeuzemodus op de volgende
manier instellen:
Houd tegelijkertijd Reset ingedrukt tot het
apparaat in de programmakeuzemodus
staat.
6.2 De waterontharder
De waterontharder verwijdert mineralen uit
van de watertoevoer die een nadelige
invloed hebben op de wasresultaten en
het apparaat.
Hoe hoger het gehalte van deze
mineralen, des te harder is het water. De
waterhardheid wordt gemeten in de
volgende gelijkwaardige schalen.
De waterontharder moet worden afgesteld
op de hardheid van het water in uw
woonplaats. Uw waterleidingbedrijf kan u
informeren over de hardheid van het water
in uw woonplaats. Het is belangrijk om het
correcte niveau voor de waterontharder in
te stellen voor goede wasresultaten.
Waterhardheid
Duitse graden
(°dH)
Franse graden
(°fH)
mmol/l Clarke-
graden
Wateronthar-
dingsniveau
47 - 50 84 - 90 8.4 - 9.0 58 - 63 10
43 - 46 76 - 83 7.6 - 8.3 53 - 57 9
37 - 42 65 - 75 6.5 - 7.5 46 - 52 8
29 - 36 51 - 64 5.1 - 6.4 36 - 45 7
23 - 28 40 - 50 4.0 - 5.0 28 - 35 6
19 - 22 33 - 39 3.3 - 3.9 23 - 27
5
1)
15 - 18 26 - 32 2.6 - 3.2 18 - 22 4
11 - 14 19 - 25 1.9 - 2.5 13 - 17 3
4 - 10 7 - 18 0.7 - 1.8 5 - 12 2
NEDERLANDS
9

Duitse graden
(°dH)
Franse graden
(°fH)
mmol/l Clarke-
graden
Wateronthar-
dingsniveau
<4 <7 <0.7 < 5
1
2)
1)
Fabrieksinstelling.
2)
Gebruik geen zout op dit niveau.
Het waterontharderniveau
instellen
Het apparaat moet in de
programmakeuzemodus staan.
1. Houd om de gebruikersmodus in te
voeren tegelijkertijd en
ingedrukt tot de indicatielampjes ,
en gaan knipperen en het
display blanco is.
2. Druk op .
• De indicatielampjes en
gaan uit.
• Blijft het indicatielampje
knipperen
• Het display toont de huidige
instelling: bijv. = niveau 5.
3. Druk herhaaldelijk op om de
instelling te wijzigen.
4. Druk op de knop aan/uit om de
instelling te bevestigen.
6.3 Het glansmiddeldoseerbakje
Met glansmiddel wordt het serviesgoed
zonder vlekken of strepen gedroogd.
Het glansmiddel wordt automatisch
vrijgegeven tijdens de warme spoelfase.
Gebruik van glansmiddel en
multitabletten
Als u de optie Multitab activeert, blijft het
glansmiddeldoseerbakje glansmiddel
afgeven. Maar u kunt de
glansmiddeldosering uitschakelen. In dat
geval is het mogelijk dat de
droogresultaten niet goed zijn.
Als het glansmiddeldoseerbakje is
uitgeschakeld, is het indicatielampje altijd
uit.
Het uitschakelen van het
glansmiddeldoseerbakje
Het apparaat moet in de
programmakeuzemodus staan.
1. Om de gebruikersmodus in te voeren,
drukt u tegelijkertijd en totdat
de lampjes , en gaan
knipperen en het display leeg is.
2. Druk op .
• De indicatielampjes en
gaan uit.
• Blijft het indicatielampje
knipperen.
• Het display toont de huidige
instelling.
– = glansmiddelbakje
geactiveerd.
–
= glansmiddelbakje
gedeactiveerd.
3. Druk op om de instelling te
wijzigen.
4. Druk op de aan-/uitknop om de
instelling te bevestigen.
6.4 Geluidssignalen
Er klinken geluidssignalen als het apparaat
een storing heeft. Het is niet mogelijk deze
geluidssignalen uit te schakelen.
Na het beëindigen van het programma
klinkt er tevens een geluidssignaal. Dit
geluidssignaal is standaard uitgeschakeld,
maar kan worden geactiveerd.
www.electrolux.com10

Het geluidssignaal voor het
einde van het programma
inschakelen
Het apparaat moet in de
programmakeuzemodus staan.
1. Houd om de gebruikersmodus in te
voeren tegelijkertijd en
ingedrukt tot de indicatielampjes ,
en gaan knipperen en het
display blanco is.
2. Druk op .
• De indicatielampjes en
gaan uit.
• Blijft het indicatielampje
knipperen
• Het display toont de huidige
instelling:
– = Geluidssignaal uit.
– = Geluidssignaal aan.
3. Druk op om de instelling te
wijzigen.
4. Druk op de knop aan/uit om de
instelling te bevestigen.
7. OPTIES
De gewenste opties moeten
elke keer dat u een
programma start worden
geactiveerd.
De opties kunnen niet
worden in- of uitgeschakeld
als een programma in
werking is.
Niet alle opties kunnen met
elkaar worden gecombineerd.
Als u opties hebt
geselecteerd die niet met
elkaar te combineren zijn, dan
schakelt het apparaat
automatisch één of meerdere
opties uit. Alleen de
indicatielampjes van de
actieve opties blijven aan.
7.1 Multitab
Activeer deze optie als u multitabletten
gebruikt met zout, glansmiddel en
wasmiddel in één tablet. Ze bevatten ook
andere schoonmaakmiddelen of
spoelmiddelen.
Deze optie schakelt de afgifte van zout uit.
Het zoutindicatielampje gaat niet branden.
Met deze optie wordt de programmaduur
verlengd om de schoonmaak- en
droogresultaten te verbeteren met het
gebruik van multitabletten.
Multitab is geen permanente optie en
moet elke cyclus geselecteerd worden.
Multitab activeren
Druk op .
Het bijbehorende indicatielampje gaat
branden.
7.2 TimeManager
Met deze optie verhoogt u de druk en de
temperatuur van het water. De was- en
droogfasen zijn korter.
De totale duur van het programma neemt
met ongeveer 50% af.
De wasresultaten zijn hetzelfde als bij de
normale programmaduur. De
droogresultaten nemen mogelijk iets af.
TimeManager activeren
Druk op TimeManager. Het bijbehorende
indicatielampje gaat nu branden.
Als de optie niet van toepassing is op het
programma, dan gaat het bijbehorende
indicatielampje niet branden of het
knippert even en gaat dan uit.
Het display geeft de bijgewerkte
programmaduur weer.
NEDERLANDS
11

8. VOORDAT U HET APPARAAT VOOR DE EERSTE KEER
GEBRUIKT
1. Controleer of het ingestelde
niveau van de waterontharder juist
is voor de waterhardheid in uw
omgeving. U kunt het niveau van
de waterontharder instellen.
2. Vul het zoutreservoir.
3. Vul het glansmiddeldoseerbakje.
4. Draai de waterkraan open.
5. Start een programma om resten te
verwijderen die misschien nog in het
apparaat zijn achtergebleven. Gebruik
geen afwasmiddel en gebruik de
mandjes niet.
Als u een programma start, doet het
apparaat er ongeveer 5 minuten over om
de hars in de waterontharder te herladen.
Het lijkt alsof het apparaat niet werkt. De
wasfase start pas nadat deze procedure
voltooid is. De procedure wordt periodiek
herhaald.
8.1 Het zoutreservoir
LET OP!
Gebruik uitsluitend zout dat
specifiek is bedoeld voor
gebruik in vaatwassers.
Het zout wordt gebruikt om de hars in de
waterontharder te herladen en voor goede
wasresultaten voor dagelijks gebruik.
Het zoutreservoir vullen:
1. Draai de dop linksom om het
zoutreservoir te openen.
2. Doe 1 liter water in het zoutreservoir
(alleen de eerste keer).
3. Vul het zoutreservoir met
regenereerzout.
4. Verwijder het zout rond de opening
van het zoutreservoir.
5. Draai de dop van het zoutreservoir
rechtsom om het zoutreservoir te
sluiten.
Water en zout kunnen uit het
zoutreservoir stromen als u
het bijvult. Gevaar voor roest.
Start om dit te voorkomen
een programma nadat u het
zoutreservoir heeft bijgevuld.
8.2 Het vullen van het
glansmiddeldoseerbakje
A
B
D
C
www.electrolux.com12

M
A
X
1
2
3
4
+
-
A
B
D
C
LET OP!
Gebruik alleen
glansspoelmiddel voor
afwasautomaten.
1. Druk op de ontgrendelknop (D) om de
deksel te openen (C).
2. Giet het glansmiddel in het
doseervakje (A) tot de vloeistof het
niveau 'max' heeft bereikt.
3. Verwijder gemorst glansmiddel met
een absorberend doekje om te
voorkomen dat er te veel schuim
ontstaat.
4. Sluit het deksel. Zorg ervoor dat het
ontgrendelknopje op zijn plaats
dichtklikt.
U kunt het schuifje voor de
vrij te geven hoeveelheid (B)
instellen tussen stand 1
(laagste hoeveelheid) en
stand 4 of 6 (hoogste
hoeveelheid).
9. DAGELIJKS GEBRUIK
1. Draai de waterkraan open.
2. Druk op de aan-/uittoets om het
apparaat te activeren.
Zorg dat het apparaat in de
programmakeuzemodus staat.
• Vul het zoutreservoir als het
zoutindicatielampje brandt.
• Vul het glansmiddeldoseerbakje als
het indicatielampje van het
glansmiddel brandt.
3. Ruim de korven in.
4. Voeg vaatwasmiddel toe. Activeer de
Multitab-optie als u multitabletten
gebruikt.
5. U dient het juiste programma in te
stellen en te starten voor het type
lading en de mate van vervuiling.
9.1 Vaatwasmiddel gebruiken
30
20
A BD
C
NEDERLANDS
13

20
30
B
A D
C
1.
Druk op de ontgrendelknop (B) om de
deksel te openen (C).
2. Doe de vaatwastablet of het poeder in
het doseerbakje (A).
3. Als het programma over een
voorspoelfase beschikt, plaats dan
een kleine dosis afwasmiddel in
doseerbakje (D).
4. Sluit het deksel. Zorg ervoor dat het
ontgrendelknopje op zijn plaats
dichtklikt.
9.2 Een programma instellen en
starten
De Auto Off-functie
Deze functie verlaagt het energieverbruik
door het apparaat automatisch uit te
schakelen als het niet werkt.
De functie gaat werken:
• 5 minuten na voltooiing van het
programma.
• Als het programma na 5 minuten nog
niet is gestart.
Een programma starten
1. Laat de deur op een kier staan.
2. Druk op de aan-/uittoets om het
apparaat te activeren. Zorg dat het
apparaat in de keuzemodus
Programma staat.
3. Druk op of tot het display het
nummer van het programma
weergeeft dat u wilt starten. Het
nummer en de duur van het
programma worden op het display 3
seconden weergegeven.
4. Stel de bruikbare opties in.
5. Sluit de deur van de afwasmachine
om het programma te starten.
Een programma starten met een
uitgestelde start
1. Stel een programma in.
2. Blijf op drukken tot het display de
uitgestelde tijd toont die u wilt instellen
(van 1 tot 24 uur).
Het controlelampje startuitstel gaat
branden.
3. Sluit de deur van het apparaat om het
aftellen te starten.
Als het aftellen loopt, kan de uitsteltijd
worden vergroot maar het programma en
de opties kunnen niet worden gewijzigd.
Als het aftelproces voltooid is, wordt het
programma gestart.
De deur openen als het apparaat
in werking is
Als u de deur opent terwijl een programma
loopt, stopt het apparaat. Als u de deur
weer sluit, gaat het apparaat verder vanaf
het punt van onderbreking.
Als de deur tijdens de
droogfase langer dan 30
seconden wordt geopend,
stopt het lopende
programma.
De uitgestelde start annuleren
tijdens het aftellen
Als u de uitgestelde start annuleert, moet
u het programma en de opties opnieuw
instellen.
Houd tegelijkertijd Reset ingedrukt tot het
apparaat in de programmakeuzemodus
staat.
Het programma annuleren
Houd tegelijkertijd Reset ingedrukt tot het
apparaat in de programmakeuzemodus
staat.
www.electrolux.com14

Controleer of er afwasmiddel in het
afwasmiddeldoseerbakje aanwezig is
voordat u een nieuw programma start.
Einde van het programma
Als het programma voltooid is, toont het
display 0:00 .
1. Druk op de aan/uit-toets of wacht
totdat de Auto Off-functie het
apparaat automatisch heeft
uitgeschakeld.
2. Draai de waterkraan dicht.
10. AANWIJZINGEN EN TIPS
10.1 Algemeen
De volgende tips zorgen voor optimale
schoonmaak- en droogresultaten en
helpen ook het milieu te beschermen.
• Verwijder grotere etensresten van de
borden en gooi ze in de vuilnisbak.
• Spoel de vaat niet eerst af. Gebruik
indien nodig een voorwasprogramma
(indien beschikbaar) of selecteer een
programma met een voorwasfase.
• Gebruik altijd de hele ruimte van de
mandjes.
• Zorg er bij het inladen van het apparaat
voor dat de vaat helemaal kan worden
bereikt en gewassen door het water uit
de sproeiarmen. Zorg ervoor dat de
vaat elkaar niet raakt of overlapt.
• U kunt apart vaatwasmiddel,
glansmiddel en zout gebruiken of
kiezen voor het gebruik van
multitabletten (bijv. ''3in1'', ''4in1'', ''All
in 1''). Volg de aanwijzing op de
verpakking.
• U dient het juiste programma in te
stellen voor het type lading en de mate
van vervuiling. Het programma ECO
biedt het meest efficiënte water- en
energieverbruik voor normaal vervuild
serviesgoed en bestek.
10.2 Gebruik van zout,
glansmiddel en vaatwasmiddel
• Gebruik enkel zout, glansmiddel en
vaatwasmiddel voor afwasautomaten.
Overige producten kunnen het
apparaat beschadigen.
• Multitabletten zijn doorgaans geschikt
voor een waterhardheid tot 21 °dH. Bij
een hogere waterhardheid moet zout,
glansmiddel en vaatwasmiddel worden
gebruikt naast het gebruik van
multitabletten. Maar in gebieden met
hard en erg hard water raden we het
gebruik aan van enkelvoudig
vaatwasmiddel (poeder, gel, tabletten
zonder extra functies), glansmiddel en
zout apart voor optimale reinigings- en
droogresultaten.
• Als u multitabletten gebruikt kunt u de
optie Multitab selecteren (indien van
toepassing). Deze optie vergroot de
schoonmaak- en droogresultaten met
het gebruik van multitabletten.
• Vaatwasmiddeltabletten lossen bij
korte programma's niet geheel op. Om
te voorkomen dat vaatwasmiddelresten
op het servies achterblijven, raden we
u aan om tabletten enkel bij lange
programma's te gebruiken.
• Gebruik niet meer dan de juiste
hoeveelheid vaatwasmiddel. Zie de
instructies van de
vaatwasmiddelfabrikant.
NEDERLANDS
15

10.3 Wat moet u doen als u wilt
stoppen met het gebruik van
multitabletten
Doe het volgende voordat u begint met
het gebruiken van apart wasmiddel, zout
en glansmiddel.
1. Stel het hoogste niveau van de
waterontharder in.
2. Zorg ervoor dat het zout- en het
glansmiddeldoseerbakje gevuld zijn.
3. Start het kortste programma met een
spoelfase. Voeg geen afwasmiddel toe
en ruim de mandjes niet in.
4. Als het programma is voltooid, wijzigt
u de waterontharder in de
waterhardheid van uw omgeving.
5. Stel de hoeveelheid glansmiddel in.
10.4 De korven inruimen
• Gebruik het apparaat alleen om
voorwerpen af te wassen die
vaatwasbestendig zijn.
• Doe geen voorwerpen in het apparaat
die gemaakt zijn van hout, hoorn,
aluminium, tin en koper.
• Plaats geen voorwerpen in het
apparaat die water kunnen absorberen
(sponzen, keukenhanddoeken).
• Verwijder alle voedselresten van de
voorwerpen.
• Maak aangebrande voedselresten op
de voorwerpen zachter.
• Plaats holle voorwerpen (bijv. kopjes,
glazen en pannen) met de opening
naar beneden.
• Zorg ervoor dat serviesgoed en bestek
niet in elkaar schuiven. Meng lepels
met ander bestek.
• Zorg er voor dat glazen andere glazen
niet aanraken
• Leg kleine voorwerpen in de
bestekmand.
• Leg lichte voorwerpen in het bovenrek.
Zorg ervoor dat de voorwerpen niet
verschuiven.
• Zorg er voor dat de sproeiarm vrij kan
ronddraaien voordat u een programma
start.
10.5 Voor het starten van een
programma
Controleer of:
• De filters schoon zijn en correct zijn
geplaatst.
• De dop van het zoutreservoir goed
dicht zit.
• De sproeiarmen niet zijn verstopt.
• Er regenereerzout en glansmiddel is
toegevoegd (tenzij u gecombineerde
afwastabletten gebruikt).
• De positie van de items in de mandjes
correct is.
• Het programma van toepassing is op
het type lading en de mate van
bevuiling.
• De juiste hoeveelheid afwasmiddel is
gebruikt.
10.6 De rekken uitruimen
1. Laat de borden afkoelen voordat u
deze uit het apparaat neemt Hete
borden zijn gevoelig voor
beschadigingen.
2. Ruim eerst het onderrek en dan het
bovenrek uit
Aan het einde van het
programma kan er water aan
de zijkanten en de deur van
het apparaat achterblijven.
11. ONDERHOUD EN REINIGING
WAARSCHUWING!
Schakel het apparaat uit en
trek de stekker uit het
stopcontact voordat u
onderhoudshandelingen
verricht.
Vuile filters en verstopte
sproeiarmen verminderen de
wasresultaten. Controleer
regelmatig de filters en reinig
deze zo nodig.
www.electrolux.com16

11.1 De filters reinigen
Het filtersystem bestaat uit 3 delen.
C
B
A
1. Draai de filter (B) linksom en verwijder
het.
2. Verwijder de filter (C) uit de filter (B).
3. Verwijder de platte filter (A).
4. Was de filters.
5.
Zorg ervoor dat er geen etensresten of
vuil in of rond de rand van de
opvangbak zitten.
6. Plaats de platte filter terug (A). Zorg
ervoor dat het goed onder de 2
geleidingen zit.
7. Plaats de filters (B) en (C) terug.
8. Plaats de filter (B) terug in de platte
filter (A). Rechtsom draaien tot het
vastzit.
NEDERLANDS
17

LET OP!
Een onjuiste plaatsing van de
filters kan leiden tot slechte
wasresultaten en het
apparaat beschadigen.
11.2 De sproeiarmen reinigen
Probeer niet de sproeiarmen te
verwijderen. Als etensresten de openingen
in de sproeiarmen hebben verstopt,
verwijder deze dan met een smal en
puntig voorwerp.
11.3 Buitenkant reinigen
• Maak het apparaat schoon met een
vochtige, zachte doek.
• Gebruik alleen neutrale
schoonmaakmiddelen.
• Gebruik geen schuurmiddelen,
schuursponsjes of oplosmiddelen.
11.4 De binnenkant van de
machine reinigen
• Reinig het apparaat zorgvuldig,
inclusief de rubberen afdichting van de
deur, met een zachte, vochtige doek.
• Als u regelmatig korte programma's
gebruikt dan kunnen er vetresten en
kalkaanslag achterblijven in het
apparaat. Om dit te voorkomen raden
we aan minstens 2 keer per maand
progamma's met een lange duur te
gebruiken.
12. PROBLEEMOPLOSSING
Het apparaat start of stopt niet tijdens de
werking. Kijk voordat u contact opneemt
met de klantenservice of u het probleem
zelf kunt oplossen met behulp van de
informatie in de tabel.
Bij sommige problemen wordt er op
de display een alarmcode
weergegeven.
Probleem en alarmcode Mogelijke oplossing
U kunt het apparaat niet
activeren.
• Zorg dat de stekker in het stopcontact zit.
• Zorg dat er geen zekering in de zekeringenkast is
doorgebrand.
Het programma start niet. • Zorg dat de deur van het apparaat is gesloten.
• Als de starttijdkeuze start is ingesteld, annuleert u
deze functie of wacht u tot het einde van het aftellen.
• Het apparaat is begonnen met de oplaadprocedure
van de hars in de waterontharder. De duur van de pro-
cedure is ongeveer 5 minuten.
Het apparaat wordt niet
met water gevuld.
Op het display verschijnt
.
• Controleer of de waterkraan is geopend.
• Zorg dat de waterdruk niet te laag is. Neem hiervoor
zo nodig contact op met uw lokale waterleidingbedrijf.
• Controleer of de waterkraan niet verstopt is.
• Controleer of het filter in de toevoerslang niet verstopt
is.
• Controleer of er geen knikken of bochten in de water-
toevoerslang aanwezig zijn.
Het apparaat pompt geen
water af.
Op het display verschijnt
.
• Controleer of de gootsteenafvoer niet verstopt is.
• Controleer of er geen knikken of bochten in de water-
afvoerslang aanwezig zijn.
www.electrolux.com18

Probleem en alarmcode Mogelijke oplossing
De anti-overstromingsbe-
veiliging is aan.
Op het display verschijnt
.
• Draai de waterkraan dicht en neem contact op met de
service-afdeling.
Schakel het apparaat na controle aan en
uit. Als het probleem opnieuw optreedt,
neemt u contact op met onze
klantenservice.
Voor alarmcodes die niet in de tabel
vermeld zijn, neemt u contact op met de
service-afdeling.
12.1 De was- en droogresultaten zijn niet naar tevredenheid
Probleem Mogelijke oplossing
Witte strepen of een blauwe
waas op glazen en servies-
goed
• De vrijgegeven hoeveelheid glansmiddel is te hoog.
Zet de dosering van het glansmiddel op een lagere
stand.
• Er is te veel vaatwasmiddel gebruikt.
Vlekken en opgedroogde wa-
tervlekken op glazen en ser-
vies
• De vrijgegeven hoeveelheid glansmiddel is te laag.
Zet de dosering van het glansmiddel op een hogere
stand.
• De kwaliteit van het glansmiddel kan de oorzaak zijn.
Het serviesgoed is nat. • Het programma heeft geen droogfase of heeft een
droogfase met lage temperatuur.
• Het glansmiddeldoseerbakje is leeg.
• De kwaliteit van het glansmiddel kan de oorzaak zijn.
• De kwaliteit van de multitabletten kan de oorzaak
zijn. Probeer een ander merk of activeer het glans-
middeldoseerbakje en gebruik het glansmiddel sa-
men met de multitabletten.
Zie "Aanwijzingen en tips"
voor andere mogelijke
oorzaken.
13. TECHNISCHE INFORMATIE
Afmetingen Breedte / hoogte / diepte
(mm)
596 / 818-898 / 555
Elektrische aansluiting
1)
Voltage (V) 220 - 240
Frequentie (Hz) 50
Waterdruk Min. / max. bar (MPa) 0.5 (0.05) / 8 (0.8)
Watertoevoer Koud water of warm wa-
ter
2)
max. 60 °C
NEDERLANDS
19

Capaciteit Couverts 13
Energieverbruik Modus aan laten (W) 0.99
Energieverbruik Uit-modus (W) 0.10
1)
Zie het typeplaatje voor andere waarden.
2)
Als het hete water door alternatieve, milieuvriendelijkere energiebronnen geproduceerd
wordt (bijv. zonnepanelen en windenergie), gebruik dan een heetwatervoorziening om het en-
ergieverbruik te verminderen.
14. MILIEUBESCHERMING
Recycle de materialen met het symbool
. Gooi de verpakking in een geschikte
verzamelcontainer om het te recyclen.
Help om het milieu en de volksgezondheid
te beschermen en recycle het afval van
elektrische en elektronische apparaten.
Gooi apparaten gemarkeerd met het
symbool niet weg met het huishoudelijk
afval. Breng het product naar het
milieustation bij u in de buurt of neem
contact op met de gemeente.
www.electrolux.com20

CONTENTS
1. SAFETY INFORMATION.................................................................................... 22
2. SAFETY INSTRUCTIONS...................................................................................23
3. PRODUCT DESCRIPTION................................................................................. 25
4. CONTROL PANEL............................................................................................. 25
5. PROGRAMMES.................................................................................................26
6. SETTINGS......................................................................................................... 27
7. OPTIONS...........................................................................................................29
8. BEFORE FIRST USE..........................................................................................30
9. DAILY USE........................................................................................................ 31
10. HINTS AND TIPS............................................................................................. 33
11. CARE AND CLEANING....................................................................................34
12. TROUBLESHOOTING......................................................................................36
13. TECHNICAL INFORMATION............................................................................ 37
WE’RE THINKING OF YOU
Thank you for purchasing an Electrolux appliance. You’ve chosen a product that
brings with it decades of professional experience and innovation. Ingenious and
stylish, it has been designed with you in mind. So whenever you use it, you can be
safe in the knowledge that you’ll get great results every time.
Welcome to Electrolux.
Visit our website for:
Get usage advice, brochures, trouble shooter, service information:
www.electrolux.com
Register your product for better service:
www.registerelectrolux.com
Buy Accessories, Consumables and Original spare parts for your appliance:
www.electrolux.com/shop
CUSTOMER CARE AND SERVICE
Always use original spare parts.
When contacting our Authorised Service Centre, ensure that you have the following
data available: Model, PNC, Serial Number.
The information can be found on the rating plate.
Warning / Caution-Safety information
General information and tips
Environmental information
Subject to change without notice.
ENGLISH
21

1. SAFETY INFORMATION
Before the installation and use of the appliance, carefully
read the supplied instructions. The manufacturer is not
responsible if an incorrect installation and use causes
injuries and damages. Always keep the instructions with
the appliance for future reference.
1.1 General Safety
• This appliance is intended to be used in household and
similar applications such as:
– farm houses; staff kitchen areas in shops, offices and
other working environments;
– by clients in hotels, motels, bed & breakfast and
other residential type environments.
• Do not change the specification of this appliance.
• The operating water pressure (minimum and maximum)
must be between 0.5 (0.05) / 8 (0.8) bar (Mpa)
•
Obey the maximum number of 13 place settings.
• If the supply cord is damaged, it must be replaced by
the manufacturer, its Authorised Service Centre or
similarly qualified persons in order to avoid a hazard.
• Put knives and cutlery with sharp points in the cutlery
basket with the points down or in a horizontal position.
• Do not keep the appliance door open without
supervision to prevent to fall on it.
• Before maintenance, deactivate the appliance and
disconnect the mains plug from the mains socket.
• Do not use water spray and steam to clean the
appliance.
• The ventilation openings in the base (if applicable) must
not be obstructed by a carpet.
• The appliance is to be connected to the water mains
using the new supplied hose-sets. Old hose sets must
not be reused.
www.electrolux.com22

1.2 Children and vulnerable people safety
• This appliance can be used by children aged from 8
years and above and persons with reduced physical,
sensory or mental capabilities or lack of experience and
knowledge if they have been given supervision or
instruction concerning use of the appliance in a safe
way and understand the hazards involved.
• Do not let children play with the appliance.
• Keep all detergents away from children.
• Keep children and pets away from the appliance door
when it is open.
• Cleaning and user maintenance shall not be made by
children without supervision.
2. SAFETY INSTRUCTIONS
2.1 Installation
• Remove all the packaging.
• Do not install or use a damaged
appliance.
• Do not install or use the appliance
where the temperature is less than 0
°C.
• Obey the installation instruction
supplied with the appliance.
• Make sure that the appliance is
installed below and adjacent to safe
structures.
2.2 Electrical connection
WARNING!
Risk of fire and electrical
shock.
• The appliance must be earthed.
• Make sure that the electrical
information on the rating plate agrees
with the power supply. If not, contact
an electrician.
• Always use a correctly installed
shockproof socket.
• Do not use multi-plug adapters and
extension cables.
• Make sure not to cause damage to the
mains plug and to the mains cable.
Should the mains cable need to be
replaced, this must be carried out by
our Authorised Service Centre.
• Connect the mains plug to the mains
socket only at the end of the
installation. Make sure that there is
access to the mains plug after the
installation.
• Do not pull the mains cable to
disconnect the appliance. Always pull
the mains plug.
• This appliance complies with the E.E.C.
Directives.
• Only for UK and Ireland. The appliance
has a 13 amp mains plug. If it is
necessary to change the fuse in the
mains plug, use a 13 amp ASTA (BS
1362) fuse.
2.3 Water connection
• Make sure not to cause damage to the
water hoses.
• Before you connect the appliance to
new pipes or pipes not used for a long
time, let the water flow until it is clean.
• The first time you use the appliance,
make sure that there is no leakage.
• The water inlet hose has a safety valve
and a sheath with an inner mains
cable.
ENGLISH
23

WARNING!
Dangerous voltage.
• If the water inlet hose is damaged,
immediately disconnect the mains plug
from the mains socket. Contact the
Authorised Service Centre to replace
the water inlet hose.
2.4 Use
• Do not sit or stand on the open door.
• Dishwasher detergents are dangerous.
Obey the safety instructions on the
detergent packaging.
• Do not drink and play with the water in
the appliance.
• Do not remove the dishes from the
appliance until the programme is
completed. There can be detergent on
the dishes.
• The appliance can release hot steam if
you open the door while a programme
operates.
• Do not put flammable products or
items that are wet with flammable
products in, near or on the appliance.
2.5 Service
• Contact the Authorised Service Centre
to repair the appliance. We
recommend only the use of original
spare parts.
• When you contact the Authorised
Service Centre, ensure that you have
the following information that is
available on the rating plate.
Model :
PNC :
Serial Number :
2.6 Disposal
WARNING!
Risk of injury or suffocation.
• Disconnect the appliance from the
mains supply.
• Cut off the mains cable and discard it.
• Remove the door catch to prevent
children and pets to get closed in the
appliance.
www.electrolux.com24

3. PRODUCT DESCRIPTION
4
3
7
9
8
10
56
11
1
2
1
Upper spray arm
2
Lower spray arm
3
Filters
4
Rating plate
5
Salt container
6
Air vent
7
Rinse aid dispenser
8
Detergent dispenser
9
Cutlery basket
10
Lower basket
11
Upper basket
3.1 Beam-on-Floor
The Beam-on-Floor is a light that shows
on the kitchen floor below the appliance
door.
• When the programme starts, a red light
comes on and stays on for all the
duration of the programme.
• When the programme is completed, a
green light comes on.
• When the appliance has a malfunction,
the red light flashes.
The Beam-on-Floor goes off
when the appliance is
deactivated.
4. CONTROL PANEL
1 2 93 4 5 6 7 8
1
On/off button
2
Display
ENGLISH
25

3
Delay button
4
Programme button (up)
5
Programme button (down)
6
Multitab button
7
TimeManager button
8
Reset button
9
Indicators
4.1 Indicators
Indicator Description
Salt indicator. It is always off while the programme operates.
Rinse aid indicator. It is always off while the programme operates.
5. PROGRAMMES
Programme Degree of soil
Type of load
Programme phases Options
P1
1)
• Normal soil
• Crockery and
cutlery
• Prewash
• Wash 50 °C
• Rinses
• Dry
• TimeManager
• Multitab
P2
2)
• All
• Crockery, cut-
lery, pots and
pans
• Prewash
• Wash from 45 °C to
70 °C
• Rinses
• Dry
• Multitab
P3
3)
• Heavy soil
• Crockery, cut-
lery, pots and
pans
• Prewash
• Wash 70 °C
• Rinses
• Dry
• TimeManager
• Multitab
P4
4)
• Fresh soil
• Crockery and
cutlery
• Wash 60 °C or 65 °C
• Rinses
• Multitab
P5
5)
• All • Prewash
1)
With this programme you have the most efficient use of water and energy consumption for
crockery and cutlery with normal soil. (This is the standard programme for test institutes).
2)
The appliance senses the degree of soil and the quantity of items in the baskets . It auto-
matically adjusts the temperature and the quantity of water, the energy consumption and the
programme duration.
3)
This programme has a high temperature rinsing phase for better hygiene results. During the
rinsing phase, the temperature stays at 70 °C for at least 10 minutes.
4)
With this programme you can wash a load with fresh soil. It gives good washing results in a
short time.
5)
With this programme you can quickly rinse dishes to prevent remains of food to bond on
dishes and odours to form in the appliance. Do not use detergent with this programme.
www.electrolux.com26

5.1 Consumption values
Programme
1)
Water
(l)
Energy
(kWh)
Duration
(min)
P1 9.9 0.932 195
P2 7 - 12 0.6 - 1.4 40 - 150
P3 13 - 15 1.3 - 1.5 140 - 160
P4 9 0.9 30
P5 4 0.1 14
1)
The pressure and the temperature of the water, the variations of the mains supply, the op-
tions and the quantity of dishes can change the values.
5.2 Information for test institutes
For all the necessary information for test
performance, send an email to:
Write down the product number (PNC)
that is on the rating plate.
6. SETTINGS
6.1 Programme selection mode
and user mode
When the appliance is in programme
selection mode it is possible to set a
programme and to enter the user mode.
In user mode, the following settings
can be changed:
• The level of the water softener
according to the water hardness.
• The activation or the deactivation of the
acoustic signal for end of programme.
• The deactivation of the rinse aid
dispenser when you want to use the
Multitab option without rinse aid.
These settings will be saved until you
change them again.
How to set the programme
selection mode
The appliance is in programme selection
mode when the display shows the
programme number P1.
When you activate the appliance, usually it
is in programme selection mode.
However, if this does not happen, you can
set the programme selection mode in the
following way:
Press and hold Reset until the appliance
is in programme selection mode.
6.2 The water softener
The water softener removes minerals from
the water supply, which would have a
detrimental effect on the washing results
and on the appliance.
ENGLISH
27

The higher the content of these minerals,
the harder your water is. Water hardness
is measured in equivalent scales.
The water softener should be adjusted
according to the hardness of the water in
your area. Your local water authority can
advise you on the hardness of the water in
your area. It is important to set the right
level of the water softener to assure good
washing results.
Water hardness
German de-
grees (°dH)
French de-
grees (°fH)
mmol/l Clarke de-
grees
Water softener
level
47 - 50 84 - 90 8.4 - 9.0 58 - 63 10
43 - 46 76 - 83 7.6 - 8.3 53 - 57 9
37 - 42 65 - 75 6.5 - 7.5 46 - 52 8
29 - 36 51 - 64 5.1 - 6.4 36 - 45 7
23 - 28 40 - 50 4.0 - 5.0 28 - 35 6
19 - 22 33 - 39 3.3 - 3.9 23 - 27
5
1)
15 - 18 26 - 32 2.6 - 3.2 18 - 22 4
11 - 14 19 - 25 1.9 - 2.5 13 - 17 3
4 - 10 7 - 18 0.7 - 1.8 5 - 12 2
<4 <7 <0.7 < 5
1
2)
1)
Factory setting.
2)
Do not use salt at this level.
How to set the water softener
level
The appliance must be in programme
selection mode.
1. To enter the user mode, press and
hold simultaneously and until
the indicators , and start to
flash and the display is blank.
2. Press .
• The indicators and go off.
• The indicator continues to
flash.
• The display shows the current
setting: e.g. = level 5.
3. Press again and again to change
the setting.
4. Press the on/off button to confirm the
setting.
6.3 The rinse aid dispenser
The rinse aid helps to dry the dishes
without streaks and stains.
The rinse aid is automatically released
during the hot rinse phase.
Use of rinse aid and multi-tablets
When you activate the option Multitab, the
rinse aid dispenser continues to release
rinse aid. However you can deactivate the
rinse aid dispenser. In this case the drying
results may not be satisfactory.
With the rinse aid dispenser deactivated,
the rinse aid indicator is always off.
www.electrolux.com28

How to deactivate the rinse aid
dispenser
The appliance must be in programme
selection mode.
1. To enter the user mode, press and
hold simultaneously and until
the indicators , and start to
flash and the display is blank.
2. Press .
• The indicators and go off.
• The indicator continues to
flash.
• The display shows the current
setting.
– = rinse aid dispenser
activated.
–
= rinse aid dispenser
deactivated.
3. Press to change the setting.
4. Press the on/off button to confirm the
setting.
6.4 Acoustic signals
Acoustic signals sound when a
malfunction of the appliance occurs. It is
not possible to deactivate these acoustic
signals.
There is also an acoustic signal that
sounds when the programme is
completed. By default this acoustic signal
is deactivated but it is possible to activate
it.
How to activate the acoustic
signal for the end of programme
The appliance must be in programme
selection mode.
1. To enter the user mode, press and
hold simultaneously and until
the indicators , and start to
flash and the display is blank.
2. Press .
• The indicators and go off.
• The indicator continues to
flash.
• The display shows the current
setting:
– = Acoustic signal off.
– = Acoustic signal on.
3. Press to change the setting.
4. Press the on/off button to confirm the
setting.
7. OPTIONS
Desired options must be
activated every time before
you start a programme.
It is not possible to activate or
deactivate options while a
programme is running.
Not all options are compatible
with each other. If you have
selected non compatible
options, the appliance will
automatically deactivate one
or more of them. Only the
indicators of the options still
active will stay on.
7.1 Multitab
Activate this option when you use multi-
tablets that integrate the salt, rinse aid and
detergent functions. They can also contain
other cleaning or rinsing agents.
This option deactivates the release of salt.
The salt indicator does not come on.
With the use of this option the programme
duration is prolonged to increase the
cleaning and drying results with the use of
multi-tablets.
Multitab is not a permanent option and
must be selected at every cycle.
ENGLISH
29

How to activate Multitab
Press .
The related indicator comes on.
7.2 TimeManager
This option increases the pressure and the
temperature of the water. The washing
and the drying phases are shorter.
The total programme duration decreases
by approximately 50%.
The washing results are the same as with
the normal programme duration. The
drying results can decrease.
How to activate TimeManager
Press TimeManager, the related
indicator comes on.
If the option is not applicable to the
programme, the related indicator does not
come on or it flashes quickly for a few
seconds and then goes off.
The display shows the updated
programme duration.
8. BEFORE FIRST USE
1. Make sure that the current level of
the water softener agrees with the
hardness of the water supply. If
not, adjust the level of the water
softener.
2. Fill the salt container.
3. Fill the rinse aid dispenser.
4. Open the water tap.
5. Start a programme to remove any
processing residuals that can still be
inside the appliance. Do not use
detergent and do not load the
baskets.
When you start a programme, the
appliance can take up to 5 minutes to
recharge the resin in the water softener. It
seems that the appliance is not working.
The washing phase starts only after this
procedure is completed. The procedure
will be repeated periodically.
8.1 The salt container
CAUTION!
Only use salt specifically
designed for dishwashers.
The salt is used to recharge the resin in
the water softener and to assure good
washing results in the daily use.
How to fill the salt container
1. Turn the cap of the salt container
counterclockwise and remove it.
2. Put 1 litre of water in the salt container
(Only for the first time).
3. Fill the salt container with dishwasher
salt.
4. Remove the salt around the opening
of the salt container.
5. Turn the cap of the salt container
clockwise to close the salt container.
www.electrolux.com30

Water and salt can come out
from the salt container when
you fill it. Risk of corrosion. To
prevent it, after you fill the salt
container, start a programme.
8.2 How to fill the rinse aid
dispenser
A
B
D
C
M
A
X
1
2
3
4
+
-
A
B
D
C
CAUTION!
Only use rinse aid specifically
designed for dishwashers.
1. Press the release button (D) to open
the lid (C).
2. Pour the rinse aid in the dispenser (A)
until the liquid reaches the fill level
'max'.
3. Remove the spilled rinse aid with an
absorbent cloth to prevent too much
foam.
4. Close the lid. Make sure that the
release button locks into position.
You can turn the selector of
the released quantity (B)
between position 1 (lowest
quantity) and position 4 or 6
(highest quantity).
9. DAILY USE
1. Open the water tap.
2. Press the on/off button to activate the
appliance.
Make sure that the appliance is in
programme selection mode.
• If the salt indicator is on, fill the salt
container.
• If the rinse aid indicator is on, fill
the rinse aid dispenser.
3. Load the baskets.
4. Add the detergent. If you use multi-
tablets, activate the option Multitab.
5. Set and start the correct programme
for the type of load and the degree of
soil.
9.1 Using the detergent
30
20
A BD
C
ENGLISH
31

20
30
B
A D
C
1.
Press the release button (B) to open
the lid (C).
2. Put the detergent, in powder or
tablets, in the compartment (A).
3. If the programme has a prewash
phase, put a small quantity of
detergent in the compartment (D).
4. Close the lid. Make sure that the
release button locks into position.
9.2 Setting and starting a
programme
The Auto Off function
This function decreases energy
consumption by deactivating automatically
the appliance when it is not operating.
The function comes into operation:
• 5 minutes after the completion of the
programme.
• After 5 minutes if the programme has
not started.
Starting a programme
1. Keep the appliance door ajar.
2. Press the on/off button to activate the
appliance. Make sure that the
appliance is in programme selection
mode.
3. Press repeatedly or until the
display shows the number of the
programme you want to start. The
display will show the programme
number for approximately 3 seconds
and then show the programme
duration.
4. Set the applicable options.
5. Close the appliance door to start the
programme.
Starting a programme with delay
start
1. Set a programme.
2. Press again and again until the
display shows the delay time you want
to set (from 1 to 24 hours).
The delay indicator comes on.
3. Close the appliance door to start the
countdown.
While a countdown is running it is possible
to increase the delay time but not to
change the selection of the programme
and options.
When the countdown is completed, the
programme starts.
Opening the door while the
appliance operates
If you open the door while a programme is
running, the appliance stops. When you
close the door, the appliance continues
from the point of interruption.
If the door is opened for more
than 30 seconds during the
drying phase, the running
programme will end.
Cancelling the delay start while
the countdown operates
When you cancel the delay start you have
to set the programme and options again.
Press and hold Reset until the appliance
is in programme selection mode.
Cancelling the programme
Press and hold Reset until the appliance
is in programme selection mode.
Make sure that there is detergent in the
detergent dispenser before you start a
new programme.
www.electrolux.com32

End of the programme
When the programme is completed the
display shows 0:00 .
1. Press the on/off button or wait for the
Auto Off function to automatically
deactivate the appliance.
2. Close the water tap.
10. HINTS AND TIPS
10.1 General
The following hints will ensure optimal
cleaning and drying results in daily use
and also help to protect the environment.
• Remove larger residues of food from
the dishes into the waste bin.
• Do not pre-rinse dishes by hand. When
needed, use the prewash programme
(if available) or select a programme with
a prewash phase.
• Always use the whole space of the
baskets.
• When loading the appliance, make
sure that the dishes can be completely
reached and washed by the water
released from the spray arm nozzles.
Make sure that items do not touch or
cover each other.
• You can use dishwasher detergent,
rinse aid and salt separately or you can
use the multi-tablets (e.g. ''3in1'',
''4in1'', ''All in 1''). Follow the
instructions written on the packaging.
• Select the programme according to the
type of load and degree of soil. With
the ECO programme you have the
most efficient use of water and energy
consumption for crockery and cutlery
with normal soil.
10.2 Using salt, rinse aid and
detergent
• Only use salt, rinse aid and detergent
for dishwasher. Other products can
cause damage to the appliance.
• Multi-tablets are usually suitable in
areas with a water hardness up to 21
°dH. In areas exceeding this limit, rinse
aid and salt must be used in addition to
the multi-tablets. However, in areas
with hard and very hard water we
recommend to use solo-detergent
(powder, gel, tablets without additional
functions), rinse aid and salt separately
for optimal cleaning and drying results.
• If you use multi-tablets you can select
the Multitab option (if available). This
option increases the cleaning and
drying results with the use of multi-
tablets.
• Detergent tablets do not fully dissolve
with short programmes. To prevent
detergent residues on the tableware,
we recommend that you use the
tablets with long programmes.
• Do not use more than the correct
quantity of detergent. Refer to the
instructions on the detergent
packaging.
10.3 What to do if you want to
stop using multi-tablets
Before you start to use separately
detergent, salt and rinse aid do the
following procedure.
1. Set the highest level of the water
softener.
2. Make sure that the salt and rinse aid
containers are full.
3. Start the shortest programme with a
rinsing phase. Do not add detergent
and do not load the baskets.
4. When the programme is completed,
adjust the water softener according to
the water hardness in your area.
5. Adjust the released quantity of rinse
aid.
10.4 Loading the baskets
• Only use the appliance to wash items
that are dishwasher-safe.
ENGLISH
33

• Do not put in the appliance items made
of wood, horn, aluminium, pewter and
copper.
• Do not put in the appliance items that
can absorb water (sponges, household
cloths).
• Remove remaining food from the
items.
• Make soft the remaining burned food
on the items.
• Put hollow items (cups, glasses and
pans) with the opening down.
• Make sure that cutlery and dishes do
not bond together. Mix spoons with
other cutlery.
• Make sure that glasses do not touch
other glasses.
• Put small items in the cutlery basket.
• Put light items in the upper basket.
Make sure that the items do not move.
• Make sure that the spray arm can
move freely before you start a
programme.
10.5 Before starting a
programme
Make sure that:
• The filters are clean and correctly
installed.
• The cap of the salt container is tight.
• The spray arms are not clogged.
• There is dishwasher salt and rinse aid
(unless you use multi- tablets).
• The position of the items in the baskets
is correct.
• The programme is applicable for the
type of load and for the degree of soil.
• The correct quantity of detergent is
used.
10.6 Unloading the baskets
1. Let the tableware cool down before
you remove it from the appliance. Hot
items can be easily damaged.
2. First remove items from the lower
basket, then from the upper basket.
At the end of the programme
water can still remain on the
sides and on the door of the
appliance.
11. CARE AND CLEANING
WARNING!
Before maintenance,
deactivate the appliance and
disconnect the mains plug
from the main socket.
Dirty filters and clogged spay
arms decrease the washing
results. Make a check
regularly and, if necessary,
clean them.
11.1 Cleaning the filters
The filter system is made of 3 parts.
C
B
A
1. Turn the filter (B) counterclockwise
and remove it.
www.electrolux.com34

2. Remove the filter (C) out of filter (B).
3. Remove the flat filter (A).
4. Wash the filters.
5. Make sure that there are no residues
of food or soil in or around the edge of
the sump.
6. Put back in place the flat filter (A).
Make sure that it is correctly
positioned under the 2 guides.
7. Reassemble the filters (B) and (C).
8. Put back the filter (B) in the flat filter
(A). Turn it clockwise until it locks.
CAUTION!
An incorrect position of the
filters can cause bad washing
results and damage to the
appliance.
11.2 Cleaning the spray arms
Do not remove the spray arms. If the holes
in the spray arms are clogged, remove
remaining parts of soil with a thin pointed
object.
11.3 External cleaning
• Clean the appliance with a moist soft
cloth.
• Only use neutral detergents.
• Do not use abrasive products, abrasive
cleaning pads or solvents.
11.4 Internal cleaning
• Carefully clean the appliance, including
the rubber gasket of the door, with a
soft moist cloth.
ENGLISH
35

• If you regularly use short duration
programmes, these can leave deposits
of grease and limescale inside the
appliance. To prevent this, we
recommend to run long duration
programmes at least 2 times per
month.
12. TROUBLESHOOTING
If the appliance does not start or it stops
during operation. Before you contact an
Authorised Service Centre, check if you
can solve the problem by yourself with the
help of the information in the table.
With some problems, the display
shows an alarm code.
Problem and alarm code Possible solution
You cannot activate the ap-
pliance.
• Make sure that the mains plug is connected to the
mains socket.
• Make sure that there is no a damage fuse in the fuse
box.
The programme does not
start.
• Make sure that the appliance door is closed.
• If the delay start is set, cancel the setting or wait for
the end of the countdown.
• The appliance has started the procedure to recharge
the resin inside the water softener. The duration of the
procedure is approximately 5 minutes.
The appliance does not fill
with water.
The display shows .
• Make sure that the water tap is open.
• Make sure that the pressure of the water supply is not
too low. For this information, contact your local water
authority.
• Make sure that the water tap is not clogged.
• Make sure that the filter in the inlet hose is not clog-
ged.
• Make sure that the inlet hose has no kinks or bends.
The appliance does not
drain the water.
The display shows .
• Make sure that the sink spigot is not clogged.
• Make sure that the drain hose has no kinks or bends.
The anti-flood device is on.
The display shows .
• Close the water tap and contact an Authorised Service
Centre.
Once you have checked the appliance,
deactivate and activate the appliance. If
the problem occurs again, contact an
Authorised Service Centre.
For alarm codes not described in the
table, contact an Authorised Service
Centre.
www.electrolux.com36

12.1 The washing and drying results are not satisfactory
Problem Possible solution
There are whitish streaks or
bluish layers on glasses and
dishes.
• The release quantity of rinse aid is too much. Adjust
the rinse aid selector to a lower position.
• The quantity of detergent is too much.
There are stains and dry wa-
ter drops on glasses and
dishes.
• The released quantity of rinse aid is not sufficient.
Adjust the rinse aid selector to a higher position.
• The quality of the rinse aid can be the cause.
The dishes are wet. • The programme does not have a drying phase or
has a drying phase with low temperature.
• The rinse aid dispenser is empty.
• The quality of the rinse aid can be the cause.
• The quality of the multi-tablets can be the cause. Try
a different brand or activate the rinse aid dispenser
and use rinse aid and multi-tablets together.
Refer to "Hints and tips" for
other possible causes.
13. TECHNICAL INFORMATION
Dimensions Width / height / depth
(mm)
596 / 818-898 / 555
Electrical connection
1)
Voltage (V) 220 - 240
Frequency (Hz) 50
Water supply pressure Min. / max. bar (MPa) 0.5 (0.05) / 8 (0.8)
Water supply
Cold water or hot water
2)
max 60 °C
Capacity Place settings 13
Power consumption Left-on mode (W) 0.99
Power consumption Off-mode (W) 0.10
1)
Refer to the rating plate for other values.
2)
f the hot water comes from alternative source of energy, (e.g. solar panels, aeolian energy),
use the hot water supply to decrease energy consumption.
14. ENVIRONMENT CONCERNS
Recycle the materials with the symbol .
Put the packaging in applicable containers
to recycle it. Help protect the environment
and human health and to recycle waste of
electrical and electronic appliances. Do
not dispose appliances marked with the
symbol with the household waste.
Return the product to your local recycling
facility or contact your municipal office.
ENGLISH
37

SISUKORD
1. OHUTUSINFO.................................................................................................. 39
2. OHUTUSJUHISED........................................................................................... 40
3. SEADME KIRJELDUS......................................................................................42
4. JUHTPANEEL.................................................................................................. 42
5. PROGRAMMID.................................................................................................43
6. SEADED........................................................................................................... 45
7. VALIKUD.......................................................................................................... 47
8. ENNE ESIMEST KASUTAMIST....................................................................... 47
9. IGAPÄEVANE KASUTAMINE.......................................................................... 48
10. VIHJEID JA NÄPUNÄITEID............................................................................50
11. PUHASTUS JA HOOLDUS............................................................................ 51
12. VEAOTSING...................................................................................................53
13. TEHNILISED ANDMED.................................................................................. 54
SULLE MÕELDES
Täname teid selle Electroluxi seadme ostmise eest. Olete valinud toote, mille
loomisel on rakendatud pikaaegset asjatundlikku kogemust ja uuenduslikkust.
Nutika ja stiilse disaini kõrval ei ole unustatud ka teid. Ükskõik, millal te seda ka ei
kasuta – suurepärastes tulemustes võite te alati kindel olla.
Teretulemast Electroluxi.
Külastage meie veebisaiti:
Kasutusnõuanded, brošüürid, veaotsing, teave teeninduse kohta:
www.electrolux.com
Registreerige oma toode parema teeninduse saamiseks:
www.registerelectrolux.com
Ostke lisaseadmeid, tarvikuid ja originaalvaruosi:
www.electrolux.com/shop
KLIENDITEENINDUS
Soovitame alati kasutada originaalvaruosi.
Teenindusse pöördumisel peaksid teil olema varuks järgmised andmed. Mudel,
tootenumber (PNC), seerianumber.
Andmed leiate andmesildilt.
Hoiatus / oluline ohutusinfo.
Üldine informatsioon ja nõuanded
Keskkonnateave
Jäetakse õigus teha muutusi.
www.electrolux.com38

1. OHUTUSINFO
Enne seadme paigaldamist ja kasutamist lugege
kaasasolev juhend tähelepanelikult läbi. Tootja ei
vastuta vale paigaldamise või ebaõige kasutuse tõttu
tekkinud vigastuste ja kahjude eest. Hoidke juhend alles,
et saaksite seda ka edaspidi kasutada.
1.1 Üldine ohutus
• See seade on mõeldud kasutamiseks koduses
majapidamises või muudes sarnastes kohtades,
näiteks:
– talumajapidamistes, personalile mõeldud köökides
kauplustes, kontorites ja mujal;
– hotellides, motellides ja muudes majutuskohtades.
• Ärge muutke seadme tehnilisi omadusi.
• Kasutatava vee surve (minimaalne ja maksimaalne)
peab jääma vahemikku 0.5 (0.05) / 8 (0.8) baari (Mpa)
• Järgige kohalikku maksimaalset13 taset.
• Kui toitejuhe on vigastatud, laske see ohutuse mõttes
välja vahetada tootja, selle volitatud hooldekeskuses
või lihtsalt kvalifitseeritud isiku poolt.
• Pange noad ja teravate otsadega söögiriistad
söögiriistade korvi otsaga allapoole või
horisontaalasendisse.
• Ärge jätke seadme ust lahti; vastasel korral võib keegi
selle otsa komistada.
• Enne hooldust lülitage seade välja ja ühendage
toitepistik pistikupesast lahti.
• Ärge kasutage seadme puhastamiseks vee- või
aurupihustit.
• Põhjal olevaid ventilatsiooniavasid (kui need on
olemas) ei tohi vaipkattega tõkestada.
• Seade tuleb veevarustusega ühendada kaasasolevate
uute voolikukomplektide abil. Vanu voolikukomplekte
kasutada ei tohi.
EESTI 39

1.2 Laste ja ohustatud inimeste turvalisus
• Seda seadet võivad kasutada vähemalt 8-aastased
lapsed ning füüsilise, sensoorse või vaimse puudega
inimesed või kogemuste ja teadmisteta isikud juhul,
kui nende tegevuse üle on järelvalve ja neid
juhendatakse seadme turvalise kasutamise osas ning
nad mõistavad seadme kasutamisega kaasnevaid
ohte.
• Ärge lubage lastel seadmega mängida.
• Hoidke pesuained lastele kättesaamatuna.
• Hoidke lapsed ja lemmikloomad seadme uksest
eemal, kui see on avatud.
• Ilma järelvalveta ei tohi lapsed seadet puhastada ega
hooldustoiminguid läbi viia.
2. OHUTUSJUHISED
2.1 Paigaldamine
• Eemaldage kõik pakkematerjalid.
• Kahjustatud seadet ei tohi paigaldada
ega kasutada.
• Ärge paigaldage seadet ruumi, mille
temperatuur on alla 0 °C.
• Järgige seadmega kaasas olevaid
paigaldusjuhiseid.
• Veenduge, et seade on paigaldatud
kindlate konstruktsioonide alla ja
kõrvale.
2.2 Elektriühendus
HOIATUS!
Tulekahju- ja elektrilöögioht!
• Seade peab olema maandatud.
• Kontrollige, kas andmesildil toodud
elektrilised parameetrid vastavad
vooluvõrgu näitajatele. Vastasel juhul
võtke ühendust elektrikuga.
• Kasutage alati nõuetekohaselt
paigaldatud ohutut pistikupesa.
• Ärge kasutage mitmikpistikuid ega
pikenduskaableid.
• Veenduge, et te ei vigastaks
toitepistikut ega -juhet. Kui seadme
toitekaabel tuleb välja vahetada, siis
pöörduge meie hoolduskeskusse.
• Ühendage toitepistik seinakontakti
alles pärast paigalduse lõpuleviimist.
Veenduge, et pärast paigaldamist
säilib juurdepääs toitepistikule.
• Seadet välja lülitades ärge tõmmake
toitekaablist. Hoidke alati kinni
toitepistikust.
• See seade vastab EÜ direktiividele.
• Ainult UK-s ja Iirimaal. Seadmel on
13-ampriline voolupistik. Kui on vaja
vahetada toitepistikus olevat kaitset,
kasutage 13-amprilist ASTA (BS
1362) kaitset.
2.3 Veeühendus
• Veenduge, et te veevoolikuid ei
vigastaks.
• Enne seadme ühendamist uute torude
või pikalt kasutamata torudega laske
neist vett läbi voolata, kuni vesi jääb
puhtaks.
• Seadme esmakordsel kasutamisel
veenduge, et kusagil ei oleks lekkeid.
• Vee sisselaskevoolikul on kaitseklapp
ja kattega sisemine toitejuhe.
www.electrolux.com40

HOIATUS!
Ohtlik pinge.
• Kui vee sisselaskevoolik on
kahjustada saanud, eemaldage pistik
koheselt seinakontaktist. Vee
sisselaskevooliku asendamiseks
võtke ühendust hoolduskeskusega.
2.4 Kasutamine
• Ärge avatud uksel istuge ega seiske.
• Nõudepesumasina pesuained on
ohtlikud. Järgige pesuainepakendil
olevaid kasutusjuhiseid.
• Ärge jooge ega kasutage seadmes
olnud vett.
• Ärge eemaldage nõusid seadmest
enne, kui programm on lõppenud.
Nõudele võib olla jäänud pesuainet.
• Kui avate ukse pesuprogrammi
töötamise ajal, võib ukse vahelt välja
paiskuda kuuma auru.
• Ärge pange süttivaid või süttiva
ainega määrdunud esemeid
seadmesse, selle lähedusse või
peale.
2.5 Hooldus
• Seadme remontimiseks võtke
ühendust tootja volitatud
hoolduskeskusega. Soovitame alati
kasutada ainult originaalvaruosi.
• Hooldusesse pöördumisel veenduge,
et teil on olemas järgnev
andmeplaadil kirjas olev teave.
Mudel:
PNC:
Seerianumber:
2.6 Jäätmekäitlus
HOIATUS!
Lämbumis- või vigastusoht!
• Eemaldage seade vooluvõrgust.
• Lõigake toitekaabel seadme küljest
lahti ja visake ära.
• Eemaldage seadme ukse fiksaator, et
vältida laste ja loomade seadmesse
lõksujäämist.
EESTI 41

3. SEADME KIRJELDUS
4
3
7
9
8
10
56
11
1
2
1
Ülemine pihustikonsool
2
Alumine pihustikonsool
3
Filtrid
4
Andmesilt
5
Soolamahuti
6
Ventilatsiooniava
7
Loputusvahendi jaotur
8
Pesuaine jaotur
9
Söögiriistade korv
10
Alumine korv
11
Ülemine korv
3.1 Beam-on-Floor
Beam-on-Floor on tuli, mis suunatakse
seadme ukse ette põrandale.
• Kui programm käivitub, süttib punane
tuli ja põleb kuni programmi
lõppemiseni.
• Kui programm on lõppenud, süttib
roheline tuli.
• Seadme rikke korral vilgub punane
tuli.
Beam-on-Floor kustub, kui
seade lülitatakse välja.
4. JUHTPANEEL
1 2 93 4 5 6 7 8
1
Sisse/välja-nupp
2
Ekraan
3
Delay-nupp
4
Programminupp (üles)
www.electrolux.com42

5
Programminupp (alla)
6
Multitab-nupp
7
TimeManager-nupp
8
Reset-nupp
9
Indikaatorid
4.1 Indikaatorid
Indikaator Kirjeldus
Soolaindikaator. Programmi töötamise ajal on see indikaator alati väl‐
jas.
Loputusvahendi indikaator. Programmi töötamise ajal on see indikaa‐
tor alati väljas.
5. PROGRAMMID
Programm Määrdumisaste
Nõude tüüp
Programmi faasid Funktsioonid
P1
1)
• Tavaline määr‐
dumine
• Lauanõud ja
söögiriistad
• Eelpesu
• Pesu 50 °C
• Loputused
• Kuivatamine
• TimeManager
• Multitab
P2
2)
• Kõik
• Lauanõud, söö‐
giriistad, potid
ja pannid
• Eelpesu
• Pesu alates 45 °C ku‐
ni 70 °C
• Loputused
• Kuivatamine
• Multitab
P3
3)
• Tugev määrdu‐
mine
• Lauanõud, söö‐
giriistad, potid
ja pannid
• Eelpesu
• Pesu 70 °C
• Loputused
• Kuivatamine
• TimeManager
• Multitab
P4
4)
• Värske määr‐
dumine
• Lauanõud ja
söögiriistad
• Pesu 60 °C või 65 °C
• Loputused
• Multitab
EESTI 43

Programm Määrdumisaste
Nõude tüüp
Programmi faasid Funktsioonid
P5
5)
• Kõik • Eelpesu
1)
Selle programmiga kasutate te tavalise määrdumisastmega lauanõude ja söögiriistade
pesemiseks vett ja energiat kõige efektiivsemalt. (See on standardprogramm testimisasu‐
tustele.)
2)
Seade tunneb ära korvides olevate esemete määrdumisastme ja koguse. Vee tempera‐
tuuri ja kogust, energiatarvet ja programmi kestust reguleeritakse automaatselt.
3)
Selle programmi puhul kasutatakse paremate hügieeniliste tulemuste saavutamiseks lo‐
putamisel kõrget temperatuuri. Loputusfaasis püsib temperatuur 70 °C juures vähemalt 10
minutit.
4)
See programm sobib äsja kasutatud nõude pesemiseks. Seda kasutades saate head pe‐
sutulemused lühikese ajaga.
5)
Selle programmiga saate nõusid kiiresti loputada, et takistada toidujääkide kuivamist
nõude külge ja hoida ära ebameeldiva lõhna tekkimist. Ärge kasutage selle programmi pu‐
hul pesuainet.
5.1 Tarbimisväärtused
Programm
1)
Vesi
(l)
Energia
(kWh)
Kestus
(min)
P1 9.9 0.932 195
P2 7 - 12 0.6 - 1.4 40 - 150
P3 13 - 15 1.3 - 1.5 140 - 160
P4 9 0.9 30
P5 4 0.1 14
1)
Veesurve ja -temperatuur, elektripinge kõikumine, erinevad valikud ja nõude kogus või‐
vad tarbimisväärtusi mõjutada.
5.2 Teave testimisasutustele
Kogu vajaliku teabe saamiseks testimise
kohta saatke meilisõnum aadressile:
Pange kirja tootenumber (PNC), mis
asub andmeplaadil.
www.electrolux.com44

6. SEADED
6.1 Programmi valiku režiim ja
kasutajarežiim
Kui seade on programmi valimise
režiimis, saab valida sobiva programmi ja
sisestada kasutajarežiimi.
Kasutajarežiimis saab muuta järgmisi
seadeid:
• Veepehmendaja taset vastavalt vee
karedusele.
• Programmi lõpus kõlavate
helisignaalide sisse- või
väljalülitamist.
• Loputusvahendi jaoturi väljalülitamist,
kui soovite kasutada funktsiooni
Multitab ilma loputusvahendita.
Need seaded salvestatakse seniks,
kuni te neid uuesti muudate.
Programmi valimise režiimi
valimine
Seade on programmi valimise režiimis
siis, kui ekraanil kuvatakse programmi
number P1.
Kui te seadme sisse lülitate, on see
tavaliselt programmi valimise režiimis.
Kui see nii aga pole, saate programmi
valimise režiimi sisse lülitada järgmiselt:
Vajutage ja hoidke Reset, kuni seade
jõuab programmi valimise režiimi.
6.2 Veepehmendaja
Veepehmendaja eemaldab vees olevad
mineraalid, mis halvendavad nii
pesutulemust kui ka seadet ennast.
Mida kõrgem on mineraalide tase, seda
karedam on vesi. Vee karedust
mõõdetakse vastavate skaaladega.
Veepehmendajat tuleks reguleerida
vastavalt teie piirkonna vee karedusele.
Teavet oma piirkonna vee kareduse
kohta saate kohalikult vee-ettevõttelt.
Heade pesutulemuste saamiseks tuleb
kindlasti valida õige veepehmendaja
tase.
Vee karedus
Saksa kraadid
(°dH)
Prantsuse
kraadid (°fH)
mmol/l Clarke'i
kraadid
Veepehmendaja
tase
47 - 50 84 - 90 8.4 - 9.0 58 - 63 10
43 - 46 76 - 83 7.6 - 8.3 53 - 57 9
37 - 42 65 - 75 6.5 - 7.5 46 - 52 8
29 - 36 51 - 64 5.1 - 6.4 36 - 45 7
23 - 28 40 - 50 4.0 - 5.0 28 - 35 6
19 - 22 33 - 39 3.3 - 3.9 23 - 27
5
1)
15 - 18 26 - 32 2.6 - 3.2 18 - 22 4
11 - 14 19 - 25 1.9 - 2.5 13 - 17 3
4 - 10 7 - 18 0.7 - 1.8 5 - 12 2
<4 <7 <0.7 < 5
1
2)
1)
Tehaseseade.
2)
Selle taseme puhul ärge soola kasutage.
EESTI 45

Veepehmendaja taseme
valimine
Seade peab olema programmi valimise
režiimis.
1. Kasutajarežiimi sisestamiseks
vajutage ja hoidke korraga ja
, kuni indikaatorid , ja
hakkavad vilkuma ja ekraan läheb
pimedaks.
2. Vajutage
.
• Indikaatorid ja kustuvad.
• Indikaator jätkab vilkumist.
• Ekraanil kuvatakse olemasolev
seade: nt = tase 5.
3. Seade muutmiseks vajutage
korduvalt -nuppu.
4. Seade kinnitamiseks vajutage sisse/
välja-nuppu.
6.3 Loputusvahendi jaotur
Loputusvahend võimaldab nõusid
kuivatada ilma triipude ja plekkideta.
Loputusvahendit eraldatakse
automaatselt kuuma loputusfaasi ajal.
Loputusvahendi ja
multitablettide kasutamine
Kui aktiveerite funktsiooni Multitab,
jätkab loputusvahendi jaotur
loputusvahendi eraldamist. Siiski võite
loputusvahendi jaoturi välja lülitada. Sel
juhul ei pruugi kuivatustulemused olla
rahuldavad.
Kui loputusvahendi jaotur on välja
lülitatud, siis loputusvahendi indikaator ei
põle.
Loputusvahendi jaoturi
väljalülitamine
Seade peab olema programmi valimise
režiimis.
1. Kasutajarežiimi sisestamiseks
vajutage ja hoidke korraga ja
, kuni indikaatorid , ja
hakkavad vilkuma ja ekraan läheb
tühjaks.
2. Vajutage .
• Indikaatorid ja kustuvad.
• Indikaator
jätkab vilkumist.
• Ekraanil kuvatakse kehtiv seade.
– = loputusvahendi jaotur
on sisse lülitatud.
– = loputusvahendi jaotur
on välja lülitatud.
3. Seade muutmiseks vajutage .
4. Seade kinnitamiseks vajutage sisse/
välja-nuppu.
6.4 Helisignaalid
Helisignaalid kõlavad siis, kui seadmel
tekib rike. Neid helisignaale ei ole
võimalik välja lülitada.
Programmi lõpus kõlab samuti
helisignaal. Vaikeseadena on see
signaal välja lülitatud, aga seda on
võimalik sisse lülitada.
Programmi lõpus kõlava
helisignaali sisse lülitamine
Seade peab olema programmi valimise
režiimis.
1. Kasutajarežiimi sisestamiseks
vajutage ja hoidke korraga ja
, kuni indikaatorid , ja
hakkavad vilkuma ja ekraan läheb
tühjaks.
2. Vajutage .
• Indikaatorid ja kustuvad.
• Indikaator jätkab vilkumist.
• Ekraanil kuvatakse olemasolev
seade:
– = helisignaal on väljas.
– = helisignaal on sees.
3. Seade muutmiseks vajutage .
4. Seade kinnitamiseks vajutage sisse/
välja-nuppu.
www.electrolux.com46

7. VALIKUD
Sobivad valikud tuleb sisse
lülitada iga kord, kui te
programmi käivitate.
Programmi töösoleku ajal
valikuid sisse ega välja
lülitada ei saa.
Kõik valikud omavahel ei
sobi. Kui olete sisse lülitanud
omavahel sobimatud
valikud, lülitab seade
automaatselt neist ühe või
rohkem välja. Põlema jäävad
ainult sisselülitatud valikute
indikaatorid.
7.1 Multitab
Aktiveerige see valik, kui kasutate soola,
loputusvahendit ja pesuainet sisaldavaid
multitablette. Need võivad sisaldada ka
muid puhastus- või loputusaineid.
See valik peatab soola eraldamise.
Soolaindikaator ei sütti.
Seda valikut kasutades pikeneb
programmi kestus, et multitablettide
kasutamisel pesu- ja kuivatustulemusi
tõhustada.
Multitab ei ole püsiv valik ja seetõttu
tuleb see iga tsükli jaoks eraldi sisse
lülitada.
Multitab sisselülitamine
Vajutage .
Süttib vastav indikaator.
7.2 TimeManager
See valik tõstab veesurvet ja -
temperatuuri. Pesu- ja kuivatusfaasid on
lühemad.
Programmi kogukestus väheneb
ligikaudu 50%.
Pesutulemus on sama mis tavalise
programmi kestuse puhulgi.
Kuivatustulemused võivad olla
kehvemad.
TimeManager sisselülitamine
Vajutage TimeManager, süttib vastav
indikaator.
Kui valik programmiga ei sobi, ei sütti ka
vastav indikaator (või vilgub kiiresti paar
sekundit ja kustub siis).
Ekraan näitab programmi uuendatud
kestust.
8. ENNE ESIMEST KASUTAMIST
1. Kontrollige, kas veepehmendaja
on reguleeritud vastavalt teie
piirkonna vee karedusele. Kui
mitte, reguleerige veepehmendaja
taset.
2. Täitke soolamahuti.
3. Täitke loputusvahendi jaotur.
4. Keerake veekraan lahti.
5. Käivitage programm, et eemaldada
kõik seadmes leiduda võivad
tootmisjäägid. Ärge kasutage
pesuainet ega pange midagi
korvidesse.
Programmi käivitamisel kulub seadmel
veepehmendajas sisalduva vaigu
aktiveerimiseks kuni 5 minutit. Võib jääda
mulje, et seade ei tööta. Pesutsükkel
käivitub alles pärast selle toimingu
lõppemist. Toimingut korratakse
perioodiliselt.
8.1 Soolamahuti
ETTEVAATUST!
Kasutage ainult
nõudepesumasinate jaoks
mõeldud soola.
Soola kasutatakse veepehmendaja vaigu
aktiveerimiseks ja igapäevases
kasutuses heade pesutulemuste
tagamiseks.
EESTI 47

Soolamahuti täitmine
1. Keerake soolamahuti korki
vastupäeva ja võtke see välja.
2. Valage soolamahutisse 1 liiter vett
(ainult esimesel korral).
3. Täitke soolamahuti
nõudepesumasina soolaga.
4. Eemaldage sool soolamahuti avause
ümbert.
5. Soolamahuti sulgemiseks keerake
soolamahuti korki päripäeva.
Vesi ja sool võivad
soolamahutist täitmise ajal
välja tulla. Korrosioonioht!
Selle vältimiseks käivitage
pärast soolamahuti täitmist
programm.
8.2 Loputusvahendi jaoturi
sisselülitamine
A
B
D
C
M
A
X
1
2
3
4
+
-
A
B
D
C
ETTEVAATUST!
Kasutage vaid
nõudepesumasina jaoks
mõeldud loputusvahendit.
1. Vajutage avamisnuppu (D), et avada
kaas (C).
2. Kallake loputusvahend jaoturisse (A),
kuni vedelik jõuab tasemeni "max".
3. Eemaldage mahaläinud
loputusvahend imava lapiga, et ei
tekiks liiga palju vahtu.
4. Sulgege kaas. Veenduge, et
vabastusnupp lukustub asendisse.
Aine eraldumiskogust
määravat valikunuppu (B)
saate keerata asendite 1
(väikseim kogus) ja 4 või 6
(suurim kogus) vahel.
9. IGAPÄEVANE KASUTAMINE
1. Keerake veekraan lahti.
2. Vajutage sisse/välja-nuppu, et seade
käivitada.
Veenduge, et seade on programmi
valimise režiimis.
www.electrolux.com48

• Kui soolaindikaator põleb, täitke
soolamahuti.
• Kui loputusvahendi indikaator
põleb, täitke loputusvahendi
jaotur.
3. Pange nõud korvidesse.
4. Lisage pesuaine. Multitablettide
kasutamisel aktiveerige valik
Multitab.
5. Määrake ja käivitage nõude tüübile ja
määrdumisastmele vastav
programm.
9.1 Pesuaine kasutamine
30
20
A BD
C
20
30
B
A D
C
1. Vajutage avamisnuppu (B), et avada
kaas (C).
2. Pange pesuaine (pulber või tabletid)
lahtrisse (A).
3. Kui programmil on eelpesutsükkel,
pange väike kogus pesuainet ka
lahtrisse (D).
4. Sulgege kaas. Veenduge, et
vabastusnupp lukustub asendisse.
9.2 Programmi valimine ja
käivitamine
Funktsioon Auto Off
See funktsioon võimaldab vähendada
energiatarbimist, lülitades mittetöötava
seadme automaatselt välja.
Funktsioon käivitub:
• 5 minutit pärast pesuprogrammi
lõppu.
• Kui 5 minuti jooksul ei ole programm
käivitunud.
Programmi käivitamine
1. Hoidke seadme uks praokil.
2. Vajutage sisse/välja-nuppu, et seade
käivitada. Veenduge, et seade on
programmi valimise režiimis.
3. Vajutage järjest või , kuni
ekraanil kuvatakse soovitud
programmi number. Ekraanil
kuvatakse esmalt umbes 3 sekundit
programmi number, seejärel
kuvatakse programmi kestus.
4. Valige saadaolevad funktsioonid.
5. Programmi käivitamiseks sulgege
seadme uks.
Programmi käivitamine
viitkäivitusega
1. Valige programm.
2. Vajutage järjest -nuppu, kuni
ekraanil kuvatakse soovitud
viitkäivituse aeg (1 kuni 24 tundi).
Süttib viitkäivituse indikaator.
3. Pöördloenduse käivitamiseks
sulgege seadme uks.
Pöördloenduse ajal saab küll
käivitusaega edasi lükata, kuid valitud
programmi ja valikuid muuta ei saa.
Kui pöördloendus on lõppenud, käivitub
programm.
Ukse avamine seadme töö ajal
Kui avate ukse programmi töösoleku ajal,
peatub seadme töö. Kui panete ukse
EESTI 49

uuesti kinni, jätkub seadme töö kohast,
kus see katkes.
Kui kuivatusfaasi ajal
avatakse uks kauemaks kui
30 sekundit, lülitub
käimasolev programm välja.
Viitkäivituse tühistamine
pöördloenduse ajal
Viitkäivituse tühistamisel tuleb programm
ja valikud uuesti valida.
Vajutage ja hoidke Reset, kuni seade
jõuab programmi valimise režiimi.
Programmi tühistamine
Vajutage ja hoidke Reset, kuni seade
jõuab programmi valimise režiimi.
Enne uue programmi käivitamist
veenduge, et pesuaine jaoturis on
pesuainet.
Programmi lõpp
Kui programm on lõppenud, kuvatakse
ekraanil 0:00 .
1. Vajutage sisse/välja-nuppu või
oodake, kuni funktsioon Auto Off
seadme automaatselt välja lülitab.
2. Sulgege veekraan.
10. VIHJEID JA NÄPUNÄITEID
10.1 Üldteave
Järgmisi näpunäiteid järgides saavutate
igapäevasel kasutamisel parimad pesu-
ja kuivatustulemused ning aitate säästa
keskkonda.
• Enne masinasse panekut eemaldage
nõudelt suurem mustus.
• Ärge loputage nõusid eelnevalt
käsitsi. Vajadusel kasutage
eelpesuprogrammi (kui see on
olemas) või valige mõni eelpesuga
programm.
• Kasutage alati ära kogu korvide ruum.
• Seadme täitmisel veenduge, et kõik
nõud oleks paigutatud selliselt, et
pihustikonsoolidest eralduv vesi
pääseks neile juurde ja saaks neid
pesta. Kontrollige, et nõud ei puutu
üksteise vastu ega ole üksteise peal.
• Pesemisel võib kasutada eraldi
nõudepesumasina-pesuainet,
loputusvahendit ja -soola, või ka
multitablette (nt ''3in1'', ''4in1'', ''All in
1''). Järgige pakendil olevaid juhiseid.
• Valige nõude tüübile ja
määrdumisastmele vastav programm.
Programmiga ECOkasutate te
tavalise määrdumisastmega
lauanõude ja söögiriistade
pesemiseks vett ja energiat kõige
efektiivsemalt.
10.2 Soola, loputusvahendi ja
pesuaine kasutamine
• Kasutage ainult nõudepesumasina
jaoks mõeldud soola, loputusvahendit
ja pesuainet. Teised tooted võivad
seadet kahjustada.
• Multitablette sobib kasutada
piirkondades, mille veekaredus on
kuni 21 °dH. Piirkondades, kus see
tase on kõrgem, tuleks
multitablettidele lisaks kasutada ka
loputusvahendit ja soola.
Piirkondades, kus vesi on kare või
väga kare, on parima pesu- ja
kuivatustulemuse saamiseks
soovitatav kasutada eraldi nii
pesuainet (lisaomadusteta pulbrit,
geeli või tablette), loputusvahendit kui
ka soola.
• Multitablettide kasutamisel võite
valida funktsiooni Multitab (kui see on
olemas). Kui kasutate multitablette,
parandab see valik pesu- ja
kuivatustulemusi.
• Lühikeste programmidega ei jõua
pesuainetabletid täielikult lahustuda.
Et nõudele ei jääks pesuainejääke,
www.electrolux.com50

soovitatakse pesuainetablette
kasutada ainult pikkade
programmidega.
• Ärge kasutage pesuainet rohkem, kui
ette nähtud. Vt pesuaine pakendil
olevaid juhiseid.
10.3 Kuidas lõpetada
multitablettide kasutamine
Enne pesuaine, soola ja loputusvahendi
eraldi kasutamist tehke järgmist.
1. Valige kõrgeim veepehmendaja tase.
2. Veenduge, et soolamahuti ja
loputusvahendi jaotur on täis.
3. Käivitage lühim loputusfaasiga
programm. Ärge kasutage pesuainet
ega pange midagi korvidesse.
4. Kui pesuprogramm on lõppenud,
kohandage veepehmendaja vastavalt
oma piirkonna vee karedusele.
5. Reguleerige eraldatava
loputusvahendi kogust.
10.4 Korvide täitmine
• Kasutage seadet ainult
nõudepesumasinakindlate nõude
pesemiseks.
• Ärge pange seadmesse puust,
sarvest, alumiiniumist, tinast ega
vasest esemeid.
• Ärge pange seadmesse vett imavaid
esemeid (käsnu või lappe).
• Eemaldage nõudelt toidujäägid.
• Enne pesemist leotage kõrbenud
kohad nõude küljest lahti.
• Asetage õõnsad esemed (tassid,
klaasid ja pannid) masinasse
avausega allapoole.
• Veenduge, et söögiriistad ja lauanõud
üksteise küljes kinni ei oleks. Pange
lusikad teiste söögiriistade juurde.
• Veenduge, et klaasid ei puutuks
omavahel kokku.
• Pange väikesed esemed söögiriistade
korvi.
• Pange kerged esemed ülemisse korvi.
Veenduge, et esemed liikuma ei
pääseks.
• Enne programmi käivitamist
veenduge, et pihusti tiivik saab vabalt
liikuda.
10.5 Enne programmi
käivitamist
Veenduge järgmises:
• Filtrid on puhtad ja õigesti
paigaldatud.
• Soolamahuti kork on kindlalt kinni.
• Pihustuskonsoolid ei ole ummistunud.
• Nõudepesusool ja loputusvahend on
mahutites (juhul, kui te ei kasuta
multitablette).
• Esemete paigutus korvides on õige.
• Valitud programm sobib pestavate
esemete tüübi ja määrdumisastmega.
• Kasutatav pesuainekogus on õige.
10.6 Korvide tühjendamine
1. Enne seadmest väljavõtmist laske
nõudel jahtuda. Tulised nõud
purunevad kergesti.
2. Võtke kõigepealt välja esemed
alumisest korvist, seejärel ülemisest.
Programmi lõpus võib
seadme külgedel ja uksel
olla veel vett.
11. PUHASTUS JA HOOLDUS
HOIATUS!
Enne hooldust lülitage seade
välja ja eemaldage toitepistik
pistikupesast.
Mustad filtrid ja ummistunud
pihustikonsoolid
halvendavad
pesemistulemusi. Kontrollige
nende seisukorda
regulaarselt; vajadusel
puhastage.
EESTI 51

11.1 Filtrite puhastamine
Filtrisüsteem koosneb kolmest osast.
C
B
A
1. Pöörake filtrit (B) vastupäeva ja võtke
välja.
2. Eemaldage filter (C) filtrist (B).
3. Eemaldage lame filter (A).
4. Peske filtrid puhtaks.
5.
Veenduge, ega settevanni äärte
ümber pole kogunenud toidujäätmeid
või mustust.
6. Asetage lame filter (A) tagasi.
Veenduge, et see paikneb õigesti
kahe juhiku all.
7. Pange uuesti kokku filtrid (B) ja (C).
8. Pange tagasi filter (B) lameda filtri
sees (A). Keerake päripäeva, kuni
see kohale lukustub.
www.electrolux.com52

ETTEVAATUST!
Filtrite ebaõige asend võib
põhjustada kehva
pesutulemust ja kahjustada
seadet.
11.2 Pihustikonsoolide
puhastamine
Ärge pihustikonsoole eemaldage. Kui
pihustikonsoolide avad on ummistunud,
eemaldage mustus peenikese
teravaotsalise esemega.
11.3 Välispinna puhastamine
• Puhastage seadet pehme niiske
lapiga.
• Kasutage ainult neutraalseid
pesuaineid.
• Ärge kasutage abrasiivseid tooteid,
küürimisšvamme ega lahusteid.
11.4 Sisemuse puhastamine
• Puhastage seadet, sealhulgas ukse
kummist tihendit, pehme niisutatud
lapiga.
• Kui kasutate tihti lühikesi programme,
võib sellega kaasneda rasvajääkide ja
katlakivi kogunemine seadmesse.
Selle ärahoidmiseks on soovitatav
vähemalt kaks korda kuus kasutada
ka pikki programme.
12. VEAOTSING
Seade ei käivitu või seiskub töö käigus.
Enne hoolduskeskuse poole pöördumist
proovige probleem alltoodud tabeli abil
ise lahendada.
Mõne probleemi puhul kuvatakse
ekraanil veakoodid.
Probleem ja veakood Võimalik lahendus
Seade ei käivitu. • Veenduge, et pistik on pistikupesasse ühendatud.
• Veenduge, et kaitsmekapis ei ole kaitse läbi läinud.
Programm ei käivitu. • Veenduge, et seadme uks on suletud.
• Kui olete valinud viitkäivituse, siis tühistage see või
oodake pöördloenduse lõppemiseni.
• Seade on alustanud veepehmendajas oleva vaigu
aktiveerimist. Selle toimingu kestus on umbes 5 min‐
utit.
Seade ei täitu veega.
Ekraanil kuvatakse .
• Veenduge, et veekraan on lahti.
• Veenduge, et veevarustuse surve ei ole liiga väike.
Selle teabe saamiseks pöörduge kohaliku vee-ette‐
võtte poole.
• Veenduge, et veekraan ei ole ummistunud.
• Veenduge, et sisselaskevooliku filter ei ole ummistu‐
nud.
• Veenduge, et sisselaskevoolik ei oleks muljutud ega
väänatud.
Seade ei tühjene veest.
Ekraanil kuvatakse .
• Veenduge, et valamu äravool ei ole ummistunud.
• Veenduge, et tühjendusvoolik ei ole muljutud ega
väänatud.
Üleujutuse-vastane seade
töötab.
Ekraanil kuvatakse .
• Sulgege veekraan ja pöörduge hoolduskeskusse.
EESTI 53

Kui olete seadme üle vaadanud, lülitage
see välja ja siis uuesti sisse. Kui rike
ilmneb uuesti, pöörduge
hoolduskeskusse.
Tabelis mitte leiduvate veakoodide puhul
võtke ühendust hoolduskeskusega.
12.1 Pesu- ja kuivatustulemused ei ole rahuldavad
Probleem Võimalik lahendus
Valged jooned ja plekid või
sinakas kiht klaasidel ja nõu‐
del.
• Eraldatava loputusvahendi kogus on liiga suur.
Pange loputusvahendi jaotur madalamasse asen‐
disse.
• Pesuaine kogus on liiga suur
Plekid ja kuivanud veetil‐
kade jäljed nõudel ja klaasi‐
del.
• Eraldatava loputusvahendi kogus on liiga väike.
Valige loputusvahendi jaoturi jaoks kõrgem tase.
• Põhjuseks võib olla loputusvahendi kvaliteet.
Nõud on märjad. • Programmil puudub kuivatusfaas või kasutatakse
madala temperatuuriga kuivatust.
• Loputusvahendi jaotur on tühi.
• Põhjuseks võib olla loputusvahendi kvaliteet.
• Põhjuseks võib olla pesuaine multitablettide kvali‐
teet. Proovige mõnda teist marki või aktiveerige lo‐
putusvahendi jaotur ja kasutage loputusvahendit
koos multitablettidega.
Muude võimalike põhjuste
kohta vt "Vihjeid ja
näpunäiteid".
13. TEHNILISED ANDMED
Mõõdud Laius / kõrgus / sügavus
(mm)
596 / 818-898 / 555
Elektriühendus
1)
Pinge (V) 220 - 240
Sagedus (Hz) 50
Veesurve Min. / maks. bar (MPa) 0.5 (0.05) / 8 (0.8)
Veevarustus
Külm või kuum vesi
2)
maks. 60 °C
Jõudlus Kohalikud seaded 13
Voolutarve Ooterežiim (W) 0.99
Voolutarve Väljas-režiim (W) 0.10
1)
Muud andmed leiate andmeplaadilt.
2)
Kui kuum vesi tuleb alternatiivsest energiaallikast (nt päikesepaneelid, tuuleenergia), ka‐
sutage energiakulu vähendamiseks neid kuumaveeallikaid.
www.electrolux.com54

14. JÄÄTMEKÄITLUS
Sümboliga tähistatud materjalid võib
ringlusse suunata. Selleks viige pakendid
vastavatesse konteineritesse. Aidake
hoida keskkonda ja inimeste tervist ja
suunake elektri- ja elektroonilised
jäätmed ringlusse. Ärge visake
sümboliga tähistatud seadmeid muude
majapidamisjäätmete hulka. Viige seade
kohalikku ringluspunkti või pöörduge abi
saamiseks kohalikku omavalitsusse.
*
EESTI 55

www.electrolux.com/shop
156981860-A-312014
-
 1
1
-
 2
2
-
 3
3
-
 4
4
-
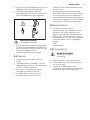 5
5
-
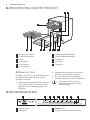 6
6
-
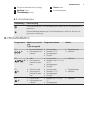 7
7
-
 8
8
-
 9
9
-
 10
10
-
 11
11
-
 12
12
-
 13
13
-
 14
14
-
 15
15
-
 16
16
-
 17
17
-
 18
18
-
 19
19
-
 20
20
-
 21
21
-
 22
22
-
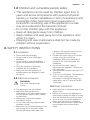 23
23
-
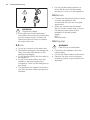 24
24
-
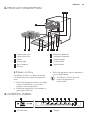 25
25
-
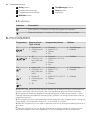 26
26
-
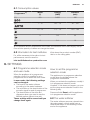 27
27
-
 28
28
-
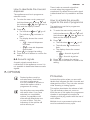 29
29
-
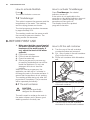 30
30
-
 31
31
-
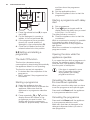 32
32
-
 33
33
-
 34
34
-
 35
35
-
 36
36
-
 37
37
-
 38
38
-
 39
39
-
 40
40
-
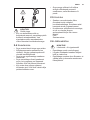 41
41
-
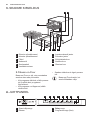 42
42
-
 43
43
-
 44
44
-
 45
45
-
 46
46
-
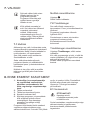 47
47
-
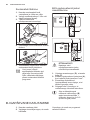 48
48
-
 49
49
-
 50
50
-
 51
51
-
 52
52
-
 53
53
-
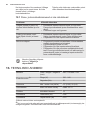 54
54
-
 55
55
-
 56
56


Electrolux ESL5340LO Handleiding
- Categorie
- Vaatwassers
- Type
- Handleiding
in andere talen
- English: Electrolux ESL5340LO User manual
- eesti: Electrolux ESL5340LO Kasutusjuhend