
Setting Up Your Computer
CAUTION:
Before you set up and operate your Dell™
computer, see the safety instructions
in your
Product Information Guide
.
WAARSCHUWING:
Lees de veiligheidsinstructies in uw
Productinformatiegids
en volg deze op
voordat u de Dell™-computer installeert
en gebruikt.
PRÉCAUTION :
Avant de configurer et d'utiliser votre
ordinateur Dell™, lisez attentivement
et appliquez les consignes de sécurité
figurant dans le
Guide d'informations
sur le produit
.
VORSICHT::
Bevor Sie den Dell™ Computer einrichten
und damit arbeiten, lesen und befolgen
Sie die Sicherheitshinweise im
Produktinformationshandbuch
.
ATTENZIONE :
Prima di installare e utilizzare il computer
Dell™, seguire le istruzioni di sicurezza
riportate nella
Guida alle informazioni
sul prodotto
.
PRECAUCIÓN:
Antes de instalar y utilizar su ordenador
Dell™, lea y aplique las instrucciones
de seguridad incluidas en la
Guía de
información del producto
.
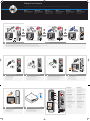
Fold
7
Attach the clear self-adhesive rubber pads
Bevestig de doorzichtige zelfklevende rubber stootkussens
Fixez les patins adhésifs en caoutchouc
Befestigen Sie die klaren selbstklebenden Gummiunterlagen
Applicare i cuscinetti adesivi di gomma
Fije las almohadillas de goma autoadhesivas
2
Connect the keyboard and mouse
Sluit het toetsenbord en de muis aan
Connectez le clavier et la souris
Tastatur und Maus anschließen
Collegare la tastiera e il mouse
Conecte el teclado y el ratón
3
Connect the network (cable not included)
Sluit het netwerk aan (kabel niet bijgeleverd)
Connectez le réseau (câble non fourni)
Netzwerk verbinden (Kabel nicht im Lieferumfang enthalten)
Collegare la rete (cavo non incluso)
Conecte el equipo a la red (cable no incluido)
4
Connect the modem (telephone cable not included)
Sluit de modem aan (telefoonkabel niet bijgeleverd)
Connectez le modem (cordon téléphonique non fourni)
Modem verbinden (Telefonkabel nicht im Lieferumfang enthalten)
Connettere il modem (cavo telefonico non incluso)
Conecte el módem (cable telefónico no incluido)
5
Connect the power cables
Sluit de stroomkabels aan
Connectez les câbles d'alimentation
Netzstromkabel anschließen
Collegare i cavi di alimentazione
Conecte los cables de alimentación
System Features
1. CD or DVD drive
2. floppy drive (optional) or
Media Card Reader (optional)
3. audio connectors
4. headphone connector
5. USB 2.0 connectors
6. IEEE 1394 connectors
Systeemkenmerken
1. cd- of dvd-station
2. diskettestation (optioneel) of
een mediakaartlezer (optioneel)
3. audioconnectoren
4. hoofdtelefoonconnector
5. USB 2.0-aansluitingen
6. IEEE 1394-connectoren
Caractéristiques du système
1. Lecteur de CD ou de DVD
2. Lecteur de disquette ou de carte
(tous deux en option)
3. Connecteurs audio
4. Prise casque
5. Connecteurs USB 2.0
6. Connecteurs IEEE 1394
Systemmerkmale
1. CD- oder DVD-Laufwerk
2. Diskettenlaufwerk (optional) oder
Medienkartenlesegerät (optional)
3. Audioanschlüsse
4. Kopfhöreranschluss
5. USB-2.0-Anschlüsse
6. IEEE-1394-Anschlüsse
Caratteristiche del sistema
1. Unità CD o DVD
2. Unità disco floppy (opzionale) o
lettore di schede flash (opzionale)
3. Connettori audio
4. Connettore della cuffia
5. Connettori USB 2.0
6. Connettori IEEE 1394
Componentes del sistema
1. Unidad de CD o DVD
2. Unidad de disquete (opcional)
o lector de tarjetas multimedia
(opcional)
3. Conectores de audio
4. Conector para auriculares
5. Conectores USB 2.0
6. Conectores IEEE 1394
Connect the monitor using ONLY ONE of the following cables: the dual monitor Y-adapter cable, the white DVI cable, or the blue VGA cable
Sluit de monitor aan met gebruik met slechts EEN van de volgende kabels: de Y-adapter-kabel voor twee monitoren, de witte DVI-kabel of de blauwe VGA-kabel
Connectez le moniteur en utilisant UN SEUL des câbles suivants : câble en Y pour deux moniteurs, câble DVI (blanc) ou câble VGA (bleu)
Schließen Sie den Bildschirm an, wobei Sie NUR EINES der folgenden Kabel verwenden: Das Y-Adapterkabel für zwei Bildschirme, das weiße DVI-Kabel oder das blaue VGA-Kabel
Collegare il monitor utilizzando SOLO UNO dei cavi seguenti: il cavo adattatore a Y per doppio monitor, il cavo DVI bianco o il cavo VGA blu
Conecte el monitor utilizando SÓLO UNO de los siguientes cables: un cable adaptador Y de monitor dual, un cable DVI blanco o un cable VGA azul
1
6
Press the power buttons
Druk op de aan/uit-knop
Appuyez sur le bouton d'alimentation
Netzschalter drücken
Premere il pulsante di accensione
Presione el botón de encendido
6
4
5
2
3
1
DVI
DVI
VGA
Uw computer installeren | Configuration de l'ordinateur | Einrichten des Computers | Installazione del computer | Instalación del ordenador
OR
OF
OU
ODER
OPPURE
O bien
OR
OF
OU
ODER
OPPURE
O bien
OR
OF
OU
ODER
OPPURE
O bien
YW869em1.qxd 18/12/2006 14:12 Page 1

Fold
Printed in Ireland
What’s Next?
www.dell.com | support.dell.com
0YW869A0 1
1
2
3
6
5
4
8
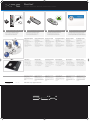
Connect the sensor for the optional remote control
9
Install the batteries into the optional remote control
Launch the optional Media Center operating system
11
See Media Center setup for optional TV tuner card
10
En vervolgens? | Que faire ensuite ? | Weitere Schritte | Operazioni successive | A continuación
Sluit de sensor aan voor de optionele afstandsbediening
Connectez le capteur de la télécommande (en option)
Sensor für die optionale Fernbedienung anschließen
Collegare il sensore del telecomando opzionale
Conecte el sensor del mando a distancia opcional
Plaats de batterijen in de optionele afstandsbediening
Installez les piles dans la télécommande (en option)
Batterien in die optionale Fernbedienung einlegen
Inserire le pile nel telecomando opzionale
Coloque las pilas en el mando a distancia opcional
Start het optionele besturingssysteem van Media Center
Lancez le système d'exploitation Media Center (en option)
Optionales Media Center-Betriebssystem starten
Avviare il sistema operativo Media Center opzionale
Inicie el sistema operativo opcional Media Center
Zie de instellingen van Media Center voor optionele tv-tunerkaart
Consultez le Media Center pour obtenir les instructions de configuration du tuner
Zum Einrichten der optionalen TV-Karte siehe Media Center-Setup
Consultare la configurazione di Media Center per la scheda di sintonizzazione TV
Consulte la configuración de Media Center para la tarjeta de sintonizador de TV
Wireless Network (Optional)
1. Internet service
2. Cable or DSL modem
3. Wireless router
4. Desktop computer with network adapter
5. Desktop computer with USB
wireless adapter
6. USB wireless adapter
See your computer or router's
documentation for more information
on how to set up and use your
wireless network.
Draadloos netwerk (optioneel)
1. Internetservice
2. Kabel- of DSL-modem
3. Draadloze router
4. Desktopcomputer met netwerkadapter
5. Desktopcomputer met draadloze
USB-adapter
6. Draadloze USB-adapter
Raadpleeg de documentatie van uw
computer of router voor meer informatie
over het installeren en gebruiken van
uw draadloze netwerk.
Réseau sans fil (en option)
1. Service Internet
2. Modem câblé ou DSL
3. Routeur sans fil
4. Ordinateur de bureau avec carte réseau
5. Ordinateur de bureau avec adaptateur
USB (connexion sans fil)
6. Adaptateur USB sans fil
Consultez la documentation fournie
avec le système ou le routeur pour
plus d'informations sur l'installation
et l'utilisation d'un réseau sans fil.
Wireless-Netzwerk (optional)
1. Internet-Dienst
2. Kabel oder DSL-Modem
3. Wireless-Router
4. Desktop-Computer mit Netzwerkadapter
5. Desktop-Computer mit USB-Wireless-
Adapter
6. USB-Wireless-Adapter
Weitere Informationen zum Einrichten
und Verwenden des Wireless-Netzwerks
finden Sie in der Dokumentation zum
Computer oder zum Router.
Rete senza fili (opzionale)
1. Servizio Internet
2. Modem via cavo o DSL
3. Router senza fili
4. Computer desktop con adattatore di rete
5. Computer desktop con adattatore
senza fili USB
6. Adattatore senza fili USB
Consultare la documentazione
del computer o del router per
ulteriori informazioni sull'installazione
e l'utilizzo della rete senza fili.
Red inalámbrica (opcional)
1. Servicio de Internet
2. Módem por cable o DSL
3. Enrutador inalámbrico
4. Ordenador de escritorio con adaptador
de red
5. Ordenador de escritorio con adaptador
USB inalámbrico
6. Adaptador USB inalámbrico
Consulte la documentación del ordenador
o del enrutador para obtener más
información sobre cómo configurar
y utilizar la red inalámbrica.
Finding Answers
For additional information about:
• Setup instructions, see your
Owner’s Manual
.
• Your computer, click Start,
then click Help and Support.
Support and educational tools
are available at support.dell.com.
Antwoorden vinden
Voor aanvullende informatie over:
• Installatie-instructies, kijkt u
in de
Gebruikershandleiding
.
• Uw computer, klikt u op Start en
vervolgens op Help en ondersteuning.
U vindt ondersteuning en educatief
materiaal op support.dell.com.
Où trouver des informations ?
Pour plus d'informations sur :
• les instructions d'installation,
voir le
Manuel du propriétaire
.
• votre ordinateur, cliquez sur Démarrer
et sélectionnez Aide et support.
Des outils de support et d'apprentissage
sont disponibles sur le site
support.dell.com.
Weitere Informationen
Hier finden Sie zusätzliche Informationen zu:
• Einrichtung und Setup:
Benutzer-
handbuch
.
• Ihrem Computer: Klicken Sie auf Start
und anschließend auf Hilfe und Support.
Support und Schulungsmaterialien finden
Sie unter support.dell.com.
Ulteriori informazioni
Per ulteriori informazioni, su:
• istruzioni di installazione:
vedere il
Manuale dell'utente
.
• il computer: fare clic su Start e quindi
su Guida in linea e supporto tecnico.
Strumenti di supporto e per la formazione
sono disponibili all'indirizzo support.dell.com.
Búsqueda de respuestas
Para obtener información adicional sobre:
• Las instrucciones de instalación,
consulte el
Manual del propietario
.
• El ordenador, haga clic en Inicio
y seleccione Ayuda y soporte técnico.
Encontrará herramientas de asistencia
y formación en support.dell.com.
Information in this document is subject to change without notice.
© 2006 Dell Inc. All rights reserved.
Reproduction in any manner whatsoever without the written
permission of Dell Inc. is strictly forbidden.
Dell,
the
DELL
logo, and
XPS
are trademarks of Dell Inc.;
Microsoft
and
Windows
are registered trademarks of Microsoft Corporation.
Dell disclaims proprietary interest in the marks and names of others.
December 2006
De informatie in dit document kan zonder kennisgeving
worden gewijzigd.
© 2006 Dell Inc. Alle rechten voorbehouden.
Reproductie in welke vorm dan ook zonder voorafgaande schriftelijke
toestemming van Dell Inc. is uitdrukkelijk verboden.
Dell
en het
DELL
-logo en
XPS
zijn handelsmerken van Dell Inc.
Microsoft
en
Windows
zijn geregistreerde handelsmerken van de
Microsoft Corporation. Dell Inc. stelt uitdrukkelijk geen eigendoms-
belangen te hebben in handelsmerken en handelsnamen van anderen.
December 2006
Les informations contenues dans ce document peuvent être
modifiées sans préavis.
© 2006 Dell Inc. Tous droits réservés.
La reproduction de ce document de quelque manière que ce soit
sans l'autorisation écrite de Dell Inc. est strictement interdite.
Dell
, le logo
DELL
et
XPS
sont des marques de Dell Inc. ;
Microsoft
et
Windows
sont des marques déposées de Microsoft Corporation.
Dell Inc. décline tout intérêt dans l'utilisation des marques et des
noms ne lui appartenant pas.
Décembre 2006
Irrtümer und technische Änderungen vorbehalten.
© 2006 Dell Inc. Alle Rechte vorbehalten.
Die Reproduktion dieses Dokuments in jeglicher Form ohne vorherige
schriftliche Genehmigung von Dell Inc. ist streng untersagt.
Dell
, das
DELL
Logo und
XPS
sind Marken von Dell Inc.;
Microsoft
und
Windows
sind eingetragene Marken von Microsoft Corporation.
Dell Inc. erhebt keinen Besitzanspruch auf Marken und Handels-
namen anderer Hersteller.
Dezember 2006
Le informazioni contenute nel presente documento sono soggette
a modifiche senza preavviso.
© 2006 Dell Inc. Tutti i diritti riservati.
È severamente vietata la riproduzione, con qualsiasi strumento,
senza l'autorizzazione scritta di Dell Inc.
Dell
, il logo
DELL
e
XPS
sono marchi di Dell Inc.;
Microsoft
e
Windows
sono marchi registrati di Microsoft Corporation. Dell Inc.
nega qualsiasi partecipazione di proprietà relativa a marchi e nomi
commerciali diversi da quelli di sua proprietà.
Dicembre 2006
La información contenida en este documento puede modificarse
sin notificación previa.
© 2006 Dell Inc. Reservados todos los derechos.
Queda estrictamente prohibida la reproducción de este documento
en cualquier forma sin la autorización por escrito de Dell Inc.
Dell
, el logotipo de
DELL
y
XPS
son marcas comerciales de Dell Inc.;
Microsoft
y
Windows
son marcas comerciales registradas de
Microsoft Corporation. Dell Inc. renuncia a cualquier interés en
la titularidad de derechos sobre marcas y nombres de terceros.
Diciembre de 2006
YW869em1.qxd 18/12/2006 14:12 Page 2
Documenttranscriptie
YW869em1.qxd 18/12/2006 14:12 Page 1 Setting Up Your Computer Uw computer installeren | Configuration de l'ordinateur | Einrichten des Computers | Installazione del computer | Instalación del ordenador CAUTION: WAARSCHUWING: Before you set up and operate your Dell™ computer, see the safety instructions in your Product Information Guide. OR OF OU ODER OPPURE O bien 1 PRÉCAUTION : Lees de veiligheidsinstructies in uw Productinformatiegids en volg deze op voordat u de Dell™-computer installeert en gebruikt. DVI VORSICHT:: Avant de configurer et d'utiliser votre ordinateur Dell™, lisez attentivement et appliquez les consignes de sécurité figurant dans le Guide d'informations sur le produit. OR OF OU ODER OPPURE O bien ATTENZIONE : Bevor Sie den Dell™ Computer einrichten und damit arbeiten, lesen und befolgen Sie die Sicherheitshinweise im Produktinformationshandbuch. Prima di installare e utilizzare il computer Dell™, seguire le istruzioni di sicurezza riportate nella Guida alle informazioni sul prodotto. OR OF OU ODER OPPURE O bien DVI PRECAUCIÓN: Antes de instalar y utilizar su ordenador Dell™, lea y aplique las instrucciones de seguridad incluidas en la Guía de información del producto. VGA Connect the monitor using ONLY ONE of the following cables: the dual monitor Y-adapter cable, the white DVI cable, or the blue VGA cable Sluit de monitor aan met gebruik met slechts EEN van de volgende kabels: de Y-adapter-kabel voor twee monitoren, de witte DVI-kabel of de blauwe VGA-kabel Connectez le moniteur en utilisant UN SEUL des câbles suivants : câble en Y pour deux moniteurs, câble DVI (blanc) ou câble VGA (bleu) Schließen Sie den Bildschirm an, wobei Sie NUR EINES der folgenden Kabel verwenden: Das Y-Adapterkabel für zwei Bildschirme, das weiße DVI-Kabel oder das blaue VGA-Kabel Collegare il monitor utilizzando SOLO UNO dei cavi seguenti: il cavo adattatore a Y per doppio monitor, il cavo DVI bianco o il cavo VGA blu Conecte el monitor utilizando SÓLO UNO de los siguientes cables: un cable adaptador Y de monitor dual, un cable DVI blanco o un cable VGA azul 2 Connect the keyboard and mouse 3 Sluit het toetsenbord en de muis aan Connectez le clavier et la souris Tastatur und Maus anschließen Collegare la tastiera e il mouse Conecte el teclado y el ratón Connect the network (cable not included) Connect the modem (telephone cable not included) Sluit de modem aan (telefoonkabel niet bijgeleverd) Connectez le modem (cordon téléphonique non fourni) Modem verbinden (Telefonkabel nicht im Lieferumfang enthalten) Connettere il modem (cavo telefonico non incluso) Conecte el módem (cable telefónico no incluido) 5 Connect the power cables Sluit de stroomkabels aan Connectez les câbles d'alimentation Netzstromkabel anschließen Collegare i cavi di alimentazione Conecte los cables de alimentación Fold Sluit het netwerk aan (kabel niet bijgeleverd) Connectez le réseau (câble non fourni) Netzwerk verbinden (Kabel nicht im Lieferumfang enthalten) Collegare la rete (cavo non incluso) Conecte el equipo a la red (cable no incluido) 4 System Features 1 1. CD or DVD drive 2. floppy drive (optional) or Media Card Reader (optional) 3. audio connectors 4. headphone connector 5. USB 2.0 connectors 6. IEEE 1394 connectors Systemmerkmale 1. CD- oder DVD-Laufwerk 2. Diskettenlaufwerk (optional) oder Medienkartenlesegerät (optional) 3. Audioanschlüsse 4. Kopfhöreranschluss 5. USB-2.0-Anschlüsse 6. IEEE-1394-Anschlüsse 2 3 4 5 6 6 Press the power buttons Druk op de aan/uit-knop Appuyez sur le bouton d'alimentation Netzschalter drücken Premere il pulsante di accensione Presione el botón de encendido 7 Attach the clear self-adhesive rubber pads Bevestig de doorzichtige zelfklevende rubber stootkussens Fixez les patins adhésifs en caoutchouc Befestigen Sie die klaren selbstklebenden Gummiunterlagen Applicare i cuscinetti adesivi di gomma Fije las almohadillas de goma autoadhesivas Systeemkenmerken 1. cd- of dvd-station 2. diskettestation (optioneel) of een mediakaartlezer (optioneel) 3. audioconnectoren 4. hoofdtelefoonconnector 5. USB 2.0-aansluitingen 6. IEEE 1394-connectoren Caratteristiche del sistema 1. Unità CD o DVD 2. Unità disco floppy (opzionale) o lettore di schede flash (opzionale) 3. Connettori audio 4. Connettore della cuffia 5. Connettori USB 2.0 6. Connettori IEEE 1394 Caractéristiques du système Componentes del sistema 1. Lecteur de CD ou de DVD 2. Lecteur de disquette ou de carte (tous deux en option) 3. Connecteurs audio 4. Prise casque 5. Connecteurs USB 2.0 6. Connecteurs IEEE 1394 1. Unidad de CD o DVD 2. Unidad de disquete (opcional) o lector de tarjetas multimedia (opcional) 3. Conectores de audio 4. Conector para auriculares 5. Conectores USB 2.0 6. Conectores IEEE 1394 Fold YW869em1.qxd 18/12/2006 14:12 Page 2 What’s Next? En vervolgens? | Que faire ensuite ? | Weitere Schritte | Operazioni successive | A continuación 8 Connect the sensor for the optional remote control 9 Sluit de sensor aan voor de optionele afstandsbediening Connectez le capteur de la télécommande (en option) Sensor für die optionale Fernbedienung anschließen Collegare il sensore del telecomando opzionale Conecte el sensor del mando a distancia opcional Install the batteries into the optional remote control 10 4 11 See Media Center setup for optional TV tuner card Zie de instellingen van Media Center voor optionele tv-tunerkaart Consultez le Media Center pour obtenir les instructions de configuration du tuner Zum Einrichten der optionalen TV-Karte siehe Media Center-Setup Consultare la configurazione di Media Center per la scheda di sintonizzazione TV Consulte la configuración de Media Center para la tarjeta de sintonizador de TV Start het optionele besturingssysteem van Media Center Lancez le système d'exploitation Media Center (en option) Optionales Media Center-Betriebssystem starten Avviare il sistema operativo Media Center opzionale Inicie el sistema operativo opcional Media Center Plaats de batterijen in de optionele afstandsbediening Installez les piles dans la télécommande (en option) Batterien in die optionale Fernbedienung einlegen Inserire le pile nel telecomando opzionale Coloque las pilas en el mando a distancia opcional 5 Launch the optional Media Center operating system Wireless Network (Optional) Draadloos netwerk (optioneel) Réseau sans fil (en option) Wireless-Netzwerk (optional) Rete senza fili (opzionale) Red inalámbrica (opcional) 1. Internet service 2. Cable or DSL modem 3. Wireless router 4. Desktop computer with network adapter 5. Desktop computer with USB wireless adapter 6. USB wireless adapter 1. Internetservice 2. Kabel- of DSL-modem 3. Draadloze router 4. Desktopcomputer met netwerkadapter 5. Desktopcomputer met draadloze USB-adapter 6. Draadloze USB-adapter 1. Service Internet 2. Modem câblé ou DSL 3. Routeur sans fil 4. Ordinateur de bureau avec carte réseau 5. Ordinateur de bureau avec adaptateur USB (connexion sans fil) 6. Adaptateur USB sans fil 1. Internet-Dienst 2. Kabel oder DSL-Modem 3. Wireless-Router 4. Desktop-Computer mit Netzwerkadapter 5. Desktop-Computer mit USB-WirelessAdapter 6. USB-Wireless-Adapter 1. Servizio Internet 2. Modem via cavo o DSL 3. Router senza fili 4. Computer desktop con adattatore di rete 5. Computer desktop con adattatore senza fili USB 6. Adattatore senza fili USB 1. Servicio de Internet 2. Módem por cable o DSL 3. Enrutador inalámbrico 4. Ordenador de escritorio con adaptador de red 5. Ordenador de escritorio con adaptador USB inalámbrico 6. Adaptador USB inalámbrico See your computer or router's documentation for more information on how to set up and use your wireless network. Raadpleeg de documentatie van uw computer of router voor meer informatie over het installeren en gebruiken van uw draadloze netwerk. Consultez la documentation fournie avec le système ou le routeur pour plus d'informations sur l'installation et l'utilisation d'un réseau sans fil. Weitere Informationen zum Einrichten und Verwenden des Wireless-Netzwerks finden Sie in der Dokumentation zum Computer oder zum Router. Consultare la documentazione del computer o del router per ulteriori informazioni sull'installazione e l'utilizzo della rete senza fili. Finding Answers Antwoorden vinden Où trouver des informations ? Weitere Informationen Ulteriori informazioni Búsqueda de respuestas For additional information about: Voor aanvullende informatie over: Pour plus d'informations sur : Hier finden Sie zusätzliche Informationen zu: Per ulteriori informazioni, su: Para obtener información adicional sobre: • Setup instructions, see your Owner’s Manual. • Your computer, click Start, then click Help and Support. • Installatie-instructies, kijkt u in de Gebruikershandleiding. • Uw computer, klikt u op Start en vervolgens op Help en ondersteuning. • les instructions d'installation, voir le Manuel du propriétaire. • votre ordinateur, cliquez sur Démarrer et sélectionnez Aide et support. • Einrichtung und Setup: Benutzerhandbuch. • Ihrem Computer: Klicken Sie auf Start und anschließend auf Hilfe und Support. • istruzioni di installazione: vedere il Manuale dell'utente. • il computer: fare clic su Start e quindi su Guida in linea e supporto tecnico. • Las instrucciones de instalación, consulte el Manual del propietario. • El ordenador, haga clic en Inicio y seleccione Ayuda y soporte técnico. Support and educational tools are available at support.dell.com. U vindt ondersteuning en educatief materiaal op support.dell.com. Des outils de support et d'apprentissage sont disponibles sur le site support.dell.com. Support und Schulungsmaterialien finden Sie unter support.dell.com. Strumenti di supporto e per la formazione sono disponibili all'indirizzo support.dell.com. Encontrará herramientas de asistencia y formación en support.dell.com. De informatie in dit document kan zonder kennisgeving worden gewijzigd. © 2006 Dell Inc. Alle rechten voorbehouden. Les informations contenues dans ce document peuvent être modifiées sans préavis. © 2006 Dell Inc. Tous droits réservés. Irrtümer und technische Änderungen vorbehalten. © 2006 Dell Inc. Alle Rechte vorbehalten. Le informazioni contenute nel presente documento sono soggette a modifiche senza preavviso. © 2006 Dell Inc. Tutti i diritti riservati. La información contenida en este documento puede modificarse sin notificación previa. © 2006 Dell Inc. Reservados todos los derechos. Reproductie in welke vorm dan ook zonder voorafgaande schriftelijke toestemming van Dell Inc. is uitdrukkelijk verboden. La reproduction de ce document de quelque manière que ce soit sans l'autorisation écrite de Dell Inc. est strictement interdite. È severamente vietata la riproduzione, con qualsiasi strumento, senza l'autorizzazione scritta di Dell Inc. Queda estrictamente prohibida la reproducción de este documento en cualquier forma sin la autorización por escrito de Dell Inc. Dell, il logo DELL e XPS sono marchi di Dell Inc.; Microsoft e Windows sono marchi registrati di Microsoft Corporation. Dell Inc. nega qualsiasi partecipazione di proprietà relativa a marchi e nomi commerciali diversi da quelli di sua proprietà. Dell, el logotipo de DELL y XPS son marcas comerciales de Dell Inc.; Microsoft y Windows son marcas comerciales registradas de Microsoft Corporation. Dell Inc. renuncia a cualquier interés en la titularidad de derechos sobre marcas y nombres de terceros. Dicembre 2006 Diciembre de 2006 Consulte la documentación del ordenador o del enrutador para obtener más información sobre cómo configurar y utilizar la red inalámbrica. 6 3 2 1 Information in this document is subject to change without notice. © 2006 Dell Inc. All rights reserved. Reproduction in any manner whatsoever without the written permission of Dell Inc. is strictly forbidden. Dell, the DELL logo, and XPS are trademarks of Dell Inc.; Microsoft and Windows are registered trademarks of Microsoft Corporation. Dell disclaims proprietary interest in the marks and names of others. December 2006 Dell en het DELL-logo en XPS zijn handelsmerken van Dell Inc. Microsoft en Windows zijn geregistreerde handelsmerken van de Microsoft Corporation. Dell Inc. stelt uitdrukkelijk geen eigendomsbelangen te hebben in handelsmerken en handelsnamen van anderen. Dell, le logo DELL et XPS sont des marques de Dell Inc. ; Microsoft et Windows sont des marques déposées de Microsoft Corporation. Dell Inc. décline tout intérêt dans l'utilisation des marques et des noms ne lui appartenant pas. December 2006 Décembre 2006 Die Reproduktion dieses Dokuments in jeglicher Form ohne vorherige schriftliche Genehmigung von Dell Inc. ist streng untersagt. Dell, das DELL Logo und XPS sind Marken von Dell Inc.; Microsoft und Windows sind eingetragene Marken von Microsoft Corporation. Dell Inc. erhebt keinen Besitzanspruch auf Marken und Handelsnamen anderer Hersteller. Dezember 2006 Printed in Ireland 0YW869A01 www.dell.com | support.dell.com-
 1
1
-
 2
2


in andere talen
- English: Dell XPS 210 Quick start guide
- italiano: Dell XPS 210 Guida Rapida
- français: Dell XPS 210 Guide de démarrage rapide
- español: Dell XPS 210 Guía de inicio rápido
- Deutsch: Dell XPS 210 Schnellstartanleitung