
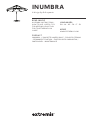
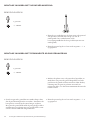
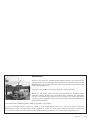
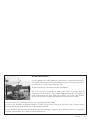
PRODUCT
INUMBRA – CONCRETE (WHEEL) BASE – FLOOR FASTENING
– PERMANENT FIXATION – FIXATION INTO GARGANTUA /
PANTAGRUEL – MAINTENANCE
INUMBRA
© design by dirk wynants
READ INSIDE
ASSEMBLY INSTRUCTIONS,
HOW TO USE, USEFUL TIPS
FOR KEEPING YOUR TOOL
FOR TOGETHERNESS IN
SHAPE
LANGUAGES
EN – NL – DE – FR – IT – ES
MORE
WWW.EXTREMIS.COM

LANGUAGES
ENGLISH P. 3
contents p. 3
assembly inumbra into gargantua p. 5
assembly inumbra into pantagruel p. 5
assembly concrete base p. 6
assembly concrete wheel base p. 7
assembly directly to the oor p. 8
assembly permanent xation p. 8
open / close inumbra p. 10
maintenance p. 11
NEDERLANDS P. 13
inhoud p. 13
montage inumbra in gargantua p. 15
montage inumbra in pantagruel p. 15
montage sokkel in beton p. 16
montage sokkel in beton op wielen p. 17
montage grondverankering p. 18
montage permantente grondverankering p. 18
inumbra openen / sluiten p. 20
onderhoud p. 21
DEUTSCH P. 23
inhalt p. 23
montage inumbra im gargantua p. 25
montage inumbra im pantagruel p. 25
montage naturbetonständer p. 26
montage naturbetonständer auf rollen p. 27
montage bodenverankerung p. 28
montage dauerhae befestigung imboden p. 28
inumbra önen / schließen p. 30
pege p. 31
FRANÇAIS P. 33
contenu p. 33
montage inumbra dans gargantua p. 35
montage inumbra dans pantagruel p. 35
montage socle en béton p. 36
montage socle en béton sur roues p. 37
montage xation dans au sol p. 38
montage xation dans le sol permanente p. 38
ouvrier / fermer inumbra p. 40
entretien p. 41
ITALIANO P. 43
contenuto p. 43
montaggio inumbra con gargantua p. 45
montaggio inumbra con pantagruel p. 45
montaggio base di calcestruzzo p. 46
montaggio base di calcestruzzo su ruote p. 47
montaggio diretto al suolo p. 48
montaggio permanente al suolo p. 48
arpertura / chiusura inumbra p. 50
manutenzione p. 51
ESPAÑOL P. 53
contenido p. 53
montaje inumbra dans gargantua p. 55
montaje inumbra dans pantagruel p. 55
montaje socle en béton p. 56
montaje socle en béton sur roues p. 57
montaje xation dans au sol p. 58
montaje xation dans le sol permanente p. 58
ouvrier / fermer inumbra p. 60
mantenimiento p. 61
2 contents

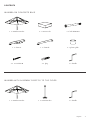
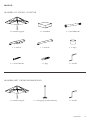
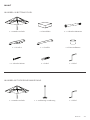
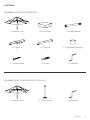
1 x inumbra on tube 1 x extension tube 1 x handle
INUMBRA WITH ASSEMBLY DIRECTLY TO THE FLOOR
4 x screw M5x40 4 x plug 1 x handle
1 x frame A 1 x frame B 4 x plastic glide
1 x inumbra on tube 4 x concrete tile 4 x bolt M10x110
CONTENTS
INUMBRA ON CONCRETE BASE
english 3

extremis
4 x lock washer 1 x handle
1 x inumbra on tube 1 x assembly piece 4 x M8x12 bolt
INUMBRA INTO GARGANTUA / PANTAGRUEL
1 x inumbra on tube 1 x extension tube 1 x handle
INUMBRA WITH PERMANENT FIXATION
CONTENTS
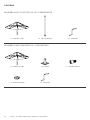
4 contents - assembly inumbra into gargantua / pantagruel

+/- 20 min.
+/- 20 min.
SHEET 1 OF 1
DATE
SCALE: 1:3
WEIGHT:
FILENAME
A4
SIZE
NAME
COMMENTS:
DRAWN
MATERIAL
PROPRIETARY AND CONFIDENTIAL
THE INFORMATION CONTAINED IN THIS DRAWING IS THE SOLE PROPERTY
OF EXTREMIS. ANY REPRODUCTION IN PART OR AS A WHOLE WITHOUT THE
WRITTEN PERMISSION OF EXTREMIS IS PROHIBITED.
IUW40 + bevestigingen
Bram Coudijzer
UNLESS OTHERWISE SPECIFIED:
DIMENSIONS ARE IN MM
NUMBER
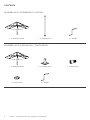
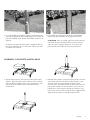
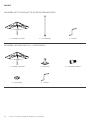
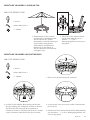
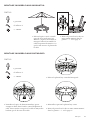
2. Put the inumbra insert in the hole in the middle of the
tabletop. Make sure that its conical part is facing
upwards. Fasten the insert to the table, putting the
bolts through the bottom of the table.
3. Put the Lazy Susan back into its original position.
4. Put the parasol on the stainless steel tube as explained
in point 6 - 7 - 8 on page 7.
1. Remove the Lazy Susan from the Pantagruel.
ASSEMBLY INUMBRA INTO PANTAGRUEL
WHAT YOU NEED
1 person
no. 5 hex key
1. Remove the central cube, which
keeps the four legs together. Fix
the stainless steel element to the
cube. en reattach the cube to
the Gargantua table making sure
the conical part is protruding
from the tabletop.
2. Install the parasol’s tube onto the
stainless steel tube as explained in
point 6 - 7 - 8 on page 7.
WHAT YOU NEED
1 person
no. 5 hex key
ASSEMBLY INUMBRA INTO GARGANTUA
english 5

+/- 30 min.
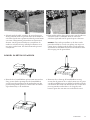
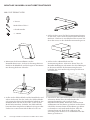
4. Position the stainless steel tube on top of the concrete
tiles. Make sure that the holes in the stainless steel
disk are perfectly aligned with the holes in the
concrete tiles. Position the at section of the conical
part of the stainless steel tube where you wish your
handle to be. You can now attach the stainless steel
tube to the concrete tiles using the four supplied bolts.
Tighten them with a 17 mm openend wrench.
5. You can now put the parasol on the stainless steel tube.
Make sure that the adjusting screw in the parasol pole
coincides with the at section of the conical part of the
stainless steel tube. If this is not the case, you will not
be able to fully slide the parasol pole over the conical
part. When the conical part is completely hidden by
the parasol pole, it should be impossible to turn the
parasol. If this is however still possible, carefully
rotate the parasol until its pole completely covers the
conical part
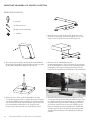
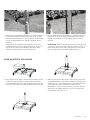
2. Fix the plastic glides to the bottom of the concrete
tiles: put the supplied plugs into the holes and tighten
the glides with the supplied screws.
3. Put the four concrete tiles on top of the cross-shaped
base. Align the holes in the concrete tiles with the
holes in the metal plate of the cross-shaped base. e
side with the bevelled corners should be facing
downwards.
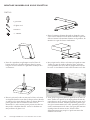
1. Position the rst element of the cross-shaped base on
the oor where you wish to place the parasol. en
slide the second element over rst one ensuring that
the grooves correspond and t perfectly.
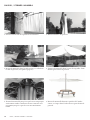
ASSEMBLY INUMBRA ON CONCRETE BASE
WHAT YOU NEED
no. 17 spanner
1 person
screwdriver
6 assembly inumbra on concrete (wheel) base

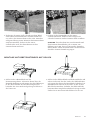
1. Put the four concrete tiles on top of the frame with
wheels. Align the holes in the concrete tiles with the
holes in the metal plate of the cross-shaped base. e
side with the bevelled corners should be facing
downwards.
2. Position the stainless steel tube on top of the concrete
tiles. Make sure that the holes in the stainless steel
disk are perfectly aligned with the holes in the
concrete tiles. Position the at section of the conical
part of the stainless steel tube where you wish your
handle to be. You can now attach the stainless steel
tube to the concrete tiles using the four supplied bolts.
Tighten them with a 17 mm openend wrench.
6. Use the handle provided for opening and closing the
parasol to tighten the lower adjusting screw so that the
parasol is rmly xed. Rotate the handle clockwise to
tighten.
To remove the parasol aerwards, completely loosen
the lower adjusting screw. Only then will you be able
to remove the parasol.
7. Put rubber cap in the lower hole aer installation.
Open and close Inumbra using upper hole only!
ATTENTION: there is a 5mm gap between the parasol
tube and the tube installed on the concrete base in
order to ensure a proper xation. As a result, the
parasol will not be able to loosen by movement.
ASSEMBLY CONCRETE WHEEL BASE
english 7

+/- 30 min.
+/- 60 min.
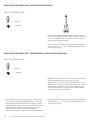
2. Dig a hole that is slightly less deep than the length of
tube you want to plant in the ground. Make sure the
tube is vertically level and correctly positioned at the
desired height. Fill the hole around the tube with a
sucient amount of thick concrete to ensure that it is
rmly xed. Allow sucient time for the concrete to
set.
3. Put the parasol on the stainless steel tube as explained
in point 6 - 7 - 8 on page 7.
1. Mark the spot where you wish to install the parasol
and dig a hole. Determine how much of the tube you
want to remain visible, taking into account the
parasol’s open and closed position (see technical
sheet). e tube should be put into the oor to a depth
of at least 70 cm.
ASSEMBLY INUMBRA WITH PERMANENT FIXATION
WHAT YOU NEED
1 person
1. Place the stainless steel tube where you want to place
the parasol and attach it to the oor using anchoring
bolts (or another type of xing medium suitable for
your kind of oor).
2. Put the parasol on the stainless steel tube as explained
in point 6 - 7 - 8 on page 7.
ASSEMBLY INUMBRA ASSEMBLY DIRECTLY TO THE FLOOR
WHAT YOU NEED
1 person
8 assembly inumbra with (permanent) fixation

WARNING
If you hear the cables whistling due to heavy wind or if you are not using
the parasol,
close it and use the slip-over cover to avoid the parasol from opening or
getting dirty.
Do not leave the parasol unattended when opened.
Ask for assistance when closing the parasol in strond winds. Opposite the
wind’s direction, at least one person needs to guide the parasol’s spines
downwards in order to avoid the parasol from blowing open ercely
halfway down.
For ventilation purposes, the cover is not 100% water proof.
Do not leave closed if not completely dry. Do not leave the parasol closed for a long time if it is still damp or wet.
Store the parasol when not in use for a long time as follows: vertically, completely dry and in a dry environment.
english 9

5. Turn the handle until the fabric is nearly fully
stretched. en continue to turn it slowly until the
fabric is fully stretched.
6. Remove the handle and enjoy the shade. Follow these
steps in reverse order to close the Parasol.
3. Put the handle into the hole in the pole.(see point 7
page 7).
4. Simply turn the handle clockwise to open.
1. Take the handle out of the pocket provided on the
cover.
2. Remove the slip-over cover from the parasol.
OPEN / CLOSE THE PARASOL
10 open / close inumbra - maintenance

MAINTENANCE
FABRIC
Clean the fabric of the parasol and
the slip over cover by rinsing it with
water and hand soap, cleaning it
with a so brush. First and foremost
beware that the parasol does not get
dirty and use the slip over cover as
much as possible.
We strongly advise you not to use a
high-pressure hose.
Do not use any aggressive detergents,
as they will remove the protective
coating of the fabric.
In order to extend the life span of the
spindle inside Inumbra’s parasol
pole, we highly recommend the use
of silicone spray grease. Apply the
silicone grease when the parasol fully
mounted.
1. Close the parasol completely and
li one of the spines so that you
can move under the fabric.
2. Look and move upwards and spray
the silicone grease all along the
groove in the pole.
3. Open and close the parasol a few
times so that the silicone grease
can equally spread over the
spindle. Now the spindle is
lubricated so that the parasol
opens and closes more easily. e
silicone grease also provides a
protective layer making the
spindle less prone to corrosion.
Silicone spray grease can be
purchased in most DIY stores. We
recommend using ‘Würth’
silicone spray,available worldwide
(seewww02.wuerth.com).
STAINLESS STEEL TUBE
Stainless steel is not sea water
proof. Especially in an aggressive
environment (maritime climate,
chlorine, acid rain, aggressive
industrial or urban environment) we
recommend to frequently use surface
cleansing, the adequate products
necessary therefore are generally
available.
WARNING
Tests in a windtunnel have shown
that the shade withstands wind
speeds up to 74 km/h (46 mph),
when anchored to the oor. Still, we
strongly advise to take of the fabric
sooner (from wind speed 49 km/h (31
mph)).
english 11

12 inhoud
LANGUAGES
ENGLISH P. 3
contents p. 3
assembly inumbra into gargantua p. 5
assembly inumbra into pantagruel p. 5
assembly concrete base p. 6
assembly concrete wheel base p. 7
assembly directly to the oor p. 8
assembly permanent xation p. 8
open / close inumbra p. 10
maintenance p. 11
NEDERLANDS P. 13
inhoud p. 13
montage inumbra in gargantua p. 15
montage inumbra in pantagruel p. 15
montage sokkel in beton p. 16
montage sokkel in beton op wielen p. 17
montage grondverankering p. 18
montage permantente grondverankering p. 18
inumbra openen / sluiten p. 20
onderhoud p. 21
DEUTSCH P. 23
inhalt p. 23
montage inumbra im gargantua p. 25
montage inumbra im pantagruel p. 25
montage naturbetonständer p. 26
montage naturbetonständer auf rollen p. 27
montage bodenverankerung p. 28
montage dauerhae befestigung imboden p. 28
inumbra önen / schließen p. 30
pege p. 31
FRANÇAIS P. 33
contenu p. 33
montage inumbra dans gargantua p. 35
montage inumbra dans pantagruel p. 35
montage socle en béton p. 36
montage socle en béton sur roues p. 37
montage xation dans au sol p. 38
montage xation dans le sol permanente p. 38
ouvrier / fermer inumbra p. 40
entretien p. 41
ITALIANO P. 43
contenuto p. 43
montaggio inumbra con gargantua p. 45
montaggio inumbra con pantagruel p. 45
montaggio base di calcestruzzo p. 46
montaggio base di calcestruzzo su ruote p. 47
montaggio diretto al suolo p. 48
montaggio permanente al suolo p. 48
arpertura / chiusura inumbra p. 50
manutenzione p. 51
ESPAÑOL P. 53
contenido p. 53
montaje inumbra dans gargantua p. 55
montaje inumbra dans pantagruel p. 55
montaje socle en béton p. 56
montaje socle en béton sur roues p. 57
montaje xation dans au sol p. 58
montaje xation dans le sol permanente p. 58
ouvrier / fermer inumbra p. 60
mantenimiento p. 61

nederlands 13
INHOUD
INUMBRA OP SOKKEL IN BETON
INUMBRA MET GRONDVERANKERING
1 x inumbra op paal 4 x betonblok 4 x bout M10x110
1 x inumbra op paal 1 x verlengpaal grondverankering 1 x hendel
1 x frame A 1 x frame B 4 x dopje
4 x schroef M5x40 4 x plug 1 x hendel

14 inhoud - montage inumbra in gargantua / pantagruel
INHOUD
INUMBRA IN GARGANTUA / PANTAGRUEL
1 x inumbra op paal 1 x bevestigingsstuk 4 x bout M8x12
4 x veerring 1 x hendel
INUMBRA MET PERMANENTE GRONDVERANKERING
1 x inumbra op paal 1 x verlengpaal permanente
bevestiging
1 x hendel
extremis

nederlands 15
MONTAGE INUMBRA IN GARGANTUA
MONTAGE INUMBRA IN PANTAGRUEL
BENODIGDHEDEN
1 persoon
2. Plaats het Inumbra bevestigingsstuk in de middelste
opening an het tafelblad. Doe dit met het conisch-stuk
naar boven gericht. Bout dit stuk vervolgens vast aan
de tafel door de bouten onderaan door de tafel te
steken.
3. Leg nu de lazy susan terug op zijn plaats in de tafel.
4. Plaats de parasol op de rvs buis zoals in punt 6 - 7 - 8
op pagina 17.
1. Verwijder de Lazy Susan van de Pantagruel.
SHEET 1 OF 1
DATE
SCALE: 1:3
WEIGHT:
FILENAME
A4
SIZE
NAME
COMMENTS:
DRAWN
MATERIAL
PROPRIETARY AND CONFIDENTIAL
THE INFORMATION CONTAINED IN THIS DRAWING IS THE SOLE PROPERTY
OF EXTREMIS. ANY REPRODUCTION IN PART OR AS A WHOLE WITHOUT THE
WRITTEN PERMISSION OF EXTREMIS IS PROHIBITED.
IUW40 + bevestigingen
Bram Coudijzer
UNLESS OTHERWISE SPECIFIED:
DIMENSIONS ARE IN MM
NUMBER
1. Demonteer het vierkante
verbindingsstuk, dat de 4 poten
met elkaar verbindt. Monteer
hierop het inox bevestigingsstuk
en monteer dit opnieuw in de
Gargantua zodat de kone door het
tafelblad steekt.
2. Plaats de parasol op de rvs buis
zoals in punt 6 - 7 - 8 op pagina 17.
BENODIGDHEDEN
1 persoon
+/- 20 min.
inbussleutel nr. 5
+/- 20 min.
inbussleutel nr. 5

MONTAGE INUMBRA OP SOKKEL IN BETON
BENODIGDHEDEN
steeksleutel nr. 17
1 persoon
philips schroevendraaier
1. Plaats het eerste stuk op de grond, daar waar u de
parasol wil opstellen. Schuif vervolgens het tweede
stuk er over, zodat de sleuven in elkaar passen.
+/- 30 min.
2. Bevestig de plastic dopjes onderaan de betonblokken:
plaats bijgeleverde plug in het blindgat en bevestig dan
de dop door middel van bijgeleverde schroef.
3. Plaats nu de 4 betonblokken op het
positionneringskruis. Zorg ervoor dat de openingen
in de betonblokken steeds boven de openingen in de
onderplaat van het postioneringskruis passen. De
kant waar de randen afgeschuind zijn, is de onderkant.
4. Plaats nu de rvs buis op de betonblokken en zorg
ervoor dat de gaten in de rvs schijf mooi over de gaten
van de betonblokken passen. Plaats het vlakke gedeelte
van de kone daar waar u de hendel wil. De rvs buis kan
nu vastgemaakt worden d.m.v. de 4 bijgeleverde
bouten. Span deze aan met een steeksleutel van 17.
5. Nu kunt u de parasol op de rvs buis plaatsen. Zorg
ervoor dat de stelschroef in de parasolbuis, juist voor
het vlakke gedeelte van de kone op de rvs onderbuis
zit, anders kan de parasol niet volledig op de kone
geschoven worden. Eens de parasol volledig op de
kone zit, kan hij niet meer ronddraaien. Indien dit
toch het geval is, moet de parasol voorzichtig rond
worden gedraaid tot hij toch volledig over de kone
schui.
16 montage inumbra op sokkel in beton (op wielen)

nederlands 17
6. Gebruik nu de hendel, waarmee de parasol open en
dicht gedraaid wordt en gebruik deze om de onderste
stelschroef goed aan te spannen zodat de parasol mooi
vast staat. Aanspannen gebeurt door in wijzerzin te
draaien. Om de parasol nadien te verwijderen: de
onderste stelschroef terug volledig losdraaien, tot u
niet meer verder kunt. Pas dan kan men de parasol
verwijderen.
7. Plaats nu het rubber dopje in het gaatje van de onderste
stelschroef om te vermijden dat u de verkeerde
stelschroef gebruikt om de parasol open te draaien.
OPGELET: Tussen de parasolbuis en de buis van de
parasolvoet blij er steeds een speling van ongeveer
5 mm. Deze is nodig opdat de kone steeds mooi zou
aansluiten en daardoor niet meer kan loskomen door
de beweging van de parasolbuis.
1. Plaats de de 4 betonblokken op het frame met wielen.
Zorg ervoor dat de openingen in de betonblokken
steeds boven de openingen in de onderplaat van het
positioneringskruis passen. De kant waar de randen
afgeschuind zijn, is de onderkant.
2. Plaats nu de rvs buis op de betonblokken en zorg
ervoor dat de gaten in de rvs schijf mooi over de gaten
van de betonblokken passen. Plaats het vlakke gedeelte
van de kone daar waar u de hendel wil. De rvs buis kan
nu vastgemaakt worden d.m.v. de 4 bijgeleverde
bouten. Span deze aan met een steeksleutel van 17.
SOKKEL IN BETON OP WIELEN

18 montage inumbra met (permanente) grondverankering
MONTAGE INUMBRA MET GRONDVERANKERING
MONTAGE INUMBRA MET PERMANENTE GRONDVERANKERING
BENODIGDHEDEN
BENODIGDHEDEN
+/- 30 min.
+/- 60 min.
1 persoon
1 persoon
1. Plaats de rvs onderbuis op de plaats waar u de parasol
wil opstellen en maak deze stevig vast aan de
ondergrond d.m.v. ankerbouten (of de
bevestigingsmiddelen die best geschikt zijn voor uw
ondergrond).
2. Plaats de parasol op de rvs buis zoals in punt 6 - 7 - 8
op pagina 17.
1. Markeer de plaats waar u de parasol wil opstellen en
maak daar een put in de grond. Bepaal hoeveel u de
paal boven de grond wil laten uitsteken. Hou daarbij
rekening met de open én gesloten toestand (zie
technische che). De buis moet minimum 70 cm in de
bodem steken.
2. Graaf een gat in de grond dat iets minder diep is dan
dat de paal dient ingebracht te worden. Positioneer de
buis perfect verticaal op de juiste hoogte en plaats.
Het gat in de grond dient rond de paal gul opgevuld te
worden met stevig beton voor een goede xatie ervan.
Laat het beton voldoende lang uitharden.
3. Plaats de parasol op de rvs buis zoals in punt 6 - 7 - 8
op pagina 17.

nederlands 19
WAARSCHUWING
Als je de kabels hoort uiten bij hevige wind of niet gebruik, sluit dan de
parasol en breng de hoes aan om te vermijden dat de parasol open waait of
vuil wordt.
Laat de geopende parasol nooit onbewaakt achter.
Vraag assistentie om te parasol te sluiten tijdens hevige wind. Minstens
1 persoon dient tijdens het sluiten aan de tegenwind zijde de uiteinden
van de baleinen naar beneden te begeleiden om te beletten dat de parasol
halverwege plots bruusk openklapt.
Om ventilatie redenen is de hoes niet 100% waterdicht.
Laat Inumbra niet gesloten als ze niet volledig droog is. Laat ze niet gedurende lange tijd gesloten in vochtige
omstandigheden. Als u de parasol voor lange tijd niet gebruikt, berg ze dan op als volgt: vertikaal, perfect
gedroogd in een droge omgeving.

20 inumbra openen / sluiten - onderhoud
PARASOL OPENEN / SLUITEN
1. Haal de hendel uit het tasje op de hoes. 2. Haal de hoes van de parasol.
3. Plaats de hendel in de bovenste opening in de buis.
(zie punt 7 pagina 17).
4. Draai de hendel in wijzerzin om de parasol te openen.
5. Draai aan de hendel tot het doek bijna onder spanning
staat. Draai daarna rustig verder tot het doek volledig
opgespannen is.
6. Haal de hendel uit de buis en geniet in de schaduw.
Volg deze stappen in omgekeerde volgorde om de
parasol te sluiten.

nederlands 21
ONDERHOUD
PARASOL STOF
Reinig het zeil van de parasol en de
hoes door te spoelen met water en
handzeep, en voorzichtig te wrijven
met een zachte borstel. Zorg er in
eerste instantie voor dat de parasol
stof niet te vuil wordt en plaats zo
veel mogelijk de hoes over de parasol.
Spuit de parasol nooit af met een
hoge drukreiniger.
Gebruik geen detergenten. Deze
tasten de beschermlaag van het
textiel aan.
Om de levensduur van de spil
binnenin de Inumbra buis te
verlengen, raden wij aan deze
regelmatig in te spuiten met
siliconenspray. Doe dit wanneer de
parasol gemonteerd is:
1. Sluit de parasol volledig en hef één
van de baleinen op zodat u onder de
stof kan.
2. Kijk naar boven en begeef u
opwaarts en spuit siliconenspray
in de gleuf, van boven tot onder.
3. Draai nu de parasol enkele keren
open en dicht zodat het silicone
zich egaal over de spil kan
verspreiden. Op deze manier
wordt de spil gesmeerd waardoor
de parasol gemakkelijker open en
dicht gaat en geen lawaai maakt.
Het silicone zorgt bovendien voor
een beschermlaagje waardoor de
spil minder snel zal roesten.
Siliconenspray is te krijgen in de
meeste doe-het-zelfzaken. Wij
kunnen de siliconenspray van het
merk Würth aanbevelen die
bovendien wereldwijd te
verkrijgen is (zie ook: www02.
wuerth.com).
INOX BUIS
Roestvast staal is niet
zeewaterbestendig. Vooral in een
agressieve omgeving (maritiem
klimaat, chloor, zure regen,
agressieve industriële of stedelijke
omgeving) raden wij aan om
regelmatig het oppervlak te reinigen.
De geschikte producten voor het
reinigen van roestvrij staal zijn in de
handel te koop.
WARNING
Tests in a windtunnel have shown
that the shade withstands wind
speeds up to 74 km/h (46 mph),
when anchored to the oor. Still, we
strongly advise to take of the fabric
sooner (from wind speed 49 km/h (31
mph)).

LANGUAGES
ENGLISH P. 3
contents p. 3
assembly inumbra into gargantua p. 5
assembly inumbra into pantagruel p. 5
assembly concrete base p. 6
assembly concrete wheel base p. 7
assembly directly to the oor p. 8
assembly permanent xation p. 8
open / close inumbra p. 10
maintenance p. 11
NEDERLANDS P. 13
inhoud p. 13
montage inumbra in gargantua p. 15
montage inumbra in pantagruel p. 15
montage sokkel in beton p. 16
montage sokkel in beton op wielen p. 17
montage grondverankering p. 18
montage permantente grondverankering p. 18
inumbra openen / sluiten p. 20
onderhoud p. 21
DEUTSCH P. 23
inhalt p. 23
montage inumbra im gargantua p. 25
montage inumbra im pantagruel p. 25
montage naturbetonständer p. 26
montage naturbetonständer auf rollen p. 27
montage bodenverankerung p. 28
montage dauerhae befestigung imboden p. 28
inumbra önen / schließen p. 30
pege p. 31
FRANÇAIS P. 33
contenu p. 33
montage inumbra dans gargantua p. 35
montage inumbra dans pantagruel p. 35
montage socle en béton p. 36
montage socle en béton sur roues p. 37
montage xation dans au sol p. 38
montage xation dans le sol permanente p. 38
ouvrier / fermer inumbra p. 40
entretien p. 41
ITALIANO P. 43
contenuto p. 43
montaggio inumbra con gargantua p. 45
montaggio inumbra con pantagruel p. 45
montaggio base di calcestruzzo p. 46
montaggio base di calcestruzzo su ruote p. 47
montaggio diretto al suolo p. 48
montaggio permanente al suolo p. 48
arpertura / chiusura inumbra p. 50
manutenzione p. 51
ESPAÑOL P. 53
contenido p. 53
montaje inumbra dans gargantua p. 55
montaje inumbra dans pantagruel p. 55
montaje socle en béton p. 56
montaje socle en béton sur roues p. 57
montaje xation dans au sol p. 58
montaje xation dans le sol permanente p. 58
ouvrier / fermer inumbra p. 60
mantenimiento p. 61
22 inhalt

1 x inumbra und rohr 1 x ausdehnung verankerung 1 x Hebel
INUMBRA MIT BODENVERANKERUNG
4 x Schraube M5x40 4 x Dübel 1 x Hebel
1 x Gestell A 1 x Gestell B 4 x Kunststomutter
1 x inumbra und rohr 4 x Betonblöke 4 x Schrauben M10x110
INHALT
INUMBRA IN BETONSOCKEL
deutsch 23

extremis
4 x Sprengring 1 x Hebel
1 x inumbra und rohr 1 x xierung 4 x Schrauben M8x12
INUMBRA IM GARGANTUA / PANTAGRUEL
1 x inumbra und rohr 1 x ausdehnung 1 x Hebel
INHALT
INUMBRA MIT DAUERHAFTE BODENVERANKERUNG
24 inhalt - montage inumbra im gargantua / pantagruel

SHEET 1 OF 1
DATE
SCALE: 1:3
WEIGHT:
FILENAME
A4
SIZE
NAME
COMMENTS:
DRAWN
MATERIAL
PROPRIETARY AND CONFIDENTIAL
THE INFORMATION CONTAINED IN THIS DRAWING IS THE SOLE PROPERTY
OF EXTREMIS. ANY REPRODUCTION IN PART OR AS A WHOLE WITHOUT THE
WRITTEN PERMISSION OF EXTREMIS IS PROHIBITED.
IUW40 + bevestigingen
Bram Coudijzer
UNLESS OTHERWISE SPECIFIED:
DIMENSIONS ARE IN MM
NUMBER
+/- 20 min.
+/- 20 min.
2. Stecken Sie das Inumba-Befestigungsstück in die
mittige Önung der Tischplatte. Achten Sie darauf,
dass die konische Seite nach oben gerichtet ist.
Schrauben Sie dieses Teil dann am Tisch fest, indem
Sie die Schrauben unten durch den Tisch stecken.
3. Setzen Sie die Lazy Susan jetzt wieder an ihrem Platz
im Tisch ein.
4. Schieben Sie den Sonnenschirm auf das Edelstahlrohr
wie in Punkt 6 – 7 – 8 der 7. Montagemöglichkeit auf
Seite 27 angegeben.
1. Die Lazy Susan der Pantagruel entfernen.
MONTAGE INUMBRA IM PANTAGRUEL
WAS SIE BRAUCHEN
1 Person
inbusschlüssel Nr. 5
1. Demontieren Sie das zentrale,
quadratische Verbindungsstück,
das die 4 Beine des Tisches
miteinander verbindet. Befestigen
Sie darauf das mitgelieferte
Edelstahlteil. Anschließend
montieren Sie das Ganze so,
dass der konische Teil durch die
Tischplatte ragt.
2. Schieben Sie den Sonnenschirm
auf das Edelstahlrohr wie in
Punkt 6 – 7 – 8 der 7.
Montagemöglichkeit auf Seite 27
angegeben.
MONTAGE INUMBRA I GARGANTUA
WAS SIE BRAUCHEN
1 Person
inbusschlüssel Nr. 5
deutsch 25

+/- 30 min.
4. Stellen Sie das Edelstahlrohr auf die Betonblöcke und
achten Sie darauf, dass die Löcher des Edelstahlrohrs
sich genau über denen der Betonblöcke benden. Der
Konusachteil soll sich an der Stelle, an der Sie den
Hebel haben möchten, benden. Das Edelstahlrohr
kann mit den 4 mitgelieferten Bolzen befestigt werden.
Ziehen Sie sie mit einem Gabelschlüssel 17 fest an.
5. Schieben Sie den Sonnenschirm auf das Edelstahlrohr.
Achten Sie darauf, dass die Stellschraube des
Sonnenschirmrohrs sich gerade vor dem
Konusachteil bendet, da-mit der Sonnenschirm
vollkommen auf den Konus geschoben werden kann.
Sobald der Sonnenschirm auf den Konus geschoben
ist, kann dieser sich nicht mehr drehen. Falls der
Sonnenschirm sich doch dreht, sollten Sie ihn
vorsichtig weiter drehen, bis er vollkommen auf den
Konus geschoben ist.
2. Montieren der Kunststomutter an der
Betonblockunterseite: Stecken Sie den mitgelieferten
Dübel in das Blindloch, und befestigen Sie die Mutter
mit der mitgelieferten Schraube.
3. Stellen Sie die 4 Betonblöcke auf das
Positionierungskreuz. Achten Sie darauf, dass die
Betonblockönungen sich immer über den Önungen
in der unteren Platte des Positionierungskreuzes
benden. Die Seite mit den abgeschrägten Ecken ist
die Unterseite.
1. Stellen Sie den ersten Teil des Positionierungskreuzes
an die Stelle, an der Sie den Sonnenschirm aufstellen
möchten. Schieben Sie anschließend den zweiten Teil
über den ersten, so dass die Rillen ineinander passen.
MONTAGE INUMBRA IN NATURBETONSTÄNDER
WAS SIE BRAUCHEN
Maulschlüssel Nr. 17
1 Person
schraubenzieher
26 montage inumbra in naturbetonständer (auf rollen)

1. Stellen Sie die 4 Betonblöcke auf das
Positionierungskreuz. Achten Sie darauf, dass die
Betonblockönungen sich immer über den Önungen
in der unteren Platte des Positionierungskreuzes
benden. Die Seite mit den abgeschrägten Ecken ist
die Unterseite.
2. Stellen Sie das Edelstahlrohr auf die Betonblöcke und
achten Sie darauf, dass die Löcher des Edelstahlrohrs
sich genau über denen der Betonblöcke benden. Der
Konusachteil soll sich an der Stelle, an der Sie den
Hebel haben möchten, benden. Das Edelstahlrohr
kann mit den 4 mitgelieferten Bolzen befestigt werden.
Ziehen Sie sie mit einem Gabelschlüssel 17 fest an.
6. Ziehen Sie die untere Stell-schraube mit dem Hebel
zum Önen und Schließen des Sonnenschirms fest
an, so dass der Sonnenschirm sicher steht. Anziehen
erfolgt im Uhrzeigersinn. Wenn Sie den Sonnenschirm
entfernen möchten, lockern Sie die untere
Stellschraube total. Erst dann können Sie den
Sonnenschirm entfernen.
7. Stecken Sie die Gummihülse in das untere
Stellschraubenloch, damit Sie die richtige Stell-
schraube benutzen um den Sonnenschirm zu önen.
ACHTUNG: Zwischen dem Son-nenschirmrohr und
dem Sonnenschirmfußrohr gibt es immer eine
Önung von 5 mm. Diese ist notwendig, damit der
Konus immer schön anschließt und er sich nicht löst
durch die Sonnenschirmbewegungen.
MONTAGE NATURBETONSTÄNDER AUF ROLLEN
deutsch 27

+/- 30 min.
+/- 60 min.
2. Achten Sie darauf, dass das gegrabene Loch weniger
tief ist als die einzutreibende Rohrlänge. Stellen Sie
das Edelstahlrohr perfekt senkrecht auf die genaue
Höhe und an die genaue Stelle. Das Bodenloch um das
Edelstahlrohr sollte reichlich mit starkem Beton
gefüllt werden, damit das Edelstahlrohr gut
xiert sei. Lassen Sie den Beton ausreichend aushärten.
3. Schieben Sie den Sonnenschirm auf das Edelstahlrohr
wie in Punkt 6 – 7 – 8 der 7. Montagemöglichkeit auf
Seite 27 angegeben.
1. Markieren Sie die Stelle, an der Sie den Sonnenschirm
aufstellen möchten und graben Sie ein Loch.
Bestimmen Sie, wie hoch das Edelstahlrohr aus dem
Boden herauszuragen hat. Berücksichtigen Sie sowohl
die Lange im geöfneten wie geschlossenen Zustand
(siehe technical sheet). Stecken Sie das Edelstahlrohr
mindestens 70 cm in den Boden.
MONTAGE INUMBRA MIT PERMANENTE BODENVERANKERUNG
WAS SIE BRAUCHEN
1 Person
1. Stellen Sie das Edelstahlrohr an die Stelle, an der Sie
den Sonnenschirm aufstellen möchten und verankern
Sie es mit Ankerbolzen (oder mit für die Unterlage ge-
eigneten Befestigungsmitteln).
2. Schieben Sie den Sonnenschirm auf das Edelstahlrohr
wie in Punkt 6 – 7 – 8 der 7. Montagemöglichkeit auf
Seite 27 angegeben.
MONTAGE INUMBRA MIT BODENVERANKERUNG
WAS SIE BRAUCHEN
1 Person
28 montage inumbra mit (dauerhafte) bodenverankerung

WARNUNG
Wenn Sie die Kabel bei starkem Wind summen hören, oder wenn Sie den
Sonnenschirm nicht benötigen, dann schließen Sie ihn und ziehen Sie die
Hülle darüber, um zu vermeiden, dass der Sonnenschirm verschmutzt oder
vom Wind geönet wird.
Lassen Sie den geöneten Sonnenschirm nie unbeaufsichtigt.
Bitten Sie um Hilfe, wenn Sie den Sonnenschirm bei heigem Wind
schließen wollen. Mindestens eine Person muss während des Schließens
auf der vom Wind abgewandten Seite die Enden der Stäbe nach unten
schieben, um zu verhindern, dass der Sonnenschirm sich auf halbem Wege
plötzlich abrupt önet.
Aus Gründen der Belüung ist die Hülle nicht 100 % wasserdicht.
Lassen Sie Inumbra nicht geschlossen, wenn er nicht vollkommen trocken ist. Lassen Sie ihn bei feuchten
Bedingungen nicht für eine längere Zeit geschlossen. Wenn Sie den Sonnenschirm eine längere Zeit nicht
verwenden, bewahren Sie ihn senkrecht und vollkommen getrocknet in einer trockenen Umgebung auf.
deutsch 29

5. Drehen Sie den Hebel, bis der Sto beinahe gespannt
ist. Drehen Sie dann langsam weiter, bis der Sto
vollkommen gespannt ist.
6. Nehmen Sie den Hebel aus dem Rohr, und genießen
Sie den Schatten. Befolgen Sie diese Schritte in
umgekehrter Reihenfolge um es zu schließen.
3. Bringen Sie den Hebel in der vorgesehenen Önung
im Rohr an (siehe Punkt 7 Seite 27).
4. Drehen Sie den Hebel im Uhrzeigersinn, um den
Sonnenschirm zu önen.
1. Nehmen Sie den Hebel aus der kleinen Tasche auf der
Hülle.
2. Streifen Sie die Hülle vom Sonnenschirm.
INUMBRA ÖFFNEN / SCHLIESSEN
30 inumbra önen / schließen - pflege

PFLEGE
STOFF
Reinigen Sie den Sto des
Sonnenschirms und den Bezug,
indem Sie diese mit Wasser und Seife
abspülen und vorsichtig mit einer
weichen Bürste abreiben. Achten Sie
darauf, dass der Sonnenschirmsto
nicht zu schmutzig wird, und ziehen
Sie so o wie möglich den Bezug
über den Sonnenschirm.
Spritzen Sie den Sonnenschirm nie
mit einem Hochdruckreiniger ab.
Verwenden Sie keine
Reinigungsmittel. Diese greifen die
Schutzschicht des Stos an.
Um die Lebensdauer der Spindel im
Inumbra-Rohr zu verlängern,
empfehlen wir Ihnen diese
regelmäßig mit Silikonspray
einzuspritzen. Tun Sie das, wenn der
Sonnenschirm montiert ist:
1.Schließen Sie den Sonnenschirm,
und heben Sie einen der Stäbe auf,
so dass Sie unter den Sto
kommen.
2. Spritzen Sie ein bisschen Spray von
oben nach unten auf der ganzen
Länge in die Rille.
3. Önen und Schließen Sie den
Sonnenschirm einige Male, damit
das Silikon sich gleichmäßig über
die Spindel verteilt. Auf diese
Weise wird die Spindel geschmiert,
und önet und schließt sich der
Sonnenschirm einfacher und
lärmlos. Außerdem bildet das
Silikon eine Schutzschicht, so dass
die Spindel nicht so schnell
anrostet. Das Silikonspray ist in
den meisten Baumärkten
erhältlich. Wir benutzen das
weltweit erhältliche Silikonspray
der Marke Würth
(siehe www02.wuerth.com).
EDELSTAHL ROHR
Edelstahl ist nicht beständig
gegen Meerwasser. Insbesondere
in einer aggressiven Umgebung
(Meeresklima, Chlor, saurer Regen,
aggressives industrielles oder
städtisches Umfeld) raten wir dazu,
die Oberäche häug zu reinigen.
Geeignete Reinigungsprodukte für
Edelstahl nden Sie im Handel.
WARNING
Tests in a windtunnel have shown
that the shade withstands wind
speeds up to 74 km/h (46 mph),
when anchored to the oor. Still, we
strongly advise to take of the fabric
sooner (from wind speed 49 km/h (31
mph)).
deutsch 31

LANGUAGES
ENGLISH P. 3
contents p. 3
assembly inumbra into gargantua p. 5
assembly inumbra into pantagruel p. 5
assembly concrete base p. 6
assembly concrete wheel base p. 7
assembly directly to the oor p. 8
assembly permanent xation p. 8
open / close inumbra p. 10
maintenance p. 11
NEDERLANDS P. 13
inhoud p. 13
montage inumbra in gargantua p. 15
montage inumbra in pantagruel p. 15
montage sokkel in beton p. 16
montage sokkel in beton op wielen p. 17
montage grondverankering p. 18
montage permantente grondverankering p. 18
inumbra openen / sluiten p. 20
onderhoud p. 21
DEUTSCH P. 23
inhalt p. 23
montage inumbra im gargantua p. 25
montage inumbra im pantagruel p. 25
montage naturbetonständer p. 26
montage naturbetonständer auf rollen p. 27
montage bodenverankerung p. 28
montage dauerhae befestigung imboden p. 28
inumbra önen / schließen p. 30
pege p. 31
FRANÇAIS P. 33
contenu p. 33
montage inumbra dans gargantua p. 35
montage inumbra dans pantagruel p. 35
montage socle en béton p. 36
montage socle en béton sur roues p. 37
montage xation dans au sol p. 38
montage xation dans le sol permanente p. 38
ouvrier / fermer inumbra p. 40
entretien p. 41
ITALIANO P. 43
contenuto p. 43
montaggio inumbra con gargantua p. 45
montaggio inumbra con pantagruel p. 45
montaggio base di calcestruzzo p. 46
montaggio base di calcestruzzo su ruote p. 47
montaggio diretto al suolo p. 48
montaggio permanente al suolo p. 48
arpertura / chiusura inumbra p. 50
manutenzione p. 51
ESPAÑOL P. 53
contenido p. 53
montaje inumbra dans gargantua p. 55
montaje inumbra dans pantagruel p. 55
montaje socle en béton p. 56
montaje socle en béton sur roues p. 57
montaje xation dans au sol p. 58
montaje xation dans le sol permanente p. 58
ouvrier / fermer inumbra p. 60
mantenimiento p. 61
32 contenu

1 x inumbra et tube 1 x tube de rallonge 1 x manivelle
INUMBRA AVEC FIXATION DIRECT AU SOL
4 x boulon M5x40 4 x cheville 1 x manivelle
1 x support A 1 x support B 4 x capouchon en plastique
1 x inumbra et tube 4 x bloc en béton 4 x boulon M10x110
CONTENU
INUMBRA SUR SOCLE EN BÉTON
français 33

extremis
4 x rondelle élastique 1 x manivelle
1 x inumbra et tube 1 x xation 4 x boulon M8x12
INUMBRA DANS GARGANTUA / PANTAGRUEL
1 x inumbra et tube 1 x tube de rallonge 1 x manivelle
CONTENU
INUMBRA AVEC FIXATION AU SOL PERMANENTE
34 contenu - montage inumbra dans gargantua / pantagruel

SHEET 1 OF 1
DATE
SCALE: 1:3
WEIGHT:
FILENAME
A4
SIZE
NAME
COMMENTS:
DRAWN
MATERIAL
PROPRIETARY AND CONFIDENTIAL
THE INFORMATION CONTAINED IN THIS DRAWING IS THE SOLE PROPERTY
OF EXTREMIS. ANY REPRODUCTION IN PART OR AS A WHOLE WITHOUT THE
WRITTEN PERMISSION OF EXTREMIS IS PROHIBITED.
IUW40 + bevestigingen
Bram Coudijzer
UNLESS OTHERWISE SPECIFIED:
DIMENSIONS ARE IN MM
NUMBER
+/- 20 min.
+/- 20 min.
2. Introduisez la pièce de xation inumbra (partie
conique en haut) dans l’orice central du plateau de
table. Fixez ensuite cette pièce à la table au moyen des
boulons, par le dessous de la table.
3. Réinstallez à présent le plateau lazy susan.
4. Mettez le parasol sur le tube en inox comme montré
dans les points 6 - 7 - 8 à la page 37.
1. Enlevez le plateau lazy susan du Pantagruel.
1 personne
clé Allen n° 5
OUTILS
MONTAGE INUMBRA DANS PANTAGRUEL
1. Enlevez la pièce carrée centrale
qui relie les 4 pieds entre eux.
Montez-y la pièce de xation en
inox puis rexez l’ensemble à la
table Gargantua de manière à ce
que le cône traverse le plateau de
la table.
2. Mettez le parasol sur le tube en
inox comme montré dans les
points 6 - 7 - 8 à la page 37.
MONTAGE INUMBRA DANS GARGANTUA
OUTILS
1 personne
clé Allen n° 5
français 35

+/- 30 min.
4. Placez à présent le tube en inox sur les blocs en béton
en alignant bien les trous dans le disque au bas du tube
en inox avec les trous dans les blocs en béton. Placez la
partie plate du cône à l’endroit où doit venir la
manivelle. Le tube en inox peut à présent être xé au
moyen des 4 boulons fournis. Serrez les boulons au
moyen d’une clé plate n° 17.
5. Vous pouvez à présent placer le parasol sur le tube en
inox. Veillez à ce que la vis de réglage dans le mât du
parasol arrive juste avant la partie plate du cône sur le
tube inférieur en inox, sinon le parasol ne pourra pas
être glissé entièrement sur le cône. Quand le parasol se
trouve entièrement sur le cône, il ne peut plus tourner.
Si malgré tout il tourne encore, il faut le faire
délicatement pivoter jusqu’à ce qu’il soit tout à fait
emboîté sur le cône.
2. Fixez les capuchons en plastique sous les blocs de
béton: insérez les chevilles fournies dans les trous
borgnes et xez ensuite les capuchons au moyen des
vis fournies.
3. Posez à présent les 4 blocs en béton sur le pied en croix.
Veillez à ce que les orices dans les blocs en béton
correspondent aux trous dans la plaque inférieure de
la croix. Le côté dont les bords sont biseautés est le bas.
1. Placez le premier élément du pied en forme de croix
sur le sol, à l’endroit où vous voulez installer le parasol.
Glissez ensuite le deuxième élément sur le premier, de
manière à ce que les fentes s’emboîtent.
MONTAGE INUMBRA SUR SOCLE EN BÉTON
OUTILS
clé plate n° 17
1 personne
tournevis
36 montage inumbra sur socle en béton (sur roues)

1. Posez à présent les 4 blocs en béton sur le pied en croix.
Veillez à ce que les orices dans les blocs en béton
correspondent aux trous dans la plaque inférieure de
la croix. Le côté dont les bords sont biseautés est le bas.
2. Placez à présent le tube en inox sur les blocs en béton
en alignant bien les trous dans le disque au bas du tube
en inox avec les trous dans les blocs en béton. Placez la
partie plate du cône à l’endroit où doit venir la
manivelle. Le tube en inox peut à présent être xé au
moyen des 4 boulons fournis. Serrez les boulons au
moyen d’une clé plate n° 17.
6. Prenez à présent la manivelle qui sert à ouvrir et fermer
le parasol, et utilisez-la pour serrer la vis de réglage
inférieure de manière à ce que le parasol soit bien xé.
Serrez en tournant dans le sens des aiguilles d’une
montre.
Pour enlever le parasol ultérieurement, desserrez
complètement la vis de réglage inférieure, jusqu’à ce
que vous ne puissiez plus tourner plus loin. Alors
seulement vous pourrez enlever le parasol.
7. Mettez maintenant le bouchon en caoutchouc dans le
petit trou de la vis de réglage inférieure an d’éviter
d’utiliser la mauvaise vis de réglage pour ouvrir le
parasol.
ATTENTION: Entre le tube de parasol et le tube du pied
de parasol, il reste une ouverture de 5 mm. Celle-ci est
nécessaire pour que le cône s’adapte bien et ne puisse
pas se dégager par le mouvement du parasol.
français 37
BASE EN BÉTON SUR ROUES

+/- 30 min.
+/- 60 min.
2. Creusez un trou un peu moins profond que la
profondeur à laquelle doit être enfoncé le tube.
Positionnez le tube à la bonne hauteur et de manière
parfaitement verticale. Comblez le trou autour du
tube avec du béton solide pour bien le xer. Laissez le
béton durcir susamment longtemps.
2. Mettez le parasol sur le tube en inox comme montré
dans les points 6 - 7 - 8 à la page 37.
1. Marquez l’endroit où vous souhaitez installer le
parasol et creusez à cet endroit un trou dans le sol.
Déterminez de quelle hauteur vous souhaitez que le
tube dépasse du sol. Tenez compte pour cela de la
position ouverte et fermée du parasol (voir technical
sheet). Le tube doit être enfoncé d’au moins 70 cm
dans le sol.
MONTAGE INUMBRA EVEC FIXATION AU SOL PERMANENTE
OUTILS
1 personne
1. Placez le tube inférieur en inox à l’endroit où vous
souhaitez installer le parasol, et xez-le solidement au
sol au moyen de boulons d’ancrage (ou avec les moyens
de xation les plus adaptés pour votre sol).
2. Mettez le parasol sur le tube en inox comme montré
dans les points 6 - 7 - 8 à la page 37.
MONTAGE INUMBRA AVEC FIXATION DIRECT AU SOL
OUTILS
1 personne
38 montage inumbra avec fixation au sol (permanente)

AVERTISSEMENT
Si vous entendez les câbles sier par grand vent ou quand le parasol n’est
pas utilisé, fermez le parasol et posez la housse pour éviter que le parasol ne
se salisse ou ne s’ouvre sous l’action du vent.
Ne laissez jamais le parasol ouvert sans surveillance.
En cas de vent fort, demandez de l’aide pour fermer le parasol. Pour la
fermeture, il faut au moins 1 personne supplémentaire du côté opposé à
celui d’où vient le vent pour guider les baleines vers le bas, an d’éviter
qu’un coup de vent ne rouvre brusquement le parasol à mi-chemin.
Pour des raisons de ventilation, la housse n’est pas imperméable à 100%.
Ne laissez pas InUmbra en position fermée si la toile n’est pas tout à fait sèche. Ne laissez pas le parasol fermé
pendant une longue période dans un environnement humide.
Si vous n’utilisez pas le parasol pendant une période prolongée, rangez-le de la manière suivante: en position
verticale, parfaitement sec et dans un environnement sec.
français 39

5. Tournez la manivelle jusqu’à ce que le tissu soit presque
entièrement tendu. Continuez ensuite à tourner avec
précaution jusqu’à ce que le tissu soit entièrement
tendu.
6. Retirez la manivelle du mât et protez de l’ombre.
Suivez ces étapes dans l’ordre inverse pour fermer le
parasol.
3. Insérez la manivelle dans l’orice prévu à cet eet dans
le mât du parasol (voir point 7 page 37).
4. Tournez la manivelle dans le sens des aiguilles d’une
montre pour ouvrir le parasol.
1. Sortez la manivelle de la pochette sur la housse. 2. Retirez la housse du parasol.
OUVRIR / FERMER INUMBRA
40 ouvrir / fermer inumbra - entretien

ENTRETIEN
français 41
LA TOILE
Pour nettoyer la toile du parasol et la
housse, utilisez de l’eau et du
savon pour les mains et frottez
délicatement avec une brosse douce.
Veillez à ce que le tissu du parasol
ne se salisse pas exagérément, et
replacez systématiquement la housse
sur le parasol.
Ne lavez jamais le parasol avec un
nettoyeur haute pression.
N’utilisez pas de détergents. Ceux-ci
endommagent la couche de
protection du textile.
Pour prolonger la longévité du pivot,
nous vous conseillons de le traiter
régulièrement avec un spray silicone.
Faites cela quand le parasol est
monté:
1. Fermez le parasol entièrement et
soulevez une des baleines pour
aller en dessous du tissu.
2. Regardez vers le haut, redressez-
vous et injectez le spray silicone
dans la fente, du haut vers le bas.
3. Ouvrez et fermez le parasol
quelques fois pour que le silicone
se repartisse sur le pivot d’une
façon égale. De cette manière le
pivot est lubrié et le parasol
s’ouvrira et se fermera plus
facilement et sans faire de bruit.
De plus le silicone forme une
couche protectrice grâce à laquelle
le pivot rouillera moins vite. Le
spray silicone est en vente dans la
plupart des magasins de bricolage.
Nous vous conseillons d’utiliser le
spray silicone de la marque Würth,
disponible dans le monde entier.
(voir www02.wuerth.com).
ACIER INOXYDABLE
L’acier inoxydable ne résiste pas
à l’eau de mer. Surtout dans un
environnement agressif (climat
maritim, chlore, pluie acide,
environnement industriel ou urbaine
agressif) nous recommendons de
nettoyer fréquemment la surface. Les
produits appropriés pour nettoyer
l’acier inoxydable sont en vente dans
le commerce.
WARNING
Tests in a windtunnel have shown
that the shade withstands wind
speeds up to 74 km/h (46 mph),
when anchored to the oor. Still, we
strongly advise to take of the fabric
sooner (from wind speed 49 km/h (31
mph)).


www.extremis.com
Our headquarters:
Couthoflaan 20b
B-8972, Poperinge
info@extremis.com
+ 32 57 346020
Connect with us:
All rights reserved. Unless otherwise specified, all designs and photographs contained in this publication are copyright protected
and are the property of Extremis. No part of this publication may be copied or distributed without Extremis’ prior written consent.
The names of the authors of photographs to which we do not hold rights are mentioned here. We have done our utmost to provide a
comprehensive list of names. In the event of an alleged breach, please contact the editorial sta. © Extremis
20230503
-
 1
1
-
 2
2
-
 3
3
-
 4
4
-
 5
5
-
 6
6
-
 7
7
-
 8
8
-
 9
9
-
 10
10
-
 11
11
-
 12
12
-
 13
13
-
 14
14
-
 15
15
-
 16
16
-
 17
17
-
 18
18
-
 19
19
-
 20
20
-
 21
21
-
 22
22
-
 23
23
-
 24
24
-
 25
25
-
 26
26
-
 27
27
-
 28
28
-
 29
29
-
 30
30
-
 31
31
-
 32
32
-
 33
33
-
 34
34
-
 35
35
-
 36
36
-
 37
37
-
 38
38
-
 39
39
-
 40
40
-
 41
41
-
 42
42
-
 43
43
-
 44
44


Extremis Inumbra medium Handleiding
- Type
- Handleiding
- Deze handleiding is ook geschikt voor
in andere talen
- English: Extremis Inumbra medium User manual
- français: Extremis Inumbra medium Manuel utilisateur
- Deutsch: Extremis Inumbra medium Benutzerhandbuch