Inventum VFI5042RVS Handleiding
- Categorie
- Kookplaten
- Type
- Handleiding

inductie fornuis
VFI5042RVS
INDUCTION COOKER
• gebruiksaanwijzing
• instruction manual

2 •

Nederlands
English
• 3
1. veiligheidsvoorschriften pagina 4
2. productomschrijving pagina 9
3. voor het eerste gebruik pagina 11
4. installatie pagina 11
5. gebruik van de oven pagina 14
6. bediening van het kookgedeelte pagina 16
7. pannen voor inductie pagina 19
1. safety instructions page 28
2. product description page 33
3. prior to first use page 35
4. installation page 35
5. use of the oven page 38
6. operating the cooking section page 40
7. pans for induction page 43
8. bediening van de multifunctionele oven pagina 20
9. baktips en baktabel pagina 21
10. reiniging en onderhoud pagina 24
11. storingen en oplossingen pagina 26
12. productkaart pagina 27
algemene service- en garantievoorwaarden pagina 52
8. operating the multifunctional oven page 44
9. baking tips and baking tables page 45
10. cleaning and maintenance page 48
11. breakdowns and solutions page 50
12. product fiche page 51
general terms and conditions of service
and warranty page 54

• Lees eerst de gebruiksaanwijzing aandachtig en geheel
door voordat u het apparaat gaat gebruiken en bewaar
deze zorgvuldig voor latere raadpleging.
• Gebruik dit apparaat uitsluitend voor de in de
gebruiksaanwijzing beschreven doeleinden. Gebruik geen
agressieve reinigingsmiddelen in dit apparaat. Het fornuis is
alleen geschikt voor het bereiden van voedsel. Het apparaat is
niet geschikt voor industrieel of laboratorium gebruik.
• WAARSCHUWING: het apparaat en de toegankelijke delen
worden heet tijdens het gebruik. Raak hete delen niet
aan. Houd kinderen jonger dan 8 jaar uit de buurt tenzij er
voortdurend op hen wordt gelet.
• Het apparaat kan worden gebruikt door kinderen van 8 jaar en
ouder en door personen met beperkte fysieke, zintuiglijke of
mentale vermogens of gebrek aan ervaring of kennis, wanneer zij
het apparaat onder toezicht gebruiken of zijn geïnstrueerd over
het veilige gebruik ervan en zij de daaruit voortkomende gevaren
begrijpen.
• Kinderen mogen niet met het apparaat spelen.
• Het apparaat mag niet door kinderen worden gereinigd of
onderhouden, tenzij dit onder toezicht gebeurt.
• Bewaar geen voorwerpen in kastjes boven of achter het
apparaat die voor kinderen interessant zijn.
• De kookzones worden warm tijdens het gebruik en blijven na
gebruik ook nog een tijd warm. Laat geen kleine kinderen in de
buurt tijdens en vlak na het koken.
• Let op: Vloeistoffen en ander voedsel mogen niet opgewarmd
worden in gesloten conservenblikken, omdat deze kunnen
exploderen door de druk.
• Alcoholdampen kunnen vlam vatten. Nooit gerechten
klaar maken die een hoog percentage alcohol bevatten.
Alleen kleine hoeveelheden drank gebruiken met een hoog
alcoholpercentage. De ovendeur voorzichtig openen.
Nederlands
veiligheidsvoorschriften
1
4 • Nederlands

Nederlands • 5
• De buitenzijde van het fornuis kan warm worden nadat het
fornuis langdurig is gebruikt. Dit geldt ook voor de ovendeur.
Bijlangdurig gebruik op de maximale temperatuur wordt de ruit
van de ovendeur heet. Let op als er kinderen in de buurt zijn.
•
WAARSCHUWING: brandgevaar: laat niets op het
fornuisstaan.
•
WAARSCHUWING
:
koken met vet of olie op een fornuis
zonder toezicht kan gevaarlijk zijn en kan brand tot gevolg
hebben. Probeer NOOIT de brand te blussen met water,
maar zet het apparaat uit en dek de vlammen daarna af met
bijvoorbeeld een deksel of een blusdeken.
• Het fornuis moet regelmatig gereinigd worden en verwijder
eventuele voedselresten.
• Wanneer er krassen op de ruit van de ovendeur zitten,
kan deze springen. Geen schraper, scherpe of schurende
schoonmaakmiddelen gebruiken.
• Gebruik het apparaat niet als werkblad. Het apparaat kan
per ongeluk worden ingeschakeld of nog heet zijn, waardoor
voorwerpen kunnen smelten, heet worden of vlam vatten.
• Dek het apparaat nooit af met een doek of iets dergelijks.
Alshet apparaat nog heet is of wordt ingeschakeld, bestaat er
brandgevaar.
• Plaats geen metalen voorwerpen zoals messen, vorken, lepels
en deksels op het oppervlak van het kookgedeelte. Deze
kunnen heet worden.
• De glaskeramische plaat is zeer sterk, maar niet onbreekbaar.
Wanneer er iets op valt, bijvoorbeeld een kruidenpotje of een
puntig voorwerp, kan er een breuk ontstaan.
•
WAARSCHUWING
:
als het kookoppervlak is gebarsten,
schakelt u het apparaat uit om het risico van een elektrische
schok te vermijden.
• Houd rekening met de zeer snelle opwarmtijd op de hogere
standen. Blijf er altijd bij staan als u een kookzone op een
hogere stand heeft ingesteld.
• Gebruik nooit een hogedruk- of stoomreiniger voor het reinigen
van het fornuis.
• Gebruik het apparaat niet in een ruimte met een
omgevingstemperatuur beneden 5°C.
• Als het apparaat voor de eerste keer gebruikt wordt, zal het
‘nieuw’ ruiken. Dit is normaal. Door te ventileren verdwijnt de
geur vanzelf.

•
WAARSCHUWING
:
indien de glasplaat van het
kookgedeelte is gebroken:
- schakel onmiddellijk alle kookzones en elektrische
verwarmingselementen uit en verbreek de stroomtoevoer
naar het apparaat.
- raak het oppervlak van het apparaat niet aan.
- gebruik het apparaat niet.
• In geval van rook het fornuis uitschakelen en de stekker uit het
stopcontact verwijderen. Houd de ovendeur gesloten om de
vlammen te verstikken.
• Controleer of het apparaat is uitgeschakeld voordat u de lamp
vervangt om het risico op een elektrische schok te vermijden.
• Zet geen toebehoren van de oven op de open ovendeur.
• De bodem van de oven nooit afdekken met aluminiumfolie.
Aluminiumfolie houdt warmte tegen en geeft daardoor slechte
bakresultaten. Bovendien kan het emaille van de ovenbodem
beschadigd raken.
• Het fornuis heeft een ventilator die de ovenmantel koelt.
Nadatde oven is uitgeschakeld, kan deze ventilator nog enige
tijd nadraaien.
• Zorg voor voldoende ventilatie tijdens het gebruik.
• Houd natuurlijke ventilatie-openingen open.
• Bij langdurig gebruik van het fornuis is extra ventilatie
noodzakelijk. Zet bijvoorbeeld een raam open of installeer
eenmechanische ventilator.
• Flambeer nooit onder een afzuigkap. Door de hoge vlammen
kan brand ontstaan, ook bij een uitgeschakelde ventilator.
• Vermijd directe aanraking en contact met niet-hittebestendige
materialen.
• Dit apparaat mag alleen door een erkend installateur worden
aangesloten.
• Defecte onderdelen mogen alleen vervangen worden door
originele onderdelen. Alleen van die onderdelen kan de
fabrikant garanderen dat zij aan de veiligheidseisen voldoen.
• Indien de aansluitkabel beschadigd is, mag deze alleen worden
vervangen door de fabrikant, zijn service-organisatie of
gelijkwaardig gekwalificeerde personen, teneinde gevaarlijke
situaties te voorkomen.
• Het apparaat mag niet via een verdeelstekker of verlengsnoer
op het elektriciteitsnet worden aangesloten. Hiermee kan veilig
gebruik van het apparaat niet worden gewaarborgd.
6 • Nederlands

• Het apparaat moet altijd geaard zijn.
• De wanden en het werkblad rondom het apparaat moeten
minimaal tot 100°C hittebestendig zijn. Ook al wordt het
apparaat zelf niet warm, door de warmte van een hete pan kan
de wand verkleuren of vervormen.
• Het niet schoon houden van het fornuis kan leiden tot slijtage
wat weer effect heeft op de levensduur en kan resulteren in
gevaarlijke situaties.
• Verplaats het fornuis met minimaal twee personen en draag
beschermende kleding, zoals stevige handschoenen.
• Til het fornuis niet op aan de handgreep van de ovendeur.
• Het fornuis is niet geschikt om gebruikt te worden met een
timer of een aparte afstandsbediening.
• Sluit het apparaat alleen aan op wisselstroom, op een
randgeaarde wandcontactdoos, met een netspanning
overeenkomstig met de informatie aangegeven op het
typeplaatje van het apparaat.
• De veiligheid tijdens het gebruik is alleen gegarandeerd als de
montage technisch correct en in overeenstemming met dit
installatievoorschrift is uitgevoerd. De installateur is aansprakelijk
voor schade veroorzaakt door een foutieve montage.
• De gasaansluiting moet voldoen aan de nationale en regionale
veiligheidsvoorschriften. Laat het fornuis daarom aansluiten
door een erkende installateur.
• De elektrische aansluiting mag alleen worden uitgevoerd door
een bevoegde electriciën. Deze is op de hoogte van de nationale
en regionale veiligheidsvoorschriften waaraan de aansluiting
moet voldoen.
• Het fornuis behoort tot beschermingsklasse I en mag alleen
worden gebruikt in combinatie met een geaarde aansluiting.
Defabrikant is niet aansprakelijk voor de ongeschikte werking en
de mogelijke schade veroorzaakt door ongeschikte installaties.
• Het fornuis moet worden aangesloten op een vaste
installatiewaarin middelen voor uitschakeling zijn ingebouwd,
inovereenstemming met de voorschriften van de installatie.
• Zorg ervoor dat de voedingskabel niet bekneld raakt tijdens de
installatie of langs scherpe randen loopt. Hij moet zo geplaatst
worden dat er geen hete delen van het fornuis geraakt worden.
• Het aansluitpunt, de wandcontactdoos en/of de stekker moeten
altijd toegankelijk zijn.
Nederlands • 7

• Door verkeerde installatie, aansluiting of montage vervalt de
garantie.
• Attentie: elke wijziging in het apparaat, inclusief het vervangen
van de voedingskabel, moet worden uitgevoerd door personeel
van de technische dienst met een specifieke opleiding.
• Dompel het snoer of de stekker nooit onder in water.
• Dit apparaat is uitsluitend geschikt voor huishoudelijk gebruik.
Wanneer het apparaat oneigenlijk gebruikt wordt, kan er bij
eventuele defecten geen aanspraak op schadevergoeding
worden gemaakt en vervalt het recht op garantie.
• Als u besluit het apparaat, vanwege een defect, niet
langer te gebruiken, adviseren wij u, nadat u de stekker
uit de wandcontactdoos heeft verwijderd, het snoer af
teknippen.
Huishoudelijke apparaten mogen niet bij het gewone
huisvuil worden gevoegd. Breng het apparaat naar een
speciaal centrum voor gescheiden afvalinzameling van
uw gemeente om op verantwoorde wijze en conform
overheidsbepalingen recycled te worden.
8 • Nederlands

Nederlands • 9
1. Kookgedeelte
2. Thermostaatlampje van de oven
3. Controlelampje van de oven
4. Temperatuurknop
5. Aan/ uit en ovenfunctieknop
6. Ovendeur
7. Schuiflade
8. Ovenlampje
9. Niveau’s in oven
10. Bakplaat
11. Rooster
2
productomschrijving
10
11
4
2
7
6
3
5
1
8
9

Kookgedeelte
1. Kookzone - linksvoor (Ø 210 mm)
2. Kookzone - linksachter (Ø 160 mm)
3. Kookzone - rechtsachter (Ø 160 mm)
4. Kookzone - rechtsvoor (Ø 160 mm)
5. Bedieningspaneel
Bedieningspaneel
6. Toets voor toetsenblokkering
7. Kookzonetoets
8. Vermogenstoetsen + en -
9. Timertoets
10. Aan-/uittoets
11. Vermogen/restwarmte indicatie
12. Display timer
2
1
3
4
5
6
7
8
9
7
7
7
10
8
11
11
11
11
12
10 • Nederlands

voor het eerste gebruik
3
Voordat u het apparaat voor de eerste maal in gebruik neemt, dient u als volgt te werk te gaan: pak het fornuis voorzichtig
uit en verwijder al het verpakkingsmateriaal en eventuele promotionele stickers. De verpakking (plastic zakken, piepschuim
en karton) buiten het bereik van kinderen houden. Controleer na het uitpakken het apparaat zorgvuldig op uiterlijke schade,
mogelijk ontstaan tijdens transport. Controleer of de spanning overeenkomt met die vermeld staat op het typeplaatje.
Voorde installatie van het fornuis volgt u de instructies in het hoofdstuk INSTALLATIE.
Reinig het fornuis en alle accessoires met warm water en een mild reinigingsmiddel. Goed naspoelen met alleen water
endroog maken.
installatie
4
• De veiligheid tijdens het gebruik is alleen gegarandeerd als de montage technisch correct en in overeenstemming met dit
installatievoorschrift is uitgevoerd. De installateur is aansprakelijk voor schade veroorzaakt door een foutieve montage.
• Het fornuis behoort tot beschermingsklasse I en mag alleen worden gebruikt in combinatie met een geaarde aansluiting.
De fabrikant is niet aansprakelijk voor de ongeschikte werking en de mogelijke schade veroorzaakt door ongeschikte
elektrische installaties.
• Het fornuis moet worden aangesloten op een vaste installatie waarin middelen voor uitschakeling zijn ingebouwd,
inovereenstemming met de voorschriften van de installatie.
• Zorg ervoor dat de voedingskabel niet bekneld raakt tijdens de installatie of langs scherpe randen loopt. Hij moet zo
geplaatst worden dat er geen hete delen van het fornuis geraakt worden.
• Het aansluitpunt, de wandcontactdoos en/of de stekker moeten altijd toegankelijk zijn.
• Verplaats het fornuis met minimaal twee personen en draag beschermende kleding, zoals stevige handschoenen.
• Til het fornuis niet op aan de handgreep van de ovendeur.
• Door verkeerde installatie, aansluiting of montage vervalt de garantie.
• Attentie: elke wijziging in het apparaat, inclusief het monteren en het vervangen van de voedingskabel, moet worden
uitgevoerd door een erkende installateur.
OPSTELLING VAN HET FORNUIS
• De locatie van het fornuis moet droog en goed gelucht zijn en een goed werkende ventilatie bezitten in overeenstemming
met de geldende technische voorschriften. De geschiktheid van de ruimte voor het opstellen van een fornuis wordt
geëvalueerd op basis van volgende rechtsvoorschriften.
• De ruimte moet voorzien zijn van een ventilatiesysteem. Deze installatie moet bestaan uit een ventilatierooster of een
afzuigkap. Afzuigkappen moeten gemonteerd worden volgens de bijgevoegde gebruikershandleidingen. De opstelling
vanhet fornuis moet een vrije toegang tot alle bedieningselementen garanderen.
• Als het fornuis intensief en lang gebruikt wordt, kan het noodzakelijk zijn om een raam te openen om de ventilatie te
verbeteren.
• Het fornuis moet opgesteld worden op een harde, effen ondergrond (niet op een onderstel zetten).
• Voordat u het fornuis in gebruik neemt, moet u het waterpas zetten. Dit is vooral belangrijk voor het gelijkmatige
verspreiden van vet in de pan. Hiervoor dienen de regelpootjes die bereikbaar zijn als u de schuiflade er uit haalt.
Regelbereik 5mm.
AFZUIGKAP
min. 600 mm
min. 420 mm
min. 420 mm
min. 700 mm
Nederlands • 11

HET FORNUIS AANSLUITEN OP DE ELEKTRISCHE INSTALLATIE
• Het fornuis wordt geleverd zonder aansluitkabel en is volgens aansluitschema A1 standaard ingesteld voor
2 x 1 fase (230V). Het fornuis maakt gebruik van een zogenaamde 5-polige Perilex stekker (niet inbegrepen).
De groepen in de meterkast moeten gezekerd zijn met minimaal 16 Ampère elk.
• Het fornuis kan ook worden aangesloten volgens aansluitschema A2. Dit mag alleen worden uitgevoerd door
een erkende installateur.
• Het stopcontact voor aansluiting op de elektrische installatie moet voorzien zijn van een aardingspin en mag
zich niet boven het fornuis bevinden. Het stopcontact voor aansluiting op de elektrische installatie moet ook
na het opstellen van het fornuis bereikbaar zijn voor de gebruiker.
• Voordat u het fornuis aansluit, moet u controleren of:
- de zekering en de elektrische installatie bestand zijn tegen de belasting van de oven,
- de elektrische installatie uitgerust is met een doeltreffend aardingssysteem dat voldoet aan de geldende
normen en voorschriften.
- het stopcontact goed bereikbaar is.
MONTAGE VAN DE OMVALBEVEILIGING
De omvalbeveiliging wordt gemonteerd om te voorkomen dat het fornuis
kantelt. Dankzij de omvalbeveiliging tegen het kantelen van
het fornuis voorkomt u dat een kind dat op de openstaande ovendeur klimt
het fornuis laat kantelen.
Fornuis, hoogte 850 mm
A = 60 mm
B = 103 mm
Fornuis, hoogte 900 mm
A = 104 mm
B = 147 mm
A
B
12 • Nederlands
aansluitkabelaansluitblokaansluitkabelaansluitblok
A2
A1

POWER MANAGEMENT
Met deze functie kunt u het totale maximale vermogen van het kookgedeelte in stellen. Dit kan nodig zijn in verband met de
beschikbare elektrische aansluiting. Het kookgedeelte is standaard ingesteld op 3,7kW.
Het kookgedeelte kan ingesteld worden op een van de volgende waarden:
Aansluitschema Maximaal vermogen
A1
2,8 kW
3,7 kW (standaard)
A2 6,5 kW (maximaal)
Zodra u het fornuis heeft voorzien van een aansluitkabel en stekker en het fornuis staat op de juiste plek dan kunt u de
stekker in het stopcontact steken.
Indien u het maximale vermogen wilt aanpassen dan moet u dit binnen 5 minuten doen nadat u de stekker in het
stopcontact heeft gedaan.
• Zet het kookgedeelte aan met de aan/uit toets
en houd daarna gedurende 3 seconden de toets van de kookzone
linksvoor
en de timertoets ingedrukt.
• Op het display van de timer wordt de standaardwaarde [ 3.7 ]of een eerder gekozen waarde getoond.
• Gebruik de en de toetsen om een andere waarde te selecteren (3.7 - 6.5 - 2.8).
• Bevestig binnen 10 seconden de geselecteerde waarde door gedurende 3 seconden de timertoets ingedrukt te
houden. De geselecteerde waarde knippert 3 keer kort en er klinkt een geluidssignaal. Daarna wordt het kookgedeelte
uitgeschakeld. Het kookgedeelte functioneert nu met het maximale vermogen wat door u is ingesteld.
• Wordt de geselecteerde waarde niet binnen 10 seconden bevestigd dan zal het kookgedeelte automatisch uitschakelen
en blijven functioneren volgens de laatste instelling.
Tijdens het gebruik van de verschillende kookzones controleert de functie Power Management of het gekozen totale
vermogen niet wordt overschreden. Instellingen die tot een overschrijding van het vermogen zouden leiden, worden
geblokkeerd en zijn niet toegankelijk voor de gebruiker.
Verwarm de oven ongeveer 30 minuten op de hoogste temperatuur om alle achtergebleven productieresten, zoals olie,
teverwijderen. U voorkomt hiermee dat er onaangename geuren ontstaan tijdens het bereiden van voedsel.
Nederlands • 13
MAXIMAAL VERMOGEN
Tijdens het koken is het maximaal beschikbare vermogen van elke kookzone afhankelijk van hoeveel er tegelijk gekookt
wordt en op welk wattage het power management is ingesteld:
Aantal kookzones tegelijk in gebruik 1 2 3 4
Aansluiting 2,8 kW
210 P 9 9 9 7 7 7
160 P 7 9 P P 8
160 P 7 9 P P 8
160 P 7 9 P P 8
Aantal kookzones tegelijk in gebruik 1 2 3 4
Aansluiting 3,7 kW -
standaard
210 P P P P 9 9 9 9 9 9 9 9 9 6
160 P 8 P P P 8 8 7 7 9 7
160 P 8 9 P P 7 8 8 7 9 7
160 P 8 P P P 7 7 8 8 9 7
Aantal kookzones tegelijk in gebruik 1 2 3 4
Aansluiting 6,5 kW
210 P P P P 9 P P 9 9 P 9
160 P 8 P P P 8 8 P P P 8 P
160 P P P P P P P P P
160 P P P P P P P P P

14 • Nederlands
gebruik van de oven
5
Opgelet! Bij fornuizen die uitgerust zijn met een elektronische klok verschijnt na het aansluiten op het stroomnet [0.00] op
het display. Stel de huidige tijd in op de klok. De oven zal niet werken als het uur niet ingesteld is.
ELEKTRONISCHE KLOK
OK - keuzetoets
> - toets voor [ + ]
< - toets voor [ - ]
- symbool apparaat aan
- symbool kookwekker
- symbool voor bereidingstijd
- symbool voor automatische uitschakeling
DE KLOK INSTELLEN
Zodra u de stekker van het fornuis in het stopcontact heeft gedaan, knippert in het display 0.00.
• Druk op de toets [ OK ] om de tijd voor de eerste keer in te stellen, totdat het symbool
in het display verschijnt.
• Stel, binnen 7 seconden, de juiste tijd in met de toetsen [ < ] of [ > ].
• Zodra u de juiste tijd heeft ingesteld, zal na ca. 7 seconden de punt onder het symbool stoppen met knipperen. De klok
is ingesteld.
• Om de tijd aan te passen, drukt u tegelijkertijd op de toetsen [ < ] en [ > ]. De punt in de tijdaanduiding begint te knipperen.
Daarna kunt u de tijd wijzigen.
• Zodra u de juiste tijd heeft ingesteld, zal na een paar seconden de punt stoppen met knipperen. De tijd is aangepast.
Opgelet! De oven kan gebruikt worden wanneer het symbool
in het display staat.
KOOKWEKKER
De kookwekker kan op elk moment geactiveerd worden, ongeacht de status van eventueel andere ingestelde functies.
Het bereik van de kookwekker is: 1 minuut tot 23 uur en 59 minuten.
• Druk op de toets [ OK ]. Het symbool
knippert nu in het display.
• Stel de gewenste tijd in met de toetsen [ < ] of [ > ]. Het display toont de ingestelde tijd van de
kookwekker en geeft met het symbool aan dat de kookwekker actief is.
Zodra de ingestelde tijd voorbij is, gaat er een geluidssignaal en begint het symbool
te knipperen.
• Houd een willekeurige toets ingedrukt om het geluidssignaal uit te schakelen. Het symbool
verdwijnt en de klok met de huidige tijd verschijnt na ca. 7 seconden.
Opgelet! Als het geluidssignaal niet handmatig uitgeschakeld wordt, slaat deze automatisch af na ongeveer 7 minuten.
AUTOMATISCHE UITSCHAKELING INSTELLEN
Gebruik deze functie als de oven op een bepaalde tijd automatisch moet uitschakelen.
• Stel met de draaiknoppen de oven in op de gewenste ovenstand en temperatuur.
• Druk op de toets [ OK ] totdat in het display de tekst dur verschijnt en het symbool
knippert.
• Stel de gewenste bereidingstijd in met de toetsen [ < ] of [ > ]. De bereidingstijd kan ingesteld
worden van 1 minuut tot 10 uur.
• De ingestelde tijd wordt na ca. 7 seconden in het geheugen opgeslagen. Het display geeft de
huidige tijd aan en het symbool
. De functie automatische uitschakeling is actief.
• Zodra de ingestelde bereidingstijd voorbij is, schakelt de oven automatisch uit. Er klinkt een
geluidssignaal en de symbolen
en knipperen.
• Houd een willekeurige toets ingedrukt om het geluidssignaal uit te schakelen. De symbolen en verdwijnen en de klok
met de huidige tijd verschijnt na ca. 7 seconden.
• Draai de knoppen voor de ovenstand en de temperatuur terug naar
de uit-stand [ 0 /
]
OK
OK
OK
OK

Nederlands • 15
AUTOMATISCHE IN
-
EN UITSCHAKELING INSTELLEN
Gebruik deze functie als de oven op een bepaalde tijd aan moet gaan gedurende een bepaalde
bereidingstijd.
Stel de bereidingstijd en de eindtijd in.
Voorbeeld: Het is 11:00 uur. De bereidingstijd is 1 uur. Het gerecht moet om 14:00 uur klaar
zijn. De oven begint om 13:00 uur (14:00 minus 1 uur) met het bakken op de vooringestelde
temperatuur en ovenfunctie en zal om 14:00 uur stoppen.
• Druk op de toets [ OK ] totdat in het display de tekst dur verschijnt en het symbool
knippert.
• Stel de gewenste bereidingstijd in met de toetsen [ < ] of [ > ].
• Druk op de toets [ OK ] totdat in het display de tekst End verschijnt en het symbool
knippert.
• Stel de gewenste uitschakeltijd in met de toetsen [ < ] of [ > ]. De eindtijd kan ingesteld
worden tot 23 uur en 59 minuten.
• Stel met de draaiknoppen de oven in op de gewenste ovenstand en temperatuur. De beide
symbolen en zijn nu aan en de functie automatische in- en uitschakeling is ingesteld.
• Zodra de ingestelde bereidingstijd voorbij is, schakelt de oven automatisch uit. Er klinkt een
geluidssignaal en de symbolen
en knipperen.
• Houd een willekeurige toets ingedrukt om het geluidssignaal uit te schakelen. De symbolen
en verdwijnen en de klok met de huidige tijd verschijnt na ca. 7 seconden - bijv. 14:02.
• Draai de knoppen voor de ovenstand en de temperatuur terug naar de uitstand [ 0 /
].
INSTELLINGEN RESETTEN
De instelling van de kookwekker of automatische (in- en) uitschakeling kunnen op elk moment gereset worden.
• Druk tegelijkertijd op de toetsen [ < ] en [ > ] om de instelling van de automatische (in- en) uitschakeling te resetten.
• Druk op de toets [ OK ] om de kookwekker functie te selecteren en daarna tegelijkertijd op de toetsen [ < ] en [ > ] om de
tijd te resetten.
HET GELUIDSSIGNAAL AANPASSEN
De toon van het geluidssignaal kunt u op de volgende wijze aanpassen.
• Druk tegelijkertijd op de toetsen [ < ] en [ > ].
• Selecteer met de toets [ OK ] de functie ton. Het display knippert.
• Kies met de toets [ > ] de gewenste toon in de volgorde: ton 1, ton 2 of ton 3
of
• kies met de toets [ < ] de gewenste toon in de omgekeerde volgorde: ton 3, ton 2 of ton 1.
OK
OK
OK
OK
OK
DE HELDERHEID VAN HET DISPLAY AANPASSEN
De helderheid van het display kan aangepast worden binnen een bereik van 1 tot 9, waarbij 1 de
donkerste instelling is en 9 de lichtste. De instelling geldt voor een inactieve weergave van de
klok. D.w.z. als gedurende minimaal 7 seconden geen van de knoppen is aangeraakt.
• Druk tegelijkertijd op de toetsen [ < ] en [ > ].
• Druk herhaaldelijk op de toets [ OK ] totdat de functie bri verschijnt. De instelling voor de
helderheid zit direct na de instelling voor het geluidssignaal.
• Kies met de toets [ > ] de gewenste helderheid in de volgorde: 1 tot 9
of
• kies met de toets [ < ] de gewenste helderheid in de omgekeerde volgorde: 9 tot 1.
Opgelet: Het display is het lichtst als deze actief gebruikt wordt. D.w.z. dat er knoppen in de laatste 7 seconden zijn
aangeraakt.
OK
NACHTMODUS
Het display wordt gedimd tijdens de nachtelijke uren: 22:00 - 6:00.

bediening van het kookgedeelte
6
Gebruik alleen pannen die geschikt zijn voor een inductie kookplaat.
Het kookgedeelte functioneert door elektronische sensoren die worden bediend door de corresponderende tiptoets aan te
raken. Bij elke aanraking van een tiptoets klinkt er een geluidssignaal.
HET KOOKGEDEELTE INSCHAKELEN
Schakel het kookgedeelte in door gedurende enkele seconden op de AAN/UIT toets te drukken. De displays van alle
kookzones tonen een [0]. Als er binnen 10 seconden geen kookzone wordt geselecteerd, zal het kookgedeelte automatisch
uitschakelen.
HET KOOKGEDEELTE UITSCHAKELEN
Schakel het kookgedeelte op elk moment uit door enkele seconden op de AAN/UIT toets te drukken.
De AAN/UIT toets heeft altijd prioriteit in de uitschakel-functie.
EEN KOOKZONE INSCHAKELEN
Druk op de tiptoets van de kookzone die u wilt gebruiken. Het display geeft [0] aan bij de gekozen kookzone.
Plaats de pan op de kookzone. Selecteer het gewenste vermogen met de + toets of met de - toets.
Om het eten snel aan de kook te brengen, selecteert u het hoogste vermogen [ 9 ] en druk nogmaals op de + toets. In het
display verschijnt een P die de Boost functie aangeeft.
BOOST FUNCTIE
-
De Boost functie geeft extra vermogen en is instelbaar voor één zone per keer. Selecteer een kookzone, zet het vermogen
op de hoogste stand [ 9 ] en druk nogmaals op de + toets. In het display van de betreffende kookzone verschijnt nu een P die
de Boost functie aangeeft.
Om de Boost functie uit te schakelen, selecteert u de kookzone en drukt u op de - toets. De P verdwijnt van het display.
Na 10 minuten schakelt de Boost functie automatisch terug naar het ingestelde vermogen.
Zodra er ook een andere kookzone ingeschakeld wordt, vervalt de Boost functie van de eerder geselecteerde
kookzone. De Boost functie kan dus alleen worden gebruikt wanneer er slechts één kookzone actief is.
In dat geval zal het vermogen van de tweede kookzone automatisch verminderd worden. De nodige
vermogensvermindering zal getoond worden door het knipperen van de betreffende kookzone. Het display
knippert gedurende 3 seconden en gedurende die tijd kunnen er aanpassingen gedaan worden voordat het
vermogen automatisch wordt verminderd.
EEN KOOKZONE UITSCHAKELEN
Selecteer de kookzone die u uit wilt schakelen door op de bijbehorende toets te drukken. Raak de - toets aan om het
vermogen terug te zetten op [0] of houdt de bijbehorende kookzone toets
gedurende 3 seconden ingedrukt.
Als de kookzone heet is, zal in het display een [H] staan in plaats van [0].
ALLE KOOKZONES TEGELIJK UITSCHAKELEN
Om alle kookzones in één keer uit te schakelen, drukt u op de AAN/UIT toets. Op het display van alle kookzones die nog heet
zijn, staat een [H].
RESTWARMTE INDICATIE
-
/
De restwarmte indicatie geeft aan dat het glas nog te heet is om aan te raken in het gebied van de kookzone.
Als het gebied van de kookzone nog te heet is, verschijnt er een [H] in het display van de betreffende kookzone, wanneer de
temperatuur hoger is dan 60°C. Zodra de temperatuur tussen de 45°C en 60°C gezakt is, zal de [H] veranderen naar [h].
Derestwarmte is laag. Zodra de temperatuur onder de 45°C komt, gaat de restwarmte indicatie uit.
Als de restwarmte indicatie brandt, raak de betreffende kookzone dan niet aan om verbrandingen te
voorkomen en zet er geen voorwerpen op die gevoelig zijn voor warmte!
Als de stroom uitgevallen is, wordt de restwarmte indicatie niet getoond. De kookzone kan echter nog steeds
heet zijn!
TOETSENBLOKKERING
De toetsenblokkering is voor het blokkeren en het instellen van een veilige modus gedurende het gebruik. Kinderen kunnen
de kookplaat dan niet per ongeluk aanzetten. Ook het aanpassen van een hoger vermogen of andere wijzigingen is niet
mogelijk. Het is in deze modus alleen mogelijk om het kookgedeelte uit te schakelen.
De toetsenblokkering is geactiveerd als de toetsblokkering
gedurende 5 seconden is ingedrukt. Dit wordt bevestigd door
een geluidssignaal. Het indicatielampje van de toetsblokkering brandt en de bediening van het kookgedeelte is geblokkeerd.
Om de toetsenblokkering op te heffen, houdt u de toetsblokkering
gedurende 3 seconden ingedrukt.
16 • Nederlands

TIMER FUNCTIE INSTELLEN
De timer functie kan op twee manieren gebruikt worden: kooktimer en kookwekker.
Kooktimer
De kooktimer is gekoppeld aan een kookzone en kan voor elke kookzone apart ingesteld worden. In tegenstelling tot de
kookwekker schakelt de kooktimer de kookzone uit als de ingestelde tijd voorbij is.
• Schakel het kookgedeelte in met de AAN/UIT toets
en selecteer een kookzone .
• Stel het vermogen in met de + en - toets.
• Druk op de TIMER toets
en stel de gewenste kooktijd in met de + en - toets.
• De brandende LED geeft aan voor welke kookzone de kooktimer is ingesteld.
De kooktimer kan op alle werkende kookzones onafhankelijk van elkaar ingesteld worden.
Wanneer er meer dan één kooktimer ingesteld is op het display van de timer dan wordt de kortste tijd
getoond. De knipperende LED geeft aan voor welke kookzone dat is.
Wanneer de ingestelde kooktijd voorbij is, klinkt er een piepsignaal. Het piepsignaal stopt automatisch na 2 minuten of nadat
u een willekeurige toets heeft aangeraakt.
De geprogrammeerde kookzone zal uitgeschakeld worden en [H] verschijnt in het display als het gebied van de kookzone
heet is.
Om een extra kooktimer in te stellen, doet u het volgende:
• Selecteer een andere kookzone
.
• Stel het vermogen in met de + en - toets.
• Druk op de TIMER toets en stel de gewenste kooktijd in met de + en - toets.
• De brandende LED geeft aan voor welke kookzone de kooktimer is ingesteld.
• 10 seconden na de laatste instelling, zal het display de tijd aangeven van de kookzone waarvan de tijd het eerste verstrijkt
(indien er meerdere kookzones geprogrammeerd zijn). De bijbehorende LED knippert in het display.
Om de ingestelde kooktijd aan te passen, doet u het volgende:
• Selecteer de gewenste kookzone
. Het ingestelde vermogen knippert in het display.
• Druk op de TIMER toets
• Stel de nieuwe gewenste kooktijd in met de + en - toets.
De kooktimer handmatig uitzetten als dit nodig is:
• Selecteer de kookzone
waarvan u de kooktimer wilt uitschakelen. Het ingestelde vermogen brandt in het display.
• Houd vervolgens de TIMER toets 3 seconden ingedrukt of wijzig de tijd met de + en - toetsen in 00.
Kookwekker
De kookwekker kan gebruikt worden als extra alarm zonder dat er een kooktimer ingesteld is voor één van de kookzones.
• Schakel het kookgedeelte in met de AAN/UIT toets
.
• Druk vervolgens op de TIMER toets en stel de gewenste kooktijd in met de + en - toets.
De kookwekker kan ingesteld worden van 0 tot 99 minuten. Als er gedurende 10 seconden geen toetsen ingedrukt worden,
start de kookwekker automatisch en wordt de tijd afgeteld.
Wanneer de ingestelde tijd voorbij is, klinkt er een piepsignaal en de timer knippert. Het piepsignaal stopt automatisch na
2minuten of nadat u een willekeurige toets heeft aangeraakt.
Om de tijd te wijzigen, drukt u nogmaals op de TIMER toets
en pas de tijd aan met de + en - toets.
DISPLAYAANDUIDING
Aanduiding op het display Beschrijving
/
Restwarmte-indicatie: de kookzone is nog warm.
Warmhoudfunctie is actief.
Boostfunctie is actief.
Aankookautomaat is actief.
Er staat geen pan of een ongeschikte pan op de actieve kookzone.
Nederlands • 17

WARMHOUDFUNCTIE
-
De warmhoudfunctie houdt reeds bereide gerechten warm op de kookzone. De geselecteerde kookzone is aan op een laag
vermogen. Het vermogen van de kookzone wordt door de warmhoudfunctie zo geregeld dat het gerecht in de pan rond
de 65°C blijft. Het warme voedsel dat klaar is om op te eten, veranderd hierdoor niet van smaak en kleeft niet vast aan de
bodem van de pan.
De warmhoudfunctie kan ook gebruikt worden voor het smelten van bijvoorbeeld boter of chocolade.
Let op: de warmhoudfunctie is niet geschikt om koud voedsel op te warmen.
De warmhoudfunctie werkt optimaal met een geschikte pan met vlakke bodem, zodat de sensor in de kookzone de
temperatuur goed kan meten.
De warmhoudfunctie kan op elke kookzone gebruikt worden.
Om te voorkomen dat zich bacteriën ontwikkelen in het voedsel, adviseren wij u om de gerechten niet te lang warm te
houden. Het bedieningspaneel schakelt de warmhoudfunctie na 2 uur automatisch uit.
De warmhoudfunctie
is een extra vermogensniveau tussen de standen 0 en 1.
• Selecteer de gewenste kookzone
.
• Stel het vermogen in met de + en - toets op de warmhoudfunctie .
• In het display staat . De warmhoudfunctie is ingesteld.
Om de warmhoudfunctie uit te schakelen, selecteert u de gewenste kookzone. Raak de - toets aan om het vermogen terug
te zetten op [0] of houdt de bijbehorende kookzone toets
gedurende 3 seconden ingedrukt.
Als de kookzone heet is, zal in het display een [H] staan in plaats van [0].
AANKOOKAUTOMAAT
-
De aankookautomaat kunt u gebruiken om een geselecteerde kookzone gedurende een bepaalde tijd op het hoogste
vermogen in te schakelen. Daarna wordt automatisch teruggeschakeld naar het ingestelde vermogen (doorkookstand).
Deaankooktijd hangt af van de ingestelde doorkookstand - zie onderstaande tabel.
Om de aankookautomaat in te schakelen, doet u het volgende:
• Selecteer de gewenste kookzone
.
• Stel het vermogen in met de + en - toets op de gewenste stand - bijvoorbeeld 7.
• Druk opnieuw op de kookzonetoets
. In het display verschijnt nu wisselend de en 7. De aankookautomaat is ingesteld
en de kookzone wordt nu gedurende 2 minuten op het maximale vermogen verwarmd.
• Na 2 minuten stopt de aankookautomaat en schakelt het vermogen automatisch terug naar de ingesteld stand, in dit geval 7.
De aankookautomaat kunt u eerder stoppen door de kookzone te selecteren en het vermogen aan te passen.
Ingesteld
vermogen
Tijdsduur
aankookautomaat
(in minuten)
1 0,8
2 1,2
3 2,3
4 3,5
5 4,4
6 7,2
7 2
8 3,2
VEILIGE AUTOMATISCHE UITSCHAKELING
Elke kookzone zal automatisch uitgeschakeld worden na een gedefinieerde maximum kookduur als het vermogen niet is
gewijzigd. De maximale kookduur is afhankelijk van het geselecteerde vermogen.
Vermogen Veilige automatische uitschakeling na:
- 1 - 2
8 uur
3 - 5 5 uur
6 - 9 1½ uur
18 • Nederlands

pannen voor inductie
7
• Gebruik pannen met een dikke,
vlakke bodem die dezelfde diameter
hebben als de betreffende kookzone.
Dit vermindert de kooktijd.
• Een pan moet in het midden van de kookzone geplaatst worden.
• Wanneer u op het glazen kookgedeelte in een pan met een sterk weerkaatsende (licht metalen oppervlak) of dikke
bodem kookt, kan het aan de kook brengen van het gerecht langer duren (tot 10 minuten extra). Als u een grote
hoeveelheid vocht aan de kook wilt brengen, is het gebruik van een pan met een vlakke donkere bodem aan te bevelen.
• De kookzone kan beschadigd raken:
- wanneer u deze leeg inschakelt of er een lege pan op zet;
- wanneer u een ongeschikte pan gebruikt, bijvoorbeeld met een niet vlakke of bolle bodem of een pan met een te kleine
doorsnede;
- gebruik geen aardewerken schalen, deze maken krassen op de keramische plaat;
• Droog de bodem van de pan goed af voordat u deze op het kookgedeelte plaatst, zodat de warmte goed geleidt en de
kookzone niet beschadigt.
ENERGIEBESPARING
• Het gebruik van pannen waarvan de bodem enigszins hol is, wordt geadviseerd, omdat hierbij de warmte van de
kookzone goed wordt overgedragen.
• De doorsnede van de bodem van de braad- en kookpannen moeten met de doorsnede van de kookzone overeenkomen.
Wanneer de pan te klein is, ontstaat er warmteverlies en kan de kookzone beschadigd raken.
• Gebruik altijd een deksel op de pan om de kooktijd te reduceren.
• Kies een pan die de juiste grootte heeft ten opzichte van de hoeveelheid voedsel die u wilt koken. Kleine hoeveelheden in
grote pannen betekent energieverlies.
• Schakel het vermogen terug wanneer vloeistof kookt.
• Gebruik niet te veel vocht of vet. Het koken of bakken duurt langer als u teveel gebruikt.
• Selecteer het juiste vermogen voor de verschillende kookmogelijkheden.
Nederlands • 19

De oven beschikt over de volgende functies:
Ovenfunctie Omschrijving
Ovenverlichting
De ovenverlichting is onafhankelijk van de oven in te schakelen. Door de
draaiknop in deze stand te plaatsen wordt de binnenkant van de oven
verlicht.
Snel verwarmen
Het bovenste verwarmingselement, het grillelement en de ventilator zijn
ingeschakeld. Te gebruiken voor het voorverwarmen van de oven.
Ontdooien
Alleen de ventilator is ingeschakeld, er wordt geen enkel
verwarmingselement gebruikt.
Ventilator en supergrill
Als de draaiknop in deze stand staat, wordt de functie supergrill met
ventilator uitgevoerd. Deze functie versnelt het grillproces en geeft meer
smaak aan het gerecht. Zorg dat de deur van de oven gesloten is tijdens
de bereiding.
Supergrill
Met de functie Supergrill worden gerechten gegrild terwijl het bovenste
verwarmingselement ook aan is. De functie zorgt voor een hogere
temperatuur in de bovenlaag van de oven, waardoor de gerechten meer
gebruind worden. Voor het grillen van grote porties vlees of gratineren.
Grillelement
Oppervlakkig grillen wordt toegepast om kleine porties vlees te
braden: steaks, schnitzels, vis, toasts, worstjes, ovenschotels te grillen
(hetgegrilde gerecht mag niet dikker dan 2-3 cm zijn, tijdens het bakken
moet het omgedraaid worden).
Onderste verwarmingsele-
ment
Bij deze stand is enkel het onderste verwarmingselement aan. Speciaal
voor gebak dat via de onderkant gebakken moet worden (bijv. vochtig
gebak met vruchten).
Boven en onder
verwarmingselement
Met deze functie wordt de oven op conventionele wijze verwarmd.
Ideaal om taarten, vlees, vis, brood, pizza te bakken op een enkel niveau
(voorverwarmen en gebruik van donkere bakplaten vereist).
bediening van de multifunctionele oven
8
De multifunctionele oven kan verwarmd worden met behulp van een verwarmingselement bovenaan en onderaan,
eengrillelement en een verwarmingselement voor heteluchtcirculatie.
INSCHAKELEN
De oven kan bediend worden met behulp van de draaiknop voor de functie van de oven - draai de draaiknop naar de
gewenste functie om de oven in te stellen – en met behulp van de draaiknop van de temperatuurregelaar – draai de
draaiknop naar de gewenste temperatuur om de oven in te stellen.
UITSCHAKELEN
De oven kan uitgeschakeld worden door de beide knoppen terug te draaien naar de uit-stand [
/ 0 ].
Opgelet! Als er een ovenfunctie ingesteld is, wordt de verwarming (van een verwarmingselement) pas ingeschakeld als de
temperatuur ingesteld is.
0
5050
100
150
200
250
20 • Nederlands

Ovenfunctie Omschrijving
Hetelucht
Op de stand hetelucht wordt de verwarming van de oven
op gecontroleerde wijze ondersteund met behulp van een
heteluchtventilator die op een centrale plaats in de achterwand van de
ovenruimte gemonteerd is. In vergelijking met een conventionele oven
wordt een lagere baktemperatuur gebruikt.
Deze methode zorgt voor een gelijkmatige spreiding van de warmte rond
de gerechten in de oven.
Boven en onder verwarm-
ingselement met ventilator
Deze functie is het meeste geschikt voor het bakken van cakes. Wanneer
deze functie geselecteerd is, maar de temperatuur staat op 0 dan zal
alleen de ventilator aan zijn. Handig voor het afkoelen van gerechten.
Turbo hetelucht
De hetelucht en het onderste verwarmingselement zijn aan. Dit verhoogt
de temperatuur aan de onderkant van het gerecht. Ideaal voor nat gebak
en pizza.
ECO hetelucht
Deze functie zorgt voor een optimale verwarmingswijze van de oven
welke geschikt is om energie te besparen tijdens het bereiden van
gerechten. De ovenverlichting zal niet functioneren op deze stand.
Het inschakelen van de oven wordt aangegeven met twee lampjes, een thermostaatlampje en een controlelampje.
Het controlelampje rechts naast de klok geeft aan dat de oven ingeschakeld is. Als het thermostaatlampje uit gaat, heeft
de oven de ingestelde temperatuur bereikt. Als het recept aangeeft dat het gerecht in een voorverwarmde oven geplaatst
moet worden, dan mag u dit pas doen als het thermostaatlampje voor de eerste maal uitgaat.
Tijdens de bereiding zal het thermostaatlampje af en toe aan- en uitgaan (de temperatuur in de oven wordt op peil
gehouden). Het controlelampje kan ook branden als u de draaiknop in stand “Verlichting van de oven” plaatst.
HET GEBRUIK VAN DE GRILL
Tijdens het grillproces worden de gerechten verwarmd door een infrarood verwarmingselement.
• Zet de draaiknop van de oven op de grillstand
om de grill in te schakelen.
• Verwarm de oven ongeveer 5 minuten voor (met gesloten deur).
• Plaats de bakplaat met het gerecht op het juiste niveau in de oven.
• Sluit de deur van de oven.
Voor de grillfunctie en supergrill moet de temperatuur ingesteld worden op 250°C. Voor de functie grill met
ventilator mag dit maximaal 190°C zijn.
Opgelet! Tijdens het grillen moet de deur van de oven gesloten zijn.
Laat geen kinderen bij de oven in de buurt komen als de grill gebruikt wordt. De buitenkant van de oven kan heet worden.
GEBAK
• Gebruik de bijgeleverde bakplaten of het rooster voor het bereiden van gebak.
• Gebak kan bereid worden in bakvormen of op bakplaten die op het rooster geplaatst moeten worden. Gebruik donkere
bakvormen omdat deze de warmte beter geleiden en de baktijd verkorten.
• Het is af te raden om bakvormen en bakplaten met een licht glimmend oppervlak te gebruiken wanneer u gebruik maakt
van de conventionele verwarmfunctie (boven en onder verwarmingselementen). Bij dit soort bakvormen wordt de
onderkant van het gebak niet goed gebakken.
• Bij het gebruik van de hetelucht functie hoeft de oven niet voorverwarmd te worden. Bij het gebruik van een andere
ovenfunctie moet de oven wel voorverwarmd worden voordat het gebak in de oven geplaatst wordt.
• Controleer de gaarheid van cake met een houten satéprikker. Als de cake gaar is, blijft het stokje droog en schoon
wanneer u deze erin steekt.
• Om te voorkomen dat een cake of taart in zakt, is het aan te raden om het gebak nog ongeveer 5 minuten in de oven te
laten nadat de oven uitgeschakeld is.
• De baktemperaturen bij het gebruik van de hetelucht functie zijn normaal gesproken ongeveer 20 tot 30 graden lager
danbij conventioneel bakken (gebruik van de boven en onder verwarmingselementen).
• De gegevens voor gebak in de baktabel zijn ter indicatie en kunnen gecorrigeerd worden volgens uw eigen ervaring en
culinaire smaak.
• Indien de informatie in kookboeken duidelijk afwijkt van de waarden in de handleiding van het fornuis, kunt u het beste de
richtlijnen in de handleiding volgen.
baktips en baktabellen
9
Nederlands • 21

VLEES BRADEN
• In de oven kunnen porties vlees van meer dan 1 kg bereid worden. Kleinere stukken kunnen beter gebakken worden op de
gasbranders van het fornuis.
• Gebruik bij het braden van vlees vuurvaste schotels. Ook de handgrepen van deze schotels moeten bestand zijn tegen
hoge temperaturen.
• Bij het braden van vlees op het rooster kan er op het laagste niveau een bakplaat met een klein laagje water worden
geplaatst om eventueel bakvocht op te vangen.
• Draai het vlees halverwege tijdens de bereidingstijd minstens één keer om. Om het vlees meer smaak te geven, kan het
bakvocht of de saus die ontstaat over het gerecht geschept worden. Dit kan ook met heet, zout water, maar nooit met
koud water.
VERWARMINGSFUNCTIE ECO- HETELUCHT
• Bij het gebruik van de functie ECO-hetelucht start een optimale verwarmingswijze van de oven die bedoeld is om energie
te besparen tijdens het bereiden van gerechten.
• Het is niet mogelijk om de bereidingstijd te verkorten door een hogere temperatuur in te stellen. Het voorverwarmen van
de oven is niet aan te raden.
• Tijdens het bakken geen temperatuurinstellingen aanpassen en de ovendeur gesloten houden.
BAKTABEL bij gebruik van de functie ECO-hetelucht
Gerecht Ovenfunctie
Temperatuur - °C
Niveau
Tijd in minuten
180 - 200 2 - 3 50 - 70
180 - 200 2 50 - 70
190 - 210 2 - 3 45 - 60
200 - 220 2 90 - 120
200 - 220 2 90 - 160
180 - 200 2 80 - 100
BAKTABEL bij gebruik van overige functies
Gerecht Ovenfuncties
Temperatuur - °C
Niveau
Tijd in minuten
160 - 200 2 - 3 30 - 50
160 - 180 2 - 3 20 - 40*
140 - 160 2 - 3 10 - 40*
200 - 230 1 - 3 10 - 20
210 - 220 2 45 - 60
160 - 180 2 - 3 45 - 60
190 2 - 3 60 - 70
22 • Nederlands

Gerecht Ovenfuncties
Temperatuur - °C
Niveau
Tijd in minuten
210 4 14 - 18
225 - 250 2 120 - 150
160 - 180 2 120 - 160
160 - 230 2 90 - 120
160 - 190 2 90 - 120
190 2 - 3 70 - 90
160 - 180 2 45 - 60
175 - 190 2 60 - 70
190 - 210 2 40 - 50
170 - 190 3 40 - 50
* kleine gebakjes
Belangrijk! De gegevens in de baktabel zijn ter indicatie en kunnen gecorrigeerd worden volgens uw eigen ervaring en
culinaire smaak.
Nederlands • 23

ACCESSOIRES
Reinig de losse accessoires zoals de bakplaat en het rooster met warm water en afwasmiddel. Maak alles goed droog
voordat het weer gebruikt wordt.
OVENLAMP VERVANGEN
Om een elektrische schok te vermijden, schakelt u het fornuis volledig uit door de stekker uit het stopcontact te
verwijderen of door de zekering in de groepenkast los te draaien.
• Draai het glazen beschermkapje tegen de klok in los. Reinig deze en goed drogen.
• Verwissel de ovenlamp voor een soortgelijke lamp (25 W, 230V, E14 fitting en geschikt voor hoge temperaturen
- tot 300°C).
• Draai het glazen beschermkapje vast.
• Steek de stekker weer in het stopcontact of draai de zekering vast in de groepenkast.
Het reinigen en onderhouden van het fornuis heeft een belangrijke invloed op de levensduur en probleemloze werking.
Hetfornuis mag niet gereinigd worden met een stoomreiniger of hogedruk reiniger.
Voor de reiniging moet het fornuis uitgeschakeld worden. Let er hierbij op dat alle draaiknoppen in de uit-stand
[
/ 0 ] staan. De oven mag pas gereinigd worden als hij afgekoeld is.
HET KOOKGEDEELTE REINIGEN
Laat alle kookzones afkoelen voordat u het kookgedeelte schoonmaakt en verwijder de stekker uit het stopcontact voordat
u begint.
• Gebruik geen agressieve schurende reinigingsmiddelen, spuitbussen of scherpe voorwerpen om het oppervlak
van het kookgedeelte te reinigen die niet voor dit doel ontwikkeld zijn.
• Reinig het oppervlak van het kookgedeelte dagelijks met een vochtige doek en een mild reinigingsmiddel, zoals
afwasmiddel. Goed droog maken met keukenpapier of een droge theedoek.
• Overgekookt voedsel kunt u verwijderen door de plek in te laten weken met een vochtige doek en een beetje afwasmiddel
of gebruik een glasschraper. Let op: de glasschraper is scherp. Houd deze uit de buurt van de kinderen.
• Gebruik een speciaal reinigingsmiddel voor keramische/inductie kookplaten voor hardnekkige vlekken. Let op: volg de
aanwijzingen op de verpakking.
DE OVEN REINIGEN
De oven moet na elk gebruik gereinigd worden. Schakel bij de reiniging de ovenverlichting in, zodat u beter in de ovenruimte
kunt kijken.
De binnenkant van de oven mag enkel met warm water met een beetje afwasmiddel gereinigd worden.
De oven kan ook gereinigd worden door middel van stoom:
• Zet een schaaltje met 250 ml (1 glas) water op een bakplaat op het eerste niveau onder in de oven.
• Sluit de deur van de oven.
• Zet de oventemperatuur op 50°C en zet de ovenfunctie op onderwarmte
.
• Verwarm de oven gedurende 30 minuten op deze stand.
• Open de deur van de oven en veeg de binnenkant van de oven met een doek of een zachte spons schoon. Reinig de
binnenkant van de oven daarna met een schone doek of spons en warm water en wat afwasmiddel.
• Droog de binnenkant van de oven goed na.
• Gebruik geen agressieve schurende reinigingsmiddelen of scherpe voorwerpen om de oven en ovendeur
tereinigen.
reiniging en onderhoud
10
24 • Nederlands

A
B
C
D
1
2
3
1
2
3
OVENDEUR DEMONTEREN EN MONTEREN
De ovendeur kan gedemonteerd worden om het schoonmaken van de binnenzijde van de oven en de ovendeur te
vergemakkelijken.
• Open de ovendeur en de klap beveiliging op het scharnier naar boven(fig. A). Doe de deur een kleine beetje dicht en til de
deur naar boven en naar buiten op om deze te verwijderen.
• Om de deur opnieuw te monteren gaat u omgekeerd te werk. Bij het monteren moet u erop letten dat de uitsparing op het
scharnier correct op de uitstulping van de scharnierhouder geplaatst is. Plaats altijd de beveiliging terug nadat u de deur
terug gemonteerd hebt en druk ze goed aan. Als u de beveiliging niet correct terugplaatst, kan het scharnier beschadigd
raken wanneer u de deur probeert te sluiten.
DEURRUIT VAN DE OVENDEUR DEMONTEREN EN MONTEREN
Om de ovendeur gemakkelijker schoon te maken, kan de binnenste ruit verwijderd worden.
• Duw met behulp van een platte schroevendraaier de bovenrand van de deur los, terwijl u hem aan de zijkanten voorzichtig
oplicht (fig. B).
• Verwijder de bovenrand van de deur (fig.B, C).
• Trek voorzichtig de binnenruit uit de houder (in het onderste deel van de deur) fig. D.
• Was de ruit met warm water en een klein beetje afwasmiddel.
• Ga omgekeerd te werk om de ruit opnieuw te monteren. Het gladde deel van de ruit moet zich bovenaan bevinden.
Attentie! Druk de bovenlijst van de deur niet gelijktijdig op beide kanten van de deur. Voor een juiste montage van de
bovenlijst van de deur drukt u eerst het linker uiteinde tegen de deur en drukt u vervolgens op het rechter uiteinde tot
ueen duidelijke “klik” hoort. Hierna drukt u op het linker uiteinde tot u een duidelijke “klik” hoort.
REGELMATIGE CONTROLE
Naast het dagelijkse onderhoud en reiniging van het fornuis moet u ook:
• regelmatig de werking van de bediening en de werkende onderdelen van het fornuis controleren. Na het verstrijken van de
garantieperiode moet u ten minste eenmaal per twee jaar een technische controle van het fornuis laten uitvoeren door
een onderhoudsdienst;
• de vastgestelde gebreken verhelpen
• een regelmatig onderhoud van de werkende onderdelen van het fornuis uitvoeren.
Opgelet!
Alle reparaties en instellingen moeten uitgevoerd worden bij een erkende onderhoudsdienst of door een erkend installateur
met gepaste kwalificaties.
Nederlands • 25

11
Bij een storing moet u:
• de werkende onderdelen van het fornuis uitschakelen;
• de elektrische voeding ontkoppelen;
• een reparatie aanvragen;
• sommige kleine problemen kan de gebruiker zelf oplossen met behulp van de aanwijzingen in de tabel hieronder.
Controleer opeenvolgend alle punten in de tabel voordat u de onderhouds- of klantendienst contacteert.
Storing(scode) Oorzaak Wat te doen
Het fornuis functioneert niet. Geen stroomtoevoer. Controleer de zekering van de groepenkast, vervang een
eventuele doorgebrande zekering.
De verlichting van de oven doet
het niet.
Het lampje zit los of defect. Draai het lampje aan of vervang het kapotte lampje
(ziehoofdstuk Reiniging en Onderhoud).
Een kookzone schakelt
automatisch uit en op het
display verschijnt [ H ] .
De maximale kookduur is bereikt. Schakel de kookzone opnieuw in.
Het fornuis reageert niet en laat
een kort piepsignaal horen.
Het kinderslot/ toetsblokkering is
ingeschakeld.
Zet het kinderslot/toetsblokkering uit.
Het hele fornuis schakelt uit.
Na het aanzetten, is er binnen
10seconden geen waarde
ingevoerd.
Zet het kookgedeelte aan en stel een kookzone in.
Er ligt iets op de tiptoets(en) of
ze zijn vuil.
Maak de tiptoetsen vrij of maak ze schoon.
De restwarmte indicatie wordt
niet weergegeven terwijl de
kookzone wel heet is.
Geen stroomtoevoer of een
korte onderbreking van de
stroomtoevoer.
Controleer of de stroomtoevoer herstelt is en zet het
kookgedeelte weer aan en uit.
De glasplaat van het
kookgedeelte is gebarsten.
Gevaar! Schakel de stroomtoevoer uit en verwijder de stekker van het apparaat.
Neemcontact op met de servicedienst van Inventum.
Het kookgedeelte maakt een
schurend geluid.
Dat is een normaal geluid. De koelventilator van de elektrische onderdelen werkt.
Het kookgedeelte maakt een
fluitend geluid.
Dat is een normaal geluid. Conform de functioneringsfrequentie van de inductiespoelen tijdens
het gebruiken van een aantal kookzones, maakt het kookgedeelte bij maximaal vermogen een
licht fluitend geluid.
E2 Het kookgedeelte is oververhit.
Schakel het kookgedeelte uit en laat de kookzones afkoelen.
Schakel het kookgedeelte opnieuw in en let op of de
ventilatie soepel draait.
Controleer of de pan voldoet aan de eisen gesteld in
hoofdstuk 6.
storingen en oplossingen
26 • Nederlands

Fabrikant INVENTUM
Typenummer VFI5042RVS
Type apparaat inductiefornuis
Aantal kookzones 4
Verwarmingstechnologie - kookgedeelte inductie
Diameter per kookzone [cm] (linksvoor) Ø 21
Diameter per kookzone [cm] (linksachter) Ø 16
Diameter per kookzone [cm] (rechtsachter) Ø 16
Diameter per kookzone [cm] (rechtsvoor) Ø 16
Energieverbruik per kookzone [Wh/kg] (linksvoor) 188,9
Energieverbruik per kookzone [Wh/kg] (linksachter) 188,9
Energieverbruik per kookzone [Wh/kg] (rechtsachter) 188,9
Energieverbruik per kookzone [Wh/kg] (rechtsvoor) 188,9
Energieverbruik van de kookplaat [kg] 188,9
Restwarmte indicator per kookzone
Aan/ uit toets
Spanning aan-indicator
Timer
Aantal ovenruimten 1
Warmtebron per ovenruimte elektrisch
Volume per ovenruimte 65
Energieverbruik volgens de EN50304 standaard 0,78 kWh
Energie-efficiëntie-index per ovenruimte 95,1
Uitvoering
Materiaal RVS
Bediening knoppen en tiptoetsen
Accessoires bakplaat
rooster
Displays LED
Technische gegevens
Afmeting (bxdxh) in mm 500 x 600 x 850
Netto gewicht in kg 39,0 kg
Elektrische aansluitwaarde [W] 10100 W
Netspanning [V] / netfrequentie [Hz] 230-400V/50Hz
Opmerking: Op het typeplaatje vindt u de de technische gegevens van het fornuis ook vermeldt.
productkaart
12
Nederlands • 27

• Carefully and fully read the instruction manual prior to
using the appliance and carefully store the manual for
future reference.
• Only use this appliance for the purposes described in the
instruction manual. Do not use aggressive cleaning agents in
this appliance. The cooker is only suitable for preparing food.
The appliance is not suitable for industrial or laboratory use.
• WARNING: the appliance and accessible parts get hot
during use. Do not touch hot parts. Keep children younger
than 8years of age out of the vicinity, unless they are
supervised at all times.
• The appliance can be used by children of 8 years and older and
persons with a limited physical, sensory or mental capacity or
lack of experience or knowledge, provided they use the appliance
under supervision or have been instructed about its safe use and
understand the hazards involved.
• Children are not allowed to play with the appliance.
• The appliance may not be cleaned or maintained by children,
unless this is done under supervision.
• Do not store objects that might be of interest to children in
cabinets above or behind the appliance.
• The cooking zones get hot when used and remain hot for
aperiod after use. Do not allow small children in the vicinity
during and immediately after cooking.
• Caution: Liquids and other foods may not be heated in closed
tin cans, as they can explode due to the pressure.
• Alcohol vapours could catch fire. Never prepare dishes
containing a large percentage of alcohol. Only use small
amounts of liquor with a high alcohol percentage. Open the
oven door carefully.
• The exterior of the cooker can become hot when the cooker
has been used for a long period of time. The same applies
to the oven door. In case of long-term use at maximum
temperature, the glass pane of the oven door will get hot.
Becareful when there are children present.
English
safety instructions
1
28 • English

•
WARNING: fire hazard: do not leave anything standing on
thecooker.
•
WARNING
:
cooking with fat or oil on an unattended cooker
can be dangerous and could result in fire. NEVER try to
extinguish the fire with water. Instead, you should turn off
the appliance and then cover the flames with a lid or an
extinguishing blanket, for example.
• The cooker must be cleaned regularly and food residues must
be removed.
• When there are scratches on the glass pane of the oven
door, itcould break. Do not use scrapers or sharp or abrasive
cleaning agents.
• Do not use the appliance as a worktop. The appliance can
be switched on by accident or still be hot, which means that
objects could melt, get hot or catch fire.
• Never cover the appliance with a cloth or something similar.
Ifthe appliance is still hot or is switched on, there is a fire hazard.
• Do not place metal objects such as knives, forks, spoons
andlids on the surface of the cooking section. These can
become hot.
• The ceramic plate is very strong, but not unbreakable.
Ifsomething falls on it, such as a spice jar or a pointy object,
thismay result in a broken plate.
•
WARNING
:
if the cooking surface is cracked, switch off the
appliance to avoid the risk of an electric shock.
• At higher positions, you should be aware of the very fast heating
time. Always remain nearby after adjusting a cooking zone to
ahigher position.
• Never clean the cooker with a high pressure cleaner or steam
cleaner.
• Do not use the appliance in a room with an ambient
temperature below 5°C.
• If the appliance is used for the first time, it will smell ‘new’.
Thisis normal. The smell will disappear through ventilation.
•
WARNING
:
if the glass plate of the cooking section is broken:
- immediately switch off all cooking zones and electrical
heating elements and interrupt the power supply to the
appliance.
- do not touch the surface of the appliance.
- do not use the appliance.
English • 29

• In case of smoke, switch off the cooker and remove the plug
from the socket. Keep the oven door closed to smother
theflames.
• Check that the appliance is switched off before replacing the
lamp, to prevent the risk of an electric shock.
• Do not place oven accessories on the opened oven door.
• Never cover the bottom of the oven with aluminium foil.
Aluminium foil stops the heat and may therefore lead to poor
baking results. Moreover, the email of the oven bottom could
get damaged.
• The cooker has a fan that cools the oven mantle. When the
oven is switched off, this fan could continue to run for some time.
• Ensure sufficient ventilation during use.
• Keep natural ventilation openings open.
• During prolonged use of the cooker, extra ventilation
will berequired. Open a window, for example, or install
amechanical fan.
• Never flambé under a cooker hood. The high flames could
cause a fire even with the fan switched off.
• Avoid direct contact with materials that are not heat-resistant.
• This appliance may only be fitted by a certified installer.
• Defective parts may only be replaced by original parts. Onlyfor
those parts will the manufacturer be able to guarantee that
they meet the safety requirements.
• If the connecting cable is damaged, it may only be replaced by
the manufacturer, its service organisation or similarly qualified
persons, in order to prevent hazardous situations.
• The appliance may not be connected to the mains supply
viaapower strip or extension cord. If this is not observed,
thesafety of the appliance cannot be guaranteed.
• The appliance must always be earthed.
• The walls and the worktop around the appliance must be heat-
resistant to at least 100°C. Even if the appliance itself does not
get hot, the heat of a hot pan could discolour or deform the wall.
• Not keeping the cooker clean could lead to wear and tear which,
in its turn, will have an effect on the life span and could result in
dangerous situations.
• Move the appliance with at least two people and wear protective
clothing, such as sturdy gloves.
• Do not lift the appliance by the handle of the oven door.
30 • English

• The cooker cannot be used with a timer or separate remote
control.
• Only connect the appliance to alternate current, to an earthed
wall socket, with a mains voltage that corresponds with the
information provided on the information plate of the appliance.
• Safety during use is only guaranteed if the assembly has taken
place in a technically correct way and in accordance with these
installation instructions. The installer is liable for damage caused
by incorrect assembly.
• The gas connection must meet national and regional safety
instructions. That is why you should have the cooker connected
by a certified installer.
• The electrical connection may be carried out only by a qualified
electrician. This person should be aware of the national and
regional safety instructions with which the connection has
tocomply.
• The cooker falls under protection factor I and may only be used
in combination with an earthed connection. The manufacturer is
not liable for unsuitable operation and possible damage caused
by unsuitable installations.
• The cooker must be connected to a permanent installation in
which provisions for switching off are integrated, in accordance
with the installation instructions.
• Make sure that the power supply cable does not get jammed
during installation or is running along sharp edges. It must be
placed in such a way that no contact is made with hot parts of
the cooker.
• The connection point, socket and/or plug must always be
accessible.
• In case of incorrect installation or connection, the warranty
becomes invalid.
• Attention: any change to the appliance, including replacement
of the power cable, must be performed by personnel of the
technical department who have been specifically trained.
• Never submerge the cord or plug in water.
• This appliance is only suitable for household use. If the
appliance is not used as intended, no compensation can be
claimed in case of defects or accidents and the warranty will
beinvalidated.
English • 31

• If you decide not to use the appliance any more due
to a defect, we recommend cutting off the cord after
removing the plug from the wall socket.
Household appliances may not be added to normal
household waste. Take the appliance to a special centre
for separated waste collection of your municipality
to have it recycled in a responsible manner and in
accordance with government regulations.
32 • English

1. Cooking section
2. Thermostat light of the oven
3. Indicator led of the oven
4. Temperature knob
5. On/off and oven mode knob
6. Oven door
7. Sliding drawer
8. Oven light
9. Levels in oven
10. Baking tray
11. Grille
2
product description
10
11
4
2
7
6
3
5
1
8
9
English • 33

Cooking section
1. Cooking zone - front left (Ø 210 mm)
2. Cooking zone - rear left (Ø 160 mm)
3. Cooking zone - rear right (Ø 160 mm)
4. Cooking zone - front right (Ø 160 mm)
5. Operating panel
Operating panel
6. Key for key lock
7. Cooking zone key
8. Power keys + and -
9. Timer key
10. On/off key
11. Power/residual heat indicator
12. Display timer
2
1
3
4
5
6
7
8
9
7
7
7
10
8
11
11
11
11
12
34 • English

prior to first use
3
Before using the appliance for the first time, you should proceed as follows: carefully unpack the cooker and remove all
packaging material and any promotional stickers. Keep the packaging (plastic bags, polystyrene and cardboard) out of the
reach of children. After unpacking the appliance, check it for external damage that may have occurred during transport.
Check that the voltage corresponds with what is stated on the information plate. For the installation of the cooker you must
observe the instructions in the INSTALLATION section.
Clean the cooker and all accessories with warm water and a mild cleaning agent. Properly rinse with water only and dry.
installation
4
• Safety during use is only guaranteed if the assembly has taken place in a technically correct way and in accordance with
these installation instructions. The installer is liable for damage caused by incorrect assembly.
• The cooker falls under protection factor I and may only be used in combination with an earthed connection.
Themanufacturer is not liable for unsuitable operation and possible damage caused by unsuitable electric installations.
• The cooker must be connected to a permanent installation in which provisions for switching off are integrated,
inaccordance with the installation instructions.
• Make sure that the power supply cable does not get jammed during installation or is running along sharp edges. It must be
placed in such a way that no contact is made with hot parts of the cooker.
• Move the appliance with at least two people and wear protective clothing, such as sturdy gloves.
• Do not lift the appliance by the handle of the oven door.
• The connection point, socket and/or plug must always be accessible.
• In case of incorrect installation or connection, the warranty becomes invalid.
• Attention: any change to the appliance, including replacement of the power supply cable, must be performed by
acertified installer.
PLACEMENT OF THE COOKER
• The location of the cooker must be dry and properly aerated and have a properly functioning ventilation in accordance
with the applicable technical regulations. The suitability of the room for placement of a cooker is evaluated on the basis
of the following legal provisions.
• The room must be provided with a ventilation system. This installation should consist of a ventilation grille or a cooker
hood. Cooker hoods must be mounted in accordance with the included user manuals. The placement of the cooker
must guarantee free access to all control elements.
• If the cooker is used intensively and for long periods of time, it may be necessary to open a window to improve ventilation.
• The cooker must be placed on a hard, even surface (do not place on a frame).
• Before you start using the cooker, you must level it. This is particularly important for an even distribution of fat in the pan.
For this you can use the adjustable legs that can be reached when the sliding drawer is removed. Adjustment range 5mm.
COOKER HOOD
min. 600 mm
min. 420 mm
min. 420 mm
min. 700 mm
English • 35

CONNECTING THE COOKER TO THE ELECTRICAL SYSTEM
• The cooker is supplied without a connection cable and, in accordance with connection diagram A1, it is set
by default for 2 x 1 phase (230V). The cooker uses a so-called 5-pole Perilex plug (not included). In the meter
cupboard, the groups must each be protected with a 16 Ampere fuse at least.
• The cooker can also be connected in accordance with connection diagram A2. This may only be performed
bya certified installer.
• The socket for connecting to the electrical system must be provided with an earthing pen and may not be
located above the cooker. The socket for connecting to the electrical system must also be accessible for
theuser after placement of the cooker.
• Before connecting the cooker, check that:
- the fuse and electrical system are suitable for the load of the oven,
- the electrical system is equipped with an efficient earthing system that meets the current standards
andregulations.
- the socket is easily accessible.
ASSEMBLY OF THE TILTING SAFEGUARD
The tilting safeguard is mounted to prevent the cooker from tilting. Thanks to
the tilting safeguard, children are prevented from climbing on the open oven
door and tilting the cooker.
Cooker, 850 mm high
A = 60 mm
B = 103 mm
Cooker, 900 mm high
A = 104 mm
B = 147 mm
A
B
connection cableconnection blockconnection cableconnection block
A2
A1
36 • English

POWER MANAGEMENT
This function allows you to set the total maximum power of the cooking section. This may be necessary in connection with
the available electrical connection. By default, the cooking section is set to 3.7kW.
The cooking section can be set to one of the following values:
Wiring diagram Maximum power
A1
2.8 kW
3.7 kW (default)
A2 6.5 kW (maximum)
Once the cooker has been provided with a connection cable and plug and the cooker is at the right location, you can insert
the plug in the socket.
If you want to adapt the maximum power, you must do this within 5 minutes after inserting the plug in the socket.
• Switch on the cooking section by means of the on/off key
and then hold down the key for the front left cooking zone
and the timer key for 3 seconds.
• The timer display shows the default value [3.7] or a previously selected value.
• Use the and keys to select a different value (3.7 - 6.5 - 2.8).
• Confirm the selected value within 10 seconds by pressing the timer key for 3 seconds. The selected value briefly
flashes 3 times and a sound signal can be heard. After that, the cooking section is switched off. The cooking section now
functions with the maximum power set by you.
• If the selected value is not confirmed within 10 seconds, the cooking section switches off automatically and continues to
function in accordance with the latest setting.
During use of the different cooking zones, the Power Management function checks that the selected total power is not
exceeded. Settings that would lead to a situation where the power is exceeded, are blocked and are not accessible to the user.
Heat the oven approximately 30 minutes at the highest temperature to remove all remaining production residues, such as
oil. In this way you prevent unpleasant odours from being generated when preparing food.
MAXIMUM POWER
During cooking, the maximum available power of each cooking zone depends on how much is being cooked at the same
time and to what wattage the power management has been set:
Number of cooking zones being
used at the same time
1 2 3 4
Connection 2.8 kW
210 P 9 9 9 7 7 7
160 P 7 9 P P 8
160 P 7 9 P P 8
160 P 7 9 P P 8
Number of cooking zones being
used at the same time
1 2 3 4
Connection 3.7 kW - default
210 P P P P 9 9 9 9 9 9 9 9 9 6
160 P 8 P P P 8 8 7 7 9 7
160 P 8 9 P P 7 8 8 7 9 7
160 P 8 P P P 7 7 8 8 9 7
Number of cooking zones being
used at the same time
1 2 3 4
Connection 6.5 kW
210 P P P P 9 P P 9 9 P 9
160 P 8 P P P 8 8 P P P 8 P
160 P P P P P P P P P
160 P P P P P P P P P
English • 37

38 • English
use of the oven
5
Important! In cookers equipped with the electronic timer, the time [0.00] will start flashing in the display field upon
connection to the power supply. Set the timer with the current time. If the current time is not set, operation of the oven is
impossible.
ELECTRONIC TIMER
OK - button to select mode of operation
> - plus button [ + ]
< - minus button [ - ]
- appliance on indicator
- minute minder indicator
- duration indicator
- end time indicator
SETTING THE CURRENT TIME
After connection to the mains or reconnection after a power cut the display shows flash 0.00.
• Press the [ OK ] key to set the current time for the first time. The display will show the symbol
.
• Press and hold the keys [ < ] / [ > ] within 7 seconds to set the current time.
• To store the new time setting, wait approximately 7 seconds after the time has been set. The dot below the symbol will
stop flashing.
• To adjust the time later, press the keys [ < ] and [ > ] simultaneously and adjust the current time while the dot below the
symbol is flashing.
• To store the new time setting, wait approximately 7 seconds after the time has been set. The dot below the symbol will
stop flashing. The current time is adjusted.
Note: The oven can be turned on when you see the
symbol on the display.
MINUTE MINDER
The minute minder can be activated at any time, regardless of the status of other functions. The minute minder can be set
from 1 minute up to 23 hours and 59 minutes.
• Press the [ OK ] key. The
symbol flashes on the display.
• Set the minute minder using the keys [ < ] and [ > ]. The display shows the set time and
the symbol indicates the minute minder is activated.
As soon as the set time has passed an alarm signal will sound and the symbol flashes.
• Press and hold any key to mute the alarm. The
symbol will be off and the display will show
the current time after approximately 7 seconds.
Note! If no key is touched, the alarm will turn off automatically after approximately 7 minutes.
SEMI
-
AUTOMATIC OPERATION
Use this function if the oven is to be switched off after a specific duration.
• Set the oven function knob and the temperature knob to the setting at which you want the
oven to operate.
• Press the [ OK ] key until the display shows dur and the
symbol flashes.
• Set the required preparation time using the keys [ < ] or [ > ]. The preparation time can be set
from 1 minute to 10 hours.
• The set time will be saved in the memory after about 7 seconds. The display will show the
current time and the symbol.
• Once the preparation time has elapsed the oven will turn off automatically. You will hear an
alarm and the symbols
and will be flashing.
• Press and hold any key to mute the alarm. The symbols and will be off and the display will show the current time
after approximately 7 seconds.
• Turn the knobs for the oven function and the temperature to the off setting [ 0 /
].
OK
OK
OK
OK

English • 39
AUTOMATIC OPERATION
Use this function if the oven is to be switched on for a specified period of time and switched off
at a fixed hour.
Set the preparation time and the end time.
Example: the current time is 11:00. The cooking time is 1 hour. The dish has to be done by 14:00.
The oven starts cooking at 13:00 (14:00 minus 1 hour) on the preset temperature and oven
function and will finish at 14:00.
• Press the [ OK ] key until the display shows dur and the
symbol flashes.
• Set the required preparation time using the keys [ < ] or [ > ].
• Press the [ OK ] key repeatedly until the display shows End and the symbol flashes.
• Set the switch off time (preparation end time) using the keys [ < ] or [ > ]. The end time is
limited to a period of 23 hours and 59 minutes.
• Set the oven function knob and the temperature knob to the setting at which you want the
oven to operate. Both symbols and are now active. Automatic operation has been set
• Once the preparation time has elapsed the oven will turn off automatically. You will hear an
alarm and the symbols
and will be flashing.
• Press and hold any key to mute the alarm. The symbols and will be off and the display
will show the current time after approximately 7 seconds - i.e. 14:02.
• Turn the knobs for the oven function and the temperature to the off setting [ 0 /
].
CANCEL SETTINGS
The timer and the automatic function settings may be cancelled at any time.
• Press the keys [ < ] and [ > ] simultaneously to cancel the automatic function settings.
• Press the [ OK ] key to select the timer settings and then press the keys [ < ] and [ > ] simultaneously to cancel the timer.
CHANGE THE TONE OF THE ALARM SIGNAL
The tone of the alarm signal may be changed as follows:
• Press the keys [ < ] and [ > ] simultaneously.
• Select with the [ OK ] key the function ton. The display will flash.
• Select with the key [ > ] the desired tone in the following order: ton 1, ton 2 or ton 3
or
• select with the key [ < ] the desired tone in the reverse order: ton 3, ton 2 or ton 1.
OK
OK
OK
OK
OK
ADJUSTING THE BRIGHTNESS OF THE DISPLAY
You can adjust the brightness of the display in the range of 1 to 9, where 1 is the darkest and 9 is
the brightest. The brightness setting applies to an inactive control panel, i.e. when none of the
controls are used 7 seconds.
• Press the keys [ < ] and [ > ] simultaneously.
• Press the [ OK ] key repeatedly to select the bri setting. The settings can be accessed in
sequence ton (tone) and bri (brightness).
• Select the desired brightness with the key [ > ] in the following order: 1 to 9
or
• select the desired brightness with the key [ < ] in the reverse order: 9 to 1.
Note: The display is at its brightest setting when active, i.e. a control was touched within the last 7 seconds.
OK
NIGHT MODE
The display is dimmed during the night hours: 22:00 - 6:00.

operating the cooking section
6
Only use pans that are suitable for an induction hob.
The cooking section works by means of electronic sensors that are operated by touching the corresponding touch control.
At each touch of a touch control, you can hear a sound signal.
SWITCHING ON THE COOKING SECTION
Switch on the cooking section by pressing the ON/OFF key for a few seconds. The displays of all cooking zones show a [0].
Ifno cooking zone is selected within 10 seconds, the cooking section switches off automatically.
SWITCHING OFF THE COOKING SECTION
Switch off the cooking section at any time by pressing the ON/OFF key for a few seconds.
The ON/OFF key always has priority in the switching off function.
SWITCHING ON A COOKING ZONE
Press the touch control of the cooking zone you wish to use. The display indicates [0] at the chosen cooking zone.
Place the pan on the cooking zone. Select the required power with the + key or - key.
To bring food to the boil quickly, you select the highest power [ 9 ] and then press the + key once more. The display shows
aP, indicating the Boost mode.
BOOST MODE
-
The Boost mode provides extra power and can be adjusted for one zone each time. Select a cooking zone, set the power
to the highest position [ 9 ] and press the + key once more. The display of the cooking zone concerned now shows a P,
indicating the Boost mode.
To switch off the Boost mode, select the cooking zone and press the - key. The P disappears from the display.
After 10 minutes, the Boost mode automatically switches back to the set power.
When a different cooking zone is also switched on, the Boost mode of the previously selected cooking zone is
cancelled. In other words, the Boost mode can only be used when there is only one cooking zone active.
In that case, the power of the second cooking zone is reduced automatically. The required power reduction is
shown through flashing of the cooking zone concerned. The display flashes for 3 seconds and during that time
adjustments can be made before the power is reduced automatically.
SWITCHING OFF A COOKING ZONE
Select the cooking zone you wish to switch off by pressing the accompanying key. Touch the - key to reduce the power
to [0] or press the accompanying cooking zone key
for 3 seconds.
If the cooking zone is hot, the display shows a [H] instead of an [0].
SWITCHING OFF ALL COOKING ZONES AT THE SAME TIME
To switch off all cooking zones at the same time, you must press the ON/OFF key. On the displays of all cooking zones that
are still hot, you can see an [H].
RESIDUAL HEAT INDICATOR
-
/
The residual heat indicator shows that the glass is still too hot to touch in the area of the cooking zone.
If the area of the cooking zone is still too hot, an [H] appears in the display of the cooking zone concerned, when the
temperature is above 60°C. Once the temperature has dropped between 45°C and 60°C, the [H] changes to [h].
Theresidual heat is low. Once the temperature is below 45°C, the residual heat indicator switches off.
When the residual heat indicator lights up, do not touch the cooking zone concerned to prevent burns and do
not place objects on it that are sensitive to heat!
In case of a power interruption, the residual heat is not shown. However, the cooking zone can still be hot!
KEY LOCK
The key lock is intended for locking and setting a safe mode during use. Children will not be able to switch on the hob by
accident. Also adjustment to a higher power or other changes are not possible. In this mode it is only possible to switch off
the cooking section.
The key lock is active when the key lock
is pressed for 5 seconds. This is confirmed by a sound signal. The key lock
indicator light burns and control of the cooking section is blocked.
To cancel the key lock, press the key lock
for 3 seconds.
40 • English

SETTING THE TIMER FUNCTION
The timer function can be used in two way: cooking timer and egg timer.
Cooking timer
The cooking timer is coupled to a cooking zone and can be set separately for each cooking zone. Contrary to the egg timer,
the cooking timer switches off the cooking zone when the set time has passed.
• Switch on the cooking section with the ON/OFF key
and select a cooking zone .
• Adjust the power with the + and - keys.
• Press the TIMER key
and set the required cooking time with the + and - keys.
• The burning LED indicates for which cooking zone the cooking timer has been set.
The cooking timer can be set independently on all operating cooking zones.
When more than one cooking timer is set on the display of the timer, the shortest time is shown. The flashing
LED indicates for which cooking zone this is.
When the set cooking time has expired, a beep sound can be heard. The beep sound stops automatically after 2 minutes or
after a random key has been touched.
The programmed cooking zone is switched off and [H] appears in the display if the area of the cooking zone is hot.
To set an additional cooking timer, proceed as follows:
• Select a different cooking zone
.
• Adjust the power with the + and - keys.
• Press the TIMER key and set the required cooking time with the + and - keys.
• The burning LED indicates for which cooking zone the cooking timer has been set.
• 10 seconds after the last setting, the display shows the time of the cooking zone of which the time expires first (if several
cooking zones are programmed). The accompanying LED flashes in the display.
To adjust the set cooking time, proceed as follows:
• Select the required cooking zone
. The set power flashes in the display.
• Press the TIMER key
• Set the new required cooking time using the + and - keys.
Switching off the cooking timer manually, if necessary:
• Select the cooking zone
of which you want to switch off the cooking timer. The set power lights up in the display.
• Then press the TIMER key for 3 seconds or change the time with the + and - keys to 00.
Egg timer
The egg timer can be used as an extra alarm, without having a cooking timer set for one of the cooking zones.
• Switch on the cooking section using the ON/OFF key
.
• Then press the TIMER key and set the required cooking time with the + and - keys.
The egg timer can be set from 0 to 99 minutes. If no keys are pressed during 10 seconds, the egg timer starts automatically
and the time is counted down.
When the set time has passed, a beep sounds and the timer flashes. The beep sound stops automatically after 2 minutes or
after a random key has been touched.
To change the time, press the TIMER key
once more and adjust the time with the + and - keys.
DISPLAY INDICATION
Indication on the display Description
/
Residual heat indicator: the cooking zone is still warm.
Heat mode is active.
Boost mode is active.
Quick boil timer is active.
There is no pan or there is an unsuitable pan on the active cooking zone.
English • 41

HEAT MODE
-
The heat mode keeps prepared dishes warm on the cooking zone. The selected cooking zone is on at a low power.
Thepower of the cooking zone is controlled in such a way by the heat mode, that the dish in the pan remains around 65°C.
The hot food that is ready to be eaten does not change in flavour and does not get stuck to the bottom of the pan.
The heat mode can also be used for melting butter or chocolate, for example.
Caution: the heat mode is not suitable for heating up cold food.
The heat mode functions best with a suitable pan with flat bottom, so that the sensor in the cooking zone is able to measure
the temperature properly.
The heat mode can be used on any cooking zone.
To prevent bacteria from developing in the food, we recommend that you do not keep the meals warm for a long period of
time. The control panel automatically switches off the heat mode after 2 hours.
The heat mode
is an extra power level between positions 0 and 1.
• Select the required cooking zone
.
• Adjust the temperature with the + and - keys on the heat mode .
• The display states . The heat mode is set.
To switch off the heat mode, you select the required cooking zone. Touch the - key to reduce the power to [0] or press the
accompanying cooking zone key
for 3 seconds.
If the cooking zone is hot, the display shows a [H] instead of an [0].
QUICK BOIL TIMER
-
The quick boil timer can be used to switch a selected cooking zone to the highest power for a certain period of time.
Afterthat, the appliance switches back to the set power (boil position). The boiling time depends on the set boiling position-
see table below.
To switch on the quick boil timer, proceed as follows:
• Select the required cooking zone
.
• Adjust the power with the + and - keys to the required position - such as 7.
• Press once more on the cooking zone key
. The display variably shows the and 7. The quick boil timer is set and the
cooking zone is heating at maximum power for 2 minutes.
• After 2 minutes the quick boiling timer stops and automatically switches the power back to the set position, in this case 7.
The quick boil timer can be stopped sooner by selecting the cooking zone and adjusting the power.
Set
power
Time
quick boil timer
(in minutes)
1 0.8
2 1.2
3 2.3
4 3.5
5 4.4
6 7.2
7 2
8 3.2
SAFE AUTOMATIC SWITCHING OFF
Each cooking zone is switched off automatically after a defined maximum cooking time, if the power has not been
changed. The maximum cooking time depends on the selected power.
Power Safe automatic switching off after:
- 1 - 2
8 hours
3 - 5 5 hours
6 - 9 1½ hours
42 • English

pans for induction
7
• Use pans with a thick, flat bottom with
the same diameter as the cooking zone
concerned. This reduces cooking time.
• A pan should always be placed in the
centre of the cooking zone.
• If you are cooking on the glass cooking
section in a pan with a strongly
reflecting (light metal surface) or thick bottom, itmay take longer for the dish to start boiling (up to 10 minutes extra). If
you want to bring a large quantity of liquid to the boil, the use of a pan with a flat dark bottom is recommended.
• The cooking zone can become damaged:
- if you switch it on without a pan on it or with an empty pan;
- if you use an unsuitable pan, for example, with a bottom that is not flat or is spherical, or a pan with a diameter that is
toosmall;
- do not use earthenware dishes, these cause scratches on the ceramic plate;
• Dry the bottom of the pan completely before you place it on the cooking section so that the heat is properly conducted
and the cooking zone is not damaged.
ENERGY SAVING
• The use of pans of which the bottom is somewhat hollow is recommended, because the heat of the cooking zone is
properly transferred in that case.
• The diameter of the bottom of the frying and cooking pans must match the diameter of the cooking zone. If the pan is
too small, there will be heat loss and the cooking zone can be damaged.
• Always use a lid on the pan to reduce cooking time.
• Choose a pan of the right size to suit the amount of food you want to cook. Small amounts in large pans mean energy will
be wasted.
• Reduce the power when the liquid is boiling.
• Do not use too much moisture or fat. Cooking or frying takes longer if you use too much.
• Select the correct power for the different cooking possibilities.
English • 43
correct false false

The oven has the following modes:
Oven mode Description
Oven lighting
The oven lighting can be switched on independently from the oven.
Bysetting the rotary button in this position, the interior of the oven is lit.
Quick heating
The upper heating element, grill element and fan are switched on.
To be used for preheating the oven.
Defrosting Only the fan is switched on, no heating element is being used.
Fan and supergrill
If the rotary button is in this position, the supergrill with fan mode is
activated. This mode speeds up the grilling process and adds more flavour
to the dish. Make sure the door of the oven is closed during cooking.
Supergrill
By means of the mode Supergrill dishes are grilled while the upper
heating element is also on. The mode ensures a higher temperature in the
higher section of the oven, as a result of which the dishes are browned
more. For grilling large portions of meat or for gratinated dishes.
Grill element
Superficial grilling is used to roast small portions of meat: to grill steaks,
schnitzels, fish, toast, sausages, oven dishes (the grilled food may not be
thicker than 2-3 cm, it should be turned over while roasting).
Lower heating element
At this position, only the lower heating element is on. Specific for pastry
that must be baked from the bottom (e.g. moist pastry with fruit).
Upper and lower heating
element
With this mode, the oven is heated in the conventional way. Ideal for
baking cakes, meat, fish, bread, pizza on a single level (preheating and
useof dark baking trays required).
operating the multifunctional oven
8
The multifunctional oven can be heated by means of a top and bottom heating element, a grill element and a heating
element for hot air circulation.
SWITCHING ON
The oven can be operated by means of the rotary button for the oven function - turn the rotary button to the required
mode to switch on the oven, and – and using the rotary button of the temperature controller – turn the rotary button to
therequired temperature to set the oven.
SWITCHING OFF
The oven can be switched off by turning both buttons back to the off position [
/ 0 ].
Caution! If an oven mode is set, the heating (of a heating element) only starts once the temperature is set.
0
5050
100
150
200
250
44 • English

Oven mode Description
Hot air
On the position hot air , heating the oven is supported in a controlled
manner by means of a hot air fan that is mounted on a central position
in the rear wall of the oven chamber. Compared to a conventional oven,
alower baking temperature is used.
This method ensures an even distribution of heat around the dishes in
the oven.
Upper and lower heating
element with fan
This mode is most suitable for baking cakes. When this mode is selected,
but the temperature is at 0, only the fan will be on. Handy for cooling
dishes.
Turbo hot air
The hot air and the lower heating element are on. This increases the
temperature at the bottom of the dish. Ideal for moist pastry and pizza.
ECO hot air
This mode ensures an optimum heating method for the oven that can be
used to save energy during the preparation of dishes. The oven lighting
will not function in this position.
Switching on the oven is indicated by two leds, a thermostat light and an indicator light.
The indicator led to the right of the clock indicates that the oven is switched on. If the thermostat light turns off, the oven
has reached the set temperature. If the recipe indicates that the dish must be placed in a preheated oven, you should do
sowhen the thermostat light switches off for the first time.
During the preparation the thermostat light will occasionally switch on and off (the temperature in the oven is kept at the
right temperature). The indicator led can also burn when you place the rotary button in the "lighting of the oven" position.
USING THE GRILL
During the grilling process, the dishes are heated by an infrared heating element.
• Set the rotary button of the oven to the grill position
to switch on the grill.
• Preheat the oven for approximately 5 minutes (with door closed).
• Place the baking tray with the dish at the right level in the oven.
• Close the door of the oven.
For the grill mode and super grill mode, the temperature must be set to 250°C. For the grill mode with
fan this may be 190°C maximum.
Caution! During grilling, the door of the oven should be closed.
Do not let children get near the oven while the grill is being used. The exterior of the oven can get hot.
PASTRY
• Use the supplied baking trays or the grille for preparing pastry.
• Pastry can be made in baking moulds or on baking trays that must be placed on the grille. Use dark baking moulds, as they
conduct heat better and shorten the baking time.
• It is not recommended to use baking moulds and baking trays with a light shining surface when using the conventional
heating function (upper and lower heating elements). In the case of this type of baking moulds, the bottom of the pastry
is not baked properly.
• When using the hot air mode, it is not necessary to preheat the oven. When using a different oven mode, the oven does
have to be preheated before the pastry is placed in the oven.
• Use a wooden skewer to check that the cake is done. If the cake is done, the skewer remains dry and clean when you
insert it.
• To prevent the cake from collapsing, we recommend leaving the cake in the oven for another 5 minutes after switching
off the oven.
• Normally, the baking temperatures when using the hot air mode are approximately 20 to 30 degrees lower compared to
conventional baking (use of the upper and lower heating elements).
• The data for pastry in the baking table are only an indication and can be corrected according to your own experience and
culinary taste.
• If the information in cook books clearly deviates from the values in the manual of the cooker, it would be best to observe
the guidelines in the manual.
baking tips and baking tables
9
English • 45

ROASTING MEAT
• In the oven, it is possible to prepare portions of meat of more than 1 kg. It is better to prepare smaller pieces on the gas
burners of the cooker.
• Use ovenproof dishes when roasting meat. The handles of these oven dishes should also be able to resist high
temperatures.
• When roasting meat on the grill, a baking tray with a small layer of water can be placed at the lowest level to collect any
cooking liquid.
• Turn the meat at least once during the cooking time. In order to give more flavour to the meat, you can scoop the created
cooking liquid or sauce over the dish. This can also be done with hot salty water, but never with cold water.
HEATING MODE ECO HOT AIR
• When using the ECO hot air mode, an optimum preparation method of the oven is started that is intended to save energy
during the preparation of meals.
• It is not possible to shorten the cooking time by setting a higher temperature. Preheating the oven is not recommended.
• Do not change temperature settings during preparation and keep the oven door closed.
BAKING TABLE for when using the ECO hot air mode
Dish Oven mode
Temperature - °C
Level
Time in minutes
180 - 200 2 - 3 50 - 70
180 - 200 2 50 - 70
190 - 210 2 - 3 45 - 60
200 - 220 2 90 - 120
200 - 220 2 90 - 160
180 - 200 2 80 - 100
BAKING TABLE for when using the other modes
Dish Oven modes
Temperature - °C
Level
Time in minutes
160 - 200 2 - 3 30 - 50
160 - 180 2 - 3 20 - 40*
140 - 160 2 - 3 10 - 40*
200 - 230 1 - 3 10 - 20
210 - 220 2 45 - 60
160 - 180 2 - 3 45 - 60
190 2 - 3 60 - 70
46 • English

Dish Oven modes
Temperature - °C
Level
Time in minutes
210 4 14 - 18
225 - 250 2 120 - 150
160 - 180 2 120 - 160
160 - 230 2 90 - 120
160 - 190 2 90 - 120
190 2 - 3 70 - 90
160 - 180 2 45 - 60
175 - 190 2 60 - 70
190 - 210 2 40 - 50
170 - 190 3 40 - 50
* small pastry
Important! The data in the baking table are only an indication and can be corrected according to your own experience and
culinary taste.
English • 47

ACCESSORIES
Clean the separate accessories in the same way as the baking tray and grill by means of warm water and washing-up liquid.
Properly dry everything before using it again.
REPLACING THE OVEN LAMP
In order to avoid an electric shock, fully switch off the cooker by removing the plug from the socket and
unscrewing the fuse in the distribution board.
• Loosen the glass protective cover by turning it anti-clockwise. Clean it and dry it properly.
• Replace the oven lamp with a similar lamp (25 W, 230V, E14 fitting and suitable for high temperatures
- up to 300°C).
• Fasten the glass protective cover.
• Insert the plug in the socket or screw the fuse in the distribution cabinet.
Cleaning and maintenance of the cooker has a major effect on life span and trouble-free operation. The cooker should not
be cleaned with a steam cleaner or high pressure cleaner.
Switch off the cooker prior to cleaning. Make sure that all rotary buttons are in the off position [
/ 0 ]. The oven
should only be cleaned once it is cooled down.
CLEANING THE COOKING SECTION
Allow all cooking zones to cool down before cleaning the cooking section and remove the plug from the socket before
youstart.
• When cleaning the surface of the cooking section, do not use aggressive abrasive cleaning agents, spray cans or
sharp objects that have not been developed for this purpose.
• Clean the surface of the cooking section daily with a damp cloth and a mild cleaning agent, such as a washing-up liquid.
Dry properly with paper towels or a dry tea towel.
• Boiled over food can be removed by soaking it with a damp cloth and a little bit of washing-up liquid, or you can use a glass
scraper. Caution: the glass scraper is sharp. Keep it away from children.
• Use a special cleaning agent for ceramic/induction cookers in case of stubborn stains. Caution: observe the instructions
on the packaging.
CLEANING THE OVEN
The oven must be cleaned after every use. When cleaning, switch on the oven lighting, so that you have a better view in the
oven chamber.
The interior of the oven must only be cleaned with warm water and a little bit of washing-up liquid.
The oven can also be cleaned by means of steam:
• Place an oven dish with 250 ml (1 glass) of water on a baking tray at the first level in the bottom of the oven.
• Close the door of the oven.
• Set the oven temperature to 50°C and set the oven mode to heating from below
.
• Heat the oven in this position for 30 minutes.
• Open the door of the oven and wipe clean the interior of the oven with a cloth or a soft sponge. Then clean the
interior of the oven with a dry cloth or sponge and warm water and a little bit of washing-up liquid.
• Properly wipe the interior of the oven dry.
• Do not use aggressive, abrasive cleaning agents or sharp objects to clean the oven and the oven door.
cleaning and maintenance
10
48 • English

A
B
C
D
1
2
3
1
2
3
DISASSEMBLING AND MOUNTING THE OVEN DOOR
The oven door can be disassembled to make it easier to clean the interior of the oven and the oven door.
• Open the oven door and fold the safeguard on the hinge upwards (fig. A). Close the door a little and lift the door upwards
and to the outside to remove it.
• To assemble the door, proceed in reverse order. When mounting, make sure that the recess on the hinge is correctly
placed on the protrusion of the hinge holder. Always place back the safeguard after mounting the door and properly press
it in its place. If you do not place back the safeguard correctly, the hinge could get damaged when you try to close the door.
DISASSEMBLING AND ASSEMBLING THE GLASS PANE OF THE OVEN DOOR
In order to make it easier to clean the oven door, it is possible to remove the inner glass pane.
• With the aid of a flat screwdriver, push loose the upper edge of the door while carefully lifting it on the sides (fig. B).
• Remove the upper edge of the door (fig.B, C).
• Carefully pull the inner glass pane from the holder (in the lower section of the door) fig. D.
• Wash the glass pane with warm water and a little washing-up liquid.
• Proceed in reverse order when assembling the glass pane. The smooth part of the glass pane should be on the top side.
Attention! Do not press the top frame of the door on both sides of the door at the same time. For a correct assembly of
the top frame of the door you must first press the left end against the door and then press the right end until you hear a
clear “click” sound. After this you press the left end until you hear a clear "click" sound.
REGULAR CHECK
In addition to daily maintenance and cleaning of the cooker, you must also:
• regularly check the function of the control elements and the working parts of the cooker. Once the warranty period has
expired, you must have the cooker subjected to a technical check at least once per year by a maintenance service;
• remedy the established faults
• perform a regular check of the working parts of the cooker.
Caution!
All repairs and settings must be performed by a certified maintenance service or an certified installer with the right
qualifications.
English • 49

11
In case of a breakdown, you must:
• switch off the working parts of the cooker;
• disconnect the power supply;
• apply for a repair;
• some small problems can be resolved by the user himself, using the instructions in the table below. Check all points in the
table in sequence, before contacting the maintenance or customer service.
Breakdown (code) Cause What to do
The cooker does not work. No power supply. Check the fuse in the distribution cabinet, replace a burnt
fuse if necessary.
The lighting in the oven does
not work.
The lamp is loose or defective. Fasten the lamp or replace the defective lamp (see section
Cleaning and Maintenance).
A cooking zone switches off
automatically and the display
shows [ H ].
The maximum cooking time has
been reached.
Switch on the cooking zone again.
The cooker does not respond
and a short beep sound can
be heard.
The child lock/key lock is activated. Switch off the child lock/key lock.
The entire cooker switches off.
After switching on, no value was
entered within 10 seconds.
Switch on the cooking section and set a cooking zone.
There is something on the touch
control(s) or they are dirty.
Make the touch controls free or clean them.
The residual heat indicator is
not shown, while the cooking
zone is hot.
No power supply or a short
interruption of the power supply.
Check that the power supply is restored and switch the
cooking section on and off.
The glass plate of the cooking
section is cracked.
Hazard! Switch off the power supply and remove the plug of the appliance. Contact the
Inventum service department.
The cooking section makes
ascratching noise.
This is a normal noise. The cooling fan of the electrical parts is working.
The cooking section makes
awhistling noise.
This is a normal noise. In accordance with the function frequency of the induction coils during
theuse of a number of cooking zone, the cooking section makes a light whistling noise at
maximum power.
E2
The cooking section is
overheated.
Switch off the cooking section and allow the cooking zones
to cool down. Switch the cooking section on again and
checkthat the ventilation is running smoothly.
Check that the pan meets the requirements stated in
section 6.
breakdowns and solutions
50 • English

Manufacturer INVENTUM
Model number VFI5042RVS
Appliance type Induction cooker
Number of cooking zones 4
Heating technology - cooking section induction
Diameter per cooking zone [cm] (front left) Ø 21
Diameter per cooking zone [cm] (rear left) Ø 16
Diameter per cooking zone [cm] (rear right) Ø 16
Diameter per cooking zone [cm] (front right) Ø 16
Energy consumption per cooking zone [Wh/kg] (front left) 188.9
Energy consumption per cooking zone [Wh/kg] (rear left) 188.9
Energy consumption per cooking zone [Wh/kg] (rear right) 188.9
Energy consumption per cooking zone [Wh/kg] (front right) 188.9
Energy consumption of the hob [kg] 188.9
Residual heat indicator per cooking zone
On / off key
Voltage on indicator
Timer
Number of oven chambers 1
Heat source per oven chamber electric
Volume per oven chamber 65
Energy consumption according to EN50304 standard 0.78 kWh
Energy-efficiency-index per oven chamber 95.1
Construction
Material stainless steel
Operation buttons and touch
controls
Accessories baking tray
grille
Displays LED
Technical data
Dimension (wxdxh) in mm 500 x 600 x 850
Nett weight in kg 39.0 kg
Electrical connected load [W] 10100 W
Mains voltage [V] / mains frequency [Hz] 230-400V/50Hz
Remark: On the information plate you will also find the technical data of the cooker.
product fiche
12
English • 51

Hoe belangrijk service is, hoeven we je niet te vertellen. We ontwikkelen onze producten zodat je er jarenlang
onbezorgd plezier van kan hebben. Ontstaat er toch een probleem, dan vinden we dat je direct een oplossing mag
verwachten. Daarom bieden we je op onze producten een omruilservice, bovenop de rechten en vorderingen die je
op grond van de wet toekomen. Door een product of onderdeel om te ruilen, besparen we je tijd, moeite en kosten.
2 jaar volledige fabrieksgarantie
1. Op alle producten van Inventum krijg je als consument standaard 2 jaar volledige fabrieksgarantie. Binnen deze periode
wordt een defect product of onderdeel altijd gratis omgeruild voor een nieuw exemplaar. Om aanspraak te maken op de
2jaar volledige fabrieksgarantie, kun je teruggaan naar de winkel waar je het product hebt gekocht of contact opnemen
met de consumentenservice van Inventum via het contactformulier op www.inventum.eu/service-aanvraag.
2. De garantieperiode van 2 jaar begint te lopen op de datum van aankoop van het product.
3. Voor het recht op garantie dien je een kopie van het originele aankoopbewijs te kunnen overleggen.
4. De garantie geldt uitsluitend bij normaal huishoudelijk gebruik van de Inventum producten binnen Nederland.
5 jaar Inventum garantie
1. Op de meeste groot huishoudelijke apparatuur en een selectie klein huishoudelijke producten biedt Inventum de
5jaar Inventum garantie. Deze 5 jaar Inventum garantie bestaat uit de 2 jaar volledige fabrieksgarantie en daarna 3 jaar
aanvullende garantie. Het enige dat je hoeft te doen voor het recht op 3 jaar aanvullende garantie is het product te
registreren binnen 45 dagen na aankoop. In de volgende paragraaf lees je meer over het registreren van het product.
2. Voor de 5 jaar Inventum garantie geldt dat een defect product of onderdeel gedurende de eerste 2 jaar altijd gratis
wordtomgeruild voor een nieuw exemplaar. Gedurende het 3e tot en met het 5e jaar betaal je alleen de omruilkosten.
Deactuele omruilkosten kun je terugvinden op www.inventum.eu/omruilkosten.
3. Om aanspraak te maken op de 5 jaar Inventum garantie kun je teruggaan naar de winkel waar je het product hebt gekocht
of contact opnemen met de consumentenservice van Inventum via het formulier op www.inventum.eu/service-aanvraag.
4. De garantieperiode van 5 jaar begint te lopen op de datum van aankoop van het product.
5. Voor het recht op garantie dien je een kopie van het originele aankoopbewijs te kunnen overleggen.
6. De garantie geldt uitsluitend bij normaal huishoudelijk gebruik van de Inventum producten binnen Nederland.
Productregistratie
1. De 3 jaar aanvullende garantie is eenvoudig en kosteloos te regelen door het product binnen 45 dagen na aankoop
te registreren via de website www.inventum.eu/garantieregistratie. Wanneer je het product niet binnen 45 dagen na
aankoop hebt geregistreerd, heb je nog tot 2 jaar na aankoop de tijd om dit te regelen. Er zijn dan wel kosten aan deze
registratie verbonden. De eenmalige registratiekosten bedragen € 89,- voor elk afzonderlijk product. Registreren is alleen
mogelijk voor producten waar de 5 jaar Inventum garantie op van toepassing is. Of het product in aanmerking komt voor
de 5 jaar Inventum garantie vind je in de gebruiksaanwijzing van het product en bij de informatie over het product op de
website van Inventum.
2. De garantieperiode begint steeds te lopen vanaf de datum van aankoop van het product. Ook wanneer het product
pas later voor aanvullende garantie wordt geregistreerd, wordt de garantieperiode vanaf de originele aankoopdatum
berekend.
3. De 3 jaar aanvullende garantie kun je alleen aanvragen als je beschikt over een kopie van het originele aankoopbewijs en
het Inventum 5 jaar garantiecertificaat.
Groot huishoudelijke apparatuur
1. Storingen of defecten aan groot huishoudelijke apparatuur (vrijstaand- en inbouw witgoed) kunnen worden gemeld via
het formulier op www.inventum.eu/service-aanvraag, telefonisch bij de consumentenservice van Inventum of via de
winkel waar je de apparatuur hebt gekocht. Het telefoonnummer van de consumentenservice vind je op www.inventum.eu.
2. Bij gemelde storingen of defecten aan groot huishoudelijke apparatuur heeft Inventum de mogelijkheid om ter plaatse
bij de consument in Nederland een witgoedmonteur het defecte apparaat te laten onderzoeken en vervolgens een
reparatie uit te laten voeren. De consumentenservice van Inventum kan ook besluiten dat het apparaat wordt omgeruild.
3. Als je een storing of defect aan groot huishoudelijke apparatuur meldt in de eerste 2 jaar vanaf de datum van aankoop,
brengt Inventum geen kosten in rekening voor omruilen, voorrijden, onderdelen, materiaalgebruik en arbeidsloon.
4. Als je het product op de hiervoor beschreven wijze hebt geregistreerd op www.inventum.eu/garantie-registratie en je
vervolgens een storing aan groot huishoudelijke apparatuur meldt in het 3e t/m 5e jaar vanaf de datum van aankoop, dan
is de 5 jaar Inventum garantie van toepassing en wordt het apparaat kosteloos gerepareerd of omgeruild. Je bent dan bij
reparatie of omruiling van het apparaat alleen omruilkosten verschuldigd. De actuele omruilkosten kun je terugvinden op
www.inventum.eu/omruilkosten. Indien je het product niet hebt geregistreerd, dan is de 3 jaar aanvullende garantie niet
van toepassing.
algemene service- en garantievoorwaarden
52 • Nederlands

Nederlands • 53
5. Bij een melding van een storing of defect zal een monteur binnen 1 werkdag contact opnemen voor het maken van een
bezoekafspraak. Bij melding in het weekend of op feestdagen is dit de eerstvolgende werkdag.
6. Indien je een storing of defect meldt via het formulier op www.inventum.eu/service-aanvraag, word je via mobiele
berichten en e-mail op de hoogte gehouden van de voortgang.
7. De garantieperiode begint te lopen op de datum van aankoop van het product.
8. Voor het recht op garantie dien je een kopie van het originele aankoopbewijs en het Inventum 5 jaar garantiecertificaat
tekunnen overleggen.
9. De garantie geldt uitsluitend bij normaal huishoudelijk gebruik van de Inventum producten binnen Nederland.
Storingen of defecten buiten de garantieperiode
1. In geval van storingen of defecten aan klein huishoudelijke apparatuur of groot huishoudelijke apparatuur buiten
de garantieperiode, kan hiervan melding worden gemaakt bij de consumentenservice via het contactformulier
www.inventum.eu/service-aanvraag of door te bellen met de consumentenservice.
2. De consumentenservice kan je vragen het product voor onderzoek of reparatie op te sturen. De kosten van verzending
zijn voor jouw rekening.
3. Aan het onderzoek naar de mogelijkheid tot repareren zijn kosten verbonden. Je moet hier vooraf toestemming voor geven.
4. Bij groot huishoudelijke apparatuur kan Inventum op jouw verzoek een witgoedmonteur sturen. De voorrijkosten,
onderdeel- en materiaalkosten en arbeidsloon worden dan aan je in rekening gebracht.
5. In geval van opdracht tot reparatie moeten de reparatiekosten vooraf worden voldaan. Bij reparatie door een
witgoedmonteur, dienen de kosten van de reparatie ter plaatse bij de monteur, bij voorkeur via pinbetaling, te
wordenafgerekend.
Uitgesloten van garantie
1. De hiervoor genoemde garanties gelden niet in geval van:
• normale slijtage;
• onoordeelkundig of oneigenlijk gebruik;
• onvoldoende onderhoud;
• het niet in acht nemen van de bedienings- en onderhoudsvoorschriften;
• ondeskundige montage of reparatie door derden of door de consument zelf;
• door de consument toegepaste niet originele onderdelen;
• zakelijk of bedrijfsmatig gebruik;
• het serienummer en/of rating-label is verwijderd.
2. Tevens geldt de garantie niet voor normale verbruiksartikelen, zoals:
• kneedhaken, bakblikken, (koolstof)filters, etc.;
• batterijen, lampjes, koolstoffilters, vetfilters enz.;
• externe verbindingskabels;
• glazen accessoires en glazen delen zoals ovendeuren;
• en soortgelijke zaken.
3. Buiten de garantie vallen transportschades, voor zover deze niet door Inventum zijn veroorzaakt. Controleer daarom je
nieuwe apparatuur voordat je deze in gebruik neemt. Als je beschadigingen aantreft, dien je deze binnen 5 werkdagen na
aankoop te melden bij de winkel waar je het product hebt gekocht, of bij de consumentenservice van Inventum via het
contactformulier op de website www.inventum.eu/service-aanvraag. Indien transportschades niet binnen deze termijn
worden gemeld, aanvaardt Inventum geen enkele aansprakelijkheid ter zake.
4. Van garantie en/of vervanging zijn uitgesloten: defecten aan, verlies en beschadiging aan het apparaat als gevolg van een
gebeurtenis die gewoonlijk verzekerd is onder de inboedelverzekering.
Van belang om te weten
1. Vervanging of herstel van een defect product of een onderdeel daarvan leidt niet tot verlenging van de oorspronkelijke
garantietermijn.
2. Vervangen onderdelen, verpakkingsmateriaal en omgewisselde apparaten worden meegenomen door de
witgoedmonteur en worden eigendom van Inventum.
3. Indien een klacht ongegrond is, komen alle kosten die daardoor zijn ontstaan voor rekening van de consument.
4. Na verloop van de garantietermijn worden alle kosten voor herstel of vervanging, inclusief administratie-, verzend- en
voorrijkosten aan de consument in rekening gebracht.
5. Inventum is niet aansprakelijk voor schade die is ontstaan als gevolg van onjuiste inbouwsituaties.
6. Inventum is niet aansprakelijk voor schade veroorzaakt door van buiten het apparaat ontstane oorzaken, tenzij deze
aansprakelijkheid voortvloeit uit dwingendrechtelijke bepalingen.
7. Op deze garantie- en servicevoorwaarden is Nederlands recht van toepassing. Geschillen zullen uitsluitend worden
berecht door de bevoegde Nederlandse rechter.

54 • English
We do not need to remind you of the importance of service. After all, we develop our products to a standard so that
you can enjoy them for many years, without any concerns. If, nevertheless, there is a problem, we believe you are
entitled to a solution straight away. Hence our products come with an exchange service, on top of the rights and
claims you are entitled to by law. By exchanging a product or part, we save you time, effort and costs.
2-year full manufacturer’s warranty
1. Customers enjoy a 2-year full manufacturer’s warranty on all Inventum products. Within this period, a faulty product
or part will always be exchanged for a new model, free of charge. In order to claim under the 2-year full manufacturer’s
warranty, you can either return the product to the shop you bought it from or contact the Inventum costumer service
department via the form at www.inventum.eu/service-aanvraag.
2. The 2-year warranty period starts from the date the product is bought.
3. In order to claim under the warranty, you must produce a copy of the original receipt.
4. The warranty applies only to normal domestic use of Inventum products within the Netherlands.
5-year Inventum warranty
1. Inventum offers a 5-year warranty on most large domestic appliances and a selection of small domestic appliances.
This 5-year Inventum warranty consists of a 2-year full manufacturer’s warranty, extended by a further 3-year warranty.
The only thing you need to do to qualify for the 3-year extended warranty is to register the product within 45 days of
purchase. You can read more about registering the product in the following paragraph.
2. In accordance with the 5-year Inventum warranty provisions, a faulty product or part will always be exchanged for a new
model during the first 2 years under the warranty. During the 3rd to 5th year under the warranty, you will only pay the costs
of exchange. The current costs of exchange are listed at www.inventum.eu/omruilkosten.
3. In order to claim under the 5-year Inventum warranty, you can either return the product to the shop you bought it from or
contact the Inventum costumer service department via the form at www.inventum.eu/service-aanvraag.
4. The 5-year warranty period starts from the date the product is bought.
5. In order to claim under the warranty, you must produce a copy of the original receipt.
6. The warranty applies only to normal domestic use of Inventum products within the Netherlands.
Product registration
1. The 3-year extended warranty is easy to obtain, free of charge, by registering the product within 45 days of purchase,
viathe website www.inventum.eu/garantie- registratie. If you did not register the product within 45 days of purchase,
youcan still do so up to 2 years after the purchase date. However, there will be a charge. The one-off registration charge
is € 89 for each separate product. Registration is possible only for products that are subject to the 5-year Inventum
warranty. Whether the product qualifies for the 5-year Inventum warranty is stated in the product user manual and in
theproduct information sheet, on Inventum’s website.
2. The warranty period always starts from the date the product is bought. If the product is registered for the extended
warranty at a later date, the warranty period still starts from the original date of purchase.
3. The 3-year extended warranty can only be applied for if you are in the possession of a copy of the original receipt and
theInventum 5-year warranty certificate.
Large domestic appliances
1. Breakdowns or faults in large domestic appliances (separate and built-in white goods) can be registered via the form at
www.inventum.eu/service-aanvraag, by calling the Inventum costumer service department or in the store where you
bought the device. The telephone number of the costumer service department can be found at www.inventum.eu.
2. In the event of breakdowns or faults in large domestic appliances, Inventum will have the option to have a service
engineer inspect the faulty device onsite at the customer in the Netherlands and to carry out repairs, there and then.
TheInventum customer service department can also decide to have the device exchanged.
3. If you suffer a breakdown or fault in a large domestic appliance during the first 2 years from the date of purchase,
Inventum will not charge any costs for the exchange, call-out or for parts and labour.
4. If you registered the product as described before at www.inventum.eu/garantie-registratie and you subsequently report
a breakdown of a large domestic appliance in the 3rd to 5th year of the date of purchase, the 5-year Inventum warranty
applies and the device will be repaired or exchanged, free of charge. In the event of a repair or exchange of the device,
you only pay the costs of exchange. The current costs of exchange are listed at www.inventum.eu/omruilkosten. If you
didnot register the product, the 3-year extended warranty does not apply.
5. When reporting a breakdown or fault, a service engineer will contact the customer within 1 working day in order to make
an appointment. When the report is made in a weekend or during a public holiday, this will be the next working day.
6. If you report a breakdown or fault via the form at www.inventum.eu/service-aanvraag, you will be kept informed of the
progress via mobile messages and e-mail.
general terms and conditions of service and warranty

English • 55
7. The warranty period starts from the date the product is bought.
8. In order to claim under the warranty, you must produce a copy of the original receipt and the Inventum 5-year warranty
certificate.
9. The warranty applies only to normal domestic use of Inventum products within the Netherlands.
Breakdowns or faults outside the warranty period
1. Breakdowns or faults in small or large domestic appliances outside the warranty period, can be reported to the costumer
services department via the form at www.inventum.eu/service-aanvraag or by calling the costumer services department.
2. The costumer services department may ask you to send the product for inspection or repair. The costs of dispatch will
be at your expense.
3. The inspection to establish whether repair is possible involves a charge. You need to grant your permission for this,
inadvance.
4. In the event of a large domestic appliance, Inventum, at your request, can send out a service engineer. In that case,
youwill be charged the call-out costs, as well as parts and labour.
5. In the event of an instruction to repair, the repair costs must be paid in advance. In the event of a repair by a service
engineer, the costs of the repair must be settled with the engineer onsite, preferably by means of PIN payment.
Warranty exclusions
1. The following is excluded from the aforesaid warranties:
• normal wear and tear;
• improper use or misuse;
• insufficient maintenance;
• failure to comply with the operating and maintenance instructions;
• unprofessional installation or repairs by third parties or the customer himself;
• non-original parts used by the customer;
• use for commercial or business purposes;
• removal of the serial number and/or rating label.
2. In addition, the warranty does not apply to normal consumer goods, such as:
• dough hooks, baking tins, (carbon) filters, etc.;
• batteries, bulbs, carbon filters, fat filters etc.;
• external connection cables;
• glass accessories and glass parts such as oven doors;
• and similar items.
3. Transport damage not caused by Inventum is also excluded. Therefore, inspect your new device before starting to use it.
If you detect any damage, you must report this to the store where you purchased the product within 5 working days, or to
the Inventum customer service department via the form at www.inventum.eu/service-aanvraag. If transport damage is
not reported within this period, Inventum does not accept any liability in this respect.
4. The following are excluded from warranty and/or replacement: faults, loss of and damage to the device as a result of an
event that is normally insured under the home contents insurance.
Important to know
1. The replacement or repair of a faulty product, or a part thereof, does not lead to an extension of the original warranty period.
2. Parts that have been replaced, packaging material and exchanged devices are taken back by the service engineer and
become the property of Inventum.
3. If a complaint is unfounded, all costs arising from it will be at the customer’s expense.
4. Following expiry of the warranty period, all costs of repair or replacement, including administration costs, dispatch and
call-out charges, will be charged to the customer.
5. Inventum cannot be held liable for damage as a result of devices built in incorrectly.
6. Inventum cannot be held liable for damage caused by external events, unless this liability arises from mandatory
statutory provisions.
7. These warranty and service provisions are governed by Dutch law. Disputes will be settled exclusively by the competent
Dutch court.

VFI5042RVS/03.0221V
Wijzigingen en drukfouten voorbehouden/ Modifications and printing errors reserved
persoonlijke verzorgingklein huishoudelijk witgoed inbouwwitgoed vrijstaand
Inventum Huishoudelijke
Apparaten B.V.
Postbus 5023
6802 EA Arnhem
www.inventum.eu
-
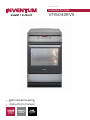 1
1
-
 2
2
-
 3
3
-
 4
4
-
 5
5
-
 6
6
-
 7
7
-
 8
8
-
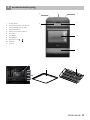 9
9
-
 10
10
-
 11
11
-
 12
12
-
 13
13
-
 14
14
-
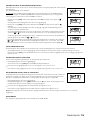 15
15
-
 16
16
-
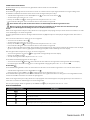 17
17
-
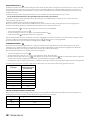 18
18
-
 19
19
-
 20
20
-
 21
21
-
 22
22
-
 23
23
-
 24
24
-
 25
25
-
 26
26
-
 27
27
-
 28
28
-
 29
29
-
 30
30
-
 31
31
-
 32
32
-
 33
33
-
 34
34
-
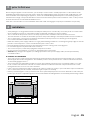 35
35
-
 36
36
-
 37
37
-
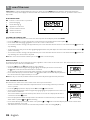 38
38
-
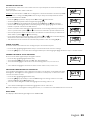 39
39
-
 40
40
-
 41
41
-
 42
42
-
 43
43
-
 44
44
-
 45
45
-
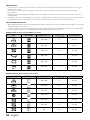 46
46
-
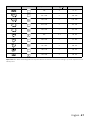 47
47
-
 48
48
-
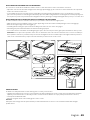 49
49
-
 50
50
-
 51
51
-
 52
52
-
 53
53
-
 54
54
-
 55
55
-
 56
56


Inventum VFI5042RVS Handleiding
- Categorie
- Kookplaten
- Type
- Handleiding
in andere talen
- English: Inventum VFI5042RVS User manual