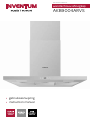
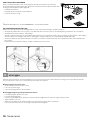
Inventum AKB9004ARVS de handleiding
- Categorie
- Afzuigkappen
- Type
- de handleiding

wandschouw afzuigkap
WALL
-
MOUNT COOKER HOOD
AKB9004ARVS
• gebruiksaanwijzing
• instruction manual

2 •

1. veiligheidsvoorschriften pagina 4
2. product omschrijving pagina 8
3. ingebruikname pagina 8
4. bediening van het apparaat pagina 9
5. reiniging & onderhoud pagina 9
6. storingen pagina 10
7. installatie voorschrift pagina 11
Garantie & Service pagina 15
1. safety instructions page 17
2. appliance description page 20
3. before first use page 20
4. controls page 21
5. cleaning & maintenance page 21
6. troubleshooting page 22
7. installation instructions page 23
Guarantee & After sales service page 26
Nederlands
English
• 3

• Lees eerst de gebruiksaanwijzing aandachtig en geheel door
voordat u het apparaat gaat gebruiken en bewaar deze zorgvuldig
voor latere raadpleging.
• Gebruik dit apparaat uitsluitend voor de in de gebruiksaanwijzing
beschreven doeleinden. Het apparaat is geschikt voor afzuiging van
lucht naar buiten en voor recirculatie.
• Sluit het apparaat alleen aan op wisselstroom, op een randgeaarde
wandcontactdoos, met een netspanning overeenkomstig met de
informatie aangegeven op het typeplaatje van het apparaat.
• Het apparaat is niet bedoeld voor installatie door hulpbehoevenden,
kleine kinderen en/of personen met gebrek aan ervaring en kennis,
tenzij zij goede begeleiding krijgen of geïnstrueerd zijn in het veilig
gebruiken van het apparaat door een persoon die verantwoordelijk is
voor hun veiligheid.
• Dit apparaat mag gebruikt worden door kinderen vanaf 8 jaar oud
en personen met een verminderd fysiek, gevoelsmatig of mentaal
vermogen of een gebrek aan ervaring en kennis als ze onder toezicht
staan van of instructies hebben gekregen met betrekking tot het
gebruik van het apparaat en ze de potentiële gevaren begrijpen.
Kinderen mogen het apparaat niet als speelgoed gebruiken. Kinderen
mogen het apparaat niet reinigen of aan onderhoud onderwerpen
zonder toezicht.
• Levensgevaar, gevaar voor vergiftiging door teruggezogen
verbrandingsgassen!
• Gebruik het apparaat nooit met luchtafvoer tegelijk met een
kooktoestel dat de lucht in de ruimte verbruikt, indien er niet
voor voldoende ventilatie is gezorgd. Kooktoestellen die de lucht
in de ruimte verbruiken (bijv. apparaten die op gas, olie, hout of
kolen worden gestookt, geisers, warmwatertoestellen) trekken de
verbrandingslucht uit de ruimte van opstelling en voeren de gassen
via een afvoer (bijv. schoorsteen) af naar buiten. In combinatie met
een ingeschakelde afzuigkap wordt aan de keuken en aan de ruimtes
ernaast lucht onttrokken - zonder voldoende luchttoevoer ontstaat er
een onderdruk. Giftige gassen uit de schoorsteen of het afvoerkanaal
worden teruggezogen in de woonruimte. Zorg daarom altijd voor
voldoende ventilatie!
• De maximaal toegestane onderdruk is 4 Pa.
Nederlands
veiligheidsvoorschriften
1
4 • Nederlands

Nederlands • 5
• Lokale voorschriften inzake de afvoer van lucht moeten worden
nageleefd.
• Het apparaat is niet bedoeld om te worden bediend door middel van
een externe timer of een apart afstandsbedieningssysteem.
• In verband met de elektrische veiligheid mag het apparaat niet met
hogedrukreinigers of stoomreinigers schoongemaakt worden.
• Waarschuwing: Vermijd de kans op een elektrische schok. Zorg
ervoor dat het apparaat is uitgeschakeld voordat u de verlichting
vervangt of het apparaat reinigt.
• Gebruik het apparaat niet als het vetfilter niet of niet goed
gemonteerd is.
• Gebruik het apparaat niet om tegenaan te leunen.
• Gebruik het apparaat nooit als afzetvlak, tenzij dit nadrukkelijk is
aangegeven.
• Zorg voor voldoende ventilatie wanneer u het apparaat samen
gebruikt met een gaskookplaat.
• De afvoer mag niet worden aangesloten op een rookkanaal dat voor
andere apparaten in gebruik is.
• Flambeer nooit onder de afzuigkap en maak de filters op tijd
schoon. Frituren moet onder voortdurend toezicht gebeuren om te
voorkomen dat verhit vet in brand raakt.
• Het apparaat moet regelmatig (minstens 1 x per maand)
schoongemaakt worden, zowel het exterieur als het interieur.
Onvoldoende reinigen of te laat vervangen van de filters kan
brandgevaar veroorzaken.
• De vetfilters kunnen heet worden tijdens het gebruik. Wacht daarom,
na het koken, minimaal 30 minuten met schoonmaken.
• Let op! Door intensief gebruik kan condensvorming op het apparaat
ontstaan. Condensvorming is eenvoudig te verwijderen met een droge
doek.
• Vet en olie zijn bij oververhitting brandbaar. Blijf in de buurt tijdens het
bereiden van gerechten.
• Brandgevaar! Als de voorschriften voor het reinigen of vervangen
van de vetfilters en/of koolstoffilters niet worden opgevolgd,
bestaat de kans op brand.
• Brandgevaar! door vetafzettingen in het metalen vetfilter. Nooit
met open vuur werken onder het apparaat (bijv. flamberen). Het
apparaat altijd gebruiken met het metalen vetfilter. Het metalen
vetfilter regelmatig reinigen.
• Brandgevaar! door oververhit vet of olie. Altijd toezicht houden
bij het verhitten van vet en olie. Blus de brand nooit met water;
gebruik altijd een branddeken, deksel of bord.

• Het apparaat kan scherpe randen bevatten; wees voorzichtig tijdens
het reinigen.
6 • Nederlands
INSTALLATIE
• Dit toestel mag alleen door een erkend installateur worden
aangesloten.
• Volg altijd de installatievoorschriften van het bijgeleverde
installatievoorschrift op.
• Controleer het apparaat op transportschade. Sluit een beschadigd
apparaat niet aan.
• Defecte onderdelen mogen alleen vervangen worden door originele
onderdelen. Alleen van die onderdelen kan de fabrikant garanderen
dat zij aan de veiligheidseisen voldoen.
• Gebruik het apparaat niet wanneer de stekker, het snoer of het
apparaat beschadigd is, of wanneer het apparaat niet meer naar
behoren functioneert of wanneer het gevallen of op een andere
manier beschadigd is. Raadpleeg dan de winkelier of onze technische
dienst. In geen geval de stekker of het snoer zelf vervangen.
• Gebruik altijd de originele kabel en stekker voor het aansluiten van het
apparaat.
• De elektrische aansluiting moet voldoen aan de nationale en lokale
voorschriften.
• De wandcontactdoos en stekker moeten altijd bereikbaar blijven.
• Als u een vaste aansluiting wilt maken, moet u er voor zorgen dat er
een omnipolaire schakelaar met een contactafstand van minimaal 3
mm in de toevoerleiding wordt aangebracht.
• Het apparaat mag niet via een verdeelstekker of verlengsnoer op het
elektriciteitsnet worden aangesloten. Hiermee kan veilig gebruik van
het apparaat niet worden gewaarborgd.
• Waarschuwing: reparaties aan elektrische apparaten dienen
uitsluitend door vakmensen uitge voerd te worden. Het is
gevaarlijk om een reparatie uit te voeren waarbij de behuizing van
het apparaat geopend moet worden.
• Maak het apparaat spanningsloos voordat met een reparatie wordt
gestart.
• In verband met eventuele scherpe randen adviseren wij u tijdens de
montage van het apparaat werkhandschoenen te gebruiken.
• De afstand tussen het laagste punt van het apparaat en een
gaskookplaat moet minimaal 75 cm bedragen. Bij een elektrische,
keramische of inductiekookplaat moet deze afstand minimaal 65 cm
bedragen.

• Indien de handleiding van de kookplaat een grotere afstand adviseert
dan dient deze afstand opgevolgd te worden.
• Indien in de instructies bij de gaskookplaat een grote afstand wordt
vermeld, moet hiermee rekening worden gehouden.
• Waarschuwing: het niet gebruiken van schroeven of
bevestigingsmiddelen voor installatie zoals beschreven in het
installatievoorschrift kan leiden tot een elektrische schok.
• Indien de veiligheidsinstructies en waarschuwingen niet
worden opgevolgd, kan de fabrikant niet aansprakelijk
worden gesteld voor de schade die daarvan het gevolg is.
• Dit apparaat is bedoeld voor huishoudelijk gebruik en soortgelijke
toepassingen, zoals:
- in personeelskeuken, in winkels, op kantoor en in andere
werkomgevingen;
- boerderijen;
- door klanten in hotels, motels en andere typen verblijfsomgevingen;
- B&B-achtige omgevingen.
• Het apparaat uitsluitend binnenshuis gebruiken.
• Verwijder de stekker altijd uit het stopcontact als het apparaat
gereinigd of gerepareerd wordt.
• Als u besluit het apparaat, vanwege een defect, niet langer te
gebruiken, adviseren wij u, nadat u de stekker uit de wandcontactdoos
heeft verwijderd, het snoer af te knippen. Breng het apparaat naar de
betreffende afvalverwerkingafdeling van uw gemeente.
• Elektronische afvalstoffen dienen niet te worden weggegooid
met het huisafval. Breng deze apparaten voor een veilige
verwerking naar de betreffende afvalverwerkingsafdeling van uw
gemeente.
Nederlands • 7

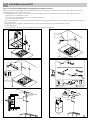
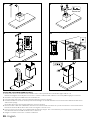
product omschrijving
2
ingebruikname
3
Voordat u het apparaat voor de eerste maal in gebruik neemt, dient u als volgt te werk te gaan: pak de afzuigkap voorzichtig uit en
verwijder al het verpakkingsmateriaal. De verpakking (plastic zakken, piepschuim en karton) buiten het bereik van kinderen houden.
Controleer na het uitpakken het apparaat zorgvuldig op uiterlijke schade, mogelijk ontstaan tijdens transport. Plaats het apparaat op
een stevige, vlakke ondergrond.
Het installeren en elektrisch aansluiten moet worden uitgevoerd door een gekwalificeerd technicus, in overeenstemming met de
installatievoorschriften en de lokale reglementen.
Hoe het apparaat moet worden geplaatst, staat beschreven in het Installatie Voorschrift - hoofdstuk 7.
Het apparaat moet worden aangesloten op een deugdelijk geïnstalleerde geaarde wandcontactdoos. Het voltage (AC) moet
overeenkomen met het op het typeplaatje van het apparaat genoemde voltage.
AFVOERSYSTEEM
Deze afzuigkap kan op twee manieren de kookdampen afvoeren: via een directe luchtafvoer naar buiten of recirculerend. Maak een
keuze hoe u de afzuigkap wilt gebruiken en installeer deze volgens de voorschriften.
AFVOER NAAR BUITEN - aansluiten op een afvoerkanaal.
De aangezogen en gefilterde kookdampen worden naar buiten afgevoerd. Dit is de
beste optie.
RECIRCULATIE - de vetdeeltjes en de aangezogen kookdampen worden gefilterd. De
aangezogen lucht wordt niet afgevoerd, maar terug geblazen in de keuken. U moet de
koolstoffilters op de vetfilters plaatsen.
Let op! De startset voor recirculatie en de koolstoffilters worden niet standaard bijgeleverd.
U moet deze accessoires apart bestellen. Bestel de accessoires bij uw winkelier of via de
onderdelenwebshop van Inventum.
STARTSET voor recirculatie - bestelnummer SB900
3 KOOLSTOFFILTERS voor model AKB9004ARVS - bestelnummer KB93
8 • Nederlands
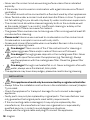
2
1
3
4
5
6
1. Bovenste schacht
2. Onderste schacht
3. Afzuigkap
4. Bedieningstoetsen met verlichting
5. Metalen vetfilters - 3
6. Verlichting (LED strips 2 x 2.1W)

Zet voordat u de afzuigkap wilt reinigen het apparaat uit, verwijder de stekker uit de wandcontactdoos of zet de
groepschakelaar in de meterkast op nul.
Reinig de binnen- en buitenkant van de afzuigkap regelmatig. Gebruik hiervoor een warm sopje met bijvoorbeeld afwasmiddel of
allesreiniger of RVS reiniger. Gebruik geen agressieve schurende reiningingsmiddelen of middelen die alcohol bevatten. Om de
knoppen te reinigen of in de buurt daarvan alleen een vochtige doek gebruiken.
Attentie: het niet tijdig reinigen van de afzuigkap kan brandgevaar opleveren.
VETFILTERS
Een metalen vetfilter vangt vetdeeltjes op uit de lucht. Het filter kan daarom, afhankelijk van het gebruik, na verloop van tijd
verstoppen. Het metalen vetfilter hoeft niet vervangen te worden, maar moet minimaal één keer per maand gereinigd worden. Dit
kunt u met de hand doen of in de vaatwasmachine op een lage temperatuur. Zorg ervoor dat de vetfilters goed droog zijn voordat ze in
de afzuigkap teruggeplaatst worden.
Gebruik geen agressieve reinigingsmiddelen.
Het niet tijdig reinigen van de vetfilters kan brandgevaar opleveren.
Het reinigen van de vetfilters in de vaatwasmachine kan leiden tot verkleuring. Dit heeft geen invloed op de werking.
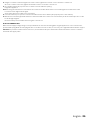
HET VERWIJDEREN VAN HET VETFILTER
Controleer of de stekker uit het stopcontact is verwijderd.
Trek het vetfilter naar u toe en kantel deze naar voren omlaag.
Houd een hand onder het filter wanneer u deze eruit haalt, zodat u er zeker van
bent dat het filter niet op uw kookplaat valt tijdens het uitnemen.
bediening van het apparaat
4
reiniging & onderhoud
5
Nederlands • 9
AFZUIGKAP AAN EN UIT ZETTEN
Om de afzuigkap te bedienen, hoeft u alleen maar met uw vinger de bedieningsknoppen rustig in te drukken.
1 UIT/SNELHEID VERLAGEN - Druk op de toets - om de motor uit te zetten of om de motor op een lagere stand te zetten.
2 AAN/SNELHEID VERHOGEN - Druk op de toets + en de motor draait op de laagste stand 1.
Druk nogmaals op de toets + en de motor draait op de middelste stand 2.
Druk een derde keer op de toets + en de motor draait op de hoogste stand 3.
3 DISPLAY - toont de ingestelde stand en de instelling van de timer.
4 TIMER - door het instellen van de automatische uitschakeltimer zal de afzuigkap automatisch uitschakelen na de ingestelde tijd.
De timer is in te stellen op een minimum van 10 minuten tot maximaal 90 minuten - in stappen van 10 minuten.
• Schakel de afzuigkap in op de gewenste stand 1, 2 of 3.
• Druk op de toets om de timer in te stellen. In het display knippert nu 0. Selecteer met de + toets de gewenste uitschakeltijd.
Let daarbij op dat het getoonde getal staat voor 10 minuten. 1 = 10 minuten; 2 = 20 minuten; 3 = 30 minuten; 4 = 40 minuten;
5 = 50 minuten; 6 = 60 minuten; 7 = 70 minuten; 8 = 80 minuten; 9 = 90 minuten.
• Bevestig de gekozen uitschakeltijd door nogmaals op de toets te drukken. Het display toont nu de ingestelde snelheid van de
motor, stand 1, 2 of 3 met daarbij een knipperend puntje. Het knipperende puntje geeft aan dat de timer aan het aftellen is.
• De ingestelde tijd kan beëindigd worden door nogmaals op de toets te drukken terwijl de timer aan het aftellen is.
Let op: het instellen van de timer moet binnen 20 seconden gedaan worden, anders gebeurt er niets en zal de motor van de
afzuigkap aan blijven.
5 VERLICHTING - Druk op de toets om de verlichting aan te doen. Druk nogmaals op dezelfde knop om de verlichting uit te
schakelen.
Schakel eventueel de verlichting in om voldoende licht op uw kookgedeelte te hebben. Zet bij voorkeur de motor van de afzuigkap een
paar minuten voordat u gaat koken al aan op de gewenste stand. Laat de motor van de afzuigkap nog 10 minuten doorlopen als u al
klaar bent met koken om alle etensgeuren uit de keuken te verwijderen.
1 2 3 4 5

storingen
6
Wat te doen bij problemen met uw afzuigkap? Controleer aan de hand van onderstaande oplossingen of u het probleem zelf kunt
oplossen alvorens contact op te nemen met de Inventum servicedienst.
De motor functioneert niet meer
• Zit de stekker goed in het stopcontact?
• Is er een stroomstoring?
• Is er een zekering defect in de meterkast?
De afzuigkap zuigt niet goed af/ maakt meer lawaai.
• Is de afmeting van de afvoer in orde?
• Is de afvoer geblokkeerd?
• De afvoer moet 150 mm zijn. Een kleine diameter kan de zuigkracht van de motor negatief beïnvloeden.
• Zijn de vetfilters schoon?
• Zijn de koolstoffilters meer dan 6 maanden niet vervangen? Vervang de koolstoffilters.
• Is er voldoende luchttoevoer om de afgevoerde lucht te vervangen?
10 • Nederlands
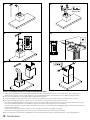
KOOLSTOFFILTERS VERVANGEN
Een koolstoffilter reinigt de lucht en filtert geuren die tijdens het koken ontstaan. Een
koolstoffilter kan niet gereinigd worden. Daarom moet u deze minstens elke vier maanden
vervangen, afhankelijk van uw kookgebruik.
• Verwijder de vetfilters.
• Bevestig drie koolstoffilters op de vetfilters.
• Plaats de vetfilters terug.
*
3 KOOLSTOFFILTERS voor model AKB9004ARVS - bestelnummer KB93
HET VERVANGEN VAN DE LED STRIP
Wanneer er een LED strip van de afzuigkap kapot is, kunt u deze zelf vervangen. Volg deze stappen:
• Verwijder de stekker uit het stopcontact of onderbreek de stroomtoevoer door de zekering in de groepenkast uit te schakelen.
• Verwijder de metalen vetfilters - afbeelding 1.
• Druk de complete LED strip vanaf de buitenzijde naar binnen en schuif deze richting de open ruimte van het vetfilter - afbeelding 2.
Trek de stekker voorzichtig los van de trafo. Vervang de complete LED strip door eenzelfde type (2.1W LED strip).
• Steek de stekker van de nieuwe LED strip in de trafo en schuif de complete LED strip weer op zijn plek totdat deze vastklikt op de
juiste plaats.
• Plaats de metalen vetfilters terug en steek de stekker in het stopcontact.
4
1 2

• 11
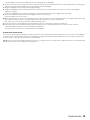
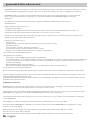
installatie voorschrift
7
Lees voor u met de installatie begint zorgvuldig deze installatie instructies.
Maak een keuze of u de afzuigkap via een luchtafvoer naar buiten installeert of dat de kap moet recirculeren. Wij adviseren u de
afzuigkap met twee personen te monteren.
• De afzuigkap moet recht boven het kookgedeelte bevestigd worden. De minimum afstand tussen het kookgedeelte en de
onderkant van de afzuigkap moet zijn:
- 65 cm voor een elektrische, keramische of inductie kookplaat
- 75 cm voor een gaskookplaat
• Sluit u de afzuigkap aan op een bestaand afvoerkanaal dan mag er geen ander apparaat op dat kanaal aangesloten zijn (zoals een
geiser of kachel).
• De werking van de afzuigkap is afhankelijk van de lengte van de afvoerpijp en het aantal bochten. Probeer
beide te beperken.
• De aansluiting voor de afvoer van de afzuigkap heeft een diameter van 150 mm.
A
X=8
0
X
Y
2 x8Ø
2x
4.5x50mm
2x 80
2x
8x40mm
>1 cm
>30 cm
16 cm
W cm
220-240V
50-60Hz
W -2 cm
>30 cm
>1 cm
1
3
5
2
4
6
2x
8 x 40 mm
2x
4.5 x 50 mm

12 • Nederlands
8
10
12
7
9
11
INSTALLATIE VAN DE AFZUIGKAP OP EEN AFVOER NAAR BUITEN
1 Teken een verticale lijn op de muur van het midden van de kookplaat naar boven met een minimale hoogte van 65 cm + A.
Markeer horizontaal op deze hoogte de gaten voor de ophangbeugel met een afstand van exact 80 mm (=X) van elkaar.
2 Boor met een Ø8mm boor in de muur de twee gemarkeerde gaten.
3 Plaats de pluggen en bevestig met de schroeven de ophangbeugel met de gevouwen kant naar beneden aan de muur.
4 Houd de bevestigingsbeugel voor het bovenste schachtdeel op de gewenste hoogte tegen de muur.
Met de bevestigingsbeugel bevestigt u het bovenste schachtdeel. Kijk van tevoren tot hoever u de schacht wilt laten doorlopen.
De sleuven in de beugel komen op dezelfde hoogte als de twee bovenste gaten in het schachtdeel.
Als u de schacht geheel tot aan het plafond wilt laten doorlopen, monteer dan de bevestigingsbeugel op 2 mm afstand vanaf het
plafond tegen de muur.
Teken in de sleufgaten de twee boorgaten af. Boor de gaten en plaats de pluggen in de gaten.
Monteer de bevestigingsbeugel voor het bovenste schachtdeel met twee schroeven op de muur.
5 Boor een gat met een diameter van 160 mm in de wand naar buiten. Zorg dat het gat minimaal 1 cm onder de geplaatste
* Alleen bij gebruik van de recirculatie startset
2

Nederlands • 13
schachtbeugel komt en minimaal 30 cm boven de ophanging van de afzuigkap.
6 Zorg voor een stopcontact die achter de schacht valt. Het stopcontact moet minimaal 1 cm onder de geplaatste schachtbeugel
gemonteerd zijn en minimaal 30 cm boven de ophanging van de afzuigkap.
7 Hang de afzuigkap aan de onderste bevestigingsbeugel.
8 Hang de afzuigkap waterpas met behulp van de twee buitenste schroeven. Draai de schroeven in of uit om de afzuigkap
waterpas te hangen.
Zodra de afzuigkap waterpas hangt, de middelste schroef vastdraaien zodat de afzuigkap goed vast hangt.
9 Monteer een flexibele afvoerbuis op de afzuigkap naar de afvoeropening.
Steek de stekker in het stopcontact.
10 Bij het gebruik van de startset voor recirculatie moeten de schroeven voor de schachtbeugel weer iets losgedraait worden zodat
de recirculatie unit aan de schroeven gehangen kan worden. Draai de schroeven opnieuw vast.
* De startset voor recirculatie wordt niet standaard meegeleverd.
11 Plaats de schacht op de afzuigkap. Zorg hierbij dat de bovenste schacht in de onderste schacht valt.
12 Schuif het bovenste schachtdeel omhoog en bevestig deze aan de schachtbeugel met twee schroeven. Het onderste
schachtdeel klikt automatisch vast door middel van magneten.
Verwijder alle beschermfolie voor het gebruik van de afzuigkap.
ELEKTRISCHE AANSLUITING
Controleer of de spanning overeenkomt met die vermeld is op het typeplaatje. Steek de stekker in het stopcontact. De afzuigkap is
voorzien van een aansluitstekker. Installeer de afzuigkap zodanig dat de stekker altijd bereikbaar is. Plaats de wandcontactdoos bij
voorkeur uit het zicht, bijvoorbeeld achter het afvoerkanaal.
Let op: als u een vaste aansluiting wilt maken, moet u er voor zorgen dat er een omnipolaire schakelaar met een contactafstand van
minimaal 3 mm in de toevoerleiding wordt aangebracht.

14 • Nederlands

Nederlands • 15
• Op alle apparaten van INVENTUM krijgt u standaard 2 jaar volledige fabrieksgarantie geldend vanaf de aankoopdatum.De garantie
dekt aantoonbare defecten in materiaal, fabricage en functioneren van onderdelen en is inclusief materiaalkosten, voorrijkosten
(indien van toepassing) en arbeidsloon.
• INVENTUM geeft naast de 2 jaar volledige garantie 3 jaar verlengde garantie op arbeidsloon en onderdelen. Het enige dat we
u berekenen zijn de voorrij- of verzendkosten. Op deze manier is de kwaliteit van uw INVENTUM apparatuur dus 5 jaar lang
gegarandeerd.
• Om in aanmerking te komen voor de uitgebreide 5 jaar garantie, dient u uw apparaat binnen 45 dagen na aanschaf te registreren op
www.inventum.eu
• Waarom is registratie belangrijk voor u?
1. U krijgt 5 jaar garantie
2. Alle details van uw apparaat zijn bij Inventum bekend. U hoeft niet meer op zoek te gaan naar uw typenummer.
3. Inventum kan u sneller en beter van dienst zijn wanneer u zich meldt bij ons servicecenter.
• De garantie is alleen van toepassing als de originele gedrukte aankoopnota (of een kopie hiervan) kan worden overlegd. Bewaar
daarom uw aankoopnota zorgvuldig. De garantietermijn vangt aan op de aankoopdatum.
• De garantie geldt niet in geval van:
- normale slijtage;
- onoordeelkundig, onjuist en/of oneigenlijk gebruik;
- onvoldoende onderhoud;
- het niet in acht nemen van bedienings- en onderhoudsvoorschriften;
- ondeskundige installatie, montage of reparatie door uzelf of derden;
- door de afnemer toegepaste niet originele onderdelen
zulks ter beoordeling van onze service organisatie.
• De garantie geldt niet voor:
- normale verbruiksartikelen;
- normale gebruiksslijtage - zoals glasbreuk, krassen op apparatuur, verkleuringen van kunststof of gelakte onderdelen;
Door onvoldoende of verkeerd onderhoud kunnen verkleuringen aan oppervlakten ontstaan en rubbers en kunststoffen snel
verouderen. Ook dit valt niet onder de garantie.
- (uitwisselbare) signaal- en verlichtingslampjes;
- defecten en gevolgschaden veroorzaakt door sterke verontreiniging en verkeerd onderhoud zulks ter beoordeling van onze
service organisatie.
Buiten de garantie vallen transportschades. Controleer daarom uw nieuwe apparatuur voordat u deze in gebruik neemt. Als u
beschadigingen aantreft, neem dan binnen 5 werkdagen na aankoop contact op met uw leverancier.
Van garantie en/of vervanging zijn uitgesloten: defecten aan, verlies en beschadiging van het apparaat als gevolg van een gebeurtenis
die gewoonlijk verzekerd is onder de inboedelverzekering.
Tot wie kunt u zich wenden?
Op www.inventum.eu vindt u - naast gebruiksadviezen en schoonmaaktips - alle antwoorden op uw service vragen. Raadpleeg eerst
de website voordat u zich meldt bij ons service center.
Via de website www.inventum.eu kunt u uw service aanvraag snel en eenvoudig online aanmelden. Het is ook mogelijke om dit
telefonisch te doen via de INVENTUM service organisatie. De contactgegevens zijn te vinden op de website: www.inventum.eu
Om u zo goed mogelijk van dienst te zijn en uw service aanvraag zo snel mogelijk te verwerken, raden wij u aan om altijd eerst contact
op te nemen met INVENTUM.
Deze garantievoorwaarden gelden voor Nederland. Voor de lokale garantievoorwaarden neemt u contact op met uw leverancier. In
de landen waar INVENTUM een vertegenwoordiging heeft, kunt u zich tot deze wenden als u een beroep wilt doen op de INVENTUM
service organisatie. In de overige landen neemt u contact op met uw leverancier. Indien de garantie is komen te vervallen of indien de
garantietermijn is verstreken, dienen wij de kosten welke verbonden zijn aan een beoordeling en/of reparatie in rekening te brengen.
Op verzoek zullen wij u eerst een prijsopgave verstrekken alvorens tot reparatie over te gaan. Zonder dit verzoek om prijsopgave gaan
wij ervan uit dat u, met het opsturen van uw apparaat, automatisch een opdracht tot reparatie heeft verstrekt. Wij verlenen twee
maanden garantie op de door onze servicedienst uitgevoerde herstelwerkzaamheden en het daarbij nieuw aangebrachte materiaal,
garantie & service

16 •
gerekend vanaf de hersteldatum. Indien zich binnen deze periode een storing voordoet welke het directe gevolg is van de uitgevoerde
herstelwerkzaamheden of het daarbij nieuw aangebrachte materiaal, heeft de koper het recht op kosteloos herstel.
Wijzigingen en drukfouten voorbehouden. De laatste versie van de gedeponeerde garantievoorwaarden is op te vragen bij via onze
service organisatie.

English
safety instructions
1
• Please read these instructions before operating the appliance and
retain for future use.
• The appliance is intended solely for domestic use within the home. The
appliance is suitable for extraction of air to the outside or for recirculation.
• Before plugging into a socket, check that the voltage in your home
corresponds with the voltage printed on the bottom of the appliance.
• This appliance can be used by children aged 8 years and over, as well by
people with reduced physical, sensory or mental capabilities, or lack of
experience and knowledge, provided they are supervised and instructed in
the safe use of the appliance and understand the hazards involved. Do not
allow children to play with the appliance. Do not allow children to clean or
maintain the appliance unless supervised.
• Life-threatening: danger of poisoning through backdrafting of
combustion gasses!
• Never use the appliance to extract air while using a cooker that consumes
air from the room, unless the room is sufficiently ventilated. Cooking
appliances that consume air in the room (such as equipment that heats
using gas, oil, wood or coal, geysers, hot water appliances) draw the
combustion air out of the room and carry these gasses outside via the
outlet (eg. chimney). In combination with an activated cooker hood, air is
withdrawn from the kitchen and the adjacent rooms. This creates negative
pressure if there is insufficient air supply. Poisonous gasses from the
chimney or outlet channel are then backdrafted into the living area. Always
provide adequate ventilation!
• The maximum permitted negative pressure is 4 Pa.
• Local regulations concerning the discharge of air have to be fullfilled.
• The appliance is not intended to be operated by means of an external timer
or separate remote control system.
• In relation with electrical safety, the appliance shall not be cleaned with high-
pressure cleaners or steam cleaners.
• Warning: Avoid the risk of electric shock; make sure the appliance is
switched off before replacing the lighting or cleaning the appliance.
• Do not use the cooker hood if the grease filter has not been fitted properly!
• Do not lean against the cooker hood.
English • 17

• Never use the cooker hood as a working surface unless this is indicated
explicitly.
• If the cooker hood is used in combination with a gas hob ensure sufficient
ventilation.
• The outlet should not be connected to a flue duct used by other appliances.
• Never flambé under a cooker hood and clean the filters on time. To prevent
hot fat catching fire you should only deep fry under continuous supervision.
• The cooker hood should be cleaned regularly both on the outside as well
as the inside (at least 1 x a month). Insufficient cleaning or a delay in the
replacement of filters can cause fire hazard.
• The grease filters can become hot during use. After cooking wait at least 30
minutes before cleaning.
• Please note! Intensive use can lead to condensation on the cooker hood.
Condensation is simple to remove with a dry cloth.
• Grease and oil are inflammable when overheated. Remain in the cooking
area when preparing meals.
• Fire danger! There is a risk of fire if the instructions for cleaning or
replacing grease filters and/or carbon filters are not followed.
• Fire danger! through grease deposits in the metal grease filter. Never
work with open flame under the appliance (eg. flambéing). Always
use the appliance with the metal grease filter. Clean the grease filter
regularly.
• Fire danger! through overheated fat or oil. Never extinguish a fire with
water; always use a fire blanket, lid or plate.
• The appliance may have sharp edges; please be careful during cleaning.
• This appliance should only be connected by a registered installer.
• Always follow the installation instructions in the installation manual (chapter
7) provided.
• Check the appliance for transport damage. Do not connect a damaged
appliance.
• Faulty parts may only be replaced by original parts. The manufacturer can
only guarantee that original parts meet safety requirements.
• If the connecting cable is damaged, it may only be replaced by the
manufacturer, the manufacturer's service organisation or equivalently
qualified persons, in order to avoid dangerous situations.
• Always use the original cable and plug to connect the appliance.
INSTALLATION
18 • English

• The electrical connection must comply with national and local regulations.
• The wall plug socket and plug should always be accessible.
• If you want to make a fixed connection, make sure that an omnipolar switch
with a contact separation of at least 3 mm is fitted in the supply cable.
• The appliance should not be connected to the mains via a multi-plug
adapter or extension cable, as the safe use of the equipment cannot be
guaranteed.
• Warning: Never open the appliance casing. The casing may only be
opened by a service technician.
• Disconnect the appliance from the mains supply before starting any repair
work.
• We advise to wear protective gloves when assembling the cooker hood
because of the possible sharp edges.
• The distance between the lowest point of the cooker hood and the
supported surface for the cooking pans gas hob should be at least 75 cm.
With an electric, ceramic or induction hob this distance should at least be
65 cm.
• If the instructions of the gas hob specify a greater distance, this should be
taken into account.
• Warning: failure to install screws or fixing devices in accordance with
these instructions may result in electrical hazard.
• If the safety instructions and warnings are not followed, the
manufacturer cannot be held responsible for any resulting
damage.
• This appliance is intended to be used in household and similar applications
such as:
- staff kitchen areas, in shops, offices and other working environments;
- farm houses and by clients in hotels, motels and other residential type
environments;
- bed and breakfast type environments;
- catering and similar non-retail applications.
• Only use the appliance inside the home.
• If you decide to discontinue using the appliance because of a fault, we
recommend you cut off the cable after removing the plug from the socket.
• Legislation requires that all electrical and electronic equipment
must be collected for reuse and recycling. Electrical and electronic
equipment marked with the symbol indicating separate collection of
such equipment must be returned to a municipal waste collection
point.
English • 19

appliance description
2
before the first use
3
Before you use the appliance for the first time, please do as follows: Carefully unpack the appliance and remove all the packaging
material. Keep the material (plastic, polystyrene and cardboard) out of reach of children. Check the appliance after unpacking for any
damage, possible from transportation. Place the appliance on a flat and stable surface.
This appliance should be installed and connected to the power supply by a recognized fitter who is familiar with, and works according
to the correct safety regulations.
How to install the appliance, is instructed in the installation instructions (chapter 7).
The appliance must be connected with a properly installed fused socket. The power supply (AC) and voltage at the operating point
must correspond with the details on the rating label of the appliance.
EXTRACTION SYSTEM
This cooker hood can be connected in two ways: to a duct or as a recirculation hood. Install the cooker hood according to the
instructions depending on your choice.
VENT OUTSIDE - to a duct, the cooking vapours extracted by suction are carried
outside, once the grease particles have been filtered. This is the best method.
RECIRCULATE - as a recirculation hood, the grease particles and the smell in the
extracted vapours are filtered. The air that has been sucked in is not carried outside
but recirculates in the kitchen. In this case you must have a carbon filter fitted.
Attention! The starter kit for recirculation en the carbon filters are not included. You need to
order these separately. Order the accessories at your supplier or at the Inventum spare parts
webshop.
STARTER KIT for recirculation - article number SB900
3 CARBON FILTERS for model AKB9004ARVS - article number KB93
20 • English
2
1
3
4
5
6
1. Inner chimney
2. Outer chimney
3. Cooker hood
4. Controls with backlight
5. Metal grease filters - 3
6. Lighting (LED strips 2 x 2.1W)

controls
4
cleaning & maintenance
5
Before performing any maintenance operation, disconnect the cooker hood from the mains power supply. Ensure that it is
switched off and pull the plug or remove the connector fuse.
Clean the in- and outside of the cooker hood regularly. Clean the cooker hood with warm soapy water and a soft cloth. If your model
is stainless steel, clean it with a stainless steel care product. Do not use any abrasive cleaning agents such as powder cleaners or
cleaners that contain alcohol. Clean the controls only with a damp cloth.
Attention: failure to carry out the basic cleaning recommendations can cause fire risks.
GREASE FILTERS
A metal grease filter filters the fat particles in the air. Therefore the filter can get clogged, depending on the use. The metal grease filter
does not have to be replaced, but should at least be cleaned once a month. You can clean it either by hand or in the dishwasher on a
low temperature. Make sure the grease filters are competely dry before placing them back.
Do not use any abrasive cleaning agents.
Not cleaning the grease filters on time can cause fire risks.
Cleaning the grease filters in the dishwasher can cause discoloration. This has no effect on the operation.
REMOVING THE GREASE FILTER
Switch off the electricity! Remove the plug from the socket.
Pull the grease filter towards you and tilt it downwards at the front. Make sure
you guide the grease filter with you other hand to prevent the grease filter from
falling down on your cooking appliance.
English • 21
SWITCHING THE COOKER HOOD ON AND OFF
To select the functions of the cooker hood, press the control buttons gently.
1 OFF/ SPEED DECREASE- Press the button - to switch the engine off or to decrease the speed of the engine.
2 ON/SPEED INCREASE - Press the button + and the engine is on at the lowest setting - 1.
Press the button + again and the engine is set to the middle setting - 2.
Press a third time on the button + and the engine is set to the highest setting - 3.
3 DISPLAY - shows the setting of the engine speed and the setting of the timer.
4 TIMER - by setting the timer the cooker hood will automatically switch off after the set time. The timer can be set with a minimum
of 10 minutes to a maximum of 90 minutes - in increments of 10 minutes.
• Switch the cooker hood on at setting 1, 2 or 3.
• Press the button to set the timer. The display shows a blinking 0. Select with the button + the desired switch off time.
Keep in mind that the number on the display stands for 10 minutes. 1 = 10 minutes; 2 = 20 minutes; 3 = 30 minutes; 4 = 40
minutes; 5 = 50 minutes; 6 = 60 minutes; 7 = 70 minutes; 8 = 80 minutes; 9 = 90 minutes.
• Confirm the selected switch off time by pressing the button again. The display now shows the set engine speed, setting 1, 2 or
3 with a blinking dot. The blinking dot shows the timer is counting down.
• The timer can be switch off by pressing the key again while the timer is counting down.
Caution: the setting of the timer must be completed within 20 seconds, otherwise no action will be taken, and the cooker hood will
resume operation in normal mode.
5 LIGHTING - Press the key to switch on the lighting. Press the same button again to turn off the lighting.
Switch the lighting on if you need more light on your cooking appliance. It is recommended to operate the appliance a few minutes
prior to cooking. Leave the appliance in operation for 10 minutes after the cooking is finished to remove all the smells from the kitchen.
1 2 3 4 5

troubleshooting
6
What to do in case of a malfunction? In most cases, you will be able to correct these faults easily yourself. Please check the solutions
below before contacting the Inventum service department.
The motor is not running
• Is it plugged in correctly?
• Is there a power outage?
• Check the electrical installation.
The performance of the cooker hood is not correct and makes more nois.
• Is the diameter of the exhaust-air pipe correct?
• Is the duct blocked?
• The diameter of the duct must be 150 mm. A smaller diameter can negatively influence the suction of the motor.
• Are the grease filters clean?
• Are the carbon filters not replaced within the last 6 months? Replace the carbon filters.
• Is there enough air supply to replace the extracted air?
22 • English
REPLACING THE CARBON FILTERS
A carbon filter cleans the air and filters the smell that occurs during cooking. A carbon filter
can not be washed and reused. In all cases it is necessary to replace the carbon filter at
least every four months.
• Remove the grease filters.
• Attach three carbon filters to the grease filters.
• Replace the grease filters.
*
3 CARBON FILTERS for model AKB9004ARVS - article number KB93
CHANGING A LED STRIP
When a LED strip of the cooker hood is broken, you can replace it yourself. Follow these steps:
• Unplug the appliance or remove the connector fuse.
• Remove the grease filters - figure 1.
• Push the complete LED strip from the outside to the inside of the cooker hood and slide it towards the opening of the grease filter.
downwards - figure 2. Unplug the broken LED strip from the transformer and replace the complete LED strip with a matching type
(2.1W, LED).
• Plug the new LED strip in the transformer and slide and push the complete LED strip gently back in its place.
• Replace the grease filters and plug the appliance in.
4
1 2

Read these installation instructions carefully before starting the installation.
Decide whether there is a duct available or if the cooker hood needs to recirculate. We advise to install the cooker hood with two
persons.
• The minimum distance between the supporting surface for the cooking pans on the cooker and the lowest part of the hood must
be:
- 65 cm for an electric, ceramic or induction cooker
- 75 cm for a gas hob
• If the cooker hood is to be fitted to an existing duct no other aplliances, such as a geyser or heater, may be connected to that same
duct.
• The shorter the duct, and the fewer the bends in it, the better the cooker hood will work.
• The connection pipe for the cooker hood has a diameter of 150 mm.
installation instructions
7
• 23
A
X=8
0
X
Y
2 x8Ø
2x
4.5x50mm
2x 80
2x
8x40mm
>1 cm
>30 cm
16 cm
W cm
220-240V
50-60Hz
W -2 cm
>30 cm
>1 cm
1
3
5
2
4
6
2x
8 x 40 mm
2x
4.5 x 50 mm

24 • English
INSTALLING THE COOKER HOOD TO A DUCT
1 Draw a vertical line on the wall from the middle of the cooker upwards with a minimum height of 65 cm + A.
Mark at this height horizontally the holes for the cooker hood bracket with a distance of exactly 80 mm (=X) of each other.
2 Drill with a masonry drill of Ø8mm the two marked holes.
3 Insert the plugs and fit the cooker hood bracket with the screws to the wall.
4 Hold the bracket for the inner chimney at the desired height on the wall. Mark the holes for the bracket. Drill the markes holes
and insert the plugs.
Fit the bracket for the inner chimney with two screws to the wall.
5 Drill a hole with a diameter of 160 mm in the wall to the outside. Make sure the hole is positioned at least 1 cm below the fitted
bracket and at least 30 cm above the screws to hang the cooker hood on.
6 Place a socket, if necessary, out of sight behind the exhaust-air pipe. The socket must be postioned at least 1 cm below the
fitted bracket and at least 30 cm aboven the cooker hood.
7 Hang the cooker hood onto the cooker hood bracket.
8
10
12
7
9
11
2
* Only when using the starter kit for recirculation

English • 25
8 Hang the cooker hood level using the two outer screws. Tighten the screw in or out to level the cooker hood.
Once the cooker hood is level, tighten the middle screw to secure the cooker hood.
9 Fit a flexible exhaust air-pipe onto the cooker hood to the exhaust opening.
Plug in the appliance.
10 When using the starter kit for recirculation the screws for the bracket must be loosened. Hang the recirculation kit on the
loosened screws. Tighten them again.
* The starter kit for recirculation is not included.
11 Place the chimney on top of the cooker hood. Make sure the inner chimney fits properly in the outer chimney.
12 Slide the inner chimney upwards and fit it to the bracket with two screws. The outer chimney clicks automatically to the cooker
hood through magnets.
Remove all the protective film before using the cooker hood.
ELECTRIC CONNECTION
Make sure the supply voltage ratings correspond with those stated on the rating plate. Plug the appliance in. The cooker hood is
provided with a plug. Make sure the plug remains accessible. Place the socket, if necessary, out of sight behind the exhaust-air pipe.
Attention: if you want to make a fixed connection, ensure that a multi-pole switch with a distance between contacts of 3 mm is
installed in the supply cable.

• INVENTUM guarantees this product for a period of 2 years starting from the date of purchase. The warranty covers proven defects
in material, manufacturing and functioning of components and includes material costs, travel- or shipping costs and labor.
• INVENTUM provides not only the 2 years standard warranty, but also gives 3 years extended warranty on spare parts and
labor costs. We only bill the travel- or shipping costs. This way, the quality of your INVENTUM equipment is 5 years
guaranteed.
• To qualify for the extended 5 year warranty, please register your appliance within 45 days of purchase on
www.inventum.eu
• Why is registration important for you?
1. You get a 5-year warranty
2. All details of your appliance are known by Inventum. No need to search for your model number when you contact us.
3. Inventum can provide a faster and better service when you contact our service center.
• Guarantee can only be given if proof of purchase (e.g. till receipt or copy) can be shown. Therefore keep it in a safe place. The
guarantee period starts at the date of purchase.
• Guarantee is not valid in case of:
- normal wear;
- damage through misuse use or when the instructions were not followed correctly;
- lack of maintenance;
- not following the operation- and safety instructions;
- incompetent montage or repairs made by yourself or others;
- using accessories and spare parts which are not suitable for the appliance;
for assessment by our technical department.
• The guarantee is not valid for:
- normal wear - such as baking tray, grill rack and removal handles;
- normal wear and tear – such as glass breakage, scratches on the equipment, discoloration of plastic or painted parts; Insufficient
or incorrect maintenance can cause discolouration of surfaces and rubbers and plastics can deteriorate fast. This is also not
covered under warranty.
- (interchangeable) signal- and controllamps;
- defects and consequential damage caused by strong contamination and incorrect maintenance;
for assessment by our technical department.
Defects which do not significantly influence the value or operation of the device asre excluded by free repair and / or replacement.
Transport damage is not guaranteed. Therefore, check your new equipment before use. If any damage is found, please contact your
supplier within 5 working days after purchase.
From warranty and/or replacement are excluded: defects, loss and damage to the appliance due to an event that usually is insured
under the home contents insurance.
To whom can you turn to?
On www.inventum.eu you will find - besides advice on how to use the appliance and cleaning tips - all the answers to your servce
related questions. Please check the website before contacting our service center.
You can register your service request quickly and easily online at www.inventum.eu. It is also possible to do this by telephone via the
INVENTUM service organization. Check the the INVENTUM website for the contact information.
To provide the best possible service and to process your service request as soon as possible, we recommend that you always first
contact INVENTUM.
These warranty conditions only apply to the Netherlands. For local warranty please contact your dealer.
In countries where INVENTUM has a distributor, you can turn to them if you need the INVENTUM service organization. In other
countries, contact your dealer.
When the guarantee is no longer valid or when the period of guarantee has passed, we will charge any costs that
flow out of an assessment and/or repairing.
On request we will supply a statement before repairing. Without requesting a statement, we assume that you, by
guarantee & after sales service
26 • English

sending the appliance, automatically order to repair the appliance.
A guarantee period of two months is valid for repairs done by our technical department and the used spare parts, counting from
the repairdate. When a malfunction occurs within this period which directly flows out of the repairs and the used spare parts, the
consumer has the right of repairs without any costs.
Modification and printing errors reserved. The latest version of the deposited guarantee conditions can be obtained through our
service organization.
English • 27

AKB9004ARVS/01.1215V
Wijzigingen en drukfouten voorbehouden/ Modifications and printing errors reserved
Inventum Huishoudelijke
Apparaten B.V.
Meander 861
6825 MH Arnhem
info@inventum.eu
www.inventum.eu
twitter.com/inventum1908
facebook.com/inventum1908
youtube.com/inventum1908
persoonlijke verzorgingklein huishoudelijk witgoed inbouwwitgoed vrijstaand
-
 1
1
-
 2
2
-
 3
3
-
 4
4
-
 5
5
-
 6
6
-
 7
7
-
 8
8
-
 9
9
-
 10
10
-
 11
11
-
 12
12
-
 13
13
-
 14
14
-
 15
15
-
 16
16
-
 17
17
-
 18
18
-
 19
19
-
 20
20
-
 21
21
-
 22
22
-
 23
23
-
 24
24
-
 25
25
-
 26
26
-
 27
27
-
 28
28


Inventum AKB9004ARVS de handleiding
- Categorie
- Afzuigkappen
- Type
- de handleiding
in andere talen
- English: Inventum AKB9004ARVS Owner's manual