
2 3 4 5 6 7 8 9
1110 12 13 14 15
1. Placez la veilleuse avec projection sur une surface plane et ferme. Appuyez sur le
bouton qui se situe sur la base pour allumer et éteindre l’appareil.
2. L’appareil s’allumera et se mettra à tourner. De magnifiques icônes seront projetées
sur les murs et une projection kaléidoscopique apparaitra au plafond.
Remarque : Plus l’environnement est sombre, plus brilliant sera l’effet de la veileuse.
NLJ030series
Mode d'emploi Instruction manualManual de instrucciones Manual
de instruçõesManuale di istruzioniBedienungsanleitung Handleiding
Night Light Projector
Veilleuse Avec Projections
FRANÇAIS
INSTALLATION
SPÉCIFICATIONS
ENTRETIEN & GARANTIE
PARAMÈTRES
Contenu de l’emballage
Lors du déballage, vérifiez que l’emballage contient tous les éléments suivants:
1 x Veilleuse avec projection 1x câble micro USB 1 x mode d’emploi
AVERTISSEMENT : Tous les matériaux d’emballage, comme le scotch, les feuilles en
plastique, les ficelles et les étiquettes ne font pas partie de ce produit et doivent être jetés.
Le revêtement de l’appareil peut être nettoyé avec un chiffon à poussière, comme un
meuble. Pour l’extérieur de l’appareil, utilisez un chiffon propre, doux, légèrement imbibé
d’eau tiède non savonneuse. Faites particulièrement attention lors du nettoyage et du
séchage des parties en plastique. Pour le panneau avant, vous pouvez si vous le
souhaitez utiliser un chiffon humide et du savon doux.
Ce produit est couvert par une garantie de deux ans.
Pour tout service après-vente et pour toute plainte intervenant pendant la période de
garantie, adressez-vous à votre magasin de vente en présentant une preuve d’achat
valide. Notre garantie couvre tous les défauts liés aux matériaux et à la
fabrication, mais exclut toute détérioration résultant du non-respect des instructions du
mode d’emploi ou d’une negligence de la part de l’utilisateur (démontage, exposition à la
chaleur ou à l’humidité, etc.). Il est recommandé de conserver l’emballage pour reference
ultérieure.
Dans un souci d’amélioration de nos services, nous procédons régulièrement à des
modifications des couleurs et de certains détails du produit montré sur l’emballage.
REMARQUE : Conservez ce mode d’emploi car il contient des informations importantes.
Référence: NLJ030series
Conçu et développé en Europe – Fabriqué en Chine
© Lexibook®
Pour vos demandes concernant un problème SAV ou une réclamation, écrivez à
www.lexibook.com
ATTENTION : D’importantes interférences électromagnétiques ou des décharges
électrostatiques peuvent provoquer un mauvais fonctionnement ou une perte de données.
Si l’appareil ne fonctionne pas correctement, enlevez puis remettez les piles ou
débranchez l’adaptateur secteur de la prise de courant puis rebranchez-le.
1. Garder une distance minimale autour de l’appareil pour une aération suffisante.
2. Il convient que l’aération ne soit pas gênée par l’obstruction des ouvertures d’aération
par des objets tels que journaux, nappes, rideaux, etc.
3. Il convient de ne pas placer sur l’appareil des sources de flamme nues, telles que des
bougies allumées.
4. Les piles doivent ête mises au rebut de façon sûre. Les déposer dans des bacs de
collecte prévus afin de protéger l’environnement.
5 L'appareil est destiné à être utilisé dans un climat tempéré.
ALIMENTATION
Ne pas recharger les piles non rechargeables. Retirer les accumulateurs du produit
avant de les recharger. Ne charger les accumulateurs que sous la surveillance d’un
adulte. Ne pas mélanger différents types de piles ou accumulateurs, ou des piles et
accumulateurs neufs et usagés. Les piles et accumulateurs doivent être mis en place en
respectant la polarité. Les piles et accumulateurs usagés doivent être enlevés du
produit. Les bornes d’une pile ou d’un accumulateur ne doivent pas être mises en
court-circuit. Ne pas jeter les piles au feu. Retirer les piles en cas de non utilisation
prolongée. Cet appareil doit être alimenté avec les piles spécifiées seulement. Les
batteries ne doivent jamais être exposées à une source de chaleur excessive, par
exemple la lumière du soleil ou un feu.
Votre veilleuse projecteur fonctionne au choix avec 3 piles
de type 1.5V AA / LR6 (non incluses)un adaptateur
de 5V 0.5A (non inclus), à centre positif , avec le
câble CC/USB (inclus).
Installation des piles
1. À l’aide d’un tournevis, ouvrez le couvercle des piles situé
sous l’appareil.
2. Insérez 3 piles de type AA/LR6 1.5V (non incluses)
en respectant la polarité indiquée.
3. Remettez le couvercle en place et serrez les vis.
Utilisation via USB
1. Branchez le câble USB/CC à l'arrière de l'appareil (2) puis l'autre extrémité à un port
USB.
2. Vous pouvez aussi brancher le câble USB à un adaptateur CA/USB (non inclus) avec
une alimentation de sortie de 5V 0.5A.
NOTE: le câble USB ne recharge pas l'appareil. Pour de meilleures performances, il est
recommandé d’utiliser des piles alcalines avec ce produit.
1.5V AA OR LR6
1.5V AA OR LR6
1.5V AA OR LR6
1.5V AA OR LR6
1.5V AA OR LR6
1.5V AA OR LR6
1.5V AA OR LR6
1.5V AA OR LR6
1.5V AA OR LR6
1.5V AA OR LR6
1.5V AA OR LR6
1.5V AA OR LR6
1.5V AA OR LR6
1.5V AA OR LR6
1.5V AA OR LR6
1.5V AA OR LR6
1.5V AA OR LR6
1.5V AA OR LR6
1.5V AA OR LR6
1.5V AA OR LR6
1.5V AA OR LR6
Informations sur la protection de l’environnement
Tout appareil électrique usé est une matière recyclable et ne devrait pas faire partie des
ordures ménagères ! Nous vous demandons de bien vouloir nous soutenir en contribuant
activement au ménagement des ressources et à la protection de l’environnement en
déposant cet appareil dans des sites de collecte (si existants).
ENGLISH
INSTALLATION
SPECIFICATIONS
MAINTENANCE AND WARRANTY
SETTINGS
Contents
When unpacking, ensure that the following elements are included:
1 x Night Light Projector 1 x instruction manual 1x USB cable
WARNING: All packaging materials, such as tape, plastic sheets, wire ties and tags are
not part of this product and should be discarded.
The finish of your unit may be cleaned with a dust cloth and cared for as other furniture.
Use a soft, clean cloth moistened with plain, lukewarm water to clean the outer side of the
unit. Use caution when cleaning and wiping the plastic parts. Mild soap and a damp cloth
may be used on the front panel.
This product is covered by our 2-years warranty.
For any claim under the warranty or after sale service, please contact your distributor and
present a valid proof of purchase. Our warranty covers any manufacturing material and
workmanship defect, with the exception of any deterioration arising from the
non-observance of the instruction manual or from any careless action implemented on this
item (such as dismantling, exposition to heat and humidity, etc.). It is recommended to
keep the packaging for any further reference.
In a bid to keep improving our services, we could implement modifications on the colours
and the details of the product shown on the packaging.
NOTE: Please keep this instruction manual, it contains important information.
Reference: NLJ030series
Designed and developed in Europe – Made in China
© Lexibook®
United Kingdom & Ireland
For after-sales service, please contact us at [email protected]
www.lexibook.com
WARNING: Malfunction or loss of memory may be caused by strong frequency
interference or electrostatic discharge. Should any abnormal function occur, remove the
batteries and insert them again or unplug the DC/USB cable and plug it in again.
BATTERY INFORMATION
Non-rechargeable batteries are not to be recharged. Rechargeable batteries are to be
removed from the product before being charged. Rechargeable batteries are only to be
charged under adult supervision. Different types of batteries or new and used batteries
are not to be mixed. Only batteries of the same or equivalent type as recommended are
to be used. Batteries are to be inserted with the correct polarity. Exhausted batteries are
to be removed from the product. The supply terminals are not to be short circuited. Do
not throw batteries into a fire. Remove the batteries if you are not going to use the
product for a long period of time. Battery shall not be exposed to excessive heat such as
sunshine, fire or the like.
Your Night Light Projector operates either with 3 x 1.5V
AA / LR6 type batteries (not included) or a 5V 0.5A
adaptor with positive centre (not included), or with
the DC/USB cable (Included).
Battery installation
When you use the Night Light Projector for the first time:
1. Using a screwdriver, open the battery compartment cover
located at the bottom of the unit.
2. Install the 3 x AA/LR6 1.5V batteries (not included)
observing the polarity symbols inside the battery
compartment.
3. Close the battery compartment and tighten the screw.
Use via USB
1. Connect the DC/USB cable on the back of the device (2) and the other end to the USB
port.
2. You can also connect the USB cable to any AC/USB adaptor (not included) which has
a 5V 0.5A output.
NOTE: the USB cable does not recharge the product. For better performance, it is
recommended to use alkaline batteries with this product.
Environmental Protection:
Unwanted electrical appliances can be recycled and should not be discarded along with
regular household waste! Please actively support the conservation of resources and help
protect the environment by returning this appliance to a collection centre (if available).
DEUTSCH
AUFSTELLEN
TECHNISCHE DATEN
WARTUNG UND GARANTIE
EINSTELLUNGEN
Auspacken des Gerätes
Achten Sie beim Auspacken darauf, dass die folgenden Elemente enthalten sind:
1 x Nachtlicht-Projektor 1 x Bedienungsanleitung 1x USB-KABLE
WARNUNG: Das gesamte Verpackungsmaterial wie Klebeband, Plastikfolie, Drähte und
Etiketten ist nicht Teil dieses Spielzeuges und sollte entsorgt werden.
Die Oberflächenausführung Ihres Gerätes kann mit einem Staubtuch gereinigt und so wie
andere Möbelstücke gepflegt werden. Reinigen Sie das Geräteäußere mit einem weichen,
sauberen Tuch, das mit klarem, lauwarmem Wasser angefeuchtet ist. Seien Sie vorsichtig,
wenn Sie die Plastikteile reinigen und abwischen. Eine milde Seife und ein feuchtes Tuch
können zum Reinigen der Vorderseite verwendet werden.
2 Jahre Garantie. Die gesetzlichen Gewährleistungsrechte bleiben neben der Garantie
bestehen.
Für jede Inanspruchnahme der Garantie oder des Kundenservices wenden Sie sich bitte
an Ihren Fachhändler und legen Sie einen gültigen Kaufbeleg vor. Unsere Garantie deckt
alle Material- und Herstellungsmängel ab, mit Ausnahme von Verschleißerscheinungen,
die aus der Missachtung der Bedienungsanleitung oder fahrlässigen Handlungen an
diesem Produkt resultieren (wie z. B. Auseinan-derbauen, das Gerät Hitze oder
Feuchtigkeit aussetzen usw.). Es wird empfoh-len, die Verpackung für spätere
Verwendung aufzubewahren. Im Bemühen unseren Service weiterhin zu verbessern,
können wir an den Farben und der Ausführung des Produktes, wie es auf der
Verpackung abgebildet ist, Änderungen vornehmen.
HINWEIS: Bitte bewahren Sie diese Bedienungsanleitung auf, sie enthält wich-tige
Informationen.
Referenz: NLJ030series
Entworfen und entwickelt in Europa – Hergestellt in China
© Lexibook®
Deutschland & Österreich
Für den Kundendienst wenden Sie sich bitte an unsere Teams:
www.lexibook.com
WARNUNG: Fehlfunktionen oder Speicherverlust können durch starke Frequenzstörungen
oder elektrostatische Entladungen verursacht werden. Sollte das Gerät nicht
ordnungsgemäß funktionieren, entfernen Sie die Batterien und legen sie wieder ein oder
ziehen Sie das den Stecker des AC/DC-Adapters aus der Wandsteckdose und verbinden
Sie es wieder.
STROMVERSORUNG
Nicht-aufladbare Batterien dürfen nicht aufgeladen werden. Aufladbare Batterien
müssen aus dem Gerät vor dem Aufladen entfernt werden. Aufladbare Batterien dürfen
nur unter Aufsicht eines Erwachsenen aufgeladen werden. Unterschiedliche
Batterietypen oder neue und alte Batterien dürfen nicht zusammen benutzt werden. Es
dürfen nur Batterien desselben oder eines gleichwertigen Typs verwendet werden.
Batterien müssen unter Beachtung der korrekten Polarität eingelegt werden.
Verbrauchte Batterien müssen aus dem Gerät entfernt werden. Die Anschlusskontakte
dürfen nicht kurzgeschlossen werden. Batterien dürfen nicht ins Feuer geworfen werden.
Entfernen Sie die Batterien aus dem Produkt, wenn es für längere Zeit nicht benutzt wird.
Wenn der Sound schwächer wird oder das Spielzeug anfängt, nicht mehr direkt zu
reagieren, deutet dieses ebenfalls darauf hin, dass es Zeit wird, neue Batterien
einzusetzen. Die Batterien dürfen keinen übermäßigen Hitzequellen ausgesetzt
werden,zum Beispiel Sonnenschein oder Feuer.
Der Nachtlicht-Projektor benötigt 3 Batterien des Typs
1,5V , AA / LR 6 (nicht enthalten) order mit 5V 0.5A
Adapter mit positiver Polarität (nicht inbegriffen), mit
dem DS/USB-Kabel (inbegriffen).
Batterie einlegen
Wenn Sie den NLJ 030 Series zum ersten Mal benutzen:
1. Öffnen Sie mithilfe eines Schraubendrehers die
Bat-teriefachabdeckung im Boden des Gerätes.
2. Legen Sie die 3 x LR6/AA 1,5 V Batterien (nicht
mitgeliefert) unter Beachtung der Polaritätsmarkierungen
im Batteriefach ein.
3. Schließen Sie das Batteriefach und ziehen Sie die Schraube fest.
Verwendung über USB
1. Verbinden Sie das USB-Kabel mit der Rückseite des Geräts (2) und das andere Ende
mit einem USB-Anschluss.
2. Sie können das USB-Kabel mit jedem beliebigen AC/USB-Adapter (nicht inbegriffen)
verbinden, der über einen DC 5 V, 0,5 A Ausgang verfügt.
HINWEIS: Das USB-Kabel lädt das Produkt nicht auf. Für eine bessere Leistung wird die
Benutzung von alkalischen Batterien mit diesem Produkt empfohlen.
Umweltschutz:
Ausrangierte Elektrogeräte können recycelt werden und sollten nicht mit dem normalen
Hausmüll entsorgt werden! Bitte unterstützen Sie aktiv die Erhaltung natürlicher Ressourcen
und helfen Sie die Umwelt zu schützen, indem Sie dieses Gerät bei einer Sammelstelle
abgeben (sofern vorhanden).
ESPAÑOL
INSTALACIÓN
ESPECIFICACIONES
MANTENIMIENTO Y GARANTÍA
CONFIGURACIÓN
Desembalaje del aparato
Cuando desembale el aparato, asegúrese de que los siguientes elementos están
presentes en el paquete:
1x Proyector de luz nocturna 1x manual de instrucciones 1x cable USB
¡ADVERTENCIA! Todos los elementos utilizados para el embalaje tales como cintas,
recubrimientos plásticos, ataduras metálicas y etiquetas no forman parte de este
producto y, por lo tanto, deberán desecharse.
El acabado de su aparato puede limpiarse con una bayeta, de la misma manera utilizada
para limpiar sus otros muebles. Para limpiar el exterior del aparato, utilice un paño limpio
y suave, ligeramente humedecido con agua clara y tibia. Tenga cuidado al limpiar los
elementos de plástico del aparato. Si lo desea, podrá utilizar un tipo de jabón suave y un
paño humedecido para limpiar el panel frontal.
Este producto está cubierto por nuestra garantía de dos (2) años.
Para efectuar cualquier reclamación en garantía o solicitud de reparación posventa, le
rogamos que se ponga en contacto con su distribuidor y le presente un comprobante
válido de compra. Nuestra garantía cubre aquellos defectos de material o mano de obra
que sean imputables al fabricante, a excepción de todo aquel deterioro que se produzca
como consecuencia de la no observación de las indicaciones señaladas en el manual de
instrucciones o de toda intervención improcedente en el aparato (como por ejemplo,
desmontaje, exposición al calor o humedad, etc.). Se recomienda conservar el embalaje
para poder utilizarlo como referencia futura. En nuestro continuo afán de optimización de
servicios, podremos implementar modificaciones en los colores y detalles del producto
mostrado en el embalaje.
NOTA: por favor conserve este manual de instrucciones, ya que contiene informaciones
importantes.
Referencia: NLJ030series
Diseñado y desarrollado en Europa - Fabricado en China
© Lexibook®
España
Para servicio postventa, entre en contacto con nuestros equipos:
www.lexibook.com
ADVERTENCIA! Las descargas electrostáticas o interferencias de una frecuencia
suficientemente fuerte podrán provocar el funcionamiento anormal del aparato o la pérdida
de los datos almacenados en su memoria. Si se observa cualquier función anómala,
reinicie el aparato, retire las pilas y vuelva a colocarlas o desenchufe el adaptador CA/CC
de la toma de corriente mural y enchúfelo de nuevo.
1. Guardar una distancia mínima alrededor del aparato, para que tenga una ventilación
adecuada.
ALIMENTACIÓN ELÉCTRICA
No se deben intentar cargar aquellas pilas que no sean recargables. Las pilas
recargables deberán retirarse del producto antes de cargarlas. Las pilas recargables
deberán recargarse únicamente bajo la supervisión de un adulto. No deberán mezclarse
diferentes tipos de pilas ni tampoco pilas nuevas con otras usadas. Utilice únicamente
pilas del mismo tipo o equivalentes a las recomendadas. Inserte las pilas observando la
polaridad correcta. Deberán retirarse del producto las pilas agotadas. No cortocircuite
los terminales de alimentación. No arroje las pilas al fuego. Retire las pilas del producto
si no va a utilizarlo durante periodos prolongados. Cuando el sonido se hace débil o el
juego no responde adecuadamente es señal de que debe sustituir las pilas. Deberá
evitarse exponer las baterías a temperaturas excesivamente elevadas tales como las
generadas por la la acción de los rayos del sol o de las llamas.
Su Proyector de luz nocturna funciona con 3 pilas de 1,5V
AA / LR6 (no incluidas) o con un adaptator 5V 0.5A de
centro positivo (no incluido), con el cable CC/USB
(incluido).
Instalacion de bateria
Antes de utilizar por primera vez su aparato, lleve a cabo los
siguientes pasos preliminares:
1. Utilizando un destornillador, abra la tapa del
compartimento de las pilas situado en la cara inferior del
aparato.
2. Instale 3 pilas de 1,5 V de tipo AA/LR6 (no incluidas)
observando las indicaciones de polaridad que se muestran en el interior del
compartimento de las pilas.
3. Cierre el compartimento de las pilas y apriete el tornillo.
Utilizar via USB
1. Conecte el cable USB a la parte posterior del dispositivo (2) y el otro extremo a un
puerto USB.
2. El cable USB también puede conectarse a cualquier adaptador CA/USB (no incluido)
con una salida CC 5 V y 0,5 A.
NOTA: el cable USB no recarga el producto. Para que el producto funcione de manera
óptima, se recomienda la utilización de pilas alcalinas.
Precauciones para la protección del medioambiente
¡Al final de su vida útil, los aparatos eléctricos pueden reciclarse y no deberán desecharse
junto con los desperdicios domésticos! Le rogamos que apoye activamente la conservación
de los recursos naturales y contribuya a la protección del medioambiente desechando este
aparato eléctrico en un centro de reciclaje autorizado (si lo hay) al final de su vida útil.
PORTUGUÊS
INSTALAÇÃO
ESPECIFICAÇÕES
MANUTENÇÃO E GARANTIA
DEFINIÇÕES
Retirar o aparelho da caixa
Quando retirar o aparelho da caixa, certifique-se de que os seguintes elementos estão
incluídos:
1x Projetor com luz noturna 1x Manual de instruções 1x cabo USB
AVISO: Todos os materiais de empacotamento, como fita, películas de plástico, arames
e etiquetas não fazem parte deste brinquedo e deverão ser deitados fora.
Fonte de energia 3 pilhas 1,5V AA/LR6
Entrada 5V 500mA
O acabamento da sua unidade pode ser limpo com um pano do pó e cuidado tal como
para qualquer outro mobiliário. Use um pano suave e limpo, ligeiramente embebido em
água morna para limpar o exterior da unidade. Tenha cuidado quando limpar as peças
de plástico. Pode usar detergente neutro e um pano ligeiramente embebido em água no
painel dianteiro.
Este produto é abrangido pela nossa garantia de 2 anos.
Se precisar de usar a nossa garantia ou serviço pós-venda, contacte o seu revendedor e
apresente-lhe uma prova válida de compra. A nossa garantia abrange defeitos de
material e de fabrico, com a excepção de qualquer deterioração devido à não
observância do manual de instruções ou qualquer acção descuidada implementada no
produto (como desmontagem, exposição ao calor e humidade, etc.). Recomendamos
que guarde a caixa para futuras referências.
Num esforço constante para melhorar os nossos serviços, podemos implementar
modificações nas cores e detalhes do produto apresentado na caixa.
NOTA: Por favor, guarde este manual de instruções, pois contém informações
importantes.
Referência: NLJ030series
Desenhado e desenvolvido na Europa – Fabricado na China
© Lexibook®
Para qualquer serviço pós-venda, por favor, contacte as nossas equipas:
www.lexibook.com
AVISO: O mau funcionamento ou perda de memória podem ser causados por fortes
interferências ou descargas electrostáticas. Caso ocorra algum funcionamento anormal,
retire e volte a colocar as pilhas ou desligue o adaptador AC/DC da tomada e volte a
ligá-lo.
ALIMENTAÇÃO ELÉTRICA
Não recarregue pilhas não recarregáveis. As pilhas recarregáveis têm de ser retiradas
do produto antes de serem recarregadas. As pilhas recarregáveis só podem ser
recarregadas sob a supervisão de um adulto. Não misture diferentes tipos de pilhas nem
pilhas novas com pilhas usadas. Utilize apenas pilhas do mesmo tipo ou equivalentes
às recomendadas. Coloque as pilhas com a polaridade correcta. Retire as pilhas gastas
do produto. Não coloque os terminais em curto-circuito. Não atire as pilhas para o fogo.
Retire as pilhas se não usar o produto durante um longo período de tempo. Quando o
som ficar fraco ou o jogo não responder, pense em substituir as pilhas. As pilhas não
deverão ser expostas a calor em excesso, como luz directa do sol, fogo ou algo
parecido.
O seu projetor com luz noturna funciona com 3 pilhas de
1,5V AA/LR6 (não incluídas) o um adaptador de
5V 0.5A com o centro positivo (não incluído), com
o cabo DC/USB (incluído).
Instalação da bateria
Quando usar o aparelho pela primeira vez:
1. Com uma chave de fendas, abra a tampa do
compartimento das pilhas, que se encontra na parte
inferior da unidade.
2. Coloque as 4 pilhas AA/LR6 de 1,5V (não incluídas),
tendo em conta os sinais da polaridade no interior do compartimento das pilhas.
3. Feche o compartimento das pilhas e aperte o parafuso.
Use via USB
1. Conecte o cabo USB à parte de trás do dispositivo (2) e a outra extremidade a uma
porta USB.
2. Também pode ligar o cabo USB a qualquer adaptador AC/USB (não incluído) com uma
saída DC 5V, 0.5A.
NOTA: O cabo USB não recarrega o produto. Para um melhor desempenho,
recomendamos que use pilhas alcalinas com este produto.
Protecção Ambiental
Os aparelhos eléctricos indesejados podem ser reciclados e não deverão ser eliminados
juntamente com o lixo doméstico comum! Por favor, apoie activamente na conservação dos
recursos e ajude a proteger o ambiente, entregando este aparelho num centro de recolha
(se disponível).
ITALIANO
INSTALLAZIONE
SPECIFICHE TECNICHE
MANUTENZIONE E GARANZIA
IMPOSTAZIONI
Aprire la confezione
Quando si apre la confezione, controllare che contenga i seguenti elementi:
1 x Proiettore notturno 1 x manuale di istruzioni 1x cavo USB
ATTENZIONE: Tutti i materiali di imballaggio, come nastri, fogli di plastica, cavi ed
etichette non fanno parte di questo prodotto e devono essere eliminati.
La finitura dell’apparecchio può essere pulita con un panno per la polvere e curato come
gli altri mobili. Usare un panno morbido e pulito inumidito con acqua tiepida per pulire
l’esterno della macchina. Prestare attenzione durante la pulizia e strofinando le parti in
plastica. Sapone delicato e un panno umido possono es-sere utilizzati sul pannello
frontale.
Questo prodotto è coperto dalla nostra garanzia di 2 anni.
Per qualsiasi richiesta di intervento in garanzia o il servizio post vendita, contattare il
distributore e presentare una prova di acquisto valida. La garanzia copre qualsiasi difetto
di fabbricazione e materiali di lavorazione, con l’eccezione di un eventuale
deterioramento derivante dal mancato rispetto delle istruzioni contenute nel manuale o
ad azioni sconsiderate sull’articolo (smontaggio, esposizione al calore e umidità, ecc.) Si
raccomanda di conservare la confezione per eventuali necessità future.
Nel tentativo di continuare a migliorare i nostri servizi, potremmo apportare modifiche ai
colori ed i dettagli del prodotto indicato sulla confezione.
NOTA: Si prega di conservare il presente manuale di istruzioni, che contiene importanti
informazioni.
Riferimento: NLJ030series
Progettato e sviluppato in Europa – Fabbricato in Cina
© Lexibook®
Per i servizi di assistenza post-vendita, contattare i nostri team:
www.lexibook.com
AVVERTENZA: Il cattivo funzionamento o la perdita di memoria può essere causato da
una forte interferenza di frequenza o scariche elettrostatiche. In caso di qualsiasi
funzionamento anormale, rimuovere le batterie e inserirle di nuovo ou desligue o
adaptador AC/DC da tomada e volte a ligá-lo. oppure togliere l’adattatore CA/CC dalla
presa di corrente e inserirlo nuovamente.
ALIMENTAZIONE
Le batterie non ricaricabili non devono essere ricaricate. Le batterie ricaricabili devono
essere rimosse dal prodotto prima di essere caricate. Le batterie ricaricabili devono
essere caricate solo sotto supervisione di un adulto. Diversi tipi di batterie o batterie
nuove e usate non devono essere mescolati. Utilizzare insieme solo batterie dello stesso
tipo o equivalente a quello consigliato da utilizzare. Le batterie devono essere inserite
con la corretta polarità. Le batterie esaurite devono essere rimosse dal prodotto. I
terminali forniti non sono da cortocircuitare. Non gettare le batterie nel fuoco. Rimuovere
le batterie se non si intende utilizzare il gioco per un lungo periodo di tempo. Sostituire
le batterie quando il suono diventa debole o il gioco non funziona. Non esporre le
batterie a un calore eccessivo, ad esempio la luce del sole o un fuoco.
Il Proiettore notturno è alimentato da 3 batterie AA/LR6 da
1,5 V (non incluse) o con un adattatore (non incluso)
5V 0.5A con centro positivo , con il cavo
CC/USB (incluso).
Installazione della batteria
Quando si utilizza l’aparato per la prima volta:
1. Con un cacciavite, aprire il coperchio del vano batterie
collocato sotto l’unità.
2. Inserire le 4 batterie AA/LR6 1,5 V (non fornite)
osservando la polarità indicata nel vano batterie.
3. Chiudere il vano batterie e serrare la vite.
Utilizzare tramite USB
1. Collegare il cavo USB al retro del dispositivo (2) e l'altra estremità a una porta USB.
2. In alternativa, è possibile collegare il cavo USB a qualsiasi adattatore CA/USB (non
incluso) dotato di uscita CC da 5 V, 0,5 A.
NOTA: il cavo USB non ricarica il prodotto. Per migliori prestazioni, si consiglia di
utilizzare batterie alcaline con questo prodotto.
Protezione Ambientale
Gli apparecchi elettrici di scarto possono essere riciclati e non devono essere gettati insieme
ai rifiuti domestici! Si prega di sostenere attivamente la conservazione delle risorse e
proteggere l’ambiente restituendo l ‘apparecchio ad un centro di raccolta (se disponibile).
NEDERLANDS
INSTALLATIE
TECHNISCHE GEGEVENS
ONDERHOUD EN GARANTIE
INSTELLINGEN
Het apparaat uitpakken
Controleer tijdens het uitpakken of de volgende onderdelen aanwezig zijn:
1 x Nachtlampprojector 1 x gebruiksaanwijzing 1x USB-kabel
WAARSCHUWING: Alle verpakkingsmateriaal, zoals kleefband, plastic vellen, koorden
en labels vormen geen onderdeel van dit speelgoed en dienen verwi-jderd te worden.
Maak de buitenkant van uw apparaat schoon met een stofdoek en onderhoud deze op
dezelfde manier als andere apparatuur. Gebruik een zachte, schone doek, bevochtigd in
lauw water om de buitenkant van het apparaat schoon te maken. Wees voorzichtig als u
de plastic onderdelen schoonmaakt. Gebruik milde zeep en een licht bevochtigde doek
om het frontpaneel schoon te maken.
Dit product is gedekt door onze garantie van 2 jaar.
Voor elke vordering onder de garantie of dienst na verkoop, neem contact op met uw
verdeler en leg een geldig aankoopbewijs voor. Onze garantie dekt om het even welke
materiaal- of fabricagefout, met uitzondering van schade veroorzaakt door het niet
opvolgen van de gebruiksaanwijzing of door een onachtzame actie uitgevoerd op dit
apparat (zoals ontmanteling, blootstelling aan warmte of vocht, enz.). Het is aanbevolen
om de verpakking te bewaren voor toekomstige raadpleging. Om onze diensten te
verbeteren, is het mogelijk dat de kleuren en de details van het product zoals
weergegeven op de verpakking wijzigen.
OPMERKING: Bewaar deze gebruiksaanwijzing, het bevat belangrijke informatie.
Referentie: NLJ030series
Ontworpen en ontwikkeld in Europa – Vervaardigd in China
© Lexibook®
Voor service na verkoop, neem contact op met onze teams:
www.lexibook.com
WAARSCHUWING: Storing of geheugenverlies van het apparaat kan worden veroorzaakt
door sterke frequentiestoringen of elektrostatische ontlading. Als een storing zich voordoet,
reset het apparaat of verwijder de batterijen en plaats deze dan terug of haal de
AC/DC-adapter uit het stopcontact en steek deze vervolgens opnieuw in.
1. Houd een minimale afstand rond het apparaat voor voldoende ventilatie.
2. De ventilatie dient niet belemmerd te worden door het afdekken van de
ventilatieopeningen door voorwerpen zoals een krant, een tafellaken, gordijnen, etc.
3. Plaats geen voorwerp met een open vlam, zoals een brandende kaars, op het
apparaat.
4. Gooi de batterijen op een juiste manier weg. Gooi gebruikte batterijen in de
inzamelbakken die voor dit doeleinde voorzien zijn.
5. Het apparaat is ontworpen om te worden gebruikt in een gematigd klimaat.
BATTERIEINFORMATIONEN
Niet-heroplaadbare batterijen kunnen niet worden heropgeladen; oplaadbare batterijen
moeten uit het speelgoed worden verwijderd alvorens deze op te laden; heroplaadbare
batterijen mogen alleen onder toezicht van een volwassene worden opgeladen;
verschillende types batterijen of nieuwe en oude batterijen mogen niet onderling gebruikt
worden; gebruik alleen batterijen van hetzelfde of equivalente type zoals aangeraden
door de fabrikant; batterijen moeten volgens de juiste polariteit worden ingestoken; lege
batterijen moeten uit het speelgoed worden verwijderd; de toevoerterminals mogen
geen kortsluiting ondervinden. Gelieve de verpakking te bewaren als referentie voor
later daar het belangrijke informatie bevat. Gooi batterijen nooit in open vuur. Indien je
het spel voor langere tijd niet zal gebruiken, neem de batterijen uit het spel. Wanneer het
geluid verzwakt of het spel niet reageert, vervang dan de batterijen. Stel de batterijen
nooit bloot aan een warmtebron, zoals zonlicht of vuur.
Uw nachtlampprojector werkt op 3 x 1,5V AA / LR6 6
batterijen (niet meegeleverd) of met 5V 0.5A adapter met
een positief midden (niet meegeleverd) , met de
DC/USB-kabel (bijgeleverd),
Batterij installatie
Als u de NLJ030 voor de eerste maal gebruikt:
1. Open het batterijvak, dat zich achteraan het apparaat
bevindt, met behulp van een schroevendraaier.
2. Plaats de 3 x AA/LR6 1,5V batterijen (niet
meegeleverd) en let hierbij op de juiste polariteit
aangegeven binnenin het batterijvak.
3. Sluit het batterijvak en draai de schroef vast.
Gebruik via USB
1. Sluit de USB-kabel aan op de achterkant van het apparaat (2) en het andere uiteinde
op een USB-poort.
2. Sie können das USB-Kabel mit jedem beliebigen AC/USB-Adapter (nicht inbegriffen)
verbinden, der über einen DC 5 V, 0,5 A Ausgang verfügt.
HINWEIS: Das USB-Kabel lädt das Produkt auf. Voor een optimale prestatie wordt het
aanbevolen om alkaline batterijen met dit product te gebruiken.
Bescherming van het milieu
Afgedankte elektrische apparatuur kan worden gerecycled en mag niet met het gewone
huishoudelijk afval worden weggegooid. Steun het behoud van onze natuurlijke rijkdommen
op een actieve manier en help met het beschermen van het milieu door dit apparaat bij een
inzamelpunt in te leveren (indien voorhanden).
1. Plaats de nachtlampprojector op een vlak en stevig oppervlak. Druk op de aan/uit-knop
aan de zijkant van het voetstuk om het apparaat in en uit te schakelen.
2. Het apparaat wordt verlicht en start met draaien. Mooie pictogrammen worden op de
muur geprojecteerd en een leuke caleidoscoopprojectie wordt op het plafond
weergegeven.
Opmerking: Hoe donkerder de ruimte, hoe mooier het lichteffect.
1
1. Collocare il proiettore notturno su una superficie stabile e piana. Premere il tasto di
accensione situato sul lato della base per accendere o spegnere l’apparecchio.
2. L’unità si accenderà e inizierà a ruotare, proiettando splendide ombre sulla parete
mentre una deliziosa proiezione caleidoscopica verrà proiettata sul soffitto.
Nota: più l’ambiente è buio, più gli effetti luminosi saranno nitidi e brillanti.
1
1. Coloque o Projetor Noturno numa superfície plana e firme. Certifique-se de que contém
pilhas e prima o botão da energia na parte lateral da base para ligar e desligar a
unidade.
2. A unidade acende e começa a girar. Belos ícones serão projetados na parede,
enquanto uma adorável projeção caleidoscópica será projetada no teto.
Nota: Quanto mais escuro estiver o local, mais brilhante se torna o efeito luminoso.
1
1
1. Put the Night Light Projector on a flat and firm surface. Press the power button
located on the side of the base to turn the unit on and off.
2. The unit will light up and start turning. Beautiful icons will be projected onto the wall,
while a lovely kaleidoscopic projection will be projected onto the ceiling.
Note: The darker the environment, the more sparkling becomes the lamp light effect.
1
1. Coloque el Proyector de Luz Nocturna sobre una superficie plana y firme. Presione el
botón de encendido ubicado en el costado de la base para encenderlo y apagarlo.
2. El aparato se iluminará y empezará a girar. Bonitos iconos se proyectarán sobre la
pared y una adorable proyección caleidoscópica se proyectará sobre el techo.
Nota: Cuanto más oscuro sea el entorno, más brillante será el efecto de la lámpara.
1
IM code: NLJ030seriesIM2280
1. Stellen Sie den Nachtlicht-Projektor auf eine ebene und feste Fläche. Drücken Sie die
Ein-/Aus-Taste an der Seite des Sockels, um es ein- bzw. auszuschalten.
2. Das Gerät leuchtet und beginnt, sich zu drehen. Es werden hübsche Bilder an die
Wand und gleichzeitig eine schöne kaleidoskopische Projektion an die Zimmerdecke
geworfen.
Hinweis: Je dunkler die Umgebung, umso mehr funkeln die Lichteffekte der Lampe.
1
1
2
5V
Tous les papiers
sont recyclables
This product is not a toy.
Dieses Produkt
ist kein Spielzeug.
Ce produit n’est pas un jouet.
Este producto
no es un juguete.
Dit product is
geen speelgoed.
Questo prodotto
non è un giocattolo.
Este produto não
é um brinquedo.
Lexibook S.A.
6 avenue des Andes
Bâtiment 11
91940 Les Ulis
France
Alimentation 3 piles de 1.5V AA / LR6
Entrée 5V 500mA
Lexibook S.A.
6 avenue des Andes
Bâtiment 11
91940 Les Ulis
France
Lexibook S.A.
6 avenue des Andes
Bâtiment 11
91940 Les Ulis
France
Lexibook S.A.
6 avenue des Andes
Bâtiment 11
91940 Les Ulis
France
Lexibook S.A.
6 avenue des Andes
Bâtiment 11
91940 Les Ulis
France
Lexibook S.A.
6 avenue des Andes
Bâtiment 11
91940 Les Ulis
France
Lexibook S.A.
6 avenue des Andes
Bâtiment 11
91940 Les Ulis
France
1. Keep a minimum distance around the device for sufficient ventilation;
2. The ventilation should not be impeded by covering the ventilation openings with items,
such as newspapers, table-cloths, curtains, etc.;
3. No naked flame sources, such as lighted candles, should be placed on the apparatus;
4. The use of apparatus in moderate climates.
5. Attention should be drawn to the environment aspects of battery disposal.
Alimentación 3 x baterias de 1,5V AA/LR6
Entrada 5V 500mA
Batterien 3 x LR6/AA 1.5 V
Eingabe 5V 500mA
Batteries 3 x 1.5V AA / LR6 batteries
Input 5V 500mA
1. Halten Sie um das Gerät herum einen Mindestabstand ein, um eine ausreichende
Luftzirkulation zu gewährleisten.
2. Die uftzirkulation darf nicht durch Bedecken der Lüftungsöffnungen durch solche
Gegenstände wie Zeitschriften, Tischdecken, Vorhängen usw. behindert werden.
3. Es dürfen keine offenen Flammen auf das Gerät gestellt werden, wie zum Beispiel
brennende Kerzen.
4. Batterien müssen auf sichere Weise entsorgt werden. Entsorgen Sie Batterien in den
hierfür vorgesehenen Sammelbehältern, um die Umwelt zu schützen.
5. Das Gerät ist für den Gebrauch in einem moderaten Klima vorgesehen.
Batterijen 3 x AA/LR6 1,5V
Invoer 5V 500mA
Batterie 3 x AA LR6 1.5V
Ingresso 5V 500mA
2. La ventilación no debe quedar impedida debido a la obstrucción de las aberturas de
ventilación por objetos como periódicos, manteles, cortinas, etc.;
3. No es conveniente colocar sobre el aparato fuentes de llama viva, como velas
encendidas.
4. Las pilas deben desecharse de manera segura. Deposítelas en contenedores selectivos
previstos a este efecto, para proteger el medio ambiente.
5. El aparato ha sido diseñado para su uso en un clima templado.
1. Mantenere una distanza minima intorno all’apparecchio per garantire un’adeguata
ventilazione.
2. Per garantire una corretta ventilazione, non ostruire le aperture di ventilazione con
oggetti come giornali, tovaglie, tende, ecc.
3. Non posizionare sull’apparecchio fonti di fiamm libere, ad esempio candele accese.
4. Smaltire le batterie in modo sicuro. Portarle presso gli appositi punti di raccolta per
salvaguardare l’ambiente.
5. L’apparecchio deve essere usato in climi temperati.
1. Guardar una distancia mínima alrededor del aparato, para que tenga una
ventilación adecuada.
2. La ventilación no debe quedar impedida debido a la obstrucción de las aberturas de
ventilación por objetos como periódicos, manteles, cortinas,etc.
3. No es conveniente colocar sobre el aparato fuentes de llama viva, como velas
encendidas.
4. Las pilas deben desecharse de manera segura. Deposítelas en contenedores
selectivos previstos a este efecto, para proteger el medio ambiente.
5. El aparato ha sido diseñado para su uso en un clima templado.
76w x112mm (each)
684w x112mm (total)
NLJ030series
(339)
76w x112mm (each)
684w x112mm (total)
NLJ030series
(339)
C
M
Y
CM
MY
CY
CMY
K
NLJ030seriesIM2280_339_V15.pdf 1 9/7/2020 2:31 PM
Documenttranscriptie
NLJ030seriesIM2280_339_V15.pdf 1 9/7/2020 2:31 PM Night Light Projector Veilleuse Avec Projections FRANÇAIS INSTALLATION Contenu de l’emballage Lors du déballage, vérifiez que l’emballage contient tous les éléments suivants: 1 x Veilleuse avec projection 1x câble micro USB 1 x mode d’emploi AVERTISSEMENT : Tous les matériaux d’emballage, comme le scotch, les feuilles en plastique, les ficelles et les étiquettes ne font pas partie de ce produit et doivent être jetés. ALIMENTATION Votre veilleuse projecteur fonctionne au choix avec 3 piles de type 1.5V AA / LR6 (non incluses), un adaptateur de 5V 0.5A (non inclus), à centre positif , avec le câble CC/USB (inclus). Installation des piles 1. À l’aide d’un tournevis, ouvrez le couvercle des piles situé sous l’appareil. 2. Insérez 3 piles de type AA/LR6 1.5V (non incluses) en respectant la polarité indiquée. 3. Remettez le couvercle en place et serrez les vis. 1.5V AA OR LR6 1.5V AA OR LR6 Utilisation via USB 1. Branchez le câble USB/CC à l'arrière de l'appareil (2) puis l'autre extrémité à un port USB. 2. Vous pouvez aussi brancher le câble USB à un adaptateur CA/USB (non inclus) avec une alimentation de sortie de 5V 0.5A. NOTE: le câble USB ne recharge pas l'appareil. Pour de meilleures performances, il est recommandé d’utiliser des piles alcalines avec ce produit. Ne pas recharger les piles non rechargeables. Retirer les accumulateurs du produit avant de les recharger. Ne charger les accumulateurs que sous la surveillance d’un adulte. Ne pas mélanger différents types de piles ou accumulateurs, ou des piles et accumulateurs neufs et usagés. Les piles et accumulateurs doivent être mis en place en respectant la polarité. Les piles et accumulateurs usagés doivent être enlevés du produit. Les bornes d’une pile ou d’un accumulateur ne doivent pas être mises en court-circuit. Ne pas jeter les piles au feu. Retirer les piles en cas de non utilisation prolongée. Cet appareil doit être alimenté avec les piles spécifiées seulement. Les batteries ne doivent jamais être exposées à une source de chaleur excessive, par exemple la lumière du soleil ou un feu. 5V 1 2 Mode d'emploi .Instruction manual.Manual de instrucciones .Manual de instruções.Manuale di istruzioni.Bedienungsanleitung .Handleiding NLJ030series C NLJ030series 76w x112mm (each) (339) 684w x112mm (total) SPÉCIFICATIONS Alimentation Entrée 1.5V AA OR LR6 ATTENTION : D’importantes interférences électromagnétiques ou des décharges électrostatiques peuvent provoquer un mauvais fonctionnement ou une perte de données. Si l’appareil ne fonctionne pas correctement, enlevez puis remettez les piles ou débranchez l’adaptateur secteur de la prise de courant puis rebranchez-le. 1. Garder une distance minimale autour de l’appareil pour une aération suffisante. 2. Il convient que l’aération ne soit pas gênée par l’obstruction des ouvertures d’aération par des objets tels que journaux, nappes, rideaux, etc. 3. Il convient de ne pas placer sur l’appareil des sources de flamme nues, telles que des bougies allumées. 4. Les piles doivent ête mises au rebut de façon sûre. Les déposer dans des bacs de collecte prévus afin de protéger l’environnement. 5 L'appareil est destiné à être utilisé dans un climat tempéré. 2 ENGLISH PARAMÈTRES 1. Placez la veilleuse avec projection sur une surface plane et ferme. Appuyez sur le bouton 1 qui se situe sur la base pour allumer et éteindre l’appareil. 2. L’appareil s’allumera et se mettra à tourner. De magnifiques icônes seront projetées sur les murs et une projection kaléidoscopique apparaitra au plafond. Remarque : Plus l’environnement est sombre, plus brilliant sera l’effet de la veileuse. Le revêtement de l’appareil peut être nettoyé avec un chiffon à poussière, comme un meuble. Pour l’extérieur de l’appareil, utilisez un chiffon propre, doux, légèrement imbibé d’eau tiède non savonneuse. Faites particulièrement attention lors du nettoyage et du séchage des parties en plastique. Pour le panneau avant, vous pouvez si vous le souhaitez utiliser un chiffon humide et du savon doux. Ce produit est couvert par une garantie de deux ans. Pour tout service après-vente et pour toute plainte intervenant pendant la période de garantie, adressez-vous à votre magasin de vente en présentant une preuve d’achat valide. Notre garantie couvre tous les défauts liés aux matériaux et à la fabrication, mais exclut toute détérioration résultant du non-respect des instructions du mode d’emploi ou d’une negligence de la part de l’utilisateur (démontage, exposition à la chaleur ou à l’humidité, etc.). Il est recommandé de conserver l’emballage pour reference ultérieure. Dans un souci d’amélioration de nos services, nous procédons régulièrement à des modifications des couleurs et de certains détails du produit montré sur l’emballage. REMARQUE : Conservez ce mode d’emploi car il contient des informations importantes. Lexibook S.A. 6 avenue des Andes Bâtiment 11 91940 Les Ulis France Référence: NLJ030series Conçu et développé en Europe – Fabriqué en Chine © Lexibook® Pour vos demandes concernant un problème SAV ou une réclamation, écrivez à [email protected] www.lexibook.com Tous les papiers sont recyclables Your Night Light Projector operates either with 3 x 1.5V AA / LR6 type batteries (not included) or a 5V 0.5A adaptor with positive centre (not included), or with the DC/USB cable (Included). 3 1. Put the Night Light Projector on a flat and firm surface. Press the power button 1 located on the side of the base to turn the unit on and off. 2. The unit will light up and start turning. Beautiful icons will be projected onto the wall, while a lovely kaleidoscopic projection will be projected onto the ceiling. Desembalaje del aparato Cuando desembale el aparato, asegúrese de que los siguientes elementos están presentes en el paquete: 1x Proyector de luz nocturna 1x manual de instrucciones 1x cable USB Note: The darker the environment, the more sparkling becomes the lamp light effect. ¡ADVERTENCIA! Todos los elementos utilizados para el embalaje tales como cintas, recubrimientos plásticos, ataduras metálicas y etiquetas no forman parte de este producto y, por lo tanto, deberán desecharse. SPECIFICATIONS Batteries Input ALIMENTACIÓN ELÉCTRICA 3 x 1.5V AA / LR6 batteries 5V 500mA MAINTENANCE AND WARRANTY 1.5V AA OR LR6 Battery installation When you use the Night Light Projector for the first time: 1. Using a screwdriver, open the battery compartment cover located at the bottom of the unit. 2. Install the 3 x AA/LR6 1.5V batteries (not included) observing the polarity symbols inside the battery compartment. 3. Close the battery compartment and tighten the screw. 1.5V AA OR LR6 The finish of your unit may be cleaned with a dust cloth and cared for as other furniture. Use a soft, clean cloth moistened with plain, lukewarm water to clean the outer side of the unit. Use caution when cleaning and wiping the plastic parts. Mild soap and a damp cloth may be used on the front panel. This product is covered by our 2-years warranty. 1.5V AA OR LR6 Use via USB 1. Connect the DC/USB cable on the back of the device (2) and the other end to the USB port. 2. You can also connect the USB cable to any AC/USB adaptor (not included) which has a 5V 0.5A output. NOTE: the USB cable does not recharge the product. For better performance, it is recommended to use alkaline batteries with this product. Non-rechargeable batteries are not to be recharged. Rechargeable batteries are to be removed from the product before being charged. Rechargeable batteries are only to be charged under adult supervision. Different types of batteries or new and used batteries are not to be mixed. Only batteries of the same or equivalent type as recommended are to be used. Batteries are to be inserted with the correct polarity. Exhausted batteries are to be removed from the product. The supply terminals are not to be short circuited. Do not throw batteries into a fire. Remove the batteries if you are not going to use the product for a long period of time. Battery shall not be exposed to excessive heat such as sunshine, fire or the like. WARNING: Malfunction or loss of memory may be caused by strong frequency interference or electrostatic discharge. Should any abnormal function occur, remove the batteries and insert them again or unplug the DC/USB cable and plug it in again. Informations sur la protection de l’environnement Tout appareil électrique usé est une matière recyclable et ne devrait pas faire partie des ordures ménagères ! Nous vous demandons de bien vouloir nous soutenir en contribuant activement au ménagement des ressources et à la protection de l’environnement en déposant cet appareil dans des sites de collecte (si existants). INSTALACIÓN SETTINGS BATTERY INFORMATION ENTRETIEN & GARANTIE Ce produit n’est pas un jouet. INSTALLATION Contents When unpacking, ensure that the following elements are included: 1 x Night Light Projector 1 x instruction manual 1x USB cable WARNING: All packaging materials, such as tape, plastic sheets, wire ties and tags are not part of this product and should be discarded. 3 piles de 1.5V AA / LR6 5V 500mA ESPAÑOL 1. Keep a minimum distance around the device for sufficient ventilation; 2. The ventilation should not be impeded by covering the ventilation openings with items, such as newspapers, table-cloths, curtains, etc.; 3. No naked flame sources, such as lighted candles, should be placed on the apparatus; 4. The use of apparatus in moderate climates. 5. Attention should be drawn to the environment aspects of battery disposal. 4 For any claim under the warranty or after sale service, please contact your distributor and present a valid proof of purchase. Our warranty covers any manufacturing material and workmanship defect, with the exception of any deterioration arising from the non-observance of the instruction manual or from any careless action implemented on this item (such as dismantling, exposition to heat and humidity, etc.). It is recommended to keep the packaging for any further reference. In a bid to keep improving our services, we could implement modifications on the colours and the details of the product shown on the packaging. NOTE: Please keep this instruction manual, it contains important information. Reference: NLJ030series Designed and developed in Europe – Made in China © Lexibook® United Kingdom & Ireland For after-sales service, please contact us at [email protected] Lexibook S.A. 6 avenue des Andes Bâtiment 11 91940 Les Ulis France www.lexibook.com This product is not a toy. Environmental Protection: Unwanted electrical appliances can be recycled and should not be discarded along with regular household waste! Please actively support the conservation of resources and help protect the environment by returning this appliance to a collection centre (if available). 5 Su Proyector de luz nocturna funciona con 3 pilas de 1,5V AA / LR6 (no incluidas) o con un adaptator 5V 0.5A de centro positivo (no incluido), con el cable CC/USB (incluido). ESPECIFICACIONES 1.5V AA OR LR6 Instalacion de bateria 1.5V AA OR LR6 Antes de utilizar por primera vez su aparato, lleve a cabo los siguientes pasos preliminares: 1. Utilizando un destornillador, abra la tapa del compartimento de las pilas situado en la cara inferior del 1.5V AA OR LR6 aparato. 2. Instale 3 pilas de 1,5 V de tipo AA/LR6 (no incluidas) observando las indicaciones de polaridad que se muestran en el interior del compartimento de las pilas. 3. Cierre el compartimento de las pilas y apriete el tornillo. Utilizar via USB 1. Conecte el cable USB a la parte posterior del dispositivo (2) y el otro extremo a un puerto USB. 2. El cable USB también puede conectarse a cualquier adaptador CA/USB (no incluido) con una salida CC 5 V y 0,5 A. NOTA: el cable USB no recarga el producto. Para que el producto funcione de manera óptima, se recomienda la utilización de pilas alcalinas. No se deben intentar cargar aquellas pilas que no sean recargables. Las pilas recargables deberán retirarse del producto antes de cargarlas. Las pilas recargables deberán recargarse únicamente bajo la supervisión de un adulto. No deberán mezclarse diferentes tipos de pilas ni tampoco pilas nuevas con otras usadas. Utilice únicamente pilas del mismo tipo o equivalentes a las recomendadas. Inserte las pilas observando la polaridad correcta. Deberán retirarse del producto las pilas agotadas. No cortocircuite los terminales de alimentación. No arroje las pilas al fuego. Retire las pilas del producto si no va a utilizarlo durante periodos prolongados. Cuando el sonido se hace débil o el juego no responde adecuadamente es señal de que debe sustituir las pilas. Deberá evitarse exponer las baterías a temperaturas excesivamente elevadas tales como las generadas por la la acción de los rayos del sol o de las llamas. ADVERTENCIA! Las descargas electrostáticas o interferencias de una frecuencia suficientemente fuerte podrán provocar el funcionamiento anormal del aparato o la pérdida de los datos almacenados en su memoria. Si se observa cualquier función anómala, reinicie el aparato, retire las pilas y vuelva a colocarlas o desenchufe el adaptador CA/CC de la toma de corriente mural y enchúfelo de nuevo. 1. Guardar una distancia mínima alrededor del aparato, para que tenga una ventilación adecuada. 6 Y CM MY CY CMY K INSTALAÇÃO Retirar o aparelho da caixa Quando retirar o aparelho da caixa, certifique-se de que os seguintes elementos estão incluídos: 1x Projetor com luz noturna 1x Manual de instruções 1x cabo USB AVISO: Todos os materiais de empacotamento, como fita, películas de plástico, arames e etiquetas não fazem parte deste brinquedo e deverão ser deitados fora. ALIMENTAÇÃO ELÉTRICA O seu projetor com luz noturna funciona com 3 pilhas de 1,5V AA/LR6 (não incluídas) o um adaptador de 5V 0.5A com o centro positivo (não incluído), com o cabo DC/USB (incluído). 3. No es conveniente colocar sobre el aparato fuentes de llama viva, como velas encendidas. 4. Las pilas deben desecharse de manera segura. Deposítelas en contenedores selectivos previstos a este efecto, para proteger el medio ambiente. 5. El aparato ha sido diseñado para su uso en un clima templado. DEFINIÇÕES 1. Coloque o Projetor Noturno numa superfície plana e firme. Certifique-se de que contém pilhas e prima o botão da energia 1 na parte lateral da base para ligar e desligar a unidade. 2. A unidade acende e começa a girar. Belos ícones serão projetados na parede, enquanto uma adorável projeção caleidoscópica será projetada no teto. Nota: Quanto mais escuro estiver o local, mais brilhante se torna o efeito luminoso. 1.5V AA OR LR6 Instalação da bateria 1.5V AA OR LR6 Quando usar o aparelho pela primeira vez: 1. Com uma chave de fendas, abra a tampa do compartimento das pilhas, que se encontra na parte 1.5V AA OR LR6 inferior da unidade. 2. Coloque as 4 pilhas AA/LR6 de 1,5V (não incluídas), tendo em conta os sinais da polaridade no interior do compartimento das pilhas. 3. Feche o compartimento das pilhas e aperte o parafuso. Use via USB 1. Conecte o cabo USB à parte de trás do dispositivo (2) e a outra extremidade a uma porta USB. 2. Também pode ligar o cabo USB a qualquer adaptador AC/USB (não incluído) com uma saída DC 5V, 0.5A. NOTA: O cabo USB não recarrega o produto. Para um melhor desempenho, recomendamos que use pilhas alcalinas com este produto. Não recarregue pilhas não recarregáveis. As pilhas recarregáveis têm de ser retiradas do produto antes de serem recarregadas. As pilhas recarregáveis só podem ser recarregadas sob a supervisão de um adulto. Não misture diferentes tipos de pilhas nem pilhas novas com pilhas usadas. Utilize apenas pilhas do mesmo tipo ou equivalentes às recomendadas. Coloque as pilhas com a polaridade correcta. Retire as pilhas gastas do produto. Não coloque os terminais em curto-circuito. Não atire as pilhas para o fogo. Retire as pilhas se não usar o produto durante um longo período de tempo. Quando o som ficar fraco ou o jogo não responder, pense em substituir as pilhas. As pilhas não deverão ser expostas a calor em excesso, como luz directa do sol, fogo ou algo parecido. AVISO: O mau funcionamento ou perda de memória podem ser causados por fortes interferências ou descargas electrostáticas. Caso ocorra algum funcionamento anormal, retire e volte a colocar as pilhas ou desligue o adaptador AC/DC da tomada e volte a ligá-lo. 1. Guardar una distancia mínima alrededor del aparato, para que tenga una ventilación adecuada. 2. La ventilación no debe quedar impedida debido a la obstrucción de las aberturas de ventilación por objetos como periódicos, manteles, cortinas,etc. 10 ESPECIFICAÇÕES Fonte de energia Entrada 3 pilhas 1,5V AA/LR6 5V 500mA MANUTENÇÃO E GARANTIA O acabamento da sua unidade pode ser limpo com um pano do pó e cuidado tal como para qualquer outro mobiliário. Use um pano suave e limpo, ligeiramente embebido em água morna para limpar o exterior da unidade. Tenha cuidado quando limpar as peças de plástico. Pode usar detergente neutro e um pano ligeiramente embebido em água no painel dianteiro. Este produto é abrangido pela nossa garantia de 2 anos. Se precisar de usar a nossa garantia ou serviço pós-venda, contacte o seu revendedor e apresente-lhe uma prova válida de compra. A nossa garantia abrange defeitos de material e de fabrico, com a excepção de qualquer deterioração devido à não observância do manual de instruções ou qualquer acção descuidada implementada no produto (como desmontagem, exposição ao calor e humidade, etc.). Recomendamos que guarde a caixa para futuras referências. Num esforço constante para melhorar os nossos serviços, podemos implementar modificações nas cores e detalhes do produto apresentado na caixa. NOTA: Por favor, guarde este manual de instruções, pois contém informações importantes. Referência: NLJ030series Desenhado e desenvolvido na Europa – Fabricado na China © Lexibook® Para qualquer serviço pós-venda, por favor, contacte as nossas equipas: www.lexibook.com Lexibook S.A. 6 avenue des Andes Bâtiment 11 91940 Les Ulis France Protecção Ambiental Os aparelhos eléctricos indesejados podem ser reciclados e não deverão ser eliminados juntamente com o lixo doméstico comum! Por favor, apoie activamente na conservação dos recursos e ajude a proteger o ambiente, entregando este aparelho num centro de recolha (se disponível). 11 NLJ030series 76w x112mm (each) (339) 684w x112mm (total) Este produto não é um brinquedo. DEUTSCH AUFSTELLEN Auspacken des Gerätes Achten Sie beim Auspacken darauf, dass die folgenden Elemente enthalten sind: 1 x Nachtlicht-Projektor 1 x Bedienungsanleitung 1x USB-KABLE WARNUNG: Das gesamte Verpackungsmaterial wie Klebeband, Plastikfolie, Drähte und Etiketten ist nicht Teil dieses Spielzeuges und sollte entsorgt werden. STROMVERSORUNG Der Nachtlicht-Projektor benötigt 3 Batterien des Typs 1,5V , AA / LR 6 (nicht enthalten) order mit 5V 0.5A Adapter mit positiver Polarität (nicht inbegriffen), mit dem DS/USB-Kabel (inbegriffen). Batterie einlegen Wenn Sie den NLJ 030 Series zum ersten Mal benutzen: 1. Öffnen Sie mithilfe eines Schraubendrehers die Bat-teriefachabdeckung im Boden des Gerätes. 2. Legen Sie die 3 x LR6/AA 1,5 V Batterien (nicht mitgeliefert) unter Beachtung der Polaritätsmarkierungen im Batteriefach ein. 3. Schließen Sie das Batteriefach und ziehen Sie die Schraube fest. EINSTELLUNGEN 1. Stellen Sie den Nachtlicht-Projektor auf eine ebene und feste Fläche. Drücken Sie die Ein-/Aus-Taste 1 an der Seite des Sockels, um es ein- bzw. auszuschalten. 2. Das Gerät leuchtet und beginnt, sich zu drehen. Es werden hübsche Bilder an die Wand und gleichzeitig eine schöne kaleidoskopische Projektion an die Zimmerdecke geworfen. Hinweis: Je dunkler die Umgebung, umso mehr funkeln die Lichteffekte der Lampe. TECHNISCHE DATEN 1.5V AA OR LR6 1.5V AA OR LR6 1.5V AA OR LR6 Verwendung über USB 1. Verbinden Sie das USB-Kabel mit der Rückseite des Geräts (2) und das andere Ende mit einem USB-Anschluss. 2. Sie können das USB-Kabel mit jedem beliebigen AC/USB-Adapter (nicht inbegriffen) verbinden, der über einen DC 5 V, 0,5 A Ausgang verfügt. HINWEIS: Das USB-Kabel lädt das Produkt nicht auf. Für eine bessere Leistung wird die Benutzung von alkalischen Batterien mit diesem Produkt empfohlen. Nicht-aufladbare Batterien dürfen nicht aufgeladen werden. Aufladbare Batterien müssen aus dem Gerät vor dem Aufladen entfernt werden. Aufladbare Batterien dürfen nur unter Aufsicht eines Erwachsenen aufgeladen werden. Unterschiedliche Batterietypen oder neue und alte Batterien dürfen nicht zusammen benutzt werden. Es dürfen nur Batterien desselben oder eines gleichwertigen Typs verwendet werden. Batterien müssen unter Beachtung der korrekten Polarität eingelegt werden. Verbrauchte Batterien müssen aus dem Gerät entfernt werden. Die Anschlusskontakte dürfen nicht kurzgeschlossen werden. Batterien dürfen nicht ins Feuer geworfen werden. Entfernen Sie die Batterien aus dem Produkt, wenn es für längere Zeit nicht benutzt wird. Wenn der Sound schwächer wird oder das Spielzeug anfängt, nicht mehr direkt zu reagieren, deutet dieses ebenfalls darauf hin, dass es Zeit wird, neue Batterien einzusetzen. Die Batterien dürfen keinen übermäßigen Hitzequellen ausgesetzt werden,zum Beispiel Sonnenschein oder Feuer. WARNUNG: Fehlfunktionen oder Speicherverlust können durch starke Frequenzstörungen oder elektrostatische Entladungen verursacht werden. Sollte das Gerät nicht ordnungsgemäß funktionieren, entfernen Sie die Batterien und legen sie wieder ein oder ziehen Sie das den Stecker des AC/DC-Adapters aus der Wandsteckdose und verbinden Sie es wieder. 1. Halten Sie um das Gerät herum einen Mindestabstand ein, um eine ausreichende Luftzirkulation zu gewährleisten. 12 2. Die uftzirkulation darf nicht durch Bedecken der Lüftungsöffnungen durch solche Gegenstände wie Zeitschriften, Tischdecken, Vorhängen usw. behindert werden. 3. Es dürfen keine offenen Flammen auf das Gerät gestellt werden, wie zum Beispiel brennende Kerzen. 4. Batterien müssen auf sichere Weise entsorgt werden. Entsorgen Sie Batterien in den hierfür vorgesehenen Sammelbehältern, um die Umwelt zu schützen. 5. Das Gerät ist für den Gebrauch in einem moderaten Klima vorgesehen. Batterien Eingabe 3 x LR6/AA 1.5 V 5V 500mA WARTUNG UND GARANTIE Die Oberflächenausführung Ihres Gerätes kann mit einem Staubtuch gereinigt und so wie andere Möbelstücke gepflegt werden. Reinigen Sie das Geräteäußere mit einem weichen, sauberen Tuch, das mit klarem, lauwarmem Wasser angefeuchtet ist. Seien Sie vorsichtig, wenn Sie die Plastikteile reinigen und abwischen. Eine milde Seife und ein feuchtes Tuch können zum Reinigen der Vorderseite verwendet werden. 2 Jahre Garantie. Die gesetzlichen Gewährleistungsrechte bleiben neben der Garantie bestehen. Für jede Inanspruchnahme der Garantie oder des Kundenservices wenden Sie sich bitte an Ihren Fachhändler und legen Sie einen gültigen Kaufbeleg vor. Unsere Garantie deckt alle Material- und Herstellungsmängel ab, mit Ausnahme von Verschleißerscheinungen, die aus der Missachtung der Bedienungsanleitung oder fahrlässigen Handlungen an diesem Produkt resultieren (wie z. B. Auseinan-derbauen, das Gerät Hitze oder Feuchtigkeit aussetzen usw.). Es wird empfoh-len, die Verpackung für spätere Verwendung aufzubewahren. Im Bemühen unseren Service weiterhin zu verbessern, können wir an den Farben und der Ausführung des Produktes, wie es auf der Verpackung abgebildet ist, Änderungen vornehmen. HINWEIS: Bitte bewahren Sie diese Bedienungsanleitung auf, sie enthält wich-tige Informationen. Referenz: NLJ030series Entworfen und entwickelt in Europa – Hergestellt in China © Lexibook® Lexibook S.A. 6 avenue des Andes Bâtiment 11 91940 Les Ulis France Deutschland & Österreich Für den Kundendienst wenden Sie sich bitte an unsere Teams: [email protected] www.lexibook.com Dieses Produkt ist kein Spielzeug. Umweltschutz: Ausrangierte Elektrogeräte können recycelt werden und sollten nicht mit dem normalen Hausmüll entsorgt werden! Bitte unterstützen Sie aktiv die Erhaltung natürlicher Ressourcen und helfen Sie die Umwelt zu schützen, indem Sie dieses Gerät bei einer Sammelstelle abgeben (sofern vorhanden). 13 NEDERLANDS INSTALLATIE Het apparaat uitpakken Controleer tijdens het uitpakken of de volgende onderdelen aanwezig zijn: 1 x Nachtlampprojector 1 x gebruiksaanwijzing 1x USB-kabel WAARSCHUWING: Alle verpakkingsmateriaal, zoals kleefband, plastic vellen, koorden en labels vormen geen onderdeel van dit speelgoed en dienen verwi-jderd te worden. BATTERIEINFORMATIONEN Uw nachtlampprojector werkt op 3 x 1,5V AA / LR6 6 batterijen (niet meegeleverd) of met 5V 0.5A adapter met een positief midden (niet meegeleverd) , met de DC/USB-kabel (bijgeleverd), Batterij installatie Als u de NLJ030 voor de eerste maal gebruikt: 1. Open het batterijvak, dat zich achteraan het apparaat bevindt, met behulp van een schroevendraaier. 2. Plaats de 3 x AA/LR6 1,5V batterijen (niet meegeleverd) en let hierbij op de juiste polariteit aangegeven binnenin het batterijvak. 3. Sluit het batterijvak en draai de schroef vast. 4. Gooi de batterijen op een juiste manier weg. Gooi gebruikte batterijen in de inzamelbakken die voor dit doeleinde voorzien zijn. 5. Het apparaat is ontworpen om te worden gebruikt in een gematigd klimaat. INSTELLINGEN 1. Plaats de nachtlampprojector op een vlak en stevig oppervlak. Druk op de aan/uit-knop 1 aan de zijkant van het voetstuk om het apparaat in en uit te schakelen. 2. Het apparaat wordt verlicht en start met draaien. Mooie pictogrammen worden op de muur geprojecteerd en een leuke caleidoscoopprojectie wordt op het plafond weergegeven. Opmerking: Hoe donkerder de ruimte, hoe mooier het lichteffect. 1.5V AA OR LR6 1.5V AA OR LR6 1.5V AA OR LR6 Gebruik via USB 1. Sluit de USB-kabel aan op de achterkant van het apparaat (2) en het andere uiteinde op een USB-poort. 2. Sie können das USB-Kabel mit jedem beliebigen AC/USB-Adapter (nicht inbegriffen) verbinden, der über einen DC 5 V, 0,5 A Ausgang verfügt. HINWEIS: Das USB-Kabel lädt das Produkt auf. Voor een optimale prestatie wordt het aanbevolen om alkaline batterijen met dit product te gebruiken. Niet-heroplaadbare batterijen kunnen niet worden heropgeladen; oplaadbare batterijen moeten uit het speelgoed worden verwijderd alvorens deze op te laden; heroplaadbare batterijen mogen alleen onder toezicht van een volwassene worden opgeladen; verschillende types batterijen of nieuwe en oude batterijen mogen niet onderling gebruikt worden; gebruik alleen batterijen van hetzelfde of equivalente type zoals aangeraden door de fabrikant; batterijen moeten volgens de juiste polariteit worden ingestoken; lege batterijen moeten uit het speelgoed worden verwijderd; de toevoerterminals mogen geen kortsluiting ondervinden. Gelieve de verpakking te bewaren als referentie voor later daar het belangrijke informatie bevat. Gooi batterijen nooit in open vuur. Indien je het spel voor langere tijd niet zal gebruiken, neem de batterijen uit het spel. Wanneer het geluid verzwakt of het spel niet reageert, vervang dan de batterijen. Stel de batterijen nooit bloot aan een warmtebron, zoals zonlicht of vuur. WAARSCHUWING: Storing of geheugenverlies van het apparaat kan worden veroorzaakt door sterke frequentiestoringen of elektrostatische ontlading. Als een storing zich voordoet, reset het apparaat of verwijder de batterijen en plaats deze dan terug of haal de AC/DC-adapter uit het stopcontact en steek deze vervolgens opnieuw in. 1. Houd een minimale afstand rond het apparaat voor voldoende ventilatie. 2. De ventilatie dient niet belemmerd te worden door het afdekken van de ventilatieopeningen door voorwerpen zoals een krant, een tafellaken, gordijnen, etc. 3. Plaats geen voorwerp met een open vlam, zoals een brandende kaars, op het apparaat. 14 TECHNISCHE GEGEVENS Batterijen Invoer 3 x AA/LR6 1,5V 5V 500mA ONDERHOUD EN GARANTIE Maak de buitenkant van uw apparaat schoon met een stofdoek en onderhoud deze op dezelfde manier als andere apparatuur. Gebruik een zachte, schone doek, bevochtigd in lauw water om de buitenkant van het apparaat schoon te maken. Wees voorzichtig als u de plastic onderdelen schoonmaakt. Gebruik milde zeep en een licht bevochtigde doek om het frontpaneel schoon te maken. Dit product is gedekt door onze garantie van 2 jaar. Voor elke vordering onder de garantie of dienst na verkoop, neem contact op met uw verdeler en leg een geldig aankoopbewijs voor. Onze garantie dekt om het even welke materiaal- of fabricagefout, met uitzondering van schade veroorzaakt door het niet opvolgen van de gebruiksaanwijzing of door een onachtzame actie uitgevoerd op dit apparat (zoals ontmanteling, blootstelling aan warmte of vocht, enz.). Het is aanbevolen om de verpakking te bewaren voor toekomstige raadpleging. Om onze diensten te verbeteren, is het mogelijk dat de kleuren en de details van het product zoals weergegeven op de verpakking wijzigen. OPMERKING: Bewaar deze gebruiksaanwijzing, het bevat belangrijke informatie. Referentie: NLJ030series Ontworpen en ontwikkeld in Europa – Vervaardigd in China © Lexibook® Voor service na verkoop, neem contact op met onze teams: www.lexibook.com Lexibook S.A. 6 avenue des Andes Bâtiment 11 91940 Les Ulis France Dit product is geen speelgoed. Bescherming van het milieu Afgedankte elektrische apparatuur kan worden gerecycled en mag niet met het gewone huishoudelijk afval worden weggegooid. Steun het behoud van onze natuurlijke rijkdommen op een actieve manier en help met het beschermen van het milieu door dit apparaat bij een inzamelpunt in te leveren (indien voorhanden). 15 CONFIGURACIÓN 1. Coloque el Proyector de Luz Nocturna sobre una superficie plana y firme. Presione el botón de encendido 1 ubicado en el costado de la base para encenderlo y apagarlo. 2. El aparato se iluminará y empezará a girar. Bonitos iconos se proyectarán sobre la pared y una adorable proyección caleidoscópica se proyectará sobre el techo. Nota: Cuanto más oscuro sea el entorno, más brillante será el efecto de la lámpara. M PORTUGUÊS 2. La ventilación no debe quedar impedida debido a la obstrucción de las aberturas de ventilación por objetos como periódicos, manteles, cortinas, etc.; 3. No es conveniente colocar sobre el aparato fuentes de llama viva, como velas encendidas. 4. Las pilas deben desecharse de manera segura. Deposítelas en contenedores selectivos previstos a este efecto, para proteger el medio ambiente. 5. El aparato ha sido diseñado para su uso en un clima templado. IM code: NLJ030seriesIM2280 Alimentación Entrada MANTENIMIENTO Y GARANTÍA El acabado de su aparato puede limpiarse con una bayeta, de la misma manera utilizada para limpiar sus otros muebles. Para limpiar el exterior del aparato, utilice un paño limpio y suave, ligeramente humedecido con agua clara y tibia. Tenga cuidado al limpiar los elementos de plástico del aparato. Si lo desea, podrá utilizar un tipo de jabón suave y un paño humedecido para limpiar el panel frontal. Este producto está cubierto por nuestra garantía de dos (2) años. Para efectuar cualquier reclamación en garantía o solicitud de reparación posventa, le rogamos que se ponga en contacto con su distribuidor y le presente un comprobante válido de compra. Nuestra garantía cubre aquellos defectos de material o mano de obra que sean imputables al fabricante, a excepción de todo aquel deterioro que se produzca como consecuencia de la no observación de las indicaciones señaladas en el manual de instrucciones o de toda intervención improcedente en el aparato (como por ejemplo, desmontaje, exposición al calor o humedad, etc.). Se recomienda conservar el embalaje para poder utilizarlo como referencia futura. En nuestro continuo afán de optimización de servicios, podremos implementar modificaciones en los colores y detalles del producto mostrado en el embalaje. NOTA: por favor conserve este manual de instrucciones, ya que contiene informaciones importantes. Lexibook S.A. 6 avenue des Andes Bâtiment 11 91940 Les Ulis France España Para servicio postventa, entre en contacto con nuestros equipos: [email protected] www.lexibook.com Este producto no es un juguete. Precauciones para la protección del medioambiente ¡Al final de su vida útil, los aparatos eléctricos pueden reciclarse y no deberán desecharse junto con los desperdicios domésticos! Le rogamos que apoye activamente la conservación de los recursos naturales y contribuya a la protección del medioambiente desechando este aparato eléctrico en un centro de reciclaje autorizado (si lo hay) al final de su vida útil. 7 INSTALLAZIONE Aprire la confezione Quando si apre la confezione, controllare che contenga i seguenti elementi: 1 x Proiettore notturno 1 x manuale di istruzioni 1x cavo USB ATTENZIONE: Tutti i materiali di imballaggio, come nastri, fogli di plastica, cavi ed etichette non fanno parte di questo prodotto e devono essere eliminati. ALIMENTAZIONE Il Proiettore notturno è alimentato da 3 batterie AA/LR6 da 1,5 V (non incluse) o con un adattatore (non incluso) 5V 0.5A con centro positivo , con il cavo CC/USB (incluso). 3 x baterias de 1,5V AA/LR6 5V 500mA Referencia: NLJ030series Diseñado y desarrollado en Europa - Fabricado en China © Lexibook® ITALIANO Installazione della batteria Quando si utilizza l’aparato per la prima volta: 1. Con un cacciavite, aprire il coperchio del vano batterie collocato sotto l’unità. 2. Inserire le 4 batterie AA/LR6 1,5 V (non fornite) osservando la polarità indicata nel vano batterie. 3. Chiudere il vano batterie e serrare la vite. IMPOSTAZIONI 1. Collocare il proiettore notturno su una superficie stabile e piana. Premere il tasto di accensione 1 situato sul lato della base per accendere o spegnere l’apparecchio. 2. L’unità si accenderà e inizierà a ruotare, proiettando splendide ombre sulla parete mentre una deliziosa proiezione caleidoscopica verrà proiettata sul soffitto. Nota: più l’ambiente è buio, più gli effetti luminosi saranno nitidi e brillanti. SPECIFICHE TECNICHE 1.5V AA OR LR6 1.5V AA OR LR6 1.5V AA OR LR6 Utilizzare tramite USB 1. Collegare il cavo USB al retro del dispositivo (2) e l'altra estremità a una porta USB. 2. In alternativa, è possibile collegare il cavo USB a qualsiasi adattatore CA/USB (non incluso) dotato di uscita CC da 5 V, 0,5 A. NOTA: il cavo USB non ricarica il prodotto. Per migliori prestazioni, si consiglia di utilizzare batterie alcaline con questo prodotto. Le batterie non ricaricabili non devono essere ricaricate. Le batterie ricaricabili devono essere rimosse dal prodotto prima di essere caricate. Le batterie ricaricabili devono essere caricate solo sotto supervisione di un adulto. Diversi tipi di batterie o batterie nuove e usate non devono essere mescolati. Utilizzare insieme solo batterie dello stesso tipo o equivalente a quello consigliato da utilizzare. Le batterie devono essere inserite con la corretta polarità. Le batterie esaurite devono essere rimosse dal prodotto. I terminali forniti non sono da cortocircuitare. Non gettare le batterie nel fuoco. Rimuovere le batterie se non si intende utilizzare il gioco per un lungo periodo di tempo. Sostituire le batterie quando il suono diventa debole o il gioco non funziona. Non esporre le batterie a un calore eccessivo, ad esempio la luce del sole o un fuoco. AVVERTENZA: Il cattivo funzionamento o la perdita di memoria può essere causato da una forte interferenza di frequenza o scariche elettrostatiche. In caso di qualsiasi funzionamento anormale, rimuovere le batterie e inserirle di nuovo ou desligue o adaptador AC/DC da tomada e volte a ligá-lo. oppure togliere l’adattatore CA/CC dalla presa di corrente e inserirlo nuovamente. 1. Mantenere una distanza minima intorno all’apparecchio per garantire un’adeguata ventilazione. 2. Per garantire una corretta ventilazione, non ostruire le aperture di ventilazione con oggetti come giornali, tovaglie, tende, ecc. 8 3. Non posizionare sull’apparecchio fonti di fiamm libere, ad esempio candele accese. 4. Smaltire le batterie in modo sicuro. Portarle presso gli appositi punti di raccolta per salvaguardare l’ambiente. 5. L’apparecchio deve essere usato in climi temperati. Batterie Ingresso 3 x AA LR6 1.5V 5V 500mA MANUTENZIONE E GARANZIA La finitura dell’apparecchio può essere pulita con un panno per la polvere e curato come gli altri mobili. Usare un panno morbido e pulito inumidito con acqua tiepida per pulire l’esterno della macchina. Prestare attenzione durante la pulizia e strofinando le parti in plastica. Sapone delicato e un panno umido possono es-sere utilizzati sul pannello frontale. Questo prodotto è coperto dalla nostra garanzia di 2 anni. Per qualsiasi richiesta di intervento in garanzia o il servizio post vendita, contattare il distributore e presentare una prova di acquisto valida. La garanzia copre qualsiasi difetto di fabbricazione e materiali di lavorazione, con l’eccezione di un eventuale deterioramento derivante dal mancato rispetto delle istruzioni contenute nel manuale o ad azioni sconsiderate sull’articolo (smontaggio, esposizione al calore e umidità, ecc.) Si raccomanda di conservare la confezione per eventuali necessità future. Nel tentativo di continuare a migliorare i nostri servizi, potremmo apportare modifiche ai colori ed i dettagli del prodotto indicato sulla confezione. NOTA: Si prega di conservare il presente manuale di istruzioni, che contiene importanti informazioni. Riferimento: NLJ030series Progettato e sviluppato in Europa – Fabbricato in Cina © Lexibook® Lexibook S.A. 6 avenue des Andes Bâtiment 11 91940 Les Ulis France Per i servizi di assistenza post-vendita, contattare i nostri team: www.lexibook.com Questo prodotto non è un giocattolo. Protezione Ambientale Gli apparecchi elettrici di scarto possono essere riciclati e non devono essere gettati insieme ai rifiuti domestici! Si prega di sostenere attivamente la conservazione delle risorse e proteggere l’ambiente restituendo l ‘apparecchio ad un centro di raccolta (se disponibile). 9-
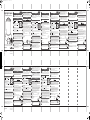 1
1

in andere talen
- English: Lexibook NLJ030 User manual
- italiano: Lexibook NLJ030 Manuale utente
- français: Lexibook NLJ030 Manuel utilisateur
- español: Lexibook NLJ030 Manual de usuario
- Deutsch: Lexibook NLJ030 Benutzerhandbuch
- português: Lexibook NLJ030 Manual do usuário
Gerelateerde papieren
-
Lexibook NLJ105An Handleiding
-
Lexibook LTP100 Handleiding
-
-
-
-
-
-
-
-
