
LECTEUR PORTATIF
BLU-RAY/DVD
MODE D’EMPLOI
BD10

1
Table des matières
Sécurité et entretien .............................................................................................................2
Instructions de sécurité .......................................................................................................2
Emplacement des commandes............................................................................................4
Télécommande ....................................................................................................................5
Guide de démarrage rapide ................................................................................................6
Connexions ..........................................................................................................................7
-Connexion oreillettes ..........................................................................................................7
-Connexion AV OUT ............................................................................................................7
-Connexion HDMI.................................................................................................................7
-Connexion réseau...............................................................................................................8
-Connexion ESB...................................................................................................................8
-Connexion carte mémoire...................................................................................................8
Fonctionnement de base......................................................................................................9
-Lecture vidéo ......................................................................................................................9
-Lecture d’un vidéodisque Blu-ray......................................................................................10
-Lecture de musique .......................................................................................................... 11
-Diaporama ........................................................................................................................12
Réglages généraux ............................................................................................................ 14
-Maniement général du menu ............................................................................................ 14
-Réglages généraux du lecteur .......................................................................................... 14
-Réglages de l’affichage.....................................................................................................17
Caractéristiques ................................................................................................................. 19
Dépannage......................................................................................................................... 21

2
Sécurité et entretien
Ce symbole indique une tension électrique dangereuse à l’intérieur du produit,
avec un risque d’électrocution ou de lésion corporelle.
Ce symbole signale des instructions importantes concernant le produit.
AVERTISSEMENT : Pour réduire le risque d’incendie ou d’électrocution, n’exposez pas le
produit à la pluie ni à l’humidité. Ne l’exposez pas aux chutes de gouttes ni aux projections
de liquides. Évitez de placer sur l’appareil des objets remplis de liquides tels que les vases.
Instructions de sécurité
Lisez toutes les instructions avant d’utiliser ce lecteur Blu-ray. Conservez ce manuel en
lieu sûr pour le consulter en cas de besoin.
1. Lisez et gardez ces instructions.
2. Prêtez attention aux avertissements et appliquez les instructions.
3. N’utilisez pas le lecteur à proximité de l’eau.
4. Nettoyez seulement avec un chiffon sec.
5. Ne colmatez pas les ouvertures de ventilation. Installez conformément aux instructions du
fabricant.
6. N’installez pas l’appareil près d’une source de chaleur (radiateur ou grille de chauffage,
autres appareils – y compris amplificateurs – produisant de la chaleur).
7. La fiche électrique polarisée ou avec conducteur de terre joue un rôle de sécurité
important. Une fiche polarisée possède deux lames de largeur différente. Une fiche avec
conducteur de terre est munie de deux lames et d’une troisième borne. La lame la plus large
ou la troisième borne sont là pour votre sécurité. Si la fiche ne s’enfonce pas dans votre
prise, demandez à un électricien de placer une prise plus moderne.
8. Protégez le cordon d’alimentation : évitez qu’on marche dessus ou qu’on le pince, en
particulier près des éléments de branchement et à l’endroit où ils sortent du lecteur.
9. Utilisez exclusivement les accessoires spécifiés par Pixela.
10. Utilisez l’appareil seulement avec le chariot, le support, le pied, la fixation ou la table
spécifiés par le fabricant ou vendus avec le lecteur. Si vous utilisez un chariot, déplacez-le
prudemment pour éviter de vous blesser en le renversant.
11. Débranchez l’appareil en cas d’orage ou d’inutilisation prolongée.
12. Confiez toute intervention technique à un personnel qualifié. Une intervention est requise
quand le lecteur a été
ATTENTION : Pour réduire le risque d’électrocution, ne déposez pas le capot (ni le dos).
Pas de pièces réparables par l’utilisateur à l’intérieur. Confiez les réparations à un
personnel qualifié.

3
endommagé de quelconque façon : cordon ou fiche endommagés, liquide renversé ou
objets tombés dans l’appareil, lecteur exposé à la pluie ou à l’humidité, fonctionnement
anormal, chute de l’appareil…
13. L’appareil doit rester dans un endroit bien ventilé.
14. AVERTISSEMENT: Pour réduire le risque d’incendie ou d’électrocution, n’exposez pas
le produit à la pluie ni à l’humidité. Ne l’exposez pas aux chutes de gouttes ni aux
projections de liquides. Évitez de placer sur l’appareil des objets remplis de liquides tels
que les vases.
15. AVERTISSEMENT: Si la fiche réseau ou une multiprise sert de dispositif de coupure,
ce dispositif doit rester aisément accessible.
16. N’exposez pas les batteries à une chaleur excessive comme celle des rayons directs
du soleil ou de sources similaires.
PRODUIT LASER CLASSE 1
Les commandes, réglages et procédures autres que ce qui est spécifié dans ce manuel
peuvent générer une exposition à des rayonnements dangereux.
Marques commerciales
DVD Video est une marque commerciale de DVD Format / Logo Licensing Corporation.
Blu-ray Disc et Blu-ray Disc logo sont des marques commerciales de Blu-ray Disc
Association. Fabriqué sous licence de Dolby Laboratories. Dolby et le symbole du double
D sont des marques commerciales de Dolby Laboratories.
Fabriqué sous licence aux conditions des brevets américains n° 5,451,942 ; 5,956,674 ;
5,974,380 ; 5.978.762 ; 6.226.616 ; 6.487.535 ; 7.212.872 ; 7.333.929 ; 7.392.195 ;
7.272.567 & et d’autres brevets américains et étrangers, octroyés ou demandés. DTS et le
Symbol sont des marques commerciales déposées, et DTS-HD, DTS-HD Master Audio, et
les logos DTS sont des marques commerciales de DTS, Inc. Un logiciel est inclus avec le
produit. © DTS, Inc. Tous droits réservés.
Java et toutes les marques commerciales Java et le logo Java sont des marques déposées
de Sun Microsystems, Inc.
BD-LIVE et BONUSVIEW sont des marques commerciales de Blu-ray Disc Association.
ATTENTION : Ce produit utilise un laser.
N’ouvrez pas le capot. Ne réparez pas vous-même. Confiez toute intervention
technique à un personnel qualifié.

4
Emplacement des commandes
L’écran principal
Vue de face
1. Écran LCD 2. PALY/PAUSE / STOP 3. Capteur IR
4. MODE 5. FUNCTION 6. VOLUME +/-
7. SETUP 8. OK 9. DIRECTION
10. Haut-parleur 11. Couvercle disque 12. PUSH CLOSE
13. Bouton OPEN 14. Témoin CHANGE 15. Témoin POWER

5
Vue de droite Vue de gauche
Vue de dos
1. Prise PHONE 2. AV OUT 3. AV IN
4. HDMI OUT 5. Prise CARTE MEMOIRE 6. ESB
7. DC IN 12V 8. ON/OFF 9. LAN
Télécommande
La télécommande
1. Fonction 2. Mode
3. Répéter 4. Affichage
5. Sous-titre 6. Aller à
7. OSC 8. Titre / Incrustation
9. Audio 10. Configuration
11. OK 12. Direction
13. Retour 14. Avance rapide
15. Retour rapide 16. Vert / signet
17. Rouge / Programme 18. Menu
19. Coupure son 20. Touches chiffres (0-9)
21. Effacer 22. 2ème audio
23. Angle 24. PIP
25. Volume+ 26. Volume-
27. Arrêt 28. Lire / Pause
29. Précédent 30. Suivant
31. Jaune / Repère 32. Bleu / Zoom
Utilisation de la télécommande
1. La télécommande doit être dirigée vers le capteur IR pour que
le lecteur de DVD fonctionne correctement.
2. La télécommande fonctionne le mieux à une distance de
moins de 5 mètres et à un angle ne dépassant pas +/-30° par
rapport à la façade de l’appareil.
3. Évitez tout obstacle entre la télécommande et le lecteur.

6
Guide de démarrage rapide
1. Connexion à une source d’alimentation extérieure
Branchez l’adaptateur (livré avec le lecteur) dans la prise latérale du lecteur et dans une
prise murale. N’utilisez aucun dispositif de branchement qui ne soit préconisé par votre
revendeur.
2. Ouvrez l’écran.
L’écran du lecteur portatif s’ouvre sur un maximum de 180°. Il peut pivoter de 270°.
3. Enfoncez le bouton OPEN à gauche pour ouvrir le couvercle de disque.
4. Insérez un disque DVD côté étiquette vers le haut.
Alignez le centre du disque DVD sur le centre du guide de disque. Appuyez doucement sur
le DVD pour le mettre en place, puis refermez le couvercle.
5. Actionnez le commutateur à gauche de l’appareil pour le mettre sous tension.
6. Appuyez sur la touche OK ou PLAY/PAUSE pour lancer la lecture.
Avec la plupart des disques, si vous appuyez sur la touche PLAY/PAUSE pendant la
lecture du film, la lecture s’interrompt ; pour reprendre la lecture, appuyez à nouveau sur la
touche PLAY/PAUSE.
Le lecteur de DVD commence tout de suite la lecture du disque DVD.
Pour arrêter la lecture et retourner au menu principal, appuyez sur la touche STOP. Vous
pouvez recharger l’appareil pendant la lecture.

7
Connexions
1. Connexion oreillettes
1. Branchez les oreillettes équipées d’une fiche stéréo de 3’5 mm.
2. Pour régler le volume, servez-vous des touches VOL+/VOL- de la télécommande.
Côté droit du lecteur portatif
Évitez les volumes d’écoute trop importants, qui peuvent être dangereux pour l’oreille.
2. Connexion AV OUT
1. Mettez l’appareil hors tension. Débranchez les deux unités avant d’effectuer toute
connexion.
2. Branchez le câble AV sur
AV OUT.
3. Branchez le câble jaune (Vidéo) dans VIDEO-IN sur le téléviseur.
4. Branchez le câble rouge et blanc dans AUDIO-IN sur le téléviseur.
5. Changez la résolution en 480P/576P ou 480I/576I dans le menu configuration.
Après avoir utilisé la connexion AV, sélectionnez la résolution de 720P pour obtenir la
meilleure qualité d’affichage.
3. Connexion HDMI
Branchez le câble HDMI (non inclus) dans la prise HDMI du lecteur et dans l’entrée HDMI
du téléviseur.

8
Changez la résolution en 1080P pour obtenir la meilleure image.
Après avoir utilisé la connexion HDMI, sélectionnez la résolution de 720P pour obtenir la
meilleure qualité d’affichage.
Conseil
• Vous pouvez optimiser la sortie vidéo en appuyant à plusieurs reprises sur la touche
Résolution jusqu’à obtenir celle qui convient le mieux à votre téléviseur.
• Pour reproduire des images vidéo numériques BD ou DVD via une connexion HDMI, il
faut que le lecteur et le dispositif d’affichage (ou un récepteur-amplificateur AV) prennent
en charge le système de protection de copyright appelé HDCP (« high-bandwidth digital
content protection »).
• Ce type de connexion garantit la meilleure qualité d’image.
4. Connexion réseau
Branchez le lecteur en réseau pour profiter des mises à jour logicielles et des contenus
gratuits BD-Live.
Branchez le câble réseau (non inclus) dans la prise LAN du lecteur ainsi que dans la prise
LAN de votre modem ou routeur haut débit.
5. Connexion ESB
Carte ESB pour la lecture de médias.
Branchez le dispositif ESB dans la prise ESB du produit.
Remarque :
Nous ne garantissons pas 100% de compatibilité avec tous les dispositifs ESB.
6. nnexion carte mémoire
Carte mémoire pour la lecture de médias.

9
Branchez la carte mémoire dans la prise CARTE MEMOIRE du lecteur.
Remarque :
Nous ne garantissons pas 100% de compatibilité avec toutes les cartes mémoire.
Pour lire un média sur un dispositif ESB ou une carte mémoire : appuyez sur STOP pendant
la lecture puis sur la touche FUNCTION du lecteur ou de la télécommande.
Fonctionnement de base
Mise sous tension
Actionnez le commutateur à gauche de l’appareil pour le mettre sous tension.
Menu configuration
Appuyez sur SETUP pour afficher le menu de configuration sur l'écran LCD.
Navigation dans le menu
Quand un menu est affiché, servez-vous des touches de navigation de la télécommande
pour parcourir les options.
Choix de la langue des menus
1. Sélectionnez General Settings au menu SETUP.
2. Appuyez sur les flèches haut/bas pour choisir la langue.
3. Appuyez sur la touche Droite pour sélectionner OSD puis encore une fois sur Droite
pour accéder au menu de sélection. Choisissez la langue.
4. Appuyez sur OK pour confirmer.
Lecture d’un disque
1. Appuyez sur le bouton OPEN pour ouvrir le compartiment du disque.
2. Insérez un disque avec l’étiquette vers le haut.
3. Appuyez sur PUSH CLOSE pour fermer le compartiment du disque et lancer la lecture.
4. Pour arrêter la lecture, appuyez sur .
LECTURE VIDÉO
Commander la lecture vidéo
1. Lancez la lecture d’un titre.
2. La télécommande permet de contrôler la lecture.
Remarque :
Sur un disque BD avec application Java, la fonction Reprendre n’est pas disponible.
Affichage menu
Disque BD :
Touches Action
Lancer ou reprendre la lecture / Interrompre la lecture.
Arrêter la lecture.
Passer au titre ou chapitre précédent ou suivant.
Avance et retour rapides.
Appuyez à plusieurs reprises pour changer la vitesse de recherche.

10
MENU: Arrête la lecture et retourne au menu disque. Cette fonction est liée au
disque.
POP UP: ouvre le menu BD-video sans interrompre la lecture du disque.
Vidéodisque DVD :
MENU affiche le menu racine du disque.
DISPLAY affiche les informations du disque et vous guide à travers les fonctions
disponibles.
Commandes de lecture vidéo
Touche Action
Audio Sélectionne la langue audio
SUBTITLE Sélectionne la langue des sous-titres
REPEAT
Active ou désactive le mode répétition.
Les options de répétition varient avec le type de disque.
DISPLAY Affiche les informations d’état ou du disque.
ZOOM Zoom avant/arrière sur l’image affichée.
MARQUER UN
REPERE
Définir des repères sur le disque en cours de lecture
VISUALISER UN
REPERE MARK
Visualiser des repères sur le disque en cours de lecture
PROGRAM Modifie le programme et la lecture.
GOTO Va directement au moment spécifié par l’utilisateur pendant la
2nd AUDIO Fait passer l’audio de la fenêtre principale à la fenêtre PIP.
OSC
Donne accès aux options relatives à l’activité ou à la sélection en
cours et contrôle la lecture vidéo
Lecture d’un vidéodisque Blu-ray
Le vidéodisque Blu-ray possède davantage de capacité et de fonctions, notamment la
vidéo haute définition, le son surround multicanal, les menus interactifs, etc.
1. Insérez un vidéodisque BD.
2. Si la lecture ne commence pas automatiquement, sélectionnez une option de lecture au
menu et appuyez sur OK.
3. Durant la lecture, vous pouvez appuyer sur MENU pour afficher d’autres informations,
fonctions ou contenus du disque.
4. Durant la lecture, vous pouvez appuyer sur POP UP pour afficher le menu disque sans
interrompre la lecture.

11
(A) Vidéo principale (B) Vidéo secondaire
1. Appuyez sur PIP pour ouvrir la fenêtre vidéo secondaire.
2. Appuyez sur 2nd AUDIO pour faire passer l’audio de la fenêtre de lecture principale à
la fenêtre PIP.
Fonctions BD-LIVE
Les fonctions BD-Live vous permettent de profiter des capacités interactives du disque
lorsque le lecteur est connecté à Internet.
Exemple de fonctions interactives BD-Live :
1. Des contenus supplémentaires (bandes-annonces, sous-titres, BD-Java, etc.) peuvent
être téléchargés sur un système de stockage connecté en ESB.
2. Il est possible de reproduire des données vidéo spéciales pendant leur téléchargement.
3. Durant la lecture d’un disque prenant en charge BD-Live, l’ID du produit ou du disque
peut être envoyé au fournisseur de contenu via Internet. Les services et les fonctions
varient avec le disque.
Remarque :
-Le lecteur doit être connecté et configuré pour accéder à Internet.
-Selon le mode de connexion, l’établissement de la liaison Internet peut demander un
certain temps.
-Avec les fonctions BD-Live et la connexion du lecteur à Internet, les tarifs standard de
votre fournisseur d’accès Internet s’appliquent.
-Suivez les instructions données par le disque pour utiliser les fonctions BD-Live.
-Il est recommandé d’utiliser un dispositif de stockage ESB pour télécharger les contenus
(au moins 1 Go d’espace recommandé).
LECTURE DE MUSIQUE
Contrôle de la reproduction musicale
Servez-vous de la télécommande pour contrôler la lecture du fichier audio.
TOUCHE ACTION
Lance / interrompt / reprend la lecture.
Arrête la lecture.
Passe directement au titre ou chapitre suivant ou précédent.
Avance et retour rapides. Appuyez à plusieurs reprises pour changer
la vitesse de recherche.

12
Sélectionne le morceau à lire.
REPEAT Active ou désactive le mode répétition.
Lecture de musique MP3
Votre lecteur peut aussi reproduire les fichiers de musique numérique. Les fichiers MP3
sont des fichiers audio fortement comprimés (fichiers avec extension .mp3 ).
1. Insérez un disque contenant des fichiers MP3.
2. Sélectionnez un dossier de musique et appuyez sur OK.
3. Sélectionnez le fichier à lire et appuyez sur OK.
REMARQUE
-Appuyez sur FUNCTION pour afficher la liste des fichiers.
-Sur les disques enregistrés en plusieurs sessions, seule la première session sera lue.
-Le lecteur ne peut reproduire les fichiers protégés par Digital Rights Management (DRM).
-Le produit ne prend pas en charge le format audio MP3PRO.
-En présence de caractères spéciaux dans le nom d’une piste MP3 (ID3) ou d’un album,
le nom risque de ne pas apparaître correctement à l’écran, ces caractères n’étant pas pris
en charge par le lecteur.
-Les dossiers/fichiers qui dépassent la limite acceptée par le produit ne sont ni affichés ni
lus.
LECTURE D’UN DIAPORAMA
Le lecteur peut lire les fichiers JPEG sous la forme d’un diaporama.
1. Insérez un disque ou un dispositif ESB contenant des fichiers JPEG.
2. Sélectionnez un dossier Photo et appuyez sur OK pour ouvrir.
-Pour sélectionner une photo, servez-vous des boutons de navigation.
-Pour agrandir la photo sélectionnée et lancer le diaporama, appuyez sur OK.
Remarque :
- L’affichage du contenu du disque sur le téléviseur peut prendre plus de temps si le
disque contient un grand nombre de titres musicaux ou de photos.
-Le produit ne peut afficher que les photos numériques au format JPEG-EXIF, utilisé par
la majorité des appareils photo numériques. Il ne peut lire ni les vidéos Motion JPEG, ni
les images dans d’autres formats que JPEG, ni les clips audio liés aux photos.
-Les dossiers/fichiers qui dépassent la limite acceptée par le produit ne sont ni
affichés ni lus.
Contrôle du diaporama
1. Lancez un diaporama de photos.
2. Servez-vous de la télécommande pour :

13
TOUCHE ACTION
Pivoter une photo
Retourner une photo
Arrêter la lecture
Définir le délai de transition et l’animation
1. Pendant la lecture du diaporama, appuyez sur OSC. Les options apparaissent.
2. Servez-vous de la touche navigation pour aller à l’option voulue.
3. Pour sélectionner une option, appuyez sur OK.
4. Appuyez sur OK.
Lecture de musique pendant un diaporama
Créez un diaporama musical pour lire en même temps des fichiers musicaux MP3 et des
fichiers images JPEG.
Remarque :
Pour créer un diaporama musical, vous devez enregistrer les fichiers MP3 sur le même
disque que les images JPEG.
1. Sélectionnez les fichiers MP3 à lire et lancez la lecture.
2. Appuyez sur Media Center pour retourner au menu principal.
3. Sélectionnez un dossier de photos et appuyez sur OK pour lancer le diaporama.
-Le diaporama commence et se poursuit jusqu’à la fin du dossier de photos.
-La lecture audio se poursuit jusqu’à la fin du disque.
-Pour arrêter le diaporama, appuyez sur .
-Appuyez à nouveau pour arrêter la musique.

14
Réglages généraux
MANIEMENT GÉNÉRAL DU MENU
1. Appuyer deux fois sur STOP pendant la lecture.
2. Appuyer sur SETUP, le MENU SETUP s’affiche à l’écran.
3. Sélectionnez un menu principal avec LEFT/RIGHT.
4. Sélectionnez le menu dans lequel vous voulez effectuer des réglages avec les touches
UP/DOWN et appuyez sur RIGHT. Appuyez sur UP pour retourner au menu principal.
5. Sélectionnez l’option avec UP/DOWN et appuyez sur RIGHT. Vous pouvez appuyer sur
LEFT pour retourner au menu précédent.
6. Sélectionnez avec les touches UP/DOWN et appuyez sur OK pour confirmer. Vous
pouvez appuyer sur LEFT pour retourner au menu précédent.
7. Pour retourner au menu principal à partir d’un sous-menu, appuyez sur RETURN.
8. Pour quitter le menu, appuyez sur SETUP.
RÉGLAGES GÉNÉRAUX DU LECTEUR
SYSTÈME
1. Screen Saver : active/inactive l’économiseur d’écran. Celui-ci apparaît après 3 minutes
d’inactivité si le lecteur est sous tension.
2. Disc Auto Playback : active/inactive la lecture automatique.
3. CEC : active/inactive la fonction CEC.
4. Disc Auto Upgrade : active/inactive la fonction Disc Auto Upgrade.
5. Load Default : rétablit les réglages par défaut.
6. Upgrade : installe la version la plus récente du logiciel du lecteur.
7. Easy setup : configuration rapide.
8. BUDA : définit la mémoire pour BD-Live.
* Remarque : BUDA Setup compte deux sous-menus, « External » et « On board ». Si
vous choisissez « External », vous devez d’abord connecter ESB.

15
LANGUE
1. OSD : sélectionne la langue d’affichage à l’écran (OSD).
2. Menu : sélectionne la langue du menu disque.
3. Audio : sélectionne la langue pour l’audio du programme.
4. Subtitle : sélectionne la langue des sous-titres
.
Remarque :
Vous devez sélectionner la langue de l’audio et des sous-titres en fonction du contenu du
disque.
LECTURE
1. Closed Caption : active/inactive la fonction CC.
2. Angle Mark : active/inactive la fonction Angle mark .
3. PIP Mark : active/inactive la fonction PIP mark.
4. Secondary Audio : active/inactive la fonction marque audio secondaire.
5. Last Memory : active/inactive la fonction dernière mémoire.
6. PBC : active/inactive la fonction PBC.

16
SÉCURITÉ
1. Change Password : change le mot de passe du menu de contrôle parental.
2. Parental Control : définit le contrôle parental.
3. Country Code : sélectionne le code pays.
Remarque :
Le code par défaut est 0000. L’utilisateur peut le modifier.
RÉSEAU
• Reliez le produit à un modem ou routeur haut débit.
• Le lecteur détecte une connexion réseau éventuelle.
• Si le test de connexion échoue, sélectionnez (Retry) et appuyez sur OK pour réessayer
la connexion au réseau.
1. Internet Connection : affiche l’état de la connexion Internet.
2. Information : affiche les informations réseau.
3. Connection Test : teste l’état de la connexion Internet.
4. IP Setting : définit l’adresse IP du lecteur.
5. BD-Live Connection : état de la connexion BD-Live.
6. Proxy Setting : définit le serveur proxy.

17
RÉGLAGES DE L’AFFICHAGE
TV
1. TV Screen : sélectionne le mode d’affichage sur le téléviseur.
2. Resolution : sélectionne la résolution du téléviseur.
3. TV System : sélectionne la norme du téléviseur.
4. Color Space : sélectionne l’espace colorimétrique.
5. HDMI Deep Color : sélectionne la couleur pour HDMI.
6. HDMI 1080 24Hz : active/inactive ce réglage.
TRAITEMENT VIDÉO
1. Video Adjust : accès au sous-menu de réglage de l’affichage vidéo.
2. Sharpness : sélectionne la netteté de l’affichage.
Ajustez la luminosité, le contraste, la teinte et la saturation de l’écran suivant les
préférences.
RÉGLAGES AUDIO
1. HDMI : sélectionne le mode HDMI.
2. Down samp : sélectionne Down samp (dans le cas où l’ampli relié au lecteur n’est pas
compatible 96 KHz)
3. DRC : Dynamic range compression – plage de compression dynamique

18
Speaker Setting : réglage des haut-parleurs
1. Configuration : sélectionne le nombre de canaux 2x
2. Test Tone :
INFORMATION SYSTÈME
Affiche les informations du système (l’écran ci-dessus est un exemple).
MISE À JOUR DU LOGICIEL
Pour obtenir les mises à jour du logiciel, qui peuvent améliorer la performance de votre
lecteur, comparez la version actuellement installée avec la dernière version disponible.
1. Appuyez sur SETUP.
2. Sélectionnez [General Setting] et appuyez sur la touche RIGHT.
3. Sélectionnez [System]>[Upgrade] et appuyez sur OK.
Mise à jour du logiciel via ESB
1. Téléchargez le logiciel sur un dispositif flash ESB.
2. Insérez le dispositif flash ESB dans la prise ESB à l’arrière du lecteur.

19
3. Dans le menu SETUP, sélectionnez [General Setting] >[System] > [Upgrade] > [ESB
Storage].
4. Suivez les instructions à l’écran du téléviseur pour confirmer la mise à jour.
5. La mise à jour achevée, le produit passe automatiquement en mode veille.
6. Débranchez le cordon d’alimentation pendant quelques secondes, puis rebranchez et
mettez le lecteur sous tension.
NETTOYAGE DE DISQUE
Essuyez le disque avec un chiffon en microfibre, d’un mouvement rectiligne partant du
centre vers la périphérie.
Remarque
Pour éviter d’endommager le lecteur, évitez de couper l’alimentation ou de retirer le
dispositif flash ESB pendant le déroulement de la mise à jour.
Attention
N’utilisez jamais de solvants disponibles dans le commerce (benzène, thinner…) ni de
vaporisateurs antistatiques destinés aux disques de nettoyage du lecteur.
Caractéristiques
Formats de disque
BD, BD-R, BD-RE, DVD-R/RW, DVD+R/RW, DVD-Video, VCD, CD, CD-R/RW
Formats vidéo
H.264MPEG1/MPEG-2/MPEG4/WMV
Formats audio
Dolby Digital, Dolby Digital Plus, Dolby TrueHD, DTS-HD, MP3, WMA
Photos
JPEG, PNG, GIF
Accessoires inclus
• Télécommande
• Câbles audio/vidéo composites
• Adaptateur d’alimentation
• Adaptateur pour voiture
• Oreillettes
• Mode d’emploi.
• Carte de garantie
Vidéo
• Norme : PAL / NTSC
• Sortie vidéo composite : 1 Vp-p (75 ohm)
• Sortie vidéo HDMI : Auto, 480i/576i, 480p/576p, 720p, 1080i, 1080p, 1080p@24Hz.

20
Audio
• Sortie analogique 2 canaux.
-Audio avant G&D: 2 Vrms (> 1 Kohm)
• Sortie numérique : 0,5-Vp-p (75 ohm)
• HDMI output
• Fréquence d’échantillonnage :
-MP3: 32 kHz, 44.1 kHz, 48 kHz
• Débit binaire constant :
• MP3 : 112 kbps - 320 kpbs
ESB
• En guise de mémoire ESB supplémentaire pour les mises à jour du logiciel ou le
stockage des contenus gratuits BD-Live .
Unité principale
• Dimensions (l x h x p): 259 x 41 x 206 (mm)
• Poids net : 1.3 kg
• Longueur d’onde :
-BD : 405 + 5nm/-5nm
-DVD : 650 + 13NM/-10NM
-CD : 790+15NM/-15NM

21
Dépannage
AVERTISSEMENT : Avant de demander une assistance technique, voyez les solutions
possibles ci-dessous. Risque d’électrocution. Ne retirez jamais le capot du produit. Si vous
tentez de réparer vous-même, vous annulez la garantie.
Pas de réaction à la
télécommande
• Vérifiez que le lecteur est branché sur une prise
de courant.
• Installez les piles correctement.
• Dirigez la télécommande sur le capteur IR situé
sur la façade du lecteur.
• Si la télécommande ne fonctionne toujours pas,
changez ses piles.
Pas d’image/de son
• Vérifiez que la connexion est en bon état, que le
volume n’est pas trop faible, que le récepteur audio
ou le téléviseur fonctionnent.
Pas d’image avec la connexion
HDMI
• Si le lecteur est relié à un dispositif d’affichage
non autorisé avec un câble HDMI, le signal
audio/vidéo peut ne pas apparaître.
• Vérifiez le bon état du câble HDMI. S’il est
défectueux ou endommagé, remplacez-le.
Si cela arrive quand vous changez la résolution,
appuyez plusieurs fois sur la touche Resolution de
la télécommande jusqu’à ce que l’image
apparaisse.
Le signal vidéo haute
définition ne parvient pas
au téléviseur
• Vérifiez que les câbles audio sont reliés à l’entrée
audio du téléviseur.
• L’entrée audio du téléviseur doit correspondre à
l’entrée vidée. Pour plus de détails, voyez le mode
d’emploi du téléviseur.
Pas de son avec la connexion
HDMI
• Vous n’entendrez aucun son venant de la sortie
HDMI si l’appareil connecté n’est pas conforme
HDCP ou est seulement compatible DIVI.
Le disque n’est pas lu
• Vérifiez que le disque est inséré correctement.
• Vérifiez que le disque est pris en charge par le
lecteur. Voir les Caractéristiques.
• Vérifiez que le lecteur prend en charge le code
région du DVD ou BD
• En DVD+RW, vérifiez que le disque est finalisé.
Nettoyez le disque.

22
Pas de lecture des fichiers de
données (JEPG, MP3)
• Assurez-vous que le fichier a été enregistré au
format standard UDF, ISO9660 ou JOLIET.
• Vérifiez que le fichier JPEG porte l’extension .jpg,
JPG, jpeg ou JPEG
• Assurez-vous que le fichier MP3 porte
l’extension .mp3 or MP3
Pas de signal d’entrée sur le
téléviseur
• L’opération demandée n’est pas possible.
Pas d’accès à la fonction
BD-Live
• Vérifiez la connexion Internet ou assurez-vous
que la connexion Internet est établie
• Videz le dispositif de stockage ESB
• Vérifiez que le disque BD prend en charge la
fonction BD-Live.

PORTABLE BLU-RAY DISC/DVD
PLAYER
USER MANUAL
BD10

1
Table of Contents
Safety and Maintenance………………………………………………………………………….. 2
Security Instructions………………………………………………………………………………. 2
Location of Controls……………………………………………………………………………….. 4
Remote Control……………………………………………………………………………………. 5
Quick Starting Guide………………………………………………………………………………. 6
Connections………………………………………………………………………………………... 7
- Connect to Earphones…………………………………………………………………………... 7
- Connect to AV OUT……………………………………………………………………………… 7
-Connect to the HDMI…………………………………………………………………………….. 7
-Connect Network…………………………………………………………………………………. 8
-Connect ESB Device…………………………………………………………………………….. 8
-Connect Memory Card………………………………………………………………………….. 8
Basic Operations…………………………………………………………………………………... 9
-Play Video………………………………………………………………………………………... 9
-Play a Blu-ray Video Disc………………………………………………………………………. 10
-Playing Music……………………………………………………………………………………. 11
-Play a Photo slideshow………………………………………………………………………… 12
General Settings………………………………………………………………………………….. 14
-Basic Operation for the Menu………………………………………………………………….. 14
-General Player Settings………………………………………………………………………… 14
-Display Settings…………………………………………………………………………………. 17
Specifications…………………………………………………………………………………….. 20
Troubleshooting………………………………………………………………………………….. 21

2
Safety and Maintenance
This symbol indicates “dangerous voltage” inside the product that presents a risk of
electric shock or personal injury.
This symbol indicates important instructions accompanying product.
WARNING: To reduce the risk of fire or electric shock, do not expose this product to rain or
moisture. Appliance shall not be exposed to dripping or splashing and no objects filled with
liquids, such as vases, shall be placed on the appliance.
Security Instructions
Read all of the instruction before using this Blu-ray player and keep this manual in safe
place for future reference.
1. Read and keep these instructions.
2. Heed all warnings and follow all instructions.
3. Do not use this player near water.
4. Clean only with dry cloth.
5. Do not block any ventilation openings and install in accordance with the manufacturer’s
instructions.
6. Do not install near any heat sources such as radiators, heat registers, or the player
(including amplifiers) that produce heat.
7. The polarized or the grounding type plug has an important safety purpose. A polarized
plug has two blades with one wider than the other. A grounding type plug has two blades
and a third grounding prong. The wide blade or the third prong is provided for your safety. If
the provided plug does not fit into your outlet, consult an electrician for replacement of the
obsolete outlet.
8. Protect the power cord from being walked on or pinched particularly near the
convenience receptacles, and the point where they exit from the player.
9. Only use attachments or accessories specified by Pixela.
10. Use only with the cart, stand, tripod, bracket, table specified by the manufacturer or
sold with the player. When a cart is used, use caution when moving the cart/player
combination to avoid injury from tip-over.
11. Unplug this player during lightning storms or when unused for long periods of time.
12. Refer all servicing to qualified service personnel.
Servicing is required when the player has been
CAUTION: To reduce the risk of electric shock, do not remove cover (or back). No user
serviceable parts inside. Refer servicing to qualified service personnel.

3
damaged in any way, such as power-supply cord or plug is damaged, liquid has been
spilled or objects have fallen into the player, the player has been exposed to rain or
moisture, does not operate normally, or has been dropped.
13. Please keep the unit in an environment with good ventilation.
14. WARNING: To reduce the risk of the fire or electric shock, do not expose this
apparatus to rain or moisture. The apparatus shall not be exposed to dripping or splashing
and that no objects filled with liquids, such as vases, shall be placed on apparatus.
15. WARNING: Where the mains plug or an appliance coupler is used as the disconnect
device, the disconnect device shall remain readily operable.
16. Do not expose the batteries to excessive heat such as fire direct sunshine or similar
sources.
CLASS 1 LASER PRODUCT
Use of controls, adjustments or performance of procedures other than those specified here
in may result in hazardous radiation exposure.
Trademark Notice
DVD Video is a trademark of DVD Format / Logo Licensing Corporation.
Blu-ray Disc and Blu-ray Disc logo are trademarks of the Blu-ray Disc Association.
Manufactured under license from Dolby Laboratories. Dolby and the double-D symbol are
trademarks of Dolby Laboratories.
Manufactured under license under U.S. Patent #’s: 5,451,942; 5,956,674; 5,974,380;
5,978,762; 6,226,616; 6,487,535; 7,212,872; 7,333,929; 7,392,195; 7,272,567 & other U.S.
and worldwide patents issued & pending. DTS and the Symbol are registered trademarks,
& DTS-HD, DTS-HD Master Audio, and the DTS logos are trademarks of DTS, Inc. Product
includes software. © DTS, Inc. All Rights Reserved.
Java and all other Java trademarks and logo are registered trademarks of Sun
Microsystems, Inc.
BD LIVE and BONUSVIEW are trademarks of the Blu-ray Disc Association.
CAUTION: This product utilizes a laser.
Do not open cover and do not repair yourself. Refer servicing to qualified personnel.

4
Location of Controls
The main screen
Front face
1. LCD panel 2. PALY/PAUSE / STOP 3. Remote sensor
4. MODE 5. FUNCTION 6. VOLUME +/-
7. SETUP 8. OK 9. DIRECTION key
10. Speaker 11. Disc lid 12. PUSH CLOSE
13. OPEN button 14. CHARGING indicator 15. POWER indicator

5
Right side Left side
Back
1. PHONE socket 2. AV OUT 3. AV IN
4. HDMI OUT 5. MEMORY socket 6. ESB
7. DC IN 12V 8. ON/OFF 9. LAN
Remote Control
The remote control
1. Function 2. Mode
3. Repeat 4. Display
5. Subtitle 6. Goto
7. OSC 8. Title/Popup
9. Audio 10. Setup
11. OK 12. Direction key
13. Return 14. Fast forward
15. Fast Reverse 16. Green / Book mark set
17. Red / Program 18. Menu
19. Mute 20. Number buttons (0-9)
21. Clear 22. 2nd Audio
23. Angle 24. PIP
25. Volume+ 26. Volume-
27. Stop 28. Play/Pause
29. Previous 30. Next
31. Yellow / Book mark view 32. Blue / Zoom
Operating with the remote control
1. The remote control must point at the remote sensor, in order
for the DVD player to function correctly.
2. The remote works best at a distance less than 5 meters and
at an angle of up to +/-30° toward the front of the unit.
3. Obstacles should not remain in between the remote control
and the remote sensor on the main unit.

6
Quick Starting Guide
1. Connecting to an External Power Source
Connect the power adapter (supplied with the player) to the side input plug and to a wall
outlet. Do not use any other device otherwise specified by your dealer.
2. Open the screen panel.
The screen panel of the portable DVD opens to a maximum 180°. And it can rotate 270°.
3. Press the open button on the left to open the disc cover.
4. Insert a DVD disc with label side facing upward.
Align the center of the DVD disc with the center of the disc guide. Press gently down on the
DVD to snap the disc into place, and then close the disc cover.
5. Slide the power switch on the left side of the unit to power it on.
6. Press the OK or PLAY/PAUSE button on the unit to start playback.
In most cases, when you leave by the PLAY/PAUSE button, continue to be used by
PLAY/PAUSE button.
The DVD player will immediately start rendering the DVD program.
When you want to stop, press the STOP button, it will return to the power-on logo.
The player can be recharged while playback.

7
Connections
1. Connect to Earphones
1. Connect the earphones. earphones with a 3.5 mm stereo plug can be connected.
2. Adjust the volume by pressing the VOL+/VOL- buttons on the remote control.
The right side of the portable
Avoid listening to sound at levels which may be harmful to your ears.
2. Connect to AV OUT
1. Turn off the power and unplug both units before setting up any connections.
2. Connect the AV cable to AV OUT.
3. Connect the yellow cable (Video) to the VIDEO-IN of the TV set.
4. Connect the red and white cable to the AUDIO-IN of the TV set.
5. Change the resolution to 480P/576P or 480I/576I by setup menu .
Please set the resolution to 720P for the best image effect of the screen after you finished
using the the AV jack.
3. Connect to the HDMI
Connect the HDMI cable (not supplied) to the HDMI jack on this product and to the HDMI
input jack on the TV.

8
Please change the resolution to 1080P for the best image effect.
Please set the resolution to 720P for the best image effect of the screen after you finished
using the HDMI jack.
Tip
• You can optimize the video output by pressing the Resolution button repeatedly to select
the best resolution the TV can support.
• To play the digital video images of a BD-video or DVD video via an HDMI connection, it is
necessary that both this product and the display device (or an AV receiver/ amplifier)
support a copyright protection system called HDCP (high-bandwidth digital content
protection system)
• This type of connection provides best picture quality.
4. Connect Network
Connect this product to the network to enjoy software updates and BD-Live bonus content.
Connect the network cable (not supplied) to the LAN jack on this product and then connect
the network cable to the LAN jack on the broadband modem or router.
5. Connect ESB Device
A ESB device card to play multi-media file.
Connect the ESB device to the ESB jack on this product.
Note:
We do not guarantee 100% compatibility with all ESB devices.
6. Connect Memory Card
A Memory card to play multi-media file.

9
Connect the Memory card to the MEMORY socket on this product.
Note:
We do not guarantee 100% compatibility with all Memory card.
To play the multi-media file on ESB device or Memory card. Press the STOP during
playback, then press FUNCTION on the unit or on the remote.
Basic Operations
Turn On
Slide the power switch on the left side of the unit to power it on.
Setup Menu
Press SETUP to display the setup menu on the LCD screen.
Navigate the Menu
When a menu is displayed, press the Navigation Keys on the remote control to navigate
through it.
Select Menu Display Language
1. Select General Settings in SETUP Menu.
2. Press Up/Down buttons to select Language.
3. Press Right button to select OSD and press Right button again to enter the select menu,
then you can select the language you want.
4. Press OK to confirm.
Play a Disc
1. Press OPEN button to open the disc compartment.
2. Insert a disc with the label facing up.
3. Press PUSH CLOSE to close the disc compartment and start disc play.
4. To stop a disc play, press
PLAY VIDEO
Control Video Play
1. Play a title
2. Use the remote to control the play back
Note:
For BD disc with Java application, the resume function is not available.
Display Menu
BD-video Disc:
MENU: Stops the video playing and returns to the disc menu. This feature is
Buttons Action
Start or resume play / Pause play.
Stop play.
Skip to a previous/next title or chapter.
Search fast-backward or fast-forward.
Press repeatedly to change the search speed.

10
disc-dependent.
POP UP: will access the BD-video disc menu without interrupting disc play.
DVD-video disc:
MENU will display the root menu of a disc.
DISPLAY will display disc information and guide you through the available functions on the
disc.
Change Video Play
Playing a Blu-ray Video Disc
Blu-ray video discs have larger capacity and support features such as high-definition video,
multichannel surround sound, Interactive menus and so on.
1. Insert a BD-video disc.
2. Playback will automatically start, or select a play option in the menu and press OK.
3. During playback, you can press MENU to display additional information, features or
content store on the disc.
4. During playback, you can press POP UP to display the disc menu without interrupting
disc play.
Button Action
Audio Selects an audio language
SUBTITLE Selects an subtitle language on a disc
REPEAT
Select or turn off repeat mode.
Repeat options may vary from the disc type
DISPLAY Display the current status or disc information
ZOOM Zoom in/out of the video image
BOOK MARK SET Set bookmarks of the currently playing disc
BOOK MARK VIEW View bookmarks of the currently playing disc
PROGRAM Edit the program and play
GOTO Jump to a user specified time during playback
2nd AUDIO
Switch over the audio displaying between the main window PIP
window.
OSC
Access options relating to the current activity or selection, and
control the video playback

11
(A) Primary video (B) Second
1.Press PIP to turn on the secondary video window.
2.Press 2nd AUDIO to switch over the audio between main Playback window and PIP
window.
Enjoy BD-LIVE
You can enjoy the BD-Live functions which enable you to use Interactive functions on the
disc when the unit is connected to the Internet.
Example of BD-Live Interactive functions:
1. Additional content (such as movie’s trailer, subtitles and BD-Java, etc.) can be
downloaded to a connected ESB storage device.
2. Special video data may be played while being downloaded.
3. When a disc supporting BD-Live is played, the product or the disc’s ID can be sent to the
content provider via the Internet. Service and functions will differ depending on the disc.
Note
-The unit must be connected and set up to access Internet.
-Depending on the connection environment, it may take time to connect to the Internet.
-When BD-Live functions are used and the unit is connected to the Internet, your standard
Internet service provider charges will apply.
-Follow the instruction given by the disc when using the BD-Live function.
-It is recommended to use a ESB storage device for download the content (at least 1GB
free space is recommended).
PLAYING MUSIC
Controlling music playback
Use the remote control to control the playback for audio file.
BUTTON ACTION
Start or Resume play / Pause Play
Stop Play
Skip to a previous or next title or chapter
Search fast-backward or fast-forward. Press repeatedly to change the
search speed.
Select an item to play
REPEAT Select or turn off repeat mode
Play MP3 music
Your player can also playback digital music files. MP3 are types of highly compressed
audio file (files with mp3 extensions).
1. Insert a disc that contains MP3 file.
2. Select a music folder, then press OK.
3. Select a file to play, then press OK.

12
NOTE
-Press FUNCTION to display the file list.
-For discs recorded in multiple sessions, Only the first session will be played.
-This player cannot playback files that are protected by Digital Rights Management (DRM).
-This product does not support the MP3PRO audio format.
-Special characters present in the MP3 track name (ID3) or album name, it might not be
displayed correctly on the screen as these characters are not supported by the player.
-Folders/files that exceed the supported limit of this product cannot be displayed or played.
PLAYING A PHOTO SLIDESHOW
You can play JPEG on the player as a slideshow.
1. Insert a disc or ESB device that contains JPEG files
2. Select a Photo folder, then press OK to open.
-To select a Photo, use the Navigation buttons.
-To enlarge the selected Photo and start slideshow, press OK.
Note:
-It may require longer time to display the disc content on your TV if there are a large
number of songs/ photos compiled onto one disc.
-This product can only display digital camera Pictures in the JPEG-EXIF format, typically
used by almost all digital cameras. It cannot display Motion JPEG, or Pictures in formats
other than JPEG, or sound clips associated with Pictures.
-Folders/files that exceed the supported limit of this product cannot be displayed or
played.
Controlling Photo slideshow
1. Begin a Photo slideshow.
2. Use the remote control to control the play as follows:
BUTTONS ACTION
Rotate a photo
Flip a photo
Stop play
Set slideshow interval and animation
1. During slideshow playback, press OSC. The options menu will be displayed.
2. Navigate the options with the Navigation button.
3. Select an option in the menu, then press OK.
4. Press OK.
Playing music during a Photo slideshow
Create a musical slideshow to play both MP3 music files and JPEG Photo files
simultaneously.
Note:
Create a musical slideshow, you must store the MP3 and JPEG files on the same disc as
the photos.
1. Select your MP3 music to play and start play-back.

13
2. Press Media Center to return to the main menu.
3. Navigate to enter a photo folder, then press OK to start slideshow play.
-Slideshow begins and continues till the end of the photo folder.
-Audio continues to play until the end of the disc.
-To stop the slideshow play, Press
-To stop the music play, press again.

14
General Settings
BASIC OPERATION FOR THE MENU
1. Press STOP twice during playback
2. Press SETUP, the SETUP MENU display on the screen.
3. Select a main menu by LEFT/RIGHT.
4. Select the menu you want to setting by UP/DOWN buttons and press RIGHT.
You can press UP to return to main menu.
5. Select the option by UP/DOWN and press RIGHT.
You can press LEFT to return to the previous menu.
6. Select by UP/DOWN buttons and press OK to confirm.
You can press LEFT to return to the previous menu.
7. To return to the mains menu from any submenu, press RETURN.
8. To exit the menu, press SETUP.
GENERAL PLAYER SETTINGS
SYSTEM
1. Screen Saver: Turns the screen saver on/off. The screen saver will display in 3 mins if
there is no operation when the unit is turned on.
2. Disc Auto Playback: Turns the disc auto playback function on/off.
3. CEC: Turns the CEC function on/off.
4. Disc Auto Upgrade: Turns the Disc Auto Upgrade function on/off.
5. Load Default: Return the player to its default settings.
6. Upgrade: select this when you want to upgrade your player software to the latest
version.
7. Easy setup: Make default settings Fast.
8. BUDA: Define memory for BD-Live.
* Notice : BUDA Setup has two-submenu of "External" & "On board". If you choose
"External", you must connect ESB first.

15
LANGUAGE
1. OSD: Selects the OSD language.
2. Menu: Selects the menu language of the disc.
3. Audio: Selects the audio language for the program.
4. Subtitle: Selects the subtitle language for the program
.
Note:
You have to select the audio and subtitle language according to the requirements on the
disc.
PLAYBACK
1. Closed Caption: Turn on/off the CC function.
2. Angle Mark: Turn on/off the Angle mark function.
3. PIP Mark: Turn on/off the PIP mark function
4. Secondary Audio: Turn on/off Secondary Audio mark function.
5. Last Memory: Turn on/off the last memory function
6. PBC: Turn the PBC function on/off.

16
SECURITY
1. Change Password: Changes the password for parental control menu.
2. Parental Control: to set the parental control.
3. Country Code: Select the Country code.
Note:
The original code is 0000. The code can be changed by user.
NETWORK
• Connect this product to a broadband MODEM or router.
• This player will start to detect if there is a connection to the network.
• If the connection test fails, select (Retry) and press OK to try and re-connect to the
network again.
1. Internet Connection: Displays the Internet connection state.
2. Information:Displays information of the current Network.
3. Connection Test: Tests the Internet connection state.
4. IP Setting: Sets the IP for the player.
5. BD-Live Connection: Connection situation of BD-Live.
6. Proxy Setting: Setup Proxy Server.

17
DISPLAY SETTINGS
TV
1. TV Screen: Selects the display mode for the TV.
2. Resolution: Selects the resolution for the TV.
3. TV System: Selects the TV system type.
4. Color Space: Selects the color space.
5. HDMI Deep Color: Selects the color for HDMI.
6. HDMI 1080 24Hz: Enable/disable this settings.
VIDEO PROCESSING
1. Video Adjust: Enter the submenu to adjust the video display.
2. Sharpness: Select the playback sharpness mode.
Adjust the Brightness, Contrast, Hue, Saturation of the screen to suit.
AUDIO SETTING
1. HDMI: Selects the HDMI mode.
2. Down sampling: Selects down sampling.
(Select this when the Amplifier connected to the placer is not 96KHz compatible)
3. DRC: Dynamic range compression

18
Speaker Setting: Selects speaker output
1. configuration: Selects the number of channels 2x
2. Test Tone:
SYSTEM INFORMATION
Displays the system information (Information in the picture above is for reference only)
UPDATE SOFTWARE
For software updates that can enhance your players performance, check the current
software version of your players with the latest software (if available).
1. Press SETUP.
2. Select [General Setting], then press RIGHT button.
3. Select [System]>[Upgrade], then press OK.
Update software via ESB
1. Download the software onto a ESB flash drive.

19
2. Insert the ESB flash drive to the ESB jack of the rear panel.
3. In the SETUP menu, select [General Setting] >[System] > [Upgrade] > [ESB Storage].
4. Follow the instructions on the TV screen to confirm the update operation.
5. Once the software update is complete, this product automatically switches into standby
mode.
6. Disconnect the power cord for a few seconds; reconnect an turn on this player.
CLEAN DISCS
Wipe the disc with a Micro Fibre Cleaning Cloth from the centre to the edge in a straight
line movement.
Note
To prevent possible damage of this product do not turn off the power or remove the ESB
flash drive while the software update is in progress.
Caution
Never use solvents such as benzene, thinner, cleaners available commercially, or
anti-static sprays intended for discs to clean the player.

20
Specifications
Playback disc formats
BD, BD-R, BD-RE, DVD-R/RW, DVD+R/RW, DVD-Video, VCD, CD, CD-R/RW
Video formats
H.264/ MPEG1/MPEG-2/MPEG4/WMV
Audio formats
Dolby Digital, Dolby Digital Plus, Dolby TrueHD, DTS-HD, MP3, WMA
Photos
JPEG, PNG, GIF,
Accessories supplied
• Remote control.
• Composite Audio/Video cables.
• Power adapter
• Car power adapter
• Earphone.
• User manual.
• Warranty card
Video
• Signal system: PAL / NTSC
• Composite video output: 1 Vp-p (75 ohm)
• HDMI video output: Auto, 480i/576i, 480p/576p, 720p, 1080i, 1080p, 1080p@24Hz.
Audio
• 2 Channel analog output.
-Audio Front L&R: 2 Vrms (> 1 kohm)
• Digital output: 0.5-Vp-p (75 ohm)
• HDMI output
• Sampling frequency:
-MP3: 32 kHz, 44.1 kHz, 48 kHz
• Constant bit rate:
• MP3: 112 kbps - 320 kpbs
ESB
• As additional ESB memory for software updates are storing BD-Live bonus contents.
Main unit
• Dimensions (w x h x d): 259x41x206(mm)
• Net Weight: 1.3kg
• Wave length:
-BD: 405 + 5nm/-5nm
-DVD:650 + 13NM/-10NM

21
-CD:790+15NM/-15NM
Troubleshooting
WARNING: Before requesting after service please check this possible resolution. Risk of
electric shock. Never remove the casing of the product. To keep the warranty valid, never
try to repair the product yourself.
No reaction to the remote
control
• Make sure the player is connected to a power
outlet.
• Insert the batteries correctly
• Point the remote control at the IR sensor located
on the front panel of this product.
• If the remote still does not function, try putting new
batteries into the remote control.
No picture/sound
• Make sure the connection is in good condition;
volume is not too low; audio receiver or TV work
normally; audio setting is proper.
No picture on HDMI connection
• If this player is connected to an unauthorized
display device with an HDMI cable, the audio/video
signal may not be displayed
• Check if the HDMI cable is faulty. If faulty or
damaged, replace the HDMI cable.
• If this happens when you change the [resolution]
setting, press Resolution on the remote control
repeatedly until the picture appears.
High-definition video signal
not playing on the TV
• Ensure that the audio cables are connected to the
audio input of the TV
• Assign the audio input of the TV to the
corresponding video input. See the TV user manual
for details.
No sound on HDMI connection
• You may not hear any sound from the HDMI output
if the connected device is non-HDCP compliant or
only DIVI compatible.
Disc cannot be played
• Ensure that the disc is loaded properly
• Ensure that this player supports the disc. See
Specifications.
• Ensure that this player supports the region code of
the DVD or BD
• For DVD+RW, ensure that the disc is finalized.
• Clean the disc

22
Data Files (JEPG, MP3, )
cannot be played or read
• Ensure that the data file was recorded in the
standard UDF, ISO9660 or JOLIET format.
• Ensure that the JPEG file extension .jpg, JPG, jpeg
or JPEG
• Ensure that the MP3 file extension is .mp3 or MP3,
Not entry sign appears on the
TV
• The requested operation is not possible
Unable to access BD-Live
feature
• Check the network internet connection or ensure
that the network Internet connection has been set up
• Clear ESB storage
• Ensure that the BD disc supports BD Live Feature.

DRAAGBARE BLU-RAY
DISK/DVD-SPELER
GEBRUIKERHANDLEIDING
BD10

1
Inhoud
Veiligheid en Onderhoud...................................................................................................... 2
Veiligheidsinstructies............................................................................................................2
Situering van bedieningselementen ..................................................................................... 4
Afstandsbediening................................................................................................................5
Snelstartgids ........................................................................................................................ 6
Aansluitingen........................................................................................................................7
- Oortelefoon aansluiten.......................................................................................................7
- Aansluiten op AV OUT....................................................................................................... 7
-Aansluiten op HDMI ............................................................................................................7
-Netwerk aansluiten .............................................................................................................8
-ESB-toestel aansluiten........................................................................................................8
-Geheugenkaart aansluiten..................................................................................................8
Basisbedieningen................................................................................................................. 9
-Video afspelen ....................................................................................................................9
-Blu-ray Videodisk afspelen ...............................................................................................10
-Muziek afspelen ................................................................................................................11
-Een fotodiashow afspelen.................................................................................................12
Algemene instellingen ........................................................................................................ 14
-Basisbediening voor het menu.......................................................................................... 14
-Algemene spelerinstellingen ............................................................................................. 14
-Displayinstellingen ............................................................................................................17
-Specificaties...................................................................................................................... 20
-Problemen verhelpen........................................................................................................21

2
Veiligheid en Onderhoud
Dit symbool geeft “gevaarlijke spanning” aan binnen het product die een risico
vormt van elektrische schok lichamelijk letsel.
Dit symbool geeft belangrijke instructies bij het product aan.
AANMANING: Om het risico van brand of elektrische schok te verkleinen mag u dit apparaat
niet blootstellen aan regen of vochtigheid. Dit apparaat mag niet worden blootgesteld aan
vochtdruppels of spatwater en er mogen geen voorwerpen gevuld met vloeistoffen, zoals
vazen, op het product worden geplaatst.
Veiligheidsinstructies
Lees alle instructies voor u deze Blu-ray speler in gebruik neemt en bewaar deze
handleiding op een veilige plaats als referentiemateriaal voor achteraf.
1. Lees en bewaar deze instructies.
2. Sla acht op alle waarschuwingen en volg alle instructies op.
3. Gebruik dit apparaat niet in de buurt van water.
4. Maak alleen schoon met een droge doek.
5. Blokkeer geen ventilatieopeningen en installeer het apparaat in overeenstemming met
de instructies van de fabrikant.
6. Installeer niet in de buurt van enige warmtebronnen zoals radiatoren,
verwarmingsroosters of andere apparaten (inclusief versterkers) die warmte ontwikkelen.
7. De gepolariseerde stekker of deze met aardpen heeft een belangrijk veiligheidsdoel.
Een gepolariseerde stekker heeft twee pennen waarvan de ene breder is dan de andere.
Een stekker van het geaarde type heeft twee pennen en een derde aardpen. De brede
derde pen dient voor uw veiligheid. Als de voorziene stekker niet past op uw stopcontact,
raadpleeg dan een elektricien voor vervanging van de onbruikbare stekker.
8. Bescherm het voedingssnoer tegen vertrappelen of afklemmen, in het bijzonder in de
buurt van het stopcontact en het punt waar het snoer uit de speler komt.
9. Gebruik uitsluitend toebehoren of accessoires gespecificeerd door Pixela.
10. Gebruik uitsluitend met een karretje, staander, statief, beugel of tafel gespecificeerd
door de fabrikant, of samen met het apparaat verkocht. Als een karretje wordt gebruikt, let
dan op bij het verplaatsen van de karretje/apparaatcombinatie om beschadiging door
omkantelen te voorkomen.
11. Trek de stekker van dit apparaat uit tijdens blikseminslagen of wanneer langere tijd niet
gebruikt.
12. Laat eventuele werkzaamheden over aan ervaren vakmensen.
WAARSCHUWING: Om het risico van elektrische schok te verkleinen, mag u het deksel (of
achterpaneel) niet afnemen. Geen door gebruiker zelf herstelbare onderdelen aanwezig.
Laat eventuele werkzaamheden over aan ervaren vakmensen.

3
Werkzaamheden zijn vereist als de speler op enige wijze werd beschadigd, bijvoorbeeld
voedingssnoer of stekker beschadigd, gemorste vloeistof of objecten die in de speler zijn
gevallen, blootstelling aan regen of vochtigheid, de speler werkt niet meer normaal of is
gevallen.
13. Bewaar de speler steeds op een goed verluchte plaats.
14. AANMANING: Om het risico van brand of elektrische schok te verkleinen mag u dit
apparaat niet blootstellen aan regen of vochtigheid. Dit apparaat mag niet worden
blootgesteld aan vochtdruppels of spatwater en er mogen geen voorwerpen gevuld met
vloeistoffen, zoals vazen, op het product worden geplaatst.
15. AANMANING: Als de voedingsstekker of een verlengkabel wordt gebruikt als
loskoppelinrichting, dan blijft de loskoppelinrichting steeds in werking.
16. Stel de batterijen niet bloot aan te grote hitte zoals brand, rechtstreekse zonneschijn of
vergelijkbare warmtebronnen.
CLASS 1 LASER PRODUCT
Het gebruik van bedieningselementen, aanpassingen van de prestaties of andere dan de
gespecificeerde procedures kan leiden tot gevaarlijke stralingsblootstelling.
Handelsmerkinformatie
DVD Video is een handelsmerk van DVD Format / Logo Licensing Corporation.
Blu-ray Disc en Blu-ray Disc logo zijn handelsmerken van de Blu-ray Disc Association.
Vervaardigd onder licentie van Dolby Laboratories. "Dolby " en het dubbele-D-symbool zijn
handelsmerken van Dolby Laboratories.
Vervaardigd onder licentie volgens U.S. Patent #’s: 5,451,942; 5,956,674; 5,974,380;
5,978,762; 6,226,616; 6,487,535; 7,212,872; 7,333,929; 7,392,195; 7,272,567 & ander U.S.
en wereldwijde patenten uitgevaardigd & aangevraagd. DTS en het Symbool zijn
gedeponeerde handelsmerken, & DTS-HD, DTS-HD Master Audio, en het DTS logo zijn
handelsmerken van DTS, Inc. Product omvat software. © DTS, Inc. Alle rechten
voorbehouden.
Java en alle andere Java handelsmerken en logo zijn gedeponeerde handelsmerken van
Sun Microsystems, Inc.
BD LIVE en BONUSVIEW zijn handelsmerken van de Blu-ray Disc Association.
WAARSCHUWING: Dit product gebruikt een laserstraal.
Open het deksel niet en voer ook zelf geen herstellingen aan de speler uit. Laat
eventuele werkzaamheden over aan ervaren vakmensen.

4
Situering van bedieningselementen
Het hoofdscherm
Voorzijde
1. LCD-paneel 2. AFSPELEN/PAUZE / STOP 3. Afstandssensor
4. MODUS 5. FUNCTIE 6. VOLUME +/-
7. SETUP (Instellen) 8. OK 9. RICHTING
10. Luidspreker 11. Diskdeksel 12. DRUKKEN SLUITEN
13. OPEN-knop 14. CHANGE (verandering) - 15. POWER (voeding)-
Indicator indicator

5
Rechterkant Linkerkant
Achterzijde
1. PHONE-bus 2. AV OUT (A/V-uitgang) 3. AV IN (A/V- ingang)
4. HDMI OUT (HDMI-uitgang) 5. MEMORY-bus 6. ESB
7. DC IN 12V 8. ON/OFF (aan/uit) 9. LAN-bus
Afstandsbediening
De afstandsbediening
1. Function (functie) 2. Mode (modus)
3. Herhalen 4. Display
5. Subtitle (ondertit.) 6. Goto (ga naar)
7. OSC 8. Titel/Popup
9. Audio 10. Setup (instellen)
11. OK 12. Richting
13. Return (terug) 14. Snel voorwaarts
15. Snel achteruit 16. Groen/Bookmark
17. Rood/Programma 18. Menu
19. Mute (dempen) 20. Cijfertoetsen (0-9)
21. Clear (wissen) 22. 2de Audio
23. Hoek 24. PIP
25. Volume+ 26. Volume-
27. Stop 28. Afspelen/Pauze
29. Vorige 30. Volgende
31. Geel/ Leeswijzer view 32. Blauw/Zoom
Bediening met de afstandsbediening
1. De afstandsbediening moet naar de afstandssensor gericht
zijn zodat de DVD-speler correct kan werken.
2. De afstandbediening werkt het best op een afstand van
minder dan 5 meter en onder een hoek van +/-30° naar het
voorpaneel gericht.
3. Hindernissen mogen niet aanwezig blijven tussen de
afstandsbediening en de afstandssensor op het hoofdtoestel.

6
Snelstartgids
1. Aansluiten op een externe stroombron.
Sluit de stroomadapter (meegeleverd met de speler) aan op de ingang aan de zijkant en op
een wandstopcontact. Gebruik geen andere inrichting dan deze gespecificeerd door uw
dealer.
2. Open het schermpaneel.
Het schermpaneel van de draagbare DVD-speler kan openen tot maximum hoek van 180°.
En het kan 270° worden verdraaid.
3. Druk op de OPEN-knop aan de linkerkant op het diskdeksel te openen.
4. Steek een DVD-disk in met label naar boven gericht.
Breng het midden van de DVD-disk in overeenstemming met het midden van de
diskgeleider. Druk zachtjes op de DVD om de disk op zijn plaats te doen vastklikken en
sluit dan het diskdeksel.
5. Verschuif de aan/uit-schakelaar aan de linkerkant van de speler om deze aan te zetten.
6. Druk op de OK- of AFSPELEN/PAUZE-knop van het toestel om de weergave te starten.
In de meeste gevallen, als u de AFSPELEN/PAUZE-knop bedient tijdens de weergave,
zal de DVD-speler het DVD-programma pauzeren en bij volgende keer indrukken de
weergave hervatten.
Als u de weergave wilt stoppen, druk dan op de STOP-knop, waarna de speler zal
terugkeren naar het hoofdmenu. De speler kan worden opgeladen tijdens weergave.

7
Aansluitingen
1. Aansluiting op oortelefoon
1. Sluit de oortelefoon aan. Oortelefoons met 3.5 mm stereo stekker kunnen worden
aangesloten.
2. Stel volume in door op knoppen VOL+/VOL- van afstandsbediening te drukken.
De rechterkant van de speler
Vermijd te luisteren met geluidsniveau dat schadelijk is voor uw gehoor.
2. Aansluiten op AV OUT (A/V-uitgang)
1. Zet voeding uit en trek beide stekkers uit vooraleer u enige aansluitingen uitvoert.
2. Sluit de A/V-kabel aan op
AV OUT.
3. Sluit de gele kabel (Video) aan op de VIDEO-IN-ingang van het TV-toestel.
4. Sluit de rode en witte kabels aan op de AUDIO-IN-ingang van het TV-toestel.
5. Verander de resolutie in 480P/576P of 480I/576I via instellingsmenu .
Stel resolutie in op 720P voor het beste beeldeffect van het scherm na beëindiging van het
gebruik van de AV jack.
3. Aansluiten op HDMI
Sluit de HDMI-kabel (niet meegeleverd) aan op de HDMI-bus van dit product en op de
HDMI-ingang van de TV.

8
Verander de resolutie in 1080P voor het beste beeldeffect.
Zet de resolutie op 720P voor het beste beeldeffect van het scherm na einde van gebruik
van de HDMI-bus.
Tip
• U kunt de videoweergave optimaliseren door de Resolutieknop meermaals in te drukken
om de beste resolutie te selecteren die de TV kan ondersteunen.
• Om de digitale videobeelden af te spelen van een BD-video of DVD video via een HDMI-
aansluiting, is het nodig dat zowel dit product als het weergavetoestel (of een A/V receiver/
versterker) ondersteuning bieden voor een zogenaamd HDCP (hoge-bandbreedte digitale-
inhoudbeschermingssysteem) met copyrightbescherming.
• Dit type aansluiting verschaft de beste beeldkwaliteit.
4. Netwerk aansluiten
Sluit dit product aan op het netwerk om te genieten van software updates en BD-Live
bonusinhoud.
Sluit de netwerkkabel (niet meegeleverd) aan op de LAN-bus van dit product en sluit dan
de netwerkkabel aan op de LAN-bus van de breedbandmodem of router.
5. ESB-toestel aansluiten
Een ESB-toestelkaart om media af te spelen.
Sluit het ESB-toestel aan op de ESB-bus van dit product.
Nota:
We kunnen geen 100% compatibiliteit met alle ESB-toestellen waarborgen.
6. MEMORY-kaart aansluiten
Een MEMORY-kaart om media af te spelen.

9
Sluit de MEMORY-kaart aan op de MEMORY-bus van dit product.
Note:
We kunnen geen 100% compatibiliteit met alle MEMORY-kaarten waarborgen.
Om de media af te spelen op een ESB-toestel of MEMORY-kaart, op STOP drukken tijdens
weergave, en dan op FUNCTION van de eenheid of van de afstandsbediening.
Basisbedieningen
Aanzetten
Verschuif de aan/uit-schakelaar aan de linkerkant van het toetstel om het aan te zetten.
Instellingsmenu
Druk op SETUP om het instellingsmenu weer te geven op het LCD-scherm.
Surfen doorheen het menu
Als een menu wordt weergegeven, druk dan op de Navigatietoetsen van de
afstandsbediening om het menu te doorlopen.
Menudisplaytaal selecteren
1. Selecteer Algemene Instellingen in SETUP-menu.
2. Druk op de Op/Neer-toetsen om een taal te selecteren.
3. Druk op knop naar rechtst om OSD te kiezen en druk dan nogmaals op Rechts-knop om
naar keuzemenu te gaan en dan kunt u de gewenste taal selecteren.
4. Druk op OK om te bevestigen.
Een disk afspelen
1. Druk op OPEN-knop om diskcompartiment te openen.
2. Zet een disk in met label naar boven gericht.
3. Druk op PUSH CLOSE om het diskcompartiment te sluiten en diskweergave te starten.
4. Om diskweergave te stoppen drukt u op
VIDEO AFSPELEN
Videoweergave bedienen
1. Speel een titel af
2. Gebruik de afstandsbediening om de weergave te bedienen
Nota:
Voor BD-disk met Java-toepassing is de herneemfunctie niet beschikbaar.
Weergavemenu
BD-videodisk:
MENU: Stopt de videoweergave en keert terug naar diskmenu. Deze functie is
Knoppen Actie
Weergave starten of hernemen / Afspelen pauseren.
Afspelen stoppen.
Overspringen naar vorige/volgende titel of hoofdstuk.
Snel voorwaarts of achterwaarts zoeken.
Herhaald indrukken om zoeksnelheid te wijzigen.

10
diskafhankelijk.
POP UP: geeft toegang tot het BD-videodiskmenu zonder diskweergave te onderbreken.
DVD-videodisk:
MENU geeft het rootmenu van een disk weer.
DISPLAY geeft diskinformatie weer en gidst u doorheen de beschikbare functies op de
disk.
Videoweergave aanpassen
Knop Actie
Audio Selecteert een audiotaal
SUBTITLE Selecteert een ondertitelingstaal op een disk
REPEAT
Selecteert herhaalmodus of schakelt deze uit.
Herhaalopties kunnen variëren volgens het disktype
DISPLAY Huidige status of diskinformatie weergeven
ZOOM Zoom in/out van videobeeld
LEESWIJZER SET Stel bladwijzers van de spelende disc
LEESWIJZER VIEW
SSET
Bekijk bladwijzers van de spelende disc
PROGRAM Het programma aanpassen en afspelen
GOTO Overspringen naar door gebruiker gespecificeerde tijd tijdens
2nd AUDIO
Overschakeling audioweergave tussen hoofdvenster en PIP-
OSC
Toegang tot opties betreffende huidige activiteit of selectie, en
bediening van videoweergave
Een Blu-ray Videodisk afspelen
Blu-ray videodisks hebben grotere capaciteit en ondersteunen functies zoals hoge-definitie
video, meerkanalen surround sound, Interactieve menu’s enzovoort.
1. Zet een BD-videodisk in.
2. Weergave start automatisch, of selecteer een weergaveoptie in het menu en druk op OK.
3. Tijdens weergave kunt u drukken op MENU om extra informatie, functies of inhoud
opgeslagen op de disk weer te geven.
4. Tijdens weergave kunt u op POP UP drukken om het diskmenu weer te geven zonder
diskweergave te onderbreken.

11
(A) Primaire video (B) Tweede videobeeld
1.Druk op PIP om het secundaire videovenster aan te zetten.
2.Druk op 2nd AUDIO om de audio om te schakelen van hoofdweergavevenster naar PIP-
venster.
Genieten van BD-LIVE
U kunt genieten van de BD-Live-functies die het u mogelijk maken Interactieve functies te
gebruiken op de disk als het toestel is aangesloten op het Internet.
Voorbeeld van BD-Live Interactieve functies:
1. Bijkomende inhoud (zoals filmtrailer, ondertitels en BD-Java enz.) kan worden
gedownload naar een aangesloten ESB-opslagtoestel.
2. Speciale videodata kunnen worden afgespeeld tijdens het downloaden.
3. Als een disk wordt afgespeeld die BD-Live ondersteunt, kan het product of de disk-ID
naar de inhoudverstrekker worden gezonden via het Internet. Service en functies zullen
verschillen afhankelijk van de disk.
Nota
-Het toestel moet aangesloten en ingesteld zijn om toegang te krijgen tot het Internet.
-Afhankelijk van de aansluitingsomgeving kan het enige tijd duren om aan te sluiten op
het Internet.
-Als BD-Live-functies worden gebruikt en het toestel is aangesloten op het Internet, zullen
kosten van uw standaard Internet serviceprovider gelden.
-Volg de instructies gegeven door de disk bij gebruik van de BD-Live-functie.
-Het is aan te raden een ESB-opslageenheid te gebruiken voor downloaden van de
inhoud (minstens 1GB vrije ruimte wordt aangeraden).
MUZIEK AFSPELEN
Muziekweergave bedienen
Gebruik de afstandsbediening om de weergave voor audiobestand te bedienen.
KNOP ACTIE
Weergave starten of hernemen / Weergave pauzeren
Weergave stoppen
Overspringen naar vorige of volgende titel of hoofdstuk
Snel voorwaarts of achterwaarts zoeken.
Herhaald indrukken om zoeksnelheid te wijzigen.
Een af te spelen element selecteren
REPEAT Herhaalmodus selecteren of uitzetten
MP3-muziek afspelen
Uw speler kan ook digitale muziekbestanden afspelen. MP3 zijn types sterk
gecomprimeerde audiobestanden (bestanden met mp3-extensies).
1. Zet een disk in die MP3-bestanden bevat.

12
2. Selecteer een muziekmap en druk dan op OK.
3. Selecteer een af te spelen bestand en druk dan op OK.
NOTA
-Druk op FUNCTION om de bestandenlijst weer te geven.
-Voor disks opgenomen in meerdere sessies, wordt alleen de eerste sessie afgespeeld.
-Deze speler kan geen bestanden afspelen die beschermd zijn door Digital Rights
Management (DRM).
-Dit product ondersteunt het MP3PRO audioformaat niet.
-Speciale tekens aanwezig in de MP3-tracknaam (ID3) of albumnaam worden soms niet
correct weergegeven op het scherm, omdat de speler de tekens niet ondersteunt.
-Mappen/bestanden die de ondersteunde limiet van dit product overschrijden, kunnen niet
worden weergegeven of afgespeeld.
EEN FOTODIASHOW AFSPELEN
U kunt JPEG afspelen op de speler als een diashow.
1. Steek een disk of een ESB-toestel in die/dat JPEG-bestanden bevat.
2. Selecteer een fotomap en druk dan op OK om te openen.
-Om een foto te selecteren, de navigatieknoppen gebruiken.
-Om de geselecteerde foto te vergroten en de diashow te starten, druk op OK.
Nota:
-Het kan langer duren om de diskinhoud op uw TV weer te geven als er een groot
aantal tracks/foto’s gecompileerd zijn op één disk.
-Dit product kan alleen digitale camerabeelden weergeven in het JPEG-EXIF-formaat, die
typisch worden gebruikt door zowat alle digitale camera’s. Het kan geen Motion JPEG, of
beelden weergeven in andere formaten dan JPEG, of geluidsclips die horen bij beelden.
-Mappen/bestanden die de ondersteunde limiet van dit product overschrijden,
kunnen niet worden weergegeven of afgespeeld.
Een fotodiashow bedienen
1. Begin een fotodiashow.
2. Gebruik de afstandsbediening om het afspelen als volgt te bedienen:
KNOPPEN ACTIE
Een foto verdraaien
Een foto omdraaien
Weergave stoppen
Diashowinterval en animatie instellen
1. Druk tijdens de diashow op OSC. Het optiemenu wordt weergegeven.
2. Surf doorheen de opties met de Navigatieknop.
3. Selecteer een optie in het menu en druk dan op OK.
4. Druk op OK.

13
Muziek afspelen tijdens een fotodiashow
Creëer een muzikale diashow om MP3-muziekbestanden en JPEG-fotobestanden tegelijk
af te spelen.
Nota:
Om diashow met muziek te creëren moet u de MP3- en JPEG-bestanden op dezelfde disk
als de foto’s opslaan.
1. Selecteer uw MP3-muziek voor weergave en start het afspelen.
2. Druk op Media Center voor terugkeer naar hoofdmenu.
3. Surf om naar fotomap te gaan, druk op OK om diashow te starten.
-Diashow begint en gaat verder tot einde van fotomap.
-Audio blijft afspelen tot einden van de disk.
-Om diashow te stoppen, druk op
-Om muziekweergave te stoppen, nogmaals indrukken.

14
Algemene instellingen
BASISBEDIENING VAN HET MENU
1. Druk tweemaal op STOP tijdens het afspelen
2. Druk op SETUP, het SETUP MENU op het beeldscherm
3. Selecteer een hoofdmenu via LINKS/RECHTS.
4. Selecteer het menu dat u wilt via de OP/NEER-knoppen en druk dan op RECHTS. U
kunt op OP drukken om terug te keren naar hoofdmenu.
5. Selecteer de optie via OP/NEER en druk dan op RECHTS. U kunt op LINKS drukken om
terug te gaan naar vorig menu.
6. Selecteer via OP/NEER-knoppen en druk dan op OK om te bevestigen. U kunt op
LINKS drukken om terug te gaan naar vorig menu.
7. Om terug naar hoofdmenu te gaan vanuit submenu, druk op RETURN.
8. Om menu te verlaten drukken op SETUP.
ALGEMENE
SPELERINSTELLINGEN
SYSTEEM
1. Screen Saver: Zet de screen saver aan/uit. De screen saver verschijnt na 3 min als geen
functie wordt geactiveerd terwijl toestel is aangezet.
2. Disc Auto Playback: Zet de “disc auto playback”-functie aan/uit.
3. CEC: Zet de CEC-functie aan/uit.
4. Disc Auto Upgrade: Zet de “Disc Auto Upgrade”-functie aan/uit.
5. Load Default: Zet de speler opnieuw in zijn standaard instelling.
6. Upgrade: selecteer deze functie als u uw spelersoftware wilt upgraden naar de
nieuwste versie.
7. Easy setup: Maken standaard instellingen sneller.
8. BUDA: Geheugen definiëren voor BD-Live.
* Opmerking: BUDA Setup heeft twee submenu’s: "External" & "On board". Als u "External"
kiest, moet u ESB eerst aansluiten.

15
TAAL
1. OSD: Selecteert de OSD-taal.
2. Menu: Selecteert de menutaal van de disk.
3. Audio: Selecteert de audiotaal voor het programma.
4. Subtitle (ondertiteling): Selecteert de ondertitelingstaal voor het programma
.
Nota:
U moet de audio- en ondertitelingstaal selecteren volgens de vereisten op de disk.
WEERGAVE
1. Closed Caption (bijschrift): De CC-functie aan- of uitzetten.
2. Angle Mark: De Angle Mark-functie aan- of uitzetten.
3. PIP Mark (PIP-merkteken): De PIP Mark-functie aan- of uitzetten.
4. Secondary Audio: De Secondary Audio-functie aan- of uitzetten.
5. Last Memory: De Last Memory-functie aan- of uitzetten.
6. PBC: De PBC-functie aan- of uitzetten.

16
BEVEILIGING
1. Change Password (wachtwoord wijzigen): Wijzigt het wachtwoord voor het
kinderslotmenu.
2. Parental Control (kinderslot): voor instelling van het kinderslot.
3. Country Code (landcode): Selecteer de landcode.
Nota:
De originele code is 0000. De code kan worden gewijzigd door de gebruiker.
NETWERK
• Sluit dit product aan op een breedband-MODEM of router.
• Deze speler zal beginnen detecteren of er een aansluiting op het netwerk is.
• Als de aansluitingstest mislukt, selecteer dan (Retry) en druk op OK om opnieuw op het
netwerk te proberen aansluiten.
1. Internet Connection (internetaansluiting: Geeft de Internetaansluitingstoestand weer.
2. Information (informatie): Geeft informatie weer van huidig netwerk.
3. Connection Test (aansluitingstest): Test de Internetaansluitingstoestand.
4. IP Setting (IP-instelling): Stelt IP voor de speler in.
5. BD-Live-aansluiting: Aansluitingssituatie van BD-Live.
6. Proxy-instelling: Instelling Proxy Server.

17
DISPLAY-INSTELLINGEN
TV
1. TV Screen (TV-scherm): Selecteert de displaymodus voor de TV.
2. Resolution (resolutie): Selecteert de resolutie voor de TV.
3. TV System (TV-systeem): Selecteert het TV-systeemtype.
4. Color Space (kleurruimte): Selecteert de kleurruimte.
5. HDMI Deep Color: Selecteert de kleur voor HDMI.
6. HDMI 1080 24Hz: Deze instellingen activeren/deactiveren.
VIDEOVERWERKING
1. Video Adjust (video aanpassen): Ga naar submenu voor videoweergave-aanpassing.
2. Sharpness (scherpte): Selecteer de weergavescherptemodus.
Stel de helderheid, het contrast, de kleurtint, de verzadiging van het scherm in naar wens.
AUDIO-INSTELLING
1. HDMI: Selecteert de HDMI-modus.
2. Down samp: Selecteert down samp. (Selecteer dit als de op de speler aangesloten
versterker niet 96KHz-compatible is.)
3. DRC: Dynamic range compression (dynamisch-bereikcompressie)

18
Luidsprekerinstelling: Selecteert luidsprekerweergave
1. Configuratie: Selecteert het aantal kanalen 2x
2. Testtoon:
SYSTEEMINFORMATIE
Geeft de systeeminformatie weer (Informatie in de afbeelding hierboven is uitsluitend als
referentie bedoeld)
UPDATE SOFTWARE
Voor software-updates die de prestaties van uw speler kunnen verbeteren de huidige
softwareversie van uw speler controleren ten opzichte van de nieuwste software (indien
beschikbaar)
1. SETUP indrukken.
2. [General Setting] selecteren, de RECHTER knop indrukken.
3. [System]>[Upgrade] selecteren en dan op OK drukken.

19
Software updaten via ESB
1. De software downloaden op een ESB-flash drive.
2. De ESB flash drive in de ESB-bus op het achterpaneel insteken.
3. In het SETUP-menu [General Setting] >[System] > [Upgrade] > [ESB Storage]
selecteren.
4. Volg de instructies op het TV-scherm om de update te bevestigen.
5. Zodra de software update voltooid is, schakelt dit product automatisch over op standby-
modus.
6. Koppel het voedingssnoer enkele seconden los; sluit het terug aan en zet de speler aan.
DISKS REINIGEN
Veeg de disk schoon met een microvezelreinigingsdoek van het midden naar de rand toe
in een rechtlijnige beweging.
Nota
Om mogelijke schade aan dit product te voorkomen het toestel niet uitzetten en de ESB
flash drive niet wegnemen terwijl de software update aan de gang is.
OPGEPAST
Gebruik nooit oplosmiddelen zoals benzee, thinner, in de handel verkrijgbare
reinigingsproducten of antistatische sprays bedoeld voor disks om de speler te reinigen.

20
Specificaties
Afspeelbare diskformaten
BD, BD-R, BD-RE, DVD-R/RW, DVD+R/RW, DVD-Video, VCD, CD, CD-R/RW
Videoformaten
H.264/ MPEG1/MPEG-2/MPEG4/WMV
Audioformaten
Dolby Digital, Dolby Digital Plus, Dolby TrueHD, DTS-HD, MP3, WMA
Foto’s
JPEG, PNG, GIF,
Meegeleverde accessoires
• Afstandsbediening.
• Composite Audio/Videokabels.
• Voedingsadapter
• Autostroomadapter
• Oortelefoon.
• Gebruikerhandleiding.
• Garantiekaart
Video
• Signaalsysteem: PAL / NTSC
• Composite video-uitgang: 1 Vp-p (75 ohm)
• HDMI video-uitgang: Auto, 480i/576i, 480p/576p, 720p, 1080i, 1080p, 1080p@24Hz.
Audio
• 2-kanalen analoge weergave.
• Audio voor L&R: 2 Vrms (> 1 kohm)
• Digitale uitgang: 0.5-Vp-p (75 ohm)
• HDMI-uitgang
• Samplingfrequentie:
• MP3: 32 kHz, 44.1 kHz, 48 kHz
• Constante bitrate:
• MP3: 112 kbps - 320 kpbs
ESB
• Als extra ESB-geheugen voor software-updates of opslag van BD-Live bonusinhoud.
Hoofdeenheid
• Afmetingen (b x h x d): 259 x 41 x 206 (mm)
• Nettogewicht: 1,3 kg
• Golflengte:
-BD: 405 + 5nm/-5nm
-DVD:650 + 13NM/-10NM

21
-CD:790+15NM/-15NM
Problemen verhelpen
AANMANING: Vooraleer u technische hulp inroept kunt u best hier de mogelijke
oplossingen raadplegen. Risico van elektische schok. Verwijder nooit de behuizing van het
product. Om de waarborgdekking intact te houden mag u nooit proberen het product zelf te
herstellen.
Geen reactie op
bediening
afstandsbediening
• Zorg dat de speler is aangesloten op een
stopcontact.
• Zet de batterijen correct in
• Richt de afstandsbediening naar een IR-sensor
gesitueerd op het frontpaneel van het product.
• Als de afstandsbediening nog altijd niet werkt, zet
dan nieuwe batterijen in.
Geen beeld/geluid
• Zorg dat de aansluiting in goede staat is;
volume niet te laag staat; audio-ontvanger van TV
normaal werkt; audio-instelling in orde is.
Geen beeld op HDMI-aansluiting
• Als deze speler is aangesloten op een niet-
toegelaten displaytoestel met een HDMI-kabel, kan
het audio/videosignaal niet worden weergegeven.
• Controleer of de HDMI-kabel defect is.Als deze
defect of beschadigd is, vervang dan de HDMI-
kabel.
• Als dit gebeurt wanneer u de [resolution]-instelling
verandert, druk dan meermaals op Resolution van de
afstandsbediening tot het beeld verschijnt.
HD- videosignaal wordt
niet afgespeeld op TV
• Controleer of de audiokabels zijn aangesloten op
de audio-ingang van de TV.
• Wijs de audio-ingang van de TV toe aan de
overeenkomstige video-ingang. Raadpleeg de TV-
gebruikerhandleiding voor details.
Geen geluid op HDMI-aansluiting
• U kunt eventueel geen geluid horen van de
HDMI-uitgang als het aangesloten toestel niet
HDCP-compatibel is of alleen DIVI-compatibel.
Disk kan niet worden afgespeeld
• Controleer of de disk correct werd ingezet.
• Controleer of deze speler de disk ondersteunt. Zie
specificaties.
• Controleer of deze speler de regiocode
ondersteunt van de DVD of BD
• Voor DVD+RW nagaan of de disk gefinaliseerd
is.
• Reinig de disk.

22
Databestanden (JEPG,
MP3, ) kunnen niet
worden afgespeeld of
gelezen
• Controleer of het databestand werd opgenomen
in het standaard UDF-, ISO9660- of JOLIET-
formaat.
• Zorg dat de JPEG-bestandsextensie .jpg, JPG,
jpeg of JPEG is.
• Zorg dat de MP3-bestandsextensie .mp3 of MP3
is.
Er verschijn geen ingangs-
signaal op TV
• De gevraagde functie is niet mogelijk.
Onmogelijk toegang te
krijgen tot BD-Live-functie
• Controleer de netwerkinternetverbinding of ga na
of deze wel degelijk werd opgezet.
• Maak ESB-opslag leeg
• Zorg dat de BD-disk BD Live-functie ondersteunt.

DECLARATION DE CONFORMITE
Nous, TAKARA MULTIMEDIA (59 avenue Henry Dunant, 06105 Nice, France), déclarons
que le produit LECTEUR BLU-RAY BD10 de la marque TAKARA MULTIMEDIA est
conforme aux exigences essentielles applicables des directives suivantes:
EN 55013:2001+A1:2003+A2:2006,
EN 55020:2007+A11:2011,
EN 55022:2010,
EN 55024:2010,
EN 61000-3-2:2006+ A1:2009+A2:2009,
EN 61000-3-3:2008.
EN 60950-1/A12:2011
EN 60065/A12:2011
BS EN 60950-1/A12:2011
BS EN 60065/A12:2011
Toute modification non autorisée par TAKARA MULTIMEDIA du produit annule cette
déclaration de conformité ainsi que l’habilitation de l’utilisateur à utiliser cet appareil.
Hereby, TAKARA MULTIMEDIA declares that this BD10 is in compliance with
the essential requirements and other relevant provisions of Directive (EMC
directive 2004/108/EC / RoHs directive 2011/65/EU / LVD directive
2006/95/EC).
Hierbij verklaart TAKARA MULTIMEDIA dat het toestel BD10 in
overeenstemming is met de essentiële eisen en de andere relevante
bepalingen van richtlijn (EMC directive 2004/108/EC / RoHs directive
2011/65/EU / LVD directive 2006/95/EC).
Hiermit erklärt TAKARA MULTIMEDIA dass sich dieses BD10 in
übereinstimmung mit den grundlegenden anforder-ungen und den anderen
relevanten vorschriften der richtlinie (EMC directive 2004/108/EC / RoHs
directive 2011/65/EU / LVD directive 2006/95/EC) befindet.
Con la presente TAKARA MULTIMEDIA dichiara che questo BD10 è
conforme ai requisiti essenziali ed alle altre disposizioni pertinenti stabilite
dalla direttiva (EMC directive 2004/108/EC / RoHs directive 2011/65/EU / LVD
directive 2006/95/EC) .
Por medio de la presente TAKARA MULTIMEDIA declara que el BD10 cumple
con los requisites esenciales y cualesquiera otras disposiciones aplicables o
exigibles de la directiva (EMC directive 2004/108/EC / RoHs directive
2011/65/EU / LVD directive 2006/95/EC) .
GB
NL
DE
IT
ES

TAKARA MULTIMEDIA declara que este BD10 está conforme com os
requisites essenciais e outras provisões da directive (EMC directive
2004/108/EC / RoHs directive 2011/65/EU / LVD directive 2006/95/EC) .
Härmed intygar TAKARA MULTIMEDIA att denna BD10 står i
överensstämmelse med de väsentliga egenskapskrav och övriga relevanta
bestämmelser som framgår av direktiv (EMC directive 2004/108/EC / RoHs
directive 2011/65/EU / LVD directive 2006/95/EC) .
Undertegnede TAKARA MULTIMEDIA erklærer herved, at følgende udstyr
BD10 overholder de væsentlige krav og øvrige relevante krav i direktiv (EMC
directive 2004/108/EC / RoHs directive 2011/65/EU / LVD directive
2006/95/EC) .
PT
SE
DK
-
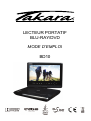 1
1
-
 2
2
-
 3
3
-
 4
4
-
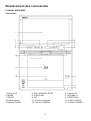 5
5
-
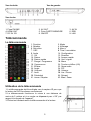 6
6
-
 7
7
-
 8
8
-
 9
9
-
 10
10
-
 11
11
-
 12
12
-
 13
13
-
 14
14
-
 15
15
-
 16
16
-
 17
17
-
 18
18
-
 19
19
-
 20
20
-
 21
21
-
 22
22
-
 23
23
-
 24
24
-
 25
25
-
 26
26
-
 27
27
-
 28
28
-
 29
29
-
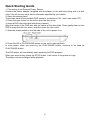 30
30
-
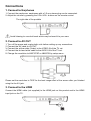 31
31
-
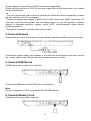 32
32
-
 33
33
-
 34
34
-
 35
35
-
 36
36
-
 37
37
-
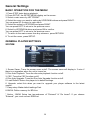 38
38
-
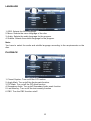 39
39
-
 40
40
-
 41
41
-
 42
42
-
 43
43
-
 44
44
-
 45
45
-
 46
46
-
 47
47
-
 48
48
-
 49
49
-
 50
50
-
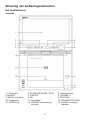 51
51
-
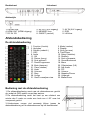 52
52
-
 53
53
-
 54
54
-
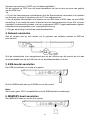 55
55
-
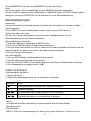 56
56
-
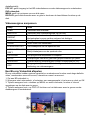 57
57
-
 58
58
-
 59
59
-
 60
60
-
 61
61
-
 62
62
-
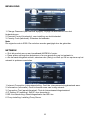 63
63
-
 64
64
-
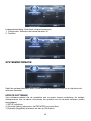 65
65
-
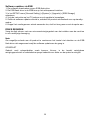 66
66
-
 67
67
-
 68
68
-
 69
69
-
 70
70
-
 71
71


in andere talen
- English: Takara BD10 Owner's manual
- italiano: Takara BD10 Manuale del proprietario
- français: Takara BD10 Le manuel du propriétaire
Gerelateerde papieren
Andere documenten
-
Lenco BRP-1150 11.5-Inch Portable Bluray and DVP Handleiding
-
Panasonic DMPUB700EF de handleiding
-
Sony UBPX500UBPX500B.EC1UBP-X500UBP-X500UBP X500 de handleiding
-
Yamaha BD-S681 S de handleiding
-
Samsung BDH5900 Handleiding
-
Samsung BD-C6900 Handleiding
-
-
Yamaha BD-S681 S de handleiding
-
Samsung BD-H5500 Handleiding
-