
Installation and Operation Manual
COFFEE MAKER
PERCOSTAR 6, 12, 15
MG4157252, MG4157254

2
01/2007
Nederlands ......................................................... 1
English ............................................................... 9
Deutsch .............................................................. 15
Français ............................................................. 21
De fabrikant behoudt zich het recht voor om onderdelen op elk gewenst moment te wijzigen, zonder voorafgaande of directe kennisgeving aan de
afnemer. De inhoud van deze handleiding kan eveneens gewijzigd worden zonder voorafgaande waarschuwing. Deze handleiding is geldig voor
de machine in standaarduitvoering. De fabrikant kan derhalve niet aansprakelijk worden gesteld voor eventuele schade voortvloeiende uit van de
standaard uitvoering afwijkende specificaties van de aan u geleverde machine. Voor informatie betreffende afstelling, onderhoudswerkzaamheden
of reparaties waarin deze handleiding niet voorziet, wordt u verzocht contact op te nemen met de technische dienst van uw leverancier. Deze
handleiding is met alle mogelijke zorg samengesteld, maar de fabrikant kan geen verantwoording op zich nemen voor eventuele fouten in dit boek of
de gevolgen daarvan.
The manufacturer has the right to change parts of the machine at any time without advice or direct announcements to the client. The contents of
this manual can also be changed without any announcements. This manual is to be used for the standard model/type of the machine. Thus The
manufacturer cannot be held responsible for any damage resulting from the application of this manual to the version delivered to you. For extra
information on adjustments maintenance and repair, contact the technical department of your supplier. This manual has been written very carefully.
However ,the manufacturer cannot be held responsible neither for mistakes in the book nor for their consequences.
Der Produzent behält sich das Recht vor, Einzelteile ohne vorherige Bekanntgabe an den Kunden zu ändern. Der Inhalt dieser Anleitung kann
ebenfalls ohne vorherige Bekanntgabe geändert werden. Diese Anleitung gilt für die Standardausführung der Maschine. Der Produzent haftet daher
nicht für Informationen über Einstellungen, Wartungsarbeiten oder Reparaturen, die nicht in dieser Anleitung enthalten sind. Wenden Sie sich bitte
gegebenenfalls an den Kundendienst Ihres Händlers. Diese Anleitung wurde mit größtmöglicher Sorgfalt zursammengestellt. Der Produzent haftet
jedoch nicht für etwaige Fehler in dieser Anleitung oder für die Folgen solcher Fehler.
Le fabricant se réserve le droit de modifier les pièces à n’importe quel instant, sans avis préalable et sans obligation de notification au client. Le
contenu de ce manuel est également sujet à modification sans avis préalable. Ce manuel s’applique au modèle standard de la machine. Par
conséquent, Le fabricant n’est past responsable pour les dommages éventuels découlant de l’application de ce manuel aux modèles non standard.
Pour les renseignements sur certains réglages, les travaux d’entretien ou réparations qui ne seraient pas traités dans ce manuel, le fabricant ne peut
ètre tenu responsable des erreurs éventuelles ni des dommages qui en dècouleraient.
NL
GB
D
F
Dit apparaat voldoet aan de volgende EEG-richtlijnen:
Cet appareil est conforme aux directives:
This appliance is in accordance with the following Directives:
Dieses Gerät wurde in Übereinstimmung gemäß den folgenden Richtlinien gebaut:
EMC 92/31/EEG &
93/68/EEG
LV
D 73/23/EEG
RoHs 2002/95/EEG
WEEE 2002/96/EEG
FOOD 1935/2004/EEG

01/2007
9
GB
TABLE OF CONTENTS
1. GENERAL DESCRIPTION ......................................................................................... 10
2. TECHNICAL DETAILS ............................................................................................... 10
3. INSTALLATION .......................................................................................................... 11
3.1 Placing the coffeemaker ................................................................................ 11
3.2 Connection to the electricity supply system . .................................................. 11
4. CONTROLS ......................................................................................................... 12
5. PREPARATION BEFORE USE ................................................................................. 12
6. OPERATION .......................................................................................................... 12
6.1 Making coffee (Brewing coffee) .................................................................... 12
6.2 Hot water for instant products ....................................................................... 12
7. MAINTENANCE ........................................................................................................ 13
7.1 Normal cleaning after use ............................................................................. 13
7.2 Special cleaning every two weeks ................................................................ 13
7.3 Descaling ...................................................................................................... 13
8. TEMPERATURE PROTECTION ............................................................................... 14
9. TRANSPORT .......................................................................................................... 14

10
01/2007
This manual has been written for users of the Percostar coffeemaker.
Please, read this manual carefully for good and safe use of this appliance.
1. GENERAL DESCRIPTION
The Percostar 6.5 L, 12 L and 15 L are semi-automatic coffeemakers, manual filled with the required
quantity of cold water. The coffeemaker is made of stainless steel and beautifully designed and
finished. Both coffeemakers function according to the percolator principle and therefore are able to
produce great quantities of high quality coffee, in comparising to other low priced coffeemakers. The
coffeemakers are supplied with a beautifully designed tap with sight glass.
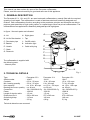
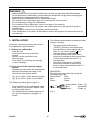
In figure 1 the main parts are indicated:
A - Lid H - Sight glass
B - Lid for filter basket I - Tap
C - Percolator pipe J - On/Off switch
D - Basket K - Indication light
E - Handle L - Cable with plug
F - Grate
G - Reservoir
The coffeemaker is supplied with
the following parts:
- Manual perco
2. TECHNICAL DETAILS
Type : Percostar 6.5 L Percostar 12 L Percostar 15 L
Articlenumber : 10407 10412 10417
Contents : 6,5 ltr., 50 cups 12 ltr., 96 cups 15 ltr., 120 cups
Min. brewing quantity : 3,2 ltr., 25 cups 6 ltr., 48 cups 7,5 ltr., 60 cups
Hour capacity : ca. 10 ltr., 80 cups ca. 15 ltr., 120 cups ca. 15 ltr., 120 cups
Brewing time max. quantity : ca. 40 min. ca. 50 min. ca. 65 min.
Connection : 1N~ 230V/50-60 Cy 1N~ 230V/50-60 Cy 1N~ 230V/50-60 Cy
Power : 1500 W 1500 W 1500 W
Length of electric cable : 1,5 mtr. 1,5 mtr. 1,5 mtr.
Dimension Ø x H : 230 x 480 mm 275 x 540 mm 275 x 600 mm
Outlet height tap : 115 mm 140 mm 140 mm
Weight : 3,5 kg 4,9 kg 5,2 kg
Technical alterations are reserved
A
B
C
D
F
G
I
H
K
J
E
L
Fig. 1

01/2007
11
3. INSTALLATION
Follow the instructions to place and connect
the coffeemaker, specified below.
3.1 Placing the coffeemaker
Place the unit:
• at counter level and on a solid flat
surface.
• where it can be connected to the
electricity grid.
• Such that it is not causing any damage
in case of leakage.
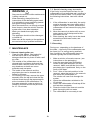
3.2 Connection to the electricity supply
system
Depending on the model, the coffeemaker
should be connected according to the
instructions in the figures below.
• (fig. 2) For 230V 1 phase with plug socket.
• (fig. 2) For 230V 1 phase (3-core cable).
The following remarks apply to figure 2:
• If the plug fitted on the coffeemaker cable
does not fit in your socket, replace it with
a new plug that does fit.
• The replaced plug should be disposed of
as it can be dangerous if plugged in a
socket.
The following points should be observed when
wiring a new plug:
• The green/yellow-coloured wire
(“EARTH”) should be connected to the
terminal which is either marked with the
letter “E”, the “earth” symbol ( ), or
coloured green or green/yellow.
• The blue-coloured wire (“NEUTRAL”)
should be connected to the terminal which
is either marked with the letter “N” or
coloured black.
• The brown-coloured wire (“PHASE”)
should be connected to the terminal
which is either marked with the letter “L”
or coloured brown.
IMPORTANT !
The three core main cable (fig. 2) has the
following wiring code:
Green/Yellow - Earth
Blue - Neutral
Brown - Phase
WARNING
* Always observe local rules while installing the unit and use approved materials and parts.
* Do not position the coffeemaker in areas where the temperature drops below freezing point
because there is always water left in the system.
* Always plug the coffeemaker into an earthed wall socket.
* The outside of the coffeemaker gets very hot during use. Do not touch!
* Do not submerge or spray the coffeemaker.
* Do not switch on the coffeemaker if there is no water in the reservoir
* Always remove the plug from the socket if the coffeemaker has to be opened for repair or
maintenance.
* Have all repairs carried out by a specially trained technician.
* If the coffeemaker is not used it is advisable to remove the plug from the socket and turn off
the water tap.
!
Green/Yellow - Earth (E)
Blue - Neutral (N)
Brown - Phase (L)
Fig. 2

12
01/2007
4. CONTROLS
On/Off switch (fig. 1J)
Indication light (fig. 1K)
5. PREPARATIONS BEFORE
USE
The following procedure should be carried out
before a new coffeemaker is used.
1. Clean before use the basket, lid for filter
basket, percolator pipe and the inside of
the reservoir with a non-abrasive
detergent.
2. Place the percolator pipe through the
center of the grate and place it in the
reservoir.
3. After you have followed the instructions
above, place the plug in the socket with
earth, but be sure that the coffeemaker is
switched off.
4. The machine is now ready for use.
6. OPERATION
Basic rules for making coffee
• Use preferably regular grinded coffee.
(approx. 40 gram/Litre or 6 gram/cup)
•
Never make lesser coffee then half of the
total capacity (in case of the perco 6,5 this
means 3,2 Litres).
•
Keep the filter and the reservoir clean.
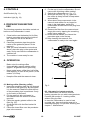
6.1 Making coffee (Brewing coffee)
1. Insert the percolator pipe (fig. 3A) through
the center of the grate (fig. 3B) and place
it in the reservoir. Make sure that the foot
of the percolator pipe is positioned firmly
on the cavity of the base.
2. Fill the reservoir with cold water in
accordance with the amount of coffee
required.
3. Place the regular grinded coffee in the
filter (fig. 3C).
4. Close the filter with the filter basket lid
(fig. 3D).
5. Place the closed filter over the percolator
pipe in the reservoir.
6. Put the top lid on the coffeemaker. Do not
remove the lid during coffee making!
7. Switch the coffeemaker on ( fig. 1J ).
8. When the red pilot ( fig. 1K ) goes on ,
the coffee is ready and will be kept warm
automatically.
9. When about three cups remain in the
reservoir and coffee can no longer be
seen in the sight glass, switch the
coffeemaker off and remove the plug from
the socket.
10. Remove the filter from the reservoir and
empty this one by tapping the remaining
coffee into a waste bin.
11. Rinse the filter basket, the lid and the
percolator pipe under the tap.
12. After cleaning the reservoir, the
coffeemaker is ready to be used again.
6.2 Hot water for instant products
This coffeemaker can also be used for
heating up water for use with instant products.
Proceed with section 6.1 making coffee,
without filling the filter.
In case the coffeemaker is used to heat
up water only, be sure that the reservoir is
cleaned thoroughly. For periodic cleaning see
chapter 7. Maintenance.
Fig. 3
A
B
C
D

01/2007
13
7.2 Special cleaning every two weeks
If the cavity is not be kept free from fur, the
coffeemaker will not percolate well, resulting in
weak and luke warm coffee. For a proper use
the following instructions has to be carried
out.
1. If the coffeemaker is used daily, the cavity
must be cleaned every two weeks with a
coffee fur remover. For this, switched the
coffeemaker off and remove the plug from
the socket.
2. Allow the reservoir to drain untill no more
water comes out of the tap and let the
percolator cool off.
3. After cleaning, the cavity has to be rinsed
several times with warm water, and
drained off.
7.3 Descaling
During use - depending on the hardness of
the water -, the cavity of the coffeemaker can
be furred up. For energy saving and fault
free functioning, the coffeemaker has to be
cleaned regulary with a scale remover.
1. Make a solution of a scale remover ( see
instructions on the packaging ).
2. Insert the percolator pipe through the
center of the grate and place it in the
reservoir. Make sure that the foot of the
percolator pipe is positioned firmly on the
cavity of the base.
3. Pour 1 Litre of the scale solution in the
reservoir, place the top lid on the reservoir
and switch the coffeemaker on.
The solution will now flush throught the
system.
4. Leave the coffeemaker switched on for
15 minutes.
5. Switch the coffeemaker off and tap off the
acid solution completely.
6. Rinse the inside of the reservoir and the
parts thoroughly with hot water.
7. The coffeemaker is now ready to use.
7. MAINTENANCE
7.1 Normal cleaning after use
• Clean the filter basket, filter basket lid
and the top lid with a non-abrasive
detergent and then dry them off with a soft
dry cloth.
• The outside of the coffeemaker can be
cleaned with a soft damp cloth and then
dried off with a soft dry cloth. Do not use
any abrasives as these can cause
scratches and mat spots.
• The inside of the reservoir and the
percolator pipe can be cleaned with a
coffee fur remover.
• For cleaning of the tap, remove the upper
assembly from the tap and clean the tap
with the brush through the tapconnection
at the innerside of the coffeemaker. For
the upper assembly, make a solution of
coffee fur remover and let the part soak
for 15 - 30 minutes.
WARNING
- Stay near the machine while maintenance
is being carried out.
- When descaling, always follow the
instructions of the descaling agent used.
- It is advisable to wear protecting glasses
and gloves during descaling.
- Allow the machine to run through at least
three times to rinse the solution from the
system after it has been descaled.
- Wash your hands thoroughly after
descaling
- The appliance should not be submerged
or hosed off.
- Make sure all the repairs to the appliance
are carried out by a qualified technician.
!

14
01/2007
9. TRANSPORT
Proceed as follows to transport the coffee-
maker:
1. Switch the coffeemaker off and remove
the plug from the wall socket.
2. Remove the lid from the reservoir.
3. Turn the coffeemaker upside down to let
the remaining water out over the sink.
4. Replace the lid
5. The coffeemaker is now ready for
transportation.
6. Proceed with section 3 “ INSTALLATION “
to reinstall the unit.
8. TEMPERATURE PROTECTION
This coffeemaker is executed with a
temperature protection. This protection
switches the coffeemaker off when
temperature rise too high, the indication light
in the switch will switch off. The most common
cause for switching off is when the percolator
is switched on without water inside or scale
that has not been removed in time.
If the protection operates proceed as follows:
1. Remove the plug from the socket.
2. Drain the reservoir completely and let the
coffeemaker cool down.
When the protection was triggered due to
scale formation, then proceed according to
section 7.3. When the cause was not in scale
formation, then contact your dealer.
WARNING
- Also clean the percolator pipe regularly
in order to prevent the dry boil protection
from becoming operative (see chapter 7
“MAINTENANCE”).
!
-
 1
1
-
 2
2
-
 3
3
-
 4
4
-
 5
5
-
 6
6
-
 7
7
-
 8
8


in andere talen
- English: Metos Percostar 15 Owner's manual
- Deutsch: Metos Percostar 15 Bedienungsanleitung