Electrolux ECM1303W Handleiding
- Categorie
- Vaatwassers
- Type
- Handleiding

SSF6106W
SSF6106X
User Manual
EN
Dishwasher

Contents
Safety information 2
Safety instructions 3
Control panel 4
Programs 5
Before first use 5
Daily use 6
Hints and tips
9
Care and cleaning 10
Troubleshooting 11
Technical information 12
Warranty 12
Subject to change without notice.
Safety information
Before the installation and use of the appliance, carefully read the supplied
instructions. The manufacturer is not responsible if an incorrect installation
and use causes injuries and damages. Always keep the instructions with the
appliance for future reference.
Children and vulnerable people safety
• This appliance can be used by children aged from 8 years and above and
persons with reduced physical, sensory or mental capabilities or lack of
experience and knowledge if they have been given supervision or
instruction concerning use of the appliance in a safe way and understand
the hazards involved.
• Do not let children play with the appliance.
• Keep all detergents away from children.
• Keep children and pets away from the appliance door when it is open.
• Cleaning and user maintenance shall not be made by children without
supervision.
General Safety
• This appliance is intended to be used in household and similar
applications such as:
– farm houses; staff kitchen areas in shops, offices and other working
environments;
– by clients in hotels, motels, bed & breakfast and other residential type
environments.
• Do not change the specification of this appliance.
• The operating water pressure (minimum and maximum) must be between
0.5 (0.05) / 8 (0.8) bar (kPa)
• Obey the maximum number of 13 place settings.
2

• If the supply cord is damaged, it must be replaced by the manufacturer, its
Authorised Service Centre or a similarly qualified persons in order to avoid
a hazard.
• Put knives and cutlery with sharp points in the cutlery basket with the
points down or in a horizontal position.
• Do not keep the appliance door open without supervision to prevent to fall
on it.
• Before maintenance, deactivate the appliance and disconnect the mains
plug from the mains socket.
• Do not use water spray and steam to clean the appliance.
• The appliance is to be connected to the water mains using the new
supplied hose-sets. Old hose sets must not be reused.
• The ventilation openings in the base (if applicable) must not be obstructed
by a carpet.
• Some dishwasher detergents are strongly alkaline. They can be extremely
dangerous if swallowed. Avoid contact with the skin and eyes and keep
children away from the dishwasher when the door is open.
• Check that the detergent receptacle is empty after completion of the wash
cycle.
Safety instructions
Installation
• Remove all the packaging.
• Do not install or use a damaged appliance.
• Do not install or use the appliance where the
temperature is less than 0 °C.
• Obey the installation instruction supplied with the
appliance.
Electrical connection
Warning! Risk of fire and electrical
shock.
• The appliance must be earthed.
• Make sure that the electrical information on the
rating plate agrees with the power supply. If not,
contact an electrician.
• Always use a correctly installed shockproof socket.
• Do not use multi-plug adapters and extension
cables.
• Make sure not to cause damage to the mains plug
and to the mains cable. Should the mains cable
need to be replaced, this must be carried out by our
Authorised Service Centre.
• Connect the mains plug to the mains socket only at
the end of the installation. Make sure that there is
access to the mains plug after the installation.
• Do not pull the mains cable to disconnect the
appliance. Always pull the mains plug.
Water connection
• Make sure not to cause damage to the water hoses.
• Before you connect the appliance to new pipes or
pipes not used for a long time, let the water flow
until it is clean.
• The first time you use the appliance, make sure that
there is no leakage.
• If the water inlet hose is damaged, immediately
disconnect the mains plug from the mains socket.
Contact the Authorised Service Centre to replace
the water inlet hose.
Use
• Do not sit or stand on the open door.
• Dishwasher detergents are dangerous. Obey the
safety instructions on the detergent packaging.
3

• Do not drink and play with the water in the
appliance.
• Do not remove the dishes from the appliance until
the programme is completed. There can be
detergent on the dishes.
• The appliance can release hot steam if you open the
door while a programme operates.
• Do not put flammable products or items that are wet
with flammable products in, near or on the
appliance.
Service
• Contact the Authorised Service Centre to repair the
appliance. We recommend only the use of original
spare parts.
• When you contact the Authorised Service Centre,
ensure that you have the following information that
is available on the rating plate.
Model :
PNC :
Serial Number :
Disposal
Warning! Risk of injury or suffocation.
• Disconnect the appliance from the mains supply.
• Cut off the mains cable and discard it.
• Remove the door catch to prevent children and pets
to get closed in the appliance.
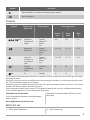
Control panel
1 2 3
456
1
On/off indicator
2
Program marker
3
Indicators
4
Start button
5
Half load button
6
Program knob
Indicators
Indicator Description
Washing phase. It comes on when the washing phase operates.
End indicator.
4

Indicator Description
Rinse aid indicator. It is always off while the program operates.
Half Load indicator.
Programs
Program Degree of soil
Type of load
Program phases Consumption values
1)
Duration
(min)
Energy
(kWh)
Water
(l)
2)
Normal soil
Crockery and
cutlery
• Prewash
• Wash 50 °C
• Rinses
• Dry
129 0.75 11.6
Medium soil
Mixed load
• Prewash
• Wash 65 °C
• Rinses
• Dry
100 - 120 1.2 - 1.4 15 - 16
Heavy soil
Crockery, cut-
lery, pots and
pans
• Prewash
• Wash 70 °C
• Rinses
• Dry
130 - 150 1.3 - 1.5 13 - 15
3)
Fresh soil
Crockery and
cutlery
• Wash 60 °C
• Rinse
30 0.9 9
4)
All
• Prewash
14 0.1 4
1) The pressure and the temperature of the water, the variations of the mains supply, the options and the quantity of dishes
can change the values.
2) With this program you have the most efficient use of water and energy consumption for crockery and cutlery with normal
soil. (This is the standard program for test institutes).
3) With this program you can wash a partial load with fresh soil. It gives good washing results in a short time. It is not recom-
mended to use detergent tablets in the Quick 30 program.
4) Use this program to quickly rinse the dishes. This prevents the remaining food to bond on the dishes and bad odours to
come out from the appliance. Do not use detergent with this program.
Information for test institutes
For all the necessary information for test performance,
send an email to:
Write down the product number (PNC) that is on the
rating plate.
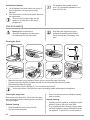
Before first use
1. Fill the rinse aid dispenser. 2. Open the water tap.
5

3. Start a program to remove any processing
residuals that can still be inside the appliance. Do
not use detergent and do not load the baskets.
Adding rinse aid
2
1
4
3
2
1
The rinse aid helps to dry the dishes without streaks and stains. It is automatically released during the hot rinse
phase.
Daily use
1. Open the water tap.
2. Set the correct program for the type of load and the
degree of soil.
Make sure that the appliance is in Program selection
mode.
• If the rinse aid indicator is on, fill the rinse aid
dispenser.
3. Load the baskets.
4. Add the detergent.
5. Start the program.
Adding detergent
2
1
2
0
3
0
A
B
If the program has a prewash phase, put a small quantity of detergent also in compartment B.
Adding multi-tablets
2
0
3
0
A
B
2
0
3
0
• Set the rinse aid dispenser to the lowest position.
6

Program selection mode
The appliance must be in Program selection mode to start a program. If the control panel does not show this
condition, use the Reset function.
Reset
With Reset you can cancel the running program . The appliance goes back to the Program selection mode.
Starting a program
Open the water tap, close the door, select a program, press .
7

Option Half load
1. Set the program.
2. Press the related indicator comes on.
3. Press to start the program.
This option is available with
, and .
With this option you can wash a small load of tableware and cookware. The option decreases the program duration
and the consumption of water and energy. Load both baskets and use less quantity of detergent.
Opening the door while the appliance operates
If you open the door while a program is running, the appliance stops. When you close the door, the appliance
continues from the point of interruption.
At the end of the program
5 min
8

The indicator comes on. If you do not deactivate the appliance within 5 minutes all indicators goes off. This
helps to decrease energy consumption.
Turn the knob to . Close the tap.
For the better drying results keep the appliance door ajar for some minutes before you remove the
dishes. Let the dishes cool down before you remove them form the appliance. Hot dishes are easily
damaged.
Hints and tips
General
The following hints will ensure optimal cleaning and
drying results in daily use and also help to protect the
environment.
• Remove larger residues of food from the dishes into
the waste bin.
• Do not pre-rinse dishes by hand. When needed, use
the prewash program (if available) or select a
program with a prewash phase.
• Always use the whole space of the baskets.
• When loading the appliance, make sure that the
dishes can be completely reached and washed by
the water released from the spray arm nozzles.
Make sure that items do not touch or cover each
other.
• You can use dishwasher detergent and rinse aid
separately or you can use the multi-tablets (e.g.
''3in1'', ''4in1'', ''All in 1''). Follow the instructions
written on the packaging.
• Select the program according to the type of load and
degree of soil. With the ECO program you have the
most efficient use of water and energy consumption
for crockery and cutlery with normal soil.
Using rinse aid and detergent
• Only use rinse aid and detergent for dishwasher.
Other products can cause damage to the appliance.
• Detergent tablets do not fully dissolve with short
programs. To prevent detergent residues on the
tableware, we recommend that you use the tablets
with long programs.
• Do not use more than the correct quantity of
detergent. Refer to the instructions on the detergent
packaging.
What to do if you want to stop using multi-tablets
Before you start to use separately detergent and rinse
aid do the following procedure.
1. Make sure that the rinse aid container is full.
2. Start the shortest program with a rinsing phase. Do
not add detergent and do not load the baskets.
3. Adjust the released quantity of rinse aid.
Loading the baskets
• Only use the appliance to wash items that are
dishwasher-safe.
• Do not put in the appliance items made of wood,
horn, aluminium, pewter and copper.
• Do not put in the appliance items that can absorb
water (sponges, household cloths).
• Remove remaining food from the items.
• Make soft the remaining burned food on the items.
• Put hollow items (cups, glasses and pans) with the
opening down.
• Make sure that cutlery and dishes do not bond
together. Mix spoons with other cutlery.
• Make sure that glasses do not touch other glasses.
• Put small items in the cutlery basket.
• Put light items in the upper basket. Make sure that
the items do not move.
• Make sure that the spray arm can move freely
before you start a program.
Before starting a programme
Make sure that:
• The filters are clean and correctly installed.
• The spray arms are not clogged.
• There is dishwasher rinse aid (unless you use multi-
tablets).
• The position of the items in the baskets is correct.
• The programme is applicable for the type of load
and for the degree of soil.
• The correct quantity of detergent is used.
9

Unloading the baskets
1. Let the tableware cool down before you remove it
from the appliance. Hot items can be easily
damaged.
2. First remove items from the lower basket, then from
the upper basket.
At the end of the program water can still
remain on the sides and on the door of
the appliance.
For the better drying results open the
door 5-10 cm and allow tableware to cool
down for 30-40 min.
Care and cleaning
Warning! Before maintenance,
deactivate the appliance and disconnect
the mains plug from the main socket.
Dirty filters and clogged spray arms
decrease the washing results. Make a
check regularly and, if necessary, clean
them.
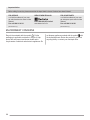
Cleaning the filters
B
A
C
• Make sure that there are no residues of food or soil in or around the edge of the sump.
• Put back in place the flat filter (C). Make sure that it is correctly positioned under the 2 guides.
• Reassemble the filters (A) and (B).
• Put back the filter (A) in the flat filter (C). Turn it clockwise until it locks.
An incorrect position of the filters can cause bad washing results and damage to the appliance
Cleaning the spray arms
Do not remove the spray arms. If the holes in the spray
arms are clogged, remove remaining parts of soil with a
thin pointed object.
External cleaning
• Clean the appliance with a moist soft cloth.
• Only use neutral detergents.
• Do not use abrasive products, abrasive cleaning
pads or solvents.
Internal cleaning
• Carefully clean the appliance, including the rubber
gasket of the door, with a soft moist cloth.
• If you regularly use short duration program, these
can leave deposits of grease and limescale inside
the appliance. To prevent this, we recommend to
10

run long duration program at least 2 times per
month.
Troubleshooting
If the appliance does not start or it stops during
operation, before you contact the Service, check if you
can solve the problem by yourself with the help of the
information in the table.
With some problems different indicators flash
intermittently and/or continuously to show an alarm
code.
Problem and alarm code Possible solution
You cannot activate the appliance.
• Make sure that the mains plug is connected to the mains socket.
• Make sure that there is no a damage fuse in the fuse box.
The program does not start.
• Make sure that the appliance door is closed.
• Press Start.
• The appliance has started the procedure to recharge the resin in-
side the water softener. The duration of the procedure is approxi-
mately 5 minutes.
The appliance does not fill with water.
• The indicator flashes 1 time in-
termittently.
• The indicator flashes continuously.
• Make sure that the water tap is open.
• Make sure that the pressure of the water supply is not too low. For
this information, contact your local water authority.
• Make sure that the water tap is not clogged.
• Make sure that the filter in the inlet hose is not clogged.
• Make sure that the inlet hose has no kinks or bends.
The appliance does not drain the water.
• The indicator flashes 2 times in-
termittently.
• The indicator flashes continuously.
• Make sure that the sink spigot is not clogged.
• Make sure that the drain hose has no kinks or bends.
The anti-flood device is on.
• The indicator flashes 3 times in-
termittently.
• The indicator flashes continuously.
• Close the water tap and contact the Service.
Once you have checked the appliance, press . If the
problem occurs again, contact the Service.
For alarm codes not described in the table, contact the
Service.
The washing and drying results are not satisfactory
Problem Possible solution
There are whitish streaks or bluish lay-
ers on glasses and dishes.
• The release quantity of rinse aid is too much. Adjust the rinse aid selec-
tor to a lower position.
• The quantity of detergent is too much.
There are stains and dry water drops
on glasses and dishes.
• The released quantity of rinse aid is not sufficient. Adjust the rinse aid
selector to a higher position.
• The quality of the rinse aid can be the cause.
11

Problem Possible solution
The dishes are wet.
• The program does not have a drying phase or has a drying phase with
low temperature.
• The rinse aid dispenser is empty.
• The quality of the rinse aid can be the cause.
• Keep the dishwasher door ajar for some time before removing table-
ware.
Refer to "Hints and tips" for other
possible causes.
Technical information
Dimensions Width / height / depth (mm) 600 / 850 / 625
Electrical connection
1)
Voltage (V) 220 - 240
Frequency (Hz) 50
Water supply pressure Min. / max. bar (MPa) 0.5 (0.05) / 8 (0.8)
Water supply
Cold water or hot water
2)
max 60 °C
Capacity Place settings 13
Power consumption Left-on mode (W) 5.0
Power consumption Off-mode (W) 0.50
1) Refer to the rating plate for other values.
2) If the hot water comes from alternative source of energy, (e.g. solar panels, aeolian energy), use the hot water supply to
decrease energy consumption.
Rating Plate
Mod. ... ... ...
Prod. No. ... ... ...
Ser. No. ...
Information for test institutes
For all the necessary information for test performance,
send an email to:
Write down the product number (PNC) that is on the
rating plate.
Warranty
FOR SALES IN NEW ZEALAND
APPLIANCE: SIMPSON DISHWASHER
This document sets out the terms and conditions of
the product warranties for Electrolux Appliances. It
is an important document. Please keep it with your
proof of purchase documents in a safe place for
future reference should you require service for your
Appliance.
1. In this warranty:
a) ‘Electrolux’ means Electrolux (NZ) Limited of
3-5 Niall Burgess Road, Mount Wellington, in
12

respect of Appliances purchased in New
Zealand;
b) ‘Appliance’ means any Electrolux product
purchased by you accompanied by this
document;
c) ‘Warranty Period’ means the Appliance is
warranted against manufacturing defects in
New Zealand for 24 months, following the date
of original purchase of the Appliance;
d) ‘you’ means the purchaser of the Appliance
not having purchased the Appliance for re-
sale, and ‘your’ has a corresponding meaning.
e) ASC means Electrolux authorised service
centres.
2. This warranty only applies to Appliances purchased
and used in New Zealand and used in normal
domestic applications and is in addition to (and
does not exclude, restrict, or modify in any way)
any non-excludable statutory warranties in New
Zealand.
3. During the Warranty Period Electrolux or its ASC
will, at no extra charge if your Appliance is readily
accessible for service, without special equipment
and subject to these terms and conditions, repair or
replace any parts which it considers to be
defective. Electrolux or its ASC may use
remanufactured parts to repair your Appliance. You
agree that any replaced Appliances or parts
become the property of Electrolux. This warranty
does not apply to light globes, batteries, filters or
similar perishable parts.
4. Parts and Appliances not supplied by Electrolux are
not covered by this warranty.
5. To the extent permitted by law, you will bear the
cost of transportation, travel and delivery of the
Appliance to and from Electrolux or its ASC. If you
reside outside of the service area, you will bear the
cost of:
a) travel of an authorised representative;
b) transportation and delivery of the Appliance to
and from Electrolux or its ASC,
In all instances, unless the Appliance is transported
by Electrolux or an Electrolux authorised
representative, the Appliance is transported at the
owner’s cost and risk while in transit to and from
Electrolux or its ASC.
6. Proof of purchase is required before you can make
a claim under this warranty.
7. You may not make a claim under this warranty
unless the defect claimed is due to faulty or
defective parts or workmanship. Electrolux is not
liable in the following situations (which are not
exhaustive):
a) the Appliance is damaged by:
– accident
– misuse or abuse, including failure to
properly maintain or service
– normal wear and tear
– power surges, electrical storm damage or
incorrect power supply
– incomplete or improper installation
– incorrect, improper or inappropriate
operation
– insect or vermin infestation
– failure to comply with any additional
instructions supplied with the Appliance;
b) the Appliance is modified without authority
from Electrolux in writing;
c) the Appliance’s serial number or warranty seal
has been removed or defaced;
d) the Appliance was serviced or repaired by
anyone other than Electrolux, an authorised
repairer or ASC.
8. This warranty, the contract to which it relates and
the relationship between you and Electrolux are
governed by the law applicable where the
Appliance was purchased. Where the Appliance
was purchased in New Zealand for commercial
purposes the Consumer Guarantee Act does not
apply.
9. To the extent permitted by law, and subject to your
non-excludable statutory rights and warranties,
Electrolux excludes all warranties and liabilities
(other than as contained in this document)
including liability for any loss or damage whether
direct or indirect arising from your purchase, use or
non use of the Appliance.
10. At all times during the Warranty Period, Electrolux
shall, at its discretion, determine whether repair,
replacement or refund will apply if an Appliance has
a valid warranty claim applicable to it.
11. For Appliances and services provided by Electrolux
in New Zealand, the Appliances come with a
guarantee by Electrolux pursuant to the provisions
of the Consumer Guarantees Act, the Sale of
Goods Act and the Fair Trading Act.
12. To enquire about claiming under this warranty,
please follow these steps:
a) carefully check the operating instructions, user
manual and the terms of this warranty;
b) have the model and serial number of the
Appliance available;
c) have the proof of purchase (e.g. an invoice)
available;
d) telephone the numbers shown below.
13. You accept that if you make a warranty claim,
Electrolux and its ASC may exchange information
in relation to you to enable Electrolux to meet its
obligations under this warranty.
13

Important Notice
Before calling for service, please ensure that the steps listed in clause 12 above have been followed.
FOR SERVICE
or to find the address of your near-
est authorised service centre in New
Zealand
Free call 0800 10 66 10
(New Zealand only)
SERVICE NEW ZEALAND
ELECTROLUX (NZ) Limited
www.electrolux.co.nz
FOR SPARE PARTS
or to find the address of your near-
est state spare parts centre in New
Zealand
Free call 0800 10 66 20
(New Zealand only)
ENVIRONMENT CONCERNS
Recycle the materials with the symbol . Put the
packaging in applicable containers to recycle it. Help
protect the environment and human health and to
recycle waste of electrical and electronic appliances. Do
not dispose appliances marked with the symbol with
the household waste. Return the product to your local
recycling facility or contact your municipal office.
14
*

15

www.simpson.co.nz
100012831-A-352015
-
 1
1
-
 2
2
-
 3
3
-
 4
4
-
 5
5
-
 6
6
-
 7
7
-
 8
8
-
 9
9
-
 10
10
-
 11
11
-
 12
12
-
 13
13
-
 14
14
-
 15
15
-
 16
16


Electrolux ECM1303W Handleiding
- Categorie
- Vaatwassers
- Type
- Handleiding
in andere talen
- English: Electrolux ECM1303W User manual