
MANUELD’INSTRUCTIONFR
INSTRUCTIONMANUALEN
MANUALDEINSTRUCCIONESES
GEBRUIKSHANDLEIDINGNL
ﻝﻳﻐﺷﺗﻟﺍﻭ ﺕﺍﺩﺎﺷﺭﻹﺍ ﻝﻳﻟﺩ ﺔﻳﺑﺭﻌﻟﺍ ﺔﻐﻠﻟﺍ
Four à micro-ondes
Microwave oven
Horno microondas
Microgolfoven
ﻒﻳﻭﻭﺮﻜﻴﻣ ﻥﺮﻓ
GE2626E*

2
Chère Cliente, Cher Client,
Vous venez d’acquérir un produit BRANDT et nous vous remercions de la confiance que
vous nous accordez.
Nous avons conçu et fabriqué ce produit en pensant à vous, à votre mode de vie, à vos
besoins, pour qu’il réponde au mieux à vos attentes. Nous y avons mis notre savoir-faire,
notre esprit d’innovation et toute la passion qui nous anime depuis plus de 60 ans.
Dans un souci permanent de toujours mieux satisfaire vos exigences, notre service
consommateurs est à votre disposition et à votre écoute pour répondre à toutes vos
questions ou suggestions.
Connectez-vous aussi sur notre site www.brandt.com où vous trouverez nos dernières
innovations, ainsi que des informations utiles et complémentaires.
BRANDT est heureux de vous accompagner au quotidien et vous souhaite de profiter
pleinement de votre achat.
Important : Avant de mettre votre appareil en marche, veuillez lire
attentivement ce guide d’installation et d’utilisation afin de vous familiariser
plus rapidement avec son fonctionnement

3
SOMMAIRE
1) À L’ATTENTION DE L’UTILISATEUR ................................................................................ 4
a) Consignes de sécurité ................................................................................................ 4
b) Données techniques ................................................................................................... 9
c) Principe de fonctionnement ........................................................................................ 9
d) Protection de l’environnement ................................................................................... 10
2) INSTALLATION DE VOTRE APPAREIL ........................................................................... 10
a) Avant le branchement .............................................................................................. 10
b) Le raccordement électrique ....................................................................................... 11
c) Ustensiles ............................................................................................................... 12
d) Description de votre appareil .................................................................................... 14
e) Présentation du bandeau de commande .................................................................... 15
f) Installation du plateau tournant ................................................................................ 15
g) Installation sur un plan de travail .............................................................................. 16
h) Installation .............................................................................................................. 16
3) UTILISATION DE VOTRE APPAREIL .............................................................................. 18
a) Instructions de fonctionnement ................................................................................. 18
b) Tableau des menus pour les programmes automatiques ............................................. 23
4) ENTRETIEN ET NETTOYAGE DE VOTRE APPAREIL ......................................................... 25
5) EN CAS D’ANOMALIES DE FONCTIONNEMENT .............................................................. 26
6) RECOMMANDATIONS POUR MESURE DE LA PERFORMANCE .......................................... 27
7) RELATIONS CONSOMMATEURS ET INTERVENTIONS ..................................................... 28
a) Relations consommateurs ......................................................................................... 28
b) Interventions ........................................................................................................... 28

4
1) À L’ATTENTION DE L’UTILISATEUR
Conservez ce mode d’emploi avec votre appareil. En cas
de vente ou de cession de cet appareil à une autre
personne, assurez-vous de transmettre ce mode
d’emploi au nouveau
propriétaire. Merci de prendre
connaissance de ces conseils avant d’installer et d’utiliser
votre appareil. Ils ont été rédigés pour votre sécurité et
celle d’autrui.
a) Consignes de sécurité
Information générale :
Votre appareil est exclusivement destiné à un usage
domestique pour la cuisson, le réchauffage ou la
décongélation d’aliments et de boissons. Il ne peut être
utilisé qu’en milieu couvert, fermé et chauffé tel qu’une
cuisine ou toute autre pièce répondant aux mêmes
spécifications.
Les enfants doivent être surveillés afin de s’assurer qu’ils ne
jouent pas avec l’appareil.
Les enfants doivent être surveillés afin de s’assurer qu’ils ne
jouent pas avec l’appareil.
Les enfants de moins de 8 ans doivent être éloignés s'ils ne
sont pas continuellement surveillés.
Gardez l'appareil et son cordon d’alimentation hors de portée
d'enfants de moins de 8 ans.
Installation :
Installez ce four en respectant strictement les instructions
d’installation fournies dans cette notice.
Reportez-vous au chapitre ‘INSTALLATION DE VOTRE
APPAREIL’.

5
Veillez à ne pas obstruer les ouïes d’aérations de votre
appareil.
Votre appareil n’est pas destiné à être installé dans une
niche de meuble.
Si cet appareil est recouvert ou en contact avec un matériau
inflammable y compris rideaux, tentures et éléments
similaires, il existe un risque d’incendie lors de son
fonctionnement.
Éloignez le cordon d’alimentation des surfaces chaudes et ne
couvrez pas ou n’encastrez pas le four.
Votre appareil n’est pas destiné à être mis en
fonctionnement au moyen d’une minuterie extérieure ou par
un système de commande à distance séparé.
Utilisation :
Les parties accessibles de cet appareil peuvent devenir
chaude pendant son fonctionnement.
Les liquides ou autres aliments ne doivent pas être
chauffés dans des récipients hermétiques car ils risquent
d’exploser.
Votre appareil ne peut être utilisé par des enfants à partir
de 8 ans et des personnes ayant des capacités physiques,
sensorielles ou mentales réduites ou un manque
d'expérience et de connaissance que s'ils sont assistés ou si
on leur a donné les instructions appropriées leur permettant
de se servir de l'appareil en toute sécurité et de comprendre
les risques encourus.
Les parties accessibles de votre appareil chauffent pendant
son utilisation.
Les enfants doivent être éloignés s'ils ne sont pas
continuellement surveillés.

6
Ne placez aucun élément sur l’appareil lorsqu’il est en
fonctionnement.
Vérifiez que les ustensiles sont appropriés à l’usage dans un
four à microondes.
Utilisez toujours des gants isolants pour retirer les plats du
four. Certains plats absorbent la chaleur des aliments, et
sont donc très chauds.
En utilisation « micro-onde » ou « micro-onde combinée à
un autre mode de cuisson », n’utilisez pas de récipient
métallique, ôtez les liens métalliques de fermeture et les
poignées métalliques des récipients / sacs avant de les
introduire dans le four.
Pour ne pas détériorer votre appareil, ne jamais le faire
fonctionner à vide ou sans plateau.
Dans le cas de petites quantités, posez un verre d’eau à côté
de l’aliment pour augmenter la charge
Le chauffage de boissons par micro-ondes peut provoquer
un jaillissement brusque et différé de liquide en ébullition,
aussi des précautions doivent être prises lorsqu’on manipule
le récipient.
Afin d’éviter les brûlures, le contenu des biberons et des pots
d’aliments pour bébés doit être remué ou agité et la
température doit être vérifiée avant consommation.
Il est recommandé de ne pas chauffer les œufs dans leur
coquille et les œufs durs entiers dans un four micro-ondes
car ils risquent d’exploser, même après la fin de la cuisson.
N’utilisez pas de papier aluminium de cuisson pour couvrir
les aliments, ne recouvrez pas une partie du four avec du
papier aluminium.

7
Pendant le chauffage de denrées alimentaires dans des
contenants en plastique ou en papier, gardez un œil sur le
four en raison de la possibilité d’inflammation.
Si de la fumée s’échappe de l’appareil, arrêtez ou
débranchez le four et gardez la porte fermée pour étouffer
les flammes éventuelles.
L’utilisation d’accessoires non recommandés par le fabricant
de l’appareil peut entraîner des situations dangereuses et
des blessures.
N’utilisez pas le compartiment du four à des fins de
rangement.
Ne placez pas d’aliments tels que le pain, les gâteaux secs,
etc. à l’intérieur du four.
Entretien :
L’absence d’entretien du four peut entraîner la
détérioration des surfaces de la cavité ou de la porte et
peut altérer irréversiblement la durée de vie de l’appareil
et provoquer des situations dangereuses.
Éteignez et débranchez l’appareil avant toute opération
d’entretien.
Votre appareil génère des microondes et contient un circuit
haute-tension, n’enlevez pas le capot.
Il est dangereux pour toute personne non qualifiée de
réaliser des opérations de maintenance qui nécessiteraient
de retirer le capot de protection de l’appareil.
Ôter le capot de protection de l’appareil peut entrainer une
exposition à l’énergie micro-onde.
Ôter le capot de protection de l’appareil, même si il est
débranché, peut entrainer une électrocution au contact du
circuit haute-tension.

8
Le nettoyage et l’entretien de l’appareil ne doivent pas être
faits par des enfants de moins de 8 ans.
Votre appareil doit être nettoyé régulièrement. Les dépôts
alimentaires doivent être enlevés.
Ne nettoyez pas l’appareil avec une éponge abrasive ou un
grattoir métallique.
Pour votre sécurité, ne nettoyez jamais l'appareil à l'aide
d'un nettoyeur à vapeur.
Le joint et l’encadrement de la porte doivent être inspectés
régulièrement pour s’assurer qu’ils ne sont pas détériorés. Si
ils sont endommagées, n’utilisez plus l’appareil et faites-le
contrôler par un technicien spécialisé.
Lorsque vous devrez changer l’ampoule de votre micro-
onde, contactez un technicien spécialisé.
Ne tirez jamais sur le cordon mais débranchez l’appareil en
tenant la prise.
Si le cordon d’alimentation est endommagé, il doit être
remplacé par le fabricant, son représentant ou toute autre
personne qualifiée afin d’éviter tous dangers.
Utilisation non conforme :
Le fabricant se dégage de toute responsabilité en cas
d’utilisations non conformes.
Utilisez uniquement cet appareil pour les usages décrits dans
ce manuel.
Respectez les consignes générales d’utilisation et de sécurité
listées dans ce chapitre.
Cet appareil n’est pas destiné au séchage de denrées
alimentaires ou de linge. De même, il n’est pas destiné au
réchauffage de coussins chauffants, pantoufles, éponges,

9
linge humide et autres articles similaires. Il n’est pas destiné
non plus à la stérilisation. Ces usages peuvent entraîner la
destruction de votre appareil et conduire à une situation
dangereuse.
Cet appareil est exclusivement destiné à un usage
domestique dans des habitations privées. Son utilisation
dans des locaux communs ou professionnels tels que local
de pause de bureau ou atelier, local de camping, hôtel, etc.
ne répond pas à une utilisation conforme telle que définie
par le fabricant.
b) Données techniques
Modèle GE2626E*
Tension nominale 230V ~ 50 Hz
Puissance d’entrée nominale (micro-ondes) 1 450 W
Puissance de sortie nominale (micro-ondes) 900 W
Puissance d’entrée nominale (Gril) 1 000 W
Diamètre du plateau tournant 31,5 cm
Dimensions extérieures (Lxlxh) 513 x 412 x 307 mm
Poids net 15,6 kg
c) Principe de fonctionnement
Les micro-ondes utilisées pour la cuisson sont des ondes électro magnétiques.
Elles existent couramment dans notre environnement comme les ondes radio-électriques, la
lumière, ou bien les rayonnements infra-rouges.
Leur fréquence se situe dans la bande des 2450 MHz.
Leur comportement :
Elles sont réfléchies par les métaux
Elles traversent tous les autres matériaux.
Elles sont absorbées par les molécules d’eau, de graisse et de sucre.
Lorsqu’un aliment est exposé aux microondes il s’ensuit une agitation rapide des molécules, ce
qui provoque un échauffement.
La profondeur de pénétration des ondes dans l’aliment est d’environ 2,5 cm, si l’aliment est plus
épais, la cuisson à cœur se fera par conduction comme en cuisson traditionnelle.

10
d) Protection de l’environnement
Il est bon de savoir que les micro-ondes provoquent à l’intérieur de l’aliment un simple
phénomène thermique et qu’elles ne sont pas nocives pour la santé.
Arrivé en fin de vie, ce produit ne doit pas être jeté avec les ordures ménagères.
Il doit être apporté dans une déchetterie ou à votre revendeur. Cela permet
d'éviter les conséquences néfastes pour l'environnement et la santé découlant d'une
élimination inappropriée et de recycler les matériaux en vue de réaliser des
économies d'énergie et de ressources significatives.
Un logo vous rappelant que vous ne devez pas le jeter avec les ordures ménagères
apparaît sur le produit. Pour de plus amples informations, contacter votre mairie ou
le magasin où vous avez acheté ce produit.
Votre appareil contient également de nombreux matériaux recyclables. Il est donc marqué de ce
logo afin de vous indiquer que les appareils usagés ne doivent pas être mélangés avec d'autres
déchets.
Le recyclage des appareils qu'organise votre fabricant sera ainsi réalisé dans les meilleures
conditions, conformément à la directive européenne 2002/96/CE sur les déchets d'équipements
électriques et électroniques. Adressez-vous à votre mairie ou à votre revendeur pour connaître
les points de collecte des appareils usagés les plus proches de votre domicile. Nous vous
remercions pour votre collaboration à la protection de l'environnement.
2) INSTALLATION DE VOTRE APPAREIL
a) Avant le branchement
Attention :
Vérifier que votre appareil n'ait subi aucune avarie lors du transport (porte ou joint
déformé, etc...).
Si vous constatez un dommage quelconque, avant toute utilisation, contactez votre revendeur.
Fig.01

11
b) Le raccordement électrique
Vérifier que :
- la puissance de l'installation est suffisante.
- les lignes d'alimentation sont en état.
- le diamètre des fils est conforme aux règles d'installation.
- votre installation est équipée d'une protection thermique de 20 ampères.
En cas de doute, veuillez consulter votre installateur électricien.
Le raccordement électrique est à réaliser avant la mise en place de l'appareil sur son emplacement
définitif.
La sécurité électrique doit être assurée par un raccordement correct. Lors des opérations
d'entretien, l'appareil doit être débranché du réseau électrique, les fusibles doivent être coupés
ou retirés.
L'appareil doit être branché avec un câble d'alimentation normalisé à trois conducteurs de
1,5 mm² (1 phase + 1 neutre + 1 terre) qui doivent être raccordés sur le réseau 220-240V 50Hz
monophasé par l'intermédiaire d'une prise de courant normalisée CEI 60083 équipée de deux
broches et d'une Terre et conformément aux règles d'installation en vigueur.
Le fil de Terre (vert jaune) est relié à la borne de l'appareil et doit être relié à la terre de votre
installation électrique.
Le fil de Neutre (bleu) doit être raccordé au neutre du réseau électrique.
Le fil de Phase (rouge, noir ou marron) doit être raccordé à la phase du réseau électrique.
La fiche de courant ou tout autre dispositif de coupure électrique, doit rester immédiatement
accessible pour permettre un arrêt d'urgence.
Prévoyez également dans votre installation électrique un dispositif accessible qui doit être en
mesure de séparer l'appareil du secteur et dont l'ouverture de contact est au moins de 3 mm au
niveau de tous les pôles.
Si le four présente une quelconque anomalie, débranchez l'appareil ou coupez le dispositif de
raccordement au secteur.
Si le câble d'alimentation de votre appareil est endommagé, il doit être remplacé par le fabricant,
son service après-vente, ou une personne de qualification similaire afin d'éviter tout danger.
Attention : Notre responsabilité ne saurait être engagée en cas d'accident ou d'incident consécutif
à une mise à la terre inexistante, défectueuse ou incorrecte.

12
c) Ustensiles
Veuillez consulter les instructions « Matériels utilisables dans votre four à micro-ondes et matériels
à éviter ». Certains ustensiles non métalliques peuvent également ne pas être utilisables au micro-
ondes. En cas de doute, testez l'ustensile en question en suivant la procédure suivante.
Test avec ustensile :
1. Remplissez un récipient allant au micro-ondes d'une tasse d'eau froide (250 ml) et placez-y
l'ustensile en question.
2. Faites réchauffer à puissance maximale pendant 1 minute.
3. Touchez prudemment l'ustensile. Si l'ustensile est très chaud, ne l'utilisez pas pour cuire au
micro-ondes.
4. Ne dépassez pas un temps de cuisson de 1 minute.
Avertissement
Risque de blessure
Il est dangereux pour une personne non qualifiée d’effectuer une opération d’entretien ou
de réparation impliquant le démontage d’un capot de protection contre l’exposition à
l’énergie à micro-ondes.

13
Matériels utilisables dans votre four à micro-ondes
Ustensiles Observations
Feuille d'aluminium Pour couvrir uniquement. On peut utiliser de petits morceaux
d'aluminium pour couvrir les parties fines de la viande ou de la volaille
et éviter une surcuisson. Un arc électrique peut se former si la feuille
est trop près des parois du four. La feuille doit être éloignée d'au
moins 2,5 cm des parois du four.
Plat brunisseur Respectez les consignes du fabricant. Le fond du plat brunisseur doit
être surélevé d'au moins 5 cm du plateau tournant. Une utilisation
incorrecte pourrait provoquer la rupture du plateau tournant.
Vaisselle Compatible micro-ondes seulement. Respectez les consignes du
fabricant. N'utilisez pas de plats fêlés ou ébréchés.
Bocaux Ôtez toujours le couvercle. Utilisez-les uniquement pour réchauffer à
peine les aliments. La plupart des bocaux ne résistent pas à la chaleur
et peuvent se briser.
Verrerie Verres spéciaux allant au four uniquement. Vérifiez l'absence de métal.
N'utilisez pas de plats fêlés ou ébréchés.
Sacs de cuisson au
four
Respectez les consignes du fabricant. Ne fermez pas le sac avec un
lien métallique. Percez pour permettre à la vapeur de s'échapper.
Assiettes et verres
en papier
À n'utiliser que pour une cuisson/un réchauffement très court. Ne vous
éloignez pas du four pendant la cuisson.
Serviettes en papier Utilisez-les pour couvrir vos aliments lors du réchauffage et pour
absorber les graisses. Utilisez-les sous surveillance pour une cuisson
très courte uniquement.
Papier sulfurisé Utilisez-le en couverture pour éviter les éclaboussures ou en papillotte
pour la cuisson vapeur.
Plastique Uniquement le plastique allant au micro-ondes. Respectez les
consignes du fabricant. Le plastique doit comporter la mention
« Utilisable au Micro-ondes ». Certains récipients en plastique fondent
lorsque les aliments qu'ils contiennent sont chauds. Les « sachets
cuisson » et les sacs en plastique hermétiquement fermés doivent être
fendus, percés ou ouverts, comme indiqué sur l'emballage.
Film plastique Uniquement le plastique allant au micro-ondes. Utilisez-le pour couvrir
vos aliments lors de la cuisson pour conserver l'humidité. Ne laissez
pas le film plastique entrer en contact avec les aliments.
Papier paraffiné Utilisez-le en couverture pour éviter les éclaboussures et conserver
l'humidité.

14
Matériels à éviter avec un four à micro-ondes
Ustensiles Observations
Plateau en
aluminium
Peut provoquer la création d'arcs électriques. Transférez vos aliments
dans un plat allant au micro-ondes.
Cartons alimentaires
avec poignée
métallique
Peut provoquer la création d'arcs électriques. Transférez vos aliments
dans un plat allant au micro-ondes.
Ustensiles en métal
ou comportant du
métal
Le métal empêche l'énergie à micro-ondes d'atteindre les aliments. Les
armatures métalliques peuvent provoquer la création d'arcs
électriques.
Liens métalliques Peuvent provoquer la création d'arcs électriques et entraîner un
incendie dans le four.
Sacs en papier Peuvent provoquer un incendie dans le four.
Mousse plastique La mousse plastique peut fondre ou contaminer le liquide à l'intérieur
lorsqu'elle subit de fortes températures.
Bois Le bois sèche s'il est placé dans un four à micro-ondes et peut se
fendre ou se craqueler.
d) Description de votre appareil
Noms des pièces et accessoires de votre four
Sortez le four et tous les accessoires de leur carton et de l'intérieur du four.
A) Bandeau de commandes
B) Entraîneur
C) Support à roulettes
D) Plateau en verre
E) Vitre de surveillance
F) Porte
G) Système de verrouillage
de sécurité
Clayette (Uniquement pour les fours avec gril).
F
G
A
CB
E
D

15
e) Présentation du bandeau de commande
A Les afficheurs :
vous facilitent la programmation en affichant les fonctions, le temps
ou le poids programmé, l'heure et les catégories d'aliments.
B La touche Autoprogramme
vous permet de sélectionner le type de plat à cuire ainsi que son
poids : l'appareil règle automatiquement puissance et temps de
cuisson.
C La touche Gril :
permet de choisir la puissance gril appropriée.
D La touche micro-ondes :
permet de choisir la puissance micro-ondes appropriée.
E La touche décongélation :
permet de programmer la décongélation selon le poids des aliments.
F La touche mise à l'heure :
permet de mettre l'horloge à l'heure.
G La touche Mémoires 1 2 3 :
permet d'accéder rapidement aux 3 opérations pré-programmées.
H Le rotacteur :
permet de choisir le temps de cuisson et le poids des aliments.
I La touche Départ :
permet de lancer la cuisson en appuyant sur le rotacteur.
J La touche Ouverture :
permet d’ouvrir la porte du micro-ondes
K La touche STOP Annulation :
permet d'interrompre ou d'effacer un programme en cours.
f) Installation du plateau tournant
1. Moyeu central (dessous)
2. Plateau en verre
3. Entraîneur du plateau tournant
4. Support à roulettes
A
B
C
D
E
F
G
H
I
J
K

16
a. Ne placez jamais le plateau en verre à l'envers. La rotation du plateau en verre ne doit
jamais être entravée.
b. Le plateau en verre et le support à roulettes doivent toujours être utilisés pendant la cuisson.
c. Tous les aliments ou récipients alimentaires sont toujours placés sur le plateau en verre
pour leur cuisson.
d. Si le plateau en verre ou le plateau tournant se fissurent ou se cassent, prenez contact avec
votre service après-vente agréé le plus proche.
g) Installation sur un plan de travail
Enlevez les emballages et mettez les accessoires de côté.
Vérifiez que le four n'est pas abîmé, par exemple en présentant des traces de chocs ou une porte
cassée. N’installez pas le four s'il est abîmé.
Carrosserie : Ôtez le film de protection de la surface de la carrosserie du four à micro-ondes.
N’enlevez pas le revêtement en Mica marron clair qui se trouve dans la cavité du four
et qui protège le magnétron.
h) Installation
1. Ce produit ne doit pas être encastré.
Afin d’assurer une ventilation optimale de votre four à micro-ondes, emboitez la pièce plastique
fournie avec cette notice dans le trou prévu à cet effet à l’arrière de votre appareil (Fig 2). Placez
ensuite votre appareil contre le mur, la pièce plastique assurant une distance correcte pour
une bonne ventilation.
Laissez au moins 30 cm d’espace libre au-dessus du four, 7,5 cm sur le côté gauche et laissez le
côté droit ouvert (Fig 1).
N’enlevez pas les pieds du four.
N’obstruez pas les grilles d’aération, vous risqueriez d’endommager prématurément votre
appareil.
Fig 1
1. 7,5 cm
2. 30 cm
3. Ouvert

17
Fig 2
2. Raccordement électrique
• Votre installation doit être équipée d'une protection thermique de 16 Ampères.
• Utilisez impérativement une prise de courant comportant une borne de mise à la terre
et raccordée conformément aux normes de sécurité en vigueur.
• Prévoyez dans votre installation électrique un dispositif accessible par l'utilisateur qui doit
être en mesure de séparer l'appareil du secteur et dont l'ouverture de contact est d'au moins
3 mm au niveau de tous les pôles.
• Si le câble d'alimentation est endommagé, il doit être remplacé par le fabricant, son service
après-vente, ou une personne de qualification similaire afin d'éviter un danger.
AVERTISSEMENT : N’installez pas le four au- dessus d'une plaque de cuisson ou de tout appareil
produisant de la chaleur.
S’il est installé près ou au-dessus d’une source de chaleur, le four pourra être endommagé et la
garantie sera annulée.
La surface accessible peut être chaude pendant le fonctionnement du four.

18
3) UTILISATION DE VOTRE APPAREIL
a) Instructions de fonctionnement
Ouverture de la porte
Pour ouvrir la porte du four à micro-ondes :
Assurez-vous que celui-ci soit sous tension, puis appuyez sur la touche .
La porte s’ouvrira automatiquement.
Lorsque le four à micro-ondes est sous tension, le four affichera « 0:00 » et la sonnerie retentira
une fois.
Réglage de l'horloge Affichage
Appuyez sur la touche , les chiffres des heures clignotent.
Tournez le sélecteur pour régler les heures, l'heure réglée devra
être comprise entre 0 et 23 (24 heures).
Appuyez sur la touche , les chiffres des minutes clignotent.
Tournez le sélecteur pour régler les minutes, les minutes réglées
devront être comprises entre 0 et 59.
Appuyez sur la touche pour achever le réglage de l'heure, « : »
clignote et l'heure s'allume.
0:00
12:00
12:35

19
Cuisson au micro-ondes
Tableau de puissance du micro-ondes
Puissance 900 W 700 W 500 W 350 W 150 W
Affichage P900 P700 P500 P350 P150
Affichage
Appuyez sur la touche M-O une fois, « P900 » s’affiche.
Continuez à appuyer pour sélectionner la puissance souhaitée et
« P900 », « P700 », « P500 », « P350 » ou « P150 » s’affichera à
chaque nouvelle pression.
Tournez le sélecteur pour régler la durée de cuisson de 0:05 à
95:00.
Appuyez sur la touche Départ pour lancer la cuisson.
Par exemple : Si vous souhaitez cuire pendant 20 minutes à 700 W,
réglez le four comme suit :
Appuyez sur la touche M-O une fois, le four affichera « P900 ».
Continuez à appuyer sur la touche M-O pour sélectionner la
puissance de 700 W. « P700 » s’affiche.
Tournez le sélecteur pour régler la durée de cuisson jusqu'à ce que
le four indique « 20:00 ».
Appuyez sur la touche Départ pour lancer la cuisson.
ou
sur la touche STOP pour annuler le réglage
Remarque :
les intervalles de réglage de la durée sont les suivants :
0---1 min : 5 secondes
1---5 min : 10 secondes
5---10 min : 30 secondes
10---30 min : 1 minute
30---95 min : 5 minutes
1:30
P900
20:00
P900
P700

20
Cuisson au gril & cuisson combinée
Ordre Affichage Puissance du micro-ondes Puissance du gril
1 G-1 0% 100%
2 G-2 20% 80%
3 G-3 40% 60%
Cuisson au gril Affichage
Appuyez une fois sur la touche Gril, « G-1 » s’affiche.
Tournez le sélecteur pour régler la durée de cuisson.
(La durée de cuisson maximum est de 95 minutes.)
Exemple
: 8 minutes 30 secondes.
Appuyez sur la touche Départ pour lancer la cuisson.
Par exemple
: Si vous souhaitez cuire au gril pendant 10 minutes,
réglez le four comme suit.
Appuyez une fois sur la touche Gril, « G-1 » s’affiche.
Tournez le sélecteur pour régler la durée de cuisson jusqu’à ce que
le four indique « 10:00 ».
Appuyez sur la touche Départ pour lancer la cuisson.
ou
sur la touche STOP pour annuler le réglage
Remarque :
A mi-cuisson le four émet deux bips pour vous indiquer qu'il faut retourner l'aliment si
besoin.

21
Cuisson combinée Affichage
Appuyez une fois sur la touche Gril, « G-1 » s’affiche.
Continuez à appuyer sur la touche Gril jusqu’à ce que « G-2 » ou
«G-3 » s’affiche.
Tournez le sélecteur pour régler la durée de cuisson. La durée de
cuisson maximum est de 95 minutes.
Appuyez sur la touche Départ pour lancer la cuisson.
ou
sur la touche STOP pour annuler le réglage
Programmation de la cuisson rapide Affichage
À l'arrêt, appuyez sur la touche Départ pour lancer la cuisson
avec 100% de puissance micro-ondes pendant 30 secondes.
Chaque pression supplémentaire augmentera le temps de cuisson
de 30 secondes jusqu'à 95 minutes au maximum.
En modes micro-ondes, gril et chaleur tournante, chaque pression
sur la touche Départ augmente la durée de 30 secondes.
Pendant la cuisson en mode Menu Auto et Décongélation au poids,
la durée ne peut pas être augmentée en appuyant sur la touche
Départ.
Programmation de la décongélation selon le poids Affichage
Appuyez sur la touche une fois, le four affichera « 100 ».
Tournez le sélecteur pour sélectionner le poids des aliments de 100
à 2 000 g.
Appuyez sur la touche Départ pour lancer la décongélation.

22
Programmation du Menu Auto Affichage
Appuyez sur la touche Auto pour sélectionner un menu de
« A1 » à « A8 ».
Tournez le sélecteur pour choisir le poids par défaut, comme
indiqué dans le tableau des menus.
Appuyez sur la touche Départ pour lancer la cuisson.
À la fin de la cuisson, la sonnerie retentira deux fois.
Par exemple
: Si vous voulez utiliser le menu auto pour cuire 150 grammes de poisson :
Affichage
Appuyez sur la touche Auto trois fois pour sélectionner «A3». Le
témoin « poisson » s'allume.
Tourner le sélecteur pour sélectionner 150 g.
Appuyez sur la touche Départ pour lancer la cuisson.
Veuillez vous reporter au tableau suivant pour consulter les menus.
Recommandation :
Cuisson des viandes : retourner l'aliment à mi-cuisson pour obtenir une couleur et une
cuisson bien homogènes.
A-1
400
150

23
b) Tableau des menus pour les programmes automatiques
MENUS POIDS TEMPS
G-2 20% M/O + 80% GRILL
A-1 VIANDES ROUGES
Utilisez un plat adapté micro-ondes et grilloir.
Sortez la viande du réfrigérateur 1 h avant la cuisson. Après
cuisson, laissez reposer la viande 10 min emballée d'une feuille
d'aluminium.
400 g
600 g
800 g
1000 g
1200 g
15 min
20 min
23 min
26 min
30 min
G-3 40% M/O +60% GRILL
A-2 VIANDES BLANCHES
Voir les conseils « viandes rouges »
400 g
600 g
800 g
1000 g
1200 g
21 min
27 min
33 min
39 min
45 min
500 W
A-3 POISSONS
Ajoutez 2 à 3 cuillérées d'eau, de jus de Citron ou devin blanc.
Couvrez d'un couvercle adapté ou d'un film alimentaire.
150 g
250 g
300 g
400 g
600 g
2 min 30
4 min
4 min 35
5 min 48
7 min 48
G-3 40% M/0+60% GRILL
A-4 VOLAILLES
Piquez la peau pour éviter les projections grasses.
En fin de cuisson, laissez reposer 5 min dans le four.
500 g
750 g
1000 g
1200 g
1500 g
20 min
25 min
30 min
35 min
40 min
G-2 20% M/O + 80% GRILL
A-5 PLATS SURGELES
Pour réchauffer des plats préparés surgelés.
300 g
450 g
600 g
750 g
1000 g
22 min
28 min
34 min
40 min
46 min
900W
A-6 LEGUMES
Pour cuire des légumes frais, ajoutez :
-2 cuillères à souped'eau pour 200 g
- ½ dl au-delà
Couvrez sauf pour les champignons.
200 g
300 g
400 g
500 g
600 g
6 min
7 min 35
8 min 50
10 min
12 min 25
900W
A-7 POMMES DETERRE
Pour cuire les pommes de terre entières, calibrées ou coupées en
morceaux réguliers.
200 g
400 g
600 g
800 g
1000 g
4 min
7 min
10 min 30
13 min 30
16 min 30
900 W
A-8 POTAGE
200 ml
300 ml
400 ml
500 ml
600 ml
2 min
3 min
4 min
5 min
6 min

24
Programmation de la fonction mémorisation Affichage
Appuyez sur la touche MEMO 1 2 3 pour sélectionner le
programme de cuisson 1, 2 ou 3.
Programmez la cuisson de votre choix.
Validez la programmation en appuyant sur la touche
MEMO 1 2 3. Bip de confirmation et affichage de l'heure.
Remarque :
La cuisson en mode Menu Auto ne peut être sélectionnée comme procédure de
mémorisation.
Par exemple
: pour inscrire le programme en mémoire 2 : cuire les aliments à 700 W pendant 3
minutes et 20 secondes.
Affichage
À l'arrêt appuyez sur la touche MEMO 1 2 3 deux fois,
l'écran affiche « 2 ».
Appuyez une fois sur la touche M-O « P900 » s'affiche.
Continuez à appuyer sur la touche M-O jusqu'à ce que « P700 »
s'affiche.
Tournez le sélecteur pour sélectionner 3 minutes et 20 secondes.
« 3:20 » s'affiche.
Appuyez sur la touche MEMO 1 2 3 pour sauvegarder le
réglage.
Ou appuyez sur la touche Départ pour lancer la cuisson et
sauvegarder le réglage en même temps.
La fois prochaine, en mode arrêt, sélectionnez Mémoire 2
puis appuyez sur la touche Départ pour lancer la cuisson
Fonction Interrogation Affichage
En mode micro-ondes, appuyez sur la touche M-O la puissance
en cours d'utilisation s'affichera pendant 3 secondes.
Pendant la cuisson, appuyez sur la touche pour connaître la
durée, elle s'affichera pendant 3 secondes.
1
P900
8:59
2
P900
P700
3:20

25
Programmation de la fonction verrouillage de protection (enfants) Affichage
Verrouillage : En mode pause, appuyez sur la touche STOP
pendant 3 secondes, vous entendrez un signal sonore indiquant
l'état de verrouillage enfant. Le témoin de verrouillage s'affichera.
Déverrouillage : En mode verrouillage, appuyez sur touche
STOP pendant 3 secondes, vous entendrez un long « bip »
indiquant que le four est déverrouillé. Le témoin de verrouillage
s'éteindra.
Remarques :
À la fin de la cuisson, la sonnerie retentira deux fois.
Pendant la cuisson, si la porte a été ouverte et après l'avoir refermée, la touche
DEPART devra être activée pour poursuivre la cuisson.
Une fois le programme de cuisson sélectionné, si vous n'appuyez pas sur la touche
DEPART.
Mode silencieux :
Il est possible de mettre le micro-ondes en mode silencieux :
Appuyer sur la touche pendant 3 secondes pour supprimer le son.
Le bip sonnera une fois et l’écran affichera " off " pendant 1 seconde.
Appuyer sur la touche pendant 3 secondes pour remettre le son.
Le bip sonnera une fois et l’écran affichera " on " pendant 1 seconde.
Remarques :
En mode décongélation et gril, à mi-cuisson le four continuera d’émettre deux bips pour
vous indiquer qu'il faut retourner l'aliment si besoin.
4) ENTRETIEN ET NETTOYAGE DE VOTRE APPAREIL
Il est recommandé de nettoyer le four régulièrement et d'enlever tout dépôt alimentaire à
l'intérieur et à l'extérieur de l'appareil. Utilisez une éponge humide et savonneuse. Si l'appareil
n'est pas maintenu dans un état de propreté, sa surface pourrait se dégrader et affecter de façon
inexorable sa durée de vie et conduire à une situation dangereuse. Si la porte ou le joint de porte
sont endommagés, le four ne doit pas être utilisé avant d'avoir été remis en état par une personne
compétente.
Ne pas nettoyer l'appareil avec un nettoyeur vapeur.
L'emploi de produits abrasifs, d'alcool ou de diluant est déconseillé ; ils sont susceptibles de
détériorer l'appareil.
En cas d'odeur ou de four encrassé, faites bouillir de l'eau additionnée de jus de citron ou de
vinaigre dans une tasse pendant 2 minutes et nettoyez les parois avec un peu de liquide vaisselle.
Le plateau peut être retiré pour faciliter le nettoyage. Pour ce faire, prenez-le par les zones d'accès
prévues à cet effet. Si vous enlevez l'entraîneur, évitez de faire pénétrer de l'eau dans le trou de
l'axe moteur. N'oubliez pas de remettre l'entraîneur, le support à roulettes et le plateau tournant.

26
5) EN CAS D’ANOMALIES DE FONCTIONNEMENT
Si vous avez des doutes sur le bon fonctionnement de votre appareil, ceci ne signifie pas
forcément qu'il est en panne. Dans tous les cas, vérifiez les points suivants :
Vous constatez que ... Que faut-il faire ?
L'appareil ne démarre pas.
Vérifiez le branchement de votre appareil.
Vérifiez que la porte de votre four soit bien
fermée.
Vérifiez que la sécurité enfant ne soit
pas programmée.
L'appareil est bruyant.
Le plateau ne tourne pas correctement.
Nettoyez les roulettes et la zone de roulement
sous le plateau tournant.
Vérifier si les roulettes sont bien positionnées.
Vous constatez de la buée sur la vitre.
Essuyez l'eau de condensation à l'aide d'un
chiffon.
L'aliment n'est pas chauffé en programme
micro-ondes.
Vérifiez que les ustensiles conviennent aux
fours à micro-ondes et que le niveau de
puissance soit bien adapté.
L'appareil produit des étincelles.
Bien nettoyer l'appareil : retirez graisses,
particules de cuisson ...
Eloignez tout élément métallique des parois du
four.
Ne jamais utiliser d'éléments métalliques avec
la grille.
L'ampoule est grillée.
Faire appel à un professionnel qualifié
dépositiaire de la marque pour changer
l'ampoule.
Attention :
Cet appareil est équipé d'un circuit haute tension. Dans tous les cas, ne jamais
intervenir vous-même à l'intérieur de l'appareil.

27
6) RECOMMANDATIONS POUR MESURE DE LA PERFORMANCE
Méthodes de mesure de l'aptitude à la fonction conformes aux normes CEI/EN/NF EN 60705.
La commission Electrotechnique Internationale SC 59 K, a établi une norme relative aux mesures
comparatives de performance effectuées sur différents fours à micro-ondes.
Nous recommandons ce qui suit pourcet appareil :
Essais Charge
Temps
approx.
Puissance Récipients / conseils
Crème aux
œufs
(12.3.1.)
1000g
50 g
21 min
13-15 min
500W plat Pyrex réf. 227
sur le plateau tournant
plat Pyrex réf. 220
Sur le plateau tournant
Gâteau de
Savoie
(12.3.2.)
475g 7 min 700W plat pyrex rond réf. 828
sur le plateau tournant
Pain de
viande
(12.3.3.)
900g 14 min 700 W plat cake Pyrex réf. 838
sur plateau tournant
Couvrir d'un film alimentaire
Décongélation
de la viande
(13.3.)
500 g 10 min 50
+ 5 min repos
speed defrost sur plateau tournant
Décongélation
des
Framboises
(B.2.1.)
250 g 6-7 min 200 W assiette plate sur plateau
tournant
Gratin de
pommes De
terre
(12.3.4.)
(Modèle avec
grilloir)
1100g 35 min G2 plat Pyrex réf. 827
sur plateau tournant
Poulet
(12.3.6.)
(Modèle avec
grilloir)
1200 g 45 min A4
C 2
plat sur plateau tournant

28
7) RELATIONS CONSOMMATEURS ET INTERVENTIONS
a) Relations consommateurs
Pour en savoir plus sur nos produits ou nous contacter, vous pouvez:
consulter notre site : www.brandt.fr
nous écrire à l’adresse postale suivante :
Service Consommateurs BRANDT
5 avenue des Béthunes
CS69526 SAINT OUEN L’AUMONE
95060 CERGY PONTOISE CEDEX
nous appeler du lundi au vendredi de 8h30 à 18h00 au :
b) Interventions
Les éventuelles interventions sur votre appareil doivent être effectuées par un professionnel
qualifié dépositaire de la marque. Lors de votre appel, afin de faciliter la prise en charge de votre
demande, munissez-vous des références complètes de votre appareil (référence commerciale,
référence service, numéro de série). Ces renseignements figurent sur la plaque signalétique.
B : Référence commerciale
C : Référence service
H : Numéro de série
Vous pouvez nous contacter du lundi au samedi de 8h00 à 20h00 au :
Pièces d’origine :
Lors d’une intervention, demandez l’utilisation exclusive de pièces détachées certifiées d’origine.
BRANDT FRANCE – SAS au capital de 1.000.000 euros
89/91 Boulevard Franklin Roosevelt – 92500 Rueil-Malmaison (France)

29
Dear Customer,
Thank you for buying a BRANDT product and for your confidence in our company.
This product has been designed and manufactured for you considering your lifestyle and
your requirements, so that it meets your expectations in the best way possible. We have
invested it with our expertise, spirit of innovation and all the enthusiasm which has driven
us for more than 60 years.
So that we are always able to satisfy your requirements as well as possible, our customer
service is available, ready to listen and answer all your questions or suggestions
You can also visit our website www.brandt.com where you will find our latest
innovations as well as additional useful information.
BRANDT is happy to support you daily and hopes you will enjoy your purchase to the
full.
Important: Before starting your machine, please read this guide for
installation and use carefully in order to familiarise yourself with how it
operates quickly.

30
CONTENTS
1) FOR THE USER’S ATTENTION ...................................................................................... 31
a) Safety Instructions ................................................................................................... 31
b) Specifications .......................................................................................................... 36
c) Operating principle .................................................................................................. 36
d) Protecting the environment ...................................................................................... 37
2) INSTALLING YOUR APPLIANCE .................................................................................... 37
a) Utensils ................................................................................................................... 37
b) Description of your appliance .................................................................................... 39
c) The control panel ..................................................................................................... 40
d) Turntable installation ............................................................................................... 40
e) Countertop installation ............................................................................................. 41
f) Installation .............................................................................................................. 41
3) USING YOUR APPLIANCE ............................................................................................ 42
a) Operation instruction ................................................................................................ 42
b) Menu chart for automatic programs ........................................................................... 46
4) CARING FOR AND CLEANING YOUR APPLIANCE ............................................................ 48
5) TROUBLESHOOTING ................................................................................................... 49
6) OPERATING PROFICIENCY TESTING ............................................................................ 50

31
1) FOR THE USER’S ATTENTION
Keep these instructions with your machine. If you sell this
machine to another person second-hand, make sure you
give the new owner these instructions. Please read these
instructions before installing and using your machine.
They are written for your safety and that of others.
a) Safety Instructions
General information:
Your appliance is designed for standard household use for
cooking, reheating and defrosting foods and beverages. Use
this appliance only for its intended uses as described in
manual.
It can not be used in covered, closed and warmed
environment such as a kitchen or a room with the same
specifications. The manufacturer declines any responsibility
in the case of inappropriate use.
Children less than 8 years of age shall be kept away unless
continuously supervised.
Children shall not play with the appliance.
Keep the appliance and its cord out of reach of children less
than 8 years.
Installation:
Install or locate this oven only in accordance with the
installation instructions provided.
See the section INSTALLING YOUR APPLIANCE.
This appliance must not be placed in a cabinet.
Do not obstruct any of the vents of your appliance.

32
If this equipment is covered or touching flammable material,
including curtains, drapes items with a similar nature there
is a risk of fire during the use.
Keep cord away from heated surface, and do not cover any
events on the oven.
The appliance is not intended to be operated by means of
an external timer or separate remote- control system.
Use:
T
he appliance and its accessible parts become hot
during use.
Liquids and other foods should not be heated in sealed
containers because they may explode.
This appliance can be used by children aged from 8 years
and above and persons with reduced physical, sensory or
mental capabilities or lack of experience and knowledge if
they have been given supervision or instruction concerning
use of the appliance in a safe way and understand the
hazards involved.
The appliance and its accessible parts become hot during
use.
Children less than 8 years of age shall be kept away unless
continuously supervised.
Do not place anything on the appliance during operation.
Ensure that the cookware is suitable for use in a microwave
oven.
Always use oven mitts to remove dishes from the oven.
Some dishes absorb the heat of foods and, therefore, are
very hot.

33
For the microwave and microwave + circular heating
functions, the use of metallic cookware is not recommended
Remove wire twist- ties and metal handles from paper or
plastic containers/bags before placing them in the oven.
To avoid damaging your appliance, never operate it while
empty or without the turn-table.
In the case of small quantities (a sausage, a croissant, etc.)
place a glass of water next to the food.
Heating beverages in the microwave oven can cause sudden
and/or delayed splattering of boiling liquid, so precautions
must be taken when handling their containers.
The contents of baby bottles and baby food jars should be
shaken or stirred and their temperature checked before
consumption to avoid burns.
Never heat a baby bottle with the nipple on (risk of explosion
It is recommended that you avoid heating eggs in their shells
and whole hard-boiled eggs in the microwave oven because
they run the risk of explosion, even after cooking is
complete.
Do not use aluminium cooking foil to cover food. Do not
cover part of the oven with aluminium foil.
While heating food items in plastic or paper containers,
monitor the microwave's contents for there is a risk of
spontaneous combustion.
If smoke is emitted, switch off or unplug the appliance and
keep the door closed in order to stifle any flames.
The cookware not recommended by the manufacturer may
result in hazardous situations and injuries.

34
Do not use the oven cavity for storage purposes. Do not
store items, such as bread, cookies, etc. inside the oven
Cleaning:
Failure to maintain the oven in a clean condition
could lead to deterioration of the surface, that could
adversely affect the life of the appliance and possibly
result in a hazardous.
T
urn the oven off and remove the power plug from
the wall socket before cleaning.
This appliance generates microwave energy and is
equipped with a high voltage circuit, do not remove
the cover.
It is hazardous for anyone other than a competent
person to remove a cover.
Remove the protective cover of the device may result in
exposure to microwave energy.
Remove the protective cover of the device, even if it is
disconnected, may cause an electric shock on contact with
the high-voltage circuit.
Cleaning and user maintenance shall not be made by
children unless they are older than 8 and supervised.
This appliance should be cleaned regularly and any food
deposits removed.
Do not use harsh abrasive cleaners or sharp metal scrapers
to clean the oven door glass since they can scratch the
surface, which may result in shattering of the glass.
Steam cleaner is not to be used.
The seal and frame of the door must be regularly examined
to ensure that they have not deteriorated. If these areas are

35
damaged, discontinue use of the appliance and have a
specialised technician check it.
When it becomes necessary to replace the oven light, please
consult a dealer to have it replaced
When unplugging the power cord, do not pull on the cord
itself but pull on the plug.
If the supply cord is damaged, it must be replaced by the
manufacturer, its service agent or similarly qualified persons
in order to avoid a hazard.
Improper use :
The manufacturer assumes no liability for improper use.
Use this appliances only for the uses described in this
manual.
Observe general instructions and safety listed in this
chapter.
This device is intended for home use in private homes. Its
use in common areas such as local professionals or pause
office or
This microwave oven is not intended for drying food or
clothes. Similarly, it is not intended for heating slippers,
heating pads, sponges, damp cloth and other similar items.
It is not intended either to sterilization. These uses can
destroy your appliance and lead to a dangerous situation,
workshop, local
camping, hotel, etc. does not respond to an
intended use as defined by the manufacturer.

36
b) Specifications
Model GE2626E*
Rated Voltage 230V ~ 50 Hz
Rated Input Power(Microwave) 1 450 W
Rated Output Power(Microwave) 900 W
Rated Input Power(Grill) 1 000 W
Turntable Diameter 31.5 cm
External Dimensions(LxWxH) 513 x 412 x 307 mm
Net Weight 15.6 kg
c) Operating principle
The micro-waves used for cooking are electro-magnetic waves. They are commonly found in our
environment in the form of radio-electric waves, light or infrared rays. Their frequency is in the
2450 MHz range.
Their behaviour:
• They are reflected by metals.
• They travel through all other materials.
• They are absorbed by water, fat and sugar molecules.
When food is exposed to micro-waves, its molecules begin moving rapidly, which causes
heating.
The penetration depth of waves into the food is approximately 2.5 cm; if the food is
thicker, the core of the food will be cooked by conduction, as in traditional cooking.
Fig.01

37
d) Protecting the environment
It is valuable to note that the micro-waves trigger within the food a simple thermal
phenomenon and that they are not harmful to one's health.
At the end of its life this product must not be discarded with household waste. It must
be taken to a recycling centre or to your dealer. This makes it possible to avoid
consequences resulting from inappropriate disposal that are harmful to health and the
environment, and to recycle materials to save energy and significant resources.
A logo appears on the product reminding you not to discard it with household waste.
For further information, contact your council offices or the shop where you bought this
product.
Your appliance also contains various recyclable materials. Thus it is stamped with this logo
to indicate to you that used appliances should be mixed with other waste. The recycling
of appliances organised by your manufacturer will take place under the best conditions,
in compliance with European directive 2002/96/CE concerning electrical and electronic
equipment waste.
Consult your city hall or your retailer to find the drop-off points for used appliances that
is nearest to your home. We thank you for your help in protecting the environment.
2) INSTALLING YOUR APPLIANCE
a) Utensils
See the instructions on "Materials you can use in microwave oven or to be avoided in
microwave oven." There may be certain non-metallic utensils that are not safe to use for
microwaving. If in doubt, you can test the utensil in question following the procedure
below.
Utensil Test:
1. Fill a microwave-safe container with 1 cup of cold water (250ml) along with the utensil in
question.
2. Cook on maximum power for 1 minute.
3. Carefully feel the utensil. If the empty utensil is warm, do not use it for microwave cooking.
4. Do not exceed 1 minute cooking time.
Caution
Personal Injury Hazard
It is hazardous for anyone other than a competent person to carry out any service or
repair operation that involves the removal of a cover which gives protection against
exposure to microwave energy.

38
Materials you can use in microwave oven
Utensils Remarks
Aluminum foil Shielding only. Small smooth pieces can be used to cover thin parts of
meat or poultry to prevent overcooking. Arcing can occur if foil is too
close to oven walls. The foil should be at least 1 inch (2.5cm) away from
oven walls.
Browning dish Follow manufacturer's instructions. The bottom of browning dish must be
at least 3/16 inch (5mm) above the turntable. Incorrect usage may cause
the turntable to break.
Dinnerware Microwave-safe only. Follow manufacturer's instructions. Do not use
cracked or chipped dishes.
Glass jars Always remove lid. Use only to heat food until just warm. Most glass jars
are not heat resistant and may break.
Glassware Heat-resistant oven glassware only. Make sure there is no metallic trim.
Do not use cracked or chipped dishes.
Oven cooking
bags
Follow manufacturer's instructions. Do not close with metal tie. Make slits
to allow steam to escape.
Paper plates and
cups
Use for short-term cooking/warming only. Do not leave oven unattended
while cooking.
Paper towels Use to cover food for reheating and absorbing fat. Use with supervision
for a short-term cooking only.
Parchment paper Use as a cover to prevent splattering or a wrap for steaming.
Plastic Microwave-safe only. Follow the manufacturer's instructions. Should be
labeled "Microwave Safe”. Some plastic containers soften, as the food
inside gets hot. "Boiling bags" and tightly closed plastic bags should be
slit, pierced or vented as directed by package.
Plastic wrap Microwave-safe only. Use to cover food during cooking to retain moisture.
Do not allow plastic wrap to touch food.
Wax paper Use as a cover to prevent splattering and retain moisture.

39
Materials to be avoided in microwave oven
Utensils Remarks
Aluminum tray May cause arcing. Transfer food into microwave-safe dish.
Food carton with
metal handle
May cause arcing. Transfer food into microwave-safe dish.
Metal or metal-
trimmed utensils
Metal shields the food from microwave energy. Metal trim may cause
arcing.
Metal twist ties May cause arcing and could cause a fire in the oven.
Paper bags May cause a fire in the oven.
Plastic foam Plastic foam may melt or contaminate the liquid inside when exposed to
high temperature.
Wood Wood will dry out when used in the microwave oven and may split or
crack.
b) Description of your appliance
Names of Oven Parts and Accessories
Remove the oven and all materials from the carton and oven cavity.
A) Control panel
B) Turntable shaft
C) Turntable ring assembly
D) Glass tray
E) Observation window
F) Door assembly
G) Safety interlock system
Grill rack (Only for Grill
series)
Grill rack (Only for Grill series)
F
G
A
CB
E
D

40
c) The control panel
A Displays:
to simplify programming, the display indicates: the time of day, the
types of food and functions, the minutes /seconds or weight
programmed.
B « Autoprogramme » key
automatically sets the correct programme time according to a
specified food type and weight.
C Grill key:
to set the grill's power level
D Microwave key:
to set the microwaves'power level.
E Defrost key:
to defrost according to the weight of food
F Clock key:
to set the clock
G Memory 12 3 key:
to reach quickly 3 preset operations
H Rotating knob:
to choose the time or the weight.
I Start button:
Starts cooking by pressing the rotary switch.
J Open button:
For opening the microwave door
K STOP / Cancel key:
to interrupt or to erase a current program
d) Turntable installation
1. Hub (underside)
2. Glass tray
3. Turntable shaft
4. Turntable ring assembly
A
B
C
D
E
F
G
H
I
J
K

41
a. Never place the glass tray upside down. The glass tray should never be restricted.
b. Both glass tray and turntable ring assembly must always be used during cooking.
c. All food and containers of food are always placed on the glass tray for cooking.
d. If glass tray or turntable ring assembly cracks or breaks, contact your nearest authorized
service center.
e) Countertop installation
Remove all packing material and accessories. Examine the oven for any damage such as dents
or broken door. Do not install if oven is damaged.
Cabinet: Remove any protective film found on the microwave oven cabinet surface.
Do not remove the light brown Mica cover that is attached on the right side to the
oven cavity to protect the magnetron.
f) Installation
1. This appliance shall not be placed in a cabinet.
In order to obtain an optimal ventilation of your microwave oven, insert the plastic pin provided
with this instruction manual behind the appliance into the specified hole (Fig 2). Then, place the
appliance against the wall, the optimal ventilation being guaranteed by the plastic pin length.
Leave a minimum clearance of 12 inches (30cm) above the oven, 3 inches (7.5cm) at the left
side and leave the right side open (Fig 1).
Do not remove the legs from the appliance. Do not block airflow outlets, blocking the outlets can
damage your microwave oven.
Fig. 1
1. 7.5 cm
2. 30 cm
3. open
Fig 2

42
2. Electrical connection
• Your installation must be protected by a 16 Amp thermal fuse.
• It is mandatory to use a power point with a ground terminal, connected in accordance with
current safety regulations.
• In your electrical installation, provide a device that is accessible to the installer, capable of
separating the appliance from the mains power and whose contact opening is at least 3 mm
at all of the poles.
• If the supply cord is damaged, it must be replaced by the manufacturer, its service agent
or similarly qualified persons in order to avoid a hazard.
WARNING: Do not install oven over a range cooktop or other heat-producing appliance. If
installed near or over a heat source, the oven could be damaged and the warranty would be void.
The accessible surface may be hot during operation.
3) USING YOUR APPLIANCE
a) Operation instruction
Opening the door
To open the microwave oven door:
Make sure it is turned on and then press the button . The door will open automatically.
When the microwave oven is electrified, the oven will display "0:00", buzzer will ring once.
Clock Setting Display
Press the key , the hour figures will flash.
Turn the function selector to adjust the hour figures, the input time
should be within 0--23.
Press the key , the minute figures will flash.
Turn the function selector to adjust the minute figures, the input
time should be within 0--59.
Press the key to finish clock setting. will flash, and the time will
light.
0:00
12:00
12:35

43
Microwave Power Chart
Power 900 W 700 W 500 W 350 W 150 W
Display
Display
Press the key M-O once,”P900” displays.
then keep pressing to choose the power you want, and “P900”,
“P700”, “P500”, “P350” or “P150” will display for each added
pressing.
Turn the function selector to set cooking time from 0:05 to 95:00.
Press the key DEPART to start cooking.
Example
: If you want to use 700W microwave power to cook for
20 minutes, you can operate the oven as the following steps.
Press the key M-O once, the screen display “P900”.
Keep pressing the key M-O to choose 700W microwave power.
“P700” displays.
Turn the function selector to adjust the cooking time until the oven
displays “20:00”.
Press the DEPART key to start cooking
or
Press the STOP key to cancel the setting.
Note:
the step quantities for the adjustment time are as follow:
0---1 min : 5 seconds
1---5 min : 10 seconds
5---10 min : 30 seconds
10---30 min : 1 minute
30---95 min : 5 minutes
P900 P700 P500 P350 P150
1:30
P900
20:00
P900
P700

44
Grill Cooking
Order Display Microwave Power Grill Power
1 G-1 0% 100%
2 G-2 20% 80%
3 G-3 40% 60%
Display
Press the Gril key once, “G-1” displays.
T
urn the function selector to adjust the cooking time.
(The maximum cooking time is 95 minutes.)
Example
: 8 minutes 30 seconds.
Press the DEPART key to start cooking.
Exampl
e
: If you want to use grill power to cook for 10
minutes, you can operate the oven as the following steps.
Press the Gril key once, “G-1” displays.
Turn the function selector to adjust the cooking time until the
oven displays “10:00”.
Press the DEPART key to start cooking
or
Press the STOP key to cancel the setting.
Note:
Halfway through the grilling time the oven will beep twice. This indicates that the food
should be turned over.
Combination Cooking Display
Press the Gril key once, the screen display “G-1”.
Keep pressing the Gril key until “G-2” or “G-3” displays.
Turn the function selector to adjust the cooking time. the maximum
cooking time is 95 minutes.
Press the DEPART key to start cooking
or
Press the STOP key to cancel the setting.

45
Speedy Cooking Display
In waiting state, press the DEPART key to start cooking with
100% microwave power for 30 seconds, each added press will
increase 30 seconds cooking time up to 95 minutes.
In microwave, grill and convection cooking states, each press of
the DEPART key can increase 30 seconds.
During auto menu and weight defrost cooking, time cannot be
increased by pressing the DEPART key.
Defrost by Weight Display
Press the key pad once, the oven will display "100".
Turn the function selector to select the weight of food from 100 to
2 000 g.
Press the DEPART key to start defrosting.
Auto Menu Display
Keep pressing the Auto key to choose the menu from "A1
","A2"..."A8".
Turn the function selector to choose the default weight as indicated
in the menu chart.
Excepted for pies A7 which indicates to you a fixed temperature.
Press the DEPART key to start cooking.
After cooking finished, buzzer will sound two times.
Example
: If you want to use auto menu to cook 150g of fish.
Display
Press the Auto key three times to choose "A3". The poisson
indicator lights up.
Turn the function selector to choose 150g.
Press the DEPART key to start cooking.
Please kindly refers to the next page for menu chart.
Comments:
Meat cooking: turn the food at mid cooking time to obtain an homogeneous colour and
cooking.
A-1
400
150

46
b) Menu chart for automatic programs
MENU WEIGHT TIME
A-1 Red Meat (G-2)
Use a dish adapted to microwaves and grill.
Take out the meat from refrigerator 1 hour before cooking.
After cooking, let rest the meat 10 min packed in an aluminium foil.
400 g
600 g
800 g
1000 g
1200 g
15 min
20 min
23 min
26 min
30 min
A-2 White Meat (G-3)
See advices for red meat
400 g
600 g
800 g
1000 g
1200 g
21 min
27 min
33 min
39 min
45 min
A-3 FISHES (500W)
Add from 2 to 3 spoon of water, lemon juice or white wine.
Cover it with an adequate lid or a plastic wrap
150 g
250 g
300 g
400 g
600 g
2 min 30
4 min
4 min 35
5 min 48
7 min 48
A-4 POULTRY (G-3)
Prick the skin to avoid the projections.
At the end of cooking, let rest the poultry 5 min in the oven
500 g
750 g
1000 g
1200 g
1500 g
20 min
25 min
30 min
35 min
40 min
A-5 PREPARED DISHES (G-2)
To warm prepared dishes
300 g
450 g
600 g
750 g
1000 g
22 min
28 min
34 min
40 min
46 min
A-6 VEGETABLES (900W)
To cook fresh vegetables, add:
- 2 tablespoonful of water for 200 grams
-1/2 dl beyond.
Cover, except for mushrooms
200 g
300 g
400 g
500 g
600 g
6 min
7 min 35
8 min 50
10 min
12 min 25
A-7 POTATOES (900W)
To cook entire, calibrated or cut in regular pieces potatoes.
200 g
400 g
600 g
800 g
1000 g
4 min
7 min
10 min 30
13 min 30
16 min 30
A-8 SOUP (900W)
200 ml
300 ml
400 ml
500 ml
600 ml
2 min
3 min
4 min
5 min
6 min

47
Memory function Display
Press the MEMO 1 2 3 key to select the cooking programme
1, 2 or 3.
Make the cooking programme of your choice.
Confirm the programme by pressing the MEMO 1 2 3
button. A bip will confirm the setting and the time is set.
Note :
Auto menu cooking cannot be set as memory procedure.
For example
: to set the program as memory 2: cook the food with 700W power for
3 minutes and 20 seconds.
Display
In waiting states, press the MEMO 1 2 3 key twice, LED
displays “2”.
Press the M-O key once, “P900” displays.
Keep pressing the M-O key until “P700”.
Turn the function selector to select 3 minutes and 20 seconds.
“3:20” displays.
Press the MEMO 1 2 3 key to save the setting.
Or you can press the Départ key to start cooking and save the
setting at the same time.
For the next time, in waiting states, select Memory 2
and then push Départ to launch cooking.
Inquiring Function Display
In states of microwave cooking, press the M-O key, the current
power will be displayed for 3 seconds.
In cooking state, press the key to inquire the current time and
the time will display for 3 seconds.
Lock-out Function for Children Display
Lock: In waiting state, press the STOP key for 3 seconds, there
will be a beep denoting entering the children-lock state and the
current time will display if the time has been set, otherwise, the
oven will display “ ”
Lock quitting: In locked state, press the STOP key for 3
seconds, there will be a long “beep“ denoting that the lock is
released.
1
P900
8:59
2
P900
P700
3:20

48
Silent mode
It is possible to put the microwave into silent mode.
Press for 3 seconds to turn the sound off.
The beep will sound once and the screen will display “Off” for 1 second.
Press for 3 seconds to turn the sound back on.
The beep will sound once and the screen will display “On” for 1 second.
Notes :
In defrosting and grill mode halfway through cooking the oven will sound two beeps to
inform you that the food should be turned if necessary.
Buzzer will sound two times when cooking finished.
During cooking, if the door is opened and after closing the door, the DEPART key
must be pressed to continue cooking.
Once the cooking program has been set, if DEPART key is not pressed in five
minutes, the setting will be cancelled.
4) CARING FOR AND CLEANING YOUR APPLIANCE
It is recommended that you regularly clean your oven and remove any food build-up on the inside
and outside of the appliance. Use a damp, soapy sponge. If the appliance is not cleaned regularly,
its surface could become damaged, permanently affecting the appliance's lifespan and possibly
causing a safety hazard. If the door or door hinge are damaged, the oven should not be used
until it has been repaired by an authorised person.
Do not clean the appliance with a steam cleaner.
The use of abrasive products, alcohol or thinner is not recommended; they may damage the
appliance.
In the event of odour or caked-on dirt, boil water with lemon juice and vinegar in a cup for two
minutes and clean the insides with a bit of dishwashing liquid.
The table can be removed to facilitate cleaning. To do this, handle it by the access zones provided
for this purpose. If you remove the turning gear, do not let water penetrate into the motor axle
hole.
Don't forget to return the turning gear, wheel guide and turntable.

49
5) TROUBLESHOOTING
If you have doubts about the proper functioning of your appliance, this does not necessarily mean
it is broken. In any event, check the following items:
You observe that... What should you do?
The appliance does not start.
Check the electrical connection of your
appliance.
Ensure that your oven's door is fully closed.
Ensure that the child safety feature is not
activated.
The appliance is noisy.
The turntable does not rotate properly.
Clean the wheels and the rolling area under
the turntable.
Ensure that the wheels are properly
positioned.
You see steam on the window. Wipe the condensation away with a cloth.
Food is not heated during a microwave
programme.
Ensure that the cookware is suitable for
microwave ovens and that the power level is
appropriate.
The appliance is creating sparks.
Thoroughly clean the appliance: remove
grease, cooking particles, etc.
Remove any metal items from the walls of the
oven.
Never use metal items with the grid.
The bulb doesn't work.
Call the brand's authorized technician to
replace the bulb.
Warning:
Be careful, this appliance is equipped with a high tension circuit. Do not make
yourself any repairing inside the oven.

50
6) OPERATING PROFICIENCY TESTING
Operating proficiency testing according to CE/EN/NF EN 60705 standards.
The international Electrotechnical Commission, SC59K, has established a standard relative to
comparative performance tests conducted on various microwaves.
We recommend the following for this appliance:
Test Load Approx time Power
Containers/
recommendations
Egg custard
(12.3.1.)
1000g
50 g
21 min
13-15 min
500W pyrex 227
on the turntable
pyrex 220
on the turntable
Sponge cake
(12.3.2.)
475g 7 min 700W pyrex 828
on the turntable
Meatloaf
(12.3.3.)
900g 14 min 700 W pyrex 838
cover with cling film On the
turntable
Defrosting
Meat
(13.3.)
500 g 10 min 50
+ standing
5 min
speed defrost on the turntable
Defrosting
Raspberries
(B.2.1.)
250 g 6-7 min 200 W on a flat plate on the
turntable
Potato gratin
(12.3.4.)
1100g 35 min G2 pyrex 827
on the turntable
Chicken
(12.3.6.)
1200 g 45 min A4
C 2
on the turntable
BRANDT FRANCE - Simplified Joint Stock Company with capital of 1,000,000 Euros
89/91 Boulevard Franklin Roosevelt - 92854 Rueil-Malmaison (France)

51
Estimada Clienta, estimado Cliente:
Acaba de comprar un producto BRANDT y le agradecemos su confianza.
Hemos diseñado y fabricado este producto pensando en usted, en su modo de vida, en
sus necesidades, para que satisfaga lo mejor posible sus expectativas. Hemos recurrido a
nuestros conocimientos, nuestro espíritu innovador y toda la pasión que nos mueve desde
hace más de 60 años.
En nuestro deseo permanente de satisfacer cada vez mejor sus exigencias, nuestro
servicio de atención al consumidor está a su disposición, y contestará todas sus preguntas
y sugerencias.
Puede conectarse también a nuestra página web www.brandt.com donde encontrará
nuestras últimas innovaciones, así como información adicional útil.
Para BRANDT es un honor acompañarle en su vida cotidiana y le deseamos que disfrute
plenamente esta compra.
Importante: Antes de poner en marcha el aparato, lea atentamente este
manual de instalación y uso para familiarizarse más rápidamente con su
funcionamiento.

52
ÍNDICE
1) A LA ATENCIÓN DEL USUARIO .................................................................................... 53
a) Instrucciones de seguridad ....................................................................................... 53
b) Datos técnicos ......................................................................................................... 58
c) Principio de funcionamiento ...................................................................................... 58
d) Protección del medio ambiente ................................................................................. 59
2) INSTALACIÓN DE SU APARATO ................................................................................... 59
a) Antes de enchufarlo ................................................................................................. 59
b) La conexión eléctrica ................................................................................................ 59
c) Utensilios ................................................................................................................ 60
d) Descripción de su aparato ........................................................................................ 62
e) Presentación del cuadro de control ............................................................................ 63
f) Instalación del plato giratorio .................................................................................... 63
g) Instalación en una encimera ..................................................................................... 64
h) Instalación .............................................................................................................. 64
3) UTILIZACIÓN DE SU APARATO .................................................................................... 65
a) Instrucciones de funcionamiento ............................................................................... 65
b) Cuadro de los menús para los programas automáticos ................................................ 70
4) CONSERVACIÓN Y LIMPIEZA DE SU APARATO .............................................................. 72
5) EN CASO DE ANOMALÍAS DE FUNCIONAMIENTO .......................................................... 73
6) RECOMENDACIONES PARA MEDIR EL RENDIMIENTO .................................................... 74

53
1) A LA ATENCIÓN DEL USUARIO
Guarde este manual de uso con su aparato. En caso de
venta o cesión de este aparato a otra persona, asegúrese
de transmitir este manual de uso al nuevo propietario. Le
agradecemos que lea estas recomendaciones antes de
instalar y utilizar este aparato. Han sido redactadas
pensando en su seguridad y en la de los demás.
a) Instrucciones de seguridad
Información general:
Su aparato está destinado exclusivamente a un uso
doméstico para cocer, calentar o descongelar alimentos y
bebidas. Sólo puede utilizarse en ambientes cubiertos,
cerrados y caldeados, como una cocina o cualquier otra
habitación con las mismas características.
Hay que vigilar a los niños para asegurarse de que no
jueguen con este aparato.
Los niños de menos de 8 años deben permanecer alejados
del aparato a menos que se les pueda vigilar continuamente.
Guarde el aparato y su cable fuera del alcance de niños
menores de 8 años.
Instalación:
Instale este horno respetando estrictamente las
instrucciones de instalación proporcionadas en el manual.
Consulte el capítulo ‘INSTALACIÓN DE SU APARATO’.
Tenga cuidado con no tapar los respiraderos de ventilación
del aparato.
Su aparato no ha sido diseñado para instalarse en el nicho
de un mueble.

54
Si este aparato se cubre o está en contacto con un material
inflamable, como cortinas, tapicerías murales y elementos
similares, existe un riesgo de incendio durante el
funcionamiento.
Aleje el cable de alimentación de las superficies calientes y
no cubra ni encastre el horno.
Su aparato no está diseñado para ponerse en marcha con
un temporizador externo ni un sistema de control remoto
separado.
Utilización:
Las partes accesibles del aparato pueden calentarse
durante su funcionamiento.
Los líquidos y otros alimentos no han de calentarse en
recipientes herméticos, ya que podrían explotar.
Su aparato sólo puede ser utilizado por niños a partir de 8
años y personas con capacidades físicas, sensoriales o
mentales reducidas, o una falta de experiencia y
conocimientos, si dichas personas reciben la ayuda
adecuada o las instrucciones apropiadas que les permitan
utilizar el aparato con total seguridad y comprender los
peligros que conlleva.
Las partes accesibles de este aparato se calientan mientras
funciona.
Los niños han de mantenerse alejados si no reciben una
atención continua.
No ponga nada encima del aparato mientras esté
funcionando.
Compruebe que los utensilios son apropiados para su uso
dentro del horno microondas.

55
Utilice siempre guantes aislantes para sacar los platos del
horno. Algunos platos absorben el calor de los alimentos y,
por lo tanto, están muy calientes.
Cuando lo use en modo «micro-ondas» o «micro-ondas
combinado a otro modo de cocción», no utilice ningún
recipiente metálico, retire los cierres metálicos y las asas
metálicas de los recipientes / bolsas antes de introducirlos
en el horno.
Para no deteriorar su aparato, no lo ponga nunca en
funcionamiento vacío ni sin plato.
En caso de cantidades pequeñas, ponga un vaso de agua
junto al alimento para aumentar la carga
El calentamiento de bebidas por microondas puede provocar
una emanación brusca y diferida de líquido en ebullición, por
lo que se han de tomar las precauciones necesarias cuando
se manipule el recipiente.
Para evitar las quemaduras, el contenido de los biberones y
los tarritos de alimentos para bebés se tienen que remover
o agitar, y se ha de comprobar su temperatura antes de su
consumo.
Se recomienda no calentar los huevos con su cáscara ni los
huevos cocidos enteros en un microondas, ya que pueden
explotar incluso después de haber terminado su cocción.
No utilice papel de aluminio de cocina para cubrir los
alimentos, no cubra una parte del horno con papel de
aluminio.
Mientras se calientan los alimentos en contenedores de
plástico o de cartón, vigile el horno de vez en cuando debido
a la posibilidad de inflamación.

56
Si sale humo del aparato, apáguelo o desenchúfelo y
mantenga la puerta cerrada para ahogar las eventuales
llamas.
Utilizar accesorios no recomendados por el fabricante del
aparato puede ser peligroso y causar lesiones.
Ni utilice el compartimento del horno como armario para
colocar cosas.
No meta alimentos como pan, galletas, etc. dentro del
horno.
Conservación:
La falta de acciones para mantener el buen estado del
horno puede conllevar el deterioro de las superficies de la
cavidad o de la puerta, y puede alterar irreversiblemente la
duración de vida del aparato y provocar situaciones
peligrosas.
Apague y desenchufe el aparato antes de limpiarlo.
Su aparato genera microondas y contiene un circuito de
alta tensión, no levante su cubierta.
Resulta peligroso para cualquier persona no cualificada
realizar operaciones de conservación que requieran la
retirada de la cubierta de protección del aparato.
Quitar la cubierta de protección del aparato puede conllevar
una exposición a la energía de microondas.
Quitar la cubierta de protección del aparato, aunque esté
desenchufado, puede conllevar una electrocución por
contacto del circuito de alta tensión.
Los niños de menos de 8 años no deben limpiar ni realizar
tareas de conservación del aparato.
Ha de limpiar regularmente su aparato. Se han de retirar los
restos de alimentos.

57
No limpie el aparato con una esponja abrasiva ni una cuchilla
metálica.
Por su seguridad, no limpie nunca el aparato con un
limpiador a vapor.
La junta y el marco de la puerta se han de inspeccionar
regularmente para comprobar que no están deteriorados. Si
están en mal estado, no vuelva a utilizar el aparato y recurra
a un técnico especializado.
Cuando tenga que cambiar la bombilla de su microondas,
póngase en contacto con un técnico especializado.
No tire nunca del cable, desenchufe el aparato cogiendo el
enchufe.
Si el cable de alimentación está dañado, tiene que cambiarlo
el fabricante, su representante o cualquier otra persona
cualificada para evitar cualquier peligro.
Utilización inadecuada:
El fabricante declina cualquier responsabilidad en caso de
utilizaciones no adecuadas.
Utilice únicamente este aparato para los usos descritos en
este manual.
Respete las instrucciones generales de uso y de seguridad
expuestas en este capítulo.
Este aparato no se ha diseñado para secar alimentos ni ropa.
Tampoco se ha diseñado para calentar cojines calentadores,
zapatillas, esponjas, ropa húmeda ni artículos similares.
Tampoco es adecuado para la esterilización. Estos usos
pueden conllevar la destrucción de su aparato y provocar
una situación peligrosa.

58
Este aparato está diseñado únicamente para uso doméstico
en viviendas particulares. Su utilización en locales
comunitarios o profesionales, tales como una sala de
descanso de oficinas o talleres, locales de campings, hoteles,
etc. no corresponde a los usos definidos por el fabricante.
b) Datos técnicos
Modelo GE2626E*
Tensión nominal 230 V ~ 50 Hz
Potencia de entrada nominal (microondas) 1.450 W
Potencia de salida nominal (microondas) 900 W
Potencia de entrada nominal (grill) 1.000 W
Diámetro del plato giratorio 31,5 cm
Dimensiones exteriores (L x l x h) 513 x 412 x 307 mm
Peso neto 15,6 kg
c) Principio de funcionamiento
Las microondas utilizadas para la cocción son ondas electromagnéticas.
Existen normalmente en nuestro entorno, como las ondas radio-eléctricas, la luz o los rayos
infrarrojos.
Su frecuencia se sitúa en la banda de los 2450 MHz.
Su comportamiento:
Se reflejan en los metales
Atraviesan el resto de los materiales.
Son absorbidas por las moléculas de agua, grasa y azúcar.
Cuando se expone un alimento a las microondas, se produce una rápida agitación de las
moléculas, lo que provoca un calentamiento.
La profundidad de penetración de las ondas en el alimento es de aproximadamente 2,5 cm, si el
alimento es más grueso, la cocción del centro se realizará por conducción, como en la cocción
tradicional.
Fig.01

59
d) Protección del medio ambiente
Es conveniente saber que las microondas provocan, en el interior del alimento, un simple
fenómeno térmico, y que no son nocivas para la salud.
Al final de su vida, este producto no debe desecharse junto a la basura doméstica.
Debe llevarlo a un punto limpio o entregárselo a su vendedor. De esta manera evitará
las consecuencias nefastas para el medio ambiente y para la salud que produciría
deshacerse del mismo de manera inapropiada. Además colaborará en el reciclaje de
materiales, con un significativo ahorro energético y de recursos.
Un logotipo colocado en el producto le recuerda que no debe arrojarlo a la basura
doméstica. Para más información, póngase en contacto con su ayuntamiento o con la
tienda donde adquirió el producto.
Su aparato también contiene numerosos materiales reciclados. Por lo tanto, está marcado con
este logotipo para indicarle que los aparatos estropeados no han de mezclarse con otros residuos.
El reciclaje de los aparatos que organiza el fabricante se realizará, así pues, en las mejores
condiciones, conforme a la directiva europea 2002/96/CE sobre los residuos de equipos eléctricos
y electrónicos. Diríjase a su ayuntamiento o al vendedor para conocer los puntos de recogida de
aparatos estropeados más cercanos a su domicilio. Le agradecemos su colaboración para proteger
el medio ambiente.
2) INSTALACIÓN DE SU APARATO
a) Antes de enchufarlo
Atención:
Compruebe que su aparato no haya sufrido ninguna avería durante el transporte (puerta
o junta deformada, etc.)
Si constata algún daño, antes de utilizarlo, póngase en contacto con su vendedor.
b) La conexión eléctrica
Comprobar que:
- la potencia de la instalación es suficiente.
- las líneas de alimentación están en buen estado.
- el diámetro de los cables cumple las normas de instalación.
- su instalación está equipada con una protección térmica de 20 amperios.
En caso de duda, consulte a su electricista.
La conexión a la electricidad se realiza antes de instalar el aparato en su sitio definitivo.
Se tiene que garantizar la seguridad eléctrica mediante una conexión correcta. Si se realizan
operaciones de conservación, se tiene que desenchufar el aparato de la red eléctrica, se tienen
que cortar o quitar los fusibles.

60
El aparato se tiene que enchufar con un cable de alimentación normalizado con tres conductores
de 1,5 mm² (1 fase + 1 neutro + 1 tierra) que han de estar conectados a la red 220-240 V 50 Hz
monofásica mediante una toma de corriente normalizada CEI 60083 equipada con dos
conductores macho y una tierra, y conforme a las normas vigentes de instalación.
El cable de tierra (verde amarillo) está conectado al terminal del aparato y debe conectarse a la
tierra de su instalación eléctrica.
El hilo neutro (azul) debe conectarse al neutro de la red eléctrica.
El hilo de fase (rojo, negro o marrón) debe conectarse a la fase de la red eléctrica.
La ficha de corriente o cualquier otro dispositivo de corte eléctrico, debe permanecer
inmediatamente accesible para permitir el apagado de emergencia.
Prevea también, en su instalación eléctrica, un dispositivo accesible que pueda separar el aparato
del sector y cuya apertura de contacto sea al menos de 3 mm a la altura de todos los polos.
Si el horno presenta cualquier anomalía, desenchufe el aparato o corte el dispositivo de conexión
al sector.
Si el cable de alimentación de su aparato está dañado, tiene que cambiarlo el fabricante, su
servicio post-venta o una persona cualificada para evitar cualquier peligro.
Atención: Declinamos toda responsabilidad en caso de accidente o incidente debido a una toma
de tierra inexistente, defectuosa o incorrecta.
c) Utensilios
Consulte las instrucciones «Materiales utilizables en su horno microondas y materiales que hay
que evitar». Hay algunos utensilios no metálicos que tampoco se pueden utilizar en el microondas.
Si tiene alguna duda, pruebe el utensilio en cuestión como se describe a continuación.
Prueba de un utensilio:
1. Eche, en un recipiente apto para el microondas, una taza de agua fría (250 ml) y meta dentro
el utensilio.
2. Caliéntelo a potencia máxima durante 1 minuto.
3. Toque con cuidado el utensilio. Si el utensilio está muy caliente, no lo utilice para cocinar en
el microondas.
4. No supere un tiempo de cocción de 1 minuto.
Advertencia
Riesgo de lesión
Para una persona no cualificada, es peligroso realizar una operación de conservación o
reparación que implique la retirada de la cubierta de protección contra la exposición a la
energía de microondas.

61
Materiales utilizables en su horno microondas
Utensilios Observaciones
Hoja de aluminio Únicamente para cubrir. También podemos utilizar pequeños trozos de
aluminio para cubrir las partes finas de la carne o las aves y evitar que
se cuezan demasiado. Puede formarse un arco eléctrico si la hoja está
demasiado cerca de las paredes del horno. La hoja debe estar alejada
de como mínimo 2,5 cm de las paredes del horno.
Fuente tostadora
para microondas
Respete las instrucciones del fabricante. El fondo de la fuente
tostadora debe situarse, por lo menos, a 5 cm del plato giratorio. Un
uso incorrecto podría provocar la ruptura del plato giratorio.
Vajilla Sólo compatible con microondas. Respete las instrucciones del
fabricante. No utilice platos agrietados ni con brechas.
Botes Quite siempre la tapa. Utilícelos sólo para calentar ligeramente los
alimentos. La mayoría de los botes no son resistentes al calor, y
pueden romperse.
Vasos Sólo vasos especiales aptos para el horno. Compruebe que no tengan
metal. No utilice platos agrietados ni con brechas.
Bolsas de cocción
en el horno
Respete las instrucciones del fabricante. No cierre la bolsa con un
cierre metálico. Haga agujeros para que pueda salir el vapor.
Platos y vasos de
cartón
Utilícelos únicamente para una cocción/un recalentamiento muy breve.
No se aleje del horno durante la cocción.
Servilletas de papel Utilícelas para cubrir los alimentos al calentarlos y para absorber las
grasas. Utilícelas con vigilancia y únicamente para una cocción muy
corta.
Papel sulfurizado Utilícelo como tapa para evitar las salpicaduras o en papillote para
cocer al vapor.
Plástico Únicamente el plástico apto para el microondas. Respete las
instrucciones del fabricante. El plástico ha de llevar la mención «Apto
para microondas». Algunos recipientes de plástico se derriten cuando
los alimentos que contienen están calientes. Las «bolsas de cocción» y
las bolsas de plástico cerradas herméticamente deben rasgarse,
agujerearse o abrirse, como se indica en el envase.
Film plástico Únicamente el plástico apto para el microondas. Utilícelo para cubrir
sus alimentos durante la cocción para conservar la humedad. No
permita que el film plástico entre en contacto con los alimentos.
Papel parafinado Utilícelo como tapa para evitar las salpicaduras y conservar la
humedad.

62
Materiales que hay que evitar en el horno microondas
Utensilios Observaciones
Molde de aluminio Puede provocar la creación de arcos eléctricos. Ponga los alimentos en
una fuente apta para el microondas.
Cartones
alimentarios con asa
metálica
Puede provocar la creación de arcos eléctricos. Ponga los alimentos en
una fuente apta para el microondas.
Utensilios de metal
o que tengan metal
El metal impide que la energía de microondas llegue a los alimentos.
Las estructuras metálicas pueden provocar la creación de arcos
eléctricos.
Cierres metálicos Pueden provocar la creación de arcos eléctricos y producir un incendio
en el horno.
Bolsas de papel Pueden provocar un incendio en el horno.
Espuma de plástico La espuma de plástico puede fundirse o contaminar el líquido que hay
en el interior cuando se expone a temperaturas elevadas.
Madera La madera se seca si se mete en el horno microondas, y puede abrirse
o agrietarse.
d) Descripción de su aparato
Nombres de la piezas y accesorios de su horno
Saque el horno y todos los accesorios de la caja y del interior del horno.
A) Cuadro de control
B) Arrastrador
C) Soporte con ruletas
D) Plato de cristal
E) Cristal de vigilancia
F) Puerta
G) Sistema de bloqueo de
seguridad
Rejilla (Sólo para los hornos con grill).
F
G
A
CB
E
D

63
e) Presentación del cuadro de control
A Las pantallas:
Le facilitan la programación mostrando las funciones, el tiempo o el
peso programado, la hora y las categorías de alimentos.
B El botón Auto-programa:
Le permite seleccionar el tipo de plato que quiere cocinar y su peso:
el aparato ajusta automáticamente la potencia y el tiempo de cocción.
C El botón Grill:
Permite escoger la potencia de grill apropiada.
D El botón microondas:
permite escoger la potencia microondas apropiada.
E El botón descongelación:
permite programar la descongelación según el peso de los alimentos.
F El botón ajuste de la hora:
permite poner el reloj en hora.
G El botón Programas 1 2 3:
permite acceder rápidamente a las 3 operaciones pre-programadas.
H El conmutador rotativo:
permite escoger el tiempo de cocción y el peso de los alimentos.
I Tecla de inicio:
inicia la cocción al pulsar el conmutador rotativo.
J Tecla de apertura:
abre la puerta del microondas
K El botón STOP Anulación:
permite interrumpir o borrar un programa en funcionamiento.
f) Instalación del plato giratorio
1. Cojinete central (abajo)
2. Plato de vidrio
3. Arrastrador del plato giratorio
4. Soporte con ruletas
A
B
C
D
E
F
G
H
I
J
K

64
a. No ponga nunca el plato de cristal al revés. La rotación del plato de cristal siempre ha de
ser fluida.
b. El plato de cristal y el soporte de ruletas siempre se deben utilizar durante la cocción.
c. Todos los alimentos o recipientes alimentarios se ponen siempre en el plato de cristal para
su cocción.
d. Si el plato de cristal o el plato giratorio se agrietan o se rompen, póngase en contacto con
su servicio post-venta autorizado más cercano.
g) Instalación en una encimera
Retire los embalajes y ponga a un lado los accesorios.
Compruebe que el horno no está dañado, por ejemplo, que no tenga ningún indicio de golpe o
una puerta rota. No instale el horno si está dañado.
Carrocería: Retire el film plástico de protección de la superficie de la carrocería del horno
microondas.
No quite el revestimiento de mica marrón claro situado en la cavidad del horno y que
protege el magnetrón.
h) Instalación
1. Este producto no debe encastrarse.
Para garantizar una ventilación óptima de su horno microondas, encaje la pieza de plástico
proporcionada con este manual en el agujero previsto para tal efecto en la parte trasera de su
aparato (Fig 2). Luego, ponga su aparato contra la pared, la pieza de plástico garantiza una
distancia correcta para una buena ventilación.
Deje al menos 30 cm de espacio libre por encima del horno, 7,5 cm en el lateral izquierdo y deje
abierto el lado derecho (Fig 1).
No quite los pies del horno.
No cubra las rejillas de ventilación, ya que podría causar daños prematuros a su aparato.
Fig 1
1. 7,5 cm
2. 30 cm
3. Abierto

65
Fig 2
2. Conexión eléctrica
• Su instalación debe estar equipada con una protección térmica de 16 amperios.
• Utilice imperativamente una toma de corriente que tenga un terminal de tierra y que esté
conectada según las normas de seguridad vigentes.
• Prevea también en su instalación eléctrica un dispositivo accesible por parte del usuario que
pueda separar el aparato del sector y cuya apertura de contacto sea de al menos 3 mm a
la altura de todos los polos.
• Si el cable de alimentación está dañado, tiene que cambiarlo el fabricante, su servicio post-
venta o una persona cualificada para evitar cualquier peligro.
ADVERTENCIA: No instale el horno encima de una placa de cocina ni de ningún aparato que
produzca calor.
Si está instalado cerca o sobre una fuente de calor, el horno podría verse dañado y la garantía
quedaría anulada.
La superficie accesible puede calentarse mientras funciona el horno.
3) UTILIZACIÓN DE SU APARATO
a) Instrucciones de funcionamiento
Apertura de la puerta
Para abrir la puerta del horno microondas:
Compruebe que el horno está encendido, y seguidamente, pulse la tecla . La puerta se
abrirá automáticamente.

66
Cuando el horno microondas está enchufado a la corriente eléctrica, se leerá «0:00» y el timbre
sonará una vez.
Ajuste del reloj Pantalla
Apriete el botón , los números de las horas parpadean.
Gire el selector para ajustar la hora, la hora tendrá que ser de entre
0 y 23 (24 horas).
Apriete el botón , los números de los minutos parpadean.
Gire el selector para ajustar los minutos, los minutos tendrán que
estar entre 0 y 59.
Apriete el botón para terminar de ajustar la hora, «:» parpadea
y la hora se enciende.
Cocción en microondas
Cuadro de potencia del microondas
Potencia 900 W 700 W 500 W 350 W 150 W
Pantalla P900 P700 P500 P350 P150
0:00
12:00
12:35

67
Pantalla
Apriete el botón M-O una vez, aparece «P900». Siga apretando
para seleccionar la potencia deseada y «P900», « P700 », «P500»,
«P350» o «P150» irán apareciendo consecutivamente cada vez que
apriete.
Gire el selector para ajustar la duración de cocción de 0:05 a 95:00.
Apriete el botón On para comenzar la cocción.
Por ejemplo: Si desea cocer durante 20 minutos a 700 W,
programe el horno como se explica a continuación:
Apriete el botón M-O una vez, el horno mostrará «P900».
Siga apretando el botón M-O para seleccionar la potencia de
700 W. «P700» aparece.
Gire el selector para ajustar la duración de cocción hasta que el
horno indique «20:00».
Apriete el botón On para comenzar la cocción.
o
en el botón STOP para anular el ajuste
Observación:
los intervalos de ajuste de la duración son los siguientes:
0---1 min: 5 segundos
1---1 min: 10 segundos
5---10 min: 30 segundos
10---30 min: 1 minuto
30---95 min: 5 minutos
Cocción al grill y cocción combinada
Orden Pantalla Potencia del microondas Potencia del grill
1 G-1 0% 100%
2 G-2 20% 80%
3 G-3 40% 60%
1:30
P900
20:00
P900
P700

68
Cocción al grill Pantalla
Apriete una vez en el botón Grill, aparece «G-1».
Gire el selector para ajustar la duración de cocción.
(La duración de cocción máxima es de 95 minutos.)
Ejemplo
: 8 minutos 30 segundos.
Apriete el botón On para comenzar la cocción.
Por ejemplo
: Si desea cocer al grill durante 10 minutos, programe
el horno como se explica a continuación.
Apriete una vez en el botón Grill, aparece «G-1».
Gire el selector para ajustar la duración de cocción hasta que el
horno indique «10:00».
Apriete el botón On para comenzar la cocción.
o
en el botón STOP para anular el ajuste
Observación:
A la mitad del tiempo de cocción, el horno emitirá dos pitidos para indicarle que hay que
dar la vuelta al alimento si es necesario.
Cocción combinada Pantalla
Apriete una vez en el botón Grill, aparece «G-1».
Siga apretando el botón Grill hasta que aparezca «G-2» o «G-3».
Gire el selector para ajustar la duración de cocción. La duración de
cocción máxima es de 95 minutos.
Apriete el botón On para comenzar la cocción.
o
en el botón STOP para anular el ajuste

69
Programación de la cocción rápida Pantalla
Cuando el aparato esté parado, apriete en el botón On para
empezar la cocción al 100% de potencia microondas durante 30
segundos. Cada presión suplementaria aumentará el tiempo de
cocción en 30 segundos hasta un máximo de 95 minutos.
En los modos microondas, grill y calor giratorio, cada presión en el
botón On aumenta la duración en 30 segundos.
Durante la cocción en modo Menú Auto y Descongelación por peso,
la duración no se puede aumentar apretando en el botón On.
Programación de la descongelación en función del peso Pantalla
Apriete el botón una vez, el horno mostrará «100».
Gire el selector para seleccionar el peso de los alimentos de 100 a
2.000 g.
Apriete el botón On para lanzar la descongelación.
Programación del Menú Auto Pantalla
Apriete en el botón Auto para seleccionar un menú de «A1» a
«A8».
Gire el selector para escoger el peso por defecto, como se indica
en el cuadro de los menús.
Apriete el botón On para comenzar la cocción.
Al final de la cocción, el timbre sonará dos veces.
Por ejemplo
: Si quiere utilizar el menú auto para cocer 150 gramos de pescado:
Pantalla
Apriete en el botón Auto tres veces para seleccionar «A3». El
piloto «pescado» se enciende.
Gire el selector para seleccionar 150 g.
Apriete el botón On para comenzar la cocción.
Consulte el siguiente cuadro para ver los menús.
Recomendación:
Cocción de las carnes: dé la vuelta al alimento cuando haya transcurrido la mitad del
tiempo para obtener un color y una cocción homogéneas.
A-1
400
150

70
b) Cuadro de los menús para los programas automáticos
MENÚS PESO TIEMPO
G-2 20% M/O + 80% GRILL
A-1 CARNES ROJAS
Utilice una fuente adaptada para el microondas y el grill.
Saque la carne del frigorífico 1 h antes de la cocción. Después de
la cocción, deje reposar la carne 10 min. envuelta en una hoja de
aluminio.
400 gr
600 gr
800 gr
1.000 gr
1.200 gr
15 min
20 min
23 min
26 min
30 min
G-3 40% M/O + 60% GRILL
A-2 CARNE BLANCA
Consulte los consejos para «carne roja».
400 gr
600 gr
800 gr
1.000 gr
1.200 gr
21 min
27 min
33 min
39 min
45 min
500 W
A-3 PESCADO
Añada 2 o 3 cucharadas de agua, zumo de limón o vino blanco.
Cubra con una tapa adaptada o un film alimentario.
150 gr
250 gr
300 gr
400 gr
600 gr
2 min 30
4 min
4 min 35
5 min 48
7 min 48
G-3 40% M/0 + 60% GRILL
A-4 AVES
Pinche la piel para evitar las salpicaduras de grasa.
Al final de la cocción, deje reposar 5 min en el horno.
500 gr
750 gr
1.000 gr
1.200 gr
1.500 gr
20 min
25 min
30 min
35 min
40 min
G-2 20% M/O + 80% GRILL
A-5 PLATOS CONGELADOS
Para calentar platos preparados congelados.
300 gr
450 gr
600 gr
750 gr
1.000 g
22 min
28 min
34 min
40 min
46 min
900 W
A-6 VERDURA
Para cocinar verdura fresca, añada:
- 2 cucharadas soperas de agua para 200 gr
- ½ dl si hay más
Cubra, excepto si son champiñones.
200 gr
300 gr
400 gr
500 gr
600 gr
6 min
7 min 35
8 min 50
10 min
12 min 25
900 W
A-7 PATATAS
Para cocer patatas enteras, calibradas o cortadas en trozos
regulares.
200 gr
400 gr
600 gr
800 g
1.000 gr
4 min
7 min
10 min 30
13 min 30
16 min 30
900 W
A-8 POTAJE
200 ml
300 ml
400 ml
500 ml
600 ml
2 min
3 min
4 min
5 min
6 min

71
Programación de la función memorización Pantalla
Apriete el botón MEMO 1 2 3 para seleccionar el programa
de cocción 1, 2 o 3.
Programe la cocción que prefiera.
Valide la programación apretando en el botón
MEMO 1 2 3. Pitido de confirmación y aparece la hora.
Observación:
La cocción en modo Menú Auto no se puede seleccionar como procedimiento de
memorización.
Por ejemplo
: para grabar el programa en memoria 2: cocer los alimentos a 700 W durante 3
minutos y 20 segundos.
Pantalla
Cuando el aparato esté parado, apriete en el botón
MEMO 1 2 3 dos veces, la pantalla muestra «2».
Apriete una vez el botón M-O, aparece «P900».
Siga apretando el botón M-O hasta que aparezca «P700».
Gire el selector para seleccionar 3 minutos y 20 segundos. Aparece
«3:20».
Apriete en el botón MEMO 1 2 3 para guardar los ajustes.
O apriete el botón On para comenzar la cocción y guardar los
ajustes a la vez.
La próxima vez, cuando el aparato esté parado, selección
Memoria 2
y luego apriete el botón On para comenzar la cocción.
Función Interrogación Pantalla
En modo microondas, apriete en el botón M-O, la potencia
vigente aparecerá durante 3 segundos.
Durante la cocción, apriete en el botón para conocer la
duración, que aparecerá durante 3 segundos.
Programación de la función bloqueo de protección (niños) Pantalla
Bloqueo: En modo pausa, apriete en el botón STOP durante
3 segundos, oirá una señal sonora que indica el estado de bloqueo
para niños. Aparecerá el piloto de bloqueo.
Desbloqueo: En modo bloqueo, apriete en el botón STOP
durante 3 segundos, oirá un pitido largo que indica que el horno
está desbloqueado. El piloto de bloqueo se apagará.
1
P900
8:59
2
P900
P700
3:20

72
Comentarios:
Al final de la cocción, la alarma sonará dos veces.
Durante la cocción, si se abre la puerta después de haberla cerrado, se deberá activar
el botón On para continuar la cocción.
Una vez que se haya seleccionado el programa de cocción, si no aprieta en el botón On
en menos de cinco minutos, se anulará la selección.
Modo silencioso:
Es posible poner el microondas en modo silencioso:
Apriete el botón durante 3 segundos para suprimir el sonido.
El pitido sonará una vez, y en la pantalla aparecerá "off" durante 1 segundo.
Apriete el botón durante 3 segundos para volver a poner el sonido.
El pitido sonará una vez, y en la pantalla aparecerá "on" durante 1 segundo.
Comentarios:
En modo descongelación y grill, a media altura, el horno emitirá dos pitidos para indicarle
que hay que dar la vuelta al alimento si es necesario.
4) CONSERVACIÓN Y LIMPIEZA DE SU APARATO
Se recomienda limpiar el horno periódicamente y eliminar todo resto de comida que haya en el
interior y el exterior del aparato. Utilice una esponja húmeda y con jabón. Si el aparato no se
mantiene limpio, su superficie podría degradarse, afectar de forma inexorable su duración de vida
y conllevar una situación peligrosa. Si la puerta o la junta de puerta sufren daños, no debe
utilizarse el microondas antes de haber sido reparado por una persona competente.
No limpiar el aparato con un limpiador de vapor.
Se desaconseja el uso de productos abrasivos, alcohol o disolvente, que podrían deteriorar el
aparato.
En caso de olores, o si el horno está encastrado, hierva agua con zumo de limón o vinagre en
una taza durante 2 minutos y limpie las paredes con un poco de lavavajillas líquido.
El plato se puede quitar para facilitar la limpieza. Para hacerlo, cójalo por las zonas de acceso
previstas para ello. Si quita el arrastrador, evite que el agua penetre en el agujero del eje motor.
No se olvide de volver a poner el arrastrador, el soporte de ruletas y el plato giratorio.

73
5) EN CASO DE ANOMALÍAS DE FUNCIONAMIENTO
Si tiene alguna duda sobre el funcionamiento correcto de su aparato, no significa que esté
forzosamente averiado. De todas formas, compruebe los siguientes puntos:
Constata que... ¿Qué hay que hacer?
El aparato no arranca.
Compruebe el enchufe de su aparato.
Compruebe que la puerta del horno esté bien
cerrada.
Compruebe que la seguridad infantil no
esté activada.
El aparato hace demasiado ruido.
El plato no da vueltas como es debido.
Limpie las ruletas y la zona de rodamiento bajo
el plato giratorio.
Compruebe que las ruletas están bien
posicionadas.
Constata que hay vapor en el cristal. Seque el agua de condensación con un trapo.
El alimento no se calienta en programa
microondas.
Compruebe que los utensilios son aptos para
el horno microondas y que el nivel de potencia
está bien adaptado.
El aparato produce chispas.
Limpiar bien el aparato: retirar las grasas, las
partículas de cocción,...
Aleje todos los elementos metálicos de las
paredes del horno.
No utilice nunca elementos metálicos con la
rejilla.
La bombilla está fundida.
Recurrir a un profesional cualificado
autorizado por la marca para cambiar la
bombilla.
Atención:
Este aparato posee un equipo de alta tensión. En todo caso, no intente nunca
acceder usted mismo al interior del aparato.

74
6) RECOMENDACIONES PARA MEDIR EL RENDIMIENTO
Métodos de medición de la aptitud a la función conformes a las normas CEI/EN/NF EN 60705.
La comisión Electrotécnica internacional SC 59 K, ha establecido una norma relativa a las medidas
comparativas de rendimiento realizadas en distintos hornos microondas.
Para este aparato, recomendamos lo siguiente:
Pruebas Carga
Tiempo
aprox.
Potencia Recipientes / consejos
Crema de
huevos
(12.3.1.)
1.000 gr
50 gr
21 min
13-15 min
500 W plato Pyrex ref. 227
en el plato giratorio
plato Pyrex ref. 220
en el plato giratorio
Pastel de
Saboya
(12.3.2.)
475 gr 7 min 700 W Plato Pyrex redondo
ref. 828
en el plato giratorio
Pan de carne
(12.3.3.)
900 gr 14 min 700 W plato cake Pyrex ref. 838
en plato giratorio
Cubrir con un film
alimentario
Descongelación
de la carne
(13.3.)
500 gr 10 min 50
+ 5 min
reposo
speed defrost en plato giratorio
Descongelación
de las
frambuesas
(B.2.1.)
250 gr 6-7 min 200 W plato llano sobre plato
giratorio
Gratinado de
patatas
(12.3.4.)
(Modelo con
grill)
1.100 gr 35 min G2 plato Pyrex ref. 827
en plato giratorio
Pollo
(12.3.6.)
(Modelo con
grill)
1.200 gr 45 min A4
C2
Fuente sobre plato giratorio
BRANDT FRANCIA - SAS con un capital social de 1 000 000 euros
89/91 Boulevard Franklin Roosevelt - 92854 Rueil-Malmaison (Francia)

75
Geachte Klant,
U heeft een product van BRANDT aangeschaft. Wij willen u graag bedanken voor uw
vertrouwen.
Wij hebben bij het ontwerpen en tijdens de vervaardiging van dit product aan u gedacht,
aan uw levenswijze, uw behoeften, opdat het zo goed mogelijk aan uw verwachten zou
voldoen. We hebben tijdens het ontwerpen al onze know-how, zin voor innovatie en alle
passie die ons reeds meer dan 60 jaar bezielt aangewend.
Onze klantendienst probeert voortdurend zo goed mogelijk tegemoet te komen aan de
eisen die u stelt. Onze mensen staan ten dienste van onze klanten en zijn bereid uw
vragen of suggesties te beantwoorden.
Kijk op onze website www.brandt.com, daar vindt u al onze laatste innovaties en
nuttige en aanvullende informatie.
BRANDT is blij u dagelijks bij te staan en hoopt dat u ten volle kan genieten van uw
aankoop.
Belangrijk: Voor installatie en gebruik van uw apparaat deze installatie- en
gebruikersgids aandachtig lezen. U zult snel gewend raken aan de werking
ervan.

76
INHOUDSOPGAVE
1) TER ATTENTIE VAN DE GEBRUIKER ............................................................................. 77
a) Veiligheidsvoorschriften ............................................................................................ 77
b) Technische gegevens ............................................................................................... 82
c) Werkingsprincipe ..................................................................................................... 82
d) Milieubescherming ................................................................................................... 83
2) INSTALLATIE VAN UW APPARAAT ................................................................................ 83
a) Voor het aansluiten .................................................................................................. 83
b) De elektrische aansluiting ......................................................................................... 84
c) Keukengerei ............................................................................................................ 85
d) Beschrijving van uw apparaat ................................................................................... 87
e) Voorstelling van het bedieningspaneel ....................................................................... 88
f) Installatie van het draaiplateau ................................................................................. 89
g) Installatie op een werkvlak ....................................................................................... 89
h) Installatie ................................................................................................................ 89
3) GEBRUIK VAN UW APPARAAT ...................................................................................... 91
a) Werkingsinstructies .................................................................................................. 91
b) Tabel met menu's voor de automatische programma's ................................................ 96
4) ONDERHOUD EN SCHOONMAKEN VAN UW APPARAAT .................................................. 98
5) IN GEVAL VAN WERKINGSPROBLEMEN ........................................................................ 99
6) AANBEVELINGEN VOOR HET METEN VAN HET VERMOGEN .......................................... 100

77
1) TER ATTENTIE VAN DE GEBRUIKER
Deze gebruikshandleiding bij het apparaat bewaren.
Mocht u het apparaat verkopen of afstaan aan iemand
anders, moet u ervoor zorgen dat de gebruikshandleiding
aan de nieuwe eigenaar wordt bezorgd. Wij verzoeken u
kennis te nemen van de handleiding voordat u het
apparaat gaat installeren en gebruiken. Deze handleiding
met de erin staande tips zijn opgesteld voor uw veiligheid
en die van anderen.
a) Veiligheidsvoorschriften
Algemene informatie:
Dit apparaat is uitsluitend bestemd voor een huishoudelijk
gebruik voor het koken, opwarmen of ontdooien van
voedingsmiddelen en drank. Het mag enkel gebruikt worden
in een afgedekte, gesloten en verwarmde omgeving zoals
een keuken of elke andere ruimte die aan dezelfde
specificaties beantwoordt.
Laat kinderen nooit onbewaakt, om te vermijden dat ze met
het apparaat zouden spelen.
Kinderen van minder dan 8 jaar moeten verwijderd worden
als zij niet voortdurend in het oog worden gehouden.
Houd het apparaat en het snoer ervan buiten het bereik van
kinderen jonger dan 8 jaar.
Installatie:
Bij installatie van deze oven moeten de in deze handleiding
vermelde installatievoorschriften gevolgd worden.
Zie hoofdstuk `INSTALLATIE VAN UW APPARAAT'.
Zorg ervoor dat de ventilatiesleuven van uw apparaat niet
belemmerd zijn.

78
Uw apparaat is niet bestemd voor installatie in een
meubelnis.
Als dit apparaat afgedekt wordt of in contact komt met
brandbaar materiaal met inbegrip van gordijnen, draperieën
en gelijkaardige elementen is er brandgevaar terwijl het
apparaat in werking is.
Houd het voedingssnoer uit de buurt van warme
oppervlakken en bedek of bouw de oven niet in.
Uw apparaat mag niet worden bediend door middel van een
externe timer of een afzonderlijk aangekocht
afstandsbedieningssysteem.
Gebruik:
De toegankelijke onderdelen van dit apparaat kunnen
warm worden tijdens de werking.
Vloeistoffen of andere voedingsmiddelen mogen niet
verwarmd worden in hermetisch afgesloten recipiënten, dit
kan leiden tot ontploffing.
Dit apparaat mag gebruikt worden door kinderen vanaf 8
jaar en personen met een beperkt lichamelijk, zintuiglijk of
geestelijk vermogen of met een gebrek aan ervaring of
kennis, op voorwaarde dat zij bijgestaan worden of zij
instructies betreffende het gebruik van dit apparaat hebben
ontvangen en zich bewust zijn van de gevaren die het
gebruik ervan kan inhouden.
De toegankelijke onderdelen van uw apparaat worden warm
tijdens het gebruik.
Kinderen moeten verwijderd worden als zij niet voortdurend
in het oog worden gehouden.
Plaats geen enkel element op het apparaat wanneer het in
werking is.

79
Ga na of het keukengerei geschikt is voor gebruik in een
microgolfoven.
Gebruik altijd isolerende handschoenen om schotels uit de
oven te verwijderen. Bepaalde schotels absorberen de
warmte van voedingsmiddelen, en zijn dus zeer warm.
Bij gebruik van "microgolfoven" of "microgolfoven
gecombineerd met een andere bakwijze" mag u geen
metalen recipiënten gebruiken, verwijder metalen sluitingen
en metalen handvaten van de recipiënten / zakken vooraleer
ze in de oven te plaatsen.
Om beschadiging van uw apparaat te voorkomen, mag u het
nooit leeg of zonder plateau laten werken.
In het geval van kleine hoeveelheden, zet u een glas water
naast het voedingsmiddel om de last te verhogen.
Indien u drank opwarmt in de microgolfoven kan dit leiden
tot een plots opspuiten en overlopen van de kokende
vloeistof, daarom dient u voorzichtig te zijn bij het hanteren
van het recipiënt.
Om brandwonden te voorkomen, moet u de inhoud van
zuigflessen en potjes met babyvoedsel roeren of schudden
en dient u de temperatuur ervan te controleren voor
verbruik.
Het wordt aanbevolen om geen eieren met pel en volledige
hardgekookte eieren in de een microgolfoven te verwarmen,
zelfs na het koken kunnen ze nog ontploffen.
Gebruik geen aluminiumfolie om voedingsmiddelen af te
dekken, dek geen deel van de oven af met aluminiumfolie.
Bij het verwarmen van voedingsmiddelen in plastic of
papieren houders, dient u de oven in het oog te houden om
ontvlamming te voorkomen.

80
Indien er rook komt uit het apparaat, schakelt u de oven uit,
verwijdert u de stekker uit het stopcontact en houdt u de
deur gesloten om eventuele vlammen te verstikken.
Het gebruik van accessoires die niet aanbevolen worden
door de fabrikant van het apparaat kan tot gevaarlijke
situaties of verwondingen leiden.
Gebruik het compartiment van de oven niet als
opbergruimte.
Plaats geen voedingsmiddelen zoals brood, droge taarten,
enz. in de oven.
Onderhoud:
Een gebrek aan onderhoud van de oven kan leiden tot
beschadiging van de oppervlakken van de holte of van de
deur en kan de levensduur van het apparaat onherstelbaar
wijzigen en leiden tot gevaarlijke situaties.
Schakel het apparaat uit en verwijder de stekker uit het
stopcontact voor elk onderhoud.
Uw apparaat genereert microgolven en bevat een
hoogspanningscircuit, verwijder de kap niet.
Het is gevaarlijk onderhoud waarvoor de beschermingskap
van het apparaat moet worden verwijderd te laten
uitvoeren door onbevoegde personen.
Verwijdering van de beschermingskap van het apparaat kan
leiden tot blootstelling aan microgolfenergie.
Verwijdering van de beschermingskap van het apparaat kan
leiden tot elektrocutie of contact met het
hoogspanningscircuit, zelfs al werd de stekker uit het
stopcontact verwijderd.
Het apparaat mag niet worden schoongemaakt of
onderhouden door kinderen jonger dan 8 jaar.

81
Uw apparaat moet regelmatig schoongemaakt worden.
Voedselresten moeten verwijderd worden.
Maak het apparaat niet schoon met een schuurspons of een
metalen schraper.
Voor uw veiligheid mag u het apparaat nooit schoonmaken
met behulp van een stoomreiniger.
De dichting en de deurkader moeten regelmatig
gecontroleerd worden op beschadiging. In geval van
beschadiging mag u het apparaat niet langer gebruiken en
dient u het te laten nakijken door een gespecialiseerde
technieker.
Wanneer u de gloeilamp van uw microgolfoven moet
veranderen, neemt u contact op met een gespecialiseerde
technieker.
Trek nooit aan het snoer, maar ontkoppel het apparaat door
het stopcontact tegen te houden.
Indien het voedingssnoer beschadigd is moet u het, om
gevaar te voorkomen, laten vervangen door de fabrikant,
zijn vertegenwoordiger of elke hiertoe gekwalificeerde
persoon.
Onzorgvuldig gebruik:
De fabrikant wijst iedere aansprakelijkheid van de hand in
geval van onzorgvuldig gebruik.
Gebruik dit apparaat uitsluitend voor de in de
gebruiksaanwijzing beschreven doeleinden.
Respecteer de algemene gebruiks- en
veiligheidsvoorschriften die in dit hoofdstuk vermeld staan.
Dit apparaat is niet bestemd voor het drogen van
voedingsmiddelen of wasgoed. Tevens is het niet bestemd

82
voor de voorverwarming van warmtekussens, pantoffels,
sponzen, vochtig wasgoed en andere gelijkaardige artikelen.
Het apparaat is evenmin bestemd voor sterilisatie. Dit soort
gebruik kan leiden tot vernieling van uw apparaat en
gevaarlijke situaties.
Dit apparaat is uitsluitend bestemd voor een huishoudelijk
gebruik in privéwoningen. Het gebruik van dit product in
gemeenschappelijke of professionele lokalen zoals
koffieruimtes op kantoren of werkplaatsen, campings, hotels
enz. beantwoordt niet aan een zorgvuldig gebruik zoals
bepaald door de fabrikant.
b) Technische gegevens
Model GE2626E*
Nominale spanning 230 V ~ 50 Hz
Nominaal toegevoerd vermogen (microgolven) 1 450 W
Nominaal uitgaand vermogen (microgolven) 900 W
Nominaal toegevoegd vermogen (Grill) 1 000 W
Diameter van het draaiplateau 31,5 cm
Afmetingen buitenkant (B x l x h) 513 x 412 x 307 mm
Netto gewicht 15,6 kg
c) Werkingsprincipe
De microgolven die voor het koken gebruikt worden, zijn elektromagnetische golven.
Ze komen veelvuldig voor in onze omgeving zoals elektrische radiogolven, licht, of zelfs
infraroodstralen.
Hun frequentie bevindt zich in de 2450 MHz-band.
Hun gedrag:
Ze worden geretroflecteerd door metalen.
Ze gaan door alle andere materialen.
Ze worden geabsorbeerd door water-, vet-, en suikermoleculen.
Wanneer een voedingsmiddel wordt blootgesteld aan microgolven volgt een snelle agitatie van
de moleculen wat leidt tot verwarming.
De penetratiediepte van de golven in het voedingsmiddel bedraagt ongeveer 2,5 cm, als het
voedingsmiddel dikker is, zal de kern van het voedingsmiddel verwarmd worden zoals bij een
traditionele opwarming.

83
d) Milieubescherming
Het is goed te weten dat de microgolven binnen in het voedingsmiddel een eenvoudig
warmteverschijnsel veroorzaken en dat zij niet schadelijk zijn voor de gezondheid.
Aan het einde van de levensduur mag dit product niet samen met ander huishoudelijk
afval weggegooid worden. Lever het in bij een containerpark of bij uw verkoper. Dat
maakt het mogelijk om de schadelijke gevolgen voor het milieu en de gezondheid te
vermijden en materialen te recyclen waardoor er heel wat energie en middelen
kunnen worden bespaard.
Het product bevat een logo dat u eraan herinnert dat u het product niet mag
weggooien met het huishoudelijk afval. Voor meer informatie neemt u contact op met
uw gemeente of de winkel waar u dit product gekocht heeft.
Uw apparaat bevat eveneens tal van recycleerbare materialen. Het is dus voorzien van dit logo
om u aan te duiden dat de gebruikte apparaten niet gemengd moeten worden met ander afval.
De apparaten zullen onder de beste omstandigheden door uw fabrikant gerecycled worden,
overeenkomstig de Europese richtlijn 2002/96/EG betreffende afgedankte elektrische en
elektronische apparatuur. Neem contact op gemeentehuis of uw verkoper om het dichtstbijzijnde
verzamelpunt voor gebruikte apparaten te kennen. Wij bedanken u voor uw bijdrage aan de
bescherming van het leefmilieu.
2) INSTALLATIE VAN UW APPARAAT
a) Voor het aansluiten
Opgelet:
Controleer of uw apparaat geen schade opgelopen heeft tijdens het transport (vervormde
deur of dichting, enz...).
Indien u om het even welke beschadiging vaststelt, contacteer dan, voor elk gebruik, uw
verkoper.
Fig.01

84
b) De elektrische aansluiting
Controleer:
- het installatievermogen voldoende is.
- de voedingskabel in goede staat zijn.
- de diameter van de draden in overeenstemming is met de installatieregels.
- uw installatie is uitgerust met een thermische bescherming van 20 ampère.
In geval van twijfel gelieve uw elektricien te raadplegen.
De elektrische aansluiting moet gebeuren voor de installatie van het apparaat op de definitieve
plaats.
De elektrische veiligheid moet verzekerd worden door een juiste aansluiting. Tijdens het
onderhoud moet het apparaat losgekoppeld worden van het elektrisch net en moeten de
zekeringen losgekoppeld of verwijderd worden.
Het apparaat moet met een genormaliseerd voedingssnoer met drie kabels 1,5 mm² (1-fasig +
1 neutraal + 1 aarding) aangesloten worden op het eenfasig netwerk 220-240 V 50 Hz met
behulp van een genormaliseerd stopcontact CEI 60083 met twee pennen en een Aarding en
overeenkomstig de vigerende installatieregels.
De draad van de Aarding (groen geel) is verbonden met de aansluitklem van het apparaat en
moet verbonden worden met de aarding van uw elektrische installatie.
De Neutrale draad (blauw) moet aangesloten worden met de neutrale draad van het elektrische
net.
De draad van Fase (rood, zwart of kastanjekleurig) moet aangesloten worden op de elektrische
fasedraad.
De stekker of elke andere elektrische stroomonderbreker moet onmiddellijk beschikbaar blijven
om een noodstop uit te voeren.
Voorziet eveneens in uw elektrische installatie een instrument waarmee u het apparaat kan
loskoppelen van het net en waarvan de opening van het contact minstens 3 mm bedraagt ter
hoogte van alle polen.
Indien de oven een anomalie vertoont, ontkoppelt u het apparaat en ontkoppelt u het apparaat.
Als de voedingskabel van uw apparaat beschadigd is, moet deze vervangen worden door de
fabrikant, zijn dienst-na-verkoop, of een bekwaam persoon om elk gevaar te voorkomen.
Opgelet: In geval van ongeval of incident ten gevolge van een onbestaande, defecte of foutieve
aarding.

85
c) Keukengerei
Raadpleeg de volgende instructies "Materialen die mogen worden gebruikt in uw microgolfoven
en materialen die moeten worden vermeden". Bepaalde niet metalen voorwerpen mogen niet
gebruikt worden in de microgolfoven. In geval van twijfel moet u het voorwerp in kwestie testen
volgens de onderstaande procedure.
Test met keukengerei:
1. Vul het recipiënt dat u in de microgolfoven wil plaatsen met een kopje koud water (250 ml)
en plaats het keukengerei in kwestie.
2. Laat gedurende 1 minuut op maximaal vermogen verwarmen.
3. Raak het voorwerp voorzichtig aan. Als het keukengerei zeer warm is, mag u het niet
gebruiken in de microgolfoven.
4. Laat niet meer dan 1 minuut koken.
Waarschuwing
Risico op letsel
Het is gevaarlijk voor een onbevoegd persoon om onderhouds- of
herstellingswerkzaamheden uit te voeren waarvoor de beschermingskap tegen
blootstelling op microgolfenergie moet gedemonteerd worden.

86
Materialen die in uw microgolfoven kunnen worden gebruikt
Keukengerei Opmerkingen
Aluminiumfolie Uitsluitend om af te dekken. Er kunnen kleine stukken aluminium
gebruikt worden om fijne deeltjes vlees of gevogelte af te dekken en
oververhitting te voorkomen. Er kan zich een vlamboog vormen als de
folie te dicht tegen de wanden van de oven komt. De folie moet
minstens 2,5 cm van de wanden van de oven verwijderd worden.
Bruinplateau Respecteer de instructies van de fabrikant. De bodem van het
bruinplateau moet minstens 5 cm hoger liggen dan het draaiplateau.
Foutief gebruik zou kunnen leiden tot barsten in het draaiplateau.
Vaatwerk Uitsluitend microgolfbestendig. Respecteer de instructies van de
fabrikant. Gebruik geen gebarsten of bekraste schotels.
Bokalen Verwijder steeds het deksel. Gebruik deze alleen om de
voedingsmiddelen een beetje te verwarmen. De meeste bokalen zijn
niet warmtebestendig en kunnen breken.
Glaswerk Uitsluitend speciale glazen die ovenbestendig zijn. Controleer de
aanwezigheid van metaal. Gebruik geen gebarsten of bekraste
schotels.
Ovenbestendige
zakken
Respecteer de instructies van de fabrikant. Sluit de zak niet met een
metalen bandje. Doorprik de zak om de stoom te kunnen laten
ontsnappen.
Papieren borden en
bekers
Uitsluitend te gebruiken voor korte bereidingstijden en opwarmen. Blijf
in de buurt van de oven tijdens het opwarmen.
Papieren servetten Gebruik ze uitsluitend om de voedingsmiddelen tijdens het opwarmen
af te dekken en voor het absorberen van overtollig vocht. Gebruik ze
onder toezicht en enkel voor een zeer korte bereidingstijd.
Vetvrij papier Enkel te gebruiken als afdekking om spatten te voorkomen of in
papillotte om te koken met stoom.
Plastic Uitsluitend plastic dat microgolven doorlaat. Respecteer de instructies
van de fabrikant. Het plastic moet de vermelding bevatten
"Microgolfovenbestendig". Bepaalde recipiënten in plastic smelten als
de voedingsmiddelen die ze bevatten warm zijn. De "kookzakjes" en de
hermetisch afgesloten plastic zakjes moeten gescheurd, doorprikt of
geopend worden, zoals aangeduid op de verpakking.
Plastic film Uitsluitend plastic dat microgolven doorlaat. Gebruik dit om uw
voedingsmiddelen af te dekken tijdens het bereidingsproces om de
vochtigheid te behouden. Laat de plastic film niet in contact komen
met de voedingsmiddelen.
Vetvrij papier Gebruik dit als afdekking om spatten te voorkomen en de vochtigheid
te behouden.

87
Materialen die moeten worden vermeden in de microgolfoven
Keukengerei Opmerkingen
Plateau in
aluminium
Kan leiden tot het ontstaan van vlambogen. Breng uw
voedingsmiddelen over in een microgolfovenbestendige schotel.
Voedselkarton met
metalen handvat
Kan leiden tot het ontstaan van vlambogen. Breng uw
voedingsmiddelen over in een microgolfovenbestendige schotel.
Keukengerei in
metaal of dat
metaal bevat
Metaal verhindert microgolfenergie de voedingsmiddelen te bereiken.
Het metalen frame kan leiden tot het ontstaan van vlambogen.
Metalen banden Kunnen leiden tot het ontstaan van vlambogen en brand in de oven.
Papieren zakken Kunnen brand veroorzaken in de oven.
Kunststof
schuimmateriaal
Het kunststof schuim kan smelten of de vloeistof aan de binnenkant
besmetten wanneer deze hoge temperaturen ondergaan.
Hout Het hout droogt als het zich in een microgolfoven bevindt en kan
splitsen of scheuren.
d) Beschrijving van uw apparaat
Namen van de stukken en accessoires van uw oven
Haal de oven en alle accessoires uit hun verpakking en de binnenkant van de oven.
A) Bedieningspaneel
B) Rolplateau
C) Steun met wieltjes
D) Glazen plaat
E) Controlevenster
F) Deur
G) Veiligheidsvergrendelings-
systeem
Rooster (alleen voor ovens met grill).
F
G
A
CB
E
D

88
e) Voorstelling van het bedieningspaneel
A Het display:
Vergemakkelijkt de programmering door de functies, de tijd of het
geprogrammeerde gewicht, het uur en de categorieën
voedingsmiddelen weer te geven.
B De toets Autoprogramma:
laat u toe het type schotel en het gewicht ervan te selecteren: het
apparaat regelt automatisch het vermogen en de baktijd.
C de toets Grill:
maakt het mogelijk om het geschikte vermogen van de grill te kiezen.
D De toets microgolven:
maakt het mogelijk om het geschikte vermogen van de microgolfoven
te kiezen.
E De toets ontdooien:
maakt het mogelijk om het ontdooien te programmeren volgens het
gewicht van de voedingsmiddelen.
F De toets uurafstelling:
maakt het mogelijk de klok juist te zetten.
G De toets Geheugens 1 2 3:
maakt het mogelijk om snel toegang te krijgen tot 3 vooraf
geprogrammeerde programma's.
H Wieltje:
maakt het mogelijk de bereidingstijd en het gewicht van de
voedingsmiddelen te kiezen
I De toets Start:
maakt het mogelijk om het koken te starten door op de rotator te
drukken.
J De toets Opening:
maakt het mogelijk om de deur van de microgolf-oven te openen
K Toets STOP/Annulatie:
maakt het mogelijk om een lopend programma te onderbreken of uit
te wissen.
A
B
C
D
E
F
G
H
I
J
K

89
f) Installatie van het draaiplateau
1. Centrale naaf (onderaan)
2. Glazen plaat
3. Rolplateau van het draaiplateau
4. Steun met wieltjes
a. Plaats nooit de glazen plaat omgekeerd. De rotatie van de glazen plaat mag nooit
belemmerd worden.
b. De glazen plaat en de steun met wieltjes moeten steeds gebruikt worden tijdens het
bakproces.
c. Alle voedingsmiddelen of -recipiënten worden altijd geplaatst op de glazen plaat voor hun
bakproces.
d. Als de glazen plaat of het draaiplateau gebarsten of gebroken is, neemt u contact op met
uw dichtstbijzijnde dienst-na-verkoop.
g) Installatie op een werkvlak
Verwijder de verpakking en leg de accessoires opzij.
Ga na of de oven niet beschadigd is, bijvoorbeeld sporen van schokken of een gebroken deur.
Installeer de oven niet in geval van beschadiging.
Carrosserie: Verwijder de beschermingsfilm van het oppervlak van de carrosserie van de
microgolfoven.
Verwijder niet de bekleding in lichtbruine Mica die zich in de holte van de oven bevindt
en die de microgolfoven beschermt.
h) Installatie
1. Dit product mag niet ingebouwd worden.
Voor een optimale ventilatie van uw microgolfoven brengt u het bijgeleverde plastic stuk met
deze handleiding in de daartoe voorziene opening aan de achterkant van uw apparaat (Fig 2).
Bevestig uw apparaat vervolgens tegen de muur, het plastic stuk zorgt voor een juiste
afstand voor een goede ventilatie.
Laat minstens 30 cm vrije ruimte boven de oven, 7,5 cm aan de linkerkant en laat de rechterkant
open (Fig. 1).

90
Verwijder de poten van de oven niet.
Belemmer de ventilatieroosters niet, het risico bestaat dat uw apparaat vroegtijdig schade
oploopt.
Fig 1
1. 7,5 cm
2. 30 cm
3. Open
Fig 2
2. Elektrische aansluiting
• Uw installatie moet uitgerust zijn met een thermische bescherming van 16 Ampère.
• Gebruik verplicht een stopcontact met aarding dat aangesloten is overeenkomstig de
vigerende veiligheidsnormen.
• Voorzie in uw elektrische installatie een instrument dat toegankelijk is voor de gebruiker
waarmee u het apparaat kan loskoppelen van het net en waarvan de opening van het
contact minstens 3 mm bedraagt ter hoogte van alle polen.
• Als de voedingskabel beschadigd is, moet deze vervangen worden door de fabrikant, zijn
dienst-na-verkoop, of een bekwaam persoon om elk gevaar te voorkomen.
WAARSCHUWING: Installeer de oven niet boven een kookplaat of elk apparaat dat warmte
produceert.
Als de oven te dicht bij een warmtebron wordt geïnstalleerd, kan dit de oven beschadigen en zal
de garantie geannuleerd worden.
Het toegankelijke oppervlak kan warm worden tijdens de werking van de oven.

91
3) GEBRUIK VAN UW APPARAAT
a) Werkingsinstructies
Opening van de deur
Om de deur van de microgolf-oven te openen:
Zorg ervoor dat deze onder spanning staat, druk vervolgens op de toets De deur zal
automatisch opengaan.
Wanneer de microgolfoven onder spanning staat, zal de oven "0:00" aangeven en zal de bel een
keer weerklinken.
Afstellen van de klok Weergave
Druk op de toets , de cijfers van de uren zullen flikkeren.
Draai aan de selectieknop om de uren af te stellen, het uur moet
liggen tussen 0 en 23 (24 uur).
Druk op de toets , de cijfers van de minuten zullen flikkeren.
Draai aan de selectieknop om de minuten te regelen, de minuten
moeten liggen tussen 0 en 59.
Druk op de toets om de uurregeling te beëindigen, " : " flikkert
en het uur gaat branden.
Koken met microgolven
Vermogenstabel van microgolven
Vermogen 900 W 700 W 500 W 350 W 150 W
Weergave P900 P700 P500 P350 P150
Weergave
Druk een keer op de toets M-O , "P900" verschijnt. Blijf drukken
om het gewenste vermogen te selecteren en "P900", "P700",
"P500", "P350" of "P150" zal bij elke druk op de knop verschijnen.
Draai aan de selectieknop voor regeling van de baktijd van 0:05 tot
95:00.
Druk op de toets Start om het koken te starten.
Bijvoorbeeld: Als u gedurende 20 minuten op 700 W wil koken,
stelt u de oven als volgt af:
0:00
12:00
12:35
1:30
P900

92
Druk een keer op de toets M-O , "P900" verschijnt.
Blijf drukken op de toets M-O om het vermogen van 700 W te
selecteren. "P700" verschijnt.
Draai aan de selectieknop om de baktijd te regelen tot de oven
"20:00" weergeeft.
Druk op de toets Start om het koken te starten.
of
op de toets STOP om te annuleren
Opmerking:
de afstelintervallen van de duur zijn de volgende:
0---1 min: 5 seconden
1---5 min: 10 seconden
5---10 min: 30 seconden
10---30 min: 1 minuut
30---95 min: 5 minuten
Bereiden met grill & gecombineerde microgolfoven
Volgorde Weergave Vermogen microgolfoven Vermogen grill
1 G-1 0% 100%
2 G-2 20% 80%
3 G-3 40% 60%
20:00
P900
P700

93
Bakken met grill Weergave
Druk een keer op de toets Grill, "G-1" verschijnt.
Draai aan de selectieknop voor de afstelling van de baktijd.
(De maximale bereidingstijd bedraagt 95 minuten.)
Voorbeeld
: 8 minuten 30 seconden
Druk op de toets Start om het bakken te starten.
Bijvoorbeeld
: Als u gedurende 10 minuten met de grill wil bakken,
stelt u de oven als volgt af:
Druk een keer op de toets Grill, "G-1" verschijnt.
Draai aan de selectieknop om de baktijd te regelen tot de oven
"10:00" weergeeft.
Druk op de toets Start om het bakken te starten.
of
op de toets STOP om de afstelling te annuleren
Opmerking:
Halverwege de bereidingstijd zal de oven twee bips laten weerklinken om aan te geven
dat het voedingsmiddel indien nodig moet omgedraaid worden.
Bakken met gecombineerde microgolfoven Weergave
Druk een keer op de toets Grill, "G-1" verschijnt.
Blijf op de toets Grill drukken tot "G-2" of "G-3" verschijnt.
Draai aan de selectieknop voor regeling van de baktijd. De
maximale bereidingstijd bedraagt 95 minuten.
Druk op de toets Start om het bakken te starten.
of
op de toets STOP om de afstelling te annuleren

94
Programmering om snel te koken Weergave
Wanneer de oven uitstaat drukt u op de toets Start om
gedurende 30 seconden het kookproces te starten aan 100%
microgolfvermogen. Bij elke druk op de knop zal de kooktijd met
30 seconden verhogen tot 95 minuten maximum.
In modus microgolven, grill en warme lucht, komt er bij elke druk
op de toets Start 30 seconden bij.
Tijdens het koken in modus Menu Auto en Ontdooien volgens het
gewicht, kan de duur vermeerderd worden door een druk op de
toets Start.
Programmering om te ontdooien volgens het gewicht Weergave
Druk een keer op de toets , de oven zal "100" weergeven.
Draai aan de selectieknop om het gewicht van de
voedingsmiddelen van 100 tot 2000 g te selecteren.
Druk op de toets Start om het ontdooien te starten.
Programmering van het Menu Auto Weergave
Druk op de toets Auto om een menu van "A1" tot "A8" te
selecteren.
Draai aan de selectieknop om het standaardgewicht te kiezen,
zoals aangeduid in de tabel van de menu's.
Druk op de toets Start om het bakken te starten.
Aan het einde van het koken, zal de bel twee keer weerklinken.
A-1
400

95
Bijvoorbeeld
: Als u het menu auto wil gebruiken om 150 gram vis te koken:
Weergave
Druk drie keer op de toets Auto om "A3" te selecteren. Het
lampje "vis" gaat branden.
Draai aan de selectieknop om 150 g te selecteren.
Druk op de toets Start om het bakken te starten.
Zie de volgende tabel om de menu's te raadplegen.
Aanbeveling:
Bereiden van vlees: draai het vlees halverwege om om een homogene kleur en bakwijze
te bekomen.
150

96
b) Tabel met menu's voor de automatische programma's
MENU'S GEWICHT TIJD
G-2 20% M/O + 80% GRILL
A1 ROOD VLEES
Gebruik een schotel die bestand is tegen gebruik in een
microgolfoven en grill.
Haal het vlees 1 uur voor de bereiding uit de koelkast. Na de
bereiding, laat u het vlees gedurende 10 min verpakt in
aluminiumfolie rusten uit de oven.
400 g
600 g
800 g
1000 g
1200 g
15 min
20 min
23 min
26 min
30 min
G-3 40% M/O +60% GRILL
A-2 WIT VLEES
Zie adviezen "rood vlees"
400 g
600 g
800 g
1000 g
1200 g
21 min
27 min
33 min
39 min
45 min
500 W
A-3 VIS
Voeg 2 tot 3 koffielepeltjes water, Citroensap of witte Wijn to
e.
Bedekt met een aangepast deksel of een voedingsmiddelenfolie.
150 g
250 g
300 g
400 g
600 g
2 min 30
4 min
4 min 35
5 min 48
7 min 48
G-3 40% M/0 +60% GRILL
A-4 GEVOGELTE
Prik in het vel om opspattend vet te voorkomen.
Na afloop laat u de bereiding 5 min rusten in de oven.
500 g
750 g
1000 g
1200 g
1500 g
20 min
25 min
30 min
35 min
40 min
G-2 20% M/O + 80% GRILL
A-5 INGEVROREN SCHOTELS
Om bereide ingevroren schotels op te warmen
300 g
450 g
600 g
750 g
1000 g
22 min
28 min
34 min
40 min
46 min
900W
A-6 GROENTEN
Om verse groenten te koken, voeg toe:
- 2 soeplepels water voor 200 g
- ½ dl extra
Bedek, behalve voor champignons.
200 g
300 g
400 g
500 g
600 g
6 min
7 min 35
8 min 50
10 min
12 min 25
900W
A-7 AARDAPPELEN
Om volledige, gekalibreerde of gelijke stukjes aardappel te kok
en.
200 g
400 g
600 g
800 g
1000 g
4 min
7 min
10 min 30
13 min 30
16 min 30
900 W
A-8 SOEP
200 ml
300 ml
400 ml
500 ml
600 ml
2 min
3 min
4 min
5 min
6 min

97
Programmering van de geheugenfunctie Weergave
Druk op de toets MEMO 1 2 3 om het bereidingsprogramma
1,2 of 3 te selecteren.
Programmeer de bereidingswijze naar keuze.
Valideer de programmering door op de toets MEMO 1 2 3
te drukken. Bevestigingsbip en weergave van het uur
Opmerking:
Het koken in modus Menu Auto kan enkel geselecteerd worden als geheugenprocedure.
Bijvoorbeeld
: om het programma in geheugen 2 op te nemen: bereid alle voedingsmiddelen
gedurende 3 minuten en 20 seconden op 700 W.
Weergave
Wanneer de oven uitgeschakeld is drukt u twee keer op de toets
MEMO 1 2 3 het scherm geeft "2" weer.
Druk een keer op de toets M-O, "P900" verschijnt.
Blijf op de toets M-O drukken tot "P700" verschijnt.
Draai aan de selectieknop om 3 minuten en 20 seconden te
selecteren. "3:20" verschijnt.
Druk op de toets MEMO 1 2 3 om de afstelling te bewaren.
Of druk op de toets Start om de bereiding te starten en de
afstelling tegelijkertijd te bewaren.
De volgende keer selecteert u in modus "stop" Geheugen 2
druk vervolgens op de toets Start om de bereiding te starten
Vraag-functie Weergave
Druk in modus "microgolven" op de toets M-O" het vermogen
tijdens het gebruik zal gedurende 3 seconden verschijnen.
Tijdens de bereiding drukt u op de toets om de duurtijd te
kennen, deze verschijnt gedurende 3 seconden.
1
P900
8:59
2
P900
P700
3:20

98
Programmering van de functie beschermingsvergrendeling
(kinderen)
Weergave
Vergrendeling: In de pauze-modus drukt u op de toets STOP
gedurende 3 seconden, u zal een geluidssignaal horen dat de
kindervergrendeling weergeeft. Het vergrendelingslampje gaat
branden.
Ontgrendeling: In de vergrendelingsmodus drukt u gedurende 3
seconden op de toets STOP, u hoort een lange "bip" om aan te
duiden dat de oven ontgrendeld is. Het vergrendelingslampje gaat
uit.
Opmerkingen:
Aan het einde van de bereiding, zal de bel twee keer weerklinken.
Als de deur, tijdens de bereiding, geopend werd en daarna opnieuw gesloten moet de
toets START opnieuw geactiveerd worden om de bereiding voort te zetten.
Eens het bereidingsprogramma geselecteerd is, en u drukt binnen de vijf minuten niet
op de toets START zal de selectie geannuleerd worden.
Stille modus:
Het is mogelijk om de microgolfoven in stille modus te zetten:
Druk gedurende 3 seconden op de toets om het geluid uit te schakelen.
De bip zal een keer weerklinken en het scherm zal gedurende 1 seconde "off" weergeven.
Druk gedurende 3 seconden op de toets om het geluid opnieuw in te schakelen.
De bip zal een keer weerklinken en het scherm zal gedurende 1 seconde "on" weergeven.
Opmerkingen:
In de ontdooimodus en grill zal de oven halverwege het dooiproces twee bips laten
weerklinken om aan te geven dat het voedingsmiddel indien nodig moet omgedraaid
worden.
4) ONDERHOUD EN SCHOONMAKEN VAN UW APPARAAT
Het is aan te raden de oven regelmatig schoon te maken en alle voedingsresten aan de binnen-
en buitenkant van het apparaat te verwijderen. Gebruik een vochtige zeepspons. Als het apparaat
niet schoon gehouden wordt, kan dit het oppervlak beschadigen en de levensduur onverbiddelijk
beperken en leiden tot een gevaarlijke situatie. Als de deur of het verbindingsstuk van de deur
beschadigd zijn, mag de oven niet meer gebruikt worden voor herstel door een bevoegd persoon.
Maak het apparaat niet schoon met een stoomreiniger.
Het gebruik van schurende producten, alcohol of verdunningsmiddelen wordt afgeraden; ze
kunnen het apparaat beschadigen.
In geval van geur of indien de oven vuil is, laat u gedurende 2 minuten water met citroensap of
azijn koken in een kop en reinig de wanden met een beetje vaatwasproduct.
Het plateau kan verwijderd worden om het reinigen te vereenvoudigen. Hiertoe neemt u deze
vast langs de hiertoe voorziene openingen. Als u het rolplateau opheft, moet u voorkomen dat er

99
water doordringt in het gat van de motoras. Vergeet niet het rolplateau, de steun met wieltjes
en het draaiplateau opnieuw te bevestigen.
5) IN GEVAL VAN WERKINGSPROBLEMEN
Als u twijfels heeft over de goede werking van uw apparaat betekent dit niet noodzakelijkerwijs
dat het defect is. In alle gevallen, controleert u de volgende punten:
U stelt vast dat… Wat moet u doen?
Het apparaat start niet.
Controleer de aansluiting van uw apparaat.
Ga na of de deur van uw oven goed gesloten
is.
Ga na of de kinderbeveiliging niet
geprogrammeerd is.
Het apparaat is luidruchtig.
Het plateau draait niet juist.
Maak de rolletjes en de zone onder het
draaiplateau schoon.
Controleer of alle wieltjes goed geplaatst zijn.
U stelt damp op de ruit vast.
Droog het condensatiewater af met behulp
van een vod.
Het voedingsmiddel wordt niet verwarmd in
het programma microgolven.
Ga na of het keukengerei geschikt is voor
microgolfovens en dat het vermogensniveau
goed aangepast is.
Het apparaat produceert vonken.
Maak het apparaat goed schoon: verwijder
vet, bakdeeltjes...
Verwijder elk metalen element van de wanden
van de oven.
Gebruik nooit metalen onderdelen met de grill.
De gloeilamp is verbrand.
Doe beroep op een professionele dealer van
het merk om de gloeilamp te vervangen.
Opgelet:
Dit apparaat is uitgerust met een hoogspanningscircuit. In elk geval mag u
nooit zelf handelingen verrichten aan de binnenkant van het apparaat.

100
6) AANBEVELINGEN VOOR HET METEN VAN HET VERMOGEN
Keuringstest volgens de normen CEI/EN/NF EN 60705.
De Internationale Elektrotechnische Commissie, SC.59K, heeft een norm opgezet met betrekking
tot vergelijkende prestatiekeuringen uitgevoerd op verschillende microgolfovens.
Wij raden u het volgende aan voor dit apparaat:
Test Lading
Geschatte
tijd
Vermogen Recipiënten / adviezen
Eiercrème
(12.3.1.)
1000 g
50 g
21 min
13-15 min
500 W schotel Pyrex ref. 227
op het draaiplateau
schotel Pyrex ref. 220
Op het draaiplateau
Savoie Gebak
(12.3.2.)
475 g 7 min 700 W ronde schotel pyrex
ref. 828
op het draaiplateau
Vleesbrood
(12.3.3.)
900 g 14 min 700 W Cakeschotel Pyrex ref. 838
op het draaiplateau
Bedek met een
voedingsmiddelenfolie
Ontdooien van
vlees
(13.3.)
500 g 10 min 50
+ 5 min rust
speed defrost op het draaiplateau
Ontdooien van
Frambozen
(B.2.1.)
250 g 6-7 min 200 W plat bord op draaiplateau
Aardappelgratin
(12.3.4.)
(Model met
grill)
1100 g 35 min G2 schotel Pyrex ref. 827
op het draaiplateau
Kip
(12.3.6.)
(Model met
grill)
1200 g 45 min A4
C 2
schotel op het draaiplateau
BRANDT FRANKRIJK - S.A.S. met een kapitaal van 1.000.000 euro
89/91 Boulevard Franklin Roosevelt - 92854 Rueil-Malmaison (Frankrijk)

ﺏﺭﺎﺠﺘﻟﺍ ﻥﺍﺯﻭﻷﺍ ﻲﻬﻄﻟﺍ ﺓﺪﻣ
ﺔﻴﺒﻳﺮﻘﺗ
ﺔﻗﺎﻄﻟﺍ ﺢﺋﺎﺼﻧ / ﻲﻧﺍﻭﻷﺍ
ﺾﻴﺒﻟﺍ ﺔﻤﻳﺮﻛ
(12.3.1.)
1000ﻍ
50ﻍ
21 ﺔﻘﻴﻗﺩ
13 -15 ﺔﻘﻴﻗﺩ
500 ﻁﺍﻭ
ﺲﻛﺮﻴﺑ ﻖﺒﻁPyrex réf. 227 ﻕﻮﻓ
ﺭﺍ
ﱠ
ﻭﺪﻟﺍ ﺹﺮﻘﻟﺍ
ﺲﻛﺮﻴﺑ ﻖﺒﻁPyrex réf. 220 ﻕﻮﻓ
ﺭﺍ
ﱠ
ﻭﺪﻟﺍ ﺹﺮﻘﻟﺍ
ﺔﻴﺠﻨﻔﺳﺃ ﺔﻜﻌﻛ
(12.3.2.)
475ﻍ 7 ﻖﺋﺎﻗﺩ 700 ﻁﺍﻭ
ﻱﺮﺋﺍﺩ ﺲﻛﺮﻴﺑ ﻖﺒﻁpyrex réf. 828
ﺭﺍ
ﱠ
ﻭﺪﻟﺍ ﺹﺮﻘﻟﺍ ﻕﻮﻓ
ﻢﺤﻠﻟﺍ ﻒﻴﻏﺭ
(12.3.3.)
900ﻍ 14 ﺔﻘﻴﻗﺩ 700 ﻁﺍﻭ
ﺲﻛﺮﻴﺑ ﻚﻴﻜﻟﺍ ﻞﻤﻋ ﻖﺒﻁPyrex réf.
838 .ﺭﺍ
ﱠ
ﻭﺪﻟﺍ ﺹﺮﻘﻟﺍ ﻕﻮﻓ
ﻦﻣ ﺔﻘﺒﻄﺑ ﺔﻴﻄﻐﺘﻟﺍﻔﺸﻟﺍ ﻚﻴﺘﺳﻼﺒﻟﺍ ﻑﺎ
ﺔﻳﺬﻏﻷﺍ ﻒﻴﻠﻐﺘﺑ ﺹﺎﺨﻟﺍ
ﻦﻣ ﺞﻠﺜﻟﺍ ﺐﻳﻭﺬﺗ
ﻡﻮﺤﻠﻟﺍ (13.3.)
500 ﻍ 10 ﻖﺋﺎﻗﺩ50 ﺔﻴﻧﺎﺛ
+ 5 ﺔﺣﺍﺮﺘﺳﺍ ﻖﺋﺎﻗﺩ
ﺞﻠﺜﻠﻟ ﻊﻳﺮﺳ ﺐﻳﻭﺬﺗ
ﺭﺍ
ﱠ
ﻭﺪﻟﺍ ﺹﺮﻘﻟﺍ ﻕﻮﻓ
ﻦﻣ ﺞﻠﺜﻟﺍ ﺐﻳﻭﺬﺗ
ﺕﻮﺘﻟﺍ ﺔﻬﻛﺎﻓ
(B.2.1.)
250ﻍ 6-7 ﻖﺋﺎﻗﺩ 200 ﻁﺍﻭ
ﺭﺍ
ﱠ
ﻭﺪﻟﺍ ﺹﺮﻘﻟﺍ ﻕﻮﻓ ﺢﻄﺴ
ُ
ﻣ ﻦﺤﺻ
ﺲﻁﺎﻄﺒﻟﺍ ﺔﻴﻨﻴﺻ
(12.3.4.)
(ءﺍﻮﺷ ﻥﺮﻓ ﻞﻳﺩﻮﻣ)
1100ﻍ 35 ﺔﻘﻴﻗﺩ G2
ﺲﻛﺮﻴﺑ ﻖﺒﻁpyrex réf. 827
ﺭﺍ
ﱠ
ﻭﺪﻟﺍ ﺹﺮﻘﻟﺍ ﻕﻮﻓ
ﺝﺎﺟﺪﻟﺍ
(12.3.6.)
(ءﺍﻮﺷ ﻥﺮﻓ ﻞﻳﺩﻮﻣ)
1200 ﻍ 45 ﺔﻘﻴﻗﺩ A4
C2
ﺭﺍ
ﱠ
ﻭﺪﻟﺍ ﺹﺮﻘﻟﺍ ﻕﻮﻓ ﻦﺤﺻ
BRANDT FRANCE – SAS au capital de 1.000.000 euros
89/91 Boulevard Franklin Roosevelt – 92500 Rueil-Malmaison (France)
121

5( ﻞﻴﻐﺸﺘﻟﺍ ﻲﻓ ﻞﻠﺧ ﺙﻭﺪﺣ ﺔﻟﺎﺣ ﻲﻓ
ﻴﻟﺎﺘﻟﺍ ﻁﺎﻘﻨﻟﺍ ﻦﻣ ﻖﻘﺤﺘﻟﺍ ﻢﺘﻳ ،ﻝﺍﻮﺣﻷﺍ ﻊﻴﻤﺟ ﻲﻓ .ﻞﻄ
ُ
ﻋ ﻪﺑ ﺯﺎﻬﺠﻟﺍ ﻥﺃ ﻚﻟﺫ ﻲﻨﻌﻳ ﻼﻓ ،ﻢﻜﻳﺪﻟ ﺯﺎﻬﺠﻟﺍ ﻞﻴﻐﺸﺗ ﻦﺴﺣ ﻦﻋ ﻙﻮﻜﺷ ﻱﺃ ﻢﻜﻳﺪﻟ ﻥﺎﻛ ﺍﺫﺇ:ﺔ
ﻪﻧﺃ ﻢﺗﺪﺟﻭ... ؟ﻪﻠﻌﻓ ﻲﻐﺒﻨﻳ ﺍﺫﺎﻣ
.ﻞﻤﻌﻳ ﻻ ﺯﺎﻬﺠﻟﺍ
ﻞﻴﺻﻮﺗ ﻦﻣ ﺪﻛﺄﺘﻟﺍ .ﺢﻴﺤﺻ ﻞﻜﺸﺑ ﻲﺋﺎﺑﺮﻬﻜﻟﺍ ﺭﺎﻴﺘﻟﺎﺑ ﺯﺎﻬﺠﻟﺍ
.
ً
ﺍﺪﻴﺟ ﻥﺮﻔﻟﺍ ﺏﺎﺑ ﻖﻠﻏ ﻦﻣ ﺪﻛﺄﺘﻟﺍ
(ﻝﺎﻔﻁﻷﺍ) ﺔﻳﺎﻤﺤﻟﺍ ﻞﻔﻗ ﻡﺎﻈﻧ ﺔﺠﻣﺮﺑ ﻡﺪﻋ ﻦﻣ ﻖﻘﺤﺘﻟﺍ
.ﻲﻟﺎﻋ ﺞﻴﺠﺿ ﺭﺪﺼ
ُ
ﻳ ﺯﺎﻬﺠﻟﺍ
.ﻢﻴﻠﺳ ﻞﻜﺸﺑ ﺭﻭﺪﻳ ﻻ ﺹﺮﻘﻟﺍ
ﺹﺮﻘﻟﺍ ﻞﻔﺳﺃ ﻥﺍﺭﻭﺪﻟﺍ ﺔﻘﻄﻨﻣﻭ ﺓﺮﻴﻐﺼﻟﺍ ﺕﻼﺠﻌﻟﺍ ﻒﻴﻈﻨﺗ ﺐﺠﻳ
.ﺭﺍ
ﱠ
ﻭﺪﻟﺍ
ﺕﻼﺠﻌﻟﺍ ﻥﺃ ﻦﻣ ﺪﻛﺄﺘﻟﺍ.ﺢﻴﺤﺼﻟﺍ ﺎﻬﻌﺿﻮﻣ ﻲﻓ ﺓﺩﻮﺟﻮﻣ ﺓﺮﻴﻐﺼﻟﺍ
.ﺏﺎﺒﻠﻟ ﻲﺟﺎﺟﺰﻟﺍ ﺡﻮﻠﻟﺍ ﻰﻠﻋ ﻢﻛﺍﺮﺘﻣ ﺭﺎﺨﺑ ﺩﻮﺟﻭ
.ﺔﻔﺸﻨﻣ ﻡﺍﺪﺨﺘﺳﺎﺑ ﻒﺛﺎﻜﺘﻤﻟﺍ ءﺎﻤﻟﺍ ﺢﺴﻣ ﻢﺘﻳ
.ﻒﻳﻭﻭﺮﻜﻴﻤﻟﺍ ﻂﻤﻨﺑ ﻡﺎﻌﻄﻟﺍ ﻦﻴﺨﺴﺗ ﻢﺘﻳ ﻻ
ﻒﻳﻭﻭﺮﻜﻴﻤﻟﺍ ﻥﺮﻓ ﻲﻓ ﺎﻬﻣﺍﺪﺨﺘﺳﺎﺑ ﺡﻮﻤﺴﻣ ﻲﻧﺍﻭﻷﺍ ﻥﺃ ﻦﻣ ﺪﻛﺄﺘﻟﺍ
.ﺐﺳﺎﻨﻣ ﺔﻗﺎﻄﻟﺍ ﻯﻮﺘﺴﻣ ﻥﺄﺑﻭ
ﺔﻴﺋﺎﺑﺮﻬﻛ ﺓﺭﺍﺮﺷ ﺙﺎﻌﺒﻧﺍ .ﺯﺎﻬﺠﻟﺍ ﻦﻣ
...ﻞﻛﻷﺍ ﺎﻳﺎﻘﺑ ﻭ ﻥﻮﻫﺪﻟﺍ ﺔﻟﺍﺯﺇ :
ً
ﺍﺪﻴﺟ ﺯﺎﻬﺠﻟﺍ ﻒﻴﻈﻨﺗ ﺐﺠﻳ
.ﻥﺮﻔﻟﺍ ﺐﻧﺍﻮﺟ ﻦﻋ ﺔﻴﻧﺪﻌﻣ ﺮﺻﺎﻨﻋ ﻱﺃ ﺩﺎﻌﺑﺇ
.ﺔﻜﺒﺸﻟﺍ ﻊﻣ ﺔﻴﻧﺪﻌﻣ ﺮﺻﺎﻨﻋ ﻡﺍﺪﺨﺘﺳﺍ ﻡﺪﻋ
ﻲﻠﺧﺍﺪﻟﺍ ﺡﺎﺒﺼﻤﻟﺍ ﻕﺍﺮﺘﺣﺍ
ﻝﺎﺼﺗﻻﺍ ﺔﻳﺭﺎﺠﺘﻟﺍ ﺔﻣﻼﻌﻟﺍ ﻞﻴﻛﻭ ﻦﻣ ﺺﺧﺮ
ُ
ﻣﻭ ﻞﻫﺆﻣ ﻲﻨﻔﺑ
.ﻥﺮﻔﻠﻟ ﻲﻠﺧﺍﺪﻟﺍ ﺡﺎﺒﺼﻤﻟﺍ ﻝﺍﺪﺒﺘﺳﻻ
:ﻪﻴﺒﻨﺗ
.ﻢﻛﺩﺮﻔﻤﺑ ﻥﺮﻔﻟﺍ ﻞﺧﺍﺪﺑ ﻝﺎﻤﻋﺃ ﻱﺄﺑ ﻡﺎﻴﻘﻟﺍ
ً
ﺍﺪﺑﺃ ﺐﺠﻳ ﻻ ،ﺕﻻﺎﺤﻟﺍ ﻊﻴﻤﺟ ﻲﻓ .ﻲﻟﺎﻋ ﺪﻬﺟ ﺓﺮﺋﺍﺪﺑ ﺩﻭﺰﻣ ﺯﺎﻬﺠﻟﺍ ﺍﺬﻫ
6( ﺯﺎﻬﺠﻟﺍ ءﺍﺩﺃ ﻦﺴﺣ ﺱﺎﻴﻘﻟ ﺕﺎﻴﺻﻮﺗ
ﺮﻴﻳﺎﻌﻤﻠﻟ
ً
ﺎﻘﻓﻭ ﺯﺎﻬﺠﻠﻟ ﺔﻴﻔﻴﻅﻮﻟﺍ ﺓﺭﺪﻘﻟﺍ ﺱﺎﻴﻗ ﺐﻴﻟﺎﺳﺃCEI/EN/NF EN 60705
ﺔﻴﻟﻭﺪﻟﺍ ﺔﻴﻨﻘﺗﻭﺮﻬﻜﻟﺍ ﺔﻨﺠﻠﻟﺍ ﺖﻌﺿﻭElectrotechnique Internationale SC 59 K ﻲﺘﻟﺍﻭ ﻥﺭﺎﻘﻤﻟﺍ ءﺍﺩﻸﻟ ﺲﻴﻳﺎﻘﻤﺑ ﺔﻘﻠﻌﺘ
ُ
ﻣ ﺮﻴﻳﺎﻌﻣ
.ﺔﻔﻠﺘﺨﻣ ﻒﻳﻭﻭﺮﻜﻴﻣ ﻥﺍﺮﻓﺃ ﻰﻠﻋ ﺖﻳﺮﺟﺃ
:ﻲﻠﻳ ﺎﻤﺑ ﻲﺻﻮﻧ ﺎﻨﻧﺈﻓ ،ﺯﺎﻬﺠﻟﺍ ﺍﺬﻫ ﺺ
ُ
ﺨﻳ ﺎﻤﻴﻓ
120

:ﺕﺎﻈﺣﻼﻣ
.ﻦﻴﺗﺮﻣ ﻲﺗﻮﺻ ﻪﻴﺒﻨﺗ ﺭﺪﺼﻳ ﻑﻮﺳ ،ﻲﻬﻄﻟﺍ ءﺎﻬﺘﻧﺍ ﺪﻨﻋ
.ﻲﻬﻄﻟﺍ ﺔﻠﺻﺍﻮﻤﻟ ﻞﻴﻐﺸﺘﻟﺍ ءﺪﺑ ﺭﺯ ﻰﻠﻋ ﻂﻐﻀﻟﺍ ﺐﺠﻴﻓ ،ﻪﻗﻼﻏﺇ ﻢﺗ ﻢﺛ ،ﻲﻬﻄﻟﺍ ﺔﻴﻠﻤﻋ ءﺎﻨﺛﺃ ﻥﺮﻔﻟﺍ ﺏﺎﺑ ﺢﺘﻓ ﻢﺗ ﺍﺫﺇ
ﻱﺬﻟﺍ ﺞﻣﺎﻧﺮﺒﻟﺍ ءﺎﻐﻟﺇ ﻢﺘﻳ ﻑﻮﺴﻓ
ﱠ
ﻻﺇﻭ ،
ٍ
ﻥﺍﻮﺛ ﺲﻤﺧ ﻝﻼﺧ ﻞﻴﻐﺸﺘﻟﺍ ءﺪﺑ ﺭﺯ ﻰﻠﻋ ﻂﻐﻀﻟﺍ ﻢﺘﻳ ﻥﺃ ﺐﺠﻳ ،ﻲﻬﻄﻟﺍ ﺞﻣﺎﻧﺮﺑ ﺭﺎﻴﺘﺧﺍ ﺭﻮﻓ
.ﻩﺭﺎﻴﺘﺧﺍ ﻢﺗ
:ﻥﻮﻜﺴﻟﺍ ﺔﻴﻌﺿﻭ
ﺮﻓ ﻊﺿﻭ ﻦﻜﻤﻤﻟﺍ ﻦﻣ:ﻥﻮﻜﺴﻟﺍ ﺔﻴﻌﺿﻭ ﻲﻓ ﻒﻳﻭﻭﺮﻜﻴﻤﻟﺍ ﻥ
ﺭﺯ ﻰﻠﻋ ﻂﻐﻀﻟﺍ ﻢﺘﻳ ﺓﺪﻤﻟ3 .ﺕﻮﺼﻟﺍ ءﺎﻐﻟﻹ
ٍ
ﻥﺍﻮﺛ
ﺔﻣﻼﻌﻟﺍ ﺔﺷﺎﺸﻟﺍ ﻰﻠﻋ ﺮﻬﻈﺗﻭ ﺓﺪﺣﺍﻭ ﺓﺮﻣ ﻲﺗﻮﺻ ﻪﻴﺒﻨﺗ ﺭﺪﺼﻳ ﻑﻮﺳ“off” .ﺓﺪﺣﺍﻭ ﺔﻴﻧﺎﺛ ﺓﺪﻤﻟ
ﺭﺯ ﻰﻠﻋ ﻂﻐﻀﻟﺍ ﻢﺘﻳ ﺓﺪﻤﻟ3 .ﺕﻮﺼﻟﺍ ﺓﺩﺎﻋﻹ
ٍ
ﻥﺍﻮﺛ
ﺔﻣﻼﻌﻟﺍ ﺔﺷﺎﺸﻟﺍ ﻰﻠﻋ ﺮﻬﻈﺗﻭ ﺓﺪﺣﺍﻭ ﺓﺮﻣ ﻲﺗﻮﺻ ﻪﻴﺒﻨﺗ ﺭﺪﺼﻳ ﻑﻮﺳ“on” .ﺓﺪﺣﺍﻭ ﺔﻴﻧﺎﺛ ﺓﺪﻤﻟ
:ﺔﻅﻮﺤﻠﻣ
،ﻲﻬﻄﻟﺍ ﺓﺪﻣ ﻒﺼﺘﻨﻣ ﻲﻓ ﺝﻭﺩﺰﻣ ﻲﺗﻮﺻ ﻪﻴﺒﻨﺗ ﺔﻠﺻﺍﻮﺘﻣ ﺓﺭﻮﺼﺑ ﻥﺮﻔﻟﺍ ﺭﺪﺼﻳ ،ﺔﻳﺍﻮﺸﻟﺍ ﻂﻤﻧ ﻭ ﺞﻠﺜﻟﺍ ﺐﻳﻭﺬﺗ ﻂﻤﻧ ﻞﻴﻐﺸﺗ ءﺎﻨﺛﺃ
.ﺮﻣﻷﺍ ﺐﺟﻮﺘﺳﺍ ﺍﺫﺇ ﻡﺎﻌﻄﻟﺍ ﺐﻴﻠﻘﺗ ﻰﻟﺇ
ً
ﺍﺮﻴﺸﻣ
4( ﻨﺘﻋﻻﺍﻭ ﻒﻴﻈﻨﺘﻟﺍﺯﺎﻬﺠﻟﺎﺑ ءﺎ
ﺫﺇ .ﻥﻮﺑﺎﺼﻟﺍﻭ ءﺎﻤﻟﺎﺑﻭ ﺔﺒﻁﺭ ﺔﺠﻨﻔﺳﺃ ﻡﺍﺪﺨﺘﺳﺎﺑ ﻒﻴﻈﻨﺘﻟﺍ ﻢﺘﻳ .ﺯﺎﻬﺠﻟﺍ ﺝﺭﺎﺧﻭ ﻞﺧﺍﺩ ﻦﻣ ﻡﺎﻌﻄﻟﺍ ﺎﻳﺎﻘﺑ ﻊﻴﻤﺟ ﺔﻟﺍﺯﺇﻭ
ً
ﺎﻳﺭﻭﺩ ﻥﺮﻔﻟﺍ ﻒﻴﻈﻨﺘﺑ ﻰﺻﻮﻳ ﺍ
ﺔﻴﻌﺿﻭ ﻲﻓ ﺢﺒﺼﻳﻭ ﻲﺿﺍﺮﺘﻓﻻﺍ ﻩﺮﻤﻋ ﻰﻠﻋ ﺔﻟﺎﺤﻣ ﻻ ﺮﻴﺛﺄﺘﻟﺍﻭ ﺯﺎﻬﺠﻟﺍ ﺢﻄﺳ ﺭﻮﻫﺪﺗ ﻰﻟﺇ ﻚﻟﺫ ﻱﺩﺆﻳ ﺪﻘﻓ ،ﺯﺎﻬﺠﻟﺍ ﺔﻓﺎﻈﻨﺑ ءﺎﻨﺘﻋﻻﺍ ﻢﺘﻳ ﻢﻟ .ﺓﺮﻄﺧ
.ﻪﺣﻼﺻﺈﺑ ﺺﺘﺨ
ُ
ﻣ ﻲﻨﻓ ﺺﺨﺷ ﻡﺎﻴﻗ ﻞﺒﻗ ﻥﺮﻔﻟﺍ ﻡﺍﺪﺨﺘﺳﺍ ﻢﺘﻳ ﻼﻓ ،ﺏﺎﺒﻟﺎﺑ ﺓﺩﻮﺟﻮﻤﻟﺍ ﺔﻴﻠﺼﻔﻤﻟﺍ ﻞﺻﺍﻮﻔﻟﺍ ﻭﺃ ﺏﺎﺒﻟﺎﺑ ﻒﻠﺗ ﻱﺃ ﻖﺤﻟ ﺍﺫﺇ
.ﺭﺎﺨﺒﻟﺎﺑ ﻞﻤﻌﺗ ﻒﻴﻈﻨﺗ ﺔﻨﻴﻛﺎﻣ ﻡﺍﺪﺨﺘﺳﺎﺑ ﺯﺎﻬﺠﻟﺍ ﻒﻴﻈﻨﺗ ﻢﺘﻳ ﻻ
ﺎﻬﻧﺄﺷ ﻦﻤﻓ ؛ﻥﺮﻔﻟﺍ ﻒﻴﻈﻨﺘﻟ ﺕﺎﺒﻳﺬ
ُ
ﻣ ﻭﺃ ﻝﻮﺤﻜﻟﺍ ﻰﻠﻋ ﻱﻮﺘﺤﺗ ﻭﺃ ﺔﻠﻛﺁ ﺩﺍﻮﻣ ﻡﺍﺪﺨﺘﺳﺎﺑ ﻰﺻﻮﻳ ﻻ .ﺭﺮﻀﻟﺍ ﻪﺑ ﻖﺤﻠ
ُ
ﺗ ﻥﺃ
،ﻦﻴﺘﻘﻴﻗﺩ ﺓﺪﻤﻟ ﻞﺨﻟﺍ ﻭﺃ ﻥﻮﻤﻴﻠﻟﺍ ﺮﻴﺼﻋ ﻦﻣ ﺾﻌﺒﻟﺍ ﻪﻴﻟﺇ ﻑﺎﻀﻣ ءﺎﻤﻟﺍ ﻦﻣ ﻥﺎﺠﻨﻓ ﺭﺍﺪﻘﻣ ﻲﻠﻏ ﻢﺘﻳ ،ﺯﺎﻬﺠﻟﺎﺑ ﺔﺒﺳﺮﺘ
ُ
ﻤﻟﺍ ﺥﺎﺳﻭﻷﺍﻭ ﺢﺋﺍﻭﺮﻟﺍ ﺔﻟﺍﺯﻹ
.ﻥﻮﺤﺼﻟﺍ ﻞﻴﺴﻏ ﻞﺋﺎﺳ ﻦﻣ ﻞﻴﻠﻘﻟﺍ ﺔﻓﺎﺿﺇ ﻊﻣ ،ﻪﺑ ﻥﺮﻔﻟﺍ ﺐﻧﺍﻮﺟ ﻒﻴﻈﻨﺗ ﻢﺘﻳ ﻢﺛ
ﺣ ،ﻪﻔﻴﻈﻨﺗ ﺔﻴﻠﻤﻋ ﻞﻴﻬﺴﺘﻟ ﺹﺮﻘﻟﺍ ﺔﻟﺍﺯﺇﻭ ﻚﻓ ﻦﻜﻤ
ُ
ﻳ ﺐﺠﻴﻓ ،ﺮﻳﻭﺪﺘﻟﺍ ﺓﺍﺩﺃ ﺔﻟﺍﺯﺇ ﺔﻟﺎﺣ ﻲﻓ .ﻚﻟﺬﻟ ﺔﺼﺼﺨ
ُ
ﻤﻟﺍ ﻊﺿﺍﻮﻤﻟﺍ ﻦﻣ ﻪﺑ ﻙﺎﺴﻣﻹﺍ ﻢﺘﻳ ﺚﻴ
ﺔﺼﺼﺨ
ُ
ﻤﻟﺍ ﻦﻛﺎﻣﻷﺍ ﻲﻓ ﺭﺍ
ﱠ
ﻭﺪﻟﺍ ﺹﺮﻘﻟﺍﻭ ﺓﺮﻴﻐﺻ ﺕﻼﺠﻌﺑ ﻞﻣﺎﺤﻟﺍﻭ ﺮﻳﻭﺪﺘﻟﺍ ﺓﺍﺩﺃ ﺓﺩﺎﻋﺇ ﺮﻛﺬﺗ ﺐﺠﻳ .ﺮﻳﻭﺪﺘﻟﺍ ﺭﻮﺤﻣ ﺐﻘﺛ ﻲﻓ ءﺎﻤﻟﺍ ﻝﻮﺧﺩ ﺐﻨﺠﺗ
.ﻢﻬﻟ
119

ﺓﺮﻛﺍﺬﻟﺍ ﺔﻔﻴﻅﻭ ﺔﺠﻣﺮﺑ
ﺔﺷﺎﺸﻟﺍ ﻰﻠﻋ ﺽﺮﻌﻟﺍ
ﺭﺯ ﻰﻠﻋ ﻂﻐﻀﻟﺍ ﻢﺘﻳMEMO 1 2 3 ﻲﻬﻄﻟﺍ ﺞﻣﺎﻧﺮﺑ ﺭﺎﻴﺘﺧﻻ1 ﻭﺃ2 ﻭﺃ3.
.ﺔﺑﻮﻠﻄﻤﻟﺍ ﻲﻬﻄﻟﺍ ﺔﻴﻋﻮﻧ ﺔﺠﻣﺮﺑ ﻢﺘﻳ
ﺭﺰﻟﺍ ﻰﻠﻋ ﻂﻐﻀﻟﺎﺑ ﺞﻣﺎﻧﺮﺒﻟﺍ ﺪﻴﻛﺄﺗ ﻢﺘﻳMEMO 1 2 3 ﺪﻴﻛﺄﺘﻠﻟ ﺔﻴﺗﻮﺻ ﺓﺭﺎﺷﺇ ﺭﺪﺼﺗ ﻑﻮﺳ .
.ﺔﺷﺎﺸﻟﺍ ﻰﻠﻋ ﺔﻋﺎﺴﻟﺍ ﺮﻬﻈﺗﻭ
:ﺔﻅﻮﺤﻠﻣ
ﻲﻬﻄﻟﺍ ﻢﺋﺍﻮﻗ ﻂﻤﻨﺑ ﻲﻬﻄﻟﺍ ﺭﺎﻴﺘﺧﺍ ﻢﺘﻳ ﻻ.ﺓﺮﻛﺍﺬﻟﺎﺑ ﻆﻔﺤﻠﻟ ءﺍﺮﺟﺈﻛ ﻲﻟﻵﺍ
ﻝﺎﺜﻤﻟﺍ ﻞﻴﺒﺳ ﻰﻠﻋ
ﺓﺮﻛﺍﺬﻟﺎﺑ ﻲﻬﻁ ﺞﻣﺎﻧﺮﺑ ﻞﻴﺠﺴﺘﻟ :2 ﺔﻗﺎﻄﺑ ﻡﺎﻌﻄﻟﺍ ﻲﻬﻁ :700 ﺓﺪﻤﻟ ، ﻁﺍﻭ3 ﻭ ﻖﺋﺎﻗﺩ20 .ﺔﻴﻧﺎﺛ
ﺔﺷﺎﺸﻟﺍ ﻰﻠﻋ ﺽﺮﻌﻟﺍ
ﺭﺯ ﻰﻠﻋ ﻂﻐﻀﻟﺍ ﻢﺘﻳ ،ﺯﺎﻬﺠﻟﺍ ﻒﻗﻮﺗ ءﺎﻨﺛﺃMEMO 1 2 3 ﺔﻣﻼﻌﻟﺍ ﺔﺷﺎﺸﻟﺍ ﻰﻠﻋ ﺮﻬﻈﻴﻓ ،ﻦﻴﺗﺮﻣ
« 2 »
ﻂﻐﻀﻟﺍ ﻢﺘﻳﺭﺯ ﻰﻠﻋ ﺓﺪﺣﺍﻭ ﺓﺮﻣ ﺔﻣﻼﻌﻟﺍ ﺮﻬﻈﺘﻓ ،ﻒﻳﻭﻭﺮﻜﻴﻤﻟﺍ« P900 » ﺔﺷﺎﺸﻟﺍ ﻰﻠﻋ
ﺭﺯ ﻰﻠﻋ ﻂﻐﻀﻟﺍ ﺔﻠﺻﺍﻮﻣ ﻢﺘﻳ ﺔﻣﻼﻌﻟﺍ ﺽﺮﻋ ﻢﺘﻳ ﻰﺘﺣ ﻒﻳﻭﻭﺮﻜﻴﻣ« P700 » ﺔﺷﺎﺸﻟﺍ ﻰﻠﻋ
ﺖﻗﻮﻟﺍ ﻦﻴﻴﻌﺘﻟ ﺭﺎﻴﺘﺧﻻﺍ ﺭﺯ ﺮﻳﻭﺪﺘﺑ ﻡﺎﻴﻘﻟﺍ3 ﻭ ﻖﺋﺎﻗﺩ20 ﺔﻣﻼﻌﻟﺍ ﺔﺷﺎﺸﻟﺍ ﻰﻠﻋ ﺮﻬﻈﺗ ﻑﻮﺳ .ﺔﻴﻧﺎﺛ
« 3:20 ».
ﻡﺎﻴﻘﻟﺍ ﺭﺰﻟﺍ ﻰﻠﻋ ﻂﻐﻀﻟﺎﺑMEMO 1 2 3 .ﺎﻬﺑ ﻡﺎﻴﻘﻟﺍ ﻢﺗ ﻲﺘﻟﺍ ﻂﺒﻀﻟﺍ ﺕﺍﺩﺍﺪﻋﺇ ﻆﻔﺤﻟ
ﺲﻔﻧ ﻲﻓ ﻂﺒﻀﻟﺍ ﺕﺍﺩﺍﺪﻋﺇ ﻆﻔﺣ ﻊﻣ ﻲﻬﻄﻟﺍ ﺔﻴﻠﻤﻋ ءﺪﺒﻟ ﻞﻴﻐﺸﺘﻟﺍ ءﺪﺑ ﺭﺯ ﻰﻠﻋ ﻂﻐﻀﻟﺍ ﻢﺘﻳ ﻭﺃ
.ﺖﻗﻮﻟﺍ
ﺓﺮﻛﺍﺬﻟﺍ ﺭﺎﻴﺘﺧﺍ ﻢﺘﻳ ،ﺯﺎﻬﺠﻟﺍ ﻒﻗﻮﺗ ءﺎﻨﺛﺃ ،ﺔﻴﻟﺎﺘﻟﺍ ﺓﺮﻤﻟﺍ ﻲﻓ2
ﺭﺯ ﻰﻠﻋ ﻂﻐﻀﻟﺍ ﻢﺘﻳ ﻢﺛ ﻞﻴﻐﺸﺘﻟﺍ ءﺪﺑ.ﻲﻬﻄﻟﺍ ﺔﻴﻠﻤﻋ ءﺪﺒﻟ
ﻡﻼﻌﺘﺳﻻﺍ ﺔﻔﻴﻅﻭ
ﺔﺷﺎﺸﻟﺍ ﻰﻠﻋ ﺽﺮﻌﻟﺍ
ﺯﺭ ﻰﻠﻋ ﻂﻐﻀﻟﺍ ﻢﺘﻳ ،ﻒﻳﻭﻭﺮﻜﻴﻤﻟﺍ ﻂﻤﻨﺑ ﻲﻬﻄﻟﺍ ءﺎﻨﺛﺃﻒﻳﻭﻭﺮﻜﻴﻣ ﻯﻮﺘﺴﻣ ﺔﺷﺎﺸﻟﺍ ﻰﻠﻋ ﺮﻬﻈﻴﻓ ،
ﺓﺪﻤﻟ ﻪﻣﺍﺪﺨﺘﺳﺍ ﻱﺭﺎﺠﻟﺍ ﺔﻗﺎﻄﻟﺍ3 .
ٍ
ﻥﺍﻮﺛ
ﺭﺰﻟﺍ ﻰﻠﻋ ﻂﻐﻀﻟﺍ ﻢﺘﻳ ،ﻲﻬﻄﻟﺍ ءﺎﻨﺛﺃ ﺓﺪﻤﻟ ﺔﺷﺎﺸﻟﺍ ﻰﻠﻋ ﺮﻬﻈﺘﺳ ﻲﺘﻟﺍﻭ ﻲﻬﻄﻟﺍ ﺓﺪﻣ ﺔﻓﺮﻌﻤﻟ 3
.
ٍ
ﻥﺍﻮﺛ
(ﻝﺎﻔﻁﻷﺍ) ﺔﻳﺎﻤﺤﻟﺍ ﻞﻔﻗ ﺔﻔﻴﻅﻭ ﺔﺠﻣﺮﺑ
ﺔﺷﺎﺸﻟﺍ ﻰﻠﻋ ﺽﺮﻌﻟﺍ
ﻂﻤﻧ ءﺎﻨﺛﺃ :ﻝﺎﻔﻗﻹﺍ ﺭﺯ ﻰﻠﻋ ﻂﻐﻀﻟﺍ ﻢﺘﻳ ،ﺭﺎﻈﺘﻧﻻﺍ STOP ﺓﺪﻤﻟ (ﻒﻴﻗﻮﺘﻟﺍ)3 ﻊﻤﺴ
ُ
ﺗ ﻑﻮﺳ ،
ٍ
ﻥﺍﻮﺛ
.ﻞﻔﻘﻟﺍ ﺮﺷﺆﻣ ﺔﺷﺎﺸﻟﺍ ﻰﻠﻋ ﺮﻬﻈﻴﺳ .ﻝﺎﻔﻁﻷﺍ ﻞﻔﻗ ﺔﻴﻌﺿﻭ ﻰﻟﺇ ﺮﻴﺸ
ُ
ﺗ ﺔﻴﺗﻮﺻ ﺓﺭﺎﺷﺇ
ﺭﺯ ﻰﻠﻋ ﻂﻐﻀﻟﺍ ﻢﺘﻳ ،ﻝﺎﻔﻗﻹﺍ ﻂﻤﻧ ءﺎﻨﺛﺃ :ﻞﻔﻘﻟﺍ ﺢﺘﻓSTOP ﺓﺪﻤﻟ (ﻒﻴﻗﻮﺘﻟﺍ)3 ﻊﻤﺴ
ُ
ﻳ ﻑﻮﺳ .
ٍ
ﻥﺍﻮﺛ
.ﻝﺎﻔﻗﻹﺍ ﺮﺷﺆﻣ ﺊﻔﻄﻨﻳﻭ ،ﻝﺎﻔﻗﻹﺍ ﺢﺘﻓ ﻢﺗ ﻪﻧﺃ ﻰﻟﺇ ﺮﻴﺸﻳ ﻞﻳﻮﻁ ﻲﺗﻮﺻ ﻪﻴﺒﻨﺗ
118
1
P900
8:59
2
P900
P700
3:20

(ﺏ ﻝﻭﺪﺟ
ﻲﻟﻵﺍ ﻲﻬﻄﻟﺍ ﻢﺋﺍﻮﻗ
ﻢﺋﺍﻮﻘﻟﺍ ﻥﺯﻮﻟﺍ ﻲﻬﻄﻟﺍ ﺓﺪﻣ
G-2 20% + ﻒﻳﻭﻭﺮﻜﻴﻤﻟﺍ80% ﺔﻳﺍﻮﺸﻟﺍ
A-1 ءﺍﺮﻤﺤﻟﺍ ﻡﻮﺤﻠﻟﺍ
.ﺺﻴﻤﺤﺘﻟﺍﻭ ﻱﻮﺸﻟﺍ ﻥﺮﻓﻭ ﻒﻳﻭﻭﺮﻜﻴﻤﻟﺍ ﻥﺮﻓ ﻲﻓ ﻪﻣﺍﺪﺨﺘﺳﺍ ﺡﻮﻤﺴﻣ ﻦﺤﺻ ﻝﺎﻤﻌﺘﺳﺍ ﻢﺘﻳ
ﻢﺤﻠﻟﺍ ﻙﺮﺘ
ُ
ﻳ ،ﻲﻬﻄﻟﺍ ءﺎﻬﺘﻧﺍ ﺪﻨﻋ .ﻲﻬﻄﻟﺍ ﻞﺒﻗ ﺓﺪﺣﺍﻭ ﺔﻋﺎﺳ ﺪﻴﻤﺠﺘﻟﺍ ﺔﺟﻼﺛ ﻦﻣ ﻢﺤﻠﻟﺍ ﺝﺍﺮﺧﺇ ﺐﺠﻳ
ﺔﺣﺍﺮﺘﺳﻼﻟ10 .ﻡﻮﻴﻨﻣﻮﻟﻷﺍ ﻖﺋﺎﻗﺮﺑ ﻒﻠﻐ
ُ
ﻣ ﻮﻫﻭ ﻥﺮﻔﻟﺍ ﺝﺭﺎﺧ ﻖﺋﺎﻗﺩ
400 ﻍ
600 ﻍ
800 ﻍ
1000 ﻍ
1200 ﻍ
15 min
20 min
23 min
26 min
30 min
G-340% + ﻒﻳﻭﻭﺮﻜﻴﻤﻟﺍ60% ﺔﻳﺍﻮﺸﻟﺍ
A-2 ءﺎﻀﻴﺒﻟﺍ ﻡﻮﺤﻠﻟﺍ
."ءﺍﺮﻤﺤﻟﺍ ﻡﻮﺤﻠﻟﺍ" ﺢﺋﺎﺼﻨﻟﺍ ﺓﺮﻘﻓ ﻰﻠﻋ ﻉﻼﻁﻹﺍ
400 ﻍ
600 ﻍ
800 ﻍ
1000 ﻍ
1200 ﻍ
21 min
27 min
33 min
39 min
45 min
500 ﻁﺍﻭ
A-3 ﻙﺎﻤﺳﻷﺍ
.ﺾﻴﺑﻷﺍ ﺬﻴﺒﻨﻟﺍ ﻭﺃ ﻥﻮﻤﻴﻠﻟﺍ ﺮﻴﺼﻋ ﻭﺃ ءﺎﻤﻟﺍ ﻦﻣ ﻖﻋﻼﻣ ﺙﻼﺛ ﻭﺃ ﻦﻴﺘﻘﻌﻠﻣ ﻑﺎﻀﺗ
ﻦﻣ ﺔﻘﺒﻄﺑ ﻭﺃ ﻒﻳﻭﻭﺮﻜﻴﻤﻟﺍ ﻲﻓ ﻪﻣﺍﺪﺨﺘﺳﺍ ﺡﻮﻤﺴﻣ ءﺎﻄﻐﺑ ﻡﺎﻌﻄﻟﺍ ﻰﻄﻐ
ُ
ﻳ ﺹﺎﺨﻟﺍ ﻑﺎﻔﺸﻟﺍ ﻚﻴﺘﺳﻼﺒﻟﺍ
ﺔﻳﺬﻏﻷﺍ ﻒﻴﻠﻐﺘﺑ
150 ﻍ
250 ﻍ
300 ﻍ
400 ﻍ
600 ﻍ
2 min 30
4 min
4 min 35
5 min 48
7 min 48
G-3 40% + ﻒﻳﻭﻭﺮﻜﻴﻤﻟﺍ60% ﺔﻳﺍﻮﺸﻟﺍ
A-4 ﺭﻮﻴﻄﻟﺍﻭ ﻦﺟﺍﻭﺪﻟﺍ
.ﻥﻮﻫﺪﻟﺍ ﺮﺛﺎﻨﺗ ﻊﻨﻤﻟ ﺪﻠﺠﻟﺍ ﺰﺧﻭ
ﺓﺪﻣ ﻥﺮﻔﻟﺍ ﻞﺧﺍﺩ ﺔﺣﺍﺮﺘﺳﻼﻟ ﻙﺮﺘ
ُ
ﺗ ،ﻲﻬﻄﻟﺍ ءﺎﻬﺘﻧﺍ ﺪﻌﺑ5 ﻖﺋﺎﻗﺩ
500 ﻍ
750 ﻍ
1000 ﻍ
1200 ﻍ
1500 ﻍ
20 min
25 min
30 min
35 min
40 min
G-2 20% + ﻒﻳﻭﻭﺮﻜﻴﻤﻟﺍ80% ﺔﻳﺍﻮﺸﻟﺍ
A-5 ﺓﺪﻤﺠ
ُ
ﻤﻟﺍ ﺕﺎﺒﺟﻮﻟﺍ
ﺓﺪﻤﺠ
ُ
ﻤﻟﺍ ﺓﺰﻫﺎﺠﻟﺍ ﺕﺎﺒﺟﻮﻟﺍﻭ ﺕﻼﻛﻷﺍ ﺔﺌﻓﺪﺘﻟ
300 ﻍ
450 ﻍ
600 ﻍ
750 ﻍ
1000 ﻍ
22 ﺔﻘﻴﻗﺩ
28 ﺔﻘﻴﻗﺩ
34 ﺔﻘﻴﻗﺩ
40 ﺔﻘﻴﻗﺩ
46 ﺔﻘﻴﻗﺩ
900 ﻁﺍﻭ
A-6 ﺕﺍﻭﺮﻀﺨﻟﺍ
:ﺔﻓﺎﺿﺇ ﻢﺘﻳ ،ﺔﺟﺯﺎﻄﻟﺍ ﺕﺍﻭﺮﻀﺨﻟﺍ ﻲﻬﻄﻟ
- 2 ﻞﻜﻟ ءﺎﻤﻟﺍ ﻦﻣ ﺓﺮﻴﺒﻛ ﺔﻘﻌﻠﻣ200 ﻍ
- ﻑﺎﻀﻳ½ ﺮﺒﻛﺃ ﻥﺍﺯﻭﻷ ﻞﺳﺩ
ﺮﻄﻔﻟﺍ ءﺎﻨﺜﺘﺳﺎﺑ ،ﺎﻬﺘﻴﻄﻐﺗ ﻢﺘﻳ
200 ﻍ
300 ﻍ
400 ﻍ
500 ﻍ
600 ﻍ
6 ﻖﺋﺎﻗﺩ
7 ﺩ 35 ﺔﻴﻧﺎﺛ
8 ﺩ 50 ﺔﻴﻧﺎﺛ
10 ﻖﺋﺎﻗﺩ
12 ﺩ 25 ﺔﻴﻧﺎﺛ
900 ﻁﺍﻭ
A-7 ﺲﻁﺎﻄﺒﻟﺍ
.ﺔﻤﻈﺘﻨﻣ
ً
ﺎﻌﻄﻗ ﺔﻌﻄﻘ
ُ
ﻣ ﻭﺃ ﻡﺎﺠﺣﺃ ،ﺔﻠﻣﺎﻛ ﺲﻁﺎﻄﺒﻟﺍ ﻲﻬﻁ ﻞﺟﺃ ﻦﻣ
200 ﻍ
400 ﻍ
600 ﻍ
800 ﻍ
1000 ﻍ
4 ﻖﺋﺎﻗﺩ
7 ﻖﺋﺎﻗﺩ
10 ﺩ 30 ﺔﻴﻧﺎﺛ
13 ﺩ 30 ﺔﻴﻧﺎﺛ
16 ﺩ 30 ﺔﻴﻧﺎﺛ
900 ﻁﺍﻭ
A-8 (ءﺎﺴﺤﻟﺍ) ﺔﺑﺭﻮﺸﻟﺍ
200 ﻞﻠﻣ
300 ﻞﻠﻣ
400 ﻞﻠﻣ
500 ﻞﻠﻣ
600 ﻞﻠﻣ
ﻦﻴﺘﻘﻴﻗﺩ
3 ﻖﺋﺎﻗﺩ
4 ﻖﺋﺎﻗﺩ
5 ﻖﺋﺎﻗﺩ
6 ﻖﺋﺎﻗﺩ
117

ﻊﻳﺮﺴﻟﺍ ﻲﻬﻄﻟﺍ ﺔﺠﻣﺮﺑ
ﺔﺷﺎﺸﻟﺍ ﻰﻠﻋ ﺽﺮﻌﻟﺍ
ﺔﻴﻠﻤﻋ ءﺪﺒﻟ ﻞﻴﻐﺸﺘﻟﺍ ءﺪﺑ ﺭﺯ ﻰﻠﻋ ﻂﻐﻀﻟﺍ ﻢﺘﻳ ،ﻲﺘﻗﻮﻟﺍ ﻒﻗﻮﺘﻟﺍ ءﺎﻨﺛﺃ ﺔﻗﺎﻁ ﻯﻮﺘﺴﻤﺑ ﻲﻬﻄﻟﺍ
ﻒﻳﻭﻭﺮﻜﻳﺎﻤﻠﻟ100% ﺓﺪﻤﻟ30 ـﺑ ﻲﻬﻄﻟﺍ ﺓﺪﻣ ﺩﺍﺩﺰﺗ ﺔﻴﻓﺎﺿﺇ ﺔﻄﻐﺿ ﻞﻛ ﻊﻣ .ﺔﻴﻧﺎﺛ30 ﻰﺘﺣ ﺔﻴﻧﺎﺛ
95 .ﻰﺼﻗﺃ ﺪﺤﻛ ﺔﻘﻴﻗﺩ
ﻲﻔﻓ ،ﻥﺮﻔﻟﺍ ﻞﻤﺠ
ُ
ﻣ ﻲﻓ ﻦﺧﺎﺴﻟﺍ ءﺍﻮﻬﻟﺍ ﻥﺍﺭﻭﺩﻭ ﺔﻳﺍﻮﺸﻟﺍﻭ ﻒﻳﻭﻭﺮﻜﻳﺎﻤﻟﺎﺑ ﻲﻬﻄﻟﺍ ﻁﺎﻤﻧﻷ ﺔﺒﺴﻨﻟﺎﺑ
ﺩﺍﺩﺰﺗ ﻞﻴﻐﺸﺘﻟﺍ ءﺪﺑ ﺭﺯ ﻰﻠﻋ ﻂﻐﻀﻟﺍ ﺎﻬﻴﻓ ﻢﺘﻳ ﺓﺮﻣ ﻞﻛ ﻲﻬﻄﻟﺍ ﺓﺮﺘﻓ30 ﺔﻴﻧﺎﺛ
ﻲﻬﻄﻟﺍ ﺓﺪﻣ ﺓﺩﺎﻳﺯ ﻦﻜﻤ
ُ
ﻳ ﻼﻓ ،ﻥﺯﻮﻟﺍ ﺐﺴﺣ ﺞﻠﺜﻟﺍ ﺐﻳﻭﺬﺗﻭ ﺔﻴﻟﻵﺍ ﻲﻬﻄﻟﺍ ﻢﺋﺍﻮﻗ ﻲﺘﻔﻴﻅﻭ ﻡﺍﺪﺨﺘﺳﺍ ﺪﻨﻋ
ﺭﺯ ﻰﻠﻋ ﻂﻐﻀﻟﺍ ﻖﻳﺮﻁ ﻦﻋ .ﻞﻴﻐﺸﺘﻟﺍ ءﺪﺑ
ﻥﺯﻮﻟﺍ ﺐﺴﺣ ﺞﻠﺜﻟﺍ ﺐﻳﻭﺬﺗ ﺔﻔﻴﻅﻭ ﺔﺠﻣﺮﺑ
ﺔﺷﺎﺸﻟﺍ ﻰﻠﻋ ﺽﺮﻌﻟﺍ
ﺭﺯ ﻰﻠﻋ ﻂﻐﻀﻟﺍ ﺔﻣﻼﻌﻟﺍ ﻥﺮﻔﻟﺍ ﺔﺷﺎﺷ ﻰﻠﻋ ﺮﻬﻈﺘﻓ ،ﺓﺪﺣﺍﻭ ﺓﺮﻣ« 100 »
ﻦﻴﺑ ﺎﻣ ﻡﺎﻌﻄﻟﺍ ﻥﺯﻭ ﻦﻴﻴﻌﺘﻟ ﺭﺎﻴﺘﺧﻻﺍ ﺭﺯ ﺮﻳﻭﺪﺗ ﻢﺘﻳ100 ﻭ2000 .ﻍ
.ﺞﻠﺜﻟﺍ ﺐﻳﻭﺬﺗ ﺔﻴﻠﻤﻋ ءﺪﺒﻟ ﻞﻴﻐﺸﺘﻟﺍ ءﺪﺑ ﺭﺯ ﻰﻠﻋ ﻂﻐﻀﻟﺍ
ﻲﻟﻵﺍ ﻲﻬﻄﻟﺍ ﻢﺋﺍﻮﻗ ﺔﺠﻣﺮﺑ
ﺔﺷﺎﺸﻟﺍ ﻰﻠﻋ ﺽﺮﻌﻟﺍ
ﺭﺯ ﻰﻠﻋ ﻂﻐﻀﻟﺍAuto ﻦﻣ ﻢﺋﺍﻮﻘﻟﺍ ﻯﺪﺣﺇ ﺭﺎﻴﺘﺧﻻ (ﻲﻟﺁ ﻲﻬﻁ ﺞﻣﺍﺮﺑ) « A1 » ﻰﻟﺇ« A8» .
ﻲﻬﻄﻟﺍ ﻢﺋﺍﻮﻗ ﻝﻭﺪﺟ ﻲﻓ ﺭﻮﻛﺬﻣ ﻮﻫ ﺎﻤﻛ ،ﻲﺿﺍﺮﺘﻓﻻﺍ ﻥﺯﻮﻟﺍ ﻦﻴﻴﻌﺘﻟ ﺭﺎﻴﺘﺧﻻﺍ ﺭﺯ ﺮﻳﻭﺪﺗ ﻢﺘﻳ
ﻲﻬﻄﻟﺍ ﺔﻴﻠﻤﻋ ءﺪﺒﻟ ﻞﻴﻐﺸﺘﻟﺍ ءﺪﺑ ﺭﺯ ﻰﻠﻋ ﻂﻐﻀﻟﺍ ﻢﺘﻳ
.ﻦﻴﺗﺮﻣ ﻲﺗﻮﺻ ﻪﻴﺒﻨﺗ ﻥﺮﻔﻟﺍ ﻦﻣ ﺭ
ُ
ﺪﺼﻳ ،ﻲﻬﻄﻟﺍ ءﺎﻬﺘﻧﺍ ﺪﻨﻋ
ﻰﻠﻋ:ﻝﺎﺜﻤﻟﺍ ﻞﻴﺒﺳ
ﻲﻬﻄﻟ ﻲﻟﻵﺍ ﻲﻬﻄﻟﺍ ﻢﺋﺍﻮﻗ ﻡﺍﺪﺨﺘﺳﺍ ﻲﻓ ﺔﺒﻏﺮﻟﺍ ﺔﻟﺎﺣ ﻲﻓ150 :ﻚﻤﺴﻟﺍ ﻦﻣ ﻡﺍﺮﻏ
ﺔﺷﺎﺸﻟﺍ ﻰﻠﻋ ﺽﺮﻌﻟﺍ
ﺭﺯ ﻰﻠﻋ ﻂﻐﻀﻟﺍAuto ﺭﺎﻴﺘﺧﻻ ﺕﺍﺮﻣ ﺙﻼﺛ«A3» ﺮﺷﺆﻣ ﺾﻣﻮﻳ ﻑﻮﺳ .
ﻚﻤﺴﻟﺍ« poisson »
ﻦﻴﻴﻌﺘﻟ ﺭﺎﻴﺘﺧﻻﺍ ﺭﺯ ﺮﻳﻭﺪﺗ ﻢﺘﻳ150 .ﻍ
ﺭﺯ ﻰﻠﻋ ﻂﻐﻀﻟﺍ ﺔﻴﻠﻤﻋ ءﺪﺒﻟ ﻞﻴﻐﺸﺘﻟﺍ ءﺪﺑ .ﻲﻬﻄﻟﺍ
.ﻲﻟﻵﺍ ﻲﻬﻄﻟﺍ ﻢﺋﺍﻮﻗ ﻰﻠﻋ ﻉﻼﻁﻼﻟ ﻲﻟﺎﺘﻟﺍ ﻝﻭﺪﺠﻟﺍ ﻰﻟﺇ ﻉﻮﺟﺮﻟﺍ ﻰﺟﺮﻳ
:ﺔﻴﺻﻮﺗ
ﻦﻴﺴﻧﺎﺠﺘﻣ ﺞﻀﻧ ﺔﺟﺭﺩ ﻭ ﻥﻮﻟ ﻰﻠﻋ ﻝﻮﺼﺤﻟﺍ ﻞﺟﺃ ﻦﻣ ﻞﻣﺎﻜﻟﺎﺑ ﻡﺎﻌﻄﻟﺍ ﺞﻀﻨﻳ ﻥﺃ ﻞﺒﻗ ﻡﺎﻌﻄﻟﺍ ﺐﻴﻠﻘﺗ ﻢﺘﻳ :ﻡﻮﺤﻠﻟﺍ ﻲﻬﻁ
116
A-1
400
150

ﺔﻳﺍﻮﺸﻟﺎﺑ ﻲﻬﻄﻟﺍ
ﺔﺷﺎﺸﻟﺍ ﻰﻠﻋ ﺽﺮﻌﻟﺍ
ﺔﻣﻼﻌﻟﺍ ﺔﺷﺎﺸﻟﺍ ﻰﻠﻋ ﺮﻬﻈﺘﻓ ،ﺔﻳﺍﻮﺸﻟﺍ ﺭﺯ ﻰﻠﻋ ﺓﺪﺣﺍﻭ ﺓﺮﻣ ﻂﻐﻀﻟﺍ ﻢﺘﻳ« G-1 »
.ﻲﻬﻄﻟﺍ ﺓﺪﻣ ﻂﺒﺿ ﻞﺟﺃ ﻦﻣ ﺭﺎﻴﺘﺧﻻﺍ ﺭﺯ ﺮﻳﻭﺪﺘﺑ ﻡﺎﻴﻘﻟﺍ
ﻲﻫ ﻯﻮﺼﻘﻟﺍ ﻲﻬﻄﻟﺍ ﺓﺪﻣ)95 (ﺔﻘﻴﻗﺩ
:ﻝﺎﺜﻣ8 ﻭ ﻖﺋﺎﻗﺩ30 .ﺔﻴﻧﺎﺛ
ﻲﻬﻄﻟﺍ ﺔﻴﻠﻤﻋ ءﺪﺒﻟ ﻞﻴﻐﺸﺘﻟﺍ ءﺪﺑ ﺭﺯ ﻰﻠﻋ ﻂﻐﻀﻟﺍ ﻢﺘﻳ
ﻝﺎﺜﻤﻟﺍ ﻞﻴﺒﺳ ﻰﻠﻋ
ﺓﺪﻤﻟ ﺔﻳﺍﻮﺸﻟﺎﺑ ﻲﻬﻄﻟﺍ ﻲﻓ ﺔﺒﻏﺮﻟﺍ ﺪﻨﻋ :10 :ﻲﻟﺎﺘﻟﺎﻛ ﻥﺮﻔﻟﺍ ﻂﺒﺿ ﻢﺘﻳ ﻪﻧﺈﻓ ،ﻖﺋﺎﻗﺩ
ﺔﻣﻼﻌﻟﺍ ﺮﻬﻈﺘﻓ ،ﺔﻳﺍﻮﺸﻟﺍ ﺭﺯ ﻰﻠﻋ ﺓﺪﺣﺍﻭ ﺓﺮﻣ ﻂﻐﻀﻟﺍ ﻢﺘﻳ« G-1 » .ﺔﺷﺎﺸﻟﺍ ﻰﻠﻋ
ﺔﻣﻼﻌﻟﺍ ﻰﻟﺇ ﻥﺮﻔﻟﺍ ﺮﻴﺸﻳ ﻰﺘﺣ ﻲﻬﻄﻟﺍ ﺓﺪﻣ ﻂﺒﻀﻟ ﺭﺎﻴﺘﺧﻻﺍ ﺭﺯ ﺮﻳﻭﺪﺗ ﻢﺘﻳ« 10:00 »
ءﺪﺑ ﺭﺯ ﻰﻠﻋ ﻂﻐﻀﻟﺍ.ﻲﻬﻄﻟﺍ ءﺪﺒﻟ ﻞﻴﻐﺸﺘﻟﺍ
ﻭﺃ
ﺭﺯ ﻰﻠﻋSTOP .ﻪﻄﺒﺿ ﻢﺗ ﺎﻣ ءﺎﻐﻟﻹ
ﺔﻅﻮﺤﻠﻣ
.ﺮﻣﻷﺍ ﺐﺟﻮﺘﺳﺍ ﺍﺫﺇ ﻡﺎﻌﻄﻟﺍ ﺐﻴﻠﻘﺗ ﻰﻟﺇ
ً
ﺍﺮﻴﺸﻣ ،ﺝﻭﺩﺰﻣ ﻲﺗﻮﺻ ﻪﻴﺒﻨﺗ ﻥﺮﻔﻟﺍ ﺭﺪﺼﻳ ،ﻞﻣﺎﻜﻟﺎﺑ ﻡﺎﻌﻄﻟﺍ ﺞﻀﻨﻳ ﻥﺃ ﻞﺒﻗ
ﻁﺎﻤﻧﻷﺍ ﻦﻴﺑ ﻊﻤﺠﻟﺎﺑ ﻲﻬﻄﻟﺍ
ﺔﺷﺎﺸﻟﺍ ﻰﻠﻋ ﺽﺮﻌﻟﺍ
ﺭﺯ ﻰﻠﻋ ﺓﺪﺣﺍﻭ ﺓﺮﻣ ﻂﻐﻀﻟﺎﺑ ﻡﺎﻴﻘﻟﺍﺔﻣﻼﻌﻟﺍ ﺮﻬﻈﺘﻓ ،ﺔﻳﺍﻮﺸﻟﺍ« G-1 » .ﺔﺷﺎﺸﻟﺍ ﻰﻠﻋ
ﺔﻣﻼﻌﻟﺍ ﺽﺮﻋ ﻢﺘﻳ ﻰﺘﺣ ﺔﻳﺍﻮﺸﻟﺍ ﺭﺯ ﻰﻠﻋ ﻂﻐﻀﻟﺍ ﺔﻠﺻﺍﻮﻣ« G-2 » ﻭﺃ«G-3 » .ﺔﺷﺎﺸﻟﺍ ﻰﻠﻋ
ﻲﻫ ﻯﻮﺼﻘﻟﺍ ﻲﻬﻄﻟﺍ ﺓﺪﻣ .ﻲﻬﻄﻟﺍ ﺓﺪﻣ ﻂﺒﻀﻟ ﺭﺎﻴﺘﺧﻻﺍ ﺭﺯ ﺮﻳﻭﺪﺗ ﻢﺘﻳ95 ﺔﻘﻴﻗﺩ
.ﻲﻬﻄﻟﺍ ءﺪﺒﻟ ﻞﻴﻐﺸﺘﻟﺍ ءﺪﺑ ﺭﺯ ﻰﻠﻋ ﻂﻐﻀﻟﺍ
ﻭﺃ
ﻰﻠﻋ ﺭﺯ STOP ﻪﻄﺒﺿ ﻢﺗ ﺎﻣ ءﺎﻐﻟﻹ
115

ﺔﺷﺎﺸﻟﺍ ﻰﻠﻋ ﺽﺮﻌﻟﺍ
ﺭﺰﻟﺍ ﻰﻠﻋ ﻂﻐﻀﻟﺍ ﻢﺘﻳ ﻒﻳﻭﻭﺮﻜﻴﻤﻟﺍ ﺔﻣﻼﻌﻟﺍ ﺔﺷﺎﺸﻟﺍ ﻰﻠﻋ ﺮﻬﻈﺘﻓ ،ﺓﺪﺣﺍﻭ ﺓﺮﻣ« P900 ». ﻢﺘﻳ
ﻞﻛ ﻊﻣ ﺔﺷﺎﺸﻟﺍ ﻰﻠﻋ ﺽﺮﻌ
ُ
ﺘﻓ ،ﺏﻮﻠﻄﻤﻟﺍ ﺔﻗﺎﻄﻟﺍ ﻯﻮﺘﺴﻣ ﺭﺎﻴﺘﺧﻻ ﺭﺰﻟﺍ ﻰﻠﻋ ﻂﻐﻀﻟﺍ ﺔﻠﺻﺍﻮﻣ
ﺕﺎﻣﻼﻌﻟﺍ ﺔﻄﻐﺿ« P900 » ،« P700 » ،« P500 »، « P350 » ﻭﺃ« P150 ».
ﻦﻴﺑ ﺎﻣ ﻲﻬﻄﻟﺍ ﺓﺪﻣ ﻂﺒﻀﻟ ﺭﺎﻴﺘﺧﻻﺍ ﺭﺯ ﺮﻳﻭﺪﺗ ﻢﺘﻳ0:05 ﻭ95:00.
.ﻲﻬﻄﻟﺍ ﺔﻴﻠﻤﻋ ءﺪﺒﻟ ﻞﻴﻐﺸﺘﻟﺍ ءﺪﺑ ﺭﺯ ﻰﻠﻋ ﻂﻐﻀﻟﺍ ﻢﺘﻳ
ﺓﺪﻤﻟ ﻲﻬﻄﻟﺍ ﻢﺘﻳ ﻥﺃ ﻲﻓ ﺔﺒﻏﺮﻟﺍ ﺪﻨﻋ :ﻝﺎﺜﻤﻟﺍ ﻞﻴﺒﺳ ﻰﻠﻋ20 ﺔﻗﺎﻁ ﻯﻮﺘﺴﻤﺑ ﺔﻘﻴﻗﺩ700 ﻢﺘﻳ ،ﻁﺍﻭ
:ﻲﻠﻳ ﺎﻤﻛ ﻥﺮﻔﻟﺍ ﻂﺒﺿ
ﺔﻣﻼﻌﻟﺍ ﺔﺷﺎﺸﻟﺍ ﻰﻠﻋ ﺮﻬﻈﻴﻓ ،ﺓﺪﺣﺍﻭ ﺓﺮﻣ ﻒﻳﻭﻭﺮﻜﻴﻤﻟﺍ ﺭﺯ ﻰﻠﻋ ﻂﻐﻀﻟﺍ« P900 » .
ﺔﻗﺎﻄﻟﺍ ﻯﻮﺘﺴﻣ ﺭﺎﻴﺘﺧﻻ ﻒﻳﻭﻭﺮﻜﻴﻤﻟﺍ ﺭﺯ ﻰﻠﻋ ﻂﻐﻀﻟﺍ ﺔﻠﺻﺍﻮﻣ700 ﺔﺷﺎﺸﻟﺍ ﻰﻠﻋ ﺮﻬﻈﺗ .ﻁﺍﻭ
ﺔﻣﻼﻌﻟﺍ« P700 » .
ﺔﻣﻼﻌﻟﺍ ﺔﺷﺎﺸﻟﺍ ﻰﻠﻋ ﺮﻬﻈﺗ ﻰﺘﺣ ﻲﻬﻄﻟﺍ ﺓﺪﻣ ﻂﺒﻀﻟ ﺭﺎﻴﺘﺧﻻﺍ ﺭﺯ ﺮﻳﻭﺪﺗ ﻢﺘﻳ« 20:00 » .
.ﻲﻬﻄﻟﺍ ﺔﻴﻠﻤﻋ ءﺪﺒﻟ ﻞﻴﻐﺸﺘﻟﺍ ءﺪﺑ ﺭﺯ ﻰﻠﻋ ﻂﻐﻀﻟﺍ ﻢﺘﻳ
ﻭﺃ
ﺭﺯ ﻰﻠﻋ STOP.ﻂﺒﻀﻟﺍ ءﺎﻐﻟﻹ
:ﺔﻅﻮﺤﻠﻣ
:ﻲﻫ ﻲﻬﻄﻟﺍ ﺓﺪﻣ ﻂﺒﻀﻟ ﺔﻠﺻﺎﻔﻟﺍ ﺕﺍﺮﺘﻔﻟﺍ
0 ---1 :ﺔﻘﻴﻗﺩ5 ﻲﻧﺍﻮﺛ
1 ---5 :ﻖﺋﺎﻗﺩ10
ٍ
ﻥﺍﻮﺛ
5 ---10 :ﻖﺋﺎﻗﺩ30 ﺔﻴﻧﺎﺛ
10 ---30 :ﺔﻘﻴﻗﺩ1 ﺔﻘﻴﻗﺩ
30 ---95 :ﺔﻘﻴﻗﺩ5 ﻖﺋﺎﻗﺩ
ﻲﻬﻄﻟﺍﻁﺎﻤﻧﻷﺍ ﻦﻴﺑ ﻊﻤﺠﻟﺎﺑ ﻲﻬﻄﻟﺍ & ﺔﻳﺍﻮﺸﻟﺍ ﻂﻤﻨﺑ
ﺐﻴﺗﺮﺘﻟﺍ ﺔﺷﺎﺸﻟﺍ ﻰﻠﻋ ﺽﺮﻌﻟﺍ ﻒﻳﻭﻭﺮﻜﻴﻤﻟﺍ ﺔﻗﺎﻁ ﺔﻳﺍﻮﺸﻟﺍ ﺔﻗﺎﻁ
1 G-1 0% 100%
2 G-2 20% 80%
3 G-3 40% 60%
114
1:30
P900
20:00
P900
P700

2. ﺔﻴﺋﺎﺑﺮﻬﻜﻟﺍ ﺕﻼﺻﻮﻟﺍ
• ﺔﻳﺭﺍﺮﺣ ﺔﻳﺎﻤﺤﺑ ﺓﺩﻭﺰﻣ ﺔﻴﺋﺎﺑﺮﻬﻜﻟﺍ ﺕﺎﺒﻴﻛﺮﺘﻟﺍ ﻥﻮﻜﺗ ﻥﺃ ﺐﺠﻳ16 .ﺮﻴﺒﻣﺃ
• ﻦﻤﻀﺘﻳ ءﺎﺑﺮﻬﻛ ﺲﺒﻘﻣ ﻡﺍﺪﺨﺘﺳﺍ ﻡﺰﻠﺘﺴﻳ ﻲﺿﺭﺃ ﻑﺮﻁ.ﺎﻬﺑ ﻝﻮﻤﻌﻤﻟﺍ ﺔﻣﻼﺴﻟﺍ ﺮﻴﻳﺎﻌﻤﻟ
ً
ﺎﻘﻓﻭ ﻝﻮﺻﻮﻣ
• ﺭﺎﻴﺘﻟﺍ ﻉﺎﻄﻗ ﻦﻋ ﺯﺎﻬﺠﻟﺍ ﻞﺼﻓ ﺔﻴﻧﺎﻜﻣﺇ ﺎﻬﻳﺪﻟﻭ ﻡﺪﺨﺘﺴ
ُ
ﻤﻟﺍ ﻝﻭﺎﻨﺘﻣ ﻲﻓ ،ﺔﻴﺋﺎﺑﺮﻬﻜﻟﺍ ﺕﺎﺒﻴﻛﺮﺘﻟﺍ ﻦﻤﺿ ،ﺓﺪﺣﻭ ﺩﻮﺟﻭ ﻰﻠﻋ
ً
ﺎﻘﺒﺴ
ُ
ﻣ ﺐﻴﺗﺮﺘﻟﺍ
ﻦﻋ ﻞﻘﻳ ﻻ ﺎﻬﻳﺪﻟ ﻞﺼﻔﻟﺍ ﺲﻣﻼﺗ ﻥﻮﻜﻳﻭ ،ﻲﺋﺎﺑﺮﻬﻜﻟﺍ3 ﻰﻠﻋ ﻢﻣ .ﺏﺎﻄﻗﻷﺍ ﻊﻴﻤﺟ ﻯﻮﺘﺴﻣ
• ﺺﺨﺷ ﻱﺃ ﻯﺪﻟ ﻭﺃ ﻪﻟ ﺔﻌﺑﺎﺘﻟﺍ ﻊﻴﺒﻟﺍ ﺪﻌﺑ ﺎﻣ ﺔﻣﺪﺧ ﻭﺃ ﻊﻨﺼ
ُ
ﻤﻟﺍ ﻯﺪﻟ ﻪﻟﺍﺪﺒﺘﺳﺍ ﺐﺠﻴﻓ ،ﺯﺎﻬﺠﻠﻟ ﻲﺋﺎﺑﺮﻬﻜﻟﺍ ﺭﺎﻴﺘﻟﺍ ﻚﻠﺴﺑ ﻒﻠﺗ ﺙﺪﺣ ﺍﺫﺇ
.ﺮﻁﺎﺨﻣ ﻱﺃ ﺙﻭﺪﺣ ﻱﺩﺎﻔﺘﻟ ﻚﻟﺫﻭ ،ﺔﻣﺪﺨﻟﺍ ﻚﻠﺗ ﻢﻳﺪﻘﺘﺑ ﻪﻟ ﺺﺧﺮ
ُ
ﻣ
:ﻪﻴﺒﻨﺗ .ﺓﺭﺍﺮﺤﻟﺍ ﺪﻟﻮﻳ ﺯﺎﻬﺟ ﻱﺃ ﻭﺃ ﻲﻬﻄﻠﻟ ﺪﻗﻮﻣ ﻕﻮﻓ ﻥﺮﻔﻟﺍ ﻊﺿﻭ ﺐﺠﻳ ﻻ
.ﻲﻏﻻ ﻥﺎﻤﻀﻟﺍ ﺪﻌ
ُ
ﻳ ﺔﻟﺎﺤﻟﺍ ﻚﻠﺗ ﻲﻓﻭ ﺭﺮﻀﻟﺍ ﻪﺑ ﻖﺤﻠﻳ ﻑﻮﺴﻓ ،ﺓﺭﺍﺮﺤﻠﻟ ﺭﺪﺼﻣ ﻱﺃ ﻕﻮﻓ ﻭﺃ ﺏﺮﻘﻟﺎﺑ ﻥﺮﻔﻟﺍ ﻊﺿﻭ ﻢﺗ ﺍﺫﺇ
.ﻞﻴﻐﺸﺘﻟﺍ ءﺎﻨﺛﺃ ﺔﻨﺧﺎﺳ ﻥﺮﻔﻠﻟ ﺔﻴﺟﺭﺎﺨﻟﺍ ﺢﻄﺳﻷﺍ ﺢﺒﺼﺗ ﺪﻗ
3( ﺯﺎﻬﺠﻟﺍ ﻡﺍﺪﺨﺘﺳﺍ ﺔﻴﻔﻴﻛ
(ﺃ
ﻞﻴﻐﺸﺘﻟﺍ ﺕﺎﻤﻴﻠﻌﺗ
ﺏﺎﺒﻟﺍ ﺢﺘﻓ
:ﻒﻳﻭﻭﺮﻜﻴﻤﻟﺍ ﻥﺮﻓ ﺏﺎﺑ ﺢﺘﻓ ﻞﺟﺃ ﻦﻣ
ﺭﺰﻟﺍ ﻰﻠﻋ ﻂﻐﻀﻟﺍ ﻢﺘﻳ ﻢﺛ ،ﻲﺋﺎﺑﺮﻬﻜﻟﺍ ﺭﺎﻴﺘﻟﺎﺑ ﻝﻮﺻﻮﻣ ﺯﺎﻬﺠﻟﺍ ﻥﺃ ﻦﻣ ﺪﻛﺄﺘﻟﺍ ﻢﺘﻳ .
ً
ﺎﻴﻟﺁ ﺏﺎﺒﻟﺍ ﺢﺘﻔ
ُ
ﻳ ﻑﻮﺳ ﺎﻫﺪﻨﻋ ،
ﻋ ﺔﻣﻼﻋ ﺽﺮﻋ ﻢﺘﻳ ،ﻲﺋﺎﺑﺮﻬﻜﻟﺍ ﺭﺎﻴﺘﻟﺎﺑ ﻒﻳﻭﻭﺮﻜﻳﺎﻤﻟﺍ ﻥﺮﻓ ﻞﻴﺻﻮﺗ ﺪﻨ« 0:00 » .ﺓﺪﺣﺍﻭ ﺓﺮﻣ ﻲﺗﻮﺻ ﻪﻴﺒﻨﺗ ﻥﺮﻔﻟﺍ ﺭﺪﺼ
ُ
ﻳ ﻭ ﺔﺷﺎﺸﻟﺍ ﻰﻠﻋ
ﺔﻋﺎﺴﻟﺍ ﻂﺒﺿ
ﺔﺷﺎﺸﻟﺍ ﻰﻠﻋ ﺽﺮﻌﻟﺍ
ﺭﺯ ﻰﻠﻋ ﻂﻐﻀﻟﺍ ﻢﺘﻳ.ﺕﺎﻋﺎﺴﻟﺍ ﻡﺎﻗﺭﺃ ﺾﻣﻮﺗ ﻑﻮﺳ ،
ﻦﻴﺑ ﺎﻣ ﺡﻭﺍﺮﺘﺗ ﻭ ،ﺕﺎﻋﺎﺴﻟﺍ ﻂﺒﻀﻟ ﺭﺎﻴﺘﺧﻻﺍ ﺡﺎﺘﻔﻣ ﺮﻳﻭﺪﺗ ﻢﺘﻳ0 ﻰﺘﺣ 23 )24 .(ﺔﻋﺎﺳ
ﺭﺰﻟﺍ ﻰﻠﻋ ﻂﻐﻀﻟﺍ ﻢﺘﻳ.ﻖﺋﺎﻗﺪﻟﺍ ﻡﺎﻗﺭﺃ ﺾﻣﻮﺗ ﻑﻮﺳ ،
ﻦﻴﺑ ﺎﻣ ﺡﻭﺍﺮﺘﺗ ﻲﺘﻟﺍ ،ﻖﺋﺎﻗﺪﻟﺍ ﻂﺒﻀﻟ ﺭﺎﻴﺘﺧﻻﺍ ﺡﺎﺘﻔﻣ ﺮﻳﻭﺪﺗ ﻢﺘﻳ0 ﻭ59.
ﺭﺰﻟﺍ ﻰﻠﻋ ﻂﻐﻀﻟﺍ ﻢﺘﻳ ﺔﻣﻼﻌﻟﺍ ﺾﻣﻮﺘﻓ ،ﺔﻋﺎﺴﻟﺍ ﻂﺒﺿ ﺔﻴﻠﻤﻋ ءﺎﻬﻧﻹ« : » ﻲﻓ ﺔﻋﺎﺴﻟﺍ ﺃﺪﺒﺗﻭ
.ﻞﻤﻌﻟﺍ
ﻂﻤﻨﺑ ﻲﻬﻄﻟﺍﻒﻳﻭﻭﺮﻜﻴﻤﻟﺍ
ﻒﻳﻭﻭﺮﻜﻴﻤﻟﺍ ﻥﺮﻔﻟ ﺔﻗﺎﻄﻟﺍ ﺕﺎﻳﻮﺘﺴﻣ ﻝﻭﺪﺟ
ﺔﻗﺎﻄﻟﺍ 900 ﻁﺍﻭ 700 ﻁﺍﻭ 500 ﻁﺍﻭ 350 ﻁﺍﻭ 150 ﻁﺍﻭ
ﺔﺷﺎﺸﻟﺍ ﻰﻠﻋ ﺽﺮﻌﻟﺍ P900 P700 P500 P350 P150
113
0:00
12:00
12:35

.ﺃ .ﻲﺟﺎﺟﺰﻟﺍ ﺹﺮﻘﻟﺍ ﻥﺍﺭﻭﺩ ﺔﻗﺎﻋﺇ ﻭﺃ ﺔﻠﻗﺮﻋ
ً
ﺍﺪﺑﺃ ﺐﺠﻳ ﻻ ﺚﻴﺣ ،ﺐﻘﻋ ﻰﻠﻋ
ً
ﺎﺳﺃﺭ ﻲﺟﺎﺟﺰﻟﺍ ﺹﺮﻘﻟﺍ ﻊﺿﻭ
ً
ﺍﺪﺑﺃ ﺐﺠﻳ ﻻ
.ﺏ .ﻲﻬﻄﻟﺍ ءﺎﻨﺛﺃ ﺓﺮﻴﻐﺻ ﺕﻼﺠﻌﺑ ﻞﻣﺎﺤﻟﺍﻭ ﻲﺟﺎﺟﺰﻟﺍ ﺹﺮﻘﻟﺍ ﻡﺍﺪﺨﺘﺳﺍ
ً
ﺎﻤﺋﺍﺩ ﺐﺠﻳ
.ﺝ .ﺎﻬﻴﻬﻁ ﻞﺟﺃ ﻦﻣ ﻲﺟﺎﺟﺰﻟﺍ ﺹﺮﻘﻟﺍ ﻕﻮﻓ ﻡﺎﻌﻄﻟﺍ ﻲﻧﺍﻭﺃ ﻭﺃ ﻡﺎﻌﻄﻟﺍ ﻊﺿﻭ
ً
ﺎﻤﺋﺍﺩ ﻢﺘﻳ
.ﺩ .ﻊﻴﺒﻟﺍ ﺪﻌﺑ ﺎﻣ ﺔﻣﺪﺨﻟ ﺪﻤﺘﻌ
ُ
ﻣ ﺰﻛﺮﻣ ﺏﺮﻗﺄﺑ ﻝﺎﺼﺗﻻﺍ ﻢﺘﻳ ،ﺭﺍ
ﱠ
ﻭﺪﻟﺍ ﺹﺮﻘﻟﺎﺑ ﻭﺃ ﻲﺟﺎﺟﺰﻟﺍ ﺹﺮﻘﻟﺎﺑ ﻕﻮﻘﺷ ﻭﺃ ﺮﺴﻛ ﻱﺃ ﻖﺤﻟ ﺍﺫﺇ
(ﺯ ﻞﻤﻌﻟﺍ ﺢﻄﺳ ﻕﻮﻓ ﺐﻴﻛﺮﺘﻟﺍ
.
ً
ﺎﺒﻧﺎﺟ ﺕﺎﻘﺤﻠﻤﻟﺍ ﻊﺿﻭ ﻭ ﻒﻴﻠﻐﺘﻟﺍ ﺩﺍﻮﻣ ﻊﻴﻤﺟ ﺔﻟﺍﺯﺇ ﻢﺘﻳ
ﻱﺃ ﻪﺑ ﺖﻘﺤﻟ ﺍﺫﺇ ﺯﺎﻬﺠﻟﺍ ﻡﺪﺨﺘﺴ
ُ
ﻳ ﻻ .ﺏﺎﺒﻟﺎﺑ ﺮﺴﻛ ﻭﺃ ﺵﻭﺪﺧ ﻱﺃ ،ﻝﺎﺜﻤﻟﺍ ﻞﻴﺒﺳ ﻰﻠﻋ ،ﺕﺎﻴﻔﻠﺗ ﻱﺃ ﺩﻮﺟﻭ ﻡﺪﻋ ﻦﻣﻭ ﺯﺎﻬﺠﻟﺍ ﺔﻣﻼﺳ ﻦﻣ ﺪﻛﺄﺘﻟﺍ ﻢﺘﻳ
.ﺕﺎﻴﻔﻠﺗ
ﺯﺎﻬﺠﻟﺍ ﻞﻜﻴﻫ: ﻢﺘﻳ ﻦﻣ ﻲﻗﺍﻮﻟﺍ ﻒﻴﻠﻐﺘﻟﺍ ﻢﻠﻴﻓ ﺔﻟﺍﺯﺇ.ﻒﻳﻭﻭﺮﻜﻴﻤﻟﺍ ﻥﺮﻔﻟﺍ ﻞﻜﻴﻫ ﺢﻄﺳ ﻕﻮﻓ
ﺓﺩﻮﺟﻮﻤﻟﺍ ﺓﻮﺴﻜﻟﺍ ﺔﻟﺍﺯﺇ ﻡﺪﻋ ﻲﻫﻭ ،ﻥﺮﻔﻟﺍ ﻒﻳﻮﺠﺗ ﻞﺧﺍﺪﺑ ﺎﻜﻴﻤﻟﺍ ﺓﺩﺎﻣ ﻦﻣMica ، ﺔﻳﺎﻤﺤﺑ ﻡﻮﻘﺗﻭ ﺢﺗﺎﻓ ﻲﻨﺑ ﺎﻬﻧﻮﻟ
.(ﻲﻧﻭﺮﺘﻜﻴﻟﺇ ﻲﺴﻴﻁﺎﻨﻐﻣ ﻡﺎﻤﺻ) ﻥﻭﺮﺗﺎﻨﻐﻤﻟﺍ
(ﻱ
ﺐﻴﻛﺮﺘﻟﺍ ﺔﻴﻔﻴﻛ
1 . .ﻖﻴﺿ ﻥﺎﻜﻣ ﻲﻓ ﺞﺘﻨﻤﻟﺍ ﺍﺬﻫ ﺮﺸﺣ ﺐﺠﻳ ﻻ
ﺔﻬﺠﻟﺎﺑ ،ﺽﺮﻐﻟﺍ ﺍﺬﻬﻟ ﻦﻴﻌ
ُ
ﻤﻟﺍ ﺐﻘﺜﻟﺍ ﻞﺧﺍﺪﺑ ﻞﻴﻟﺪﻟﺍ ﺍﺬﻫ ﻊﻣ ﺔﻘﻓﺮ
ُ
ﻤﻟﺍ ﺔﻴﻜﻴﺘﺳﻼﺒﻟﺍ ﺔﻌﻄﻘﻟﺍ ﻚﺒﺷ ﻢﺘﻳ ،ﻒﻳﻭﻭﺮﻜﻴﻤﻟﺍ ﻥﺮﻔﻟ ﺔﻳﻮﻬﺘﻟﺍ ﻦﺴﺣ ﻥﺎﻤﻀﻟ
ﺓﺭﻮﺻ) ﺯﺎﻬﺠﻠﻟ ﺔﻴﻔﻠﺨﻟﺍ2 .(،ﻂﺋﺎﺤﻟﺍ ﻞﺑﺎﻘﻣ ﻥﺮﻔﻟﺍ ﻊﺿﻭ ﻢﺘﻳ ﻢﺛ .ﺔﻳﻮﻬﺘﻟﺍ ﻦﺴﺣ ﻥﺎﻤﻀﻟ ﺔﺤﻴﺤﺼﻟﺍ ﺔﻓﺎﺴﻤﻟﺍ ﺔﻴﻜﻴﺘﺳﻼﺒﻟﺍ ﺔﻌﻄﻘﻟﺍ ﻦﻣﺆﺗ ﻑﻮﺳﻭ
ﻓﺎﺴﻣ ﻙﺮﺗ ﻢﺘﻳ ﻦﻋ ﻞﻘﺗ ﻻ ﺔ30 ﺔﻓﺎﺴﻣﻭ ،ﻥﺮﻔﻟﺍ ﻰﻠﻋﺃ ﺔﻴﻟﺎﺧ ﻢﺳ7,5 ﻑﻮﺸﻜﻣ ﻥﺮﻔﻠﻟ ﻦﻤﻳﻷﺍ ﺐﻧﺎﺠﻟﺍ ﻙﺮﺘ
ُ
ﻳﻭ ﻥﺮﻔﻠﻟ ﺮﺴﻳﻷﺍ ﺐﻧﺎﺠﻟﺍ ﻲﻓ ﻢﺳ
ﺓﺭﻮﺻ)1.(
.ﻥﺮﻔﻟﺍ ﻞﺟﺭﺃ ﺔﻟﺍﺯﺇ ﻡﺪﻋ
.ﻥﺍﻭﻷﺍ ﻞﺒﻗ ﻥﺮﻔﻟﺍ ﻑﻼﺗﺇ ﻰﻟﺇ ﻚﻟﺫ ﻱﺩﺆﻳ ﺪﻘﻓ ،ﺔﻳﻮﻬﺘﻟﺍ ﺕﺎﻜﺒﺷ ﻖﻴﻌ
ُ
ﻳ ءﻲﺷ ﻱﺃ ﻊﺿﻭ ﻢﺘﻳ ﻻ
ﺓﺭﻮﺼﻟﺍ1
1 .7,5 ﻢﺳ
2 .30 ﻢﺳ
3 .ﻑﻮﺸﻜﻣ
ﺓﺭﻮﺼﻟﺍ2
112

(ـﻫ
ﻢﻜﺤﺘﻟﺍ ﺔﺣﻮﻟ ﺕﺎﻔﺻﺍﻮﻣ
A(
ﻒﺋﺎﻅﻮﻟﺍ ﺽﺮﻋ ﺔﺣﻮﻟ:
ﻑﺎﻨﺻﺃﻭ ﺔﻋﺎﺴﻟﺍ ،ﺞﻣﺮﺒ
ُ
ﻤﻟﺍ ﻥﺯﻮﻟﺍ ﻭﺃ ﺖﻴﻗﻮﺘﻟﺍﻭ ﻒﺋﺎﻅﻮﻟﺍ ﺽﺮﻋ ﻖﻳﺮﻁ ﻦﻋ ﺔﺠﻣﺮﺒﻟﺍ ﺔﻴﻠﻤﻋ ﻞﻬﺴ
ُ
ﻳ
ﻡﺎﻌﻄﻟﺍ.
B(
ﺭﺯAuto )(ﻲﻟﻵﺍ ﻲﻬﻄﻟﺍ ﻢﺋﺍﻮﻗ
ﺯﺎﻬﺠﻟﺍ ﻡﻮﻘﻳ :
ً
ﺎﻀﻳﺃ ﻪﻧﺯﻭ ﻭ ﻪﻴﻬﻁ ﺩﺍﺮﻤﻟﺍ ﻖﺒﻄﻟﺍ ﻒﻨﺻ ﺭﺎﻴﺘﺧﺎﺑ ﺢﻤﺴﻳ ﻲﻬﻄﻟﺍ ﺓﺮﺘﻓﻭ ﺔﻗﺎﻄﻟﺍ ﻂﺒﻀﺑ
.
ً
ﺎﻴﻟﺁ
C(
ﺔﻳﺍﻮﺸﻟﺍ ﺭﺯ:
.ﺔﻳﺍﻮﺸﻠﻟ ﺔﺒﺳﺎﻨﻤﻟﺍ ﺔﻗﺎﻄﻟﺍ ﺭﺎﻴﺘﺧﺎﺑ ﺢﻤﺴﻳ
D(
ﻒﻳﻭﻭﺮﻜﻴﻤﻟﺍ ﺭﺯ:
.ﻒﻳﻭﻭﺮﻜﻴﻤﻠﻟ ﺔﺒﺳﺎﻨﻤﻟﺍ ﺔﻗﺎﻄﻟﺍ ﺭﺎﻴﺘﺧﺎﺑ ﺢﻤﺴﻳ
E(
ﺞﻠﺜﻟﺍ ﺐﻳﻭﺬﺗ ﺭﺯ:
.ﻪﻧﺯﻭ ﺐﺴﺣ ﻡﺎﻌﻄﻟﺍ ﻦﻣ ﺞﻠﺜﻟﺍ ﺐﻳﻭﺬﺗ ﺔﺠﻣﺮﺑ ﻢﺘﻳ ﻥﺄﺑ ﺢﻤﺴﻳ
F(
ﺔﻋﺎﺴﻟﺍ ﻂﺒﺿ ﺭﺯ:
ﺖﻗﻮﻟﺍﻭ ﺔﻋﺎﺴﻟﺍ ﻂﺒﻀﺑ ﺢﻤﺴﻳ
G(
ﺭﺯ MEMO 1 2 3 ﺓﺮﻛﺍﺬﻟﺍ)3 2 1(:
ﻞﻴﻐﺸﺗ ﻰﻟﺇ
ً
ﺎﻌﻳﺮﺳ ﻝﻮﺻﻮﻟﺎﺑ ﺢﻤﺴﻳ3 ﺔﻘﺑﺎﺳ ﺔﺠﻣﺮﺒ
ُ
ﻣ ﺕﺎﻴﻠﻤﻋ
H(
ﺭﺍﻭﺩ ﺡﺎﺘﻔﻣ:
.ﻡﺎﻌﻄﻟﺍ ﻥﺯﻭ ﻭ ﻲﻬﻄﻟﺍ ﺓﺪﻣ ﺭﺎﻴﺘﺧﺎﺑ ﺢﻤﺴﻳ
I( ﻞﻴﻐﺸﺘﻟﺍ ءﺪﺑ ﺭﺯDépart
ﺍ ﺡﺎﺘﻔﻤﻟﺍ ﻰﻠﻋ ﻂﻐﻀﻟﺎﺑﻲﻬﻄﻟﺍ ﺔﻴﻠﻤﻋ ﻞﻴﻐﺸﺗ ﺃﺪﺒﻳ ﺭﺍ
ﱠ
ﻭﺪﻟ.
J( ﺢﺘﻔﻟﺍ ﺭﺯOuverture
ﺏﺎﺑ ﺢﺘﻔﺑ ﺢﻤﺴﻳﻒﻳﻭﻭﺮﻜﻴﻤﻟﺍ.
K( ﺭﺯ STOP )ءﺎﻐﻟﻹﺍ (ﻒﻴﻗﻮﺘﻟﺍ:
.ﻞﻴﻐﺸﺘﻟﺍ ﺪﻴﻗ ﺞﻣﺎﻧﺮﺑ ءﺎﻐﻟﺇ ﻭﺃ ﺔﻌﻁﺎﻘﻤﺑ ﺢﻤﺴﻳ
(ﻭ ﺭﺍﻭﺪﻟﺍ ﺹﺮﻘﻟﺍ ﺐﻴﻛﺮﺗ
1.
(ﻞﻔﺳﺃ) ﻱﺰﻛﺮﻣ ﺐﻘﺛ
2.
ﻲﺟﺎﺟﺯ ﺹﺮﻗ
3.
ﺭﺍﻭﺪﻟﺍ ﺹﺮﻘﻟﺍ ﺮﻳﻭﺪﺗ ﺓﺍﺩﺃ
4.
ﺓﺮﻴﻐﺻ ﺕﻼﺠﻌﺑ ﻞﻣﺎﺣ
111
A
B
C
D
E
F
G
H
I
J
K

ﻒﻳﻭﻭﺮﻜﻴﻤﻟﺍ ﻥﺮﻓ ﻲﻓ ﺎﻬﻣﺍﺪﺨﺘﺳﺍ ﺐﻨﺠﺗ ﺐﺠﻳ ﻲﺘﻟﺍ ﺕﺎﻣﺰﻠﺘﺴﻤﻟﺍﻭ ﻲﻧﺍﻭﻷﺍ
ﺕﺎﻣﺰﻠﺘﺴﻤﻟﺍﻭ ﻲﻧﺍﻭﻷﺍ ﺕﺎﻈﺣﻼﻣ
ﻡﻮﻴﻨﻣﻮﻟﻷﺍ ﻦﻣ ﺔﻴﻨﻴﺻ .ﻒﻳﻭﻭﺮﻜﻴﻤﻟﺍ ﻥﺮﻓ ﻲﻓ ﻡﺍﺪﺨﺘﺳﻼﻟ ﺐﺳﺎﻨﻣ ﻖﺒﻁ ﻲﻓ ﻡﺎﻌﻄﻟﺍ ﻞﻘﻧ ﻢﺘﻳ .ﺔﻴﺋﺎﺑﺮﻬﻛ ﺓﺭﺍﺮﺷ ﺪﻟﻮﺘﺗ ﺪﻗ
ﺔﻴﺋﺍﺬﻐﻟﺍ ﻥﻮﺗﺮﻜﻟﺍ ﺐﻠ
ُ
ﻋ
ﺔﻴﻧﺪﻌﻣ ﺾﺑﺎﻘﻤﺑ ﺓﺩﻭﺰﻤﻟﺍ
ﺓﺭﺍﺮﺷ ﺪﻟﻮﺘﺗ.ﻒﻳﻭﻭﺮﻜﻴﻤﻟﺍ ﻥﺮﻓ ﻲﻓ ﻡﺍﺪﺨﺘﺳﻼﻟ ﺐﺳﺎﻨﻣ ﻖﺒﻁ ﻲﻓ ﻡﺎﻌﻄﻟﺍ ﻞﻘﻧ ﻢﺘﻳ .ﺔﻴﺋﺎﺑﺮﻬﻛ
ﺓﺩﺎﻤﺑ ﺓﺩﻭﺰﻣ ﻭﺃ ﺔﻴﻧﺪﻌﻣ ﻲﻧﺍﻭﺃ
ﺔﻴﻧﺪﻌﻣ
.ﺔﻴﺋﺎﺑﺮﻬﻛ ﺓﺭﺍﺮﺷ ﺪﻟﻮﺗ ﺪﻗ ﺔﻴﻧﺪﻌﻤﻟﺍ ﻞﻛﺎﻴﻬﻟﺍ .ﻡﺎﻌﻄﻟﺍ ﻰﻟﺇ ﻒﻳﻭﻭﺮﻜﻴﻤﻟﺍ ﺔﻗﺎﻁ ﻝﻮﺻﻭ ﻊﻨﻤﺗ ﺔﻴﻧﺪﻌﻤﻟﺍ ﺓﺩﺎﻤﻟﺍ
ﺔﻴﻧﺪﻌﻤﻟﺍ ﺔﻄﺑﺭﻷﺍ ﻉﻻﺪﻧﺍ ﻲﻓ ﺐﺒﺴﺘﺗﻭ ﺔﻴﺋﺎﺑﺮﻬﻛ ﺓﺭﺍﺮﺷ ﺪﻟﻮﺘﺗ ﺪﻗ .ﻥﺮﻔﻟﺍ ﻞﺧﺍﺪﺑ ﺭﺎﻨﻟﺍ
ﺔﻴﻗﺭﻭ ﺱﺎﻴﻛﺃ ﻥﺮﻔﻟﺍ ﻞﺧﺍﺪﺑ ﺭﺎﻨﻟﺍ ﻉﻻﺪﻧﺍ ﻲﻓ ﺐﺒﺴﺘﺗ ﺪﻗ
ﻲﻜﻴﺘﺳﻼﺒﻟﺍ ﺞﻨﻔﺳﻷﺍ .ﺔﻴﻟﺎﻋ ﺓﺭﺍﺮﺣ ﺔﺟﺭﺪﻟ ﻪﺿﺮﻌﺗ ﺪﻨﻋ ﻞﺧﺍﺪﻟﺎﺑ ﻞﺋﺎﺴﻟﺍ ﺙﻮﻠ
ُ
ﻳ ﻭﺃ ﻲﻜﻴﺘﺳﻼﺒﻟﺍ ﺞﻨﻔﺳﻹﺍ ﺏﻭﺬﻳ ﺪﻗ
ﺐﺸﺨﻟﺍ .ﻖﻘﺸﺘﻳﻭ ﻉﺪﺼﺘﻳ ﺪﻗ ﻭ ﻒﻳﻭﻭﺮﻜﻴﻣ ﻥﺮﻓ ﻲﻓ ﻪﻌﺿﻭ ﺪﻨﻋ ﻒﺠﻳ ﺐﺸﺨﻟﺍ ﻥﺇ
(ﺩ ﺯﺎﻬﺠﻟﺍ ﺕﺎﻔﺻﺍﻮﻣ
ﻥﺮﻔﻟﺍ ﺕﺎﻘﺤﻠﻣ ﻭ ءﺍﺰﺟﺃ ءﺎﻤﺳﺃ
.ﻪﺴﻔﻧ ﻥﺮﻔﻟﺍ ﻞﺧﺍﺩ ﻦﻣﻭ ﻕﻭﺪﻨﺼﻟﺍ ﻦﻣ ﺕﺎﻘﺤﻠﻤﻟﺍ ﻊﻴﻤﺟ ﻊﻣ ﻥﺮﻔﻟﺍ ﺝﺍﺮﺧﺇ ﻢﺘﻳ
A)( ﻢﻜﺤﺘﻟﺍ ﺔﺣﻮﻟ
B)( ﺮﻳﻭﺪﺘﻟﺍ ﺓﺍﺩﺃ
C)( ﺓﺮﻴﻐﺻ ﺕﻼﺠﻌﺑ ﻞﻣﺎﺣ
D)( ﻲﺟﺎﺟﺯ ﺹﺮﻗ
E)( ﺔﺒﻗﺍﺮﻤﻠﻟ ﻲﺟﺎﺟﺯ ﺏﺎﺒﻟﺍ ﺡﻮﻟ
F)( ﺏﺎﺒﻟﺍ
G)( ﻥﺎﻣﻷﺍ ﻼﻔﻗ
ﺎﻬﺑ ﻲﺘﻟﺍ ﻥﺍﺮﻓﻷﺍ ﻲﻓ ﻂﻘﻓ) ﺔﻣﺎ
َ
ﻋ
ِ
ﺩ ﻑﺭ (ﺔﻳﺍﻮﺷ
110
F
G
A
CB
E
D

(ﺝ ﺎﻬﻣﺍﺪﺨﺘﺳﺎﺑ ﺡﻮﻤﺴﻤﻟﺍ ﻲﻧﺍﻭﻷﺍ
ﺐﻨﺠﺗ ﺐﺠﻳ ﺎﻣﻭ ﻒﻳﻭﻭﺮﻜﻴﻤﻟﺍ ﻥﺮﻓ ﻲﻓ ﺎﻬﻣﺍﺪﺨﺘﺳﺎﺑ ﺡﻮﻤﺴﻤﻟﺍ ﺕﺎﻣﺰﻠﺘﺴﻤﻟﺍﻭ ﻲﻧﺍﻭﻷﺍ" ﺓﺮﻘﻔﺑ ﺓﺭﻮﻛﺬﻤﻟﺍ ﺕﺎﻤﻴﻠﻌﺘﻟﺍ ﻰﻠﻋ ﻉﻼﻁﻻﺍ ﻰﺟﺮﻳ
،ﺪﻛﺄﺘﻟﺍ ﻡﺪﻋ ﺔﻟﺎﺣ ﻲﻓ .ﻒﻳﻭﻭﺮﻜﻴﻤﻟﺍ ﻥﺮﻓ ﻲﻓ ﺎﻬﻣﺍﺪﺨﺘﺳﺍ ﻦﻜﻤ
ُ
ﻳ ﻻ ﺔﻴﻧﺪﻌﻣ ﺮﻴﻏ ﻲﻧﺍﻭﻷﺍ ﺾﻌﺑ ﻙﺎﻨﻫ ."ﻪﻣﺍﺪﺨﺘﺳﺍ ﺭﺎﺒﺘﺧﻻ ﺔﻴﻟﺎﺘﻟﺍ ﺓﻮﻄﺨﻟﺍ ﻉﺎﺒﺗﺇ ﻢﺘﻳ
.ﻪﻣﺍﺪﺨﺘﺳﺍ ﻖﻓﺍﻮﺗ ﻦﻣ ﺪﻛﺄﺘﻟﺍ ﺩﺍﺮﻤﻟﺍ ءﺎﻧﻹﺍ
:ﻲﻧﺍﻭﻷﺍ ﺭﺎﺒﺘﺧﺍ
1. ) ﺩﺭﺎﺒﻟﺍ ءﺎﻤﻟﺍ ﻦﻣ ﻥﺎﺠﻨﻓ ﺭﺍﺪﻘﻤﺑ ﻒﻳﻭﻭﺮﻜﻴﻤﻟﺍ ﻥﺮﻓ ﻲﻓ ﻊﺿﻮﻴﺳ ﻱﺬﻟﺍ ءﺎﻧﻹﺍ ءﻞﻣ ﻢﺘﻳ250 .ﻥﺮﻔﻟﺍ ﻲﻓ ءﺎﻧﻹﺍ ﻚﻟﺫ ﻊﺿﻭ ﻭ ،(ﻞﻠﻣ
2. .ﺓﺪﺣﺍﻭ ﺔﻘﻴﻗﺩ ﺓﺪﻤﻟ ﺔﻗﺎﻄﻠﻟ ﻯﻮﺘﺴﻣ ﻰﻠﻋﺄﺑ ﺔﺌﻓﺪﺘﻟﺍ ﻢﺘﻳ
3. .ﻒﻳﻭﻭﺮﻜﻴﻤﻟﺍ ﻥﺮﻓ ﻲﻓ ﻲﻬﻄﻠﻟ ﻡﺪﺨﺘﺴ
ُ
ﻳ ﻼﻓ
ً
ﺍﺪﺟ ﻦﺧﺎﺳ ءﺎﻧﻹﺍ ﻥﺎﻛ ﺍﺫﺇ .ﺭﺬﺤﺑ ءﺎﻧﻹﺍ ﺲﻤﻟ ﻢﺘﻳ
4. .ﺓﺪﺣﺍﻭ ﺔﻘﻴﻗﺩ ﻲﻬﻄﻟﺍ ﺓﺮﺘﻓ ﺯﻭﺎﺠﺗ ﻡﺪﻋ
ﻪﻴﺒﻨﺗ
ﺡﻭﺮﺠﺑ ﺔﺑﺎﺻﻹﺍ ﺮﻄﺧ
ﻒﻳﻭﻭﺮﻜﻴﻤﻟﺍ ﺔﻗﺎﻁ ﺪﺿ ﻲﻗﺍﻮﻟﺍ ءﺎﻄﻐﻟﺍ ﺔﻟﺍﺯﺇ ﺎﻬﻟﻼﺧ ﻢﺘﻳ ﺡﻼﺻﺇ ﺔﻴﻠﻤﻌﺑ ﻭﺃ ﺯﺎﻬﺠﻟﺍ ﺔﻧﺎﻴﺼﺑ ﻡﻮﻘﻳ ﺺﺼﺨﺘ
ُ
ﻣ ﺮﻴﻏ ﺺﺨﺷ ﻱﺃ ﻪﻧﺈﻓ
.ﺮﻄﺨﻠﻟ ﻪﺴﻔﻧ ﺽﺮﻌ
ُ
ﻳ
ﻒﻳﻭﻭﺮﻜﻴﻤﻟﺍ ﻥﺮﻓ ﻲﻓ ﺎﻬﻣﺍﺪﺨﺘﺳﺎﺑ ﺡﻮﻤﺴﻤﻟﺍ ﺕﺎﻣﺰﻠﺘﺴﻤﻟﺍ ﻭ ﻲﻧﺍﻭﻷﺍ
ﺕﺎﻣﺰﻠﺘﺴﻤﻟﺍ ﻭ ﻲﻧﺍﻭﻷﺍ ﺕﺎﻈﺣﻼﻣ
ﻡﻮﻴﻨﻣﻮﻟﻷﺍ ﻕﺭﻭ ﻭﺃ ﻢﺤﻠﻟﺍ ﻦﻣ ﺔﻘﻴﻗﺮﻟﺍ ﻊﻄﻘﻟﺍ ﺔﻴﻄﻐﺘﻟ ﻡﻮﻴﻨﻣﻮﻟﻷﺍ ﻦﻣ ﺕﺎﺻﺎﺼ
ُ
ﻗ ﻡﺍﺪﺨﺘﺳﺍ ﻦﻜﻤ
ُ
ﻳ .ﻂﻘﻓ ﺔﻴﻄﻐﺘﻠﻟ ﻡﺪﺨﺘﺴ
ُ
ﺗ
ﻲﻓ .ﺪﺋﺍﺰﻟﺍ ﺞﻀﻨﻟﺍ ﺐﻨﺠﺘﻟ ﻦﺟﺍﻭﺪﻟﺍ ﺪﻟﻮﺘﺗ ﺪﻘﻓ ﻥﺮﻔﻟﺍ ﺐﻧﺍﻮﺟ ﻦﻣ ﺔﺒﻳﺮﻗ ﻡﻮﻴﻨﻣﻮﻟﻷﺍ ﻖﺋﺎﻗﺭ ﺩﻮﺟﻭ ﺔﻟﺎﺣ
ﻦﻋ ﻞﻘﺗ ﻻ ﺔﻓﺎﺴﻤﺑ ﻥﺮﻔﻟﺍ ﺐﻧﺍﻮﺟ ﻦﻣ ﻡﻮﻴﻨﻣﻮﻟﻷﺍ ﻖﺋﺎﻗﺭ ﺩﺎﻌﺑﺇ ﺐﺠﻳ .ﺔﻴﺋﺎﺑﺮﻬﻛ ﺓﺭﺍﺮﺷ2,5 .ﻢﺳ
ﺮﻴﻤﺤﺘﻟﺍ ﻦﺤﺻ ﻦﻋ ﻞﻘﻳ ﻻ ﺎﻤﺑ ﺭﺍ
ﱠ
ﻭﺪﻟﺍ ﺹﺮﻘﻟﺍ ﻦﻋ ﺮﻴﻤﺤﺘﻟﺍ ﻦﺤﺻ ﻉﺎﻗ ﻊﻓﺭ ﺐﺠﻳ .ﻊﻨﺼ
ُ
ﻤﻟﺍ ﺕﺎﻤﻴﻠﻌﺘﺑ ﻡﺍﺰﺘﻟﻻﺍ ﺐﺠﻳ5 .ﻢﺳ
ﺘﺳﻻﺍ ءﻮﺳ.ﺭﺍ
ﱠ
ﻭﺪﻟﺍ ﺹﺮﻘﻟﺍ ﺮﺴﻛ ﻰﻟﺇ ﻱﺩﺆﻳ ﺪﻗ ﻡﺍﺪﺨ
ﺔﻳﺭﺎﺨﻓ ﺔﻴﻧﺁ ﻻ .ﻊﻨﺼ
ُ
ﻤﻟﺍ ﺕﺎﻤﻴﻠﻌﺘﺑ ﻡﺍﺰﺘﻟﻻﺍ ﺐﺠﻳ .ﻒﻳﻭﻭﺮﻜﻴﻤﻟﺍ ﻥﺮﻔﻟﺍ ﻲﻓ ﻡﺍﺪﺨﺘﺳﻼﻟ ﺔﺒﺳﺎﻨﻣﻭ ﺔﻘﻓﺍﻮﺘﻣ ﺖﻧﺎﻛ ﺍﺫﺇ ﻂﻘﻓ
.ﺭﻮﺴﻛ ﻭﺃ ﻕﻮﻘﺷ ﺎﻬﺑ ﻕﺎﺒﻁﺃ ﻡﺪﺨﺘﺴ
ُ
ﺗ
ﺕﺎﻧﺎﻤﻁﺮﺑ ﻟﺍ ﻢﻈﻌ
ُ
ﻣ .ﻂﻴﺴﺑ ﻞﻜﺸﺑ ﻡﺎﻌﻄﻟﺍ ﺔﺌﻓﺪﺘﻟ ﻂﻘﻓ ﻡﺪﺨﺘﺴ
ُ
ﺗ .ءﺎﻄﻐﻟﺍ ﺔﻟﺍﺯﺇ
ً
ﺎﻤﺋﺍﺩ ﺐﺠﻳ ﺓﺭﺍﺮﺤﻟﺍ ﻡﻭﺎﻘﺗ ﻻ ﺕﺎﻧﺎﻤﻁﺮﺒ
.ﺮﺴﻜﻨﺗﻭ
ﺔﻴﺟﺎﺟﺯ ﺔﻴﻧﺁ ﻕﺎﺒﻁﺃ ﻡﺪﺨﺘﺴ
ُ
ﺗ ﻻ .ﻥﺪﻌﻣ ﻱﺃ ﺏﺎﻴﻏ ﻦﻣ ﻖﻘﺤﺘﻟﺍ .ﻥﺮﻔﻟﺍ ﻲﻓ ﻡﺍﺪﺨﺘﺳﻻﺍ ﻊﻣ ﺔﻘﻓﺍﻮﺘﻣ ﺝﺎﺟﺰﻟﺍ ﻦﻣ ﺔﺻﺎﺧ ﻉﺍﻮﻧﺃ
.ﺭﻮﺴﻛ ﻭﺃ ﻕﻮﻘﺷ ﺎﻬﺑ
ﻥﺮﻔﻟﺎﺑ ﺦﺒﻄﻟﺍ ﺱﺎﻴﻛﺃ
(ﺔﻳﺭﺍﺮﺤﻟﺍ ﺱﺎﻴﻛﻷﺍ)
ﺔﻄﺳﺍﻮﺑ ﺲﻴﻜﻟﺍ ﻝﺎﻔﻗﺇ ﻢﺘﻳ ﻻ .ﻊﻨﺼ
ُ
ﻤﻟﺍ ﺕﺎﻤﻴﻠﻌﺘﺑ ﻡﺍﺰﺘﻟﻻﺍ ﺐﺠﻳ ﺝﺍﺮﺧﺈﺑ ﺡﺎﻤﺴﻠﻟ ﺲﻴﻜﻟﺍ ﺐﻘﺜ
ُ
ﻳ .ﻲﻧﺪﻌﻣ ﻂﺑﺍﺭ
.ﺭﺎﺨﺒﻟﺍ
ﺔﻴﻗﺭﻭ ﺏﺍﻮﻛﺃﻭ ﻕﺎﺒﻁﺃ .ﻲﻬﻄﻠﻟ ﺎﻬﻣﺍﺪﺨﺘﺳﺍ ءﺎﻨﺛﺃ ﻥﺮﻔﻟﺍ ﻦﻋ ﺩﺎﻌﺘﺑﻻﺍ ﻡﺪﻋ .
ً
ﺍﺪﺟ ﺓﺮﻴﺼﻗ ﺓﺮﺘﻔﻟ ﻦﻴﺨﺴﺘﻠﻟ/ ﻲﻬﻄﻠﻟ
ﱠ
ﻻﺇ ﻡﺪﺨﺘﺴ
ُ
ﺗ ﻻ
ﺔﻴﻗﺭﻭ ﻒﺷﺎﻨﻣ ﺓﺮﻴﺼﻗ ﺓﺮﺘﻔﻟ ﻲﻬﻄﻟﺍ ءﺎﻨﺛﺃ ﻡﺪﺨﺘﺴ
ُ
ﺗ .ﺕﻮﻳﺰﻟﺍ ﺹﺎﺼﺘﻣﺍﻭ ﻦﻴﺨﺴﺘﻟﺍ ﺪﻨﻋ ﻡﺎﻌﻄﻟﺍ ﺔﻴﻄﻐﺘﻟ ﻡﺪﺨﺘﺴ
ُ
ﺗ ﻊﻣ
ً
ﺍﺪﺟ
.ﺔﺒﻗﺍﺮﻤﻟﺍ
ﻡﻮﺤﺸﻠﻟ ﺩﺎﻀﻣ ﻕﺭﻭ .ﺭﺎﺨﺒﻟﺎﺑ ﻲﻬﻄﻠﻟ ﺔﻴﻗﺭﻭ ﺔﻓﺎﻔﻠﻛ ﻡﺪﺨﺘﺴ
ُ
ﻳ ﻭﺃ ،ﺮﺛﺎﻨﺘﻟﺍﻭ ﺦﻴﻄﻠﺘﻟﺍ ﻊﻨﻤﻟ ءﺎﻄﻐﻛ ﻡﺪﺨﺘﺴ
ُ
ﻳ
ﺔﻴﻜﻴﺘﺳﻼﺑ ﺕﺎﻣﺰﻠﺘﺴﻣ ﺐﺠﻳ .ﻒﻳﻭﻭﺮﻜﻴﻣ ﻥﺮﻓ ﻲﻓ ﻪﻣﺍﺪﺨﺘﺳﺍ ﻖﻓﺍﻮﺘﻤﻟﺍ ﻚﻴﺘﺳﻼﺒﻟﺍ ﺓﺩﺎﻣ ﻦﻣ ﺔﻌﻨﺼ
ُ
ﻤﻟﺍ ﺕﺎﻣﺰﻠﺘﺴ
ُ
ﻤﻟﺍ ﻝﺎﻤﻌﺘﺳﺍ ﻢﺘﻳ
ﻥﺃ ﺐﺠﻳ .ﻊﻨﺼ
ُ
ﻤﻟﺍ ﺕﺎﻤﻴﻠﻌﺘﺑ ﻡﺍﺰﺘﻟﻻﺍ ﻰﻠﻋ ﺓﺩﻮﺟﻮﻣ "ﻒﻳﻭﻭﺮﻜﻴﻣ ﻥﺮﻓ ﻲﻓ ﻡﺍﺪﺨﺘﺳﻼﻟ ﻞﺑﺎﻗ" ﺔﻣﻼﻋ ﻥﻮﻜﺗ
ﺔﺒﺴﻨﻟﺎﺑ .
ً
ﺎﻨﺧﺎﺳ ﺎﻬﻠﺧﺍﺪﺑ ﻡﺎﻌﻄﻟﺍ ﺢﺒﺼﻳ ﺎﻣﺪﻨﻋ ﺏﻭﺬﺗ ﺔﻴﻜﻴﺘﺳﻼﺒﻟﺍ ﺔﻴﻋﻭﻷﺍ ﺾﻌﺑ .ﺞﺘﻨﻤﻟﺍ ﺦﺒﻄﻟﺍ ﺱﺎﻴﻛﺃ"ـﻟ
،ﺔﺣﻮﺘﻔﻣ ﺎﻬﻛﺮﺗ ﻭﺃ ﺱﺎﻴﻛﻷﺍ ﻚﻠﺘﺑ ﺐﻘﺛ ﻭﺃ ﻖﺷ ﻞﻤﻋ ﻢﺘﻳ ﻥﺃ ﺐﺠﻳ ﻪﻧﺈﻓ ﻡﺎﻜﺣﺈﺑ ﺔﻘﻠﻐ
ُ
ﻤﻟﺍ ﺱﺎﻴﻛﻷﺍ ﻭ "ﺔﻳﺭﺍﺮﺤﻟﺍ
ﺢﺿﻮﻣ ﻮﻫ ﺎﻤﻛ .ﺎﻬﻓﻼﻏ ﻰﻠﻋ
ﺹﺎﺧ ﻑﺎﻔﺸﻟﺍ ﻚﻴﺘﺳﻼﺒﻟﺍ
ﺔﻳﺬﻏﻷﺍ ﻒﻴﻠﻐﺘﺑ
ءﺎﻨﺛﺃ ﻡﺎﻌﻄﻟﺍ ﺔﻴﻄﻐﺘﻟ ﻡﺪﺨﺘﺴ
ُ
ﻳ .ﻒﻳﻭﻭﺮﻜﻴﻤﻟﺍ ﻥﺮﻓ ﻲﻓ ﺎﻬﻣﺍﺪﺨﺘﺳﺍ ﻖﻓﺍﻮﺘﻤﻟﺍ ﻚﻴﺘﺳﻼﺒﻟﺍ ﺓﺩﺎﻣ ﻻﺇ ﻡﺪﺨﺘﺴ
ُ
ﺗ ﻻ
.ﻡﺎﻌﻄﻟﺎﺑ ﻑﺎﻔﺸﻟﺍ ﻚﻴﺘﺳﻼﺒﻟﺍ ﺔﻘﺒﻁ ﻙﺎﻜﺘﺣﺎﺑ ﺡﺎﻤﺴﻟﺍ ﻡﺪﻋ .ﺔﺑﻮﻁﺮﻟﺍ ﻰﻠﻋ ﻅﺎﻔﺤﻠﻟ ﻲﻬﻄﻟﺍ
ﻦﻴﻓﺍﺮﺒﻟﺎﺑ ﻥﻮﻫﺪﻣ ﻕﺭﻭ ءﺎﻄﻐﻛ ﻡﺪﺨﺘﺴ
ُ
ﻳ .ﺔﺑﻮﻁﺮﻟﺍ ﻰﻠﻋ ﻅﺎﻔﺤﻟﺍﻭ ﺮﺛﺎﻨﺘﻟﺍﻭ ﺦﻴﻄﻠﺘﻟﺍ ﻊﻨﻤﻟ
109

2( ﺯﺎﻬﺠﻟﺍ ﺐﻴﻛﺮﺗ ﺔﻴﻔﻴﻛ
(ﺃ ﻲﺋﺎﺑﺮﻬﻜﻟﺍ ﺭﺎﻴﺘﻟﺎﺑ ﺯﺎﻬﺠﻟﺍ ﻞﻴﺻﻮﺗ ﻞﺒﻗ ﺎﻣ
:ﻪﻴﺒﻨﺗ
.(...ﺦﻟﺍ ،ﺔﻴﻠﺼﻔﻤﻟﺍ ﻞﺻﺍﻮﻔﻟﺍ ﻭﺃ ﺏﺎﺒﻟﺍ ﻞﻜﺷ ﻲﻓ ﻩﻮﺸﺗ) ﻞﻘﻨﻟﺍ ﺔﻴﻠﻤﻋ ءﺎﻨﺛﺃ ﺯﺎﻬﺠﻟﺎﺑ ﻒﻠﺗ ﻱﺃ ﻖﺤﻠﻳ ﻢﻟ ﻪﻧﺃ ﻦﻣ ﻖﻘﺤﺘﻟﺍ ﺐﺠﻳ
ﻢﺘﻳ ،ﻒﻠﺗ ﻱﺃ ﺩﻮﺟﻭ ﻆﺣﻮﻟ ﺍﺫﺇ.ﺯﺎﻬﺠﻟﺍ ﻡﺍﺪﺨﺘﺳﺍ ﻞﺒﻗ ﻊﺋﺎﺒﻟﺎﺑ ﻝﺎﺼﺗﻻﺍ
(ﺏ ﺔﻴﺋﺎﺑﺮﻬﻜﻟﺍ ﺕﻼﺻﻮﻟﺍ ﻂﺑﺭ
:ﻥﺃ ﻦﻣ ﺪﻛﺄﺘﻟﺍ ﺐﺠﻳ
- .ﺔﻴﻓﺎﻛ ﺔﻴﺋﺎﺑﺮﻬﻜﻟﺍ ﺕﺎﺒﻴﻛﺮﺘﻠﻟ ﻲﺋﺎﺑﺮﻬﻜﻟﺍ ﺭﺎﻴﺘﻟﺍ ﺓﺭﺪﻗ
- .ﺔﻤﻴﻠﺳ ﻲﺋﺎﺑﺮﻬﻜﻟﺍ ﺭﺎﻴﺘﻟﺍ ﺔﻳﺬﻐﺗ ﺕﻼﺻﻭ
- .ﺐﻴﻛﺮﺘﻟﺍ ﺪﻋﺍﻮﻗ ﻊﻣ ﻖﻓﺍﻮﺘﻣ ﻙﻼﺳﻷﺍ ﺮﻄﻗ
- ﺔﻳﺭﺍﺮﺣ ﺔﻳﺎﻤﺤﺑ ﺓﺩﻭﺰﻣ ﺔﻴﺋﺎﺑﺮﻬﻜﻟﺍ ﺕﺎﺒﻴﻛﺮﺘﻟﺍ20 .ﺮﻴﺒﻣﺃ
.ﻢﻜﻳﺪﻟ ﻲﺋﺎﺑﺮﻬﻜﻟﺍ ﻲﻨﻔﻟﺎﺑ ﻝﺎﺼﺗﻻﺍ ﻰﺟﺮ
ُ
ﻳ ،ﻚﺸﻟﺍ ﺔﻟﺎﺣ ﻲﻓ
.ﻲﺋﺎﻬﻨﻟﺍ ﻪﻌﺿﻮﻣ ﻲﻓ ﺯﺎﻬﺠﻟﺍ ﻊﺿﻭ ﻞﺒﻗ ﺔﻴﺋﺎﺑﺮﻬﻜﻟﺍ ﺕﻼﺻﻮﻟﺍ ﻂﺑﺭ ﻢﺘﻳ
ﺔﻜﺒﺸﻟﺍ ﻦﻋ ﺯﺎﻬﺠﻟﺍ ﻞﺼﻓ ﺐﺠﻳ ،ﺔﻧﺎﻴﺼﻟﺍ ﻝﺎﻤﻋﺄﺑ ﻡﺎﻴﻘﻟﺍ ﺪﻨﻋ .ﺢﻴﺤﺻ ﻞﻜﺸﺑ ﺔﻴﺋﺎﺑﺮﻬﻜﻟﺍ ﺕﻼﺻﻮﻟﺍ ﻂﺑﺮﺑ ﻲﺋﺎﺑﺮﻬﻜﻟﺍ ﻦﻣﻷﺍ ﻥﺎﻤﺿ ﺐﺠﻳ
ﺐﺠﻳ ﻭ ،ﺔﻴﺋﺎﺑﺮﻬﻜﻟﺍ.ﺕﺍﺮﻬﺼﻨﻤﻟﺍ ﺐﺤﺳ ﻭﺃ ﻞﺼﻓ ﻢﺘﻳ ﻥﺃ
ءﺎﺑﺮﻬﻛ ﺕﻼﺻﻮﻣ ﺙﻼﺛ ﻦﻣ ﻥﻮﻜﻣ ﻲﺳﺎﻴﻗ ءﺎﺑﺮﻬﻛ ﻚﻠﺳ ﻡﺍﺪﺨﺘﺳﺍ ﻢﺘﻳ ﻥﺃ ﺐﺠﻳ1,5 ﻢﻣ
2
)1 + ﺭﻮﻁ1 +ﻱﺩﺎﻴﺣ1 ﻢﻬﻄﺑﺭ ﻢﺘﻳ ﻥﺃ ﻭ ،(ﻲﺿﺭﺃ
ﺔﻴﺋﺎﺑﺮﻬﻜﻟﺍ ﺔﻜﺒﺸﻟﺎﺑ220 - 240 ،ﻂﻟﻮﻓ50 ﻲﺳﺎﻴﻗ ءﺎﺑﺮﻬﻛ ﺬﺧﺄﻣ ﺮﺒﻋ ،ﺭﻮﻄﻟﺍ ﺔﻳﺩﺎﺣﺃ ،ﺰﺗﺮﻫCEI 60083
ً
ﺎﻘﻓﻭ ﻭ ﻲﺿﺭﺃﻭ ﻦﻴﻓﺮﻄﺑ ﺩﻭﺰﻣ
.ﺎﻬﺑ ﻝﻮﻤﻌﻤﻟﺍ ﺐﻴﻛﺮﺘﻟﺍ ﺪﻋﺍﻮﻘﻟ
ﻲﺿﺭﻷﺍ ﻚﻠﺳ .ﻢﻜﺑ ﺔﺻﺎﺨﻟﺍ ﺔﻴﺋﺎﺑﺮﻬﻜﻟﺍ ﺕﺎﺒﻴﻛﺮﺘﻟﺎﺑ ﺹﺎﺨﻟﺍ ﻲﺿﺭﻷﺎﺑ ﻪﻄﺑﺭ ﺐﺠﻳﻭ ﺯﺎﻬﺠﻠﻟ ﻲﺴﻴﺋﺮﻟﺍ ﻑﺮﻄﻟﺎﺑ ﻞﺼﺘ
ُ
ﻣ (ﺮﻔﺻﺃﻭ ﺮﻀﺧﺃ)
.ﺔﻴﺋﺎﺑﺮﻬﻜﻟﺍ ﺔﻜﺒﺸﻟﺎﺑ ﻱﺩﺎﻴﺤﻟﺍ ﻑﺮﻄﻟﺎﺑ (ﻕﺭﺯﺃ) ﻱﺩﺎﻴﺤﻟﺍ ﻚﻠﺳ ﻂﺑﺭ ﺐﺠﻳ
ﻂﺑﺭ ﺐﺠﻳﻭ ﺭﻮﻄﻟﺍ ﻚﻠﺴﺑ (ﻲﻨﺑ ﻭﺃ ﺩﻮﺳﺍ ،ﺮﻤﺣﺃ) ﺭﻮﻄﻟﺍ ﻚﻠﺳﺔﻴﺋﺎﺑﺮﻬﻜﻟﺍ ﺔﻜﺒﺸﻟﺎﺑ.
.ﺉﺭﺍﻮﻄﻟﺍ ﺪﻨﻋ ﻱﺭﻮﻔﻟﺍ ﻞﺼﻔﻠﻟ ﻝﺎﻨﻤﻟﺍ ﻞﻬﺳ ﺮﺧﺁ ﻊﻁﺎﻗ ﻱﺃ ﻭﺃ ءﺎﺑﺮﻬﻜﻟﺍ ﺲﺑﺎﻗ ﻰﻘﺒﻳ ﻥﺃ ﺐﺠﻳ
ﻮﻜﻳﻭ ،ﻲﺋﺎﺑﺮﻬﻜﻟﺍ ﺭﺎﻴﺘﻟﺍ ﻉﺎﻄﻗ ﻦﻋ ﺯﺎﻬﺠﻟﺍ ﻞﺼﻓ ﺔﻴﻧﺎﻜﻣﺇ ﺎﻬﻳﺪﻟﻭ ﻝﺎﻨﻤﻟﺍ ﺔﻠﻬﺳ ،ﺔﻴﺋﺎﺑﺮﻬﻜﻟﺍ ﺕﺎﺒﻴﻛﺮﺘﻟﺍ ﻦﻤﺿ ،ﺓﺪﺣﻭ ﺩﻮﺟﻭ ﻰﻠﻋ
ً
ﺎﻘﺒﺴ
ُ
ﻣ ﺐﻴﺗﺮﺘﻟﺍ ﻥ
ﻦﻋ ﻞﻘﻳ ﻻ ﺎﻬﻳﺪﻟ ﻞﺼﻔﻟﺍ ﺲﻣﻼﺗ3 .ﺏﺎﻄﻗﻷﺍ ﻊﻴﻤﺟ ﻯﻮﺘﺴﻣ ﻰﻠﻋ ﻢﻣ
.ﻲﺋﺎﺑﺮﻬﻜﻟﺍ ﺭﺎﻴﺘﻟﺍ ﻉﺎﻄﻘﺑ ﻞﻴﺻﻮﺘﻟﺍ ﺓﺪﺣﻭ ﻞﺼﻓ ﻭﺃ ﻲﺋﺎﺑﺮﻬﻜﻟﺍ ﺭﺎﻴﺘﻟﺍ ﻦﻋ ﺯﺎﻬﺠﻟﺍ ﻞﺼﻓ ﻢﺘﻳ ،ﻥﺮﻔﻟﺎﺑ ﻝﻼﺘﺧﺍ ﻱﺃ ﺔﻈﺣﻼﻣ ﺔﻟﺎﺣ ﻲﻓ
ﺮ
ُ
ﻣ ﺺﺨﺷ ﻱﺃ ﻯﺪﻟ ﻭﺃ ﻪﻟ ﺔﻌﺑﺎﺘﻟﺍ ﻊﻴﺒﻟﺍ ﺪﻌﺑ ﺎﻣ ﺔﻣﺪﺧ ﻭﺃ ﻊﻨﺼ
ُ
ﻤﻟﺍ ﻯﺪﻟ ﻪﻟﺍﺪﺒﺘﺳﺍ ﺐﺠﻴﻓ ،ﺯﺎﻬﺠﻠﻟ ﻲﺋﺎﺑﺮﻬﻜﻟﺍ ﺭﺎﻴﺘﻟﺍ ﻚﻠﺴﺑ ﻒﻠﺗ ﺙﺪﺣ ﺍﺫﺇ ﻪﻟ ﺺﺧ
.ﺮﻁﺎﺨﻣ ﻱﺃ ﺙﻭﺪﺣ ﻱﺩﺎﻔﺘﻟ ﻚﻟﺫﻭ ،ﺔﻣﺪﺨﻟﺍ ﻚﻠﺗ ﻢﻳﺪﻘﺘﺑ
.ﻪﺑ ﺺﻘﻧ ﺩﻮﺟﻭ ﻭﺃ ﻪﺑ ﺐﻴﻋ ﺩﻮﺟﻭ ﻭﺃ ﻲﺿﺭﻷﺍ ﺩﻮﺟﻭ ﻡﺪﻋ ﺔﺠﻴﺘﻧ ﺔﻌﻗﺍﻭ ﻭﺃ ﺙﺩﺎﺣ ﻉﻮﻗﻭ ﺔﻟﺎﺣ ﻲﻓ ﺔﻴﻟﻭﺆﺴﻣ ﻰﻧﺩﺃ ﺎﻨﻴﻠﻋ ﻊﻘﺗ ﻻ :ﻪﻴﺒﻨﺗ
108

(ﺝ ﻒﻳﻭﻭﺮﻜﻳﺎﻤﻟﺍ ﻥﺮﻓ ﻞﻤﻋ ﺔﻴﻔﻴﻛ
ﻬﻛ ﺕﺎﺟﻮﻣ ﻦﻋ ﺓﺭﺎﺒﻋ ﻲﻫ ﻲﻬﻄﻠﻟ ﺔﻣﺪﺨﺘﺴ
ُ
ﻤﻟﺍ ﺓﺮﻴﻐﺼﻟﺍ ﺕﺎﺟﻮﻤﻟﺍ ﻥﺇ.ﺔﻴﺴﻴﻁﺎﻨﻐﻣﻭﺮ
ﻮﻳﺩﺍﺮﻟﺍ ﺕﺎﺟﻮﻤﻟﺍ ﻞﺜﻣ ﺎﻨﺘﺌﻴﺑ ﻲﻓ ﺮﺴ
ُ
ﻴﺑ ﺓﺪﺟﺍﻮﺘﻣ ﺕﺎﺟﻮﻤﻟﺍ ﻚﻠﺗ- .ءﺍﺮﻤﺤﻟﺍ ﺖﺤﺗ ﺔﻌﺷﻷﺍ ﻭﺃ ،ءﻮﻀﻟﺍ ،ﺔﻴﺋﺎﺑﺮﻬﻛ
ﻱﺩﺩﺮﺘﻟﺍ ﻯﺪﻤﻟﺍ ﻦﻤﺿ ﺎﻫﺩﺩﺮﺗ ﻊﻘﻳﻭ 2450 ﺰﺗﺮﻫﺎﻐﻴﻣ.
:ﺎﻬﺼﺋﺎﺼﺧ
.ﻥﺩﺎﻌﻤﻟﺍ ﻞﺒﻗ ﻦﻣ ﺲﻜﻌﻨﺗ
.ﻯﺮﺧﻷﺍ ﺩﺍﻮﻤﻟﺍ ﻊﻴﻤﺟ ﺮﺒﻋ ﺬ
ُ
ﻔﻨﺗ
ﻥﻮﻫﺪﻟﺍﻭ ءﺎﻤﻟﺍ ﺕﺎﺌﻳﺰﺟ ﻞﺒﻗ ﻦﻣ ﺎﻬﺻﺎﺼﺘﻣﺍ ﻢﺘﻳ .ﺮﻜﺴﻟﺍﻭ
.ﻦﻴﺨﺴﺘﻟﺍ ﻰﻟﺇ ﻱﺩﺆﻳ ﺎﻤﻣ ،ﺕﺎﻴﺋﺰﺠﻠﻟ ﻊﻳﺮﺳ ﺾﻳﺮﺤﺗ ﻪﻌﺒﺘﻳ ،ﺓﺮﻴﻐﺼﻟﺍ ﺔﻴﺴﻴﻁﺎﻨﻐﻣﻭﺮﻬﻜﻟﺍ ﺕﺎﺟﻮﻤﻠﻟ ﻡﺎﻌﻄﻟﺍ ﺽ
ُ
ﺮﻌﺗ ﺪﻨﻋ
ﻲﻟﺍﻮﺣ ﻎﻠﺒﻳ ﻖﻤﻋ ﻰﻟﺇ ﻡﺎﻌﻄﻟﺍ ﻞﺧﺍﺩ ﺕﺎﺟﻮﻤﻟﺍ ﻞﻠﺨﺘﺗ2,5 ﻲﻠﺧﺍﺪﻟﺍ ءﺰﺠﻟﺍ ﻰﺘﺣ
ً
ﺍﺪﻴﺟ ﺎﻬﺘﻳﻮﺴﺗ ﻢﺘﻳ ﻑﻮﺴﻓ ،ﺔﻜﻴﻤﺳ ﻡﺎﻌﻄﻟﺍ ﺔﻌﻄﻗ ﺖﻧﺎﻛ ﺍﺫﺇ .ﻢﺳ
ﻮﺘﻟﺍ ﺔﻴﻠﻤﻋ ﻝﻼﺧ ﻦﻣ ،ﻡﺎﻌﻄﻠﻟ.ﻱﺪﻴﻠﻘﺘﻟﺍ ﻲﻬﻄﻟﺍ ﻞﺜﻣ ﻱﺭﺍﺮﺤﻟﺍ ﻊﻳﺯ
(ﺩ ﺔﺌﻴﺒﻟﺍ ﺔﻳﺎﻤﺣ
.ﺔﺤﺼﻟﺎﺑ ﺓﺭﺎﺿ ﺮﻴﻏ ﺎﻬﻨﻜﻟ ﻡﺎﻌﻄﻟﺍ ﻞﺧﺍﺪﺑ ﻂﻴﺴﺑ ﻱﺭﺍﺮﺣ ﺮﻴﺛﺄﺗ ﺎﻬﻳﺪﻟ ﺓﺮﻴﻐﺼﻟﺍ ﺔﻴﺴﻴﻁﺎﻨﻐﻣﻭﺮﻬﻜﻟﺍ ﺕﺎﺟﻮﻤﻟﺍ ﻥﺄﺑ ﻑﺮﻌﻧ ﻥﺃ ﻦﺌﻤﻄ
ُ
ﻤﻟﺍﻭ ﺪﻴﺠﻟﺍ ﻦﻣ
ﺃ ﺐﺠﻳ ﺚﻴﺣ ؛ﻲﺿﺍﺮﺘﻓﻻﺍ ﺮﻤﻌﻟﺍ ءﺎﻬﺘﻧﺍ ﺪﻨﻋ ﺔﻴﻟﺰﻨﻤﻟﺍ ﺕﺎﻳﺎﻔﻨﻟﺍ ﻊﻣ ﺞﺘﻨﻤﻟﺍ ﺍﺬﻫ ﻲﻣﺭ ﺐﺠﻳ ﻻ ﺮﻳﻭﺪﺘﻟﺍ ﺓﺩﺎﻋﺇ ﺰﻛﺍﺮﻣ ﻯﺪﺣﺇ ﻰﻟﺇ ﻩﺬﺧ
ﺺﻠﺨﺘﻟﺍ ءﻮﺳ ﻦﻋ ﺔﺠﺗﺎﻨﻟﺍ ﺔﺤﺼﻟﺍ ﻰﻠﻋﻭ ﺔﺌﻴﺒﻟﺍ ﻰﻠﻋ ﺓﺭﺎﻀﻟﺍ ﺐﻗﺍﻮﻌﻟﺍ ﺐﻨﺠﺘﺑ ﺢﻤﺴﻳ ﺍﺬﻬﻓ .ﻢﻜﻳﺪﻟ ﺔﻠﻤﻌﺘﺴﻤﻟﺍ ءﺎﻴﺷﻷﺍ ﻊﺋﺎﺑ ﻰﻟﺇ ﻭﺃ
.ﺔﻤﻬﻤﻟﺍ ﺩﺭﺍﻮﻤﻟﺍﻭ ﺔﻗﺎﻄﻟﺍ ﺮﻴﻓﻮﺗ ﺽﺮﻐﺑ ﺩﺍﻮﻤﻟﺍ ﺮﻳﻭﺪﺗ ﺓﺩﺎﻋﺇ ﻲﻟﺎﺘﻟﺎﺑﻭ ؛ﺞﺘﻨﻤﻟﺍ ﻚﻟﺫ ﻦﻣ
ﺪﺟﻮﺗ ﺪﻌﺑ ﺮﻴﻛﺬﺘﻠﻟ ﺔﻣﻼﻋ ﺞﺘﻨﻤﻟﺍ ﻰﻠﻋ ﺔﻳﺪﻠﺒﻟﺎﺑ ﻝﺎﺼﺗﻻﺍ ﻰﺟﺮﻳ ،ﺕﺎﻣﻮﻠﻌﻤﻟﺍ ﻦﻣ ﺪﻳﺰﻤﻠﻟ .ﺔﻴﻟﺰﻨﻤﻟﺍ ﺕﺎﻳﺎﻔﻨﻟﺍ ﺔﻴﻘﺑ ﻊﻣ ﺯﺎﻬﺠﻟﺍ ﻲﻣﺭ ﻡ
.ﻪﻨﻣ ﺞﺘﻨﻤﻟﺍ ءﺍﺮﺷ ﻢﺗ ﻱﺬﻟﺍ ﻞﺤﻤﻟﺎﺑ ﻭﺃ ،ﺎﻬﻟ ﻦﻴﻌﺑﺎﺘﻟﺍ
ﺓﺰﻬﺟﻷﺍ ﻂﻠﺧ ﺐﺠﻳ ﻻ ﻪﻧﺃ ﻢﻜﻟ ﻦﻴﺒﺘﻟ ﺔﻣﻼﻌﻟﺍ ﻩﺬﻫ ﻪﻴﻠﻋ ﺖﻌﺿﻭ ﺍﺬﻟ .ﺮﻳﻭﺪﺘﻠﻟ ﺔﻠﺑﺎﻘﻟﺍ ﺩﺍﻮﻤﻟﺍ ﻦﻣ ﺪﻳﺪﻌﻟﺍ ﻰﻠﻋ
ً
ﺎﻀﻳﺃ ﻱﻮﺘﺤﻳ ﺯﺎﻬﺠﻟﺍ ﻥﺇ ﺔﻣﺪﺨﺘﺴﻤﻟﺍ
.ﻯﺮﺧﻷﺍ ﺕﺎﻳﺎﻔﻨﻟﺍ ﻊﻣ
ﺔﻴﺑﻭﺭﻭﻷﺍ ﺕﺎﻬﻴﺟﻮﺘﻠﻟ
ً
ﺎﻘﻓﻭ ،ﻑﻭﺮﻈﻟﺍ ﻞﻀﻓﺃ ﻲﻓ ﻥﻮﻜﺘﺳ ﻊﻨﺼ
ُ
ﻤﻟﺍ ﺎﻬﺑ ﻡﻮﻘﻴﺳ ﻲﺘﻟﺍ ﺓﺰﻬﺟﻷﺍ ﺮﻳﻭﺪﺗ ﺓﺩﺎﻋﺇ ﺔﻴﻠﻤﻋ ﻥﺇ2002/96/CE ﺕﺎﻳﺎﻔﻧ ﻦﻋ
.ﺔﻴﻧﻭﺮﺘﻜﻴﻟﻹﺍﻭ ﺔﻴﺋﺎﺑﺮﻬﻜﻟﺍ ﺓﺰﻬﺟﻷﺍ،ﻊﺋﺎﺒﻟﺎﺑ ﻭﺃ ﺎﻬﻟ ﻦﻴﻌﺑﺎﺘﻟﺍ ﺔﻳﺪﻠﺒﻟﺎﺑ ﻝﺎﺼﺗﻻﺍ ﻰﺟﺮﻳ ﺮﻘﻤﻟ ﺏﺮﻗﻷﺍ ﺔﻣﺪﺨﺘﺴ
ُ
ﻤﻟﺍ ﺓﺰﻬﺟﻷﺍ ﻊﻤﺟ ﻦﻛﺎﻣﺃ ﺔﻓﺮﻌﻤﻟ
.ﺔﺌﻴﺒﻟﺍ ﺔﻳﺎﻤﺣ ﻲﻓ ﻢﻜﺘﻛﺭﺎﺸﻣ ﻦﺴﺣ ﻰﻠﻋ ﻢﻛﺮﻜﺸﻧ .ﻦﻜﺴﻟﺍ
107
Fig.01

ﻥﺮﻔﻟ ﻲﻠﺧﺍﺪﻟﺍ ﺡﺎﺒﺼﻤﻟﺍ ﺮﻴﻴﻐﺗ ﻰﻟﺇ ﺔﺟﺎﺤﻟﺍ ﺪﻨﻋ ﺺﺼﺨﺘ
ُ
ﻣ ﻲﻨﻔﺑ ﻝﺎﺼﺗﻻﺍ ﻢﺘﻳ
.ﻒﻳﻭﻭﺮﻜﻴﻤﻟﺍ
ﻢﺘﻳ ﻞﺑ ،ﻲﺋﺎﺑﺮﻬﻜﻟﺍ ﺭﺎﻴﺘﻟﺍ ﻦﻋ ﺔﻟﻵﺍ ﻞﺼﻓ ﺔﻴﻐ
ُ
ﺑ ءﺎﺑﺮﻬﻜﻟﺍ ﻚﻠﺳ
ّ
ﺪ
َ
ﺷ
ً
ﺍﺪﺑﺃ ﺐﺠﻳ ﻻ ﻙﺎﺴﻣﻹﺍ
ﻪﻠﺼﻓﻭ ﻚﻠﺴﻟﺍ ﺲﺑﺎﻘﺑ.
ﻯﺪﻟ ﻭﺃ ﻞﻴﻛﻮﻟﺍ ﻯﺪﻟ ﻭﺃ ﻊﻨﺼ
ُ
ﻤﻟﺍ ﻯﺪﻟ ﻪﻟﺍﺪﺒﺘﺳﺍ ﺐﺠﻳ ﻪﻧﺈﻓ ،ءﺎﺑﺮﻬﻜﻟﺍ ﻚﻠﺳ ﻒﻠﺗ ﺔﻟﺎﺣ ﻲﻓ
.ﺮﻁﺎﺨﻣ ﻱﺃ ﻱﺩﺎﻔﺘﻟ ،ﻚﻟﺬﺑ ﺺﺧﺮ
ُ
ﻣ ﺺﺨﺷ ﻱﺃ
ﺯﺎﻬﺠﻠﻟ ﻖﺑﺎﻄﻣ ﺮﻴﻏ ﻡﺍﺪﺨﺘﺳﺍ:
.ﻖﺑﺎﻄﻣ ﺮﻴﻏ
ً
ﺎﻣﺍﺪﺨﺘﺳﺍ ﺯﺎﻬﺠﻟﺍ ﻡﺍﺪﺨﺘﺳﺍ ﺔﻟﺎﺣ ﻲﻓ ﺔﻴﻟﻭﺆﺴﻣ ﻰﻧﺩﺃ ﻊﻨﺼ
ُ
ﻤﻟﺍ ﻰﻠﻋ ﻊﻘﺗ ﻻ
ُ
ﻳ ﻡﺪﺨﺘﺴﺯﺎﻬﺠﻟﺍ ﺍﺬﻫ ﻞﻴﻟﺪﻟﺍ ﺍﺬﻫ ﻲﻓ ﺓﺭﻮﻛﺬﻤﻟﺍ ﺕﺎﻣﺍﺪﺨﺘﺳﻼﻟ ﻂﻘﻓ.
.ﺓﺮﻘﻔﻟﺍ ﻩﺬﻫ ﻲﻓ ﺓﺭﻮﻛﺬﻤﻟﺍ ﺔﻣﻼﺴﻟﺍ ﺕﺍﺩﺎﺷﺭﺇﻭ ﺔﻣﺎﻌﻟﺍ ﻡﺍﺪﺨﺘﺳﻻﺍ ﺕﺍﺩﺎﺷﺭﺈﺑ ﻡﺍﺰﺘﻟﻻﺍ ﺐﺠﻳ
ﺺﺼﺨ
ُ
ﻣ ﺮﻴﻏ ﻪﻧﺃ ﺎﻤﻛ .ﺔﺸﻤﻗﻷﺍ ﻭﺃ ﺔﻴﺋﺍﺬﻐﻟﺍ ﺩﺍﻮﻤﻟﺍ ﻒﻴﻔﺠﺘﻟ ﺺﺼﺨ
ُ
ﻣ ﺮﻴﻏ ﺯﺎﻬﺠﻟﺍ ﺍﺬﻫ
ﻷﺍ ،ﺞﻨﻔﺳﻷﺍ ﻊﻄﻗ ،ﺝﻮﺑﺎﺒﻟﺍ ﻝﺎﻌﻧ ،ﺔﺌﻓﺪﺘﻟﺍ ﺪﺋﺎﺳﻭ ﻦﻴﺨﺴﺘﻟ ﻯﺮﺧﺃ ﺽﺍﺮﻏﺃﻭ ﺔﺒﻁﺮﻟﺍ ﺔﺸﻤﻗ
ﻑﻼﺗﺇ ﻰﻟﺇ ﻱﺩﺆﺗ ﺕﺎﻣﺍﺪﺨﺘﺳﻻﺍ ﻚﻠﺗ ﻊﻴﻤﺟ .ﻢﻴﻘﻌﺘﻠﻟ ﺺﺼﺨ
ُ
ﻣ ﺮﻴﻏ ﻪﻧﺃ ﺎﻤﻛ .ﺔﻬﺑﺎﺸﻣ
.ﺓﺮﻄﺧ ﻒﻗﺍﻮﻣ ﺙﺍﺪﺣﺇﻭ ﺯﺎﻬﺠﻟﺍ
ﺮﺼﺣ ﺺﺼﺨ
ُ
ﻣ ﺯﺎﻬﺠﻟﺍ ﺍﺬﻫﻳ ﻪﻣﺍﺪﺨﺘﺳﺍ ﻥﺇﻭ .ﺔﺻﺎﺧ ﻦﻛﺎﺴﻣ ﻲﻓ ﻲﻟﺰﻨﻤﻟﺍ ﻡﺍﺪﺨﺘﺳﻼﻟ
ً
ﺎ
ﺐﺗﺎﻜﻤﻟﺎﺑ ﺔﺣﺍﺮﺘﺳﻻﺍ ﻦﻛﺎﻣﺃ ﻞﺜﻣ ﻞﻤﻌﻟﺍ ﻊﻗﺍﻮﻣ ﻲﻓ ﻭﺃ ﺔﻛﺮﺘﺸ
ُ
ﻣ ﻦﻛﺎﻣﺃ ﻲﻓ ﻭﺃ ﺵﺭﻮﻟﺍ ﻭﺃ
.ﻊﻨﺼ
ُ
ﻤﻟﺍ ﻞﺒﻗ ﻦﻣ ﺩﺪﺤ
ُ
ﻤﻟﺍ ﻡﺍﺪﺨﺘﺳﻻﺍ ﻊﻣ ﻖﻔﺘﻳ ﻻ ،ﺦﻟﺍ...،ﻕﺩﺎﻨﻔﻟﺍ ﻲﻓ ﻭﺃ ﻢﻴﻴﺨﺘﻟﺍ ﻊﻗﺍﻮﻣ ﻲﻓ
(ﺏ ﺔﻴﻨﻓ ﺕﺎﻧﺎﻴﺑ
ﻞﻳﺩﻮﻤﻟﺍ
GE2626E*
ﻲﻤﺳﻻﺍ ﺪﻬﺠﻟﺍ 230V ~ 50 Hz
(ﻒﻳﻭﻭﺮﻜﻴﻤﻟﺍ) ﻞﺧﺪﻤﻠﻟ ﻲﻤﺳﻻﺍ ﺪﻬﺠﻟﺍ 1450 ﻁﺍﻭ
(ﻒﻳﻭﻭﺮﻜﻴﻤﻟﺍ) ﺝﺮﺨﻤﻠﻟ ﻲﻤﺳﻻﺍ ﺪﻬﺠﻟﺍ 900 ﻁﺍﻭ
ﺪﻬﺠﻟﺍ(ﺔﻳﺍﻮﺸﻟﺍ) ﻞﺧﺪﻤﻠﻟ ﻲﻤﺳﻻﺍ 1000 ﻁﺍﻭ
ﺭﺍ
ﱠ
ﻭﺪﻟﺍ ﺹﺮﻘﻟﺍ ﺮﻄﻗ 31,5 ﻢﺳ
ﻝﻮﻁ) ﺔﻴﺟﺭﺎﺨﻟﺍ ﺩﺎﻌﺑﻷﺍ×ﺽﺮﻋ×(ﻉﺎﻔﺗﺭﺍ 513 4 ×307 ﻢﻣ
ﻲﻓﺎﺼﻟﺍ ﻥﺯﻮﻟﺍ 15,6 ﻎﻛ
106
12 ×

ﺫﺎﺨﺗﻻ ﻥﺮﻔﻟﺍ ﺔﺒﻗﺍﺮﻣ ﺐﺠﻴﻓ ،ﺔﻴﻗﺭﻭ ﻭﺃ ﺔﻴﻜﻴﺘﺳﻼﺑ ﻲﻧﺍﻭﺃ ﻲﻓ ﺔﻴﺋﺍﺬﻐﻟﺍ ﺩﺍﻮﻤﻟﺍ ﻦﻴﺨﺴﺗ ﺪﻨﻋ
ﺙﻭﺪﺣ ﺔﻟﺎﺣ ﻲﻓ ﺔﻣﺯﻼﻟﺍ ﺕﺍءﺍﺮﺟﻹﺍ.ﻝﺎﻌﺘﺷﺍ
،ﻲﺋﺎﺑﺮﻬﻜﻟﺍ ﺭﺎﻴﺘﻟﺍ ﻦﻋ ﻥﺮﻔﻟﺍ ﻞﺼﻓ ﻭﺃ ﻑﺎﻘﻳﺇ ﻢﺘﻳ ،ﺯﺎﻬﺠﻟﺍ ﻦﻣ ﻥﺎﺧﺩ ﺪﻋﺎﺼﺗ ﺔﻟﺎﺣ ﻲﻓ
.ﻥﺮﻔﻟﺍ ﻞﺧﺍﺪﺑ ﺎﻬﺑﻮﺸﻧ ﻞﻤﺘﺤﻣ ﺔﻠﻌﺷ ﻱﺃ ﺪﻤﺨﻟ
ً
ﺎﻘﻠﻐ
ُ
ﻣ ﻥﺮﻔﻟﺍ ﺏﺎﺑ ءﺎﻘﺑﺇﻭ
ﻰﻟﺇ ﻱﺩﺆﻳ ﺪﻗ ﻊﻨﺼ
ُ
ﻤﻟﺍ ﻞﺒﻗ ﻦﻣ ﺎﻬﺑ ﻰﺻﻮﻤﻟﺍ ﻚﻠﺗ ﻦﻋ ﺔﻔﻠﺘﺨﻣ ﺕﺎﻘﺤﻠﻣ ﻡﺍﺪﺨﺘﺳﺍ ﻥﺇ
.ﺡﻭﺮﺠﺑﻭ ﻯﺫﻷﺎﺑ ﺔﺑﺎﺻﻹﺍ
ﻒﻳﻮﺠﺗ ﻡﺍﺪﺨﺘﺳﺍ ﻡﺪﻋ .ﻦﻳﺰﺨﺘﻟﺍ ﺽﺮﻐﻟ ﻥﺮﻔﻟﺍ
.ﻥﺮﻔﻟﺍ ﻞﺧﺍﺩ ﺖﻳﻮﻜﺴﺒﻟﺍ ﻭﺃ ﺰﺒﺨﻟﺍ ﻞﺜﻣ ﻡﺎﻌﻄﻟﺍ ﻦﻳﺰﺨﺗ ﻡﺪﻋ
:ﺯﺎﻬﺠﻟﺎﺑ ءﺎﻨﺘﻋﻻﺍ
ﻥﺮﻔﻟﺍ ﻒﻳﻮﺠﺗ ﺢﻄﺳﺄﺑ ﻒﻠﺗ ﺙﻭﺪﺣ ﻰﻟﺇ ﻱﺩﺆﻳ ﺪﻗ ﺭﺍﺮﻤﺘﺳﺎﺑ ﻥﺮﻔﻟﺍ ﺔﻓﺎﻈﻨﺑ ءﺎﻨﺘﻋﻻﺍ ﻡﺪﻋ
؛ﺏﺎﺒﻟﺍ ﺢﻄﺳﻭ ﺙﺍﺪﺣﺇﻭ ﺯﺎﻬﺠﻠﻟ ﻲﺿﺍﺮﺘﻓﻻﺍ ﺮﻤﻌﻟﺎﺑ ﻪﻴﻓ ﺔﻌﺟﺭ ﻻ ﺮﻴﻴﻐﺗ ﺙﺍﺪﺣﺇ ﻲﻟﺎﺘﻟﺎﺑﻭ
.ﺓﺮﻄﺧ ﻒﻗﺍﻮﻣ
.ﺔﻧﺎﻴﺼﻟﺍ ﻝﺎﻤﻋﺄﺑ ﻡﺎﻴﻘﻟﺍ ﻞﺒﻗ ﻲﺋﺎﺑﺮﻬﻜﻟﺍ ﺭﺎﻴﺘﻟﺍ ﻦﻋ ﻪﻠﺼﻓﻭ ﺯﺎﻬﺠﻟﺍ ﻑﺎﻘﻳﺇ ﺐﺠﻳ
ﺪﻟﻮﻳ ﺯﺎﻬﺠﻟﺍﺓﺮﻴﻐﺻ ﺔﻴﺴﻴﻁﺎﻨﻐﻣﻭﺮﻬﻛ ﺕﺎﺟﻮﻣ ﻲﻟﺎﺘﻟﺎﺑ ،ﻲﻟﺎﻋ ﺪﻬﺟ ﺓﺮﺋﺍﺩ ﻰﻠﻋ ﻱﻮﺘﺤﻳﻭ
.ﻲﻗﺍﻮﻟﺍ ءﺎﻄﻐﻟﺍ ﻊﻓﺭ ﺐﺠﻳ ﻻ
ﺐﻠﻄﺘﺗ ﻲﺘﻟﺍﻭ ﺯﺎﻬﺠﻠﻟ ﺔﻧﺎﻴﺼﻟﺍ ﻝﺎﻤﻋﺄﺑ ﻞﻫﺆﻣ ﺮﻴﻏ ﺺﺨﺷ ﻱﺃ ﻡﻮﻘﻳ ﻥﺃ ﺮﻴﻄﺧ ﺮﻣﻷ ﻪﻧﺇ
ﺎﻄﻐﻟﺍ ﺔﻟﺍﺯﺇ.ﺯﺎﻬﺠﻟﺍ ﻦﻋ ﻲﻗﺍﻮﻟﺍ ء
ﺕﺎﺟﻮﻣ ﺔﻗﺎﻁ ﻰﻟﺇ ﺽﺮﻌﺘﻟﺍ ﻰﻟﺇ ﻱﺩﺆﻳ ﺪﻗ ﺯﺎﻬﺠﻠﻟ ﻲﻗﺍﻮﻟﺍ ءﺎﻄﻐﻟﺍ ﺔﻟﺍﺯﺇ ﻥﺇ
.ﺓﺮﻴﻐﺻ ﺔﻴﺴﻴﻁﺎﻨﻐﻣﻭﺮﻬﻛ
ﻲﻗﺍﻮﻟﺍ ءﺎﻄﻐﻟﺍ ﺔﻟﺍﺯﺇ ﻥﺈﻓ ،ﻲﺋﺎﺑﺮﻬﻜﻟﺍ ﺭﺎﻴﺘﻟﺎﺑ ﻞﺼﺘﻣ ﺮﻴﻏ ﺯﺎﻬﺠﻟﺍ ﻥﻮﻜﻳ ﺎﻣﺪﻨﻋ ﻰﺘﺣ
.ﻲﻟﺎﻌﻟﺍ ﺪﻬﺠﻟﺍ ﺓﺮﺋﺍﺪﺑ ﻙﺎﻜﺘﺣﻻﺍ ءﺍﺮﺟ ﺔﻴﺋﺎﺑﺮﻬﻛ ﺔﻘﻌﺼﺑ ﺔﺑﺎﺻﻹﺍ ﻰﻟﺇ ﻱﺩﺆﻳ ﺪﻗ ﺯﺎﻬﺠﻠﻟ
ﻥﺃ ﺐﺠﻳ ﻻ ﻒﻴﻈﻨﺘﺑ ﻝﺎﻔﻁﻷﺍ ﻡﻮﻘﻳﺯﺎﻬﺠﻟﺍ ﻦﻋ ﺪﻳﺰﺗ ﻢﻫﺭﺎﻤﻋﺃ ﺖﻧﺎﻛ ﺍﺫﺇ
ﱠ
ﻻﺇ ﻪﺑ ءﺎﻨﺘﻋﻻﺍﻭ
8 ﺕﺍﻮﻨﺳ
.ﺔﻤﻌﻁﻷﺍ ﺎﻳﺎﻘﺑ ﻊﻴﻤﺟ ﺔﻟﺍﺯﺇﻭ
ً
ﺎﻳﺭﻭﺩ ﺯﺎﻬﺠﻟﺍ ﻒﻴﻈﻨﺗ ﺐﺠﻳ
ﻒﻴﻈﻨﺗ ﻞﺟﺃ ﻦﻣ ﺔﻴﻧﺪﻌﻣ ﺔﻄﺸﻜﻣ ﻭﺃ ﺔﻄﺷﺎﻛ ﺔﺠﻨﻔﺳﺃ ﻡﺍﺪﺨﺘﺳﺍ ﻢﺘﻳ ﻻ .ﺯﺎﻬﺠﻟﺍ
ﻦﻣ ﻞﻤﻌﺗ ﻒﻴﻈﻨﺗ ﺔﻨﻴﻛﺎﻣ ﻡﺍﺪﺨﺘﺳﺍ ﻢﺘﻳ ﻻ ،ﻢﻜﺘﻣﻼﺳ ﻞﺟﺃ.ﺯﺎﻬﺠﻟﺍ ﻒﻴﻈﻨﺘﻟ ﺭﺎﺨﺒﻟﺎﺑ
.ﻢﻬﺑ ﻒﻠﺗ ﻱﺃ ﺩﻮﺟﻭ ﻡﺪﻋ ﻦﻣ ﺪﻛﺄﺘﻠﻟ
ً
ﺎﻳﺭﻭﺩ ﺏﺎﺒﻟﺍ ﺭﺎﻁﺇﻭ ﺔﻴﻠﺼﻔﻤﻟﺍ ﻞﺻﺍﻮﻔﻟﺍ ﺪﻘﻔﺗ ﺐﺠﻳ ﺍﺫﺇ
ﻢﻬﺑ ﺪﺟﻭ ،ﻒﻠﺗ ﻱﺃ ﺺﺼﺨﺘ
ُ
ﻣ ﻲﻨﻓ ﻰﻠﻋ ﻪﺿﺮﻋ ﻢﺘﻳﻭ ﺯﺎﻬﺠﻟﺍ ﻡﺍﺪﺨﺘﺳﺍ ﺐﺠﻳ ﻼﻓ
.ﻪﺼﺤﻓﻭ ﻪﺘﻌﺟﺍﺮﻤﻟ
105

:ﻡﺍﺪﺨﺘﺳﻻﺍ
ءﺎﻨﺛﺃ ﺔﻨﺧﺎﺳ ﺯﺎﻬﺠﻠﻟ ﺔﻴﺟﺭﺎﺨﻟﺍ ءﺍﺰﺟﻷﺍ ﺢﺒﺼﺗ ﺪﻗ.ﻡﺍﺪﺨﺘﺳﻻﺍ
ﻻ ﻰﺘﺣ ﻖﻠﻐﻟﺍ ﺔﻤﻜﺤ
ُ
ﻣ ﺔﻴﻋﻭﺃﻭ ﻲﻧﺍﻭﺃ ﻞﺧﺍﺪﺑ ﺔﻤﻌﻁﺃ ﻭﺃ ﻞﺋﺍﻮﺳ ﻱﺃ ﻦﻴﺨﺴﺗ ﺐﺠﻳ ﻻ
.ﺮﺠﻔﻨﺗ
ﻦﻋ ﺪﻳﺰﺗ ﻢﻫﺭﺎﻤﻋﺃ ﺖﻧﺎﻛ ﺍﺫﺇ ﻝﺎﻔﻁﻷﺍ ﻞﺒﻗ ﻦﻣ ﺯﺎﻬﺠﻟﺍ ﺍﺬﻫ ﻡﺍﺪﺨﺘﺳﺍ ﻦﻜﻤ
ُ
ﻳ 8 ﻦﻣﻭ ،ﺕﺍﻮﻨﺳ
ﻞﺒﻗ ﺹﺎﺨﺷﺃ ﻱﻭﺫﺓﺩﻭﺪﺤﻣ ﺔﻴﻨﻫﺫ ﻭﺃ ﺔﻴﺴﺣ ﻭﺃ ﺔﻴﻧﺪﺑ ﺕﺍﺭﺪﻗ ﺓﺮﺒﺨﻟﺍ ﻲﻠﻴﻠﻗ ﺹﺎﺨﺷﺃ ﻭﺃ ،
ﺍﺫﺇ ﺔﻓﺮﻌﻤﻟﺍ ﻭﺃ ﻢﺗﻢﻬﻴﻠﻋ ﻑﺍﺮﺷﻹﺍ
ً
ﺎﻘﺒﺴ
ُ
ﻣ ﻢﻫﺪﻳﻭﺰﺗﻭ ﻼﻟﺍ ﺕﺎﻣﻮﻠﻌﻤﻟﺎﺑ ﺔﻴﻔﻴﻛ ﻦﻋ ﺔﻣﺯ
ﺯﺎﻬﺠﻟﺍ ﻡﺍﺪﺨﺘﺳﺍ ﻥﺎﻣﺄﺑﺔﻳﺍﺭﺩ ﻰﻠﻋﻭ ﺑ ﺮﻁﺎﺨﻤﻟﺎ.ﺎﻬﺛﻭﺪﺣ ﻞﻤﺘﺤﻤﻟﺍ
.ﻪﻠﻴﻐﺸﺗ ءﺎﻨﺛﺃ ﺔﻨﺧﺎﺳ ﺢﺒﺼﺗ ﺯﺎﻬﺠﻠﻟ ﺔﻴﺟﺭﺎﺨﻟﺍ ءﺍﺰﺟﻷﺍ ﻥﺇ
ﻦﻜﻳ ﻢﻟ ﺎﻣ ،ﻝﺎﻔﻁﻷﺍ ﻝﻭﺎﻨﺘﻣ ﻦﻋ ﺯﺎﻬﺠﻟﺍ ﺩﺎﻌﺑﺇ ﺐﺠﻳ.ﻢﻬﺒﻗﺍﺮﻳ ﻦﻣ ﻙﺎﻨﻫ
ﻡﺪﻋﻪﻠﻴﻐﺸﺗ ءﺎﻨﺛﺃ ﻥﺮﻔﻟﺍ ﻕﻮﻓ ءﻲﺷ ﻱﺃ ﻊﺿﻭ.
ﻢﺘﻳ ﺔﻘﻓﺍﻮﺘﻣ ﺔﻣﺪﺨﺘﺴ
ُ
ﻤﻟﺍ ﻲﻧﺍﻭﻷﺍ ﻥﺃ ﻦﻣ ﺪﻛﺄﺘﻟﺍﺔﺒﺳﺎﻨﻣﻭ ﻡﺍﺪﺨﺘﺳﻼﻟ ﻥﺮﻓ ﻞﺧﺍﺩ
ﻒﻳﻭﻭﺮﻜﻴﻣ.
ﺐﺠﻳ ﺔﻟﺯﺎﻋ ﺕﺍﺯﺎﻔﻗ ءﺍﺪﺗﺭﺍ
ً
ﺎﻤﺋﺍﺩ ﻕﺎﺒﻁﻷﺍ ﺾﻌﺒﻓ .ﻥﺮﻔﻟﺍ ﻦﻣ ﻕﺎﺒﻁﻷﺍ ﺝﺍﺮﺧﺇ ﺪﻨﻋ
ﺲﻤﻠﻤﻟﺍ ﺔﻨﺧﺎﺳ ﺢﺒﺼﺗ ﻲﻟﺎﺘﻟﺎﺑﻭ ﻡﺎﻌﻄﻟﺍ ﺓﺭﺍﺮﺣ ﺺﺘﻤﺗ.
ً
ﺍﺪﺟ
ﻂﻤﻧ ﻊﻣ ﻊﻤﺠﻟﺎﺑ ﻒﻳﻭﻭﺮﻜﻴﻣ" ﻲﻬﻄﻟﺍ ﻂﻤﻧ ﻭﺃ "ﻒﻳﻭﻭﺮﻜﻴﻣ" ﻲﻬﻄﻟﺍ ﻂﻤﻧ ﻡﺍﺪﺨﺘﺳﺍ ﺪﻨﻋ
ﺾﺑﺎﻘﻤﻟﺍﻭ ﺔﻴﻧﺪﻌﻤﻟﺍ ﺔﻄﺑﺭﻷﺍ ﺔﻟﺍﺯﺇ ﺐﺠﻳﻭ ،ﻲﻧﺪﻌﻣ ءﺎﻧﺇ ﻡﺍﺪﺨﺘﺳﺍ ﺐﺠﻳ ﻼﻓ ،"ﺮﺧﺁ ﻲﻬﻁ
.ﻥﺮﻔﻟﺍ ﻞﺧﺍﺩ ﻢﻬﻌﺿﻭ ﻞﺒﻗ ﺱﺎﻴﻛﻷﺍ / ﺦﺒﻄﻟﺍ ﻲﻧﺍﻭﻷ ﺔﻴﻧﺪﻌﻤﻟﺍ
ﻍﺭﺎﻓ ﻮﻫﻭ ﻪﻠﻴﻐﺸﺗ
ً
ﺍﺪﺑﺃ ﻢﺘﻳ ﻼﻓ ،ﺯﺎﻬﺠﻟﺍ ﻑﻼﺗﺇ ﻱﺩﺎﻔﺘﻟ.ﺹﺮﻘﻟﺍ ﺩﻮﺟﻭ ﻥﻭﺪﺑ ﻭﺃ
.ﺔﻟﻮﻤﺤﻟﺍ ﺓﺩﺎﻳﺰﻟ ﻡﺎﻌﻄﻟﺍ ﺐﻧﺎﺠﺑ ءﺎﻤﻟﺍ ﻦﻣ ﺏﻮﻛ ﻊﺿﻭ ﻢﺘﻳ ،ﺓﺮﻴﻐﺻ ﺕﺎﻴﻤﻛ ﻲﻬﻁ ﺔﻟﺎﺣ ﻲﻓ
ﺐﺠﻴﻓ ؛ﺎﻬﻧﺎﻴﻠﻏ ﺪﻨﻋ ﺪﻳﺪﺷ ﻥﺍﺭﻮﻓ ﻒﻳﻭﻭﺮﻜﻴﻤﻟﺍ ﻡﺍﺪﺨﺘﺳﺎﺑ ﺕﺎﺑﻭﺮﺸﻤﻟﺍ ﻦﻴﺨﺴﺗ ﻦﻋ ﺞﺘﻨﻳ ﺪﻗ
.ءﺎﻋﻮﻟﺎﺑ ﻙﺎﺴﻣﻹﺍ ﺪﻨﻋ ﺭﺬﺤﻟﺍ ﻲﺧﻮﺗ
ﻡﺎﻌﻁ ﺔﻴﻋﻭﺃﻭ ﺔﻋﺎﺿﺮﻟﺍ ﺕﺎﺟﺎﺟﺯ ﻯﻮﺘﺤﻣ ﺝ
َ
ﺭ ﻭﺃ ﺐﻴﻠﻘﺗ ﺐﺠﻳ ﺔﺟﺭﺩ ﺪﻘﻔﺗﻭ ﻝﺎﻔﻁﻷﺍ
.ﻦﺧﺎﺴﻟﺍ ﻡﺎﻌﻄﻟﺍ ءﺍﺮﺟ ﻕﻭﺮﺣ ﻱﺃ ﺙﻭﺪﺣ ﻱﺩﺎﻔﺘﻟ ،ﺎﻬﻟﻭﺎﻨﺗ ﻞﺒﻗ ﺓﺭﺍﺮﺤﻟﺍ
ﻥﺮﻓ ﻞﺧﺍﺩ ﻩﺮﻴﺸﻘﺗ ﻥﻭﺩ ﻕﻮﻠﺴﻤﻟﺍ ﺾﻴﺒﻟﺍﻭ ﻩﺮﺸﻘﺑ ﺾﻴﺒﻟﺍ ﻦﻴﺨﺴﺗ ﻡﺪﻌﺑ ﻰﺻﻮﻳ
.ﻲﻬﻄﻟﺍ ﻦﻣ ءﺎﻬﺘﻧﻻﺍ ﺪﻌﺑ ﻰﺘﺣ ،ﺮﺠﻔﻨﻳ ﺪﻘﻓ ﻒﻳﻭﻭﺮﻜﻴﻤﻟﺍ
ﻡﺪﻋ ﻢﺘﻳ ﻻﻭ ،ﻡﺎﻌﻄﻟﺍ ﺔﻴﻄﻐﺘﻟ ﻲﻬﻄﻟﺎﺑ ﺹﺎﺨﻟﺍ ﻡﻮﻴﻨﻣﻮﻟﻷﺍ ﻖﺋﺎﻗﺭ ﻡﺍﺪﺨﺘﺳﺍ ﺔﻴﻄﻐﺗ ءﺰﺟ ﻱﺃ
ﻡﻮﻴﻨﻣﻮﻟﻷﺍ ﻖﺋﺎﻗﺮﺑ ﻥﺮﻔﻟﺍ ﻦﻣ.
104

1( ﻡﺪﺨﺘﺴ
ُ
ﻤﻟﺍ ﻢ
ُ
ﻬﺗ ﺕﺎﻣﻮﻠﻌﻣ
ﻦﻋ ﻝﺯﺎﻨﺘﻟﺍ ﻭﺃ ﻊﻴﺑ ﺓﺩﺎﻋﺇ ﺔﻟﺎﺣ ﻲﻓ .ﻢﻛﺯﺎﻬﺟ ﺔﻘﻓﺮﺑ ﺍﺬﻫ ﻞﻴﻐﺸﺘﻟﺍ ﻞﻴﻟﺪﺑ ﻅﺎﻔﺘﺣﻻﺍ ﺐﺠﻳ
.ﺪﻳﺪﺠﻟﺍ ﻚﻟﺎﻤﻠﻟ ﺍﺬﻫ ﻞﻴﻐﺸﺘﻟﺍ ﻞﻴﻟﺩ ﻢﻴﻠﺴﺗ ﻦﻣ ﺪﻛﺄﺘﻟﺍ ﻰﺟﺮﻳ ،ﺮﺧﺁ ﺺﺨﺸﻟ ﺯﺎﻬﺠﻟﺍ ﺍﺬﻫ
ﻩﺬﻫ ﻰﻠﻋ ﻑﺮﻌﺘﻟﺍﻭ ﻉﻼﻁﻻﺍ ﻰﺟﺮﻳ ﺐﻴﻛﺮﺗ ﻞﺒﻗ ﺢﺋﺎﺼﻨﻟﺍ ﻢﺗ ﺪﻘﻟ .ﻢﻛﺯﺎﻬﺟ ﻡﺍﺪﺨﺘﺳﺍﻭ
.ﻦﻳﺮﺧﻵﺍ ﺔﻣﻼﺳﻭ ﻢﻜﺘﻣﻼﺳ ﻞﺟﺃ ﻦﻣ ﻞﻴﻟﺪﻟﺍ ﺍﺬﻫ ﺔﻏﺎﻴﺻ
(ﺃ ﺔﻣﻼﺴﻟﺍ ﺕﺍﺩﺎﺷﺭﺇ
:ﺔﻣﺎﻋ ﺕﺎﻣﻮﻠﻌﻣ
ﺮﺼﺣ ﺺﺼﺨ
ُ
ﻣ ﺯﺎﻬﺠﻟﺍ ﺍﺬﻫ ﻥﺇﻳ ﻦﻴﺨﺴﺗﻭ ﻲﻬﻄﻟﺍ ﻪﻨﻣ ﺽﺮﻐﻟﺍﻭ ،ﻲﻟﺰﻨﻤﻟﺍ ﻡﺍﺪﺨﺘﺳﻼﻟ
ً
ﺎ
ﺔﻤﻌﻁﻷﺍ ﺕﺎﺑﻭﺮﺸﻤﻟﺍﻭ ﺔﻤﻌﻁﻷﺍ ﻦﻣ ﺞﻠﺜﻟﺍ ﺐﻳﻭﺬﺗ ﻭﺃ ﻢﺘﻳ ﻻ . ﻂﻴﺤﻣ ﻲﻓ
ﱠ
ﻻﺇ ﻪﻣﺍﺪﺨﺘﺳﺍ
.ﺕﺎﻔﺻﺍﻮﻤﻟﺍ ﻩﺬﻬﺑ ﻒﺼﺘﺗ ﻯﺮﺧﺃ ﺔﻓﺮﻏ ﻱﺃ ﻭﺃ ﺦﺒﻄﻤﻟﺍ ﻞﺜﻣ ،ﺊﻓﺍﺩﻭ ﻖﻠﻐ
ُ
ﻣﻭ ﻰﻄﻐ
ُ
ﻣ
.ﺯﺎﻬﺠﻟﺍ ﺍﺬﻬﺑ ﺚﺒﻌﻟﺍﻭ ﺐﻌﻠﻟﺎﺑ ﻥﻮﻣﻮﻘﻳ ﻻ ﻰﺘﺣ ﻝﺎﻔﻁﻷﺍ ﺔﺒﻗﺍﺮﻣ ﻲﻐﺒﻨﻳ
ﻝﺎﻔﻁﻷﺍ ﻦﻋ ﻢﻫﺭﺎﻤﻋﺃ ﻞﻘﺗ ﻦﻳﺬﻟﺍ8 ﺕﺍﻮﻨﺳ .ﻢﻬﺒﻗﺍﺮﻳ ﻦﻣ ﻙﺎﻨﻫ ﻦﻜﻳ ﻢﻟ ﺎﻣ
ﻦﻋ
ً
ﺍﺪﻴﻌﺑ ءﺎﺑﺮﻬﻜﻟﺍ ﻚﻠﺳﻭ ﺯﺎﻬﺠﻟﺍ ﻆﻔﺣ ﺐﺠﻳﻦﻋ ﻢﻫﺭﺎﻤﻋﺃ ﻞﻘﺗ ﻦﻳﺬﻟﺍ ﻝﺎﻔﻁﻷﺍ ﻝﻭﺎﻨﺘﻣ 8
.ﺕﺍﻮﻨﺳ
:ﺐﻴﻛﺮﺘﻟﺍ
.ﻥﺮﻔﻟﺍ ﺍﺬﻫ ﺐﻴﻛﺮﺗ ﺪﻨﻋ ﻞﻴﻟﺪﻟﺍ ﺍﺬﻫ ﻲﻓ ﺓﺩﺭﺍﻮﻟﺍ ﺐﻴﻛﺮﺘﻟﺍ ﺕﺎﻤﻴﻠﻌﺘﺑ ﻡﺍﺰﺘﻟﻻﺍ ﻢﺘﻳ
."ﺯﺎﻬﺠﻟﺍ ﺐﻴﻛﺮﺗ ﺔﻴﻔﻴﻛ" ﺓﺮﻘﻓ ﻰﻠﻋ ﻉﻼﻁﻹﺍ
.ﺯﺎﻬﺠﻟﺎﺑ ﺓﺩﻮﺟﻮﻤﻟﺍ ﺔﻳﻮﻬﺘﻟﺍ ﺕﺎﺤﺘﻓ ﺪ
َ
ﺳ ﻡﺪﻋ ﻰﻠﻋ ﺹﺮﺤﻟﺍ
.ﺔﻧﺍﺰﺧ ﻞﺧﺍﺪﺑ ﺯﺎﻬﺠﻟﺍ ﻊﺿﻭ ﺐﺠﻳ ﻻ
ﻥﺎﻛ ﺍﺫﺇ ﻭﺃ ﺮﺋﺎﺘﺴﻟﺍ ﻚﻟﺫ ﻲﻓ ﺎﻤﺑ ،ﻝﺎﻌﺘﺷﻼﻟ ﺔﻠﺑﺎﻗ ﺓﺩﺎﻤﺑ ﻙﺎﻜﺘﺣﺍ ﻰﻠﻋ ﻭﺃ ﻰﻄﻐ
ُ
ﻣ ﺯﺎﻬﺠﻟﺍ ﺍﺬﻫ
.ﺯﺎﻬﺠﻟﺍ ﻞﻴﻐﺸﺗ ءﺎﻨﺛﺃ ﻖﻳﺮﺣ ﻉﻮﻗﻭ ﺮﻄﺧ ﻙﺎﻨﻬﻓ ،ﺔﻠﺛﺎﻤﻣ ﺮﺻﺎﻨﻋ ﻭﺃ ﺮﺗﺍﻮﺴﻟﺍ
ﻲﻓ ﻥﺮﻔﻟﺍ ﺮﺸﺣ ﻭﺃ ﻥﺮﻔﻟﺍ ﺔﻴﻄﻐﺗ ﻡﺪﻋﻭ ،ﻦﺧﺎﺳ ﺢﻄﺳ ﻱﺃ ﻦﻋ ءﺎﺑﺮﻬﻜﻟﺍ ﻚﻠﺳ ﺩﺎﻌﺑﺇ ﺐﺠﻳ
.ﻖﻴﺿ ﻥﺎﻜﻣ
ﻄﺳﺍﻮﺑ ﻪﻠﻴﻐﺸﺘﻟ ﻢﻤﺼ
ُ
ﻣ ﺮﻴﻏ ﺯﺎﻬﺠﻟﺍ ﺍﺬﻫ ﺪﻌ
ُ
ﺑ ﻦﻋ ﻢﻜﺤﺗ ﻡﺎﻈﻧ ﺔﻄﺳﺍﻮﺑ ﻭﺃ ﻲﺟﺭﺎﺧ ﺖﻗﺆﻣ ﺔ
.ﻞﺼﻔﻨﻣ
103

ﺱﺮﻬﻔﻟﺍ
1( ﻡﺪﺨﺘﺴ
ُ
ﻤﻟﺍ ﻢ
ُ
ﻬﺗ ﺕﺎﻣﻮﻠﻌﻣ ..................................................................................................... 103
(ﺃ ﺔﻣﻼﺴﻟﺍ ﺕﺍﺩﺎﺷﺭﺇ ..................................................................................................................... 103
(ﺏ ﺔﻴﻨﻓ ﺕﺎﻧﺎﻴﺑ ............................................................................................................................ 104
(ﺝ ﻒﻳﻭﻭﺮﻜﻳﺎﻤﻟﺍ ﻥﺮﻓ ﻞﻤﻋ ﺔﻴﻔﻴﻛ ....................................................................................................... 105
(ﺩ ﺔﺌﻴﺒﻟﺍ ﺔﻳﺎﻤﺣ ............................................................................................................................. 107
2( ﺯﺎﻬﺠﻟﺍ ﺐﻴﻛﺮﺗ ﺔﻴﻔﻴﻛ ........................................................................................................ 108
(ﺃ ﻲﺋﺎﺑﺮﻬﻜﻟﺍ ﺭﺎﻴﺘﻟﺎﺑ ﺯﺎﻬﺠﻟﺍ ﻞﻴﺻﻮﺗ ﻞﺒﻗ ﺎﻣ ......................................................................................... 108
(ﺏ ﺔﻴﺋﺎﺑﺮﻬﻜﻟﺍ ﺕﻼﺻﻮﻟﺍ ﻂﺑﺭ ........................................................................................................... 108
(ﺝ ﺎﻬﻣﺍﺪﺨﺘﺳﺎﺑ ﺡﻮﻤﺴﻤﻟﺍ ﻲﻧﺍﻭﻷﺍ ........................................................................................................ 109
(ﺩ ﺯﺎﻬﺠﻟﺍ ﺕﺎﻔﺻﺍﻮﻣ .................................................................................................................... 110
(ـﻫ ﻢﻜﺤﺘﻟﺍ ﺔﺣﻮﻟ ﺕﺎﻔﺻﺍﻮﻣ ............................................................................................................... 111
(ﻭ ﺭﺍﻭﺪﻟﺍ ﺹﺮﻘﻟﺍ ﺐﻴﻛﺮﺗ ................................................................................................................ 111
(ﺯ ﻞﻤﻌﻟﺍ ﺢﻄﺳ ﻕﻮﻓ ﺐﻴﻛﺮﺘﻟﺍ .......................................................................................................... 112
(ﻱ ﺐﻴﻛﺮﺘﻟﺍ ﺔﻴﻔﻴﻛ ................................................................
.......................................................... 112
3( ﻡﺍﺪﺨﺘﺳﺍ ﺔﻴﻔﻴﻛﺯﺎﻬﺠﻟﺍ ....................................................................................................... 113
(ﺃ ﻞﻴﻐﺸﺘﻟﺍ ﺕﺎﻤﻴﻠﻌﺗ ....................................................................................................................... 113
(ﺏ ﻲﻟﻵﺍ ﻲﻬﻄﻟﺍ ﻢﺋﺍﻮﻗ ﻝﻭﺪﺟ ............................................................................................................ 117
4( ﺯﺎﻬﺠﻟﺎﺑ ءﺎﻨﺘﻋﻻﺍﻭ ﻒﻴﻈﻨﺘﻟﺍ ................................................................................................ 119
5( ﻞﻴﻐﺸﺘﻟﺍ ﻲﻓ ﻞﻠﺧ ﺙﻭﺪﺣ ﺔﻟﺎﺣ ﻲﻓ ......................................................................................... 120
6( ﺯﺎﻬﺠﻟﺍ ءﺍﺩﺃ ﻦﺴﺣ ﺱﺎﻴﻘﻟ ﺕﺎﻴﺻﻮﺗ ........................................................................................ 120
102

،ﻢﻳﺮﻜﻟﺍ ﺎﻨﻠﻴﻤﻋ ،ﺔﻤﻳﺮﻜﻟﺍ ﺎﻨﺘﻠﻴﻤﻋ
ﺕﺎﺠﺘﻨﻣ ﻲﻓ ﻢﻜﺘﻘﺛ ﻰﻠﻋ ﻢﻛﺮﻜﺸﻧﺕﺪﻧﺍﺮﺑ .ﺎﻬﺗﺎﺠﺘﻨﻣ ﻯﺪﺣﺇ ﻢﻜﺋﺍﺮﺷﻭ
ﻟﺮﻜﺘﺑ ﺎﻨﻤﻗﻭ .ﻪﺟﻭ ﻞﻤﻛﺃ ﻰﻠﻋ ﻪﻴﻟﺇ ﻥﻮﻌﻠﻄﺘﺗ ﺎﻣ ﻲﺒﻠ
ُ
ﻳ ﻪﻠﻌﺠﻟ ﻢﻜﺗﺎﺟﺎﻴﺘﺣﺍﻭ ﻢﻜﺗﺎﻴﺣ ﻂﻤﻧ ﺭﺎﺒﺘﻋﻻﺍ ﻲﻓ ﻦﻴﻌﺿﺍﻭ ﺞﺘﻨ
ُ
ﻤﻟﺍ ﺍﺬﻫ ﻊﻴﻨﺼﺗﻭ ﻢﻴﻤﺼﺗ ﻢﺗ ﺪﻘ ﺲﻳ
ﻦﻣ ﺮﺜﻛﻷ ﺎﻨﻌﻓﺪﻳ ﻱﺬﻟﺍ ﻒﻐﺸﻟﺍﻭ ﺭﺎﻜﺘﺑﻻﺍ ﺡﻭﺭﻭ ﺓﺭﺎﻬﻣ ﻦﻣ ﻪﺑ ﻊﺘﻤﺘﻧ ﺎﻣ60 .ﻚﻟﺫ ﻖﻴﻘﺤﺗ ﻰﻟﺇ
ً
ﺎﻣﺎﻋ
ً
ﺎﻤﺋﺍﺩ ﺎﻨﻣ
ً
ﺎﻴﻌﺳﻭ ﻢﻜﺗﻻﺅﺎﺴﺗ ﻊﻴﻤﺟ ﻰﻠﻋ ﺩﺮﻠﻟ ﺩﺍﺪﻌﺘﺳﻻﺍ ﻢﺗﺃ ﻰﻠﻋ ﺎﻨﻳﺪﻟ ءﻼﻤﻌﻟﺍ ﺔﻣﺪﺧ ﻥﺈﻓ ،ﻉﺎﻄﺘﺴﻤﻟﺍ ﺭﺪﻗ ﺎﻨﺗﺎﺠﺘﻨﻤﺑ ﺔﻘﻠﻌﺘﻤﻟﺍ ﻢﻜﺗﺎﺒﻠﻄﺘﻣ ﺔﻴﺒﻠﺗ ﻰﻟﺇ
.ﻢﻜﺗﺎﺣﺍﺮﺘﻗﺍ ﻰﻟﺇ ﻉﺎﻤﺘﺳﻻﺍﻭ
ﺎﻨﻌﻗﻮﻣ ﺮﺒﻋ
ً
ﺎﻨﻌﻣ ﻞﺻﺍﻮﺘﻟﺍ ﻢﻜﻧﺎﻜﻣﺈﺑ ﺎﻤﻛwww.brandt.com ﺙﺪﺣﺃ ﻥﻭﺪﺠﺘﺳ ﺚﻴﺣ ،.
ً
ﺎﻀﻳﺃ ﺔﻴﻠﻴﻤﻜﺗﻭ ﺓﺪﻴﻔﻣ ﺕﺎﻣﻮﻠﻌﻣﻭ ﺎﻨﺗﺍﺭﺎﻜﺘﺑﺍ
ﻥﺇﺕﺪﻧﺍﺮﺑ .ﻢﻜﺗﺎﻳﺮﺘﺸﻣ ﻦﻣ ﺓﺩﺎﻔﺘﺳﻻﺍ ﻦﺴﺣ ﻢﻜﻟ ﻰﻨﻤﺘﺗﻭ ﻢﻜﺗﺎﻴﻣﻮﻳ ﻲﻓ ﻢﻛﺎﻳﺇ ﺎﻬﺘﻘﻓﺍﺮﻤﺑ ﺓﺪﻴﻌﺳ
ﺞﺘﻨﻤﻟﺍ ﻰﻠﻋ ﻑﺮﻌﺘﻟﺍ ﻦﻣ ﺍﻮﻨﻜﻤﺘﺗ ﻥﺃ ﻞﺟﺃ ﻦﻣ ،ﻪﻣﺍﺪﺨﺘﺳﺍ ﻞﺒﻗ ﺔﻳﺎﻨﻌﺑ ﺯﺎﻬﺠﻟﺍ ﻊﻣ ﻖﻓﺮ
ُ
ﻤﻟﺍ ﻞﻴﻐﺸﺘﻟﺍﻭ ﺕﺍﺩﺎﺷﺭﻹﺍ ﻞﻴﻟﺩ ﺓءﺍﺮﻗ ﻰﺟﺮﻳ :
ً
ﺍﺪﺟ ﻡﺎﻫ
ﻰﻠﻋﻭ.ﻊﻳﺮﺳﻭ ﺪﻴﺟ ﻞﻜﺸﺑ ﻪﻠﻴﻐﺸﺗ ﺔﻴﻔﻴﻛ
101
PN:16170000A29375

-
 1
1
-
 2
2
-
 3
3
-
 4
4
-
 5
5
-
 6
6
-
 7
7
-
 8
8
-
 9
9
-
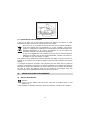 10
10
-
 11
11
-
 12
12
-
 13
13
-
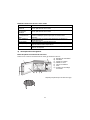 14
14
-
 15
15
-
 16
16
-
 17
17
-
 18
18
-
 19
19
-
 20
20
-
 21
21
-
 22
22
-
 23
23
-
 24
24
-
 25
25
-
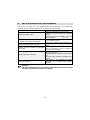 26
26
-
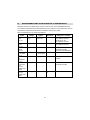 27
27
-
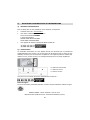 28
28
-
 29
29
-
 30
30
-
 31
31
-
 32
32
-
 33
33
-
 34
34
-
 35
35
-
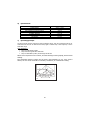 36
36
-
 37
37
-
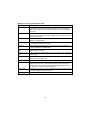 38
38
-
 39
39
-
 40
40
-
 41
41
-
 42
42
-
 43
43
-
 44
44
-
 45
45
-
 46
46
-
 47
47
-
 48
48
-
 49
49
-
 50
50
-
 51
51
-
 52
52
-
 53
53
-
 54
54
-
 55
55
-
 56
56
-
 57
57
-
 58
58
-
 59
59
-
 60
60
-
 61
61
-
 62
62
-
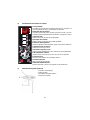 63
63
-
 64
64
-
 65
65
-
 66
66
-
 67
67
-
 68
68
-
 69
69
-
 70
70
-
 71
71
-
 72
72
-
 73
73
-
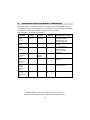 74
74
-
 75
75
-
 76
76
-
 77
77
-
 78
78
-
 79
79
-
 80
80
-
 81
81
-
 82
82
-
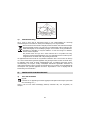 83
83
-
 84
84
-
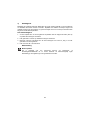 85
85
-
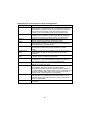 86
86
-
 87
87
-
 88
88
-
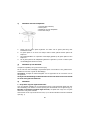 89
89
-
 90
90
-
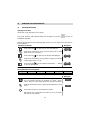 91
91
-
 92
92
-
 93
93
-
 94
94
-
 95
95
-
 96
96
-
 97
97
-
 98
98
-
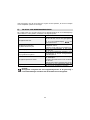 99
99
-
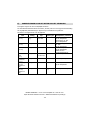 100
100
-
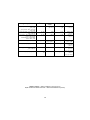 101
101
-
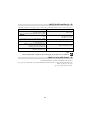 102
102
-
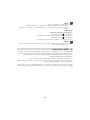 103
103
-
 104
104
-
 105
105
-
 106
106
-
 107
107
-
 108
108
-
 109
109
-
 110
110
-
 111
111
-
 112
112
-
 113
113
-
 114
114
-
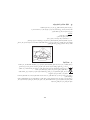 115
115
-
 116
116
-
 117
117
-
 118
118
-
 119
119
-
 120
120
-
 121
121
-
 122
122


in andere talen
- français: Brandt GE2626S Manuel utilisateur
- español: Brandt GE2626S Manual de usuario