Yamaha AV-S7 de handleiding
- Categorie
- Luidsprekersets
- Type
- de handleiding
Deze handleiding is ook geschikt voor

OWNER‘S MANUAL
MODE D‘EMPLOI
Home Cinema Sound System
Système Audio Home Cinéma
STANDBY
INPUT 1
C
INPUT 2
L
A
B
E
D
C
VOLUME
REAR
R
STANDBY/ON
INPUT
PROGRAM
U C A
AV-S7(E)(E/F)1-16 9/11/0 9:36 AM Page 1

@
1 Read Instructions – All the safety and operating
instructions should be read before the unit is operated.
2 Retain Instructions – The safety and operating instructions
should be retained for future reference.
3 Heed Warnings – All warnings on the unit and in the
operating instructions should be adhered to.
4 Follow Instructions – All operating and other instructions
should be followed.
5 Water and Moisture – The unit should not be used near
water – for example, near a bathtub, washbowl, kitchen
sink, laundry tub, in a wet basement, or near a swimming
pool.
6 Carts and Stands – The unit should be used only with a
cart or stand that is recommended by the manufacturer.
6A A unit and cart combination should be
moved with care. Quick stops,
excessive force, and uneven surfaces
may cause the unit and
cart combination to overturn.
7 Wall or Ceiling Mounting – The unit should be mounted to
a wall or ceiling only as recommended by the
manufacturer.
8 Ventilation – The unit should be situated so that its
location or position does not interfere with its proper
ventilation. For example, the unit should not be situated
on a bed, sofa, rug, or similar surface that may block the
ventilation openings; or placed in a built-in installation,
such as a bookcase or cabinet that may impede the flow
of air through the ventilation openings.
9 Heat – The unit should be situated away from heat
sources such as radiators, stoves, or other appliances
that produce heat.
10 Power Sources – The unit should be connected to a
power supply only of the type described in the operating
instructions or as marked on the unit.
11 Power-Cord Protection – Power-supply cords should be
routed so that they are not likely to be walked on or
pinched by items placed upon or against them, paying
particular attention to cords at plugs, convenience
receptacles, and the point where they exit from the unit.
12 Cleaning – The unit should be cleaned only as
recommended by the manufacturer.
13 Nonuse Periods – The power cord of the unit should be
unplugged from the outlet when left unused for a long
period of time.
14 Object and Liquid Entry – Care should be taken so that
objects do not fall into and liquids are not spilled into the
inside of the unit.
15 Damage Requiring Service – The unit should be serviced
by qualified service personnel when:
A. The power-supply cord or the plug has been
damaged; or
B. Objects have fallen, or liquid has been spilled into the
unit; or
C. The unit has been exposed to rain; or
D. The unit does not appear to operate normally or
exhibits a marked change in performance; or
E. The unit has been dropped, or the cabinet damaged.
16 Servicing – The user should not attempt to service the unit
beyond those means described in the operating
instructions. All other servicing should be referred to
qualified service personnel.
17 Power Lines – An outdoor antenna should be located
away from power lines.
18 Grounding or Polarization – Precautions should be taken
so that the grounding or polarization is not defeated.
SAFETY INSTRUCTIONS
RISK OF ELECTRIC SHOCK
DO NOT OPEN
CAUTION: TO REDUCE THE RISK OF
ELECTRIC SHOCK, DO NOT REMOVE
COVER (OR BACK). NO USER-SERVICEABLE
PARTS INSIDE. REFER SERVICING TO
QUALIFIED SERVICE PERSONNEL.
The lightning flash with arrowhead
symbol, within an equilateral triangle,
is intended to alert you to the
presence of uninsulated “dangerous
voltage” within the product’s
enclosure that may be of sufficient
magnitude to constitute a risk of
electric shock to persons.
The exclamation point within an
equilateral triangle is intended to alert
you to the presence of important
operating and maintenance
(servicing) instructions in the
literature accompanying the
appliance.
•
Explanation of Graphical Symbols
CAUTION
WARNING
TO REDUCE THE RISK OF FIRE OR
ELECTRIC SHOCK, DO NOT EXPOSE THIS
UNIT TO RAIN OR MOISTURE.
AV-S7(E)(E/F)1-16 9/11/0 9:36 AM Page 2

#
1. IMPORTANT NOTICE : DO NOT MODIFY THIS UNIT!
This product, when installed as indicated in the
instructions contained in this manual, meets FCC
requirements. Modifications not expressly approved by
Yamaha may void your authority, granted by the FCC, to
use the product.
2. IMPORTANT : When connecting this product to
accessories and/or another product use only high quality
shielded cables. Cable/s supplied with this product
MUST be used. Follow all installation instructions.
Failure to follow instructions could void your FCC
authorization to use this product in the USA.
3. NOTE : This product has been tested and found to
comply with the requirements listed in FCC Regulations,
Part 15 for Class “B” digital devices. Compliance with
these requirements provides a reasonable level of
assurance that your use of this product in a residential
environment will not result in harmful interference with
other electronic devices.
This equipment generates/uses radio frequencies and, if
not installed and used according to the instructions
found in the users manual, may cause interference
harmful to the operation of other electronic devices.
Compliance with FCC regulations does not guarantee that
interference will not occur in all installations. If this product
is found to be the source of interference, which can be
determined by turning the unit “OFF” and “ON”, please try
to eliminate the problem by using one of the following
measures:
Relocate either this product or the device that is being
affected by the interference.
Utilize power outlets that are on different branch (circuit
breaker or fuse) circuits or install AC line filter/s.
In the case of radio or TV interference, relocate/reorient the
antenna. If the antenna lead-in is 300 ohm ribbon lead,
change the lead-in to coaxial type cable.
If these corrective measures do not produce satisfactory
results, please contact the local retailer authorized to
distribute this type of product. If you can not locate the
appropriate retailer, please contact Yamaha Electronics
Corp., U.S.A. 6660 Orangethorpe Ave, Buena Park, CA
90620.
The above statements apply ONLY to those products
distributed by Yamaha Corporation of America or its
subsidiaries.
FCC INFORMATION (for US customers only)
YAMAHA and the Electronic Industries Association’s
Consumer Electronics Group want you to get the most out of
your equipment by playing it at a safe level. One that lets the
sound come through loud and clear without annoying blaring
or distortion – and, most importantly, without affecting your
sensitive hearing.
Since hearing damage from loud sounds is often
undetectable until it is too late, YAMAHA and the
Electronic Industries Association’s Consumer
Electronics Group recommend you to avoid
prolonged exposure from excessive volume levels.
We Want You Listening For A Lifetime (for US customers only)
AV-S7(E)(E/F)1-16 9/11/0 9:36 AM Page 3

●
Remote control transmitter
●
Télécommande
●
Batteries (size AA, UM/SUM-3, R6, HP-7)
●
Piles (format AA, UM/SUM-3, R6, HP-7)
●
Audio connection cord
●
Câble de connexion audio
●
System connector cable
●
Câble de connexion du système
●
Speaker cords
●
Câbles d’enceintes
●
Mounting brackets
●
Supports de montage
●
Screws
●
Vis
●
Velcro strips
●
Bandes Velcro
$
SUPPLIED ACCESSORIES
●
After unpacking, check that the following parts are included.
ACCESSOIRES FOURNIS
●
Après le déballage, vérifier que les pièces suivantes sont incluses.
POWER
SYS8
V004550
VOLUME
TEST
D
E
BC
A
ENHANCED
CONCENTPROLOGIC
MONO MOVIESPORTS
OFF
DSP
CENTER
REAR
SUBWOOFER
INPUT
AMP
1/2
x 2
(A)
(B)
x 4
(C)
(A)
(B)
AV-S7(E)(E/F)1-16 9/11/0 9:36 AM Page 4

Page
PRECAUTIONS........................................................2-3
NOTES ABOUT THE REMOTE CONTROL
TRANSMITTER............................................................4
SYSTEM CONFIGURATION .......................................5
FEATURES..................................................................6
DIGITAL SOUND FIELD PROCESSOR (DSP)...........7
SETTING UP THE SPEAKERS..............................8-11
CONNECTIONS....................................................12-15
CONTROLS AND THEIR FUNCTIONS................16-17
TURNING ON THIS SYSTEM OR SETTING IT TO
STANDBY MODE ......................................................18
SPEAKER BALANCE ADJUSTMENT......................19
Page
USING THE AV-S7...............................................20-22
TROUBLESHOOTING...............................................23
SPECIFICATIONS .....................................................24
USING THE AV-S7
E-1
English
PRECAUTIONS
TROUBLESHOOTING
SPECIFICATIONS
OUTLINE OF THIS SYSTEM
SETTING UP THE SPEAKERS
CONNECTIONS
CONTROLS AND THEIR FUNCTIONS
ADJUSTMENTS BEFORE LISTENING OPERATIONS
CONTENTS
TURNING ON THIS SYSTEM OR SETTING IT TO
SYANDBY MODE
AV-S7(E)(E/F)1-16 9/11/0 9:36 AM Page E-1

E-2
PRECAUTIONS
■ To assure the finest performance, please read this
manual carefully. Keep it in a safe place for future
reference.
■ Choose the installation location of this system
carefully. Avoid placing it in direct sunlight or close to
a source of heat. Also avoid locations subject to
vibration and excessive dust, heat, cold or moisture.
Keep it away from sources of humming such as
transformers and electric motors.
■ Do not operate this system upside-down. It may
overheat, possibly causing damage.
■ Never open the cabinet. If something drops into the
set, contact your dealer.
■ The openings on the surface of the power
amplifier/subwoofer unit assure proper ventilation of
the unit. If these openings are obstructed, the
temperature inside the unit will rise rapidly.
Therefore, avoid placing objects against these
openings, and install the unit in a well-ventilated
place. Make sure to allow a space of at least
10 cm behind, 10 cm on the both sides and 20 cm
above the top panel of the unit, and never use the
unit with the unit laid down on the floor. Doing so
may not only damage the unit, but also cause a fire.
■ Always set the volume setting to minimum before
starting play of an audio source. Increase the volume
gradually to an appropriate level.
■ When not planning to use this system for long
periods of time (such as during vacation), disconnect
the AC power plug from the wall outlet.
■ Do not use excessive force on the switches, controls
or connection wires. When moving the unit, first
disconnect the power plug and the wires connected
to other equipment. Never pull the wire itself.
■ Do not attempt to clean the system with chemical
solvents; this might damage the finish. Use a clean,
dry cloth.
■ Be sure to read the “TROUBLESHOOTING” section
regarding common operating errors before
concluding that the system is faulty.
■ To prevent lightning damage, disconnect the AC
power plug and the antenna cable when there is an
electrical storm.
■ Do not plug the AC power plug into the wall outlet
before you finish all connections.
■ The voltage to be used must be the same as that
specified on this system. Using this unit with a higher
voltage than that which is specified is dangerous and
may result in a fire or other type of accident causing
damage. YAMAHA will not be held responsible for
any damage resulting from use of this system with a
voltage other than that which is specified.
■ The sound level at a given volume setting depends
on the speaker location and other factors. Care
should be taken to avoid exposure to sudden high
levels of sound which may occur when turning on the
system with the volume setting at high, and to
continuous high levels of sound.
■ Sudden temperature changes and storage or
operation in an extremely humid environment may
cause condensation inside the system.
Condensation can cause the system to malfunction.
To eliminate condensation:
•
Remote control
Wipe off condensation on the transmitter window
with a soft cloth before operating the system.
■ Secure placement or installation is the owner’s
responsibility.
YAMAHA shall not be liable for any accident
caused by improper placement or installation of
this system.
PRECAUTIONS: READ THIS BEFORE OPERATING THIS SYSTEM
IMPORTANT
Please record the serial number of this system in
the space below.
Serial No.:
The serial number is located on the rear of the
power amplifier/subwoofer (SW-AVS7).
Retain this Owner’s Manual in a safe place for future
reference.
AV-S7(E)(E/F)1-16 9/11/0 9:36 AM Page E-2

E-3
English
WARNING
To reduce the risk of fire or electric shock, do not
expose this system to rain or moisture.
To avoid electrical shock, do not open the cabinet.
Refer servicing to qualified personnel only.
MAIN POWER switch
The U.K. and Europe models are equipped with a
MAIN POWER switch on the rear bottom panel of
the power amplifier/subwoofer (SW-AVS7).
Setting this to ON switches the AV-S7 system to
STANDBY mode. To power on the system, press
the STANDBY/ON button on the center speaker or
the POWER button on the remote control
transmitter.
For U.K. customers
If the socket outlets in the home are not suitable for the
plug supplied with this appliance, it should be cut off
and an appropriate 3 pin plug fitted. For details, refer to
the instructions described below.
Note: The plug severed from the mains lead must be
destroyed, as a plug with bared flexible cord is
hazardous if engaged in a live socket outlet.
SPECIAL INSTRUCTIONS FOR U.K. MODEL
IMPORTANT
THE WIRES IN THE MAINS LEAD ARE COLOURED
IN ACCORDANCE WITH THE FOLLOWING CODE:
Blue: NEUTRAL
Brown: LIVE
As the colours of the wires in the mains lead of this
apparatus may not correspond with the coloured
markings identifying the terminals in your plug,
proceed as follows:
The wire which is coloured BLUE must be
connected to the terminal which is marked with the
letter N or coloured BLACK. The wire which is
coloured BROWN must be connected to the terminal
which is marked with the letter L or coloured RED.
Make sure that neither core is connected to the
earth terminal of the three pin plug.
PRECAUTIONS
This system is still connected to the AC power
source as long as it is connected to the wall outlet,
even if the system itself is turned off.
In this state, this system is designed to consume a
very small quantity of power. Pressing the
STANDBY/ON button (or POWER button) lights up
the STANDBY indicator and puts the system into
standby. This is called STANDBY mode.
VOLTAGE SELECTOR (FOR GENERAL AND
CHINA MODELS ONLY)
The voltage selector on the bottom of the power
amplifier/subwoofer (SW-AVS7) must be set for
your local main voltage BEFORE plugging into
the AC main supply.
Voltages are 110/120/220/240V AC, 50/60 Hz.
VOLTAGE
SELECTOR
CAUTION (FOR CANADA MODEL)
TO PREVENT ELECTRIC SHOCK, MATCH WIDE
BLADE OF PLUG TO WIDE SLOT AND FULLY
INSERT.
FOR CANADIAN CUSTOMER
THIS CLASS B DIGITAL APPARATUS MEETS ALL
REQUIREMENTS OF THE CANADIAN
INTERFERENCE-CAUSING EQUIPMENT
REGULATIONS.
FOR U.K. AND EUROPE MODELS ONLY
AV-S7(E)(E/F)1-16 9/11/0 9:36 AM Page E-3

Loading the batteries for the
remote control transmitter
1
Remove the battery compartment cover.
(Slide the cover in the direction of the arrow.)
2 Insert 2 “AA” size batteries (UM/SUM-3, R6, HP-7 or
equivalent) into the battery compartment.
* Installing the batteries improperly may cause
failure.
3 Replace the battery compartment cover.
Precautions for battery use
•
Insert the batteries according to the direction
indicated in the battery compartment.
•
Replace all batteries with new ones at the same
time.
•
Remove the batteries if they are weak or if the unit
will not be used for a long period of time.
•
Do not mix normal batteries with rechargeable
batteries.
Proper use of the remote control
transmitter
Aim the remote control transmitter at the remote control
sensor (within a 60° range with no obstacles) and
operate as shown.
Notes concerning use
•
Replace the batteries if the control distance
decreases or operation becomes unstable.
•
Periodically clean the transmitter window on the
remote control transmitter and the sensor on the
center speaker with a soft cloth.
•
Exposing the sensor on the center speaker to strong
light (such as an inverter-type fluorescent lamp) may
interfere with operation. In this case, reposition the
center speaker to avoid direct light.
•
Keep the remote control transmitter away from
moisture, excessive heat, shock and vibrations.
•
The remote control transmitter’s range is from 0.2m
(8”) to 6m (20’) from the sensor.
STANDBY
INPUT 1
C
INPUT 2
L
A
B
E
D
C
VOLUME
REAR
R
STANDBY/ON
INPUT
PROGRAM
30°
30°
E-4
PRECAUTIONS
NOTES ABOUT THE REMOTE CONTROL TRANSMITTER
2
1
3
Remote control
sensor
Within approximately
6 m (19.7 feet)
AV-S7(E)(E/F)1-16 9/11/0 9:36 AM Page E-4

E-5
English
Active Servo
Technology
6CH POWER AMPLIFIER
ACTIVE SERVO PROCESSING SUBWOOFER
STANDBY
INPUT 1
C
INPUT 2
L
A
B
E
D
C
VOLUME
REAR
R
STANDBY/ON
INPUT
PROGRAM
OUTLINE OF THIS SYSTEM
• The AV-S7 system consists of the SW-AVS7, NX-AVS7 and the NX-AV1.
This system is a multi-channel audio system which consists of the units shown below.
By driving 6 speakers, the built-in digital sound field processor (DSP) creates various kinds of Yamaha original digital
sound fields simulating an actual concert hall, live house and other venues. When watching a movie source, the built-
in Dolby Pro Logic Surround decoder and the digital sound field processor turn your room into a movie theater with
tremendous impact.
Ultra-low bass reproduced by the subwoofer (SW-AVS7) makes sound more real and powerful.
This system will give you great enjoyment in watching TV and playing various audio sources.
NX-AVS7
Center Speaker
(Full-range speaker with built-
in control unit)
NX-AV1
Front and Rear Speakers
(Full-range speakers)
SYSTEM CONFIGURATION
SW-AVS7
(6-channel power amplifier
and Active Servo Processing
Subwoofer system)
AV-S7(E)(E/F)1-16 9/11/0 9:36 AM Page E-5

E-6
OUTLINE OF THIS SYSTEM
The System
● 6-Speaker Multi-Channel Audio
System Including Two Front
Speakers, One Center Speaker, Two
Rear Speakers and One Subwoofer
● Minimum RMS Output Power per
Channel
Front L, R: 30W + 30W (6Ω) RMS
Output
Power, 10% THD,
1 kHz
25W + 25W (6Ω) RMS
Output
Power, 0.9% THD,
1 kHz
Center
: 30W (6Ω) RMS Output
Power, 10% THD, 1 kHz
25W (6Ω) RMS Output
Power, 0.9% THD, 1 kHz
Rear L, R: 30W + 30W (6Ω) RMS
Output Power, 10% THD,
1 kHz
25W + 25W (6Ω) RMS
Output Power, 0.9% THD,
1 kHz
Subwoofer
: 50W (4Ω) RMS Output
Power, 10% THD, 100 Hz
40W (4Ω) RMS Output
Power, 0.9% THD, 100 Hz
● Active Servo Processing Subwoofer
System for Ultra-low Bass
Reproduction (SW-AVS7)
● Center Speaker (NX-AVS7) with Built-
in Control Unit Equipped with
STANDBY, INPUT 1/2, VOLUME, and
PROGRAM Indicators
● Simple and Easy Operating
Procedures
● Remote Control Capability
Sound Field Processor Including
Dolby Pro Logic Surround
Decoder
● Digital Sound Field Processor
(Programs: CONCERT, SPORTS,
MONO MOVIE)
● Dolby Pro Logic Surround Decoder
(Program: DOLBY PRO LOGIC)
● CINEMA DSP:
Theater-like Sound Experience by a
Combination of Dolby Pro Logic and
YAMAHA DSP Technology
(Program: DOLBY PRO LOGIC
ENHANCED)
● Automatic Input Balance Control for
Dolby Pro Logic Surround
● Test Tone Generator for Easier
Speaker Balance Adjustment
FEATURES
AV-S7(E)(E/F)1-16 9/11/0 9:36 AM Page E-6

E-7
English
OUTLINE OF THIS SYSTEM
DIGITAL SOUND FIELD PROCESSOR (DSP)
The Digital Sound Field Processor (DSP) built into this system takes advantage of Yamaha’s undisputed leadership in
the field of digital audio processing to bring you a whole new world of listening experiences. Follow the instructions in
this manual carefully when setting up your system, and this unit will sonically transform your room into a wide range of
listening environments –movie theater, concert hall, and so on. In addition, you get incredible realism from sources
encoded with Dolby Surround using the built-in Dolby Pro Logic Surround Decoder.
Please read this operation manual carefully and store it in a safe place for later reference.
Digital Sound Field Processing
What is it that makes live music so good? Today’s
advanced sound reproduction technology lets you get
extremely close to the sound of a live performance, but
chances are you’ll still notice something missing: the
acoustic environment of the live concert hall. Extensive
research into the exact nature of the sonic reflections
that create the ambience of a large hall has made it
possible for Yamaha engineers to bring you this same
sound in your own listening room, so you’ll feel all the
sound of a live concert.
Furthermore, our technicians, armed with sophisticated
measuring equipment, have even made it possible to
capture the acoustics of a variety of venues such as an
actual concert hall and theater to allow you to accurately
recreate one of several actual live performance
environments, all in your own home.
Dolby Pro Logic Surround
This unit employs a Dolby Pro Logic Surround decoder
similar to professional Dolby Stereo decoders used in
many movie theaters. By using the Dolby Pro Logic
Surround decoder, you can experience the dramatic
realism and impact of Dolby Surround movie theater
sound in your own home. Dolby Pro Logic employs a
four-channel five-speaker system. The Pro Logic
Surround system divides the input signal into four levels:
the left and right main channels, the center channel
(used for dialog), and the rear surround sound channels
(used for sound effects, background noise, and other
ambient noises). The center channel allows listeners
seated in even less-than-ideal positions to hear the
dialog originating from the action on the screen while
experiencing good stereo imaging.
Dolby Surround is encoded on the sound track of pre-
recorded video tapes, laser discs, and some TV/cable
broadcasts. When you play a source encoded with Dolby
Surround on this unit, the Dolby Pro Logic Surround
decoder decodes the signal and distributes the
surround-sound effects.
This Dolby Pro Logic Surround Decoder employs a
digital signal processing system. This system improves
the stability of sound at each channel and minimizes
crosstalk between channels, so that positioning of
sounds around the room is more accurate compared
with conventional analog signal processing systems.
In addition, this unit features a built-in automatic input
balance control. This always assures you the best
performance without manual adjustment.
Manufactured under license from Dolby Laboratories
Licensing Corporation. “Dolby”, “Pro Logic”, and the
double-D symbol are trademarks of Dolby Laboratories
Licensing Corporation.
Dolby Pro Logic Surround + DSP
Dolby Surround sound system shows its full ability in a
large movie theater, because movie sounds are
originally designed to be reproduced in a large movie
theater using many speakers. It is difficult to create a
sound environment similar to that of a movie theater in
your listening room, because the room size, materials of
inside walls, the number of speakers, and other factors
of your listening room are much different from those of a
movie theater.
Yamaha DSP technology made it possible to present
you with nearly the same sound experience as that of a
large movie theater in your listening room by
compensating for lack of presence and dynamics in your
listening room with its original digital sound fields
combined with Dolby Surround sound field.
The combination of Dolby Pro Logic Surround and DSP
is used on the sound field program “ PRO LOGIC
ENHANCED”.
The YAMAHA “CINEMA DSP” logo indicates these
programs are created by the combination of Dolby Pro
Logic and YAMAHA DSP technology.
CINEMA DSP
AV-S7(E)(E/F)1-16 9/11/0 9:36 AM Page E-7

E-8
SETTING UP THE SPEAKERS
SETTING UP THE SPEAKERS
Speaker configuration
This system employs a 6-speaker configuration: 2 front
speakers, 2 rear speakers, a center speaker and a
subwoofer.
The front speakers are used for the main source sound
plus the effect sounds. The rear speakers are used for
the effect and surround sounds, and the center speaker
is for the center sounds (such as dialog.). The
subwoofer is for reinforcing low frequencies of the main
source sound and the center sound.
Rear L
Rear R
TV set
Front R
Subwoofer
Center
Front L
Rear L
Rear R
Placing speakers
Front speakers: On both sides of the TV and at
almost the same height as the TV.
Rear speakers: Behind your listening position,
facing slightly inward. Nearly six
feet (approx. 1.8 m) up from the
floor.
Center speaker: Precisely between the front
speakers.
Subwoofer: The position of the subwoofer is not
so critical because low bass tones
are not highly directional.
Note
Although FRONT, REAR, and CENTER speakers are
magnetically shielded, there may be some
influence on the TV picture depending on the type
of TV or the placement of the speakers. In such a
case, place the speakers far enough from the TV so
that there is no influence on the TV picture.
Before you make connections, place all units in this system in their proper positions. Above all, the positioning of the
speakers is important because it controls the whole sound quality of this system.
Position the speakers on the basis of your listening position by following the instructions in this section.
Front L Center Front R
Rear L Rear R
Subwoofer
AV-S7(E)(E/F)1-16 9/11/0 9:36 AM Page E-8

E-9
English
SETTING UP THE SPEAKERS
When installing the center speaker on the TV, be sure to
secure the center speaker to the TV using the velcro strips
provided so that it does not fall.
Notes
• Do not place the center speaker on top of a TV
whose area is smaller than the bottom area of the
center speaker, as the center speaker may drop and
cause personal injury.
• Although this center speaker is a magnetically
shielded type, there may be some influence on the
TV picture depending on the type of TV or the
placement of the center speaker. In such a case,
place the center speaker apart from the TV so that
there is no influence on the TV picture.
• Be sure to remove all dust, debris, oil, and other
substances adhering to the section where the velcro
strip is affixed. If this section is dirty, the velcro strip
will not affix properly, and the center speaker may
move or fall.
• When peeling off the backing paper of the velcro
strips, be careful not to touch the adhesive surface.
Doing so harms the adhesion strength.
• If there is a gap between the center speaker and TV,
turn and extend the adjuster on the bottom rear
section of the center speaker so that the center
speaker is stable.
Center Speaker Installation
1
2
Smooth surface
Rough surface
Affix to the bottom of the center speaker (2 locations)
Adjust as necessary
Adjuster
Bottom of the center speaker
STAND BY
INPUT 1
C
INPUT 2
L
A
B
E
D
C
VOLUME
REAR
R
STANDBY/ON
INPUT PROGRAM
AV-S7(E)(E/F)1-16 9/11/0 9:36 AM Page E-9

E-10
SETTING UP THE SPEAKERS
■ Mounting the front speakers
Place the front speakers on a rack or on a shelf, so that
they are stabilized.
To obtain more stability and usefulness, we recommend
that you mount the speakers on the provided mounting
brackets (type A).
To mount speakers on the mounting
brackets (type A)
1 Attach the bracket to the bottom of the speaker using
the provided screw (type A).
2 Turn and/or slide the speaker on the bracket to the
desired position, and then tighten the screw.
■ Mounting the rear speakers
Mount the rear speakers on a shelf, rack or put them
directly on the floor, or hang them on the wall.
To mount the rear speakers on a wall using
the provided mounting brackets (type B)
Note
It is recommended that you connect the speaker cords
to the speaker’s terminals before attaching the bracket
to the speaker.
1 Attach the bracket to the bottom of the speaker using
the provided screw (type B).
2 Turn and/or slide the speaker on the bracket to the
desired position, and then tighten the screw.
Mounting
bracket
(type A)
Screw
(type A)
1
2
1
2
Screw
(type B)
Mounting
bracket
(type B)
AV-S7(E)(E/F)1-16 9/11/0 9:36 AM Page E-10

E-11
English
3 Fasten the screws into a firm wall or wall support as
shown in the figure, and hang the holes of the
mounting bracket on the protruding screws.
* Make sure that the screws are held firmly in the
holes.
Note
If desired, you can hang the speaker on the protruding
screws on the wall without using the bracket.
WARNING:
● Each speaker weighs 0.7 kg (1 lbs. 9 oz.). Do not
mount them on thin plywood or a soft wall
surface material, as the screws may come out of
the flimsy surface, causing the speakers to fall
down and be damaged, or cause personal injury.
● Do not fasten the speakers to the wall with nails,
adhesives, or other unstable hardware. Long-
term use and vibrations may cause them to fall
down.
● To avoid accidents resulting from tripping over
loose speaker cords, fix them to the wall.
● Select a proper position on the wall to mount the
speaker and the bracket so that no one will hit
his head or face on the protruding part of the
bracket and be injured.
SETTING UP THE SPEAKERS
65 mm
3
Tapping screw
(Available at a
hardware store)
Wall/ wall
support
Mounting
bracket
(type B)
Min.
12 mm
Mounting
bracket
(type C)
Screw
(type A)
60 mm
■ Mounting the speaker on a
commercially available speaker
stand
The provided mounting bracket (type C) has one pair of
screw holes (spaced 60 mm apart) available to mount
the speaker on a speaker stand.
* These screw holes use only M4 screws.
1 Attach the bracket to the bottom of the speaker
using the provided screw (type A) so that the convex
part of the bracket fits in the grooved part on the
bottom of the speaker as shown on the left.
2 Mount the speaker on the speaker stand using the
screw holes on the bracket.
Note
Mounting brackets (type C) are provided for each
speaker (4).
AV-S7(E)(E/F)1-16 9/11/0 9:36 AM Page E-11

E-12
INPUT
THROUGH
SYSTEM
CONNECTOR
MARK
FRONT
RL
FRONT
RL
L
R
12
INPUT
THROUGH
SYSTEM
CONNECTOR
MARK
L
R
12
AUDIO
INPUT
VIDEO
INPUT
AUDIO
OUTPUT
L
R
VIDEO
OUTPUT
AUDIO
OUTPUT
L
R
AUDIO
OUTPUT
L
R
MARK
SYSTEM
CONNECTOR
MARK
SYSTEM
CONNECTOR
■ Making a system connection between the center speaker (NX-AVS7) and the
power amplifier/subwoofer (SW-AVS7)
CONNECTIONS
CONNECTIONS
1 Connect the SYSTEM CONNECTOR terminals on
both units with each other using the provided system
connector cable.
* When connecting the system connector cable to
both terminals, note the directions of each
SYSTEM CONNECTOR terminal’s face.
2 Connect the AUDIO OUTPUT terminals on the TV to
the INPUT1 terminals on the SW-AVS7 using the
provided connection cord.
* Be sure to connect the red plug of the connection
cord to the “R” (right) terminal and the white plug
to the “L” (left) terminal.
3 Connect the INPUT 2 terminals to the AUDIO output
terminals of a CD, MD, laser disc player or DVD
player.
Power amplifier/subwoofer
(SW-AVS7)
Center speaker
(NX-AVS7)
System
connector
VCR
TV
CD or MD
player
Audio connection
cord (provided)
System connector cable (provided)
Never plug the AC supply lead of this system into the outlet until all connections are
completed.
When you have finished placing or installing all units in this system, begin making connections by following the
instructions in this section.
This system requires three connections: system connection, speaker connection and AC supply connection.
However, the order of these connections is not important.
*1
Caution
Be careful not to damage the system connector
cable by placing something heavy on the cable,
putting metal fittings on the cable, or tugging the
cable. Damaging the cable may cause the system
to break down.
Connection to a TV with an AUDIO OUT terminal
*2
*3
*1 : Video connection cable (optional)
*2,3 : Audio connection cable (optional)
Set the volume control of the
TV to the minimum setting.
AV-S7(E)(E/F)1-16 9/11/0 9:36 AM Page E-12

E-13
English
CONNECTIONS
Connection to a TV without an AUDIO OUT terminal
INPUT
THROUGH
SYSTEM
CONNECTOR
MARK
FRONT
RL
FRONT
RL
L
R
12
INPUT
THROUGH
SYSTEM
CONNECTOR
MARK
L
R
12
AUDIO
INPUT
VIDEO
INPUT
L
R
VIDEO
OUTPUT
AUDIO
OUTPUT
L
R
AUDIO
OUTPUT
L
R
MARK
SYSTEM
CONNECTOR
MARK
SYSTEM
CONNECTOR
Power amplifier/subwoofer
(SW-AVS7)
Center speaker
(NX-AVS7)
System
connector
VCR
TV
CD or MD
player
Audio connection
cord (provided)
System connector cable (provided)
*1
*2
*3
*1 : Video connection cable (optional)
*2,3 : Audio connection cable (optional)
1 Connect the SYSTEM CONNECTOR (Refer to page
12).
2 Connect the AUDIO OUTPUT terminals on the VCR
to the INPUT1 terminals on the SW-AVS7.
3 Connect the THROUGH terminals of INPUT 1 to the
AUDIO INPUT terminals on the TV using connector
cable (optional).
* A signal is applied to INPUT 1 at the THROUGH
terminals only when the AV-S7 is off.
4 Connect the INPUT 2 terminals (Refer to page 12).
• If the AV-S7 system is set to STANDBY or the turned off, the signal applied to INPUT 1 is sent to the THROUGH terminal of
INPUT 1.
• Use the volume control of the TV when playing back sound from the TV or VCR without using the AV-S7.
*3
AV-S7(E)(E/F)1-16 9/11/0 9:36 AM Page E-13

E-14
CONNECTIONS
Right front
speaker
Left front
speaker
Right rear
speaker
Left rear
speaker
■ Connecting the speakers to the power amplifier/subwoofer (SW-AVS7)
INPUT
THROUGH
SYSTEM
CONNECTOR
MARK
REAR
RL
FRONT
RL
L
R
12
REAR
RL
FRONT
RL
Power amplifier/subwoofer
(SW-AVS7)
■ Connecting the AC supply lead
•
After completing all connections, plug the AC supply
lead into a convenient outlet.
•
Unplug the AC supply lead from the outlet if this
system is not to be used for a long period of time.
INPUT
THROUGH
SYSTEM
CONNECTOR
MARK
REAR
RL
FRONT
RL
L
R
12
VOLTAGE
SELECTOR
POWER
OFF ON
To outlet
VOLTAGE SELECTOR
For General and China models only
The voltage selector on the bottom of the power
amplifier/subwoofer (SW-AVS7) must be set for
your local main voltage BEFORE plugging it into
the AC main supply.
Voltages are 110/120/220/240V AC, 50/60 Hz.
MAIN POWER switch
For U.K. and Europe
models only
Setting this to ON switches
the AV-S7 system to
STANDBY mode. To start
the system, press the
STANDBY/ON button on the
center speaker or the
POWER button on the
remote control transmitter.
AV-S7(E)(E/F)1-16 9/11/0 9:36 AM Page E-14

E-15
English
CONNECTIONS
Connect the provided speakers to the SPEAKERS
terminals on the rear of the SW-AVS7.
All of the speakers are identical.
The speakers connected to the FRONT R and L
terminals should be used as the right and left front
speakers.
The speakers connected to the REAR R and L
terminals should be used as the right and left rear
speakers.
Notes
● Do not connect speakers to the SW-AVS7 other than
the provided ones.
● Use the provided speaker cords for the connections.
Normally, use the short cords to connect to the front
speakers, and use the long ones to connect to the
rear speakers. The four cords are marked FRONT L,
FRONT R, REAR L and REAR R for your reference.
How to Connect:
Connect the provided speaker cords between the
SPEAKERS terminals on the power
amplifier/subwoofer (SW-AVS7) and the speaker
terminals on each speaker as shown below. If the
connections are incorrect, no sound will be heard from
the speakers. Make sure that the polarity of the
speaker wires is correct with reference to the + and –
markings. If these wires are reversed, the sound will
be unnatural and lack bass.
To avoid mistakes, connect the wire with a line to the +
terminals on both the power amplifier/subwoofer (SW-
AVS7) and speaker, and connect the wire with no line
to the – terminals on both of them.
Caution
Do not let the bare speaker wires touch each other
as this could damage the SW-AVS7 and/or the
speakers.
On the SW-AVS7:
Red: positive (+)
Black: negative (–)
➀
Lift up the tab.
➁
Insert the bare wire.
[Remove approx.
5mm (1/4”)
insulation from the
speaker wires.]
➂
Press down the tab
and secure the
wire.
On the FRONT and REAR speakers (NX-AV1):
Red: positive (+)
Black: negative (–)
➀
Press the tab.
➁
Insert the bare wire.
[Remove approx.
5mm (1/4”)
insulation from the
speaker wires.]
➂
Release the tab and
secure the wire.
➀
➁
➂
Label
AV-S7(E)(E/F)1-16 9/11/0 9:36 AM Page E-15

E-16
1
INPUT selector button
This button switches between INPUT 1 and INPUT 2
each time it is pressed. Check the INPUT 1/2 indicator
5 to see which is in use.
2 STANDBY/ON (Switch) button
This button switches between power-on and standby
each time it is pressed.
When standby mode is activated, the STANDBY
indicator 4 lights up.
When the power-on is activated, the STANDBY
indicator 4 is off. You can tell that the power is on since
the INPUT 1/2 indicator 5 and other indicators are lit
up.
Standby mode
In this state, this unit consumes a very small
quantity of power to receive infrared signals from
the remote control transmitter.
3 PROGRAM selector button
This button is used for selecting the DSP program. The
selections cycle through A→B→C→D→E→OFF→A
when pressed.
A: Dolby Pro Logic Enhanced
B: Dolby Pro Logic
C: Concert
D: Sports
E: Mono Movie
Check the PROGRAM indicator 7 when making the
selection.
4 STANDBY indicator
This indicator lights up when in standby mode.
5 INPUT 1/2 indicators
These indicators light up to show whether INPUT 1 or 2
is selected.
6 VOLUME indicators
These indicators light up according to the setting of the
VOLUME buttons 9 on the remote control transmitter.
7 PROGRAM indicators
These indicators light up to show the selected DSP
program.
Remote control sensor
The sensor is a window for receiving the signal from the
remote control transmitter.
STANDBY
INPUT 1 C
INPUT 2
L
A
B
E
D
C
VOLUME
R
4
5
6
7
STANDBY/ON
INPUT
PROGRAM
132
132
REAR
CONTROLS AND THEIR FUNCTIONS
CONTROLS AND THEIR FUNCTIONS
CENTER SPEAKER (WITH CONTROL UNIT)
Remote control
sensor
AV-S7(E)(E/F)1-16 9/11/0 9:36 AM Page E-16

E-17
English
CONTROLS AND THEIR FUNCTIONS
REMOTE CONTROL TRANSMITTER
1 POWER button
This button turns on the power to this system and
switches this system to standby mode alternately.
2 INPUT selector button
This button switches between INPUT 1 and INPUT 2
each time it is pressed. Check the INPUT 1/2 indicator
5 of the center speaker to see which is activated.
3 TEST button
This button is used for speaker balance adjustment.
(For details, refer to page 19.)
4 DSP OFF button
This button switches off the digital sound field
processor (including the Dolby Pro Logic Surround
decoder).
5 PROGRAM selector buttons
These buttons are used for selecting the DSP program.
A: Dolby Pro Logic Enhanced
B: Dolby Pro Logic
C: Concert
D: Sports
E: Mono Movie
Check the PROGRAM indicators 7 of the center
speaker when making the selection.
6 CENTER level (+/–) buttons
Pressing the “+” button raises and pressing the “–”
button lowers the volume level of the center speaker.
7 REAR level (+/–) buttons
Pressing the “+” button raises and pressing the “–”
button lowers the volume level of the rear speakers.
8 SUBWOOFER level (+/–) buttons
Pressing the “+” button raises and pressing the “–”
button lowers the volume level of the subwoofer.
9 VOLUME (+/–) buttons
Pressing the “+” button raises and pressing the “–”
button lowers the volume of the whole system.
444
8
7
POWER
VOLUME
TEST
D
E
BC
A
ENHANCED
CONCERTPROLOGIC
MONO MOVIESPORTS
OFF
DSP
CENTER
REAR
SUBWOOFER
INPUT
AMP
1/2
6
5
1
9
3
2
AV-S7(E)(E/F)1-16 9/11/0 9:36 AM Page E-17

STANDBY/ON
INPUT PROGRAM
POWER
VOLUME
TEST
D
E
BC
A
ENHANCED
CONCERTPROLOGIC
MONO MOVIESPORTS
OFF
DSP
CENTER
REAR
SUBWOOFER
INPUT
AMP
1/2
E-18
Standby mode
While the power is on, pressing the STANDBY/ON
button (or the POWER button on the remote control
transmitter) switches the system to standby mode.
In this mode, the main voltage still flows through the
system. If you want to turn off the system
completely, remove the AC power plug from the
outlet.
TURNING 0N THE POWER TO THIS SYSTEM OR SETTING IT TO THE STANDBY MODE
TURNING ON THE POWER TO THIS SYSTEM OR SETTING IT TO THE STANDBY MODE
If the AC supply lead is connected to an outlet, this
system can be turned on or switched to the standby
mode by pressing the STANDBY/ON button on the
front panel of the center speaker or the POWER button
on the remote control transmitter.
Note: When the power is turned on by pressing the
STANDBY/ON button (or the POWER button on
the remote control transmitter), the volume
indicator flashes and no sound is emitted from the
speakers for several seconds.
AV-S7(E)17-24 9/11/0 9:07 AM Page E-18

E-19
English
ADJUSTMENTS BEFORE LISTENING OPERATIONS
SPEAKER BALANCE ADJUSTMENT
STANDBY/ON
INPUT PROGRAM
POWER
VOLUME
TEST
D
E
BC
A
ENHANCED
CONCERTPROLOGIC
MONO MOVIESPORTS
OFF
DSP
CENTER
REAR
SUBWOOFER
INPUT
AMP
1/2
This procedure lets you adjust the sound balance
between the front, center, and rear speakers using the
built-in test tone generator. When this adjustment is
performed, the sound output level heard at the listening
position will be the same from each speaker. This is
important for the best performance of the built-in Dolby
Pro Logic surround decoder.
The adjustment of each speaker output level
should be done at your listening position with the
remote control transmitter. Otherwise, the result
may not be satisfactory.
1 Press the STANDBY/ON button (or the POWER
button on the remote control transmitter) to turn the
power on.
2 Press the VOLUME “–” button to reduce the volume
to minimum.
3 Press the TEST button. Make sure that B of the
PROGRAM indicators light up.
4 Press the VOLUME “+” button to increase the
volume.
• You will hear a test tone from the left front
speaker, the center speaker, the right front
speaker, and then the rear speakers, for about
two seconds each.
• The test tone from the left rear speaker and the
right rear speaker will be heard at the same time.
5 Press the CENTER level (+/–) buttons to adjust the
volume of the center speaker to the same level as
the front speakers.
Be sure to always press the CENTER level buttons
while a test tone is being emitted from the center
speaker.
6 Press the REAR level (+/–) buttons to adjust the
volume of the rear speakers to the same level as the
front speakers.
Be sure to always press the REAR level buttons
while a test tone is being emitted from the rear
speakers.
7 When all the speakers are adjusted, press the TEST
button to stop the test signal.
Note
Once each speaker is adjusted, the system volume can
be adjusted to the desired level using the VOLUME
(+/–) buttons on the remote control transmitter.
1
4
6
5
2
3, 7
1
The test tone is emitted.
The indicators shown in the figure blink.
L C R
L C R
L C R
L C R
REAR
Left front
Center
Right front
Rear (L, R)
AV-S7(E)17-24 9/11/0 9:07 AM Page E-19

E-20
USING THE AV-S7
USING THE AV-S7
This system incorporates a sophisticated, multi-
program digital sound field processor. The processor
allows you to electronically expand and change the
shape of the audio sound field from both audio and
video sources, creating a theater-like experience in
your listening room. You can create an excellent audio
sound field by selecting a suitable sound field program
(this will, of course, depend on what you will be
listening to) and adding desired adjustments.
In addition, this unit incorporates a Dolby Pro Logic
Surround decoder for multi-channel sound reproduction
of sources encoded with Dolby Surround.
The operation of the Dolby Pro Logic Surround decoder
can be controlled by selecting the DSP program,
PRO LOGIC or PRO LOGIC ENHANCED.
Brief Overview of Digital Sound Field
Programs
The following list gives you a brief description of the
sound fields produced by each DSP program. Keep in
mind that most of these are precise digital recreations
of actual acoustic environments. The data for these
sound fields was recorded at actual locations using
sophisticated sound field measurement equipment.
Note
The channel level balance between the left and
right rear effect speakers may vary depending on
the sound field you are listening to. This is because
most of these sound field recreations are actual
acoustic environments.
FEATURE
This program is used for playing of sources encoded with Dolby Surround.
Enhancing the “Normal” Dolby Pro Logic, the DSP technology simulates the multi-surround
speaker systems of a 35 mm movie theater. This effect creates a wide surround sound field,
and expands the sound stage with an improved presence image. This program is used for
musical based movies, as well as drama and comedy based movies.
This program is also used for playing of sources encoded with Dolby Surround.
The application of a sophisticated digital signal processing system reduces crosstalk and
directs or steers the sound source more smoothly and precisely, as compared to conventional
types.
This program is effective for music videos and gives excellent depth and clarity for vocals.
For opera, the orchestra and stage are ideally recreated, making you feel as if you were in an
actual concert hall.
This program is ideal for enjoying sports programs which take place in arenas, indoor
stadiums, or other venues.
This program is designed specifically to enhance mono source programs. Compared to a
strictly mono setting, the sound image created in this mode is wider and slightly forward of the
speaker pair, lending an immediacy to the overall sound. It is particularly effective when used
with old mono movies, news broadcasts and dialog.
PROGRAM
PRO LOGIC
ENHANCED
PRO LOGIC
CONCERT
SPORTS
MONO MOVIE
AV-S7(E)17-24 9/11/0 9:07 AM Page E-20

E-21
English
Listening to a source with sound
effects by digital sound field
processing (including Dolby Pro
Logic Surround decoding)
1
Press the POWER button.
When the system is turned on, the STANDBY
indicator turns off, and INPUT indicator 1 or 2 lights
up.
2 Press the VOLUME “–” button to lower the volume.
3 Use the INPUT selector button to select the listening
source.
INPUT 1: For playing a TV or VCR
INPUT 2: For playing audio signals from a
CD player or MD player connected to
INPUT 2
4 Play the source.
5 Press the VOLUME “+” button to adjust the volume
to the desired level.
6 Use the PROGRAM selector button to select the
DSP program (A, B, C, D, or E) matching the play
source.
* The PROGRAM selector button on the center
speaker cycles through
A→B→C→D→E→OFF→A when pressed.
* Check the program settings at the PROGRAM
indicator.
7 The volume for all speakers can be adjusted
simultaneously with the VOLUME button.
Notes
●
Program selection can be made for individual input
sources. Once you select a program, it is linked with
the input source selected at that time. So, when you
select the input source next time, the same program
is automatically called.
●
If you prefer to cancel the DSP, press the DSP OFF
button. The sound will be the normal 2-channel
stereo without the surround sound effect.
●
When CONCERT, SPORTS or MONO MOVIE is
selected, no sound is heard from the center
speaker.
●
When a monaural sound source is played with
DOLBY PRO LOGIC or DOLBY PRO LOGIC
ENHANCED, sound is heard from the center
speaker and subwoofer.
●
If the AV-S7 system is set to STANDBY or turned
off, the signal applied to INPUT 1 is sent to the
THROUGH terminals of INPUT 1.
USING THE AV-S7
POWER
VOLUME
TEST
D
E
BC
A
ENHANCED
CONCERTPROLOGIC
MONO MOVIESPORTS
OFF
DSP
CENTER
REAR
SUBWOOFER
INPUT
AMP
1/2
3
1
5
6
2
PRO LOGIC
PRO LOGIC ENHANCED
OFF
CONCERT
MONO MOVIE
SPORTS
Press the PROGRAM selector button on the center
speaker to select the programs shown below.
AV-S7(E)17-24 9/11/0 9:07 AM Page E-21

E-22
USING THE AV-S7
STANDBY/ON
INPUT PROGRAM
Adjusting the center speaker volume
If desired, you can adjust the volume level of the center
speaker even if the volume is already set in “SPEAKER
BALANCE ADJUSTMENT” on page 19.
By continuously pressing the CENTER (+ or –) button,
the volume value changes continuously.
Notes
●
This adjustment can be made only when the digital
sound field program DOLBY PRO LOGIC or DOLBY
PRO LOGIC ENHANCED is selected.
●
Once the volume level is adjusted, the volume value
will be the same in all the digital sound field
programs mentioned above.
Adjusting the rear speaker volume
If desired, you can adjust the volume level of the rear
speakers even if the volume is already set in
“SPEAKER BALANCE ADJUSTMENT” on page 19.
By continuously pressing the REAR level (+ or –)
button, the volume value changes continuously.
Notes
●
This adjustment can be made only when the built-in
digital sound field processor is on.
●
Once the volume level is adjusted, the volume value
will be the same in all the digital sound field
programs.
Adjusting the subwoofer output volume
Adjust the subwoofer output volume to the desired level
by pressing the SUBWOOFER level (+ or –) button.
If you feel that the bass tone is insufficient, increase the
volume, or if you feel it is overly emphasized, reduce
the volume.
To finish listening to a source
1
Stop playing a source.
2 Press the VOLUME “ –” button to decrease the
volume to the minimum.
3 Press the STANDBY/ON button (or the POWER
button on the remote control transmitter) to switch
the system to standby mode.
POWER
VOLUME
TEST
D
E
BC
A
ENHANCED
CONCERTPROLOGIC
MONO MOVIESPORTS
OFF
DSP
CENTER
REAR
SUBWOOFER
INPUT
AMP
1/2
3
3
2
SUBWOOFER
REAR LEVEL
CENTER LEVEL
AV-S7(E)17-24 9/11/0 9:07 AM Page E-22

E-23
English
If your unit fails to operate normally, check the following points to determine whether the fault can be corrected by the simple
measures suggested. If it cannot, or if the fault is not listed in the SYMPTOM column, unplug the power cord and contact your
authorized YAMAHA dealer or service center for help.
TROUBLESHOOTING
CAUSE
The power cord is not connected.
(U.K. and Europe models)
The MAIN POWER switch is set to OFF.
The internal microcomputer has been
frozen by an external electric shock
(lightning, excessive static electricity, etc.)
or a low-voltage power supply .
Loose speaker connections.
Internal protection circuit is functioning.
One rear speaker connection is loose or
bad.
The volume level of the rear speakers is
set to minimum.
No DSP program is selected.
The volume level of the center speaker is
set to minimum.
Incorrect DSP program selection.
No DSP program is selected.
Incorrect cord connections.
Input source selection is not correct.
Batteries are dead.
Remote control transmitter is too far away
or is being used at an incorrect angle.
Direct sunlight or lighting (an inverter type
flourescent lamp) is striking the remote
control sensor of the center speaker.
SYMPTOM
The system does not turn on even
when the STANDBY/ON button (or the
POWER button on the remote control
transmitter) is pressed.
This unit will not operate properly.
No sound from a speaker.
No sound from speakers.
No sound from the rear speakers.
No sound from the center speaker.
No sound from an external unit
connected with this system.
The remote control transmitter does not
work.
REMEDY
Connect the power cord.
Set the MAIN POWER switch to ON.
Unplug the AC supply lead from the wall outlet, and
then plug it in again after about one minute.
Connect properly.
Unplug the AC supply lead from the wall outlet, and
then plug it in again.
Connect it properly.
Raise the volume level of the rear speakers.
Select the appropriate program.
Raise the volume level of the center speaker.
Select the appropriate program.
Connect the cords correctly. If the problem persists,
the cords may be defective.
Make a proper input source selection.
Replace batteries.
Use within 6 m and 60° of the sensor.
Change the position of the center speaker.
GENERAL
REMOTE CONTROL
AV-S7(E)17-24 9/11/0 9:07 AM Page E-23

E-24
SPECIFICATIONS
As a part of its policy of continued product improvement, YAMAHA reserves the right to make design and
specification changes without prior notice. The performance specification figures indicated are the nominal
values for production units.
■Amplifier Section
Minimum RMS Output Power per Channel
Front L, R
6 ohms, 1 kHz, 10% THD ...................... 30W+30W
6 ohms, 1 kHz, 0.9% THD ..................... 25W+25W
Center
6 ohms, 1 kHz, 10% THD ................................ 30W
6 ohms, 1 kHz, 0.9% THD ............................... 25W
Rear L, R
6 ohms, 1 kHz, 10% THD ...................... 30W+30W
6 ohms, 1 kHz, 0.9% THD ..................... 25W+25W
Subwoofer
4 ohms, 100 Hz, 10% THD .............................. 50W
4 ohms, 100 Hz, 0.9% THD ............................. 40W
DIN Standard Output Power per Channel
[Europe model only]
6 ohms, 1 kHz, 1% THD..................................... 25W
IEC Power [Europe model only]
6 ohms, 1 kHz, 0.1% THD.................................. 20W
Input Sensitivity/Impedance
INPUT 1 ....................................... 100 mV/20 k-ohms
Total Harmonic Distortion (1 kHz)
INPUT 1 (12.5W/6 ohms)................................. 0.08%
Signal-to-Noise Ratio (IHF-A Network)
INPUT 1 ............................................................ 85 dB
■Speaker Section
Type
Front, Rear, Center ..................... 1-Way, 1-Speaker,
Acoustic-Suspension Type
(Magnetically-Shielded Type)
Subwoofer .......................... Active Servo Processing
Speaker System
(Magnetically-Shielded Type)
Speakers
Front, Rear............................................ 8 cm (3-1/8”)
Center.................................................... 8 cm (3-1/8”)
Subwoofer................................................. 20 cm (8”)
Maximum Power Handling Capacity
Front, Rear............................................. 40W (15.5V)
Center .................................................... 40W (15.5V)
Subwoofer............................................. 60W (15.5V)
Impedance
Front, Rear..................................................... 6 ohms
Center............................................................ 6 ohms
Subwoofer...................................................... 4 ohms
■General
Power Supply
[U.S.A. and Canada models] ......... AC 120V, 60 Hz
[U.K. and Europe models]...............AC 230V, 50 Hz
[Australia model] ............................ AC 240V, 50 Hz
[General and China models]
.................................AC 110/120/220/240V, 60/50 Hz
Power consumption ......................................... 155W
Dimensions (W x H x D)
SW-AVS7 ............... 250 (W) x 425 (H) x 418 (D) mm
(9-13/16” x 16-3/4” x 16-7/16”)
NX-AVS7 ................ 280 (W) x 117 (H) x 125 (D) mm
(11” x 4-10/16” x 4-14/16”)
NX-AV1 ..................... 94 (W) x 117 (H) x 108 (D) mm
(3-11/16” x 4-10/16” x 4-1/4”)
Weight
SW-AVS7 .............................. 14.5 kg (31 lbs. 15 oz.)
NX-AVS7 ................................... 1.3 kg (2 lbs. 14 oz.)
NX-AV1 ...................................... 0.7 kg (1 lbs. 9 oz.)
AV-S7(E)17-24 9/11/0 9:07 AM Page E-24

CARACTERISTIQUES TECHNIQUES
YAMAHA se réserve le droit d’apporter des modifications sans préavis à la présentation et aux caractéristiques
des appareils à fin d’amélioration. Les valeurs indiquées dans ce document sont les valeurs nominales des
appareils de série.
■Amplificateur
Puissance de sortie minimum RMS par canal
Enceinte avant G, D
6 ohms, 1 kHz, 10% de DHT...................30W+30W
6 ohms, 1 kHz, 0.9% de DHT..................25W+25W
Enceinte centrale
6 ohms, 1 kHz, 10% de DHT.............................30W
6 ohms, 1 kHz, 0.9% de DHT............................25W
Enceinte arrière G, D
6 ohms, 1 kHz, 10% de DHT...................30W+30W
6 ohms, 1 kHz, 0.9% de DHT..................25W+25W
Subwoofer
4 ohms, 100 Hz, 10% de DHT...........................50W
4 ohms, 100 Hz, 0.9% de DHT..........................40W
Puissance de sortie standard DIN par canal
[Modèle pour l’Europe seulement]
6 ohms, 1 kHz, 1% de DHT.................................25W
Puissance IEC [Modèle pour l’Europe seulement]
6 ohms, 1 kHz, 0,1% de DHT..............................20W
Sensibilité d’entrée/impédance
INPUT 1.........................................100 mV/20 k-ohms
Distorsion harmonique totale (1 kHz)
INPUT 1 (12,5W/6 ohms)..................................0,08%
Rapport signal/bruit (IHF réseau A)
INPUT 1..............................................................85 dB
■Enceintes
Type
Enceintes avant, arrière, enceinte centrale
....................................Type à suspension acoustique
à 1 voie, 1 enceinte
(Type blindage magnétique)
Subwoofer................................Système d’enceinte à
traitement servo-actif
(Type blindage magnétique)
Enceintes
Enceintes avant, arrière ....................................8 cm
Enceinte centrale ...............................................8 cm
Subwoofer.........................................................20 cm
Puissance nominale maximale
Enceintes avant, arrière....................... 40W (15,5V)
Enceinte centrale...................................40W (15,5V)
Subwoofer..............................................60W (15,5V)
Impédance
Enceintes avant, arrière ............................... 6 ohms
Enceinte centrale ...........................................6 ohms
Subwoofer...................................................... 4 ohms
■Général
Alimentation
[Modèles pour les Etats-Unis et le Canada]
.........................................................CA 120V, 60 Hz
[Modèles pour le Royaume-Uni et l’Europe]
.........................................................CA 230V, 50 Hz
[Modèle pour l’Australie]...............CA 240V, 50 Hz
[Modèle général et Modèle pour la Chine]
...............................CA 110/120/220/240V, 50/60 Hz
Consommation ................................................. 155W
Dimensions (L x H x P)
SW-AVS7..................................250 x 425 x 418 mm
NX-AVS7...................................280 x 117 x 125 mm
NX-AV1.......................................94 x 117 x 108 mm
Poids
SW-AVS7.......................................................14,5 kg
NX-AVS7 .........................................................1,3 kg
NX-AV1............................................................0,7 kg
YAMAHA ELECTRONICS CORPORATION, USA 6660 ORANGETHORPE AVE., BUENA PARK, CALIF. 90620, U.S.A.
YAMAHA CANADA MUSIC LTD. 135 MILNER AVE., SCARBOROUGH, ONTARIO M1S 3R1, CANADA
YAMAHA ELECTRONIK EUROPA G.m.b.H. SIEMENSSTR. 22-34, 25462 RELLINGEN BEI HAMBURG, F.R. OF GERMANY
YAMAHA ELECTRONIQUE FRANCE S.A. RUE AMBROISE CROIZAT BP70 CROISSY-BEAUBOURG 77312 MARNE-LA-VALLEE CEDEX02, FRANCE
YAMAHA ELECTRONICS (UK) LTD. YAMAHA HOUSE, 200 RICKMANSWORTH ROAD WATFORD, HERTS WD1 7JS, ENGLAND
YAMAHA SCANDINAVIA A.B. J A WETTERGRENS GATA 1, BOX 30053, 400 43 VÄSTRA FRÖLUNDA, SWEDEN
YAMAHA MUSIC AUSTRALIA PTY, LTD. 17-33 MARKET ST., SOUTH MELBOURNE, 3205 VIC., AUSTRALIA
V214790-1 Printed in Malaysia
(F)E/F-AV7p18-24 9/7/0 2:27 PM Page F-24
Documenttranscriptie
AV-S7(E)(E/F)1-16 9/11/0 9:36 AM Page 1 UCA Home Cinema Sound System Système Audio Home Cinéma OWNER‘S MANUAL MODE D‘EMPLOI STANDBY/ON INPUT STANDBY L INPUT 1 VOLUME C INPUT 2 PROGRAM R A REAR B C D E AV-S7(E)(E/F)1-16 9/11/0 9:36 AM Page 2 SAFETY INSTRUCTIONS 7 Wall or Ceiling Mounting – The unit should be mounted to a wall or ceiling only as recommended by the manufacturer. 8 Ventilation – The unit should be situated so that its location or position does not interfere with its proper ventilation. For example, the unit should not be situated on a bed, sofa, rug, or similar surface that may block the ventilation openings; or placed in a built-in installation, such as a bookcase or cabinet that may impede the flow of air through the ventilation openings. 9 Heat – The unit should be situated away from heat sources such as radiators, stoves, or other appliances that produce heat. CAUTION RISK OF ELECTRIC SHOCK DO NOT OPEN CAUTION: TO REDUCE THE RISK OF ELECTRIC SHOCK, DO NOT REMOVE COVER (OR BACK). NO USER-SERVICEABLE PARTS INSIDE. REFER SERVICING TO QUALIFIED SERVICE PERSONNEL. • Explanation of Graphical Symbols The lightning flash with arrowhead symbol, within an equilateral triangle, is intended to alert you to the presence of uninsulated “dangerous voltage” within the product’s enclosure that may be of sufficient magnitude to constitute a risk of electric shock to persons. 10 Power Sources – The unit should be connected to a power supply only of the type described in the operating instructions or as marked on the unit. 11 Power-Cord Protection – Power-supply cords should be The exclamation point within an equilateral triangle is intended to alert you to the presence of important operating and maintenance (servicing) instructions in the literature accompanying the appliance. routed so that they are not likely to be walked on or pinched by items placed upon or against them, paying particular attention to cords at plugs, convenience receptacles, and the point where they exit from the unit. 12 Cleaning – The unit should be cleaned only as recommended by the manufacturer. WARNING TO REDUCE THE RISK OF FIRE OR ELECTRIC SHOCK, DO NOT EXPOSE THIS UNIT TO RAIN OR MOISTURE. 1 Read Instructions – All the safety and operating instructions should be read before the unit is operated. 2 Retain Instructions – The safety and operating instructions should be retained for future reference. 3 Heed Warnings – All warnings on the unit and in the operating instructions should be adhered to. 4 Follow Instructions – All operating and other instructions should be followed. 5 Water and Moisture – The unit should not be used near water – for example, near a bathtub, washbowl, kitchen sink, laundry tub, in a wet basement, or near a swimming pool. 6 13 Nonuse Periods – The power cord of the unit should be unplugged from the outlet when left unused for a long period of time. 14 Object and Liquid Entry – Care should be taken so that objects do not fall into and liquids are not spilled into the inside of the unit. 15 Damage Requiring Service – The unit should be serviced by qualified service personnel when: A. The power-supply cord or the plug has been damaged; or B. Objects have fallen, or liquid has been spilled into the unit; or C. The unit has been exposed to rain; or D. The unit does not appear to operate normally or exhibits a marked change in performance; or E. The unit has been dropped, or the cabinet damaged. 16 Servicing – The user should not attempt to service the unit beyond those means described in the operating instructions. All other servicing should be referred to qualified service personnel. Carts and Stands – The unit should be used only with a cart or stand that is recommended by the manufacturer. 17 Power Lines – An outdoor antenna should be located 6A A unit and cart combination should be away from power lines. moved with care. Quick stops, excessive force, and uneven surfaces may cause the unit and cart combination to overturn. 18 Grounding or Polarization – Precautions should be taken so that the grounding or polarization is not defeated. @ AV-S7(E)(E/F)1-16 9/11/0 9:36 AM Page 3 FCC INFORMATION (for US customers only) Compliance with FCC regulations does not guarantee that interference will not occur in all installations. If this product is found to be the source of interference, which can be determined by turning the unit “OFF” and “ON”, please try to eliminate the problem by using one of the following measures: 1. IMPORTANT NOTICE : DO NOT MODIFY THIS UNIT! This product, when installed as indicated in the instructions contained in this manual, meets FCC requirements. Modifications not expressly approved by Yamaha may void your authority, granted by the FCC, to use the product. 2. IMPORTANT : When connecting this product to accessories and/or another product use only high quality shielded cables. Cable/s supplied with this product MUST be used. Follow all installation instructions. Failure to follow instructions could void your FCC authorization to use this product in the USA. 3. NOTE : This product has been tested and found to comply with the requirements listed in FCC Regulations, Part 15 for Class “B” digital devices. Compliance with these requirements provides a reasonable level of assurance that your use of this product in a residential environment will not result in harmful interference with other electronic devices. This equipment generates/uses radio frequencies and, if not installed and used according to the instructions found in the users manual, may cause interference harmful to the operation of other electronic devices. Relocate either this product or the device that is being affected by the interference. Utilize power outlets that are on different branch (circuit breaker or fuse) circuits or install AC line filter/s. In the case of radio or TV interference, relocate/reorient the antenna. If the antenna lead-in is 300 ohm ribbon lead, change the lead-in to coaxial type cable. If these corrective measures do not produce satisfactory results, please contact the local retailer authorized to distribute this type of product. If you can not locate the appropriate retailer, please contact Yamaha Electronics Corp., U.S.A. 6660 Orangethorpe Ave, Buena Park, CA 90620. The above statements apply ONLY to those products distributed by Yamaha Corporation of America or its subsidiaries. We Want You Listening For A Lifetime (for US customers only) YAMAHA and the Electronic Industries Association’s Consumer Electronics Group want you to get the most out of your equipment by playing it at a safe level. One that lets the sound come through loud and clear without annoying blaring or distortion – and, most importantly, without affecting your sensitive hearing. Since hearing damage from loud sounds is often undetectable until it is too late, YAMAHA and the Electronic Industries Association’s Consumer Electronics Group recommend you to avoid prolonged exposure from excessive volume levels. # AV-S7(E)(E/F)1-16 9/11/0 9:36 AM Page 4 SUPPLIED ACCESSORIES ACCESSOIRES FOURNIS ● ● ● ● After unpacking, check that the following parts are included. Après le déballage, vérifier que les pièces suivantes sont incluses. Remote control transmitter Télécommande ● ● Speaker cords Câbles d’enceintes ENHANCED A OFF PROLOGIC CONCENT B C SPORTS MONO MOVIE E D DSP CENTER TEST REAR SUBWOOFER INPUT 1/2 POWER AMP VOLUME SYS8 V004550 ● ● ● ● Mounting brackets Supports de montage (A) Batteries (size AA, UM/SUM-3, R6, HP-7) Piles (format AA, UM/SUM-3, R6, HP-7) x2 (C) (B) x4 ● ● Audio connection cord Câble de connexion audio ● ● Screws Vis (A) (B) ● ● ● System connector cable Câble de connexion du système ● $ Velcro strips Bandes Velcro AV-S7(E)(E/F)1-16 9/11/0 9:36 AM Page E-1 Page Page USING THE AV-S7 PRECAUTIONS PRECAUTIONS ........................................................2-3 USING THE AV-S7 ...............................................20-22 NOTES ABOUT THE REMOTE CONTROL TRANSMITTER............................................................4 TROUBLESHOOTING TROUBLESHOOTING ...............................................23 OUTLINE OF THIS SYSTEM SPECIFICATIONS SYSTEM CONFIGURATION .......................................5 SPECIFICATIONS .....................................................24 FEATURES ..................................................................6 DIGITAL SOUND FIELD PROCESSOR (DSP) ...........7 SETTING UP THE SPEAKERS SETTING UP THE SPEAKERS..............................8-11 CONNECTIONS CONNECTIONS....................................................12-15 CONTROLS AND THEIR FUNCTIONS CONTROLS AND THEIR FUNCTIONS................16-17 TURNING ON THIS SYSTEM OR SETTING IT TO SYANDBY MODE TURNING ON THIS SYSTEM OR SETTING IT TO STANDBY MODE ......................................................18 ADJUSTMENTS BEFORE LISTENING OPERATIONS SPEAKER BALANCE ADJUSTMENT ......................19 E-1 English CONTENTS AV-S7(E)(E/F)1-16 9/11/0 9:36 AM Page E-2 PRECAUTIONS PRECAUTIONS: READ THIS BEFORE OPERATING THIS SYSTEM ■ To assure the finest performance, please read this manual carefully. Keep it in a safe place for future reference. ■ To prevent lightning damage, disconnect the AC power plug and the antenna cable when there is an electrical storm. ■ Choose the installation location of this system carefully. Avoid placing it in direct sunlight or close to a source of heat. Also avoid locations subject to vibration and excessive dust, heat, cold or moisture. Keep it away from sources of humming such as transformers and electric motors. ■ Do not plug the AC power plug into the wall outlet before you finish all connections. ■ The voltage to be used must be the same as that specified on this system. Using this unit with a higher voltage than that which is specified is dangerous and may result in a fire or other type of accident causing damage. YAMAHA will not be held responsible for any damage resulting from use of this system with a voltage other than that which is specified. ■ Do not operate this system upside-down. It may overheat, possibly causing damage. ■ Never open the cabinet. If something drops into the set, contact your dealer. ■ The sound level at a given volume setting depends on the speaker location and other factors. Care should be taken to avoid exposure to sudden high levels of sound which may occur when turning on the system with the volume setting at high, and to continuous high levels of sound. ■ The openings on the surface of the power amplifier/subwoofer unit assure proper ventilation of the unit. If these openings are obstructed, the temperature inside the unit will rise rapidly. Therefore, avoid placing objects against these openings, and install the unit in a well-ventilated place. Make sure to allow a space of at least 10 cm behind, 10 cm on the both sides and 20 cm above the top panel of the unit, and never use the unit with the unit laid down on the floor. Doing so may not only damage the unit, but also cause a fire. ■ Sudden temperature changes and storage or operation in an extremely humid environment may cause condensation inside the system. Condensation can cause the system to malfunction. To eliminate condensation: • Remote control Wipe off condensation on the transmitter window with a soft cloth before operating the system. ■ Always set the volume setting to minimum before starting play of an audio source. Increase the volume gradually to an appropriate level. ■ Secure placement or installation is the owner’s responsibility. YAMAHA shall not be liable for any accident caused by improper placement or installation of this system. ■ When not planning to use this system for long periods of time (such as during vacation), disconnect the AC power plug from the wall outlet. ■ Do not use excessive force on the switches, controls or connection wires. When moving the unit, first disconnect the power plug and the wires connected to other equipment. Never pull the wire itself. IMPORTANT Please record the serial number of this system in the space below. ■ Do not attempt to clean the system with chemical solvents; this might damage the finish. Use a clean, dry cloth. Serial No.: The serial number is located on the rear of the power amplifier/subwoofer (SW-AVS7). Retain this Owner’s Manual in a safe place for future reference. ■ Be sure to read the “TROUBLESHOOTING” section regarding common operating errors before concluding that the system is faulty. E-2 AV-S7(E)(E/F)1-16 9/11/0 9:36 AM Page E-3 PRECAUTIONS VOLTAGE SELECTOR (FOR GENERAL AND CHINA MODELS ONLY) The voltage selector on the bottom of the power amplifier/subwoofer (SW-AVS7) must be set for your local main voltage BEFORE plugging into the AC main supply. Voltages are 110/120/220/240V AC, 50/60 Hz. FOR CANADIAN CUSTOMER THIS CLASS B DIGITAL APPARATUS MEETS ALL REQUIREMENTS OF THE CANADIAN INTERFERENCE-CAUSING EQUIPMENT REGULATIONS. VOLTAGE SELECTOR For U.K. customers If the socket outlets in the home are not suitable for the plug supplied with this appliance, it should be cut off and an appropriate 3 pin plug fitted. For details, refer to the instructions described below. Note: The plug severed from the mains lead must be destroyed, as a plug with bared flexible cord is hazardous if engaged in a live socket outlet. This system is still connected to the AC power source as long as it is connected to the wall outlet, even if the system itself is turned off. In this state, this system is designed to consume a very small quantity of power. Pressing the STANDBY/ON button (or POWER button) lights up the STANDBY indicator and puts the system into standby. This is called STANDBY mode. SPECIAL INSTRUCTIONS FOR U.K. MODEL IMPORTANT THE WIRES IN THE MAINS LEAD ARE COLOURED IN ACCORDANCE WITH THE FOLLOWING CODE: Blue: NEUTRAL Brown: LIVE WARNING As the colours of the wires in the mains lead of this apparatus may not correspond with the coloured markings identifying the terminals in your plug, proceed as follows: The wire which is coloured BLUE must be connected to the terminal which is marked with the letter N or coloured BLACK. The wire which is coloured BROWN must be connected to the terminal which is marked with the letter L or coloured RED. Make sure that neither core is connected to the earth terminal of the three pin plug. To reduce the risk of fire or electric shock, do not expose this system to rain or moisture. To avoid electrical shock, do not open the cabinet. Refer servicing to qualified personnel only. FOR U.K. AND EUROPE MODELS ONLY MAIN POWER switch The U.K. and Europe models are equipped with a MAIN POWER switch on the rear bottom panel of the power amplifier/subwoofer (SW-AVS7). Setting this to ON switches the AV-S7 system to STANDBY mode. To power on the system, press the STANDBY/ON button on the center speaker or the POWER button on the remote control transmitter. E-3 English CAUTION (FOR CANADA MODEL) TO PREVENT ELECTRIC SHOCK, MATCH WIDE BLADE OF PLUG TO WIDE SLOT AND FULLY INSERT. AV-S7(E)(E/F)1-16 9/11/0 9:36 AM Page E-4 PRECAUTIONS NOTES ABOUT THE REMOTE CONTROL TRANSMITTER Loading the batteries for the remote control transmitter Proper use of the remote control transmitter 1 STANDBY/ON INPUT STANDBY L INPUT 1 VOLUME C INPUT 2 PROGRAM R A B C D E REAR 3 2 Within approximately 6 m (19.7 feet) Remote control sensor 30° 1 Remove the battery compartment cover. 30° (Slide the cover in the direction of the arrow.) 2 Insert 2 “AA” size batteries (UM/SUM-3, R6, HP-7 or equivalent) into the battery compartment. * Installing the batteries improperly may cause failure. Aim the remote control transmitter at the remote control sensor (within a 60° range with no obstacles) and operate as shown. 3 Replace the battery compartment cover. Notes concerning use • Replace the batteries if the control distance decreases or operation becomes unstable. • Periodically clean the transmitter window on the remote control transmitter and the sensor on the center speaker with a soft cloth. • Exposing the sensor on the center speaker to strong light (such as an inverter-type fluorescent lamp) may interfere with operation. In this case, reposition the center speaker to avoid direct light. • Keep the remote control transmitter away from moisture, excessive heat, shock and vibrations. • The remote control transmitter’s range is from 0.2m (8”) to 6m (20’) from the sensor. Precautions for battery use • Insert the batteries according to the direction indicated in the battery compartment. • Replace all batteries with new ones at the same time. • Remove the batteries if they are weak or if the unit will not be used for a long period of time. • Do not mix normal batteries with rechargeable batteries. E-4 AV-S7(E)(E/F)1-16 9/11/0 9:36 AM Page E-5 OUTLINE OF THIS SYSTEM • The AV-S7 system consists of the SW-AVS7, NX-AVS7 and the NX-AV1. This system is a multi-channel audio system which consists of the units shown below. By driving 6 speakers, the built-in digital sound field processor (DSP) creates various kinds of Yamaha original digital sound fields simulating an actual concert hall, live house and other venues. When watching a movie source, the builtin Dolby Pro Logic Surround decoder and the digital sound field processor turn your room into a movie theater with tremendous impact. Ultra-low bass reproduced by the subwoofer (SW-AVS7) makes sound more real and powerful. This system will give you great enjoyment in watching TV and playing various audio sources. SW-AVS7 (6-channel power amplifier and Active Servo Processing Subwoofer system) 6CH POWER AMPLIFIER ACTIVE SERVO PROCESSING SUBWOOFER Active Servo Technology NX-AV1 Front and Rear Speakers (Full-range speakers) NX-AVS7 Center Speaker (Full-range speaker with builtin control unit) STANDBY/ON INPUT STANDBY L INPUT 1 VOLUME C INPUT 2 A REAR E-5 PROGRAM R B C D E English SYSTEM CONFIGURATION AV-S7(E)(E/F)1-16 9/11/0 9:36 AM Page E-6 OUTLINE OF THIS SYSTEM FEATURES The System Sound Field Processor Including Dolby Pro Logic Surround Decoder ● 6-Speaker Multi-Channel Audio System Including Two Front Speakers, One Center Speaker, Two Rear Speakers and One Subwoofer ● Digital Sound Field Processor (Programs: CONCERT, SPORTS, MONO MOVIE) ● Minimum RMS Output Power per Channel ● Dolby Pro Logic Surround Decoder (Program: DOLBY PRO LOGIC) Front L, R: 30W + 30W (6Ω) RMS Output Power, 10% THD, 1 kHz 25W + 25W (6Ω) RMS Output Power, 0.9% THD, 1 kHz Center: ● CINEMA DSP: Theater-like Sound Experience by a Combination of Dolby Pro Logic and YAMAHA DSP Technology (Program: DOLBY PRO LOGIC ENHANCED) 30W (6Ω) RMS Output Power, 10% THD, 1 kHz 25W (6Ω) RMS Output Power, 0.9% THD, 1 kHz ● Automatic Input Balance Control for Dolby Pro Logic Surround ● Test Tone Generator for Easier Speaker Balance Adjustment Rear L, R: 30W + 30W (6Ω) RMS Output Power, 10% THD, 1 kHz 25W + 25W (6Ω) RMS Output Power, 0.9% THD, 1 kHz Subwoofer: 50W (4Ω) RMS Output Power, 10% THD, 100 Hz 40W (4Ω) RMS Output Power, 0.9% THD, 100 Hz ● Active Servo Processing Subwoofer System for Ultra-low Bass Reproduction (SW-AVS7) ● Center Speaker (NX-AVS7) with Builtin Control Unit Equipped with STANDBY, INPUT 1/2, VOLUME, and PROGRAM Indicators ● Simple and Easy Operating Procedures ● Remote Control Capability E-6 AV-S7(E)(E/F)1-16 9/11/0 9:36 AM Page E-7 OUTLINE OF THIS SYSTEM The Digital Sound Field Processor (DSP) built into this system takes advantage of Yamaha’s undisputed leadership in the field of digital audio processing to bring you a whole new world of listening experiences. Follow the instructions in this manual carefully when setting up your system, and this unit will sonically transform your room into a wide range of listening environments –movie theater, concert hall, and so on. In addition, you get incredible realism from sources encoded with Dolby Surround using the built-in Dolby Pro Logic Surround Decoder. Please read this operation manual carefully and store it in a safe place for later reference. Digital Sound Field Processing What is it that makes live music so good? Today’s advanced sound reproduction technology lets you get extremely close to the sound of a live performance, but chances are you’ll still notice something missing: the acoustic environment of the live concert hall. Extensive research into the exact nature of the sonic reflections that create the ambience of a large hall has made it possible for Yamaha engineers to bring you this same sound in your own listening room, so you’ll feel all the sound of a live concert. Furthermore, our technicians, armed with sophisticated measuring equipment, have even made it possible to capture the acoustics of a variety of venues such as an actual concert hall and theater to allow you to accurately recreate one of several actual live performance environments, all in your own home. Dolby Pro Logic Surround This unit employs a Dolby Pro Logic Surround decoder similar to professional Dolby Stereo decoders used in many movie theaters. By using the Dolby Pro Logic Surround decoder, you can experience the dramatic realism and impact of Dolby Surround movie theater sound in your own home. Dolby Pro Logic employs a four-channel five-speaker system. The Pro Logic Surround system divides the input signal into four levels: the left and right main channels, the center channel (used for dialog), and the rear surround sound channels (used for sound effects, background noise, and other ambient noises). The center channel allows listeners seated in even less-than-ideal positions to hear the dialog originating from the action on the screen while experiencing good stereo imaging. Dolby Surround is encoded on the sound track of prerecorded video tapes, laser discs, and some TV/cable broadcasts. When you play a source encoded with Dolby Surround on this unit, the Dolby Pro Logic Surround decoder decodes the signal and distributes the surround-sound effects. This Dolby Pro Logic Surround Decoder employs a digital signal processing system. This system improves the stability of sound at each channel and minimizes crosstalk between channels, so that positioning of sounds around the room is more accurate compared with conventional analog signal processing systems. In addition, this unit features a built-in automatic input balance control. This always assures you the best performance without manual adjustment. Manufactured under license from Dolby Laboratories Licensing Corporation. “Dolby”, “Pro Logic”, and the double-D symbol are trademarks of Dolby Laboratories Licensing Corporation. Dolby Pro Logic Surround + DSP Dolby Surround sound system shows its full ability in a large movie theater, because movie sounds are originally designed to be reproduced in a large movie theater using many speakers. It is difficult to create a sound environment similar to that of a movie theater in your listening room, because the room size, materials of inside walls, the number of speakers, and other factors of your listening room are much different from those of a movie theater. Yamaha DSP technology made it possible to present you with nearly the same sound experience as that of a large movie theater in your listening room by compensating for lack of presence and dynamics in your listening room with its original digital sound fields combined with Dolby Surround sound field. The combination of Dolby Pro Logic Surround and DSP is used on the sound field program “ PRO LOGIC ENHANCED”. CINEMA DSP The YAMAHA “CINEMA DSP” logo indicates these programs are created by the combination of Dolby Pro Logic and YAMAHA DSP technology. E-7 English DIGITAL SOUND FIELD PROCESSOR (DSP) AV-S7(E)(E/F)1-16 9/11/0 9:36 AM Page E-8 SETTING UP THE SPEAKERS SETTING UP THE SPEAKERS Before you make connections, place all units in this system in their proper positions. Above all, the positioning of the speakers is important because it controls the whole sound quality of this system. Position the speakers on the basis of your listening position by following the instructions in this section. Front L Center Speaker configuration Front R This system employs a 6-speaker configuration: 2 front speakers, 2 rear speakers, a center speaker and a subwoofer. The front speakers are used for the main source sound plus the effect sounds. The rear speakers are used for the effect and surround sounds, and the center speaker is for the center sounds (such as dialog.). The subwoofer is for reinforcing low frequencies of the main source sound and the center sound. Subwoofer Rear L Rear R Placing speakers Front speakers: On both sides of the TV and at almost the same height as the TV. Rear speakers: Behind your listening position, facing slightly inward. Nearly six feet (approx. 1.8 m) up from the floor. Center speaker: Precisely between the front speakers. Subwoofer: The position of the subwoofer is not so critical because low bass tones are not highly directional. Front R Center Subwoofer Front L TV set Rear R Rear L Note Although FRONT, REAR, and CENTER speakers are magnetically shielded, there may be some influence on the TV picture depending on the type of TV or the placement of the speakers. In such a case, place the speakers far enough from the TV so that there is no influence on the TV picture. E-8 AV-S7(E)(E/F)1-16 9/11/0 9:36 AM Page E-9 SETTING UP THE SPEAKERS When installing the center speaker on the TV, be sure to secure the center speaker to the TV using the velcro strips provided so that it does not fall. INPUT STAND BY STANDBY/ON L INPUT 1 VOLUME C INPUT 2 PROGRAM R A B C D E REAR Notes • Do not place the center speaker on top of a TV whose area is smaller than the bottom area of the center speaker, as the center speaker may drop and cause personal injury. • Although this center speaker is a magnetically shielded type, there may be some influence on the TV picture depending on the type of TV or the placement of the center speaker. In such a case, place the center speaker apart from the TV so that there is no influence on the TV picture. • Be sure to remove all dust, debris, oil, and other substances adhering to the section where the velcro strip is affixed. If this section is dirty, the velcro strip will not affix properly, and the center speaker may move or fall. • When peeling off the backing paper of the velcro strips, be careful not to touch the adhesive surface. Doing so harms the adhesion strength. • If there is a gap between the center speaker and TV, turn and extend the adjuster on the bottom rear section of the center speaker so that the center speaker is stable. Rough surface Smooth surface 1 2 Bottom of the center speaker Affix to the bottom of the center speaker (2 locations) Adjuster Adjust as necessary E-9 English Center Speaker Installation AV-S7(E)(E/F)1-16 9/11/0 9:36 AM Page E-10 SETTING UP THE SPEAKERS ■ Mounting the front speakers 1 Mounting bracket (type A) 2 To mount speakers on the mounting brackets (type A) 1 Attach the bracket to the bottom of the speaker using the provided screw (type A). 2 Turn and/or slide the speaker on the bracket to the desired position, and then tighten the screw. Screw (type A) ■ Mounting the rear speakers 1 Mounting bracket (type B) Screw (type B) 2 Place the front speakers on a rack or on a shelf, so that they are stabilized. To obtain more stability and usefulness, we recommend that you mount the speakers on the provided mounting brackets (type A). Mount the rear speakers on a shelf, rack or put them directly on the floor, or hang them on the wall. To mount the rear speakers on a wall using the provided mounting brackets (type B) Note It is recommended that you connect the speaker cords to the speaker’s terminals before attaching the bracket to the speaker. 1 Attach the bracket to the bottom of the speaker using the provided screw (type B). 2 Turn and/or slide the speaker on the bracket to the desired position, and then tighten the screw. E-10 AV-S7(E)(E/F)1-16 9/11/0 9:36 AM Page E-11 SETTING UP THE SPEAKERS Tapping screw (Available at a hardware store) Note If desired, you can hang the speaker on the protruding screws on the wall without using the bracket. WARNING: ● Each speaker weighs 0.7 kg (1 lbs. 9 oz.). Do not mount them on thin plywood or a soft wall surface material, as the screws may come out of the flimsy surface, causing the speakers to fall down and be damaged, or cause personal injury. ● Do not fasten the speakers to the wall with nails, adhesives, or other unstable hardware. Longterm use and vibrations may cause them to fall down. ● To avoid accidents resulting from tripping over loose speaker cords, fix them to the wall. ● Select a proper position on the wall to mount the speaker and the bracket so that no one will hit his head or face on the protruding part of the bracket and be injured. Min. 12 mm 65 mm Wall/ wall support Fasten the screws into a firm wall or wall support as shown in the figure, and hang the holes of the mounting bracket on the protruding screws. * Make sure that the screws are held firmly in the holes. Mounting bracket (type B) ■ Mounting the speaker on a commercially available speaker stand Mounting bracket (type C) The provided mounting bracket (type C) has one pair of screw holes (spaced 60 mm apart) available to mount the speaker on a speaker stand. * These screw holes use only M4 screws. Screw (type A) 1 Attach the bracket to the bottom of the speaker using the provided screw (type A) so that the convex part of the bracket fits in the grooved part on the bottom of the speaker as shown on the left. 2 Mount the speaker on the speaker stand using the screw holes on the bracket. Note Mounting brackets (type C) are provided for each speaker (4). 60 mm E-11 English 3 3 AV-S7(E)(E/F)1-16 9/11/0 9:36 AM Page E-12 CONNECTIONS CONNECTIONS When you have finished placing or installing all units in this system, begin making connections by following the instructions in this section. This system requires three connections: system connection, speaker connection and AC supply connection. However, the order of these connections is not important. Never plug the AC supply lead of this system into the outlet until all connections are completed. ■ Making a system connection between the center speaker (NX-AVS7) and the power amplifier/subwoofer (SW-AVS7) 1 2 Connect the SYSTEM CONNECTOR terminals on both units with each other using the provided system connector cable. * When connecting the system connector cable to both terminals, note the directions of each SYSTEM CONNECTOR terminal’s face. 3 Connect the INPUT 2 terminals to the AUDIO output terminals of a CD, MD, laser disc player or DVD player. Caution Be careful not to damage the system connector cable by placing something heavy on the cable, putting metal fittings on the cable, or tugging the cable. Damaging the cable may cause the system to break down. Connect the AUDIO OUTPUT terminals on the TV to the INPUT1 terminals on the SW-AVS7 using the provided connection cord. * Be sure to connect the red plug of the connection cord to the “R” (right) terminal and the white plug to the “L” (left) terminal. Connection to a TV with an AUDIO OUT terminal System connector cable (provided) Center speaker (NX-AVS7) SYSTEM CONNECTOR MARK System connector SYSTEM CONNECTOR MARK Power amplifier/subwoofer (SW-AVS7) TV L VIDEO INPUT AUDIO AUDIO INPUT OUTPUT L L R R MARK 1 THROUGH INPUT 2 SYSTEM CONNECTOR R L FRONT R L FRONT MARK 1 R THROUGH 2 INPUT Set the volume control of the TV to the minimum setting. VCR *1 Audio connection cord (provided) *2 L R SYSTEM CONNECTOR *3 L CD or MD player VIDEO AUDIO OUTPUT OUTPUT R AUDIO OUTPUT E-12 *1 : Video connection cable (optional) *2,3 : Audio connection cable (optional) AV-S7(E)(E/F)1-16 9/11/0 9:36 AM Page E-13 CONNECTIONS 1 Connect the SYSTEM CONNECTOR (Refer to page 12). 2 Connect the AUDIO OUTPUT terminals on the VCR to the INPUT1 terminals on the SW-AVS7. 3 Connect the THROUGH terminals of INPUT 1 to the AUDIO INPUT terminals on the TV using connector cable (optional). * A signal is applied to INPUT 1 at the THROUGH terminals only when the AV-S7 is off. 4 Connect the INPUT 2 terminals (Refer to page 12). System connector cable (provided) Center speaker (NX-AVS7) SYSTEM CONNECTOR MARK System connector SYSTEM CONNECTOR MARK Power amplifier/subwoofer (SW-AVS7) *2 TV L L L THROUGH 2 SYSTEM CONNECTOR R L FRONT R L FRONT R MARK 1 AUDIO INPUT THROUGH 2 *3 INPUT Audio connection cord (provided) *1 VCR MARK 1 INPUT R VIDEO INPUT R L R SYSTEM CONNECTOR *3 L CD or MD player VIDEO AUDIO OUTPUT OUTPUT R AUDIO OUTPUT *1 : Video connection cable (optional) *2,3 : Audio connection cable (optional) • If the AV-S7 system is set to STANDBY or the turned off, the signal applied to INPUT 1 is sent to the THROUGH terminal of INPUT 1. • Use the volume control of the TV when playing back sound from the TV or VCR without using the AV-S7. E-13 English Connection to a TV without an AUDIO OUT terminal AV-S7(E)(E/F)1-16 9/11/0 9:36 AM Page E-14 CONNECTIONS ■ Connecting the speakers to the power amplifier/subwoofer (SW-AVS7) Right front speaker Left front speaker Right rear speaker Left rear speaker Power amplifier/subwoofer (SW-AVS7) L R MARK 1 THROUGH INPUT 2 SYSTEM CONNECTOR R L FRONT R L REAR R L R FRONT L REAR ■ Connecting the AC supply lead • Unplug the AC supply lead from the outlet if this system is not to be used for a long period of time. • After completing all connections, plug the AC supply lead into a convenient outlet. VOLTAGE SELECTOR For General and China models only The voltage selector on the bottom of the power amplifier/subwoofer (SW-AVS7) must be set for your local main voltage BEFORE plugging it into the AC main supply. Voltages are 110/120/220/240V AC, 50/60 Hz. L R MARK 1 THROUGH INPUT SYSTEM CONNECTOR R L FRONT R L REAR O F F O P N O W E R VOLTAGE SELECTOR 2 MAIN POWER switch For U.K. and Europe models only Setting this to ON switches the AV-S7 system to STANDBY mode. To start the system, press the STANDBY/ON button on the center speaker or the POWER button on the remote control transmitter. To outlet E-14 AV-S7(E)(E/F)1-16 9/11/0 9:36 AM Page E-15 CONNECTIONS How to Connect: Connect the provided speaker cords between the SPEAKERS terminals on the power amplifier/subwoofer (SW-AVS7) and the speaker terminals on each speaker as shown below. If the connections are incorrect, no sound will be heard from the speakers. Make sure that the polarity of the speaker wires is correct with reference to the + and – markings. If these wires are reversed, the sound will be unnatural and lack bass. All of the speakers are identical. The speakers connected to the FRONT R and L terminals should be used as the right and left front speakers. The speakers connected to the REAR R and L terminals should be used as the right and left rear speakers. To avoid mistakes, connect the wire with a line to the + terminals on both the power amplifier/subwoofer (SWAVS7) and speaker, and connect the wire with no line to the – terminals on both of them. Notes ● Do not connect speakers to the SW-AVS7 other than the provided ones. ● Use the provided speaker cords for the connections. Normally, use the short cords to connect to the front speakers, and use the long ones to connect to the rear speakers. The four cords are marked FRONT L, FRONT R, REAR L and REAR R for your reference. Caution Do not let the bare speaker wires touch each other as this could damage the SW-AVS7 and/or the speakers. On the SW-AVS7: Red: positive (+) Black: negative (–) ➀ ➀ Lift up the tab. ➁ Insert the bare wire. ➂ Label ➁ [Remove approx. 5mm (1/4”) insulation from the speaker wires.] ➂ Press down the tab and secure the wire. On the FRONT and REAR speakers (NX-AV1): Red: positive (+) Black: negative (–) ➀ Press the tab. ➁ Insert the bare wire. [Remove approx. 5mm (1/4”) insulation from the speaker wires.] ➂ Release the tab and secure the wire. E-15 English Connect the provided speakers to the SPEAKERS terminals on the rear of the SW-AVS7. AV-S7(E)(E/F)1-16 9/11/0 9:36 AM Page E-16 CONTROLS AND THEIR FUNCTIONS CONTROLS AND THEIR FUNCTIONS CENTER SPEAKER (WITH CONTROL UNIT) 1 INPUT Remote control sensor 2 3 STANDBY/ON PROGRAM 2 3 1 STANDBY L INPUT 1 VOLUME C INPUT 2 R A B C D E REAR 4 6 5 1 INPUT selector button D: Sports E: Mono Movie Check the PROGRAM indicator 7 when making the selection. This button switches between INPUT 1 and INPUT 2 each time it is pressed. Check the INPUT 1/2 indicator 5 to see which is in use. 4 STANDBY indicator 2 STANDBY/ON (Switch) button This button switches between power-on and standby each time it is pressed. When standby mode is activated, the STANDBY indicator 4 lights up. When the power-on is activated, the STANDBY indicator 4 is off. You can tell that the power is on since the INPUT 1/2 indicator 5 and other indicators are lit up. Standby mode In this state, this unit consumes a very small quantity of power to receive infrared signals from the remote control transmitter. 3 PROGRAM selector button This button is used for selecting the DSP program. The selections cycle through A→B→C→D→E→OFF→A when pressed. A: Dolby Pro Logic Enhanced B: Dolby Pro Logic C: Concert 7 This indicator lights up when in standby mode. 5 INPUT 1/2 indicators These indicators light up to show whether INPUT 1 or 2 is selected. 6 VOLUME indicators These indicators light up according to the setting of the VOLUME buttons 9 on the remote control transmitter. 7 PROGRAM indicators These indicators light up to show the selected DSP program. Remote control sensor The sensor is a window for receiving the signal from the remote control transmitter. E-16 AV-S7(E)(E/F)1-16 9/11/0 9:36 AM Page E-17 CONTROLS AND THEIR FUNCTIONS English REMOTE CONTROL TRANSMITTER 4 ENHANCED A OFF PROLOGIC CONCERT B C SPORTS 5 MONO MOVIE E D DSP 3 CENTER TEST REAR 2 6 7 SUBWOOFER INPUT 8 1/2 AMP POWER VOLUME 1 9 C: Concert D: Sports E: Mono Movie Check the PROGRAM indicators 7 of the center speaker when making the selection. 1 POWER button This button turns on the power to this system and switches this system to standby mode alternately. 2 INPUT selector button This button switches between INPUT 1 and INPUT 2 each time it is pressed. Check the INPUT 1/2 indicator 5 of the center speaker to see which is activated. 6 CENTER level (+/–) buttons Pressing the “+” button raises and pressing the “–” button lowers the volume level of the center speaker. 3 TEST button 7 REAR level (+/–) buttons This button is used for speaker balance adjustment. (For details, refer to page 19.) Pressing the “+” button raises and pressing the “–” button lowers the volume level of the rear speakers. 4 DSP OFF button 8 SUBWOOFER level (+/–) buttons This button switches off the digital sound field processor (including the Dolby Pro Logic Surround decoder). Pressing the “+” button raises and pressing the “–” button lowers the volume level of the subwoofer. 9 VOLUME (+/–) buttons 5 PROGRAM selector buttons Pressing the “+” button raises and pressing the “–” button lowers the volume of the whole system. These buttons are used for selecting the DSP program. A: Dolby Pro Logic Enhanced B: Dolby Pro Logic E-17 AV-S7(E)17-24 9/11/0 9:07 AM Page E-18 TURNING 0N THE POWER TO THIS SYSTEM OR SETTING IT TO THE STANDBY MODE TURNING ON THE POWER TO THIS SYSTEM OR SETTING IT TO THE STANDBY MODE If the AC supply lead is connected to an outlet, this system can be turned on or switched to the standby mode by pressing the STANDBY/ON button on the front panel of the center speaker or the POWER button on the remote control transmitter. INPUT STANDBY/ON PROGRAM Standby mode While the power is on, pressing the STANDBY/ON button (or the POWER button on the remote control transmitter) switches the system to standby mode. In this mode, the main voltage still flows through the system. If you want to turn off the system completely, remove the AC power plug from the outlet. ENHANCED A OFF PROLOGIC CONCERT B C SPORTS MONO MOVIE E D DSP CENTER TEST REAR SUBWOOFER INPUT 1/2 AMP POWER VOLUME Note: When the power is turned on by pressing the STANDBY/ON button (or the POWER button on the remote control transmitter), the volume indicator flashes and no sound is emitted from the speakers for several seconds. E-18 AV-S7(E)17-24 9/11/0 9:07 AM Page E-19 ADJUSTMENTS BEFORE LISTENING OPERATIONS INPUT This procedure lets you adjust the sound balance between the front, center, and rear speakers using the built-in test tone generator. When this adjustment is performed, the sound output level heard at the listening position will be the same from each speaker. This is important for the best performance of the built-in Dolby Pro Logic surround decoder. The adjustment of each speaker output level should be done at your listening position with the remote control transmitter. Otherwise, the result may not be satisfactory. PROGRAM STANDBY/ON 1 Press the STANDBY/ON button (or the POWER 1 button on the remote control transmitter) to turn the power on. 2 Press the VOLUME “–” button to reduce the volume to minimum. 3 Press the TEST button. Make sure that B of the PROGRAM indicators light up. 4 Press the VOLUME “+” button to increase the volume. ENHANCED A OFF PROLOGIC CONCERT B C SPORTS MONO MOVIE E D DSP 3, 7 5 6 CENTER TEST REAR INPUT • You will hear a test tone from the left front speaker, the center speaker, the right front speaker, and then the rear speakers, for about two seconds each. • The test tone from the left rear speaker and the right rear speaker will be heard at the same time. 5 Press the CENTER level (+/–) buttons to adjust the SUBWOOFER 1/2 AMP POWER volume of the center speaker to the same level as the front speakers. Be sure to always press the CENTER level buttons while a test tone is being emitted from the center speaker. VOLUME 1 4 6 Press the REAR level (+/–) buttons to adjust the 2 volume of the rear speakers to the same level as the front speakers. Be sure to always press the REAR level buttons while a test tone is being emitted from the rear speakers. 7 When all the speakers are adjusted, press the TEST button to stop the test signal. Note Once each speaker is adjusted, the system volume can be adjusted to the desired level using the VOLUME (+/–) buttons on the remote control transmitter. The test tone is emitted. The indicators shown in the figure blink. L C R L C R L C R L C R Left front Center Right front Rear (L, R) REAR E-19 English SPEAKER BALANCE ADJUSTMENT AV-S7(E)17-24 9/11/0 9:07 AM Page E-20 USING THE AV-S7 USING THE AV-S7 This system incorporates a sophisticated, multiprogram digital sound field processor. The processor allows you to electronically expand and change the shape of the audio sound field from both audio and video sources, creating a theater-like experience in your listening room. You can create an excellent audio sound field by selecting a suitable sound field program (this will, of course, depend on what you will be listening to) and adding desired adjustments. Brief Overview of Digital Sound Field Programs The following list gives you a brief description of the sound fields produced by each DSP program. Keep in mind that most of these are precise digital recreations of actual acoustic environments. The data for these sound fields was recorded at actual locations using sophisticated sound field measurement equipment. In addition, this unit incorporates a Dolby Pro Logic Surround decoder for multi-channel sound reproduction of sources encoded with Dolby Surround. The operation of the Dolby Pro Logic Surround decoder can be controlled by selecting the DSP program, PRO LOGIC or PRO LOGIC ENHANCED. Note The channel level balance between the left and right rear effect speakers may vary depending on the sound field you are listening to. This is because most of these sound field recreations are actual acoustic environments. PROGRAM PRO LOGIC ENHANCED PRO LOGIC CONCERT SPORTS MONO MOVIE FEATURE This program is used for playing of sources encoded with Dolby Surround. Enhancing the “Normal” Dolby Pro Logic, the DSP technology simulates the multi-surround speaker systems of a 35 mm movie theater. This effect creates a wide surround sound field, and expands the sound stage with an improved presence image. This program is used for musical based movies, as well as drama and comedy based movies. This program is also used for playing of sources encoded with Dolby Surround. The application of a sophisticated digital signal processing system reduces crosstalk and directs or steers the sound source more smoothly and precisely, as compared to conventional types. This program is effective for music videos and gives excellent depth and clarity for vocals. For opera, the orchestra and stage are ideally recreated, making you feel as if you were in an actual concert hall. This program is ideal for enjoying sports programs which take place in arenas, indoor stadiums, or other venues. This program is designed specifically to enhance mono source programs. Compared to a strictly mono setting, the sound image created in this mode is wider and slightly forward of the speaker pair, lending an immediacy to the overall sound. It is particularly effective when used with old mono movies, news broadcasts and dialog. E-20 AV-S7(E)17-24 9/11/0 9:07 AM Page E-21 USING THE AV-S7 1 Press the POWER button. When the system is turned on, the STANDBY indicator turns off, and INPUT indicator 1 or 2 lights up. ENHANCED A OFF PROLOGIC CONCERT B C SPORTS 2 Press the VOLUME “–” button to lower the volume. 6 3 Use the INPUT selector button to select the listening MONO MOVIE E D DSP CENTER source. INPUT 1: INPUT 2: TEST REAR 3 INPUT SUBWOOFER 1/2 AMP POWER 4 Play the source. VOLUME 1 For playing a TV or VCR For playing audio signals from a CD player or MD player connected to INPUT 2 5 2 5 Press the VOLUME “+” button to adjust the volume to the desired level. 6 Use the PROGRAM selector button to select the DSP program (A, B, C, D, or E) matching the play source. * The PROGRAM selector button on the center speaker cycles through A→B→C→D→E→OFF→A when pressed. * Check the program settings at the PROGRAM indicator. 7 The volume for all speakers can be adjusted simultaneously with the VOLUME button. Press the PROGRAM selector button on the center speaker to select the programs shown below. Notes Program selection can be made for individual input sources. Once you select a program, it is linked with the input source selected at that time. So, when you select the input source next time, the same program is automatically called. ● If you prefer to cancel the DSP, press the DSP OFF button. The sound will be the normal 2-channel stereo without the surround sound effect. ● When CONCERT, SPORTS or MONO MOVIE is selected, no sound is heard from the center speaker. ● When a monaural sound source is played with DOLBY PRO LOGIC or DOLBY PRO LOGIC ENHANCED, sound is heard from the center speaker and subwoofer. ● If the AV-S7 system is set to STANDBY or turned off, the signal applied to INPUT 1 is sent to the THROUGH terminals of INPUT 1. ● PRO LOGIC ENHANCED PRO LOGIC CONCERT SPORTS MONO MOVIE OFF E-21 English Listening to a source with sound effects by digital sound field processing (including Dolby Pro Logic Surround decoding) AV-S7(E)17-24 9/11/0 9:07 AM Page E-22 USING THE AV-S7 Adjusting the center speaker volume If desired, you can adjust the volume level of the center speaker even if the volume is already set in “SPEAKER BALANCE ADJUSTMENT” on page 19. INPUT By continuously pressing the CENTER (+ or –) button, the volume value changes continuously. PROGRAM STANDBY/ON Notes ● This adjustment can be made only when the digital sound field program DOLBY PRO LOGIC or DOLBY PRO LOGIC ENHANCED is selected. ● Once the volume level is adjusted, the volume value will be the same in all the digital sound field programs mentioned above. 3 Adjusting the rear speaker volume If desired, you can adjust the volume level of the rear speakers even if the volume is already set in “SPEAKER BALANCE ADJUSTMENT” on page 19. By continuously pressing the REAR level (+ or –) button, the volume value changes continuously. ENHANCED Notes ● This adjustment can be made only when the built-in digital sound field processor is on. ● Once the volume level is adjusted, the volume value will be the same in all the digital sound field programs. A OFF PROLOGIC CONCERT B C SPORTS MONO MOVIE E D DSP CENTER TEST REAR INPUT REAR LEVEL SUBWOOFER SUBWOOFER 1/2 AMP POWER CENTER LEVEL Adjusting the subwoofer output volume VOLUME 3 Adjust the subwoofer output volume to the desired level by pressing the SUBWOOFER level (+ or –) button. 2 If you feel that the bass tone is insufficient, increase the volume, or if you feel it is overly emphasized, reduce the volume. To finish listening to a source 1 Stop playing a source. 2 Press the VOLUME “ –” button to decrease the volume to the minimum. 3 Press the STANDBY/ON button (or the POWER button on the remote control transmitter) to switch the system to standby mode. E-22 AV-S7(E)17-24 9/11/0 9:07 AM Page E-23 TROUBLESHOOTING GENERAL SYMPTOM REMEDY The power cord is not connected. Connect the power cord. (U.K. and Europe models) The MAIN POWER switch is set to OFF. Set the MAIN POWER switch to ON. This unit will not operate properly. The internal microcomputer has been frozen by an external electric shock (lightning, excessive static electricity, etc.) or a low-voltage power supply . Unplug the AC supply lead from the wall outlet, and then plug it in again after about one minute. No sound from a speaker. Loose speaker connections. Connect properly. No sound from speakers. Internal protection circuit is functioning. Unplug the AC supply lead from the wall outlet, and then plug it in again. No sound from the rear speakers. One rear speaker connection is loose or bad. Connect it properly. The volume level of the rear speakers is set to minimum. Raise the volume level of the rear speakers. No DSP program is selected. Select the appropriate program. The volume level of the center speaker is set to minimum. Raise the volume level of the center speaker. Incorrect DSP program selection. No DSP program is selected. Select the appropriate program. Incorrect cord connections. Connect the cords correctly. If the problem persists, the cords may be defective. Input source selection is not correct. Make a proper input source selection. Batteries are dead. Replace batteries. Remote control transmitter is too far away or is being used at an incorrect angle. Use within 6 m and 60° of the sensor. Direct sunlight or lighting (an inverter type flourescent lamp) is striking the remote control sensor of the center speaker. Change the position of the center speaker. No sound from the center speaker. No sound from an external unit connected with this system. REMOTE CONTROL CAUSE The system does not turn on even when the STANDBY/ON button (or the POWER button on the remote control transmitter) is pressed. The remote control transmitter does not work. E-23 English If your unit fails to operate normally, check the following points to determine whether the fault can be corrected by the simple measures suggested. If it cannot, or if the fault is not listed in the SYMPTOM column, unplug the power cord and contact your authorized YAMAHA dealer or service center for help. AV-S7(E)17-24 9/11/0 9:07 AM Page E-24 SPECIFICATIONS As a part of its policy of continued product improvement, YAMAHA reserves the right to make design and specification changes without prior notice. The performance specification figures indicated are the nominal values for production units. ■ Amplifier Section Impedance Front, Rear ..................................................... 6 ohms Center............................................................ 6 ohms Subwoofer...................................................... 4 ohms Minimum RMS Output Power per Channel Front L, R 6 ohms, 1 kHz, 10% THD ...................... 30W+30W 6 ohms, 1 kHz, 0.9% THD ..................... 25W+25W Center 6 ohms, 1 kHz, 10% THD ................................ 30W 6 ohms, 1 kHz, 0.9% THD ............................... 25W Rear L, R 6 ohms, 1 kHz, 10% THD ...................... 30W+30W 6 ohms, 1 kHz, 0.9% THD ..................... 25W+25W Subwoofer 4 ohms, 100 Hz, 10% THD .............................. 50W 4 ohms, 100 Hz, 0.9% THD ............................. 40W ■ General Power Supply [U.S.A. and Canada models] ......... AC 120V, 60 Hz [U.K. and Europe models] ...............AC 230V, 50 Hz [Australia model] ............................ AC 240V, 50 Hz [General and China models] .................................AC 110/120/220/240V, 60/50 Hz Power consumption ......................................... 155W Dimensions (W x H x D) SW-AVS7 ............... 250 (W) x 425 (H) x 418 (D) mm (9-13/16” x 16-3/4” x 16-7/16”) NX-AVS7 ................ 280 (W) x 117 (H) x 125 (D) mm (11” x 4-10/16” x 4-14/16”) NX-AV1 ..................... 94 (W) x 117 (H) x 108 (D) mm (3-11/16” x 4-10/16” x 4-1/4”) DIN Standard Output Power per Channel [Europe model only] 6 ohms, 1 kHz, 1% THD ..................................... 25W IEC Power [Europe model only] 6 ohms, 1 kHz, 0.1% THD .................................. 20W Input Sensitivity/Impedance INPUT 1 ....................................... 100 mV/20 k-ohms Weight SW-AVS7 .............................. 14.5 kg (31 lbs. 15 oz.) NX-AVS7 ................................... 1.3 kg (2 lbs. 14 oz.) NX-AV1 ...................................... 0.7 kg (1 lbs. 9 oz.) Total Harmonic Distortion (1 kHz) INPUT 1 (12.5W/6 ohms)................................. 0.08% Signal-to-Noise Ratio (IHF-A Network) INPUT 1 ............................................................ 85 dB ■ Speaker Section Type Front, Rear, Center ..................... 1-Way, 1-Speaker, Acoustic-Suspension Type (Magnetically-Shielded Type) Subwoofer .......................... Active Servo Processing Speaker System (Magnetically-Shielded Type) Speakers Front, Rear ............................................ 8 cm (3-1/8”) Center .................................................... 8 cm (3-1/8”) Subwoofer ................................................. 20 cm (8”) Maximum Power Handling Capacity Front, Rear............................................. 40W (15.5V) Center .................................................... 40W (15.5V) Subwoofer ............................................. 60W (15.5V) E-24 (F)E/F-AV7p18-24 9/7/0 2:27 PM Page F-24 CARACTERISTIQUES TECHNIQUES YAMAHA se réserve le droit d’apporter des modifications sans préavis à la présentation et aux caractéristiques des appareils à fin d’amélioration. Les valeurs indiquées dans ce document sont les valeurs nominales des appareils de série. ■ Amplificateur Puissance de sortie minimum RMS par canal Enceinte avant G, D 6 ohms, 1 kHz, 10% de DHT ...................30W+30W 6 ohms, 1 kHz, 0.9% de DHT ..................25W+25W Enceinte centrale 6 ohms, 1 kHz, 10% de DHT.............................30W 6 ohms, 1 kHz, 0.9% de DHT............................25W Enceinte arrière G, D 6 ohms, 1 kHz, 10% de DHT ...................30W+30W 6 ohms, 1 kHz, 0.9% de DHT ..................25W+25W Subwoofer 4 ohms, 100 Hz, 10% de DHT...........................50W 4 ohms, 100 Hz, 0.9% de DHT..........................40W Impédance Enceintes avant, arrière ............................... 6 ohms Enceinte centrale ...........................................6 ohms Subwoofer...................................................... 4 ohms ■ Général Alimentation [Modèles pour les Etats-Unis et le Canada] .........................................................CA 120V, 60 Hz [Modèles pour le Royaume-Uni et l’Europe] .........................................................CA 230V, 50 Hz [Modèle pour l’Australie]...............CA 240V, 50 Hz [Modèle général et Modèle pour la Chine] ...............................CA 110/120/220/240V, 50/60 Hz Puissance de sortie standard DIN par canal [Modèle pour l’Europe seulement] 6 ohms, 1 kHz, 1% de DHT.................................25W Consommation ................................................. 155W Puissance IEC [Modèle pour l’Europe seulement] 6 ohms, 1 kHz, 0,1% de DHT..............................20W Dimensions (L x H x P) SW-AVS7..................................250 x 425 x 418 mm NX-AVS7...................................280 x 117 x 125 mm NX-AV1 .......................................94 x 117 x 108 mm Sensibilité d’entrée/impédance INPUT 1 .........................................100 mV/20 k-ohms Distorsion harmonique totale (1 kHz) INPUT 1 (12,5W/6 ohms)..................................0,08% Poids SW-AVS7.......................................................14,5 kg NX-AVS7 .........................................................1,3 kg NX-AV1............................................................0,7 kg Rapport signal/bruit (IHF réseau A) INPUT 1..............................................................85 dB ■ Enceintes Type Enceintes avant, arrière, enceinte centrale ....................................Type à suspension acoustique à 1 voie, 1 enceinte (Type blindage magnétique) Subwoofer ................................Système d’enceinte à traitement servo-actif (Type blindage magnétique) Enceintes Enceintes avant, arrière ....................................8 cm Enceinte centrale ...............................................8 cm Subwoofer.........................................................20 cm Puissance nominale maximale Enceintes avant, arrière ....................... 40W (15,5V) Enceinte centrale ...................................40W (15,5V) Subwoofer ..............................................60W (15,5V) YAMAHA YAMAHA YAMAHA YAMAHA YAMAHA YAMAHA YAMAHA ELECTRONICS CORPORATION, USA 6660 ORANGETHORPE AVE., BUENA PARK, CALIF. 90620, U.S.A. CANADA MUSIC LTD. 135 MILNER AVE., SCARBOROUGH, ONTARIO M1S 3R1, CANADA ELECTRONIK EUROPA G.m.b.H. SIEMENSSTR. 22-34, 25462 RELLINGEN BEI HAMBURG, F.R. OF GERMANY ELECTRONIQUE FRANCE S.A. RUE AMBROISE CROIZAT BP70 CROISSY-BEAUBOURG 77312 MARNE-LA-VALLEE CEDEX02, FRANCE ELECTRONICS (UK) LTD. YAMAHA HOUSE, 200 RICKMANSWORTH ROAD WATFORD, HERTS WD1 7JS, ENGLAND SCANDINAVIA A.B. J A WETTERGRENS GATA 1, BOX 30053, 400 43 VÄSTRA FRÖLUNDA, SWEDEN MUSIC AUSTRALIA PTY, LTD. 17-33 MARKET ST., SOUTH MELBOURNE, 3205 VIC., AUSTRALIA V214790-1 Printed in Malaysia-
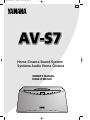 1
1
-
 2
2
-
 3
3
-
 4
4
-
 5
5
-
 6
6
-
 7
7
-
 8
8
-
 9
9
-
 10
10
-
 11
11
-
 12
12
-
 13
13
-
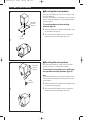 14
14
-
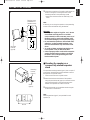 15
15
-
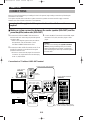 16
16
-
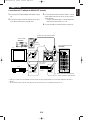 17
17
-
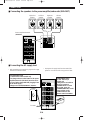 18
18
-
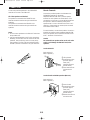 19
19
-
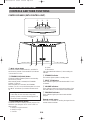 20
20
-
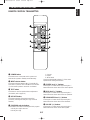 21
21
-
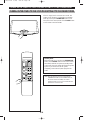 22
22
-
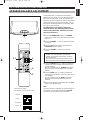 23
23
-
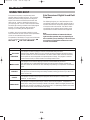 24
24
-
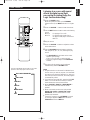 25
25
-
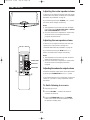 26
26
-
 27
27
-
 28
28
-
 29
29


Yamaha AV-S7 de handleiding
- Categorie
- Luidsprekersets
- Type
- de handleiding
- Deze handleiding is ook geschikt voor
in andere talen
- English: Yamaha AV-S7 Owner's manual
- italiano: Yamaha AV-S7 Manuale del proprietario
- русский: Yamaha AV-S7 Инструкция по применению
- français: Yamaha AV-S7 Le manuel du propriétaire
- español: Yamaha AV-S7 El manual del propietario
- Deutsch: Yamaha AV-S7 Bedienungsanleitung
- português: Yamaha AV-S7 Manual do proprietário
- dansk: Yamaha AV-S7 Brugervejledning
- suomi: Yamaha AV-S7 Omistajan opas
- čeština: Yamaha AV-S7 Návod k obsluze
- svenska: Yamaha AV-S7 Bruksanvisning
- Türkçe: Yamaha AV-S7 El kitabı
- polski: Yamaha AV-S7 Instrukcja obsługi
- română: Yamaha AV-S7 Manualul proprietarului