Indesit XWE 71483X WSSS NL Gebruikershandleiding
- Categorie
- Wasmachines
- Type
- Gebruikershandleiding

1
NL
Nederlands,1
NL
WASAUTOMAAT
Inhoud
Installatie, 2-3
Uitpakken en waterpas zetten
Hydraulische en elektrische aansluitingen
Eerste wascyclus
Technische gegevens
Onderhoud en verzorging, 4
Afsluiten van water en stroom
Reinigen van de wasautomaat
Reinigen van het wasmiddelbakje
Onderhoud van deur en trommel
Reinigen van de pomp
Controle van de buis van de watertoevoer
Voorzorgsmaatregelen en advies, 5
Algemene veiligheid
Afvalverwijdering
Handmatige opening van het deurtje
Beschrijving van de wasautomaat, 6-7
Bedieningspaneel
Display
Het uitvoeren van een wascyclus, 8
Programma’s en opties, 9-10
Programmatabel
Wasopties
Push & Wash
Wasmiddelen en wasgoed, 11-12
Wasmiddelbakje
Bleekcyclus
Voorbereiden van het wasgoed
Speciale programma’s
Balanceersysteem van de lading
Storingen en oplossingen, 13
Service, 14
XWE 71483
Gebruiksaanwijzing
GB
English,15

2
NL
Een correcte nivellering geeft de machine
stabiliteit en voorkomt trillingen, lawaai en het
zich verplaatsen van de automaat tijdens de
werking. In het geval van vloerbedekking of
een tapijt regelt u de stelvoetjes zodanig dat
onder de wasmachine genoeg plaats is voor
ventilatie.
Hydraulische en elektrische
aansluitingen
Aansluiting van de watertoevoerbuis
1. Sluit de toevoerbuis
aan op de
koudwaterkraan met
een mondstuk met
schroefdraad van 3/4
gas (zie afbeelding).
Voordat u de
wasautomaat aansluit
moet u het water laten
lopen totdat het helder is.
2. Verbind de
watertoevoerbuis aan
de wasautomaat door
hem op de betreffende
watertoevoer te
schroeven, rechtsboven
aan de achterkant (zie
afbeelding).
3. Let erop dat er geen knellingen of kronkels
in de buis zijn.
! De waterdruk van de kraan moet zich
binnen de waarden van de tabel Technische
Gegevens bevinden (zie bladzijde hiernaast).
! Als de toevoerbuis niet lang genoeg is moet
u zich wenden tot een gespecialiseerde winkel
of een bevoegde installateur.
! Gebruik nooit tweedehands buizen.
! Gebruik de buizen die bij het apparaat
worden geleverd.
Installatie
! Het is belangrijk deze handleiding te bewaren
voor latere raadpleging. In het geval u het
apparaat verkoopt, of u verhuist, moet het
boekje bij de wasautomaat blijven zodat de
nieuwe gebruiker de functies en betreffende
raadgevingen kan doornemen.
! Lees de instructies aandachtig door: u vindt
er belangrijke informatie betreffende installatie,
gebruik en veiligheid.
Uitpakken en waterpas zetten
Uitpakken
1. De wasautomaat uitpakken.
2. Controleer of de wasautomaat geen schade
heeft geleden gedurende het vervoer. Indien
dit wel het geval is moet hij niet worden
aangesloten en moet u contact opnemen met
de handelaar.
3. Verwijder de 4
schroeven die het
apparaat beschermen
tijdens het vervoer
en de rubberen ring
met bijbehorende
afstandsleider die zich
aan de achterkant
bevinden (zie
afbeelding).
4. Sluit de openingen af met de bijgeleverde
plastic doppen.
5. Bewaar alle onderdelen: mocht de
wasautomaat ooit worden vervoerd, dan
moeten deze weer worden aangebracht.
! Het verpakkingsmateriaal is geen speelgoed
voor kinderen.
Waterpas zetten
1. Installeer de wasautomaat op een rechte en
stevige vloer en laat hem niet steunen tegen een
muur, meubel of dergelijke.
2. Als de vloer niet
volledig horizontaal
is kunt u de
onregelmatigheid
opheffen door de
stelvoetjes aan de
voorkant losser of
vaster te schroeven
(zie afbeelding);
de inclinatiehoek,
gemeten ten
opzichte van het werkvlak, mag de 2° niet
overschrijden.

3
NL
Aansluiting van de afvoerbuis
Verbind de buis,
zonder hem te
buigen, aan een
afvoerleiding of aan
een afvoer in de muur
tussen de 65 en 100
cm van de grond af;
of hang hem aan de
rand van een wasbak
of badkuip, en bind
de bijgeleverde
steun aan de kraan
(zie afbeelding).
Het uiteinde van de
afvoerslang mag niet
onder water hangen.
! Gebruik nooit verlengstukken voor de
buis; indien dit niet te vermijden is moet het
verlengstuk dezelfde doorsnede hebben als de
oorspronkelijke buis en mag hij niet langer zijn
dan 150 cm.
Elektrische aansluiting
Voordat u de stekker in het stopcontact steekt
moet u zich ervan verzekeren dat:
• het stopcontact geaard is en voldoet aan de
geldende normen;
• het stopcontact het maximum vermogen van de
wasautomaat kan dragen, zoals aangegeven in
de tabel Technische Gegevens (zie hiernaast);
• de spanning zich bevindt tussen de
waarden die zijn aangegeven in de tabel
Technische Gegevens (zie hiernaast);
• de contactdoos geschikt is voor de stekker
van de wasautomaat. Indien dit niet zo
is moet de stekker of het stopcontact
vervangen worden.
! De machine mag alleen binnenshuis op een
vorstvrije en droge plek worden geïnstalleerd
om elektronische schade door bevriezing of
condensatie te voorkomen.
! Als de wasautomaat is geïnstalleerd moet het
stopcontact gemakkelijk te bereiken zijn.
! Gebruik geen verlengsnoeren of dubbelstekkers.
65 - 100 cm
! Het snoer mag niet gebogen of
samengedrukt worden.
! De voedingskabel mag alleen door een
bevoegde installateur worden vervangen.
Belangrijk! De fabrikant kan niet aansprakelijk
worden gesteld wanneer deze normen niet
worden nageleefd.
Eerste wascyclus
Na de installatie en voor u de wasautomaat in
gebruik neemt, dient u een wascyclus uit te
voeren met wasmiddel maar zonder wasgoed,
op het programma “WASMACHINE REINIGEN”
(zie “Reinigen van de wasautomaat”).
Technische gegevens
Model
XWE 71483
Afmetingen
breedte 59,5 cm
hoogte 85 cm
diepte 60,5 cm
Laadcapaci-
teit
van 1 tot 7 kg
Elektrische
aansluitin-
gen
zie het typeplaatje met de tech-
nische eigenschappen dat op
het apparaat is bevestigd
Hydraulische
aansluitin-
gen
maximale druk
1 MPa (10 bar)
minimale druk
0,05 MPa (0,5 bar)
inhoud trommel 62 liter
Centrifuge-
toerental
tot 1400 toeren per minuut
Controlepro-
gramma’s
volgens de
richtlijnen
1061/2010
en
1015/2010
programma 8; Katoen 60°C.
programma 9; Katoen 40°C.
Deze apparatuur voldoet
aan de volgende CE voor-
schriften:
- 2004/108/CE (Elektroma-
gnetische compatiabiliteit)
- 2012/19/EU
- 2006/95/CE (Laagspanning)

4
NL
Onderhoud van deur en trommel
• Laat de deur altijd op een kier staan om nare
luchtjes te vermijden.
Reinigen van de pomp
De wasautomaat is voorzien van een
zelfreinigende pomp en hoeft dus niet te
worden onderhouden. Het kan echter
gebeuren dat kleine voorwerpen (muntjes,
knopen) in het voorvakje dat de pomp
beschermt en zich aan de onderkant ervan
bevindt, terechtkomen.
! Verzeker u ervan dat de wascyclus beëindigd
is en haal de stekker uit het stopcontact.
Toegang tot het voorvakje:
1. verwijder het
afdekpaneel aan
de voorzijde van de
wasautomaat door
er op het midden
op te drukken. Duw
beide zijkanten naar
beneden toe en
verwijder het paneel
(zie afbeeldingen).
2. draai het deksel
eraf, tegen de klok in
(zie afbeelding): het
is normaal dat er een
beetje water uit komt;
3. maak de binnenkant goed schoon;
4. schroef het deksel er weer op;
5. monteer het paneel weer, met de haakjes
goed bevestigd in de juiste openingen, voordat
u het paneel tegen de machine aandrukt.
Controleren van de buis van de
watertoevoer
Controleer minstens eenmaal per jaar de
slang van de watertoevoer. Als er barstjes of
scheuren in zitten moet hij vervangen worden:
gedurende het wassen kan de hoge waterdruk
onverwachts breuken veroorzaken.
! Gebruik nooit tweedehands buizen.
Onderhoud en verzorging
Afsluiten van water en stroom
• Sluit na iedere wasbeurt de kraan
af. Hiermee beperkt u slijtage van de
waterinstallatie van de wasmachine en
voorkomt u lekkage.
• Sluit altijd eerst de stroom af voordat u
de wasautomaat gaat schoonmaken en
gedurende onderhoudswerkzaamheden.
Reinigen van de wasautomaat
• De buitenkant en de rubberen onderdelen
kunnen met een spons en een lauw sopje
worden schoongemaakt. Gebruik nooit
schuurmiddelen of oplosmiddelen.
• De wasautomaat beschikt over een
programma “WASMACHINE REINIGEN”
voor het reinigen van de binnenkant van de
automaat. Dit moet worden uitgevoerd als de
automaat volledig leeg is.
Het wasmiddel (circa 10% van de hoeveelheid
die wordt aanbevolen voor een niet zo vuile
was) of de speciale reinigingsmiddelen voor
wasautomaten kunnen worden gebruikt als
hulpmiddelen tijdens dit wasprogramma. We
raden u aan dit reinigingsprogramma elke 40
wascycli uit te voeren.
Om dit programma te activeren drukt u
tegelijkertijd 5 sec. op de toetsen A en B (zie
afb.).
Het programma start automatisch en heeft een
duur van circa 70 minuten. Om de cyclus te
beëindigen drukt u op de toets START/PAUSE.
Reinigen van het wasmiddelbakje
Verwijder het laadje
door op het hendeltje
(1) te drukken en het
naar voren te trekken
(2) (zie afbeelding).
Was het onder
stromend water. Dit
moet u regelmatig
doen.
2
1
1
2
3
A
B

5
NL
te optimaliseren en om potentiële schade aan de
gezondheid en het milieu te voorkomen. Het symbool van
de afvalemmer met een kruis staat op elk product, om aan
te geven dat het apart moet worden weggegooid.
Voor verdere informatie betreffende het correcte verwijderen
van huishoudelijke apparatuur kunnen de gebruikers zich
wenden tot de gemeentelijke reinigingsdienst of de verkoper.
Handmatige opening van het deurtje
Mocht er in het huis geen stroom aanwezig zijn en u wilt
het deurtje openen om de was op te hangen, dan dient u
het volgende te doen:
1. haal de stekker uit het
stopcontact.
2. controleer dat het
waterniveau in de automaat
lager is dan het deurtje; als
dat niet het geval is kunt het
water weg laten vloeien door
middel van de afvoerbuis en
dit opvangen in een emmer,
zoals aangegeven in de
afbeelding.
3. verwijder het paneel
aan de voorkant van de
wasautomaat (zie volgende
pagina).
4. trek het lipje aangegeven in de afbeelding naar voren
totdat het plastic bandje loskomt; trek hem daarna naar
beneden totdat u klik hoort, wat aangeeft dat de deur is
geopend.
5. monteer het paneel weer, met de haakjes goed
bevestigd in de juiste openingen, voordat u het paneel
tegen de machine aandrukt.
Voorzorgsmaatregelen
en advies
! De wasmachine is ontworpen en geproduceerd volgens
de internationale veiligheidsnormen. Deze aanwijzingen zijn
voor uw eigen veiligheid geschreven en moeten aandachtig
worden doorgenomen.
Algemene veiligheid
• Dit apparaat is uitsluitend ontworpen voor huishoudelijk
niet-professioneel gebruik.
• Dit apparaat mag alleen door kinderen van
8 jaar en ouder, door personen met een
beperkt lichamelijk, sensorieel of geestelijk
vermogen, of met onvoldoende ervaring
of kennis worden gebruikt, mits ze worden
begeleid, of wanneer zij toereikende
instructies hebben gekregen betreffende
het veilige gebruik van het apparaat en mits
zij op de hoogte zijn van de betreffende
gevaren. Kinderen mogen niet met het
apparaat spelen. Onderhoud en reiniging
mogen niet door kinderen zonder supervisie
worden uitgevoerd.
• Raak de machine niet aan als u blootsvoets bent of met
natte of vochtige handen of voeten.
• Trek de stekker nooit uit het stopcontact door aan het
snoer te trekken, maar altijd door de stekker zelf beet te
pakken.
• Open het wasmiddelbakje niet terwijl de machine in
werking is.
• Raak het afvoerwater niet aan aangezien het behoorlijk
warm kan zijn.
• Forceer de deur nooit: het veiligheidsmechanisme
dat een ongewild openen van de deur voorkomt, kan
beschadigd worden.
• Probeer in geval van storingen nooit zelf de interne
mechanismen van de wasautomaat te repareren.
• Zorg ervoor dat kleine kinderen niet te dicht bij de
machine komen als deze in werking is.
• De deur kan tijdens het wassen zeer heet worden.
• Als de machine verplaatst moet worden, doe dit dan
met twee of drie personen tegelijk en zeer voorzichtig.
Doe dit nooit alleen, want het apparaat is erg zwaar.
• Voordat u het wasgoed in de automaat laadt, moet u
controleren of hij leeg is.
Afvalverwijdering
• Het verwijderen van het verpakkingsmateriaal:
houdt u aan de plaatselijke normen zodat het materiaal
hergebruikt kan worden.
• De Europese richtlijn 2012/19/EU, betreffende
afgedankte elektrische en elektronische apparatuur,
voorziet dat huishoudelijke apparatuur niet met het
normale afval mag worden meegegeven. De afgedankte
apparatuur moet apart worden opgehaald om het
wedergebruik van materialen waarvan hij is gemaakt
20
1
2
3

6
NL
Beschrijving van de wasautomaat
Bedieningspaneel
Knop
TEMPERATUUR
DRAAIKNOP
PROGRAMMA’S
Wasmiddelbakje
Knop ON/OFF
Knop
CENTRIFUGE
Knop en controlelampje
START/PAUSE
Knop
UITGESTELDE
START
Knoppen
OPTIE
Wasmiddelbakje: voor wasmiddelen en wasversterkers
(zie “Wasmiddelen en wasgoed”).
Knop ON/OFF : druk even op de toets om de
wasautomaat aan of uit te zetten. Het groen START/
PAUSE controlelampje dat langzaam knippert geeft aan
dat de wasautomaat aanstaat. Om de wasautomaat
tijdens de wascyclus uit te zetten moet u de toets iets
langer, circa 3 seconden, ingedrukt te houden. Als u de
toets kort, of per ongeluk indrukt zal de wasautomaat
niet uitgaan. Als u de wasautomaat tijdens de wascyclus
uitdoet wordt de cyclus automatisch geannuleerd.
Knop PUSH & WASH: (zie “Wasmiddelen en wasgoed”).
DRAAIKNOP PROGAMMA’S voor het instellen van het
gewenste programma (zie “Programmatabel”).
Knoppen OPTIE: om de beschikbare opties te selecteren.
Het controlelampje van de gekozen optie zal aanblijven.
Knop TEMPERATUUR : druk hierop om de
temperatuur te verminderen of om met koud water te
wassen: de waarde wordt op het display aangegeven.
Knop CENTRIFUGE : druk hierop om het
centrifugetoerental te verminderen of om de centrifuge in
zijn geheel uit te sluiten; de waarde wordt op het display
aangegeven.
Knop UITGESTELDE START : druk om een
uitgestelde start voor het gekozen programma in te stellen;
het uitstel wordt op de display aangegeven.
Knop en controlelampje START/PAUSE : als het
groen controlelampje langzaam knippert, moet u op de
toets drukken om de wascyclus te starten. Als de cyclus
is gestart blijft het controlelampje vast aanstaan. Als u de
wascyclus wilt pauzeren drukt u nogmaals op de toets; het
controlelampje wordt amberkleurig en gaat knipperen. Als
het symbool niet aan is kunt u de deur openen. Om het
programma te hervatten drukt u opnieuw op de toets.
Stand- by modus
Deze wasautomaat beschikt, in overeenkomst met de
nieuwe normen betreffende de energiebesparing, over
een systeem wat het apparaat automatisch na 30 minuten
uitschakelt (stand-by) indien men het niet gebruikt. Druk
kort op de ON-OFF toets en wacht tot de wasautomaat
weer aangaat.
DISPLAY
Knop
PUSH & WASH

7
NL
Display
Het display is nodig om de wasautomaat te programmeren en geeft meerdere soorten informatie.
In de sectie A verschijnt de duur van de beschikbare programma’s en, als de cyclus is gestart, de resterende tijd tot
het einde ervan. Indien een UITGESTELDE START is geselecteerd verschijnt de resterende tijd tot aan de start van het
geselecteerde wasprogramma.
Bovendien verschijnen, na het drukken op de betreffende toets, de maximale waarden van de centrifugesnelheid en van de
temperatuur die de wasautomaat kan uitvoeren bij het geselecteerde programma of voor de laatstgekozen waarden indien
deze voor het gekozen programma kunnen worden gebruikt.
De zandloper knippert tijdens de fase waarin het apparaat de gegevens verwerkt op basis van het gekozen programma. Na
max. 10 minuten na de start, gaat het symbool aan en wordt de definitieve resterende tijd weergegeven. Het symbool
wateruurwerk gaat na ongeveer 1 minuut na de weergave van de definitieve resterende tijd weer uit.
In de sectie B verschijnen de “wasfases” voor de geselecteerde cyclus en, als het programma reeds is gestart, de lopende
“wasfase”:
Wassen
Spoelen
Centrifugeren
Afpompen
Indien het symbool “UITGESTELDE START” verlicht is, geeft dit aan dat op de display de waarde van de ingestelde
“Uitgestelde start” wordt weergegeven.
In sectie C bestaan 3 niveaus die betrekking hebben op de wasopties.
Controlelampje deur geblokkeerd
Het verlichte symbool geeft aan dat de deur is geblokkeerd. Om schade te voorkomen moet u wachten tot het symbool
uitgaat voordat u de deur van de wasautomaat opent.
Om de deur te openen terwijl de cyclus bezig is, drukt u op de toets START/PAUSE; als het symbool DEUR GEBLOKKEERD
uit is kunt u de deur openen.
B
C
A
C

8
NL
Het uitvoeren van een wascyclus
Snelle programmering
1. HET WASGOED INLADEN. Open de deur. Laad het
wasgoed in en zorg ervoor nooit de laadhoeveelheid te
overschrijden aangegeven in de programmatabel op de
volgende bladzijde.
2. WASMIDDEL DOSEREN.Trek het bakje naar buiten
en doe het wasmiddel in de speciale bakjes, zoals
aangegeven in “Wasmiddelen en wasgoed”.
3. SLUIT DE DEUR.
4. Druk op de toets “PUSH & WASH” om het
wasprogramma te starten.
Traditionele programmering
1. DE WASAUTOMAAT AANZETTEN. Druk optoets
; het controlelampje START/PAUSE wordt groen en
gaat langzaam knipperen.
2. HET WASGOED INLADEN. Open de deur. Laad het
wasgoed in en zorg ervoor nooit de laadhoeveelheid te
overschrijden aangegeven in de programmatabel op de
volgende bladzijde.
3. WASMIDDEL DOSEREN.Trek het bakje naar buiten
en doe het wasmiddel in de speciale bakjes, zoals
aangegeven in “Wasmiddelen en wasgoed”.
4. SLUIT DE DEUR.
5. KIES HET PROGRAMMA. Kies met de draaiknop
PROGRAMMA’a het gewenste programma; hiermee
zijn een temperatuur en een centrifugesnelheid
verbonden die gewijzigd kunnen worden. Op het display
verschijnt de duur van de cyclus.
6. DE WASCYCLUS AANPASSEN. Druk op de speciale
toetsen:
Wijzig de temperatuur en/of de centrifuge. Het
apparaat toont automatisch de maximale temperatuur
en centrifuge die voor het ingestelde programma
gelden of de laatst geselecteerde waarden, mits deze
compatibel zijn met het gekozen programma. Door
op de toets te drukken kunt u de temperatuur
langzaamaan verlagen, tot aan de koude wascyclus
“OFF”. Door te drukken op de toets kunt u het
toerental van de centrifuge langzaamaan verlagen, tot
aan nul toe” OFF”. Als u nogmaals op de toetsen drukt
zult u op de maximaal toegestane waarden terugkeren.
! Uitzondering: als u het programma 8 selecteert kunt u
de temperatuur tot op 90° instellen.
Een uitgestelde start instellen
Om de uitgestelde start van het gekozen programma
in te stellen drukt u op de betreffendetoetstotdat u de
gewenste vertraging heeft bereikt. Wanneer deze optie
geactiveerd is, wordt op de display het symbool
verlicht. Om de uitgestelde start te verwijderen drukt u op
de toets totdat op het display de tekst “OFF” verschijnt.
De kenmerken van de cyclus wijzigen.
• Druk op de toets om de optie te activeren. Het
controlelampje dat bij de toets hoort gaat aan.
• Druk nogmaals op de knop om de optie te
deactiveren; desbetreffend controlelampje gaat uit.
! Als de geselecteerde optie niet compatibel is met
het ingestelde programma gaat het controlelampje
knipperen en zal de optie niet worden geactiveerd.
! Als de gekozen optie niet compatibel is met een
voorheen ingestelde optie, zal dit worden aangegeven
door het knipperen van het betreffende controlelampje
en door een geluidssignaal (3 pieptonen). Alleen de
tweede optie zal worden geactiveerd en het lampje van
de geactiveerde optie zal aan gaan.
! De opties kunnen van invloed zijn op de aanbevolen
washoeveelheid en/of de duur van de cyclus.
7. HET PROGRAMMA STARTEN.Druk op de toets
START/PAUSE. Het betreffende controlelampje
zal aangaan met een groen licht en de deur wordt
geblokkeerd (het symbool DEUR GEBLOKKEERD is
aan). Om een programma te wijzigen terwijl de cyclus
bezig is, zet u de wasautomaat in pauzestand door
middel van de toets START/PAUSE (het controlelampje
START/PAUSE gaat langzaam knipperen met een
oranje licht); selecteer daarna de gewenste cyclus en
druk opnieuw op de toets START/PAUSE.
Om de deur te openen terwijl de cyclus bezig is, drukt
u op de START/PAUSE toets. Als het symbool DEUR
GEBLOKKEERD uit is kunt u de deur openen.
Druk nogmaals op de START/PAUSE toets om het
programma te hervatten vanaf het punt dat het werd
onderbroken.
8. EINDE VAN HET PROGRAMMA. De tekst “END”
verschijnt op het display. Als het symbool DEUR
GEBLOKKEERD uitgaat kunt u de deur openen.
Open het deurtje, laad het wasgoed uit en schakel het
apparaat uit.
! Als u een reeds gestarte wascyclus wilt annuleren moet u
enkele seconden de toets ingedrukt houden. De cyclus
zal worden onderbroken en de wasautomaat gaat uit.

9
NL
Programma’s en opties
Wasopties
De eerste keer dat u drukt gaat het symbool 9’ aan,
de tweede keer het symbool 30’ en de derde keer het
symbool 1h. Als u een vierde keer drukt gaat opnieuw het
symbool 9’ aan.
! Deze optie kan niet worden geactiveerd bij de programma’s
1-2-3-4-5-6-7-8-9-10-11-12-13- - .
Einde snelle cyclus
Als u tijdens een wasprogramma bij bepaalde
omstandigheden op deze toets drukt, kunt u het
programma in slechts 20’ beëindigen. U voert hierdoor
slechts een korte spoelcyclus uit en een maximale
centrifuge van 800 toeren of minder, als u dit tijdens de
persoonlijke instellingen van het programma al handmatig
had beperkt. In dit geval zal de was- en spoelkwaliteit
niet optimaal zijn. Als u op de toets drukt gaat zowel het
betreffende controlelampje aan als het lampje dat de
spoelfase aangeeft. Als de geselecteerde temperatuur
40° of hoger is en/of de toets wordt ingedrukt tijdens de
beginfase van het programma, zal de duur van de optie
“Einde snelle cyclus” langer zijn om ervoor te zorgen dat
het wasmiddel goed in het water wordt opgelost en de
kleding niet wordt beschadigd. In dit geval knippert het
controlelampje van de spoelfase en zal het lampje van
de wasfase aanblijven totdat de nodige omstandigheden
worden bereikt. In het geval de overgebleven duur van het
wasprogramma minder is dan 20’ minuten, zal de optie
niet beschikbaar zijn.
! Deze optie kan niet worden geactiveerd bij de programma’s
2-4-5-6-14- - .
Met deze optie selecteert u het geschiktste programma voor
sportkleding. Dit is ontwikkeld om het vuil te verwijderen
en de technische eigenschappen van de kleding zo goed
mogelijk te handhaven. De verschillende niveaus van de
optie Sport bieden de volgende wascycli aan:
- Sportschoenen: een cyclus die speciaal is
ontwikkeld voor het in totale zekerheid wassen van 2 paar
gymschoenen.
- Sportkleding en handdoeken: met deze cyclus kunt
u elk type sportkleding wassen samen met de handdoeken
van de sportschool.
- Technische kleding: ontwikkeld om waterafstotende
kleding of speciale technische vezels, zoals Gore-Tex, te
wassen. Op deze manier optimaliseert u de wasprestaties
en houdt u de technische eigenschappen van de kleding
intact. Gebruik bij technische vezels nooit wasverzachter.
! Deze optie kan niet worden geactiveerd bij de
programma’s 2-3-4-5-6-7-8-9-10-11-12-13-14- - .
Programmatabel
De duur van de cyclus die wordt aangegeven op het display of op de gebruiksaanwijzing is een geschatte waarde die wordt gecalculeerd bij standaard omstandigheden. De effectieve tijd kan variëren aan de hand van
talloze factoren zoals temperatuur en druk van de watertoevoer, de kamertemperatuur, de hoeveelheid wasmiddel, de hoeveelheid en type lading, de balancering van de was en de geselecteerde aanvullende opties.
1) Controleprogramma volgens de norm 1061/2010: selecteer het programma 8
met een temperatuur van 60°C.
Dit is de geschiktste cyclus voor het wassen van een middelmatig vuile lading katoenen wasgoed. Het is ook de efficiëntste cyclus v.w.b. het gecombineerde verbruik van energie en water, voor
wasgoed dat op 60°C kan worden gewassen. De effectieve wastemperatuur kan verschillen van de temperatuur die wordt aangegeven.
2) Controleprogramma volgens de norm 1061/2010: selecteer het programma 9
met een temperatuur van 40°C.
Dit is de geschiktste cyclus voor het wassen van een middelmatig vuile lading katoenen wasgoed. Het is ook de efficiëntste cyclus v.w.b. het gecombineerde verbruik van energie en water, voor
wasgoed dat op 40°C kan worden gewassen. De effectieve wastemperatuur kan verschillen van de temperatuur die wordt aangegeven.
Voor alle Test Institutes:
2) Programma katoen lang: selecteer het programma 9 met een temperatuur van 40°C.
3) Programma Synthetisch lang: selecteer het programma 10 met een temperatuur van 40°C.
Programma’s
Beschrijving van het Programma
Maxi. Temp
(°C)
Maximaal
toerental
(toeren
per mi-
nuut)
Wasmiddel
Maximale lading
(kg)
Overgebleven
vochtigheid %
Energieverbruik
kWh
Totaal water lt
Duur cyclus
Voorwas
Wassen
Wasver-
zachter
Bleken
Speciaal
1
Sport kleding
30° 600 -
- 4 - - - 60’
2
Donkere kleding
30° 800 -
- 5 - - - 80’
3
Anti-Geur cyclus (Katoen) 60° 1000 -
- 3,5 - - - 120’
3
Anti-Geur cyclus (Synthetisch) 40° 1000 -
- 3,5 - - - 105’
4
DeliIcaat
30° 0 -
- 1 - - - 80’
5
Wol: voor wol, kasjmier, etc. 40° 800 -
- 2 - - - 85’
6
Dekbedden: voor kledingstukken/beddengoed gevuld met dons. 30° 1000 -
- 3,5 - - - 100’
Standaard
7
Katoen Wit 90° + P: Zeer vuile witte was. 90° 1400
- 7 53 2,75 100 205’
8
Katoen 60° (Standaard) (1): Zeer vuil wit en kleurecht bont wasgoed.
60°
(Max. 90°)
1400 -
- 7 53 0,90 52,5 205’
9
Katoen 40° (Standaard) (2): Niet zo vuile witte en bonte was.
40° 1400 -
- 7 53 0,88 80 165’
10
Synthetisch: Zeer vuile kleurvaste bonte was. 60° 800 -
- 4,5 46 0,86 47 115’
10
Synthetisch (3): Niet zo vuile kleurvaste bonte was. 40° 800 -
- 4,5 46 0,60 51 105’
11
Gekleurd
40° 1400 -
- 7 53 0,88 77 105’
Eco & Snel
12
Katoen 20°: Niet zo vuile witte en bonte was. 20° 1400 -
- 7 - - - 180’
13
Eco Synthetisch 20°
20° 800 -
- 7 - - - 120’
14
Snel
- 800 - -
- 1,5 - - - 9’
14
Snel
30° 800 -
- 3,5 80 0,18 43 30’
14
Snel
60° 1000 -
- 7 - - - 60’
Delprogramma’s
Spoelen/Bleken - 1400 - -
7 - - - 55’
Centrifugeren + Afpompen - 1400 - - - - 7 - - - 25’

10
NL
Push & Wash
Met deze functie kunt u een wascyclus starten terwijl de wasautomaat uit is, zonder dat u daarvoor op de toets ON/OFF
hoeft te drukken of, nadien als u de wasautomaat aanzet, zonder dat u andere toetsen en/of knoppen in hoeft te drukken
(als u dit niet doet zal het programma Push & Wash worden uitgeschakeld). Om de Push & Wash cyclus te starten houdt u
de knop 2 seconden lang ingedrukt. Het controlelampje geeft aan dat de cyclus is gestart. Deze wascyclus is ideaal voor het
wassen van katoenen en synthetische was en wast op een temperatuur van 30° met een maximaal centrifugetoerental van
1200 toeren per minuut. Max. lading 4 kg. (Duur cyclus 50’).
Hoe werkt dit?
1. Laad het wasgoed in (katoenen en/of synthetische was) en sluit de deur.
2. Wasmiddel en toevoegmiddelen invoeren.
3. Start het programma door 2 seconden op de toets Push & Wash te drukken. Het betreffende controlelampje zal groen
worden en de deur zal worden geblokkeerd (het symbool deur geblokkeerd gaat aan).
N.B.: Als u het programma start met de Push & Wash toets wordt een automatische cyclus geactiveerd, aangeraden voor
katoen en synthetisch wasgoed. Deze cyclus kan niet worden aangepast. Bij dit programma kunt u geen verdere opties
instellen.
Om de deur te openen terwijl de automatische cyclus bezig is, drukt u op de START/PAUSE toets. Als het symbool deur
geblokkeerd uit is kunt u de deur openen. Druk nogmaals op de START/PAUSE toets om het programma te hervatten vanaf
het punt dat het werd onderbroken.
4. Aan het einde van het programma gaat het controlelampje END aan.

11
NL
Wasmiddelbakje
Een goed wasresultaat hangt ook af van de juiste dosis
wasmiddel: te veel wasmiddel maakt het wassen niet beter.
Het wasmiddel blijft aan de binnenzijde van de wasautomaat
zitten en zorgt voor het vervuilen van het milieu.
! Gebruik nooit wasmiddelen voor handwas aangezien die
te veel schuim vormen.
! Gebruik waspoeder voor witte katoenen was, voor de voorwas
en voor het wassen op temperaturen van meer dan 60°C.
! Volg de aanwijzingen op de wasmiddelverpakking.
Trek het laatje naar voren
en giet het wasmiddel of de
wasversterker er als volgt in:
Vak 1: Wasmiddel voor voorwas (poeder)
Voordat u het middel erin strooit moet u controleren of het
aanvullende bakje 4 er niet in zit.
Vak 2: Wasmiddel voor hoofdwas (poeder of vloeibaar)
Als u een vloeibaar wasmiddel gebruikt raden we u aan
het bijgeleverde schotje A te gebruiken voor een correcte
dosering. Voor het gebruik van poederwasmiddel doet u
het schotje terug in de opening B.
Vak 3: Wasversterkers (wasverzachter, enz.)
De wasverzachter mag nooit het niveau “max”
overschrijden dat staat aangegeven op de centrale pin.
Extra bakje 4: Bleekmiddel
Bleekcyclus
Plaats het bijgeleverde bakje 4 in het vak 1. Schenk het
bleekmiddel en zorg ervoor nooit het “max” niveau, dat
staat aangegeven op de centrale spil, te overschrijden.
Om te bleken giet u het bleekwater in het aanvullende
bakje 4 en stelt u het programma in .
! Het traditionele bleekmiddel kan voor stevig wit wasgoed
gebruikt worden, terwijl het delicate bleekmiddel geschikt
is voor gekleurde stoffen, synthetische stoffen en wol.
Voorbereiden van het wasgoed
• Verdeel het wasgoed volgens:
- het soort stof / het symbool op het etiket.
- de kleuren: scheid de bonte was van de witte was.
• Leeg de zakken en controleer de knopen.
• Overschrijd het aangegeven gewicht, berekend voor
droog wasgoed, nooit: zie “Programmatabel”.
Hoeveel weegt wasgoed?
1 laken 400-500 g.
1 sloop 150-200 g.
1 tafelkleed 400-500 g.
1 badjas 900-1200 g.
1 handdoek 150-250 g.
Speciale programma’s
Sport kleding (programma 1) is ontwikkeld voor het
wassen van niet zo vuile sportkleding (trainingspakken,
sportbroeken, enz.). Om optimale resultaten te bereiken
raden wij u aan nooit de maximaal aangegeven
hoeveelheid te overschrijden die staat aangegeven in
de “Programmatabel”. We raden u aan een vloeibaar
wasmiddel te gebruiken, met een hoeveelheid die
voldoende is voor een halve lading.
Donkere kleding: gebruik de programma 2 voor het
wassen van bonte was. Het programma is ontwikkeld voor
het langdurige behoud van de donkere kleuren. Voor een
beter resultaat raden we u aan voor de bonte was een
vloeibaar wasmiddel te gebruiken.
Anti-Geur cyclus: gebruik het programma
3
voor het
wassen van wasgoed waar nare luchtjes aan zitten (bv.
rook, zweet, frituur). Het programma is speciaal ontwikkeld
voor het verwijderen van nare luchtjes en het behouden
van de vezels van de kleding. We raden u aan synthetisch
wasgoed of gemengd wasgoed op 40° te wassen en
kleurbestendig katoen op 60°.
Delicaat: gebruik het programma
4
voor het wassen van
zeer fijne was. We raden u aan de kleding binnenstebuiten
te keren voor u hem wast. Voor een beter resultaat raden
we u voor de fijne was aan een vloeibaar wasmiddel te
gebruiken.
Wol: het “Wol” wasprogramma van deze wasmachine is
door The Woolmark Company getest en goedgekeurd
voor het wassen van kleding waar wol in is verwerkt en die
als handwas geclassificeerd is, op voorwaarde dat de
aanwijzingen worden opgevolgd die op het etiket van het
kledingstuk vermeld staan en de instructies van de
fabrikant van de wasmachine. (M1127)
Dekbedden: om donzen wasgoed te wassen zoals
bijvoorbeeld één- of tweepersoons dekbedden (niet
zwaarder dan 3,5 kg.), kussens, ski-jacks, gebruikt u
het speciale programma 6. We raden u aan de jacks
in de trommel te laden met de randen naar binnen toe
gevouwen (zie afbeeldingen) en ervoor te zorgen de ¾ van
het volume van de trommel niet te overschrijden.
Voor het beste resultaat raden wij aan vloeibaar wasmiddel
in het doseerbakje te gieten.
Wasmiddelen en wasgoed
1
2
3
4
A
B

12
NL
Gekleurd: gebruik de programma 11 voor het wassen
van licht gekleurde was. Het programma is ontwikkeld
voor het langdurige behoud van de mooie kleuren van uw
wasgoed.
Katoen 20° (programma 12) Katoen ideaal voor een
lading vuil katoen. De optimale prestaties, zelf met koud
water, die kunnen worden vergeleken met een wascyclus
op 40°C, worden gegarandeerd door een mechanische
werking die de snelheid varieert met herhaaldelijke en zeer
dicht op elkaar liggende piekvariaties.
Eco Synthetisch 20° (programma 13) ideaal voor
gemengd wasgoed (katoen en synthetisch) dat
middelmatig vuil is. De optimale prestaties, zelf met koud
water, worden gegarandeerd door een mechanische
werking die de snelheid varieert met middelmatige en van
te voren vastgestelde intervallen.
Snel (programma 14) hiermee kunt u de duur van de was
bepalen, van 9’ tot 1h. Als u op de overeenkomende toets
“Snel” drukt kunt u de duur van de cyclus laten variëren
van 9’ (refresh), tot 30’ (wassen), tot aan 1h (wassen). De
cyclus 9’ zorgt ervoor dat u de kledingstukken met alleen
wasverzachter kunt spoelen. Gebruik absoluut geen
wasmiddel! De cyclus 30’ is ontwikkeld om een licht
vuile was te wassen op 30° (wol en zijde uitgezonderd),
met een maximale lading van 3 kg, in een zeer korte
tijd: de cyclus duurt slechts 30 minuten en bespaart dus
elektriciteit en tijd. De programma “1h” is ontwikkeld
om wasgoed van kleurbestendig katoen in een uur op
60° te wassen. Het wasgoed moet middelmatig vuil zijn,
zodat de wasprestaties kunnen worden gegarandeerd.
Voor synthetische of gemengde was raden we u aan de
temperatuur te verlagen naar 40°.
Balanceersysteem van de lading
Om overmatige trillingen te vermijden verdeelt de automaat
de lading voor het centrifugeren op een gelijkmatige
manier. Dit gebeurt door de trommel te laten draaien op
een snelheid die iets hoger ligt dan de wassnelheid. Als na
herhaaldelijke pogingen de lading nog steeds niet goed is
gebalanceerd, zal de wasautomaat de centrifuge op een
lagere snelheid uitvoeren dan die voorzien was. Als de
lading zeer uit balans is zal de wasautomaat een verdeling
uitvoeren in plaats van een centrifuge. Teneinde een betere
distributie van de waslading en een juiste balancering te
bereiken raden wij u aan kleine en grote kledingstukken te
mengen.

13
NL
Storingen en oplossingen
Het kan gebeuren dat de wasautomaat niet werkt. Voor u contact opneemt met de Servicedienst (zie “Service”) moet u
controleren of het niet een storing betreft die u zelf makkelijk kunt verhelpen met behulp van de volgende lijst.
Storingen:
De wasautomaat gaat niet aan.
De wascyclus start niet.
De wasmachine ontvangt geen
water (Op de display de tekst
“H2O”).
De wasautomaat blijft water aan-
en afvoeren
De wasautomaat voert het water
niet af of centrifugeert niet.
De machine trilt erg tijdens het
centrifugeren.
De wasautomaat lekt.
De controlelampjes van de “Opties”
en het controlelampje START/PAUSE
gaan snel knipperen en op het
display verschijnt een storingscode
(bv.: F-01, F-..).
Er ontstaat teveel schuim.
Push & Wash wordt niet
geactiveerd.
Het programma duurt veel minder
dan verwacht.
Mogelijke oorzaken / Oplossing:
• De stekker zit niet in het stopcontact of niet ver genoeg om contact te maken.
• Het hele huis zit zonder stroom.
• De deur zit niet goed dicht.
• De ON/OFF toets is niet ingedrukt.
• De START/PAUSE toets is niet ingedrukt.
• De waterkraan is niet open.
• Er is een uitgestelde start ingesteld.
• De watertoevoerbuis is niet aangesloten op de kraan.
• De buis is gebogen.
• De waterkraan is niet open.
• Het hele huis zit zonder water.
• Er is onvoldoende druk.
• De START/PAUSE toets is niet ingedrukt.
• De afvoerbuis is niet op 65 tot 100 cm afstand van de grond af geïnstalleerd (zie
“Installatie”).
• Het uiteinde van de afvoerbuis ligt onder water (zie “Installatie”).
• De afvoer in de muur heeft geen ontluchting.
Als na deze controles het probleem niet is opgelost, moet u de waterkraan
dichtdraaien, de wasautomaat uitzetten en de Servicedienst inschakelen. Als u
op een van de hoogste verdiepingen van een flatgebouw woont kan zich een
hevelingsprobleem voordoen, waarbij de wasautomaat voortdurend water aan- en
afvoert. Om deze storing te verhelpen zijn er in de handel speciale beluchters te koop.
• Het programma voorziet geen afvoer: met enkele programma’s dient de machine
handmatig te worden ingesteld.
• De afvoerbuis is gebogen (zie “Installatie”).
• De afvoerleiding is verstopt.
• De trommel is bij het installeren niet op de juiste wijze gedeblokkeerd (zie “Installatie”).
• De wasautomaat staat niet goed recht (zie “Installatie”).
• De wasautomaat staat te krap tussen meubels en muur (zie “Installatie”).
• De buis van de watertoevoer is niet goed aangeschroefd (zie “Installatie”).
• Het wasmiddelbakje is verstopt (voor reiniging zie “Onderhoud en verzorging”).
• De afvoerbuis is niet goed aangesloten (zie “Installatie”).
• Doe de wasautomaat uit en haal de stekker uit het stopcontact. Wacht circa 1
minuut en doe hem daarna weer aan.
Als de storing voortzet, dient u de Servicedienst in te schakelen.
• Het wasmiddel is niet bedoeld voor wasautomaten (er moet “voor
wasautomaat”, “handwas en machinewas”, of dergelijke op staan).
• U heeft teveel wasmiddel gebruikt.
• Nadat de wasautomaat wordt ingeschakeld heeft u een andere opdracht ingevoerd
i.p.v. Push & Wash. Schakel de wasautomaat uit en druk op de knop Push & Wash.
• U heeft de optie “Einde snelle cyclus” geactiveerd.

14
NL
Service
Voordat u de Servicedienst inschakelt:
• Controleer eerst of u het probleem zelf kunt oplossen (zie “Storingen en oplossingen”).
• Start het programma opnieuw om te controleren of de storing is verholpen;
• Neem indien dit niet helpt contact op met de servicedienst.
! Wendt u nooit tot een niet erkende installateur.
Comunicare:
• het type storing;
• het model wasautomaat (Mod.);
• het serienummer (S/N).
Deze informatie vindt u op het typeplaatje aan de achterkant van de wasautomaat en aan de voorzijde als u het deurtje
opendoet.

15
GB
WASHING MACHINE
Instructions for use
Contents
Installation, 16-17
Unpacking and levelling
Connecting the electricity and water supplies
The first wash cycle
Technical data
Care and maintenance, 18
Cutting off the water and electricity supplies
Cleaning the washing machine
Cleaning the detergent dispenser drawer
Caring for the door and drum of your appliance
Cleaning the pump
Checking the water inlet hose
Precautions and tips, 19
General safety
Disposal
Opening the porthole door manually
Description of the washing machine, 20-21
Control panel
Display
Running a wash cycle, 22
Wash cycles and options, 23-24
Table of wash cycles
Wash options
Push & Wash
Detergents and laundry, 25-26
Detergent dispenser drawer
Bleach cycle
Preparing the laundry
Special wash cycles
Load balancing system
Troubleshooting, 27
Service, 28
English
GB
XWE 71483

16
GB
! This instruction manual should be kept in a safe
place for future reference. If the washing machine
is sold, transferred or moved, make sure that the
instruction manual remains with the machine so
that the new owner is able to familiarise himself/
herself with its operation and features.
! Read these instructions carefully: they contain
vital information relating to the safe installation
and operation of the appliance.
Unpacking and levelling
Unpacking
1. Remove the washing machine from its packaging.
2. Make sure that the washing machine has
not been damaged during the transportation
process. If it has been damaged, contact the
retailer and do not proceed any further with the
installation process.
3 . R e m o v e t h e 4
protective screws (used
during transportation)
and the rubber washer
with the corresponding
spacer, located on
the rear part of the
appliance (see figure).
4. Close off the holes using the plastic plugs
provided.
5. Keep all the parts in a safe place: you will need
them again if the washing machine needs to be
moved to another location.
! Packaging materials should not be used as
toys for children.
Levelling
1. Install the washing machine on a flat sturdy
floor, without resting it up against walls, furniture
cabinets or anything else.
2. If the floor is not
p e r f e c t l y l e v e l ,
c o m p e n s a t e f o r
any unevenness by
tightening or loosening
the adjustable front
feet (see figure); the
angle of inclination,
measured in relation
to the worktop, must
not exceed 2°.
Levelling the machine correctly will provide
it with stability, help to avoid vibrations and
excessive noise and prevent it from shifting
while it is operating. If it is placed on carpet or
a rug, adjust the feet in such a way as to allow
a sufficient ventilation space underneath the
washing machine.
Connecting the electricity and
water supplies
Connecting the water inlet hose
1. Connect the supply
pipe by screwing it
to a cold water tap
using a ¾ gas threaded
connection (see figure).
Before performing the
connection, allow the
water to run freely until
it is perfectly clear.
2 . C o n n e c t t h e
i n l e t h o s e t o t h e
washing machine by
screwing it onto the
corresponding water
inlet of the appliance,
which is situated on
the top right-hand side
of the rear part of the
appliance (see figure).
3. Make sure that the hose is not folded over
or bent.
! The water pressure at the tap must fall within
the values indicated in the Technical details table
(see next page).
! If the inlet hose is not long enough, contact a
specialised shop or an authorised technician.
! Never use second-hand hoses.
! Use the ones supplied with the machine.
Installation

17
GB
Connecting the drain hose
Connect the drain
hose, without bending
it, to a drainage duct or
a wall drain located at a
height between 65 and
100 cm from the floor;
alternatively, rest it on
the side of a washbasin
or bathtub, fastening
the duct supplied to
the tap (see figure).
The free end of the
hose should not be
underwater.
! We advise against the use of hose extensions;
if it is absolutely necessary, the extension must
have the same diameter as the original hose and
must not exceed 150 cm in length.
Electrical connections
Before plugging the appliance into the electricity
socket, make sure that:
• the socket is earthed and complies with all
applicable laws;
• the socket is able to withstand the maximum
power load of the appliance as indicated in the
Technical data table (see opposite);
• the power supply voltage falls within the values
indicated in the Technical data table (see
opposite);
• the socket is compatible with the plug of
the washing machine. If this is not the case,
replace the socket or the plug.
! The washing machine must not be installed
outdoors, even in covered areas. It is extremely
dangerous to leave the appliance exposed to
rain, storms and other weather conditions.
! When the washing machine has been installed,
the electricity socket must be within easy reach.
! Do not use extension cords or multiple sockets.
! The cable should not be bent or compressed.
! The power supply cable must only be replaced
by authorised technicians.
Warning! The company shall not be held responsible
in the event that these regulations are not respected.
The first wash cycle
Once the appliance has been installed, and before
you use it for the first time, run a wash cycle
with detergent and no laundry, using the wash
cycle “Auto Clean” (see “Cleaning the washing
machine”).
65 - 100 cm
Technical data
Model
XWE 71483
Dimensions
width 59.5 cm
height 85 cm
depth 60.5 cm
Capacity
from 1 to 7 kg
Electrical
connections
please refer to the technical
data plate fixed to the ma-
chine
Water
connections
maximum pressure
1 MPa (10 bar)
minimum pressure
0.05 MPa (0.5 bar)
drum capacity 62 litres
Spin speed
up to 1400 rotations per minute
Test wash
cycles in
accordan-
ce with
directives
1061/2010
and
1015/2010
Programme 8:
Cotton Standard 60°.
Programme 9:
Cotton Standard 40°.
This appliance conforms to
the following EC Directives:
- 2004/108/EC (Electroma-
gnetic Compatibility)
- 2006/95/EC (Low Voltage)
- 2012/19/EU

18
GB
Care and maintenance
Cleaning the pump
The washing machine is fitted with a self-
cleaning pump which does not require any
maintenance. Sometimes, small items (such
as coins or buttons) may fall into the protective
pre-chamber at the base of the pump.
! Make sure the wash cycle has finished and
unplug the appliance.
To access the pre-chamber:
1. Take off the cover
panel on the front
of the machine by
first pressing it in
the centre and then
pushing downwards
on both sides until
you can remove it
(see figures).
2. Unscrew the lid
by rotating it anti-
clockwise (see figure):
a little water may
trickle out. This is
perfectly normal.
3. Clean the inside thoroughly.
4. Screw the lid back on.
5. Reposition the panel, making sure the hooks
are securely in place before you push it onto
the appliance.
Checking the water inlet hose
Check the inlet hose at least once a year. If
there are any cracks, it should be replaced
immediately: during the wash cycles, water
pressure is very strong and a cracked hose
could easily split open.
! Never use second-hand hoses.
Cutting off the water and electricity
supplies
• Turn off the water tap after every wash cycle.
This will limit wear on the hydraulic system inside
the washing machine and help to prevent leaks.
• Unplug the washing machine when cleaning it
and during all maintenance work.
Cleaning the washing machine
• The outer parts and rubber components
of the appliance can be cleaned using a soft
cloth soaked in lukewarm soapy water. Do not
use solvents or abrasives.
• The washing machine has a “Auto Clean”
programme for its internal parts that must be
run with no load in the drum.
For maximum performance you may want
to use either the detergent (i.e. a quantity
10% the quantity specified for lightly-soiled
garments) or special additives to clean the
washing machine. We recommend running a
cleaning programme every 40 wash cycles.
To start the programme press buttons A and
B simultaneously for 5 seconds (see figure).
The programme will start automatically and
will last approximately 70 minutes. To stop the
cycle press the START/PAUSE button.
Cleaning the detergent dispenser
drawer
To remove the drawer,
press lever (1) and pull
the drawer outwards
(2) (see figure).
Wash it under running
water; this procedure
should be repeated
frequently.
Caring for the door and drum of your
appliance
• Always leave the porthole door ajar in order to
prevent unpleasant odours from forming.
2
1
1
2
3
A
B

19
GB
Precautions and tips
! This washing machine was designed and constructed
in accordance with international safety regulations. The
following information is provided for safety reasons and
must therefore be read carefully.
General safety
• This appliance was designed for domestic use only.
• This appliance can be used by children
aged from 8 years and above and
persons with reduced physical, sensory or
mental capabilities or lack of experience
and knowledge if they have been given
supervision or instruction concerning use of
the appliance in a safe way and understand
the hazards involved. Children shall not
play with the appliance. Cleaning and user
maintenance shall not be made by children
without supervision.
• The washing machine must only be used by adults, in
accordance with the instructions provided in this manual.
• Do not touch the machine when barefoot or with wet or
damp hands or feet.
• Do not pull on the power supply cable when unplugging
the appliance from the electricity socket. Hold the plug
and pull.
• Do not open the detergent dispenser drawer while the
machine is in operation.
• Do not touch the drained water as it may reach
extremely high temperatures.
• Never force the porthole door. This could damage the
safety lock mechanism designed to prevent accidental
opening.
• If the appliance breaks down, do not under any
circumstances access the internal mechanisms in an
attempt to repair it yourself.
• Always keep children well away from the appliance while
it is operating.
• The door can become quite hot during the wash cycle.
• If the appliance has to be moved, work in a group of two
or three people and handle it with the utmost care. Never
try to do this alone, because the appliance is very heavy.
• Before loading laundry into the washing machine, make
sure the drum is empty.
Disposal
• Disposing of the packaging materials: observe local
regulations so that the packaging may be re-used.
• The European Directive 2012/19/EU on Waste
Electrical and Electronic Equipment, requires that
old household electrical appliances must not be
disposed of in the normal unsorted municipal waste
stream. Old appliances must be collected
separately in order to optimise the recovery and
recycling of the materials they contain and reduce
the impact on human health and the environment.
The crossed out “wheeled bin” symbol on the
product reminds you of your obligation, that when
you dispose of the appliance it must be separately
collected.
Consumers should contact their local authority or
retailer for information concerning the correct
disposal of their old appliance.
Opening the porthole door manually
In the event that it is not possible to open the porthole
door due to a powercut, and if you wish to remove the
laundry, proceed as follows:
1. remove the plug from the
electrical socket.
2. make sure the water level
inside the machine is lower
than the door opening; if
it is not, remove excess
water using the drain hose,
collecting it in a bucket as
indicated in the figure.
3. remove the cover panel
on the lower front part of
the washing machine (see
figure).
4. pull outwards using the tab as indicated in the figure,
until the plastic tie-rod is freed from its stop position; pull
downwards and open the door at the same time.
5. reposition the panel, making sure the hooks are securely
in place before you push it onto the appliance.
20
1
2
3

20
GB
Description of the washing
machine
Control panel
TEMPERATURE
button
WASH
CYCLE
SELECTOR
KNOB
Detergent dispenser drawer
ON/OFF
button
SPIN
button
START/PAUSE
button
and indicator light
DELAYED
START
button
OPTION
buttons
Detergent dispenser drawer: used to dispense
detergents and washing additives (see “Detergents and
laundry”).
ON/OFF button: press this briefly to switch the
machine on or off. The START/PAUSE indicator light which
flashes slowly in a green colour shows that the machine is
switched on. To switch off the washing machine during the
wash cycle, press and hold the button for approximately 3
seconds; if the button is pressed briefly or accidentally the
machine will not switch off.
If the machine is switched off during a wash cycle, this
wash cycle will be cancelled.
PUSH & WASH button: (see “Wash cycles and options”).
WASH CYCLE SELECTOR KNOB: used to set the
desired wash cycle (see “Table of wash cycles”).
OPTION buttons: press to select the available options.
The indicator light corresponding to the selected option will
remain lit.
TEMPERATURE button: press to reduce or
completely exclude the temperature; the value appears on
the display.
SPIN button: press to reduce or completely exclude
the spin cycle; the value appears on the display.
DELAYED START button: press to set a delayed
start for the selected wash cycle; the delay period appears
on the display.
START/PAUSE button and indicator light: when the
green indicator light flashes slowly, press the button to
start a wash cycle. Once the cycle has begun the indicator
light will remain lit in a fixed manner. To pause the wash
cycle, press the button again; the indicator light will flash
in an amber colour. If the symbol is not illuminated, the
door may be opened. To start the wash cycle from the
point at which it was interrupted, press the button again.
Standby mode
This washing machine, in compliance with new energy
saving regulations, is fitted with an automatic standby
system which is enabled after about 30 minutes if no
activity is detected. Press the ON-OFF button briefly and
wait for the machine to start up again.
DISPLAY
PUSH & WASH
button

21
GB
The display is useful when programming the machine and provides a great deal of information.
The duration of the available wash cycles and the remaining time of a running cycle appear in section A; if the DELAYED
START option has been set, the countdown to the start of the selected wash cycle will appear.
Pressing the corresponding button allows you to view the maximum spin speed and temperature values attained by the
machine during the set wash cycle, or the values selected most recently, if these are compatible with the set wash cycle.
The hour-glass flashes while the machine processes the data on the basis of the selected programme. After a maximum of
10 minutes, the icon remains lit in a fixed manner and the final amount of time remaining is displayed. The hour-glass icon
will then switch off approximately 1 minute after the final amount of time remaining has appeared.
The “wash cycle phases” corresponding to the selected wash cycle and the “wash cycle phase” of the running wash cycle
appear in section B:
Main wash
Rinse
Spin
Drain
The “delay” symbol , when lit, indicates that the set “delayed start” value has appeared on the display.
There are three levels in section C concerning the washing options.
DOOR LOCKED indicator light:
The lit symbol indicates that the door is locked. To prevent any damage, wait until the symbol turns off before opening the
door.
To open the door while a cycle is in progress, press the START/PAUSE button; if the DOOR LOCKED symbol is switched
off the door may be opened.
Display
B
C
A
C

22
GB
Running a wash cycle
Rapid programming
1. LOAD THE LAUNDRY. Open the porthole door.
Load the laundry, making sure you do not exceed
the maximum load value indicated in the table of
programmes and wash cycles on the following page.
2. ADD THE DETERGENT. Pull out the detergent
dispenser drawer and pour the detergent into the
relevant compartments as described in “Detergents and
laundry”.
3. CLOSE THE DOOR.
4. Press the “PUSH & WASH” button to start the wash
programme.
Traditional programming
1. SWITCH THE MACHINE ON. Press the button;
the START/PAUSE indicator light will flash slowly in a
green colour.
2. LOAD THE LAUNDRY. Open the porthole door.
Load the laundry, making sure you do not exceed
the maximum load value indicated in the table of
programmes and wash cycles on the following page.
3. ADD THE DETERGENT. Pull out the detergent
dispenser drawer and pour the detergent into the relevant
compartments as described in “Detergents and laundry”.
4. CLOSE THE DOOR.
5. SELECT THE WASH CYCLE. Use the WASH CYCLE
SELECTOR knob to select the desired wash cycle. A
temperature and spin speed is set for each wash cycle;
these values may be adjusted. The duration of the cycle
will appear on the display.
6. CUSTOMISE THE WASH CYCLE. Use the relevant
buttons:
Modify the temperature and/or spin
speed. The machine automatically displays the
maximum temperature and spin speed values set for
the selected cycle, or the most recently-used settings
if they are compatible with the selected cycle. The
temperature can be decreased by pressing the
button, until the cold wash “OFF” setting is reached.
The spin speed may be progressively reduced by
pressing the button, until it is completely excluded
(the “OFF” setting). If these buttons are pressed again,
the maximum values are restored.
! Exception: if the 8 programme is selected, the
temperature can be increased up to a value of 90°C.
Setting a delayed start.
To set a delayed start for the selected cycle, press the
corresponding button repeatedly until the required delay
period has been reached. When this option has been
activated, the symbol lights up on the display. To
remove the delayed start setting, press the button until
the text “OFF” appears on the display.
Modify the cycle settings.
• Press the button to enable the option; the indicator
light corresponding to the button will switch on.
• Press the button again to disable the option; the
indicator light will switch off.
! If the selected option is not compatible with the set
wash cycle, the indicator light will flash and the option
will not be activated.
! If the selected option is not compatible with another
previously selected option, the indicator light will
flash accompanied by a buzzer (3 beeps), and only
the latter option will be activated; the indicator light
corresponding to the activated option will turn on.
! The options may affect the recommended load value
and/or the duration of the cycle.
7. START THE WASH CYCLE. Press the START/
PAUSE button. The corresponding indicator light will
turn green, remaining lit in a fixed manner, and the door
will be locked (the DOOR LOCKED symbol will be lit).
To change a wash cycle while it is in progress, pause
the washing machine using the START/PAUSE button
(the START/PAUSE indicator light will flash slowly in an
amber colour); then select the desired cycle and press
the START/PAUSE button again.
To open the door while a cycle is in progress, press
the START/PAUSE button; if the DOOR LOCKED
symbol is switched off the door may be opened. Press
the START/PAUSE button again to restart the wash
cycle from the point at which it was interrupted.
8. THE END OF THE WASH CYCLE. This will be
indicated by the text “END” on the display; when the
DOOR LOCKED symbol switches off the door may
be opened. Open the door, unload the laundry and
switch off the machine.
! If you wish to cancel a cycle which has already begun,
press and hold the button. The cycle will be stopped
and the machine will switch off.

23
GB
Wash cycles and options
Table of wash cycles
Wash options
Rapid
When this button is pressed the first time, the 9’ icon will
light up, when pressed the second time the 30’ icon lights
up and the third time the 1h icon lights up. When pressed
the fourth time the 9’ icon lights up again.
! It cannot be used in conjunction with wash cycles 1-2-3-
4-5-6-7-8-9-10-11-12-13- - .
Fast Forward
During a wash programme and under certain conditions,
pressing this button allows for ending the wash
programme after only 20’ if necessary, by performing a
brief rinse cycle followed by a spin cycle at maximum 800
rpm or lower, if reduced manually during the programme
customisation phase. In this case, washing and rinsing
performance will be reduced. After pressing the button, the
relative indicator light turns on together with the indicator
light of the rinse phase. If the selected temperature is
equal to 40° and/or the button is pressed during the initial
phase of the programme, the “Fast Forward” option lasts
longer so that the detergent can dissolve properly and
avoid damaging the fabrics. In this case, the rinse phase
indicator light flashes while the wash indicator light remains
fixed until the necessary activation conditions are fulfilled.
If less than 20’ remain of the wash programme, the option
will be disabled.
! It cannot be used in conjunction with wash cycles 2-4-5-
6-14- - .
This option allows for selecting the most suitable
programme for any type of sports clothing, and is
designed to remove dirt while optimally preserving the
technical features of the garments. The various Sport
option levels offer the following wash cycles:
- Sport Shoes, a cycle designed to safely wash up to
2 pairs of sports shoes simultaneously.
- Gym Kit, a cycle designed to simultaneously wash
any type of sports clothing together with gym towels.
- Technical Wear, designed for specifically washing
waterproof garments or clothing with special technical fibres
like Gore-Tex, so as to optimise washing performance while
preserving their technical properties over time. Do not use
fabric softeners for garments with technical fibres.
! It cannot be used in conjunction with wash cycles 2-3-4-5-
6-7-8-9-10-11-12-13-14- - .
The length of cycle shown on the display or in this booklet is an estimation only and is calculated assuming standard working conditions. The actual duration can vary accor-
ding to factors such as water temperature and pressure, the amount of detergent used, the amount and type of load inserted, load balancing and any wash options selected.
1) Test wash cycle in compliance with directive 1061/2010: set wash cycle 8 with a temperature of 60°C.
This cycle is designed for cotton loads with a normal soil level and is the most efficient in terms of both electricity and water consumption; it should
be used for garments which can be washed at 60°C. The actual washing temperature may differ from the indicated value.
2) Test wash cycle in compliance with directive 1061/2010: set wash cycle 9 with a temperature of 40°C.
This cycle is designed for cotton loads with a normal soil level and is the most efficient in terms of both electricity and water consumption; it should
be used for garments which can be washed at 40°C. The actual washing temperature may differ from the indicated value.
For all Test Institutes:
2) Long wash cycle for cottons: set wash cycle 9 with a temperature of 40°C.
3) Synthetic program along: set wash cycle 10 with a temperature of 40°C.
Wash cycles
Description of the wash cycle
Max.
temp.
(°C)
Max.
speed
(rpm)
Detergents
Max. load (kg)
Residual
dampness %
Energy
consumption
kWh
Total water lt
Cycle duration
Prewash
Wash
Fabric
softener
Bleach
Special
1
Sport
30° 600 -
- 4 - - - 60’
2
Dark
30° 800 -
- 5 - - - 80’
3
Anti-odour (Cotton) 60° 1000 -
- 3,5 - - - 120’
3
Anti-odour (Synthetic) 40° 1000 -
- 3,5 - - - 105’
4
Delicate
30° 0 -
- 1 - - - 80’
5
Wool: for wool, cashmere, etc. 40° 800 -
- 2 - - - 85’
6
Duvet: for down-stuffed garments. 30° 1000 -
- 3,5 - - - 100’
Standard
7
Cottons with Pre-wash: extremely soiled whites. 90° 1400
- 7 53 2,75 100 205’
8
Cotton Standard 60° (1): heavily soiled whites and resistant colours.
60°
(Max. 90°)
1400 -
- 7 53 0,90 52,5 205’
9
Cotton Standard 40° (2): lightly soiled whites and delicate colours.
40° 1400 -
- 7 53 0,88 80 165’
10
Synthetic: heavily soiled resistant colours. 60° 800 -
- 4,5 46 0,86 47 115’
10
Synthetic (3): lightly soiled resistant colours. 40° 800 -
- 4,5 46 0,60 51 105’
11
Coloured
40° 1400 -
- 7 53 0,88 77 105’
Eco & Rapid
12
Cotton Standard 20°: lightly soiled whites and delicate colours. 20° 1400 -
- 7 - - - 180’
13
Eco Synthetic
20° 800 -
- 7 - - - 120’
14
Rapid
- 800 - -
- 1,5 - - - 9’
14
Rapid
30° 800 -
- 3,5 80 0,18 43 30’
14
Rapid
60° 1000 -
- 7 - - - 60’
Partials
Rinse/Bleach - 1400 - -
7 - - - 55’
Spin + Drain - 1400 - - - - 7 - - - 25’

24
GB
Push & Wash
This function allows for starting a wash cycle even when the machine is switched off without having to press the ON/OFF
button in advance, or after switching on the machine, without having activated any button and/or selector (otherwise, the
Push & Wash function will be deactivated). To start the Push & Wash cycle press and hold the relative button for 2 seconds.
The lit indicator light indicates that the cycle has started. This wash cycle is ideal for cotton or synthetic fabrics, as it washes
at a temperature of 30° and a maximum spin speed of 1200 rpm. Maximum load 4 kg. (Cycle duration 50’).
How does it work?
1. Load the laundry (cotton and/or synthetic garments) and close the door.
2. Pour the detergent and additives.
3. Start the programme by pressing and holding the Push & Wash button for 2 seconds. The relative indicator light turns
green and the door will lock (the DOOR LOCKED symbol turns on).
N.B.: starting the wash cycle through the Push & Wash button activates an automatic non-customisable cycle
recommended for cotton and synthetic fabrics. This programme does not allow for setting any additional options.
To open the door while an automatic cycle is under way, press the START/PAUSE button; if the DOOR LOCKED symbol
is switched off the door may be opened. Press the START/PAUSE button again to restart the wash cycle from the point at
which it was interrupted.
4. Once the programme is finished, the END indicator light turns on.

25
GB
Detergents and laundry
Detergent dispenser drawer
Successful washing results also depend on the correct
dose of detergent: adding too much detergent will not
necessarily result in a more efficient wash, and may in
fact cause build up on the inside of your appliance and
contribute to environmental pollution.
! Do not use hand washing detergents because these
create too much foam.
! Use powder detergent for white cotton garments, for pre-
washing, and for washing at temperatures over 60°C.
! Follow the instructions given on the detergent packaging.
Open the detergent
dispenser drawer and pour
in the detergent or washing
additive, as follows.
Compartment 1: Pre-wash detergent (powder)
Before pouring in the detergent, make sure that extra
compartment 4 has been removed.
Compartment 2: Washing detergent (powder or liquid)
If liquid detergent is used, it is recommended that the
removable plastic partition A (supplied) be used for proper
dosage. If powder detergent is used, place the partition
into slot B.
Compartment 3: Additives (fabric softeners, etc.)
The fabric softener must not exceed the “max” level indicated
on the central pin.
Extra compartment 4: Bleach
Bleach cycle
Insert the additional compartment 4 (provided) into
compartment 1. In pouring the bleach do not exceed the
“max” level indicated on the central pin.
Perform bleaching by pouring the bleach into additional
compartment 4 and set the programme .
! Traditional bleach should be used on resistant white
fabrics, and delicate bleach for coloured and synthetics
fabrics and for wool.
Preparing the laundry
• Divide the laundry according to:
- the type of fabric/the symbol on the label
- the colours: separate coloured garments from whites.
• Empty all garment pockets and check the buttons.
• Do not exceed the values listed in the “Table of wash
cycles”, which refer to the weight of the laundry when dry.
How much does your laundry weigh?
1 sheet 400-500 g
1 pillow case 150-200 g
1 tablecloth 400-500 g
1 bathrobe 900-1.200 g
1 towel 150-250 g
Special wash cycles
Sport (programme 1) is designed for washing lightly soiled
sports clothing (tracksuits, shorts, etc.); for best results, we
recommend not exceeding the maximum load indicated
in the “Table of wash cycles” We recommend using liquid
detergent, and adding the amount suitable for a half-load.
Dark: use programme 2 to wash dark-coloured garments.
This programme is designed to maintain dark colours over
time. We recommend using a liquid detergent for the best
results when washing dark-coloured garments.
Anti-odour: use programme 3 for washing garments
with bad odours (e.g. smoke, sweat, fried food). The
programme is designed to remove bad odours while
preserving the fabric fibres. Synthetics fabrics or mixed
loads should be washed at 40°, and resistant cotton
fabrics at 60°.
Delicate: use programme 4 to wash very delicate
garments. It is advisable to turn the garments inside out
before washing them. For best results, use liquid detergent
on delicate garments.
Wool: the wool wash programme of this machine has
been tested and approved by The Woolmark Company
for the washing of wool containing garments labelled as
“hand wash” provided that the garments are washed
according to the instructions on the garment label and
those issued by the manufacturer of this washing machine.
(M1127)
In UK, Eire, Hong Kong and India the Woolmark trade mark
is a Certification trade mark.
Duvet: to wash double or single duvets (the weight of
which should not exceed 3,5 kg), cushions or clothes
padded with goose down such as puffa jackets, use the
special wash programme number 6. We recommend that
duvets are placed in the drum with their edges folded
inwards (see figure) and that no more than ¾ of the total
volume of the drum is used. To achieve the best results,
we recommend that a liquid detergent is used and placed
inside the detergent dispenser drawer.
Coloured: use this programme 11 to wash bright
coloured clothes. The programme is designed to maintain
bright colours over time.
1
2
3
4
A
B

26
GB
Cotton Standard 20° (programme 12) ideal for lightly
soiled cotton loads. The effective performance levels
achieved at cold temperatures, which are comparable to
washing at 40°, are guaranteed by a mechanical action
which operates at varying speed, with repeated and
frequent peaks.
Eco Synthetic (programme 13) ideal for mixed loads
(cotton and synthetics) with a normal soil level. The
effective performance levels achieved at cold temperatures
are guaranteed by a mechanical action which operates at
varying speed, across set average intervals.
Rapid (programme 14) allows for varying the garment
treatment duration from 9’ to 1h. Pressing the
corresponding “Rapid” button allows for varying the cycle
duration between 9’ (refresh), 30’ (wash), 1h (wash).
The 9’ cycle refreshes garments using fabric softener
only; it is advisable not to add any detergent into
the machine. The 30’ programme is designed to wash
lightly soiled garments at 30° (excluding wool and silk)
with a 3 kg maximum load in a short time: it only lasts 30
minutes and allows for saving time and energy. The “1h”
cycle is designed to wash moderately soiled resistant
cotton garments at 60° in an hour, with good washing
performance. For synthetic or mixed garments, we
recommend lowering the temperature down to 40°.
Load balancing system
Before every spin cycle, to avoid excessive vibrations
before every spin and to distribute the load in a uniform
manner, the drum rotates continuously at a speed which
is slightly greater than the washing rotation speed. If,
after several attempts, the load is not balanced correctly,
the machine spins at a reduced spin speed. If the load is
excessively unbalanced, the washing machine performs
the distribution process instead of spinning. To encourage
improved load distribution and balance, we recommend
small and large garments are mixed in the load.

27
GB
Troubleshooting
Your washing machine could occasionally fail to work. Before contacting the Technical Assistance Service (see “ Service”),
make sure that the problem cannot be solved easily using the following list.
Problem:
The washing machine does not
switch on.
The wash cycle does not start.
The washing machine does not fill
with water (the text “H2O” on the
display).
The washing machine
continuously takes in and drains
water.
The washing machine does not
drain or spin.
The washing machine vibrates a
lot during the spin cycle.
The washing machine leaks.
The “option” and START/PAUSE
indicator lights flash rapidly and an
error code appears on the display
(e.g.: F-01, F-..).
There is too much foam.
Push & Wash does not activate.
The programme lasts a lot less
that expected.
Possible causes / Solutions:
• The appliance is not plugged into the socket fully, or not enough to make contact.
• There is no power in the house.
• The washing machine door is not closed properly.
• The ON/OFF button has not been pressed.
• The START/PAUSE button has not been pressed.
• The water tap has not been opened.
• A delayed start has been set.
• The water inlet hose is not connected to the tap.
• The hose is bent.
• The water tap has not been opened.
• There is no water supply in the house.
• The pressure is too low.
• The START/PAUSE button has not been pressed.
• The drain hose is not fitted at a height between 65 and 100 cm from the floor
(see “Installation”).
• The free end of the hose is under water (see “Installation”).
• The wall drainage system is not fitted with a breather pipe.
If the problem persists even after these checks, turn off the water tap, switch the
appliance off and contact the Technical Assistance Service. If the dwelling is on one
of the upper floors of a building, there may be problems relating to water drainage,
causing the washing machine to fill with water and drain continuously. Special anti-
draining valves are available in shops and help to prevent this inconvenience.
• The wash cycle does not include draining: some cycles require the draining
process to be enabled manually.
• The drain hose is bent (see “Installation”).
• The drainage duct is clogged.
• The drum was not unlocked correctly during installation (see “Installation”).
• The washing machine is not level (see “Installation”).
• The washing machine is trapped between cabinets and walls (see “Installation”).
• The water inlet hose is not screwed on properly (see “Installation”).
• The detergent dispenser drawer is blocked (for cleaning instructions, see “Care
and maintenance”).
• The drain hose is not fixed properly (see “Installation”).
• Switch off the machine and unplug it, wait for approximately 1 minute and then
switch it back on again.
If the problem persists, contact the Technical Assistance Service.
• The detergent is not suitable for machine washing (it should display the text “for
washing machines” or “hand and machine wash”, or the like).
• Too much detergent was used.
• After switching on the machine a control other than Push & Wash was activated.
Switch the machine off and press the Push & Wash button.
• The “Fast Forward” option was activated.

28
GB
Service
Before contacting the Technical Assistance Service:
• Check whether you can solve the problem alone (see “Troubleshooting”).
• Restart the wash cycle to check whether the problem has been solved.
• If this is not the case, contact an authorised Technical Assistance Centre.
! Always request the assistance of authorised technicians.
Have the following information to hand:
• the type of problem;
• the appliance model (Mod.);
• the serial number (S/N).
This information can be found on the data plate applied to the rear of the washing machine, and can also be found on the
front of the appliance by opening the door.
195110451.01
09/2013 - Xerox Fabriano
-
 1
1
-
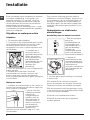 2
2
-
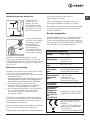 3
3
-
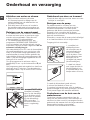 4
4
-
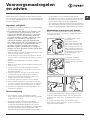 5
5
-
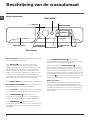 6
6
-
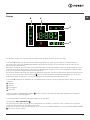 7
7
-
 8
8
-
 9
9
-
 10
10
-
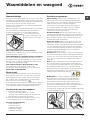 11
11
-
 12
12
-
 13
13
-
 14
14
-
 15
15
-
 16
16
-
 17
17
-
 18
18
-
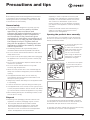 19
19
-
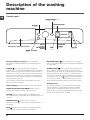 20
20
-
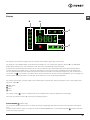 21
21
-
 22
22
-
 23
23
-
 24
24
-
 25
25
-
 26
26
-
 27
27
-
 28
28


Indesit XWE 71483X WSSS NL Gebruikershandleiding
- Categorie
- Wasmachines
- Type
- Gebruikershandleiding
in andere talen
Gerelateerde papieren
Andere documenten
-
Whirlpool IWD 7148 SL (NL) Gebruikershandleiding
-
-
-
-
-
-
Otsein-Hoover DYN 8163D8P Handleiding
-