
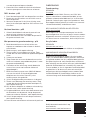
MANUAL
LAB162
Assembly instructions, how to use, useful tips for keeping
your tool for togetherness in shape.
EN – NL – DE – FR
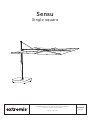
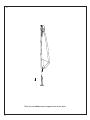
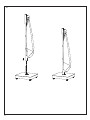
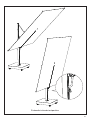
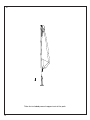
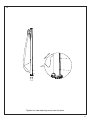
Sensu
Single square

Tools for togetherness
© All our designs are original creations and protected by intellectual property rights.

IMPORTANT! RETAIN FOR FUTURE
REFERENCE: READ CAREFULLY.
BELANGRIJK! LEES DIT DOCUMENT
AANDACHTIG EN BEWAAR HET VOOR
TOEKOMSTIGE RAADPLEGING!
WICHTIG! AUFHEBEN, UM SPÄTER
ETWAS NACHSEHEN ZU KÖNNEN:
SORGFÄLTIG DURCHLESEN!
IMPORTANT! LISEZ ATTENTIVEMENT
CE MANUEL ET CONSERVEZ-LE POUR
RÉFÉRENCE ULTÉRIEURE!
IMPORTANTE! CONSERVARE COME
RIFERIMENTO PER IL FUTURO:
LEGGERE ATTENTAMENTE!
¡IMPORTANTE! CONSÉRVELO PARA
FUTURA REFERENCIA: LÉALO
ATENTAMENTE!

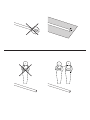
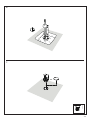
Do not use
power tools!


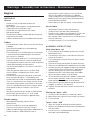
Table of contents
Mounting kit
6
Assembly with wheel base
8
Open / close
18
Moving up/down
16
Rotate 360°
20
Tilting vertically
22
Assembly with permanent fixation
24
Warnings – Assembly text instructions – Maintenance
34

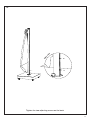
scale 1:1
scale 1:1
scale 1:1
4 x wheel
4 x M10x16 din 7991 4 x M10x16 din 7991
16 x M6x12 iso 7380
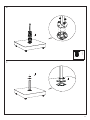
Mounting kit to fix wheels to the wheel base
Mounting kit to fix
rotating system to the
wheel base
Mounting kit to fix
parasol support to the
permanent fixation
Mounting kit


10
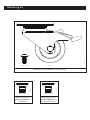
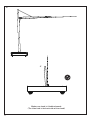
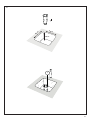
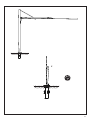
1.
2.
15’
p 30
Assembly with wheel base
N° 4 - 6
scale 1:2
4 x wheel16 x M6x12

11
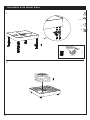
3.
4.
scale 1:2
4 x M10x16

12
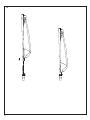
5.
Take the included parasol support out of the pole

13
6.
7.
scale 1:2
4 x M10x16

14
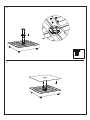
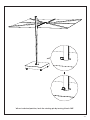
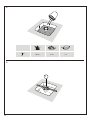
8.
2°
Make sure shade is tilted backwards
(The tilted side is the back side of the shade)

15
2°

16
9.

17
10.
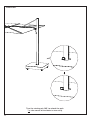
B
a
c
k
s
i
d
e
Tighten the two adjusting screws on the back

18
Moving up / down
Use the handle to move the shade up / down

19
Move all the way up + fix the handle

20
Open / Close

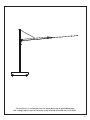
21
Put the Sensu in a tilted position for water drainage & wind advantage
We strongly advise you to close the shade at wind speed 28 km/h (18 mph)

22
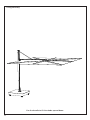
Rotate 360°
Turn the rotating pin 180° to unlock the pole
Tip: take corner of the fabric to turn easily

23
When in desired position, lock the rotating pin by turning it back 180°

24
Tilting vertically
Use the handle to tilt the shade up and down

25
Fix handle in the desired position

26
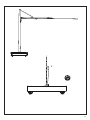
1.
2.
45’
p 31
Assembly with permanent fixation
Use tape to close the bottom side of the tube
N° 6

27
3.
!
60 cm
60 cm
40 cm

28
4.
!
5.
X* 10 cm 4 cm = H
GRASS GRAVEL TILES
H
X*

29
6.
7.
!
or
scale 1:2
4 x M10x16

30
8.
Take the included parasol support out of the pole

31
9.
10.
scale 1:2
4 x M10x16
.....

32
11.
2°
Make sure shade is tilted backwards
(The tilted side is the back side of the shade)

33
2°

34
12.

35
13.
B
a
c
k
s
i
d
e
Tighten the two adjusting screws on the back

36
English
WARNINGS
General
• Do not use any sharp tools to open the
packaging.
• We strongly advise against using power tools.
• Tripping hazard, mind your step.
• Do not put out cigarettes on the shade.
• Not grafitti proof.
• Do not leave children unattended whilst playing
underneath the shade.
• Colors can dier over years and from batch to batch.
Product
• Do not drag the shade, but carry it with minimum
2 people.
• Anchoring the product has to be done by
qualified people.
• For anchoring: use suitable bolts or screws from
a specialized store depending on the material
your terrace is made of.
• In case of strong winds or if it is not being used,
close the shade and tilt the latches downwards.
Put the protective cover over the shade to prevent
it from blowing open or getting dirty.
• For ventilation purposes, the cover is not 100%
water proof.
• Store the parasol when not in use for a long
time as follows: completely dry and in a dry
environment.
• Do not leave the parasol closed for a long time
when the parasol fabric is still damp or wet.
• Do not leave the shade unattended when opened.
• Tests in a windtunnel have shown that the shade
withstands wind speeds up to 49 km/h (31 mph).
Still, we strongly advise to close it sooner (from
wind speed 28 km/h (18 mph) is the rule of
thumb.
• We advise to position the shade in the direction
of the wind, put the arm in a 5° à 10° angle.
• Fix the closed Sensu with the supplied strap.
Powder coating
• White powder coating requires more
maintenance.
• Do not use abrasive scouring powders or
scourers as they will scratch the surface.
• Color can fade to some extent when exposed to UV.
• Flame retarding - NEN-EN13501-1 A2-sl -
Satisfying the same criteria as Class B for the
SBI-test according to EN13823. In addition,
under conditions of a fully developed fire these
products will nog significantly contribute to the
fire load and fire growth.
• Dark colors can get very hot in sunny weather.
Acrylic fabric
• White fabric requires more maintenance.
• Shake or brush o loose dirt immediately.
• Do not use any aggressive detergents as they will
remove the protective coating of the fabric.
• We strongly advise you not to use a high-pressure
hose for cleaning.
• UV color fasteness: 7/8 (ISO 105-B02).
ASSEMBLY INSTRUCTIONS
With wheel base - p8
1. Fix the wheels to the bottom of the base using 4
bolts M6x12 each.
2. Put two large and seven small concrete tiles per
corner on the base.
3. Fix the rotating system to the base and fix with 4
bolts M10x16.
4. Position the large cover plate on top of the base.
5. Take the included parasol support out of the pole.
6. Position the parasol support on top of the rotating
system. Make sure that the cutout is positioned
with the rotating pin as shown in the drawing.
7. Now position the small cover plate and rubber
spacer on top as shown in the drawing.
8. The tilted side of the parasol support is back side
of the shade. Attention: make sure the shade is
tilted backwards as shown in the drawing.
9. Now slide the parasol pole on top of the parasol
support as shown in the drawing.
10. Tighten the two adjusting screws on the back of
the pole.
Moving up / down - p26
1. Use the handle to move the shade up / down.
2. Move all the way up until it can’t move any further.
3. Fix the handle.
Open / close - p28
1. Open the shade by pulling the outer balleens.
2. Now fix the shade by connecting the two balleens
with the hook.
3. Put the Sensu in a tilted position for water
drainage & wind advantage.
Warnings – Assembly text instructions – Maintenance

37
Rotate 360° - p30
1. Turn the rotating pin 180° to unlock the pole.
2. Now take the corner of the fabric to turn the
shade easily.
3. When in the desired position, lock the rotating
pin by turning it back 180°.
Tilting vertically - 32
1. Us the handle to move the shade up / down.
2. Fix the handle when the shade is in the desired
position.
With permanent fixation - p14
1. Tape the bottom side of the tube to make sure no
concrete gets inside the tube.
2. Make a well as shown in the drawing.
3. Place the anchor in the middle of the well and
make sure the anchor is perpendicular.
4. Fill the well with concrete.
5. Make sure the top of the anchor is aligned with
the disired floor.
6. Check if the anchor is still perpendicular and let
it rest for a while until the concrete is hard.
7. Fix the rotating system to the anchor and fix with
4 bolts M10x16. Or place the included cover plate
when not using the rotating system.
8. Take the included parasol support out of the pole.
9. Position the parasol support on top of the
rotating system. Make sure that the cutout is
positioned with the rotating pin is shown in the
drawing.
10. Now position the small cover plate and rubber
spacer on top as shown in the drawing.
11. The tilted side of the parasol support is back side
of the shade. Attention: make sure the shade is
tilted backwards as shown in the drawing.
12. Now slide the parasol pole on top of the parasol
support as shown in the drawing.
13. Tighten the two adjusting screws on the back of
the pole.
MAINTENANCE
Powder coating
CLEANING
Regularly
Use Extremis Multicleaner, a 100% biodegradable
detergent or common kitchen cleaning products.
Avoid using aggressive products. These surfaces are
best cleaned with a neutral cleaning product diluted
in water.
REPAIRING DAMAGED POWDER COATING
When damaged
The impact of sharp objects can damage the
coating. Scratches or dents can be touched up with
our paint pens. However this only camouflages the
scratches without removing them.
Acrylic fabric
CLEANING
When dirty
Make a solution to remove stains.
REMOVING STUBBORN STAINS
Only if nothing else helps
More drastic measures needed? Bleach can be used
if nothing else helps. Protect the area around your
fabric when using a bleach solution – bleach may
discolor fabrics. Please be aware of the environment
when cleaning with bleach. Bleach can have harmful
eects on the natural environment around you. We
do not advise using bleach if you are surrounded by
a body of water or another environment that could
be aected. If stains and/or mildew marks are seve-
re, the quantity of bleach may be increased.
Watch the maintenance video on
our website:
www.extremis.com/maintenance

38
Nederlands
WAARSCHUWINGEN
Algemeen
• Gebruik geen scherp gereedschap om de
verpakking te openen.
• Het gebruik van elektrisch gereedschap wordt
ten zeerste afgeraden.
• Struikelgevaar, let op waar u loopt.
• Doof geen sigaretten uit op de parasol.
• Niet bestand tegen grati.
• Laat kinderen niet onbewaakt achter wanneer ze
onder de parasol spelen.
• Kleuren kunnen van jaar tot jaar en van partij tot
partij verschillen.
Product
• Sleep de parasol niet, maar draag hem met
minstens 2 personen.
• Het product moet worden verankerd door
gekwalificeerde personen.
• Voor verankering: gebruik geschikte bouten
of schroeven uit een gespecialiseerde winkel,
afhankelijk van het materiaal waarvan uw terras
is gemaakt.
• Sluit de parasol en draai de blokkeerhaak naar
beneden als er hevige wind optreedt of als je de
parasol niet gebruikt.
• Trek de beschermhoes over de parasol om te
vermijden dat hij openwaait of vuil wordt.
• Een goede ventilatie is belangrijk en dus is de
hoes niet 100% waterbestendig.
• Berg de parasol volledig droog op een droge plek
op als je hem lange tijd niet gebruikt.
• Laat de parasol niet te lang toe als de stof nog
vochtig of nat is.
• Laat de parasol niet onbewaakt achter als hij
open staat.
• Testen in windtunnels hebben aangetoond dat
de parasol bestand is tegen windsnelheden tot 6
op de schaal van Beaufort (49 km/h). Toch is het
aangeraden de parasol eerder te sluiten (vanaf 4
Beaufort (31 km/h).
• Wij adviseren om de parasol in de windrichting te
plaatsen, zet de arm in een hoek van 5° à 10°.
• Bind de stof vast met het bijgeleverde koord
wanneer je de Sensu sluit.
Poedercoating
• Witte poedercoating vereist meer onderhoud.
• Gebruik geen schuurpoeders of schuursponsjes
omdat deze krassen op het oppervlak
veroorzaken.
• De kleur kan in zekere mate vervagen bij
blootstelling aan uv-straling.
• Vlamvertragend - NEN-EN13501-1 A2-sl - Voldoet
aan dezelfde criteria als klasse B voor de SBI-
test volgens EN13823. Bovendien zullen deze
producten onder omstandigheden van een volledig
ontwikkelde brand geen significante bijdrage
leveren aan de brandbelasting en brandgroei.
• Donkere kleuren kunnen bij zonnig weer zeer
heet worden.
Acryl stof
• Witte stoen zijn onderhoudsintensiever.
• Schud of borstel los vuil onmiddellijk weg.
• Gebruik geen agressieve schoonmaakmiddelen.
Deze verwijderen namelijk de beschermende
coating op de stof.
• Het reinigen met een hogedrukslang wordt ten
zeerste afgeraden.
• UV-bestendigheid: 7/8 (ISO 105-B02).
MONTAGE INSTRUCTIES
Met sokkel op wieltjes - p8
1. Maak elk wieltje met 4 M6x12-bouten vast aan de
onderkant van de voet.
2. Vul elke hoek van de voet op met twee grote en
zeven kleine betonnen tegels.
3. Maak het rotatiesysteem met 4 M10x16-bouten
vast aan de voet.
4. Leg de grote dekplaat bovenop de voet.
5. Schuif de bijgeleverde parasolsteun uit de paal.
6. Zet de steun bovenop het rotatiesysteem. Zorg
ervoor dat de uitsnijding rond de rotatiepen zit,
zoals op de tekening.
7. Glij de kleine dekplaat en rubberen afstandsring
over de steun, zoals op de tekening.
8. De gekantelde kant van de steun komt overeen
met de achterkant van de parasol. Let op: de
parasol moet naar achteren kantelen, zoals op de
tekening.
9. Schuif de parasolpaal nu over de parasolsteun,
zoals op de tekening.
10. Draai de twee stelschroeven achteraan de paal
vast.
Omhoog / naar beneden doen - p26
1. Gebruik de blokkeerhaak om de parasol omhoog
en naar beneden te schuiven.
2. Schuif de parasol helemaal naar boven, tot je niet
meer verder kunt.
3. Draai de blokkeerhaak vast.
Openen / sluiten - p28
1. Trek aan de luifels om de parasol te openen.
2. Maak de twee luifels nu met de haak aan elkaar

39
vast om de parasol open te houden.
3. Kantel de Sensu zodat de luifels de wind beter
kunnen opvangen en water kunnen afvoeren.
360° draaien - p30
1. Draai de rotatiepen 180° om de paal los te maken.
2. Neem een van de hoeken van de luifels vast en
draai de parasol.
3. Wanneer de parasol in de juiste richting staat,
draai je de rotatiepen opnieuw 180° om hem vast
te maken.
Verticaal kantelen - p32
1. Gebruik de blokkeerhaak om de parasol naar
voren of naar achteren te kantelen.
2. Draai de blokkeerhaak vast zodra de parasol in
de gewenste hoek staat.
Met permanente grondverankering - p14
1. Maak de onderkant van de buis dicht met
tape om te voorkomen dat er beton in de buis
terechtkomt.
2. Maak een put, zoals op de tekening.
3. Zet het anker in het midden van de put. Zorg
ervoor dat het anker loodrecht op de ondergrond
staat.
4. Vul de put met beton.
5. Zorg ervoor dat er tussen de bovenkant van het
anker en het beton nog voldoende plaats is voor
de gewenste bedekking.
6. Controleer of het anker nog steeds loodrecht
staat en laat rusten tot het beton helemaal
opgedroogd is.
7. Maak het rotatiesysteem met 4 M10x16-bouten
vast aan het anker. Of leg de bijgeleverde
dekplaat over het anker wanneer je het
rotatiesysteem niet gebruikt.
8. Schuif de bijgeleverde parasolsteun uit de paal.
9. Zet de steun bovenop het rotatiesysteem. Zorg
ervoor dat de uitsnijding rond de rotatiepen zit,
zoals op de tekening.
10. Glij de kleine dekplaat en rubberen afstandsring
over de steun, zoals op de tekening.
11. De gekantelde kant van de steun komt overeen met
de achterkant van de parasol. Let op: de parasol
moet naar achteren kantelen, zoals op de tekening.
12. Schuif de parasolpaal nu over de parasolsteun,
zoals op de tekening.
13. Draai de twee stelschroeven achteraan de paal vast.
ONDERHOUD
Poedercoating
REINIGEN
Geregeld
Gebruik Extremis Multi Cleaner, een 100% bio-
logisch afbreekbaar schoonmaakmiddel, of een
gewoon schoonmaakmiddel zoals je in de keuken
gebruikt. Gebruik geen agressieve producten. Voor
deze oppervlakken gebruik je het best een neutraal
schoonmaakmiddel, verdund met water.
BESCHADIGDE POEDERLAK HERSTELLEN
Indien beschadigd
Door impact van scherpe voorwerpen kan de lak
beschadigd raken. Krassen of putjes kunnen worden
bijgewerkt met onze verfstiften. Hiermee kun je ech-
ter alleen krassen camoufleren, de kras blijft echter.
Acrylic fabric
REINIGEN
Wanneer de stof vuil is
Maak een oplossing om de vlekken te verwijderen.
HARDNEKKIGE VLEKKEN VERWIJDEREN
Alleen als laatste redmiddel
Drastischer maatregelen nodig? Als niets anders
helpt, kan bleekmiddel worden gebruikt. Bescherm
het gebied rond de stof als je bleekmiddel gebruikt.
De oplossing kan de stof namelijk doen verkleuren.
Hou rekening met het milieu wanneer je bleekmiddel
gebruikt. Bleekmiddel kan schadelijk zijn voor de
natuur rondom je. Het is afgeraden om bleekmiddel
te gebruiken in de buurt van water of natuurlijke
omgevingen die beschadigd kunnen worden door
het bleekmiddel. Bij hardnekkige vlekken en/of
schimmel mag meer bleekmiddel worden gebruikt.
Bekijk de onderhoudsvideo’s op
onze website:
www.extremis.com/maintenance

40
Deutsch
WARNUNG
Allgemeines
• Zum Önen der Verpackung keine scharfen
Werkzeuge verwenden.
• Wir raten dringend davon ab, Elektrowerkzeuge
zu nutzen.
• Stolpergefahr, Vorsicht beim Gehen!
• Zigaretten nicht auf dem Sonnenschirm ausdrücken.
• Nicht gratibeständig.
• Lassen Sie Kinder nicht unbeaufsichtigt unter
dem Schirm spielen.
• Farben können über die Jahre und von Charge zu
Charge variieren.
Produkt
• Ziehen Sie den Schirm nicht, sondern tragen Sie
ihn mit mindestens zwei Personen.
• Die Verankerung im Boden muss durch
Fachpersonal geschehen.
• Für die Bodenverankerung: Verwenden Sie je
nach Material Ihrer Terrasse geeignete Bolzen
oder Schrauben aus dem Fachhandel.
• Schließen Sie den Schirm bei starkem Wind oder
Nichtgebrauch und klappen Sie den Riegel nach unten.
• Ziehen Sie die Schutzhülle über den Schirm, um
zu verhindern, dass er sich durch einen Windstoß
önet oder dreckig wird.
• Die Schutzhülle ist nicht 100 % wasserfest, um
eine gewisse Belüftung zu gewährleisten.
• Wenn der Schirm nicht verwendet wird, sollte er
vollkommen trocken und in trockener
• Umgebung aufbewahrt werden.
• Lassen Sie den Schirm nicht über einen längeren
Zeitraum geschlossen, wenn der Schirmsto
noch feucht oder nass ist.
• Lassen Sie den Schirm nicht unbeobachtet
oenstehen.
• Tests in einem Windtunnel haben gezeigt, dass der
Sonnenschirm Wind der Stärke 6 auf der Beaufort-
Skala standhält (49 km/h). Trotzdem sollte er
geschlossen werden, bevor eine solche Windstärke
erreicht wird (von 4 Beaufort, 28 km/h).
• Wir empfehlen, den Sonnenschirm in die
Windrichtung zu stellen, den Arm in einem
Winkel von 5° bis 10°.
• Fixieren Sie den geschlossenen Sensu mit dem
mitgelieferten Band.
Pulverbeschichtung
• Weiße Pulverbeschichtung erfordert mehr Wartung.
• Verwenden Sie keine scheuernden
Reinigungsmittel oder Topfreiniger, da diese die
Oberfläche verkratzen.
• Die Farbe kann unter UV-Belastung bis zu einem
gewissen Grad verblassen.
• Flammhemmend - NEN-EN13501-1 A2-sl - Erfüllt
die gleichen Kriterien wie Klasse B für die SBI-
Prüfung nach EN13823. Darüber hinaus werden
diese Produkte bei einem voll entwickelten
Feuer nicht wesentlich zur Brandlast und zur
Brandverbreitung beitragen.
• Dunkle Farben können bei sonnigem Wetter sehr
heiß werden.
Acrylsto
• Weißer Sto bedarf mehr Pflege.
• Schütteln Sie lose Verschmutzungen sofort
herunter oder bürsten Sie diese ab.
• Verwenden Sie keine aggressiven Waschmittel,
da diese den Schutzfilm des Stoes beschädigen
würden.
• Wir raten dringend davon ab, den Schirm mithilfe
eines Hochdruckreinigers zu säubern.
• UV-Beständigkeit der Farbe: 7/8 (ISO 105-B02).
MONTAGEANLEITUNGEN
Mit Ständer mit Rollen - S. 8
1. Befestigen Sie die Rollen mit 4 M6x12 Schrauben
an der Unterseite des Ständers.
2. Legen Sie zwei große und sieben kleine
Betonfliesen in die Ecken des Ständers.
3. Befestigen Sie das Drehsystem mit 4 M10x16
Schrauben am Ständer.
4. Legen Sie eine große Platte auf den Ständer auf.
5. Nehmen Sie die mitgelieferte
Sonnenschirmhalterung aus der Stange.
6. Positionieren Sie den Schirm über dem
Drehsystem. Vergewissern Sie sich, dass
die Aussparung mit dem Drehstift wie in der
Zeichnung gezeigt positioniert ist.
7. Legen Sie nun die kleine Abdeckung und den
Gummiabstandhalter wie auf dem Bild gezeigt
obenauf.
8. Die angewinkelte Seite der Schirmhalterung ist
die Hinterseite des Schirms. Achtung: Stellen Sie
sicher, dass die Schirmhaltung sich nach hinten
neigt, wie auf der Zeichnung gezeigt.
9. Stellen Sie nun die Sonnenschirmstange auf die
Halterung, wie auf der Zeichnung gezeigt.
10. Ziehen Sie die beiden Stellschrauben hinten an
der Stange an.
Höheneinstellung - S. 26
1. Verstellen Sie die Höhe des Schirms mithilfe des Gris.
2. Stellen Sie ihn auf die höchstmögliche Einstellung.
3. Stellen Sie den Gri fest.

41
Önen/schließen - S. 28
1. Önen Sie den Schirm, indem Sie an den äußeren
Schirmspeichen ziehen.
2. Fixieren Sie den Schirm, indem Sie die beiden
Speichen mit dem Haken verbinden.
3. Positionieren Sie Sensu leicht schräg, damit
Wasser abfließen kann und der Schirm Wind
besser standhält.
Um 360° drehen - S. 30
1. Drehen Sie den Drehstift um 180°, um die Stange
zu lösen.
2. Fassen Sie nun den Schirm an der Ecke an, um
ihn ganz einfach zu drehen.
3. Sobald der Schirm in der gewünschten Position
ist, drehen Sie den Drehstift um 180° zurück, um
ihn in der Position zu fixieren.
Senkrecht kippen - S. 32
1. Bewegen Sie den Schirm mithilfe des Gris nach
oben/unten.
2. Fixieren Sie den Gri, wenn der Schirm in der
gewünschten Position ist.
Mit permanenter verankerung - S. 14
1. Decken Sie die Unterseite der Stange mit
Klebeband ab, um ein Eindringen von Beton zu
verhindern.
2. Graben Sie ein Loch, wie in der Zeichnung gezeigt.
3. Platzieren Sie den Anker in der Mitte des Lochs und
stellen Sie sicher, dass er senkrecht steht.
4. Füllen Sie das Loch mit Beton.
5. Stellen Sie sicher, dass die Oberseite des Ankers auf
eine Höhe mit dem Boden abschließt.
6. Überprüfen Sie, ob der Anker noch senkrecht ist
und lassen Sie alles eine Weile ruhen, bis der Beton
erstarrt ist.
7. Befestigen Sie das Drehsystem mit 4 M10x16
Schrauben am Anker. Oder legen Sie die Platte auf,
wenn sie das Drehsystem nicht verwenden möchten.
8. Nehmen Sie die mitgelieferte
Sonnenschirmhalterung aus der Stange.
9. Positionieren Sie den Schirm über dem Drehsystem.
Vergewissern Sie sich, dass die Aussparung
mit dem Drehstift wie in der Zeichnung gezeigt
positioniert ist.
10. Legen Sie nun die kleine Abdeckung und den
Gummiabstandhalter wie auf dem Bild gezeigt
obenauf.
11. Die angewinkelte Seite der Schirmhalterung ist die
Hinterseite des Schirms. Achtung: Stellen Sie sicher,
dass die Schirmhaltung sich nach hinten neigt, wie
auf der Zeichnung gezeigt.
12. Stellen Sie nun die Sonnenschirmstange auf die
Halterung, wie auf der Zeichnung gezeigt.
13. Ziehen Sie die beiden Stellschrauben hinten an der
Stange an.
PFLEGE
Pulverbeschichtung
REINIGEN
Regelmäßig
Verwenden Sie den zum 100 % biologisch abbaub-
aren Extremis-Multireiniger oder einen herköm-
mlichen Allesreiniger. Keine aggressiven Reiniger
verwenden. Am besten eignet sich ein neutrales
Reinigungsmittel in Wasser.
Acrylsto
SÄUBERUNG
Wenn dreckig
Stellen Sie eine Lösung zum Entfernen von Flecken her.
ENTFERNEN HARTNÄCKIGER FLECKEN
Nur, wenn nichts anderes Wirkung zeigt
Sie müssen härtere Bandagen anlegen? Wenn nichts
anderes hilft, können Sie Bleichmittel verwenden. Schüt-
zen Sie die Umgebung, wenn Sie Ihren Schirmsto mit
Bleichmittel behandeln, da Bleichmittel zu Verfärbungen
von Stoen führen kann. Bitte achten Sie auf die Umwelt,
wenn Sie Bleichmittel verwenden. Bleichmittel kann sich
negativ auf die Umwelt auswirken. Wir raten davon ab,
Bleichmittel zu verwenden, wenn Sie sich in der Nähe ei-
nes Gewässers oder einer anderen Umgebung befinden,
die davon betroen sein könnte. Wenn Flecken und/
oder Stock sehr hartnäckig sind, kann die Konzentration
des Bleichmittels erhöht werden.
Sehen Sie sich die Wartungsvi-
deos auf unserer Website an:
www.extremis.com/maintenance

42
Français
AVERTISSEMENTS
Général
• N’utilisez pas d’outils pointus pour ouvrir l’emballage.
• Nous déconseillons fortement d’utiliser des outils
électriques.
• Risque de trébuchement, attention à la marche.
• N’éteignez pas de cigarettes sur la parasol.
• Ne résiste pas aux gratis.
• Ne laissez pas les enfants jouer sous le parasol
sans surveillance.
• Les couleurs peuvent varier au fil des années ou
d’un lot à l’autre.
Produit
• Ne faites pas traîner le parasol : portez-le au
moins à deux.
• L’ancrage du produit doit être eectué par des
personnes qualifiées.
• Pour l’ancrage : utilisez des boulons ou des vis
appropriés provenant d’un magasin spécialisé,
en fonction du matériau de votre terrasse.
• En cas de vent fort ou si vous ne l’utilisez pas,
fermez le parasol et rabaissez les loquets.
• Placez la housse de protection sur la toile du
parasol pour l’empêcher de s’ouvrir ou de se salir.
• Pour des raisons de ventilation, la housse n’est
pas étanche à 100 %.
• Lorsque vous n’utilisez pas le parasol pendant
une longue période, rangez-le comme suit :
• complètement sec et dans un environnement sec.
• Ne laissez pas le parasol fermé pendant une
longue période lorsque la toile est encore humide
ou mouillée.
• Ne laissez pas le parasol sans surveillance
lorsqu’il est ouvert.
• Des tests eectués en souerie ont montré que
le parasol résiste à des vents d’une force allant
jusqu’à 6 sur l’échelle de Beaufort ( 49 km/h). Il
est toutefois préférable de le fermer plus tôt (4
Beaufort, 28 km/h).
• Nous conseillons de positionner le parasol dans
le sens du vent, en mettant le bras dans un angle
de 5° à 10°.
• Fixez Sensu refermé avec la sangle fournie.
Thermolaquage
• Le thermolaquage nécessite plus d’entretien.
• N’utilisez pas de poudres à récurer abrasives ou de
produits abrasifs, car ils risquent de rayer la surface.
• La couleur peut s’estomper dans une certaine
mesure lorsqu’elle est exposée aux UV.
• Ignifuge- NEN-EN13501-1 A2-sl - Satisfaisant aux
mêmes critères que la classe B pour l’essai SBI
selon EN13823. De plus, dans les conditions d’un
feu complètement développé, ces produits ne
contribueront pas de manière significative à la
charge calorifique et à la croissance du feu.
• Les couleurs foncées peuvent devenir très
chaudes par temps ensoleillé.
Toile acrylique
• Un tissu blanc nécessite plus d’entretien.
• Secouez ou brossez immédiatement les saletés
non incrustées.
• N’utilisez pas de détergents agressifs : ils
enlèveraient le revêtement protecteur de la toile.
• Nous vous déconseillons vivement d’utiliser un
système à haute pression pour le nettoyage.
• Solidité des couleurs aux UV : 7/8 (ISO 105-B02).
INSTRUCTIONS DE MONTAGE
Sur le socle à roulettes - p. 8
1. Fixez les roulettes sur le fond du socle à l’aide de
4 boulons M6x12 par roulette.
2. Placez deux grandes dalles de béton et sept
petites dans chaque quartier du socle.
3. Fixez le système rotatif sur le socle et arrimez-le
avec 4 boulons M10x16.
4. Placez la grande plaque de protection sur le
dessus du socle.
5. Retirez du mât le support de parasol fourni.
6. Positionnez le support de parasol sur le
système rotatif. Assurez-vous que la découpe
est positionnée comme indiqué sur le dessin
relativement à la goupille de rotation.
7. Positionnez ensuite la petite plaque de protection
et l’entretoise en caoutchouc sur le dessus,
comme indiqué sur le dessin.
8. Le côté incliné du support du parasol est le côté
arrière du parasol. Attention : assurez-vous que le
parasol est incliné vers l’arrière, comme indiqué
sur le dessin.
9. Faites ensuite glisser le mât du parasol sur le
support, comme indiqué sur le dessin.
10. Serrez les deux vis de réglage à l’arrière du mât.
Relever / Abaisser le parasol - p. 26
1. Utilisez la poignée pour relever/abaisser le parasol.
2. Remontez jusqu’à la position maximum.
3. Bloquez la poignée.
Ouverture / Fermeture - p. 28
1. Ouvrez le parasol en tirant sur les baleines extérieures.
2. Fixez maintenant le parasol en reliant les deux
baleines à l’aide du crochet.
3. Placez Sensu en position inclinée pour faciliter

43
l’évacuation de l’eau et le protéger du vent.
Rotation à 360° - p. 30
1. Tournez la goupille de rotation de 180° pour
déverrouiller le mât.
2. Attrapez ensuite le coin de la toile pour faire
pivoter le parasol.
3. Une fois la position souhaitée obtenue,
verrouillez la goupille de rotation en la tournant
de 180° en sens inverse.
Inclinaison verticale - p. 32
1. Utilisez la poignée pour relever/abaisser le parasol.
2. Fixez la poignée lorsque le parasol est dans la
position souhaitée.
Avec fixation permanente - p. 14
1. Bouchez la partie inférieure du tube avec du
ruban adhésif pour éviter que du béton ne
pénètre dans le tube.
2. Faites un puits comme indiqué sur le dessin.
3. Placez l’ancrage au milieu du puits et assurez-
vous que l’ancrage est bien perpendiculaire.
4. Remplissez le puits de béton.
5. Assurez-vous d’aligner le haut de l’ancrage avec le sol.
6. Vérifiez que l’ancrage est toujours
perpendiculaire et laissez reposer un moment
jusqu’à durcissement du béton.
7. Fixez le système rotatif sur l’ancrage et arrimez-le
avec 4 boulons M10x16. Vous pouvez également
placer la plaque de protection fournie lorsque
vous n’utilisez pas le système rotatif.
8. Retirez du mât le support de parasol fourni.
9. Positionnez le support de parasol sur le
système rotatif. Assurez-vous que la découpe
est positionnée comme indiqué sur le dessin
relativement à la goupille de rotation.
10. Positionnez ensuite la petite plaque de protection
et l’entretoise en caoutchouc sur le dessus,
comme indiqué sur le dessin.
11. Le côté incliné du support du parasol est le côté
arrière du parasol. Attention : veillez à ce que le
parasol soit bien incliné vers l’arrière, comme
indiqué sur le dessin.
12. Faites ensuite glisser le mât du parasol sur le
support, comme indiqué sur le dessin.
13. Serrez les deux vis de réglage à l’arrière du mât.
ENTRETIEN
Thermolaquage
NETTOYAGE
Régulièrement
Utilisez de l’Extremis Multicleaner, un détergent
100% biodégradable ou un produit de nettoyage
classique. Evitez d’utiliser des produits agressifs.
Il est préférable de nettoyer ces surfaces avec un
produit de nettoyage neutre dilué dans l’eau.
RÉPARER DU MOBILIER
Si le revêtement poudré est endommagé
L’impact d’objets contondants peut endommager le
revêtement. Les éraflures et les entailles peuvent être
retouchées avec nos marqueurs de peinture. Cela
ne fait toutefois que camoufler, et non éliminer le
problème.
Toile acrylique
NETTOYAGE
Lorsque le parasol est sale
Préparez une solution pour éliminer les taches.
ÉLIMINER LES TACHES TENACES
Uniquement si aucune autre solution n’est ecace
Des mesures plus radicales sont nécessaires ? En
dernier recours, vous pouvez utiliser de l’eau de
Javel si rien d’autre ne fonctionne. Protégez la zone
où se trouve votre toile lorsque vous utilisez une so-
lution à base d’eau de Javel – celle-ci peut décolorer
les tissus. Soyez attentif à l’environnement lorsque
vous nettoyez à l’eau de Javel, car elle peut avoir des
eets nocifs sur la nature environnante. Nous vous
déconseillons d’utiliser de l’eau de Javel si vous êtes
à proximité d’un plan d’eau ou d’un autre écosystè-
me susceptible d’être aecté. Si les taches et/ou les
traces de moisissure sont importantes, la quantité
d’eau de Javel peut être augmentée.
Voir les vidéos d’entretien sur
notre site web:
www.extremis.com/maintenance

extremis.com
Our headquarters:
Couthoflaan 20b
B-8972, Poperinge
info@extremis.com
+ 32 57 346020
Connect with us:
All rights reserved. Unless otherwise specified, all designs and photographs contained in this publication are copyright protected
and are the property of Extremis. No part of this publication may be copied or distributed without Extremis’ prior written consent.
The names of the authors of photographs to which we do not hold rights are mentioned here. We have done our utmost to provide a
comprehensive list of names. In the event of an alleged breach, please contact the editorial sta. © Extremis
20230531
-
 1
1
-
 2
2
-
 3
3
-
 4
4
-
 5
5
-
 6
6
-
 7
7
-
 8
8
-
 9
9
-
 10
10
-
 11
11
-
 12
12
-
 13
13
-
 14
14
-
 15
15
-
 16
16
-
 17
17
-
 18
18
-
 19
19
-
 20
20
-
 21
21
-
 22
22
-
 23
23
-
 24
24
-
 25
25
-
 26
26
-
 27
27
-
 28
28
-
 29
29
-
 30
30
-
 31
31
-
 32
32
-
 33
33
-
 34
34
-
 35
35
-
 36
36
-
 37
37
-
 38
38
-
 39
39
-
 40
40
-
 41
41
-
 42
42
-
 43
43
-
 44
44


